The right bedroom paint can change everything—your sleep vibe, your morning light, even how big your room feels. Here are my favorite bedroom paint ideas that range from timeless and calming to artsy, bold, and totally you.
Greige Walls for a Modern, Cozy Neutral
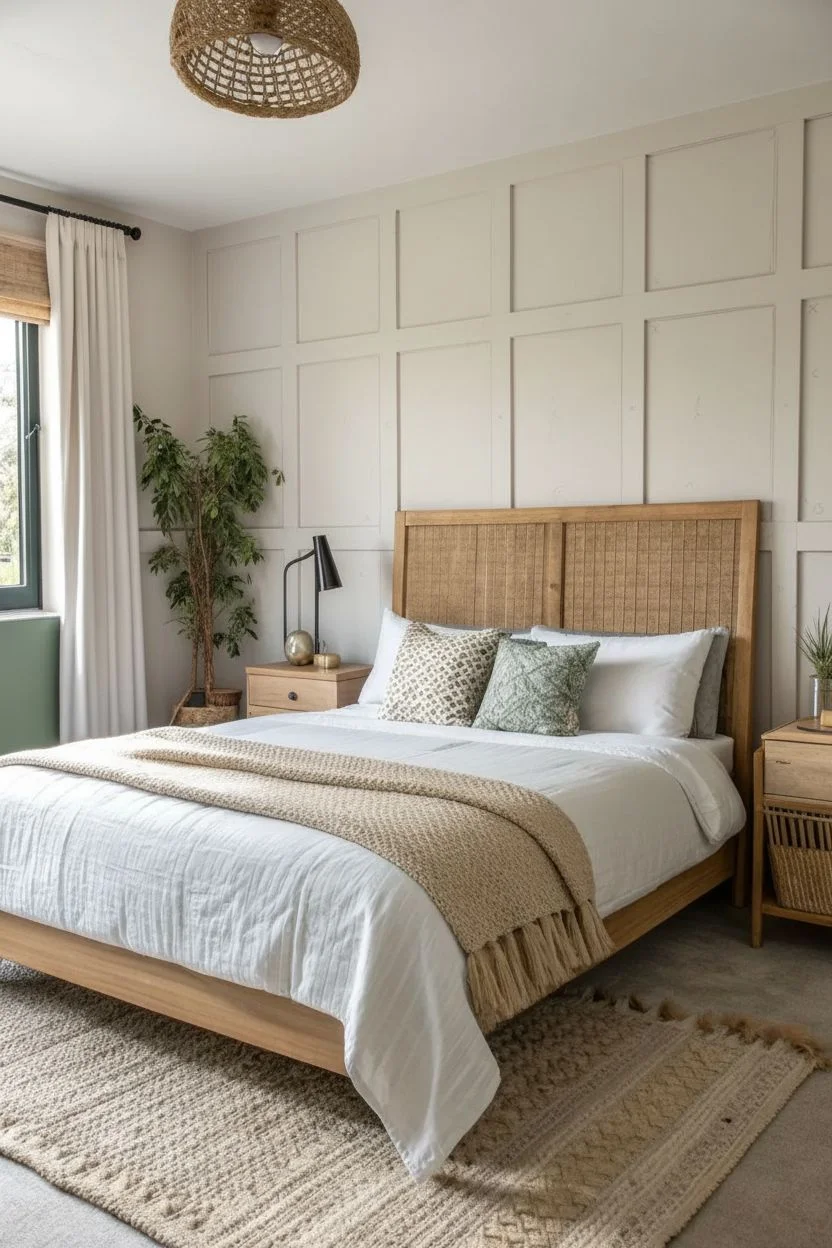
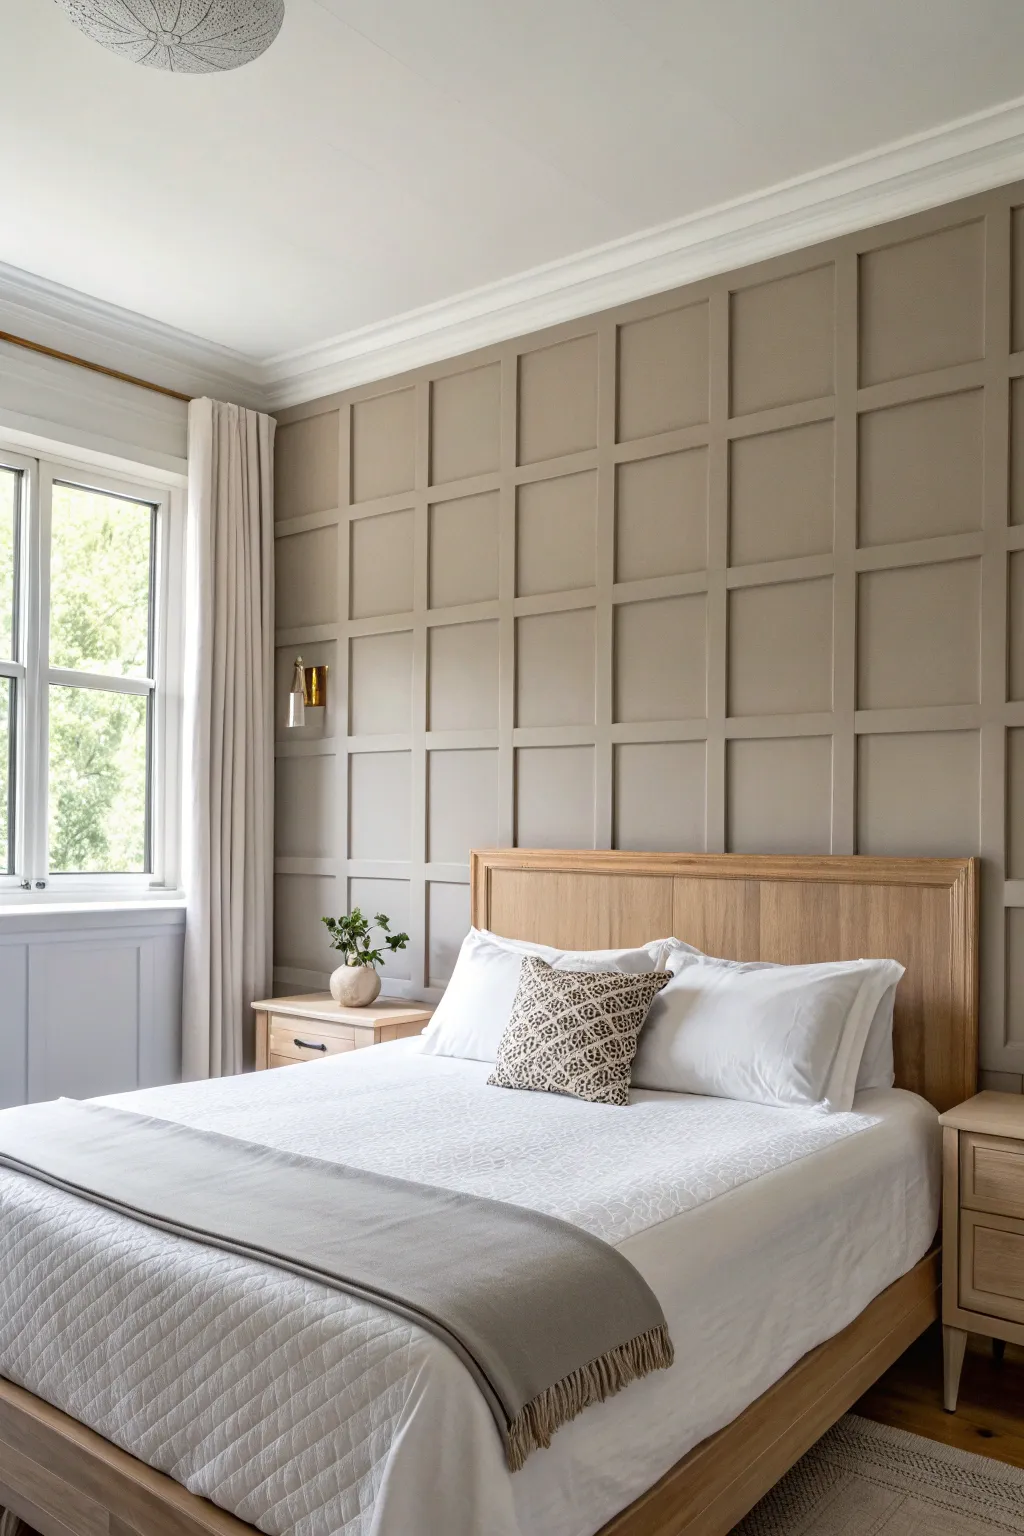
Transform a plain bedroom into a cozy, sophisticated retreat by adding a custom board and batten accent wall painted in a warm greige. This project adds architectural interest and depth without requiring major renovation skills, creating the perfect backdrop for a modern neutral aesthetic.
Step-by-Step
Materials
- 1×2 inch MDF or priming wood trim boards
- Construction adhesive (Liquid Nails or similar)
- Brad nailer and 1.5-inch brad nails
- Paintable wood filler
- Fine-grit sandpaper (220 grit)
- Painter’s caulk and caulk gun
- Laser level or traditional spirit level
- Tape measure and pencil
- Miter saw or hand saw
- Interior latex paint (greige color)
- Paint roller (3/8 nap) and angled sash brush
- Drop cloths and painter’s tape
Step 1: Planning and Preparation
-
Measure the wall:
Start by measuring the total width and height of your wall. This is crucial for determining how many vertical battens you will need and the spacing between them. -
Calculate spacing:
Decide on the number of vertical panels you want. For the look in the photo, aim for panels roughly 20-24 inches wide. Subtract the total width of your batten boards from the wall width, then divide the remaining space by the number of cavities to find your exact spacing. -
Prepare the surface:
Remove any existing baseboards if you plan to replace them, or decide if your vertical battens will sit on top of the existing baseboard. Patch any holes and lightly sand the wall to ensure good adhesion.
Step 2: Installing the Trim
-
Install the top horizontal rail:
If you aren’t going all the way to the ceiling, determine your height and mark a level line. Install the horizontal top board first, securing it with construction adhesive and brad nails into the studs where possible. -
Mark vertical positions:
Using your calculated measurements, mark the positions for the vertical battens along the wall. I find it helpful to mark both the top and bottom to ensure they stay perfectly straight. -
Cut vertical battens:
Measure the distance from the top of your baseboard (or floor) to the bottom of the top rail for each specific spot. Floors are rarely perfectly level, so measure individually for a tight fit. -
Adhere vertical boards:
Apply a wavy line of construction adhesive to the back of your first vertical board. Place it on your mark. -
Level and nail:
Use your laser level or spirit level to ensure the board is perfectly plumb (vertical). Once positioned correctly, secure it with brad nails every 12-16 inches. -
Repeat for remaining boards:
Continue installing the rest of the vertical battens across the wall, checking for plumb on every single board before nailing.
Spacer Block Hack
Cut a scrap piece of wood to the exact width of your calculated spacing. Use this block between battens as you install them to instantly get perfect spacing without measuring every time.
Step 3: Finishing and Painting
-
Fill nail holes:
Use a putty knife to press wood filler into every nail hole. Overfill slightly, as the filler will shrink when it dries. -
Sand smooth:
Once the filler is completely dry, sand the filled areas flush with the wood surface using 220-grit sandpaper. Wipe away all dust with a tack cloth or damp rag. -
Caulk the seams:
Run a thin bead of painter’s caulk along every edge where the wood meets the wall and where boards meet each other. Smooth the bead with a wet finger or finish tool for a seamless look. -
Prime the wood:
If you used raw wood or MDF, apply a coat of primer to the trim pieces. This ensures the final sheen is consistent between the wall and the trim. -
Cut in the edges:
Using an angled sash brush, paint the corners, edges, and all the trim work first with your chosen greige color. Brush strokes should follow the direction of the wood grain. -
Roll the wall:
While the cut-in paint is still wet (maintain a ‘wet edge’), roll the flat wall sections between the battens using a roller. Apply two coats for the richest color depth.
Add a Picture Ledge
Top the horizontal rail with a slightly deeper 1×3 board to create a narrow shelf. It’s perfect for leaning framed art or small decor items.
Step back and admire how this simple architectural detail completely elevates the room’s atmosphere


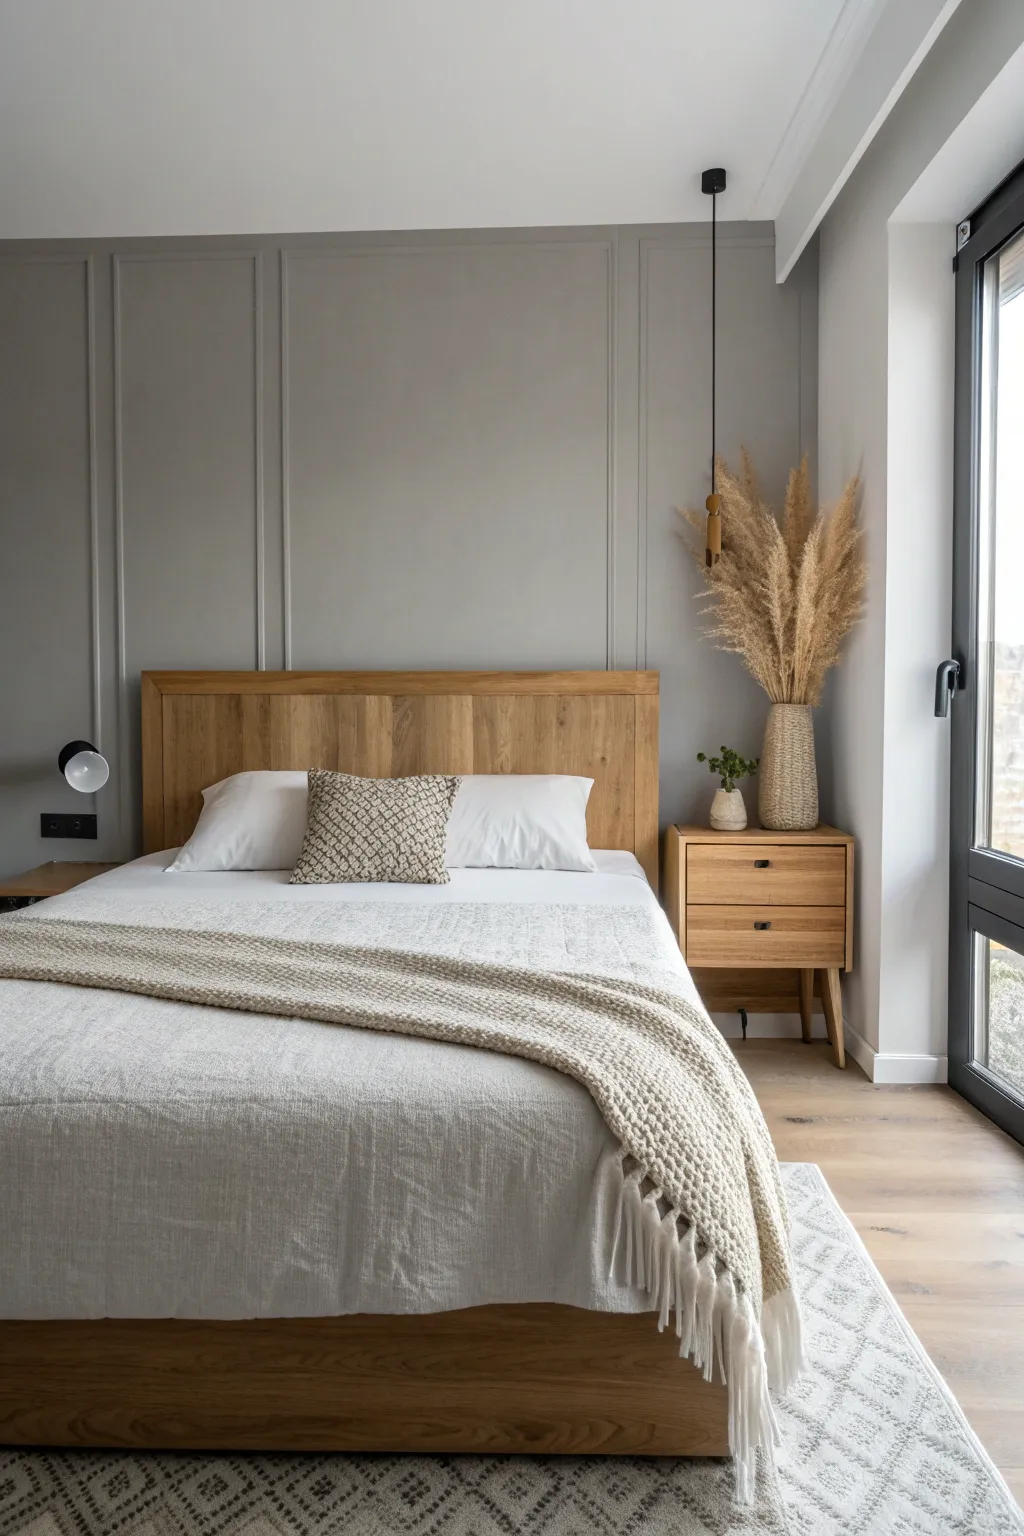
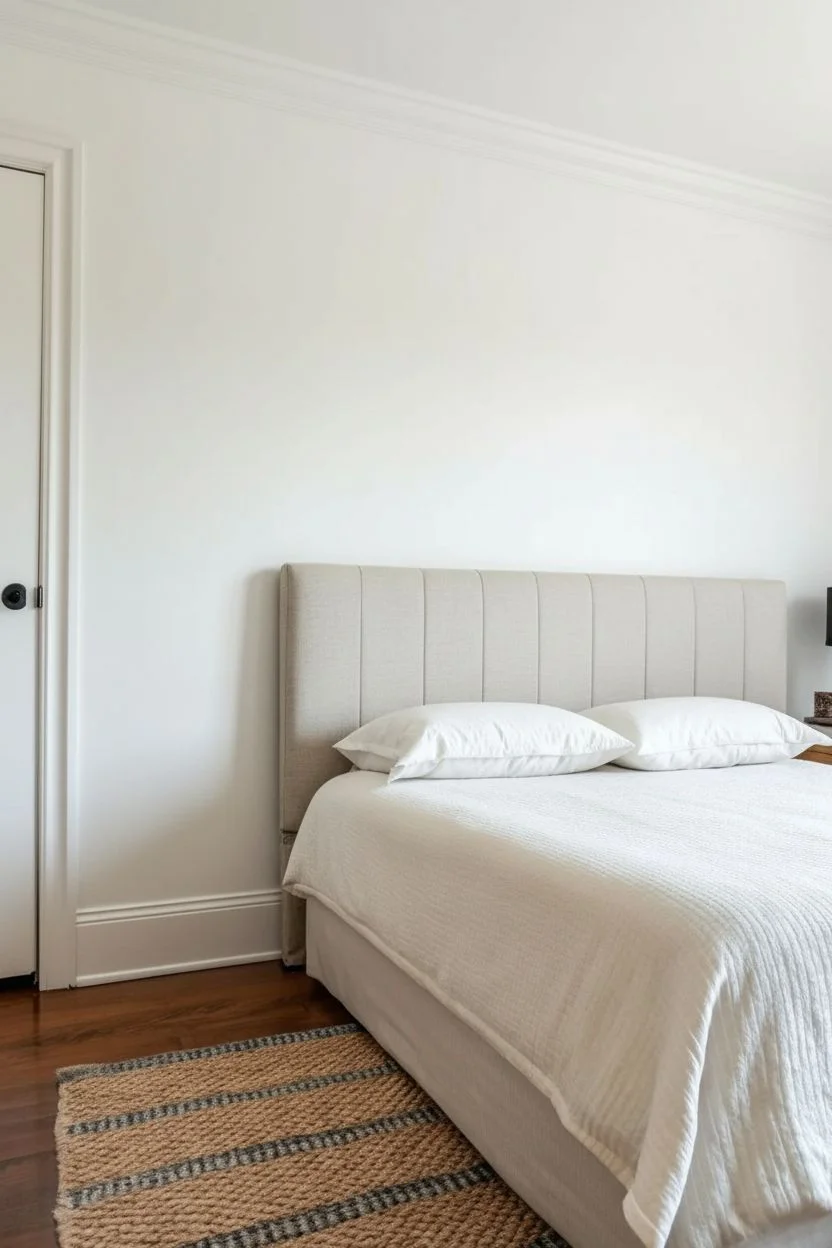
Pale Gray for a Light-Expanding Small Bedroom
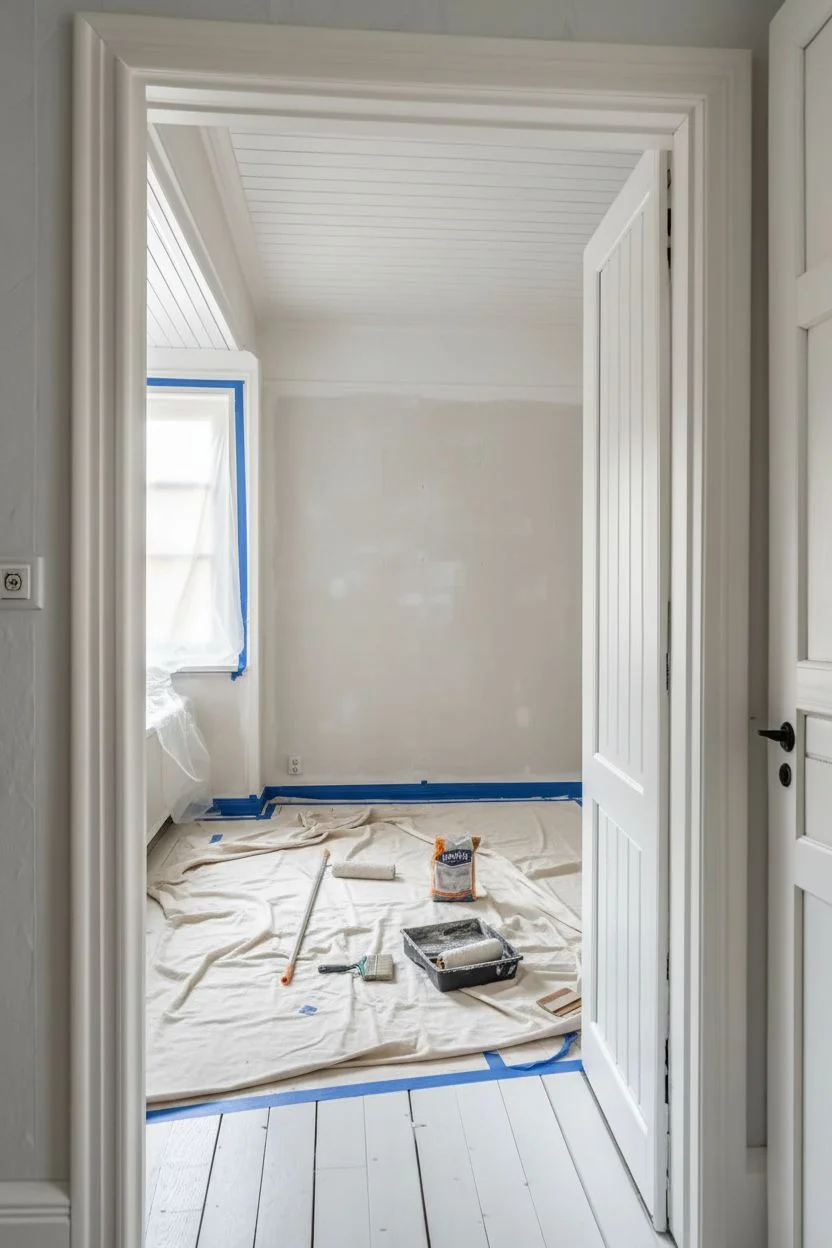
Transform a small bedroom into a bright, airy sanctuary using a soft pale gray palette that maximizes natural light. This project focuses on painting walls, refinishing floors, and layering textures to create space.
Step-by-Step Tutorial
Materials
- Pale gray interior latex paint (eggshell or satin finish)
- Bright white trim paint (semi-gloss)
- White floor paint (specifically formulated for wood floors)
- Painter’s tape
- Drop cloths
- Sandpaper (120 and 220 grit)
- Spackle and putty knife
- Paint rollers (medium nap) and extension pole
- Angled sash brush (2-inch)
- Floor sander (optional, for heavily worn floors)
- Primer (high-adhesion for floors and walls)
- Paint tray and liners
Step 1: Preparation & Floor Base
-
Clear and Clean:
Remove all furniture, rugs, and fixtures from the room. Thoroughly sweep and vacuum the floors, ensuring every corner and crevice is free of dust. -
Prep the Walls:
Inspect the walls for nail holes or cracks. Fill them with spackle, let dry, and sand smooth. Wash the walls with a mild detergent or TSP substitute to remove grease or grime. -
Scuff Sand the Floor:
If your floorboards are previously finished, lightly sand them with 120-grit sandpaper to create a ‘tooth’ for the new paint to grip. Vacuum up all dust and wipe with a tack cloth. -
Protect Surfaces:
Apply painter’s tape to the edges of window panes, door hardware, and electrical outlets. Cover any immovable fixtures with plastic.
Light Check
Test your gray paint samples at different times of day. Pale gray can turn blue, purple, or green depending on the natural light in your specific room.
Step 2: Painting the Envelope
-
Prime the Floor:
Using a floor-specific primer, cut in the edges of the room with a brush first. Then roll the rest of the floor, working your way out the door. -
Prime the Walls:
While the floor dries (follow manufacturer times), apply a coat of primer to the walls if you are making a drastic color change or covering repairs. -
Ceiling First:
Paint the ceiling with a flat bright white paint. I like to do this first so any drips don’t land on freshly painted walls. -
Cut in the Gray:
Using your pale gray paint and an angled brush, carefully paint a 2-3 inch border around the ceiling line, corners, baseboards, and door frames. -
Roll the Walls:
Fill the main wall areas with the gray paint using a roller in a ‘W’ pattern to distribute paint evenly. Keep a wet edge to avoid lap marks. -
Second Coat:
Allow the first coat to dry fully, then apply a second coat for true color depth and coverage.
Step 3: Finishing Details
-
Trim Work:
Once walls are dry, tape off the wall edge if you have an unsteady hand. Paint the door frames, baseboards, and window trim with bright white semi-gloss paint. -
Paint the Floor:
Apply your white floor paint. Use thin, even layers. Floors often require 2-3 coats for durability. Wait at least 24 hours between coats if possible for hardness. -
Install Lighting:
Hang the woven pendant light. Ensure it hangs low enough to be a focal point but high enough to clear head movement. -
Layer Textiles:
Place the large jute rug to ground the space. The natural texture warms up the cool gray and white palette. -
Style the Bed:
Assemble the wicker bed frame (or frame with under-bed baskets). Dress with crisp white linens and neutral throw pillows. -
Accessorize:
Hang a round mirror to reflect light and place a small plant for a touch of life.
Floor Durability
If the white floor paint is chipping easily, you likely skipped the sanding or priming step. You must de-gloss the old finish for the new paint to bond properly.
Now you have a refreshing, spacious retreat that feels miles away from the chaos of the day


Sage Green for a Restful, Nature-Loving Bedroom

Transform a plain bedroom into a restful sanctuary with this classic board and batten accent wall painted in a soothing sage green. The architectural grid adds instant depth and character, creating a sophisticated backdrop that feels both modern and timeless.
Step-by-Step
Materials
- 1×4 inch MDF boards or primed pine (for the grid)
- 1×6 inch MDF or primed pine (suggested for top/baseboard)
- Construction adhesive (Liquid Nails)
- Brad nailer and 2-inch nails
- Wood filler
- Paintable caulk and caulk gun
- Fine-grit sandpaper (220 grit) or sanding sponge
- Level (4-foot or laser level)
- Tape measure
- Painter’s tape
- Sage green interior paint (satin or eggshell finish)
- Angled sash brush (2.5 inch)
- Paint roller (9 inch) with medium nap
- Primer (if using raw wood or changing wall color drastically)
Step 1: Planning and Layout
-
Measure your wall:
Start by getting the exact height and width of your accent wall. This is crucial for determining how many squares or rectangles will fit comfortably. -
Calculate spacing:
Decide on the size of your grid. A common approach is dividing the wall width into equal sections. Sketch this out on paper first to visualize the final look. -
Mark the studs:
Use a stud finder to locate and mark the studs along the wall. While you’ll use adhesive, nailing into studs where possible provides the best security. -
Draw level lines:
Using a long level or a laser level, lightly draw your grid pattern directly onto the wall with a pencil. This acts as your roadmap during installation.
Step 2: Installing the Grid
-
Install the frame:
Begin by attaching your horizontal top board near the ceiling and your baseboard at the bottom if creating a full replacement. Secure these with adhesive and nails. -
Place vertical battens:
Measure, cut, and install your vertical boards first. Apply a wavy line of construction adhesive to the back, press firmly against your pencil lines, and secure with your brad nailer. -
Double-check plumb:
Before the glue sets completely, use your level on each vertical piece to ensure it is perfectly straight up and down. -
Cut horizontal spacers:
Measure the distance between each vertical board individually. Walls are rarely perfectly square, so cut each horizontal piece to fit its specific spot snugly. -
Install horizontal pieces:
Glue and nail these horizontal spacers between the verticals to complete your grid pattern.
Uneven Wall Woes?
If your wall bows and leaves gaps behind the boards, don’t force the wood. Nail it securely and depend on the caulk in the finishing phase to fill those gaps visually.
Step 3: Finishing and Painting
-
Fill nail holes:
Dab a small amount of wood filler into every nail hole. Let it dry completely, usually about an hour or as directed on the package. -
Sand smooth:
Using fine-grit sandpaper, smooth down the dried wood filler until it’s flush with the board surface. I like to run my hand over it to ensure it’s imperceptible. -
Caulk the seams:
Run a thin bead of paintable caulk along every edge where the wood meets the wall and where boards meet each other. Wipe excess away with a damp finger for a seamless look. -
Prime the woodwork:
If your boards are unprimed or raw wood, apply a coat of primer to the trim pieces to ensure the final paint color adheres evenly. -
Cut in edges:
Using your angled brush, paint the corners, edges, and the detail work of the grid first. This ‘cutting in’ process makes rolling much faster. -
Roll the first coat:
Use a roller to paint the flat wall sections inside the grid and the faces of the boards. Move in ‘W’ shapes for even coverage. -
Apply second coat:
Once the first coat is dry to the touch, apply a second coat for a rich, true sage color and a durable finish. -
Remove tape:
If you used painter’s tape on the adjacent walls or ceiling, peel it off slowly while the paint is still slightly tacky to prevent peeling.
Pro Tip: Spacer Block
Cut a scrap piece of wood to the exact width of your intended spacing. Use this ‘spacer block’ to quickly position boards without measuring every single gap.
Step back and admire the calm, structured elegance your new sage feature wall brings to the room


Dusty Blue for a Classic Sleepy Mood
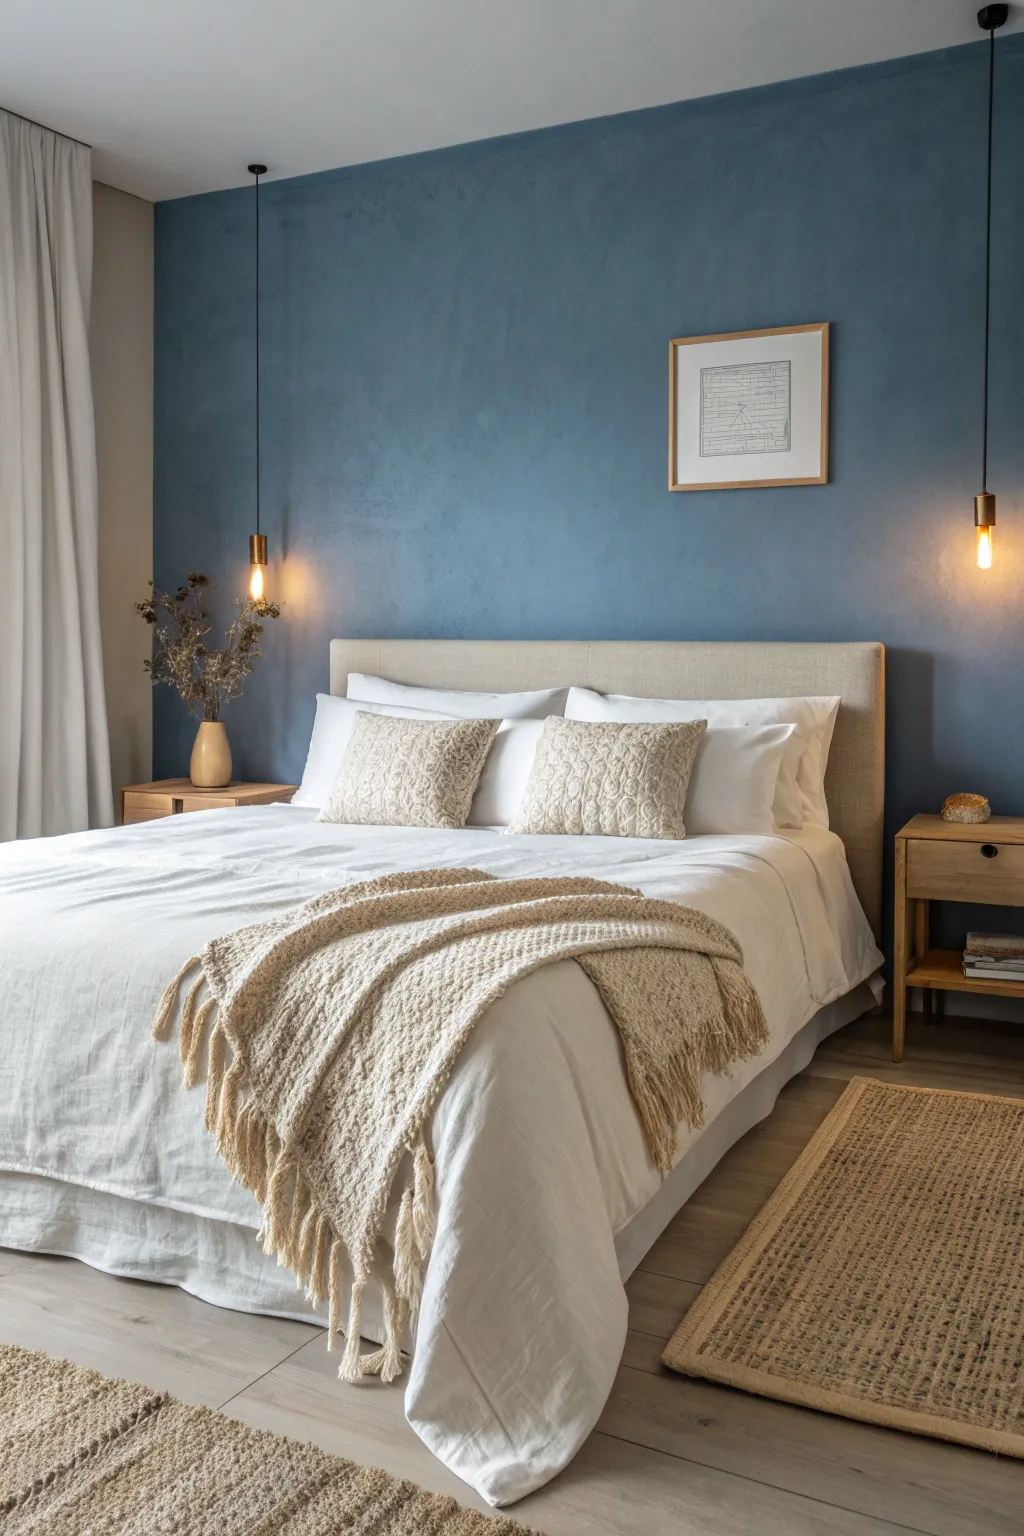
Transform a plain bedroom into a tranquil retreat with a deep, dusty blue feature wall that exudes a classic, sleepy mood. This project focuses on achieving that rich, matte wall finish and styling the room with natural textures for a cohesive look.
Step-by-Step Tutorial
Materials
- Matte interior latex paint (Dusty Blue/Slate Blue shade)
- Painter’s tape
- Drop cloths
- Paint roller and extension pole
- Angled sash brush (2-inch)
- Paint tray and liners
- Spackling paste and putty knife (for wall prep)
- Fine-grit sandpaper
- Cleaning cloths
- Ladder
Step 1: Preparation
-
Clear and Protect:
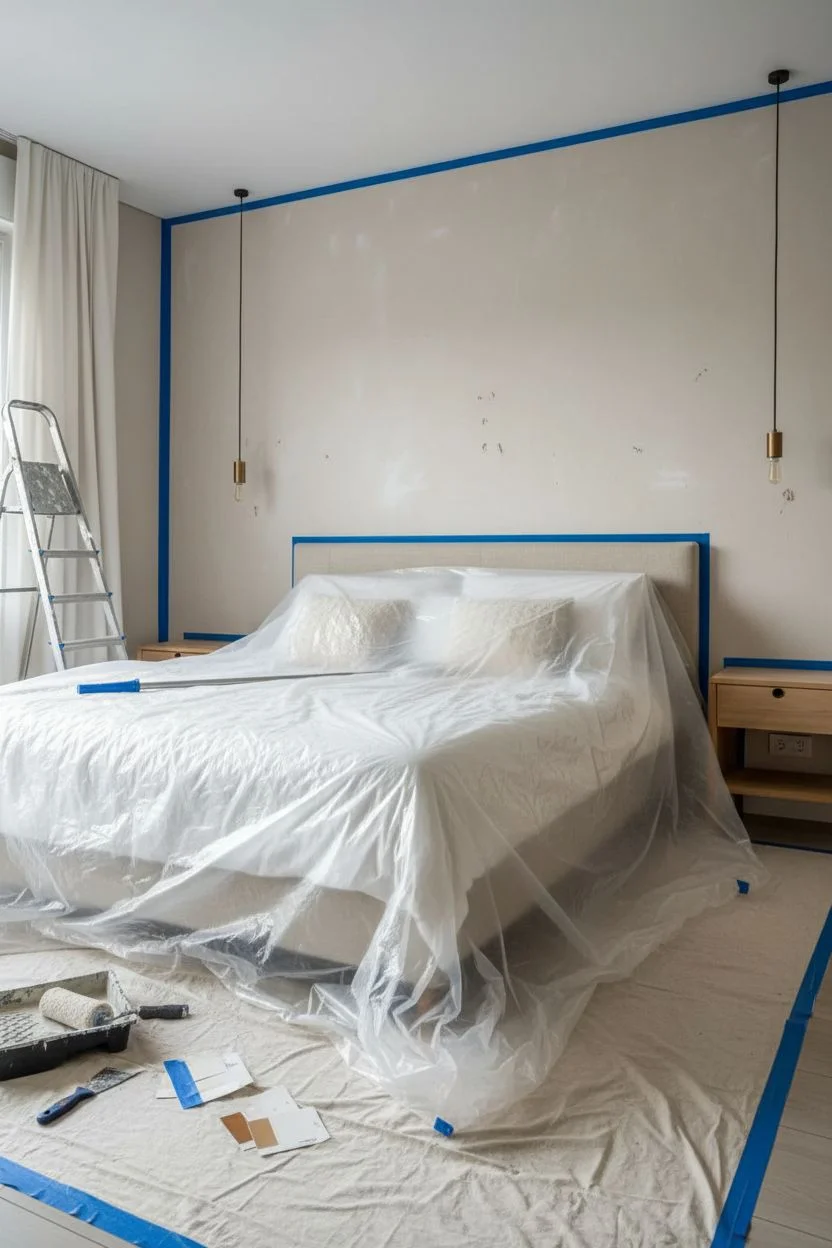
Begin by removing all furniture from the wall you intend to paint. If the bed is heavy, simply pull it to the center of the room and cover it completely with a plastic drop cloth to protect against accidental splatters. -
Wall Inspection:
Examine the wall surface for any holes or imperfections. Fill nail holes with spackling paste using a putty knife. Let it dry completely according to the product instructions. -
Sanding Down:
Once the spackle is dry, lightly sand the patched areas with fine-grit sandpaper until they are flush with the wall. I like to run my hand over the spots to ensure they feel perfectly smooth. -
Clean Surfaces:
Wipe down the entire wall with a damp cloth to remove sanding dust and any surface grime. A clean wall ensures the paint adheres properly for a durable finish. -
Tape Edges:
Apply painter’s tape carefully along the ceiling line, baseboards, and any adjacent walls. Press the tape edge down firmly with your finger or a putty knife to prevent paint bleed.
Step 2: Painting the Feature Wall
-
Cutting In:
Open your dusty blue paint and stir it thoroughly. Using the angled sash brush, ‘cut in’ a 2-3 inch border of paint along the taped edges, ceiling line, and corners. -
Rolling the First Coat:
Pour paint into the tray. Load your roller evenly and begin rolling the wall in ‘W’ or ‘M’ shaped patterns. work in 3-foot sections, blending back into the wet edge of your previous section. -
Drying Time:
Allow the first coat to dry completely. This usually takes about 2 to 4 hours, but check your specific paint can label. Don’t rush this step, as painting over tacky paint can pull it off the wall. -
Second Coat Application:
Apply a second coat using the same rolling technique. This step is crucial for achieved that deep, saturated blue color seen in the inspiration photo. -
Texture Check:
While the second coat is wet, inspect for any roller marks or uneven spots. Lightly roll over these areas to smooth them out. -
Remove Tape:
Carefully peel off the painter’s tape while the paint is still slightly tacky, pulling it away from the paint edge at a 45-degree angle. This helps create a crisp, clean line.
Pro Tip: Seamless Finish
For a truly velvety look, use a high-quality microfiber roller cover with a 3/8-inch nap. It holds more paint and reduces stippling for a smoother matte finish.
Step 3: Styling & Finishing Touches
-
Re-assemble Furniture:
Once the wall is fully cured (give it at least 24 hours), move your bed back into position against the new feature wall. A beige or oatmeal-colored headboard contrasts beautifully against the blue. -
Install Lighting:
Hang pendulum lights on either side of the bed. Adjust the height so the bulbs sit just above where a bedside lamp would typically be. -
Hang Artwork:
Position a simple, framed line drawing or minimalist print off-center above the right side of the bed. Aim for a light wood frame to match the warm tones of the room. -
Layer Bedding:
Make the bed with crisp white linens. Layer textured beige throw pillows against standard white pillows. -
Adding Texture:
Drape a chunky knit throw blanket casually across the foot of the bed. The cream color breaks up the white bedding and ties in with the headboard. -
Natural Accents:
Place a ceramic vase with dried botanicals or twigs on the bedside table. This adds an organic, earthy element that complements the serene blue wall. -
Rug Placement:
Lay down jute or sisal rugs on either side or at the foot of the bed to introduce warmth and texture to the flooring.
Level Up: Limewash Look
Want more depth? Mix a glaze into your topcoat or use a special limewash paint to create subtle cloudy variations for an old-world, plastered effect.
Enjoy the calm atmosphere of your new bedroom oasis every night
BRUSH GUIDE
The Right Brush for Every Stroke
From clean lines to bold texture — master brush choice, stroke control, and essential techniques.
Explore the Full Guide
Warm Taupe for a Cozy, Hotel-Like Bedroom
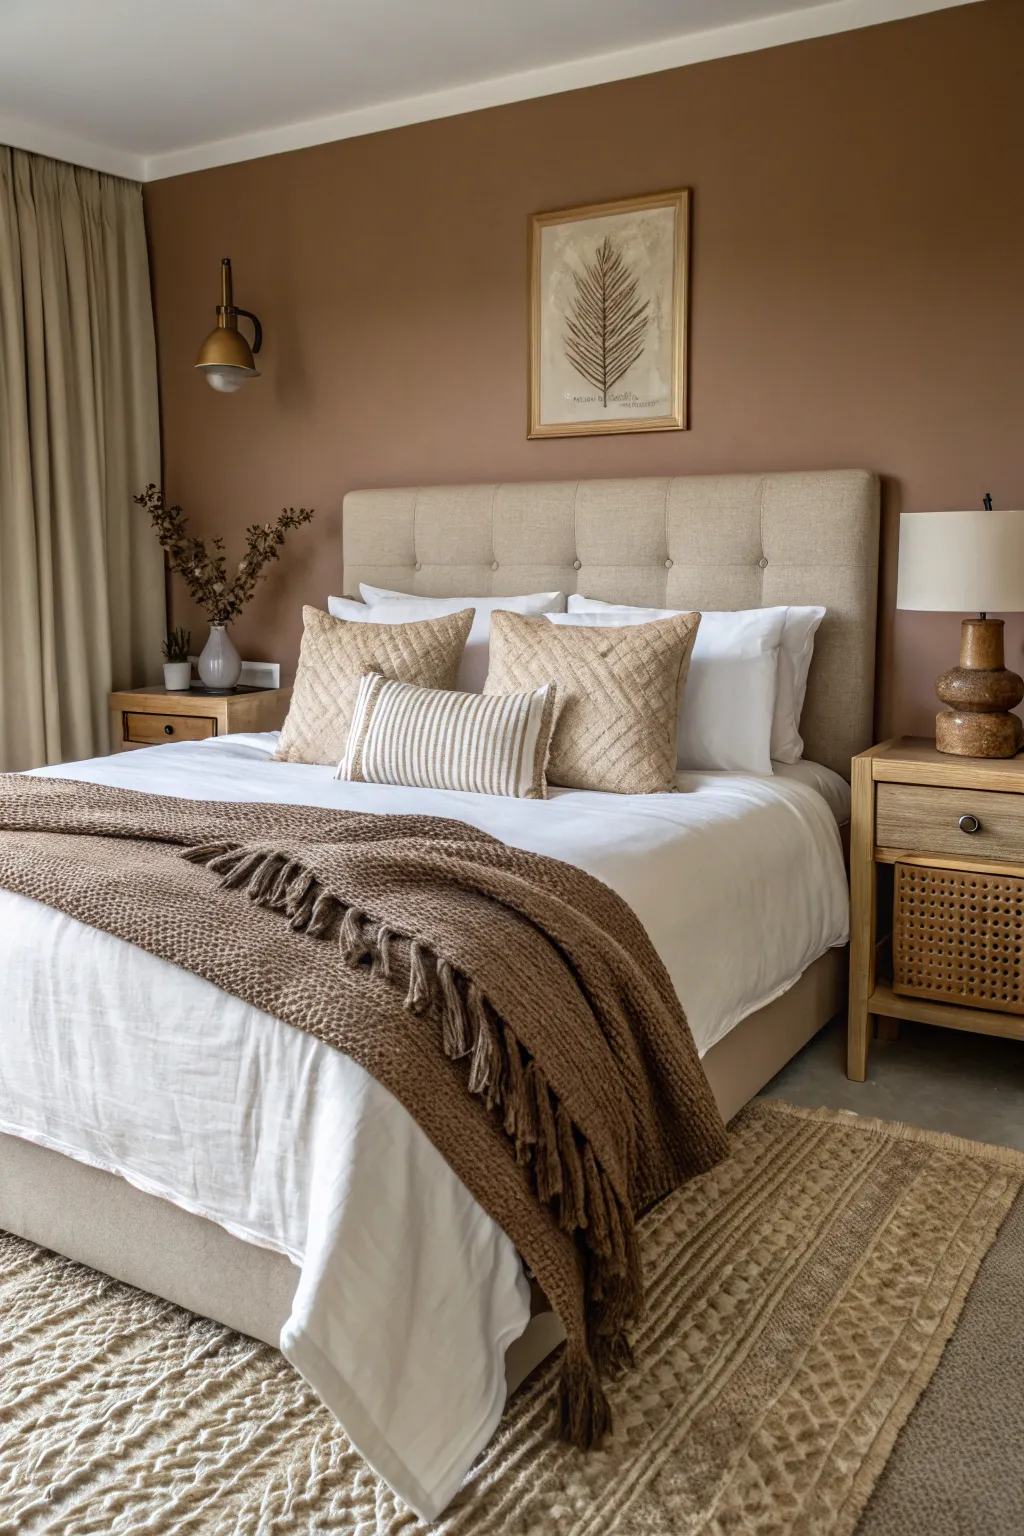
Transform your bedroom into a sanctuary of calm with this monochromatic, textural design that centers on a warm taupe color palette. By layering natural linens, woven textures, and soft lighting, you will create a high-end hotel feel right at home.
Detailed Instructions
Materials
- Warm taupe wall paint (matte or eggshell finish)
- Painter’s tape and drop cloths
- Paint rollers and angled sash brush
- Upholstered beige tufted headboard
- Two light wood nightstands with drawers
- Ceramic or wood table lamp with linen shade
- Wall sconce (brass finish)
- White linen duvet set
- Two standard white pillowcases
- Two beige quilted Euro sham covers
- One lumbar pillow with striped pattern
- Large waffle-knit throw blanket (brown/taupe)
- Textured area rug (jute or wool blend)
- Framed botanical print (sepia tone)
- Dried botanical arrangement in white vase
Step 1: Setting the Canvas
-
Clear and prep the room:
Begin by removing all furniture from the wall you intend to paint. Lay down drop cloths to protect your flooring and apply painter’s tape along the baseboards, ceiling line, and adjacent walls for crisp edges. -
Apply the base coat:
Cut in around the edges of the wall with your angled sash brush first. Then, using a roller, apply an even coat of warm taupe paint. This color is the anchor of the design, so ensure full coverage. -
Second coat for depth:
Once the first coat is dry to the touch, apply a second coat. I find this second layer crucial for achieving that rich, velvety depth seen in high-end hotel rooms. Remove the tape while the paint is still slightly tacky to avoid peeling. -
Install the rug:
Position your textured area rug. For a queen or king bed, place the rug horizontally so it extends out from the sides and foot of the bed, anchoring the sleeping area.
Step 2: Furniture & Lighting
-
Position the headboard:
Center your upholstered tufted headboard against the newly painted taupe wall. The fabric should be a light beige or oatmeal tone to offer a subtle contrast without breaking the monochromatic scheme. -
Place nightstands:
Set a light wood nightstand on either side of the bed. Leave a few inches of breathing room between the bed frame and the nightstand for a spacious look. -
Install the sconce:
Mount a brass wall sconce on the left side of the bed. Install it high enough to cast a downward glow but low enough to be reachable. If you aren’t hardwiring, use a puck light trick or a plug-in version. -
Add table lighting:
On the opposite nightstand, place a ceramic or wooden lamp with a textured base. The asymmetry between the sconce and the table lamp adds visual interest and a custom, designer touch.
Pro Tip: Bedding Texture
Mix linen, cotton, and wool textures. Even if colors are similar, varied fabrics prevent the look from falling flat.
Step 3: Layering the Bed
-
Start with crisp white linens:
Make the bed with a fitted sheet and a fluffy white duvet. The white acts as a palate cleanser against the warm brown tones, keeping the room feeling fresh. -
Stack sleeping pillows:
Place two standard sleeping pillows in crisp white cases flat against the headboard or propped up slightly behind the decorative pillows. -
Add texture with Euro shams:
Place two square Euro pillows in beige quilted shams in front of the sleeping pillows. The quilted texture mimics the tufting of the headboard. -
Center the lumbar pillow:
Finish the pillow arrangement with a single rectangular lumbar pillow featuring a subtle stripe pattern. Place it front and center for a polished look. -
Drape the throw blanket:
Take your large, brown waffle-knit throw and drape it casually but neatly across the foot of the bed. Let the fringe detail hang visibly to enhance the tactile quality of the bedding.
Level Up: Double Drapery
Install a double curtain rod with sheer white curtains behind your beige panels for a true luxury hotel window treatment.
Step 4: Finishing Touches
-
Hang the artwork:
Center the framed botanical print over the bed. Ensure it is hung high enough to clear the headboard but low enough to feel connected to the furniture group. A gold or light wood frame works best here. -
Style the nightstand:
On the nightstand with the sconce, arrange a simple white vase with dried botanicals. The dried leaves should echo the brown tones of the wall. -
dress the window:
Hang floor-to-ceiling curtains in a beige or light taupe fabric. Ensure they are long enough to ‘kiss’ the floor, adding height and elegance to the room.
Step back and enjoy the serene, monochromatic warmth of your new hotel-inspired retreat
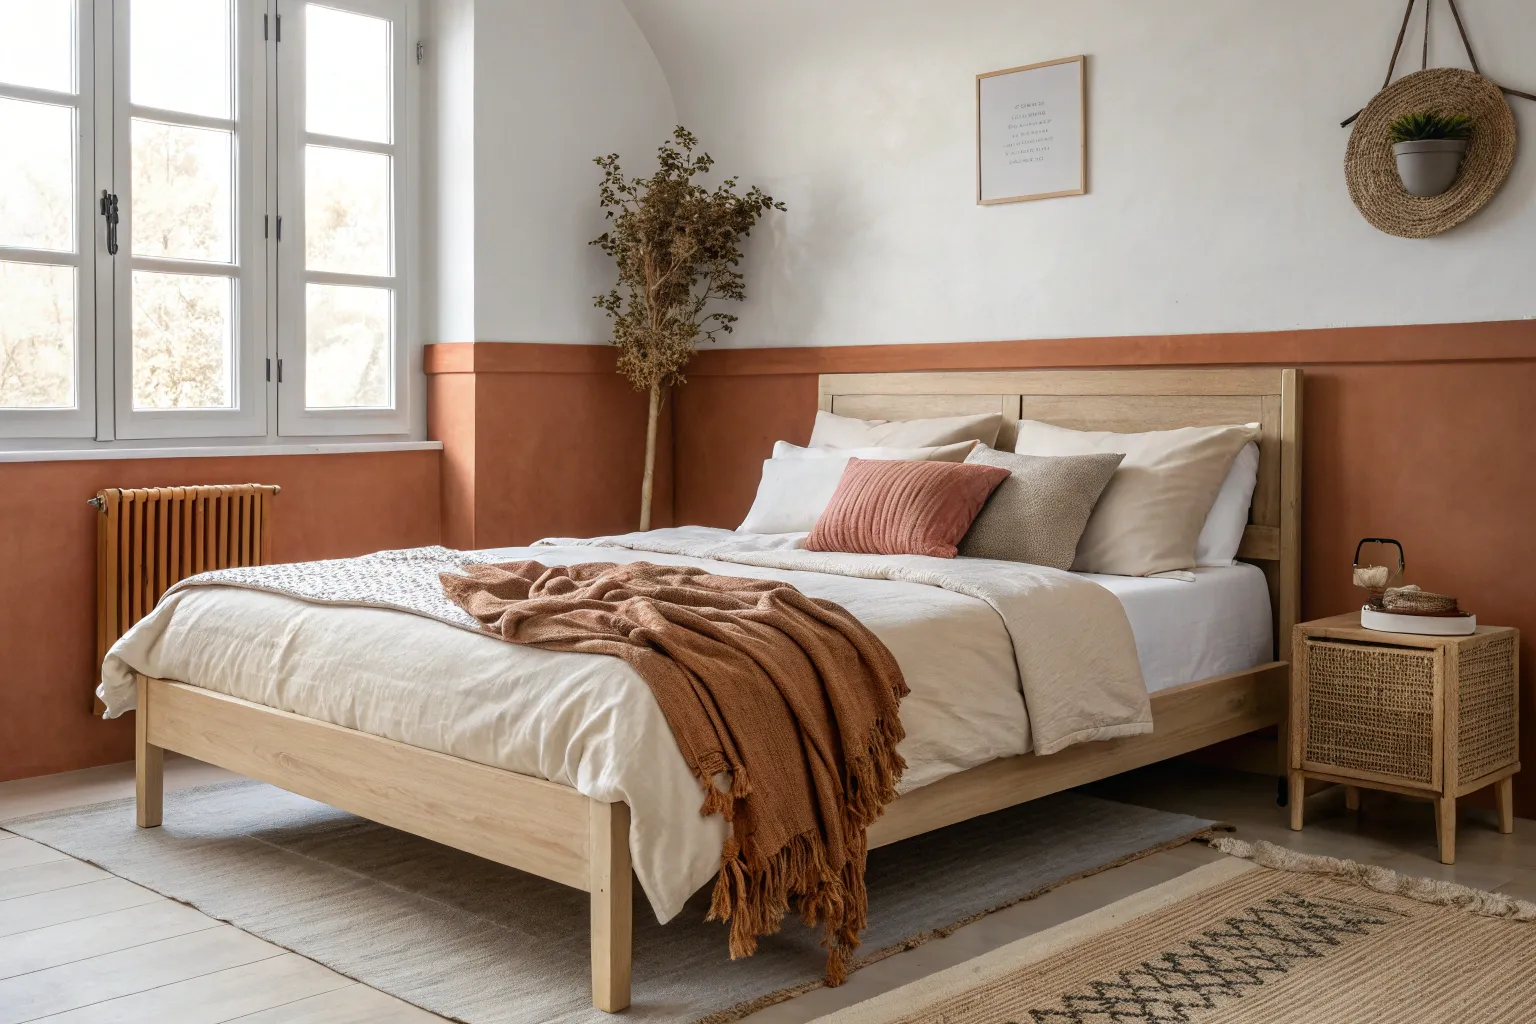
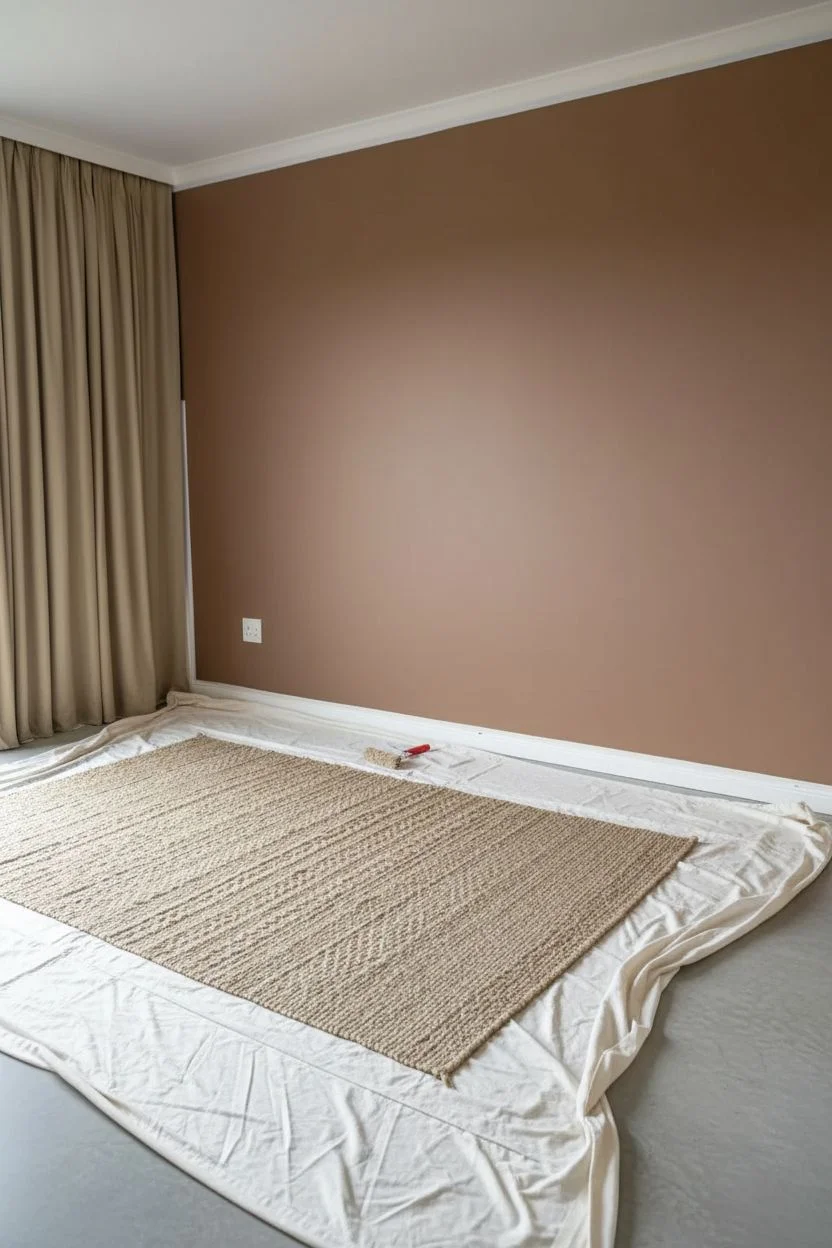
Terracotta Blush for Instant Warmth and Comfort
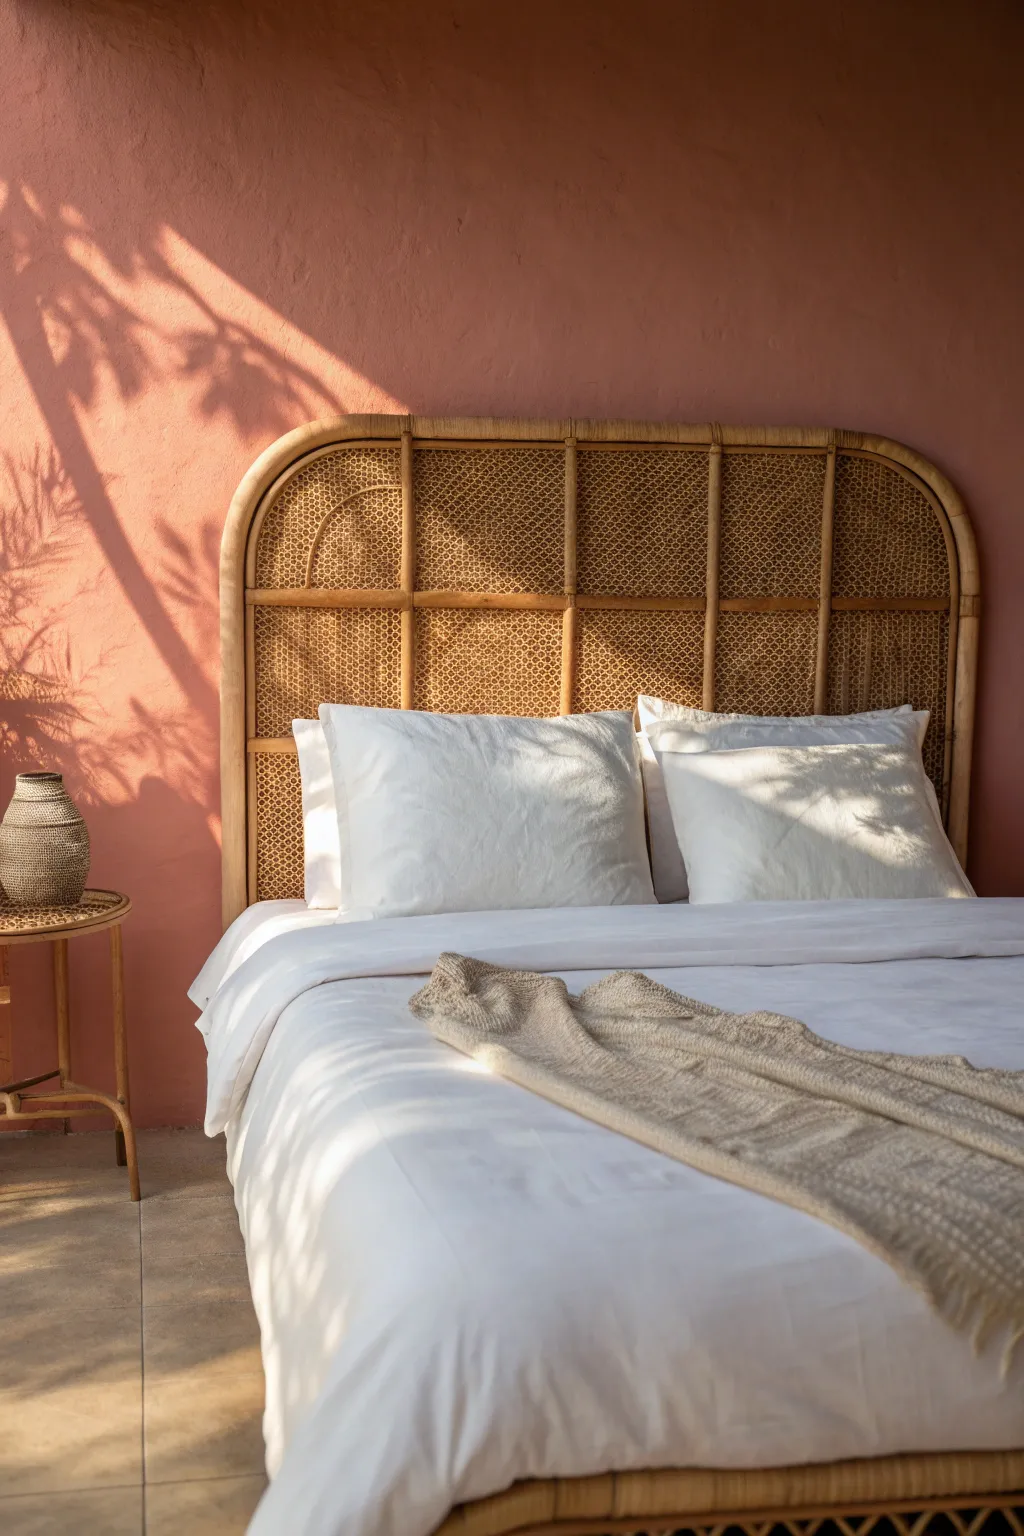
Recreate the soothing warmth of a sun-drenched bedroom interior with this acrylic painting tutorial. You’ll learn to balance the earthy tones of terracotta walls with the intricate texture of rattan and the stark, beautiful play of light and shadow.
Step-by-Step Guide
Materials
- Canvas or primed panel (12×16 inch or similar)
- Acrylic paints: Burnt Sienna, Yellow Ochre, Titanium White, unbleached Titanium, Burnt Umber, Alizarin Crimson, Paynes Grey
- Flat brushes (various sizes: 3/4 inch, 1/2 inch)
- Small round detail brushes (sizes 0, 2)
- Rigger or liner brush
- Palette knife for mixing
- Water container and paper towels
- Masking tape (optional for straight lines)
Step 1: Setting the Scene
-
Base layer:
Mix a warm, neutral wash using Unbleached Titanium and a touch of Burnt Sienna. Apply this loosely over the entire canvas to kill the stark white background, allowing it to dry completely. -
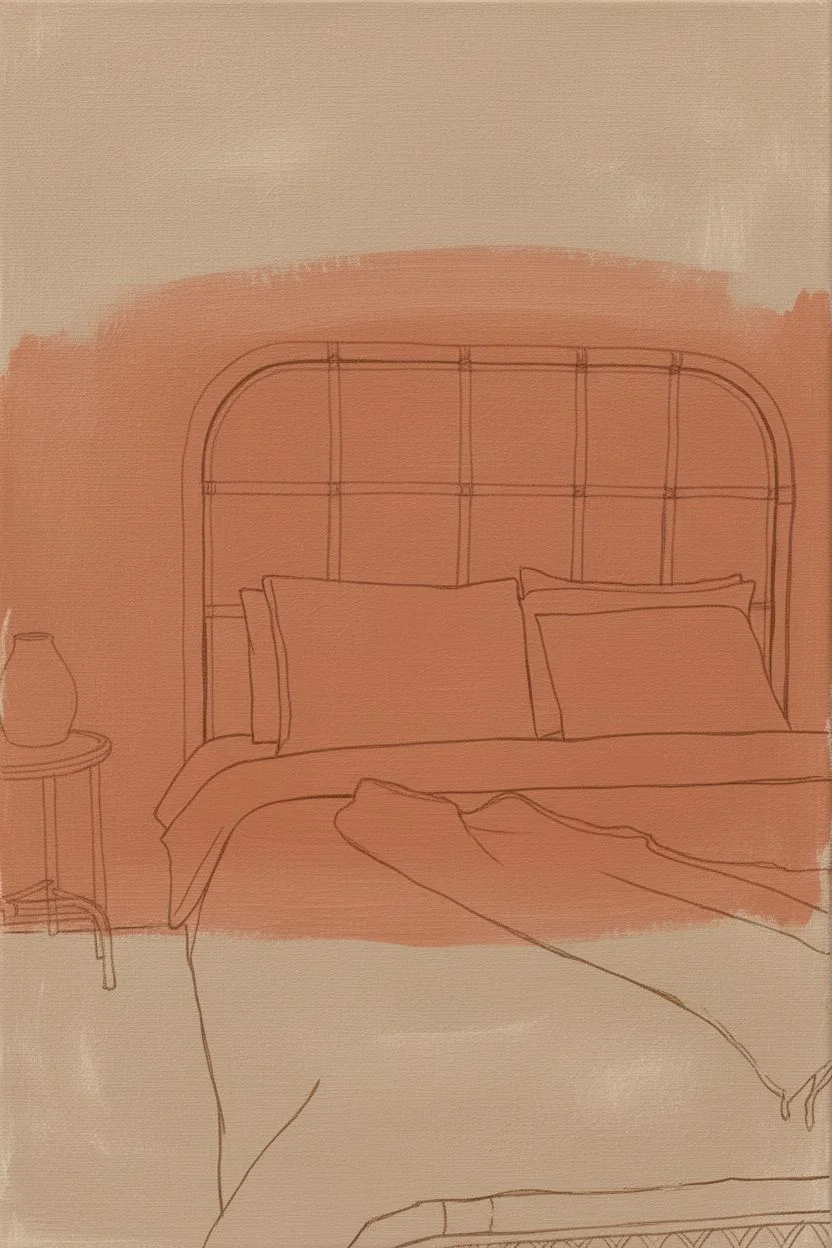
Sketch the layout:
Using a small round brush and a very diluted Burnt Umber, map out the major shapes. Draw the large rectangle for the headboard, the horizon line of the mattress, and the vertical line of the side table on the left. -
Refine the perspective:
Ensure the top curve of the headboard is symmetrical. Sketch the outlines of the pillows, noting how they prop up against the headboard, and lightly indicate the folds of the duvet and the throw blanket at the foot. -
Block in the wall color:
Mix a generous amount of your main wall color: Burnt Sienna, a touch of Alizarin Crimson for pinkish warmth, and Titanium White to soften it. Paint the entire wall area, painting around the furniture outlines.
Master the Mesh
Don’t try to paint every single strand of rattan. Suggest the texture with impressionistic dabs and crosses; the viewer’s eye will fill in the rest of the pattern.
Step 2: Bedding and Shadows
-
Bedding base coat:
For the sheets and pillows, use Titanium White mixed with a tiny drop of Paynes Grey for a cool white base. Don’t worry about shadows yet; just get a solid, opaque coverage. -
Mapping the shadows:
The crucial element here is the shadow cast by the window foliage. Mix a slightly darker version of your wall color using a bit more Alizarin and a tiny touch of Paynes Grey. -
Painting the foliage shadows:
Paint the leafy shadow shapes on the wall to the left. Keep the edges relatively crisp but fluid to mimic the distinct silhouette of palm or fern leaves. -
Softening the light:
While the shadow paint is still slightly wet, I like to gently dry-brush the edges in some areas to suggest the light diffusing through the window. -
Pillow volume:
Using a light grey-blue mix, paint the shadowed sides of the pillows to give them volume. The light source is coming from the left, so the right sides will be darker.
Step 3: The Rattan Headboard
-
Underpainting the cane:
Paint the wooden frame of the headboard with a mix of Yellow Ochre and Burnt Sienna. Fill the ‘mesh’ areas with a darker, solid Burnt Umber tone to represent the depth behind the weaving. -
Highlighting the frame:
Once the frame color is dry, mix Unbleached Titanium with Yellow Ochre. Paint the highlighted tops of the bamboo curves and vertical supports where the sunlight hits them. -
Creating the weave texture:
This is the patient part. Take your smallest rigger brush and a mix of Yellow Ochre and White. Paint tiny cross-hatching or small ‘x’ shapes over the dark umber areas to simulate the rattan mesh. -
Varying the weave value:
Where the shadow from the foliage hits the headboard, switch to a darker ochre mix for your cross-hatching. This helps the shadow pattern flow seamlessly from the wall onto the furniture.
Shadows Look Muddy?
If wall shadows look too brown or dirty, mix in more Alizarin Crimson or purple. Shadows on warm colors often lean towards cool violets rather than just black.
Step 4: Textile Details and Finishing
-
Throw blanket texture:
Mix a warm beige using Unbleached Titanium and a speck of Burnt Umber. Paint the throw blanket, using rough, vertical strokes to mimic the knit texture. -
Deepening folds:
Add dark, thin lines within the throw blanket and the duvet using a grey-brown mix to emphasize the deepest creases and folds. -
Sunlight hits:
Using pure Titanium White, paint the brightest highlights on the tops of the pillows and the crest of the duvet folds where the sun hits directly. -
Side table details:
Quickly block in the side table using the same colors as the headboard frame. Add the vase silhouette in a neutral grey-brown, keeping it loose. -
Final shadow check:
Ideally, step back and look at the overall contrast. Deepen the shadow directly under the duvet overhang to ground the bed on the floor.
Step back and enjoy the serene, sunlit atmosphere you’ve captured on canvas

PENCIL GUIDE
Understanding Pencil Grades from H to B
From first sketch to finished drawing — learn pencil grades, line control, and shading techniques.
Explore the Full Guide
Charcoal Gray for a Modern, Quiet Luxury Look
Transform your bedroom into a quiet luxury retreat with this modern charcoal gray painting project. This guide focuses on achieving that velvety matte finish on an accent wall, paired with soft neutrals for a calm, sophisticated atmosphere.
How-To Guide
Materials
- High-quality interior latex paint (Charcoal/Dark Gray, matte finish)
- White ceiling paint (flat finish)
- Painter’s tape (blue or green)
- Canvas drop cloths
- Spackling paste and putty knife
- Sandpaper (120 and 220 grit)
- Paint roller frame and extension pole
- Microfiber roller covers (3/8 or 1/2 inch nap)
- Angled sash brush (2.5 inch)
- Paint tray and liners
- TSP substitute or mild degreaser
- Primer (tinted gray recommended)
Step 1: Preparation
-
Clear and Protect:
Move all furniture such as the bed and nightstands to the center of the room or out completely. Cover the flooring and remaining furniture with canvas drop cloths to protect against splatters. -
Surface Prep:
Inspect your walls for any holes or nail pops. Fill these imperfections with spackling paste. Once dry, sand the patches smooth with fine-grit sandpaper until flush with the wall. -
Clean Walls:
Wipe down all walls with a TSP substitute or mild soapy water to remove dust and oils. This step ensures the dark paint adheres properly and doesn’t peel later. -
Tape Edges:
Apply painter’s tape carefully along the skirting boards, door frames, and the ceiling line where it meets your accent wall. Press the tape edges down firmly with a putty knife to prevent bleed-through.
Uneven Sheen?
If you see shiny spots (flashing) on the wall, it’s likely from patch repairs that weren’t primed. Lightly sand the spot, spot-prime it, and repaint the entire wall section for a unified finish.
Step 2: Priming
-
Tinted Primer Application:
Since you are using a deep charcoal color, ask your paint store to tint your primer gray. Roll a coat of this tinted primer onto the accent wall. This helps achieve true color depth with fewer topcoats. -
Cutting In:
While the roller work is handy, first use your angled sash brush to ‘cut in’ a 2-3 inch border of primer around the edges of the wall. -
Drying Time:
Allow the primer to dry completely according to the manufacturer’s instructions, typically 1 to 3 hours.
Level Up: Art Placement
Use painter’s tape to map out the exact placement of your artwork frames on the wall before hammering nails. This helps you visualize the spacing perfectly without damaging your fresh paint job.
Step 3: Painting the Accent Wall
-
First Coat Cutting In:
Open your charcoal gray paint and stir thoroughly. Begin by cutting in along the ceiling line, corners, and baseboards with your angled brush. Maintain a wet edge by not working too far ahead of your rolling. -
Rolling Technique:
Load your roller with paint and apply it to the wall using a ‘W’ or ‘M’ pattern. Fill in the section without lifting the roller, then smooth it out with vertical strokes. -
Even Coverage:
Continue rolling across the wall in manageable sections. I like to overlap my previous wet edge slightly to avoid lap marks, which show up easily in dark matte paints. -
First Coat Dry:
Let the first coat dry for at least 4 hours. Dark colors often look patchy or streaky after just one coat, so don’t panic. -
Second Coat Application:
Repeat the cutting and rolling process for a second coat. This layer will deepen the color and hide any streakiness, solidifying that rich, velvety look.
Step 4: Finishing Touches
-
Remove Tape:
Carefully peel off the painter’s tape while the second coat is still slightly tacky. Pulling it off at a 45-degree angle helps ensure a crisp, clean line. -
Touch Up:
Inspect the edges near the ceiling and baseboards. Use a small artist’s brush to correct any minor bleeds or uneven spots. -
Clean Up:
Wash your brushes and rollers immediately with warm soapy water (for water-based paints) to preserve them for future projects. -
Replace Furniture:
Allow the paint to cure for at least 24 hours before moving your bed frame and nightstands back against the wall to prevent scuffs. -
Styling:
Hang your neutral artwork and dress the bed with white linens and textured throws to complete the quiet luxury aesthetic shown in the photo.
Enjoy the calm and serene atmosphere created by your new charcoal gray feature wall
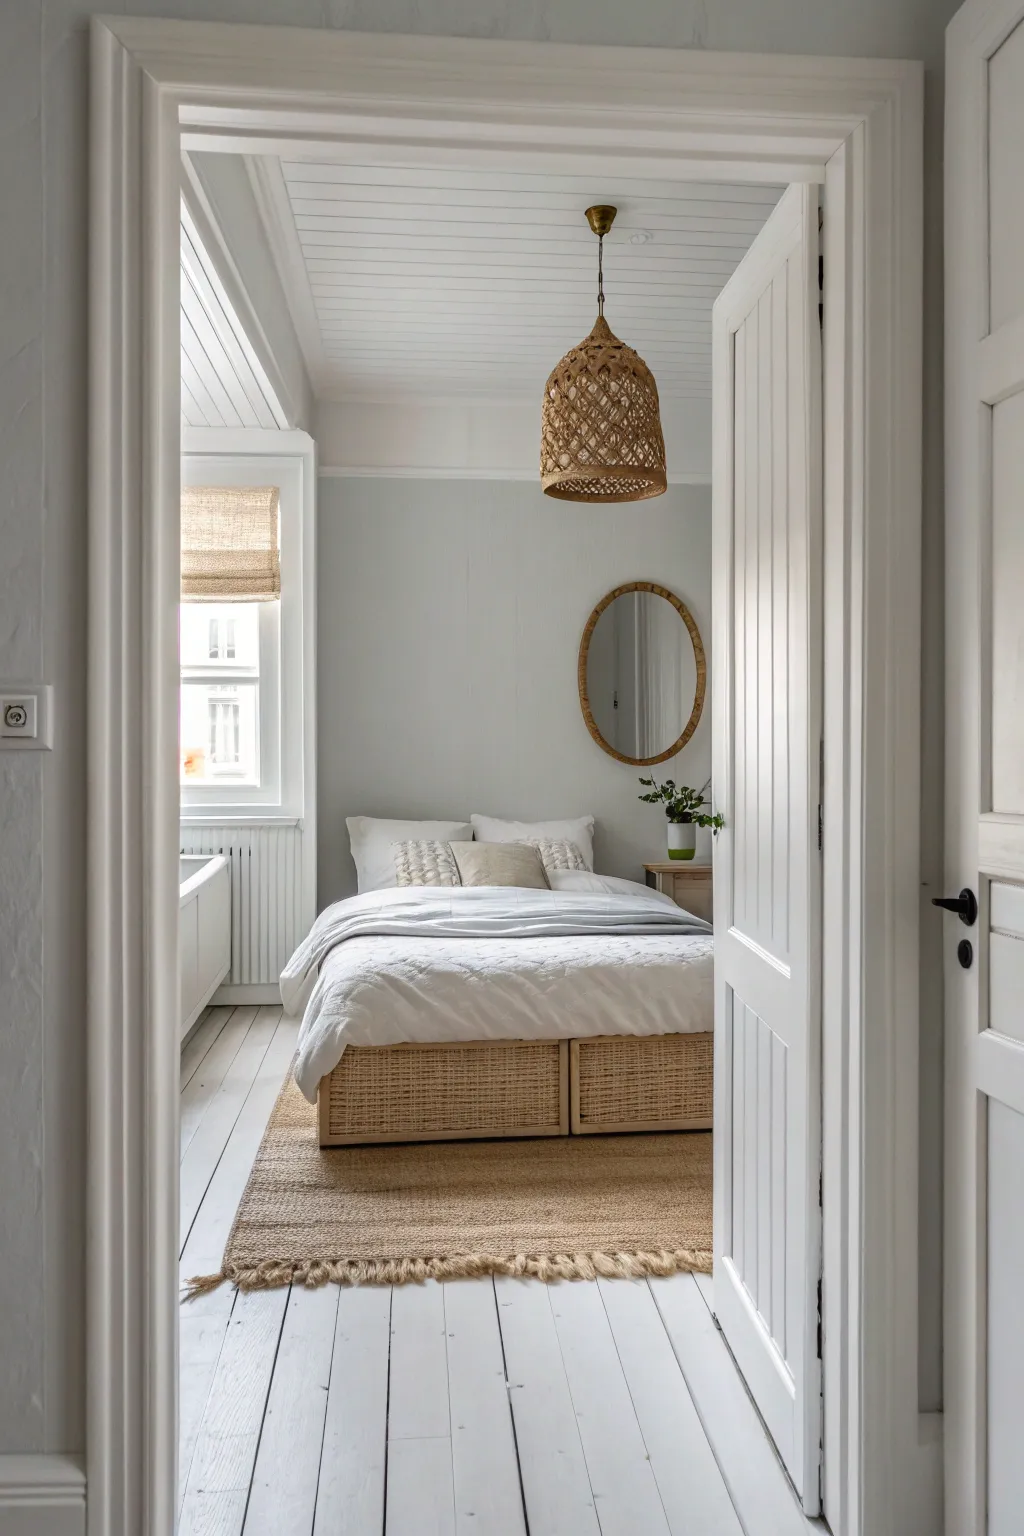
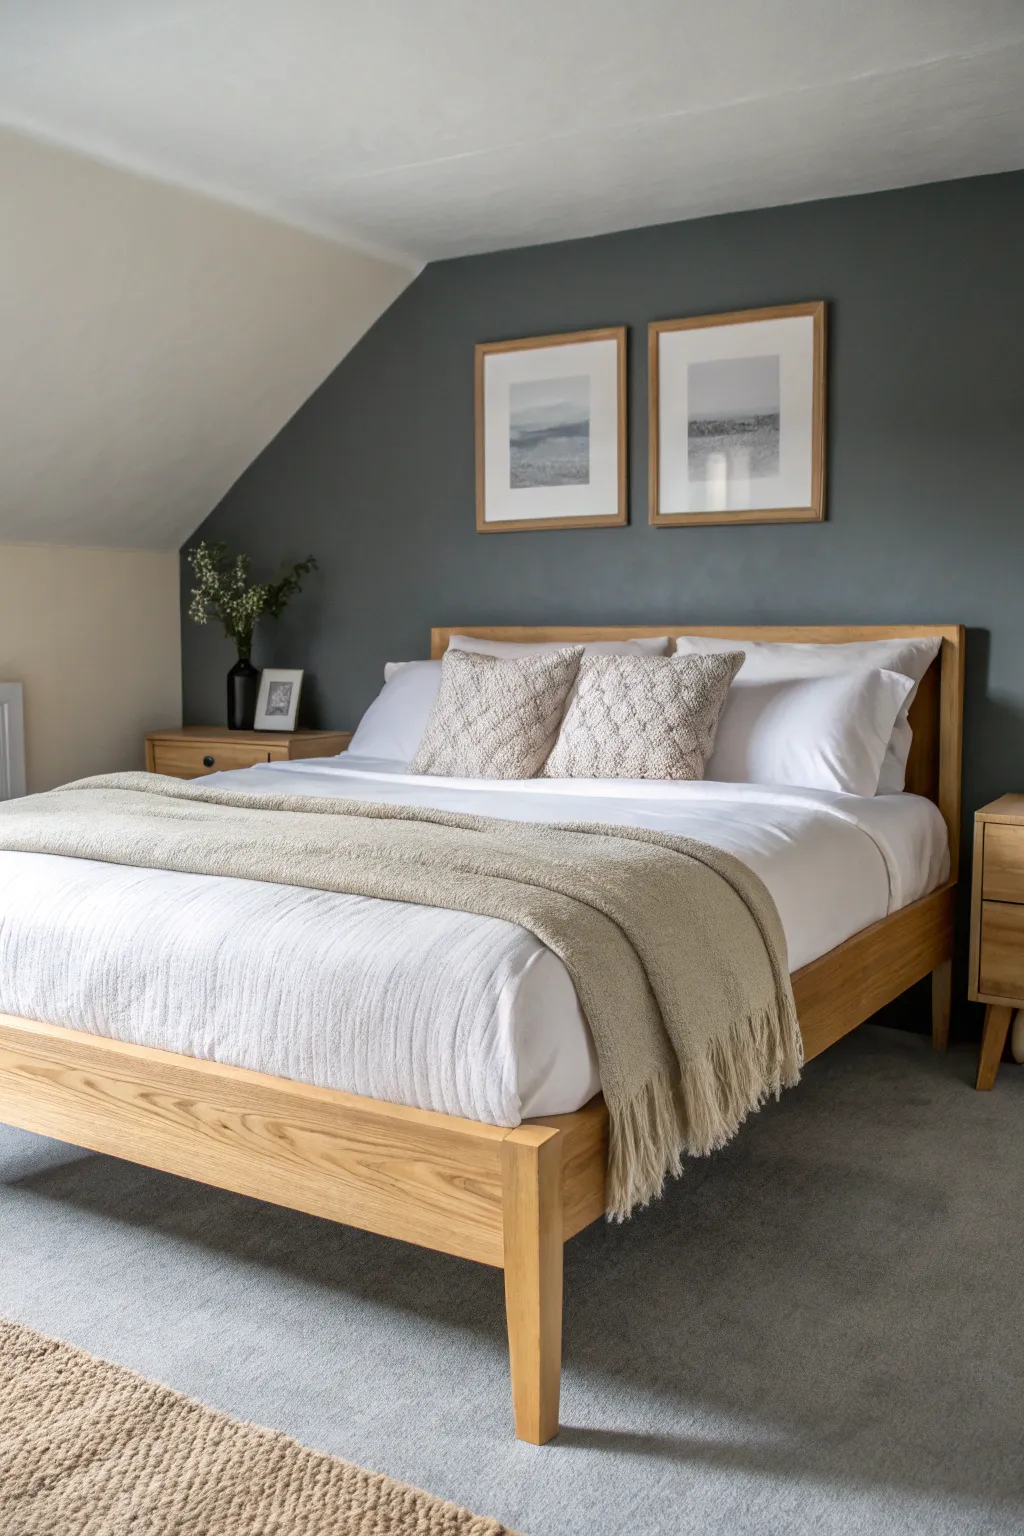
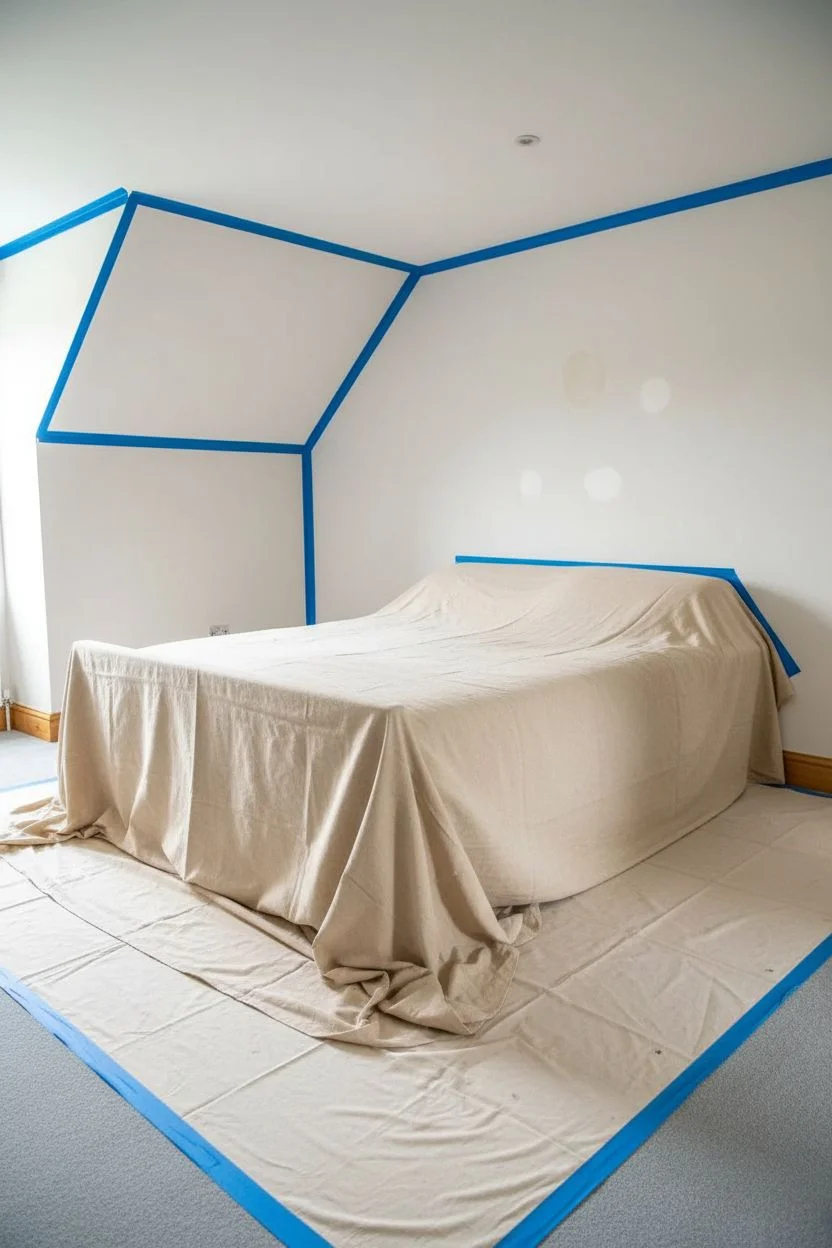
Single Accent Wall Behind the Bed for Easy Impact
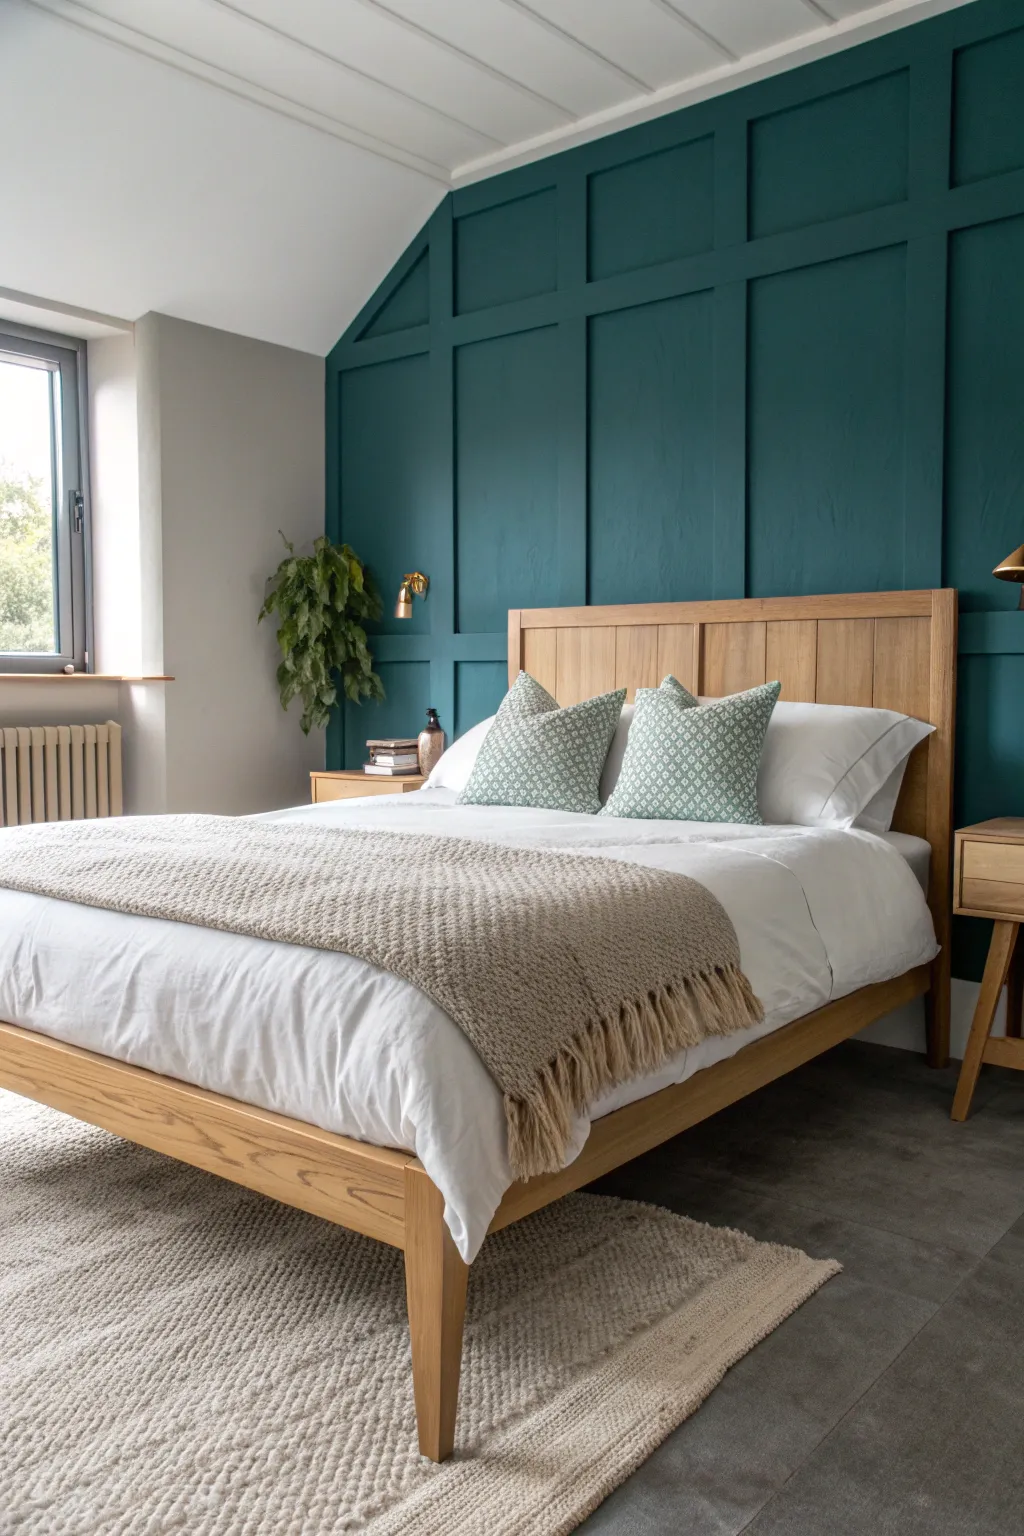
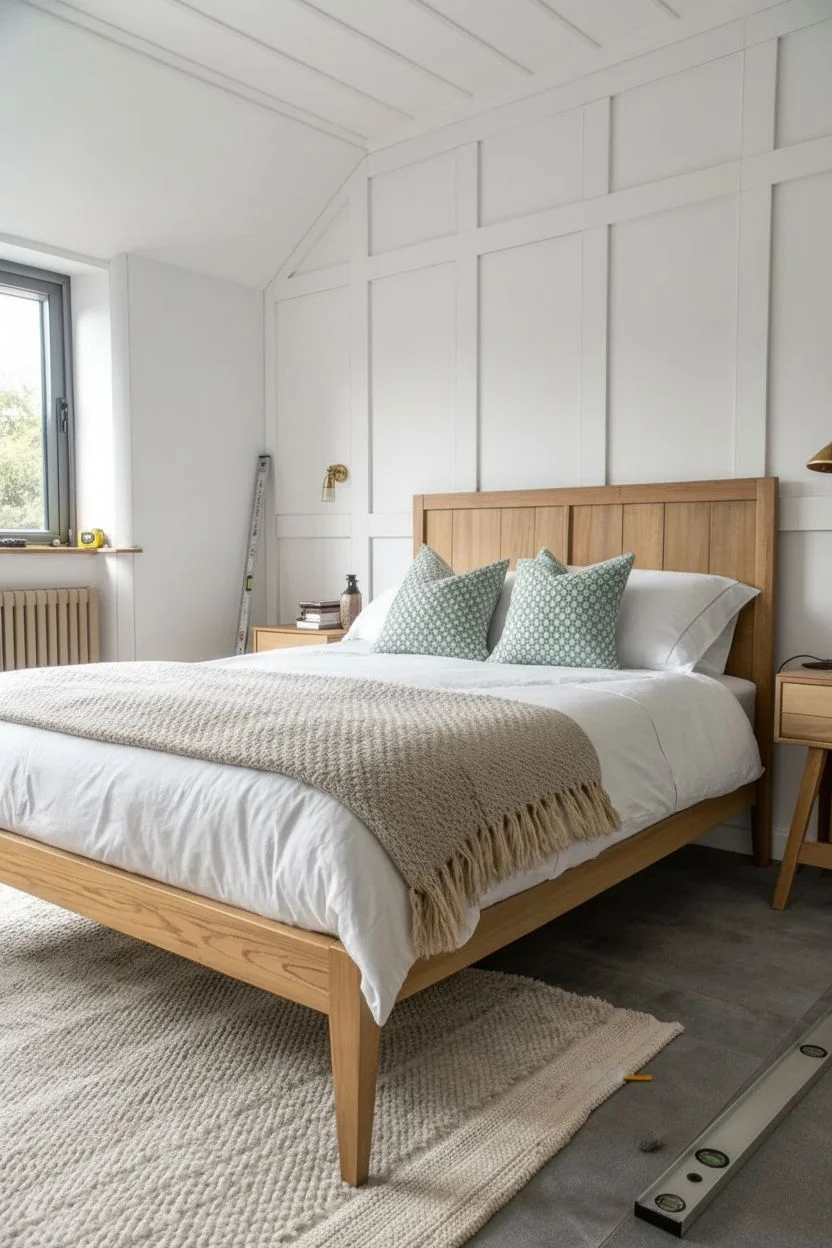
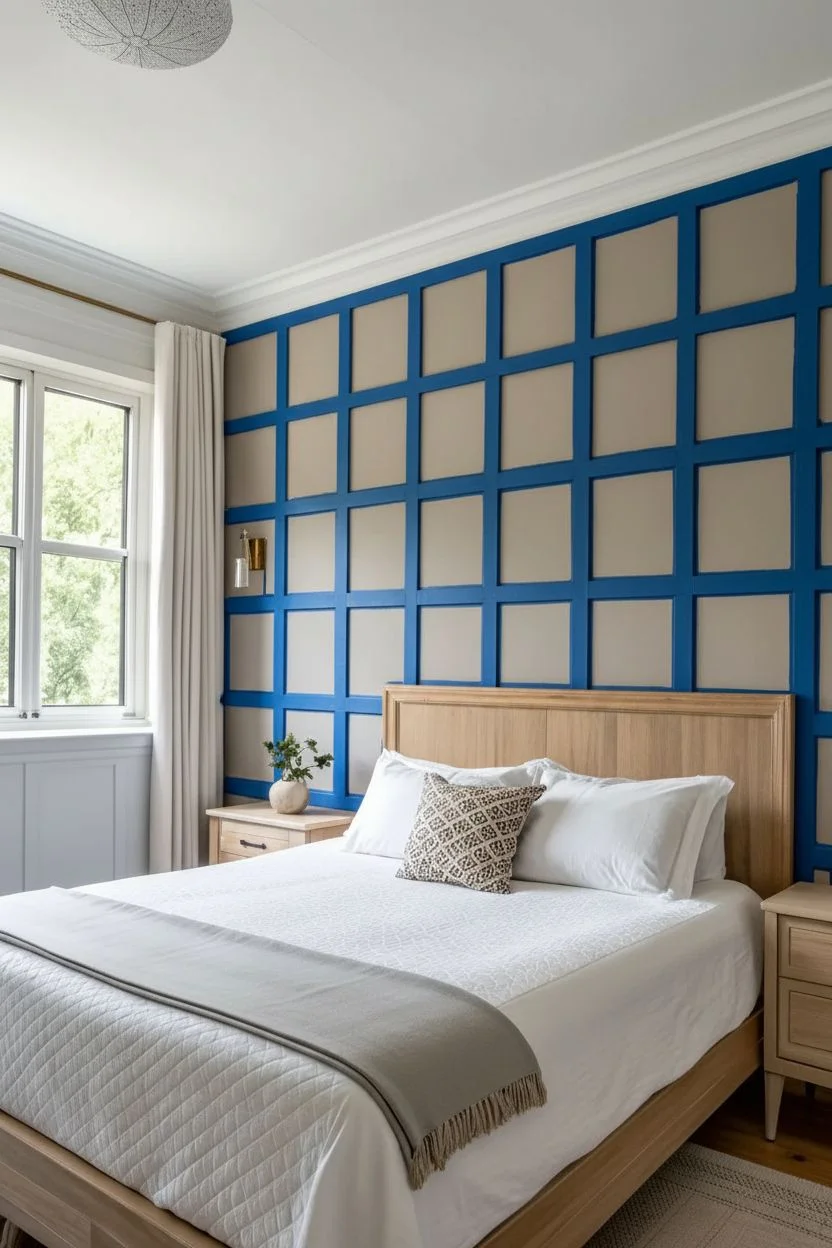
Transform a plain white bedroom into a cozy retreat with this deep teal-green paneling project. The structured grid pattern adds architectural interest and depth, creating the perfect backdrop for a simple wooden bed frame.
Step-by-Step
Materials
- MDF strips (1×3 or 1×4 inch)
- Panel adhesive (e.g., Liquid Nails)
- Caulk gun
- Bubble level or laser level
- Measuring tape
- Pencil
- Miter saw or hand saw
- Brad nailer and 1-inch to 1.5-inch brad nails
- Wood filler
- Sandpaper (medium and fine grit)
- Paintable caulk
- Painter’s tape
- Primer (if using bare wood)
- Interior latex paint (deep teal or forest green)
- Paint roller (medium nap)
- Angled sash brush
- Drop cloths
Step 1: Planning and Layout
-
Measure the wall:
Measure the total width and height of your accent wall. Note any obstacles like outlets or switches that fall within the grid. -
Calculate spacing:
Decide on the number of vertical battens you want. For this look, aim for roughly 20-30 inches between verticals. Divide your wall width by the number of spaces to get precise measurements. -
Draw a sketch:
Visualize the grid on paper. This specific design uses a full-height grid with horizontal rails near the top and middle, creating rectangular panels. -
Mark the wall:
Using a pencil and your level, lightly mark where each vertical batten and horizontal rail will go directly on the wall. This is a crucial sanity check before cutting any wood.
Step 2: Installation
-
Install the frame:
Start by attaching the top horizontal board (if adding crown molding or a top rail) and the bottom baseboard. If you are keeping existing baseboards, you can rest your vertical battens on top of them. -
Place vertical battens:
Cut your vertical MDF strips to size. Apply a wavy line of adhesive to the back of the first strip. -
Secure the battens:
Place the strip against your vertical mark on the wall. Use a level to ensure it is perfectly plumb, then secure it with your brad nailer. Repeat for all vertical strips. -
Cut horizontal rails:
Measure the distance between each vertical batten individually. Walls are rarely perfectly straight, so cutting these ‘to fit’ is better than cutting them all at once. -
Install horizontal rails:
Apply adhesive and nail the horizontal pieces into place between the verticals to form your grid pattern. I like to use a spacer block cut to size to ensure every horizontal rail is at the exact same height without constant measuring. -
Check sturdiness:
Gently wiggle the boards to ensure they are firmly attached. Add extra nails to any loose areas if necessary.
Spacer Block Magic
Cut a scrap piece of wood to the exact vertical distance between your horizontal rails. Use this as a spacer guide for quick, consistent placement without measuring every time.
Step 3: Prep for Paint
-
Fill nail holes:
Apply a dab of wood filler to every nail hole. Overfill slightly, as the filler will shrink when it dries. -
Sand smooth:
Once dry, sand the filler flush with the wood surface. Run your hand over the joints to ensure they feel seamless. -
Caulk the seams:
This step makes the project look professional. Apply a thin bead of printable caulk along every edge where the wood meets the wall and where boards meet each other. Smooth with a wet finger. -
Protect adjacent surfaces:
Apply painter’s tape to the adjacent walls, ceiling, and floor to protect them from the dark paint color.
Add a Picture Ledge
Top the paneling with a slightly deeper piece of wood (like a 1×2) to create a shallow shelf for displaying art or small plants.
Step 4: Painting
-
Prime the wood:
If your MDF is raw, apply a coat of primer to the wood strips. MDF soaks up paint like a sponge, so this seals it. -
Cut in edges:
Using your angled brush, paint the corners, edges, and the sides of the battens first. Getting into those grid corners with a roller is nearly impossible. -
Roll the first coat:
Use a medium nap roller to paint the flat wall sections and the faces of the battens. Roll in a ‘W’ pattern for even coverage. -
Apply second coat:
Allow the first coat to dry completely according to the paint can instructions. Apply a second coat for that rich, opaque finish seen in the photo. -
Remove tape:
Peel off the painter’s tape slowly while the paint is still slightly tacky to prevent peeling.
Step back and admire how this bold architectural element completely redefines the character of your room


Painted Arch Headboard for a Built-In Focal Point
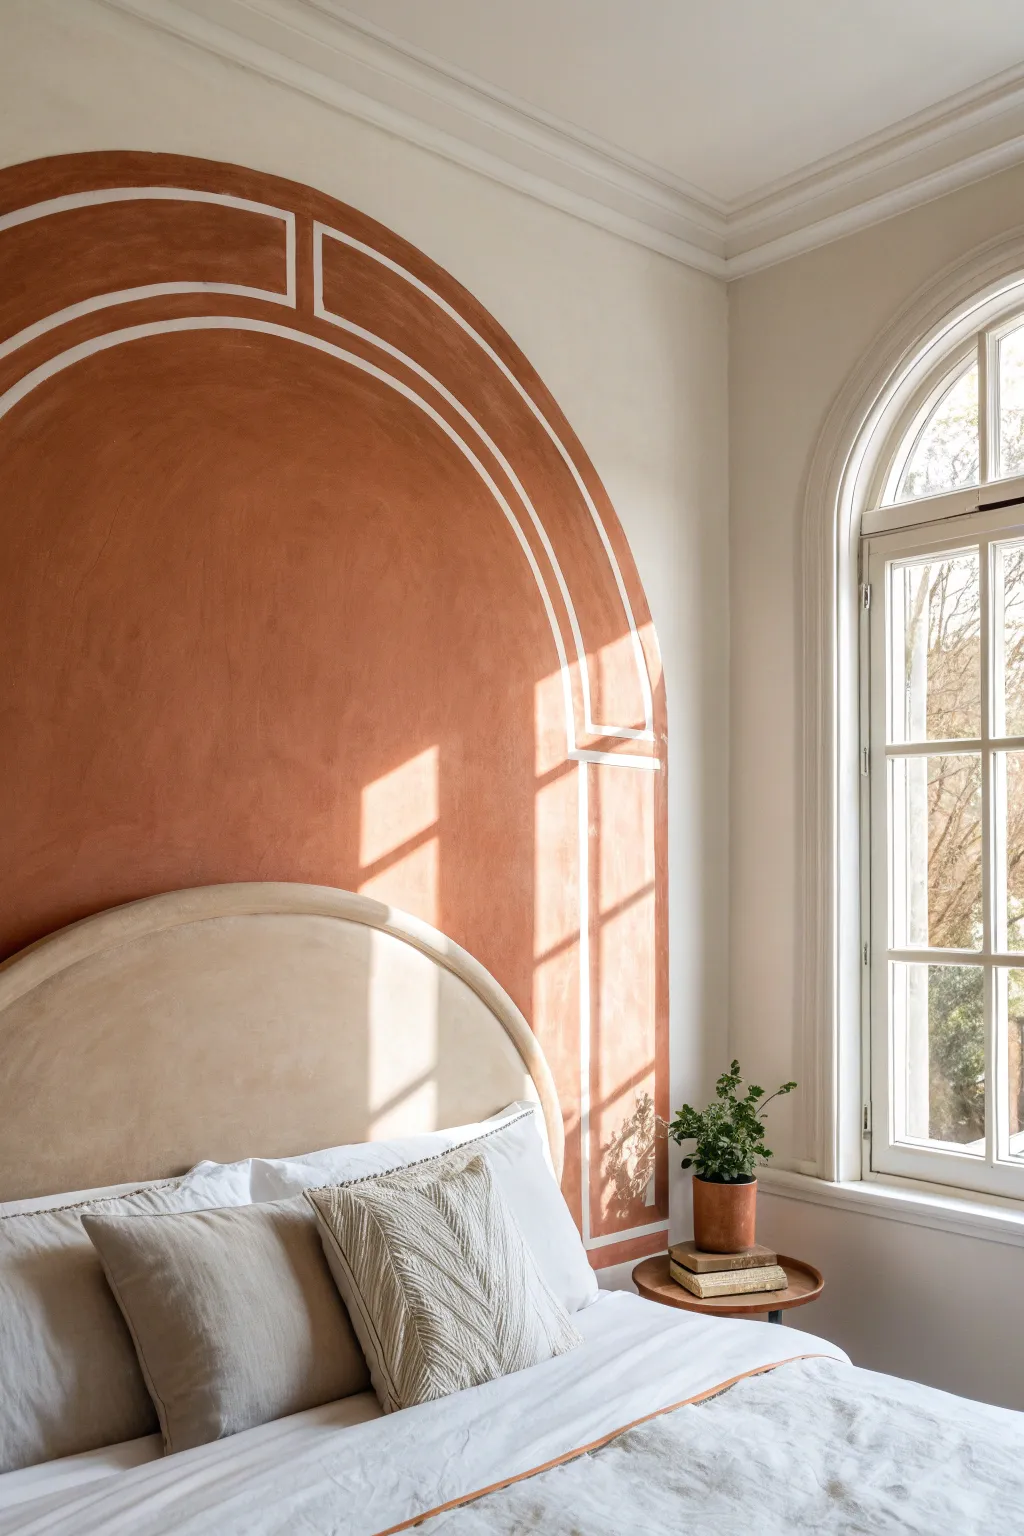
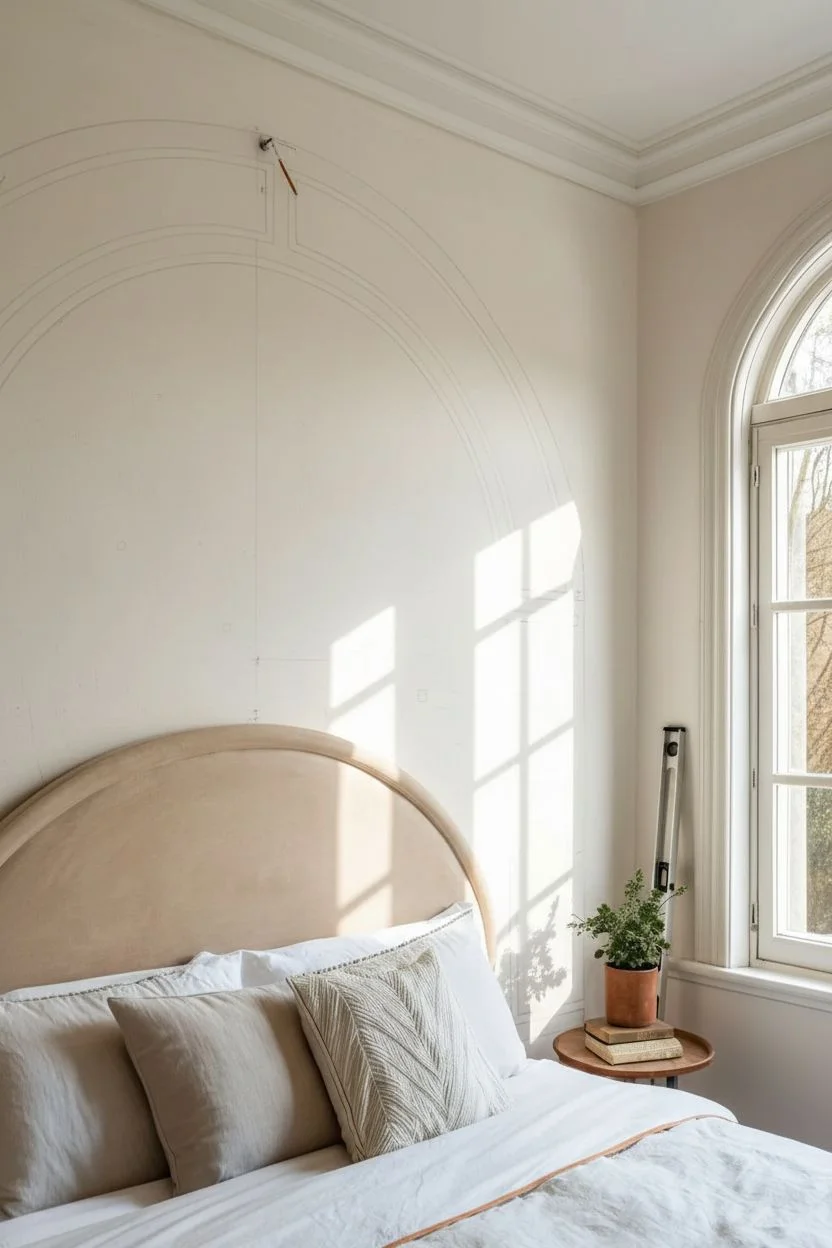
Transform a plain white wall into a Mediterranean-inspired retreat with this stunning terracotta arch mural. The design creates a faux-architectural headboard effect using warm, earthy lime wash paint and clean negative space to mimic classic stone inlay.
How-To Guide
Materials
- Light terracotta/rust-colored lime wash paint
- Pencil
- Measuring tape
- Level (2-foot or longer)
- Painter’s tape (high quality)
- String and push pin (for compass method)
- Wide lime wash block brush (4-5 inch)
- Small angled sash brush
- Drop cloth
- Ladder or step stool
Step 1: Planning and Mapping
-
Measure your bed width:
Start by measuring the width of your actual bed frame or headboard. The painted arch needs to be significantly wider—aim for about 6 to 10 inches past the mattress on each side to create a framing effect. -
Find the center point:
Mark the exact center of your bed on the wall with a pencil. Use a level to draw a light vertical line upwards from this point to guide your arch height. -
Establish the arch height:
Determine how tall you want the arch. For high ceilings like the one in the photo, the arch peak looks best about 2-3 feet below the crown molding. Mark this peak on your center line. -
Draw the outer arch:
Create a simple compass tool by tying a string to a pencil. Pin the other end of the string to your center line at the desired radius point. Pull the string taut and carefully swing the pencil to draw the large, outer semi-circle. -
Mark the vertical sides:
Using your level, draw straight vertical lines down from the widest points of your semi-circle all the way to the floor (or baseboard). This creates the main ‘tunnel’ shape.
Mastering the Curve
For the sharpest curved tape lines, use specific ‘flexible’ painter’s tape designed for curves, or cut standard tape into many small, overlapping 2-inch strips to navigate the bend.
Step 2: Taping the Negative Space
-
Create the inner border:
Adjust your string compass length to be about 4 inches shorter than the first setting. Draw a second, smaller arch inside the first one to create the curved border band. -
Define the rectangular panels:
Draw the inner rectangular shapes. Notice how the design has a ‘keystone’ break at the very top and horizontal breaks on the sides where the arch meets the vertical lines. Sketch these spacing gaps lightly. -
Tape the outlines:
Apply painter’s tape along the *outside* of your main shape to protect the surrounding white wall. Press the edges down firmly to prevent bleed-through. -
Tape the detailed inlays:
Now, tape off the internal white lines. You are taping over the areas that will remain white. Use short pieces of tape to navigate the curves, or execute the curve by carefully cutting tape strips with an X-Acto knife. -
Seal the tape edges:
I usually like to run a fingernail or a credit card firmly over all tape edges. This is crucial for crisp lines, especially when working with textured walls.
Custom Keystone
Add a level of grandeur by extending the top ‘gap’ in the arch slightly higher or wider to mimic a true masonry keystone, giving the illusion of structural weight.
Step 3: Painting and Finishing
-
Cut in the edges:
Dip your angled sash brush into the terracotta lime wash. Carefully paint along all the taped edges first. Don’t worry about texture yet; just ensure coverage near the lines. -
Apply the first coat:
Use the large block brush to fill in the main areas. With lime wash, apply it in random, X-shaped strokes rather than straight lines. This creates that cloudy, old-world plaster texture. -
Let it dry completely:
Lime wash dries much lighter than it looks when wet. Allow the first coat to dry for at least 4-6 hours to see the true color and texture develop. -
Apply the second coat:
Repeat the cross-hatch painting process. The second coat adds depth and emphasizes the suede-like movement in the paint. -
Remove tape while damp:
Carefully peel off the painter’s tape while the second coat is still slightly tacky. If the paint is fully dry, it might chip, so moving while it’s damp ensures a cleaner edge. -
Touch up lines:
Once the tape is gone, you might see tiny bleeds. Use a very small artist’s brush and your original white wall paint to clean up any terracotta that escaped the borders. -
Style the focal point:
Push your bed back into place, ensuring it is centered perfectly within your new architectural mural.
Step back and admire how this simple painted addition completely changes the architectural feel of your room
Two-Tone Split Wall to Add Height and Structure
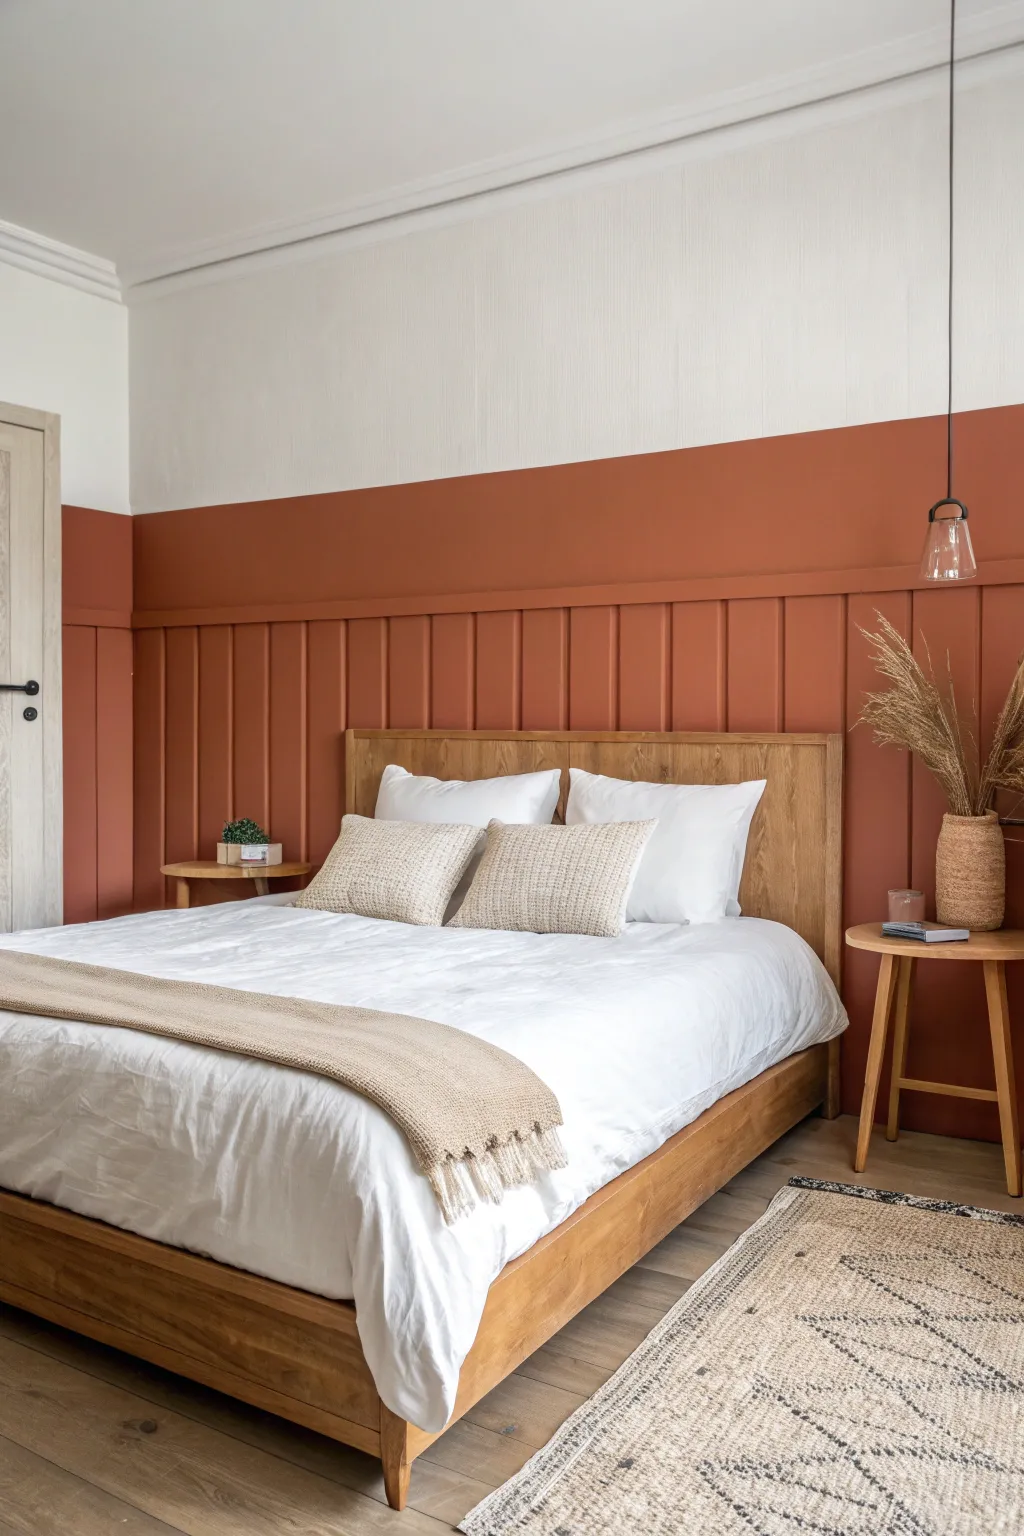
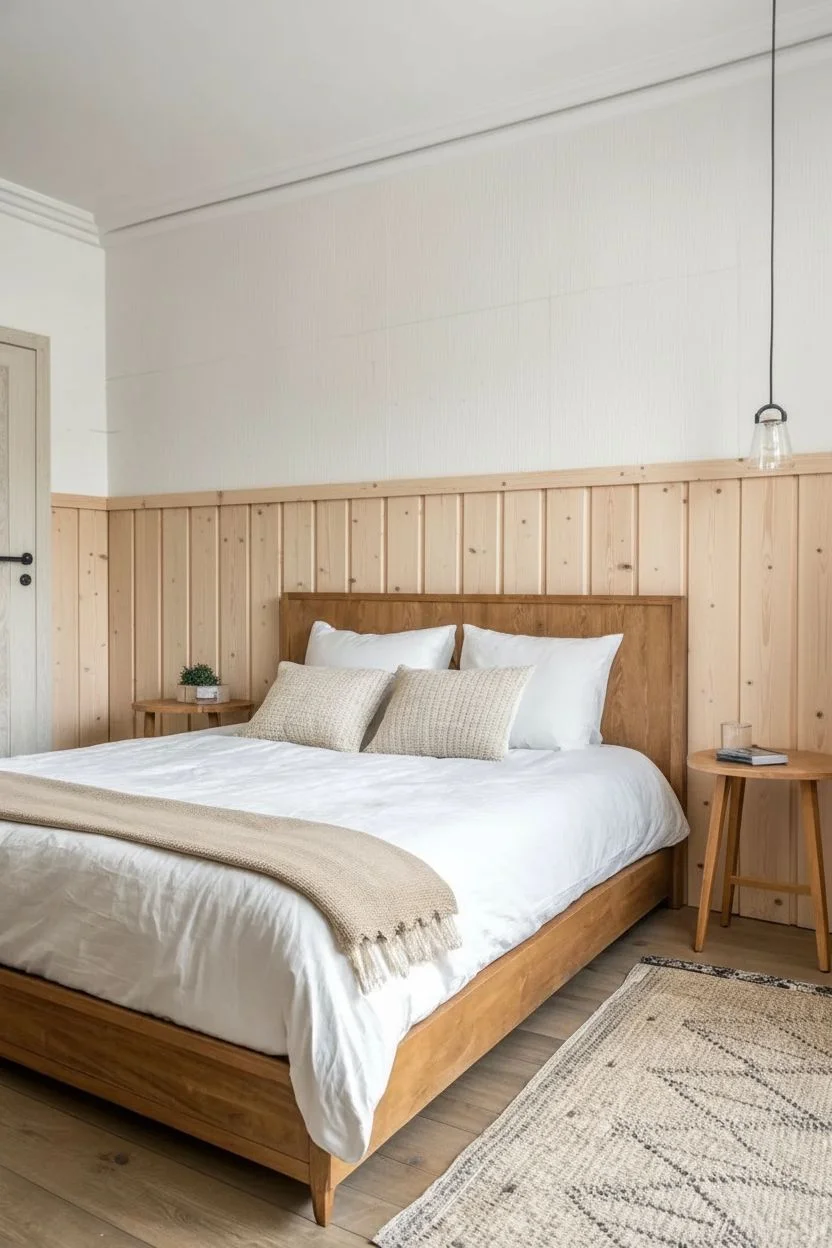
This project transforms a plain bedroom wall into a structured focal point by combining classic beadboard paneling with a rich terracotta paint tone. The split-wall technique draws the eye up while the warm lower section anchors the space with cozy texture.
Step-by-Step Tutorial
Materials
- Wall panels (beadboard sheets or tongue-and-groove planks)
- Top rail molding (dado rail)
- Construction adhesive
- Paneling nails or brad nailer
- Wood filler
- Sandpaper (120 and 220 grit)
- Caulk and caulk gun
- Painter’s tape
- Primer (suitable for wood)
- Terracotta latex paint (satin finish)
- White latex paint (eggshell or matte finish)
- Paint roller and tray
- Angled sash brush
- Level
- Measuring tape
- Circular saw or jigsaw
Step 1: Preparation & Layout
-
Measure and mark:
Begin by determining the height of your paneling. A good rule of thumb is to go about one-half to two-thirds up the wall; mark a level horizontal line across the entire length of the wall to guide your installation. -
Clear and clean:
Remove any existing baseboards carefully if you plan to reuse them, or purchase new ones to match the paneling depth. Ensure the wall surface is clean and dry. -
Cut the panels:
Measure the distance from the floor to your level line. Cut your beadboard sheets or planks to this exact height using a circular saw. If your floor is uneven, you may need to scribe the bottom of the panels for a flush fit.
Uneven Floor Gaps?
If gaps appear between the panel bottom and the floor, don’t stress. Your baseboard molding will cover the bottom few inches, hiding jagged cuts or uneven floor levels perfectly.
Step 2: Installation
-
Apply adhesive:
Apply a zigzag pattern of construction adhesive to the back of your first panel. This ensures a strong bond that won’t rattle. -
Secure the first panel:
Place the first panel in the corner, ensuring it is perfectly plumb using your level. Nail it into place with paneling nails or a brad nailer, targeting the studs where possible. -
Continue the run:
Install the remaining panels, butting them tightly against each other. If using sheets, make sure the seams land on studs if possible, or use extra adhesive at the joints. -
Install the top rail:
Place the top rail molding (dado rail) directly on top of the cut panels. Use a level to ensure it is straight, then nail it into the studs. This piece hides the raw cut edge of the wood.
Level Up: Hidden Shelf
Use a deeper piece of wood (like a 1×3) for the top rail capping piece. This creates a narrow ledge perfect for leaning small framed art or displaying mini succulents along the wall.
Step 3: Finishing the Woodwork
-
Fill the holes:
Use wood filler to cover all nail holes and any gaps in the panel seams. I prefer to overfill slightly as it shrinks when drying. -
Sand smooth:
Once dry, sand the filler flush with 220-grit sandpaper. Wipe away all dust with a tack cloth or damp rag. -
Caulk the seams:
Run a thin bead of paintable caulk along the top edge of the rail where it meets the drywall, and along the corners. Smooth it with a wet finger for a seamless look.
Step 4: Painting
-
Prime the wood:
Apply a coat of high-quality wood primer to the beadboard and the new rail. This seals the wood and ensures the terracotta color will be true and rich. -
Paint the upper wall:
Start by painting the upper portion of the wall white. Don’t worry about getting a little paint on the top of the rail, as you will cover it later. -
Cut in the color:
Once the white paint is fully dry, use painter’s tape to mask off the wall just above the rail. Use an angled sash brush to carefully paint the top rail and the grooves of the beadboard with the terracotta paint. -
Roll the panels:
Use a roller to paint the flat surfaces of the beadboard. Work in small sections to maintain a wet edge and avoid roller marks. -
Second coat:
Allow the first coat to dry completely according to the can’s instructions, then apply a second coat for full, opaque coverage. -
Remove tape:
Peel off the painter’s tape while the paint is still slightly tacky to prevent it from pulling up dry paint chips.
Step 5: Final Touches
-
Reinstall baseboards:
Attach your baseboards at the bottom of the paneling. Fill nail holes, sand, and paint them the same terracotta color to create a continuous floor-to-rail block of color. -
Clean up:
Touch up any small imperfections with a small artist’s brush and enjoy your new architectural feature.
Step back and admire how the warm two-tone effect instantly adds character and architectural depth to your room
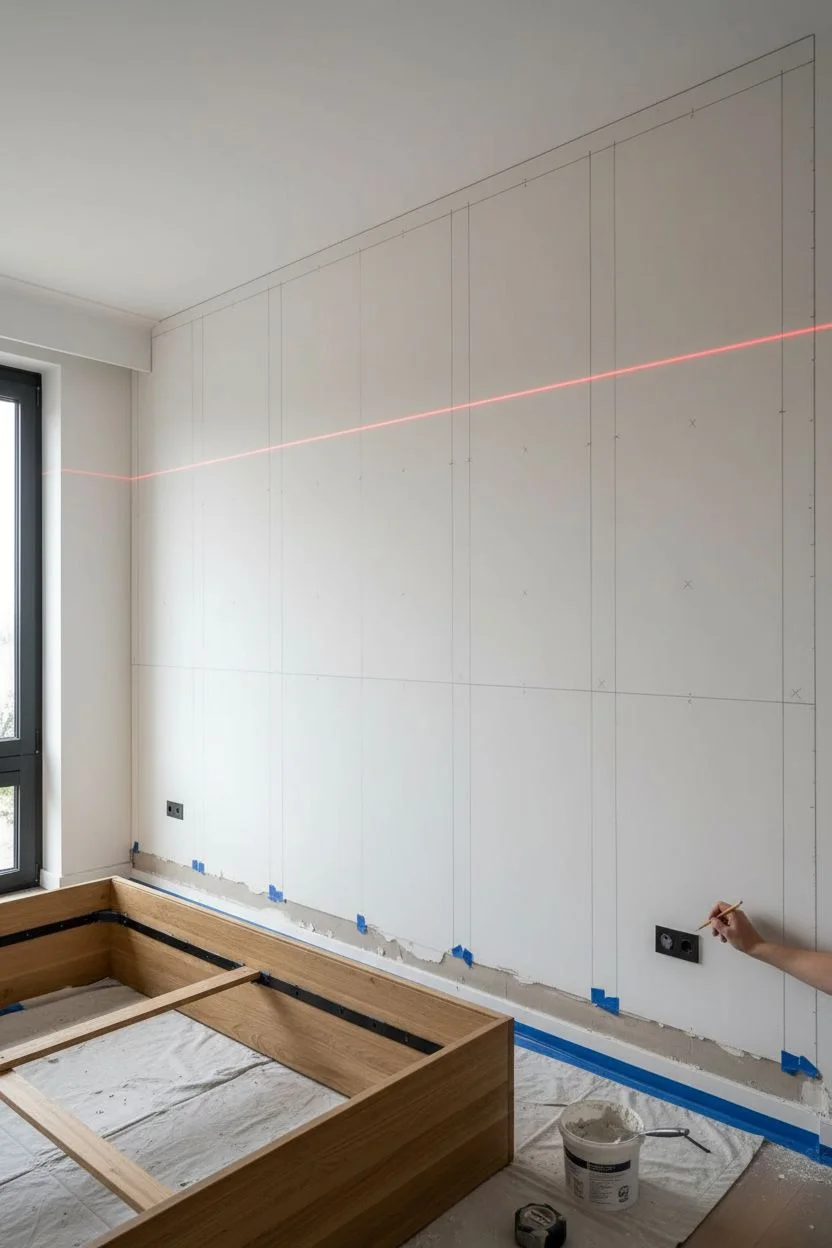
Painted “Panel” Blocks to Mimic Molding Without Carpentry
Elevate your bedroom with the sophisticated look of traditional wainscoting without picking up a hammer or buying expensive lumber. This clever paint technique uses precise taping and shading to create the illusion of three-dimensional recessed panels on a flat wall.
Step-by-Step
Materials
- High-quality painter’s tape (multi-width pack recommended)
- Laser level (or long spirit level)
- Measuring tape
- Pencil
- Base wall paint (e.g., beige or taupe)
- Highlight paint (2 shades lighter than base)
- Shadow paint (2 shades darker than base)
- Small angled sash brush (1.5 – 2 inch)
- Mini foam roller
- Paint tray
- Drop cloths
- Straight edge or ruler
Step 1: Preparation & Mapping
-
Clear and clean:
Remove any existing wall decor and move furniture away from the feature wall. Clean the surface thoroughly with a mild degreaser to ensure perfect tape adhesion, then lay down your drop cloths. -
Establish the grid:
Measure the total width and height of your wall. Calculate how many squares will fit evenly, aiming for squares roughly 18-24 inches wide. I find it helpful to sketch this on paper first to visualize the spacing. -
Draw the grid lines:
Using a laser level as your guide, lightly mark your vertical and horizontal grid lines on the wall with a pencil. These lines represent the *center* of your faux molding strips. -
Tape the ‘molding’:
Apply painter’s tape perfectly straight along your grid lines. The width of the tape will determine the width of your ‘molding’ strips. For the look in the photo, 1.5-inch or 2-inch tape works best. -
Seal the edges:
Running your finger or a plastic putty knife firmly over the tape edges is crucial to prevent bleed-through. You can also lightly brush the base wall color over the tape edges to create a perfect seal.
Seal the Tape
Before painting your shadows, brush a layer of the *base* wall color over the tape edges. This fills any tiny gaps so your darker shadow lines stay remarkably crisp.
Step 2: Creating Dimension
-
Identify light source:
Look at the natural light in your room. If the window is on the left (as in the photo), the ‘shadows’ will fall on the top and left inside edges of the squares, while highlights hit the bottom and right inside edges. -
Mix your shadow tone:
Create a shadow color by mixing a small amount of dark grey or black into your base color, or simply purchase a tester pot two shades darker. It needs to be subtle, not stark. -
Apply the shadow lines:
Using a small angled artist brush or sash brush, paint a thin, consistent line (about 1/4 inch) along the top and left inner edges of every taped square. Feather it out slightly toward the center. -
Mix your highlight tone:
Prepare a highlight color that is about two shades lighter than your base wall color. This simulates the light catching the edge of the recessed panel. -
Apply the highlight lines:
Paint a thin line along the bottom and right inner edges of every taped square. Be careful not to let the highlight and shadow wet paint touch at the corners. -
Blend for realism:
While the paint is still slightly tacky, use a clean, dry brush to very softly blur the outer edge of your shadow and highlight lines into the base wall color. The line against the tape must remain crisp.
Step 3: The Reveal & Finish
-
Let it dry:
Allow the painted accents to dry completely to the touch. This prevents smearing during tape removal. -
Remove vertical tape:
Slowly peel off the vertical strips of painter’s tape at a 45-degree angle. Pulling slowly away from the paint edge yields the sharpest lines. -
Remove horizontal tape:
Remove the horizontal tape strips. You will now see ‘broken’ lines where the tapes crossed. -
Connect the molding:
Using your base wall color and a small detail brush, carefully fill in the empty squares where the tape intersections were. This connects the grid into a solid lattice. -
Touch up corners:
Inspect the corners where your shadows and highlights meet. Use a tiny brush to sharpen these junctions so the 3D effect looks convincing from a distance.
Add Real Trim
For a hybrid look, glue actual thin wood stripping over the flat ‘molding’ areas you taped off. The painted shadows behind it will add incredible depth to the real wood.
Step back and enjoy the depth and architectural interest you’ve added to your room with just a few cans of paint
Mustard Yellow for a Sunny, Creative Bedroom Boost
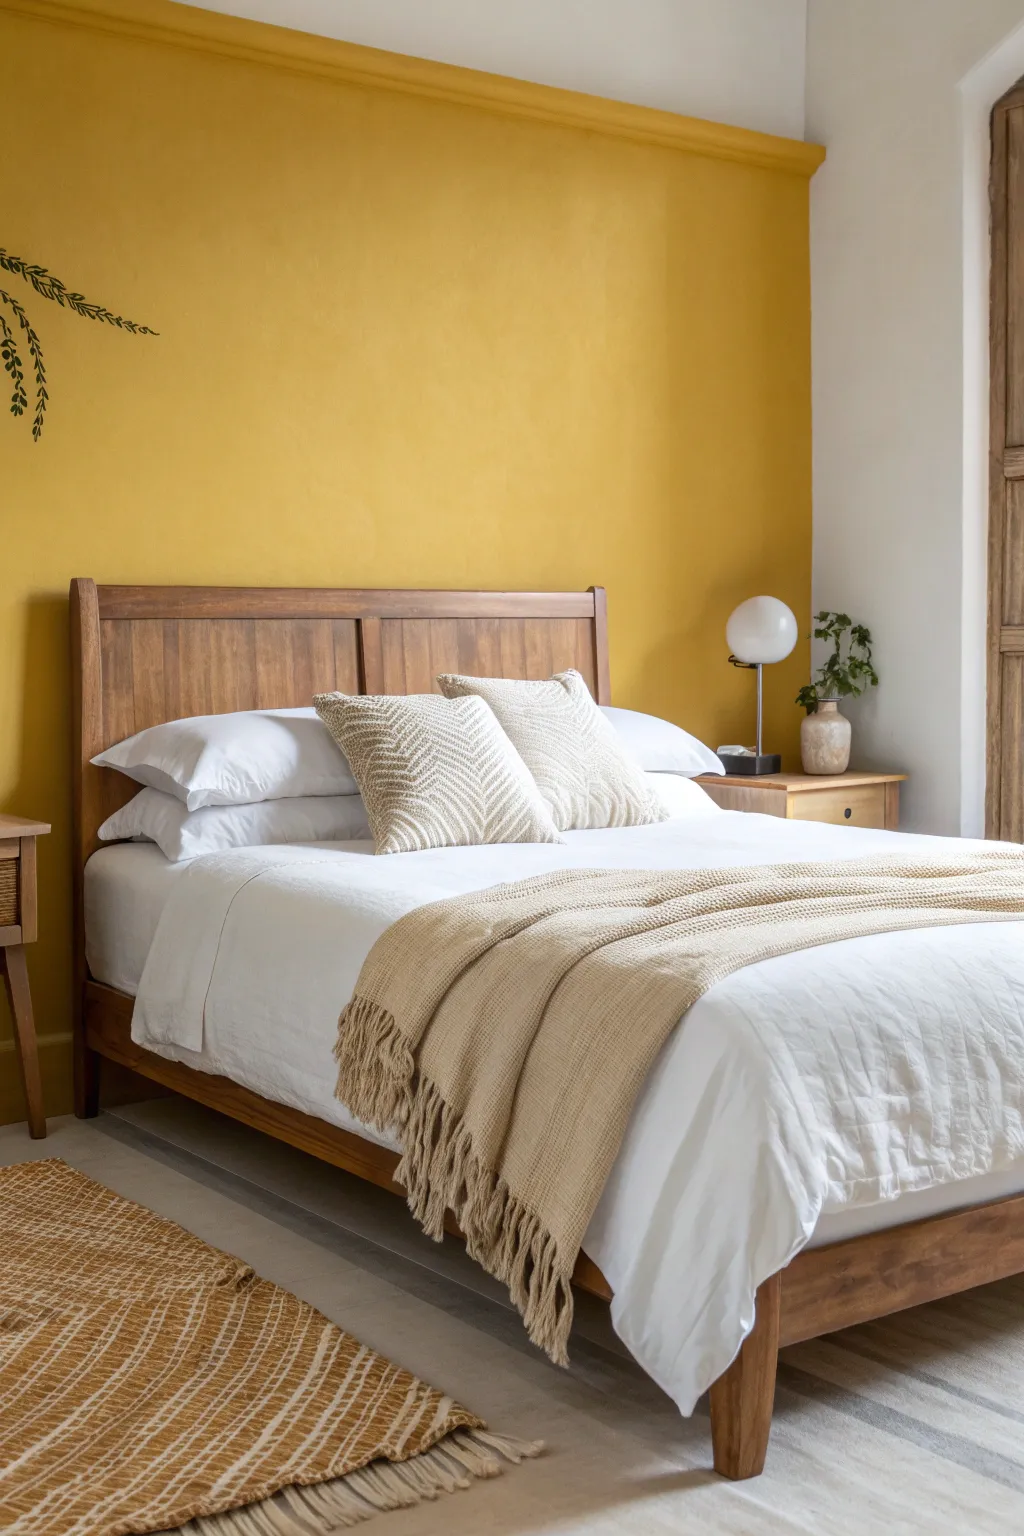
Bring the warmth of a Mediterranean summer into your bedroom with this bold mustard yellow accent wall project. It transforms a standard white room into a cozy, creative sanctuary using rich, earthy tones and precise cutting-in techniques.
Step-by-Step Tutorial
Materials
- Mustard yellow interior paint (matte or eggshell finish)
- White or off-white ceiling paint
- Painter’s tape (high quality)
- Drop cloths
- Spackle and putty knife
- Sandpaper (120-grit)
- Angled sash brush (2.5 inch)
- Microfiber roller cover (3/8 inch nap)
- Roller frame and extension pole
- Paint tray and liner
- Screen or grid for tray
- Damp rag for cleanup
- Ladder
Step 1: Preparation
-
Clear the space:
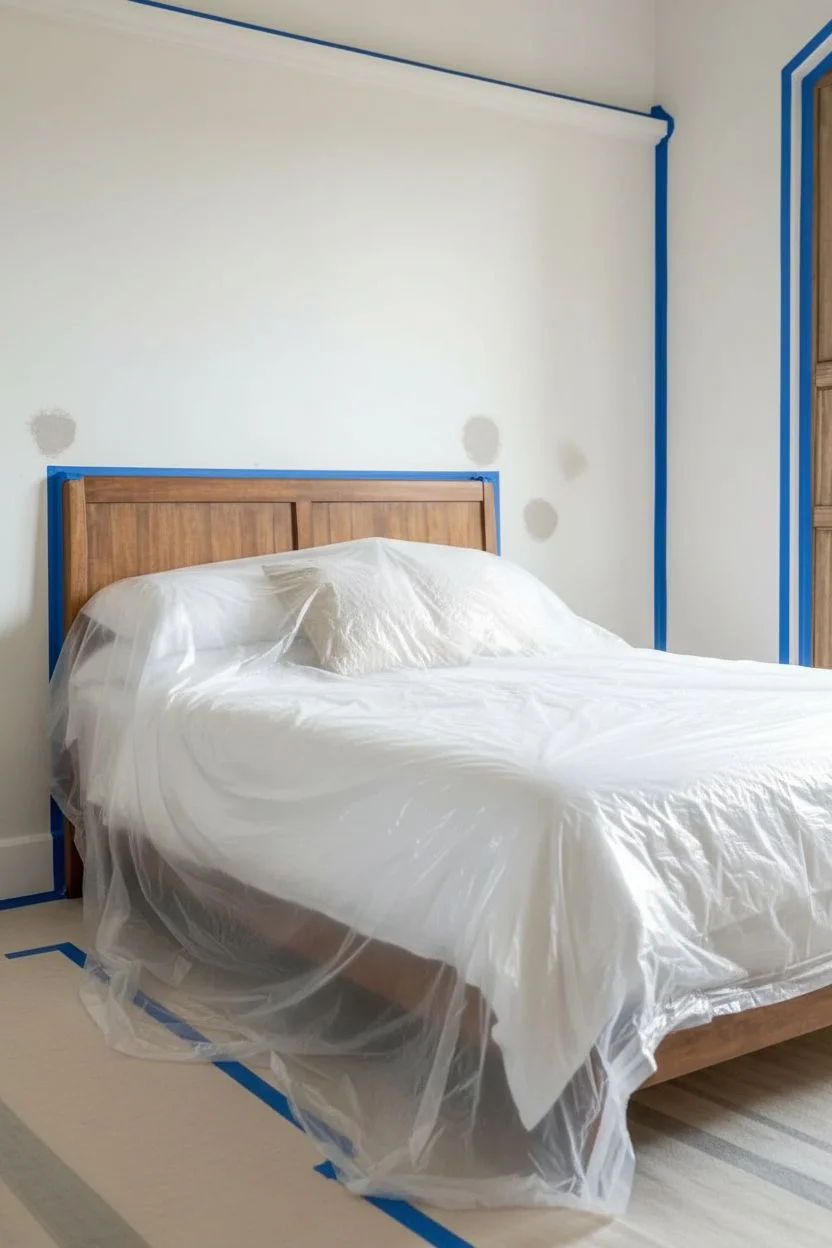
Begin by removing all furniture from the wall you intend to paint. If the bed is heavy, simply pull it to the center of the room and cover it completely with a plastic drop cloth to protect against accidental splatters. -
Clean the surface:
Dust the wall thoroughly with a microfiber cloth or vacuum attachment. If there are any greasy spots or marks, wash them down with a mild detergent solution and let the wall dry completely. -
Patch imperfections:
Inspect the wall for nail holes or dings. Fill these with lightweight spackle using your putty knife. Once dry, sand the patched areas smooth so they are flush with the wall surface. -
Tape the edges:
This is crucial for that crisp line. Apply painter’s tape along the baseboards, the adjacent walls, and the ceiling line. Press the tape down firmly with a putty knife or your finger to prevent paint bleed.
Step 2: Cutting In
-
Stir the paint:
Open your mustard yellow paint can and stir it thoroughly from the bottom up to ensure the pigments are evenly mixed. This particular shade relies on consistent mixing to avoid streaking. -
Load the brush:
Dip your angled sash brush about one-third of the way into the paint. Tap the excess off against the side of the can—don’t wipe it, as you want the bristles loaded not dripping. -
Paint the perimeter:
Carefully paint a 2-to-3-inch strip along the tape lines at the ceiling, corners, and baseboards. This process, called ‘cutting in,’ creates a border that your roller can’t reach safely. -
Feather the edges:
As you paint this border, feather the inner edge out slightly so it doesn’t leave a thick ridge. This helps the rolled paint blend seamlessly later.
Uneven Coverage?
Yellow pigments can be translucent. If the wall looks streaky after two coats, don’t panic. A third thin coat is often standard for deep yellows to get full opacity.
Step 3: Rolling the Wall
-
Prepare the roller:
Pour paint into the tray. Load your roller by rolling it back and forth on the ramp until it is evenly saturated but not dripping. -
Start the first section:
Starting from one corner, apply the paint in a ‘W’ or ‘M’ pattern on a 3-by-3 foot section of the wall. This distributes the bulk of the paint quickly. -
Fill and smooth:
Without reloading, roll back over that section to fill in the gaps, using vertical strokes to smooth out the texture. Aim for an even coat without pressing too hard. -
maintain a wet edge:
Move immediately to the next adjacent section, overlapping the wet edge of your previous section. This prevents lap marks from forming as the paint dries. -
Let it dry:
Allow the first coat to dry completely according to the manufacturer’s instructions, usually about 2-4 hours. It might look patchy at this stage, but don’t worry.
Pro Tip: The “W” Method
Always roll a ‘W’ on the wall first to unload the paint, then immediately fill it in. This prevents thick patches and ensures that smooth, professional finish.
Step 4: Second Coat & Finish
-
Repeat cutting in:
For a truly rich mustard color, you almost always need a second coat. Briefly cut in the edges again with your brush. -
Apply second coat:
Roll the entire wall again, following the same technique. I find that the second coat is where the true depth of this yellow really comes to life. -
Remove tape:
While the second coat is still slightly tacky (not fully dry), carefully peel off the painter’s tape at a 45-degree angle. This prevents the dried paint from peeling off with the tape. -
Touch up:
Once fully dry, inspect for any small misses. Use a small artist’s brush to touch up any tiny spots near the trim or ceiling if necessary.
Step back and enjoy the vibrant, sunny warmth your new accent wall brings to the room
Diagonal Color Blocking for Artsy Motion and Energy
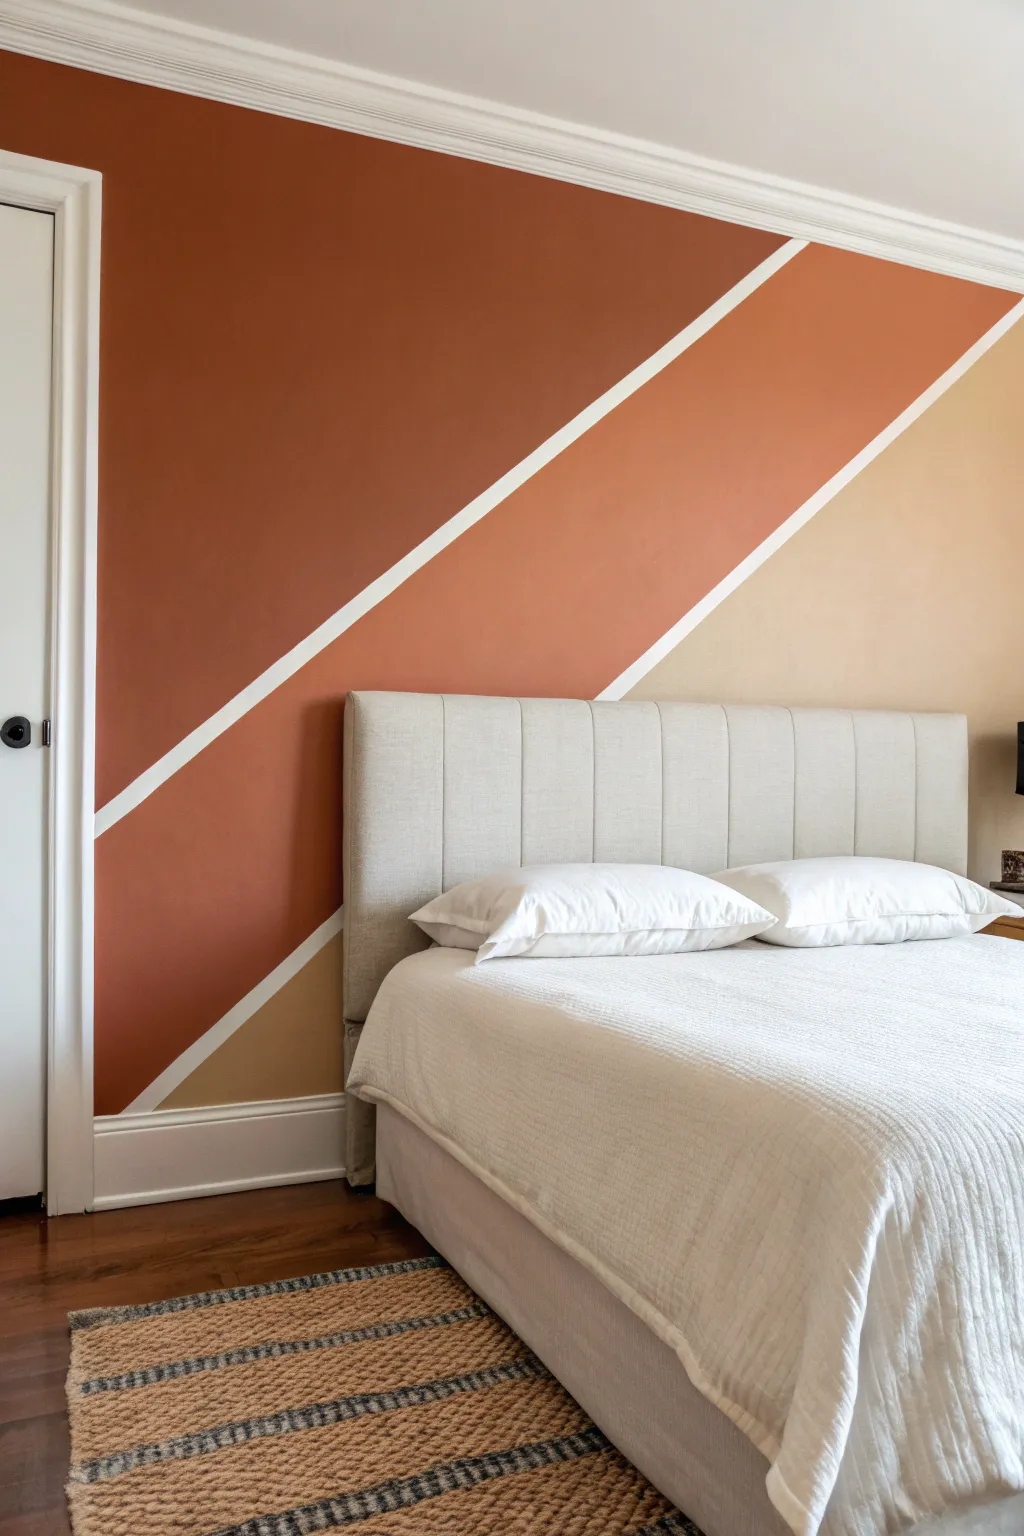
Transform a plain bedroom wall into a dynamic focal point with this bold, geometric color-blocking technique. By using warm terracotta and beige tones separated by crisp white lines, you introduce movement and modern art vibes directly behind your headboard.
Detailed Instructions
Materials
- Interior latex paint (Deep Terracotta)
- Interior latex paint (Warm Beige/Tan)
- Painter’s tape (high quality, 1-inch width)
- Paint rollers (9-inch for large areas, 4-inch for edges)
- Paint tray and liners
- Angled sash brush (2-inch)
- Drop cloth
- Bubble level or laser level
- Pencil
- Measuring tape
- Step ladder
- Damp rag
Step 1: Preparation & Base Coat
-
Clear and Prep:
Start by moving the bed and nightstands away from the wall to give yourself plenty of working room. Lay down a drop cloth to protect your beautiful floors from any accidental drips. -
Clean the Surface:
Wipe down the wall with a damp rag to remove dust or cobwebs, ensuring the tape will stick perfectly later on. -
Paint the Base Color:
For this design, the white lines are actually the base wall color showing through. If your wall isn’t already white, paint the entire wall with a crisp white paint first and let it cure for at least 24 hours so the tape doesn’t peel it up.
Seal for Sharpness
Always paint over the tape edge with your existing wall color first. This creates a barrier that prevents the colored paint from bleeding underneath.
Step 2: Mapping the Diagonals
-
Visualize the Layout:
Stand back and decide where you want your stripes to flow. This design features three distinct diagonal sections sloping upward from left to right. -
Mark the Tape Points:
Use a pencil and measuring tape to mark the start and end points of your diagonal lines on the adjacent walls or ceiling and baseboard. This ensures your angles are consistent. -
Apply the First Tape Line:
Stretch your painter’s tape from your bottom left mark up toward the ceiling mark. Don’t press it down firmly until you are happy with the angle. -
Apply the Second Tape Line:
Place the second strip of tape parallel to the first suitable for the lower beige section. I find stepping back frequently helps verify that the lines feel parallel to the eye. -
Seal the Edges:
Once satisfied with the placement, run your finger firmly along all tape edges to seal them tight. This is crucial for crisp lines.
Step 3: Sealing & Painting
-
The Anti-Bleed Trick:
Paint a thin layer of your *base wall color* (white) over the edges of the tape where you will be adding color. This seals the gap; if any paint bleeds under, it will be white-on-white and invisible. -
Let the Seal Dry:
Allow this sealing layer to dry completely. It usually only takes about 30–60 minutes since it’s a light coat. -
Cut In the Darkest Color:
Open your deep terracotta paint first. Use the angled sash brush to carefully cut in along the ceiling line, the left corner, and the top edge of the upper tape strip. -
Roll the Top Section:
Use a roller to fill in the large top-left section with the terracotta color. Apply a second coat if needed for full opacity. -
Cut In the Middle Section:
Repeat the cutting-in process for the middle stripe, using the same terracotta shade. Be careful to stay within your taped boundaries. -
Roll the Middle Section:
Roll out the middle section with the terracotta paint. Two coats usually provide that rich, velvety finish shown in the photo. -
Paint the Lower Section:
Switch to a fresh tray liner and roller for the warm beige paint. Fill in the bottom-right triangular section, cutting in along the baseboard and the bottom edge of the lower tape strip.
Peeling Paint?
If paint lifts when removing tape, hold a hair dryer on low heat near the tape edge as you peel to soften the adhesive without damaging the wall.
Step 4: The Reveal
-
Remove Tape While Damp:
Here is the most satisfying part: peel off the painter’s tape while your final coat is still slightly tacky set, pulling slowly at a 45-degree angle away from the fresh paint. -
Touch Up:
Inspect your lines once everything is dry. If any tiny imperfections occurred, use a small artist’s brush to tidy them up. -
Reset the Room:
Move your bed back into place, centering it against the new impactful design, and enjoy the instant warmth added to your space.
Step back and admire how a simple afternoon of painting has completely redefined the energy of your bedroom
Soft Ombre Wall Wash for a Dreamy, Painted-Light Effect
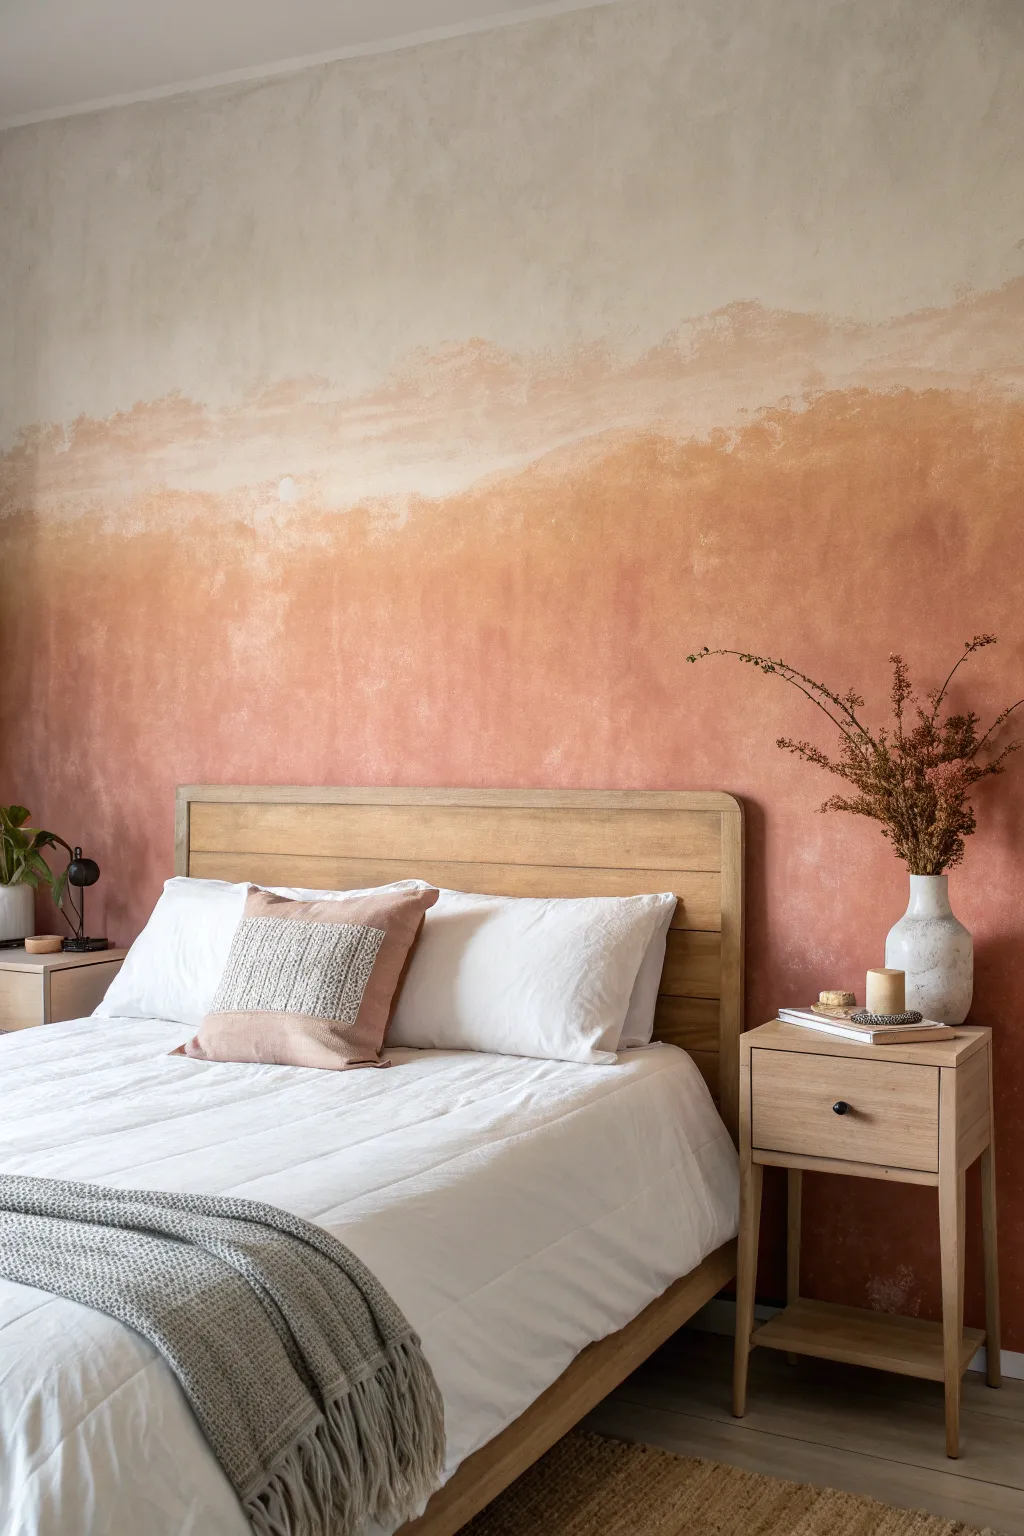
Transform your bedroom into a serene sanctuary with this painterly ombre wall effect that mimics the soft haze of a desert sunset. By layering watered-down paint in organic, uneven motions, you’ll achieve a dreamy, textured gradient that feels both modern and romantic.
How-To Guide
Materials
- Matte latex wall paint (Creamy White)
- Matte latex wall paint (Deep Terracotta or Rust)
- Medium shade of Terracotta paint (optional, for smoother blending)
- Clear glaze medium
- Large blending brush or wallpaper brush
- Several clean, lint-free rags
- 2-3 small paint buckets or deep trays
- Water spray bottle
- Painter’s tape
- Drop cloths
- Stir sticks
Step 1: Preparation & Base Coat
-
Clear and protect:
Begin by moving furniture away from the wall you intend to paint. Lay down drop cloths to protect your flooring, as this technique can be drippier than standard painting. Tape off baseboards, adjacent walls, and ceiling edges with painter’s tape for clean lines. -
Apply the lighter base:
Paint the entire wall with your chosen Creamy White base color. Use a roller for efficiency, ensuring full, opaque coverage. This light background is crucial for the translucent top layers to glow properly. -
Full dry time:
Allow this base coat to dry completely, preferably overnight. A fully cured base prevents the new wet layers from lifting up the underlying paint during the blending process.
Step 2: Mixing the Hazy Glazes
-
Create the dark wash:
In a bucket, mix your Deep Terracotta paint with clear glaze medium and water. I like to aim for a ratio of 1 part paint, 1 part glaze, and 1 part water. The consistency should be like heavy cream or a thin soup—runny enough to spread easily but colorful enough to tint. -
Prepare the light wash:
In a second bucket, mix a small amount of your Creamy White paint with water and glaze using the same ratio. This will act as your ‘eraser’ or blending tool at the top edge. -
Test the transparency:
Find a scrap piece of cardboard or drywall to test your dark wash. Brush it on; it should be semi-transparent. If it’s too opaque, add more water or glaze. If it’s too runny, add a touch more paint.
Natural Texture
Use a natural sea sponge instead of a rag for blotting. The irregular pores of the sponge create a truly organic, plaster-like texture that brushes can’t replicate.
Step 3: Painting the Gradient
-
Start at the bottom:
Dip your large blending brush into the Deep Terracotta wash. Begin applying it to the bottom third of the wall using large, crisscross ‘X’ motions. Don’t worry about neat rows; chaotic strokes create the best texture. -
Work upwards:
Ideally, work in 3-4 foot wide sections so the paint doesn’t dry before you can blend it. Gradually move your brush strokes upward towards the middle of the wall, reloading your brush less frequently as you go higher to naturally deposit less pigment. -
Soften the edges:
Keep a damp rag or sponge handy. While the paint is still wet, gently dab and blot areas that look too heavy or show hard brush marks. This creates that clouded, uneven aesthetic. -
Mist for mobility:
If the paint starts setting too quickly or feels sticky, spritz the wall lightly with your water spray bottle. This reactivates the paint and allows you to push the pigment around for smoother clouds.
Level Up: Color depth
Mix a tiny drop of gold metallic paint into your final glaze layer. It won’t sparkle overtly, but it adds a warm, sunlit luminosity when natural light hits the wall.
Step 4: Blending the Transition
-
Introduce the transition zone:
Around the horizon line (roughly eye level or slightly lower), switch to a clean brush. Dip it lightly into the dark wash but wipe most of it off. Dry-brush the upper edge of your color, feathering it softly up into the white space. -
Blend with white wash:
Dip a fresh brush into your Creamy White wash mixture. Start painting from the clean white area above and work downwards into the wet terracotta edge. The two washes will meet and swirl together. -
Create the ‘Cloud’ line:
Use a pouncing or stippling motion where the colors meet to create an organic, rolling horizon lines rather than a straight stripe. Allow some areas of color to reach higher and others to dip lower. -
Step back and assess:
Walk to the other side of the room frequently to view your progress. Up close it can look messy, but distance reveals the overall ombre effect. Look for hard lines that need softening.
Step 5: Finishing Touches
-
Layer for depth:
Once the first layer of wash is dry to the touch, you might notice it dried lighter. Go back in with your Deep Terracotta wash at the very bottom of the wall to intensify the saturation and ground the look. -
Final softening:
Use a barely-damp rag to gently buff the very highest edges of the color transition if they look too harsh. This mimics the way clouds dissipate into the sky. -
Clean up:
Carefully remove the painter’s tape while the wall is still slightly tacky to prevent peeling. Clean any drips on the baseboards immediately with a wet cloth.
Step back and enjoy the warmth of your new sunset-inspired feature wall


Have a question or want to share your own experience? I'd love to hear from you in the comments below!