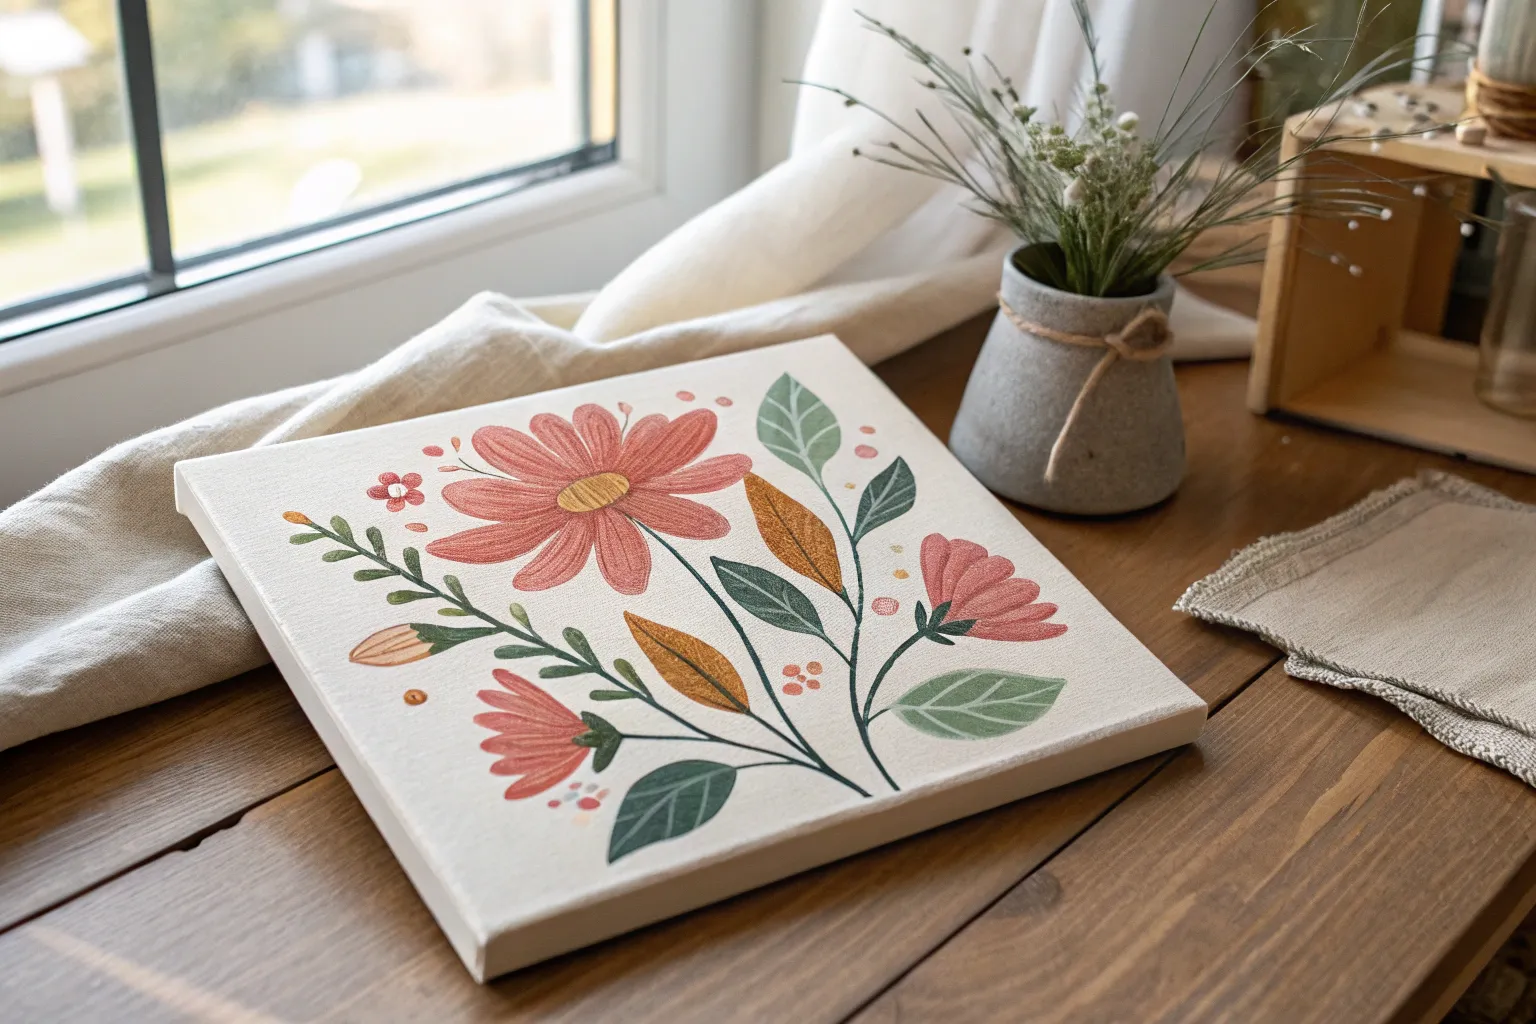
Flowers are my favorite subject to paint on canvas because you can keep it super simple or go wildly detailed depending on your mood. Here are my go-to canvas flower painting ideas—from classic, beginner-friendly blooms to creative twists that still feel totally doable.
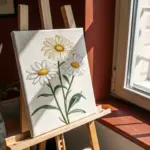
Classic White Daisies With Sunny Yellow Centers
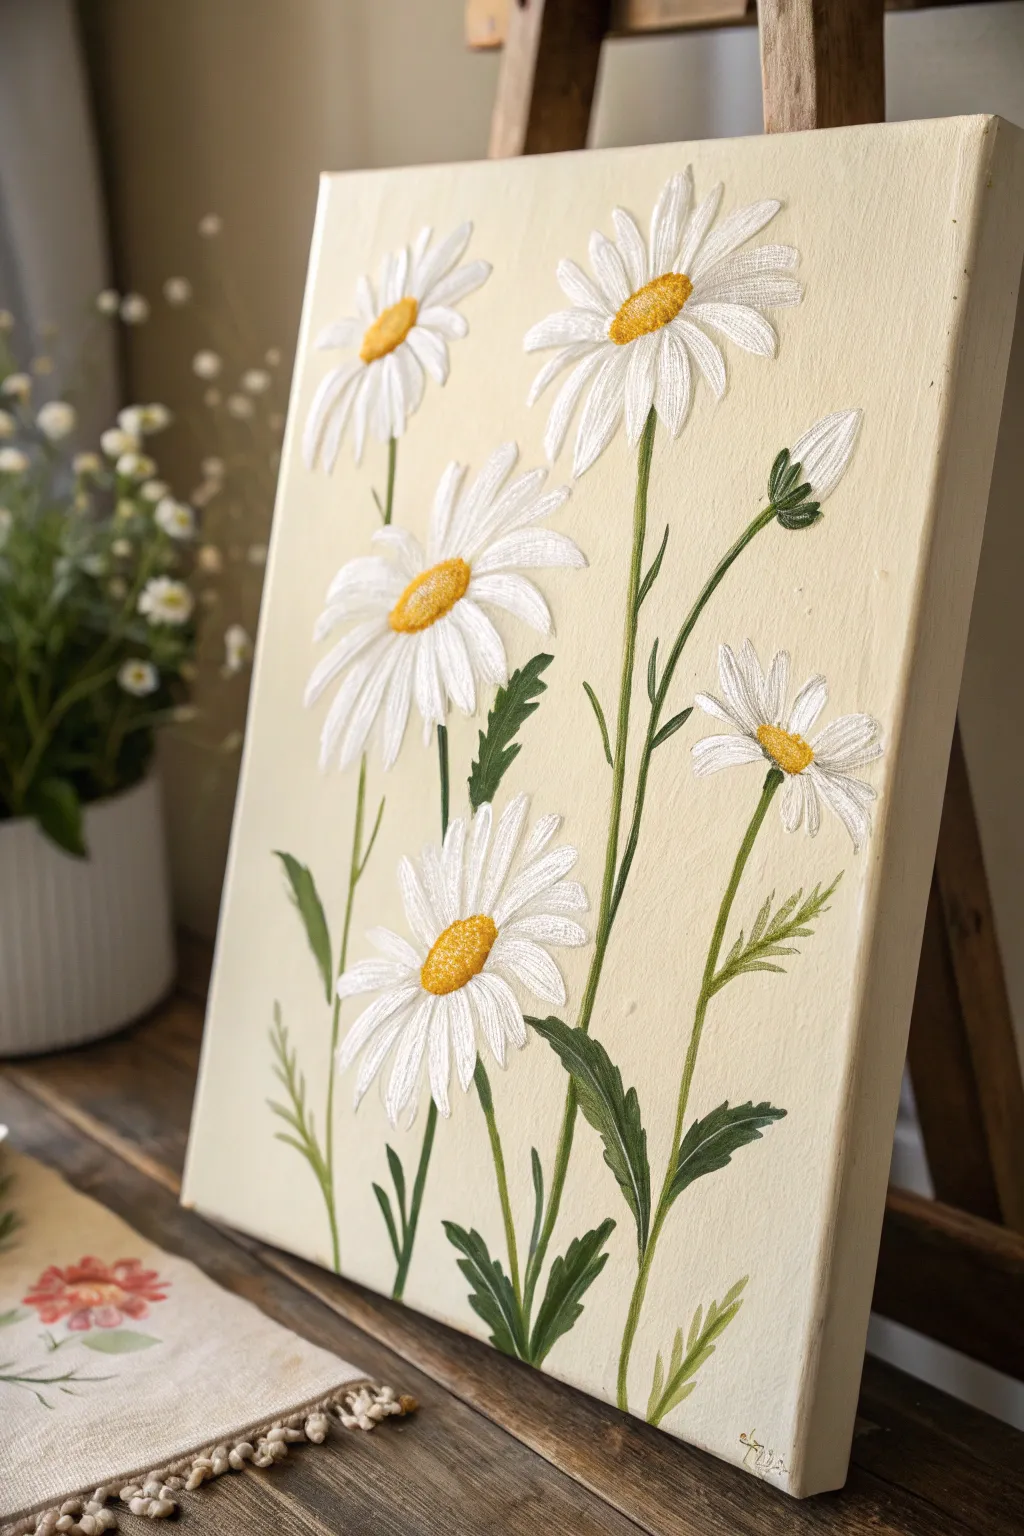
Capture the fresh beauty of a summer meadow with this elegant daisy painting that focuses on texture and simplicity. Using thick acrylics or modeling paste creates a tactile, slightly raised effect for the petals that mimics the look of fine embroidery.
Step-by-Step Guide
Materials
- Rectangular stretched canvas (e.g., 11×14 or 12×16)
- Acrylic paints: Titanium White, Cadmium Yellow, Yellow Ochre, Sap Green, Olive Green, Cream (or mix white with a touch of ochre)
- Modeling paste or heavy gel medium (optional but recommended for texture)
- Flat brush (1-inch for background)
- Filbert brushes (small and medium)
- Fine liner brush
- Palette knife
- Pencil for sketching
- Palette for mixing
Step 1: Preparation & Background
-
Prime the canvas:
Start by mixing a lovely, warm cream color. Combine Titanium White with a tiny drop of Yellow Ochre. You want a very pale, buttery background, not a stark white. -
Apply the base coat:
Using your large flat brush, paint the entire canvas with your cream mixture. Use long, smooth strokes to ensure even coverage. Don’t forget to paint the sides of the canvas for a professional finish. -
Let it dry completely:
Allow the background to dry fully before moving on. If the first coat looks streaky, add a second coat for opacity. -
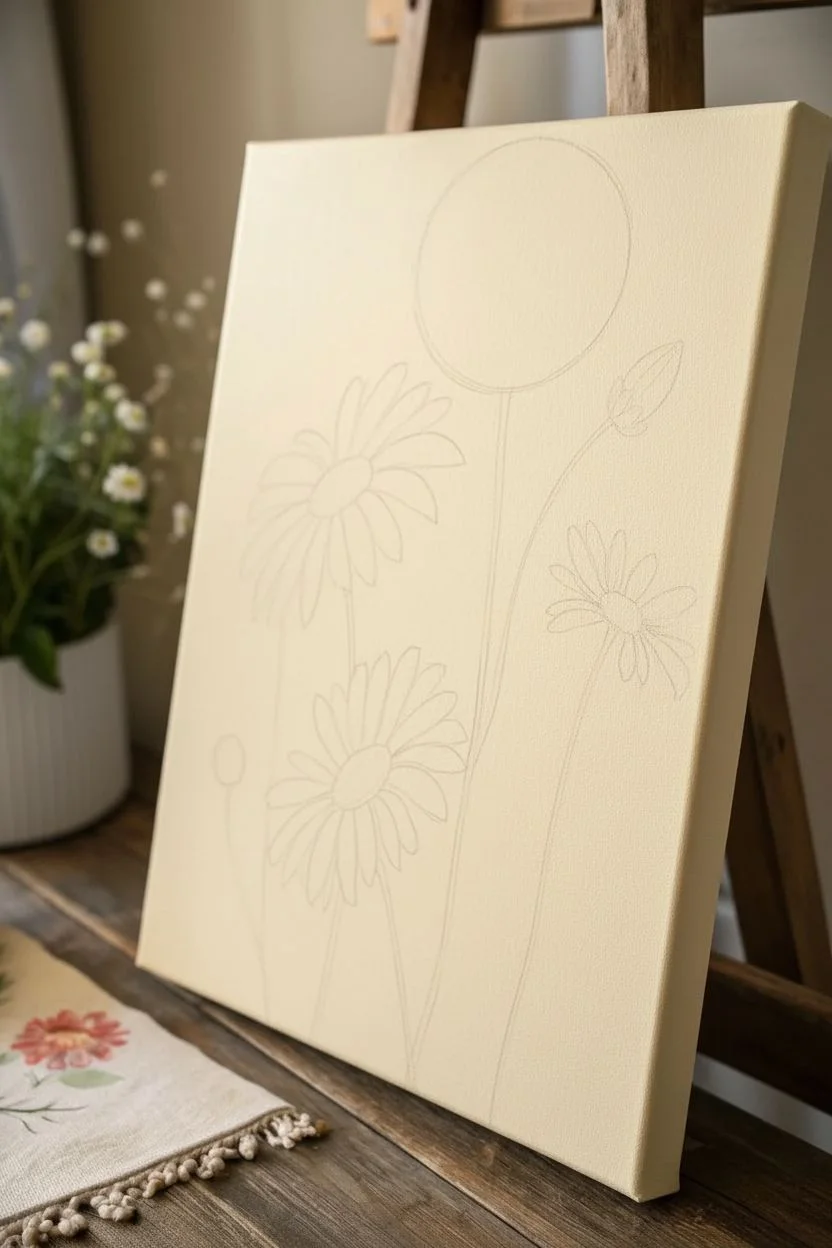
Sketch the composition:
Lightly sketch the placement of five main flower heads using a pencil. Place one large blossom near the top right, one centered slightly left, and a large one bottom center. Add a few buds and tilted blooms to fill the gaps naturally.
Petals Looking Flat?
If acrylics flatten as they dry, try adding a second layer of strokes specifically down the center of each petal. This builds physical height, mimicking the embroidered look in the inspiration image.
Step 2: Painting the Stems & Leaves
-
Mix your greens:
Prepare two shades of green on your palette: a darker mix using Sap Green with a touch of blue or black, and a lighter, fresher mix using Olive Green with a bit of yellow. -
Draft the main stems:
Take a liner brush or a small round brush and paint thin, elegant lines connecting your sketched flower heads to the bottom edge. Keep the lines slightly curved and organic, not perfectly straight. -
Add the leaves:
Using the small filbert brush, paint the jagged, lance-shaped leaves. Start at the stem and flick the brush outward to create the tapered tips. Use the darker green for lower leaves to create depth. -
Highlight the greenery:
While the green paint is still tacky, blend in a little of your lighter olive mix on the tips of the leaves and the sides of the stems where light would hit. -
Detail the buds:
For the unopened buds (like the one on the mid-right), paint a tight green encasing shape at the bottom, graduating into a white pointed tip.
Step 3: Creating the Petals
-
Prepare the petal mixture:
This is where the magic happens. Mix Titanium White with modeling paste (about 50/50 ratio) to get a thick, frosting-like consistency. If you don’t have paste, just use heavy body acrylic straight from the tube. -
Start the back petals:
Using a small filbert brush or a small palette knife, lay down the first layer of petals. Start from the outside edge of the flower and stroke inward toward the center. These should be somewhat flat. -
Build petal texture:
Load your brush heavily with the white mixture. Apply a second layer of petals on top of the first, using a distinct, singular stroke for each petal to create ridges that look like stitched thread. -
Refine the shape:
Ensure the petals vary in length. For the flowers facing sideways, the petals on the ‘far’ side should be much shorter than those in the front. -
Add subtle shading:
I like to mix a tiny drop of grey or pale blue into a bit of white and add very thin shadow lines between overlapping petals to define them individually.
Pro Tip: Directional Strokes
Always stroke your brush from the tip of the petal toward the flower’s center. This naturally tapers the paint at the end of the stroke, creating perfect petal shapes without overworking.
Step 4: The Centers & Finishing Touches
-
Base the centers:
Mix Cadmium Yellow with a little Ochre. Paint oval or circular shapes in the middle of your open daisies. Make them slightly domed rather than flat circles. -
Texturize the pollen:
Once the yellow base is tacky, use a small, dry brush or the tip of a palette knife to stipple (tap repeatedly) thick yellow and orange paint onto the centers. This mimics the fuzzy texture of pollen. -
Highlight the centers:
Add a tiny dab of lighter yellow or white on the upper left side of each center to make them look spherical and dimensional. -
Connect heads to stems:
Go back with your green liner brush and ensure the green stems meet the flower heads cleanly. Add small green sepals (little leaves) at the base of the petals if gaps are visible. -
Final inspection:
Step back and check the balance. If the white petals look too stark, you can dry-brush a tiny whisper of the cream background color over the very tips to integrate them. -
Sign and seal:
Once the thick paint is thoroughly dry (which may take overnight due to the texture), sign your work in the bottom corner with a fine brush.
Hang your textured masterpiece in a well-lit spot to let shadows play across the raised petals


Bold Sunflower Head With Textured Center Dots
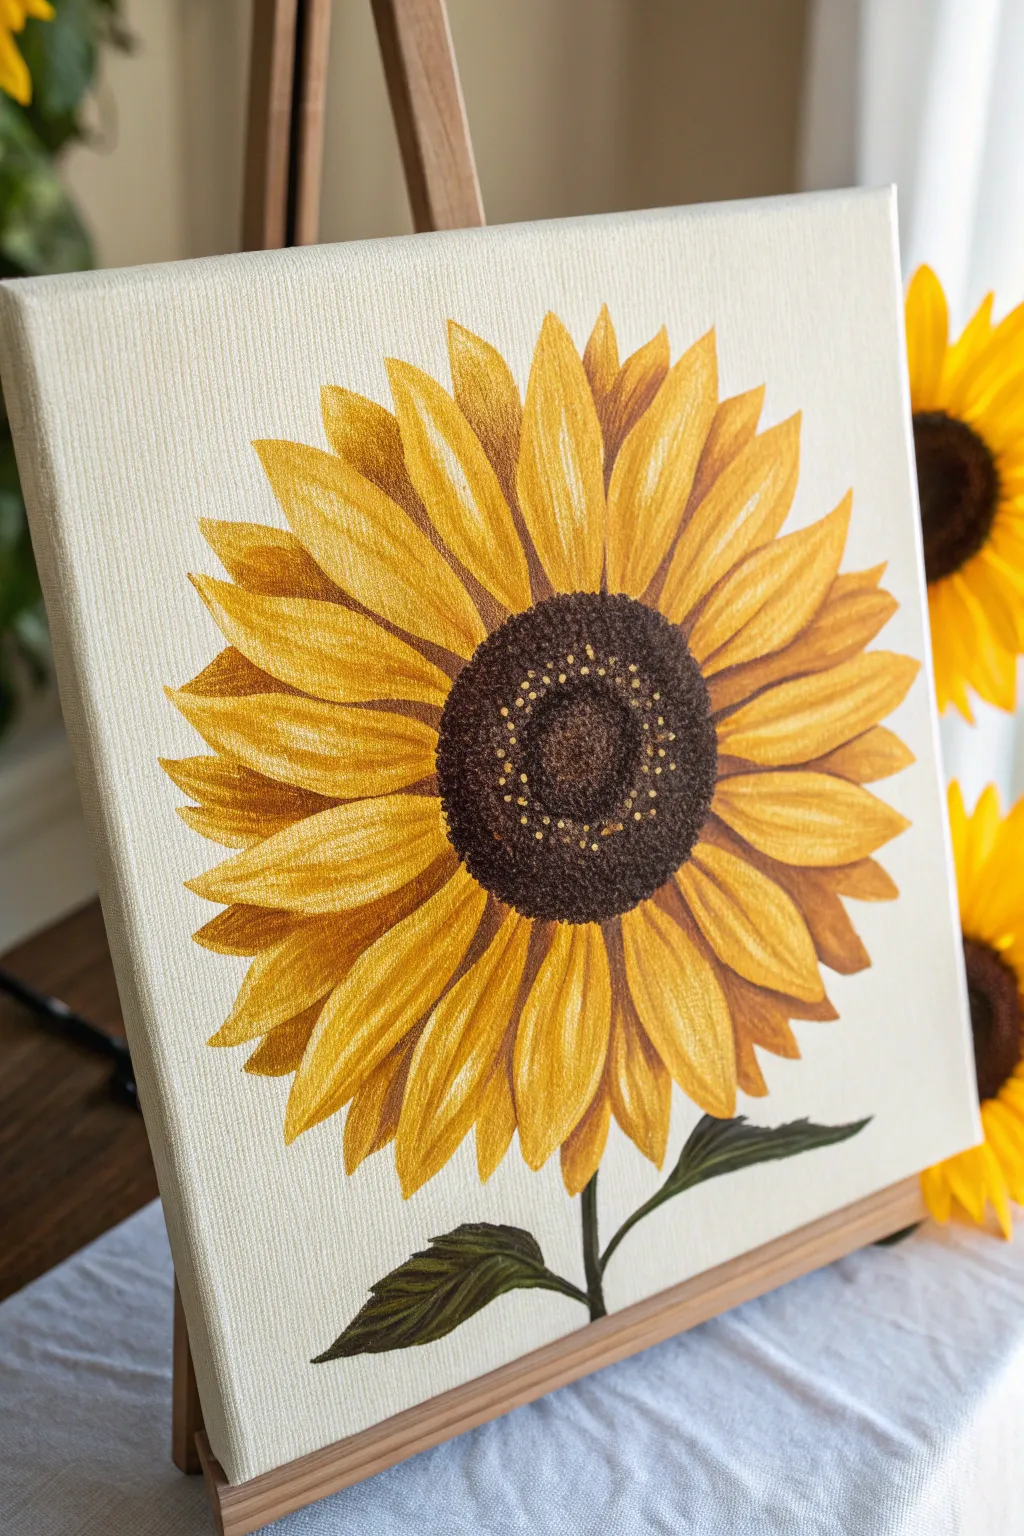
Capture the warmth of late summer with this striking sunflower study characterized by its radiant, overlapping petals and a deeply textured core. The clean white canvas background ensures the golden yellows and rich browns pop with contemporary clarity.
Detailed Instructions
Materials
- Square stretched canvas (approx. 10×10 or 12×12 inches)
- Acrylic paints: Cadmium Yellow, Yellow Ochre, Burnt Sienna, Burnt Umber, Titanium White, Sap Green
- Round synthetic brushes (sizes 2, 4, and 6)
- Detail liner brush (size 0 or 00)
- Pencil (HB or lighter) for sketching
- Palette for mixing
- Cup of water and paper towels
- Easel (optional but recommended)
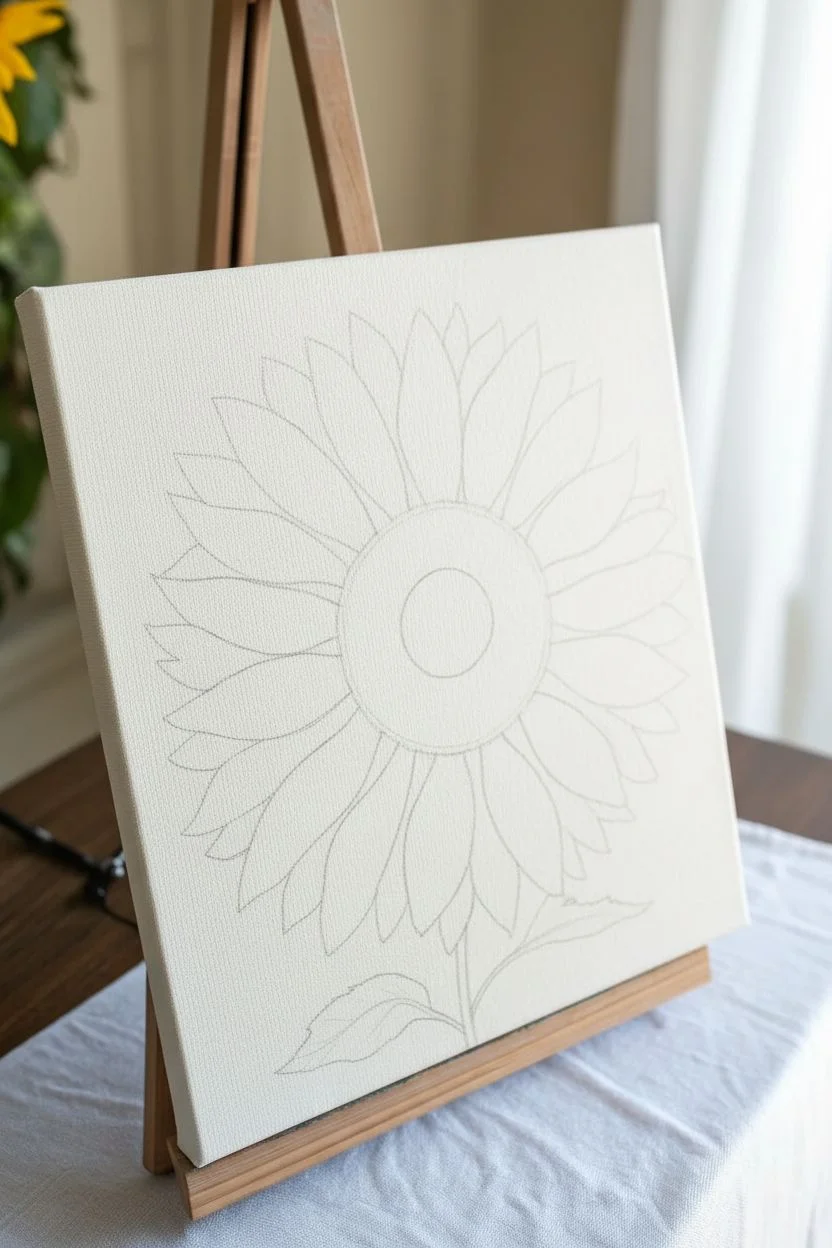
Step 1: Sketching the Structure
-
Establish the center:
Begin by lightly sketching a large circle in the middle of your canvas. It doesn’t need to be perfectly geometric; a slightly organic oval feels more natural. -
Mark the center depression:
Inside the large circle, draw a smaller, slightly off-center circle to represent the deeper depression where the seeds are most dense. -
Draft the petal guidelines:
Sketch radiating lines outward from the center circle to guide the direction of your petals, ensuring they flow naturally rather than looking like stiff spokes. -
Draw the primary petals:
Sketch the first layer of petals. These are the large, broad ones in the front. Give them pointed tips and vary their widths slightly for realism. -
Add secondary petals:
Fill in the gaps behind the primary petals with smaller, peek-a-boo petal tips. This layering creates depth and volume. -
Sketch the stem and leaves:
Draw a slender, curved stem originating from the bottom center, along with two simple leaves branching off near the base.
Muddy Colors?
If your yellow petals are turning green when shading near the center, ensure your brown paint is fully dry before glazing over it, or simply use orange instead of brown for shading.
Step 2: Painting the Petals
-
Base coat the petals:
Mix Cadmium Yellow with a touch of Titanium White. Using a size 6 round brush, paint a solid base coat on all the petals. Don’t worry about shading yet; just get the color down. -
Layer in shadows:
Mix Yellow Ochre with a tiny bit of Burnt Sienna. Apply this darker golden hue to the base of the petals near the center and along the edges where one petal overlaps another. -
Create distinct separation:
Use a size 4 brush and a mix of Burnt Sienna and Cadmium Yellow to paint the petals specifically in the back layer. These should be slightly darker than the front petals to push them into the background. -
Add highlights:
Clean your brush thoroughly. Mix Titanium White with a small amount of Cadmium Yellow to create a pale lemon shade. Paint streaks down the center of the front petals to mimic sunlight hitting the curved surfaces. -
Refine the texture:
Using a drier brush technique, feather the highlight color and the shadow color together slightly, creating vertical striations that mimic the vein texture of a sunflower petal.
Add 3D Texture
Mix modeling paste or heavy gel medium into your brown paint for the center. Apply it with a tapping motion to create a physically raised, bumpy texture for the seeds.
Step 3: The Textured Center
-
Block in the dark center:
Mix Burnt Umber with a touch of black or deep blue if available (or just use pure Burnt Umber). Fill in the entire center circle, creating a dark, rich foundation. -
Define the inner depression:
While the paint is wet, dab the very center (the inner circle you sketched) with a slightly lighter brown mix to create a subtle separation between the outer seed ring and the inner divot. -
Stipple the texture:
Once the brown base is dry to the touch, mix a lighter brown (Burnt Umber + Burnt Sienna). Take a size 2 brush and use a stippling motion (tapping the tip) to create a ring of texture around the outer edge of the dark center. -
Add the golden pollen dots:
Using your smallest detail brush or the handle end of a paintbrush, dip into thick Yellow Ochre or light yellow paint. Dot small points in a ring formation inside the dark center to represent pollen and light catching the seeds. -
Highlight the seed ring:
Add a few tiny dots of pure White mixed with yellow to the very brightest points of your texture ring to make the center look three-dimensional.
Step 4: Greenery and Finishing Touches
-
Paint the stem:
Mix Sap Green with a little Burnt Umber for a natural, earthy green. Paint the stem with a steady, smooth stroke. -
Fill the leaves:
Paint the leaves with the same base green mixture. Outline the edges clearly against the canvas. -
Add leaf details:
Mix a lighter green (Sap Green + Yellow) and paint thin veins on the leaves. Add a darker green shadow on the underside of the leaves for dimension. -
Step back and assess:
Look at the painting from a distance. If any petal edges look too fuzzy, use a small brush with Titanium White to carefully ‘cut in’ the background and sharpen the silhouette.
Let your beautiful botanical study dry completely before displaying it on a shelf or wall.


Simple Tulips Using One-Stroke Petal Shapes
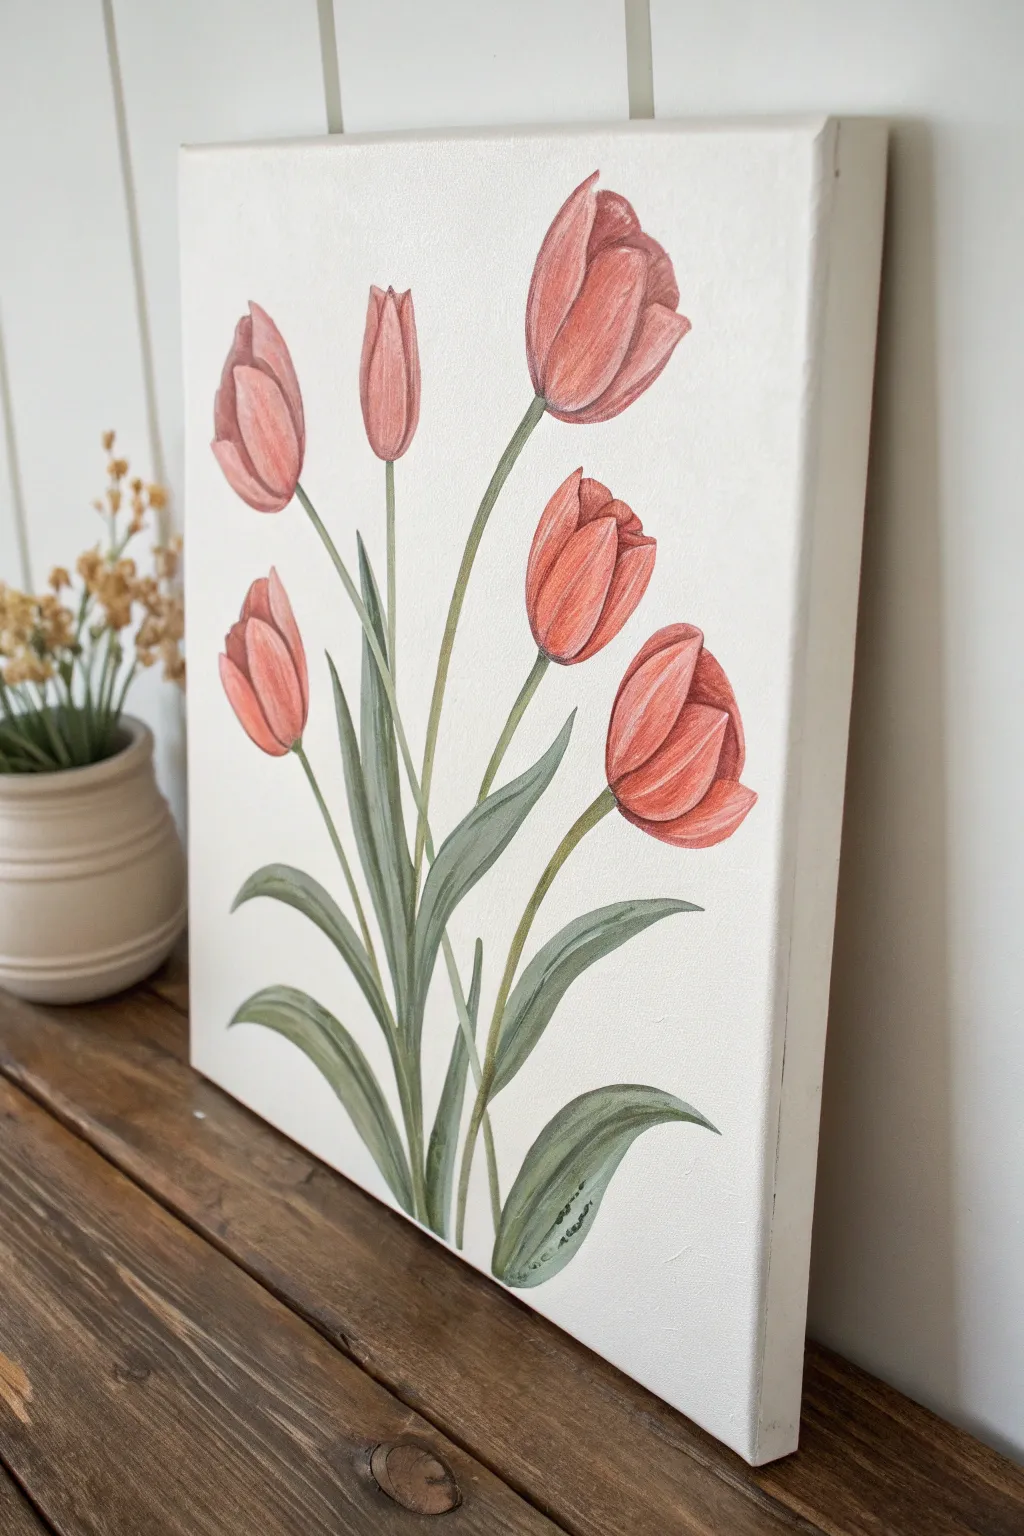
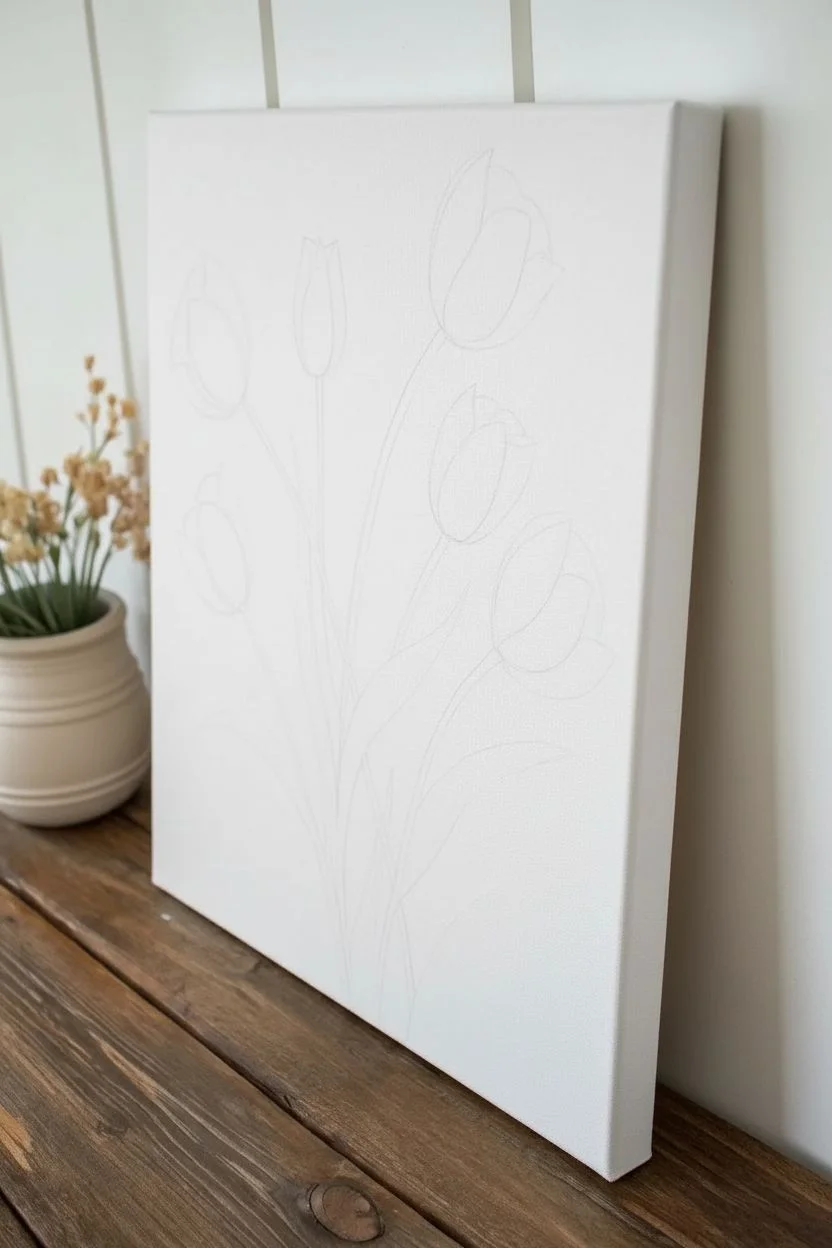
Capture the delicate elegance of spring with this minimalist tulip study on canvas. Using soft, layered petals and sweeping stems, you’ll create a sophisticated floral arrangement that looks deceptively simple yet full of depth.
Step-by-Step
Materials
- Rectangular stretched canvas (e.g., 11×14 or similar)
- Acrylic paints: Titanium White, Alizarin Crimson (or a soft pink/red), Sap Green, Burnt Umber
- Flat shader brush (size 8 or 10)
- Round brush (size 4 or 6)
- Small liner brush
- Palette or paper plate
- Cup of water
- Paper towels
Step 1: Preparing the Composition
-
Prime the Surface:
Begin by ensuring your canvas is clean. While the background in the image is a plain, possibly unpainted or gessoed white, applying a fresh coat of Titanium White gives you a smooth, even surface to work on. Let this base coat dry completely. -
Sketch the Layout:
Lightly sketch the flower positions using a very faint pencil line or watered-down green paint. Plan for six blooms at varying heights—three taller ones near the center/top and three slightly lower ones on the sides. -
Map the Stems:
Draw faint, curved lines originating from a central point at the bottom center of the canvas. Let them fan out gently, avoiding perfectly straight lines to maintain an organic feel.
Step 2: Painting the Blooms
-
Mix the Petal Color:
Create a soft, dusty rose hue by mixing Alizarin Crimson with a touch of Titanium White and a tiny speck of Burnt Umber to desaturate it. You want a color that isn’t too neon. -
Paint the Central Petal:
Start with the topmost flower using your flat shader brush. Orient the brush vertically and make a teardrop shape for the back, central petal. This establishes the height of the bloom. -
Add Side Petals:
Reload your brush. Paint two curving strokes on either side of the central petal, hugging it like a cup. These strokes should start slightly lower and curve inward at the top to meet the center. -
Create Depth:
While the paint is still wet, pick up a tiny bit of darker red on one corner of your brush and a bit of white on the other. Go over the outer edges of the petals to create a subtle highlight and shadow effect, mimicking the curve of the flower. -
Complete the Flower Heads:
Repeat this process for the remaining five tulips. Vary the openness of the blooms slightly—make some tighter like buds and others more open to add visual interest. -
Add Interior Details:
For the blooms that are tilted towards the viewer, use a darker mix of crimson inside the ‘cup’ shape to show depth and shadow where the petals overlap.
Uneven Petal Coverage?
If your pink paint looks streaky or transparent, let the first layer dry completely before adding a second. Don’t overwork wet acrylics or they will begin to lift off the canvas.
Step 3: Adding Stems and Greenery
-
Mix Leaf Green:
Combine Sap Green with a generous amount of Titanium White and a touch of Burnt Umber. This creates a muted, sage-like green that complements the vintage feel of the pink. -
Paint the Stems:
Using a round brush and a fluid mix of paint (add a drop of water if needed), paint the stems. Start from the base of each flower head and pull the brush smoothly down toward the bottom center cluster. -
Start the Leaves:
Switch back to your flat brush for the leaves. I find it easiest to start at the bottom of the canvas and pull upward. Press firmly at the base to widen the stroke, then twist and lift as you go up to create a tapered point. -
Curve the Foliage:
Ensure the leaves curve gracefully. Some should bend to the left, some to the right. Let a few leaves overlap the lower parts of the stems to integrate the bouquet. -
Add Leaf Dimension:
Mix a slightly lighter version of your green. Add a highlight stroke down one side of the larger leaves to suggest light hitting the curve.
Pro Tip: Organic Flow
When painting long stems, hold the brush handle near the end, not the ferrule. This loose grip creates shakier, more natural lines rather than rigid, perfect sticks.
Step 4: Final Touches
-
Refine Connections:
Check where the stems meet the flower heads. If there’s a gap, use a small dab of green to create the receptacle (the little cup) at the base of the petals. -
Clean Up Edges:
If you painted outside the lines or want sharper petals, use a small brush with Titanium White to carefully ‘cut in’ around the flower shapes, refining the silhouette. -
Signature:
Sign your name discreetly near the bottom of a leaf using your liner brush and watered-down dark green paint, following the curve of the foliage.
Step back and admire your fresh, everlasting bouquet that brings a touch of spring indoors regardless of the season


Loose Wildflower Meadow Along the Bottom Edge
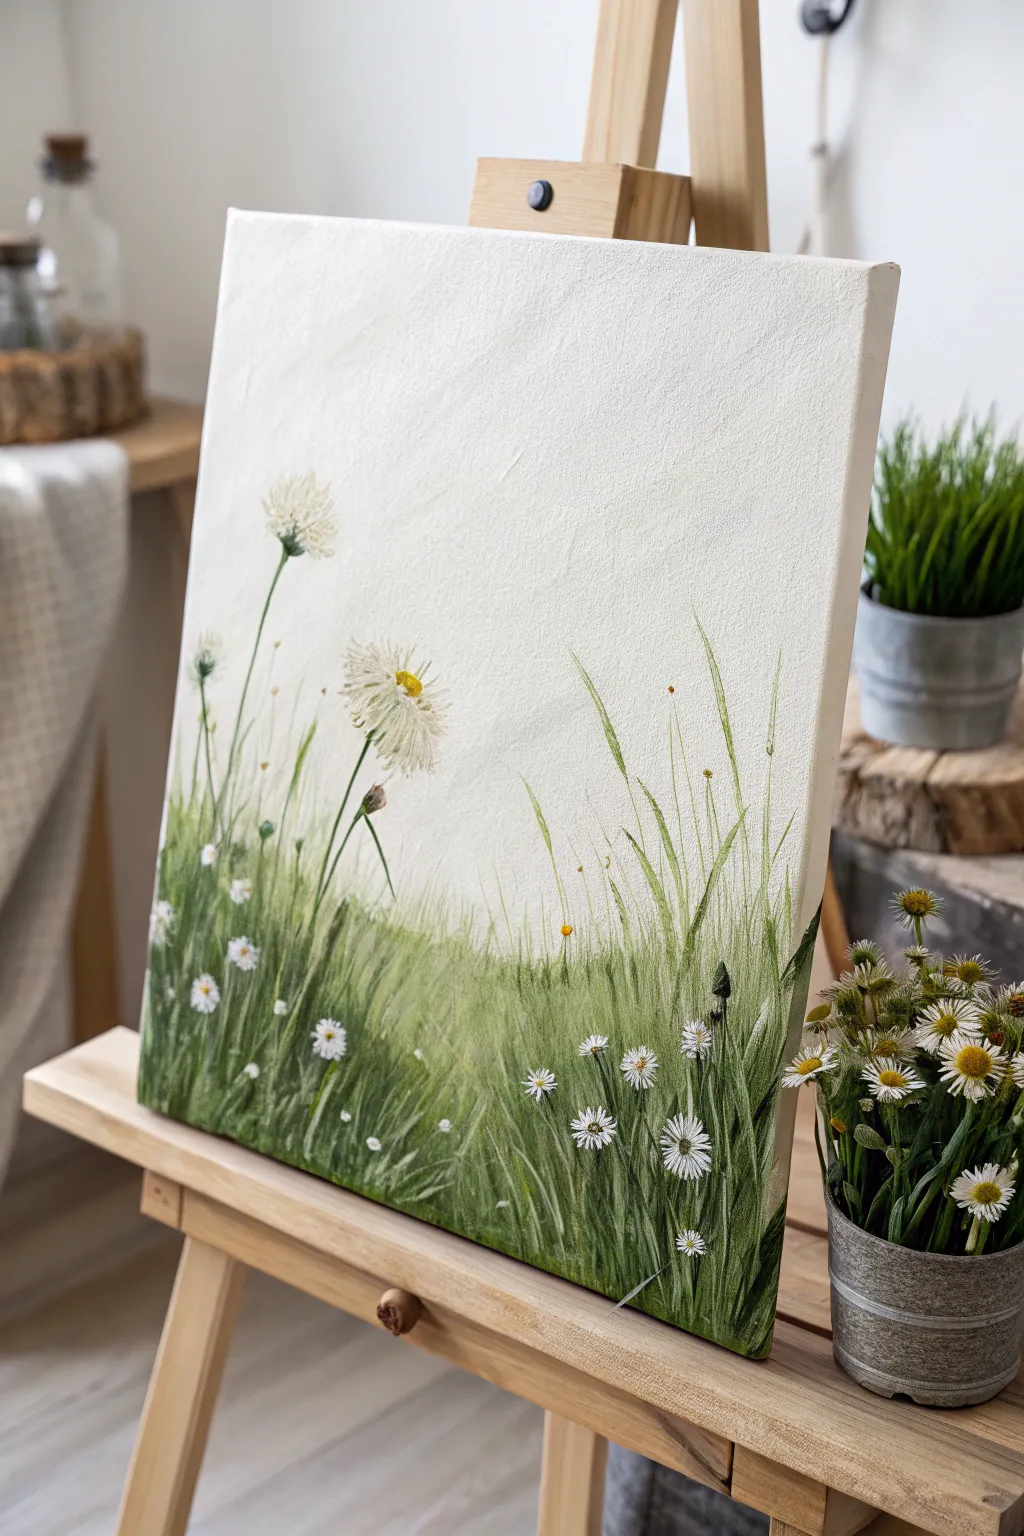

Capture the breezy elegance of a summer field with this airy, botanical canvas painting. Featuring delicate dandelions and crisp white daisies rising from deep green grasses, this piece relies on negative space to create a sense of height and openness.
Step-by-Step Guide
Materials
- Stretched canvas (rectangular, portrait orientation)
- Acrylic paints: Titanium White, Sap Green, Hooker’s Green, Yellow Ochre, Lemon Yellow, Burnt Umber
- Gesso (optional, for warmer base)
- Flat brush (1/2 inch)
- Small liner brush (size 0 or 00)
- Round brush (size 2)
- Fan brush (optional, for texture)
- Palette knife (optional)
- Water cup and paper towels
Step 1: Preparing the Background
-
Prime the Surface:
Start with a clean white canvas. If your canvas is raw or too rough, apply a coat of white gesso to smooth it out. For this specific look, stick to a pure white or very slightly off-white background to make the greens pop, leaving the top two-thirds largely empty. -
Map the Horizon:
Visualize a low horizon line—about 1/4 of the way up from the bottom edge. You don’t need to draw a hard line; simply keep in mind that your dense painting will happen below this mark.
Uneven Paint Thickness?
If your white dandelion puffs look transparent, let the first layer dry completely before dabbing a second layer of thick, unthinned white on top for opacity.
Step 2: Painting the Grasses
-
Establish the Dark Base:
Mix Hooker’s Green with a tiny touch of Burnt Umber to create a deep, shadow green. Using your flat brush turned vertically or a round brush, paint short, upward strokes right at the very bottom edge of the canvas to create a dense undergrowth. -
Add Mid-Tone Blades:
Clean your brush and switch to pure Sap Green. Paint longer blades of grass rising out of your dark base. Vary the angle slightly so they aren’t all standing straight up like soldiers; let them lean left and right naturally. -
Create Height and Variety:
Using your small liner brush and a mix of Sap Green and White (to make a lighter sage color), paint several very tall, thin stems reaching almost halfway up the canvas. These will serve as the anchors for your taller wildflowers later. -
Texture with Dry Brushing:
I like to take a fairly dry brush with lighter green paint and flick it upwards quickly from the base. This creates the wispy, soft look of fine meadow grass blurring together in the distance.
Step 3: Painting the Dandelions
-
Position the Heads:
Locate the tops of your tallest stems on the left side. These will be your dandelion seed heads. Use a very light touch to mark where the center of each flower head will be. -
Paint the Seed Puff:
Mix a tiny bit of Yellow Ochre with a lot of Titanium White. Using a small round brush or a fan brush tapped gently, create a fluffy, circular shape. Keep the edges ragged and irregular—dandelions are rarely perfect circles. -
Detail the Seeds:
With your liner brush and pure white paint, add individual seed strands radiating outward from the center of the puff. Make these lines extremely fine. -
Add the Center Detail:
Dap a tiny spot of yellow mixed with green in the very center of the white puff to suggest the remaining flower parts sometimes seen in fading dandelions.
Movement Tip
Always pull your brush strokes from the bottom up (root to tip). Lifting the brush as you finish the stroke naturally creates a tapered, realistic grass tip.
Step 4: Adding Daisies and Details
-
Place Low Daisies:
Scattered in the lower, denser grass, paint small white circles or ovals for the daisy heads. Group them in clusters of two or three for a natural look. -
Define Petals:
Using the smallest brush, paint distinct white petals radiating from the centers of your low daisies. Don’t worry about detailing every single petal; mere impressions of white dashes work well here. -
Add Yellow Centers:
Drop a small dot of Lemon Yellow into the center of each daisy. Add a microscopic speck of brown on the bottom edge of the yellow dot to give it a 3D shadow. -
Paint Closed Buds:
Mix a darker green shade. Paint small, teardrop shapes at the ends of a few medium-height stems to represent flower buds that haven’t opened yet. -
Insert Wispy Accents:
Mix white with a drop of green to make a very pale tint. Add a few ‘ghost’ blades of grass in the background area of the greenery to add depth without drawing focus. -
Final Adjustments:
Step back and look at the negative space. If the top looks too empty, you can add one or two extremely faint, tall grass blades reaching higher, or perhaps a tiny floating seed or two drifting away from the dandelion.
Now you have a serene little slice of nature that brings freshness to any room
BRUSH GUIDE
The Right Brush for Every Stroke
From clean lines to bold texture — master brush choice, stroke control, and essential techniques.
Explore the Full Guide
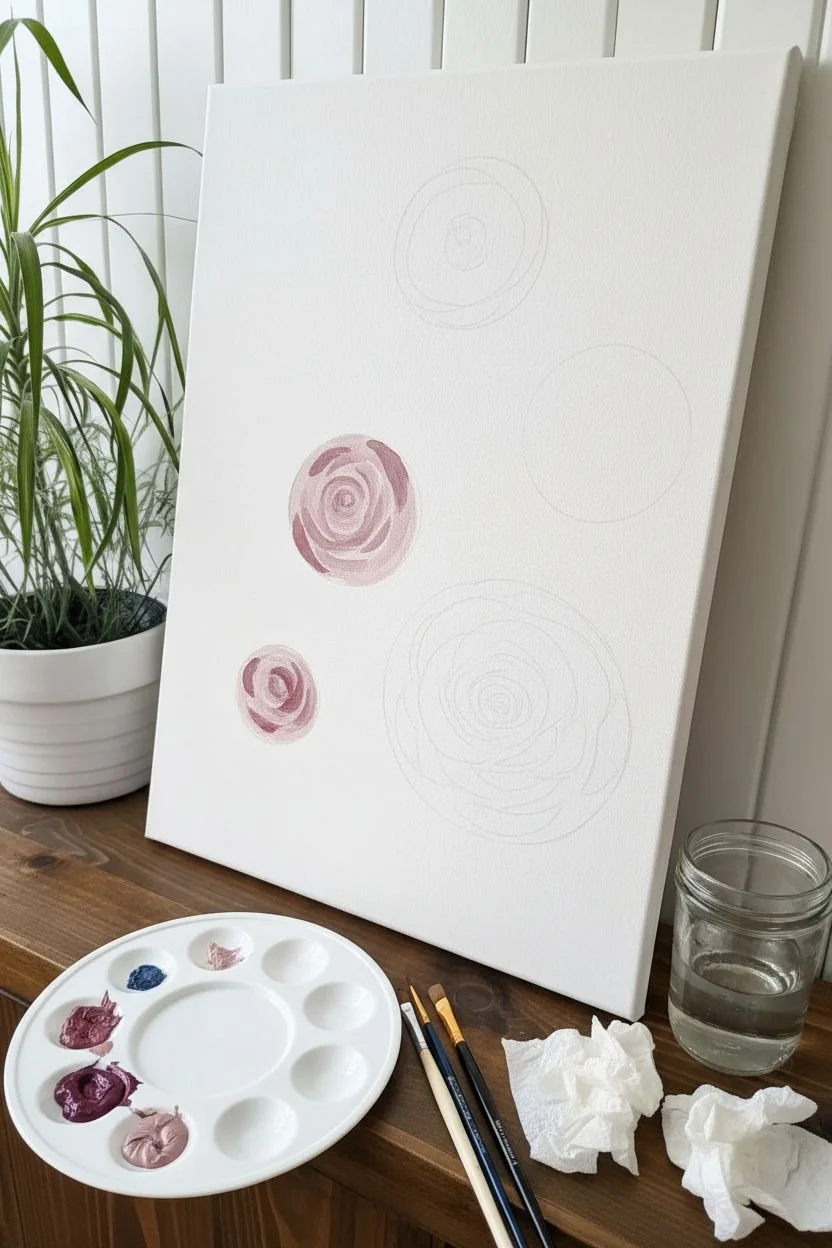
Roses in a Simple Spiral-Petal Style
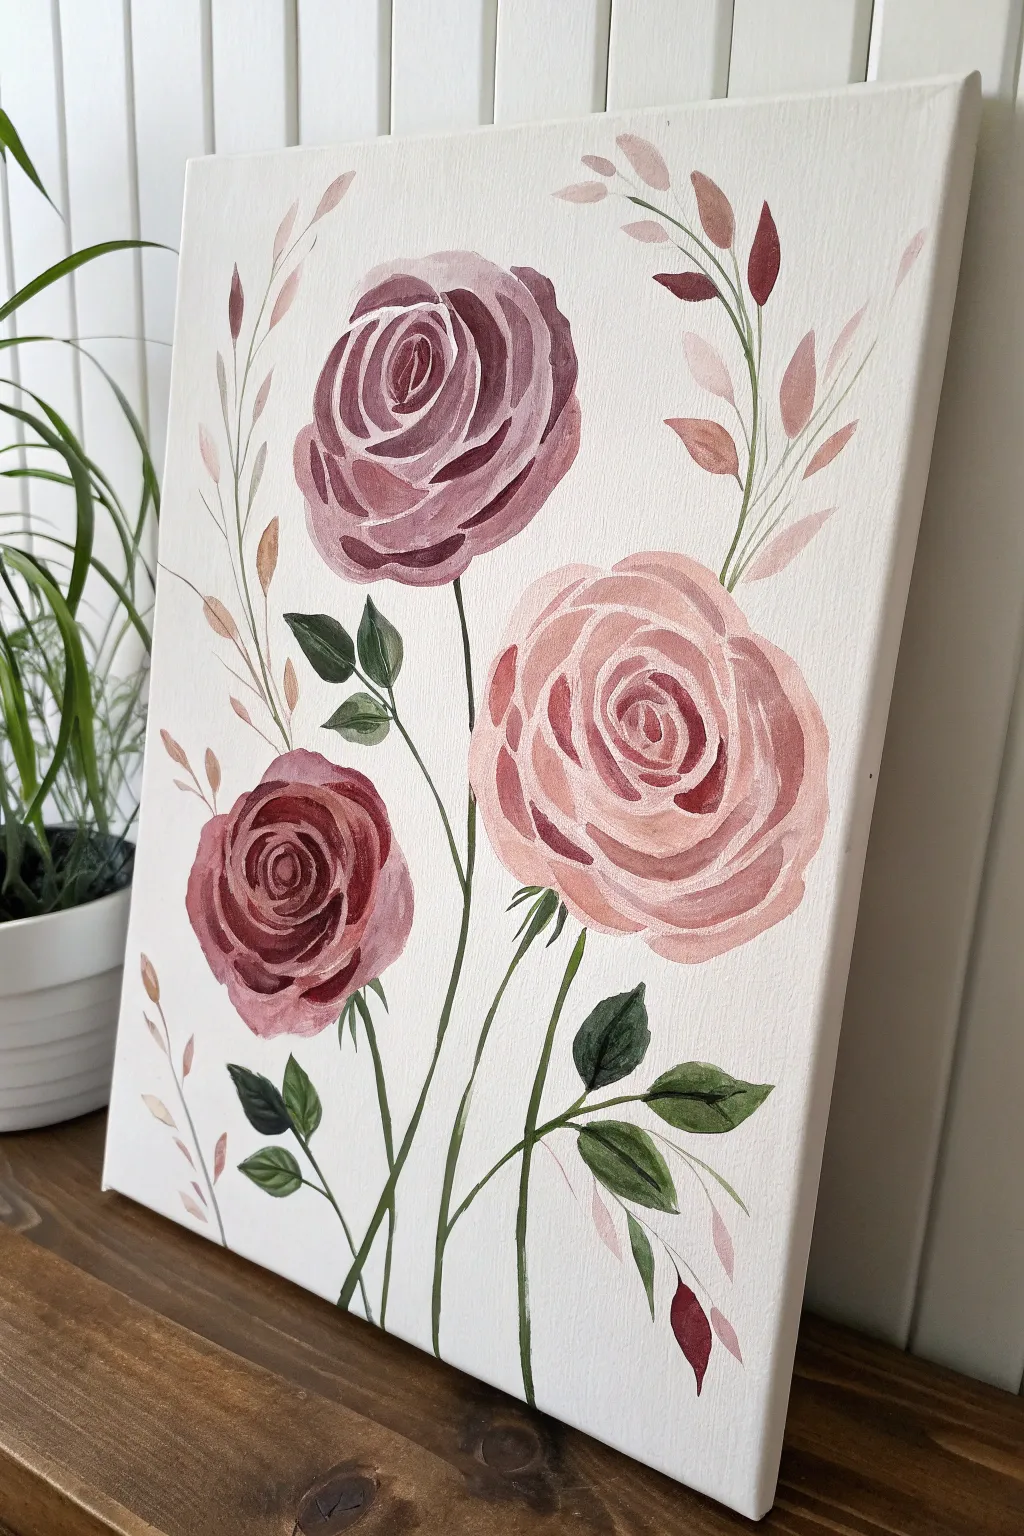
Capture the romantic charm of a garden with this loose, illustrative painting of three roses in varying shades of mauve, blush, and burgundy. This project focuses on simple brushstrokes to build dimension without needing hyper-realistic blending skills, perfect for a relaxing afternoon session.
Step-by-Step
Materials
- Stretched canvas (11×14 or similar)
- Acrylic paints: Titanium White, Alizarin Crimson, Burnt Umber, Sap Green, Yellow Ochre, Ultramarine Blue
- Flat shader brushes (sizes 6 and 8)
- Round brushes (sizes 2 and 4)
- Rigger or liner brush for fine stems
- Palette for mixing
- Cup of water and paper towels
Step 1: Planning the Composition
-
Map out the blooms:
Visualize a triangle formation for your three main flowers. Place the largest bloom (the blush pink one) on the lower right, the medium bloom (mauve) near the top center, and the smallest (burgundy) on the lower left. You can sketch faint circles with a pencil to mark these spots if you like. -
Mix your base colors:
Prepare three distinct palettes. For the top flower, mix Alizarin Crimson with White and a touch of Blue for a dusty mauve. For the bottom left, mix Crimson with a tiny bit of Burnt Umber for a deep burgundy. For the large right flower, mix White with a very small amount of Crimson and Yellow Ochre for a warm blush pink.
Step 2: Painting the Roses
-
Construct the Mauve center:
Start with the top mauve rose. Using a round brush, paint a tight, C-shaped curve in the center using a darker version of your mauve mix. -
Build the petals outward:
Switch to a flat shader brush. Load it with your main mauve color. Create short, curved strokes around the center, overlapping slightly like shingles. Keep jagged white spaces between strokes to define the petals. -
Add highlights:
Mix more white into your mauve. Add a few c-curves on the outer edges of the petals to simulate light hitting the softest parts of the flower. Keep the edges loose and not perfectly round. -
Paint the Blush Rose center:
Move to the large pink flower. With a clean brush, paint the center spiral using a slightly darker pink mix (add a tiny bit more crimson). -
Create broad pink petals:
Use your largest flat brush here. Create wide, sweeping C-curves around the center. As you move outward, make the strokes larger and flatter. Allow the texture of the canvas to show through slightly for a painterly look. -
Deepen the shadows:
While the pink paint is still slightly tacky, touch in a deeper red-brown mix into the crevices between the center petals to give the rose depth. -
Form the Burgundy Rose:
For the bottom left flower, use your deep burgundy mix. Start with a tight center spiral. Since this is a darker flower, use a lighter pink mix to highlight the top edges of the petals so the layers don’t get lost in the dark paint.
Keep it Loose
Don’t over-blend! The charm of this style comes from visible brushstrokes. Allow the colors to sit side-by-side rather than smoothing them into a perfect gradient.
Step 3: Adding Foliage and Details
-
Mix the greenery:
Create a natural green by mixing Sap Green with a touch of Burnt Umber and a tiny bit of White. You want an earthy, muted green rather than a bright electric lime. -
Draft the main stems:
Using your liner or rigger brush and a thinned-down green paint, draw long, slender lines extending from the bottom of the canvas up to the base of each flower head. Let them curve naturally. -
Add leaf clusters:
Use a size 4 round brush to press and lift shapes attached to the stems. Paint varying sizes—some small near the buds and larger leaves closer to the bottom. I find painting leaves in groups of two or three looks most natural. -
Detail the leaves:
While the green is wet, add a stroke of darker green (mix in unthinned Sap Green or a touch of Blue) to one side of each leaf to suggest a shadow or vein. -
Paint wispy filler stems:
Mix a diluted reddish-brown wash using Alizarin Crimson and Burnt Umber. Using the liner brush, paint very thin, curving sprigs that reach high above the flowers, filling the empty white space at the top corners. -
Add delicate filler leaves:
Along these thin brown stems, dab small, almond-shaped leaves using the same reddish-brown wash. Keep these very transparent and light compared to the main green leaves. -
Final touches:
Step back and look at your composition. If any rose looks too flat, add a crisp white highlight to the very edge of the outermost petal to make it pop.
Metallic Accent
Once the painting is fully dry, outline just the very outer edges of the blush pink rose with a fine line of metallic gold paint for a touch of modern elegance.
Hang your floral masterpiece in a well-lit spot to enjoy the soft, romantic vibes it brings to your space
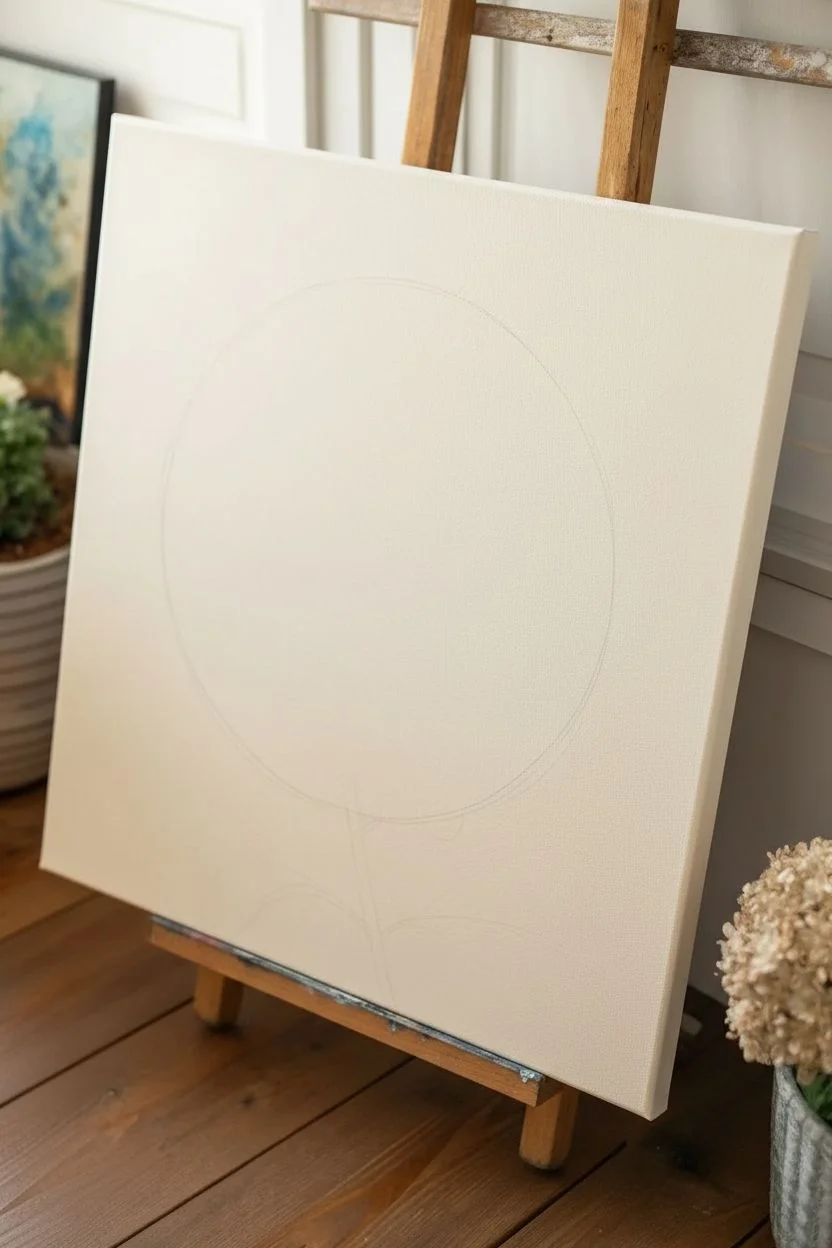
Hydrangea Clusters Built From Overlapping Petal Dabs
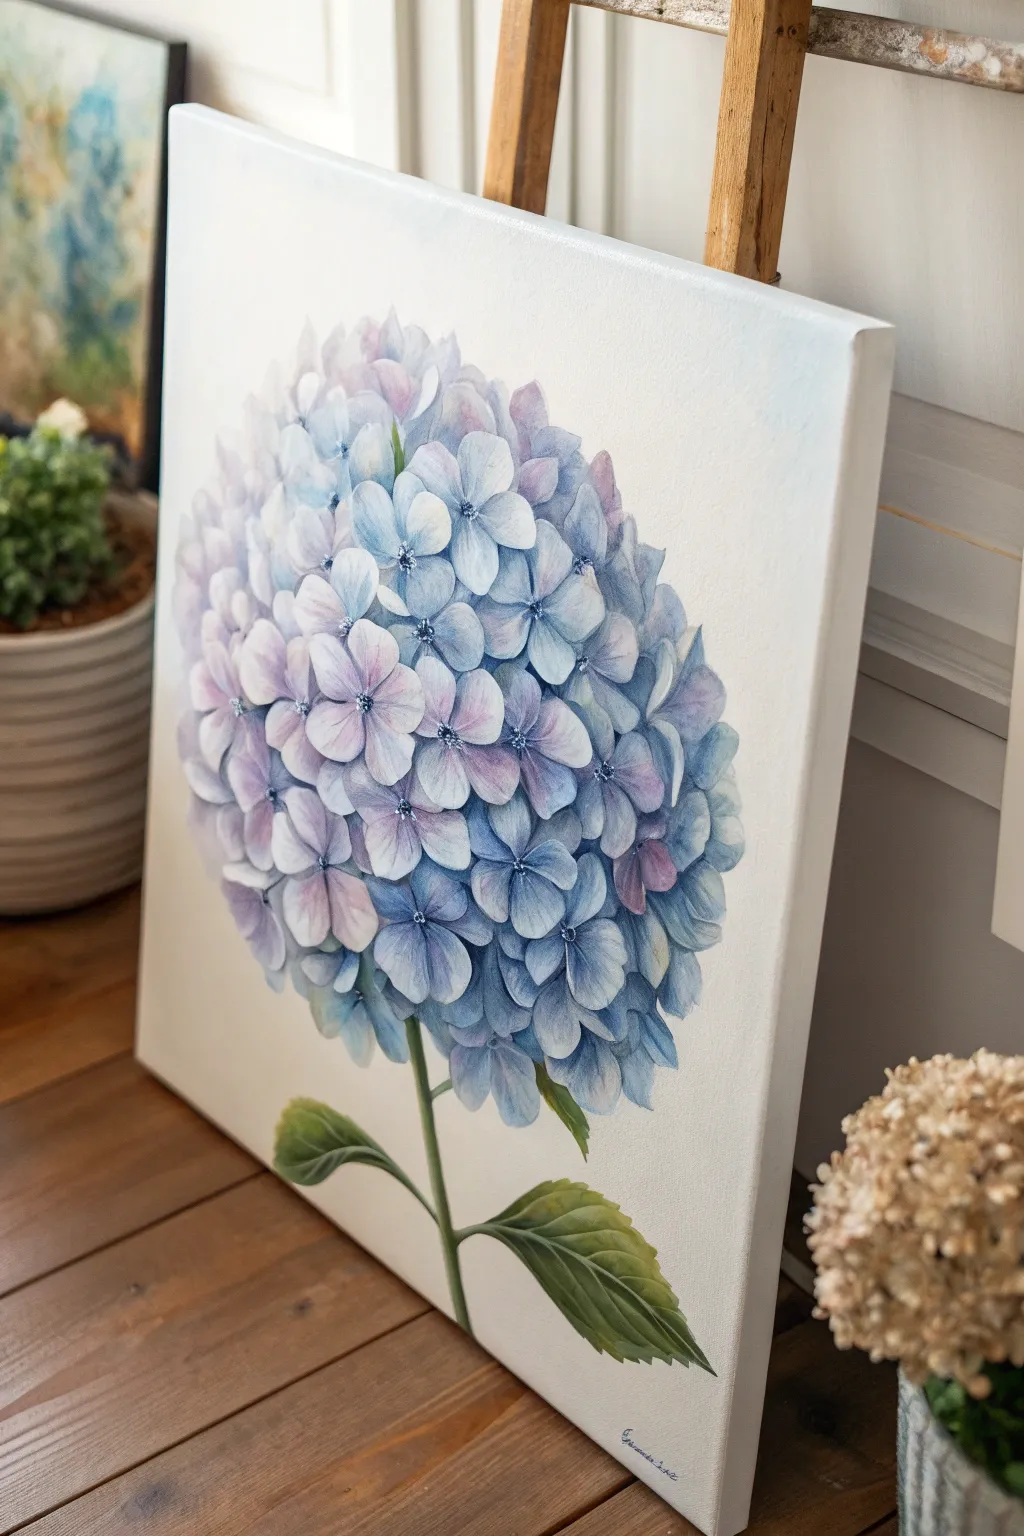
Capture the delicate volume of a hydrangea bloom with this technique that builds form through layer upon layer of individual florets. By shifting from soft lilacs to cool blues, you will create a spherical masterpiece that feels like it’s popping off the canvas.
How-To Guide
Materials
- Square stretched canvas (approx. 16×16 or 20×20 inches)
- Acrylic paints: Titanium White, Ultramarine Blue, Phthalo Blue, Dioxazine Purple, Sap Green, Burnt Umber
- Flat brushes (1-inch for background)
- Filbert brushes (small and medium sizes)
- Round detail brush (size 1 or 0)
- Palette for mixing
- Water cup and paper towels
- Pencil for sketching
Step 1: Preparation and Base Layer
-
Prepare the canvas:
Start with a clean, primed canvas. If you want a subtle warmth underneath, wash the entire surface with a very watered-down mix of white and a tiny drop of yellow ochre or cream, then let it dry completely. -
Define the sphere:
Use a pencil to lightly sketch a large circle in the center of your canvas. It doesn’t need to be perfect; hydrangeas are organic. Add a single stem line coming down from the bottom center. -
Block in the shadow map:
Mix a muted periwinkle shade using Ultramarine Blue, a touch of Purple, and White. Paint the ‘shadow side’ of your sphere (usually the bottom right) with a loose wash to establish the 3D form early on.
Muddy Petals?
If your blue and purple petals are turning gray where they overlap, let the bottom layer dry completely before adding the next one. Wet-on-wet blends too much.
Step 2: Building the Hydrangea Head
-
Mix your palette spectrum:
Prepare three main petal piles on your palette: a pale lavender (Purple + White), a soft sky blue (Ultramarine + White), and a brighter highlight blue (Phthalo Blue + heaps of White). Keep these moist. -
Start the background florets:
Using a medium filbert brush, paint the first layer of four-petaled flowers around the outer edges of your circle. These should be darker and blurrier, receding into the background. -
Layering the mid-tones:
Move inward with slightly lighter colors. Paint individual four-petal shapes overlapping the background layer. Vary the colors between your lavender and sky blue mixes to create natural variety. -
Creating the focal point:
As you reach the center and top-left of the sphere (the light source), step down to a smaller brush. Use your lightest white-blue mix to paint crisp, defined florets. -
Wait for drying:
I like to let this main layer dry for about 20 minutes. If you paint the centers too soon, they will bleed into the petals and look muddy.
Dew Drop Depth
Make it real: Add a tiny, clear dew drop on one petal. Paint a small dark semi-circle, highlight the bottom curve with white, and add a specular dot on top.
Step 3: Defining Details
-
Add the centers:
Mix a dark Indigo color (Blue + Purple + tiny bit of Black or Umber). Using your smallest detail brush, place tiny dots in the center of each four-petal floret. -
Highlight the centers:
Once the dark dots are tacky, add a microscopic spec of pure white or yellow to the very center of the dot to make it look like a stamen catching the light. -
Deepen the shadows:
Look for the gaps between the florets. Use a watered-down dark blue glaze to carefully darken the negative spaces, pushing the top petals forward visually. -
Refine petal edges:
Go back with pure Titanium White on your detail brush and crisp up the edges of the petals that are closest to the viewer. This sharp edge makes the painting look realistic.
Step 4: Stem and Leaves
-
Paint the stem:
Mix Sap Green with a little White and Burnt Umber for a natural olive tone. Paint the main stem with a steady hand, tapering it slightly as it goes down. -
Block in the leaves:
Sketch two large leaves near the bottom. Fill them in with a dark green base coat (Sap Green + Burnt Umber). -
Add leaf veins and highlights:
Mix a lighter lime green (Sap Green + Yellow + White). Paint delicate veins radiating from the center of the leaf, and dry-brush some of this light green onto the high points of the leaf surface. -
Final shadow adjustment:
Add a touch of the dark indigo mix under the bloom where the stem connects, casting a shadow onto the stalk.
Step back and admire the spherical volume you’ve created with simple overlapping shapes

PENCIL GUIDE
Understanding Pencil Grades from H to B
From first sketch to finished drawing — learn pencil grades, line control, and shading techniques.
Explore the Full Guide
Elegant Lilies With Long, Curved Petals and Stamens
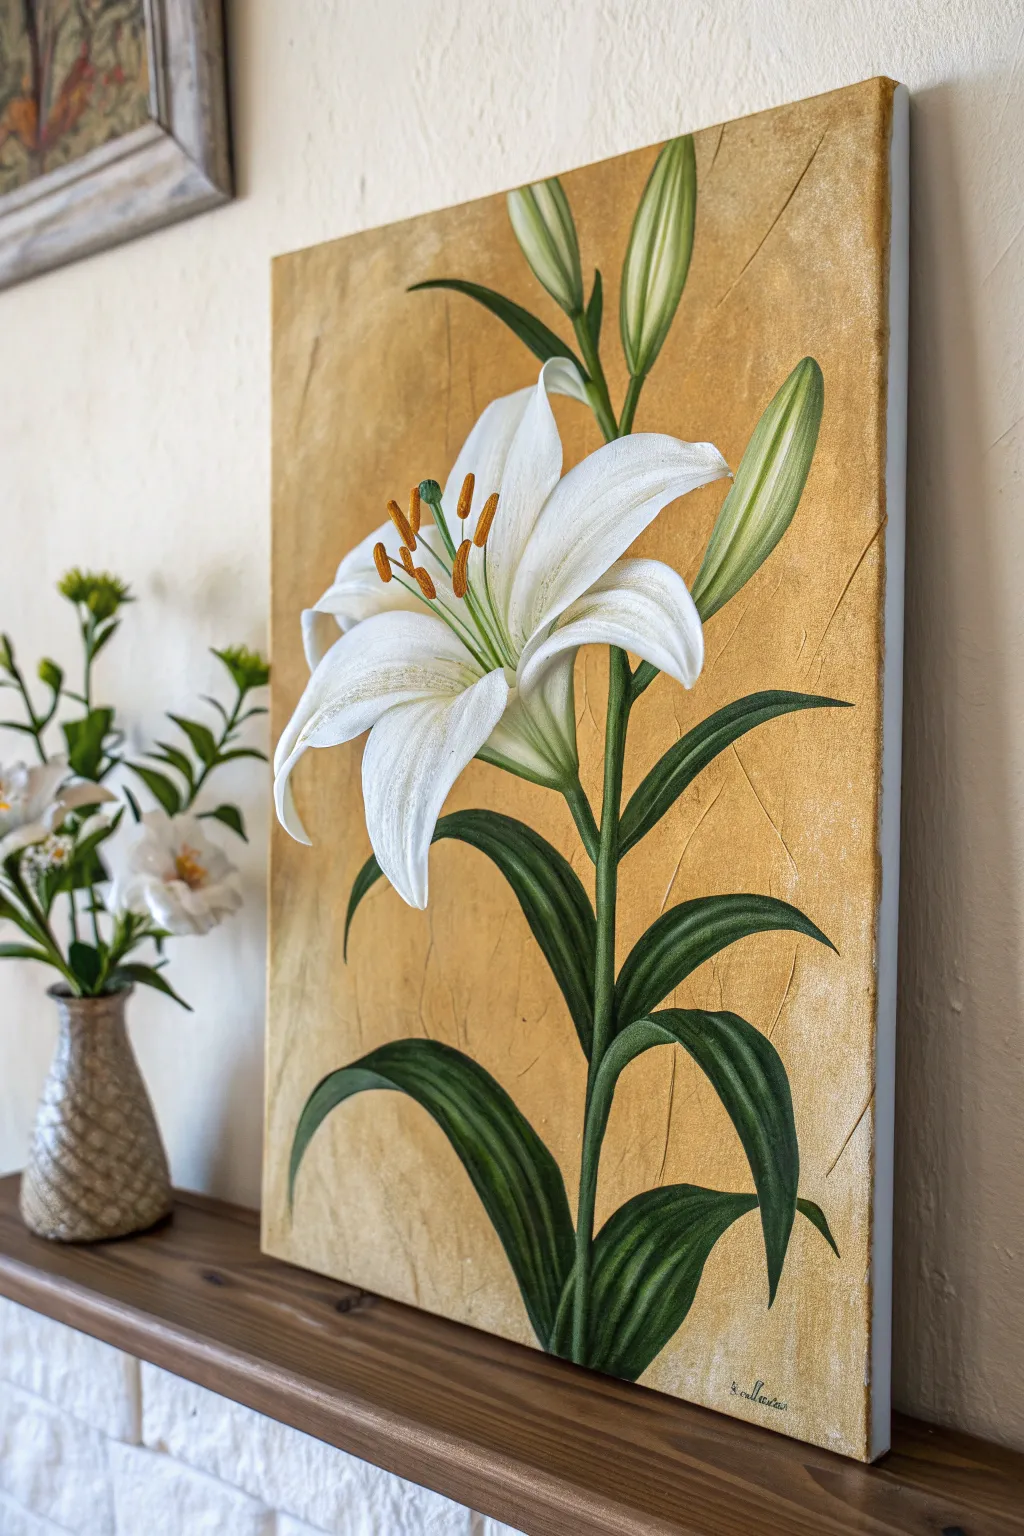

Capture the timeless elegance of a white lily set against a stunning, textured gold background. This painting project combines bold botanical forms with delicate shading to create a piece that feels both classic and contemporary.
Step-by-Step
Materials
- Stretched canvas (rectangular, vertical orientation)
- Acrylic paints: Titanium White, Sap Green, Phthalo Green, Burnt Umber, Cadmium Orange, Yellow Ochre
- Metallic Gold acrylic paint (heavy body preferred)
- Modeling paste or texture gel
- Palette knife
- Flat brushes (various sizes for background and leaves)
- Round brushes (small and medium for details)
- Pencil for sketching
- Palette for mixing
Step 1: Textured Foundation
-
Prepare the canvas:
Start by applying a layer of modeling paste or texture gel to your canvas using a palette knife. Spread it somewhat unevenly, creating subtle ridges and sweeping motions to give the background character. -
Dry thoroughly:
Let the texture paste dry completely. This creates a physical dimension that will interact beautifully with the gold paint later. -
Apply the base gold:
Paint the entire canvas with a coat of metallic gold acrylic. Use a wide flat brush and apply it in different directions to enhance the light reflection on the texture. -
Add depth to gold:
While the gold is still slightly tacky, I like to mix a tiny drop of burnt umber with gold and lightly brush it into the corners or textured valleys to add an antiqued look. Let this layer cure fully.
Step 2: Sketching and Blocking
-
Sketch the lily:
Using a pencil, lightly draw the central stem rising from the bottom. Outline the main flower head in the upper center, drawing six long, recurved petals. -
Add buds and leaves:
Sketch two closed buds extending upward from the stem. Add several long, lance-shaped leaves curving out from the main stalk. -
Block in green:
Mix Sap Green with a touch of Phthalo Green. Paint the base color for the stem, leaves, and the outer skin of the buds. Keep this layer flat for now. -
Block in white:
Fill in the petal shapes with Titanium White. You might need two coats to ensure the gold background doesn’t show through completely.
Textural Pro-Tip
For the petal veins, try using a slightly dry brush. Wipe most paint off, then drag it lightly. It creates faint, feathery scratches that look very realistic.
Step 3: Detailed Petals
-
Define shadows:
Mix a very light grey or pale green using White and a speck of Sap Green. Paint faint shadow lines running down the center of each petal to show the midrib indentation. -
Deepen the throat:
At the center of the flower where the petals meet, blend a soft wash of light green. This pulls the eye inward and creates the illusion of depth. -
Highlight edges:
Use pure Titanium White on a small round brush to highlight the curled edges and tips of the petals, making them pop against the background. -
Refining texture:
Add very subtle, thin lines radiating from the center of the petals outward to mimic the delicate veins of the lily.
Make It Pop
Add a tiny dot of pure white to the very top of the curved orange anthers. This ‘specular highlight’ makes them look moist and three-dimensional.
Step 4: Leaves and Stamens
-
Shade the greenery:
Mix Phthalo Green with a little Burnt Umber to create a dark shadow green. Paint this along one side of the stem and on the underside of the curving leaves to create volume. -
Highlight the leaves:
Mix Sap Green with Yellow Ochre or White for a lighter green. Brush this onto the tops of the leaves where the light would naturally hit. -
Paint filaments:
Using a thin liner brush and light green paint, draw delicate filaments reaching out from the center of the flower. -
Create anthers:
Mix Cadmium Orange with a tiny bit of Burnt Umber. At the tip of each filament, dab a small, elongated oval to form the pollen-heavy anthers. -
Final touches:
Check your edges. If any paint strayed onto the gold, carefully cover it with a small brush and fresh gold paint to keep the silhouette crisp. -
Sign and seal:
Add your signature in the bottom corner. Once fully dry, consider a gloss varnish on just the flower and leaves to make them shine against the metallic background.
Step back and admire how the gold background illuminates your elegant white lily
Dahlia Petals in Repeating, Satisfying Layers
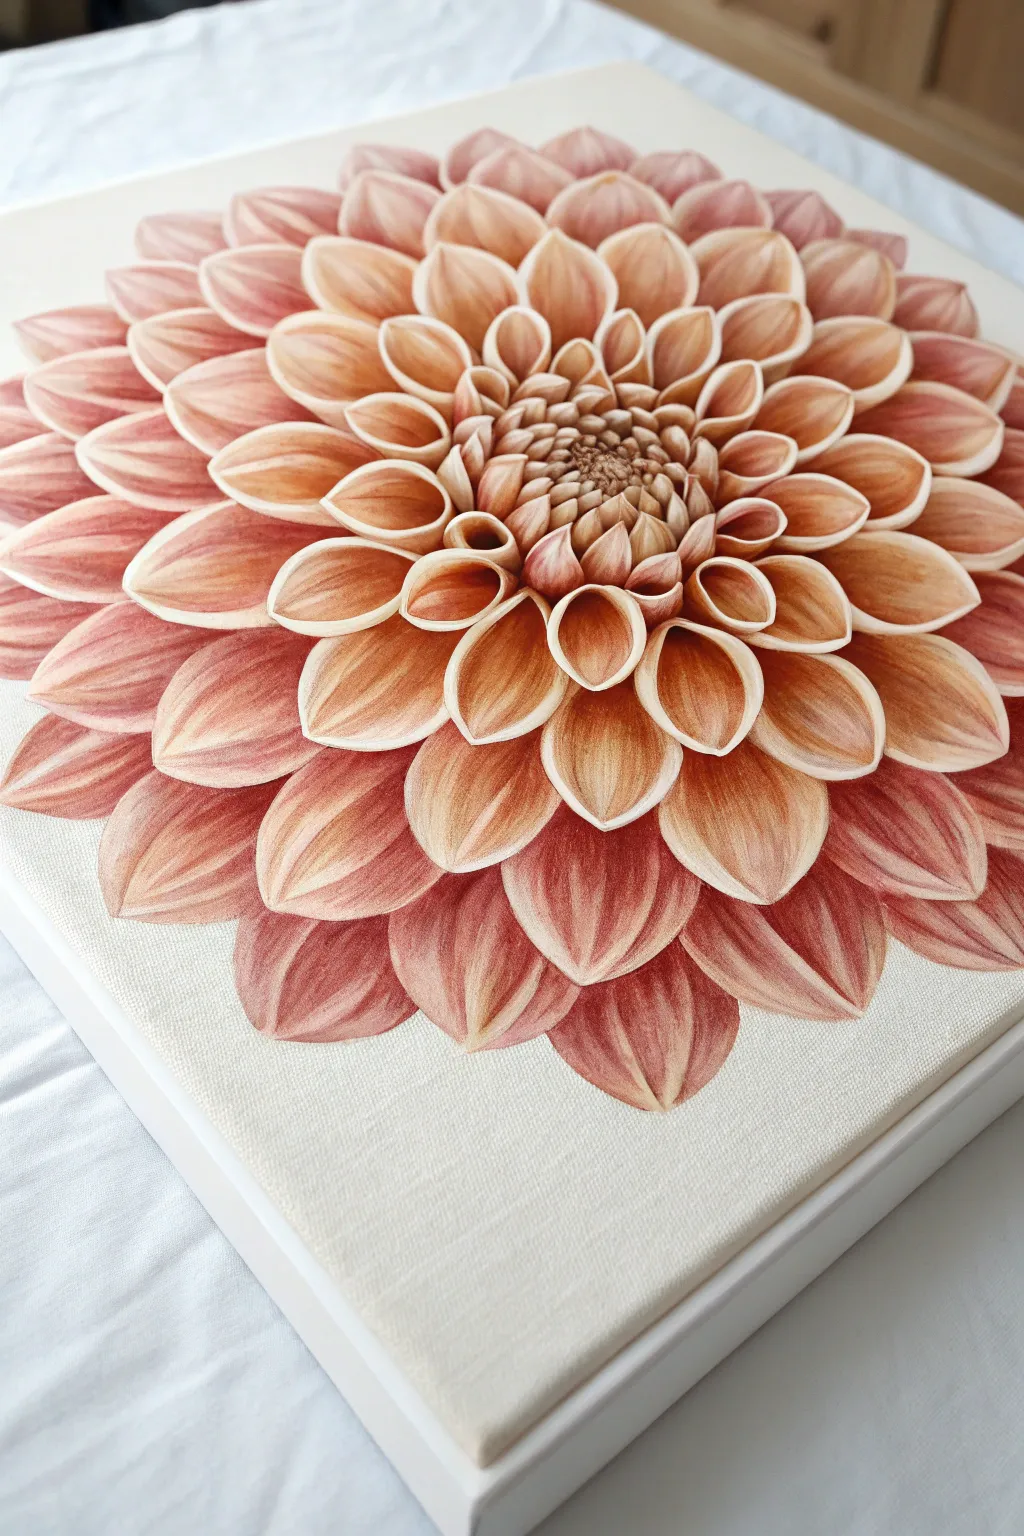
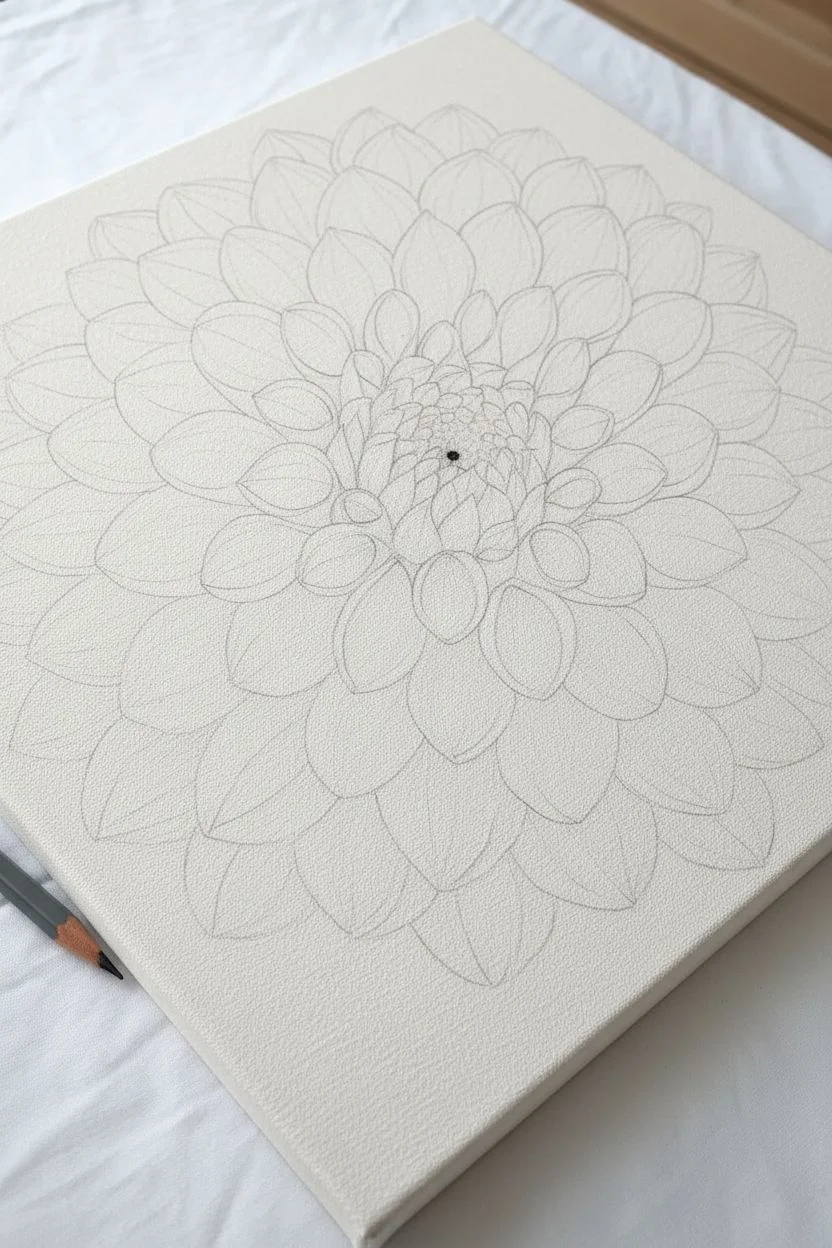
Capture the mesmerizing geometry of nature with this detailed acrylic painting of a blooming dahlia. By building up layers from the center outward, you will create a sense of depth and realism that makes the petals appear to lift right off the canvas.
Step-by-Step
Materials
- Square stretched canvas (12×12 or similar)
- Acrylic paints: Titanium White, Burnt Sienna, Yellow Ochre, Alizarin Crimson, Raw Umber
- Slow-drying medium or retarder (essential for blending)
- Round synthetic brushes (sizes 2, 4, and 6)
- Small filbert brush (size 4)
- Detail liner brush (size 0 or 00)
- Pencil and eraser
- Palette and water cup
Step 1: Planning the Geometry
-
Mark the center:
Begin by finding the exact center of your square canvas. Lightly mark a small dot with your pencil to anchor the entire composition. -
Sketch concentric circles:
Draw faint concentric circles radiating from the center dot. These don’t need to be perfect, but they will serve as guidelines to ensure your petal layers remain symmetrical. -
Outline the central cluster:
Sketch the tight, unopened bud cluster in the very middle. These are small, seed-like shapes that haven’t unfurled yet. -
Draft the petal layers:
Working outward, sketch the petals. The inner petals should be short and curled, gradually becoming longer and flatter as you reach the canvas edges. Pay attention to how the petals overlap in an alternating brick-work pattern.
Step 2: Base Layers and Background
-
Paint the negative space:
Mix a warm white (Titanium White with a tiny dot of Yellow Ochre) and paint the background corners outside the flower. Getting this done first helps you visualize the flower’s boundaries. -
Mix your palette:
Prepare three main petal shades: a dark shadow tone (Burnt Sienna + Alizarin Crimson), a mid-tone peach (Burnt Sienna + Yellow Ochre + White), and a highlight tone (White + tiny amount of Burnt Sienna). -
Block in the petals:
Using your mid-tone peach and a size 6 round brush, fill in all the petals with a solid base coat. Don’t worry about shading yet; just cover the canvas texture.
Keep it Creamy
Dahlias have soft transitions. Use a slow-drying medium or a ‘wet palette’ to keep your acrylics open longer, allowing for smoother blending on the petals.
Step 3: Creating Depth and Detail
-
Establish the center depth:
Mix Raw Umber with your dark shadow tone. Use a size 2 brush to paint the deepest crevices in the very center bud. This high contrast draws the eye immediately inward. -
Shade the petal bases:
For each petal, apply the dark shadow tone at the base where it tucks under the petal above it. This creates the illusion of overlapping layers. -
Blend the gradients:
While the shadow paint is still slightly tacky, use a damp brush (or one with a little slow-drying medium) to pull the color about halfway up the petal, fading it into the mid-tone. -
Highlight the tips:
Load your filbert brush with the highlight tone. Paint the outer tips and curved edges of the petals. The contrast between the light tips and dark bases creates the 3D curl effect. -
Detail the petal veins:
Using your smallest liner brush and a watered-down version of the shadow tone, paint very fine lines mimicking veins on the petals. Keep your hand loose to avoid stiff, straight lines. -
Add the rim light:
I particularly like to mix pure Titanium White with a touch of fluid medium for this step. Carefully paint the very finest edge of the curled petals—the ‘rim’—to make them pop against the darker petal beneath.
Flat Looking Flower?
Improve contrast. If your flower looks flat, your darks aren’t dark enough. Add a glaze of pure Burnt Umber into the deepest crevices to force the highlighted tips forward.
Step 4: Refining the Center
-
Texturize the bud:
Return to the center cluster. Use tiny dots and dashes of the highlight color to suggest the texture of the tightly packed, unopened petals. -
Deepen shadows:
Look at the composition from a distance. If the layers look flat, glaze a very thin wash of Alizarin Crimson into the deepest recesses between the petal rings to boost the vibrancy. -
Final clean up:
Use your background warm white color to clean up any petal edges that got messy, ensuring the silhouette remains crisp against the canvas.
Step back and admire the rhythmic beauty of the botanical mandala you have created


Peony Puff With Soft Blends and Ruffled Petal Edges
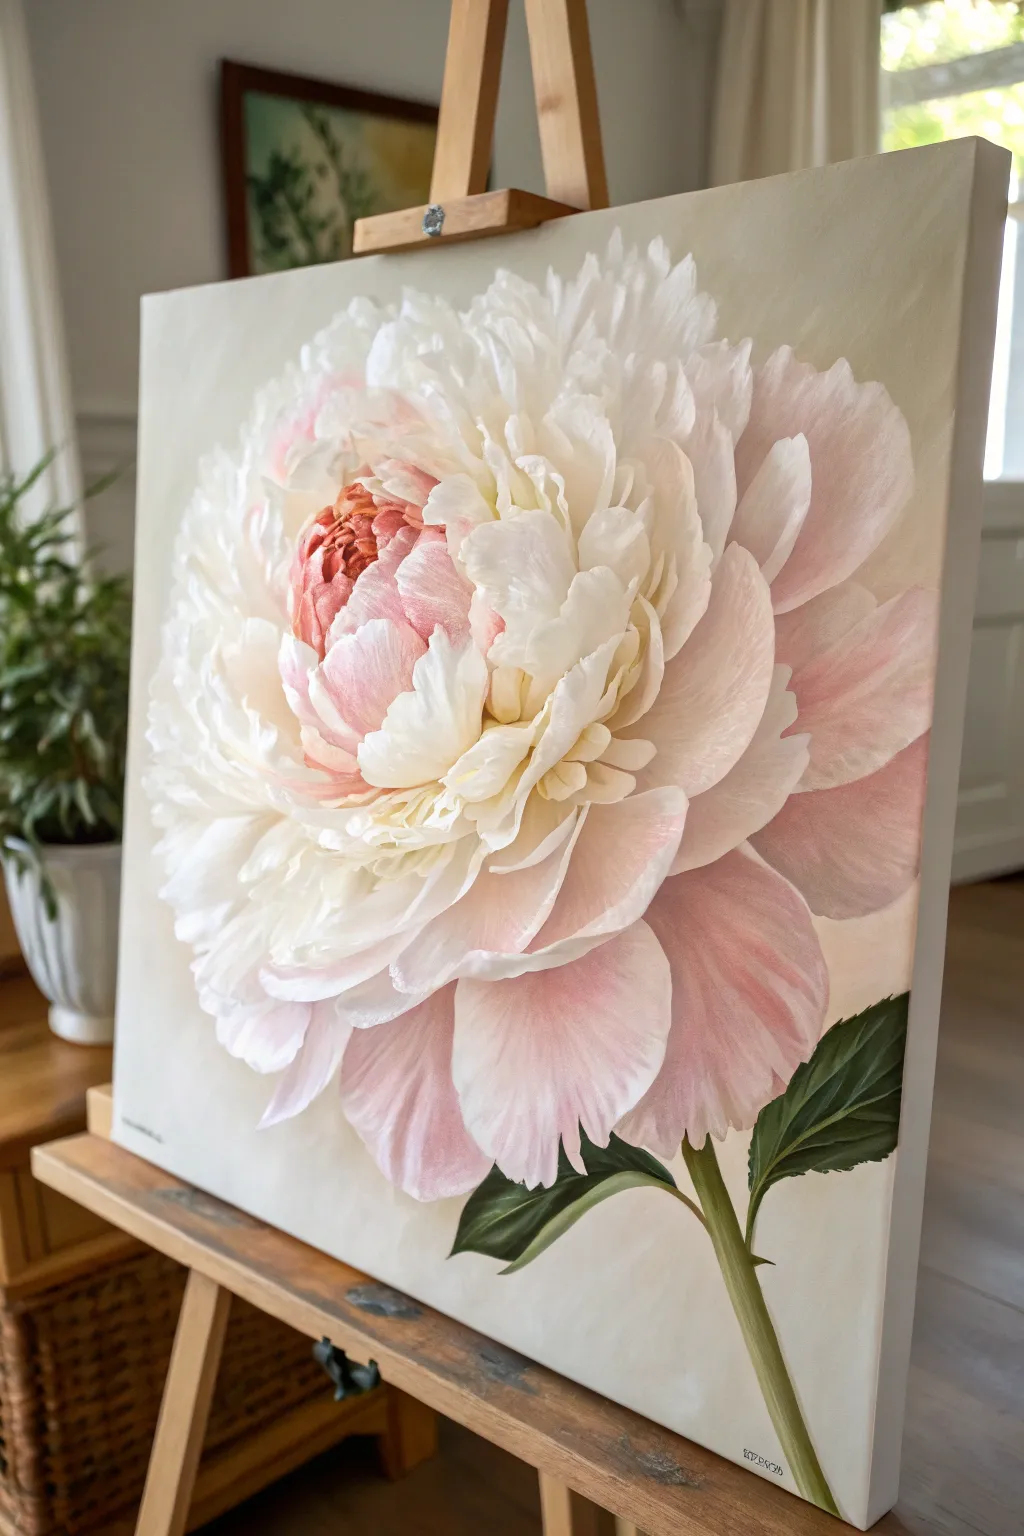

Capture the delicate beauty of a blooming peony with this tutorial focused on soft color transitions and intricate petal layering. The resulting canvas features a luminous, cloud-like flower that seems to float against a neutral background.
Detailed Instructions
Materials
- Stretched canvas (square, e.g., 20×20 inches)
- Acrylic or oil paints (Titanium White, Alizarin Crimson, Cadmium Red light, Yellow Ochre, Sap Green, Burnt Umber)
- Set of filbert brushes (sizes 4, 8, 12)
- Small round detail brush (size 1 or 2)
- Large flat brush for background
- Slow-drying medium (retarder) or linseed oil
- Palette knife for mixing
- Easel
- Palette
- Chalk or pastel pencil for sketching
Step 1: Preparation and Background
-
Prime and tone:
Begin with a primed canvas. I like to apply a very thin wash of Yellow Ochre mixed with plenty of white to kill the stark white of the canvas, creating a warm undertone that will glow through later layers. -
Establish the background:
Mix a large amount of a soft, neutral beige-grey using Titanium White, a touch of Yellow Ochre, and a tiny speck of Burnt Umber. Use a large flat brush to cover the entire canvas with smooth, even strokes. -
Rough sketch:
Once the background is dry to the touch, use a neutral-colored chalk or pastel pencil to lightly sketch the large circular form of the peony. Mark the center point slightly off-center to the left for a dynamic composition.
Keep it Creamy
Use a slow-drying medium or retarder with your acrylics. The key to the soft ‘puff’ look is wet-on-wet blending, which isn’t possible if your paint skins over too quickly.
Step 2: Building the Core
-
Mix the core colors:
On your palette, create a gradient of pinks. Mix Alizarin Crimson and Cadmium Red with varying amounts of white. You need a deep coral for the deepest shadows and a pale blush for the mid-tones. -
Block in the center:
Using a size 8 filbert brush, paint the tight cluster of petals in the very center. Use your deeper coral and warm pink mix here, as this is where the shadows are strongest. -
Establish the shape:
Don’t worry about individual petals yet. Focus on creating a ball-like shape in the center that transitions from the dark coral core to lighter pinks as it moves outward. -
Softening edges:
While the paint is still wet, use a clean, dry brush to gently soften the edges of your central color mass so it looks slightly out of focus.
Dew Drop Drama
Add a realistic dew drop on one of the lower petals. Use a dark shadow for the top of the drop, a bright highlight at the bottom, and a tiny spec of white reflection on top.
Step 3: Layering the Petals
-
Outer petal structure:
Switch to a size 12 filbert brush. Mix a large pile of Titanium White with just a whisper of Alizarin Crimson for the large outer petals. Paint broad, sweeping strokes to define the largest petals at the bottom and sides. -
Defining the ruffled edges:
Peonies are known for their jagged, frilly edges. Use the tip of your filbert brush to create uneven, wavy lines along the perimeter of the white petals. -
Adding texture:
Load your brush with pure Titanium White. Lay thick strokes on the tops of the petals where the light would hit essentially ‘sculpting’ the flower with paint. -
Developing the mid-section:
Between the tight dark center and the large white outer petals, paint medium-sized petals using a mid-tone blush pink. These should bridge the gap between the dark core and the white edges. -
Adding depth:
Mix a cool shadow color using white and a tiny touch of Burnt Umber or a cool violet. Glaze this lightly under the large white petals to separate them from each other.
Step 4: Foliage and Refining
-
Stem and leaves base:
Mix Sap Green with a little Burnt Umber for a deep, natural green. Using a size 8 brush, paint the thick stem extending from the bottom right and the two primary leaves. -
Highlighting the greens:
Add a little Yellow Ochre and White to your green mix. Paint veins and highlights on the leaves where the light catches the ridges. -
Blend the transitions:
Return to the flower petals. Use a dry blending brush to smooth out any transitions that look too harsh, especially where the pink center fades into the white edges. The goal is a ‘puff’ effect. -
Detail work:
With a small round brush (size 1 or 2), add tiny, crisp highlights of pure white to the very tips of the central ruffled petals to make them pop forward. -
Final assessment:
Step back from the easel. Check if the flower feels spherical. If the center feels flat, deepen the darkest shadows in the creases with a mix of Alizarin Crimson and a speck of green (to darken without turning black). -
Varnishing:
Allow the painting to dry completely. This may take a few days for acrylics or weeks for oils. Once cured, apply a satin or gloss varnish to unify the sheen and protect those delicate whites.
Hang your masterpiece in a prominent spot where the light catches those textured white highlights perfectly
High-Contrast Flowers on a Deep, Dark Background
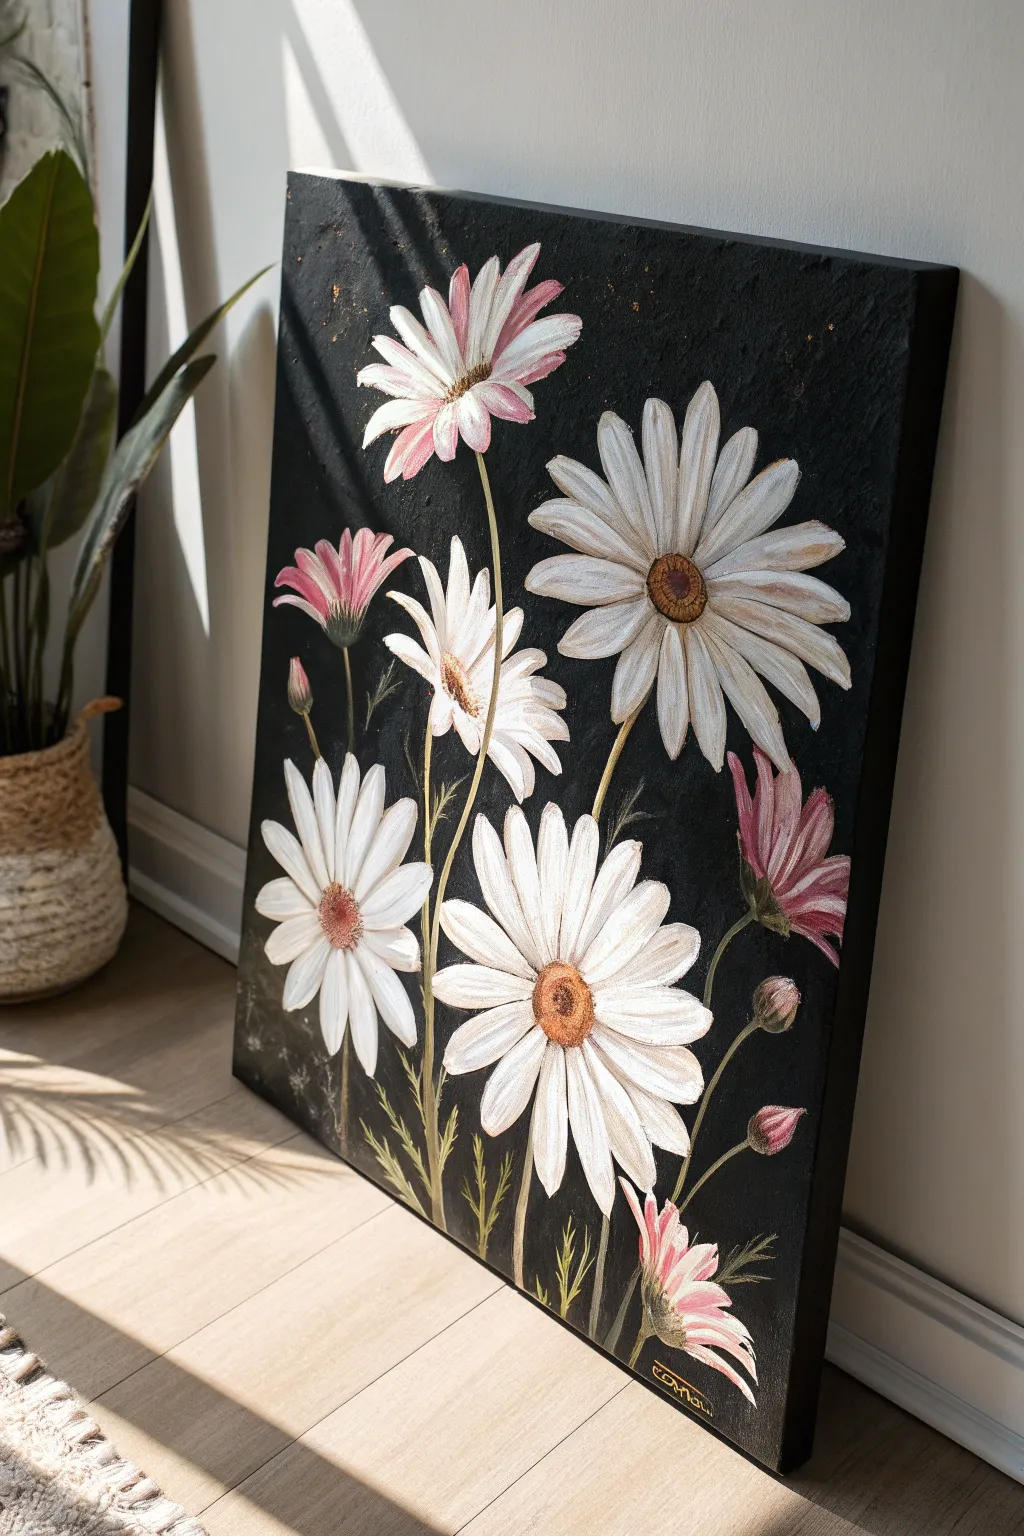
This striking project showcases elegant white and pink-hued daisies which pop brilliantly against a textured, matte black background. The high-contrast style brings a contemporary, sophisticated mood to classic floral subjects, making it a perfect statement piece.
Step-by-Step
Materials
- Stretched canvas (rectangular portrait orientation, approx. 18×24 or larger)
- Acrylic paints: Carbon Black or Mars Black, Titanium White, Raw Sienna, Magenta or Rose Madder, and Olive Green
- Large flat brush (for background)
- Medium filbert brush (for petals)
- Small round detail brush (size 0 or 1)
- Texture medium or modeling paste (optional, for background depth)
- Palette knife
- Gold metallic paint or gold leaf flakes (optional accent)
- Water cup and paper towels
Step 1: Preparing the Void
-
Texture the Base:
Before painting, inspect your canvas surface. If you want the visible texture seen in the reference, mix a little modeling paste with your black paint or apply a thin, uneven layer of gesso with a palette knife first. Let this dry completely. -
Apply the Midnight Layer:
Using a large flat brush, cover the entire canvas in a rich Carbon Black. Don’t worry about perfect smoothness; slight brushstroke visibility adds character. Ensure you paint the sides of the canvas for a gallery-wrapped finish. -
Second Coat:
Once the first layer is dry to the touch, apply a second coat of black to ensure total opacity. You want a deep, velvety void with no white canvas showing through. Let this cure fully, perhaps for an hour or two.
Chalk Marks Stick?
If your white chalk sketch lines are stubborn and won’t erase fully from the textured black paint, use a slightly damp Q-tip to gently lift the chalk dust without disturbing the acrylic layer.
Step 2: Sketching and Stems
-
Ghosting the Composition:
Using a piece of chalk or a white charcoal pencil, lightly sketch the placement of your flower heads. Draw ovals to represent where the main daisies will sit. Plan for a variety of angles—some facing forward, some tilted up. -
Painting the Stems:
Mix Olive Green with a touch of White and a tiny bit of Raw Sienna to get a muted, natural green. Using your small round brush, pull thin lines from the bottom of the canvas up to your flower ovals. Keep them wispy and slightly curved. -
Adding Leaves:
Along the stems, faint, grass-like leaves can be added. Keep these very subtle and blending into the background slightly—they shouldn’t compete with the bright blooms.
Add Dimension
Mix heavy gel medium into your petal paint. This allows you to sculpt the petals so they physically rise off the canvas, mimicking the detailed texture seen in the original artwork.
Step 3: Painting the Blooms
-
Blocking the White Petals:
Load your filbert brush with Titanium White. Start with the largest, most prominent daisy. Press the brush down near the center and lift as you pull outward to create a tapered petal shape. -
layering Petals:
Continue adding white petals around the center. Don’t make them all identical; overlap some and vary their lengths. For flowers that are angled, shorten the petals on the far side to create perspective. -
Introducing Pink Tones:
For the pink-tinged flowers, mix a very small amount of Magenta with plenty of White. Paint these petals just like the white ones, or stroke this pink mix over existing wet white paint for a soft blend. -
The Pink Buds:
Locate the spots for the closed buds. Use a darker pink mix (more Magenta, less White) to paint tear-drop shapes at the ends of the smaller stems. -
Defining Petal Textures:
Once the base white petals are dry, mix a light grey using White and a speck of Black. Use your smallest brush to add very faint lines down the center of some petals to suggest ridges and shadows.
Step 4: Centers and Details
-
Base of the Centers:
Mix Raw Sienna with a tiny dot of Magenta to create a warm golden-brown. Paint the round centers of the open daisies. Dab the paint on rather than stroking it to create a fuzzy texture. -
Deepening the Core:
While the center is still wet, take a tiny bit of pure dark brown or black on the corner of your brush and tap it into the very middle of the flower center to create a recessed, cup-like shape. -
Highlighting the Centers:
Add a highlight to the top edge of the flower centers using pure Yellow or a mix of Sienna and White. This makes them look three-dimensional. -
Refining the Buds:
Go back to the pink buds and add tiny sepals (green leaves) hugging the bottom of the pink tear-drop shapes using your green mix. -
Green Haze:
I like to dry-brush a tiny bit of the green mixture around the stems and leaves very faintly. This helps push them back into the shadows and softens the stark contrast.
Step 5: Final Touches
-
Gold Splatter (Optional):
Load a wet brush with metallic gold paint or thinned yellow-ochre. Flick the bristles to create tiny, magical speckles across the black background, resembling pollen or stardust. -
Brightening Highlights:
Step back and look at the painting. Use pure Titanium White to hit the tips of the petals that are catching the most ‘light’ to ensure maximum contrast. -
Signing and Sealing:
Sign your name in the corner with a metallic gold pen or thin brush. Once fully dry (give it 24 hours), apply a matte or satin varnish to protect the surface without creating too much glare.
Hang your masterpiece in a well-lit area to watch the white petals truly glow against the dark backdrop
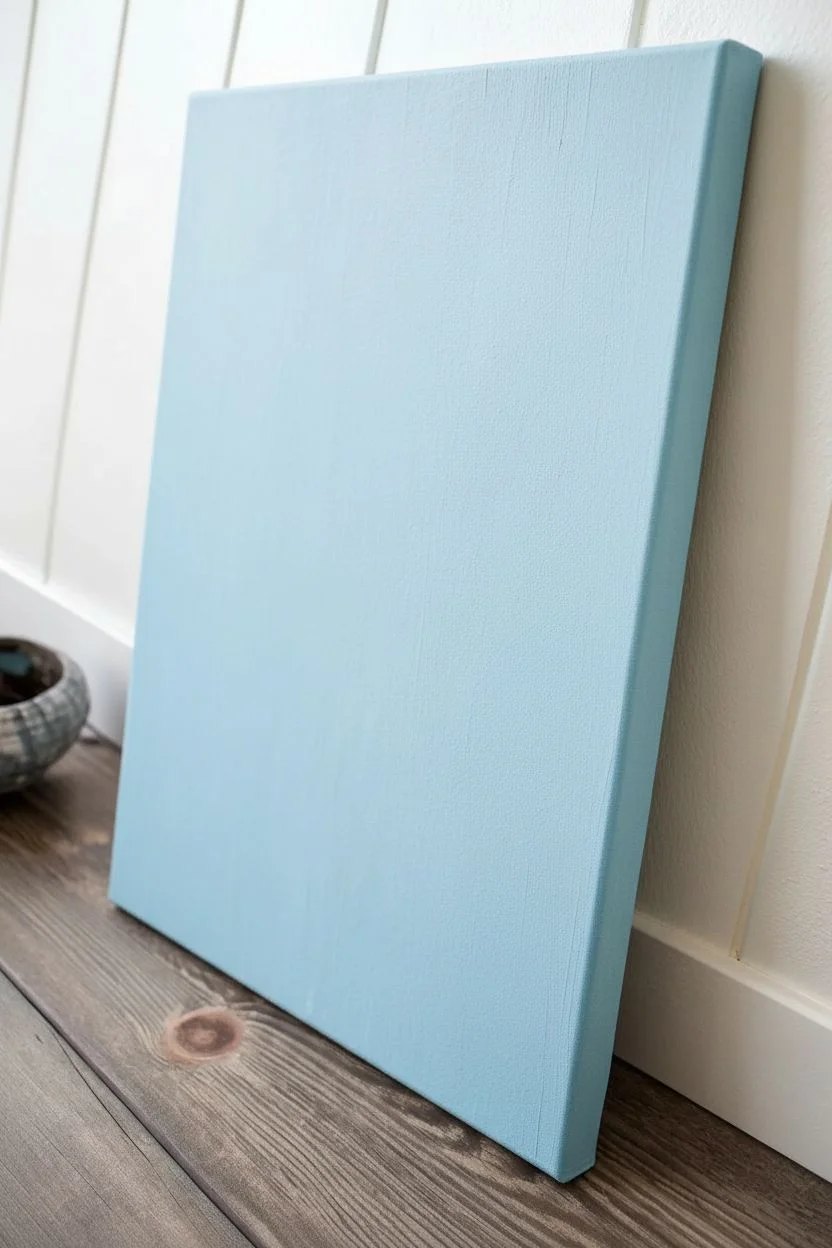
Cheerful Blooms on a Bright Sky-Blue Backdrop
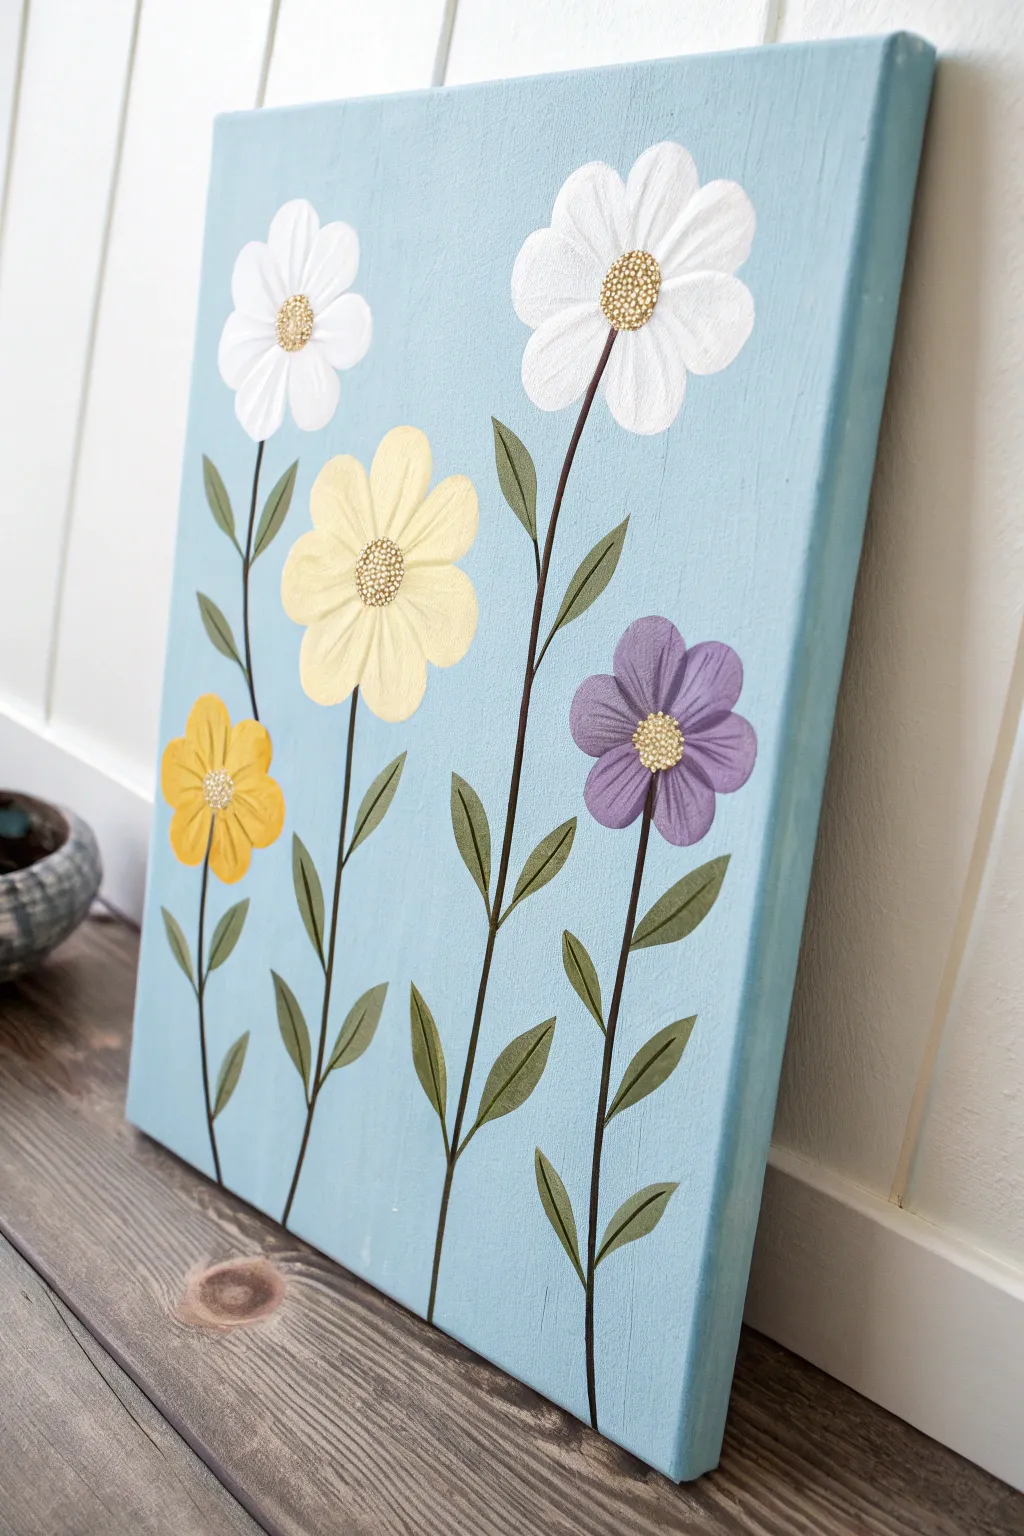
Bring a breath of fresh air into your space with this charming canvas painting featuring five stylized wildflowers. The cheerful mix of white, yellow, and purple blooms against a serene sky-blue background creates a simple yet uplifting piece of art ideal for any room.
Step-by-Step Guide
Materials
- Rectangular stretched canvas (e.g., 16×20 inches)
- Acrylic paints: Light sky blue, titanium white, buttery yellow, golden yellow, lavender/purple, sap green, dark brown, and metallic gold
- Flat paintbrush (1-inch width for background)
- Round paintbrushes (size 4 and 8 for petals and leaves)
- Fine liner brush (size 1 or 0 for stems)
- Palette or paper plate
- Cup of water and paper towels
- Pencil (optional)
Step 1: Setting the Sky
-
Prepare the backdrop:
Begin by squeezing a generous amount of light sky blue acrylic paint onto your palette. Using the large flat brush, apply the paint across the canvas using long, vertical strokes. -
Create texture:
Don’t worry about making the background perfectly smooth; keeping the brushstrokes visible adds a nice, painterly texture that mimics the wood grain seen in rustic art. Paint the sides of the canvas as well for a polished gallery look. -
Let it dry completely:
Allow the blue background to dry fully before proceeding. Ideally, wait about 15-20 minutes, or speed it up with a hair dryer on a cool setting.
Clean Lines
If your petal edges look messy, wait for them to dry completely. Then, cut back in with the sky blue background color to reshape and sharpen the edges.
Step 2: Planting the Stems
-
Map out positions:
Visualize where your five flowers will go. You’ll want varied heights: tall ones near the top corners, and shorter ones filling the lower space. You can lightly mark the center point of each flower head with a pencil if it helps. -
Paint the stems:
Load your fine liner brush with dark brown paint. Starting from the bottom edge of the canvas, paint thin, slightly wavy lines extending upward toward your marked flower spots. -
Vary the flow:
Keep the pressure light to ensure the lines remain delicate. I find that slightly curving the stems makes them look more natural and less like stiff sticks.
Step 3: Blooming Petals
-
Start the white flowers:
Using a clean round brush (size 8), pick up titanium white paint. Paint two large flowers near the top—one on the left, one on the right. Create teardrop-shaped petals that radiate outward from the top of the stem. -
Layering the white:
Because blue is a cool tone, white can sometimes look transparent. You may need a second coat of white once the first is dry to get that bright, opaque pop. -
Add the yellow blooms:
Switch to your buttery yellow paint. Create a large flower in the middle-left area and a smaller, simpler one near the bottom left. Use the same teardrop stroke technique, pressing down at the base of the petal and lifting as you pull outward. -
Paint the purple flower:
Rinse your brush and load it with lavender or purple paint. Create the final flower on the right side, roughly halfway down the canvas. Give these petals a slightly rounded tip for variety. -
Add petal details:
Once the base colors are dry, mix a tiny bit of white with your original petal colors to paint thin highlight lines down the center of each petal, adding dimension and a ribbed texture.
Depth Trick
Mix a tiny drop of brown into your yellow or purple paint. Paint this darker shade at the very center of the flower before adding the textured dots for a 3D cupped look.
Step 4: Leaves and Centers
-
Add the leaves:
Load a size 4 round brush with sap green paint. Along each brown stem, paint simple, pointed oval leaves in pairs. Start near the stem and pull outward, lifting the brush at the end to create a sharp point. -
Leaf details:
For extra depth, you can mix a little brown into your green to darken the base of the leaves where they meet the stem. -
Create the centers:
Using the handle end of a small brush or a dotting tool, dip into the metallic gold and dark brown paint. Stamp a cluster of small dots in the center of each flower. -
Build texture:
Overlap the dots slightly, piling the paint a bit thicker here. This stippling technique creates a bumpy, pollen-like texture that catches the light. -
Final drying:
Allow the entire painting to cure for several hours, especially the thicker paint in the flower centers.
Hang your new floral artwork in a sunny spot to enjoy those happy colors all year round
Macro Crop of One Oversized Flower Filling the Canvas
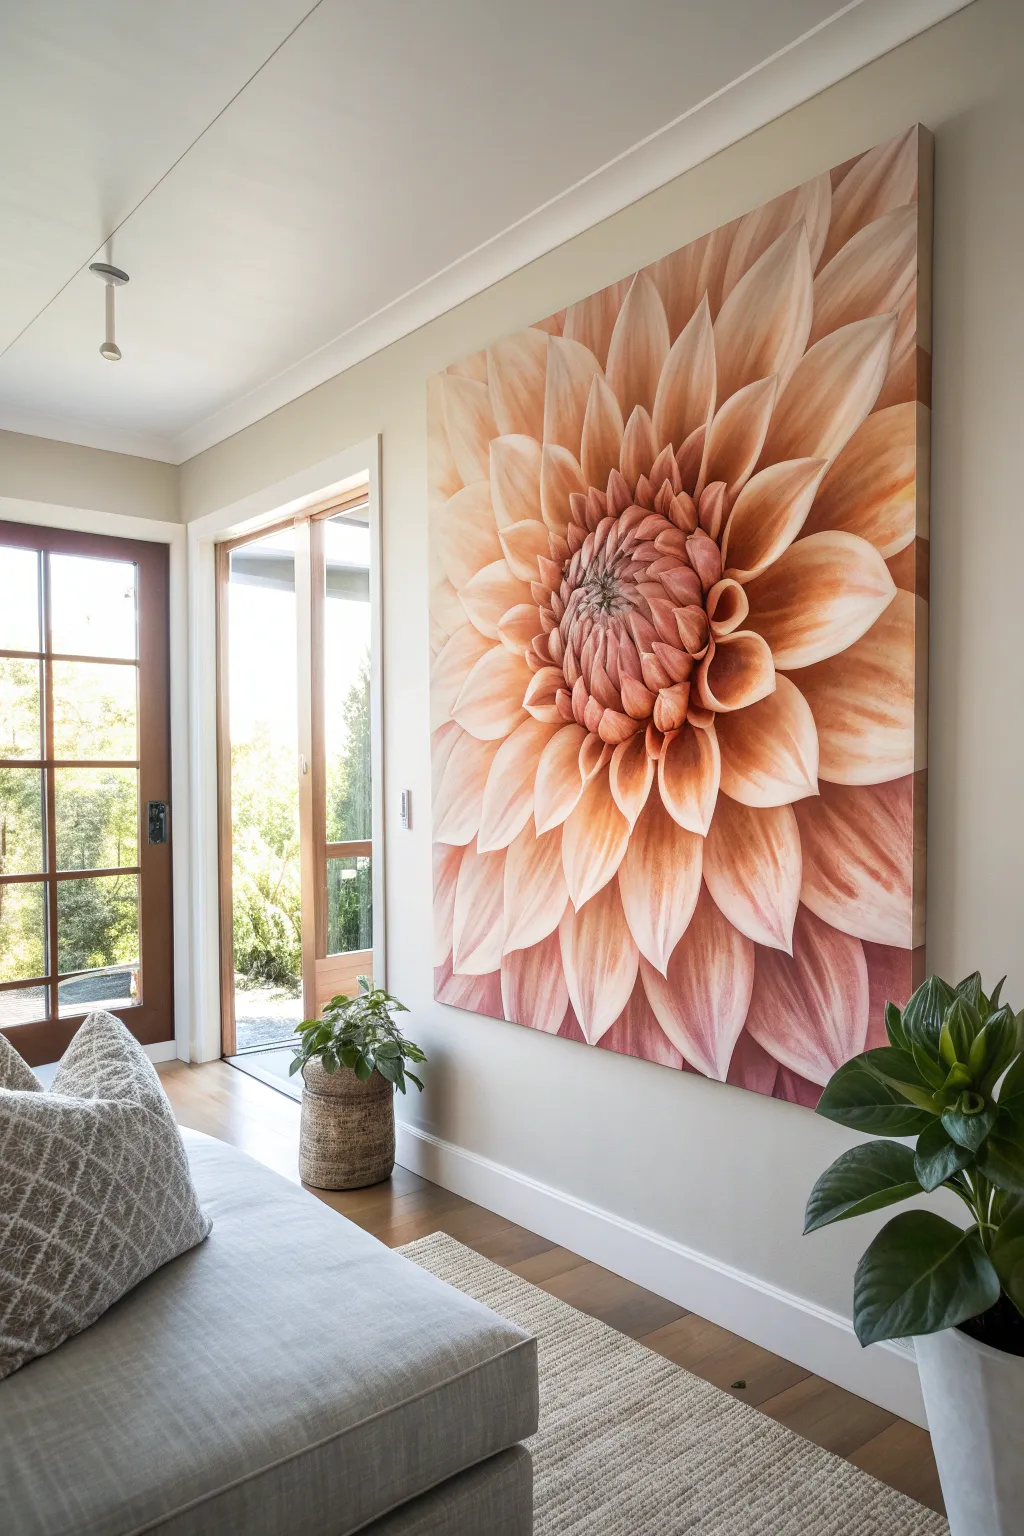
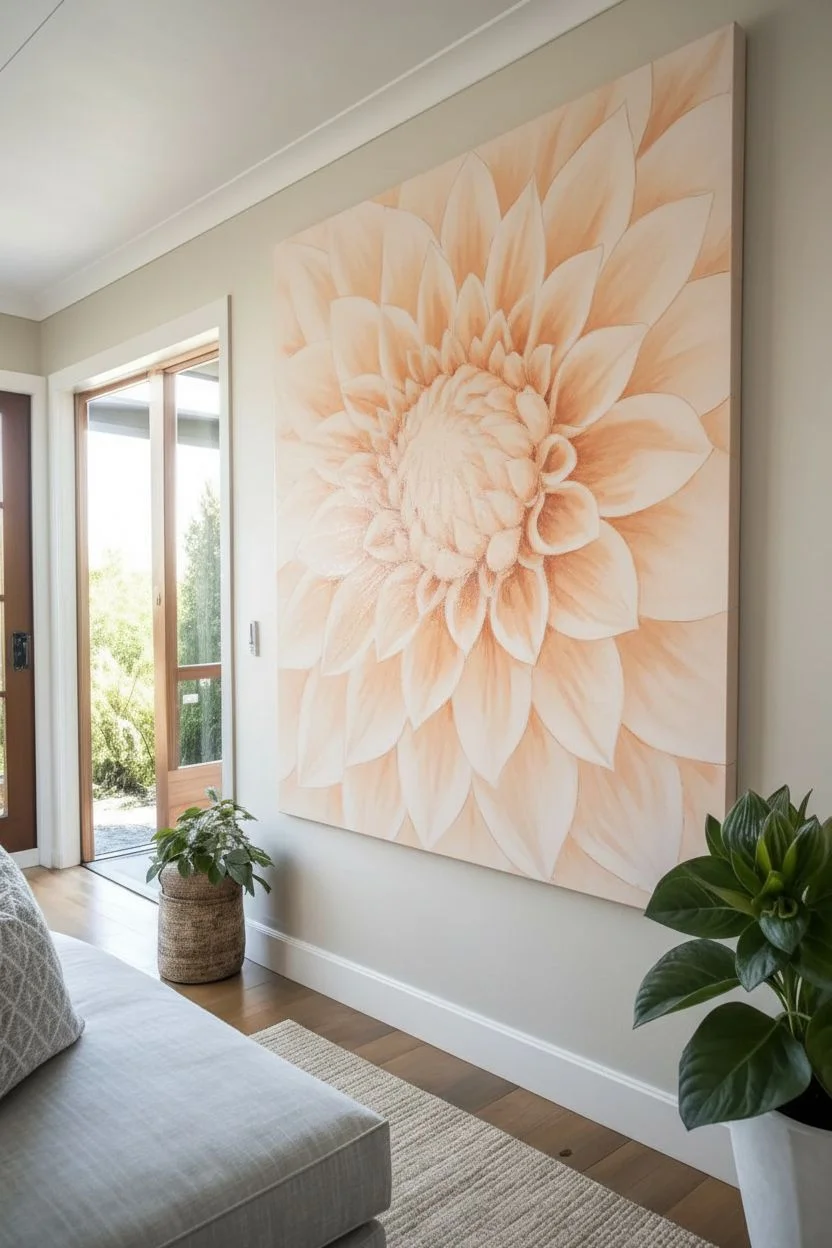
Capture the delicate drama of a dahlia bloom on a massive scale with this macro painting project. By zooming in close on the flower’s center, you’ll create a mesmerizing focal point full of soft peach gradients and radiating petals.
Step-by-Step Tutorial
Materials
- Large-scale gallery wrapped canvas (at least 48×60 inches)
- Acrylic paints (Titanium White, Unbleached Titanium, Peach, Cadmium Orange, Burnt Sienna, Quinacridone Magenta)
- Wide flat brushes (2-3 inch) for background layers
- Medium filbert brushes (size 8-12) for petal forms
- Small round brushes for fine details
- Acrylic glazing medium
- Slow-drying blending medium (optional)
- Chalk or pastel pencil for sketching
- Reference photo of a dahlia center
- Water spray bottle
Step 1: Planning and Blocking
-
Scale your canvas:
Begin with the largest canvas your wall can accommodate. For this impactful look, bigger is better. Prime it with a coat of gesso if it isn’t pre-primed, ensuring a smooth surface. -
Sketch the radiating center:
Using a light chalk or pastel pencil, locate the center of the flower slightly off-center on the canvas for dynamic composition. Sketch a small circle for the tightest core petals. -
Map the petal explosion:
Draw the outlines of the larger petals radiating outward. Don’t worry about perfect symmetry; natural irregularities add realism. Ensure the outer petals run off the edge of the canvas to emphasize the ‘macro crop’ effect. -
Mix a base gradient:
Create a large volume of base color using Titanium White and a touch of Peach. You’ll need enough to cover most of the canvas. -
Apply the underpainting:
Block in the petals with your base peach-white mixture. While the paint is wet, mix a slightly darker value using Cadmium Orange and blocking in the shadows where petals overlap.
Muddy Colors?
If your peach tones look dull, you likely mixed black into your shadows. Use complementary colors like blue mixed with burnt sienna to darken orange instead.
Step 2: Building Form and Depth
-
Darken the core:
Focus on the tight center cluster first. Mix Burnt Sienna with Quinacridone Magenta to create deep, warm shadows. Paint the crevices between the smallest central petals to establish depth. -
Define individual petals:
Moving outward, use a medium filbert brush to define the shape of each petal. Create a gradient on each individual petal: lighter at the tip, darker at the base where it attaches to the bloom. -
Glazing for glow:
Once the underlayer is dry, mix glazing medium with Cadmium Orange. Apply this transparent wash over the mid-sections of the petals to boost the vibrancy without losing the details underneath. -
Refining the edges:
Clean up your petal edges. Dahlias have crisp, pointed tips but soft sides. Use unbleached titanium white to highlight the very tips and edges of the petals that catch the most light. -
Deepen the contrast:
Go back into the deepest recesses between the large outer petals. I like to use a mix of Burnt Sienna and a tiny dot of blue to create a neutral shadow that makes the peach tones pop.
Level Up: Texture
Mix modeling paste into your white paint for the petal tips. Use a palette knife to apply it, creating actual 3D texture that catches the room’s light.
Step 3: Detailing and Softening
-
Soft blending:
The key to this painting is creamy transitions. If your acrylics are drying too fast, mist the canvas with water or use a slow-drying medium. Blend the shadow areas into the highlights using a clean, dry brush. -
Adding texture:
Dahlia petals often have subtle veining. Mix a watery wash of your mid-tone peach and use a fine liner brush to streak very faint lines running from the petal base toward the tip. -
Highlighting the center:
Return to the intricate center cone. Add tiny dots or dashes of almost pure white to the tips of the smallest un-opened petals to make them look wet or waxy. -
Color temperature adjustments:
Step back and view the painting from a distance. If an area looks too flat, glaze it with a little warm pink (Magenta) to add life, or cool it down with a thin wash of white. -
Final varnish:
Allow the heavy layers of paint to cure for at least 72 hours. Apply a satin varnish to unify the sheen of the different paint mixtures and protect your massive centerpiece.
Hang your oversized masterpiece and enjoy the botanical warmth it brings to the entire room
Monochrome Flowers Using One Color Family Plus White
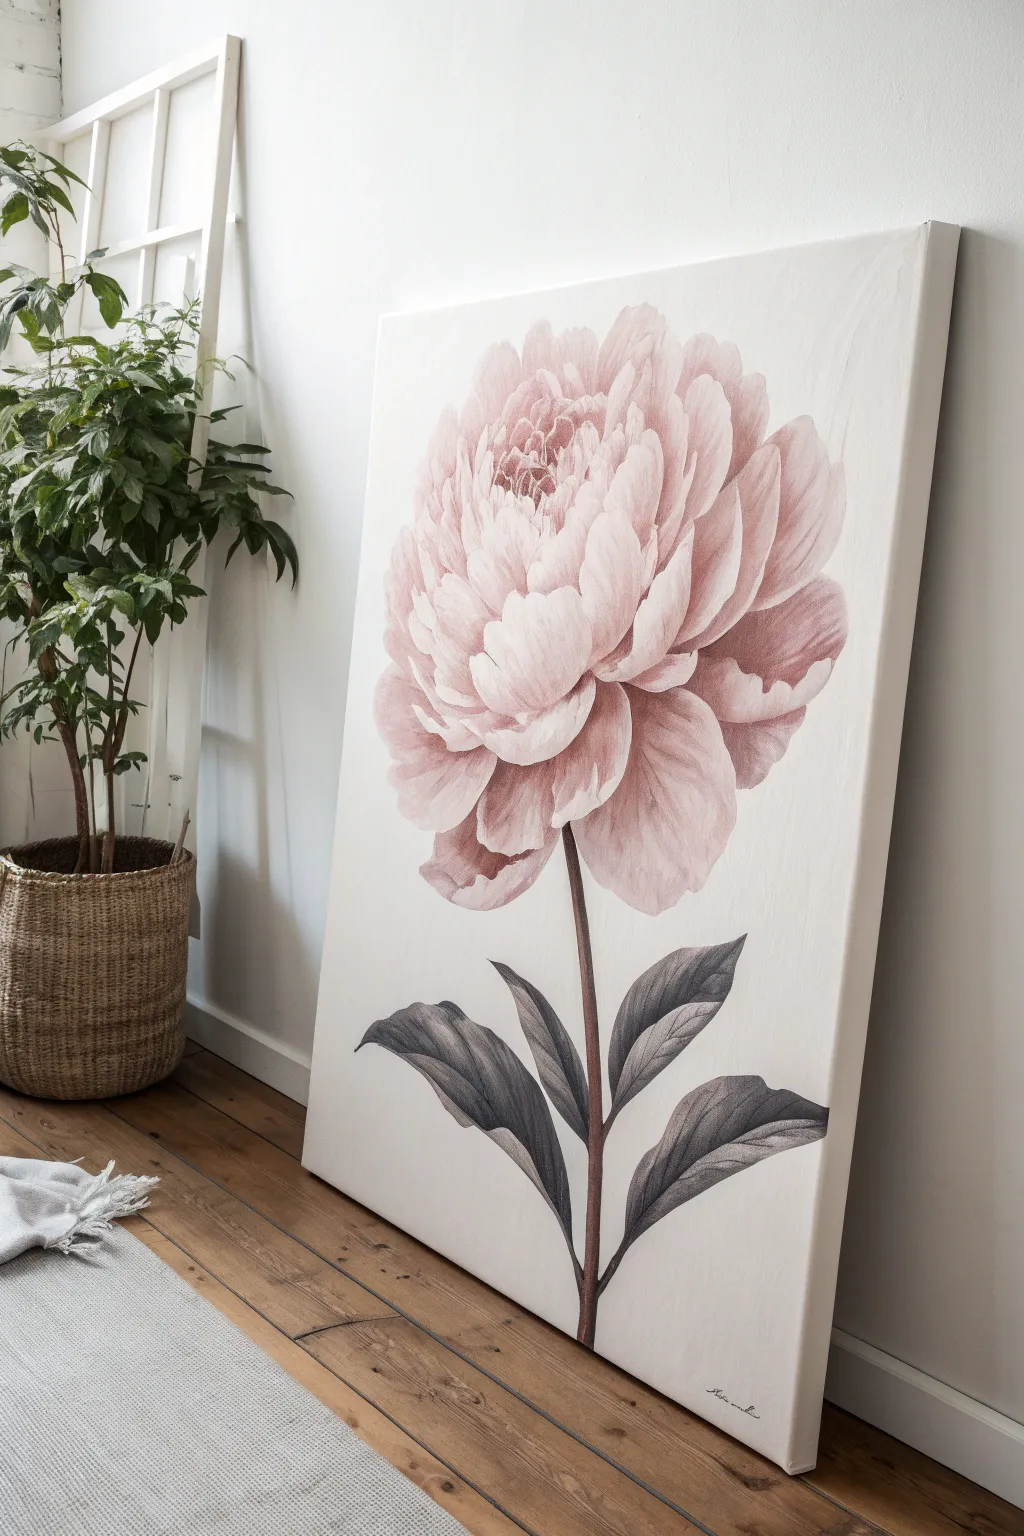
This elegant project focuses on capturing the delicate, ruffled layers of a single peony bloom using a simple palette of dusty pinks and creamy whites. The result is a striking, large-scale botanical portrait that feels both vintage and modern, perfect for leaning casually against a studio wall.
Detailed Instructions
Materials
- Large rectangular canvas (approx. 24×36 or 30×40 inches)
- Acrylic paints: Alizarin Crimson, Titanium White, Raw Umber, Payne’s Grey, and Yellow Ochre
- Large flat brush (2-inch) for background
- Assorted filbert brushes (sizes 4, 8, and 12) for petals
- Small round brush (size 2) for details
- Palette knife for mixing
- Pencil for sketching
- Water container and paper towels
- Acrylic matte medium (optional, for blending)
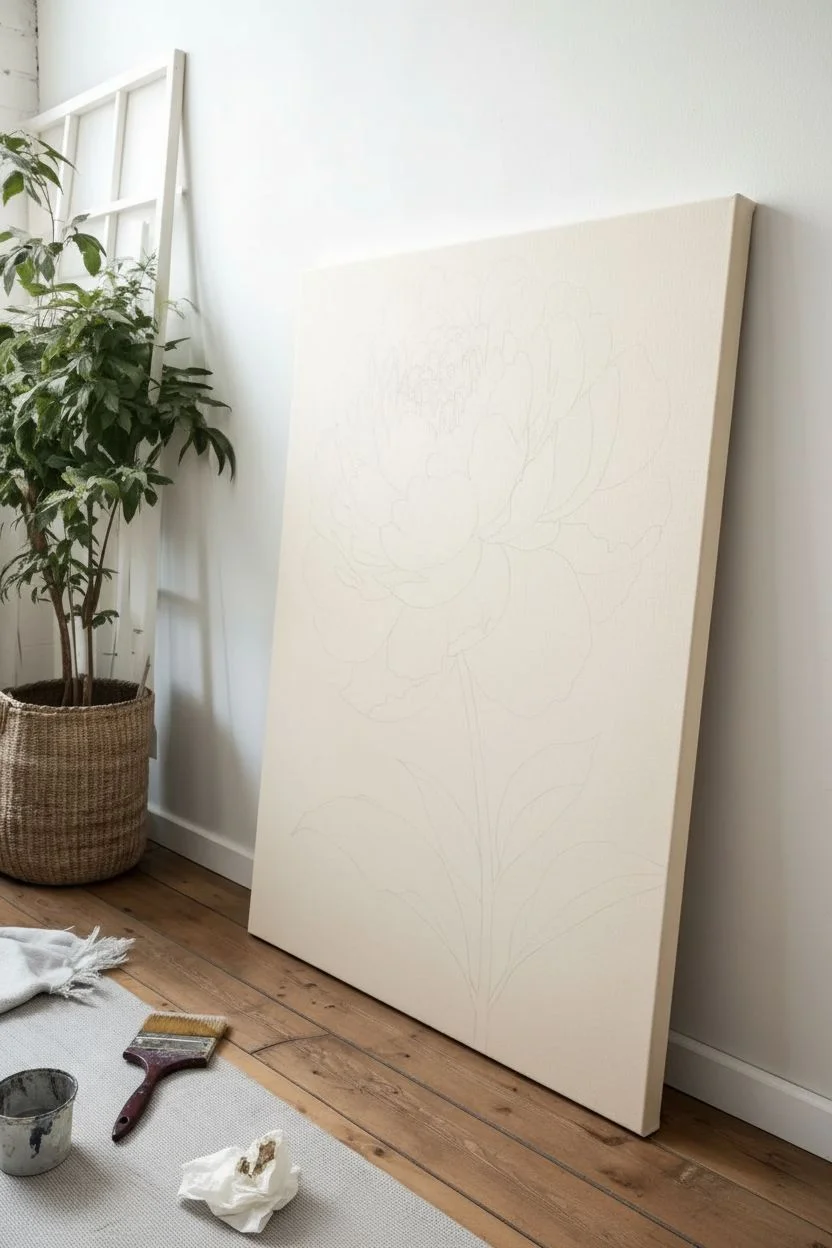
Step 1: Preparation and Sketching
-
Prime the background:
Mix a large amount of Titanium White with a tiny touch of Yellow Ochre and Raw Umber to create a warm, creamy off-white. Coat the entire canvas evenly using your large flat brush. Let this base layer dry completely before sketching. -
Map the composition:
Visualize the flower head taking up the top two-thirds of the canvas. Use a pencil to lightly sketch a large oval shape for the bloom and a central vertical line for the stem. -
Sketch petal layers:
Inside your oval, draw concentric u-shapes to suggest layers of petals. Start with tight, small shapes in the center and let them become larger and looser as they fan out toward the edges. -
Outline the foliage:
Draw the stem extending straight down from the flower base. Add two pairs of large, lance-shaped leaves branching off the lower stem, keeping their lines fluid and organic.
Step 2: Painting the Bloom
-
Mix your master pink:
Create a ‘mother color’ pool of dusty pink by mixing Alizarin Crimson with Titanium White and a very small dot of Raw Umber to desaturate it. This ensures color harmony throughout. -
Block in shadow areas:
Using a size 8 filbert brush, mix a darker version of your pink (more crimson, less white) and paint the deepest recesses between the petals, primarily at the base of the bloom and the center core. -
Establish mid-tones:
Refine your pink mixture with more white. Apply this mid-tone to the main body of the petals, blending the edges slightly into the shadow areas while the paint is still tacky. -
Build the outer petals:
Switch to the largest filbert brush. Paint the large, sweeping outer petals with a lighter pink wash. Use quick, curved strokes that follow the shape of the petal to mimic the texture of the flower. -
Create highlights:
Mix almost pure Titanium White with just a whisper of pink. Apply this to the top edges and tips of the petals where the light would naturally hit, giving the flower volume and a ruffled appearance. -
Detail the center:
With your small round brush, add thin, crisp lines of highlight color to the tightly packed center petals to separate them. I like to keep these strokes somewhat loose to maintain a painterly feel. -
Soften the transitions:
If any edges feel too hard, use a clean, slightly damp brush to gently feather the paint where the light and dark pinks meet. This mimics the velvety texture of peony petals.
Chalky Blending
If your acrylics are drying too fast to blend smoothly, mix in a slow-dry medium. This keeps the paint workable longer, allowing for those soft, dreamy transitions between the pink hues.
Step 3: Stem and Leaves
-
Mix the foliage color:
Combine Payne’s Grey with a touch of Alizarin Crimson and Raw Umber. You want a dark, desaturated brownish-purple tone rather than a standard bright green. -
Paint the stem:
Using a size 4 filbert brush, paint the stem in a single, confident stroke if possible. It can be slightly thicker at the bottom and taper as it reaches the flower head. -
Block in leaves:
Fill in the leaf shapes with your dark foliage mix. Ensure the paint is opaque enough to cover the background fully. -
Add leaf dimension:
Mix a lighter version of your foliage color by adding a little white. Paint the upper half or one side of each leaf to indicate a light source, blending it gently into the darker base. -
Define leaf veins:
Use the small round brush and your darkest grey mix to draw a central vein down each leaf. Add faint side veins for subtle texture. -
Add connecting shadows:
Paint small, dark shadows where the leaf stems join the main stalk to anchor them visually.
Vintage Patina
To enhance the antique look, mix a very watery wash of raw umber and glaze over specific shadow areas of the petals once dry. This instantly ages the brightness of the pink.
Step 4: Final Touches
-
Check the silhouette:
Step back and look at the edges of the flower against the background. If you need to clean up the shape, use your background off-white color to cut back into the petals. -
Add deepest contrast:
Mix a tiny amount of pure Alizarin Crimson and Payne’s Grey. Carefully dab this into the very deepest crevices of the flower center to make the pale pinks pop. -
Sign and seal:
Once fully dry (give it at least 24 hours), sign your work in the bottom corner with a fine liner brush and apply a matte varnish to protect the surface.
Hang your masterpiece in a well-lit spot to let those soft pink layers truly shine


Have a question or want to share your own experience? I'd love to hear from you in the comments below!