Painting on wine glasses is one of my favorite ways to get a big, fancy-looking payoff without needing a perfect sketch. If you’ve been craving fresh painted wine glass ideas that actually work on a curved, glossy surface, you’re going to love this list.
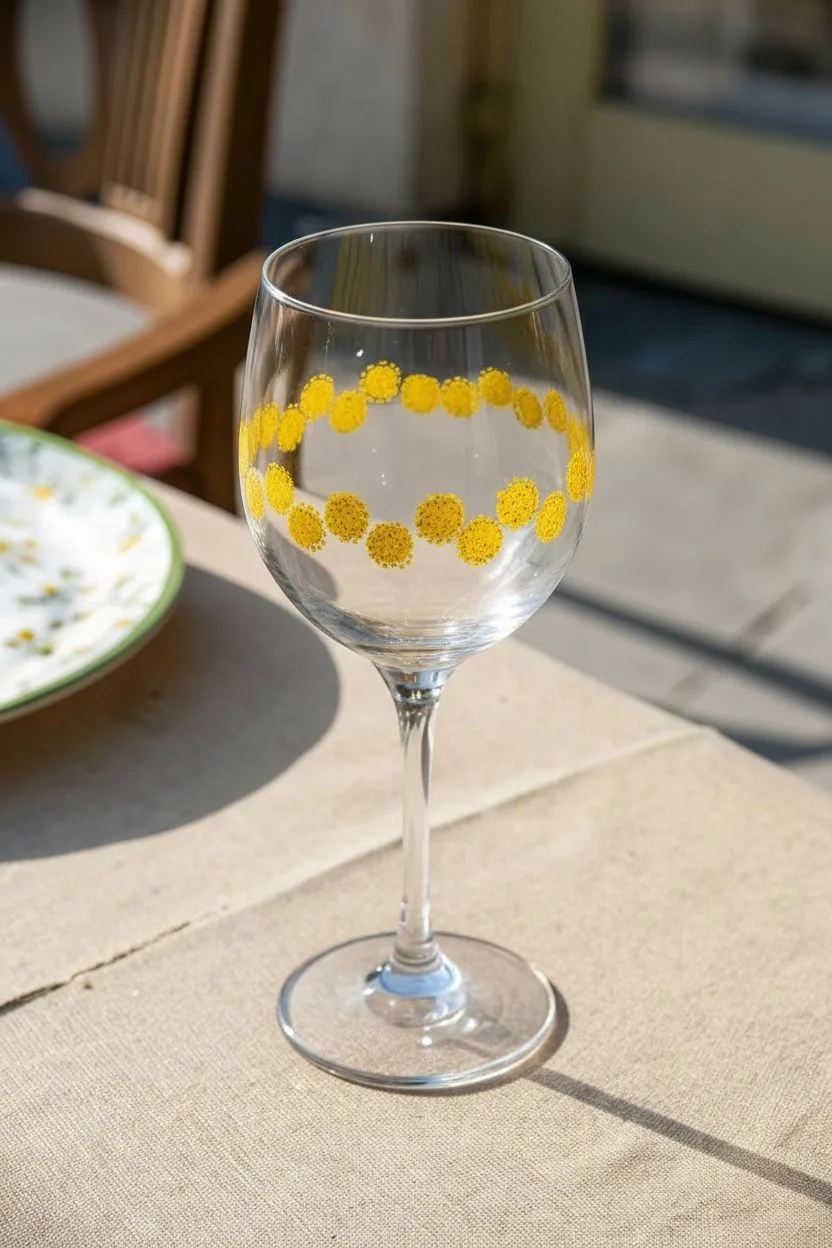
Polka Dot Confetti Wine Glasses
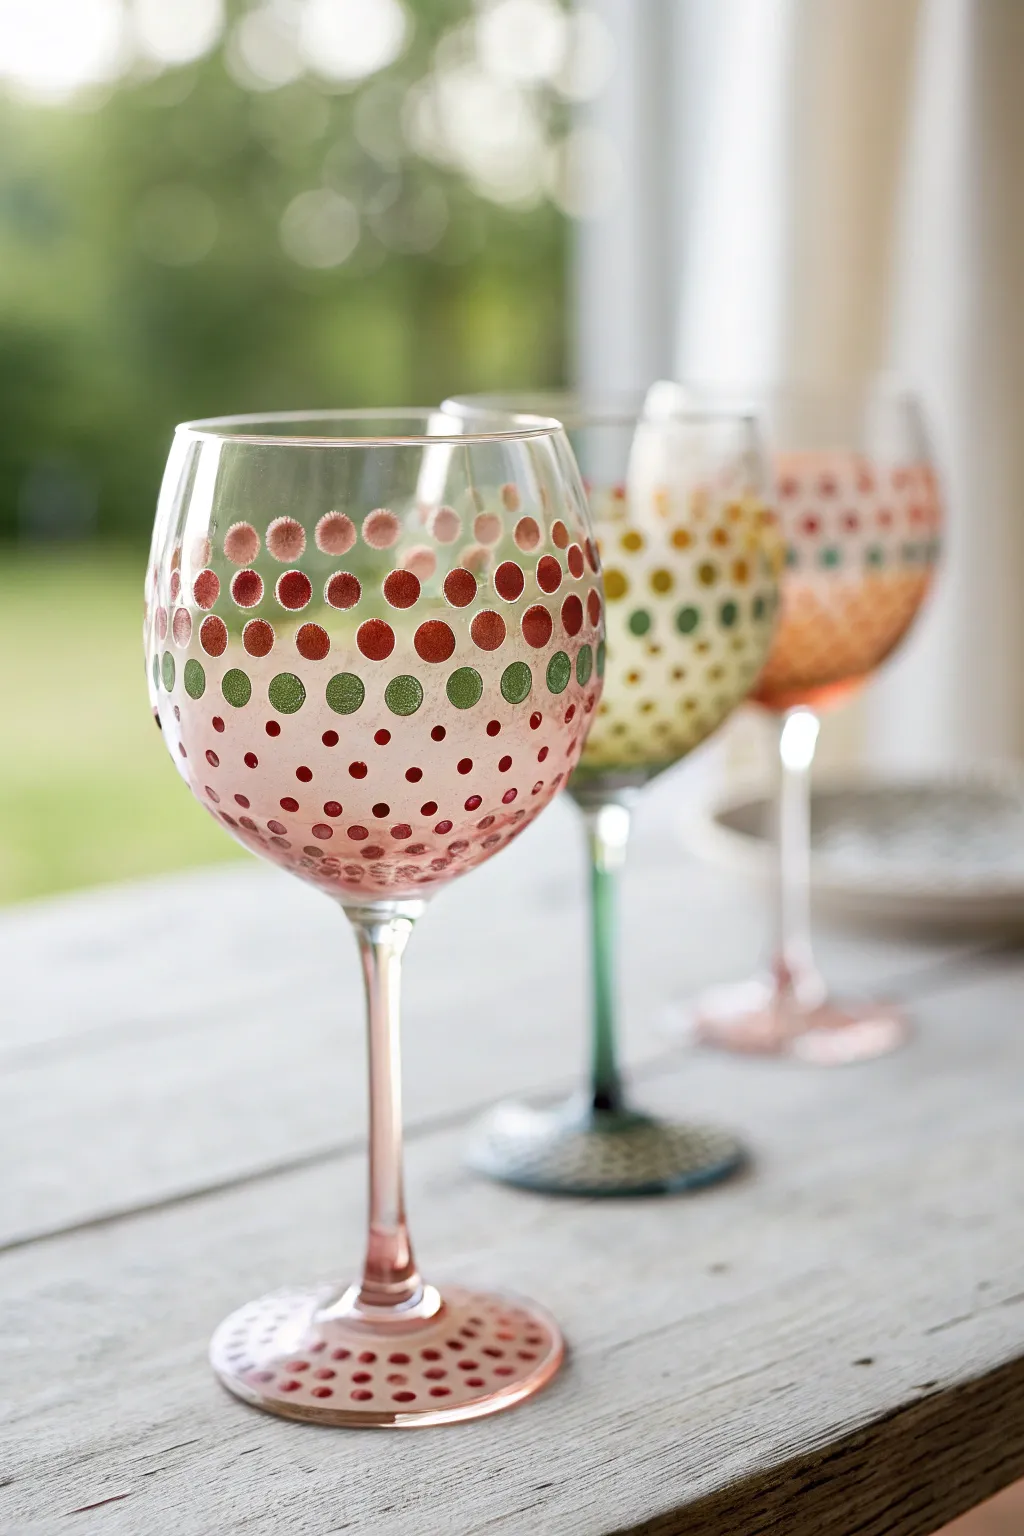
Transform plain glassware into vibrant, textured party pieces with this layered dotting technique. The design features a cascading ombre effect of matte and metallic dots that creates a playful confetti look perfect for summer gatherings.
Step-by-Step Tutorial
Materials
- Large-bowl wine glasses
- Rubbing alcohol
- Cotton rounds or paper towel
- Enamel glass paints (Matte Pink, Deep Red, Metallic Gold/Bronze, Sage Green)
- Foam pouncers (various small sizes)
- Cotton swabs
- Toothpicks
- Paper plate or palette
- Oven (for curing)
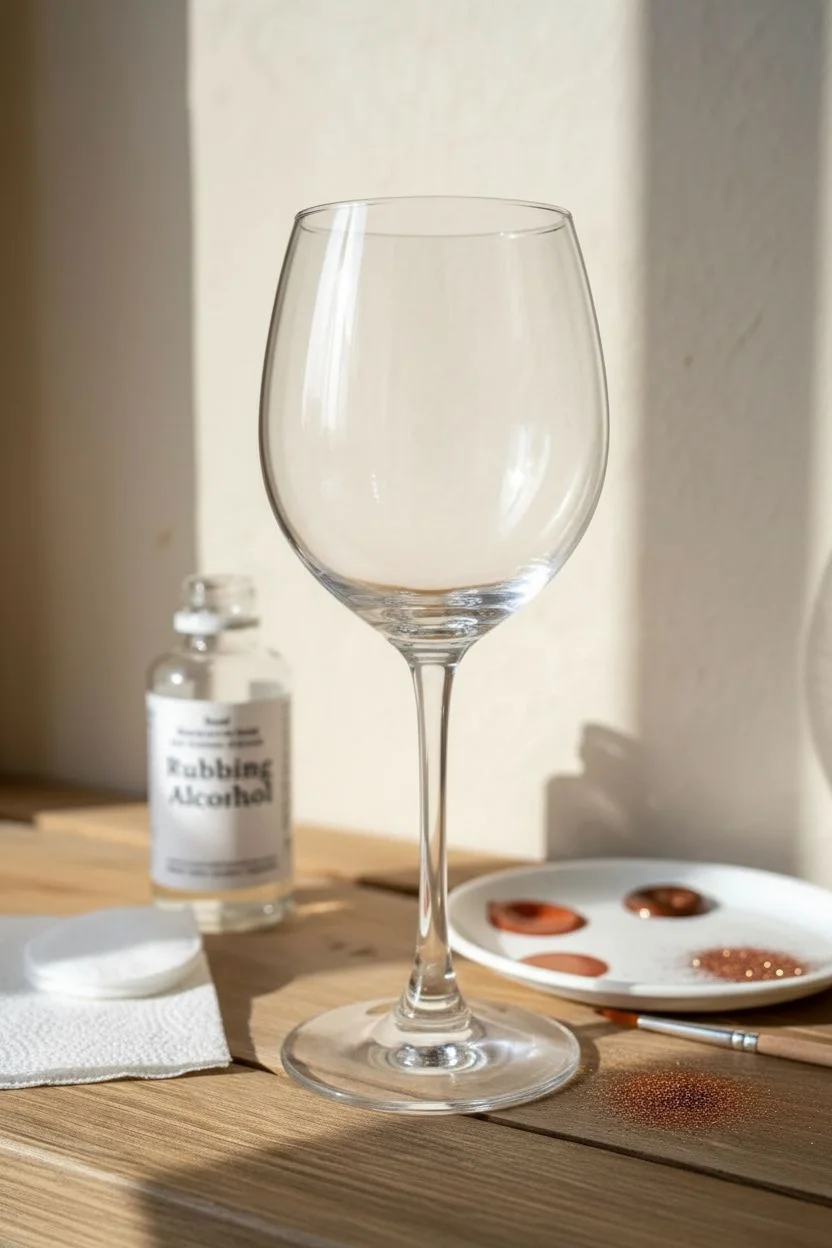
Step 1: Glass Preparation
-
Clean surface:
Begin by washing your wine glasses thoroughly with warm soapy water to remove any factory dust or sticker residue. -
Degrease glass:
Once dried, wipe down the entire exterior surface with rubbing alcohol on a cotton round. This step is crucial because it removes oils from your fingerprints that can prevent paint adhesion. -
Air dry:
Let the alcohol evaporate completely for a few moments, and handle the glass by the rim or inside the bowl from this point forward.
Fixing Smudges
If a dot smudges or runs, wait for it to dry slightly, then use a toothpick to scrape it off cleanly. Wiping it wet often just smears the pigment further.
Step 2: Creating the Base Layer
-
Prepare palette:
Dispense a dime-sized amount of your Deep Red and Metallic Gold/Bronze enamel paints onto your paper plate. -
Load largest pouncer:
Dip your medium-sized foam pouncer into the Deep Red paint, dab it once on a clean part of the plate to even out the load, and prepare to apply. -
Establish the horizon line:
Create a distinct row of heavy dots around the widest part of the glass bowl. I like to space them evenly, leaving enough room between them for a second color. -
Add accent dots:
Using a clean pouncer of the same size, stamp the Metallic Gold/Bronze dots in the spaces between your red dots to complete the main band. -
Second row:
Move slightly downward and stamp a second row of dots, alternating the colors so they sit in the ‘windows’ of the row above, like bricks in a wall. -
Introduce green:
Switch to your Sage Green paint. Stamp a row of green dots below the gold/red layers, beginning the transition toward the stem.
Step 3: The Confetti Fade
-
Switch tools:
Transition to using smaller foam pouncers or large cotton swabs for the next section to create visually smaller dots. -
Apply pink layer:
Load your tool with Matte Pink paint and stamp a dense field of dots beneath the green layer, allowing them to start scattering downwards. -
Create the fade:
Continue stamping pink dots as you move toward the bottom of the bowl, but spacing them further apart to create a ‘falling confetti’ effect. -
Detailing the bottom:
Use the non-cotton end of a swab or a toothpick dipped in pink paint to add tiny micro-dots near the very bottom of the bowl where it meets the stem.
Make It 3D
For added texture, use dimensional fabric paint (often called ‘puff paint’) for the dots instead of flat enamel. It provides a tactile, raised surface.
Step 4: Stem and Base
-
Paint the stem:
Using a soft flat brush, paint the entire stem of the glass in the Matte Pink (or Green, for variety). Apply two thin coats rather than one thick one to avoid drips. -
Decorate the foot:
Moving to the circular foot of the glass, replicate the pattern from the bowl. Start with larger red/gold dots near the stem connection. -
Fade outward:
Finish the foot by stamping smaller pink dots toward the outer rim of the base. -
Clean up:
Before the paint sets, use a damp cotton swab or toothpick to gently scrape away any mistakes or smudged dots.
Step 5: Curing Process
-
Initial dry time:
Allow the glasses to air dry for at least one hour until the paint is dry to the touch. -
Load the oven:
Place the glasses into a cool oven. Do not preheat the oven, as the sudden temperature change can crack the glass. -
Bake:
Set the temperature to 350°F (175°C) and bake for 30 minutes. Turn the oven off and leave the glasses inside to cool down completely with the oven.
Once fully cured, your custom confetti glasses are ready to be the center of conversation at your next dinner party


Tiny Heart Scatter Pattern
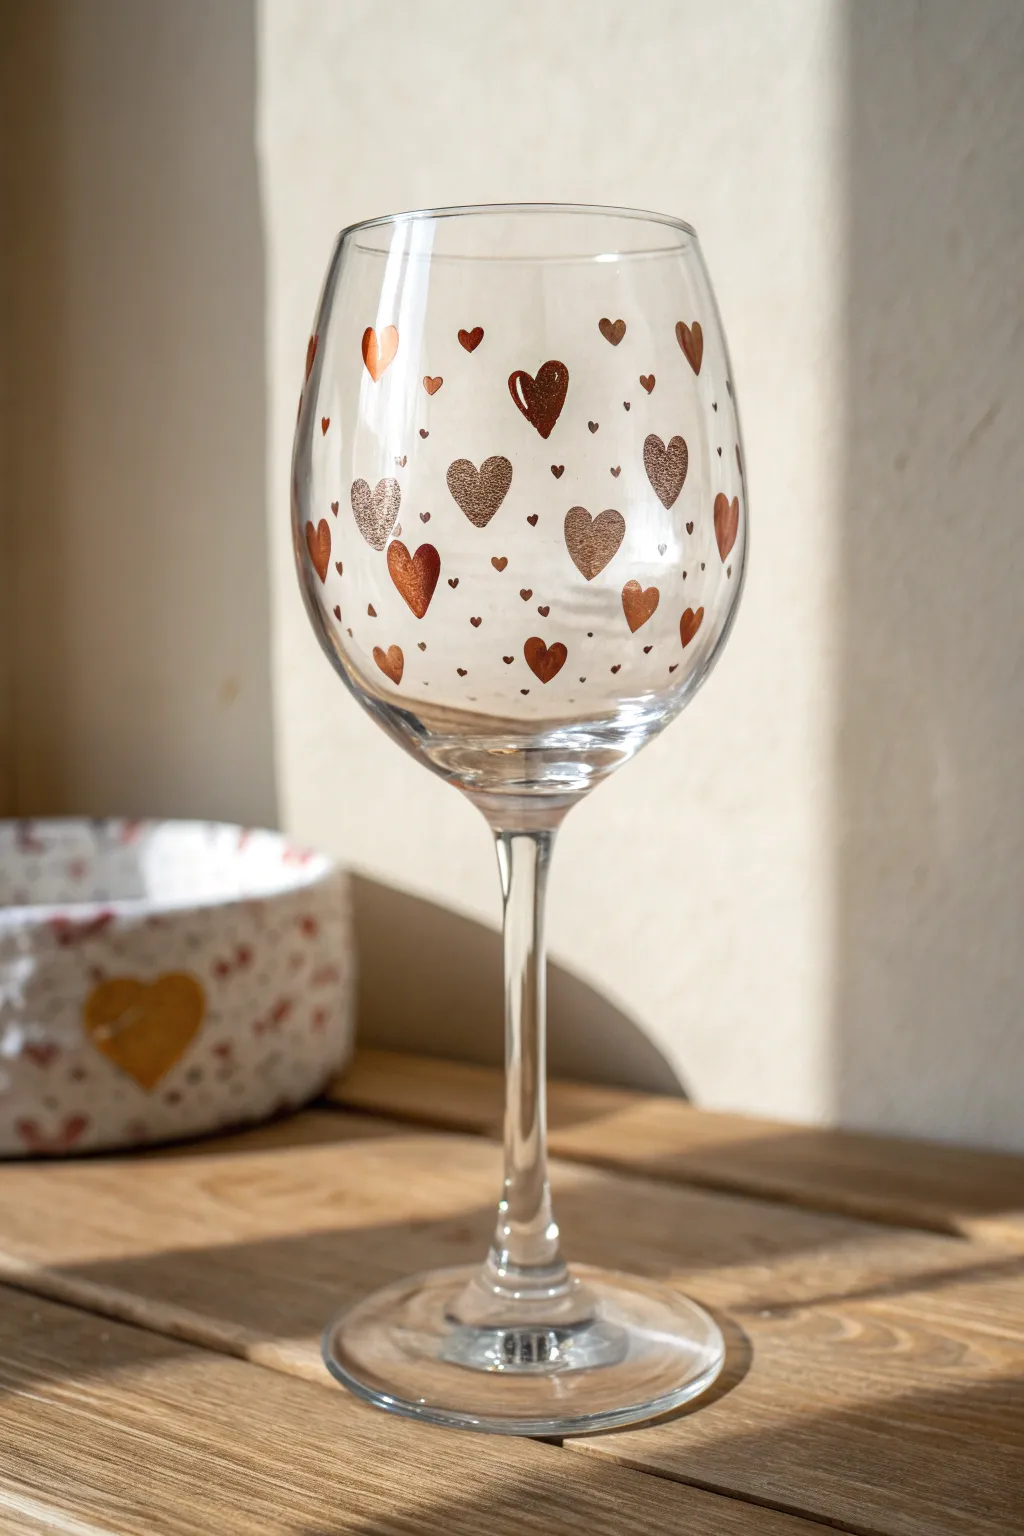
Transform a plain glass into a romantic vessel with this delicate scatter pattern of hearts. Using a warm palette of copper, bronze, and chocolate tones creates a sophisticated look that feels special enough for Valentine’s Day but subtle enough for year-round sipping.
Step-by-Step Guide
Materials
- Clear stemmed wine glass
- Rubbing alcohol
- Cotton pads or paper towel
- Glass enamel paints (metallic copper, bronze, dark brown/chocolate)
- Small fine-point liner brush (size 0 or 00)
- Small detailing tool or toothpick
- Fine copper glitter (optional)
- Palette or small dish
- Oven (for curing)
Step 1: Preparation & Planning
-
Clean the surface:
Before you start painting, it is crucial to remove any oils or fingerprints from the glass. Thoroughly wipe down the entire bowl of the wine glass using rubbing alcohol and a cotton pad. -
Let it air dry:
Allow the alcohol to evaporate completely for a minute or so. Avoid touching the glass bowl with your bare hands after this point; try to hold it by the stem or the base. -
Prepare your palette:
Squeeze out small amounts of your metallic copper, bronze, and chocolate brown enamel paints onto your palette. If you plan to use glitter, have a small pile ready nearby.
Uneven Coverage?
If your metallic paint looks streaky or translucent, let the first coat dry for 20 minutes, then apply a second thin layer right on top for opacity.
Step 2: Painting the Hearts
-
Start the largest hearts:
Begin with your medium-sized liner brush and the metallic copper paint. Paint scattered hearts around the middle section of the glass bowl. These should be the largest elements, about the size of a fingernail. -
Vary the orientation:
As you paint, rotate the glass and tilt the hearts slightly in different directions. You don’t want them all standing perfectly straight; a little tilt gives that fluttering confetti look. -
Add bronze hearts:
Switch to the bronze paint shade. Paint slightly smaller hearts in the empty spaces between your copper ones. I like to let a few of these overlap slightly with the ‘lines’ of the previous layer, but keep them distinct. -
Create the glitter hearts:
While the paint is still wet on a few selected larger hearts, carefully sprinkle a pinch of fine copper glitter over them. Tap the stem gently to shake off excess glitter immediately. -
Add chocolate accents:
Using the dark brown paint, add the smallest hearts near the top rim and fading down toward the bottom of the bowl. These darker tones add depth and contrast to the shiny metallics. -
Detail with dots:
Dip a detailing tool or a toothpick into your bronze or copper paint. Place tiny dots randomly between the hearts to fill negative space and create a starry, twinkling effect. -
Check for density:
Hold the glass up to the light. The pattern should look denser in the middle of the bowl and more sparse as it reaches the rim and the base. -
Refine the edges:
If any heart looks a bit wonky, use a clean, damp cotton swab to gently wipe it away or reshape the edge before the paint sets.
Add a Frosty Finish
Before painting hearts, sponge a light layer of frosted glass medium on the lower third of the bowl for a ‘chilled wine’ effect behind the hearts.
Step 3: Curing & Finishing
-
Initial dry time:
Let the glass sit undisturbed for at least one hour to allow the surface layer of the paint to tack up. If you used glitter, be careful not to brush against it. -
Full cure time:
Follow the manufacturer’s instructions on your specific paint bottle. Most glass paints require 21 days of air drying or a shorter heat-curing method in the oven. -
The oven method (optional):
If heat curing, place the glass in a cold oven. Set the temperature to 350°F (175°C). Once the oven reaches temperature, bake for 30 minutes. -
Cooling down:
Turn the oven off and leave the glass inside to cool down gradually with the oven. Removing hot glass into room temperature air can cause cracks. -
Final wash:
Once fully cured (either by time or heat), hand wash the glass gently with mild soap to remove any glitter residue that didn’t stick to the paint.
Now you have a stunning piece of functional art ready for your next toast


Bold Vertical Stripes for a Modern Look
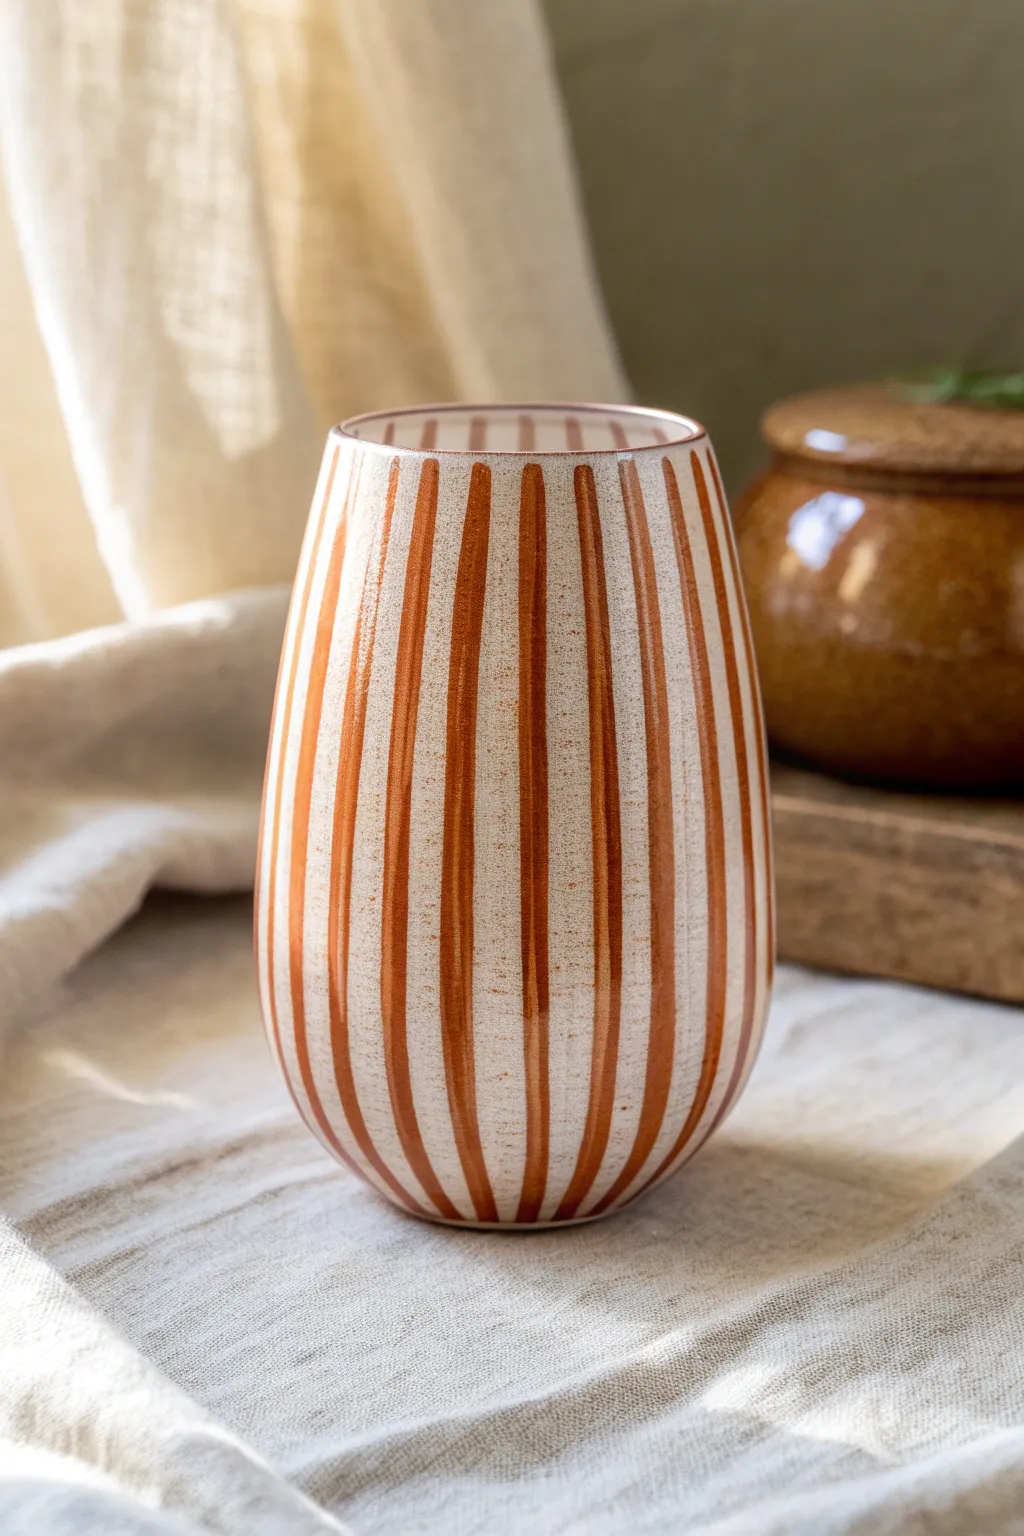
Bring the warmth of earthy clay to your tabletop with this modern, stemless wine glass design. The bold, vertical terracotta stripes create a striking contrast against the clear glass, offering a rustic yet sophisticated aesthetic perfect for any season.
Step-by-Step Tutorial
Materials
- Stemless wine glass (or clear glass tumbler)
- Rubbing alcohol
- Cotton pads or paper towel
- Terracotta or burnt orange enamel glass paint (gloss finish)
- Flat shader brush (size 6 or 8)
- Thin liner brush (optional, for touch-ups)
- Painter’s tape or masking tape (approx 1/4 or 1/2 inch width)
- Palette or small plate
- Scissors
Step 1: Preparation
-
Clean surface:
Before you begin, wipe down the entire exterior surface of the wine glass with rubbing alcohol on a cotton pad. This step is crucial to remove oils and fingerprints that prevent paint adhesion. -
Dry thoroughly:
Allow the alcohol to evaporate completely, ensuring the glass is bone dry and lint-free before applying any tape. -
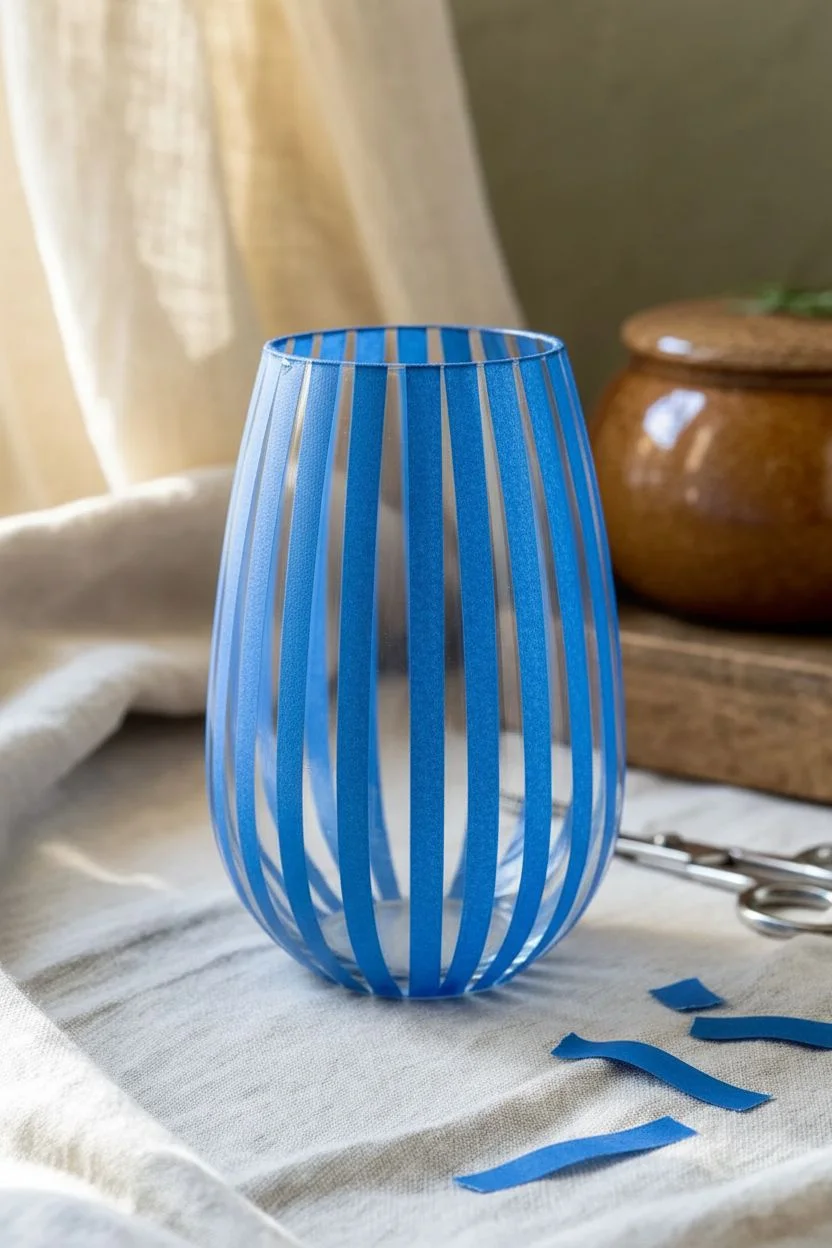
Prepare tape strips:
Cut several lengths of painter’s tape that are slightly longer than the height of your glass. You will need enough strips to go around the entire circumference.
Step 2: Creating the Pattern
-
Apply first strip:
Place your first strip of tape vertically on the glass, running from the very rim down to the base. Smooth it down firmly to prevent bleed-through. -
Spacing the stripes:
Eye-ball the gap for your painted stripe. Aim for a gap that is roughly the same width as your tape, or slightly narrower for a denser pattern. Place your next strip of tape parallel to the first. -
Navigate the curve:
Since wine glasses are curved, the tape might bunch slightly at the bottom. Pinched tape is fine on the masked area, but ensure the *edges* where you will paint are pressed absolutely flat against the glass. -
Complete the taping:
Continue applying tape strips around the entire glass until you return to the start. If the last gap is too wide or narrow, adjust the spacing of the last few strips slightly to even it out. -
Seal the edges:
Run your fingernail or a credit card firmly along the edge of every piece of tape. This burnishing step is the secret to crisp, professional lines.
Bleeding Lines?
If paint seeps under the tape, wait until it’s barely dry, then use a toothpick to gently scrape the excess away. A clean, damp Q-tip also works wonders for immediate mistakes.
Step 3: Painting
-
Load the brush:
Squeeze a generous amount of terracotta enamel paint onto your palette. Load your flat shader brush, ensuring the bristles are coated but not dripping. -
Apply first coat:
Paint the exposed glass strips using long, vertical strokes. Start from just below the rim and pull the brush down toward the base. -
Watch the thickness:
Keep the paint application relatively thin for the first layer. It’s better to do multiple thin coats than one thick, gloopy one that might drip. -
Rim finish:
For a neat look, I usually leave a tiny hairline of clear glass at the very rim so your lips don’t touch the paint, though you can paint to the edge if preferred. -
Let it tack:
Allow the first coat to dry for about 20-30 minutes, or until it feels tacky but not wet. -
Second coat:
Apply a second coat of paint over the stripes to achieve that rich, opaque terracotta color shown in the image. Use a light touch to avoid lifting the previous layer.
Pro Tip: Rustic Texture
For the slightly speckled look in the photo, dab the wet paint lightly with a dry sponge instead of brushing smooth. It mimics real clay texture perfectly.
Step 4: Finishing Touches
-
Remove tape:
Carefully peel off the tape while the paint is still slightly wet (do not wait for it to fully cure, or the paint might peel off with the tape). Pull the tape away at an angle. -
Cleanup:
If any paint bled under the tape, use a damp cotton swab or a toothpick to gently scrape away the excess while it’s still fresh. -
Dry time:
Let the glass sit undisturbed for at least 1 hour to become dry to the touch. -
Cure the paint:
Follow the specific instructions on your paint bottle for curing. This typically involves either air-drying for 21 days or baking the glass in the oven (usually 350°F for 30 mins) to make it dishwasher safe.
Once baked and cooled, your custom glassware is ready to hold your favorite vintage or sparkling water with style


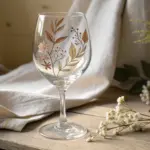
Daisy Blooms Around the Bowl
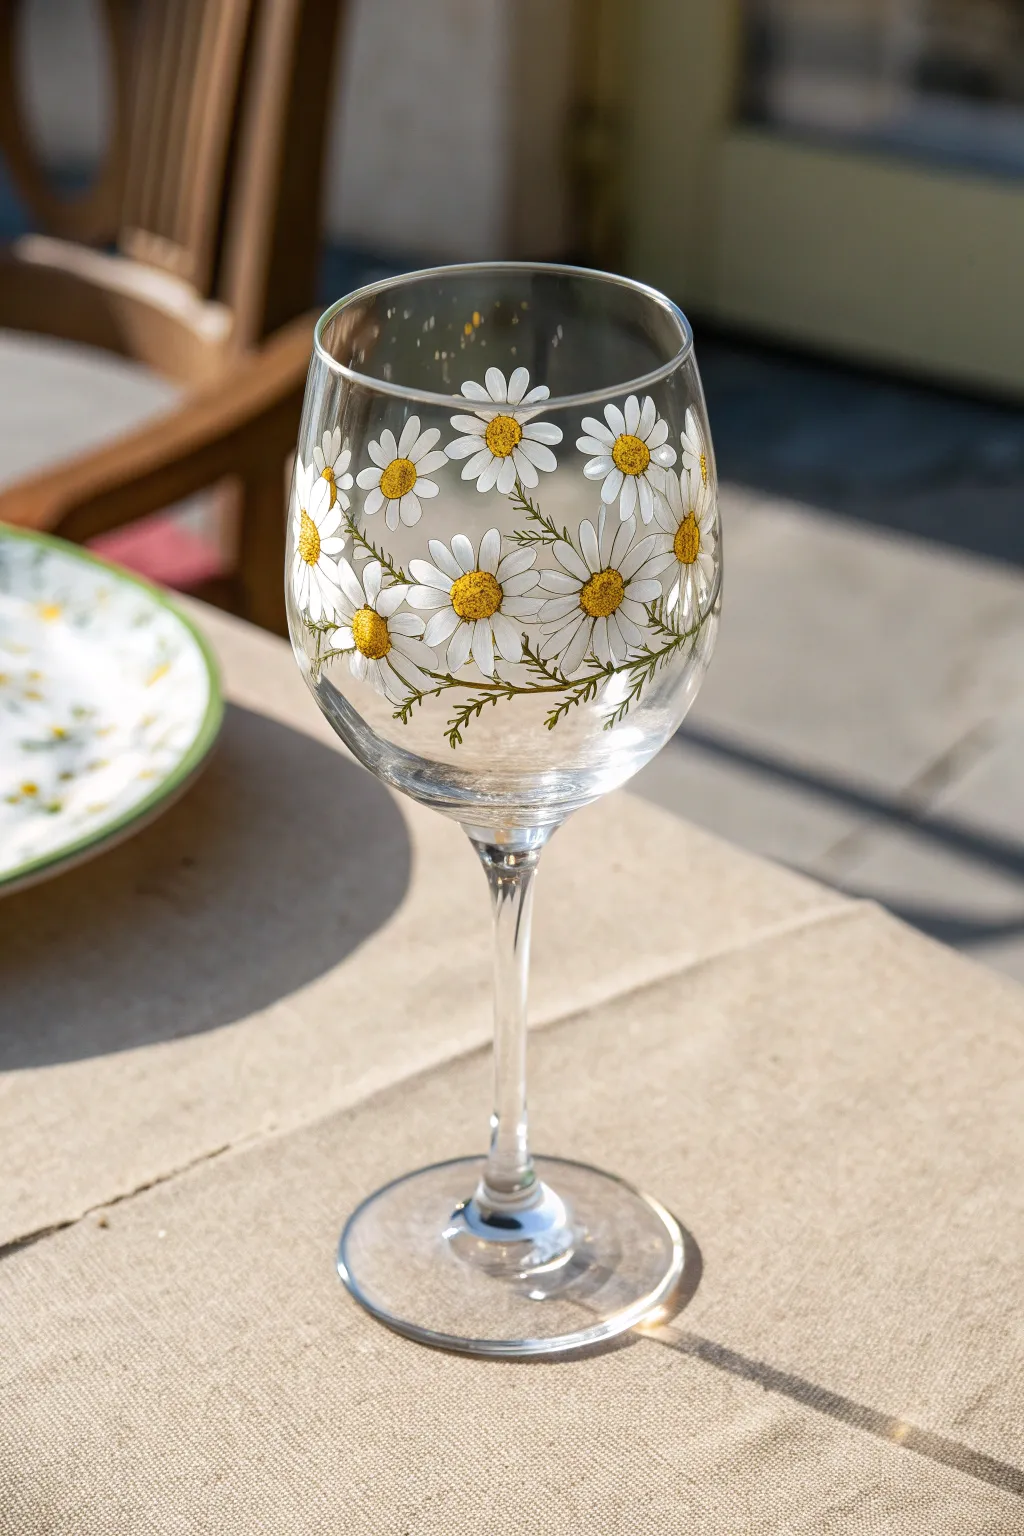
Bring the freshness of a summer meadow to your table with this lovely hand-painted wine glass featuring a wraparound chain of daisies. The design uses simple brushstrokes and dotting techniques to create a sophisticated, airy floral arrangement that looks perfect for outdoor dining.
Detailed Instructions
Materials
- Clear stemmed wine glass (washed and dried)
- Rubbing alcohol
- Cotton rounds or paper towels
- Enamel glass paints: Opaque White, Golden Yellow, Olive Green
- Fine liner brush (size 00 or 0)
- Small round brush (size 1 or 2)
- Dotting tool or toothpick
- Small palette or ceramic dish
- Oven for baking (if using heat-set paints)
Step 1: Preparation & Planning
-
Clean surface:
Begin by wiping down the entire exterior of the glass bowl with rubbing alcohol on a cotton round to remove any oils or fingerprints. -
Visualize placement:
Imagine a horizontal band running around the widest part of the glass bowl; this is where your main flower chain will sit, about halfway down.
Uneven Petals?
If your petals look streaky, your brush might be too dry. Dip the brush tip in water or medium, wipe slightly, then reload with plenty of paint for smoother strokes.
Step 2: Painting the Flower Centers
-
Load yellow paint:
Squeeze a small amount of Golden Yellow enamel paint onto your palette. -
Create center dots:
Using a dotting tool or the handle end of a paintbrush, place a series of yellow dots around the circumference of the glass. -
Vary the spacing:
Don’t place them in a perfectly straight line; stagger them slightly up and down to create a natural, organic flow. -
Texture the centers:
While the yellow paint is still wet, dip the very tip of a clean toothpick into a tiny bit of brown or darker yellow (optional) and stipple the surface of the dots to create a pollen texture. -
Allow to set:
Let these yellow centers dry for about 15-20 minutes so you don’t accidentally smear them while adding petals.
Step 3: Adding the Petals
-
Load white paint:
Load your small round brush with Opaque White enamel paint. -
Paint first petals:
Starting near a yellow center, press the brush down and pull outward quickly to create a teardrop shape. Repeat this around the center. -
Layering technique:
For a fuller look, I like to paint a bottom layer of petals first, let them dry slightly, and then add a top layer of petals in the gaps between them. -
Vary petal direction:
Ensure the petals radiate naturally; some flowers can face slightly upward or downward rather than straight at the viewer. -
Connect the blooms:
Continue painting petals for each yellow center until the flowers gently touch or overlap, forming a continuous chain.
Add Some Sparkle
Mix a tiny amount of glitter medium into your yellow center paint before applying, or dot a metallic gold highlight on the petals for a subtle evening shimmer.
Step 4: Stems & Foliage
-
Switch to liner brush:
Using your fine liner brush, pick up the Olive Green paint. You want the paint consistency to be fluid, almost like ink. -
Paint delicate stems:
Draw very thin, wispy lines connecting the flowers. Allow the lines to curve and intersect naturally beneath the blooms. -
Add tiny leaves:
Along these green stems, add tiny ‘V’ shapes or small fern-like strokes to represent minimal greenery. -
Fill empty spaces:
If there are large gaps between flowers, paint delicate, free-floating sprigs of greenery to balance the composition.
Step 5: Finishing Touches
-
Check for opacity:
Hold the glass up to the light. If the white petals look too translucent, carefully add a second coat of white over the existing strokes. -
Clean up edges:
If any paint went astray, use a damp cotton swab or toothpick to gently scrape away the error before it cures fully. -
Cure the paint:
Follow the manufacturer’s instructions for your specific paint. This usually involves air drying for 24 hours and then baking the glass in a cool oven that heats up to 350°F (176°C) for 30 minutes.
Once baked and cooled, your custom daisy glass is ready to be filled with your favorite white wine or iced tea
BRUSH GUIDE
The Right Brush for Every Stroke
From clean lines to bold texture — master brush choice, stroke control, and essential techniques.
Explore the Full Guide
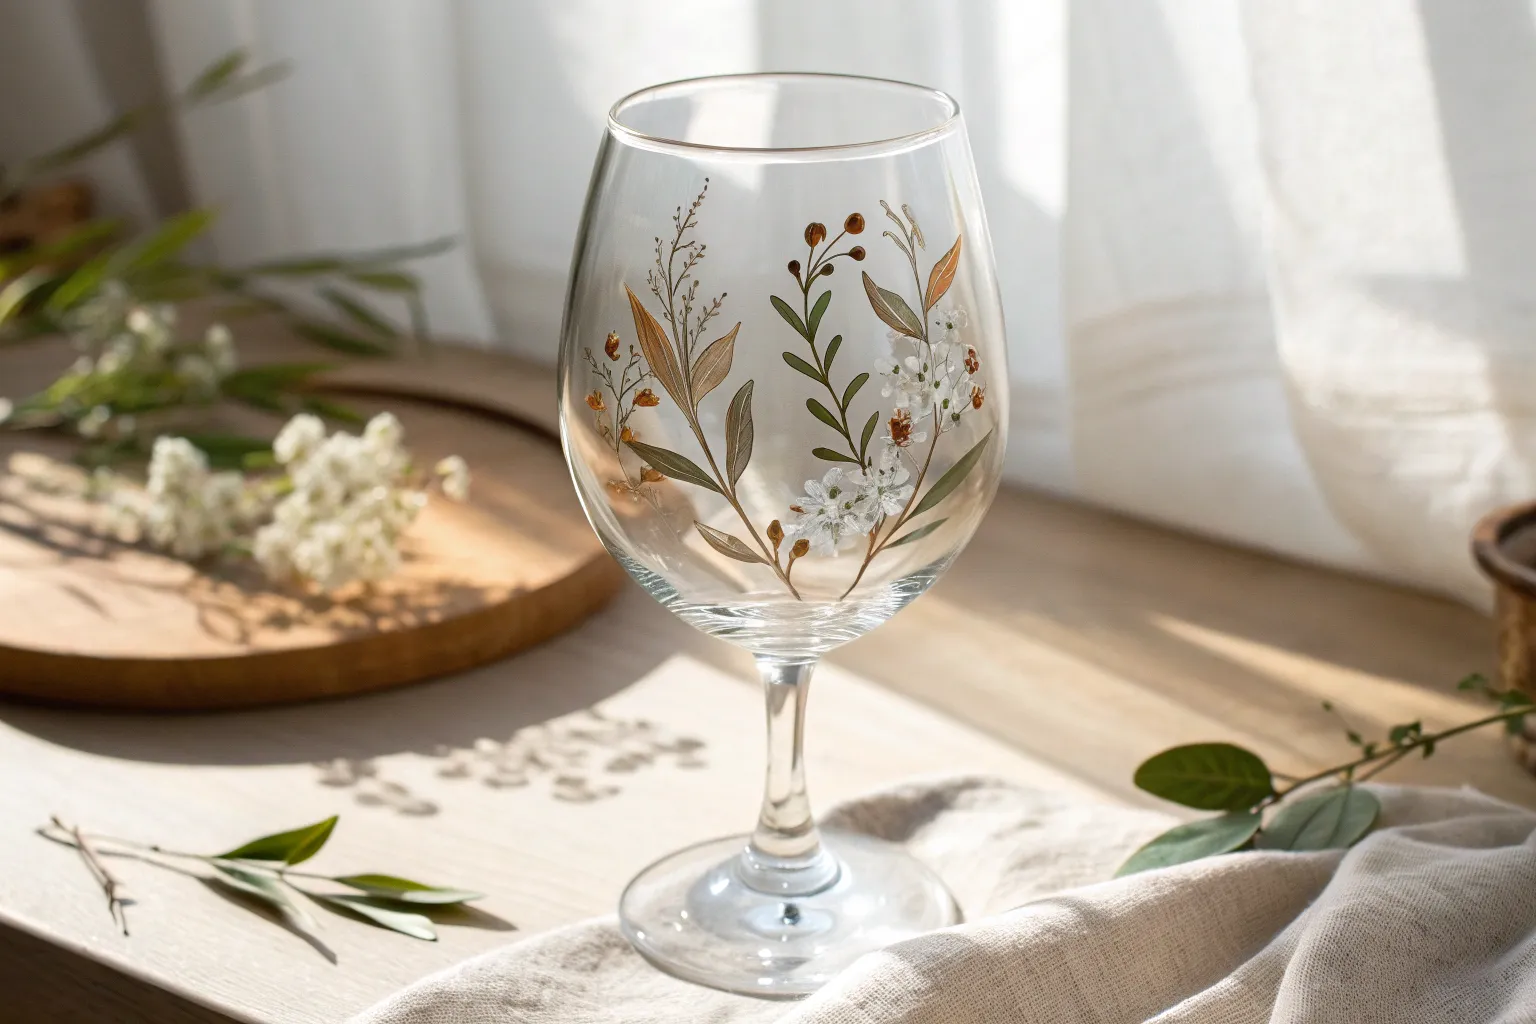
Trailing Floral Vines Up the Stem
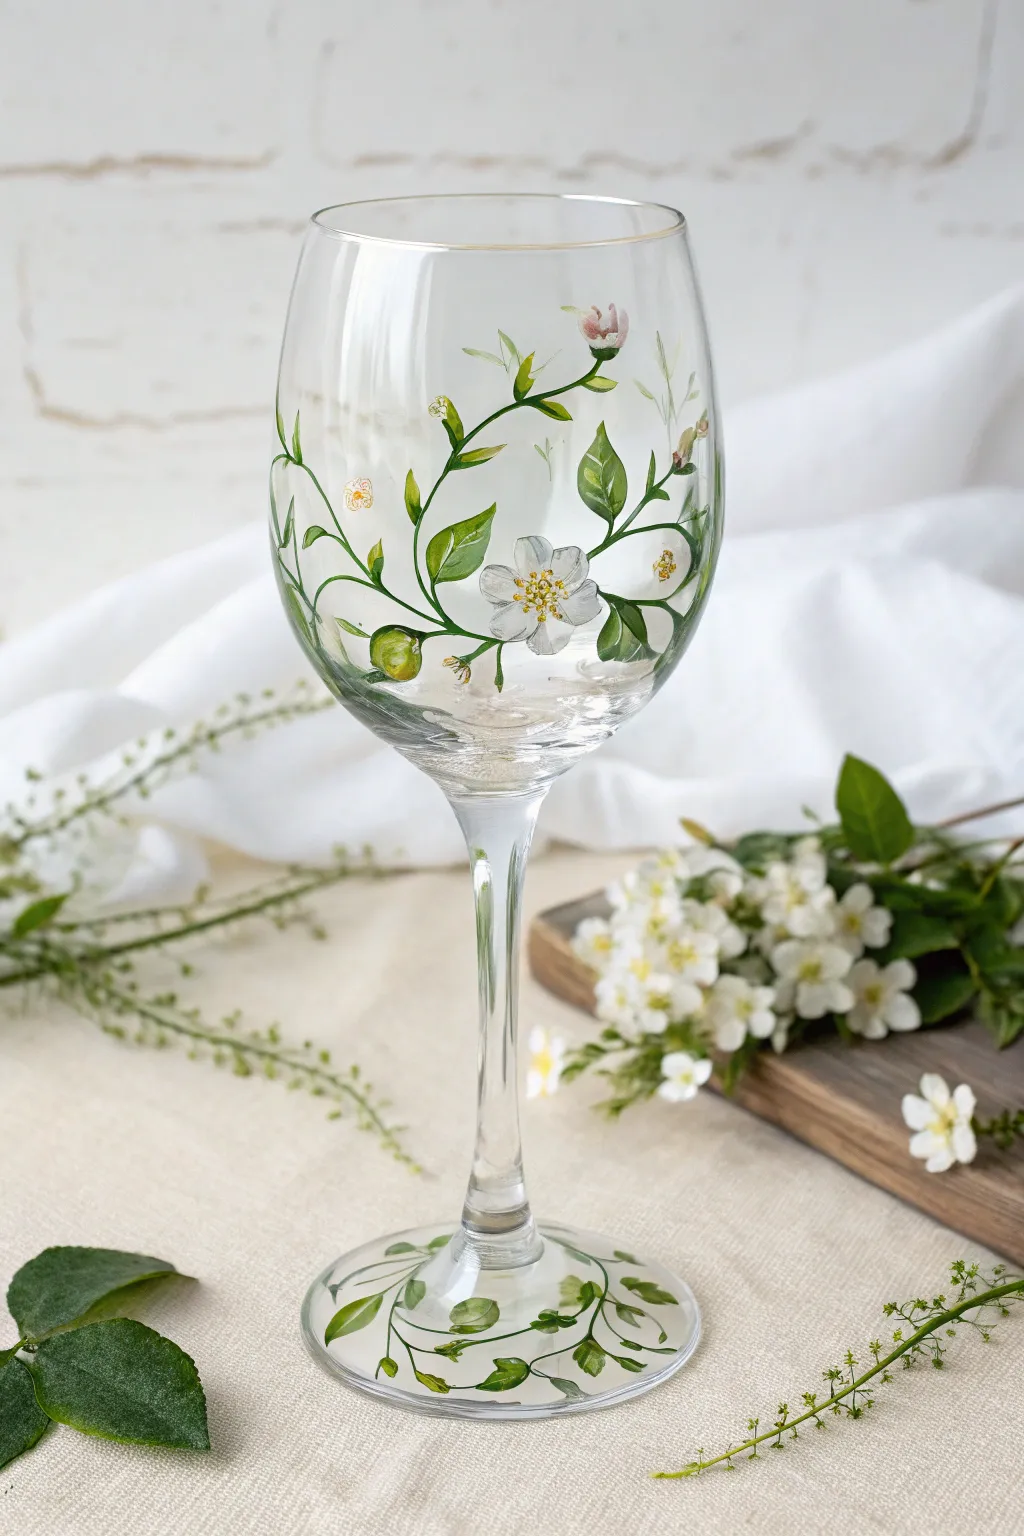

Transform plain glassware into a botanical masterpiece with delicate white blooms and fresh greenery trailing from base to rim. This airy, elegant design captures the essence of a spring garden, making every sip feel like a special occasion.
Step-by-Step
Materials
- Large-bowl wine glass
- Rubbing alcohol and cotton pads
- Enamel glass paint (opaque white, sap green, olive green, yellow ochre, warm pink)
- Small round brushes (sizes 0 and 2/0)
- Fine liner brush
- Palette or small plate
- Paper towels
- Oven (for curing)
Step 1: Preparation & Base Framework
-
Clean the surface:
Before dipping your brush, thoroughly wipe the entire glass surface—especially the stem and lower bowl—with rubbing alcohol. This removes oils and ensures the paint adheres properly. -
Mix your greens:
On your palette, create two main green shades: a fresh, vibrant green by mixing sap green with a tiny touch of white, and a darker olive tone for stems and older leaves. -
Sketch the main vine:
Using the fine liner brush and the darker olive green mix, paint the primary vine structure. Start at the very base of the glass, swirling up safely over the foot, climbing the stem, and branching out onto the bowl in gentle, organic curves. -
Add secondary stems:
Paint thinner, smaller offshoot branches diverging from the main vine on the bowl. Keep your hand loose to mimic nature’s randomness, avoiding stiff or perfectly symmetrical lines.
Step 2: Foliage & Buds
-
Paint base leaves:
Using the size 0 round brush, load it with the vibrant sap green mix. Press the belly of the brush down and lift sharply to create pointed, almond-shaped leaves along the vines. -
Add depth to greenery:
While the first layer is still slightly tacky, streak a tiny amount of olive green along the veins or base of the leaves to create dimension. I find this wet-on-wet technique adds instant realism. -
Detail the foot:
Don’t forget the base of the glass. Paint a ring of horizontal vines and smaller leaves wrapping around the foot of the glass to ground the design. -
Create small buds:
Mix a soft pink using white and a dot of warm pink. Paint small, teardrop-shaped buds at the tips of the thinnest branches, particularly near the top of the design. -
Add budding leaves:
Surround the base of these pink buds with tiny strokes of green to represent the sepals holding the flower closed.
Transparency Trick
For translucent leaves that look sun-drenched, mix a tiny drop of clear gloss medium into your green paint. It creates a beautiful stained-glass effect.
Step 3: The White Blossoms
-
Form the petals:
For the main open flowers, clean your size 0 brush and load it with opaque white. Paint five rounded petals radiating from a center point. You’ll want about 3-4 main blooms scattered across the bowl. -
Layering opacity:
Allow the first layer of white to dry completely (about 15-20 minutes). Adding a second layer of white over the petals will make them pop against the translucent glass. -
Shade the petals:
Mix a very dilute grey-green wash. Carefully sweep this color near the center of the white petals to create a cupped, 3D effect. -
Add tiny fillers:
Using the tip of your smallest brush, dot clusters of tiny, four-petaled white flowers in empty spaces to balance the composition. -
Paint flower centers:
Once the white petals are dry, dip the very tip of your liner brush into yellow ochre. Dot the center of the large white flowers with tiny stippling motions. -
Final pollen details:
Add extremely fine dots of brown or dark orange over the yellow centers to simulate the anthers and pollen texture.
Metallic Accents
Use a metallic gold liner pen or paint to trace the very rim of the glass or add tiny gold highlights to the leaf veins for an extra luxurious finish.
Step 4: Curing
-
Dry styling:
Let the glass sit undisturbed for at least 24 hours (or follow your specific paint brand’s instructions) to fully harden the surface. -
Bake to set:
Place the glass in a *cold* oven. Set the temperature to 350°F (175°C). Once the oven reaches temperature, bake for 30 minutes. Turn the oven off and let the glass cool completely inside before removing.
Now you have a stunning, durable piece of floral art ready for your next dinner party
Zesty Citrus Slice Wine Glass Motifs


Brighten up your stemware collection with this refreshing design featuring vibrant lemon and orange slices interspersed with delicate greenery. The translucent quality of the glass paint mimics the juicy texture of real citrus fruit, making every sip feel like a summer day.
Step-by-Step Tutorial
Materials
- Clear wine glass (stemmed or stemless)
- Rubbing alcohol
- Cotton rounds or paper towels
- Enamel glass paints (Yellow, Orange, Red-Orange, White, Green)
- Small round paintbrushes (sizes 0 and 2)
- Fine liner brush
- Paper plate or palette
- Water cup for rinsing
- Oven (for curing, if paint requires)
Step 1: Preparation
-
Clean surface:
Before you begin, wipe down the entire outer surface of the wine glass with rubbing alcohol and a cotton round. This removes fingerprints and oils that could prevent the paint from adhering properly. -
Plan placement:
Visualize where your main citrus slices will go. You’ll want 3-5 large slices spaced randomly around the bowl of the glass, leaving room for smaller accents and leaves.
Mix it Up
Mix a tiny drop of clear gloss medium into your fruit colors to make them more translucent, enhancing that juicy ‘stained glass’ effect.
Step 2: Painting the Citrus
-
Base circles:
Load a size 2 brush with yellow paint. Paint a solid circle about 1.5 inches in diameter for a lemon slice. Don’t worry about transparency yet; a slightly thin layer is okay. -
Orange base:
Repeat the previous step using orange or red-orange paint for grapefruit or blood orange slices. Vary the sizes slightly for a natural look. -
Mini segments:
Paint much smaller ovals or semi-circles in orange or yellow to represent smaller fruit wedges or kumquats scattered between the large slices. -
Adding pith:
Once the colored circles are dry to the touch, mix a tiny amount of yellow or orange into your white paint to create a creamy off-white. Use the fine liner brush to paint a thin ring just inside the outer edge of each fruit circle. -
Segment lines:
Using that same creamy off-white mixture and the fine liner brush, paint straight lines radiating from the center of the fruit like spokes on a wheel. This creates the individual segments. -
Defining segments:
For added realism, gently round off the corners of the fruit segments near the rind, softening the harsh spoke lines into distinct triangular wedges. -
Adding texture:
Mix a slightly lighter shade of your fruit color (light yellow or light orange). Use a very small brush to dab tiny dots or short strokes inside the fleshy part of each segment to mimic pulp texture.
Oops! Smudged paint?
If you smear wet paint, don’t wipe it immediately. Let it dry slightly, then scrape it off cleanly with a craft knife or razor blade.
Step 3: Adding Greenery
-
Stem lines:
Switch to your green paint and a fine liner brush. Paint delicate, winding stems that weave between the citrus slices, connecting the design elements. -
Leaf shape:
Where you want a leaf, press the belly of a small round brush (size 0) down onto the stem and lift up quickly as you drag away. This creates a natural teardrop leaf shape. -
Leaf details:
Add tiny sprigs of leaves coming off the main stems. Keep these light and varying in direction to create a playful, organic movement.
Step 4: Finishing Touches
-
Highlighting:
Add tiny specks of pure white to the rind or leaves to simulate light reflecting off the shiny fruit surface. -
Cleanup:
Use a damp cotton swab or a toothpick to gently scrape away any mistakes or sharpen the edges of your circles before the paint fully hardens. -
Dry time:
Allow the glass to dry for at least 1 hour before handling, or according to the specific instructions on your paint bottle. -
Curing:
To make the glass washable, place the dry glass into a cold oven. Turn the oven to 350°F (175°C) and bake for 30 minutes. Let the glass cool completely inside the oven before removing.
Once cured, your zesty new glassware is ready to hold your favorite sangria or lemonade

PENCIL GUIDE
Understanding Pencil Grades from H to B
From first sketch to finished drawing — learn pencil grades, line control, and shading techniques.
Explore the Full Guide
Soft Ombre Fade Bands That Catch the Light
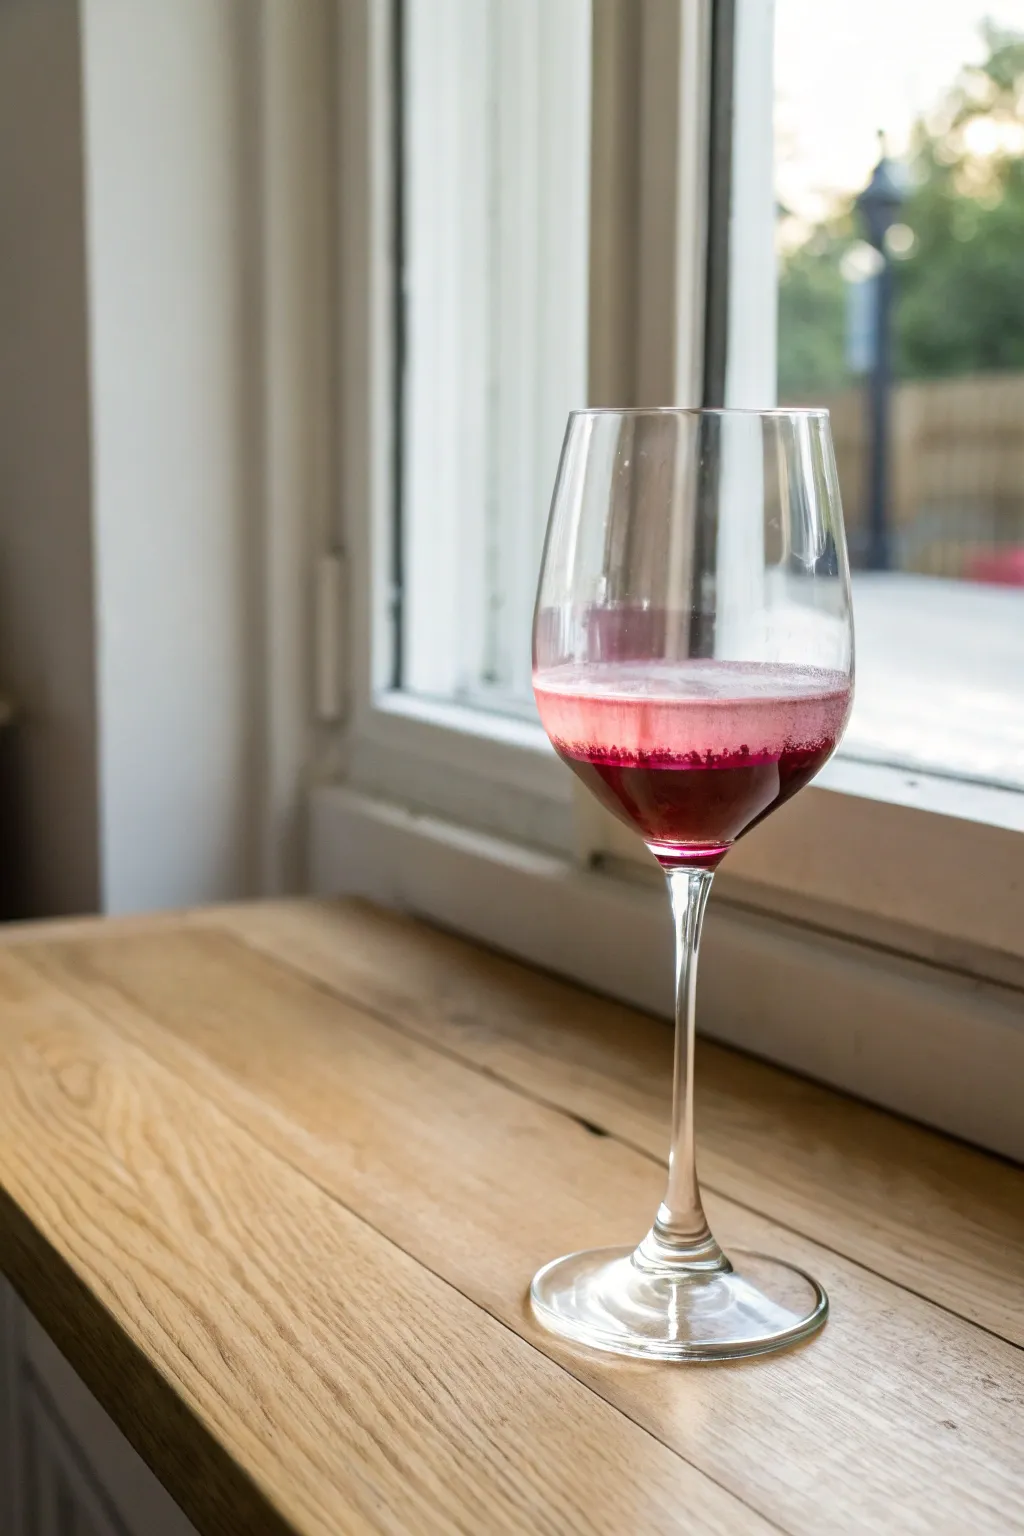
Capture the fleeting beauty of twilight with this elegant, understated design. By creating a soft, translucent band of berry-hued paint that fades gently upwards, you’ll transform plain glassware into a sophisticated vessel that catches the light beautifully.
How-To Guide
Materials
- Clear white wine glass (thoroughly cleaned)
- Rubbing alcohol
- Cotton pads or lint-free cloth
- Glass paint (translucent berry/magenta shade)
- Glass paint medium or clear extender (for transparency)
- Make-up sponge wedges
- Small flat brush
- Ceramic or glass palette
- Oven (for curing, if required by paint brand)
Step 1: Preparation & Surface Prep
-
Clean the surface:
Begin by washing your wine glass with warm, soapy water to remove any stickers or dust. -
Degrease the glass:
Pour a small amount of rubbing alcohol onto a cotton pad. Wipe the exterior of the glass bowl thoroughly, focusing on the bottom half where the paint will go. Avoid touching this area with your fingers afterward. -
Dry completely:
Let the alcohol air dry for a moment. This step is crucial because even tiny oils from your skin can prevent the paint from adhering properly.
Sponge Texture Fix
If the sponge leaves too many bubbles, wait 30 seconds for the paint to tack up slightly, then very gently tap over the area again with a dry sponge to smooth it out.
Step 2: Mixing the Gradient
-
Prepare the palette:
Squeeze a dime-sized amount of your berry-colored glass paint onto your palette. -
Adding transparency:
Next to the colored paint, add a larger amount of clear glass medium or extender. We want a very sheer look, not an opaque block of color. -
Create a tint:
Mix a tiny amount of color into the clear medium. This should create a very pale, watery version of your main color. -
Prepare the saturated mix:
Leave some of the original darker paint unmixed or slightly thinned for the very bottom edge where the color needs to be strongest.
Step 3: Applying the Ombre
-
Load the sponge:
Dip the flat bottom of a cosmetic sponge wedge into your darkest paint mixture. Dab the excess off onto the palette; you want the sponge loaded but not dripping. -
Start at the base:
Begin stippling (dabbing up and down) right at the very bottom of the glass bowl, where it meets the stem. Create a solid ring of color here. -
Work upwards:
As you move slightly up the curve of the glass, switch to your lighter, more transparent mixture. Dab gently, overlapping slightly with the darker section. -
Feather the edge:
When you reach the midline of the glass, use a clean side of the sponge with almost no paint on it. -
Create the fade:
Tap lightly along the top edge of your painted section to blur the line. The goal is to make the paint ‘disappear’ into the clear glass so there is no hard stripe. -
Check for consistency:
Hold the glass up to a light source. Look for any areas that seem patchy and gently dab them with the appropriate shade to even out the texture. -
Clean any mistakes:
If paint got onto the stem or too high up the rim, use a cotton swab dipped in rubbing alcohol to wipe it away immediately while wet.
Lip Safety Rule
Always keep painted designs at least 2cm below the rim of the glass. Even non-toxic paints shouldn’t be ingested or constantly touched by lips.
Step 4: Curing & Finishing
-
Initial dry time:
Allow the glass to air dry according to the manufacturer’s instructions, usually at least 1 hour to becoming touch-dry. -
Full cure process:
Most glass paints require either 21 days of air drying or heat curing in an oven. I usually prefer the oven method for durability. -
Oven loading:
If baking, place the glass in a cold oven. Do not preheat, as the thermal shock could break the glass. -
Baking step:
Set the oven to the temperature specified on your paint bottle (typically 350°F/176°C) and bake for 30 minutes. -
Cool down:
Turn the oven off and leave the glass inside until the oven is completely cool. This ensures the glass adjusts slowly to room temperature.
Now you have a stunning, custom-tinted glass perfect for your next evening gathering
Metallic Accents for an Elevated Finish
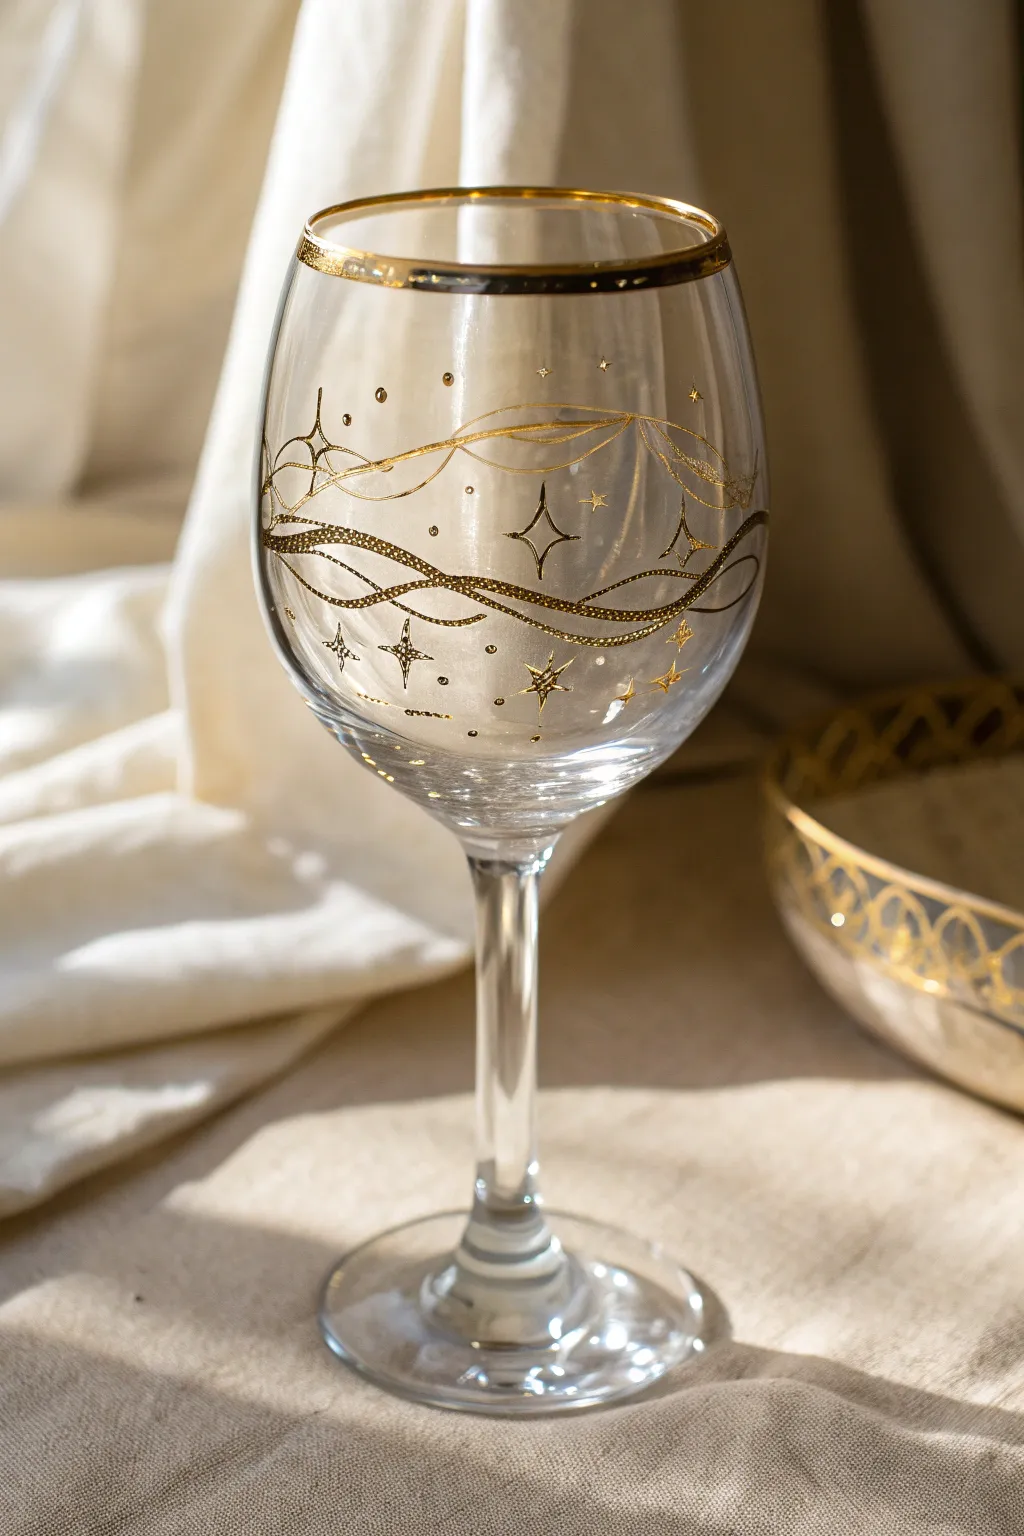
Transform a plain glass into a piece of starlit art with this delicate metallic design. Featuring sweeping curves and shimmering stars, this project uses gold accents to add a sophisticated, astronomical touch to your stemware.
How-To Guide
Materials
- Clear wine glass (cleaned with rubbing alcohol)
- Gold enamel glass paint (or a high-quality gold oil-based paint marker)
- Fine liner brush (size 00 or 000) if using liquid paint
- Rubbing alcohol
- Cotton pads
- Cotton swabs (for corrections)
- Paper towel
- Oven (for curing, if required by paint type)
Step 1: Preparation & Planning
-
Clean surface:
Begin by thoroughly wiping down the exterior of your wine glass with rubbing alcohol on a cotton pad. This removes any oils or fingerprints that could prevent the gold paint from adhering properly. -
Plan the flow:
Visualize where your main wavy lines will go. The design features two primary sweeping curves that wrap horizontally around the bowl of the glass, creating a sense of movement.
Step 2: Painting the Gold Rim
-
Establish the rim:
Load your fine liner brush with gold enamel paint, or prime your gold paint marker. Carefully trace the very top edge of the glass rim. -
Thicken the line:
Go over the rim a second time, extending the paint slightly down the exterior edge to create a visible band of gold about 2-3mm thick. Keep your hand steady by resting your pinky on the glass stem. -
Set aside:
Let this rim dry for about 10–15 minutes before handling the main bowl again to avoid smudging.
Fixing Smudges
If you smudge the gold while working, don’t wipe immediately! Let it dry slightly, then scrape it off cleanly with a craft knife or toothpick.
Step 3: Creating the Celestial waves
-
First wave:
Starting near the middle of the glass bowl, paint a long, continuous wavy line that undulates gently around the circumference. Don’t worry if it isn’t perfectly smooth; organic lines look better here. -
Second wave:
Paint a second wavy line slightly below or intersecting the first one. Let these lines dance around each other, creating pockets of negative space. -
Thick and thin:
Go back over specific sections of your wavy lines to vary the thickness. This calligraphy-style variation adds depth and elegance to the movement. -
Add texture:
Inside the thicker parts of the waves, you can gently stipple the paint or add tiny cross-hatching strokes to give it a textured, almost glittery appearance as seen in the reference.
Cosmic Depth
Mix a tiny drop of pearl white medium into your gold paint for the smaller stars. This creates a subtle two-tone effect that adds magical depth.
Step 4: Adding the Stars
-
Major stars:
Identify 3 or 4 larger open spaces between your waves. Paint a four-pointed star (a simple cross shape with curved inner corners) in these spots. These are your focal points. -
Refining points:
Use the very tip of your brush or marker to extend the points of these large stars into fine, sharp lines. -
Minor stars:
Scatter smaller, simple cross-shaped stars around the larger ones. I prefer to vary the sizes here to create a sense of distance and depth. -
Micro stars:
Fill in remaining larger gaps with tiny five-pointed asterisks or simple ‘x’ shapes to mimic distant twinkling stars.
Step 5: Detailing & Curing
-
Stardust dots:
Using the very tip of your tool, gently dot the glass in clusters around the waves and stars. These dots represent stardust and tie the whole composition together. -
Clean up:
Inspect your work. If you made any slips, dip a cotton swab in rubbing alcohol and carefully wipe away the wet paint. -
Initial dry:
Allow the glass to dry completely according to the manufacturer’s instructions, usually at least 24 hours. -
Bake to cure:
Most glass enamels require baking to become dishwasher safe. Place the glass in a cool oven, set temperature to 350°F (175°C), and bake for 30 minutes. Turn off the oven and let the glass cool down inside completely.
Once baked and cooled, your celestial glass is ready to sparkle at your next dinner party


Fall Leaves and Berries for Seasonal Sets
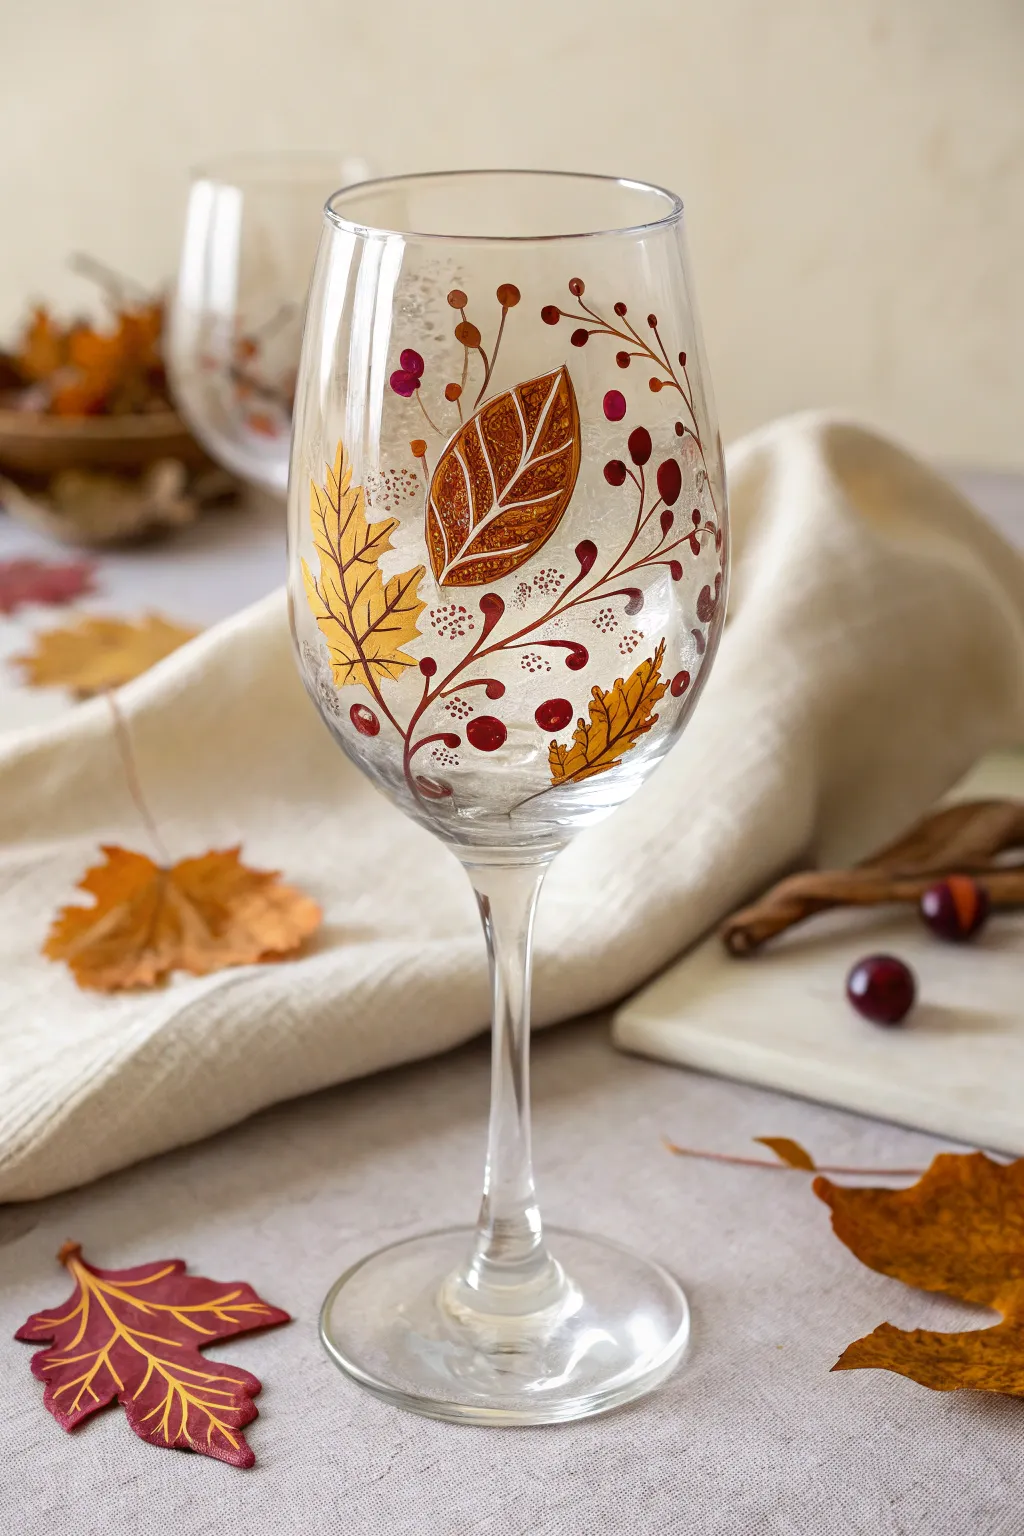
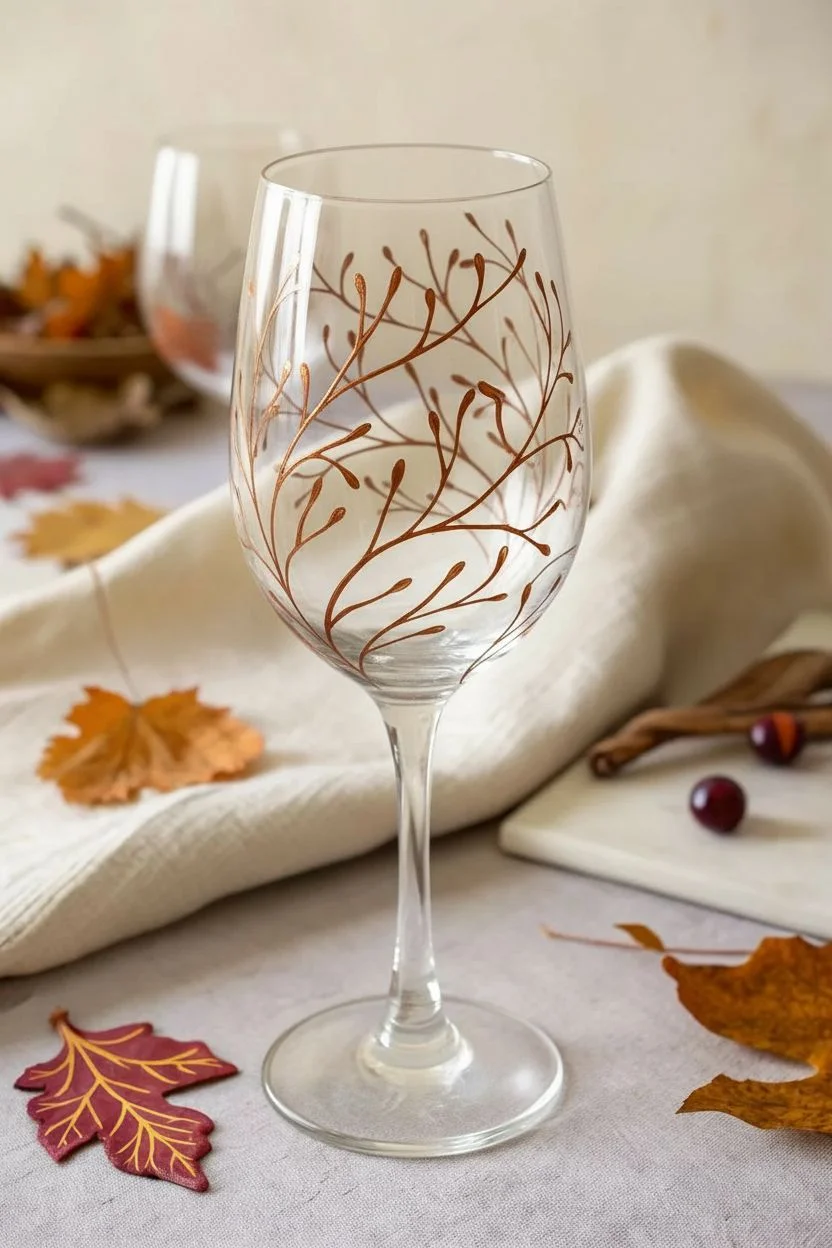
Capture the essence of a crisp fall day with this elegant wine glass design featuring shimmering metallic leaves and deep red berries. The delicate linework and warm color palette make this a sophisticated addition to your Thanksgiving table setting.
Detailed Instructions
Materials
- White wine glass (wash and dry thoroughly)
- Rubbing alcohol
- Enamel glass paints: Metallic Gold, Metallic Copper/Bronze, Deep Burgundy, White
- Fine liner brush (size 0 or 00)
- Small round brush (size 1 or 2)
- Palette or paper plate
- Paper towels
- Cotton swabs (for mistakes)
- Oven (for curing)
Step 1: Preparation and Base Vines
-
Prep the Surface:
Before you begin painting, wipe the exterior of the glass down with rubbing alcohol on a paper towel. This removes any oils or fingerprints that could prevent the paint from adhering properly. -
Load Your Brush:
Squeeze a small amount of the Metallic Copper or Bronze enamel paint onto your palette. Thin the paint slightly with a drop of water if it feels too thick for fine lines. -
Paint the Vine Structure:
Using your fine liner brush, start painting sweeping, curved lines that originate from the base of the bowl and reach upwards. These will be the main vines. Keep your hand loose to create organic, natural curves rather than stiff lines. -
Add Secondary Branches:
Paint smaller, shorter offshoots connecting to your main vine lines. Vary the lengths and directions so the branches look like they are swaying in the wind.
Step 2: Painting the Leaves
-
Outline the Main Leaves:
Switching to the Metallic Gold paint, use your fine liner brush to outline leaf shapes. Create a mix of classic maple leaf shapes (with pointed lobes) and simpler oval pointed leaves attached to the ends of your vines. -
Fill in the Leaves:
Using the small round brush, fill in the gold leaf outlines. You don’t need to make this opaque; a slightly translucent layer allows the light to shine through the glass later. -
Create a Focal Leaf:
Choose one prominent spot for a larger, detailed leaf. Outline a broad leaf shape using the Metallic Copper paint instead of gold. Fill this one in with the copper tone to create contrast against the lighter foliage. -
Add Leaf Details:
Once the base gold and copper layers are touch-dry (about 15 minutes), go back in with your fine liner brush and the opposite metallic color. Paint delicate central veins and branching veins inside each leaf for definition.
Don’t Rush the Oven
Crucial Step: Always put glass in a cold oven and let it cool inside after baking. Sudden temperature changes will cause the glass to shatter immediately.
Step 3: Berries and Finishing Touches
-
Dot the Berries:
Dip the handle end of a small paintbrush or a dotting tool into the Deep Burgundy paint. Gently press dots onto the ends of the smaller vine branches. Vary the size of your pressure to create berries of different sizes. -
Add Tiny Accents:
Using your fine liner brush and the burgundy paint, add very small, singular berries floating near the vines or attached with tiny stems to the main branch. -
Decorative Stippling:
Clean your fine liner brush thoroughly and load it with a small amount of White enamel paint. Add clusters of tiny dots (stippling) around the leaves and vines. I find this creates a lovely ‘frosted’ or pollen effect that fills empty space beautifully. -
Highlight the Veins:
For extra dimension, carefully add extremely thin white highlights to the veins of the largest copper leaf. This makes the metallic paint pop. -
Clean Up:
Check your work for any smudges. If you find any, use a damp cotton swab to wipe them away before the paint sets completely.
Dual-Tone Effect
For more depth, load your brush with gold paint and just dip the very tip in copper before painting a leaf. The colors will swirl together naturally.
Step 4: Curing
-
Air Dry First:
Allow the glass to air dry for at least 1 hour, or up to 24 hours depending on your specific paint brand’s instructions. -
Bake to Set:
Place the glass in a *cold* oven. Turn the heat to 350°F (175°C) and bake for 30 minutes. Turn the oven off and let the glass cool down heavily inside the oven to prevent cracking.
Once cooled, your custom autumn glassware is ready to be filled with your favorite seasonal vintage
Cherry Blossom Tree Using the Stem as the Trunk
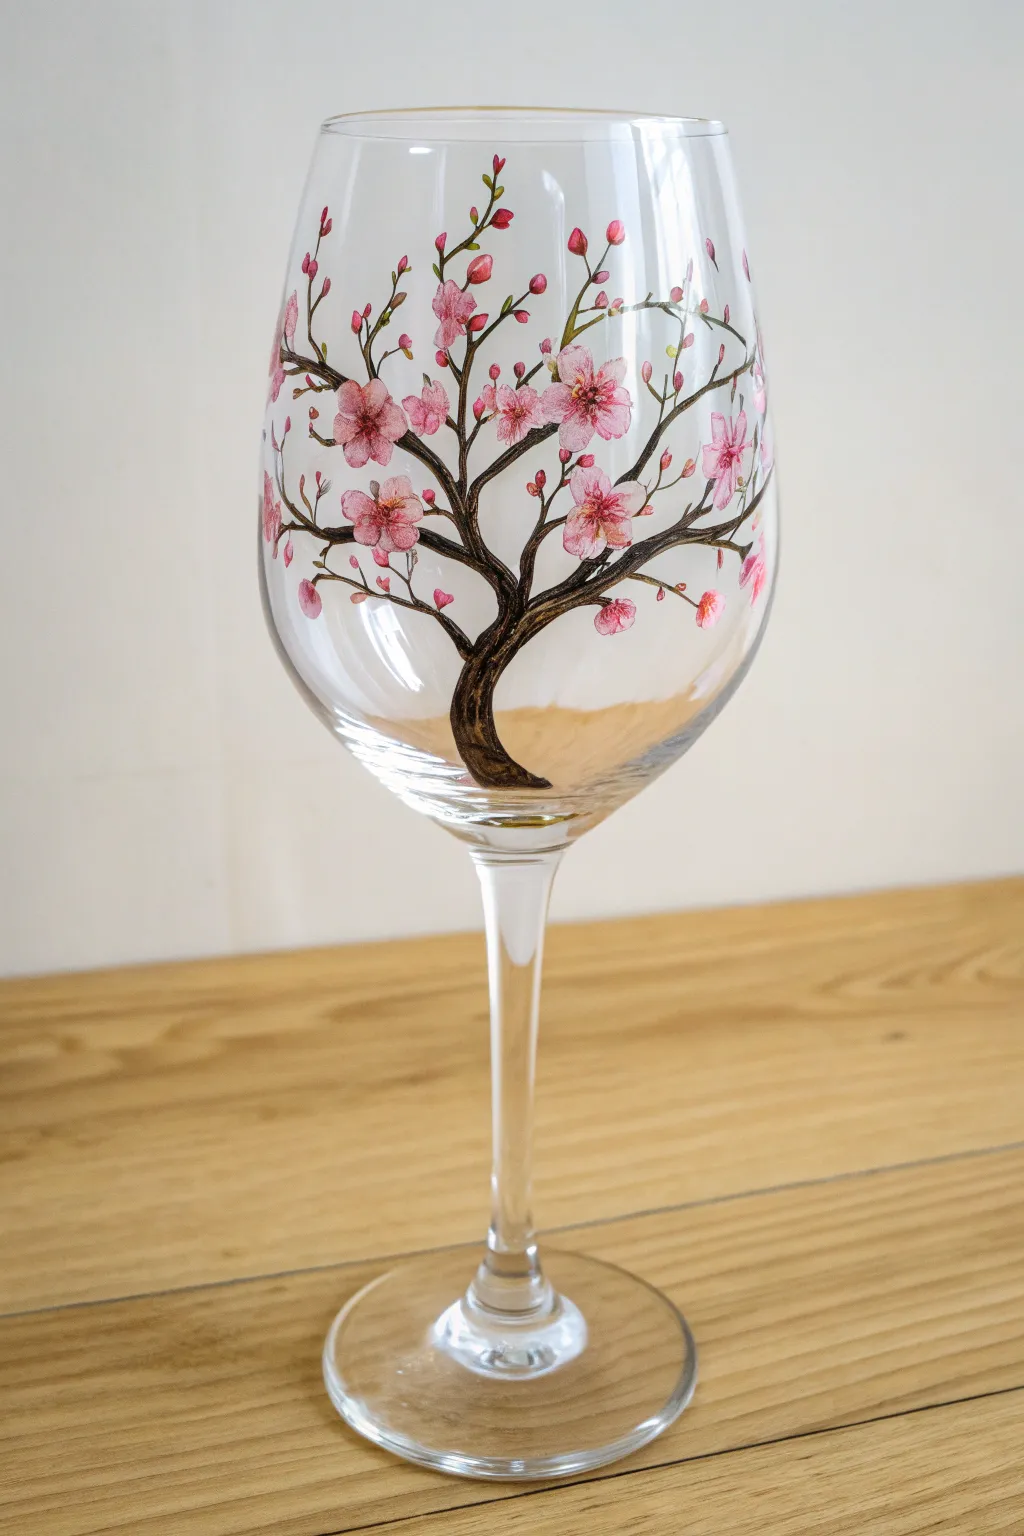
Transform a plain wine glass into a delicate piece of art by rooting a cherry blossom tree right at the stem. This design features a dark, winding trunk that expands up the bowl, bursting with soft pink petals and intricate buds for a romantic, organic look.
Step-by-Step Tutorial
Materials
- Large-bowled white wine glass
- Rubbing alcohol and cotton pads
- Enamel glass paints (dark brown, black, white, light pink, dark pink/magenta)
- Fine liner brush (size 00 or 000)
- Small round brush (size 1 or 2)
- Palette or small plate
- Cotton swabs
- Oven (for curing, unless using air-dry paints)
Step 1: Preparation & Trunk Structure
-
Clean the surface:
Before making a single stroke, wipe the entire exterior of the wine glass bowl with rubbing alcohol to remove oils and fingerprints, ensuring the paint adheres perfectly. -
Mix the trunk color:
On your palette, mix a small amount of dark brown enamel paint with a tiny drop of black to create a deep, rich bark color. -
Establish the root:
Using your fine liner brush, paint the base of the trunk starting exactly where the clear glass stem meets the bowl. Make this part slightly thicker to anchor the tree visually. -
Extend the main branches:
Drag the paint upwards from the base in wavy, uneven lines. Split the main trunk into two or three primary branches that reach about halfway up the glass bowl. I like to twist the brush slightly to create a gnarled texture. -
Add secondary twigs:
From your main branches, paint thinner, spindly twigs reaching outward and upward towards the rim. Keep your lines shaky and organic rather than straight; nature rarely moves in straight lines. -
Create depth on the bark:
While the brown paint is still slightly tacky but mostly dry, stroke a tiny bit of lighter brown or tan highlights along the ‘sunny’ side of the larger branches to give them volume.
Fixing Smudges
If you accidentally smear wet paint, don’t wipe it immediately! Let it dry completely, then scrape it off gently with a craft knife or fingernail for a clean removal.
Step 2: Blossoms & Details
-
Prepare bloom colors:
Squeeze out white, light pink, and dark pink paints. Leave them separate but have space for mixing intermediate shades. -
Paint the main flowers:
Choose 5-7 spots on the branches for full blooms. Using the small round brush, dab five small petal shapes in a circle using the medium pink shade. Don’t worry about perfect symmetry. -
Add small buds:
Switch back to the fine liner brush. Dip it in the darker pink or magenta and add tiny, tear-drop shaped buds at the very tips of the thinnest twigs. -
Highlight the petals:
Clean your small round brush and pick up a tiny amount of white paint. Gently layer this onto the center or edges of your established pink flowers to create a soft, gradient effect. -
Detail the flower centers:
Once the flower base layers are dry to the touch, use the liner brush to add a tiny cluster of dark pink or reddish dots in the very center of each open bloom. -
Add floating petals:
For a whimsical touch, paint a few single pink petals drifting in the empty spaces between branches, as if caught in a breeze. -
Connect the buds:
Use your brown mix and the liner brush to paint tiny green or brown stems connecting the floating buds to the main branches so they don’t look like they are hovering magically. -
Final inspection:
Hold the glass up to the light to check for opacity. If the pinks look too sheer, carefully dab a second layer of paint over the dry petals. -
cleanup edges:
If you made any mistakes or have jagged edges on the petals, dip a cotton swab in rubbing alcohol or water (depending on paint base) and gently wipe away the error. -
Cure the paint:
Follow the manufacturer’s instructions for your specific paint. This usually involves letting it air cure for 24 hours (I prefer 48 to be safe) or baking the glass in a cool oven that heats up gradually.
Lustrous Finish
After baking and cooling, apply a clear gloss medium over just the flowers to make the petals capture the light and look wet like fresh dew.
Enjoy your beautiful new glassware with a favorite vintage or gift it to bring a touch of eternal spring to a friend
Under-the-Sea Wraparound Scene With Bubbles
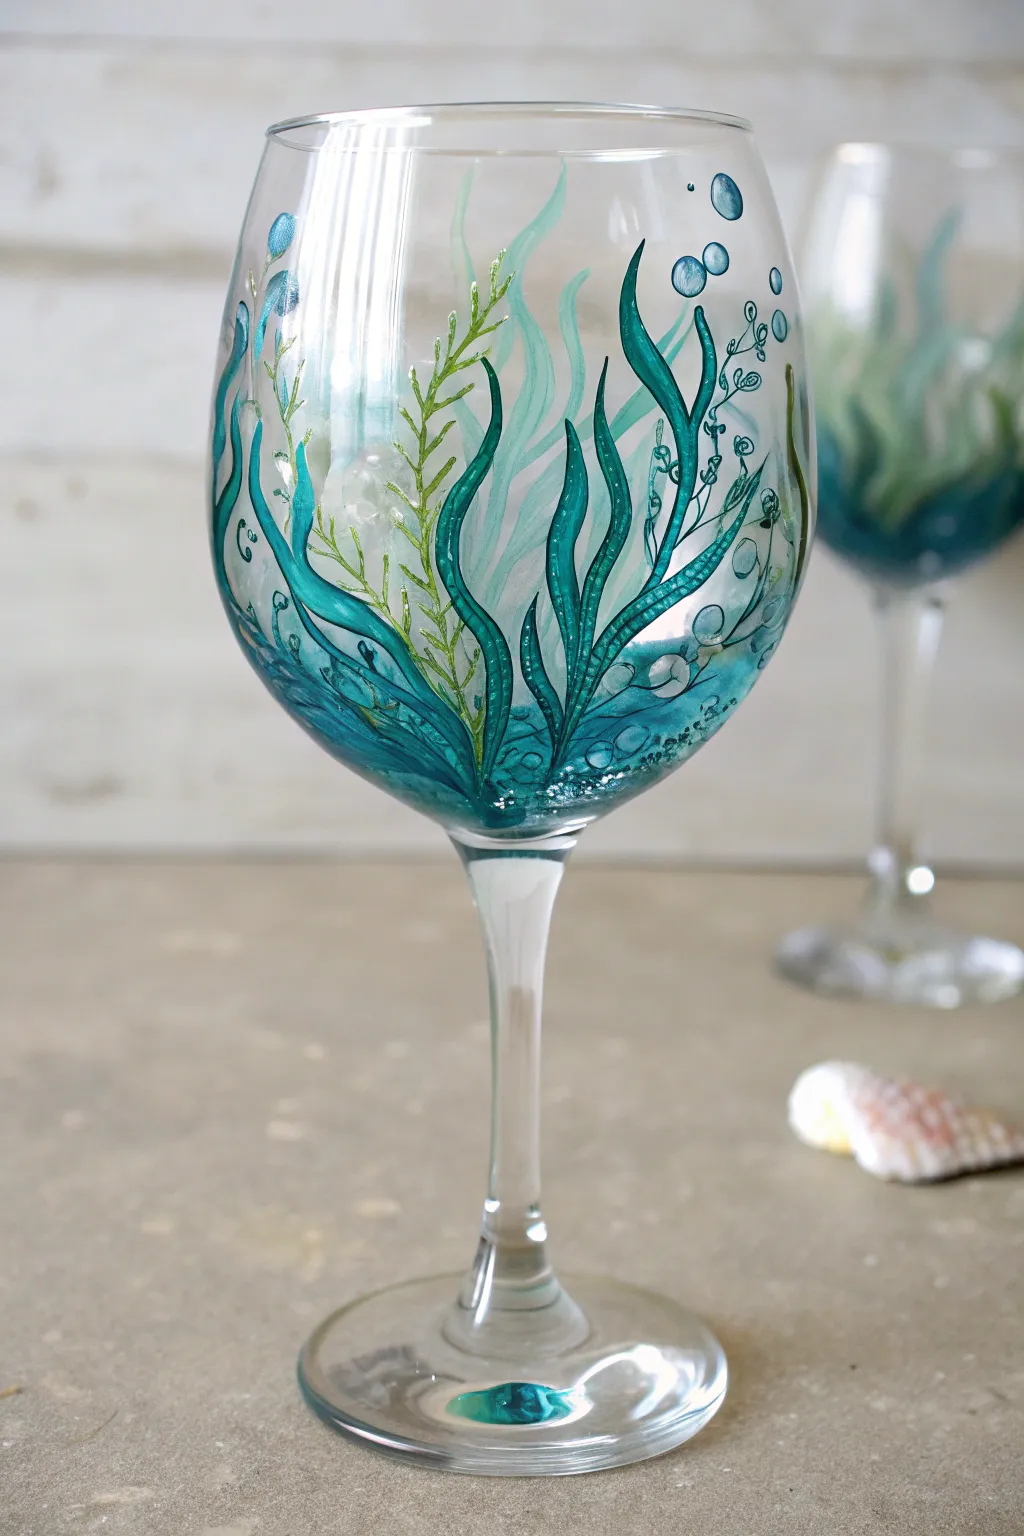
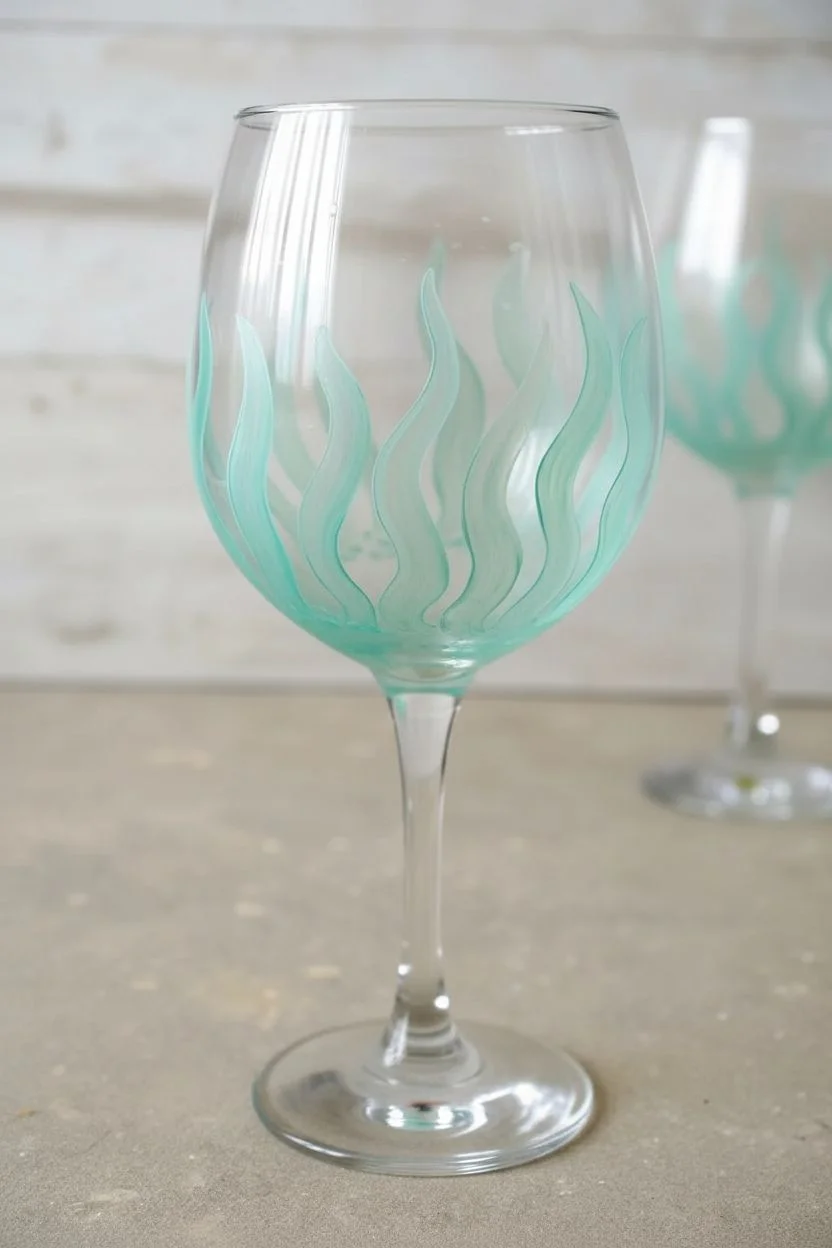
Transform plain glassware into a serene underwater seascape featuring graceful kelp strands, textured coral, and rising bubbles. This project uses layers of translucent teal and green enamels to create depth, making your glass look like a captured piece of the ocean.
Detailed Instructions
Materials
- Large wine glass (clean and grease-free)
- Rubbing alcohol
- Gloss enamel glass paints (Teal, Hunter Green, Lime Green, White, and Clear Medium)
- Fine liner brush (size 0 or 00)
- Small round brush (size 2)
- Palette or small plastic lid (for mixing)
- Paper towels
- Oven (for curing)
Step 1: Preparation & Background
-
Clean surface:
Before dipping your brush, thoroughly wipe the entire glass surface with rubbing alcohol and a paper towel to remove any oils or fingerprints that could prevent paint adhesion. -
Mix the base colors:
Create a translucent wash by mixing a drop of Teal paint with a generous amount of Clear Medium. You want a color that is ghostly and sheer for the furthest background plants. -
Paint background fronds:
Using the small round brush, paint wide, wavy ribbons starting from the bottom of the bowl and reaching about halfway up. Let these be loose and faint, mimicking distant seagrass. -
Dry layer one:
Allow this initial background layer to dry for at least 20 minutes. It doesn’t need to be fully cured, just dry to the touch so you don’t smudge it.
Fixing Smudges
Made a mistake? Don’t panic. Use a damp cotton swab or a toothpick to gently wipe or scrape away wet paint. If it has dried slightly, a little rubbing alcohol on the swab works wonders.
Step 2: Painting the Texture & Plants
-
Create the seabed:
Mix Teal with a tiny dot of Hunter Green. Using a stippling motion (dabbing the brush tip up and down), create a textured, dense area at the very bottom of the glass bowl to anchor your scene. -
Add main kelp stalks:
Switch to your fine liner brush. Load it with pure Teal paint. Starting from your stippled base, pull long, sinuous lines upward, twisting and curving them almost like flames rising. -
Thicken the leaves:
Go back over your kelp lines, pressing slightly harder on the curves to widen the stroke, giving the seaweed a ribbon-like appearance that tapers at the top. -
Paint delicate ferns:
Mix Lime Green with a touch of White. Using the very tip of the liner brush, paint a thin central stem rising up. Add tiny, short dashes on either side of this stem to create a fern or feather-like sea plant. -
Contrast lines:
Add a few very dark strands using Hunter Green to create depth and contrast among the lighter teal ribbons.
Step 3: Details & Curing
-
Outline for definition:
If some shapes look too soft, use the liner brush and a slightly darker mix of Teal to carefully outline one side of the main seaweed ribbons, adding dimension. -
Add bubbles:
Using the handle end of a paintbrush or a dotting tool, dip into a mix of Teal and White. Dot various sized circles drifting upward from the plants toward the rim. -
Highlight the bubbles:
Once the dots are tacky, add a tiny speck of pure White to the top-left curve of each bubble to create a reflective ‘shine’ effect. -
Add sparkle (optional):
For a bit of magic, I like to lightly dab a very small amount of clear glitter medium or pearlescent paint near the base of the stems where the light would hit the sand. -
Check transparency:
Hold the glass up to the light. If any areas look too solid, you can gently lift a little paint with a dry brush while it is wet to regain translucency. -
Air dry:
Let the glass sit undisturbed for at least 24 hours (or follow your specific paint brand’s instructions for air curing time) before baking. -
Bake to cure:
Place the glass in a cold oven. Set the temperature to 350°F (176°C) and bake for 30 minutes. Turn the oven off and let the glass cool completely inside the oven before removing.
Add Hidden Details
For a fun surprise, paint a tiny orange goldfish or a silver silhouette of a shark hiding behind the dense teal kelp layers near the bottom stem.
Enjoy sipping from your personal ocean oasis while admiring the play of light through the layers
Stippled Cactus Texture With Tiny Blooms

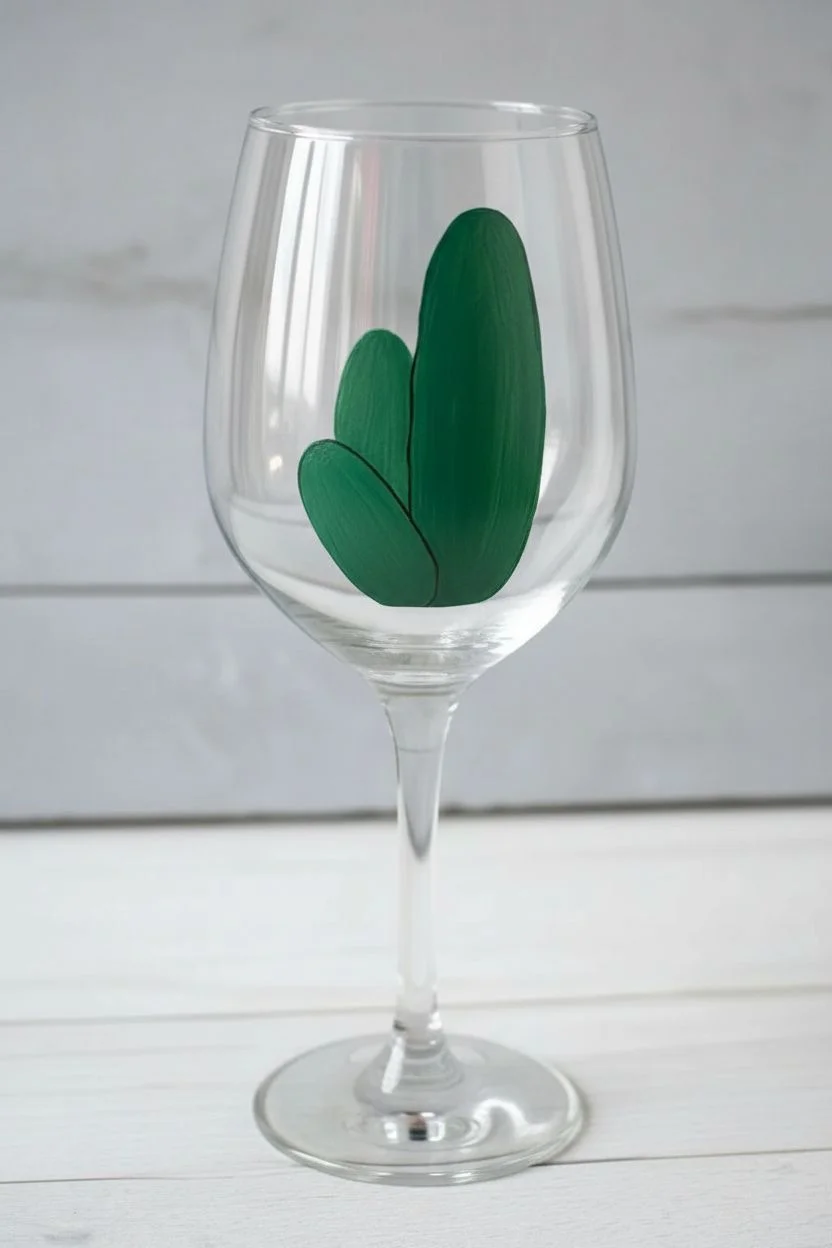
Bring the desert to your dinner table with this charming painted wine glass featuring a stylized cactus and a soft pink bloom. The stippled texture adds a delightful tactile element that makes sipping your favorite vintage even more enjoyable.
How-To Guide
Materials
- Clear wine glass (cleaned with rubbing alcohol)
- Enamel glass paints (Deep Emerald Green, Light Sage Green, White, Soft Pink, Golden Yellow)
- Fine liner brush (size 0 or 00)
- Small round detail brush (size 1 or 2)
- Rubbing alcohol
- Cotton pads
- Paper palette or foil
- Oven for curing (optional based on paint brand)
Step 1: Preparation and Outline
-
Clean surface:
Before you even pick up a brush, ensure your wine glass is free of oils and fingerprints. Wipe the entire outer surface of the bowl with rubbing alcohol and let it air dry completely. -
Mix base color:
On your palette, mix a small amount of Deep Emerald Green with a touch of Light Sage Green to create a rich, mid-tone cactus green. -
Paint main cactus body:
Using your small round brush, paint a tall, elongated oval shape slightly off-center on the glass. This will be the main stem of your cactus. Keep the edges smooth but don’t worry about perfection; organic shapes look best. -
Add the side arm:
While the first shape is still wet or tacky, paint a smaller, shorter oval emerging from the lower left side of the main body slightly angled upwards. -
Initial drying:
Let this base layer dry for about 15-20 minutes. It doesn’t need to be fully cured, just dry enough to not smear when we add details.
Paint Viscosity Tip
Does your white paint for the spines feel too runny? Let a small puddle sit on your foil palette for 5 minutes. As it thickens slightly, it holds a raised ‘dot’ shape much better.
Step 2: Adding Dimension and Texture
-
Create shadows:
Dip your fine liner brush into pure Deep Emerald Green. Carefully paint thin vertical lines along the sides and center of both cactus shapes to mimic the ribs of the plant. -
Blend the shadows:
While the lines are fresh, gently feather them slightly inward with a clean, slightly damp brush to soften the transition, giving the cactus a rounded, 3D appearance. -
Define the outline:
Use the fine liner brush and the darkest green (or even a tiny drop of black mixed with green) to crisply outline both cactus segments. This gives the illustrative style shown in the photo. -
Stipple the texture:
Here comes the fun part. Dip the very tip of your fine liner or a toothpick into white paint. Gently dot (stipple) rows of tiny white specks down the center of the dark shaded areas. These represent the spines. -
Vary dot size:
Keep the dots quite small and random, clustered in neat vertical rows following the ‘ribs’ you painted earlier. I find holding the glass up to the light helps me see spacing better.
Desert Garden Set
Paint a matching set of 4 glasses, giving each one a different cactus shape—try a round barrel cactus or a tall prickly pear—to create a full desert garden collection for guests.
Step 3: Painting the Bloom
-
Base the flower:
Locate the spot where the small arm meets the main body. Paint a fluffy, circular shape using Soft Pink. Use a dabbing motion rather than smooth strokes to build texture immediately. -
Add depth to petals:
Mix a tiny bit of white into your pink. While the base is wet, dab this lighter pink onto the upper edges of your flower circle to simulate light hitting the petals. -
Create the center:
Dab a small spot of Golden Yellow right in the middle of the pink bloom. Gently blend the edges outward into the pink so it looks like a glowing center rather than a hard dot. -
Texture the bloom:
Once the flower is tacky, use your smallest brush to stipple tiny dots of pure White and deep pink over the flower surface to mimic the complex, fuzzy texture of a cactus flower.
Step 4: Final Touches and Curing
-
Clean up edges:
If any paint went astray, use a cotton swab dipped in rubbing alcohol to tidy up the edges of your design before it sets. -
Final drying:
Allow the glass to dry for at least 24 hours. This step is crucial for durability. -
Baking instructions:
Place your glass in a cool oven. Turn the heat to 350°F (175°C) and bake for 30 minutes. Turn the oven off and let the glass cool completely inside the oven to prevent cracking.
Enjoy using your new botanical glassware for your next relaxing evening drink
Water Lily Pond Inspired Florals Around the Glass
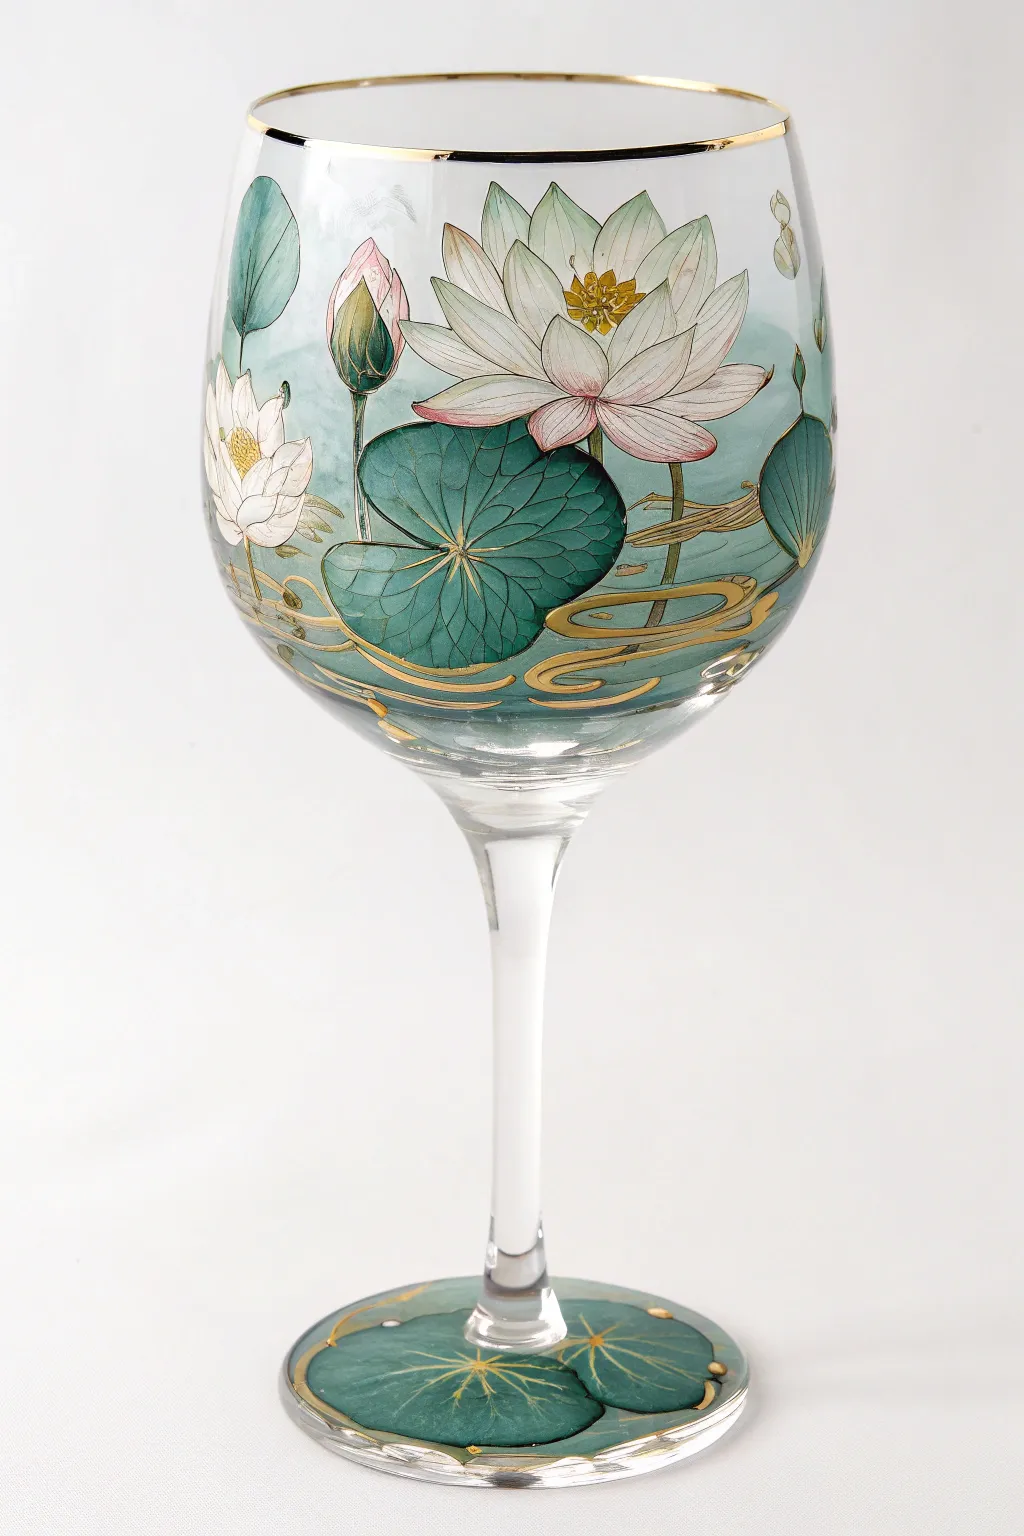
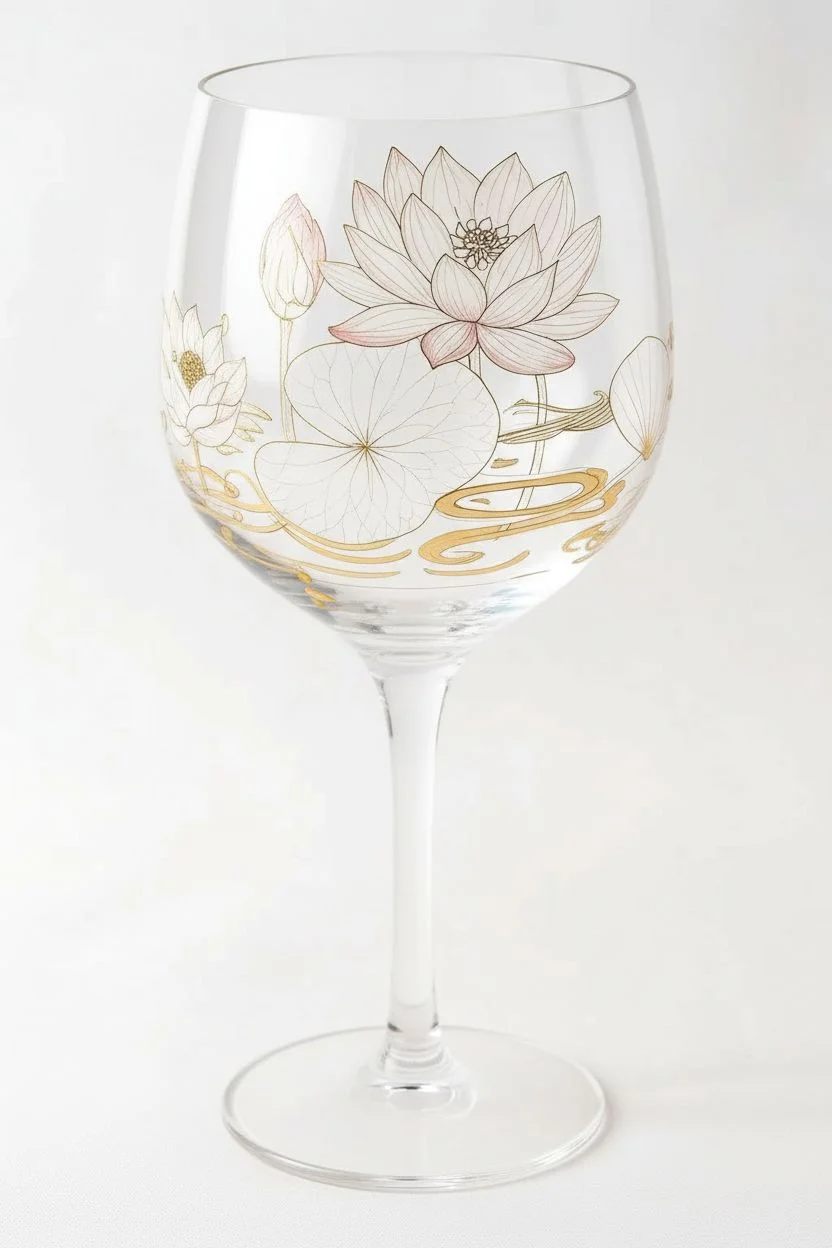
Transform a standard wine glass into an ethereal water garden with this delicate lotus and lily pad design. Featuring translucent floral petals, rich teal leaves, and luxurious gold outlining, this project captures the serenity of a pond right in the palm of your hand.
Step-by-Step
Materials
- Large, clear wine glass (red wine shape works best for the bowl)
- Enamel glass paints (Teal, Deep Green, White, Pale Pink, Butter Yellow)
- Gold relief outliner paste (or gold glass liner)
- Gold liquid glass paint or gilding lacquer (for the rim)
- Fine detail brushes (sizes 00, 0, and 1)
- Flat shader brush (size 4)
- Rubbing alcohol and lint-free cloth
- Paper plate or palette
- Cotton swabs (for cleanup)
Step 1: Preparation and Base Layer
-
Clean the surface:
Before making a single mark, wipe the entire glass surface—including the base—with rubbing alcohol on a lint-free cloth. This removes oils and fingerprints that could prevent the paint from adhering properly. -
Rough out the composition:
Using a very light touch with the gold relief outliner, sketch the main shapes directly onto the glass. Start with the large central lotus flower, flanked by a smaller bud on the left and a white blossom on the far left. Keep your lines very thin. -
Outline the pads:
Draw the large, circular lily pads beneath the flowers. Notice how some pads have a notch removed or radial lines extending from the center; include these details with your gold liner. -
Add swirling water:
Connect the floral elements with flowing, horizontal gold swirls near the bottom of the bowl to represent rippling water. Let the gold outliner dry completely according to the manufacturer’s instructions (usually 1-2 hours) before painting.
Clean Lines Tip
Keep a cotton swab dipped in rubbing alcohol nearby while using the gold outliner. If a line goes rogue, you can wipe it away instantly before it sets.
Step 2: Painting the Flowers
-
Mix the lotus pink:
On your palette, mix a predominately white puddle with just a microscopic dot of pale pink. You want a very translucent, barely-there blush color. -
Fill the lotus petals:
Using the #1 brush, paint the petals of the large central flower. Start at the tip of the petal with pure white and blend the pale pink mixture toward the base of the petal to create a soft gradient. -
Detail the buds:
Paint the smaller bud on the left. Use a darker green at the base of the bud, blending up into pink at the tip. For the white blossom on the far left, stick to pure white paint, perhaps thinning it slightly for transparency. -
Add the centers:
Once the petals strictly are dry, use a tiny dot of yellow mixed with gold liner to create the textured stamen centers of the open flowers.
Step 3: Creating the Leaves and Water
-
Mix the leaf greens:
Create two shades of green: a deep, rich emerald for the lily pads and a lighter, muted teal for the background water effect. -
Paint the lily pads:
Fill in the large circular leaves with the emerald green. I find that using short strokes that follow the radial veins of the leaf adds a nice texture rather than just filling it flatly. -
Wash the background:
Take your teal mixture and thin it significantly with a thinning medium or water (if water-based). Apply a very sheer wash around the flowers and leaves to suggest the water’s depth without obscuring the glass clarity. -
Add leaf veining:
Once the green pads are dry, go back over them with the gold outliner to draw the veins radiating from the center of each pad.
Level Up: 3D Dewdrops
Add tiny dots of clear glass medium or high-gloss varnish on top of the green lily pads after baking. They will look like permanent 3D morning dew.
Step 4: Finishing Touches
-
Decorate the base:
Don’t forget the foot of the glass! Paint the entire top surface of the base with your emerald green paint to look like one giant lily pad supporting the stem. -
Gold veins on the base:
Add gold radial lines on the green base, meeting at the stem, to mimic the veins of a lily pad. -
Gild the rim:
Carefully apply a line of liquid gold paint or gilding lacquer to the very rim of the glass. Use the side of your brush for a steady line. -
Cure the glass:
Follow your specific paint brand’s instructions for curing. This usually involves air drying for 24 hours, followed by baking the glass in a cool oven that heats up to 325°F (160°C) for about 30-40 minutes.
Once baked and cooled, your stunning, hand-painted glass is ready for a toast or to be displayed as a work of art.
Loose Abstract Brushstrokes With Negative Space
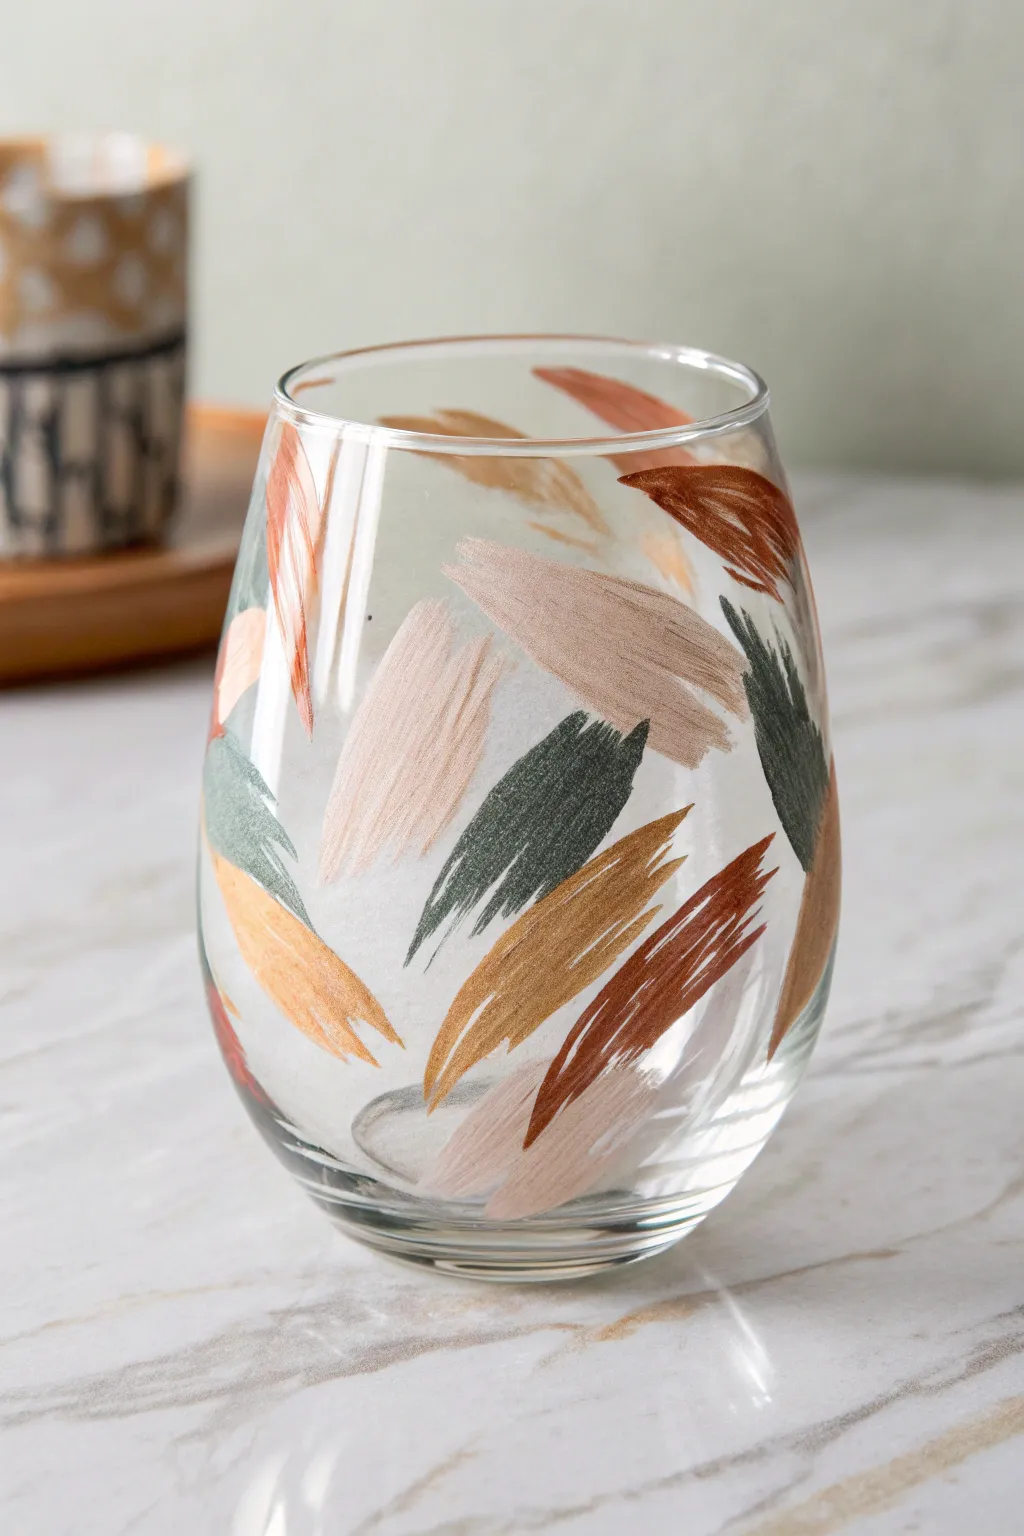
Capture the essence of an autumn breeze with this sophisticated stemless wine glass design featuring loose, dry-brushed strokes. The overlapping layers of rust, sage, and sand create a textural, organic look that feels both modern and grounded.
How-To Guide
Materials
- Stemless wine glass (washed and dried)
- Rubbing alcohol
- Cotton rounds or paper towel
- Enamel glass paints (Rust/Burnt Orange, Sage Green, Beige/Sand, Metallic Bronze)
- Flat shader brushes (size 6 or 8)
- Small flat brush (size 4)
- Paper plate or palette
- Oven (for curing)
Step 1: Preparation & Planning
-
Clean surface:
Before putting any paint down, wipe the entire exterior of your glass with rubbing alcohol using a cotton round. This removes unseen oils and ensures long-lasting adhesion. -
Visualize the pattern:
Study the reference image and notice the spacing. The strokes are floating and random, not crowded. You want to maintain plenty of negative space (clear glass) between the clusters of strokes. -
Prepare the palette:
Squeeze small amounts of your enamel paints onto your palette. You want a distinct rust, a soft sage green, a creamy beige, and a metallic bronze for shimmer.
Step 2: Painting the Base Strokes
-
Load the brush:
Dip your clean, flat shader brush into the beige paint. Wipe off the excess on the palette; you want a semi-dry brush to achieve that feathery, bristle-streaked texture seen in the photo. -
Apply the first layer:
Place your brush midway down the glass and flick upward in a confident, diagonal motion. The stroke should start slightly thicker and taper off at the top. -
Rotate and repeat:
Turn the glass slightly and add 3-4 more beige strokes at varying heights and angles. Keep them loose and uncalculated. -
Switch to sage:
Clean your brush thoroughly or grab a fresh one. Load it with the sage green paint, again aiming for a dry-brush consistency. -
Intersperse the green:
Paint green strokes near the beige ones, but try not to overlap them perfectly just yet. Let the colors sit side-by-side or slightly angled away from each other. -
Dry time:
Allow these first colors to dry to the touch, usually about 15-20 minutes, to prevent muddying the next layer.
Paint Slipping?
If paint slides around or pools, your brush is too overloaded or the glass is oily. Clean the glass again with alcohol and blot your brush on a paper towel before painting.
Step 3: Layering & Metals
-
Add the rust tones:
Using a smaller flat brush, apply the rust/burnt orange strokes. Focus these near the bottom or top of existing clusters to create depth. -
Create texture:
If a stroke looks too solid or heavy, I like to use a clean, dry brush to lightly drag through the wet paint, revealing those characteristic brush lines. -
Introduce the bronze:
Load a brush with the metallic bronze paint. This layer is crucial for that sophisticated finish. Add these strokes sparingly, letting them overlap the drier beige and green areas. -
Fill the gaps:
Rotate the glass and inspect it from all sides. If there’s a large empty patch, add a single, small floating stroke to balance the composition. -
Check the rim:
Ensure no paint is clinging to the top lip of the glass where a mouth would touch; keep the pattern at least half an inch from the rim.
Pro Tip: The Flick
To get that perfect tapered ‘tail’ on each brushstroke, lift your brush pressure rapidly as you reach the end of the stroke, rather than stopping abruptly.
Step 4: Finish & Cure
-
Final dry:
Let the glass sit for at least an hour until the paint is completely manageable. -
Clean up:
Use a cotton bud dip in alcohol to clean up any smudges or stray drips on the clear sections of the glass. -
Air cure:
Follow your specific paint bottle’s instructions, but typically you need to let the glass air cure for 21 days or bake it. -
Baking method:
Place the glass in a cool oven. Turn the heat to 350°F (176°C) and bake for 30 minutes. Turn the oven off and let the glass cool completely inside before removing to prevent cracking.
Now you have a stunning piece of functional art perfect for your next dinner party
Painted-From-the-Inside Hidden Surprise Design
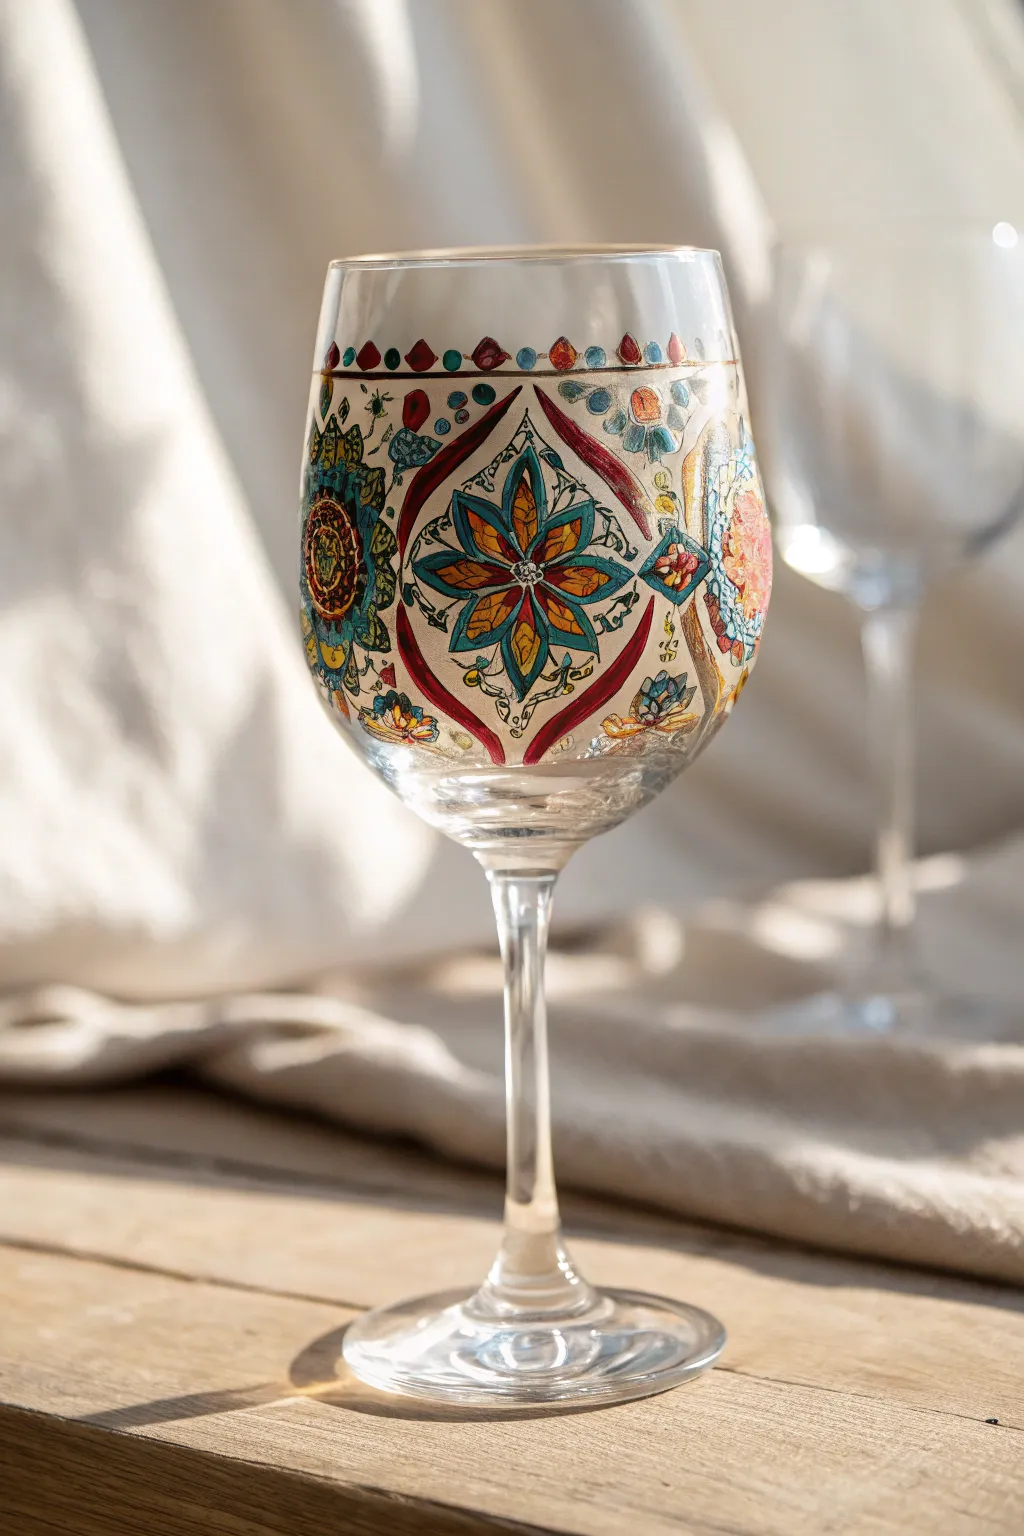

Transform a plain wine glass into a stunning piece of usable art with this intricate, translucent mandala design. By using glass paints and liners, you can replicate the vibrant, light-catching effect of a cathedral window right on your stemware.
Step-by-Step Guide
Materials
- Clear, bowl-shaped wine glass
- Rubbing alcohol and cotton pads
- Glass relief outliner (gold or bronze)
- Solvent-based glass paints (teal, deep red, amber, orange)
- Fine detail paintbrush (size 0 or 00)
- Printed mandala pattern (sized to fit inside the glass)
- Tape
- Cotton swabs
- Oven (for curing, if paint requires)
Step 1: Preparation & Setup
-
Clean surface:
Begin by thoroughly cleaning the wine glass with warm soapy water to remove any grease or stickers. -
Degrease glass:
Wipe the entire outer surface of the bowl with rubbing alcohol on a cotton pad. This ensures the best possible adhesion for your paints and prevents peeling later. -
Position pattern:
Insert your printed mandala pattern inside the glass bowl. I like to crumple the paper slightly or cut slits in it so it curves naturally against the glass, then secure it with tape so the design faces outward.
Pro Tip: Gravity is Key
Work on a horizontal surface and rotate the glass frequently. Glass paint is fluid; if you hold the glass upright too soon, the paint will pool at the bottom of the outlined sections.
Step 2: Outlining the Design
-
Start the relief:
Using your gold or bronze glass relief outliner, begin tracing the main structural lines of the design directly onto the outside of the glass. -
Trace dominant shapes:
Focus on the large, almond-shaped frames (the ogive shapes) first. Keep steady pressure on the tube to ensure a consistent, raised line. -
Add central details:
Outline the flower petals inside the main frame. Work from the center outward to avoid smudging your wet lines with your hand. -
Create borders:
Draw the straight horizontal lines near the rim. Add the small scalloped or dot details along this top border for a finished look. -
Dry the outline:
Allow the outliner to dry completely according to the manufacturer’s instructions. This usually takes at least 1-2 hours; the lines must be hard before you start painting.
Step 3: Filling with Color
-
Paint the petals:
Dip your fine brush into the teal glass paint. Carefully fill in the outer petals of the central flower, letting the paint flow right up to the gold relief lines. -
Add warm accents:
Switch to amber or orange paint for the inner petal details and the small floral motifs surrounding the main shape. Clean your brush thoroughly with solvent between color changes. -
Fill the frame:
Use the deep red paint to color the thick, almond-shaped border surrounding the central flower. This strong contrast frames the delicate teal beautifully. -
Create translucent textures:
For the background areas inside the main shapes, apply a very thin wash of a pale cream or clear medium if you want a frosted look, or leave them clear as negative space. -
Dab the dots:
Using a small dotting tool or the back of your paintbrush, apply tiny distinct dots of color (teal and red) along the upper rim border and within the floral patterns.
Oops! Smudged Line?
Don’t panic if your relief liner goes astray. Wait for it to dry slightly, then use a craft knife or a toothpick to gently scrape the mistake off the glass without leaving a residue.
Step 4: Finishing Touches
-
Check for gaps:
Hold the glass up to a light source. Look for pinholes where the paint didn’t quite reach the gold outline and carefully touch them up. -
Remove the pattern:
Once the paint is tacky and no longer runny, gently un-tape and remove the paper pattern from the inside of the glass. -
Cure the glass:
Allow the glass to air dry for 24 hours. If your paint requires heat setting, place the glass in a cold oven, set to the recommended temperature (usually 325°F/160°C), bake for 40 minutes, and let it cool down inside the oven.
Enjoy your beautiful hand-painted glass at your next dinner party as the light shines through your colorful creation


Have a question or want to share your own experience? I'd love to hear from you in the comments below!