If you’re itching to draw something festive, St. Patrick’s Day is basically an all-you-can-sketch buffet of clovers, rainbows, and lucky little details. I pulled together my favorite St. Patrick’s Day drawing ideas—starting with the classics you expect, then drifting into more playful, unexpected twists.
Classic Three-Leaf Shamrock Doodles
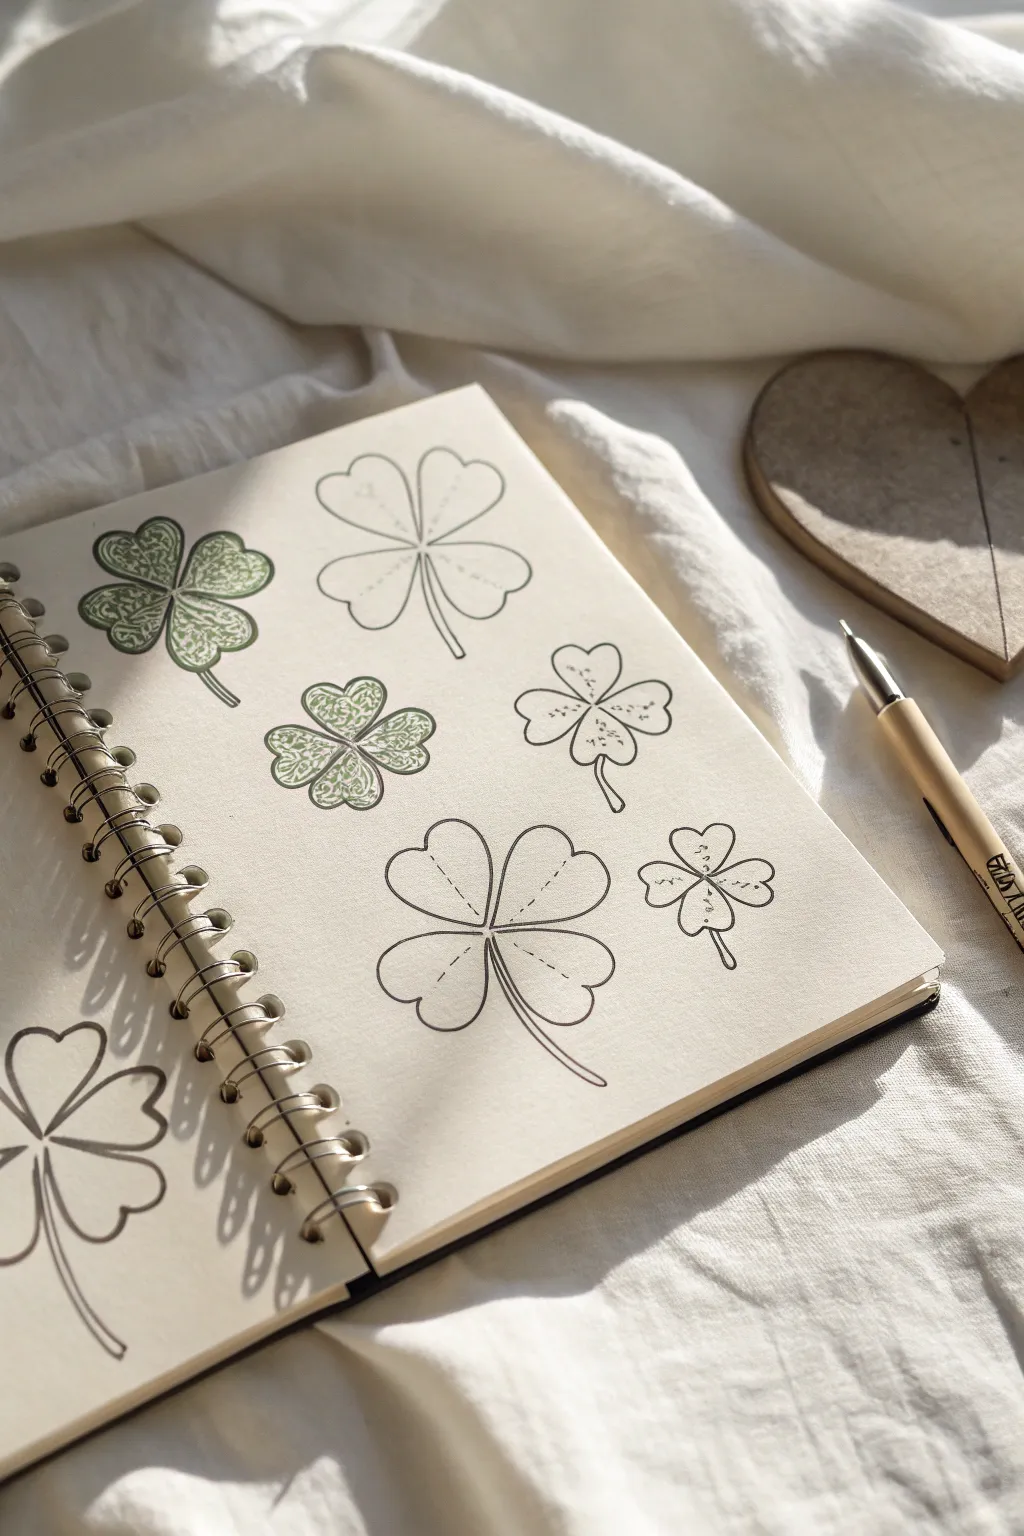
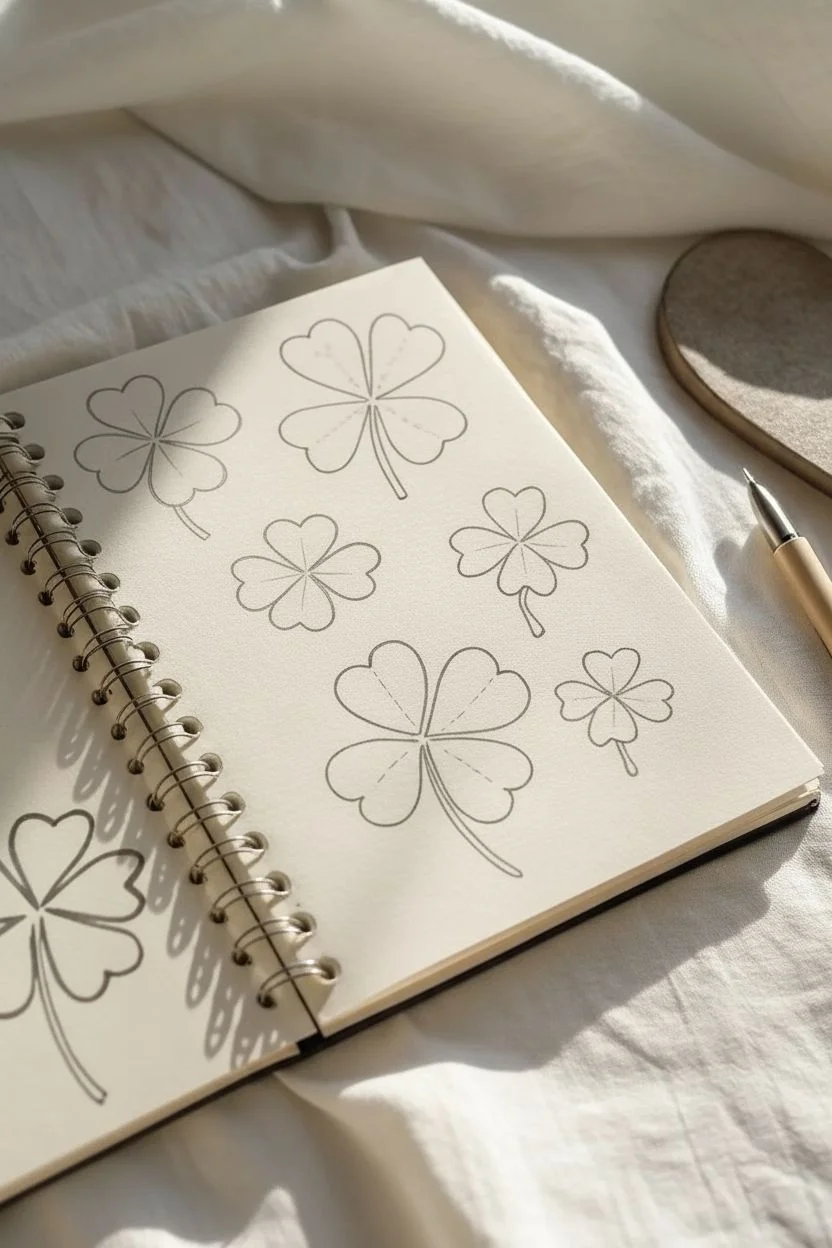
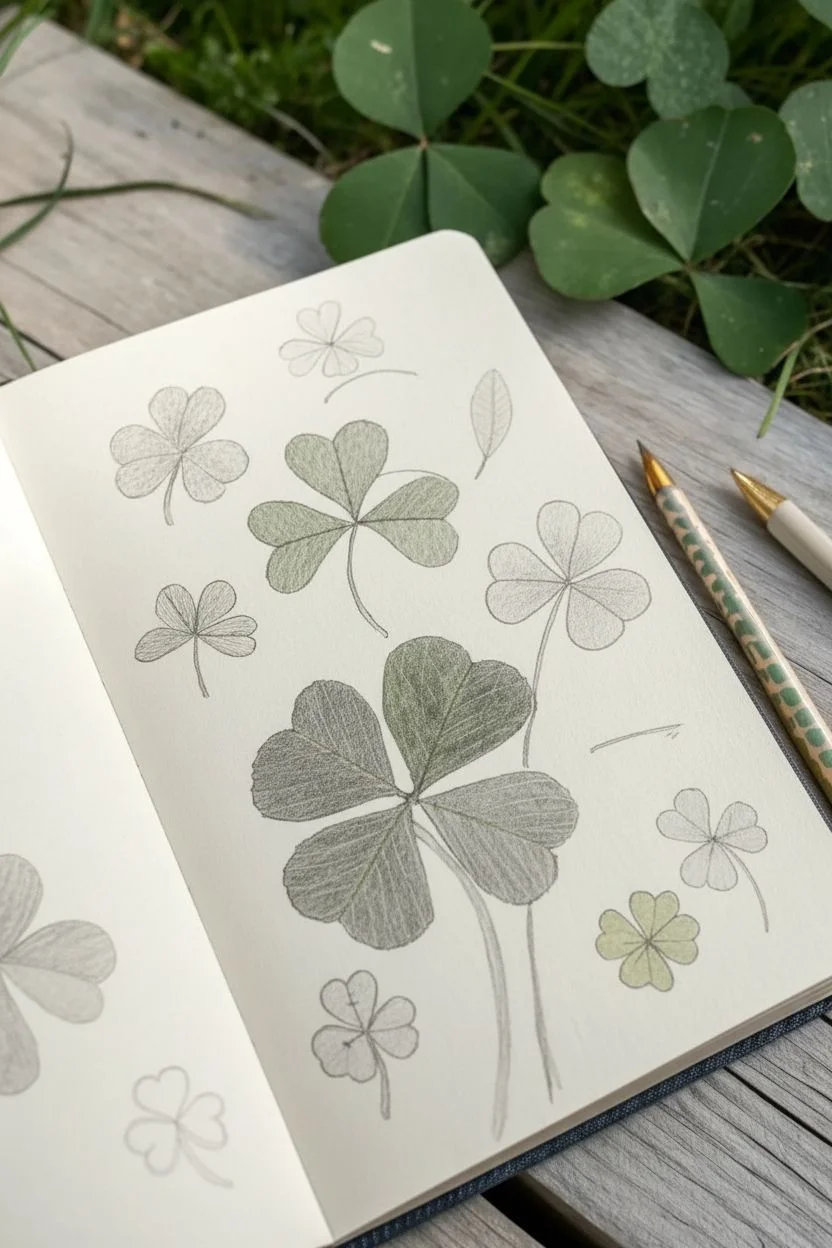
Create a charming spread of four-leaf clovers and shamrocks using fine line work and intricate botanical details. This sketchbook project explores different filling techniques, from delicate stippling to Celtic-inspired filigree, perfect for a relaxing drawing session.
Step-by-Step
Materials
- Spiral-bound sketchbook (smooth or mixed media paper)
- Fine liner pens (sizes 0.1, 0.3, and 0.5)
- Pencil (HB or H for sketching)
- Kneaded eraser
- Green colored pencil or thin marker (sage or olive tone)
Step 1: Planning the Layout
-
Lightly Pencil Shapes:
Start by lightly sketching heart shapes arranged in groups of three or four. Use an HB pencil so the lines are easy to erase later. Vary the sizes and angles so the clovers look scattered naturally across the page. -
Add Stems:
Draw thin, curved stems extending from the center of each cluster. Allow them to curve gently in different directions to give the page a loose, organic flow. -
Define the Petals:
Refine the heart shapes. Make the indent at the top of each leaf distinct, and ensure the leaves narrow slightly as they meet in the center of the clover.
Step 2: Inking the Outlines
-
Outline the Simple Glovers:
Using a 0.3 fine liner, trace over your pencil lines for the larger, open clovers. Keep your hand relaxed to achieve clean, confident curves. -
Detail the Centers:
Draw a tiny ‘V’ shape or simple lines radiating from the center point of each clover into the leaves. This adds dimension and suggests the vein structure. -
Erase Basic Lines:
Once the ink is completely dry, gently run your kneaded eraser over the page to remove graphite guidelines, leaving just your clean ink outlines.
Uneven Petals?
Don’t stress perfect symmetry! Real clovers are rarely perfect. Slightly misshapen or different-sized leaves actually make the botanical drawing look more organic and realistic.
Step 3: Adding Texture & Pattern
-
Stipple Shading:
Select one of the medium-sized clovers for stippling. Using a 0.1 pen, place tiny dots near the center of the flower and the base of the petals. I like to disperse the dots as they move outward to create a gradient effect. -
Celtic Fill Preparation:
For the ornate, filled clovers, choose a green colored pencil or fine marker. Outline the inner edge of each petal, leaving a tiny white gap between this green line and the black outline. -
Drawing the Filigree:
Inside the green areas, draw tight, swirling patterns. Think of small vines or infinite loops. Keep the pattern dense so the clover looks darker than the surrounding paper. -
Layering the Veins:
On the simple line-art clovers, add dashed lines running down the center of each leaf. This subtle detail mimics the central fold of a real clover leaf. -
Mixed Media Touch:
If you want variation, use a lighter green pencil to barely shade the tips of the ’empty’ clovers, keeping the look distinct from the intricate filled ones.
Add a Vintage Wash
Brush a very dilute layer of tea or coffee stain over the page before drawing (let it dry fully!) to give your sketchbook an antique, field-note appearance.
Step 4: Final Flourishes
-
Stem Definition:
Go back over the stems with a slightly thicker 0.5 pen or double up your 0.3 line to give them weight, grounding the flowers. -
Tiny Botanicals:
Fill any awkward negative spaces with very small, single shamrocks or even loose dots to balance the composition. -
Final Clean Up:
Do one last pass with the eraser to catch any stray pencil marks, ensuring the white of the paper contrasts crisply with your ink work.
Now you have a sketchbook page full of lucky botanical studies ready to be admired


Four-Leaf Clover Lucky Charm Sketches
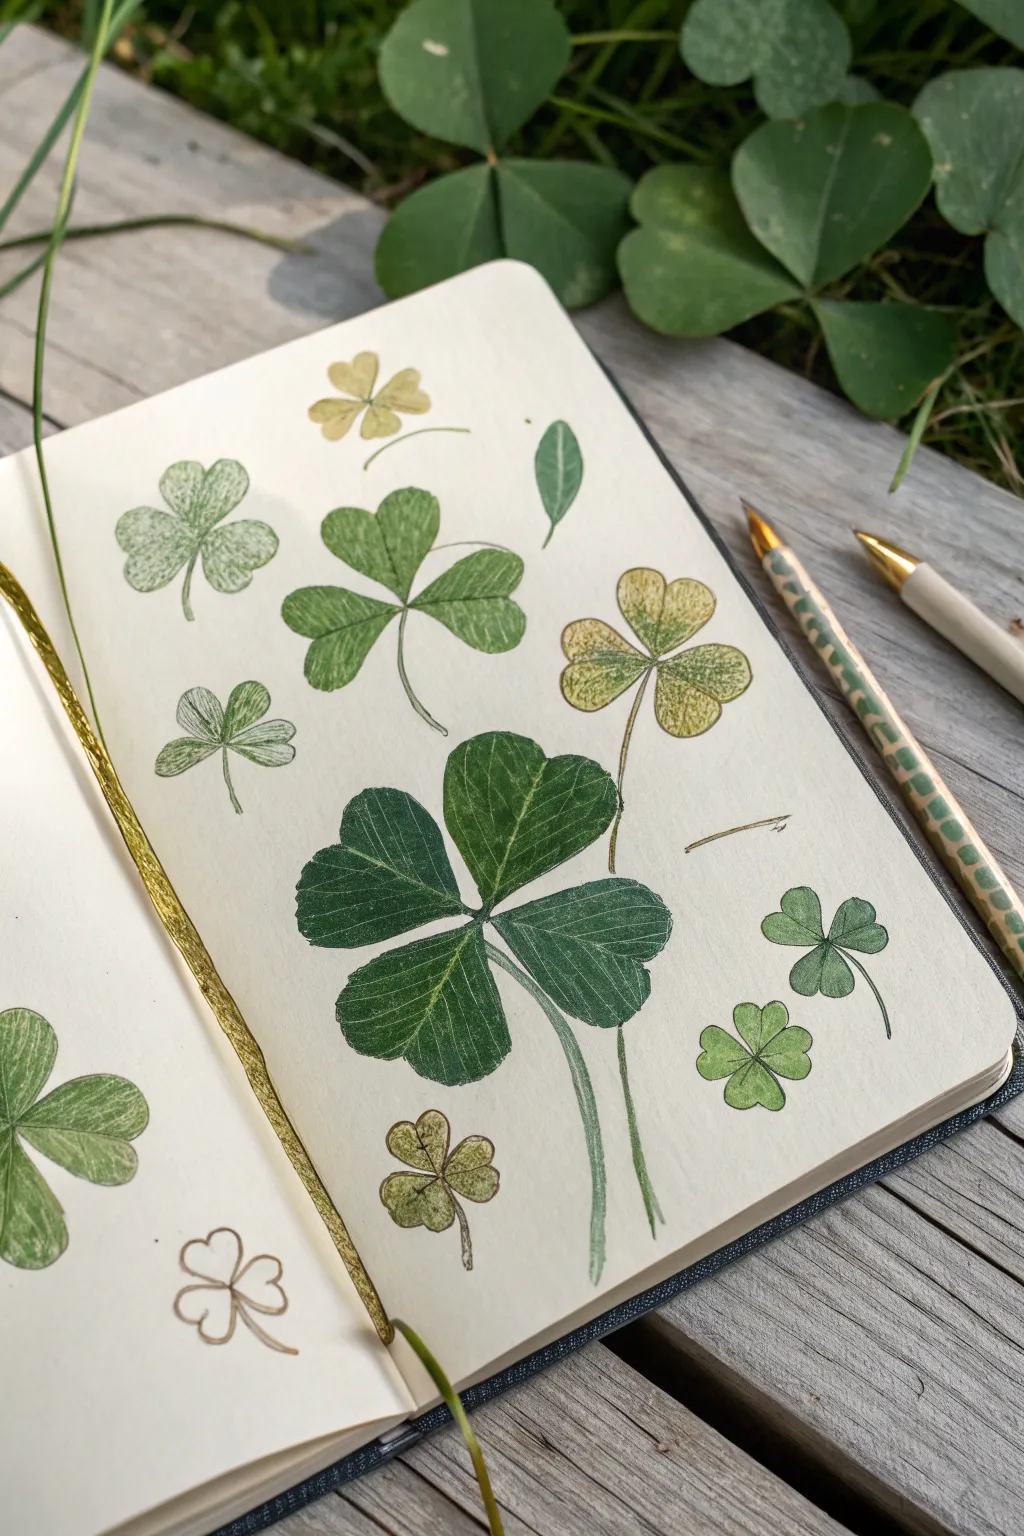
Create a charming page of botanical observations featuring various clover species, from simple three-leaf shamrocks to the lucky four-leaf variety. The result is a naturalistic, sketchbook-style layout that balances detailed realism with delicate linework.
Step-by-Step Guide
Materials
- Heavyweight sketchbook paper (mixed media or smooth bristol)
- H or HB graphite pencil for sketching
- Colored pencils (various greens: olive, hunter, sap, and yellow-ochre)
- Fine liner pen (0.1mm or 0.05mm, sepia or dark grey)
- Kneadable eraser
- Real clover leaves for reference (optional)
Step 1: Planning and Sketching
-
Establish the focal point:
Begin by lightly sketching the largest four-leaf clover near the bottom-center of your page. Draw four heart-shaped leaves meeting at a central point, making the bottom leaf slightly larger to create depth. -
Map out smaller specimens:
Scatter 5-6 smaller three-leaf clovers around the main subject. Vary their sizes and angles; have some facing forward and others slightly tilted to make the composition feel organic. -
Add variety with buds and singles:
Fill in the negative spaces with a few tiny, unbloomed clover buds or single leaflets. This mimics the randomness of a real patch of clover. -
Refine the leaf shapes:
Go back over your rough shapes and define the edges. Clover leaves often have a slight notch at the top and taper gently toward the center. Keep your pencil pressure very light so lines disappear later. -
Draw the stems:
Add thin, curving stems to each clover. Let them flow naturally, intertwining slightly or trailing off the page edge for a candid look.
Step 2: Adding Color and Texture
-
Base layer of light green:
Using a pale sap green or yellow-green colored pencil, fill in all the leaves with a light, even layer. Use small circular motions to avoid harsh directional strokes. -
Deepen the shadows:
Take a darker hunter green and shade the center of each clover where the leaves meet. Also, add shading to the underside of leaves that are overlapping others. -
Create the characteristic V-shape:
Many clovers have a faint white or light green ‘V’ chevron pattern on each leaf. Lift some pigment with your kneadable eraser or use a white pencil to suggest this marking before coloring too darkly around it. -
Add yellow variation:
For a few of the smaller clovers, use a yellow-ochre pencil instead of pure green. This suggests drying or variegated leaves and adds visual interest to the page. -
Detailing the veins:
Sharpen your pencils to a fine point. Lightly draw the main central vein on each leaflet, branching out into delicate secondary veins. Keep these subtle; they shouldn’t look like distinct stripes. -
Texture the large clover:
On the main four-leaf subject, build up layers of dark green, leaving tiny flecks of the paper showing through to simulate the matte texture of the leaf surface.
Fixing Wax Bloom
If colors look waxy or shiny, you’ve pressed too hard. Lightly dab with a kneadable eraser to lift excess wax, then gently layer again.
Step 3: Inking and Final Touches
-
Outline with discretion:
Using a very fine sepia or grey pen, outline parts of the leaves. I prefer to use broken lines rather than a solid continuous outline to maintain a soft, botanical feel. -
Ink the stems:
Go over the pencil stems with your pen, adding tiny hairs or texture lines if you want high realism. Vary the line weight slightly to show curve and shadow. -
Add a simple outline sketch:
Leave one or two of the smallest clovers as simple line drawings without color. This makes the sketchbook look like a work in progress and adds artistic flair. -
Clean up:
Gently erase any remaining graphite sketch lines that are visible outside your colored areas. -
Final assessment:
Step back and look at the overall balance. If a green looks too flat, layer a touch of blue or brown over it to deepen the tone.
Aged Paper Look
Lightly wash the background with watered-down coffee or tea before drawing to give your page a vintage, scientific journal aesthetic.
You now have a beautiful botanical study that captures the delicate luck of the Irish fields


Easy Leprechaun Character With Big Features
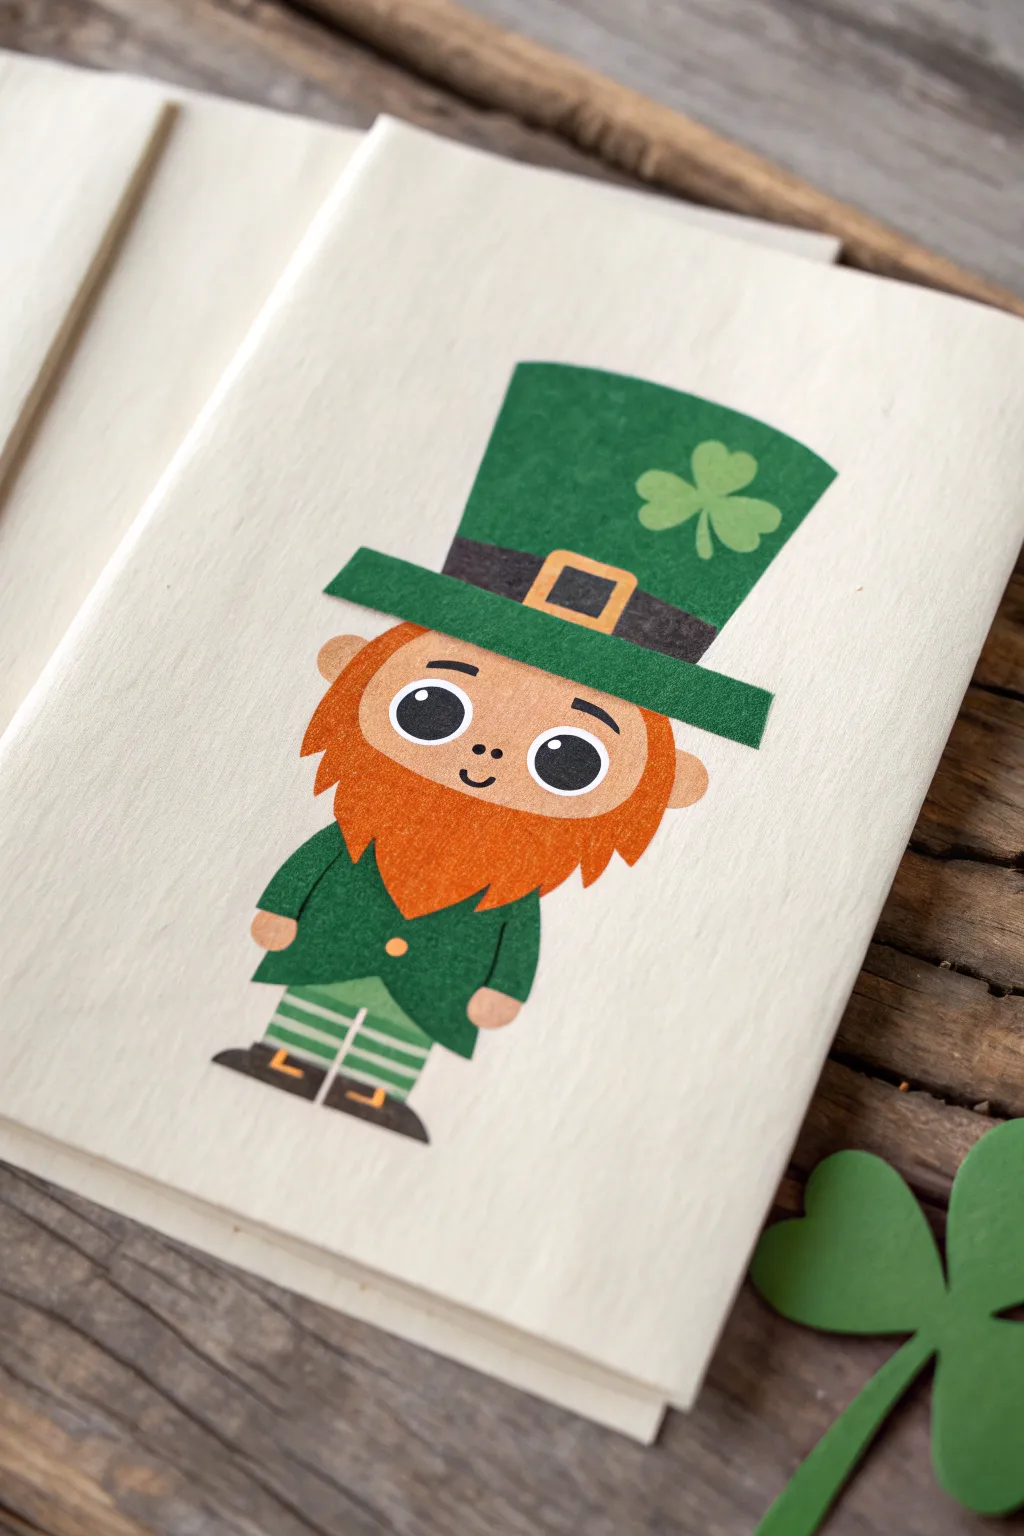
Using simple shapes and bold paper textures, this charming leprechaun comes to life with a clean, cut-paper aesthetic. It features oversized eyes and a warm orange beard, perfect for a personalized St. Patrick’s Day greeting.
Step-by-Step
Materials
- Textured cream cardstock (or light wood veneer paper for the base)
- Construction paper or cardstock (Kelly green, darker forest green, bright orange, black, gold/yellow, skin tone)
- Craft glue or glue stick
- Scissors and precision craft knife
- Pencil and eraser
- Fine-tip black marker
- White gel pen (optional)
- Ruler
Step 1: Shaping the Head
-
Cut the face shape:
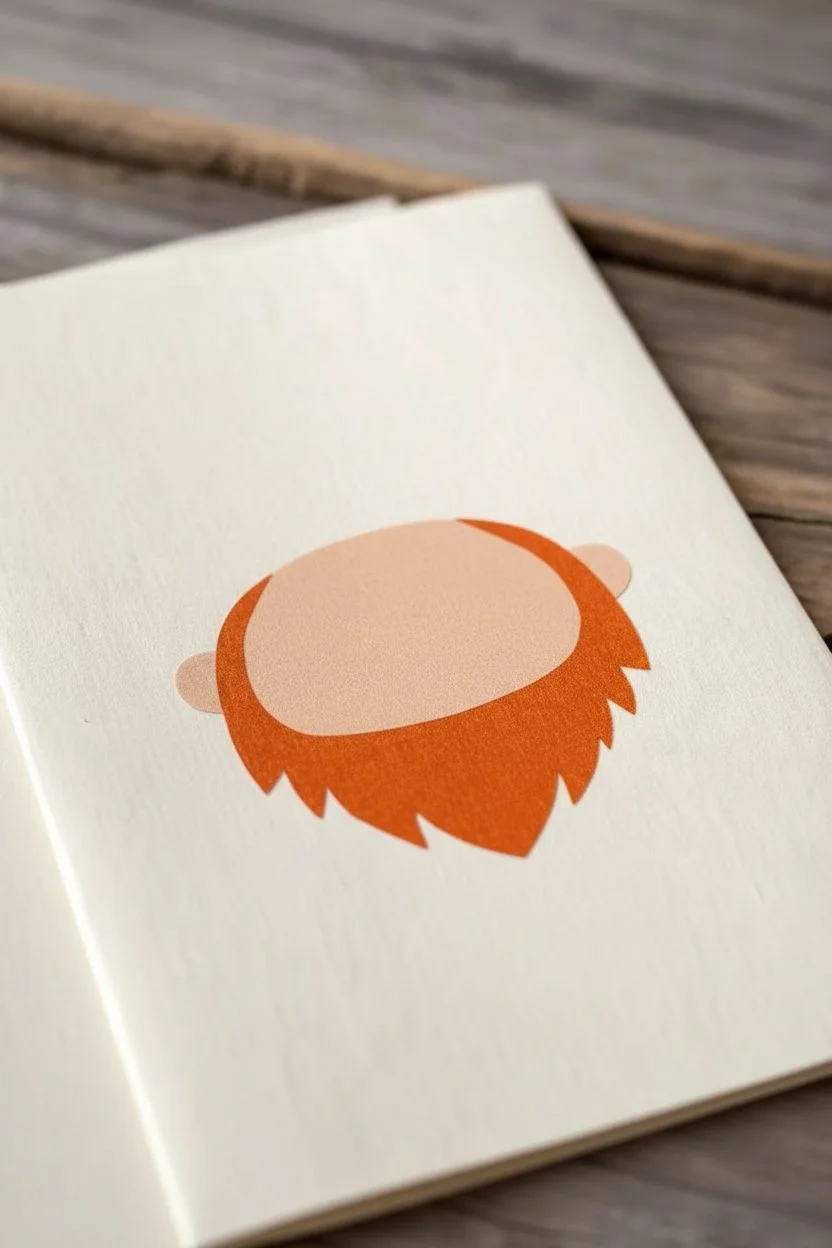
Begin by cutting a wide oval from your skin-tone paper. This doesn’t need to be perfectly round; a slightly flattened oval works best to accommodate the large beard later. -
Form the beard:
Place your skin-tone oval over orange paper to gauge the size. Sketch a large, U-shaped beard that wraps around the bottom half of the face. Give the edges jagged, sawtooth cuts to simulate hair texture. -
Add the ears:
Cut two small half-circles from the skin-tone paper for ears. Glue these behind the head shape on the left and right sides so they just peek out. -
Assemble the head:
Glue the orange beard onto the lower half of the face oval. The top edge of the beard should curve slightly upward on the cheeks.
Sticky Situation
If glue seeps out from under the paper pieces, let it dry completely and rub it away gently with a gum eraser rather than wiping it wet, which smears.
Step 2: Building the Hat
-
Cut the main hat cylinder:
From Kelly green paper, cut a rectangle that flares out slightly at the top. The top edge can be slightly curved to give it dimension. -
Create the brim:
Cut a long, thin rectangle from the same green paper for the brim. It should be wider than the hat cylinder but not too tall. -
Design the hat band:
Cut a strip of black paper that matches the width of the hat cylinder. Glue this near the bottom of the cylinder shape. -
Add the buckle:
Cut a small square from gold or yellow paper. Cut a smaller black square and glue it into the center of the gold one to create a hollow buckle look. Adhere this to the center of the black hat band. -
Attach the shamrock:
Cut a simple three-leaf clover shape from a slightly lighter green paper and glue it to the upper right side of the hat for a festive touch. -
Finalize the hat placement:
Glue the brim over the bottom of the hat cylinder. Then, glue the entire hat assembly onto the top of the leprechaun’s hear, slightly overlapping the forehead.
Step 3: Body and Details
-
Create the coat:
Cut a trapezoid shape from the dark forest green paper for the body. Cut a small triangle out of the bottom center to create the look of coat tails. -
Add arms and hands:
Cut two small curved shapes for sleeves from the forest green paper and attach them to the sides of the coat. Add tiny skin-tone semi-circles at the ends for hands. -
Make the legs:
Cut two thin rectangles from white paper. Using a green marker or thin strips of green paper, create horizontal stripes on these legs. -
Attach shoes:
Cut two black boot shapes. Add tiny gold rectangles for buckles near the ankles. Glue the striped legs onto the boots. -
Assemble the body:
Glue the legs to the back of the coat shape, then glue the head assembly onto the top of the coat.
Dimensional Pop
Use squares of thick foam tape behind the hat brim and the beard to lift them off the card surface, giving the character a fun 3D effect.
Step 4: Bringing it to Life
-
Draw the eyes:
Cut two large ovals from white paper for the eyes. Inside, draw large black circles, leaving small white spots for light reflection (or use a white gel pen later). -
Adhere the eyes:
Glue the eyes onto the face. They should be spaced somewhat wide apart for a cute, innocent look. -
Add facial details:
Use a fine-tip black marker to draw small eyebrows above the eyes, a tiny nose dot, and a simple curved smile. -
Mount to card:
Take your textured cream cardstock and fold it to create a card base. Glue your finished leprechaun onto the center of the card front. -
Final touches:
I like to add a tiny gold circle button to the center of the coat to tie the colors together.
Your cheerful leprechaun is now ready to spread some lucky charm


St. Patrick’s Day Gnome With a Clover Hat
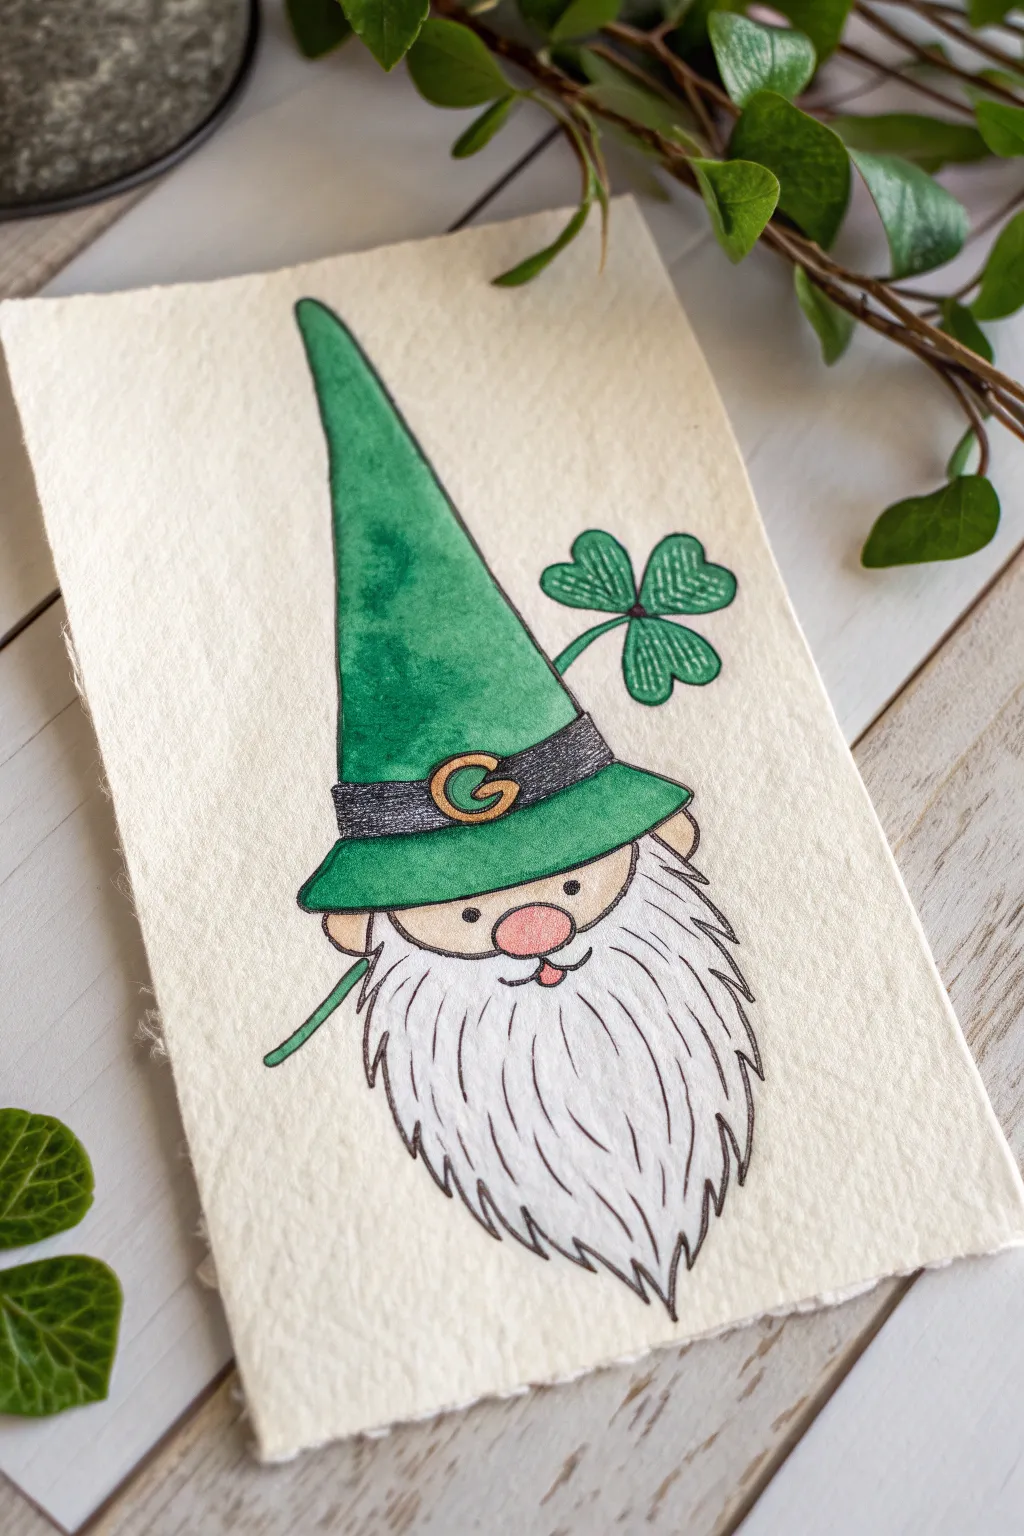
This charming illustration combines fine liner details with soft watercolor washes to create a festive St. Patrick’s Day character. The textured paper adds a lovely organic feel to the gnome’s rustic beard and tall, pointed hat.
Detailed Instructions
Materials
- Cold-press watercolor paper (300gsm for texture)
- Fine liner pen (black, waterproof, size 0.3 or 0.5)
- Watercolor paints (Emerald Green, Sap Green, Yellow Ochre, Rose/Pink, Skin Tone/Beige)
- Small round watercolor brush (size 2 or 4)
- Pencil and eraser
- Gold metallic paint or gel pen (optional for buckle)
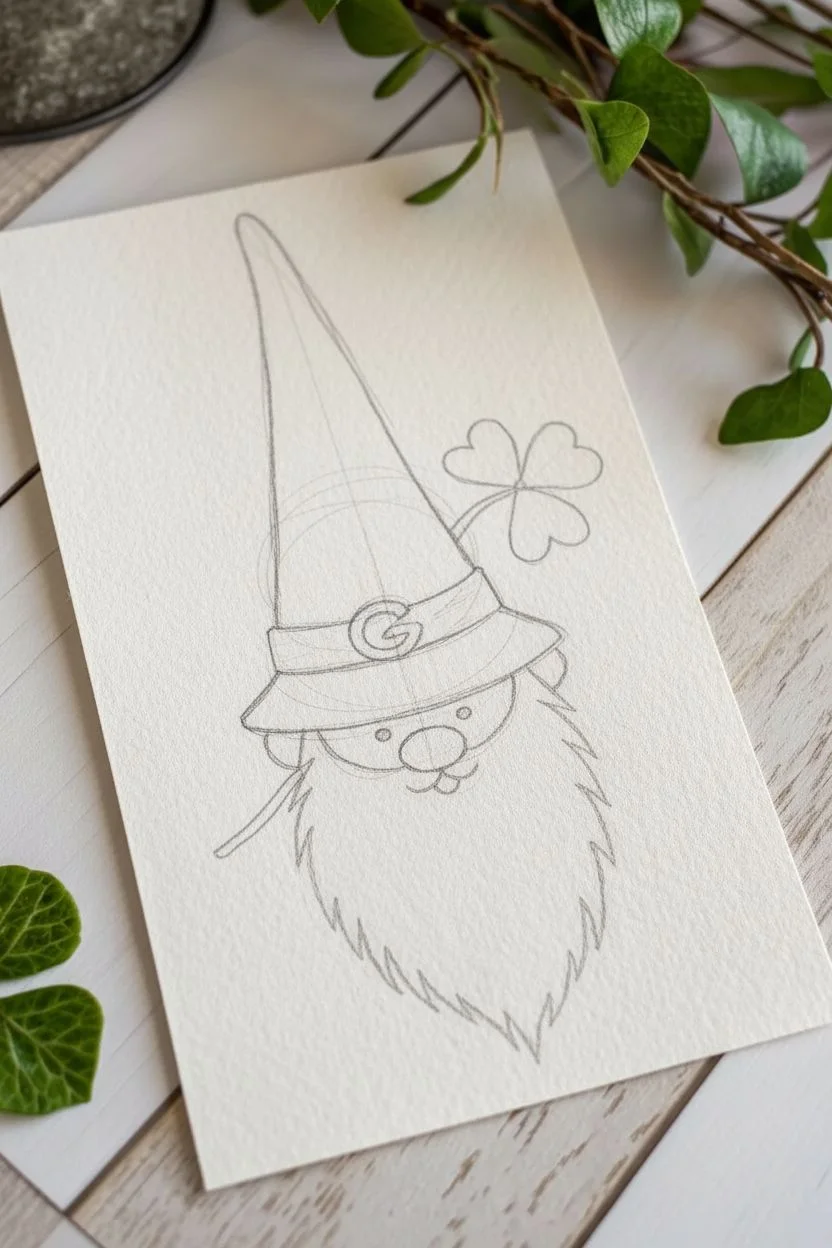
Step 1: Sketching the Outline
-
Map out the shapes:
Start lightly with a pencil. Draw a large, elongated triangle for the hat that curves slightly to the left. Just below the hat’s brim, sketch a semi-circle for the face area. -
Add the brim and nose:
Define the hat’s brim as a curved band wrapping around the base of the triangle. Draw a prominent oval nose right in the center of the face area, overlapping the brim slightly. -
Draft the beard:
From the sides of the hat brim, draw the outline of the beard. Let it taper down into a point, creating a flowing, triangular shape that curves to the right. -
Include the clover:
Sketch a three-leaf clover tucking behind the right side of the hat. Draw a thin stem extending downwards and three heart-shaped leaves clustering together. -
Detail the face:
Add small, simple circles for eyes and a tiny crescent shape underneath the nose for a smiling mouth. Don’t forget the small semi-circles on the sides for ears.
Step 2: Inking the Drawing
-
Outline with waterproof ink:
Using your waterproof fine liner, trace over your pencil lines. For the beard, use jagged, uneven strokes to simulate hair texture rather than a single smooth line. -
Refine the textures:
Add internal lines within the beard flow to show individual strands of hair. Stipple the belt on the hat with tiny dots to give it a textured, leather-like appearance. -
Detail the clover:
Draw the veins inside the clover leaves using very light pressure on your pen. Once the ink is completely dry, gently erase all pencil marks.
Ink Smearing?
If your black lines bleed when creating the watercolor washes, your pen isn’t fully waterproof. Let the ink dry for at least 20 minutes before painting, or switch to micron pens.
Step 3: Painting with Watercolors
-
Paint the hat base:
Load your brush with a vibrant emerald green. Paint the main body of the hat, letting the color pool slightly in some areas to create a natural mottled texture on the paper. -
Add belt contrast:
For the hat’s belt, use a very dark grey or black, but keep it transparent enough to see your stippling work underneath. -
Gild the buckle:
Fill in the belt buckle with yellow ochre or gold paint. Ensure the ‘G’ shape or inner detail remains clear. -
Define the brim and clover:
Use a slightly different shade of green, perhaps mixed with a touch of blue, for the hat brim to distinguish it from the cone. Paint the clover leaves in a fresh, bright green. -
Warm up the face:
Apply a dilute beige or skin tone wash to the face and ears. While the paint is still wet, drop a tiny bit of pink onto the cheeks for a rosy glow. -
Highlight the nose:
Paint the nose with a slightly stronger pink or coral tone. Leave a tiny white spot unpainted on the upper curve to act as a highlight. -
Shade the beard:
I find that the beard looks best left mostly white. Just add very faint grey washes near the top, under the nose and brim, to create shadow and depth. -
Final touches:
Once everything is dry, check your lines. If the paint has obscured any ink details, go back over them lightly with your fine liner to make them pop.
Add Some Sparkle
Mix a tiny amount of gold mica powder into your green paint for the hat, or use a clear glitter pen over the clover leaves once dry for extra magic.
Display your cheerful gnome in a small frame to bring a bit of luck to your home decor
BRUSH GUIDE
The Right Brush for Every Stroke
From clean lines to bold texture — master brush choice, stroke control, and essential techniques.
Explore the Full Guide
Green Top Hat With a Bold Buckle
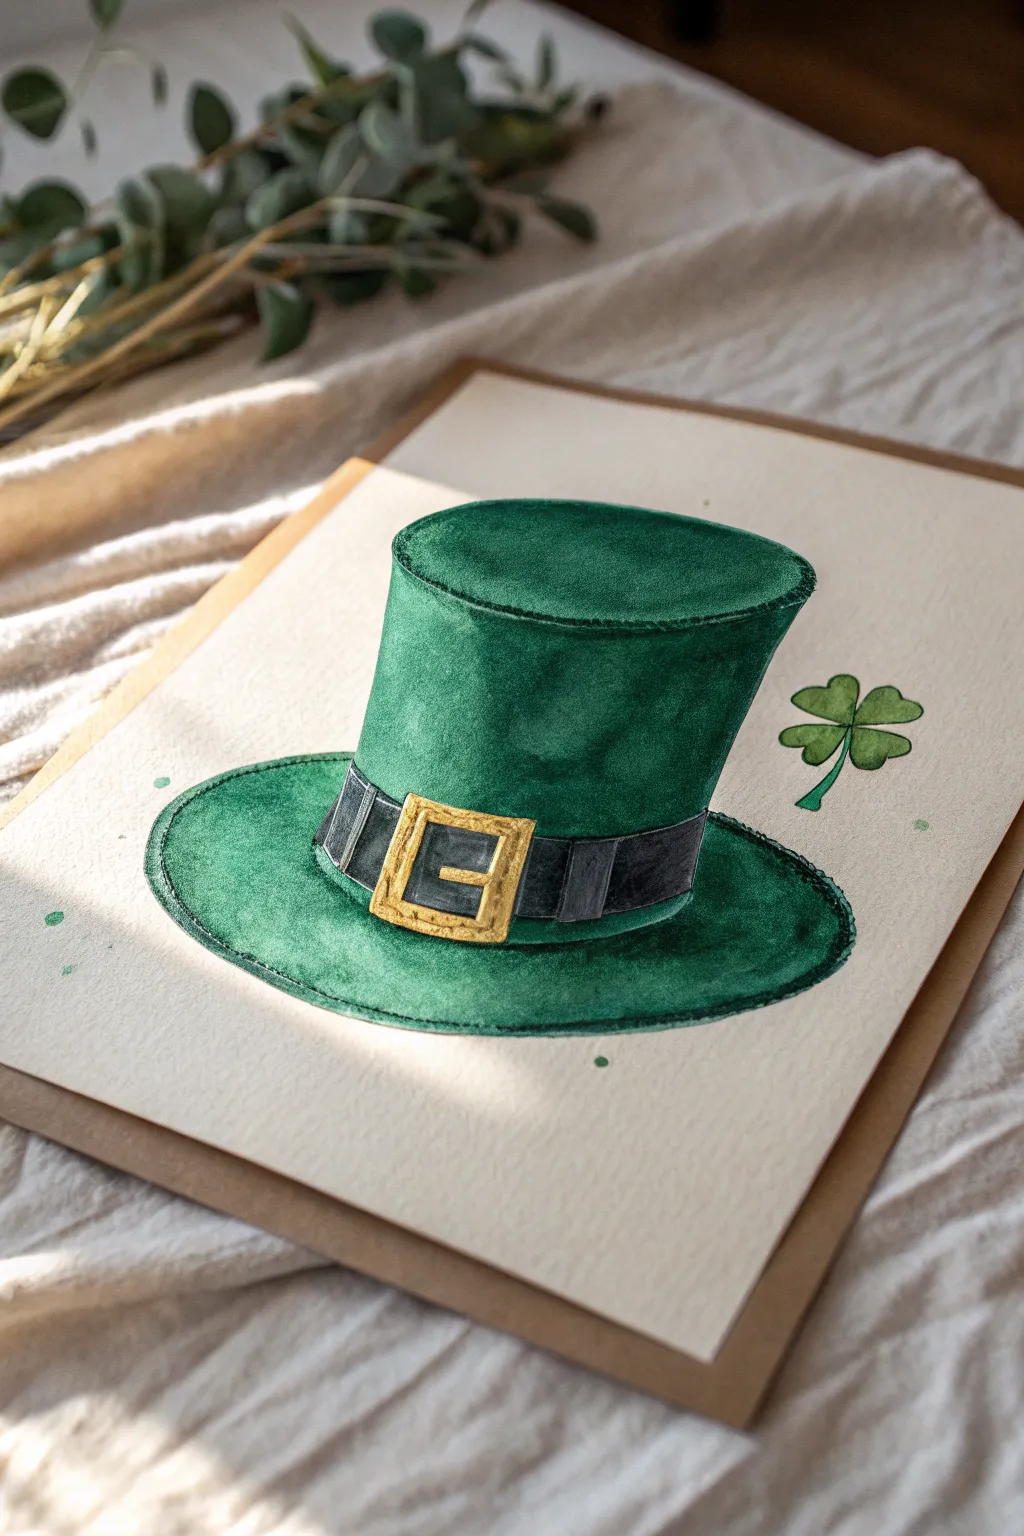

Capture the luck of the Irish with this vibrant watercolor illustration of a classic leprechaun hat. The rich emerald tones and contrasting gold buckle make this piece pop off the page, perfect for a handmade St. Patrick’s Day card.
Step-by-Step Guide
Materials
- Cold press watercolor paper (300 gsm)
- Pencil (HB or 2H)
- Kneadable eraser
- Watercolor paints (Emerald Green, Sap Green, Deep Green, Black, Yellow Ochre, Burnt Sienna)
- Round watercolor brushes (sizes 2, 6, and 8)
- Fine liner pen (optional, for final touches)
- Clean water and paper towels
Step 1: Sketching the Outline
-
Draft the crown:
Begin by lightly drawing a vertical cylinder shape slightly tapered at the bottom. The top should be a flattened oval to show perspective, curving slightly downward at the front. -
Add the brim and band:
Sketch a wider oval around the base of the cylinder for the hat’s brim. Make the brim curl up slightly at the sides. Then, draw parallel lines near the base of the crown to mark where the belt will sit. -
Detail the buckle:
Draw a rectangular buckle centered on the front of the band, making sure to sketch the inner rectangular hole and the prong resting against the side. -
Include the clover:
To the right of the hat, lightly sketch a four-leaf clover with heart-shaped leaves meeting at a central point and a thin stem curving downward. -
Refine and erase:
Use your kneadable eraser to lighten the pencil lines until they are just barely visible, removing any heavy graphite that might muddy the watercolor later.
Shadow Secrets
Don’t use straight black for shadows on the green felt. Mix a complementary red or purple into your green paint to create a rich, natural-looking dark shade.
Step 2: Painting the Greens
-
First wash on the crown:
Mix a medium Emerald Green with plenty of water. Using your size 8 brush, apply a wet wash over the main body of the hat, leaving the very top edge slightly lighter for a highlight. -
Shadowing the cylinder:
While the first layer is still damp, drop in concentrated Deep Green along the left and right edges of the cylinder to create a rounded 3D form. -
Painting the brim:
Apply the same Emerald Green mix to the extensive brim. As you paint, add darker green pigment closer to the base of the crown where the hat would cast a shadow. -
Top surface depth:
Paint the top oval surface of the hat. Keep the center lighter and darken the perimeter to emphasize the indented shape common in top hats. -
Clover details:
Switch to a smaller brush and paint the clover using a fresh Sap Green. Leave tiny slivers of white paper between the leaves to help define them without outlining.
Make It Sparkle
Once the watercolor is totally dry, use a metallic gold gel pen or gold watercolor paint to add sharp highlights to the buckle’s corners.
Step 3: Adding Contrast and Metallic Tones
-
The black belt:
Mix Black with a touch of blue to cool it down. Carefully paint the band around the hat, working around the gold buckle area. -
Belt highlights:
Lift a small line of paint from the upper edge of the black belt while it’s wet, or leave a tiny strip unpainted to suggest a glossy leather texture. -
Base gold layer:
Fill the buckle shape with a wash of Yellow Ochre. It doesn’t need to be perfectly solid; some variation adds to the metallic look. -
Buckle shading:
Once the ochre is dry, use Burnt Sienna to paint the inner edges and corners of the buckle to give it a beveled, dimensional appearance.
Step 4: Final Definition
-
Deepen the shadows:
Wait for the green layers to dry completely. Glaze a very dark mixture of Green and a touch of Black under the brim and along the darkest side of the cylinder. -
Sharpen the edges:
I find that using a size 2 brush with intense dark green pigment to outline the brim’s edge really helps separate the object from the background. -
Texturize the buckle:
Add tiny dots or lines of dark brown on the gold buckle to suggest an aged or hammered metal texture. -
Splatter effect:
Load a loose brush with watery green paint and tap it against your finger to create gentle splatters around the hat for a whimsical finish.
Allow your painting to dry fully before erasing any remaining pencil marks to reveal your festive creation
Hand-Lettered “Lucky” With Clover Flourishes
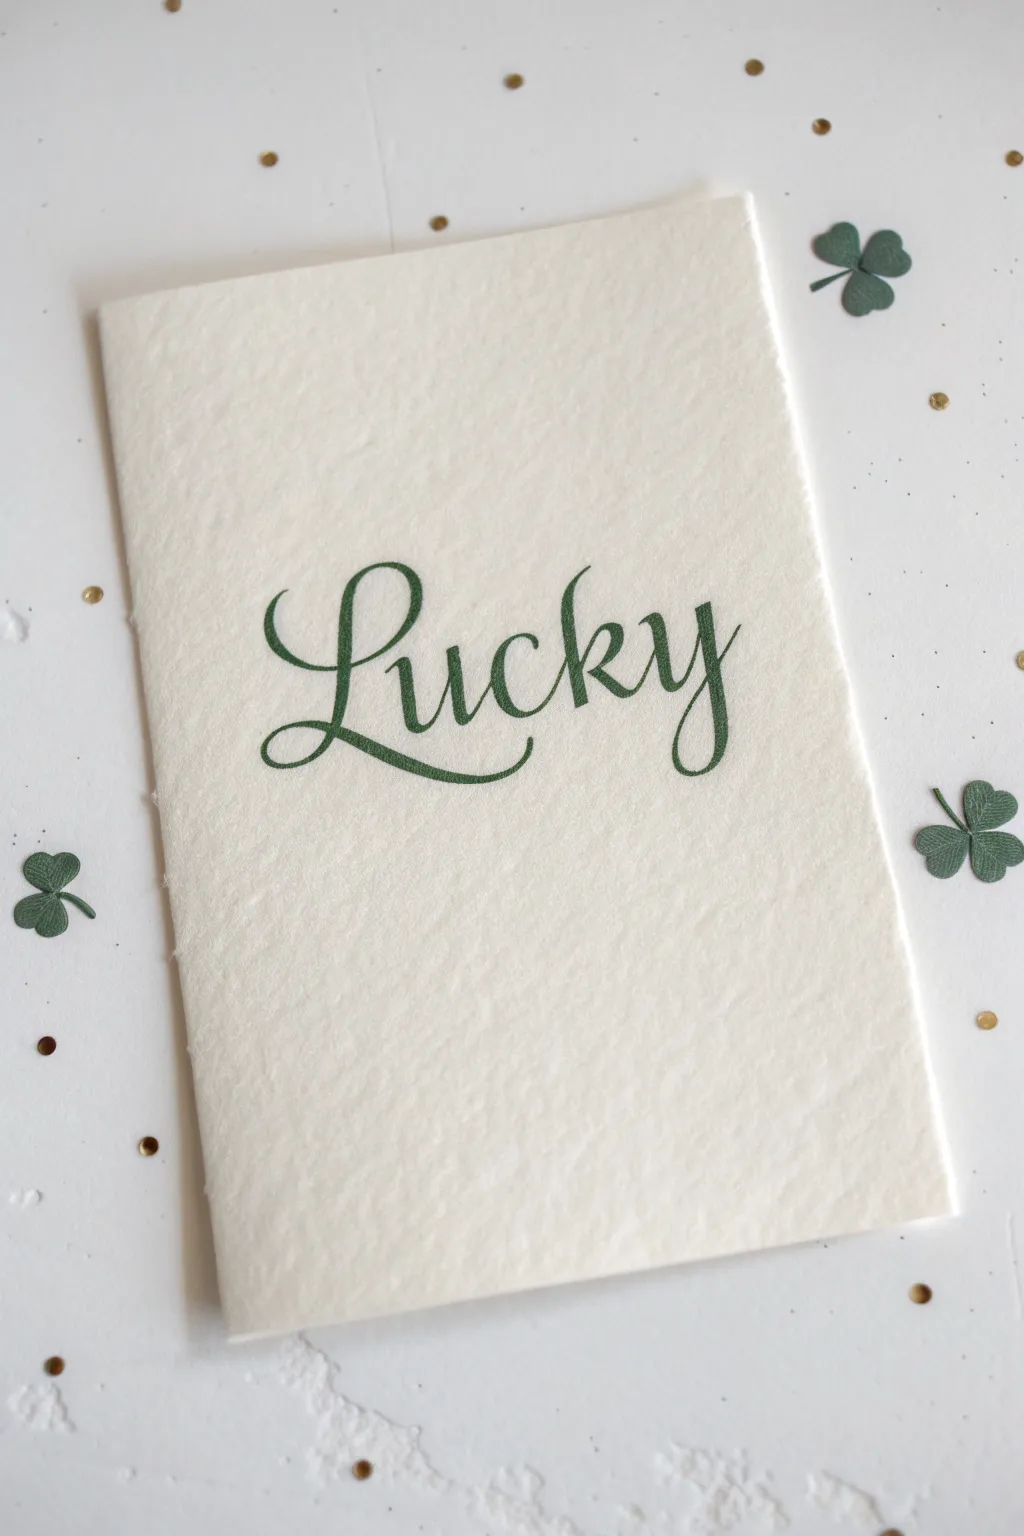
Sometimes the simplest designs make the boldest statements, as seen in this minimalist card featuring the word “Lucky” in a flowing script. This project focuses on mastering clean lettering on textured paper for a sophisticated St. Patrick’s Day greeting.
How-To Guide
Materials
- Heavyweight textured cardstock or watercolor paper (cold press)
- Dark forest green calligraphy ink or brush pen
- Fine-point pencil (H or HB)
- Kneaded eraser
- Pointed calligraphy nib and holder (or fine tip brush pen)
- Ruler
- Green clover confetti (optional for styling)
- Gold glitter confetti (optional for styling)
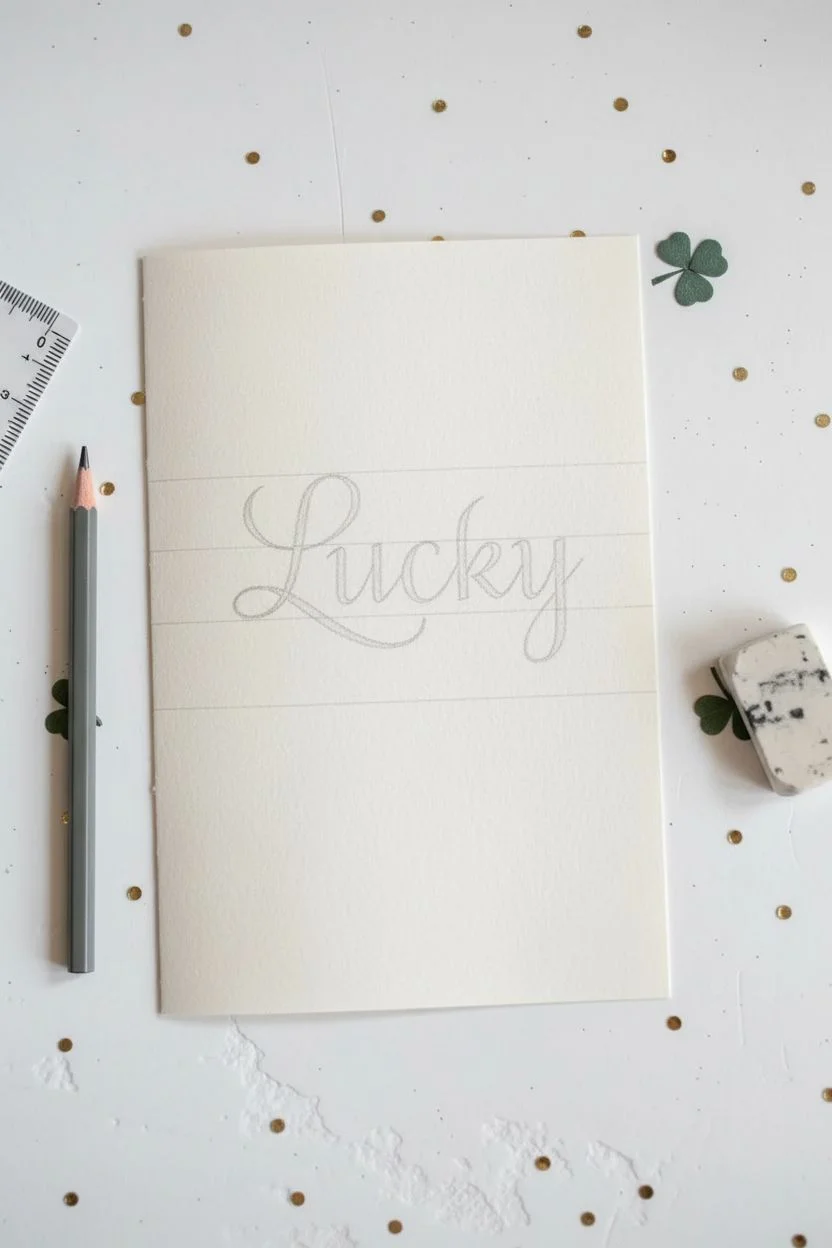
Step 1: Preparation & Layout
-
Select your paper:
Choose a high-quality paper with visible texture, like cold press watercolor paper, to mimic the upscale look in the photo. Cut it to your desired folded card size, such as 5×7 inches. -
Create the fold:
If you are making a folded card, score the center line gently with a bone folder so the thick paper folds cleanly without cracking. -
Find the center:
Using your ruler, measure the front face of the card to find the exact vertical and horizontal center points. Mark them very lightly with your pencil. -
Sketch guidelines:
Draw three very faint horizontal lines centered on the page: a baseline (where the letters sit), a waistline (for lowercase heights), and a cap height line. -
Draft the lettering:
Lightly sketch the word “Lucky” in cursive. Focus on the large loop of the ‘L’ and the descending tail of the ‘y’ to balance the composition.
Step 2: Inking the Lettering
-
Prepare your tool:
Dip your nib into the forest green ink or uncap your brush pen. Test the flow on a scrap piece of the same textured paper to ensure it doesn’t bleed or feather. -
Start with the capital L:
Begin the ‘L’ with a confident downstroke. Apply pressure on the downward motion to create a thick line, then release pressure as you curve up for the thin loop. -
Connect the letters:
Move seamlessly into the ‘u’. Remember the rule of calligraphy: thin upstrokes (light pressure) and thick downstrokes (heavy pressure). -
Form the c and k:
Continue smoothly. For the ‘k’, ensure the ascender loop reaches high, matching the height of your ‘L’ loop for symmetry. -
Finish with the y:
Draw the ‘y’ and extend the descender loop below the word. Curve the tail slightly upward at the end to frame the bottom of the word. -
Refine the edges:
I like to go back and carefully touch up any jagged edges where the nib might have skipped over the paper texture, ensuring the lines look crisp.
Smooth Moves on Texture
When writing on textured paper, move your pen slightly slower than usual. This allows the ink to settle into the tiny valleys of the paper for a solid line.
Step 3: Finishing Touches
-
Let it dry completely:
Allow the ink to dry fully. Since thick paper absorbs ink differently, give it at least 20-30 minutes to avoid smudging. -
Erase guidelines:
Gently dab—don’t rub—your kneaded eraser over the pencil marks to lift them without damaging the paper surface or the ink. -
Deckle the edges (optional):
To recreate the artisan look from the photo, you can carefully tear the edges of the card against a ruler, creating a soft, feathered ‘deckled’ edge. -
Style the scene:
If you are photographing your work or presenting it, scatter small green clover cutouts and gold confetti dots around the card to complete the festive theme.
Add Subtle Dimension
Once the green ink is dry, use a very fine clear glitter pen to trace just the thick downstrokes for a secret shimmer that catches the light.
Now you have a beautifully understated card ready to share some luck.

PENCIL GUIDE
Understanding Pencil Grades from H to B
From first sketch to finished drawing — learn pencil grades, line control, and shading techniques.
Explore the Full Guide
“Happy St. Patrick’s Day” Card Layout Sketch
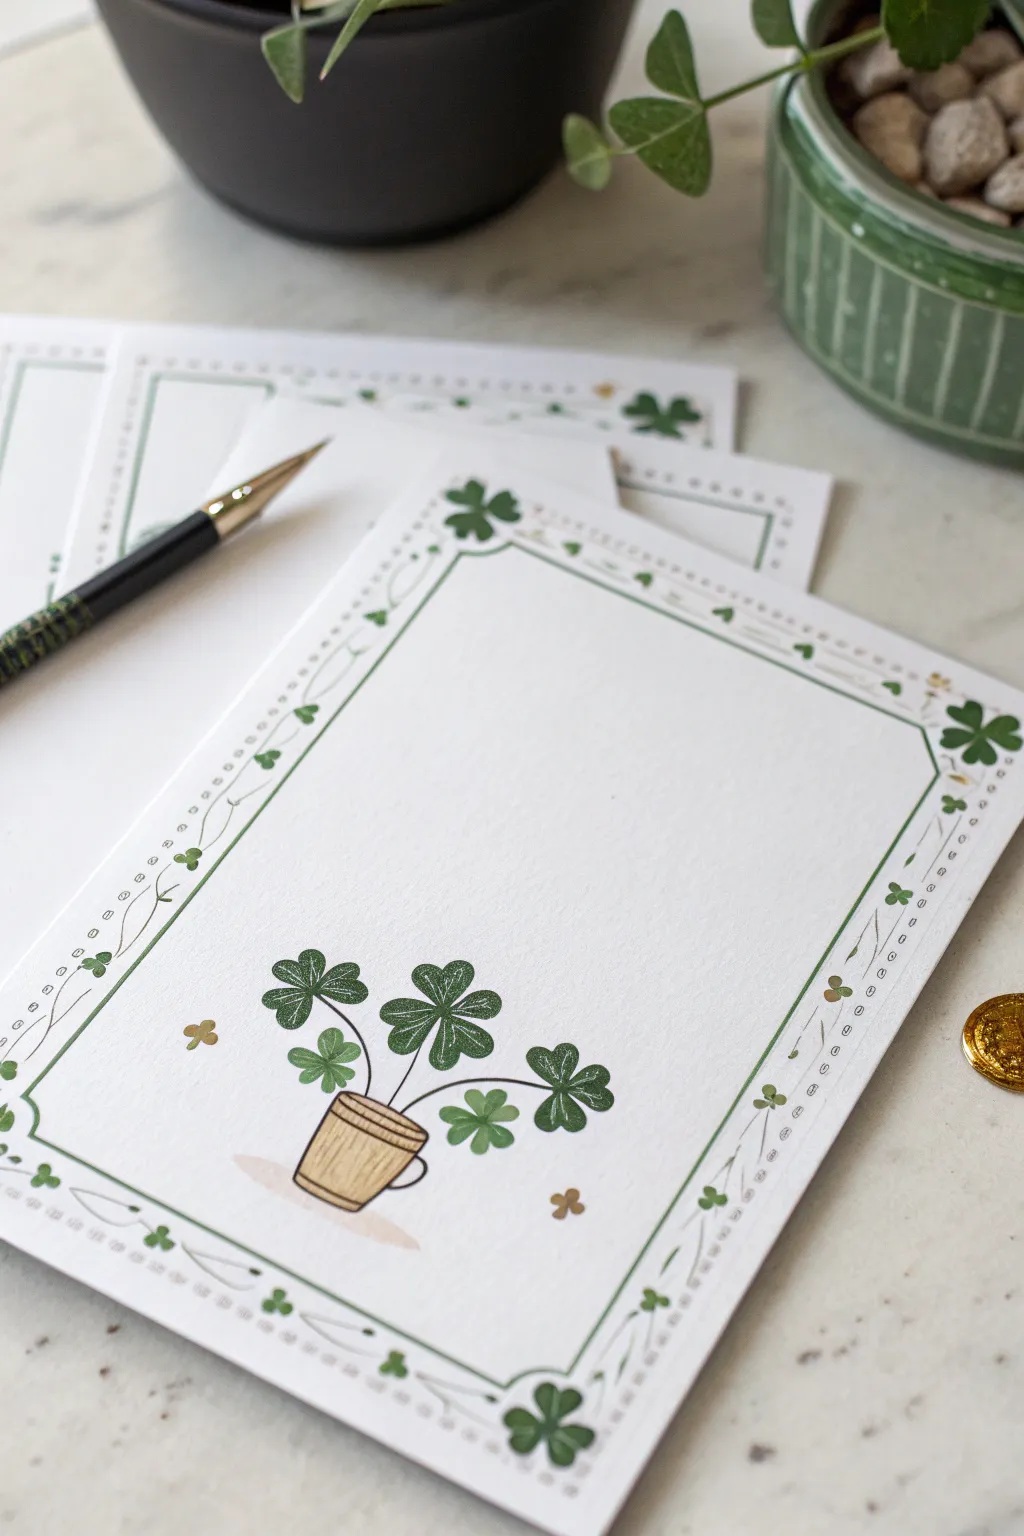
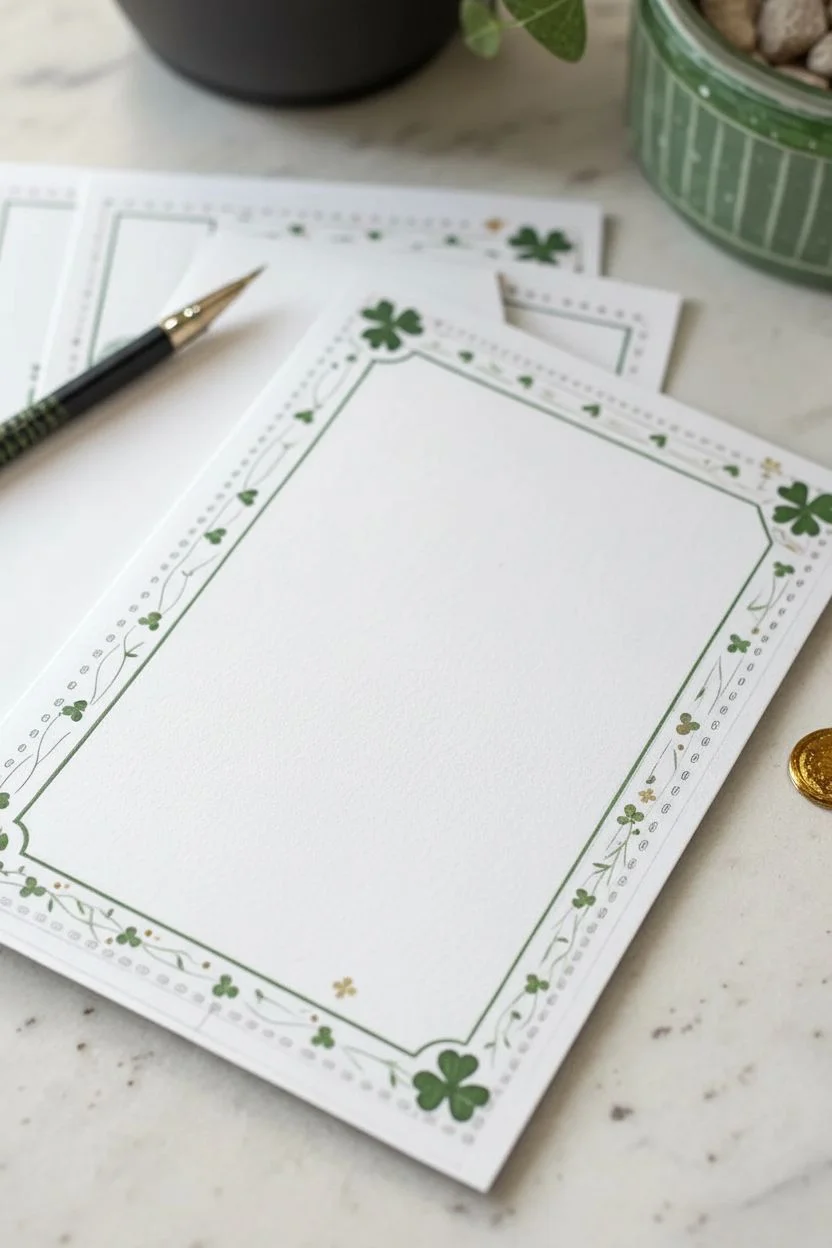
This elegant greeting card features a simple yet charming illustration of four-leaf clovers in a rustic pot, framed by a delicate green border. The design combines clean lines with touches of whimsy, perfect for sending a bit of luck to someone special.
Detailed Instructions
Materials
- Heavyweight white cardstock or watercolor paper (A5 size)
- Pencil (HB or H)
- Eraser
- Fine-liner pen (black or dark sepia, 0.3mm)
- Green colored pencils (light and dark shades) or markers
- Light brown and dark brown colored pencils
- Gold gel pen or metallic marker
- Ruler
Step 1: Setting the Frame
-
Draw the main border:
Begin by lightly measuring about 3/4 inch from the edge of your cardstock on all four sides. Using a ruler and a green colored pencil or marker, draw a straight line to create a rectangular frame inside the page. -
Add decorative corners:
At each of the four corners of your green rectange, draw a small four-leaf clover shape. Orient them diagonally so they point inward toward the center of the card. -
Create the inner detail line:
Sketch a very faint pencil line about 1/4 inch outside your main green border. This will act as a guide for your decorative details. -
Add the vine details:
Along this outer guide line, draw a delicate, wavy vine pattern using a fine-tipped green pen or pencil. Intersperse tiny leaves or buds along the vine for an organic feel. -
Incorporate gold accents:
Using your gold gel pen, add small dots or tiny geometric shapes in the negative space between the main green border and the outer vine detail to add a subtle sparkle.
Step 2: Illustrating the Centerpiece
-
Position the pot:
Find the horizontal center of the card, near the bottom third of the framed area. Sketch a simple cylinder shape for the pot, slightly wider at the top than the bottom. -
Detail the pot texture:
Draw faint vertical curves on the pot to mimic wooden staves. Add two horizontal bands near the top and bottom to represent metal hoops holding the planter together. -
Color the planter:
Fill in the pot with a light brown pencil. Use a darker brown to shade the ‘wood’ grain and outline the hoops for dimension. -
Sketch the stems:
Draw three or four slender, arching lines emerging from the pot. Vary their heights and directions—I like to have the central ones stand taller while the side ones droop slightly. -
Draw the clover leaves:
At the end of each stem, draw four heart-shaped leaves meeting at a central point. Make the leaves slightly different sizes to keep the look natural. -
Add foliage depth:
Color the clover leaves with a medium green. Use a darker green to add vein details within each heart shape and to shadow the area where the leaves join the stem. -
Create a shadow base:
Underneath the pot, gently shade a small oval using a very light beige or grey pencil to anchor the object so it doesn’t look like it’s floating.
Fixing Smudges
If you smudge the green ink, turn it into a ‘falling leaf’ or an extra clover. Accidental marks can easily be disguised as intentional organic details.
Step 3: Final Touches
-
Add scattered elements:
In the white space around the pot, draw a few tiny, floating shamrocks or gold specks to balance the composition. -
Clean up sketch lines:
Once all ink and marker work is completely dry, gently erase any visible pencil guide lines, particularly around the border. -
Enhance with gold:
Go back in with your gold gel pen and add tiny highlights to the clover centers or the metal bands on the pot for a finished, professional look.
Add Dimension
Use a white gel pen to add tiny reflection dots on the clover leaves and the pot’s metal bands. This small highlight makes the drawing pop.
Your handcrafted card is now ready to share a little luck and joy with a friend
St. Patrick’s Day Icon Doodle Sheet
Create a charming collection of St. Patrick’s Day miniature icons perfect for bullet journals or handmade cards. This project combines simple line drawing with subtle green shading to create a cohesive and festive doodle spread.
How-To Guide
Materials
- Smooth white cardstock or drawing paper (A5 size)
- Fine liner pen (black, 0.3mm or 0.5mm)
- Green colored pencils or watercolor markers (sage, emerald, olive)
- Pencil and eraser for sketching
- Ruler (optional for spacing)
Step 1: Planning and Sketching
-
Layout guidelines:
Begin by lightly visualizing a grid on your paper to keep the doodles somewhat evenly spaced, though they don’t need to be perfectly aligned. You want a scattered, organic look. -
Sketch the primary shapes:
Using a light pencil touch, sketch the basic forms. Start with the larger items like the top hat in the upper left, the rainbows in the middle-right, and a few large clovers to anchor the page. -
Fill in the gaps:
Fill the remaining spaces with smaller icons. Sketch various styles of three-leaf shamrocks—some heart-shaped, some rounded, and some more angular. -
Add lucky details:
In the lower section, pencil in special icons like the jar of clover, the lucky coin with a clover design, and the heart shape.
Step 2: Inking the Doodles
-
Outline the hat:
Switch to your fine liner pen. Trace the top hat, giving it a curved brim and a simple band with a small flower tucked into it. -
Ink the clovers:
Go over your shamrock sketches. Vary the stems—some can be straight, while others look nice with a slight curve or hooked end. Leave the inside of the leaves open for coloring later. -
Draw the rainbows:
Ink the rainbow arches carefully. For the one in the middle, draw three concentric arches. For the lower rainbow, add small vertical lines inside the bands to create texture. -
Detail the coins and heart:
Ink the round coin shape and draw a simple four-petaled flower or clover in the center. For the heart at the bottom, draw a double outline to create a border effect. -
Create the lucky jar:
Draw the jar in the bottom right corner with a lid and a simple label area. Sketch a tiny clover inside the jar to make it look like a captured specimen. -
Erase pencil lines:
I always wait a few minutes to ensure the ink is totally dry, then gently erase all your underlying pencil sketches to clean up the page.
Keep it clean
Place a piece of scrap paper under your hand while drawing. This prevents oils from your hand smudging pencil lines or smearing fresh ink as you move across the page.
Step 3: Adding Green Tones
-
Select your palette:
Choose two or three distinct shades of green—perhaps a light mint, a true grass green, and a darker forest green to add depth. -
Solid coloring:
Pick a few specific clovers to color in completely with your medium green. For the clover next to the top hat, fill the leaves with a textured, scribbled look rather than solid block color. -
Patterned fun:
On the heart icon, color the inner stripe with vertical hatch marks. Use the same hatching technique on the lucky coin’s border. -
Rainbow stripes:
For the rainbow doodle, alternate coloring the bands. Leave one white, color one light green, and use lines for another to keep it visually interesting. -
Two-tone leaves:
Take a darker green pencil and color only half of the leaves on the four-leaf clover icon to give it a shadowed, dimensional effect. -
Final accents:
Add tiny touches of green to the hat band and the clover inside the jar. Keep the coloring sparse on some icons to maintain a minimalist aesthetic.
Sticker creation
Draw these on sticker paper or full-sheet label paper instead of cardstock. Once colored, you can cut them out individually to make your own custom planner stickers.
Now you have a festive reference sheet ready to inspire your seasonal cards or journal layouts


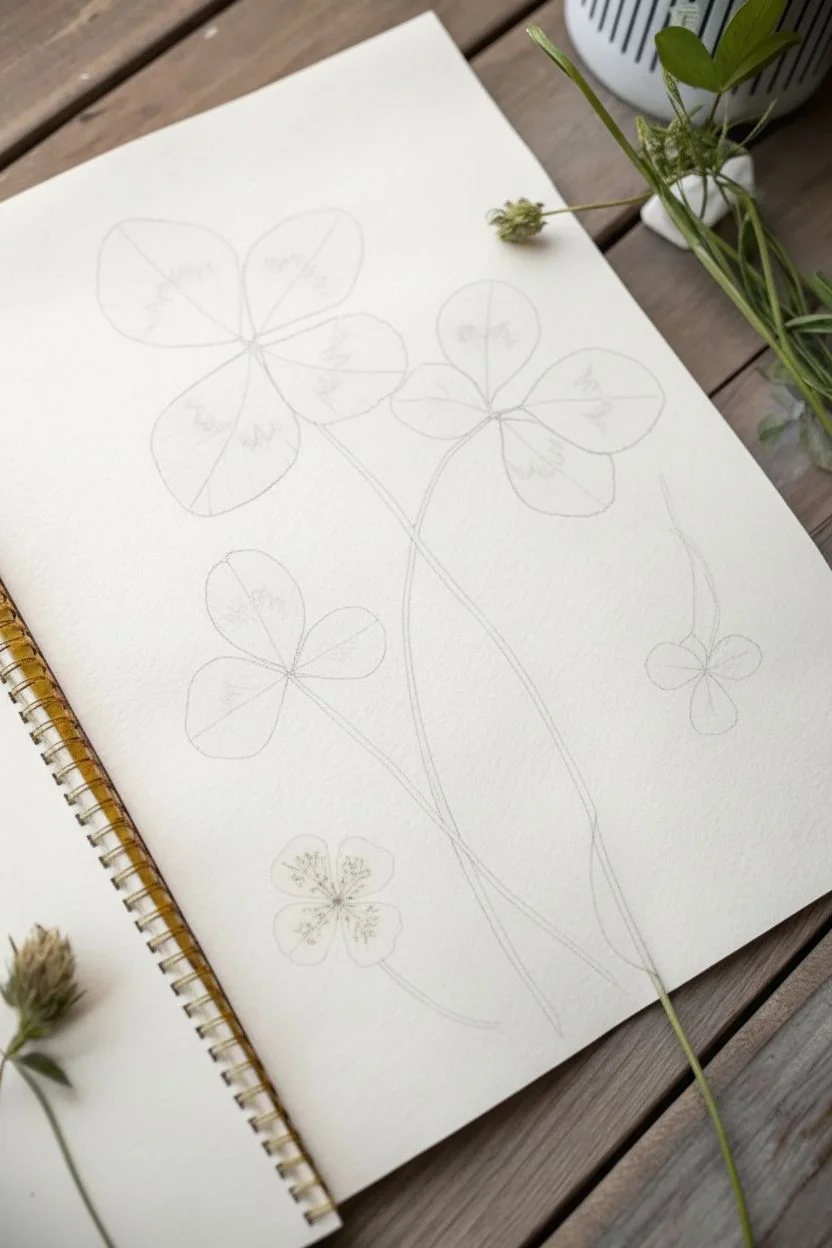
Botanical Clover Study With Veins and Stems
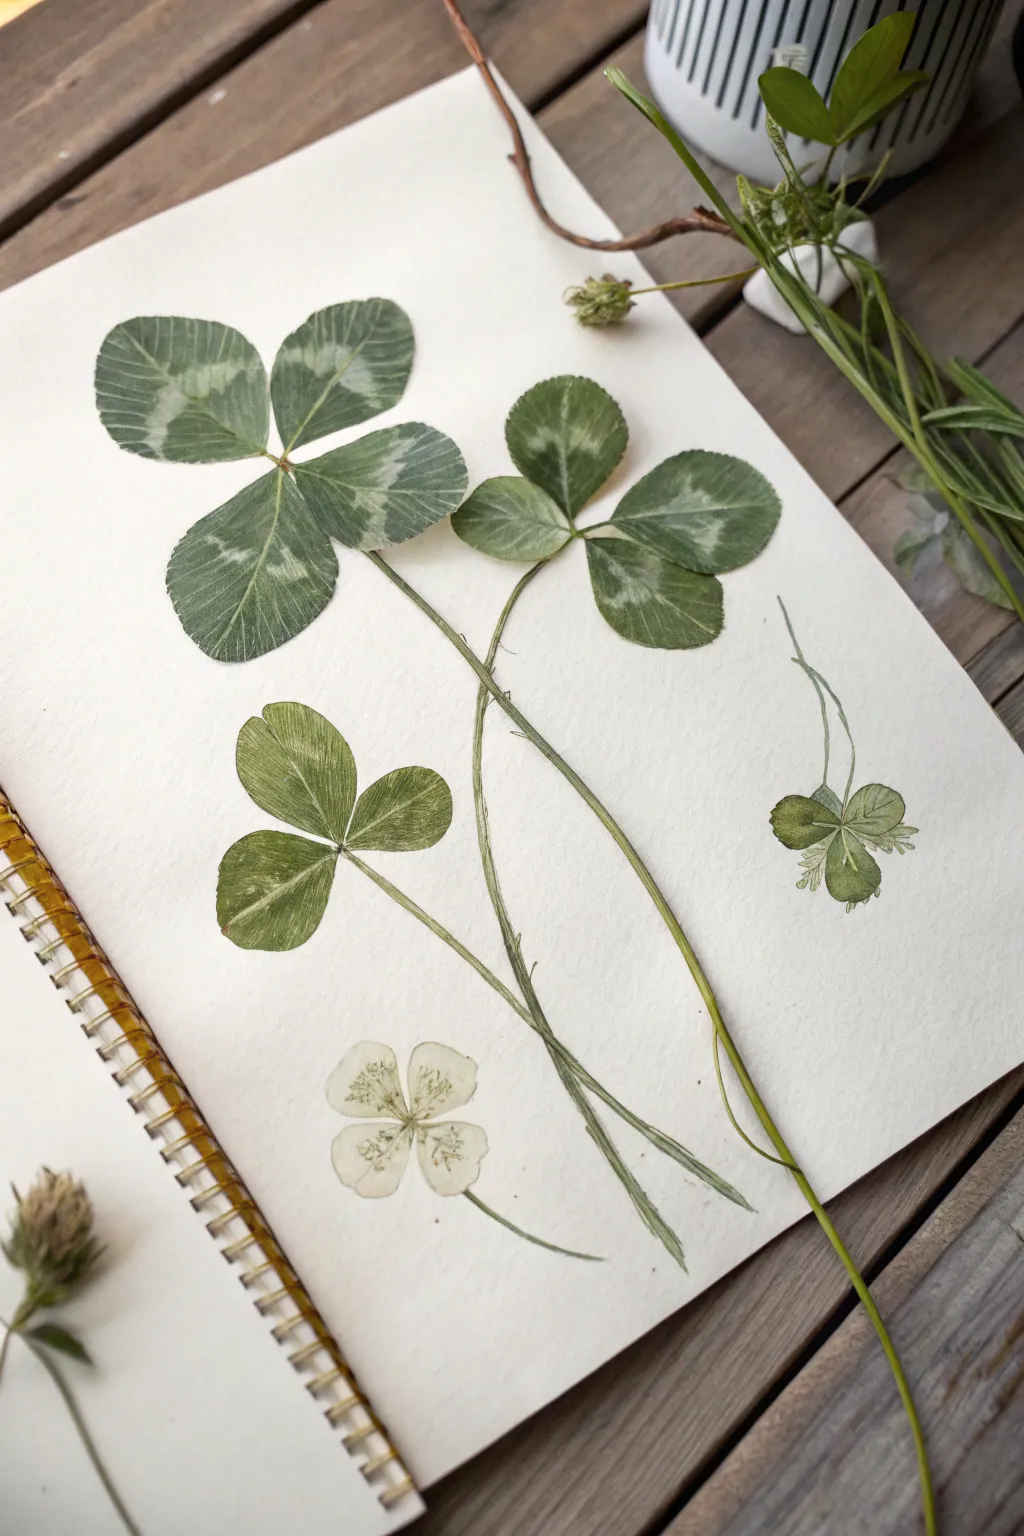
Capture the delicate beauty of clovers with this detailed botanical study that focuses on natural textures and vein patterns. By layering watercolor washes with precise pencil detailing, you’ll create a lifelike page that looks like a pressed flower specimen come to life.
Step-by-Step Tutorial
Materials
- Hot press watercolor paper or smooth mixed media sketchbook
- Watercolor paints (Sap Green, Olive Green, White, touches of Brown)
- Fine liner brushes (size 0 and 00)
- Colored pencils (various greens, white, and a sharp grey)
- HB pencil for sketching
- Kneaded eraser
- Water and palette
- Real clover specimen (optional, for reference)
Step 1: Initial Sketching
-
Observe the shapes:
Start by studying the layout. You have one large four-leaf clover at the top left, a traditional three-leaf shamrock below it, another three-leaf variety to the right, and a delicate white flower at the bottom. Notice how the stems curve naturally—they aren’t perfectly straight lines. -
Lightly pencil the outlines:
Using an HB pencil, extremely lightly sketch the heart-shaped leaflets. Keep the pressure minimal so you don’t groove the paper. Draw the long, slender stems intersecting near the bottom of the page, creating a pleasing composition. -
Refine the edges:
Go back over your leaf shapes and give them slight irregularities. Real leaves aren’t perfect geometric shapes; add tiny notches or waves to the edges for realism. Gently lift excess graphite with a kneaded eraser until only a faint ghost image remains.
Natural Variety
Don’t make every leaf the exact same shade of green. Adding a touch of yellow ochre to one and a bit of blue to another creates a more organic, realistic look.
Step 2: Watercolor Base Layers
-
Mix your greens:
Prepare a few puddles of green watercolor. You’ll need a vibrant, fresh green for the base and a slightly murkier, olive tone for shadows. Keep the paint relatively watery for transparency. -
Wash the leaves:
Apply a pale, even wash of the lighter green to all the leaf shapes. For the four-leaf clover, leave the distinct V-shaped band in the center of each leaflet unpainted or very pale; this white chevron is key to the white clover species look. -
Paint the stems:
With a fine brush, carefully pull the green paint down the stem lines. Vary the pressure slightly to create natural thick and thin sections. If the paint pools, dab it gently with a tissue. -
Layering depth:
Once the first layer is bone dry, glaze a slightly darker green near where the leaflets meet the stem. This central point is usually in shadow and adding pigment here creates a sense of concavity. -
The white flower base:
For the bottom flower, use extremely diluted brownish-green to outline the petal shapes, keeping the interior mostly the white of the paper. It needs to look gossamer-thin.
Step 3: Detailing & Veins
-
Pencil shading:
When the watercolor is completely dry, take a sharp green colored pencil. Lightly shade the outer edges of the leaves, graduating inward. This gives the leaves a convex, puffy appearance. -
Drawing the veins:
Using a very sharp colored pencil or a fine liner brush with concentrated paint, draw the central vein of each leaflet. Then, feather out tiny, hairline veins towards the edges. Keep these lines incredibly subtle. -
Enhancing the chevron:
For the four-leaf clover, use a white colored pencil or a little opaque white gouache to redefine that V-shaped pattern, feathering the white edges so they blend softly into the green. -
Dark accents:
Use a darker olive pencil to deepen the shadows where leaves overlap or curl. I find that deepening these tiny crevices instantly pops the illustration from flat to 3D. -
Stem texture:
Add linear texture to the long stems using a mix of green and brown pencils. Draw long, continuous lines along the length of the stem to mimic the fibrous texture of the plant. -
The tiny bud:
For the small budding clover on the right, use short, staccato pencil strokes to suggest folded, crinkled leaves that haven’t fully opened yet.
Folded & Flawed
Draw one leaf slightly folded over or with a small brown spot. Imperfections make botanical drawings feel like real specimens rather than computer icons.
Step 4: Final Touches
-
Flower center:
Add tiny dots of yellow-green and brown in the center of the white flower to represent the stamens and pistils. Keep them delicate. -
Clean up:
Erase any remaining stray graphite marks from your initial sketch. Use a white gel pen sparingly if you need to recover any lost highlights on the stem edges.
Now you have a serene page of botanical studies that captures the quiet charm of the clover patch.
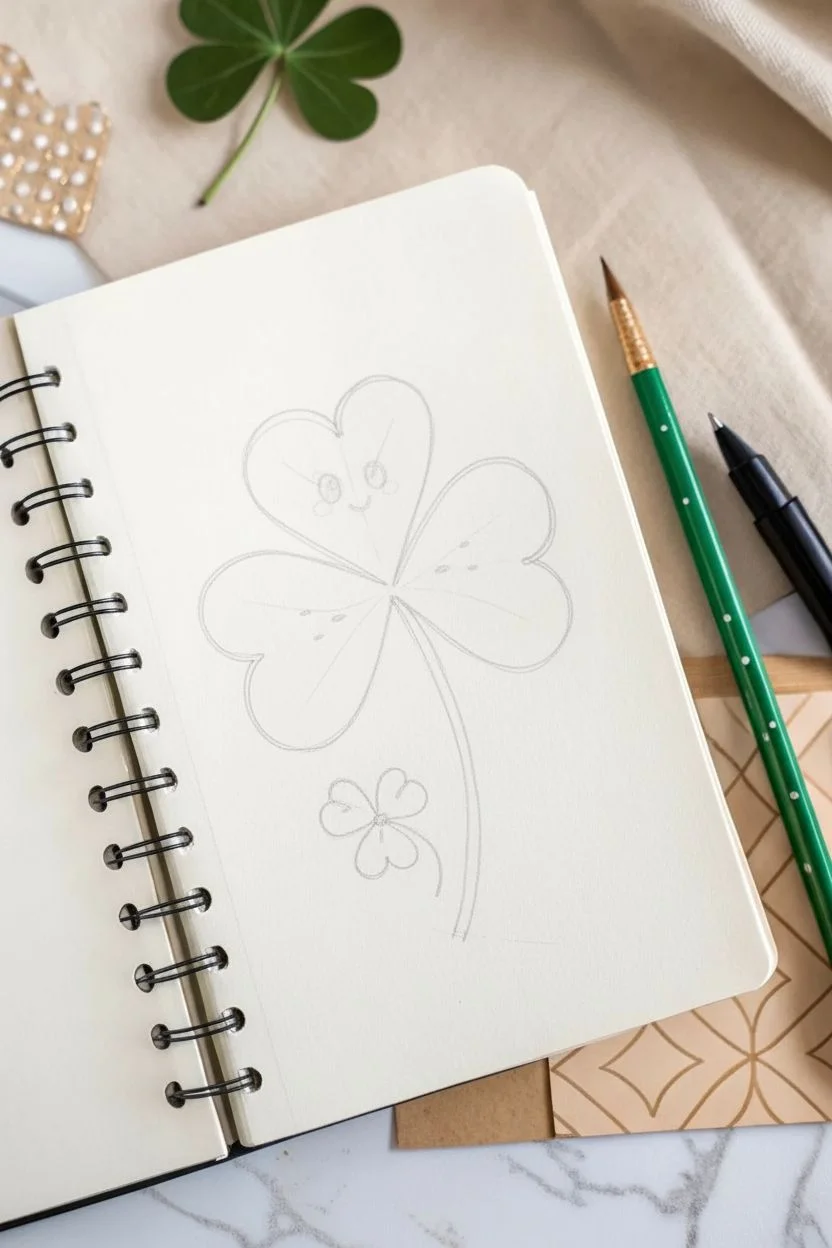
Cute Shamrock Face With Arms and a Smile
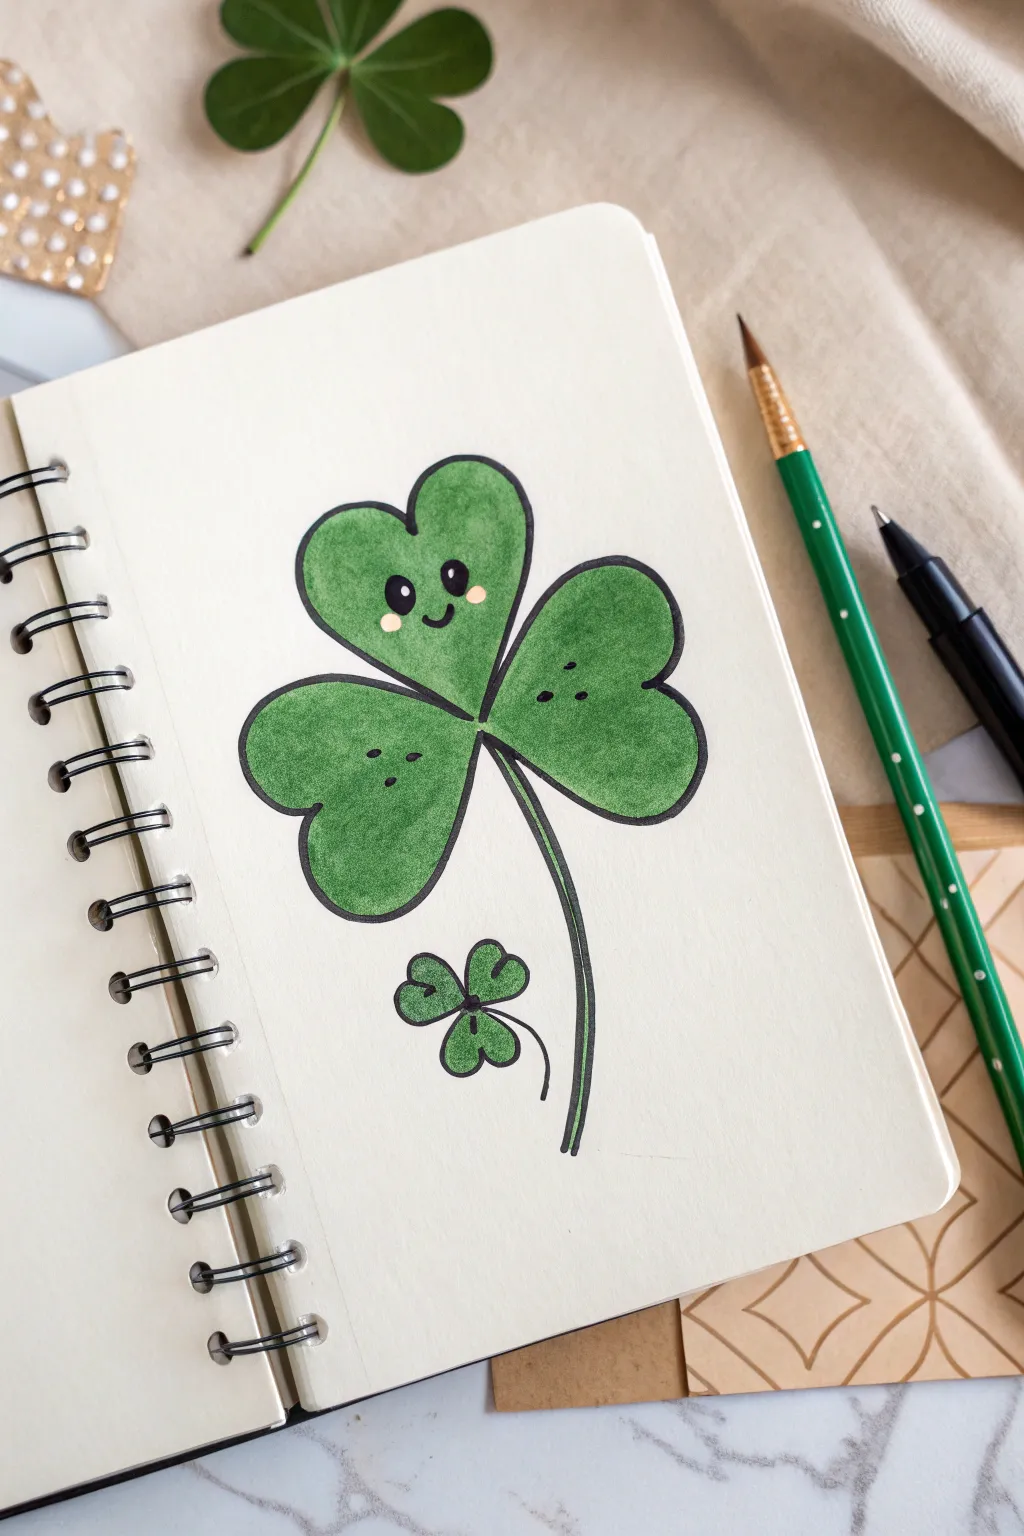
Add a touch of whimsy to your St. Patrick’s Day sketchbook with this simple yet adorable shamrock character. The charming little face on the top leaf transforms a standard clover into a friendly personality that’s fun and easy to draw.
Detailed Instructions
Materials
- Sketchbook or drawing paper
- Pencil (HB or H)
- Eraser
- Black fine-liner pen (0.5mm or 0.8mm)
- Green alcohol-based marker (medium shade)
- White gel pen or Posca marker
Step 1: Sketching the Outline
-
Start the center:
Begin by lightly marking a small center point on your paper where the three leaves will eventually meet. This helps keep your drawing balanced. -
Draw the top leaf:
Draw an upside-down heart shape stemming from your center point. Make this top leaf slightly larger than the others, as it will be the ‘face’ of your character. -
Add the side leaves:
Sketch two more heart shapes extending to the left and right from the center point. Try to keep them roughly symmetrical, though a little natural variation looks organic. -
Check the spacing:
Ensure there is a tiny bit of space between the leaves so they don’t look too crowded, creating that classic clover silhouette. -
Draw the stem:
From the center point, draw two parallel curved lines sweeping downwards to create the stem. Close the shape at the bottom with a slight ragged edge. -
Sketch the mini clover:
Near the bottom of the stem, sketch a tiny, four-leaf clover floating just to the left. This acts as a cute accessory to the main drawing.
Uneven Color Fix
If your marker strokes look streaky, try coloring in small circular motions rather than straight lines, or apply a second layer of ink once the first is completely dry.
Step 2: Adding Ink and Details
-
Ink the main outline:
Using your black fine-liner, trace over your pencil lines for the three main leaves. Use a confident, steady hand for a clean look. -
Define the stem:
Ink the stem outlines. Extend a central line from the meeting point of the leaves slightly down into the stem to show where the veins merge. -
Add leaf details:
Draw single, straight lines down the center of each leaf to represent the main vein. These shouldn’t touch the outer edges. -
Create the face:
On the top leaf, draw two small solid black circles for eyes. Add a tiny ‘u’ shape between them for a smile. Position these relatively low on the leaf for maximum cuteness. -
Add freckles:
Draw three small dots on each of the side leaves to add texture and detail to the open green space. -
Ink the mini clover:
Trace the tiny four-leaf clover at the bottom, including its little curved stem. -
Erase guidelines:
Wait a moment for the ink to set, then gently erase all your initial pencil sketches.
Make It 3D
Use a darker green pencil or marker to add unexpected shadows where the leaves overlap and under the chin of the face for depth.
Step 3: Coloring and Highlights
-
Fill with green:
Take your green marker and fill in the leaves and stem. Use long, even strokes to minimize streakiness. I like to work one leaf at a time to keep the color saturation consistent. -
Color the mini clover:
Use the same green to carefully fill in the tiny clover at the bottom. -
Add eye sparkles:
Once the marker ink is fully dry, use a white gel pen to add a tiny white dot in the upper corner of each black eye. This brings the character to life. -
Draw cheek highlights:
Using a light pink marker or a white pen (if you don’t have pink), add small oval blushes underneath each eye. -
Final touches:
Review your drawing. If the black outline looks a bit faded against the green marker, re-trace the outer lines to make them pop again.
Now you have a cheerful lucky charm beaming up from your notebook page
Rainbow Background With Clover Foreground Silhouettes
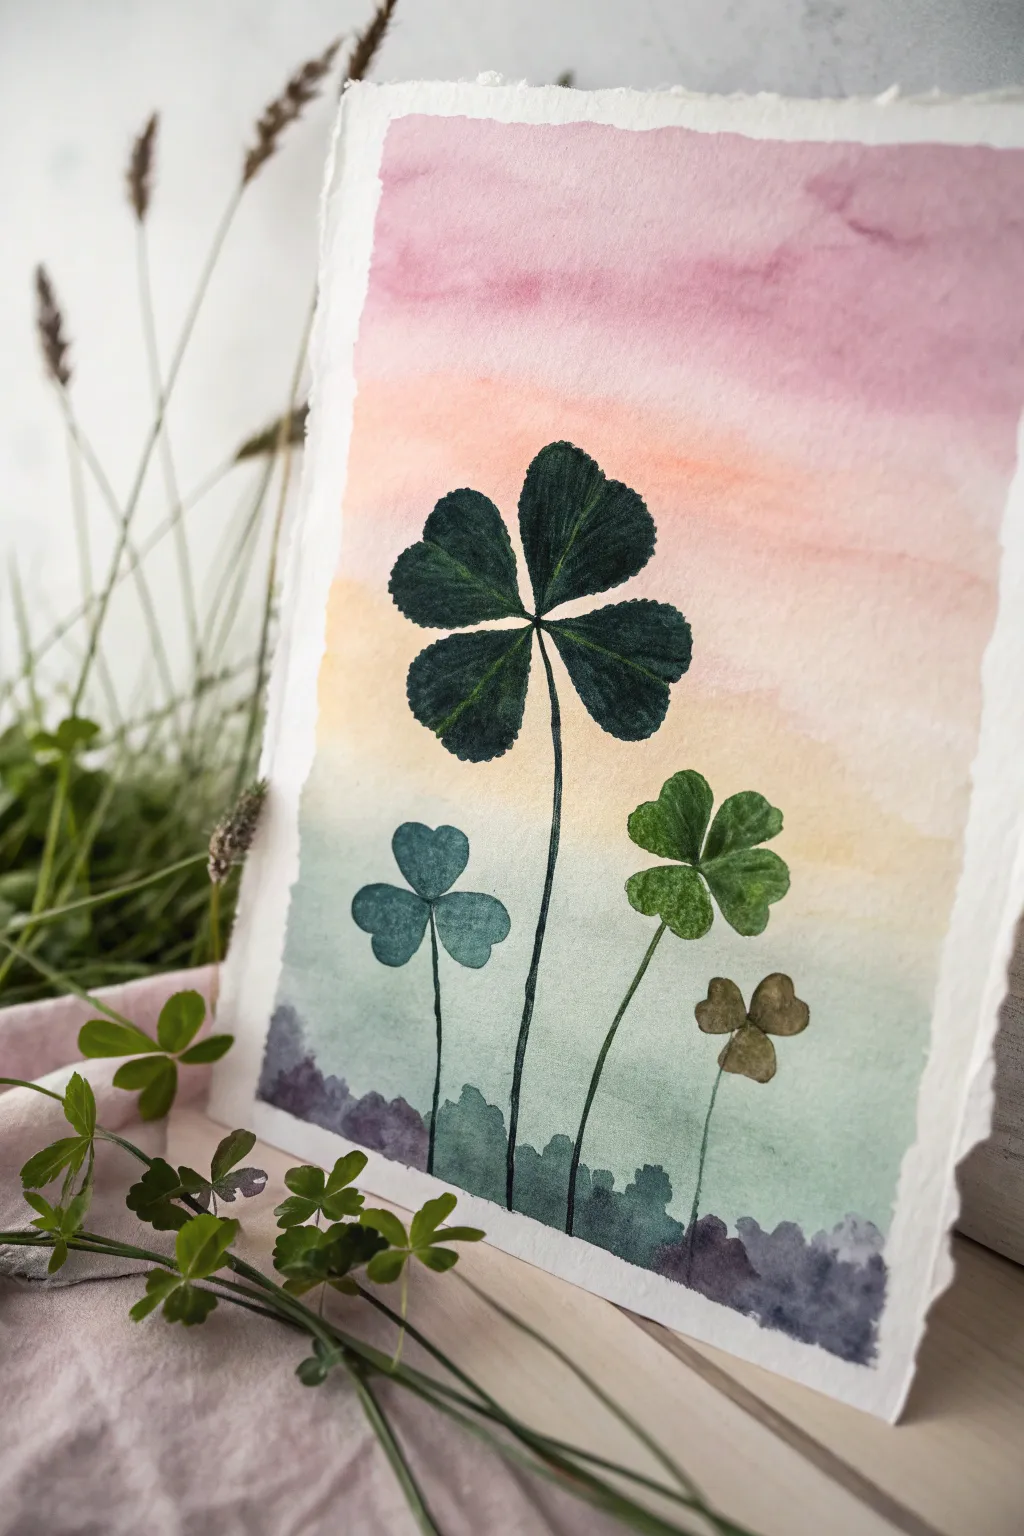
Capture the delicate beauty of finding luck in nature with this serene watercolor piece. Featuring a soft, sunset-inspired gradient wash and detailed, almost pressed-flower style clovers, this project balances dreamy backgrounds with crisp foreground details.
How-To Guide
Materials
- Cold press watercolor paper (300 gsm recommended)
- Watercolor paints (Pink, Peach/Orange, Yellow, Teal/Turquoise, Indigo, Sap Green, Dark Green)
- Flat wash brush (large)
- Round detail brushes (sizes 0, 2, and 4)
- Pencil (HB or H)
- Kneaded eraser
- Masking tape
- Jar of clean water
- Paper towels
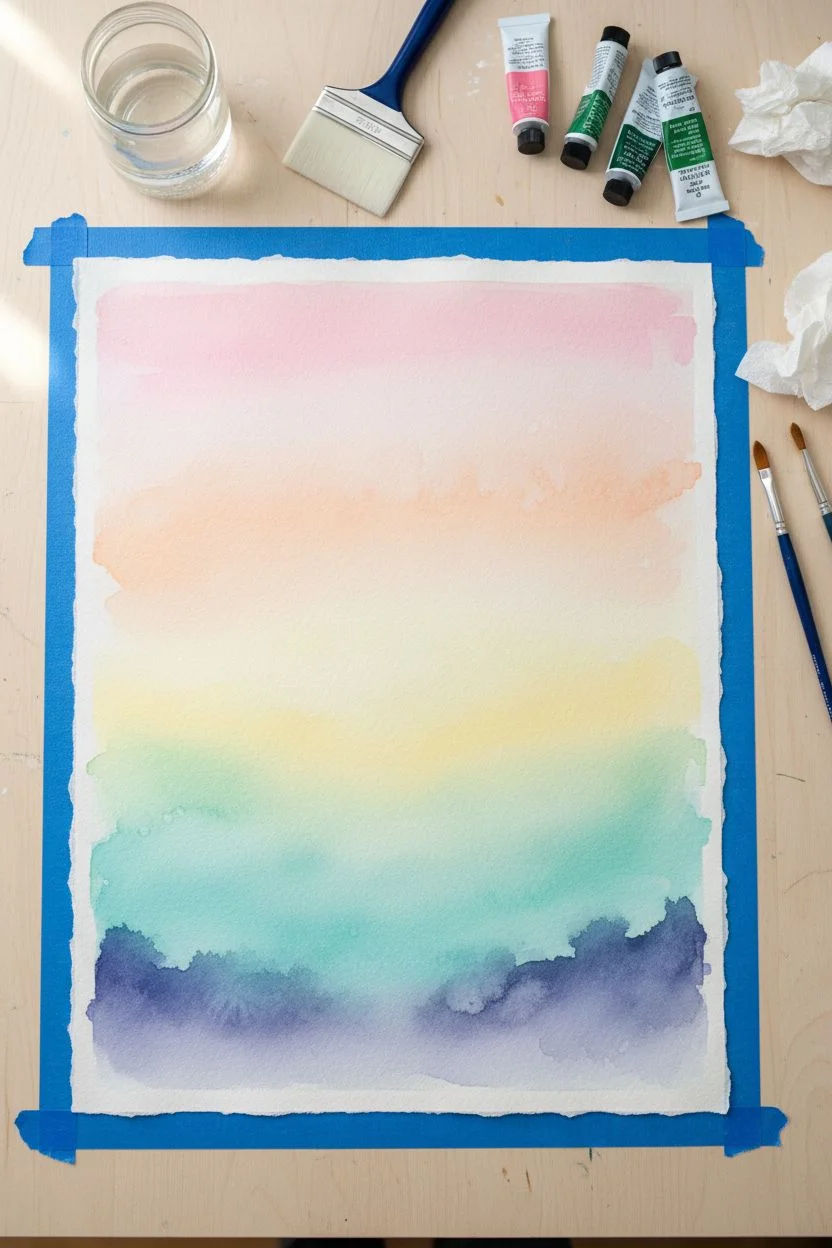
Step 1: Creating the Sunset Gradient
-
Preparing the paper:
Begin by tearing the edges of your watercolor paper if you want that rustic, deckled look shown in the example. Tape the paper down to your work surface on all four sides to prevent buckling. -
Wetting the surface:
Use your large flat brush to apply a clean coat of water across the entire paper. You want the surface to be glistening but not forming puddles. -
Applying the pink sky:
Load your brush with a watery mix of soft pink. Gently sweep it across the top third of the wet paper, allowing the pigment to bloom naturally. -
Blending the middle tones:
While the paper is still wet, introduce a soft peach or light orange hue just below the pink. Let the colors bleed into each other slightly to create a seamless transition. -
Adding the horizon light:
Move to a pale yellow wash for the middle section. This represents the last light of the day and should be the brightest part of your background. -
Grounding with cool tones:
For the bottom third, switch to a teal or turquoise mix. Blend this up into the yellow carefully so you get a soft green transition rather than a muddy brown. -
Adding the distant hills:
While the bottom teal layer is damp (but not soaking), drop in concentrated touches of indigo and purple along the very bottom edge to suggest distant, rolling hills. Let this background dry completely.
Muddy Background?
If your yellow and purple sections mix and turn brown, wait for the yellow area to dry completely before adding the purple hills at the bottom.
Step 2: Painting the Clovers
-
Sketching placement:
Once the paper is bone dry, lightly sketch the stems and basic leaf shapes of four clovers. Vary their heights and sizes for a natural composition—make one large, focal clover and three smaller companions. -
Base layer for the large clover:
Mix a deep, dark green using sap green and a touch of indigo. Using a size 4 brush, paint the four heart-shaped leaves of the largest clover. Keep the edges relatively crisp. -
Adding texture to the leaves:
While the green paint is wet, lift a tiny bit of pigment from the center of each leaf with a dry brush or paper towel to create a vein highlight. Alternatively, add darker green lines radiating from the center for texture. -
Painting the smaller clovers:
For the medium clovers, use slightly different shades of green. Mix one with a bit more yellow for a brighter look, and another with more blue for a cool, shadowed effect. -
The withered clover:
Paint the smallest, lowest clover using a muddy ochre or brownish-green mix. This adds realism, as not every plant is perfectly green in nature. -
Drawing the stems:
Switch to your smallest brush (size 0 or 00). With a steady hand, draw thin, slightly curving lines from the base of the leaves down to the ‘ground’ area. -
Connecting the stems:
Ensure the stems disappear naturally into the dark purple/indigo wash at the bottom of the painting. -
Final leaf details:
Once the leaves are dry, use a very fine brush or even a colored pencil to add tiny veins or definition to the clover leaves if they look too flat.
Level Up: Real Texture
Instead of painting the clovers, find real four-leaf clovers (or stick to three-leaf shamrocks), press them flat in a heavy book, and glue them onto your dry painted background.
Remove the tape carefully to reveal a crisp border around your beautiful, luck-filled landscape
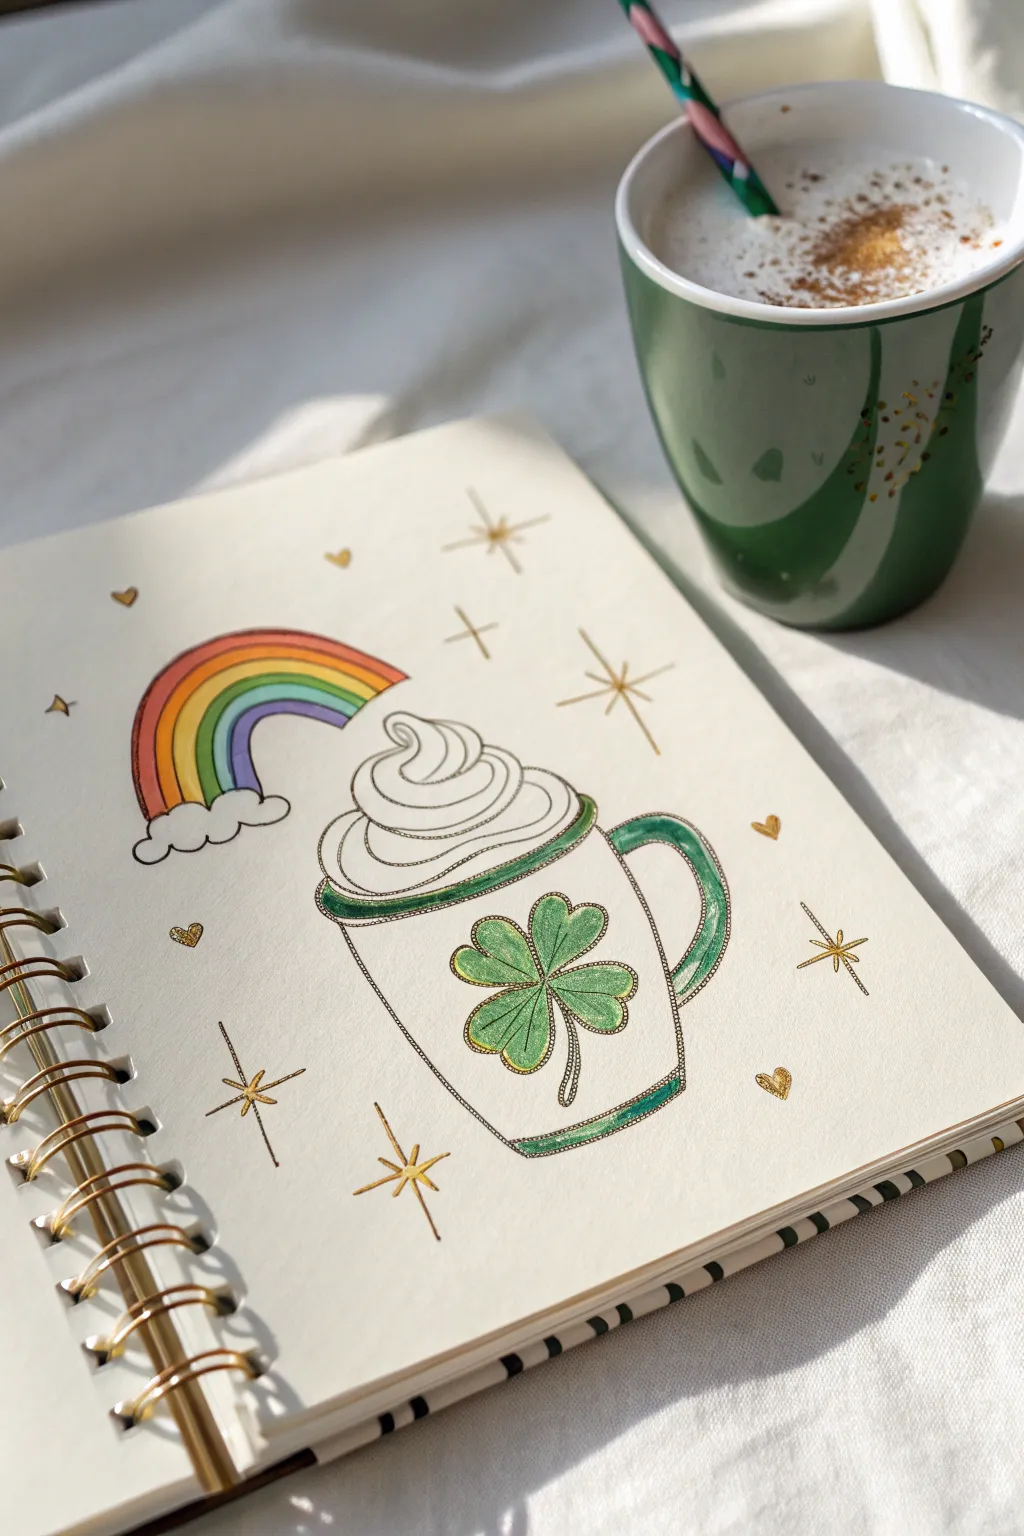
St. Patrick’s Day Mug Illustration With Clover Foam

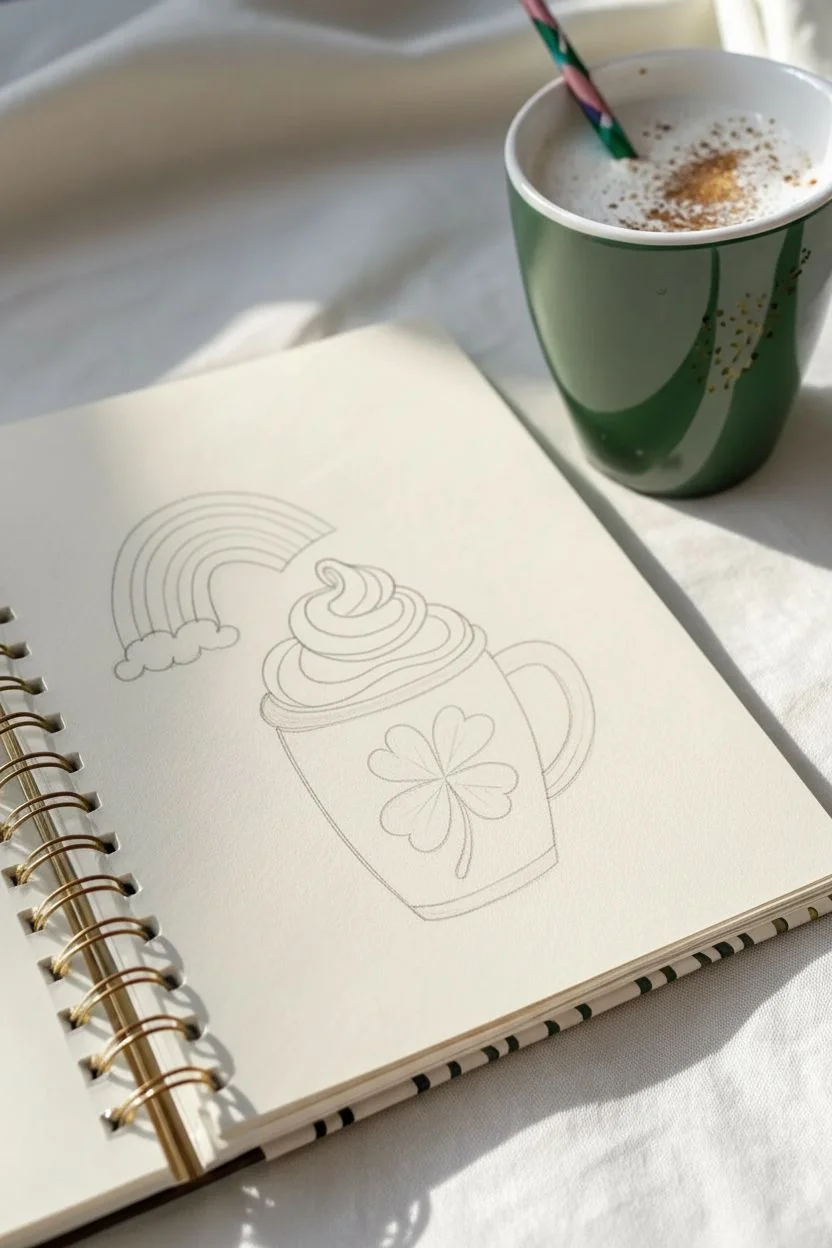
Capture the cozy magic of St. Patrick’s Day with this charming illustration of a festive mug topped high with whipped cream. Featuring a vibrant rainbow, a lucky four-leaf clover, and sparkling gold accents, this drawing is perfect for adding a little luck to your sketchbook.
Detailed Instructions
Materials
- Sketchbook or drawing paper (heavyweight preferred)
- Pencil (HB or H)
- Eraser
- Fine liner pens (black, 0.3mm and 0.5mm)
- Green colored pencils or markers (light and dark)
- Rainbow colored markers (red, orange, yellow, green, blue, purple)
- Gold metallic gel pen or paint marker
Step 1: Sketching the Base Design
-
Outline the mug shape:
Start by lightly sketching a simple U-shape for the mug’s body. Add a slightly curved line at the bottom to give it dimension, and draw a large, C-shaped handle on the right side. -
Add the rim and foam:
Draw an oval at the top of the U-shape to form the mug’s rim. Instead of closing the top of the oval, sketch a fluffy, swirled cloud shape rising out of it to represent a generous dollop of whipped cream. -
Sketch the rainbow and cloud:
Emerging from the left side behind the whipped cream, draw an arching rainbow shape that ends in a small, puffy cloud on the left. Divide the arch into six even bands. -
Place the clover detail:
In the center of the mug, lightly sketch a four-leaf clover. Start with a central point and draw four heart shapes meeting in the middle, adding a small stem that curves downward.
Step 2: Inking and Colors
-
Inking the outlines:
Using your 0.3mm black fine liner, carefully trace over your pencil sketch. Use a slightly thicker line (0.5mm) for the main mug outline to make it pop, but keep the whipped cream lines light and airy. -
Erase pencil guides:
Once the ink is completely dry—give it a full minute so it doesn’t smudge—gently erase all the underlying pencil marks to clean up your drawing. -
Color the rainbow:
Fill in the rainbow bands with your markers, starting with red at the top and working your way down through orange, yellow, green, blue, and purple. -
Fill in the clover:
Color the four-leaf clover on the mug using a light green pencil or marker. Leave the very edges slightly lighter if possible to suggest a bit of dimension. -
Detail the handle and rim:
Color the rim of the mug and the outer edge of the handle with a matching green. If you have a darker green, add a thin shadow line along the bottom of the rim for depth.
Clean Lines
When drawing the starbursts, rotate your paper as you draw each line. Pulling the pen toward your body usually results in straighter, sharper lines than pushing away.
Step 3: Adding the Sparkle
-
Outline the gold accents:
Take your gold metallic gel pen and trace just inside the black lines of the clover on the mug. This double-outline technique adds an immediate decorative feel. -
Add gold to the mug trim:
Run the gold pen along the green rim of the mug and trace a line down the center of the green handle strip. -
Draw the starbursts:
Scatter several eight-pointed stars around the background. Draw a cross first, then a smaller ‘X’ through the center using the gold pen. -
Add floating hearts:
Draw tiny gold hearts randomly in the empty spaces around the mug. Fill them in solidly with the gold ink for maximum shine. -
Enhance the starbursts:
For the larger gold stars, use your fine black pen to draw a very thin line through the vertical and horizontal gold beams, emphasizing their shape. -
Final touches:
Add a few small gold dots or tiny sparkles near the rainbow cloud to tie the magical theme together.
Make it Pop
Use a white gel pen to add tiny highlight dots on the clover leaves and the rainbow bands. This simple addition makes the drawing look glossy and finished.
Enjoy the festive sparkle of your new lucky latte illustration


Have a question or want to share your own experience? I'd love to hear from you in the comments below!