If you’ve ever looked at the female form and thought, “This is the most beautiful canvas,” you’re in the right headspace. These female body painting ideas range from classic crowd-pleasers to artsy, jaw-dropper concepts you can totally make your own.
Butterfly Wings Across Shoulders and Back
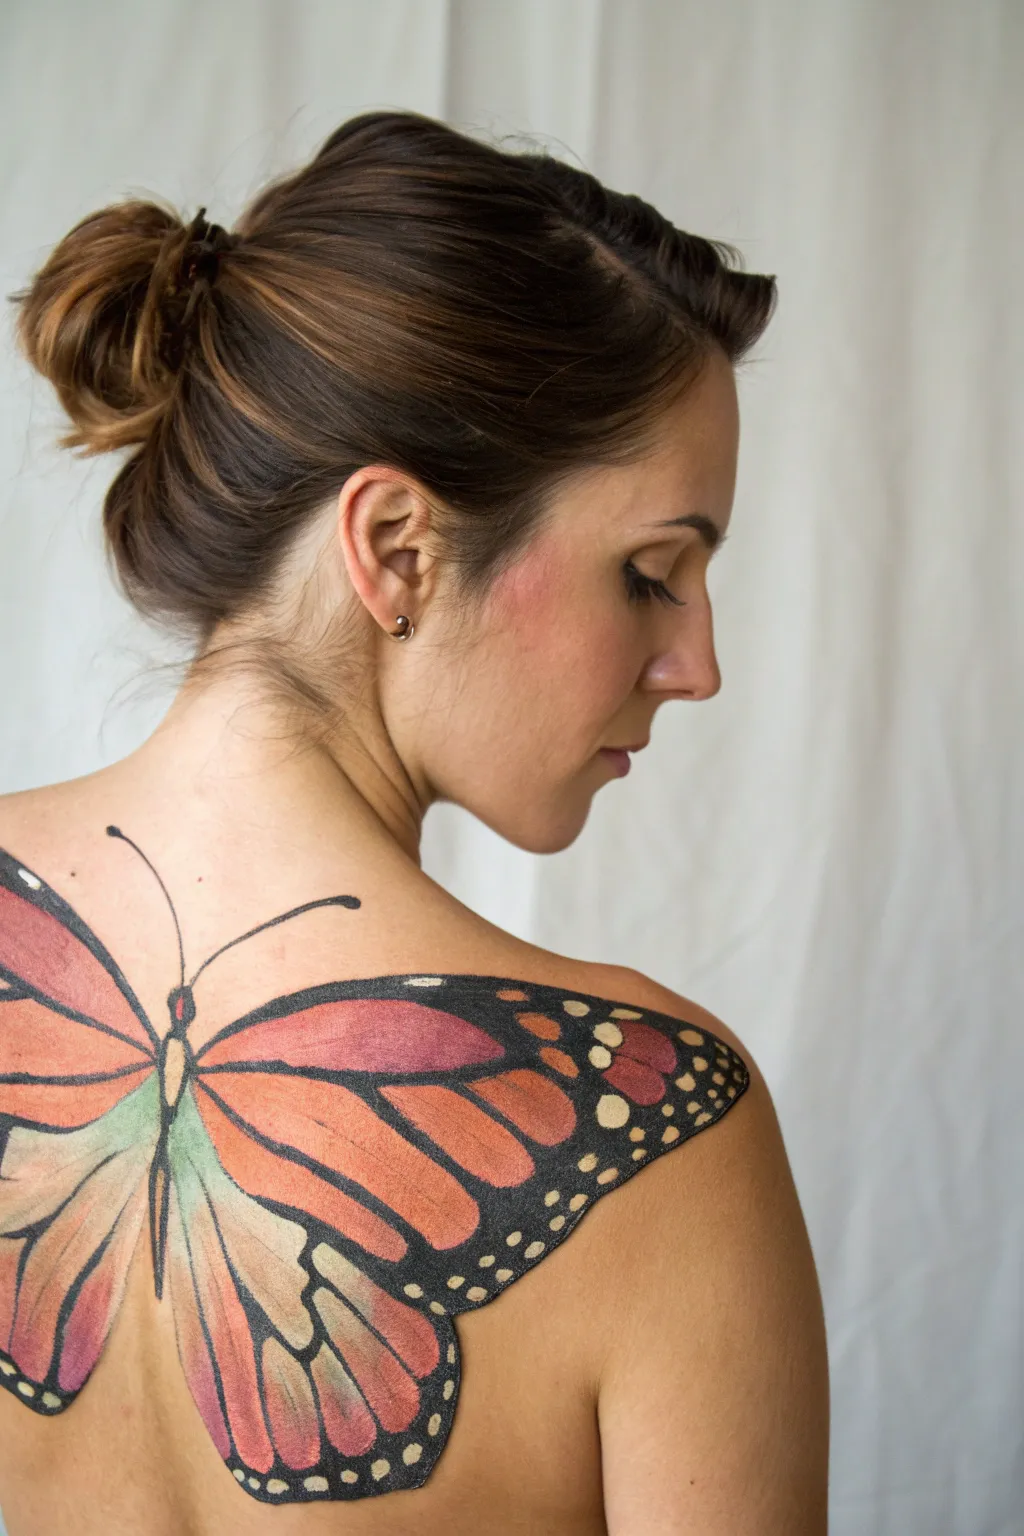
Transform a bare back into a masterpiece of nature with this sweeping Monarch butterfly design that spans gracefully across the shoulder blades. Using water-activated body paints, this tutorial guides you through creating realistic wing textures, vibrant gradients, and crisp black veining.
Step-by-Step Tutorial
Materials
- Water-activated body paint (Black, White, Orange, Red, Yellow, Light Green)
- Flat shader brushes (Size 4, 8, and 12)
- Round liner brushes (Size 1 and 2)
- Cup of clean water
- Makeup setting spray
- Sponge wedges (optional for base blending)
- Skin-safe adhesive stencils (optional for symmetry)
- Baby wipes for cleanup
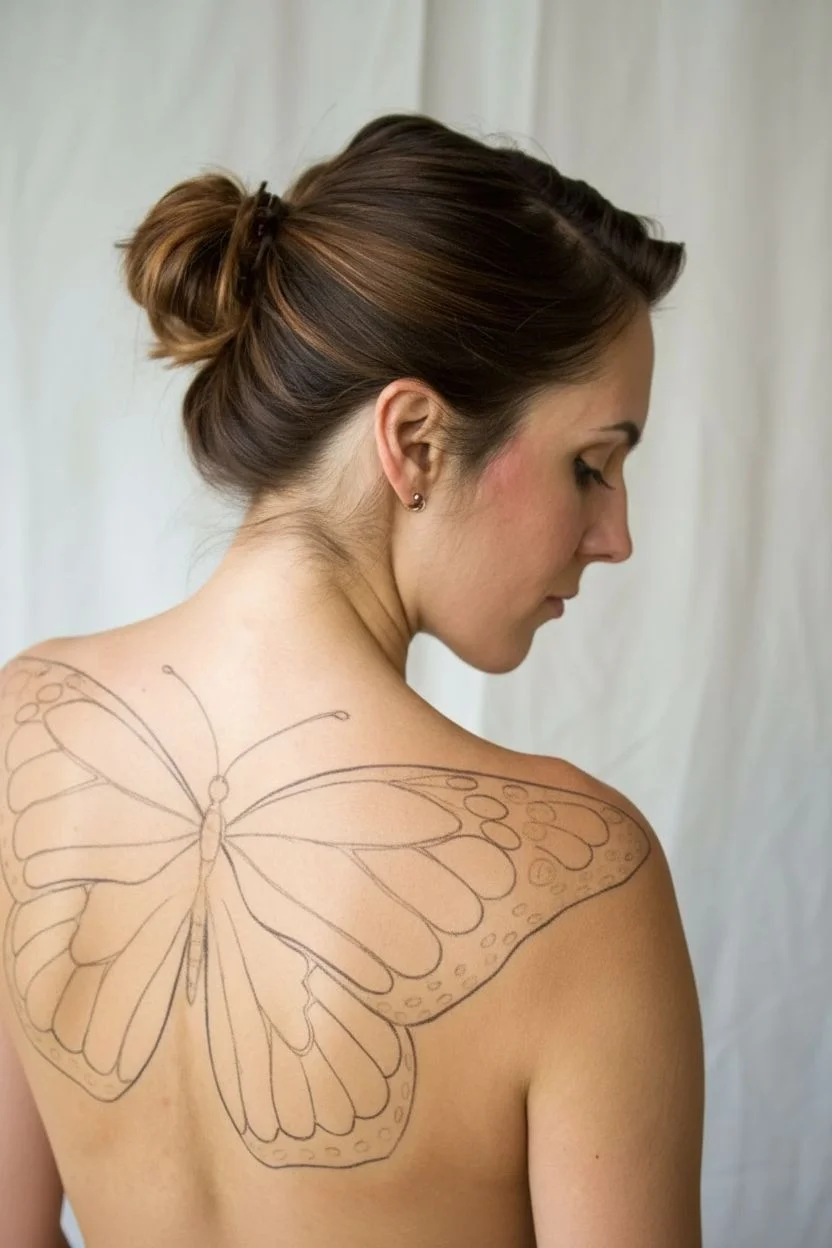
Step 1: Mapping the Wings
-
Position the spine:
Begin by cleaning the skin to remove oils. Locate the center of the upper back (the spine) and mentally mark where the butterfly’s body will sit, roughly between the shoulder blades. -
Draft the outline:
Using a very diluted black paint or a skin-safe pencil, lightly sketch the large upper wing shapes extending outward towards the shoulders. The top edge should follow the natural slope of the shoulder line. -
Define the lower wings:
Sketch the lower wing sections extending down the mid-back. Keep these slightly narrower than the upper wings to mimic a resting butterfly posture. -
Draw the body:
Paint a slender, segmented black body down the center spine line. Add a small head at the top and two long, delicate antennae curving outward.
Step 2: Color Blocking & Blending
-
Apply the warm gradient base:
Load a medium flat brush with orange body paint. Fill the inner sections of the wings closest to the body, leaving the outer edges bare for the black borders later. -
Introduce red tones:
While the orange is still slightly damp, blend deep red or reddish-orange into the very top sections of the upper wings and the outer tips of the lower wings to create depth. -
Add highlights:
Mix a bit of yellow into your orange and paint the center sections of the wing panels. This creates a luminosity that makes the wings look like they are catching light. -
Incorporate the green accent:
Uniquely to this design, add a soft wash of light green near the butterfly’s body where the wings attach. I find this unexpected cool tone adds a beautiful contrast to the warm orange wings. -
Blend the transitions:
Use a clean, slightly damp brush to soften the edges where the green meets the orange, ensuring a seamless gradient rather than harsh lines.
Pro Tip: Better Flow
Add a single drop of mixing liquid or water to your black paint before lining. This creates an inky consistency that allows for long, uninterrupted strokes without the brush dragging.
Step 3: Veining & Details
-
Outline the wing panels:
Switch to a fine liner brush (size 1 or 2) loaded with creamy, ink-consistency black paint. Roughly outline the segments within the colored areas. -
Create the thick borders:
Using a larger brush, paint the thick black borders along the outer edges of all wings. The top edge of the upper wing should be the thickest and most dramatic. -
Connect the veins:
Draw thick black lines connecting the outer border to the butterfly’s body. These lines should taper, being thicker at the edges and thinner near the center spine. -
Refine the interior lines:
Go back over your interior vein lines, thickening them slightly at the intersections to mimic organic growing patterns.
Troubleshooting: Cracking Paint
If the paint cracks after drying, you likely applied the layer too thick. Use a damp sponge to gently re-wet and smooth the area, or use thinner layers next time.
Step 4: Finishing Touches
-
Paint the white spots:
Load a small round brush with opaque white face paint. Dot small circles along the thick black outer borders of the wings. Vary the sizes—larger dots near the tips, smaller ones inward. -
Add elongated spots:
On the upper corners of the wings, paint a few slightly elongated white dashes instead of simple dots to follow the curve of the wing. -
Adjust contrast:
If the wings look too flat, add a tiny bit of diluted black shading right next to the veins on the orange sections to create a 3D effect. -
Seal the design:
Once fully dry, lightly mist the entire back with a makeup setting spray. This prevents the body paint from rubbing off on clothing or smudging with movement.
Step back and admire how the natural movement of the shoulder blades brings these colorful wings to life


Floral Vine Wrap With Peonies and Leaves
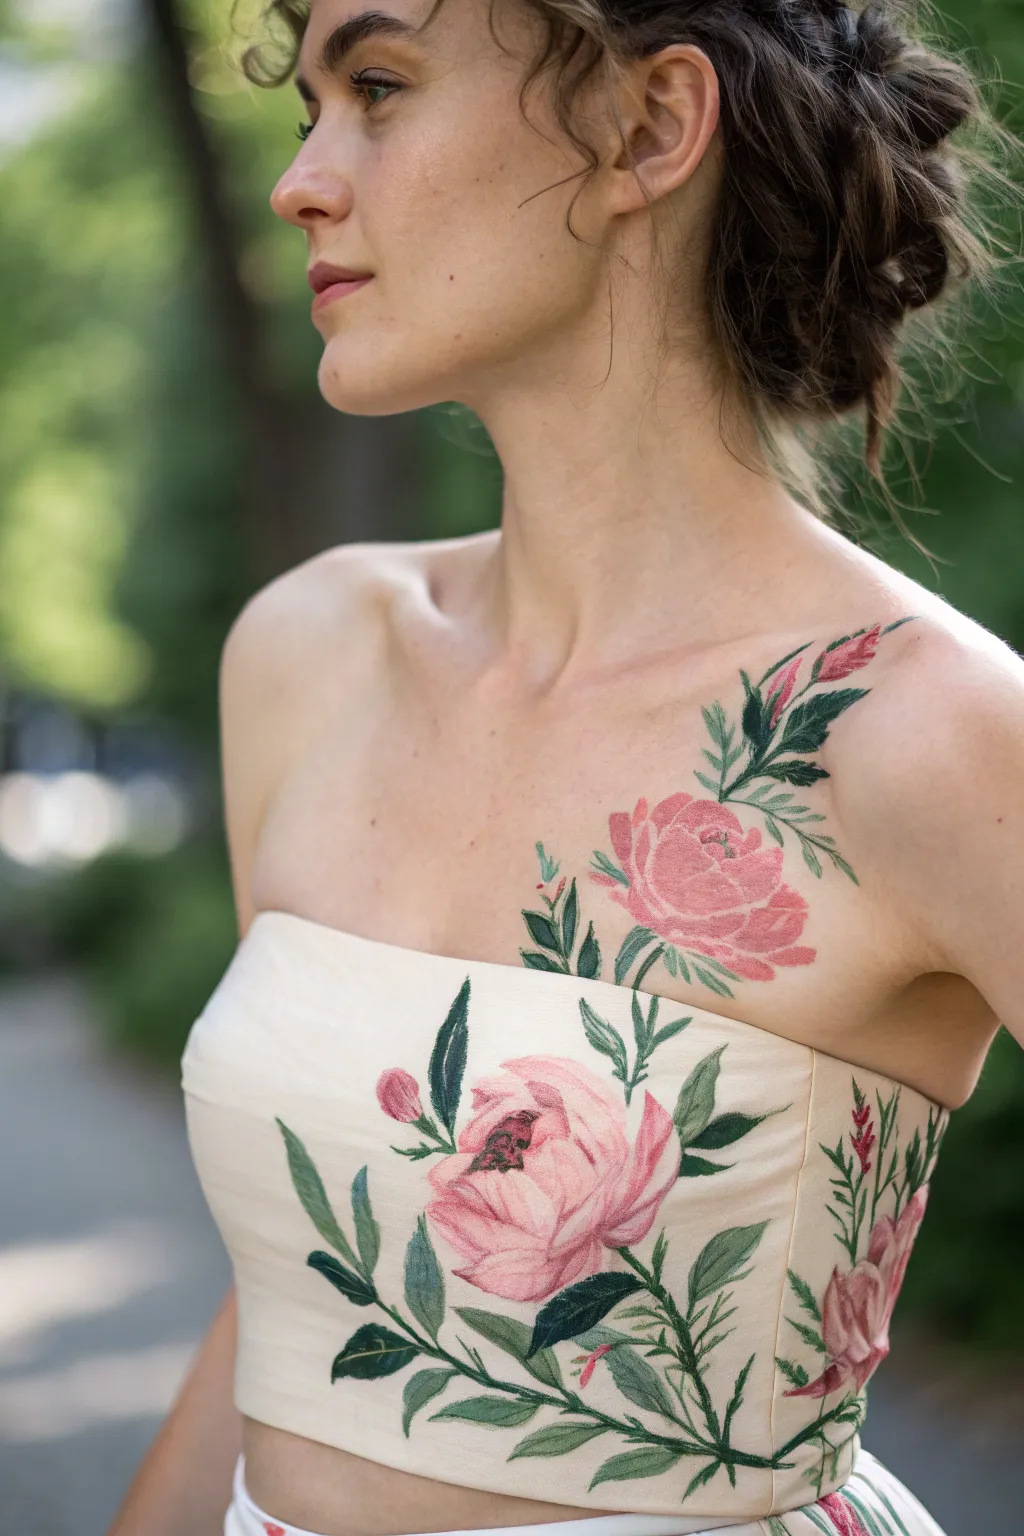
This stunning body painting project blurs the line between skin and fabric, creating a seamless floral vine that appears to grow from a garment directly onto the body. Using soft pinks and deep greens, the design mimics the texture of embroidery for a romantic, organic look.
Step-by-Step Tutorial
Materials
- Water-activated body paints (light pink, dark pink, forest green, olive green, cream/white, brown)
- Small flat shader brush (size 4 or 6)
- Fine liner brush (size 0 or 00)
- Round brush (size 2 or 4)
- Small spray bottle with water
- Setting spray (alcohol-based for longevity)
- Strapless top (light beige or cream)
- Fabric medium (if painting the matching top permanently)
- Paper towels
- Reference photo of peony flowers
Step 1: Planning the Flow
-
Mapping the connection:
Begin by putting on the strapless top you intend to match. Stand in front of a mirror and verify where the existing pattern on the fabric ends (if the top is already patterned) or decide where your painted fabric design will meet the skin. Use a very pale wash of brown paint on a liner brush to lightly sketch a guide line connecting the fabric design upward onto your collarbone and shoulder. -
Sketching the main shapes:
Continuing with that pale brown wash, outline the placement of the main peony bloom just above the neckline on the chest. Add a smaller bud shape near the shoulder joint and sketch the rough direction of the connecting stems.
Paint Cracking?
If the paint starts cracking on the skin, you’ve likely applied it too thickly or with too little water. Remove that section with a wet wipe and reapply using thinner, creamier layers.
Step 2: Painting the Foliage
-
Base coat for leaves:
Load a round brush with olive green paint. Fill in the leaf shapes you sketched, starting with the larger leaves near the flower base and tapering off toward the shoulder. Keep the consistency creamy but not too watery to ensure opacity. -
Adding depth with dark green:
While the olive base is still slightly damp, take a smaller brush with forest green. Add shadows to the base of each leaf and along one side of the central vein line. This wet-on-wet technique helps soft blending. -
Detailing the veins:
Switch to your fine liner brush and mix a small amount of forest green with a touch of brown. Carefully trace the central vein of each leaf and add tiny, feathery veins branching out. Use a very light hand here; the lines should be whisper-thin. -
Creating the stems:
Connect your leaves and floral spots with thin, elegant stems using the dark green mix. Ensure the line thickness varies slightly—thicker at the base, thinner as it reaches the shoulder tip.
Step 3: Creating the Peonies
-
Blocking in the petals:
For the main flower, load a flat shader brush with light pink. Paint the outer petals first using broad, curved strokes that cup inward. Leave the center empty for now. -
layering the inner petals:
Moving inward, create smaller, tighter petal shapes resembling a cabbage rose or peony center. I prefer to use a slightly more saturated pink here to suggest density in the flower’s heart. -
Adding texture and stroke marks:
To mimic an embroidered thread look, use a damp liner brush with dark pink paint. Make tiny, directional hatch marks on the petals. These strokes should follow the curve of each petal, looking like individual stitches. -
Highlighting edges:
Mix a little white into your light pink to create a pale highlight shade. Use the fine liner brush to outline the very tips of the petals, separating them from one another and making the flower pop. -
Painting the shoulder bud:
Repeat the petal process for the small bud on the shoulder, keeping the shape tight and elongated rather than open and round. Use more dark pink here to show it is tightly closed.
Textured Realism
To enhance the embroidery illusion, adhere tiny bits of real thread or flocking powder onto the wet paint in select areas for genuine 3D texture.
Step 4: Refining and Connecting
-
Blending the transition line:
Focus on the area where skin meets fabric. If you painted the shirt yourself, ensure the green stems on the fabric line up perfectly with the ones on the skin. You may need to extend the body paint slightly over the very rim of the fabric (carefully!) to hide the gap. -
Adding distinct embroidery details:
Go back over the leaves with the ‘stitch’ technique. Use a mix of cream and light green on a fine liner brush to add tiny, diagonal dashes across the leaves. This sells the illusion that the painted leaves are actually sewn onto the skin. -
Final contrast check:
Step back from the mirror. If the edges of the design look too soft, sharpen them with a clean brush and minute amount of darker green or deep magenta in the deepest crevices of the design. -
Setting the work:
Once fully dry, mist the entire area with a barrier spray or setting spray. Close your eyes and hold your breath while spraying. This ensures the paint doesn’t rub off onto the clothing or sweat away.
Now you have a seamless floral masterpiece that beautifully bridges fashion and body art


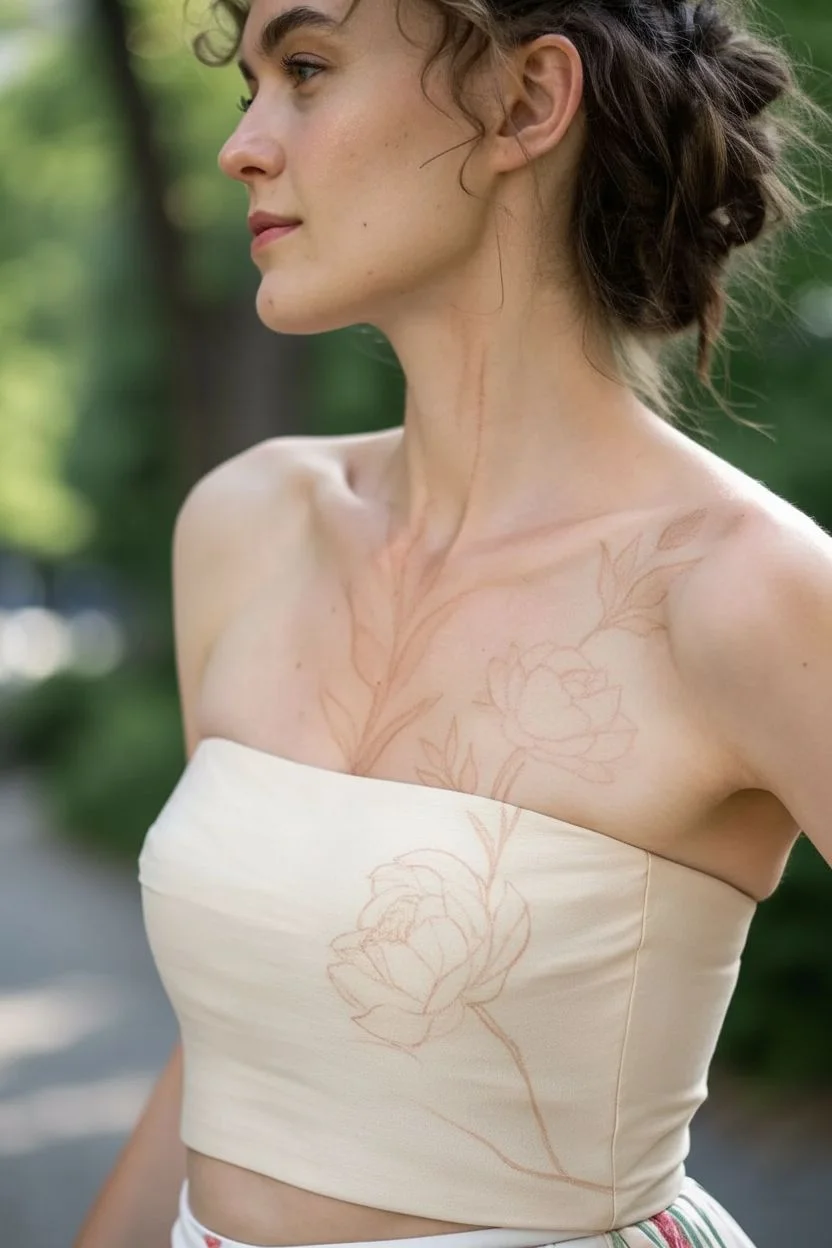
Glam Animal Print With Color-Pop Accents
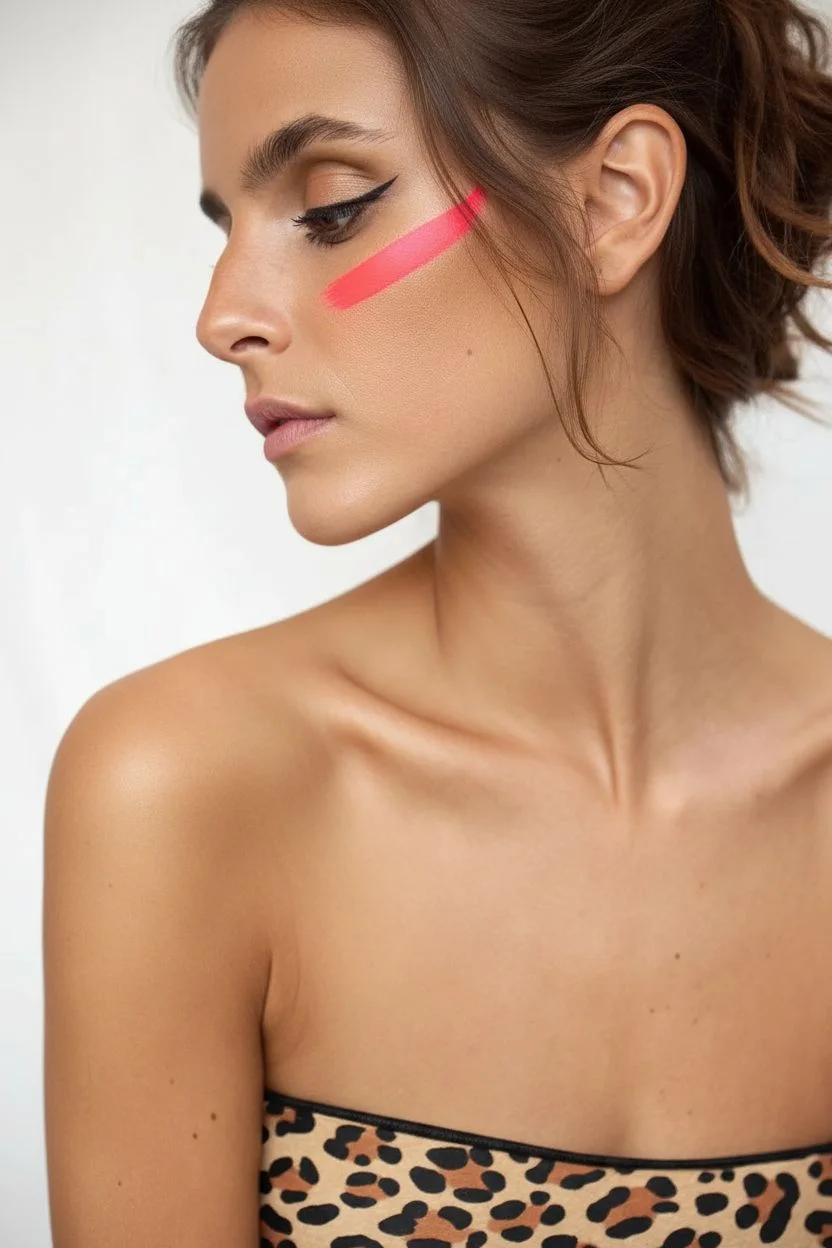
Unleash your wild side with this high-fashion body paint design that combines classic leopard spots with a striking neon accent. It is a bold, editorial look perfect for festivals or photoshoots, blending meticulous detail with vibrant energy.
Step-by-Step
Materials
- Matte black body paint (water-activated or cream)
- Neon coral or salmon pink body paint
- Fine detail brush (size 0 or 1)
- Medium flat brush
- Makeup setting spray
- Small round brush
- Black liquid eyeliner (optional for precision)
- Micellar water and cotton buds (for cleanup)
- Leopard print top (for reference/styling)
Step 1: Setting the Stage
-
Prep the skin:
Start with clean, dry skin free of heavy lotions to ensure the paint adheres properly. If you are doing the face makeup as well, apply your base foundation and a subtle contour now. -
Face accent:
Load a medium flat brush with neon coral body paint. Create a single, sweeping stroke starting just under the outer corner of the eye, moving upwards across the cheekbone toward the hairline. Keep the edges raw and painterly rather than perfectly blended. -
Graphic eyeliner:
Using a black liquid eyeliner or a very fine brush with black body paint, draw a sharp, elongated wing on the eyelid. Keep the line crisp and extend it outwards to balance the neon streak below it.
Smudge Patrol
If black paint bleeds into the neon, wait for it to fully dry. Then, gently scratch the black mistake away with a dry spoolie brush before re-patching with neon.
Step 2: The Neon Stripe
-
Shoulder line placement:
Visualize a line running from the top of the shoulder down the outer arm. Using the flat brush and neon coral paint, paint a bold, vertical stripe approximately 1 inch wide. -
Opacity building:
Let the first layer of neon paint dry for a minute. If it looks sheer, apply a second coat to make the color truly pop against the skin tone. I find patting the paint on gives better coverage than dragging. -
Adding dots:
Once the stripe is dry, take your fine detail brush dipped in black paint. Carefully paint a vertical line of small, evenly spaced dots right down the center of the neon stripe.
Step 3: Painting the Spots
-
Planning the flow:
The leopard spots should feel organic. They will start densely on the shoulder and disperse as they move across the chest and up the neck. -
Creating the basic shape:
Load a small round brush with matte black paint. To make a leopard rosette, paint two or three small, curved ‘C’ or ‘U’ shapes that almost touch but leave a gap in the middle. -
Varying the sizes:
Paint larger, more defined rosettes on the shoulder cap where the pattern is densest. As you move toward the chest, make the shapes slightly smaller and more fragmented. -
Solid spots:
Intersperse the open rosettes with solid, irregular black dots. These ‘filler’ spots are crucial for a realistic animal print look. -
Neck details:
Extend the pattern up the side of the neck. Here, use simpler shapes—mostly single dots or small pairs—to keep the look elegant and not too heavy near the jawline. -
Chest dispersion:
Scatter the spots across the collarbone and upper chest. Increase the distance between the clusters as you move away from the shoulder to create a fading effect. -
Painting over the neon:
Don’t be afraid to overlap the neon stripe slightly with a few black spots at the very top of the shoulder. This integrates the graphic line with the organic pattern. -
Detail refinement:
Switch to your tiniest liner brush. Go back to your larger rosettes and add tiny flicks or irregularities to the edges so they don’t look too round or manufactured.
Level Up
Fill the centers of the larger black rosettes with a metallic gold or bronze pigment to add a luxurious, 3D dimension to the print.
Step 4: Finishing Touches
-
Clean up edges:
Dip a cotton bud in micellar water to sharpen any smudged edges on the rosettes or the neon stripe. -
Set the design:
Mist a makeup setting spray over the painted areas. Hold the bottle at arm’s length to avoid creating water droplets that might run the paint. -
Style the look:
Pull your hair back loosely to reveal the neck detail and wear a strapless top (or a matching leopard print bandeau) to showcase the shoulder artwork.
Now you are ready to turn heads with this stunning fusion of wild nature and modern art


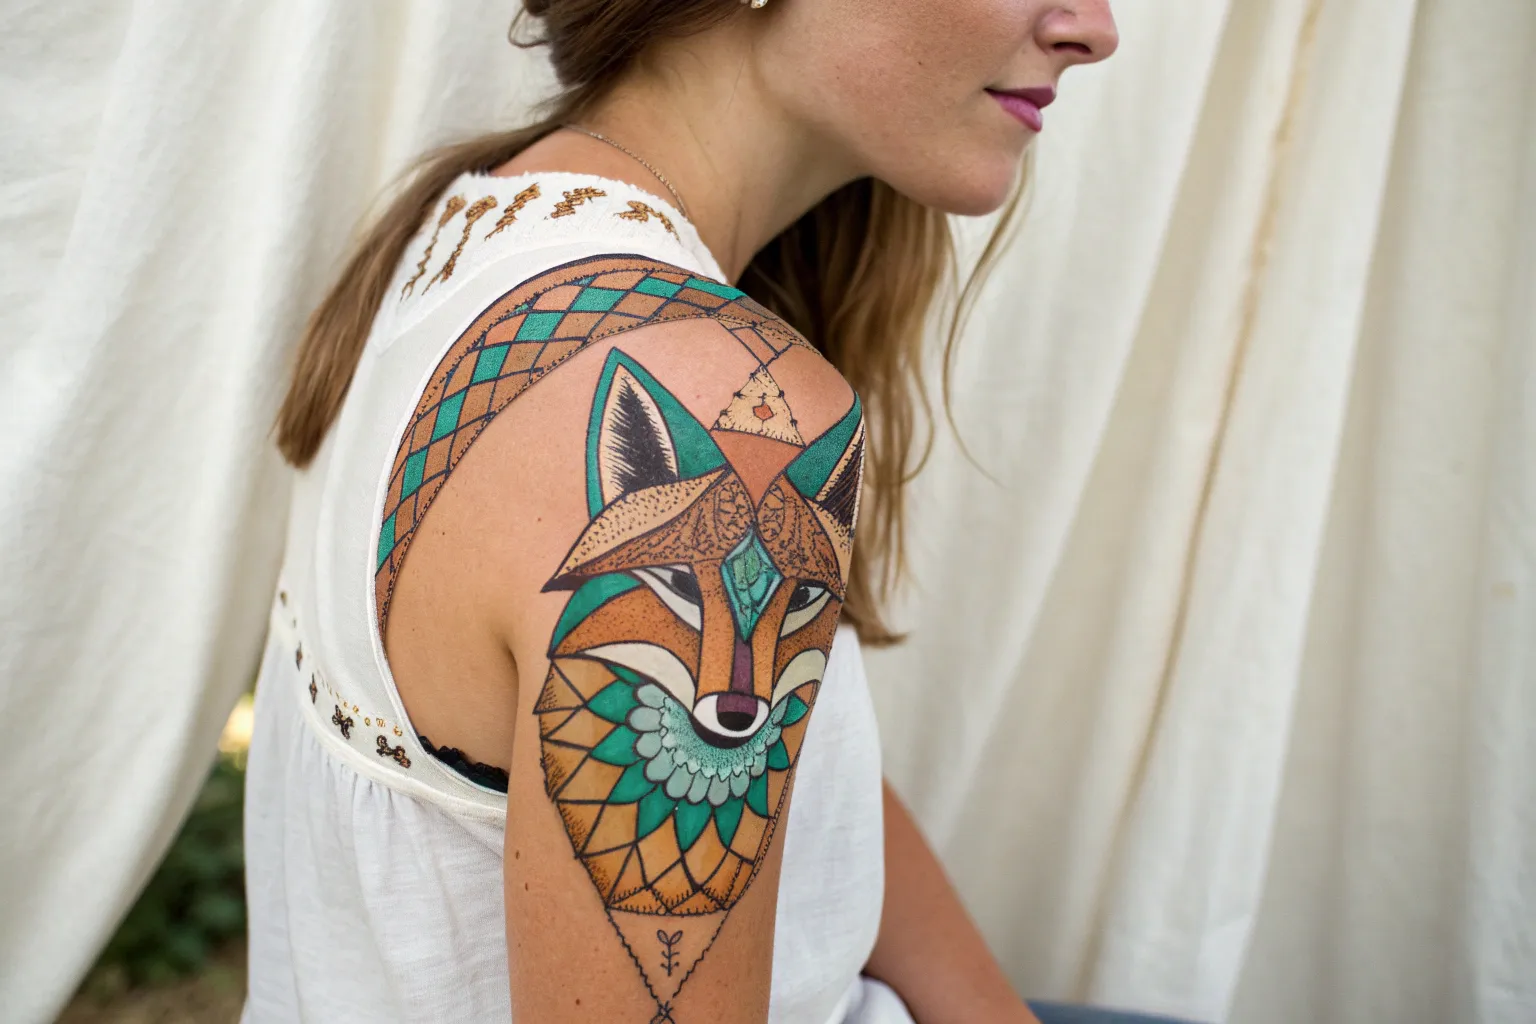
Symmetrical Geometric Chest and Collarbone Design
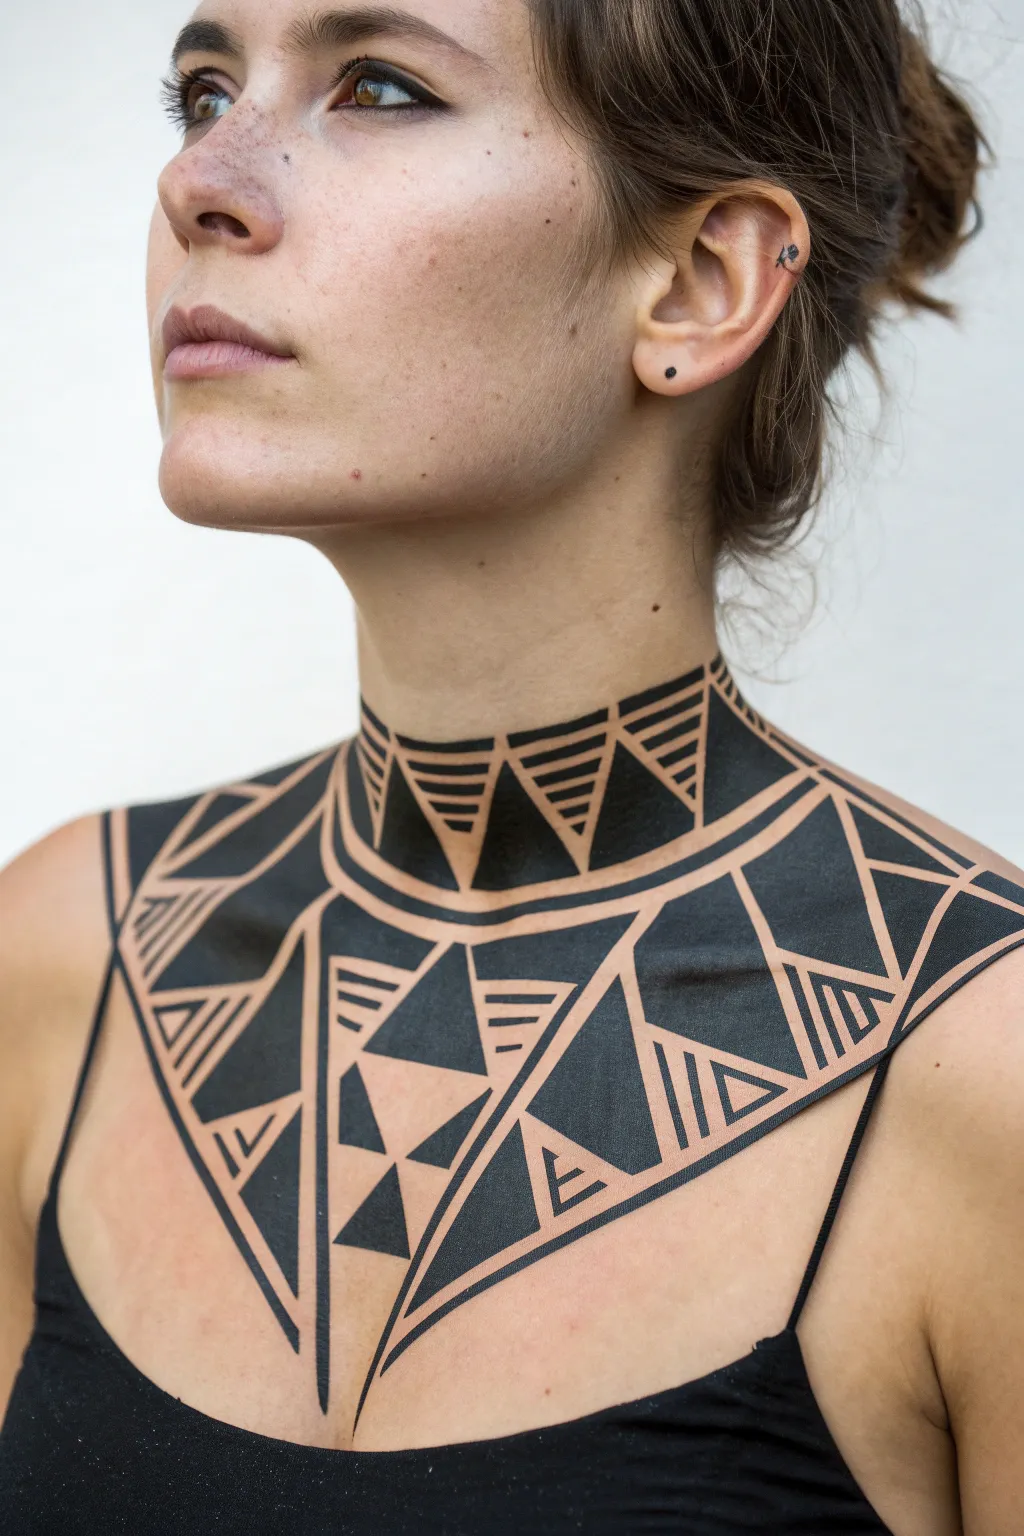
This striking body art project mimics the bold aesthetic of heavy blackwork tattoos using precise geometric shapes and sharp lines. The symmetrical design frames the neck and collarbones, creating a powerful, tribal-inspired look perfect for photoshoots or conceptual costuming.
How-To Guide
Materials
- High-quality water-activated body paint (Black)
- Flat shader brush (medium size)
- Fine liner brush (size 0 or 1)
- Angled brush (small to medium)
- White or skin-tone eyeliner pencil (for sketching)
- Setting spray or fixing powder
- Cotton swabs and makeup remover (for clean-up)
- Baby wipes
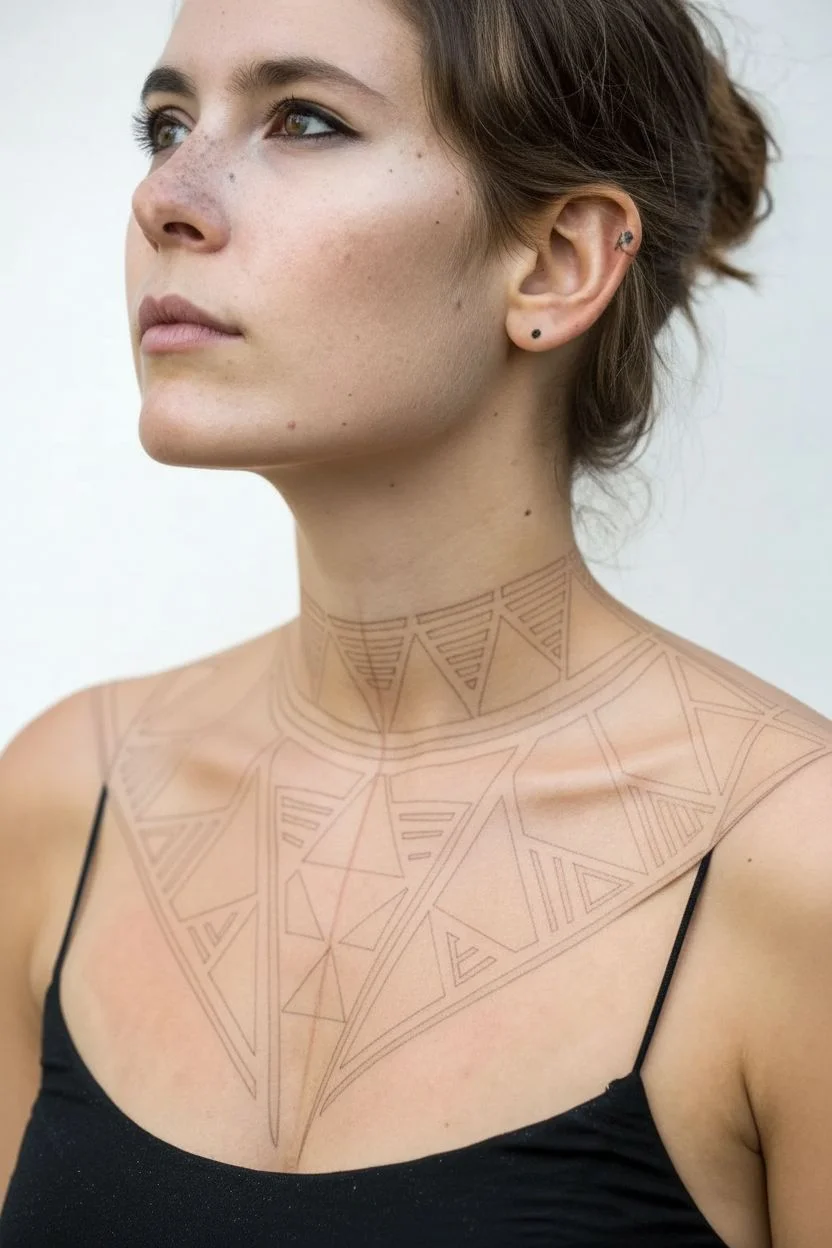
Step 1: Planning and Sketching
-
Clean the canvas:
Begin with clean, dry skin free of lotions or oils. Wipe the chest, neck, and shoulders with a baby wipe or a little toner to ensure the paint adheres properly. -
Mark the center line:
Using your white or skin-tone eyeliner pencil, lightly draw a vertical line down the center of the throat and chest. This is your crucial anchor for keeping the entire design symmetrical. -
Outline the neckband:
Sketch a horizontal guideline around the base of the neck. Create a series of triangles pointing downwards along this band. The bottom points should meet a curved line that mimics the curve of a necklace. -
Draft the main chest triangles:
From the necklace curve, sketch two large, dominant triangles extending outward towards the shoulders. Add a central inverted triangle shape pointing down the sternum. -
Detail the inner geometry:
Inside your main shapes, lightly sketch the internal details. Map out the smaller triangles, the parallel lines (striped sections), and the negative space gaps. Don’t worry about perfection yet; this is just a map.
Clean Lines Hack
For ultra-crisp straight edges on the chest, use medical tape or masking tape as a stencil. Stick it down, paint over the edge, and peel it off gently for razor-sharp lines.
Step 2: Lining and Filling
-
Mix your paint:
Activate your black body paint with water until it reaches an inky, creamy consistency. It should be fluid enough to glide but opaque enough to cover in one pass. -
Start with the neck outlines:
Using your fine liner brush, carefully trace over your sketch lines on the neck. I find it helpful to rest my pinky finger on a dry spot of skin to steady my hand for these curves. -
Define the chest structure:
Move down to the chest and outline the major exterior boundaries of the design with the liner brush. Ensure the lines are crisp and sharp, as these edges define the whole look. -
The triangle details:
Outline the smaller internal triangles and the ‘striped’ sections within the design. Keep your lines thin initially; you can always thicken them later. -
Switch to the flat brush:
Load up your medium flat brush with the black paint. You will use this for the solid fill areas. -
Fill the large sections:
Begin filling in the large triangular shapes on the chest and shoulder areas. Use smooth, confident strokes to avoid patchiness. If these areas look streaky, let them dry and apply a second coat. -
Tackle the neck fill:
Carefully fill in the solid black triangles around the neck. Be mindful of movement here; ask the model to keep their chin up to stretch the skin slightly, preventing creases while the paint dries. -
Refining edges:
Use the angled brush to sharpen any corners or edges where the flat brush couldn’t reach. The tips of the triangles need to be needle-sharp for this geometric effect.
Step 3: Finishing Touches
-
Create the striped effect:
Go back to the areas marked for stripes (like the top of the neck triangles). Using the fine liner brush, paint the horizontal lines carefully, ensuring the skin showing through—the negative space—is consistent in width. -
Clean up negative space:
Dip a cotton swab in a little makeup remover or water. Clean up the ‘gaps’ between the shapes to make the skin separation distinct and clean. This contrast is what makes the design pop. -
Check symmetry:
Step back and look at the design from a distance. If one side looks heavier, thicken the lines on the opposite side slightly to balance it out. -
Set the paint:
Once everything is fully dry, lightly mist the entire area with a setting spray. This prevents the black paint from smudging onto clothing or transferring if the skin gets warm.
Add Dimension
Mix a tiny drop of metallic silver or gold powder into your setting spray for a subtle shimmer, or trace the inner edges of the black shapes with a white liner for a glowing effect.
Now you have a bold, graphic masterpiece that transforms the body into a work of modern art
BRUSH GUIDE
The Right Brush for Every Stroke
From clean lines to bold texture — master brush choice, stroke control, and essential techniques.
Explore the Full Guide
Galaxy Goddess With Stars and Nebula Blends
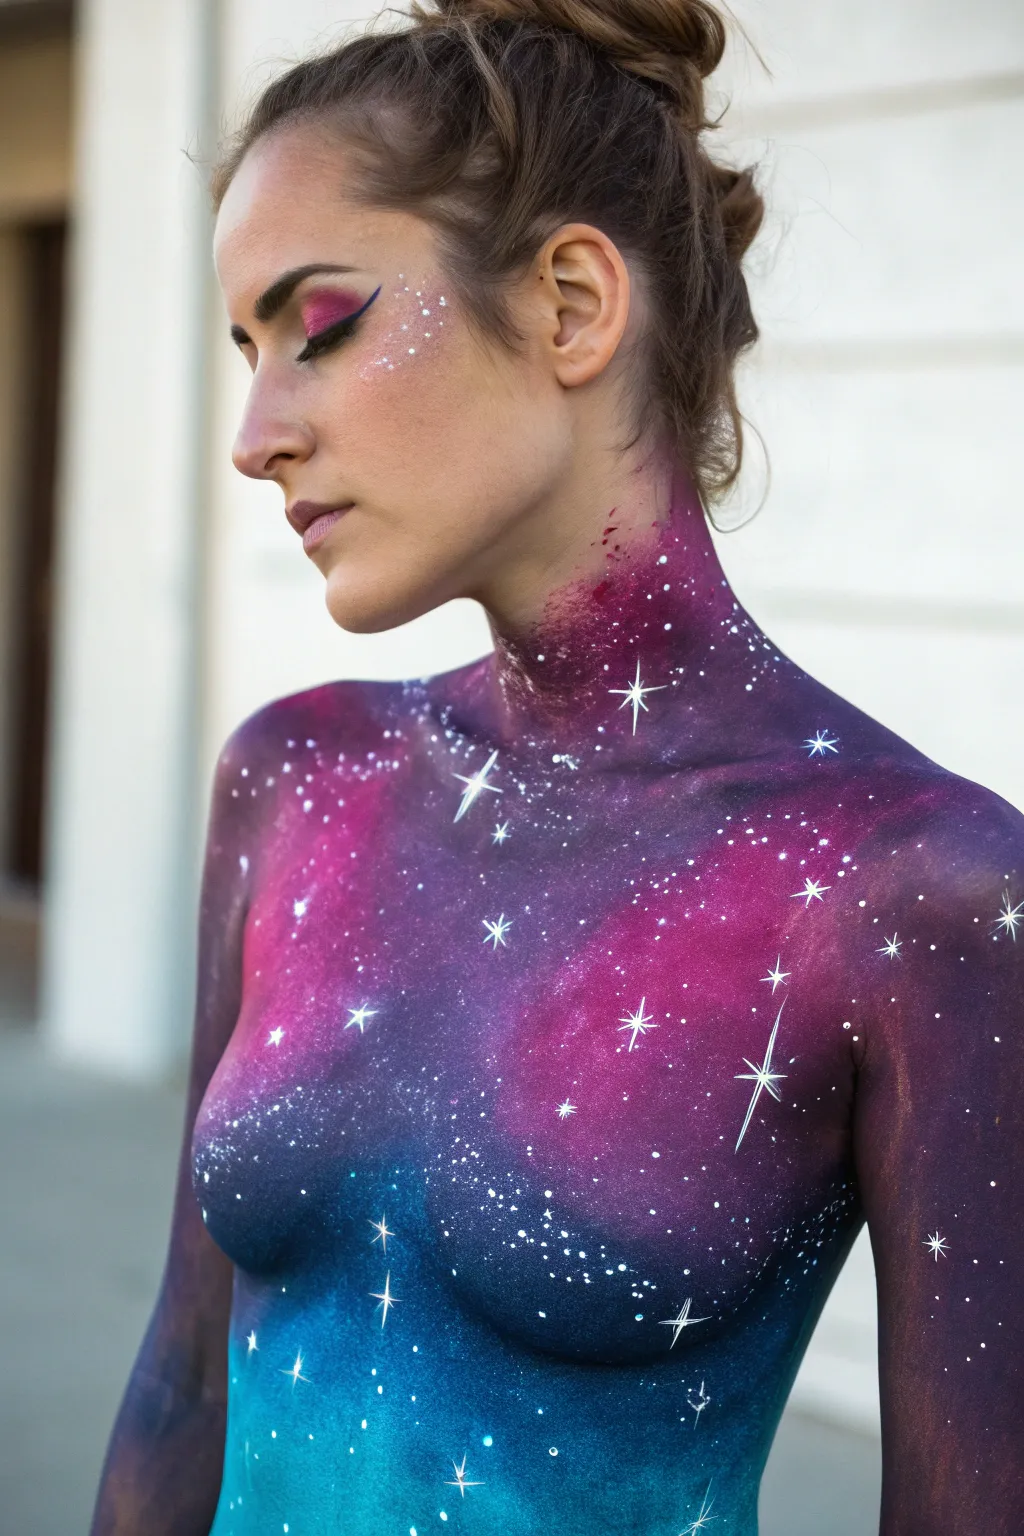
Transform skin into a breathtaking celestial canvas featuring deep space hues and sparkling constellations. This galaxy-themed body paint blends vibrant magentas, deep purples, and teals, accented by hand-painted twinkling stars for an ethereal, otherworldly finish.
Detailed Instructions
Materials
- Water-activated body paints (magenta, deep purple, navy blue, teal/turquoise, black, white)
- High-density application sponges (wedges or teardrop)
- Round synthetic brushes (sizes #2 and #4)
- Fine liner brush (size #0 or #00)
- Mixing palette
- Spray bottle with water
- Cosmetic glitter gel or loose iridescent glitter
- Setting spray
- Makeup remover wipes (for cleanup)
Step 1: Creating the Nebula Base
-
Prep the skin:
Ensure the model’s skin is clean, dry, and free of oils or heavy lotions to help the water-activated paint adhere smoothly. -
Activate the base colors:
Mist your palette with water to activate the magenta, purple, and teal body paints until they reach a creamy consistency. -
Sponge on the mid-tones:
Using a damp sponge, begin pouncing magenta paint onto the upper chest, shoulders, and neck in organic, cloud-like patches. Don’t worry about perfect shapes; asymmetry looks more natural. -
Add deep space hues:
Load a fresh sponge with deep purple and begin blending it around the edges of the magenta areas, working up the neck towards the jawline and down the arms. -
Transition to cool tones:
Near the lower torso and mid-chest, sponge on the teal or turquoise paint. Blend the edges where the teal meets the purple to create a soft, seamless transition without muddying the colors. -
Create depth with shadows:
Lightly dab a small amount of black or navy blue into the deepest recesses of the purple areas and around the collarbones to add dimension and contrast.
Gradient Mastery Tip
Work quickly while the paint is damp to blend colors. If a darker color overpowers a lighter one, wait for it to dry, then Sponge the lighter color back on top for opacity.
Step 2: Face & Neck Detailing
-
Extend the galaxy upward:
Continue the purple and magenta gradient up the neck, fading it out softly as you reach the jawline and ear. The paint should look like it’s creeping up the skin. -
Apply matching eye makeup:
Using a small brush or eyeshadow applicator, sweep the magenta pigment across the eyelids, blending into a sharp winged shape with black liner to mirror the body art. -
Add facial glitter accents:
Dab a few spots of glitter or white paint dots on the cheekbone and temple area to connect the face to the body design concepts.
Fixing Muddy Colors
If your purple and teal blend into a muddy gray, let the area dry completely. Apply a transition layer of white, let that dry, then apply your desired color on top to restore vibrancy.
Step 3: Stars and Constellations
-
Prepare the star paint:
Mix white body paint with a little extra water to create an inky, fluid consistency that flows easily off a fine liner brush. -
Splatter the background stars:
I like to load a toothbrush or stiff brush with thin white paint and flick the bristles with my thumb to spray a fine mist of tiny stars across the painted areas. -
Hand-paint major stars:
Using your fine liner brush (#0), paint small, solid white dots scattered randomly among the splatter. Vary the size of the dots for realism. -
Create the signature flares:
Select a few of the larger white dots to turn into ‘lens flare’ stars. Paint a thin vertical line through the center, followed by a shorter horizontal line to create a cross shape. -
Refine the flare shape:
Carefully taper the ends of your cross lines so they end in sharp points rather than blunt edges. This makes the stars look like they are gleaming. -
Add diagonal rays:
For the largest ‘hero’ stars on the chest and shoulder, add two very short diagonal lines between original cross lines to create an eight-pointed glimmer effect. -
Highlight specific clusters:
Group a few medium-sized dots together in key areas, like the collarbone or shoulder cap, to simulate star clusters or recognizable constellations.
Step 4: Finishing Touches
-
Seal the artwork:
Close the model’s eyes and lightly mist the entire painted area with a setting spray to prevent the water-based paint from cracking or rubbing off too easily. -
Final glitter application:
While the setting spray is still slightly tacky, gently pat a small amount of loose iridescent glitter onto the lightest parts of the nebula clouds for extra dimension.
Step back and admire your celestial creation as the stars now seemingly align on the skin
Forest Spirit With Bark Texture and Mossy Greens
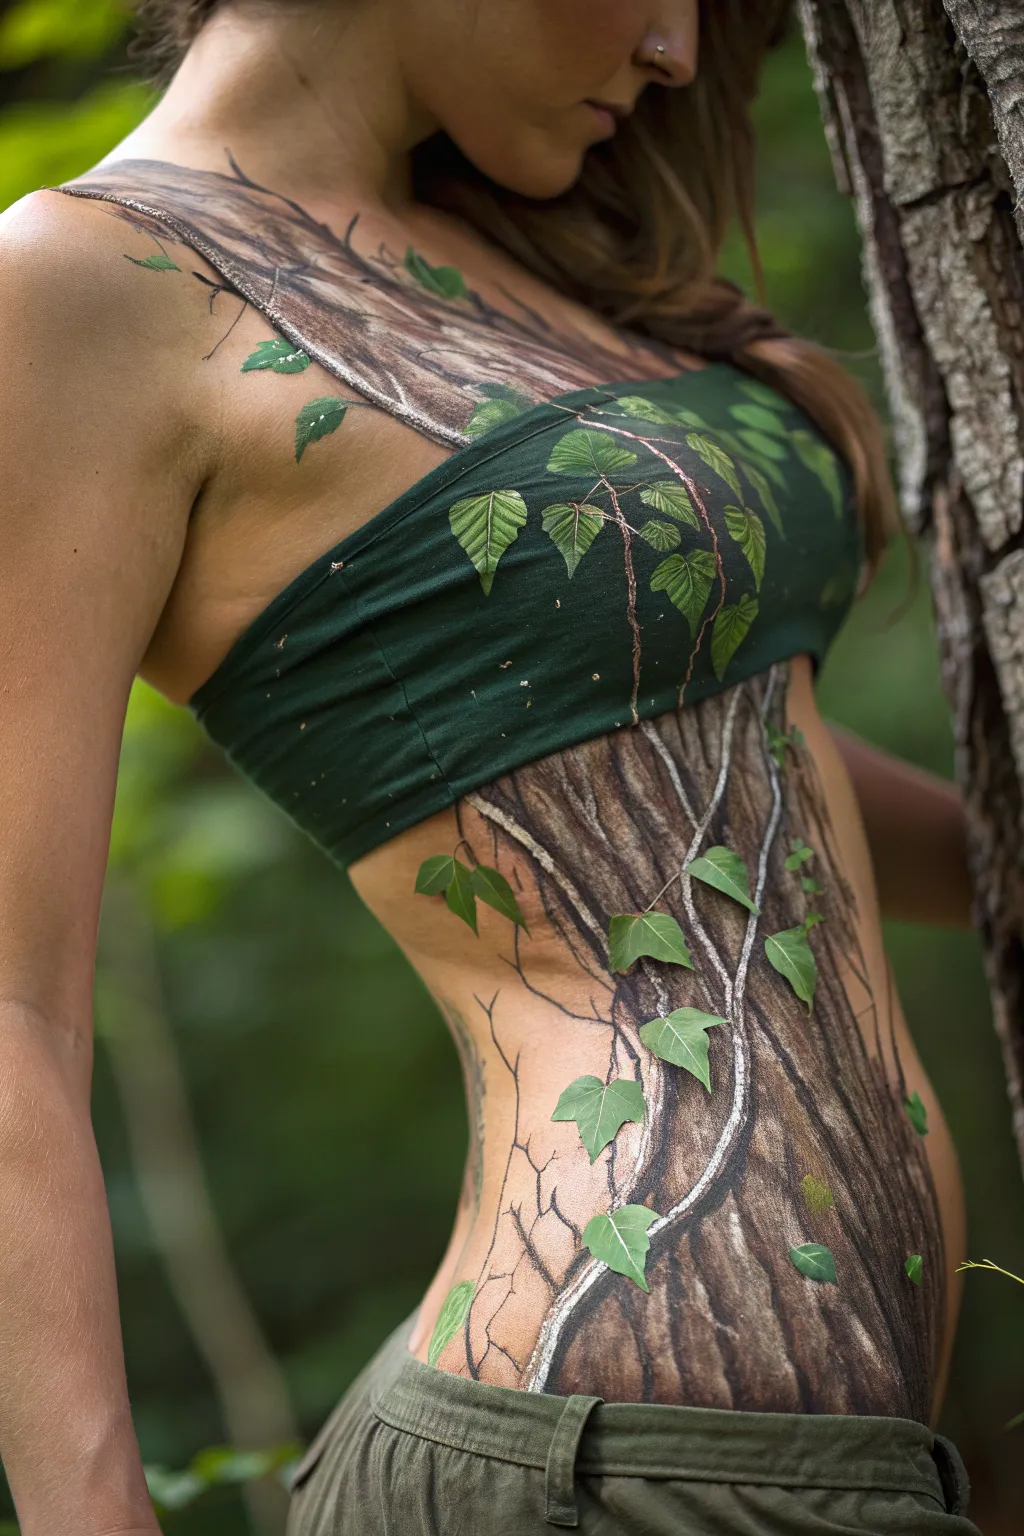
Transform the human form into a living part of the forest with this intricate body painting design. By blending realistic bark textures with vibrant ivy leaves across skin and clothing, you’ll create a seamless camouflage effect perfect for photoshoots or nature-themed events.
How-To Guide
Materials
- Water-based body paints (dark brown, medium brown, tan, black, white)
- Water-based body paints (dark green, light green, yellow-green)
- Dark green bandeau top or crop top (cotton blends work best for painting)
- Flat brushes (various sizes: 1 inch, 1/2 inch)
- Fine liner brushes (sizes 0, 00)
- Texturing cosmetic sponge or stipple sponge
- Setting spray or fixing powder
- Small cup of water
- Palette for mixing
Step 1: Preparing the Canvas
-
Base Layer Prep:
Begin with clean, dry skin free of lotions or oils to ensure the paint adheres properly. Have the model wear the dark green bandeau top, as you will be painting directly over the fabric to create a continuous design. -
Mapping the Trunk:
Using a light brown or tan face paint and a medium flat brush, lightly sketch the outline of the tree trunk on the torso. Create a vertical flow that follows the natural curves of the waist and hip, leaving some skin exposed on the sides for contrast.
Paint Cracking?
If the bark paint cracks when the model moves, mix a tiny drop of liquid glycerin or castor oil into your water cup. This keeps the paint flexible on the skin.
Step 2: Creating the Bark Texture
-
Blocking in Color:
Fill in the mapped trunk area with a medium brown base coat. Use a large flat brush for broad strokes. Don’t worry about perfect coverage; a slightly streaky application actually helps build the wood grain effect later. -
Adding Depth with Shadows:
Mix a dark brown with a touch of black. With a slightly smaller flat brush, paint vertical, irregular stripes to simulate deep fissures in the bark. I like to twist the brush slightly as I drag it down to create organic, non-uniform lines. -
Highlighting the Ridges:
Load a flat brush with tan or a creamy white mixed with light brown. Lightly drag this color along the edges of your dark fissures to create raised ridges. This ‘highlight next to shadow’ technique is key for 3D realism. -
Extending to the Neck:
Continue these bark textures upward past the top, painting onto the chest, collarbone, and neck. Ensure the transition from the fabric (which we will paint later) to skin looks deliberate, though the fabric itself will mostly serve as a background for leaves. -
Fine Details:
Using a fine liner brush and black paint, deepen the darkest cracks in the bark. Add small knots or ‘eyes’ in the wood grain by painting small, elongated swirls.
Level Up: 3D Texture
Glue small patches of dried moss or real bark chips onto the skin using eyelash glue or spirit gum for a hyper-realistic, tactile finish.
Step 3: Painting the Foliage
-
Vines and Stems:
Mix a light brown with a hint of white. Using a liner brush, paint thin, winding vines that travel up the painted trunk and across the green top. Make these lines wiggly and branching to mimic climbing ivy stems. -
Leaf Placement:
Select spots along the vines to place your leaves. Aim for a mix of clusters and solitary leaves. Use a dark green to paint the basic tear-drop or heart shapes of ivy leaves. -
Painting on Fabric:
When painting leaves on the bandeau top, use slightly less water to prevent bleeding. Press the paint into the fabric fibers. Continue the vine pattern seamlessly from skin onto the fabric. -
Leaf Highlights:
Mix a light yellow-green. Paint one half of each leaf or the outer edges with this lighter shade to simulate captured light. This variation makes the foliage pop against the dark background. -
Veining Details:
With your finest liner brush and a very diluted light green or white, carefully paint the central vein and smaller branching veins on each leaf. This step adds incredible intricacy. -
Adding Shadow:
To make the leaves look like they are sitting *on top* of the bark, use a diluted black or dark grey to paint a small drop shadow on the bark/skin directly underneath one side of each leaf.
Step 4: Transition and Finish
-
Fading the Edges:
On the model’s sides where the bark paint ends, use a stipple sponge with a dry-brush technique to fade the brown edges into the natural skin tone. This creates a softer, more organic transition than a hard line. -
Neck Branching:
Extend a few thin, bare branches up the neck toward the jawline using dark brown paint. This helps integrate the head into the tree concept without covering the face entirely. -
Setting the Paint:
Once all paint is dry, lightly mist the painted skin (and fabric) with a setting spray. This prevents smudging, especially if the model will be moving or posing in warm conditions.
Step back and admire how the human form disappears into the texture of the forest

PENCIL GUIDE
Understanding Pencil Grades from H to B
From first sketch to finished drawing — learn pencil grades, line control, and shading techniques.
Explore the Full Guide
Bird Chest Centerpiece Using Natural Symmetry
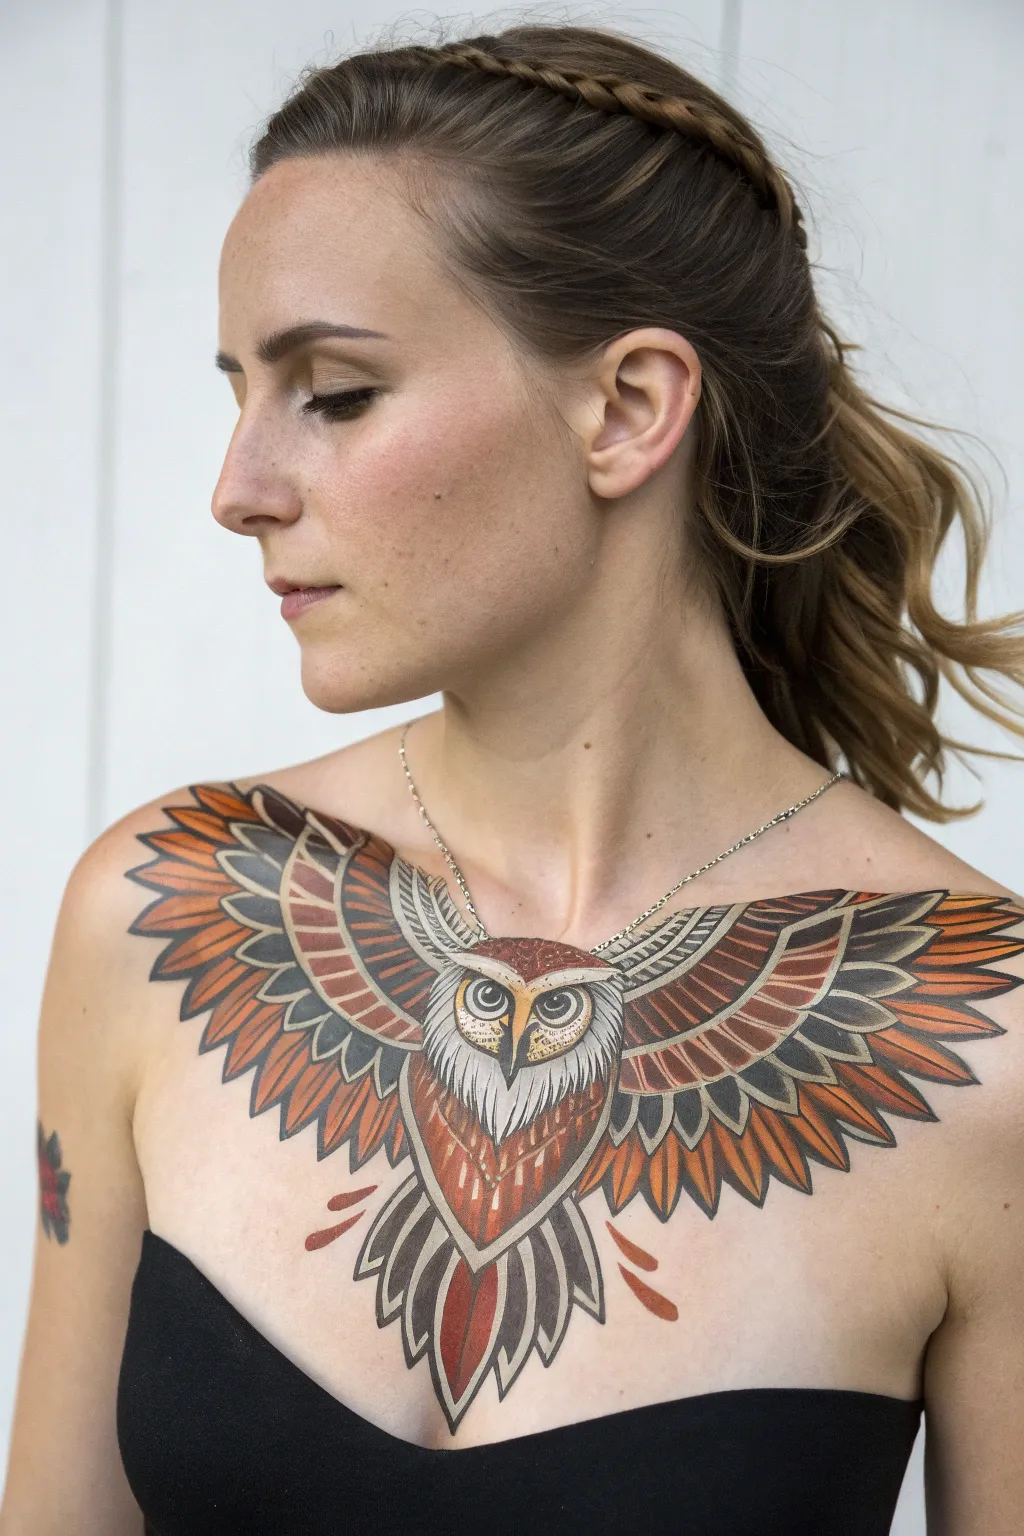
Transform yourself with this striking owl chest piece that uses the body’s natural symmetry for maximum impact. The warm browns, greys, and crisp black outlines create a design that mimics the look of a traditional neo-traditional tattoo.
Step-by-Step
Materials
- Skin-safe body paints (water-based or alcohol-based)
- Palette: White, Black, Burnt Sienna, Dark Grey, Mustard Yellow, Dark Red
- Fine liner brushes (size 0 and 00)
- Flat shader brushes (medium and small)
- Setting spray or translucent powder
- Skin pencil (light grey or nude)
- Small sponge for blending
- Water container and paper towels
Step 1: Planning and Sketching
-
Define the Center:
Begin by finding the exact center of the sternum. Use a light skin pencil to mark a vertical line from the hollow of the neck down to the solar plexus. This is crucial for keeping the bird symmetrical. -
Map the Wing Span:
Sketch the upper curve of the wings, following the natural line of the collarbones out towards the shoulders. The wings should curve slightly upward at the tips to frame the neck beautifully. -
Draft the Owl’s Face:
Draw the central owl head directly over the upper sternum. Sketch two large almond shapes for eyes and a small, sharp triangle for the beak beak pointed downward. -
Outline the Feathers:
Lightly sketch the rows of feathers radiating from the central body. Start with the shorter neck feathers, then move to medium wing coverts, and finally the long primary flight feathers extending to the shoulders.
Step 2: Base Colors and Filling
-
Block in the Browns:
Using a flat brush and Burnt Sienna, fill in the primary flight feathers on the outer edges and the central chest feathers. Apply the paint smoothly, but don’t worry about perfect edges yet. -
Grey Feather Accents:
Mix a soft Dark Grey. Fill in the secondary row of feathers just below the top edge of the wing. I find that keeping this grey sheer helps it blend better later. -
Face Details:
Paint the area around the eyes with a creamy White to make them pop. Use Mustard Yellow for the irises and the beak. -
Red Highlights:
Add touches of Dark Red to the lower tail feathers and the tips of the upper wing feathers for a bit of warmth and dimension.
Linework Woes?
If your black outlines look shaky, thicken the line slightly to hide the wobble. Resting your pinky finger on a dry part of the skin acts as an anchor for stability.
Step 3: Linework and Definition
-
The Main Outline:
Load a size 0 round brush with deep Black paint. Carefully trace the outer perimeter of the entire design. Keep your hand steady and breathe out as you pull the long lines. -
Feather Textures:
Outline each individual feather inside the wings. For the brown flight feathers, add a central quill line to give them structure. -
Detailing the Face:
Outline the large eyes and pupils with black. Add small, sharp hatch marks around the white facial disk to simulate fine fur or downy feathers. -
Adding Contrast:
Fill in the negative spaces between the grey and brown feather rows with solid black. This ‘black packing’ technique mimics tattoo artwork and makes the colors vibrant.
Add Metallic Flair
Swap the Mustard Yellow in the eyes for a metallic gold body paint. It catches the light beautifully and gives the owl a mystical, piercing gaze.
Step 4: Shading and Finishing
-
Gradient Shading:
Dilute a tiny bit of black paint or use a darker brown. Glaze it over the top of the brown feathers where they tuck under the row above. This creates a shadow and implies layering. -
White Highlights:
Using your smallest brush and pure White, add tiny dots to the eyes for life. Add thin scratchy lines to the grey feathers for texture. -
The Necklace Element:
Paint the thin black chain draped around the neck, disappearing behind the owl’s head. Add tiny metallic silver or white dots on the chain links for realism. -
Tail Feathers:
Finish the bottom of the design with the inverted scallop arrangement of tail feathers, ensuring sharp, pointed tips that direct the eye down the torso. -
Set the Design:
Once fully dry, lightly mist the entire painted area with a setting spray. This prevents smudging when you move or put on clothing.
Step back and admire your fierce, majestic new wings capable of taking flight at any costume party
Underwater Scene With Koi and Water Ripples
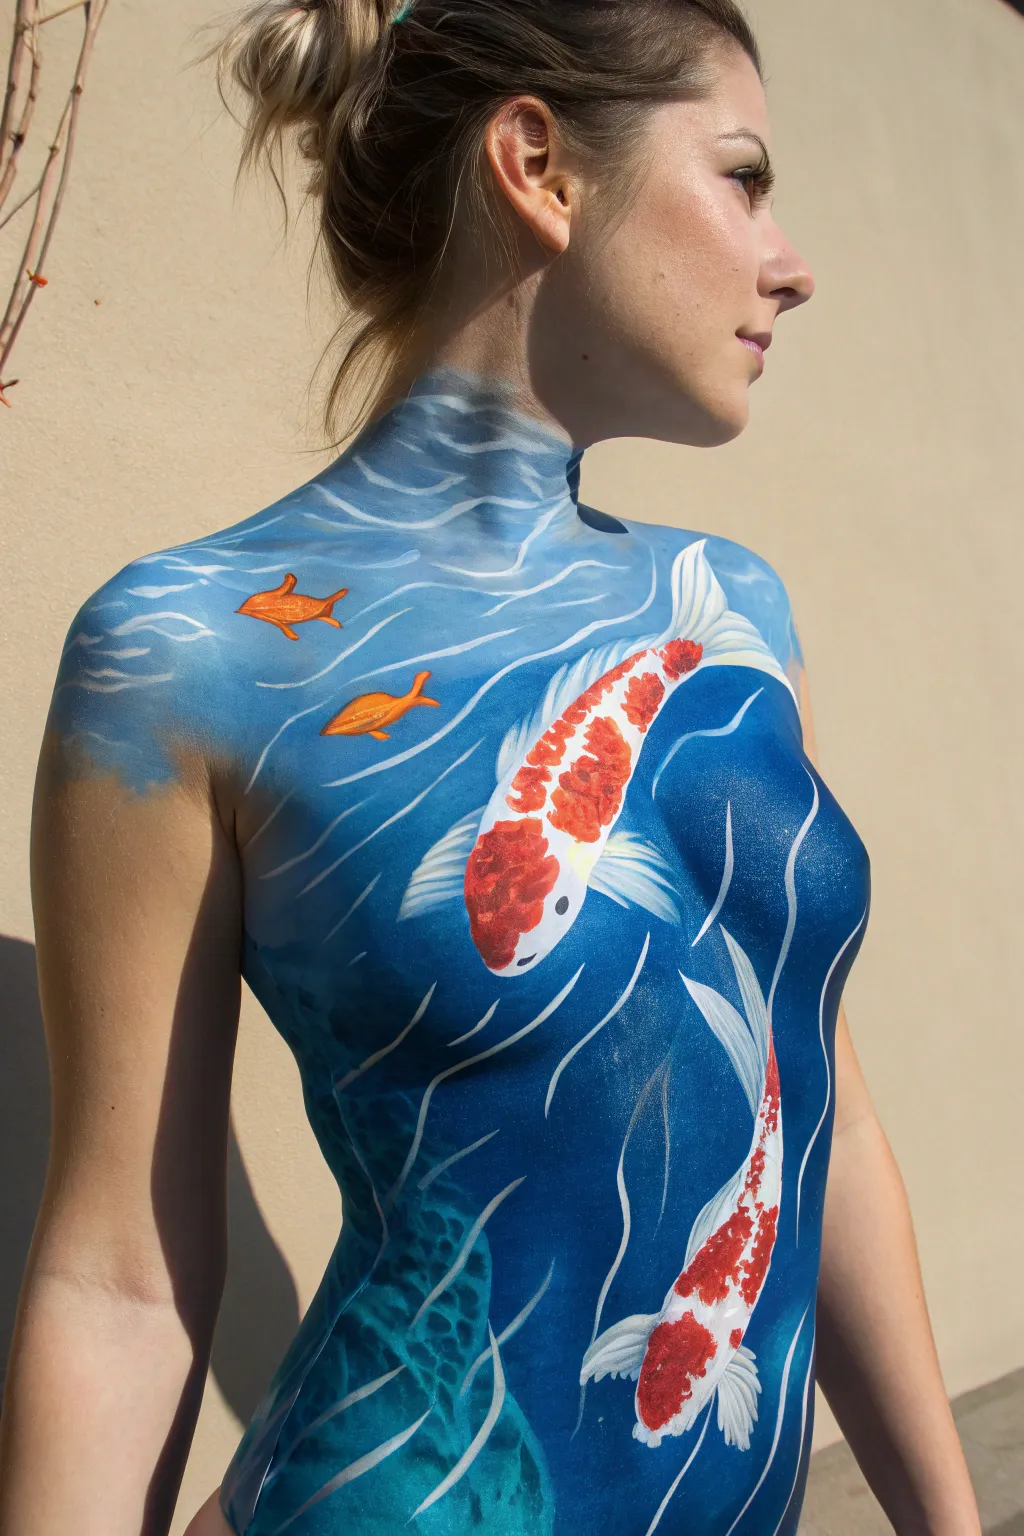
Transform the human form into a serene aquatic habitat with this intricate body painting design. Highlighting the natural curves of the body, this underwater scene features swimming koi fish amidst stylized currents and deep blue depths.
Step-by-Step
Materials
- Water-activated body paints (Dark Blue, Medium Blue, Light Blue/Teal, White, Red, Orange, Black)
- Flat body painting brushes (1-inch and 1/2-inch)
- Round detail brushes (Size 2 and 4)
- Filbert brush (for soft blending)
- Cup of water
- Spray bottle
- Paper towels
- Skin barrier spray or primer (optional but recommended)
Step 1: Setting the Scene
-
Prep the canvas:
Begin with clean, dry skin. If you are planning for a long wear time, mist a light layer of barrier spray over the torso, neck, and shoulders to prevent sweating off the makeup. -
Map the water levels:
Using a wide flat brush and medium blue paint, establish the middle water tone. Paint broadly across the chest and upper torso, leaving specific negative spaces empty where the large koi fish will go (one diagonally across the chest, one lower on the abdomen). -
Deepen the depths:
Load a sponge or large brush with dark royal blue. Apply this to the sides of the ribs, the underbust area, and the lower abdomen to create depth and dimension, blending it upwards into the medium blue. -
Create the surface:
Switch to a lighter blue mixed with a touch of white. Paint the neck and collarbone area to represent the sunlit surface of the water, blending it softly downwards into the mid-tone blue on the chest. -
Define the water surface:
With a smaller flat brush and white paint, create wavy, horizontal ripple lines across the neck and very top of the chest to simulate the water’s surface texture.
Mapping the Fish
For better composition, use a white eyeliner pencil to sketch the outline of the large koi fish before you start applying the heavy blue background paint.
Step 2: Bringing the Koi to Life
-
Fill the fish base:
Using white body paint and a filbert brush, fill in the negative spaces you left earlier for the large koi fish. Ensure the coverage is opaque; you may need a second coat once the first is dry. -
Add iconic markings:
Load a round brush with bright red or deep orange paint. Stipple organic, blotchy patterns along the spine of the white fish shapes to create the classic Kohaku koi signage. -
Detail the fins:
Mix a very translucent wash of white or light grey. Gently paint the fanned-out tail and pectoral fins extending from the white body into the blue water, using quick, wispy strokes to keep them looking delicate. -
Paint the eyes:
Using a fine detail brush and black paint, add small dots for the eyes on the sides of the fish heads. I find placing them slightly wide gives the fish a more realistic perspective.
Step 3: Adding Movement and Life
-
Paint the goldfish:
In the upper left chest area (the shallow water), paint two small, simple fish silhouettes using solid bright orange paint. These should look like distant goldfish swimming near the surface. -
Outline the small fish:
Give the small orange fish a tiny bit of definition with a thin black outline on their bellies to make them pop against the blue background. -
Flowing currents:
Load a thin round brush with white paint that has been thinned slightly with water to an ink-like consistency. -
Draw the ripples:
Paint long, flowing S-curve lines vertically and diagonally around the koi and the torso contours. These lines represent the water current and movement. -
Add shine:
Paint small, sharp white highlights on the scales of the red patches and near the heads of the koi to make them look wet and glistening.
Patchy White Paint?
White pigment can be streaky. Instead of dragging the brush, use a patting or stippling motion to pack the pigment onto the skin for a solid, opaque finish.
Step 4: Final Touches
-
Refine the edges:
Check the perimeter of your painting, especially near the armpits and hips. Use a clean wet wipe to clean up any messy edges for a sharp, ‘bodysuit’ look. -
Add underwater texture:
If parts of the deep blue look too flat, lightly sponge a textured teal or dark green pattern near the bottom to suggest sea floor vegetation or deep currents. -
Set the design:
Once everything is fully dry, spray a final layer of sealer over the entire painting to lock the colors in and prevent smudging during movement.
Step back and admire the fluid motion captured in your living artwork


Neon Skeleton Lines for Blacklight Drama
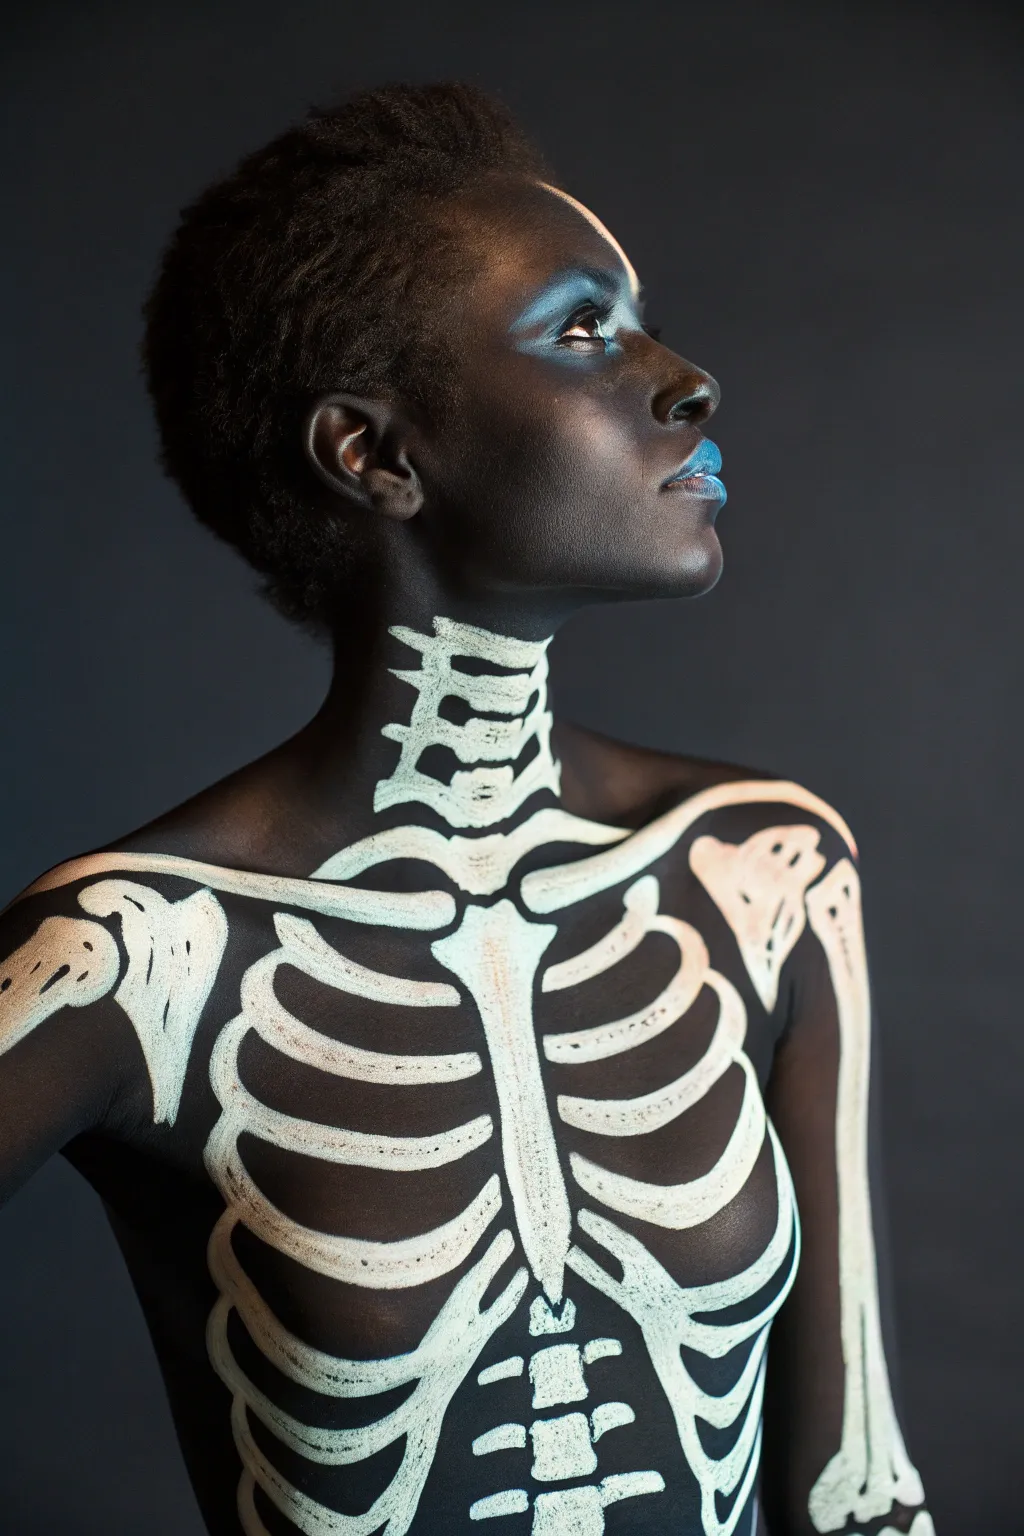
Transform yourself into a walking work of art with this striking skeletal body paint design. By combining stark white linework against skin with subtle ethereal blue highlights, you’ll create a look that is both bone-chilling and beautiful.
Step-by-Step Tutorial
Materials
- High-quality white body paint (water-activated cake or cream)
- Black body paint (optional, for negative space correction)
- Metallic or pearlescent blue eyeshadow/pigment
- Flat shader brush (medium width)
- Detail liner brush (fine tip)
- Soft blending brush
- Setting spray
- Black eyeliner pencil (white or nude for drafting)
- Makeup sponges
Step 1: Preparation and Mapping
-
Skin Prep:
Begin with clean, dry skin free of heavy oils or lotions, which can cause the paint to slide. Apply a very light layer of setting spray to create a tacky base for the paint to adhere to. -
Drafting the Spine:
Using a nude or white eyeliner pencil, faintly sketch the cervical vertebrae on the front of the neck. These should look like stacked, blocky shapes that narrow as they go up toward the jawline. -
Mapping the Clavicle:
Feel for your own collarbones and sketch a simplified bone shape directly over them. The design should extend from the center of the chest out toward the shoulders, widening at the ends. -
Sternum Sketching:
Draw the sternum (breastbone) down the center of the chest. It should look somewhat like a necktie, wider at the top and tapering to a point at the bottom, just below the bust line. -
rib Placement:
Lightly mark the placement of the ribs curving out from the sternum. Remember that ribs create a cage; they should curve upward slightly and wrap around the torso rather than just sitting flat.
Step 2: Painting the Bones
-
Mixing the White:
Activate your white body paint with a little water until it reaches a creamy consistency similar to melted ice cream. If it’s too watery, it will drip; too thick, and it will crack. -
Neck Vertebrae:
Using a medium flat brush, fill in the neck vertebrae shapes. Keep the edges relatively sharp but lend them an organic, slightly textured feel—bones aren’t perfect geometric shapes. -
The Collarbone:
Paint the clavicles, ensuring the white is opaque. I like to double-load the brush slightly to keep the coverage solid in one sweep. -
Shoulder Joints:
At the outer edge of the shoulder, paint the large, rounded ball-and-socket joint shapes (the humerus head and scapula connection). Add a few internal sketchy lines to suggest bone texture. -
Sternum and Ribs:
Fill in the central sternum and the ribs. Leave clear gaps between each rib to let the skin show through—this negative space is crucial for the skeletal effect. -
Arm Bones:
Paint a long bone structure down the outer arm. You don’t need to be anatomically perfect; a strong vertical line that flares at the elbow joint communicates the idea clearly.
Fixing Cracked Paint
If the white paint cracks upon drying, it was likely applied too thick. Dampen a sponge slightly and gently press over the crack to rehydrate and smooth it out without lifting the pigment.
Step 3: Detailing and Depth
-
Creating Texture:
Once the white base is dry, take a slightly drier brush with white paint and scuff it over the painted bones. This ‘dry brushing’ technique adds a chalky, realistic texture. -
Correction and Definition:
If any white lines became too thick, use black body paint (or a clean brush with makeup remover) to carve back into the negative space, sharpening the edges of the ribs. -
Blue Ethereal Glow:
Dip a soft blending brush into the metallic blue pigment. Gently buff this color onto the high points of the face: the brow bone, the bridge of the nose, and the cheekbones. -
Lip Highlight:
Pat the same metallic blue pigment onto the center of the lips for a futuristic, frozen touch. -
Eye Drama:
Apply the blue pigment to the eyelids, concentrating the color on the inner corners and blending outward for a highlighted, celestial gaze. -
Final Set:
Mist the entire body art with a strong-hold setting spray. Let it dry completely before moving to prevent smudging your crisp lines.
UV Pop Factor
To make this truly glow under blacklight as suggested, trace over your white bone lines with a clear or white UV-reactive topcoat. It stays invisible in light but pops in the dark.
Now you are ready to step into the dark and let your skeletal structure shine
Anatomy Line Art With Floral Overlays
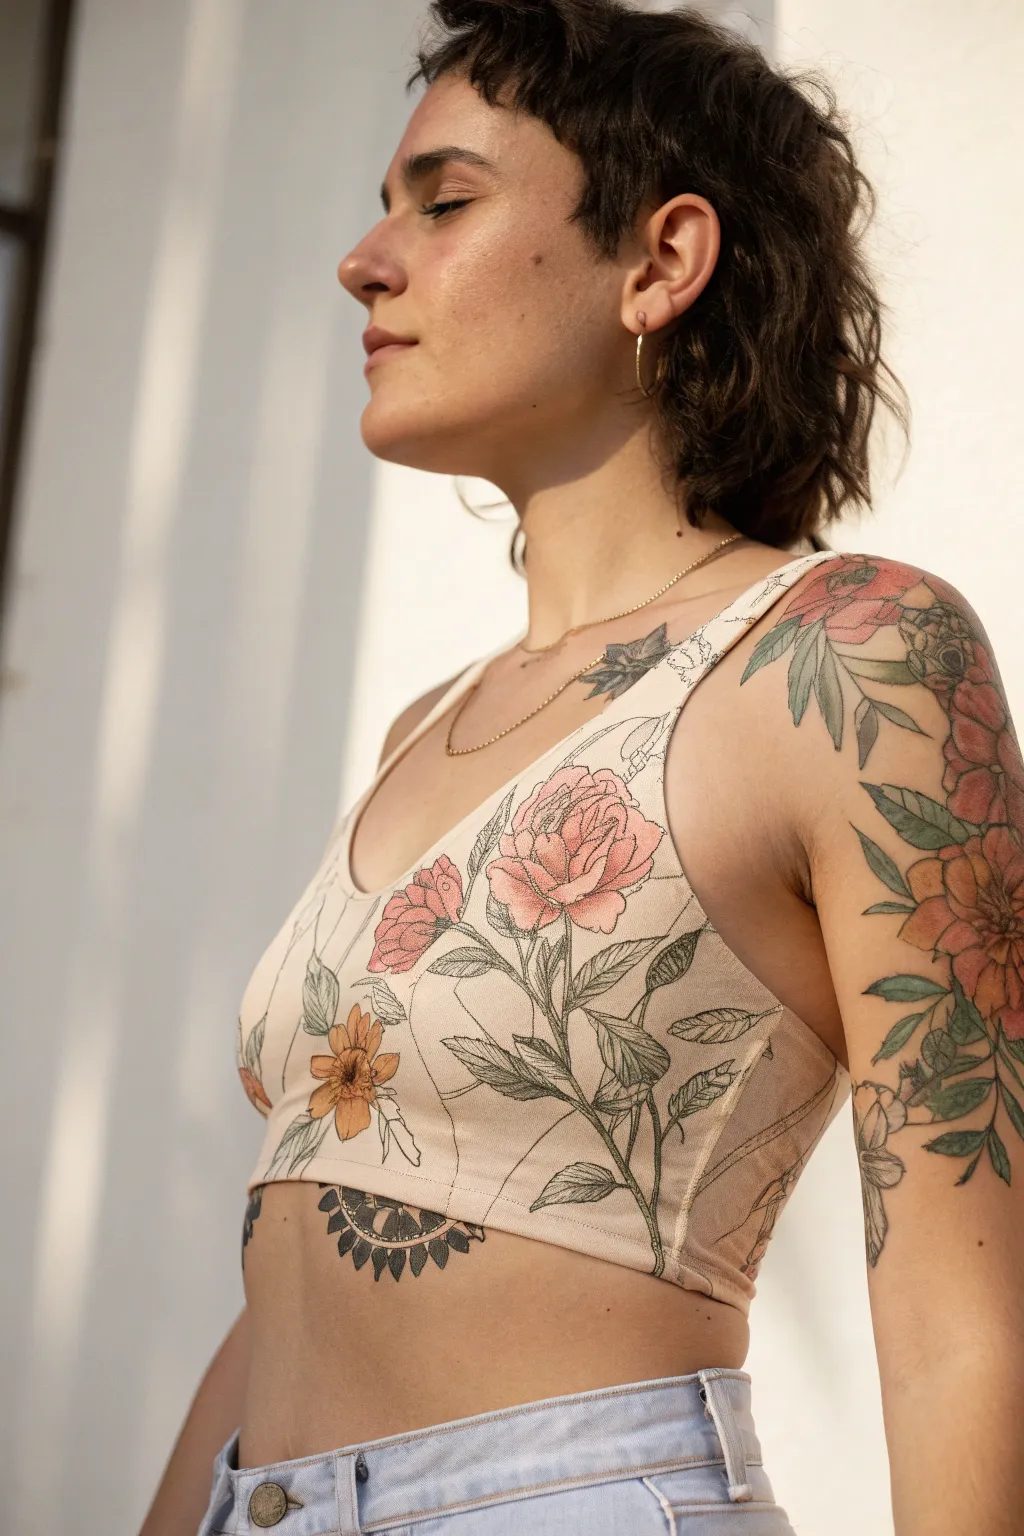
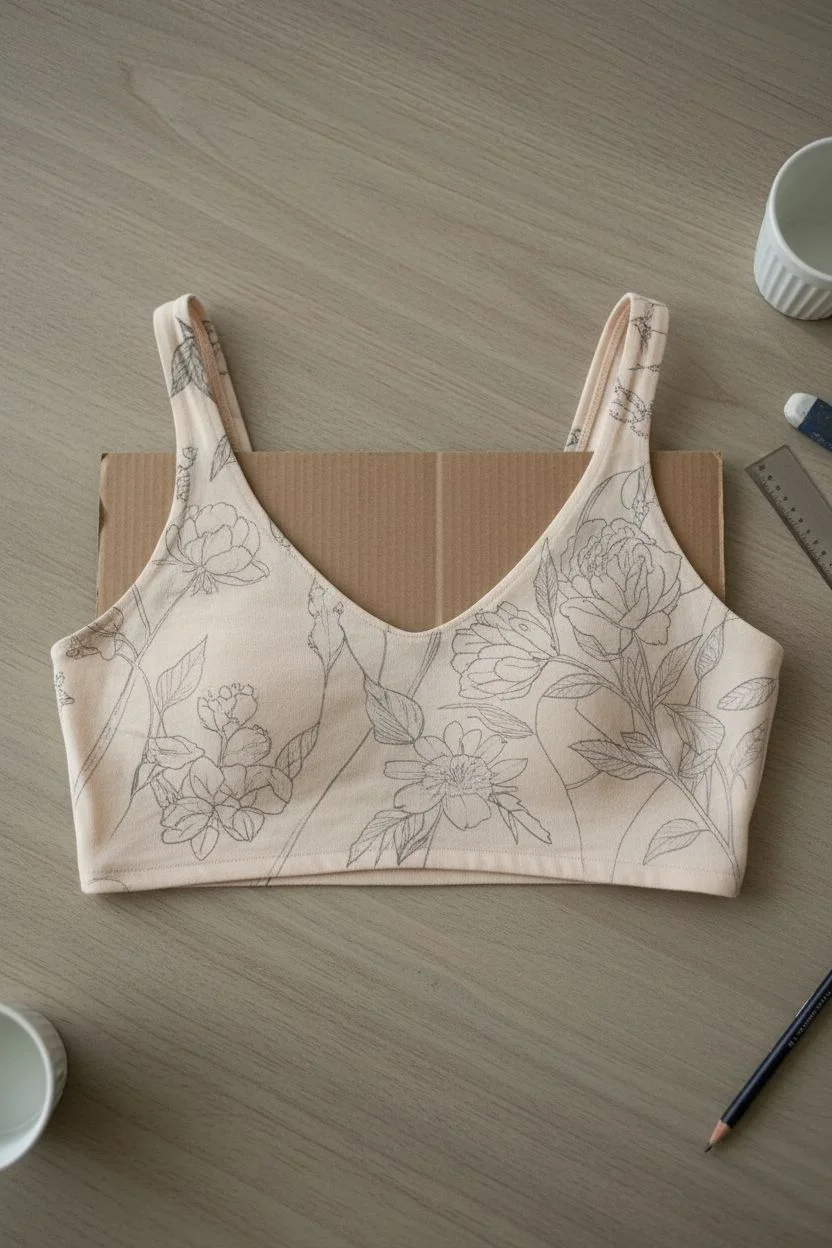
Transform a simple nude crop top into a wearable piece of art by mimicking the look of botanical tattoos and anatomical illustrations. This project combines delicate fine-line drawing with soft washes of fabric paint to create a vintage scientific aesthetic.
How-To Guide
Materials
- Nude or beige cotton crop top/sports bra
- Fabric medium
- Acrylic paints (Vintage Pink, Sage Green, Mustard Yellow)
- Fine tip permanent fabric marker (Black, 0.5mm)
- Small flat shade brush (Size 4)
- Round detail brush (Size 0)
- Cardboard insert
- Iron (for heat setting)
- Pencil or disappearing ink fabric pen
- Water cup and palette
Step 1: Preparation & Sketching
-
Prepare the fabric:
Begin by washing and drying your crop top without using fabric softener, as this helps the paint adhere better to the fibers. -
Insert protection:
Place a piece of stiff cardboard inside the top to stretch the fabric slightly and prevent ink or paint from bleeding through to the back layer. -
Map the composition:
Using a pencil or disappearing ink pen, lightly sketch out the main stems of your floral design. I like to have the stems rise organically from the bottom hem. -
Add floral shapes:
Sketch open peony-style blooms and smaller wildflowers. Keep the lines faint, focusing on placement rather than perfect detail at this stage. -
Incorporate geometric lines:
Draw faint, straight lines intersecting parts of the flowers to mimic anatomical connection lines or polygonal mesh overlays, enhancing the ‘technical drawing’ vibe.
Keep it Fluid
Dampen the fabric slightly with a spray bottle before painting. This helps the paint bleed slightly, enhancing the watercolor effect.
Step 2: Line Work
-
Outline the botanicals:
Take your fine tip fabric marker and carefully trace over your pencil sketches for the leaves and petals. -
Add textural details:
Use short, flicking strokes with the pen to create shading on the petals and veins in the leaves. This hatching technique mimics vintage engravings. -
Draw the geometric mesh:
Go over the straight geometric lines with a steady hand. These should be thinner than the floral outlines if possible, creating a background ‘blueprint’ effect. -
Clean up preliminary markings:
If you used a disappearing ink pen, allow the air to fade it or dab gently with water as per manufacturer instructions. If pencil was used, gently erase visible stray marks.
Tattoo Extension
If you have tattoos, continue lines from your skin onto the fabric for a surreal, seamless blend between body and garment.
Step 3: Color Application
-
Mix your medium:
Mix your acrylic paints with fabric medium in a 1:1 ratio. This turns standard acrylics into flexible fabric paint that won’t crack. -
Dilute for a watercolor look:
Add a tiny drop of water to your paint mix. You want the consistency to be thin and semi-transparent, acting like a watercolor wash. -
Paint the leaves:
Dip your flat shade brush into the Sage Green mixture. Apply it to the leaves, staying loosely within the lines but allowing some fading for a natural look. -
Color the blooms:
Use the Vintage Pink mix for the large peony shapes. Start from the center of the flower and pull outward, letting the color fade near the petal tips. -
Add accent colors:
Using the small round brush, add touches of Mustard Yellow to the smaller wildflowers or the centers of the main blooms. -
Layering depth:
Once the first layer is dry to the touch, add a second, slightly less diluted layer of paint to the darkest shadow areas of the petals and leaves for dimension.
Step 4: Finishing Touches
-
Re-define lines:
If the paint has obscured any important details, go back in with the fabric marker to subtly re-outline specific areas. -
Allow to cure:
Let the garment sit undisturbed for at least 24 hours to ensure the paint and ink are completely dry. -
Heat set the design:
iron the design on a medium heat setting without steam. Place a clean cloth between the iron and the painted fabric to protect the artwork while sealing it.
Wear your anatomical artwork with pride knowing each line was drawn by hand
3D Optical Illusion Body Mapping With Cubes and Ribbons
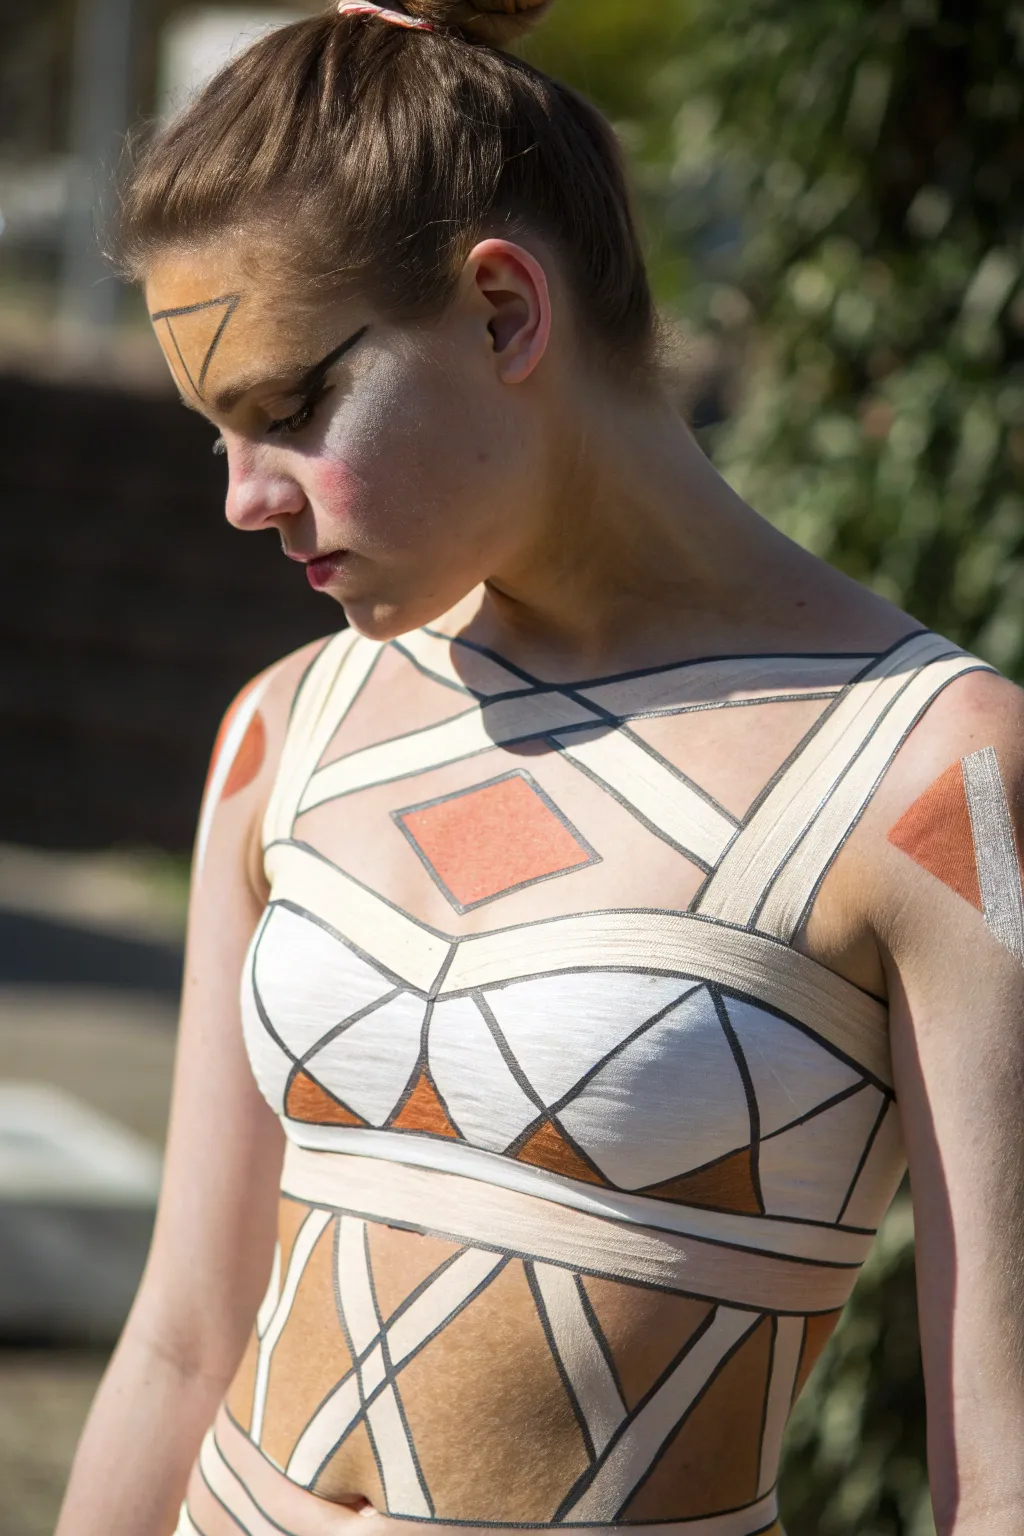

Transform the human form into a living canvas of interlaced ribbons and floating geometry with this striking body painting design. By using high-contrast outlining and strategic shading, you’ll create a convincing 3D optical illusion that mimics fabric straps wrapping around the torso.
Step-by-Step Tutorial
Materials
- White body paint (waiter-activated or cream)
- Black body paint (for outlining)
- Terra cotta or burnt orange body paint
- Silver metallic body paint
- Flat shader brushes (medium and large)
- Fine liner brush (Script or size 0)
- Skin-safe setting spray
- Makeup sponges
- Black eyeliner or gel liner
- Translucent setting powder
Step 1: Base Construction
-
Map the Chest Ribbons:
Start by visualizing the crisscross pattern across the upper chest. Using a medium flat brush and white body paint, block out two wide, diagonal bands that cross over near the collarbones. Keep the edges relatively crisp, but don’t worry about perfection yet. -
Create the Bralette Structure:
Paint the main ‘garment’ shape across the bust area. Use horizontal strokes of white to create a solid band just under the armpits, then create the triangular cup shapes filled in with solid white. -
Define the Torso Straps:
Move down to the midriff and stomach area. Paint intersecting diagonal lines of white to create a diamond lattice pattern. I find it helps to have the model stand naturally to ensure the lines don’t distort too much when she breathes. -
Add Geometric Accents:
Select your terra cotta or orange paint. In the center of the upper chest, within the negative space of the white straps, paint a clean diamond shape. Add triangular wedges of this same burnt orange at the bottom corners of the bust sections for a pop of color. -
Shoulder Details:
On the upper deltoids, add asymmetric geometric elements. Paint a terra cotta triangle on one shoulder and a corresponding silver metallic shape on the other to create visual interest.
Straight Lines Secret
Use masking tape or medical tape on the skin as a stencil for the long white straps. Peel it off to reveal crisp edges before outlining with black.
Step 2: Illusion Outlining
-
Outline the Ribbons:
Load a fine liner brush with black body paint. Carefully trace the outer edges of every white ‘ribbon’ you painted. This high-contrast border is essential for separating the ‘fabric’ from the skin. -
Establish Overlaps:
Pay close attention to where the lines cross on the chest. If a strap is supposed to look like it is going *over* another, do not paint a black line across it. Instead, stop the black line at the intersection to reinforce the layering effect. -
Create Depth on the Bust:
Within the white bust area, paint internal geometric lines—triangles and intersecting diagonals—using thin black lines. This breaks up the solid white mass and mimics constructed fabric panels. -
Sharpen Geometric Edges:
Outline your orange diamonds and triangles with the same black liner brush. Sharp corners are key here to make the geometry feel deliberate and architectural.
Metallic Upgrade
Swap the matte orange sections for gold leaf or copper metallic powder mixed with mixing medium for a futuristic, armored appearance.
Step 3: Texture and Shading
-
Simulate Fabric Texture:
The white paint shouldn’t look perfectly flat. Take a nearly dry, stiff brush with a tiny amount of grey or diluted black paint and gently streak it horizontally across the white bands. This creates a subtle ‘woven’ fabric texture. -
Drop Shadows:
To make the ribbons really pop off the skin, mix a soft grey or taupe shadow color. With a small angled brush, paint a faint shadow on the skin *underneath* where the ribbons lay, especially below the chest band and crisscrossed straps. -
Highlighting Shapes:
Add a touch of lighter orange or white to the center of your terra cotta shapes to give them a slight dimension, preventing them from looking like flat stickers.
Step 4: Face and Finish
-
Forehead Geometry:
Using a thin brush and black paint, draw an inverted triangle on the forehead. Paint a straight vertical line bisecting it, then softly smudge the top inside areas with a bit of gold or orange for a distressed look. -
Graphic Eye Makeup:
Apply a very sharp, extended black wing eyeliner that stretches toward the temples. Keep the lines geometric rather than curved to match the body art style. -
Face Contouring:
Use a greyish contour powder or face paint to hollow out the distinct cheekbone area, blending it back toward the ear to create a stark, sculptural face shape. -
Setting the Art:
Once all paint is fully dry, lightly dust the chest and torso with translucent setting powder to remove any shine, then mist with a barrier spray to lock the design in place for the photoshoot or event.
Step back and admire how simple lines and shading have constructed an intricate woven armor on the skin
Minimalist Single-Line Figure Drawings on Skin

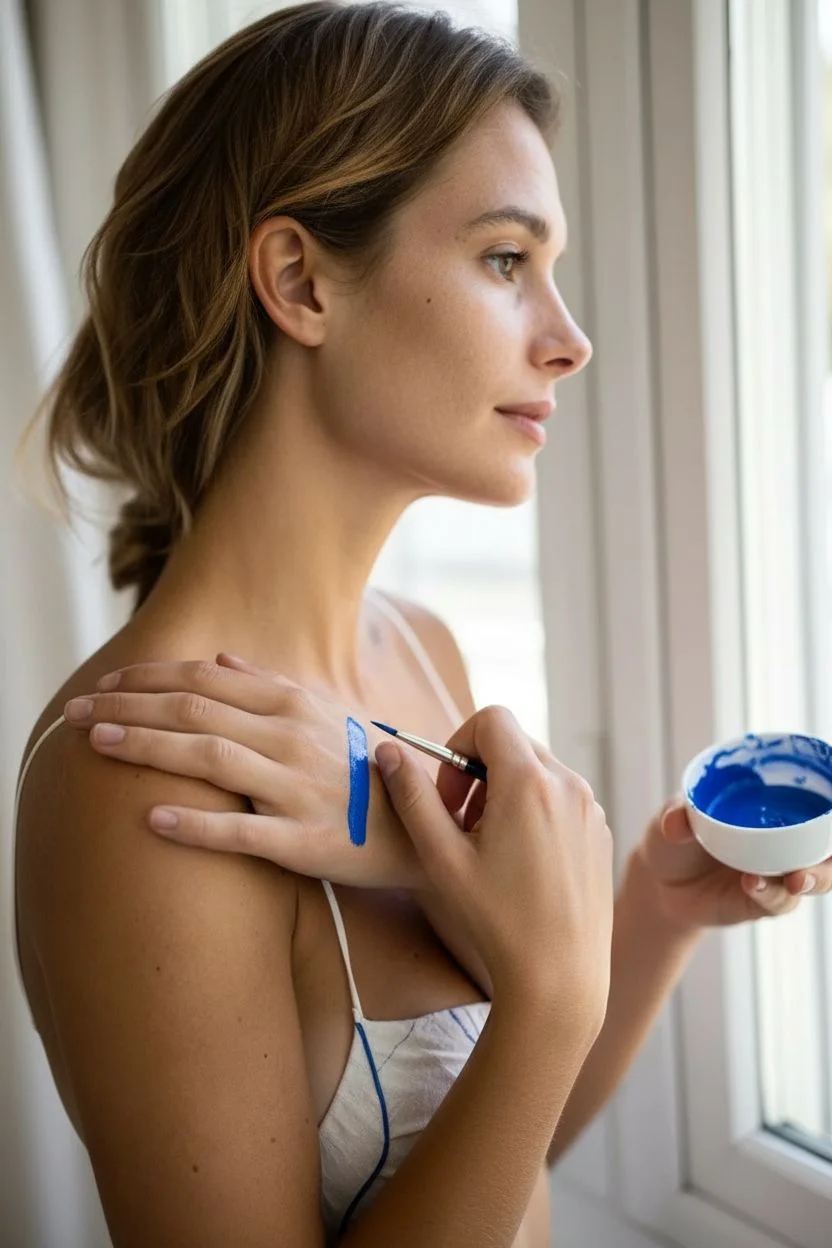
Capture the graceful simplicity of minimalist line art directly on the skin with this Matisse-inspired body painting project. Using a strikingly vibrant electric blue, you’ll transform the natural curves of the neck and shoulder into a living canvas for fluid, continuous-line illustrations.
Step-by-Step Guide
Materials
- body paint in electric blue (water-activated or alcohol-based)
- fine round brush (size 1 or 2)
- clean skin (free of oils and lotions)
- small mixing palette or cup of water
- makeup remover wipes (for corrections)
- setting spray (optional)
- reference image of line art profile
Step 1: Preparing the Canvas
-
Cleanse the skin:
Start with completely clean, dry skin on the neck, shoulder, and upper arm area. Remove any moisturizers or body oils with soap and water or rubbing alcohol to ensure the paint adheres crisply without sliding. -
Activate your paint:
If using water-activated body cake make-up (often called aquacolor), dip your brush into water and swirl it into the blue cake until you achieve a creamy, ink-like consistency. It shouldn’t be too watery or too thick. -
Test the consistency:
Draw a quick line on the back of your hand to test the flow. The line should be opaque and smooth. If it’s streaky, add more pigment; if it’s dripping, swirl the brush more to thicken the mixture. -
Position the model:
Have your model or subject turn their head to the side, exposing the long muscle of the neck (sternocleidomastoid) to create a taut surface for drawing.
Brush control secret
Load your brush fully but wipe the very tip on your palette before touching skin. This prevents that initial ‘blob’ of paint and ensures a razor-sharp start to your lines.
Step 2: The Neck Profile
-
Start the hairline:
Begin at the base of the neck, just above the collarbone. Using the tip of your fine brush, draw a sweeping, upward curve that mimics a side-swept hairline. Keep your hand steady but loose. -
Define the forehead:
Continue the line from the top of the ‘hair’ downwards to create the forehead slope. This should be a gentle, slight outward curve. -
Draw the nose:
Extend the line down to create the nose. In minimalist single-line art, the nose bridge flows directly into the tip. Keep this feature simple and angular. -
Add the lips and chin:
Below the nose, create a small indentation for the philtrum, then two quick curves for lips, and a downward sweep for the chin. Connect this back toward the neck area. -
Detail the eye:
Inside the facial outline, paint a simple closed eye. This is just a small u-shape or crescent with a tiny lash line. Placement is key here; put it roughly halfway down the face profile. -
Connect the neck:
Draw the back of the figure’s neck and a line representing the shoulder, anchoring the floating head to the subject’s actual collarbone area.
Step 3: The Arm Motif
-
Outline the shoulder cap:
Moving to the shoulder, paint a large, bold arch that frames the deltoid muscle. Start near the collarbone and sweep over the shoulder cap down the arm. -
Start the branch stem:
Inside this shoulder arch, on the upper arm, paint a central line for a botanical stem. I usually angle this slightly to follow the natural contour of the arm. -
Add leaves:
Paint simple, open leaf shapes branching off the stem. Keep them stylized and almond-shaped, consistent with the minimalist aesthetic. -
Thicken key lines:
Go back over specific areas, like the curve of the profile’s hair or the shoulder arch, to modulate line weight. A slightly thicker line in certain spots adds visual interest.
Shaky hands?
Rest your pinky finger on the model’s skin (use a powder puff under it to avoid smudging) to anchor your hand. This stabilizes your drawing motion significantly.
Step 4: Finishing Touches
-
Clean up edges:
Use a cotton swab or a clean, damp angled brush to sharpen any blurry edges or correct small mistakes. The beauty of this look is in the crispness of the lines. -
Check symmetry & flow:
Step back and look at the composition. Ensure the blue lines coordinate well with any clothing being worn, like the matching blue stitching on the white top in the reference. -
Set the paint:
Lightly mist the painted areas with a setting spray (or hairspray in a pinch) from arm’s length to prevent smudging during wear.
Enjoy the striking contrast of the electric blue against the skin as you admire your wearable art piece
Glitchy Holographic Gradient With Pixel-Like Details
Transform your skin into a shimmering digital landscape with this striking body art concept. By combining precise geometric linework with iridescent pigments, you’ll create a futuristic grid that looks like a beautiful system error on human skin.
Detailed Instructions
Materials
- High-quality white face/body paint (water-activated or cream)
- Holographic or iridescent eyeshadow palette (blues, pinks, yellows, greens)
- Flat shader brush (small to medium)
- Fine liner brush
- Medium square-tipped brush
- Makeup mixing medium or setting spray
- Body tape or low-tack painter’s tape (optional for guidelines)
- Setting powder
- Skin-safe glitter (optional)
Step 1: Planning the Grid
-
Map the layout:
Visualize where your grid will sit. The key to this look is asymmetry; start the pattern on one shoulder and let it jaggedly break apart as it moves up the neck and across the chest. -
Mark anchor points:
Using a very faint eyeliner pencil or a pale eyeshadow, mark small dots to guide your grid. This helps ensure your squares remain roughly uniform in size, about 1-1.5 inches each, without committing to hard lines yet. -
Create the boundary:
Decide where the ‘glitch’ happens. Instead of a perfect rectangle, sketch a stepped, pixelated edge at the top near the neck and bottom near the chest to mimic digital fragmentation.
Step 2: Painting the Grid Lines
-
Prepare your white paint:
Activate your white body paint with a little water until it reaches a creamy consistency. You want it opaque enough to cover in one pass but fluid enough to drag in straight lines. -
Paint vertical lines:
Using a fine liner brush or a small flat brush turned on its side, paint your vertical grid lines first. Keep your hand steady and try to maintain consistent spacing between them. -
Paint horizontal lines:
Connect the verticals with horizontal strokes to form your squares. Don’t worry if intersections aren’t mathematically perfect; the iridescent filler will hide minor flaws. -
Thicken the lattice:
Go back over your lines to ensure they have a consistent thickness, roughly 3-4mm wide. The white needs to act as a bright frame for the colors. -
Clean edges:
Dip a cotton swab or a small clean brush in makeup remover to tidy up any smudges or wobbly lines, keeping the grid structure sharp.
Clean Lines Hack
Use flat, ¼-inch paint brushes instead of round brushes. Simply stamp the brush down to create the lines rather than dragging it.
Step 3: Adding the Holographic Effect
-
Prime the squares:
To make the colors pop, apply a very thin layer of mixing medium or tacky primer inside the squares you plan to color. I find this helps the shimmer adhere better than on dry skin. -
Apply the first tone:
Load a flat shader brush with a pearlescent pink or peach. Press this color into random squares, focusing on one area like the outer shoulder, then fading it out. -
Shift to cool tones:
Clean your brush and pick up an iridescent blue or teal. Fill in squares adjacent to the pink ones, or even blend two colors within a single square for a true holographic gradient feel. -
Add highlights:
Use a yellow-gold or white shimmer in the squares that would catch the most light, typically on the collarbone peaks and the top of the shoulder. -
Create the fade:
Leave some squares with just a wash of sheer shimmer rather than full opaque color. This transparency makes the grid look like it’s fading into the skin. -
Intensify the shimmer:
For a ‘wet’ look, dampen your brush with setting spray before picking up the pigment. This foils the eyeshadow, making it look metallic and reflective.
Level Up: UV Glow
Swap the standard white body paint for UV-reactive white paint. Under blacklight, the grid will glow neon, making the glitch effect even more cybernetic.
Step 4: Finishing Touches
-
Brighten the grid:
Since coloring might have dusted pigment onto your white lines, re-trace the white grid with your liner painting brush to restore that crisp computer-graphic contrast. -
Highlight the face:
Bring the concept upward by applying the same iridescent highlighters to the high points of the cheekbones and inner corner of the eyes. -
Set the work:
Mist the entire area with a strong-hold setting spray. Let it dry completely without moving your shoulders too much to prevent cracking.
Now you are ready to showcase this stunning optical illusion that blends biology with digital geometry


Have a question or want to share your own experience? I'd love to hear from you in the comments below!