I love how a bathroom mural can turn the most practical little room into a mini escape, even if you’re working with one tiny wall and a lot of tile. Here are my favorite mural directions to play with—starting with the classic crowd-pleasers and drifting into the more unexpected, artsy stuff.
Tropical Jungle Feature Wall Behind the Tub
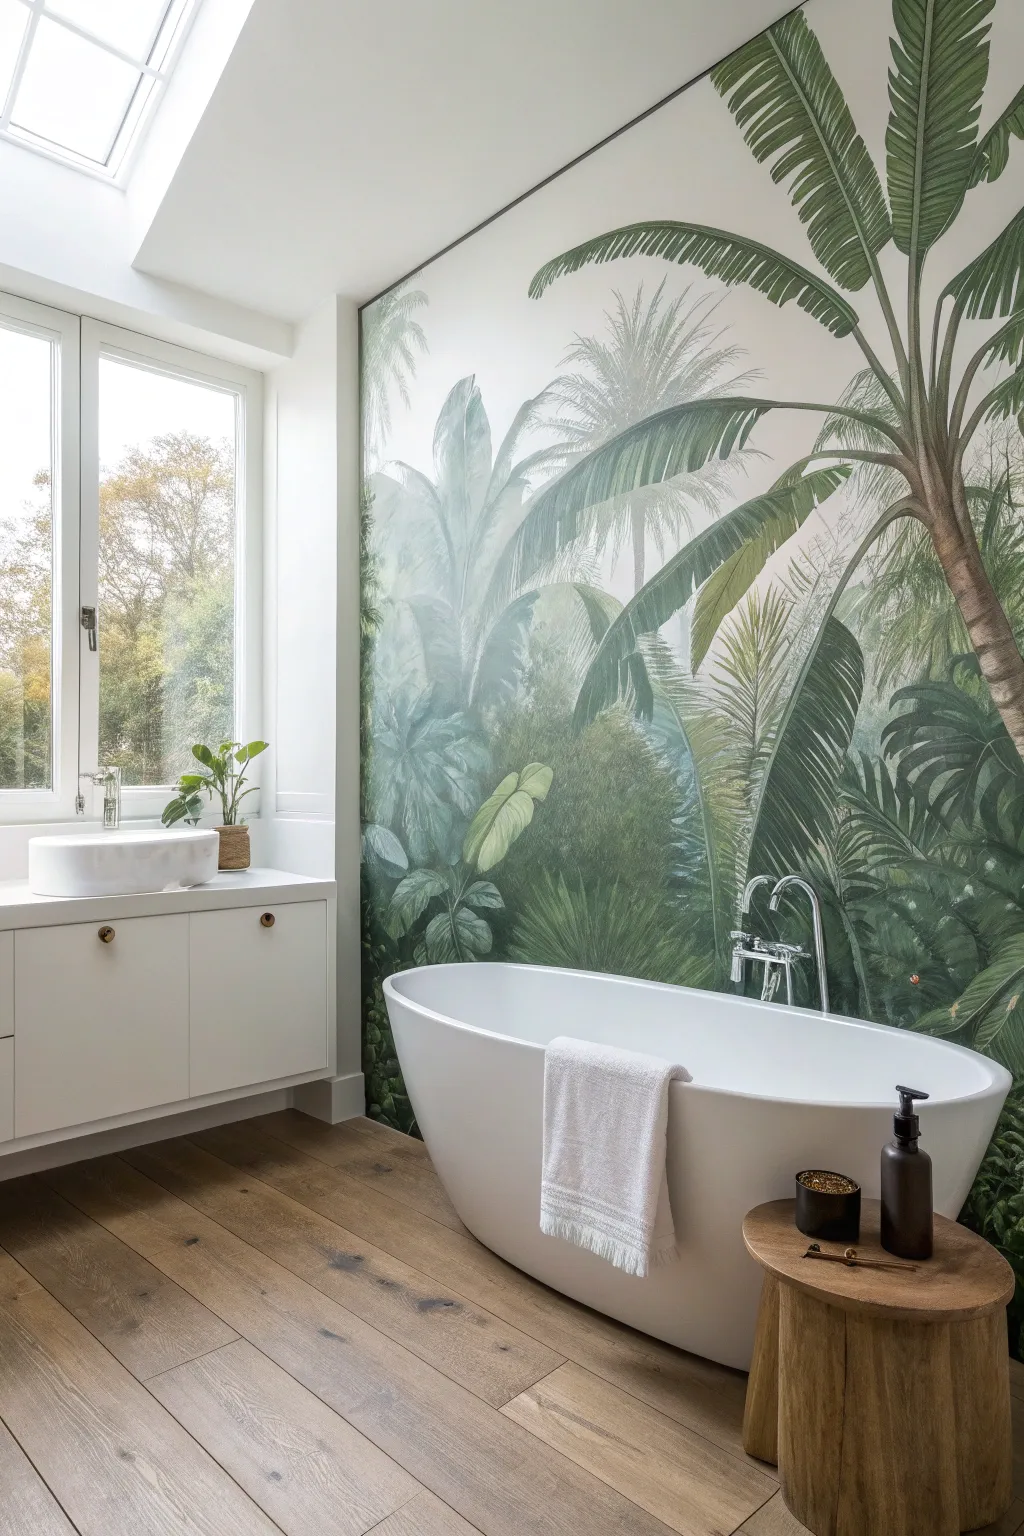
Transform your bathroom into a serene tropical sanctuary with this large-scale wall mural project. By applying a custom-sized, pre-pasted or paste-the-wall mural, you can bring the vibrant depth of a rainforest right behind your soaking tub without needing to be a professional painter.
Detailed Instructions
Materials
- Custom-sized tropical wall mural (vinyl or non-woven)
- Wallpaper paste (if not pre-pasted)
- Roller and tray (for paste application)
- Plumb line or spirit level
- Smoothing tool (plastic smoother or felt squeegee)
- Sharp crafting knife or snap-off blade
- Metal straight edge or trim guide
- Sponge and bucket of clean water
- Step ladder
- Seam roller
- Drop cloth
- Mild sugar soap or wall cleaner
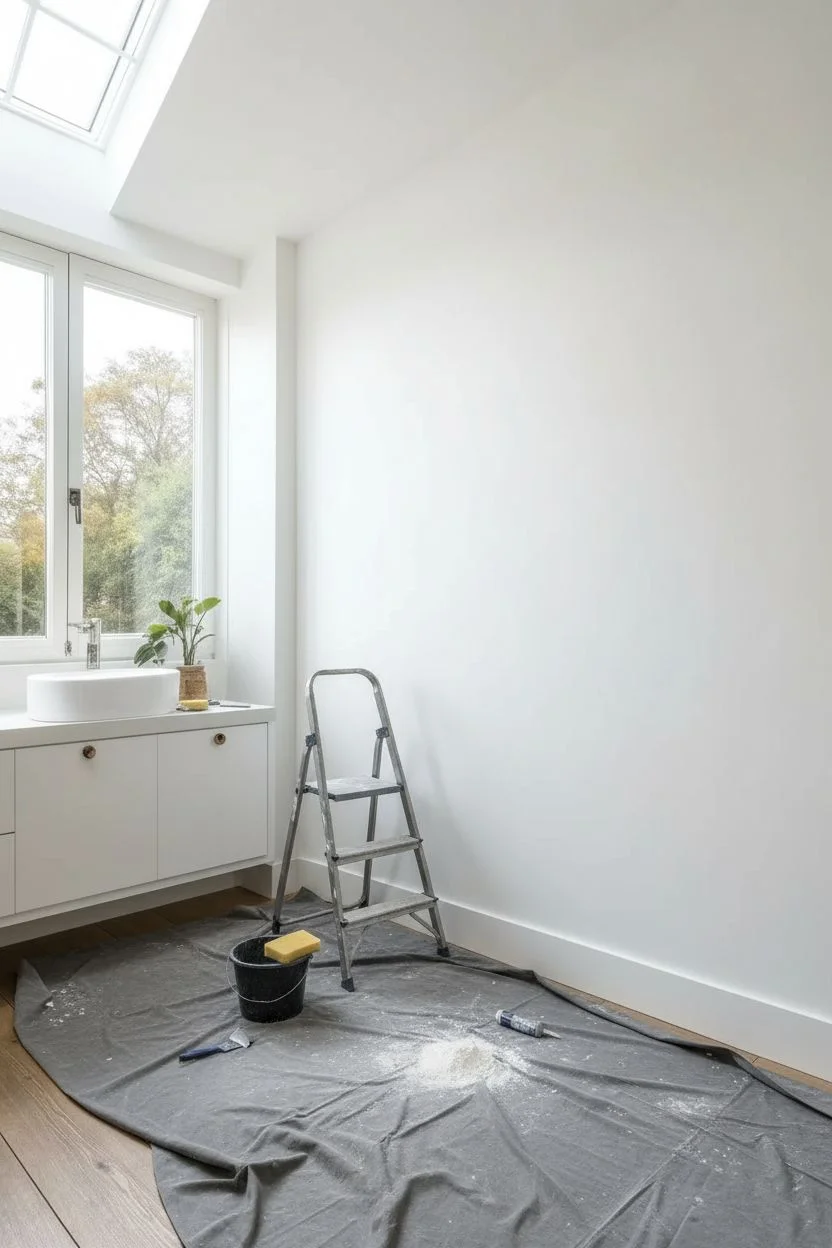
Step 1: Wall Preparation
-
Clear the area:
Before anything else, move the freestanding tub away from the wall if possible. If it is plumbed in place, cover it completely with a heavy-duty drop cloth to protect the finish. -
Clean the surface:
Wash the wall thoroughly with sugar soap or a mild detergent to remove any potential soap scum, dust, or oils that could prevent adhesion. -
Smooth the texture:
Inspect the wall for any holes or significant bumps. Fill holes with spackling paste and sand them flush once dry to ensure a smooth canvas for your mural. -
Prime the wall:
Apply a coat of quality wallpaper primer. This seals the drywall and helps the paste adhere evenly, while also making future removal easier.
Moisture Defense
In bathrooms, always use ‘non-woven’ wallpaper or vinyl. They are breathable and dimensionally stable, meaning they won’t expand or shrink when the room gets steamy.
Step 2: Planning and Layout
-
Unroll and inspect:
Lay out the mural panels on a clean, dry floor in the correct order to ensure the pattern matches perfectly. Number them lightly on the back with a pencil if they aren’t already marked. -
Establish a plumb line:
This is the most crucial step. Measure the width of your first panel. Using a spirit level and pencil, draw a perfectly vertical line on the wall roughly an inch less than that width from the corner or starting edge. This guide ensures your entire jungle scene stands straight.
Step 3: Mural Application
-
Paste the wall:
Assuming you are using a ‘paste-the-wall’ mural paper (which I find much easier to handle than pre-pasted), roll a generous, even layer of adhesive onto the wall area where the first panel will go, extending slightly past your width mark. -
Hang the first panel:
Carefully lift your first panel. Align the right edge exactly with your drawn pencil line. Don’t worry about the corner edge yet; let the excess overlap onto the adjacent wall or ceiling. -
Smooth it out:
Using your plastic smoothing tool, work from the center of the panel outwards. Apply gentle pressure to push out air bubbles and ensure solid contact with the wall. -
Add the second panel:
Apply paste for the next section. Butt the edge of the second panel tightly against the first. Do not overlap them unless your specific manufacturer instructions say otherwise; usually, a butt joint creates the most seamless look. -
Match the pattern:
Slide the paper gently while the paste is wet to align the palm fronds and leaves perfectly. Step back periodically to check the overall alignment. -
Continue the process:
Repeat the pasting and hanging process for the remaining panels, always wiping away excess glue from the surface immediately with a damp sponge.
Fixing Bubbles
If a stubborn air bubble appears after drying, prick it with a fine needle to release the air, then inject a tiny amount of wallpaper paste with a glue syringe and smooth it flat.
Step 4: Trimming and Finishing
-
Trim the excess:
Once all panels are up, use your metal straight edge and a very sharp knife to trim the excess paper at the ceiling, floor, and corners. Change your blade frequently to avoid tearing the damp paper. -
Roll the seams:
Run a small seam roller gently down the join lines where the panels meet. This keeps the edges from curling up later in the humid bathroom environment. -
Apply clear matte varnish:
For a high-humidity area like a bathroom, apply a coat of clear, matte decorator’s varnish over the completely dry mural. This acts as a splash guard and protects the print from moisture damage. -
Final clean:
Wipe down any baseboards or trim to remove sticky residue. Move your tub back into position once the varnish is fully cured.
Now you can soak in your tub and enjoy the view of your private, evergreen paradise


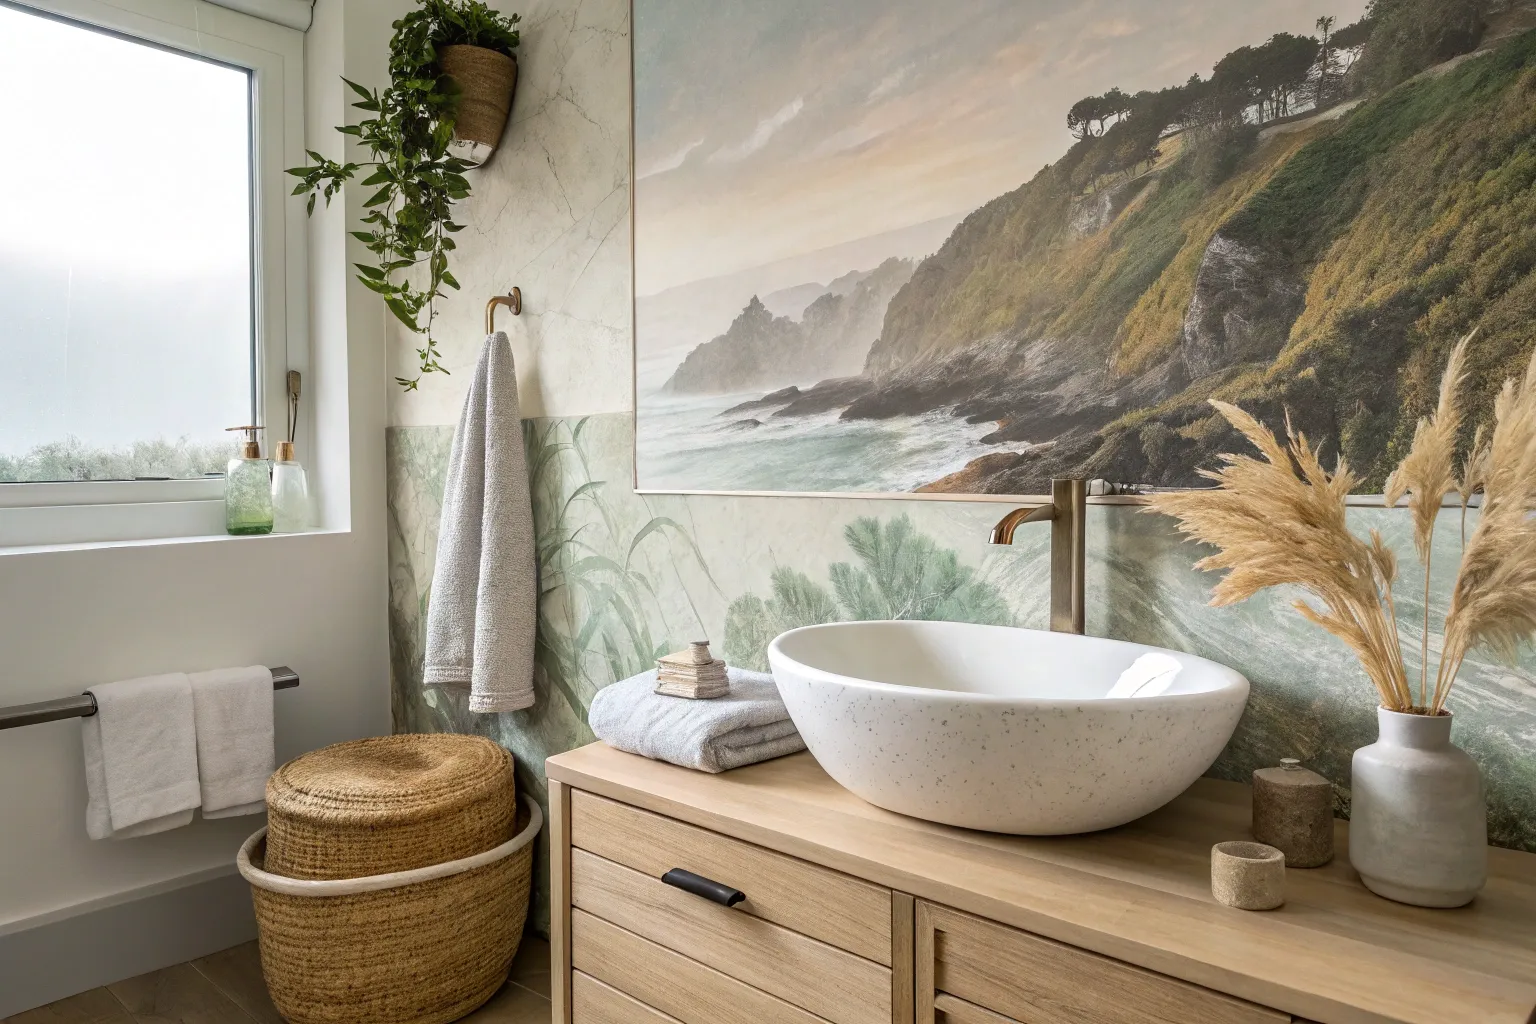
Serene Coastal Horizon to Visually Widen a Small Bathroom
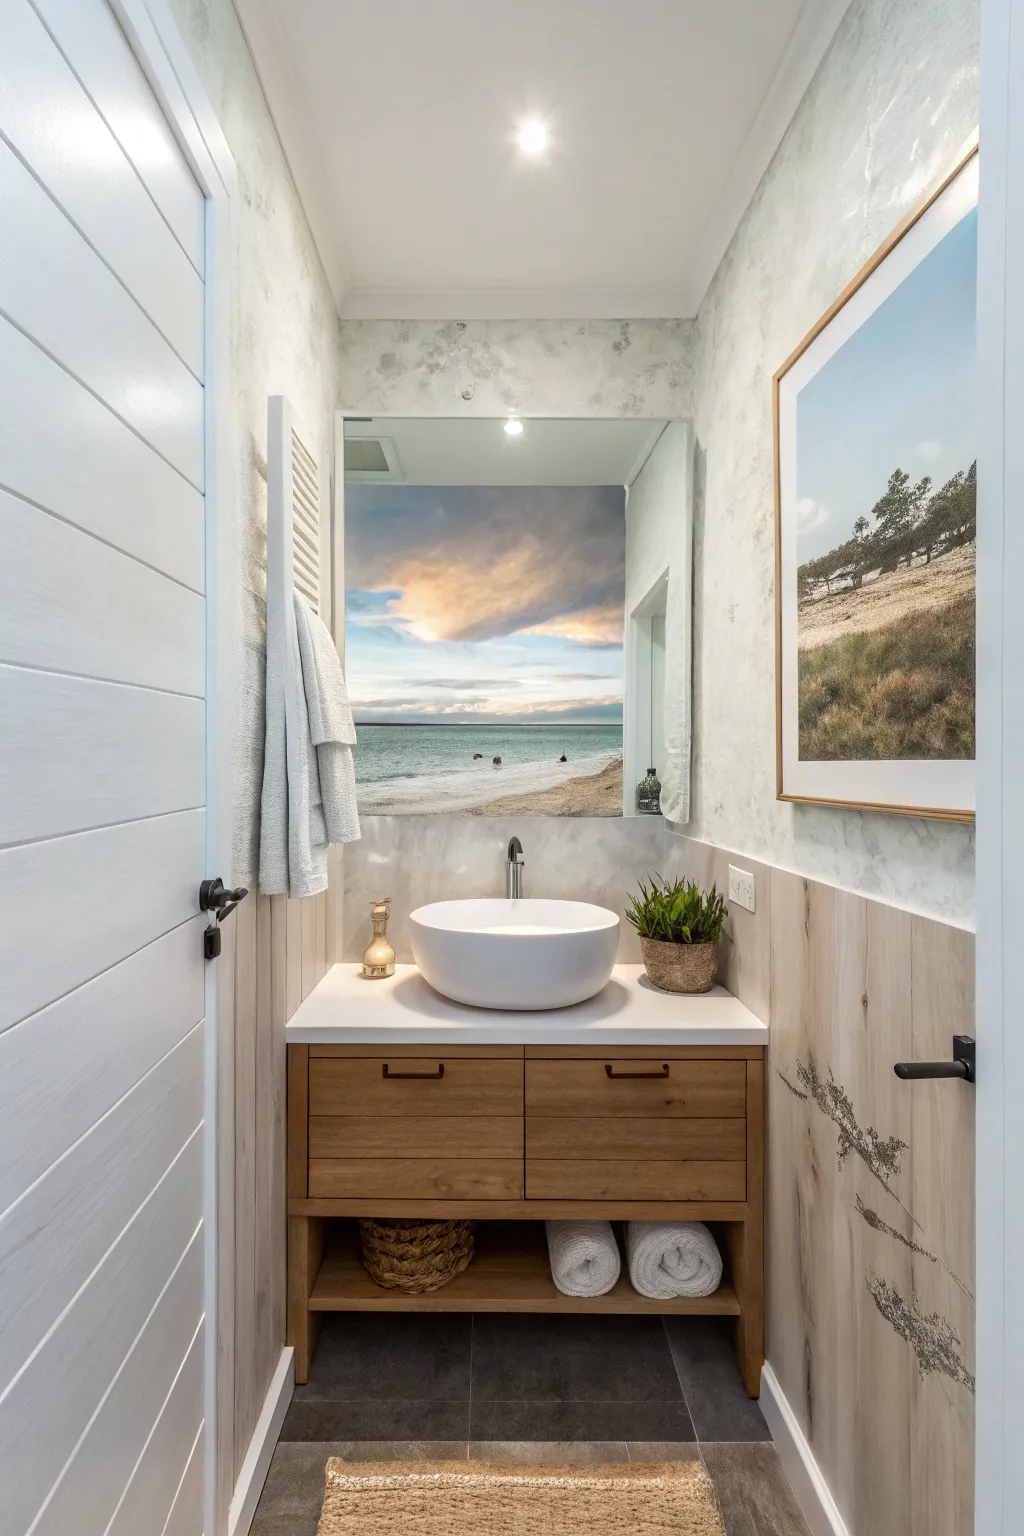

Transform a compact bathroom into a serene retreat by painting a realistic coastal horizon directly onto the wall. This project creates an incredible sense of depth, utilizing soft pastels and atmospheric perspective to make even the smallest space feel open and airy.
How-To Guide
Materials
- High-quality interior acrylic latex paint (white base)
- Acrylic paints (Phthalo Blue, Ultramarine Blue, Burnt Sienna, Yellow Ochre, Titanium White, Alizarin Crimson)
- Glazing medium
- Painter’s tape (delicate surface)
- Drop cloths
- Large flat brushes (2-3 inch) for blocking
- Medium filbert brushes for clouds
- Small round brushes for details
- Sea sponge (natural)
- Mixing palette or paper plates
- Water spray bottle
- Level and pencil
Step 1: Preparation and Sky
-
Prepare the Surface:
Clean the wall thoroughly with a damp cloth to remove any dust or soap residue. Tape off the ceiling, baseboards, and any fixtures you can’t remove, like the vanity countertop edge. -
Establish the Horizon:
Using your level and a pencil, lightly draw a straight horizontal line across the wall where the sky will meet the water. Position this roughly at eye level or slightly lower to create a grounded feeling. -
Mix Sky Base Colors:
Create a gradient palette for the sky. Mix a pale, dusty blue using Titanium White with a touch of Ultramarine Blue. For the sunset area near the horizon, mix a soft peach using White, Yellow Ochre, and a tiny dot of Alizarin Crimson. -
Paint the Upper Sky:
Start at the top of the wall with your darker blue mix. Use long, horizontal strokes with a large flat brush, working your way down about one-third of the sky space. -
Blend the Transition:
While the blue is still wet, introduce the peach tone below it. Use a clean, dry brush to feather the two colors together where they meet, creating a soft, hazy transition. -
Add Cloud Formations:
Mix a slightly darker, purplish-grey for the underside of the clouds using White, Blue, and a touch of Burnt Sienna. Use a filbert brush or a sea sponge to dab in organic cloud shapes, keeping the bottom edges flatter and the tops fluffy. -
Highlight the Clouds:
Add dimension to the clouds by brushing the top edges with a mix of White and Yellow Ochre to simulate sunlight catching the vapor.
Blending Woes?
If acrylics are drying too fast to blend smooth gradients, mist the wall lightly with water or mix a slow-drying medium into your paint to buy more working time.
Step 2: Ocean and Shoreline
-
Paint the Deep Water:
Mix a teal color using Phthalo Blue, a touch of Yellow Ochre, and White. Paint a distinct line right below your pencil horizon line. This should be the darkest, flattest part of the water. -
Create Water Gradient:
As you move down the wall towards the sand, lighten your teal mix with more White. The water should become paler and more transparent-looking as it gets ‘closer’ to the viewer. -
Sketch the Shoreline:
Decide on the curve of your beach. Lightly pencil in a gentle, sweeping curve where the water meets the sand, making it wider in the foreground. -
Block in the Sand:
Mix a sandy beige using Titanium White, Yellow Ochre, and a very small amount of Burnt Sienna. Fill in the beach area completely. -
Add Wet Sand Texture:
Darken your sand mixture slightly. Paint the area immediately adjacent to the water line to mimic wet, compacted sand. -
Paint the Foam Line:
Using pure Titanium White on a small round brush, paint a slightly jiggly line along the water’s edge. Dry brush or smudge the paint slightly away from the water to create the look of dissipating foam.
Level Up: Reflection
Make the water look wet by adding vertical streaks of the sky color into the water area directly below the brightest clouds, mimicking a reflection.
Step 3: Details and Glazing
-
Add Ocean Ripples:
Mix the sky color with a bit of glazing medium. Use a thin liner brush to paint very subtle, horizontal lines in the water area to suggest gentle waves catching the light. -
Detail the Foreground:
Use a fan brush or an old, splayed brush with varied greens and browns to tap in texture for dune grass or seaweed in the immediate foreground corners if desired. -
Place Rocks or Debris:
Paint small, dark brownish-grey shapes in the water or on the sand for rocks. Paint a darker shadow underneath them and to one side to anchor them to the ground. -
Final Light Check:
Step back and look at the mural in the bathroom’s actual lighting. Brighten up the white highlights on the waves or clouds if they look too dull under artificial light. -
Seal the Artwork:
Once fully dry (give it at least 24-48 hours), apply a clear, water-based matte varnish over the entire mural. This is crucial for a bathroom environment to protect against humidity.
Now step back and enjoy the peaceful view from your new seaside sanctuary


Underwater Panorama That Plays With the Room’s Water Theme

Transform your bathroom into a tranquil underwater sanctuary with this stunning, room-height panoramic mural installation. The deep turquoise waters and vibrant coral bring serenity to the space, especially when paired with whimsical starlight ceiling effects.
Detailed Instructions
Materials
- High-quality custom-sized underwater vinyl mural or wallpaper
- Wallpaper paste (specifically for heavy-duty or vinyl paper)
- Wallpaper smoothing tool (squeegee or broad brush)
- Sharp utility knife (snap-off blades recommended)
- Plumb line or laser level
- Measuring tape
- Ladder
- Sponge and bucket of clean water
- Seam roller
- Clean microfiber cloths
- Clear silicone caulk (mold-resistant)
- Caulking gun
Step 1: Preparation & Wall Priming
-
Measure the space:
Carefully measure the height and width of the wall adjacent to your tub or shower. Add 2-3 inches to both dimensions when ordering your custom mural to account for any wall irregularities. -
Prepare the surface:
Ensure the wall surface is pristine. Fill any holes, sand down bumps, and wash the wall thoroughly to remove soap scum or dust. Since this is a bathroom, the surface must be clean and dry. -
Prime the wall:
Apply a coat of quality primer-sealer. This is crucial in humid environments as it prevents the paste from soaking too quickly into the drywall and protects against future moisture issues.
Humidity Protection
For bathrooms with poor ventilation, apply a coat of clear matte decorator’s varnish over the finished (and dry) mural. This adds a crucial waterproof barrier against steam.
Step 2: Setting the First Panel
-
Establish a plumb line:
Using a laser level or a plumb bob, draw a strictly vertical line about 20 inches from the corner (or the width of your first panel minus 1 inch). Do not rely on the corner being straight. -
Prepare the adhesive:
Mix your wallpaper paste according to the manufacturer’s instructions. Allow it to ‘slake’ or rest for the required time often mentioned on the packet. -
Paste the wall (or paper):
Depending on your specific mural type (paste-the-wall vs. paste-the-paper), apply a generous, even layer of adhesive. I prefer paste-the-wall types for large scale murals as they are easier to handle. -
Hang the first panel:
Align the edge of your first panel with your pencil plumb line, allowing the excess paper to overlap the ceiling and corner. Smooth it gently from the center outwards to remove large air bubbles.
Step 3: Completing the Underwater Scene
-
Match the pattern:
Apply paste for the second panel. Carefully align the underwater imagery—watching the light rays and coral shapes—to ensure a seamless transition between sheets. Butt the seams together tightly without overlapping. -
Smooth and secure:
Use your smoothing tool to press the paper firmly against the wall, working air bubbles out toward the edges. Wipe away any excess glue immediately with a damp sponge. -
Continue across the wall:
Repeat the process for all remaining panels. Check your vertical alignment periodically to ensure the image isn’t drifting. -
Roll the seams:
Once the paper has set for about 15-20 minutes, gently go over the vertical joins with a seam roller. This ensures the edges don’t curl up in the humid bathroom environment.
Level Up: 3D Lighting
Install a hidden LED strip light in a recess or bulkhead above the mural. The downlighting will mimic sunlight filtering through the water surface.
Step 4: Trimming & Sealing
-
Trim excess paper:
Use a very sharp utility knife and a straight edge to trim the excess paper at the ceiling, floor, and corners. Change your blade frequently to avoid tearing wet paper. -
Let it cure:
Allow the mural to dry completely for at least 24-48 hours. Keep the room ventilated but avoid strong drafts that might dry the edges too fast. -
Waterproof the edges:
For bathroom longevity, apply a thin bead of clear, mold-resistant silicone caulk along the bottom edge where the mural meets the tile or baseboard, and along vertical corners near splash zones.
Step 5: The Ceiling Twinkle (Optional)
-
Install fiber optics:
To truly match the photo’s ambiance, install a fiber optic star kit in the ceiling. Drill tiny holes in the drywall, thread the fibers through, and connect them to a light source hidden in the ceiling void.
Step back and enjoy the relaxing depth this new view brings to your daily routine


Misty Forest Mural for a Calm, Spa-Like Mood
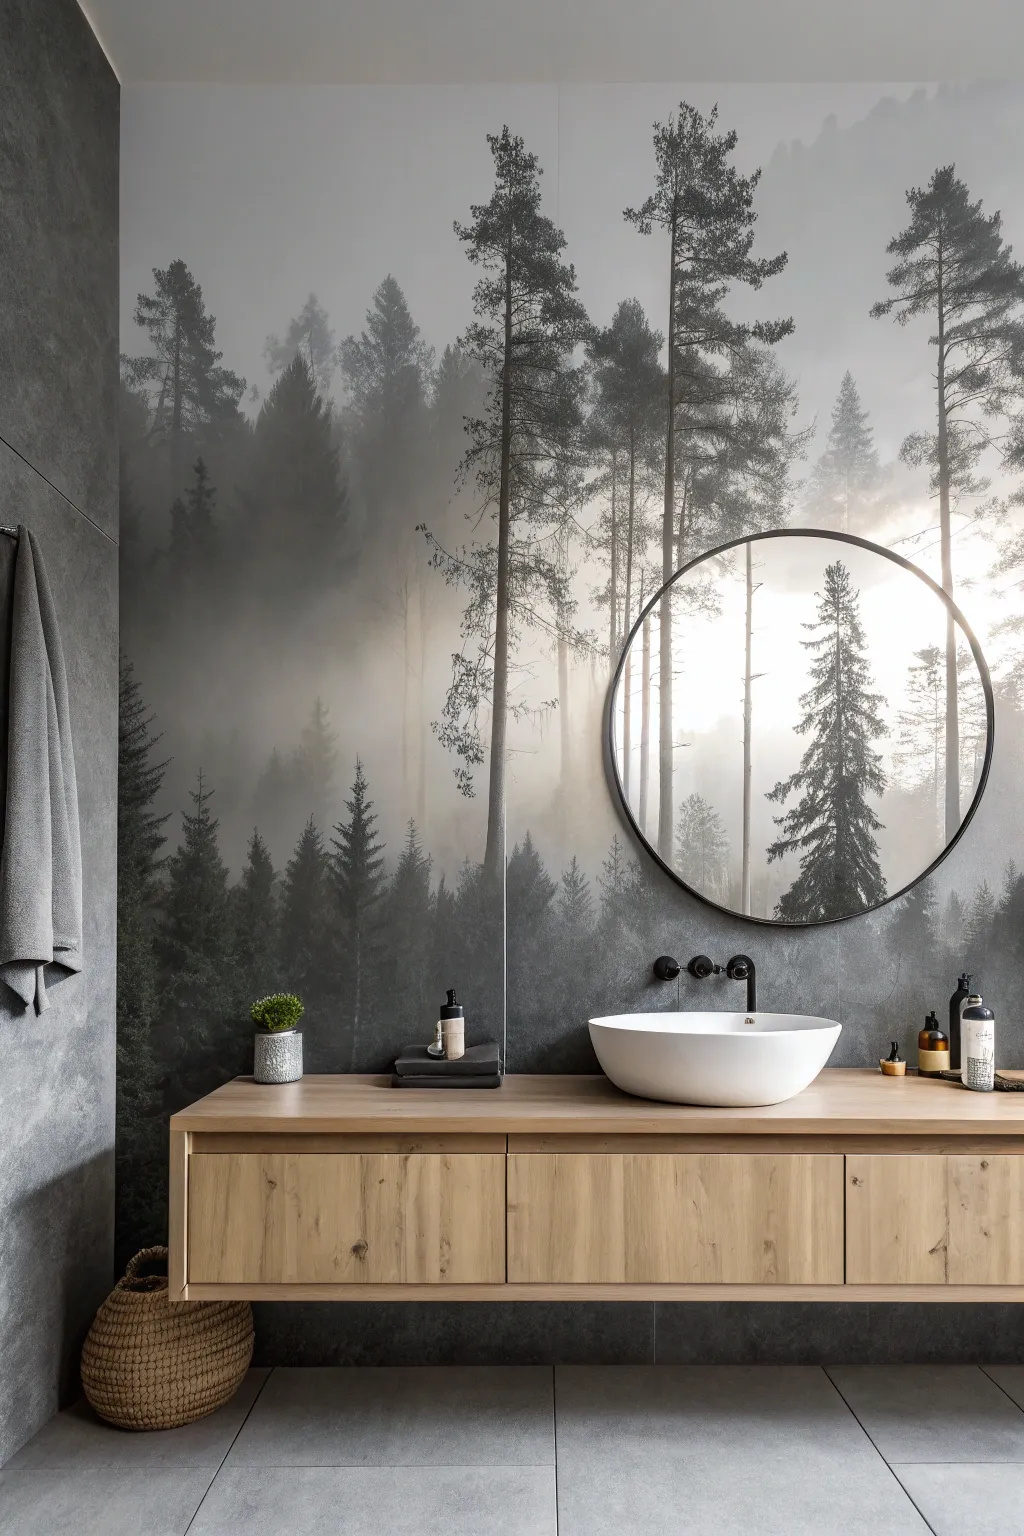

Transform your bathroom into a serene spa sanctuary with this breathtaking, wall-to-ceiling misty forest mural. The monochrome palette of fog and pine creates an immediate sense of depth and calm that expands the visual space of the room.
Step-by-Step Tutorial
Materials
- High-quality non-woven mural wallpaper (custom sized)
- Wallpaper adhesive (paste-the-wall type recommended)
- Measuring tape
- Spirit level or laser level
- Pencil
- Wallpaper smoother or soft plastic squeegee
- Seam roller
- Sharp utility knife with snap-off blades
- Metal straight edge or trim guide
- Paint roller and tray
- Clean sponge and bucket of water
- Drop cloth
- Ladder or step stool
Step 1: Preparation & Planning
-
Measure twice:
Before ordering your mural, measure the wall’s height and width at three different points: left/top, middle, and right/bottom. Use the largest measurement for both dimensions and add 2-3 inches of excess to account for uneven walls. -
Surface prep:
Ensure the wall is perfectly smooth. Fill any holes with spackling paste and sand them down. If the wall was recently painted, wait at least 3-4 weeks for the paint to fully cure before applying wallpaper. -
Remove obstacles:
Turn off the electricity to the room. Remove the circular mirror, wall sconces, or any shelving. If you have a vanity backsplash that can be removed, take it off; otherwise, you’ll trim around it. -
Clean the wall:
Wipe the wall down with a damp sponge and a mild sugar soap or TSP solution to remove dust and grease, ensuring the adhesive bonds properly. -
Establish a plumb line:
Measure the width of your first wallpaper panel. Mark this distance on the wall from the left corner (minus 1 inch for overlap). Use a level to draw a strict vertical pencil line at this mark to guide your first panel.
Step 2: Applying the Mural
-
Mix the adhesive:
Prepare your wallpaper paste according to the manufacturer’s instructions. I prefer to let it sit for a few minutes to thicken up slightly before use. -
Paste the wall:
Using a roller, apply a generous, even layer of paste directly to the wall section where the first panel will go. Overlap the pasted area slightly past your pencil line so the edges are well-covered. -
Hang the first panel:
Carefully unroll the first panel. Align the right edge with your plumb line, allowing the excess paper to hang over the ceiling and the left corner. Smooth it extensively with the squeegee. -
Smooth out bubbles:
Work your smoother from the center of the panel outwards to push out any trapped air bubbles. Don’t be too aggressive; gentle, firm pressure is best. -
Continue the pattern:
Apply paste for the second panel. Butt the edge of the second panel directly against the first to match the tree design seamlessly. Avoid overlapping unless your specific mural instructions require it. -
Complete the wall:
Continue hanging the remaining panels, checking the pattern alignment at eye level frequently. Wipe away any excess paste on the surface immediately with a damp sponge.
Moisture Protection Tip
For bathrooms, apply a clear, matte decorator’s varnish over the dried wallpaper. This seals it against steam and splashes without altering the look.
Step 3: Trimming & Finishing
-
Top and bottom trim:
Once all panels are up, use your metal straight edge and a very sharp utility knife to trim the excess paper at the ceiling line and the floor or baseboard. -
Corner trimming:
Carefully trim the excess paper in the corners. Change your knife blade often; a dull blade will tear wet paper rather than slicing it cleanly. -
Cut out fixtures:
Locate the electrical boxes or plumbing outlets behind the paper. Make a small ‘X’ cut over the center of the hole and carefully trim away the flaps to expose the opening. -
Secure the seams:
Runs a seam roller gently over the joins between panels. This ensures they don’t curl up later, which is crucial in a humid bathroom environment. -
Hardware reinstallation:
Allow the wallpaper to dry for at least 24 hours. Reinstall your circular mirror, faucets, and any lighting fixtures directly over the new mural.
Level Up: Backlighting
Install an LED strip light behind the round mirror before hanging it. This creates a halo effect that mimics the sun glowing through the foggy trees.
Enjoy the peaceful atmosphere of your new forest bathroom every time you step inside
BRUSH GUIDE
The Right Brush for Every Stroke
From clean lines to bold texture — master brush choice, stroke control, and essential techniques.
Explore the Full Guide
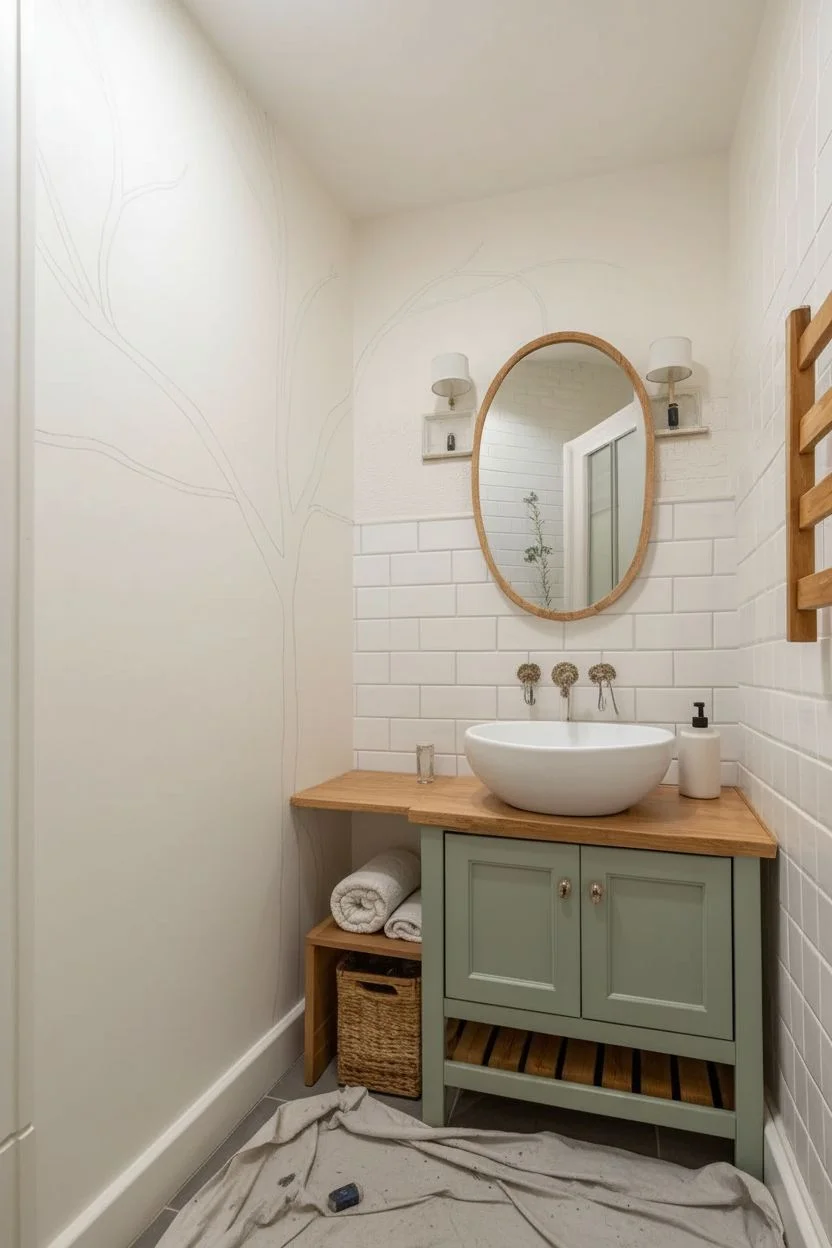
Oversized Botanical Line Art for a Clean, Modern Look
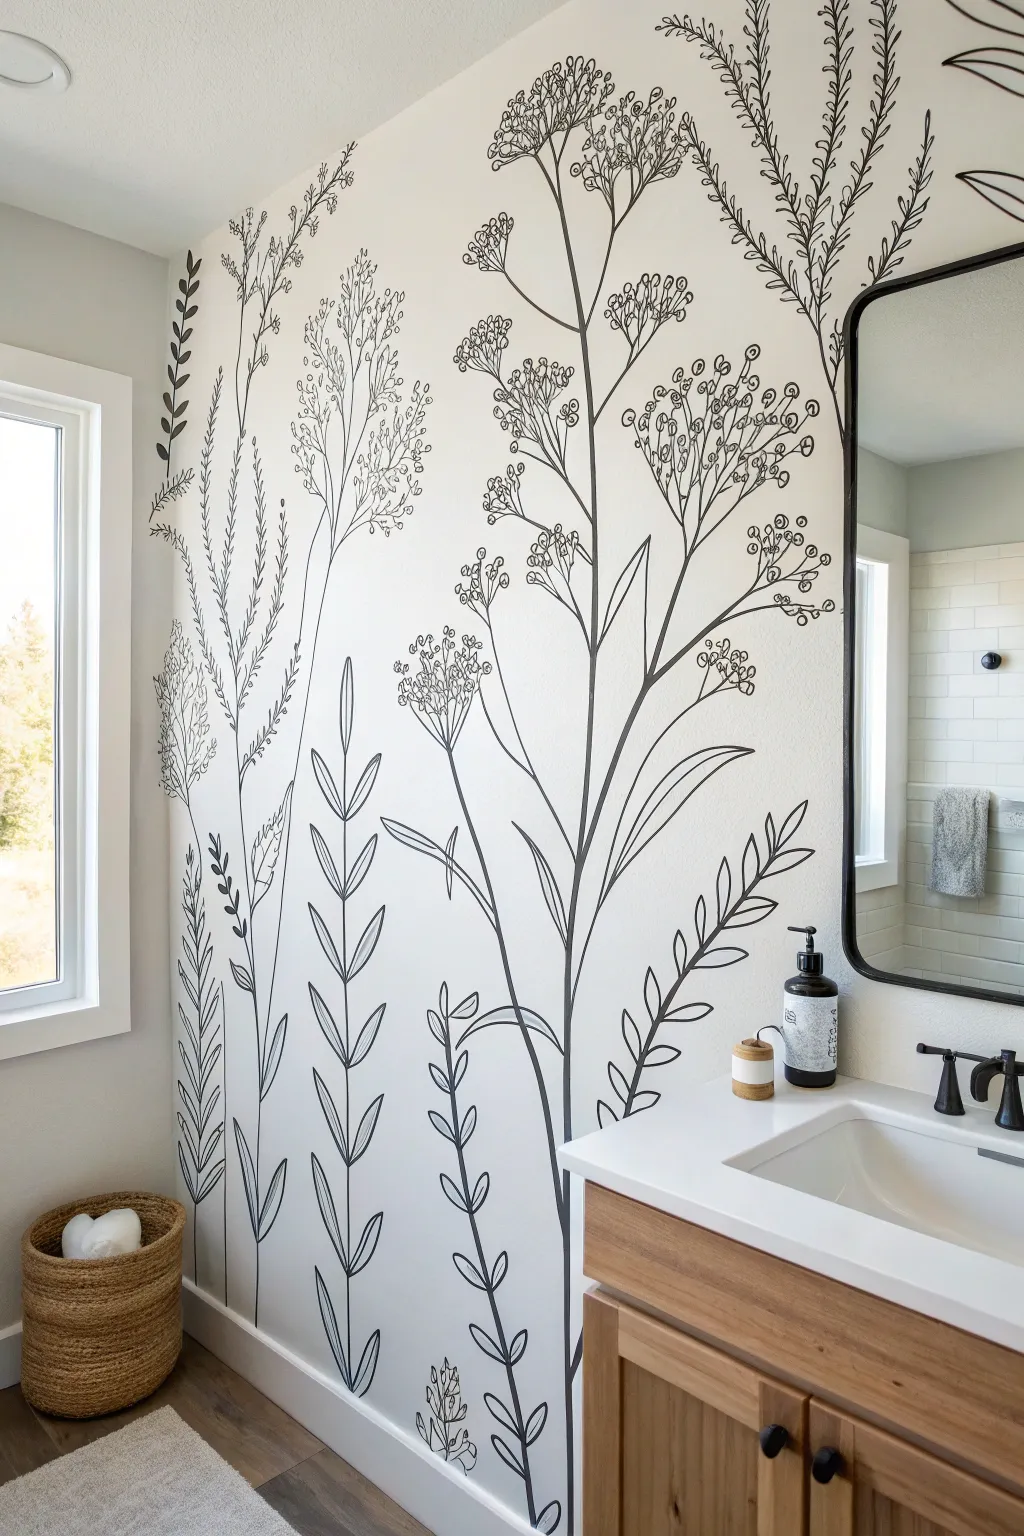
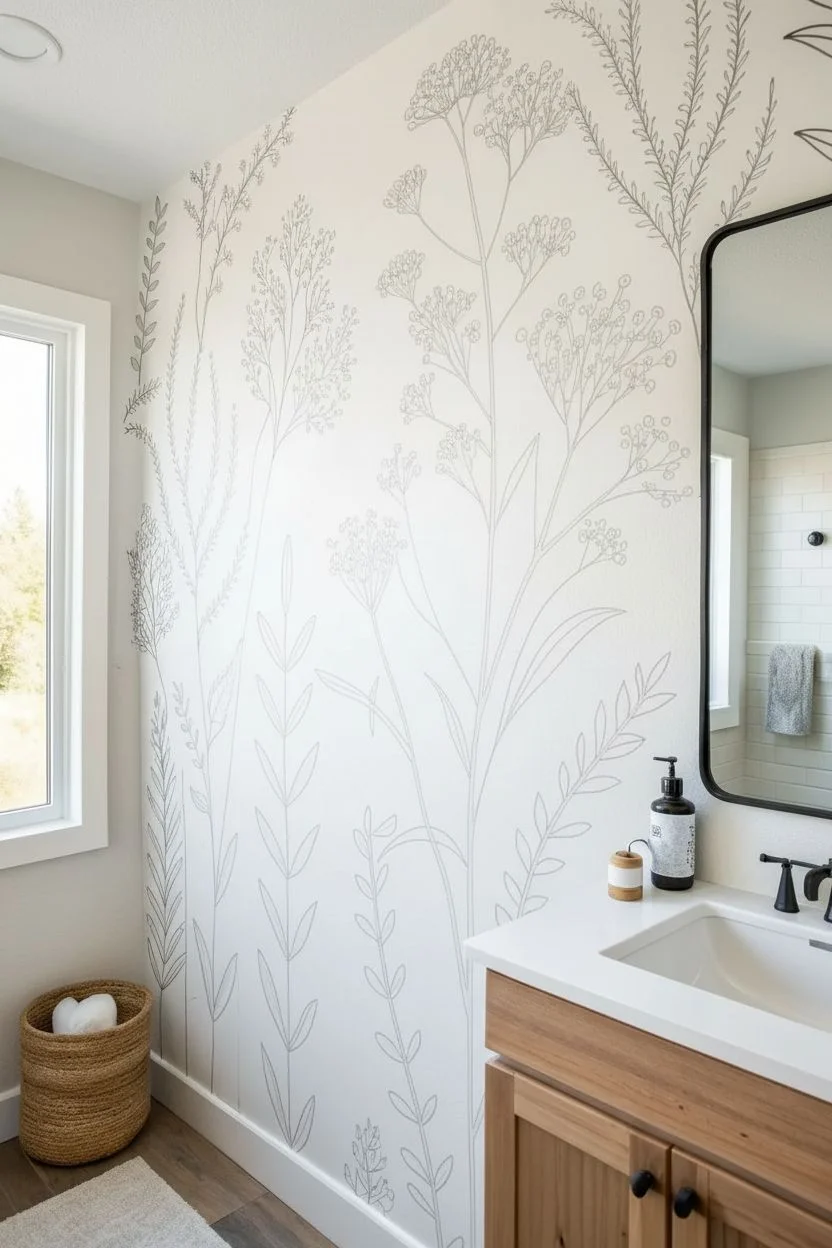
Transform a plain bathroom wall into a serene, blooming meadow with this oversized botanical line art mural. The crisp black lines against a white background create a modern, graphic statement that feels both organic and structured.
How-To Guide
Materials
- High-quality interior latex paint (white for base, matte black for mural)
- Pencil and large eraser
- Transparency sheets and overhead projector (optional but recommended)
- Painter’s tape
- Assorted round brushes (sizes #2, #4, and #6)
- Liner brush (size #0 or #1)
- Drop cloth
- Level
- Digital botanical illustrations (for reference)
Step 1: Preparation & Layout
-
Prep the canvas:
Begin by cleaning the wall thoroughly with a damp cloth to remove any dust or bathroom humidity residue. If your current wall color isn’t a crisp, clean white, apply two coats of stain-blocking primer and your chosen white base paint. Let this cure for at least 24 hours. -
Select your botanicals:
Choose 3-4 distinct plant shapes to repeat. Look for wild carrot (Queen Anne’s lace), tall grasses, and fern-like structures. High-contrast line drawings work best as references. -
Plan the composition:
Before drawing on the wall, sketch your layout on paper. Vary the heights of the plants—some should reach nearly to the ceiling, while others fill the lower space. This staggering creates a natural, field-like depth. -
Project or sketch:
If you are less confident in freehand drawing, print your reference images onto transparency sheets and use an overhead projector to cast the image onto the wall. Adjust the projector distance to get that dramatic, oversized scale. -
Trace the outlines:
Lightly trace the projected lines with a pencil. If drawing freehand, start with the main vertical stems first to establish the flow, then add the branching elements. Keep your pencil pressure very light so lines are easy to paint over or erase later. -
Refine the sketch:
Step back frequently to check relationships between the plants. You want them to overlap slightly, just like in nature. Ensure the stems originate from the bottom edge of the wall or baseboard for a grounded look.
Uneven Lines?
If your hand shakes, use a mahl stick (or a yardstick resting on the wall) to steady your wrist. Painting faster actually helps create smoother curves than moving slowly.
Step 2: Painting the Lines
-
Prepare your palette:
Pour a small amount of matte black latex paint into a cup. I often dilute the paint with a tiny splash of water—just enough to make it flow like ink, which helps achieve smoother long lines without the brush dragging. -
Master the stems:
Using a #4 round brush, begin painting the long, main stems. Start from the bottom and pull the brush upward. Apply slightly more pressure at the base and lift off as you reach the top to taper the line naturally. -
Paint the leaves:
Switch to a #2 brush for the leaves. For the fern-like plants, use a quick, flicking motion to create the pointed tips. Treat each leaf as a simple shape; don’t worry about filling in veins or shading. -
Detail the blossoms:
For the Queen Anne’s lace or seed pods, use your smallest liner brush. These are composed of tiny circles or short dashes. Group them in umbrella shapes, keeping the individual marks loose and irregular. -
Handle intersections:
Where stems cross over each other, pause and decide which plant is ‘in front.’ Stop the line of the rear plant just short of the front stem, leaving a microscopic gap, or paint right through if you prefer a transparent, sketch-like aesthetic. -
Correcting mistakes:
Keep a damp rag handy. If a line goes rogue, wipe it away immediately. For stubborn mistakes, wait for the black paint to dry completely, then touch it up with your white base paint.
Add Dimension
Mix a dark charcoal grey and paint a few ‘background’ stems slightly lighter than the main black ones. This subtle value shift adds incredible depth to the thicker areas.
Step 3: Finishing Touches
-
Assess line weight:
Stand back and look for areas that feel too thin or weak compared to the rest. Go back in with your #4 brush to thicken lines where necessary, adding visual weight to the bottom of the mural. -
Clean up sketch marks:
Once the black paint is fully dry (give it at least 4 hours), gently erase any visible pencil lines. Be careful not to rub too hard over the fresh paint. -
Seal (optional but smart):
Since this is a bathroom, consider applying a clear, water-based polycrylic sealer over the wall, especially near the sink area. Use a matte finish so you don’t lose the look of the drawing.
Enjoy the calm atmosphere your new botanical sanctuary brings to your daily routine
Soft Ombré Color Wash That Feels Like Steam and Light
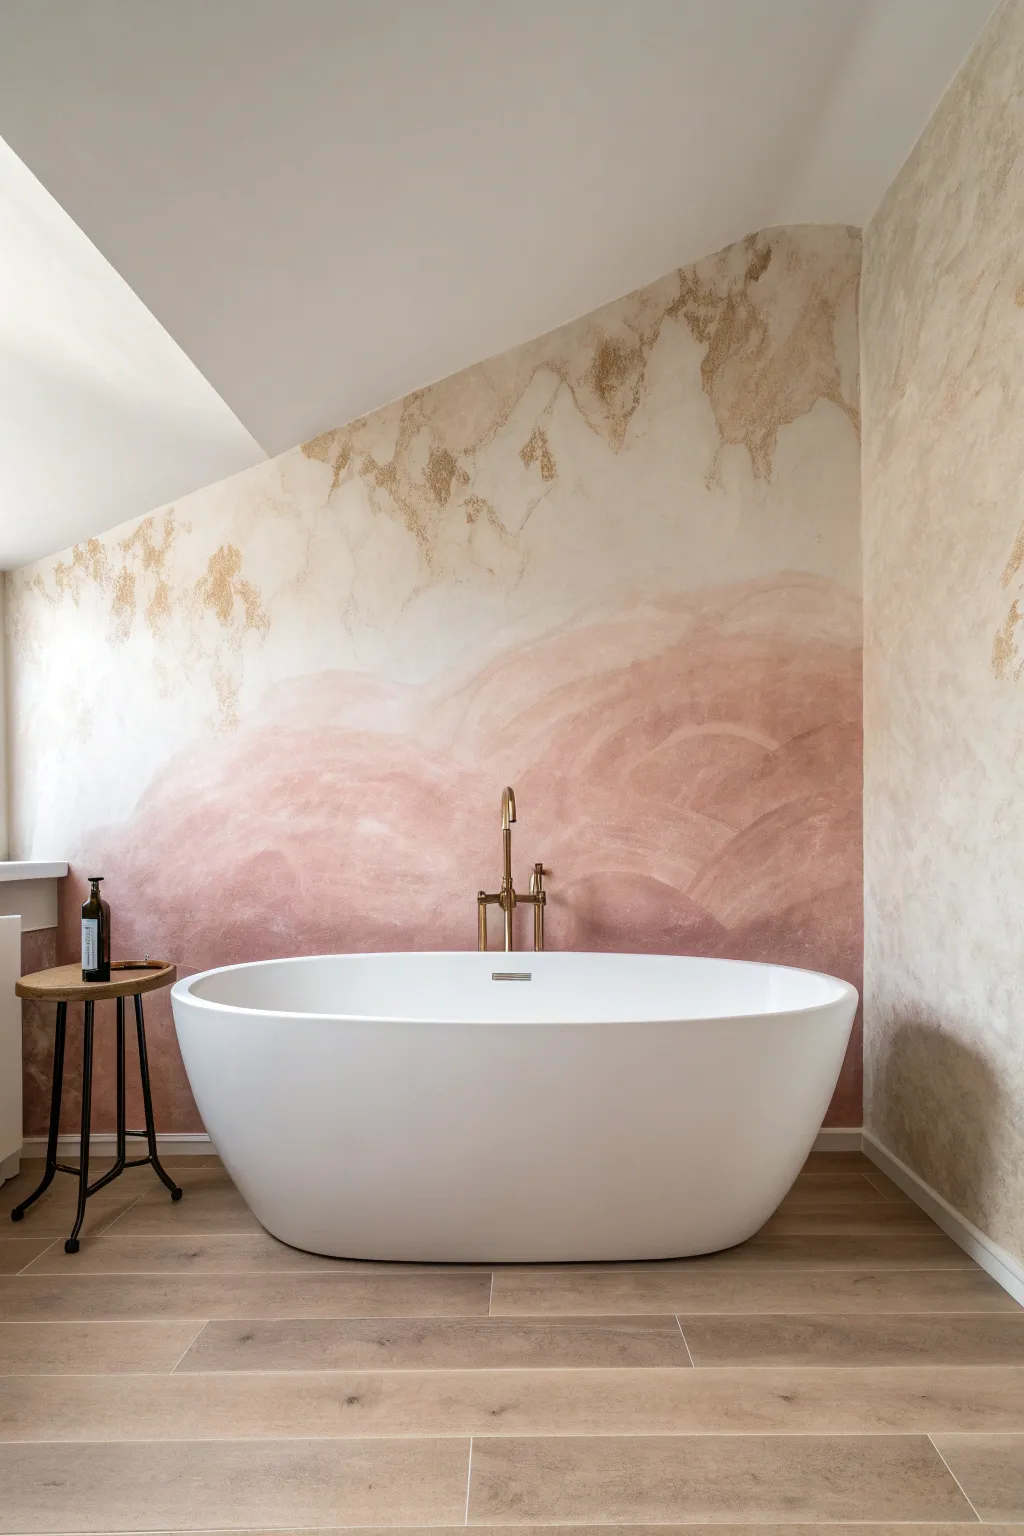
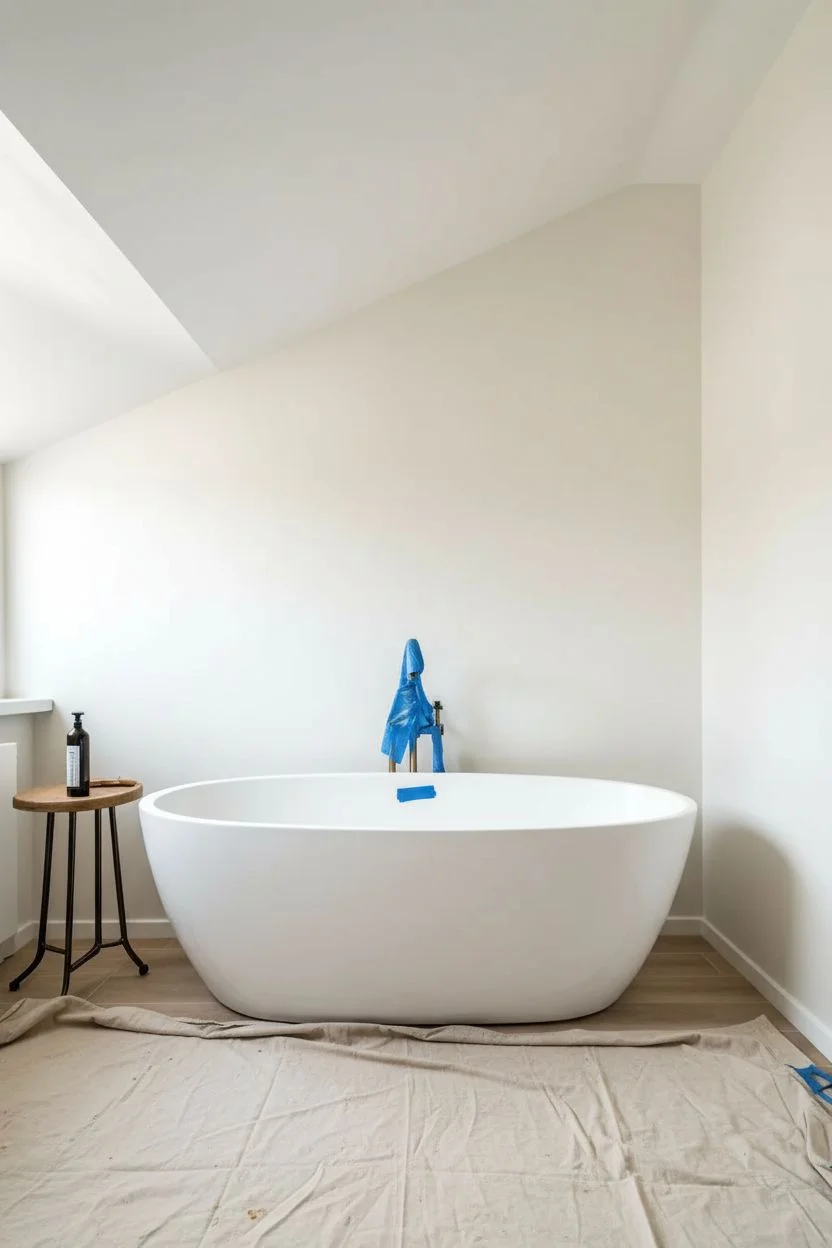
Transform your bathroom into a serene sanctuary with this soft, cloudy mural that mimics the interplay of steam and light. Using a color-washing technique with plaster-like textures, this project creates a warm, cocooning atmosphere perfect for relaxation.
Step-by-Step
Materials
- High-quality interior latex paint (White/Cream base)
- Interior latex paint (Terracotta/Deep Rose)
- Interior latex paint (Gold/Ochre accent)
- Glaze medium or water for thinning
- Large sea sponge or wool sponge
- Wide, soft-bristled blending brush (4-inch)
- Clean cotton rags
- Painter’s tape
- Drop cloths
- Paint tray and liners
- Small mixing buckets
Step 1: Preparation and Base Coat
-
Protect the space:
Begin by removing any fixtures you can, or carefully taping around plumbing like the gold floor-mounted faucet shown here. Lay down drop cloths to protect your flooring, especially if you have beautiful wood tile like in the example. -
Clean the surface:
Wipe down the wall with a damp cloth to remove dust and oils. This ensures your color wash adheres properly and lasts longer in a humid bathroom environment. -
Apply the base color:
Roll on a coat of your lightest cream or off-white paint to the entire wall. This acts as the background for the upper section and provides a fresh canvas. Let this dry completely, usually for about 4–6 hours.
Uneven Blending?
If the paint dries too fast and creates hard lines, keep a spray bottle of water handy. Mist the wall lightly to reactivate the glaze, allowing you to re-blend edges for a softer look.
Step 2: Mixing the Glazes
-
Create the rose wash:
In a mixing bucket, combine your deep terracotta or rose paint with glaze medium (or water). A ratio of 1 part paint to 4 parts glaze works well for a translucent, watercolor effect. Test the transparency on a piece of cardboard first. -
Create the gold wash:
Repeat the process with your gold or ochre accent color in a separate bucket. You want this mixture to be equally thin so it floats on top of the other colors without looking heavy. -
Prepare the transition shade:
Mix a small amount of the rose glaze with some of the original cream base paint to create a mid-tone. This will help bridge the gap between the dark bottom and the light top.
Step 3: Creating the Ombré Effect
-
Start at the bottom:
Dip your wide blending brush or a damp sea sponge into the dark rose glaze. Apply it to the bottom third of the wall using large, sweeping, crisscross strokes. Don’t worry about perfect coverage; the texture is part of the charm. -
Work upwards:
While the bottom section is still wet, start bringing the color up towards the middle of the wall. Lighten your touch as you go higher to naturally deposit less pigment. -
Soften the edges:
Use a clean, damp rag to blot and soften the top edge of the rose section. You want an irregular, cloud-like horizon line rather than a straight stripe. -
Introduce the mid-tone:
Apply your transition shade just above the darkest rose area, blending it downwards into the wet rose paint. This creates that seamless, foggy gradient. -
Add texture:
Take a dry brush and lightly sweep it over the wet paint in circular motions. This lifts some pigment and creates the ‘plaster’ movement seen in the photo.
Add Metallic Shimmer
Mix a tiny amount of metallic gold mica powder into your final clear sealant coat. It adds a subtle, luxurious shimmer that only appears when the bathroom lights hit the wall.
Step 4: Adding the Gold Accents
-
Apply gold highlights:
Dip a sea sponge into the gold/ochre glaze mixture. Dab off excess paint onto a paper towel until the sponge is almost dry. -
Create organic shapes:
Press the sponge lightly near the top half of the wall, focusing on the areas where the cream meets the ceiling. Imagine where sunlight might hit mist and place your gold marks there. -
Blend the gold:
Immediately soften the sponge marks with a dry brush or rag to blur the edges, ensuring they look like stained plaster rather than stamped shapes. -
Layering for depth:
If you want more depth, wait for the first layer to dry slightly, then add a second, very faint layer of rose wash in select areas to make the ‘clouds’ feel three-dimensional. -
Final blending check:
Step back to the other side of the room. If any lines look too harsh, lightly mist them with water from a spray bottle and dab with a clean dry brush to diffuse them. -
Seal the work:
Once the mural is bone dry (give it at least 24 hours), apply a clear, matte water-based sealer. This is crucial for a bathroom setting to protect your art from humidity and splashes.
Now you can sink into a warm bath and enjoy the peaceful, misty view you created with your own hands

PENCIL GUIDE
Understanding Pencil Grades from H to B
From first sketch to finished drawing — learn pencil grades, line control, and shading techniques.
Explore the Full Guide
Painted Arch “Niche” Illusion to Frame the Vanity
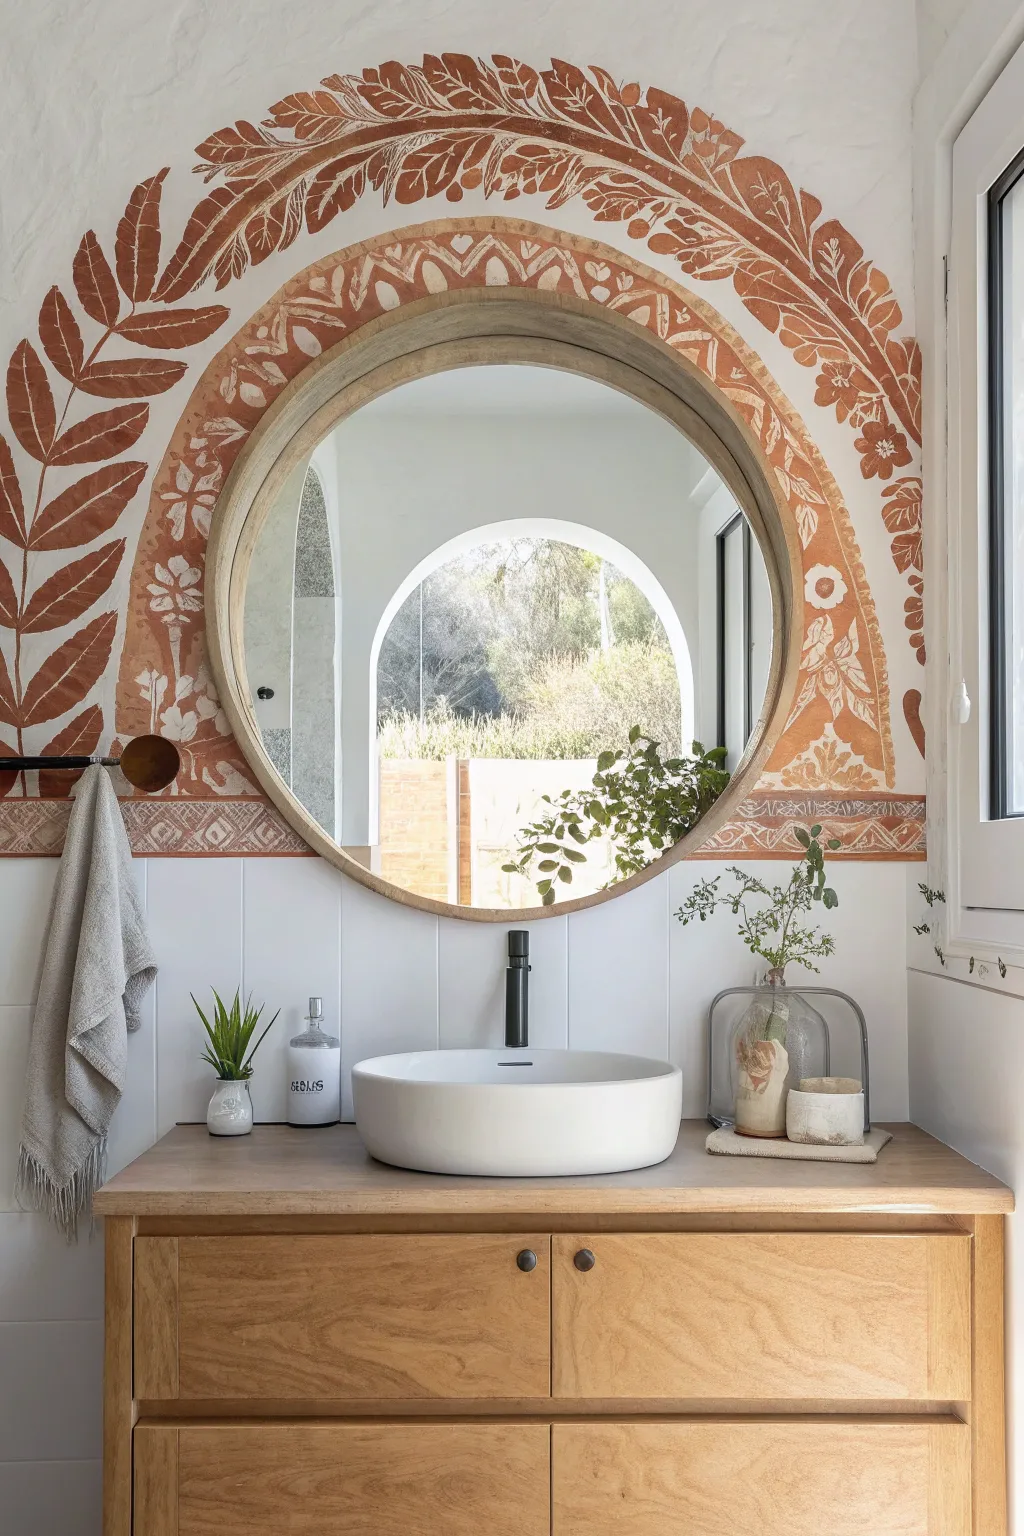
Transform a plain vanity wall into a stunning focal point with this hand-painted arch that creates the illusion of an architectural niche. Using warm terracotta tones and organic leaf motifs, this mural adds depth and a Mediterranean feel without any renovation.
Step-by-Step
Materials
- Latex wall paint (white or off-white base)
- Acrylic or interior latex paint (terracotta/burnt orange)
- Pencil
- String and push pin (for compass)
- Round mirror (approx. 24-30 inches)
- Painter’s tape
- Various paintbrushes (1-inch flat, medium round, fine liner)
- Level
- Measuring tape
- drop cloth
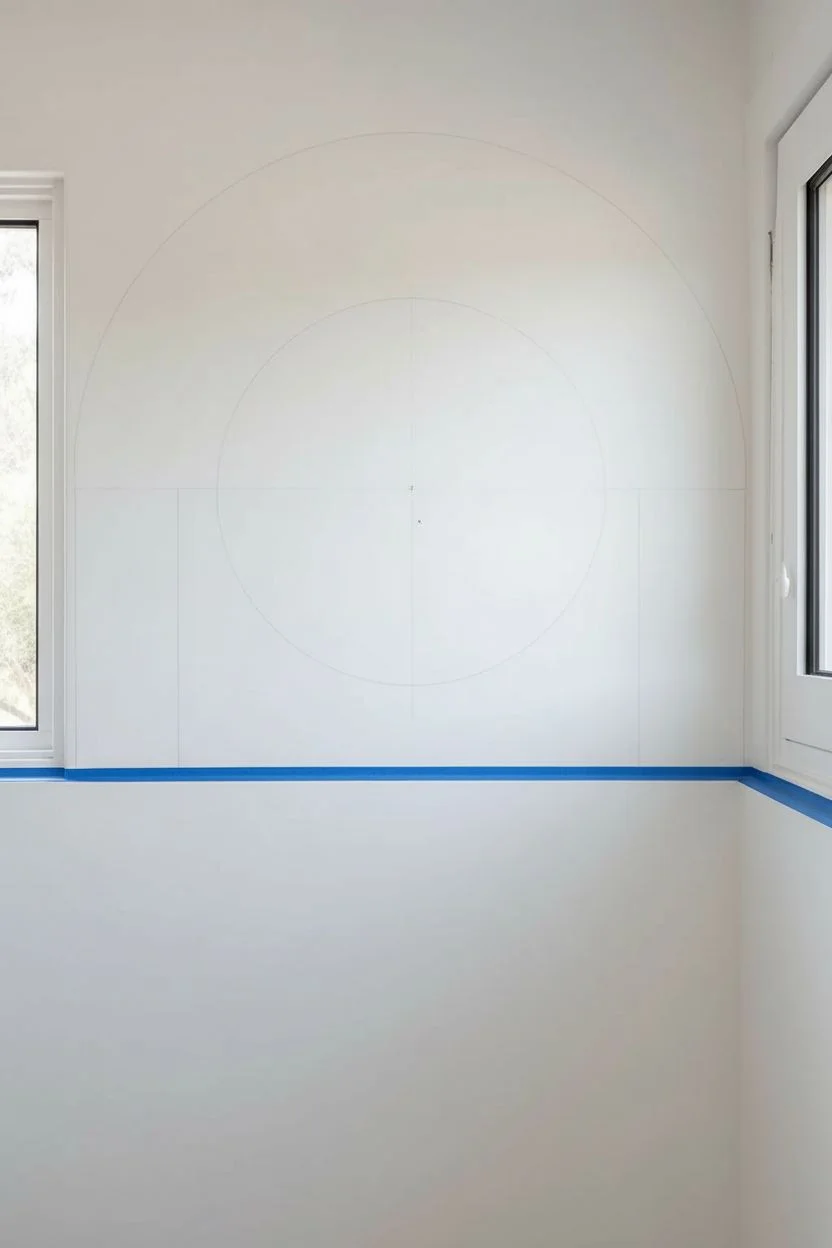
Step 1: Preparation & Mapping
-
Clean and clear:
Start by removing the mirror if it is already hung, or determine exactly where your round mirror will sit. Clean the wall surface thoroughly to ensure good paint adhesion. -
Find the center:
Measure the width of your vanity to find the center point. Mark this point on the wall at the height where the center of your mirror will be. -
Draw the inner circle:
Create a makeshift compass by tying a string to a pencil. Pin the string to your center mark so the length matches the radius of your mirror. Lightly draw the circle where the mirror will eventually hang. -
Draft the arch outline:
Lengthen your string by about 6-8 inches (depending on how wide you want the border). Draw a larger semi-circle over the top half, extending straight lines down to the vanity surface using a level for accuracy. -
Block off the horizon:
Use painter’s tape to create a crisp horizontal line just above the backsplash or vanity top where the mural will end. This creates a clean base for your artwork.
Paint Bleeding?
If using tape for the straight bottom edges, seal the tape edge with a thin layer of your base wall color first. This blocks heavy paint from seeping under.
Step 2: Painting the Base & Border
-
Paint the background band:
Mix a diluted wash of your terracotta paint (about 3 parts paint to 1 part water) to fill in the arch shape. This creates a subtle, softer background tone rather than a solid block of color. -
Define the edges:
Once the wash is dry, use your undiluted terracotta paint and a flat brush to paint a distinct border line along the outer arch and the horizontal base strip. I find using a steady hand here works better than tape for curves. -
Create the horizontal frieze:
Paint a horizontal band about 2-3 inches high at the bottom of the arch. Inside this band, paint a geometric diamond or zig-zag pattern using a fine liner brush.
Pro Tip: Depth trick
Mix a tiny drop of dark brown or grey into your terracotta paint for the leaves closest to the outer edge to create a shadow effect that adds 3D dimension.
Step 3: Adding the Botanical Details
-
Sketch the primary leaves:
Lightly sketch large, sweeping fern-like fronds in pencil. These should follow the curve of the arch, originating from the outer edges and curving inward. -
Paint the large leaves:
Using a medium round brush loaded with solid terracotta paint, fill in the large leaf shapes. Use the ‘press and lift’ technique: press down for the wide part of the leaf and lift up as you reach the tip. -
Add negative space veins:
Before the paint fully dries, you can use a clean, damp brush or a rubber tip tool to lift a thin line of paint from the center of each leaf, revealing the lighter background for a veined look. -
Fill the inner arch:
Inside the main painted arch area (around the mirror space), paint smaller, delicate floral vines and geometric scallops. Keep these lighter and more intricate than the bold outer leaves. -
Layer textures:
To mimic the aged fresco look in the photo, create a ‘dry brush’ effect by wiping most paint off your brush and lightly dragging it over some of the solid terracotta areas. -
Paint the floral accents:
Add small four-petal flowers and circular berries within the arc pattern using your fine liner brush. This adds variety to the leafy composition.
Step 4: Finishing Touches
-
Erase guidelines:
Once the paint is completely cured (give it at least 24 hours), gently erase any visible pencil marks that weren’t covered by paint. -
Seal the work (optional):
Since this is a bathroom, apply a matte clear polycrylic sealer over the painted area to protect it from humidity and splashes. -
Hang the mirror:
Install your round mirror directly in the center of the unpainted circle. The wood frame of the mirror should sit just inside your painted design, completing the illusion.
Step back and admire how a simple paint design has given your bathroom instant architectural character and warmth
In-Shower Mural Panels With a Sealed, Water-Safe Finish

Transform a plain white shower into a Mediterranean-inspired oasis with this clever mural technique. By painting detailed tile motifs directly onto a specialized waterproof panel, you get the look of expensive artisanal ceramics without the grout lines or heavy installation.
Step-by-Step Tutorial
Materials
- Waterproof shower wall panel (e.g., acrylic or PVC board)
- High-adhesion primer (bonding primer)
- Epoxy or enamel paints (Water-based epoxy works best)
- Colors: Teal blue, burnt orange/rust, off-white, cream
- Fine detail brushes (sizes 0, 2, and 4)
- Painter’s tape (1/4 inch and 1 inch)
- Stencil material or heavy cardstock
- Pencil and ruler
- Clear polyurethane sealer (marine grade or designed for wet areas)
- Sandpaper (220 grit)
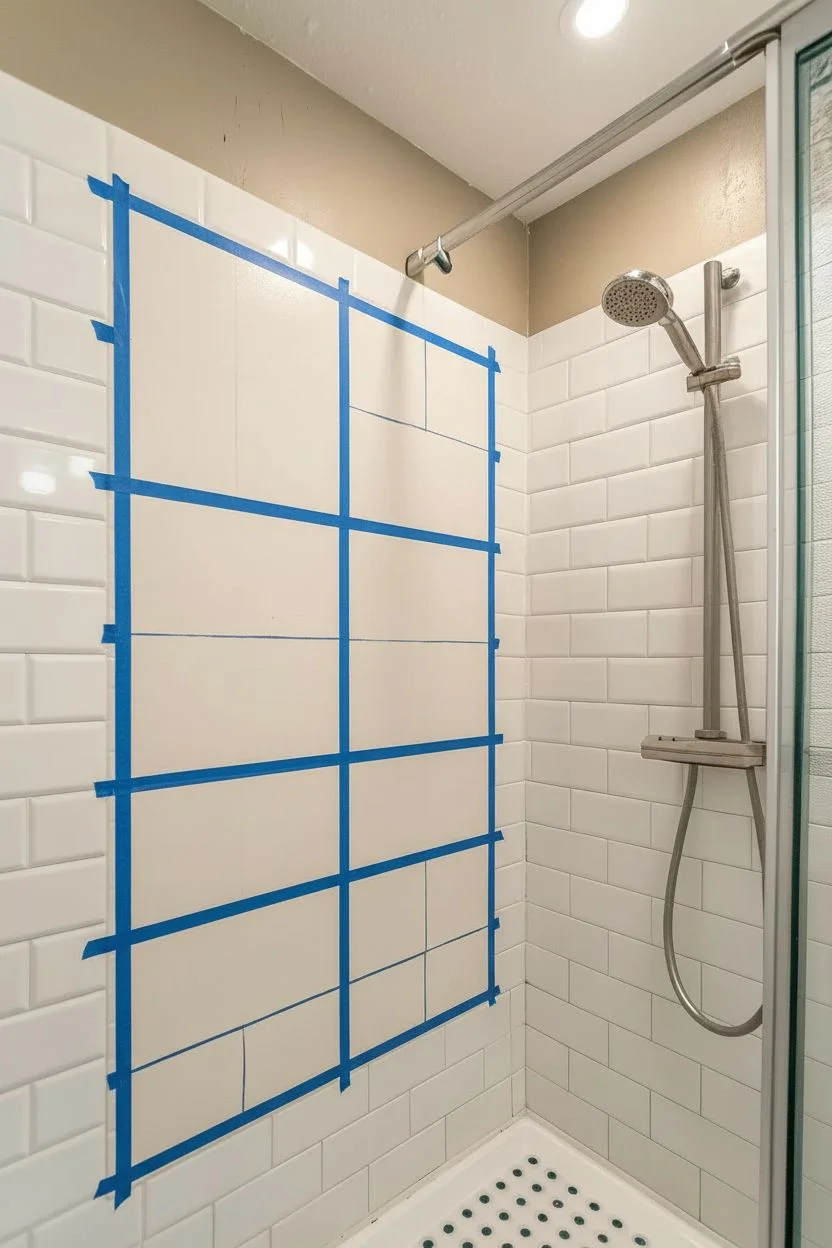
Step 1: Preparation and Grid Layout
-
Surface Prep:
Begin by lightly sanding your waterproof panel to create a ‘tooth’ for the paint to grip. Wipe it down thoroughly with a tack cloth or rubbing alcohol to remove any dust or oils. -
Prime the Base:
Apply a coat of high-adhesion bonding primer across the entire panel area where the mural will go. Let this cure fully according to the manufacturer’s instructions; a solid foundation is crucial for shower environments. -
Measure the Grid:
Decide on the size of your ’tiles’ (e.g., 8×8 inches). Use a ruler and a light pencil touch to measure a 2×4 grid, mimicking the eight-tile layout seen in the example. -
Tape the Grout Lines:
Apply 1/4 inch painter’s tape over your penciled grid lines. This tape will preserve the white ‘grout’ space between your painted designs.
Bleeding Lines?
If paint bleeds under your tape, wait for it to fully dry. Then, gently scrape the excess away with a craft knife or touch it up with a tiny brush and your background ‘grout’ color.
Step 2: Painting the Patterns
-
Create Stencils:
Draft the repeating floral and geometric shapes onto stencil sheets. You will need two main designs: the full four-petal flower seen in the top squares and the scrolling distinct half-flower motif for the lower sections. -
Base Color Blocking:
Looking at your reference, identify the background colors for each square. Use a small roller or flat brush to block in the background colors—alternating between the teal blue and the burnt orange sections. -
Stencil Application:
Once the base background is dry, position your stencil over the first square. Lightly secure it with tape. Using a stippling brush and off-white epoxy paint, tap the paint gently into the open stencil areas to establish the main shapes. -
Refining Edges:
Lift the stencil carefully. Use a size 2 brush to touch up any bleed-under and sharpen the edges of your cream-colored floral shapes against the colored background. -
Adding Detailed Accents:
Using a size 0 liner brush, hand-paint the intricate details inside the flower petals. Add the rust-orange ‘seeds’ inside the teal flowers and the teal outlines or centers within the orange flowers. -
Corner Motifs:
Don’t forget the corners. In the top blocks, hand-paint the small triangular flourishes in the corners of each square to complete the encaustic tile look. -
The Lower Patterns:
For the bottom four ’tiles’, replicate the scrolling vine design. I find it helpful to paint the central stem first to center the design, then curve the leaves outwards towards the edges. -
Drying Time:
Allow the paint to cure for at least 24 hours. The shower environment is harsh, so patience during the drying phase prevents future peeling.
Step 3: Sealing and Finishing
-
Reveal the Grout:
Slowly peel away the grid of painter’s tape. You should now have crisp, white lines separating your distinct painted ’tiles’. -
First Seal Coat:
Apply a thin, even layer of marine-grade polyurethane or a specialized waterproof clear coat over the entire mural. Ensure you overlap slightly onto the surrounding wall material to create a watertight seal. -
Sand and Repeat:
Once the first coat is dry, lightly scuff it with very fine sandpaper (like 400 grit) to smooth out any bubbles. Wipe clean. -
Final Protection:
Apply two more coats of the sealer. This multi-layer barrier is essential for resisting hot water, soap scum, and daily use. -
Installation:
If you painted this on a board separate from the wall, adhere the finished panel into your shower niche using construction adhesive and silicone caulk around the perimeter.
Add Texture
To mimic the feel of real aged ceramic tiles, mix a tiny pinch of plaster powder or thickener into your base paints. This adds subtle tactile dimension to your brushstrokes.
Now you have a stunning, waterproof piece of art that brightens your morning routine


Wraparound Corner Mural That Connects Two Bathroom Walls
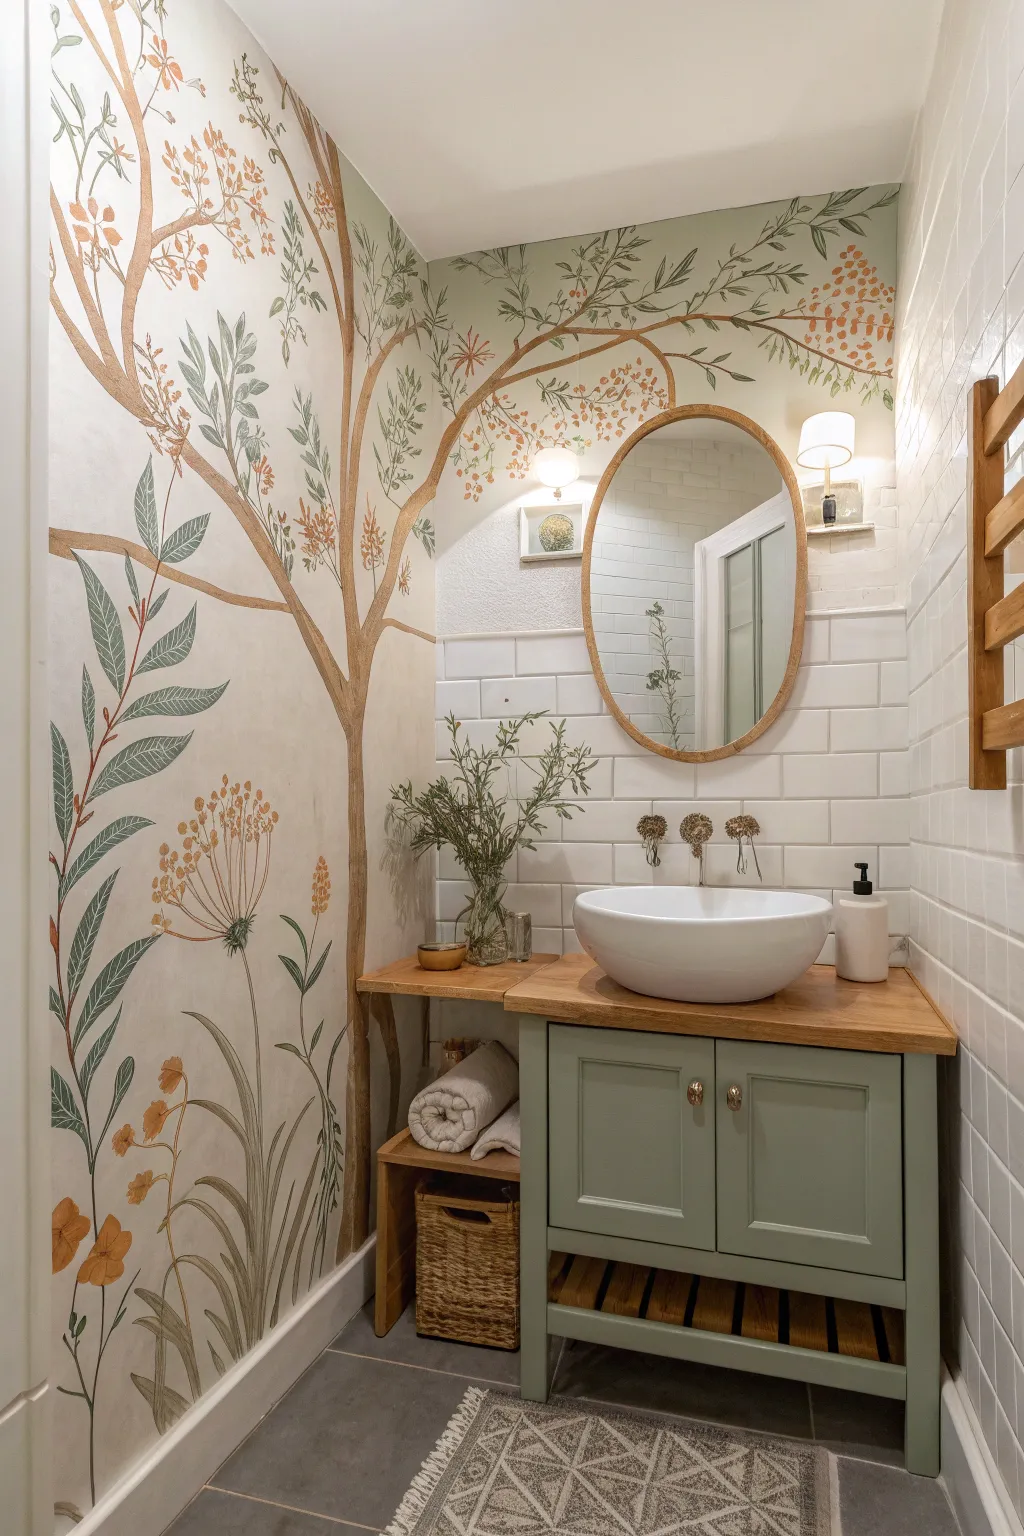
Transform a compact corner into a serene forest grove with this continuous line-art mural that seamlessly spans two walls. Featuring delicate botanical silhouettes and a warm, earthy palette, this hand-painted design softens hard architectural lines and brings the outdoors in.
Detailed Instructions
Materials
- Interior emulsion paint (base coat, off-white/cream)
- Acrylic paints (terracotta/burnt orange, sage green, olive green, warm brown)
- Glaze medium (acrylic)
- Pencil (HB or H)
- Large eraser
- Painter’s tape
- Drop cloths
- Round artist brushes (sizes 2, 4, 6)
- Flat brush (1 inch)
- Fine liner brush (size 0 or 00)
- Reference images of botanical illustrations
- Step ladder
- Clear matte varnish (optional)
Step 1: Preparation & Base Work
-
Prepare the space:
Begin by removing all fixtures, mirrors, and shelving from the target walls. Cover the vanity, floor, and any remaining hardware with drop cloths and blue painter’s tape to protect them from splatters. -
Clean and prime:
Wipe down the walls with a mild degreaser or sugar soap solution to remove bathroom humidity residue. Let this dry completely before proceeding. -
Apply the background color:
Roll on two coats of your chosen off-white or cream base color. Choose a paint with a satin or eggshell finish, as it holds up better in damp bathroom environments than flat matte. -
Map the main structure:
Using a light HB pencil, sketch the main trunk of the tree emerging from the corner or lower wall. Draw the primary branches reaching up and across the ceiling line, ensuring the curve flows naturally from one wall to the adjacent one.
Pro Tip: Flow & Motion
When painting branches, hold the brush by the end of the handle, not near the bristles. This loosens your wrist and creates far more natural, organic curves compared to stiff, controlled lines.
Step 2: Painting the Structure
-
Mix your trunk color:
Combine warm brown acrylic paint with a small amount of glazing medium. This increases transparency, giving the mural a slightly watercolor-like, hand-painted aesthetic rather than a solid sticker look. -
Paint the main trunk:
Using a size 6 round brush, fill in the trunk and main branches. Keep your strokes long and fluid to mimic organic growth, tapering the thickness as the branches extend outward. -
Add secondary branches:
Switch to a size 4 brush to paint thinner offshoots. I find it helpful to slightly wiggle the brush as I pull it to create the natural irregularities found in wood. -
Sketch the foliage placement:
Lightly pencil in huge, sweeping leaves and clusters of berries or flowers. Focus on balance; if you have a heavy cluster on the left wall, ensure a branch reaches over to the right wall to connect the visual. -
Establish the color palette:
Prepare your palette with sage green, olive green, and terracotta. Mix a tiny bit of the wall color into each to desaturate them slightly, ensuring they harmonize with the room.
Level Up: Metallic Accents
For a touch of luxury, use a gold leaf pen or metallic acrylic paint to highlight the tips of the terracotta flowers or add tiny dots of ‘pollen’ to the center of the blooms.
Step 3: Detailing the Botanicals
-
Paint the large leaves:
Load a size 4 brush with sage green. Paint the large, elongated leaves using a ‘press and lift’ motion: press down at the base of the leaf to widen the stroke, then lift as you reach the tip. -
Add vein details:
Once the green leaves are dry, use a fine liner brush (size 0) and a darker olive green (or white mixed with water) to paint delicate central veins and ribs on the leaves. -
Create the floral elements:
Use the terracotta paint for the floral clusters. Start by painting the stems with a size 2 brush, then dab small, irregular dots or petal shapes at the ends to simulate wildflowers like Queen Anne’s Lace or blossoming buds. -
Layering for depth:
Go back over some of the denser foliage areas with a lighter, more translucent wash of green. This layering creates depth and makes the mural feel lush. -
Ground the composition:
near the base of the wall or vanity line, paint taller grasses and wildflowers rising up. This grounds the tree and integrates the furniture into the scene.
Step 4: Refining & Finishing
-
Check continuity:
Step back and look at the corner specifically. If the line breaks awkwardly, bridge the gap with a small painted twig or leaf that physically spans the corner crease. -
Clean up edges:
Use your base wall color and a small flat brush to ‘cut in’ and tidy up any branch edges that became too thick or messy. -
Erase guidelines:
Wait at least 24 hours for the paint to fully cure, then gently erase any remaining visible pencil marks with a large, clean eraser. -
Seal the work:
Since this is a bathroom, apply a thin layer of clear matte varnish over the painted areas. This protects the acrylic work from steam and splashes. -
Reassemble the room:
Rehang your mirror and lights. Notice how the mural frames these elements—it’s part of the charm.
Enjoy the calming atmosphere of your new hand-painted botanical sanctuary whenever you step into the room
Monochrome Ink-Wash Waves for a Zen, Gallery-Style Bathroom

Transform your bathroom into a serene sanctuary with this dramatic, monochrome mural inspired by Hokusai’s iconic ‘The Great Wave off Kanagawa.’ This large-scale project uses grayscale tones to create a modern, zen-like focal point that doubles as fine art.
How-To Guide
Materials
- High-resolution digital file of ‘The Great Wave’ (grayscale)
- Custom-printed peel-and-stick wallpaper or vinyl mural panels
- Squeegee or wallpaper smoothing tool
- Step ladder
- Utility knife with fresh blades
- Tape measure
- Level or laser level
- Pencil
- Mild cleaner and sponge
- Painter’s tape
Step 1: Preparation & Wall Sizing
-
Measure the space:
Begin by carefully measuring the height and width of the wall behind your bathtub. Measure in three places for both dimensions (left, center, right; top, middle, bottom) and use the largest measurement to account for any wall slant. -
Source the image:
Locate a high-resolution, public domain image of Hokusai’s wave. Convert the image to black and white using photo editing software if it isn’t already, adjusting the contrast to ensure deep blacks and crisp whites. -
Order the mural:
Upload your file to a custom wallpaper printing service. Request a mock-up to ensure the wave crest sits perfectly above where your tub edge will be. Order the material with a 2-3 inch bleed on all sides for trimming. -
Clean the surface:
While waiting for your delivery, wipe down the wall thoroughly with a mild cleaner to remove any dust, soap scum, or oils. A perfectly clean surface is critical for adhesion. -
Prime (optional):
If your wall has significant texture or old glossy paint, a coat of wallpaper primer can help smooth the surface and improve grip. Allow this to cure fully according to the can’s instructions.
Pro Tip: Moisture Barrier
Apply a clear, matte decorator’s varnish over the wallpaper if it’s not specifically rated for high-humidity bathrooms. This adds a wipeable, waterproof layer.
Step 2: Installation
-
Set a plumb line:
Using a level and pencil, draw a faint vertical guide line roughly where the edge of your first panel will fall. Never rely on the room’s corners being perfectly straight. -
Align the first panel:
Peel back the top 6-10 inches of the backing paper on your first panel. Align the edge with your pencil guide line, leaving about 2 inches of excess material at the ceiling. -
Secure the top:
Press the exposed adhesive section against the wall firmly. Use your smoothing tool to push out any air bubbles, working from the center outward. -
Work downwards:
Slowly peel the backing paper down in 6-inch increments. As you peel, follow immediately with the squeegee, using sweeping, overlapping horizontal strokes. -
Repeat for subsequent panels:
Line up the pattern of the next panel precisely with the edge of the first. Most custom murals have a slight overlap—check your manufacturer’s instructions. I find painter’s tape helps hold the seam in place temporarily. -
Smooth the seams:
Pay extra attention to the seams. Run your smoothing tool gently but firmly along the overlap to ensure the edges don’t lift later in the humid environment. -
Trim the excess:
Once all panels are up, use a sharp utility knife and a straight edge (like your smoothing tool) to trim the excess material at the ceiling, floor, and corners. Change your blade frequently to avoid tearing wet or warm vinyl.
Level Up: Texture
Choose a ‘canvas’ or ‘linen’ textured wallpaper material when ordering. This subtle grain mimics the feel of an original ink painting rather than a flat poster.
Step 3: Finishing Touches
-
Seal the edges:
For bathroom applications, run a very thin bead of clear silicone caulk along the bottom edge where the mural meets the floor or baseboard to prevent moisture from seeping behind. -
Reinstall fixtures:
If you removed any sconces or towel bars, reinstall them now. Be careful not to twist the hardware against the fresh wallpaper; hand-tightening is safest. -
Style the space:
Position your freestanding tub back in place, ensuring it doesn’t rub directly against the mural to prevent scratches.
Step back and enjoy the calming, oceanic atmosphere your new feature wall brings to the room


Have a question or want to share your own experience? I'd love to hear from you in the comments below!