If you love painting and drawing, a DIY resin tabletop is basically your chance to turn a functional surface into a glossy, gallery-level piece. I’m sharing my favorite diy resin table top ideas—from classic looks everyone pins to the wild, artsy ones that make you stop scrolling.
Live Edge River Resin Tabletop
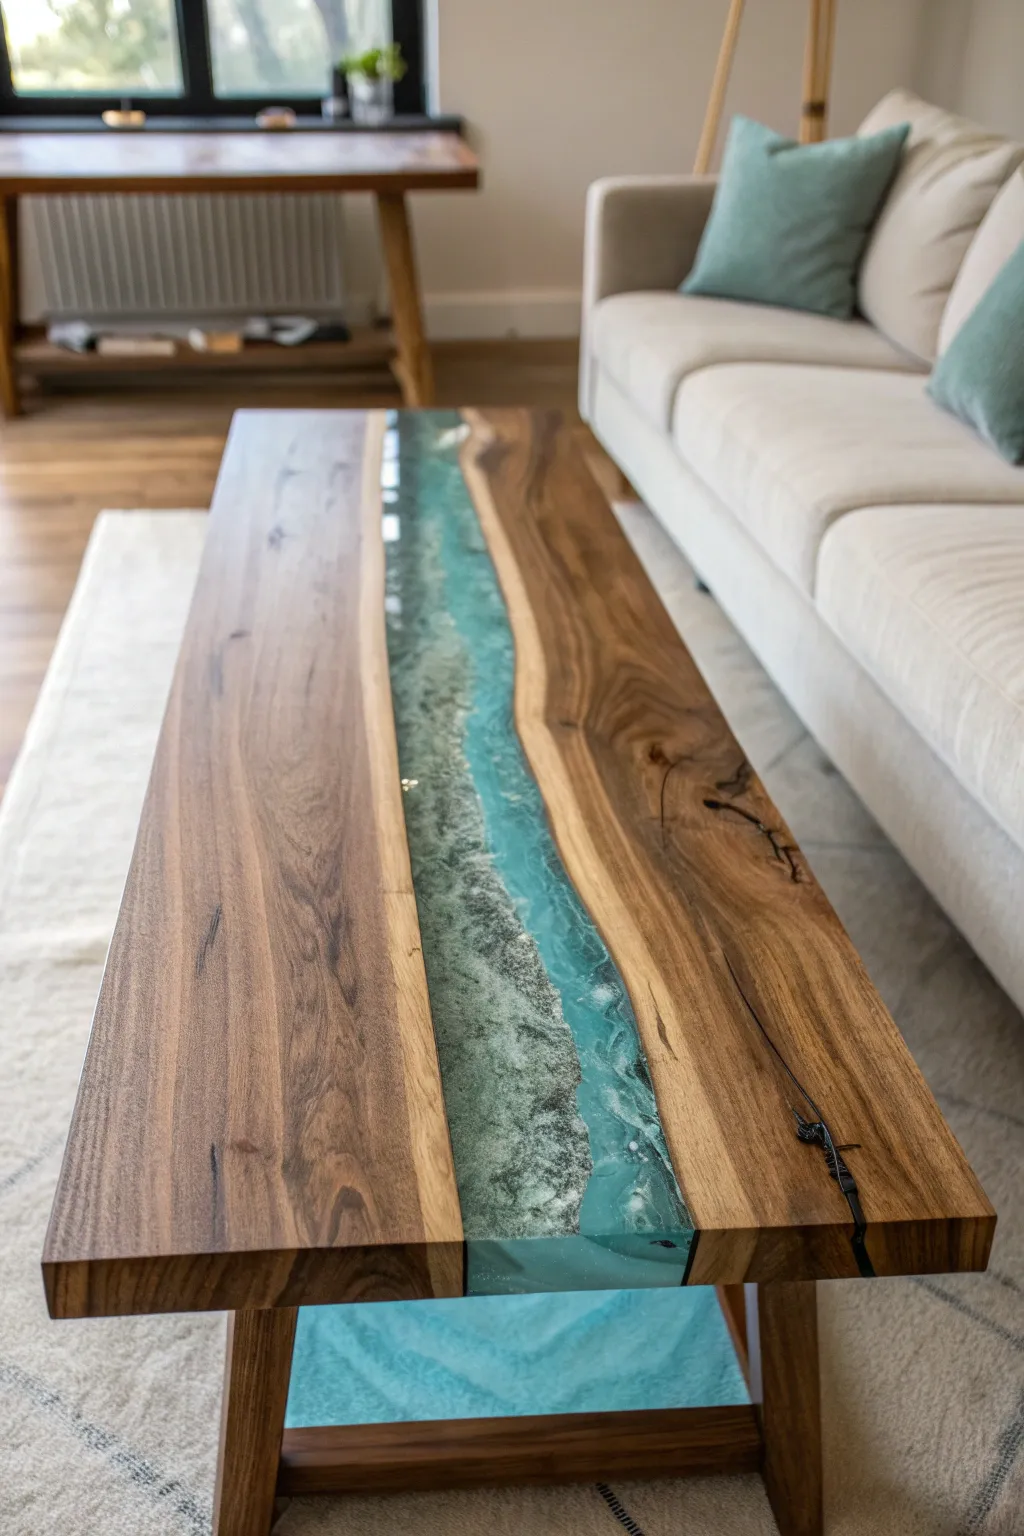
This stunning river table combines the warmth of live-edge walnut with a mesmerizing turquoise epoxy stream that seems to flow right through your living room. The project captures the natural beauty of water and wood, featuring a translucent, swirling river effect that separates two distinct wooden banks.
Detailed Instructions
Materials
- Two live-edge wood slabs (walnut recommended)
- Deep pour epoxy resin (approx. 3-5 gallons depending on size)
- Turquoise metallic mica powder or alcohol inks
- Melamine board (for the mold)
- Tyvek tape or sheathing tape
- Silicone caulk
- Router with flattening sled and bits
- Orbital sander with discs (80 to 3000 grit)
- Polishing compound and buffer
- Wood finish (Rubio Monocoat or similar oil)
- Hot glue gun
- Clamps
- Table legs (wooden or metal)
- Mixing buckets and stirring sticks
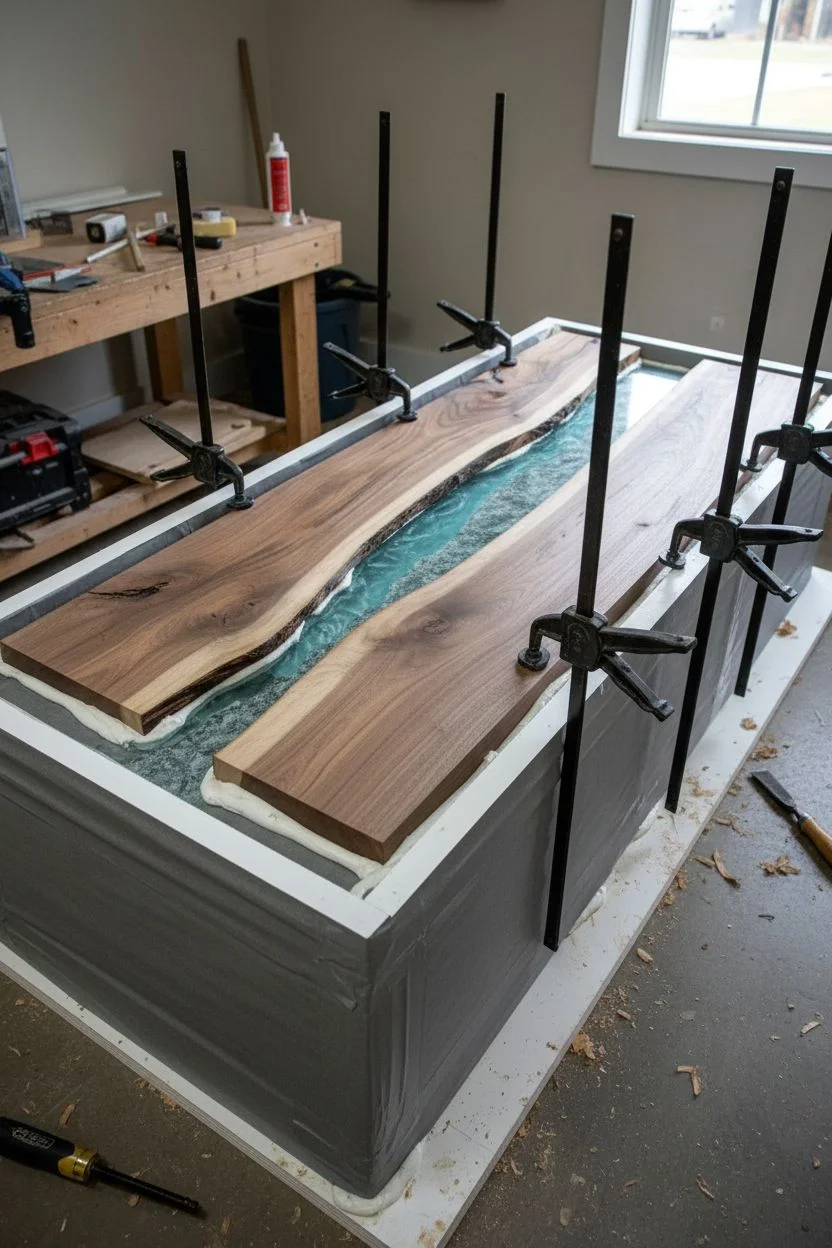
Step 1: Preparation and Form Building
-
Select and prep the wood:
Choose two slabs of live-edge wood that roughly match in length. Remove all loose bark using a drawknife or chisel, then sand the live edges with a wire brush attachment to ensure a strong bond with the resin. -
Plan the layout:
Arrange the slabs on a flat surface with the live edges facing inward to create the ‘river’ channel. Adjust the gap width to your preference, keeping in mind that a wider river requires more epoxy. -
Construct the mold:
Cut a piece of melamine slightly larger than your final table dimensions to serve as the base. Create side walls from melamine strips that are slightly taller than the wood thickness. -
Seal the mold:
Cover the entire inside surface of the mold (base and walls) with Tyvek or sheathing tape. This crucial step prevents the epoxy from sticking to the mold permanently. -
Assemble and seal edges:
Attach the side walls to the base using screws. Run a bead of silicone caulk along all interior seams and corners, smoothing it with your finger to ensure the mold is completely liquid-tight. -
Secure the wood:
Place the wood slabs into the mold. Apply a thick bead of silicone to the bottom of the wood where it meets the mold, and use clamps or heavy weights to hold the wood down so it doesn’t float when you pour.
Leak Patrol
Before the main pour, brush a thin layer of quick-set epoxy along the bottom edges of the wood inside the mold. This acts as a dam to prevent the deep pour resin from leaking underneath the slabs.
Step 2: The Resin Pour
-
Calculate volume:
Measure the length, average width, and depth of your river channel to calculate exactly how much resin you need, adding about 10% extra for safety. -
Mix the base epoxy:
Combine your deep pour epoxy resin and hardener in a clean bucket according to the manufacturer’s ratio. Mix thoroughly by hand for several minutes, scraping the sides and bottom. -
Tint the resin:
Add a small amount of turquoise metallic mica powder or alcohol ink. Start with less than you think you need; you want a translucent, watery look rather than an opaque block of color. -
The pour:
Slowly pour the mixed resin into the river channel. If you see bubbles rising, gently pass a heat gun or torch over the surface to pop them, but keep the heat moving constanty. -
Create the swirl effect:
Wait until the resin reaches a ‘gel’ state (usually several hours after pouring). I like to gently drag a stir stick through the resin at this stage to create water-like currents and swirls that will hold their shape. -
Curing time:
Allow the project to cure undisturbed for the time specified by your resin brand, typically 72 hours for a deep pour, before attempting to de-mold.
Step 3: Finishing
-
Demold the table:
Unscrew the mold walls and use plastic wedges to carefully pry the melamine base away from the cured slab. -
Flatten the surface:
Use a router mounted on a flattening sled to shave off the top layer of the entire table. This ensures the wood and resin are perfectly level with each other. -
Sanding sequence:
Begin sanding with an orbital sander at 80 grit to remove router marks. Progressively move up through 120, 180, 220, and 320 grits. Thoroughly clean the dust off between every grit change. -
Polishing the resin:
For the resin section specifically, continue sanding up to 3000 grit using wet-sanding techniques. Finish with a buffing compound and a polishing pad to make the river section shine like glass. -
Apply finish:
Apply a high-quality wood finish like Rubio Monocoat or Odie’s Oil to the entire piece. Buff it into the wood to bring out the grain and protect the surface. -
Install the base:
Flip the table over and attach your chosen legs or wooden base structure to complete your river table masterpiece.
Glow Up
Mix a small amount of phosphorescent (glow-in-the-dark) powder into your turquoise pigment. The table will look normal during the day but emit a soft, magical blue glow at night.
Now you have a centerpiece that brings the serenity of nature right into your home


Marble-Inspired Resin Tabletop Swirls

Achieve the luxurious look of high-end Italian marble without the heavy price tag using a clever resin pouring technique. This project creates a stunning, glossy white surface featuring intricate veins of soft grey and rich gold that looks incredibly realistic.
Step-by-Step Tutorial
Materials
- Round wooden tabletop (pre-sealed)
- Epoxy resin (tabletop or art resin formula)
- White opacity pigment paste or liquid
- Metallic gold pigment powder or alcohol ink
- Grey epoxy pigment or charcoal spray paint
- Isopropyl alcohol (91% or higher) in a spray bottle
- Heat gun or culinary torch
- Small artist brushes (fine tip)
- Plastic mixing cups and stir sticks
- Dust cover (large cardboard box)
- Sandpaper (220 grit)
- Painter’s tape
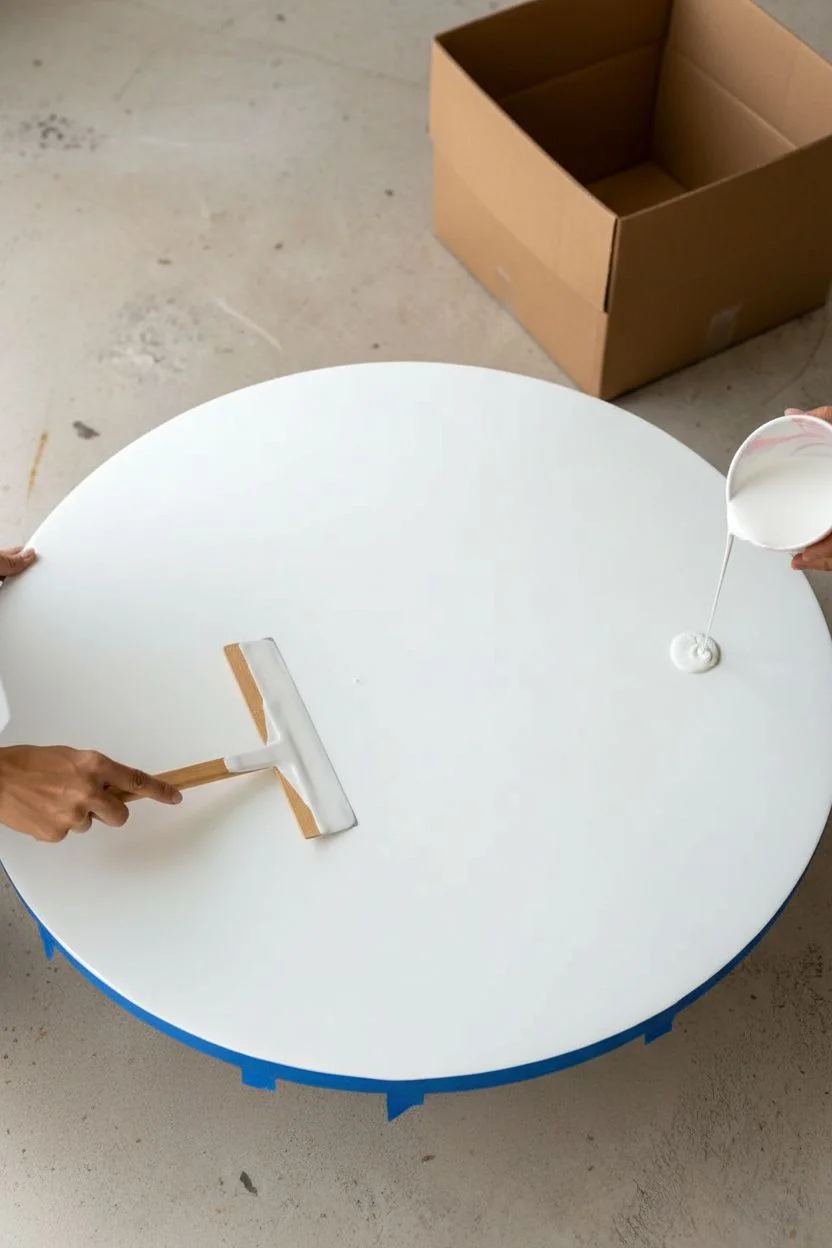
Step 1: Preparation and Base Coat
-
Prep the surface:
Begin by sanding your wooden tabletop with 220-grit sandpaper to create a smooth surface with enough tooth for adhesion. Wipe away all dust with a tack cloth or damp rag. -
Seal the edges:
Apply painter’s tape to the underside of the table edge to catch drips. This small step saves significant cleanup time later. -
Mix the resin:
Calculate the amount of resin needed for your tabletop size. Mix the resin and hardener according to the manufacturer’s instructions, stirring slowly to minimize bubbles. -
Create the white base:
Separate about 90% of your mixed resin into a large container and tint it with white pigment. You want a solid, opaque white to mimic the dense look of marble stone. -
Pour the flood coat:
Pour the white resin onto the center of the table. Use a spreader or a gloved hand to push the material all the way to the edges, ensuring the entire surface is evenly covered.
Vein Naturalism
Look at photos of real marble while you work. Nature is random—vary the thickness of your veins and leave plenty of negative white space.
Step 2: Creating the Veins
-
Mix accent colors:
In small separate cups, mix the remaining clear resin with your grey pigment and metallic gold powder. Aim for a semi-opaque consistency for the grey and a rich shimmer for the gold. -
Lay down primary veins:
Using a stick or a small pour cup, drizzle thin, trembling lines of the grey resin across the wet white base. Avoid straight lines; mimick organic lightning shapes. -
Add gold highlights:
Here I prefer to drizzle the gold resin directly alongside or intertwining with the grey veins. The contrast between the cool grey and warm gold is what defines the Calacatta look. -
Feather the edges:
Take a clean stick or a gloved finger and gently disturb the edges of the veins to blend them slightly into the white. Marble veins rarely have hard, sharp edges everywhere. -
Apply heat:
Pass a heat gun or torch quickly over the surface. This pops air bubbles and encourages the colored veins to flow and soften into the white base. -
Create fractured details:
Spray a light mist of isopropyl alcohol over some of the vein areas. This disperses the pigment, creating beautiful cellular effects and ‘fractures’ often seen in natural stone.
Matte Finish
For a honed marble look instead of glossy, let the resin fully cure, then lightly sand the surface with 1000-grit to 3000-grit pads until satin.
Step 3: Refining and Curing
-
Enhance with fine lines:
Wait about 20-30 minutes for the resin to gel slightly. Use a fine artist brush dipped in gold pigment to draw very delicate, sharp crack lines branching off the main veins. -
Check for debris:
Inspect the surface at eye level for any dust hairs or unpopped bubbles. Remove them carefully with a toothpick. -
Remove the tape:
Once the resin has stopped dripping but is still tacky (usually 4-5 hours), carefully peel off the painter’s tape from the underside. -
Protect the cure:
Place a large box or dust cover over the table to prevent environmental dust from settling on the finish while it cures. -
Final cure:
Allow the table to cure undisturbed for at least 72 hours, or as directed by your specific resin brand, before placing any objects on it.
Once fully cured, your new table will have the timeless elegance of stone with the durability of modern resin


Crystal-Clear Flood Coat Over Painted Tabletop Art

Transform a plain tabletop into a stunning mid-century modern statement piece with bold acrylic colors and a glass-like finish. This project combines precise geometric painting with a thick, self-leveling resin flood coat to create dimensional, enduring art furniture.
Step-by-Step
Materials
- Existing table (rectangular with a rimmed edge is ideal)
- White primer and acrylic paint (base coat)
- Acrylic paints (red, orange, deep red, gold/yellow, teal)
- High-gloss tabletop epoxy resin kit
- Painter’s tape or masking tape
- Compass or round objects for tracing curves
- Various paintbrushes (angled and flat)
- Plastic drop cloths
- Mixing buckets and stir sticks
- Heat gun or propane torch
- Sandpaper (220 grit)
Step 1: Prep and Design
-
Surface Preparation:
Clean your table thoroughly to remove any grease or wax. If the surface is glossy, lightly scuff it with 220-grit sandpaper to help the primer adhere, then wipe away all dust with a tack cloth. -
Prime the Base:
Apply two even coats of white primer to the tabletop. Allow the first coat to dry completely before applying the second to ensure a bright, opaque canvas for your colors. -
Plan the Geometry:
Using a pencil, lightly sketch your geometric design directly onto the dry white base. You can use a compass or trace round household objects like bowls or plates to get perfect curves and arches.
Step 2: Painting the Artwork
-
Blocking Colors:
Begin painting the largest shapes first. I find it easiest to start with the boldest reds and oranges to define the main flow of the pattern. -
Layering for Opacity:
Acrylics often need multiple coats for full saturation. Apply thin layers of the red, orange, and teal paints, letting each dry fully, rather than one thick gloppy coat. -
Adding Detail:
Use a smaller angled brush to refine the edges where colors meet the white background. Clean lines are crucial here since the resin will magnify every detail. -
The Gold Accent:
Paint the yellow/gold circular accent. If your yellow paint is translucent, mix in a tiny dot of white to increase its covering power before painting. -
Dry Time:
Allow the entire painted surface to cure for at least 24-48 hours. The paint must be completely moisture-free before resin is applied to prevent clouding.
Sticky Resin?
If your resin remains sticky after 24 hours, the ratio was likely off or it wasn’t mixed enough. Unfortunately, you must scrape it off and re-pour, or sand it down if it’s tacky and add a fresh top coat.
Step 3: The Resin Flood Coat
-
Create a Dam (If Needed):
If your table doesn’t have a raised lip, use sturdy foil tape around the edges to create a temporary dam that will hold the liquid resin in place. -
Level the Table:
Check the table with a spirit level in both directions. If it isn’t perfectly flat, the resin will pool on one side and leave bare spots on the other. -
Mix the Resin:
Combine your resin and hardener strictly according to the package instructions (usually a 1:1 ratio). Stir slowly for several minutes, scraping the sides and bottom of the bucket. -
The Pour:
Pour the mixed resin into the center of the table. Use a plastic spreader or a notched trowel to guide the liquid out toward the edges and corners. -
Removing Bubbles:
Wait about 5-10 minutes for bubbles to rise to the surface. Gently sweep a heat gun or torch over the surface to pop them, keeping the heat moving constantly to avoid scorching. -
Dust Cover:
Tent a clean plastic sheet over the table (without touching the surface) to prevent dust or hair from settling into the wet resin while it cures. -
Final Cure:
Leave the table undisturbed for 72 hours or the time recommended by your resin manufacturer until it is rock hard.
Add Sparkle
For a subtle shimmer that catches the light, mix a tiny pinch of pearl mica powder or iridescent glitter into the resin before pouring. It adds depth without overpowering the geometric design.
Now you have a durable, custom piece of furniture that looks like it came straight from a gallery


Ocean Wave Resin Tabletop With White Lacing
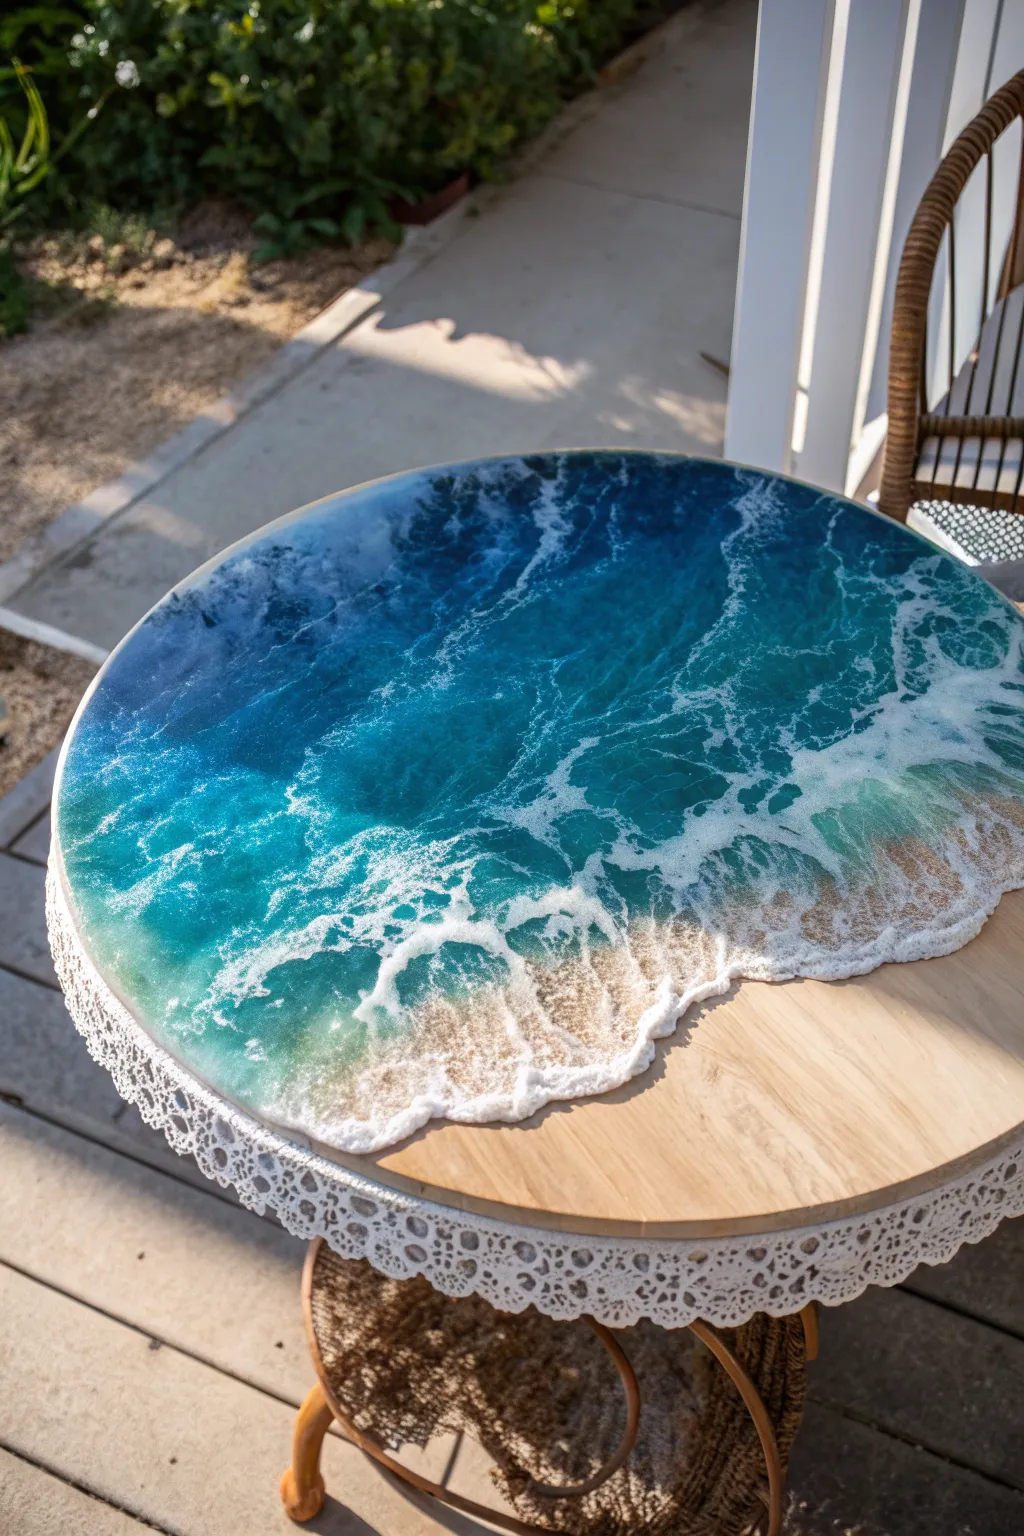
Capture the beauty of crashing waves right on your furniture with this stunning ocean resin tabletop project. Using layered epoxy and white pigment, you’ll create realistic depth and lacing foam effects that wash over gorgeous natural wood.
Step-by-Step Guide
Materials
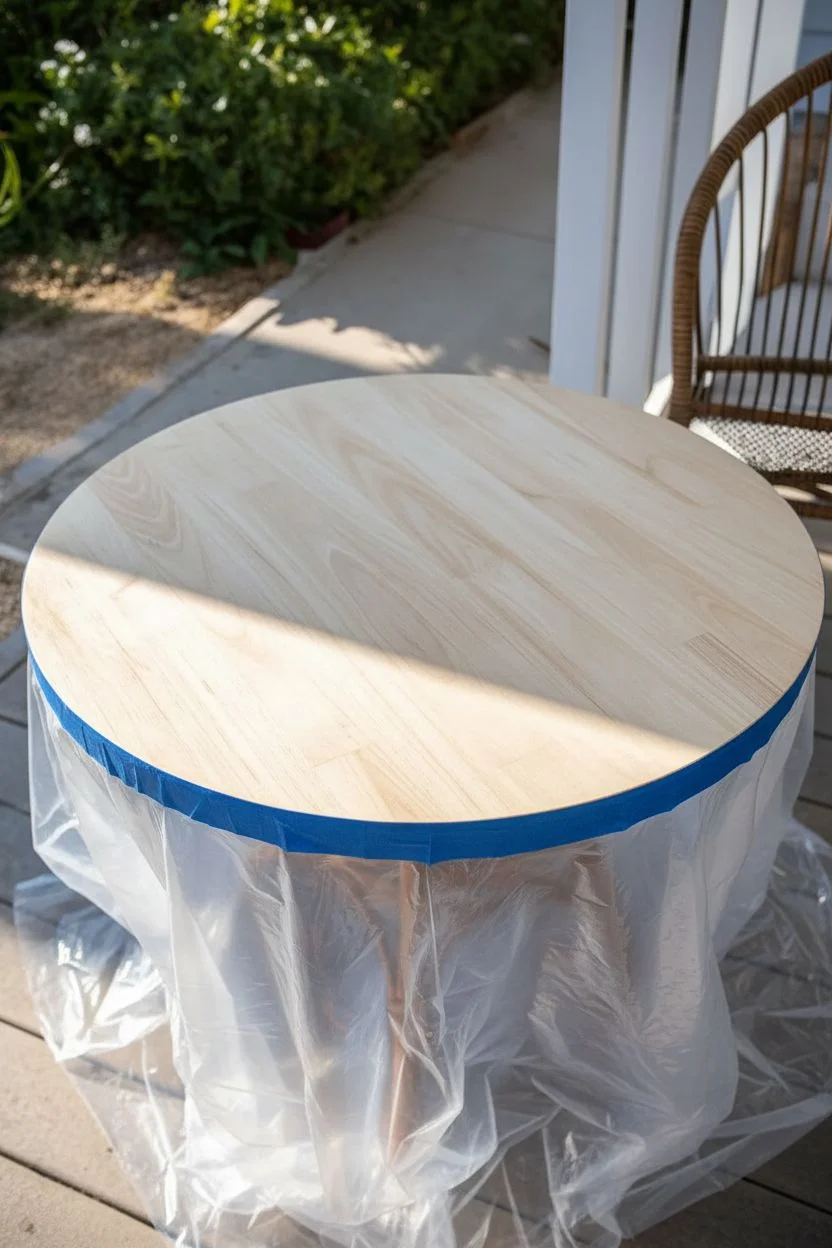
- Round wooden table (pre-sanded)
- Epoxy resin (2-part art resin)
- Pigments: Navy blue, teal/turquoise, white (opaque pigment paste is best for white)
- Real sand or beige glitter (optional)
- Heat gun
- Painter’s tape
- Plastic drop cloth
- Mixing cups and stir sticks
- Gloves and respirator mask
- Level
- Lace trim (optional for edging)
Step 1: Preparation
-
Prep the workspace:
Set up your table in a well-ventilated, dust-free area. Cover the floor with a plastic drop cloth to catch drips. It is absolutely crucial that the table is 100% level before you pour, or your ocean will slide right off. -
Seal the edges:
Apply painter’s tape tightly around the underside edge of the table. This acts as a dam to stop drips from ruining the bottom surface and helps with cleanup later. -
Clean the surface:
Wipe down the wooden top with a tack cloth or rubbing alcohol to ensure there is no dust or oil that could repel the resin.
Pro Tip: Lacing Cells
To get those coveted ‘cells’ in your white foam, add 2-3 drops of silicone oil to your white resin cup before pouring, or use a specific ‘cell creator’ additive.
Step 2: The First Pour
-
Mix the resin:
Measure and mix your resin according to the manufacturer’s instructions—usually a 1:1 ratio. Stir slowly for at least 3 minutes to minimize bubbles. -
Divide and color:
Separate the mixed resin into four cups. Leave one clear, and tint the others: one dark navy, one bright teal, and one opaque white. If using sand, mix some clear resin with sand in a separate cup until it feels like wet kinetic sand. -
Pour the deep ocean:
Start by pouring the dark navy resin at the ‘back’ of your wave design, covering the area furthest from the shore. Spread it out with a gloved finger or stick. -
Create the shallows:
Pour the teal resin next to the navy, blending the line between them slightly so there is a gradient transition rather than a hard stripe. -
Add the shoreline:
Apply your resin-sand mixture (or just clear resin if you want the wood to be the sand) at the edge where you want the wave to end. Leave about 1/3 of the wood exposed for that beautiful contrast.
Step 3: Creating the Waves
-
Lay the wave line:
Pour a thin line of clear resin between the teal section and the sandy section. Then, pour a thin line of your white resin directly on top of that clear line. -
Blow the waves:
Using your heat gun on a medium setting, blow the white resin line over the clear resin and towards the ‘shore’ (the wood/sand area). The heat will make the resin thinner and create wispy, foamy effects. -
Torch for bubbles:
Quickly pass a torch or heat gun over the entire surface to pop any air bubbles that have risen to the top. Be careful not to scorch the resin. -
Check for debris:
Inspect the wet surface carefully for dust hairs or gnats. Pick them out delicately with a toothpick.
Troubleshooting: Overheating
Keep the heat gun moving constantly. Holding it in one spot too long can scorch the resin, turning it yellow or causing it to seize up and not flow properly.
Step 4: Finishing Touches
-
Let it cure:
Allow the first layer to cure for 24 hours. Cover it with a large box if possible to prevent dust from settling on the sticky surface. -
Second wave layer (optional):
For more depth, mix a small amount of clear and white resin. Pour a second wave line slightly further back than the first one and blow it out with the heat gun. This creates a 3D effect. -
Clean the drips:
Once the resin is soft-cured (usually 12-24 hours), peel off the painter’s tape. If there are hardened drips, sand them down gently. -
Add the trim:
To match the reference photo, glue a delicate lace trim around the edge of the table. This adds a bohemian touch and can hide any imperfect resin edges.
Once fully cured, your new table brings a permanent splash of summer into your home all year round
BRUSH GUIDE
The Right Brush for Every Stroke
From clean lines to bold texture — master brush choice, stroke control, and essential techniques.
Explore the Full Guide
Smoky Black-and-Gold Resin Tabletop Drama
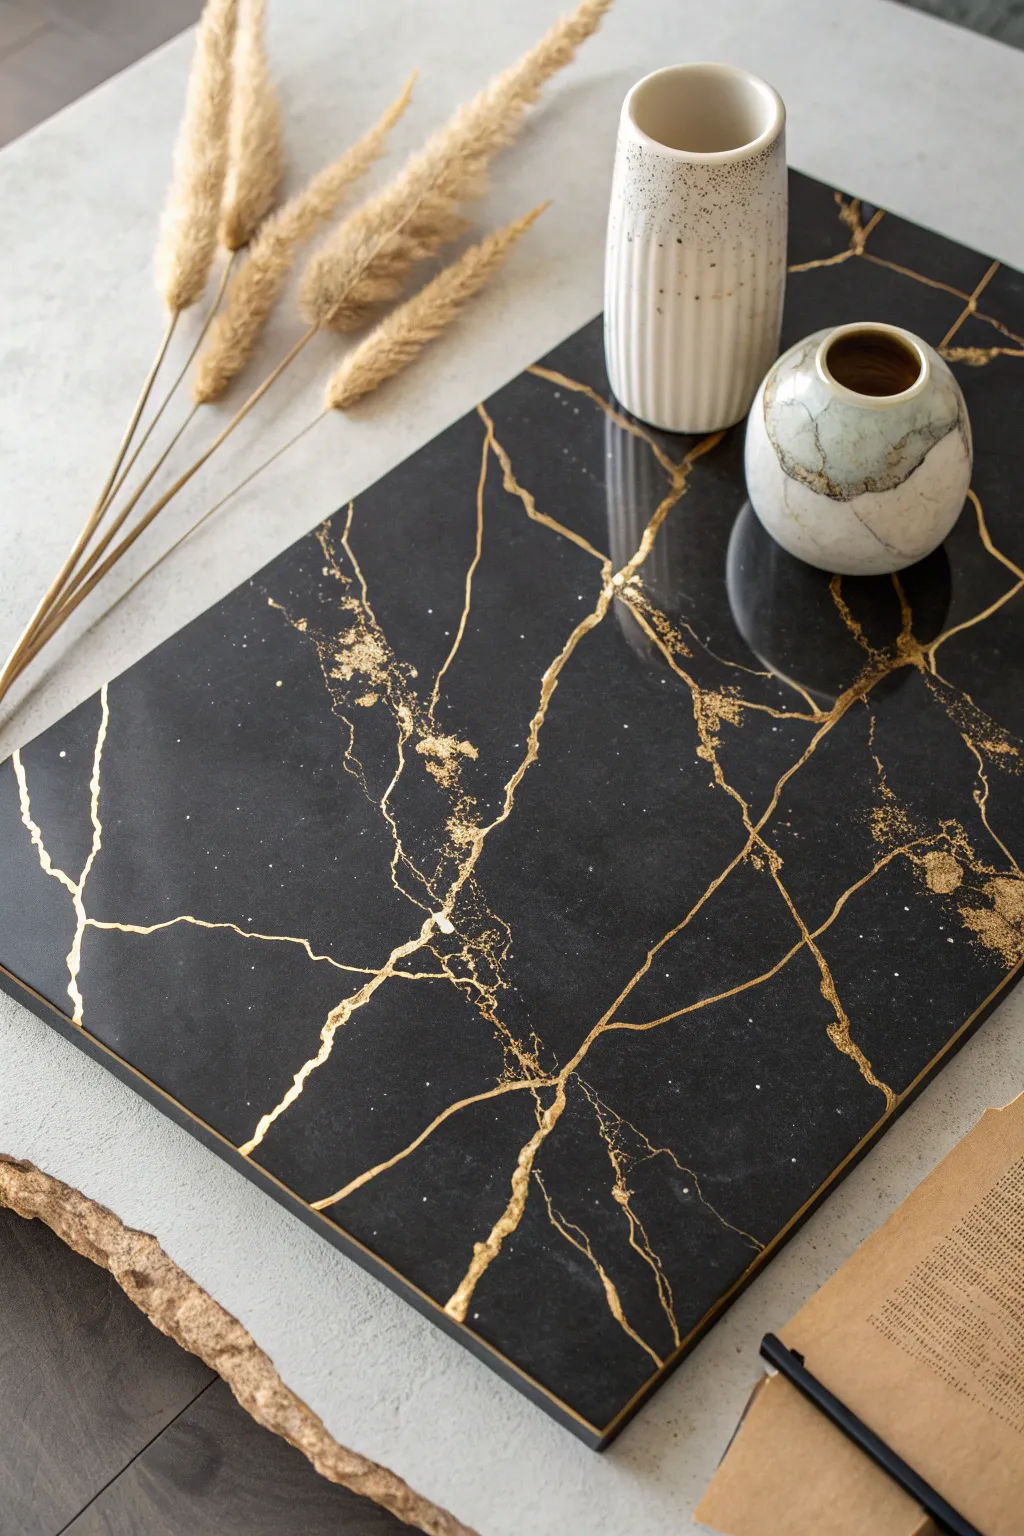
Achieve the sophisticated look of high-end black marble without the weight or price tag using this dramatic resin pouring technique. The deeply saturated black base is illuminated by striking gold veins that crackle and flow across the surface.
Step-by-Step Tutorial
Materials
- Epoxy resin (tabletop or art resin)
- Black alcohol ink or resin pigment paste
- Fine gold metallic powder pigment
- Isopropyl alcohol (91% or higher)
- Rectangular wooden board or tabletop base (primed black)
- Small artist paintbrushes
- Heat gun or torch
- Mixing cups and stir sticks
- Painter’s tape and plastic drop cloth
Step 1: Preparation & Base Coat
-
Prepare your workspace:
Ensure your environment is dust-free, well-ventilated, and level. Cover your working surface with a plastic drop cloth and tape off the underside of your board to catch drips. -
Prime the surface:
If your wooden base isn’t already black, paint it with a smooth coat of black acrylic primer or paint. Let it dry completely to ensure the deep black background shows through seamlessly. -
Mix the resin:
Combine your resin and hardener according to the manufacturer’s instructions. Mix slowly for several minutes to minimize bubbles.
Blurred Lines?
If your gold veins are spreading too much and losing definition, wait 15-20 minutes for the resin to thicken slightly before adding the metallic ink mixture.
Step 2: Creating the Smoky Black Foundation
-
Tint the resin:
Separate about 80% of your mixed resin into a larger cup. Add black pigment paste or alcohol ink until the resin is opaque. Remember, you want a deep, solid black. -
Pour the base:
Pour the black resin onto the center of your board. Use a spreader or a gloved hand to guide the resin to the edges and corners, ensuring full, varying coverage. -
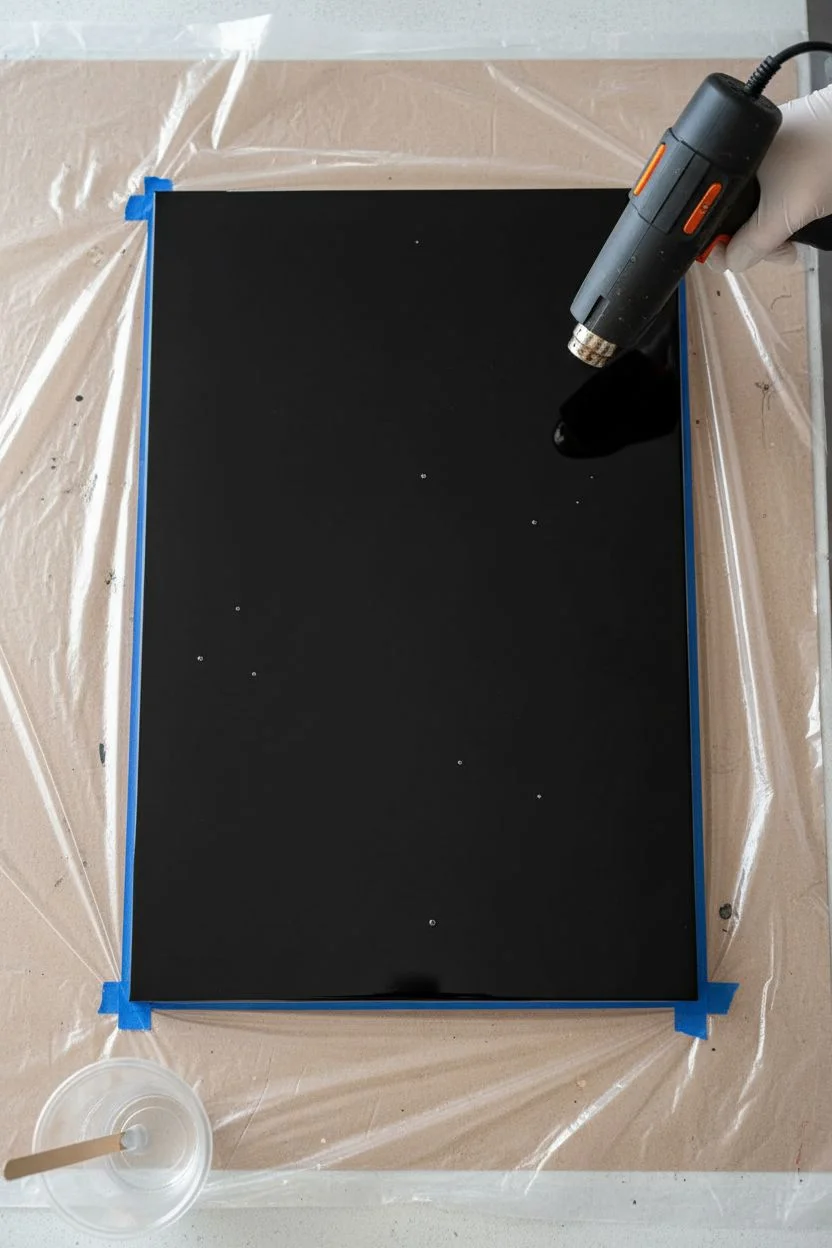
Pop surface bubbles:
Pass a heat gun or torch quickly over the surface to pop any air bubbles that have risen to the top.
Add Texture
Sprinkle crushed black glass or small gold flakes along a few of the major veins while wet to add physical texture and extra sparkle to the piece.
Step 3: Designing the Gold Veins
-
Prepare the gold mixture:
In a small cup, mix a dense amount of gold metallic powder with a very small amount of isopropyl alcohol. You want a liquid metal consistency, not a paste. -
Add clear resin accents:
With the remaining 20% of clear resin, drizzle thin, random lines across the black surface. This creates pathways for the gold to travel. -
Apply the gold:
Dip a stir stick or a pipette into your gold alcohol mixture. Drag it through the clear resin lines you just created, and create new jagged crack-like lines directly on the black. -
Disperse the gold:
Use a heat gun on a low setting or a straw to gently blow the gold lines. The alcohol will react with the resin, creating that fractured, natural stone effect. -
Enhance details:
For finer control, I like to use a toothpick or small brush to pull tiny tendrils of gold out from the main veins, mimicking the unpredictability of real marble. -
Create smoky depth:
Mist a tiny amount of plain isopropyl alcohol over specific gold areas. This disperses the pigment slightly, creating a ghostly, smoky effect around the sharp gold lines.
Step 4: Finishing and Curing
-
Check for debris:
Inspect the surface closely for dust or stray brush hairs. Pick them out carefully with tweezers before the resin starts to gel. -
Final torch pass:
Do one last quick pass with the torch to ensure a glass-like finish free of bubbles. -
Cover and cure:
Place a large cardboard box or plastic tub over the project to protect it from dust. Let it cure undisturbed for at least 24-48 hours. -
Remove tape:
Once the resin is hard to the touch but potentially still slightly pliable (usually around the 24-hour mark), peel off the painter’s tape from the underside. -
Clean edges:
If there are sharp drips underneath, sand them down carefully once the piece is fully cured.
Once fully cured, your dramatic new surface is ready to act as a stunning centerpiece tray or side table
Terrazzo Chip Resin Tabletop Confetti
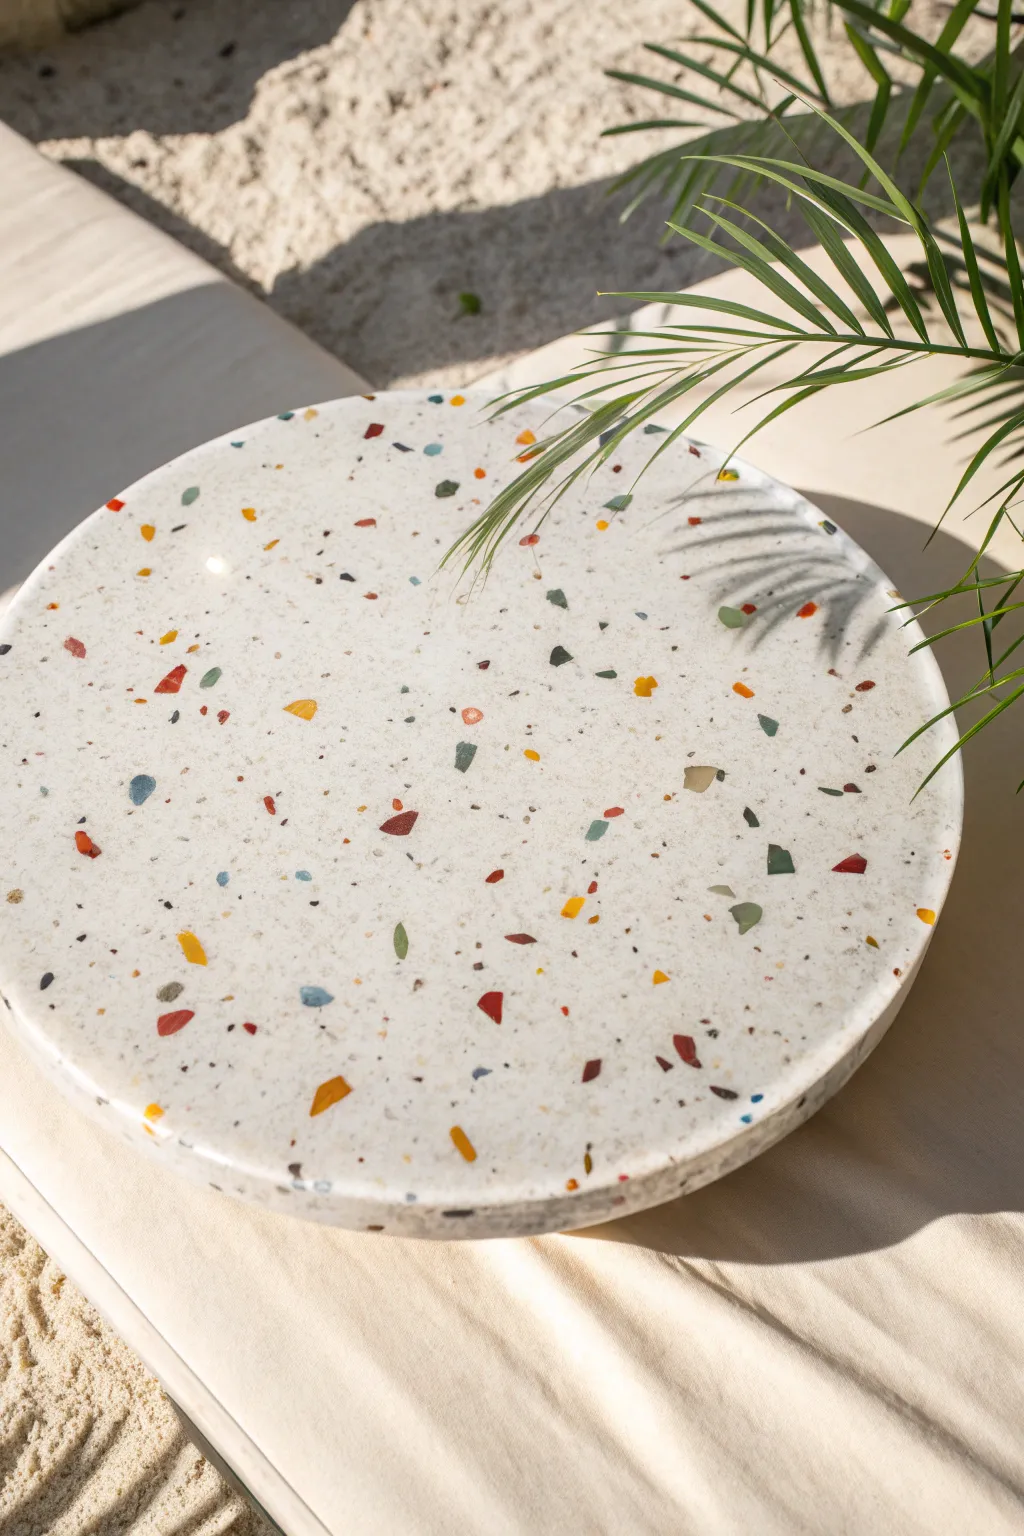
Bring the timeless elegance of Italian flooring to your furniture with this vibrant terrazzo-style resin tabletop. By suspending colorful polymer clay chips in a white resin base, you can create a unique, speckled surface that feels both modern and playfully retro.
How-To Guide
Materials
- Epoxy resin (casting resin)
- Resin hardener
- White resin pigment (opaque)
- Polymer clay (various colors: red, yellow, blue, green)
- Round silicone mold (tabletop size)
- Rolling pin
- Baking sheet
- Parchment paper
- Sharp crafting blade
- Mixing cups and stirring sticks
- Heat gun or torch
- Sandpaper (grits 120 to 1000)
- Polishing compound and microfiber cloth
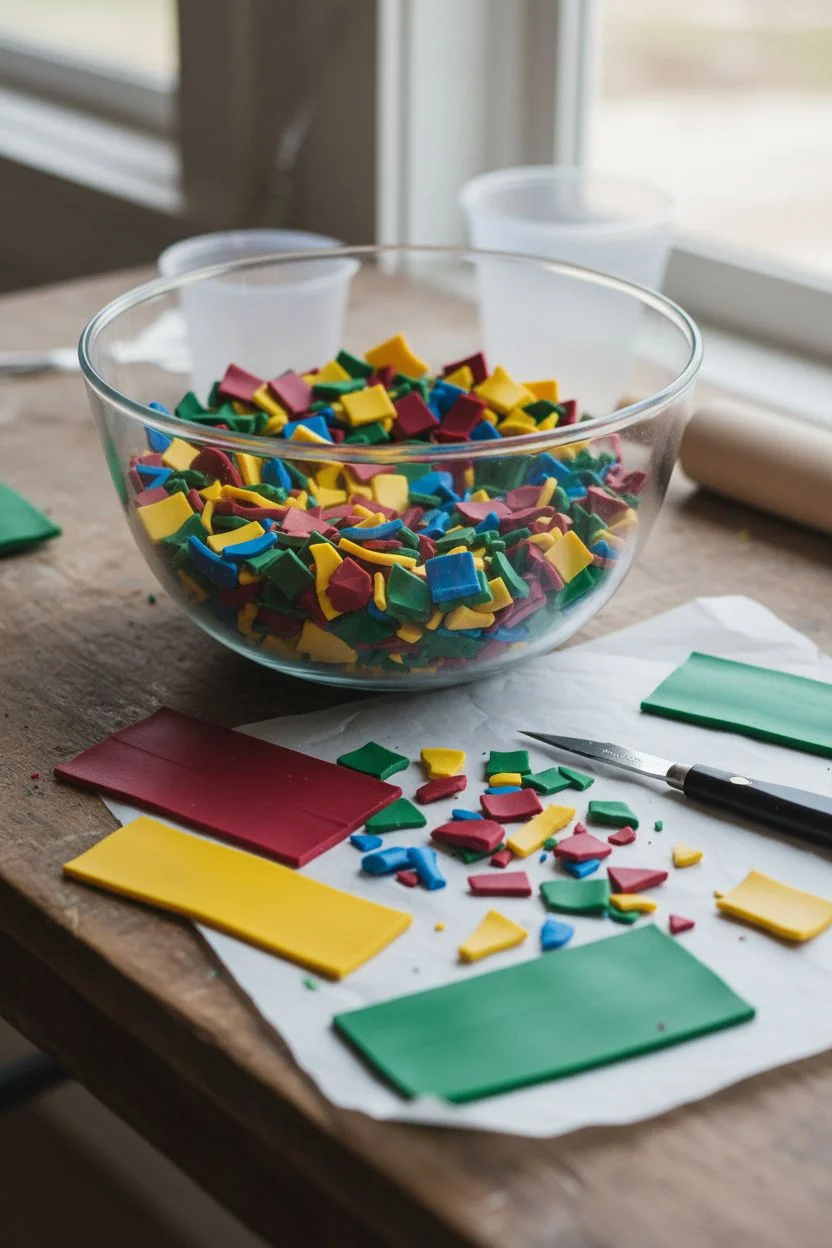
Step 1: Prepping Your Terrazzo Chips
-
Roll out clay:
Begin by conditioning your polymer clay blocks until they are soft. Roll each color out into a thin, flat sheet, approximately 2-3mm thick. The thinner the sheet, the more delicate your final chips will look. -
Bake the sheets:
Place your rolled sheets onto a parchment-lined baking sheet. Bake them according to the package instructions (usually around 275°F for 15-30 minutes) until fully cured and hard. -
Create the confetti:
Once the clay sheets have cooled completely, break them into large shards with your hands. Then, take your sharp crafting blade and chop these shards into smaller, irregular geometric pieces. Aim for a variety of sizes to create visual interest. -
Organize your mix:
Combine all your colored chips into a bowl and mix them thoroughly. Having your ‘confetti’ ready to go is crucial once the resin starts pouring.
Step 2: Pouring the Base
-
Prepare the mold:
Clean your round silicone mold thoroughly to ensure no dust particles end up in your tabletop surface. Place it on a perfectly level work surface. -
Mix the resin:
Measure and mix your epoxy resin and hardener according to the manufacturer’s ratio. Stir slowly for several minutes to minimize air bubbles, scraping the sides and bottom of the cup often. -
Tint the resin:
Add your opaque white pigment to the mixed resin. You want a solid, creamy white base, so add enough pigment that it isn’t translucent, but be careful not to exceed the recommended pigment-to-resin ratio. -
First layer pour:
Pour a thin layer of the white resin into the mold—just enough to cover the bottom entirely. This will be the ‘face’ of your table.
Clear Chip Clarity
If you want visual depth, mix some transparent or translucent clay chips into your confetti pile. They catch the light differently than the opaque ones.
Step 3: Embedding the Chips
-
Scatter the chips:
Sprinkle your pre-made clay chips liberally over the wet resin layer. I like to drop them from a slight height so they land randomly, rather than looking placed. Ensure you get chips close to the edges for a professional finish. -
Saturate the chips:
Pour the remaining white resin over the scattered chips. Depending on the depth of your mold, you may need to mix more resin. The chips should be fully encapsulated. -
Pop bubbles:
Let the resin sit for about 10 minutes to allow bubbles to rise. Briefly sweep a heat gun or torch over the surface to pop any trapped air bubbles. -
Cure completely:
Cover the mold with a box to prevent dust from settling on it and let it cure fully. This usually takes 24-48 hours depending on your specific resin brand.
Level Up: Metallic Flecks
Mix crushed gold or copper leaf into your chip pile before scattering. When you sand it back, you’ll reveal glittering metallic accents.
Step 4: Finishing Touches
-
Demold:
Once hardened, carefully peel the silicone mold away from your new tabletop. -
Sanding strategy:
The bottom of the mold is now the top of your table. You will likely have a thin layer of white resin covering your colorful chips. Start sanding with 120 grit sandpaper to reveal the chips hidden beneath the surface. -
Refine the surface:
Progress through higher grits of sandpaper (240, 400, 600, 1000). Wet sanding is highly recommended here to keep dust down and prevent the resin from overheating. -
Polish to shine:
After your final sanding pass, the surface should feel silky smooth but might look matte. Apply a polishing compound with a microfiber cloth or a buffering wheel to bring back a high-gloss, glass-like shine.
Mount your finished slab onto hairpin legs or a wooden base to complete your custom furniture piece

PENCIL GUIDE
Understanding Pencil Grades from H to B
From first sketch to finished drawing — learn pencil grades, line control, and shading techniques.
Explore the Full Guide
Stone Slice and Crystal Inlay Resin Tabletop
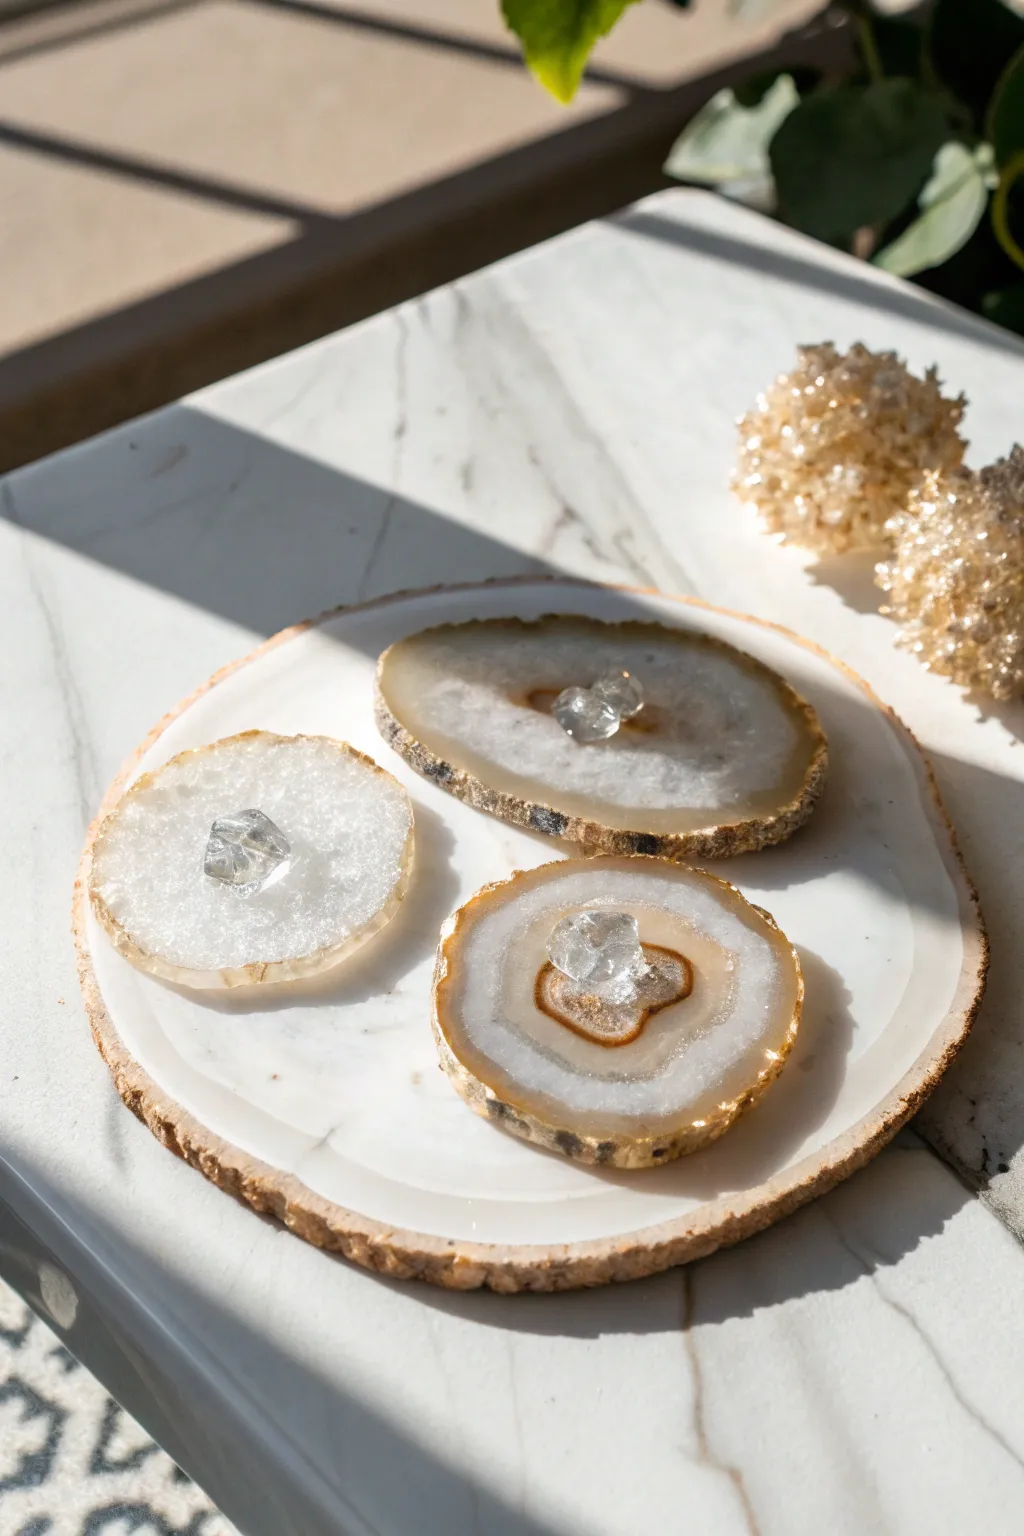
Create a stunning, ethereal tabletop accent or centerpiece by layering natural agate slices and raw crystals onto a resin base. This project mimics the organic beauty of geodes, combining translucent stone layers with the high-shine finish of epoxy resin for a sophisticated, modern look.
Step-by-Step Guide
Materials
- Large round silicone mold (tray or tabletop size)
- White epoxy resin pigment (opaque)
- Clear epoxy casting resin (slow-curing is best)
- Hardener
- Three agate slices (varying sizes/shapes)
- Small raw quartz points or Herkimer diamonds
- Gold leaf paint or gold gilding marker
- Blowing torch or heat gun
- Mixing cups and stir sticks
- Gloves and protective eyewear
- Sandpaper (various grits up to 2000)
- Polishing compound and cloth
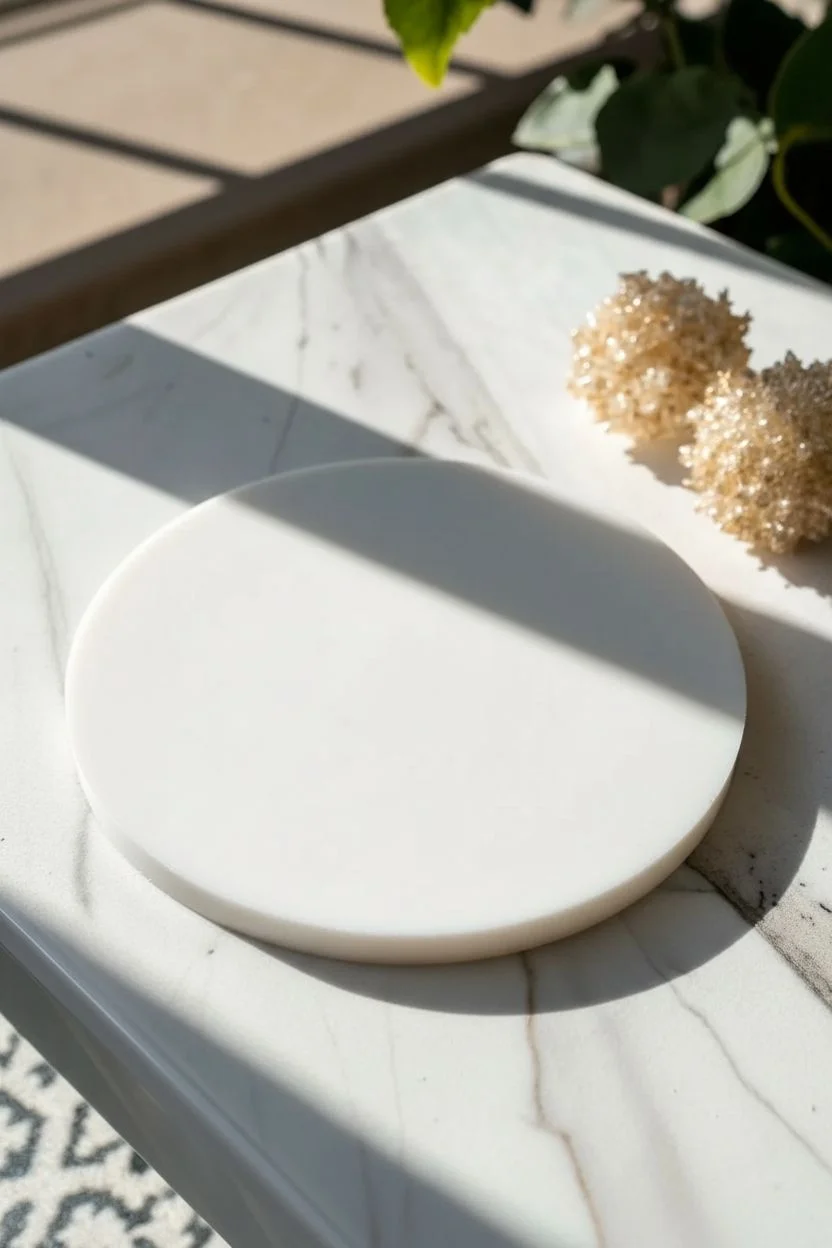
Step 1: Creating the Base Layer
-
Prepare your workspace:
Ensure your work area is level and dust-free. If your silicone mold is flexible, place it on a rigid board so you can move it later if necessary without distorting the resin. -
Mix the base resin:
Measure and mix a sufficient amount of epoxy resin to fill your mold to a depth of about 1/4 to 1/2 inch. Follow the manufacturer’s ratio instructions precisely and stir slowly to minimize bubbles. -
Tint the resin:
Add opaque white pigment to the mixed resin. You want a solid, milky white look to replicate the base seen in the photo, so ensure the color is evenly distributed. -
Pour the base:
Pour the white resin into the mold. Give it a minute to self-level, then pass a torch or heat gun quickly over the surface to pop any rising air bubbles. -
Let it cure:
Allow this white base layer to cure completely. This usually takes 24 hours, depending on your brand of resin. I like to cover the mold with a cardboard box to keep dust particles out while it hardens.
Step 2: Base Finishing & Detailing
-
Demold and edge:
Once fully cured, remove the white disk from the mold. The edges might be sharp or slightly uneven, so sand them gently if needed. -
Apply the gold edge:
To mimic the natural rough edge of a geode, paint the outer rim of the white resin disk with gold leaf paint or use a broad gilding marker. Let the paint dry completely.
Pro Tip: Better Adhesion
Before gluing the agate slices down, lightly sand the spot on the white base where they will sit. This rough texture helps the epoxy bond much stronger than on a sleek surface.
Step 3: Arranging the Inlays
-
Prepare the agate slices:
Clean your three agate slices thoroughly with alcohol to remove oils. If they don’t have gold edges already, paint their rims with gold to match the base. -
Plan your layout:
Place the agate slices onto the cured white base to find the most pleasing arrangement. In the photo, they are clustered centrally but slightly offset for a natural look. -
Secure the slices:
Mix a very small amount of clear 5-minute epoxy or use a dab of UV resin. Apply it to the back of each agate slice and press them firmly onto the white base. This prevents them from floating during the next pour.
Troubleshooting: Runny Paint
If your gold edge paint bleeds into the white resin, switch to a Gold Leafing Pen. They offer more control and dry faster than liquid liquid gilding paints.
Step 4: The Final Crystal Pour
-
Mix clear topcoat resin:
Mix a fresh batch of clear epoxy resin. You don’t need a thick layer here; just enough to coat the surface and bond the final crystals. -
Surface coat:
Pour a thin layer of clear resin over the entire piece—covering the white base and flowing over the agate slices. It should look like a glossy layer of water. -
Place the crystals:
While the clear coat is still wet, carefully place a single raw quartz point or crystal chunk into the center of each agate slice. -
Stabilize the crystals:
Watch the crystals for the first hour. If they start to slide or tilt as the resin settles, gently nudge them back into the center of the agate rings. -
Final cure:
Allow the entire assembly to cure for another 24-48 hours until rock hard. Ensure the environment is warm to assist with a crystal-clear cure.
Once fully cured, you will have a sophisticated, multi-layered resin piece that captures the elegance of natural stone formations
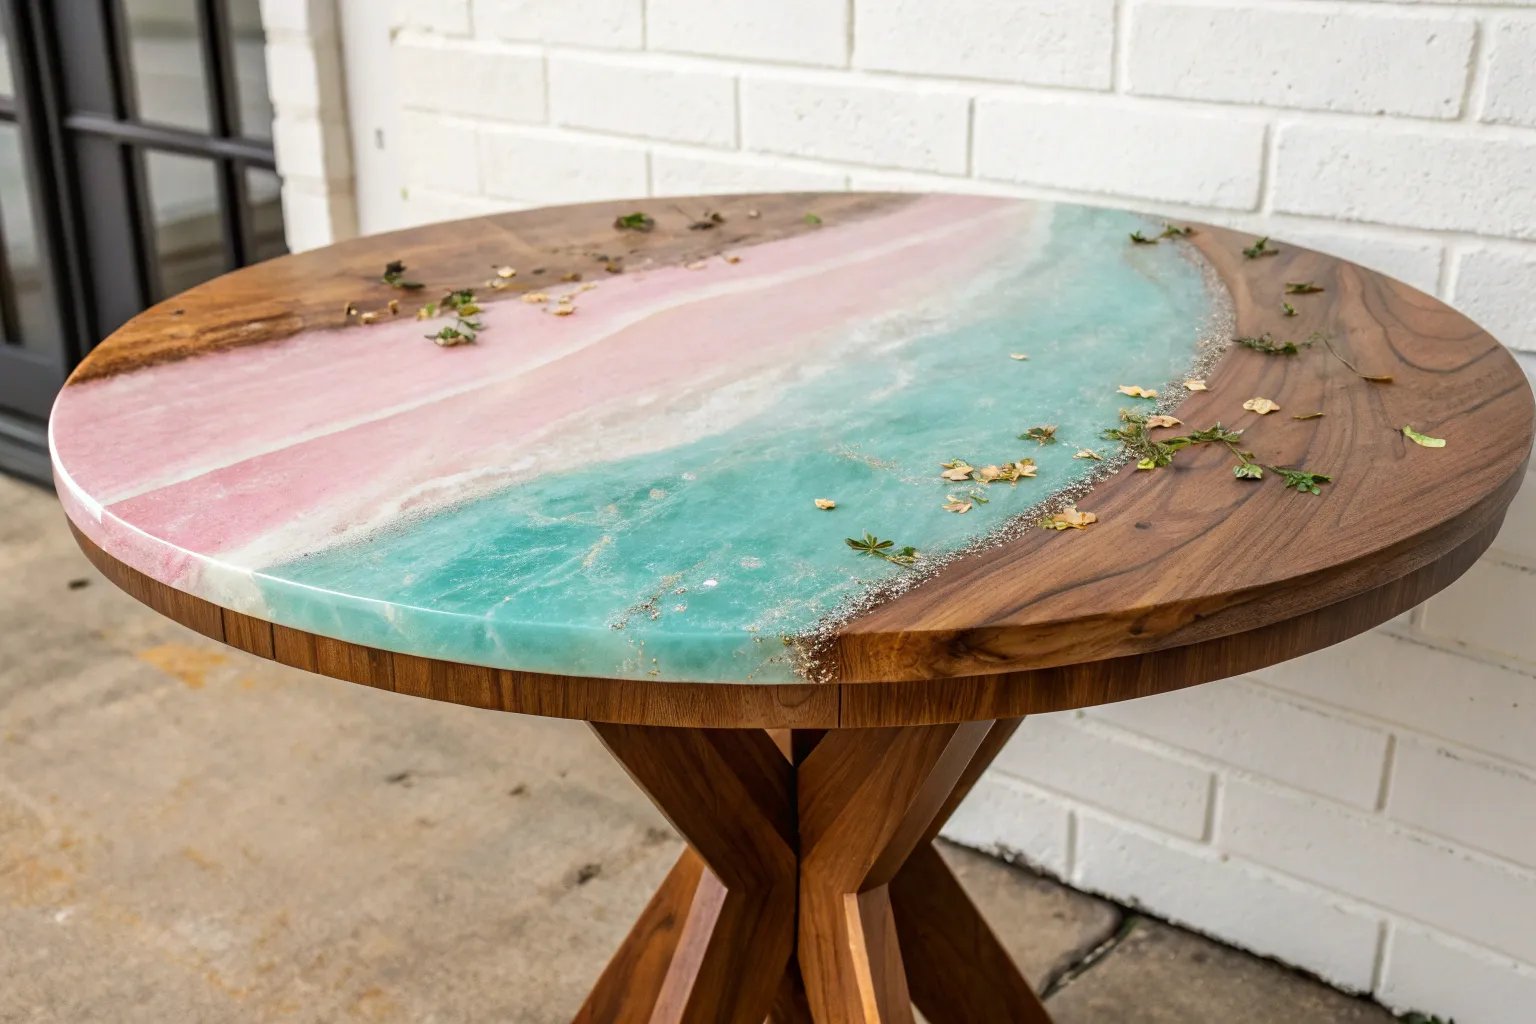
Sunset Ombre Resin Tabletop Gradient
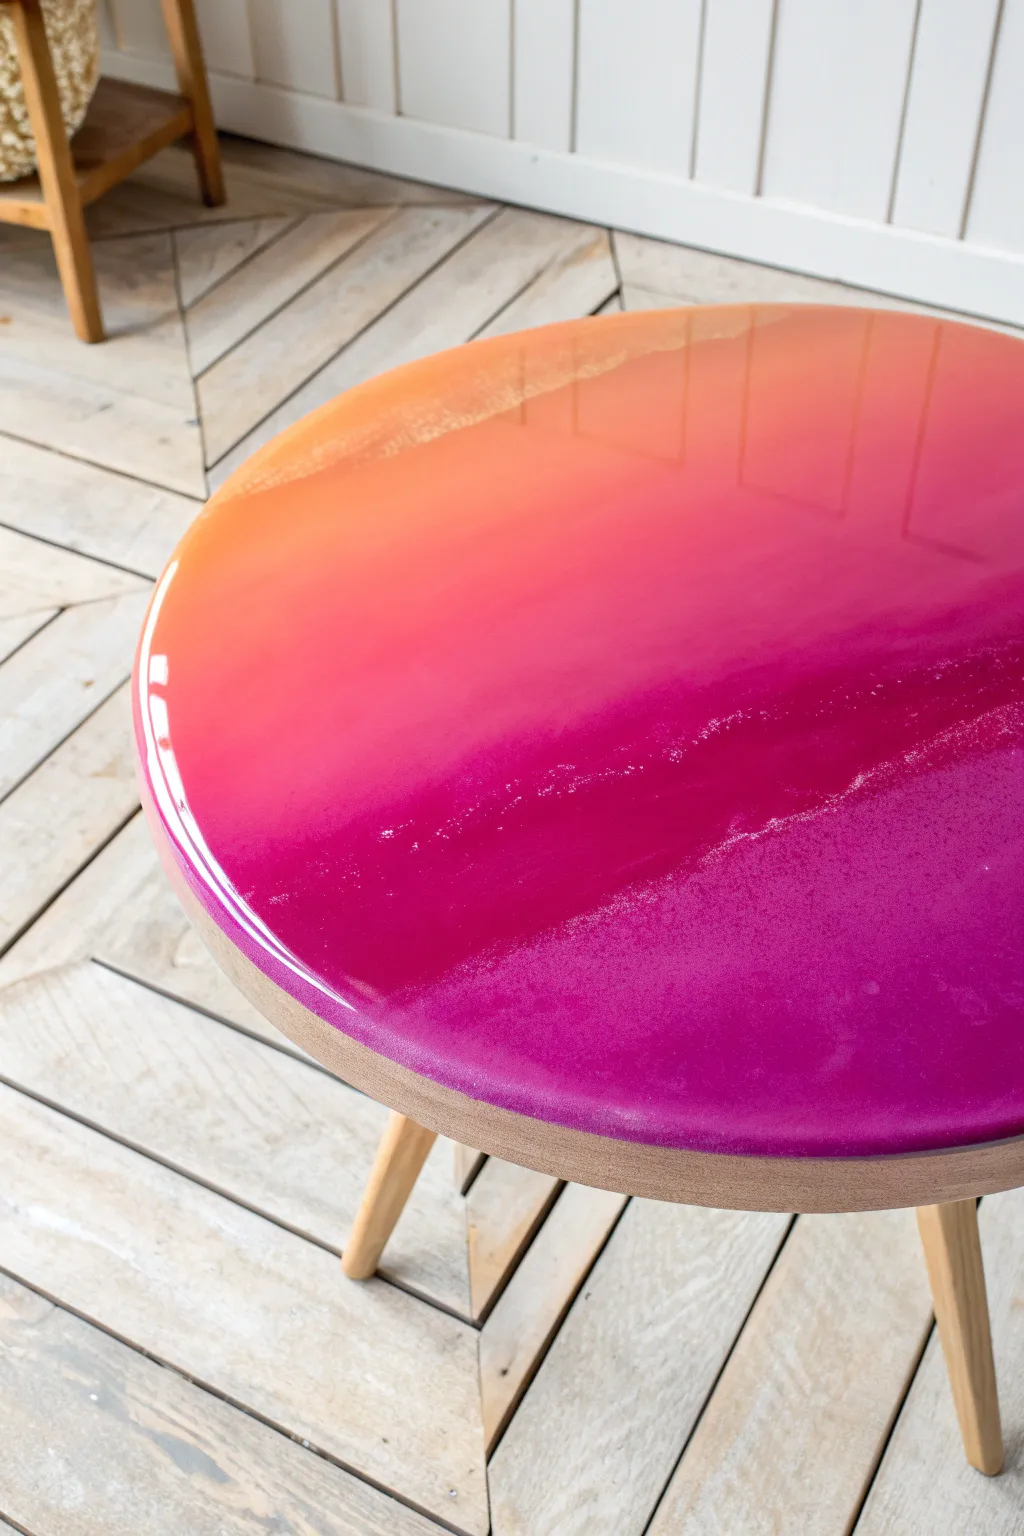
Capture the magic of golden hour on furniture with this vibrant sunset-inspired resin table. The smooth gradient transitions from a deep, romantic magenta into a warm, glowing orange for a statement piece that brightens any corner.
Step-by-Step Guide
Materials
- Round wooden side table (unfinished or sanded down)
- Epoxy resin (tabletop or art resin formula)
- Resin pigments in magenta, violet-pink, orange, and yellow
- Gold metallic powder (optional for shimmer)
- 4 disposable mixing cups
- Stir sticks
- Heat gun or torch
- Painter’s tape
- Drop cloth
- Dust cover (large box)
- Sandpaper (220 grit)
Step 1: Prep and Base
-
Prepare the surface:
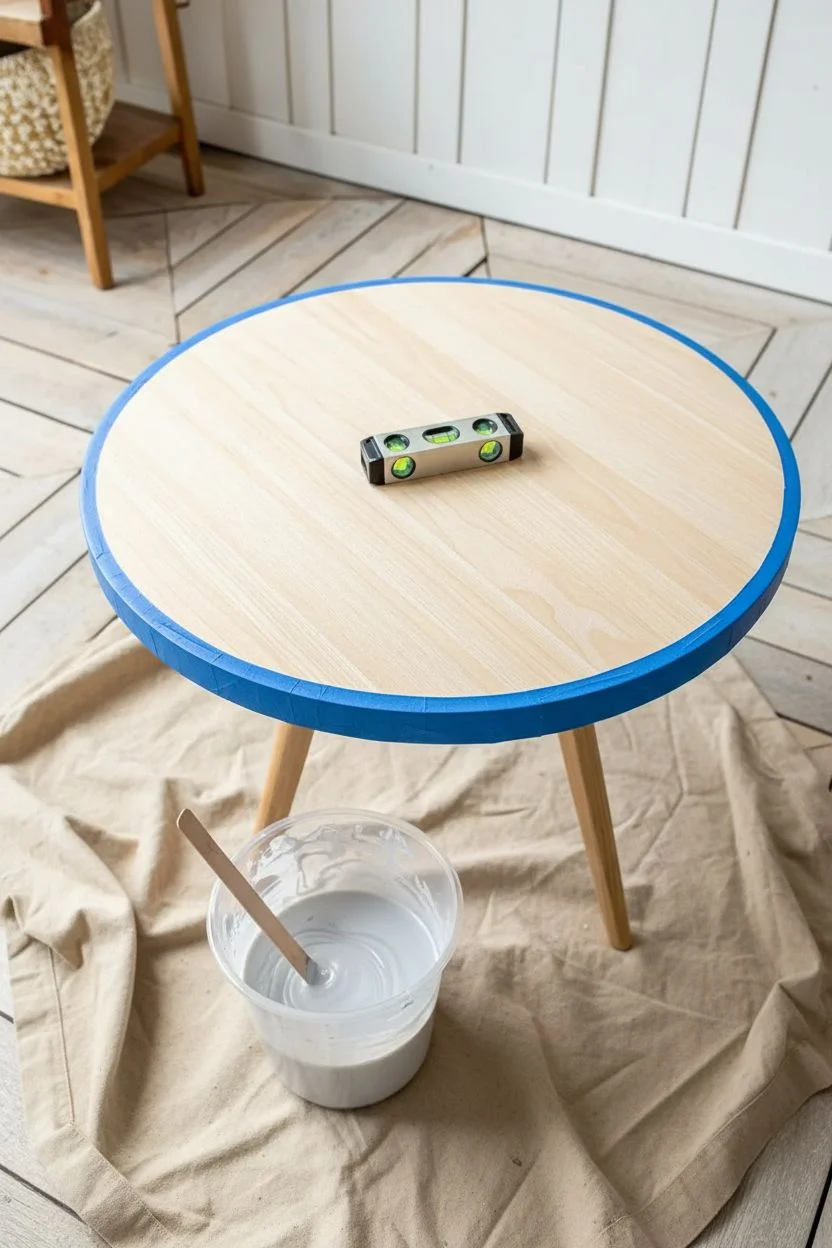
Begin by ensuring your wooden tabletop is clean, dry, and sanded smooth. If the table has a raised lip or rim like the one in the photo, you’re in luck as it acts as a natural dam; if not, you’ll need to create a tape dam. -
Tape the edges:
Even with a rim, apply painter’s tape tightly around the exterior vertical edge of the table to catch any accidental drips or overflows. -
Protect your workspace:
Lay down a drop cloth and ensure your table is perfectly level using a spirit level. This is crucial for resin work, otherwise, your beautiful gradient will slide off to one side. -
Mix the main resin batch:
Mix a large batch of clear epoxy resin according to the manufacturer’s instructions, ensuring you scrape the sides and bottom of the cup thoroughly to avoid unmixed sticky spots.
Clean Edges Protocol
Work from the center out. When blending colors, push the resin toward the rim last. This prevents tinting the wood rim prematurely and keeps the overflow controlled.
Step 2: Mixing colors
-
Divide the resin:
Pour your mixed resin into four separate cups. You will need slightly more of the magenta and orange than the transition shade. -
Create the deep base:
In the first cup, mix a generous amount of magenta pigment with a tiny drop of violet for that deep, rich bottom tone. -
Mix the mid-tone:
In the second cup, creating a pure, bright pink-magenta. This will serve as the bridge between the dark base and the orange. -
Mix the sunset orange:
In the third cup, mix a vibrant orange pigment. I like to add a pinch of gold powder here to give it that sun-kissed glow. -
Create the lightest tone:
In the final cup, mix a yellow-orange shade for the very top edge of the gradient.
Add Some Sparkle
Mix just a tiny bit of ultra-fine holographic glitter into the darkest magenta layer. It mimics the look of stars appearing just as the sun sets.
Step 3: The Pour
-
Pour the dark band:
Start by pouring the darkest magenta mixture along the bottom third of the table surface. -
Add the mid-tone:
Pour the bright pink mixture next to the dark magenta, slightly overlapping the edges. -
Pour the orange:
Pour the orange resin next to the pink, covering the center-upper section of the table. -
Finish with yellow:
Fill the remaining top sliver of the table with the yellow-orange mixture. -
Blend the transitions:
Using a heat gun on a low setting or a gloved finger, gently blur the lines where the colors meet. Don’t overmix, or it will turn muddy; just nudge the colors into each other to create a soft fade. -
Pop bubbles:
Pass a heat gun or torch quickly over the entire surface to pop air bubbles. Keep the heat moving constantly to avoid scorching the resin. -
Cover and cure:
Place a large dust cover over the table immediately. Let it cure for 24 to 72 hours depending on your brand of resin.
Step 4: Finishing
-
Remove tape:
Once fully cured, carefully peel away the painter’s tape from the edge. -
Sand drips:
If any resin seeped under the tape, use 220 grit sandpaper to gently smooth the underside edge. -
Final polish:
Wipe down the wooden legs and rim to remove any dust, and your sunset table is ready for display.
This glowing gradient adds a permanent splash of warmth to your room that looks incredible in natural light


Acrylic Pour Look Resin Tabletop Finish
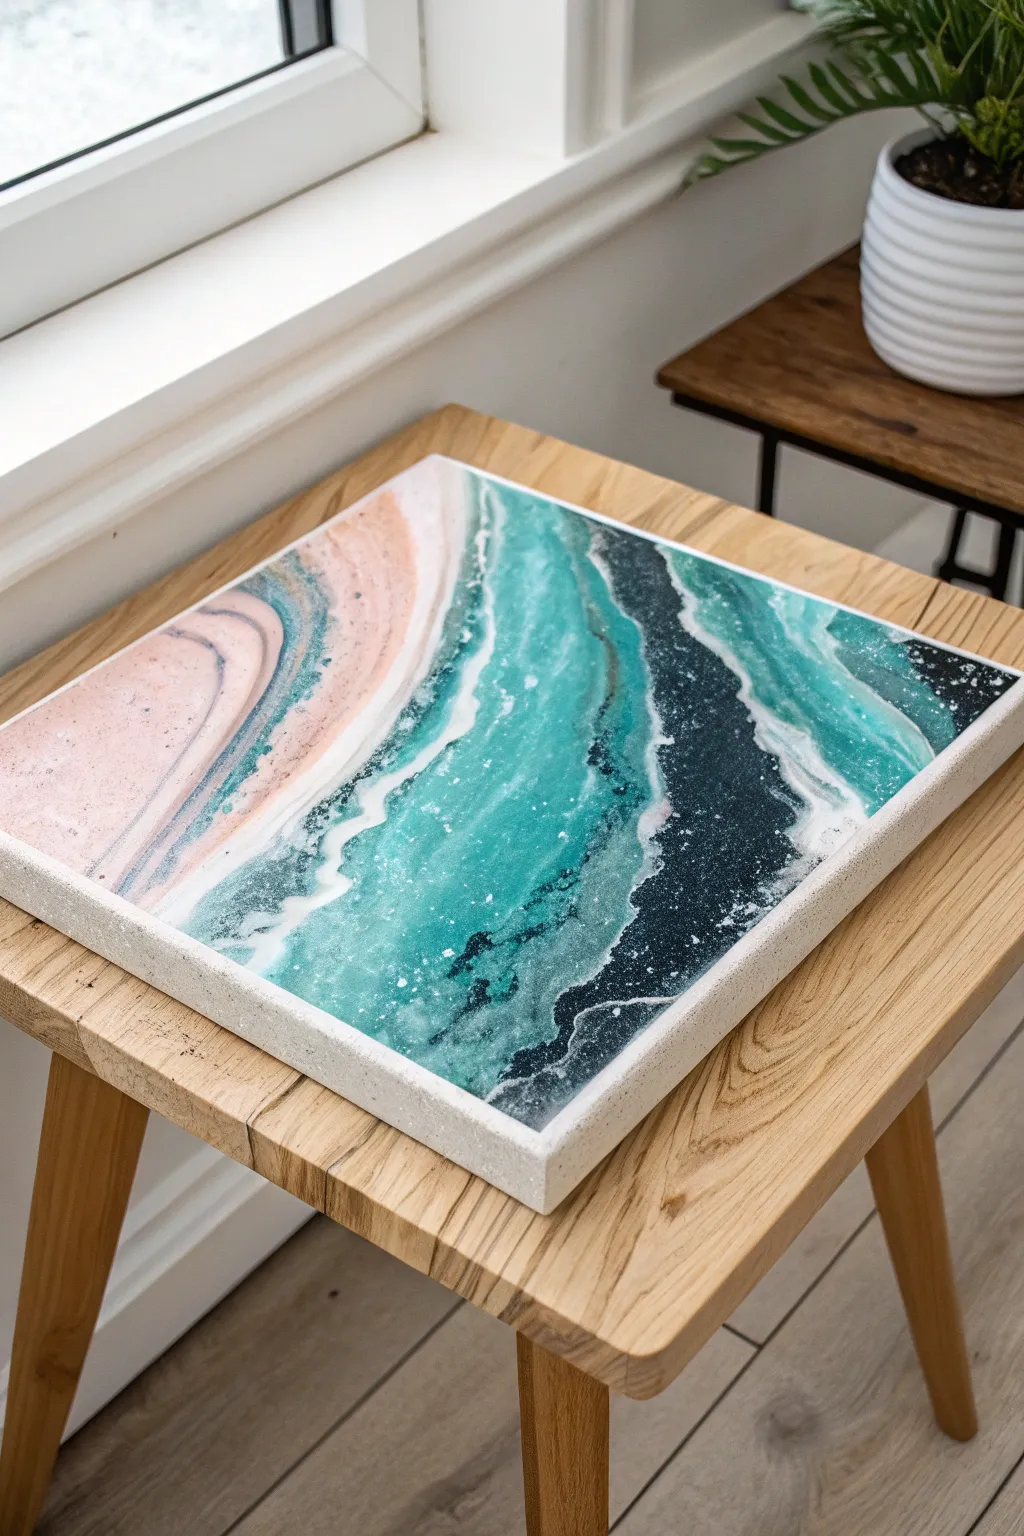
Transform a simple square surface into a stunning piece of ocean-inspired art with this easy resin pour technique. The swirling blend of soft pinks, deep teals, and crashing white waves creates a glossy, glass-like finish that instantly upgrades any side table.
How-To Guide
Materials
- Square wooden tabletop or deep canvas panel (approx. 12×12 or 16×16 inches)
- Epoxy resin kit (art grade, 1:1 ratio)
- Acrylic paints (Soft Pink, Turquoise/Teal, Navy Blue/Black, Titanium White)
- White silicone pigment or cell activator (optional for cells)
- Plastic cups for mixing
- Stir sticks
- Heat gun or culinary torch
- Painter’s tape
- Drop cloth or plastic sheeting
- Gloves
- Level
- Sandpaper (fine grit)
Step 1: Preparation
-
Surface Prep:
Begin by sanding your wooden tabletop or panel lightly to ensure the resin adheres properly. Wipe away all dust. -
Taping the Edges:
Apply painter’s tape tightly around the underside of the tabletop edges to catch drips. If your tabletop has a raised lip or frame like the one pictured, ensure the inside edges are clean. -
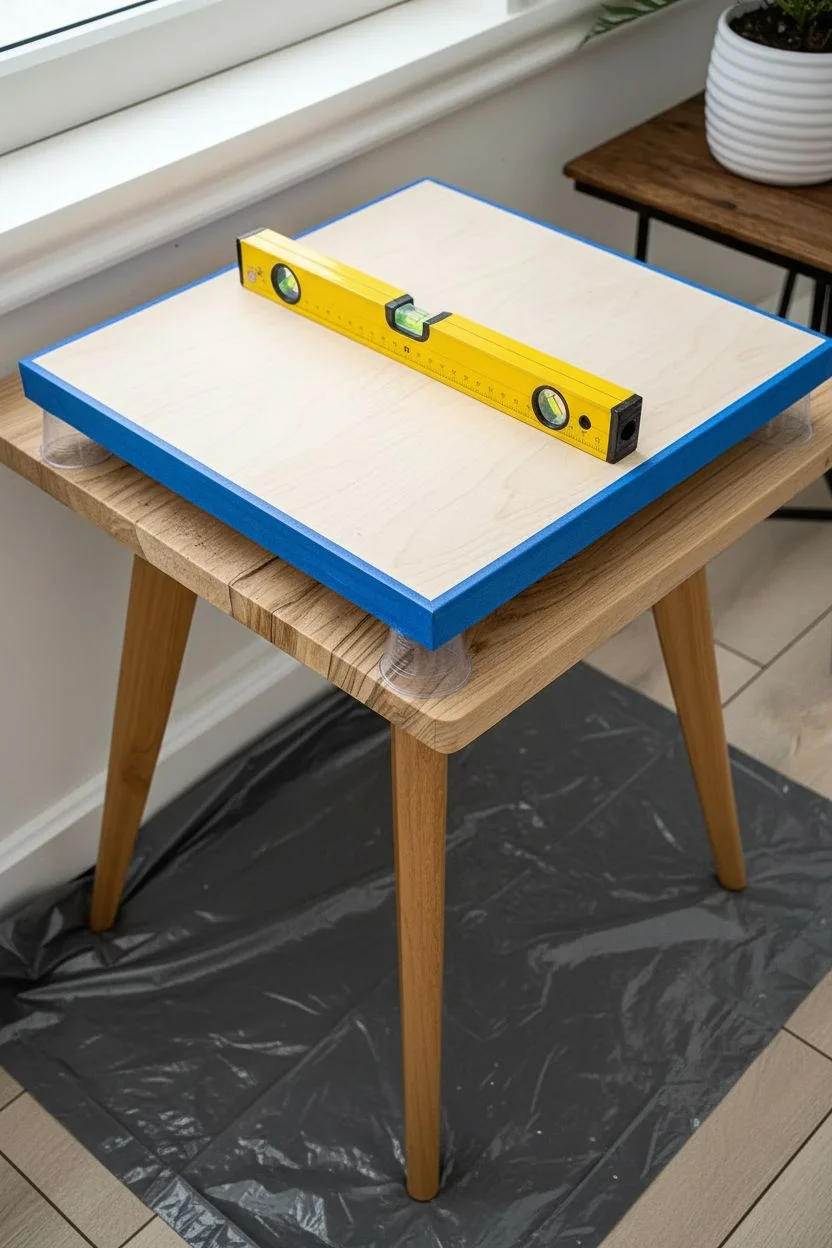
Leveling:
Place your tabletop on a raised work surface (like cups upside down) over your drop cloth. Use a spirit level to check it is perfectly flat; if the resin isn’t level, your design will slide off.
Torch Technique
Keep the torch moving constantly and hold it 6 inches away. If you linger too long in one spot, you might scorch the resin or yellow the white pigment.
Step 2: Mixing the Medium
-
Measure Resin:
Pour equal parts of resin and hardener into a large mixing cup. The amount depends on your surface area, but aim for enough to cover the top about 1/8th inch thick. -
Mix Thoroughly:
Stir the mixture slowly but thoroughly for at least 3 minutes, scraping the sides and bottom of the cup to incorporate all material. -
Divide and Color:
Pour the mixed resin into four smaller cups. Add a few drops of acrylic paint to each: one pink, one teal, one navy/black mix, and one white. -
Stir Colors:
Mix the paint into the resin completely until the color is opaque. For the white, you can add a drop of silicone oil if you want distinctive ‘cells’ or lacing, though smooth swirls work beautifully too.
Add Sparkle
Mix fine silver glitter or crushed glass into the dark navy section before pouring to mimic the shimmer of deep ocean water or a geode effect.
Step 3: The Pour
-
Pink Base:
Start by pouring the pink resin mixture into the upper left corner, creating a curved shape. -
Ocean Hues:
Pour the teal mixture next to the pink, following the same curve. Then, pour the dark navy/black mixture towards the bottom right corner to create depth. -
Adding White:
Drizzle thin lines of the white resin between the color transitions. This will act as the ‘foam’ or separation lines between the hues.
Step 4: Creating Movement
-
Tilt and Spread:
Gently lift the tabletop and tilt it slightly to let the colors flow into each other naturally. Don’t over-tilt, or the colors will become muddy. -
Heat Application:
Run your heat gun or torch quickly over the surface. This pops air bubbles and encourages the white resin to lace out and soften into the other colors. -
Detailing:
I like to use a clean stir stick or a straw to blow or drag the white lines slightly, creating those feathery, wave-like textures seen between the teal and black. -
Refining Edges:
Ensure the resin covers the entire surface right up to the frame or edge. Use a gloved finger to help spread it to dry spots if needed.
Step 5: Curing
-
Cover and Wait:
Place a large box or dust cover over the piece to prevent lint from falling into the wet resin. Let it cure undisturbed for 24 hours. -
Tape Removal:
Once the resin is tacky but not fully hard (usually around the 8-10 hour mark), carefully peel off the painter’s tape from the underside. -
Final Polish:
After full cleaning (typically 72 hours), inspect the surface. If you see any imperfections, you can lightly sand and do a crystal-clear topcoat, but usually, one pour is perfect.
Now you have a durable, high-gloss surface that captures the movement of the ocean right in your living room
Textured Topographic Relief Resin Tabletop
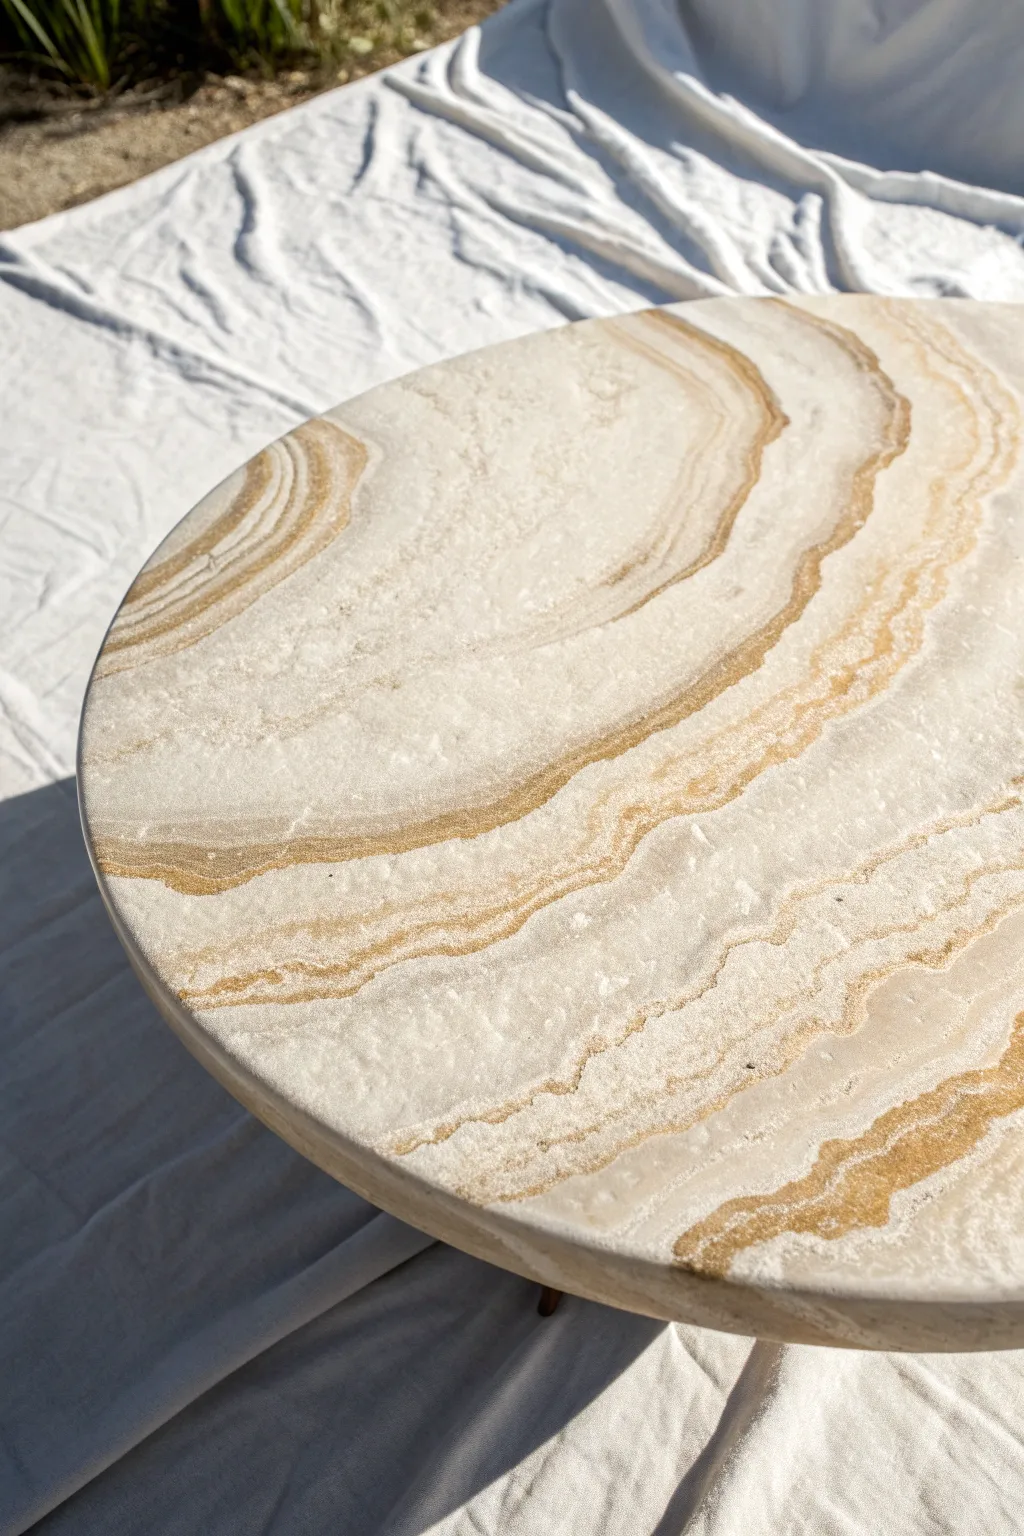
Transform a simple round tabletop into a luxurious statement piece that mimics the natural banding of agate or sandstone. By layering colored resin and textured pastes, you’ll create a durable surface with subtle relief and organic, flowing lines.
Step-by-Step Tutorial
Materials
- Round wooden tabletop or MDF circle (pre-sealed)
- Epoxy resin (casting or tabletop grade)
- White texture paste or modeling paste
- Acrylic paints or resin pigments (white, cream, metallic gold, burnt sienna, raw umber)
- Heat gun or torch
- Plastic cups and mixing sticks
- Spreader tool or palette knife
- Sandpaper (various grits: 120, 220, 400)
- Polishing compound (optional)
- Drop cloth and gloves
Step 1: Preparation & Base Texture
-
Prep your surface:
Ensure your wooden circle is clean, dry, and sealed. If using raw MDF, apply a coat of primer or a thin seal coat of resin to prevent air bubbles from escaping later. -
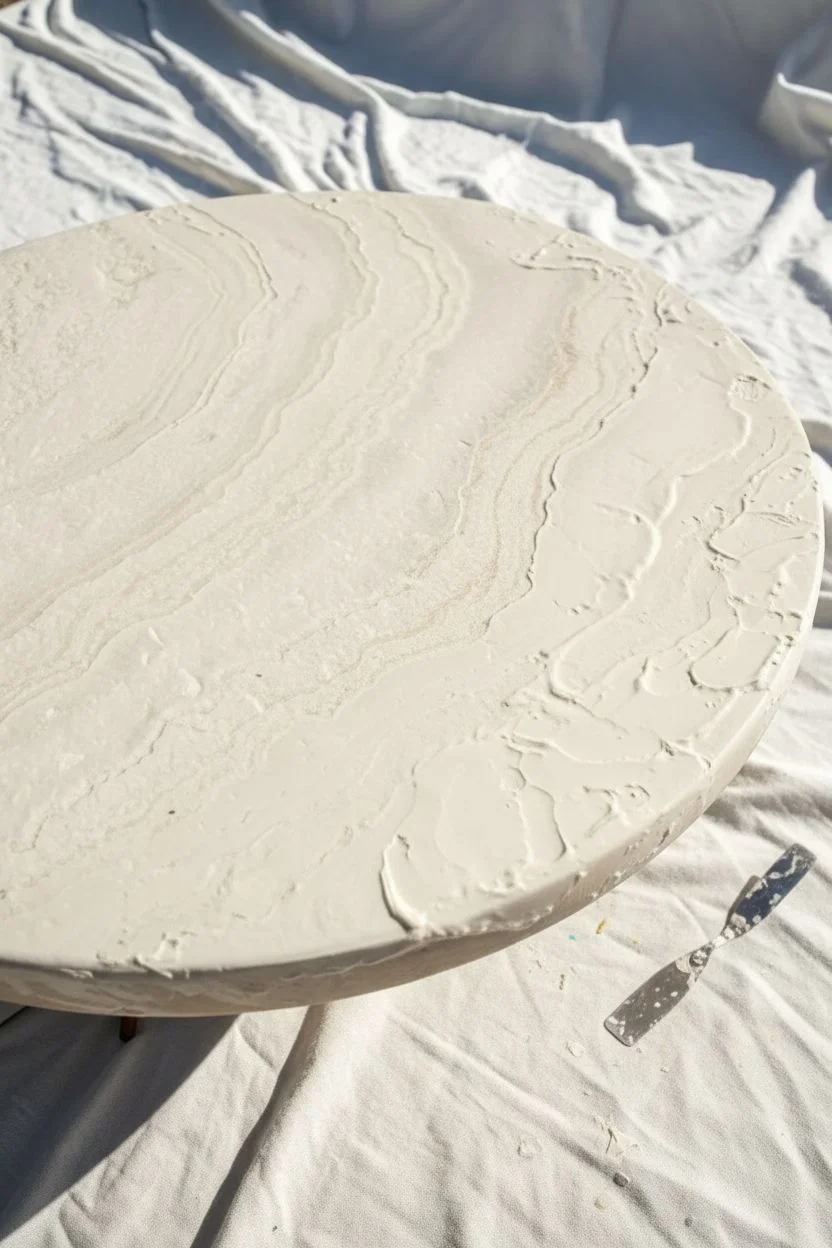
Mix the texture paste:
Scoop a generous amount of modeling paste into a cup. Tint it slightly with a drop of cream or white acrylic paint to establish an opaque base color. -
Create the topographic ridges:
Using a palette knife, apply the paste in organic, concentric irregular circles. Vary the thickness; you want some areas raised to create physical texture that mimics natural stone veins. -
Dry partially:
Let the texture paste set until it’s firm to the touch but not fully cured—usually about 30-60 minutes depending on the brand.
Step 2: Pouring the Resin Layers
-
Mix the resin:
Combine your resin and hardener according to the manufacturer’s package instructions. Stir slowly for at least 3 minutes to minimize bubbles. -
Separate into cups:
Divide the mixed resin into four small cups. Leave the largest portion clear or tinted very slightly white. -
Tint the resin:
Add your pigments: one cup bright white, one cream/beige, one metallic gold mixed with burnt sienna for the dark band, and one translucent amber. -
Pour the primary bands:
Start pouring the cream and white resin mixtures along the dried texture paste ridges. Let the resin flow naturally into the valleys created by the paste. -
Add definition lines:
Carefully pour thin streams of the darker sienna-gold mixture alongside the cream bands. This contrast creates the specific ‘banded stone’ look seen in the photo. -
Blend the edges:
Use a heat gun on a low setting to gently push the colors together. You don’t want them to mix into a muddy grey, but rather to soften the hard lines between colors. -
Create depth:
I like to drizzle the clear or translucent resin over the top of the color bands now. This adds optical depth, making the ‘stone’ look deeper than it actually is.
Sticky Situation?
If your texture paste lifts when pouring resin, it wasn’t dry enough. Let the paste dry overnight next time to ensure a rock-hard bond with the wood.
Step 3: Finishing Touches
-
Pop bubbles:
Pass your torch quickly over the surface to pop any rising air bubbles. Check repeatedly for the first 20 minutes. -
Cure:
Cover the table with a dust box and let it cure fully for 24 to 48 hours in a dust-free environment. -
Sand for matte finish:
The image shows a natural, stone-like matte finish rather than high gloss. Once cured, wet sand the surface lightly with 400 grit sandpaper to knock back the high-gloss shine. -
Clean and refine:
Wipe away all sanding residue with a damp cloth. If you want a satin sheen, buff the surface with a vehicle polishing compound and a soft rag. -
Paint the edges:
Finish the vertical edge of the table with a solid coordinating color, like cream or a soft gold, to hide any drips.
Geode Glamour
Embed small crushed glass or glitter into the dark gold veins while the resin is wet for a sparkling geode effect that catches the light beautifully.
Place your new faux-stone masterpiece on its base and enjoy the organic warmth it brings to your room


Have a question or want to share your own experience? I'd love to hear from you in the comments below!