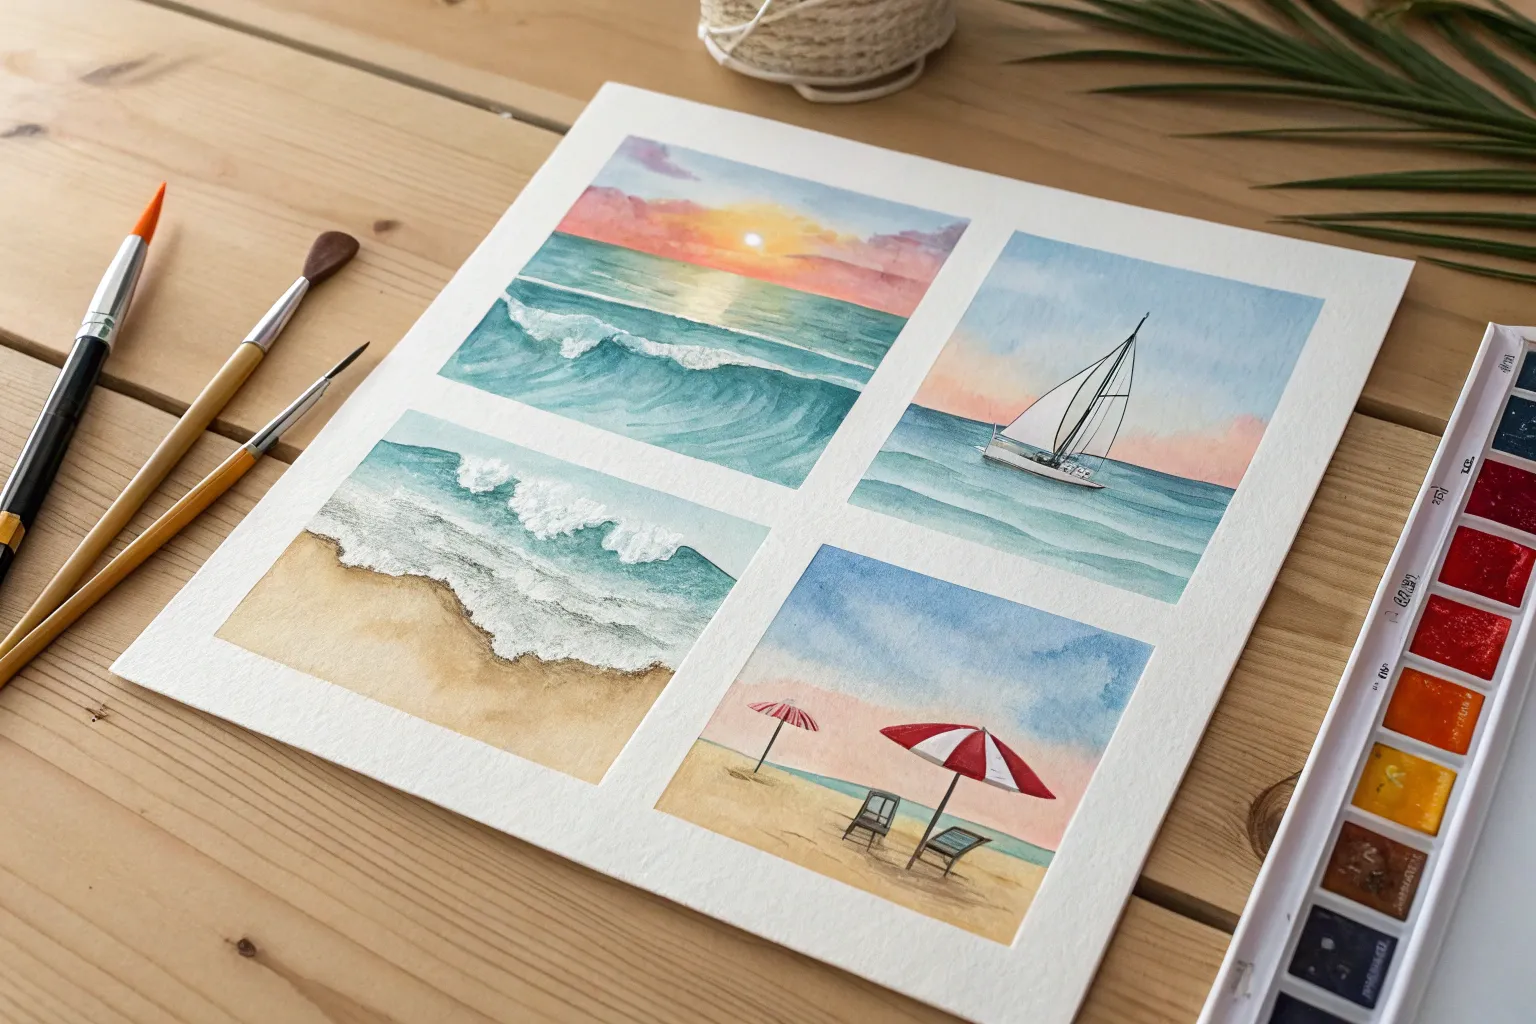
Summer is basically an excuse to paint in the happiest colors and keep things delightfully simple. Here are my favorite easy summer painting ideas that capture those sunny vibes without needing perfection—just a playful, relaxed hand.
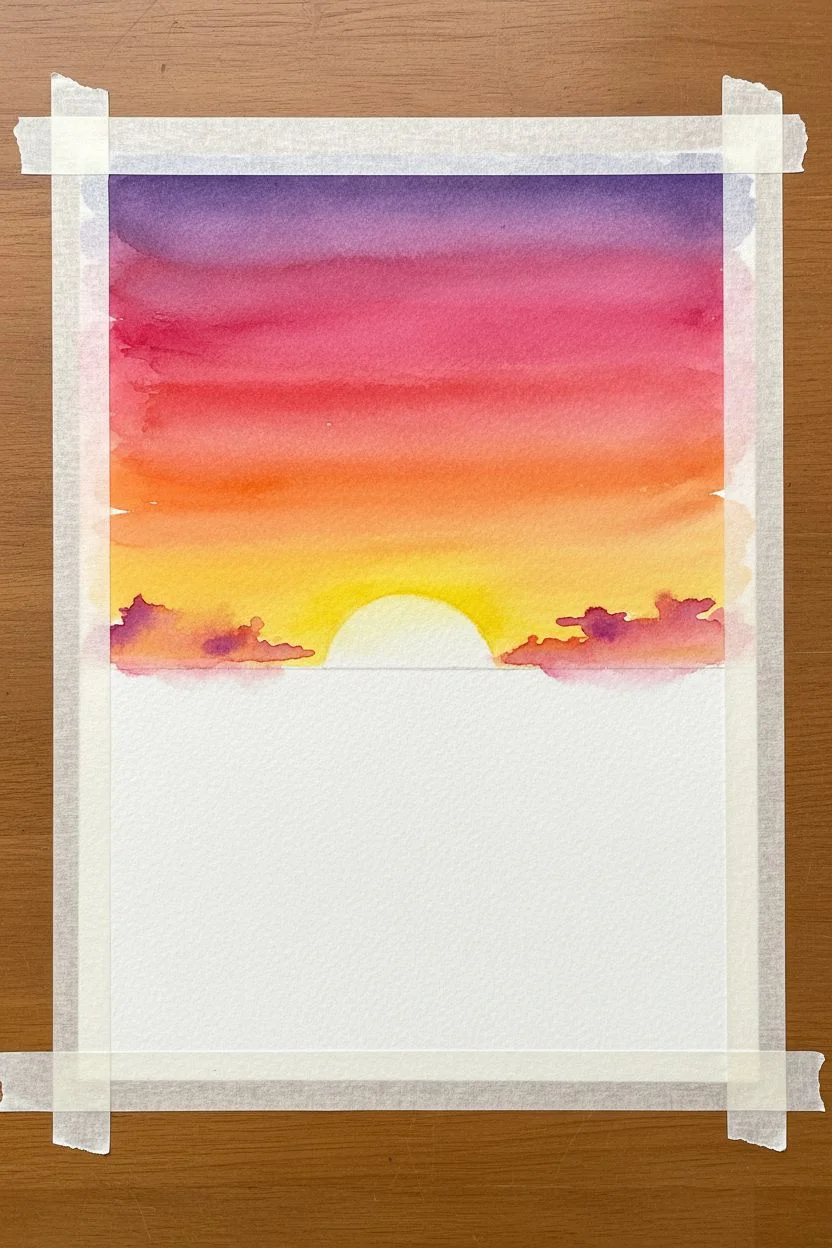
Sunset Over the Ocean in Warm Gradient Bands
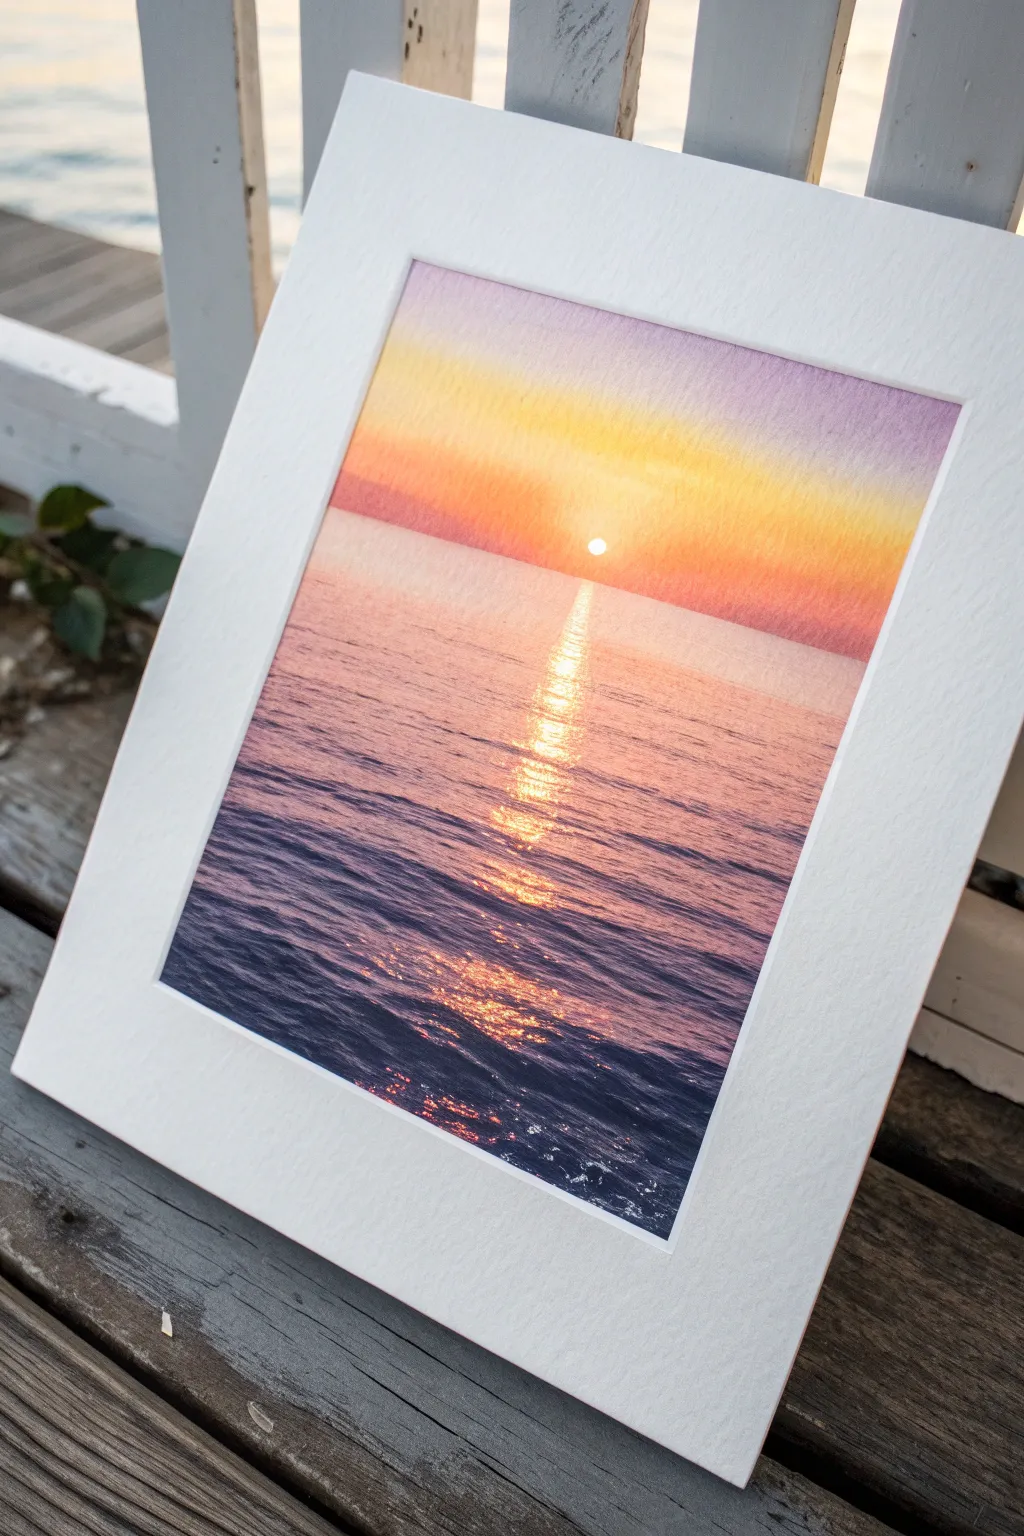
Capture the serene beauty of a setting sun with this vibrant watercolor project. You will learn to blend a seamless wash for the sky and create the shimmering effect of sunlight dancing on ocean waves.
Detailed Instructions
Materials
- Cold press watercolor paper (140 lb / 300 gsm)
- Watercolor paints (Indanthrone Blue, Alizarin Crimson, Cadmium Orange, Lemon Yellow, Titanium White gouache)
- Painter’s tape (masking tape)
- Backing board or clipboard
- Large flat wash brush (3/4 or 1 inch)
- Medium round brush (size 6 or 8)
- Small detail brush (size 0 or 2)
- Two jars of water
- Paper towels
- Pencil and ruler
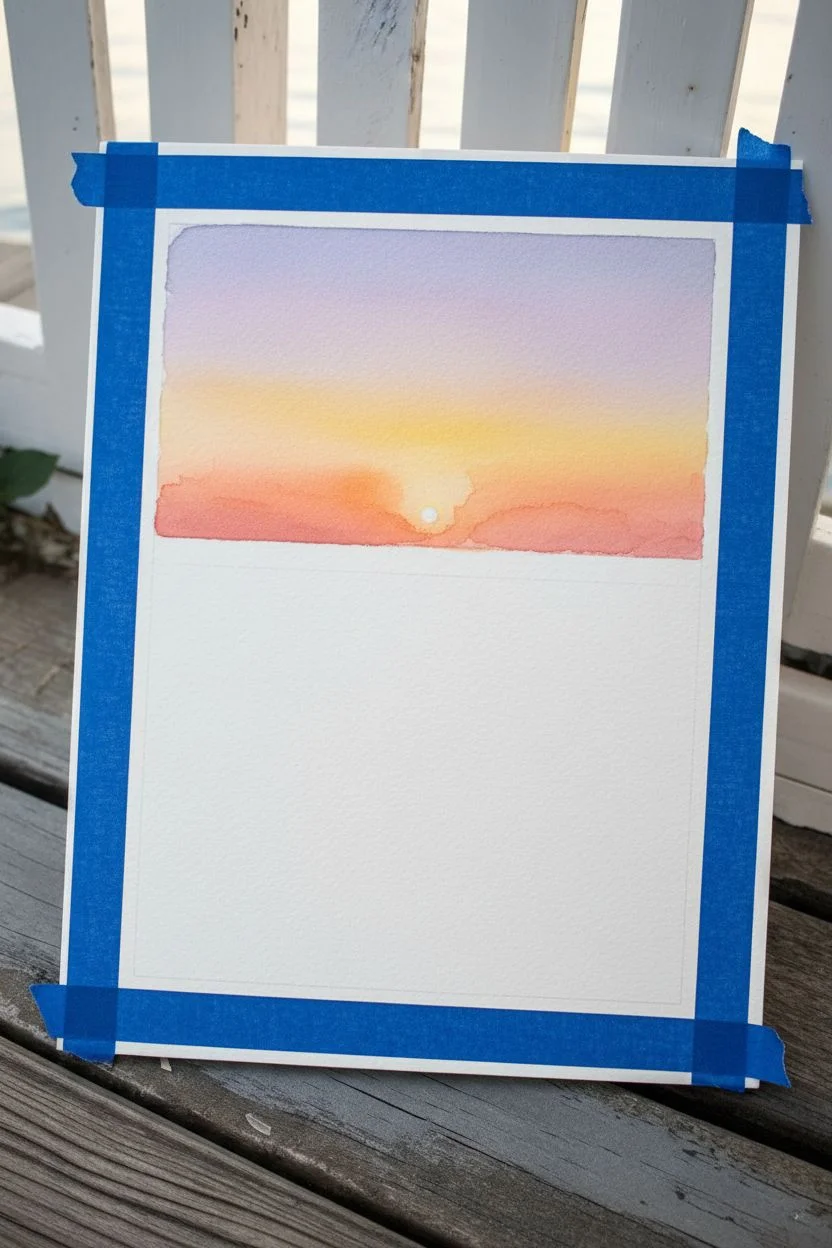
Step 1: Preparation and Sky
-
Tape boundaries:
Begin by taping down all four edges of your watercolor paper to your backing board. This creates a clean white border and prevents the paper from buckling when wet. -
Sketch the horizon:
Using a ruler, lightly draw a straight horizontal line about one-third of the way up from the bottom edge. This marks where the sky meets the ocean. -
Reserve the sun:
Lightly trace a small circle just above the horizon line in the center. If you have masking fluid, apply a drop here; otherwise, simply paint carefully around this white circle to keep the paper bright. -
Pre-wet the sky:
With your large flat brush and clean water, wet the entire sky area above the horizon line. The paper should glisten evenly but not have standing puddles. -
Apply the upper sky:
Load your brush with a watery mix of light purple (mix blue and a touch of red). Paint the top strip of the sky, letting the color bleed downward slightly. -
Transition to warmth:
Rinse your brush and switch to a reddish-orange hue. Apply this band below the purple, tilting the board slightly to encourage the colors to softly merge without creating hard lines. -
Paint the horizon glow:
Finish the sky with strong Lemon Yellow right at the horizon line and around the sun area. Blend this upward into the orange ensuring a smooth, seamless gradient. -
Dry completely:
Let this layer dry fully. The paper must be bone dry before you start the sharp line of the horizon, otherwise, the ocean will bleed into the sky.
Step 2: The Ocean and Reflection
-
Start the dark foreground:
Switch to your medium round brush. Mix a deep, saturated dark blue (Indanthrone Blue with a touch of purple). Begin painting the bottom-most section of the water with horizontal strokes. -
Create wave texture:
As you move upward, leave small slivers of white paper showing between your dark blue strokes. These gaps suggest the crests of waves catching scattered light. -
Transition water colors:
Gradually mix more red and orange into your blue as you move toward the middle of the ocean section. The water reflects the sky, so it should become purple-pinkish. -
Paint the horizon water:
Near the horizon line, dilute your paint significantly to a pale orange-pink wash. Paint horizontal strokes right up to the pencil line, keeping it perfectly straight. -
Establish the sun path:
While painted, ensure you have left a vertical column of lighter paper directly beneath the sun. This is where the strongest reflection will sit. -
Intensify the reflection:
Once the base water layer is dry, mix a bright yellow-orange. Using the small detail brush, paint short, horizontal zig-zag lines down the center column to mimic sunlight reflections. -
Add deep contrast:
I like to go back in with the darkest blue mix and crisp up the shadows in the foreground waves. Deepening these darks makes the sun reflection look much brighter by comparison. -
Sun details:
If you masked the sun, remove the fluid now. If edges are rough, smooth them with a slightly damp brush or add a tiny dot of white gouache to the center for maximum brightness. -
Reveal the border:
Wait until the painting feels cool to the touch (completely dry) before peeling off the tape. Pull the tape away at a 45-degree angle to keep the edges crisp.
Flat Brush Magic
For the smoothest sky gradient, use the largest flat brush you have. Fewer strokes mean less streakiness and a softer blend.
Sparkle Effect
Add tiny dots of white gouache or gel pen to the very center of the sun reflection path on the water for extra sparkle.
Place your finished piece in a simple white mat to let those sunset colors truly shine


Palm Tree Silhouette at Golden Hour
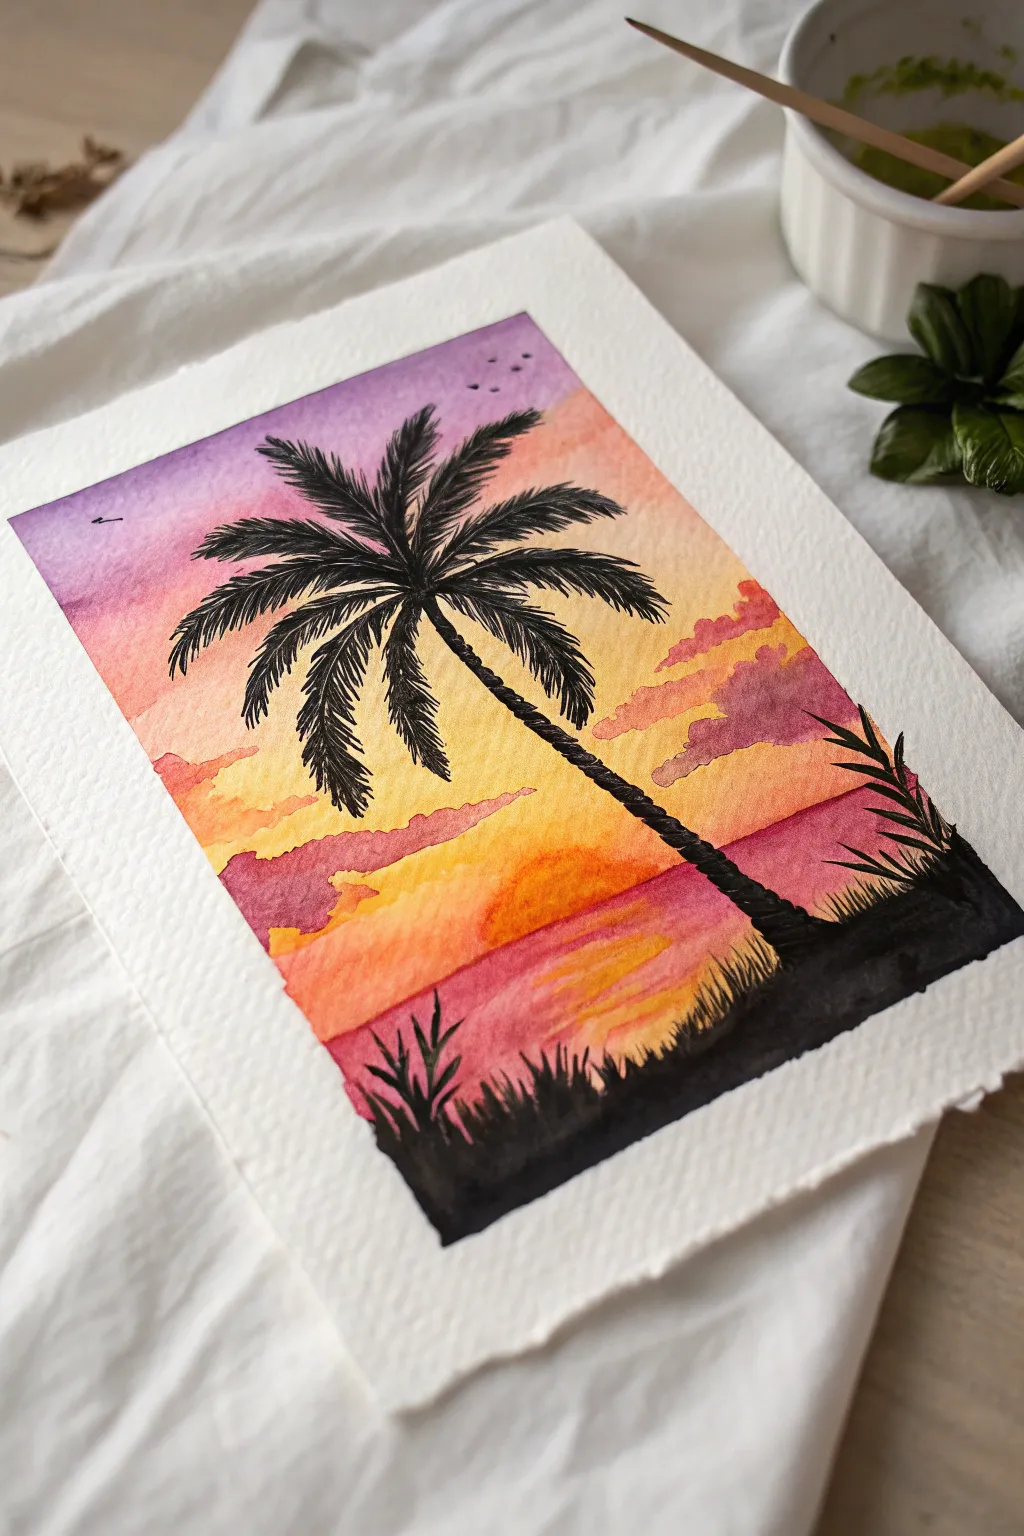
Capture the warmth of a tropical sunset with this vibrant watercolor project that focuses on gradient blending and bold silhouettes. The striking contrast between the fiery sky and the deep black palm tree creates an iconic summer scene that looks impressive but is beginner-friendly.
How-To Guide
Materials
- Cold press watercolor paper (300 gsm)
- Watercolor paints (Purple, Magenta, Orange, Yellow, Black)
- Flat wash brush (3/4 inch)
- Round brushes (size 6 and size 2)
- Clean water jar
- Paper towels
- Masking tape
- Pencil and eraser
Step 1: Painting the Sunset Sky
-
Tape the edges:
Begin by taping down all four edges of your watercolor paper to a board or table. This creates a crisp white border and prevents the paper from buckling when wet. -
Lightly sketch boundaries:
Draw an extremely faint horizon line about a third of the way up from the bottom. You can also lightly mark where the sun will sit just above the horizon, but keep pencil marks minimal. -
Wet the paper:
Using your large flat brush, apply a layer of clean water to the entire sky area (above the horizon line). The paper should be glistening but not forming puddles. -
Start with yellow:
Load your brush with a bright yellow. Paint a semi-circle shape for the sun right above the horizon, and sweep yellow horizontally across the lower part of the sky. -
Blend in orange:
While the yellow is still wet, introduce a vibrant orange above it. Use horizontal strokes to blend the orange down into the yellow slightly, creating a soft transition. -
Add magenta tones:
Moving upward, switch to a magenta or reddish-pink hue. Paint this across the middle section of the sky, letting it bleed naturally into the wet orange layer below. -
Finish with purple:
Paint the very top of the sky with a deep purple. Blend this down into the magenta. The goal is a smooth gradient from purple at the top to yellow at the horizon. -
Add cloud texture:
While the sky is damp but not soaking, dab in a few irregular shapes of concentrated magenta or purple near the horizon to suggest distant clouds.
Muddy colors?
If your sky gradient looks brown, stop over-brushing. Lay the colors down next to each other and let the water on the paper do the mixing work for you.
Step 2: Creating the Ocean Reflection
-
Mirror the colors:
Paint the ocean area below the horizon. Start with yellow in the center (under the sun) and blend out to orange and magenta towards the edges. -
Add water ripples:
While the paint is wet, use a slightly drier brush to lift out horizontal lines or add darker streaks of purple to suggest waves reflecting the twilight. -
Let it dry completely:
Wait for the entire background to be bone dry. If the paper is cool to the touch, it’s still wet. This is crucial before painting the black silhouette.
Step 3: The Silhouette Details
-
Paint the ground:
Using concentrated black paint (or watercolor mixed with minimal water) and a size 6 round brush, fill in the bottom foreground with an uneven, rocky terrain shape. -
Sketch the trunk:
With the same black paint, draw a long, slightly curved line stretching diagonally from the bottom right corner towards the center sky. Taper it so it’s thinner at the top. -
Texture the trunk:
Add small, jagged bumps along the sides of the trunk to replicate the rough texture of palm bark rather than making it a smooth pole. -
Start the fronds:
Switch to your size 2 detail brush. From the top of the trunk, paint several curved arched lines radiating outward like a firework explosion. -
Fill in the leaves:
Along each arched line, paint quick, downward dashes to create the palm leaves. Keep these strokes loose and jagged for a natural look. -
Add foreground grasses:
At the base of the tree in the black foreground, flick your brush upward to create sharp blades of grass and small tropical foliage shapes. -
Final touches:
Add a few tiny ‘v’ shapes in the upper purple sky to represent distant birds flying home.
Level Up: Birds
For sharper birds, use a fine-tip waterproof ink pen instead of a brush. It gives you more control over the tiny silhouette shapes.
Peel off the tape carefully to reveal your crisp edges and enjoy your tropical masterpiece


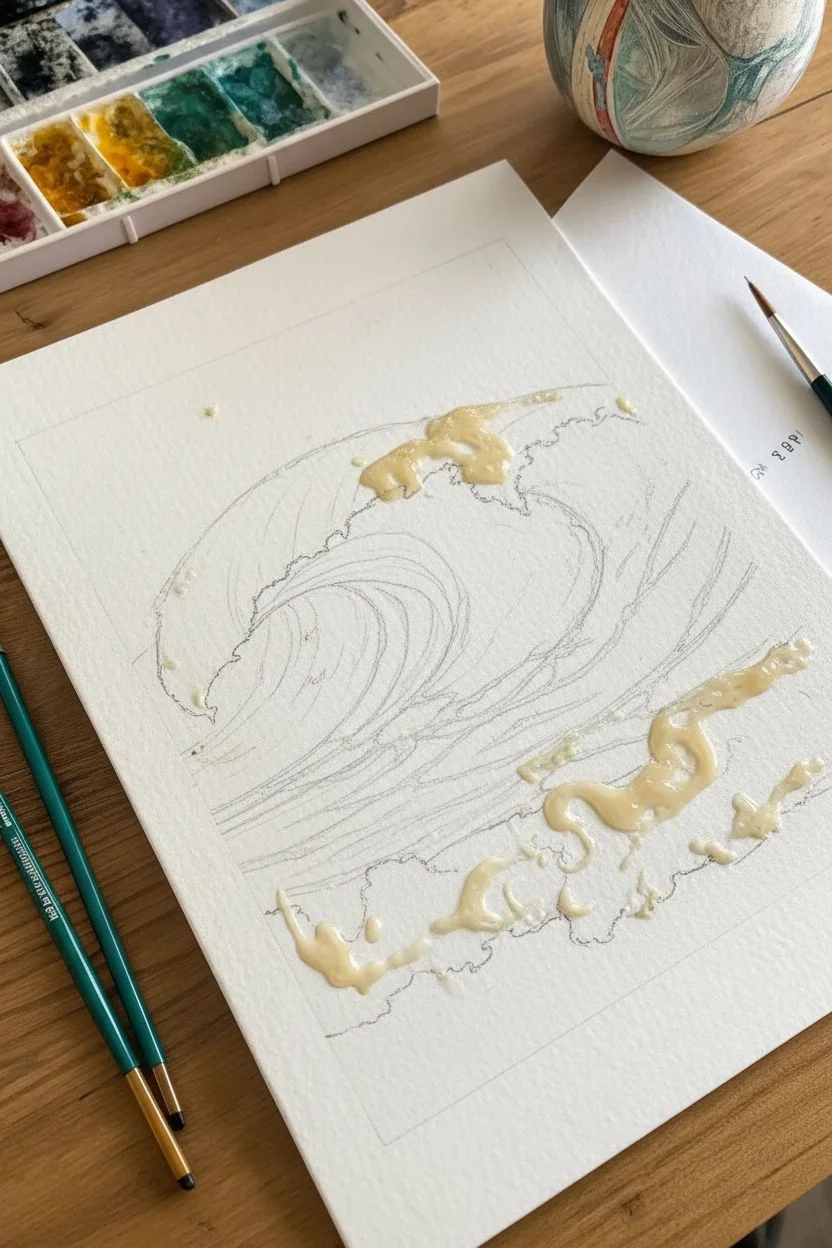
Easy Ocean Wave With Foamy White Edge
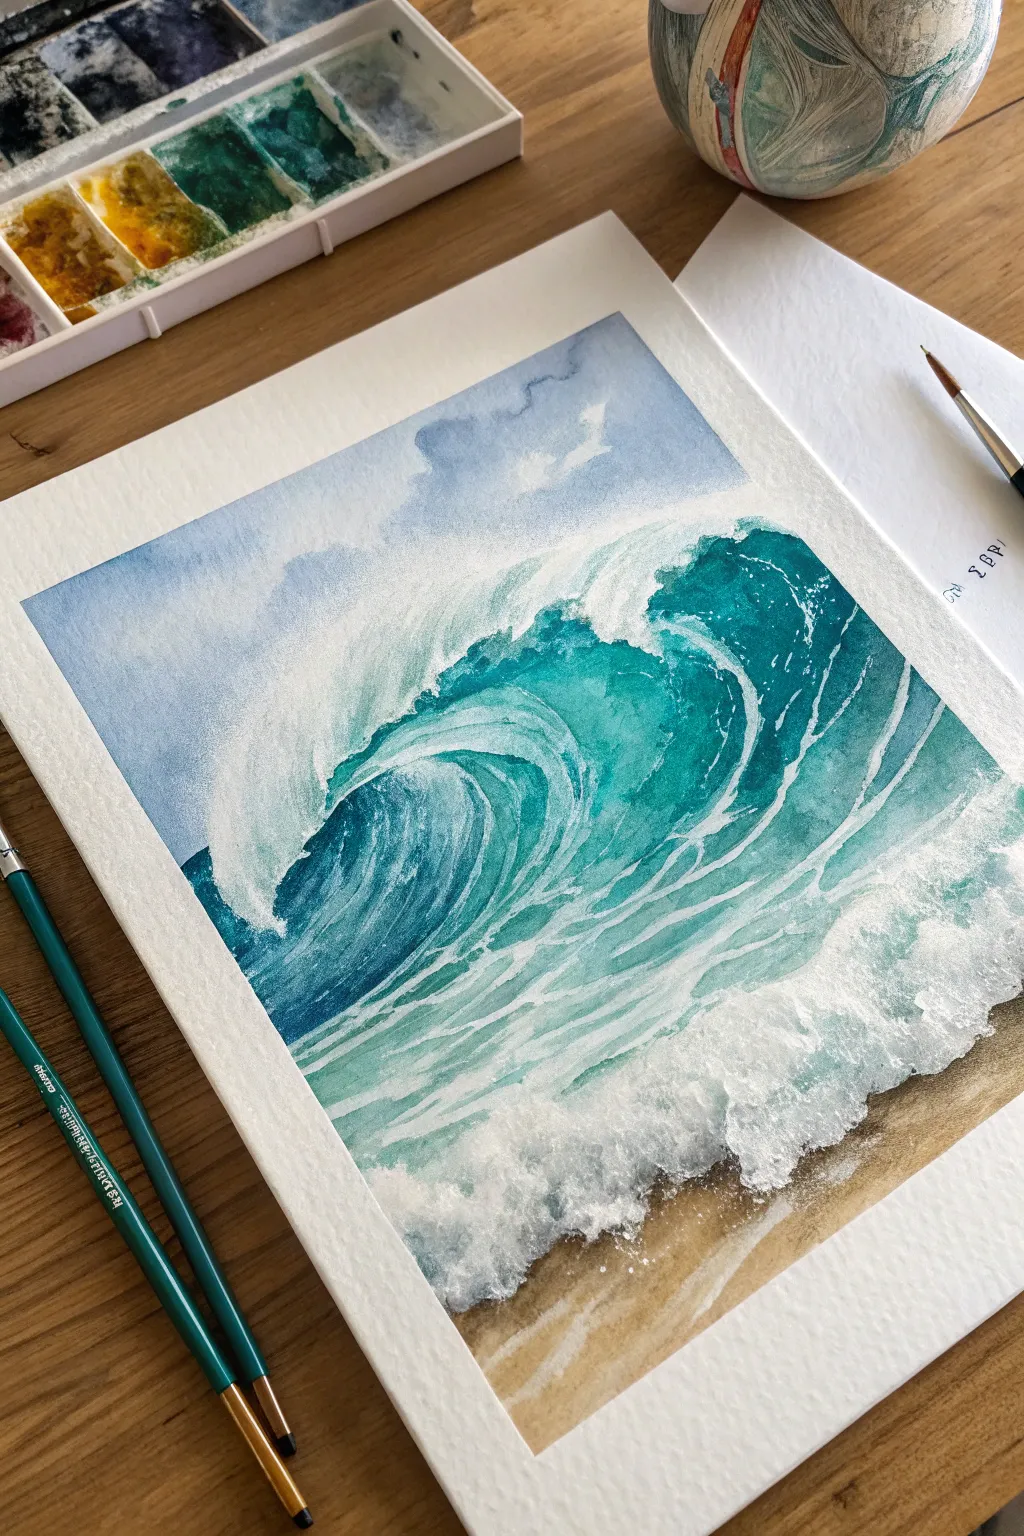
Capture the refreshing energy of the ocean with this vibrant watercolor project that focuses on movement and texture. You’ll layer turquoise and teal hues to build depth in the wave’s curve while creating realistic, foamy sea spray along the shoreline.
Detailed Instructions
Materials
- Cold press watercolor paper (block or taped down)
- Watercolor paints (Turquoise, Paynes Gray, Raw Sienna, Cobalt Blue)
- White Gouache or White Ink
- Masking fluid (drawing gum) and an old brush
- Round watercolor brushes (size 4 and 8)
- Fine liner brush
- Pencil and eraser
- Jar of clean water
- Paper towels
- Salt (optional for texture)
Step 1: Planning and Protecting
-
Sketch the wave:
Lightly sketch the outline of your wave using a pencil. Draw the main curve of the wave breaking, the horizon line, and the jagged edge where the water meets the sand. -
Mask the white foam:
Using an old brush or a masking fluid applicator, apply masking fluid to the areas that need to stay bright white. Focus on the very top crest of the wave, the splashes in the air, main veins of foam on the wave’s face, and the bubbly sea foam on the sand. -
Let it cure:
Allow the masking fluid to dry completely. It will feel tacky but shouldn’t transfer to your finger. Do not proceed until it is 100% dry or you will damage your paper.
Sticky Situation
Never use your good brushes for masking fluid! It dries into an impossible-to-remove clump. Coat bristles in dish soap first to protect them.
Step 2: Painting the Sky and Sand
-
Wet the sky area:
Brush clean water onto the sky portion, stopping just above the wave’s edge. This prepares the paper for a wet-on-wet technique. -
Paint soft clouds:
Drop in diluted Cobalt Blue for the sky. Use a tissue to blot out soft, fluffy cloud shapes while the paint is still wet to create a dreamy atmosphere. -
Base layer for sand:
Mix a watery wash of Raw Sienna or diluted brown. Paint the bottom section of the paper for the beach, letting it fade out as it reaches the masked foam area. -
Dry the background:
Let these initial background washes dry completely before starting the main wave.
Step 3: Building the Wave
-
First wave wash:
Mix a light wash of Turquoise. Paint the entire body of the wave, going right over the masked lines on the wave’s face. Keep the water behind the wave slightly lighter. -
Deepening the color:
While the first layer is still damp, drop in a more saturated Turquoise mixed with a tiny bit of Paynes Gray into the curve of the wave (the ‘tube’). This creates the shadow where the water is thickest. -
Adding texture to the water:
Use a smaller brush to paint strokes following the curve of the wave. Think about the direction the water is moving—up and over. -
Darkening the shadows:
Add your darkest teal or blue mix right under the curling lip of the wave and at the base of the wave where it hits the flat water. Contrast is key here. -
Painting the flat water:
Fill in the rest of the ocean surface between the main wave and the beach foam with horizontal strokes of lighter turquoise, simulating rippling water.
Pro Tip: Foam Effect
For realistic sea spray, load a stiff brush with white gouache and flick the bristles with your thumb to splatter tiny dots near the wave crest.
Step 4: Finishing Touches
-
Remove the mask:
Once the paint is bone dry, gently rub off the masking fluid with your clean finger or a rubber cement pickup tool to reveal the crisp white paper underneath. -
Soften harsh edges:
If the white lines from the masking fluid look too sharp, take a clean, slightly damp brush and gently soften some of the edges to blend them back into the water. -
Enhance the foam:
I like to use white gouache now to add extra brightness. Paint small dots and splashes around the crash zone and over the white lines you just revealed to add dimension. -
Detail the foreground:
Use dry-brushing with white gouache on the sand to create the look of retreating sea foam bubbles fizzing on the beach. -
Add shadows to foam:
Mix a very watery, pale grey-blue. lightly paint underneath some of the biggest foam splashes to give them volume so they don’t look flat.
Step back and admire the refreshing splash of color you’ve just created on paper


Wildflower Field Under a Big Blue Summer Sky
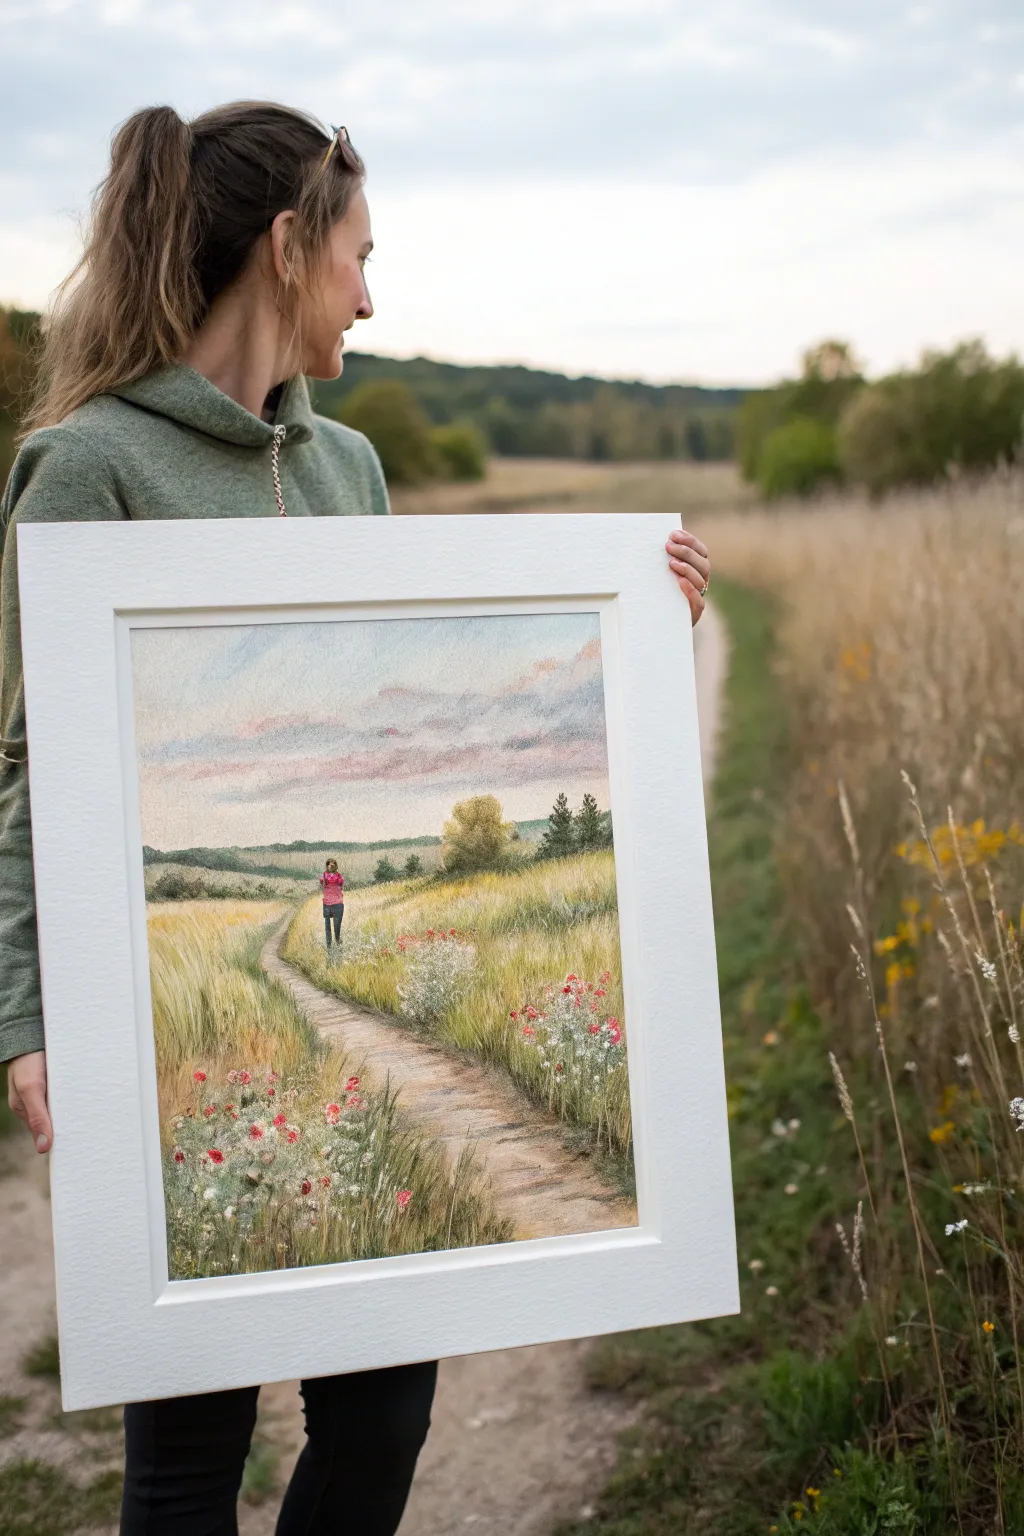
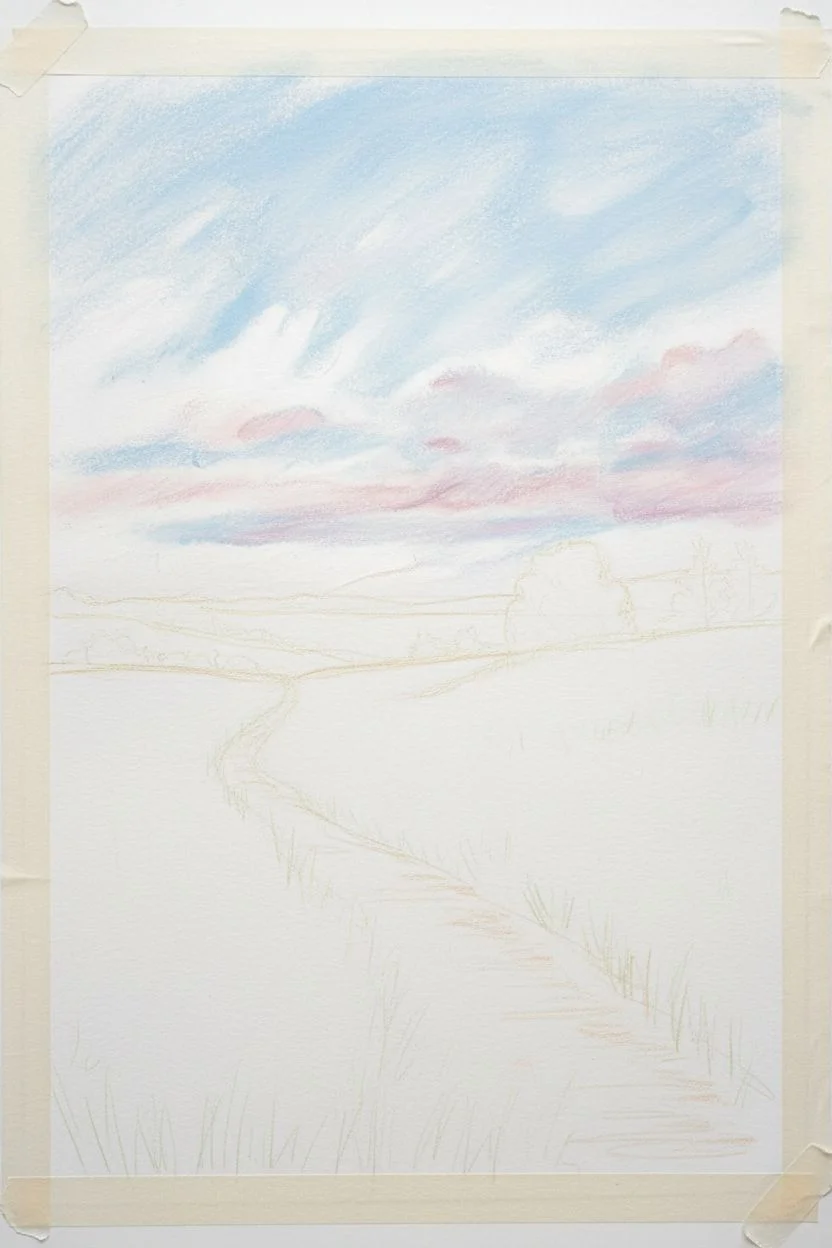
Capture the serenity of a late summer evening with this textured landscape piece, featuring a solitary figure walking through tall grasses. The soft, layered quality of pastels brings the swaying wildflowers and rolling clouds to life with gentle, hazy charm.
Step-by-Step Tutorial
Materials
- Textured pastel paper or mixed media board (approx. 16×20 inches)
- Soft pastels (assorted landscape greens, ochres, blues, pinks, whites)
- Hard pastel sticks or pastel pencils (for fine details)
- Workable fixative spray
- Blurring tool (tortillon or soft cloth)
- Masking tape
- Drawing board
Step 1: Setting the Scene
-
Preparation:
Secure your textured paper to the drawing board using masking tape on all four edges. This creates a clean border and keeps the paper flat while you work. -
Light sketch:
Using a light gray or ochre pastel pencil, sketch the horizon line about two-thirds up the paper. Draw the winding path starting wide at the bottom center and curving toward the left, disappearing into the mid-ground. -
Blocking the sky:
Start with the sky area. Apply broad side-strokes of pale blue, leaving patches of white paper exposed for the clouds. Keep the application loose and airy. -
Cloud structure:
Layer soft pinks and touches of lavender along the bottom of your cloud shapes to suggest a sunset glow or early evening light. Blend these gently with your finger or a cloth into the blue for a soft transition.
Clean Colors Tip
Keep a paper towel in your non-dominant hand. Wipe your pastel sticks frequently to prevent ‘muddying’ colors when layering bright flowers over green grass.
Step 2: Developing the Landscape
-
Distant hills:
For the horizon, use muted sage greens and dull blues to create distant tree lines and hills. Keep the edges slightly soft to push them into the background. -
Mid-ground trees:
Add the specific shapes of the mid-ground shrubbery and trees. Use a darker olive green for the shadows and a warm yellow-green for the sunlit tops of the central bush. -
Underpainting the field:
Lay down a base color for the grassy fields using sweeping vertical strokes of yellow ochre and sap green. I find that following the direction of grass growth right from the start helps build believable texture. -
Path foundation:
Fill in the dirt path with light browns, creams, and touches of gray. Use horizontal strokes here to distinguish the ground plane from the vertical grasses.
Step 3: Refining Details
-
Layering grass:
Over your field base, use the edge of your hard pastels to draw distinct blades of grass. Vary the colors between bright lime, burnt sienna, and wheat to show depth. -
Adding the figure:
Draw the small figure walking on the path in the middle distance. Start with simple shapes—a pink tone for the shirt and dark blue for jeans—keeping the posture relaxed. -
Shadows and depth:
Deepen the shadows along the edges of the path where the tall grass meets the dirt. Use dark greens and browns to anchor the vegetation. -
Texture on the path:
Add texture to the path itself by scumbling a bit of darker earth tone over the light base, suggesting footprints or uneven dirt.
Season Shift
Change the mood by altering the palette: swap green grasses for burnt oranges and deep reds to turn this summer scene into a crisp autumn walk.
Step 4: Floral Finale
-
Foreground wildflowers:
In the immediate foreground, press harder with your pastels to create crisp details. Use bright red for poppy-like flowers and white for Queen Anne’s lace. -
Stems and leaves:
Use a sharp pastel pencil to connect the flower heads to the ground with thin, delicate green lines. Add a few stray grasses overlapping the path edge to integrate the walkway. -
Atmospheric blending:
Lightly smudge the distant grass areas again if they look too sharp, ensuring the focus remains on the foreground flowers and the figure. -
Final highlights:
Add touches of pure white or pale yellow to the tops of the closest grass blades and the figure’s shoulders where the light creates a halo effect. -
Fix and frame:
Spray a light coat of workable fixative to prevent smudging. carefully remove the tape to reveal your crisp border.
Now you have a tranquil landscape that invites the viewer to take a peaceful mental stroll
BRUSH GUIDE
The Right Brush for Every Stroke
From clean lines to bold texture — master brush choice, stroke control, and essential techniques.
Explore the Full Guide
Pool Water Ripples With Sparkly Highlights
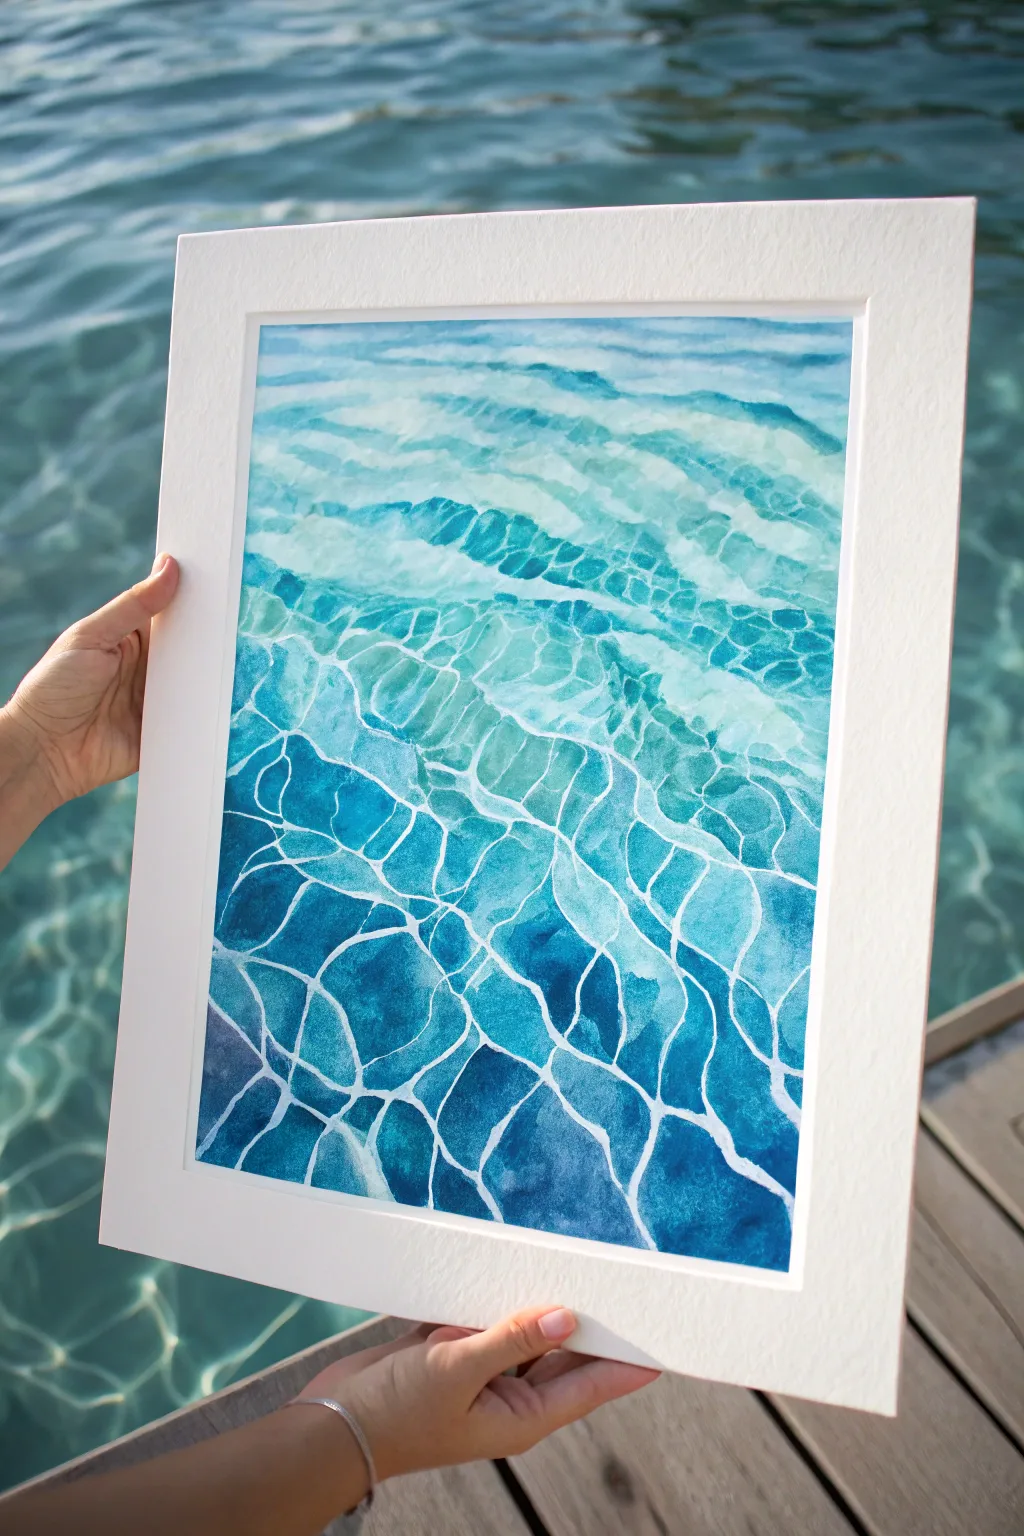
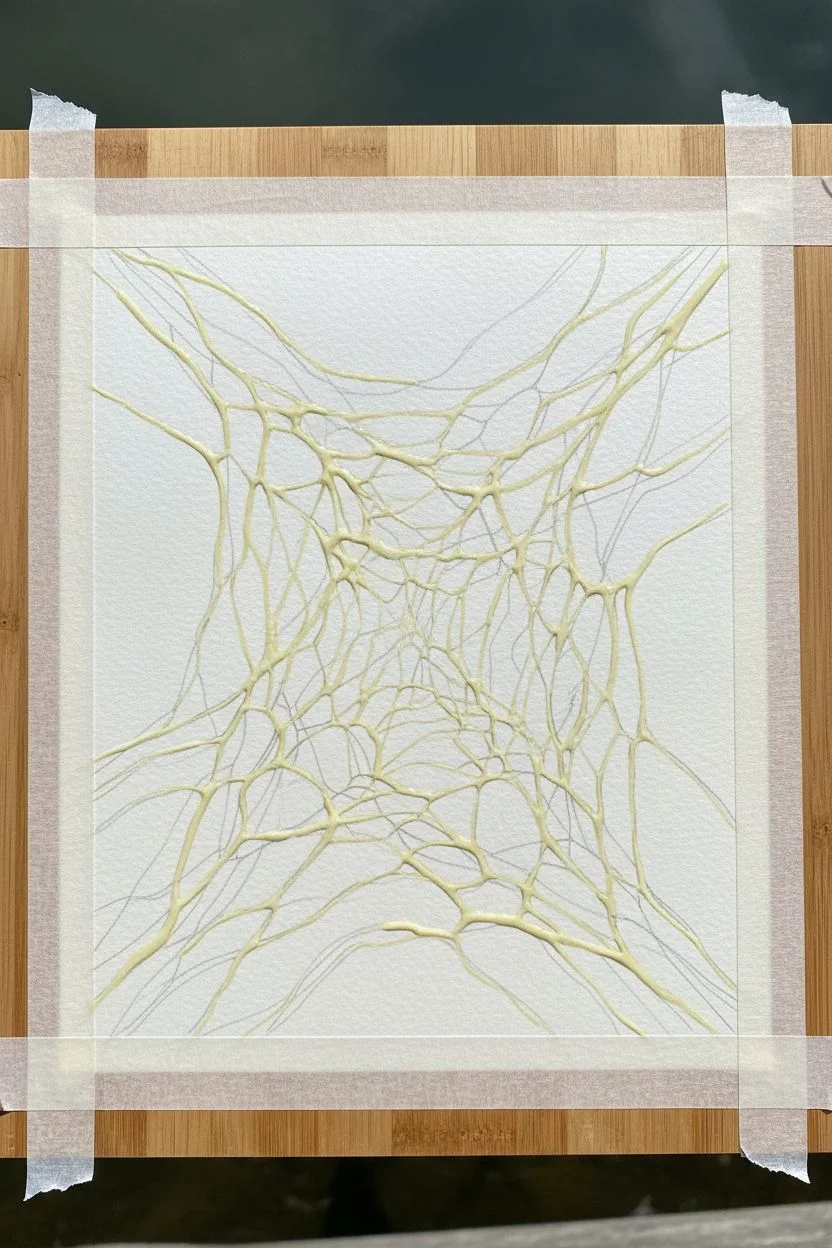
Capture the mesmerizing dance of sunlight on water with this refreshing watercolor project. By preserving the white of the paper or using masking fluid, you’ll create brilliant, glowing caustics that look just like a summer day at the pool.
Detailed Instructions
Materials
- Cold press watercolor paper (300 gsm)
- Watercolor paints (Phthalo Blue, Turquoise, Cobalt Teal, Payne’s Gray)
- Masking fluid (drawing gum)
- Old brush or ruling pen for applying masking fluid
- Round watercolor brushes (sizes 4, 8, and 12)
- Flat brush (1 inch)
- Rubber cement pick-up eraser
- Painter’s tape and drawing board
Step 1: Preparation and Masking
-
Tape it down:
Secure your watercolor paper to a board using painter’s tape on all four sides. This ensures a clean white border and prevents the paper from buckling under heavy washes. -
Sketch the web:
Lightly sketch the pattern of the water ripples. Think of it like a warped spiderweb or a distorted net; the cells are larger near the bottom foreground and get smaller and flatter as they recede toward the top. -
Apply masking fluid:
Using an old brush or a ruling pen, trace your pencil lines with masking fluid. These lines represent the brightest sunlight hitting the ripple crests, so vary the thickness slightly for a natural look. -
Let it cure:
Allow the masking fluid to dry completely. It must be solid to the touch before you introduce any water, or it will ruin your brushes and smear the paper.
Save Your Brush
Masking fluid ruins bristles instantly. Coat your brush bristles with bar soap before dipping into the fluid to create a protective barrier that washes out later.
Step 2: Painting the Depths
-
Mix your palette:
Prepare three puddles of blue: a light Cobalt Teal, a mid-tone Turquoise, and a deep Phthalo Blue mixed with a touch of Payne’s Gray for the deepest shadows. -
First wash:
Wet the entire paper surface with clean water using your large flat brush. Drop in the lightest teal color, focusing on the top third of the painting where the water looks shallower. -
Build the gradient:
While the paper is still wet, introduce the mid-tone turquoise into the middle section, letting it bleed softly into the lighter teal above. -
Deepen the bottom:
Brush the darkest blue mixture into the bottom third. The goal is a smooth gradient from light at the top to deep, rich blue at the bottom. -
Dry completely:
Let this base layer bone dry. If the paper feels cool to the touch, it’s still wet.
Fixing Broken Lines
If a white line is too thick, don’t worry. Wait for everything to dry, then use a small brush with your dark blue paint to ‘cut back’ into the white line.
Step 3: Adding Dimension
-
Define the cells:
Working on dry paper, paint inside the ‘cells’ created by your masking fluid lines. Use a round brush to apply darker blue paint inside the shapes. -
Create volume:
When painting inside a cell, don’t fill it solidly. Paint the darker blue on one side (usually the bottom or side of the shape) and fade it out with a damp brush toward the other side to create a rounded, 3D water volume. -
Vary the tones:
I like to use pure turquoise for the upper cells and switch to the Phthalo/Gray mix for the large foreground shapes. This reinforces the depth perspective. -
Refine the shadows:
Go back into the largest foreground ripples and add a second layer of your darkest blue right against the masked lines to heighten the contrast. -
Final drying stage:
Ensure the paint is absolutely dry before touching the surface again. Impatience here can cause smudging.
Step 4: The Big Reveal
-
Remove the mask:
Gently rub away the masking fluid using a rubber cement pick-up or your clean finger. Seeing the bright white lines emerge from the blue is the most satisfying part. -
Soften harsh edges:
If any white lines look too stark or thick, use a stiff, damp brush to gently scrub and soften the edges, blending a tiny bit of the surrounding blue into the white. -
Add subtle tints:
Glaze a very watered-down teal over some of the receding white lines at the very top of the painting. This pushes them into the distance compared to the bright white foreground. -
Mat and frame:
Remove the tape carefully. Place a white mat over your work to give it that professional, finished gallery look shown in the inspiration photo.
Hang this piece in a bright room and enjoy the cool, aquatic vibes year-round


Have a question or want to share your own experience? I'd love to hear from you in the comments below!