There’s something ridiculously satisfying about turning an empty glass bottle into a little piece of decor with just paint and a simple plan. These easy bottle painting ideas are all about big impact with low stress—perfect for a relaxed, creative afternoon at your table.
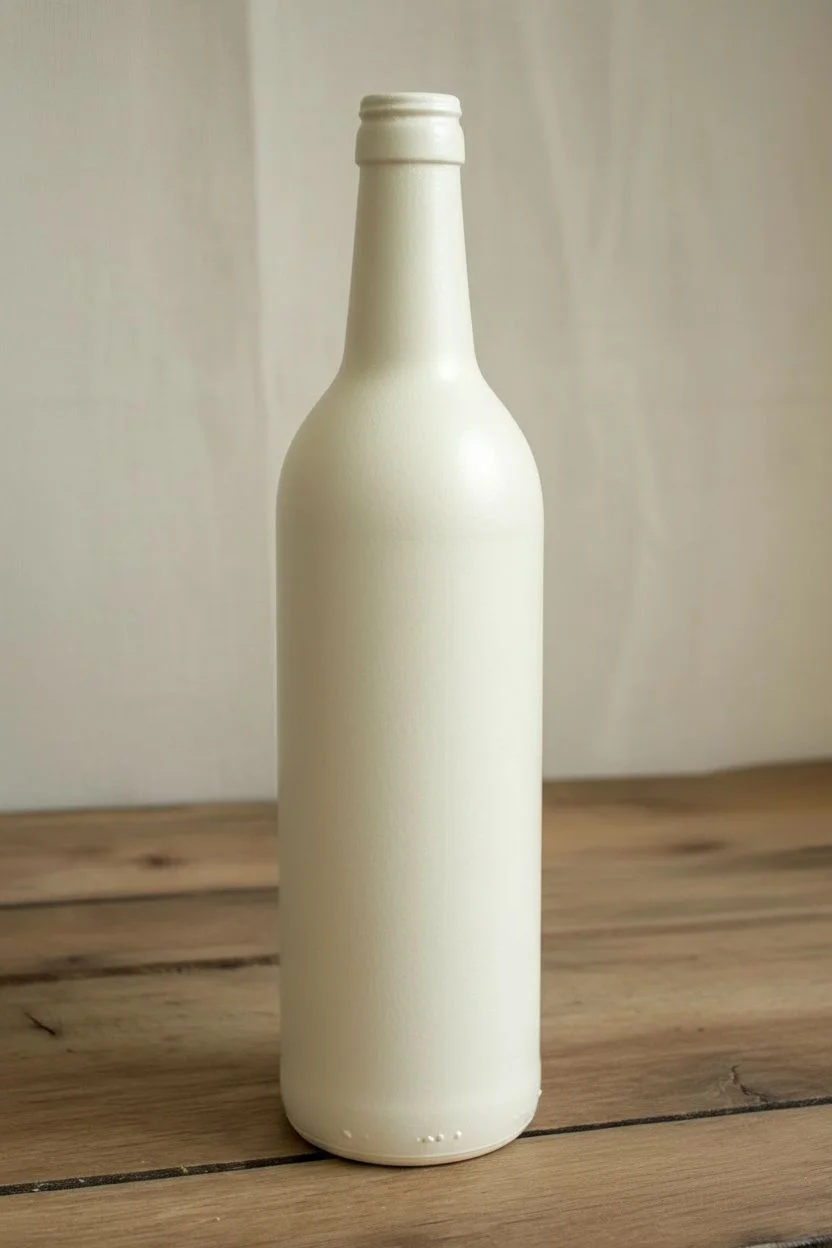
Classic Solid Color Bottle Vases
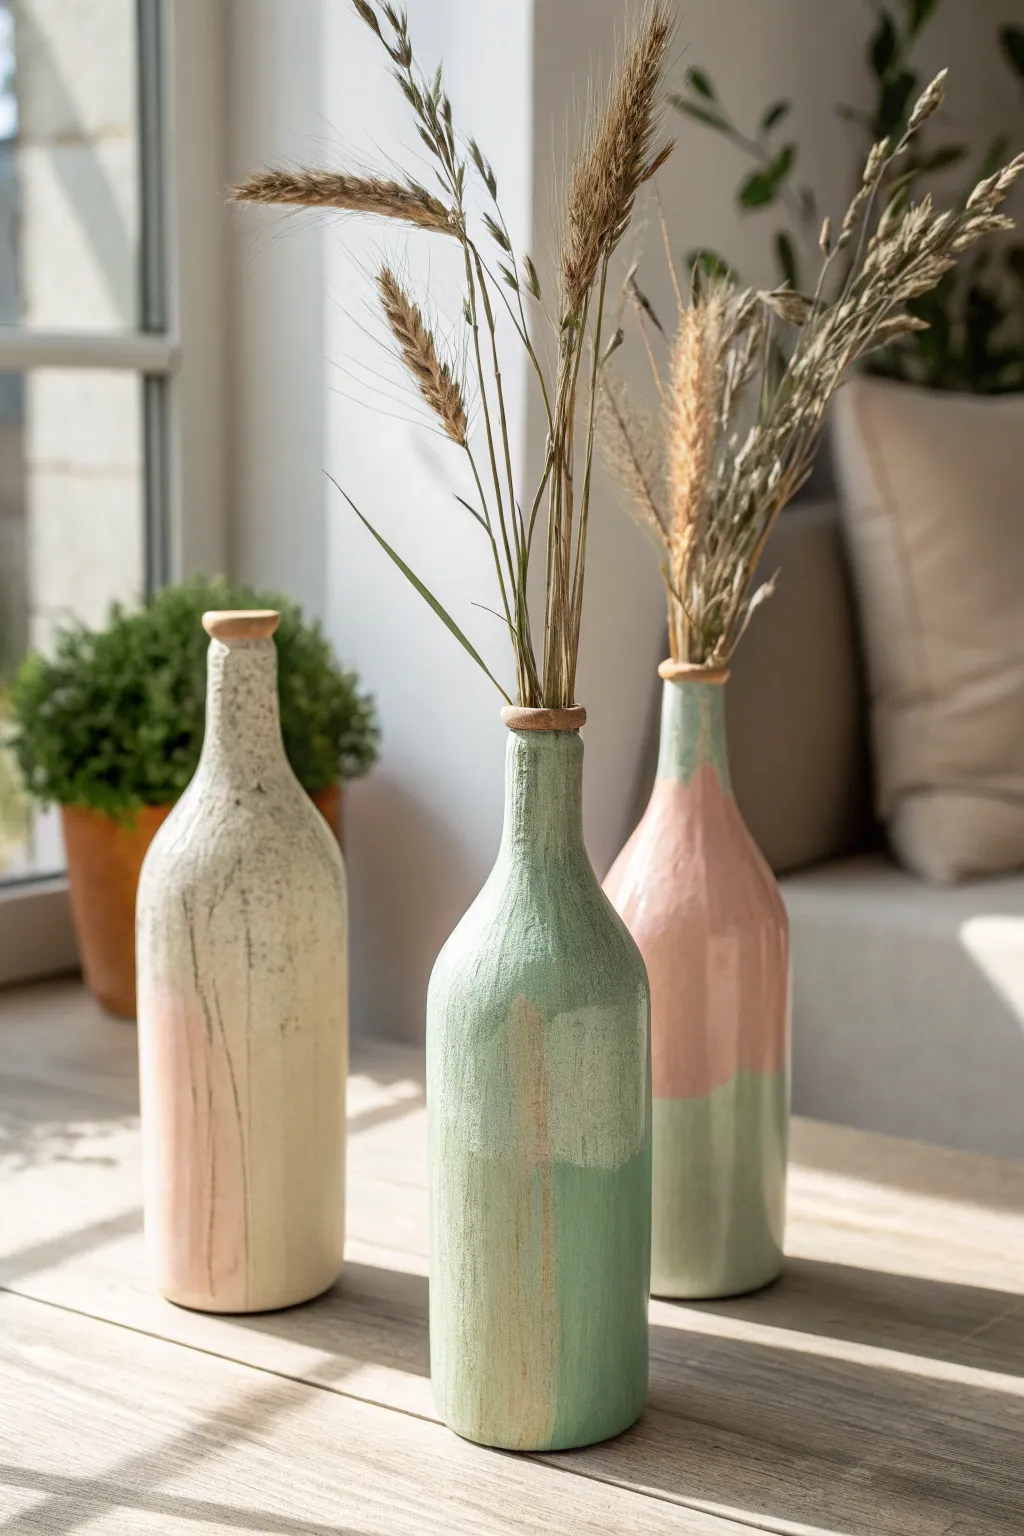
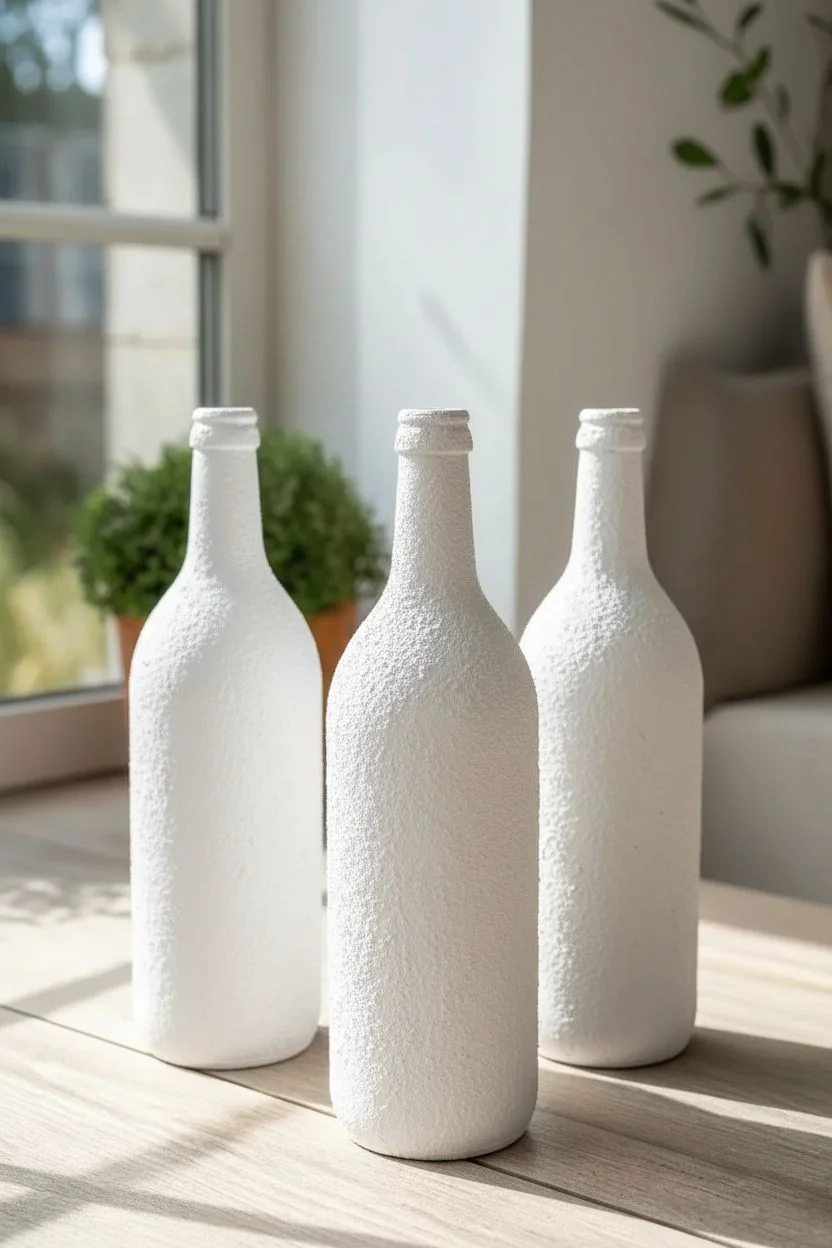
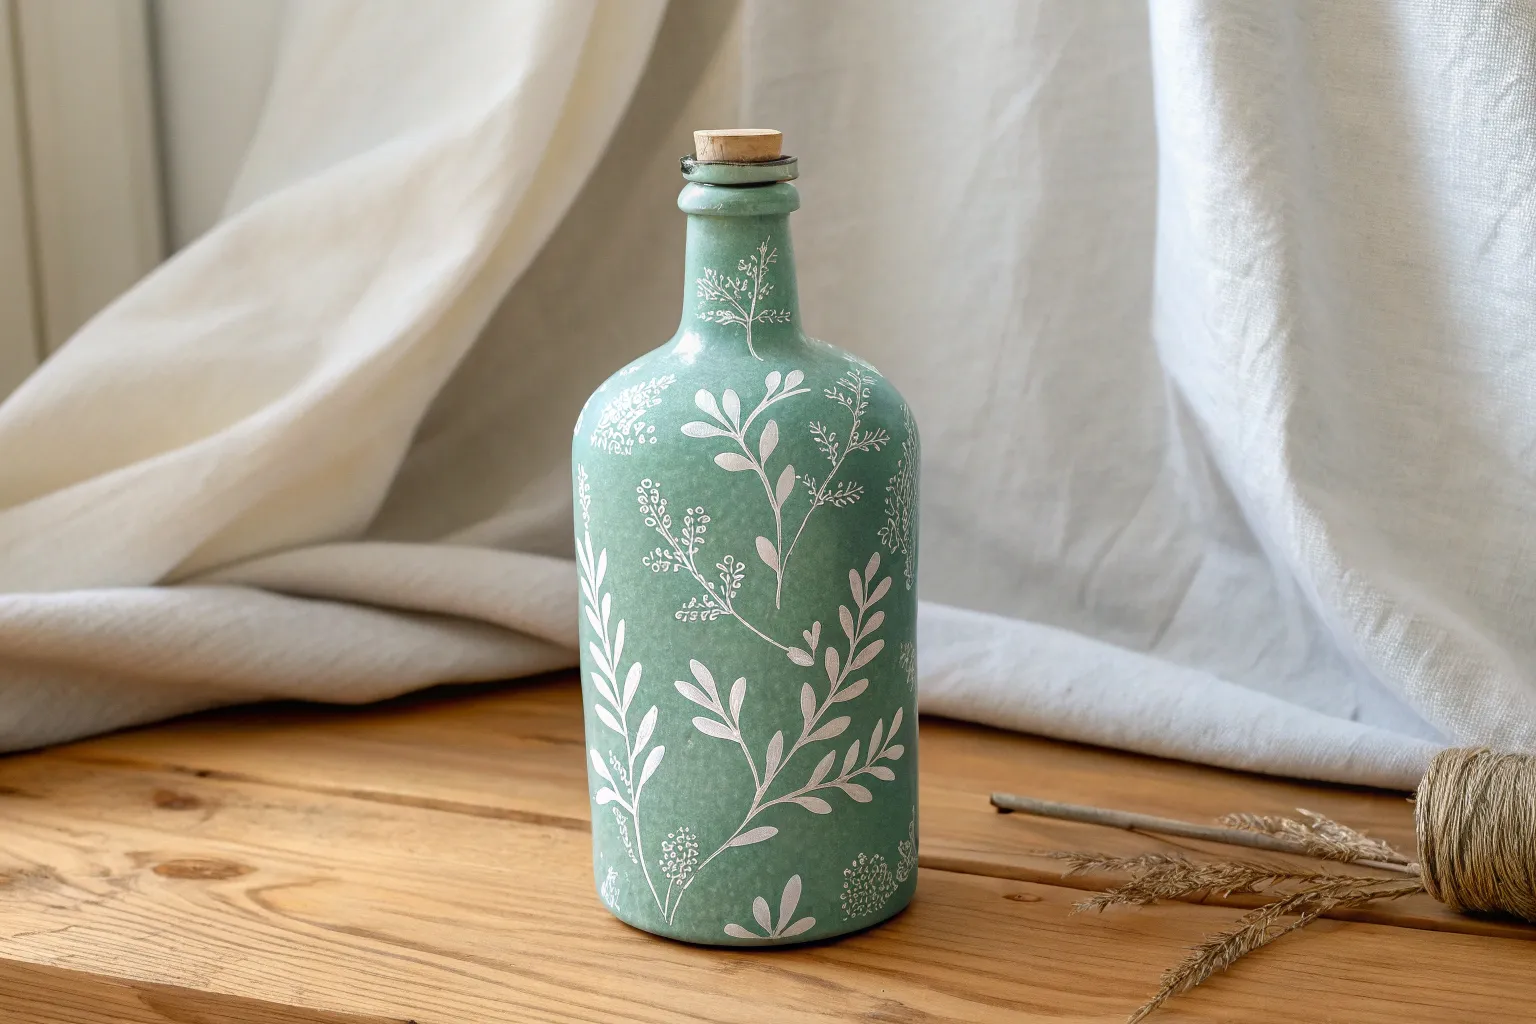
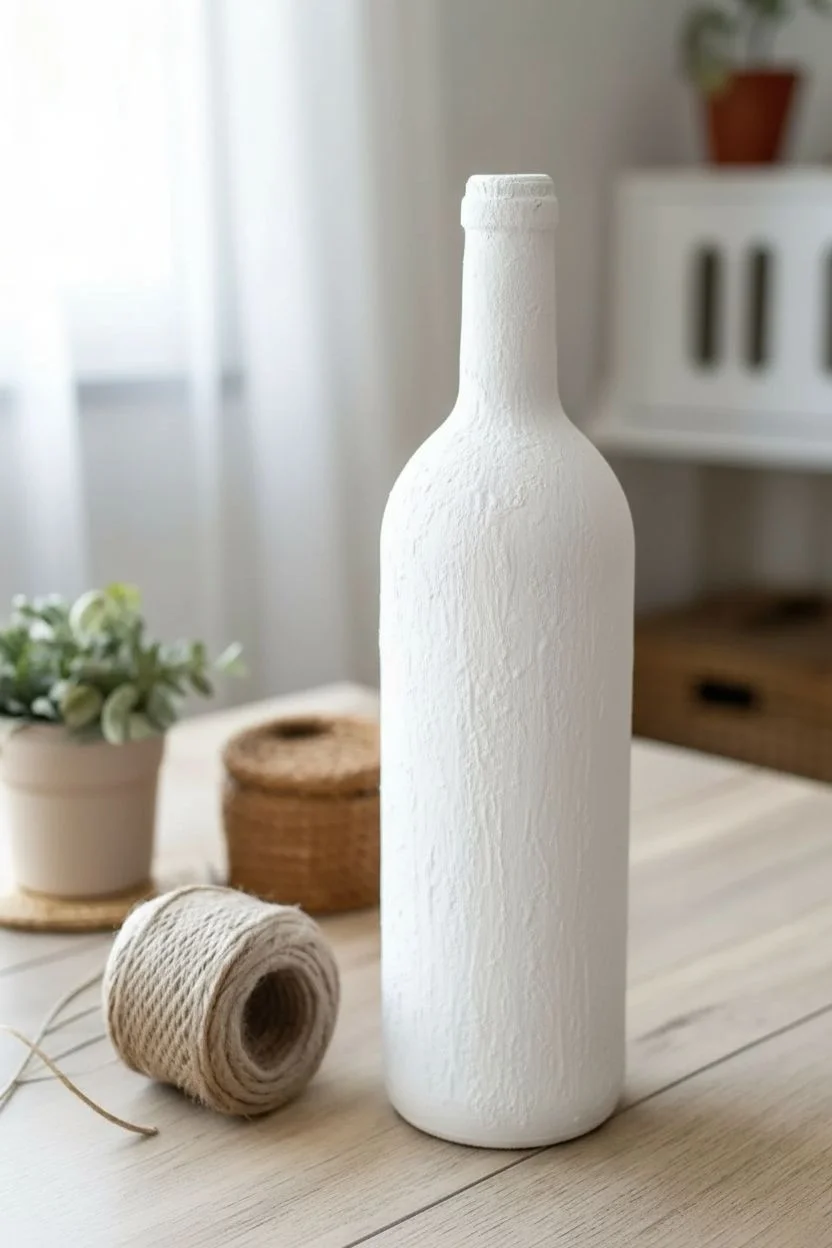
Transform ordinary glass bottles into chic, textured home decor with this simple painting technique. The result is a matte, stone-like finish in soft pastel tones that perfectly complements dried grasses and floral arrangements.
Step-by-Step Tutorial
Materials
- Clean glass bottles (wine or beverage bottles)
- Rubbing alcohol
- White chalk paint or acrylic paint
- Baking soda (for texture)
- Pastel acrylic paints (sage green, dusty pink, cream)
- Small mixing cups or palette
- Flat paintbrushes (medium width)
- Sponge brush (optional)
- Matte clear sealant spray
Step 1: Preparation
-
Bottle Prep:
Begin by removing all labels and adhesive residue from your glass bottles. Soaking them in warm, soapy water usually does the trick. -
Degrease Surface:
Wipe the entire exterior of each bottle with rubbing alcohol on a lint-free cloth. This step removes lingering oils and ensures better paint adhesion. -
Create Texture Mix:
In a mixing cup, combine your white base paint with baking soda. I like to start with a ratio of about 1 part baking soda to 2 parts paint, but adjust depending on how thick and textured you want the ‘faux ceramic’ look to be.
Paint Peeling Off?
If the paint slides off the glass, the surface wasn’t degreased enough. Wipe it down again with alcohol or prime with a layer of Mod Podge before repainting.
Step 2: Base Coating
-
First Layer:
Apply the white texture mixture to the entire bottle using a flat brush or sponge brush. Don’t worry about brush strokes; the texture is part of the charm. -
Let it Dry:
Allow this first coat to dry completely. Depending on humidity, this could take 30 to 60 minutes. The baking soda mix tends to dry faster than plain paint. -
Second Layer:
Apply a second coat of the white texture mix if you can still see the glass through the paint. This solidifies the opaque, stone-like foundation. -
Rim Detail:
Don’t forget to paint the very top rim of the bottle. Some crafters leave a small strip unpainted or paint it a contrasting earth tone to mimic a cork or clay stopper look.
Step 3: Color Blocking
-
Mix Pastel Colors:
Prepare your pastel shades—sage green and dusty pink—by mixing acrylics with a small amount of baking soda. This ensures the colored layers have the same matte, grainy texture as the base. -
Planning the Design:
Visualize a color-blocked design. As seen in the reference, these bottles feature large, organic patches of color rather than precise geometric shapes. -
Applying the Green:
On one bottle, use a flat brush to paint a large section with the sage green mixture. Start from the bottom and work your way up about two-thirds of the bottle, leaving the top cream. -
Creating Soft Edges:
Instead of a masking tape line, use the brush to create a hand-painted, slightly uneven edge where the color meets the white base. This enhances the artisanal feel. -
Applying the Pink:
On another bottle, apply the dusty pink mixture. You might choose to paint the top half pink and leave the bottom green, or create vertical vertical strokes of pink against the cream base as shown. -
Reference the Look:
For the middle bottle, try layering. Paint a green base section, let it dry slightly, and then dry-brush a little cream or pink over parts of it to create depth and a weathered aesthetic.
Pro Tip: Baking Powder
If you don’t have baking soda, baking powder works too. It creates a slightly foamier texture that dries into a really unique, fluffy matte finish.
Step 4: Finishing Touches
-
Distressing (Optional):
Once the colored layers are dry to the touch, you can lightly sand specific high points with fine-grit sandpaper if you want a more distressed, vintage vibe. -
Final Texture Check:
Inspect the bottles. If any area looks too flat, dab a little extra baking soda paint mixture onto that spot to build up the ‘ceramic’ grain. -
Sealing:
To protect your work, take the bottles to a well-ventilated area and apply a light coat of matte clear sealant spray. This prevents the baking soda paint from flaking off over time. -
Drying Time:
Let the sealant cure fully according to the manufacturer’s instructions, usually for at least 24 hours, before handling extensively. -
Styling:
Insert dried grasses, wheat stems, or faux flowers to complete the rustic, modern arrangement.
Enjoy styling these versatile vases in a sunny corner of your home


Simple Polka Dots Using a Cotton Swab
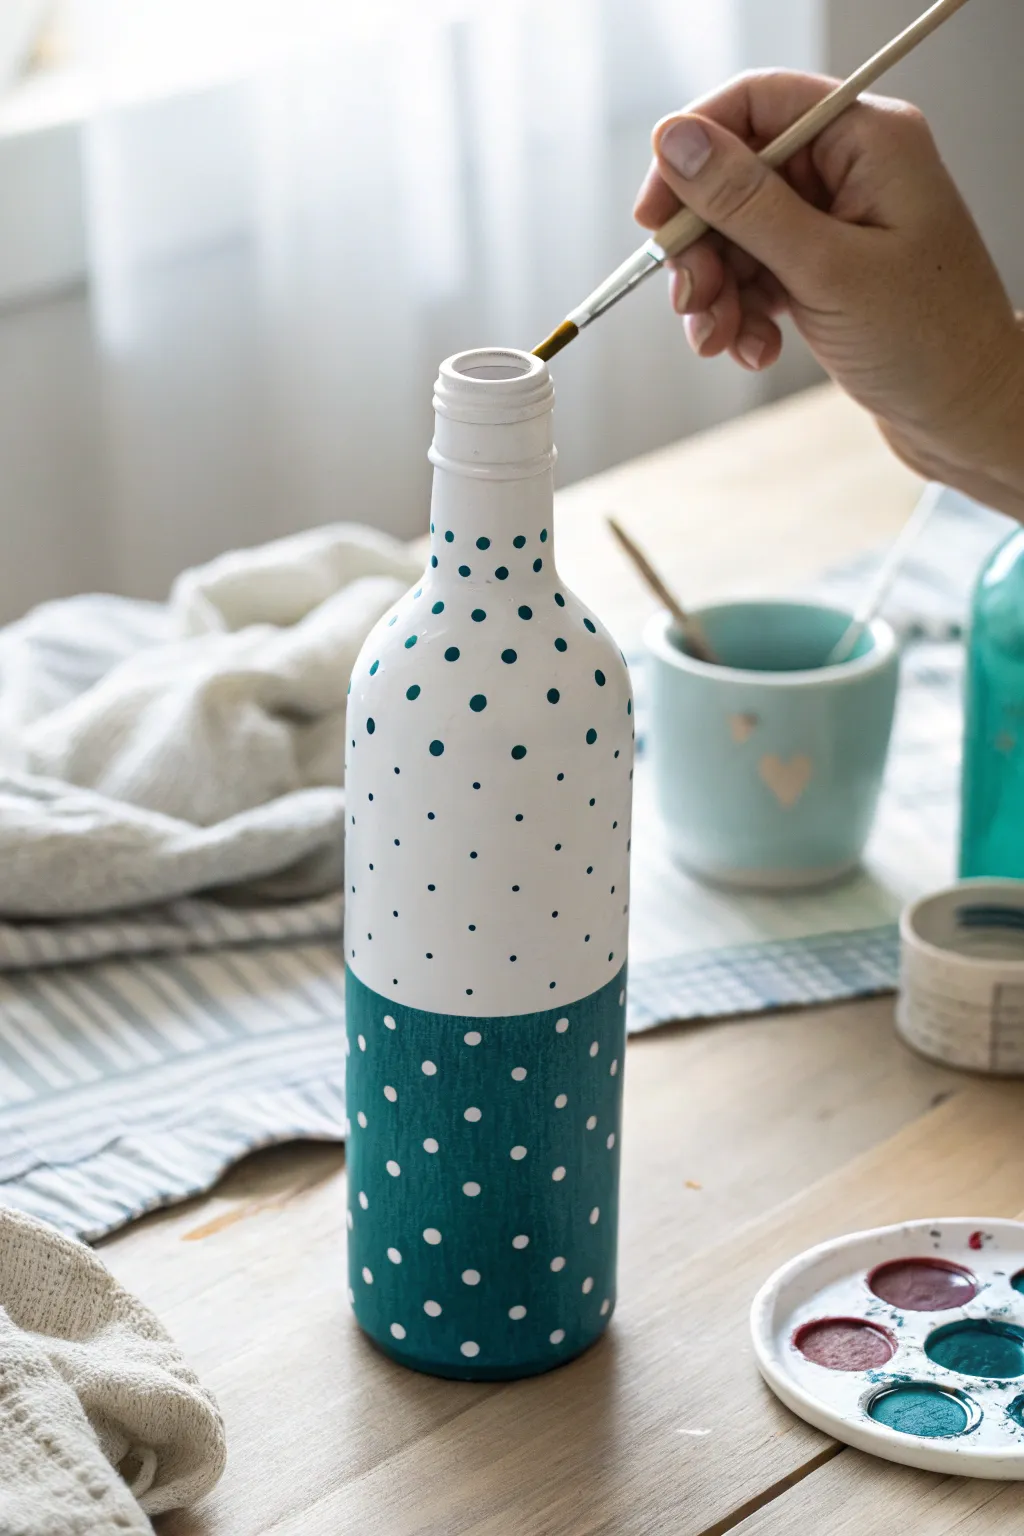
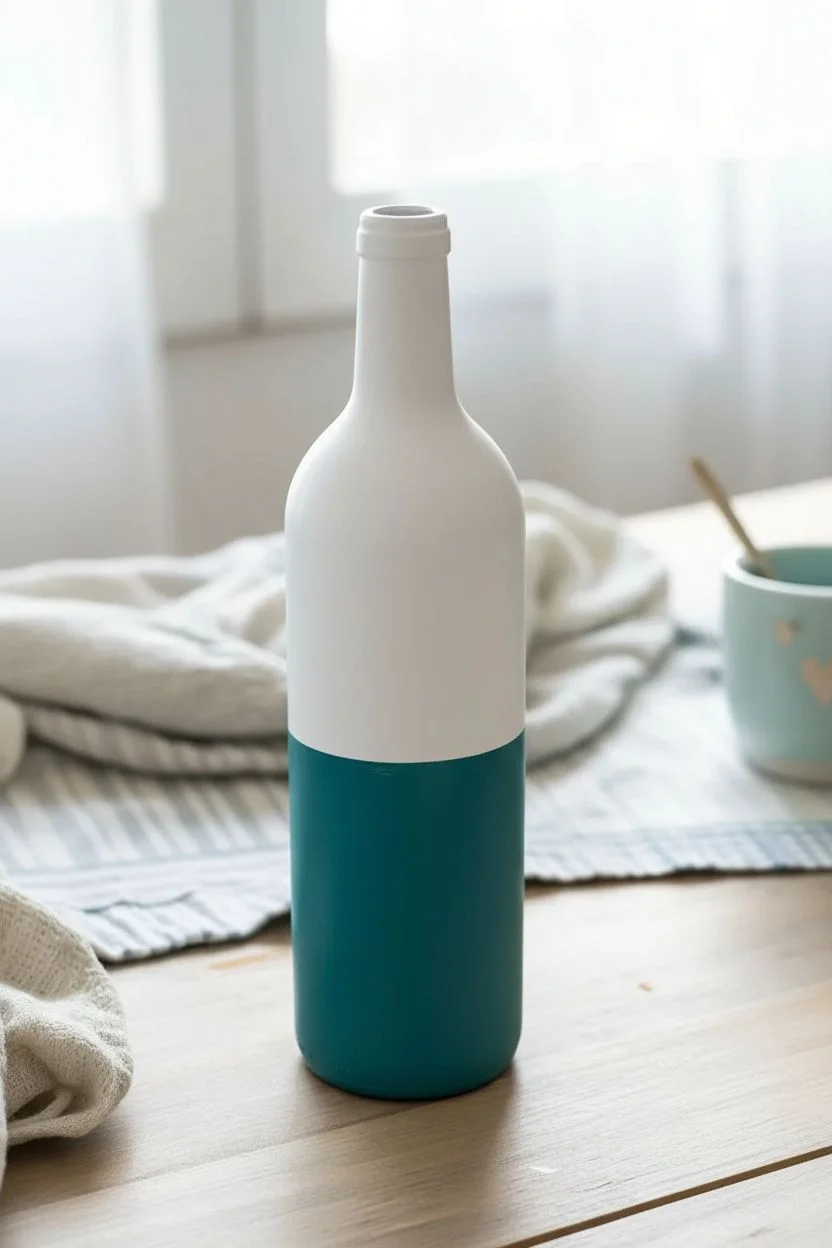
Transform a plain glass bottle into a chic vase with this two-tone polka dot design. The contrast between the crisp white upper and the teal base creates a modern look, while the playful dots add a touch of whimsy to any table setting.
Detailed Instructions
Materials
- Clean glass bottle (wine bottle or similar)
- White acrylic paint (or chalk paint)
- Teal or turquoise acrylic paint
- Painter’s tape or masking tape
- Cotton swabs (Q-tips)
- Flat paintbrush (medium size)
- Small round paintbrush (optional, for touch-ups)
- Palette or paper plate
- Water cup
- Paper towels
Step 1: Base Coat and Color Blocking
-
Prepare the bottle:
Begin by thoroughly washing your glass bottle with warm soapy water to remove any labels and adhesive residue. Let it dry completely. Wipe the surface down with rubbing alcohol to ensure the paint adheres properly. -
Paint the bottle white:
Apply a coat of white acrylic paint to the entire bottle using your flat paintbrush. Don’t worry if it looks streaky at first; glass usually needs layers. -
Apply second coat:
Once the first layer is dry to the touch (usually 15-20 minutes), apply a second coat of white paint. You want a solid, opaque finish, so a third coat might be necessary depending on your paint’s thickness. -
Mark the horizon line:
Decide where you want your color break to be. In the example, it’s slightly below the halfway point. Wrap a piece of painter’s tape horizontally around the bottle at this level. Press the edge of the tape down firmly to prevent paint bleed. -
Paint the lower section:
Using the teal acrylic paint, cover the bottom portion of the bottle below the tape line. Use long, smooth vertical strokes for the best finish. -
Let it dry and repeat:
Allow the teal paint to dry completely before adding a second coat. This deep color looks best when fully opaque. -
Remove the tape:
Carefully peel off the painter’s tape while the final coat of teal paint is still slightly tacky. This helps ensure a crisp, clean line between the white and teal sections.
Step 2: The Polka Dot Design
-
Prepare the dots:
Squeeze a fresh dollop of teal paint and a separate dollop of white paint onto your palette. -
Start the upper dots:
Dip a cotton swab into the teal paint. You want enough paint to cover the tip but not so much that it drips. -
Apply teal dots on white:
Press the cotton swab gently onto the white upper section of the bottle to create a perfect circle. Lift straight up to avoid smearing. -
Create a pattern:
Continue adding teal dots, spacing them out evenly. I find it easiest to work in diagonal rows to keep the pattern consistent around the curve of the bottle. -
Switch to white dots:
Using a clean cotton swab, dip it into the white paint. Now, move to the teal bottom section of the bottle. -
Apply white dots on teal:
Press the white paint onto the lower teal section. Try to align these dots vertically with the teal dots above for a cohesive look, or offset them slightly for a more random feel. -
Handle the transition:
Be careful near the transition line where the two background colors meet. You can place dots right near the line, but avoid painting directly over the seam to keep the color-block effect sharp. -
Clean up edges:
If any dots look uneven or haven’t fully covered the glass, dip a fine-tip brush into the paint and carefully fill in the centers. -
Final drying:
Let the entire bottle sit undisturbed for at least 24 hours to let the paint fully cure. If you plan to use this as a functional vase, consider spraying a clear acrylic sealer over the top for protection.
Uneven Dots?
If your cotton swab dots look too fuzzy or uneven, switch to using the eraser end of a standard pencil. Dip it in paint and stamp for a perfect, solid circle every time.
Paint Peeling Tip
To stop paint from peeling off slick glass, prime the bottle with a layer of Mod Podge or a specific glass primer before applying your first coat of colored acrylic.
Place a few dried flowers or a single stem in your new vase and enjoy the handmade charm on your shelf


Quick Heart Pattern for a Sweet Gift Bottle
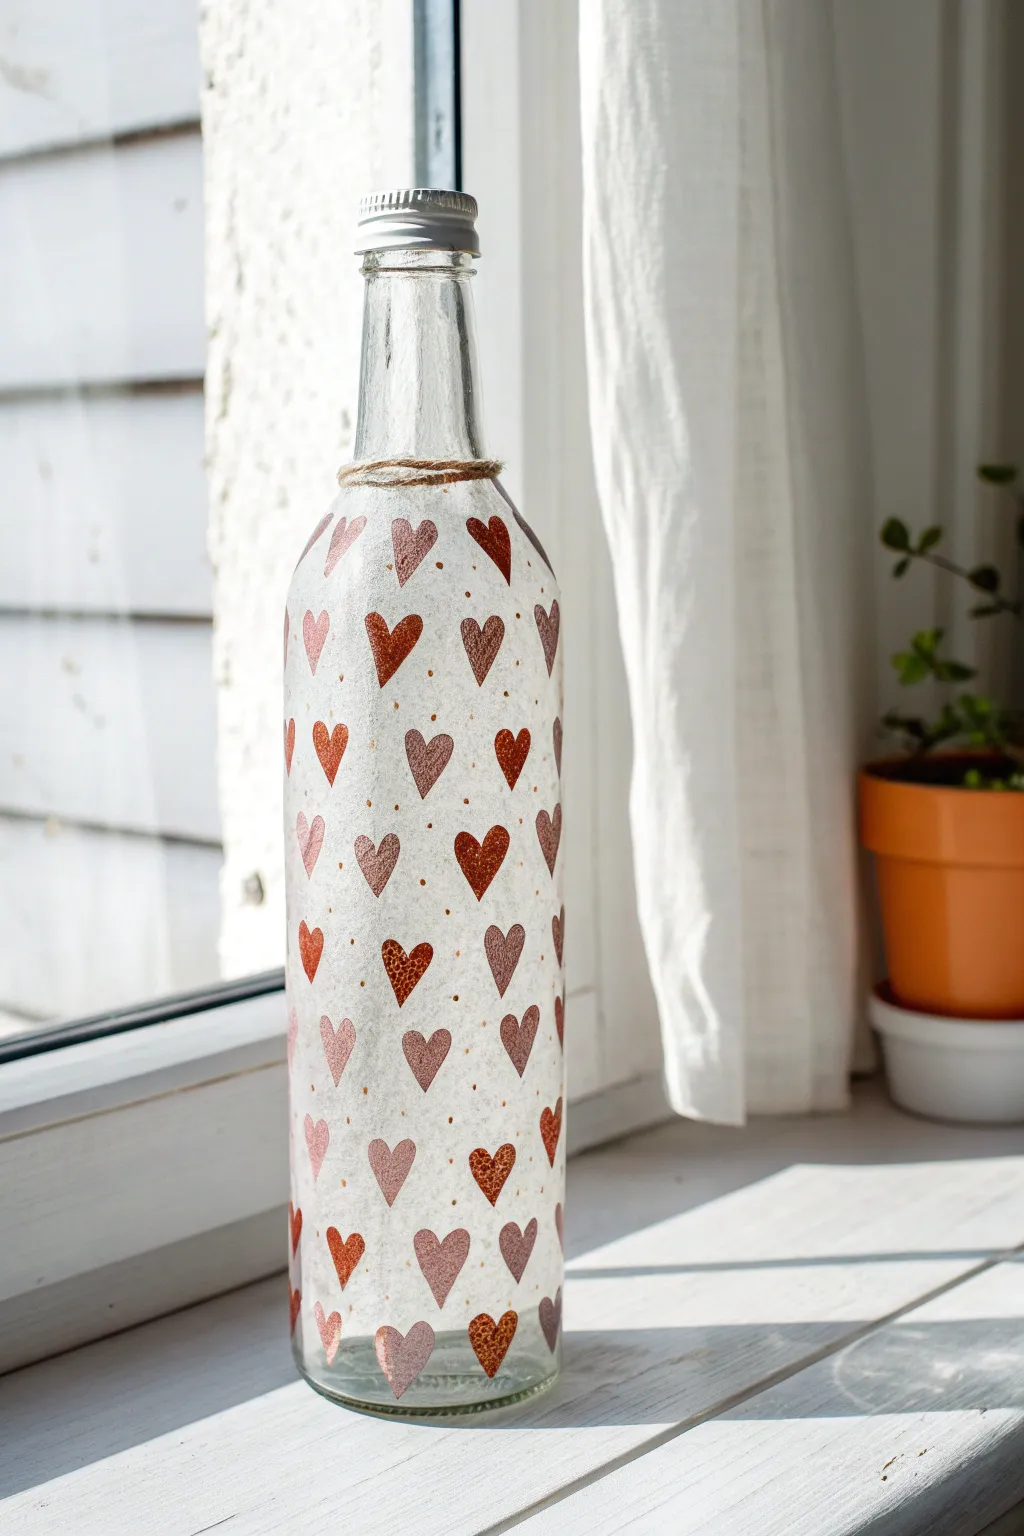
Transform a simple glass bottle into a charming piece of rustic decor with this delicate heart pattern project. The translucent paper finish gives the glass a frosted look, while the warm terracotta hearts add a cozy, handmade feel.
Detailed Instructions
Materials
- Clean glass bottle (recycled olive oil or soda bottle)
- White tissue paper (wrapping style)
- Mod Podge or white craft glue diluted with water
- Paintbrushes (one wide flat brush, one small detail brush)
- Acrylic paints (terracotta, brick red, burnt sienna, dusty pink)
- Scissors
- Jute twine
- Hot glue gun and glue sticks
Step 1: Preparing the Base
-
Clean the surface:
Start by thoroughly washing your glass bottle. Remove any existing labels by soaking the bottle in warm, soapy water and scrubbing away residue. Dry it completely. -
Measure the tissue:
Lay your white tissue paper next to the bottle. Roughly measure a piece large enough to wrap around the main body of the bottle, from the base to just below the neck. -
Tear the paper:
Instead of cutting straight edges, gently tear the tissue paper to size. This creates a softer, more organic edge that blends better onto the glass surface later. -
Apply the first layer:
Brush a thin layer of Mod Podge or diluted white glue directly onto the glass. Lay your tissue paper over the glue, smoothing it out gently with your fingers to minimize major wrinkles, though a few small creases add character. -
Seal the base:
Brush another coat of your adhesive over the top of the tissue paper to seal it. Let this base layer dry completely until it is no longer tacky to the touch.
Wrinkle Free
To reduce wrinkles when applying tissue paper, lay the paper on a plastic sheet first, wet it with glue mixture, then transfer it to the glass.
Step 2: Creating the Pattern
-
Practice your hearts:
Before painting on the bottle, practice painting simple hearts on a scrap piece of paper. Aim for a mix of sizes but generally keep them uniform, about the size of a thumbnail. -
Mix your palette:
Squeeze out small amounts of your acrylic paints. I like to mix the brick red with a touch of brown to get distinct earthy tones, creating variations for visual interest. -
Paint the first row:
Using your small detail brush, paint a row of hearts near the top of the tissue paper section. Leave about an inch of space between each heart. -
Create the repeating pattern:
Move down to paint text the next row. Offset these hearts so they sit in the spaces between the hearts in the row above, creating a classic polka-dot style layout. -
Vary the colors:
As you work your way down the bottle, switch between your different shades of red and brown. Some hearts can be solid opaque, while others can be slightly lighter for variety. -
Add detail dots:
Once the main hearts are painted, dip the very tip of your brush or a toothpick into a dark brownish-gold paint. Add tiny dots randomly in the empty spaces between the hearts to fill the negative space. -
Dry the paint:
Allow the painted hearts and dots to dry completely. This usually takes about 15 to 20 minutes depending on how thick your paint application was.
Add Sparkle
Mix a tiny pinch of fine gold glitter into your sealing coat of Mod Podge for a subtle shimmer that catches the light.
Step 3: Finishing Touches
-
Seal the artwork:
Protect your design by applying one final coat of Mod Podge over the entire painted area. This seals the paint and gives the bottle a uniform finish. -
Prepare the twine:
Cut a length of jute twine, roughly 12 to 15 inches long, to wrap around the neck of the bottle. -
Secure the twine:
Apply a small dab of hot glue to the back of the bottle neck. Press the end of the twine into the glue to anchor it. -
Wrap the neck:
Wind the twine tightly around the neck of the bottle about 3-4 times. Secure the end with another small dot of hot glue and trim any excess. -
Replace cap (optional):
If you kept the original metal screw cap, screw it back on for a complete look, or leave it off if you plan to use the bottle as a vase.
Place your lovely new bottle on a windowsill where the sunlight can filter through the tissue paper for a glowing effect


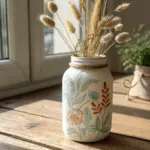
Leafy Vines That Forgive Every Wiggly Line
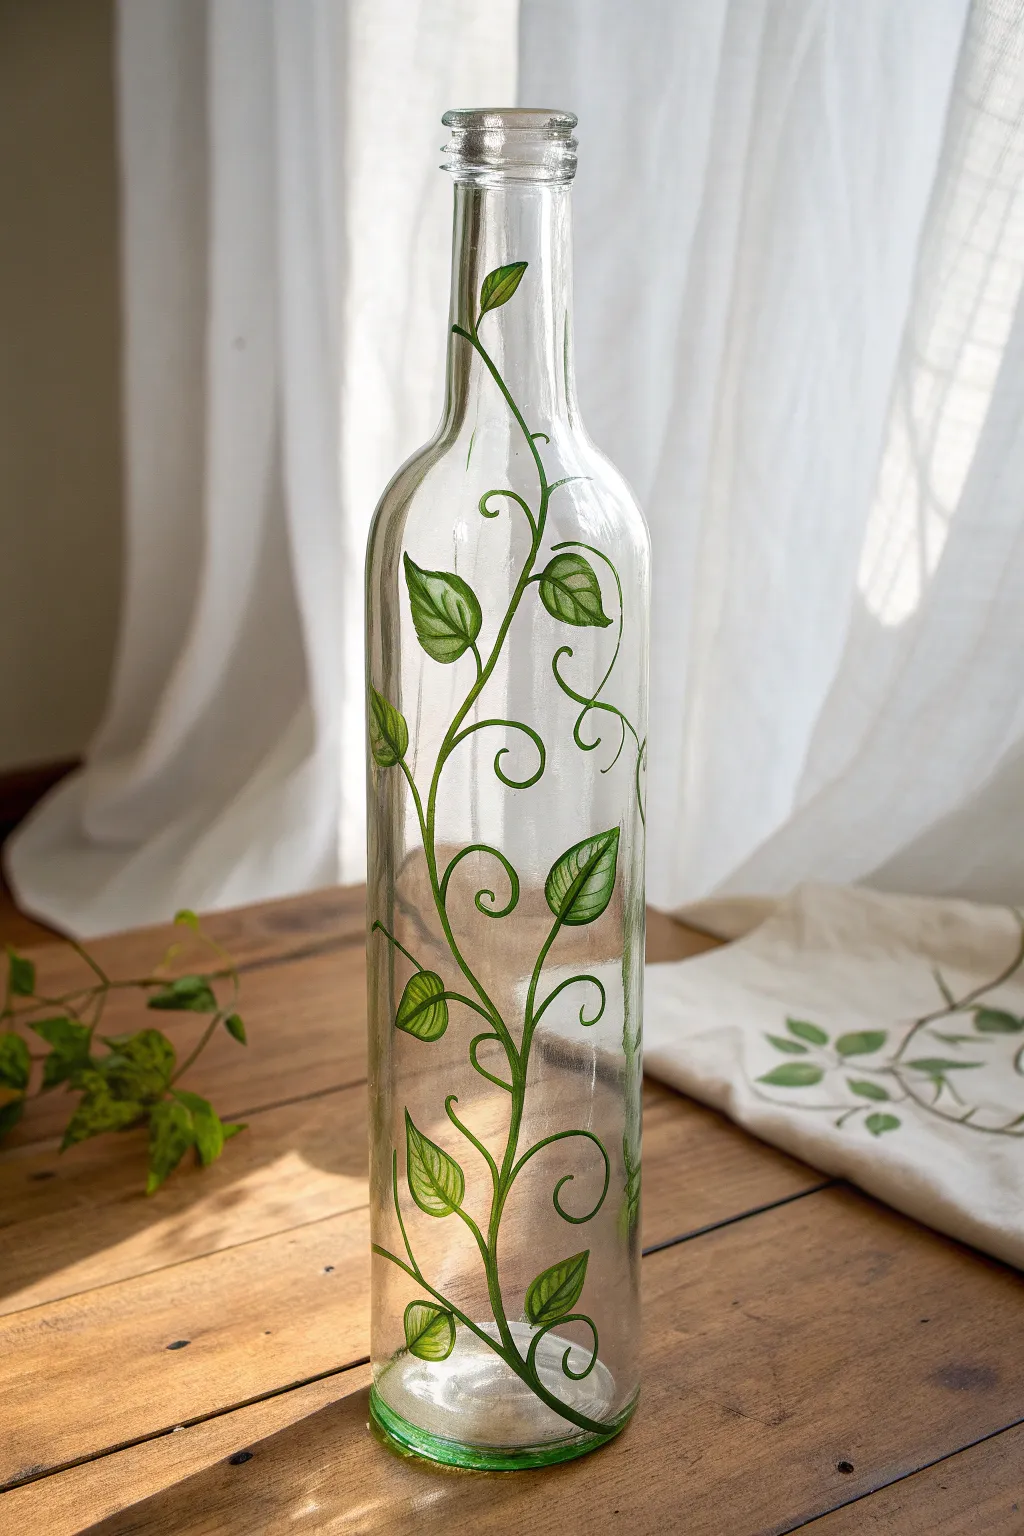
Transform an empty glass bottle into a charming piece of rustic decor with this forgiving painting project. The swirling vines and simple leaf shapes embrace loose hand movements, making this perfect for beginners who want a breezy, organic look.
Step-by-Step Tutorial
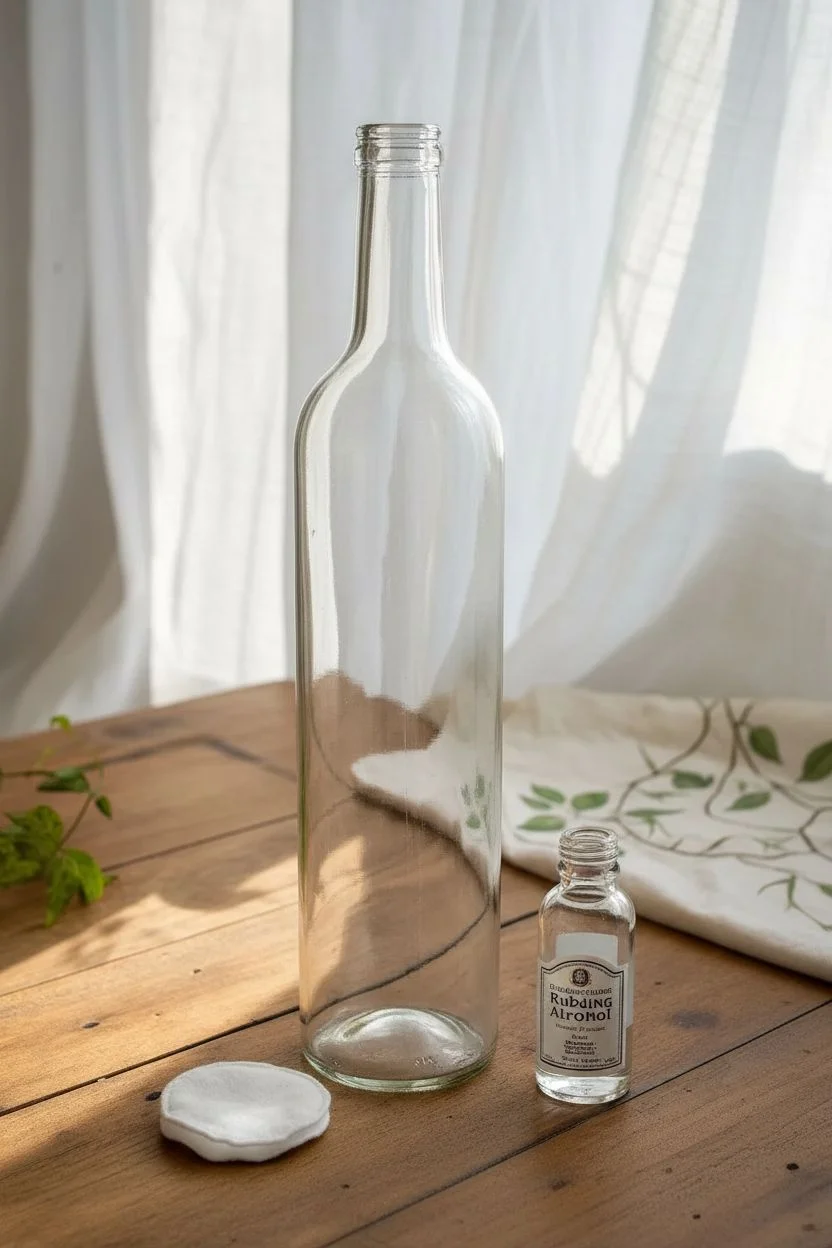
Materials
- Clean, clear wine bottle (label removed)
- Rubbing alcohol and cotton pad
- Green glass paint or multi-surface acrylic paint (emerald or sap green)
- Fine liner brush (size 0 or 00)
- Small round brush (size 2 or 3)
- Paper plate or palette
- Paper towels
- Water cup for rinsing
- Oven (optional, if using bake-to-set paints)
Step 1: Preparation
-
Clean the canvas:
Start by ensuring your bottle is perfectly clean. Soak it in warm soapy water to remove any labels and adhesive residue. -
Degrease the surface:
Wipe the entire exterior of the glass with rubbing alcohol on a cotton pad. This step is crucial because oils from your fingers can prevent the paint from adhering properly.
Paint Slipping?
If paint is sliding off the glass, your brush might be too wet or the glass too oily. Clean again with alcohol and try using slightly thicker paint without adding water.
Step 2: Painting the Vine Structure
-
Load the liner brush:
Squeeze a small amount of green paint onto your palette. Dip your fine liner brush in, rolling it slightly to keep the bristles pointed and loaded with paint. -
Start the main stem:
Starting near the bottom of the bottle, paint a long, wavy line climbing upward. Don’t worry about making it straight; natural vines are irregular. -
Add sweeping curves:
Instead of a single line straight up, let the vine curve dramatically to the left and right as it ascends the bottle neck. -
Paint secondary tendrils:
From the main vine, pull out smaller, curling lines. Create little loops or ‘C’ shapes that mimic the tendrils plants use to grab onto trellises. -
Branch out:
Add a few alternate branches splitting off the main stem to fill empty negative spaces on the glass.
Two-Tone Leaves
Mix a tiny bit of yellow or white into your green for half of each leaf. This creates a sunlight effect and adds instant dimensional depth to your vines.
Step 3: Adding the Leaves
-
Switch brushes:
Switch to your small round brush (size 2 or 3) for the foliage. This brush holds more paint and naturally creates a tear-drop shape. -
Paint the first leaf:
Place the tip of the brush on a vine branch, press down gently to widen the stroke for the leaf body, and then lift up as you pull away to create a sharp point. -
Vary the direction:
Paint leaves pointing in different directions along the vine. Some should angle up, others out to the side. -
Outline the leaves:
I like to go back with the fine liner brush and add a very thin, darker outline to some leaves if the paint looks too flat, but this is optional. -
Add leaf veins:
Using the very tip of your fine liner brush and a tiny amount of paint, draw a central vein down the middle of the larger leaves for added detail. -
Review the composition:
Step back and look at the bottle. If a spot looks too empty, add a small floating leaf or a tiny curly tendril to balance it out. -
Clean up edges:
If you made any marks you don’t like, quickly wipe them away with a damp cotton swab before the paint sets.
Step 4: Curing the Artwork
-
Air drying:
Let the bottle sit undisturbed for at least 1 hour until it is dry to the touch. Most glass paints require 24 hours to fully cure by air. -
Baking (if applicable):
Check your paint bottle instructions. If it requires baking for durability, place the bottle in a cool oven, set the temp (usually 350°F or 176°C), bake for 30 minutes, and let it cool completely inside the oven.
Place your beautiful new bottle near a window where the light can shine through your painted vines
BRUSH GUIDE
The Right Brush for Every Stroke
From clean lines to bold texture — master brush choice, stroke control, and essential techniques.
Explore the Full Guide
Abstract Blobs With Minimal Line Details
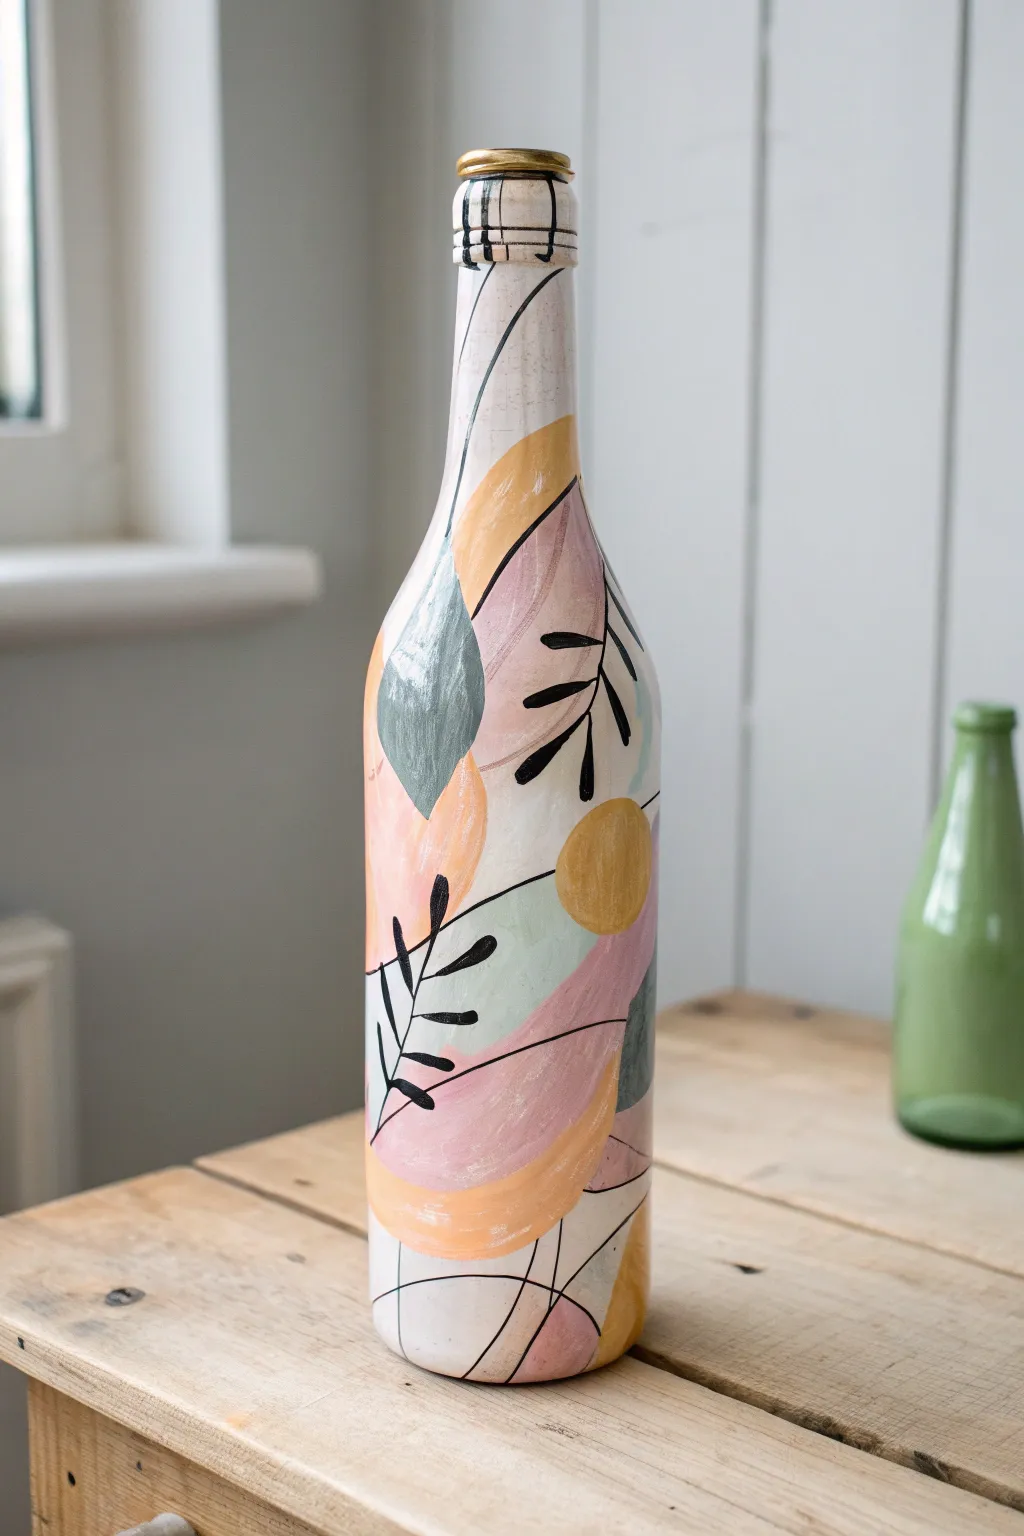
Transform a plain glass bottle into a piece of modern art with this relaxing abstract design. Combining soft, organic shapes in earthy pastels with crisp black botanical lines creates a trendy, high-end look that is surprisingly simple to achieve.
How-To Guide
Materials
- Clean glass bottle (labels removed)
- White gesso or primer
- Acrylic paints (mustard yellow, dusty pink, sage green, slate blue, peach)
- White acrylic paint (for mixing)
- Flat shader brush (medium size)
- Fine liner brush or black acrylic paint marker
- Matte spray varnish or sealant
- Palette or paper plate
- Water cup and paper towels
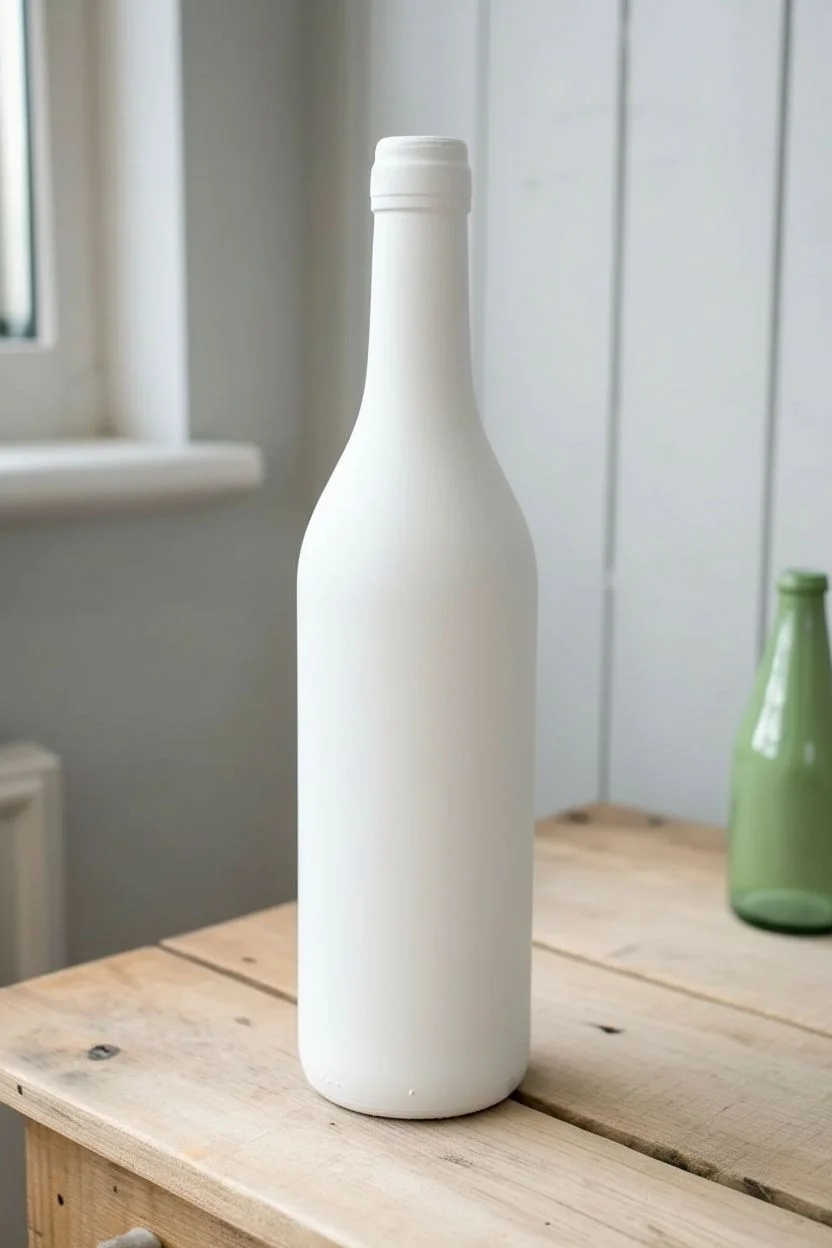
Step 1: Base Preparation
-
Clean and Dry:
Begin by thoroughly washing your glass bottle with warm soapy water to remove any grease or label residue. Dry it completely with a lint-free cloth. -
Prime the Surface:
Apply a coat of white gesso or primer over the entire exterior of the bottle. This step is crucial because glass is slippery, and regular acrylics need a toothy surface to grip onto. -
Let it Cure:
Allow the primer to dry fully according to the manufacturer’s instructions. Keep the bottle upside down on a stick or pencil if you want to paint the very bottom edge without smudging. -
Apply Base Coat:
Once primed, paint the entire bottle with a layer of white acrylic paint (a slightly off-white or cream works wonderfully too). This provides a clean, neutral canvas for your colors. -
Second Base Coat:
If the first coat looks streaky, apply a second layer of white paint. Let this base dry completely before moving on to the colored shapes.
Paint Peeling Off?
If paint scrapes off easily, the glass wasn’t clean or the primer didn’t cure. Lightly sand smooth glass before priming for better grip.
Step 2: Painting the Blobs
-
Mix Your Palette:
Squeeze out your acrylic colors. To achieve that trendy muted look, I like to mix a tiny dot of white or a speck of grey into bright colors to tone them down into pastels and earth tones. -
First Abstract Shape:
Load your flat shader brush with your first color, perhaps the dusty pink. Paint a large, organic kidney-bean or oval shape on the side of the bottle. Don’t worry about perfect edges. -
Add Variation:
Rinse your brush and switch to a mustard yellow. Paint a semi-circle or curved blob near the neck of the bottle, letting it float independently of the pink shape. -
Layering Colors:
Continue adding shapes with sage green and slate blue. Feel free to let some shapes slightly overlap others if the first layer is dry, but keeping them separate creates a nice spacious feel. -
Fill the Gaps:
Look for empty white spaces and fill them with smaller peach or light grey accents. The goal is a balanced composition, not total coverage. -
Dry Time:
Allow the painted blobs to dry thoroughly. They must be completely dry to the touch before you add the line work, or the black ink will bleed.
Step 3: Line Detail & Finish
-
Plan Your Lines:
Visualize where you want your black details. The lines should weave in and out of the colored shapes, connecting the composition together. -
Draw Botanical Stems:
Using a black paint marker (or a very fine liner brush with thinned black paint), draw simple leaf stems. A central line with small, almond-shaped leaves branching off looks elegant. -
Add Abstract Curves:
Draw long, sweeping curved lines that travel across the bottle, intersecting the color blobs. These lines shouldn’t depict anything specific, just movement. -
Detailing:
Add smaller details like dots or tiny circles near your botanical shapes to add texture and visual interest. -
Rim Detail:
For a polished look, carefully paint a ring or add line details around the very top rim of the bottle neck. -
Seal the Art:
Once all paint and ink is totally dry (give it a few hours), take the bottle to a well-ventilated area and apply a clear matte spray varnish to protect your work from scratches.
Textured Touch
Mix a teaspoon of baking soda into your acrylic paints before applying the blobs. This creates a terracotta-like texture for a ceramic look.
Place your finished bottle on a sunny shelf or use it as a vase for dried flowers to enjoy your handiwork
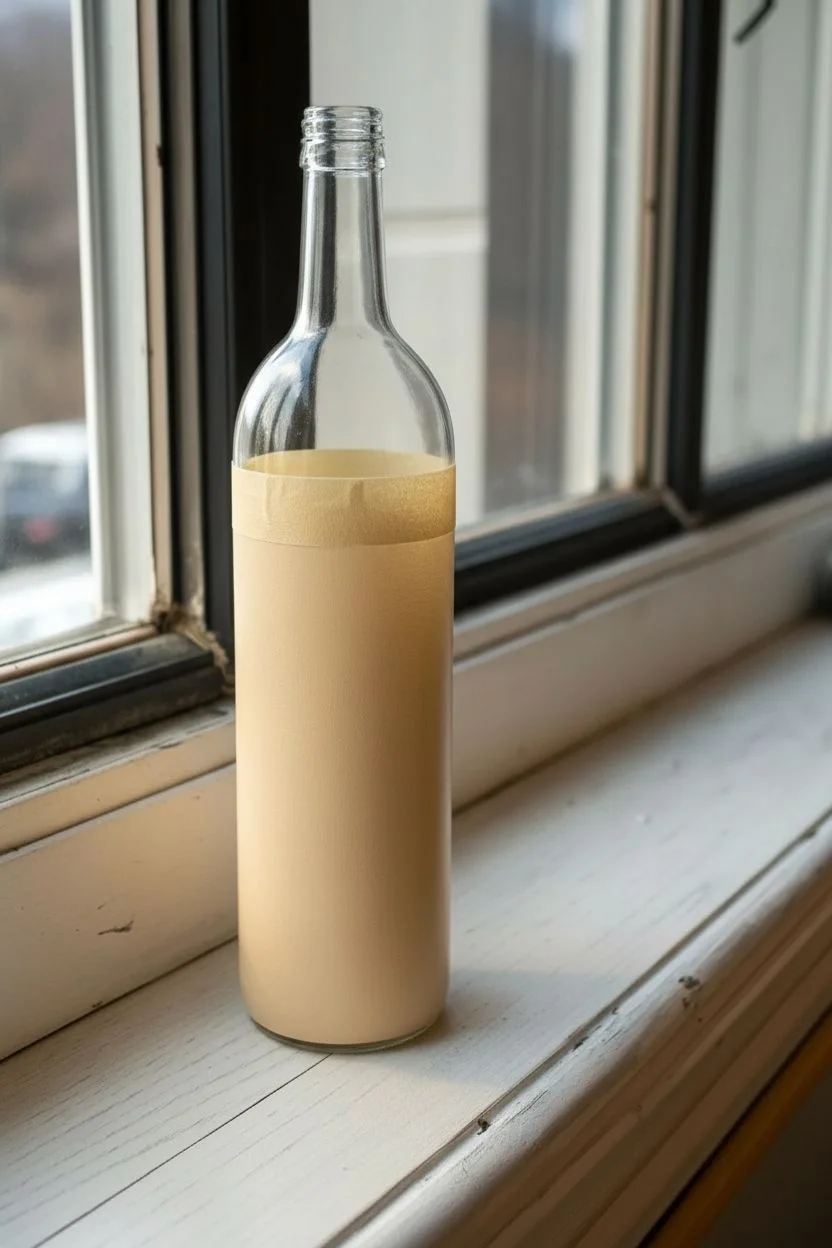
Minimal Mountain Silhouette Around the Bottle
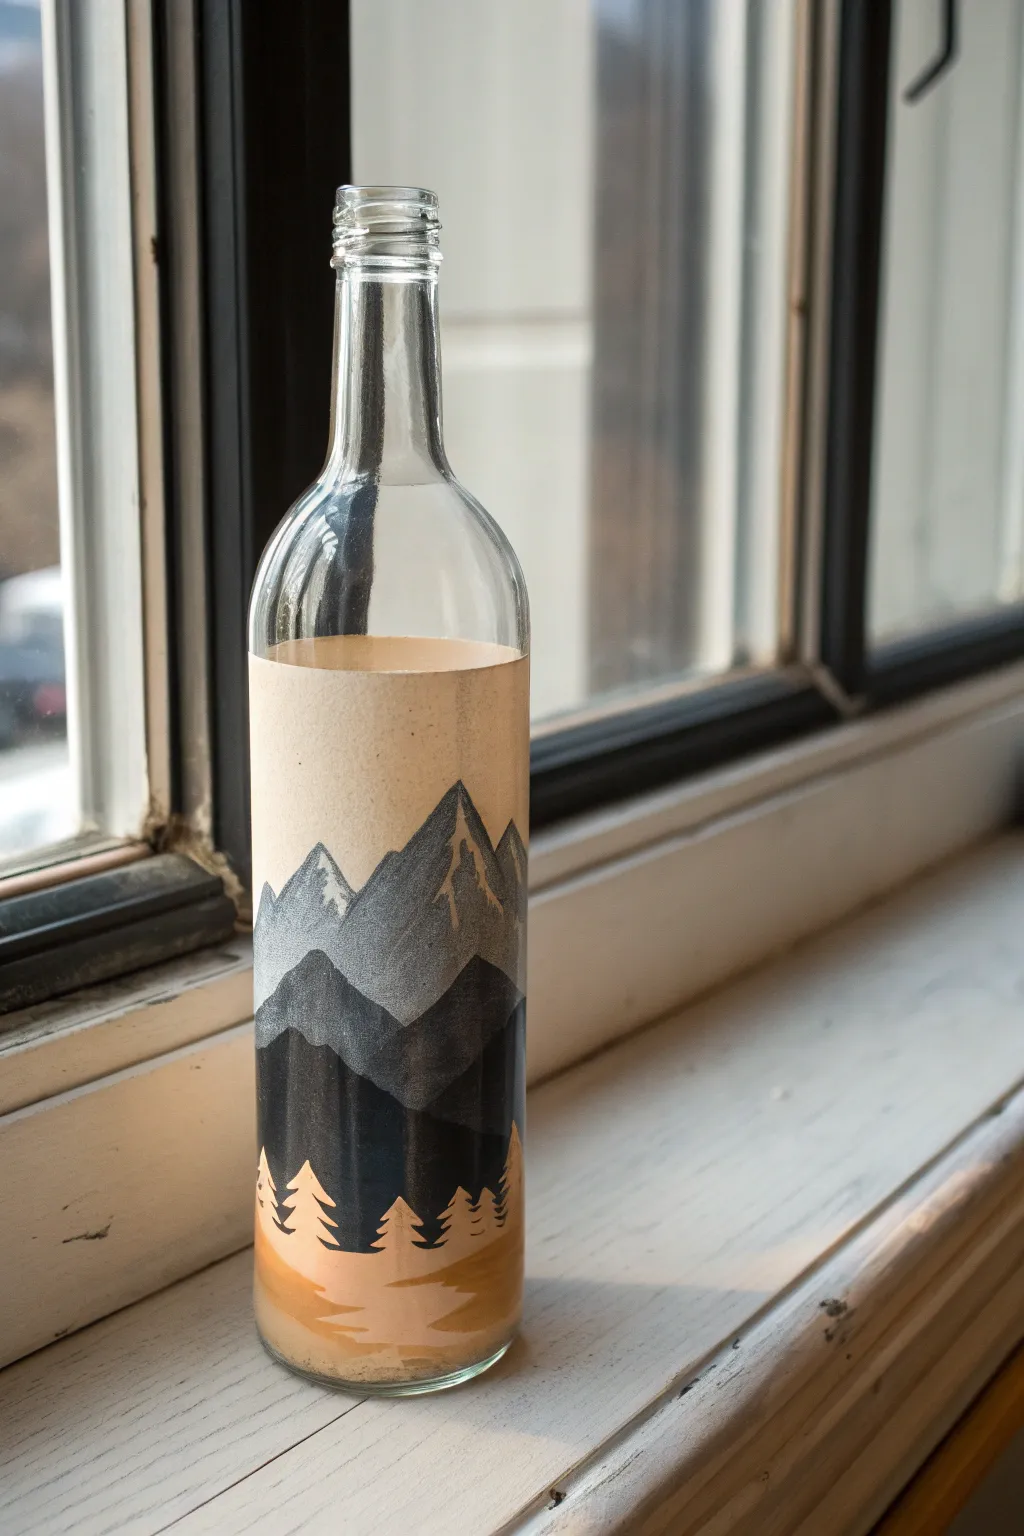
Transform a plain glass bottle into a serene mountain escape with this layered painting project. Featuring soothing earth tones, sharp geometric peaks, and a cozy forest silhouette, this design brings a touch of modern cabin aesthetic to any shelf.
Detailed Instructions
Materials
- Clean, clear wine bottle (label removed)
- Rubbing alcohol
- Acrylic paints (Titanium White, Mars Black, Burnt Sienna, Yellow Ochre, Raw Umber)
- Medium flat synthetic brush
- Small round detail brush (size 0 or 1)
- Painter’s tape or masking tape
- Palette or paper plate
- Cup of water and paper towels
- Clear matte varnish (spray or brush-on)
Step 1: Preparation & Background
-
Clean the surface:
Begin by thoroughly washing your bottle with warm soapy water to remove any label residue. Wipe the entire surface down with rubbing alcohol on a paper towel to remove oils and fingerprints, ensuring the paint adheres properly. -
Define the canvas area:
Decide how high you want your artwork to go. Apply a strip of painter’s tape horizontally around the upper middle of the bottle to create a crisp top edge for your design. -
Mix the sky color:
Process a creamy beige tone for the background. Mix a large amount of Titanium White with a tiny dot of Burnt Sienna and a touch of Yellow Ochre. You want a very pale, warm parchment color. -
Paint the base layer:
Using a flat brush, paint the entire area below your tape line with this beige mixture. You will likely need two or three coats to get full opacity on glass, letting each coat dry completely in between.
Glass Grip Tip
If you find your paint looks streaky or slides around on the first coat, dab the paint on with a sponge instead of brushing. This creates texture and grip for subsequent layers.
Step 2: Layering the Mountains
-
Mix the distant grey:
Create a light, cool grey for the furthest mountains. Mix White with a small drop of Black. Adding a tiny touch of blue is optional if you want a cooler tone, but keep it subtle. -
Paint the first peaks:
Paint two or three triangular shapes about a third of the way down from your tape line. These represent the distant peaks. I like to keep the edges slightly ragged or varied so they look like rock faces rather than perfect pyramids. -
Add highlights:
While the grey is drying, mix a slightly lighter version of it. Use your small round brush to add ‘snow’ or light hitting the right side of the mountain peaks. Keep these strokes minimal and jagged. -
Create the mid-ground grey:
Mix a darker charcoal grey. This should be significantly darker than your first layer but not yet pure black. You can add a speck of Raw Umber to warm it up slightly. -
Paint the second mountain range:
Paint a new layer of mountains overlapping the first set, positioned slightly lower. Make these shapes broader and softer to create depth. -
Paint the foreground peaks:
For the closest mountain layer, use a very dark grey (almost black). Paint large, sweeping mountain shapes that cover the bottom third of your painted area, creating a dark backdrop for the trees.
Step 3: The Forest Floor
-
Paint the ground:
Mix a golden tan color using Yellow Ochre, Burnt Sienna, and White. Paint a rolling landscape at the very bottom of the bottle, overlapping the base of your dark mountains. -
Add water reflection details:
Using a slightly lighter version of your ground color, paint horizontal, wavy lines near the bottom to suggest a reflection on a lake or river surface. -
Start the tree line:
Switch to your smallest detail brush and pure Mars Black paint. Along the top edge of your golden ground layer, paint a horizontal line to anchor your trees. -
Detail the pines:
Paint small vertical lines rising from the baseline. Then, using tiny horizontal dabbing motions, create the branches of pine trees. Make them wider at the bottom and taper them to a point at the top. -
Vary sizes:
Ensure the trees vary in height and spacing to look natural. Group a few together and leave some gaps to let the mountain background peek through.
Level Up: Starry Night
Before removing the tape, use an old toothbrush to flick tiny specks of white paint across the upper ‘sky’ portion of the beige background to create a subtle starry effect.
Step 4: Finishing Touches
-
Remove the tape:
Once the paint is dry to the touch but not fully cured, carefully peel off the top masking tape at a 45-degree angle to reveal a clean edge. -
Touch ups:
Inspect the edges where you removed the tape. If any paint bled underneath, gently scrape it away with a toothpick or clean it up with a damp cotton swab. -
Seal the artwork:
Allow the bottle to dry for at least 24 hours. Once fully cured, apply a coat of clear matte varnish over the painted area to protect it from scratches and dust.
Place your new mountain bottle near a window where the light can highlight the layers of your landscape

PENCIL GUIDE
Understanding Pencil Grades from H to B
From first sketch to finished drawing — learn pencil grades, line control, and shading techniques.
Explore the Full Guide
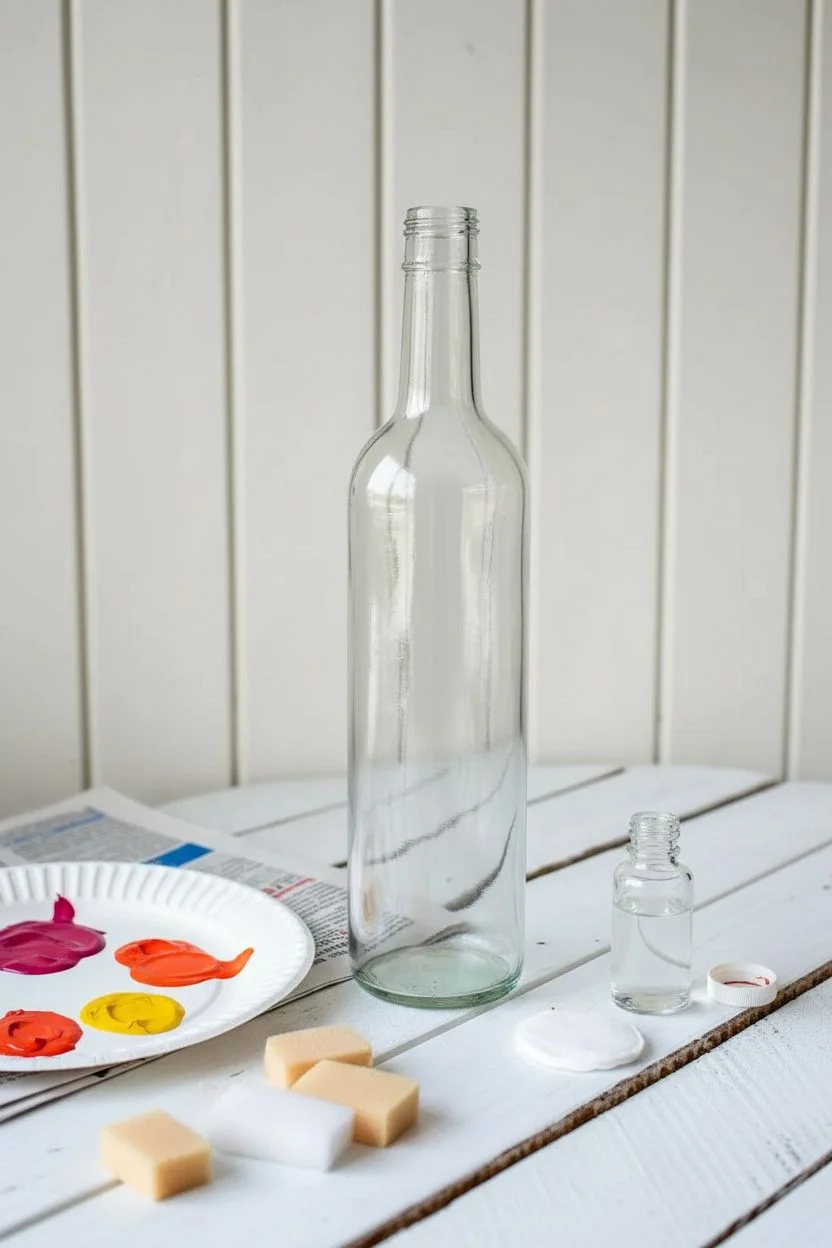
Sunset Ombre That Blends in Three Easy Steps
Transform a plain glass bottle into a warm, glowing decorative piece that captures the vibrant colors of a summer sunset. This project uses a sponge technique to create a seamless gradient from deep magenta to sunny yellow.
How-To Guide
Materials
- Clean glass bottle (label removed)
- Rubbing alcohol
- Cotton pads
- Acrylic craft paints (Deep Magenta, Bright Orange, Sunny Yellow)
- Makeup sponges or small craft sponge wedges
- Paper plate or palette
- Clear acrylic sealer (glossy spray)
- Small paintbrush (for touch ups)
- Newspaper or drop cloth
Step 1: Preparation
-
Clean the Surface:
Begin by ensuring your bottle is completely free of adhesive residue and oils. Wipe the entire exterior surface down with rubbing alcohol and a cotton pad. Let it air dry for a moment. -
Set Up Your Palette:
Squeeze a generous dollop of magenta, orange, and yellow paint onto your paper plate. Leave a little space between each color initially. -
Mix Transition Shades:
To make blending easier later, mix a small amount of magenta and orange together to create a reddish-orange hue. Do the same with the orange and yellow to create a golden marigold color.
Step 2: Creating the Ombre Base
-
Start at the Bottom:
Load a sponge wedge with the deep magenta paint. Dab the sponge straight up and down onto the bottom third of the bottle. -
Build Coverage:
Continue dabbing the magenta until you have a solid, consistent layer around the base. Don’t worry if it looks slightly textured; this adds to the frosted glass look. -
Apply the Middle Tone:
Take a fresh sponge and dip it into your bright orange paint. Apply this color to the middle section of the bottle, overlapping slightly with the top edge of the magenta section. -
Apply the Top Tone:
Using a third sponge, apply the sunny yellow paint to the upper straight section of the bottle, just before the neck starts to curve inward. -
Address the Neck:
For the neck of the bottle, go back to your magenta or a mix of magenta and orange. Carefully sponge this color onto the neck and rim to create a bookended color effect.
Uneven Blending?
If the paint starts lifting while you blend, you are overworking it. Stop, let that section dry completely, and then fix the blend with a fresh, thin layer of paint on top.
Step 3: Blending the Gradient
-
Blend Magenta and Orange:
While the paint is still tacky, take your sponge with the reddish-orange mix. Gently dab along the line where the magenta and orange sections meet to blur the hard edge. -
Blend Orange and Yellow:
Use the sponge with the marigold mix (yellow/orange) to tap along the transition line between the orange and yellow sections. -
Refine the Gradient:
Step back and look at the bottle. If any lines look too stark, add a tiny bit of fresh paint to your sponge and tap lightly over the area until the colors melt into each other. -
Dry and Repeat:
Let the first layer dry completely—this usually takes about 20 minutes. I prefer to add a second coat following the exact same steps to ensure the colors are rich and opaque.
Add Some Sparkle
Once the paint is dry but before sealing, lightly sponge a layer of iridescent glitter varnish over the yellow section to mimic the shimmering sun.
Step 4: Finishing Touches
-
Inspect Coverage:
Hold the bottle up to a light source. If you see any accidental pinholes or thin spots, use a small paintbrush to dab a tiny amount of the correct color into the gap. -
Clean the Threads:
If you plan to re-cork the bottle or just want a cleaner look, adhere to a crisp line at the top rim. You can carefully wipe the screw threads clean with a damp cloth if paint got where it shouldn’t be. -
Seal the Project:
Take the bottle to a well-ventilated area. Apply a thin, even coat of clear glossy acrylic spray sealer. This protects the paint from scratching and gives it that beautiful glass-like shine. -
Final Cure:
Allow the sealer to cure for at least 24 hours before handling the bottle excessively or placing it on a display shelf.
Place your beautiful sunset bottle on a windowsill to let the light shine through those warm colors
Simple Stenciled Shapes for Crisp Edges

Transform a simple glass bottle into a chic decor piece using clean geometric shapes and a warm, earthy color palette. This project combines crisp triangles and delicate dots against a creamy matte background for a modern bohemian look.
Detailed Instructions
Materials
- Clean glass bottle (label removed)
- Cream or off-white acrylic paint (matte finish)
- Terra cotta/burnt orange acrylic paint
- Navy blue acrylic paint
- Flat shader paintbrush (medium width)
- Small round detail brush (size 0 or 1)
- Dotting tool or toothpick
- Pencil for sketching
- Spray sealer or varnish (matte or satin)
- Painter’s tape or stencil tape (optional)
Step 1: Base Preparation
-
Prepare the Glass:
Begin by washing your bottle thoroughly with warm soapy water to remove any grease or label residue. Wipe it down with rubbing alcohol to ensure the cleanest possible surface for paint adhesion. -
Apply the Base Coat:
Using your flat shader brush, apply a layer of cream acrylic paint over the entire exterior of the bottle, including the neck. -
Build Opacity:
Let the first coat dry completely. Apply a second, and possibly a third coat, until the glass is fully covered and the finish is opaque and smooth. Allow this base to cure for at least an hour.
Step 2: Drafting the Design
-
Mark Horizontal Guides:
Lightly sketch horizontal rings around the bottle using a pencil. These will serve as the baselines for your triangle rows. Create one ring at the neck, two in the middle section, and two near the base. -
Plan the Triangles:
Lightly pencil in the triangular shapes along your guide lines. Aim for uniform sizing, but don’t stress about perfection; the hand-painted look adds charm.
Uneven Lines?
If freehand painting is difficult, create a makeshift stencil by cutting a triangle shape out of a piece of painter’s tape or cardstock to guide your brush.
Step 3: Painting the Neck Pattern
-
Paint Orange Triangles:
Start at the neck. load your small detail brush with terra cotta paint and fill in the upward-pointing triangles you sketched comfortably. -
Add Neck Details:
Once the orange triangles assume a dry matte finish, dip your dotting tool into the navy blue paint. Add a small dot between the peaks of the triangles, and a row of tiny dots along the bottom edge of this band.
Texture Twist
Mix a teaspoon of baking soda into your cream base paint before applying. This creates a grainy, ceramic-like texture that makes the bottle look like real pottery.
Step 4: The Central Bands
-
Create the Navy Row:
Moving to the upper-middle section, paint a row of inverted (downward-pointing) triangles using the navy blue paint. Keep your edges as sharp as possible with the detail brush. -
Dot the Navy Band:
Using the dotting tool, place a single navy dot between each triangle at the top edge, and a continuous line of dots beneath the points of the triangles. -
Paint the Dual-Color Band:
Below the navy row, paint a band of alternating triangles. Paint the downward-pointing ones in navy blue first, spacing them out to leave room for the orange ones. -
Fill in Orange Triangles:
Fill the gaps in this row with upward-pointing terra cotta triangles. The points of the blue and orange triangles should nestle next to each other without touching.
Step 5: The Base Design
-
Paint Large Orange Triangles:
Near the bottom, paint a row of larger, inverted orange triangles. These anchor the design with a bold splash of color. -
Add the Bottom Navy Row:
Below the large orange shapes, paint a final row of upward-pointing navy blue triangles. -
Paint the Stripe:
Carefully paint a thin, continuous orange stripe horizontally across the very bottom of the navy triangles. I find rotating the bottle while holding the brush steady helps get a straight line. -
Final Dot Details:
Finish the painting phase by adding a row of navy dots beneath the orange stripe near the very base of the bottle.
Step 6: Finishing Touches
-
Erase Guide Lines:
Once you are absolutely certain the paint is bone dry (give it a few hours), gently erase any visible pencil marks. -
Seal the Work:
Apply a spray varnish or sealer over the bottle. A matte finish works best to maintain that unglazed pottery aesthetic shown in the photo.
Place your finished bottle on a shelf or use it as a single-stem vase to show off your handiwork


Speckled “Terrazzo” Dots for Trendy Texture
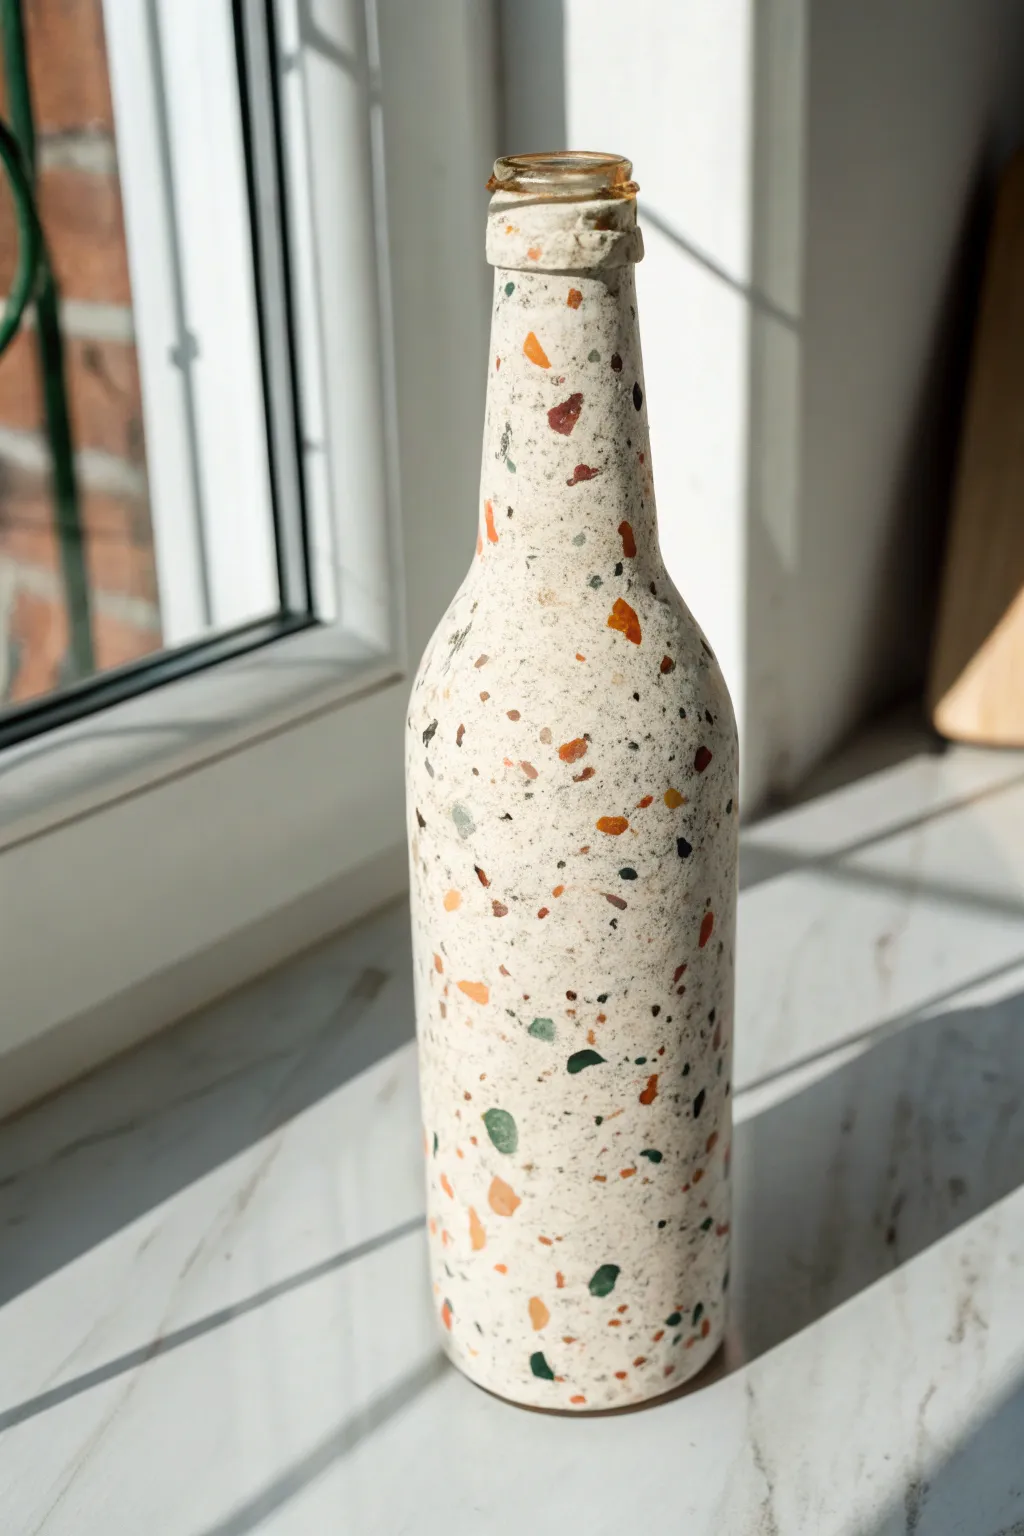
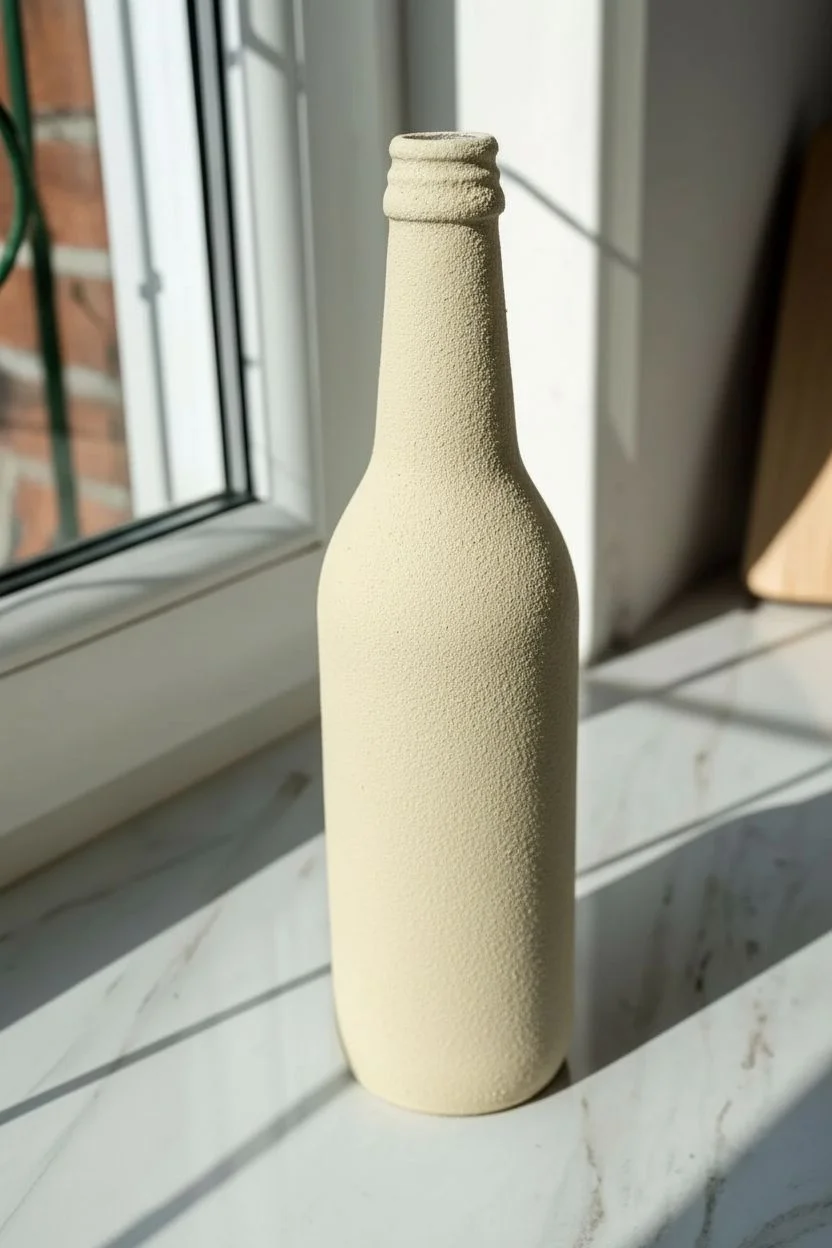
Transform a plain glass bottle into a trendy piece of decor that mimics the classic look of terrazzo stone. With a sandy, textured base and colorful, irregular chips, this upcycled project adds a sophisticated, architectural vibe to any shelf.
How-To Guide
Materials
- Clean glass bottle (label removed)
- Rubbing alcohol
- Primer spray paint (white or grey)
- Stone-texture spray paint (cream or off-white)
- Acrylic paints (terracotta, burnt sienna, dark green, black, grey)
- Fine detail paintbrush or toothpick
- Paper plate or palette
- Clear matte sealer spray
Step 1: Prepping the Base
-
Clean the surface:
Start by thoroughly washing your glass bottle with warm soapy water to remove any label glue residue. -
Degrease the glass:
Wipe the entire exterior of the bottle with rubbing alcohol on a lint-free cloth or paper towel to remove oils that might repel paint. -
Prime the glass:
Spray a thin, even coat of primer over the entire bottle. This helps the textured paint adhere properly and prevents it from sliding off the slick glass. -
Let the primer cure:
Allow the primer to dry completely according to the can’s instructions, usually about an hour. -
Apply texture base:
Shake your stone-texture spray paint vigorously. Apply a light coat over the primed bottle, holding the can about 10-12 inches away. -
Build opaque coverage:
Once the first coat is tacky but dry, apply a second coat of the textured spray to ensure the glass is fully hidden and the sandy ‘stone’ look is consistent. -
Dry completely:
Let the bottle sit overnight or for at least 4-6 hours so the textured base hardens fully before you start painting details.
Paint won’t stick?
If acrylics slide off the textured spray, the base coat might be too slick or wet. Let it cure longer, or lightly dab paint on rather than dragging the brush.
Step 2: Painting the Terrazzo Chips
-
Prepare your palette:
Squeeze dime-sized amounts of your acrylic paints onto a paper plate. Stick to earthy tones like terracotta, burnt sienna, deep green, and black to match the photo. -
Start with largest shapes:
Using a fine detail brush, paint small, irregular polygon shapes with your terracotta color. Avoid making perfect circles; think jagged little rocks. -
Space them out:
Scatter these orange shapes randomly around the bottle, leaving plenty of empty space between them for other colors. -
Add secondary colors:
Clean your brush and switch to the burnt sienna or dark red. Paint similar irregular ‘chips’ in the gaps, varying the sizes slightly. -
Incorporate cool tones:
Using the dark green paint, add a few scattered shapes. I like to make these slightly smaller than the orange ones for visual variety. -
Add contrast with darks:
Use black or dark grey to add the smallest chips. These act as tiny pebbles in the mix and add depth to the pattern. -
Check density:
Step back and look at the bottle. Fills in any large empty voids with a tiny speck or two to balance the composition. -
Create texture depth:
Allow the paint shapes to dry fully. If any look too transparent, dab a second layer of paint on top of that specific shape. -
Protect the artwork:
Once all paint is bone dry, spray the entire bottle with a clear matte sealer. This locks in the acrylics and protects the textured finish from chipping.
Natural stone look
For realistic terrazzo, overlap one or two shapes very slightly, or paint a tiny dot of a different color inside a larger chip to mimic complex minerals.
Place your new faux-stone vase near a window to let the texture catch the light
Twine-Wrapped Necks to Instantly Finish the Look
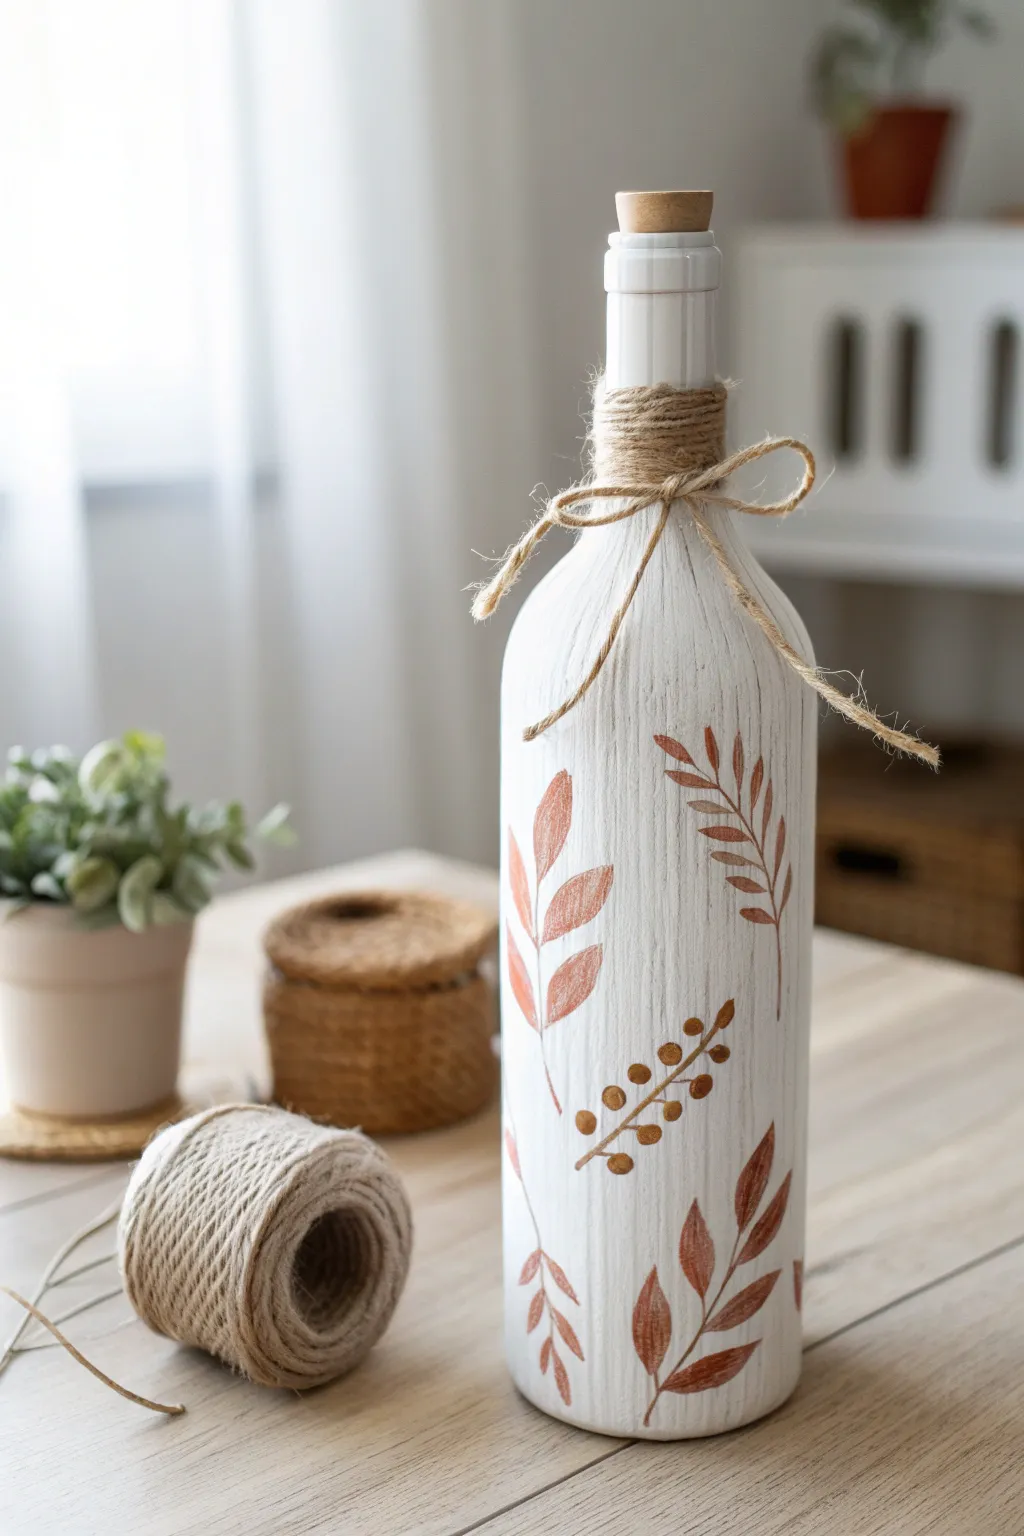
Transform a simple glass bottle into a charming piece of rustic decor featuring hand-painted botanical motifs. The textured, chalk-finish background provides the perfect canvas for warm, earthy leaf designs, while a simple twine wrapping adds that essential farmhouse finishing touch.
Step-by-Step
Materials
- Clean glass wine bottle (labels removed)
- White or cream chalk paint
- Rubbing alcohol
- Paint sponge or foam dabber
- Small round paintbrushes (sizes 2 and 4)
- Acrylic paints (terracotta, burnt sienna, metallic bronze, gold)
- Jute twine
- Hot glue gun and clear glue sticks
- Cork stopper
- Clear matte sealer spray (optional)
Step 1: Preparing the Canvas
-
Clean the surface:
Begin by thoroughly washing your glass bottle with warm soapy water to remove any label residue. Once dry, wipe the entire surface with rubbing alcohol to ensure the paint adheres perfectly without peeling. -
Apply the base coat:
Pour some white chalk paint onto a palette or paper plate. Using a paint sponge or foam dabber, apply the paint to the bottle using a straight up-and-down dabbing motion. -
Build texture:
The dabbing technique is key here—it creates that lovely, slightly rough surface texture visible in the photo rather than a smooth, brush-stroked finish. Cover the entire bottle up to the very top rim. -
Let it dry:
Allow this first coat to dry completely for at least one hour. Chalk paint dries quickly, but patience here prevents pulling up the first layer. -
Add a second coat:
Apply a second layer of chalk paint using the same dabbing motion. This will ensure solid opacity so no glass shows through. Let this layer dry fully, preferably overnight or for several hours.
Textured Base Tip
To get the vertical striated texture seen in the photo, lightly drag a dry, stiff-bristle brush vertically through the wet chalk paint immediately after dabbing it on.
Step 2: Painting the Botanicals
-
Plan the layout:
Visualize where your three main stems will go. In the project shown, the leaves are spaced loosely around the bottle, floating freely rather than growing from a single ground line. -
Paint the terracotta stems:
Dip a small round brush (size 2) into terracotta or burnt sienna acrylic paint. Paint thin, slightly curved stems intermittently around the bottle. -
Add the red leaves:
Using the same brush, add small, pointed oval leaves to these stems. Press down near the stem and lift up as you drag outward to create a tapered point at the leaf tip. -
Create the berry stem:
Switch to a metallic bronze or dark gold paint. Paint a central stem line, then add small stems branching off alternating sides. -
Dot the berries:
Dip the back end of your paintbrush handle into the metallic paint and stamp dots onto the ends of the bronze branches to create perfectly round berries. -
Paint the larger ferns:
Using a slightly larger brush (size 4) and a reddish-brown color, paint longer, fern-like fronds. Create a long central spine and add rapid, short strokes angling upward on both sides. -
Add detail highlights:
I find that adding a tiny line of white or lighter orange down the center of the larger leaves helps give them dimension and separates them visually from the textured background. -
Seal the work:
Once your botanical designs are completely dry (give them about an hour), you can lightly spray the bottle with a clear matte sealer to protect the paint from chipping.
Add Subtle Shimmer
Mix a tiny drop of metallic gold paint into your terracotta color for the leaves. It won’t look glitzy, but it will catch the light beautifully on a mantle.
Step 3: Finishing Touches
-
Start the wrap:
Apply a small dot of hot glue to the back of the bottle neck, right where the curve begins to straighten out. Press the end of your jute twine into the glue. -
Wrap the neck:
Tightly wind the twine around the bottle neck, moving upward. Keep each loop snug against the previous one so no white bottle shows through the twine. -
Secure the top:
Continue wrapping until you are about a half-inch from the top rim. Cut the twine and secure the end with another small dot of hot glue on the back side. -
Tie the bow:
Cut a separate piece of twine, about 10 inches long. Tie this around the center of your wrapped section into a classic bow. This creates a cleaner look than trying to tie off the main wrapping strand. -
Insert the cork:
Finish the look by pressing a clean cork stopper into the top of the bottle.
Place your new decorative bottle on a shelf or side table to bring a touch of autumn warmth to your room
Simple Seasonal Motifs You Can Swap Anytime
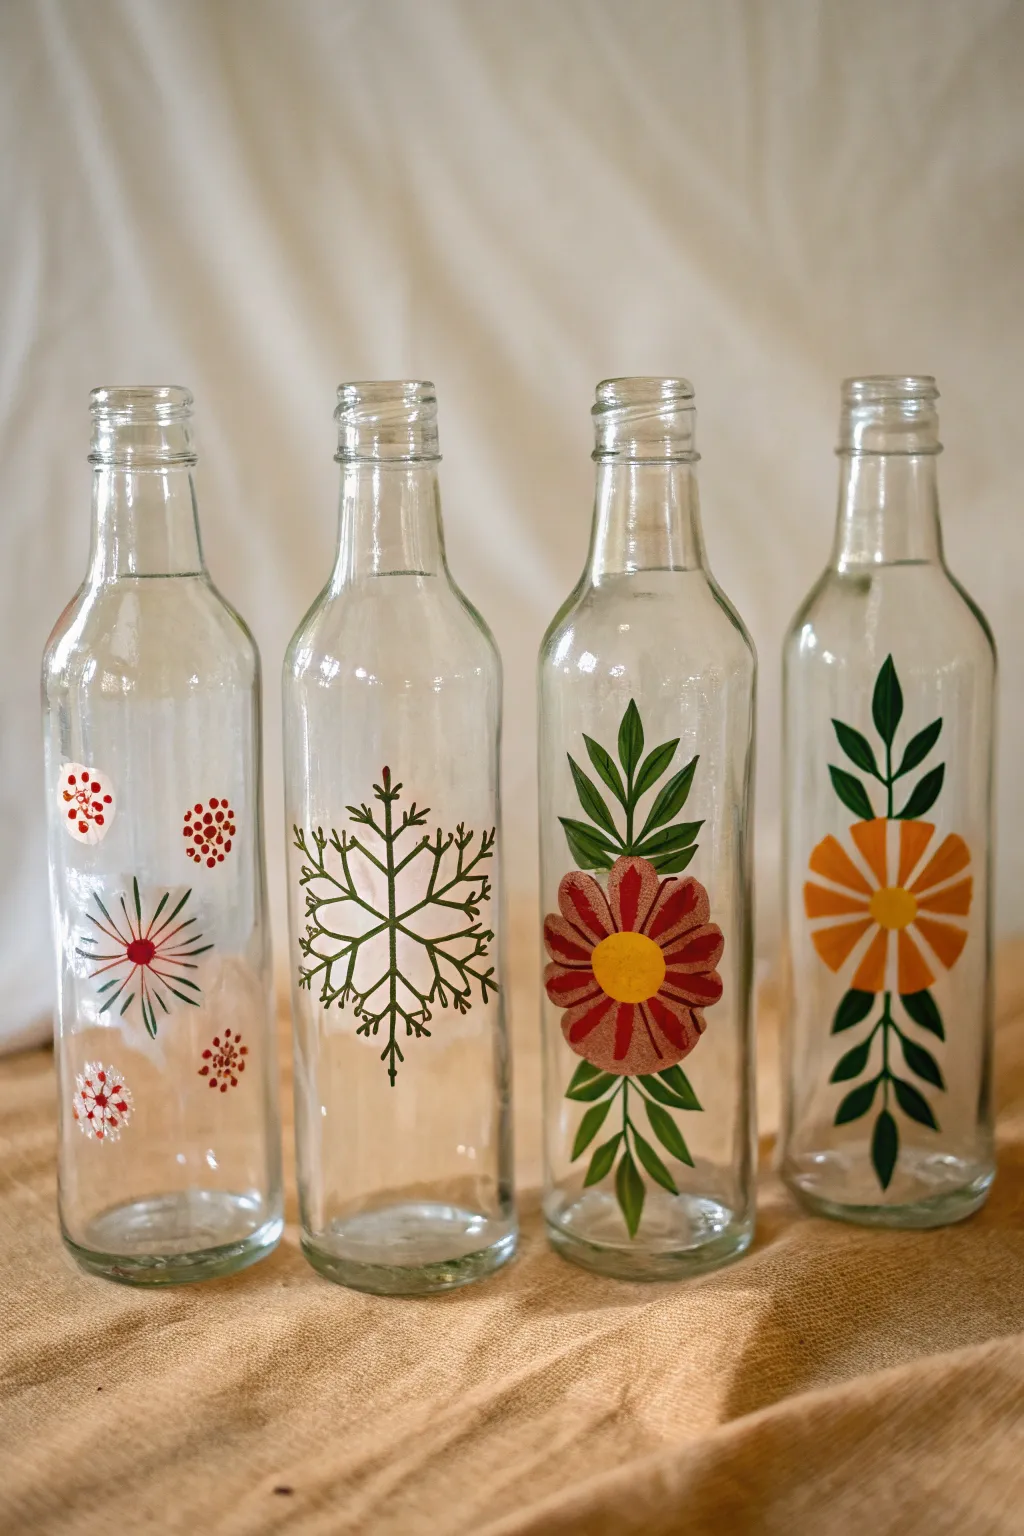
Transform ordinary glass bottles into a charming seasonal display with these four distinct hand-painted designs. From delicate winter snowflakes to vibrant summer blooms, these motifs use simple strokes to create elegant, transparent decor that catches the light beautifully.
Step-by-Step Tutorial
Materials
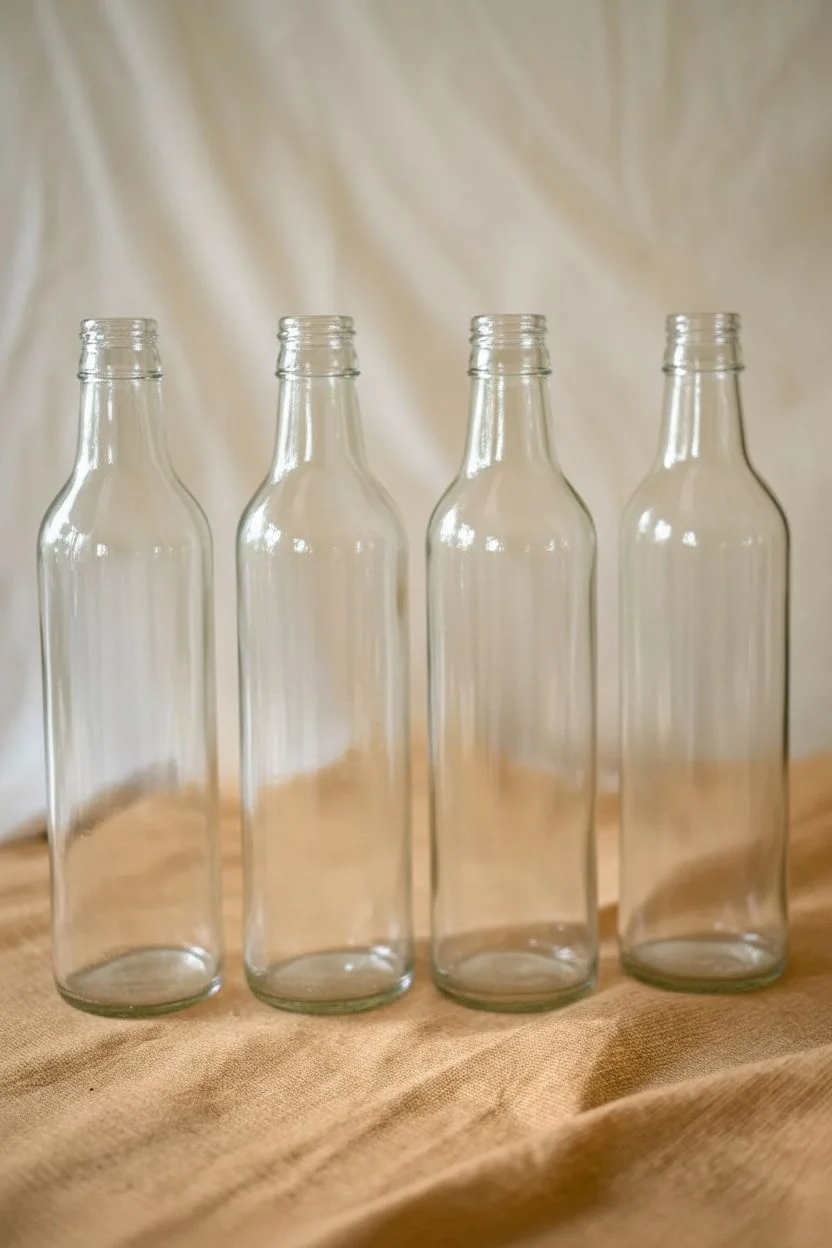
- 4 Clear glass bottles (wine or sauce bottles work well)
- Rubbing alcohol and cotton pads
- Glass paints or multi-surface acrylics (Red, Dark Green, Light Green, Yellow, Orange, White)
- Fine detail paintbrush (size 0 or 1)
- Small round paintbrush (size 2 or 4)
- Paper plate or palette
- Cotton swabs (for cleanup)
- Oven (optional, for curing)
Step 1: Preparation
-
Clean the surface:
Begin by thoroughly washing your glass bottles with warm floral soapy water to remove any labels or glue residue. -
Degrease the glass:
Wipe the entire exterior surface with rubbing alcohol on a cotton pad. This step is crucial because it removes oils from your fingers that could prevent the paint from adhering properly.
Step 2: Bottle 1: Winter Bursts
-
Paint the centers:
Using your fine brush and red paint, create a small central dot for your main flower burst on the lower third of the bottle. -
Add radiating lines:
Paint thin, straight lines radiating outward from the center dot in dark green and red, alternating colors to create a starburst effect. -
Create berry clusters:
Scatter groups of small red dots around the main burst. Paint these in tight circular clusters to resemble winter berries. -
Add white accents:
Once the red paint is tacky, add tiny white dots or another distinct berry cluster using white paint to brighten the composition.
Clean Lines Hack
Keep a damp cotton swab and a toothpick handy. Use the swab to wipe big mistakes and the toothpick to gently scrape away dried paint edges for sharper lines.
Step 3: Bottle 2: The Geometric Snowflake
-
Paint the main axis:
For the snowflake design, draw a long vertical line down the center of the bottle using dark green paint and a fine liner brush. -
Cross the lines:
Paint a horizontal line crossing the vertical one, followed by two diagonal lines intersecting at the same center point, creating an eight-pointed star structure. -
Add the connectors:
Connect the tips of adjacent radiating lines with V-shapes (chevrons) pointing outward. Repeat this closer to the center to create that intricate crystalline look.
Seasonal Switch
Fill the bottles with water and insert real stems that match the paintings—pine sprigs for winter or fresh daisies for summer—to create a 3D effect.
Step 4: Bottle 3: The Red Zinnia
-
Paint the yellow center:
On the third bottle, paint a solid yellow circle in the middle of the glass. -
Form the petals:
Use a round brush to paint broad, tear-shaped red petals extending from the yellow center. Leave a tiny gap between the petals so they remain distinct. -
Draw the stem:
Paint a thin green line extending both upward and downward from the flower head to act as the main stem. -
Add leaves:
Paint pointed, almond-shaped leaves branching off the stem in pairs. Add a darker green stroke down the center of each leaf for depth.
Step 5: Bottle 4: The Orange Daisy
-
Create the core:
Directly beside your previous bottle design, paint a small yellow center dot for the fourth motif. -
Paint geometric petals:
Using orange paint and a flat or angle brush, create wedge-shaped petals that are wider at the outside edge and narrow toward the center. -
Extend the vine:
Draw a long, dark green vertical stem passing ‘behind’ the flower head, reaching from the base of the neck to the bottom of the bottle. -
Detail the foliage:
Add symmetrical, lance-shaped leaves along the stem. I find it helps to tilt the bottle slightly while painting these curves to get a natural flow.
Step 6: Finishing
-
Dry thoroughly:
Let the bottles sit undisturbed for at least 24 hours to allow the paint to cure on the surface. -
Bake to set:
If your specific paint brand allows for heat setting, place the bottles in a cold oven, heat to 350°F (175°C) for 30 minutes, and let them cool completely inside the oven before removing.
Now you have a stunning set of custom glassware ready to brighten up any windowsill or dining table
Glow-From-Within Bottles With Painted Cutout Windows
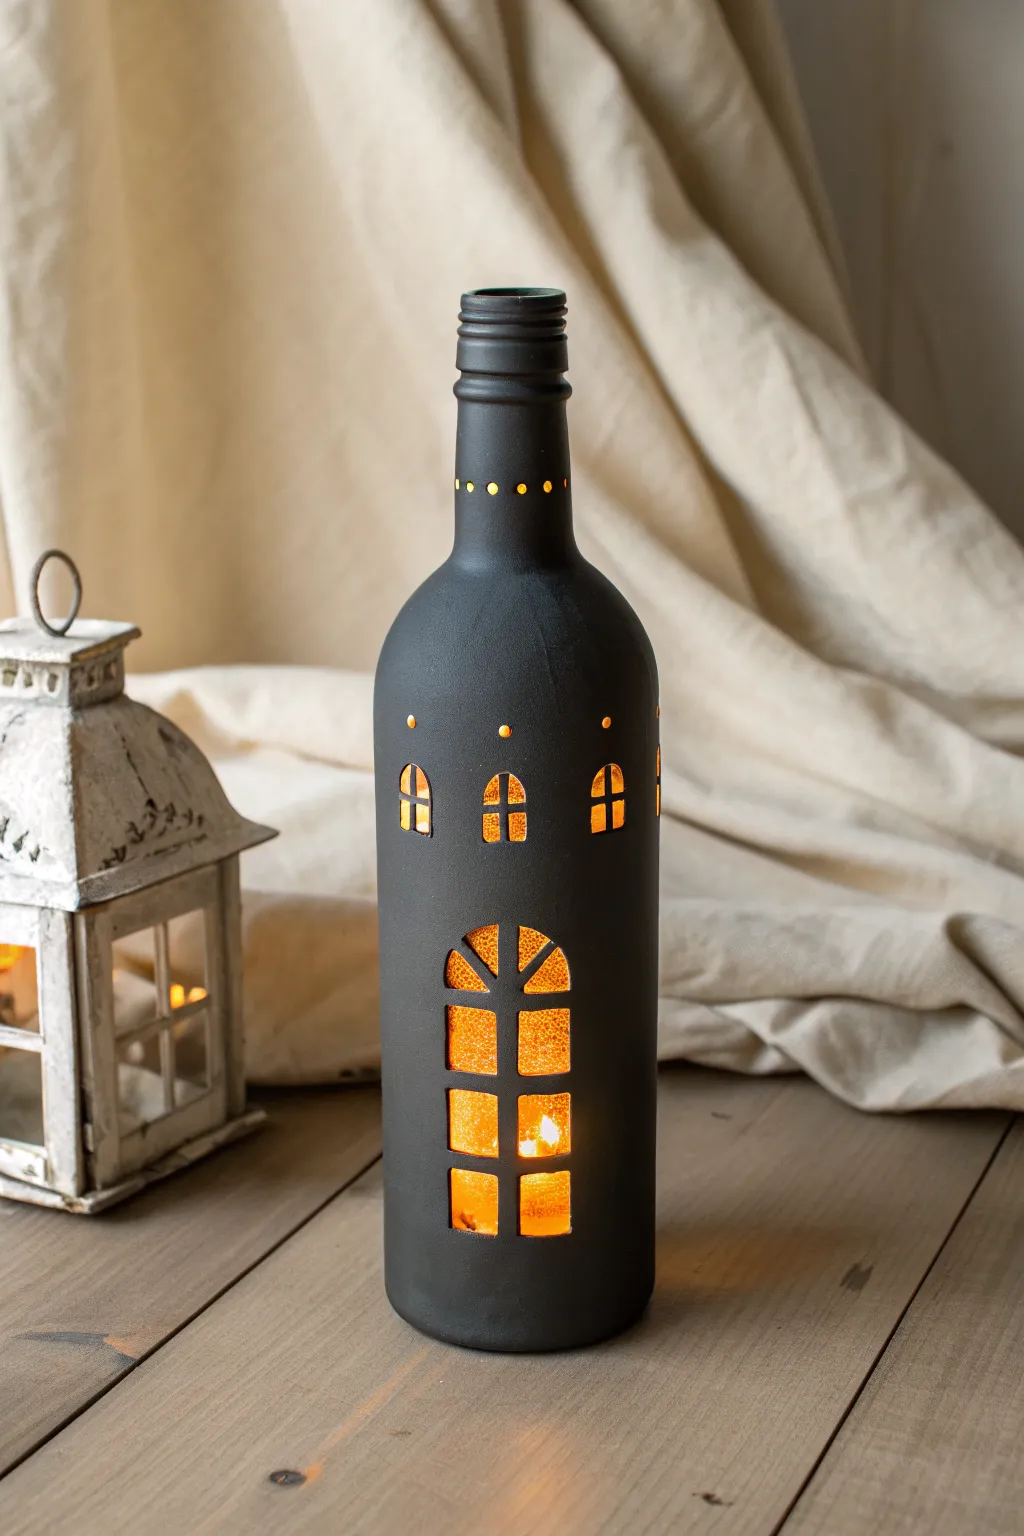

Transform an ordinary wine bottle into a mysterious architectural lantern that casts a warm, inviting glow. By painting the exterior matte black while leaving specific areas clear, you create the illusion of a cozy building lit from within.
Step-by-Step
Materials
- Clean glass wine bottle (labels removed)
- Rubbing alcohol
- Self-adhesive vinyl or painter’s tape
- Craft knife (X-Acto)
- Cutting mat
- Matte black spray paint (or chalkboard paint)
- Warm white LED fairy lights (battery operated cork string is ideal)
- Tweezers
- Pencil and paper (for sketching template)
- Small round stickers (optional, for dots)
Step 1: Planning and Preparation
-
Clean the surface:
Begin by thoroughly washing your glass bottle to remove any label residue. Wipe the entire surface down with rubbing alcohol and a lint-free cloth to ensure the glass is perfectly clean and free of oils. -
Design your windows:
Sketch a simple architectural design on paper first. For this project, you want a large arched window divided into six panes for the bottom section, and a row of smaller arched windows for the upper section. -
Create the mask:
Adhere a sheet of sticker vinyl or wide painter’s tape to your cutting mat. -
Cut the shapes:
Using your craft knife, carefully cut out the shapes that will eventually be the ‘light’ areas. You need the solid positive shapes of the windows, not the negative space. Cut out the six individual panes for the main window and the smaller arches.
Step 2: Applying the Stencils
-
Position the main window:
Starting near the bottom third of the bottle, peel and stick your vinyl pane shapes onto the glass. Use tweezers for precise placement to ensure the spacing between the panes (the muntins) is even and straight. -
Add the upper tier:
Place the smaller arched window stickers in a ring around the bottle, roughly two inches above the main window. Keeping them level is key to a polished look. -
Detail the neck:
For the tiny decorative dots near the neck, you can either use small circular stickers or create small dots with a hole punch on your tape. Place these in a consistent ring around the bottle’s shoulder. -
Seal the edges:
Press down firmly on all sticker edges with your fingernail or a credit card. It is crucial that there are no gaps where paint could seep under the vinyl.
Ragged Edges?
If your paint lines look jagged after peeling, you likely waited too long. Use a fine-tip black paint marker to touch up the edges and smooth out the curves.
Step 3: Painting and Revealing
-
Prime the surface:
If your spray paint doesn’t have a built-in primer, apply a light coat of glass primer first. This isn’t strictly necessary with most modern ultra-matte sprays, but it helps durability. -
First coat:
Place the bottle upright in a well-ventilated area. Apply a thin, even coat of matte black spray paint. Don’t try to get full opaque coverage immediately; light mists prevent drips. -
Second coat:
Wait about 15-20 minutes for the first coat to become tacky but dry. Apply a second coat to ensure complete opacity. You want the black to block all light except where your stickers are. -
Dry partially:
Allow the paint to dry until it is firm to the touch but not fully cured—usually about 30 to 45 minutes. I find removing tape is easier before the paint creates a hard, brittle shell. -
The reveal:
Using likely the tip of your craft knife or fine tweezers, very carefully lift the corner of each vinyl sticker and peel it away. Pull the sticker back against itself rather than straight up to encourage a clean edge. -
Tidy up:
If any paint bled under the stickers, gently scrape it away with the craft knife or a toothpick while the paint is still relatively fresh.
Texturize It
For a rustic wrought-iron look, spray the wet black paint lightly with stone-texture spray effectively creating a bumpy, antique metal finish before it dries.
Step 4: Lighting the Lantern
-
Final cure:
Let the bottle sit for 24 hours to allowing the paint to fully cure and harden against scratching. -
Insert lights:
Unravel your fairy light string and gently feed it into the neck of the bottle. A warm white color best mimics the look of candlelight. -
Secure the battery:
If using a cork-style battery pack, simply press it into the opening. If using a standard battery pack, tape it discreetly to the back of the bottle or tuck it behind a decor element.
Place your new lantern on a mantle or tablescape to enjoy the architectural warmth it brings to the room

Have a question or want to share your own experience? I'd love to hear from you in the comments below!