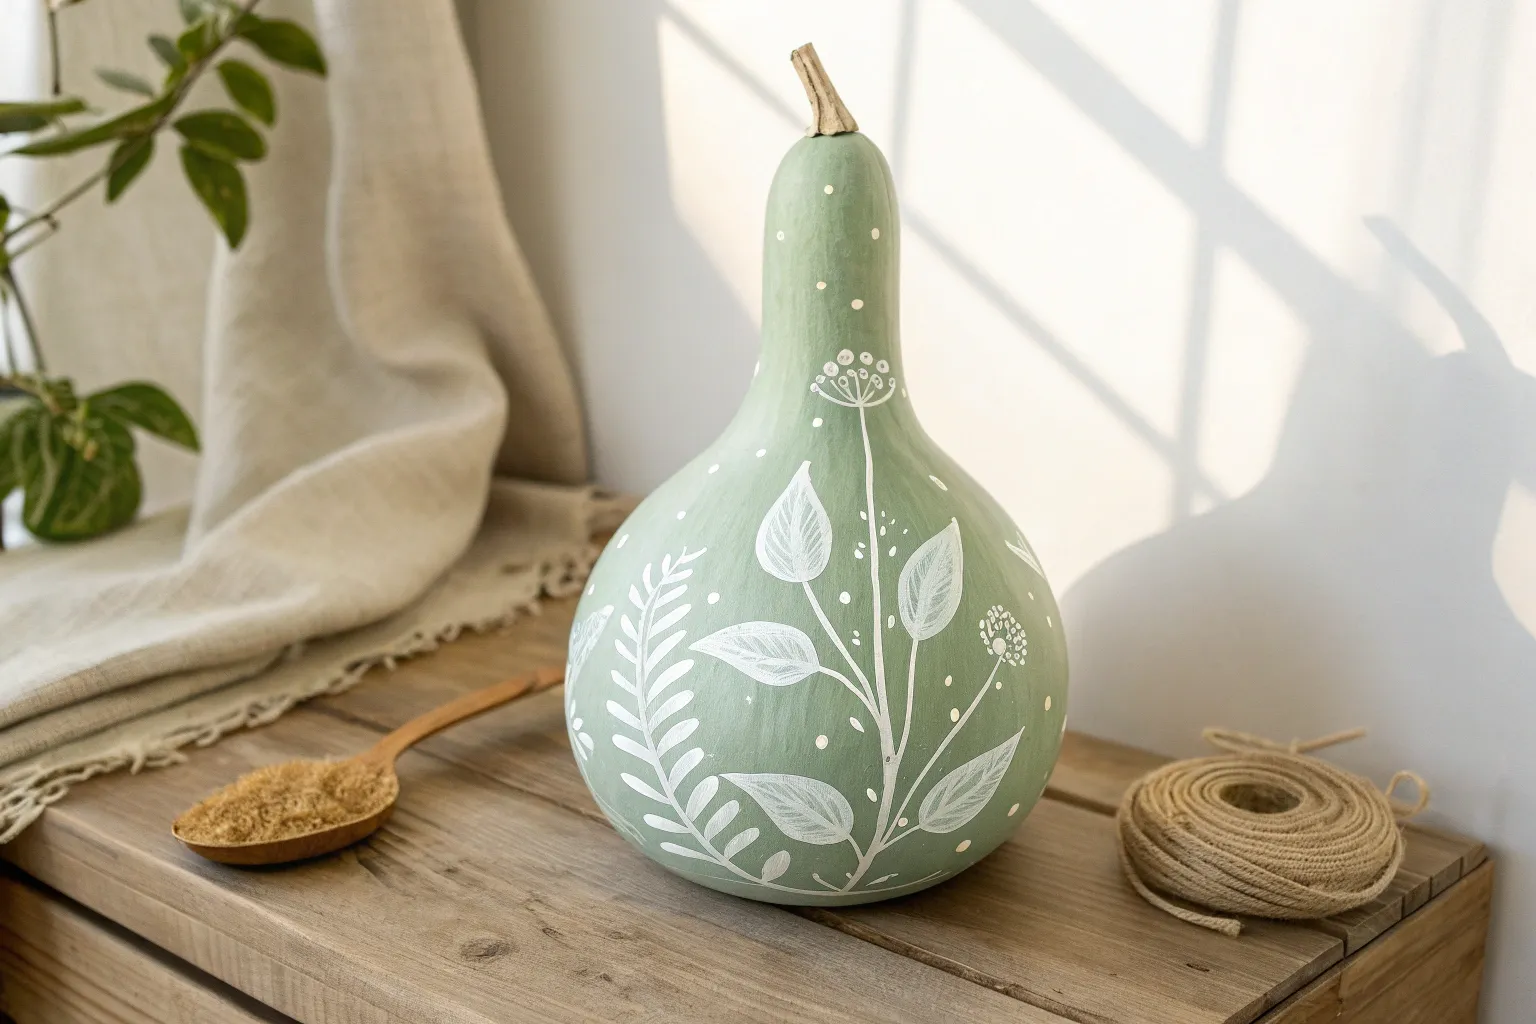
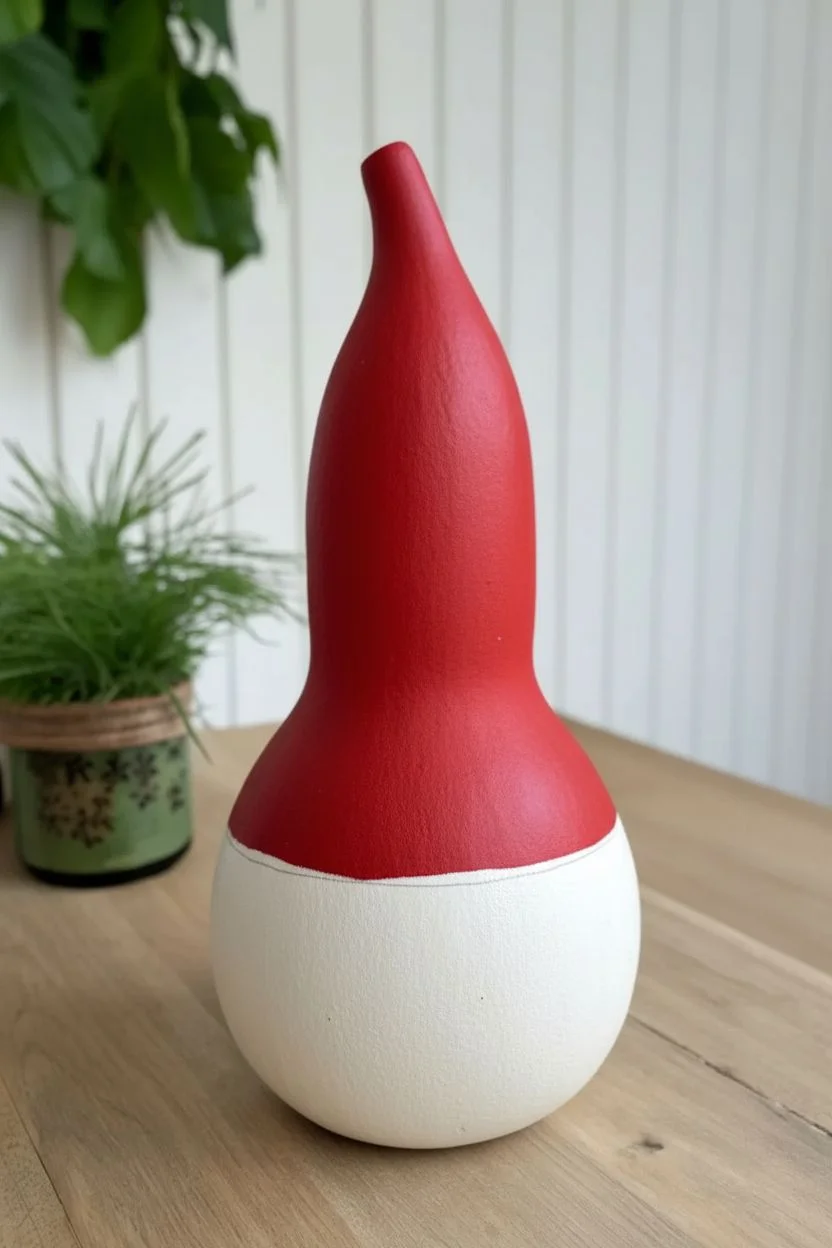
Dried gourds are basically nature’s little 3D canvases, and they’re perfect for simple paint projects that look way fancier than they are. Here are my favorite easy gourd painting ideas that use bold shapes, quick base coats, and beginner-friendly details you can absolutely pull off.
Sweet Ghost Gourds With Big Eyes
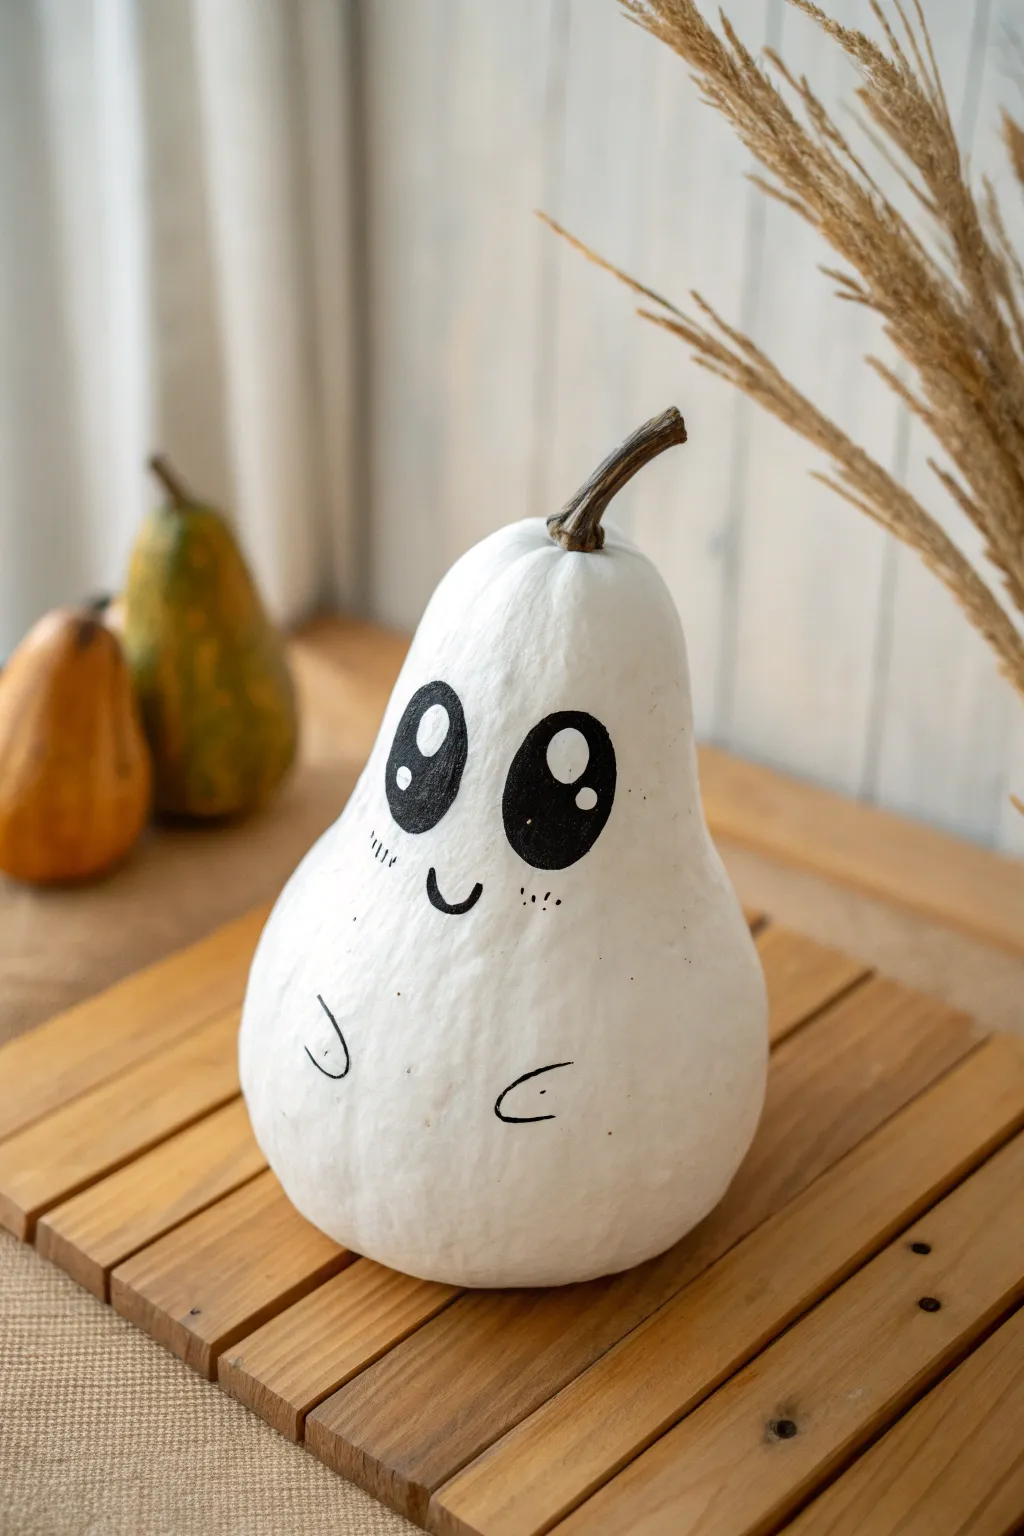
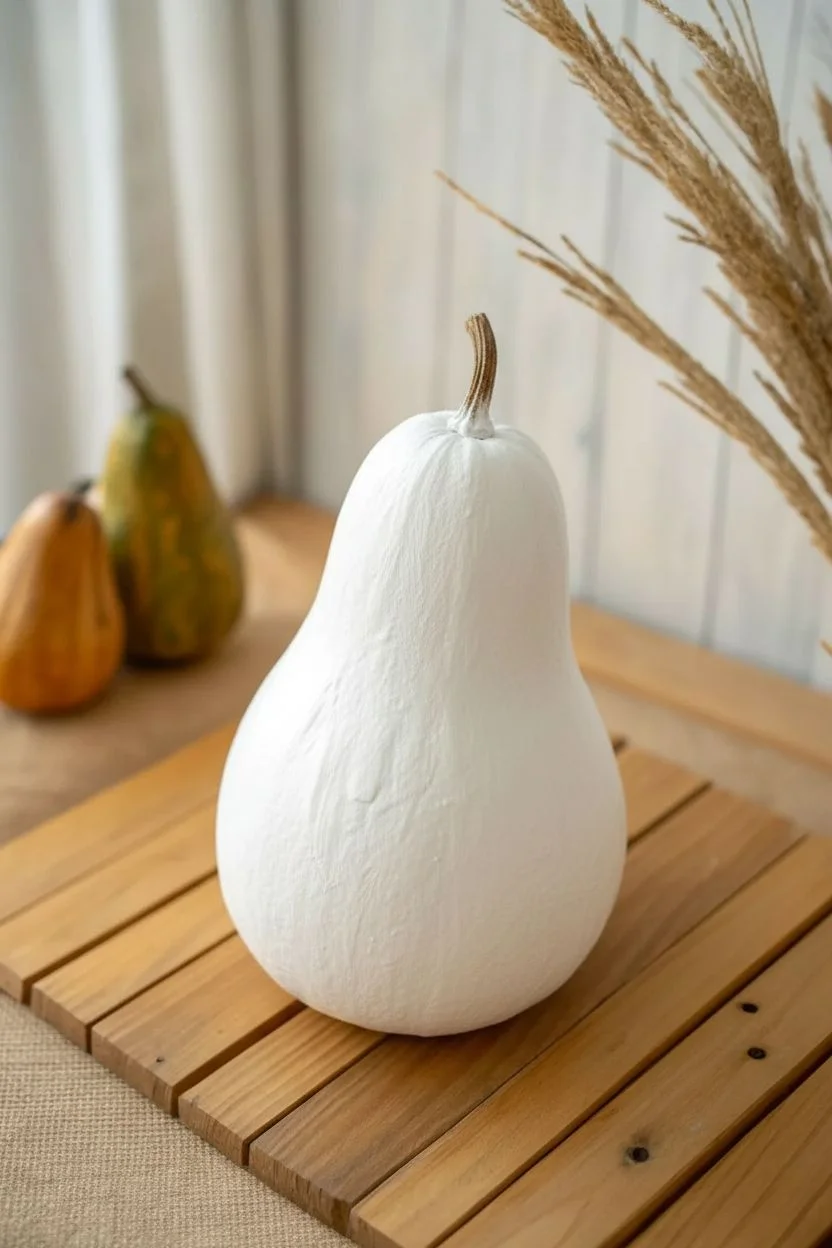
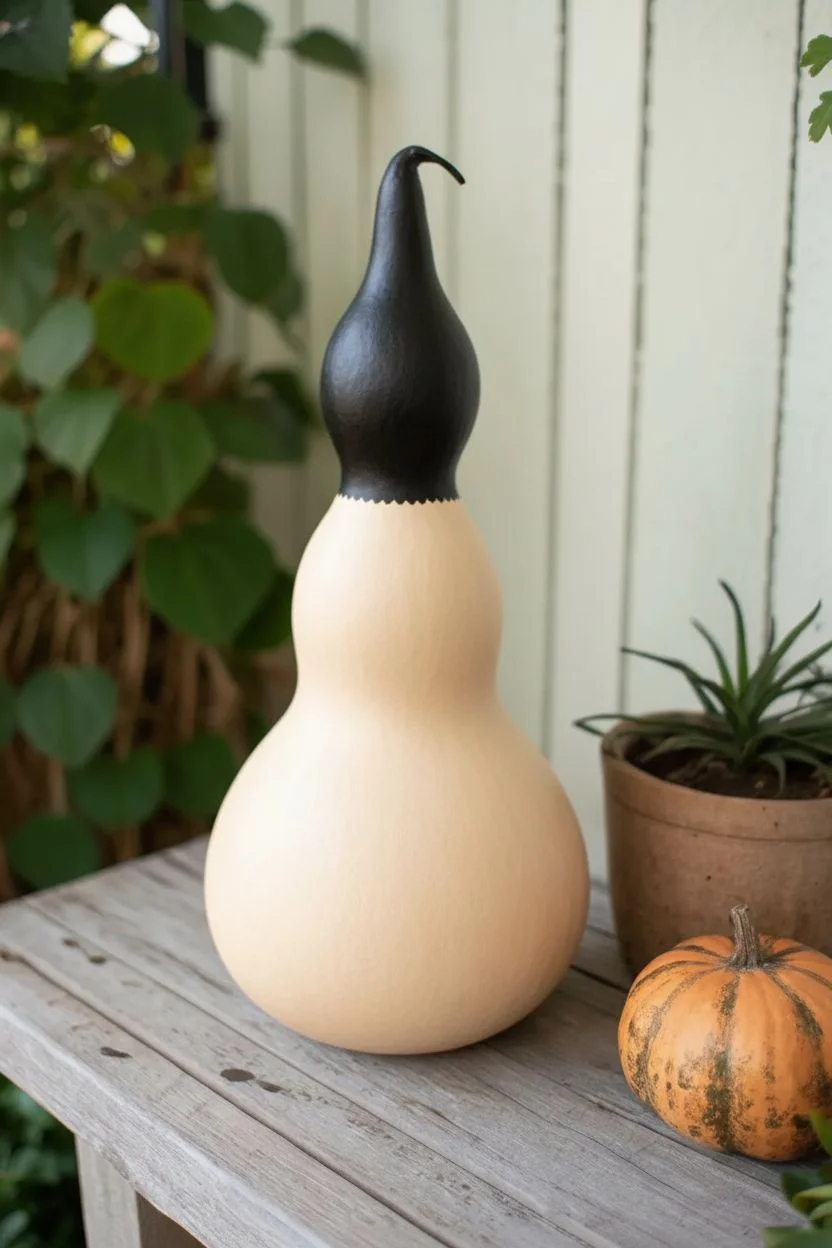
Transform a simple pear-shaped gourd into an adorable, spooky companion with just a splash of paint and some expressive details. This project turns the natural curves of the gourd into a charming ghost figure featuring oversized eyes that are impossible to resist.
Detailed Instructions
Materials
- Pear-shaped gourd (clean and dry)
- White acrylic paint (matte finish)
- Black acrylic paint or a broad black paint marker
- Flat paintbrush (medium size)
- Fine detail paintbrush or fine-tip black marker
- Pencil
- Matte spray sealer (optional)
Step 1: Preparation and Base Coat
-
Clean the Gourd:
Begin by wiping down your gourd with a damp cloth to remove any dirt or oils. The stem should be left natural, so be careful not to get it too wet. Let it dry completely before painting. -
Apply First White Coat:
Squeeze a generous amount of white acrylic paint onto your palette. Using a flat paintbrush, apply a smooth, even layer of white paint over the entire body of the gourd. -
Cut In Around the Stem:
Carefully paint up to the base of the stem. I like to leave a tiny, messy edge right where the stem meets the gourd skin to keep that rustic, harvested look. -
Let It Dry:
Allow the first coat to dry to the touch, which usually takes about 15 to 20 minutes depending on your paint thickness. -
Apply Second Coat:
Apply a second layer of white paint to ensure full opacity. You want the gourd to look solid white, hiding the natural green or yellow skin underneath. Let this layer dry completely.
Pro Tip: Eye Placement
Place the eyes slightly lower on the ‘head’ portion of the gourd than you think you should. This ‘low face’ technique instantly makes characters look cuter and more childlike.
Step 2: Drafting the Face
-
Sketch the Eyes:
Using a pencil very lightly, sketch two large, tall ovals on the upper half of the gourd. Slant them slightly toward each other at the top to create a sweet expression. -
Add Highlights:
Inside each oval, lightly circle two highlight spots—one larger circle in the upper left and a smaller dot in the lower right. These will stay white. -
Sketch the Mouth:
Draw a small, simple ‘U’ shape between and slightly below the eyes for the smiling mouth. -
Mark the Arms:
Near the bottom of the gourd belly, sketch two small ‘C’ shapes facing inward to represent tiny, stubby ghost arms.
Step 3: Painting the Details
-
Outline the Eyes:
Switch to your black paint and a fine detail brush, or use a black paint marker. Carefully trace the outer edge of your eye ovals. -
Fill the Eyes:
color in the large black areas of the eyes, being extremely careful to paint *around* the highlight circles you sketched earlier. The white base coat should show through for the highlights. -
Refine Edges:
Smooth out the curves of the eyes so they look nice and round. If you accidentally paint over a highlight, don’t worry—you can dot it back on with white paint later. -
Paint the Mouth:
Trace over your pencil line for the mouth with a confident, dark stroke to create a happy smile. -
Add Cheeks:
Just under the outer corners of the eyes, add three tiny hash marks or dots on each side using your finest brush tip or a fine-tip marker. This gives the ghost a blushing effect. -
Define the Arms:
Trace the small curved lines near the bottom to finalize the little arms. -
Clean Up:
Check your work for any stray pencil marks. If the paint is fully dry, you can gently erase visible graphite lines. -
Seal (Optional):
If you plan to display your ghost on a porch, spray it lightly with a matte sealer to protect the paint from moisture.
Level Up: Glowing Ghost
Paint the base with glow-in-the-dark acrylic paint instead of plain white. During the day it looks normal, but at night your little ghost friend will softly glow green.
Your finished ghost is now ready to haunt your table centerpiece with cuteness


Black Cat Gourds With Simple Whiskers
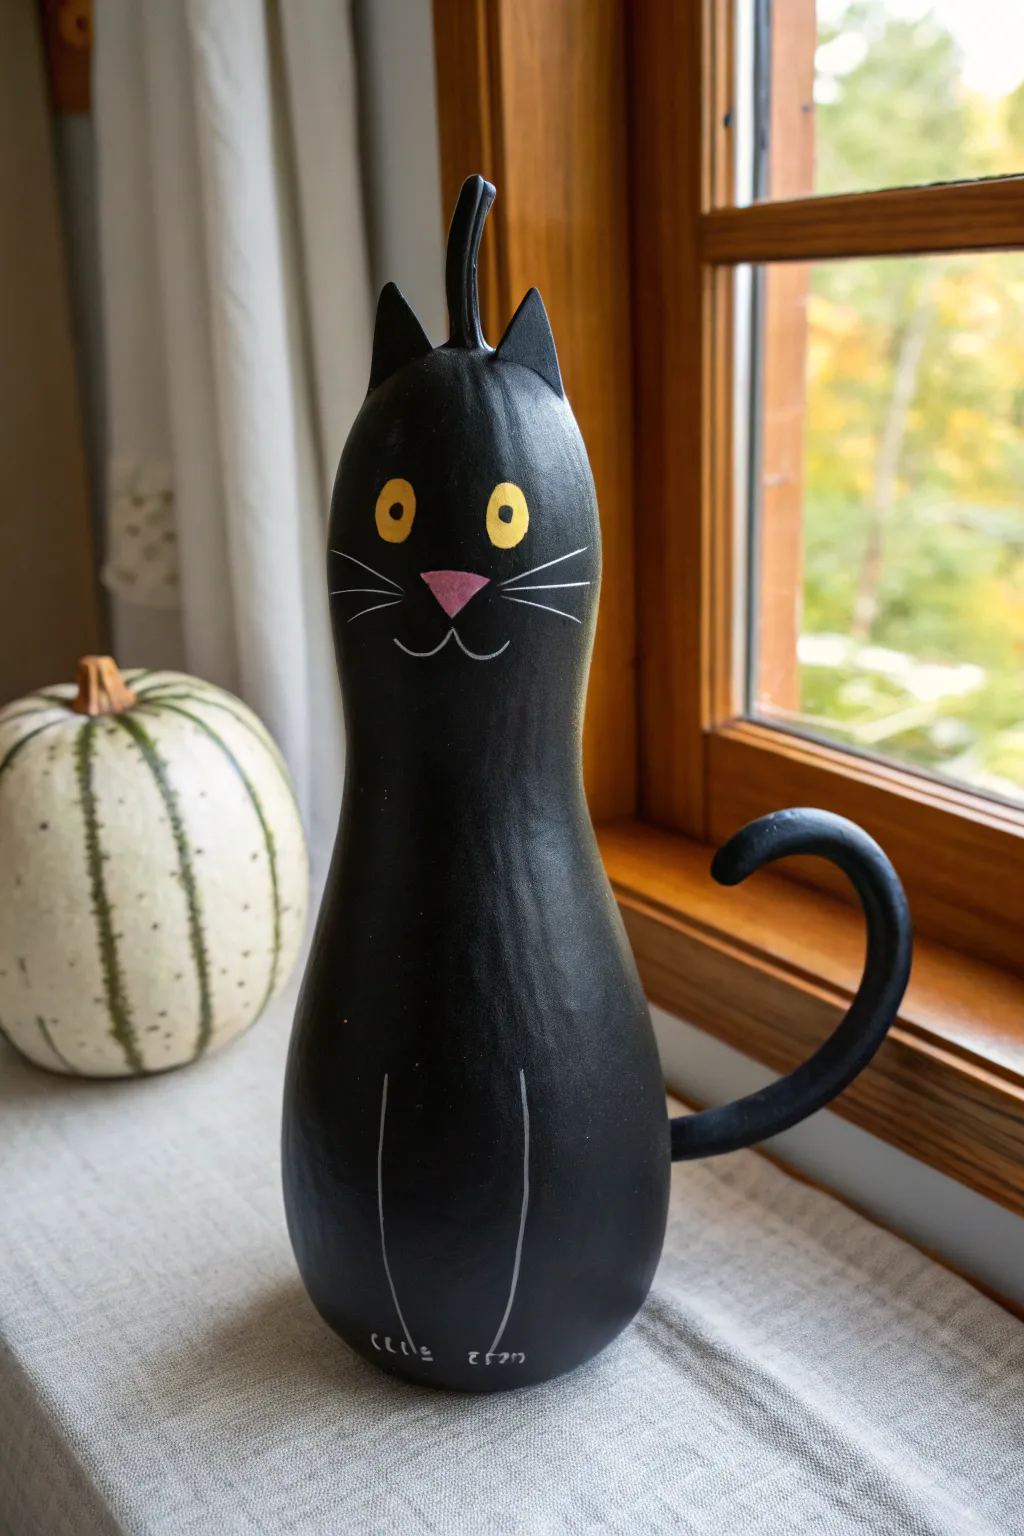
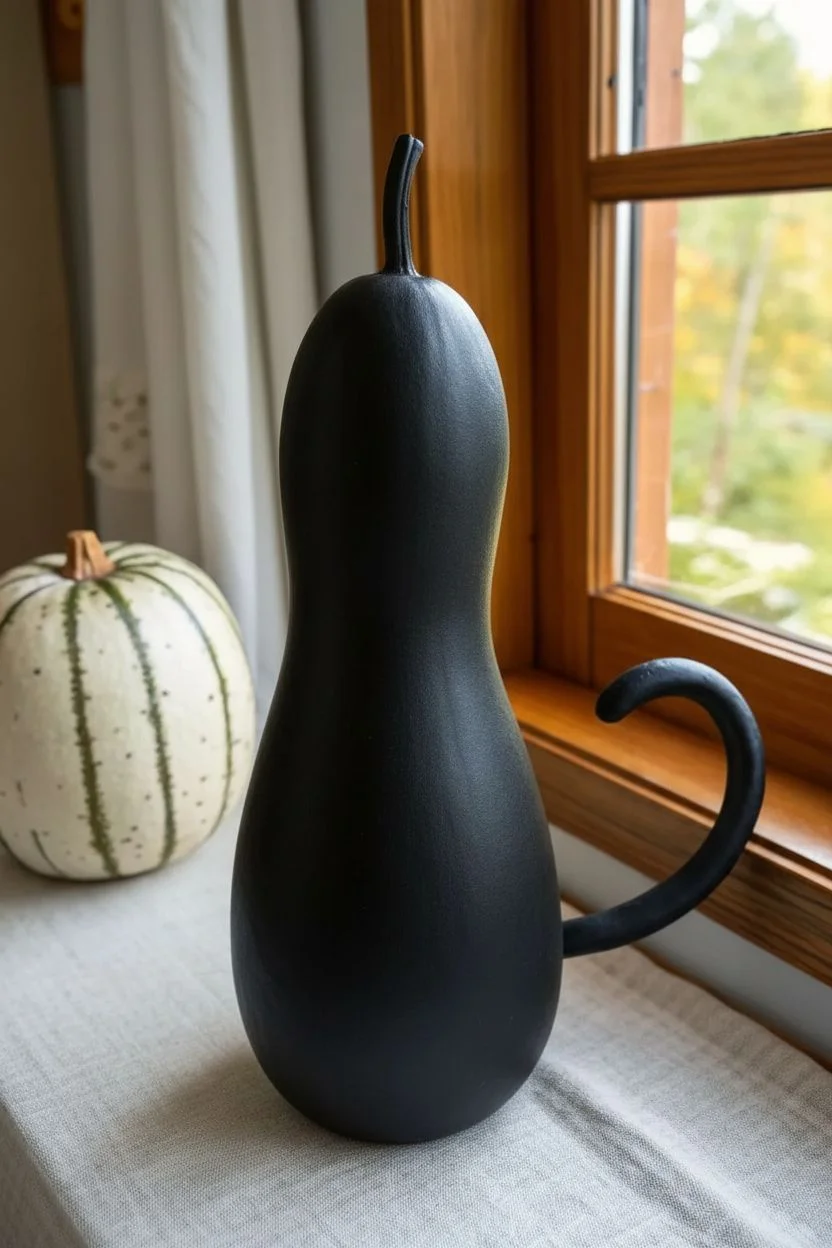
Transform an ordinary bottle gourd into a charming feline friend with sleek black paint and minimal details. This project uses the natural shape of the gourd to mimic a cat’s sitting posture, featuring big yellow eyes and a jaunty curled tail.
Step-by-Step Guide
Materials
- Dried bottle gourd (cleaned)
- Black acrylic craft paint
- Yellow acrylic craft paint
- Pink acrylic craft paint
- White paint marker or fine liner brush
- Air-dry clay or polymer clay (black or paintable)
- Strong craft glue (E6000 or similar)
- Cardboard or stiff felt (for ears)
- Medium flat paintbrush
- Small round detail brush
- Matte or satin clear sealant spray
Step 1: Preparing the Base
-
Clean the Gourd Surface:
Begin by ensuring your dried gourd is completely clean. Wipe it down with a damp cloth to remove any dust or dirt, as this ensures the paint adheres smoothly. Let it dry fully before moving on. -
Apply the Base Coat:
Using a medium flat brush, apply a coat of black acrylic paint over the entire gourd. Don’t worry about the stem just yet; focus on the main body. -
Dry and Repeat:
Allow the first coat to dry for about 20 minutes. Apply a second coat of black paint to ensure opaque, solid coverage where no gourd skin shows through. -
Paint the Stem:
Carefully paint the stem black as well. I like to leave this for last so I have something to hold onto while painting the body. Let the entire gourd dry completely.
Stem Strategy
Don’t cut the stem off! Leaving the natural stem adds quirky character and looks like a little tuft of fur on top of the cat’s head.
Step 2: Creating the Features
-
Form the Ears:
While the paint dries, cut two small triangles out of stiff cardboard or felt for the ears. If using cardboard, paint them black to match the body. -
Attach the Ears:
Glue the ears near the top of the gourd, positioning them just behind the ‘forehead’ area but in front of the stem. Hold them in place for a moment until the glue grabs. -
Paint the Eyes:
Load a small round brush with yellow acrylic paint. Paint two oval shapes on the upper bulb of the gourd for the eyes. You may need two layers of yellow to make them pop against the black background. -
Add Pupils:
Once the yellow is dry, use a dotting tool or the back end of a paintbrush dipped in black paint to add a small pupil in the center of each yellow eye. -
Paint the Nose:
Mix a tiny bit of red and white paint (or use pink) to paint an inverted triangle nose just below the eyes.
Glowing Gaze
For a spooky Halloween twist, paint the yellow eyes with glow-in-the-dark acrylic paint so your cat watches you when the lights go out.
Step 3: Adding Details & Tail
-
Draw Whiskers:
Using a white paint marker or a very fine liner brush with white paint, draw three straight whiskers extending horizontally from each side of the nose. -
Add Mouth Lines:
With the same white marker, draw two small curved lines extending downward from the nose tip to create the cat’s mouth. -
Outline the Legs:
Near the bottom of the gourd, draw two tall, vertical curved lines to suggest the front legs. This simple detail helps define the seated posture. -
Detail the Paws:
At the bottom of your vertical leg lines, sketch small ‘toes’ or curves to represent the paws resting on the ground. -
Sculpt the Tail:
Roll a snake of air-dry clay that tapers at one end. Curl the end into a loop to mimic a swishing cat tail. Allow the clay to harden according to package instructions. -
Attach the Tail:
If your clay wasn’t black, paint it now. Once dry, glue the thicker end of the tail to the lower back side of the gourd using strong craft glue. -
Seal the Project:
Finish by spraying the entire gourd with a matte or satin clear sealant to protect the paint and give it a uniform finish.
Place your new gourd cat on a windowsill or porch to greet visitors with its quiet charm


Simple Santa Hat Gourds (Face Optional)
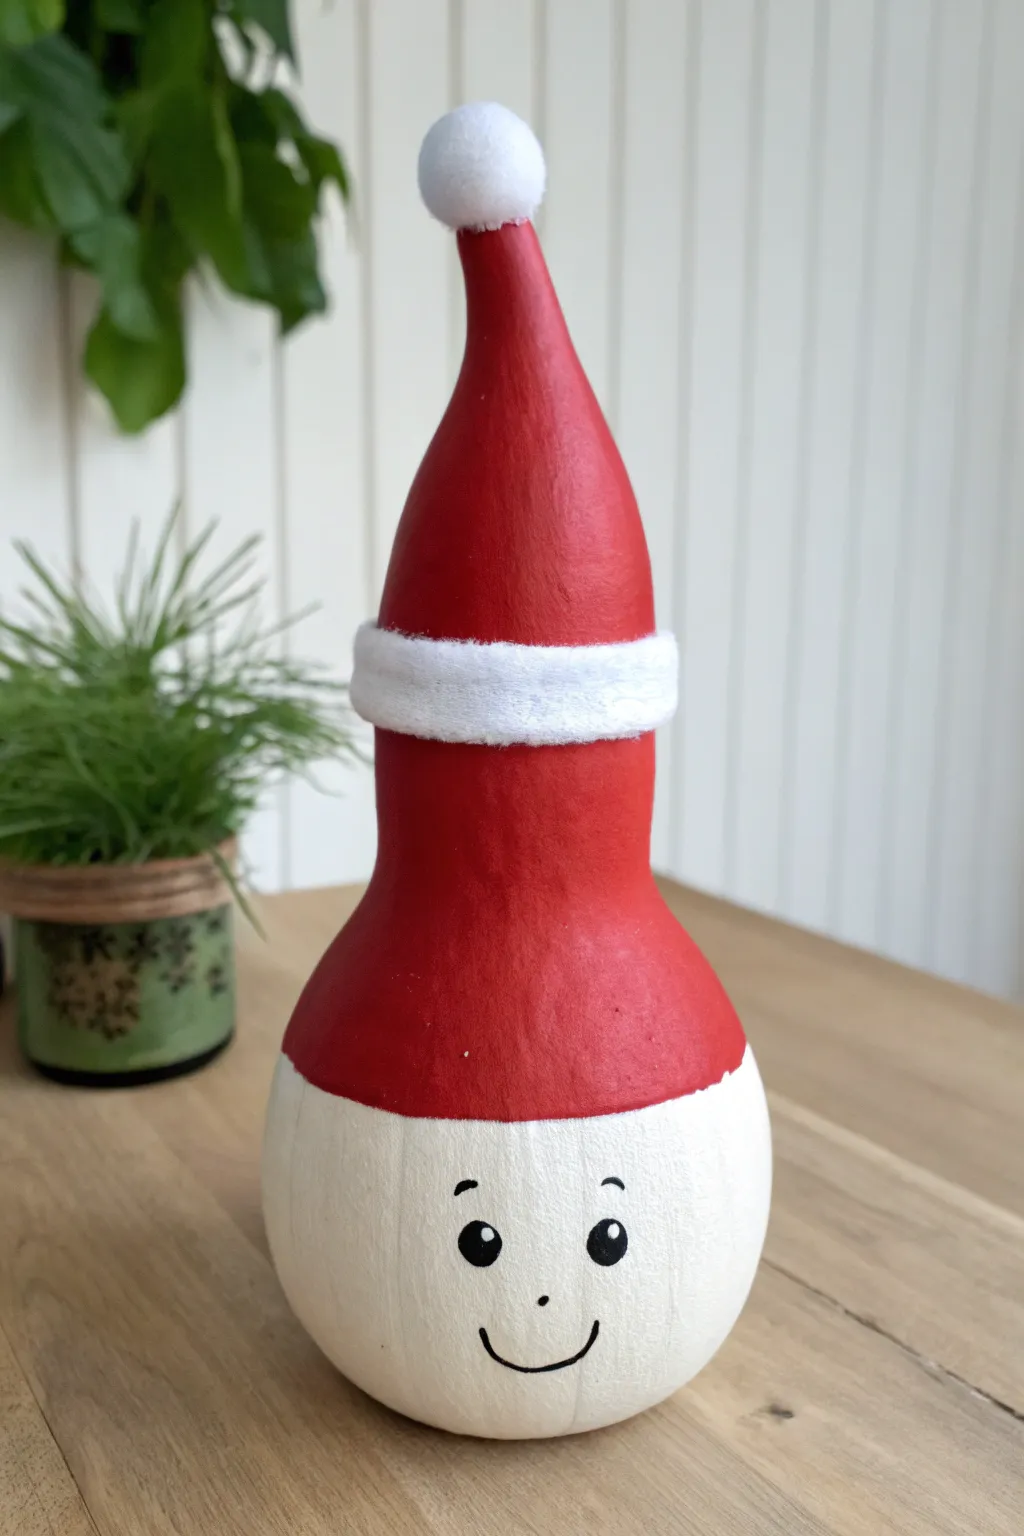
Transform a simple dried gourd into this minimalistic and charming Santa character perfect for holiday shelf decor. With its elongated neck acting as a festive hat and a bulbous base for a cheerful face, this project creates a warm, rustic Christmas accent.
Step-by-Step Guide
Materials
- Dried bottle gourd (cleaned and smoothed)
- White acrylic craft paint
- Red acrylic craft paint
- Black acrylic paint or paint pen
- Wide flat paintbrush
- Medium round paintbrush
- Small fine-line detail brush
- White faux fur trim or white felt strip
- Small white pom-pom
- Hot glue gun and glue sticks
- Pencil
- Painter’s tape (optional)
- Matte spray sealer (optional)
Step 1: Preparation and Base Coating
-
Surface Prep:
Begin by inspecting your dried gourd. Ensure the surface is completely clean of dirt or mold. If there are any rough patches, give them a light sanding with fine-grit sandpaper to create a smooth canvas for your paint. -
Marking the Split:
Visualize where the hat ends and the face begins. The natural bottleneck shape is your guide; find the point just below where the neck widens into the base. -
Pencil Line:
Lightly sketch a horizontal line all the way around the gourd at this chosen point. This will separate your red hat area from the white face area. -
Painting the Base White:
Load your wide flat brush with white acrylic paint. Paint the entire bottom section below your pencil line. Don’t worry about being perfectly neat at the top edge since we will cover it later. -
Second Coat:
Let the first layer dry completely. Apply a second coat of white to ensure full opacity so the natural gourd color doesn’t peek through the face area. -
Painting the Hat Base:
Using a clean brush, paint the upper ‘neck’ section of the gourd with bright red acrylic paint. Bring the red paint down to meet your white line. -
Refining the Red:
Apply a second or third coat of red as needed. The red needs to be bold and solid to contrast well with the white trim.
Uneven Coverage?
If the red paint looks streaky, switch to a soft sponge brush for the final coat. Dabbing the paint on rather than dragging it creates a uniform, opaque texture.
Step 2: Adding the Face Details
-
Sketching the Features:
Once the white paint is bone dry, use a pencil to very lightly sketch the face on the lower bulb. Place the eyes about one-third of the way down the white section for a cute proportion. -
Painting the Eyes:
Use a medium round brush or a black paint pen to fill in the oval eye shapes. I find paint pens offer better control here if you aren’t confident with a brush. -
Adding Shine:
Dip the non-brush end of a detail brush into white paint. Dot a tiny speck of white into the upper right corner of each black eye to give Santa a lively sparkle. -
Drawing the Brows:
Using your finest detail brush or a thin black marker, draw small, arched eyebrows floating slightly above the eyes. -
The Nose:
Place a single, small black dot centered between and slightly below the eyes to serve as a minimalist nose. -
The Smile:
Paint a simple, thin U-shaped curve for the mouth using your fine-liner brush. Keep the line steady and smooth for a friendly expression.
Step 3: Applying Texture and Finishing
-
Measuring the Brim:
Take your strip of white faux fur or felt. Wrap it around the neck of the gourd right where the red and white paint meet to measure the correct length. -
Cutting the Material:
Cut the strip to size, allowing for a tiny bit of overlap at the back. -
Gluing the Brim:
Apply a line of hot glue directly over the paint seam where the colors meet. Press the fur strip firmly into the glue, circling the entire neck. -
Preparing the Pom-pom:
Check the very tip of the gourd’s stem. If it is jagged, you might want to sand it slightly or add a dab of glue to smooth it out. -
Topping it Off:
Apply a generous dollop of hot glue to the very top tip of the hat. Press the white pom-pom onto the tip and hold it in place for 10-20 seconds until the glue sets. -
Sealing (Optional):
If you plan to display this on a patio or porch, give the entire painted surface (avoiding the fur) a light coat of matte spray sealer to protect it.
Make It Sparkle
Mix a small amount of fine iridescent glitter into your red paint for the final coat, or dust clear glitter over the wet white paint base for a frosty, snowy look.
Place your jolly new creation on a mantel or nestled near a houseplant to spread some handcrafted holiday cheer


Bold Polka-Dot Gourds With One Accent Color
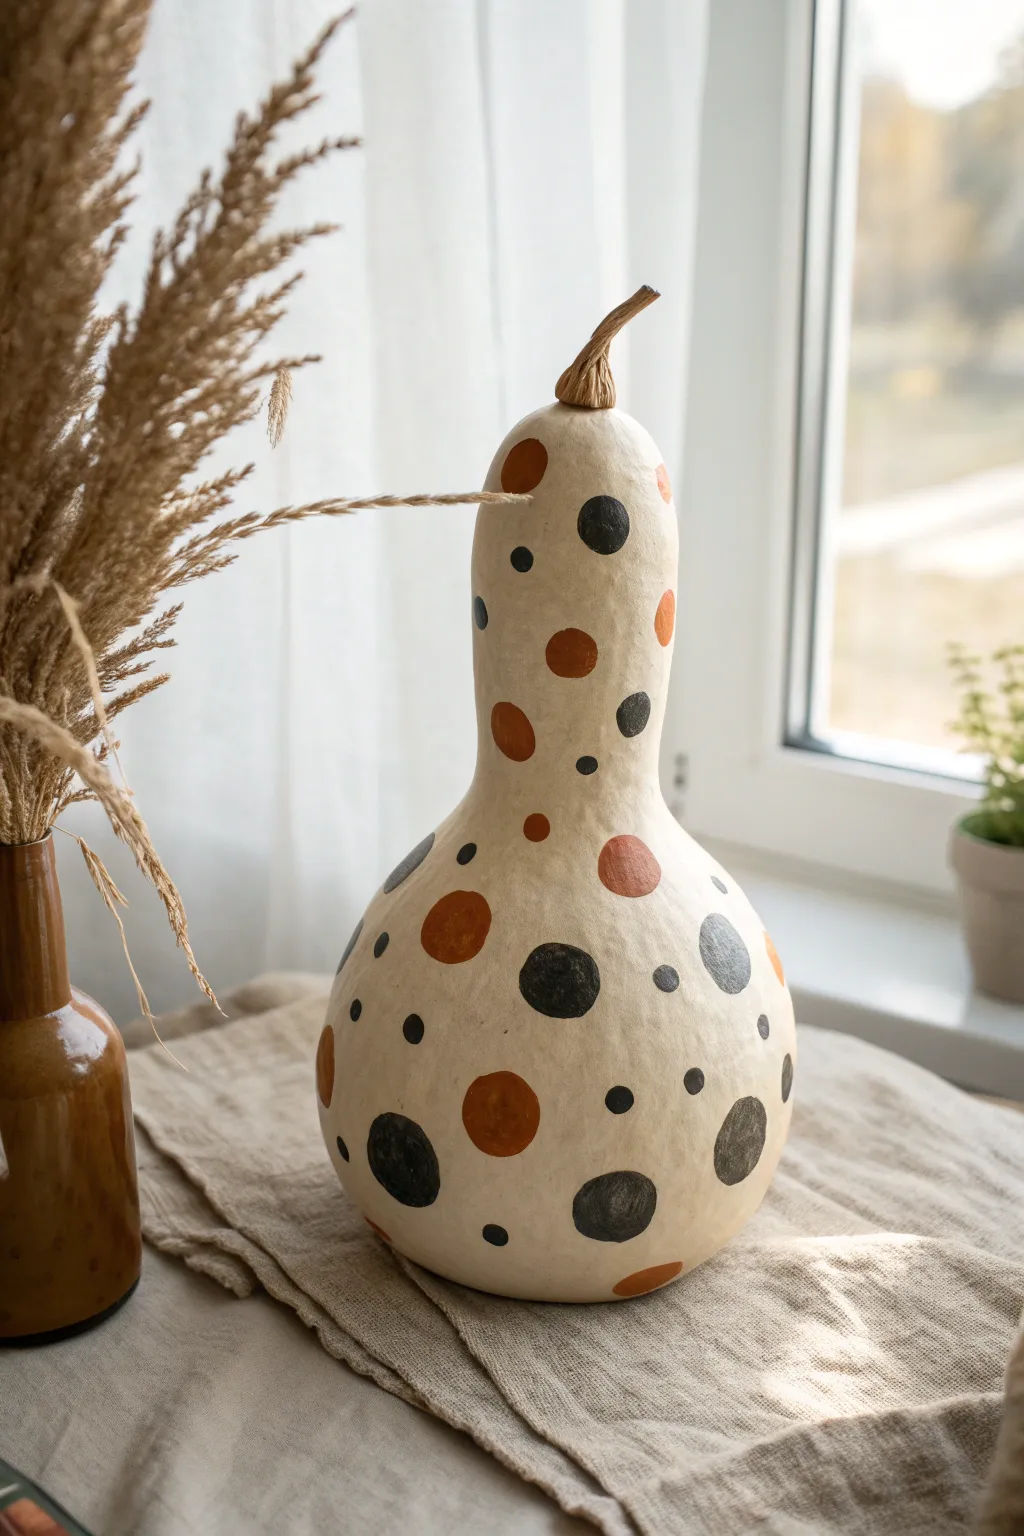
Transform a simple dried bottle gourd into a modern fall centerpiece with this striking polka-dot design. By combining stark black circles with warm terracotta accents on a creamy base, you achieve a look that feels both rustic and contemporary.
How-To Guide
Materials
- Dried, cleaned bottle gourd
- Cream or off-white acrylic craft paint (chalk finish works well)
- Black acrylic paint
- Terracotta or burnt orange acrylic paint
- Assorted round foam pouncers (small, medium, large)
- Small round detail brush
- Flat paintbrush (approx. 1 inch)
- Paper plate or palette
- Clear matte sealer spray (optional)
- Damp cloth or baby wipes
Step 1: Preparing the Base
-
Clean surface:
Ensure your dried gourd is free of dust and debris by wiping it down gently with a damp cloth. A smooth surface is key for the dots to look crisp. -
Protect the stem:
Before painting, carefully wrap the natural stem with painter’s tape if you’re worried about stray brushstrokes, though I usually just paint carefully around the base of the stem to keep that lovely twisted texture natural. -
Base coat application:
Using the flat paintbrush, apply a layer of cream or off-white acrylic paint over the entire body of the gourd. Use long, vertical strokes to minimize texture. -
Check coverage:
Allow the first coat to dry for about 15-20 minutes. If the gourd’s natural mottling still shows through significantly, apply a second coat for a solid, opaque background. -
Full dry time:
Let the base coat dry completely for at least an hour. The paint must be fully set so the sponge pouncers don’t lift it up in the next phase.
Perfect Circles
Don’t press the foam pouncer too hard! Squishing the foam spreads paint unevenly. Use a light, firm press and twist slightly as you lift.
Step 2: Creating the Polka Dots
-
Load the large pouncer:
Pour a small amount of black paint onto your palette. Dip your largest round foam pouncer into the paint, then dab off the excess on a clean part of the plate to ensure an even load. -
Apply anchor dots:
Press the foam pouncer straight down onto the widest part of the gourd to create your first large black dot. twisting slightly as you lift can help release the sponge without leaving a ridge. -
Scatter large black dots:
Add 3-5 more large black dots randomly around the bottom bulb and the neck of the gourd, leaving plenty of negative space between them. -
Introduce the accent color:
Switch to a medium-sized pouncer and dip it into the terracotta/burnt orange paint. Apply these medium dots in the spaces between the large black ones. -
Cluster check:
Take a step back to look at the distribution. I like to make sure no two dots of the exact same size and color are right next to each other. -
Add medium black dots:
Using a clean medium pouncer (or the washed and dried previous one), add medium-sized black dots to balance the composition. -
Fill with small dots:
Use your smallest foam pouncer or the handle end of a paintbrush to add small black dots in the remaining open areas, creating a confetti-like effect. -
Small accent dots:
Add just a few small terracotta dots to echo the larger orange circles. Keep these sparse to maintain the black-dominant contrast.
Make It Metallic
Swap the terracotta paint for gold or copper leafing paint to turn this rustic gourd into a glamorous, shimmering holiday decoration.
Step 3: Finishing Touches
-
Touch up edges:
If any of your foam pouncer circles look patchy or have rough edges, use a small round detail brush to carefully fill them in and smooth the perimeter. -
Clean the stem base:
If you got any paint on the start of the stem, now is the time to carefully wipe it away or paint over it with a bit of brown paint to blend it back into the natural stem color. -
Seal the project:
Once all dots are completely dry (give it a few hours), spray the entire gourd with a clear matte sealer. This protects the finish and unifies the sheen of the different paint colors.
Place your finished gourd near a window or group it with dried grasses to really highlight those cozy fall colors
BRUSH GUIDE
The Right Brush for Every Stroke
From clean lines to bold texture — master brush choice, stroke control, and essential techniques.
Explore the Full Guide
Easy Buffalo Plaid Gourds With Blocky Stripes
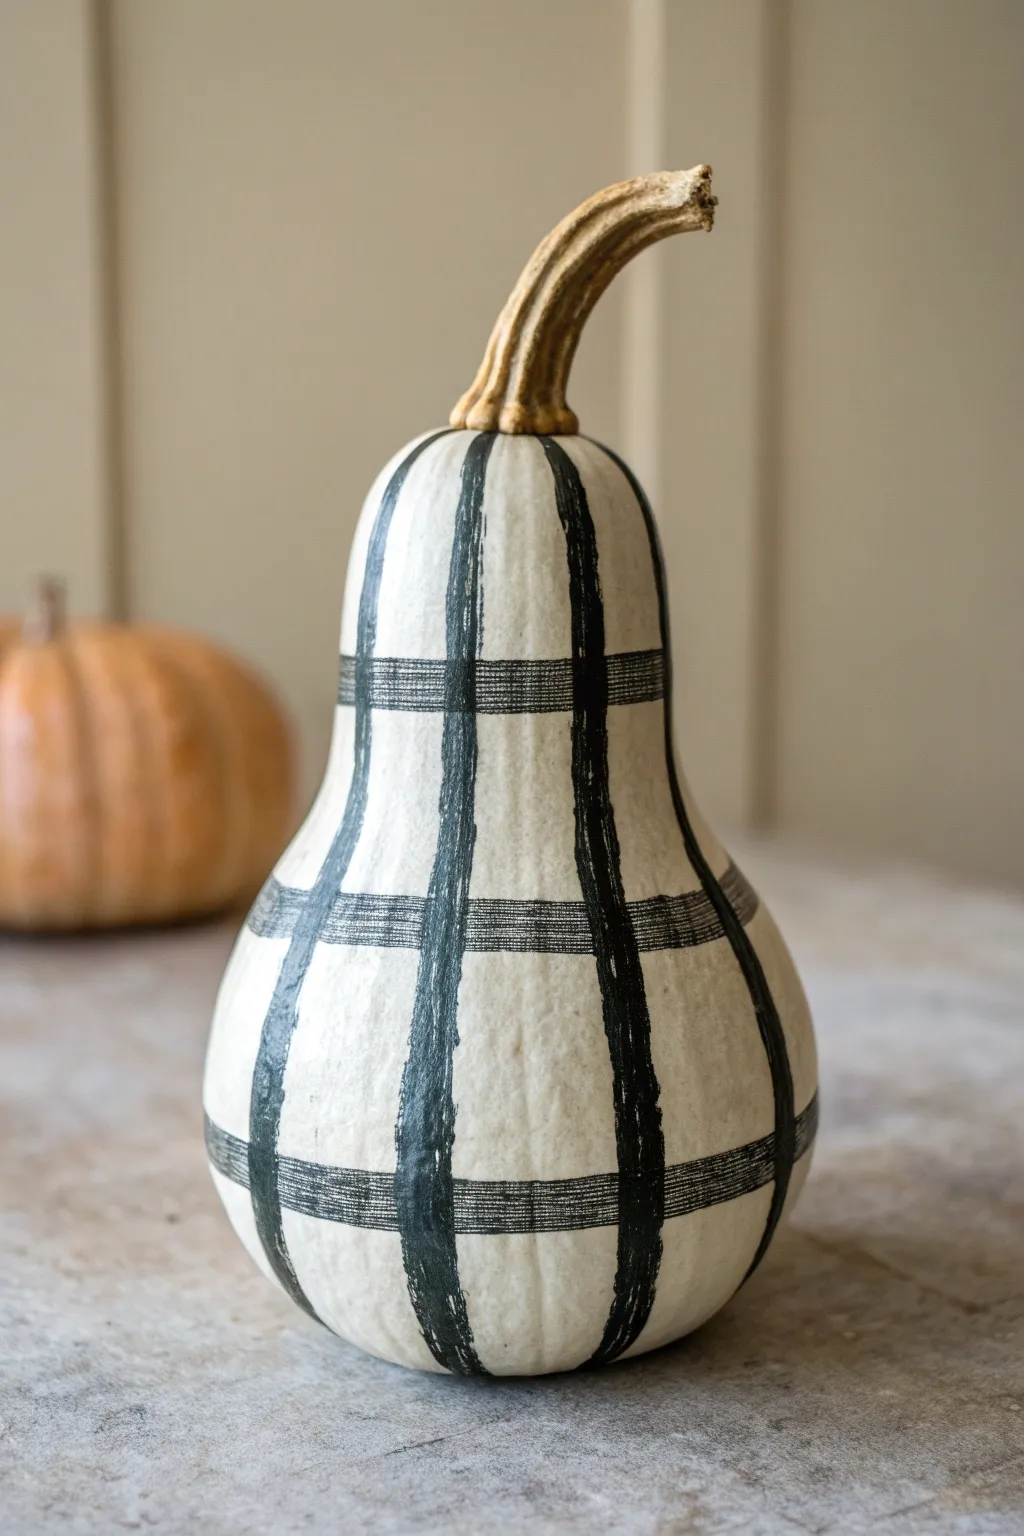
Transform a simple dried gourd into a chic, modern farmhouse decor piece with this straightforward painting technique. The contrast of bold, blocky stripes against delicate cross-hatching creates a textural plaid effect that looks sophisticated yet takes minimal artistic skill to achieve.
Step-by-Step Tutorial
Materials
- Clean, dried gourd (pear or bottle shape)
- Cream or off-white acrylic craft paint
- Carbon black acrylic craft paint
- Foam brush or wide flat shader brush (1-inch working well)
- Small flat brush (approx. 1/4 inch)
- Fine liner brush
- Pencil
- Matte spray sealer (optional)
Step 1: Base Coat Preparation
-
Clean surface:
Begin by wiping down your dried gourd with a slightly damp cloth to remove any dust or debris, which ensures the paint adheres smoothly. -
Apply base color:
Using your wide flat brush or foam brush, coat the entire gourd with the cream or off-white acrylic paint. -
Reassess coverage:
Let the first coat dry completely. If the underlying gourd pattern is still showing through, apply a second coat for solid, opaque coverage. -
Protect the stem:
Be careful when painting near the stem; leaving the stem natural adds to the rustic charm, so avoid getting white paint on it.
Step 2: Vertical Block Stripes
-
Plan vertical lines:
Lightly sketch vertical lines from the top stem down to the base using a pencil to guide your spacing. Aim for four to six even main sections around the gourd. -
Load the brush:
Load your smaller flat brush (1/4 inch) with the carbon black paint. Don’t overload it; a slightly drier brush helps achieve that textured, fabric-like look visible in the photo. -
Paint primary stripes:
Following your pencil guides, paint thick vertical stripes from the neck down to the bottom. Start at the very base of the stem. -
Refine the edges:
I like to go over the lines once more to smudge the edges slightly, making them imperfect and ‘hand-woven’ rather than perfectly sharp. -
Dry vertical lines:
Allow these heavy black stripes to dry fully before moving on, so you don’t smudge the black into the white areas.
Wobbly Lines?
Don’t stress over imperfection! The fabric look relies on uneven edges. If a line goes astray, just feather it out to make the stripe look intentionally wider and more textured.
Step 3: Horizontal Cross-Hatching
-
Mark horizontal zones:
Visualize where your horizontal bands will go. Typically, one band around the widest part (the belly) and one around the neck creates a balanced composition. -
Start the hatch marks:
Switch to your fine liner brush with black paint. Instead of painting a solid horizontal line, create the band using multiple thin, parallel horizontal scratches. -
Build density:
Paint 3-4 distinct thin lines quickly across a section to form the first part of the horizontal band. -
Overlap lines:
Go back over that same horizontal section and add more thin lines, slightly overlapping the previous ones to create a ‘sketchy’ or ‘threaded’ look. -
Cross intersections:
When your horizontal band meets a vertical black stripe, paint the thin horizontal lines right over the top of the solid black stripe to maintain continuity. -
Vary line pressure:
Vary your pressure with the liner brush. Some lines should be darker, some lighter, mimicking the warp and weft of woven fabric. -
Repeat bands:
Repeat this scratching technique for any other horizontal bands you identified earlier, ensuring they remain parallel to the ground as much as possible given the gourd’s curve.
Add Dimension
Mix a tiny drop of water into a drop of grey paint and glaze over the intersections where vertical and horizontal lines meet. This mimics the darker squares found in real buffalo plaid.
Step 4: Finishing Touches
-
Check balance:
Step back and look at the gourd. If the horizontal bands look too faint compared to the bold vertical stripes, add a few more dark ticks to the horizontal sections. -
Clean up:
If you accidentally got paint on the natural stem, carefully scrape it off with a craft knife or fingernail while the paint is semi-dry. -
Seal:
Once fully cured (at least 24 hours), spray with a clear matte sealer to protect the finish without adding unwanted shine.
Set your finished gourd on a mantel or centerpiece arrangement to enjoy the cozy, handmade vibe you just created
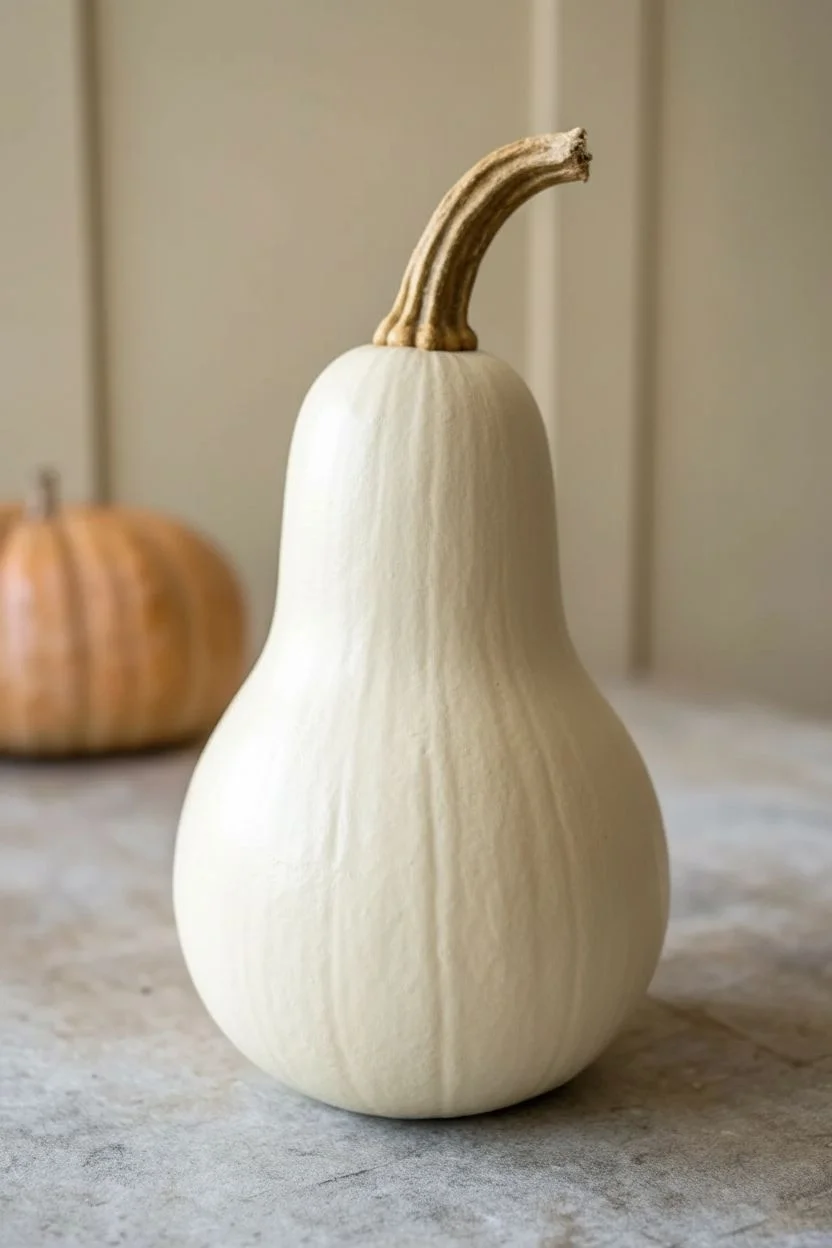
Maple Leaf Silhouette Gourds (Trace and Fill)
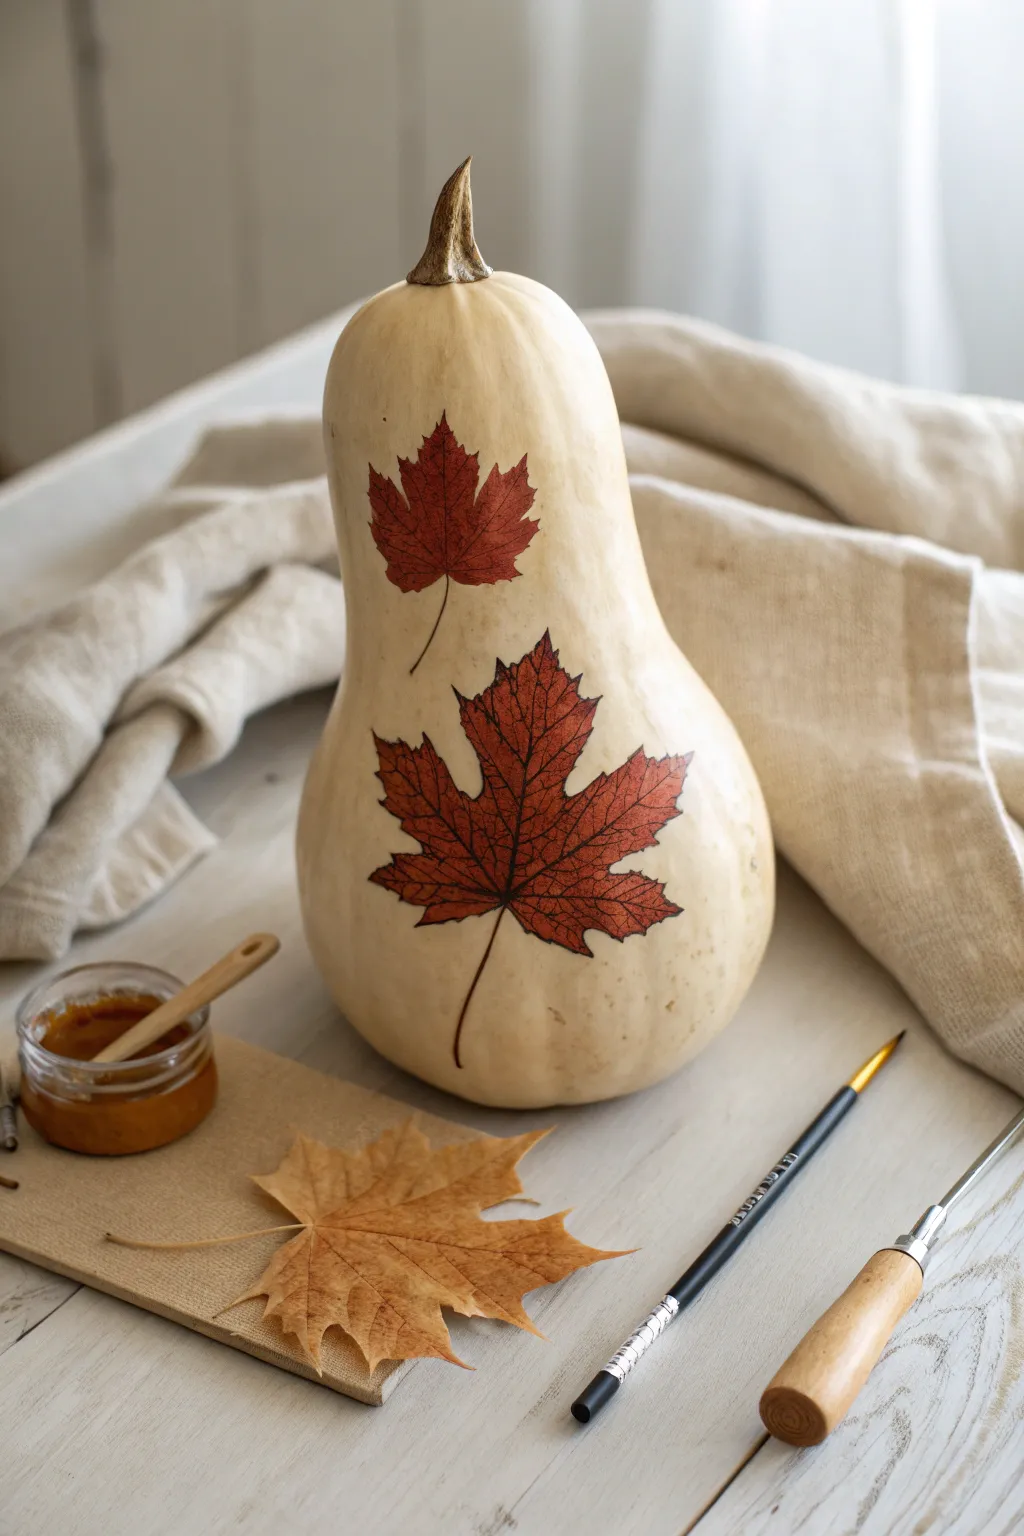
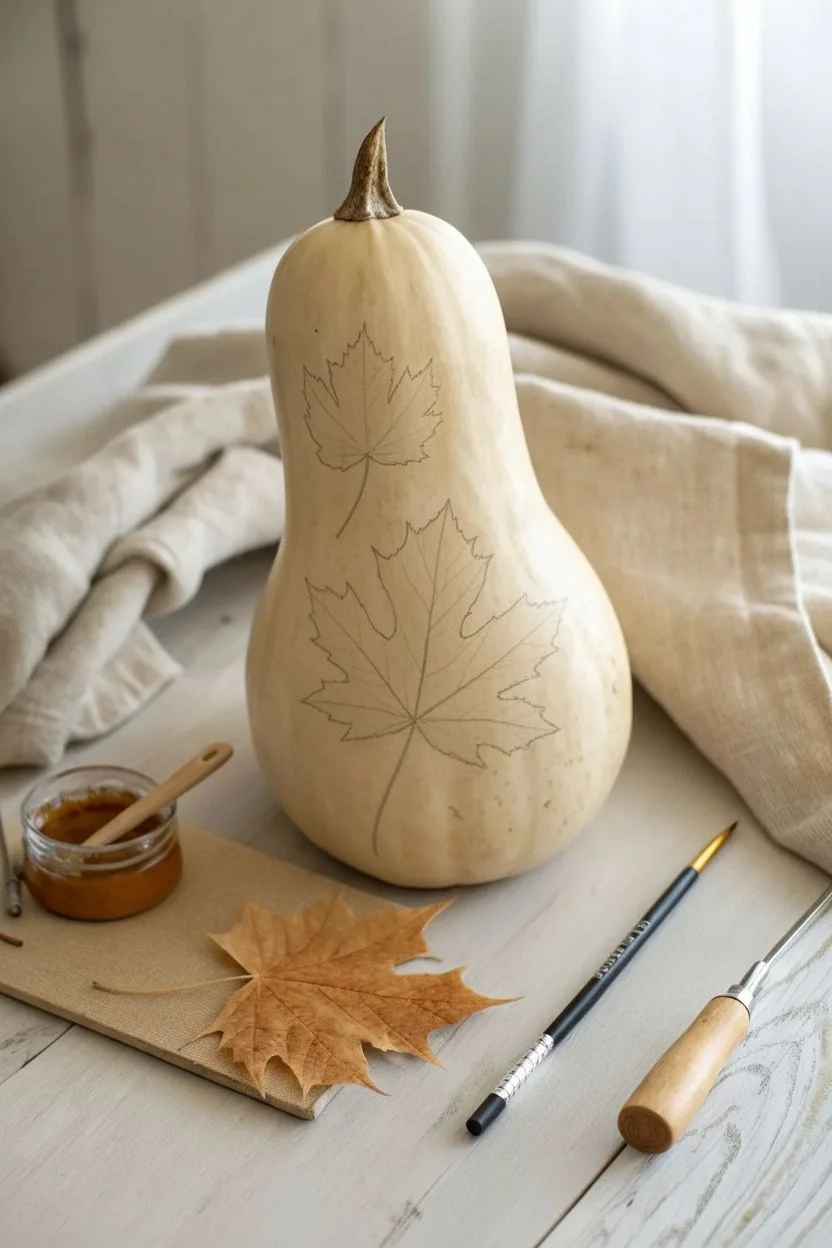
Transform a smooth-skinned butternut squash into a piece of autumn decor with this precise tracing and painting technique. The result features incredibly lifelike maple leaves that mimic the look of vintage botanical illustrations against the squash’s creamy background.
Detailed Instructions
Materials
- Large, smooth butternut squash (cleaned and dried)
- Real or artificial maple leaves (various sizes)
- Pencil or disappearing ink pen
- Fine-point permanent marker or archival ink pen (brown or black)
- Acrylic paints (burnt sienna, rusty orange, deep red, brown)
- Fine detail paintbrush (size 0 or 00)
- Small flat paintbrush
- Matte mod podge or acrylic sealer
- Paper plate or palette
Step 1: Design Transfer
-
Select your specimens:
Choose two real dried maple leaves or realistic artificial ones. Pick one larger leaf for the bulbous bottom of the squash and a smaller one for the neck to create a balanced composition. -
Position the main leaf:
Place the larger leaf against the widest part of the squash. Use small pieces of painter’s tape to hold it securely in place if it keeps slipping. -
Trace the outline:
Using a pencil, carefully trace around the entire perimeter of the leaf. Press lightly to avoid denting the squash skin. -
Add the stem:
Don’t forget to trace the stem line so it curves naturally down the squash’s form. -
Repeat for the top leaf:
Position the smaller leaf on the upper neck of the squash. Angle it slightly differently than the bottom one to make the arrangement look organic. -
Sketch internal veins:
Remove the physical leaves. Looking at them for reference, lightly sketch the main vein structure inside your traced outlines with pencil.
Step 2: Painting and Detailing
-
Mix the base color:
On your palette, mix burnt sienna with a touch of rusty orange to get a warm, dried-leaf tone. -
Fill the silhouette:
Using the small flat brush, carefully fill in the traced shapes with your paint mixture. Keep the edges crisp. -
Apply a second coat:
Allow the first layer to dry completely (about 15 minutes). Apply a second coat if the squash skin is showing through. -
Add color variation:
While the paint is still slightly tacky, I like to dab a tiny bit of deep red into the tips of the leaves and blend it downward for a natural gradient. -
Dry thoroughly:
Let the painted areas dry completely before moving on to the ink work. This prevents the marker from clogging or bleeding. -
Outline the shape:
Take your fine-point archival pen and slowly trace the outer edge of the painted area. A slightly wiggly line actually looks more natural here. -
Draw the main veins:
Draw the central vein running from the stem to the tip of each lobe using the pen. -
Add fine webbing:
Branching off the main veins, draw the delicate, netting-like sub-veins. Create tiny ‘Y’ shapes that fill the orange space. -
Detail the stem:
Go over the painted stem with the pen, adding a few vertical lines to give it texture. -
Seal the art:
Once the ink is fully set, brush a thin layer of matte sealer over just the painted areas to protect your work.
Steady Hand Trick
Rest your pinky finger on a dry part of the squash while doing the fine ink detailing. It acts as an anchor to keep your hand from shaking on the curved surface.
Vintage Patina
Before sealing, lightly dry-brush a tiny amount of pale yellow or cream paint over the center of the leaf to make it look sun-faded and aged.
Display your botanical gourd on a mantle or centerpiece for an elegant touch of autumn nature

PENCIL GUIDE
Understanding Pencil Grades from H to B
From first sketch to finished drawing — learn pencil grades, line control, and shading techniques.
Explore the Full Guide
Simple Witch Hat Gourds With Graphic Shapes
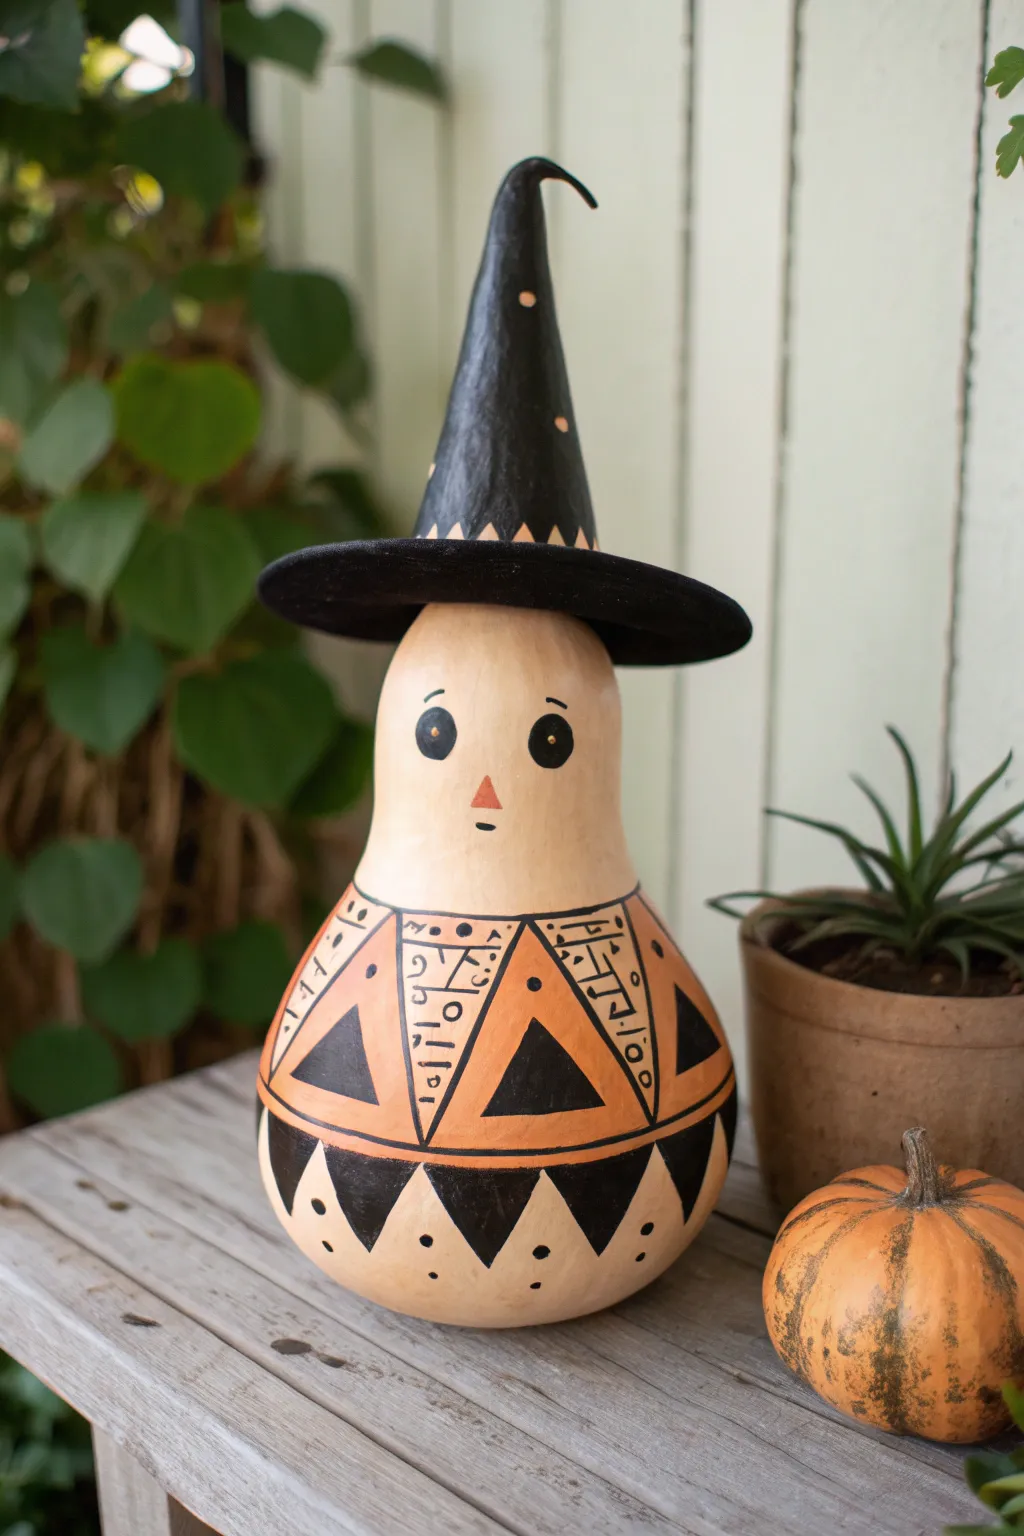
Transform a simple dried gourd into this charmingly modern witch character using graphic shapes and a warm autumn palette. The combination of clean lines, geometric triangles, and the natural gourd shape creates a piece that feels both folk-art inspired and contemporary.
Detailed Instructions
Materials
- Medium-sized dried bottle gourd with a curved neck
- Gesso or white primer
- Acrylic paints: Black, antique white/cream, pumpkin orange
- Black felt sheet (stiff preferred)
- Pencil and eraser
- Fine grit sandpaper
- Ruler or flexible measuring tape
- Flat shader paintbrush
- Fine liner paintbrush
- Scissors
Step 1: Planning and Priming
-
Surface Preparation:
Begin by cleaning your dried gourd with a damp cloth to remove any dust or dirt. If there are rough spots or bumps, gently smooth them out with fine-grit sandpaper, but try to preserve the natural character of the gourd. -
Prime the Base:
Apply a coat of gesso or white primer over the entire gourd. This step helps seal the porous surface and ensures your top colors will be vibrant and opaque. Let this base coat dry completely. -
Base Color Application:
Paint the entire body of the gourd, excluding the very top of the neck, with your antique white or cream acrylic paint. You might need two coats to get a solid, even finish without streaks. -
Defining the Hat:
Paint the upper neck of the gourd solid black. This will form the cone of the witch’s hat. I like to bring the black paint down to where the neck begins to widen into the body.
Step 2: Creating the Face and Hat Brim
-
Sketching the Face:
Lightly sketch the placement of the eyes and nose with a pencil. Position them high on the bulbous part of the gourd, leaving plenty of room below for the patterned clothing. -
Painting the Features:
Use a small round brush to paint two solid black circles for eyes. Add a tiny white dot in the upper corner of each eye for a reflective glint. -
Adding Details:
Paint a small, orange triangle for the nose. Then, use your fine liner brush to add thin, curved eyebrows above the eyes and a tiny horizontal dash for the mouth. -
Cutting the Brim:
Cut a circle out of black stiff felt. Cut a smaller hole in the center of that circle that matches the diameter of the gourd’s neck where the black paint starts. -
Attaching the Brim:
Slide the felt circle down the neck of the gourd until it sits snugly at the transition line between the black neck and the cream body to complete the hat. -
Hat Details:
For extra flair, use a small brush to dot tiny orange specks onto the black painted neck of the gourd, simulating a starry pattern on the hat.
Clean Lines Hack
Use narrow washi tape or painter’s tape to mask off the main horizontal bands and large triangles. It guarantees sharp edges versus freehanding.
Step 3: Geometric Body Design
-
Marking Guidelines:
Using a pencil and a flexible measuring tape, lightly draw a horizontal band around the middle of the gourd’s body. Create a second band near the bottom. -
Drafting Triangles:
Within the central band, sketch a series of large, alternating triangles. Some will point up, others down. This zigzag pattern is the core of the design. -
Painting Orange Sections:
Fill in the triangles that point upward with pumpkin orange paint. Use a flat shader brush to keep the edges crisp. -
Adding Black Shapes:
Inside each orange triangle, paint a smaller black triangle. This creates a nested geometric look. -
Detailed Linework:
For the triangles pointing downward (the cream ones), use a fine liner brush and black paint to draw decorative markings—small dots, dashes, and cryptic-looking symbols or runes. -
Bottom Border:
Along the bottom band of the gourd, paint a row of connected black triangles pointing downward. -
Final Accents:
In the negative space between the bottom black triangles, add small black dots for visual balance. Paint thin black lines to clearly outline all the major sections and separate the orange and cream areas. -
Sealing:
Once all paint is completely dry, apply a matte clear sealant spray to protect your work and give the gourd a unified finish.
Bleeding Lines?
If black paint bleeds into the cream, let it dry fully. Then, touch up the mistake with the cream paint. Don’t wipe it while wet; it smears.
Now you have a whimsical, handcrafted character ready to join your fall display
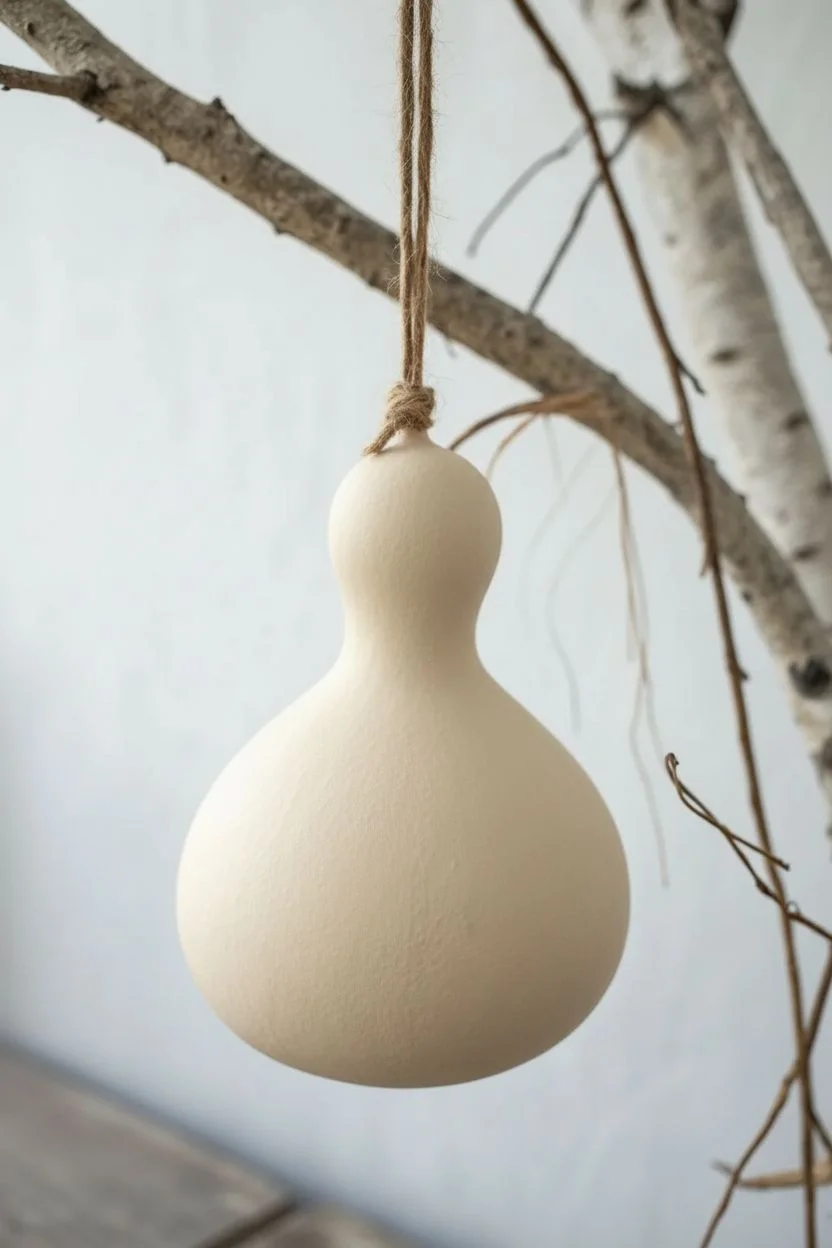
Hanging Ornament Gourds With Simple Stripes and Dots
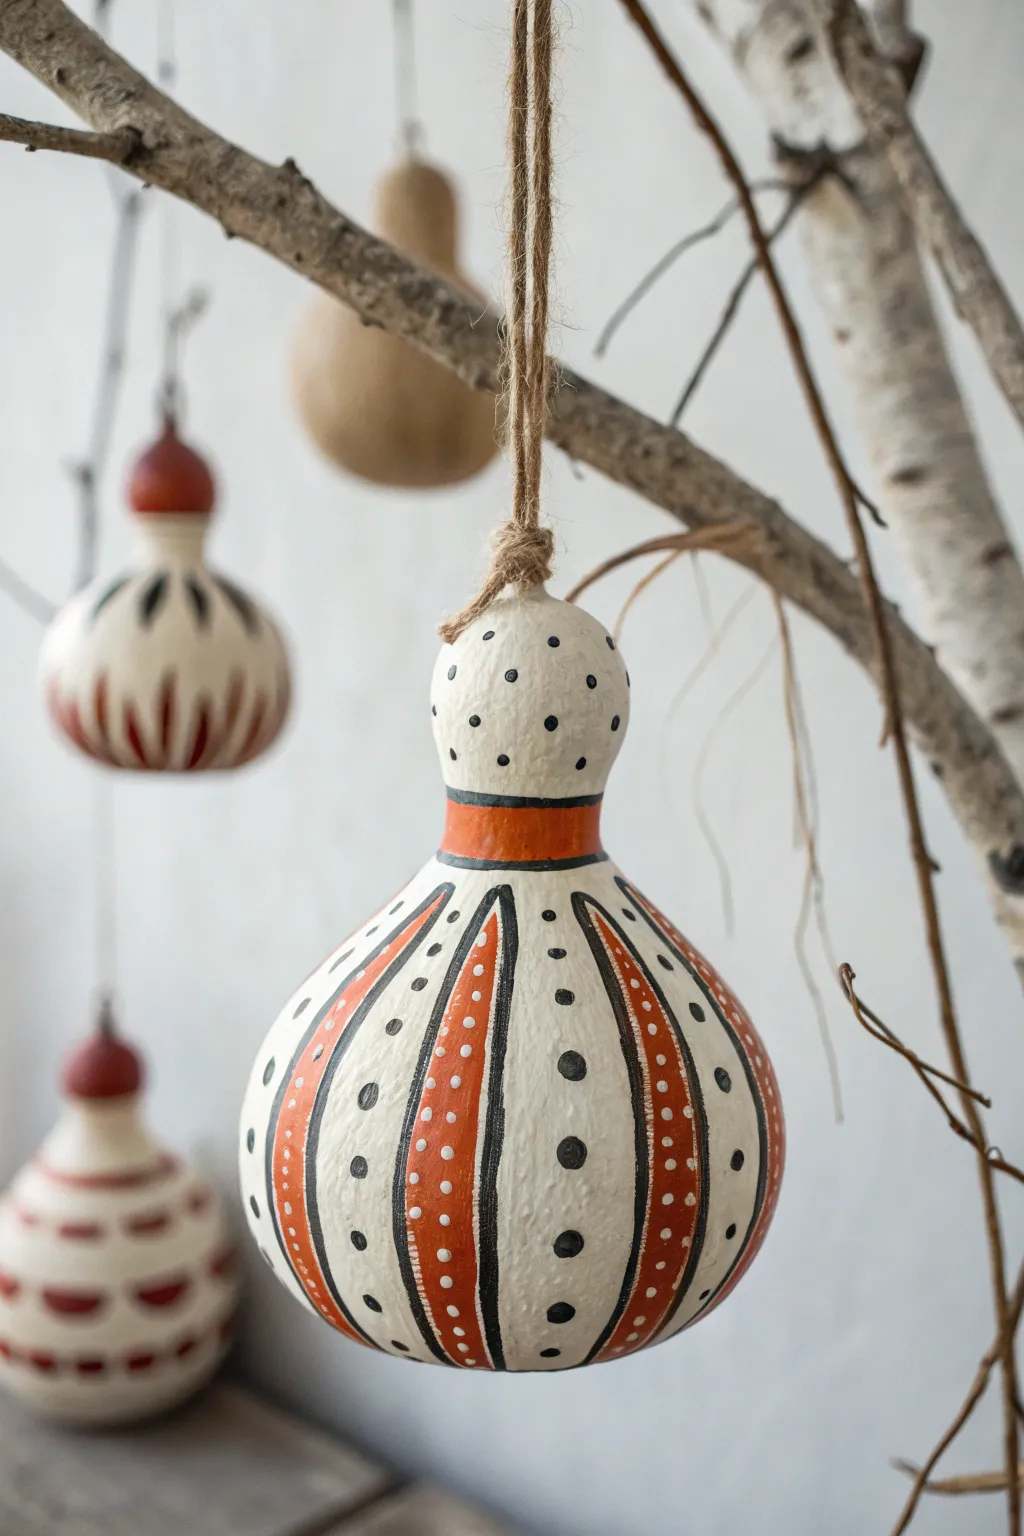
Transform a simple dried gourd into rustic holiday decor with this classic folk art-inspired design. The pattern features bold terracotta-orange stripes bordered in dark charcoal, contrasting beautifully with a creamy white background and dotted accents.
How-To Guide
Materials
- Small dried bottle gourd (approx. 4-5 inches tall)
- Fine-grit sandpaper (220 grit)
- Acrylic craft paints: Cream/Off-White, Terracotta Orange, Black/Dark Charcoal
- Paintbrushes: Flat shader brush (medium), fine liner brush, and a very small round brush
- Pencil for sketching
- Jute twine for hanging
- Matte sealer or varnish spray
- Paper towel
- Cup of water
Step 1: Preparation & Base Coat
-
Clean and sand the gourd:
Start by ensuring your dried gourd is clean. Lightly sand the surface with 220-grit sandpaper to remove any rough patches or lingering skin, creating a smooth canvas for your paint. Wipe away the dust with a slightly damp cloth. -
Apply the base coat:
Using your medium flat brush, paint the entire gourd with the cream or off-white acrylic paint. You may need two coats to get solid, opaque coverage, especially over darker spots on the gourd shell. -
Let it dry completely:
Allow the base coat to dry fully. If the surface feels cool to the touch, it still holds moisture. Proper drying prevents the pencil sketch from gouging the paint layer.
Wobbly Lines?
If your hand shakes while painting outlines, stabilize your painting hand by resting your pinky finger on the dry surface of the gourd as you work.
Step 2: Drafting the Design
-
Mark the neck band:
Visualize a distinct band around the neck of the gourd. Lightly pencil two horizontal rings around the narrowest part of the neck to define where the orange band will go. -
Sketch vertical segments:
Starting from the bottom of your neck band and extending almost to the base, sketch vertical curved lines. These will separate your striped sections from the dotted sections. Aim for symmetry, creating alternating panels. -
Define the stripe width:
Inside every other panel, draw the outline for the tapered orange stripes. They should be wider in the middle of the gourd’s belly and taper to a point near the bottom. I find it easier to sketch these loosely first before committing to paint.
Step 3: Painting the Pattern
-
Fill the neck band:
Using a small round brush, fill in the band around the neck with terracotta orange paint. Keep your hand steady to maintain a clean edge, but don’t worry about perfection as we will add outlines later. -
Paint the main stripes:
Fill in the vertical tapered stripes on the body with the same terracotta orange. You might need a second coat of orange to make the color pop against the cream background. -
Outline the neck band:
Switch to your fine liner brush and black paint. Carefully paint a thin ring above and below the orange neck band. -
Add dots to the neck:
Dip the handle end of a paintbrush into black paint to create uniform dots. Place these randomly but spaced out on the upper cream section of the gourd’s neck. -
Outline the vertical stripes:
Using the liner brush, paint thin black lines hugging both sides of each orange vertical stripe. Try to keep the line thickness consistent from top to bottom. -
Create the white dot detail:
Clean your liner brush or use a very small dotting tool. Dip into the cream base paint and add a line of tiny dots running down the center of each orange stripe. This adds a lovely textured look. -
Add the large black dots:
In the white panels between the orange stripes, paint a vertical column of black dots. Use the back of a larger brush handle for these to get a consistent round shape, starting from the top and working down.
Level Up: Aging Effect
Mix a tiny drop of brown paint with water to make a glaze. Lightly brush it over the finished dry paint and wipe off immediately for a vintage look.
Step 4: Finishing Touches
-
Seal the artwork:
Once all paint is completely bone dry, apply a coat of matte artistic sealer. A spray sealer is best here to avoid smearing the dots. This protects the finish and gives it a professional look. -
Attach the hanger:
Cut a length of jute twine, about 8-10 inches long. Loop it around the very top stem of the gourd. -
Secure the knot:
Tie a secure knot at the base of the stem and create a loop for hanging. For extra security, you can add a tiny dab of glue under the knot where it touches the gourd.
Hang your beautiful hand-painted gourd on a branch or tree to enjoy a touch of rustic charm


Have a question or want to share your own experience? I'd love to hear from you in the comments below!