If you’re planning a family portrait, the biggest magic happens when everyone feels connected and comfortable. Here are my favorite ideas to help you design a scene that feels warm, cohesive, and totally you—perfect for reference photos or a finished drawing or painting.
Classic Shoulder-to-Shoulder Standing Portrait
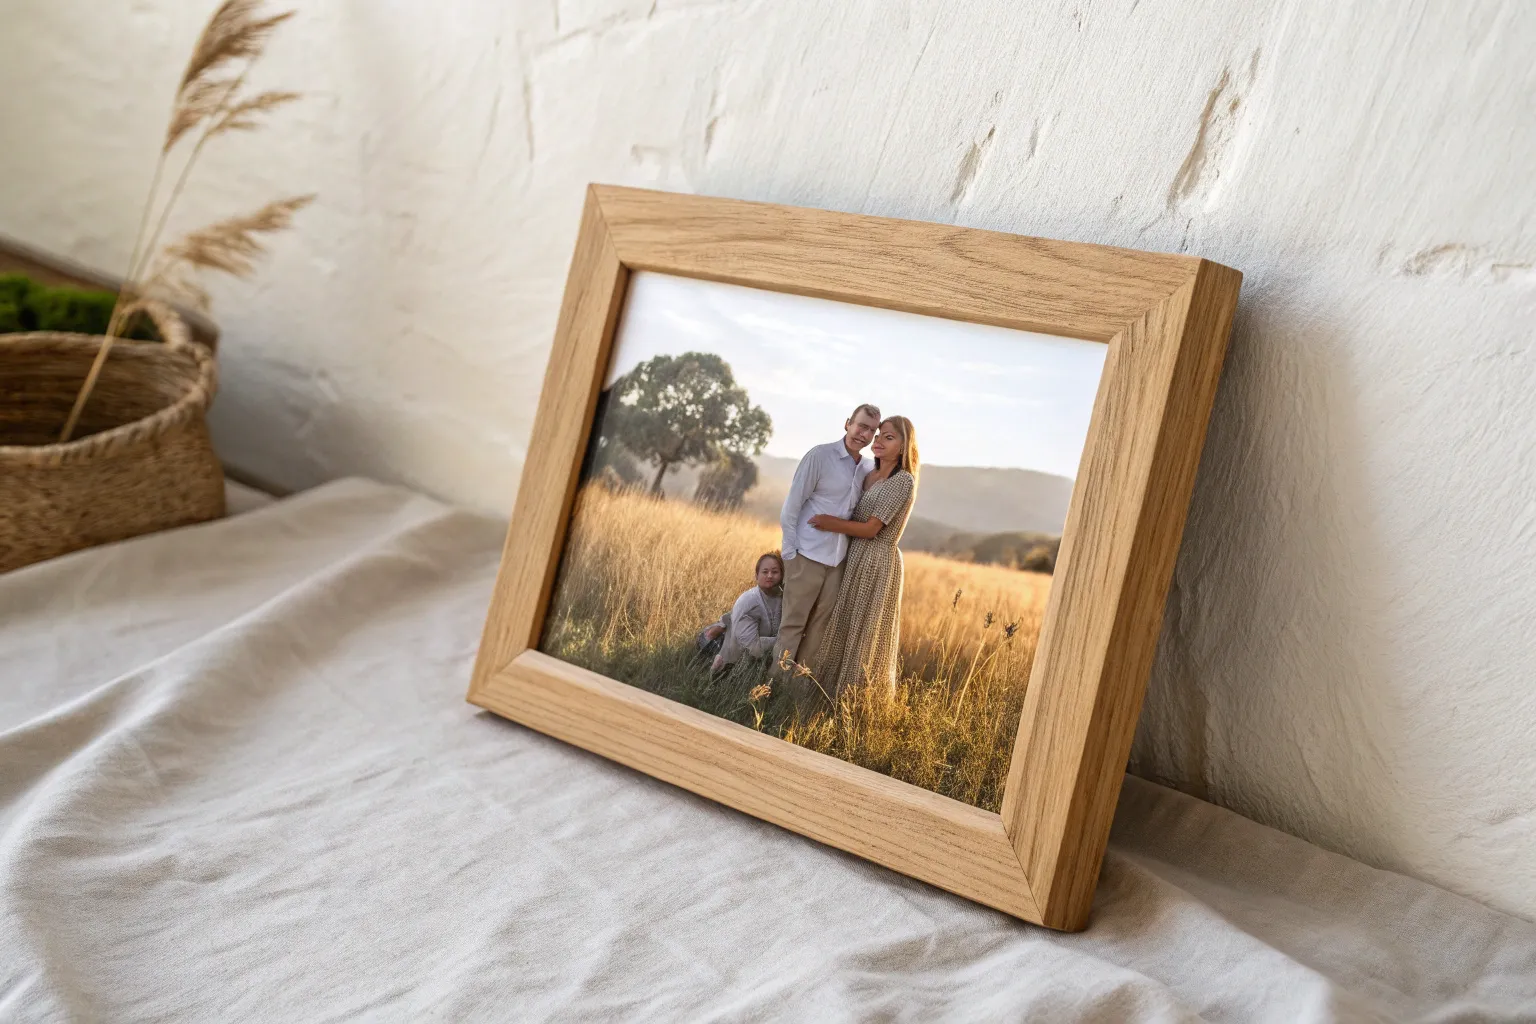
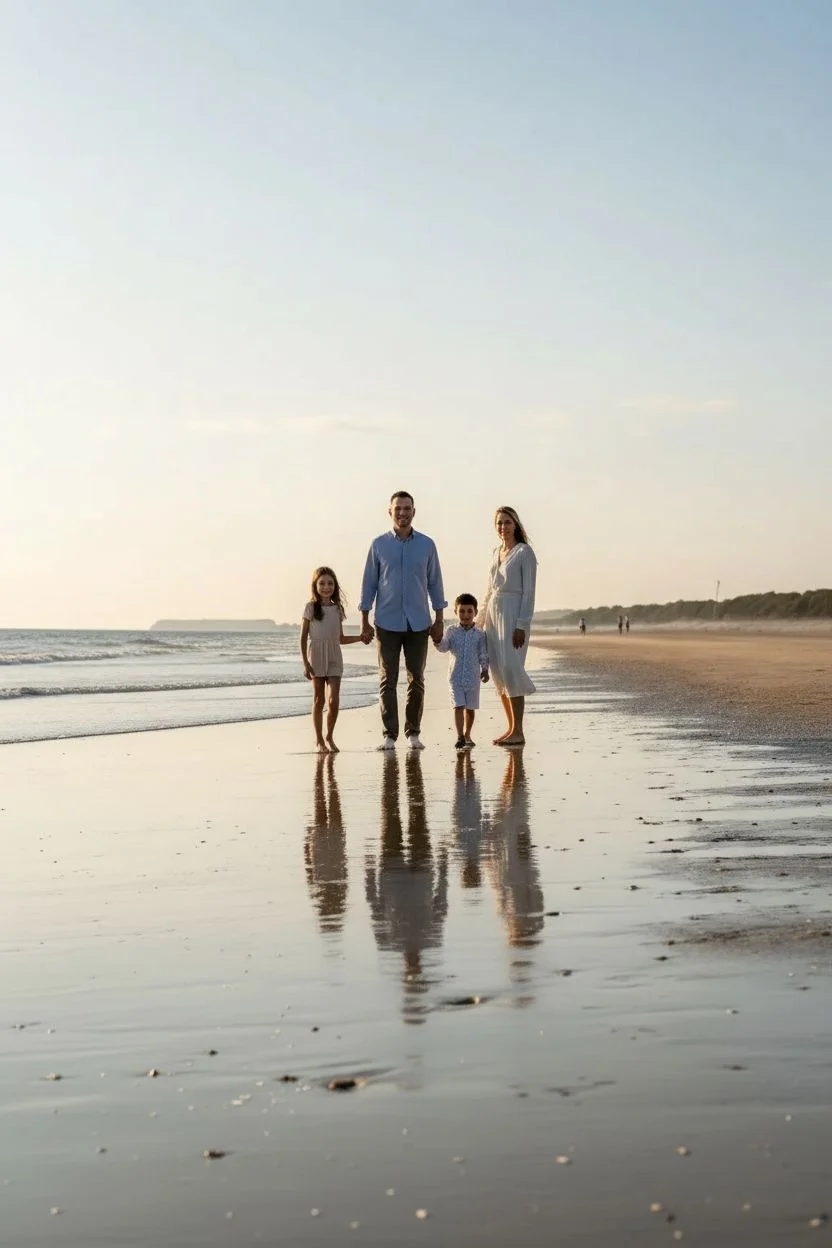
Capture the warmth and connection of a family unit with this classic shoulder-to-shoulder composition set against a serene beach backdrop. This tutorial guides you through taking the photo, editing for natural tones, and framing it in beautiful oak to create a lasting keepsake.
Step-by-Step Tutorial
Materials
- DSLR or Mirrorless Camera (35mm or 50mm lens recommended)
- Adobe Lightroom or similar photo editing software
- High-quality inkjet photo paper (Luster finish)
- Inkjet photo printer
- Solid oak wide-profile photo frame (8×10 or 11×14 inch)
- Glass cleaner
- Microfiber cloth
- Framing tape or ph-neutral backing tape
Step 1: Capturing the Shot
-
Scout the location:
Find a beach location with a clean horizon line. Look for a spot where the sand meets the water in the middle distance to create depth, avoiding busy backgrounds like piers or crowds. -
Position the subjects:
Arrange the family in a tight triangle formation. Have the tallest person (usually the father) stand centrally in the back, with the other two subjects slightly to the front and sides, leaning inward so their shoulders touch or overlap. -
Check the lighting:
Shoot during the ‘golden hour’ just before sunset or on an overcast day for soft, diffuse light. Avoid harsh midday sun which creates unflattering shadows under the eyes and nose. -
Compose the frame:
Position yourself at eye level with the subjects. Frame the shot from the chest up to capture facial expressions clearly while still showing enough of the environment. -
Direct the gaze:
Encourage a natural smile. Have them look directly into the lens to establish a connection with the viewer. Taking multiple burst shots ensures everyone has their eyes open.
Clothing Coordination
Stick to neutral tones like creams, soft greys, or muted greens (as seen in the photo). Avoid bright patterns or logos that date the photo quickly or distract from faces.
Step 2: Editing the Image
-
Import and crop:
Import your photos into Lightroom. Select the best expression and crop the image to a standard 4:5 or 8:10 aspect ratio to fit your frame. -
Adjust exposure:
Lift the exposure slightly to brighten the faces. I like to bring up the shadows (+15 to +20) to reveal details in darker clothing or hair without washing out the image. -
Balance the temperature:
Ideally, the beach tones should feel warm but natural. Adjust the White Balance slightly towards yellow/warmth if the overcast sky made the skin tones look too cool or blue. -
Soften the background:
If the ocean is too sharp, use a masking brush with negative clarity or texture on the background only. This mimics a shallow depth of field and keeps the focus entirely on the faces. -
Desaturate distractions:
Slightly desaturate the blues in the sky and water so they don’t compete with the subjects. Keep the skin tones vibrant but natural.
Add a Mat Board
For a gallery look, print the photo smaller (e.g., 5×7) and use a wide white mat inside an 8×10 frame. This adds breathing room and draws the eye inward.
Step 3: Printing and Framing
-
Prepare for print:
Resize the image to your desired print dimensions (e.g., 8×10 inches) at 300 DPI. Sharpening specifically for ‘Glossy’ or ‘Luster’ paper is often necessary at this stage. -
Print the photograph:
Load Iuster paper into your printer. Luster is perfect here because it reduces glare under glass while maintaining rich color saturation. -
Dry the print:
Allow the print to dry completely flat for at least 24 hours. Handling it too soon can smudge the ink or cause the paper to curl inside the frame. -
Clean the glass:
Disassemble your oak frame. Clean the glass on both sides meticulously with glass cleaner and a microfiber cloth to remove all dust and fingerprints. -
Mount the photo:
Place the photo face down on the glass (or behind the mat if using one). Secure it to the backing board using small strips of framing tape to prevent slipping. -
Assemble the frame:
Insert the backing board into the frame. Press down the flexible tabs or turn-buttons to lock everything tight. Check the front for any trapped dust specks before hanging.
Place your finished piece in a well-lit spot where the natural wood tones can complement your home decor


Seated Blanket Cluster on the Ground
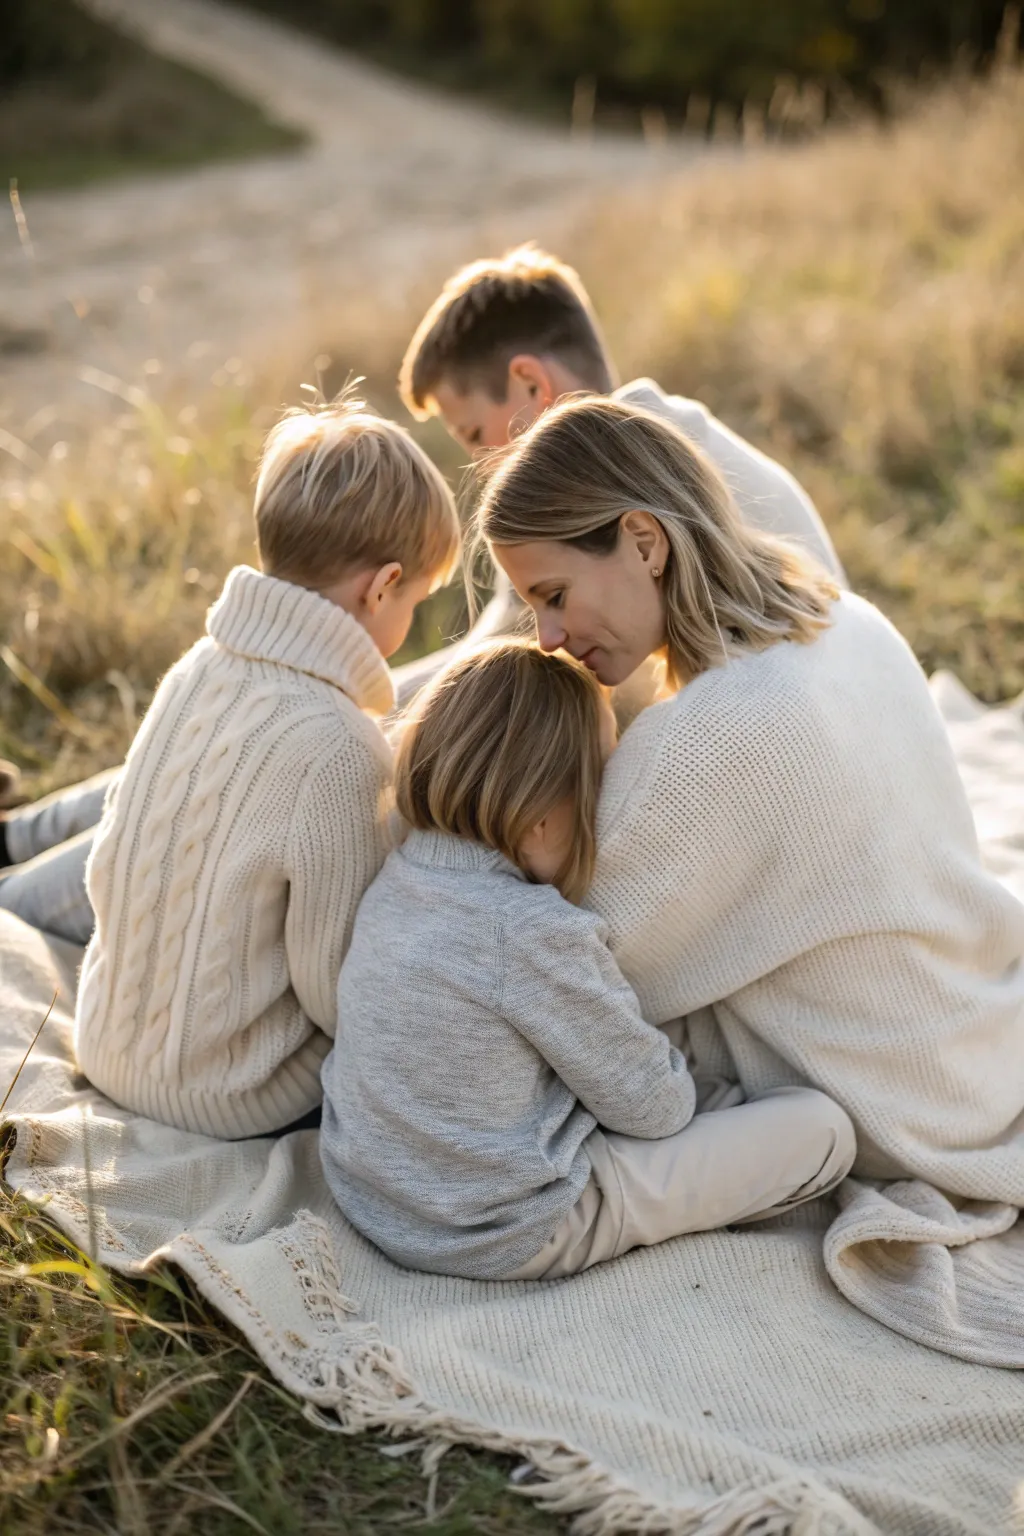
Capture the warmth and intimacy of a family moment with this realistic oil painting tutorial. Using soft, layered brushwork and a glowing palette, you will recreate the gentle textures of knit sweaters and the ethereal backlight of a sun-drenched field.
How-To Guide
Materials
- Stretched canvas (16×20 inches or larger)
- Oil paints (Titanium White, Yellow Ochre, Burnt Sienna, Raw Umber, Alizarin Crimson, Ultramarine Blue, Cadmium Yellow Light)
- Odorless mineral spirits
- Liquin or linseed oil medium
- Assorted brushes (filberts #4-#10, round #2, flat #12)
- Palette knife
- Lint-free rags
- Easel
Step 1: Preparation and Underpainting
-
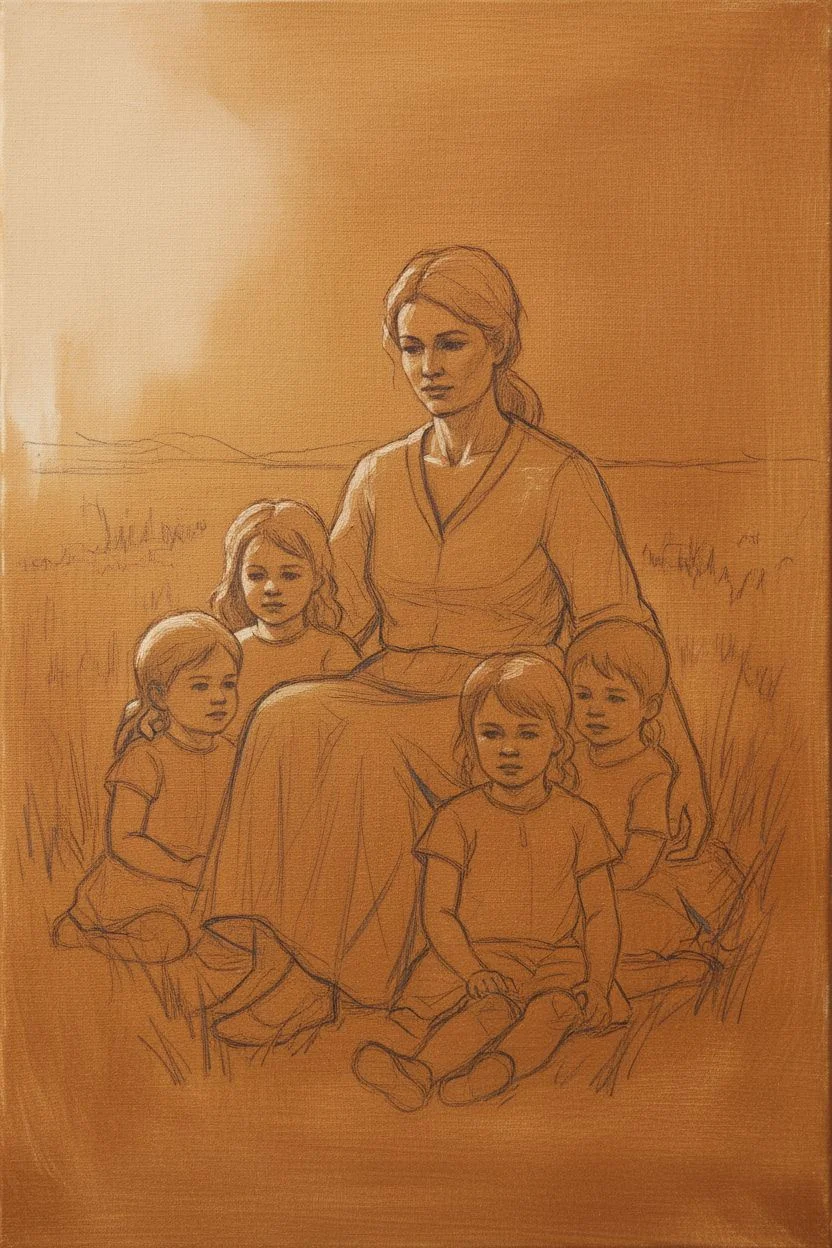
Tone the Canvas:
Begin by applying a thin wash of Burnt Sienna diluted with mineral spirits across the entire canvas. This warm undertone will help establish the golden hour glow later on. -
Sketch the Composition:
Using a small round brush and a thinned mixture of Raw Umber, lightly sketch the outlines of the four figures. Focus on the triangular composition created by the seated group, ensuring the mother is slightly right of center. -
Block in Darks:
Identify the darkest areas creates by shadows—specifically the hair roots, the shadows between the figures, and the folds in the clothing. Paint these loosely with Raw Umber and Ultramarine Blue to establish your value map. -
Establish Light Sources:
Rub away paint with a rag on the upper left side of the figures where the sunlight creates a rim light effect. This negative painting helps visualize the strong backlight early in the process.
Rim Light Magic
Don’t overmix the rim light. Lay down a stroke of pure light color on the edge of the hair or sweater and leave it alone to keep it vibrant.
Step 2: Layering Skin and Features
-
Mix Skin Tones:
Prepare a base skin tone using White, Yellow Ochre, and a touch of Cadmium Red. Make a shadow tone by adding Burnt Sienna and a tiny bit of Blue. -
Paint the Profiles:
Start with the mother’s profile. Apply the mid-tones first, then carefully carve out the highlight on her forehead and nose bridge. Remember that with strong backlight, faces are often in soft shadow. -
Detail the Children’s Faces:
Move to the boy on the left and the child in the center. Keep their features soft; avoid hard lines. Use the shadow mixture for the boy’s cheek to show the turn of his head away from the light. -
Refine Hair Texture:
For the blonde hair, use a mixture of Yellow Ochre and White. I like to apply this with a dry filbert brush to mimic the strands catching the light. Add pure White highlights only at the very edges where the sun hits.
Impasto Texture
For the chunky knit sweaters, try mixing a little cold wax medium into your white paint. This holds the brushstroke ridges better for a 3D wool effect.
Step 3: Texturing the Sweaters
-
Block in Sweater Values:
The knit textures are crucial here. Mix a creamy off-white using Titanium White and a dot of Raw Umber. Paint the general shapes of the sweaters, observing how the light falls on the shoulders. -
Create Cable Knit Effects:
On the boy’s sweater (left), use a smaller round brush to paint the shadows of the cable pattern using a slightly darker grey-beige. Follow the curves of his back to suggest volume. -
Soften the Mother’s Sweater:
For the mother’s cardigan, use a scumbling technique. Load a dry brush with thick, light paint and drag it mostly over the high points of the fabric texture, letting the underpainting show through in the valleys. -
Define the Center Child’s Grey Sweater:
Switch to a cool grey mix (White + trace Ultramarine + Burnt Sienna). Dab the paint on to create the fuzzy, soft texture of wool, rather than smoothing it out completely.
Step 4: Background and Atmosphere
-
Paint the Foreground Blanket:
Use broad, horizontal strokes with a large flat brush to paint the blanket. Use a dirty white mixture and add texture to the fringe area with a rigger brush or the edge of a palette knife. -
Create the Golden Background:
Mix a hazy, warm grey-green for the distant field. Keep the edges extremely soft and blurred to simulate depth of field. The background should not distract from the sharp focus of the figures. -
Add Sun Flare:
Glaze a very thin layer of transparent Yellow Ochre and White over the top left corner and the hair edges. This unifies the lighting and enhances the golden hour feel. -
Finishing Touches:
Review the rim lighting. Add pure Titanium White impasto strokes on the shoulders and hair tips where the light is strongest to make the image pop.
Step back and admire the warm, nostalgic atmosphere you’ve captured on canvas


Walking Hand-in-Hand Toward the Camera
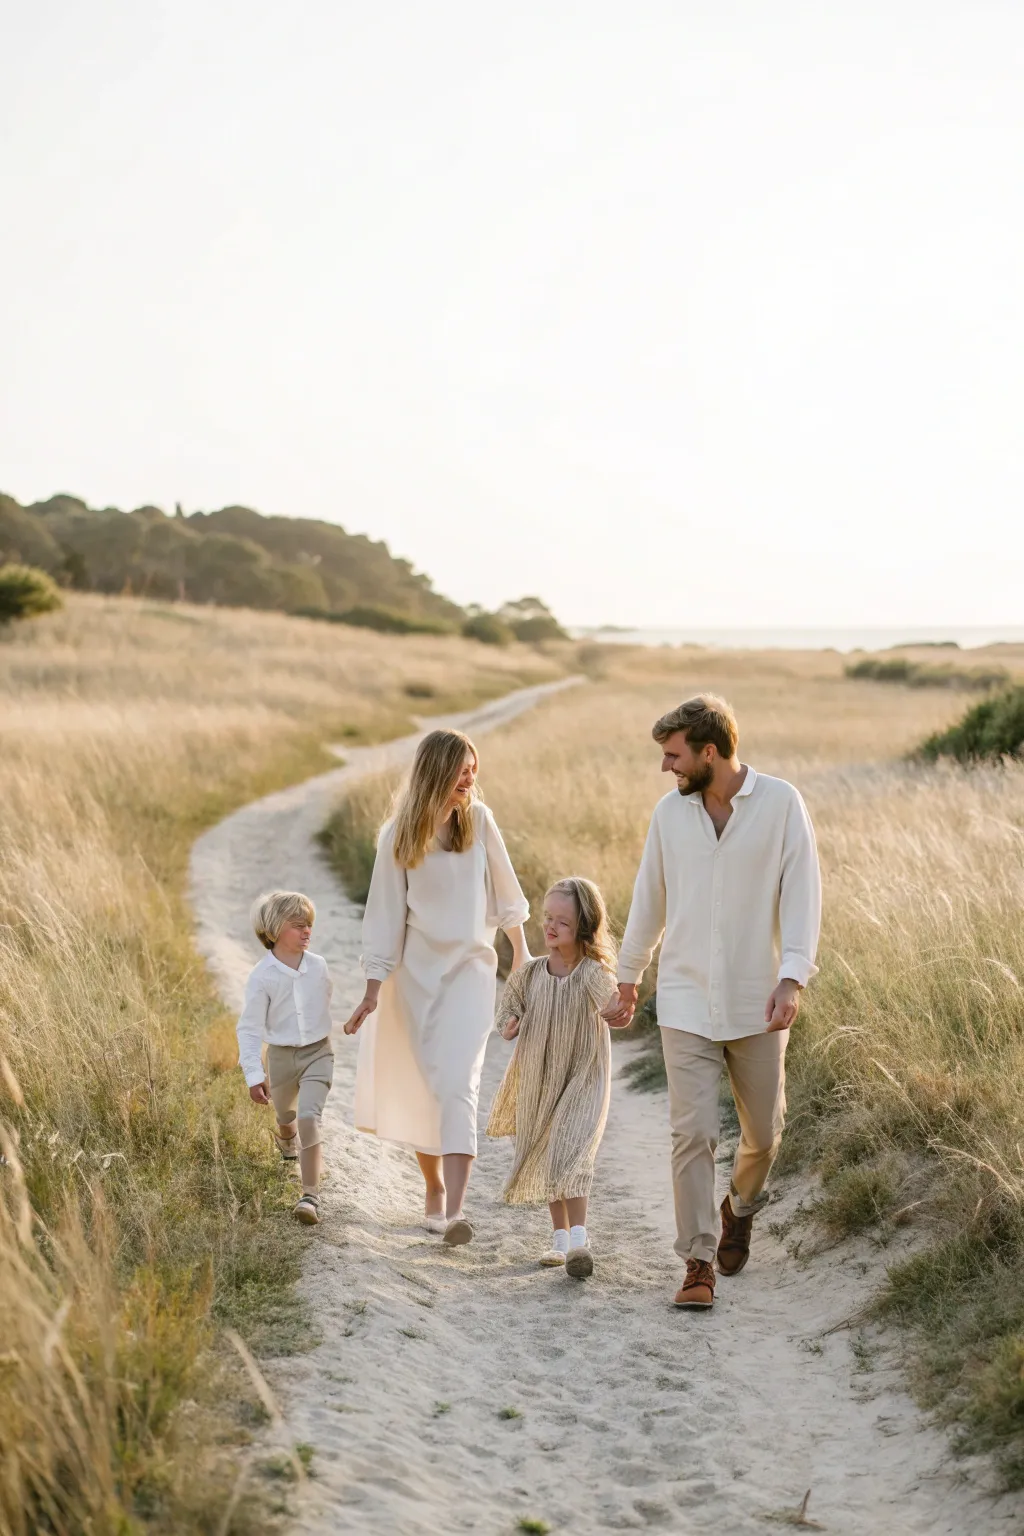
Capture the warmth and movement of a family walk with this delicate watercolor tutorial. By focusing on soft light and loose brushwork, you’ll create a dreamy, backlit effect that perfectly preserves a precious memory.
Detailed Instructions
Materials
- Cold press watercolor paper (300 gsm)
- HB pencil for sketching
- Kneaded eraser
- Masking fluid
- Watercolor paints: Yellow Ochre, Burnt Sienna, Raw Umber, Ultramarine Blue, Alizarin Crimson, Sepia
- Round brushes (sizes 4, 8, and 12)
- Small detail brush (size 0 or 1)
- Paper towels
- Two jars of water
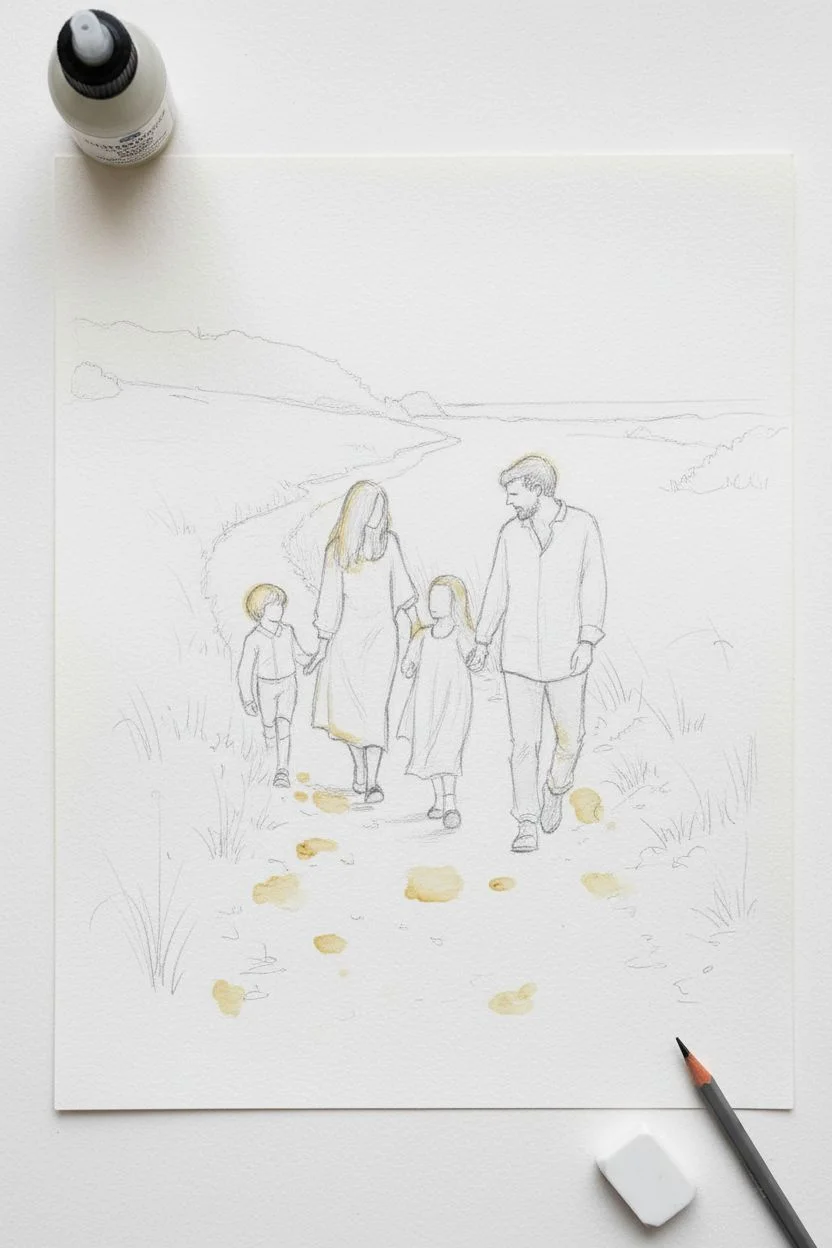
Step 1: Planning and Sketching
-
Establish the horizon:
Lightly draw the horizon line about two-thirds up the paper and sketch the winding path leading from the foreground to the background. Ensure the path narrows as it recedes to create depth. -
Position the figures:
Sketch the four family members walking along the path. I find it helpful to start with simple oval shapes for heads and stick figures for limbs to get the proportions right before adding details. -
Refine the shapes:
Flesh out the clothing and hairstyles. Keep the lines light and loose; you don’t need to draw every fold, just the main shapes of the flowing dresses and shirts. -
Protect the highlights:
Apply masking fluid to the brightest areas: the backlit hair of the figures, the rims of their white clothing, and the brightest spots on the sandy path. Let this dry completely.
Muddy colors?
If your field colors turn muddy, let the paper dry completely between layers. Patience prevents the wet pigments from blending into a dull brown mess.
Step 2: Golden Hour Background
-
The sky wash:
Wet the sky area with clean water. Drop in a very dilute mix of Yellow Ochre near the horizon, fading into almost pure water at the top to mimic the bright, blown-out sky. -
Distant hills:
While the sky is still slightly damp but not soaking, paint the distant tree line using a mix of Ultramarine Blue and a touch of Sepia. Keep the edges soft to suggest atmospheric perspective. -
Field base layer:
Mix a large wash of Yellow Ochre and a touch of Burnt Sienna. Paint the grassy fields on either side of the path, using broad, horizontal strokes. Leave some white paper showing for texture. -
Adding field texture:
While the field wash is still wet, drop in slightly darker mixture of Raw Umber and Burnt Sienna near the bottom corners to ground the image. Splatter a tiny bit of clean water to create blooms that look like dry grass.
Pro Tip: Lost Edges
Don’t outline everything. Let the light-colored clothing blend into the light background in some spots. These ‘lost edges’ create a sense of bright, blinding light.
Step 3: Painting the Family
-
Skin tones:
Mix a watery flesh tone using Yellow Ochre and a tiny bit of Alizarin Crimson. Paint the faces, arms, and legs. Drop a slightly darker mix into the shadowed sides of the limbs while wet. -
Clothing shadows:
For the white clothing, we aren’t painting ‘white’ but rather the shadows. Mix a very pale, cool grey using Ultramarine Blue and Burnt Sienna. Paint the shadow shapes on the dresses and shirts, softening hard edges with a clean, damp brush. -
Warm sunlight:
Glaze a very dilute Yellow Ochre over the sun-facing sides of the clothing once the shadow layer is dry, emphasizing that warm, late-afternoon glow. -
Pants and details:
Paint the father’s and son’s trousers with a mix of Raw Umber and Yellow Ochre. Keep the wash uneven to suggest movement and folding fabric. -
Hair details:
Using a smaller brush, paint the hair masses. Use Yellow Ochre for the blond tones and add Sepia for the darker roots and shadowed areas. Avoid painting individual strands; think in clumps of color.
Step 4: Finishing Touches
-
Path texture:
Add texture to the path with dry brush techniques. Drag a brush with thick, dry paint (Raw Umber) lightly over the paper grain to create the sandy look. -
Grassy details:
Use a rigger or size 1 brush to flick upward strokes of Raw Umber and Sepia in the foreground, suggesting tall, dry grass blades catching the light. -
Remove masking fluid:
Once the paper is bone dry, gently rub off the masking fluid with your finger or a rubber cement pickup. This reveals the sparkling rim light. -
Soften edges:
If the revealed white areas look too stark, gently soften the edges with a clean, damp brush to blend them into the surrounding painting. -
Final shadows:
Mix a cool, transparent purple-grey. Paint the cast shadows on the ground extending from the figures’ feet, anchoring them to the path.
Now you have a heartwarming, light-filled portrait that captures a fleeting family moment forever.


Parents Holding Little Kids at Face Level


Capture the pure joy of connection with this simple yet powerful pose, where parents lift their little one high to create a triangle of laughter and eye contact. The warm yellow backdrop and candid expressions make this shot feel both spontaneous and beautifully composed.
Step-by-Step Tutorial
Materials
- DSLR or Mirrorless camera
- Portrait lens (35mm or 50mm ideal)
- Small step ladder (optional, for height adjustments)
- Plain building wall (preferably warm-toned)
- Natural daylight
- Casual, coordinating outfits (denim, beige, knitwear)
Step 1: Setting the Scene
-
Find the backdrop:
Scout for a location with a fairly uniform wall color that isn’t too distracting. A warm yellow or terracotta wall works beautifully to add a sunny feel. -
Check the lighting:
Position your subjects in open shade or soft, diffused daylight. Avoid harsh, direct sun that creates strong shadows under the eyes. -
Framing the windows:
If your chosen wall has windows, use them to frame the subjects. Position the family between two windows to create natural symmetry and balance in the layout. -
Camera settings:
Set your aperture to around f/2.8 or f/4. This keeps the whole family in focus while slightly blurring the architectural details in the background. -
Shutter speed check:
Ensure your shutter speed is at least 1/250s or faster. Since the baby is moving and being lifted, you need a fast shutter to freeze the motion without blur.
Step 2: Posing the Parents
-
Position the dad:
Have the father stand sideways, facing toward the center. His feet should be shoulder-width apart for a sturdy base, ready to lift. -
Position the mom:
Place the mother opposite the father, also facing inward. She should be close enough to touch the baby but leaning back slightly to look up. -
Coordinate the outfits:
Check the clothing for bunching. I often ask parents to do a quick ‘wiggle’ to let coats and cardigans settle naturally before the action starts. -
Foot placement:
Ask the mom to pop her back heel or extend one leg slightly for a more dynamic, less static stance.
Safety First
Always prioritize safety over the shot. Ensure the baby’s head is supported if they are very young, or modify the pose to a lower shoulder hold.
Step 3: The Lift and Interaction
-
The grip:
Instruct the dad to hold the baby securely under the arms or around the torso, ensuring a safe and comfortable grip. -
The lift:
On the count of three, have the dad lift the baby straight up. Aim for the baby’s face to be slightly above the dad’s head level. -
Mom’s role:
Ask the mom to reach up with one or both hands, touching the baby’s feet or legs gently. This connects the visual circle between all three family members. -
Eye contact:
This is crucial: tell both parents to look solely at the baby, not the camera. The baby will likely look down at the dad or mom, creating a beautiful emotional loop.
Capture the Giggle
Make funny noises or have someone behind you wave a toy to get the baby to look down and laugh right as they reach the top of the lift.
Step 4: Capturing the Moment
-
Burst mode:
Switch your camera to continuous shooting mode. The perfect expression often happens in the split second just after the lift reaches its peak. -
Shoot wide:
Frame the shot slightly wider than you think you need. You want to capture the full extension of arms and legs, and you can always crop tighter later. -
Capture the reaction:
Keep shooting as they bring the baby down. The giggle and relief on the parents’ faces immediately after the exertion can be just as cute as the lift itself. -
Check focus:
Quickly review image sharpness on your screen, zooming in on the baby’s eyes to ensure the movement didn’t cause motion blur. -
Repeat if needed:
Don’t be afraid to ask for ‘one more time.’ Lifting a baby is tiring, so give the dad a moment to breathe between takes.
Once you have the shot, crop it to balance the negative space above the baby for a perfectly composed family heirloom
BRUSH GUIDE
The Right Brush for Every Stroke
From clean lines to bold texture — master brush choice, stroke control, and essential techniques.
Explore the Full Guide
Sibling Hug Stack With Parents Framing

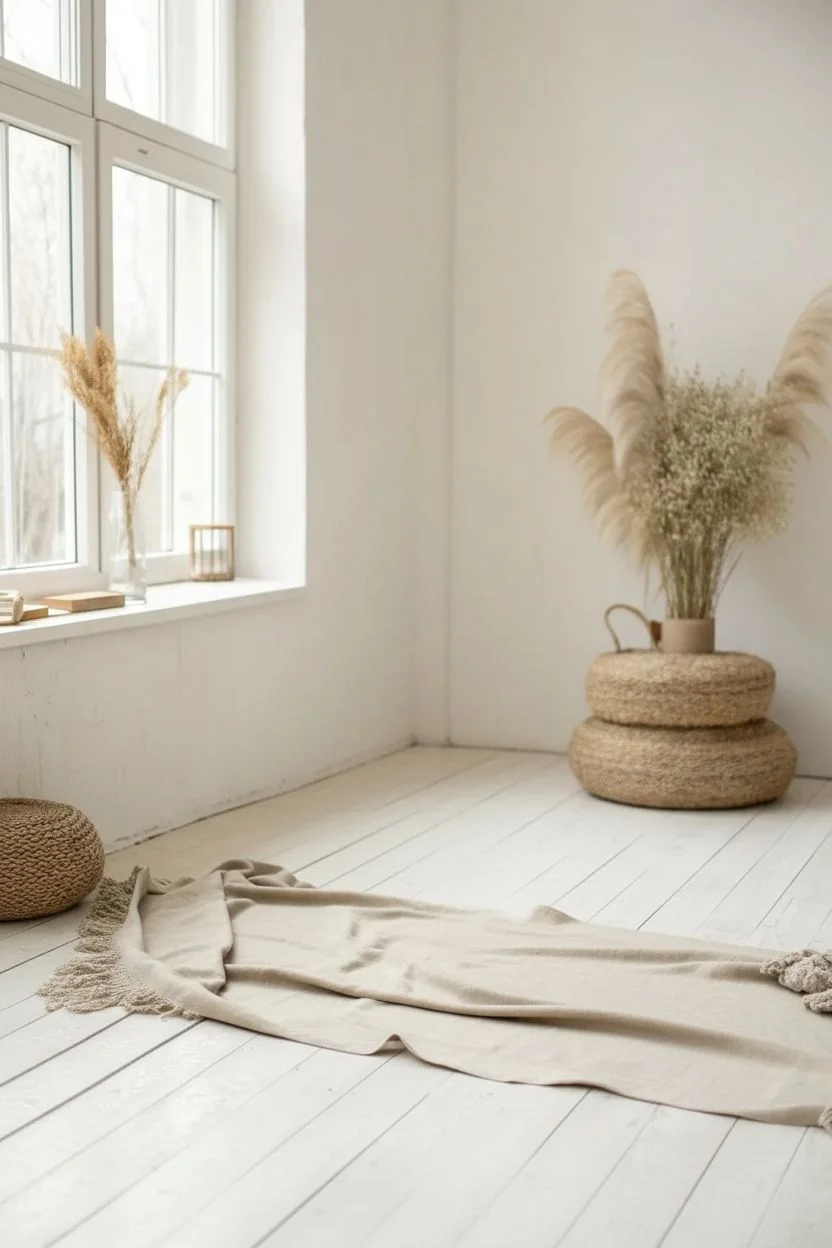
Capture the tender connection of family with this intimate indoor photography setup that emphasizes warmth and closeness. The result is a soft, light-filled portrait showcasing a father wrapping his arms around two hugging siblings, creating a cozy and emotional composition perfect for framing.
Step-by-Step Guide
Materials
- DSLR or Mirrorless Camera
- Portrait Lens (50mm or 85mm prime recommended)
- Natural light source (large window)
- Beige or off-white blanket/throw
- Neutral colored clothing (creams, tans, muted textures)
- Reflector (optional)
- Tripod (optional but helpful)
Step 1: Setting the Scene
-
Scout the Location:
Choose a room with a large window that lets in ample soft, diffused daylight. A north-facing window is ideal for avoiding harsh shadows. -
Prepare the Floor:
Clear a space on the floor near the window. Lay down a textured beige or off-white blanket or rug to create a designated, cozy posing area. -
Style the Background:
Keep the background minimal to maintain focus on the subjects. Add subtle, organic elements like dried pampas grass in a vase or woven baskets to add texture without distraction. -
Coordinate Wardrobe:
Dress your subjects in coordinating neutral tones. Think knit sweaters in oatmeal, rust, or cream, and simple denim or khaki pants. Avoid busy patterns or logos.
Uneven Lighting?
If the shadow side of the embrace is too dark, use a white reflector or a large piece of white foam board opposite the window to bounce light back onto their faces.
Step 2: Posing and Composition
-
Position the Siblings:
Have the two children kneel on the blanket facing each other. Ask them to wrap their arms around one another in a tight, genuine hug, resting their heads on each other’s shoulders. -
Add the Parent:
Position the father kneeling directly behind the children. He should lean forward gently, wrapping his arms around both children to encompass them in a protective embrace. -
Refine the Embrace:
Encourage the father to rest his chin gently on the top of the taller child’s head or lean his forehead against them to create a closed, intimate loop of connection. -
Check Angles:
Ensure no faces are completely hidden. Adjust the tilt of their heads slightly so the profiles are visible and the emotion is readable.
Creative Crop
Try a tight crop that cuts off the top of the heads or focuses solely on the tangle of arms and hands to emphasize the tactile nature of their connection.
Step 3: Lighting and Shooting
-
Angles of Light:
Position the group so the window light hits them from the side (roughly 45-90 degrees). This side lighting adds dimension and depth to the knitted textures of their clothing. -
Camera Settings:
Set your aperture wide (around f/2.8 or f/4) to blur the background slightly while keeping all three faces reasonably sharp. Keep your ISO low to minimize grain. -
Compose the Shot:
Shoot from a low angle, getting down to their eye level. This perspective makes the viewer feel part of the moment rather than looking down on it. -
Direct the Mood:
Ask them to close their eyes for a moment and take a deep breath together. This often relaxes their shoulders and creates a serene, quiet expression. -
Capture the Details:
Take several shots focusing on different focal points—one on the father’s face, one on the children’s embrace, and one wider shot showing the whole group interaction. -
Post-Processing:
In editing, slightly desaturate the colors to enhance the neutral palette. Boost the exposure slightly for a light, airy feel, and add a touch of warmth to the white balance.
Now you have a timeless, emotive family portrait ready to be printed and framed for your wall
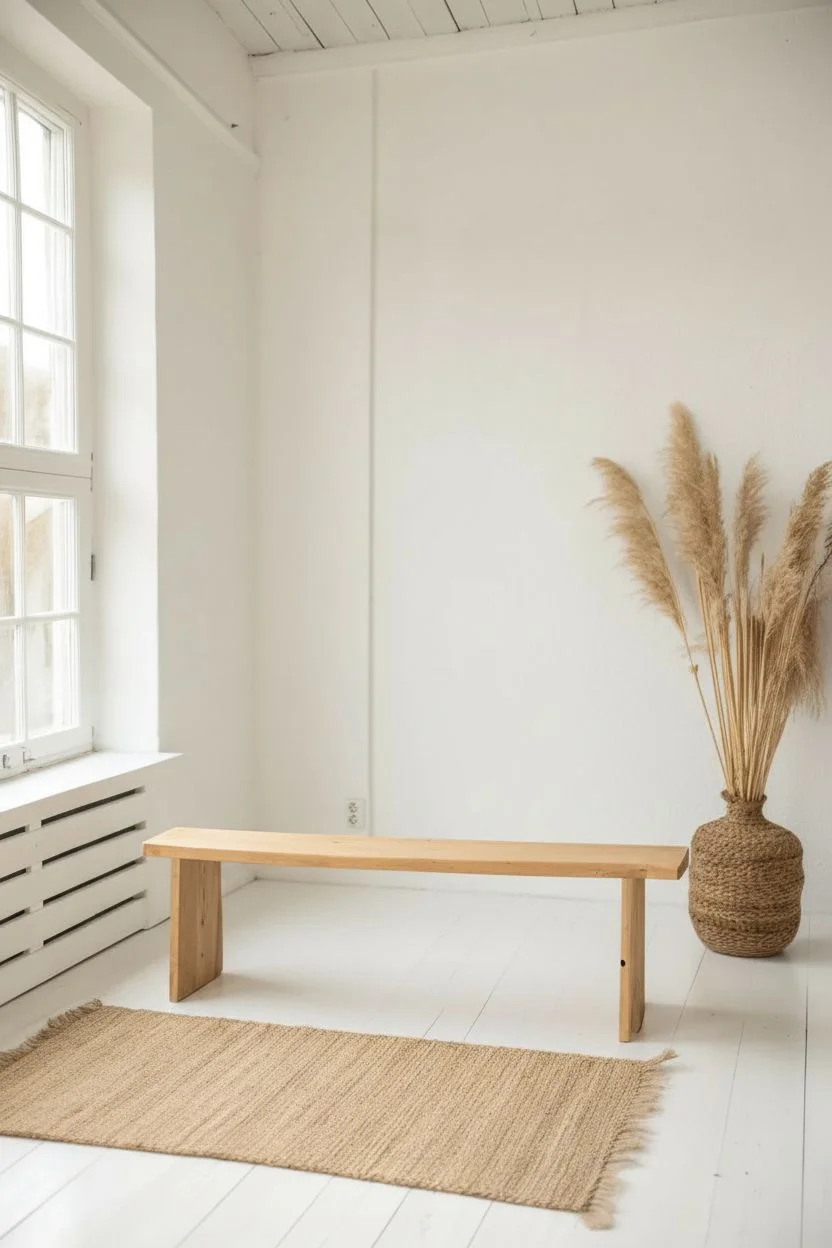
Multi-Generational Layered Group Arrangement
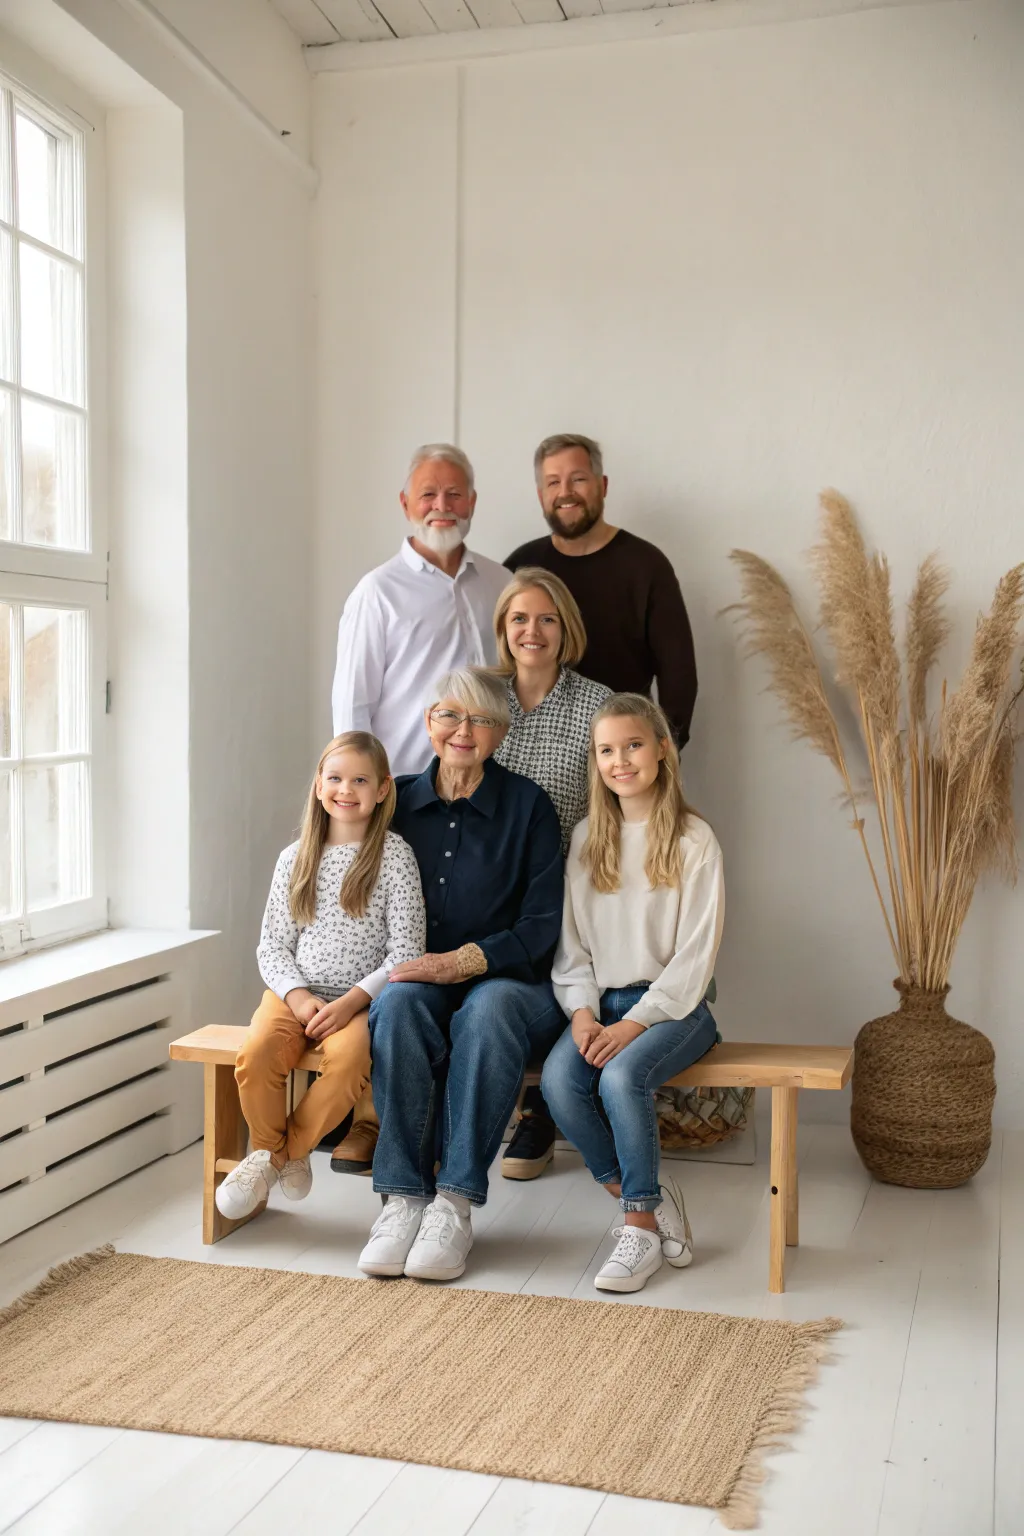
Capture the beauty of your multi-generational family with this elegant, light-filled portrait arrangement. This guide will help you set up and shoot a professional-quality group photo that balances warmth with clean, modern composition.
Step-by-Step
Materials
- DSLR or mirrorless camera with a 50mm or 85mm lens
- Sturdy tripod
- Wooden bench or low seating platform
- Large window for natural light
- White reflector or V-flat (optional)
- Tall dried pampas grass or wheat decor in a wicker vase
- Jute rug
- Coordinated outfits in neutrals, denim, and earth tones
Step 1: Setting the Scene
-
Scout the Location:
Find a room with ample natural light, preferably with a large window on the left side of your frame. A white wall background is essential for this clean, airy look. -
Arrange the Seating:
Place a simple wooden bench parallel to the wall, slightly angled so that it faces the light at about 45 degrees. Ensure there is enough space behind it so subjects aren’t pressed flat against the wall. -
Add Texture:
Lay down a jute or natural fiber rug in the foreground. This grounds the image and adds warmth without distracting from the faces. -
Style the Background:
Position a large vase with tall, dried pampas grass to the right of the bench. It should frame the composition without blocking anyone’s view.
Blurry Faces?
If back row faces are soft, your aperture is too wide. Increase your f-stop to f/8 or f/11 and boost ISO if needed to maintain shutter speed.
Step 2: Posing and Styling
-
Coordinate Clothing:
Ensure your subjects are dressed in a harmonious palette of creams, whites, denim blues, and browns. Avoiding bright patterns keeps the focus on their expressions. -
Create the First Layer:
Seat your matriarch and the youngest children on the bench. Have the grandmother sit slightly off-center, with one grandchild on her immediate left and another on her right. -
Refine Seated Poses:
Ask the seated subjects to lean slightly inward toward the center. Have the little girl on the left rest her hands in her lap, and the teen on the right place her hands on her legs for a relaxed feel. -
Build the Second Layer:
Position the middle generation—the mother—directly behind the grandmother. She should lean slightly forward to bridge the gap between rows. -
Arrange the Back Row:
Have the grandfather and father stand behind the bench. Place the grandfather on the left and the father on the right, framing the group. -
Check Visual Flow:
Ensure no heads are directly stacked on top of one another. Everyone’s face should be clearly visible in the windows between shoulders.
Color Consistency
Ask everyone to lay their outfits on a bed together before the shoot. Swap out any item that jumps out or clashes with the neutral theme.
Step 3: Lighting and Shooting
-
Manage the Light:
Use the natural window light from the left as your main source. If the shadows on the right side of faces are too dark, I like to place a white reflector on the right side to bounce light back in. -
Set Camera Settings:
Set your aperture to around f/5.6 or f/8. This depth of field is crucial to keep everyone from the front row to the back row in sharp focus. -
Check White Balance:
Set white balance to ‘Cloudy’ or ‘flash’ if using strobes, or manually set Kelvin to around 5500K to keep the skin tones warm and natural. -
Engage the Subjects:
Talk to the family to elicit natural smiles. A soft, genuine expression works best for this calm aesthetic. -
Review and Adjust:
Take a test shot and zoom in on the camera’s LCD to check focus on the eyes of the person in the front and the person in the back. -
Take the Final Shots:
Shoot a series of images, encouraging small micro-movements between frames so you have options where everyone looks their best.
You now have a beautifully composed family heirloom ready for printing and framing

PENCIL GUIDE
Understanding Pencil Grades from H to B
From first sketch to finished drawing — learn pencil grades, line control, and shading techniques.
Explore the Full Guide
Circle Around the Newest Family Member

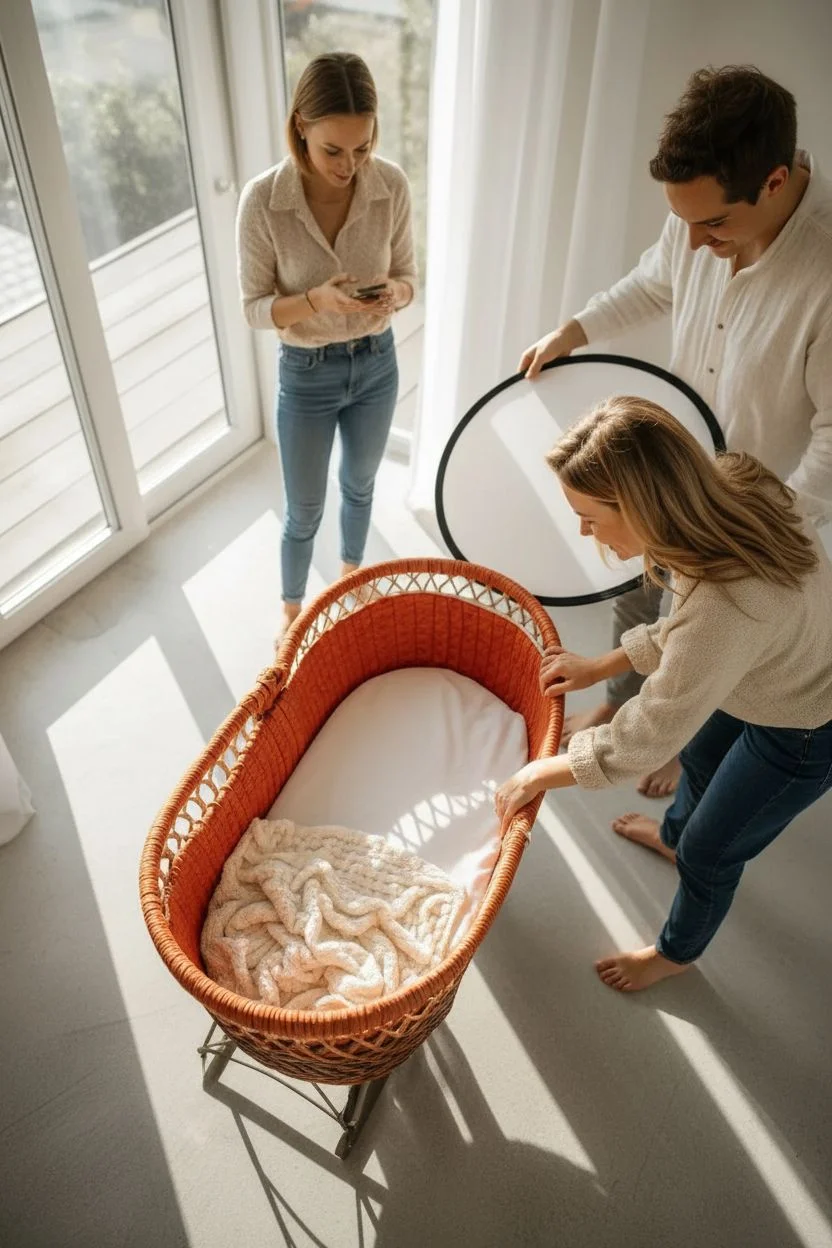
This photography project captures a tender, high-angle composition where three adults surround a newborn in a traditional wicker bassinet. The focus is on creating a sense of protection and adoration through careful framing and soft, diffused natural lighting.
Step-by-Step Guide
Materials
- DSLR or Mirrorless Camera
- Wide-to-Normal Lens (e.g., 24mm – 35mm)
- Step ladder or sturdy chair
- Traditional wicker bassinet or Moses basket
- White fabric liner and soft knitted baby blanket (cream/white)
- Light-colored, neutral clothing for all subjects (beiges, whites, creams)
- Large window for natural light
- Reflector (optional)
Step 1: Setting the Scene & Lighting
-
Light source selection:
Choose a room with a large window or glass door. Position the bassinet on the floor near the window so the light spills across it from the side, creating soft highlights rather than harsh shadows. -
Bassinet preparation:
Line the wicker bassinet with a smooth white sheet. Ensure it’s pulled taut to avoid distracting wrinkles under the baby. -
Texture layering:
Place a chunky knit blanket inside. I like to arrange it so it looks cozy but not messy, leaving space for the baby’s face to be the brightest point. -
Camera setup:
Set your aperture to something relatively wide, around f/2.8 or f/3.2. You want the baby’s face sharp, but a slight softness on the adults’ faces adds to the dreamy, nostalgic feel. -
Perspective check:
Set up your step ladder safely next to the scene. You need to be high enough to shoot almost directly down, but at a slight angle to capture the depth of the basket.
Step 2: Styling & Posing the Subjects
-
Wardrobe coordination:
Have the adults dress in soft neutrals—linens, creams, and light beiges work best. Avoid patterns or logos that would compete with the wicker texture and the baby. -
Placing the baby:
Gently lay the baby in the bassinet on their back, slightly angled toward the light source. Ensure their hands are free or resting gently on the blanket. -
Positioning the adults:
Direct the three adults to stand around the head and side of the bassinet. They should lean in closely, creating a visual ‘circle’ of protection. -
Creating connection:
Ask the subjects to look at the baby, not the camera. Their gazes should all converge on the infant to guide the viewer’s eye. -
Hand placement:
Suggest one adult gently rest a hand on the rim of the basket. This connects the standing subjects to the sleeping baby and adds a tactile element.
Safety First
Always have a spotter when shooting from a ladder. Never stand on the very top step, and ensure the ladder is on stable ground before ascending.
Step 3: Shooting & Refining
-
Test shot:
Take a test photo from your elevated position. Check for harsh shadows on the baby’s face. If the shadows are too deep, use a reflector on the shadow side to bounce some light back in. -
Composition adjustment:
Frame the shot so the bassinet creates a strong diagonal or curve in the lower half of the frame. Include the window frame in the background if it adds context, but keep it blurry. -
Expressions and adjustments:
Encourage natural smiles and soft interactions. If the baby stirs, wait for a moment of eye contact or a peaceful expression. -
Focus point:
Lock your focus specifically on the baby’s eyes. Even if the adults are slightly softer focus, the baby must be sharp. -
Shutter speed check:
Ensure your shutter speed is at least 1/200th of a second. Even though the subjects are relatively still, babies twitch, and you want to freeze that motion. -
Shooting variations:
Take several shots, slightly adjusting your angle on the ladder. Try moving a few inches left or right to see how the light changes on the wicker texture.
Add Natural Frames
Try shooting through a doorway or having a sheer curtain partially frame the edge of the lens to create a ‘voyeuristic’ softness.
Step 4: Post-Processing
-
Color temperature:
In editing, warm up the white balance slightly. This enhances the golden tones of the wicker and the skin tones. -
Softening shadows:
Lift the shadows gently to bring out details in the adult’s hair and the darker parts of the basket.
This approach yields a timeless family heirloom that perfectly centers the new arrival.
Everyone Looking at Each Other Instead of the Camera


Capture the genuine joy of family life with this tutorial on creating a candid-style photographic portrait. The result creates a warm, airy aesthetic that focuses on emotional connection rather than perfect posing.
Step-by-Step
Materials
- DSLR or Mirrorless Camera
- Portrait lens (50mm or 85mm prime recommended)
- White or cream sofa
- Neutral, light-colored clothing (cream, beige, white)
- Large window for natural light
- Pampas grass or dried florals
- Wicker decor (basket, wall hanging)
- Lightroom or Photoshop (optional)
Step 1: Setting the Scene
-
Scout the light:
Choose a room with a large window that lets in ample soft, diffused daylight. Position a white or cream-colored sofa so the light hits it from the side or slightly diagonally, ensuring everyone’s faces will be illuminated without harsh shadows. -
Style the background:
Arrange the background to be simple but textured. Place a large vase of tall pampas grass behind the sofa to add height and warm, earthy tones. Hang a woven wicker decoration on the wall to echo the bohemian vibe. -
Add foreground details:
Place a wicker basket or small wooden side table slightly out of focus in the foreground or background to bracket the scene. This creates depth and makes the photo feel like a slice of life rather than a studio setup. -
Coordinate wardrobe:
Dress the family in coordinated neutrals—think whites, beiges, and soft creams. Avoid heavy patterns or logos that distract from the faces. Textured fabrics like knits or linen work beautifully here.
Pro Tip: Tickle Monster
For genuine laughter, tell parents to squeeze or tickle the kids on the count of three. The sudden action creates real smiles.
Step 2: The Shoot
-
Arrange the seating:
Have the parents sit comfortably on the sofa, perhaps slightly angled toward each other. Place the children strategically—one between the parents and one to the side, or nestled close. The goal is a compact, cozy grouping where everyone is physically touching. -
Camera settings:
Set your aperture wide (low f-stop number like f/2.0 or f/2.8) to blur the background slightly and focus attention on the family. Keep your shutter speed fast enough (at least 1/250s) to freeze laughter and movement. -
Direct the interaction:
Instruct the family NOT to look at the camera. Ask the father to look at the mother, the mother to look at the child, or tell a funny joke. The key here is to prompt a genuine reaction. -
Capture the laughter:
Shoot in burst mode. Real laughter happens quickly, and the best expressions often occur in the split seconds between posed smiles. Wait for the moment when heads throw back or eyes crinkle with joy. -
Check angles:
I like to get down to the family’s eye level or slightly above. Shooting from too high can distort features, while eye level feels more intimate and inviting.
Troubleshooting: Blurry Kids
If kids move too fast, increase ISO to allow a faster shutter speed (1/500s+). Grain is better than motion blur.
Step 3: Post-Processing
-
Import and cull:
Load your images into your editing software. Look specifically for the frame where the most family members have genuine smiles and the eyes are sharpest. -
Adjust exposure:
Slightly overexpose the image to achieve that ‘bright and airy’ look. Lift the shadows to ensure details in the darker hair or clothing aren’t lost. -
Warm the tones:
Adjust the white balance to favor warmer tones. Increase the temperature slightly to enhance the creamy, golden feeling of the dried grass and skin tones. -
Soft contrast:
Instead of heavy contrast, try reducing the ‘Dehaze’ slider slightly or reducing clarity very subtly on the skin to create a softer, dreamier atmosphere. -
Desaturate distractions:
If any colors in the room pop too much (like a bright toy or book), desaturate those specific color channels to keep the palette uniform and neutral. -
Crop for balance:
Crop the image to remove unnecessary ceiling or floor space, focusing tight on the group interaction while leaving a little ‘breathing room’ on the sides.
Now you have a timeless, heartwarming image that perfectly preserves a moment of family joy


Simple Wall Backdrop for a Clean, Timeless Look


This tutorial guides you through recreating the serene aesthetic of this family portrait, focusing on the interplay of natural light, textured backdrops, and harmonious wardrobe styling. You will learn to compose a balanced group shot that feels both posed and effortlessly organic.
Step-by-Step Tutorial
Materials
- DSLR or Mirrorless camera
- Portrait lens (50mm or 85mm recommended)
- Large, warm-toned textured wall (stucco or plaster)
- Natural sunlight (aim for golden hour or harsh afternoon sun for sharp shadows)
- Neutral, linen, or cotton clothing in beige, cream, and dusty rose
- Reflector (optional, white or silver)
- Tripod (optional but helpful for composition)
Step 1: Scouting and Setting the Scene
-
Find the perfect wall:
Locate a large exterior wall with a visible texture like stucco, adobe, or aged plaster. The color should be a warm, earthy tone like ochre, beige, or Tuscan yellow to match the reference. -
Observe the light:
Visit your location at different times of day. To replicate this specific look, you need strong, directional sunlight that creates a diagonal shadow (chiaroscuro) across the upper portion of the wall. -
Check the ground:
Ensure the ground surface interacts well with the wall. Stone pavers, concrete, or sand work best to maintain the rustic, natural vibe. -
Clean the area:
Sweep away distracting debris or litter from the base of the wall where the subjects’ feet will be visible.
Uneven Lighting?
If subjects have patchy light on faces due to the shadow line, move them further into the shade or use a scrim to diffuse the sun above them.
Step 2: Wardrobe Styling
-
Select a color palette:
Coordinate outfits using an earthy, neutral palette. Stick to shades of oatmeal, cream, taupe, and dusty rose. Avoid bright whites or patterns. -
Choose natural fabrics:
Prioritize linen and cotton textures. The natural wrinkles and drape of these fabrics add softness that complements the hard wall texture. -
Style for simplicity:
Keep the look minimal. Have subjects go barefoot to emphasize a grounded, natural feeling, and avoid jewelry or watches that might look too modern.
Add Depth
Place a few branches or leaves (like olive or eucalyptus) extremely close to the lens in the corner to create a soft, blurry foreground frame.
Step 3: Posing and Composition
-
Arranging the group:
Line up the family members horizontally against the wall. Place the tallest individuals on one side (usually the parents) and taper down to the children. -
Establish connection:
Have the subjects stand close enough that their arms or shoulders lightly touch. I find that this physical connection translates into emotional warmth in the final image. -
Refine body language:
Keep poses relaxed. Ask the father to put one hand in his pocket and lean slightly. The mother can stand straight with arms at her side. Children should stand naturally, perhaps with a slight hip tilt. -
Direct the gaze:
Instruct everyone to look directly into the lens with a soft, serious, or neutral expression rather than big smiles. This adds a timeless, fine-art quality. -
Create space:
Leave significant ‘negative space’ above their heads. The expanse of the yellow wall is a key subject in itself.
Step 4: Shooting and Editing
-
Check camera settings:
Set your aperture around f/4 or f/5.6. You want everyone in focus, but with just enough depth of field to keep the wall texture sharp. -
Manage the shadows:
Position the subjects so they are fully in the shade of the wall, or diffuse the light if it’s hitting their faces too harshly. The sharp shadow line should remain above them on the wall. -
Capture variations:
Take multiple shots, adjusting the composition slightly. Try a few vertical shots to capture the full height of the wall. -
Edit for warmth:
In post-processing, slightly increase the color temperature to enhance the golden tones of the wall and skin. -
Soften the highlights:
Pull back highlights slightly to recover texture in the bright wall areas, specifically near the shadow line. -
Final touches:
Apply a subtle matte finish or grain to the photo to give it an editorial, film-like appearance.
The result is a stunningly simple yet sophisticated portrait that highlights family connection through texture and tone
Golden Hour Field With Tall Grass and Glow
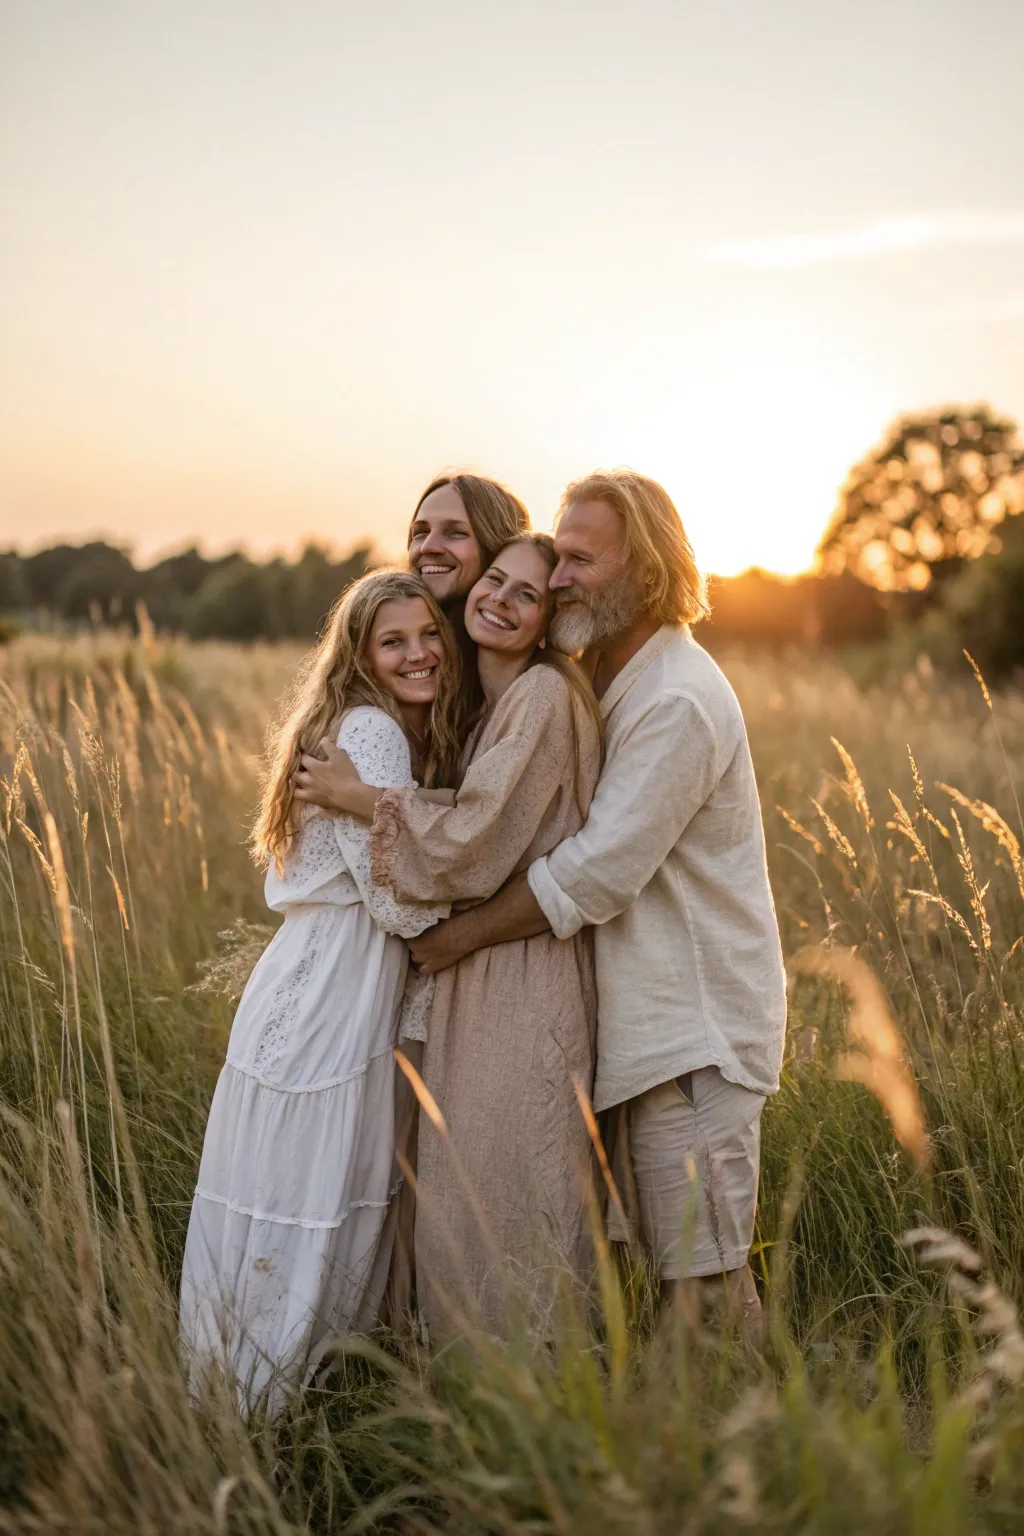
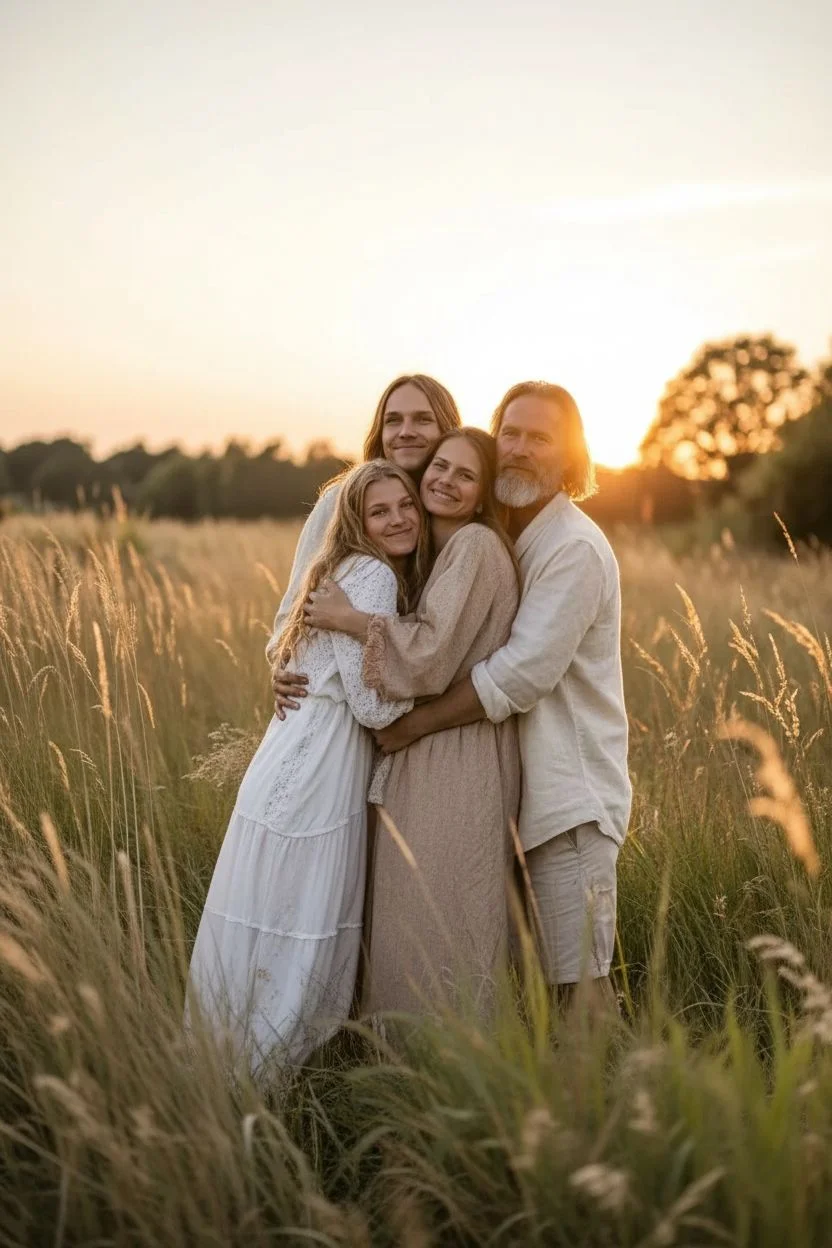
Capture the warmth and connection of family love with this guide to creating a stunning backlit portrait. Using the magic of golden hour light, you’ll learn to balance soft halos with gentle facial illumination for a timeless, ethereal look.
Step-by-Step
Materials
- DSLR or Mirrorless Camera
- Portrait Lens (50mm or 85mm recommended)
- Reflector (Gold or white/silver mix)
- Tall grassy field location
- Editing software (Lightroom or similar)
Step 1: Setting the Scene
-
Time It Right:
Plan your shoot for the ‘golden hour,’ which is roughly the last hour before sunset. You want the sun low on the horizon to create that soft, directional rim light. -
Scout the Location:
Find a field with tall, dry grass. The neutral tones of dried wheat or field grass act as a perfect natural reflector and add texture to the foreground without distracting from the subjects. -
Positioning Relative to the Sun:
Place your subjects so the sun is directly behind them or slightly off to one side behind them. This backlighting is crucial for creating the glowing rim light on their hair and clothes.
Step 2: Styling and Posing
-
Wardrobe Selection:
Ask the family to wear cohesive, neutral tones like creams, beiges, and soft whites. Textured fabrics like linen or lace catch the light beautifully and enhance the rustic vibe. -
Create the Formation:
Arrange the group tightly. Have the tallest person (usually the father) stand slightly back and to the side, wrapping an arm around the group. Encourage a ‘group hug’ dynamic where everyone is touching. -
Prompt for Connection:
Direct their attention inward. Ask them to look at each other or squeeze in tighter rather than staring stiffly at the lens. Genuine smiles come from interaction, not instruction.
Lens Flare Mastery
Remove your lens hood! Shooting backlit without the hood invites beautiful, hazy flares that enhance the dreamy atmosphere.
Step 3: Capturing the Shot
-
Camera Settings:
Set your aperture wide (around f/2.0 to f/2.8) to blur the background and foreground grass, isolating your subjects. Keep your ISO low (100-200) for maximum quality. -
Managing Exposure:
Spot meter for the faces, not the bright background. If you meter for the sky, the faces will be silhouettes. You want the faces properly exposed, which means the sky will likely blow out to white—that’s part of the style. -
Use a Reflector:
If the faces are too shadowed, have an assistant hold a reflector low and in front of the group to bounce some of that golden sunlight back into their eyes and faces. -
Shoot Through Elements:
I like to crouch low and shoot through some of the tall grass stems in the immediate foreground. This adds depth and a soft, hazy vignette to the bottom of the frame. -
Focus Bracketing (Optional):
If shooting wide open, ensure the eyes of the person closest to the camera are sharp. Take multiple shots, slightly adjusting focus if everyone isn’t on the exact same focal plane.
Creative Depth
Hold a sheer piece of fabric or a prism close to the lens edge to create unique, ethereal refractions and soft blurs.
Step 4: Editing for Warmth
-
Import and Crop:
Bring your RAW image into your editor. Crop if necessary to center the group but leave plenty of negative space above their heads for the glowing sky. -
Warm Up the Temperature:
Slide the white balance temperature toward yellow/amber. We want to emphasize the golden hour feel, so don’t be afraid to make it warmer than ‘neutral’. -
Lift the Shadows:
Since we shot backlit, the faces might still have shadows. Gently raise the ‘Shadows’ slider to reveal details in the faces and clothing folds. -
Soften the Highlights:
Slightly pull back the ‘Highlights’ slider to recover just a bit of detail in the sky, or let it bloom if you prefer the dreamy, high-key look. -
Final Color Grading:
Add a subtle orange or gold tint to the highlights and a very faint brown or teal to the shadows using color grading wheels to unify the color palette. -
Add a Sun Flare:
If your camera didn’t catch a natural flare, use a radial filter in the corner where the sun is coming from. Increase exposure and temperature within that circle to simulate a sun burst.
Now you have a beautifully lit, heartfelt portrait that captures the golden warmth of the moment
Seasonal Foliage Frame in Fall or Spring
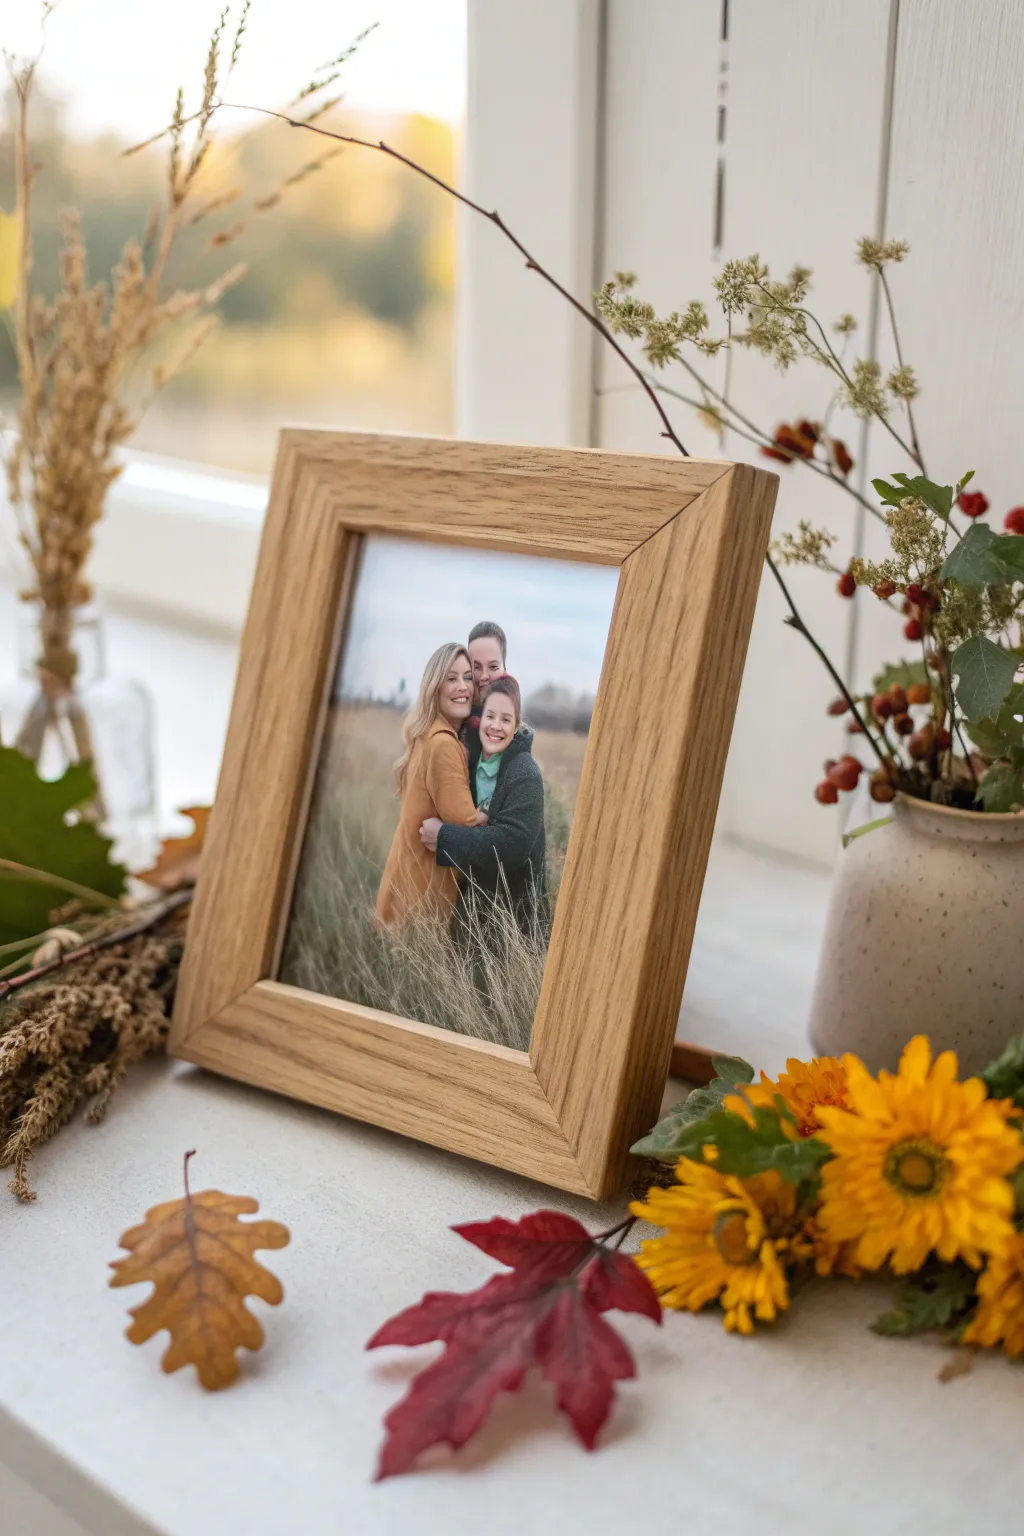
Bring the warmth of the harvest season into your home with this beautifully simple framing project. By combining a chunky, natural oak frame with a carefully styled vignette of dried grasses and vibrant fall blooms, you can transform a standard family portrait into a cozy seasonal centerpiece.
Detailed Instructions
Materials
- Unfinished wide oak wood picture frame (8×10 or similar)
- High-quality matte photo print
- Fine-grit sandpaper (220 grit)
- Clear matte wood finish or beeswax polish
- Lint-free cloth
- Glass cleaner
- Small ceramic vase (speckled or neutral tone)
- Dried ornamental grasses or wheat stalks
- Fresh yellow mums or sunflowers
- Dried oak and maple leaves (preserved)
- Small branch with red berries (artificial or dried)
- Clear floral tape or hidden twist ties
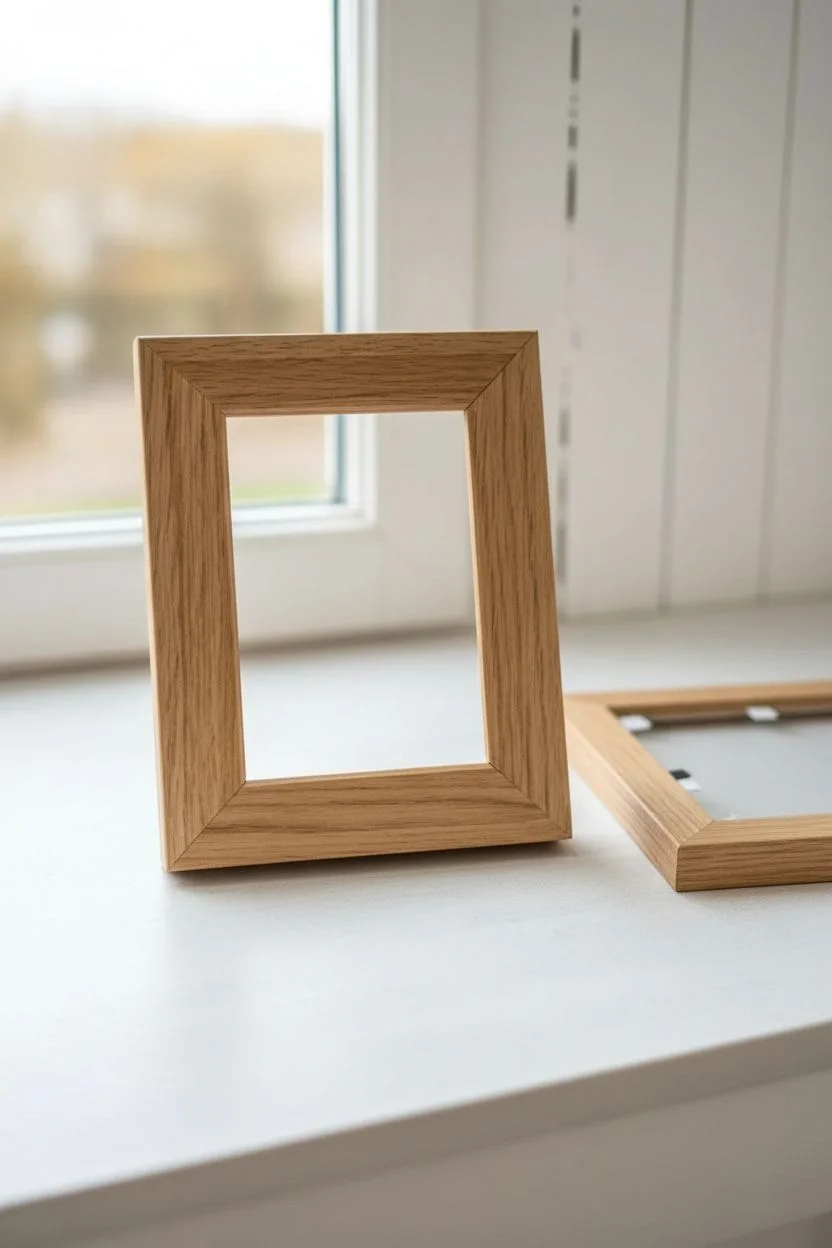
Step 1: Preparing the Wooden Frame
-
Sand the surface:
Begin by lightly sanding your unfinished oak frame with 220-grit sandpaper. Follow the grain of the wood carefully to smooth out any rough fibers without scratching the surface. -
Clean away dust:
Use a tack cloth or a slightly damp lint-free rag to wipe away all the sawdust. It is crucial that the wood is completely clean before applying any finish. -
Apply a natural finish:
To keep that raw, organic look seen in the photo, apply a thin coat of clear beeswax polish or a matte sealant. I prefer rubbing this in with a soft cloth in circular motions. -
Buff and dry:
Let the finish sit for about 15 minutes, then buff it gently with a clean dry cloth to bring out a soft, low-sheen glow. Allow it to cure fully according to the product instructions.
Grain Direction Tip
When sanding the mitered corners of the frame, use masking tape to cover the adjacent side. This prevents you from accidentally sanding across the grain on the perpendicular piece.
Step 2: Framing the Photograph
-
Clean the glass:
Remove the glass from the frame and clean both sides thoroughly with glass cleaner to ensure there are no fingerprints or smudges trapped inside. -
Insert the photo:
Place your matte family portrait face down on the glass. The matte finish helps reduce glare, which complements the rustic aesthetic of the wood. -
Secure the backing:
Place the backing board over the photo and secure the tabs or clips. Give the frame a gentle shake to ensure the photo doesn’t slide around.
Step 3: Creating the Floral Vignette
-
Select your dried grasses:
Choose a small clear glass bottle for the tall dried grasses. Trim the stems of your wheat or ornamental grass so they stand about twice the height of the bottle. -
Arrange the background height:
Place the tall grasses in the clear bottle and position this to the left and slightly behind where your frame will sit. -
Prepare the berry arrangement:
Take your speckled ceramic vase. Arrange a few sprigs of wild greenery and the red berry branches to create a loose, asymmetrical shape that reaches upward. -
Position the main florals:
Place the ceramic vase to the right of the frame area. The branches should reach up just past the top corner of the frame for balance. -
Place the frame:
Set your finished oak frame in the center of the arrangement, angling it slightly so it catches the light naturally.
Loose Leaves?
If the scattered leaves keep blowing away or shifting, use a tiny dot of removable poster putty or museum wax on the underside to keep them perfectly in place on the shelf.
Step 4: The Final Seasonal Touches
-
Add foreground color:
Cut the stems of your fresh yellow mums or sunflowers very short. Tuck these blooms at the base of the frame on the right side to anchor the composition. -
Scatter autumn leaves:
Select two or three perfect dried oak or maple leaves. Place one near the front left corner and another near the red/brown leaf cluster for a casual, fallen look. -
Check the composition:
Step back and look at the setup. Ensure the foliage doesn’t obscure the faces in the photograph. -
Adjust lighting:
If possible, set this display near a window to let natural light highlight the wood grain and the texture of the dried grasses.
Enjoy the cozy atmosphere this personalized autumn display adds to your room
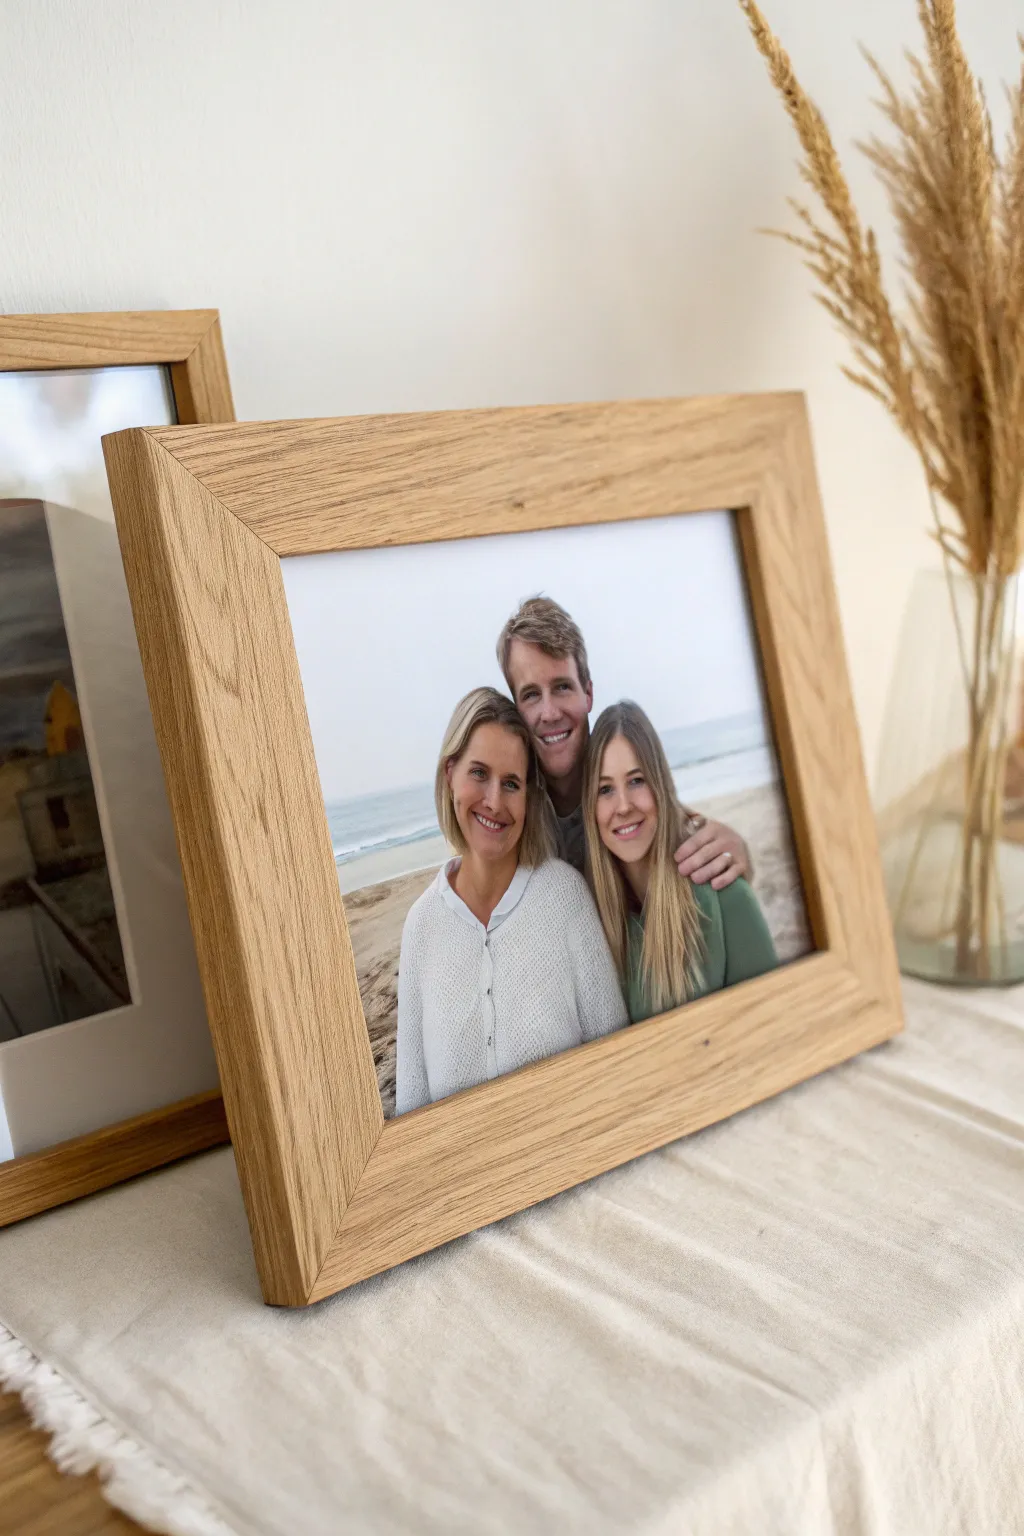
Beach Shoreline With Soft Reflections

Capture the warmth and serenity of a family beach walk with this photography project that emphasizes soft light and stunning reflections. This image relies on timing and perspective to create a timeless, mirrored effect on the shoreline.
How-To Guide
Materials
- DSLR or Mirrorless camera
- Wide to mid-range lens (24-70mm recommended)
- Tripod (optional but helpful for stability)
- Family subjects (or models)
- Light-colored, comfortable clothing
- A beach with a flat, wet tideline
- Golden hour lighting conditions
Step 1: Planning and Setup
-
Schedule Timing:
Plan your shoot for the ‘golden hour’—roughly one hour before sunset. This provides the soft, warm directional light seen in the reference image. -
Check the Tides:
Consult tide charts for your location. You need a receding or low tide to reveal a wide stretch of flat, wet sand which is crucial for the reflection. -
Styling the Subjects:
Dress your subjects in casual, neutral-toned clothing like white, beige, or denim. Loose fabrics capture the gentle sea breeze beautifully.
Broken Reflections?
If ripples or footprints are ruining the reflection, wait for a wave to wash over the sand and recede. Shoot immediately while the water film is smooth.
Step 2: Capturing the Shot
-
Position the Camera:
Get low. Crouch down or position your tripod at waist level or lower. A lower angle lengthens the legs and, more importantly, maximizes the visible surface area of the reflection on the wet sand. -
Direct the Family:
Ask the family hold hands and walk slowly away from the camera, parallel to the water’s edge but staying on the saturated, mirrored sand. -
Set Exposure:
Set your aperture to around f/4.0 to f/5.6 to keep the whole family in focus while slightly softening the distant background. -
Adjust Shutter Speed:
Ensure your shutter speed is at least 1/250th of a second to freeze the walking motion and prevent motion blur in swinging arms or legs. -
Watch the Horizon:
Compose the shot so the family is centered. I always double-check that the horizon line is straight and cuts across the upper third or middle of the frame, avoiding decapitating the subjects’ reflections. -
Shoot in Bursts:
Enable ‘continuous’ or ‘burst’ mode on your camera. As they walk, hold the shutter down to capture the natural stride phases; you want a frame where their feet look natural, not awkward. -
Review and Reflect:
Check your LCD screen specifically for the reflection quality. If the sand is drying out, ask the family to move closer to the receding water line.
Silhouette Effect
Underexpose the shot by 1-2 stops to turn the family into dark silhouettes against a bright sunset sky for a more dramatic, artistic look.
Step 3: Post-Processing
-
Warm the Highlights:
Import your photos into editing software like Lightroom. Increase the White Balance temperature slightly to enhance the amber golden hour tones. -
Enhance Contrast:
Gently boost the contrast slider to make the silhouettes and shadows pop against the bright sand. -
Deepen the Shadows:
Pull the ‘Blacks’ or ‘Shadows’ slider down slightly. This will make the reflections in the sand appear clearer and more defined. -
Straighten and Crop:
Use the crop tool to fix a crooked horizon line—this is vital for beach photos. Ensure there is enough ‘negative space’ below the reflections so they aren’t cut off at the bottom edge. -
Soften Clarity:
Apply a tiny bit of negative clarity or texture to the surrounding sand (using a brush mask) to give the water a glassy, smooth appearance.
Now you have a serene, reflective family portrait that perfectly captures the mood of a quiet evening at the beach
Rustic Texture Moment With Stone, Wood, or Steps
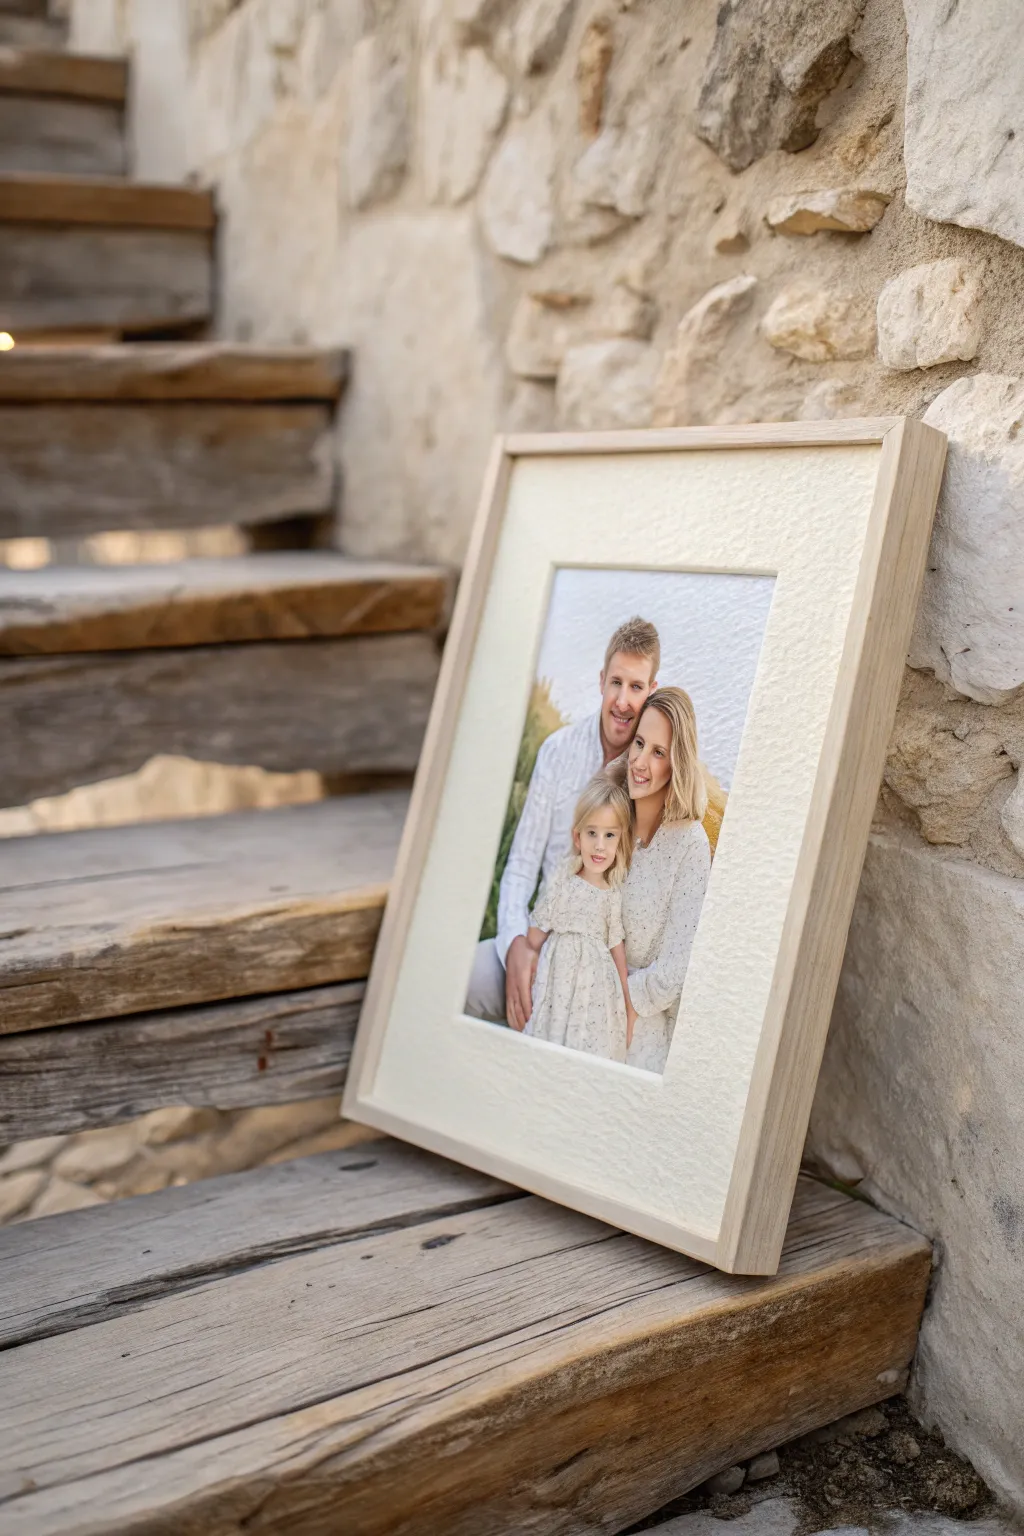

Capture a cherished family memory with this clean, minimalist framing project that pairs perfectly with rustic textures like stone and wood. The key features are the deep, extra-wide textured mat board and the simple, light-toned wooden frame that emphasizes the warmth of the portrait.
Step-by-Step Tutorial
Materials
- High-quality printed family portrait (sized smaller than the frame)
- Light wood frame (ash, maple, or unfinished pine)
- Thick, textured watercolor paper or specialized art mat board (off-white)
- Foam core backing board
- Acid-free photo mounting tape or corners
- Glass or acrylic glazing (cut to frame size)
- Utility knife or mat cutter
- Metal ruler
- Pencil
- Clean microfiber cloth
- Framing points or diverse glazing points
- Point driver tool (or flathead screwdriver)
Step 1: Planning and Printing
-
Select the photo:
Choose a high-resolution family portrait that has soft, natural lighting. The image in the example uses a light, airy edit which complements the neutral frame. -
Determine dimensions:
Decide on your final frame size. For this look, you want a significant amount of white space. If your frame is 11×14 inches, print your photo as a 5×7 or 6×8 to allow for a wide border. -
Print the image:
Print the photo on high-quality archival luster or matte paper. Avoid high-gloss finishes as they can create distracting reflections behind the glazing.
Step 2: Creating the Textured Mount
-
Choose the mat material:
The specific look of this project comes from the textured mat. Instead of standard smooth mat board, use a sheet of heavy cold-press watercolor paper with a rough grain. -
Measure the opening:
Place your printed photo on the backing board to visualize the placement. Measure the exact size of your photo, then subtract 1/4 inch from length and width to determine the window opening size. -
Mark the cut lines:
On the back side of your textured paper or mat board, gently mark the window opening with a pencil and ruler. Ensure it is perfectly centered. -
Cut the bevel:
Using a sharp new blade in your mat cutter (or a steady hand with a utility knife and metal ruler), cut the window opening. A 45-degree bevel cut adds a professional depth, revealing the core of the board.
Uneven Mat Borders?
This is usually caused by the photo slipping during measurement. Always measure the photo twice and tape it down temporarily with low-tack tape while marking your cuts.
Step 3: Assembly and Framing
-
Clean the glass:
Clean both sides of your glass or acrylic thoroughly with a microfiber cloth to remove dust and fingerprints. I always do a final check against a light source to catch hidden specks. -
Mount the photo:
Using acid-free mounting tape, create a T-hinge to attach your photo to the back of the textured mat board. This keeps the photo suspended correctly without warping over time. -
Stack the layers:
Place the glass into the frame first. Follow this with your matted photo, and finally the foam core backing board. -
Secure the back:
Use a point driver to insert framing points into the inside edge of the wooden frame to hold the stack tight. If you don’t have a driver, you can gently push glazing points in with a flathead screwdriver. -
Seal the frame:
For extra protection, you can apply a dust cover paper to the back of the frame using double-sided tape, trimming the excess with a blade. -
Attach hardware:
Install D-rings and wire or a sawtooth hanger on the back, ensuring it is level for hanging or safe leaning.
Add Depth
Make it a ‘shadow box’ style by placing a spacer between the glass and the mat. This creates a gap that adds dramatic shadows and protects the photo surface.
Step 4: Styling the Display
-
Select the location:
Find a spot with natural textures, like the stone steps or wooden beams shown in the inspiration image. -
The lean technique:
Instead of hanging it, lean the frame casually. Ensure the bottom edge has good friction so it doesn’t slide; you can use small rubber bumpers on the bottom corners for grip.
Now you have a beautifully framed piece that feels organic and timeless, ready to brighten any corner of your home
Play-Based Portrait With a Simple Family Game


Capture the spontaneous energy of a family playtime moment in this bright, high-key photograph. This guide focuses on recreating the specific lighting, wardrobe cohesion, and dynamic posing needed to achieve this clean, magazine-style look.
Step-by-Step Tutorial
Materials
- DSLR or Mirrorless camera
- 35mm or 50mm fast prime lens (e.g., f/1.8)
- Large, soft natural light source (window/glass door)
- White or light neutral wall background
- Large circular jute or natural fiber rug
- White reflector (collapsible)
- Wardrobe: Light denim jeans and white/cream tops
- Tripod (optional, if shooting alone)
Step 1: Setting the Scene
-
Find the Light:
Locate a room with large windows or French doors that let in ample indirect sunlight. Position your shooting area so the main light source is coming from the side or slightly in front of the subjects, ensuring soft, wrapping illumination. -
Prepare the Background:
Clear a wide area of floor space. Use a white wall or white paneled doors as your backdrop to keep the high-key, airy aesthetic essential to this style. -
Place the Anchor:
Lay down a large, round jute or woven rug in the center of your light pool. This adds texture and defines the ‘stage’ for the action without cluttering the frame.
Hair Movement Tip
For the best hair motion, have the subject looking completely opposite the camera first, then swing their head around fast. It creates better volume than just shaking it.
Step 2: Styling the Subjects
-
Clean Color Palette:
Dress all family members in a coordinated palette of light blue denim and white or cream tops. The tops should be simple—knits, button-downs, or tees—without large logos to keep the focus on expressions. -
Comfort Check:
Ensure the clothing is flexible enough for movement. Since the subjects will be kneeling and wrestling, stiff fabrics will hinder the natural flow of the pose. -
Footwear Decisions:
Decide on footwear or bare feet. In this look, the father and daughter wear clean white sneakers, while the son is barefoot, adding a casual, at-home vulnerability.
Level Up: Perspective
Get low! Shoot from the floor level or slightly below the subjects’ eye line. This makes the viewer feel like part of the game rather than an observer.
Step 3: Camera Configuration
-
Shutter Speed Priority:
Set your shutter speed to at least 1/500th of a second. The hair flip and laughter happen fast, and you need to freeze that motion sharply. -
Aperture Check:
Open your aperture to roughly f/2.8 or f/3.2. You want a shallow depth of field to blur the background slightly, but enough depth to keep all three faces reasonably sharp. -
Continuous Focus:
Switch your autofocus mode to Continuous (AI Servo on Canon, AF-C on Nikon/Sony) to track the subjects as they move and sway during the hug.
Step 4: Directing the Action
-
The Base Pose:
Have the father figure kneel on the rug first, facing slightly away from the main light source but angled toward the camera. -
Positioning the Kids:
Ask the son to climb onto the father’s back or side, wrapping his arms around his neck. Ask the daughter to kneel in front, ready to grab dad in a bear hug. -
Create the Game:
Don’t ask them to smile. Instead, tell them to play ‘Squeeze Dad’ or ‘Wrestlemania.’ The goal is to get physically close and exert energy. -
Trigger the Hair Flip:
Instruct the daughter to look away and then whip her head back toward her dad on the count of three. This creates the beautiful motion blur and flying hair arc seen in the shot. -
The Burst Mode:
Set your camera to high-speed burst mode. Hold down the shutter as the ‘tickle attack’ or ‘squeeze’ happens. I always shoot way more frames than I think I need here to catch that perfect split-second expression.
Step 5: Post-Processing
-
Select the Hero:
Cull your images specifically looking for genuine laughter and the most flattering hair movement. Discard blurry faces. -
Lift Shadows:
In Lightroom or your editing software, lift the shadows slightly to recover details in the denim and hair that might be hidden by the hugging angles. -
Desaturate Yellows:
Indoor reflected light can cast yellow tones on white walls. slightly reduce the saturation of yellow and orange channels to keep the whites looking crisp and neutral. -
Brighten the Eyes:
Use a local adjustment brush to add a tiny bit of exposure and clarity to the visible eyes to make the expressions pop.
With these steps, you will freeze a moment of pure family connection that feels both candid and beautifully polished
Overhead “Heads Together” Ground Pose
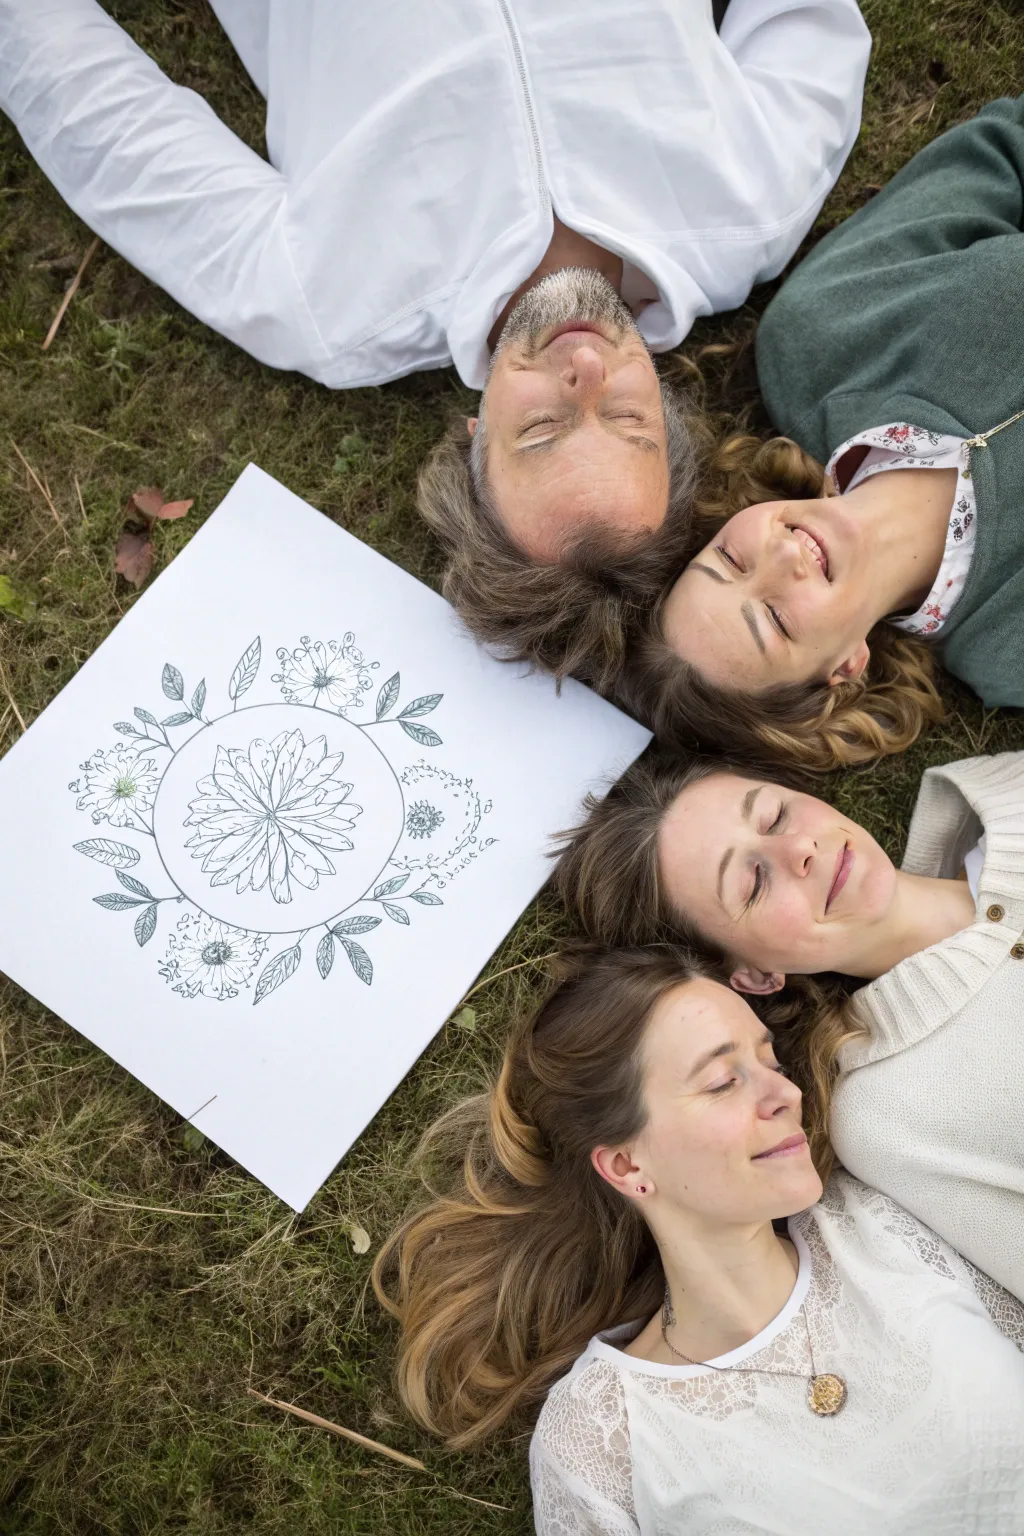
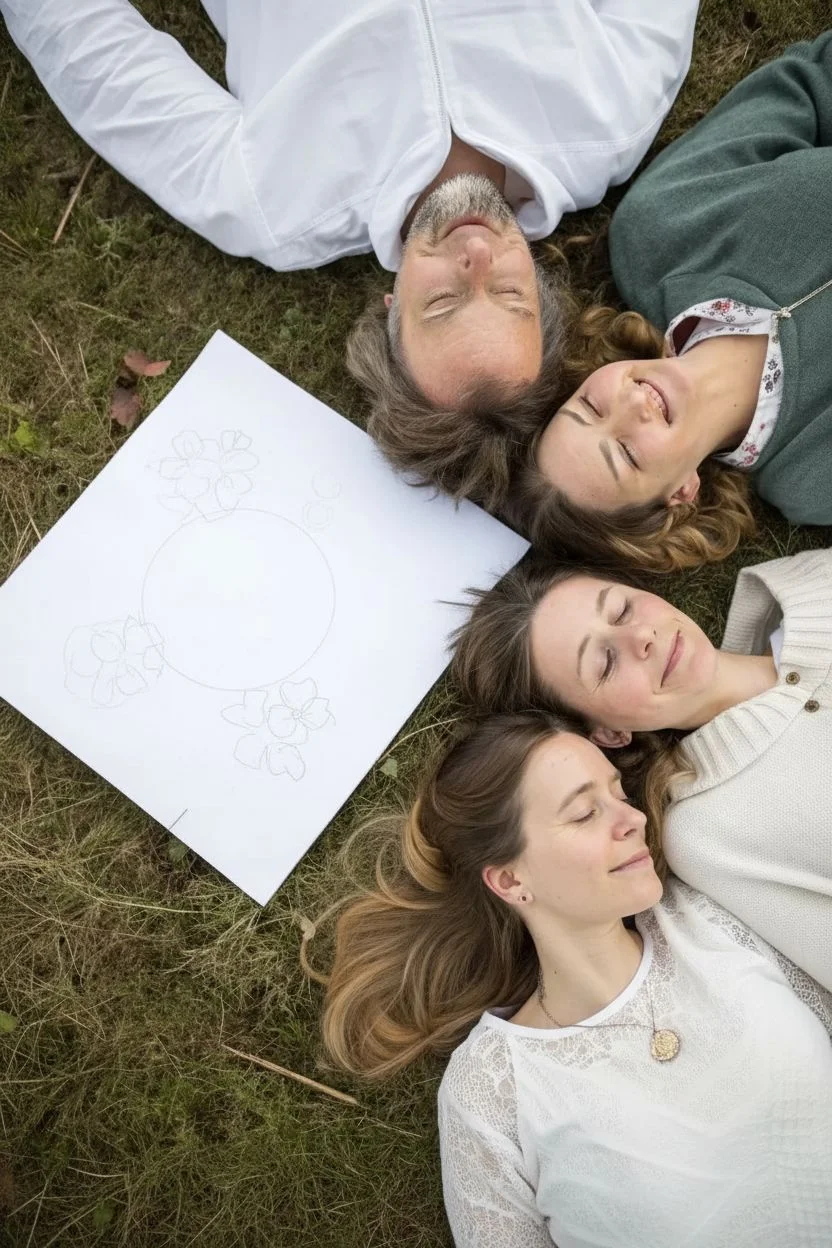
This simple yet elegant line drawing acts as a beautiful focal point for overhead photography, anchoring the composition with organic shapes. Using high-contrast ink on crisp white paper creates a striking visual element that complements a natural outdoor setting.
Step-by-Step
Materials
- Heavyweight white drawing paper or Bristol board (square, approx. 12×12 inches)
- Pencil (HB or H)
- Eraser (kneaded or vinyl)
- Fine liner pen (0.3mm or 0.5mm, black)
- Medium marker pen (0.8mm or 1.0mm, black)
- Compass or a circular object to trace (approx. 4-5 inches diameter)
- Ruler
Step 1: Planning the Layout
-
Prepare the canvas:
Start with a sturdy piece of white paper or Bristol board cut into a perfect square. A size of 12×12 inches works well to be visible without overwhelming the faces in a photo. -
Establish the center circle:
Find the center of your paper using a ruler. Use a compass or trace a circular object to draw a light circle in the middle. This circle will serve as the boundary for your central flower motif. -
Sketch the outer ring:
Draw three or four rough placements for smaller floral clusters around the outside of your central circle. Imagine these as orbital points where you will build the secondary design elements.
Step 2: Drafting the Design
-
Sketch the central flower core:
Lightly sketch the center of the main flower. Start with a small oval or circle in the very middle of your guide ring. -
Add the main petals:
Draw long, pointed petals radiating outward from the flower core. Ensure they extend all the way to the edge of your initial guide circle to create a full, blooming look. -
Layer interior petals:
Inside the main petals, sketch a second layer of smaller, shorter petals to add depth and dimension to the bloom. -
Draw supporting foliage:
Around the main circle, lightly sketch pairs of leaves branching outwards. Aim for a mix of simple oval leaves and serrated ones for variety. -
Add secondary flowers:
In the spaces between the leaf branches, sketch smaller, simpler flowers—think daisies or wild poppies—to balance the visual weight of the central bloom.
Steady Hand Trick
Work from the center outwards to avoid smudging wet ink with your hand. You can also place a scrap piece of paper under your drawing hand to protect the surface.
Step 3: Inking and Details
-
Outline the central flower:
Switch to your medium marker pen (around 0.8mm). Carefully trace the main petals of the central flower. I like to break the lines slightly near the tips to keep it looking organic. -
Ink the outer foliage:
Use the same medium marker to ink the outlines of the leaves and the secondary flowers surrounding the center. -
Add fine details:
Switch to your finer 0.3mm or 0.5mm pen. Add texture lines inside the petals of the central flower, radiating from the center outward. -
Detail the leaves:
Draw the veins inside the leaves using the fine pen. Keep these lines light and delicate so they don’t overpower the outline. -
Stipple the centers:
Use a stippling technique (lots of small dots) with the fine pen to create texture in the very center of your flowers. This adds a nice contrast to the clean lines of the petals. -
Refine connections:
Check the connections between stems and leaves. If any areas look floating, add thin connecting lines with your fine pen to root them to the central design structure.
Add a Pop of Color
After inking, use watercolor paints or colored pencils to fill in just the leaves or the central bloom for a subtle splash of color that matches your photo outfits.
Step 4: Finishing Touches
-
Let the ink set:
Wait at least 15 minutes for the ink to dry completely. This is crucial to prevent smudging during the erasing step. -
Erase pencil guides:
Gently erase all your initial pencil sketches and the guide circle. Hold the paper firmly with one hand while erasing to avoid crinkling the page. -
Assess contrast:
Step back and look at the drawing from a distance (similar to how a camera would see it). If lines look too thin, go over the main outlines once more with the thicker marker to ensure readability.
Place your finished artwork on the grass and gather everyone around for a truly memorable shot
Mini Groupings: One Big Family Portrait Plus Small Pairings
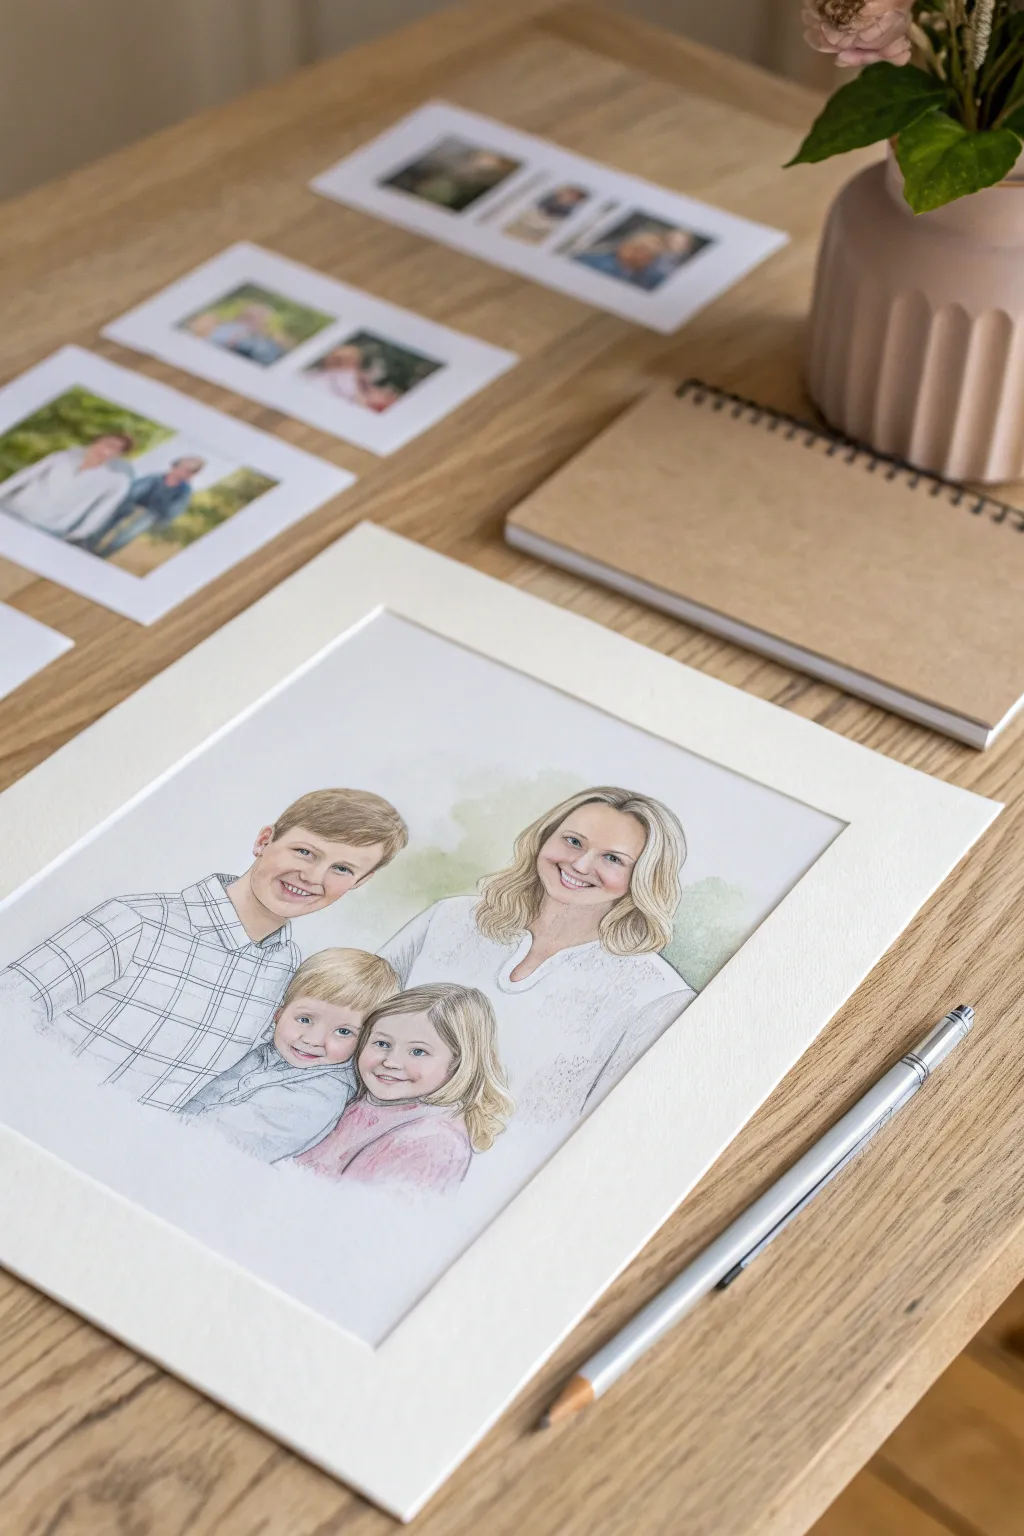

Capture the warmth of your loved ones with this delicate mixed-media portrait that combines precise pencil sketching with soft, airy color washes. The result is a timeless, illustrative style piece that feels both personal and professionally crafted, perfect for displaying alongside your favorite reference photos.
Step-by-Step Tutorial
Materials
- High-quality watercolor paper (hot press for smoother detail)
- Graphite pencils (HB and 2B)
- Kneaded eraser
- Watercolors or watercolor pencils (skin tones, hair colors, soft blue/green for clothes)
- Fine liner pens (light grey or sepia for subtle outlines)
- Small round brushes (sizes 0, 2, and 4)
- White mat board
- Reference photographs of the family subjects
Step 1: Preparation and Sketching
-
Select your references:
Gather clear photos of each family member. You don’t need one perfect group shot; you can composite individual best angles together, just like the separate photos shown in the background of the image. -
Map out the composition:
Lightly sketch oval shapes on your watercolor paper to position the heads. Create a pleasing cluster, perhaps with the tallest members in the back and smaller children tucked in front. -
Draft the facial features:
Using an HB pencil, draw the facial features with a very light hand. Focus on the eyes and smiles first, as these anchor the likeness. -
Refine the outlines:
Once the proportions look correct, firm up your lines slightly. Keep the drawing varying in weight—slightly darker for eyes and jawlines, lighter for hair strands. -
Add clothing details:
Sketch the collars and shoulders. Since this is a vignette style, you don’t need to draw full bodies; let the lines for the shirts fade out softly at the bottom to create a floating effect. -
Clean up the sketch:
Roll your kneaded eraser over the entire drawing to lift excess graphite, leaving faint ‘ghost’ lines that will guide your painting without overpowering it.
Pro Tip: Grid Method
Struggling with likeness? Print your reference photo the same size as your final art. Draw a light grid on both, then transfer the drawing square by square for accuracy.
Step 2: Adding Color and Depth
-
Mix skin tones:
Prepare a watery wash of skin tone colors. For a natural look, I like to mix a touch of burnt sienna with white and a tiny dot of yellow ochre. -
Apply the first wash:
Gently paint the faces, avoiding the eyes and teeth. Keep this layer very pale and translucent; you can always add more later. -
Add facial shadows:
While the paper is still slightly damp, drop in a slightly darker, rosier mix on the cheeks, nose tip, and under the chin to create three-dimensional form. -
Define the hair:
Use a size 2 brush to streak in hair colors. Don’t fill it in solid; leave white paper showing for highlights to give the hair texture and shine. -
Tint the clothing:
Apply very light washes to the clothing. For patterns like the plaid shirt, paint the base color first, let it dry completely, and then add the grid lines with a fine brush or colored pencil. -
Paint the eyes:
Use your smallest brush (size 0) to carefully fill in the irises. Leave a tiny speck of white paper in each pupil for the ‘catchlight’ or add it back later with white gouache. -
Add background ambience:
Wash a very diluted, soft green or blue into the background behind the heads. Let the edges of this wash be uneven and watery for an artistic feel.
Step 3: Finishing Touches and Mounting
-
Strengthen details with pencil:
Once the paint is bone dry, use a sharp colored pencil or fine liner to re-emphasize key details like eyelashes, nostrils, and the separation of lips. -
Add hair texture:
Use colored pencils to draw individual stray hairs and define the flow of the locks, adding crispness over the soft watercolor base. -
Final assessment:
Step back and look at the portrait from a distance. Darken any areas that feel too washed out, typically the corners of the mouth or the pupils. -
Prepare the mat:
Measure your artwork and cut a window in your white mat board that frames the vignette perfectly, leaving ample white space around the painted area for breathing room. -
Mount and frame:
Secure the artwork behind the mat using acid-free tape and place it into your chosen frame, ready to display.
Troubleshooting: Paper Buckle
If your paper warps from the water, let it dry completely, then place it face down on a clean towel and iron the back on a low, dry setting to flatten it out.
Now you have a beautifully handcrafted family portrait that captures a moment in time with artistic flair
Storybook Family Portrait With Symbolic Props and Setting
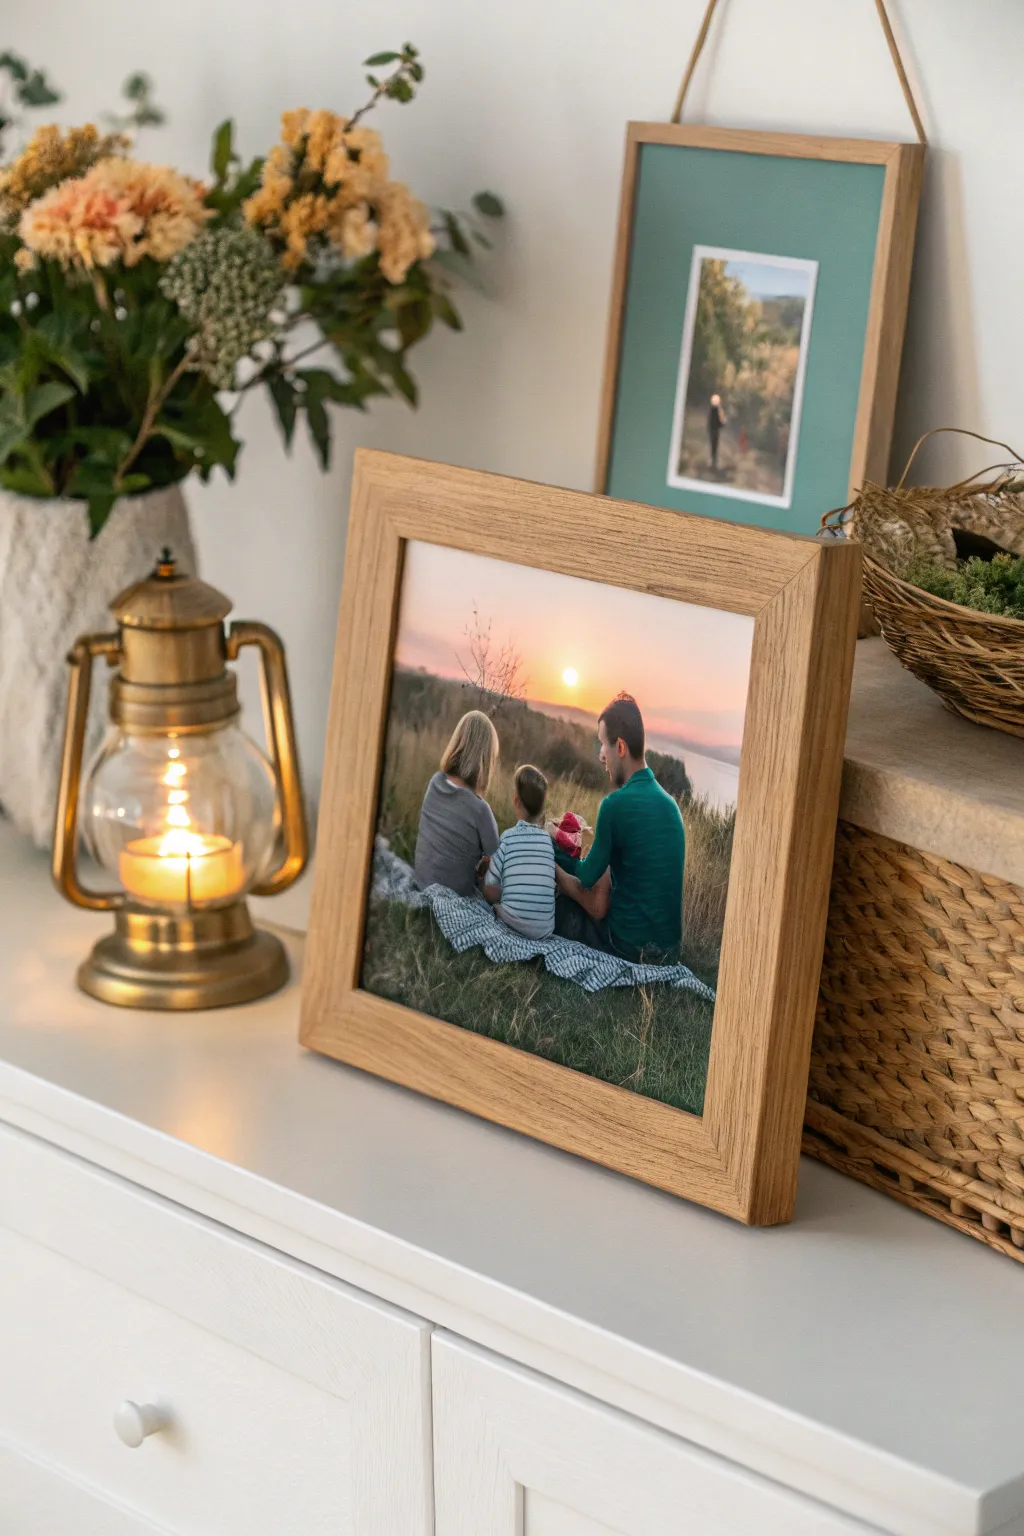
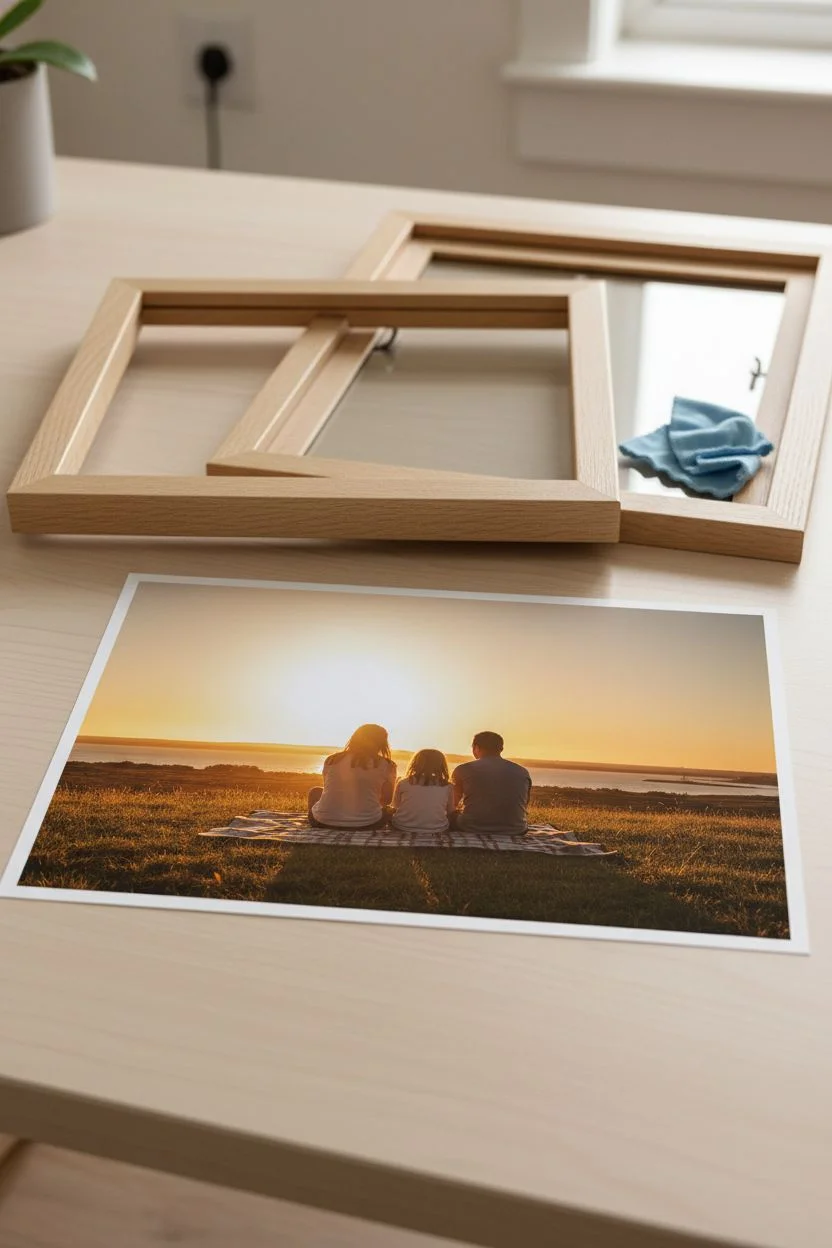
Transform a fleeting moment into a timeless piece of decor with this simple yet impactful framing project. By combining a warm, candid family photo with a rustic wooden frame, you create a cozy vignette that brings a touch of storytelling into your home.
Step-by-Step Guide
Materials
- High-resolution digital photo (sunset or golden hour lighting)
- Photo printer or printing service
- Semi-gloss or luster photo paper (8×10 or similar size)
- Light oak or natural wood picture frame (wide flat profile)
- Glass cleaner and microfiber cloth
- Point driver or small flathead screwdriver
- Optional: Mat board (if frame is larger than print)
Step 1: Preparing the Image
-
Select the perfect shot:
Choose a photo that tells a story rather than just showing faces. Look for images taken during ‘golden hour’ where the subjects are engaged with each other or the landscape, their backs slightly turned to create a sense of shared perspective. -
Edit for warmth:
Open your photo in editing software. Bump up the saturation slightly on the oranges and yellows to emphasize the sunset glow. Increase the contrast gently to silhouette the figures against the bright horizon. -
Crop and size:
Crop the image to match your frame’s aspect ratio, typically 4:5 for an 8×10 print. Ensure the horizon line is straight and the subjects are centered or placed according to the rule of thirds for visual balance. -
Print the photo:
Print the image on high-quality semi-gloss or luster paper. These finishes reduce glare while maintaining vibrancy, unlike matte paper which can dull the sunset colors, or glossy which reflects too much room light.
Natural Texture
Use a frame with visible wood grain. The organic lines in the wood subtly mimic the grassy textures in outdoor photography, creating harmony.
Step 2: Preparing the Frame
-
Choose the frame style:
Select a frame with a natural, light wood finish like oak. The raw wood texture complements outdoor photography perfectly and adds an organic, grounded feel to the display. -
Disassemble the frame:
Flip the frame over and carefully bend back the flexible tabs or turn buttons to remove the backing board. Take out any sample paper or inserts. -
Clean the glass:
Remove the glass carefully. Spray a small amount of non-ammonia glass cleaner onto a microfiber cloth—never directly on the glass—and wipe both sides until completely streak-free and dry. -
Check for dust:
Hold the glass up to a light source to check for any lingering lint or dust specks. I find a quick blast of canned air helps remove stubborn particles before final assembly.
Seasonal Switch
Swap the photo seasonally. In winter, use a snowy landscape photo and replace the lantern with a small pine wreath or white ceramic house.
Step 3: Assembly and Display
-
Insert the glass:
Place the clean glass back into the frame recess, handling it by the edges to avoid leaving fresh fingerprints. -
Place the photo:
Gently lay your print face down onto the glass. Double-check that it is oriented correctly with the top of the image near the frame’s hanging mechanism if it has one. -
Secure the backing:
Place the backing board over the photo. Press down firmly but gently while securing the tabs or points. If using a point driver, shoot points every 2-3 inches for a tight seal. -
Clean the exterior:
Once assembled, wipe down the front of the glass one last time to remove any smudges from the assembly process. -
Stage the vignette:
Place the framed photo on a sideboard or dresser. Lean it slightly back for a casual look. -
Add lighting props:
Position a small lantern or candleholder to the left of the frame. The warm glow of a candle (real or LED) will echo the sunset in the photo, reinforcing the ‘golden hour’ theme. -
Incorporate greenery:
Add a vase with natural elements likedried flowers or fresh greenery nearby to soften the hard edges of the frame and connect to the outdoor setting of the photograph.
This warm and inviting display turns a simple memory into a central storytelling piece for your room


Have a question or want to share your own experience? I'd love to hear from you in the comments below!