
There’s something magical about fall window painting—the light shines through your brushstrokes and instantly makes the whole room feel cozier. I pulled together my go-to autumn glass painting ideas, starting with the classics and ending with a few creative twists that always get people stopping to stare.
Drifting Fall Leaves in a Swirly Wind Pattern
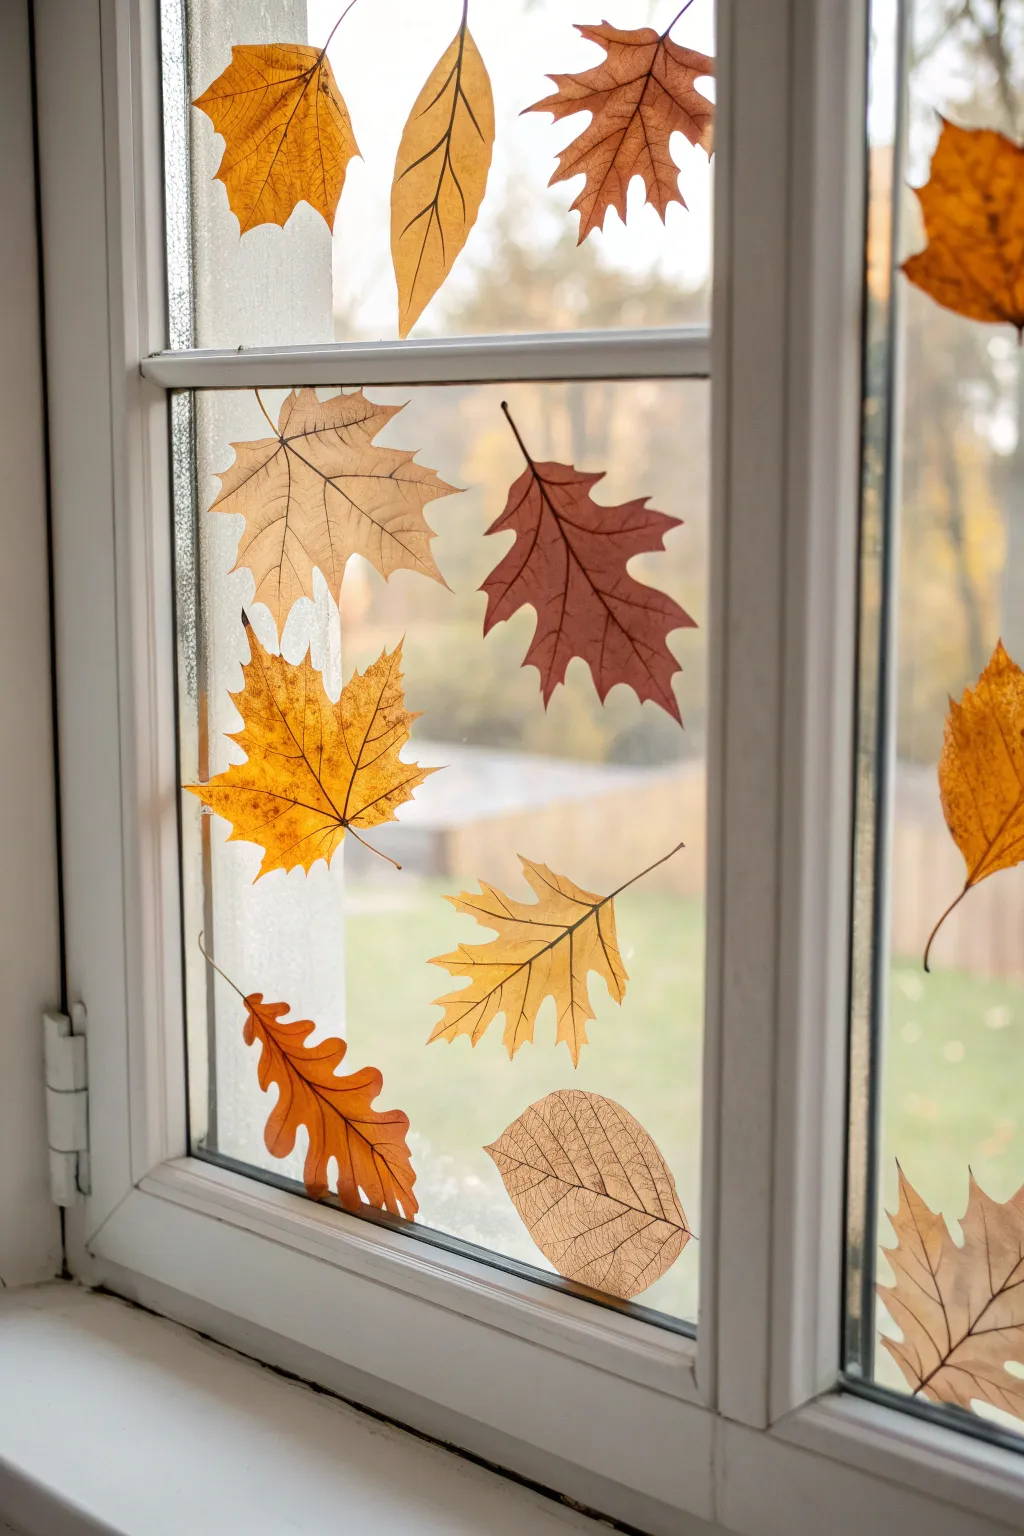
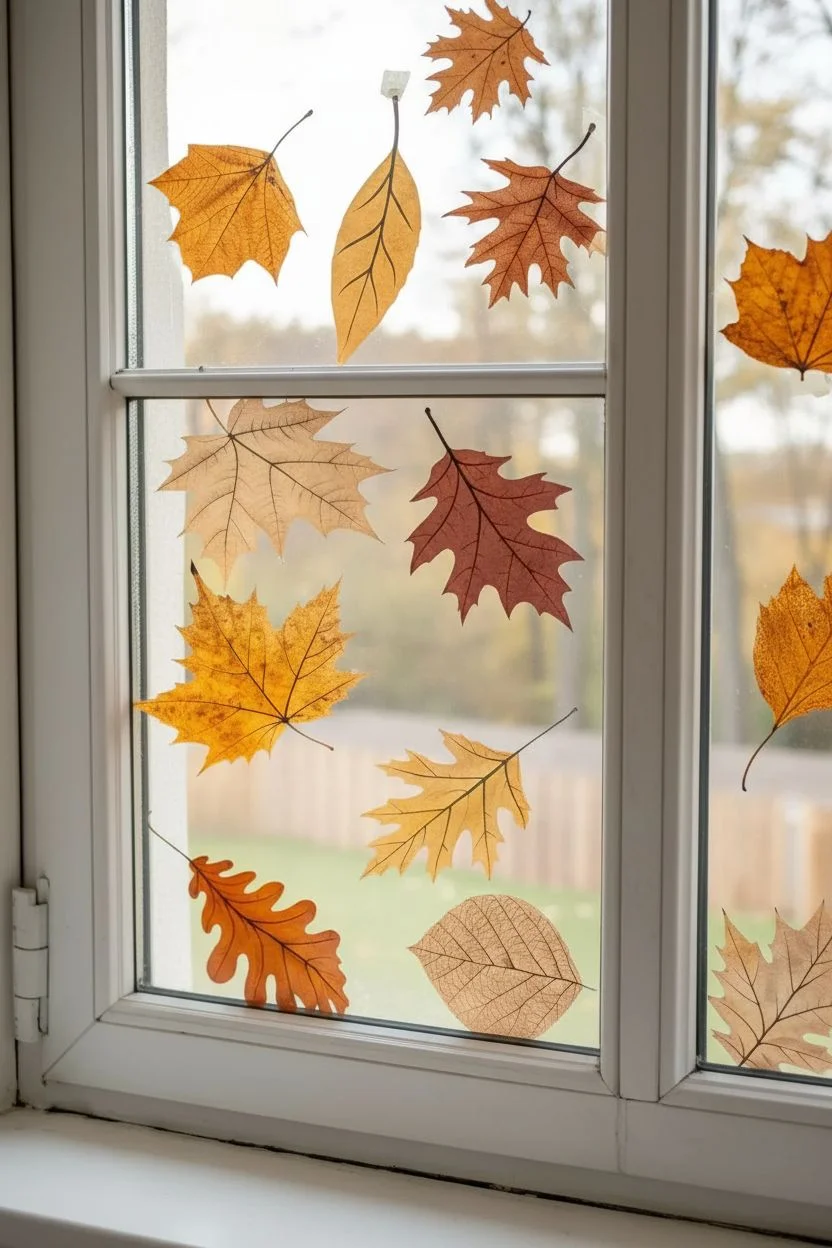
Transform your view into an eternal autumn day with these startlingly realistic painted leaves that seem to drift right across the glass. By using translucent paints and fine liner work, you can capture the delicate veins and warm amber glow of fall foliage without blocking your natural light.
Step-by-Step Guide
Materials
- Window glass paints (transparent/translucent varieties)
- Black or dark brown liquid lead liner (or window paint outline tube)
- Reference images of maple, oak, and birch leaves
- Small round paintbrushes (sizes 0 and 2)
- Rubbing alcohol
- Lint-free cloth
- Paper towels
- Clear acetate sheet (optional, for practice)
- Tape
Step 1: Preparation & Mapping
-
Clean the canvas:
Begin by thoroughly cleaning the inside of your window pane with rubbing alcohol and a lint-free cloth. Any dust or fingerprints will prevent the paint from adhering smoothly, so ensure the glass is completely dry and streak-free. -
Tape your references:
Choose a variety of leaf shapes from your reference images—mix jagged maple leaves with rounded oak leaves for variety. Tape these images to the *outside* of the window facing in. This gives you a perfect template to trace without needing to draw freehand on the glass. -
Plan the composition:
Arrange your templates to look like they are tumbling in a breeze. avoid placing them in straight lines; instead, angle them slightly and vary the spacing to mimic a natural, swirling wind pattern.
Fixing Wobbly Lines
If your outlining hand shakes, rest your pinky finger on the glass for stability. You can also wipe away wet liner mistakes instantly with a Q-tip dipped in rubbing alcohol.
Step 2: Outlining the Foliage
-
Trace the stems:
Using your liquid lead liner or dark outline paint, start by drawing the central stem of the leaf first. Keep your hand steady and apply even pressure to the tube to avoid blobs. -
Outline the perimeter:
Carefully trace the outer edges of your leaf templates. For maple leaves, ensure the points are sharp; for oak leaves, use smooth, curving strokes. Connect these outer lines back to the central stem base. -
Add primary veins:
Draw the main veins branching off the center stem. Keep these lines very thin, as they need to look delicate. -
Detail the micro-veins:
For an ultra-realistic look, add tiny, branching veins connecting the larger ones. This intricate web is what makes the final result look so lifelike when the light hits it. Let the outlines dry completely, usually for about 1-2 hours depending on the brand.
Create a 3D Effect
Paint a very faint, grey shadow on the glass slightly below and to the right of each leaf. This optical illusion makes the leaves look like they are floating just off the surface.
Step 3: Adding Color & Light
-
Mix your base shades:
Prepare your palette with autumn hues: ochre, burnt orange, golden yellow, and rust red. Because we want the light to shine through, don’t mix white into these colors; keep them pure and translucent. -
Fill the sections:
Dip a small round brush into your lightest yellow or ochre. Gently fill in the spaces between the dried outline veins. I like to apply the paint a bit thicker near the edges for a stained-glass effect. -
Create gradients:
While the first color is still wet, drop in a small amount of orange or rust red near the leaf tips or the stem base. Use a clean, slightly damp brush to blend the two colors where they meet, creating a soft, natural transition. -
Vary the leaves:
Don’t make every leaf identical. Paint some fully yellow-brown like a dried birch leaf, and give others a vibrant orange-red tint like a fresh maple leaf. -
Simulate texture:
To mimic the dry, crinkly texture of a fallen leaf, you can dab the wet paint slightly with a dry brush or a tiny piece of crumpled tissue. This lifts a little pigment and creates a mottled, organic look. -
Let it cure:
Allow the paint to dry undisturbed. Translucent window paints often look cloudy when wet but will clear up and become gem-like as they dry.
Step 4: Final Touches
-
Remove templates:
Once the paint is dry to the touch, go outside and remove the paper templates you taped up earlier. -
Inspect from outside:
Check your work from the exterior. Sometimes gaps in the paint are more visible from the other side of the glass. If you spot any pinholes of light, dab a little extra paint on the inside to seal them. -
Clean up edges:
If you made any smudges or have shaky outline bits, use a craft knife or a razor blade to gently scrape away the excess cured paint for a crisp finish.
Now step back and enjoy the warm, golden glow these everlasting leaves cast into your room


Harvest Wheat and Corn Stalk Border on the Sides
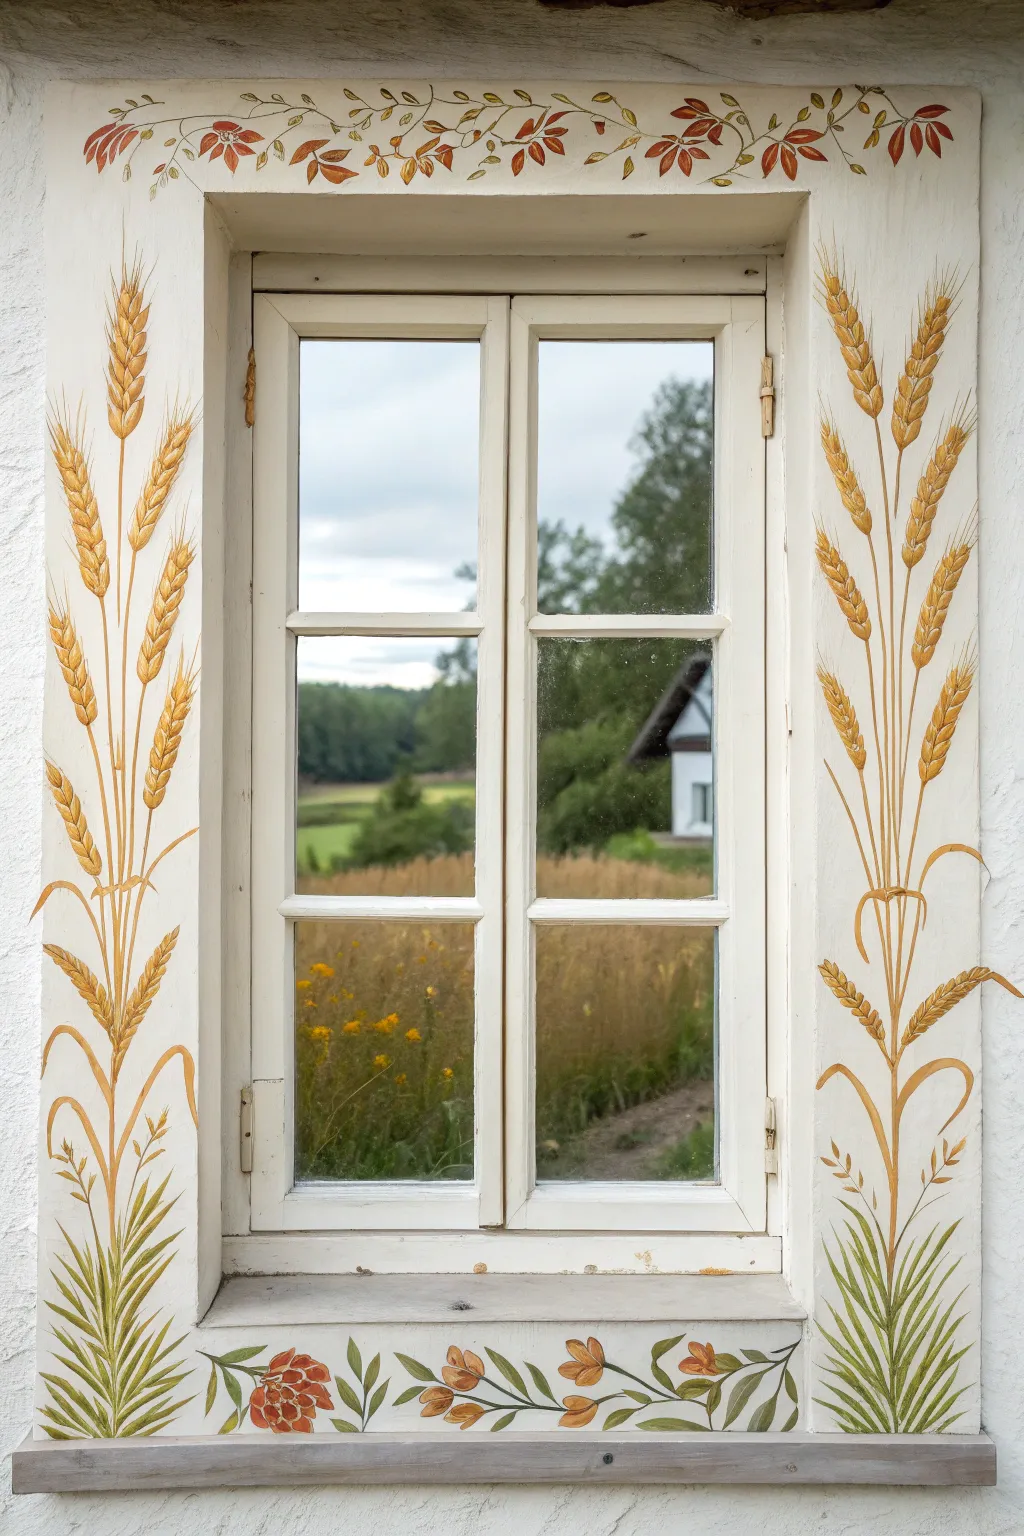
Transform a plain window frame into a rustic masterpiece with this hand-painted wheat stalk design. The warm golden hues of the grain paired with delicate floral vines create a welcoming harvest atmosphere that frames the view outside perfectly.
Step-by-Step
Materials
- White exterior or interior trim paint (for base coat)
- Acrylic craft paints (Golden Yellow, Burnt Sienna, Raw Umber, Olive Green, Forest Green, Terra Cotta)
- Set of round synthetic brushes (sizes 2, 4, and 6)
- Fine liner brush (size 0 or 00 for details)
- Painter’s tape
- Pencil and eraser
- Palette or paper plate
- Water cup and paper towels
- Clear matte or satin varnish (optional, for protection)
Step 1: Preparation and Base
-
Clean surface:
Begin by thoroughly cleaning the window frame with mild soapy water to remove dust and grime. Let it dry completely before starting. -
Refresh the frame:
If your existing paint is chipped or discolored, apply a fresh coat of white satin or semi-gloss paint to create a clean, bright canvas for your artwork. Allow this to cure for at least 24 hours. -
Mask edges:
Apply painter’s tape to the inner glass edges and the outer wall boundary to ensure crisp lines and protect surrounding areas from happy accidents.
Step 2: Sketching the Design
-
Draft the wheat structure:
Using a light pencil, sketch the tall, vertical lines for the wheat stalks on both side jambs. Start from the bottom sill and extend them about three-quarters up the frame. -
Add grass clumps:
At the base of the stalks, sketch a tuft of spiky grass blades fanning outward. This anchors the floating wheat design. -
Outline the top vine:
Lightly draw a wavy, sinusoidal line across the top header of the frame. Mark small circles or teardrop shapes where the leaves and flowers will sit. -
Detail the bottom vine:
Similarly, sketch a horizontal vine across the bottom sill area, adding larger flower shapes—perhaps zinnias or marigolds—interspersed with leaves.
Wobbly Lines?
Support your painting hand with your pinky finger resting on a dry part of the frame. This ‘bridge’ stabilizes your hand for straight stems and fine details.
Step 3: Painting the Wheat Stalks
-
Paint main stems:
Mix Golden Yellow with a touch of Raw Umber to get a warm straw color. Using a size 4 round brush, paint the long vertical stems with confident, smooth strokes. -
Create the base grass:
Switch to Olive Green and paint the grassy tufts at the bottom. Use a flicking motion upward to create tapering, sharp tips for the blades. -
Form the wheat heads:
Dip your size 4 brush into Golden Yellow. Paint the wheat grains using a ‘V’ formation, stacking small, teardrop-shaped brushstrokes on top of each other at the end of each stem. -
Add dimension:
While the yellow is still slightly tacky, mix a bit of Burnt Sienna into your yellow. Add a small dab of this darker shade to the bottom of each wheat grain kernel to create shadow and volume. -
Paint the beard:
Use your finest liner brush and thinned Raw Umber paint to add the ‘beard’ or awns—the hair-like whiskers extending from the wheat tips. Keep your hand loose for organic variations.
Pro Tip: Depth of Field
Paint the wheat stalks in the ‘back’ with slightly paler, cooler colors than the front ones. This atmospheric perspective adds subtle 3D depth to the flat surface.
Step 4: Painting the Floral Borders
-
Paint the vine stems:
Using Forest Green thinned slightly with water, paint the winding vine stems along the top and bottom borders with a size 2 brush. -
Add leaves:
Paint small, simple leaf shapes along the vines using Olive Green. Vary the angle of the leaves to make the vine look natural. -
Block in flowers:
For the top border, use Terra Cotta to paint small, clustered berries or three-petaled shapes. On the bottom sill, paint larger floral shapes using the same color. -
Highlight florals:
I like to mix a tiny bit of white into the Terra Cotta and add a highlight to the upper edge of each petal or berry to make them pop against the white background.
Step 5: Finishing Touches
-
Clean up lines:
Once the paint is dry, use a clean eraser to gently remove any visible pencil lines. -
Seal the work:
Apply a coat of clear matte or satin water-based varnish over the painted areas. This is crucial if the window is frequently opened or exposed to sunlight. -
Remove tape:
carefully peel away the painter’s tape at a 45-degree angle to reveal your crisp, finished edges.
Step back and admire how your simple painted border now frames the changing seasons outside like a living picture.


Apple Branches and Falling Apples for a Orchard Feel
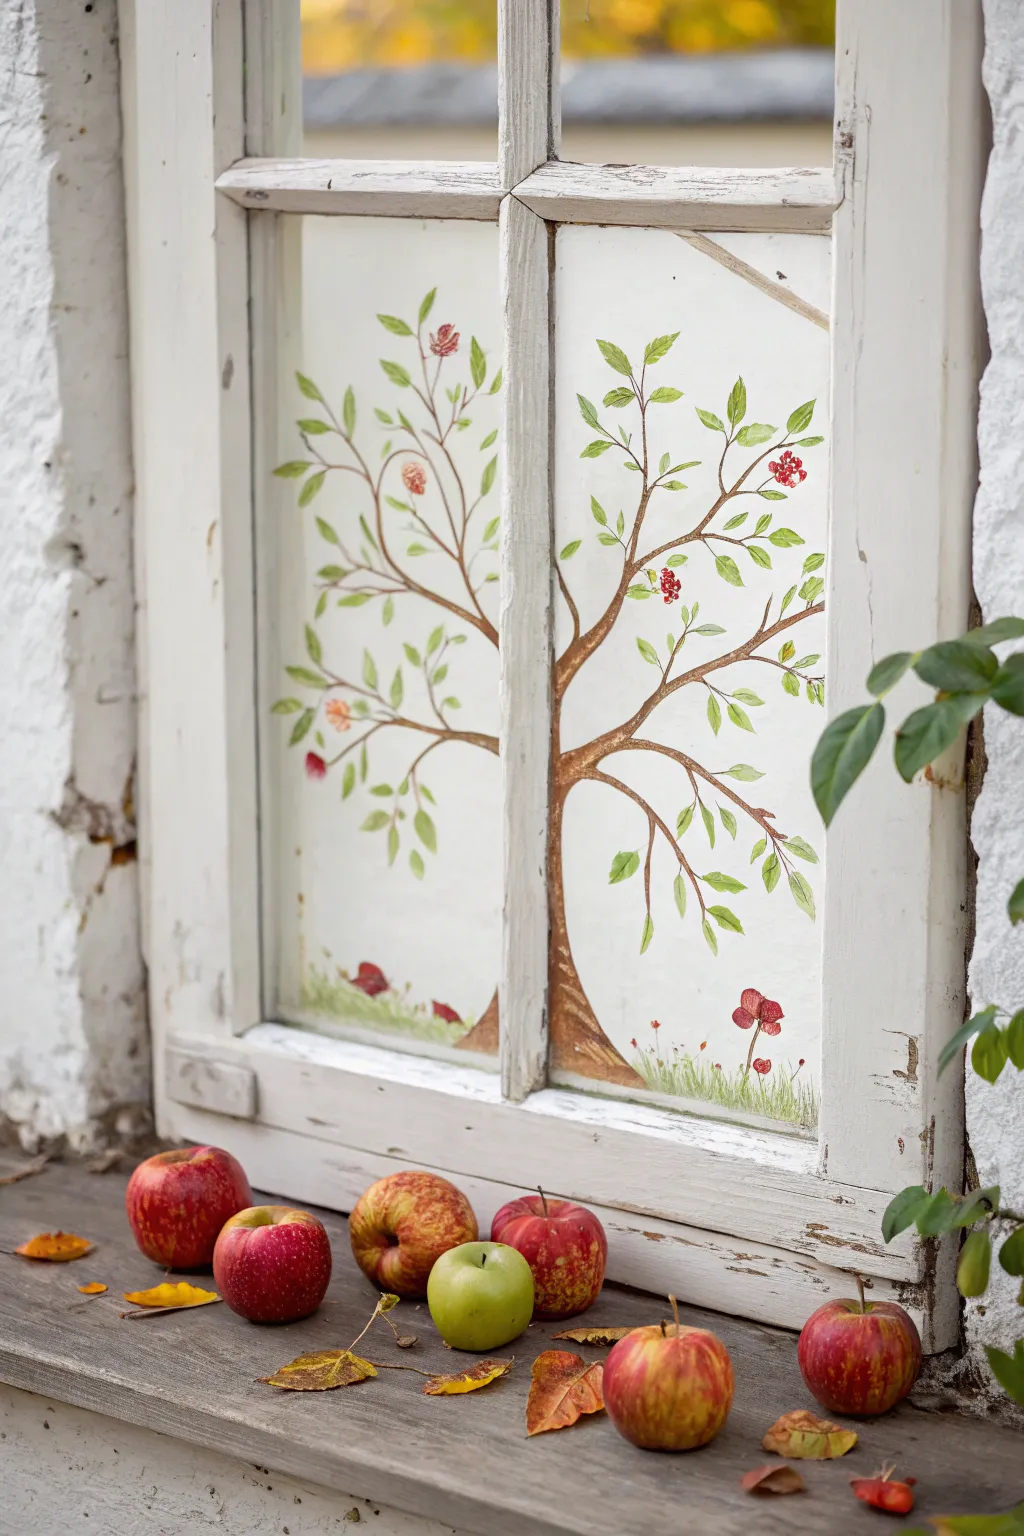
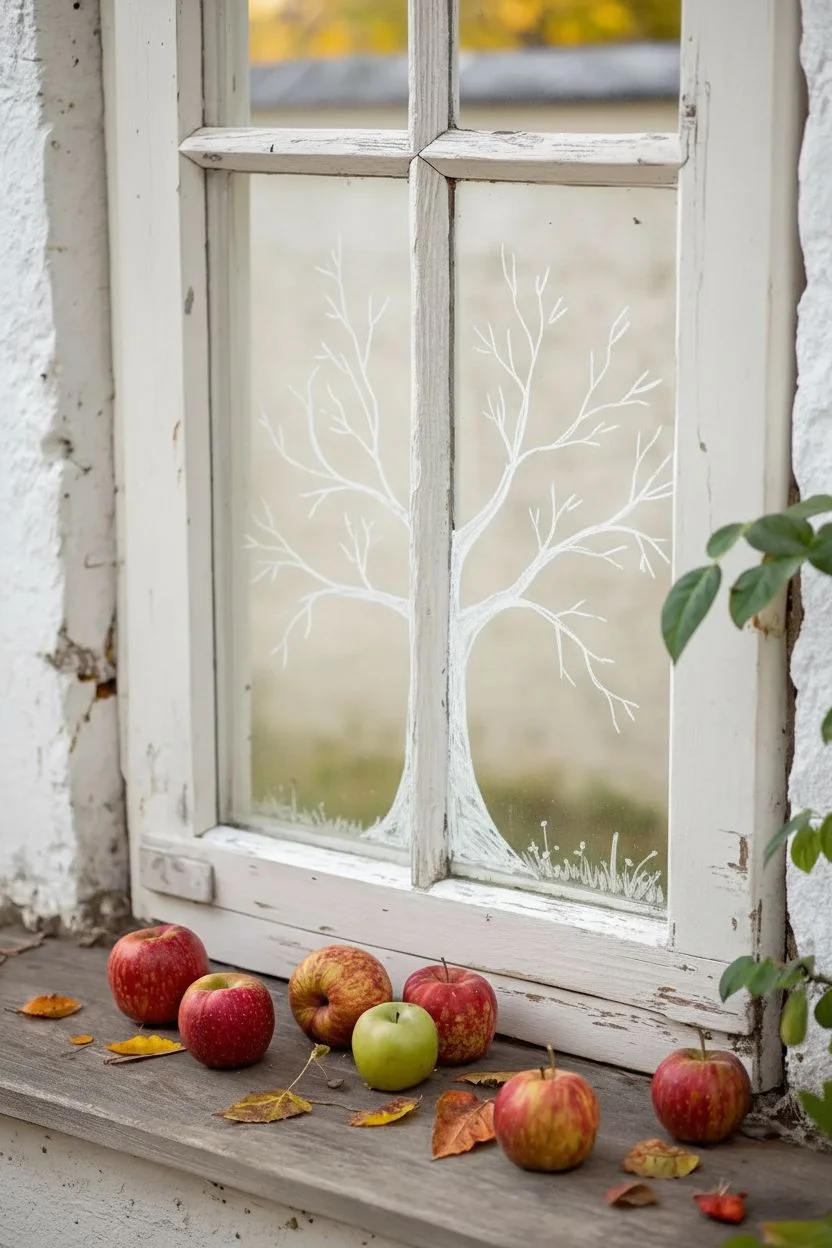
Transform a plain window pane into a whimsical view of an apple orchard using simple acrylic painting techniques. This project captures the essence of autumn with delicate branches and tiny red fruits, perfect for adding seasonal charm to your home.
Step-by-Step Guide
Materials
- Acrylic craft paints (brown, dark green, light green, red, white, yellow)
- Window cleaner and lint-free cloth
- Various paintbrushes (fine liner, small round, and flat shader)
- Palette or paper plate
- Cup of water
- Paper towels
- Painter’s tape (optional)
- Chalk marker or dry erase marker (for sketching)
Step 1: Preparation and Sketching
-
Clean the Glass:
Begin by thoroughly cleaning the window pane with glass cleaner. Ensure the surface is completely free of dust, grease, or fingerprints, as paint adheres best to a pristine surface. -
Plan the Tree Structure:
Visualize where the main trunk will sit. In this design, the trunk is split between the two central panes, emerging from the bottom corners and reaching upward. -
Sketch the Outline:
Use a white chalk marker or dry erase marker to lightly sketch the main trunk and primary branches directly onto the glass. This acts as a forgiving guide that you can wipe away and redraw until you’re happy with the composition.
Clean Lines Hack
Keep a damp cotton swab handy while painting. It works like a tiny eraser to instantly fix wobbly lines or paint smudges on the glass before they dry.
Step 2: Painting the Tree Structure
-
Mix the Trunk Color:
On your palette, mix a warm brown shade. You might want to add a touch of white to lighten it slightly so it stands out against the unpredictable background of the outdoors. -
Paint the Base Trunk:
Using a flat shader brush or medium round brush, fill in the main trunk area at the bottom of the window pane. Use vertical strokes to mimic the texture of bark. -
Extend the Branches:
Switch to a smaller round brush. Extend lines upward and outward from the trunk to create the main branches. Let them meander naturally, getting thinner as they reach the top. -
Add Fine Twigs:
With a fine liner brush, add delicate twigs branching off the larger limbs. Keep your hand loose to create organic, slightly wavering lines rather than perfect straights. -
Add Dimension:
While the brown paint is still slightly tacky, streak in a tiny bit of darker brown on the shadowed side of the branches and a lighter tan on the top to suggest sunlight hitting the wood.
Creative Twist
Paint a few ‘falling’ leaves in mid-air using yellow and orange tones to enhance the autumn feeling and add a sense of movement to the static image.
Step 3: Adding Foliage and Fruit
-
Mix Leaf Greens:
Prepare two shades of green: a darker olive tone and a fresh, yellowish-green. This variety adds depth and realism to the foliage. -
Paint the leaves:
Using a small round brush, press down and lift up to create simple almond-shaped leaves along the branches. I prefer to alternate between the dark and light greens for a varied, natural look. -
Place the Applies:
Dip a small round brush into bright red paint. Dab small circles or ovals randomly throughout the branches to represent the apples. -
Highlight the Fruit:
Once the red dots are dry, use the very tip of a fine brush to add a tiny white spectral highlight to the top of each apple, making them look shiny and round. -
Add Berry Clusters:
If you want extra detail, create clusters of tiny red dots near the ends of some branches to resemble berries, adding texture to the composition.
Step 4: Ground Details and Finish
-
Paint the Grass:
At the very bottom of the pane, use short, upward flicking strokes with your green paints to create clumps of grass growing around the base of the tree trunk. -
Add Ground Elements:
Paint a few fallen red apples or maybe a small red mushroom within the grass to anchor the scene. -
Refine Edges:
Allow the entire painting to dry completely. If you spot any rough edges or mistakes, you can carefully scrape them away with a razor blade or a damp cotton swab. -
Seal (Optional):
If this window is exposed to heavy condensation, you might apply a clear acrylic sealer over the painted areas, though usually, acrylic paint holds up well on its own for the season.
Step back and enjoy your private orchard view, regardless of the weather outside


Friendly Scarecrow Character Peeking In From One Side
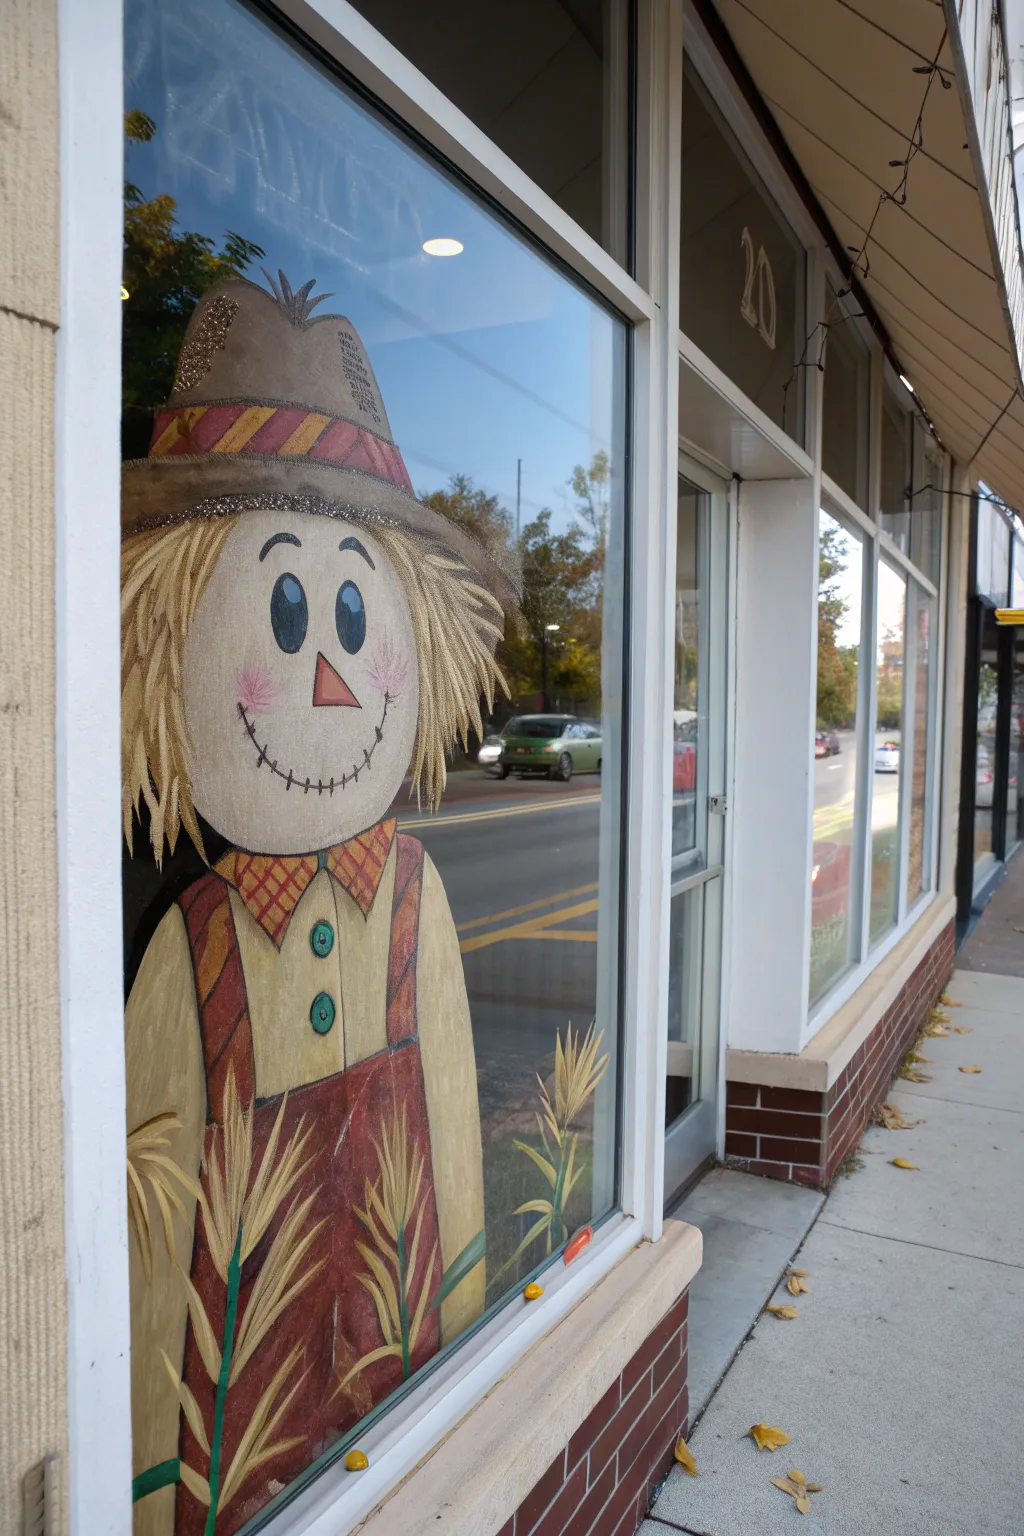
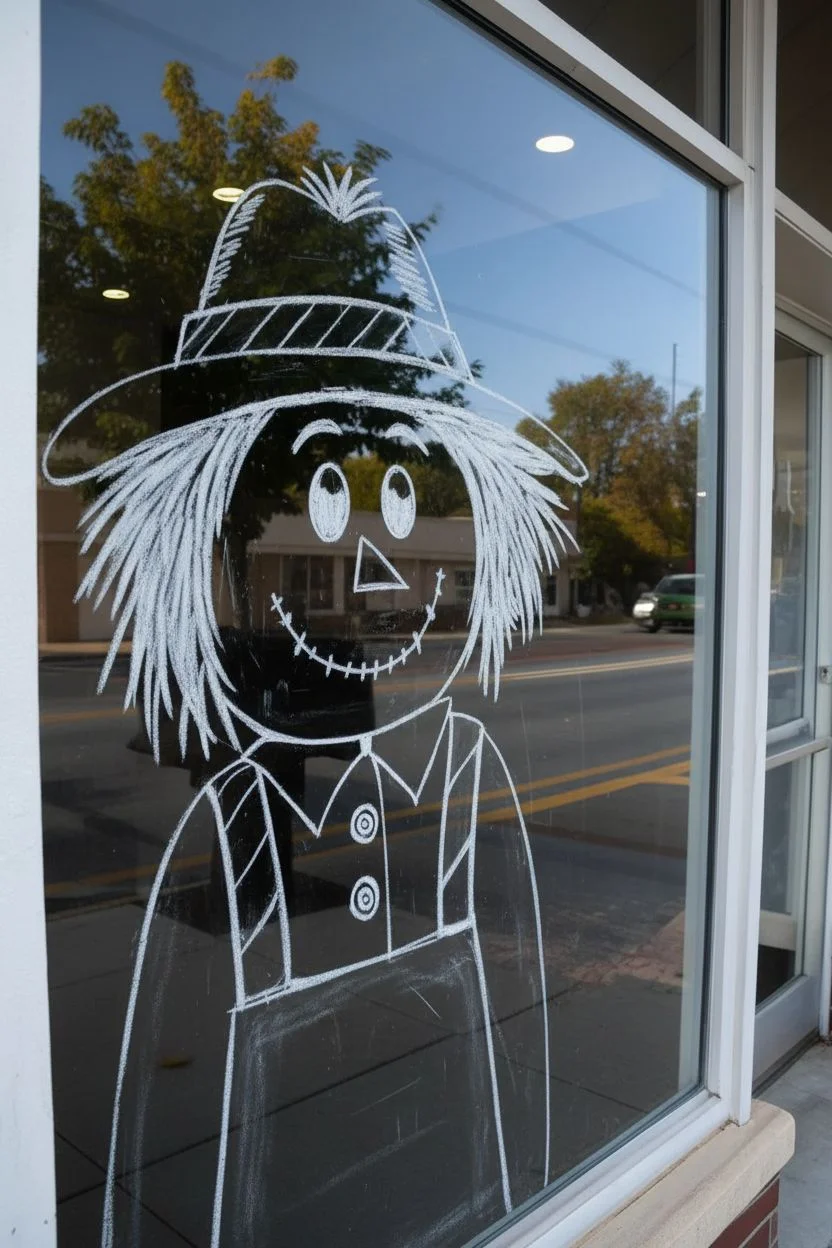
Bring the harvest season to your storefront or home window with this cheerful, oversized scarecrow that appears to be peeking out at passersby. Using acrylic window paints, you’ll build up layers of rustic texture to create his burlap face, straw hair, and plaid collar.
Step-by-Step Tutorial
Materials
- Glass cleaner and lint-free cloth
- White or yellow chalk marker (for sketching)
- Acrylic craft paints (Beige/Tan, Brown, Red, Yellow, White, Black, Orange, Metallic Gold)
- Wide flat paintbrush (1-2 inch)
- Medium flat brush
- Small round detail brush
- Fan brush (optional, for straw texture)
- Container of water and paper towels
- Window scraper (for cleanup)
Step 1: Preparation and Sketching
-
Clean the Surface:
Start by thoroughly cleaning the inside of the window glass to remove dust, grease, and fingerprints, ensuring the paint adheres properly. -
Establish the Placement:
Decide on the scale of your scarecrow. Since he is peeking in from the side, position his left shoulder against the window frame so he anchors the composition. -
Sketch the Outline:
Using a chalk marker, draw the basic shapes on the inside of the glass. Start with a large oval for the head, a triangle for the hat, and the torso disappearing off the bottom edge. -
Detail the Sketch:
Add the brim of the hat, the collar triangles, and the suspender straps over the shoulders. Don’t worry about perfect lines, as the paint will cover them.
See-Through Problem?
If the window backlighting makes your colors look washed out, paint the back of the dried design with a layer of white paint to make the colors opaque.
Step 2: Blocking in Base Colors
-
Paint the Face Base:
Mix a warm beige or tan color. Using your wide flat brush, fill in the entire face oval. Using X-shaped brushstrokes here creates a nice fabric-like texture resembling burlap. -
Fill the Shirt:
Paint the shirt area underneath the overalls with a pale yellow or cream color. Apply two coats if necessary to make it opaque against the light coming from outside. -
Color the Overalls:
Use a deep red or maroon to fill in the overalls. Paint vertical strokes to simulate the weave of denim or heavy canvas. -
Paint the Hat:
Fill in the hat shape with a medium brown tone. Let this base layer dry completely before moving on to decorative details.
Step 3: Adding Details and Texture
-
Create the Straw Hair:
Mix yellow, tan, and white. Using a liner brush or the edge of a flat brush, flick quick, tapered strokes outward from under the hat brim to create messy straw hair. -
Detail the Hat Band:
Paint a band across the hat just above the brim. Once the base color is dry, add diagonal stripes in red and yellow to give it a festive look. -
Paint the Plaid Collar:
Fill the collar triangles with orange or red. Once dry, use a thin brush with brown paint to create a cross-hatch grid pattern for a plaid flannel effect. -
Add Suspender Details:
Paint the suspender straps with brown diagonal stripes. Add two teal or green circles for buttons where the straps meet the bib of the overalls. -
Paint Facial Features:
Use black to paint two tall oval eyes and a stitched smile line. Add small hatch marks across the smile line for that classic sewn look. Paint a bright orange triangle for the nose. -
Add Cheeks and Highlights:
Dry brush a little bit of pink or red on the cheeks for a rosy glow. Add tiny white dots to the eyes to make them look alive and shiny.
Pop of Texture
Mix a little baking soda into your tan paint for the face. It creates a gritty, real burlap texture that looks amazing on glass.
Step 4: Finishing Touches
-
Paint Corn Stalks:
At the bottom of the window, paint sweeping green and yellow lines extending upward to represent corn stalks growing in front of him. -
Add Glitter Accents:
While the paint on the hat or corn stalks is still slightly tacky, I like to sprinkle a tiny bit of glitter or use a glitter topcoat for extra sparkle in the sunlight. -
Clean Up Edges:
Once everything is fully dry, use a wet cloth or a scraper to gently remove any stray paint drips or chalk marks around the edges of your design.
Step back outside and admire your friendly neighborhood scarecrow greeting the autumn season
BRUSH GUIDE
The Right Brush for Every Stroke
From clean lines to bold texture — master brush choice, stroke control, and essential techniques.
Explore the Full Guide
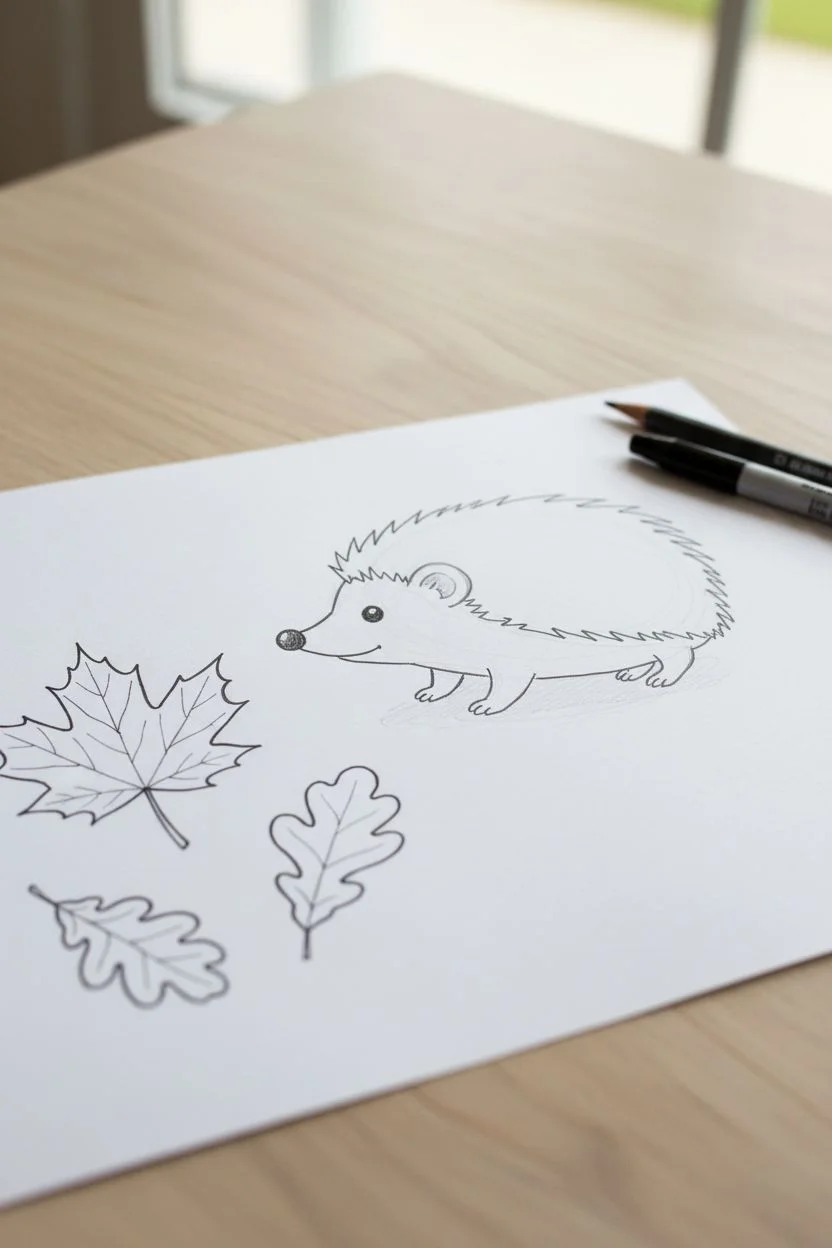
Woodland Critters With Acorns and Little Leaf Piles
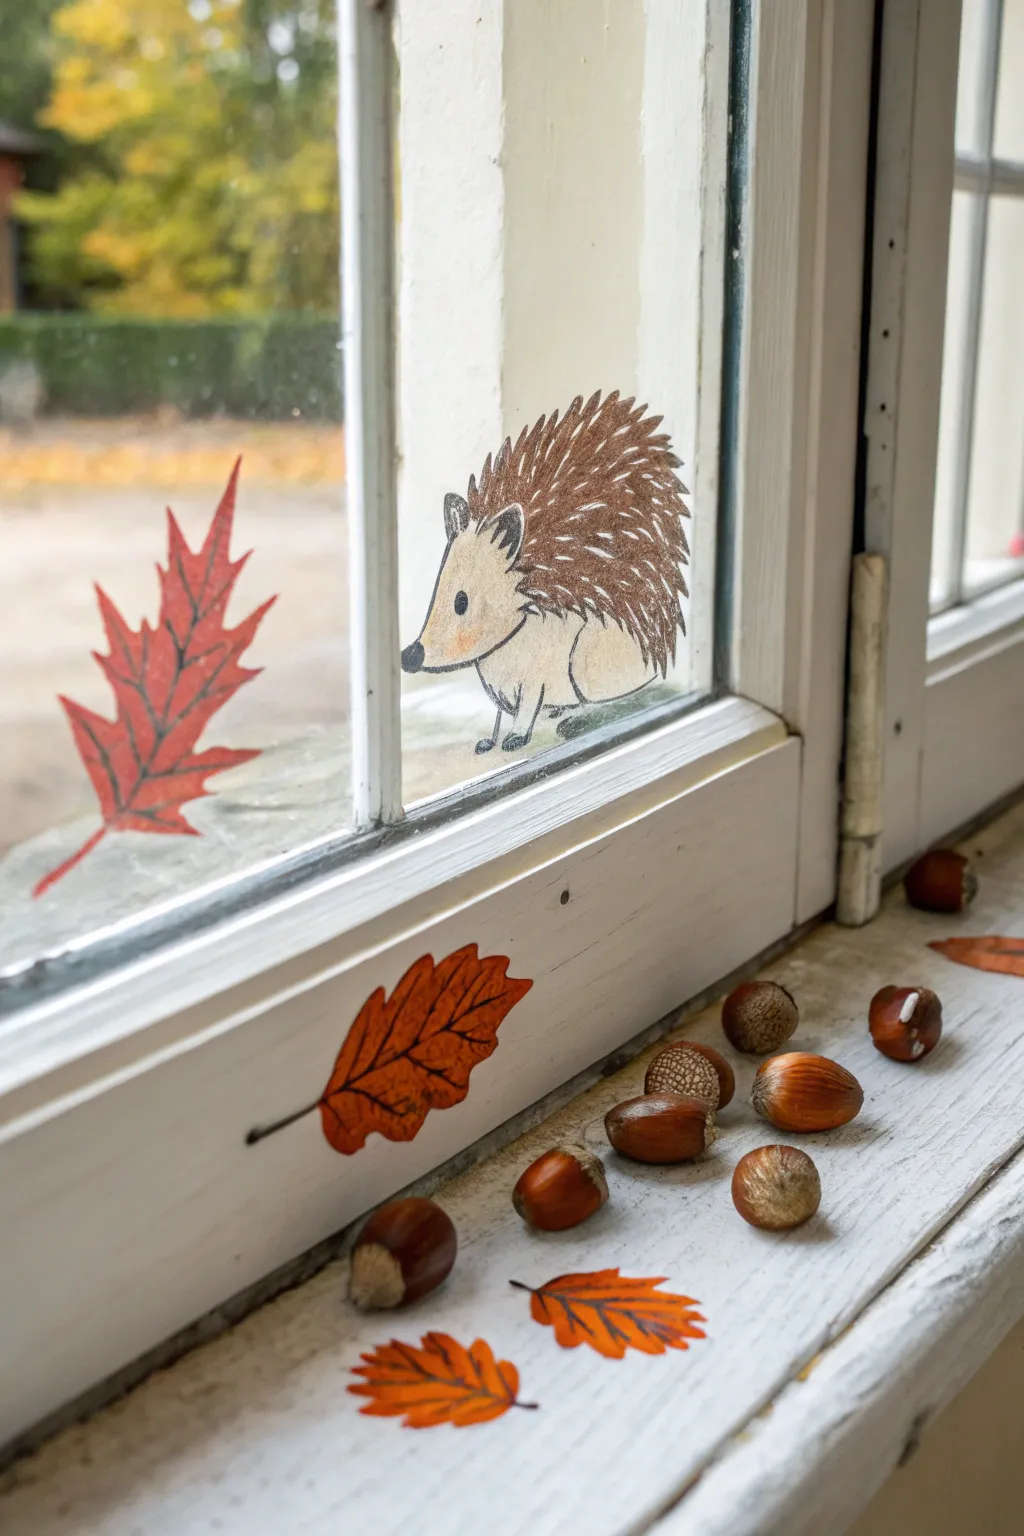
Transform your windowsill into a cozy woodland vignette with this charming mixed-media project. By combining hand-illustrated paper cutouts with real natural elements, you create a layered autumnal scene that brings the outdoors inside.
Step-by-Step Guide
Materials
- White cardstock or heavy drawing paper
- Colored pencils (browns, creams, reddish-orange)
- Fine-tip black marker or pen
- Scissors
- Clear double-sided tape or glue dots
- Real hazelnuts and acorns (clean and dry)
- Pencil and eraser
Step 1: Sketching the Characters
-
Outline the hedgehog shape:
Start with a light pencil sketch on your white cardstock. Draw a rounded teardrop shape for the body, with a slightly pointed snout on the left side. -
Add facial features:
Draw a small round nose at the tip of the snout and a small oval eye just behind it. Sketch a little smile line and a curved ear near the top of the head. -
Define the legs:
Sketch two small, stubby front legs and a hint of a rounded back leg at the bottom of the body so your hedgehog looks like he is walking along the ledge. -
Sketch the leaves:
On a separate part of the paper, draw several leaf shapes. Create a few classic lobed oak leaves and one large, jagged maple leaf. -
Ink the outlines:
Once you are happy with your pencil sketches, go over the main lines with a fine-tip black marker. Use jagged, short strokes for the hedgehog’s back to suggest spikes.
Step 2: Coloring and Details
-
Color the hedgehog’s body:
Use a creamy beige or light tan colored pencil to fill in the hedgehog’s face and belly area. Apply the color lightly for a soft texture. -
Create the spikes:
Switch to a medium brown pencil. Draw hundreds of short, directional strokes covering the back of the hedgehog to simulate quills. Layer a darker brown over top for depth. -
Color the oak leaves:
Fill in your small oak leaves with warm orange and rust-colored pencils. Add darker veins with your fine-tip pen or a dark brown pencil. -
Color the maple leaf:
Color the large maple leaf a vibrant reddish-orange. I like to press harder near the edges to give it that rich fall intensity. -
Cut everything out:
Carefully cut out the hedgehog and all the leaf shapes with scissors. Leave a tiny white border around the edges if you prefer a sticker-like look, or cut right to the black line.
Natural Texture
For the hedgehog’s quills, use three different shades of brown pencil. Layering light, medium, and dark strokes creates realistic volume.
Step 3: Assembly and Arrangement
-
Clean the surface:
Wipe down your window pane and the wooden windowsill to ensure they are free of dust and grease so the tape sticks well. -
Attach the window art:
Apply small pieces of double-sided tape to the front side of your hedgehog cutout and stick it to the glass pane, positioning it as if it’s walking on the window frame. -
Place the floating leaf:
Tape the large red maple leaf onto the glass to the left of the hedgehog, angling it slightly as if it is falling. -
Apply leaves to the frame:
Stick one oak leaf cutout directly onto the vertical face of the white window frame below the glass. Scatter two or three more small paper leaves flat on the windowsill surface. -
Arrange the nuts:
Take your real acorns and hazelnuts and scatter them casually along the windowsill. Mix them in with the paper leaves to blur the line between the drawing and reality. -
Final adjustment:
Step back and check the composition. Nudge the nuts closer to the paper leaves to make the scene feel interactive and cohesive.
Adhesive Issues
If the paper curls off the glass due to cold condensation, try using a tiny dab of water-soluble glue stick instead of tape; it washes off easily.
Enjoy the whimsical touch this little scene adds to your room as the seasons change
Rainy Fall Umbrella With Leaves Floating Down
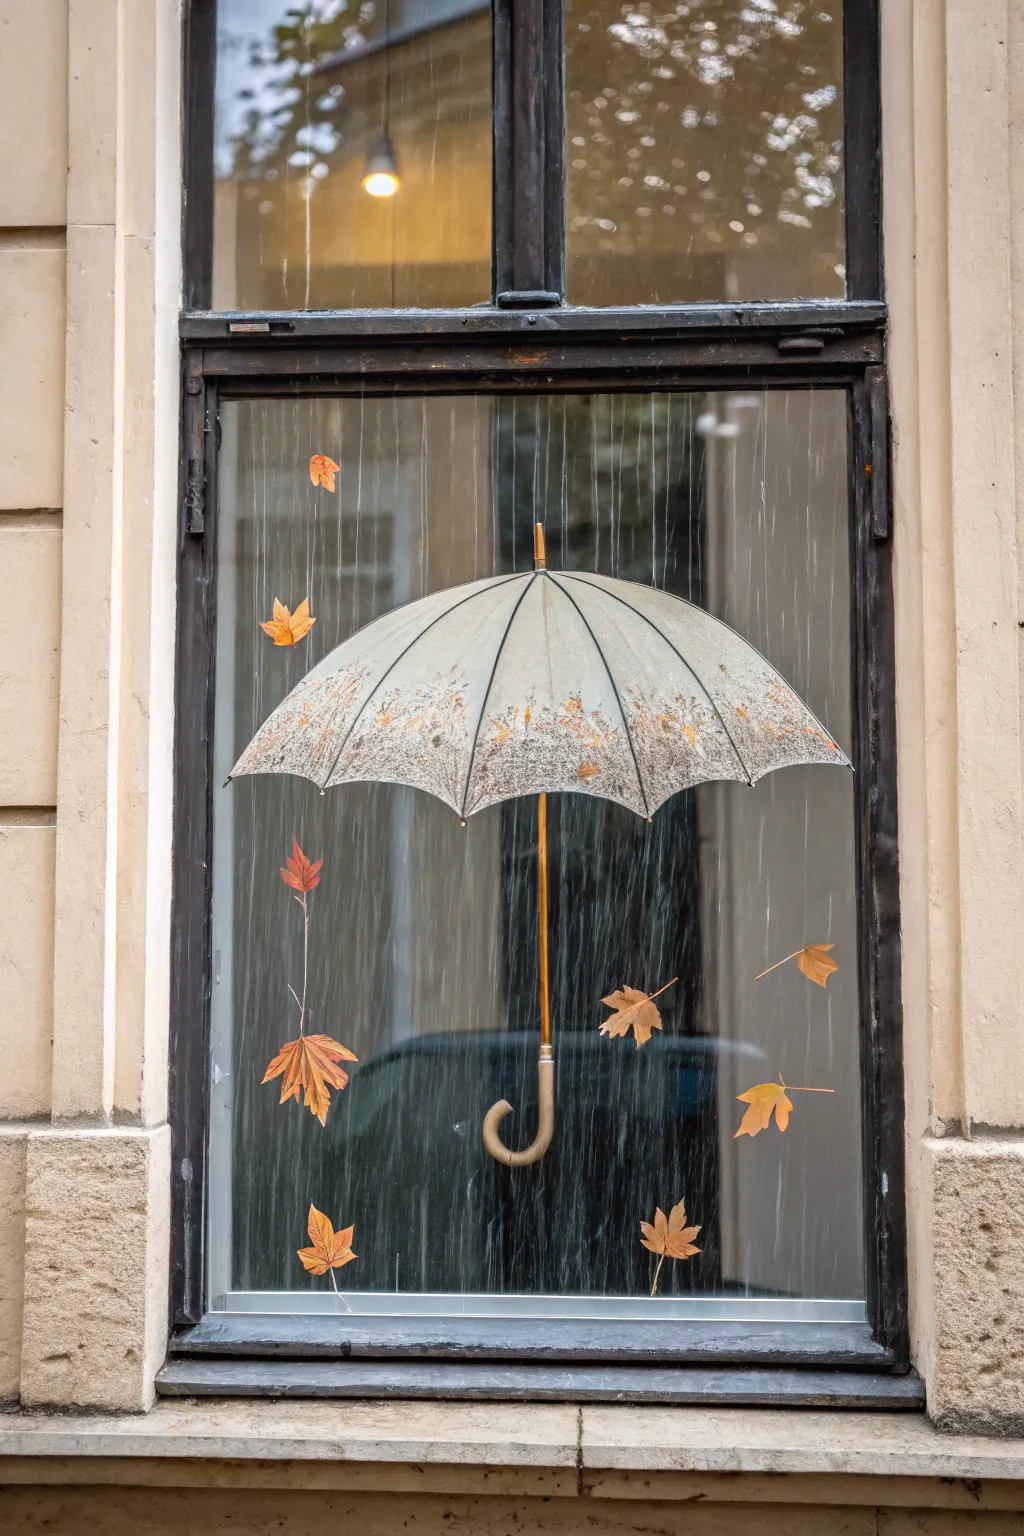
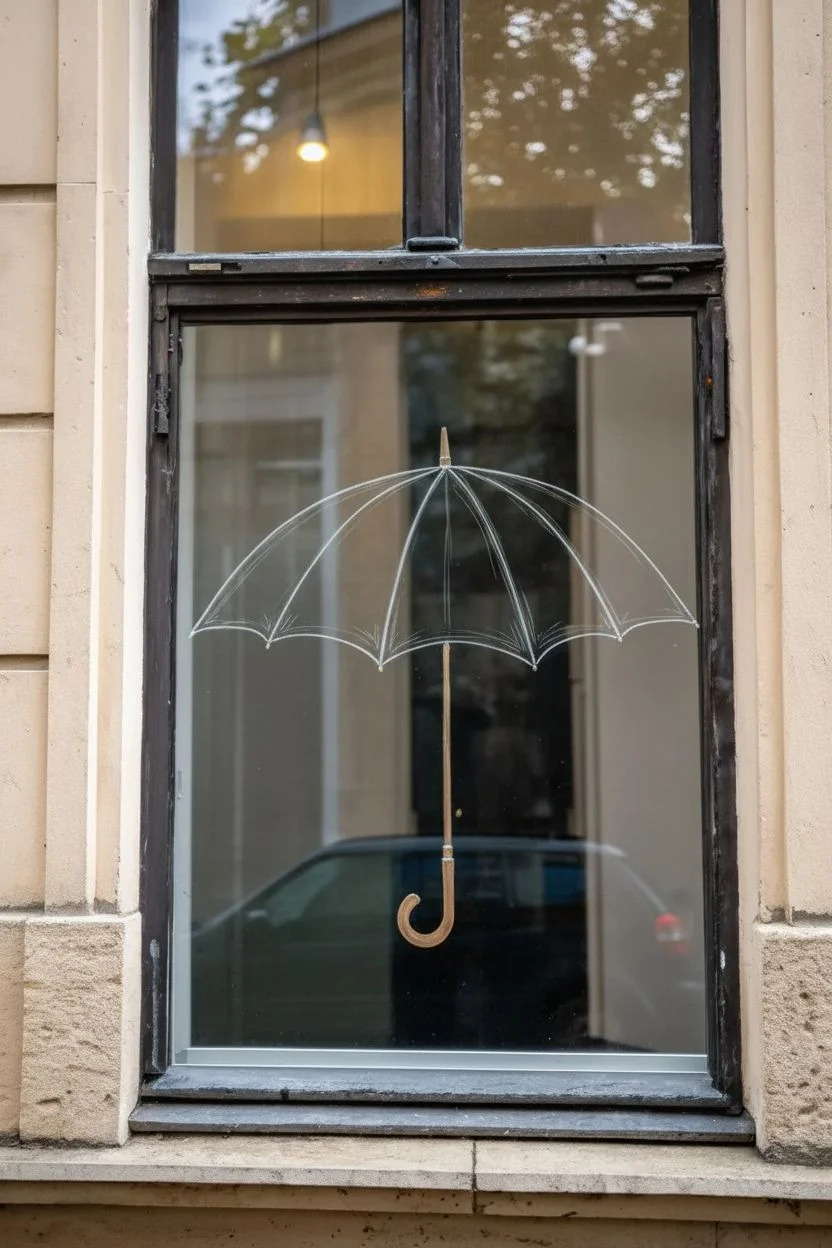
Capture the cozy essence of a rainy autumn afternoon directly on your windowpane with this evocative display. By layering translucent washes for the umbrella and adding crisp, falling leaves, you’ll create a dimensional scene that celebrates the season’s beautiful gloom.
Step-by-Step Tutorial
Materials
- Glass cleaner and lint-free cloth
- Chalk markers or acrylic paint markers (white, orange, red, brown, yellow, black)
- Wide flat brush (1-inch)
- White acrylic paint (mixed with a tiny bit of water)
- Small detail brush
- Ruler or straight edge
- Paper towels
- Reference photo of an umbrella
Step 1: Setting the Stage
-
Clean the Surface:
Begin by thoroughly cleaning the inside of your window. Any dust or grease will prevent the paint markers from adhering smoothly, so give it a good wipe with glass cleaner and a lint-free cloth. -
Outline the Umbrella Canopy:
Using a light gray or white chalk marker, lightly sketch the large arc of the umbrella canopy in the center of the window. Draw the bottom scalloped edge, ensuring the curves are relatively symmetrical. -
Add the Central Shaft:
Draw a straight vertical line coming down from the center of the canopy for the umbrella shaft. Add the curved ‘J’ handle at the bottom using a brown or tan marker to mimic wood. -
Define the Ribs:
From the top point of the canopy, draw curved lines extending down to the points of the scalloped edge. These are the ribs of the umbrella that give it structure.
Step 2: Painting the Umbrella
-
Fill the Canopy Base:
Mix a very small amount of black onto your white paint or use a grey marker to create a translucent, ‘off-white’ wash. Fill in the canopy panels, keeping the strokes vertical to follow the curve of the fabric. -
Add Shadows and Depth:
Where the ribs dip inward, darken the shading slightly with a touch of grey or diluted black marker. This contouring makes the umbrella look three-dimensional rather than flat. -
Detail the Floral Pattern:
Once the base layer is dry, use fine-tip orange and brown markers to stipple a subtle floral or leaf pattern along the bottom edge of the canopy fabric, just like the vintage design in the photo. -
Highlight the Ribs:
Go back over your structural rib lines with a fine black or dark grey marker to crispen them up so they stand out against the fabric fill. -
Color the Wood Handle:
Fill in the handle and shaft with a solid layer of light brown. I find adding a tiny sliver of white highlight on the curve of the handle makes it look polished and rounded.
Streaky Paint?
If your large umbrella fill looks too uneven, try dabbing with a slightly damp sponge instead of brushing. This creates a textured ‘fabric’ look.
Step 3: Weather and Foliage
-
Sketch Leaf Outlines:
Randomly scatter outlines of maple and oak leaves around the umbrella. Vary their sizes and angles to make them look like they are tumbling in the wind. -
Fill with Fall Colors:
Color your leaves using blends of orange, yellow, and brownish-red. Don’t worry about perfect blending; the streaks add texture. -
Add Leaf Veins:
Once the leaf color is dry (chalk markers dry quickly), use a fine-tip brown or black marker to draw the central vein and smaller branching veins on each leaf. -
Create Rain Streaks:
Prepare a watery mix of white acrylic paint. Dip a flat brush in, wipe off the excess, and drag long, thin, vertical lines down the entire window pane. -
Vary Line Pressure:
Keep your hand light for the rain. Some streaks should be barely visible while others can be more opaque to simulate depth in the rainfall. -
Interupt the Rain:
Crucially, do not paint rain lines *over* the umbrella or the leaves. The rain should appear to be falling behind or around these objects, or stopping at the umbrella’s surface. -
Add Water Droplets:
For a final realistic touch, add tiny white dots or short dashes along the rim of the umbrella where water would naturally collect and drip off.
Depth Trick
Paint the rain streaks on the *outside* of the window and the umbrella on the *inside*. This creates incredible physical depth between the rain and the art
Step back and enjoy the cozy atmosphere you have created, regardless of the real weather outside

PENCIL GUIDE
Understanding Pencil Grades from H to B
From first sketch to finished drawing — learn pencil grades, line control, and shading techniques.
Explore the Full Guide
Night Market Glow With Painted Lanterns and Tiny Stars
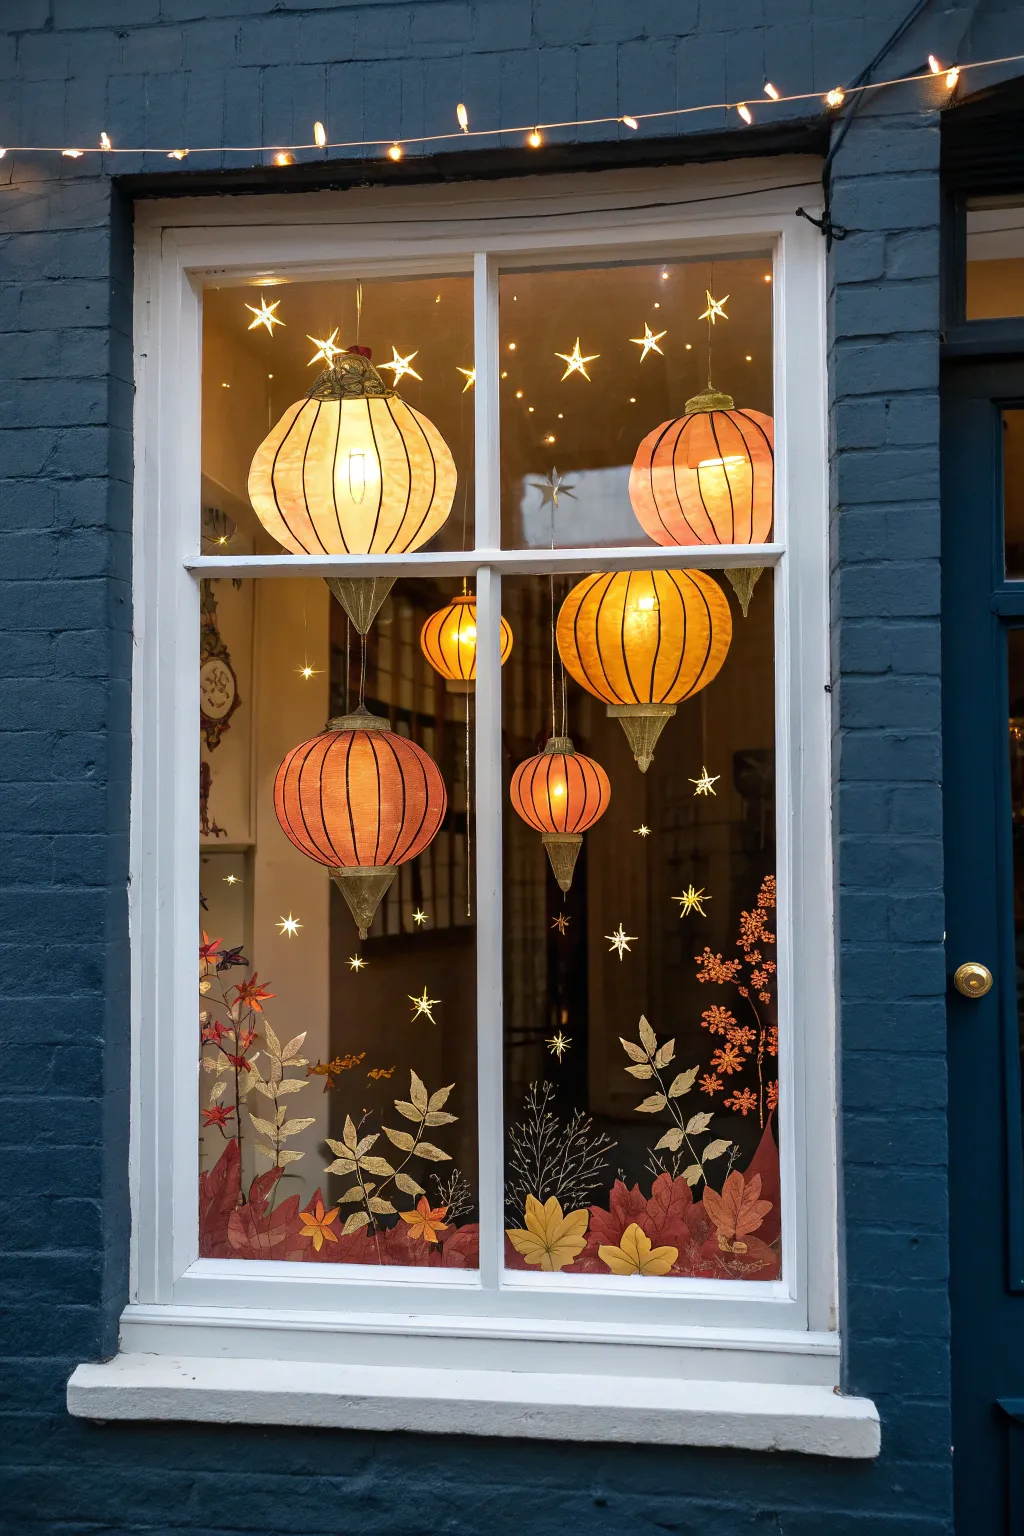

Transform your window into a glowing autumn festival scene with these vibrant lantern illustrations and delicate foliage details. The warm orange tones create a cozy atmosphere that looks stunning from both inside the home and out on the street.
Detailed Instructions
Materials
- Chalkola or Posca window markers (white, orange, yellow, brown, red, gold)
- Glass cleaner and lint-free cloth
- Paper towels
- Reference image or printed stencil (optional)
- Painter’s tape (if using stencils)
- Thin detailed brush (optional, for blending)
- Q-tips (for cleanup)
Step 1: Preparation & Layout
-
Clean surface:
Begin by thoroughly cleaning the inside of your window. Any dust or grease will prevent the markers from adhering smoothly, so give it a good wipe with glass cleaner and a lint-free cloth. -
Plan composition:
Sketch the rough placement of your lanterns using a dry-erase marker first, or lightly tap your chalk marker to make guide dots. Aim for varying heights: place larger lanterns near the top and smaller ones hanging lower to create depth. -
Draw lantern outlines:
Using a fine-tip white or gold marker, draw the outer shapes of the lanterns. Most form simple globes or flattened pumpkin shapes. Add the connecting vertical lines (ribs) that give the lanterns their structure.
Step 2: Painting the Lanterns
-
Fill base colors:
Color in the segments of the lanterns using broad-tip orange and yellow markers. I prefer to alternate colors slightly—using yellow in the center of a segment and orange at the edges—to mimic an inner glow. -
Blend the gradients:
While the marker ink is still slightly wet, use your finger or a dry brush to gently blend the yellow centers into the orange edges. This creates that soft, illuminated effect. -
Add structural details:
Once the color layer is dry, go back over the vertical ‘rib’ lines with a darker orange or thin brown marker to define the shape again. Add the decorative caps at the top and bottom of each lantern using grey or muted green. -
Create tassels:
Draw small triangular shapes at the bottom of the lanterns to represent hanging tassels, using quick downward strokes to simulate thread texture.
Uneven Coverage?
If the marker ink looks streaky, let the first layer dry completely (about 5-10 mins) before applying a second coat. Dab the paint on rather than dragging.
Step 3: Adding the Foliage
-
Outline leaves:
Along the bottom sill, sketch outlines of various autumn leaves—maple, oak, and fern shapes work best. Overlap them slightly to create a lush, piled look. -
Fill leaf colors:
Color the leaves using opaque reds, browns, and ochre yellows. Don’t worry about perfect coverage; a little transparency can look nice against the outdoor light. -
Draw delicate branches:
Using a fine-tip gold or white marker, draw thin, spindly branches rising up from the leaf pile. Add small, fern-like leaves to these stems using quick, repetitive dashes. -
Add leaf veins:
Once the main leaf colors are dry, use a contrasting color (like gold on red, or brown on yellow) to draw the central veins and stems.
Pro Tip: Exterior Glow
For maximum impact, place a warm lamp or actual LED string lights inside the room near the window. It will backlight your painted lanterns at night.
Step 4: Stars & Finishing Touches
-
Scatter the stars:
Fill the empty space between the lanterns and leaves with stars. Draw a mix of five-pointed stars and simple eight-point ‘glints’ (a long cross with a smaller X in the middle). -
Paint string lights:
If your composition allows, draw very thin, swooping lines connecting the tops of the lanterns to suggest they are hanging from a string. -
Add highlights:
Use a white marker to add tiny highlight dots or lines on the curve of the lanterns and on the tips of the leaves. This makes the artwork pop and look glossy. -
Cleanup edges:
Inspect your lines for any smudges. Use a damp Q-tip to sharpen the edges of your stars or lantern ribs for a crisp finish.
Enjoy the warm and inviting glow your new window art brings to the neighborhood during the autumn evenings
Repurposed Vintage Window Frame Painted as Fall Decor
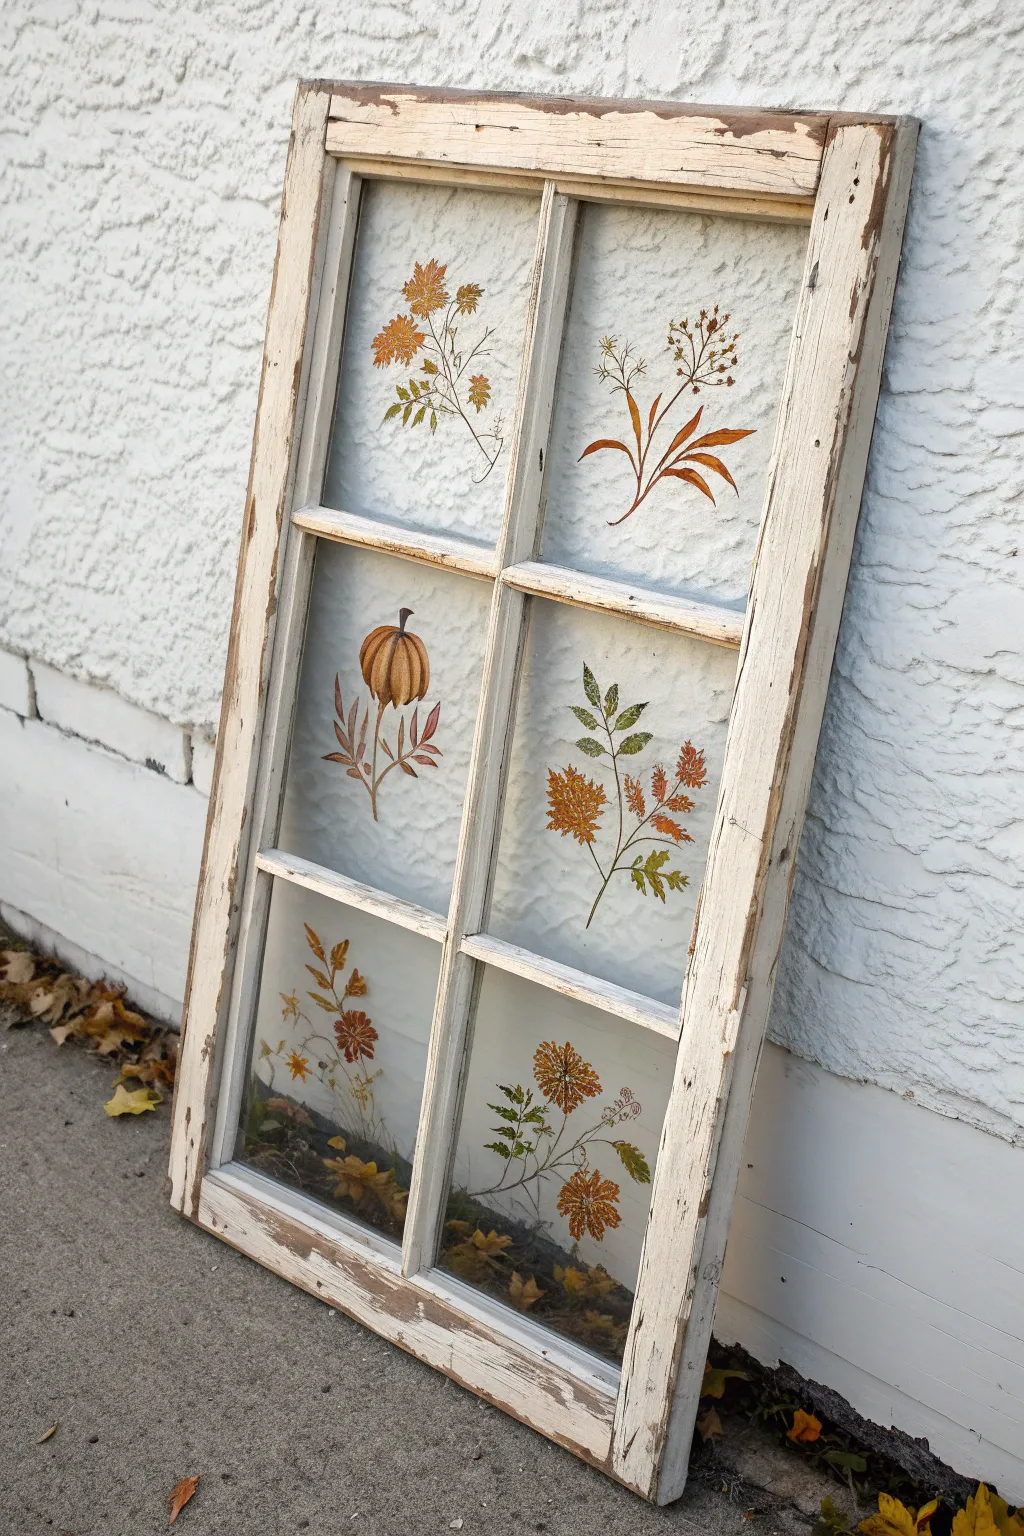
Transform an architectural salvage find into a stunning piece of seasonal art with this vintage window makeover. Featuring delicate autumn botanicals painted directly onto the glass, this project combines rustic farmhouse charm with the elegance of a naturalist’s sketchbook.
Step-by-Step
Materials
- Vintage 6-pane wood window frame
- Chalk paint (creamy white or antique white)
- Sandpaper (medium-grit and fine-grit)
- Glass cleaner and lint-free cloth
- Acrylic craft paints (burnt orange, mustard yellow, olive green, deep red, brown)
- Fine liner brushes (sizes 0 and 00)
- Small flat brush and round brush (sizes 2-4)
- Printed botanical clip art (pumpkins, leaves, dried flowers)
- Painter’s tape
- Clear matte sealer (spray)
- Paint scraper
- Razor blade
Step 1: Preparing the Frame
-
Clean the surface:
Begin by giving the vintage window a thorough cleaning. Remove any loose dirt, spiderwebs, or large flakes of old paint with a stiff brush. Clean the glass on both sides using glass cleaner. -
Address loose paint:
If the original paint is flaking heavily, use a paint scraper to gently remove the loose chips. Be careful not to gouge the wood underneath. -
Sand for texture:
Lightly sand the wooden frame to smooth out rough patches and create a surface the new paint can grip. If you want to keep the existing patina, you can skip heavy sanding and just scuff it up slightly. -
Apply the base coat:
Paint the wooden frame with a creamy white chalk paint. Don’t worry about perfect coverage; a slightly streaky application adds to the aged look. -
Distress the finish:
Once the paint is dry, take your medium-grit sandpaper to the edges and corners. Sand away the new white paint in areas where natural wear would occur to reveal the wood or old paint layers beneath. -
Final glass cleaning:
Paint often strays onto the glass during the frame makeover. Use a razor blade to scrape off any paint drips, then clean the glass one last time to ensure a pristine surface for your artwork.
Paint Adhesion Tip
Glass is slippery! If your acrylic paint slides around too much, mix a tiny drop of dish soap into your paint. This breaks the surface tension and helps it grip the glass better.
Step 2: Creating the Botanical Art
-
Choose your designs:
Select six distinct autumn motifs—one for each pane. Good choices include a pumpkin, maple leaves, dried seed heads, and wildflowers. Print these images out sized to fit nicely within your window panes. -
Position the templates:
Tape your printed designs onto the *back* side of the window glass, facing forward. This allows you to trace the image through the glass without needing to freehand the design. -
Outline the stems:
Using a fine liner brush and brown paint slightly thinned with water, carefully trace the delicate stems and branches of your botanical designs directly onto the front of the glass. -
Block in base colors:
Use a small round brush to fill in the main shapes, such as the body of the pumpkin or the larger leaves. Apply the paint somewhat thinly; acrylic on glass can look beautiful when slightly translucent. -
Add shading and detail:
While the base coat is still slightly tacky, blend in darker shades (like deep red on an orange leaf) to create depth. I find that dabbing the paint rather than stroking it helps it stick better to the slick glass surface. -
Create fine textures:
Switch back to your smallest liner brush. Add veins to the leaves, ridges to the pumpkin, and tiny dots for pollen or seeds using contrasting colors like dark brown or pale yellow. -
Paint the ‘spatter’ look:
For a more organic, textured feel on larger leaves or flowers, try stippling different autumn hues together directly on the glass rather than mixing them on your palette first. -
Review and refine:
Step back and look at the window as a whole. Ensure the colors are balanced across the six panes. If any lines look shaky, you can gently scrape them away with a damp cotton swab or toothpick while wet. -
Seal the artwork:
Once the designs are completely cured (give it at least 24 hours), lightly mist the painted areas with a clear matte sealer spray to prevent scratching. -
Embellish the bottom (optional):
To mimic the look of fallen leaves gathering at a window, you can glue a few dried faux leaves or moss into the bottom corners of the lower panes for a 3D effect.
Backlighting Idea
Turn this into a glowing display by mounting a strand of battery-operated fairy lights behind the frame. The light will shine through the unpainted glass and illuminate your art.
Prop your finished window on a mantel or porch to welcome the changing season with rustic elegance


Have a question or want to share your own experience? I'd love to hear from you in the comments below!