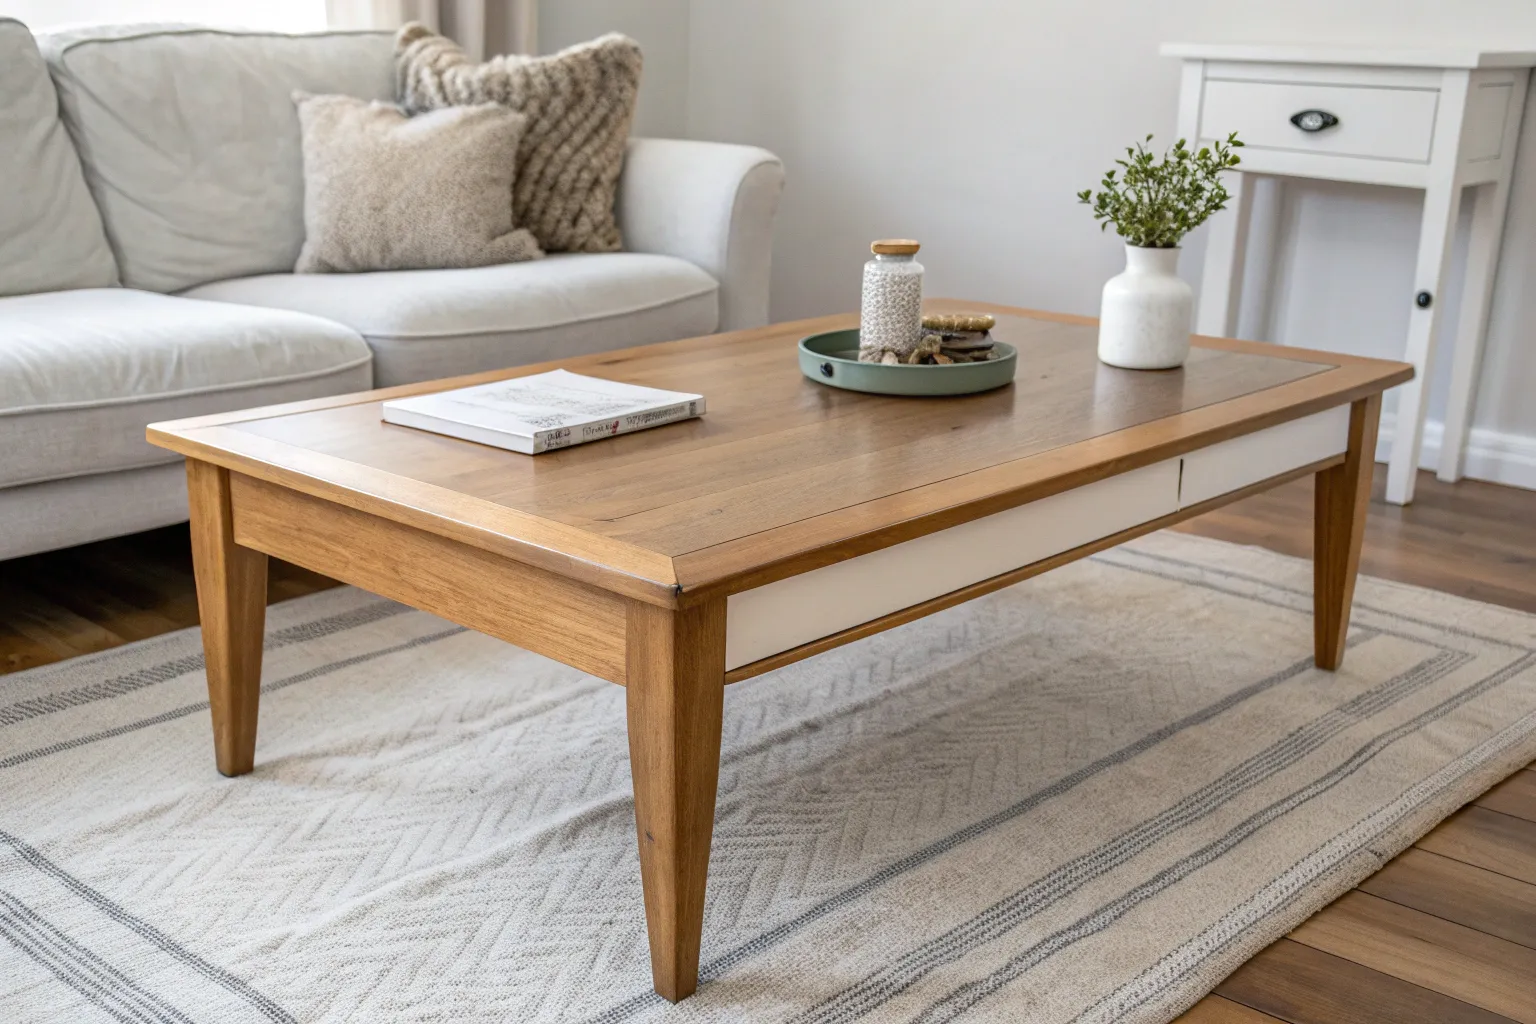
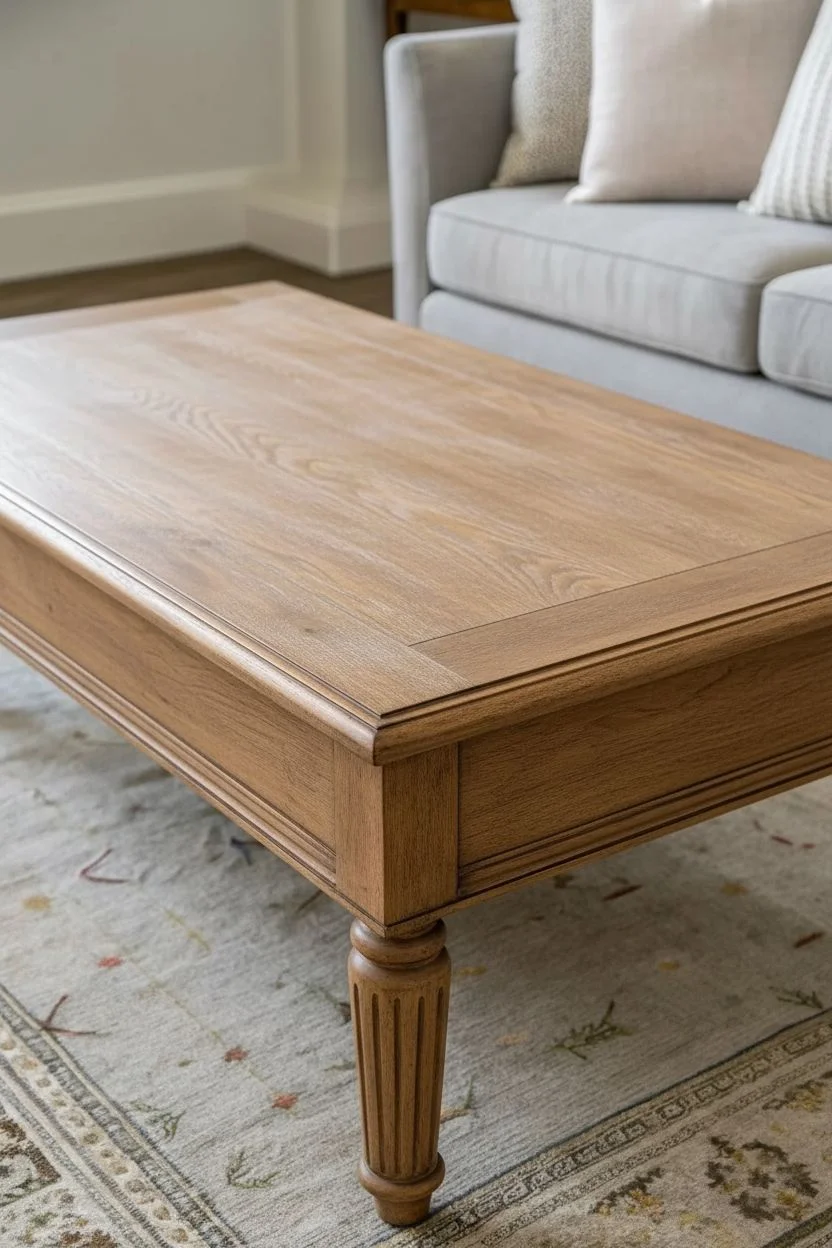
A painted coffee table makeover is one of those projects that gives you instant “new room” energy without changing anything else. If you love a good before and after moment, these ideas will help you turn a tired table into a piece you actually want to show off.
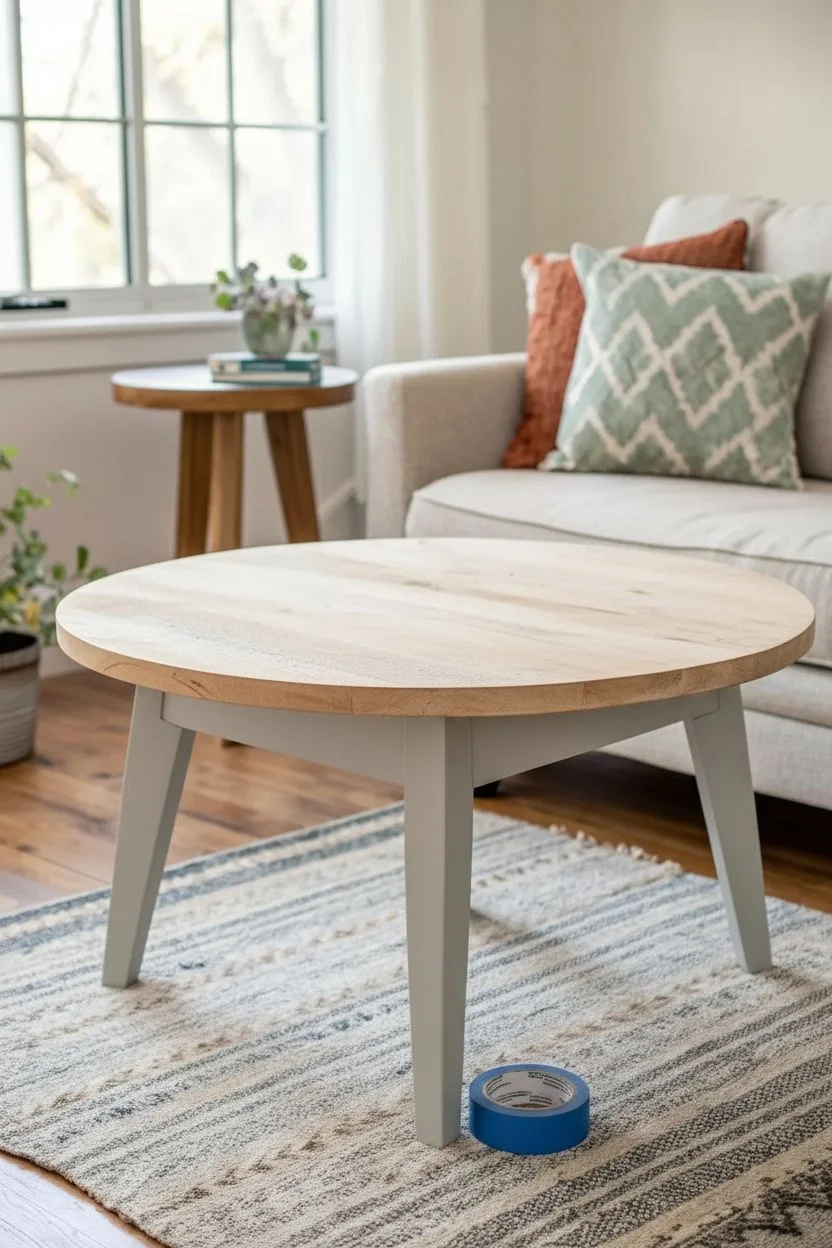
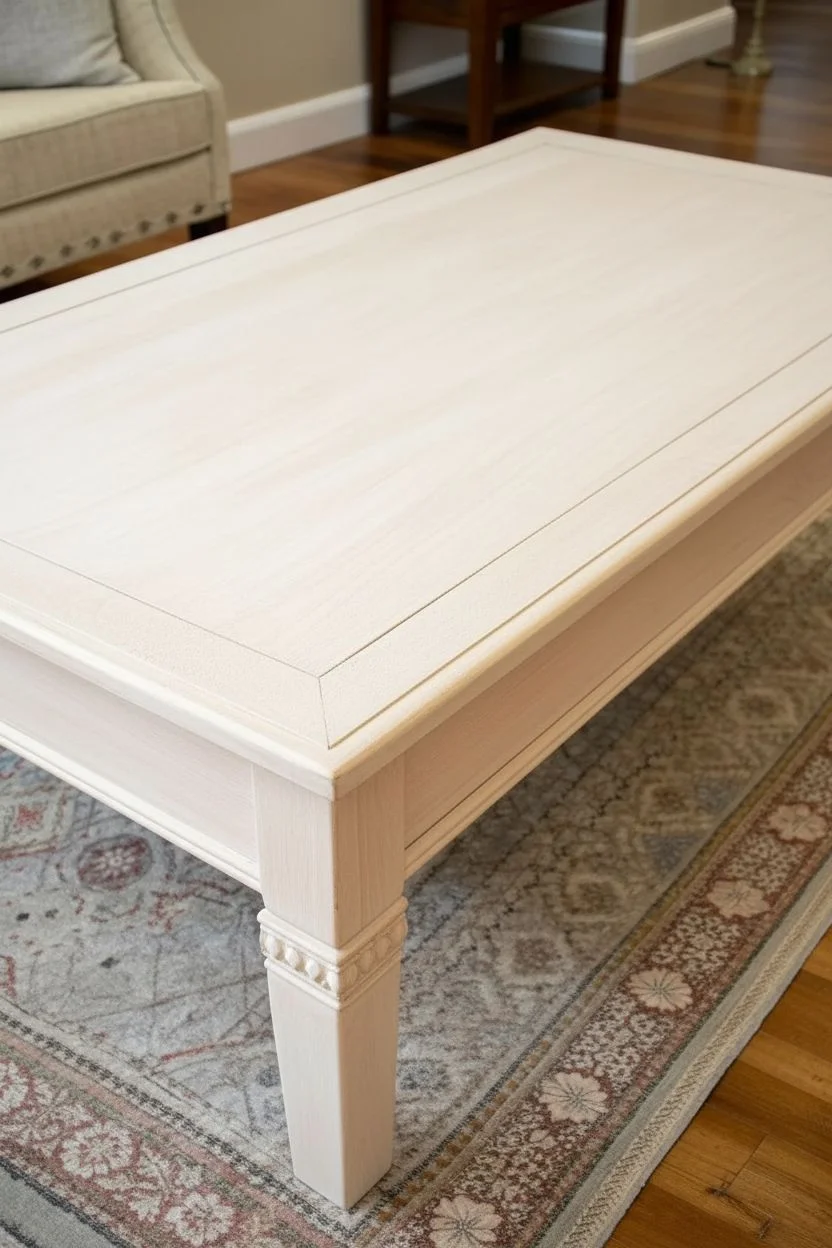
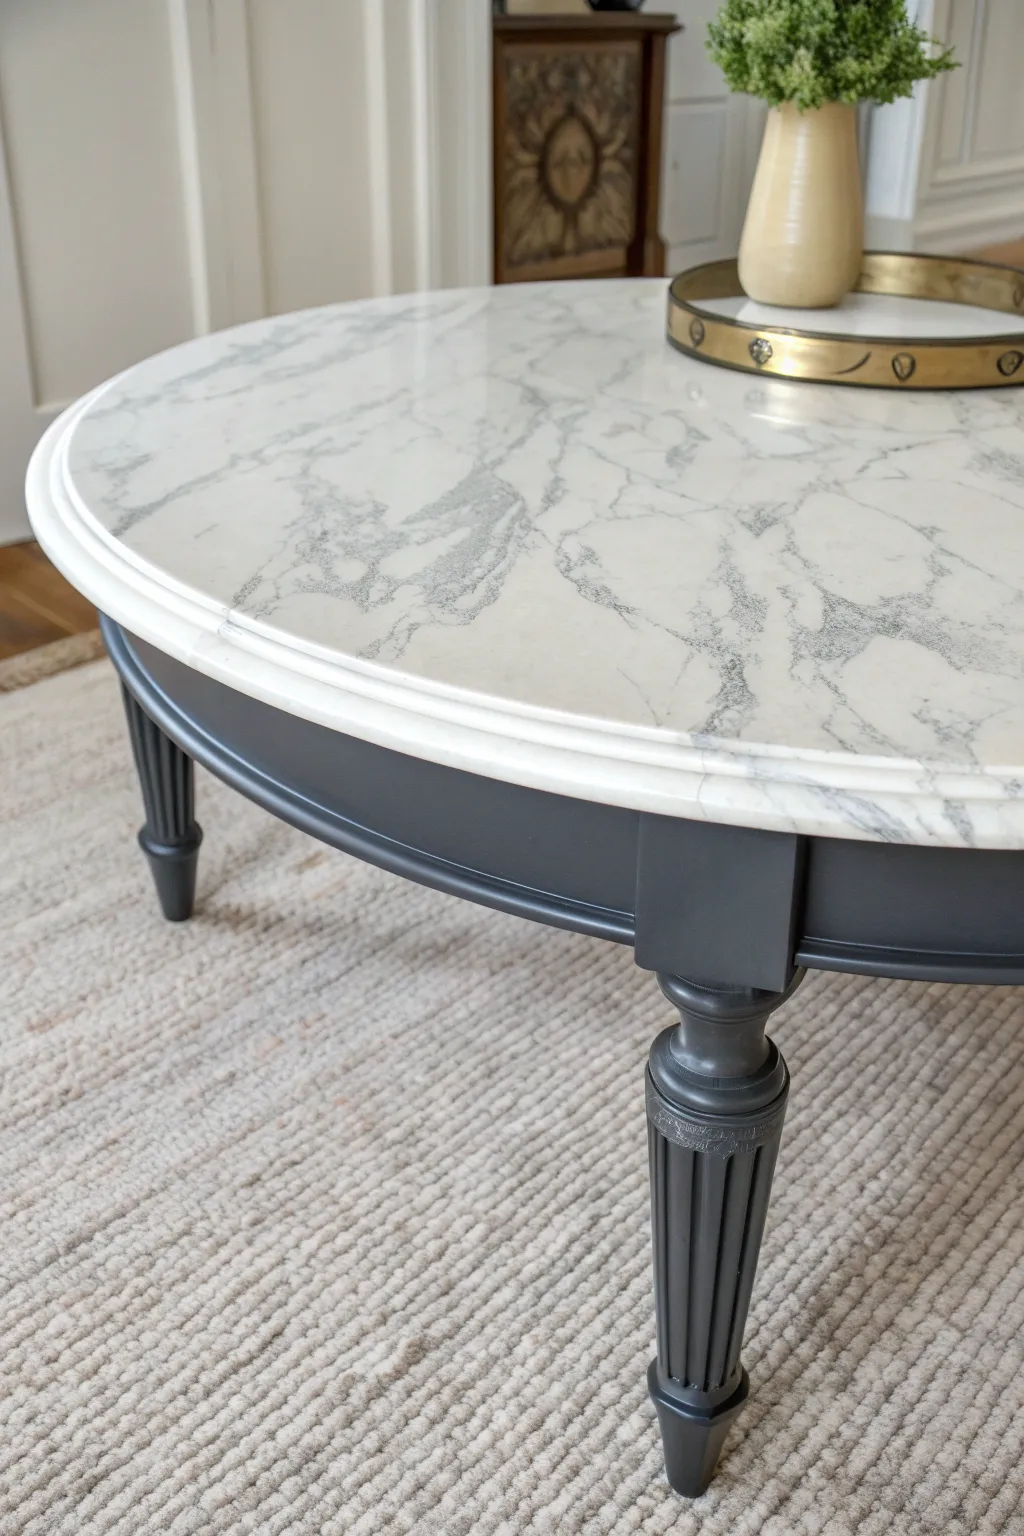
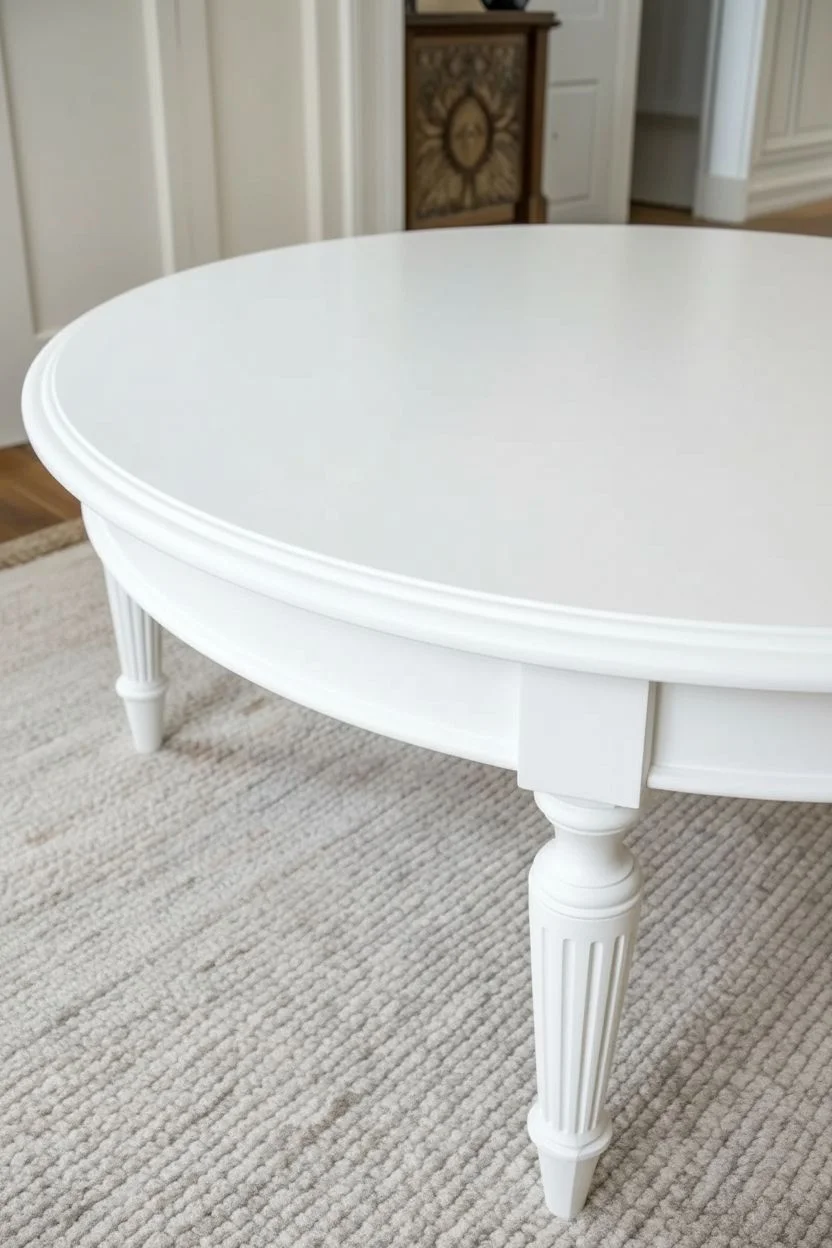
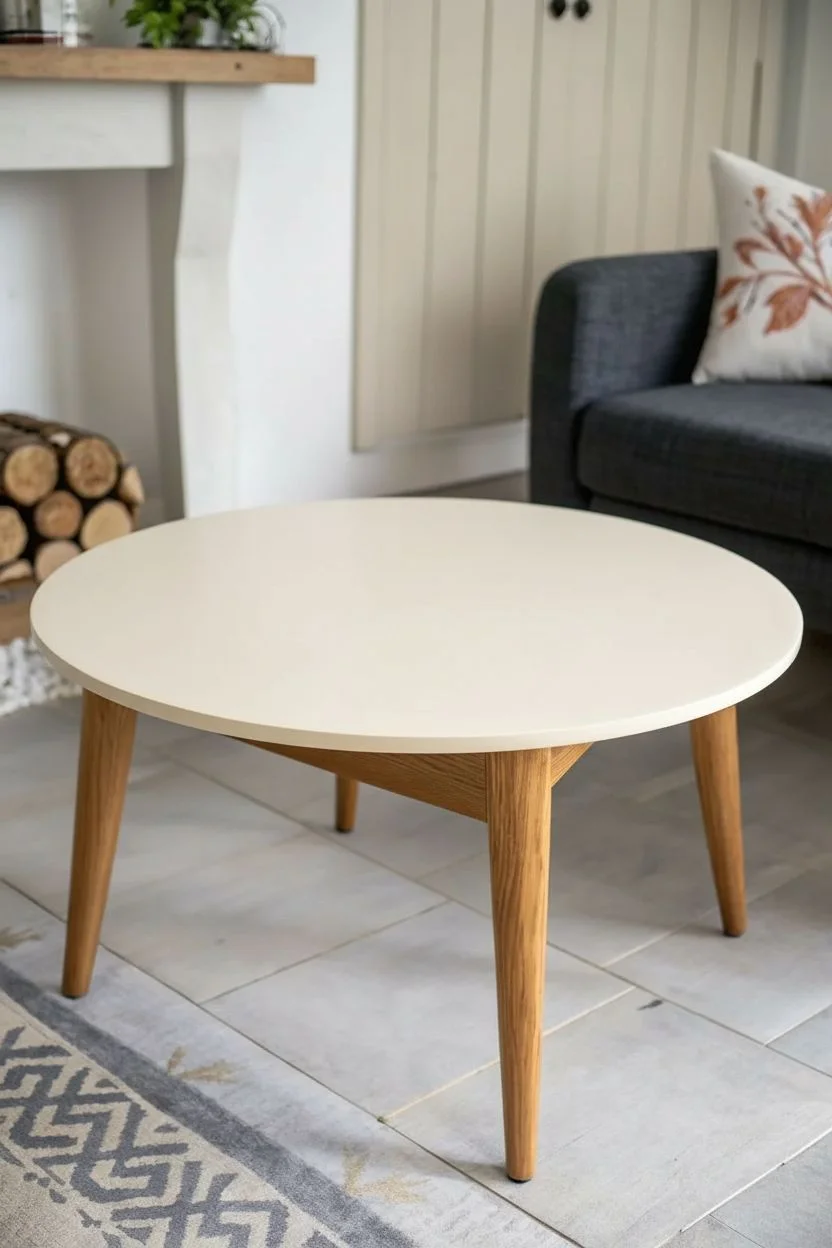
Classic White Painted Coffee Table Refresh
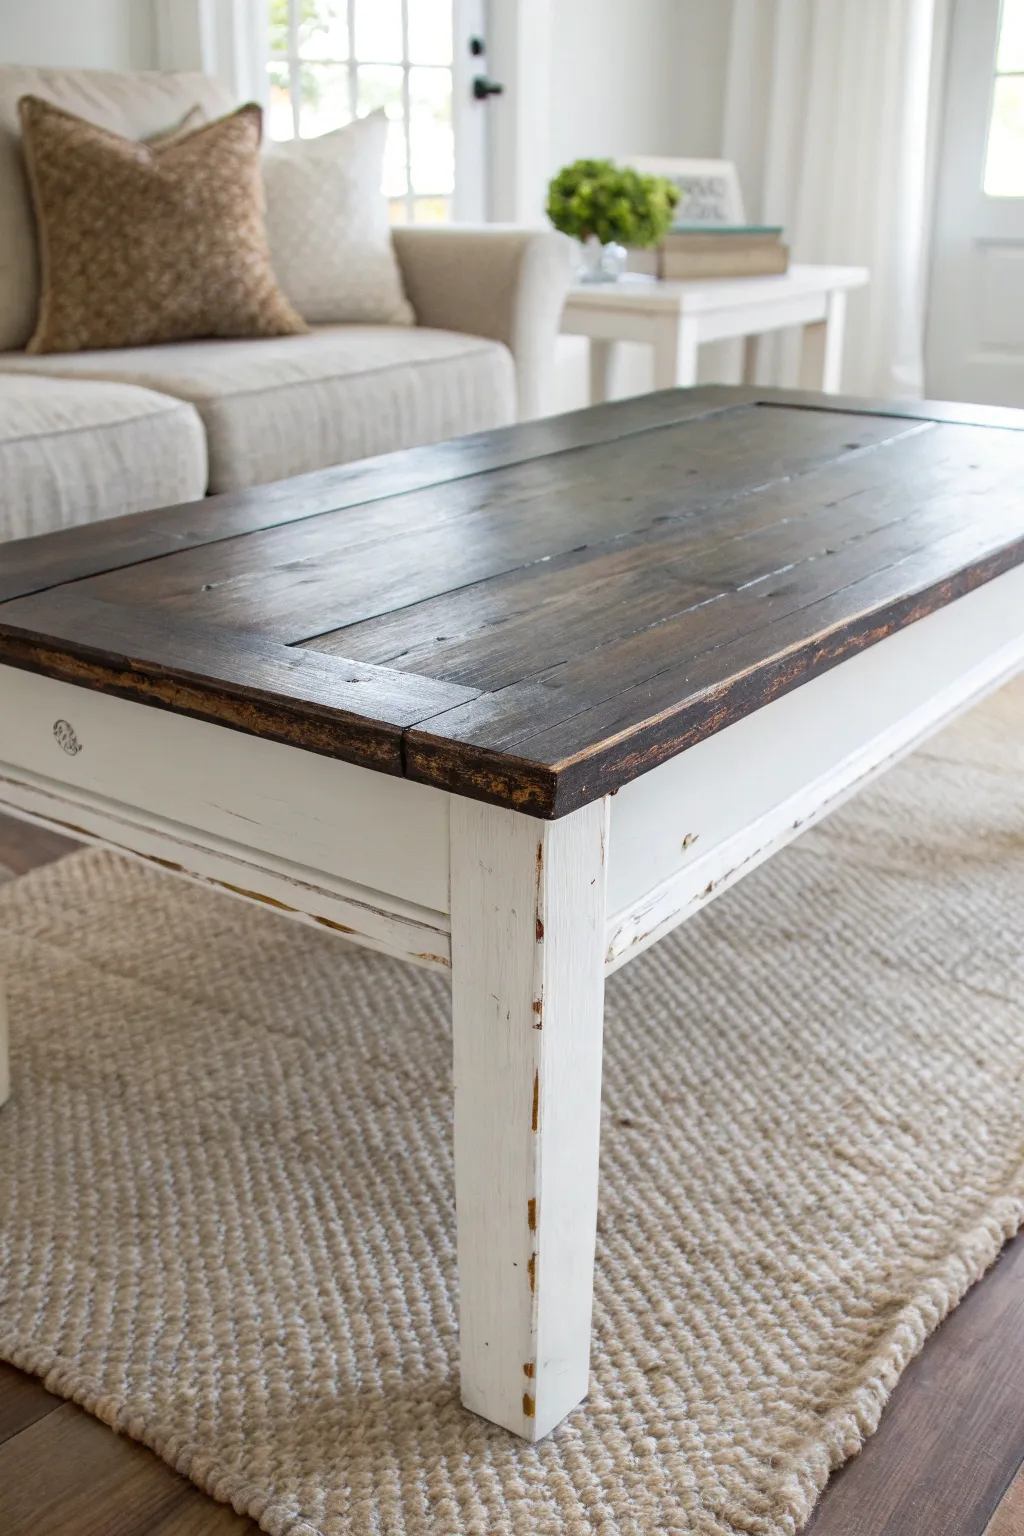
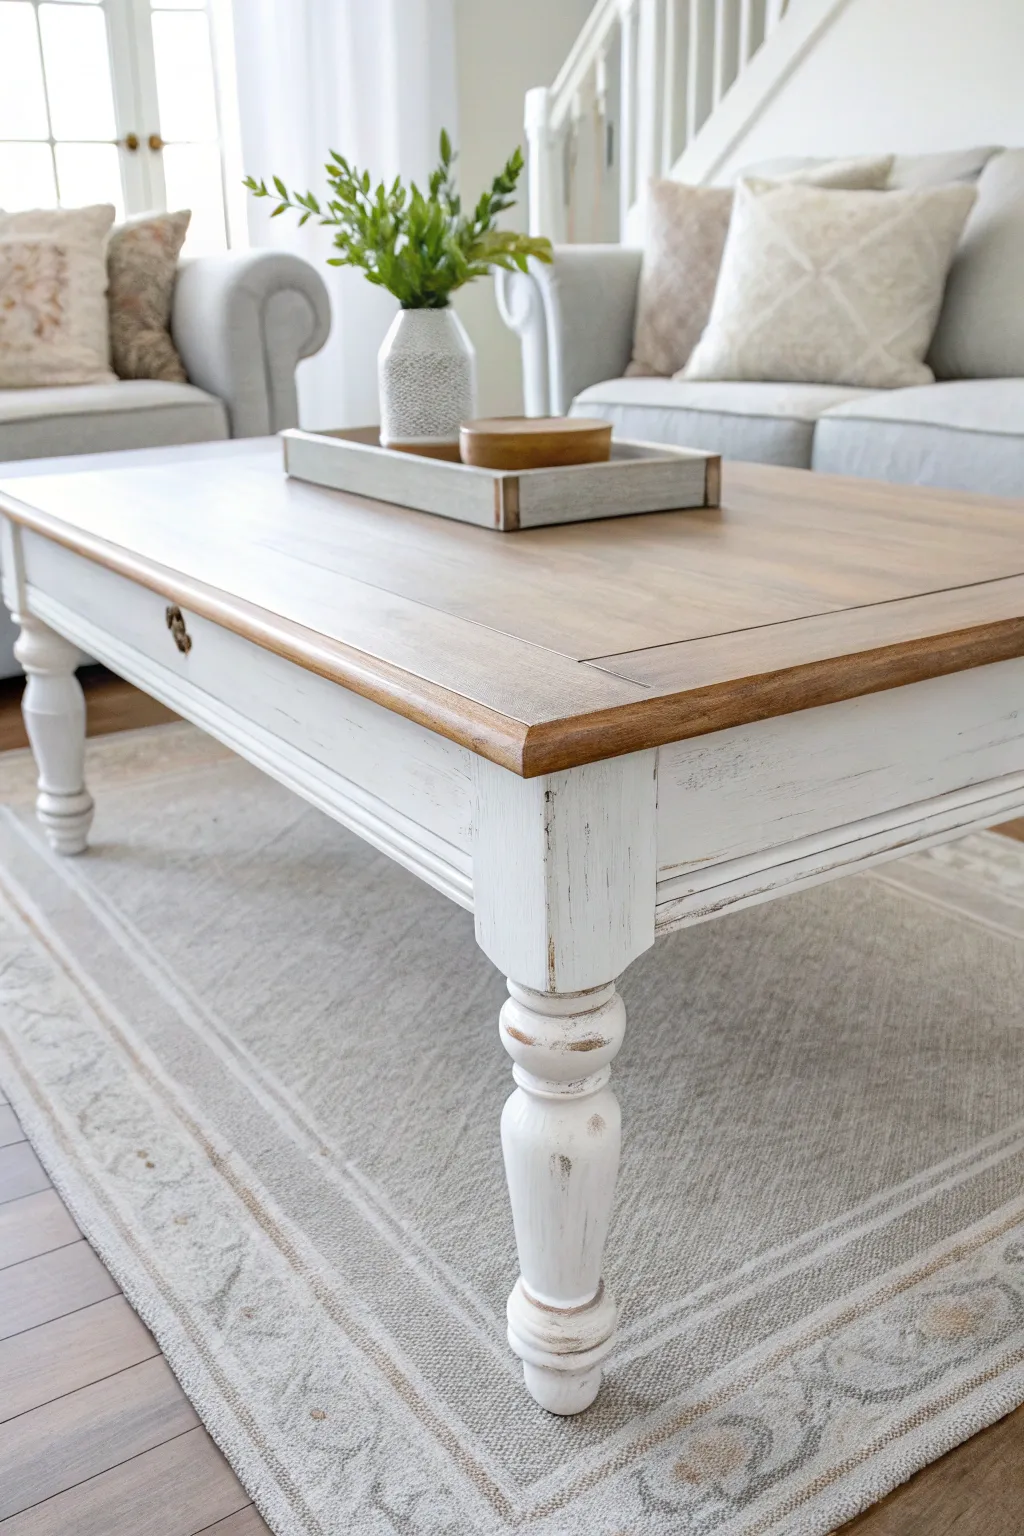
Achieve a harmonious blend of rustic warmth and clean cottage style with this two-tone coffee table revamp. By pairing a deeply stained tabletop with a crisp, distressed white base, you create a timeless piece that anchors any living space with casual elegance.
How-To Guide
Materials
- Solid wood coffee table (existing or thrifted)
- Orbital sander
- Sandpaper (80, 120, and 220 grit)
- Dark wood stain (e.g., Espresso or Dark Walnut)
- Pre-stain wood conditioner
- Chalk-style paint in warm white or cream
- Polyurethane topcoat (satin or matte finish)
- Polycrylic topcoat (water-based, for the white base)
- Foam brushes and high-quality synthetic bristles brushes
- Clean lint-free rags
- Painter’s tape
- Tack cloth
- Screwdriver (to remove hardware)
Step 1: Preparation & Sanding
-
Assess and dismantle:
Begin by removing any existing hardware like drawer pulls or decorative knobs. If the table has removable legs or drawers, take them out to make handling easier. -
Clean the surface:
Wipe down the entire table with a degreasing cleaner or a mix of vinegar and water to remove oils, wax, and old polish. A clean surface is crucial for the sander to work effectively. -
Strip the finish:
Using an orbital sander with 80-grit sandpaper, strip the old finish off the tabletop completely. You want to expose the raw wood grain underneath. -
Smooth the top:
Switch to 120-grit and then 220-grit sandpaper on the tabletop to create a buttery smooth surface ready for new stain. -
Scuff the base:
For the legs and apron (the base), you don’t need to strip it to bare wood since you will be painting it. Simply scuff-sand these areas with 120-grit paper to give the paint something to grip. -
Dust removal:
Vacuum up all the sawdust, then wipe everything down thoroughly with a tack cloth to ensure no dust particles ruin your finish.
Bleed-Through Blues
If pink or yellow spots appear through your white paint, stop! The old wood tannins are bleeding. Apply a shellac-based primer over the spots before repainting.
Step 2: Staining the Top
-
Tape off the base:
Use painter’s tape to protect the upper edge of the base where it meets the tabletop, ensuring stain doesn’t drip onto the areas you intend to paint white. -
Condition the wood:
Apply a pre-stain wood conditioner to the raw tabletop using a clean rag. This prevents blotchiness and helps the dark stain absorb evenly. -
Apply the first coat:
Stir your dark stain well. Using a foam brush or rag, apply the stain with the grain in long, even strokes. Work in manageable sections. -
Wipe away excess:
After letting the stain sit for 5-10 minutes (check your can’s instructions), wipe away the excess with a clean lint-free cloth. I always wipe heavily to see the true color emerge. -
Deepen the color:
If you want a richer, darker look like the example image, wait for the first coat to dry and apply a second coat using the same technique.
Step 3: Painting & Distressing
-
Prime the base:
Once the stain is dry, tape off the edge of the finished tabletop. Apply a coat of stain-blocking primer to the legs and apron to prevent old wood tannins from bleeding through the white paint. -
Apply paint base:
Paint the legs and apron with a chalk-style white paint. Use a high-quality synthetic brush to minimize stroke marks. Let the first coat dry completely. -
Add coverage:
Apply a second coat of white paint for solid, opaque coverage. Chalk paint dries quickly, but ensure it is fully cured before moving to the distressing step. -
Distress the edges:
Take a sanding block with 220-grit paper and gently sand high-traffic areas—corners, raised trim, and the feet of the legs. The goal is to reveal bits of increased wood underneath for that aged farmhouse look. -
Clean up dust:
Wipe down the painted base with a tack cloth again to remove the fine powder created by distressing.
Add Antique Wax
For deeper dimension on the legs, apply a clear wax followed by a dark antique wax into the grooves and corners before the final seal to highlight the texture.
Step 4: Sealing & Protection
-
Seal the top:
Apply a clear oil-based polyurethane (or a durable water-based alternative) to the stained tabletop. Use a foam brush or high-quality bristle brush for a smooth finish. -
Sand between coats:
Once dry, lightly hand-sand with 320-grit sandpaper to remove any bumps, wipe clean, and apply a second or third topcoat for maximum durability. -
Seal the base:
Seal the white painted base with a water-based Polycrylic. Avoid oil-based sealers here, as they can yellow the white paint over time.
Place your newly refreshed table in the center of the room and enjoy the brightness it brings


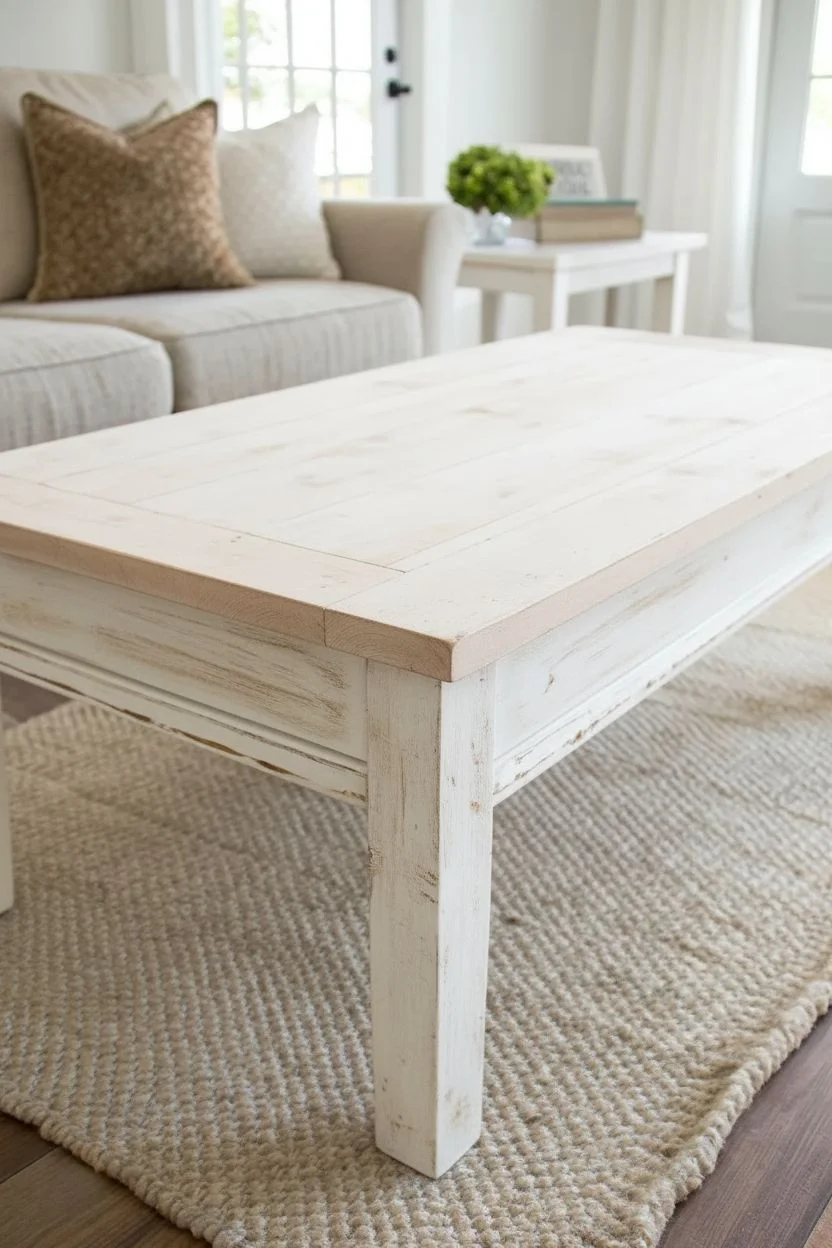
Chalky Matte Finish for Cozy Farmhouse Vibes
Transform a dated or plain wooden table into a cozy centerpiece with this layered chalk finish. The result is a soft, matte ‘greige’ look that highlights architectural details like fluted legs while offering a relaxed, lived-in farmhouse appeal.
Step-by-Step Tutorial
Materials
- Solid wood coffee table (with turned/fluted legs preferred)
- Medium grit sandpaper (120-150 grit)
- Clean tack cloths
- Chalk-style paint in a warm beige or ‘greige’ tone
- Chalk-style paint in an antique white or cream
- White lime wax or clear furniture wax
- Round chalk paint brush
- Lint-free cotton rags
- Matte polycrylic topcoat (optional)
Step 1: Preparation
-
Clean surface:
Begin by thoroughly cleaning the entire table with a degreasing cleaner to remove old furniture polish, oils, and dust. -
Scuff sand:
Use your sandpaper to lightly scuff the entire surface. You aren’t trying to strip it bare, just creating enough ‘tooth’ for the paint to adhere properly. -
Dust removal:
Wipe away all sanding residue with a tack cloth. Any leftover dust will create a gritty finish, so be thorough.
Clean Grooves
When sanding fluted legs, fold your sandpaper over a playing card or thin scraper. This helps you get into the deep vertical grooves.
Step 2: Base Coat Application
-
First layer:
Apply the warm beige or greige chalk paint as your base. Use long, smooth strokes following the wood grain. -
Table legs:
When painting the fluted legs, use a round brush to stipple stain into the grooves, ensuring full coverage in the detailed areas. -
Dry time:
Allow this base coat to dry completely, which typically takes about 30 to 60 minutes depending on your humidity.
Bleed-Through Block
If you see pink or yellow stains seeping through your light paint (tannin bleed), stop and apply a coat of shellac-based primer before continuing.
Step 3: Creating the Wash
-
Mix the wash:
In a separate container, dilute your antique white or cream paint with water. A 50/50 ratio works well for a translucent wash. -
Brush on:
Working in small sections (like the tabletop frame or one leg at a time), brush the watered-down white mixture over the dried beige base. -
Wipe back:
Immediately after brushing, use a damp lint-free rag to wipe off the excess wash. I like to wipe in the direction of the grain to leave white pigment settling into the texture. -
Leg details:
On the legs, let the white wash settle deeper into the fluted grooves but wipe it back more heavily on the raised areas to create depth. -
Full dry:
Let the wash layer dry completely. It will look chalky and lighter once the moisture evaporates.
Step 4: Distressing and Sealing
-
Spot sanding:
Take a piece of fine sandpaper and gently rub high-traffic areas—corners, edges of the tabletop, and the raised parts of the legs—to expose the base color or raw wood slightly. -
Final clean:
Remove all dust generated from the distressing process. -
Wax application:
Apply a coat of white lime wax or clear wax using a wax brush. The wax seals the chalk paint and enhances the soft, velvety texture. -
Buffing:
Wait about 15 minutes for the wax to absorb, then buff vigorously with a clean cotton cloth to achieve a subtle sheen. -
Optional durability:
For a high-traffic coffee table, consider applying a coat of matte polycrylic over the tabletop surface instead of wax for stronger protection against spills.
Now you have a beautifully refreshed table ready for your morning coffee


Distressed Edges for a Gently Worn Look
Transform an ordinary coffee table into a charming farmhouse centerpiece with this two-tone makeover method. The combination of a warm wood top and a chippy, distressed white base creates a lived-in, cozy aesthetic perfect for a family living room.
Detailed Instructions
Materials
- Wood coffee table (solid wood works best)
- Orbital sander with 80, 120, and 220-grit sandpaper
- Chemical paint stripper (optional)
- White chalk-style paint
- Water-based polyurethane (matte finish)
- Wood stain (e.g., Early American or weathered oak tones)
- Pre-stain wood conditioner
- Staining pads or lint-free rags
- Synthetic paint brushes (oval or round shape)
- Medium-grit sanding block
- Old candle or beeswax puck
- Tack cloth
- Painter’s tape
Step 1: Restoring the Wooden Top
-
Assess the existing finish:
Begin by determining if the current top has a thick clear coat. If it’s heavy varnish, use a chemical stripper according to manufacturer instructions to remove the bulk of the old finish before sanding. -
Sand to bare wood:
Use an orbital sander with 80-grit paper to remove any remaining old finish from the tabletop. Work carefully to avoid gouging the wood. Progress to 120-grit, then finish with 220-grit for a buttery smooth surface. -
Clean surface thoroughly:
Wipe away all sanding dust. I like to use a shop vac first, followed by a tack cloth to ensure absolutely no debris remains in the wood grain. -
Apply pre-stain conditioner:
Brush on a coat of pre-stain wood conditioner. This is a crucial step for preventing blotchiness, especially on softwoods like pine. Let it sit for about 10-15 minutes, then wipe off the excess. -
Apply the new stain:
Using a staining pad or lint-free rag, wipe on your chosen stain color in the direction of the grain. Work in manageable sections. Let it penetrate for a few minutes before wiping away excess for a lighter, more natural look. -
Seal the top:
Once the stain is completely dry (usually 24 hours), apply three thin coats of matte water-based polyurethane. Lightly hand sand with high-grit paper between coats for a professional finish.
Pro Tip: Custom Glaze
For extra depth, mix brown paint with water (50/50) and brush it into the leg crevices. Wipe it back immediately with a damp cloth to leave shadows in the details.
Step 2: Painting and Distressing the Base
-
Prep the base:
Scuff sand the legs and apron of the table with 120-grit sandpaper. You don’t need to remove all the old finish here, just roughen it up so the paint adheres well. -
Protect the new top:
Carefully run a line of painter’s tape underneath the lip of the table top to protect your freshly stained wood from the white paint. -
Apply a wax resist:
This is the secret to authentic chipping. Take an old candle or beeswax puck and rub it vigorously on edges, turning details on the legs, and corners where wear would naturally occur. -
First coat of paint:
Apply your first coat of white chalk-style paint. Don’t worry if it looks streaky; chalk paint builds coverage beautifully. Let it dry completely. -
Second coat coverage:
Apply a second coat of paint for full opacity. Pay attention to the turned legs, ensuring you get into the crevices but don’t let paint pool excessively. -
Manual distressing:
Once the paint is dry, take a medium-grit sanding block and sand over the areas where you applied the wax. The paint will flake off easily in those spots, revealing the dark wood underneath. -
General sanding:
Continue sanding the flat surfaces lightly to smooth out brush strokes and create a soft, worn texture. The goal is to make it feel smooth to the touch, not chalky. -
Seal the base:
Finish the base with a clear wax or a matte polycrylic. If using wax, buff it with a soft cloth after applying to create a subtle sheen and harden the finish.
Troubleshooting: Paint Peeling?
If paint peels in sheets rather than chipping nicely, the underlying surface was likely too glossy or oily. Always clean with harsh degreaser and scuff sand before painting.
Now you have a stunning, heavy-duty table that balances rustic charm with bright elegance


Two-Tone Coffee Table: Painted Base and Wood Top

Give a tired coffee table a fresh, dual-personality look by combining rich natural wood tones with a bold pop of color. This teal-base makeover highlights beautiful grain patterns while adding a contemporary edge that perfectly suits boho or mid-century modern spaces.
Step-by-Step Tutorial
Materials
- Round wood coffee table (solid wood or high-quality veneer)
- Orbital sander with 80, 120, and 220-grit discs
- Degreaser or TSP substitute
- Painter’s tape (high-quality edging tape)
- Plastic drop cloth or old sheet
- Primer (bonding primer recommended)
- Deep teal chalk paint or emerald mineral paint
- Clear matte polyurethane topcoat
- Angled sash brush (2-inch)
- Natural bristle brush or staining pad
- Fine-grit sanding block
- Tack cloths
- Wood stain (optional, purely to match tone if needed)
Step 1: Preparation & Sanding
-
Clean surface:
Begin by thoroughly cleaning the entire table with a degreaser or TSP substitute to remove decades of furniture polish, oils, and dirt. Let it dry completely. -
Examine the top:
Check the tabletop material. If it is a thin veneer, you must sand very carefully by hand. If it is solid wood, you can proceed with a power sander. -
Strip the old finish:
Using your orbital sander with 80-grit paper (or 100-grit for veneer), sand the top surface to remove the old varnish and stain. Move the sander slowly in the direction of the grain. -
Scuff the base:
Since the legs and apron will be painted, you don’t need to strip them to bare wood. Use 120-grit sandpaper to scuff the existing finish, creating enough ‘tooth’ for the primer to stick. -
Final smooth sanding:
Switch to 220-grit sandpaper for the tabletop to achieve a silky smooth finish. Wipe away all dust with a tack cloth.
Step 2: Protecting & Painting the Base
-
Flip and tape:
Flip the table upside down onto a drop cloth. Carefully apply painter’s tape to the underside edge of the tabletop where it meets the apron to protect the raw wood you just sanded. -
Prime the legs:
Apply a coat of high-quality bonding primer to the legs and the apron (the skirt piece connecting the legs). Brush in long strokes to minimize texture. -
Light sanding:
Once the primer is fully dry, lightly run a fine-grit sanding block over the legs to knock down any raised grain or brush marks. Wipe away the dust. -
Apply first paint coat:
Stir your deep teal chalk or mineral paint well. Using an angled sash brush, apply the first coat to the legs, getting into all corners and crevices. I find thin coats work best here to avoid drips. -
Second coat coverage:
After the recommended drying time, apply a second coat of teal paint for rich, opaque coverage. Peel off the painter’s tape while the paint is still slightly tacky to ensure a crisp line.
Bleed-Through Blues?
If you see pink or yellow stains seeping through your primer on the legs, the wood has tannins. Switch to a shellac-based printer (like BIN) to lock them in before painting.
Step 3: Sealing the Top
-
Enhance grain (Optional):
If the raw wood looks too pale, apply a natural or honey-toned wood stain with a rag. However, usually, just the clear coat will darken the wood enough to look rich and warm. -
First clear coat:
Flip the table right-side up. Using a clean natural bristle brush, apply a coat of matte polyurethane to the wood top. Work in sections following the pattern of the wood grain. -
Sand between coats:
After the first coat dries (usually 2-4 hours), very lightly sand the surface with 400-grit sandpaper or a brown paper bag to remove any dust nibs. -
Seal the legs:
While you have the clear coat out, apply a protective layer over the painted teal legs to prevent scuffs and chips. -
Final topcoat:
Apply two more thin coats of polyurethane to the tabletop, allowing proper drying time between each. This ensures your coffee table is durable enough for daily mugs and magazines.
Level Up: Ombré Legs
Create a dipped look by painting the bottom 3 inches of the legs in gold or brass metallic paint. Use tape for a sharp line to mimic metal caps.
Place your newly refreshed table in the center of the room and enjoy the beautifully balanced contrast of color and warmth
BRUSH GUIDE
The Right Brush for Every Stroke
From clean lines to bold texture — master brush choice, stroke control, and essential techniques.
Explore the Full Guide
Moody Black Paint Makeover for Modern Contrast
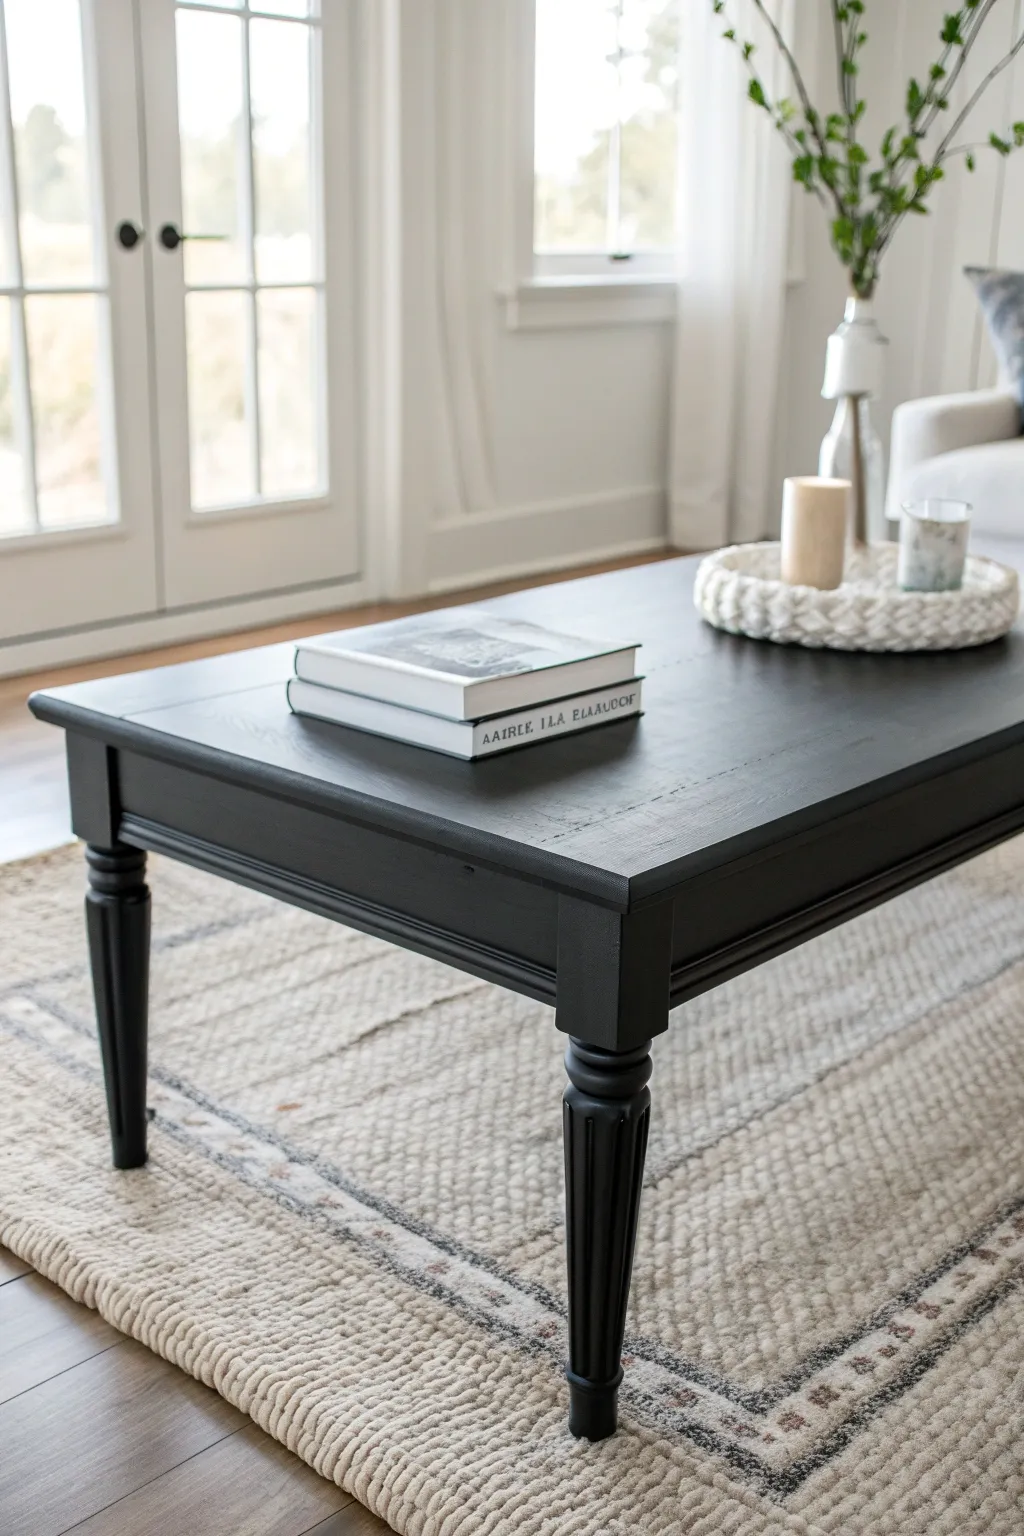
Transform a dated or thrifted wooden coffee table into a striking centerpiece with a moody black finish that anchors any room. This project creates a smooth, durable surface with just the right amount of sheen to look high-end and intentional.
How-To Guide
Materials
- Wooden coffee table (preferably with turned legs)
- Medium-grit sandpaper (150-grit)
- Fine-grit sandpaper (220-grit)
- Tack cloth
- Liquid deglosser (optional but recommended)
- High-quality primer (stain-blocking)
- Matte or satin black furniture paint (chalk or mineral paint)
- Polycrylic top coat (matte finish)
- High-density foam roller
- Angled sash brush (2-inch)
- Drop cloth
- Painter’s tape
- Wood filler (if repairs are needed)
- Cleaning rags
- Mild degreasing cleaner
Step 1: Preparation
-
Assess and Clean:
Start by thoroughly examining your table for any deep scratches or loose joints. Clean the entire piece with a mild degreasing cleaner to remove years of furniture polish, oil, and dust. -
Fill Imperfections:
If you found any gouges or deep dents during your inspection, apply a small amount of wood filler. Let it dry completely according to the package instructions before moving on. -
Surface Scuffing:
Using your 150-grit sandpaper, sanding the entire table. You don’t need to strip it to bare wood; you just want to scuff the glossy finish so the new paint has something to grip. -
Detail Sanding:
Pay special attention to the turned legs. I like to fold the sandpaper into a small square to get into those crevices and curves without flattening the details. -
Remove Dust:
Wipe away the sanding residue with a vacuum brush attachment first, followed by a tack cloth to pick up the finest particles. A clean surface is crucial for a smooth black finish. -
Deglossing (Optional):
For extra adhesion on particularly shiny pieces, wipe down the surface with a liquid deglosser. This acts as a chemical sander and ensures your primer sticks tight. -
Tape Off:
If your table has any hardware or if you are working on a floor you want to protect, apply painter’s tape now. Place the table on a drop cloth.
Lighting Check
Black paint absorbs light, hiding missed spots. Use a bright flashlight or work near a window during painting to catch skipped areas or subtle drips before they dry.
Step 2: Priming and Painting
-
Apply Primer:
Brush or roll on a coat of high-quality stain-blocking primer. Gray primer is excellent here as it’s easier to cover with black paint than white primer is. -
Sand the Primer:
Once the primer is fully dry, lightly run your 220-grit sandpaper over the flat surfaces to knock down any brush strokes or texture. Wipe clean with a tack cloth. -
First Coat of Black:
Begin applying your black paint. Use the angled sash brush for the turned legs and intricate corners, smoothing out drips immediately. -
Rolling the Top:
Switch to a high-density foam roller for the flat tabletop. This helps achieve a factory-like finish without visible brush strokes. Work in long, even passes. -
Dry and Assess:
Allow the first coat to dry completely. Black paint can sometimes look patchy on the first pass, but don’t worry—the second coat will even it out. -
Second Coat Application:
Apply the second coat of black paint using the same method: brush for details, roller for flats. Ensure full coverage, looking at the table from different angles to catch missed spots. -
Touch-ups:
Check for any drips on the legs or thin spots on the edges. Lightly embrace imperfections if you want a more rustic look, or sand and re-coat for perfection.
Step 3: Sealing and Styling
-
Apply Top Coat:
Stir your matte polycrylic gently (don’t shake, bubbles are the enemy of black finishes). Apply a thin, even layer over the entire piece. -
Sand Between Coats:
After the first top coat is dry, very lightly sand with 220-grit sandpaper. This feels scary on a fresh finish, but it creates that buttery smooth professional feel. -
Final Surface Seal:
Wipe the dust away and apply a second, final coat of polycrylic. Ensure you don’t overwork the product; lay it down and leave it alone to self-level. -
Curing Time:
Let the table cure for at least 48 hours before placing heavy objects on it. The paint needs time to harden fully to prevent dents. -
Final Styling:
Once cured, style your new centerpiece. The deep black pairs beautifully with light, textural elements like a woven tray or white linen books to create that modern contrast.
Leg Detail Pop
For subtle dimension, lightly distress the edges of the turned legs with fine sandpaper after the black paint dries, revealing a hint of wood before sealing.
Enjoy the dramatic elegance your newly refined coffee table brings to your living space
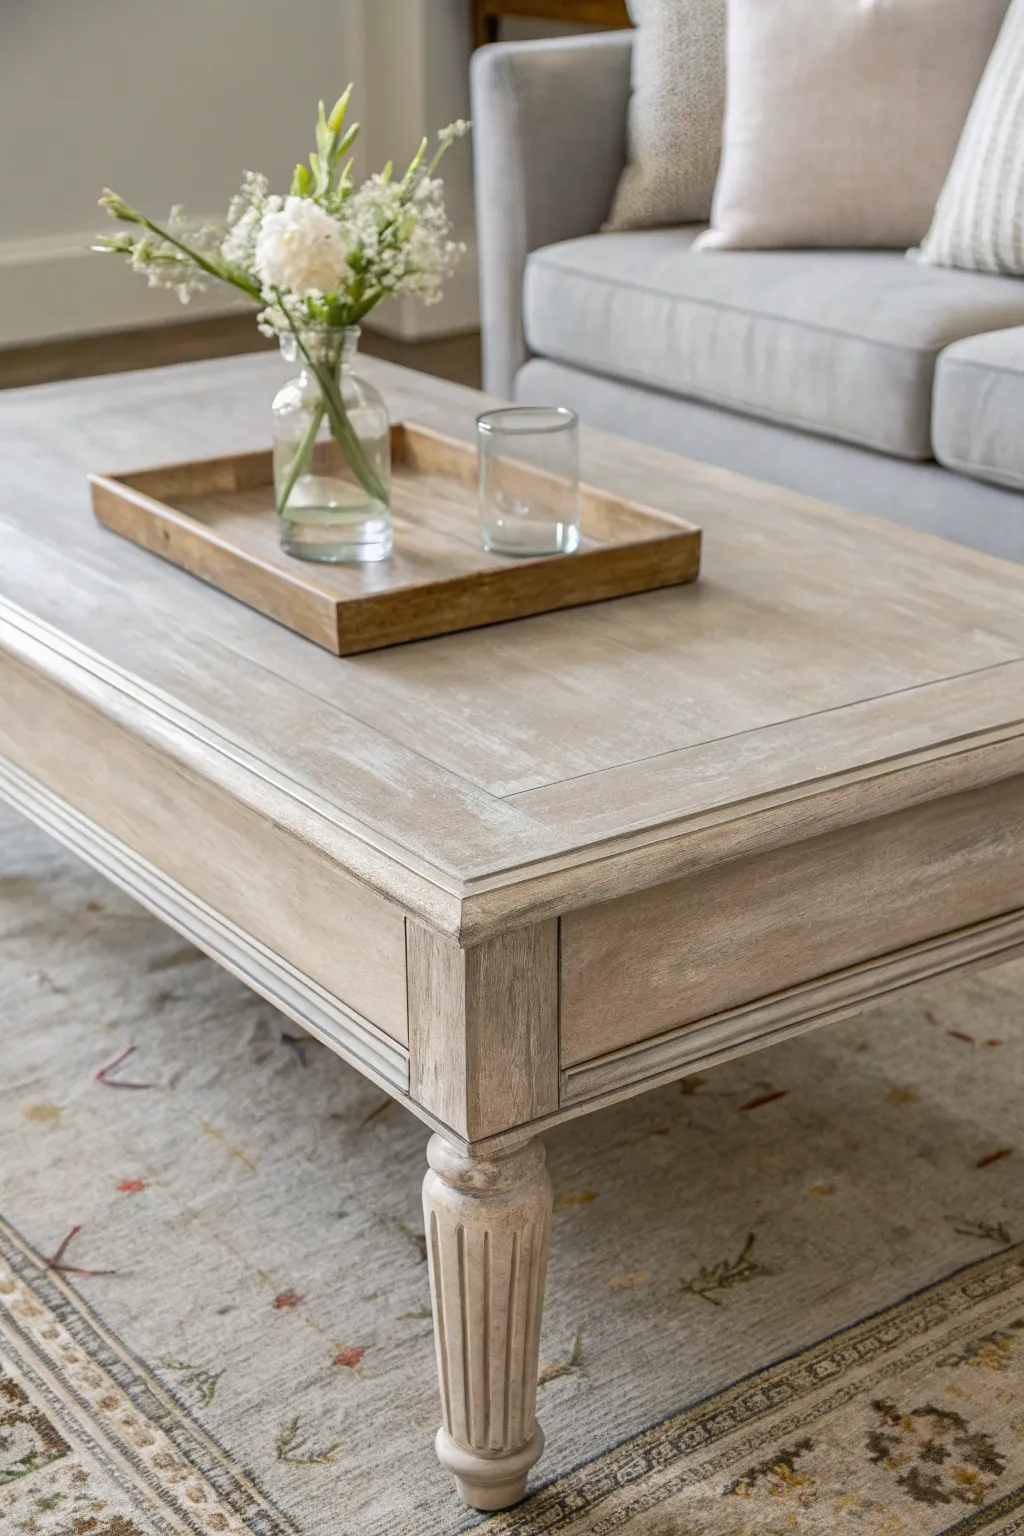
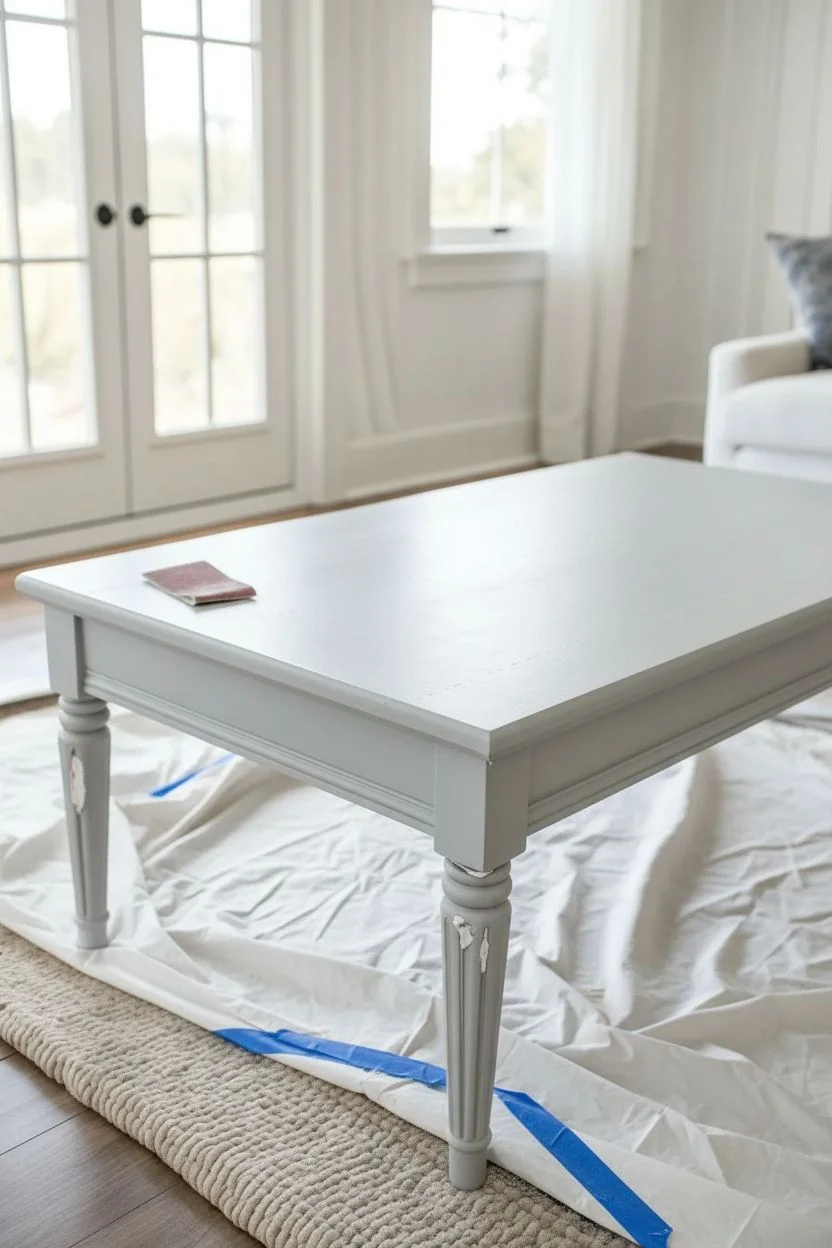
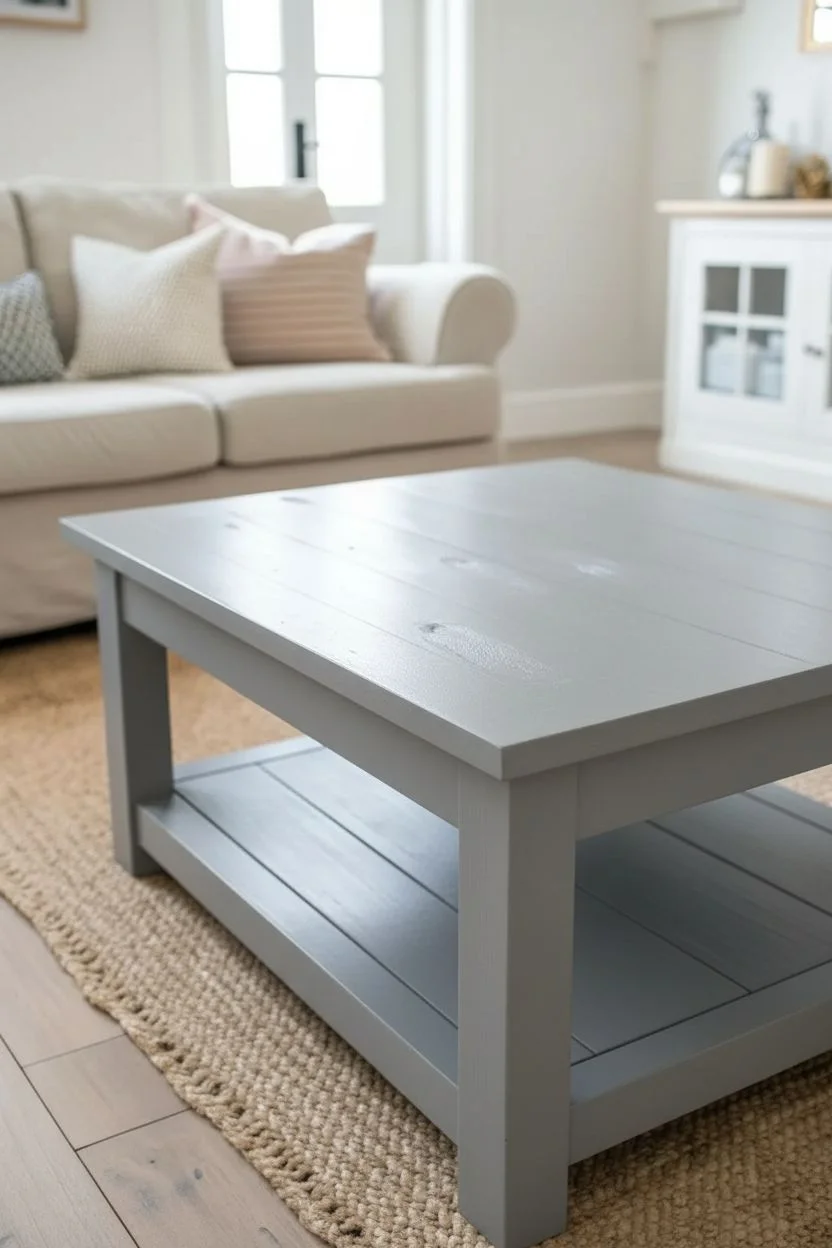
Soft Greige Paint Wash for an Updated Neutral
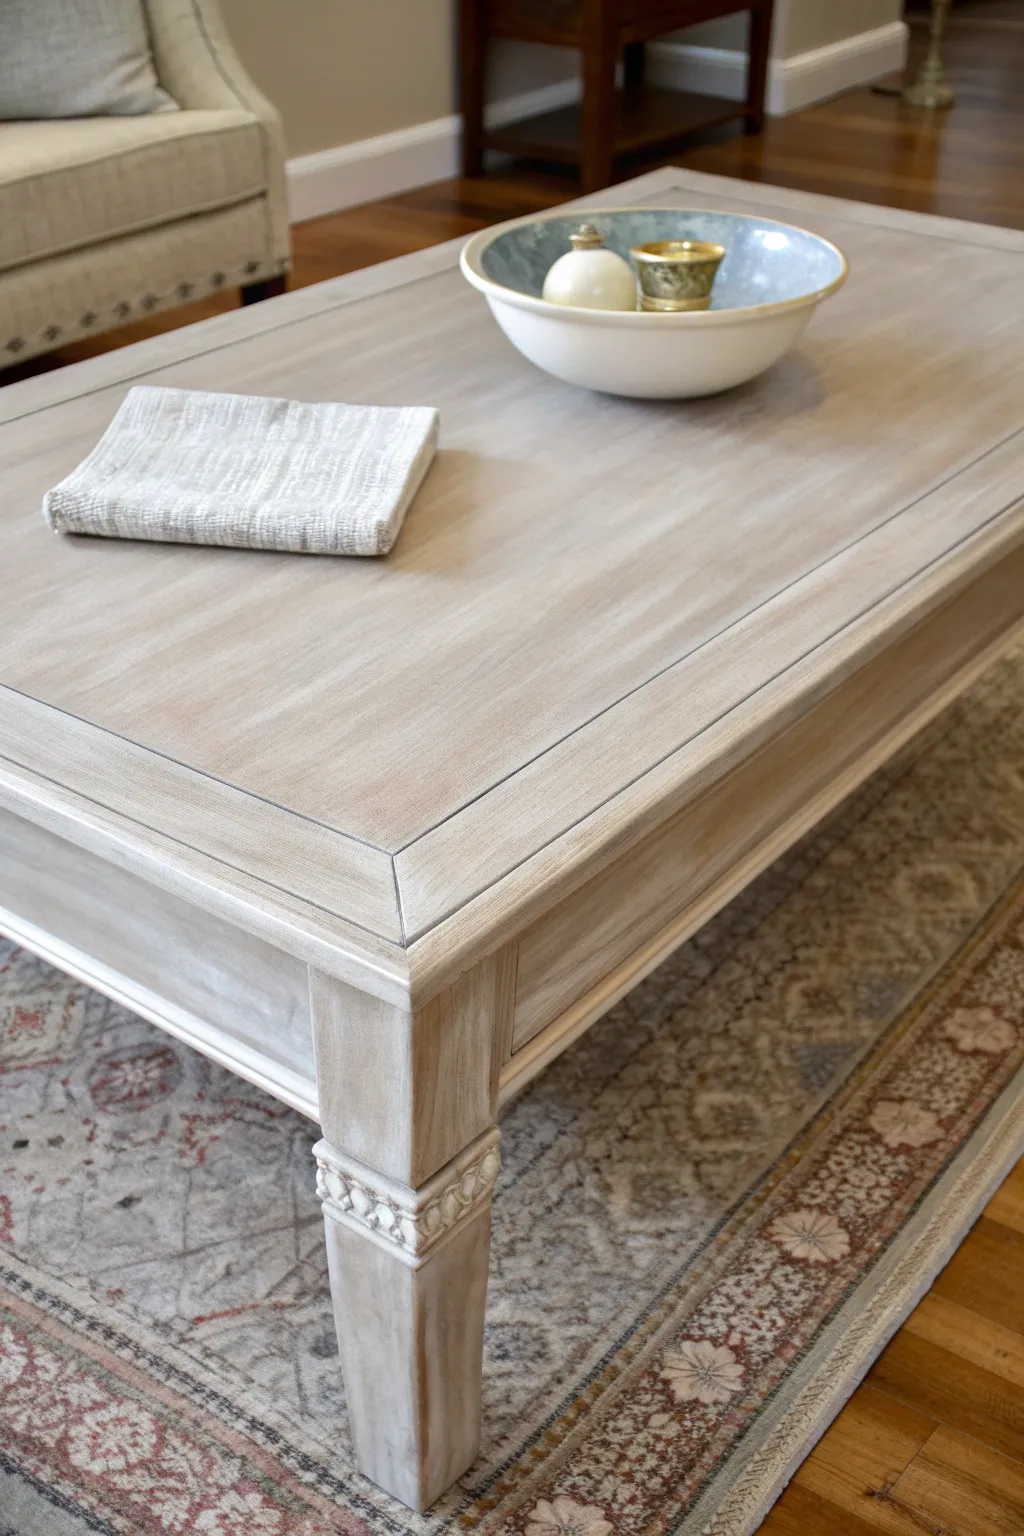
This technique transforms a dark or dated coffee table into a modern farmhouse centerpiece with a soft, weathered finish. By layering a diluted paint wash over raw wood, you achieve that coveted Restoration Hardware look for a fraction of the price.
Detailed Instructions
Materials
- Solid wood coffee table
- Orbital sander
- Sandpaper discs (80, 120, and 220 grit)
- Tack cloth or microfiber rags
- Gray-beige (greige) latex or chalk paint
- Water (for diluting)
- Small plastic container for mixing
- High-quality synthetic paintbrush (2-inch)
- Lint-free cotton rags (old t-shirts work well)
- Matte polycrylic topcoat
- Foam brush or fine-finish synthetic brush
Step 1: Strip to Bare Wood
-
Initial Sanding:
Begin by removing the existing finish. Use an orbital sander with 80-grit sandpaper to strip away the old varnish, stain, or paint. Move the sander slowly with the grain to avoid swirl marks. -
Refining the Surface:
Switch to 120-grit sandpaper once the majority of the old finish is gone. This step smooths out the rougher scratches left by the coarse paper. -
Final Polish:
Finish the sanding process with 220-grit sandpaper. This ensures the wood pores are open but the surface feels buttery smooth to the touch. -
Clean the Dust:
Vacuum the table thoroughly to remove all sawdust. Follow up by wiping the entire piece with a tack cloth or a slightly damp rag to ensure a pristine surface for the wash.
Step 2: Creating the Wash
-
Mixing the Paint:
In your plastic container, mix your chosen greige paint with water. I generally aim for a 1:1 ratio—50% paint to 50% water. Stir until fully combined. -
Testing the Consistency:
Test your mixture on a hidden area, like the underside of the table or a leg. It should be thin enough to show the grain but pigmented enough to change the wood’s tone.
Avoid Blotching
If working with soft wood like pine, applying a pre-stain wood conditioner before your paint wash prevents the color from soaking in unevenly.
Step 3: Applying the Finish
-
Brush On:
Dip your synthetic brush into the wash and apply it generously to one section of the table top. Work in manageable sections so the paint doesn’t dry before you can wipe it. -
Wipe Off:
Immediately use a clean, lint-free cotton rag to wipe off the excess paint. Wipe in long, continuous strokes following the direction of the wood grain. -
Evaluate Coverage:
Check the opacity. If you want a more opaque look, wait for this layer to dry and repeat the process. For this specific look, one thorough coat is usually sufficient. -
Legs and Details:
Move on to the legs and apron of the table. Use the brush to get into any carved details or crevices, then wipe back with the rag to ensure paint doesn’t pool in the corners. -
Dry Time:
Allow the wash to dry completely. Since it is water-based, this usually takes about 2-4 hours depending on humidity, but overnight is safest.
Antique Glaze
For more depth, apply a white wax or a barely-there dark wax into the carved details of the legs after sealing to highlight the texture.
Step 4: Sealing and Protection
-
Light Sanding:
Once dry, very lightly run a piece of ultra-fine sandpaper or a crumpled paper bag over the surface to knock down any raised grain. -
First Coat of Sealer:
Apply a thin layer of matte polycrylic using a foam brush or fine-finish brush. Long, even strokes are key to avoiding bubbles. -
Sand Between Coats:
Let the first coat dry for at least 2 hours. Sand lightly with 220-grit paper and wipe away dust before proceeding. -
Final Coat:
Apply a second and final coat of polycrylic for durability. Let this cure for at least 24 hours before placing any heavy items on the table.
Enjoy your customized table that perfectly balances rustic warmth with modern elegance

PENCIL GUIDE
Understanding Pencil Grades from H to B
From first sketch to finished drawing — learn pencil grades, line control, and shading techniques.
Explore the Full Guide
Navy Painted Coffee Table for a Bold Statement
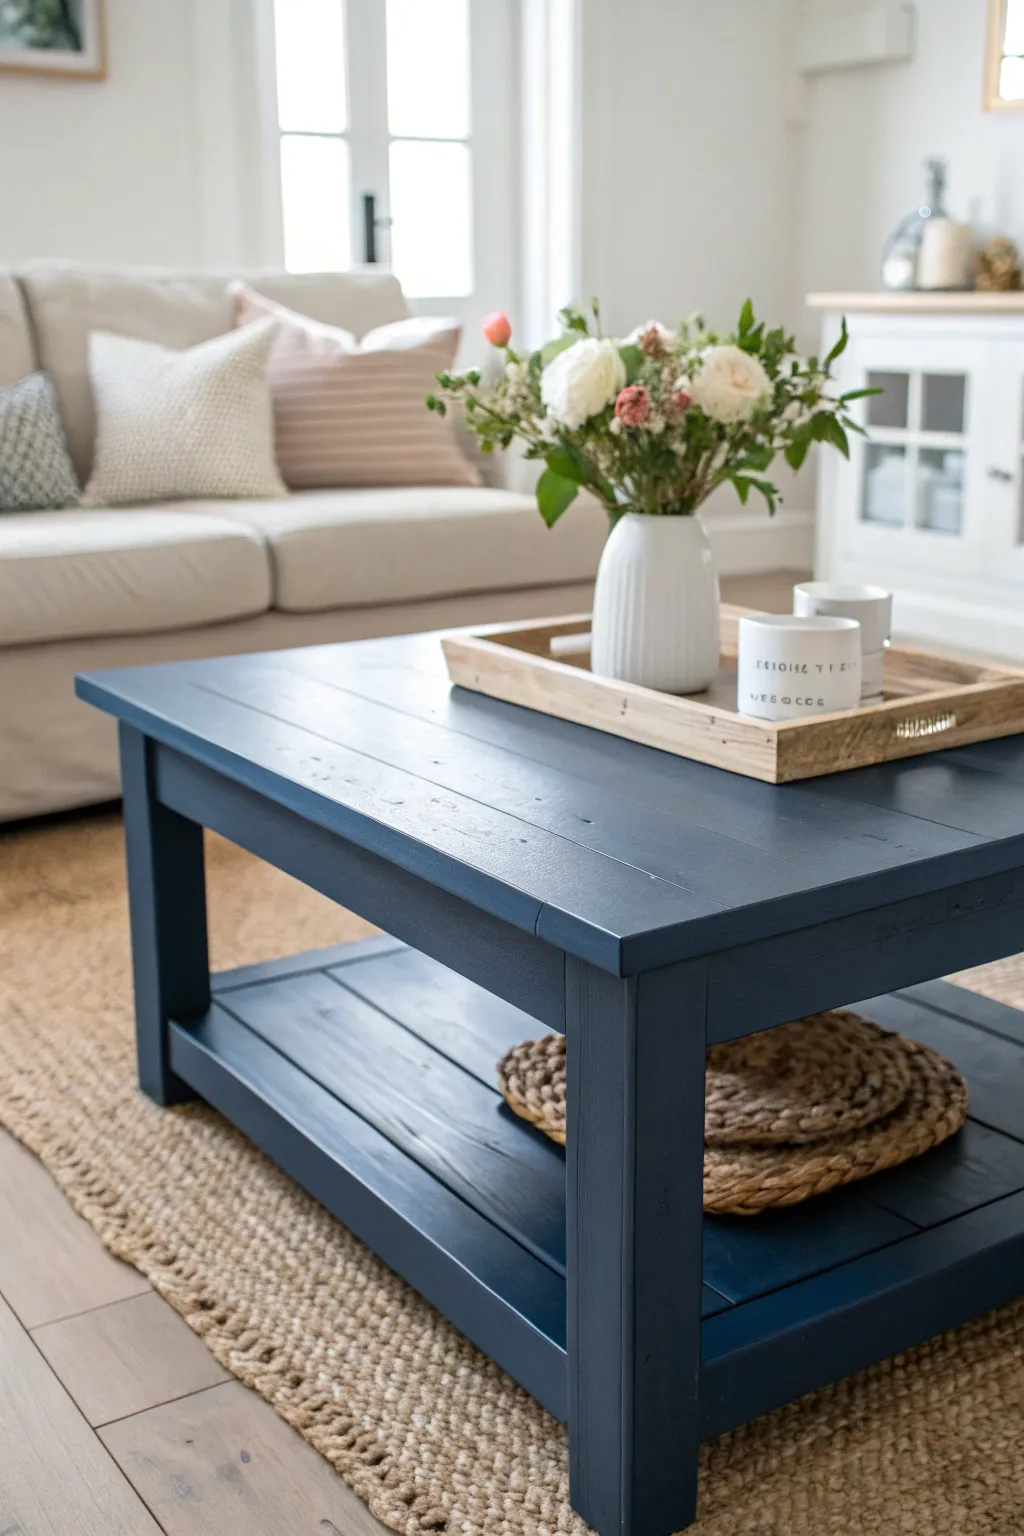
Transform a plain wooden coffee table into a stunning focal point with a deep, moody navy blue finish. This project balances rustic charm with modern elegance, proving that a bold color choice can completely redefine a living space.
Step-by-Step
Materials
- Solid wood coffee table (ready for refinishing)
- Medium-grit sandpaper (100-120 grit)
- Fine-grit sandpaper (220 grit)
- Electric orbital sander (optional but recommended)
- Tack cloth or microfiber rags
- Wood filler (if repairing deep scratches)
- High-quality bonding primer (grey or dark tinted preferred)
- Navy blue satin or semi-gloss furniture paint (e.g., ‘Hale Navy’ or ‘Naval’)
- Synthentic angled sash brush (2 inch)
- Mini foam roller or velour roller for smooth finishes
- Clear matte or satin polyurethane topcoat
- Drop cloths
- Painter’s tape
Step 1: Prep and Prime
-
Clean the surface:
Begin by thoroughly cleaning the entire coffee table with a degreasing cleaner or a mix of warm water and mild dish soap to remove any furniture polish, oils, or grime. -
Assess for repairs:
Inspect the table for any deep gouges or cracks. Fill these imperfections with wood filler and allow it to dry completely according to the package instructions. -
Initial scuff sanding:
Using 100-120 grit sandpaper, sand the entire piece. You don’t need to strip it to bare wood, but you must remove the glossy sheen of the old finish to help the new paint adhere. -
Smooth the surface:
Follow up with 220-grit sandpaper to smooth out the scratches from the coarser paper, ensuring a buttery smooth base. -
Remove dust:
Wipe the table down thoroughly with a tack cloth or a damp microfiber rag to remove every speck of sanding dust. -
Tape off areas:
If there are parts of the table you want to remain unpainted (like hardware or specific trim), mask them off carefully with painter’s tape. -
Apply primer:
Apply a coat of high-quality bonding primer. Since we are going for a dark navy, I prefer using a grey-tinted primer here as it helps cover the wood tone faster than white. -
Light sand after priming:
Once the primer is fully dry, lightly run your fine-grit sandpaper over the surface to knock down any raised grain or brush strokes, then wipe clean again.
Sticky Situation?
If the paint feels tacky days later, humidity or thick application is likely the cause. Place a fan nearby to circulate air, but don’t aim it directly at the wet paint.
Step 2: Painting the Navy Finish
-
Cut in corners:
Dip your angled sash brush into the navy paint and start by painting the corners, crevices, and legs where a roller won’t reach effectively. -
Roll the flat surfaces:
Pour some paint into a tray and use a high-density foam or velour roller to apply paint to the large flat surfaces, like the tabletop and lower shelf. -
Watch for drips:
Immediately check the edges and legs for any paint drips and smooth them out with your brush before they start to tack up. -
Dry time:
Let the first coat dry completely. Dark colors often require longer drying times to cure properly between coats, so be patient. -
Apply second coat:
Repeat the process for a second coat. Is the coverage solid? Navy often needs two to three thin coats for that deep, rich opacity shown in the photo. -
Check for holidays:
Inspect the piece in good lighting to ensure you haven’t missed any spots (painters call missed spots ‘holidays’), especially on the undersides of the top lip.
Smooth Finish Secret
Add a paint conditioner like Floetrol to your navy paint. It slows drying time, allowing brush strokes to level out for a glass-like factory finish.
Step 3: Sealing and Styling
-
Apply topcoat:
Once the paint has cured (wait at least 24 hours), apply a clear polyurethane topcoat. A satin finish works best to mimic the subtle sheen in the image without being too glossy. -
Sand between coats:
For a professional feel, very lightly sand the decorative topcoat with ultra-fine sandpaper (300+ grit) once dry, wipe clean, and apply a second layer. -
Final cure:
Allow the table to cure for several days before placing heavy objects on it to prevent indentation.
Now step back and admire how this rich navy piece anchors your living room with sophisticated style
Painted Coffee Table With Metallic Accent Tips

Give an old table a sleek, high-end update by combining a rich, reddish-brown wood tone with striking metallic accents. This project creates a stunning faux-finished top and trendy gold-dipped legs that look straight out of a designer catalog.
Step-by-Step Tutorial
Materials
- Wooden coffee table (mid-century style preferred)
- Sandpaper (120 and 220 grit)
- Painter’s tape (high quality)
- Reddish-brown wood stain or paint (e.g., mahogany or cherry)
- Metallic gold spray paint
- Gold leaf paint or metallic acrylic (brush-on)
- Small flat paintbrush
- Primer (spray or brush-on)
- Polyurethane topcoat (satin or semi-gloss)
- Drop cloth
- Tack cloth
- Ruler or measuring tape
Step 1: Prep and Prime
-
Clean surface:
Begin by thoroughly cleaning the entire table with a degreaser or mild soap and water to remove oils and dirt. Let it dry completely. -
Sand the finish:
Scuff sand the entire piece with 120-grit sandpaper to remove the existing sheen. You don’t need to strip it to bare wood unless the finish is peeling, just create a grippy surface. -
Wipe down:
Remove all sanding dust using a tack cloth. This step is crucial for a smooth final finish. -
Prime the surface:
Apply a coat of primer to the entire table. If you are using a lighter paint color, use white primer; for darker stains or paints, a grey or tinted primer works well. Allow it to dry according to the can’s instructions.
Bleeding Lines?
If paint bleeds under the tape, wait for it to dry fully. Then, create a ‘shield’ with a piece of cardstock and spray a tiny bit of the base color over the mistake to erase it.
Step 2: Base Color and Top
-
Apply base color:
Paint or stain the tabletop and legs with your chosen reddish-brown hue. Use long, even strokes to simulate wood grain if you are using opaque paint. Apply 2-3 coats for full coverage, sanding lightly with 220-grit paper between coats. -
Let it cure:
Allow the base color to cure fully for at least 24 hours. This is important because you will be applying tape over it, and you don’t want the paint to peel.
Add Texture
For a true vintage feel, lightly dry-brush a darker brown glaze over the red base coat before sealing. This mimics real wood grain and adds depth to the finish.
Step 3: The Gold Accents
-
Measure the legs:
Decide how high you want the gold ‘dipped’ effect to go. Measure usually 3 to 4 inches up from the bottom of each leg and mark lightly with a pencil. -
Tape the legs:
Wrap painter’s tape precisely around the leg at your mark. Ensure the tape is sealed tightly to prevent bleed-through. Cover the rest of the leg above the tape with paper or plastic to protect it from overspray. -
Spray the feet:
Apply the metallic gold spray paint to the bottom section of the legs. I prefer to use light, misty coats rather than one heavy coat to avoid drips. Do 2-3 light coats. -
Remove leg tape:
Carefully peel off the tape while the last coat of gold paint is still slightly tacky to ensure a crisp, sharp line. -
Tape the table edge:
Now, tackle the tabletop edge. Tape off the top surface and the underside, leaving only the vertical edge exposed. Press the tape edges down firmly. -
Paint the edge:
Using a small flat brush and your liquid gold leaf or metallic acrylic paint, carefully paint the exposed edge. This gives a more controlled, solid finish than spray paint for this area. -
Apply second coat:
Once the first coat on the edge is dry, apply a second coat to ensure the gold looks solid and brilliant. -
Remove edge tape:
Peel away the tape from the table edge slowly. If any paint seeped under, use a tiny artist’s brush to touch up the base color.
Step 4: Protection
-
Seal the deal:
Once all paint is fully cured (give it another 24 hours), apply a clear polyurethane topcoat over the entire piece. This protects the gold leaf from tarnishing and the table from coffee rings.
Now step back and admire how a little bit of gold completely transformed the character of your furniture


Painted Coffee Table With Updated Drawer Fronts and Hardware
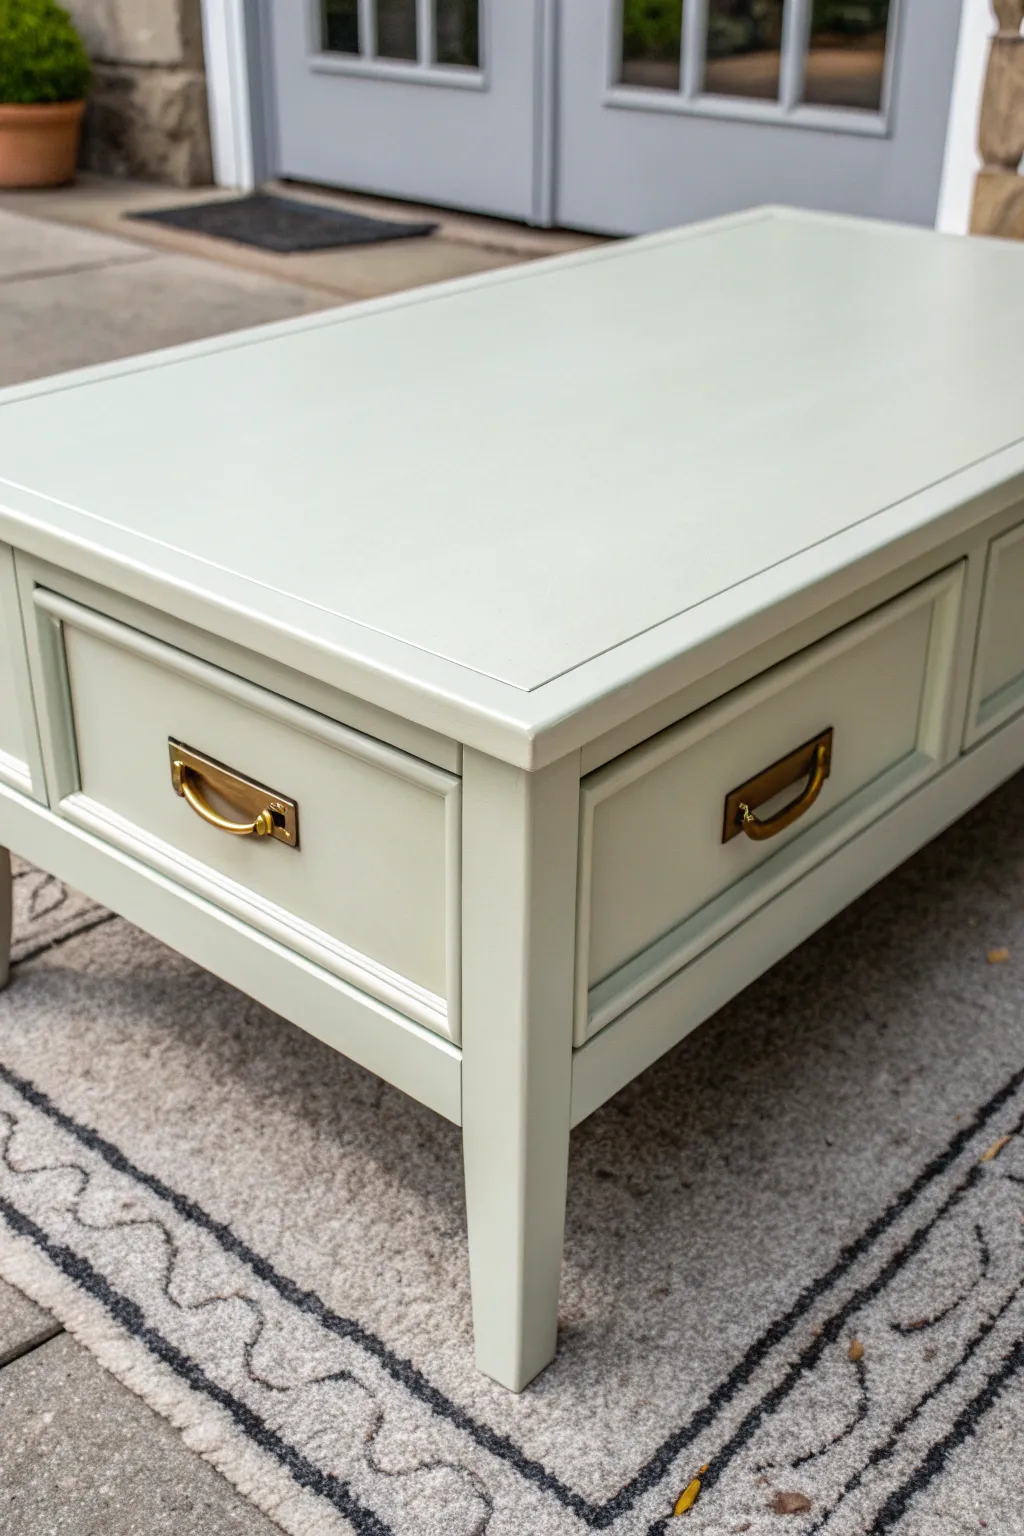
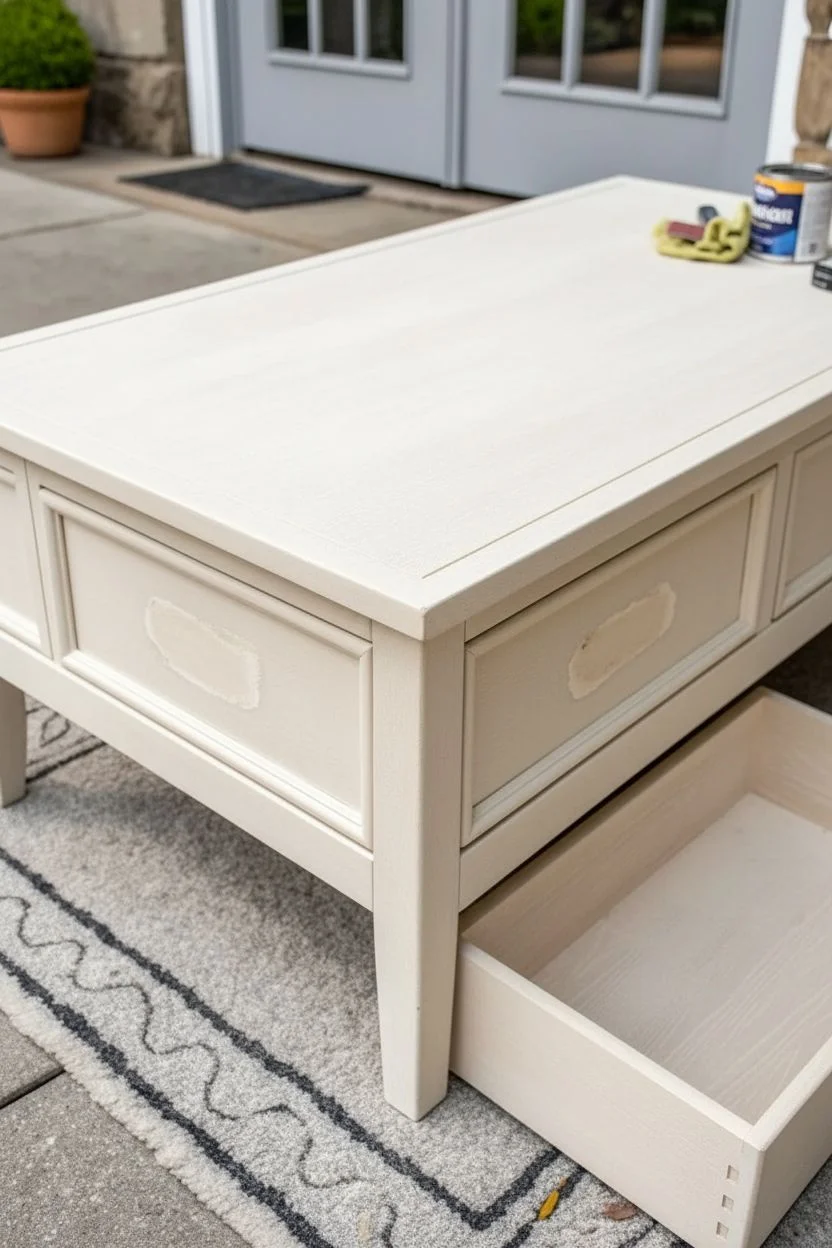
Transform a standard coffee table into a sophisticated piece of furniture using a soft sage green palette and striking brass hardware. This makeover focuses on a smooth, flawless paint finish and the installation of campaign-style pulls for a timeless, upscale look.
How-To Guide
Materials
- Wooden coffee table with drawers
- High-quality furniture cleaner or degreaser
- Medium and fine grit sandpaper (120 and 220 grit)
- Tack cloth
- Wood filler (if repairing old hardware holes)
- Putty knife
- High-adhesion primer (oil-based or stain-blocking)
- Self-leveling furniture paint (Pale Sage Green)
- Synthetic bristle angled brush (2 inch)
- Foam roller or velour roller for smooth finishes
- Paint tray
- Brass campaign-style drawer pulls
- Drill with assorted bits
- Screwdriver
- Measuring tape and pencil
- Chisel (if recessing hardware is required)
Step 1: Preparation & Repairs
-
Clean thoroughly:
Begin by removing all drawers and old hardware from the coffee table. Scrub the entire piece with a degreaser or TSP alternative to remove oils, wax, and dirt that could prevent paint adhesion. -
Fill old holes:
If your new campaign hardware has different spacing than the old handles, fill the original screw holes with wood filler. Overfill slightly as the filler shrinks when drying. -
Sand smooth:
Once dry, sand the filled areas flush with the drawer surface. Scuff sand the entire table with 120-grit sandpaper to remove the old glossy finish and create ‘tooth’ for the primer. -
Remove dust:
Vacuum up the sanding dust and wipe everything down with a tack cloth to ensure a perfectly clean surface.
Sticky Drawers?
If painted drawers stick, rub a plain candle or beeswax along the wooden runners and sides. This lubricates the friction points without damaging paint.
Step 2: Priming for Adhesion
-
Apply primer:
Coat the entire table and drawer fronts with a high-quality stain-blocking primer. I prefer using a roller for the large flat top to avoid brush marks, switching to a brush for legs and corners. -
Inspect and sand:
Let the primer dry completely according to the can’s instructions. Lightly sand the primed surface with fine 220-grit sandpaper to knock down any bumps or brush ridges. -
Wipe clean:
Use your tack cloth again to remove every speck of white dust before moving on to your paint color.
Step 3: Painting
-
First coat:
Stir your pale sage green paint gently to avoid bubbles. Apply the first coat using a high-density foam roller on the flat top and drawer fronts for a sprayed-on look. -
Detail work:
Use an angled synthetic brush to paint the molding crevices, legs, and side panels, feathering out the edges to blend with the rolled sections. -
Dry and sand:
Allow this first coat to dry for at least 4-6 hours. Lightly sand with 220-grit paper if you feel any roughness, then wipe clean. -
Second coat:
Apply a second coat of paint just like the first. This layer should provide full opacity and a rich, consistent color. -
Cure time:
Let the paint cure for at least 24-48 hours before handling heavily. This patience prevents the fresh paint from denting or scraping during hardware installation.
Add Campaign Detail
For authentic campaign style, add L-shaped brass corner brackets to the table’s corners. They match the pulls and elevate the high-end look instantly.
Step 4: Hardware Installation
-
Measure placement:
Find the center of your drawer front. Mark the screw holes for your new campaign pulls precisely with a pencil. -
Drill pilot holes:
Drill holes for the hardware screws. If your campaign pulls require recessing (sitting flush inside the wood), trace the back plate shape and carefully chisel out the area. -
Attach pulls:
Screw the brass pulls into place. Ensure they sit level and tight against the freshly painted surface. -
Protective topcoat (Optional):
If you used a chalk or mineral paint, apply a clear water-based polycrylic topcoat now for durability. -
Reassemble:
Slide the drawers back into their tracks and enjoy your refreshed, modern classic coffee table.
This sophisticated sage finish combined with classic brass accents creates a centerpiece that feels both historic and fresh
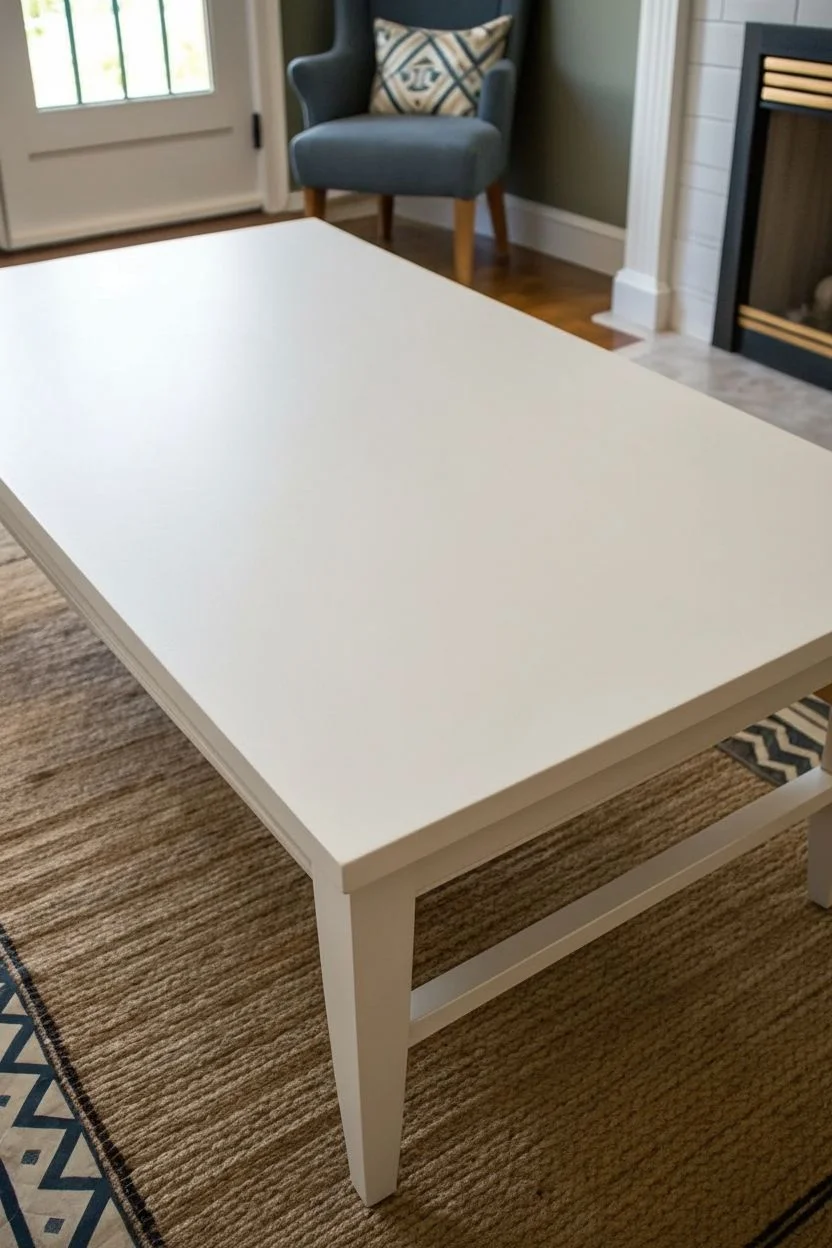
Stenciled Pattern Coffee Table Top for Instant Detail
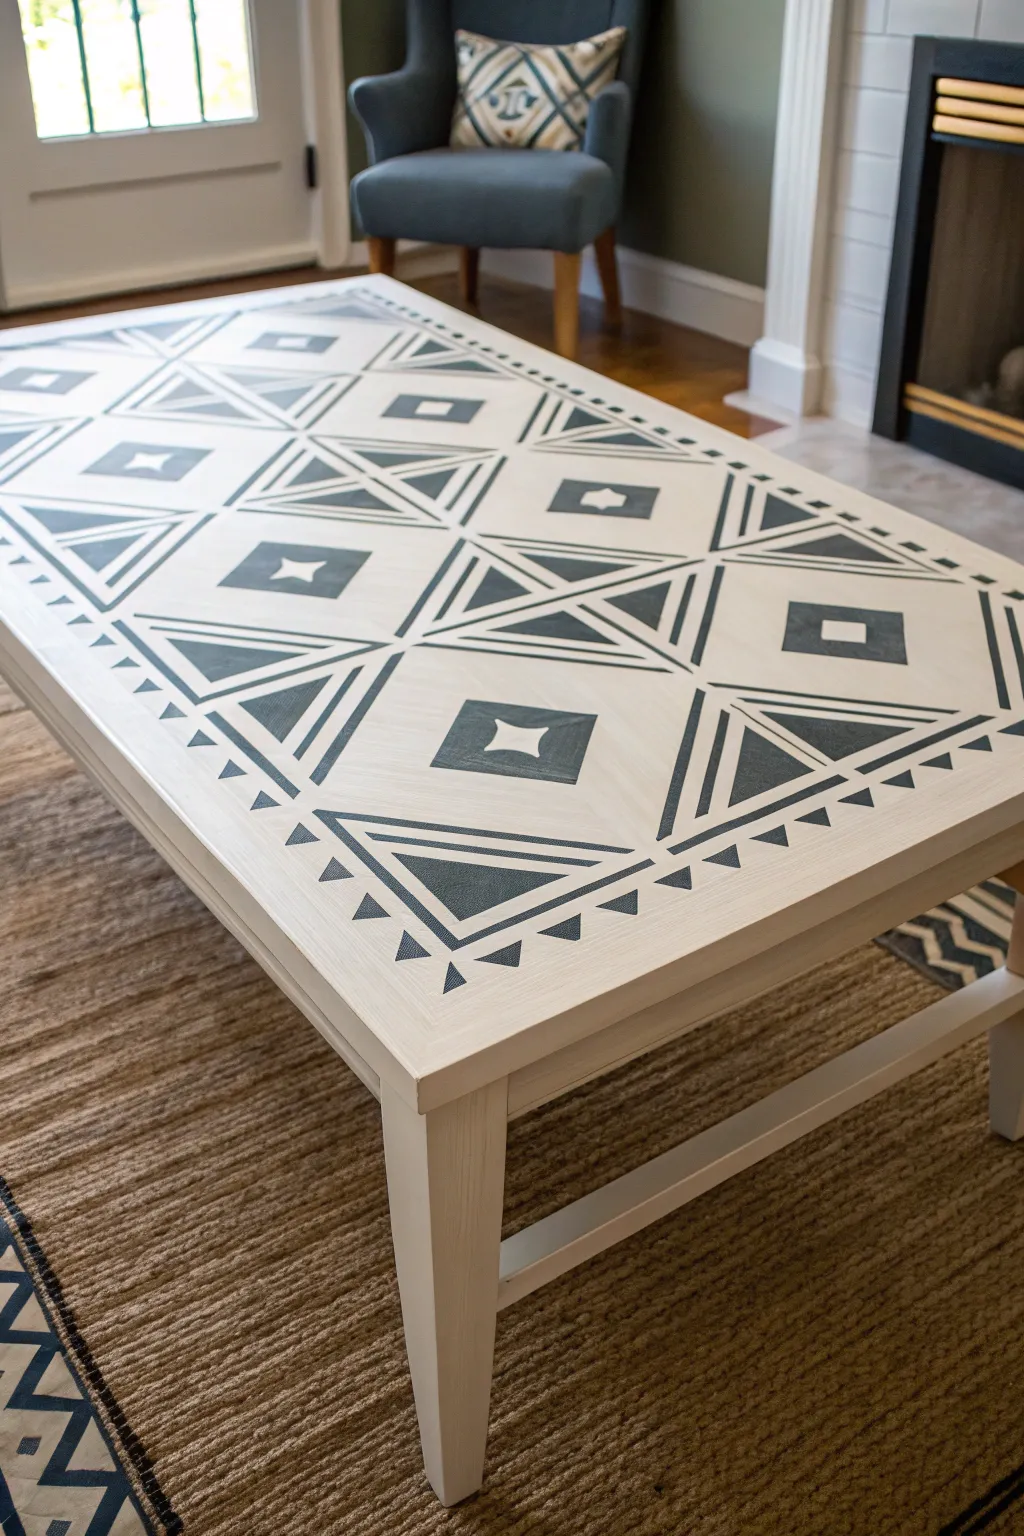
Transform a plain or dated coffee table into a custom statement piece with a bold, mudcloth-inspired geometric design. This technique uses sharp stencil work on a clean white base to achieve a high-contrast look that feels both tribal and modern.
Step-by-Step Guide
Materials
- Coffee table ready for refinishing
- Sander with 120 and 220 grit sandpaper
- Primer (stain-blocking)
- White chalk paint or latex paint (eggshell finish)
- Dark charcoal or navy blue acrylic paint
- Large geometric stencil (diamond/triangle mudcloth pattern)
- Stencil brush (stippling brush)
- Painter’s tape
- Spray adhesive (repositionable)
- Paper towels
- Matte polycrylic sealer
- Small artist brush (for touch-ups)
Step 1: Preparation & Base Coat
-
Clean surface:
Begin by thoroughly cleaning the entire coffee table with a degreaser or TSP substitute to remove oils and dirt. -
Scuff sand:
Using 120-grit sandpaper, lightly scuff the existing finish to create a ‘tooth’ for the new paint to adhere to. -
Wipe down:
Clean off all sanding dust with a damp lint-free cloth or tack cloth before proceeding. -
Apply primer:
Apply a coat of stain-blocking primer to the entire table, focusing heavily on the top to ensure a bright, clean foundation. -
Apply base color:
Paint the table with your white base color. Chalk paint works beautifully for this matte look, but a durable latex works too. -
Second coat:
Once the first coat is dry, apply a second coat of white paint for full, smooth coverage. Let this cure for at least 24 hours to prevent peeling tape later.
Step 2: Stenciling the Design
-
Plan layout:
Place your stencil on the table dry to determine the best layout. Centering the pattern usually looks best, ensuring the partial shapes on the edges are symmetrical. -
Secure stencil:
Spray the back of your stencil with a light mist of repositionable spray adhesive. Wait 30 seconds for it to get tacky, then press the stencil firmly onto the center of the table. -
Tape edges:
Use painter’s tape to secure the outside edges of the stencil to prevent shifting. -
Load brush:
Dip just the tip of your stencil brush into the charcoal paint. Offload most of the paint onto a paper towel until the brush feels almost dry—this is crucial to prevent bleeding. -
Stipple paint:
Apply the paint over the stencil openings using a straight up-and-down stippling (pouncing) motion rather than a brushing stroke. -
Check density:
Aim for solid coverage, but build it up in light layers. If the color looks too sheer, adding a second light pass is safer than applying one thick glob. -
Move stencil:
Carefully peel up the stencil. Align it with the registration marks of the pattern you just painted to continue the design across the rest of the tabletop. -
Complete top:
Continue moving and stippling until the entire surface is covered. Don’t worry about the pattern wrapping over the edge; stop cleanly at the rim. -
Add detail border:
As seen in the photo, create a border. Use tape to mark off a 1-inch strip around the table edge and use a smaller triangle stencil or freehand small triangles to frame the main design.
Bleed-Proof Lines
Before applying the dark color, paint a thin layer of your clear sealer over the stencil first. This seals the edges so any bleed is invisible clear coat, resulting in razor-sharp lines.
Step 3: Finishing Touches
-
Touch up:
Once the stencil paint is dry, inspect your lines. Use a small artist brush and white paint to clean up any areas where dark paint might have bled under the stencil. -
Light sand:
For a smoother, more worn-in feel, I like to very lightly pass over the stenciled top with 320-grit sandpaper once everything is bone dry. -
Seal heavily:
Coffee tables take a beating, so apply 3-4 coats of matte polycrylic sealer. Use a high-quality synthetic brush and let each coat dry fully before adding the next. -
Final cure:
Let the sealer cure for a few days before placing heavy objects on the surface.
Distressed Finish
For a vintage vibe, lightly sand the dried stencil pattern with 220-grit paper before sealing. Focus on the edges to make the graphic look naturally worn.
Now you have a durable, custom piece of furniture that anchors your living room with style
Striped Coffee Table Paint Design Using Tape Lines
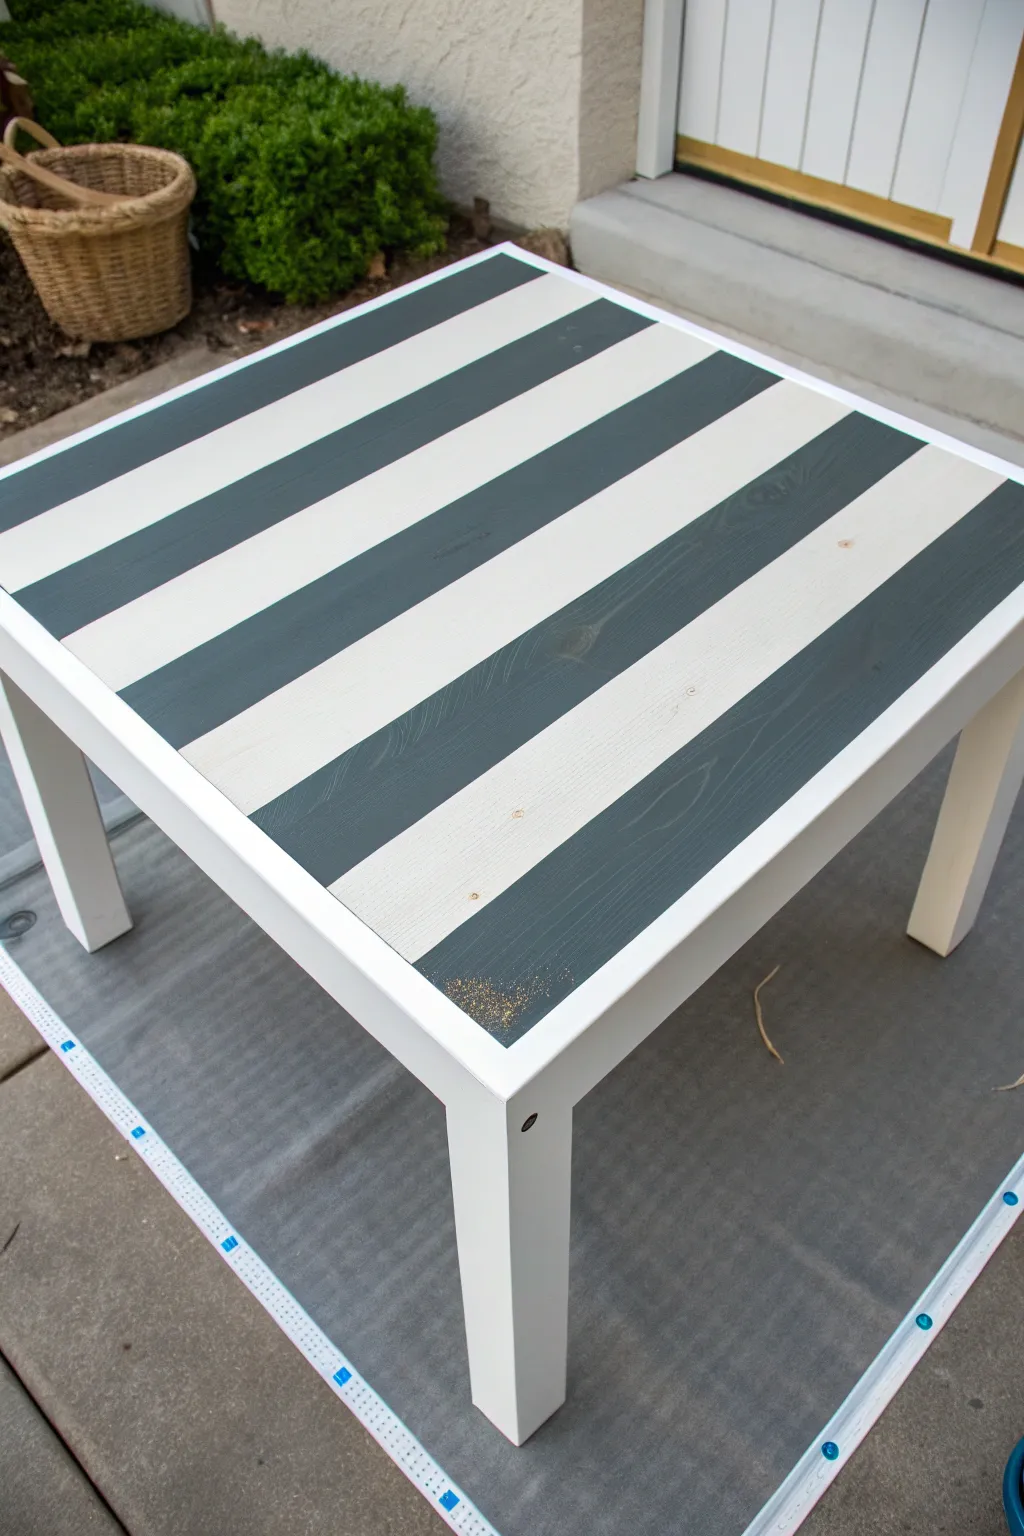
Transform a plain, tired coffee table into a modern statement piece with clean, crisp lines. This project uses a simple taping technique to create alternating diagonal stripes that add instant visual interest to any patio or living room.
Detailed Instructions
Materials
- Wooden coffee table (square works best)
- Orbital sander or sanding block
- Sandpaper (80, 150, and 220 grit)
- Painter’s tape (1.5 or 2-inch width)
- White semi-gloss paint (exterior grade if for outdoor use)
- Charcoal or dark grey paint
- Primer (bonding primer recommended)
- Paint rollers (foam for smooth finish)
- Angled sash brush
- Polyurethane sealer (water-based)
- Tack cloth
- Ruler or tape measure
- Pencil
Step 1: Preparation & Base Coat
-
Clean and sand:
Begin by thoroughly cleaning the table to remove dirt and grease. Once dry, sand the entire surface using coarse grit sandpaper to strip away the old finish, working your way up to 220 grit for a smooth surface. -
Remove dust:
Wipe away all sanding dust using a damp rag followed by a tack cloth. It is crucial the surface is completely debris-free before painting. -
Prime the table:
Apply a coat of high-quality bonding primer to the entire table, including the legs and the top. Let it dry according to the manufacturer’s instructions. -
Paint the frame:
Using your angled brush and small roller, paint the legs and the apron (the side edges of the table top) with your white paint. You may need two coats for solid coverage. -
Base coat the top:
Roll two coats of white paint onto the tabletop surface. This white layer will eventually become your lighter stripes. Allow this to cure fully—I recommend waiting at least 24 hours so the tape doesn’t peel it up later.
Step 2: Taping the Design
-
Establish the angle:
Decide on the angle of your stripes. For the look in the image, find the exact center of two adjacent sides and draw a faint pencil line connecting them to guide your first piece of tape. -
Apply the first strip:
Lay your first piece of painter’s tape down. Press it firmly against the surface. -
Use a spacer:
To ensure perfectly even spacing without constant measuring, place a small piece of tape directly next to your first strip as a temporary spacer. -
Continue the pattern:
Place your next long strip of tape on the other side of your spacer. Remove the spacer immediately and reuse it for the next gap. -
Cover the whole top:
Repeat this process across the entire tabletop until the surface is covered in alternating bands of tape and exposed white paint. -
Seal the edges:
Run a credit card or a putty knife firmly over the edges of all the tape strips. This prevents paint from bleeding under the tape and ensures crisp lines. -
The white paint trick:
Lightly brush a thin layer of your *white* base color over the tape edges. This fills any tiny gaps with white paint so that any bleed-through matches the base color.
Bleed-Proof Lines
Painting a thin layer of the *base* color over your tape edges before applying the stripe color seals the tape. This is the secret to getting razor-sharp lines every time.
Step 3: Painting Stripes & Sealing
-
Apply the dark color:
Using a small foam roller, apply your charcoal or dark grey paint to the exposed areas between the tape. Avoid overloading the roller to prevent drips. -
Second coat:
Once the first coat is dry to the touch, apply a second coat of the dark color for a rich, opaque finish. -
Remove the tape:
While the final coat of paint is still slightly tacky (not fully dry), carefully peel back the painter’s tape at a 45-degree angle. This is the most satisfying part. -
Touch ups:
Inspect your lines. If any paint bled through, use a tiny artist’s brush and the appropriate color to fix the imperfection once both paints are dry. -
Protect the finish:
Apply two to three coats of water-based polyurethane over the entire tabletop to protect your hard work from water rings and scratches. Lightly sand with 220-grit sandpaper between clear coats for a professional feel.
Go Geometric
Instead of stripes, try using different widths of tape to create a plaid pattern, or tape off a chevron design for a more dynamic, energetic look.
Now step back and admire how a simple roll of tape gave your old table a completely fresh personality
Color-Blocked Coffee Table for a Graphic Modern Look
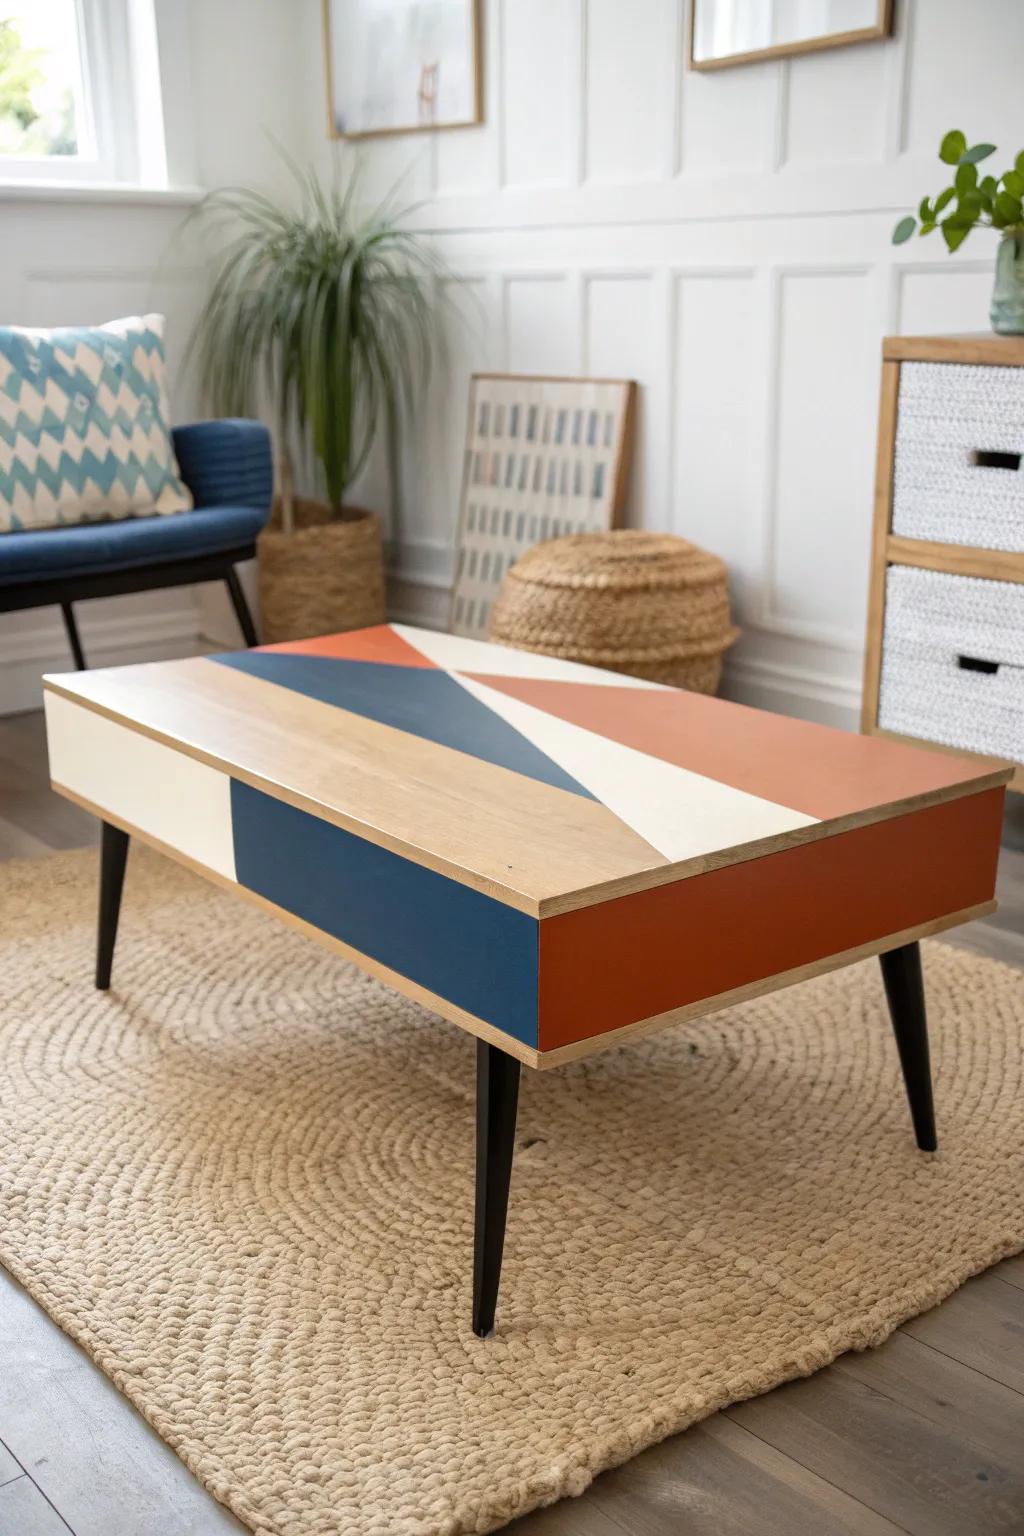
Transform a plain wooden coffee table into a striking modern centerpiece with this geometric color-blocking technique. The combination of exposed wood grain, deep navy, and terracotta creates a sophisticated look that feels custom-made.
Step-by-Step Guide
Materials
- Wooden coffee table (rectangular)
- Sandpaper (120 and 220 grit)
- Painter’s tape (high quality, multiple widths optional)
- Primer (white, suitable for wood)
- Furniture paint (Cream/Off-White)
- Furniture paint (Navy Blue)
- Furniture paint (Terracotta/Rust Orange)
- Small foam roller
- Synthetic angled sash brush (1.5 – 2 inch)
- Water-based polyurethane topcoat (matte or satin)
- Pencil
- Ruler or straight edge
- Tack cloth
- Drop cloth
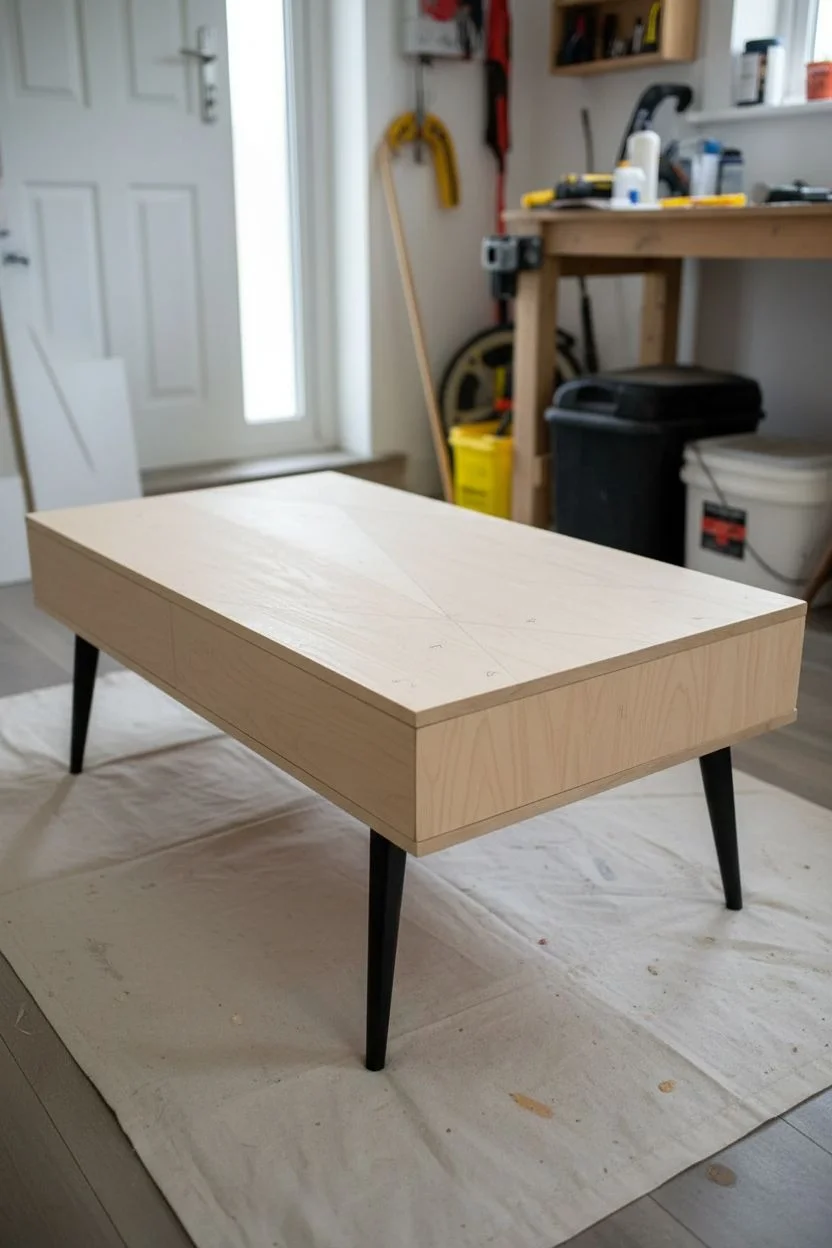
Step 1: Preparation & Planning
-
Clean and sand:
Begin by removing any existing finish from the table. Use 120-grit sandpaper to strip old varnish or paint, ensuring you get down to raw wood if you want the wood grain sections to shine. Wipe away dust with a tack cloth. -
Smooth the surface:
Follow up with 220-grit sandpaper to create an ultra-smooth surface. This step is crucial for crisp paint lines later. -
Plan your geometry:
Use a pencil and a long straight edge to sketch your design directly onto the bare wood. For this look, create large intersecting triangles that span across the top and flow down the sides. -
Map your colors:
Lightly mark each section with a letter (W for wood, N for navy, T for terracotta, C for cream) so you don’t lose track of your pattern once the tape starts going down.
Step 2: Taping & Painting
-
Tape the first sections:
Apply painter’s tape along the pencil lines for your first color group. Press the tape edges down firmly with a credit card to prevent bleed-under. I like to tape off non-adjacent sections first so I can paint multiple areas at once. -
Seal the tape edge:
To get perfectly crisp lines, brush a very thin layer of the *existing base color* (in this case, clear matte medium or a tiny bit of primer) along the edge of the tape. This seals the gap. -
Prime painted sections:
Apply primer only to the geometric shapes that will be painted cream or terracotta, as these lighter colors need a solid base. The navy is usually dark enough to skip primer if using high-quality paint, but priming never hurts. -
Apply the Cream paint:
Using a small foam roller for a smooth finish, apply your cream paint to the designated triangles. Use light coats to avoid ridges. -
Paint the Terracotta:
Move on to the rust/terracotta sections. Use an angled brush to cut in near the tape and a roller to fill the center. -
Paint the Navy:
Apply the deep navy blue to its assigned sections. This color often needs two or three thin coats for full, rich opacity. -
Address the sides:
Don’t forget to carry the design over the edge! Ensure your tape lines wrap perfectly perpendicular down the vertical side (apron) of the table so the shapes look continuous. -
Remove tape while damp:
Carefully peel back the painter’s tape while the final coat of paint is still slightly tacky, not fully dry. Pull at a 45-degree angle away from the paint line.
Bleeding Lines?
If paint seeps under the tape, wait for it to dry fully. Then, gently scrape the excess away with an X-Acto knife or razor blade held at a low angle.
Step 3: Finishing Touches
-
Tape remaining sections:
Once the first set regarding colors are 100% dry (give it at least 24 hours to be safe), tape over the fresh paint to define the remaining shapes if your design requires overlapping lines. -
Touch ups:
Inspect your lines. If any paint bled, use a small artist’s brush or a razor blade to gently tidy up the mistakes. -
Seal the entire top:
Apply a water-based polyurethane topcoat over the entire table surface—both the painted areas and the exposed wood. This unifies the sheen and protects the wood. -
Light sanding between coats:
Once the first layer of poly is dry, hand sand very lightly with fine-grit paper, wipe clean, and apply a second coat for durability. -
Final cure:
Allow the table to cure for several days before placing heavy objects on it to prevent indentations in the fresh finish.
Level Up: Metallic
Add a thin stripe of gold or copper automotive tape between the color blocks. It hides uneven transitions and adds a luxury mid-century detail.
Now you have a custom statement piece that combines artistic flair with practical design
Faux Marble Painted Coffee Table Top for High-End Drama
Transform a tired wooden coffee table into a high-end statement piece with nothing but paint and a feather. This project combines a rich, dark base with a bright, convincingly realistic faux Carrera marble top for stunning contrast.
Step-by-Step Tutorial
Materials
- Round wooden coffee table
- Sander and sandpaper (120 and 220 grit)
- Primer (bonding primer recommended)
- White satin or semi-gloss paint (base coat)
- Light grey acrylic paint
- Medium grey acrylic paint
- Dark charcoal chalk paint or acrylic paint (for the base)
- Water
- Sea sponge
- Turkey feather or fine liner brush
- Large blending brush (soft bristle)
- Polycrylic topcoat (satin or gloss finish)
- Painter’s tape
Step 1: Prep and Base Framework
-
Clean and sand:
Begin by thoroughly cleaning the table to remove grease or wax. Scuff sand the entire piece with 120-grit sandpaper to give the primer something to grip, then wipe away all dust with a tack cloth. -
Prime the table:
Apply a high-quality bonding primer to the entire table. Since we are doing a light top and dark bottom, a white primer works best. Let this dry completely according to the can’s instructions. -
Paint the table skirt and legs:
Flip the table or mask off the top edge. Paint the legs and apron in your dark charcoal color. The fluted details on the legs might need a smaller brush to get into the grooves without pooling. -
Apply the white top base:
Paint the tabletop surface with your white satin paint. You will likely need two or three thin coats to get a solid, opaque finish. Lightly sand with 220-grit paper between coats for a super smooth, stone-like feel.
Step 2: Creating the Marble Effect
-
Prepare the glaze:
Mix your light grey paint with water (about a 1:4 ratio) to create a translucent glaze. This shouldn’t be opaque; you want a watery, misty consistency. -
Create background clouds:
Dip a dampened sea sponge into your grey glaze and blot off the excess on a paper towel. Lightly dab varied patches of ‘clouding’ diagonally across the table to create the underlying stone structure. -
Soften the clouds:
While the glaze is still wet, use a large, dry softening brush to feather out the sponge marks. Use a pouncing motion to blur distinct edges so the grey looks like it’s below the surface. -
Establish the main vein line:
Dip the edge of a turkey feather or a fine liner brush into slightly darker grey paint mixed with a little water. Drag it across the table following the general direction of your clouding, twisting and turning the tool to create organic, jagged lines. -
Mist and blur:
Immediately spritz the wet vein with a little water from a spray bottle. This causes the paint to bleed slightly, mimicking how mineral veins naturally diffuse into stone. -
Blotting technique:
Tap over the wet vein gently with a dry badger brush or soft makeup brush. This softens the harsh line, making it look embedded rather than painted on top. -
Add secondary veins:
Create smaller, finer offshoot veins branching from your main line. I like to use a very diluted charcoal grey here for depth, keeping these lines much thinner than the primary vein. -
Intensify contrast:
Go back and accentuate a few ‘intersections’ where veins meet with a tiny bit of darker grey. This adds visual weight and realism.
Veins look too stiff?
Don’t depend on your wrist alone. Hold the brush or feather loosely at the very end of the handle and wiggle your arm while dragging to create jittery, natural-looking tremors in the line.
Step 3: Leveling and Protection
-
Apply a white wash layer:
Once your veining is totally dry, mix a tiny amount of white paint with water (very thin wash). Lightly brush this over the entire surface. This pushes the veins ‘back’ visually so they aren’t too stark. -
Final cure:
Allow the painted faux finish to dry for at least 24 hours. This ensures no moisture is trapped under your clear coat. -
Seal the top:
Apply a coat of water-based Polycrylic. Use a high-quality synthetic brush and long strokes to avoid bubbles. For that realistic polished stone look, a gloss or semi-gloss sheen is ideal. -
Sand and re-coat:
Once the first coat is dry, lightly sand with 400-grit sandpaper to remove any dust nibs. Wipe clean and apply a second coat. Three coats total will provide the best durability for a coffee table.
Add Metallic Glamour
For a glamorous twist, mix gold or silver metallic powder into a glazing medium and trace very thin, sporadic highlights along the darkest parts of your grey veins.
Now you have a sophisticated centerpiece that looks heavy and expensive but cost only pennies to create
Geometric Herringbone Paint Illusion on the Table Surface
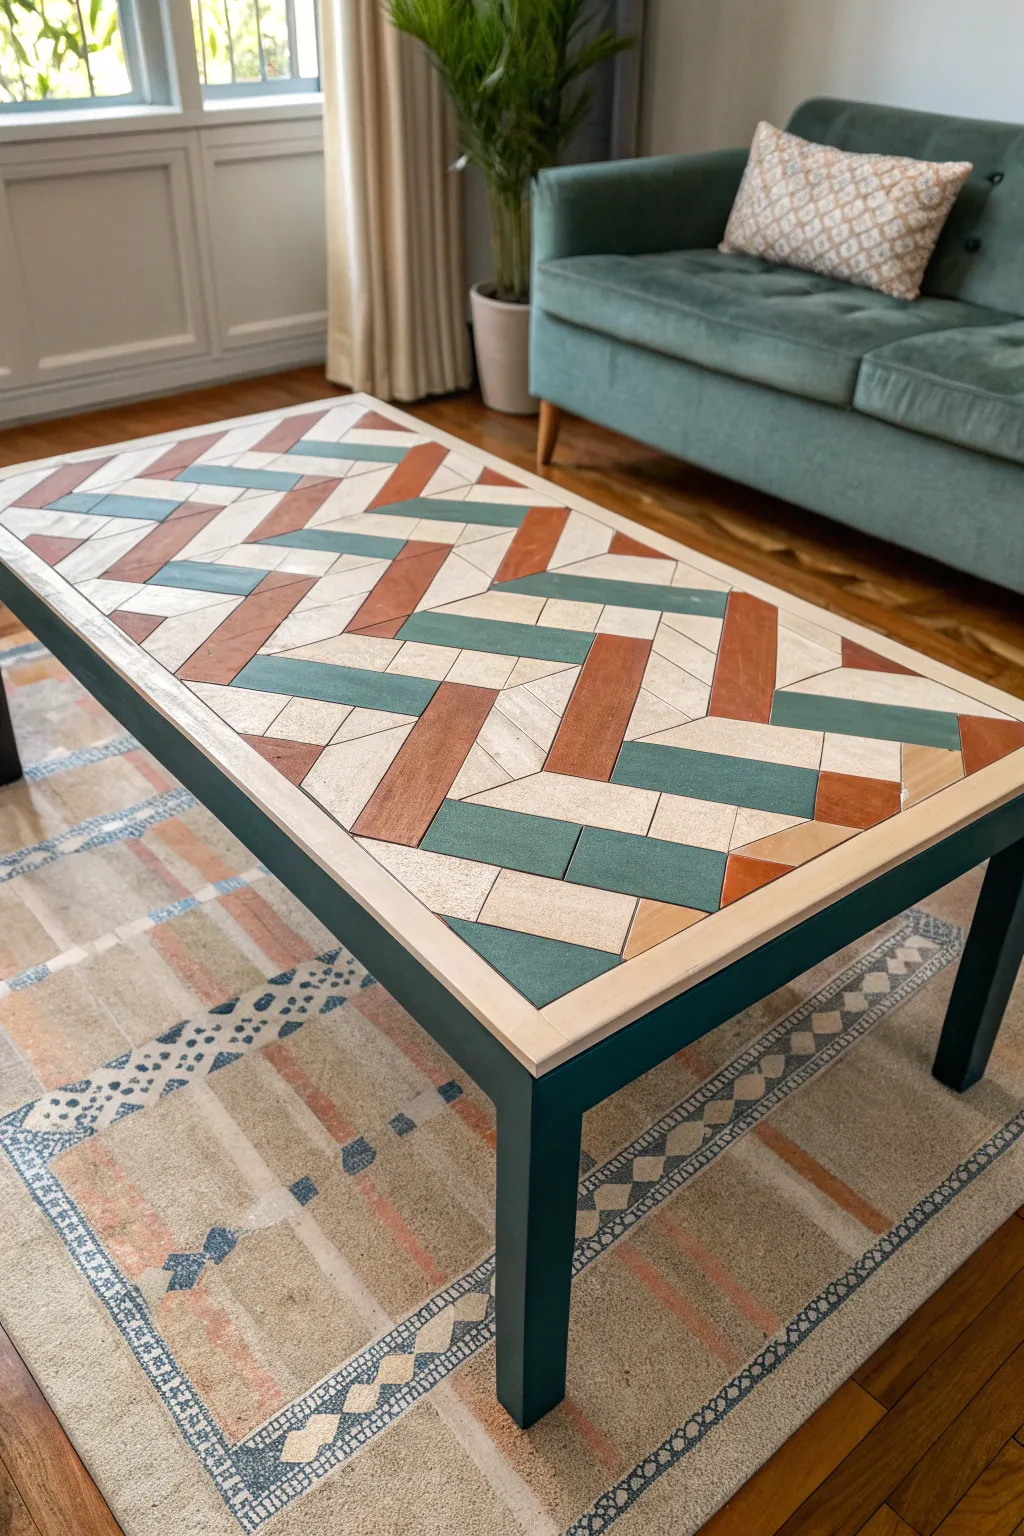
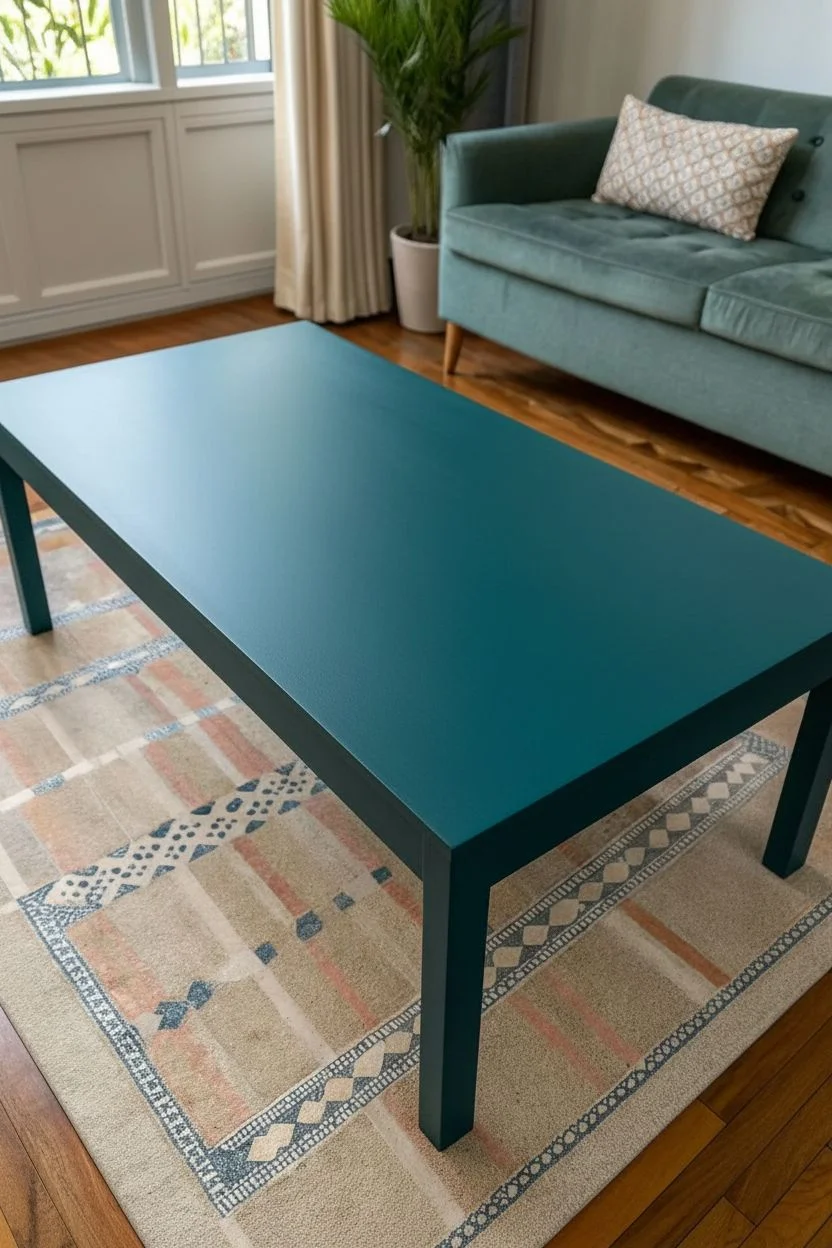
Transform a plain coffee table into a modern statement piece with this clever paint illusion. By using tape and contrasting colors, you’ll create a stunning faux-inlay herringbone top that looks like expensive woodwork or tile.
Step-by-Step
Materials
- Coffee table (wood or laminate)
- Sandpaper (120 and 220 grit)
- Primer (bonding primer for laminate, standard for wood)
- Deep teal chalk or latex paint (base color)
- Terracotta or rust-orange acrylic paint
- Cream or off-white acrylic paint
- Painter’s tape (various widths, mostly 1-inch and 2-inch)
- Ruler or T-square
- Pencil
- Small foam rollers
- Flat artist brushes
- Polycrylic topcoat (matte or satin finish)
- X-Acto knife or craft blade
Step 1: Preparation & Base Coat
-
Clean surface:
Thoroughly wipe down the entire table with a degreaser to remove oils and dirt. -
Sand thoroughly:
Scuff sand the entire piece with 120-grit sandpaper to give the primer something to grip, then wipe away the dust. -
Prime the table:
Apply a coat of high-quality primer. If your table has a shiny laminate surface, ensure you use a bonding primer specifically designed for slick surfaces. -
Paint the legs:
Paint the legs and the apron (the side edges of the table top) with your deep teal base color. I prefer using a foam roller here for the smoothest finish, but a brush works for tricky corners. -
Paint the tabletop base:
Apply the teal paint to the entire tabletop surface as well. This will serve as the ‘grout’ lines and the teal segments of the pattern later. -
Let it cure:
Allow the base coat to dry completely, ideally overnight, so the tape used in the next phase doesn’t peel up the fresh paint.
Step 2: Creating the Pattern
-
Find the center:
Measure the width of your table and lightly mark the vertical center line with a pencil. -
Layout guidelines:
Use a T-square to draw faint pencil lines creating a grid. This helps ensure your herringbone pattern doesn’t drift crooked as you tape. -
Apply the tape grid:
Using your pencil grid as a guide, apply painter’s tape to block off the ‘rectangles’ of your herringbone design. You are taping over the areas that will remain teal. -
Seal edges:
Firmly press down all tape edges with an old credit card to prevent paint bleed. -
Refine the shapes:
If you want the intricate, smaller triangle cutouts seen in the inspiration image, use an X-Acto knife to carefully cut and remove small sections of tape, or add small diagonal pieces of tape to bifurcate larger rectangles.
Bleeding Lines?
If paint bleeds under the tape, don’t panic. Wait for it to dry fully, then use a tiny liner brush and your base teal color to carefully ‘erase’ the mistake.
Step 3: Painting & Revealing
-
Plan your colors:
Decide which exposed rectangles will be terracotta and which will be cream. A random distribution usually looks more organic and interesting than a strict repeating pattern. -
Paint the terracotta:
Using a flat artist brush, fill in your chosen sections with the rust-orange paint. Two thin coats are better than one thick one to avoid ridges. -
Paint the cream:
Fill in the remaining exposed sections with the off-white paint. I find stippling (dabbing) the brush slightly can add a nice stone-like texture. -
Remove tape:
While the paint is still slightly tacky (not fully dried), carefully peel back the tape at a 45-degree angle to reveal the crisp teal lines underneath. -
Touch up:
Once dry, use a tiny detailed brush to fix any areas where paint might have bled under the tape. -
Seal the surface:
Finish the tabletop with 2-3 coats of Polycrylic sealer to protect your artwork from coffee spills and scratches.
Add Faux Grain
For a rustic look, use a dry chip brush to lightly drag a darker glaze over the cream sections before sealing to mimic wood grain or stone texture.
Enjoy your custom functional art piece that is sure to spark conversation
Hand-Painted Illustrative Motifs for a One-of-a-Kind Coffee Table

Give a plain coffee table a handcrafted soul with these delicate, illustrative botanical motifs. The monochromatic leaf trails mixed with soft earthy accents create a whimsical yet modern centerpiece that feels custom-made for your living space.
Step-by-Step
Materials
- Round wooden coffee table (unfinished or sanded)
- Sandpaper (120 and 220 grit)
- Primer (suitable for wood)
- Cream or off-white chalk paint or latex paint (base color)
- Carbon paper or graphite transfer paper
- Pencil
- Black acrylic paint or paint marker (fine tip)
- Terracotta or rust-orange acrylic paint
- Detail brushes (sizes 0 and 1)
- Medium flat brush (for base coat)
- Clear matte or satin polycrylic sealer
- Ruler or tape measure
Step 1: Preparation & Base Coat
-
Prepare the surface:
Before painting, ensure your table surface is smooth and clean. If you are upcycling an older table with a glossy finish, give the top a thorough sanding with 120-grit paper to remove the shine, then wipe away all dust with a tack cloth. -
Apply primer:
Apply a thin, even coat of high-quality wood primer to the tabletop. This ensures your beautiful cream background adheres properly and lasts longer without chipping. -
Paint the background:
Using a flat brush, apply your cream or off-white base color. Move in the direction of the wood grain for the smoothest finish. I prefer to apply two thin coats rather than one thick one, allowing the first to the dry completely before adding the second. -
Smooth the canvas:
Once the final base coat is fully dry—give it overnight if possible—lightly sand the surface with 220-grit sandpaper. This creates a buttery smooth surface that makes detailed illustration work much easier.
Use a Paint Marker
Does painting fine lines with a brush make you nervous? Use an acrylic paint pen for the black outlines! It offers control like a normal marker but is permanent when dry.
Step 2: Drafting the Design
-
Plan the composition:
Sketch your design on paper first. The motif in the image features two main curved branches that frame the table like a wreath, leaving negative space in the center. Notice the asymmetry; one branch is heavier with black leaves, the other introduces color. -
Transfer or sketch:
If you are confident, sketch the main stems lightly directly onto the table with a pencil. To mirror the image exactly, draw a long, sweeping curve starting from the bottom left and another coming from the top right. -
Refine leaf placement:
Sketch the individual leaves along your stems. Vary the shapes—some should be solid ovals, others distinct leaf shapes with veins, and include delicate sprigs of berries or tiny buds for variety.
Fixing Smudges
If you smudge black paint on the cream background, don’t wipe it! Let it dry completely, then carefully paint over the mistake with your cream base color.
Step 3: Painting the Motifs
-
Paint the main stems:
Load a fine liner brush (size 0 or 1) with black acrylic paint. With a steady hand, paint the long, central stems first. Keep your pressure light at the tips to taper the lines naturally. -
Fill the solid black leaves:
Using the same black paint, fill in the solid leaves on the lower branch. Work from the stem outward, ensuring the edges are crisp and clean. -
Add line-work leaves:
For the leaves that aren’t solid black, paint just the outline and a central vein line. This illustrative style adds visual lightness to the design. -
Introduce the accent color:
Clean your brush thoroughly and switch to the terracotta paint. Fill in selected leaves—specifically the striped/patterned ones on the left and the butterfly-like shape in the center. -
Add details to colored leaves:
Once the terracotta paint is dry to the touch, go back in with a very fine brush (or a fine-tip white paint pen) to add the white veins or striped details over the orange sections. -
Create the delicate sprigs:
Paint the smaller, wispy sprigs that branch off the main design. These should be thinner and more delicate than the main leaves. Use the very tip of your brush. -
Incorporate tiny details:
Add small dots or tiny floating leaves around the main branches to soften the look and fill awkward gaps without cluttering the design.
Step 4: Sealing & Finishing
-
Check your work:
Step back and look at the table from a distance. If any lines look shaky, you can carefully touch them up with a bit of the cream base paint acting as an eraser. -
Apply the first coat of sealer:
Once the artwork has cured for at least 24 hours, apply a coat of clear polycrylic sealant. Use a high-quality synthetic brush to avoid brushstrokes. -
Sand and re-seal:
After the first coat dries, do a very light sanding with 220-grit paper, wipe clean, and apply a second coat for durability. This protects your art from coffee cup rings and everyday use.
Now you have a stunning, modernized piece of furniture that serves as a functional canvas for your living room.


Have a question or want to share your own experience? I'd love to hear from you in the comments below!