When you’re craving something sweet and satisfying to paint, cute painting ideas are the fastest way to get that happy little “I made this!” feeling. I’m sharing my go-to subjects that stay simple, beginner-friendly, and extra charming—especially on a mini canvas with a soft pastel palette.
Chubby Cat With Big Sparkly Eyes
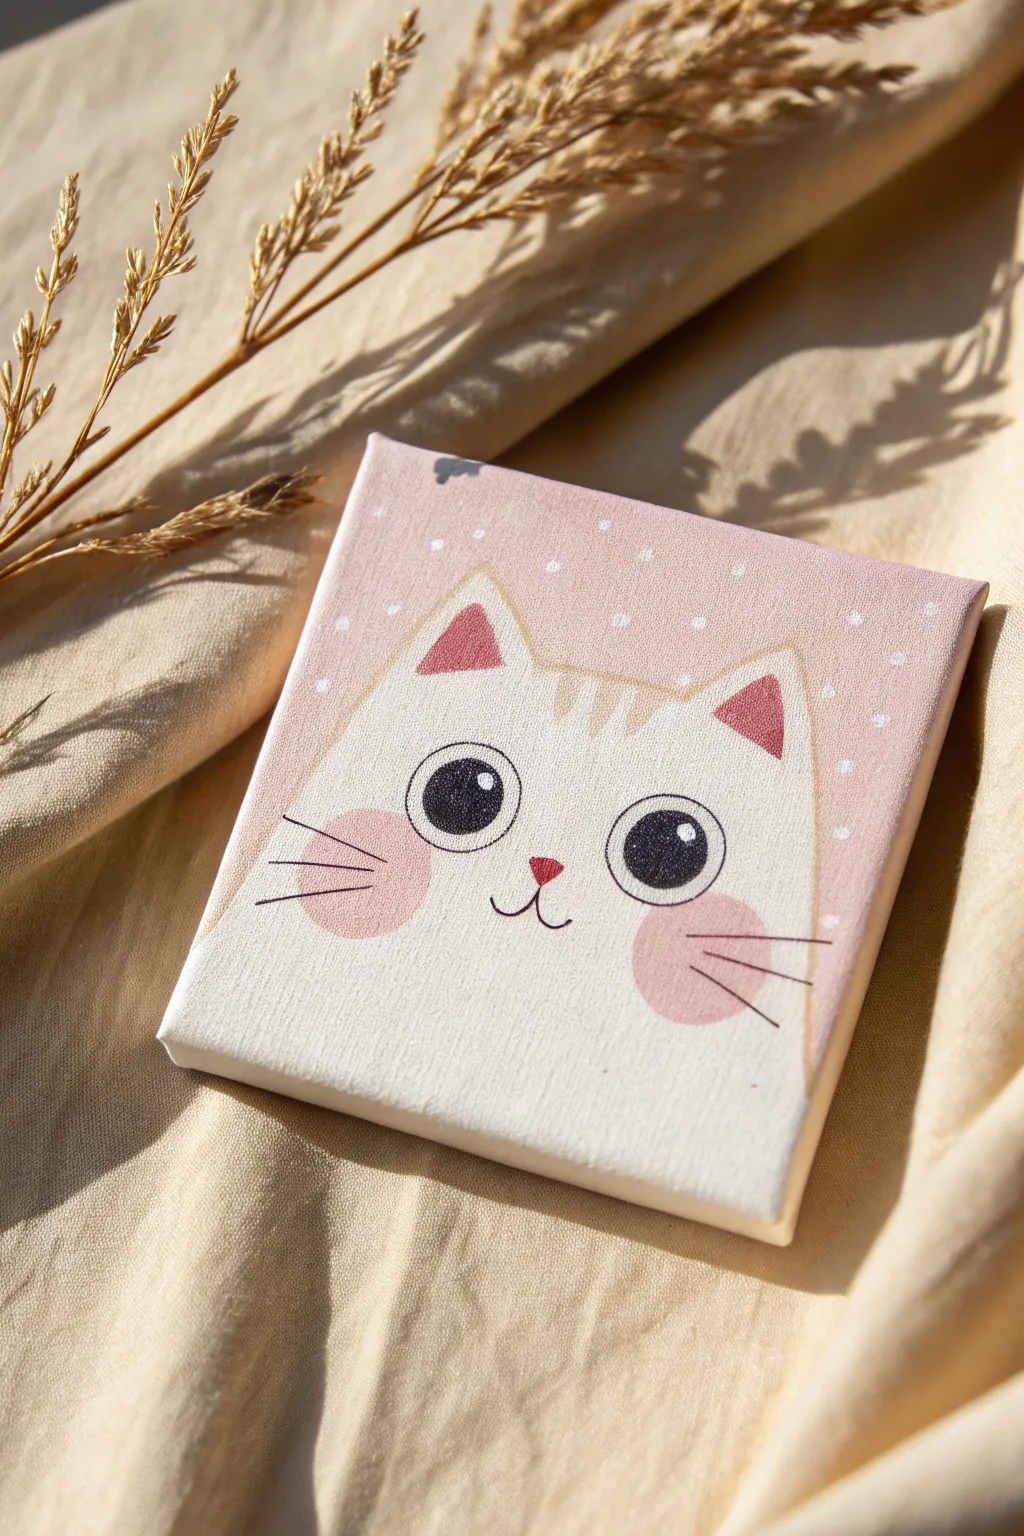
This adorable mini-canvas project features a rosy-cheeked white cat with irresistibly huge eyes set against a soft, polka-dot pink background. It’s a simple, heartwarming design perfect for brightening up a desk area or gifting to a fellow cat lover.
Step-by-Step
Materials
- Small square canvas (e.g., 4×4 or 6×6 inches)
- Acrylic paints: Titanium White, Pastel Pink, Dark Grey or Black, Soft Peach/Beige
- Flat paint brushes (size 6 or 8 for background)
- Round paint brushes (size 2 and 00 for details)
- Pencil and eraser
- Palette or mixing plate
- Water cup and paper towels
Step 1: Base and Background
-
Prepare the background color:
Mix a soft pastel pink shade on your palette. If your pink is too vibrant, tone it down with a significant amount of white to achieve that gentle, milky rose color seen in the reference. -
Paint the background:
Using your larger flat brush, paint the entire canvas with the pink mixture. Don’t worry about leaving a space for the cat yet; acrylics are opaque, so we can paint right over this layer once dry. -
Let it dry completely:
Allow the pink background to dry fully. If the canvas texture is still showing through too much, apply a second coat for a smooth, matte finish. -
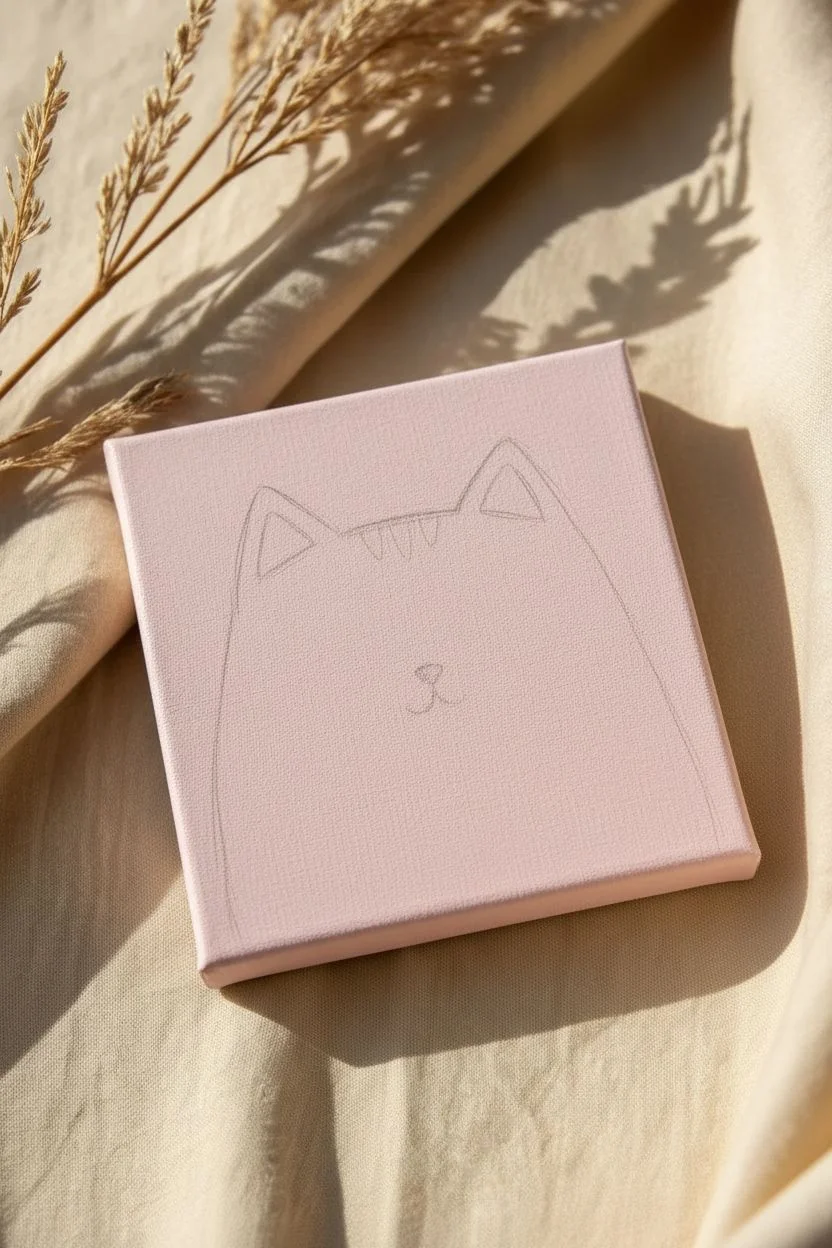
Sketch the outline:
Lightly sketch the cat’s head shape with a pencil. Draw a wide, rounded trapezoid shape that takes up the bottom two-thirds of the canvas. Add two triangular ears at the top corners of the head.
Perfect Circles Tip
Struggling to paint perfect circles for the eyes? Find a household object like a marker cap or wide straw, dip the rim in paint, and stamp the outline before filling it in.
Step 2: Blocking in the Cat
-
Fill in the white fur:
Using a clean flat brush and titanium white acrylic, fill in the entire cat shape you just sketched. You will likely need two or three thin coats to completely cover the pink background without streaks. -
Paint the inner ears:
Mix a slightly darker, warmer pink than your background color. Using a small round brush, paint triangles inside the ears, leaving a white border around the edges. -
Add the forehead stripes:
Mix a very pale beige or peach color. Paint three small, vertical lozenge or teardrop shapes on the forehead, right between the ears. These should be subtle markings. -
Create the rosy cheeks:
Dilute your pink paint slightly with water to make it semi-transparent. Paint two large, soft ovals on the lower sides of the face. Using a dry brush to feather the edges helps them look soft like blush.
Step 3: The Big Eyes and Details
-
Draft the facial features:
Once the white paint is bone dry, lightly pencil in two large circles for eyes. They should overlap slightly with the top edge of the blush spots. Mark a small triangle for the nose centered below the eyes. -
Fill the eyes:
Use a dark grey or black paint and a size 2 round brush to fill in the large eye circles. Keep your hand steady to get a smooth, rounded edge. I prefer dark grey over pure black for a softer, more illustrative look. -
Add the nose:
Paint the small inverted triangle nose using a deeply saturated pink or red tone. -
Paint the mouth:
With your thinnest liner brush (size 00) and black paint, draw a ‘w’ shape extending down from the nose to create the mouth. Keep the lines thin and delicate. -
Add whiskers:
Using the same liner brush, paint three straight whiskers on each cheek. Start from the blush area and flick the brush outward for a tapered line. -
Apply eye highlights:
This is crucial for the ‘sparkly’ look. Dip the end of a brush handle or a dotting tool into white paint. Place a large white dot in the upper left of each pupil, and a slightly smaller dot in the lower right.
Paint Too Streaky?
If your white paint looks streaky over the background, resist painting over it while wet! Wait for it to dry completely, then apply another thin layer. Patience prevents clumps.
Step 4: Final Touches
-
Outline the head:
Mix a very pale, warm beige (similar to the forehead stripes). Use a fine brush to create a very subtle outline around the cat’s head and ears to separate it from the background without using a harsh black line. -
Dotted background:
Dip the tip of a toothpick or a small dotting tool into white paint. gently press small dots all over the pink background area. Try to keep the spacing random for a whimsical feel. -
Protect your work:
Once everything is completely cured (give it at least an hour), apply a coat of matte varnish to protect the paint and unify the sheen.
Place your charming kitty painting on a small easel or shelf to add a dash of cuteness to your room


Sweet Little Hearts With A Soft Gradient Background
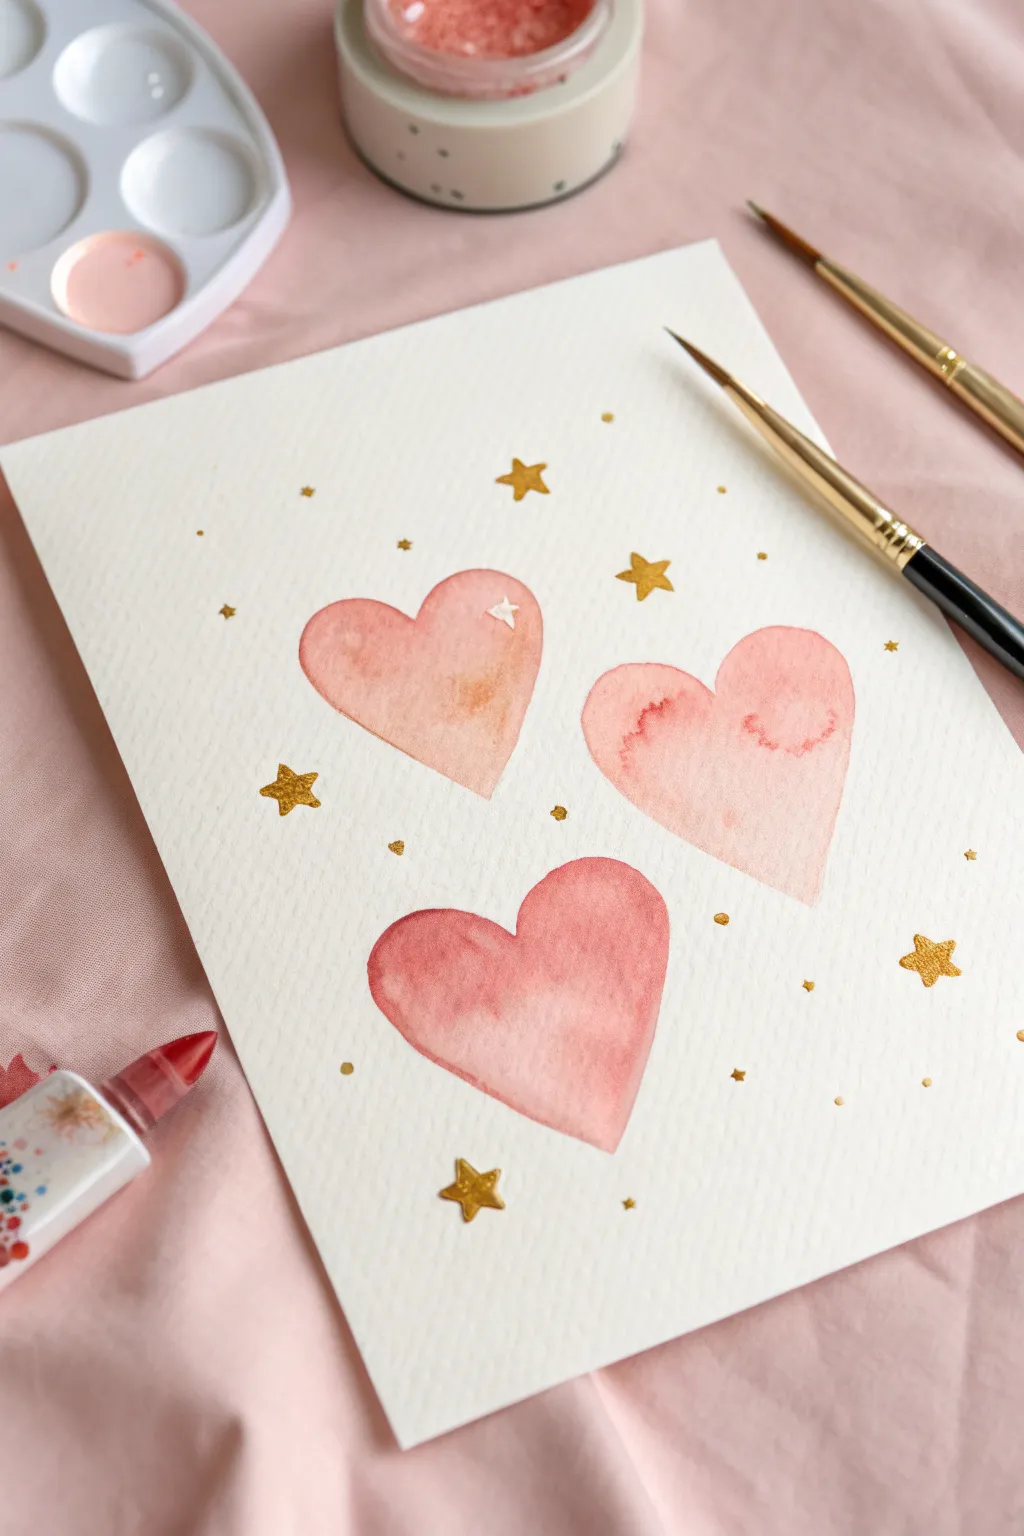
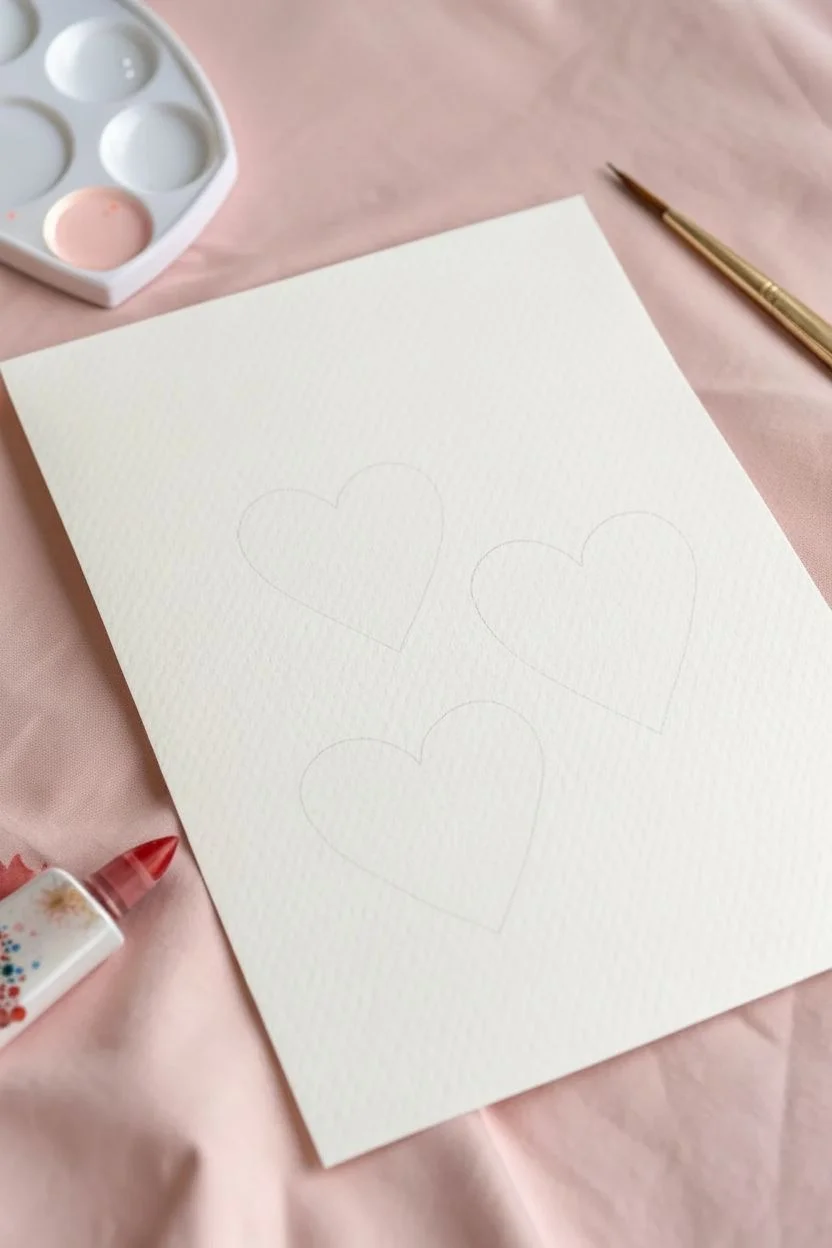
Create a dreamy and delicate art piece featuring soft, blushing hearts surrounded by a constellation of golden stars. This beginner-friendly watercolor project explores wet-on-wet techniques to achieve beautiful, pillowy textures and gradients.
How-To Guide
Materials
- Cold press watercolor paper (300 gsm recommended)
- Watercolor paints (shades of pink, rose, and peach)
- Gold acrylic paint or gouache (for stars)
- Round watercolor brushes (size 6 or 8 for hearts, size 0 or 2 for details)
- Clear water jar
- Paper towel
- Pencil and eraser
Step 1: Preparation & Sketching
-
Paper placement:
Begin by securing your watercolor paper to a flat surface if it isn’t a block. This helps prevent buckling when we introduce water later. -
Light sketching:
Using a very light hand, sketch the outlines of three hearts scattered across the page. Aim for slightly varied sizes and angles to keep the composition dynamic and organic. -
Softening lines:
Take a kneadable eraser and gently dab over your pencil lines. You want the graphite to be barely visible so it doesn’t show through the translucent watercolor paint.
Unwanted Blooms?
If ‘cauliflower’ edges appear where you don’t want them, your brush might be too wet when adding new layers. Dry your brush on a towel before touching wet paper to control the moisture balance.
Step 2: Painting the Hearts
-
Mixing the base color:
Prepare a watery mix of a soft pink or rose color on your palette. You want a high water-to-paint ratio for a pastel effect. -
First wash:
Starting with the top left heart, load your larger round brush and fill the shape with clean water first—this is the wet-on-wet technique. Alternatively, apply a very pale wash of your pink mix. -
Adding depth:
While the first layer is still wet, drop in a slightly more saturated reddish-pink or peach color near the top curves or bottom point of the heart. Watch the pigment spread naturally. -
Creating texture:
To achieve the ‘cauliflower’ or bloom effects seen in the sample, you can drop a tiny bit of clean water into the semi-drying paint. This pushes the pigment aside, creating those lovely soft edges. -
Lifting highlights:
If a section gets too dark, rinse your brush, dry it well on a paper towel, and lift the color off the paper while it’s still damp to create a highlight. -
Painting the second heart:
Move to the second heart (middle right). Repeat the process, perhaps using a slightly different mix of peach and pink to give it a unique character. -
Painting the third heart:
Paint the bottom center heart. I like to make the lowest heart slightly more saturated to ‘anchor’ the composition visually. -
Drying time:
Let the hearts dry completely. The paper must be bone dry before you add the metallic details, or the gold will bleed into the pink.
Step 3: Golden Details
-
Mixing the gold:
Prepare your gold paint. If using watercolor gold, wet the pan thoroughly to get a creamy consistency. If using acrylic or gouache, thin it slightly so it flows off a small brush. -
Painting large stars:
Switch to your smallest detail brush. Locate the empty spaces around the hearts and paint a few larger, five-pointed stars. Keep them whimsical; they don’t need to be geometrically perfect. -
Adding tiny stars:
Fill in smaller gaps with tiny four-pointed sparkly shapes or simple diamond shapes. -
Micro dots:
Dip the tip of your brush in the gold and add tiny micro-dots or ‘stardust’ scattered randomly throughout the white space. -
Heart accents:
For a magical touch, you can add a tiny white or gold star directly on top of one of the hearts, like a reflection shine. -
Final assessment:
Step back and look at the balance of your galaxy. Add a few more gold specs if any area feels too empty.
Make It Pop
Add a tiny drop of white gouache to the center of your sparkles or the highlight of the hearts. The opaque white creates a bright, reflective shine that makes the piece look glossy.
Now you have a sweet, romantic illustration perfect for scanning into a greeting card or framing for a nursery


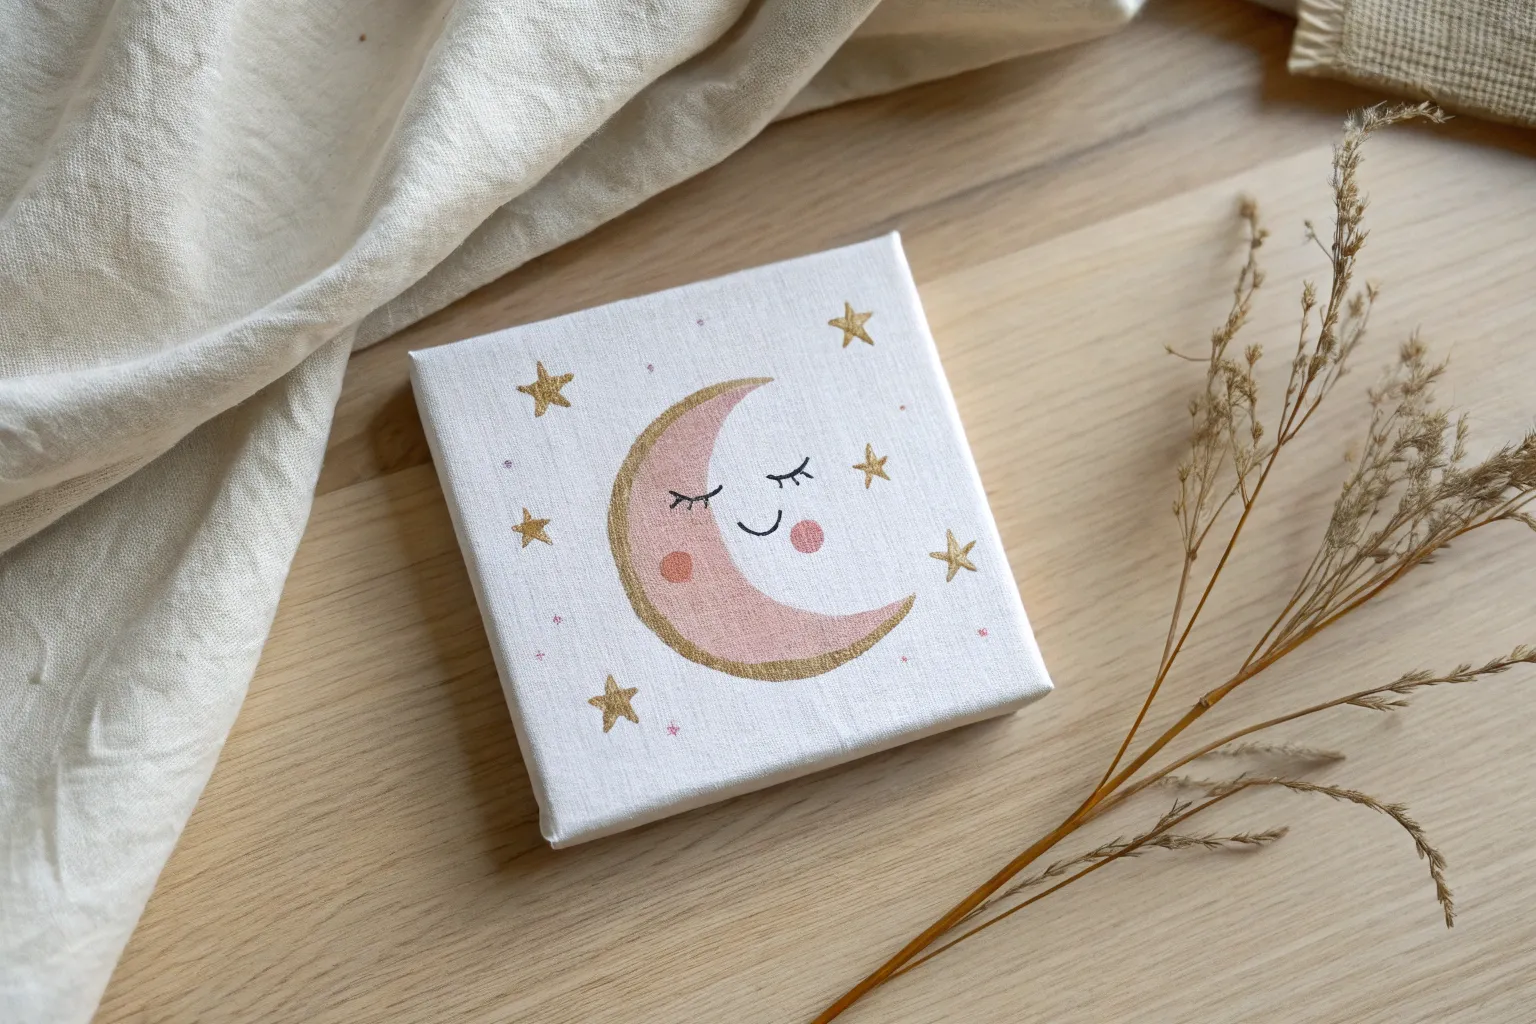
Dreamy Pink Sky With A Crescent Moon

Capture the magic of twilight with this serene acrylic painting featuring billowing pink and purple clouds against a soft blue sky. The gentle gradients and fluffy textures make this piece perfect for beginners looking to practice blending and cloud techniques.
Detailed Instructions
Materials
- Small square canvas (e.g., 6×6 or 8×8 inches)
- Acrylic paints: Titanium White, Baby Blue, Light Pink, Lavender (or Purple mixed with White)
- Flat brush (roughly 1 inch for background)
- Medium round brush
- Small detail brush
- Palette or paper plate
- Cup of water and paper towels
Step 1: Creating the Gradient Sky
-
Paint the top section:
Start by squeezing out your Baby Blue and Titanium White paints. Using your flat brush, paint the top third of the canvas with the blue, ensuring you cover the top edge of the canvas as well. -
Blend downwards:
While the blue is still wet, mix a little white into it to lighten the shade as you move toward the middle of the canvas. -
Introduce purple:
Clean your brush and pick up your Lavender paint. Apply this to the middle section of the canvas, slightly overlapping with the wet blue edge above it. -
Create the transition:
Use gentle horizontal strokes back and forth where the blue and lavender meet to create a seamless, soft transition. If the paint feels too dry to blend, dip just the corner of your brush in water. -
Finish the background:
Apply your Light Pink paint to the bottom third of the canvas. Blend it up into the lavender section just like before, creating a smooth gradient from blue to purple to pink. Don’t forget to paint the sides of your canvas to match the colors on the front.
Step 2: Painting the Fluffy Clouds
-
Mix your cloud colors:
Prepare three shades of pink/purple for your clouds: a dark lavender for the shadows, a medium pink for the body, and a very pale pink for highlights. -
Block in cloud shapes:
Switch to your medium round brush. Using the darkest lavender shade, map out the basic rounded shapes of your cloud placement along the bottom half and rising up the right side. -
Add volume:
Load your brush with the medium pink shade. Dab paint onto the upper curves of your dark shapes using a stippling motion (tapping the brush up and down) to create a fluffy texture. -
Refine the edges:
Clean your brush and pick up some Titanium White mixed with a tiny drop of pink. Outline the very tops of the clouds with scalloped, rounded strokes. -
Soften the blend:
While the white edges are wet, gently pull some of that white paint downwards into the pink body of the cloud using a dry brush. This softens the line so it doesn’t look like a cartoon outline. -
Layering details:
Repeat the highlighting process on inner sections of the clouds to make them look three-dimensional. Think of them as piles of cotton balls; the ones in front need their own bright top edge. -
Side wrapping:
Extend key cloud shapes around the sides of the canvas so the image looks complete from every angle.
Cloud Fluff Trick
Use a dry specific ‘scruffy’ old brush or even your finger to smudge the bottom of the clouds into the background sky for a mistier look.
Step 3: Celestial Details
-
Position the moon:
Wait for the background sky to be dry to the touch. Using a small detail brush and pure Titanium White, paint a small ‘C’ shape in the upper left quadrant. -
Refine the moon shape:
Thicken the center of the arc and taper the ends to sharp points to create a clean crescent moon. -
Add stars:
Dip the very tip of your detail brush into white paint. Gently dot the canvas in the blue section to create distant stars. -
Vary star sizes:
Make some dots slightly larger than others for variety, or paint tiny crosses to represent twinkling stars. -
Final touches:
Check your cloud highlights one last time. If the white has faded as it dried, add a second layer to the brightest peaks for extra ‘pop’.
Make It Sparkle
Once the painting is fully dry, apply a layer of clear glitter glaze over the clouds or just on the moon to give the artwork a magical shimmer.
Place your new masterpiece on a shelf or windowsill where it can remind you to keep your head in the clouds


Tiny Rainbow With Puffy Cloud Ends
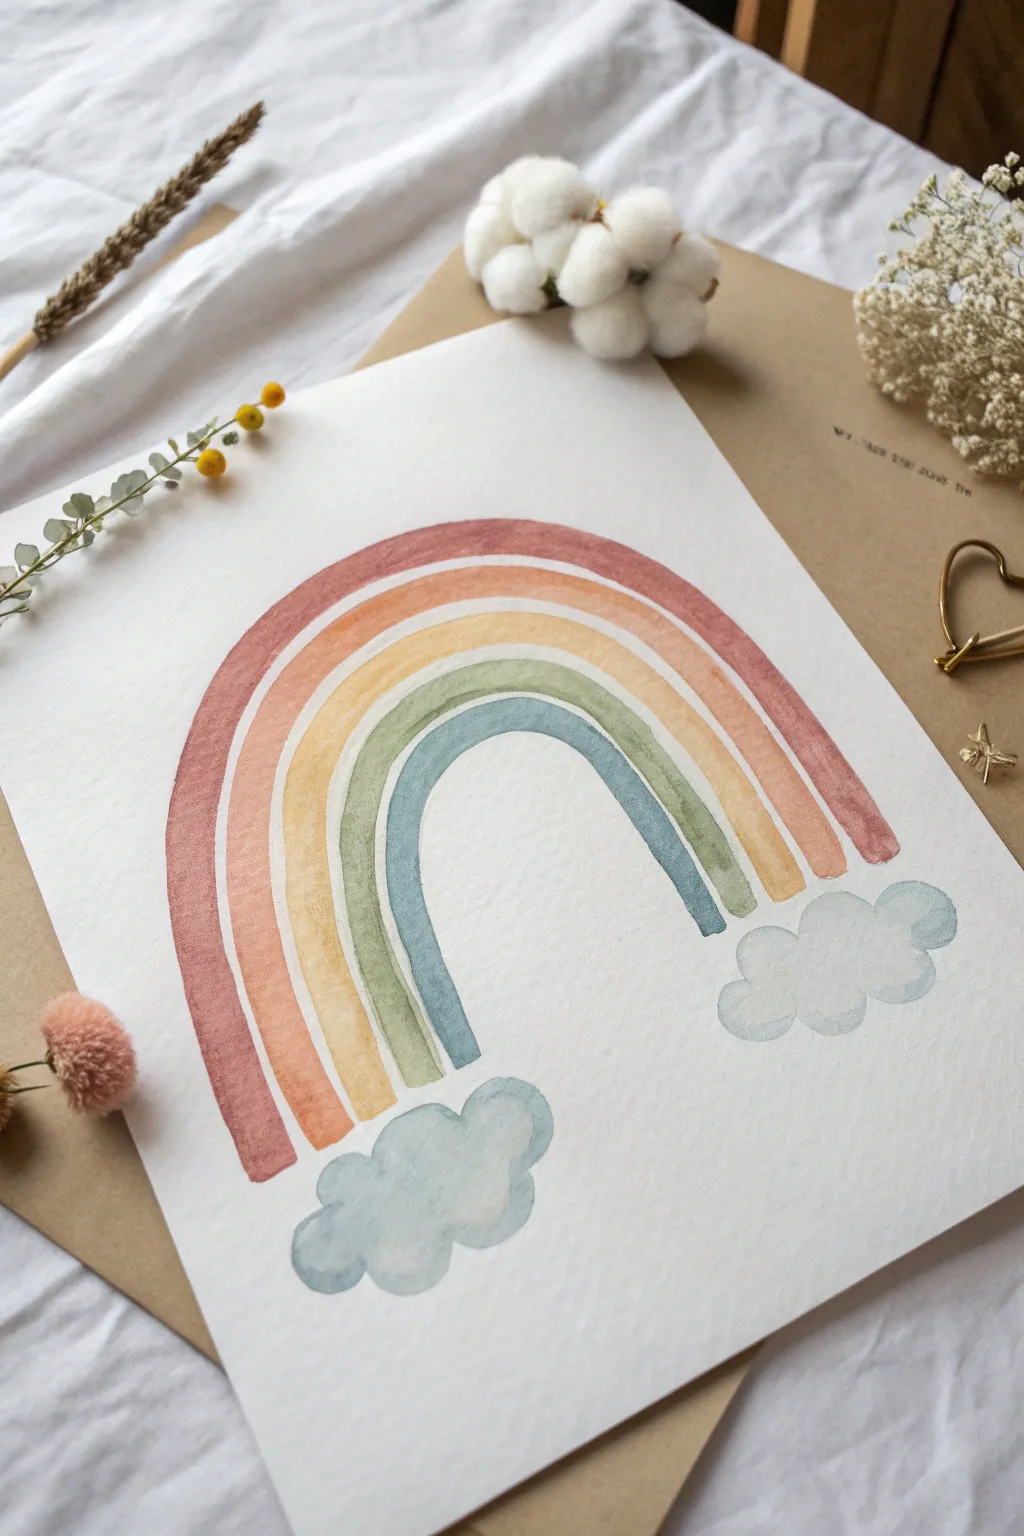
This charming, muted rainbow painting embraces a soft, bohemian aesthetic with earthy tones and fluffy cloud bookends. It’s a forgiving project perfect for beginners, focusing on organic arcs rather than strict perfection.
Step-by-Step
Materials
- Cold-press watercolor paper (300 gsm)
- Watercolor paint set
- Round watercolor brush (size 6 or 8)
- Small round brush (size 2) for details
- Jar of clean water
- Paper towel
- Pencil for light sketching
- Kneaded eraser
Step 1: Preparation & Sketching
-
Paper placement:
Begin by taping down your watercolor paper to a hard surface if you aren’t using a block. This prevents buckling as you apply water. -
Sketch the baseline:
Using a very light hand, draw a horizontal line near the bottom third of your paper to ensure your rainbow’s base is level. -
Map the clouds:
Sketch two abstract, puffy cloud shapes at either end of your baseline. Keep the lines incredibly faint so they disappear under the paint later. -
Draft the arcs:
Lightly sketch the five arches of the rainbow connecting the two clouds. Don’t worry about perfect symmetry; a slightly hand-drawn look adds character. -
Lighten the sketch:
Take your kneaded eraser and gently roll it over the pencil lines until they are barely visible ghosts.
Fixing Bleeds
If two wet stripes accidentally touch and bleed, dry your brush on a towel and gently lift the excess paint away. Wait for it to dry completely before repainting the edge.
Step 2: Painting the Rainbow Arcs
-
Mix the red tone:
Create a muted red by mixing a standard crimson with a tiny touch of brown or burnt sienna to desaturate it. Test the color on a scrap piece of paper first. -
Paint the outer arch:
Using your medium round brush, paint the outermost arch. Start from the left cloud and sweep over to the right in one confident stroke if possible, but short connected strokes work too. -
Mix the orange:
Prepare a soft orange hue. If your orange is too neon, tone it down with a dab of the red mixture you just used. -
Paint the second arch:
Leave a tiny sliver of white space—about a millimeter—between the red arch and this new orange one to prevent the wet colors from bleeding into each other. -
Mix the mustard yellow:
Create a mustard yellow by mixing yellow ochre with a hint of standard yellow. It should feel warm and earthy. -
Paint the middle arch:
Apply the yellow strip, maintaining that consistent thin gap of white paper between this stroke and the orange one. -
Mix the sage green:
Mix a sap green with a little grey or a touch of red to neutralize it into a sage color. -
Paint the green arch:
Carefully paint the fourth arch. I like to rotate the paper slightly here to get a better angle for my hand. -
Mix the slate blue:
Finally, mix a blue that leans towards grey or denim, avoiding bright primary blues. -
Paint the inner arch:
Paint the final, smallest arch. Let all the rainbow stripes dry completely before moving on to the clouds.
Add Sparkle
Once fully dry, use metallic gold watercolor or a gold gel pen to add tiny stars or dots around the clouds for a magical nursery-art finish.
Step 3: Finishing with Clouds
-
Prepare a watery blue:
Dilute your slate blue mix significantly with water until it is a very pale, transparent wash. -
Outline the first cloud:
Using the smaller brush, paint the lumpy outline of the left cloud. Use a slightly more concentrated pigment for the edge to define the shape. -
Fill the form:
Immediately rinse your brush, dry it slightly, and drag the wet edge of the outline inward to fill the cloud with a soft, uneven wash. -
Repeat for the second cloud:
Do the same technique for the right cloud, ensuring the paint touches the ends of the rainbow stripes so they look ‘tucked in’. -
Final dry:
Let the artwork sit flat until it is bone dry to avoid any water runs.
You now have a lovely piece of wall art ready to frame
BRUSH GUIDE
The Right Brush for Every Stroke
From clean lines to bold texture — master brush choice, stroke control, and essential techniques.
Explore the Full Guide
Strawberry With Cute Seeds And A Simple Shine Spot
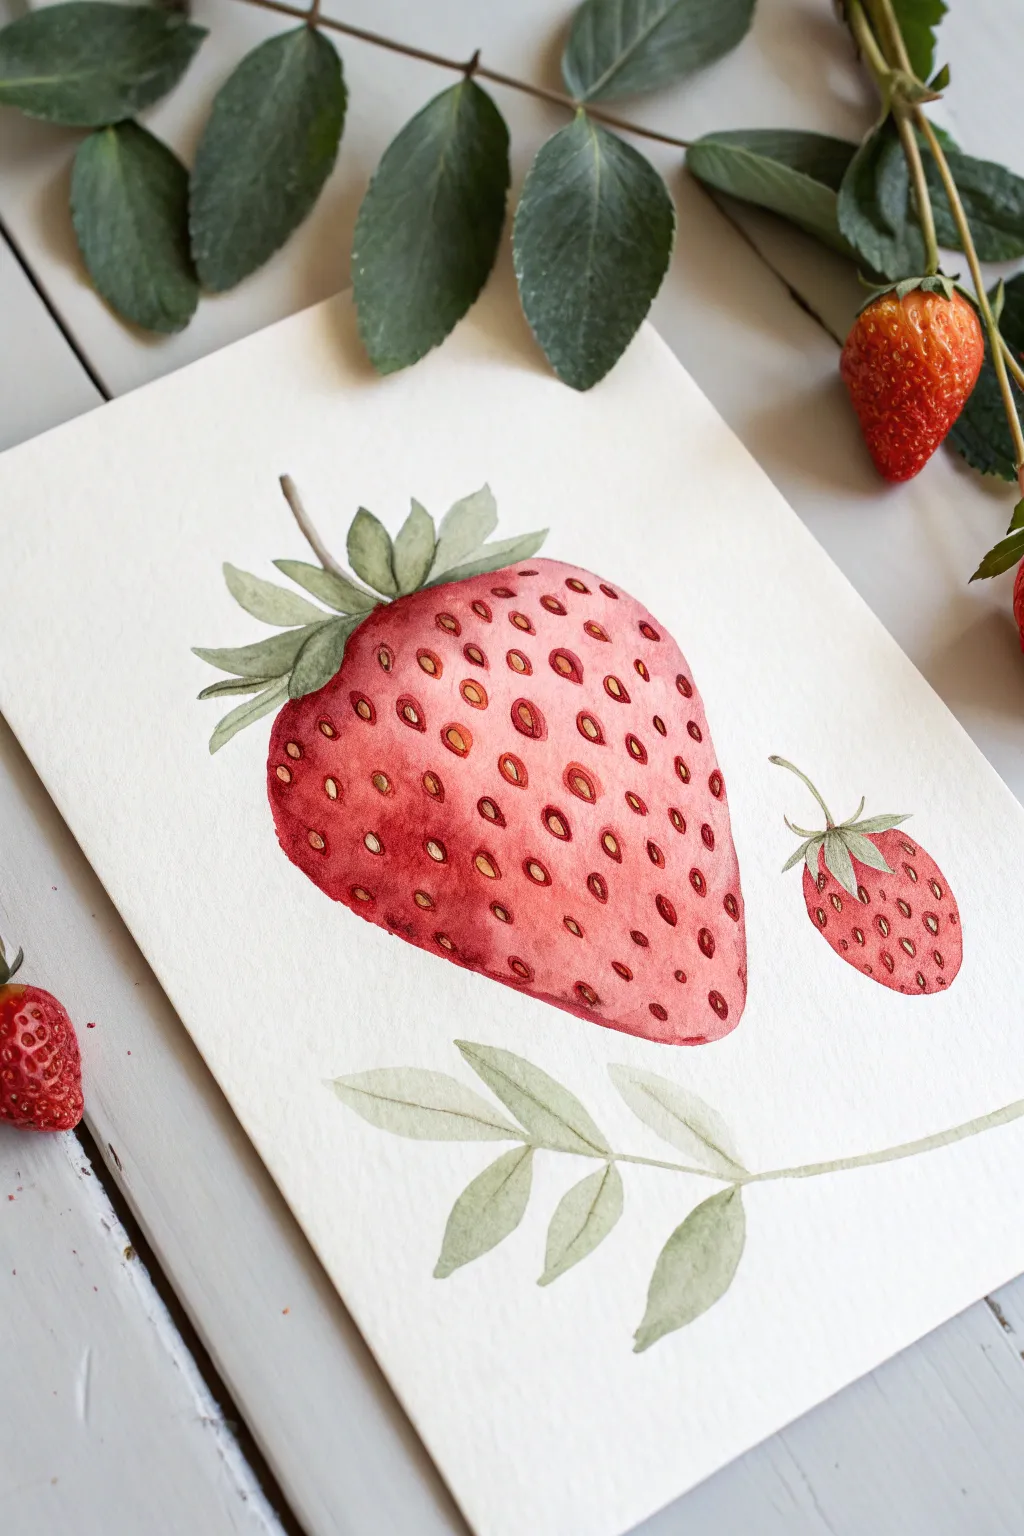
Capture the juicy vibrance of summer with this delightful watercolor study featuring a large, detailed strawberry alongside a petite berry and delicate leaves. This beginner-friendly project focuses on building layers of red to create volume and adding precise seed details for a realistic yet charming finish.
Step-by-Step Tutorial
Materials
- Cold press watercolor paper (300 gsm)
- Watercolor paints (Alizarin Crimson, Scarlet Lake, Sap Green, Yellow Ochre, Burnt Umber)
- Round watercolor brushes (size 6 for washes, size 2 for details)
- Pencil (HB) and kneadable eraser
- Clean water and paper towels
- White gouache or white gel pen (optional for highlights)
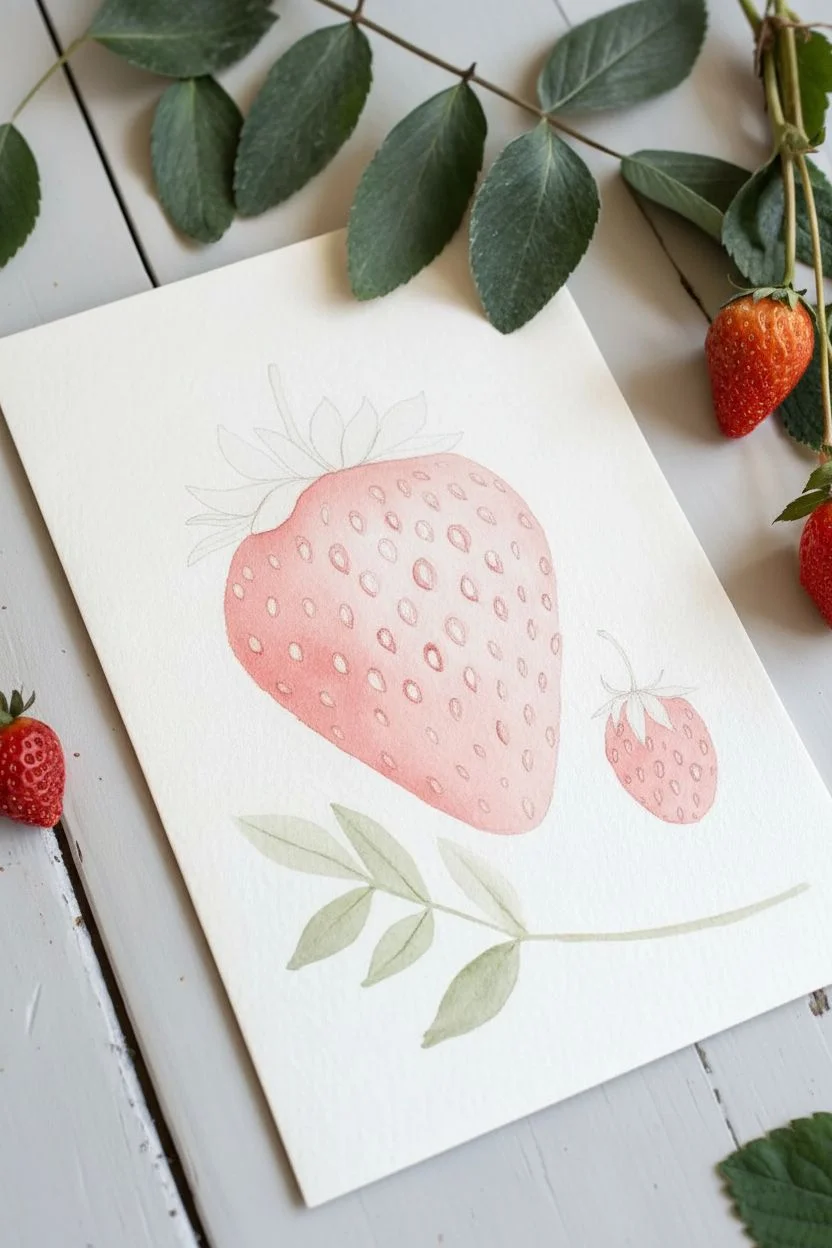
Step 1: Sketching and Base Washes
-
Outline the shapes:
Start by lightly sketching the large strawberry shape in the center of your paper, which looks a bit like a rounded heart with the bottom point flattened. Add the smaller berry to the right and a leafy stem section below. Keep your pencil lines extremely faint so they won’t show through the transparent watercolor later. -
Mask the seeds:
Before painting any red, you need to plan where the seeds go. Small oval shapes should be scattered across the berry. You can either carefully paint around these tiny spots or use masking fluid to protect the paper white; for this tutorial, we will carefully paint around them to keep edges soft. -
First red wash:
Mix a watery wash of Scarlet Lake. Apply this light red layer over the entire body of the large strawberry, carefully leaving the small seed ovals unpainted. While the paint is still wet, lift a little color from the top left area with a clean, damp brush to create the initial highlight zone. -
Paint the leaves:
While the red dries, mix a soft Sap Green with plenty of water. Paint the leafy caps (calyx) on top of both strawberries. For the separated leaf sprig at the bottom, use the same pale green, keeping your brush strokes loose and fluid. -
Base for the small berry:
Apply the same light red wash to the small strawberry on the right. Just like the big one, try to leave tiny speckles of white paper showing for the seeds.
Muddy colors?
If your red looks brownish, you might be overworking the paint while it’s damp. Let layers dry completely! Use a hair dryer on a low setting to speed this up.
Step 2: Building Depth and Form
-
Deepen the shadows:
Once the first layer is bone dry, mix a stronger, more concentrated Alizarin Crimson. I like to apply this to the bottom and right side of the large berry to create a shadow side, blending it gently toward the middle with a damp brush so there are no hard lines. -
Refine the leaf color:
Go back to the green leaves at the top. Add a second layer of slightly darker green (mix Sap Green with a touch of blue or brown) to the base of the leaves where they meet the berry, giving them dimension. -
Mid-tone texture:
On the large berry, use your size 6 brush to dab slightly darker red (a mix of Scarlet and Alizarin) around the seed areas. This shouldn’t be a solid wash; let the lighter red from the first layer show through in the highlighted areas to keep the fruit looking round. -
Leaf details:
Paint a thin line down the center of the detached leaves at the bottom using the darker green mix. This simple detail separates the leaf halves and adds instant realism. -
Second pass on small berry:
Add a touch of the darker red to the bottom curve of the small strawberry, reinforcing the idea that the light source is coming from the top left.
Step 3: The Seeds and Final Details
-
Color the seeds:
Now that the red body is dry, fill in those tiny white ovals we left blank. Mix Yellow Ochre with a tiny bit of red to get a warm, golden color. Paint each seed carefully with your smallest brush. -
Shadow the seeds:
To make the seeds look embedded rather than floating, mix a dark reddish-brown (Alizarin Crimson + Burnt Umber). Paint a tiny crescent shadow inside the seed pits, specifically on the upper or left edge of the seed indentation. -
Deepest shadows:
Look at the very bottom of the large strawberry. Add your most concentrated red here to ground the form. If the transition looks harsh, soften it immediately with a slightly damp clean brush. -
Leaf veins:
Use the size 2 brush and a concentrated green mix to add very fine veins to the strawberry caps. Keep these lines broken and subtle rather than continuous outlines. -
Final highlights:
Assess your lighting. If you lost your bright highlights during the painting process, you can use a tiny amount of white gouache or a white gel pen to add a dot of shine near the top left shoulder of the berry.
Seed placement pro-tip
Don’t line up your seeds in perfect rows. Stagger them slightly in diagonal curves that follow the round shape of the berry to enhance the 3D effect.
Once the paint is fully dry, erase any remaining stray pencil marks to reveal your fresh, juicy masterpiece
Smiling Bear Face In Soft Neutrals
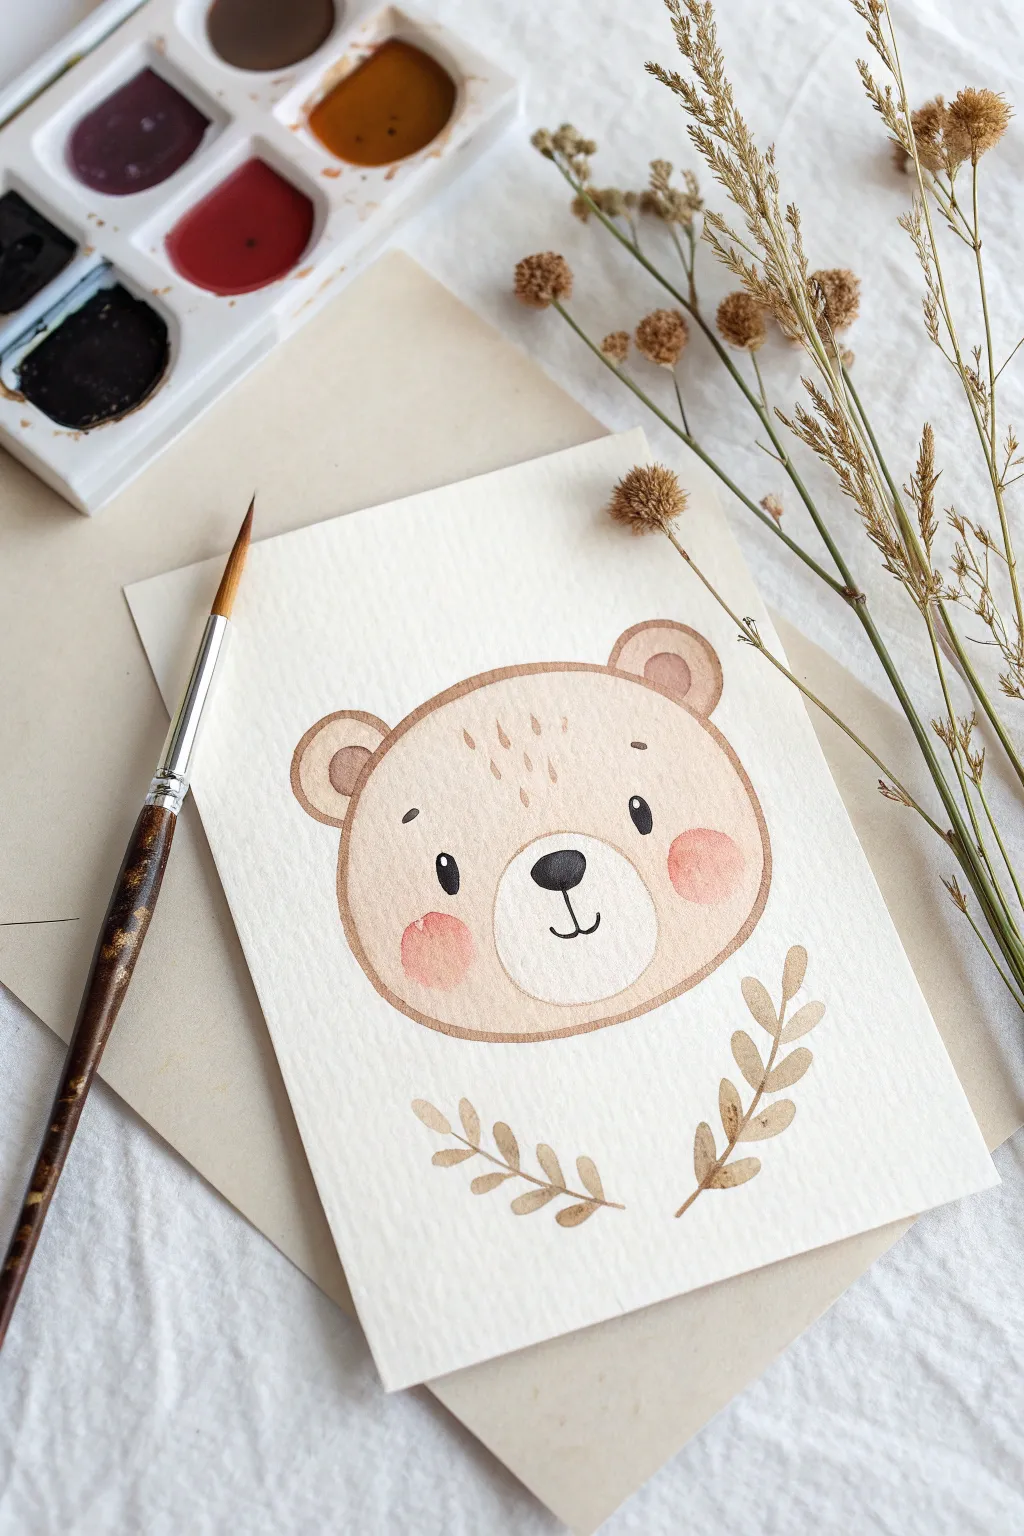
This sweet, smiling bear face painted in soft neutrals captures a sense of warmth and simplicity perfect for nursery art or greeting cards. Using gentle washes and fine lines, you’ll create a charming character framed by delicate foliage.
Step-by-Step Tutorial
Materials
- Cold-pressed watercolor paper (300 gsm)
- Round watercolor brushes (sizes 2 and 6)
- Pencil for sketching
- Kneaded eraser
- Watercolor paints: Medium Brown/Ochre, Dark Umber, Black/Payne’s Grey, Soft Pink
- Clean water jar
- Paper towel
Step 1: Sketching the Outline
-
Draw the main shape:
Start by lightly sketching a wide, slightly flattened oval for the bear’s head. Keep your pencil pressure very light so the lines don’t show through the paint later. -
Add the ears:
Sketch two rounded semi-circles on the top corners of the head. Inside each ear, draw a smaller semi-circle to define the inner ear shape. -
Place the features:
Draw an oval in the lower center of the face for the snout area. Inside this, sketch a small nose and a simple curved mouth. Mark positions for two small, wide-set eyes. -
Sketch the foliage:
Beneath the bear’s head, sketch two curved lines branching outward for the stems, adding small, simple leaf shapes along them.
Step 2: Painting the Bear
-
Mix the base color:
Prepare a watery mix of Medium Brown or Ochre. You want a very pale, milky tea consistency for the first wash of the fur. -
Wash the face area:
Using your size 6 brush, fill in the main head shape, carefully painting around the snout oval and the ears. Keep the wash even and wet. -
Paint the ears:
Using the same pale brown mix, fill in the outer ring of the ears. For the inner ear, create a slightly darker, warmer mix with a touch of pink or more brown and fill those small semi-circles while the outer ring is still drying slightly for a soft blend. -
Outline the head:
Once the main face wash is dry, mix a slightly stronger version of your brown. Use the tip of the brush to outline the head shape and ears to give the bear definition. -
Add texture:
With the smaller brush and the darker brown mix, add tiny, vertical dashed lines near the top of the forehead to suggest fur texture.
Fixing Blotchy Washes
If your main face wash dries with ‘cauliflower’ blooms, wet the area again slightly and lift pigment with a thirsty, clean brush to smooth it out.
Step 3: Adding Details & Foliage
-
Paint the cheeks:
Load a clean brush with watery Soft Pink paint. Dab two distinct circles on the cheeks. I like to let the edges soften naturally into the drying brown wash if possible, or paint them wet-on-dry for a clearer shape. -
Define the face:
Using a size 2 brush and opaque black or dark grey paint, carefully fill in the two small oval eyes. Add tiny white highlights if you wish, or leave a spec of paper white. -
Nose and mouth:
Paint the nose shape in solid black. From the bottom of the nose, draw a thin vertical line connecting to the mouth curve. Add tiny eyebrows above the eyes. -
Paint the stems:
Switch to a diluted brown-grey mix. Paint the thin central stems of the foliage at the bottom using the very tip of your brush. -
Fill the leaves:
Using the same brown-grey mix, press the belly of the brush down and lift up to create the small, almond-shaped leaves attached to the stems. -
Final touches:
Check for any uneven edges. If the snout area looks too stark, you can add a barely-there wash of cream or extremely pale grey to shadow the bottom edge.
Level Up: Texture
Use a dry brush technique with darker brown on the edges of the ears and cheeks to make the bear look extra fuzzy and soft.
Allow the entire piece to dry completely before erasing any visible pencil marks to reveal your adorable bear portrait

PENCIL GUIDE
Understanding Pencil Grades from H to B
From first sketch to finished drawing — learn pencil grades, line control, and shading techniques.
Explore the Full Guide
Happy Frog Peeking Out Of Water
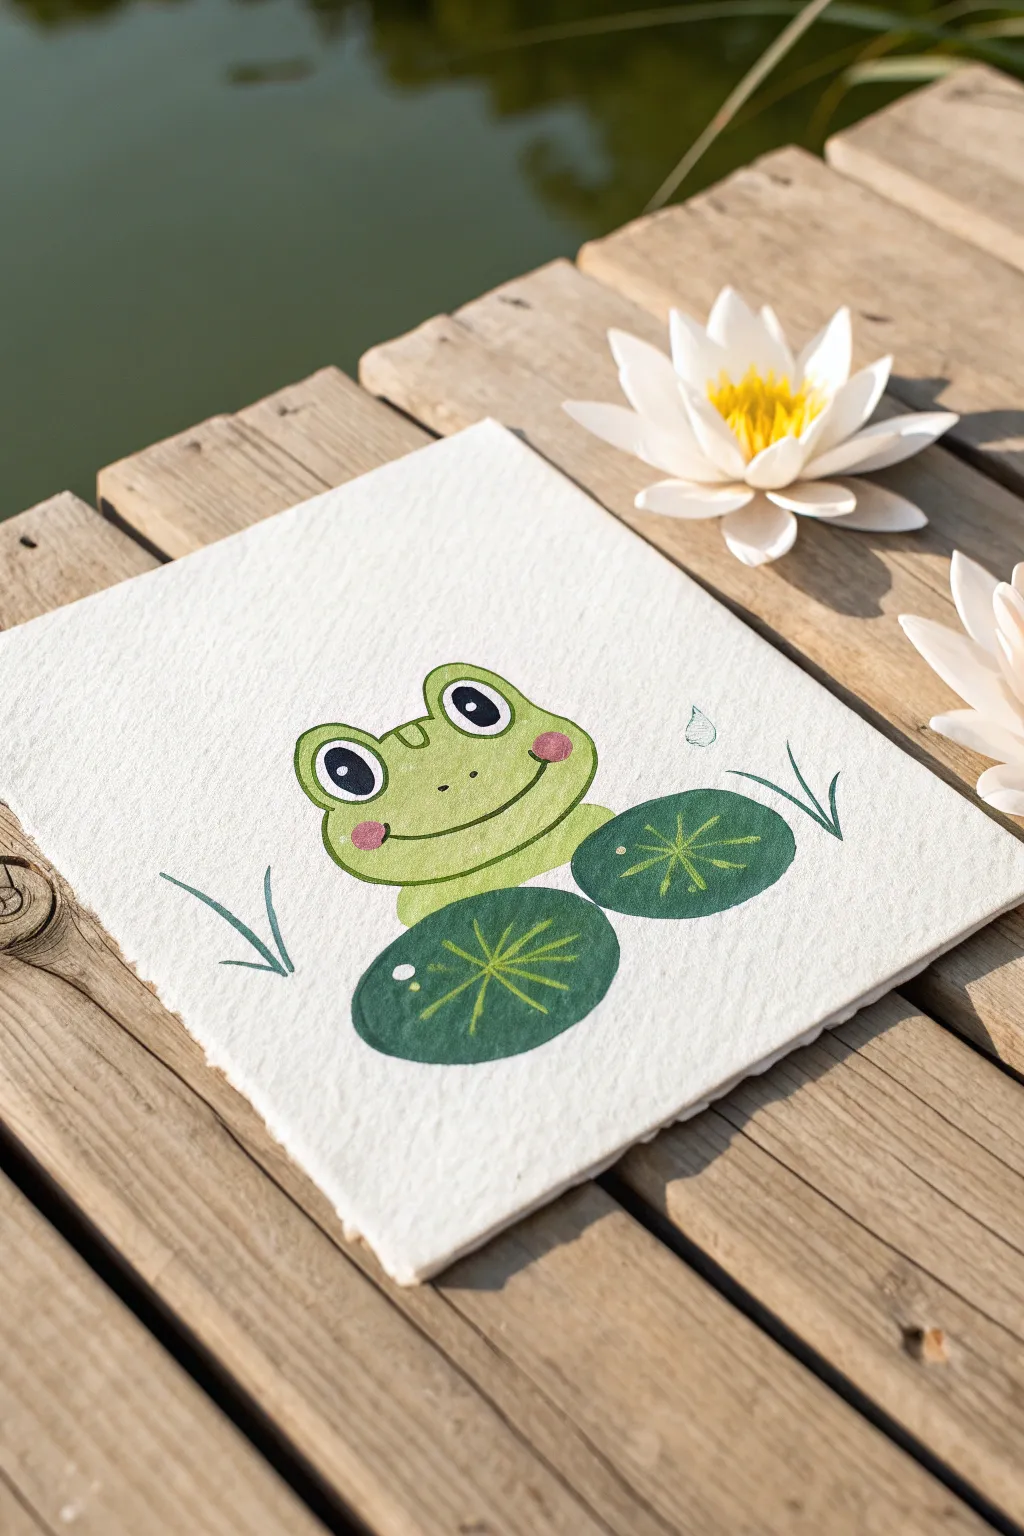
This charming, smiling frog painting uses simple shapes and flat colors to create a cheerful scene perfect for beginners. The textured paper adds a lovely organic feel to the crisp lines of this gouache or acrylic illustration.
How-To Guide
Materials
- Cold press watercolor paper (heavy texture)
- Pencil and eraser
- Gouache or matte acrylic paints (Green, Dark Green, Pink, Black, White)
- Round synthetic brushes (sizes 2 and 4)
- Fine liner brush (size 0 or 00)
- Palette for mixing
- Water cup and paper towels
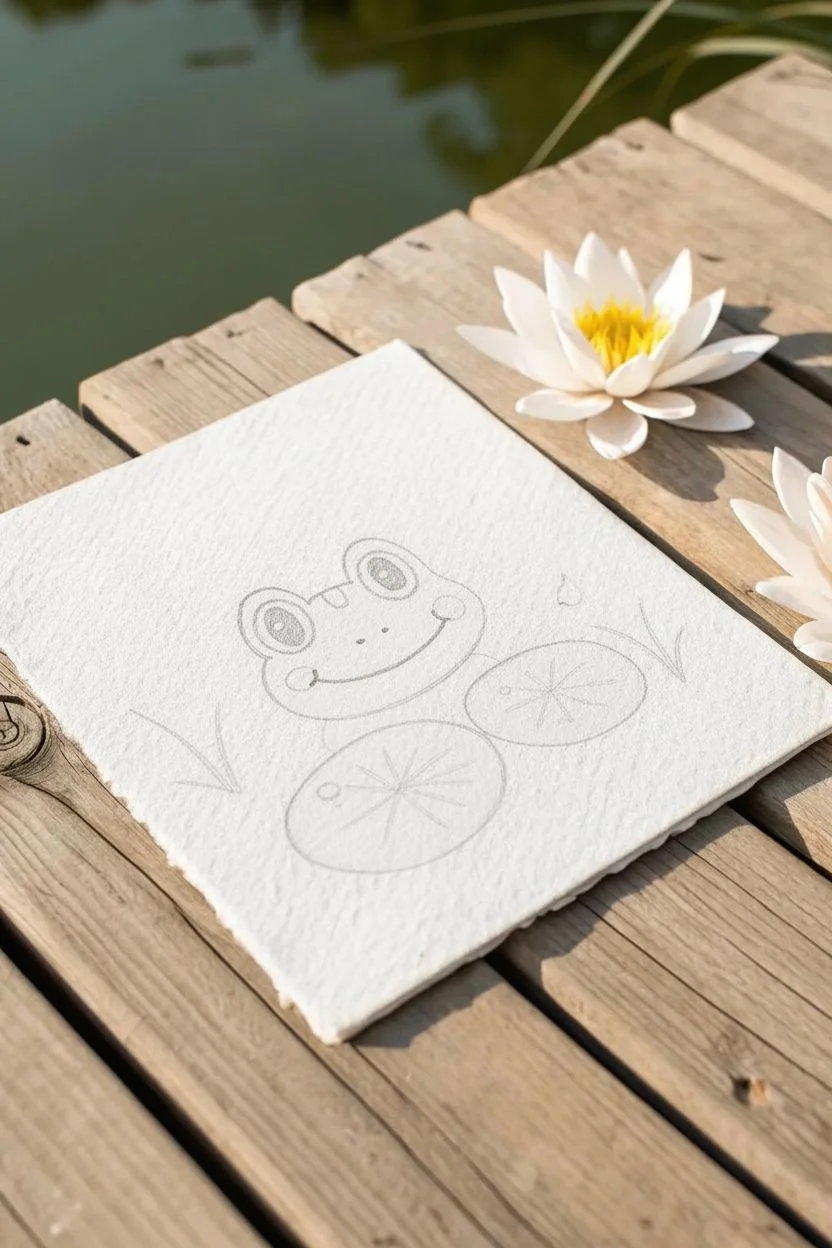
Step 1: Sketching the Shapes
-
Base sketch:
Start by lightly sketching a wide oval shape for the frog’s head near the center of your paper. Don’t press too hard with your pencil so lines can be easily erased later. -
Add the eyes:
Draw two prominent semi-circles on top of the oval for the eyes. Inside each, sketch a large oval for the pupil. -
Form the lily pads:
Below the head, sketch two overlapping ovals for the lily pads. They should look like they are floating in front of the frog, partially covering its body. -
Finalize details:
Add smaller details like the two curved lines for the nose, a wide U-shape for the smile, and circular cheeks. Add simple curved lines on either side to suggest water ripples or reeds.
Smooth Operator
To get those clean, flat shapes typical of this illustration style, mix your gouache to the consistency of heavy cream before applying.
Step 2: Painting the Frog
-
Base green layer:
Mix a bright, yellowish-green. Using your size 4 round brush, fill in the entire head shape, carefully painting around the eye areas and the cheek circles. -
Second coat:
Gouache can sometimes be streaky. Once the first layer is dry, I like to add a second thin coat of the same green to ensure the color is solid and opaque. -
Rosy cheeks:
Take a soft pink color and fill in the circular cheek shapes. Start with a light wash and build up the opacity if needed. -
Painting the eyes:
Use white paint to fill the large eye shapes. Let this dry completely before moving on to the pupils to prevent bleeding. -
Pupils:
Using black paint and a size 2 brush, paint the large oval pupils inside the white areas, leaving a tiny sliver of white around the edge if you like, or filling them entirely. -
Eye shine:
Once the black is bone dry, add a small white dot in the upper corner of each pupil for that classic ‘sparkle’ look.
Step 3: Lily Pads and Finishes
-
Dark green pads:
Mix a deep, forest green shade. Paint the two oval lily pads beneath the frog. These should contrast nicely with the lighter lime green of the frog. -
Pad details:
Mix a lighter yellow-green (lighter than the pad, similar to the frog). Using your fine liner brush, paint a central dot on each pad and radiating lines outward like a starburst. -
Outline work:
Using a very thin brush and dark olive or black paint, carefully outline the frog’s head, the eyes, and the lily pads to define the shapes. -
Facial features:
Paint the nostrils and the wide smile using the same dark outline color. A steady hand is key here. -
Water accents:
Use a teal or bluish-green to paint the simple reed lines on the left and right sides of the frog. -
The droplet:
Finally, add a simplified water droplet shape floating near the frog using a light blue outline.
Make It Pop
Add a tiny highlight of white on the top curve of the lily pads or the frog’s nose to make them look wet and shiny.
Let your little green friend dry completely before displaying it on a desk or shelf to bring a smile to your day
Mini Peach With Blushy Cheeks
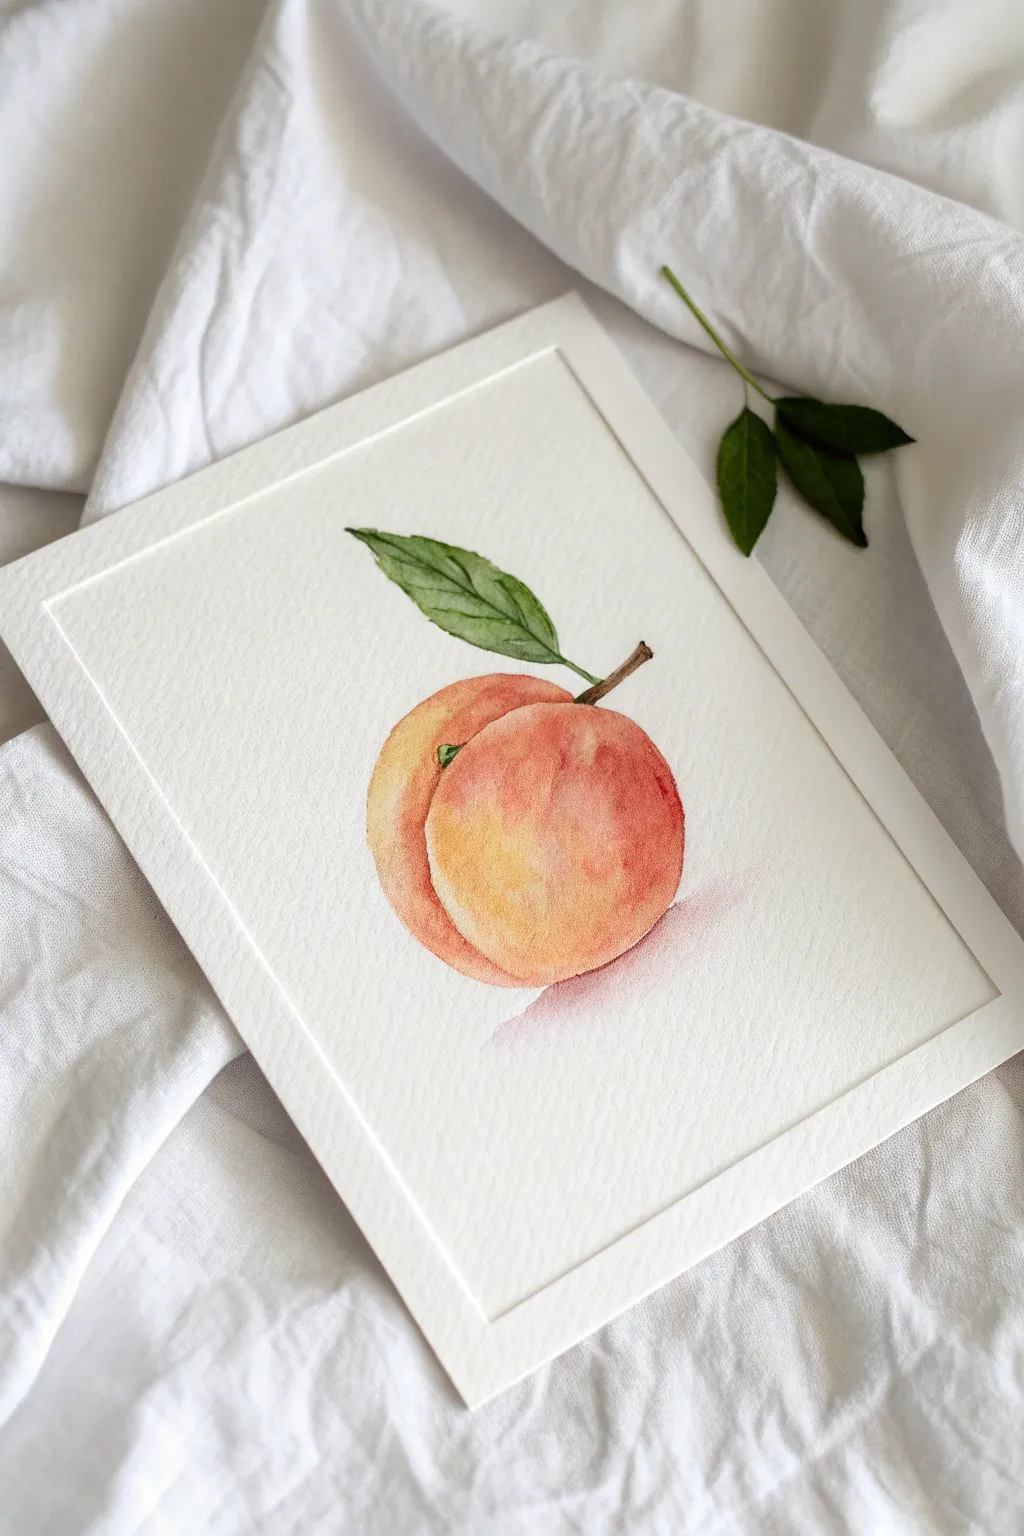
Capture the soft sweetness of summer with this delicate watercolor tutorial featuring a sun-ripened peach. You will learn to blend yellow and red hues wet-on-wet to create that signature fuzzy skin texture and gentle glow.
Step-by-Step Tutorial
Materials
- Cold press watercolor paper (300 gsm)
- Watercolor paints (Lemon Yellow, Cadmium Red or Alizarin Crimson, Sap Green, Burnt Umber)
- Round brushes (sizes 4 and 8)
- Pencil (HB or H)
- Kneaded eraser
- Clean water jar
- Paper towel
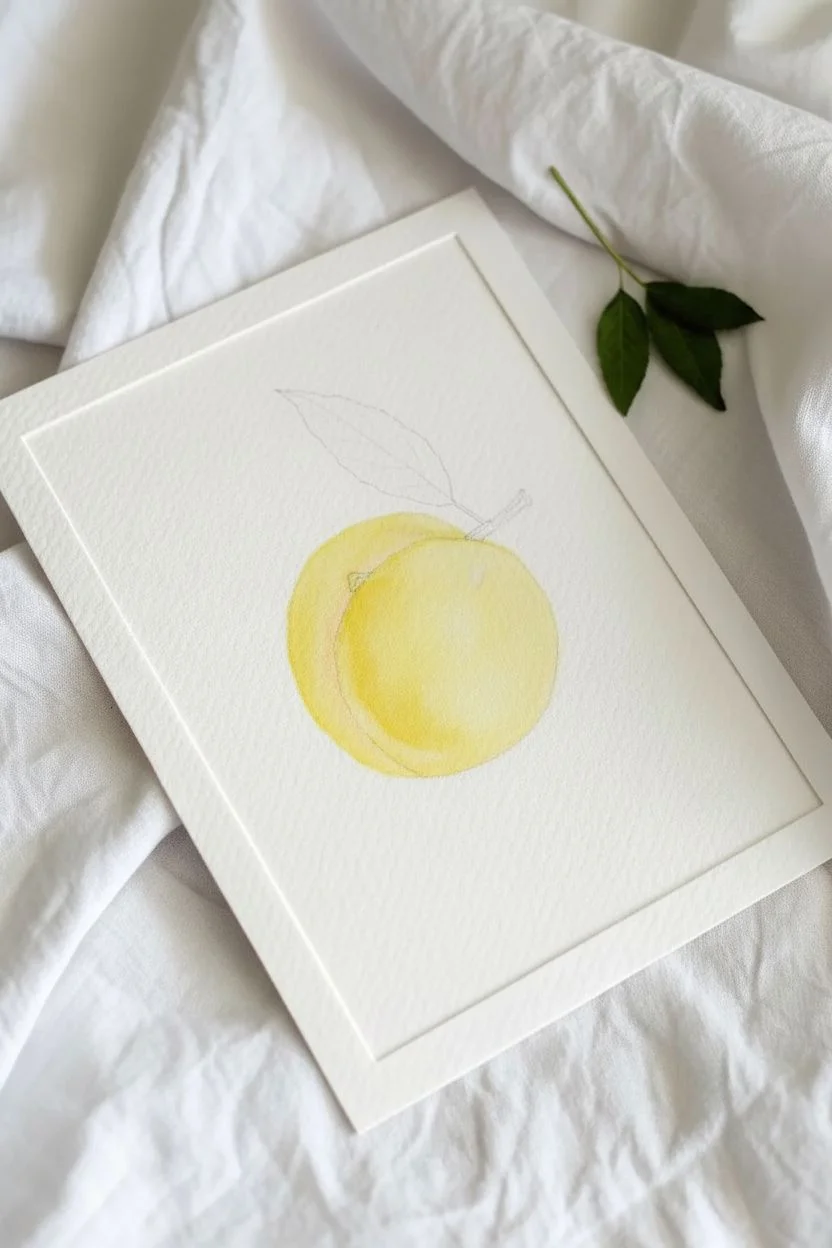
Step 1: Sketching and Base Layer
-
Outline the shape:
Lightly sketch a round shape for the peach. Add a cleft or indentation near the top center where the stem will emerge so the fruit doesn’t look perfectly spherical. -
Add the stem and leaf:
Draw a short, slightly curved stem coming out of the cleft. Attach a single, elongated leaf extending upward and to the left, adding a central vein guideline. -
Lighten the lines:
Use your kneaded eraser to roll over the sketch, lifting up most of the graphite until only faint guidelines remain so the pencil won’t show through the transparent paint. -
Wet the paper:
With a clean size 8 brush and clear water, wet the entire inside area of the peach fruit body. The paper should glisten but not have standing puddles. -
First wash of yellow:
Load your brush with a watery Lemon Yellow. Drop this color onto the wet paper, mostly focusing on the center and left side of the peach where the light would hit.
Step 2: Building the Blush
-
Introduce the red:
While the yellow layer is still wet, mix a watery red or coral shade. Gently touch this color to the right side and bottom edges of the peach. -
Blend the gradients:
Let the wet yellow and red paints bleed into each other naturally. If the transition is too harsh, clean your brush, dampen it slightly, and gently tickle the border where the colors meet. -
Deepen the shadows:
Mix a slightly more concentrated red with a touch of purple or brown. Drop this into the cleft near the stem and along the bottom right curve to create volume. -
Lift a highlight:
If your paint has covered the highlight area too much, use a clean, thirsty brush to lift a small spot of pigment on the upper left cheek of the fruit. -
Let it dry completely:
Allow the fruit body to dry fully before moving on. The paper must be bone dry to prevent the green leaf from bleeding into the peach.
Hard Edges?
If you get ‘cauliflower’ blooms or hard edges inside the fruit, your paper may have dried too fast. Soften dry edges with a damp brush.
Step 3: Details and Definition
-
Paint the leaf base:
Mix a fresh Sap Green. Using the size 4 brush, paint the leaf shape carefully. Start with a lighter green wash. -
Add leaf texture:
While the leaf is still damp, drop in a darker green mixed with a little blue along the center vein and one edge to create a sense of folding. -
Paint the stem:
Using Burnt Umber and a fine tip, paint the woody stem. I like to add a tiny touch of the stem color bleeding slightly into the very top of the peach for realism. -
Refine the cleft:
Once dry, use a very small amount of reddish-brown to sharpen the deep shadow right where the stem meets the fruit. -
Cast shadow:
Mix a very watery purple-grey. Paint a soft, diffuse shadow underneath the peach to ground it, softening the edges with clean water so it fades out. -
Final touches:
Evaluate the painting. If the peach looks too flat, you can add a final transparent glaze of red over the shadow side to boost the vibrancy.
Fuzzy Texture
To mimic peach fuzz, sprinkle a tiny pinch of salt onto the wet paint of the peach body. Brush it off once totally dry for texture.
Frame this sweet little artwork in a simple white mat to let the delicate colors shine


Cute Planets With Ringed Hearts In Space
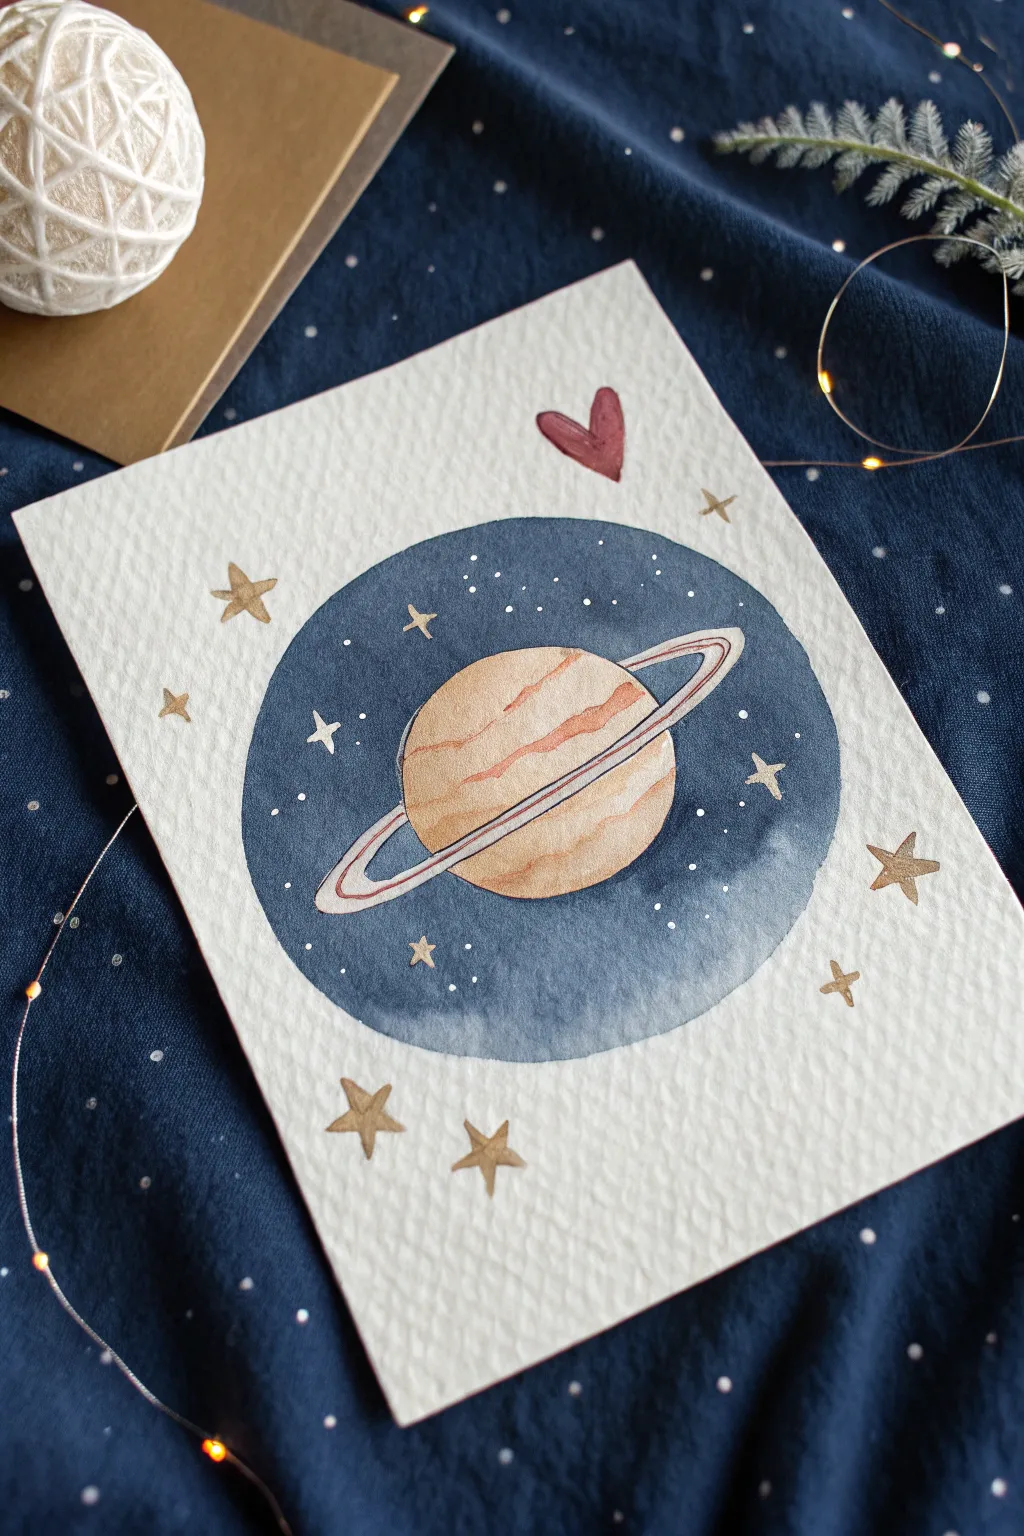
Capture the whimsy of outer space with this charming watercolor illustration featuring a ringed planet floating in a starry navy circle. The combination of textured paper, warm beige tones, and a pop of heart-shaped red makes this perfect for a handmade greeting card or wall art.
Detailed Instructions
Materials
- Cold press watercolor paper (300 gsm)
- Watercolor paints (Navy Paynes Gray, Yellow Ochre, Burnt Sienna, Alizarin Crimson)
- White gouache or white gel pen
- Gold metallic watercolor or gold ink
- Compass or circular object for tracing
- Round brushes (sizes 2, 4, and 6)
- Pencil and kneaded eraser
- Masking fluid or white wax crayon (optional)
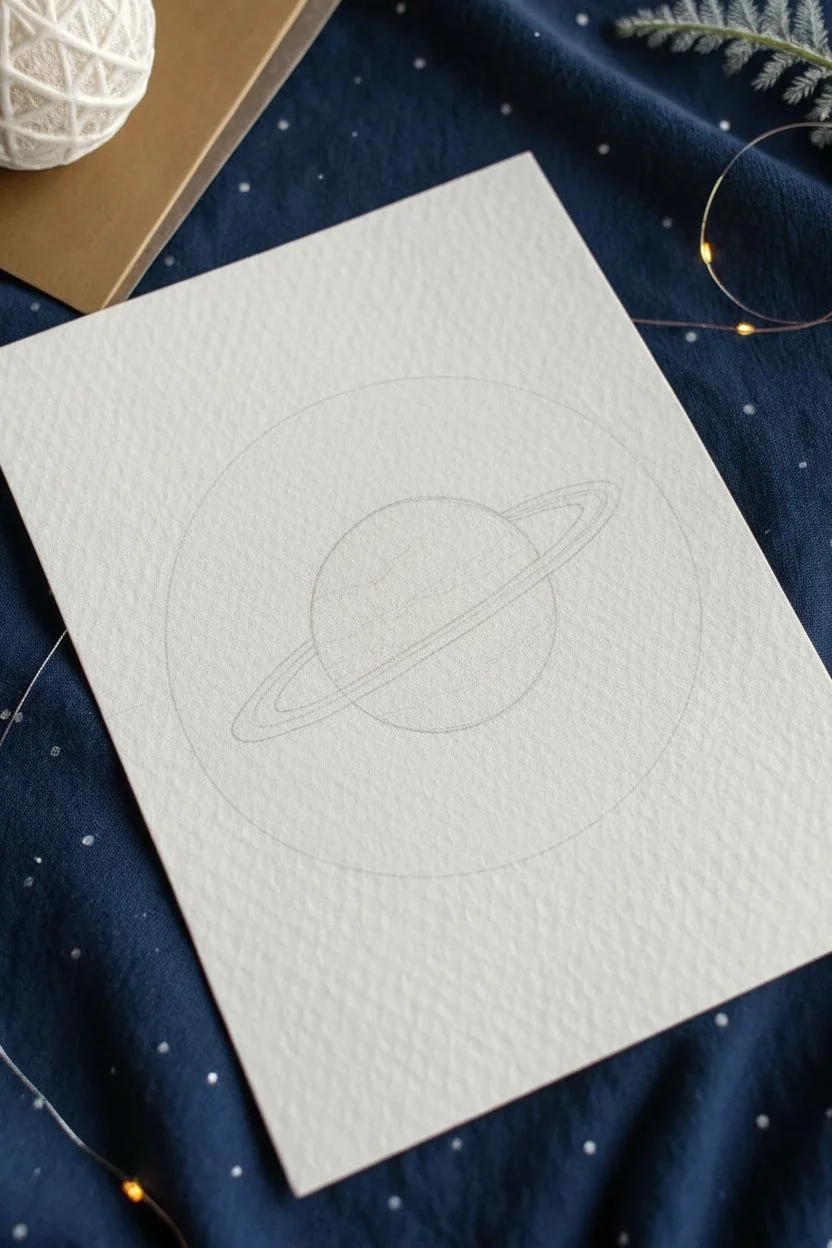
Step 1: Planning the Cosmos
-
Trace the circle:
Start by lightly drawing a perfect circle in the center of your paper using a compass or by tracing a lid. Keep the pencil lines faint so they don’t show through the lighter paints later. -
Sketch the planet:
Inside the circle, sketch a slightly tilted sphere for the planet body. Don’t worry if it’s not perfectly round; organic shapes look artisanal. -
Add the rings:
Draw the rings specifically wrapping around the planet. The back of the ring should disappear behind the sphere, while the front passes clearly over it. Leave a small gap between the planet body and the inner ring edge. -
Place outer elements:
Outside the main circle, lightly sketch a few scattered stars and a single heart floating near the top right.
Clean Edges Pro-Tip
For the perfectly crisp outer circle edge seen in the photo, masking tape won’t work on curves. Instead, practice your brush control or use a slight amount of masking fluid on the line before painting.
Step 2: Painting the Planet
-
Base wash:
Mix a watery wash of Yellow Ochre and fill in the planet’s spherical body. Keep this layer very light and consistently wet. -
Add stripes:
While the base is still slightly damp, introduce horizontal stripes using a mix of Burnt Sienna. I like to let these bleed slightly for a soft, atmospheric look. -
Define the shadow:
Once the stripes are semi-dry, glaze a tiny amount of diluted purple or brown on the bottom right curve of the planet to give it 3D form. -
Paint the rings:
Using a size 2 brush, carefully paint the rings. Use the Ochre mix for the outer bands and leave thin white stripes between them to represent the separation. -
The heart detail:
Paint the floating heart with Alizarin Crimson. Keep the edges crisp, but allow the center to have a slightly lighter wash for volume.
Step 3: The Deep Blue Background
-
Preparing the background:
Ensure the planet is completely dry before starting the navy background. If it’s wet, the dark blue will bleed into your work. -
Outline carefully:
Load a size 4 brush with concentrated Navy Blue or Payne’s Gray. Carefully outline the planet and rings first to establish a clean barrier. -
Fill the circle:
Working quickly to avoid drying lines, fill in the rest of the large circle with the navy paint. Vary the pigment density slightly—letting it pool in some areas and be thinner in others creates a nebular texture. -
Add speckles:
While the navy paint is still wet, drop in tiny specks of clean water or sprinkle pinch of salt. This pushes the pigment away to create subtle star-like textures.
Level Up: 3D Texture
Make the stars outside the circle pop by adding a second layer of gold paint once the first is dry. This builds physical texture on the paper that catches the light beautifully.
Step 4: Starry Details
-
White stars:
Once the background is bone dry, use a white gel pen or a fine brush with white gouache to dot varying sizes of stars inside the navy circle. -
Constellation lines:
Consider connecting a few of the white dots with hair-thin lines to suggest distant constellations. -
Gold accents:
Mix your metallic gold paint. Paint the sketched stars outside the circle, filling them in solidly. -
Internal sparkle:
Add tiny gold crosses or dots inside the navy circle as well to tie the composition together. -
Final touches:
Erase any visible pencil marks around the exterior stars once the gold is dry. If the rings look too dull, add a thin highlight of white gouache along the brightest edge.
Now you have a celestial masterpiece ready to gift to a loved one or display on your desk
Whale Tail Popping Out Of Fluffy Clouds
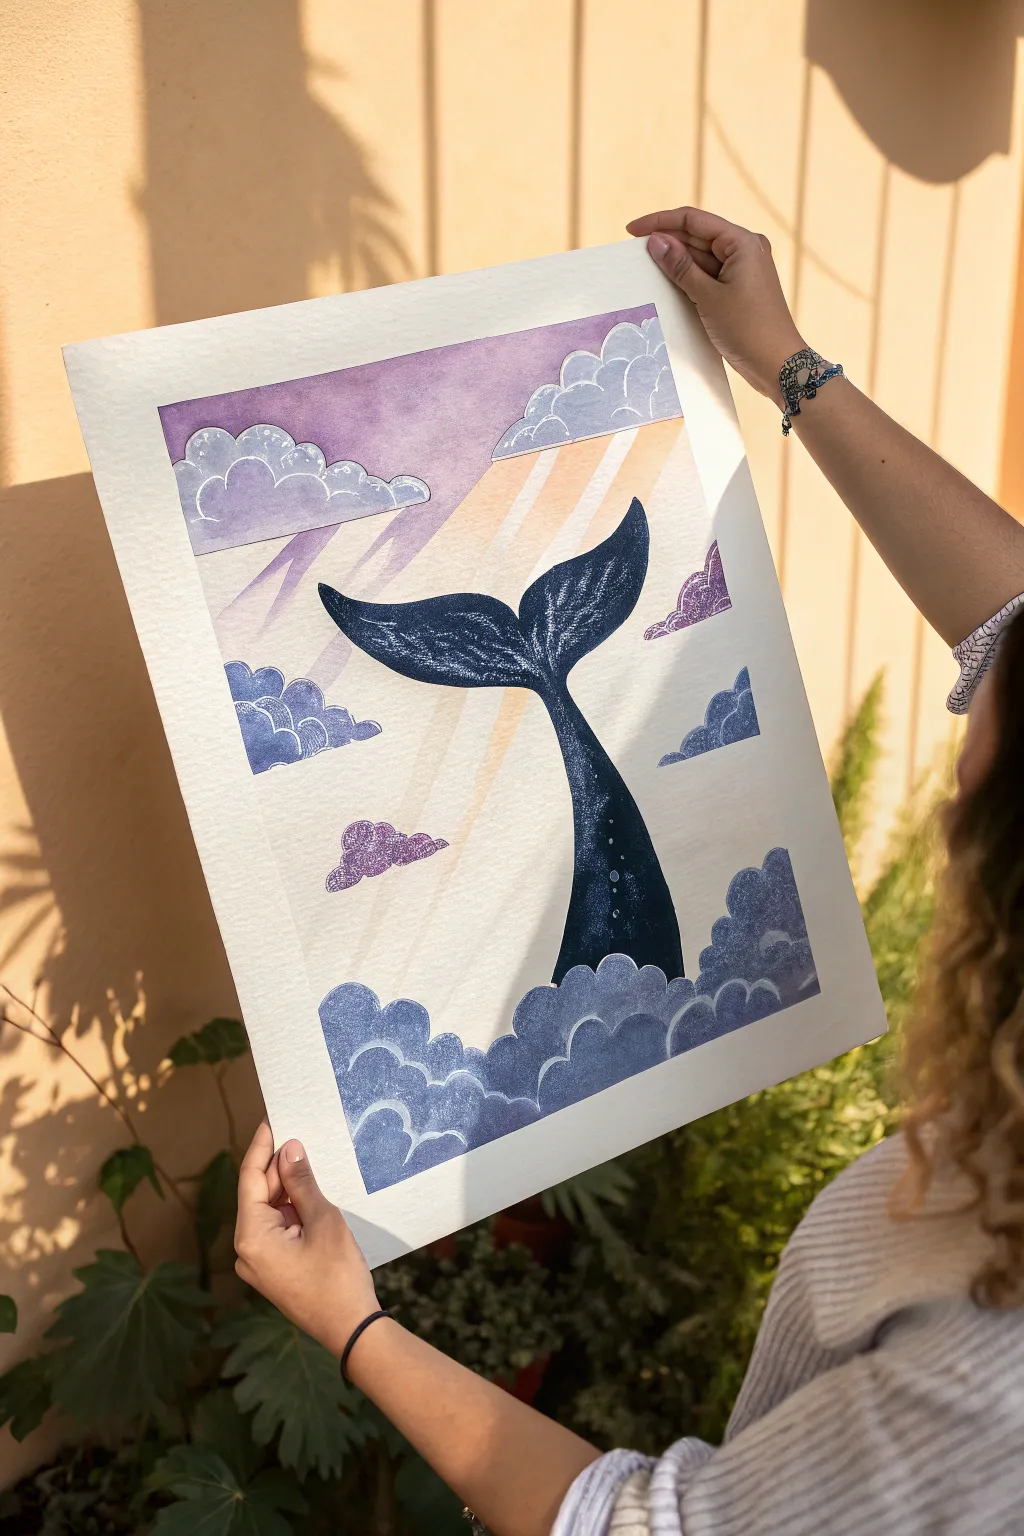
This whimsical mixed-media artwork combines soft watercolor gradients with crisp cut-paper layers to create a dreamlike scene. By painting the clouds and whale separately and assembling them, you achieve incredible depth and sharp, clean edges that traditional painting alone can’t quite match.
Step-by-Step Guide
Materials
- Heavyweight watercolor paper (300gsm, cold press)
- Watercolor paints (Indigo, Purple, Ultramarine Blue, Peach/Light Orange)
- White opacity medium (white gouache or opaque watercolor white)
- Detailed paintbrushes (round size 2 and 6)
- Precision scissors or X-Acto knife
- Foam tape or glue dots (for 3D effect)
- Pencil for sketching
- White gel pen (optional)
- Backing board or thick paper for the base
Step 1: Painting the Elements
-
Paint the background sky:
On a separate sheet of paper, paint a rectangular gradient for your main sky. Start with a deep purple wash at the top and transition into a warm, diluted peach hue towards the bottom to mimic a sunset glow. -
Add the sunbeams:
While your sky is drying, you can lift out pigment using a clean, damp brush to create the diagonal sun rays, or paint them in gently with a very diluted white gouache mixed with peach. -
Sketch the cloud shapes:
On a fresh sheet of watercolor paper to be used for the cutouts, lightly sketch several groupings of fluffy, bubbled clouds. Create a variety of sizes—some large banks for the bottom and smaller clusters for the sky. -
Paint the clouds:
Fill in your cloud sketches with varying shades of blue-purple. For the upper clouds, use a lighter wash; for the bottom ‘sea’ of clouds, use a deeper, saturated blue-purple mix. -
Add cloud details:
Once the base cloud color is dry, use your small brush to outline the curves in a slightly darker shade, adding small hatch marks or dots to give them texture and volume. -
Outline using white:
Outline the top edges of your painted clouds with white gouache or a gel pen to make them pop against the background later. -
Sketch the whale tail:
Draw the main subject—a large, elegant whale fluke rising vertically. Keep the stem (peduncle) relatively straight and flare out widely curved flukes at the top. -
Paint the whale base:
Fill the whale shape with a rich, dark indigo. You want this to be the darkest part of the composition to create a strong silhouette. -
Texture the whale skin:
While the indigo is still slightly damp, drop in hints of lighter blue or purple to create a mottled skin texture. Allow this layer to dry completely. -
Add ocean speckles:
Using your white gouache or gel pen, add tiny dots along the side of the whale’s body and tail to represent barnacles or water droplets catching the light.
Uneven Edges?
If your scissor cuts aren’t perfectly smooth, go over the cut edge with a colored pencil that matches the paint color. This hides the white paper core and sharpens the silhouette.
Step 2: Cutting and Assembly
-
Cut out the components:
Carefully cut out your whale tail and all your individual cloud clusters using precision scissors. Leave no white border; cut right up to the painted edge. -
Arrange the composition:
Place your painted sky background on your work surface. Dry fit your pieces first—position the whale tail in the center and arrange clouds around the base to hide where the tail ends. -
Glue the background elements:
Glue the flat sky background onto your sturdy backing board if you haven’t already. Attach the highest, furthest clouds directly to this background using standard glue. -
Mount the whale:
Adhere the whale tail so it sits partially over the background sky. I find using a small piece of foam tape here adds a nice shadow behind the tail. -
Layer the foreground clouds:
Attach the largest bank of clouds at the very bottom using foam tape. This physical elevation creates real depth, making it look like the whale is truly emerging from a fluffy sea. -
Add floating clouds:
Place a few smaller mid-ground clouds strategically around the whale’s midsection, overlapping the tail slightly to integrate the subject into the environment. -
Final highlights:
Check your composition. If any edges get lost in shadow, touch them up with a final stroke of white gel pen to ensure distinct separation between layers.
Level Up: Sparkle
Mix a tiny amount of iridescent medium or silver watercolor into the water droplets on the whale’s skin for a magical shimmer when the light hits the artwork.
Step back and admire how your simple paper layers have come together to create a magical ocean in the sky
Candle With A Heart-Shaped Flame
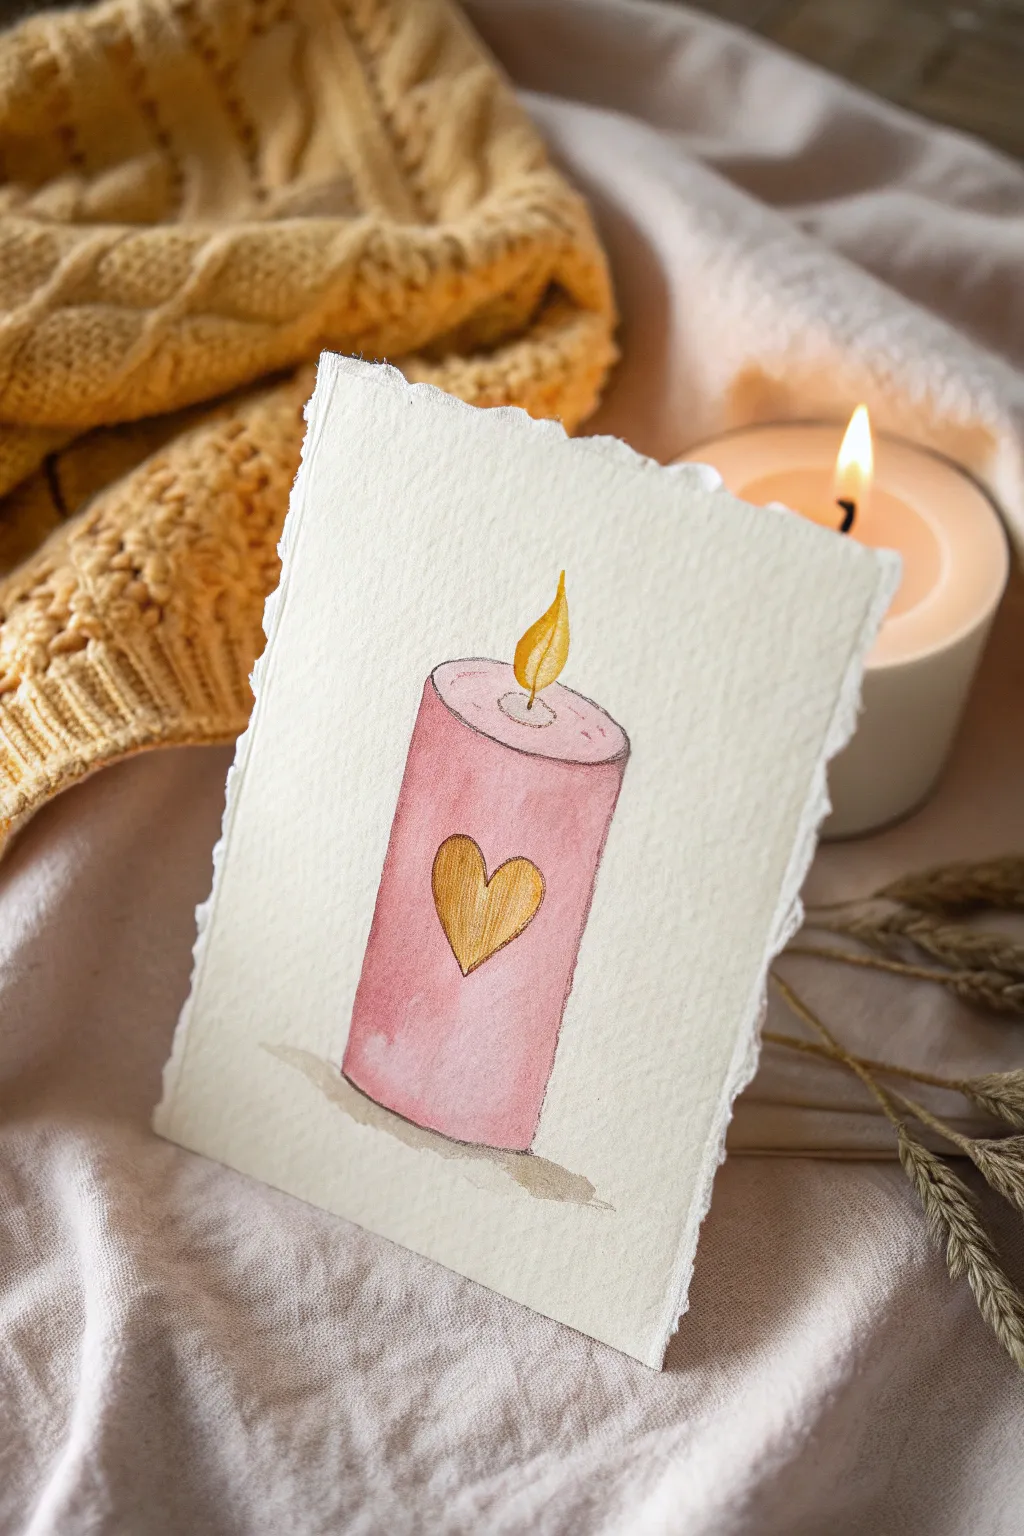
This charming little watercolor painting features a soft pink pillar candle adorned with a golden heart, perfect for adding warmth to any greeting card. The textured paper and gentle color palette create a wonderfully cozy, handmade feel that is simple yet elegant.
Step-by-Step
Materials
- Cold-pressed watercolor paper (300gsm with deckle edge preferred)
- Watercolor paints (Alizarin Crimson, Burnt Sienna, Yellow Ochre, Cadmium Yellow)
- Metallic gold watercolor paint or gouache
- Round watercolor brush (size 4 or 6)
- Fine detail brush (size 0 or 1)
- Pencil and eraser
- Two jars of water
- Paper towel
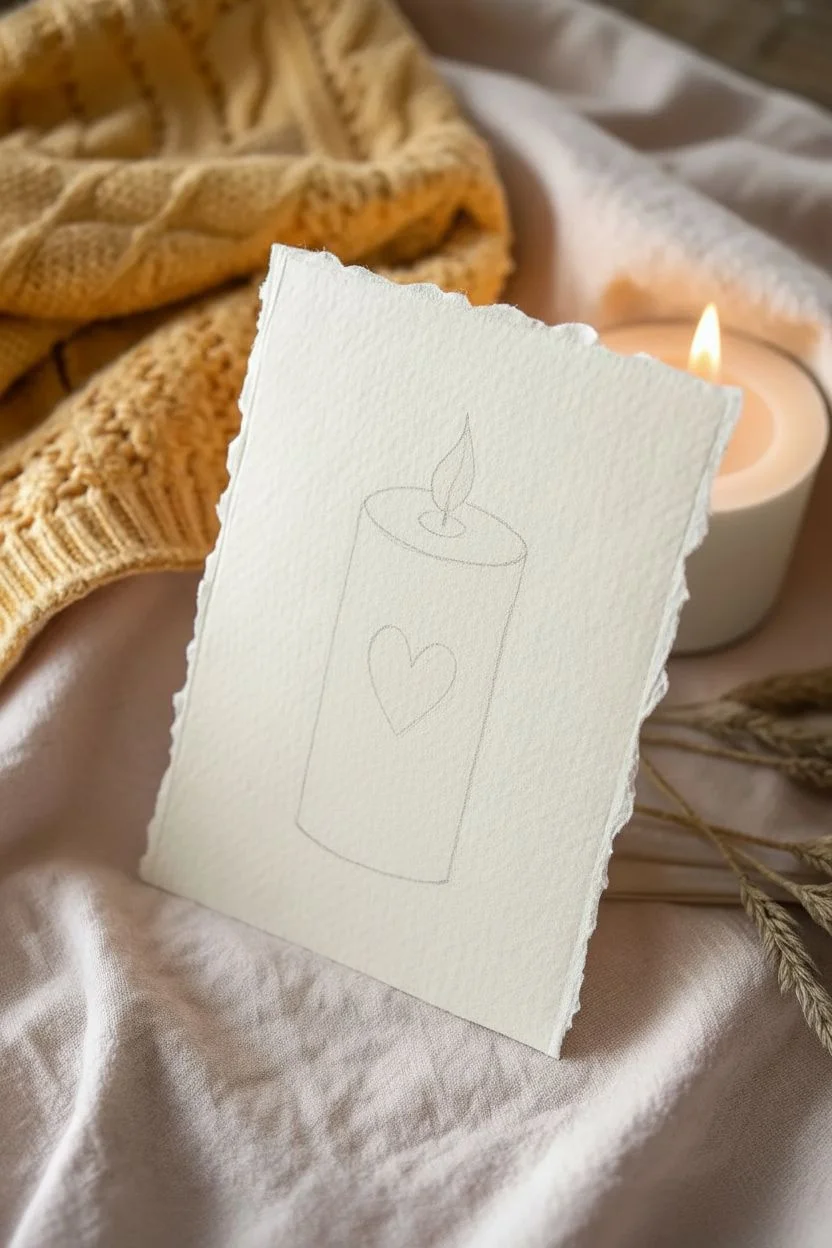
Step 1: Sketching the Outline
-
Paper preparation:
Begin with a piece of high-quality watercolor paper. If you want to replicate the rustic look of the sample, tear the paper edges against a ruler to create a soft, deckled effect instead of cutting it with scissors. -
Draw the cylinder shape:
Lightly sketch a vertical rectangle in the center of your paper. At the top and bottom of the rectangle, draw shallow ellipses to give the candle its cylindrical 3D form. -
Add details:
Sketch a small heart shape right in the middle of the candle body. Then, draw a small wick sticking up from the top ellipse and a teardrop-shaped flame hovering just above it. -
Refine the lines:
Gently erase your graphite lines until they are barely visible so they don’t show through the final paint layers.
Uneven Wash?
If your pink wash looks blotchy, pre-wet the paper with clean water before applying pigment. This ‘wet-on-wet’ technique helps color spread evenly.
Step 2: Painting the Candle Body
-
Mix the pink hue:
Create a watery mix of Alizarin Crimson with a tiny touch of Burnt Sienna to dull it down into a dusty pink rose color. -
First wash:
Using your round brush, apply a light, even wash of the pink mixture over the entire body of the candle, carefully painting around the heart shape. Leave the heart white for now. -
Add dimension:
While the paint is still damp but not soaking wet, drop a slightly more concentrated amount of the pink mix onto the left and right sides of the cylinder. This creates a rounded shadow effect. -
Paint the top surface:
Use a very pale, watered-down version of your pink mix for the top oval of the candle. I like to leave a tiny sliver of white paper unpainted near the rim to act as a highlight. -
Outline definition:
Once the first layer is dry, take a fine detail brush with a darker, more saturated pink mix and very delicately outline the rim of the candle and the heart shape to make them pop.
Level Up
Add a tiny halo of water around the flame and drop in very faint yellow pigment to create a glowing light effect around the candle tip.
Step 3: Golden Details & Flame
-
Paint the heart:
Load your brush with metallic gold paint or a yellow ochre mixed with a bright yellow. Fill in the heart shape carefully. -
Add heart texture:
If using non-metallic paint, add a stroke of darker golden-brown on one side of the heart to give it a bit of shape. -
Base of the flame:
Paint the bottom teardrop of the flame using a bright yellow. Let the color fade slightly as it moves upward. -
Flame tip:
While the yellow is wet, drop a tiny hint of orange or darker yellow into the very tip of the flame for a realistic glow. -
The wick:
Use a fine detail brush and a dark brown or grey mix to paint the thin wick connecting the candle to the flame.
Step 4: Grounding & Finishing
-
Mix a shadow color:
Combine a bit of brown with a touch of purple or grey to create a neutral shadow tone. -
Cast shadow:
Paint a loose, organic puddle shape at the base of the candle. Keep the edges soft to show that the candle is resting on a surface. -
Final touches:
Check your edges. If the outline of the candle feels too faint, reinforce the sides with a broken, delicate line using a fine brush and your darkest pink mix. -
Dry completely:
Let the entire piece dry completely before touching or framing to prevent smudging the metallic or delicate watercolor layers.
Now you have a heartwarming piece of art ready to brighten someone’s day.
Cozy Campsite With Heart-Shaped Smoke
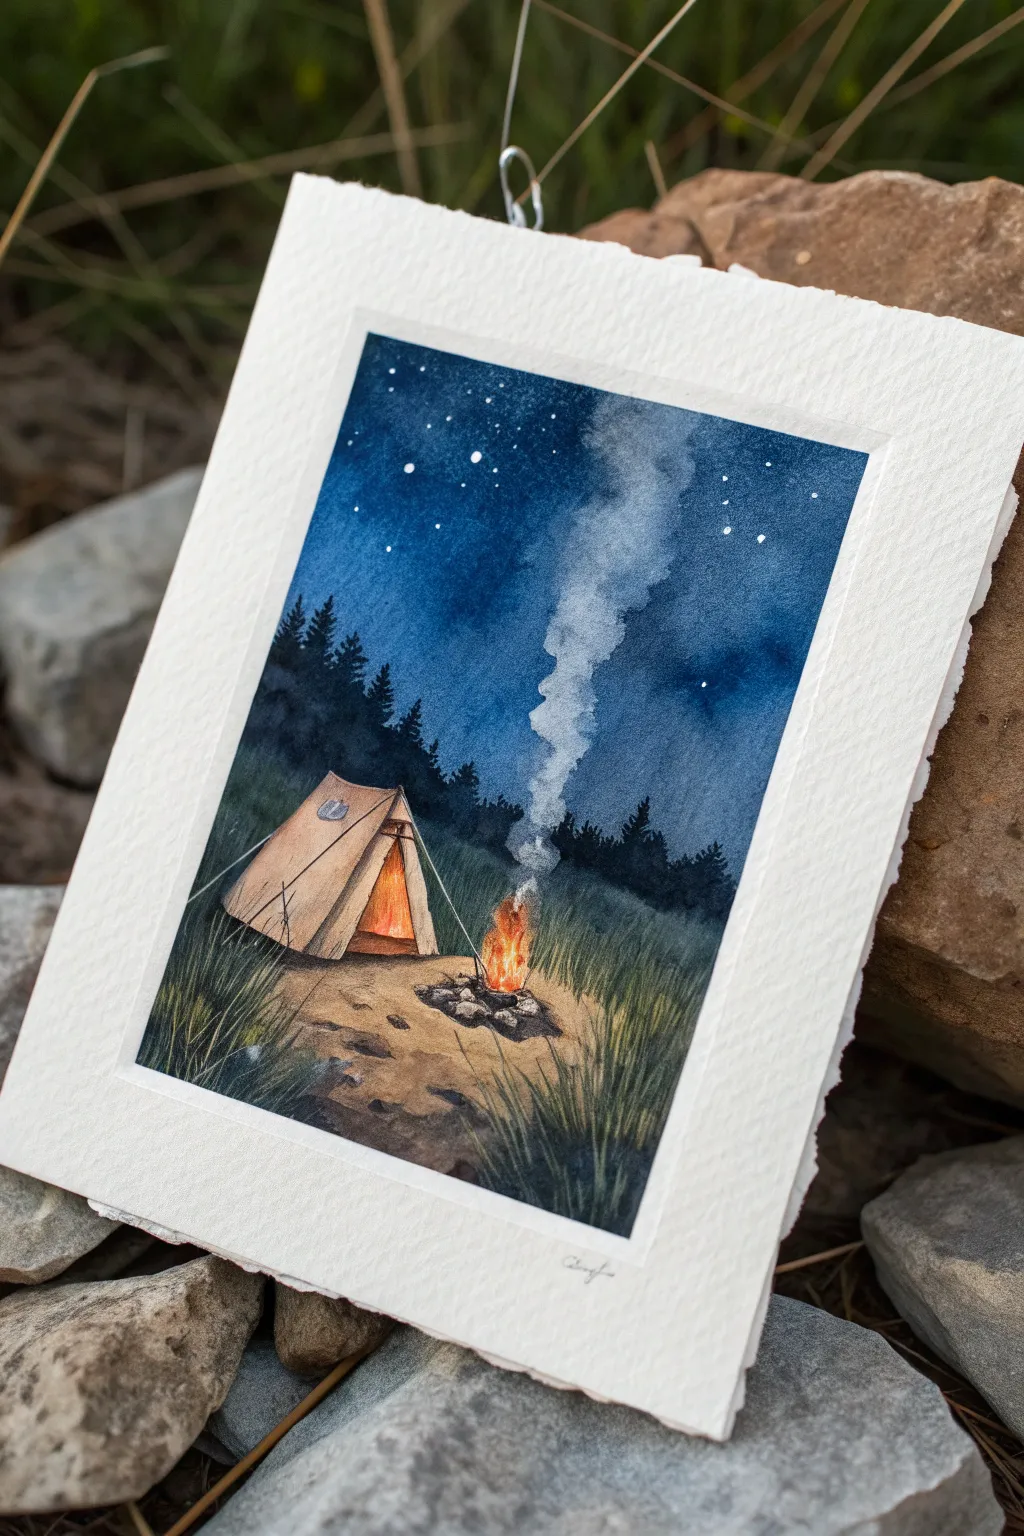

Capture the magic of an evening outdoors with this atmospheric watercolor painting featuring a glowing tent and a crackling fire under a star-filled sky. The deep indigo tones contrast beautifully with the warm oranges of the firelight, creating a cozy and inviting scene.
Step-by-Step Tutorial
Materials
- Cold press watercolor paper (300 gsm)
- Watercolor paints (Indigo, Payne’s Gray, Burnt Sienna, Cadmium Orange, Yellow Ochre, Sap Green, Forest Green, White Gouache)
- Masking fluid
- Round brushes (sizes 2, 6, and 10)
- Pencil (HB) and kneaded eraser
- Two jars of water
- Paper towels
- Painter’s tape
Step 1: Preparation and Sketching
-
Prepare your paper:
Tape down your watercolor paper to a board on all four sides. This creates that crisp white collection border seen in the photo and prevents buckling. -
Light sketch:
Using an HB pencil, very lightly sketch the placement of the tent on the left side and the fire pit in the center. Keep the lines faint so they don’t show through the final paint. -
Outline the horizon:
Draw an uneven horizon line about one-third of the way up the paper where the dark trees will eventually sit. -
Mask the stars:
Dip the handle of a brush or a fine nib into masking fluid and dot random stars across the upper sky area. Vary the sizes for realism and let this dry completely before painting.
Step 2: Painting the Sky and Background
-
Wet-on-wet sky base:
Cleanly wet the entire sky area with clear water, stopping just above the tree line. The paper should glisten but not have puddles. -
Apply the darks:
Load a size 10 brush with a rich mix of Indigo and Payne’s Gray. Start at the very top corners where the sky is darkest and work your way down. -
Create the smoke path:
While the sky paint is still wet, lift out a column of pigment using a clean, damp paper towel or ‘thirsty’ brush to create the soft, white path where the smoke will rise. -
Deepen the gradient:
Add more concentrated Indigo to the top while the paper is damp to create a deep night gradient, fading slightly lighter as you approach the horizon. -
Paint the tree silhouette:
Once the sky involves a semi-dry state (damp but not flowing), use a thick mix of Payne’s Gray and Forest Green to dab in the distant pine trees along the horizon line. Their tops should be soft and slightly blurry against the sky.
Muddy colors?
If your fire glow looks dull, wait for surrounding dark colors to dry completely before painting the bright oranges. Wet dark paint bleeding into yellow creates mud instantly.
Step 3: The Tent and Fire
-
Tent base layer:
Mix a watery wash of Yellow Ochre and Burnt Sienna. Paint the entire tent shape, leaving the front flap area slightly lighter. -
Adding tent shadows:
While the base is drying, mix Burnt Sienna with a touch of purple or gray colors. Paint the seams and the shadowed side of the tent to give it dimension. -
The fire’s glow:
Paint the inside of the tent opening with bright Cadmium Orange, blending outward to show the fire’s light reflecting on the canvas. -
Painting the flames:
Use pure Cadmium Orange and dashes of Yellow for the campfire itself. Keep edges loose and energetic. -
Fire pit rocks:
Use a small size 2 brush and a mix of brown and gray to paint the individual stones circling the fire. Keep highlights on the side facing the flames.
Make it magical
Splatter opaque white gouache over the dry sky using an old toothbrush. This creates a dense ‘Milky Way’ effect that adds incredible depth compared to just painted stars.
Step 4: Foreground and Details
-
Ground wash:
Apply a wash of muted greens and browns for the foreground ground, keeping it lighter near the fire to represent the illuminated dirt patch. -
Grass textures:
Using a rigger brush or the tip of a size 2 round, flick upward strokes of dark Sap Green mixed with Indigo to create tall grasses in the immediate foreground corners. -
Defining the smoke:
Once the sky is bone dry, use very dilute white gouache or a watered-down gray to define the wispy edges of the smoke column, keeping it translucent. -
Remove masking:
Gently rub away the masking fluid from the sky to reveal the crisp white stars. -
Final highlights:
Use white gouache to add the tent ropes, extra bright stars, and the hottest white sparks flying up from the fire.
Now peel off the tape to reveal the clean border that frames your peaceful night scene


Have a question or want to share your own experience? I'd love to hear from you in the comments below!