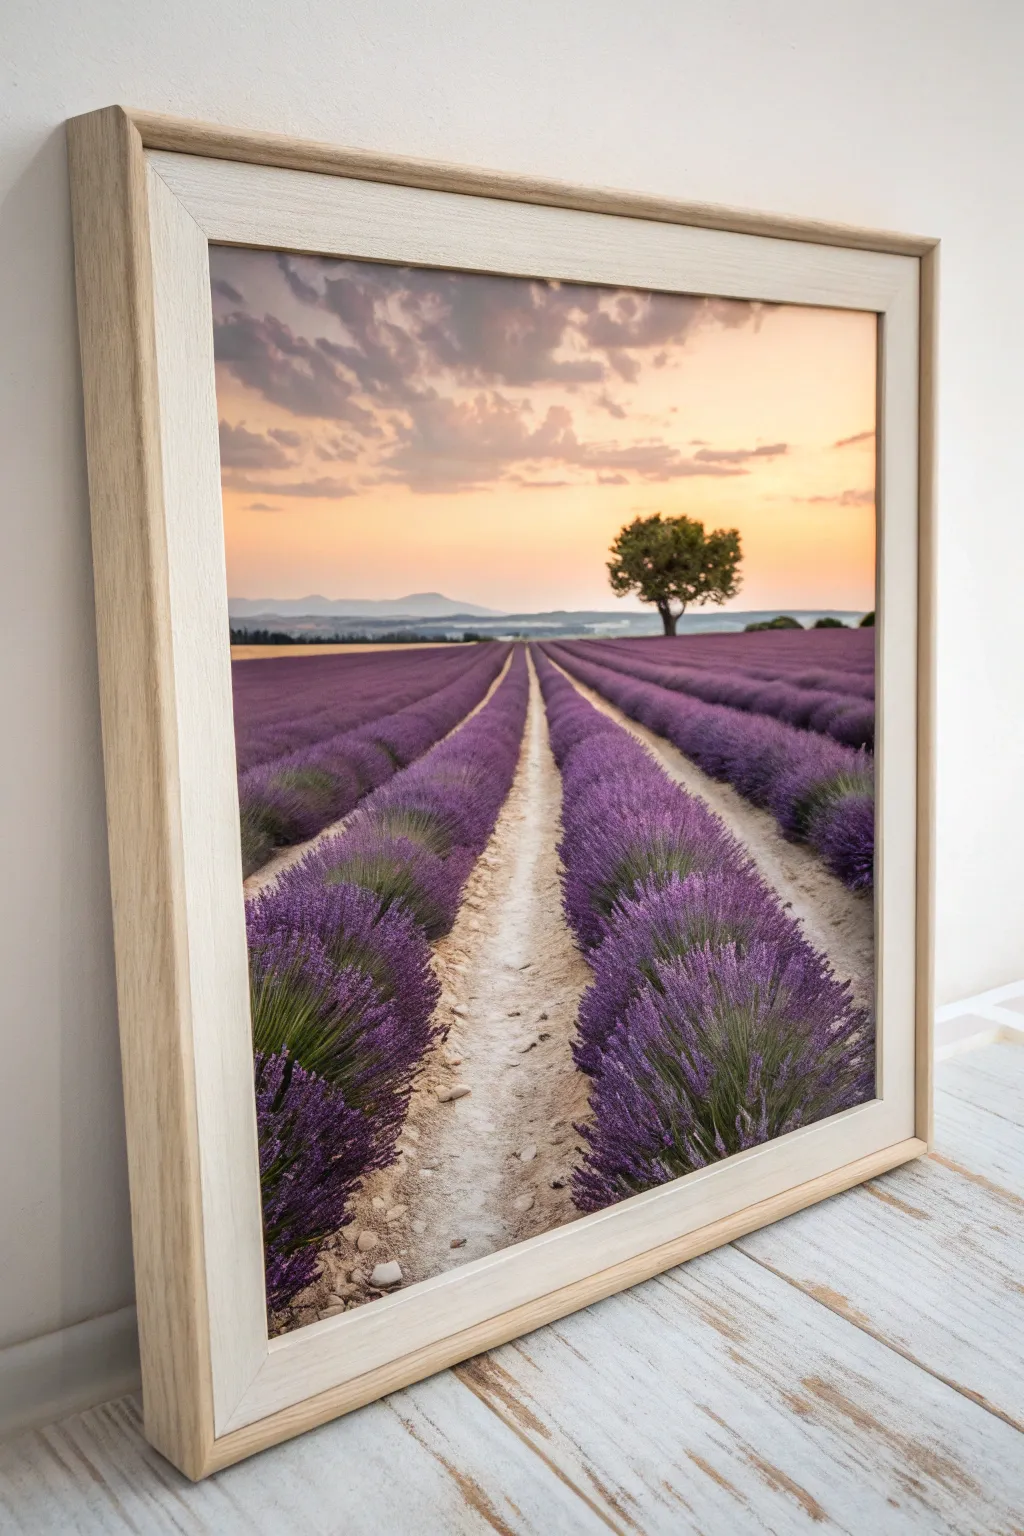
If you’re craving pretty painting ideas that look like they belong on a dreamy mood board, I’ve got you. These are my go-to scenes and techniques for getting soft gradients, glowing light, and charming details without stressing over perfection.
Sunset Ombre Sky With Silhouetted Trees
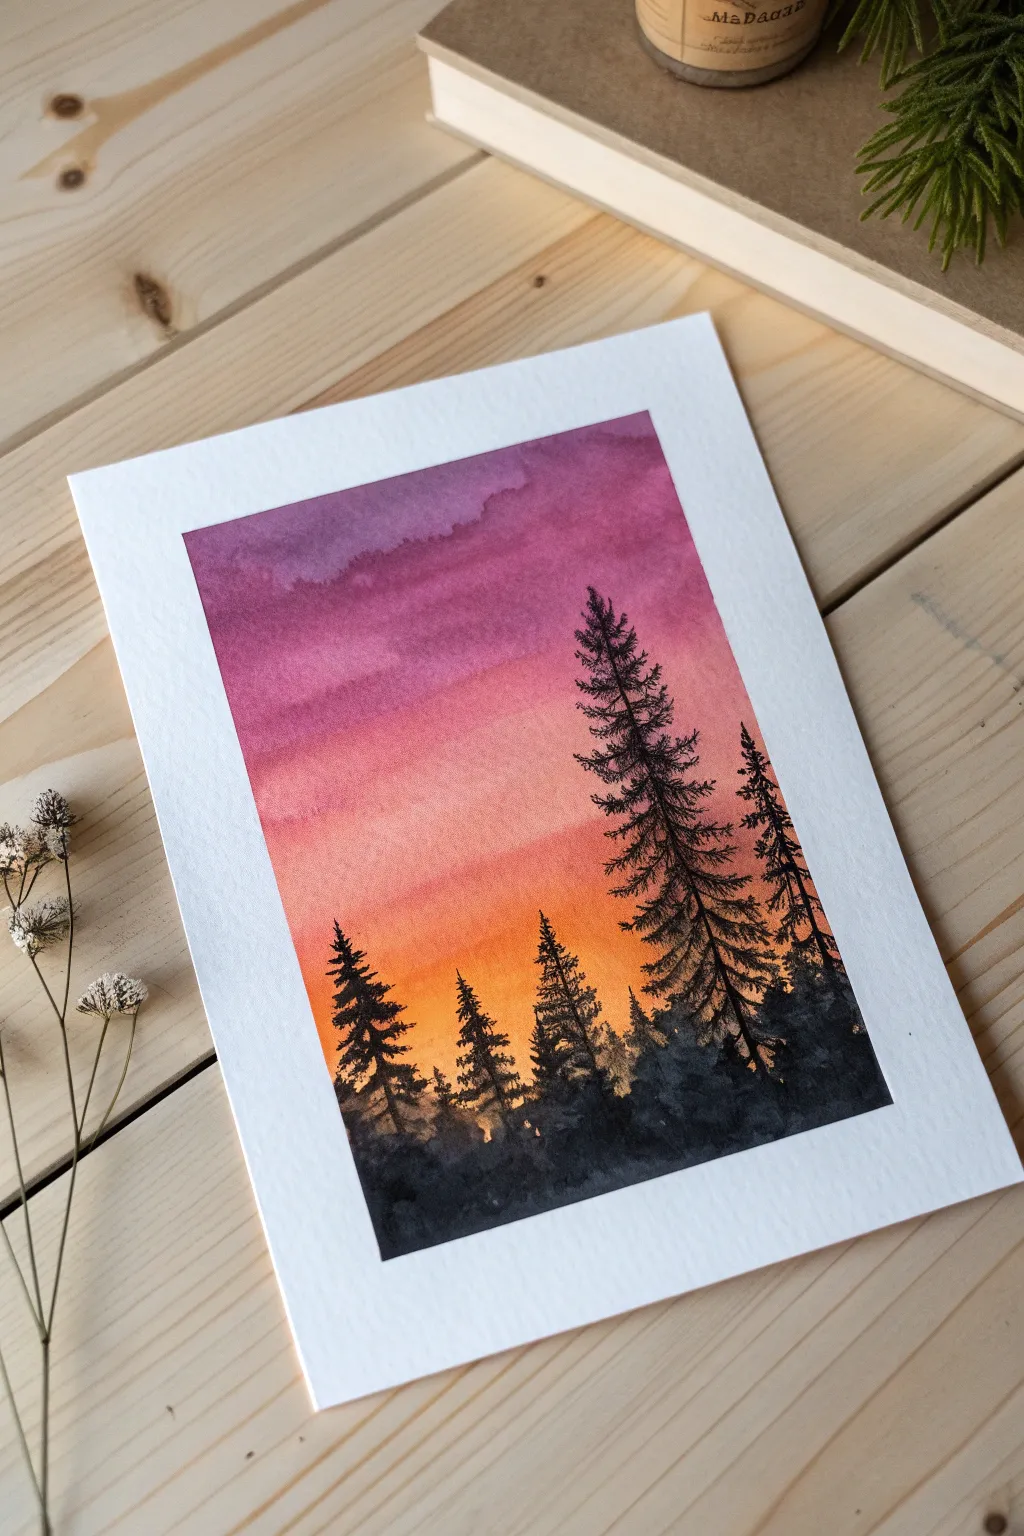
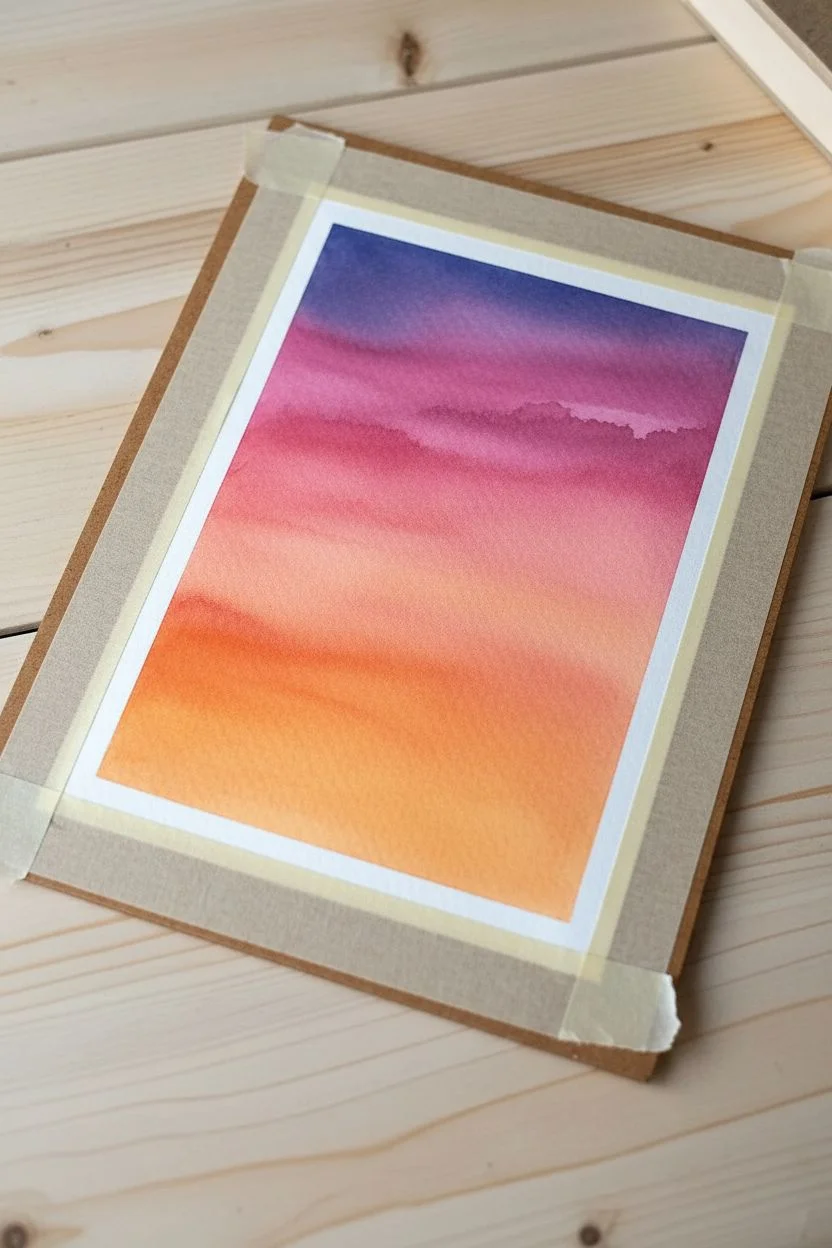
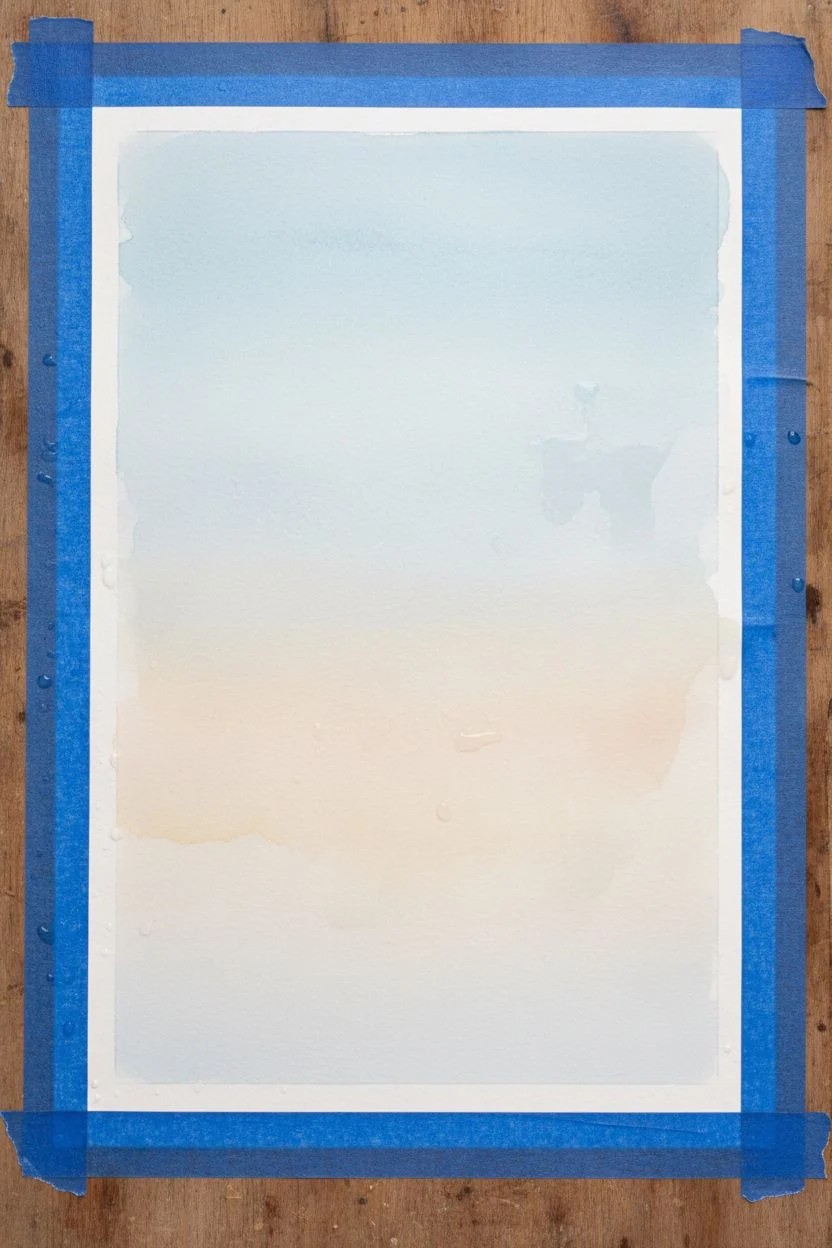
This stunning watercolor project captures the peaceful transition from day to night with a seamless ombre wash of dusky purples, vibrant pinks, and warm oranges. The high-contrast silhouette of pine trees adds depth and drama, making it a perfect exercise for practicing wet-on-wet blending and fine brush control.
Step-by-Step Tutorial
Materials
- Cold press watercolor paper (300gsm/140lb)
- Painter’s tape or masking tape
- Flat wash brush (3/4 inch or 1 inch)
- Round brushes (size 6 for washes, sizes 0 and 2 for details)
- Watercolor paints: Indigo/Dioxazine Purple, Magenta/Rose, Cadmium Orange/Yellow Ochre, Lamp Black
- Jar of clean water
- Paper towels
- Mixing palette
- Hardboard or table to tape paper down
Step 1: Preparing the Sky Wash
-
Secure the paper:
Tape down all four edges of your watercolor paper to a hardboard or your table. Press the tape firmly to ensure clean, crisp borders once finished. -
Pre-mix colors:
Before wetting the paper, prepare generous puddles of your sky colors on the palette. You’ll need a deep purple mix, a vibrant magenta-pink, and a warm, glowing orange. -
Wet the surface:
Using your large flat brush and clean water, apply an even coat of water across the entire sky area. The paper should glisten evenly but not have standing puddles. -
Apply the purple:
Load your brush with the purple mix and apply broad horizontal strokes at the very top of the paper. Let the pigment flow naturally into the wet surface. -
Transition to pink:
Clean your brush slightly, pick up the magenta paint, and apply it just below the purple. Allow the edges of the two colors to touch and bleed together naturally for a soft gradient. -
Add the orange glow:
Rinse the brush well and load it with the orange mix. Paint the bottom third of the sky, blending it upwards into the pink section to create a warm horizon line. -
Refine the blend:
If the transitions look too harsh, dry your clean brush on a paper towel and gently sweep it horizontally across the boundary lines to soften them. I sometimes tilt the board slightly to encourage gravity to help the blend. -
Let it dry completely:
This step is crucial. The paper must be bone-dry before you paint the trees, or the black silhouettes will bleed into the sky. You can use a hairdryer on a low setting to speed this up.
Fixing “Cauliflowers”
If water drops bloom on your drying sky, wait until it’s fully dry, then gently scrub the spot with a damp stiff brush to soften the hard edge.
Step 2: Painting the Silhouettes
-
Mix the black:
Create a concentrated mix of black paint. It should be thick and opaque—think the consistency of heavy cream—so it stands out boldly against the colorful background. -
Establish the treeline:
Using a size 6 round brush, paint an uneven, jagged shape across the very bottom of the paper to represent the dense forest floor and lower bushes. -
Paint the main trunks:
Switch to a smaller round brush (size 2). Draw thin, vertical lines extending upward from the base to act as the trunks for your tallest trees. Ideally, place the tallest tree slightly off-center for a better composition. -
Add top branches:
Starting at the very tip of your tallest tree line, use short, dabbling strokes to create the narrow, pointed top of the pine. Keep these marks very small. -
Build the tree shape:
Work your way down the trunk, making your horizontal strokes wider as you descend. flick the brush tip upward slightly at the ends of branches to mimic natural pine growth. -
Vary the density:
Leave small gaps of sky showing through the branches, especially in the upper half of the tree. This transparency prevents the tree from looking like a solid triangle. -
Add shorter trees:
Paint a few medium-sized trees next to your main focal point using the same technique. vary their heights to keep the horizon looking natural and organic. -
Create distant trees:
For trees that visually recede into the background, mix a tiny amount of water into your black to make a dark grey. Paint simpler, smaller tree shapes lower down near the horizon line. -
Detail with the smallest brush:
Switch to your size 0 or detail brush. Add tiny stray branches, twigs, or uneven texture to the tops of the treeline to break up any smooth edges. -
Remove tape:
Once the black paint is fully dry to the touch, slowly peel away the painter’s tape at a 45-degree angle to reveal your crisp white border.
Add Starlight
Before removing the tape, flick a tiny amount of opaque white gouache or white ink over the purple section to create a starry night effect.
Step back and admire the glowing atmosphere you have captured in this serene landscape


Pink Sky With an Oversized Glowing Moon
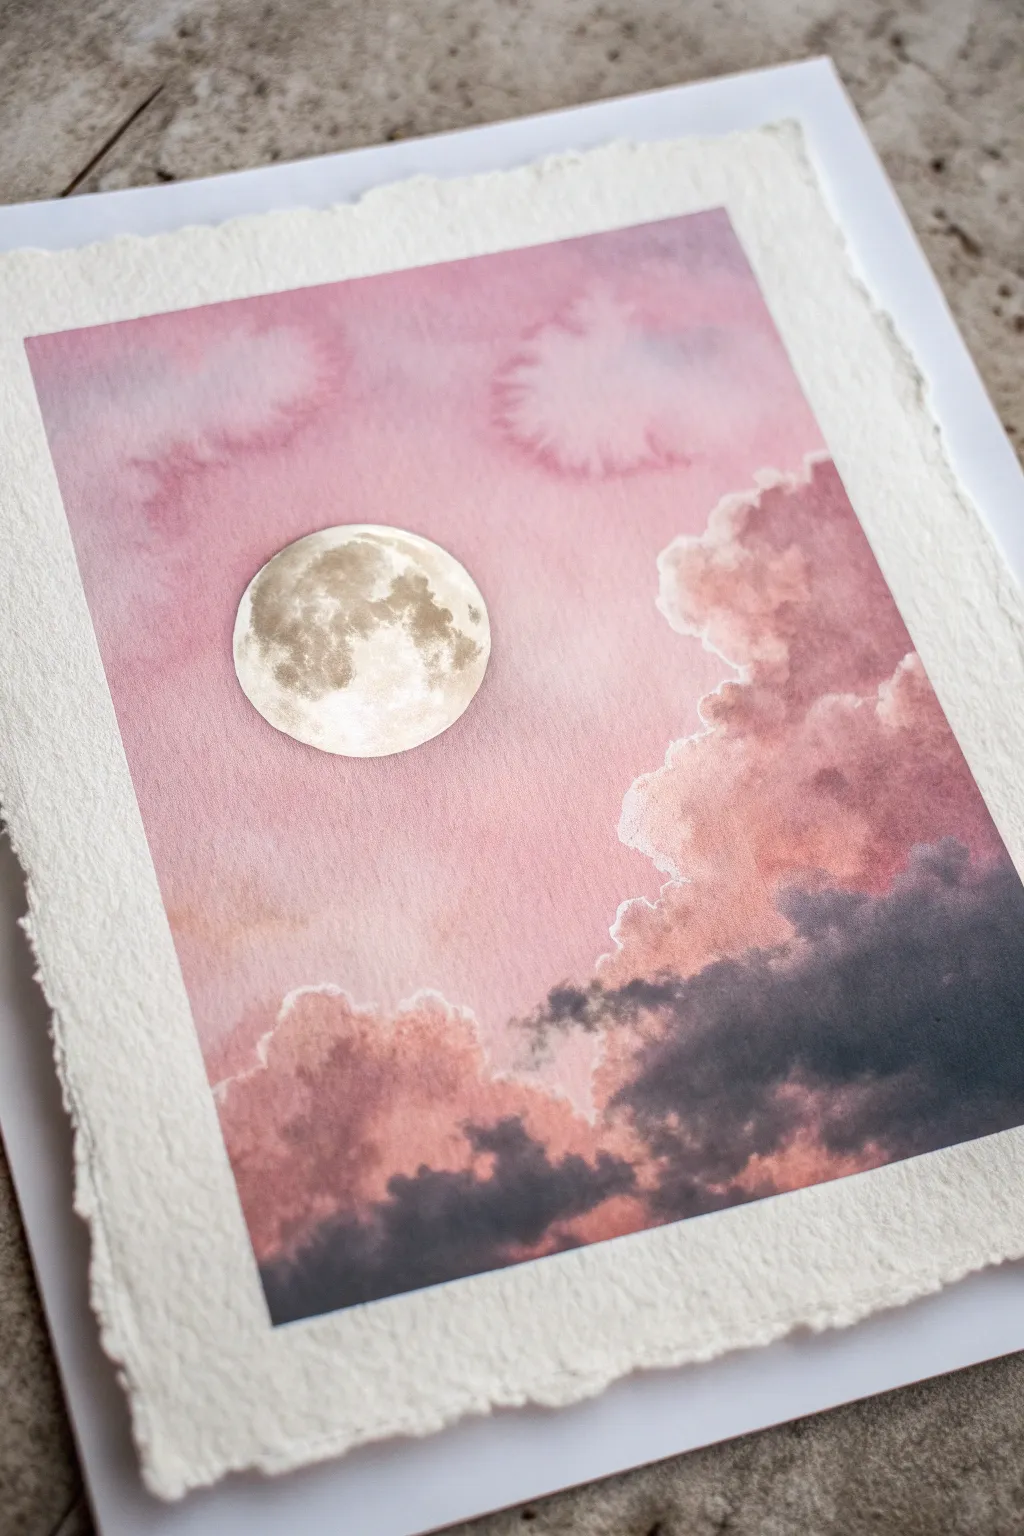

Capture the ethereal beauty of a twilight sky with this soft, romantic composition featuring billowing pink clouds and a strikingly detailed moon. Using wet-on-wet watercolor techniques alongside careful masking creates a stunning contrast between the soft atmosphere and the crisp celestial body.
How-To Guide
Materials
- Cold-press watercolor paper (300 gsm or heavier)
- Watercolor paints (Alizarin Crimson, Rose Madder, Payne’s Grey, Winsor Violet, Ultramarine Blue, Yellow Ochre)
- White gouache or opaque white watercolor
- Masking fluid
- Round brushes (size 4, 8, and 12)
- Pencil and circular object/compass for tracing
- Spray bottle with water
- Paper towels
- Hairdryer (optional)
Step 1: Preparation and The Moon
-
Outline the moon:
Start by lightly tracing a perfect circle in the upper-left quadrant of your paper using a compass or a circular object like a jar lid. Keep the pencil lines barely visible so they don’t show through later. -
Protect the moon:
Apply a careful layer of masking fluid to the entire interior of the moon circle. This step is crucial because it preserves the bright white of the paper while you paint the vibrant sky around it. -
Let it cure:
Allow the masking fluid to dry completely. It should feel tacky but not wet to the touch. Rushing this can ruin your brushes or tear the paper later. -
Pre-wet the sky:
Using your largest clean brush, wet the entire paper area outside the masked moon. The paper should be glisten with a satin sheen, but there shouldn’t be large puddles of water.
Edge Softening
To get that ‘bloom’ effect on the background clouds, drop clear water into the drying pink wash. The water pushes the pigment outward, creating natural, feathery edges automatically.
Step 2: Painting the Atmospheric Sky
-
First wash of pink:
Load a size 12 brush with a watery mix of Rose Madder or a soft pink. Drop this color into the wet paper, letting it spread naturally. Keep the color lightest near the moon and slightly darker towards the edges. -
Creating cloud forms:
While the paper is still damp, mix a slightly stronger purple-pink using Alizarin Crimson and a touch of Ultramarine. Start dabbing in soft, blooming shapes to suggest distant clouds in the upper section. -
Lifting for softness:
If pigments get too dark or uniform, use a clean, thirsty brush or the corner of a paper towel to gently lift color away, creating soft white highlights in the upper clouds. -
Building the main cloud bank:
Mix a thicker, creamy consistency of Rose Madder and a warm orange-pink. Paint the large, billowing cloud structure on the right side. Because the paper is drying slightly, these edges will be soft but more defined than the background layer. -
Adding shadow depth:
Mix Payne’s Grey with a little Alizarin Crimson to create a moody, dark purple-grey. While the cloud bank is still damp, drop this dark pigment into the bottom-right and bottom-center areas to create the heavy, shadowed underbellies of the clouds. -
Refining edges:
For the crisp, glowing edges of the clouds (like the ‘silver lining’), use a damp brush to soften the transition between the pink cloud tops and the sky, or leave tiny slivers of dry white paper for maximum brightness. -
Final sky adjustments:
Add a few smaller, floating dark clouds near the bottom left to balance the composition. Let the entire painting dry completely. The paper must be bone-dry before proceeding.
Patchy Sky Fix
If your sky dries with hard water lines (backruns), don’t panic. Re-wet the area very gently with a soft brush and drop in a slightly darker pigment to blend the hard edge away.
Step 3: Detailing the Moon
-
Reveal the moon:
Gently rub away the masking fluid using your finger or a rubber cement pickup tool. You should now have a stark white circle against your pink sky. -
Base crater wash:
Mix a very watery, pale Yellow Ochre or warm grey. Paint a patchy, uneven wash over parts of the moon, leaving some areas pure white to represent the brightest lunar highlands. -
Adding lunar texture:
Switch to your smallest brush (size 4). Using a mix of Sepia or diluted Payne’s Grey, stipple and dab paint to create the ‘maria’ (the dark spots) typical of the moon’s surface. Keep your hand loose to mimic random organic textures. -
Softening the features:
Before the moon details dry, use a clean, damp brush to gently smudge the edges of your dark spots. This blending technique makes the craters look distant and realistic rather than like harsh polka dots. -
Final highlight:
If you lost any brightness on the moon’s edge, use a tiny amount of opaque white gouache to re-establish the bright rim on the side facing the imagined light source.
Finish by carefully tearing the edges of your paper against a ruler to achieve that beautiful deckled, vintage look shown in the photo


Starry Night Galaxy With Colorful Nebula Blends
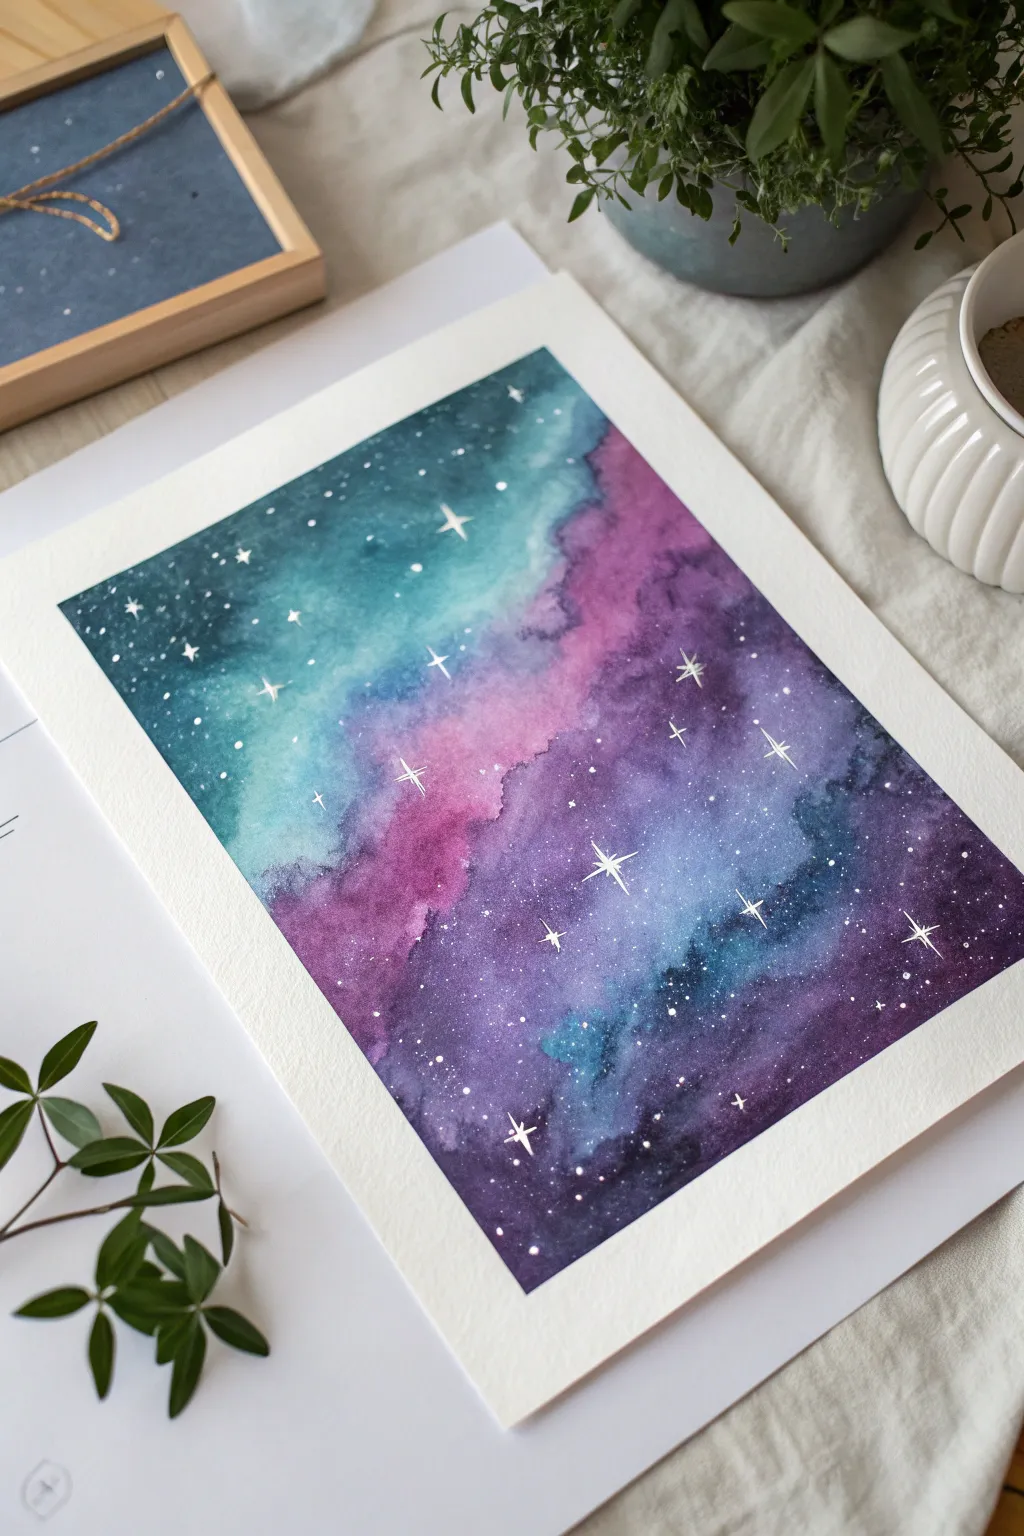
Capture the magic of an infinite universe with this vibrant celestial painting, blending deep teals, indigos, and hot pinks into a dreamy night sky. This beginner-friendly project uses the wet-on-wet technique to create seamless, cloudy transitions that look impressively complex.
Detailed Instructions
Materials
- Cold press watercolor paper (300 gsm)
- Painter’s tape or masking tape
- Watercolor paints (Indigo, Teal/Turquoise, Magenta/Purple, Black)
- White gouache or white gel pen
- Large round brush (size 10 or 12)
- Small liner brush (size 0 or 1)
- Two jars of water
- Paper towels
- Optional: Toothbrush for splatter
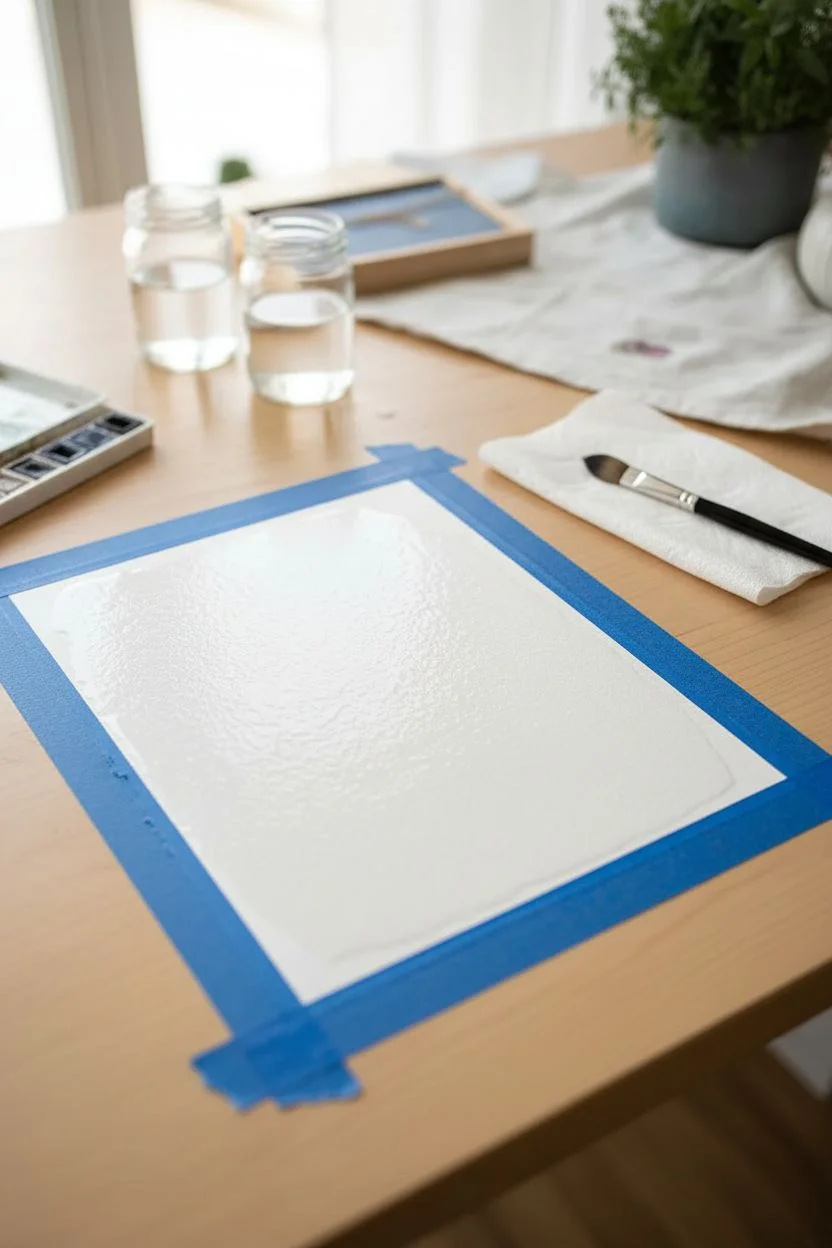
Step 1: Preparing the Base
-
Tape the edges:
Secure your watercolor paper to a flat, hard surface using painter’s tape. Create a crisp border of about half an inch on all sides; this not only frames the art but keeps the paper from buckling too much when wet. -
Wet the paper:
Using your large clean brush, apply a generous layer of clear water to the entire area inside the tape. The paper should have a glistening sheen but shouldn’t have swimming pools of water sitting on top.
Muddy Colors?
If your purple and teal turn gray where they meet, let the first color dry slightly longer before adding the second, or leave a tiny gap of clear water between them to let them merge slowly.
Step 2: Painting the Nebula
-
Start with lighter colors:
Load your brush with a vibrant teal or turquoise. Dab this color into the upper-left and lower-middle sections of the paper, letting the water carry the pigment. Keep the edges irregular to mimic organic gas clouds. -
Add the nebula core:
While the teal is still wet, introduce a rich magenta or purple paint adjacent to the teal areas. Let them touch slightly so they bless together on the paper, creating a soft violet transition rather than a hard line. -
Deepen the space:
Now, mix a strong indigo or dark blue. Apply this to the remaining white spaces on your paper, particularly in the bottom right and top left corners. This represents the deeper, darker vacuum of space. -
Blend the edges:
Gently nudge the dark indigo into the edges of the teal and pink sections. You want the colors to swirl into each other. If the paper starts drying, add a tiny bit of water to your brush to re-activate the blending. -
Intensify darkness:
To create real depth, drop concentrated black or Payne’s gray into the very corners and the edges furthest from the bright nebula center. This high contrast makes the bright colors pop. -
Refine the texture:
I like to tilt the board slightly at this stage to encourage gravity to do some mixing. If a pool of water forms, gently lift it out with the corner of a dry paper towel to create a textured, cloud-like effect known as a ‘bloom’. -
Let it dry completely:
Leave the painting to dry flat. It must be bone dry before the next step. If the paper feels cool to the touch, it is still damp inside.
Make It Sparkle
For a magical finish, mix a tiny amount of iridescent medium or pearl watercolor into your teal and pink paints. The nebula will shimmer subtly when the light hits it.
Step 3: Adding the Stars
-
Mix the stars:
Prepare your white gouache with a small drop of water until it has the consistency of heavy cream. It needs to be opaque enough to cover the dark paint. -
Splatter heavy stars:
Dip a toothbrush or a firm bristle brush into the white mix. Run your thumb across the bristles to flick tiny specks of ‘stardust’ across the entire galaxy. Vary the density, leaving some dark areas emptier. -
Paint larger stars:
Using the fine liner brush or a white gel pen, manually dot a few slightly larger stars in the darker indigo areas to create variety in distance. -
Create starbursts:
Select 5 to 7 of your larger dots to turn into twinkling stars. Paint a simple cross (+) shape through the dot, and then a smaller ‘x’ shape over that to create an eight-pointed flare. -
Remove the tape:
Once the white paint is fully dry, slowly peel off the masking tape at a 45-degree angle away from the painting to reveal those crisp, clean edges.
Frame your new cosmic masterpiece and enjoy the soothing depth of your handmade galaxy


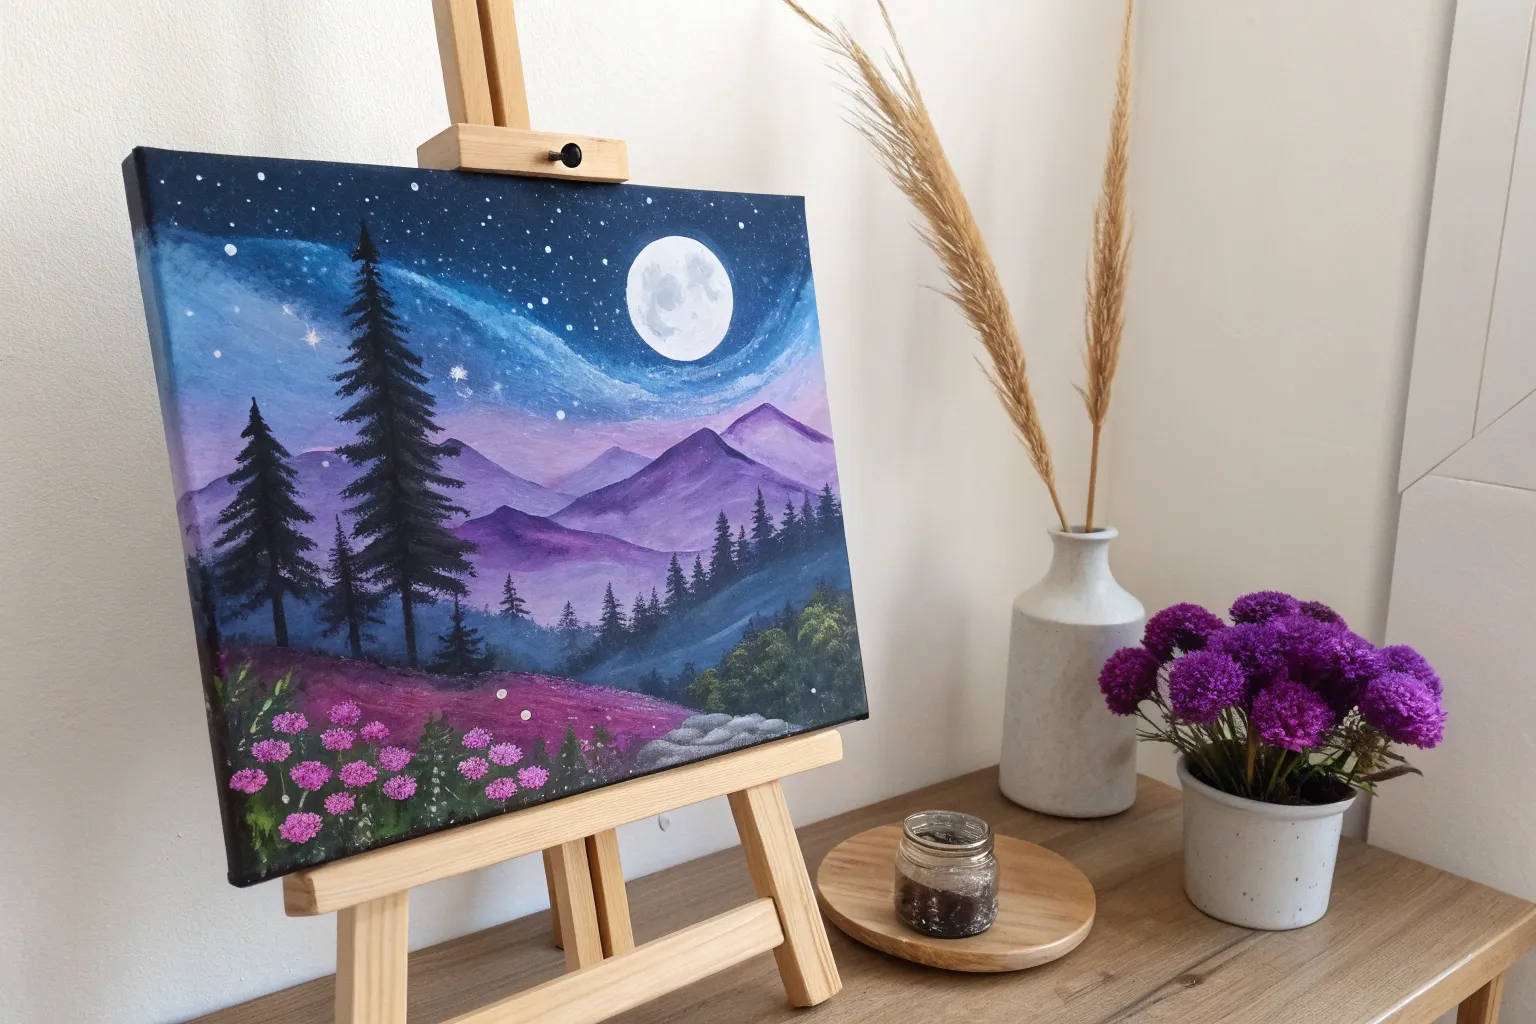
Dreamy Mountain Layers in Misty Pastels
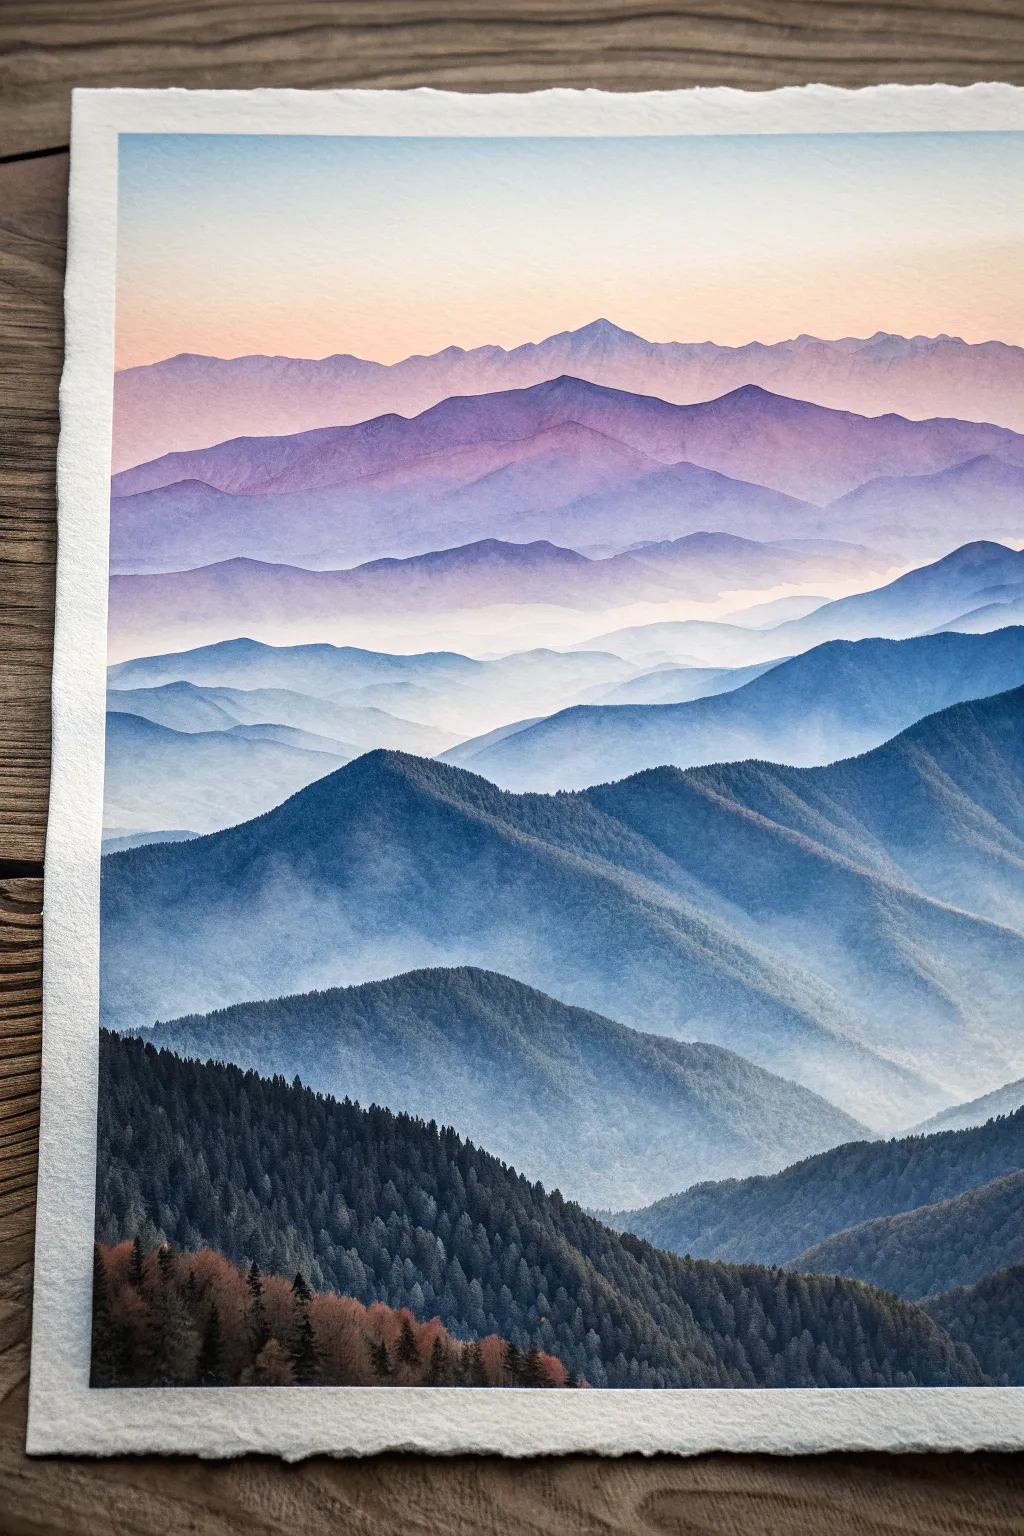
Capture the serene beauty of distant peaks fading into the sunset with this layered landscape project. By utilizing atmospheric perspective and soft color gradients, you will create a sense of immense depth and tranquility on your page.
Step-by-Step Tutorial
Materials
- Heavyweight watercolor paper (300gsm cold press recommended)
- Watercolor paints (Indigo, Prussian Blue, Violet, Alizarin Crimson, Burnt Sienna, Payne’s Grey)
- White Gouache (for opacity in misty areas)
- Masking tape
- Flat wash brush (3/4 inch)
- Round brushes (size 4 and 8)
- Detail brush (size 0 or 00)
- Two jars of water
- Paper towels
- Mixing palette
Step 1: Setting the Sky
-
Prepare the paper:
Begin by taping down all four edges of your watercolor paper to a board. Ensure the tape creates a crisp border, which will frame the finished piece beautifully. -
Mix the sky gradient:
On your palette, prepare a very watered-down wash of pale yellow or peach, and a separate wash of very light blue. The goal is transparency. -
Paint the sky:
Using the flat wash brush, wet the top third of the paper with clean water. Apply the pale blue at the very top edge, blending it downwards. While wet, introduce the peach tone near the horizon line, letting them bleed softly together without creating a hard green line in the middle.
Hard Lines Appearing?
If your misty bottoms are drying with hard lines, your paper might be drying too fast. works quickly and keep a spray bottle handy to mist the paper, keeping the gradient soft.
Step 2: The Distant Ranges
-
Mix the furthest mountain color:
Create a pale violet wash by mixing a touch of Alizarin Crimson with blue and lots of water. It needs to be very light, almost blending into the sky. -
Paint the first peak:
Paint the silhouette of the furthest mountain peak just below the sky wash. Keep the top edge crisp, but soften the bottom edge with clean water so it fades into nothingness. -
Add the second layer:
Once the previous layer is dry to the touch, mix a slightly more saturated purple-blue. Paint a range of mountains overlapping the first, slightly lower down. Again, soften the bottom edge with water to create that misty effect. -
Introduce texture:
While this second layer is still damp, you can drop in tiny amounts of slightly darker pigment near the peaks to suggest shadow and form.
Atmospheric Depth
Remember the golden rule of atmospheric perspective: objects get lighter, cooler (bluer), and less detailed the further away they are. Keep your foreground warm and dark.
Step 3: Building the Middle Ground
-
Shift to blue tones:
As you move down the paper, shift your color mixture towards Indigo and Prussian Blue. Each new layer of mountains should be slightly darker and more pigmented than the one before. -
Create the misty valley:
Paint a rolling mountain line across the middle of the page. Immediately after defining the top edge, use a clean, damp brush to drag the paint downwards, fading it almost completely to white at the bottom of the shape. -
Enhance the fog:
I like to mix a tiny bit of white gouache into a pale blue wash here. Glaze this milky mixture into the ‘valleys’ between mountain ridges to simulate heavy settling mist. -
Sharpen the ridges:
Paint the next ridge line with a stronger blue mix. Use the size 8 round brush to create more jagged, defined peaks compared to the smooth distant mountains.
Step 4: The Dark Foreground
-
Mix deep forest greens:
Combine Indigo, Payne’s Grey, and a touch of Burnt Sienna to create a very dark, near-black teal. This needs to provide strong contrast against the misty background. -
Block in the main hill:
Paint the large, sweeping hill shape in the immediate foreground. Don’t worry about individual trees yet; just establish the dark mass and the overall slope. -
Add texture to the dark hill:
While the large dark shape is semi-dry, use a fairly dry brush to scumble some texture, suggesting dense foliage without drawing every leaf. -
Detail the evergreens:
Switch to your size 0 detail brush. Along the ridge of the dark foreground hill, paint tiny vertical lines and stipple small triangular shapes to create the illusion of individual pine trees breaking the silhouette. -
Pop of autumn color:
Mix a rusty orange using Burnt Sienna and Alizarin Crimson. Carefully dab this color into the bottom-left corner among the dark trees to represent a patch of autumn foliage catching the last light. -
Final touches:
Once everything is bone dry, carefully peel off the masking tape to reveal the clean edges. Assess the mist levels; if needed, glaze a final whisper of white gouache over the middle ground to push it back further.
Step back and admire the calm depth you have created on paper.
BRUSH GUIDE
The Right Brush for Every Stroke
From clean lines to bold texture — master brush choice, stroke control, and essential techniques.
Explore the Full Guide
Cherry Blossom Tree Against a Soft Sunset
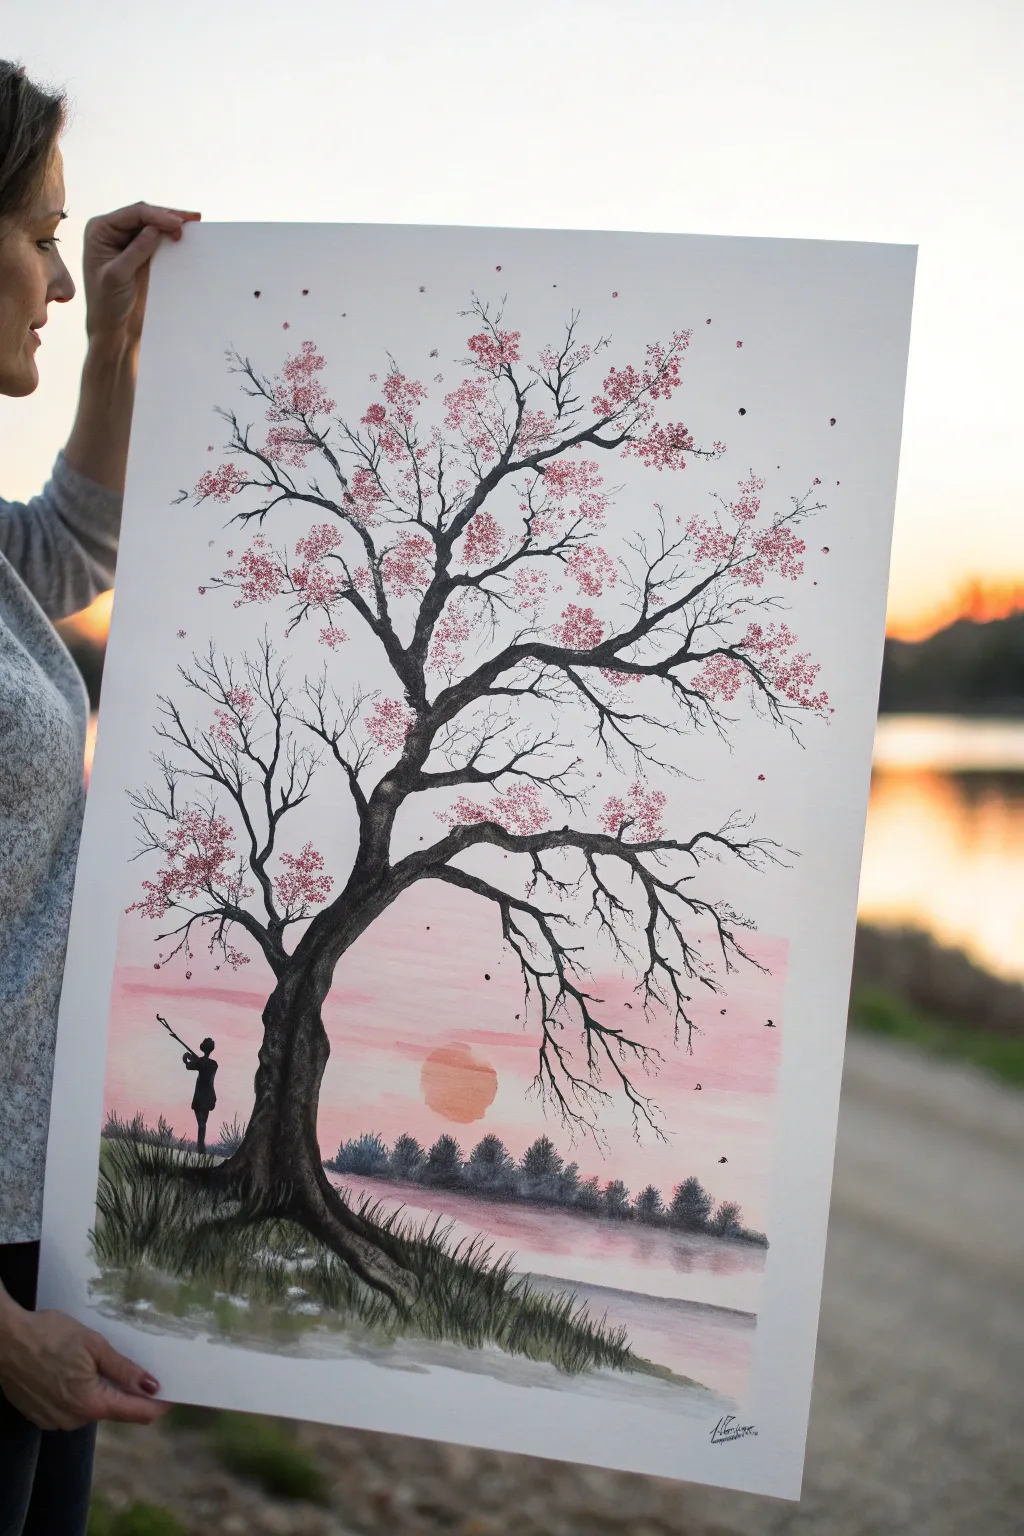
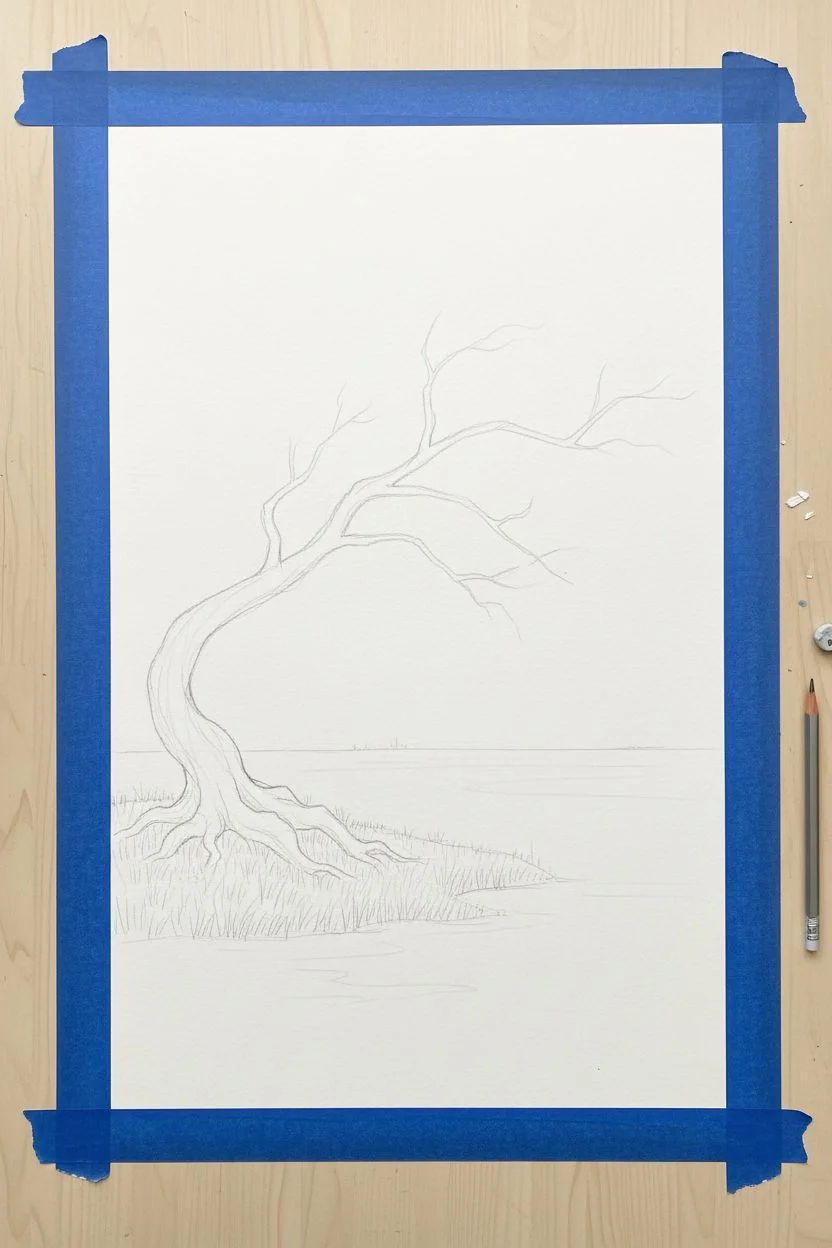
Capture the serene beauty of a lone tree against a dusky sky with this mixed-media project. By combining the precision of ink or charcoal with the softness of watercolor washes, you can create a striking contrast that feels both grounded and ethereal.
Step-by-Step Guide
Materials
- Large sheet of cold-press watercolor paper (A3 or larger)
- Watercolor paints (Pink, Rose, Orange, Red, Light Blue, Black)
- Black ink or black watercolor paint (heavy pigment)
- Fine liner pens (0.3mm and 0.5mm)
- Round watercolor brushes (Size 4, 8, and a large wash brush)
- Masking tape
- Pencil for sketching
- Paper towels
- Water cups
Step 1: Setting the Scene
-
Prepare the canvas:
Tape down your large watercolor paper to a board or table on all four sides. This prevents the paper from buckling when we add the wet washes for the sky and water later. -
Establish the horizon:
Lightly sketch a horizon line about a quarter of the way up from the bottom of the page. This separates your grassy bank and water from the expansive sky. -
Map the tree structure:
With a light pencil, sketch the main trunk of the tree on the left side. Give it character by curving the trunk slightly and ensuring the roots spread out into the grassy bank. Sketch the main structural branches reaching upward and outward towards the right.
Natural Texture
For realistic blossoms, don’t use a brush! Dip a small piece of scrunched-up natural sea sponge into your pink paint and lightly dab it onto the branches for an organic texture.
Step 2: Painting the Sunset Sky
-
Wet the sky area:
Using your large wash brush, apply clean water to the entire sky area above the horizon line. You want the paper damp but not swimming in puddles. -
Apply the sunset base:
Load your brush with a diluted soft pink or rose color. Start applying horizontal strokes from the horizon line moving upward, letting the color fade naturally as you go higher. -
Add warmth:
While the paper is still wet, drop in a hints of soft orange near the center horizon to create a glow where the sun will be. -
Paint the sun:
Using a slightly stronger orange mix, paint a soft circle just above the horizon line. Because the paper is damp, the edges will bleed slightly, creating a hazy, atmospheric look. -
Reflect the sky:
Repeat these colors in the water area below the horizon line, mirroring the pinks and the orange glow of the sun. -
Let it dry completely:
This is crucial. Walk away for a bit or use a hairdryer on a low setting. The paper must be bone dry before you start the intricate tree details.
Add Subtle Sparkle
Once the painting is completely dry, mix a tiny amount of iridescent medium or pearl watercolor into a light pink glaze and dab it over the brightest parts of the blossoms.
Step 3: Creating the Focal Points
-
Paint the trunk base:
Mix a deep black using watercolor or ink. Start at the bottom of the trunk, painting solid darkness to anchor the tree. Paint the roots gripping the earth. -
Detail the bark:
As you move up the trunk, switch to a slightly smaller brush. Use mostly black, but leave tiny slivers of white paper or diluted grey areas to suggest texture and light hitting the bark. -
Extend the branches:
Follow your pencil sketch to paint the main branches. They should tapers as they extend. Keep your hand loose to create natural, jagged growth patterns rather than perfectly straight lines. -
Add fine twigs:
Switch to your smallest brush or a fine liner pen. Draw the delicate, spindly twigs extending from the main branches. These should be very fine and plentiful to support the blossoms. -
Paint the silhouette figure:
On the left side of the bank, carefully paint a small black silhouette of a person gazing up at the tree. This adds scale and narrative to the piece.
Step 4: Adding Blossoms and Landscape
-
Prepare the blossom color:
Mix a vibrant pink watercolor. You want a consistency that isn’t too watery so the dots hold their shape. -
Stipple the leaves:
Using the tip of a round brush, a sponge, or even a cotton swab, dab clusters of pink dots onto the ends of the fine twigs. Group them in cloud-like formations rather than single dots. -
Vary the density:
Make some clusters dense and dark pink, and others sparse and lighter. I like to add a few falling petals drifting down through the air for movement. -
Paint the distant trees:
Along the horizon line (background), paint a row of small, indistinct trees in a muted grey-blue or dark grey. This creates depth and separates the foreground from the sunset. -
Establish the grassy bank:
Using the black paint or ink, paint short, upward flicking strokes at the base of the main tree to simulate tall grass. Vary the height and direction of the blades. -
Refine the water line:
Add a few faint horizontal lines in the water with a diluted grey to suggest ripples, and ensure the bank connects solidly with the water’s edge.
Once the final petal dries, strip away the tape to reveal a crisp border that frames your peaceful sunset scene perfectly
Flower Field Hills With Tiny Dabbed Blooms
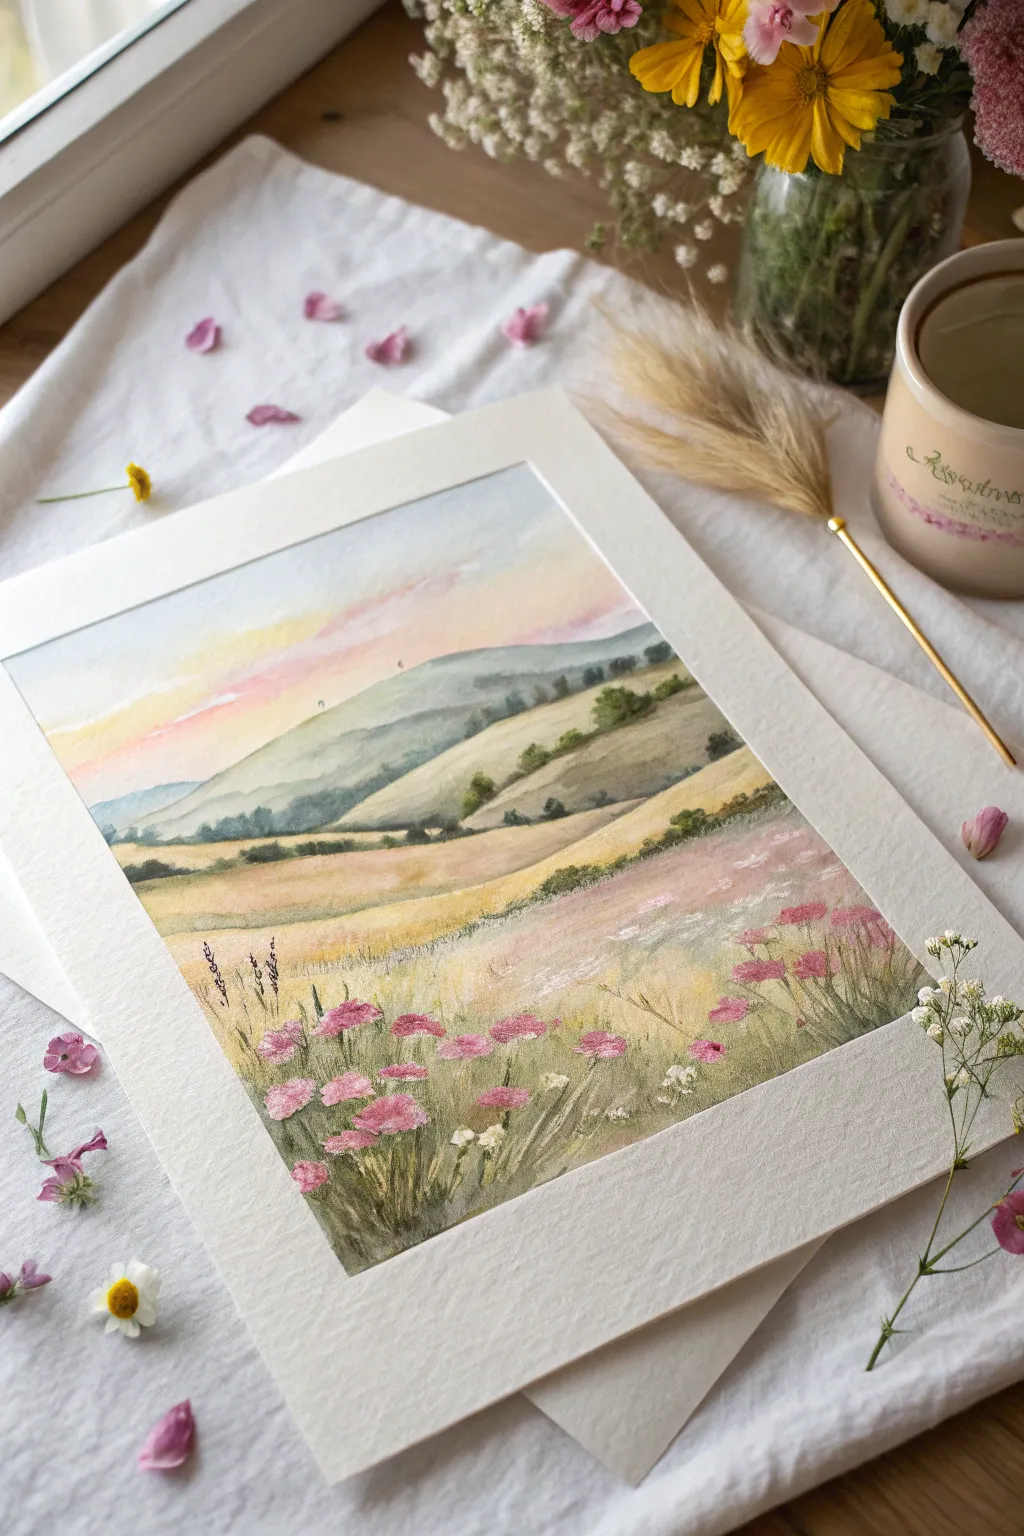

Capture the serenity of a countryside sunset with this soft watercolor landscape featuring gentle rolling hills and a foreground bursting with tiny pink blooms. This project emphasizes layering washes and using simple dabbing techniques to create a detailed floral meadow without needing complex brushwork.
Detailed Instructions
Materials
- Cold press watercolor paper (300 gsm recommended)
- Watercolor paints (Suggested palette: Sap Green, Yellow Ochre, Burnt Sienna, Alizarin Crimson, Rose Madder, Cobalt Blue, Cerulean Blue, Lemon Yellow)
- Set of watercolor brushes (1″ flat wash, Size 8 round, Size 2 small detail)
- Two jars of water (one clean, one for rinsing)
- Masking tape
- Paper towels
- Pencil (HB) and kneaded eraser
- White gouache or white gel pen (optional for highlights)
- Pre-cut picture mount/mat (white or cream)
Step 1: Sketching and Sky
-
Tape and Prep:
Begin by taping your paper down to a board with masking tape. This creates a crisp border and prevents the paper from buckling when wet. Ensure the visible area matches the size of your mat opening. -
Light Sketch:
Using an HB pencil, very lightly sketch the horizon line and the overlapping curves of the hills. Keep the lines faint so they won’t show through the transparent watercolor layers later. -
Wet-on-Wet Sky:
With your large flat brush, wet the sky area with clean water until it glistens. You want it damp, not soaking wet. -
Applying Sunset Colors:
While the paper is wet, drop in a pale wash of Lemon Yellow near the horizon. Quickly transition into a soft mix of Rose Madder or Alizarin Crimson above it, and finish with a very pale Cerulean Blue at the very top. Allow the colors to bleed together naturally. -
Sky Drying:
Let the sky dry completely before moving to the hills. If the paper is cool to the touch, it’s still wet.
Soften Your Edges
To keep the hills looking dreamy, soften the top edge of a newly painted hill with a clean, damp brush before the paint dries completely.
Step 2: Painting the Hills
-
Distant Hills:
Mix a cool, muted green using Sap Green and a touch of Cobalt Blue. Paint the furthest hill with a watery wash to create atmospheric perspective—objects further away should look lighter and cooler. -
Middle Ground Hills:
Once the distant hill is dry, mix a warmer green using Sap Green and Yellow Ochre. Paint the middle hills, allowing the brush strokes to follow the slope of the land. -
Golden Fields:
For the rolling fields closer to the viewer, switch to a warm Yellow Ochre mixed with a tiny bit of Burnt Sienna. Apply this wash in horizontal bands, leaving some lighter patches to suggest sunlight hitting the grass. -
Adding Depth:
While the golden field layer is still slightly damp, drop in touches of darker green along the bottom edges of the hills to create shadows and separation between the slopes. -
Distant Trees:
Using a size 8 round brush and a concentrated dark green mixture, dab small, irregular shapes along the ridge lines of the middle hills to suggest distant clusters of trees and bushes.
Muddy Greens?
If your greens look dull, stop mixing too many colors. Stick to one yellow and one blue, or use a pre-mixed tube green and modify it slightly with red (to darken) or yellow (to warm).
Step 3: Foreground Detail
-
Grassy Texture:
Once the base layers are dry, take your smallest detail brush (size 2). Mix various shades of green and ochre. Paint thin, upward flickering strokes in the immediate foreground to simulate tall grasses. -
Building the Bloom Base:
I like to create a soft ‘bed’ for the flowers first. Use a watery wash of pink (Rose Madder) in the lower third of the painting, letting it blend loosely with the green grass stems. -
Dabbing Flowers:
Load your round brush with a more pigmented, creamy mix of pink and red. Hold the brush perpendicular to the paper and gently press the tip down to create varied, organic petal shapes. Group some together and leave others solitary. -
Flower Centers and Stems:
Mix a dark, earthy green. Connect your pink blooms to the ground with very fine stem lines. Add tiny dots of dark brown or deep red in the centers of a few flowers for definition. -
Stray Wildflowers:
Paint a few tall, thin stalks rising higher than the rest, perhaps with small purple or lavender buds (like the lavender springs on the left side of the example) to break up the composition. -
Final Highlights:
If desired, use white gouache or a gel pen to add tiny specks of white among the flowers for a sparkle effect or ‘Baby’s Breath’ look. -
Mounting:
Once perfectly dry, carefully peel off the tape. Place the painting behind your pre-cut mat board to frame the scene cleanly.
Step back and enjoy the peaceful view you have created on paper

PENCIL GUIDE
Understanding Pencil Grades from H to B
From first sketch to finished drawing — learn pencil grades, line control, and shading techniques.
Explore the Full Guide
Lavender Meadow Path at Golden Hour
Capture the serene beauty of Provence with this stunning landscape painting, focusing on the dramatic perspective of lavender rows leading to a lone tree. The warm sunset hues contrast beautifully with the deep purples, creating a peaceful and romantic atmosphere perfect for any room.
Step-by-Step Tutorial
Materials
- Stretched canvas (16×20 inches or similar)
- Acrylic paints (Titanium White, Ultramarine Blue, Dioxazine Purple, Magenta, Burnt Umber, Yellow Ochre, Cadmium Orange, Cadmium Yellow)
- Set of brushes: large flat brush (1-2 inch), medium filbert, lush fan brush, small detail round brush
- Palette knife
- Water cup and paper towels
- Easel
- Pencil for sketching
- Ruler (optional for perspective lines)
Step 1: Setting the Scene
-
Establish the Horizon:
Begin by lightly sketching a horizontal line about one-third of the way from the top of your canvas to mark the horizon. -
Sketch Perspective Lines:
Mark a vanishing point near the center of your horizon line. Draw radiating diagonal lines extending from this point down to the bottom corners to define the lavender rows and the central dirt path. -
Outline the Tree:
Sketch the silhouette of the single tree on the right side of the horizon, ensuring the trunk is grounded just slightly below the horizon line.
Step 2: Painting the Sky and Background
-
Mix Golden Hour Colors:
Prepare a gradient on your palette ranging from Cadmium Yellow and White at the bottom to a mix of Orange and a touch of Purple for the upper sky. -
Paint the Sky Gradient:
Using a large flat brush, apply the pale yellow mix near the horizon set against the mountains. While wet, blend upwards into the orange and finally the dusky purple-grey clouds at the top. -
Add Cloud Details:
Switch to a smaller filbert brush. Mix a soft grey-purple and dab in the cloud shapes, keeping the edges soft to mimic movement. -
Paint Distant Mountains:
Mix a hazy blue-grey using Ultramarine Blue and White. Paint the distant mountain range along the horizon, keeping the color desaturated to push them into the background.
Muddy Purple?
If your lavender looks muddy, stop mixing white directly into purple. Instead, mix purple with magenta first, then add white. Avoid adding yellow, as it cancels out purple.
Step 3: The Lavender Fields
-
Block in Dark Shadows:
Mix Dioxazine Purple with a little Ultramarine Blue. Paint the shadowed troughs between the lavender rows, following your perspective lines exactly. -
Base Coat for Lavender:
Apply a mid-tone purple to the tops of the lavender rows. Use long, sweeping strokes that follow the direction of the rows toward the vanishing point. -
Create Texture:
Take a fan brush or an old, splayed bristle brush. Dip it into a lighter purple mix (purple + magenta + white) and tap vertically along the tops of the rows to simulate flower spikes. -
Highlight the Blooms:
This is where I emphasize the light direction. Mix a very pale lavender-pink and tap highlights primarily on the right side of each row, suggesting the sunset light hitting them. -
Paint the Dirt Path:
Mix Titanium White, Yellow Ochre, and a tiny bit of Burnt Umber. paint the central path, using horizontal strokes near the front and vertical near the back to help perspective.
Golden Glow
For an intense sunset effect, use neon pink or fluorescent orange paint for the final highlights on the clouds and the tips of the lavender facing the sun.
Step 4: Tree and Final Details
-
Paint the Trunk:
Use a small round brush and dark brown paint to fill in the tree trunk and main branches. -
Add Tree Foliage:
Stipple dark green (Yellow + Blue + Black) for the shadow side of the tree canopy. Add highlights on the right side using a lighter olive green mix. -
Enhance Foreground Texture:
Using your smallest detail brush, paint individual stalks of lavender in the immediate foreground (bottom of the canvas) to create a sharp focus effect. -
Add Pebbles and Debris:
Dot a few small grey and white shapes on the dirt path to look like pebbles, adding tiny shadows underneath them for realism. -
Final Glazing:
Once fully dry, you can apply a very thin glaze of transparent orange over the whole painting to unify the lighting and enhance the golden hour feel.
Step back and admire the depth you’ve created as the rows vanish into that warm, glowing horizon
Cozy Cottage With Climbing Flowers and Warm Windows
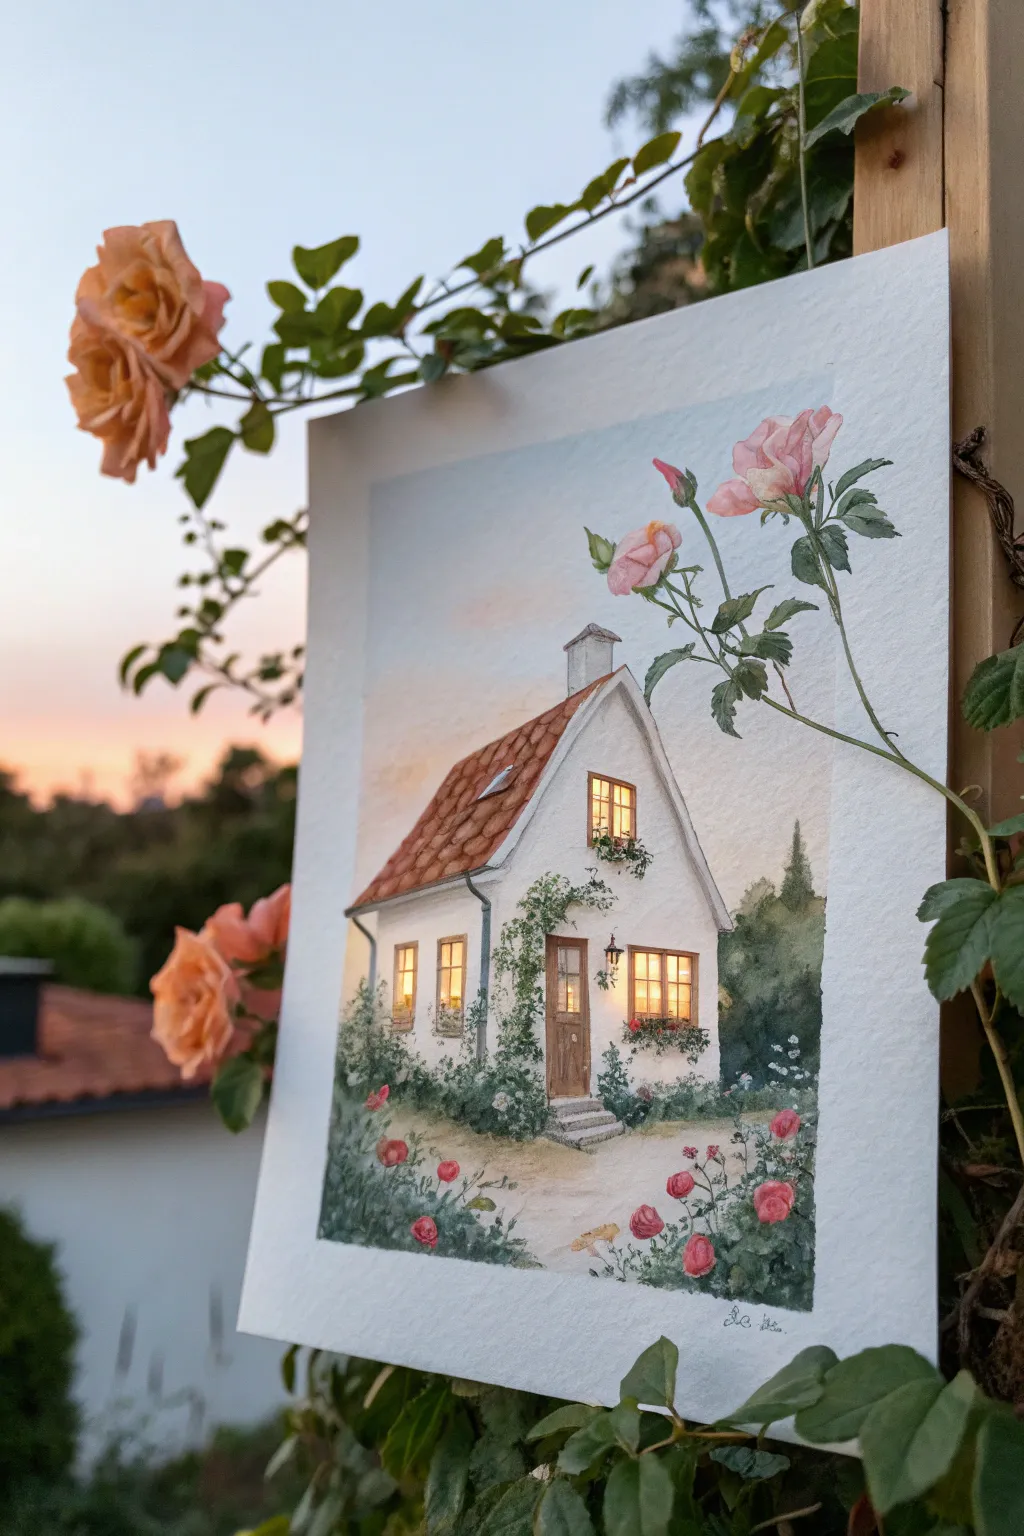
Capture the magic of coming home with this heartwarming watercolor scene featuring a glowing white cottage, tiled roof, and an abundance of garden roses. The soft, ambient light and lit windows create a welcoming atmosphere that feels like a warm embrace on paper.
Step-by-Step Guide
Materials
- Cold press watercolor paper (300 gsm)
- Watercolor paints (Ultramarine Blue, Burnt Sienna, Burnt Umber, Alizarin Crimson, Sap Green, Yellow Ochre, Cadmium Yellow)
- White gouache paint
- Round brushes (sizes 2, 6, and 10)
- Rigger brush or fine liner (size 0)
- Masking fluid (drawing gum) and an old brush
- Pencil (HB) and kneaded eraser
- Two jars of water
- Paper towels
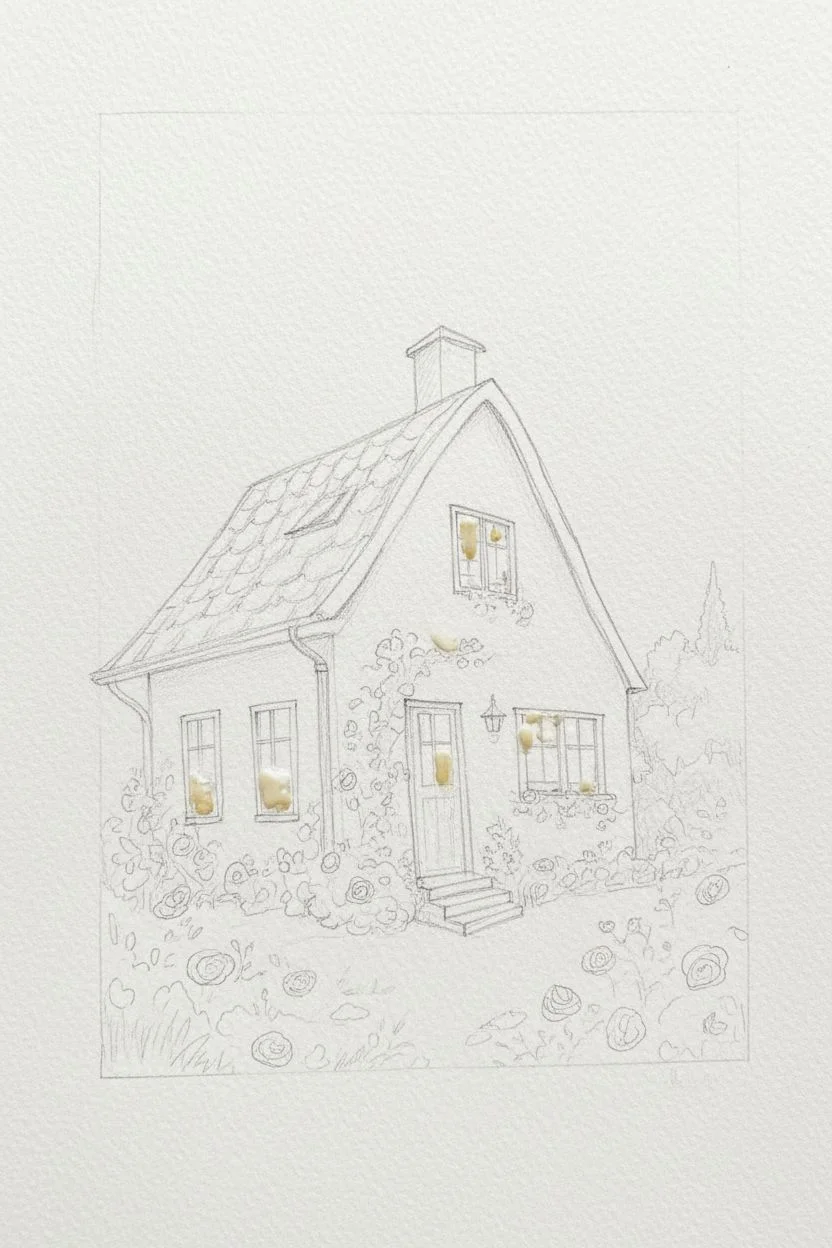
Step 1: Sketching and Masking
-
Outline the structure:
Begin with a light pencil sketch of the cottage. Position the house slightly off-center to allow room for the garden in the foreground. Focus on the steep triangular roofline and the placement of the windows and door. -
Detail the garden:
Sketch the rough shapes of the climbing vines on the facade and the rose bushes in the foreground. You don’t need to draw every petal, just circular guides for where the flower heads will sit. -
Protect the highlights:
Using an old brush or a silicone tool, apply masking fluid to the window panes (the muntins) and the brightest white highlights on the climbing roses. Allow this to dry completely before touching the paper with water.
Glow Factor
To make the windows pop, ensure the surrounding wall paint is a cool tone (bluish-grey). The contrast between cool walls and warm yellow windows creates the illusion of light.
Step 2: Sky and First Washes
-
Paint the twilight sky:
Wet the sky area with clean water. Drop in a very dilute mix of Ultramarine Blue at the top, fading into a touches of Alizarin Crimson and Yellow Ochre near the horizon to mimic a soft sunset glow. -
Define the roof:
While the sky dries, mix Burnt Sienna with a touch of Alizarin Crimson. Paint the roof area, leaving slight gaps or varying the color intensity to suggest individual tiles. Let the texture of the paper do some of the work here. -
Shadow the walls:
The house is white, but white in shadow has color. Mix a very pale wash of Ultramarine Blue and a tiny bit of Burnt Umber to create a cool grey. Apply this to the shadowed side of the house (left) and under the eaves, softening the edges with a clean, damp brush.
Framing Tip
Extend a tall rose stem or tree branch up the right side of the paper, reaching towards the roof. This ‘frames’ the cottage and pushes the house into the mid-ground distance.
Step 3: Windows and Warmth
-
Light the windows:
Once the masking fluid is removed (or painting carefully around the muntins), use a rich mix of Cadmium Yellow and Yellow Ochre to fill the window panes. To make them look truly glowing, they should be the warmest, brightest spots on the paper. -
Add window depth:
While the yellow is still slightly damp, touch the edges with a bit of orange or diluted Burnt Sienna to suggest the interior warmth radiating outward. -
Paint the door:
Use Burnt Umber to paint the wooden door, keeping the color varied to suggest wood grain. Leave the small window pane in the door bright yellow.
Step 4: Greenery and Florals
-
Base layer for greens:
Mix Sap Green with a little Yellow Ochre for a fresh, leafy base. Stipple this color around the door frame and climbing up the wall to create the ivy foundation. -
Deepen the foliage:
Add Ultramarine Blue or Burnt Umber to your green mix to create a dark shadow tone. Dab this into the lower sections of the bushes and behind the lighter leaves to create volume and depth. -
Paint the roses:
For the pink roses, use Alizarin Crimson diluted with plenty of water. Paint loose, C-shaped strokes to form the rose heads, leaving the white of the paper peaking through for highlights. Vary the size, making the foreground roses larger and looser. -
Connect nature to structure:
Use your smallest brush to paint fine stems connecting the floating rose heads to the main bushes. I find a rigger brush works perfectly here for getting those spindly, natural lines.
Step 5: Final Details
-
Add architectural details:
Using a dark grey mix (Ultramarine + Burnt Umber), paint the gutter downspout, the lantern by the door, and the chimney details. Keep lines crisp. -
Define the path:
Wash a very diluted Yellow Ochre and Burnt Sienna mix across the foreground to create a dirt path leading to the door. Keep the edges soft where the path meets the grass. -
Enhance the glow:
Take a tiny amount of white gouache and mix it with bold yellow. carefuly dab this into the absolute center of the light sources in the windows to maximize the glowing effect. -
Final touches:
Use opaque white gouache to add tiny highlights on the rose petals or to bring back the crisp white of a window frame if it got muddy. Sign your name in the corner.
Step back and enjoy the peaceful, inviting atmosphere you’ve created with just a few colors and brushes


Minimalist Line Art Portrait With a Soft Color Wash
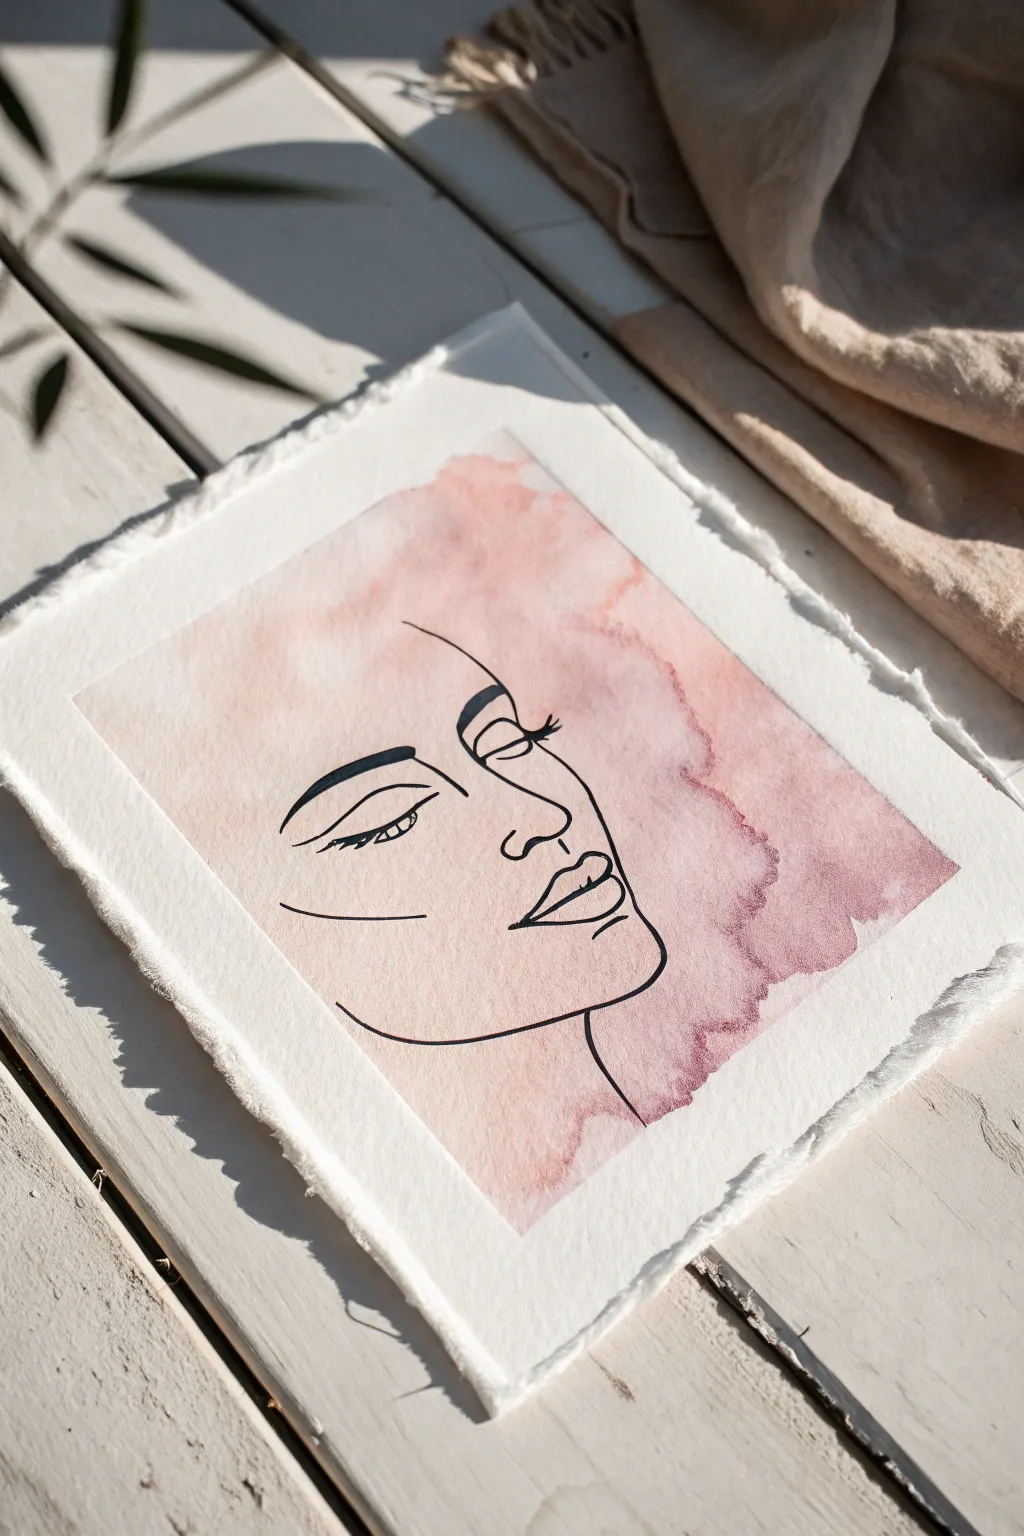
This elegant project combines the loose, watery freedom of abstract painting with the structured beauty of minimalist line art. The result is a sophisticated piece featuring a soft, mauve-pink wash that seems to float behind a striking black contour face.
Step-by-Step Guide
Materials
- High-quality watercolor paper (300gsm, cold press recommended)
- Watercolor paints (Alizarin Crimson, Burnt Sienna, and a touch of Ultramarine Blue)
- Black waterproof fine liner pen (0.5mm or 0.8mm) or India ink with a dip pen
- Large round watercolor brush (size 10 or 12)
- Pencil (HB or H)
- Kneaded eraser
- Masking tape
- Ruler (metal edge is best technique)
- Jar of clean water
- Paper towels
Step 1: Creating the Soft Background
-
Tape your paper:
Begin by taping your watercolor paper down to a flat surface or drawing board. This prevents the paper from buckling when we add the water wash. -
Mix your dreamy color:
Create a vintage dusty rose color by mixing plenty of water with Alizarin Crimson and a small amount of Burnt Sienna. If it’s too bright, dull it down with the tiniest dot of Ultramarine Blue. -
Wet the paper:
Using your large round brush and clean water, paint a loose, abstract shape in the center of the paper where the face will eventually go. Keep the edges ragged and uneven for that organic look. -
Drop in the pigment:
While the paper is still glistening wet, load your brush with the paint mixture and touch it to the wet area. Watch the color bloom and spread naturally. -
Create texture:
Add a bit more concentrated pigment to the right side of the shape to create the darker ‘cloud’ effect seen in the reference. Tilt the board slightly if needed to encourage flow. -
Let it dry completely:
This is crucial—wait until the paper is bone dry and flat. Painting ink over damp paper will cause the lines to bleed and ruin the crisp effect.
Step 2: Drawing the Minimalist Portrait
-
Sketch the framework:
Lightly sketch the face using an H pencil. Focus on the profile view: a strong brow, a closed eye with prominent lashes, and full lips. Don’t worry about shading; we only want the contour. -
Refine the composition:
Ensure the face is centered over your watercolor wash. The color wash shouldn’t fill the lines perfectly; it looks better if it spills outside the lines or stops short, creating a modern, offset look. -
Start the ink work:
Using your waterproof pen or dip pen, begin tracing your pencil lines. Start with the eyebrow to anchor the face. -
Creating fluid lines:
Try to keep your hand moving confidently. A slightly wavering line adds character, but hesitant, scratchy lines can look messy. I find it helps to lock my wrist and move my whole arm. -
Detailing the eye:
Draw the closed eyelid with a smooth curve. Add thick, bold lashes to give the expression a sense of serenity and femininity. -
Defining the lips and jaw:
Outline the lips, leaving them open slightly. Then, trace the strong jawline, stopping the line abruptly at the neck to maintain the floating, ephemeral aesthetic. -
Erase guidelines:
Once the ink is 100% dry (give it at least 20 minutes to be safe), gently use a kneaded eraser to lift away any visible pencil marks.
Bleeding Lines?
If your ink feathers, the paper wasn’t dry enough. Wait longer or use a hairdryer on the cool setting. Ensure your pen is labeled ‘waterproof’ or ‘archival’.
Step 3: Finishing Touches
-
Prepare for the deckled edge:
To get that torn, vintage paper edge, place your metal ruler firmly along the edge of the paper where you want the tear to be. -
Wet the tear line:
Run a wet brush along the edge of the ruler on the paper. This softens the fibers, making them easier to separate. -
Tear the edges:
Pressing down hard on the ruler, pull the excess paper upward and toward the ruler edge to rip it. Repeat this on all four sides. -
Final inspection:
Check your line weight. If some areas look too thin, go back over them carefully to thicken the line, particularly on the underside of the jaw and the brows.
Add Metallic Glam
Mix a tiny amount of gold watercolor paint or gold ink and splatter it lightly over the dried pink wash for a luxurious, shimmering finish
Frame your beautiful new artwork in a floating glass frame to show off those lovely deckled edges
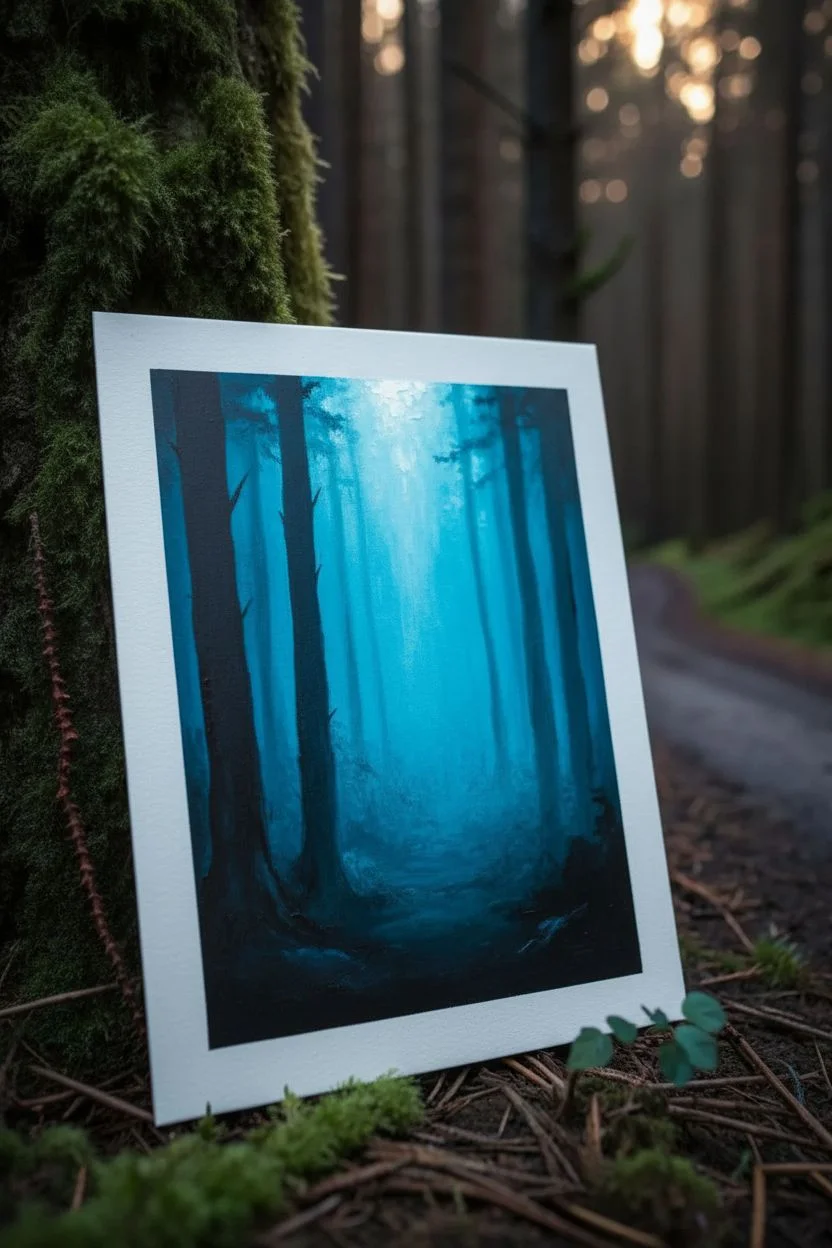
Polaroid-Style Mini Landscapes as a Cute Series
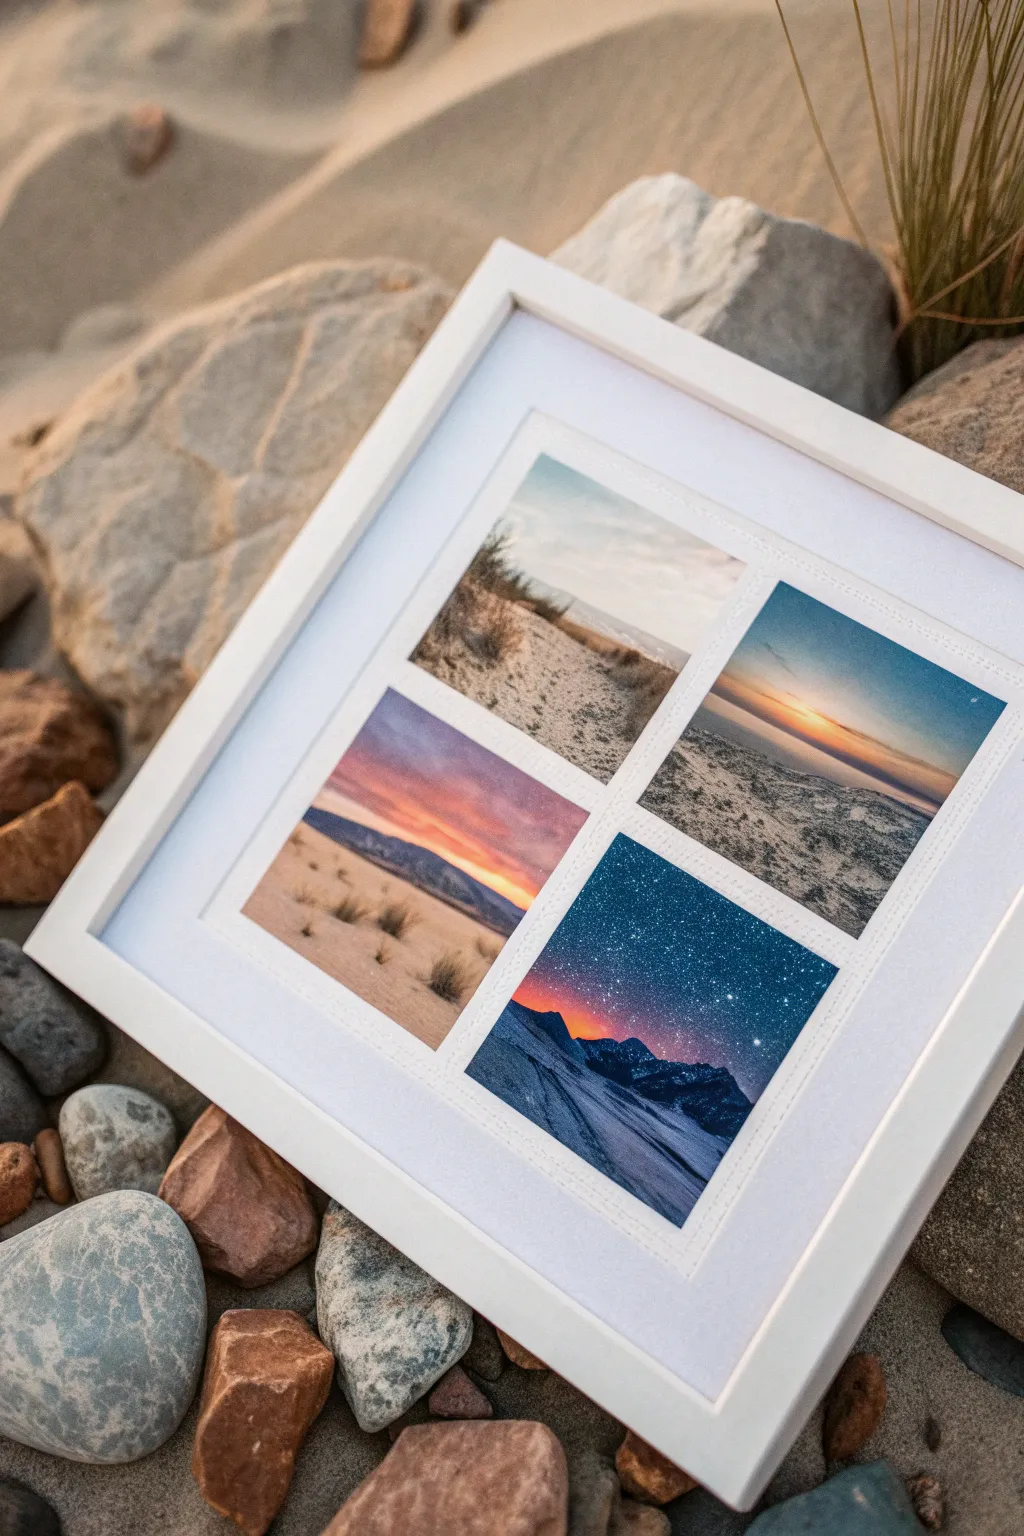

Capturing the beauty of nature in bite-sized snapshots, this project arranges four distinct landscape paintings into a charming, cohesive grid. The white borders and frame give it a clean, modern aesthetic that mimics the nostalgic feel of vintage instant photos.
How-To Guide
Materials
- Square white picture frame (approx 8×8 or 10×10 inches)
- Heavyweight cold-press watercolor paper
- Pencil and ruler
- Painter’s tape or masking tape
- Watercolor or gouache paints
- Resulting palette: sunset oranges, deep blues, sandy beiges, and starry white
- Small round brushes (sizes 0, 2, and 4)
- White gel pen or opaque white gouache
- Exacto knife or scissors
- Double-sided tape or photo mounting squares
Step 1: Preparation & Layout
-
Measure your grid:
Begin by deciding on the size of your four mini paintings. Measure the inner opening of your frame and divide the space to allow for four equal squares with a healthy white border around and between them. -
Cut the paper:
Cut four separate square pieces of watercolor paper to your determined size. Alternatively, you can paint all four on one large sheet if you masking tape them off carefully, but painting them separately allows for mistakes to be discarded more easily. -
Tape the edges:
Secure each small square to your workspace using painter’s tape. Cover about 1/8th of an inch on all four sides to create that crisp, clean border essential for the ‘Polaroid’ look. -
Sketch the horizons:
Lightly sketch the horizon lines for all four scenes. Vary the height of the horizon in each square—some lower like the starry night, others higher like the beach path—to create visual interest across the grid.
Step 2: Painting the Scenes
-
Paint the first scene: Sandy Path:
For the top-left square, start with a pale blue wash for the sky. While that dries, mix sandy beige and light brown for the dunes. Use a stippling motion with a dry brush to suggest grass texture along the edges of the path. -
Paint the second scene: Coastal Sunset:
Moving to the top-right, create a gradient sky. Start with deep blue at the top, blending into orange and yellow at the horizon line. Paint the water with horizontal strokes of dark blue, reflecting a bit of the sunset orange. -
Paint the third scene: Desert Dusk:
For the bottom-left image, paint the sky in soft purples and pinks. Render the distant mountains in a muted violet-grey. Keep the foreground sand smooth, adding tiny vertical strokes for desert scrub brushes once the base layer is dry. -
Paint the fourth scene: Starry Night:
The bottom-right is the darkest scene. Saturate the sky with deep indigo and black, leaving a faint glow of red or orange just behind the mountains. Paint the snowy foreground with cool blue-greys to suggest shadows.
Tape Tearing Paper?
If your tape tears the paper upon removal, try heating it briefly with a hair dryer to loosen the adhesive, or stick the tape to your clothes first to reduce its tackiness.
Step 3: Adding Details & Assembly
-
Add highlights and stars:
Once the night scene is fully dry, use a white gel pen or a toothbrush flicked with white gouache to create the starry sky. Add bright white highlights to the snow peaks and water reflections in the other panels. -
Remove the tape:
Carefully peel away the painter’s tape at a 45-degree angle. This is the most satisfying part, revealing the crisp edges that frame your miniature worlds. -
Arrange the backing:
Cut a piece of white cardstock or thick paper to fit your frame’s backing board. Mark the center point and lightly pencil guidelines to ensure your four paintings will be perfectly centered and evenly spaced. -
Mount the paintings:
Apply double-sided tape or mounting squares to the back of each dry painting. Press them firmly onto your guide marks on the backing paper. -
Frame the artwork:
Clean the glass of your frame to remove any dust or fingerprints. Place your mounted artwork into the frame, secure the back, and check that the alignment looks straight from the front.
Add a Faux Stitch
Use a pin or a very fine needle tool to pierce tiny holes around the border of each painting to mimic the look of stitched fabric or textured paper edges.
Now you have a gallery of miniature worlds captured in a single frame, ready to hang or gift to a nature lover
Romantic City Skyline Silhouette With Twinkly Lights
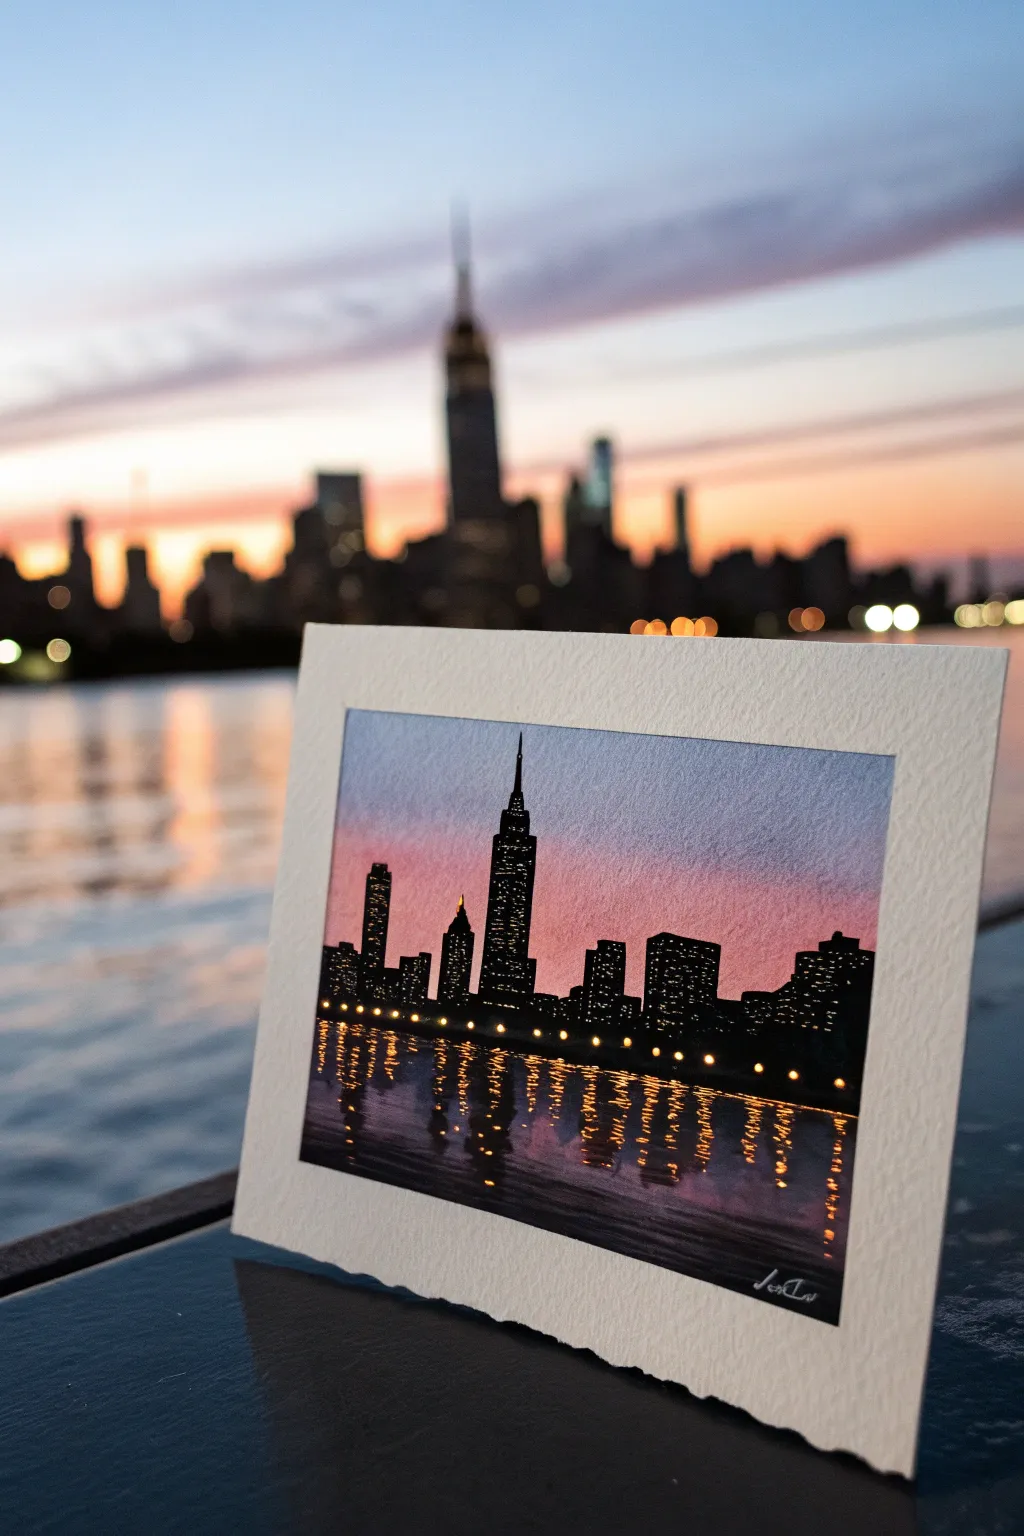
Capture the magic of an urban sunset with this moody and romantic watercolor silhouette. By blending a soft gradient sky with stark black architecture and bright reflected lights, you can create a postcard-perfect memory of your favorite city view.
Detailed Instructions
Materials
- Cold press watercolor paper (300 gsm)
- Watercolor paints (Indigo, Alizarin Crimson, Burnt Sienna, Payne’s Grey, Black)
- White gouache or white gel pen
- Soft round paintbrush (size 8 or 10)
- Fine detail paintbrush (size 0 or 1)
- Masking tape
- Jar of clean water
- Paper towels
- Pencil and eraser
Step 1: Setting the Scene
-
Tape the edges:
Begin by securing your watercolor paper to a flat board or table using masking tape. This creates that crisp, professional white border seen in the example image and prevents the paper from buckling when wet. -
Draft the horizon:
Lightly sketch a horizontal line about one-third of the way up from the bottom of your paper to separate the water from the sky. -
Sketch the silhouette:
Very faintly outline the shapes of the buildings. Focus on the taller landmarks first, like the central spire, and fill in surrounding blocks with varied heights. Don’t worry about windows yet—just get the outer shape right.
Bleeding edges?
If paint seeps under the tape, use a slightly damp, clean brush to gently lift the excess pigment while it’s still wet, or cover it with white gouache later.
Step 2: Painting the Sky & Water
-
Wet the sky area:
Using your large round brush, apply a layer of clean water to the sky area, stopping right at the building outlines. -
Apply the sunset base:
While the paper is glistening, drop in a wash of Alizarin Crimson mixed with a touch of Burnt Sienna near the horizon line to create that warm, sunset glow. -
Blend the upper sky:
As you move upward, introduce Indigo or a mix of Blue and Purple. Let it bleed naturally into the pink layer to create a soft, seamless gradient. -
Mirror the water:
Repeat this gradient process for the water section below the horizon, but make the colors slightly darker and moodier. Keep the darker blue at the bottom and the warm pink near the horizon line. -
Dry completely:
Allow the paper to dry fully. If the paper feels cool to the touch, it’s still wet. I usually wait an extra five minutes just to be safe before starting the details.
Step 3: Adding the City & Lights
-
Fill the silhouette:
Load your medium brush with saturated Black watercolor or black ink. Carefully fill in the building shapes you sketched earlier, ensuring the edges are sharp against the colorful sky. -
Add water ripples:
Using the same black paint, add horizontal, wavy lines into the water area. These should be wider near the bottom and get thinner and closer together as they approach the horizon. -
Create reflections:
Darken the water directly underneath the tallest buildings to simulate their shadows casting onto the river. -
Let the black dry:
Ensure the black silhouette layer is bone dry before proceeding to the lights, otherwise the white paint will turn gray. -
Dot the windows:
Switch to your fine detail brush and white gouache (or a white gel pen). Add tiny rows of dots to the black buildings to represent lit windows. vary the patterns so some buildings look busy and others quiet. -
Paint the reflections:
Using a mix of yellow ochre or gold watercolor, paint short, wiggly vertical lines in the water beneath the light sources. This mimics the shimmering reflection of streetlights. -
Highlight the ripples:
Add a few very thin strokes of white gouache over the dark water ripples to suggest movement and surface shine. -
Final touches:
Review the painting for balance. If the sky feels too empty, you can add a tiny, subtle crescent moon with white gouache. -
Reveal the border:
Once everything is dry, slowly peel away the masking tape at a 45-degree angle to reveal your crisp white frame.
Make it shimmer
For the reflected lights in the water, mix a tiny amount of iridescent or metallic gold watercolor medium into your yellow paint for a genuine glow.
Place your finished piece in a frame or on a small easel to enjoy your personal city view
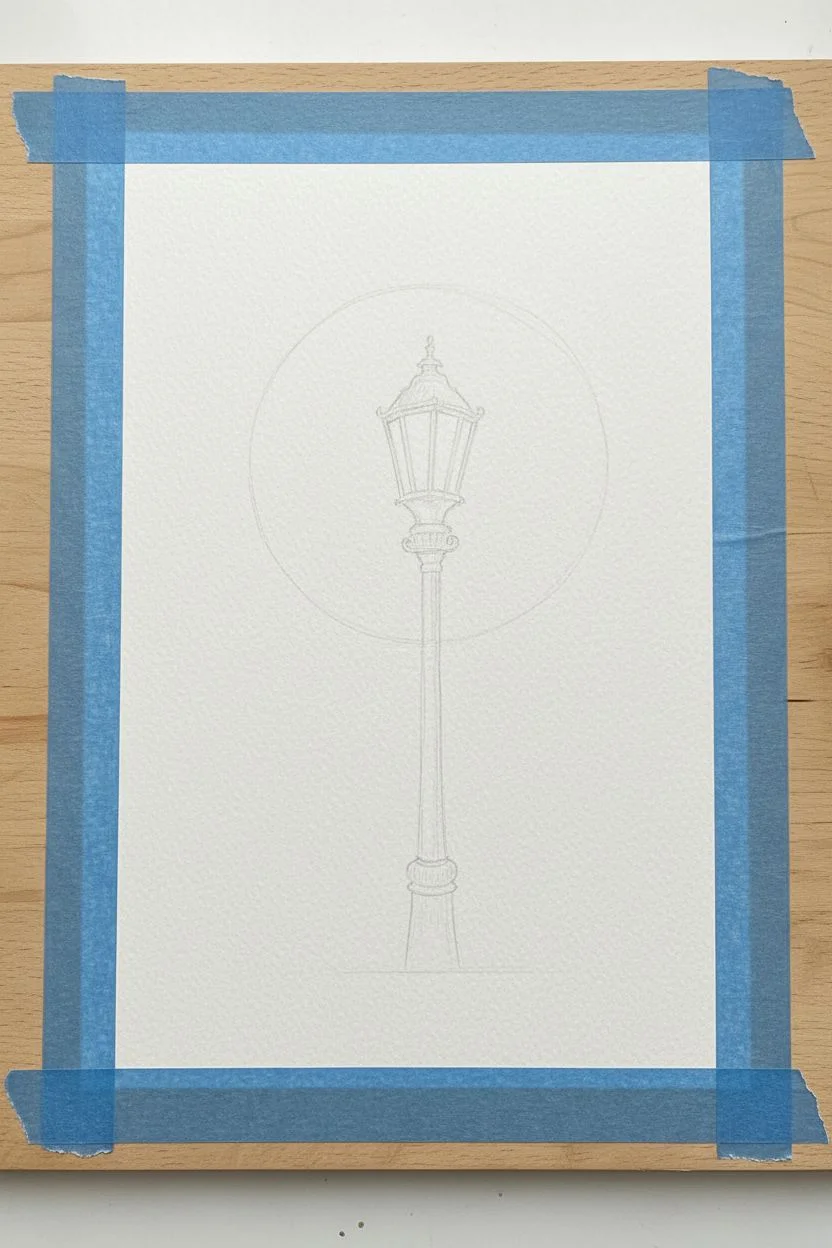
Streetlamp Glow With a Soft, Hazy Night Sky
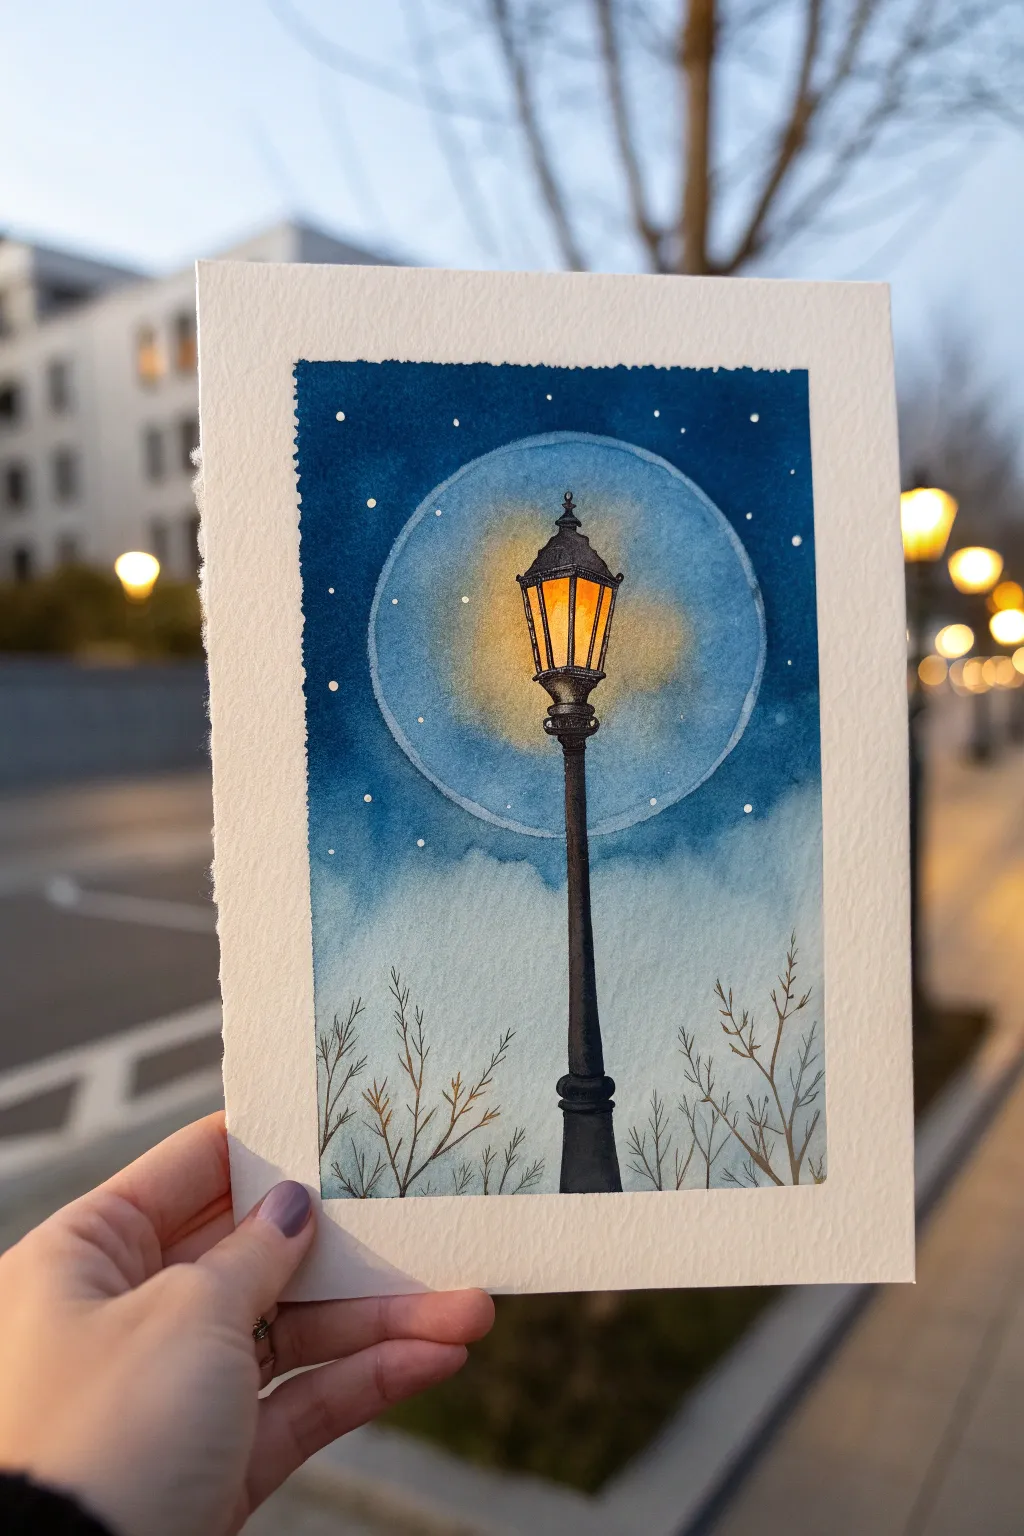
Capture the magic of a snowy evening with this enchanting watercolor painting featuring a glowing streetlamp against a deep blue night sky. The contrast between the warm, inviting light and the cool, atmospheric background creates a stunning focal point.
How-To Guide
Materials
- Cold press watercolor paper (approx. 5×7 inches)
- Masking tape
- Pencil and eraser
- Round object (bowl or compass) for tracing
- Watercolor paints: Indigo, Prussian Blue, Ultramarine Blue, Yellow Ochre, Cadmium Orange, Burnt Umber, Lamp Black
- White gouache or white gel pen
- Watercolor brushes: Large round (size 8-10), small detail round (size 0-2)
- Clean water and paper towels
Step 1: Preparation and Sketching
-
Tape the edges:
Begin by taping down all four edges of your watercolor paper to a board. This creates the crisp, clean white border seen in the original piece and prevents buckling. -
Trace the glow:
Using a compass or a round household object, lightly trace a large circle in the upper center of the paper. This will define the area of the hazy light halo. -
Sketch the lamp:
Lightly sketch the streetlamp silhouette. Start with the vertical pole in the center, then add the lantern housing on top. Keep the lantern centered within your pencil circle.
Wet-on-Wet Glow
To get a truly soft glow, ensure the paper inside the circle is shiny-wet before dropping in the yellow. If it’s too dry, you’ll get hard edges instead of a haze.
Step 2: Painting the Glowing Halo
-
Wet the circle:
With clean water, wet the entire inside of the circle you traced, being careful to stay within the lines. -
Add the warm light:
While the paper is wet, drop watery Yellow Ochre into the center of the lantern area. Let it bloom outward naturally toward the edges of the circle. -
Blend the halo edges:
While the yellow is still damp, introduce a very diluted wash of Ultramarine Blue around the outer rim of the circle, letting it touch the yellow slightly to create a soft, glowing transition. -
Strengthen the center:
Once the first layer is damp (not soaking), dab a richer mix of Cadmium Orange and Yellow into the very center of the lantern panels to imply the light source.
Step 3: The Night Sky Background
-
Prepare the dark sky:
Mix a deep, dark blue using Indigo and Prussian Blue. You want a saturated, heavy color for the night sky. -
Paint around the halo:
Carefully paint the area outside the circle. Use the tip of your brush to cut in neatly around the circular edge. The contrast between the painted dark sky and the painted halo should be distinct. -
Create a gradient:
As you move down the paper below the circle, add more water to your brush to fade the dark blue into a lighter, hazier blue near the bottom horizon. -
Add texture:
While the dark sky is still wet, you can tap in a few spots of concentrated Indigo to create depth and cloud-like variations. -
Let it dry completely:
This is crucial. Wait until the paper is bone dry before proceeding to the next step to prevent the black lamp paint from bleeding.
Level Up: Metallic Touch
Use metallic gold watercolor for the brightest part of the flame or for scrolling details on the lamp post to make the artwork shimmer under direct light.
Step 4: Details and Atmosphere
-
Paint the lamp post:
Using your smallest brush and a thick mix of Lamp Black (or very dark gray), paint the vertical post of the streetlamp. -
Detail the lantern:
Carefully outline the metal frame of the lantern, painting the cap and the decorative bottom contours. Keep your lines steady and sharp. -
Add the branches:
Mix a watery Burnt Umber or a brownish-grey. Paint delicate, twiggy branches reaching up from the bottom edge. Keep strokes loose and organic. -
Create snow:
Load a small brush or toothbrush with white gouache. Tap it against another brush to splatter tiny ‘snow’ dots over the blue sky. Add a few specific white dots manually for larger snowflakes. -
Final highlights:
I like to use a white gel pen or thick gouache to add tiny highlights on the black metal of the lamp where the snow might have caught. -
Reveal:
Once everything is absolutely dry, slowly peel off the masking tape at a 45-degree angle to reveal the crisp border.
Frame your mini masterpiece or turn it into a beautiful winter greeting card
Glowing Mushroom Forest With Magical Light Spots
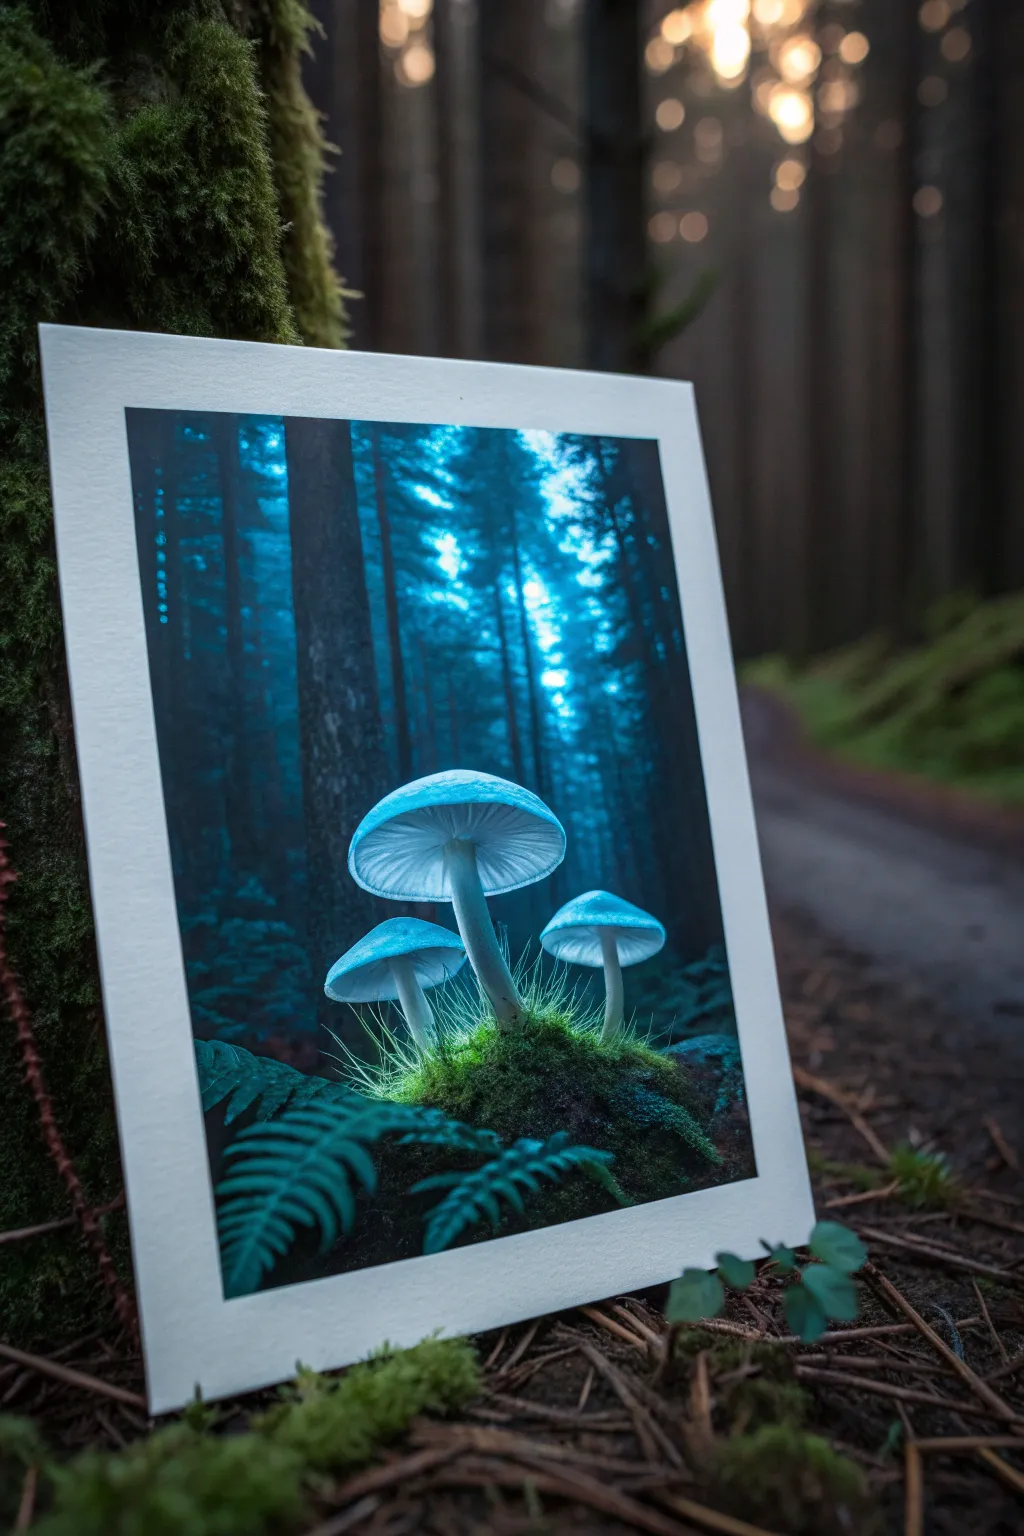
Capture the mystic beauty of bioluminescent fungi deep within a twilight forest with this striking acrylic painting project. The contrast between deep midnight blues and glowing cyan creates an otherworldly atmosphere that seems to light up the room.
How-To Guide
Materials
- Heavyweight acrylic paper or primed canvas board (9×12 inch)
- Acrylic paints: Phthalo Blue, Ultramarine Blue, Titanium White, Black, Teal/Turquoise, Lime Green
- Brushes: Large flat wash brush, medium round brush, fine liner brush, old scruffy brush for texture
- Water cup and palette
- Paper towels
- Painter’s tape (optional for clean borders)
Step 1: Setting the Atmosphere
-
Prepare the Background Gradient:
Start by mixing a dark, rich background color using Phthalo Blue and a touch of Black. Apply this to the outer edges of your canvas or paper, leaving the center slightly lighter. -
Establish the Light Source:
While the paint is still wet, blend in pure Phthalo Blue towards the middle. Then, mix a light blue using Phthalo Blue and White, painting this directly in the upper center where the forest canopy light breaks through. -
Create Vertical Depth:
Using a flat brush turned vertically, streak lines of watered-down Black and Phthalo Blue mixture downwards to suggest distant tree trunks fading into the mist. -
Add Foreground Trees:
Mix a darker charcoal tone (Black + Phthalo Blue) and paint two distinct, thicker tree trunks on the left side. These should be silhouetted against the lighter background glow.
Step 2: Painting the Glowing Fungi
-
Sketch the Composition:
Once the background is dry, use very diluted white paint or a white chalk pencil to lightly outline three mushroom shapes: a large central one and two smaller companions on either side. -
Base Coat the Caps:
Fill in the mushroom caps with a pale blue-white mixture. Don’t make it pure white yet; keep it slightly tinted with Teal to establish the base glow color. -
Define the Gills:
Using your fine liner brush and a mix of White and the tiniest drop of Phthalo Blue, paint thin, curved lines radiating from the stem connection point to the edge of the cap to create the gill texture. -
Highlight the Caps:
Paint the very top domes of the mushrooms with a mix of White and Teal. The center of the cap should be the brightest point to look like it’s catching moonlight. -
Paint the Stems:
Stroke downwards for the stems using a translucent white-teal mix. I like to keep the stems slightly transparent to enhance that ghostly, fleshy fungus look.
Glow Like a Pro
For the most intense neon effect, paint the glowing areas pure white first, let it dry completely, and then glaze over it with a transparent flourescent blue or teal paint.
Step 3: Creating the Magical Glow
-
Glaze the Glow:
Mix a very thin, watery glaze of Teal and Neon Blue (or light Phthalo). Gently brush this over the area immediately surrounding the mushroom caps to create a soft halo effect. -
Intensify the Forest Floor:
Darken the bottom of the canvas with pure Black to create a mound for the mushrooms to sit on. Use an old scruffy brush to stipple this area, creating a mossy, uneven texture. -
Add Glowing Grasses:
Using your liner brush and a mix of Lime Green and White, flick quick, upward strokes at the base of the stems. These grass blades should look like they are being backlit by the mushrooms. -
Paint the Ferns:
In the dark foreground corners, paint simple fern silhouettes using a dark teal-black mix. These should be framed by the glow but remain largely in shadow. -
Final Highlights:
Tap pure Titanium White onto the edges of the ferns and the tips of the grass blades where the light from the mushrooms would naturally hit them. -
Mist and Atmosphere:
Dry brush a tiny amount of pale blue mist around the base of the mushrooms to settle them into the environment.
Muddy Colors?
If your blue glow looks dull, you likely mixed orange or yellow into your blue. Stick to cool colors (greens, blues, teals) and only use white to lighten, never yellow.
Place your finished painting in a simple white mat to really make those deep blues pop against the border
Abstract Waves With Pearly Highlights and Smooth Blends
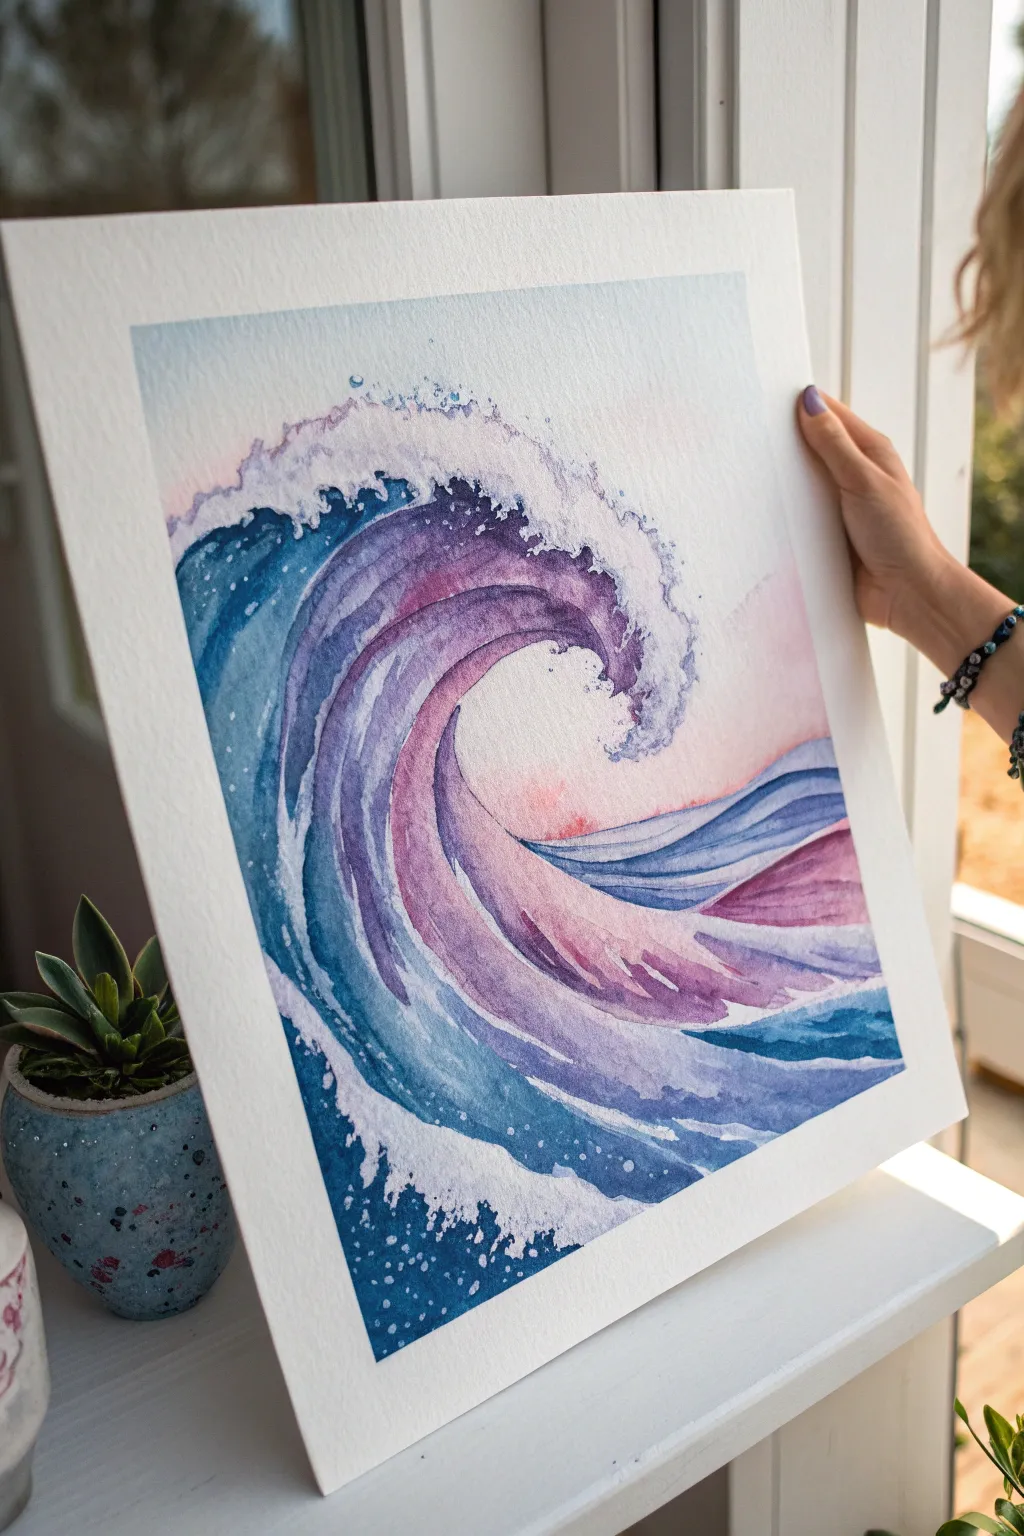
Capture the fluid motion of the ocean with this vibrant watercolor project that trades traditional blues for a stunning palette of violet, indigo, and blush pink. You will practice mastering wet-on-wet blends to create smooth transitions while using masking techniques to preserve crisp, foaming whitecaps.
How-To Guide
Materials
- Cold press watercolor paper (140lb/300gsm)
- Watercolor paints (Indigo, Pthalo Blue, Violet/Purple, Rose/Magenta, Peach)
- Masking fluid (drawing gum) and old brush
- Round watercolor brushes (sizes 4, 8, and 12)
- White gouache or opaque white ink
- Washi tape or masking tape
- Pencil and eraser
- Two jars of water
- Paper towels
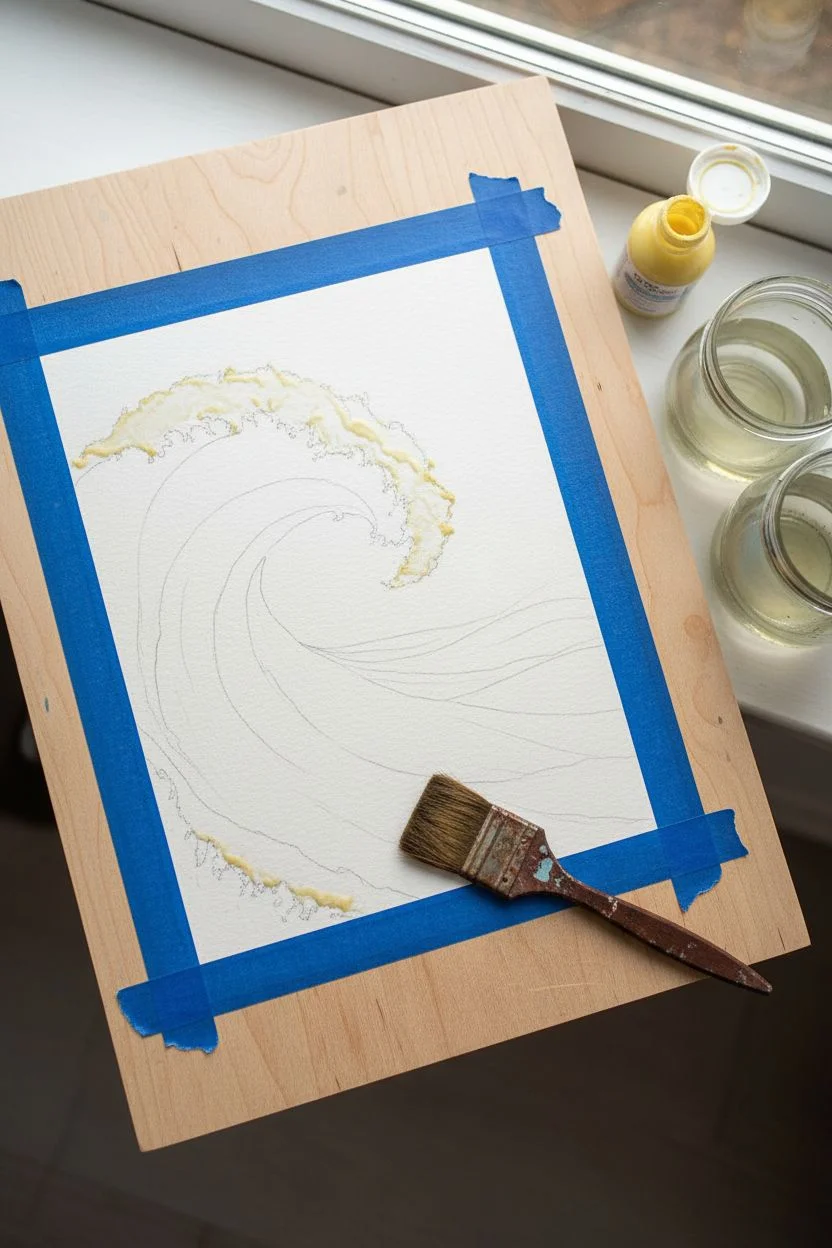
Step 1: Preparation and Sketching
-
Secure the paper:
Tape your watercolor paper down to a board on all four sides. This prevents buckling when the paper gets wet and creates that satisfying clean border at the end. -
Sketch the wave motion:
Lightly draw the outline of a large, curling wave. Start from the bottom left, swooping up and curving over to the right. Don’t worry about tiny details, just get the main C-curve shape and the horizon line. -
Protect the whitecaps:
Using an old brush (one you don’t care about), apply masking fluid to the crest of the wave and the splashing foam at the bottom. Dab it on irregularly to mimic the chaotic texture of sea foam. Let this dry completely before painting.
Step 2: Painting the Wave Body
-
Wet the main curve:
With clean water and your size 12 brush, wet the inner curve of the wave (the ‘barrel’). The paper should be glisten but not have puddles. -
Drop in color:
While the paper is wet, load your brush with violet and paint stripes following the curve of the wave. Leave some gaps between the stripes. -
Blend with cool tones:
Quickly add stripes of indigo and pthalo blue in the gaps. Let the colors bleed into the violet on the wet paper. This creates those beautiful, soft gradients. -
Deepen the shadows:
While the paint is still damp, drop concentrated indigo into the deepest part of the curve (under the crest) to create depth and dimension. -
Add warmth:
Mix a watery rose or magenta. Paint the lower, flatter section of the water where the wave is rising up. Allow this pinkish hue to touch the blue bottom edges for a dreamy purple mix. -
Detail the background:
For the water behind the main wave, paint horizontal strokes of blue and violet. Keep these strokes somewhat distinct to suggest rolling swells in the distance.
Uneven Blending?
If your wave stripes have hard edges instead of soft blends, the paper dried too fast. Re-wet the area very gently with a clean brush and drop pigment in quickly.
Step 3: Sunset Sky and Atmosphere
-
Paint the sky:
Once the wave is dry enough that colors won’t bleed uncontrollably, wet the sky area. Wash a very pale peach or barely-there pink across the top right corner, fading into white near the horizon. -
Intensify the horizon:
Add a stronger touch of rose right at the horizon line where the sun would be hitting the water, peering through the barrel of the wave.
Add Some sparkle
For a magical finish, mix a tiny amount of iridescent medium or pearlescent watercolor into your white gouache before splattering the sea spray.
Step 4: Texture and Finishing Touches
-
Remove the mask:
Ensure the paper is 100% bone dry. Gently rub off the masking fluid with your finger or a rubber cement pickup tool to reveal the stark white paper underneath. -
Soften the foam:
The white areas might look too sharp. Take a damp, clean small brush and gently scrub the bottom edge of the white foam to soften it and blend it slightly into the colored water. -
Shadow the foam:
Mix a very diluted violet-grey. Paint tiny shadows on the underside of the white foam clumps to give them volume so they look 3D rather than flat. -
Spray highlights:
Load a toothbrush or stiff brush with white gouache. Shield the sky area with a paper towel, then flick the bristles to splatter white droplets over the darker blue areas, mimicking sea spray. -
Define the spray:
Use a detail brush and opaque white gouache to add a few deliberate dots and sharp lines near the crest to emphasize the splashing motion. -
Final reveal:
Once fully dry, slowly peel off the tape at a 45-degree angle to reveal your crisp white border.
Step back and admire the rhythmic movement and calming colors of your seascape


Have a question or want to share your own experience? I'd love to hear from you in the comments below!