I love turning plain glass into a winter window painting that instantly makes everything feel quieter, cozier, and a little bit magical. If you’re craving fresh winter window painting ideas, here are my go-to designs—starting with the classics you expect and ending with some fun, artsy twists.
Classic Snowflake Scatter

Transform your view into a winter wonderland with this crisp, clean snowflake display. The scattered design mimics a gentle snowfall, bringing a cozy, festive atmosphere into your home without blocking the natural light.
Step-by-Step Tutorial
Materials
- White window marker (chalk marker) or white water-based acrylic paint
- Fine-tipped paintbrush (if using acrylic paint)
- Painter’s tape or stencil tape
- Glass cleaner and microfiber cloth
- Paper towels
- Printed snowflake templates (optional but helpful)
- Scissors and tape (for templates)
Step 1: Preparation & Layout
-
Clean the Canvas:
Begin by thoroughly cleaning the inside of your window pane with glass cleaner and a microfiber cloth. Any dust or grease will prevent the paint or marker from adhering smoothly, so ensure the surface is spotless and completely dry. -
Choose Your Scale:
Decide on the size of your snowflakes. The reference image features a mix of two or three large ‘hero’ flakes per pane, surrounded by smaller fillers. Variety is key to a natural look. -
Template Placement:
If you aren’t confident freehanding, tape your snowflake templates to the *outside* of the glass facing in. This gives you a perfect guide to trace without obstructing your brush or pen on the inside.
Marker vs. Paint
Chalk markers offer easier control for straight lines, while acrylic paint with a brush allows for more artistic, varying line weights.
Step 2: Painting the Large Snowflakes
-
Start with the Spine:
Using your white chalk marker or fine brush, draw a simple vertical line for the center of your first large snowflake. Add a horizontal line crossing it in the middle to form a ‘plus’ sign. -
Create the Star:
Draw two diagonal lines intersecting the center point, creating an eight-pointed asterisk shape. Keep these lines relatively thin for now; you can thicken them later. -
Add the Branches:
For the classic varying patterns shown, add small ‘V’ shapes or little branching arms coming off the main spokes. On the largest flake, you might add multiple tiers of these branches pointing outward. -
Detail the Tips:
Finish the varying spokes by adding small diamonds or arrowheads at the very tips. This gives the snowflake a sharp, crystalline appearance. -
Refine the Lines:
Go back over your main lines to thicken them slightly if needed, ensuring the white is opaque and solid. I find that a second pass often makes the white pop much better against the daylight. -
Repeat with Variation:
Move to the next large spot. Change the design slightly—perhaps this one has six points instead of eight, or uses rounded ends instead of sharp ones. No two snowflakes should look identical.
Step 3: Adding the Scatter Effect
-
Draw Medium Flakes:
Fill the larger empty gaps with medium-sized stars. These can be simpler six-pointed asterisks without the complex branching details of the hero flakes. -
Create Tiny Stars:
In the remaining open spaces, draw small, simple crosses or four-pointed stars. These act as distant snowflakes and add depth to the scene. -
The Polka Dot Snow:
To create the soft falling snow effect, add solid white dots scattered randomly throughout the pane. Use varying pressure to make some dots slightly larger than others. -
Check density:
Step back a few feet to view the composition. You want a balanced look that isn’t too crowded but fills the visual space evenly.
Fixing Smudges
Wait for a mistake to dry completely, then scrape it off gently with a fingernail or plastic card before re-painting that section.
Step 4: Finishing Touches
-
Clean Edges:
If any lines look wobbly or a dot has a smudge, use a damp cotton swab to wipe away the mistake. The glass surface makes corrections incredibly easy while the paint is fresh. -
Remove Templates:
If you used templates on the exterior of the glass, go outside and peel them off now. -
Final Cure:
Let the artwork dry undisturbed for at least an hour. Markers dry quickly, but acrylic paint may need a bit more time to set fully against the cold glass.
Enjoy your customized frosty view that stays perfect regardless of the weather outside


Faux Frosted Corners and Icy Edges
Bring the delicate beauty of a frozen morning indoors without the chill by creating hyper-realistic frost patterns directly on your window pane. Using simple household ingredients, you can paint intricate, fern-like ice crystals that catch the light just like the real thing.
Step-by-Step Guide
Materials
- Epsom salts (magnesium sulfate)
- Warm water
- Small glass jar or bowl for mixing
- Spoon for stirring
- Small splash of dish soap (optional, helps adhesion)
- Fine liner brush (size 0 or 1)
- Small fan brush or soft angular brush
- Clean cloth and glass cleaner (for prep)
- Hairdryer (optional, for speed)
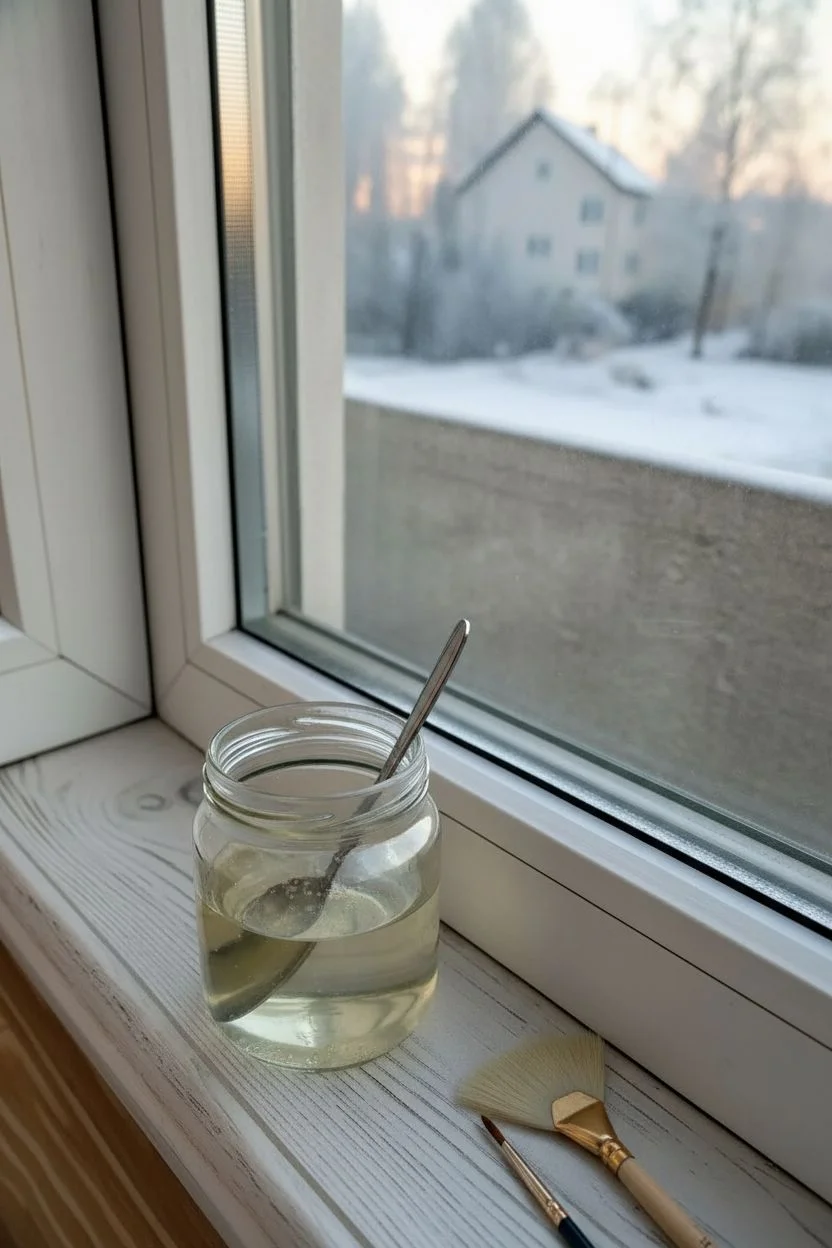
Step 1: Crystal Solution Prep
-
Measure the salts:
Start by measuring out equal parts Epsom salts and boiling water. For a window corner like this, 1/4 cup of each is plenty. -
Dissolve completely:
Pour the boiling water over the salts in your glass container. Stir vigorously until every single grain of salt has dissolved. -
Add a binder:
I like to add a tiny drop of clear dish soap to the mixture. This breaks the surface tension and helps the liquid stick to the vertical glass rather than dripping immediately. -
Cool down:
Let the mixture sit until it is warm but no longer hot. A slightly cooler solution starts the crystallization process faster once it hits the glass.
Step 2: Painting the Base Structure
-
Clean the canvas:
Ensure your window corner is perfectly clean and dry using glass cleaner. Any grease or fingerprints will resist the water mixture. -
Map the growth:
dip your fine liner brush into the saturated solution. Start at the very corner where the glass meets the frame. -
Draw the stems:
Pull the brush upward along the side frame and outward along the bottom frame to create the main ‘stems’ of the frost. Keep these lines tremulous and organic, not straight. -
Create the heavy frost:
Use your fan brush or a wider brush to dab a heavier concentration of liquid right against the caulking or frame edge. This mimics how ice builds up thickest at the coldest points.
Crystals Not Forming?
If it dries clear without crystals, your solution wasn’t saturated enough. Add more salt to your mix, heat it up again to dissolve, and repaint.
Step 3: Detailing Ferns and Feathers
-
Start the branching:
Switch back to your fine liner brush. From your main stems, paint diagonal offshoots moving upward and outward, resembling the structure of a fern leaf. -
Feather the edges:
From each diagonal offshoot, add tiny, quick flicks of liquid. These micro-strokes will become the delicate feathery tips of the ice crystals. -
Vary opacity:
Apply more liquid to the center of the ‘leaves’ and less towards the tips. As it dries, the thicker areas will turn opaque white, while thin areas remain semi-transparent. -
Build the bottom layer:
Along the bottom sill, paint a dense cluster of shorter, overlapping fern shapes. Allow them to crowd together to form a solid icy base. -
Add isolated floaters:
Paint a few small, standalone crystal stars floating slightly above the main mass to suggest new ice forming. -
Watch for drips:
Since the liquid is thin, watch for drips running down the pane. Catch them quickly with a paper towel or incorporate them into a new crystal stem.
Sparkle Booster
While the mixture is still wet on the glass, sprinkle a tiny pinch of white ultra-fine glitter onto the thickest parts for magical shimmer.
Step 4: Crystallization and Drying
-
Let nature work:
As the water evaporates, the Epsom salts will recrystallize on the glass. This is where the magic happens; the strokes you painted will transform into jagged, real crystals. -
Speed drying (optional):
If you are impatient, you can use a hairdryer on a low, cool setting from a distance to speed evaporation, but natural air drying often produces larger, distinct crystals. -
Assess coverage:
Once fully dry (usually 15-30 minutes), look for bare spots. If an area looks too thin, paint a second layer of solution right over the first. -
Clean up edges:
If any liquid got onto the window frame or sill, simply wipe it away with a damp cloth. The salt won’t stain your woodwork.
Step back and enjoy the cozy winter vibe created by your custom frost patterns


Snowman Family Window Portrait
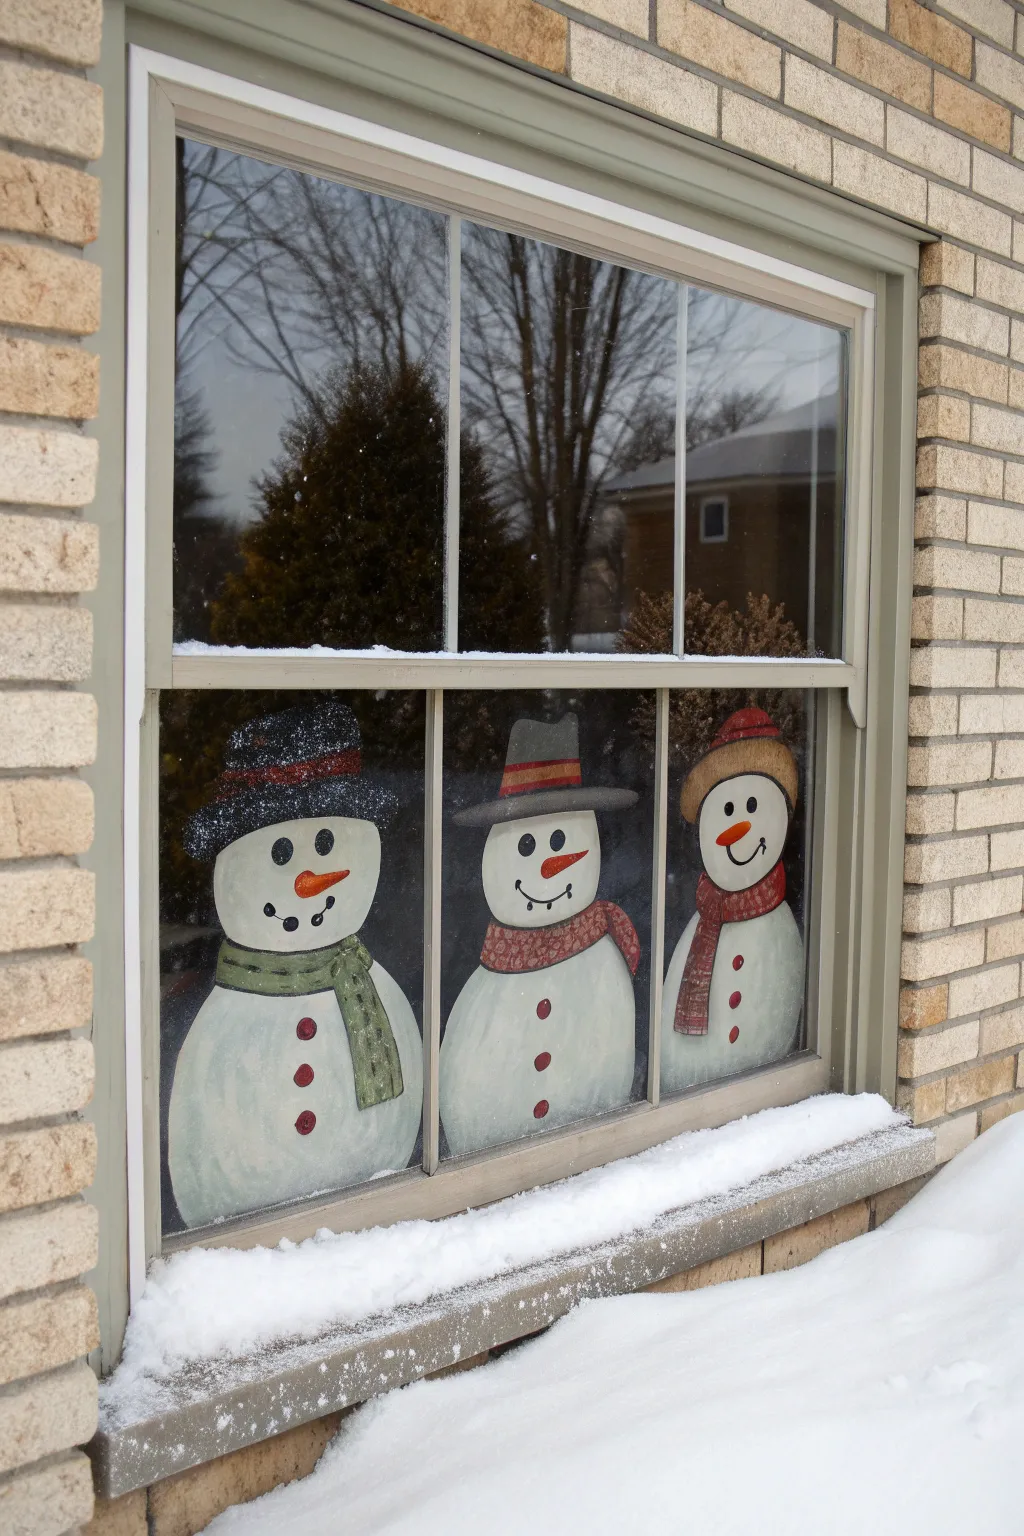
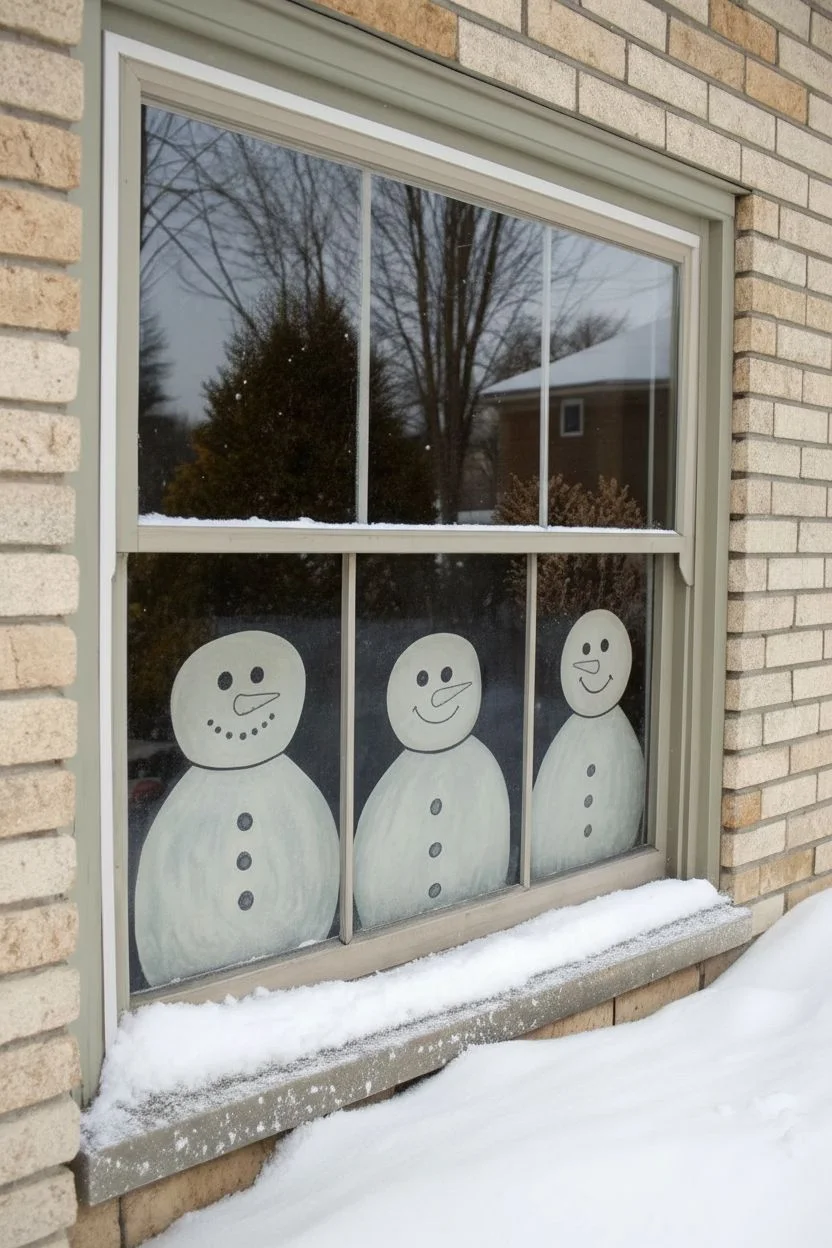
Transform your view into a winter wonderland with this cheerful painting of three stylized snowmen right on the glass. This simple yet striking project uses window-safe paints to create a cozy, festive greeting for neighbors and passersby.
How-To Guide
Materials
- White acrylic craft paint or tempera paint
- Colored acrylic paints (black, red, orange, green, brown, grey)
- Assorted paintbrushes (1-inch flat brush, medium round brush, fine liner brush)
- Rubbing alcohol
- Paper towels or lint-free cloth
- Paper plate or palette
- Cup of water
- Window cleaner
- Painter’s tape (optional)
Step 1: Preparing the Surface
-
Clean the glass:
Start by thoroughly cleaning the inside of your chosen window with glass cleaner to remove any dust or grime. -
Degrease the area:
Wipe the specific area where you will be painting with rubbing alcohol on a paper towel. This removes oily residues and ensures the paint adheres properly. -
Plan your placement:
Visualize three evenly spaced ovals along the bottom of the window pane. You want the bodies to look like they are sitting right on the window sill.
Transparency Trouble?
If the white paint looks too sheer against daylight, mix a tiny drop of white dish soap into the paint. This helps it stick better and coat the glass more thickly.
Step 2: Painting the Bodies
-
Outline the shapes:
Using a medium round brush and white paint, sketch out the basic snowman shapes directly on the glass. Draw a larger oval for the body and a slightly smaller circle on top for the head for each of the three figures. -
Fill in the base coat:
Use your 1-inch flat brush to fill in the outlines with white paint. Don’t worry if it looks streaky at first; opacity comes with layers. -
Apply a second coat:
Once the first layer is dry to the touch (usually 10-15 minutes), apply a second coat of white paint. I find using a dabbing motion creates a nice, fluffy snow texture. -
Clean up edges:
If you went outside your intended lines, use a damp paper towel or cotton swab to wipe away excess wet paint for a crisp outline.
Step 3: Adding Hats & Accessories
-
Paint the hats:
For the left snowman, paint a black top hat shape. For the middle, a grey fedora style, and for the right, a simple brown beanie shape. Make sure these sit snugly on their heads. -
Add hat details:
Once the hat base colors are dry, use a small brush to add decorative bands. A red stripe for the black hat, a red and yellow band for the grey hat, and perhaps a highlight on the beanie. -
Create the scarves:
Paint distinctive scarves for each snowman. Give the left one a green scarf, the middle a red patterned scarf, and the right a solid red scarf. Let the ends drape down over their white bodies. -
Add texture to clothing:
Use a fine liner brush to add details like fringe on the scarf ends or a checkered pattern on the middle snowman’s scarf once the base color is dry.
Winter Sparkle
While the white paint is still wet, lightly sprinkle clear or iridescent glitter onto the bodies. It catches the light and mimics real glistening snow.
Step 4: Facial Features & Details
-
Paint carrot noses:
Using orange paint and a small round brush, paint a triangular carrot nose on each face. Vary the direction they point to give them personality. -
Add eyes and mouths:
Dip the handle end of a paintbrush into black paint to dot perfect circles for eyes. Use a fine liner brush and black paint to draw the ‘coal’ mouths creating smiles. -
Paint the buttons:
Add three red buttons down the center of each snowman’s body. Space them evenly to emphasize their round bellies. -
Refine the outlines:
Mix a very watery grey or light blue paint. Use this to add subtle shading along the curved edges of the white bodies to give them a 3D, rounded appearance. -
Final touches:
Check for any transparent spots in the white paint and touch them up. Ensure all details are opaque and bright against the light coming through the window.
Enjoy your cheerful window display all season long.


Santa Sleigh Silhouette Across the Sky
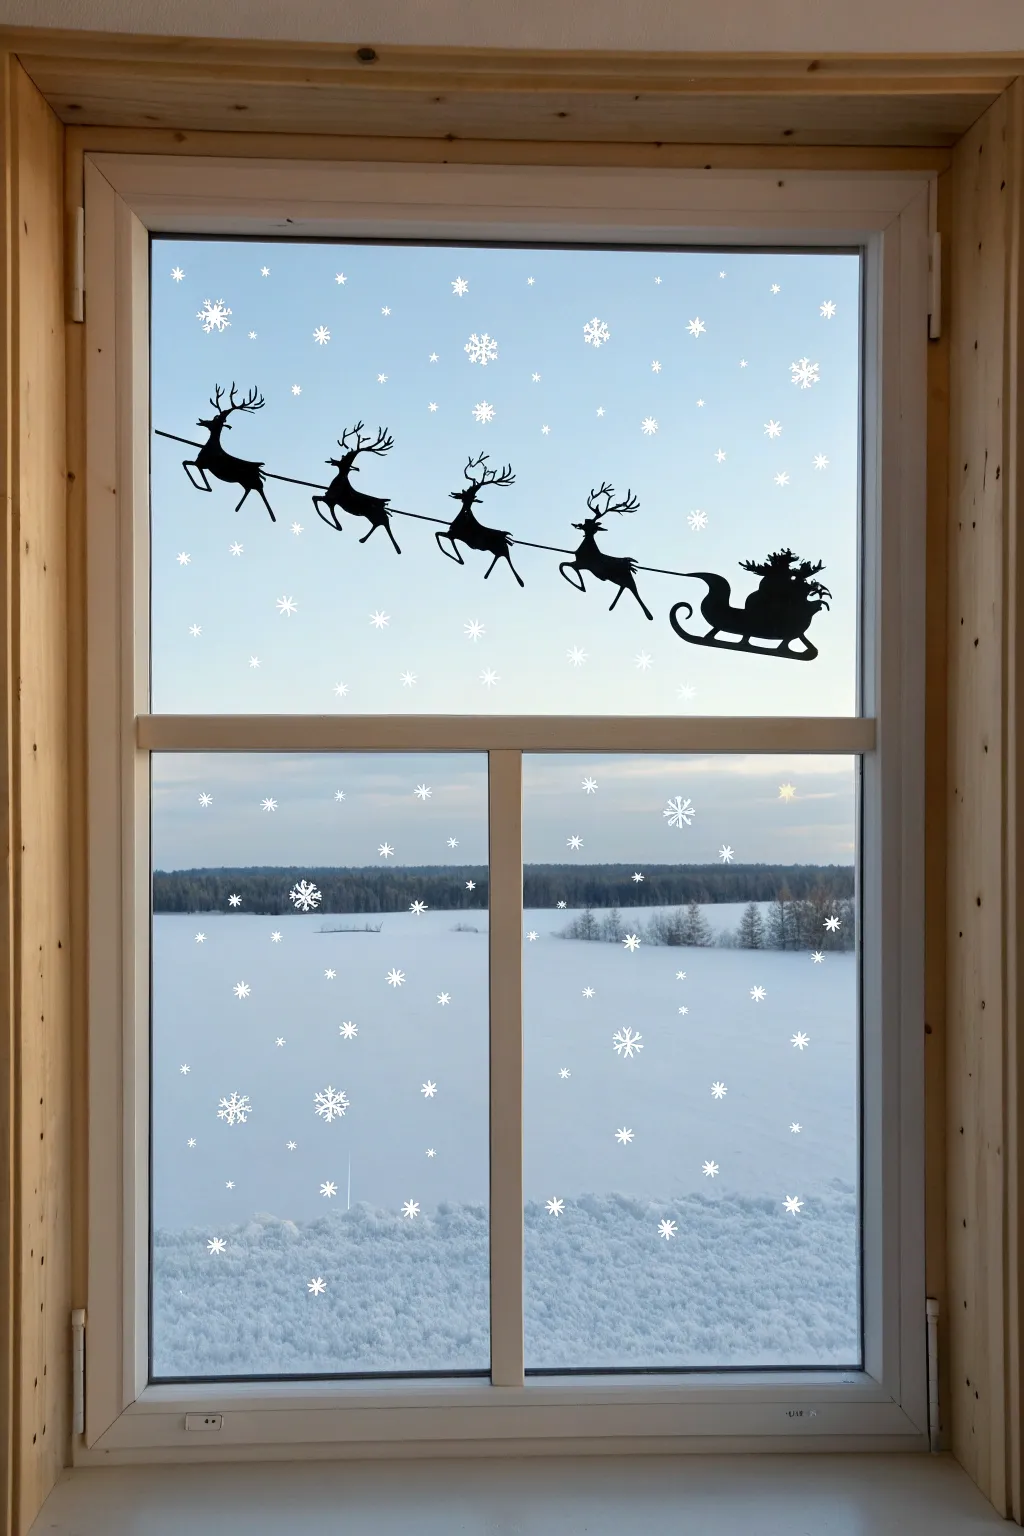
Transform your view into a magical holiday scene with this striking high-contrast window art. Using black vinyl or paint creates a crisp silhouette that stands out beautifully against the winter sky, while scattered snowflakes add a delicate frosted touch.
Step-by-Step Tutorial
Materials
- Black removable vinyl sheets or black window paint
- White or silver snowflake window clings (or white liquid chalk marker)
- Cricut machine (optional) or precision craft knife
- Self-healing cutting mat
- Transfer tape (if using vinyl)
- Glass cleaner and lint-free cloth
- Squeegee or credit card
- Printed template of Santa and reindeer
- Scissors
Step 1: Planning and Preparation
-
Clean surface:
Begin by thoroughly cleaning the inside of your window pane with glass cleaner and a lint-free cloth. Any dust or grease will prevent your silhouette from adhering properly. -
Determine scale:
Hold a ruler up to your window to decide how large your Santa and reindeer should be. For a standard window, a total width of 18-24 inches usually works well for the main silhouette. -
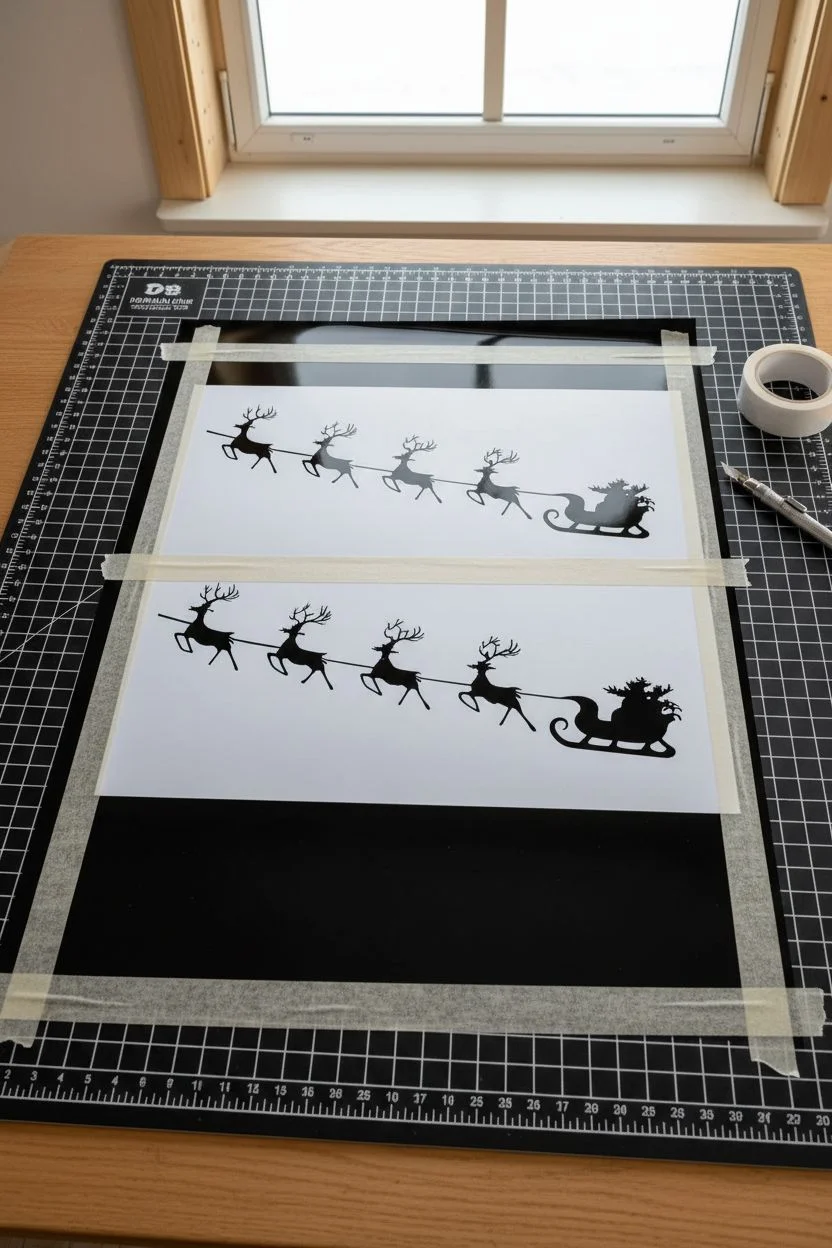
Select a template:
Find a clipart image of Santa’s sleigh with four reindeer. If you are cutting by hand, look for a simpler outline without too many tiny internal details. -
Resize and print:
Resize your image to match your measurements. You may need to print this across two or three sheets of paper if the design is long.
Clean Lines, Sharp Look
If you don’t have vinyl, print the silhouette on paper, tape it to the OUTSIDE of the glass, and paint the inside with black acrylic craft paint for the same effect.
Step 2: Creating the Silhouette
-
Rough cut:
Cut the vinyl sheet to a size slightly larger than your template. It is much easier to manage smaller sections than one giant roll. -
Tape down template:
If cutting by hand, tape your paper template securely on top of the black vinyl sheet. Ensure the vinyl backing is facing down. -
Cut the outline:
Using a sharp precision craft knife, carefully trace and cut through both the paper and the vinyl layer. Do not rush the antlers or the reins, as these thin lines are fragile. -
Weeding excess:
Once the cut is complete, peel away the excess black vinyl surrounding the design, leaving the silhouette on the backing paper. -
Apply transfer tape:
Smooth a layer of transfer tape over the black vinyl cutout. Rub it firmly with a squeegee to ensure the vinyl sticks to the tape. -
Peel backing:
Slowly peel the white backing paper away, leaving the black silhouette attached to the clear transfer tape.
Stubborn Bubbles?
If air bubbles appear under the vinyl after application, prick them gently with a sewing needle and smooth the air out with your finger.
Step 3: Installation
-
Position the lead reindeer:
Decide on the angle of flight. I prefer a slight upward diagonal starting from the lower third of the window pane. -
Attach to glass:
Press the transfer tape onto the glass. Start from the center of the sleigh and work outwards toward the reindeer to prevent bubbling. -
Burnish down:
Use your squeegee or a credit card to rub over the design firmly, pressing the vinyl onto the cold glass. -
Remove tape:
Peel the transfer tape back at a sharp 180-degree angle. Go slowly; if a reindeer leg lifts, press it back down and rub again.
Step 4: Adding the Snowfall
-
Gather snowflake elements:
Prepare your white snowflake decals. You can buy pre-made clings or cut your own from white vinyl using the same method as the sleigh. -
Scatter small flakes:
Place the smallest snowflake stickers randomly around the sky area, focusing heavily on the upper pane to simulate a snowy sky. -
Place feature flakes:
Intersperse larger, more detailed snowflakes among the smaller dots to create depth and visual interest. -
Balance the scene:
Step back to check the composition. Add a few tiny dots near the horizon line (if visible) to connect the sky to the ground outside.
Enjoy the whimsical silhouette as it flies across your snowy backdrop all season long
BRUSH GUIDE
The Right Brush for Every Stroke
From clean lines to bold texture — master brush choice, stroke control, and essential techniques.
Explore the Full Guide
Painted Winter Wreath With Berries and Bow
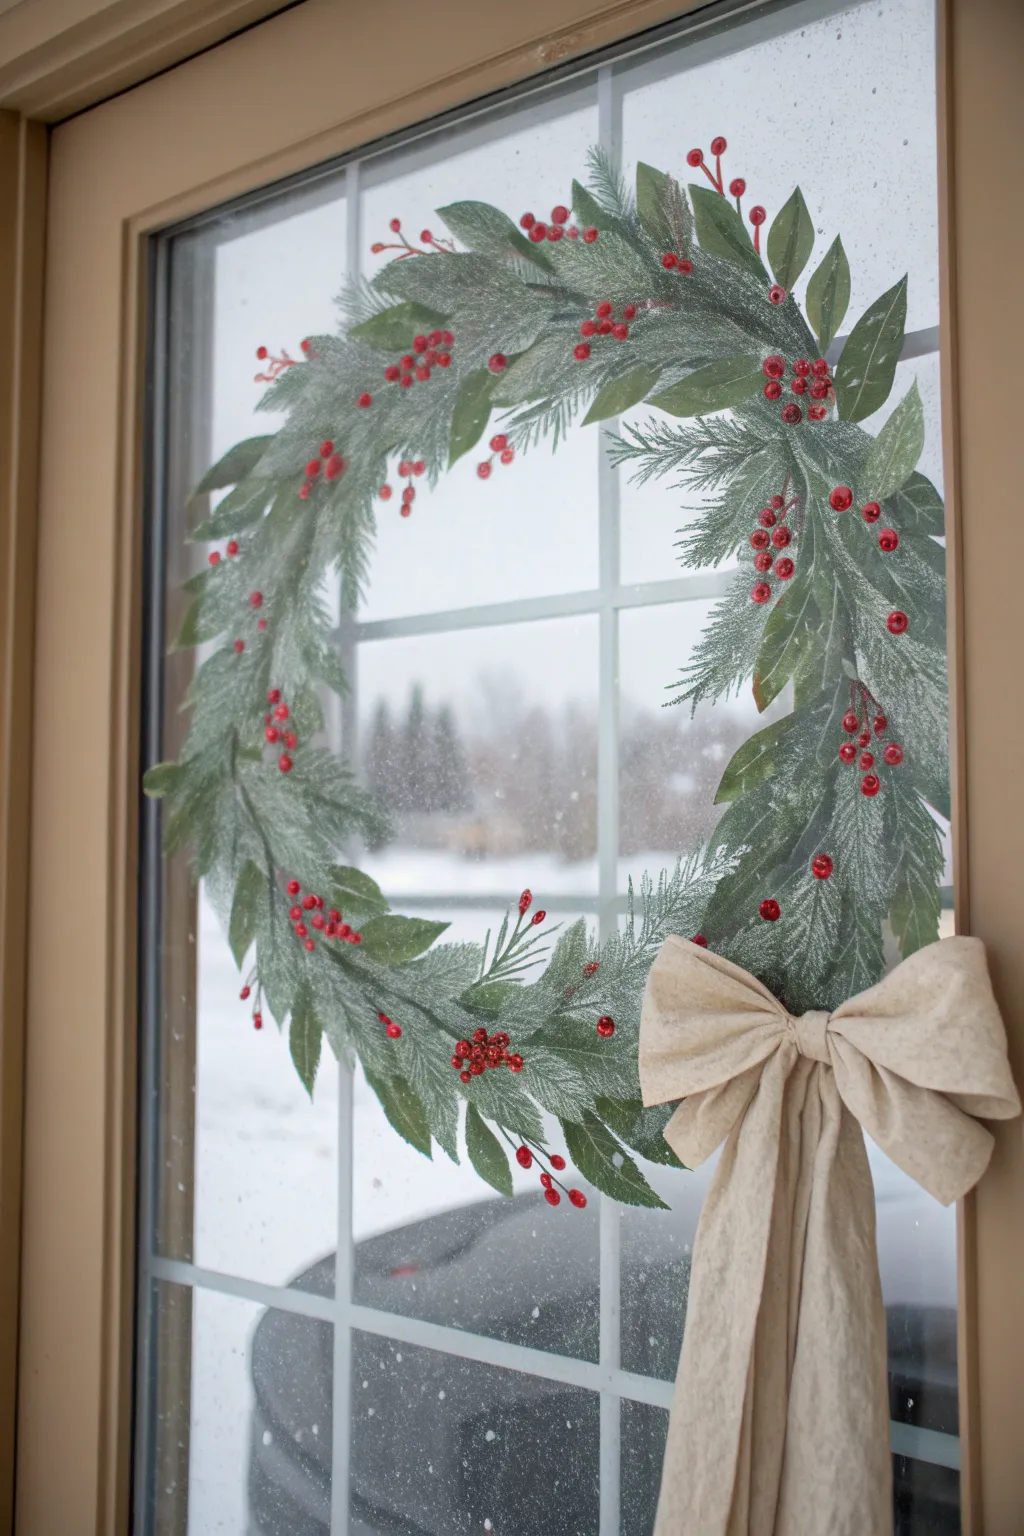

Transform your view into a winter wonderland with this elegant, hand-painted window wreath. Featuring frosted greens, vibrant berries, and a faux-fabric bow, this design brings holiday cheer to your home regardless of the weather outside.
Step-by-Step Guide
Materials
- Acrylic craft paints (Deep Green, Sage Green, Bright Red, Deep Red, Cream, Tan, White)
- Window cleaner and lint-free cloth
- Medium flat brush (for large leaves)
- Small round brush (for detail work)
- Fan brush (for pine needles)
- Sponge dabber or old toothbrush (for snow effect)
- Painter’s tape or a large circular object (like a serving platter) for tracing
- Chalk marker or dry erase marker
Step 1: Preparation & Mapping
-
Clean surface:
Begin by thoroughly cleaning the inside of your window glass. Any dust or grease will prevent the acrylic paint from adhering properly. -
Draw the guide:
Place a large circular plate or platter against the glass (or just use freehand if you’re confident) and lightly trace a circle using a chalk marker or dry erase marker. This will be the spine of your wreath.
Pro Tip: Transparency
Work with the light! Apply paint thicker in the center of leaves for opacity, but thinner at edges to let outside light glow through.
Step 2: Painting the Foliage
-
Layer the dark leaves:
Load your medium flat brush with Deep Green. Starting from the top and working down the sides, paint broad, laurel-shaped leaves that follow the curve of your guide circle. Paint them so they point outwards and slightly downwards. -
Add lighter pine:
Switch to a fan brush or fine liner brush loaded with Sage Green mixed with a touch of White. In the gaps between the darker leaves, add feathery strokes to mimic soft pine needles. These should look lighter and wispsier than the heavy leaves. -
Create depth:
Go back in with your Deep Green paint and add a few darker strokes near the center of the wreath ring to create shadow and density. -
Frost the greenery:
I like to take a nearly dry brush with just a tiny amount of White paint and lightly drag it over the tips of the green leaves. This ‘dry brushing’ technique simulates a light dusting of frost.
Level Up: 3D Texture
Mix a pinch of baking soda into your white ‘snow’ paint before splattering. It dries with a gritty, real-snow texture on the glass.
Step 3: Adding the Berries
-
Paint berry clusters:
Using the back end of a paintbrush handle or a small round brush, dip into Bright Red paint. Dot clusters of 3-5 berries sporadically throughout the wreath. -
Stem work:
With your smallest detail brush and a mix of brown (create by mixing green and red) or thin green paint, draw very fine lines connecting the berry clusters to the main wreath branch. -
Berry highlights:
Once the red dots are tacky or dry, add a tiny speck of White to the top right of each berry to make them look spherical and shiny.
Step 4: The Statement Bow
-
Outline the shape:
In the bottom right corner of the wreath, sketch the outline of a large, droopy bow using Tme/Cream paint. Draw two loops at the top and two long, flowing tails hanging down. -
Fill the base color:
Fill in the entire bow shape with a solid coat of Cream paint. It may need two layers to be fully opaque against the outdoor light. -
Add folds and shadows:
Mix a little Tan paint into your Cream. Paint curved lines where the fabric would naturally gather at the knot and where the ribbons ripple downwards. This creates the illusion of fabric texture. -
Highlight the ribbon:
Use pure White to highlight the highest points of the bow loops and the edges of the tails to give it a fresh, crisp linen look.
Step 5: Final Winter Touches
-
Create snow splatter:
Dilute some White paint with a drop of water. Dip an old toothbrush or stiff bristle brush into it, then flick the bristles with your thumb to spray fine ‘snow’ speckles over the entire wreath and the surrounding glass. -
Cleanup:
Once everything is fully dry, wipe away any visible guide marks from your chalk marker with a damp Q-tip.
Now step back and enjoy your cozy, frost-proof view all winter long
Whimsical Ice Castle on the Glass
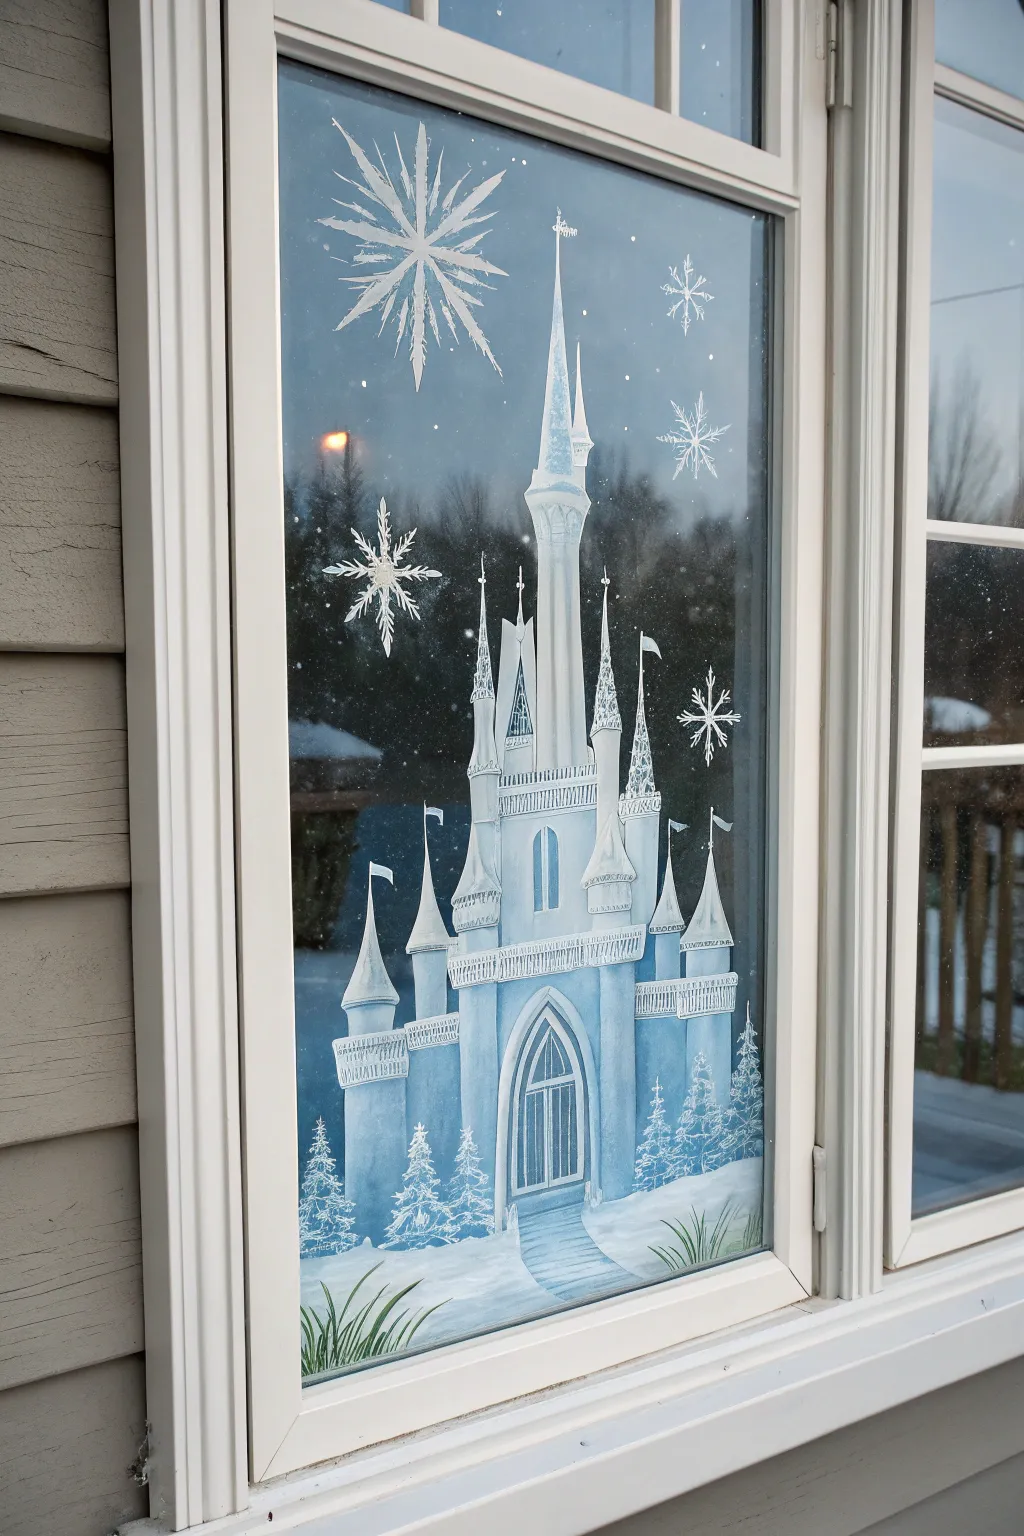
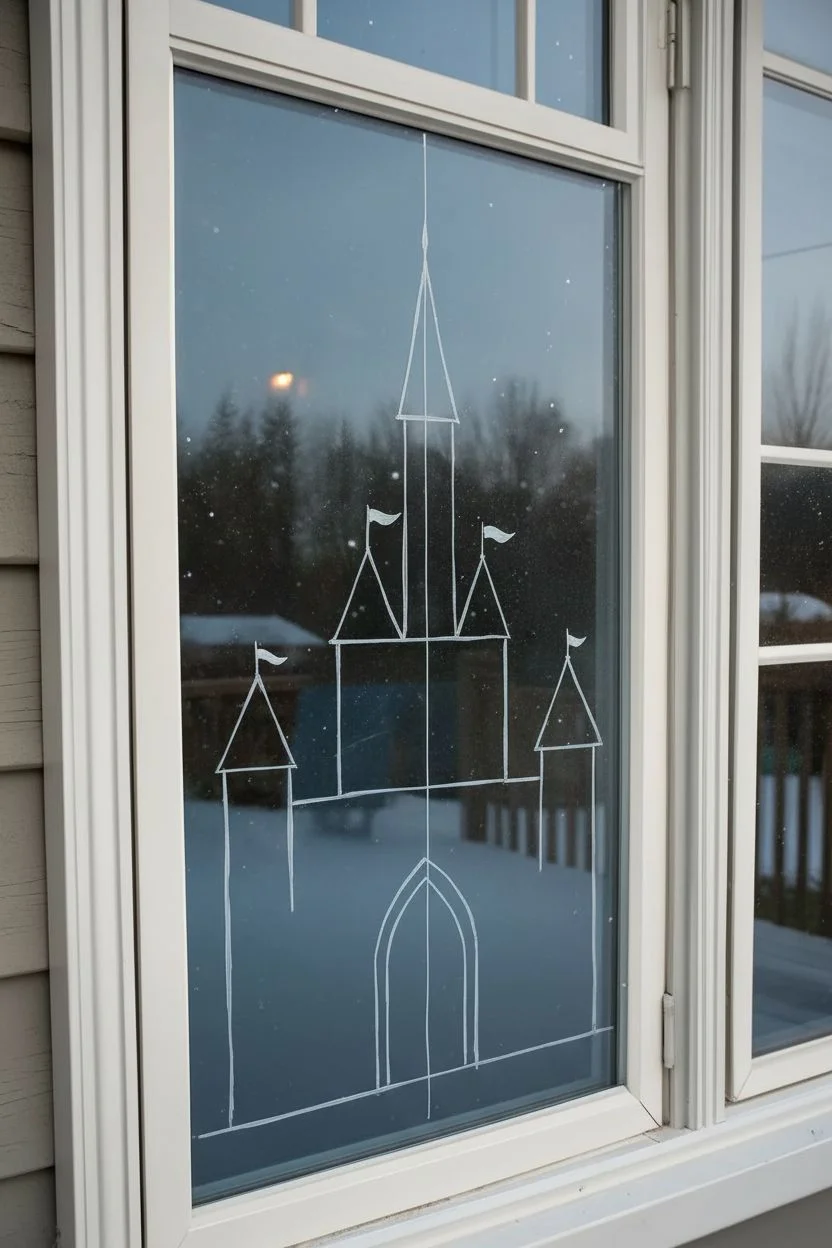
Transform your view into a magical winter wonderland with this stunning ice castle window mural. Using simple acrylics or window paints, you’ll create a towering blue and white fortress complete with delicate snowflakes and snowy pine trees.
Detailed Instructions
Materials
- Glass cleaner and lint-free cloth
- White acrylic paint or specialized window paint
- Light blue acrylic paint (or ultramarine blue mixed with white)
- Small flat brush (1/4 inch)
- Fine liner brush (size 0 or 00)
- Medium round brush
- Paper plate or palette
- Cup of water and paper towels
- Optional: Dry erase marker for sketching
Step 1: Preparation and Base Sketch
-
Clean surface:
Begin by thoroughly cleaning the window pane with glass cleaner and a lint-free cloth to ensure the paint adheres properly and glides smoothly. -
Outline the structure:
Using a very thin mixture of white paint and a fine liner brush (or a dry erase marker), faintly sketch the vertical centerline of your castle. -
Mark heights:
Mark the top of the highest spire about three-quarters up the window, and establish the ground lins near the bottom of the pane. -
Draft the towers:
Sketch the basic geometric shapes: a long central triangle for the main tower, and smaller rectangles with triangular tops for the side turrets. Don’t worry about details yet; just get the proportions right.
Step 2: Painting the Castle Walls
-
Mix your blues:
On your palette, create a gradient of blues. You’ll need a pure white, a very pale ice blue (mostly white with a dot of blue), and a slightly deeper sky blue. -
Block in the main tower:
Use the flat brush to fill in the central tower using the pale ice blue. It’s okay if it looks a bit streaky; vertical strokes mimic the texture of ice. -
Paint side turrets:
Fill in the flanking towers with the same pale blue, keeping your edges crisp and vertical. -
Add shading:
While the paint is still slightly tacky, take a tiny amount of the deeper blue on your brush and blend it into the right side of each tower to create rounded dimension and shadow. -
Define the roofs:
Paint the conical roofs using pure white to make them look snow-capped. I find starting at the tip and pulling down creates a nice tapered shape. -
Create the entrance:
Near the base of the central tower, paint a large Gothic arch shape in the darker blue tone to represent the deeply shadowed doorway.
Clean Lines Hack
Keep a damp Q-tip or cotton swab handy while you work. If you make a smudge or a line gets wobbly, you can swipe it away instantly like an eraser for perfect edges.
Step 3: Architectural Details
-
Add battlements:
Using the fine liner brush and pure white paint, add the tiny crenellations (the castle teeth) around the balconies and where roofs meet the towers. -
Detail the door:
Outline the dark blue arch with a thick white line. Then, paint vertical white lines inside the arch to create the look of tall double doors. -
Windows and flags:
Paint small vertical slits or arched windows on the turrets using the darker blue. Add tiny white triangular flags flying from the very tips of the taller spires. -
Highlight edges:
Use the liner brush with pure white to highlight the left side of the towers and the rims of the balconies, making the structure pop against the background.
Glittering Finish
While the white paint on the snowy roofs and ground is still wet, sprinkle a pinch of iridescent white glitter over it. It will catch the sunlight and look like real frost.
Step 4: Winter Atmosphere
-
Paint the ground:
Use the medium round brush to paint rolling hills of snow at the bottom. Use sweeping horizontal strokes with white paint, blending slightly upward into the glass. -
Add the pathway:
Paint a winding path leading from the door to the bottom edge. Use horizontal blue strokes that get wider as they come forward. -
Create pine trees:
On either side of the castle base, paint white pine trees. Use a dabbing or stippling motion with a relatively dry brush to create the texture of snow-laden branches. -
Detail the foreground:
In the bottom corners, use your liner brush to flick upwards with green or dark blue paint to suggest frozen patches of grass poking through the snow. -
Draw the main star:
In the top left corner, paint a large, elaborate snowflake or starburst. Start with a cross, add an X, and then fill in the spaces with smaller radiating lines. -
Scatter snowflakes:
Fill the empty sky space with smaller, six-pointed snowflakes and tiny dots of white paint to represent falling snow.
Step back and admire your frosty kingdom as the light shines through the translucent blues

PENCIL GUIDE
Understanding Pencil Grades from H to B
From first sketch to finished drawing — learn pencil grades, line control, and shading techniques.
Explore the Full Guide
Geometric Ice Crystal Mandala
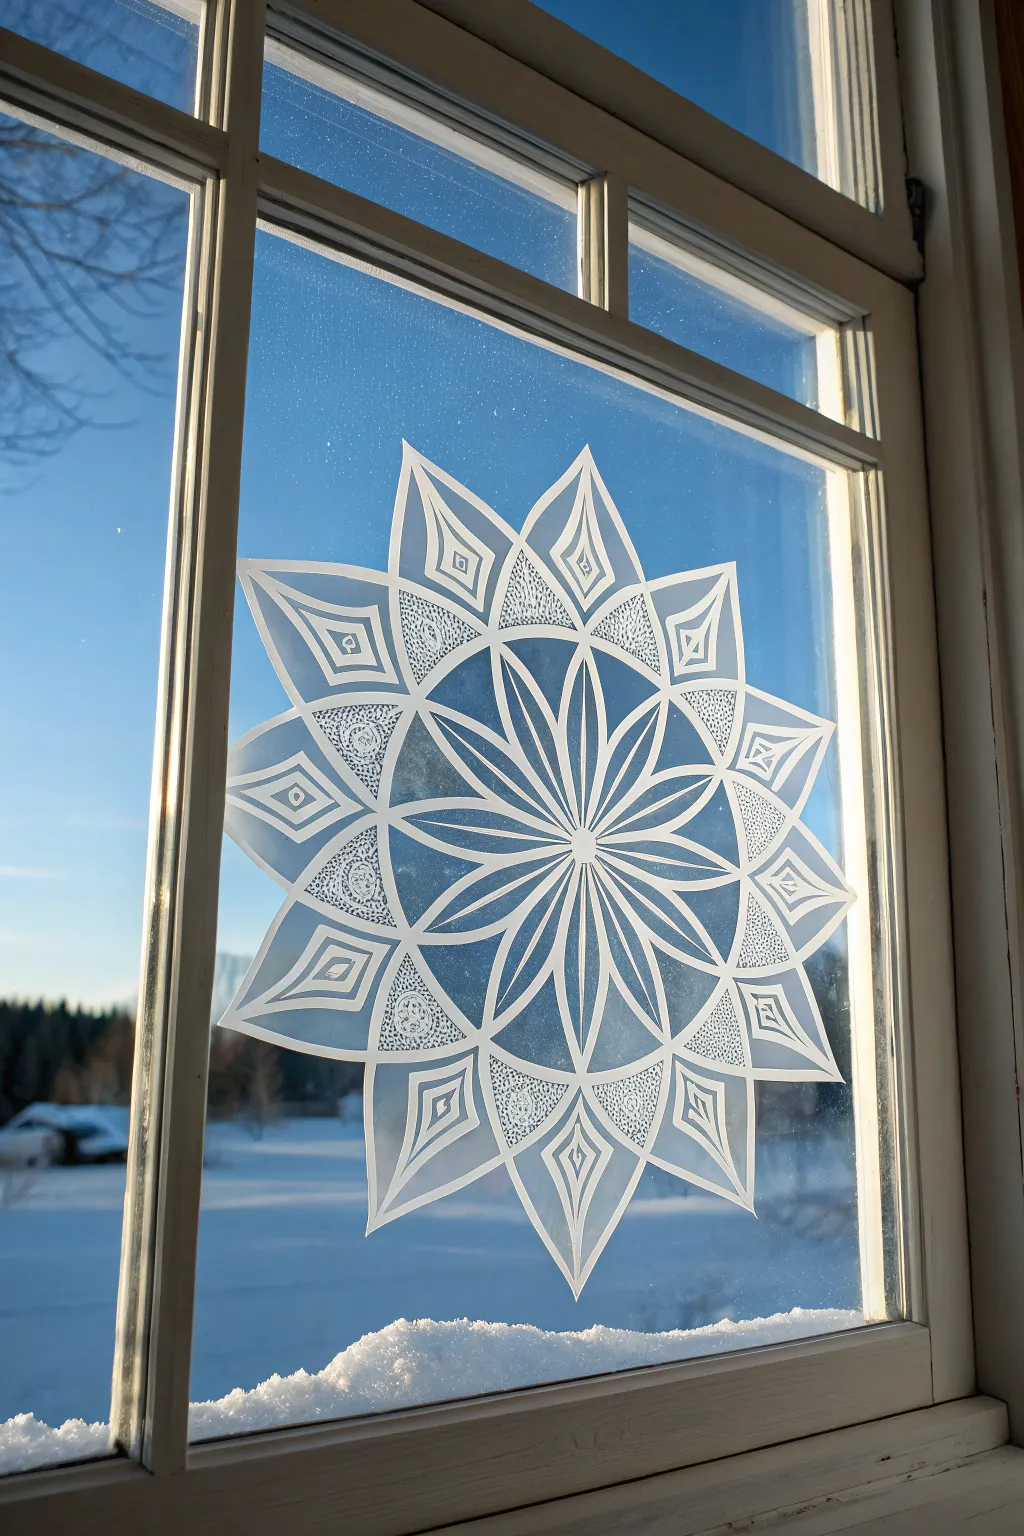
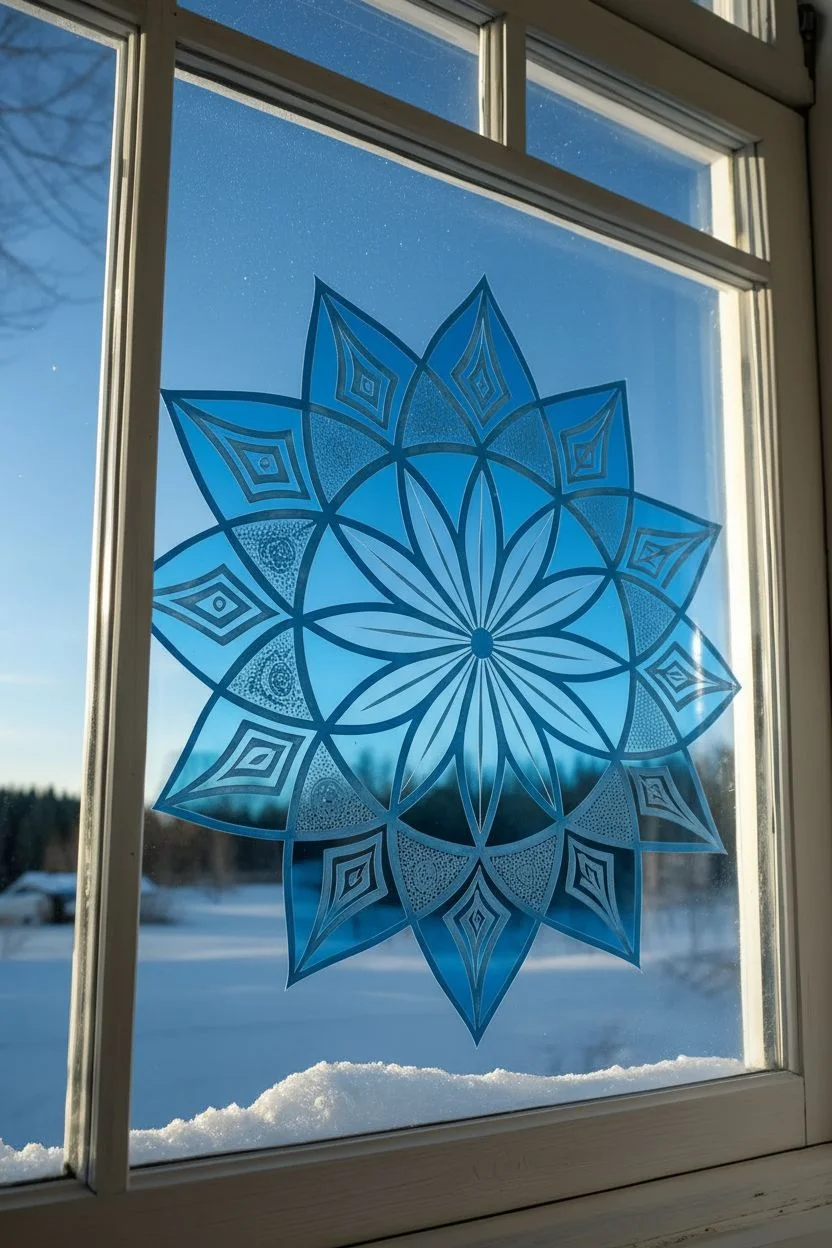
Transform your view into a winter wonderland with this intricate, frosted window mandala that mimics the delicate structure of a giant snowflake. Using a specialized frost effect medium, this project captures the crisp beauty of ice crystals without the freezing temperatures.
Step-by-Step
Materials
- Glass frost paint or etching medium (white/translucent)
- Fine-point synthetic angular brush
- Self-adhesive vinyl or painter’s tape
- Craft knife (X-Acto style) and cutting mat
- Flexible ruler
- Compass
- Printed mandala template (optional, for tracing)
- Glass cleaner and microfiber cloth
- Permanent marker (fine tip)
Step 1: Design & Stencil Creation
-
Measure your window:
Before you begin, measure the pane of glass you intend to decorate to determine the maximum diameter for your mandala. -
Draft the template:
If you are confident, draw your 12-pointed star pattern directly on a piece of paper using a compass and ruler. Alternatively, find a ’12-pointed geometric snowflake’ template online and print it to size. -
Prepare the stencil material:
Lay a sheet of self-adhesive vinyl (or wide strips of masking tape layered together) onto a cutting mat. -
Transfer the design:
Tape your paper template over the vinyl. Using a firm hand, trace the lines with a pen so the indentation transfers, or use carbon paper for a clearer guide. -
Cut the primary shapes:
Using a sharp craft knife, cut out the negative spaces of the design. You want to keep the frame of the snowflake intact while removing the areas where the ‘frost’ will go. -
Add detailing cuts:
Don’t forget the small internal details, like the diamonds inside the outer points and the thin separator lines between the central petals.
Step 2: Preparation & Application
-
Clean the surface:
Thoroughly clean the window glass with glass cleaner and a lint-free cloth. Any dust or grease will prevent the stencil from adhering properly and ruin the crisp edges. -
Position the stencil:
Peel the backing off your vinyl stencil (or lift your tape lattice) and position it centrally on the window. I find it helpful to start sticking it from the center outwards to avoid air bubbles. -
Burnish the edges:
Run a credit card or a bone folder firmly over all the edges of the stencil to ensure a tight seal against the glass. This is crucial to prevent paint bleed. -
Mix the medium:
Stir your glass frost paint gently. Avoid shaking it vigorously, as this introduces bubbles that will dry as bumps in your finish. -
Apply the first coat:
Using the angular brush, dab the frost paint into the open stencil areas. Use a stippling motion (up and down) rather than stroking, to create a uniform, icy texture. -
Let it tack:
Allow the first layer to dry until it is tacky to the touch but not wet—usually about 15 to 20 minutes depending on your room’s humidity. -
Apply the second coat:
Apply a second layer to increase opacity. Focus on getting an even coverage, especially in the larger petal areas.
Bleeding edges?
If paint seeps under your stencil, wrap a damp wipe around a toothpick to clean it immediately while wet. If dry, a razor blade scrapes it off perfectly.
Step 3: Refining & Texturing
-
Create the texture:
While the second coat is still wet, use a stiff, dry bristle brush to tap lightly over the larger triangular sections. This creates the ‘frosted’ noise texture seen in the reference. -
Detailing the inner ring:
For the inner ring of texture (the shorter spikes), use a toothpick or very fine tool to gently scratch tiny swirls or dots into the wet paint for extra dimension. -
Remove the stencil:
Carefully peel away the vinyl stencil *before* the paint is 100% dry. Pull at a sharp angle away from the painted edge to ensure a clean line. -
Clean up edges:
If any paint bled under the stencil, wait for it to dry completely, then gently scrape the excess away with your craft knife or a razor blade. -
Final cure:
Allow the design to cure fully according to the bottle instructions (often 24 hours) before touching or cleaning the window again.
Add some sparkle
While the top coat of frost paint is still wet, lightly blow a pinch of iridescent white glitter onto the center petals for a magical morning shimmer.
Enjoy the cozy view through your new permanent frost design as the winter season unfolds
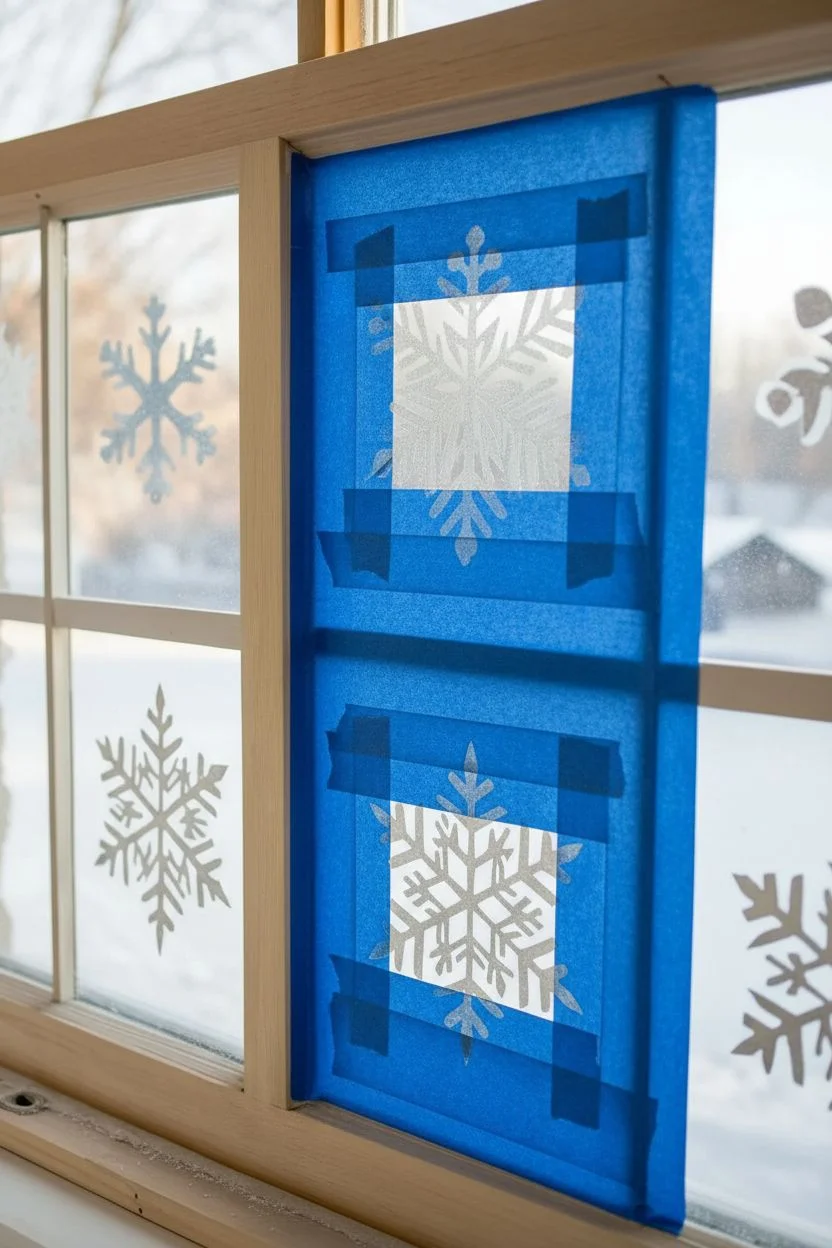
Negative Space Snowflakes With Tape Resist
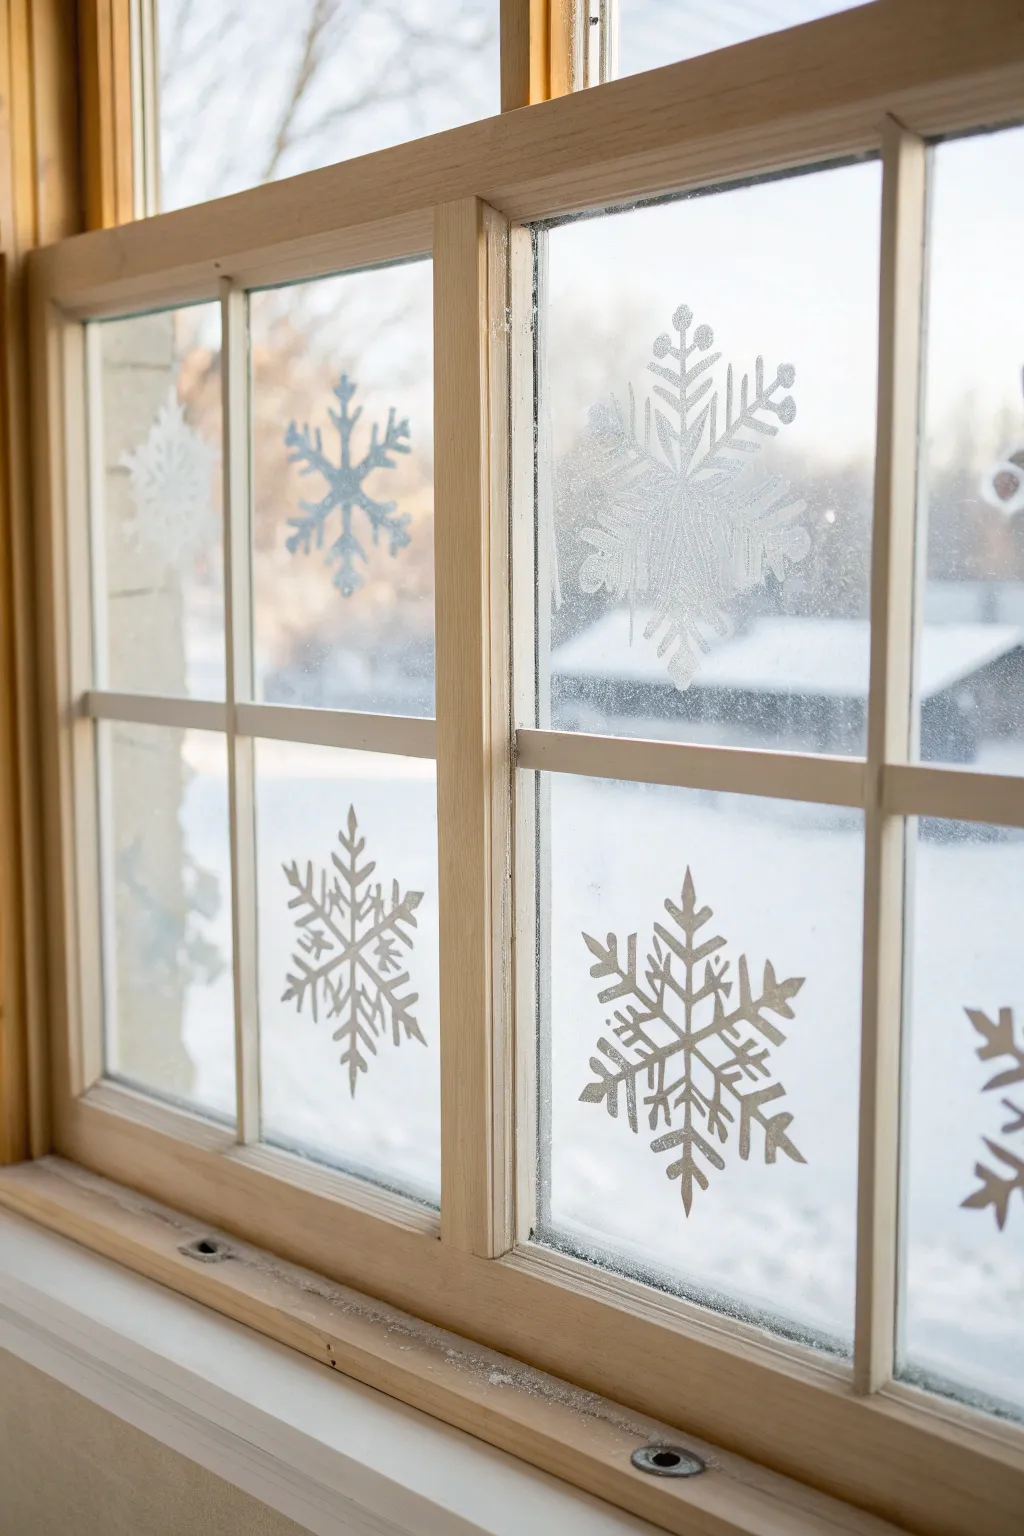
Transform your view of the cold outdoors into a cozy winter scene with these delicate, frosted-look snowflakes directly on your windowpane. Using simple materials, you can create intricate ice crystal designs that catch the light beautifully without blocking your view.
How-To Guide
Materials
- White acrylic paint or specialized window chalk markers
- Painter’s tape or stencil tape (blue or green)
- X-Acto knife or craft blade
- Cutting mat
- Small sponge dabber or stencil brush
- Glass cleaner and paper towels
- Ruler
- Printed snowflake templates (optional)
Step 1: Preparation & Masking
-
Clean surface:
Begin by thoroughly cleaning the inside of your window pane with glass cleaner. Any dust or fingerprints will prevent the stencil tape from adhering properly, leading to paint bleed later on. -
Map out placement:
Decide where you want your snowflakes to land. Aim for a random, natural look—some high, some low, and varied across the different panes. You generally want one large detailed flake per pane section to avoid visual clutter. -
Create the tape canvas:
Apply wide strips of painter’s tape directly onto the glass where you want a snowflake. Overlap the strips slightly to create a solid block of tape large enough to cover the entire design you plan to cut. -
Transfer design:
If you aren’t comfortable freehanding, tape a printed snowflake template on the *outside* of the glass facing in. This gives you a guide to trace without marking up your fresh tape surface.
Step 2: Cutting the Stencil
-
Cut the center lines:
Using a sharp X-Acto knife, carefully cut the main structural lines of the snowflake directly into the tape. Start with the vertical and horizontal cross, then add the diagonal intersecting lines. -
Add intricate details:
Carve out the smaller V-shapes and branches extending from the main arms. Use light pressure—you only need to slice through the tape, not scratch the glass underneath. -
Peel away the design:
This is the reverse-stenciling part. Carefully peel away only the pieces of tape that represent the snowflake shape. Leaving the background tape intact creates a negative mold. -
Burnish edges:
Once the snowflake shape is revealed (bare glass), run your fingernail or a credit card firmly along the cut edges of the remaining tape to ensure a tight seal against paint seepage.
Clean Lines Hack
Before painting white, seal your tape edges with a tiny bit of clear acrylic medium. This blocks gaps so the white paint has zero bleed.
Step 3: Painting & Reveal
-
Load the sponge:
Dip your sponge dabber lightly into white acrylic paint. Dab it off on a paper towel first—you want the sponge to be almost dry, not dripping wet. -
Apply the frost:
Gently tap the sponge over the exposed glass areas. I prefer to use a straight up-and-down motion rather than dragging or brushing, which helps mimic the texture of real frost. -
Layer for opacity:
Let the first light coat dry for about five minutes. If you want a brighter white, apply a second coat. For a more icy, translucent look, one thin coat is often perfect. -
Wait briefly:
Allow the paint to set until it is dry to the touch, usually about 15 to 20 minutes depending on the humidity in your room. -
Remove the mask:
Slowly peel away the large background tape blocks. Pull the tape at a sharp 45-degree angle away from the paint edges to ensure crisp lines. -
Clean up details:
If any paint bled under the tape, use a slightly damp Q-tip or the edge of your craft knife to gently scrape it away and refine the snowflake’s sharp points. -
Repeat for variety:
Continue this process on other panes, varying the size and complexity of the flakes. Mix intricate starburst shapes with simple hex-style crystals.
Sparkle Finish
While the white paint is still wet, lightly blow some ultra-fine iridescent glitter onto the glass for a magical, shimmering ice effect.
Step back and admire how your new winter window display captures the light and adds seasonal charm to your room


Winter Woodland Animals in Scarves
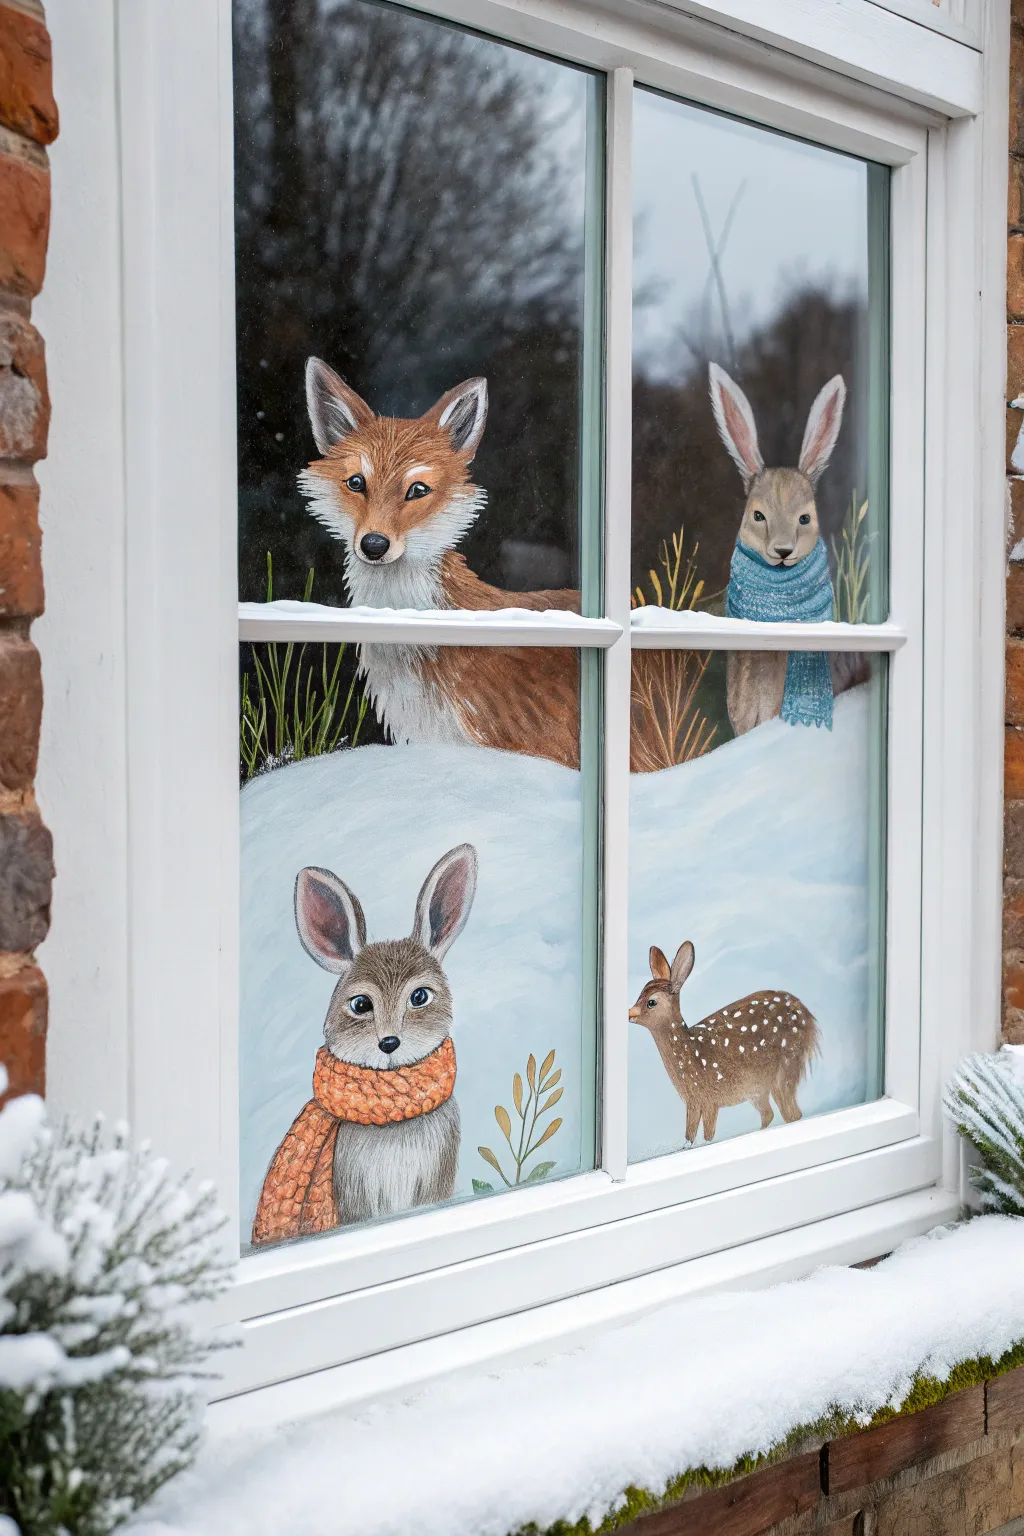
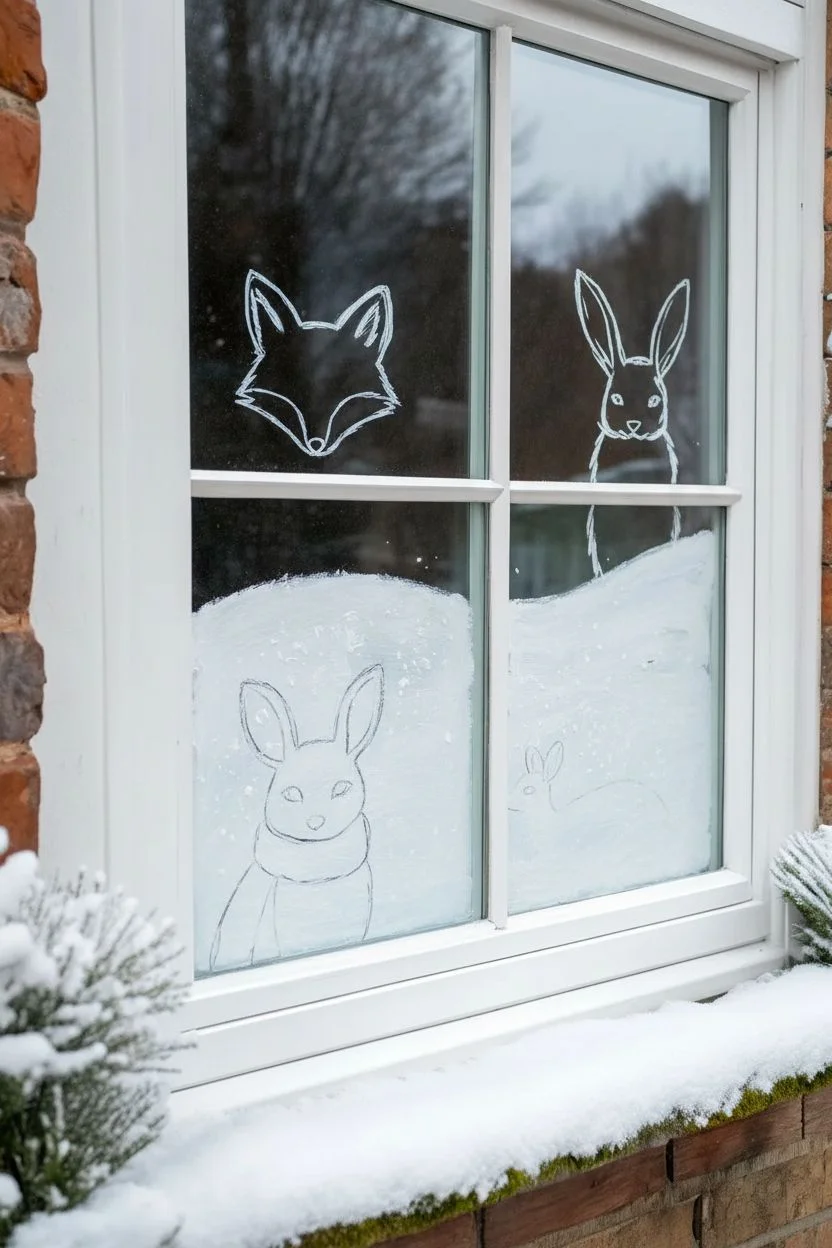
Transform a plain window pane into a charming woodland storybook scene featuring a curious fox, two rabbits, and a delicate fawn. This acrylic window painting captures the texture of fur and knit scarves against a snowy backdrop, perfect for adding warmth to a chilly view.
Detailed Instructions
Materials
- Acrylic craft paints (white, amber/burnt sienna, black, slate blue, orange, brown)
- Window cleaner and lint-free cloth
- Chalk marker (white) or dry-erase marker
- Assorted brushes: 1 inch flat brush, small round brush (size 2 or 4), fine liner brush
- Palette or paper plate
- Paper towels
- Small cup of water
Step 1: Preparation & Snow Base
-
Clean surface:
Thoroughly clean the inside of your window glass with cleaner and a lint-free cloth to ensure the paint adheres properly. -
Draft the layout:
Using a white chalk marker, sketch the basic outlines of your animals. Place the fox and one rabbit in the upper panes, and the scarf-wearing rabbit and fawn in the bottom panes. Don’t worry about details yet; just get the oval head shapes and body placement right. -
Create the snowdrifts:
Mix a large amount of white acrylic with a tiny drop of blue or grey for shadow. Use a 1-inch flat brush to paint the snowy ground at the bottom of each pane, using sweeping, curved strokes to mimic soft drifts. -
Add snow depth:
While the white is still tacky, stipple pure white along the top edge of the snow drifts to create a fluffy, fresh-snow texture.
Paint Peeling?
If acrylics are peeling off the cold glass too easily as you paint, mix a tiny amount of dish soap into your paint. This helps it stick to the slick surface.
Step 2: Painting the Animals
-
Fox base coat:
For the fox in the top left, mix an amber/orange hue. Fill in the head and body shape, leaving white space for the cheeks, chest, and inner ears. -
Rabbit base coats:
Paint the rabbits using a mix of brown, white, and a touch of grey. Apply the paint in the direction of fur growth using short strokes rather than flat color. -
Fawn base coat:
Fill in the small deer shape with a warm light brown. Keep the legs spindly and delicate. -
Adding snow details to outlines:
I like to dampen my brush slightly to blend the bottom edges of the animals into the white snow mounds, making it look like they are sitting deep in the powder.
Step 3: Fur Texture & Details
-
Defining the fox:
Using a small round brush, add white fur texture to the fox’s cheeks and chest. Use a fine liner with black paint to define the nose and eyes, adding a tiny white reflection dot to the pupil for life. -
Rabbit details:
Layer lighter grey/brown strokes over the rabbit base coats to build volume. Use the fine liner to flick distinct hairs on the ears and outline the eyes. -
Fawn spots:
Dip the back of a brush handle into white paint and gently dot spots onto the fawn’s back. Use the liner brush to add the dark nose and eye details. -
Painting the blue scarf:
For the top right rabbit, paint a thick blue band around the neck. Once dry, use a lighter blue mix and a liner brush to paint small ‘V’ shapes or horizontal lines to mimic a knit texture. -
Painting the orange scarf:
Give the bottom left rabbit a chunky orange scarf. Paint the base shape, let it dry, then use a darker orange to create shadow lines that suggest wrapped layers of wool.
Go 3D
Make the scene pop by hot-gluing real buttons onto the painted scarves or adding a tiny real ribbon bow to the fawn’s neck.
Step 4: Final Touches
-
Add greenery:
In the corners of the window panes, paint simple stems using brown or olive green. Add small, quick leaves poking out of the snow. -
Background atmosphere:
To suggest a snowy day outside, you can lightly dab a dry sponge with very little white paint on the glass behind the animals to create a subtle frost effect, or leave it clear to see the outdoors. -
Cleanup lines:
Once the paint is fully dry, take a damp Q-tip or a precision scraper to clean up any messy edges or paint smears on the glass.
Step back and enjoy your adorable winter neighbors peering in from the cold
Painted Fireplace and Stockings Illusion
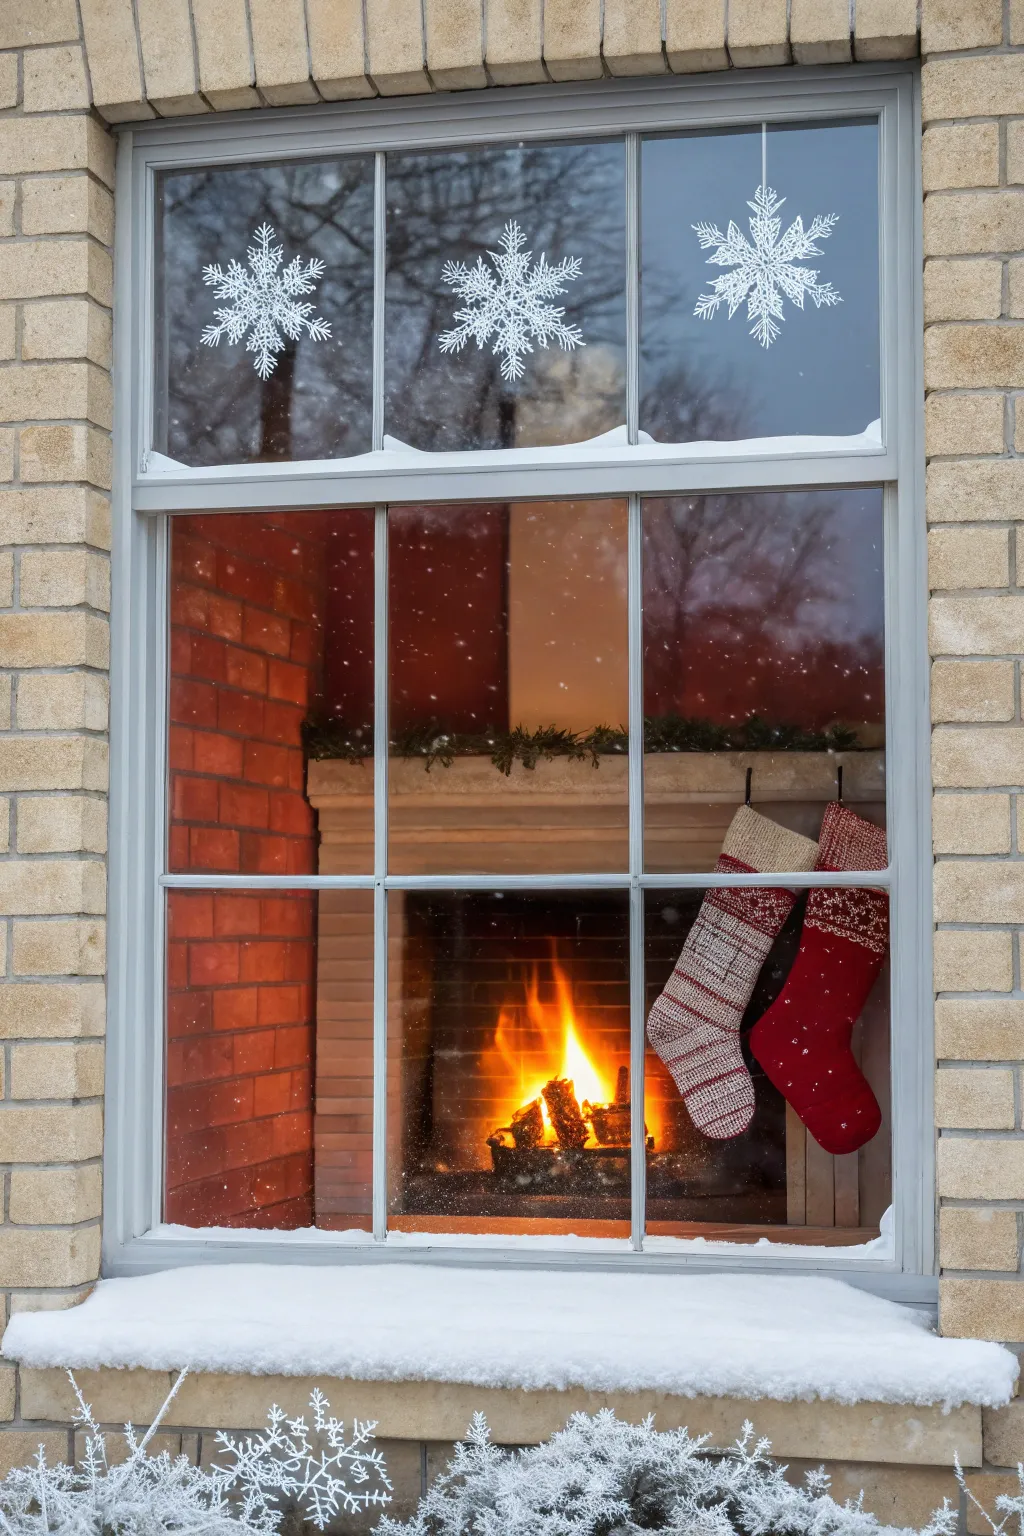
Transform a plain exterior window into a magical portal revealing a warm, inviting holiday scene. This project uses acrylic paints directly on the glass to create a realistic fireplace, complete with flickering flames and festive stockings.
Step-by-Step Tutorial
Materials
- Acrylic glass paints (brick red, brown, black, white, yellow, orange, cream)
- Wide flat brush (1-2 inch)
- Small round detail brush
- Medium filbert brush
- Painter’s tape or masking tape
- Glass cleaner and microfiber cloth
- Ruler or straight edge
- Palette or paper plate
- Sponge for texture
Step 1: Preparation & Layout
-
Clean surface:
Begin by thoroughly cleaning the exterior of your window with glass cleaner and a microfiber cloth. Any dirt or grit will prevent the paint from adhering smoothly. -
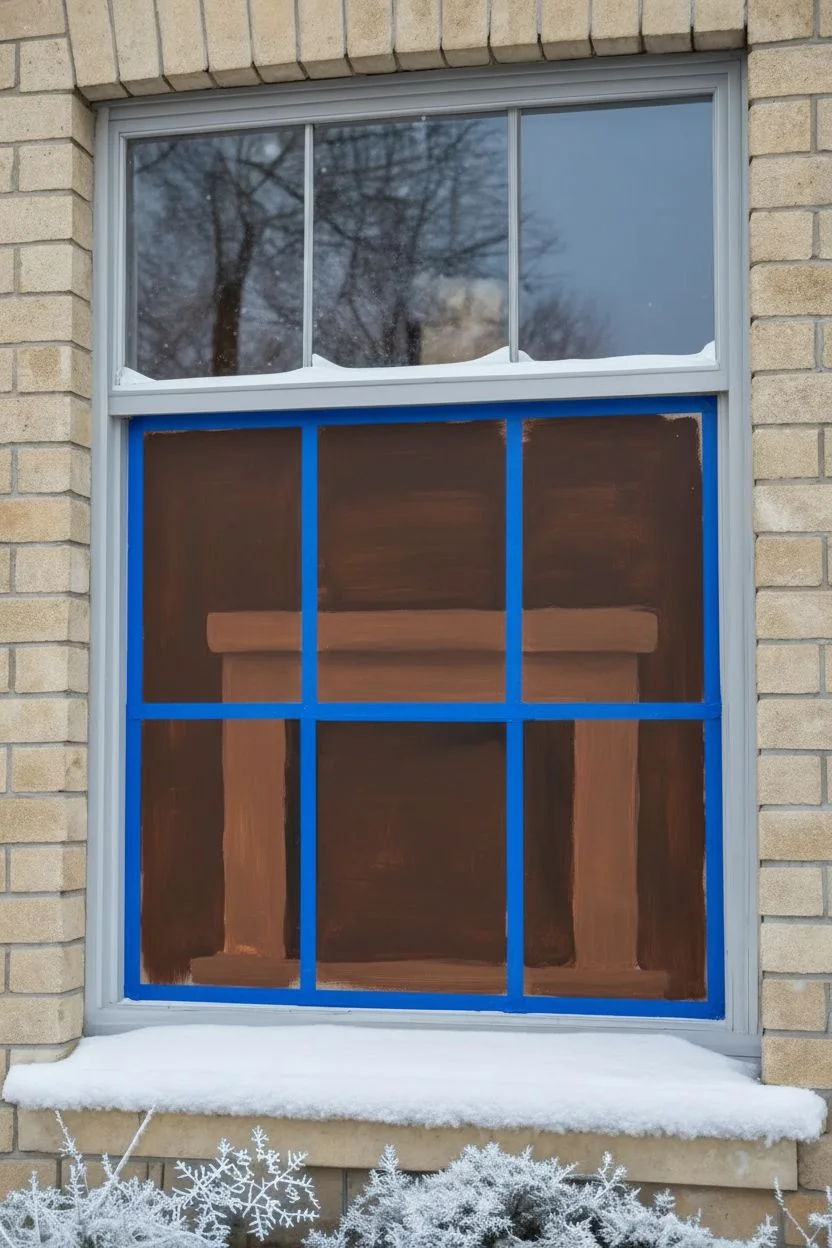
Tape guides:
Because this is a multi-pane window illusion, you need to plan where your fireplace structure sits. Use painter’s tape on the outside of the glass to mark vertical lines for the brickwork and the mantelpiece shelf. -
Block background:
Using a wide flat brush, mix a dark, warm brown with a touch of black. Paint the deep background areas where the firebox will be, keeping it darker near the edges to create depth.
Step 2: Building the Architecture
-
Paint the bricks:
Mix a rusty red color for the bricks. Using your flat brush and the straight edge of your ruler, paint rectangular brick shapes on the left side of the window pane. Leave thin gaps of clear glass or paint them grey to represent mortar. -
Add texture:
While the red paint is still tacky, lightly dab it with a sponge or a dry brush dipped in darker brown to give the bricks a rough, realistic texture. -
Create the mantel:
Mix a creamy beige color. Paint the horizontal shelf of the mantelpiece across the middle section. Use horizontal strokes to simulate wood grain or stone texture. -
Shadows and depth:
Add a thin line of dark brown or black just underneath the mantel shelf to create a shadow, making it look 3D and separating it from the fireplace opening below.
Reverse Painting Tip
Since you are painting on the outside but looking ‘in’, paint foreground items (like stockings) first if painting on the inside of the glass. If painting outside, layer normally.
Step 3: Lighting the Fire
-
Lay the logs:
In the central lower pane, use a medium brush to paint dark brown, rough shapes for the logs. Stack them in a pyramid shape, overlapping slightly. -
Start the glow:
Mix a bright orange with a little red. With a filbert brush, paint soft, upward strokes originating from the logs. I find it helps to keep the paint slightly translucent here to mimic light. -
Intensify the flames:
Layer bright yellow paint into the center of your orange flames. Keep your strokes loose and flickering upward. -
Highlight the core:
Add touches of pure white right at the base of the fire where it would be hottest. Blend this wet-on-wet into the yellow for a blindingly bright effect. -
Reflections:
Lightly dry-brush some orange and yellow onto the nearby brickwork and mantel to show the fire’s warm glow reflecting off the surfaces.
Too Transparent?
If your fire or bricks look too see-through, let the first coat dry completely. Apply a second layer of paint mixed with a tiny bit of white to increase opacity.
Step 4: Festive Details
-
Outline stockings:
On the right side, sketching directly with a small round brush and diluted white paint, outline two stocking shapes hanging from the mantel. -
Fill colors:
Fill one stocking with a deep red and the other with a cream or beige base. Let this layer dry completely before adding patterns. -
Knit patterns:
Using your smallest detail brush and white paint, create little ‘V’ shapes or cross-hatching on the stockings to simulate a knitted texture. -
Add snowdrift:
Paint a thick, wavy line of white along the very bottom of the window frame to look like accumulated snow. -
Paint snowflakes:
In the upper window panes, use a fine liner brush and pure white paint. Draw a central cross, then add diagonal lines and tiny V-shaped branches to create three distinct crystal snowflakes. -
Final touches:
Step back and check your work. If the fire looks too dim, add one final layer of bright yellow highlights to make it pop.
Enjoy the warm glow of your new fireplace art all winter long


Have a question or want to share your own experience? I'd love to hear from you in the comments below!