
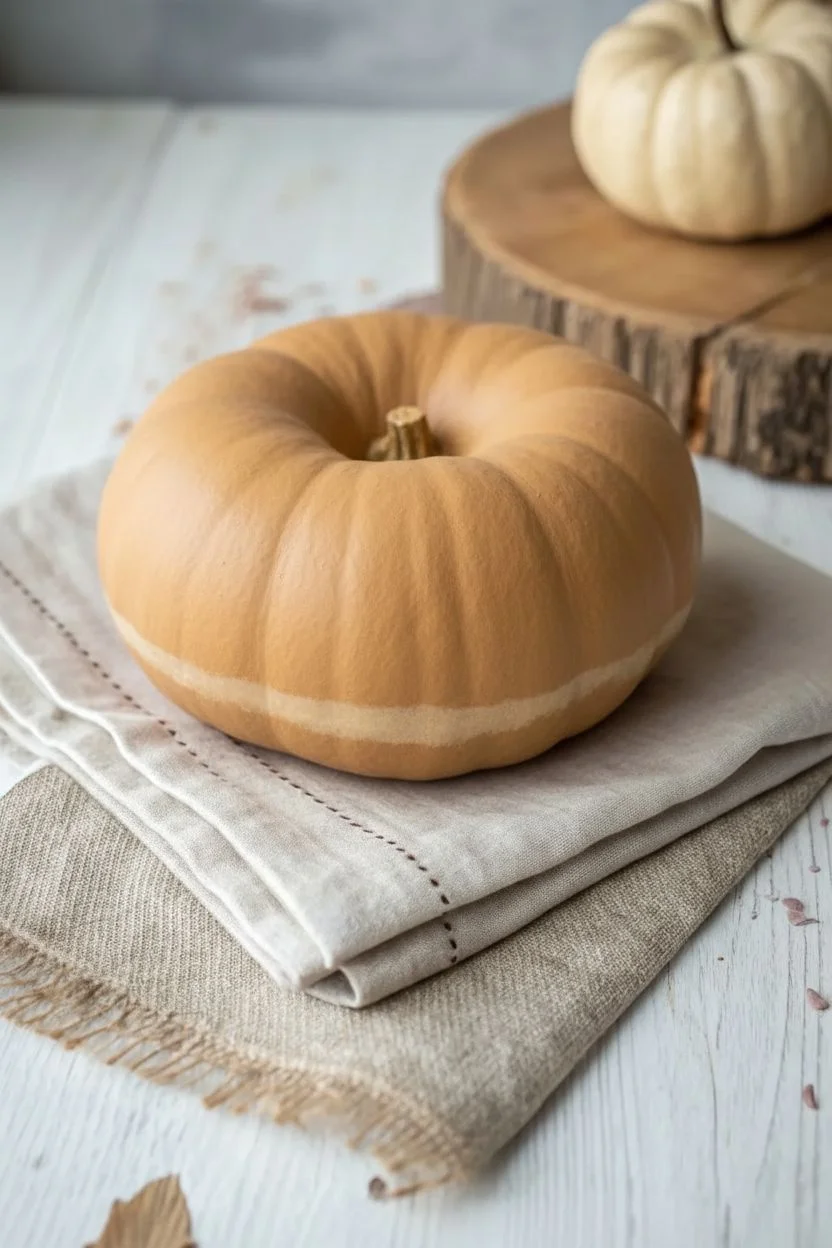
I’m obsessed with how a simple pumpkin can turn into a convincing donut pumpkin with a little color blocking, a drippy glaze edge, and a sprinkle party on top. These ideas are all about that playful trompe-l’œil moment—so your pumpkins look sweet enough to belong behind a bakery counter.
Chocolate Frosted Donut Pumpkin With Extra Drips
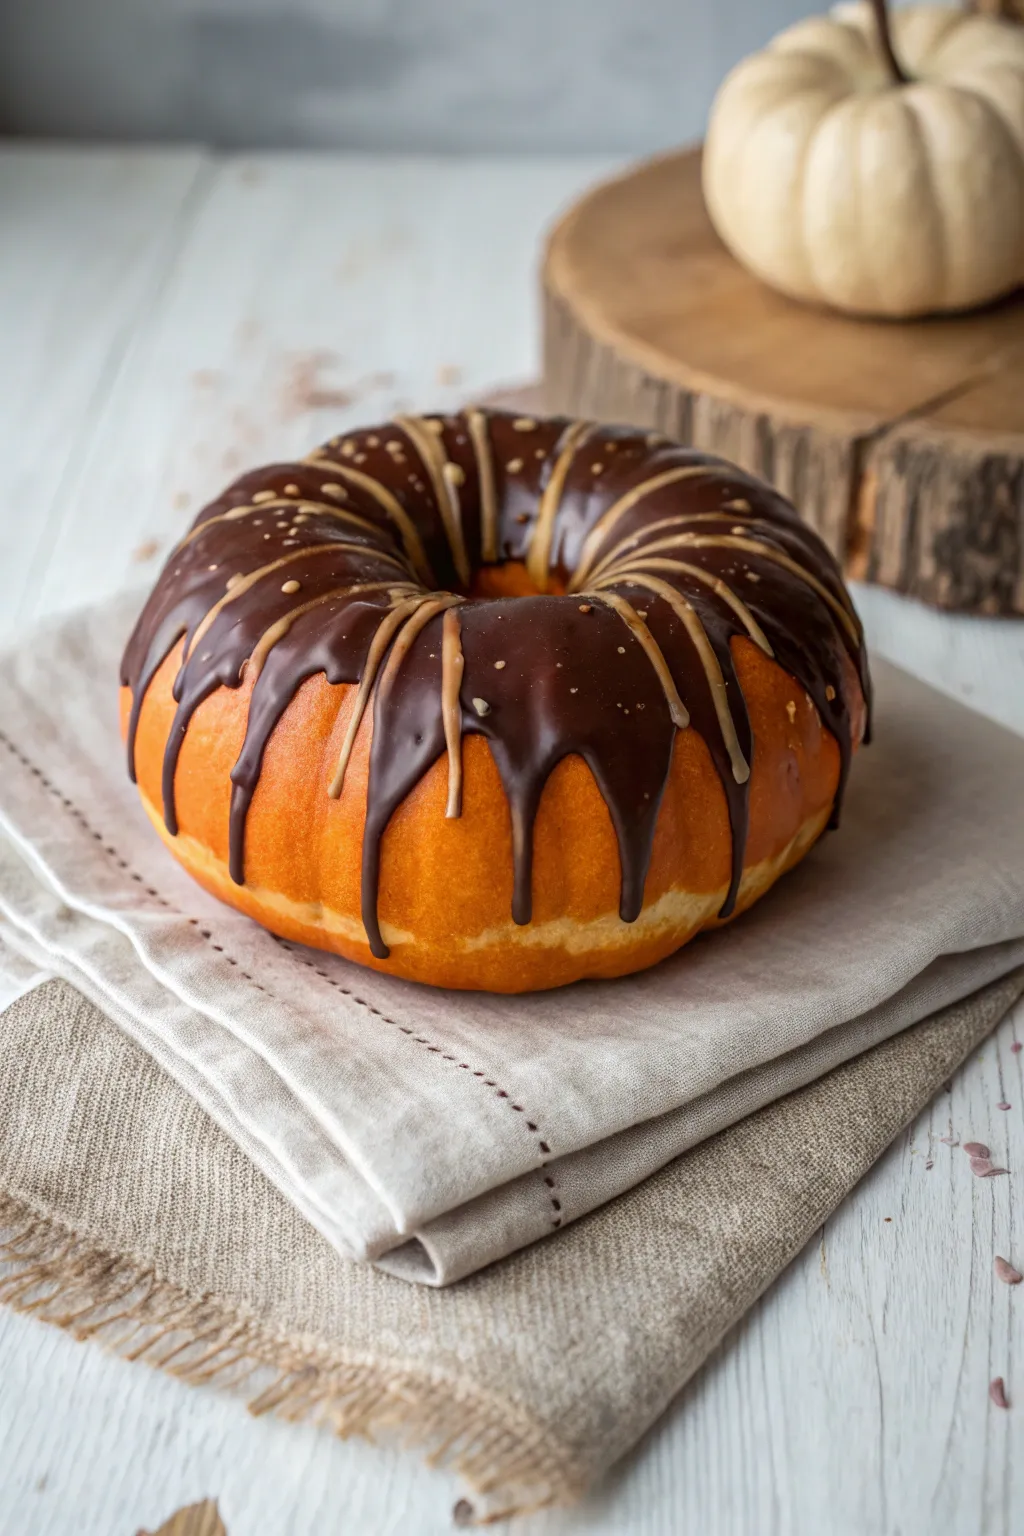
Transform a simple round pumpkin into a mouth-watering treat that looks almost too good not to eat. This project uses clever painting techniques to mimic the rich sheen of chocolate Ganache and the delicious contrast of a ‘baked’ pastry base.
Step-by-Step Tutorial
Materials
- Small round pumpkin (sugar pie or mini variety)
- Acrylic paint: Warm Tan/Beige
- Acrylic paint: Burnt Orange
- Acrylic paint: Dark Brown (chocolate shade)
- Acrylic paint: Light Caramel/Toffee (or mix ochre and white)
- Acrylic paint: White (for mixing highlights)
- Medium soft flat brush
- Small round detail brush
- Squeeze bottle or piping bag (optional but recommended for glaze)
- Palette for mixing
- Matte spray sealer (optional)
- Gloss varnish or clear nail polish
Step 1: Prepping the Pastry Base
-
Clean and Dry:
Start by wiping down your pumpkin with a damp cloth to remove any dirt or oils. Dry it thoroughly so the paint adheres properly. -
Base Coast Mixing:
Mix your warm tan paint with just a touch of burnt orange. You want a color that resembles perfectly golden-fried dough. It shouldn’t be too bright orange, but warm and inviting. -
Apply the Base:
Using a medium flat brush, paint the entire pumpkin with your dough color mixture. Don’t worry about the bottom, but cover all the sides and the top well. -
Second Coat:
Allow the first layer to dry completely. Apply a second coat to ensure the natural pumpkin skin doesn’t show through, creating a solid, cake-like appearance. -
Add Dimension:
To make it look like a real donut, create a ‘fry line.’ Lightly sponge or brush a slightly lighter beige strip horizontally around the middle or bottom third of the pumpkin. This mimics where the dough floats in the oil.
Smooth Moves
For the most realistic chocolate drips, mix your brown acrylic paint with a little fabric puffy paint or pouring medium. This adds physical volume so the dripping frosting stands off the pumpkin surface.
Step 2: Adding the Chocolate Ganache
-
Map the Glaze:
Take your dark brown paint. Using a brush, outline a wavy, uneven circle around the top of the pumpkin where the chocolate frosting will sit. Let the drips extend naturally down the sides. -
Fill the Chocolate:
Fill in the mapped area with the dark brown paint. Use a generous amount of paint here to create a slightly raised texture, covering the top stem area completely (or painting the stem brown to hide it). -
Create the Drips:
Refine your drip shapes. Round out the bottom of each drip so gravity looks like it did the work. Vary the lengths—some should stop halfway down, others should reach near the bottom. -
Highlight the Chocolate:
Mix a tiny amount of white into your dark brown to make a lighter cocoa shade. Paint very subtle, soft highlights on the ‘shoulder’ of the chocolate curve to simulate light hitting a glossy surface.
Step 3: Drizzles and Details
-
Mix the Caramel Drizzle:
Prepare your light caramel or toffee colored paint. If it’s too thick, thin it slightly with a drop of water or pouring medium so it flows smoothly. -
Apply the Drizzle:
Load a fine linear brush or fill a small squeeze bottle with the caramel paint. Start from the center hole area and drag lines outward over the chocolate, letting them trail off down the sides. -
Stripe Variation:
Make sure your drizzle lines aren’t perfectly straight. Let them wiggle slightly and vary the spacing between them for a handmade, bakery-style look. -
Add Tiny Sprinkles:
Dip the very tip of a toothpick or a tiny brush into white or light beige paint. Dot random specks across the chocolate area to look like sugar crystals or crushed nuts. -
Gloss the Frosting:
Once the paint is fully dry, apply a high-gloss varnish only to the chocolate and caramel sections. Leave the orange ‘dough’ part matte. This contrast is the secret to making it look sticky and real.
Go Nuts
Instead of painted sprinkles, sprinkle real poppy seeds or sesames into the wet paint or wet varnish layer. The texture adds incredible realism to your faux pastry.
Now you have a deceptively delicious decoration that is perfect for confusing hungry guests


Glossy Highlights And Shadows To Sell The Glaze
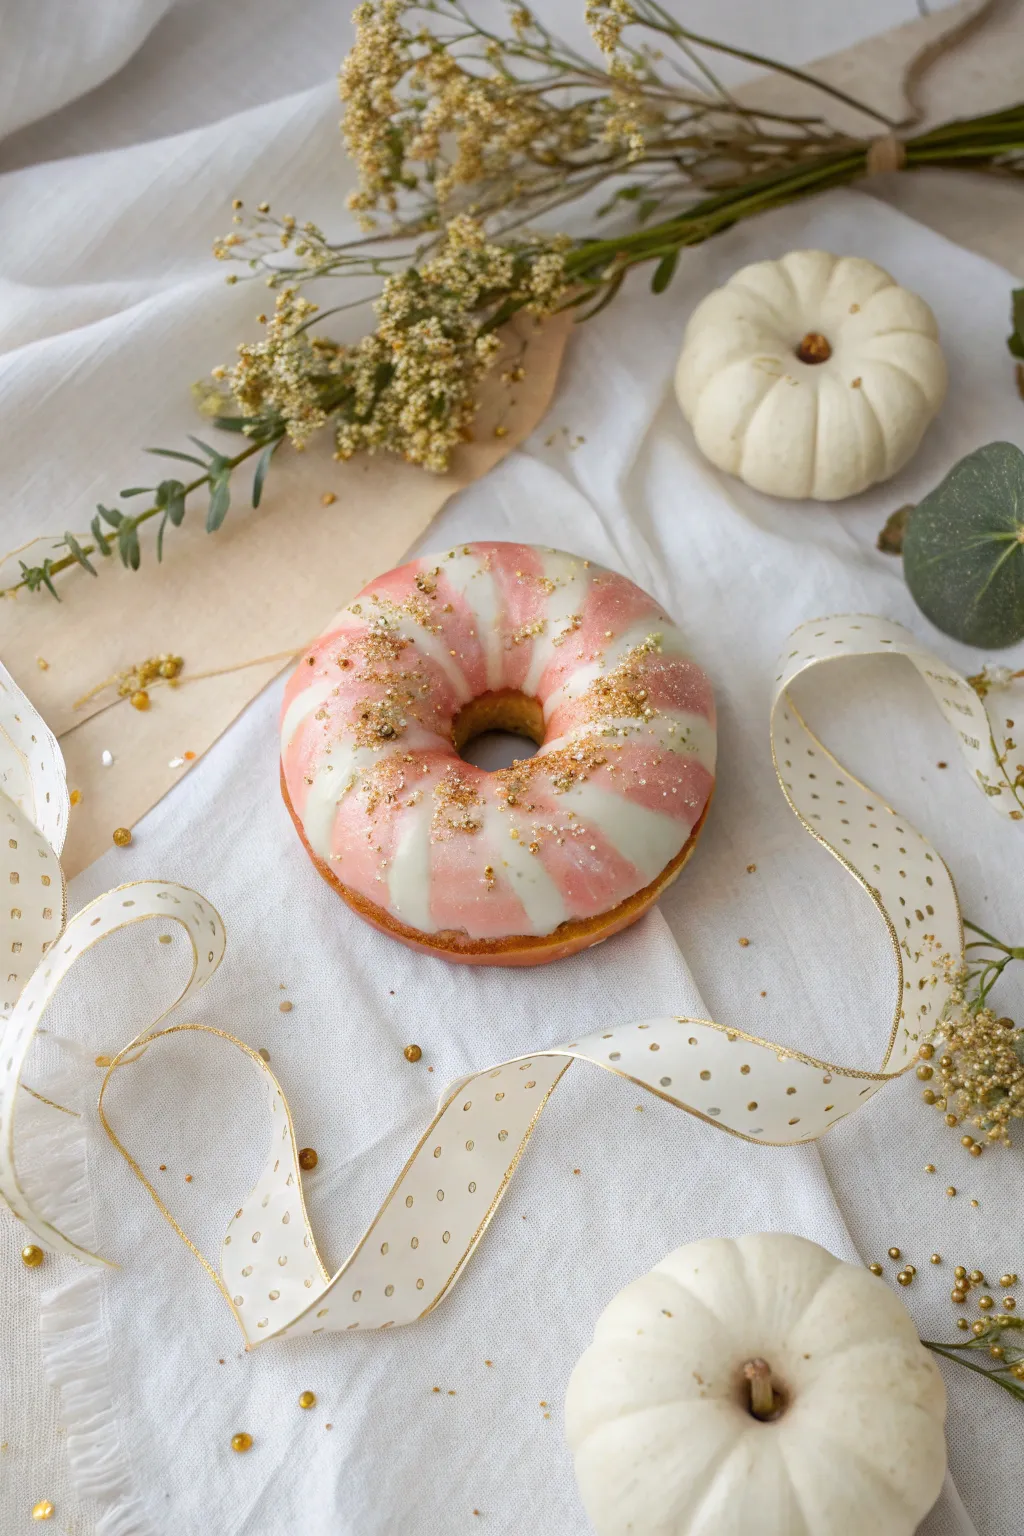
Master the art of illusion with this hyper-realistic donut painting project featuring a glossy, pink-frosted treat. By focusing on specular highlights and subtle shadow play, you’ll create a finish so convincing it looks good enough to eat.
Step-by-Step Tutorial
Materials
- Canvas or primed panel (small square format works best)
- Acrylic paints (Titanium White, Burnt Sienna, Yellow Ochre, Cadmium Red, Alizarin Crimson, Raw Umber)
- Glazing medium
- Synthetic brushes: filbert (medium), round (small), liner brush
- Palette knife for mixing
- Water container and paper towels
Step 1: Base Structure
-
Sketch the form:
Begin by lightly sketching a slightly flattened circle for the donut shape. Mark the center hole, ensuring the perspective creates an ellipse rather than a perfect circle. -
Define the glaze line:
Draw the irregular, wavy line where the glaze ends and the bare dough begins. Keep this line organic—it shouldn’t be perfect. -
Mix the dough color:
Create a golden-brown hue by mixing Yellow Ochre, Titanium White, and a touch of Burnt Sienna. You want a warm, baked pastry shade. -
Paint the dough:
Apply the dough color to the bottom third of the donut shape. While wet, stipple in a tiny amount of Raw Umber near the very bottom edge for textural shadow. -
Add the center stick:
Using Raw Umber and a liner brush, paint the small cinnamon stick or stem protruding from the center hole. Add a thin highlight line on its left side.
Wet-on-Wet Blending
For the smoothest glaze look, apply your highlights while the underlying pink layer is still slightly tacky. This softens the edges naturally.
Step 2: Applying the Glaze
-
Mix the base pink:
Combine Titanium White with a very small amount of Cadmium Red and a speck of Burnt Sienna to dull the pink. It should look like strawberry frosting. -
Block in the frosting:
Paint the entire top section of the donut with your mixed pink. Maintain a smooth, even consistency here to simulate the sleek texture of glaze. -
Mix a translucent glaze shadow:
Take your base pink and mix in a drop of Alizarin Crimson and Glazing Medium. This creates a slightly darker, transparent version of the frosting color. -
Add volume with shadows:
Apply this darker glaze mixture to the sides of the donut where the frosting curves downward, and inside the center hole divot. -
Create the stripe color:
Mix a slightly more saturated, darker pink-orange using the base pink plus a touch more Cadmium Red and Yellow Ochre.
Step 3: Details & Highlights
-
Paint the drizzle stripes:
Using a liner brush and steady hand, paint thin, curved stripes radiating from the center hole down the sides. Ensure the lines follow the contour of the donut’s curve. -
Soften the edges:
I like to take a clean, slightly damp brush and very gently run it along one side of the stripes to soften them slightly, so they look melted into the main glaze rather than sitting stiffly on top. -
Add speckling:
Mix a watery reddish-brown and flick infinitesimal specks onto the pink glaze using an old toothbrush or stiff brush to mimic real strawberry bits. -
Identify light source:
Decide on your light source (the reference image has light coming from the upper left). This is crucial for the final step. -
Paint primary reflections:
Using pure Titanium White, paint strong, crisp highlights on the upper left curve of the main glaze body. Make these shapes slightly irregular. -
Highlight the stripes:
Add tiny, sharp dots or thin lines of pure white on the highest point of each drizzle stripe where it catches the light. -
Cast shadow:
Mix a cool grey using White, Raw Umber, and a touch of Blue. Paint a soft shadow underneath the donut to ground it.
Flavor Variations
Swap the pink palette for deep browns to make chocolate glaze, or cream and white for a vanilla bean version. The highlight technique stays exactly the same.
Step back and admire how a few well-placed white dots transform paint into a glossy, delicious treat


Mini Donut Pumpkin “Holes” As A Tiny Assortment
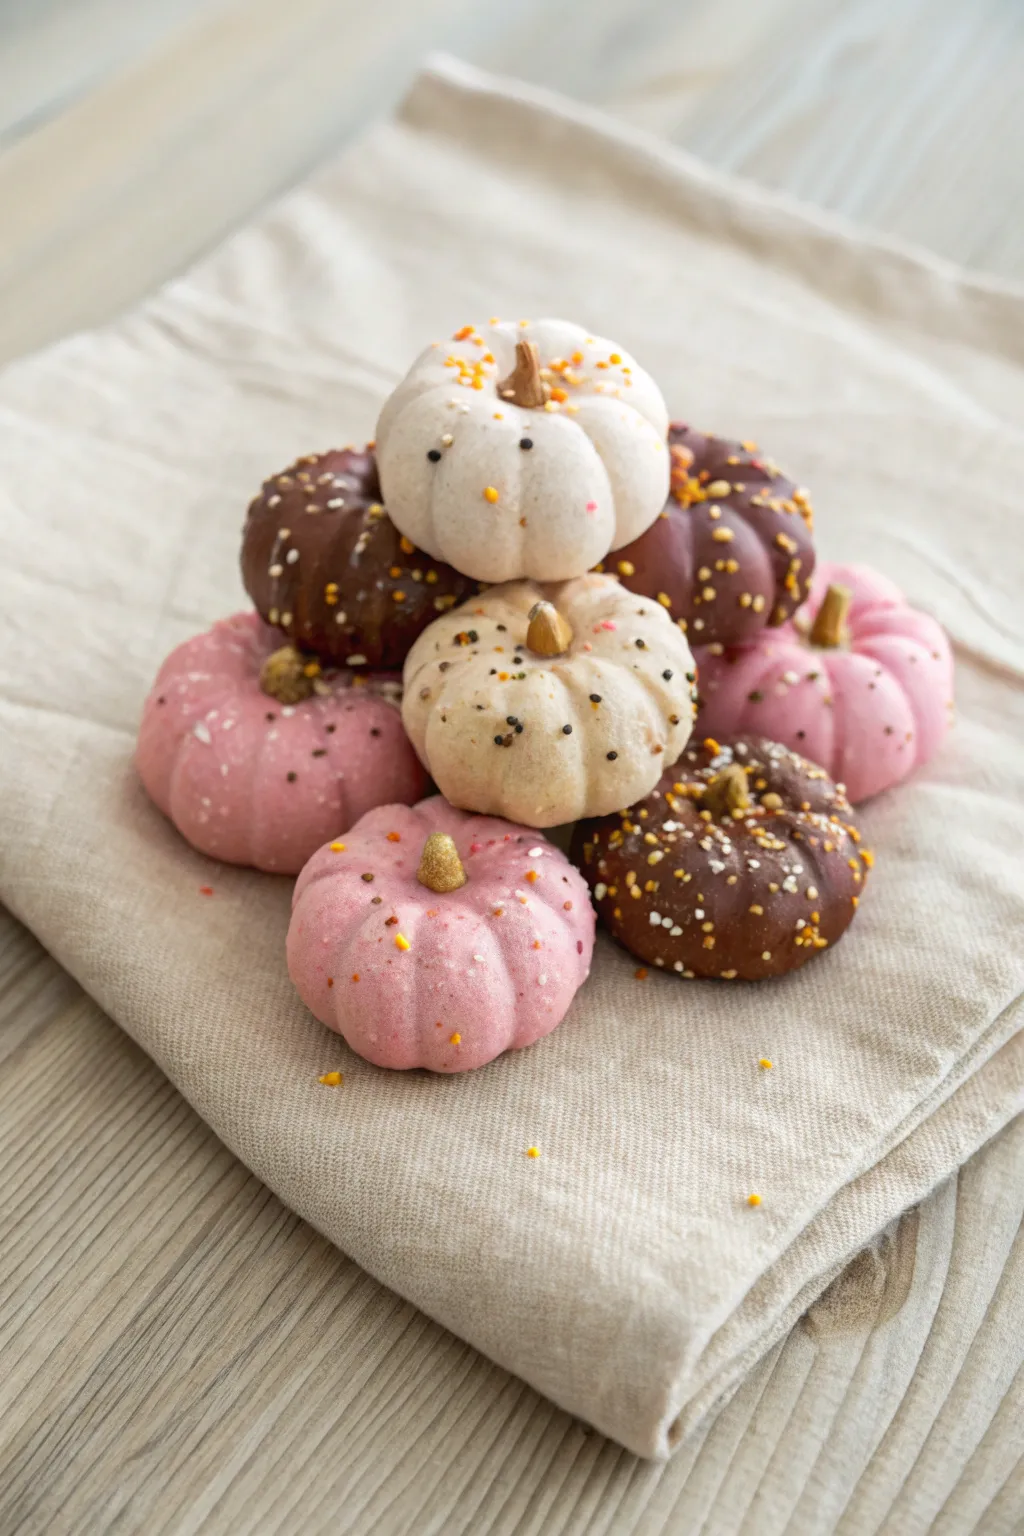
Transform bite-sized donut holes into an irresistible autumn harvest with this sweet trompe l’oeil project. By shaping and dipping simple cake donuts, you’ll create a miniature pumpkin patch featuring classic white, pastel pink, and rich chocolate varieties speckled with festive sprinkles.
Detailed Instructions
Materials
- Plain cake donut holes (store-bought or homemade)
- White melting chocolate or candy melts
- Pink candy melts (or red food coloring)
- Dark or milk chocolate melting wafers
- Vegetable oil or coconut oil (for thinning)
- Whole cloves or small pretzel sticks (for stems)
- Fall-colored sprinkles (orange, yellow, white nonpareils)
- Gold luster dust (optional)
- Small kitchen knife or clean craft knife
- Toothpicks or skewer
- Parchment paper
- Microwave-safe bowls
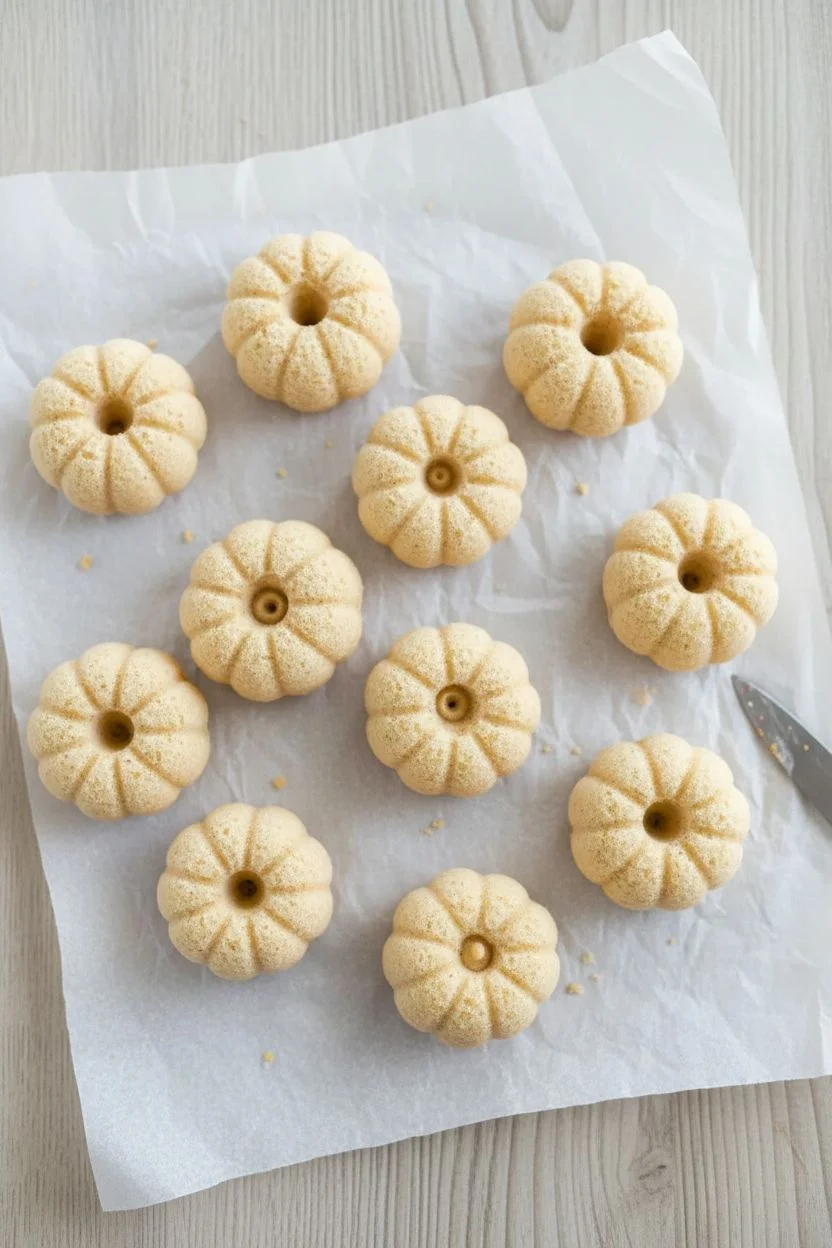
Step 1: Shaping the Pumpkins
-
Prepare your workspace:
Lay out a sheet of parchment paper on a flat surface or baking sheet. This ensures your glazed pumpkins won’t stick while they set. -
Create the center indentation:
Take a plain cake donut hole and gently press your pinky finger or the back of a small utensil into the very top center to create a divot where the stem will eventually go. -
Score the ridges:
Using the back (dull side) of a small knife, gently press vertical lines down the sides of the donut hole. Start from the top divot and rock the knife downward to the base. -
Define the shape:
Repeat this scoring process 5 to 6 times around the circumference of the donut to mimic the natural ribs of a pumpkin. Don’t cut too deep; you just want to create distinct sections. -
Repeat the process:
Continue shaping all your donut holes until you have a full ‘pumpkin patch’ ready for glazing.
Glaze Consistency
The glaze must be thin enough to run into the grooves. If it’s thick like frosting, you’ll lose the pumpkin definition.
Step 2: Glazing and Decorating
-
Melt the white base:
Place your white candy melts in a microwave-safe bowl. Heat in 30-second intervals, stirring vigorously between each burst until completely smooth. -
Adding the pink hue:
In a second bowl, melt your pink candy wafers. If you only have white melts, add a microscopic drop of red gel coloring to a portion of the white chocolate to achieve a soft, dusty rose color. -
Prepare the chocolate:
Melt the dark or milk chocolate wafers in a third bowl using the same microwave method. If any of the melts are too thick to pour, stir in a teaspoon of vegetable oil to thin the consistency. -
The dipping technique:
Insert a toothpick into the bottom of a shaped donut hole. Lower it completely into the glaze of your choice—white, pink, or chocolate—ensuring the glaze settles into the scored ridges. -
Remove excess glaze:
Lift the donut out and gently tap the toothpick against the side of the bowl. This helps excess chocolate drip off so you don’t lose the pumpkin shape you carved earlier. -
Add the stem:
While the glaze is still very wet, immediately press a whole clove (spiky side down) or a small broken piece of pretzel stick into the top divot to act as the pumpkin stem. -
Sprinkle application:
Take a pinch of fall-colored sprinkles (orange, yellow, and white nonpareils) and lightly dust them over the wet glaze. Let them fall naturally rather than placing them perfectly. -
Gold detailing:
For an elegant touch on the pink pumpkins, I like to mix a tiny bit of gold luster dust with the sprinkles or dust the stem slightly for a bit of shimmer. -
Create the pile:
Once you have dipped pumpkins in white, pink, and chocolate, place them on the parchment paper and allow the coating to harden completely, which usually takes about 15-20 minutes at room temperature. -
Final arrangement:
Once dry, carefully remove the toothpicks from the bottom. Arrange them in a pyramid stack on a linen napkin to mimic the cozy harvest look shown in the photo.
Fingerprints?
If you accidentally touch a wet pumpkin, wait for it to dry, then dap a tiny bit of fresh melted chocolate over the smudge to patch it.
Serve these delightful autumnal treats at your next gathering for a dessert that looks as charming as it tastes


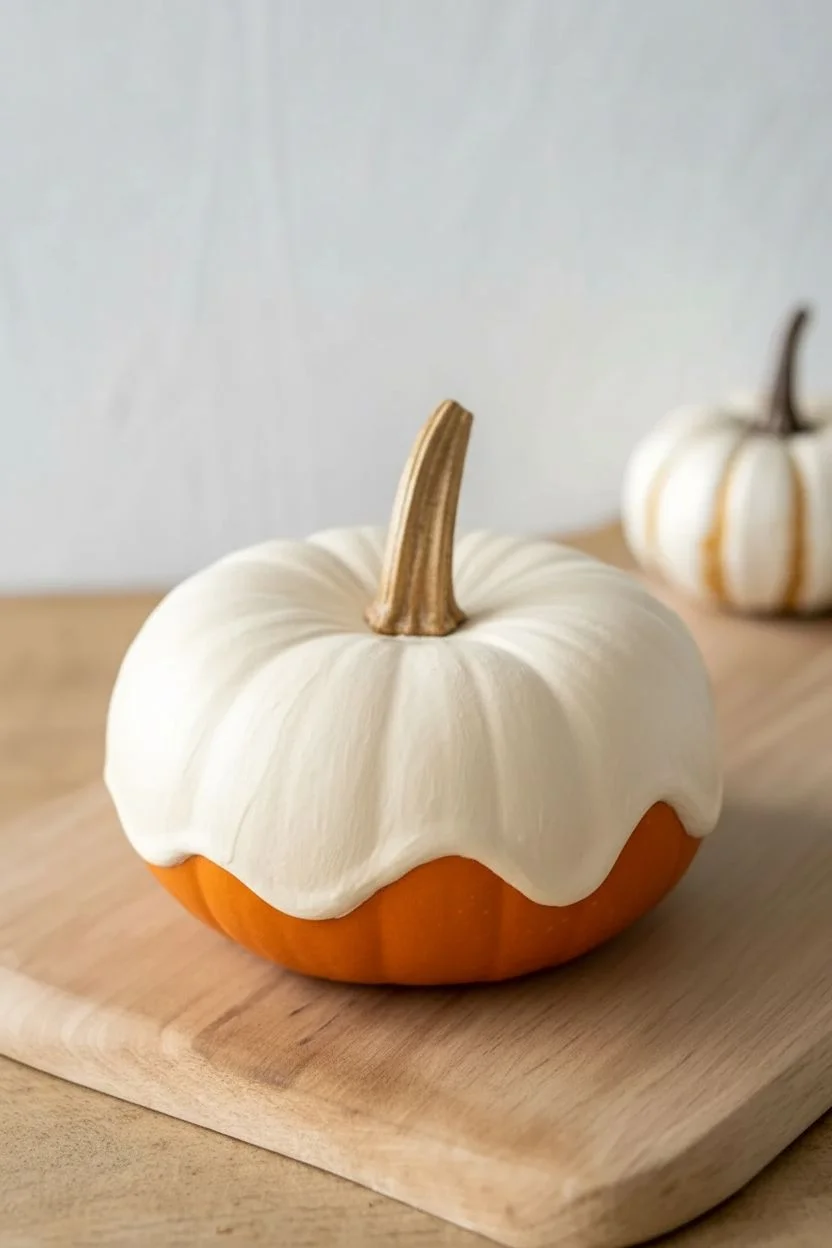
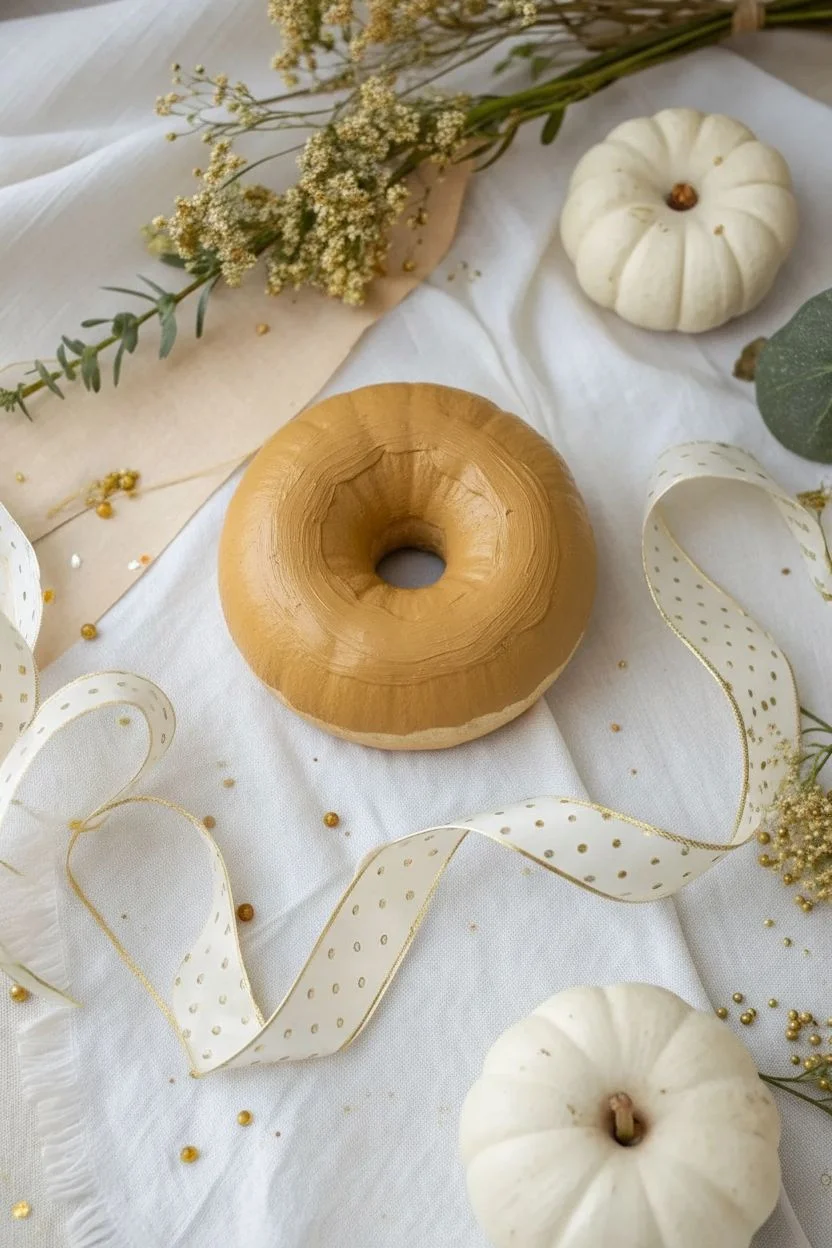
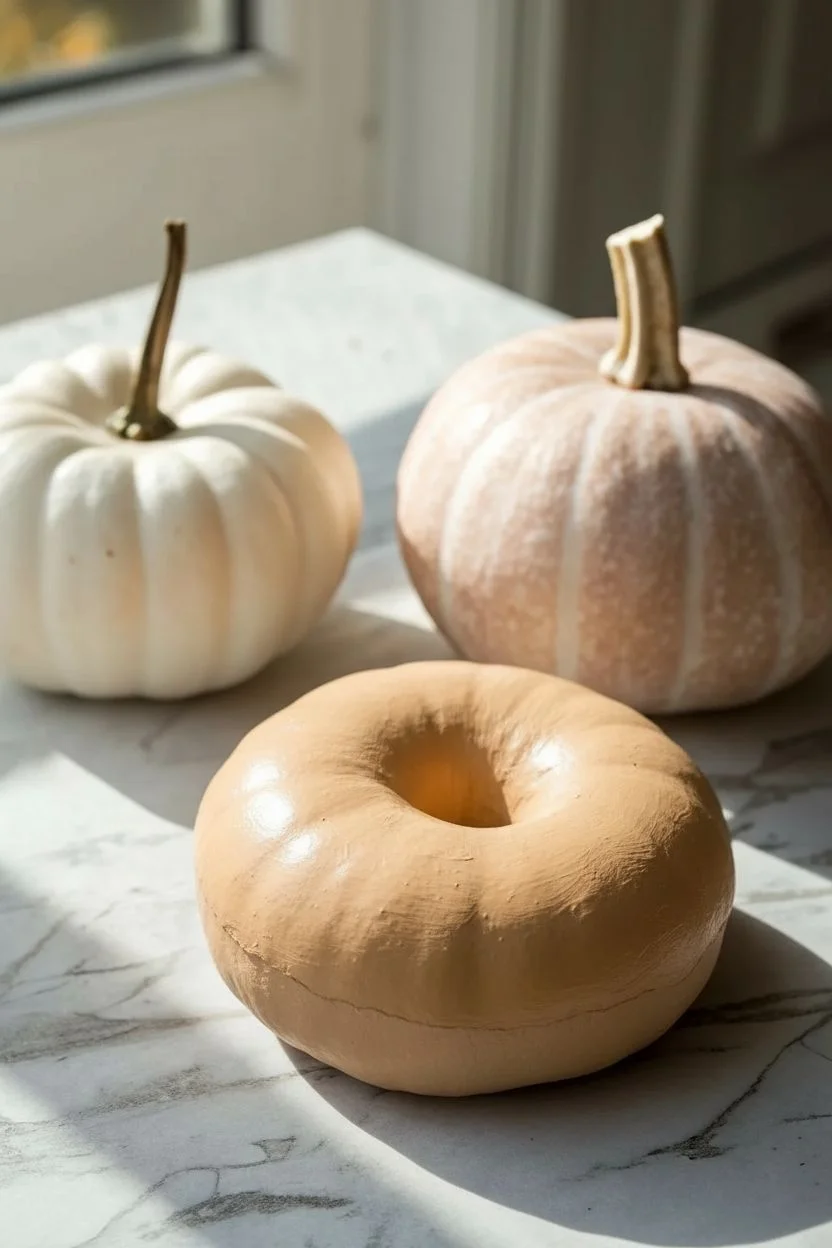
Stem-As-Donut-Hole Shading Trick
Transform a simple mini white pumpkin into a mouth-watering treat that looks almost too good to not eat. This whimsical project uses clever shading around the stem to create the illusion of a classic donut hole without any carving required.
Step-by-Step
Materials
- Small white pumpkin (real or faux)
- Orange acrylic paint (bright, donut-glaze shade)
- White acrylic paint
- Burnt umber or dark brown acrylic paint
- Small flat brush
- Fine detail brush
- White puffy paint or dimensional fabric paint
- Matte or satin sealant spray (optional)
- Palette or paper plate
- Cup of water and paper towels
Step 1: Base Glazing
-
Clean and Prep:
Begin by wiping down your pumpkin with a damp cloth to remove any dirt or oils. If using a real pumpkin, ensure it is completely dry before applying any paint. -
Mix the Glaze Color:
On your palette, squeeze out a generous amount of bright orange paint. If it feels too flat, mix in a tiny drop of white to give it that creamy, opaque frosting appearance. -
Apply the First Coat:
Using your small flat brush, paint the top half of the pumpkin. Start near the stem but don’t touch it yet. Paint downwards, following the natural curves and ribs of the pumpkin. -
Create the Drip Edge:
Stop painting about halfway down the pumpkin’s sides. Try to create an uneven, wavy line to mimic how glaze naturally drips and settles. It shouldn’t be a perfect circle. -
Second Coat for Opacity:
Let the first layer dry for about 10-15 minutes. Apply a second coat of orange to ensure the white pumpkin skin doesn’t show through, keeping the texture smooth.
Glaze Realism Tip
Mix a clear gloss medium into your orange paint instead of water. This gives the ‘icing’ a genuine shine and dimension without needing a final varnish spray.
Step 2: The Donut Hole Illusion
-
Remove the Stem (Optional):
If your pumpkin has a very long stem, you might want to trim it down carefully. However, for the shading trick, leaving a short stub actually helps the illusion. -
Mix the Shadow Color:
Create a ‘baked dough’ shadow color by mixing a small amount of burnt umber with a drop of orange and a drop of water to make a thin wash. -
Paint the Center Well:
With a detail brush, paint the depression right where the stem meets the pumpkin skin. Use the dark wash to create a deep shadow that mimics the empty center of a donut. -
Blend the Inner Edge:
While the shadow is still slightly wet, feather the paint outward just a tiny bit onto the orange glaze area to soften the transition. This depth is what sells the ‘hole’ effect. -
Add Inner Glaze Beading:
Take your original orange color and paint a very clean, crisp ring around the dark shadow center. This represents where the glaze pools slightly before falling into the hole.
Sprinkle Variation
Instead of round dots, use actual rainbow elongated sprinkles! Use a dab of wet paint or craft glue to attach real candy sprinkles for an authentic texture.
Step 3: Stripes and Sprinkles
-
Dilute White Paint:
Thin down a bit of white acrylic paint with water until it has an inky consistency suitable for creating translucent lines. -
Paint Glaze Reflections:
Using a fine liner brush, paint thin, vertical white stripes down the ‘ribs’ of the pumpkin—on top of the orange paint. These act as highlights where the light would hit the sticky glaze. -
Soften the Highlights:
I like to use a clean, slightly damp brush to gently fade the edges of these white lines so they look like soft light reflections rather than hard stripes. -
Prep the Puffy Paint:
Shake your bottle of white puffy paint well to remove air bubbles. Test a few dots on a paper towel to ensure the flow is consistent. -
Add the Sprinkles:
Apply small, raised dots of white puffy paint scattered randomly over the orange section. Group some closer together and leave other areas sparse for a realistic look. -
Vary Sprinkle Sizes:
Make some dots tiny and others slightly larger to add textural interest. Allow the puffy paint to dry completely, which usually takes at least 4 hours. -
Final Seal (Optional):
Once everything is bone dry, you can mist the pumpkin with a satin sealant to give the whole ‘donut’ a consistent, sugary sheen.
Now you have a sweet, perennial decoration that captures the cozy essence of fall baking
BRUSH GUIDE
The Right Brush for Every Stroke
From clean lines to bold texture — master brush choice, stroke control, and essential techniques.
Explore the Full Guide
Sugar-Coated Sparkle With A Glittery Finish
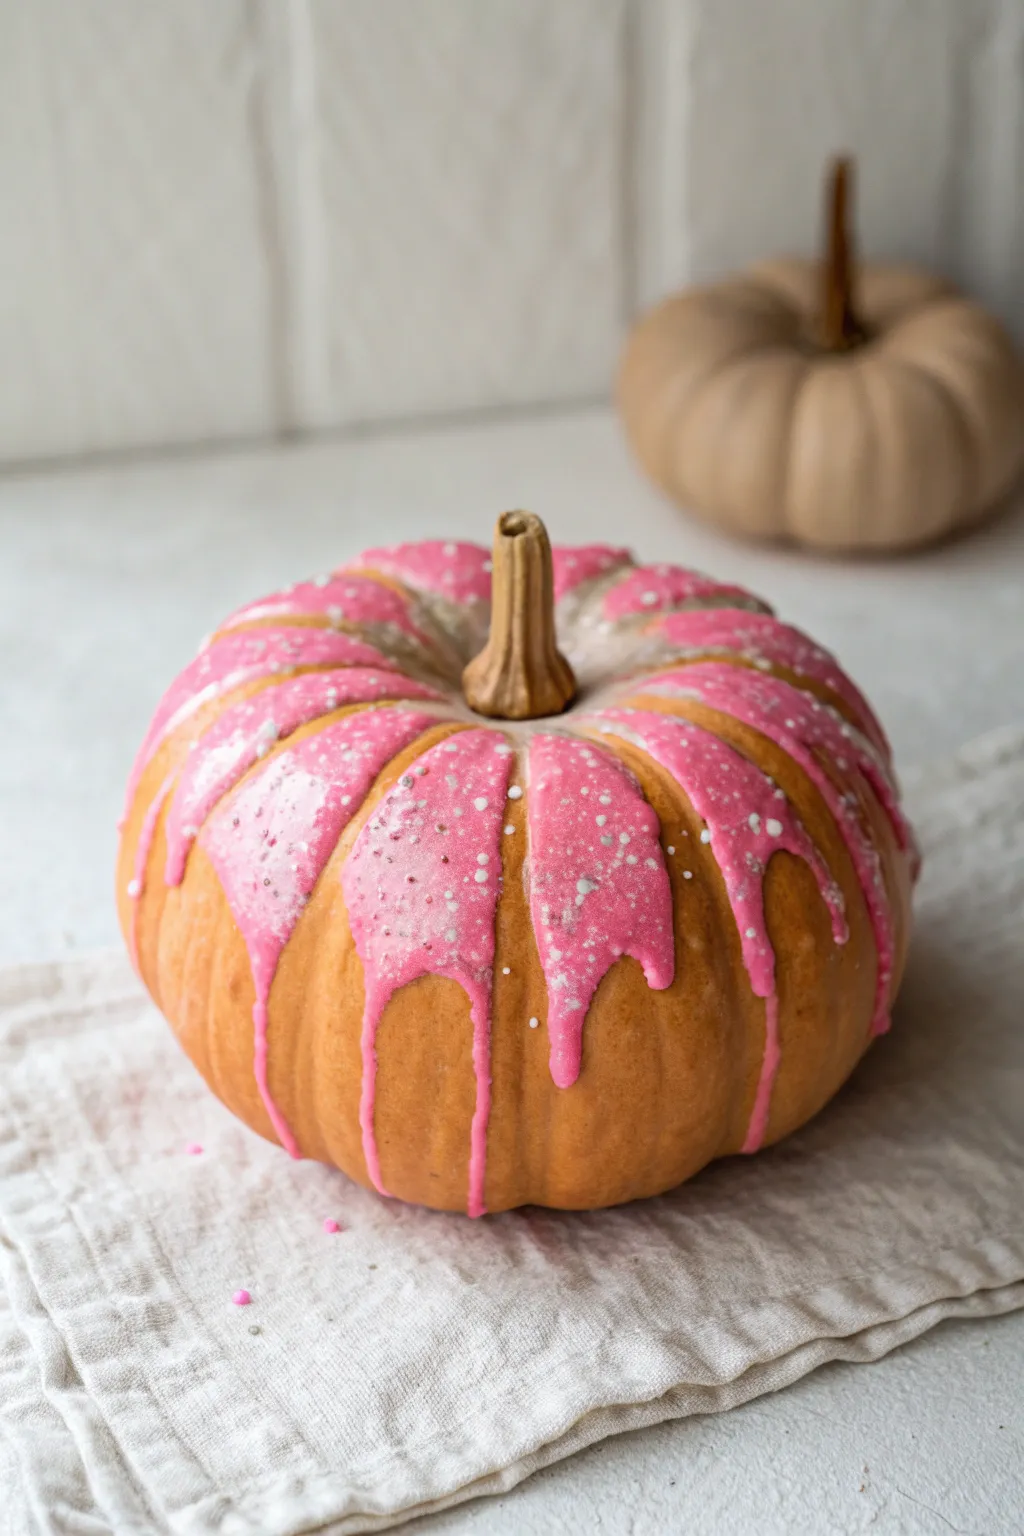
Transform a simple pumpkin into a sweet treat with this whimsical donut-inspired design. The thick, dripping pink glaze and delicate sugary speckles give it a realistic, mouth-watering finish without any actual baking required.
Detailed Instructions
Materials
- Medium-sized orange pumpkin (real or faux)
- Acrylic paint (bright pink for icing, white for sheen)
- Fabric medium or pouring medium
- Small squeeze bottle or plastic piping bag
- Fine glitter (iridescent or silver)
- White splatter paint or white acrylic ink
- Old toothbrush or stiff bristle brush
- Palette or small mixing cup
- Damp cloth for clean up
- Newspaper or drop cloth
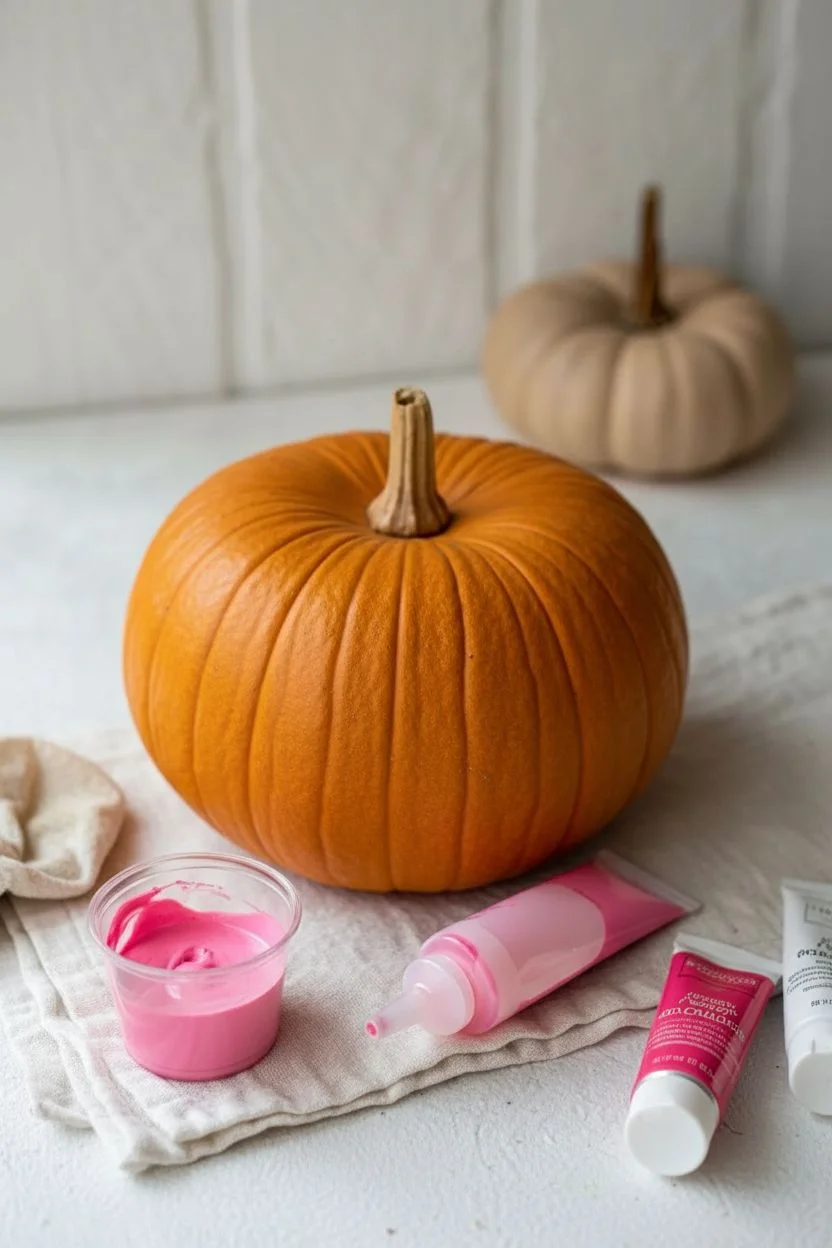
Step 1: Preparation & Mixing
-
Clean the surface:
Before starting, wipe your pumpkin down with a damp cloth to remove any dirt or oils. If you are using a real pumpkin, ensure the stem is completely dry and intact. -
Prepare the workspace:
Lay down newspaper or a drop cloth. This project involves dripping paint and splattering, so protect your table surface well. -
Mix the base icing color:
In your mixing cup, combine the bright pink acrylic paint with a generous amount of pouring medium or fabric medium. Aim for a consistency similar to heavy cream or honey so it flows but holds its shape. -
Adjust opacity:
If your pink looks too transparent after mixing, add a tiny touch of white acrylic paint to make the ‘icing’ look thick and opaque. -
Fill the applicator:
Carefully pour your pink mixture into a small squeeze bottle or a plastic piping bag with the very tip snipped off.
Donut Glaze Pro Tip
Mix a tiny drop of PVA glue into your paint mixture. It helps the paint level out smoothly like real fondant and adds a glossy finish when dry.
Step 2: Creating the Glaze
-
Outline the top:
Start near the stem, but not touching it directly. Squeeze a generous ring of paint around the top shoulder of the pumpkin to create the main pool of icing. -
Create the drips:
Gently squeeze the bottle while guiding the paint down the vertical grooves of the pumpkin. Let gravity help pull the paint down to form natural-looking drips. -
Vary the lengths:
Make some drips long and others short to mimic the uneven way real glaze runs down a donut. I like to stop the drips about halfway down the pumpkin for the most realistic look. -
Fill in the gaps:
Go back to the top ring and fill in any empty spaces between the drips and the stem base, ensuring full coverage on the ‘shoulders’ of the pumpkin. -
Smooth the connections:
If the point where a drip meets the top pool looks jagged, use the tip of your bottle or a small brush to smooth out the transition while the paint is wet.
Step 3: Adding the Sparkle
-
Apply glitter while wet:
Immediately after pouring the paint, while it is still very wet and tacky, sprinkle the fine iridescent glitter over the pink areas. Focus on the top curves where light would naturally hit. -
Prepare for splatter:
Pour a small amount of white acrylic ink or watered-down white acrylic paint onto a palette or plate. -
Load the brush:
Dip an old toothbrush or stiff bristle brush into the white liquid. Test the spray on a piece of paper first to ensure the droplets aren’t too large. -
Create sugar speckles:
Hold the brush near the pumpkin and run your thumb across the bristles to flick tiny white specks onto the wet pink glaze. This mimics powdered sugar or nonpareils. -
Let it set:
Allow the paint to settle. Since the ‘icing’ layer is thick, I recommend letting it dry undisturbed for at least 24 hours to prevent smudging. -
Clean the stem:
If any pink paint accidentally got onto the stem, use a damp Q-tip to wipe it off carefully before it hardens.
Drip Troubleshooting
If your drips are running too fast and reaching the bottom, your paint is too thin. Let the mix sit for 10 minutes to thicken slightly before applying more.
Display your sweet creation on a subtle linen cloth to let the sugary colors really pop
Pastel Bakery Background For Pinterest-Perfect Styling
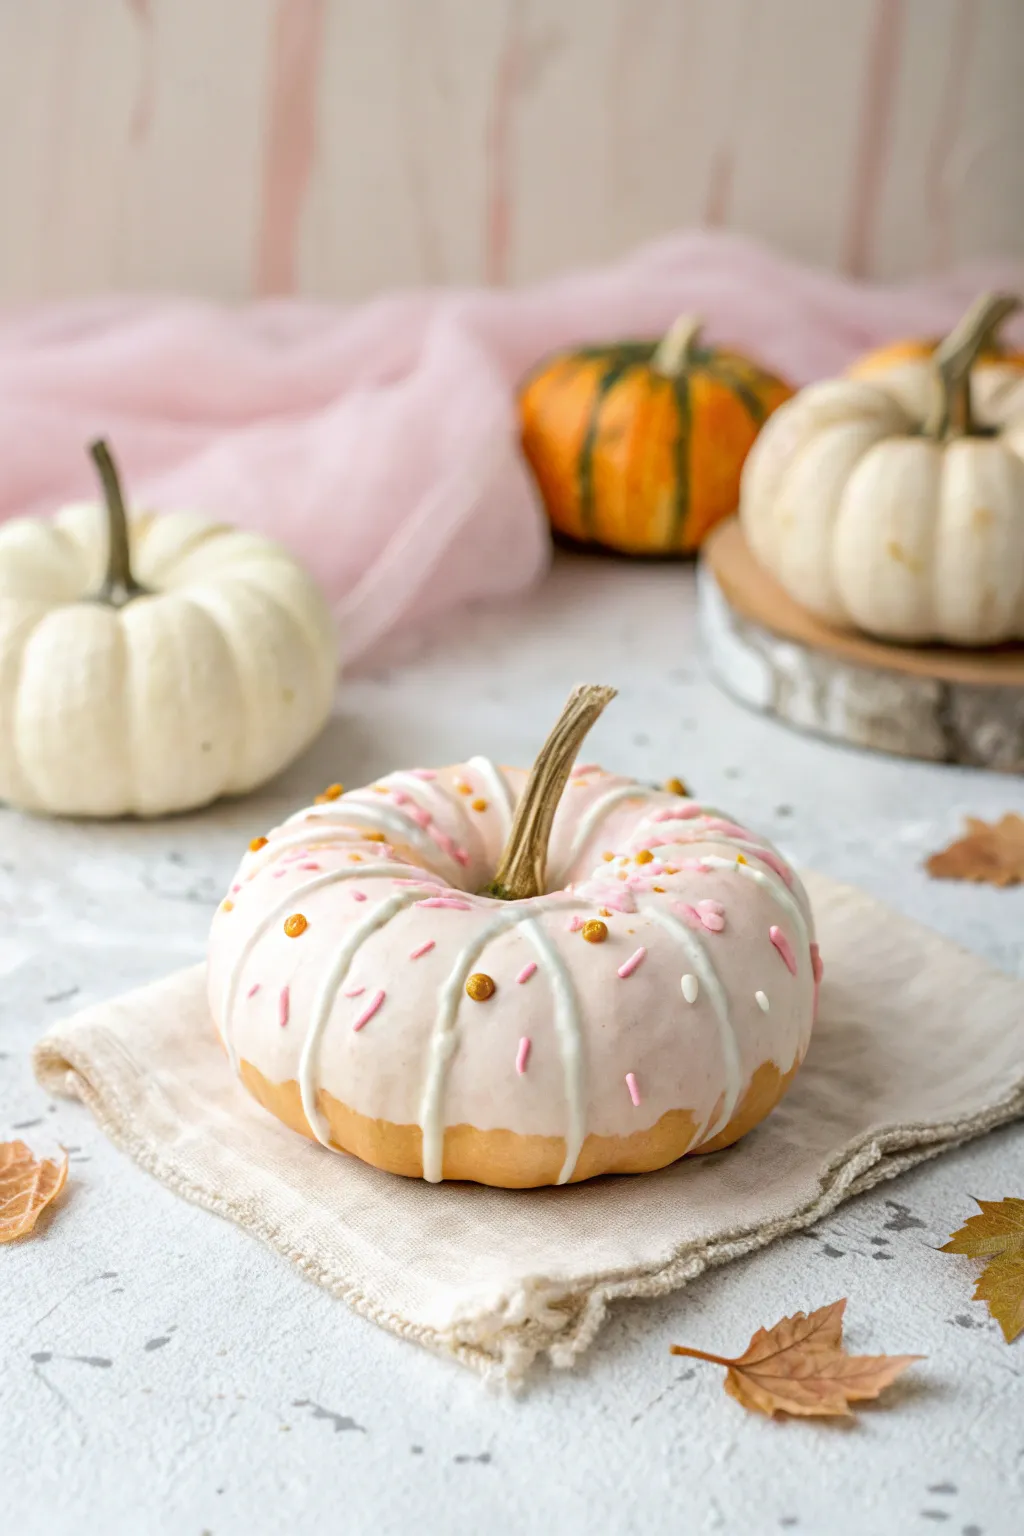
Transform a mini pumpkin into a sweet treat with this trompe-l’œil painting project that mimics the glossy, delicious look of a frosted donut. This whimsical design uses soft colors and careful layering to capture that irresistible bakery window aesthetic.
Step-by-Step
Materials
- Small pumpkin (real or faux, orange base preferred)
- Beige-pink acrylic paint (frosting base)
- White acrylic paint (icing drizzle)
- Pink acrylic paint (sprinkles)
- Orange acrylic paint (sprinkles)
- Gold or yellow-ochre thick paint or puff paint (bead sprinkles)
- Small round brush
- Fine liner detail brush
- Matte or satin sealant spray
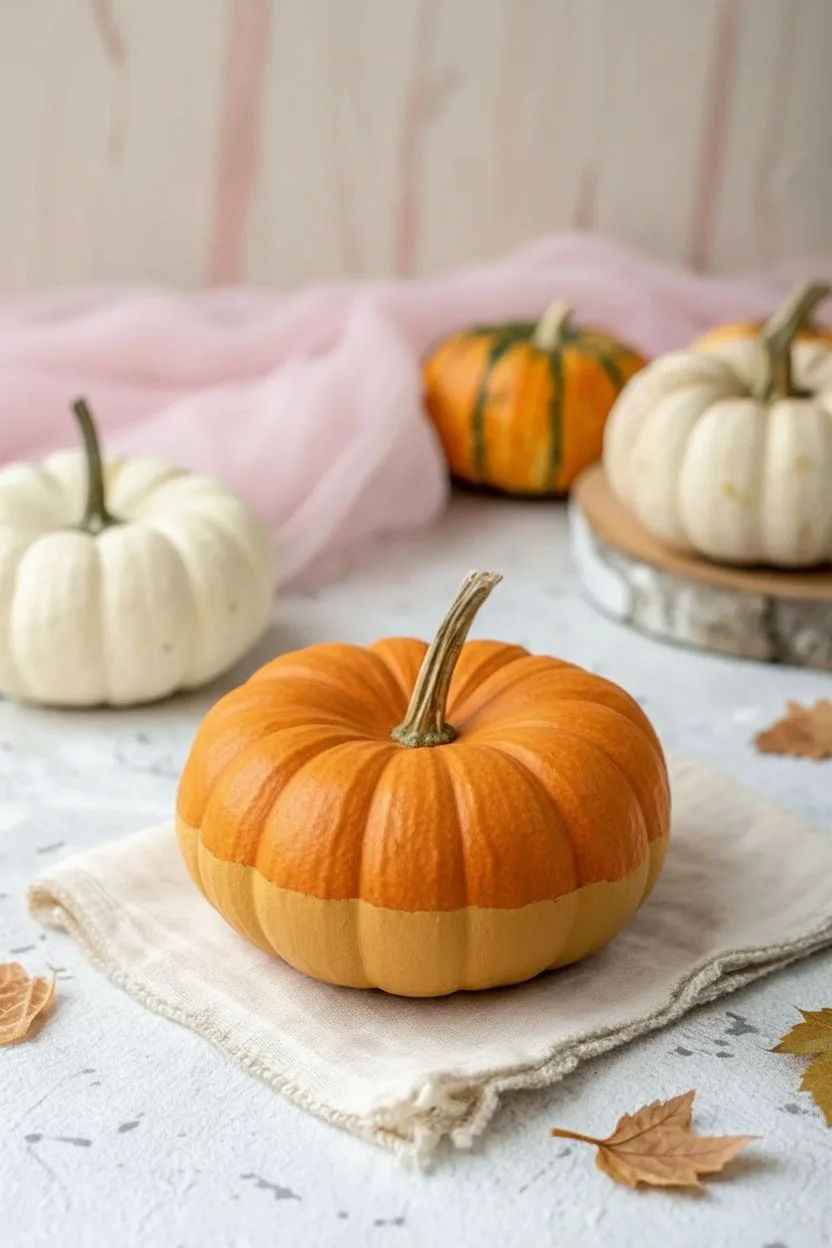
Step 1: Creating the Dough Base
-
Prep the surface:
Begin by cleaning your pumpkin thoroughly. If using a real pumpkin, wipe it down with a damp cloth to remove dirt; if using faux, ensure there is no dust. -
Assess the base color:
The bottom third of the pumpkin represents the ‘dough’ of the donut. If your pumpkin is already a nice bakery-orange, you can leave it natural. If it’s too bright or pale, mix a touch of light brown into orange acrylic and paint the bottom rim to resemble golden-brown fried dough.
Uneven Drips?
If your frosting line looks shaky, go back with the original orange ‘dough’ color and clean up the bottom edge to sharpen the curve
Step 2: Applying the Frosting
-
Mix the glaze color:
Create a creamy, strawberry-beige glaze color. Mix white acrylic with just a tiny drop of pink and a hint of beige or yellow ochre to warm it up. It should look like retro strawberry frosting. -
Outline the drip line:
Using a small round brush, paint a wavy line around the circumference of the pumpkin, about halfway down or slightly lower. This establishes where the frosting stops. -
Fill in the top:
Fill in the entire top section of the pumpkin above your wavy line with the glaze color. Paint right up to the stem base, but try not to get paint on the stem itself. -
Create the drip effect:
To make the frosting look realistic, thicken the paint slightly at the bottom of the wavy lobes. Smooth out the curves so they look heavy and drippy, rather than jagged. -
Apply a second coat:
Let the first layer dry completely. Apply a second coat of the glaze color to ensure it is opaque and the orange pumpkin skin doesn’t show through the pastel frosting.
Step 3: Adding the Drizzle Detail
-
Prepare the drizzle paint:
Use pure white acrylic paint. If your paint is very thick, thin it with a barely-there drop of water so it flows smoothly off the brush. -
Paint radial stripes:
Using a fine liner brush, paint thin white lines radiating from the stem down to the edge of the frosting. Follow the natural ribs of the pumpkin for guidance. -
Connect the lines:
For a zigzag drizzle look, loosely connect the radial lines with curved strokes, or simply ensure your lines follow the contour of the pumpkin segments to mimic piped icing.
Glossy Glaze
Mix a gloss medium into your frosting paint color before applying it. This creates a high-shine finish that looks like real sugar glaze
Step 4: Sprinkling carefully
-
Start with pink sprinkles:
Using your smallest detail brush or a toothpick, paint tiny dash marks in pink. Scatter them randomly over the glazed area, varying the angle of each dash. -
Add white accents:
Repeat the process with white paint, adding small white dashes or dots in the empty spaces between the pink sprinkles. -
Create dimensional beads:
To add texture, use a thick ochre or gold paint (3D puff paint works wonders here). Place small dots sporadically to mimic round sugar pearls or nonpareils. -
Clean up the stem:
If any paint got onto the stem, wipe it off or paint over it with a natural brown or beige shade to keep the organic pumpkin look. -
Seal the finish:
Once all paint layers are fully dry, lightly mist the pumpkin with a satin or matte sealant to protect your work and give the ‘frosting’ a realistic sheen.
Place your sweet creation on a pastel napkin or wooden board for the ultimate bakery-inspired display

PENCIL GUIDE
Understanding Pencil Grades from H to B
From first sketch to finished drawing — learn pencil grades, line control, and shading techniques.
Explore the Full Guide
Donut Box Display That Sells The Illusion
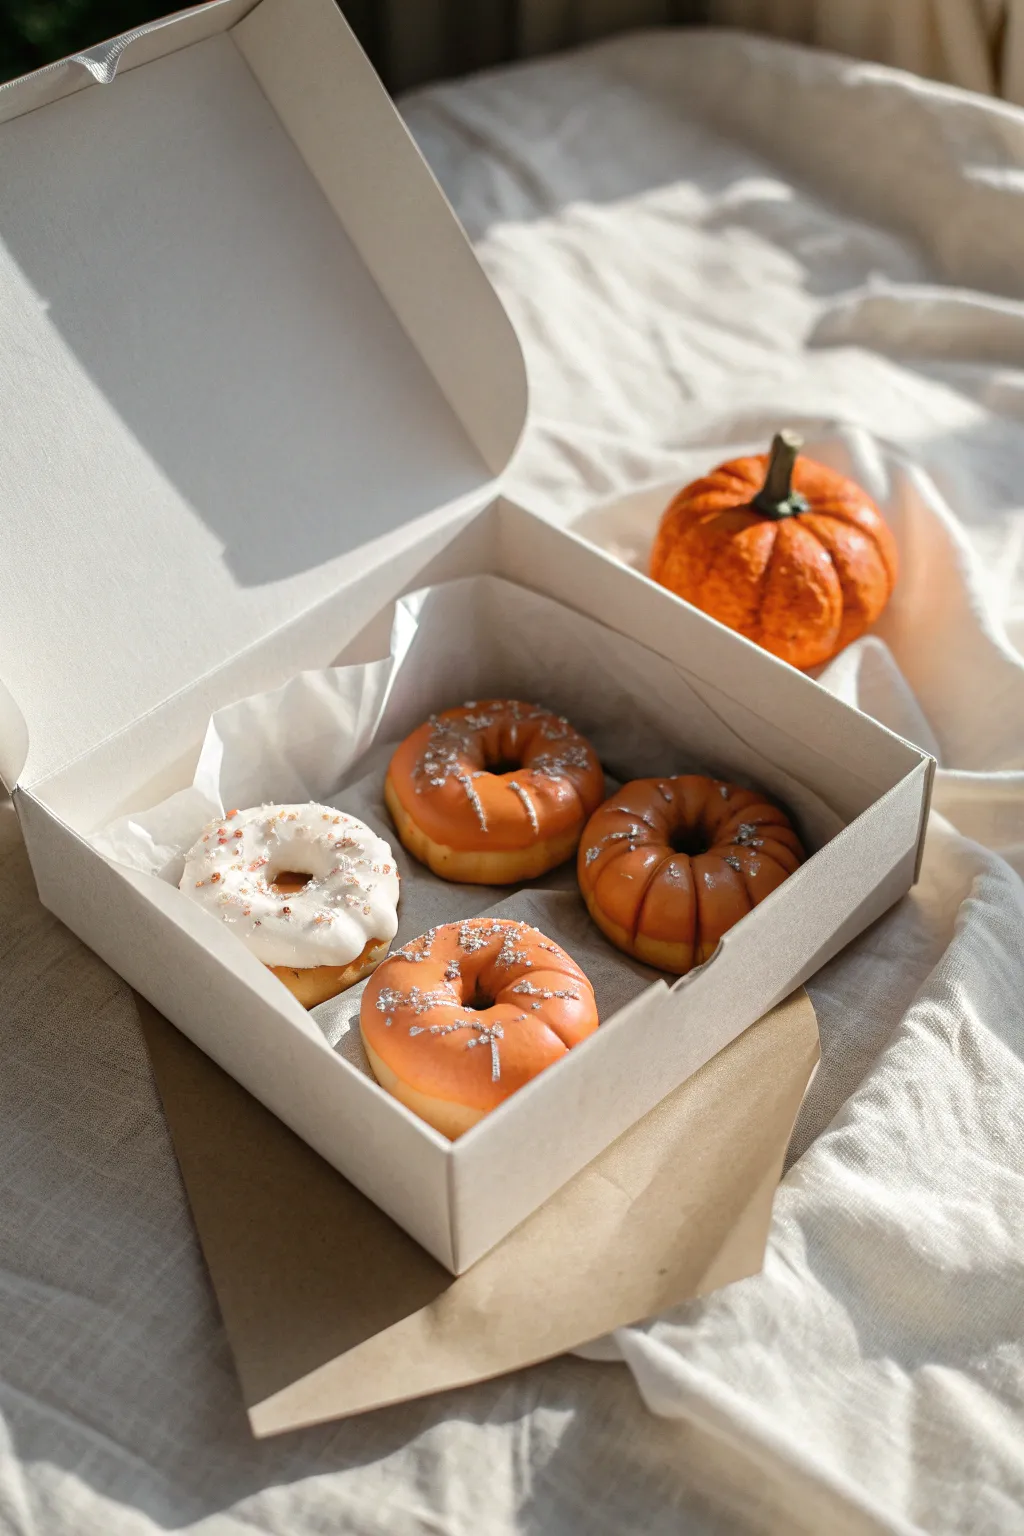
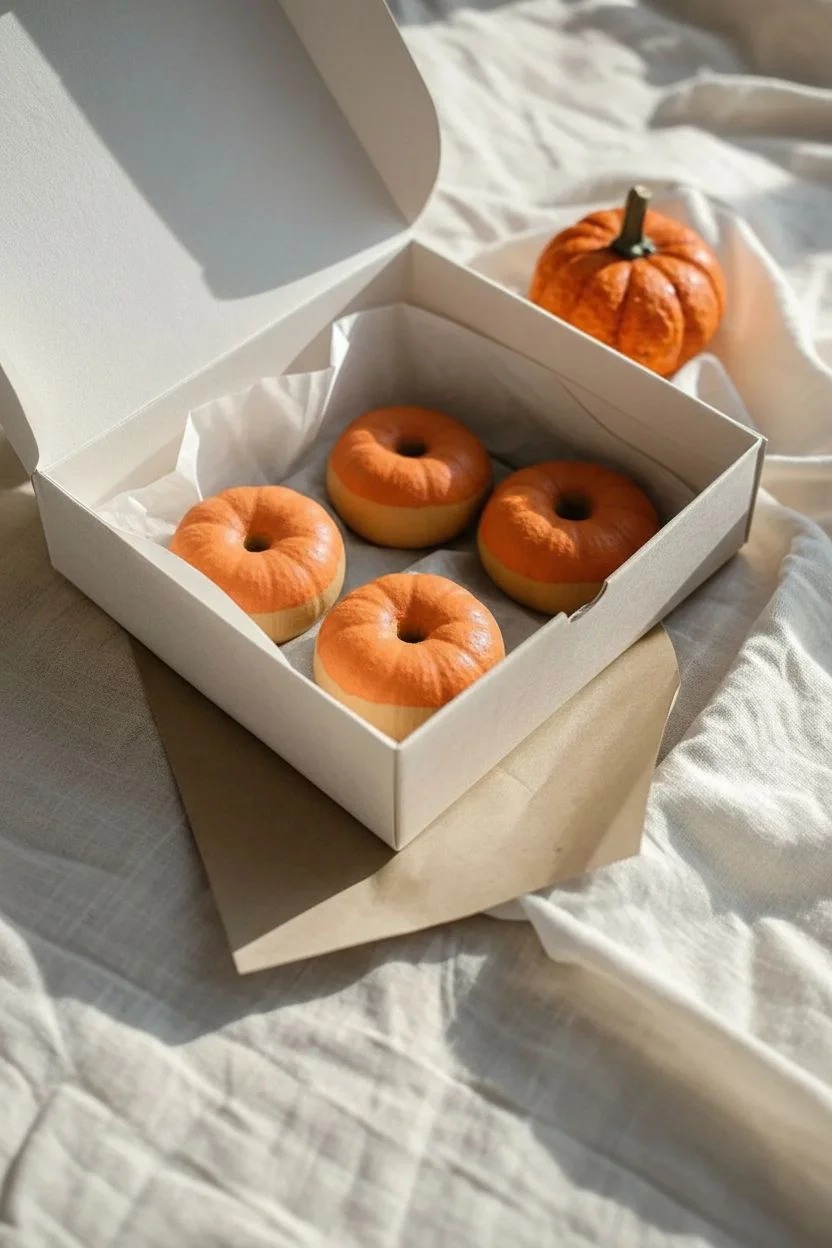
Transform ordinary miniature pumpkins into a delectable box of faux donuts that will have everyone doing a double-take. This trompe l’oeil project uses the natural shape of munchkin pumpkins to mimic the soft curves of glazed pastries, perfect for a playful fall centerpiece.
Detailed Instructions
Materials
- 4 miniature pumpkins (Munchkin or Jack Be Little variety)
- Acrylic craft paint: Warm beige/tan (dough color)
- Acrylic craft paint: Bright orange (glaze color)
- Acrylic craft paint: White (icing color)
- Acrylic craft paint: Metallic silver or glitter paint
- Paint brushes: Medium flat brush, small round detail brush
- Masking tape or painter’s tape
- White bakery box (approx. 8×8 inches)
- White tissue paper or parchment paper
- Matte or satin clear coat spray (optional)
Step 1: Prepping the Produce
-
Clean and dry:
Begin by thoroughly washing your miniature pumpkins to remove any dirt or field debris. Dry them completely with a towel, as acrylic paint won’t stick well to a waxy or damp surface. -
Remove the stems:
Carefully snap off the stems from all four pumpkins. Don’t worry if the spot looks rough; this recessed area actually helps simulate the donut hole perfectly. -
Base coat the bottom:
Turn the pumpkins upside down. Paint the bottom half of each pumpkin with the warm beige or tan acrylic paint. This represents the ‘cooked dough’ portion of the donut. -
Extend the dough color:
Bring the tan paint up the sides, stopping just past the equator of the pumpkin. We want a clean line where the glaze will eventually start, but it doesn’t need to be perfect since real glaze drips unevenly. -
Let it cure:
Allow this base layer to dry completely. I usually give it about 15-20 minutes, or you can use a hairdryer on a cool setting to speed things up.
Paint Peeling?
If paint beads up on the pumpkin skin, the natural wax is resisting it. Wipe the surface gently with rubbing alcohol or fine-grit sandpaper before repainting.
Step 2: Glazing the Goods
-
Painting the orange glaze:
Take three of your pumpkins. Using the bright orange paint, cover the top half, overlapping the tan base slightly. Let the paint follow the natural vertical grooves of the pumpkin to look like icing settling into the dough. -
Softening the edge:
While the orange paint is still wet, use a clean, slightly damp brush to soften the bottom edge of the orange line, making it look like melted sugar glaze rather than a hard painted stripe. -
Creating the vanilla donut:
For the fourth pumpkin, use thick white acrylic paint on the top half instead of orange. Apply it generously to mimic fluffy vanilla frosting. -
Adding texture:
Dab the white paint on thickly rather than brushing it smooth. This creates a realistic texture that resembles thick buttercream or heavy royal icing. -
Create the hole illusion:
Use a small brush to paint the very center depression (where the stem was) with a darker shade of tan or light brown. This creates visual depth, selling the illusion of a hole going all the way through.
Pro Glazing Tip
Mix your acrylic paint with a gloss pouring medium or a drop of PVA glue. It makes the paint slightly translucent and super shiny, just like real sugar glaze.
Step 3: Finishing Touches
-
Striping the orange donuts:
On the three orange pumpkins, mix a tiny bit of white into your diluted silver or light gray paint. Use a fine detail brush to paint thin, curved lines radiating from the center outward, mimicking a drizzle. -
Adding sprinkles:
Dip the back end of a small paintbrush into metallic silver or glitter paint. Dot this randomly over the ‘glaze’ areas of all four pumpkins to create faux sprinkles or sanding sugar. -
Applying the glitter:
While the silver dots are wet, you can pinch a tiny amount of real silver glitter and drop it onto the white donut for extra sparkle. -
Sealing the work:
Once fully dry, you may spray the pumpkins with a satin clear coat. This gives them a slight sheen, making the ‘glaze’ look freshly poured and sticky. -
Prepping the box:
Take your white bakery box and crumple up a sheet of white tissue paper or parchment paper. Place this inside to create a nest for the donuts. -
Arranging the display:
Nestle the painted pumpkins into the tissue paper. Angle them slightly differently—some flat, some tilted—to make the arrangement feel natural and casual.
Place your box on a table or counter and enjoy the delightful confusion when guests realize these sweet treats are actually seasonal decor
Milk-And-Cookies Snack Scene With Donut Pumpkins
Transform a small pumpkin into a deceptively delicious-looking glazed donut with this realistic painting technique. The result is a cozy, bakery-style decoration perfect for autumn vignettes that looks good enough to eat.
Step-by-Step Tutorial
Materials
- Small, round pumpkin (Cinderella or munchkin variety)
- Sandpaper (fine grit)
- Acrylic craft paints (burnt sienna, raw ochre, heavy body titanium white, cream/beige)
- Gloss varnish or clear topcoat
- Various paintbrushes (medium flat, small round, fine liner)
- Palette or paper plate
- Water cup and paper towels
Step 1: Donut Base & Texture
-
Prep the pumpkin:
Begin by removing the stem from your pumpkin completely; you want a smooth, indented center to mimic a donut hole. Gently sand the entire surface to remove any waxy coating, which helps the paint adhere better. -
Mix the dough color:
Create a ‘fried dough’ shade by mixing golden ochre with a touch of burnt sienna and a tiny drop of white. Adjust the mix until it resembles a golden-brown pastry. -
Apply the base coat:
Paint the entire pumpkin with your dough color mixture. It may take two coats to get full opaque coverage, so let the first layer dry completely before adding the second. -
Add fried texture:
To make the dough look realistic, take a dry sponge or a stiff brush with a slightly darker brown shade. Lightly stipple this around the very bottom edge and near the center hole where a real donut would fry darker.
Sticky Situation?
If your glaze paint looks too chalky or flat, mix gloss varnish directly into the white paint before applying it for built-in shine and depth.
Step 2: The Vanilla Glaze
-
Create the glaze mixture:
Mix a generous amount of heavy body titanium white with a very small amount of cream or beige paint. I prefer adding a drop of fluid matte medium if you have it, to make the paint slightly translucent like real glaze. -
Map out the drip:
Using a round brush, paint the top half of the pumpkin with your glaze mixture. Don’t make a straight line; instead, paint irregular, wavy drips extending down the sides. -
Layer the opacity:
Real glaze is thicker in some spots and thinner in others. Add a second coat of pure white to the very center top and the tips of the ‘drips’ to create highlights where the icing would naturally pool. -
Soften the edges:
Before the paint fully dries, use a slightly damp, clean brush to gently feather the edges of the glaze into the dough color. This prevents it from looking like a hard sticker and more like melted sugar.
Step 3: Caramel Drizzle & Details
-
Mix the caramel color:
Combine burnt sienna with a little yellow ochre and a tiny dot of water to improve flow. You want an inky consistency that glides smoothly off a liner brush. -
Paint the drizzle stripes:
Starting from the center hole, pull your liner brush outward in confident, curved strokes down to the edge of the pumpkin. Vary the spacing slightly so it doesn’t look too mechanical. -
Add depth to the stripes:
Go back over your caramel lines. Where the line crosses over a ‘hump’ of the pumpkin rib, press slightly harder to widen the line, mimicking how sauce behaves on a curved surface. -
Create speckles:
Mix a dark reddish-brown. Using the very tip of your finest brush or a toothpick, dot tiny ‘spices’ or imperfections into the glaze area for a realistic nutmeg or cinnamon look. -
Varnish for shine:
Once all paint is 100% dry, apply a high-gloss varnish over the entire pumpkin. This is crucial—it gives that sticky, sugary sheen that convinces the eye it’s a real pastry.
Chef’s Kiss
Before the glaze paint dries, sprinkle actual cinnamon or nutmeg onto the wet paint for authentic texture and a delicious scent.
Now you have a sweet, calorie-free treat to display on your coffee table for the season


Half-Dipped Glaze For A Modern Donut Pumpkin Twist
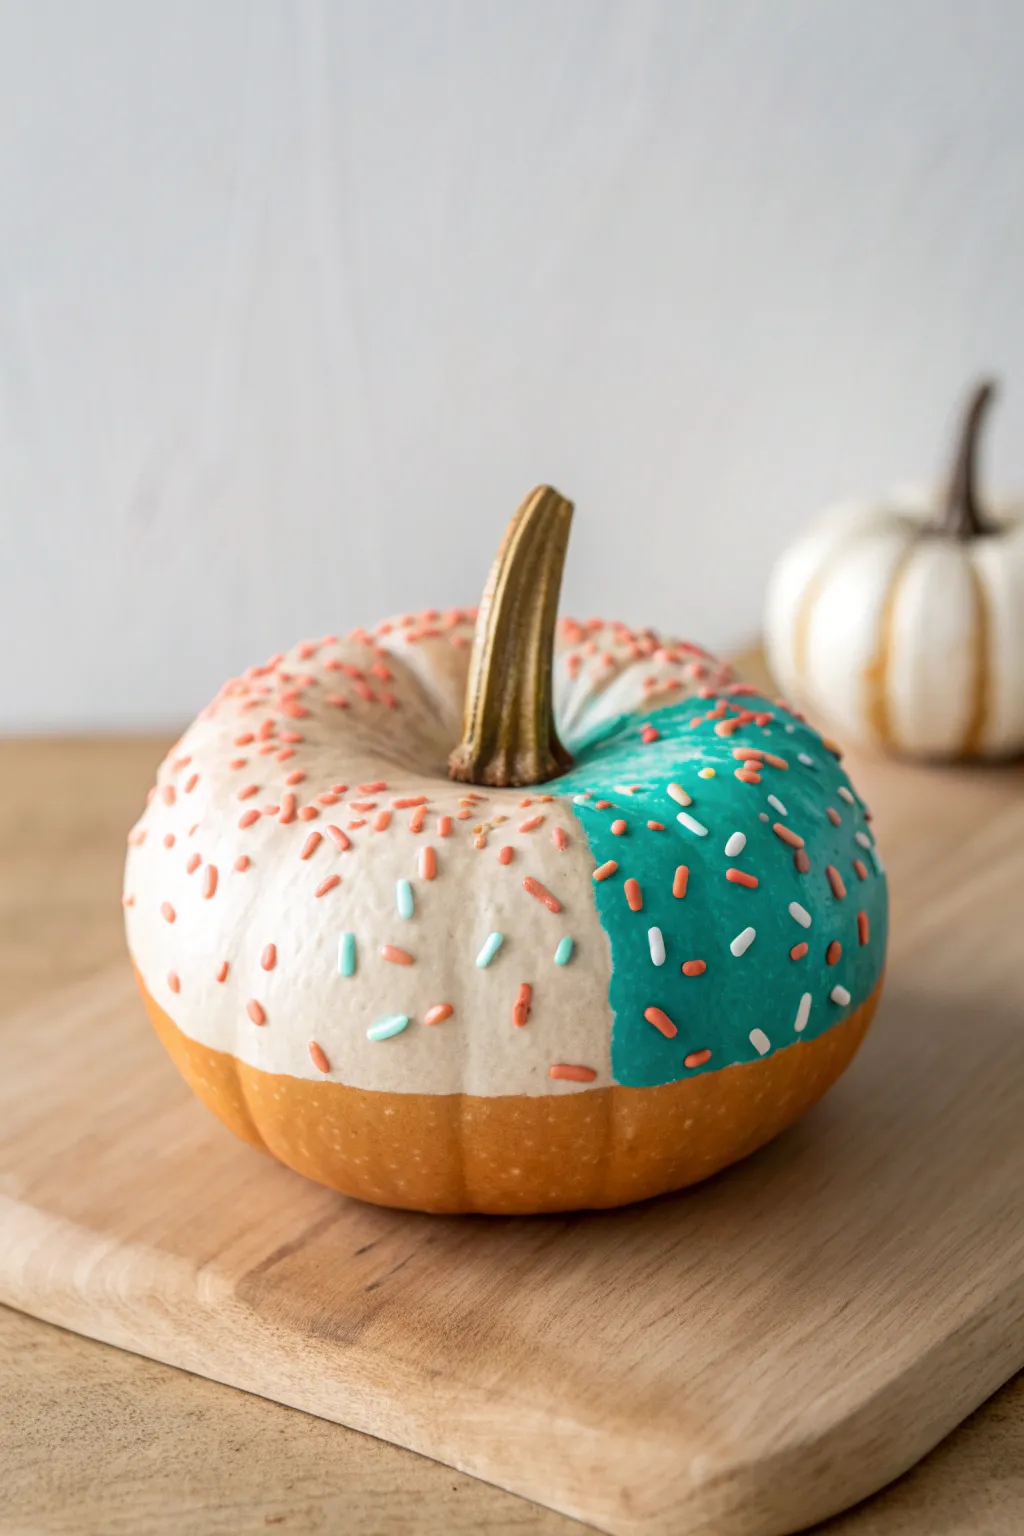
Transform a classic autumn gourd into a sweet treat with this modern, color-blocked design. By combining a creamy base with a bold pop of turquoise frosting, you achieve a sophisticated half-dipped look that is playfully topped with faux sprinkles.
Step-by-Step Guide
Materials
- Small to medium round pumpkin (orange or white)
- Acrylic craft paint: Cream/Latte color
- Acrylic craft paint: Turquoise/Teal
- Acrylic craft paint: White (for sprinkles)
- Acrylic craft paint: Peach/Orange (for sprinkles)
- Medium flat paintbrush
- Small round detail brush (size 1 or 2)
- Palette or paper plate
- Painter’s tape (optional)
- Paper towels
- Water cup
Step 1: Base Glazing
-
Clean surface:
Begin by wiping down your pumpkin with a damp paper towel to remove any dirt or field dust. Dry it completely to ensure the paint adheres smoothly. -
Mix the dough color:
Pour out a generous amount of your cream or latte-colored acrylic paint. If it feels too starkly white, mix in a tiny drop of brown or yellow to warm it up, resembling actual donut dough or vanilla glaze. -
Paint the top half:
Using your medium flat brush, paint the top half of the pumpkin. Start near the stem and stroke outward and downward, creating a slightly wavy, uneven line around the ‘equator’ of the pumpkin to mimic dripping glaze. -
Refine the stem:
Carefully paint right up to the base of the stem. I prefer to leave the stem completely unpainted for a natural contrast, but take your time getting the brush bristles into the crevices where the stem meets the skin. -
Second coat:
Allow the first layer of cream paint to dry for about 10-15 minutes. Apply a second coat to ensure the bright orange pumpkin skin doesn’t show through, giving you a solid, opaque ‘glaze’.
Sprinkle Master Tip
For perfectly uniform sprinkles, don’t use a brush! Dip the end of a toothpick or a matchstick into the paint and drag it gently on the pumpkin surface.
Step 2: The Half-Dip
-
Plan the color block:
Visualize a section of the pumpkin that will be ‘dipped’ in blue frosting. This should cover about one-third to one-half of the cream area you just painted. -
Apply turquoise paint:
Using the turquoise paint and a clean flat brush, paint over the dry cream section. Create a distinct vertical line or a soft curve where the blue meets the cream; there is no need to blend them. -
Match the edges:
Extend the turquoise paint down to the same wavy ‘drip line’ on the bottom edge that you established with the cream paint. -
Solidify the color:
Let the turquoise layer dry to the touch. Apply a second coat if the color looks streaky, ensuring a rich, vibrant finish that stands out against the neutral side.
Oops, Smudged It?
If you accidentally smear a wet sprinkle, wait for it to dry completely. Then, touch it up with a dot of the background color (cream or blue) before trying again.
Step 3: Sprinkle Details
-
Prepare sprinkle colors:
Dispense small amounts of peach/orange paint, white paint, and a little bit of the turquoise onto your palette. You will use these for the confetti sprinkles. -
Start the orange sprinkles:
Using your small round detail brush, paint short, thin dashes of peach/orange paint. Scatter these randomly over the cream section of the pumpkin. -
Add white accents:
Rinse your brush and switch to white paint. Add white dashes interspersed among the orange ones on the cream side. Also, paint white dashes on the turquoise ‘dipped’ section to create high contrast. -
Cross-pollinate colors:
To tie the look together, add a few turquoise sprinkles onto the cream side. Conversely, ensure plenty of peach sprinkles appear on the turquoise side for a cohesive color palette. -
Vary direction:
Make sure your dashes are facing all different directions—horizontal, vertical, and diagonal—to capture that chaotic, scattered sprinkle look. -
Check density:
Step back and look at the distribution. Fill in any large empty gaps with one final sprinkle color of your choice, keeping the density balanced across the whole top.
Place your sweet new creation on a mantle or kitchen island for a fun, zero-calorie treat
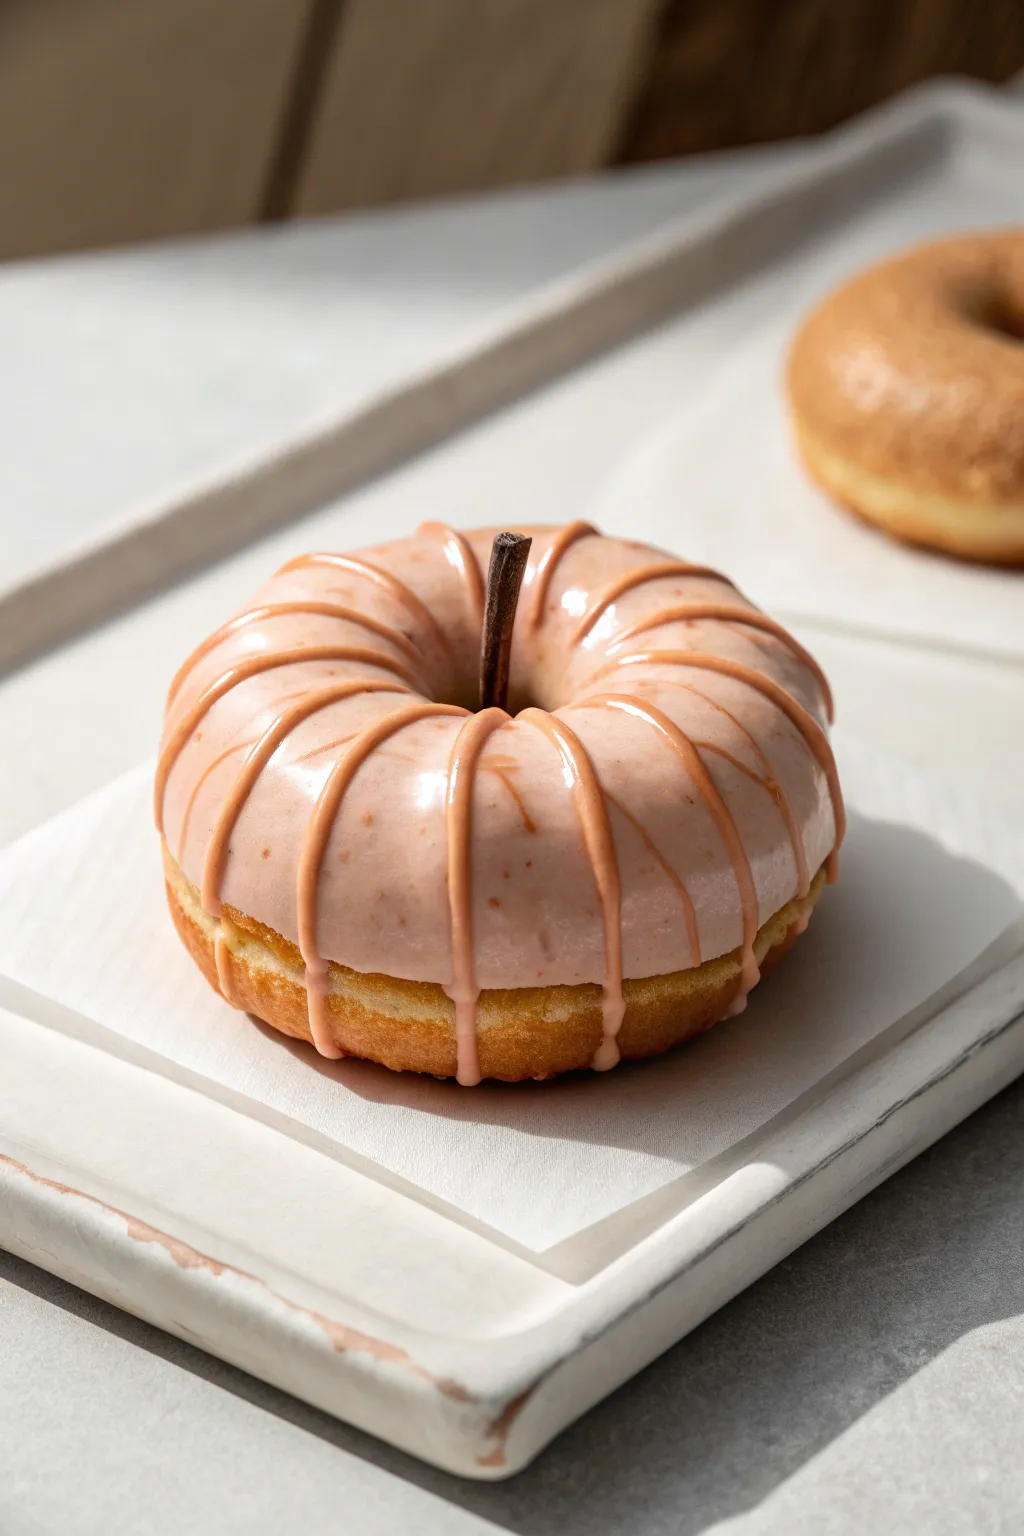
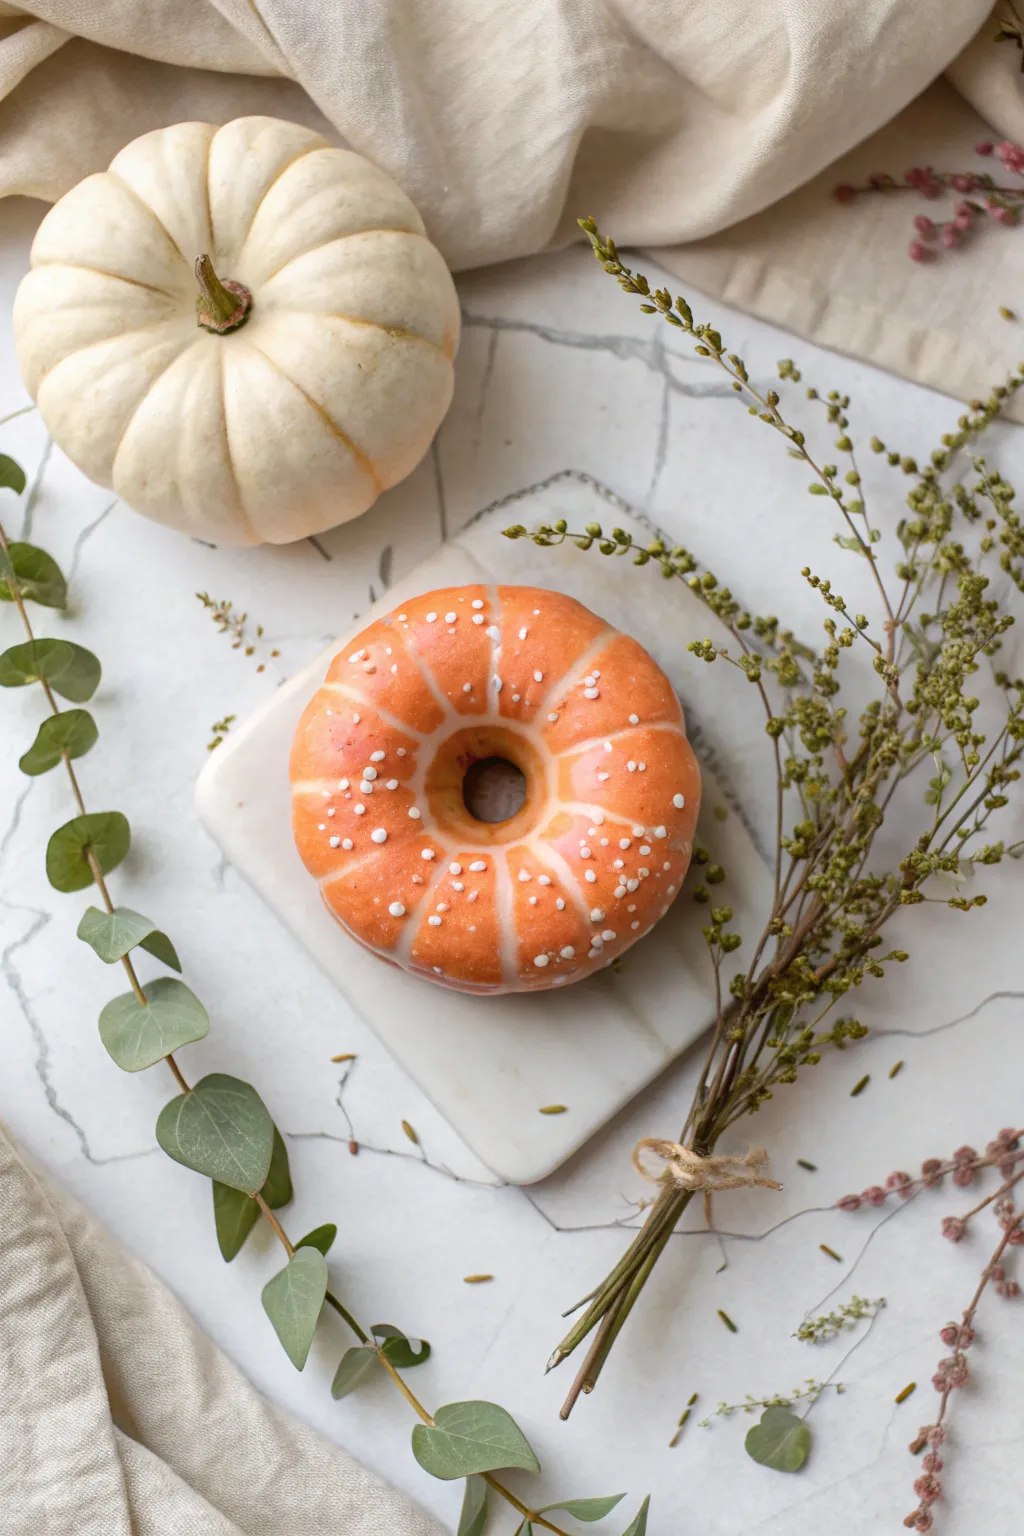
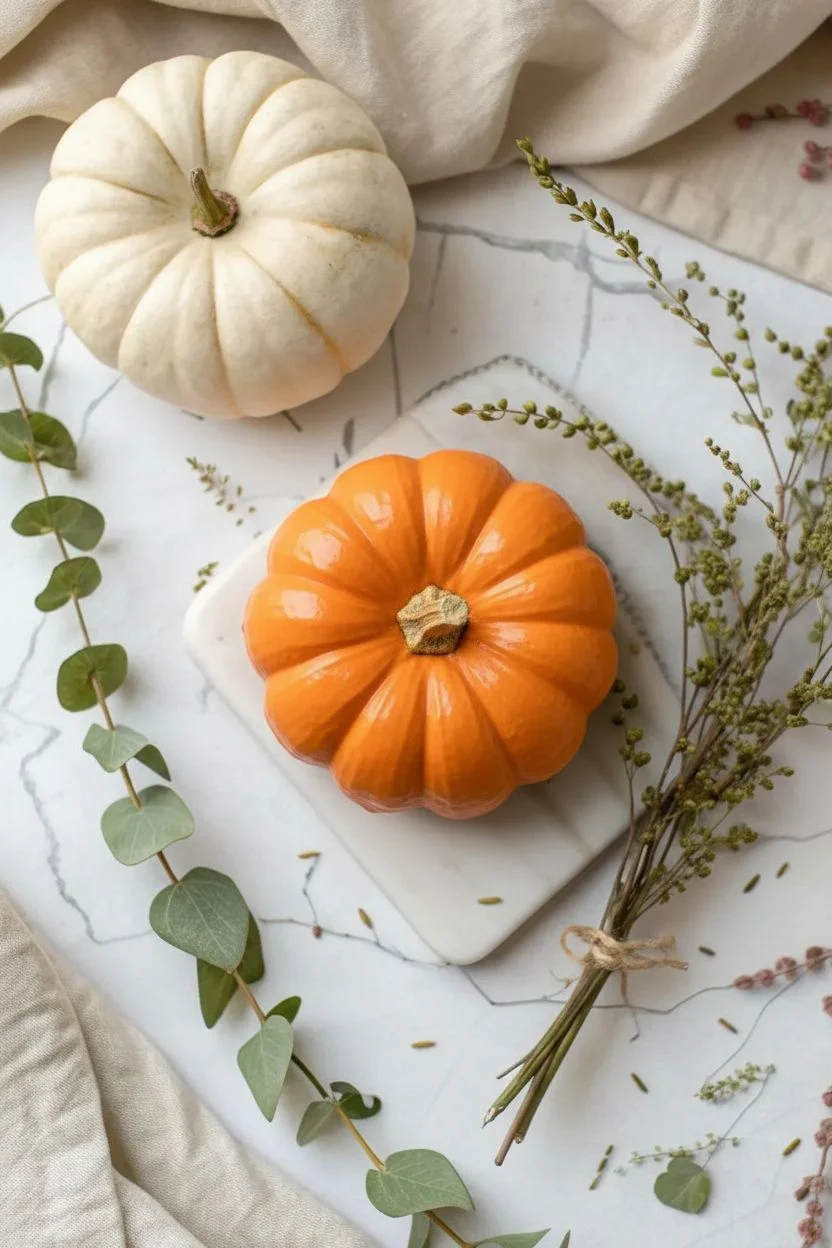
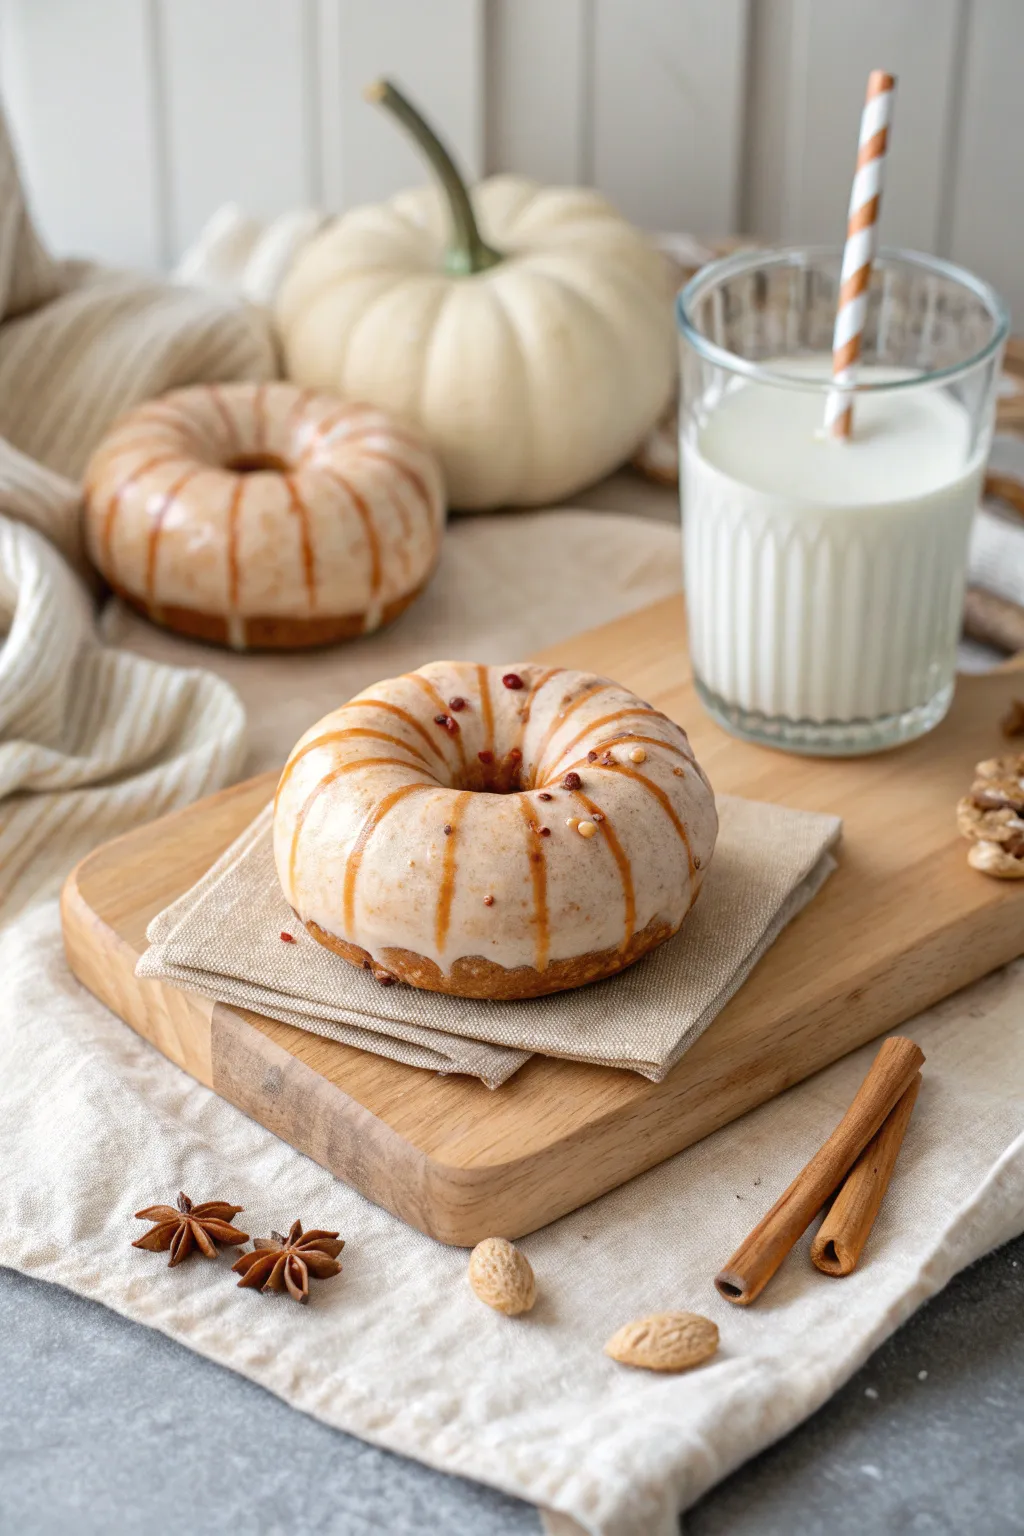
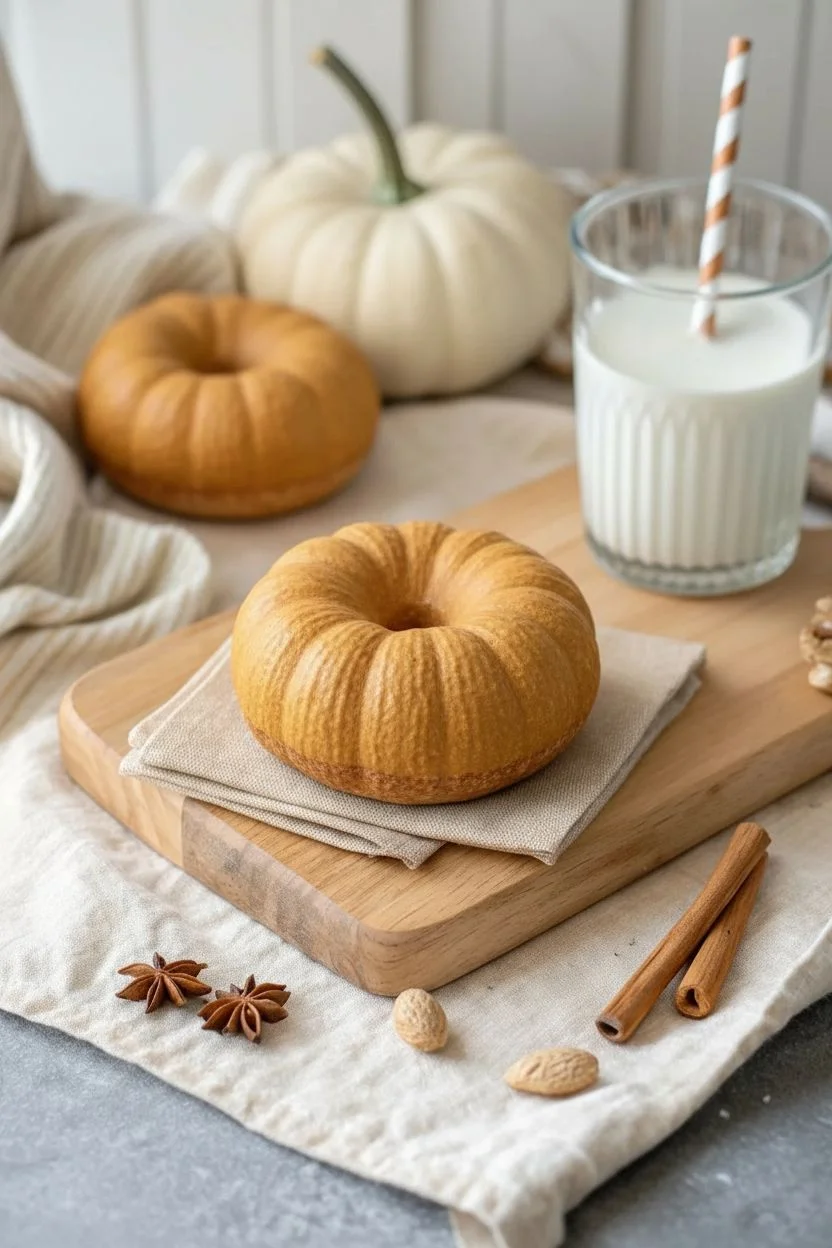
Ombre Frosting That Fades Like Real Icing
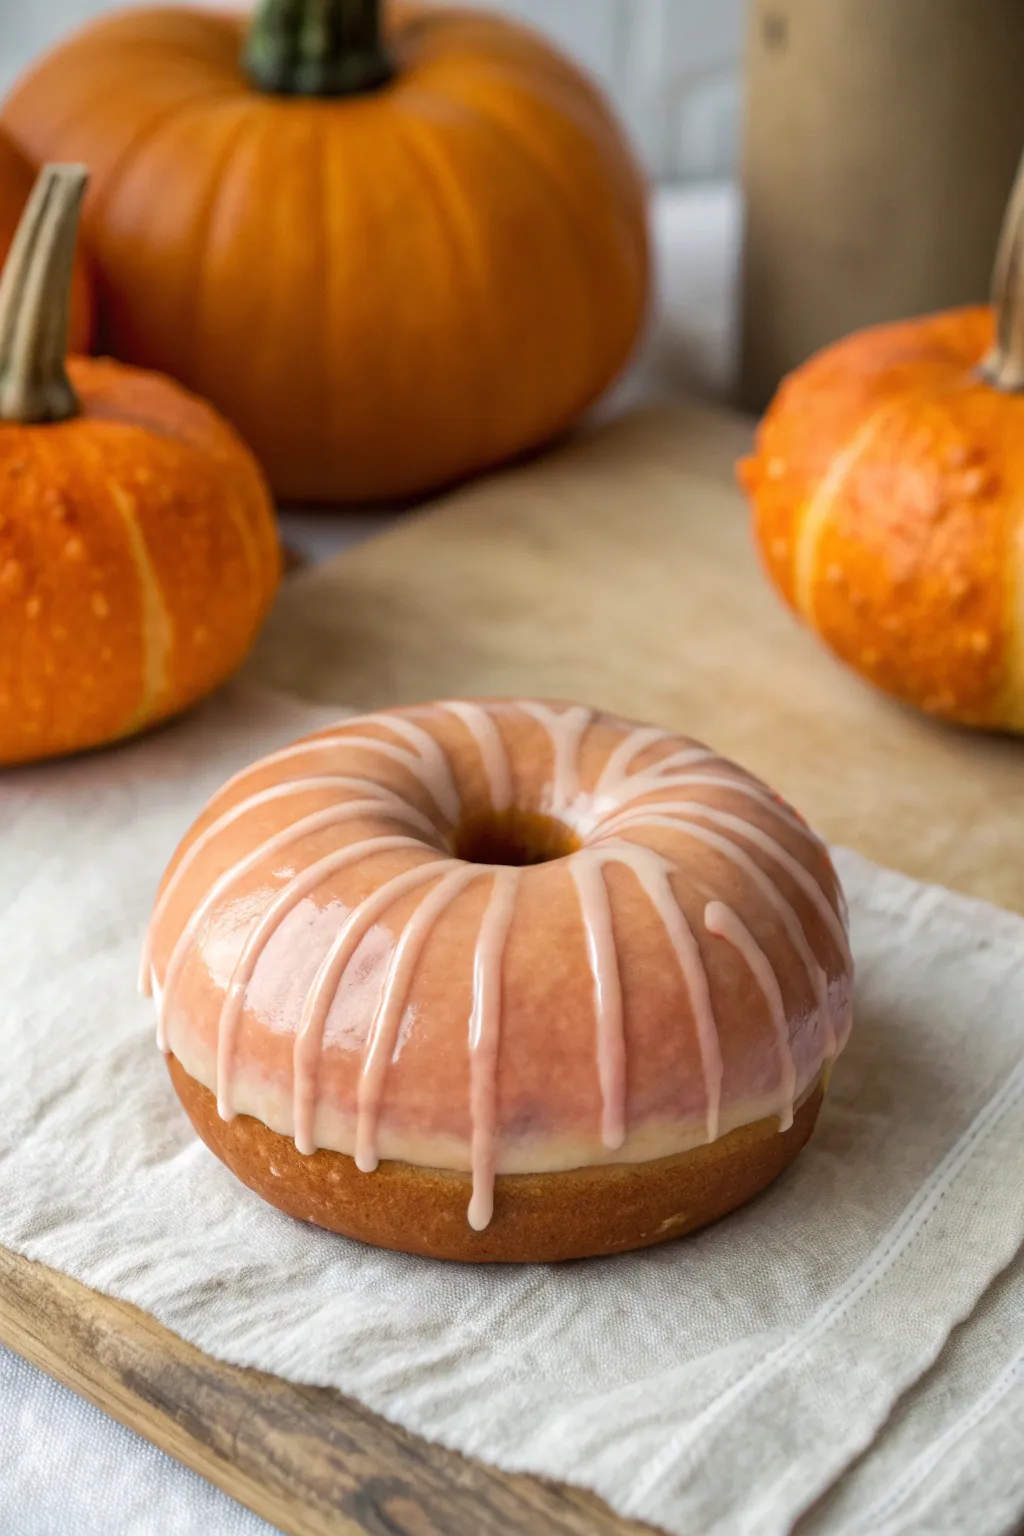
Transform a small, round pumpkin into a mouth-watering masterpiece that looks good enough to eat with this hyper-realistic painting technique. The secret lies in creating a convincing baked dough base and a glossy, semi-translucent glaze that perfectly mimics real icing.
Detailed Instructions
Materials
- Small round pumpkin (sugar pie or miniature variety)
- Acrylic paints: warm beige, raw sienna, burnt umber, titanium white, cream, soft pink
- High-gloss varnish or pouring medium
- Medium flat brush
- Fine liner brush
- Round sponge applicator or cosmetic sponge
- Mixing palette
- Water cup and paper towels
Step 1: Prepping and Base Coat
-
Clean the canvas:
Begin by wiping down your pumpkin with a damp cloth to remove any dirt or oils that might prevent the paint from sticking. -
Remove the stem:
Carefully snap off or cut the stem as flush to the pumpkin as possible, since donut holes don’t have stems sticking out of them. -
Mix the dough color:
On your palette, mix a generous amount of warm beige with a tiny touch of raw sienna to create a light, golden-brown dough color. -
Paint the bottom half:
Using your medium flat brush, paint the entire bottom two-thirds of the pumpkin with this dough color, covering the natural orange completely. -
Add a baked effect:
While the base coat is still slightly tacky, sponge a very light amount of burnt umber along the very bottom edge and the ‘waist’ of the pumpkin to simulate the darker, crispier crust of a fried donut.
Glazing Pro Tip
Mix your acrylic paint with clear school glue instead of water. This naturally creates that thick, shiny, slightly translucent texture of real donut glaze.
Step 2: Creating the Glaze
-
Mix the glaze base:
Combine titanium white with just a drop of cream paint. To get that semi-translucent, sugary look, mix this paint with an equal part of gloss pouring medium or varnish. -
Tint the glaze:
Separate a small portion of your glaze mixture and add a tiny speck of soft pink if you want the strawberry glaze look shown in the photo, or keep it creamy for a vanilla dip. -
Apply the main dip:
Pour or heavily brush the glaze mixture over the top third of the pumpkin. Allow it to drip naturally down the sides, stopping irregularly just above the ‘baked’ line you painted earlier. -
Soften the edges:
I like to use a clean, slightly damp brush to feather out the very bottom edges of the main glaze patch so it looks like it’s melting into the dough rather than sitting like a sticker. -
Create the center hole:
Paint a small, dark circle (using burnt umber mixed with black) right where the stem was to create the illusion of the donut hole.
Custom Flavors
Change the ‘flavor’ by swapping the pink tint for light brown (maple glaze) or dark brown (chocolate). Add real sprinkles into the wet paint for texture.
Step 3: The Drizzle Detail
-
Prepare the drizzle paint:
Mix a lighter version of your glaze color (more white, less medium) so it is more opaque than the base dip. It needs to stand out against the first layer. -
Plan your lines:
Visualize a radial pattern coming from the center hole out toward the edges. -
Paint the stripes:
Using a fine liner brush loaded with the opaque mixture, paint thin stripes radiating from the center ‘hole’ down the sides. -
Vary the line width:
As you pull the brush down, press a little harder in the middle of the stroke and lift up at the end to taper the line, making the drizzle look fluid. -
Add highlights:
Once the stripes are dry, use a tiny dot of pure white paint on the highest curve of the pumpkin to mimic light reflecting off wet sugar. -
Final gloss coat:
To really sell the effect, coat only the frosting area (both the dip and the stripes) with a thick layer of high-gloss varnish.
Now you have a deceptive faux-pastry that brings a sweet twist to your seasonal decor
Marbled Glaze Swirls For A Fancy Bakery Look
Transform a simple craft pumpkin into a high-end patisserie treat with this elegant marbled technique. The swirling pink and white paints mimic a sugary glaze, while gold glitter adds that perfect touch of sparkle for a sophisticated autumn decoration.
How-To Guide
Materials
- Small flat real or faux pumpkin (donut shape preferred, or use a standard mini pumpkin)
- Acrylic paint in ‘dough’ color (light golden brown/tan)
- Acrylic paint in creamy white
- Acrylic paint in soft pink
- Pouring medium or flotrol
- Gold glitter (fine grain)
- Gold mica powder or larger gold flakes (optional)
- Paintbrushes (medium flat brush and small detail brush)
- Disposable cups for mixing
- Stir sticks
- Wire cooling rack or drip tray
- Cardboard or drop cloth
- Glossy varnish or sealant spray
Step 1: Base Prep
-
Clean and Dry:
Begin by wiping down your pumpkin to remove any dust or oils. If you are using a real pumpkin, ensure it is completely dry. Remove the stem carefully; if it doesn’t snap off easily, you can paint around it or cover it later, but a stemless look works best for the donut illusion. -
The Dough Layer:
Mix your golden brown acrylic paint to create a realistic fried dough color. If it’s too dark, mix in a little white or yellow ochre. -
Apply Base Coat:
Using a medium flat brush, paint the entire bottom half of the pumpkin and a rim around the top edge. You want the ‘dough’ to peek out from under the glaze, just like a real donut. Let this base coat dry completely.
Step 2: Creating the Glaze
-
Mix Pouring Medium:
In two separate disposable cups, prepare your glaze colors. Mix the creamy white paint with pouring medium according to the bottle’s ratio instructions (usually 1:1 or 2:1 medium to paint). -
Pink Glaze Prep:
Repeat the process in a second cup with the soft pink paint and pouring medium. The consistency should be fluid like warm honey—thick enough to coat, but thin enough to flow. -
Dirty Pour Setup:
Take a third, clean cup. Pour about half of your white mixture into the bottom. Slowly pour the pink mixture right into the center of the white paint. Do not stir them together. -
Layering the Colors:
Add the remaining white paint on top of the pink, followed by any remaining pink. The goal is to have layers of color sitting on top of each other within the cup.
Donut Shape Cheat
Can’t find a flat pumpkin? Use a flat-bottomed butternut squash slice or mold aluminum foil into a ring shape, cover with air-dry clay, and paint that instead for a true donut shape.
Step 3: Pouring and Decorating
-
Position the Pumpkin:
Place your pumpkin on a wire cooling rack with a drip tray or cardboard underneath to catch the excess paint. -
The Pour:
Starting at the center top of the pumpkin (around the stem area), slowly pour the contents of your layered cup in a circular motion. I tend to move my hand slightly while pouring to encourage the colors to swirl. -
Manage Flow:
Watch as the paint flows down the sides. If it’s not covering enough area, gently tilt the pumpkin or the rack to guide the paint. Stop before it completely covers the ‘dough’ painted bottom. -
Refine the Drips:
If the glaze looks too uniform, use a small stick or the back of a paintbrush to gently drag lines through the wet paint to enhance the marbling effect. -
Add Sparkle:
While the paint is still completely wet, take a pinch of fine gold glitter. -
Sprinkle Technique:
Gently sprinkle the glitter over the top curve of the pumpkin. Focus on the high points where light would naturally hit a glazed donut. Less is more here; you want it to look like edible gold dust. -
Texture Variation:
For added dimension, you can press a few larger gold flakes or coarser glitter grains into the wet paint sporadically. -
Drying Time:
Allow the pumpkin to sit undisturbed for at least 24 hours. Pouring paint takes much longer to cure than standard acrylics. Ensure it is in a dust-free area. -
Seal (Optional):
Once fully dry, if you want that extra high-gloss sticky bun look, spray the top with a glossy clear sealant. This also keeps the glitter from shedding. -
Display:
Arrange your finished illusion pumpkin with neutral decor or ribbons to let the pink pop.
Glaze Running Too Fast?
If the paint runs off too quickly, the mix is too thin. Let the cup sit for 5-10 minutes to thicken slightly before pouring, or add a tiny drop more paint to the mixture.
Now you have a stunning faux-pastry centerpiece that looks good enough to eat on your autumn table
Graphic Sprinkle Patterns Instead Of Random Scatter
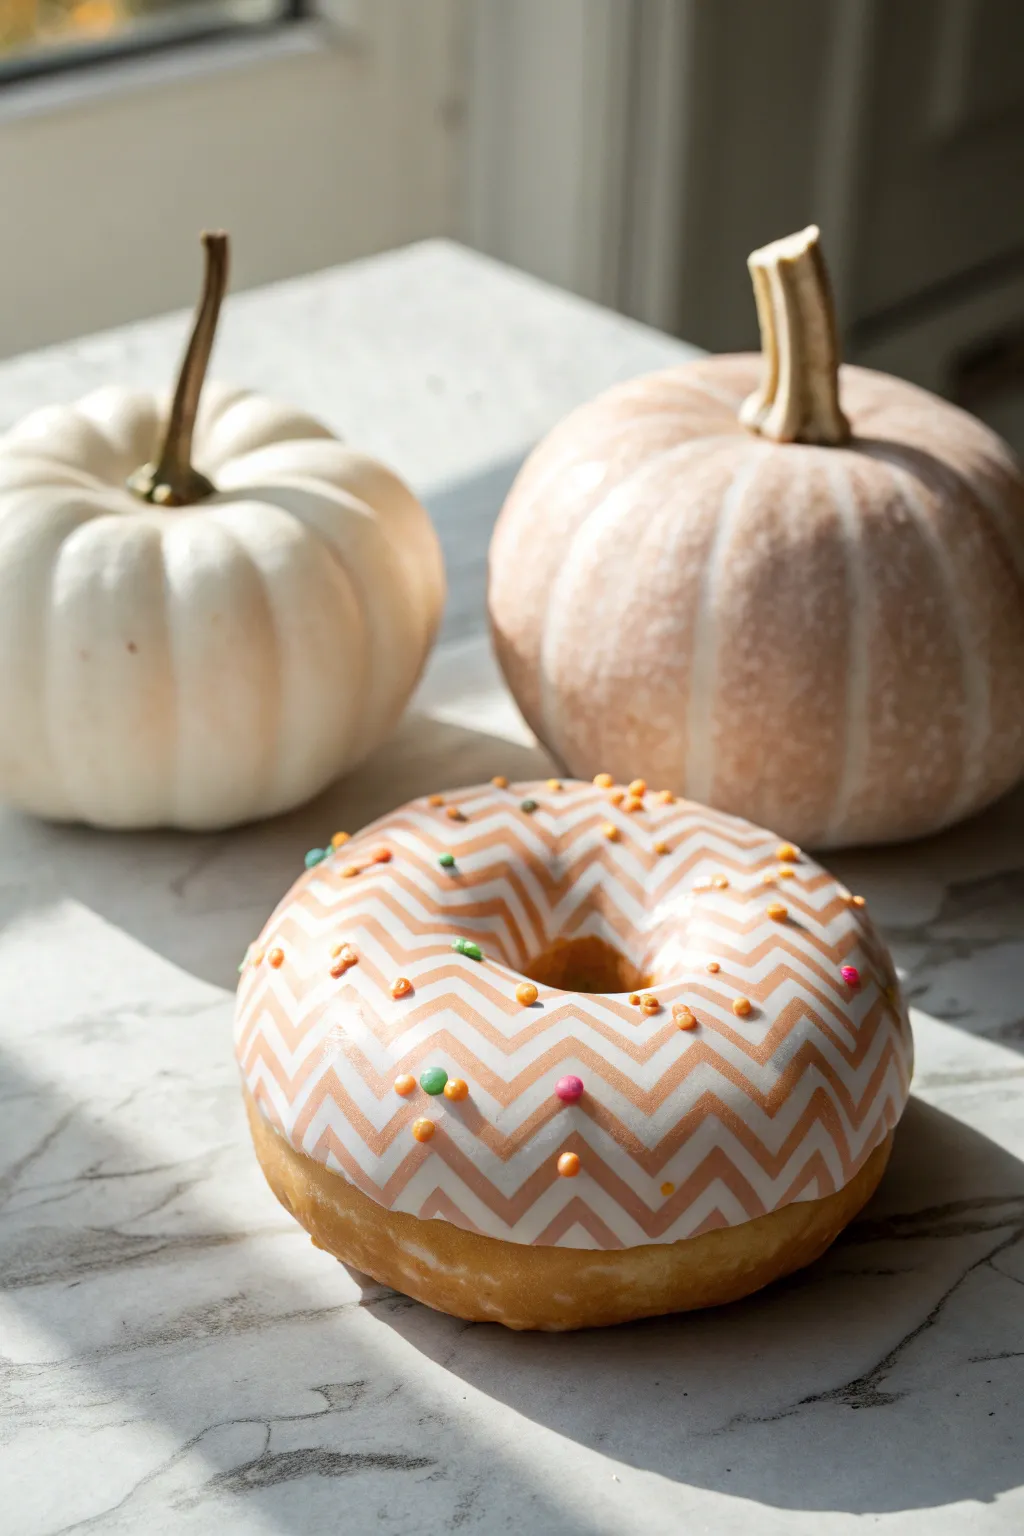
For a sophisticated twist on the classic donut pumpkin, try this elegant chevron pattern that mimics piped icing. The crisp white zig-zags against the warm orange base create a modern, graphic look that feels less like a cartoon and more like a designer pastry.
Detailed Instructions
Materials
- Small to medium craft pumpkin (real or faux)
- Acrylic paint: Warm donut-dough beige/tan
- Acrylic paint: Bright white
- Paint pens: Pastel blue, pink, orange, yellow
- Painter’s tape or thin masking tape (optional for guidelines)
- Small flat brush
- Fine liner brush
- Pencil
- Satin or gloss varnish (spray or brush-on)
- Palette
Step 1: Base Preparation
-
Clean the surface:
Wipe down your pumpkin with a damp cloth to remove any dust or oils. If you are using a real pumpkin, ensure it is completely dry before starting; for faux pumpkins, a quick wipe with rubbing alcohol helps paint adhere. -
Mix the dough color:
On your palette, mix a warm beige tone. If your tan paint is too dark, add a touch of white and a tiny drop of yellow to get that perfect ‘golden fried’ donut shade. -
Paint the bottom half:
Paint the lower 1/3 to 1/2 of the pumpkin with your beige mixture. Since this represents the unglazed part of the donut, create a slightly wavy, uneven line around the middle where the ‘glaze’ will eventually sit. -
Let it dry:
Allow this base layer to dry completely to the touch. This prevents the white paint from mixing with the beige later on.
Step 2: Creating the Glaze Pattern
-
Outline the glaze:
Using your bright white paint, map out the top section. You want to cover the stem area and drape down over the beige section, creating a thick, irregular ‘drip’ edge. -
Fill the glaze base:
Fill in the entire top section with white paint. You may need two coats here to ensure the orange of the pumpkin or the beige undercoat doesn’t show through. -
Sketch the chevrons:
Once the white base is bone dry, lightly sketch your chevron (zig-zag) pattern with a pencil. Start from the center hole (stem) and radiate outward. Keeping the points of the zig-zags aligned creates a tidy, graphic effect. -
Mix the pattern color:
Mix a soft, muted peach or light terracotta color. You want a tone that contrasts with the white but harmonizes with the beige bottom. -
Paint the first zig-zag:
Using a fine liner brush, paint the first chevron stripe following your pencil marks. I find it easiest to pull the brush towards me for steadier lines. -
Continue the pattern:
Work your way around the pumpkin, painting parallel zig-zag lines. Maintain consistent spacing between the peach stripes so the white ‘glaze’ shows through as its own stripe. -
Clean up edges:
If any lines look shaky, wait for the peach paint to dry, then use a tiny bit of white paint to sharpen the edges or correct the spacing.
Steady Hand Tip
Rest your pinky finger on a dry part of the pumpkin while painting the chevron lines. This anchors your hand for smoother, straighter brushwork.
Step 3: Sprinkles and Finish
-
Select sprinkle spots:
Visualise where your sprinkles will go. Unlike random scattering, place these strategically along the white bands of the chevron pattern for a deliberate, designed look. -
Dot the sprinkles:
Use your paint pens or a small dotting tool dipped in pastel acrylics to add small, raised dots. Use blue, pink, orange, and yellow to match the reference image. -
Add dimension:
For a realistic confectionery look, add a tiny highlight of white on top of each sprinkle dot to make them look shiny and spherical. -
Seal the deal:
Once everything is fully dry, apply a coat of gloss varnish over the entire painted area. This mimics the sugary sheen of a real glazed donut. -
Paint the stem:
Finally, paint the pumpkin stem a neutral beige or soft brown to blend in, or leave it natural if it complements your color palette.
Wobbly Lines?
If painting chevrons is too hard, cut the zig-zag pattern out of masking tape, apply it over the white base, paint over it, and peel it off.
Display your chic pumpkin alongside some real treats for a delightful autumn centerpiece
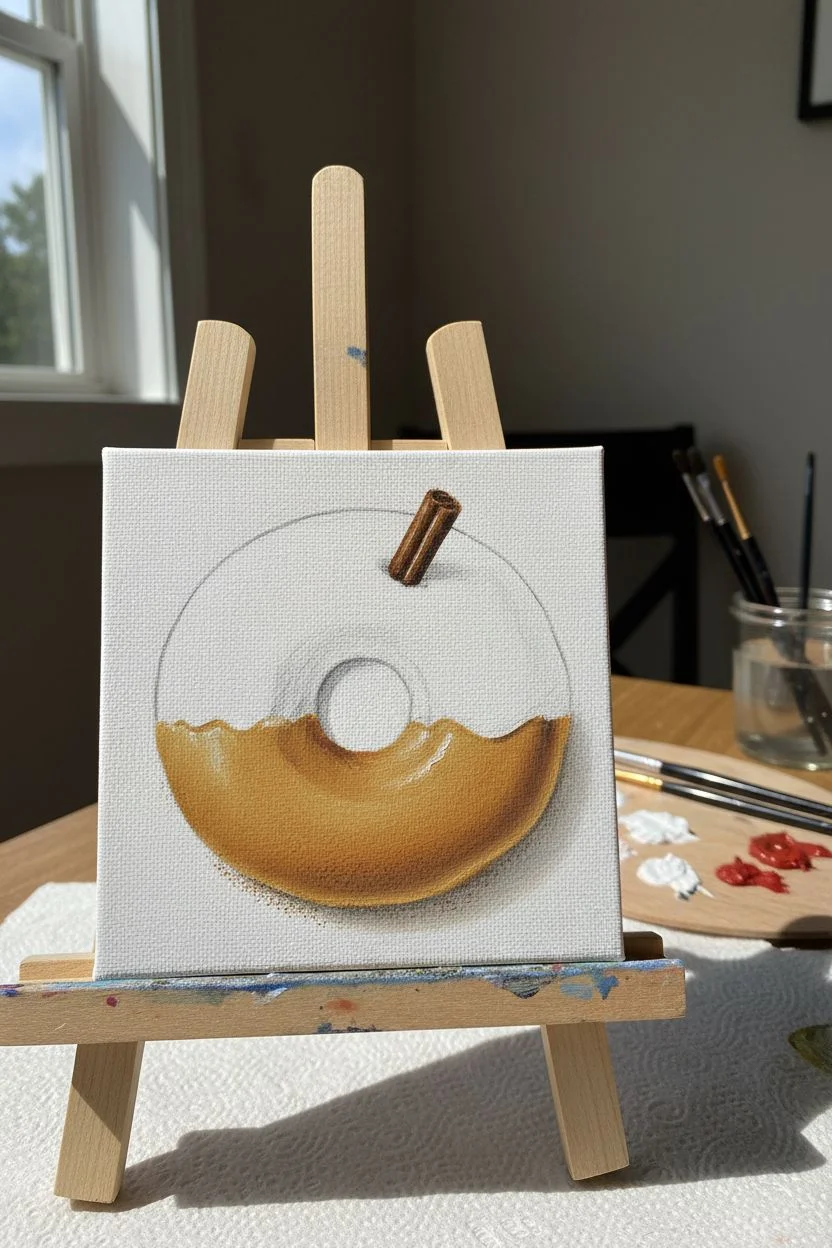
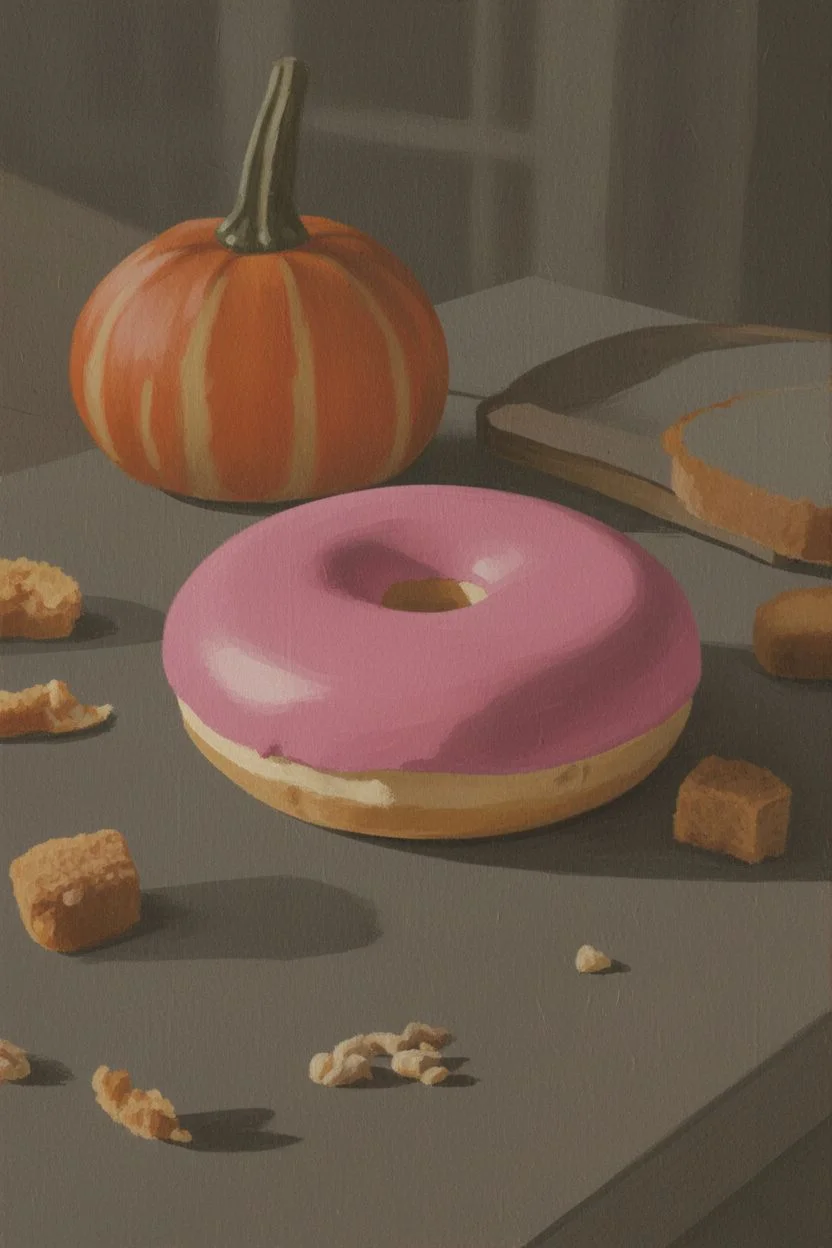
Trompe-l’Œil “Bite Mark” Donut Pumpkin With Crumbs
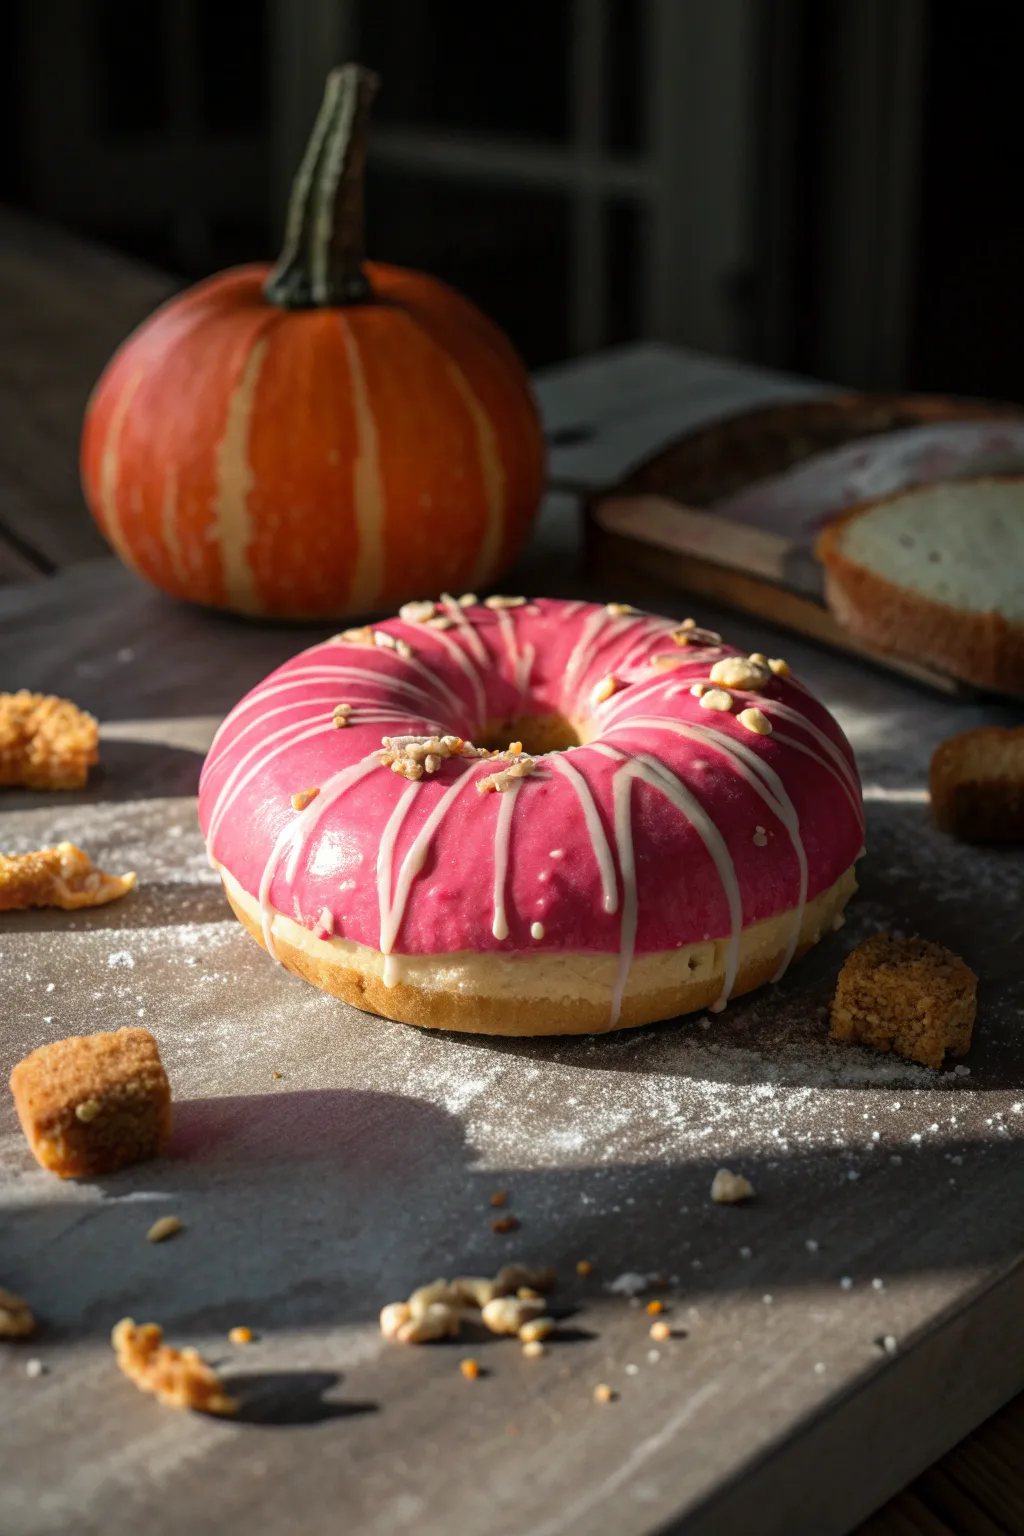
Master the art of trompe-l’œil with this stunningly lifelike painting of a pink glazed donut. You’ll learn how to capture the sheen of frosting, the texture of cake, and even the scattered crumbs that bring the entire composition to life.
Step-by-Step Guide
Materials
- Canvas or primed wood panel (smooth surface preferred)
- Acrylic paints (Titanium White, Magenta, Alizarin Crimson, Yellow Ochre, Burnt Umber, Raw Sienna, Unbleached Titanium)
- Glazing medium
- Synthetic brushes (various sizes: flats for blocking, rounds for details)
- Fine liner brush (00 or 000)
- Palette knife and palette
- Reference photo of a donut
- Pencil for sketching
- Clean water and rag
Step 1: Base Sketch and Underpainting
-
Establish the Composition:
Begin by lightly sketching the oval shape of the donut on your canvas. Place the inner hole slightly off-center to suggest perspective. Sketch the rough positions of the larger crumbs scattered around the foreground. -
Block in the Cake:
Mix Yellow Ochre, a touch of Titanium White, and a tiny bit of Burnt Umber to create a dough color. Paint the bottom half of the donut ring where the cake is visible beneath the frosting. -
Base the Frosting:
For the pink glaze, mix Magenta with Titanium White. You want a vibrant middle tone—not the brightest highlight, nor the deepest shadow. Fill in the top ring of the donut entirely. -
Background Values:
Mix a dark grey-brown for the surface (Burnt Umber + White + tiny black). Paint the background and foreground, leaving space for the pumpkin if you choose to include it, and carefully painting around your pencil sketch of the crumbs.
Step 2: Building Form and Volume
-
Define the Shadow Side:
Mix a darker version of your pink by adding Alizarin Crimson and a speck of blue or green to desaturate it slightly. Apply this to the left side and inner hole area of the donut to create roundness. -
Deepen the Dough Shadows:
Using Raw Sienna and Burnt Umber, paint the shadow underneath the donut where it meets the table. This anchors the object. -
The ‘Fried Line’:
Where the frosting meets the cake, blend a transition line. Often, there is a slightly lighter ‘fried’ ring right below the icing; use Unbleached Titanium here to sell the realism. -
Glaze Smoothness:
To make the pink look like poured fondant, use a soft, dry brush to gently blur any hard edges between your light pink and dark pink areas. The transition should be seamless.
Donut looks flat?
Increase your contrast. If the pink glaze looks 2D, darken your shadows significantly in the donut hole and brighten the ‘wet’ highlight spots on the opposite side.
Step 3: The White Drizzle
-
Map the Stripes:
Wait for the pink layer to be completely dry. Using a thin round brush and slightly thinned Titanium White, paint the arching stripes of drizzle. Follow the curve of the donut; lines should hug the form. -
Translucency:
The drizzle isn’t solid opaque everywhere. I like to dry-brush the ends or thinner parts of the stripes so the pink shows through slightly, making it look like real sugar glaze. -
Shadowing the Drizzle:
Where the white stripes go into the shaded areas (the hole or the left side), mix a tiny bit of the shadow pink color into the white. White icing in shadow is not pure white.
Make it Your Own
Switch the flavor palette! Used Burnt Umber and Blue for chocolate, or keep the pink but add multi-colored sprinkles by painting tiny tubes of pure color with hard shadows.
Step 4: Texture and Details
-
Nut Toppings:
Use Yellow Ochre mixed with White to dab small, irregular shapes on top where the nuts or crumbs sit. Add tiny shadows on one side of each nut using Burnt Umber to make them pop 3D. -
Scattered Crumbs:
Paint the cubes of cake on the table. Use the dough color mix, but stipple the texture with a small brush to look porous. Add strong cast shadows underneath each crumb on the table surface. -
Powdered Sugar Dust:
With a very dry brush and a tiny amount of white paint, gently scumble (scrub) some ‘dust’ areas on the table surface, specifically around the donut base. -
High Gloss Highlights:
This is the ‘magic’ step. Use pure, thick Titanium White on a fine liner brush. Add sharp, crisp dots and lines on the pink icing where the light would hit hardest. -
Drizzle Highlights:
Don’t forget to highlight the white stripes too. A brighter white on top of the base white stripe adds dimension. -
Final Glaze:
For an ultra-realistic wet look, once the painting is fully cured, apply a clear gloss medium only over the pink frosted areas to make them physically shine.
Step back and admire your sweet creation, ensuring the glossy highlights truly sparkle before displaying it


Have a question or want to share your own experience? I'd love to hear from you in the comments below!