
Concrete basement walls can feel cold and a little intimidating, but paint turns them into a canvas with serious potential. I’m sharing my favorite ways to make concrete basement walls feel brighter, warmer, and actually lived-in—without pretending they aren’t concrete.
Bright White Light-Boosting Coat
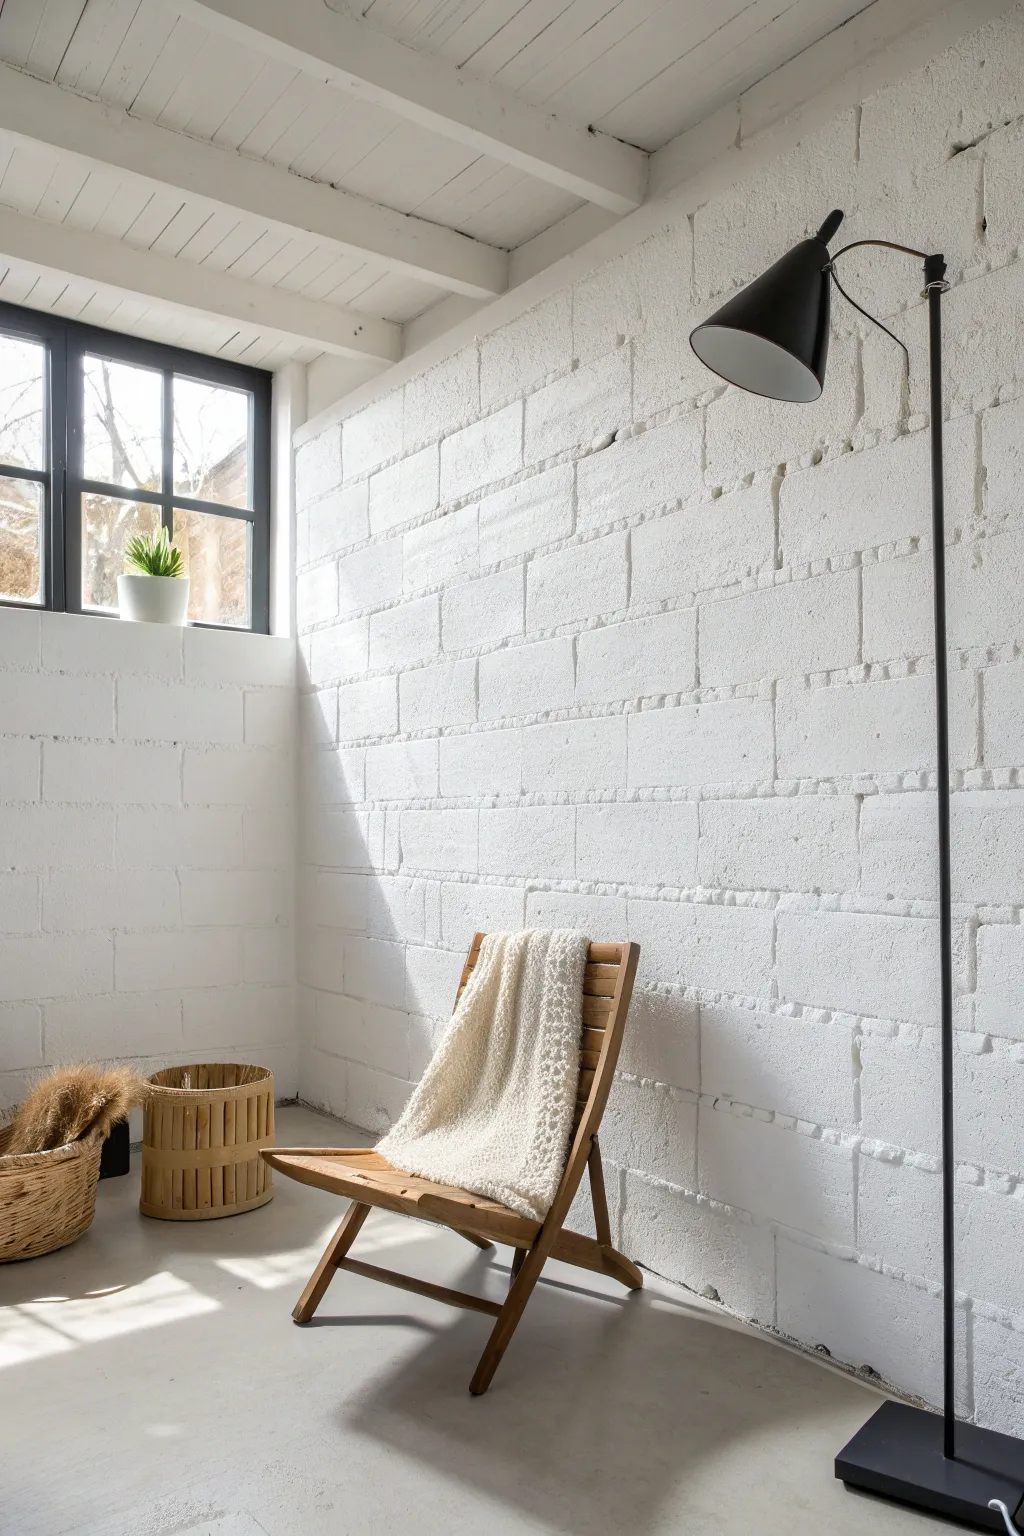
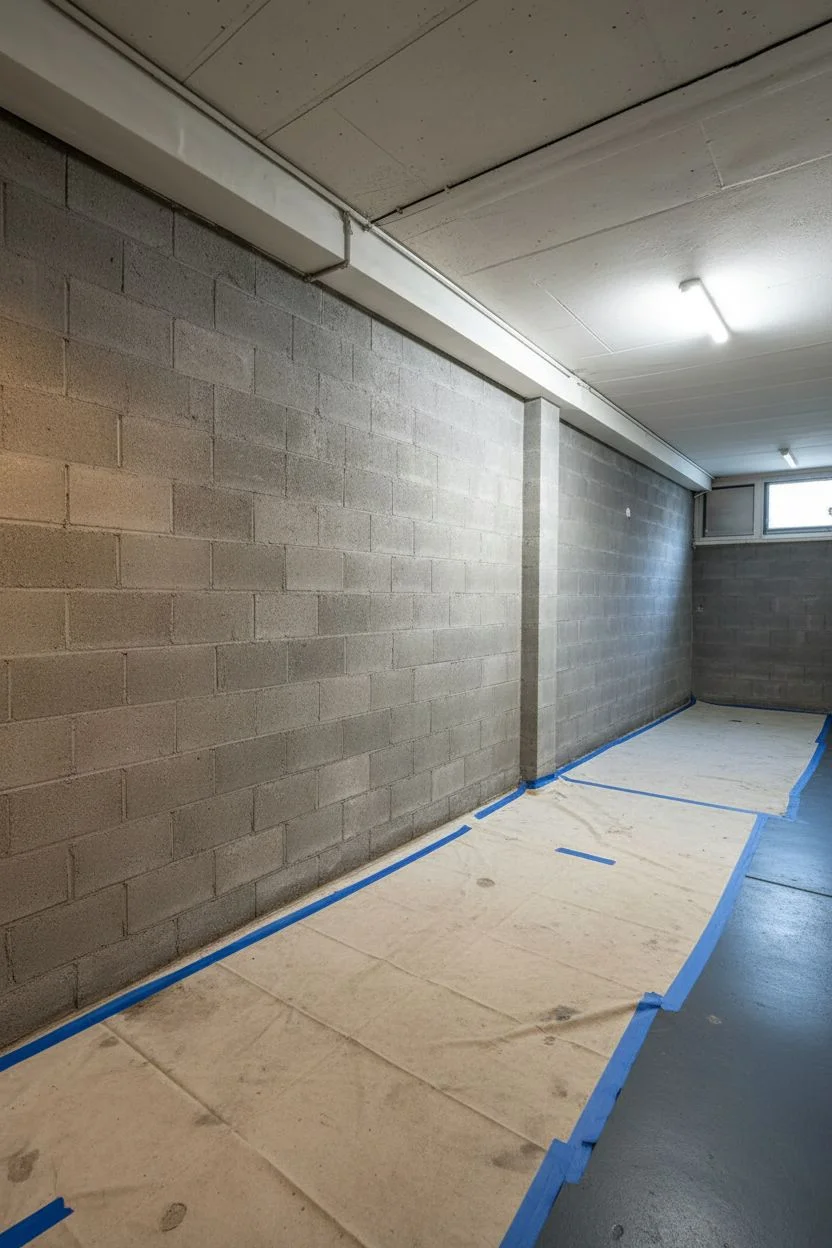
Transform a gloomy basement into an airy, light-filled sanctuary with this monochromatic painting guide. By coating heavy cinder blocks in crisp white, you’ll bounce natural light around the room and create a modern, minimalist backdrop perfect for relaxing.
Step-by-Step Guide
Materials
- TSP substitute (heavy duty cleaner)
- Scrub brush with stiff bristles
- Masonry filler & putty knife (if needed)
- Painter’s tape and plastic drop cloths
- High-quality masonry primer (white)
- Interior acrylic latex paint (bright white, eggshell or satin finish)
- Thick nap roller (3/4 inch or higher for rough surfaces)
- Extension pole for roller
- Angled sash brush (2.5 inch) for cutting in
- Paint try and liner
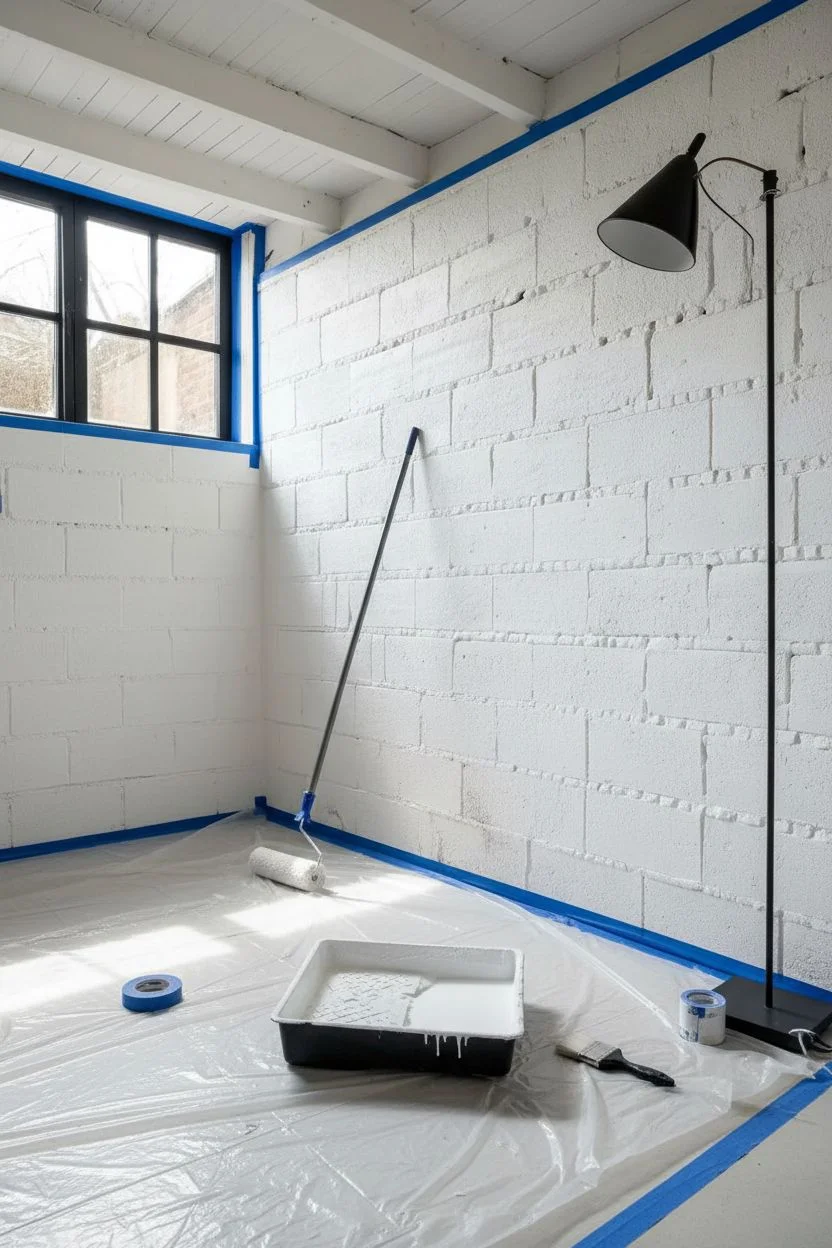
Step 1: Prep & Prime
-
Clear and protect:
Remove all furniture and decor from the area. Lay down plastic drop cloths to protect your floors, taping the edges down securely so they don’t shift while you work. -
Deep clean the masonry:
Mix your TSP substitute according to the package directions. Using a stiff scrub brush, vigorously scrub the cinder block walls to remove dust, efflorescence (white salty deposits), and grime. This is crucial for adhesion. -
Rinse and dry:
Wipe down the walls with clean water to remove any cleaning residue. Allow the masonry to dry completely—this can take 24–48 hours depending on the humidity in your basement. -
Patch imperfections:
Inspect the mortar lines and blocks for deep cracks or missing chunks. Fill these with masonry filler using a putty knife, smoothing it out as best as possible. Let the filler cure fully. -
Tape the edges:
Apply painter’s tape around window frames, ceiling edges (if not painting them), and baseboards/floor edges to ensure crisp lines. -
Cut in the primer:
Using your angled sash brush and masonry primer, paint along the perimeter of the walls, around windows, and into the deep corners where the roller won’t reach. -
Roll the primer:
Pour masonry primer into your tray. Load up a thick nap roller—the fluffier the better for getting into those cinder block pores. Roll the primer onto the walls using vertical strokes. Don’t be afraid to press firmly. -
Check for pinholes:
As you prime, keep an eye out for pinholes in the mortar or block texture. I often use the brush to dab primer into particularly deep pores that the roller missed. -
Dry time:
Let the primer dry according to the manufacturer’s instructions, usually at least 4 hours, before moving to the top coat.
Moisture Warning
Tape a piece of plastic to the bare wall for 24 hours before painting. If condensation forms underneath, you have a moisture issue that must be sealed before painting.
Step 2: The Bright Finish
-
Cut in the top coat:
Just like with the primer, start by using your angled brush to apply the bright white acrylic latex paint around the edges and corners. -
First heavy coat:
Load your thick nap roller generously with paint. Apply the first coat using a ‘W’ or ‘M’ pattern to distribute the paint, then fill in the section with vertical strokes. -
Back-rolling:
After rolling a section, go back over it lightly without adding more paint to even out the texture and catch any drips. -
Let it cure:
Allow the first coat to dry completely. Cinder blocks absorb a lot of paint, so don’t be discouraged if it looks patchy after just one round. -
Second coat application:
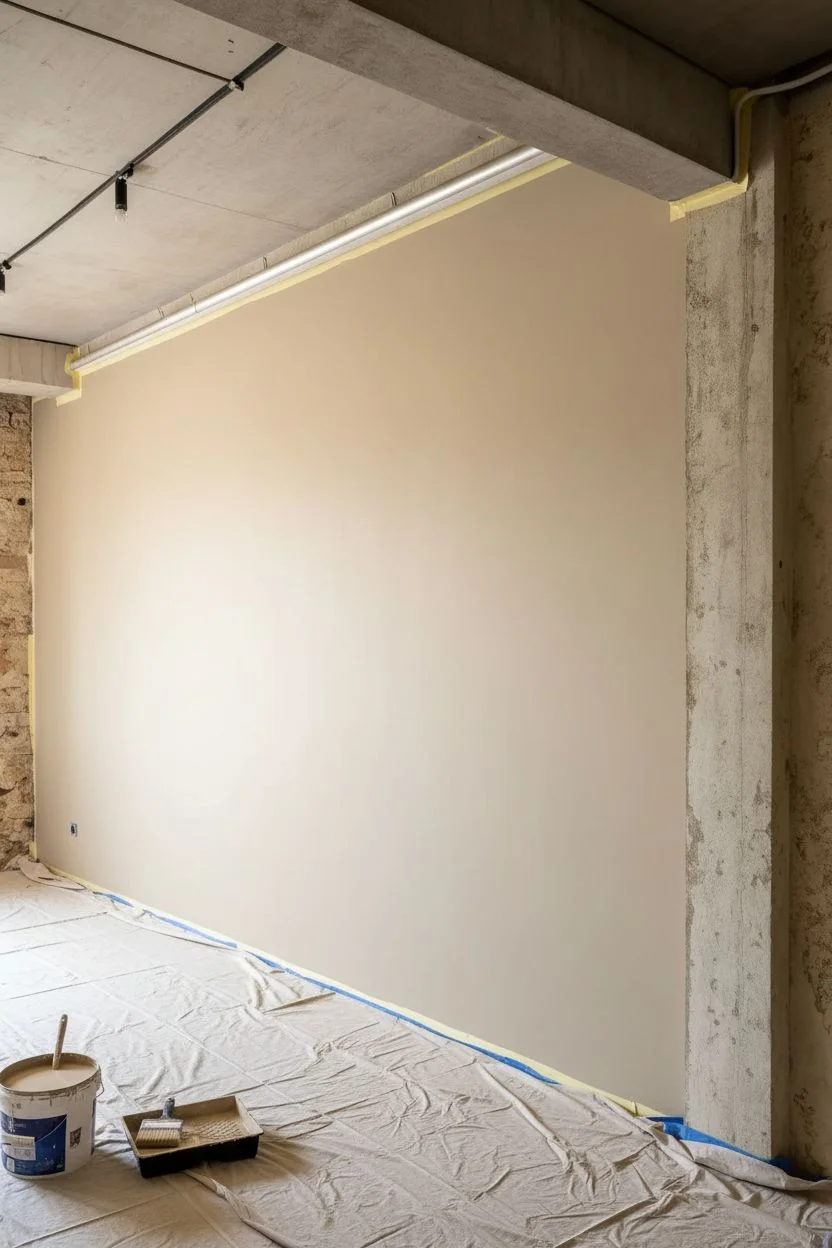
Repeat the cutting in and rolling process for a second coat. This layer provides that true covering power and the solid, light-bouncing finish seen in the photo. -
Evaluate coverage:
Stand back and look at the wall from different angles. If you see dark shadows or grey block showing through, a third coat might be necessary for that ultra-pure white look. -
Remove tape:
While the final coat is still slightly tacky (but not wet), carefully peel away the painter’s tape at a 45-degree angle to prevent peeling any paint off the wall. -
Final touch-ups:
Once dry, use a small artist’s brush to touch up any tiny missed spots or uneven lines near the trim or ceiling.
Soften the Look
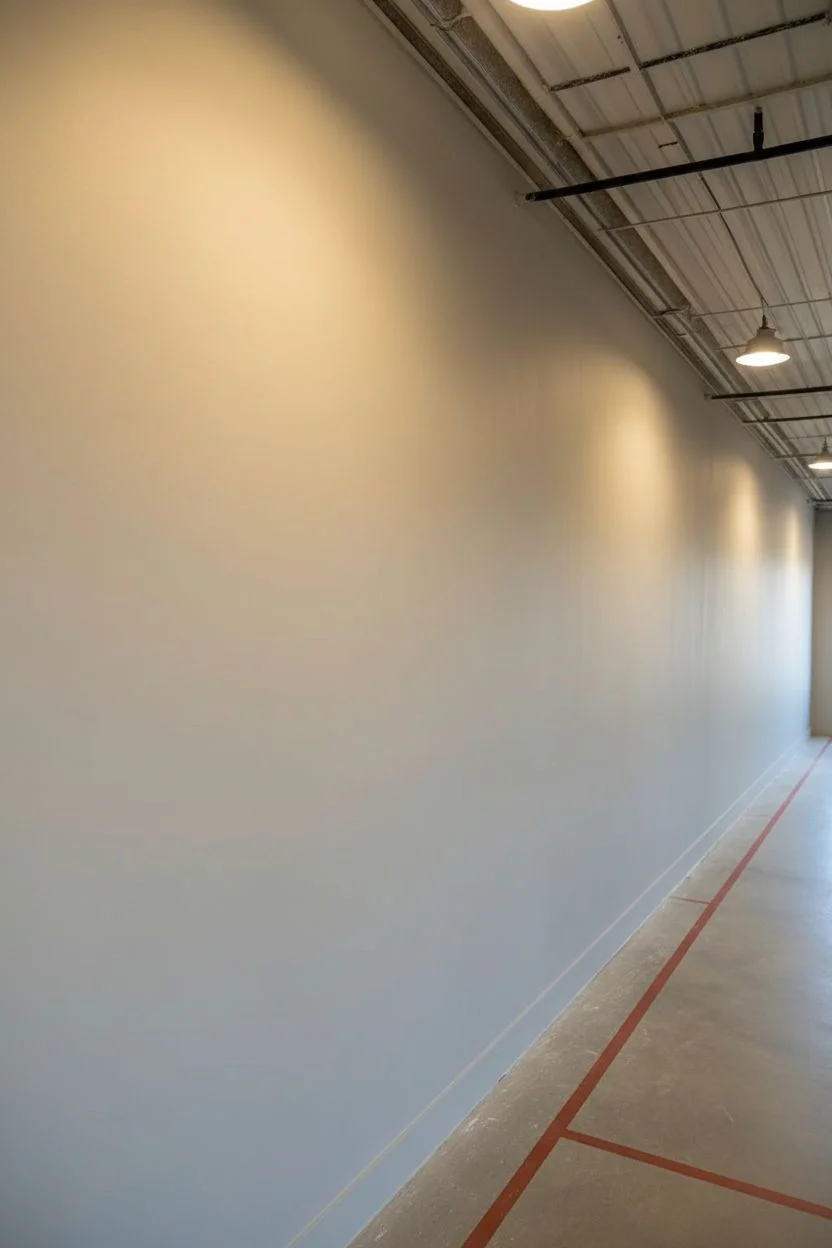
Consider skipping the baseboard trim entirely for a gallery-like feel. Instead, let the white wall meet the floor directly for a seamless, ultra-modern industrial aesthetic.
Enjoy your renewed space, where every sunbeam finds a surface to shine on


Moody Charcoal Accent Wall to Add Depth
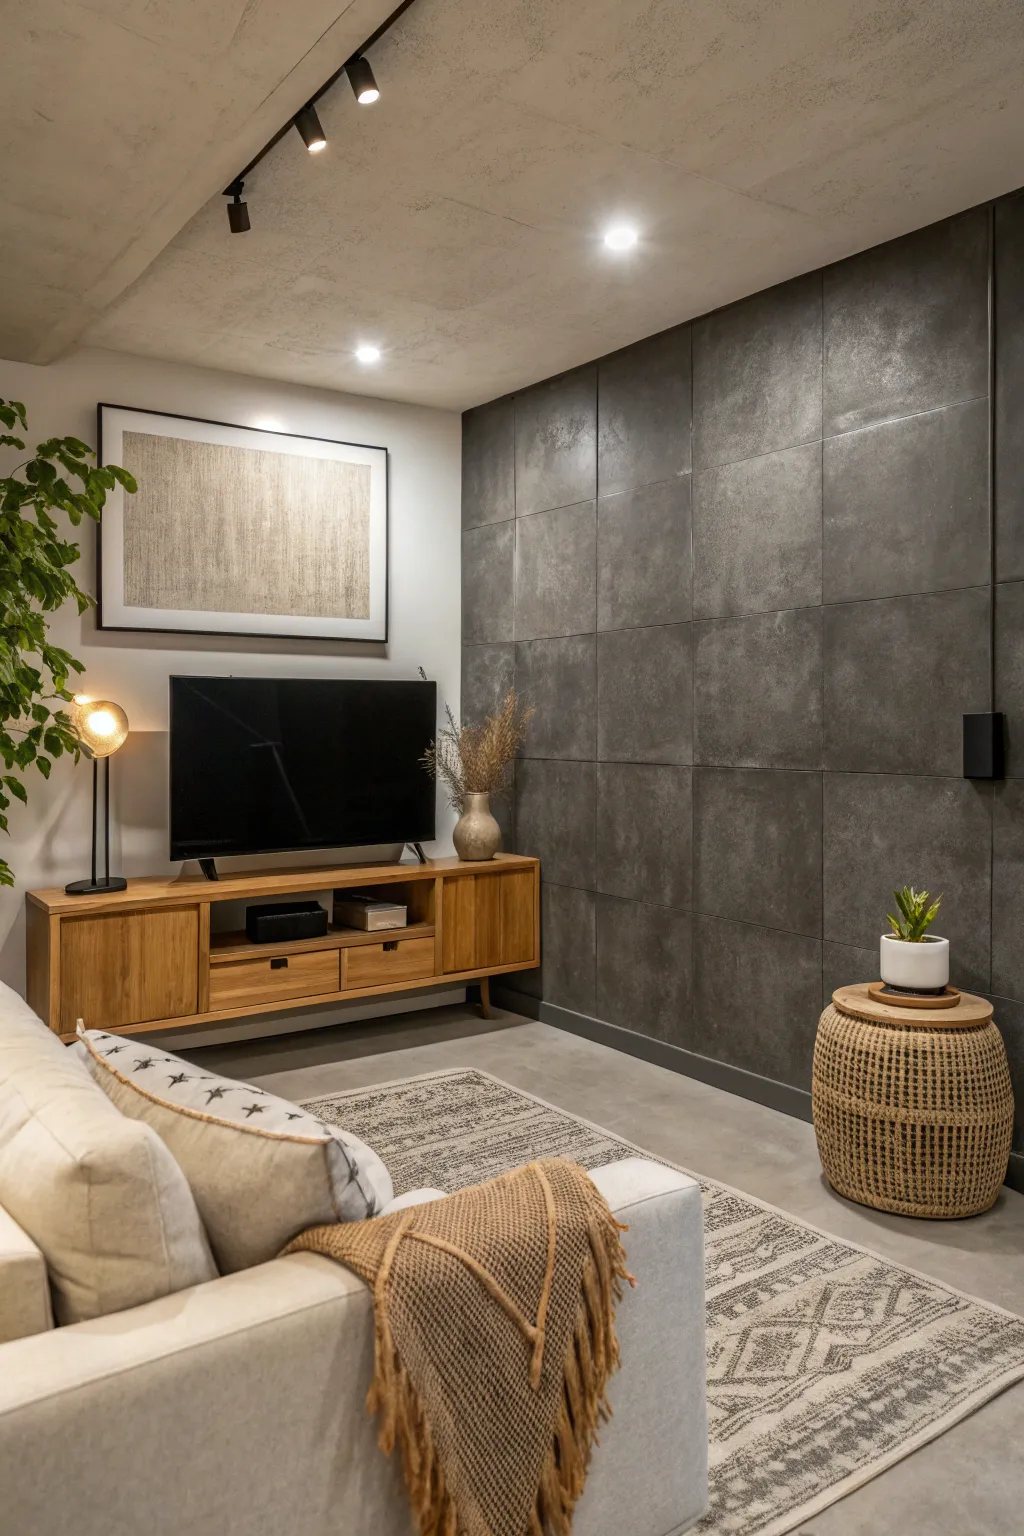
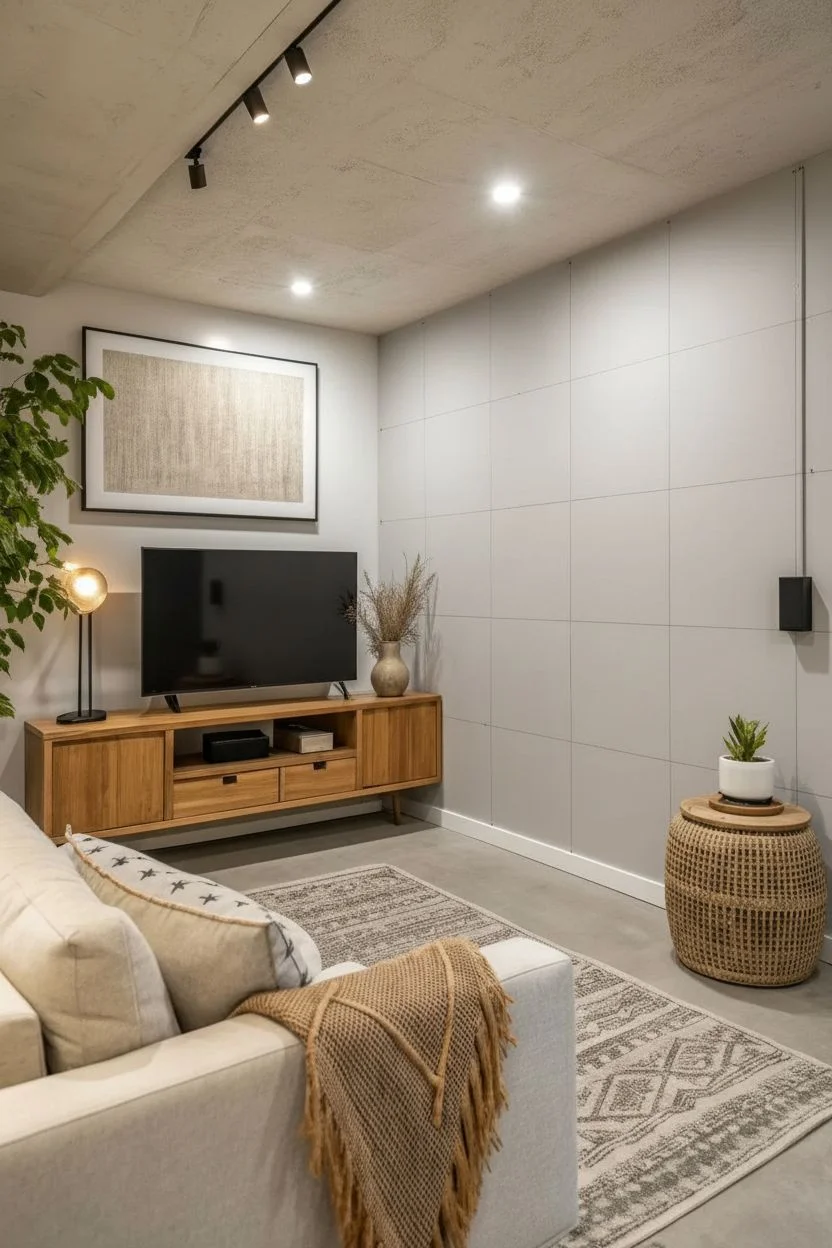
Transform a plain basement wall into a sophisticated focal point with this moody charcoal accent wall that mimics the look of high-end oversized concrete tiles. This technique uses paint and precise taping to create depth, texture, and industrial elegance without the heavy lifting of real stone.
Step-by-Step Tutorial
Materials
- Dark charcoal latex paint (matte finish)
- Black acrylic paint (for shading)
- Silver metallic glaze or gray craft paint
- Painter’s tape (0.25 inch width for grout lines)
- Laser level (or long spirit level)
- Pencil
- Tape measure
- Medium-nap roller and tray
- Large sea sponge or glaze rag
- Small angled brush
- Matte clear coat (optional)
Step 1: Planning and Layout
-
Prepare the surface:
Begin by cleaning your concrete or drywall surface thoroughly to remove any dust or oils. If the wall is raw concrete, apply a bonding primer first to ensure your dark base coat adheres properly. -
Determine grid size:
Measure the total width and height of your wall. To replicate the look in the photo, aim for large squares, roughly 24×24 inches or 30×30 inches, depending on what divides evenly into your wall dimensions. -
Mark vertical lines:
Using a tape measure, make small tick marks along the ceiling and floor at your determined intervals. I find it helpful to start from the center and work outward so the cut tiles are symmetrical at the ends. -
Mark horizontal lines:
Repeat the marking process up the side walls for your horizontal rows. Ensure your bottom row isn’t a tiny sliver; adjust your starting height if necessary. -
Draw the grid:
Connect your marks using a pencil and a long straight edge or a chalk line. A laser level is invaluable here to keep everything perfectly plumb and level.
Tape Removal Trick
Score the edge of the tape very lightly with a utility knife before peeling. This breaks any paint bridging and ensures razor-sharp grout lines without lifting paint.
Step 2: Creating the Tile Effect
-
Tape the grout lines:
Apply the thin 0.25-inch painter’s tape directly over your pencil lines. Run the tape continuously; having the tape overlap at intersections is fine for now. -
Seal the tape edges:
Press the tape down firmly with a putty knife or credit card. To really ensure crisp lines, you can lightly brush a bit of the existing wall color (or clear matte medium) over the tape edges to seal them. -
Apply base color:
Roll on your dark charcoal paint over the entire wall, covering the tape completely. You will likely need two coats to get that rich, opaque coverage seen in the image. -
Let the base dry:
Allow the base coat to dry completely, usually at least 4-6 hours, before starting the texturing process.
Step 3: Adding Texture and Depth
-
Prepare texture glazes:
Pour two small amounts of paint onto a paper plate or palette: one of slightly darker black and one of the metallic silver or light gray. -
Sponge application:
Dampen your sea sponge and wring it out well. Dip it lightly into the silver/gray paint and blot most of it off onto a paper towel until almost dry. -
Create stone texture:
Gently dab the sponge randomly across the center of the ’tiles.’ You want a subtle mottled effect, not heavy polka dots, to mimic the natural variation of concrete. -
Add corner shadows:
Using the darker black paint and a dry brush or clean corner of the sponge, lightly darken the edges and corners of individual squares. This creates a vignette effect that adds 3D dimension. -
Blend the textures:
While the texture paint is still slightly tacky, use a soft, dry brush to gently sweep over the surface to soften any harsh sponge marks. -
Check consistency:
Step back frequently to view the wall as a whole. Ensure no single tile looks too busy or too plain compared to its neighbors. -
Remove tape:
Carefully peel off the painter’s tape while the final texture layer is still slightly damp to prevent peeling. Pull the tape at a 45-degree angle away from the painted area. -
Touch up grout lines:
The lines revealed will be your original wall color. If you prefer dark grout lines, you can now carefully hand-paint these lines with black paint and a steady hand. -
Final cure:
Allow the entire wall to cure for 24 hours. Because basement walls can hold moisture, avoid placing furniture directly against it for a few days.
Industrial Sheen
Mix a small amount of pearlized medium into your charcoal topcoat. It catches the ambient light just like polished concrete or slate.
Once the paint has fully cured, you can move your furniture back and enjoy the dramatic new atmosphere of your space


Navy Basement Wall for a Classic Rec Room Vibe
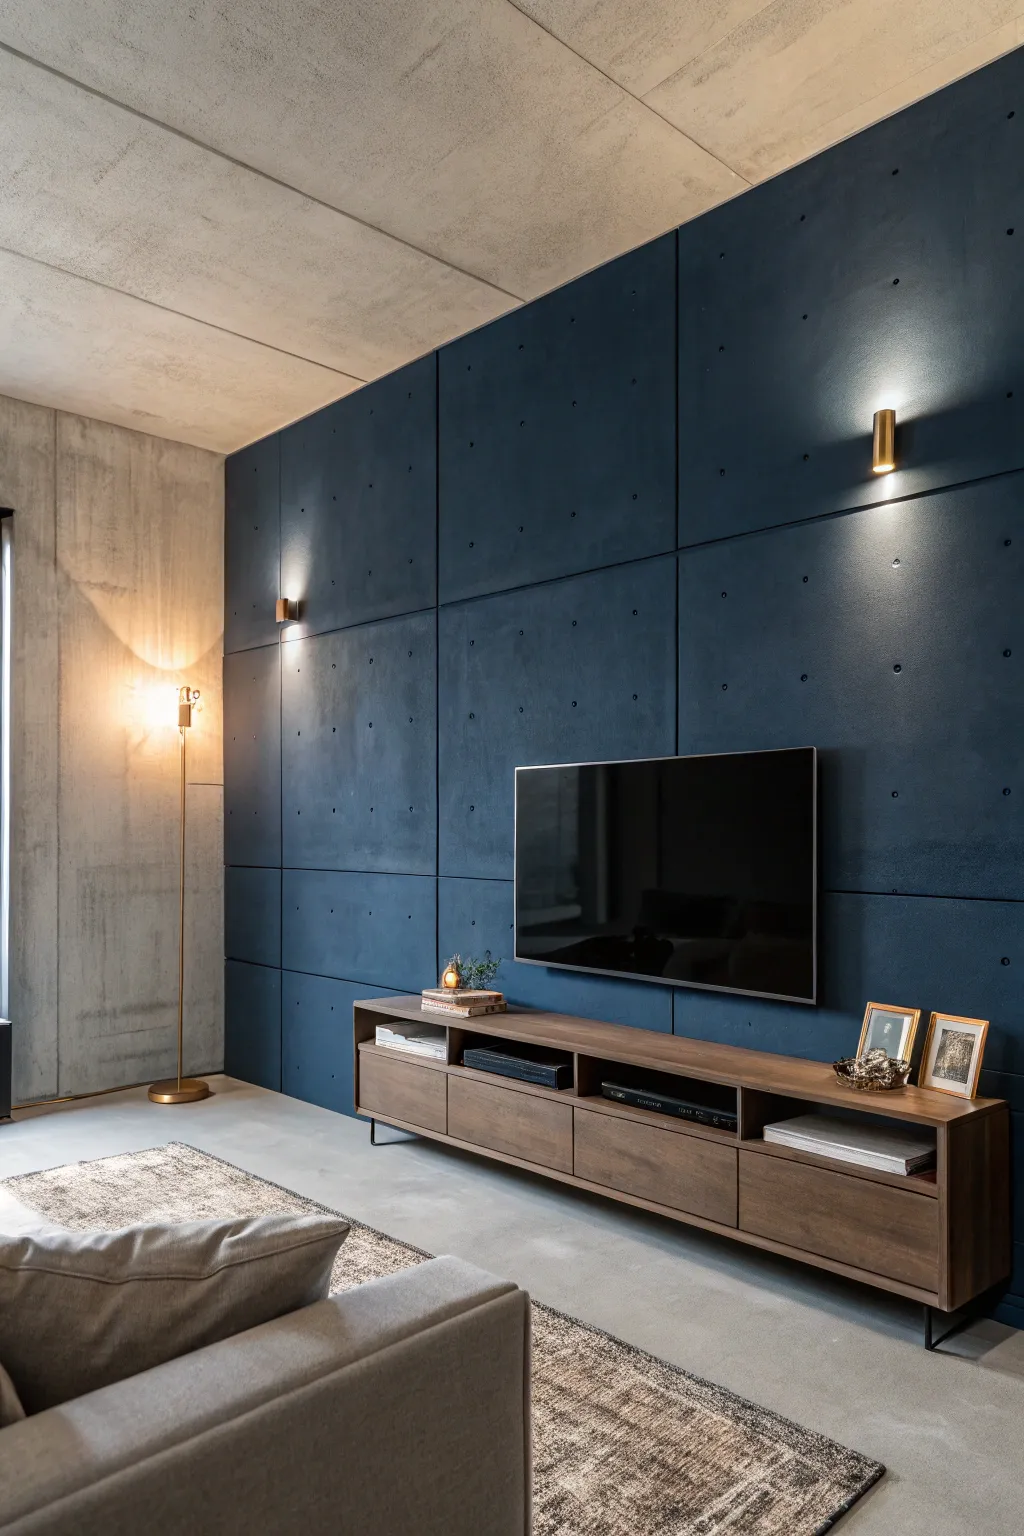
Transform a boring basement wall into a stunning architectural feature that blends raw industrial texture with sophisticated color. This project creates the look of poured concrete panels—complete with form tie holes—using simple materials and a striking navy finish.
Detailed Instructions
Materials
- Joint compound or texture medium
- Wide drywall knife or trowel
- Painter’s tape (1-inch width works well)
- Level and pencil
- Measuring tape
- Drill with a 3/4-inch spade bit or Forstner bit
- Sanding block (medium grit)
- Deep navy blue matte paint
- Heavy nap paint roller (3/4 inch)
- Small artist brush
- Drop cloth
- Construction adhesive (optional if adding faux panels)
- Primer
Step 1: Preparation and Mapping
-
Clear and clean:
Begin by removing all furniture, outlet covers, and wall hangings from the work area. Wipe down the entire wall surface with a damp cloth to remove dust and let it dry completely. -
Measure the grid:
Decide on the size of your ‘concrete panels.’ In the inspiration photo, large rectangular blocks are used. Measure your wall height and width, then divide these dimensions to create even rows and columns. A grid of 4×3 or 4×4 often looks balanced. -
Draw layout lines:
Using your level and pencil, lightly draw the entire grid onto the wall. These lines will guide where you create the separation gaps between the faux panels. -
Tape the first set of seams:
Apply painter’s tape directly over your vertical pencil lines. Press the edges down firmly so no compound seeps underneath. We will texture the wall in alternating sections to keep lines crisp.
Industrial Edge
For a grittier look, don’t mix the joint compound too thoroughly. Leaving small dry crumbles or air bubbles in the mix creates realistic pockmarks when applied to the wall.
Step 2: Creating the Texture
-
Apply the compound base:
Scoop joint compound onto your wide trowel. Apply a thin layer (about 1/8 inch thick) to the wall sections between your tape lines. Don’t worry about making it perfectly smooth; slight variations enhance the concrete look. -
Add concrete character:
While the compound is still wet, use the flat face of the trowel to gently pat and drag across the surface. This creates the pitted, industrial texture typical of poured concrete. -
Remove tape while wet:
I prefer to peel the tape off immediately while the compound is still wet. Pull it gently at a 45-degree angle to reveal sharp, recessed lines that mimic the seams between concrete forms. -
Dry and repeat:
Allow the first set of panels to dry until firm to the touch (usually 4-6 hours). Once dry, carefully tape over the vertical gaps you just created and tape the horizontal lines. Repeat the texturing process for the remaining sections. -
Drill form tie holes:
Once all compound is completely dry, mark spots for the ‘form tie’ holes—the distinctive circles seen in industrial concrete. Place one in each corner of your panels, indented about 3-4 inches from the edges. -
Create the indentations:
Gently drill into the dry compound at your marked spots using the spade bit. You only want to create a shallow recess, not a hole through the drywall. A depth of about 1/4 inch is perfect. -
Light sanding:
Run a sanding block lightly over the entire wall to knock down any overly sharp peaks or ridges. Wipe away the sanding dust with a microfiber cloth.
Cracking Compound?
If hairline cracks appear as the compound dries, don’t panic. This actually adds to the realism of aged concrete. Just ensure they aren’t peeling away from the drywall before painting.
Step 3: Painting and Finishing
-
Prime the surface:
Apply a coat of high-quality primer to the entire wall. The joint compound is very absorbent, so this step ensures your navy topcoat will look even and rich. -
Cut in the edges:
Using an angled sash brush, paint the navy color around the perimeter of the wall, into the recessed seam lines between panels, and inside the drilled tie holes. -
Roll the main color:
Load your heavy nap roller with the deep navy paint. Roll the paint onto the panels, ensuring you get into the texture of the compound. Two coats are usually necessary for a deep, opaque finish. -
Highlight the holes:
If the paint filled in your tie holes too much, use a small artist brush or a Q-tip to define them again, possibly adding a tiny dab of darker paint inside to emphasize the shadow. -
Install lighting:
Reinstall outlet covers. Mount sconces or install accent lighting (like the brass fixture shown) to cast shadows across the texture, which really brings the faux concrete effect to life.
Step 4: Final Styling
-
Add furnishings:
Position your media console and television. The dark wall makes a perfect backdrop for screens, reducing glare and deepening the room’s atmosphere. -
Accessorize:
Finish the look with metallic accents, like brass picture frames or a gold floor lamp, which pop beautifully against the matte navy background.
Now sit back and enjoy the depth and modern drama your new feature wall brings to the space


Two-Tone Wainscot Effect on Concrete Block
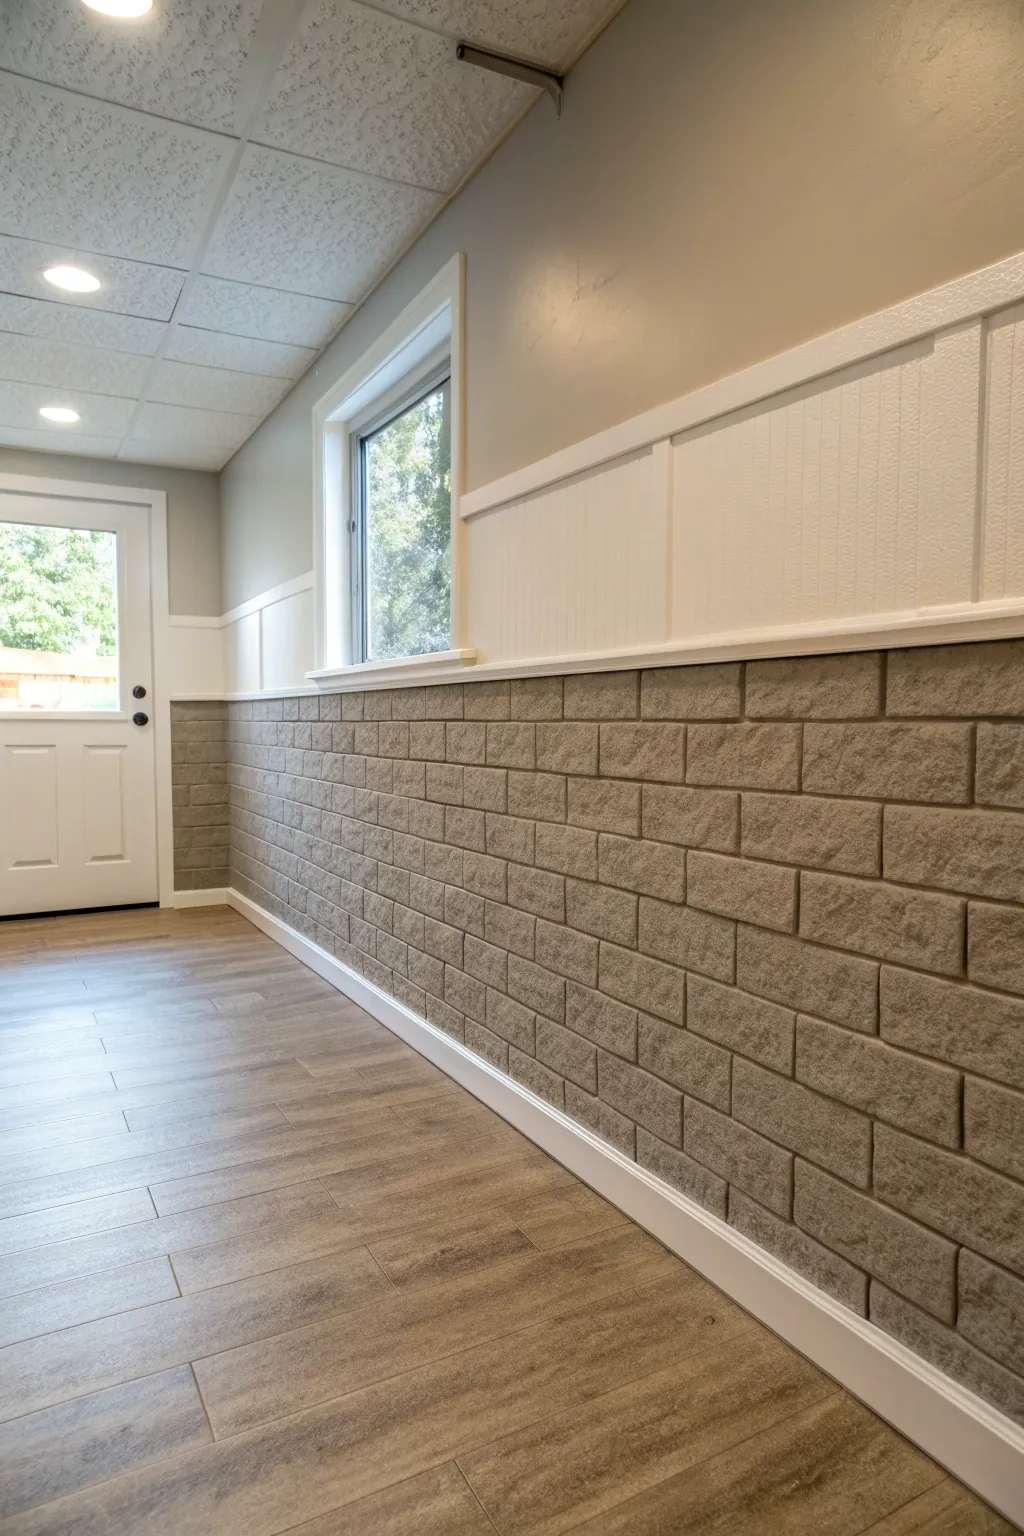
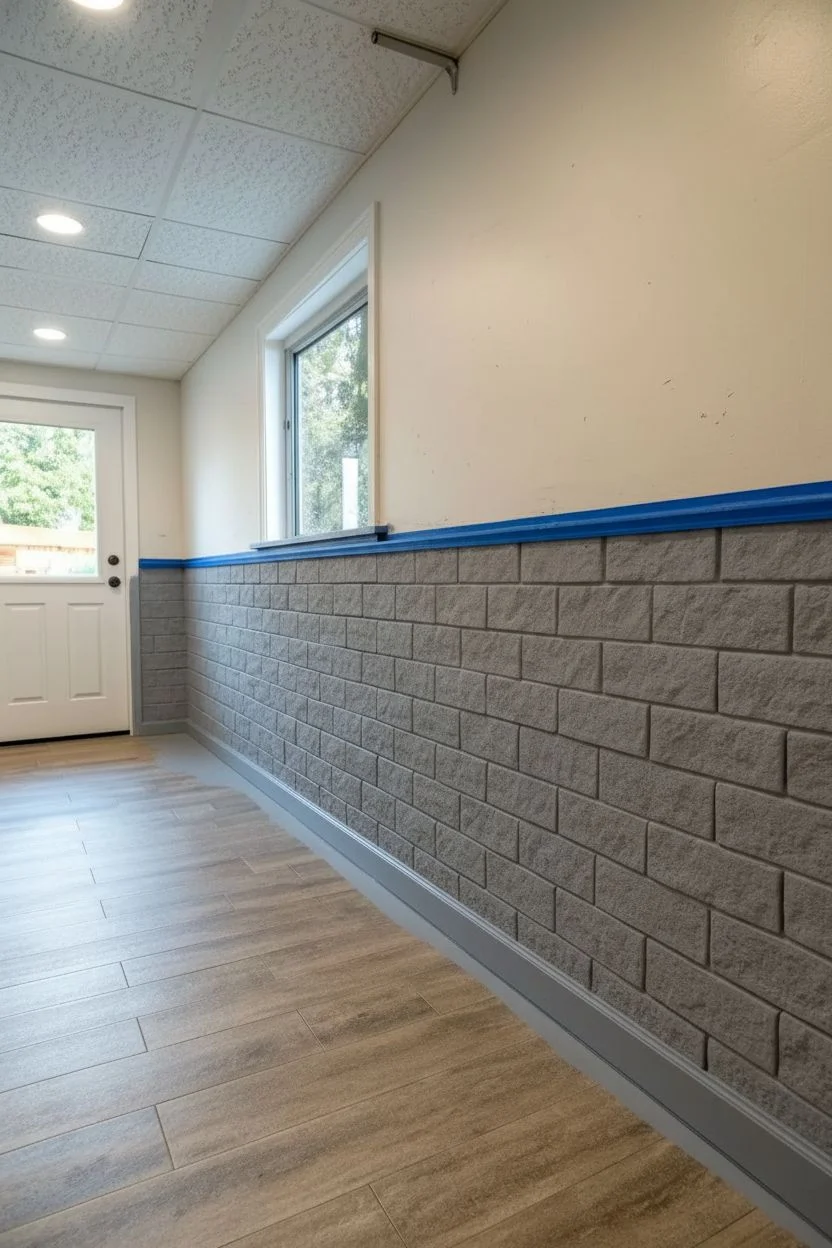
Transform a cold, unfinished basement wall into a cozy living space by combining classic beadboard wainscoting with the industrial texture of painted concrete block. This project cleverly utilizes existing textures while adding bright, clean lines to warm up the room.
How-To Guide
Materials
- Concrete block primer
- High-quality latex paint (Gray)
- Beadboard paneling sheets
- 1×4 pine or MDF boards (for rails and stiles)
- 1×2 trim molding (for top cap)
- Baseboard molding
- Construction adhesive
- Brad nailer and trim nails
- Caulk and caulk gun
- Painter’s tape
- Paint rollers (medium nap for block, smooth for wood)
- Paintbrushes
- Spackle or wood filler
- Sandpaper (220 grit)
Step 1: Prepping and Painting the Block
-
Clean the surface:
Begin by thoroughly cleaning the concrete block wall. Remove any loose mortar, dust, or efflorescence with a stiff wire brush and vacuum the surface entirely. -
Tape off the transition line:
Determine the height where your beadboard will start. Run a straight level line of painter’s tape across the wall just above where the bottom of the beadboard rail will sit to protect the upper wall area. -
Prime the concrete:
Apply a thick coat of masonry or concrete block primer. Use a high-nap roller (at least 3/4-inch) to ensure the primer gets into all the porous crevices of the block. -
Apply the base color:
Once primed and dry, paint the concrete block section with your chosen gray latex paint. You will likely need two coats to get full coverage over the rough texture. -
Touch up mortar lines:
Inspect the mortar lines closely. If the roller missed deep spots, use a small sash brush to dab paint into those recesses for a solid, uniform look.
Adhesion Secret
When attaching wood trim directly to concrete block, construction adhesive is mandatory. Nails alone won’t hold in the masonry without specialized tools.
Step 2: Installing the Beadboard Wainscoting
-
Measure and cut beadboard:
Measure the remaining wall height above your concrete block section. Cut your beadboard sheets to fit this upper section perfectly. -
Attach the panels:
Apply construction adhesive to the back of the beadboard panels. Press them firmly onto the wall and secure them with a few brad nails into studs where possible. -
Install the bottom rail:
Place a 1×4 horizontal board directly over the seam where the beadboard meets the concrete block. This acts as the visual divider; secure it with adhesive and nails. -
Add vertical stiles:
To create the paneled look shown in the photo, cut vertical strips of 1×4 lumber. Space them out evenly along the wall (every 3 to 4 feet creates a nice balance) and attach them over the beadboard seams. -
Cap the top:
Finish the top edge of the beadboard with a 1×2 trim piece or a small chair rail molding creates a polished ledge. -
Install baseboard:
Attach your white baseboard molding at the very bottom of the concrete block wall where it meets the floor. I like to use a PVC baseboard here since concrete floors can sometimes hold moisture.
Step 3: Finishing Touches
-
Fill the holes:
Go over all your wood trim with spackle or wood filler, covering every nail hole. Let it dry completely. -
Sand smooth:
Lightly sand the filled holes and any rough wood edges with 220-grit sandpaper until everything feels seamless to the touch. -
Caulk the seams:
Run a bead of paintable caulk along every edge where wood meets wood, and especially where the trim meets the wall. This eliminates gaps and makes the woodwork look built-in. -
Paint the woodwork:
Paint all the wainscoting, rails, and baseboards with a crisp semi-gloss white paint. Use a high-quality brush for corners and a small foam roller for flat areas to minimize brush strokes. -
Remove tape and clean up:
Carefully peel away any remaining painter’s tape and clean up any dust. Step back and admire the stark, beautiful contrast between the rustic block and the refined woodwork.
Add a Window Shelf
Extend the wainscot top rail deep into the window jamb to create a functional display shelf for plants, tying the trim seamlessly into the window casing.
You have successfully turned a standard basement wall into a textured architectural feature that brightens the entire room
BRUSH GUIDE
The Right Brush for Every Stroke
From clean lines to bold texture — master brush choice, stroke control, and essential techniques.
Explore the Full Guide
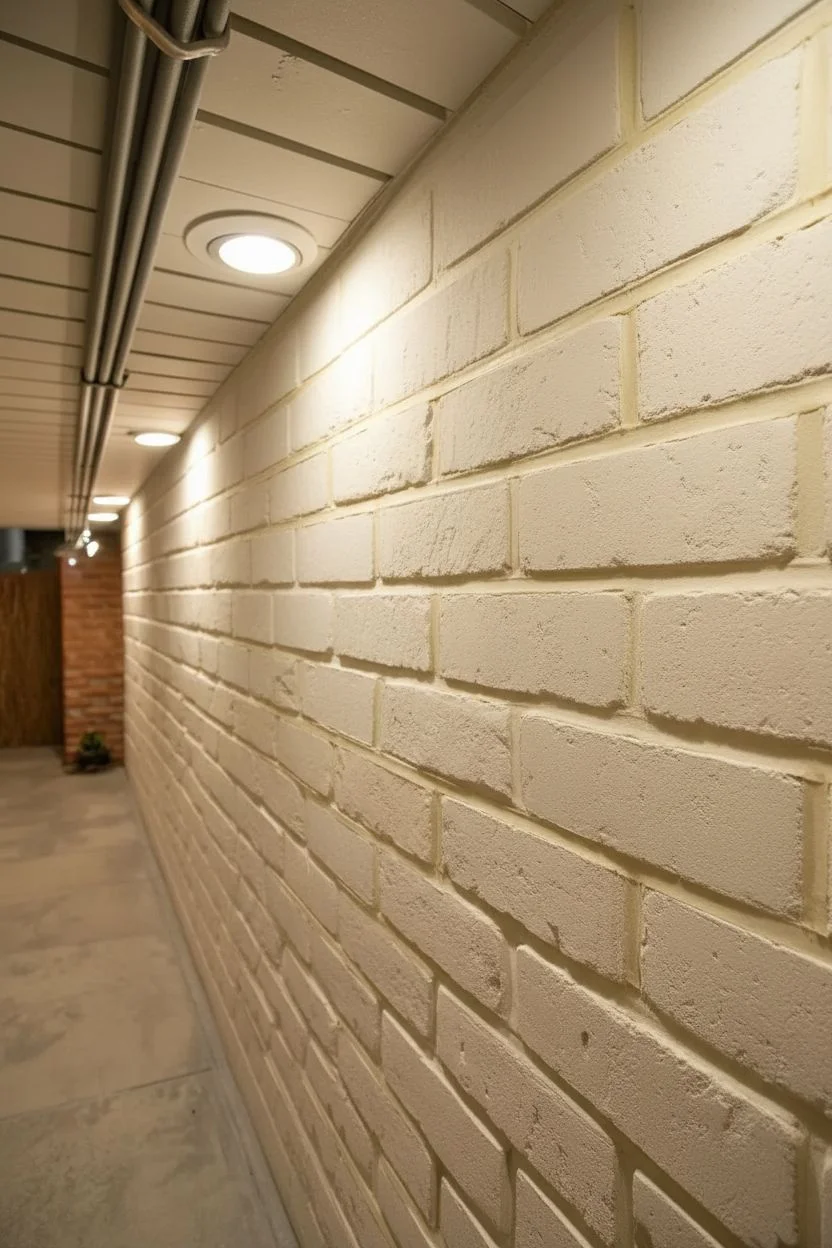
Whitewashed Block to Keep the Texture
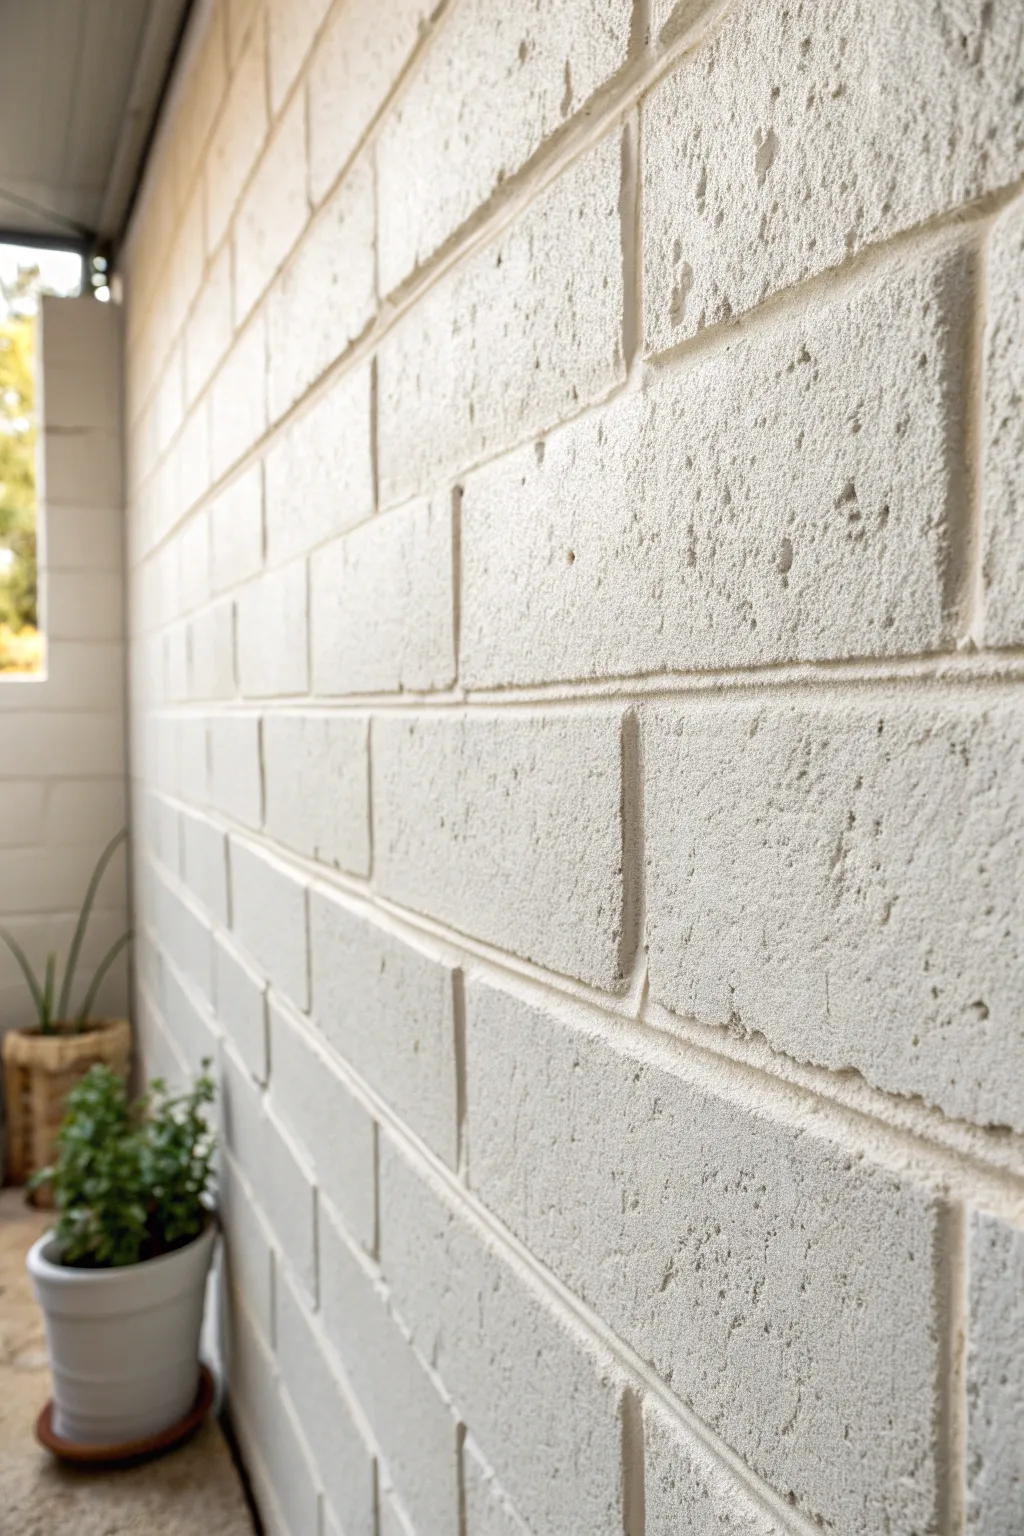
Transform drab basement or exterior cinder blocks into a bright, airy feature wall without losing their characteristic grit. This whitewash-style technique brightens the space significantly while allowing the beautiful, natural pitting of the concrete to remain a focal point.
Detailed Instructions
Materials
- Masonry cleaner or TSP substitute
- Stiff-bristle scrub brush
- Painter’s tape
- White latex masonry paint or chalk-finish paint
- Water (for diluting)
- Large bucket for mixing
- Wide masonry brush (4-6 inch)
- Small angled brush for corners
- Drop cloths
- Drill with mixing paddle attachment
- Matte masonry sealer (optional)
Step 1: Preparation
-
Clear the area:
Move all furniture, planters, and decor away from the wall. Lay down sturdy drop cloths to protect your flooring, as the diluted paint mixture can be quite splashy. -
Scrub the masonry:
Mix your masonry cleaner or TSP substitute with warm water according to the package instructions. Using a stiff-bristle brush, scrub the blocks vigorously to remove dust, cobwebs, and any efflorescence (white powdery deposits). -
Rinse and dry:
Rinse the wall thoroughly with a sponge and clean water. Allow the concrete to dry completely; waiting 24 hours is best to ensure moisture doesn’t get trapped behind the paint. -
Tape off edges:
Apply painter’s tape to the ceiling line, adjacent walls, and floor trim. Press the edges of the tape down firmly to prevent the watery paint form bleeding onto other surfaces.
Use a Garden Sprayer
For large walls, you can apply the watered-down paint using a garden pump sprayer to get it onto the wall quickly, then back-brush it immediately for an even finish.
Step 2: Mixing the Whitewash
-
Pour the paint:
Pour about half a gallon of your white masonry paint into a clean, large bucket. Masonry paint is preferred over standard latex because it allows the concrete to breathe. -
Add water gradually:
Begin adding water to the paint. Start with a 1:1 ratio (equal parts paint and water) if you want a semi-transparent look, or a 2:1 ratio (two parts paint, one part water) for the fuller coverage seen in the example image. -
Mix thoroughly:
Use a drill with a mixing paddle attachment to blend the water and paint. This ensures the pigment is evenly suspended, which is crucial for a consistent finish. -
Test the consistency:
Dip your brush in the mixture and test it on a spare block or inconspicuous corner. The mixture should be runny like heavy cream but thick enough to not immediately run down the wall.
Step 3: Application
-
Cut in the edges:
Dip your small angled brush into the mixture and carefully paint along the taped edges, corners, and ceiling line first. -
Saturate the masonry brush:
Load your wide masonry brush with the whitewash mixture. You want it fairly wet, as the porous block will drink up the liquid quickly. -
Apply firmly:
Apply the paint to the blocks using multidirectional strokes. Push the bristles into the pores and pits of the concrete. I like to work in small 3×3 foot sections to maintain a wet edge. -
Feather the grout lines:
Make sure to push paint specifically into the deep grout lines. Don’t let it pool there; use the brush to spread any excess liquid outward onto the block faces. -
Inspect for drips:
Watch the area you just painted for about 5 minutes. Since the paint is thin, runs are common. Back-brush over any drips immediately to smooth them out. -
Let the first coat dry:
Allow the first coat to dry for at least 4 hours. The wall may look patchy or grayish while wet, but it will whiten significantly as it dries. -
Assess coverage:
Once dry, check the opacity. If you want a more solid white look like the photo, a second coat is usually necessary. Repeat the application process with the same mixture. -
Seal the surface:
If this is in a high-moisture area or you want to prevent concrete dust, roll on a clear, matte masonry sealer once the paint has cured for 48 hours.
Add Warmth
Instead of stark white, mix a drop of warm gray or beige into your white base. It keeps the brightness but softens the harshness under basement lighting.
Enjoy the fresh, clean atmosphere your new bright walls bring to the room
Limewash-Inspired Cloudy Finish for Old-World Softness
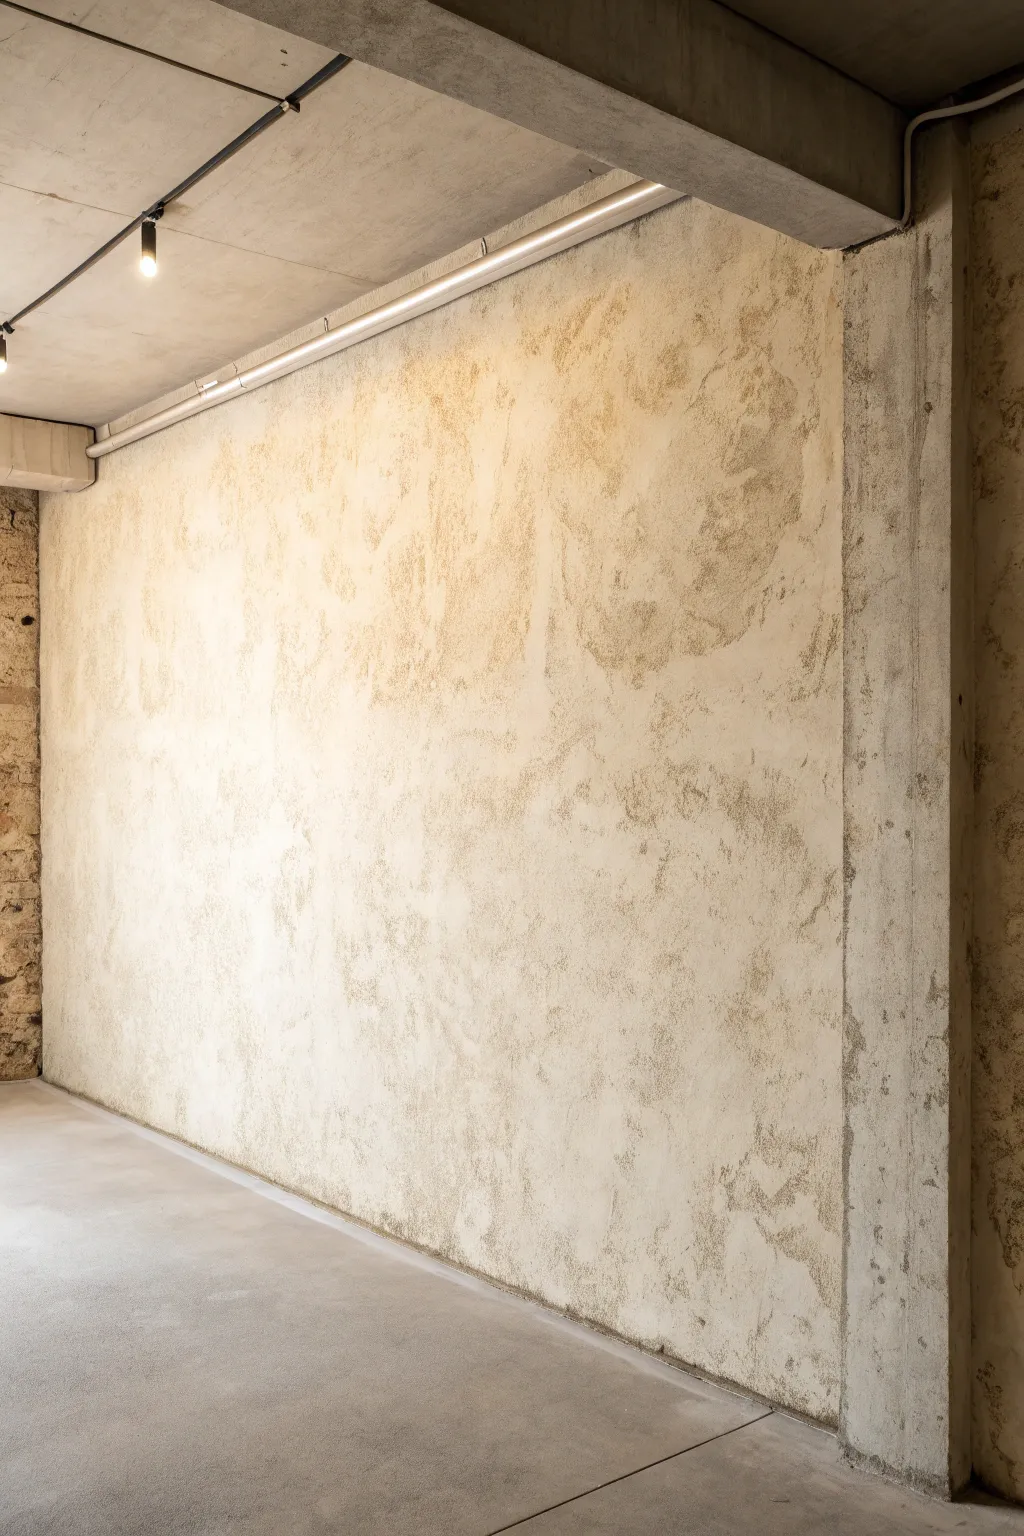
Transform cold, hard concrete into a surface that feels warm and historic with this faux limewash technique. By layering diluted paint glazes, you create a soft, mottled texture that mimics the old-world charm of European plaster without the heavy construction work.
Step-by-Step
Materials
- High-quality interior latex paint (matte finish, warm beige/cream)
- Glaze medium (clear)
- Water
- Large block brush (4-6 inch, natural bristle if possible)
- Sea sponge or clean cotton rags
- Painter’s tape
- Drop cloths
- Paint tray and multiple mixing buckets
- Primer (masonry specific if painting raw concrete)
Step 1: Preparation and Base Coat
-
Clean the Surface:
Begin by thoroughly cleaning the concrete wall to remove dust, efflorescence, or grease. A stiff brush and a mild detergent solution usually work well; rinse and let it dry completely. -
Mask the Area:
Protect your ceiling, adjacent walls, and floor with painter’s tape and drop cloths. This technique can get a bit drippy, so cover more floor area than you think you need. -
Prime the Concrete:
If your wall is raw concrete, apply a high-quality masonry primer to ensure adhesion. If it’s already painted, a standard bonding primer is sufficient. Let this cure fully. -
Apply the Base Color:
Roll on a solid coat of your matte beige paint. This serves as the background color and ensures no gray concrete shows through the final hazy layers.
Step 2: Mixing the Glaze
-
Create the Glaze Mixture:
In a bucket, mix one part of your beige latex paint with four parts clear glaze medium. This extends drying time and creates transparency. -
Adjust Viscosity:
Add water slowly to the mix until it reaches the consistency of heavy cream. I prefer it slightly runny so it moves easily across the rough texture. -
Test the Opacity:
Brush a small amount onto a scrap piece of cardboard. It should be semi-transparent; if it’s too opaque, add a splash more water or glaze.
Uneven Patches?
If you see hard lines where sections dried too fast, dampen a sea sponge with warm water and gently rub the edge to re-activate and blur the glaze line.
Step 3: Creating the Cloudy Texture
-
Load the Block Brush:
Dip just the bottom inch of your large block brush into the glaze mixture. Tap off the excess so it isn’t dripping wet. -
Apply in X-Strokes:
Starting in a top corner, apply the glaze using large, random ‘X’ shaped strokes. Keep your wrist loose and change the angle frequently. -
Work in Sections:
Focus on a 3-foot by 3-foot section at a time. The goal is to keep a ‘wet edge’ so you don’t end up with visible seam lines between patches. -
Feather the Edges:
As you move to the next section, lightly brush over the boundary of the previous section to blend them seamlessly. -
Softening with a Rag:
while the glaze is still wet, gently pat areas that look too heavy or uniform with a damp cotton rag or sea sponge to lift clearer patches. -
Create Depth Variations:
Leave some areas with very thin glaze application and allow others to act as pools of slightly deeper color. This irregularity creates the authentic cloudy look.
Add Pigment Depth
Mix a second glaze batch with a slightly darker beige or taupe. Apply this randomly in just a few areas during the second pass for rich, tonal dimension.
Step 4: Layering and Refining
-
Dry the First Layer:
Allow the first glaze application to dry until it is tacky but not fully cured, usually about 30 to 45 minutes. -
Assess the Pattern:
Step back about ten feet to look for any repeating patterns or harsh lines. The wall should look organic and random. -
Apply a Second Pass:
Using the same ‘X’ stroke technique, apply a second, very thin layer of glaze, concentrating on the areas that look too light. -
Add Water Drips (Optional):
For an older, more weathered look, flick a tiny amount of clean water onto the wet glaze and lightly drag a dry brush downward through it. -
Final Blending:
Use a clean, dry brush to gently sweep over the entire surface in varying directions. This softens the brush marks into the desired velvety texture. -
Full Cure:
Let the wall dry undisturbed for at least 24 hours. The glaze will look different when wet versus dry, so patience is key here.
Enjoy the calm, sophisticated atmosphere your new walls bring to the space

PENCIL GUIDE
Understanding Pencil Grades from H to B
From first sketch to finished drawing — learn pencil grades, line control, and shading techniques.
Explore the Full Guide
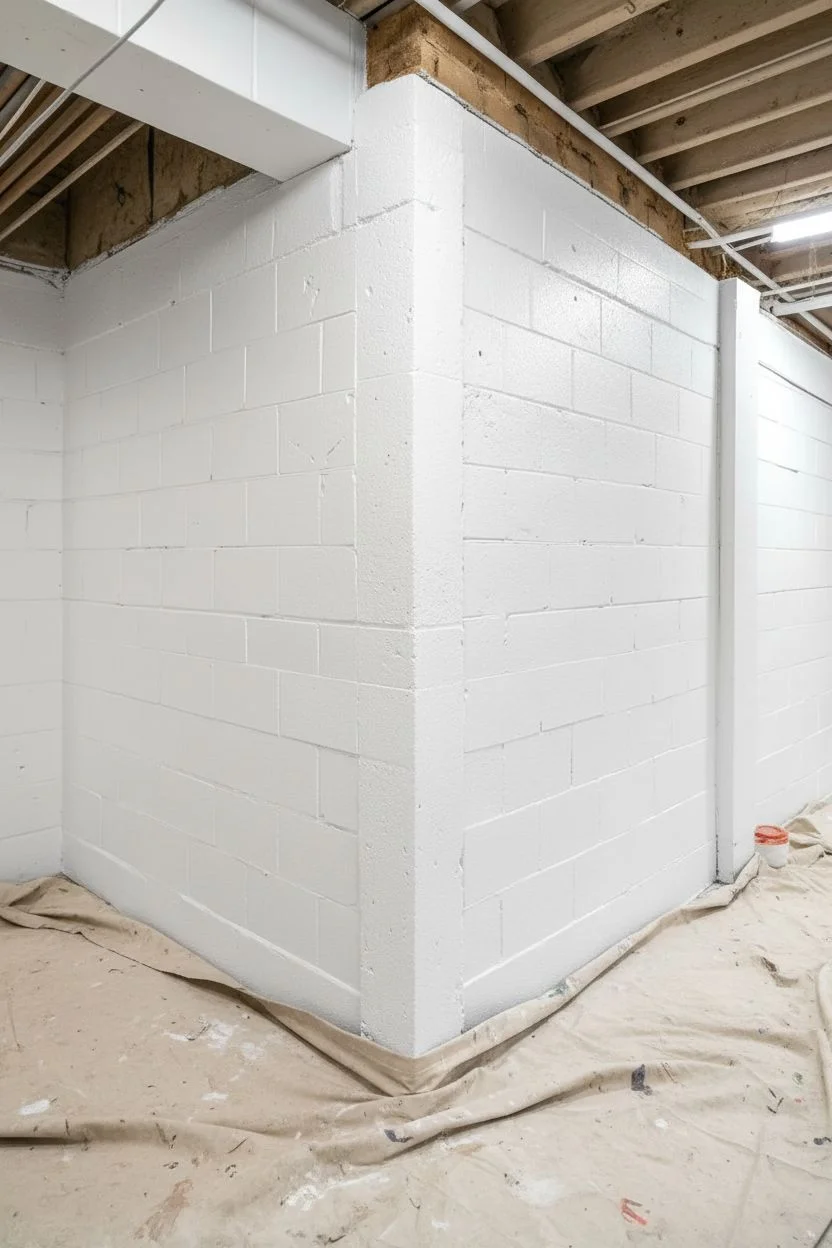
Smooth-It-Out Look Using a Skim-Style Paint Approach
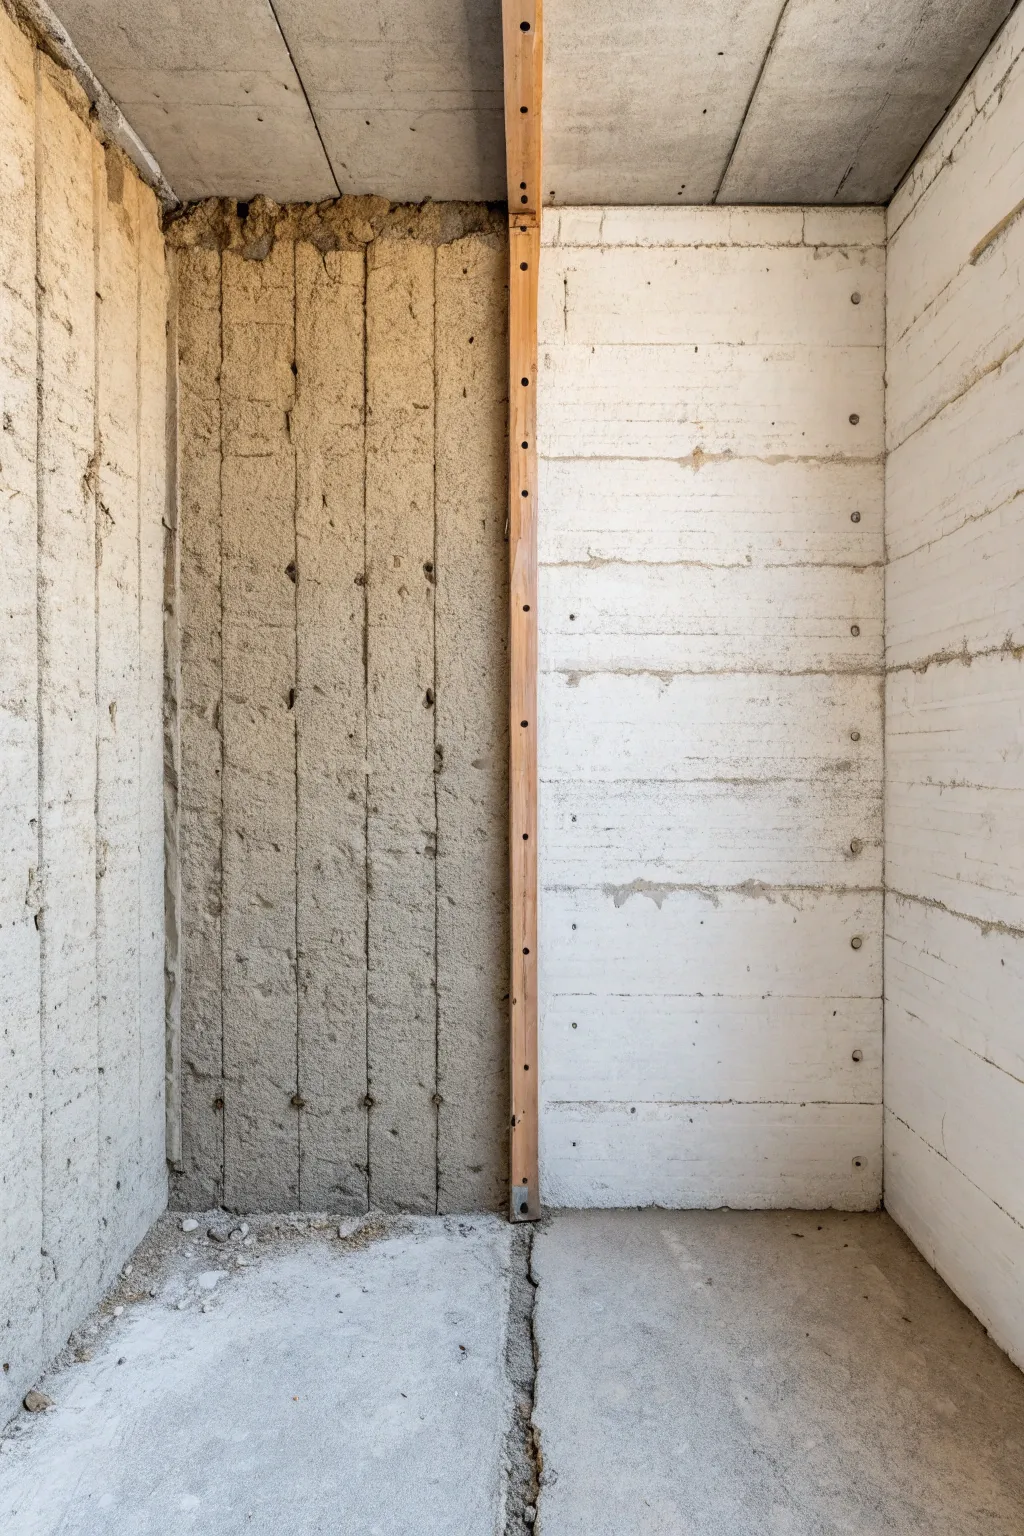
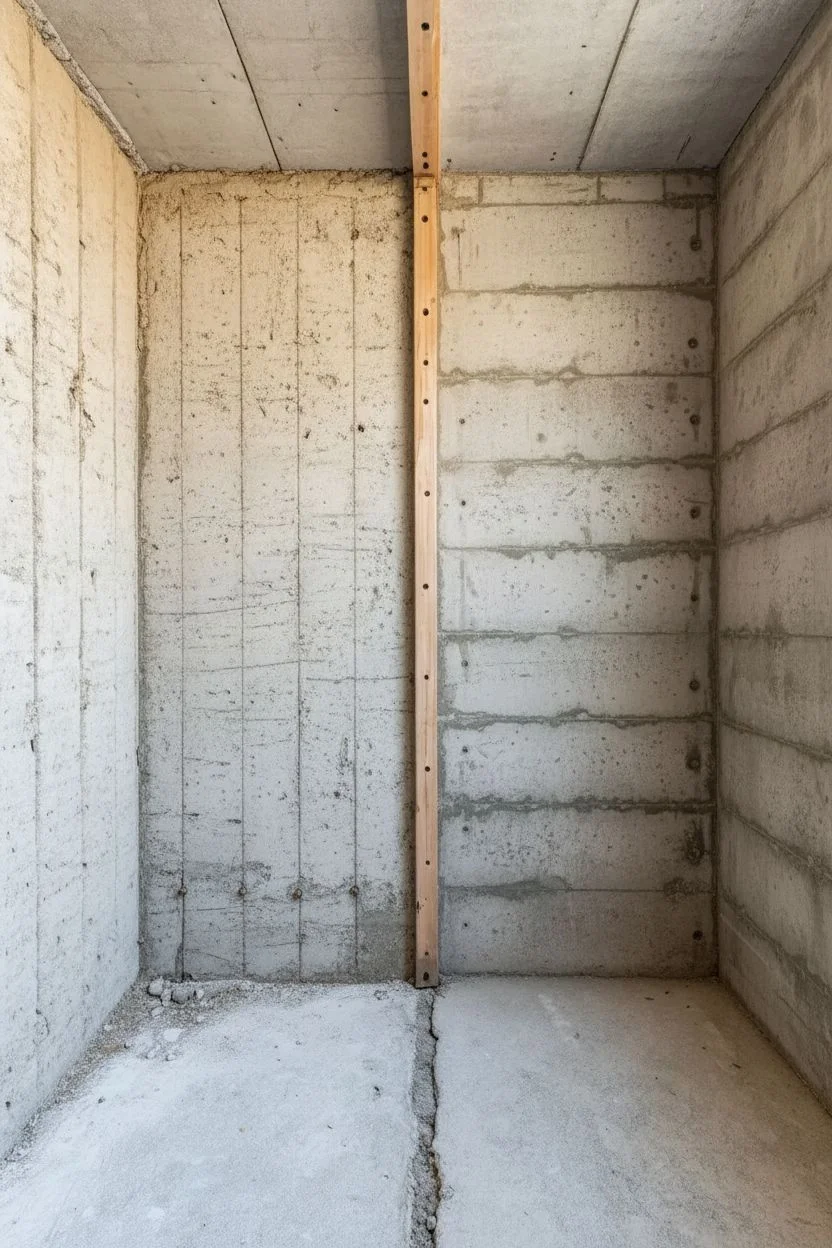
This project transforms a standard concrete basement corner into a striking architectural statement by juxtaposing rugged texture with a sleek, whitewashed finish. The result highlights the raw beauty of board-formed concrete while brightening the space with a sophisticated two-tone effect.
How-To Guide
Materials
- Wire brush or stiff-bristle scrub brush
- Concrete cleaner or degreaser
- Pressure washer (optional)
- Painter’s tape (2-inch width)
- Heavy-duty drop cloths
- Masonry primer (white)
- High-quality masonry paint (bright white)
- Paint roller with thick nap (3/4-inch to 1-inch)
- Wide paintbrush (4-inch)
- Vertical wooden beam (4×4 or similar size to match ceiling height)
- Construction adhesive
- Concrete screws or anchors
- Drill with masonry bits
- Matte clear concrete sealer
- Spackle or fast-setting cement patch (optional for filling voids)
Step 1: Setting the Divide
-
Clean the substrate:
Begin by thoroughly cleaning the entire concrete surface. Use a wire brush to remove distinct loose debris, efflorescence, or dirt, then scrub with a concrete cleaner. If the area allows, a light pressure wash ensures the best adhesion for later steps. -
Dry completely:
Allow the concrete to dry fully, which may take 24 to 48 hours depending on humidity. Trapped moisture can cause paint failure later. -
Position the beam:
Determine the exact line where you want the transition between the raw and painted wall to occur. Place your vertical wooden beam against the wall to act as a physical divider, ensuring it is perfectly plumb with a level. -
Secure the timber:
Fasten the wooden beam securely. I like to apply a bead of heavy-duty construction adhesive to the back, then anchor it mechanically using concrete screws countersunk into the wood for a clean look.
Step 2: Preserving the Raw Side
-
Protect the beam:
Since the left side will remain raw, apply painter’s tape carefully along the left edge of your newly installed wooden beam to protect it from any accidental sealant splashes. -
Dust check:
Give the left wall section one final wipe-down with a dry cloth or vacuum to ensure no dust is sitting in the deep crevices of the board-formed texture. -
Apply matte sealer:
Using a roller or sprayer, apply a coat of matte clear concrete sealer to the raw wall section. This won’t change the color significantly but will stop the concrete from shedding dust and darken the tone slightly for better contrast. -
Work into crevices:
Use an inexpensive chip brush to dab the sealer into the deeper pockets and horizontal lines of the concrete texture to ensure full coverage.
Uneven Paint Coverage?
Concrete holds paint differently due to porosity. If you see dark spots after drying, dab undiluted primer into those specific pores with a brush before rolling again.
Step 3: Creating the Smoothed White Finish
-
Tape off the right side:
Once the sealer on the left is dry, move to the right side or the adjacent wall. Apply painter’s tape to the right edge of the wooden beam to keep your paint line sharp. -
Fill major voids (Optional):
If you want a significantly smoother look than the raw side, use a spackle or cement patch to fill larger ‘bug holes’ or deep pits on the right wall. Sand flush once dry. -
Prime the surface:
Apply a heavy coat of high-quality masonry primer. This is crucial for sealing the porous concrete and provides a uniform base for the topcoat. -
Cut in edges:
Use your wide paintbrush to cut in around the ceiling, floor, and along the wooden beam. Because concrete is rough, use a dabbing motion to get paint into the corners. -
Roll the first coat:
Load a thick-nap roller with masonry paint. Apply using moderate pressure to push the paint into the surface texture. You aren’t trying to hide the texture completely, just coat it uniformly. -
Assess coverage:
Let the first coat dry for the manufacturer’s recommended time. Check for pinholes where the concrete absorbed too much paint. -
Apply final coat:
Roll on a second, generous coat of bright white masonry paint. This layer will provide the solid, opaque ‘skim-style’ finish that contrasts so well with the raw wall. -
Floor treatment:
For the floor, clean the concrete slab thoroughly. If you want to replicate the image’s division, create a similar hard line on the floor using tape, sealing the raw side and painting or staining the right side to match the walls. -
Remove tape:
While the final coat is still slightly tacky, carefully peel away the painter’s tape from the wooden beam to reveal crisp, clean lines. -
Final inspection:
Walk through the space and check for any touch-ups needed near the beam or corners.
Pro Tip: Better Adhesion
Dampen the concrete slightly with a misting bottle before painting. This prevents the porous wall from sucking the moisture out of the paint too fast.
Enjoy the dramatic and industrial atmosphere your new feature wall brings to the basement
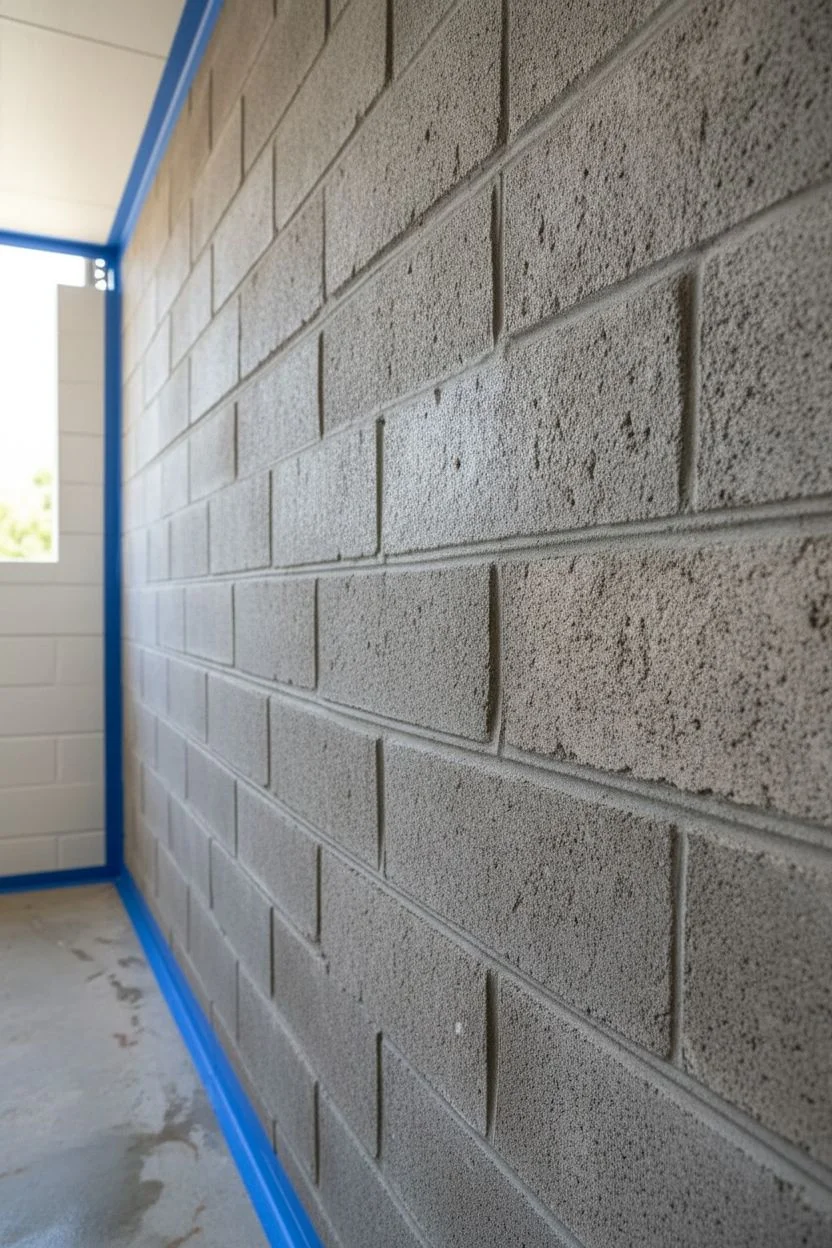
Color-Blocked Zones for a Multi-Use Basement
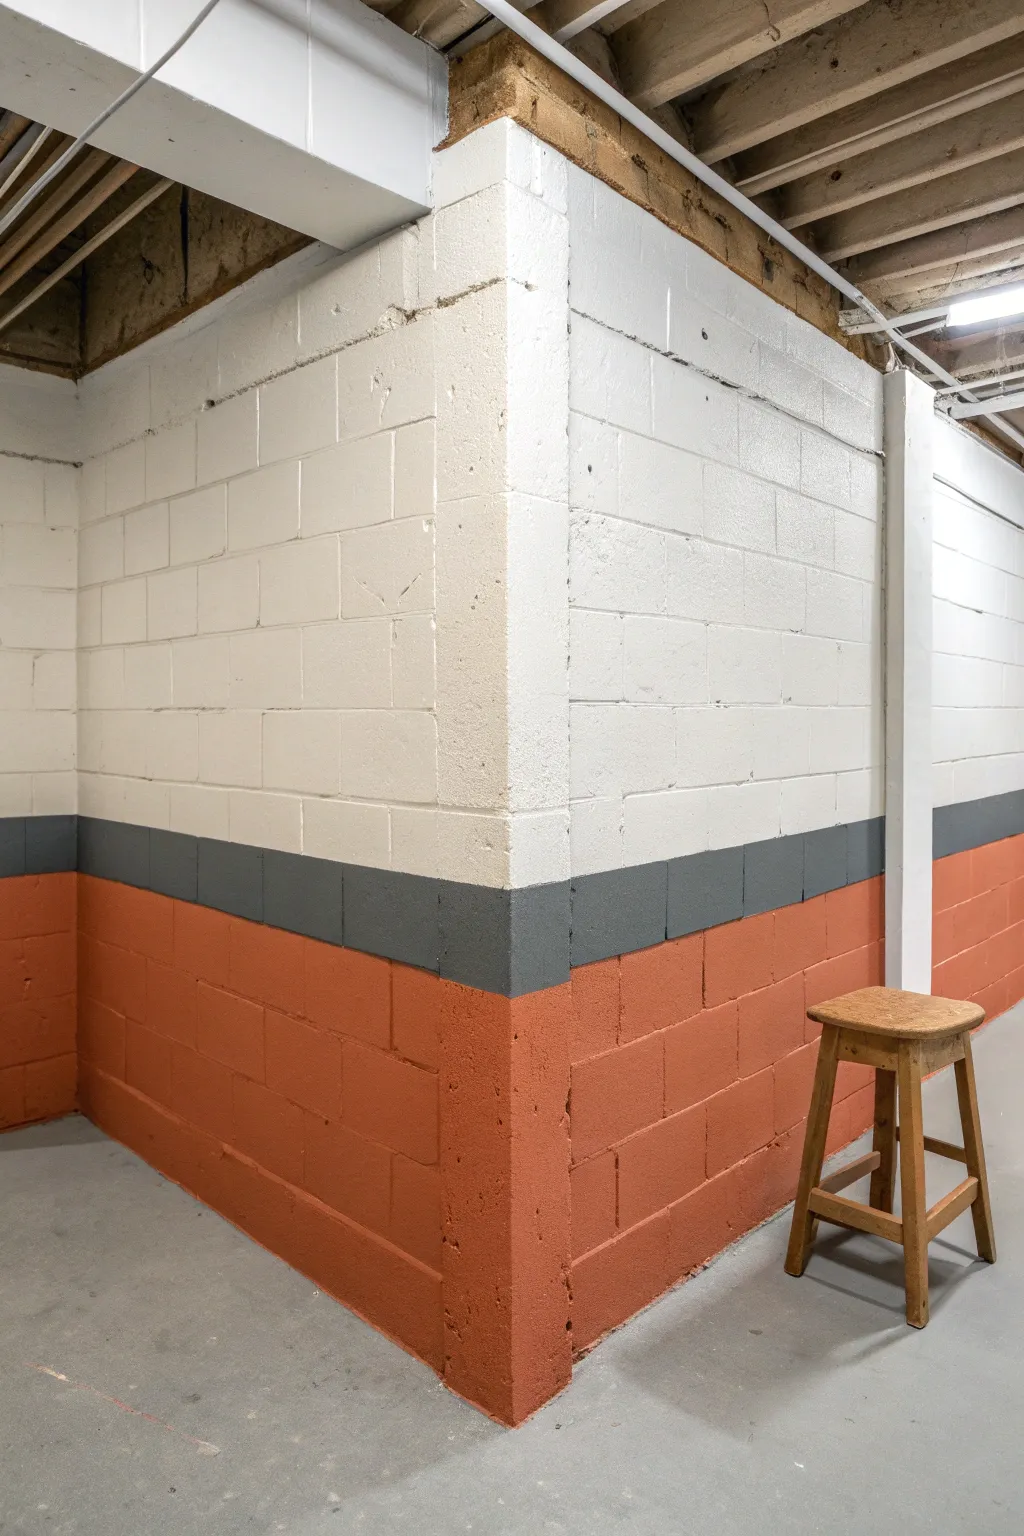
Transform a plain concrete block wall into a modern, industrial statement piece with this bold color-blocking technique. The sharp horizontal lines and contrasting palette of terra cotta, charcoal, and bright white create defined zones that make a large basement feel structured and intentional.
Step-by-Step Tutorial
Materials
- Wire brush or stiff-bristle scrub brush
- Concrete cleaner or degreaser
- Masonry primer (white)
- Masonry paint or high-quality acrylic latex paint (Terra Cotta/Burnt Orange)
- Masonry paint or high-quality acrylic latex paint (Charcoal Gray)
- Masonry paint or high-quality acrylic latex paint (Bright White)
- Painter’s tape (high adhesion for textured surfaces)
- 3/4-inch nap roller covers
- Paint roller frame and extension pole
- 2-inch angled sash brush
- Drop cloths
- Measuring tape
- Laser level or chalk line
- Pencil
Step 1: Preparation
-
Clear the area:
Move all furniture and items away from the walls. Lay down heavy-duty drop cloths to protect your concrete floor from inevitable drips, especially since cinder block is porous and absorbs spills quickly. -
Clean the surface:
Scrub the concrete blocks vigorously with a wire brush or stiff scrub brush to remove efflorescence (white powdery deposits), loose mortar, and dirt. This is the most critical step for adhesion. -
Wash the walls:
Use a specialized concrete cleaner or a degreaser mixed with warm water to wash the walls down. Allow the concrete to dry completely—this can take 24 to 48 hours depending on humidity, but don’t rush it. -
Prime the surface:
Apply a coat of masonry primer using a thick 3/4-inch nap roller. This thick nap is essential to push primer into the deep pores and mortar joints. Cut in the edges and corners first with your angled brush.
Step 2: Adding the Base Colors
-
Paint the top section white:
Start by painting the top two-thirds of the wall with your bright white masonry paint. Don’t worry about a perfect bottom edge yet; just paint slightly lower than where you want your gray stripe to begin to ensure full coverage. -
Fill the texture:
Use the brush to dab paint into any deep pinholes or mortar gaps the roller missed. I find doing this immediately while the paint is wet helps it blend better without leaving brush marks. -
Apply a second coat:
Once the first white coat feels dry to the touch, roll on a second coat for a solid, opaque finish. Let this cure fully for at least 24 hours before applying any tape.
Seal the Tape
For crisp lines on bumpy cinder blocks, always paint the ‘base’ color over your tape edge first. This seals gaps so your new color sits perfectly on top.
Step 3: Creating the Stripes
-
Measure the stripe heights:
Decide on your heights. In the reference image, the terra cotta base covers roughly the bottom four block courses, while the gray stripe is exactly one block high. Mark these heights lightly with a pencil. -
Mark level lines:
Use a laser level to project a straight line across the wall for the top of the gray stripe. If you don’t have a laser level, snap a chalk line, but verify it with a standard level to ensure it’s perfectly horizontal. -
Tape the top edge:
Apply painter’s tape along the laser line/chalk mark on the white painted section. Press the tape edge firmly into the texture of the blocks using a putty knife or your fingers to minimize bleed. -
Seal the tape edge:
Lightly brush a small amount of the *white* paint over the edge of the tape. This trick seals the tape edge with the existing wall color, preventing the gray paint from bleeding underneath later. -
Paint the gray stripe:
Using a smaller roller or brush, paint the charcoal gray stripe. Extend this color slightly lower than where the orange section will start to ensure no white gaps appear later. -
Remove tape and dry:
Peel off the tape while the gray paint is still slightly tacky to get a crisp line. Allow the gray paint to dry completely (overnight is best) before taping over it for the next section.
Tape Won’t Stick?
Concrete holds dust and moisture. If tape peels, the wall may still be damp or unfinished. Let it dry longer or wipe the tape line with a dry microfiber cloth.
Step 4: Finishing with Color
-
Tape the bottom edge:
Establish the line where the gray stripe meets the terra cotta bottom. This should ideally align with a mortar joint line for a clean look, or simply measure one block height down from your top line. Apply tape over the now-dry gray paint. -
Seal the second tape line:
Just like before, brush a little bit of the *gray* paint over the tape edge to lock it in. -
Paint the bottom section:
Roll on the terra cotta/burnt orange masonry paint for the bottom section. Use the sash brush to work the paint carefully into the intricate corner joints and near the floor. -
Second coat for richness:
Apply a second coat of the terra cotta paint to achieve that deep, saturated hue seen in the photos. -
Reveal the design:
Carefully remove the final strip of tape. Use a small artist’s brush to touch up any tiny spots where the texture might have caused a skip or bleed.
Step back and admire how a simple trio of colors turns a utilitarian space into a finished room suitable for work or play


Faux Brick Illusion Painted Right on Concrete Block
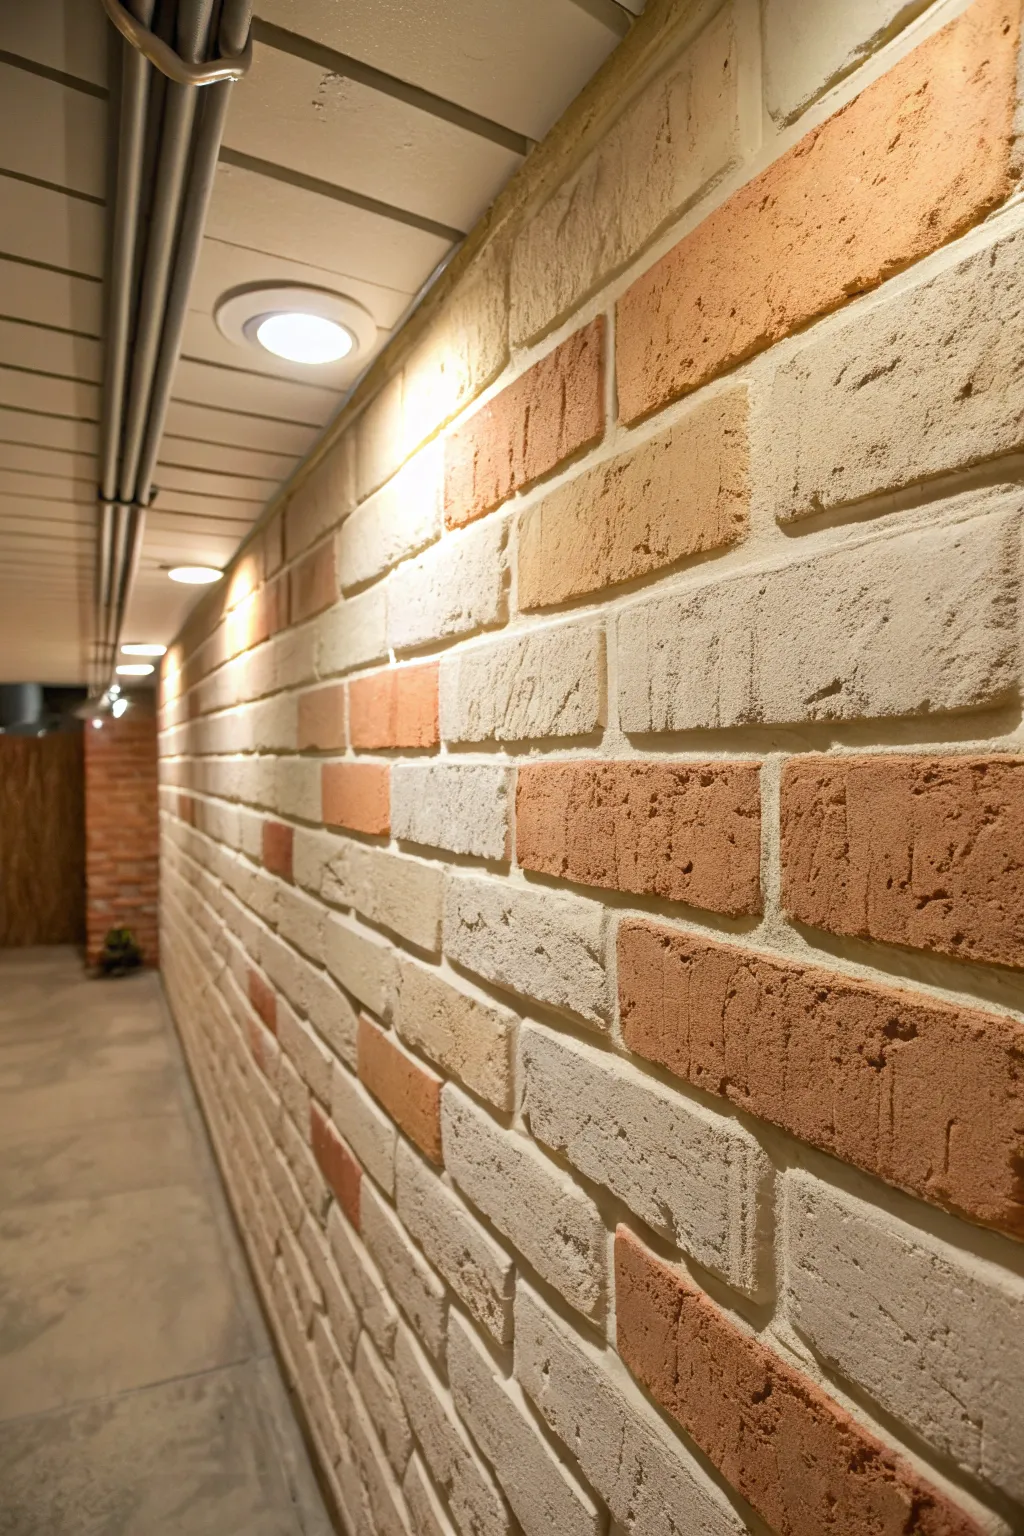
Transform a plain concrete wall into a warm, textured brick masterpiece with this deceptive faux finishing technique. By using texture mediums and a careful layering process, you can achieve the depth and grit of real aged brick without laying a single stone.
Step-by-Step Tutorial
Materials
- TSP substitute or degreaser
- Painter’s tape
- Base coat primer (gray or cream)
- Texture medium (sand additive or stucco patch)
- Joint compound or thick texture paste
- Trowel or wide putty knife
- Stencil tape (1/4 inch or 3/8 inch width)
- Level and chalk line
- Sea sponge or texture roller
- Latex paint (Terracotta, Burnt Orange, Cream, Tan)
- Chip brushes (various sizes)
- Matte clear sealer
Step 1: Preparation & Base Application
-
Clean the Surface:
Begin by thoroughly cleaning the concrete wall with a TSP substitute or degreaser. Remove any dust, cobwebs, or oil spots to ensure your materials bond properly. Allow the wall to dry completely before moving forward. -
Prime the Surface:
Roll on a solid base coat of primer. Choose a color that represents your desired ‘mortar’ color, such as a light gray or a creamy off-white. This will be the color revealed between the bricks later, so ensure full coverage. -
Measure and Mark:
Once dry, decide on the size of your bricks. Standard dimensions are roughly 3 inches tall by 8 inches wide. Use a level and a chalk line to lightly snap horizontal grid lines across the wall to keep your courses straight. -
Tape the Grout Lines:
Apply thin painter’s tape or dedicated stencil tape over your chalk lines to create the horizontal mortar joints. Then, add short vertical tape pieces to create the staggered brick pattern. Press the tape edges down firmly to prevent bleed-under.
Sticky Tape Blues?
If the tape pulls up your base coat, your primer wasn’t fully cured. Touch up the peeled spots with a small brush and wait longer before taping the next section.
Step 2: Creating Texture
-
Mix the Texture Compound:
In a bucket, mix joint compound or thick texture paste with a gritty additive like sand. You want a heavy, oatmeal-like consistency that will hold its shape on the wall. -
Apply the Base Texture:
Using a trowel or putty knife, spread the texture mixture over the exposed areas between the tape. Don’t try to make it perfectly smooth; real bricks have imperfections, pits, and ridges. -
Add Dimension:
While the compound is still wet, gently press a clean sea sponge or scrunched-up foil into random bricks to create pockmarks and deeper texture. Vary your pressure so no two bricks look identical. -
Remove Tape While Wet:
Here I prefer to carefully peel off the tape before the compound fully hardens. Pull the tape gently away from the wall at a 45-degree angle. This keeps the edges slightly soft and organic rather than razor-sharp, which enhances realism. -
Let it Cure:
Allow the textured ‘bricks’ to dry completely, typically for at least 24 hours depending on humidity and thickness. The compound should be hard to the touch.
Step 3: Painting & Coloring
-
Paint the Base Brick Color:
Select your main brick colors—mostly tans and creams for this look, with accents of terracotta. Paint the textured rectangles completely with your lightest neutral shade (cream or light tan) first. -
Sponge on Accents:
Dip a sea sponge into your terracotta or burnt orange paint. Dab off most of the paint onto a paper towel until the sponge is almost dry. Lightly pounce color onto random bricks, focusing on about 30% of them for variety. -
Layering Colors:
Repeat the sponging process with a darker tan or brown shade. Apply this even more sparsely to create an aged, weathered appearance. The goal is to have some bricks look newer and others more worn. -
Adding Highlights:
Using a dry chip brush with a tiny amount of off-white paint, gently drag the bristles horizontally across the raised textures of the darker bricks. This highlights the grit and mimics surface wear. -
Touch Up Mortar:
If any brick paint accidentally strayed into the grout lines, use a small craft brush and your original base mortar color to touch up those gaps, keeping the definition crisp.
Pro Tip: Shadow Play
For ultimate realism, paint a thin, translucent line of dark gray glaze along the bottom edge of each brick. It creates a false shadow that makes the bricks pop.
Step 4: Finishing Touches
-
Inspect the Wall:
Step back about five feet to view the overall pattern. If any area looks too uniform or patchy, add small dabs of color to balance the composition. -
Seal the Surface:
Once all paint is fully dry, roll on a coat of matte clear sealer. This protects the textured finish from dust and moisture, which is especially important in basement environments.
Step back and enjoy the depth and character your new wall brings to the space
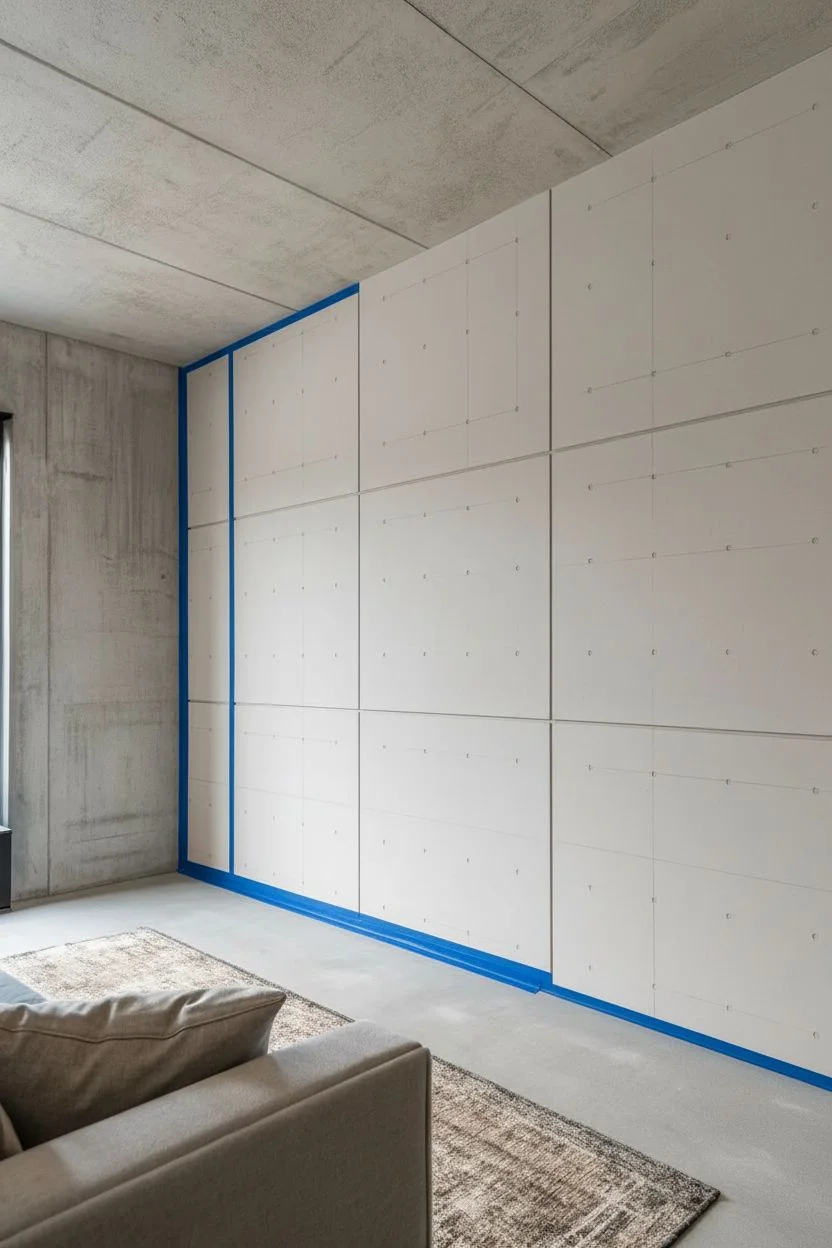
Faux Concrete Panel Lines for a Sleek Industrial Look
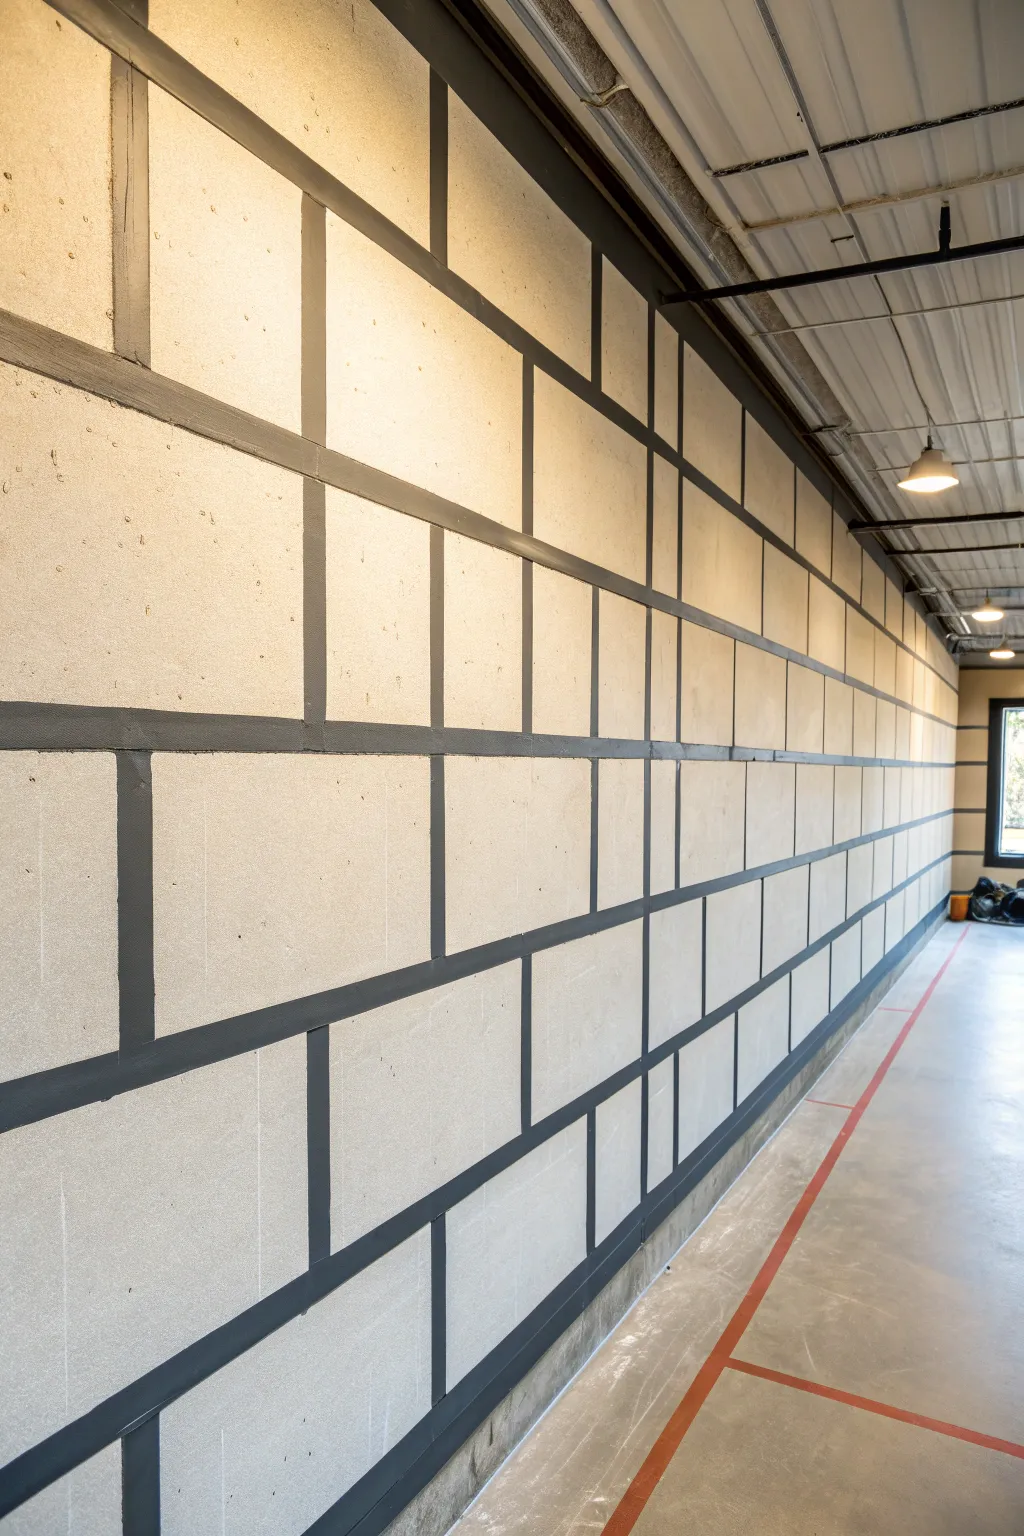
Transform a plain, expansive concrete wall into a sophisticated industrial feature with this high-contrast faux finish. By using strategic taping and bold paint, you’ll create the illusion of large-scale architectural panels without the hefty cost of actual stonework.
Step-by-Step
Materials
- High-quality painter’s tape (1-inch width)
- Laser level or chalk line
- Measuring tape
- Pencil
- Dark charcoal or black latex paint (eggshell or satin finish)
- Light warm gray or off-white concrete paint (masonry formulated)
- Medium sash brush (2-inch)
- Paint roller (9-inch) and extendable pole
- Roller covers (3/8-inch nap for smoother concrete, 1/2-inch for rougher)
- Small foam roller (4-inch)
- Drop cloths
- Damp rag
Step 1: Preparation and Base Coat
-
Clean the Surface:
Begin by thoroughly cleaning the concrete wall. Sweep away cobwebs and dust with a broom, then wipe down any grimy areas with a damp rag to ensure proper paint adhesion. -
Seal Cracks:
Inspect the wall for any deep cracks or holes. Fill these with a concrete patch compound and sand them smooth once dry so your faux panels look pristine. -
Apply the Base Coat:
Roll on your light warm gray or off-white masonry paint across the entire wall. This color will act as the ‘panel’ face. -
Allow to Dry:
Let the base coat dry completely, usually overnight. This step is crucial because adhering tape to wet paint will ruin your finish.
Step 2: Mapping the Grid
-
Calculate Panel Sizes:
Determine the dimensions of your faux blocks. A staggered ‘running bond’ pattern—like standard brickwork but larger—works best. Aim for rectangles that are roughly 24 inches wide by 12 inches high for a balanced look. -
Mark Horizontal Lines:
Use a laser level to project straight horizontal lines across the length of the wall at your chosen height intervals. -
Trace the Lines:
Lightly trace these projected lines with a pencil. Double-check your measurements from floor to ceiling to ensure everything remains level. -
Mark Vertical Lines:
Mark your vertical lines to create the columns of the grid. Remember to stagger them; the vertical line of one row should land exactly in the middle of the block above/below it.
Laser Level Logic
Work in dim lighting when tracing your initial lines. It makes the laser level beam much sharper and easier to follow with your pencil.
Step 3: Taping the Grout Lines
-
Tape the Horizontals:
Apply your 1-inch painter’s tape *over* your pencil lines. The area covered by the tape will eventually become your dark grout line, which seems counter-intuitive, so pay attention here. -
Tape the Verticals:
Place tape over your vertical pencil marks. Where the vertical tape meets a horizontal tape line, cut the tape cleanly so it butts up against the horizontal strip without overlapping excessively. -
Press and Seal:
Run your finger or a putty knife firmly along the edges of all tape strips. A tight seal prevents paint bleed. -
Seal the Edges:
I like to take a tiny bit of the *base wall color* and brush it lightly over the edges of the tape. This seals the tape and ensures that if any paint bleeds under, it matches the wall color, keeping lines crisp.
Bleeding Lines?
If paint bled under the tape, wait for it to dry completely. Then, re-mask that specific edge and touch up with the original background color.
Step 4: Painting the Grout
-
Wait for Sealer to Dry:
If you used the base coat sealing trick, wait about 30 minutes for that to dry. -
Paint the Lines:
This is where the technique flips. Instead of painting the tape, you are actually going to paint *over* the tape lines using your dark charcoal paint. Yes, paint right over the tape. -
Use the Foam Roller:
Using the 4-inch foam roller, roll a solid coat of dark charcoal paint directly over the tape grid. Make sure the roller overlaps onto the wall about 1-2 inches on either side of the tape. -
Feather the Edges (Optional):
If you want a softer shadow look, you can feather the dark paint out, but for the sharp graphic look in the image, keep the dark paint fairly concentrated around the tape lines.
Step 5: The Big Reveal
-
Repaint the Panels (The Inversion):
Wait for the dark line paint to fully dry. Now, carefully re-taped over the *dark painted areas*? No! We need to reveal the lines. Remove the tape? Not quite yet. *Correction*: The image shows dark recessed lines. To achieve this easily on an existing wall, you actually paint the *lines* first, then tape them off, then paint the wall. Since we started with a *light* wall, we need to hand-paint the lines *between* the blocks. -
Revised Strategy: Hand-Painting the Grout:
Since we already have a light wall and tape on it, let’s pivot to the most precise method for the image shown. You have tape on the wall representing the *grout lines*. Paint the *panels* again with your light color to cover pencil marks? No. Remove the tape to reveal… the wall color? That’s invisible. -
The Correct Method for this Photo’s Look:
Let’s restart the painting logic for the specific result in the photo. The *grout* is dark, the *panel* is light. The Tape represents the GROUT. Paint the *spaces between the tape* with your Light Panel Color. Oh wait, the wall is already light. -
Final Taping Step Correction:
Actually, looking at the photo’s thick dark lines, the easiest way to get this result is: 1. Base coat the wall the LIGHT color. 2. Tape off the rectangles (the *panels*), leaving 1-inch gaps between tape squares exposed. 3. Paint the exposed gaps DARK. -
Tape the Panels (Masking the Blocks):
Using your mapped grid, apply tape to the *inside* edges of your pencil lines, essentially masking off the large rectangular ‘blocks’. This leaves a 1-inch gap (the pencil line area) exposed between the tape squares. -
Paint the Grout Lines:
Now, take your small sash brush or 4-inch roller and paint the dark charcoal color into those exposed 1-inch channels between the taped rectangles. -
Remove Tape:
While the dark paint is still slightly tacky (don’t wait for it to cure fully or it might peel), gently pull off the tape at a 45-degree angle. -
Touch Up:
Use a small artist’s brush to tidy up any spots where the tape might have lifted the base paint or where the dark line isn’t perfectly crisp.
Step back and admire how this simple paint technique adds architectural depth and modern structure to your space
Painted Mural Feature Wall for a Basement Lounge Corner
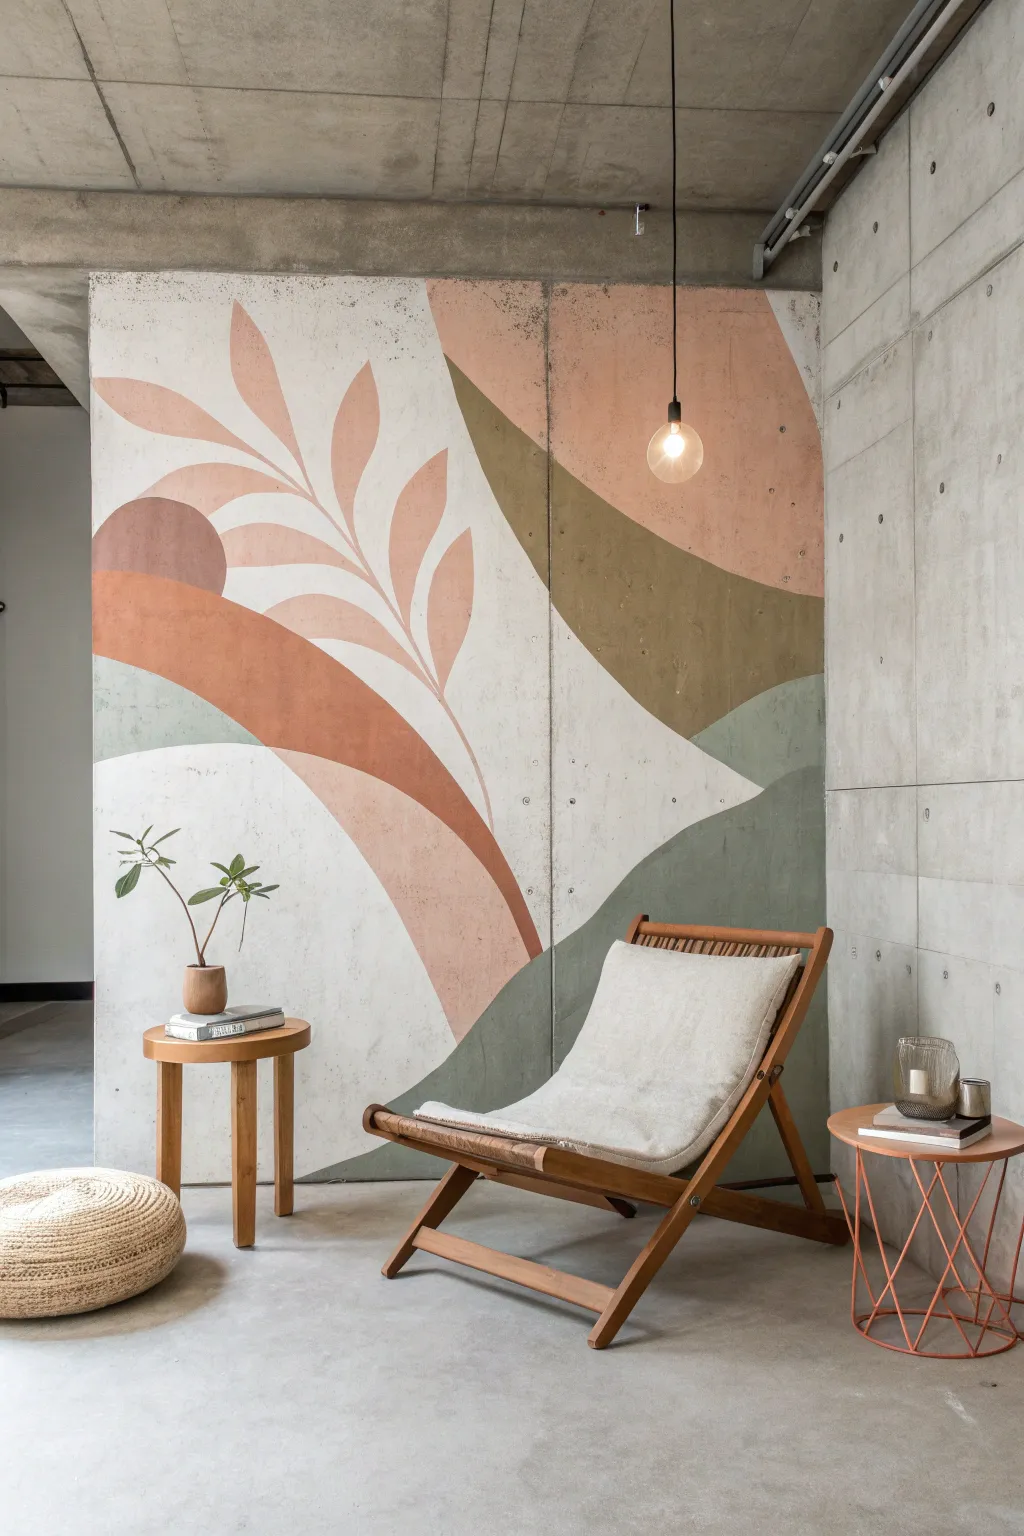
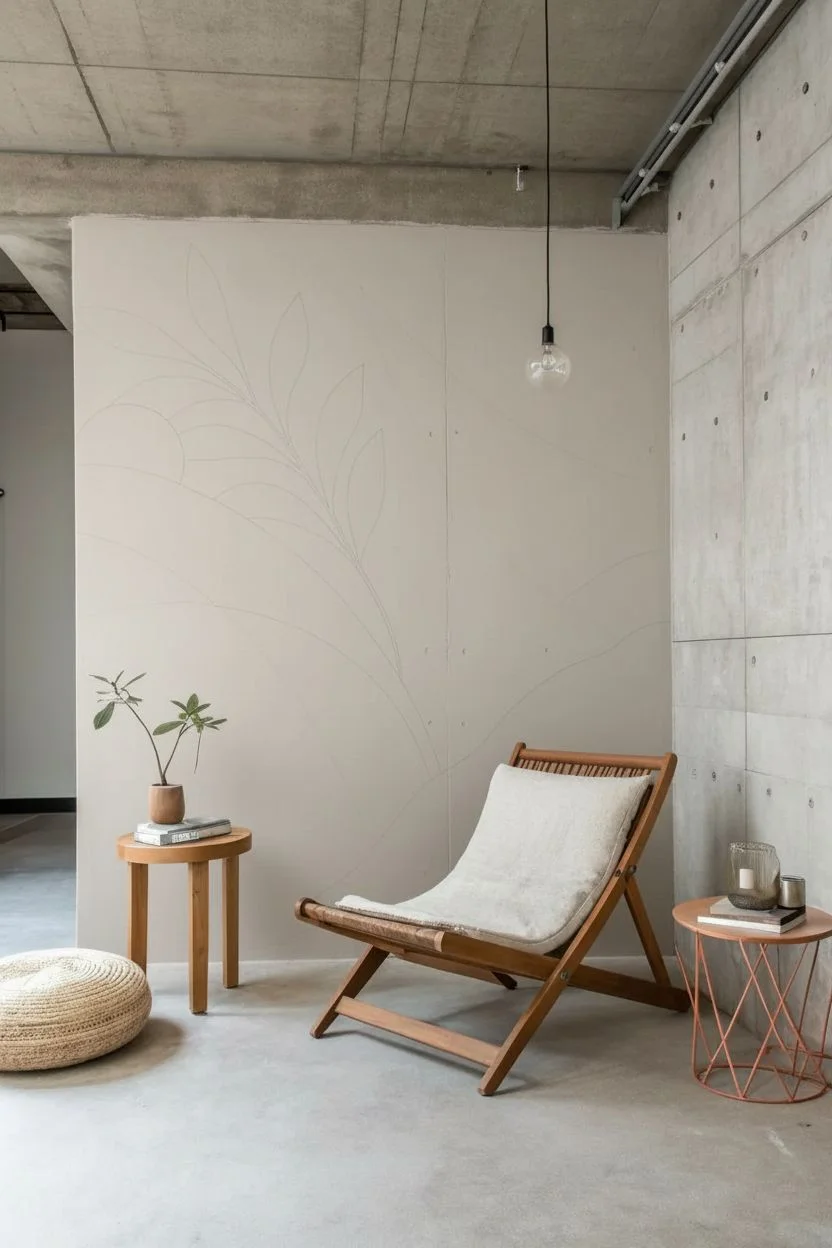
Transform a cold concrete corner into a cozy, artistic focal point with this abstract botanical mural. Featuring soothing earth tones and flowing organic shapes, this project uses the raw texture of the wall to create a modern, high-end look.
How-To Guide
Materials
- Concrete primer (latex-based)
- Painter’s tape (multi-surface)
- Chalk or pencil
- Small roller and tray
- Various angled brushes (1-inch to 2-inch)
- High-quality acrylic latex wall paint (Cream, Terracotta, Peach, Sage Green, Olive)
- Drop cloth
- Damp rags
Step 1: Preparation and Design
-
Clean surface:
Begin by thoroughly cleaning the concrete wall with a stiff brush and a damp rag to remove dust, loose grit, and cobwebs. Let it dry completely. -
Prime the wall:
Apply a clear or white latex-based concrete primer. This step is crucial because raw concrete is porous and will soak up your colorful paint unevenly if skipped. -
Sketch the major curves:
Once the primer is dry, use chalk to lightly sketch the large swooping curves that define the main color blocks. Don’t press too hard; just create guidelines for where the green intersects the cream and peach sections. -
Outline the botanical element:
Sketch the large, central leaf stem rising diagonally. Focus on the placement of the leaves—they should feel airy and not cluttered. I find it helps to stand back frequently to check the scale. -
Mark the circle:
Draw the semi-circle shape on the left side. You can use a string tied to a pencil as a compass to get a perfect arc, or trace a large platter if the size fits.
Clean Lines on Concrete
Since tape doesn’t seal well on bumpy concrete, paint the edge, then immediately wipe any bleed-under with a damp rag while wet.
Step 2: Painting the Background
-
Paint the base cream:
Start with the lightest color—the cream or off-white sections—using a small roller. This serves as the background for the leaves and brightens the concrete. -
Fill the olive zones:
Using a smaller brush for edges and a roller for the center, fill in the deep olive green sections. These are the darker grounding shapes at the bottom right and the curved section near the top. -
Apply the sage green:
Paint the softer sage green section connecting to the olive areas. Feather the edges slightly if you want a softer look, or keep lines crisp for a graphic style. -
Add the terracotta swash:
Paint the bold terracotta (rust-orange) curve that sweeps across the bottom left. Use an angled brush to get a smooth, flowing line along the top edge of this shape. -
Block in the peach tones:
Fill in the upper right corner with a soft peach hue. This balances the composition against the heavier earth tones below. -
Paint the semi-circle:
Fill the semi-circle on the left with a darker mauve or clay tone to distinguish it from the surrounding terracotta curve.
Step 3: Detailing the Botanical
-
Paint the stem:
Switch to a smaller artist’s brush or a very fine angled sash brush. Paint the central stem of the plant using the soft peach or a slightly darker pink tone. -
Fill the leaves:
Carefully paint each leaf shape attached to the stem. Use long, smooth strokes starting from the stem and pulling outward to the leaf tip to mimic natural growth direction. -
Refine the edges:
Go back with a small flat brush and touch up any blurry edges where different colors meet. The raw concrete texture makes tape difficult, so a steady hand works best here. -
Second coat:
Step back and inspect opacity. Concrete absorbs paint thirsty-style, so you will likely need a second coat on the solid color blocks to get rich saturation. -
Erase guidelines:
Once the paint is fully cured (give it at least 24 hours), gently wipe away any visible chalk marks with a slightly damp cloth.
Add Metallic Accents
Trace the edge of the large leaves with a thin gold paint marker for a touch of glamour that catches the light.
Now your basement corner has a stunning, custom art piece that completely changes the atmosphere of the room
Ombre Fade to Lift the Basement Ceiling Line
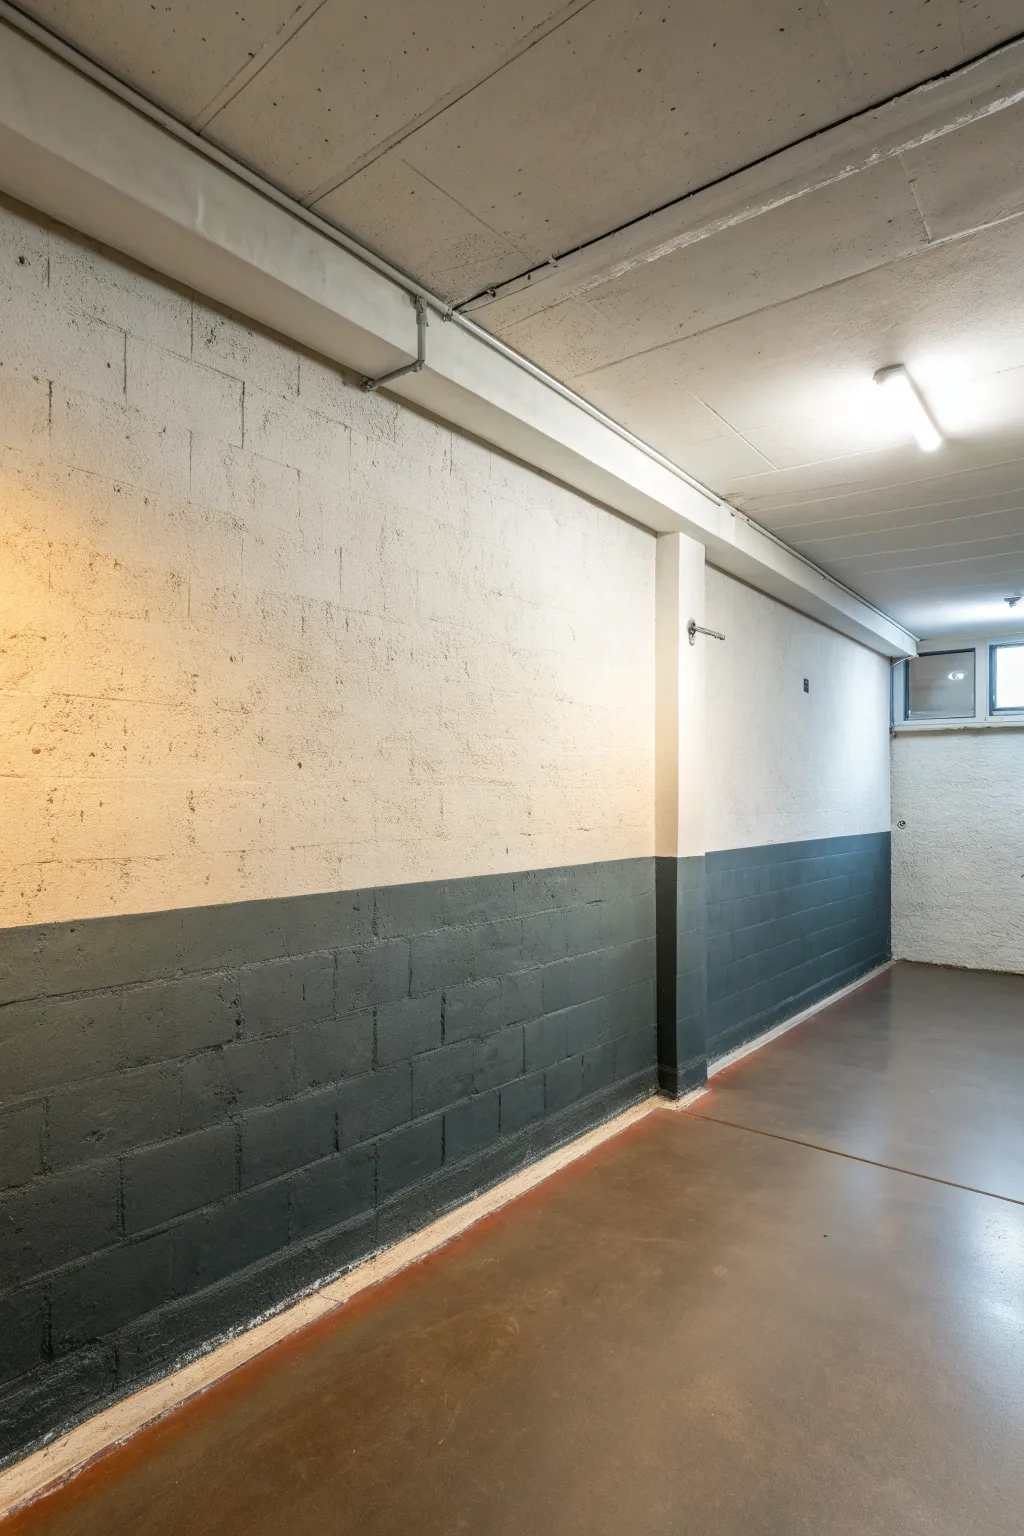
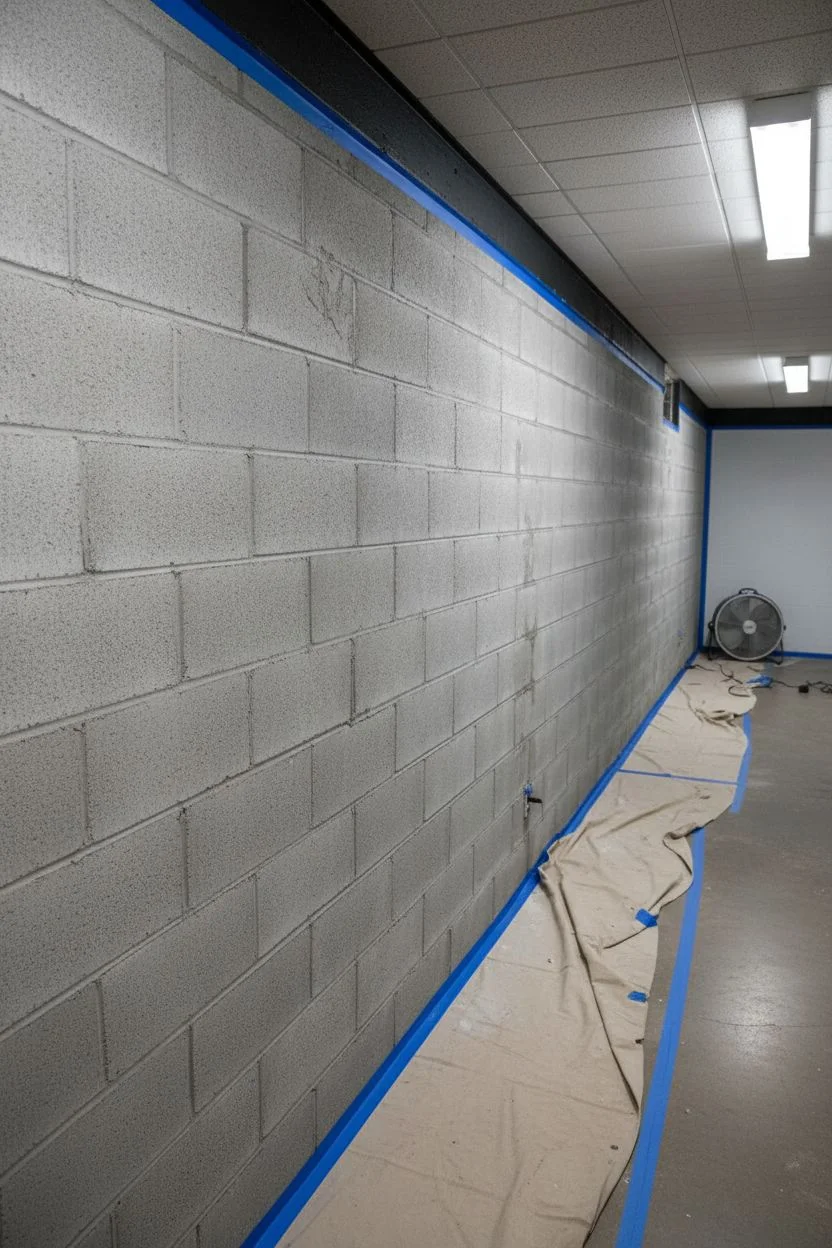
Transform a utilitarian basement into a stylish space by embracing the industrial texture of concrete blocks with a high-contrast, two-tone paint scheme. This design grounds the room with a dark, durable base while keeping the upper walls bright to maximize light reflection and create a sense of height.
Step-by-Step Tutorial
Materials
- High-quality masonry primer
- Dark charcoal or slate grey latex masonry paint (satin finish)
- Warm white or cream latex masonry paint (matte or eggshell finish)
- Heavy-duty painter’s tape (for rough surfaces)
- Stiff nylon bristle brush (for cutting in and mortar joints)
- High-nap roller cover (3/4 inch or thicker for rough texture)
- Extension pole
- Drop cloths
- TSP substitute cleaner
- Scrub brush
- Level and chalk line
Step 1: Cleaning & Prep
-
Clear the area:
Remove all furniture and cover the floors with heavy-duty drop cloths, taping them down at the edges to prevent shifting. -
Scrub the walls:
Mix a TSP substitute cleaner with warm water according to package directions. Using a stiff scrub brush, vigorously clean the concrete blocks to remove dust, efflorescence, and spiderwebs. -
Rinse and dry:
Wipe down the walls with clean water to remove chemical residue. Allow the masonry to dry completely for at least 24 hours; trapped moisture can cause paint failure later. -
Inspect for cracks:
Check the mortar joints and block faces for significant cracks. Fill any gaps with masonry caulk or concrete patch, smoothing them out to blend with the surrounding texture.
Step 2: The Top Coat
-
Prime the upper section:
Starting from the ceiling line down to about waist height, apply a generous coat of masonry primer. Use a brush to work it into the deep pores of the blocks and mortar lines. -
Cut in the ceiling:
Using your warm white paint and a high-quality angled sash brush, cut in a clean line along the ceiling junction and any corners. -
Roll the light color:
Saturate your high-nap roller with the warm white paint. Roll the upper portion of the wall, extending well below where you plan your dividing line to be. I find it easier to paint slightly lower than needed to ensure full coverage. -
Back-brush if needed:
If the concrete block texture is very deep, you may need to immediately follow the roller with a brush to push paint into pinholes (a technique called back-brushing). -
Apply a second coat:
Once the first coat is dry to the touch, apply a second coat of the light color for solid opacity and a uniform finish.
Sealing the Deal
Don’t skip the ‘sealing’ step with the light paint on the tape edge. Concrete block is uneven; failing to seal the tape will almost guarantee messy bleed-under.
Step 3: The Dark Foundation
-
Measure the line:
Decide on the height of your dark lower section (typically 32-36 inches). Measure up from the floor at several points along the wall and mark with a pencil. -
Snap a chalk line:
Have a partner help you hold a chalk line tight across your marks. Snap the line to create a perfectly straight guide across the textured surface. -
Apply the tape:
Apply wide, heavy-duty painter’s tape specifically designed for rough surfaces along the top edge of your chalk line. -
Seal the tape edge:
To prevent the dark paint from bleeding under on the bumpy surface, brush a thin layer of the *light* paint color over the bottom edge of the tape. This seals the gaps with the wall color. -
Prime the lower section:
Apply masonry primer to the lower wall section, being careful not to slop it onto your fresh white paint above the tape line. -
Cut in the floor and corners:
Using the dark charcoal paint, brush along the floor edges, corners, and carefully along the bottom edge of the tape line. -
Roll the dark color:
Use a fresh high-nap roller to apply the dark grey paint to the lower section. Apply pressure to get the paint into the mortar grooves. -
Apply the final coat:
After the recommended drying time, roll on the final coat of dark grey paint for a rich, deep finish. -
Remove tape immediately:
While the final coat is still slightly tacky, slowly peel off the painter’s tape at a 45-degree angle to reveal your crisp, straight horizon line.
Add an Accent Line
For a sportier look, place a second strip of tape 1/2 inch below the first one before painting the dark grey, creating a thin pinstripe of the original wall color.
Step back and admire how this simple color blocking adds architectural interest and structure to your basement walls
Painted Concrete Block “Gallery Wall” Backdrop
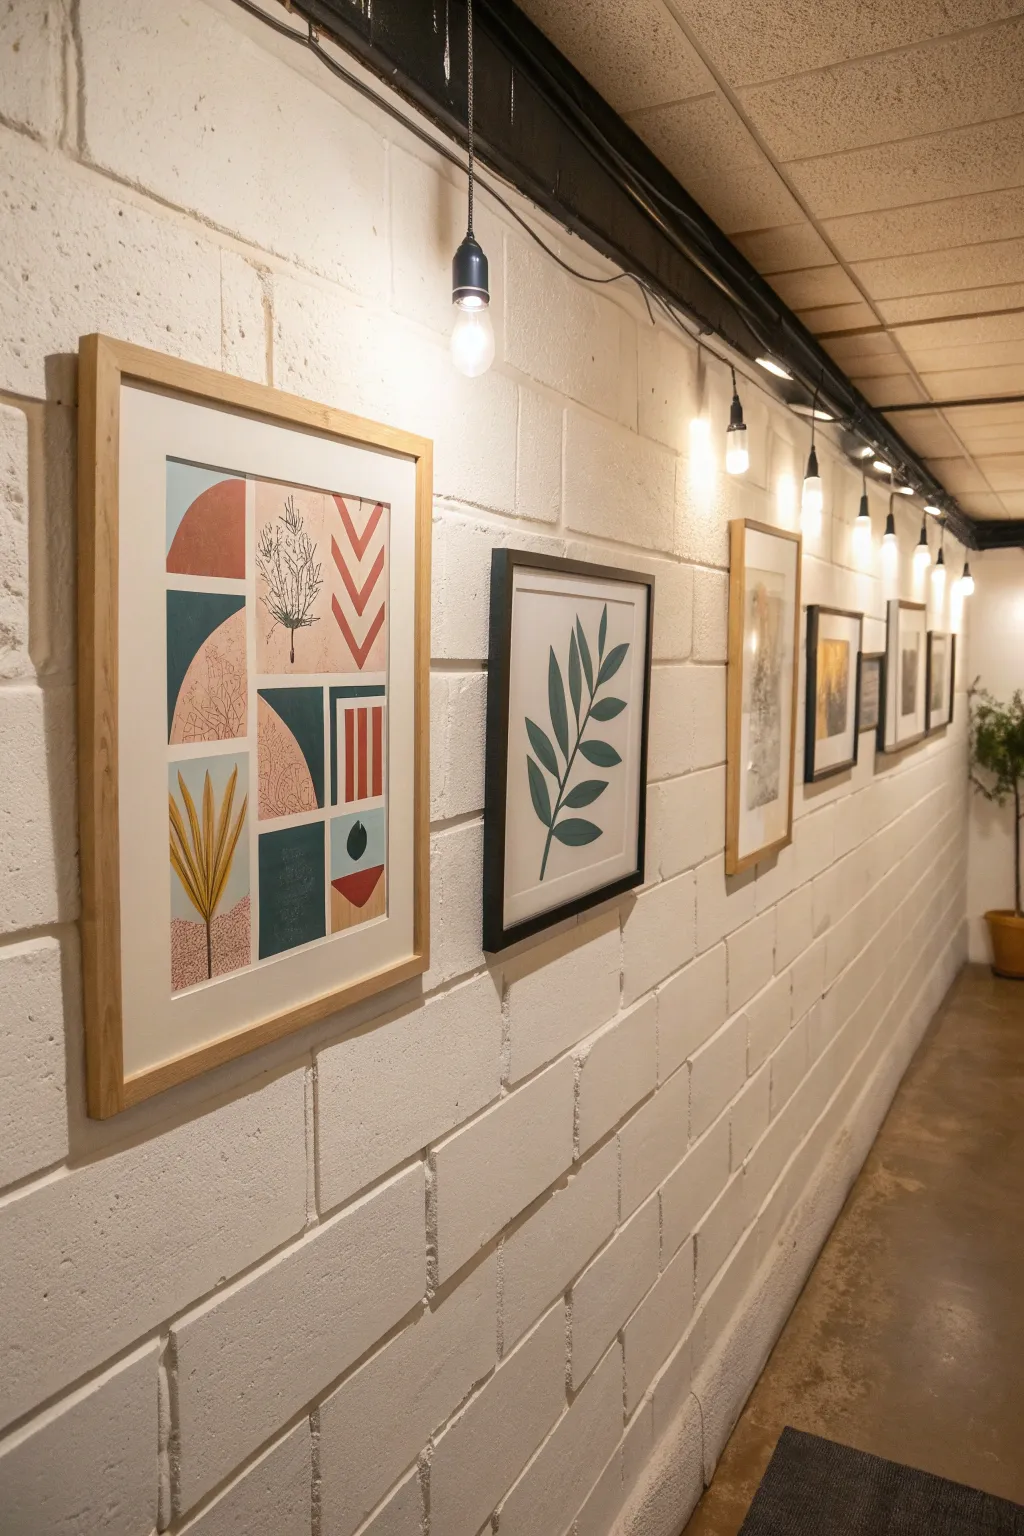
Transform a dreary basement hallway into a bright, modern gallery space using nothing more than paint and strategic lighting. This project takes raw, textured concrete blocks and unifies them with a crisp white finish that makes artwork pop.
Detailed Instructions
Materials
- High-quality masonry primer (e.g., Kilz or Zinsser)
- Interior acrylic latex paint (bright white, satin or semi-gloss finish)
- Thick-nap roller (3/4 inch to 1 inch) for rough surfaces
- Extension pole for roller
- Wide angled sash brush (2.5 to 3 inch)
- Heavy-duty degreaser or TSP substitute
- Stiff bristle scrub brush
- Painter’s tape
- Drop cloths or plastic sheeting
- String lights with Edison bulbs (black cord)
- Command strips or masonry hooks for hanging art
- Screw eyes or hooks for string lights
Step 1: Preparation & Cleaning
-
Clear the area:
Remove all furniture, old fixtures, and decor from the wall. Lay down drop cloths to protect your flooring, taping them securely at the baseboards to prevent shifting. -
Inspect the blocks:
Check the concrete blocks for any cracks or large holes. Fill any significant damage with concrete filler or hydraulic cement and let it cure according to the package instructions. -
Deep clean the surface:
Mix your heavy-duty degreaser or TSP substitute with warm water. Using the stiff bristle brush, scrub the walls vigorously to remove dust, cobwebs, and any efflorescence (white powdery deposits). -
Rinse and dry:
Wipe down the walls with clean water to remove chemical residue. Allow the concrete to dry completely; this is crucial as moisture trapped behind paint can cause peeling later. I usually set up a box fan to speed this up. -
Protect adjacent surfaces:
Apply painter’s tape to the ceiling line, floor trim (if present), and any electrical outlets or switches you aren’t removing.
Seal the Deal
If your basement tends to be damp, use a waterproofing masonry paint (like Drylok) instead of standard primer. This seals out moisture and prevents future mold growth.
Step 2: Painting the Concrete
-
Cut in the edges:
Dip your angled sash brush into the masonry primer. Carefully paint along the ceiling line, corners, and base, pushing the bristles into the textured mortar joints. -
Prime the mortar joints:
Before rolling, use your brush to spot-prime the deep mortar grooves between the blocks. A roller often misses these recessed areas, so hitting them with a brush first ensures full coverage. -
Roll on the primer:
Load your thick-nap roller with primer. Apply it to the wall in vertical sections, using enough pressure to push the primer into the porous concrete texture. -
Allow primer to dry:
Let the primer coat dry completely. Masonry primers are often thicker and may take longer than standard drywall primer, so check the manufacturer’s recommended time. -
Apply the first topcoat:
Switch to your bright white latex paint. Using the same technique—brushing the joints first, then rolling—apply your first coat. A satin or semi-gloss finish reflects light beautifully in dimmer basements. -
Apply the second topcoat:
Once the first coat is dry to the touch, apply a second coat for a solid, opaque white finish. Inspect the wall from different angles to ensure no gray concrete is showing through. -
Remove tape:
While the final coat is still slightly tacky, carefully peel away the painter’s tape at a 45-degree angle to get a crisp clean line.
Style It Up
Add warmth to the stark white walls by incorporating artwork with organic shapes and earthy tones (terracotta, sage, mustard) to soften the industrial feel of the blocks.
Step 3: Installing Lighting
-
Plan the light path:
Hold up your string lights to determine where you want the drape to fall. Mark spots along the ceiling joists or the top plate of the wall where the hooks will go. -
Install hooks:
Screw cup hooks or eyes into the wooden joists or beam above the wall. If attaching directly to concrete, you will need a masonry bit and plastic anchors. -
Hang the lights:
String the black corded lights through your hooks. Allow for a slight swag between hooks for a relaxed, industrial look rather than pulling them perfectly tight. -
Secure the cord:
Ensure the plug end reaches your outlet safely. You may need to use cable clips to manage the cord neatly down the wall corner.
Step 4: Creating the Gallery
-
Select your frames:
Choose a mix of frame styles like natural wood and thin black metal to create visual interest. The contrast against the white block is stunning. -
Plan layout on the floor:
Before making holes, arrange your artwork on the floor to find a composition you like. Aim for consistent spacing between frames. -
Hang the art:
For painted concrete, heavy-duty adhesive strips often work if the paint has cured for 30 days. Otherwise, use masonry hooks or concrete screws for a permanent hold. -
Level and adjust:
Place a small spirit level on top of each frame to ensure they are perfectly straight, then step back and admire your new gallery backdrop.
Enjoy your transformed gallery space that proves unfinished basements can be just as stylish as the rest of the home
Glow-Up the Utility Wall With Painted Pipes and Color Harmony
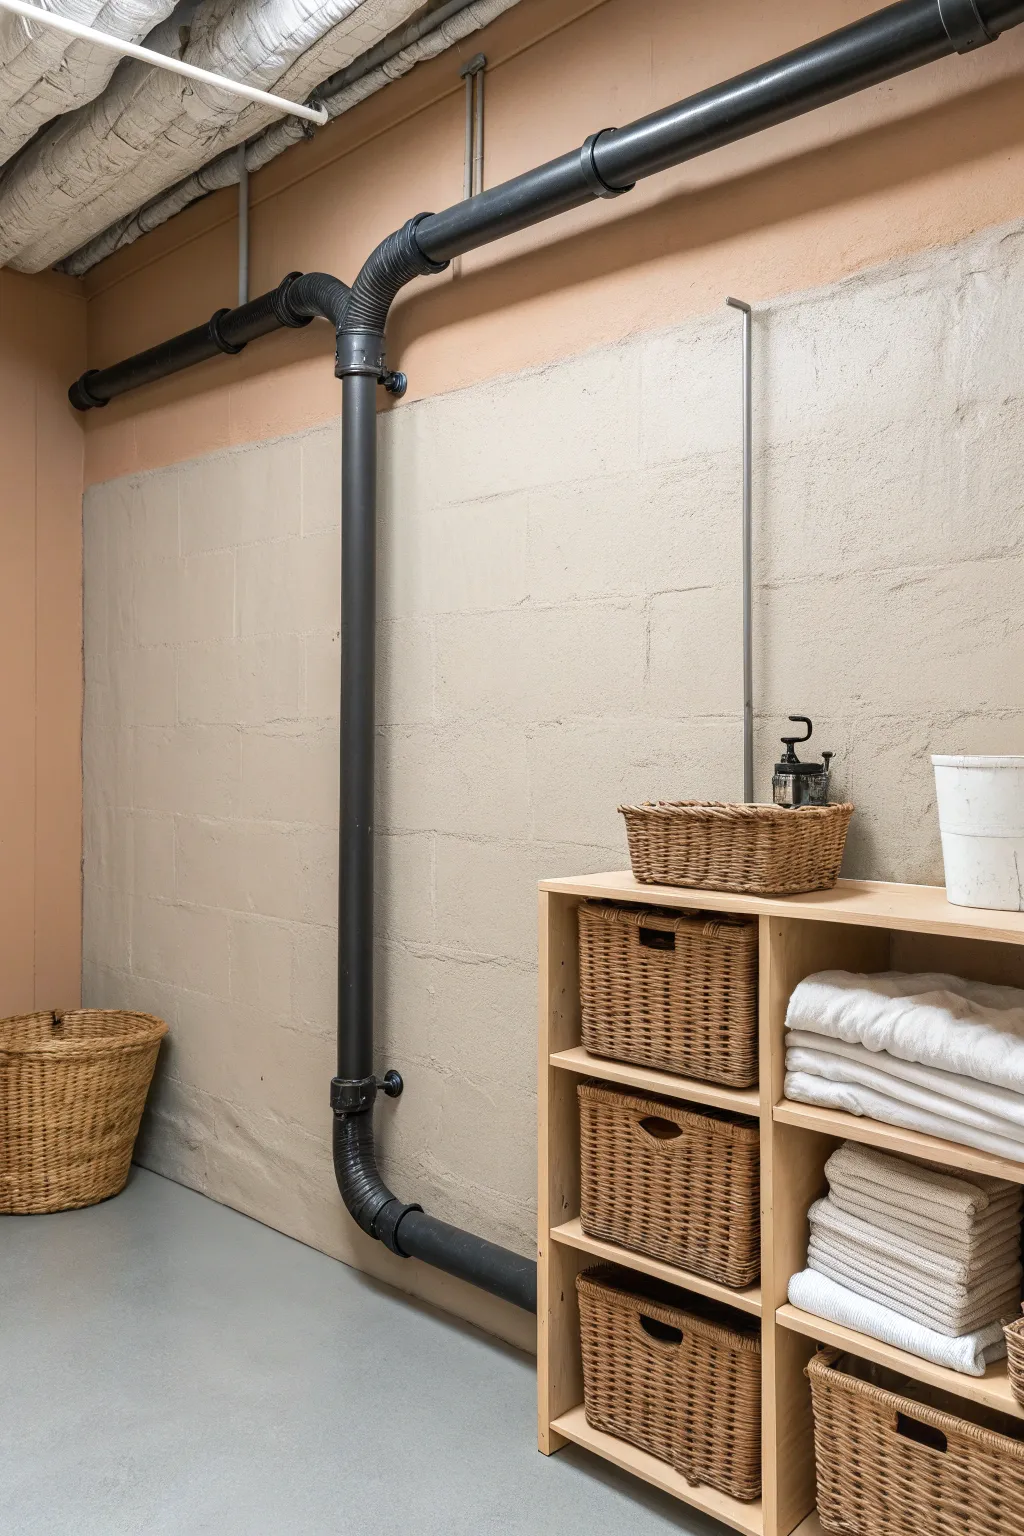
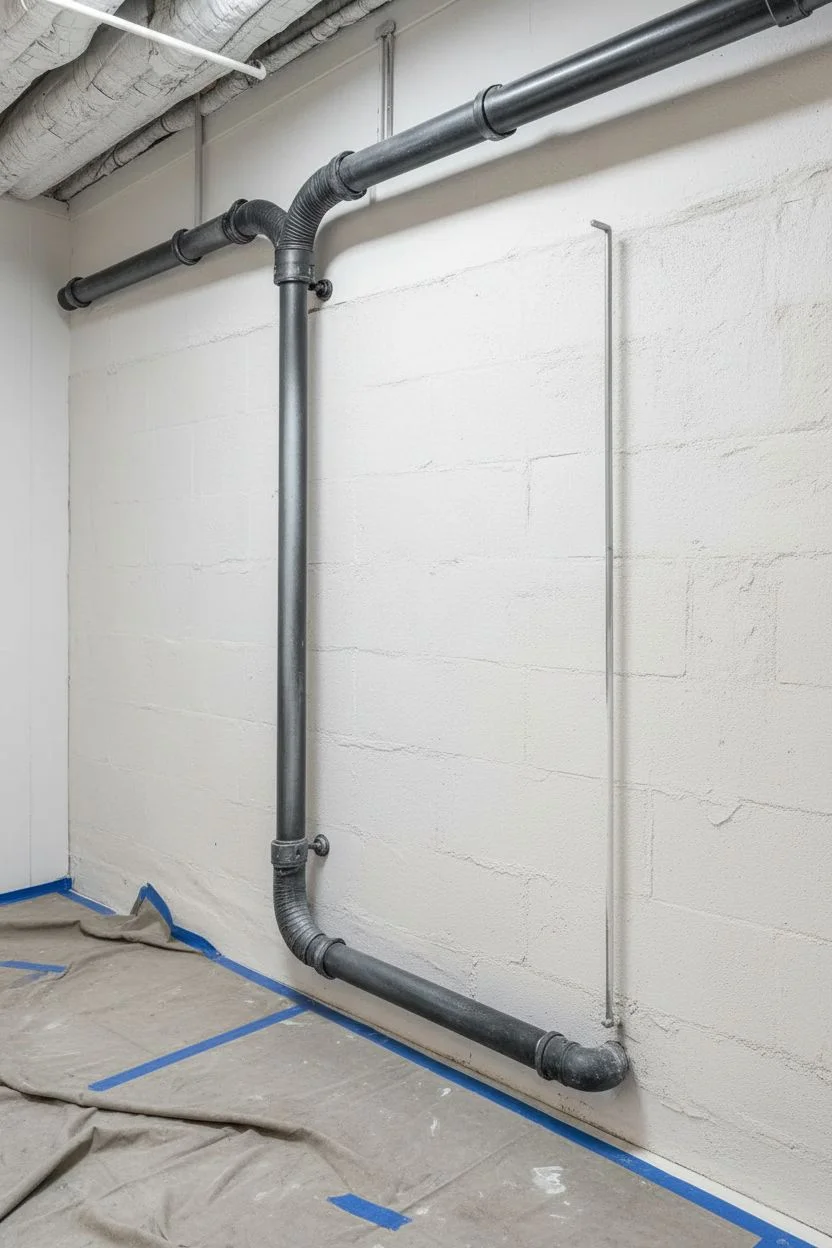
Transform a utilitarian basement corner into a warm, organized feature by embracing exposed elements rather than hiding them. This project combines a soft, two-tone color block effect with bold matte black piping to create a space that feels intentional and stylishly industrial.
Step-by-Step Tutorial
Materials
- TSP substitute or heavy-duty degreaser
- Wire brush and scraping tool
- Masonry primer (blocks)
- Metal primer (pipes)
- Interior latex paint (Beige/Greige for main wall)
- Interior latex paint (Peach/Terracotta for upper band)
- High-heat or multi-surface enamel spray paint (Matte Black)
- Painter’s tape (high adhesion for masonry)
- Heavy-duty drop cloths
- Paint roller with thick nap (3/4 inch for textured blocks)
- Angled sash brush
- Medium grit sandpaper or sanding sponge
- Cleaning rags
Step 1: Prep and Prime
-
Clear the area:
Remove all shelving, baskets, and moveable items from the wall area. Lay down heavy-duty drop cloths to protect your flooring, sealing the edges with tape to prevent shifting. -
Clean surface thoroughly:
Scrub the concrete block wall and the metal pipes with a TSP substitute. Utility areas often accumulate grease or soot; if the walls are dirty, paint won’t adhere properly. -
Address loose mortar:
Inspect the mortar joints. Use a wire brush to whisk away any crumbling bits. If you find significant gaps, fill them with masonry caulk now and let it cure fully. -
Scuff the pipes:
Lightly sand surface rust or glossy patches on the metal pipes using medium-grit sandpaper. This creates a ‘tooth’ for the primer to grab onto. -
Wipe down:
Do a final wipe-down with a damp rag to remove all sanding dust and debris from both the wall and pipes. Let everything dry completely. -
Prime the metal:
Apply a metal-specific primer to the pipes. I prefer using a spray primer for this to get into the crevices of the joints, but a brush-on oil-based primer works well too. -
Prime the masonry:
Roll a coat of masonry primer onto the cinder blocks. Use a thick nap roller to work the product into the porous surface and mortar lines.
Paint Choice Matter
Use a ‘block filler’ primer if your wall is very pitted. It’s much thicker than standard primer and smooths out the rough texture.
Step 2: The Pipe Statement
-
Mask the wall:
Once the wall primer is dry, protect the wall area directly behind the pipes with paper or plastic masking if you are spraying the pipes. If brushing, you can skip this rigorous masking. -
Apply matte black:
Coat the pipes with matte black enamel. If spraying, use short, controlled bursts to avoid drips. If brushing, use a high-quality synthetic brush to minimize stroke marks. This high-contrast look defines the space. -
Check angles:
Inspect the pipes from underneath and above to ensure you haven’t missed any hidden spots, particularly around the elbows and joints. -
Dry time:
Allow the pipes to cure fully according to the manufacturer’s instructions before moving on to the wall painting to avoid accidental smudges.
Style With Warmth
Add warmth back into the space with natural wood shelving and woven rattan baskets to soften the hard industrial lines.
Step 3: Color Harmony
-
Cut in the main color:
Using your beige or greige latex paint, cut in the edges around the floor and corners with an angled brush. Don’t worry about the ceiling line yet. -
Roll the main wall:
Roll the main color onto the concrete blocks. You will likely need to apply significant pressure to get the paint into the heavy texture of the block. Stop your roller about 12-18 inches from the ceiling. -
Second coat:
Masonry drinks paint. Apply a second coat to ensure solid, opaque coverage without pinholes showing through. -
Establish the horizon line:
Once the beige base is dry, measure down from the ceiling to your desired height (aligned with the horizontal pipe run looks great) and apply a level line of painter’s tape across the wall. -
Seal the tape:
I always brush a tiny bit of the *base* beige color over the tape edge first. This seals the tape and prevents the upper color from bleeding under. -
Apply the accent color:
Paint the upper section and the ceiling (if desired) with the peach/terracotta tone. Use a brush for the intricate areas around pipe brackets. -
Refine pipe edges:
Use a small artist’s brush to carefully cut in the wall color around the pipe brackets where the roller couldn’t reach, ensuring a crisp transition between the black metal and the painted wall. -
Reveal:
Remove the painter’s tape while the top coat is still slightly tacky to pull a perfect, sharp line.
Step back and appreciate how a simple color block and fresh paint turned a dark corner into a bright, functional asset


Have a question or want to share your own experience? I'd love to hear from you in the comments below!