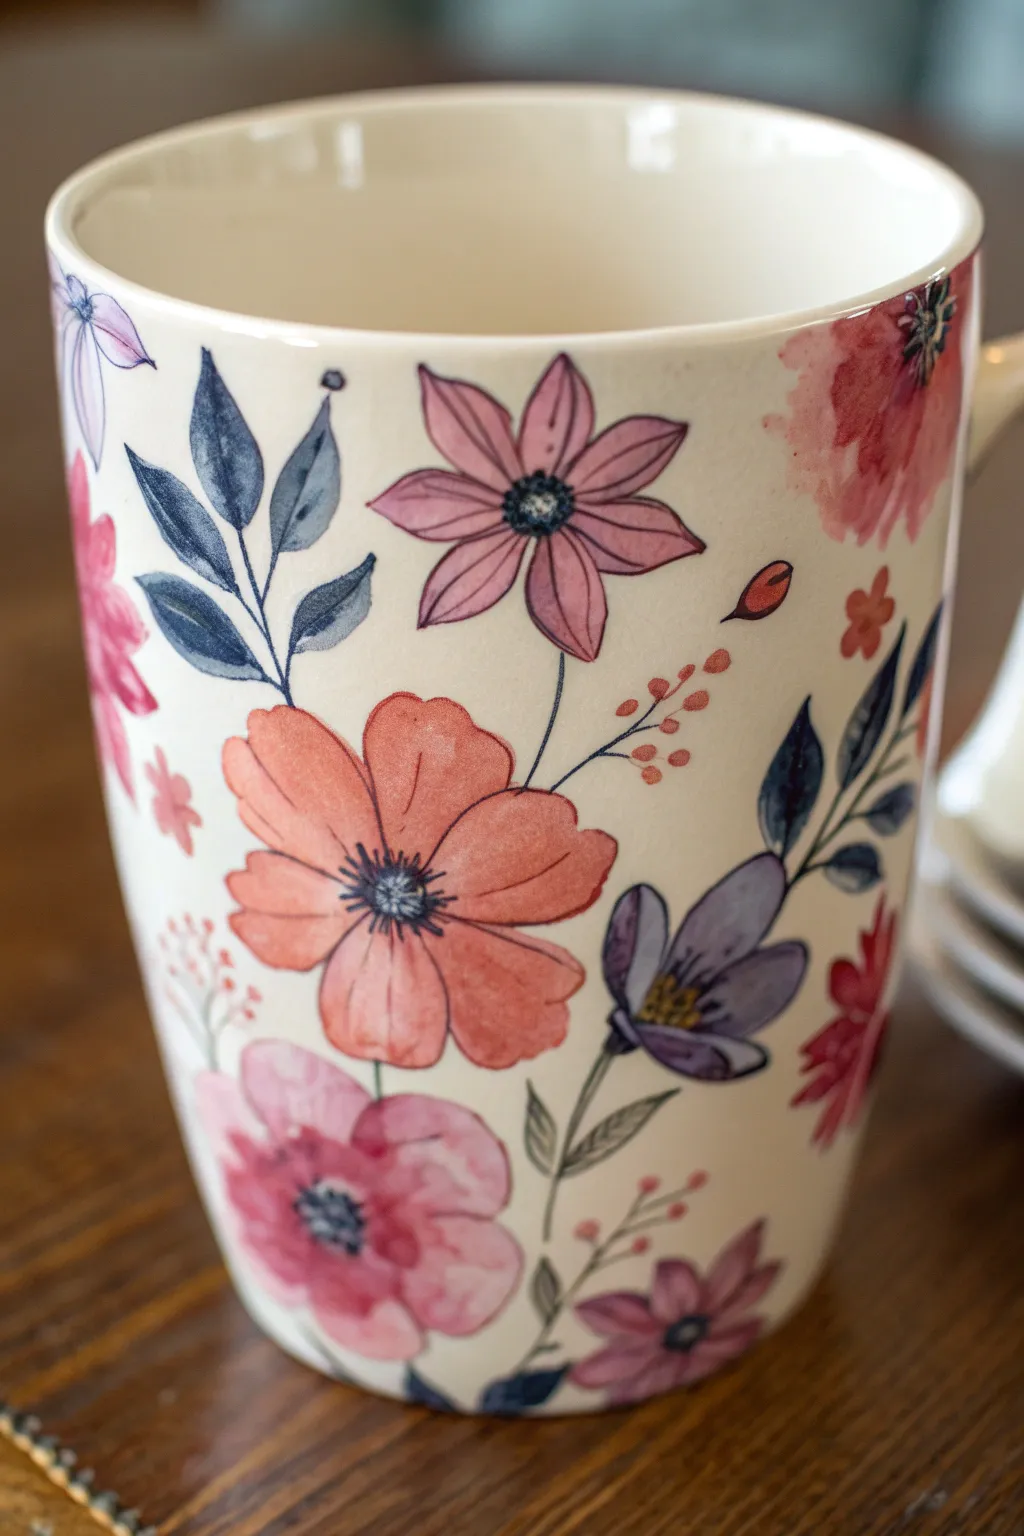
Flower designs and pottery just belong together—the curves of ceramics make petals and stems feel extra alive. Here are my favorite pottery painting ideas with flowers, starting with the classic crowd-pleasers and moving into the artsy, unexpected stuff.
One Big Statement Bloom on a Plate Center
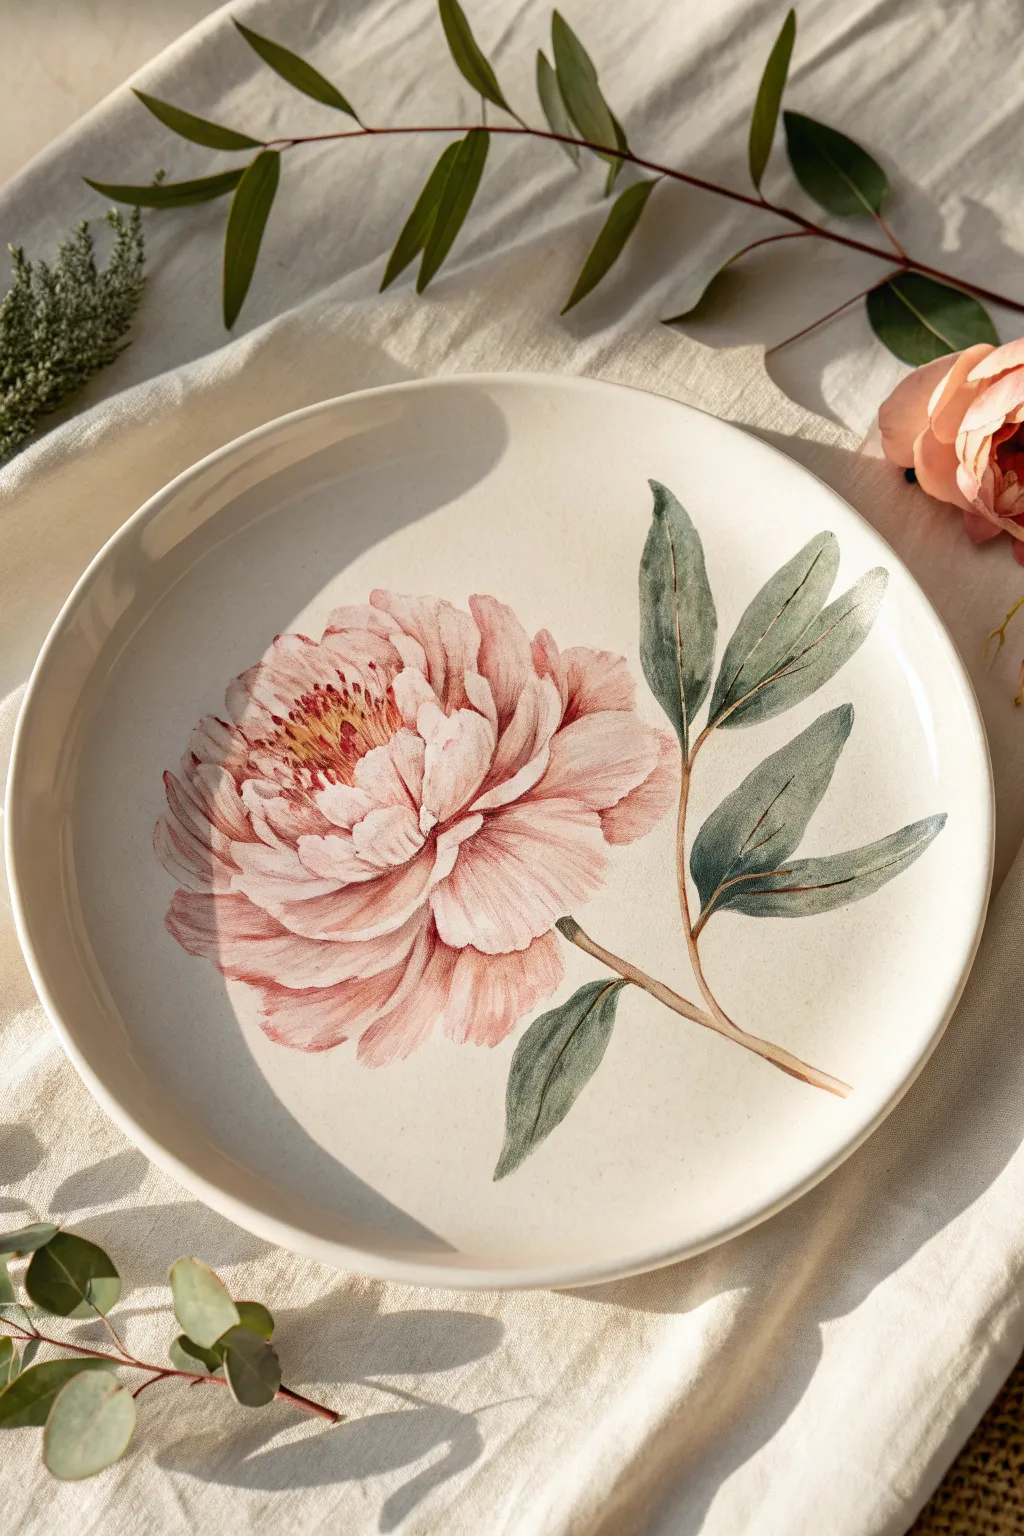
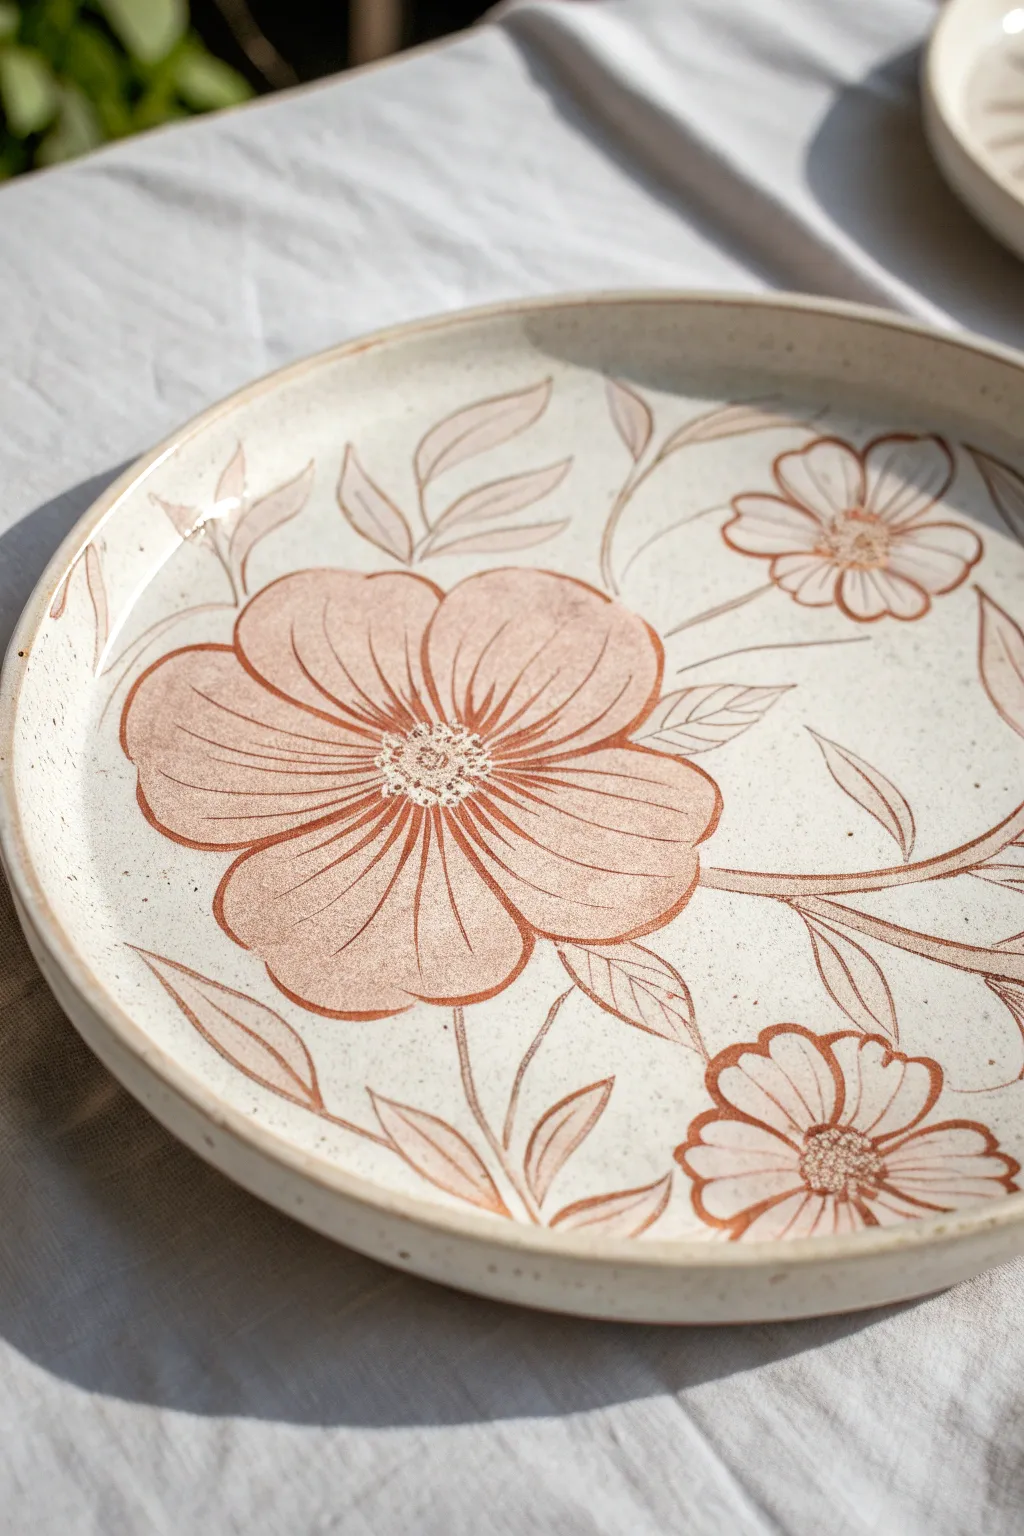
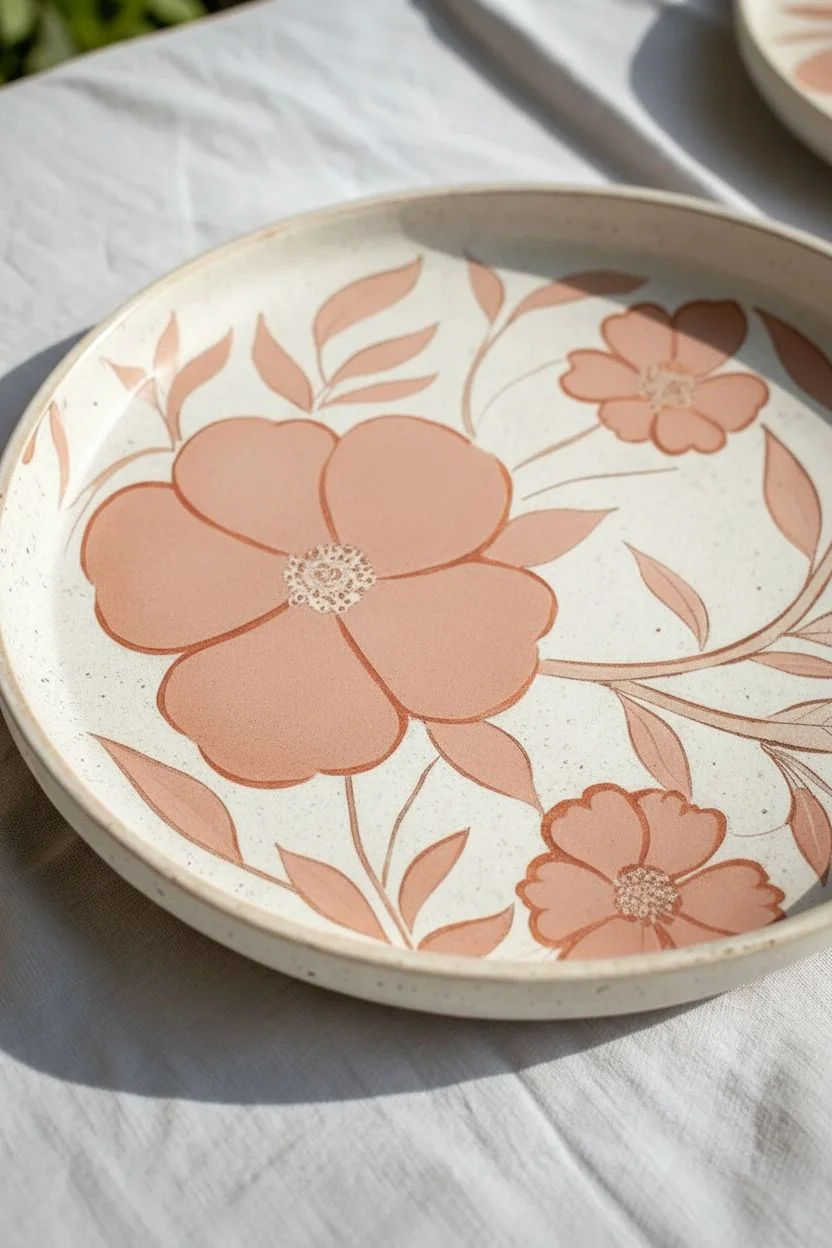
Transform a plain ceramic bisque plate into a stunning work of art with a single, oversized peony bloom. This project uses delicate shading and fine lines to create a realistic, watercolor-style floral that serves as a beautiful focal point for any table setting.
How-To Guide
Materials
- Round ceramic bisque plate (dinner or salad size)
- Pencil (HB or lighter)
- Underglazes: Light pink, deep magenta/rose, sage green, forest green, warm yellow, burnt orange, brown
- Round brushes: sizes 2, 4, and 6
- Fine liner brush: size 0 or 00
- Palette for mixing
- Cup of water and paper towels
- Clear dipping glaze
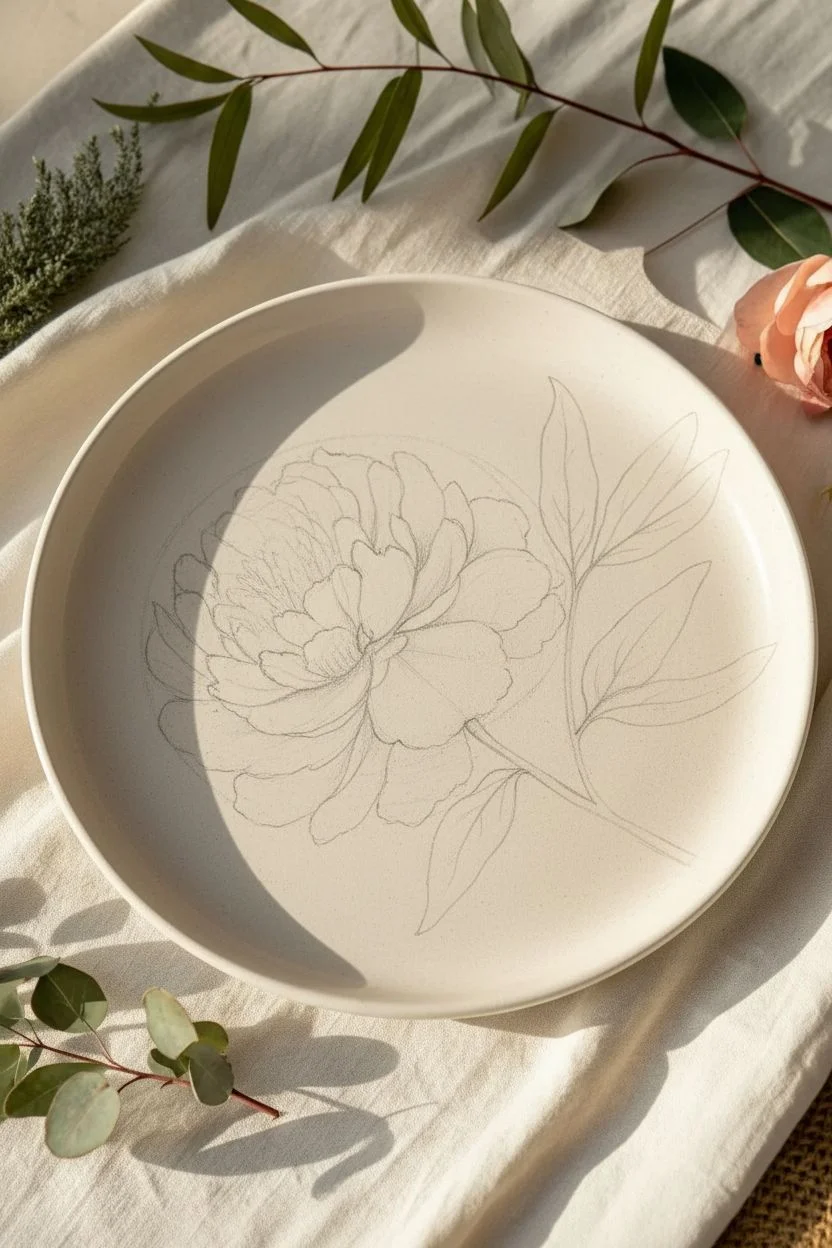
Step 1: Planning and Sketching
-
Center the Composition:
Visualize where the flower head will sit. For this design, place the large bloom slightly off-center to the left, allowing the stem and leaves to extend elegantly toward the right rim. -
Rough Sketching:
Using a very light pencil touch, sketch the main oval shape of the flower head. Don’t worry about individual petals yet; just establish the boundary of the bloom. -
Define the Petals:
Refine your sketch by drawing the layers of ruffled petals. Start from the center and spiral outwards. Peonies have jagged, uneven edges, so keep your pencil lines loose and organic rather than perfect circles. -
Add Stem and Leaves:
Draw a thick, sturdy stem extending from the bottom right of the flower. Add two to three large, lance-shaped leaves branching off the stem.
Pro Tip: Watering Down
Treat underglaze like watercolor. Thinning it with water allows the white of the plate to show through, creating that soft, sun-drenched look on the petals.
Step 2: Painting the Bloom
-
Base Pink Wash:
Dilute your light pink underglaze with a little water to create a translucent wash. Using the size 6 round brush, fill in the entire flower shape, avoiding the very center where the stamens will go. -
Layering Depth:
While the base is still slightly damp, mix a slightly darker pink. Apply this to the base of each petal where it meets the center, blending outward to create a soft gradient. -
Defining Petal Edges:
Switch to the deep magenta/rose color and your size 4 brush. Paint the shadows between the petal layers. This separates the petals and gives the flower volume. -
Adding Texture:
Use a nearly dry brush with the deep rose color to drag fine lines from the base of the petals outward. This mimics the natural veining of the peony. -
Painting the Center:
In the open center of the flower, dab warm yellow underglaze. Let it dry for a moment, then add tiny dots of burnt orange to create depth in the pollen area. -
Stamen Details:
Using your fine liner brush and the reddish-brown underglaze, paint delicate filaments radiating from the yellow center.
Troubleshooting: Pencil Marks
Worried about visible sketch lines? Don’t stress. Standard graphite burns off completely in the kiln, leaving only your beautiful painted design behind.
Step 3: Greenery and Finishing Touches
-
Base Green Layer:
Paint the leaves and stem with the sage green underglaze. I like to keep this layer fairly opaque to contrast with the delicate flower. -
Adding Leaf Shadows:
While the sage green is tacky, stroke forest green along one side of the stem and the lower halves of the leaves to imply a light source. -
Leaf Veining:
With the fine liner brush and diluted brown or dark green, paint a central vein down each leaf. Add smaller veins branching off toward the edges. -
Crisping the Edges:
Check the outer edges of your flower mechanism. If the definition got lost, use the fine liner brush and a very diluted brown-pink mix to subtly outline the most prominent petals. -
Clear Glaze Application:
Once the underglaze is bone dry, carefully dip the plate into clear glaze. Ensure an even coat and wipe the foot of the plate clean before firing.
Once fired, you will have a permanent bloom that captures the romance of a spring garden on your table


Wildflower Meadow Scatter Pattern
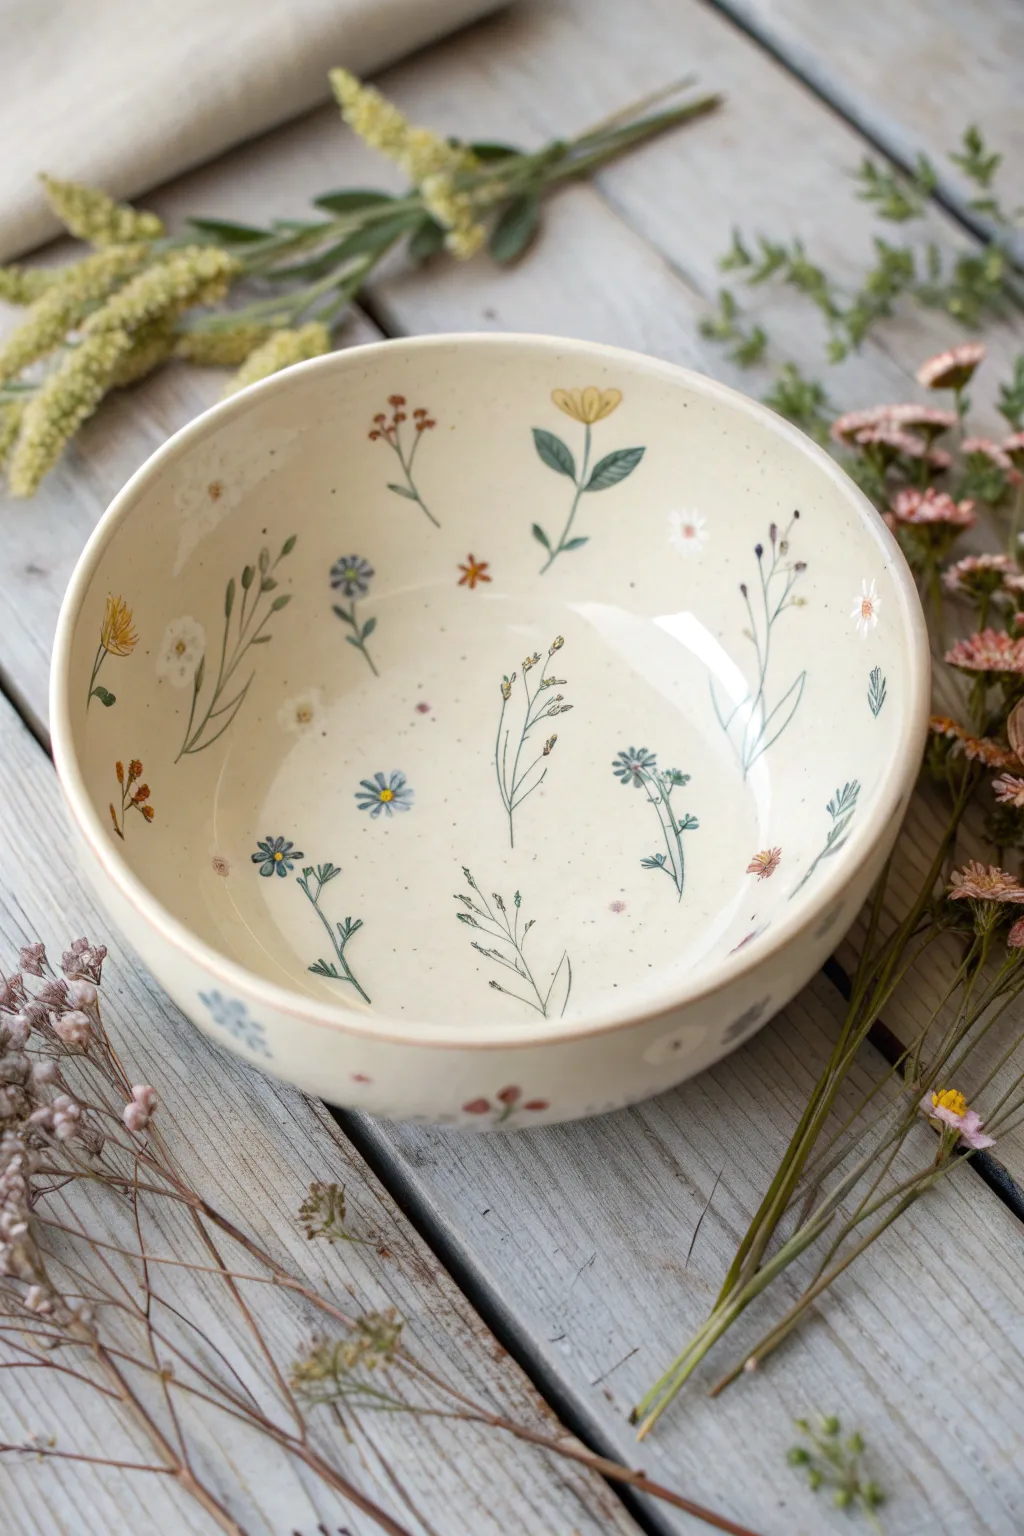

Transform a plain bisque bowl into a delicate meadow scene with this airy scatter pattern. The beauty of this design lies in its imperfection, mimiciking the random, joyful growth of wildflowers in nature while keeping a clean, creamy background.
Step-by-Step
Materials
- Ceramic bisque bowl (cereal or soup size)
- Underglazes: Dark Green, Sage Green, Cornflower Blue, Mustard Yellow, Terracotta, White
- Clear transparent glaze
- Liner brush (size 0 or 00)
- Small round brush (size 2)
- Pencil for sketching
- Sponge
- Clean water
Step 1: Preparation & Layout
-
Clean the surface:
Wipe your bisque bowl thoroughly with a damp sponge. This removes any dust that could repel the glaze and ensures a smooth painting surface. -
Plan the random scatter:
Visualize a ‘controlled chaos.’ You want the flowers to look random but evenly spaced. Lightly sketch the stems using a pencil. Remember, the pencil marks will burn off in the kiln. -
Vary the heights:
When sketching, ensure some stems are tall and reaching up the sides, while others are small sprigs near the bottom curve. This creates depth and movement. -
Sketch the focal flowers:
Draw small circles or ovals where your main flower heads will go. Don’t add petals yet; just mark the placement to ensure you don’t clutter the center.
Fixing Smudges
If you smear a stem, don’t wipe it! Let it dry completely, then gently scratch the mistake away with a wooden skewer or toothpick.
Step 2: Painting the Foliage
-
Mix your greens:
On a palette, put down drops of Dark Green and Sage Green. I like to mix a tiny bit of brown into the dark green for a more earthy, dried-stem look. -
Paint main stems:
Using your liner brush and the Dark Green mixture, paint the primary vertical lines. Keep your hand loose and use very light pressure to keep the lines thin. -
Add delicate leaves:
For the leaves, press the belly of the brush down and lift up quickly to create tapered shapes. Vary the leaf structures—some alternating up the stem, some clustered at the base. -
Create wispy grasses:
Switch to the Sage Green or a diluted version of your dark green. Paint very faint, thread-like strands of grass in empty spaces to act as fillers. -
Paint sprig details:
For the tiny filler sprigs, use short, flicking motions. These don’t need distinct leaves, just suggestion of organic growth.
Add an Insect
Hide a tiny painted ladybug or bumblebee on one of the leaves. It’s a delightful surprise that reveals itself as you finish your soup.
Step 3: Adding the Blooms
-
Paint the yellow buds:
Using the round brush and Mustard Yellow, paint small oval blobs at the top of some stems. These act as closed buds or buttercups. -
Create blue cornflowers:
With the liner brush and Cornflower Blue, paint star-like shapes. Start from a center point and brush outward in short strokes to mimic petals. -
Add terracotta accents:
Use the Terracotta color for small, dried-looking flowers. These can be simple clusters of three or four dots at the end of a stem. -
Detail the daisies:
For the white daisies, use the White underglaze. Even though the background is light, the white paint adds texture. Paint small radiating petals and add a tiny yellow dot center when dry. -
Add tiny speckles:
Dip a stiff brush (like a toothbrush) in watered-down brown or dark green paint. Run your thumb over the bristles to flick tiny speckles onto the bowl. This adds that rustic, ceramic studio charm.
Step 4: Finishing
-
Check density:
Step back and look at the inside of the bowl. If there are large empty gaps, add a free-floating leaf or a tiny ‘x’ shape to fill the void. -
Let it dry completely:
Allow the underglaze to dry until it is chalky and room temperature to the touch. This prevents smudging during the glazing process. -
Apply clear glaze:
Dip the bowl into clear transparent glaze or brush on three smooth coats. Be careful not to drag your brush too hard over the painted flowers. -
Clean the distinct foot:
Wipe the bottom foot of the bowl with a sponge to ensure no glaze remains on the part that touches the kiln shelf.
Once fired, you will have a beautiful, permanent whimsical meadow to enjoy with every meal


Lavender Sprigs in Clean Vertical Strokes
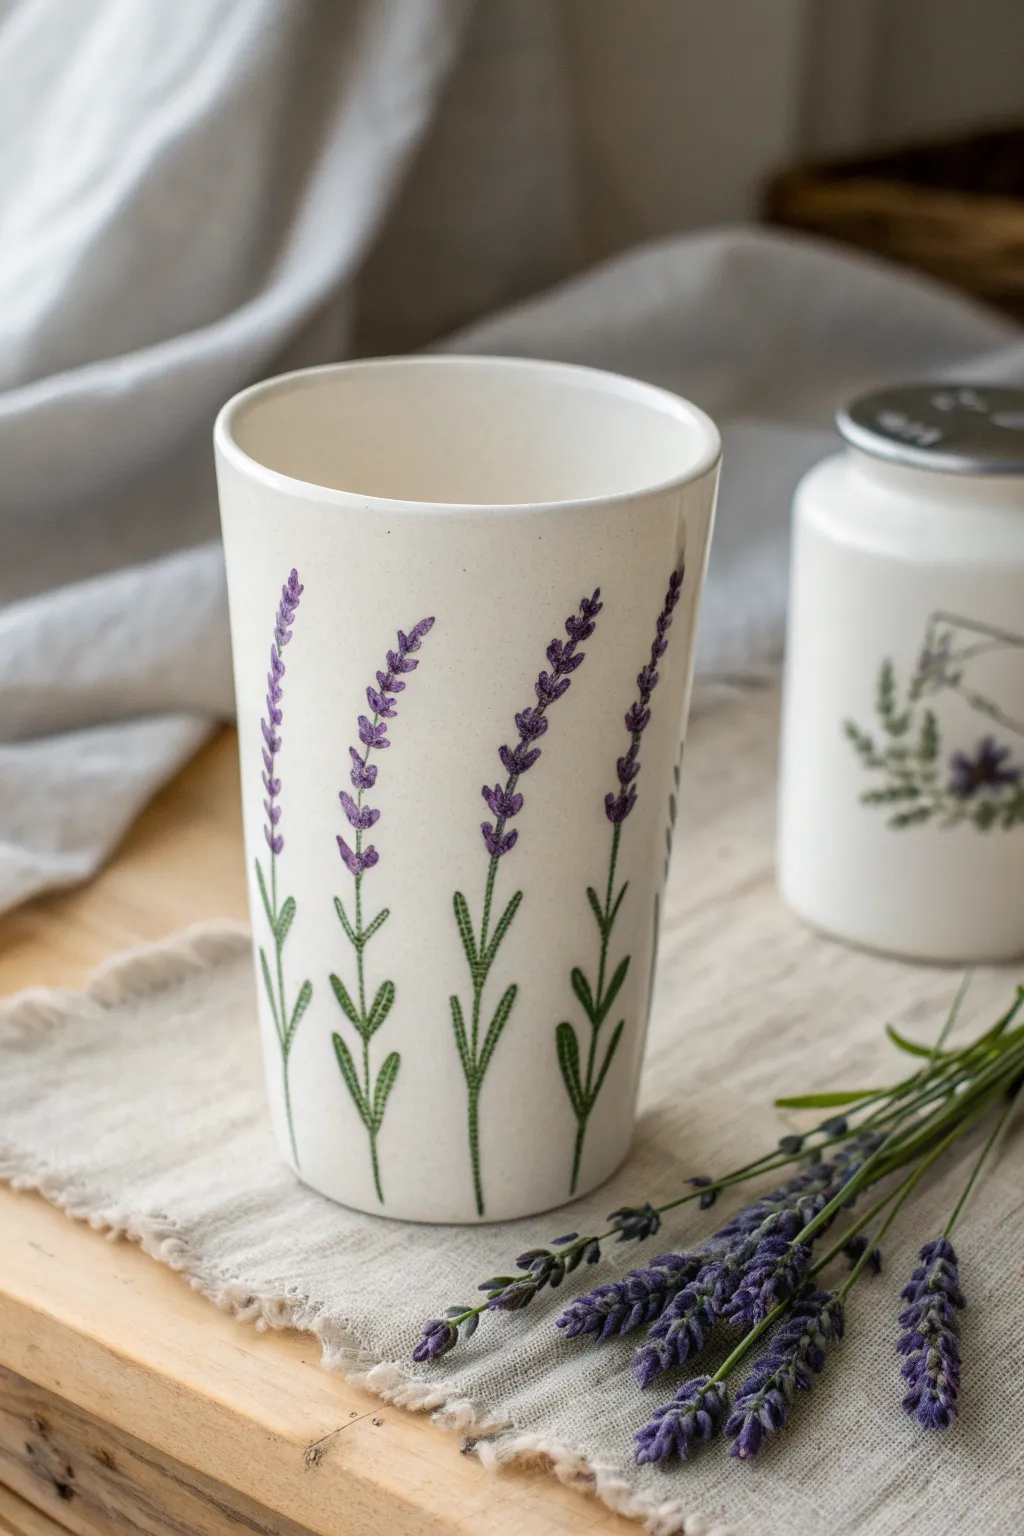
This elegant ceramic painting project features simplified, vertical lavender sprigs that mimic the look of botanical illustrations. The clean white background emphasizes the delicate purple blooms and structured green stems, making for a serene and modern piece.
Detailed Instructions
Materials
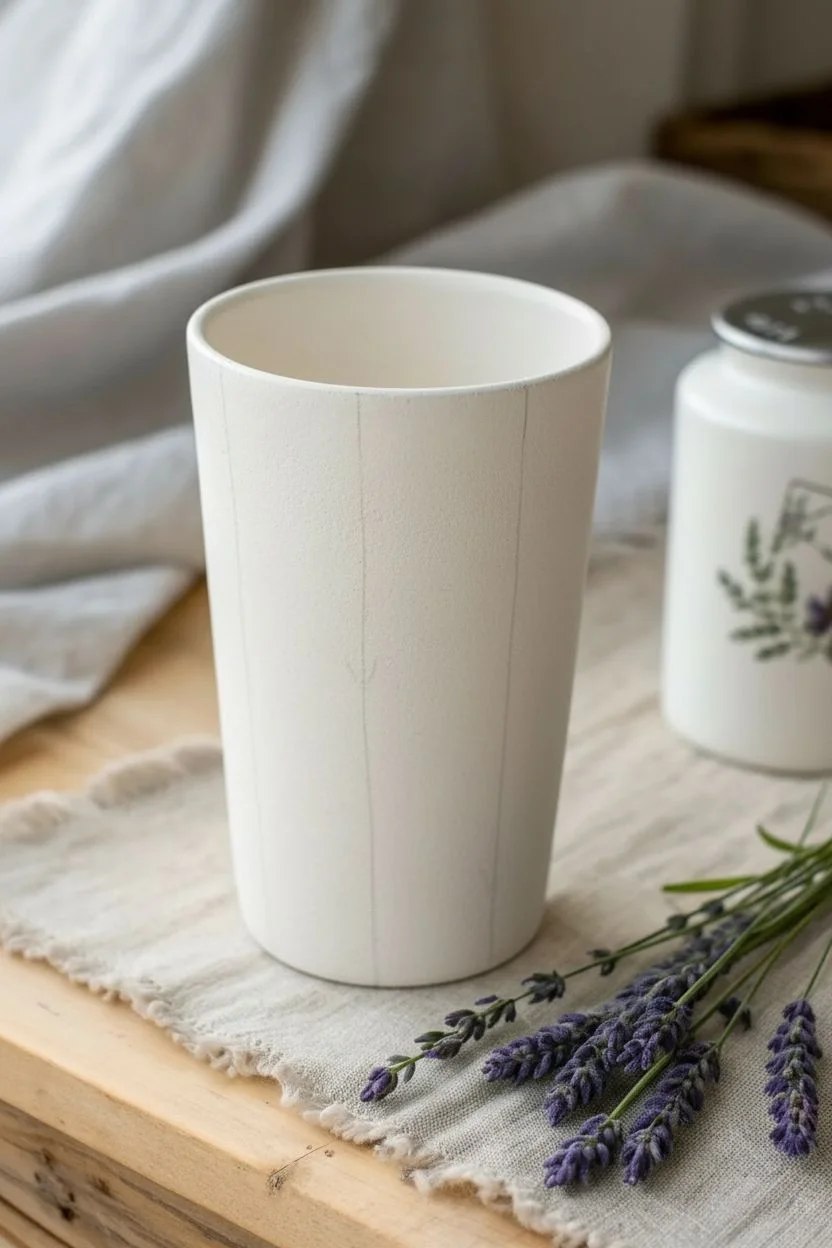
- Bisque ceramic tumbler or tall vase (clean and dust-free)
- Underglazes: Deep forest green, olive green, medium purple, dark violet
- Small round brush (size 0 or 1)
- Fine liner brush (size 00 or 000)
- Clear transparent glaze
- Sponge and water bowl
- Pencil (optional for sketching)
- Palette or glazed tile
Step 1: Planning the Layout
-
Clean the Bisque:
Start by wiping down your bisque tumbler with a slightly damp sponge. This removes any ceramic dust that could prevent the underglaze from adhering properly. -
Visualize Spacing:
Look at the circumference of your cup. You want to space the lavender sprigs evenly around the vessel. Imagine 4 to 6 vertical lines running from the bottom to about an inch from the rim. -
Light Sketching (Optional):
If you are nervous about freehanding, use a regular number 2 pencil to faintly mark vertical guide lines for your stems. Don’t worry about erasing; the graphite will burn off completely in the kiln.
Step 2: Painting the Foliage
-
Mix Your Greens:
On your palette, place a dollop of deep forest green and a smaller amount of olive green. Mixing them slightly gives a more natural, less synthetic look. -
Paint the Main Stems:
Using your fine liner brush loaded with the green mixture, paint thin, steady lines from the bottom of the cup upward. Stop these lines about two-thirds of the way up the cup height. -
Add Leaf Structure:
Switch to the small round brush. At the base of the stems, paint small, elongated V-shapes or simple pairs of leaves branching out. Keep them low on the stem, leaving the upper stem bare for the flowers. -
Detailing the Leaves:
Go back over the leaves with the liner brush to add a darker vein down the center if you like, or simply ensure the edges are crisp. Let the green layer dry for a few minutes until it is matte.
Brush Technique Tip
For the lavender buds, try a “stippling” motion rather than a dragging stroke. Pressing the belly of the brush down makes a perfect organic oval shape instantly.
Step 3: Creating the Blooms
-
Prepare Purple Tones:
Squeeze out your medium purple and dark violet underglazes. You won’t blend these fully; you want distinct strokes of color to create depth. -
Start the Bloom Structure:
Dip the tip of your small round brush into the medium purple. Starting at the very top of your green stem, create the ‘buds’ by pressing the brush tip down gently and lifting up. This creates a tiny teardrop shape. -
Building the Flower Spike:
Work your way down the stem about 1.5 to 2 inches. Paint these small teardrop strokes in pairs or alternating sides along the stem, mimicking the stacked look of real lavender. -
Layering for Texture:
I like to let the first purple layer dry to the touch, then go back in with the dark violet. -
Adding Contrast:
Using the dark violet and your finest liner brush, add tiny dots or smaller strokes near the base of the purple teardrops. This gives the illusion of individual flower bracts and shadow. -
Connecting the Dots:
If any flower clusters look like they are floating too far from the main line, use the liner brush with a tiny amount of green to connect them back to the main stem.
Add a buzzing friend
Paint a tiny, simple bumblebee hovering near one of the sprigs. Use a dot of yellow and black stripes to add a whimsical narrative to your garden scene.
Step 4: Final Glazing
-
Check Coverage:
Underglaze usually requires 2-3 coats for solid opacity. If your strokes look too watery or streaky, carefully dab a second coat of color over the existing shapes once dry. -
Final Drying:
Allow the entire painted design to dry completely. It should feel chalky and room temperature, not cool to the touch. -
Clear Glaze Application:
Dip the tumbler into a clear transparent glaze, or brush on three even coats if you are brushing. This will seal the design and make the white background glossy. -
Kiln Fire:
Fire the piece according to the clay and glaze specifications (usually cone 06 or cone 6).
Once fired, you’ll have a beautifully serene tumbler perfect for enjoying herbal tea or displaying fresh cut flowers.


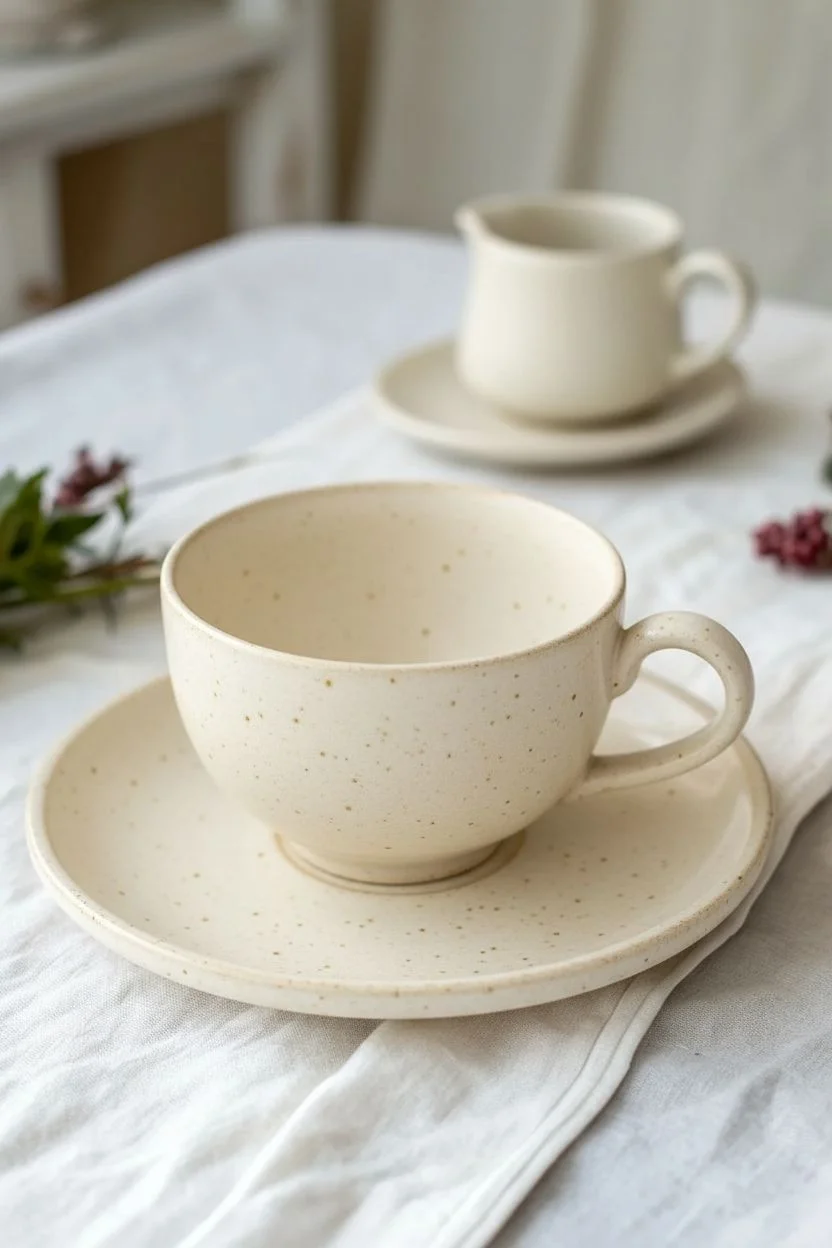
Roses in a Soft Vintage Color Palette
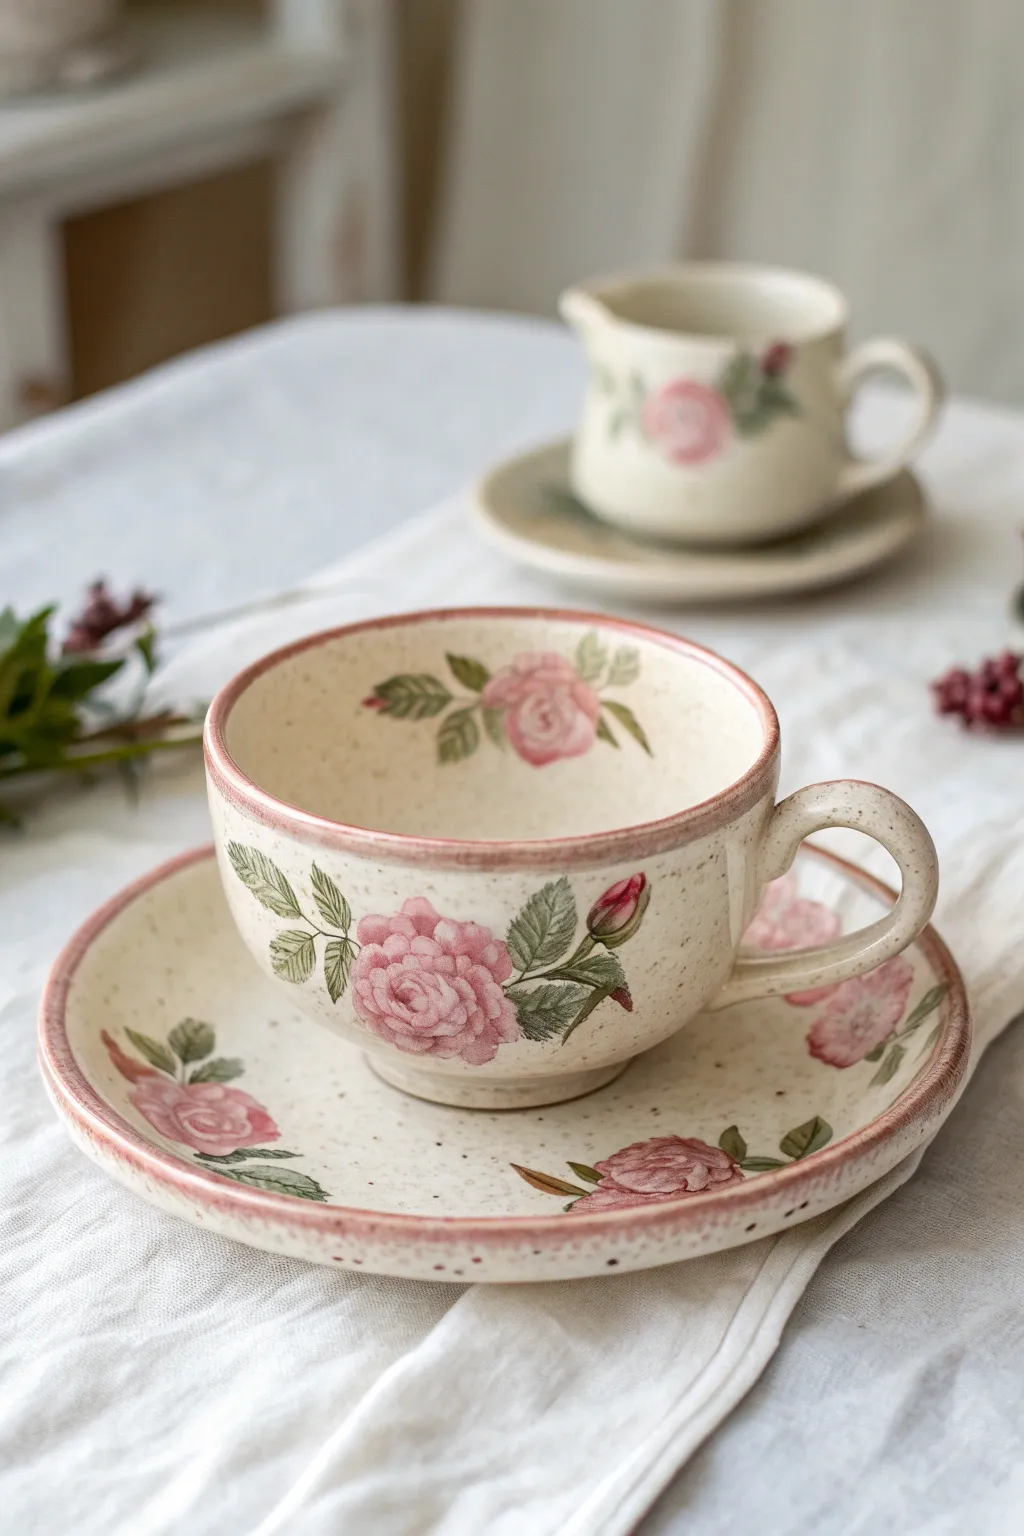
Capture the romance of an English garden with this delicate pottery painting project featuring soft pink roses on a speckled cream base. The finished piece evokes a lovely aged quality, perfect for cozy afternoon tea.
Step-by-Step Guide
Materials
- Bisque teacup and saucer
- Underglaze (Cream/Off-White)
- Underglaze (Dusty Pink)
- Underglaze (Deep Rose/Mauve)
- Underglaze (Sage Green)
- Underglaze (Olive Green)
- Speckled glaze (clear or lightly tinted) or splatter brush
- Selection of soft round brushes (size 2, 4, and 6)
- Fine liner brush (size 0 or 00)
- Sponge
- Water and palette
Step 1: Base Preparation
-
Clean the bisque:
Start by wiping down your bisque teacup and saucer with a damp sponge to remove any dust or oils that might repel the glaze. -
Apply the background color:
Using a wide soft brush, apply three even coats of Cream or Off-White underglaze to the entire surface of the cup and saucer. Allow each coat to dry until it’s chalky to the touch before adding the next. -
Create the speckle effect:
Create that rustic, vintage look by flicking a very small amount of diluted brown or warm grey underglaze onto the piece using a toothbrush or stiff bristle brush. Alternatively, you can use a specialty ‘speckled’ top glaze later, but I prefer controlling the texture at this stage.
Step 2: Painting the Roses
-
Map out floral placement:
Lightly sketch the position of your main blooms using a regular pencil. Place one large bloom on the side of the cup, one inside the rim, and about three scattered across the saucer. The pencil marks will burn off in the kiln. -
Base the rose shapes:
Load a size 4 round brush with Dusty Pink. Paint a rough, organic circle for the main rose shape, keeping the edges slightly uneven. Don’t make it a perfect solid ball; keep the paint somewhat translucent. -
Add petal definition:
While the base is still slightly damp, pick up the Deep Rose color on the tip of the same brush. Start in the center of the bloom and paint small ‘C’ curve markings to suggest tightly packed petals. -
Expand the petals:
Continuing with the Deep Rose, make larger, sweeping curved strokes around the center to create the outer petals. Leave some of the lighter pink showing through for highlights. -
Include rosebuds:
Paint small teardrop shapes near the main blooms using the Deep Rose color to represent unopen buds.
Paint looking streaky?
If your cream background looks streaky, sponge the final coat on instead of brushing it. This creates a smooth, airbrushed texture.
Step 3: Adding Greenery & Details
-
Paint the leaves:
Using the Sage Green and a size 2 brush, paint almond-shaped leaves extending from the roses. Group them in pairs or threes for a natural look. -
Detail the leaf veins:
Switch to your fine liner brush and the Olive Green underglaze. carefully paint a central line down each leaf and tiny diagonal veins branching off. -
Connect stems:
Use the liner brush and Olive Green to draw thin, delicate stems connecting the buds to the main cluster and anchoring the leaves. -
Create sepals on buds:
Add tiny green strokes at the base of your pink rosebuds to create the sepals hugging the flower.
Golden Hour Glow
Mix a tiny drop of yellow underglaze into your cream base for a warmer, ‘aged’ porcelain look that makes the pinks pop.
Step 4: Finishing Touches
-
Rim the edges:
Dip a sponge or a steady brush into the Dusty Pink underglaze. Gently run it along the rim of the cup and the edge of the saucer to create a soft, distressed pink band. -
Check opacity:
Look over your design. If the roses look too pale, add a second thin layer of the Deep Rose to the darkest shadowy areas between petals. -
Clear glaze application:
Once the underglaze design is completely dry, apply two to three coats of clear dipping glaze or brush-on clear glaze over the entire piece. -
Fire:
Fire the piece according to the clay and glaze specifications (usually cone 06 or cone 6 depending on your materials).
Enjoy sipping tea from your beautiful, custom-painted vintage garden set
BRUSH GUIDE
The Right Brush for Every Stroke
From clean lines to bold texture — master brush choice, stroke control, and essential techniques.
Explore the Full Guide
Sunflower Faces That Fit a Round Surface
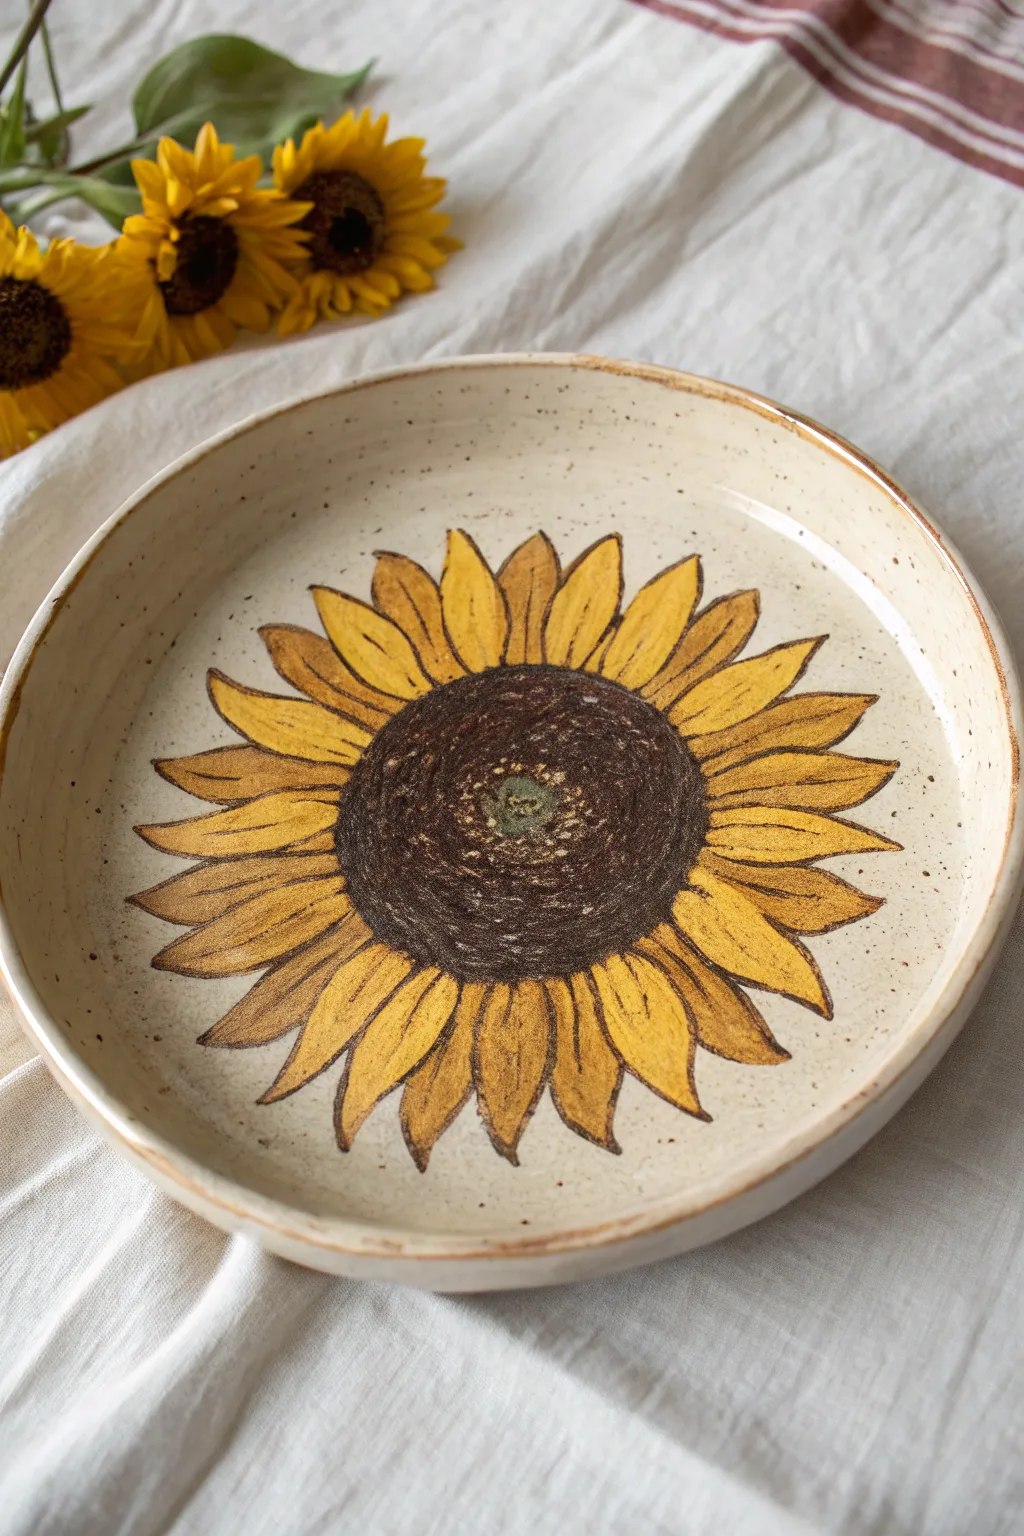
Embrace the warmth of nature with this rustic sunflower design that perfectly fills the face of a round dish. The sketchy, organic outlines and rich earth tones give this piece a delightful, hand-drawn character that feels cozy and inviting.
How-To Guide
Materials
- Bisque fired round shallow dish or plate (approx. 8-10 inches)
- Pencil
- Bisque stain or underglaze (Dark Brown)
- Underglaze (Golden Yellow)
- Underglaze (Deep Ochre or Amber)
- Underglaze (Muted Green for center detail)
- Underglaze (Cream/Off-White for speckling)
- Fine liner brush (size 0 or 00)
- Round watercolor style brush (size 4 or 6)
- Old toothbrush (for speckling)
- Clear dipping glaze
- Sponge and water bucket
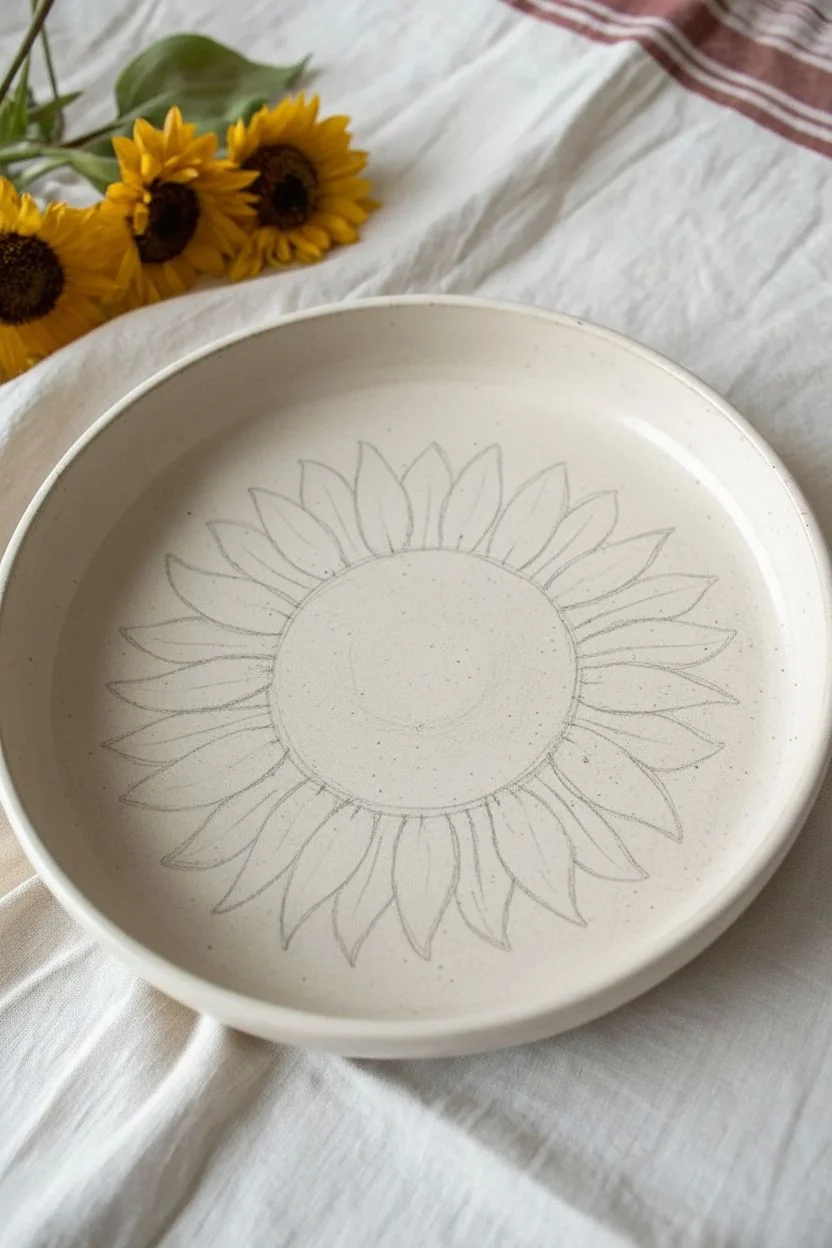
Step 1: Preparation & Sketching
-
Clean the bisque:
Begin by wiping down your bisque piece with a slightly damp sponge. This removes any dust from the shelf that could repel your glaze later. -
Mark the center:
Using your pencil, lightly mark the absolute center of the dish. This doesn’t need to be mathematical, just a visual anchor. -
Sketch the seed head:
Draw a large circle around your center point for the sunflower’s seed head. It should take up about a third of the plate’s diameter to create that bold, graphic look. -
Outline the petals:
Sketch a ring of petals radiating from the center circle. Draw them slightly irregularly—some overlapping, some twisting—to mimic the natural ‘flawed’ beauty of real flowers. They should extend nearly to the rim of the dish.
Step 2: Painting the Center
-
Base coat the seeds:
Using the dark brown underglaze and a round brush, fill in the large central circle. Apply two to three coats, letting each dry until it’s chalky to the touch before adding the next. -
Add texture marks:
Once the brown base is dry, take a clean, slightly damp brush and gently ‘lift’ a few tiny spots in the very center to reveal the lighter clay body, or dab a tiny amount of muted green in the middle for a focal point. -
Stipple for depth:
Dip your fine brush into a slightly lighter brown or a mix of brown and yellow. Stipple (tap tiny dots) around the outer edge of the seed circle to soften the transition where the petals begin.
Uneven Coverage?
If your yellow looks too transparent after firing, you likely needed a third coat. Always alternate brushing directions (horizontal then vertical) for solid opacity.
Step 3: Painting the Petals
-
Apply the primary yellow:
Load your round brush with Golden Yellow. Fill in each petal individually. Use long, sweeping strokes starting from the seed head and pulling outward toward the tip. -
Build the second layer:
Apply a second coat of yellow to ensure solid coverage, but don’t worry if it looks slightly streaky; that brush texture adds to the illustrative style. -
Add shading:
Switch to your Deep Ochre or Amber color. Paint thin streaks at the base of the petals (where they meet the center) and along one side of each petal to suggest shadow and dimension. -
Blend the tones:
If the shadow lines look too harsh, use a slightly damp brush to gently smudge the amber into the yellow while the paint is still tacky.
Pro Tip: Scratchy Lines
For the specific sketchy look in the image, use a ‘sgraffito’ tool to scratch through the paint slightly in the dark center, revealing the clay before glazing.
Step 4: Detailing & Finishing
-
Outline the design:
Here is where the artwork comes alive. Using your finest liner brush and thinned dark brown underglaze, outline every petal and re-circle the seed head. I find keepings the lines scratchy and loose works best. -
Create petal veins:
Flick the liner brush from the center outward into the petals to create quick, energetic vein lines. Don’t overthink these; quick gestures look more natural. -
Simulate clay speckles:
Dilute a small amount of dark brown underglaze with water. Dip an old toothbrush into it, point it at the plate, and run your thumb across the bristles to flick tiny speckles over the entire background and flower. -
Clean the rim:
If you want a framed look, run a sponge trimmed with brown underglaze around the top edge of the rim. -
Glaze and fire:
Once the underglaze is bone dry, dip the entire plate into a clear glaze. Fire according to your clay body’s specifications (usually cone 06 or cone 6).
Now you have a stunning, permanent bloom that will brighten up any table setting
Tulip Trio With Minimal Leaves
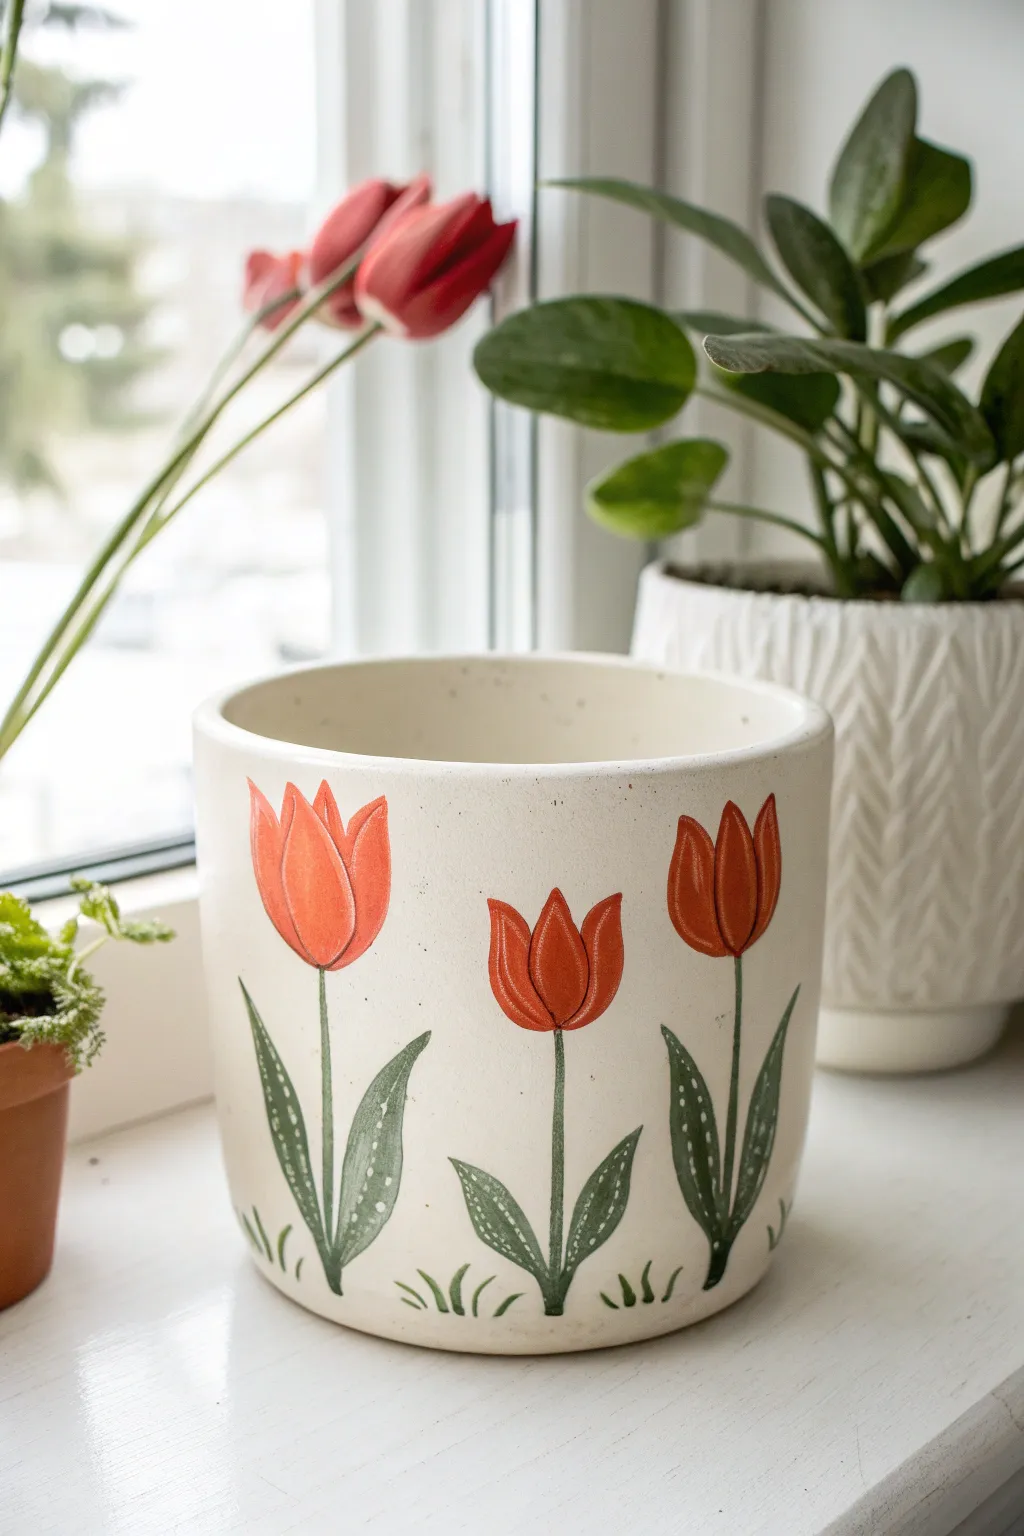
Bring the freshness of spring indoors with this wonderfully simple yet striking planter design. Its creamy white background makes the vibrant orange-red tulips and dotted green leaves truly pop, creating a clean, modern aesthetic.
Step-by-Step
Materials
- Bisque ceramic planter (cylindrical shape)
- Underglaze pencil (light grey or brown)
- Cream or off-white underglaze for the base
- Orange-red underglaze
- Deep green or hunter green underglaze
- Fan brush
- Small round brush (size 2 or 4)
- Fine liner brush (size 0 or 00)
- Stylus tool or toothpick (for dots)
- Clear dipping glaze
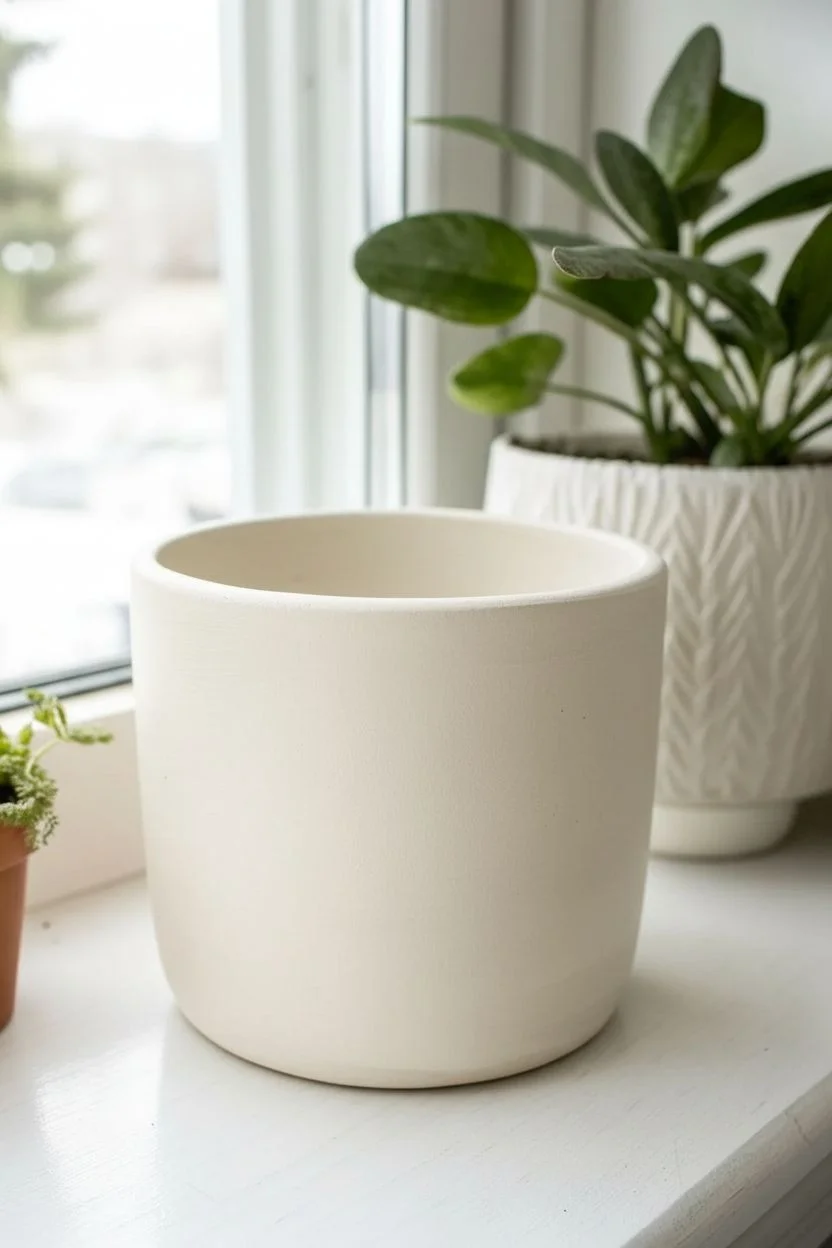
Step 1: Base Preparation
-
Clean the bisque:
Start by wiping down your bisque planter with a damp sponge. This removes any dust that might prevent the glaze from adhering properly. -
Apply the background:
Using a fan brush, apply three even coats of a cream or soft off-white underglaze to the entire exterior of the pot. Ensure each coat is dry to the touch before adding the next one to create a solid, opaque base.
Fixing Smudges
If you smudge red paint onto the white background, don’t wipe it! Let it dry completely, then gently scratch the mistake off with a pin or tool.
Step 2: Drafting the Design
-
Sketch the tulips:
Once the base is bone dry, lightly sketch three tulip flowers using an underglaze pencil. Draw simple U-shapes for the heads, spaced evenly around the front. -
Add stems and leaves:
Draw single straight lines down from the center of each flower head. Then, sketch two pointed, slender leaves curving upward at the base of each stem. -
Include grass accents:
At the very bottom edge, add tiny, curved strokes to represent blades of grass peeking up between the flowers.
Step 3: Painting the Blooms
-
Fill the flower heads:
Using a small round brush, fill in the tulip shapes with your orange-red underglaze. Apply 2-3 coats for rich color opacity. -
Define the petals:
To give the tulips depth, leave extremely thin unpainted lines within the red shape to separate the petals, or paint the whole shape red and go back later with a darker liner. -
Outline the petals:
Switch to a fine liner brush and the original cream color (or a dark brown if you prefer high contrast). Carefully outline the individual petals inside the tulip shape to define the overlapping layers.
Add Dimension
Mix a tiny drop of brown into your red paint and apply it to the base of the petals. This creates a shadow effect that makes the flower look rounded.
Step 4: Greenery and Details
-
Paint the leaves:
Fill in the leaf shapes with deep green underglaze using the round brush. Because these leaves are dark, two solid coats should suffice. -
Paint the stems:
With the liner brush, carefully trace over your sketched stem lines with the green underglaze. Keep your hand steady and the pressure light for a thin line. -
Add leaf texture:
This is the signature detail: dip a stylus tool or a toothpick into white or cream underglaze. Dot the edges and spines of the green leaves to create a playful pattern. -
Paint the grass:
Quickly flick the liner brush upward at the base using the green paint to fill in the small grass tufts.
Step 5: Finishing
-
Final outlined details:
If your design looks a little soft, you can use a fine liner brush with a dark wash or brown underglaze to very lightly outline the stems and grass blades for sharpness. -
Clear glaze application:
Once all your painting is bone dry, dip the entire planter into a clear glaze. This will seal the design and make it food-safe and shiny after firing. -
Check the bottom:
I always wipe the bottom foot of the pot with a sponge to ensure no glaze is left there, preventing it from sticking to the kiln shelf. -
Fire the piece:
Have the pottery fired in a kiln according to the specifications of the clay and glaze used (usually cone 06 or cone 6).
Place your finished pot on a sunny windowsill to enjoy spring vibes all year round

PENCIL GUIDE
Understanding Pencil Grades from H to B
From first sketch to finished drawing — learn pencil grades, line control, and shading techniques.
Explore the Full Guide
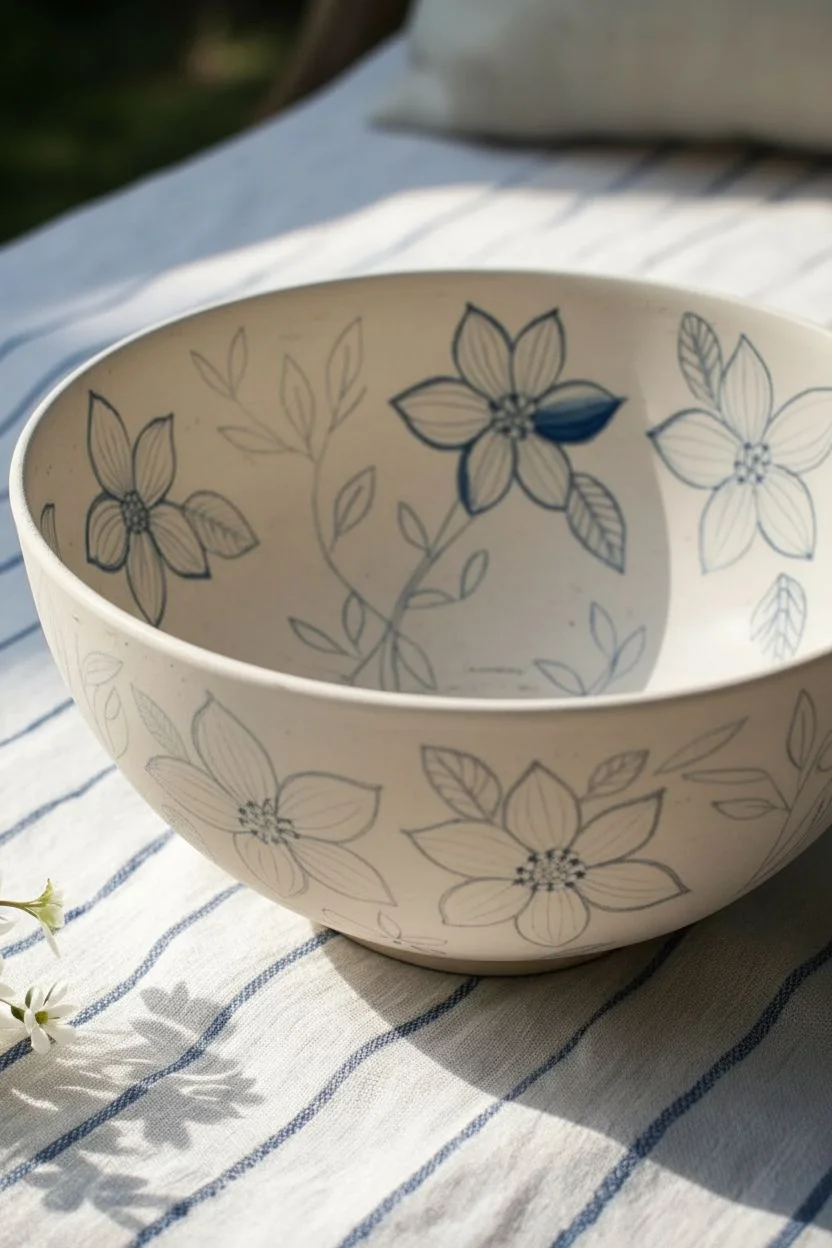
Blue-and-White Floral Motifs With Crisp Linework
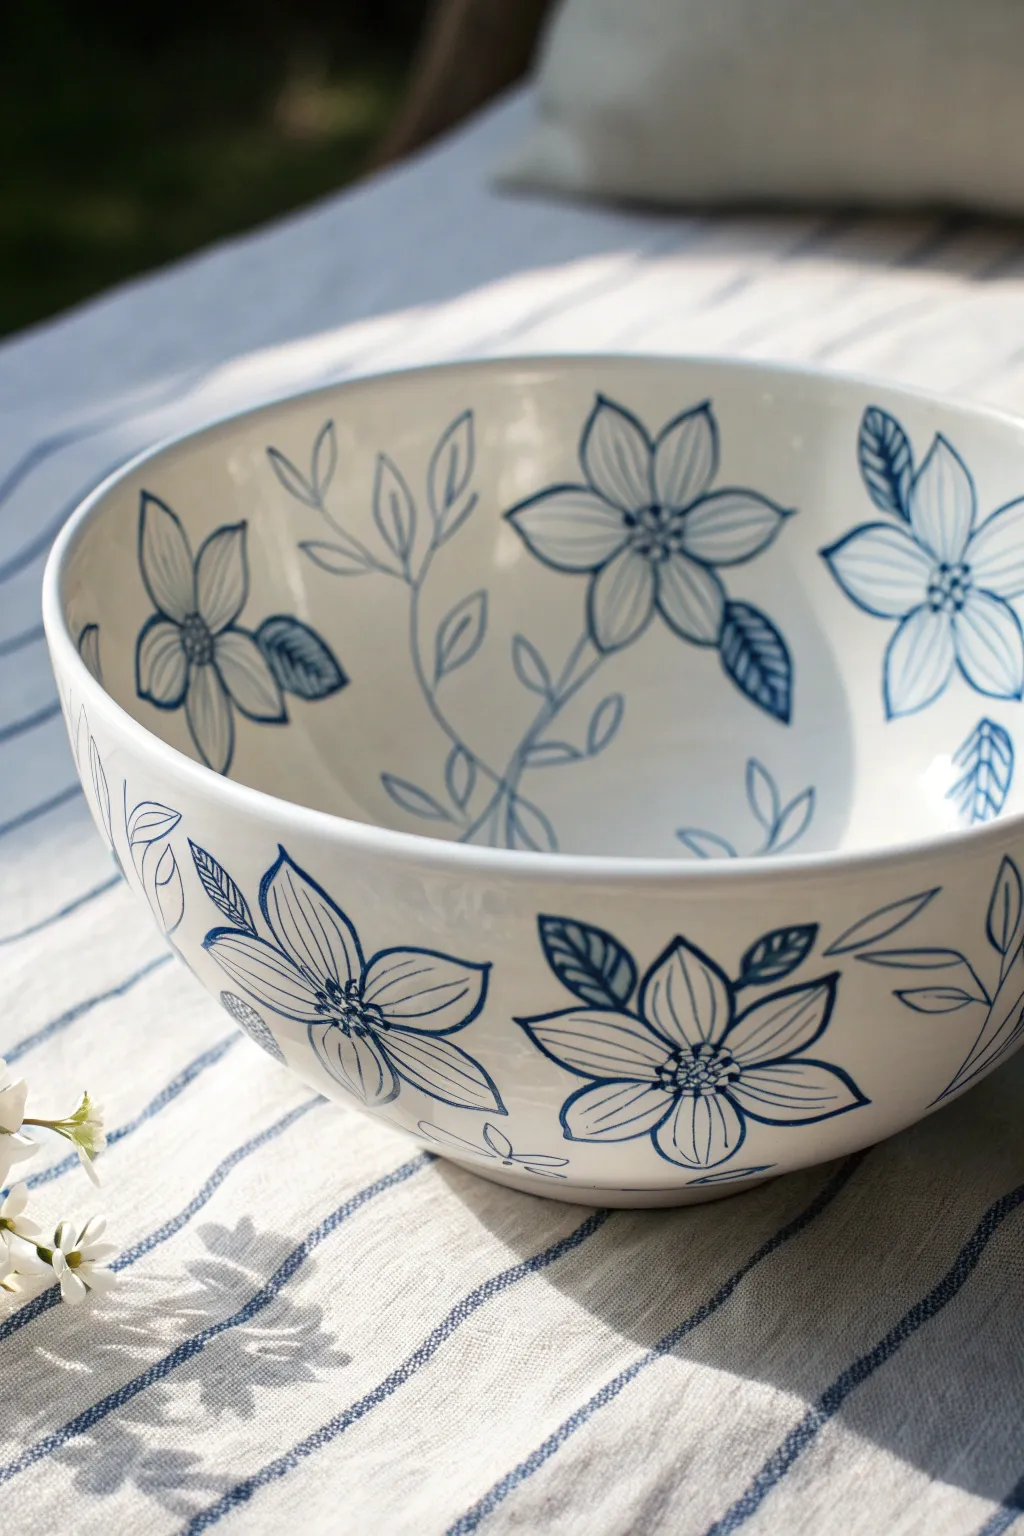
Achieve a timeless look that feels both modern and classic with this blue-and-white floral bowl project. The clean lines and open negative space allow the glossy white ceramic to shine through, creating a piece that feels fresh and airy.
Detailed Instructions
Materials
- Bisque ceramic bowl (ready for glazing)
- Underglaze pencil (blue or graphite) or carbon paper
- Cobalt blue underglaze (specifically designed for fine lines)
- Fine liner brush (size 0 or 00)
- Small round brush (size 2)
- Clean water for rinsing
- Damp sponge
- Clear dipping glaze or brush-on clear glaze
- Kiln access (or local studio firing service)
Step 1: Preparation & Planning
-
Wipe down the bisque:
Before you begin painting, take a damp sponge and gently wipe the entire surface of your bisque bowl. This removes any ceramic dust that might prevent the glaze from adhering properly. -
Sketch the flower placement:
Using a pencil, lightly sketch the positions of your main flowers. Don’t worry about perfection; graphite will burn off in the kiln. Aim for a scattering effect, placing large blooms on the inside walls and mirroring them on the exterior. -
Connect with stems:
Draw loose, flowing lines to connect the flowers with stems. Let the vines wrap naturally around the curve of the bowl, allowing some to trail off near the rim.
Step 2: Painting the Outline
-
Load your liner brush:
Dip your fine liner brush (size 0 or 00) into the cobalt blue underglaze. You want the consistency to be like ink—add a tiny drop of water if the glaze feels too thick or drags on the dry bisque. -
Define the petals:
Starting with the central flower on the inside, paint the outline of the petals. Use varying pressure: press down slightly for the wider curves of the petals and lift up for the pointed tips to create dynamic line weight. -
Add petal details:
Inside each petal, paint a single central vein line. Keep these lines swift and confident; hesitation can cause shaky marks. -
Detail the center:
In the middle of the flower, dab small dots or tiny circles to represent the stamen and pollen. This cluster of detail contrasts beautifully with the open petals. -
Trace the stems:
Follow your pencil guides to paint the long, winding stems. Try to do these in long, continuous strokes rather than short, sketchy ones for a smoother look. -
Leaf outlines:
Add simple leaf shapes along the stems. Similar to the petals, outline the leaf shape first. -
Leaf veining styling:
For the leaves, I like to try a different texture. Instead of a single line, use quick diagonal hatching lines inside some of the leaves to create shading and visual interest.
Shaky Lines?
Support your painting hand with your pinky finger resting on the bowl surface. This creates a bridge for stability, allowing you to draw smoother, more controlled curves on the rounded form.
Step 3: Painting the Exterior
-
Flip and stabilize:
Carefully turn the bowl over. You might want to rest it on a towel or a banding wheel to keep it steady while you paint the outside. -
Repeat the motifs:
Recreate the same floral process on the exterior. Ensure the design wraps around the curvature, perhaps allowing a petals or leaves to peek over the bottom edge. -
Check for density:
Step back and look at the whole piece. If there are large empty white spaces that feel unbalanced, add small floating leaves or buds to fill the gaps without cluttering the design.
Add Subtle Depth
Water down your blue underglaze significantly to create a transparent wash. Gently fill in just one side of each petal for a beautiful, watercolor-like shadow effect.
Step 4: Finishing Touches
-
Clean up smudges:
If you smudged any blue glaze or made a mistake, wait for it to dry completely. Then, scratch it off gently with a toothpick or a stiff, clean brush. Do not wipe it while wet, or you’ll stain the white clay blue. -
Dry thoroughy:
Let the underglaze dry completely. It should look chalky and matte. -
Clear glaze application:
Apply your clear glaze. If brushing, use a large soft fan brush to apply 2-3 even coats, letting each dry in between. If dipping, dip swiftly to avoid smudging the design. -
Check the foot:
Sponge off any glaze from the foot ring (the bottom rim that touches the table) to prevent the bowl from sticking to the kiln shelf. -
Fire:
Submit your piece for a final glaze firing according to the clay and glaze specifications (usually cone 06 or cone 6).
Once fired, the deep blue will pop against the glossy white, giving you a stunning piece ready for your table.
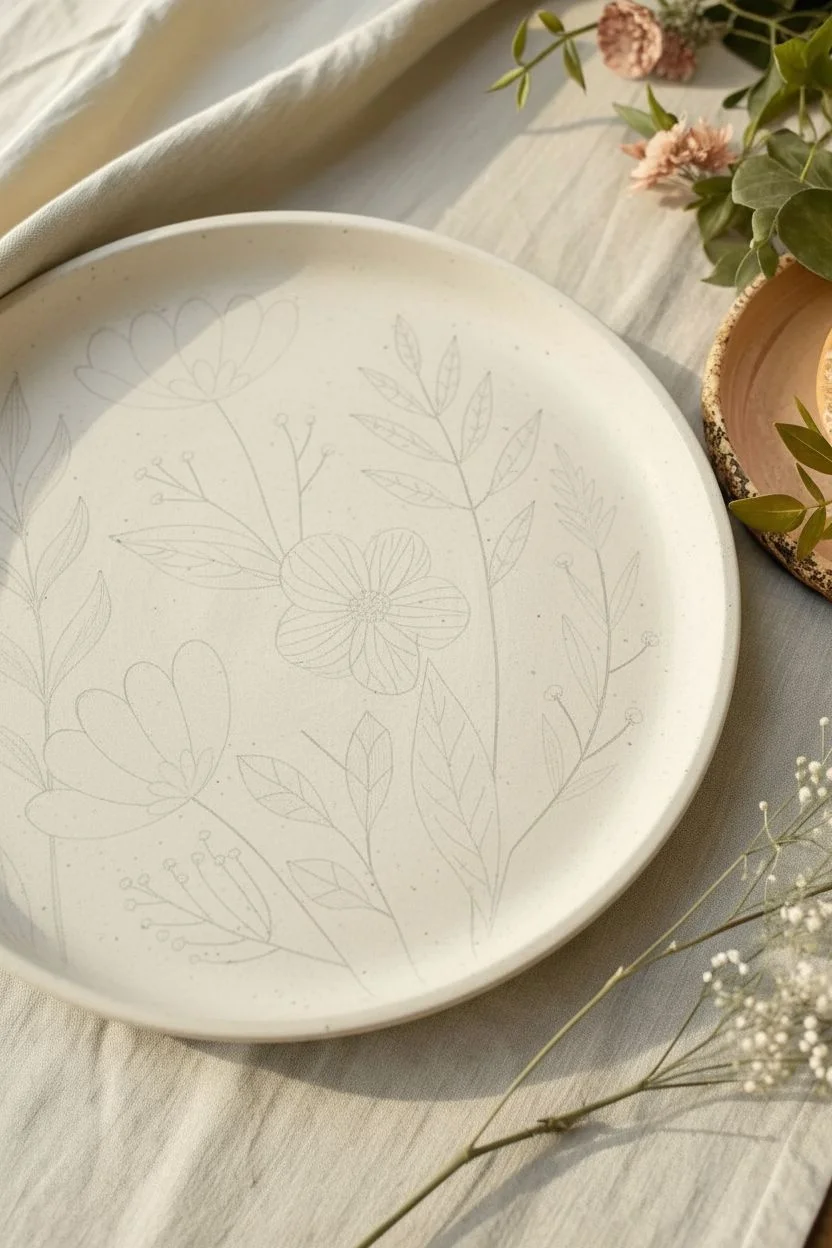
Leafy Florals With Bold Outlines and Flat Color
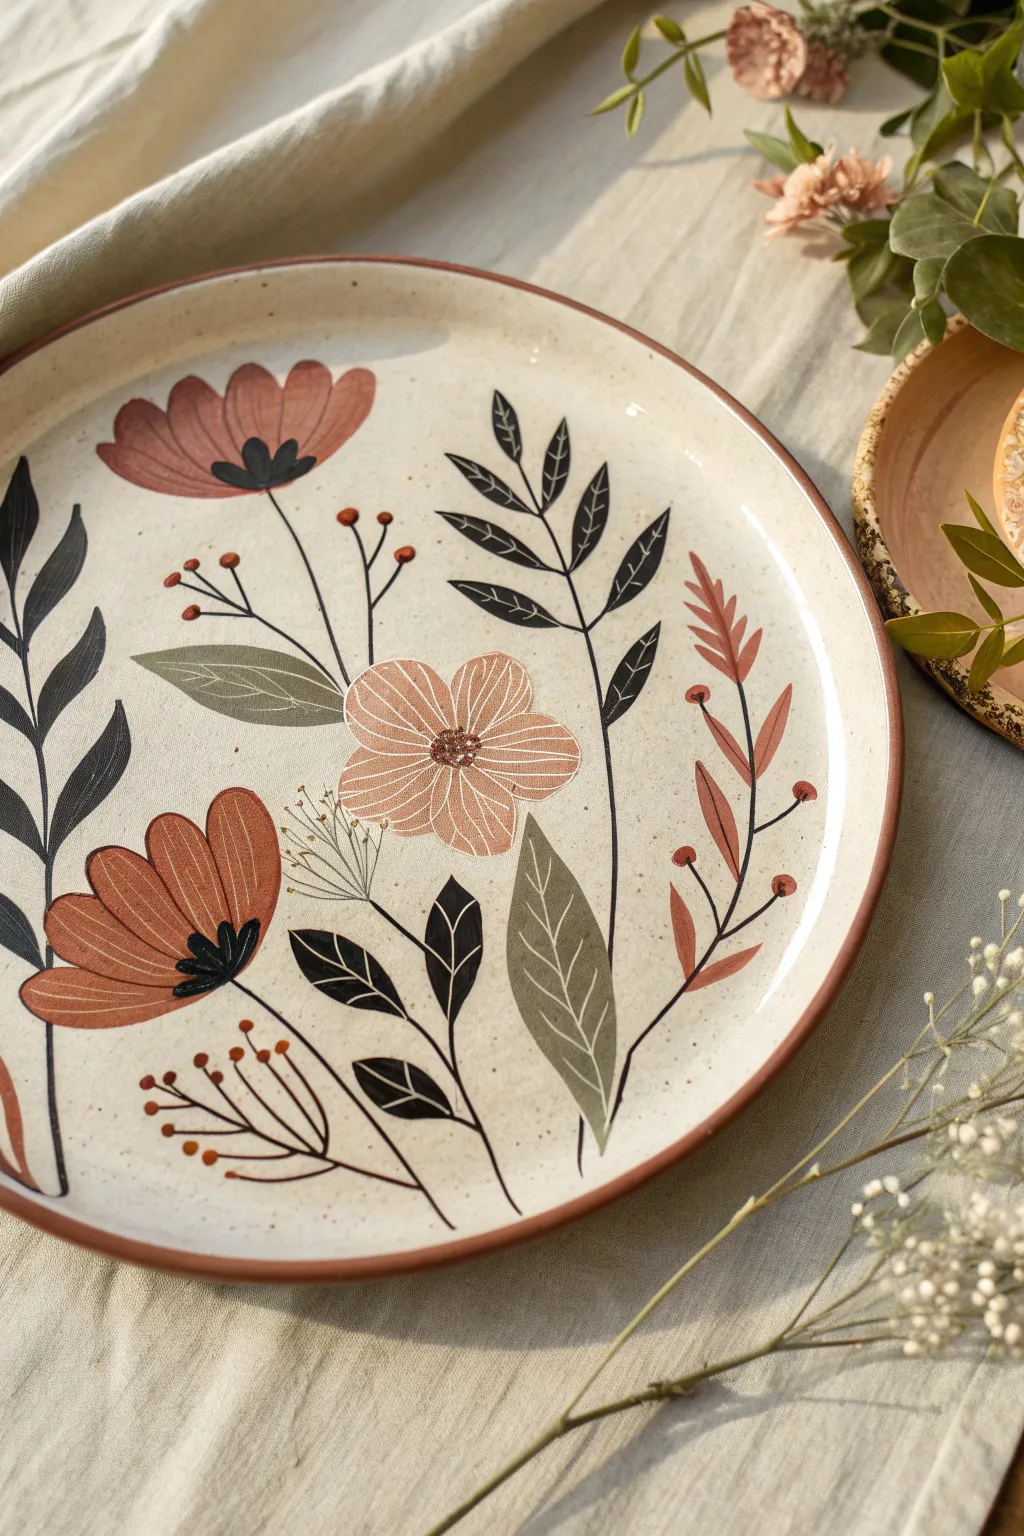
Embrace the charm of earthy tones and crisp botanicals with this striking plate design, featuring bold black leaves contrasted against softer terracotta and sage hues. The flat color application gives it a modern, illustrative feel that looks beautiful on any table.
Step-by-Step Tutorial
Materials
- Bisque-fired ceramic plate (10-12 inch diameter recommended)
- Underglazes: Black, Terracotta/Burnt Orange, Sage Green, Deep Maroon, Cream/Pale Peach
- Pencil (for sketching)
- Fine-tipped liner brush (size 0 or 00)
- Round shader brush (size 4 or 6)
- Clear transparent glaze (for finishing)
- Sponge and water bowl
- Palette or tile for mixing
Step 1: Preparation and Sketching
-
Clean the surface:
Wipe down your bisque plate with a damp sponge to remove any kiln dust. This ensures your underglazes adhere smoothly without crawling. -
Plan the composition:
Visualize the layout. The design features a central cluster with elements radiating slightly outward. Notice how the largest black frond anchors the left side, while the peach flower sits near the center. -
Lightly sketch the main blooms:
Using a pencil, lightly outline the two large poppy-like flowers on the left and the five-petaled flower in the center. Don’t press too hard; the graphite will burn off in the kiln. -
Add foliage guidelines:
Sketch simple lines to indicate where the stems and leafy branches will flow. You don’t need to draw every leaf perfectly right now, just the direction of growth.
Step 2: Painting the Base Colors
-
Paint the terracotta blooms:
Using your round shader brush, fill in the petals of the two poppy-like flowers with the Terracotta underglaze. Apply 2-3 coats, letting each layer dry until matte to ensure solid, opaque coverage. -
Create the center flower:
Switch to the Cream or Pale Peach color for the five-petaled flower in the middle. Paint the petals carefully, leaving a tiny gap in the center for detailing later. -
Add the sage leaves:
Identify the broad, singular leaves in your sketch (like the one near the peach flower). Fill these in with Sage Green. I prefer using long, smooth strokes here to minimize brush marks. -
Paint the maroon sprigs:
Mix a little Terracotta with a touch of Black if you don’t have a distinct Deep Maroon. Use this darker hue to paint the fern-like sprig on the right side of the plate.
Fixing Smudges
Did a black line go astray? Don’t wipe it! Let it dry completely, then gently scratch the mistake off with a toothpick or needle tool before re-painting the area.
Step 3: Adding the Black Details
-
Paint the dark foliage:
Using the Black underglaze and a steady hand, paint the large, bold leaf branches on the left and top-left. These are solid shapes, unlike the outlined stems we will do later. -
Add detail leaves:
Paint the smaller, solid black leaves clustered near the bottom center. Ensure the points of the leaves are crisp. -
Outline the peach flower:
Switch to your fine liner brush. Carefully outline the petals of the central peach flower with very thin white script lines if you want a subtle look, or use a very diluted version of the petal color for definition. -
Texture the peach flower:
Using the liner brush and white or a slightly darker peach tone, draw thin, radiating lines inside the petals of the center flower to give it texture. -
Detail the poppy centers:
Paint a solid black semi-circle at the base of the terracotta flowers. Once dry, add three thick black spikes extending into the petals. -
Add the delicate stems:
With the liner brush loaded with Black, draw the thin, sweeping stems connecting your flowers and leaves. Keep the pressure light to maintain a consistent line width. -
Create berry accents:
Paint the tiny stems that end in berries. For the berries themselves, dip the handle end of a brush into Terracotta paint and dot it onto the ends of the stems for perfect circles. -
Draw the wispy filler:
Using the thinnest brush, add the very delicate, hair-like sprigs near the heavy black leaves. These should look airy and light, almost like dried grass. -
Rim the plate:
For a cohesive finish, run a damp sponge dipped in Terracotta along the rim of the plate to create a soft, imperfect border.
Flowing Lines
Thin your black underglaze slightly with a drop of water. Ink-like consistency helps the liner brush glide smoothly for long, uninterrupted stems.
Step 4: Finishing
-
Check for mistakes:
Look over your work. You can carefully scrape away any stray black droplets with a craft knife or a stiff clean brush. -
Clear glaze application:
Once the underglaze is bone dry, apply a coat of clear transparent glaze over the entire piece (dipping or brushing), then fire according to your clay body’s instructions.
Enjoy using your new botanical plate for serving snacks or displaying as a piece of art


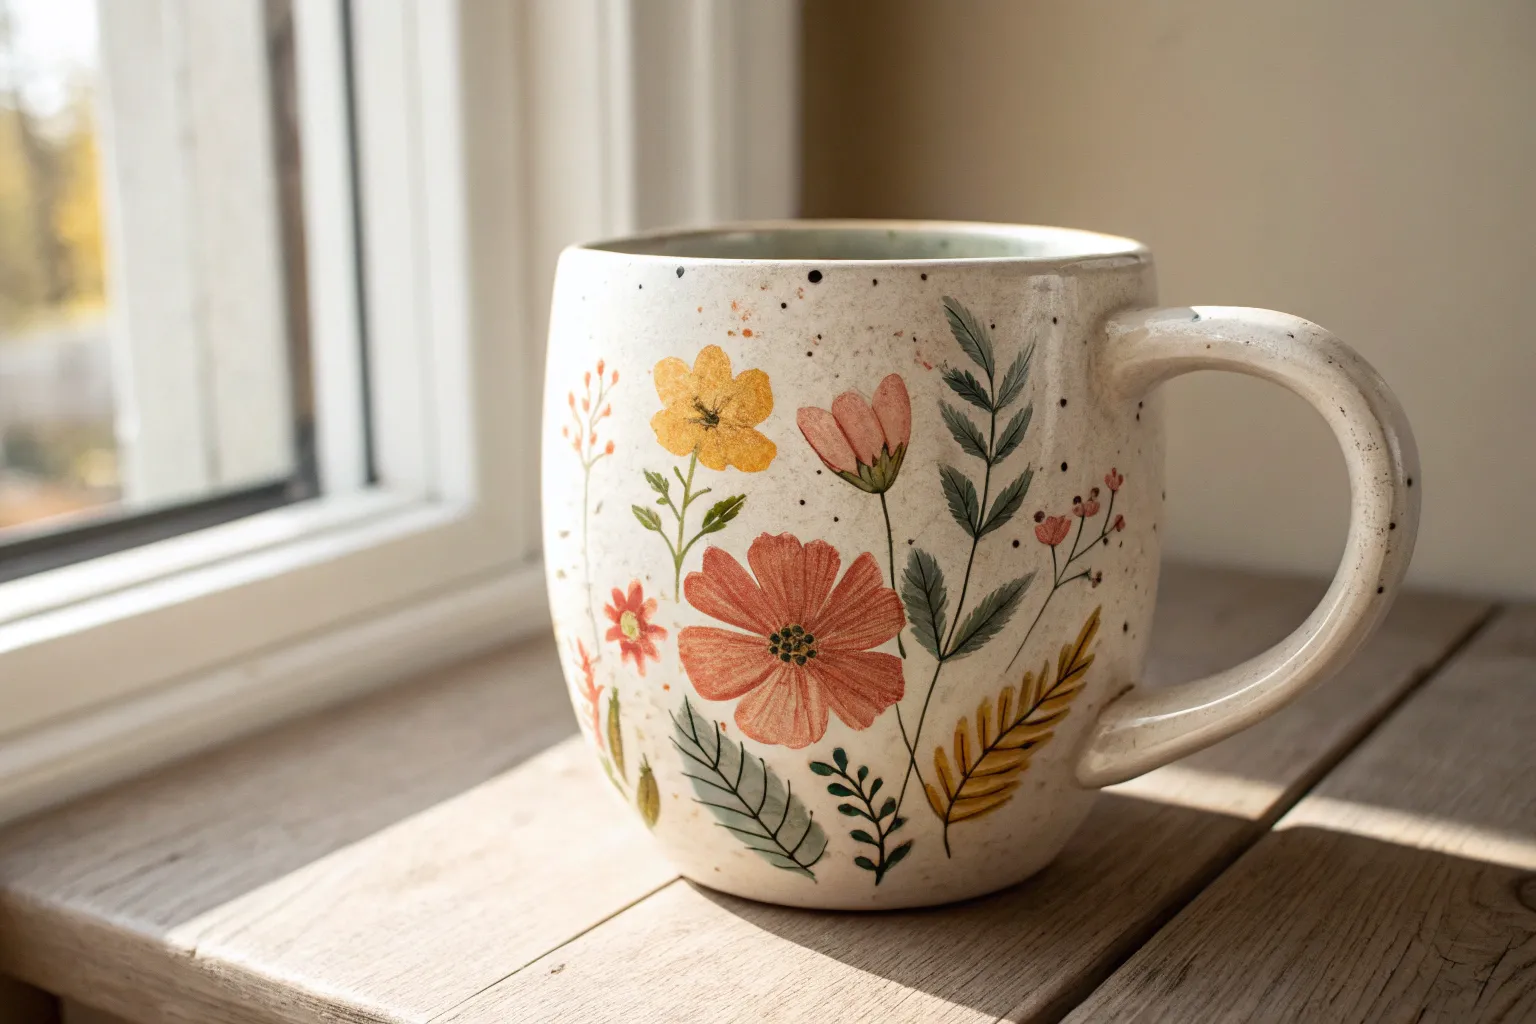
Watercolor-Style Flowers With Soft Blended Glaze
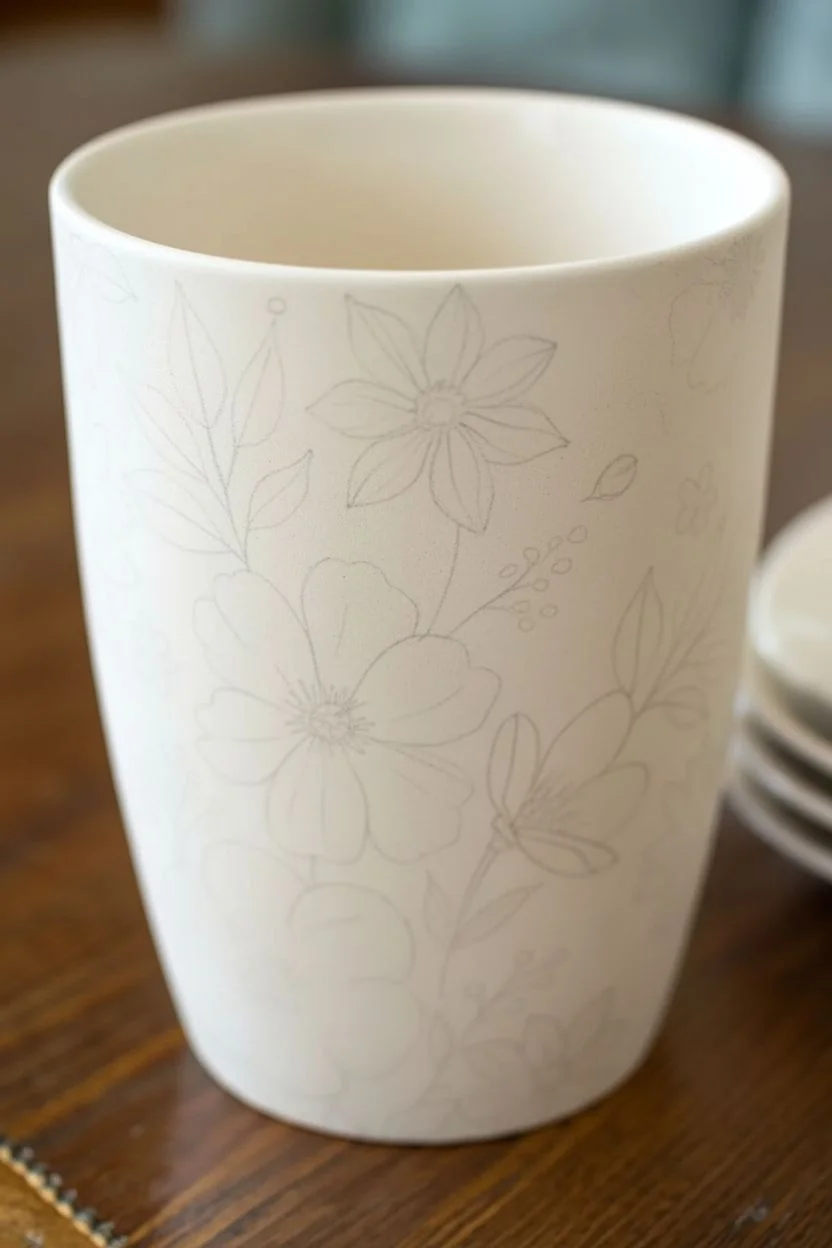
Capture the delicate beauty of a spring garden with this watercolor-style floral mug project. By thinning your underglazes and layering translucent washes, you’ll create soft petals and leaves that look as if they were painted on paper, all finished with fine, ink-like details.
Step-by-Step Guide
Materials
- Bisque ceramic mug (smooth surface recommended)
- Underglaze paints (Pink, Coral, Lavender, Dark Blue, Sage Green, Deep Red)
- Fine liner brush (size 0 or 00)
- Small round watercolor brush (size 2 or 4)
- Water cup for thinning paints
- Palette or small dishes for mixing
- Black underglaze pencil or ultra-fine squeeze bottle (for outlining)
- Clear dipping glaze
- Pencil (optional for sketching)
Step 1: Planning and Sketching
-
Clean surface:
Begin by wiping down your bisque mug with a damp sponge to remove any kiln dust. This ensures your glaze adheres smoothly and prevents crawling later. -
Light sketching:
Using a standard number 2 pencil, very lightly sketch the placement of your main flowers. Don’t worry about drawing every petal perfectly; you just want anchor points for the large coral flower and the purple blooms. The graphite will burn off in the kiln.
Bleeding Colors?
If your black outlines start to run into the colors, your flower washes were likely too wet. Let the colored base layers dry completely (bone dry) before adding the fine detail lines on top.
Step 2: Painting the Flowers
-
Prepare the wash:
To achieve that signature watercolor look, mix a small amount of coral underglaze with water on your palette. You want a consistency similar to heavy cream or whole milk—not too watery, but thin enough to be translucent. -
Coral petals base:
Using your round brush, paint the petals of the large central flower. Load the brush and press down near the center, lifting as you sweep outward to create a natural petal shape. Let the brushstrokes show; unevenness adds charm. -
Layering pinks:
While the coral is still slightly damp, add a touch of pink to the center of the petals or the tips. This wet-on-wet technique allows the colors to bleed slightly, mimicking real watercolor paper effects. -
Purple blooms:
Switch to your lavender shade. Thin it down just like the coral. Paint the smaller violets or pansy-like flowers, varying the pressure on your brush to create different petal sizes. I find adding a tiny drop of dark blue to the wet lavender creates lovely depth. -
Star flowers:
For the star-shaped pink flowers, use fewer strokes. Start from the center and flick the brush outward five or six times. Keep these quite sheer. -
Adding texture:
Once the base layers are dry to the touch, mix a slightly thicker, darker version of your flower colors. Dab this into the centers of the blooms to create depth and focus.
Glaze Resist Effect
Before painting, use liquid wax resist on the very edges of petals or stamens. When you paint the washes over it, the white bisque will show through, creating stunning bright highlights.
Step 3: Leaves and Accents
-
Mixing greens:
Mix your sage green with a tiny bit of blue for a cool-toned leaf color. Keep the consistency watery. -
Painting foliage:
Paint leaves clustering around the flowers. Use a single stroke for each leaf: press down to widen the stroke and lift up to create a sharp point. -
Variation:
For variety, paint some leaves effectively ‘blue-green’ and others purely green. Notice the dark blue leaves on the left of the image—don’t be afraid to use non-traditional leaf colors for contrast. -
Tiny buds:
Using the tip of your brush, dot small red or pink circles on the ends of thin stems to create little bud clusters or berries.
Step 4: Fine Lines and Glazing
-
Black outlines:
This is the crucial step for definition. Using a liner brush with black underglaze (or a specialized underglaze pencil), outline your petals and leaves. Keep the line extremely thin and broken—don’t fully enclose shapes. Let the line skip naturally. -
Center details:
Add tiny stamens and pollen dots in the centers of the flowers using dark blue or black. Small, quick dabs work best here. -
Stem connections:
Draw very fine, wispy lines to connect your floating leaves and berries to the main floral clusters. -
Final drying:
Allow the mug to dry completely, ideally overnight. The underglaze should feel chalky and look matte. -
Clear glaze application:
Dip the entire mug into a clear, transparent glaze. Shake gently to remove excess drips. This will seal your design and make the colors pop after firing.
Enjoy your morning coffee surrounded by a garden that blooms all year round
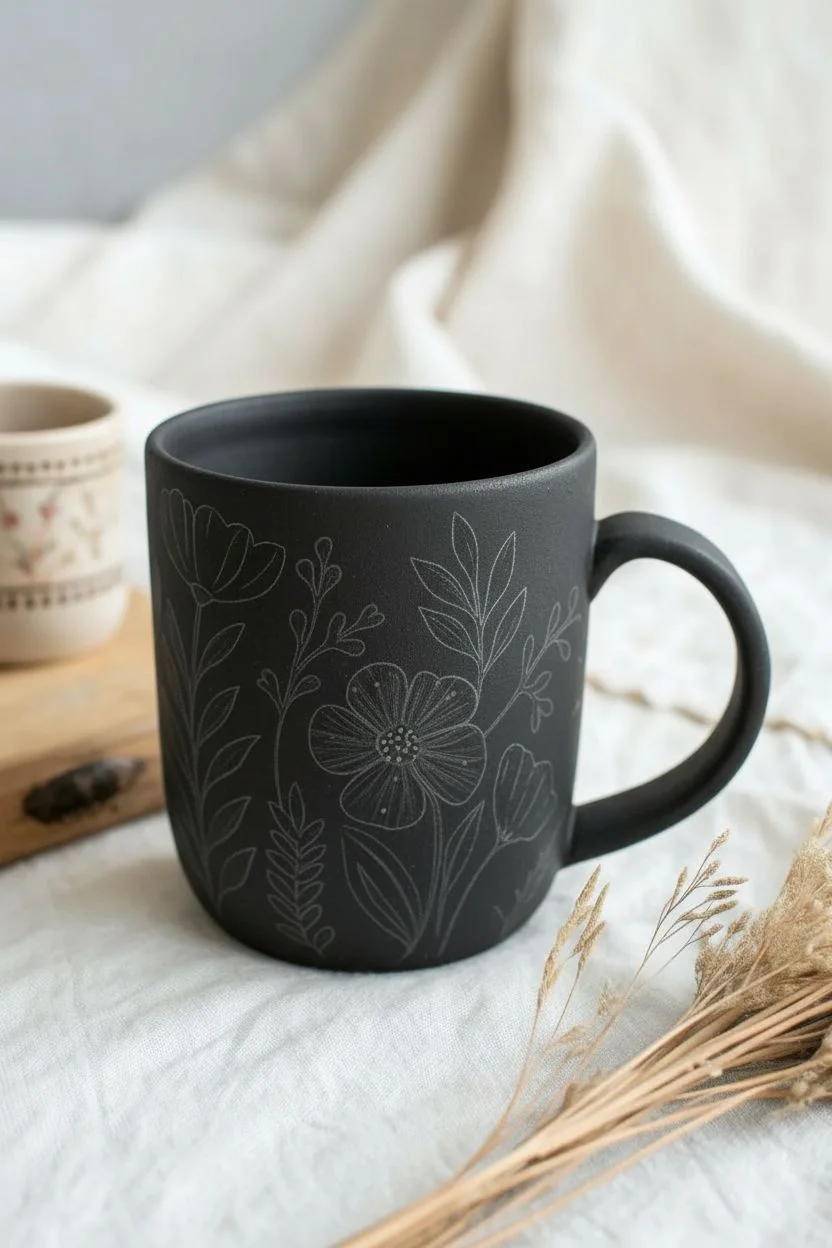
Negative Space Florals on a Dark Background
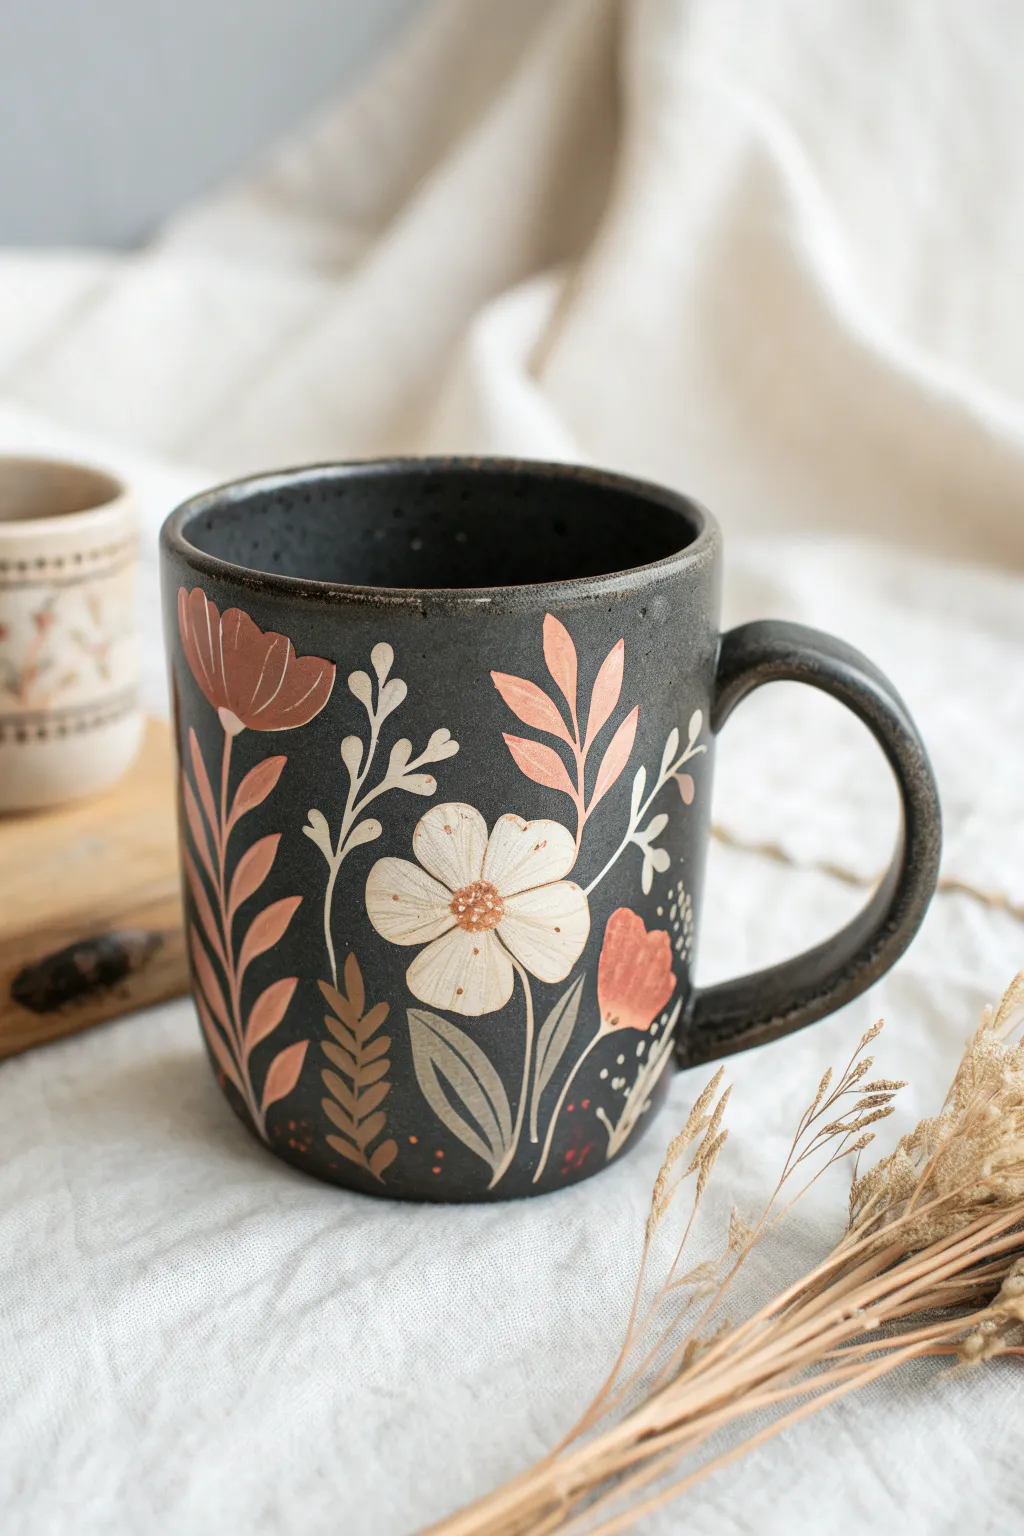
Embrace the moody elegance of dark florals with this striking pottery painting project. By layering creamy whites and earthy terracottas against a deep, matte black background, you’ll create a stunning botanical design that feels both modern and timeless.
How-To Guide
Materials
- Bisque-fired ceramic mug (cylindrical shape preferred)
- Matte black underglaze
- Cream or off-white underglaze
- Terracotta or rust-orange underglaze
- Sage or olive green underglaze
- Wide flat brush (for base coat)
- Small round brush (size 2 or 4)
- Fine liner brush (size 0 or 00)
- Pencil (optional)
- Clear matte dipping glaze or brush-on matte glaze
Step 1: Setting the Scene
-
Prep the surface:
Begin by wiping down your bisque mug with a damp sponge to remove any dust. This ensures the underglaze adheres smoothly to the clay body. -
Apply the dark base:
Using a wide flat brush, apply three even coats of matte black underglaze to the entire exterior and handle of the mug. Allow each coat to dry until it’s chalky to the touch before applying the next. -
Interior glazing:
You can choose to paint the inside black as well, or leave it for a contrasting color later. For this specific look, I typically carry the black onto the inner rim for a seamless edge. -
Sketching the layout:
Once the black base is bone dry, lightly sketch your floral placement using a pencil. Don’t worry about mistakes; the graphite will burn off in the kiln, leaving no trace.
Smudged the black?
If you accidentally smudge white paint onto the black background, don’t wipe it! Let it dry completely, then touch it up with a dollop of fresh black underglaze.
Step 2: Painting the Blooms
-
Start with the main flower:
Locate the focal point for your large white flower. Using a small round brush and cream underglaze, paint five broad, rounded petals. You may need 2-3 coats to ensure the white pops against the black background. -
Add terracotta accents:
Switching to your terracotta underglaze, paint the tulip-shaped blooms on either side of the white flower. Use confident, sweeping strokes to create the cup shape of the petals. -
Create the buds:
In the lower right area, dab a smaller irregular shape of terracotta to form a flower bud that is just beginning to open. -
Layering the foliage:
Using the sage green underglaze, paint the leaves stemming from the white flower. Create simple, elongated leaf shapes that curve naturally around the bloom. -
Contrasting leaves:
For variety, paint the fern-like sprigs near the terracotta flowers using a lighter wash of cream or a very pale grey. This mimics the ‘negative space’ feel mentioned in the intro. -
Background foliage:
Fill in remaining larger gaps with terracotta-colored leaves. Use a ‘V’ shape repetitive pattern to create stems that look like wheat or dried grass.
Step 3: Fine Details & Finishing
-
Adding stems:
With your fine liner brush and cream underglaze, draw thin, delicate lines connecting your floating leaves and buds to the base of the design. Keep your hand loose for organic lines. -
Detailing the white bloom:
Mix a tiny amount of water into your terracotta underglaze to thin it slightly. Use the liner brush to add a central cluster of dots in the middle of the white flower. -
Defining petals:
Using a very dark grey or black (or simply leaving the background show through negative space lines), define the separation between the white petals if they have merged too much. -
Decorative dots:
Sprinkle small groups of white and terracotta dots around the outer edges of the floral cluster to soften the transition into the negative space. -
Final inspection:
Check for any smudges or thick drips. You can gently scratch away mistakes on the dry black background with a toothpick or clean up edges with a damp brush. -
Glazing:
After the underglaze is fully dry, apply a clear matte glaze. A glossy glaze would work, but the matte finish really enhances the moody, earthy aesthetic of this piece. -
Firing:
Fire the mug according to the specific temperature guidelines of your clay and glaze (typically cone 06 or cone 6 depending on your studio’s setup).
Paint opacity hack
When painting light colors over black, applying the first coat, letting it dry, and then applying a second coat cross-hatch style (perpendicular strokes) ensures solid coverage.
Enjoy your morning coffee in a piece of functional art that celebrates the quiet beauty of nature
Sgraffito-Style Scratched Flower Details
Master the art of negative space with this stunning sgraffito plate design, where warm terracotta tones meet creamy white glaze. The delicately scratched lines create textured floral petals that pop against the smooth, speckled stoneware background.
Detailed Instructions
Materials
- Bisque-fired ceramic plate (white stoneware)
- Red-brown underglaze (terracotta or rust color)
- Small round paintbrush (size 2 or 4)
- Needle tool or sgraffito tool
- Carving tool with a small loop (optional)
- Clear dipping or brushing glaze
- Damp sponge
- Pencil (optional)
Step 1: Planning and Underglaze Application
-
Surface Prep:
Begin by wiping down your bisque-fired plate with a damp sponge to remove any dust or oils that might resist the underglaze. -
Sketching the Blooms:
Lightly sketch your floral design directly onto the plate using a pencil. Focus on one large, dominant flower slightly off-center and two smaller blooms near the rim. -
Connecting Vines:
Draw sweeping, curved lines to act as stems connecting the flowers, adding simple leaf shapes along the vines to fill the negative space. -
Blocking in Color:
Using your red-brown underglaze, paint the entire shape of the flowers and leaves. Don’t worry about the internal details yet; just create solid silhouettes. -
Stem Work:
Paint the thin stem lines connecting your floral elements. A steady hand is key here, or you can paint them slightly thicker and refine their shape later. -
Second Layer:
Apply a second coat of underglaze to the flowers and leaves once the first is dry to touch. This ensures a rich, opaque color that stands out against the white clay. -
Drying Time:
Allow the underglaze to dry until it feels chalky and room temperature. If it’s too wet, the clay will smear; too dry, and it might chip excessively.
Step 2: Carving the Details
-
Center Definition:
Start with the center of the large flower. Use your needle tool to scratch tiny, tight circles or stippling dots to create the pollen texture, revealing the white clay underneath. -
Petal Separation:
Carve clear outlines around each individual petal to distinguish them from one another inside the painted silhouette. -
Initial Petal Veins:
From the center of the flower, scratch long, sweeping lines outwards toward the petal tips. I find following the natural curve of the petal makes the flower look more organic. -
Adding Fine Texture:
In between your main vein lines, scratch shorter, finer parallel lines. This shading technique gives the petals depth and visual direction. -
Leaf Detailing:
Move to the leaves. Carve a central vein down the middle of each leaf, followed by angled veins branching off to the sides. -
Refining Edges:
Use your tool to clean up the outer edges of your painted shapes. If you painted outside the lines earlier, gently scratch that excess glaze away now to sharpen the silhouette. -
Clean Up:
Gently brush away the underglaze crumbs/burrs created by carving with a soft, dry brush. Avoid using your finger, as oils can affect the final glaze adhesion.
Clean Lines Pro Tip
Keep your carving tool sharp. A dull tool will drag and chip the underglaze rather than slicing cleanly through it, resulting in jagged lines.
Step 3: Finishing Touches
-
Bisque Fire (Optional):
If your studio practice allows, do a quick bisque fire to set the underglaze. This prevents smearing during the clear glazing process, though it’s not strictly mandatory. -
Clear Glaze Application:
Dip the entire plate into a clear glaze, or brush on three even coats. Ensure the clear glaze is compatible with your clay body temperature. -
Rim Detail:
Wipe the very edge of the rim with a damp sponge if you want to expose a raw clay ring, or leave it glazed for a smooth finish. -
Final Fire:
Fire the piece in the kiln according to the specific cone requirements of your clay and glaze combination.
Level Up: Rim Wash
Before glazing, sponge a very watered-down wash of iron oxide or coffee-colored stain around the rim for that vintage, rustic pottery aesthetic.
Once fired, you will have a timeless piece that beautifully balances illustrated detail with the raw warmth of pottery
Botanical Label Florals With Handwritten Names
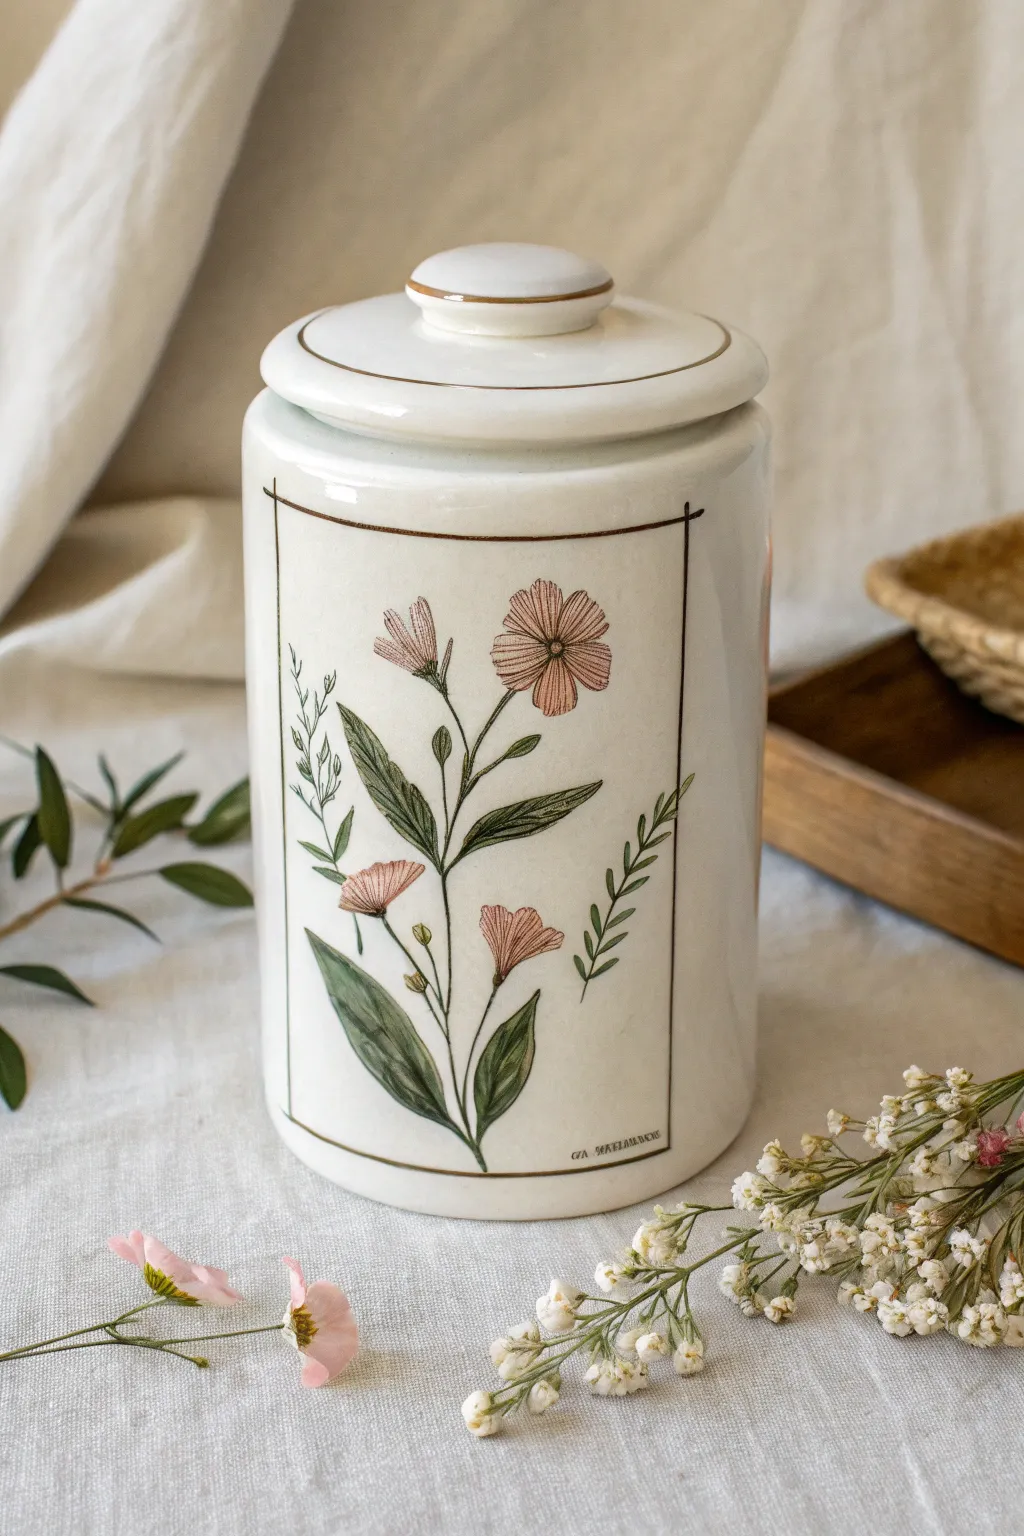
Transform a plain ceramic jar into a piece of apothecary-style decor with this delicate botanical design. The combination of fine line work and soft watercolor-style glazing creates a timeless, scientifically illustrated look perfect for kitchen counters or vanity storage.
Step-by-Step
Materials
- White ceramic lidded jar (bisque)
- Underglaze pencil or fine liner brush (dark brown or sepia)
- Underglaze paints (dusty pink, sage green, olive green, dark brown)
- Detail brushes (sizes 0, 00, and 1)
- Flat shader brush (size 4 or 6)
- Ruler (ideally flexible)
- Pencil (standard #2)
- Clear dipping glaze
- Bowl of water and paper towels
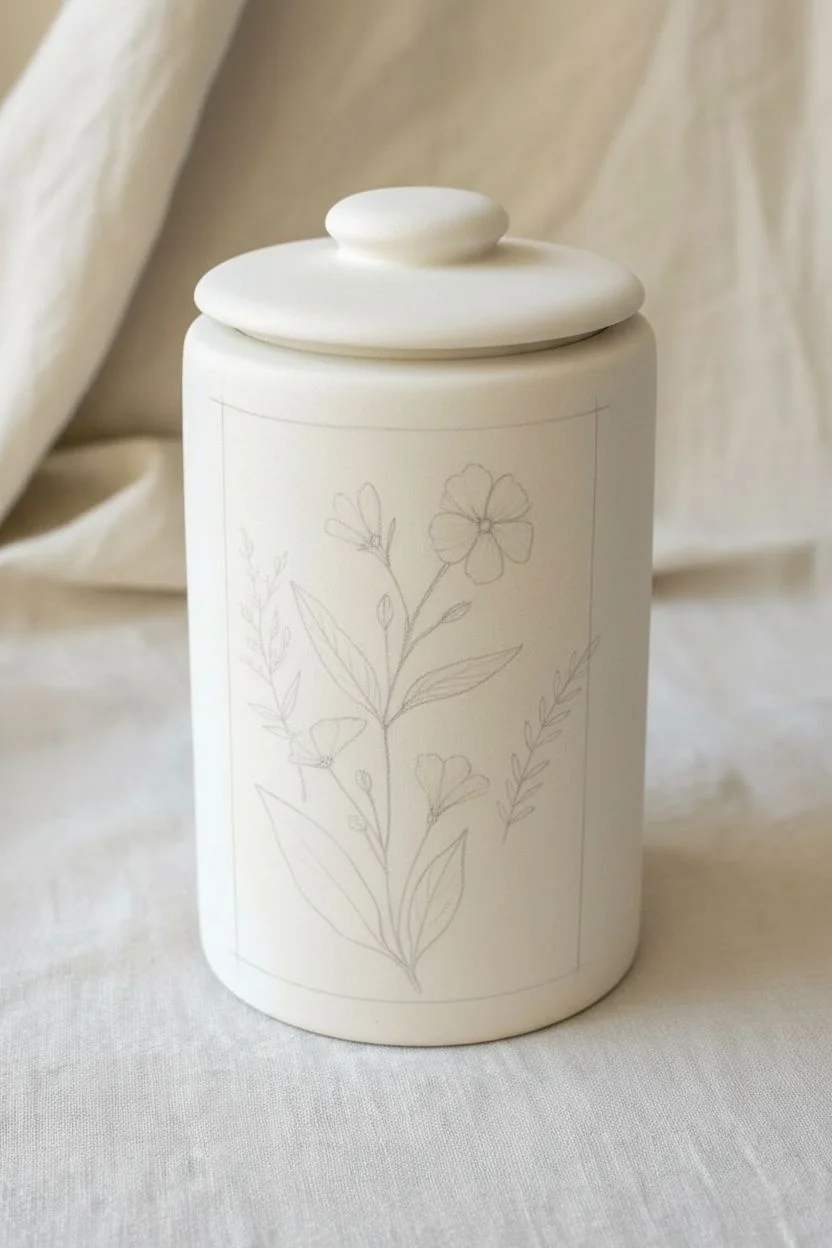
Step 1: Drafting the Design
-
Clean surface:
Begin by wiping down your bisque ware with a slightly damp sponge to remove any dust or oils that could resist the glaze. -
Mark the frame:
Using a flexible ruler and a light pencil, lightly sketch a tall rectangle on the front of the jar. This frame grounds the botanical illustration and gives it that vintage specimen card look. -
Sketch the stems:
Lightly sketch the main central stem rising from the bottom center. Add a few branching lines for the smaller stems and buds, keeping the movement organic and slighty curved. -
Outline leaves and blooms:
Flesh out your sketch by drawing long, lance-shaped leaves near the base and simpler, smaller leaves higher up. Sketch in the four-petaled open flowers and small closed buds. -
Add secondary foliage:
Draw delicate, fern-like fronds or thinner grasses on either side of the main plant to fill the negative space without overwhelming the focal point.
Step 2: Painting the Botanicals
-
Base coat leaves:
Load your size 1 brush with sage green underglaze diluted slightly with water. Fill in the leaves with semi-transparent washes to mimic watercolor. -
Shading leaves:
While the sage is still damp, touch a tiny amount of olive green to the base and center veins of the leaves to add depth and dimension. -
Painting flowers:
Use a diluted dusty pink for the flower petals. Apply the color from the center outward, lifting the brush at the petal tips to keep them light and delicate. -
Layering petals:
Once the first pink layer is dry, add thin streaks of undiluted pink near the flower centers to define individual petals and add texture. -
Painting stems:
Using a very fine liner brush (size 0 or 00), trace over your stem sketches with olive green. Keep your hand steady but allow for natural variations in line thickness.
Vintage Patina Tip
Water down your colors significantly! The vintage look relies on the white ceramic base showing through the paint, creating a soft, aged watercolor effect rather than solid opaque color.
Step 3: Fine Lines and Finishing
-
Outline the frame:
Using dark brown or sepia underglaze and a liner brush (or an underglaze pencil/pen), carefully trace the rectangular frame you sketched earlier. Avoid using a ruler here; a slightly wavering hand-painted line looks more authentic. -
Lid details:
Paint a thin brown ring around the knob of the lid and a matching ring around the outer rim of the lid to tie it visually to the jar’s frame. -
Detailing the flowers:
With your finest brush and dark brown underglaze, add tiny stippling dots to the center of the open flowers. -
Leaf veining:
Add very subtle central veins to the largest leaves using the dark brown. Keep these lines incredibly thin, almost breaking up, rather than solid heavy strokes. -
Adding text:
I like to finish by adding tiny, illegible ‘scribble’ writing or a specific Latin plant name in the bottom right corner of the frame to mimic a signed scientific print. -
Check and clean:
Look over the piece for any stray smudges. Use a clean, damp brush to eraser any mistakes or visible pencil lines that weren’t covered (though pencil usually burns off in the kiln). -
Glazing:
Once the underglaze is bone dry, apply a clear dipping glaze over the entire piece (lid and jar separately) according to the manufacturer’s instructions.
Level Up: Crackle Finishes
Instead of a standard clear glaze, use a crackle clear glaze. After firing, rub black ink or tea into the cracks to give the jar an antique, crazed porcelain appearance.
Fire your piece according to the clay and glaze specifications and enjoy your beautiful new storage jar
Flower Mandalas Built From Repeating Petals
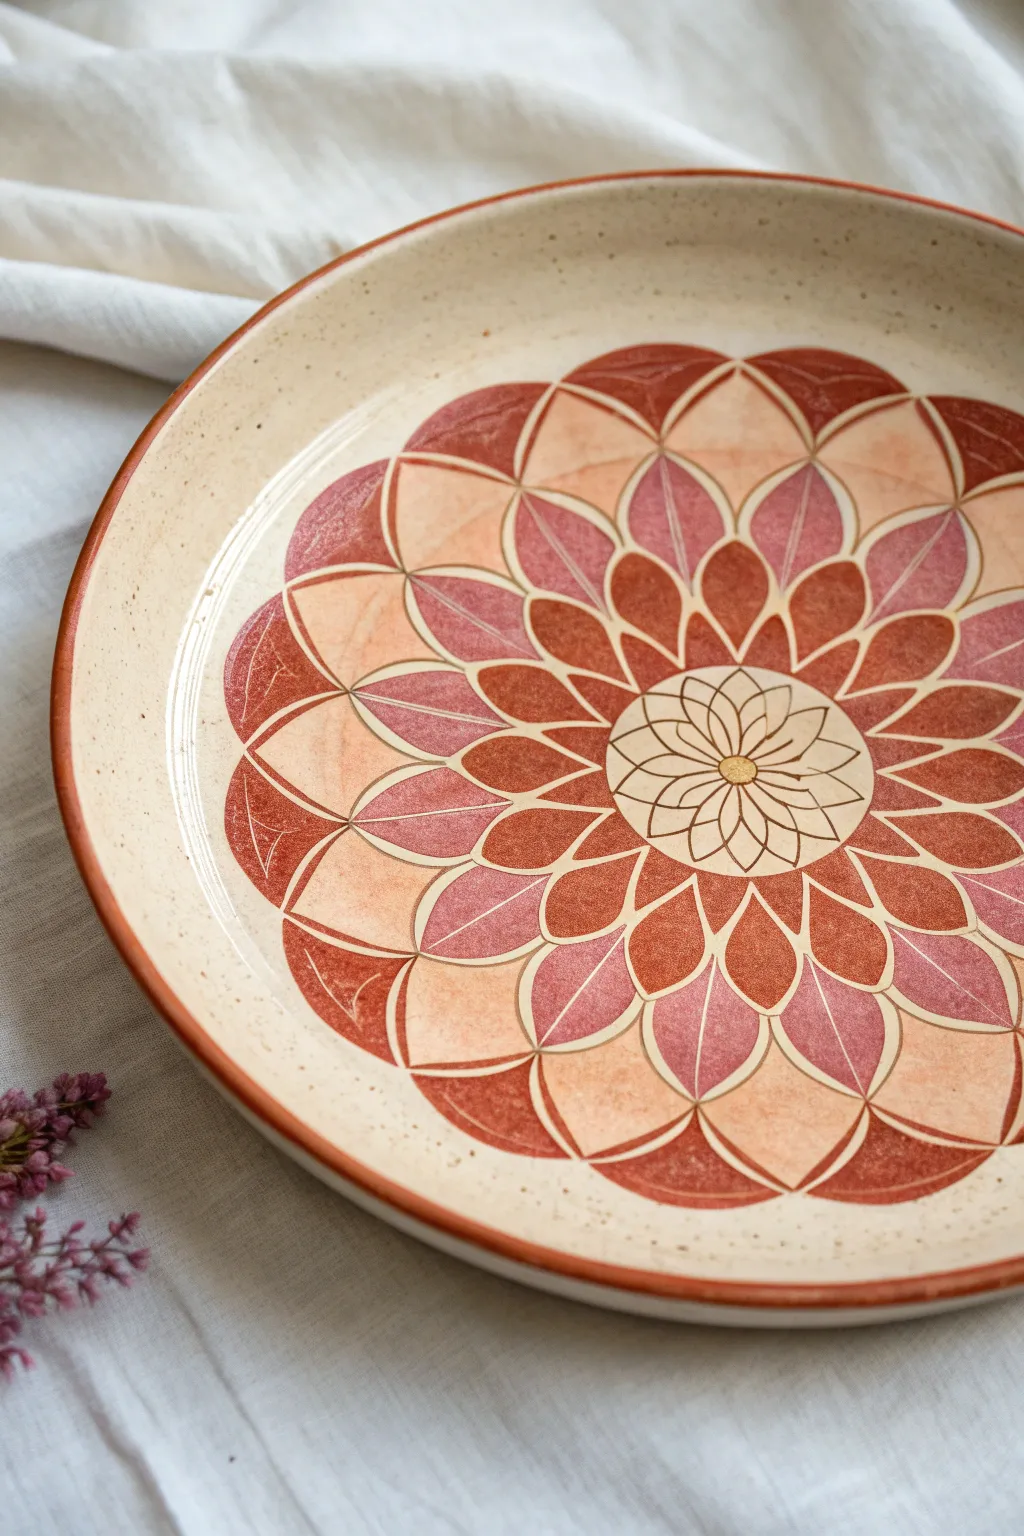

Achieve a stunning blend of symmetry and warmth with this petal-based mandala design. The repeating layers of burnt orange, terracotta, and soft pink create a mesmerizing effect that looks complex but is built from simple, rhythmic strokes.
Step-by-Step Guide
Materials
- Bisque-fired ceramic plate or shallow bowl
- Underglazes: Dark Rust/Brown, Terracotta, Coral Pink, Beige/Cream for background
- Clear dipping glaze (or brush-on)
- Small round brush (size 2 or 4)
- Fine liner brush (size 0 or 00)
- Pencil (HB or lighter)
- Compass and ruler
- Sponge and water bowl
- Lazy Susan or banding wheel (optional but helpful)
Step 1: Preparation & Base
-
Clean the bisque:
Wipe down your bisque plate with a damp sponge to remove any kiln dust. This ensures the glaze adheres properly. -
Apply the background:
Using a wide soft brush, apply three even coats of a speckled beige or cream underglaze to the entire surface. If your clay body is naturally speckled and light, you can skip this to let the natural clay show through. -
Mark the center:
Find the precise center of the plate using a ruler. Mark a tiny dot with your pencil. -
Draw guide circles:
Using a compass centered on your dot, lightly draw three concentric circles expanding outward. These will be the boundaries for your three main layers of petals. -
Sketch the petal grid:
Lightly sketch the petal shapes within these circular guides. Start with the innermost flower shape, then stagger the second row of petals in the gaps of the first, and repeat for the third, largest row.
Wobbly Lines?
If your outlines aren’t crisp, scratch away excess dried underglaze with a wooden toothpick to refine edges before applying the clear glaze.
Step 2: Painting the Core
-
Outline the center:
Take your fine liner brush and the Dark Rust color. Carefully trace the delicate, thin outlines of the very center flower shape. -
Base the center:
Fill the tiny space around the center flower lines with a light wash of beige if needed to clean up edges, but keep the center design crisp and linear. -
First petal layer:
Using the dark terracotta color, paint the first ring of solid petals surrounding the center line-work. Apply 2-3 coats for solid opacity. -
Add definition:
While you have the terracotta loaded, you can paint the thin outlines for the remaining outer two layers of petals. Keeping lines consistent is key here; I find steadying my hand on the table helps.
Step 3: Layering the Petals
-
Middle ring color:
Switch to your Coral Pink underglaze. Fill in the second ring of petals, carefully staying within the terracotta outlines you just painted. Apply multiple coats until opaque. -
Outer ring variety:
For the largest, outermost row of petals, this design uses an alternating pattern. Paint every other petal section with a diluted wash of terracotta. -
Finishing the outer ring:
Fill the remaining alternating petals in the outer ring with the solid dark rust color. This contrast creates depth and visual movement. -
Leaf detailing:
Using your fine liner brush and the beige/cream color, paint a thin spine line down the center of each solid dark petal in the middle and outer rings.
Speckle Effect
If using plain white clay, flick a toothbrush loaded with thinned brown glaze over the plate before painting the mandala to mimic natural clay speckles.
Step 4: Final Touches & Glazing
-
Rim border:
Load a round brush with Terracotta or Rust. Spin the banding wheel (or carefully rotate the plate manually) to paint a single solid band along the rim of the plate. -
Clean up:
Check your work for any stray paint drops. Scrape them away gently with a wooden tool or pin if they are dry. -
Bisque fire (optional):
If your studio requires a bisque fire to set the underglaze, do that now. Otherwise, proceed to clear glazing. -
Clear glaze:
Dip the plate into clear glaze or brush on 2-3 coats of clear brushing glaze. Ensure the application is even to avoid clouding over your detailed work. -
Final wipe:
Wipe the bottom foot of the plate clean with a sponge so it doesn’t stick to the kiln shelf. -
Final fire:
Fire the piece according to your clay and glaze specifications (usually cone 06 or cone 6).
Now you have a warm, earthy centerpiece ready for your table or wall display
Surreal Florals: Floating Petals and Abstract Stems
Transform a plain ceramic vase into a piece of art with this delicate, earth-toned floral design. The look combines a textured, speckled creamy base with soft, hand-painted botanical illustrations for a serene and organic aesthetic.
How-To Guide
Materials
- Tall bisque or matte ceramic vase (pre-fired)
- Acrylic paints (Cream/Off-White, Sage Green, Terracotta, Ochre, Soft Pink, Burnt Umber)
- Texturing medium or fine sand (optional)
- Angle shader brushes (small)
- Round liner brushes (size 0 and 00)
- Palette for mixing
- Water cup and paper towels
- Pencil for sketching
- Matte spray sealant
Step 1: Base Preparation
-
Clean surface:
Ensure your vase is completely clean and dry. Wipe it down with a slightly damp cloth to remove any dust or oils that might repel the paint. -
Mix base color:
Mix a large amount of a warm off-white or cream acrylic paint. To achieve the speckled, stoneware look shown in the photo, you can mix in a tiny pinch of fine sand or use a dedicated texturing medium. -
Apply base coat:
Apply the cream color over the entire exterior of the vase using a wide, flat brush. Use crisscross strokes to create subtle texture rather than perfectly smooth lines. -
Add speckles:
If your paint didn’t have texture, create the speckled effect now. Dilute a tiny bit of Burnt Umber with water. Dip an old toothbrush into it and flick the bristles with your thumb to spray tiny dots onto the vase. Let this dry completely for at least an hour.
Fixing Shaky Lines
If your stems look wobbly, don’t paint over them immediately. wait for it to dry, then use a Q-tip dipped in rubbing alcohol to gently erase the error before re-painting.
Step 2: Planning the Layout
-
Light sketch:
Using a pencil, very lightly sketch the main stems of your design directly onto the dry base. Focus on creating long, flowing S-curves that move upward to elongate the form. -
Place focal flowers:
Mark circles where your main blooms will sit—one large daisy shape on the lower left and a ruffled bloom on the mid-right—to ensure the composition feels balanced before you start painting.
Add Dimension
Mix a little baking soda into your floral paint colors. This thickens the paint significantly, allowing you to create raised, impasto-style petals that stick out slightly.
Step 3: Painting the Flowers
-
Mix floral palette:
Prepare your floral colors on the palette: a dusty pink for the small petals, a burnt orange/terracotta for the ruffled flower, and a pale yellow-orange for the daisy outlines. -
Paint the daisy shape:
For the open flower on the left, use a liner brush with watered-down ochre paint. Outline five distinct petals, leaving the inside the color of the base vase, and sketch a loose center. -
Create the ruffled bloom:
Using your terracotta shade and a small angle brush, paint the flower on the right. Use short, choppy strokes radiating from a center point to mimic the texture of a carnation or marigold. -
Add floating buds:
Paint small, simple tear-drop shapes in soft pink near the top of the stems to represent closed buds. Keep these strokes fluid and unlabored.
Step 4: Adding Foliage
-
Mix green tones:
Mix two shades of green: a pale, silvery sage and a deeper olive green. This variety adds depth to the illustration. -
Paint main leaves:
Using the olive green, paint the larger, lance-shaped leaves attached to the main central stem. Press the brush down to widen the stroke and lift as you reach the tip to create a sharp point. -
Add texture to leaves:
While the green is still slightly tacky, use a very fine liner brush with a darker green or brown to draw a thin central vein down each leaf. I find this creates a nice, vintage botanical look. -
Create fern stems:
On the bottom left, paint a fern-like frond using the lighter sage color. Use quick, feathery strokes outward from a central line. -
Layer colorful leaves:
Intersperse a few leaves painted in the terracotta and pink shades among the green ones. This ‘surreal’ touch ties the color palette together beautifully.
Step 5: Details & Finishing
-
Connect the stems:
With a liner brush and very thin brownish-green paint, retrace your initial stem lines, connecting all the floating flowers and leaves to the main structure. Keep lines thin and delicate. -
Add berries:
Dot small circles of opaque rust or ochre on the ends of the finest branches to look like berries or pollen pods. -
Refine outlines:
Go back over your main ‘daisy’ flower with a fine liner brush and the ochre paint to crispen the edges if they look too faint. -
Seal the work:
Once the paint is cured (wait 24 hours to be safe), take the vase outside and apply two light coats of matte spray sealant to protect the design without making it shiny.
Place your finished vase near a window where natural light can highlight the delicate textures and soft colors you’ve created


Have a question or want to share your own experience? I'd love to hear from you in the comments below!