Nothing says cozy like sitting down to paint a plate that instantly feels like Christmas—especially when it can actually be used at the table or for treats. I pulled together my favorite Christmas plate painting ideas that range from super classic to delightfully unexpected, so you can find a design that fits your vibe.
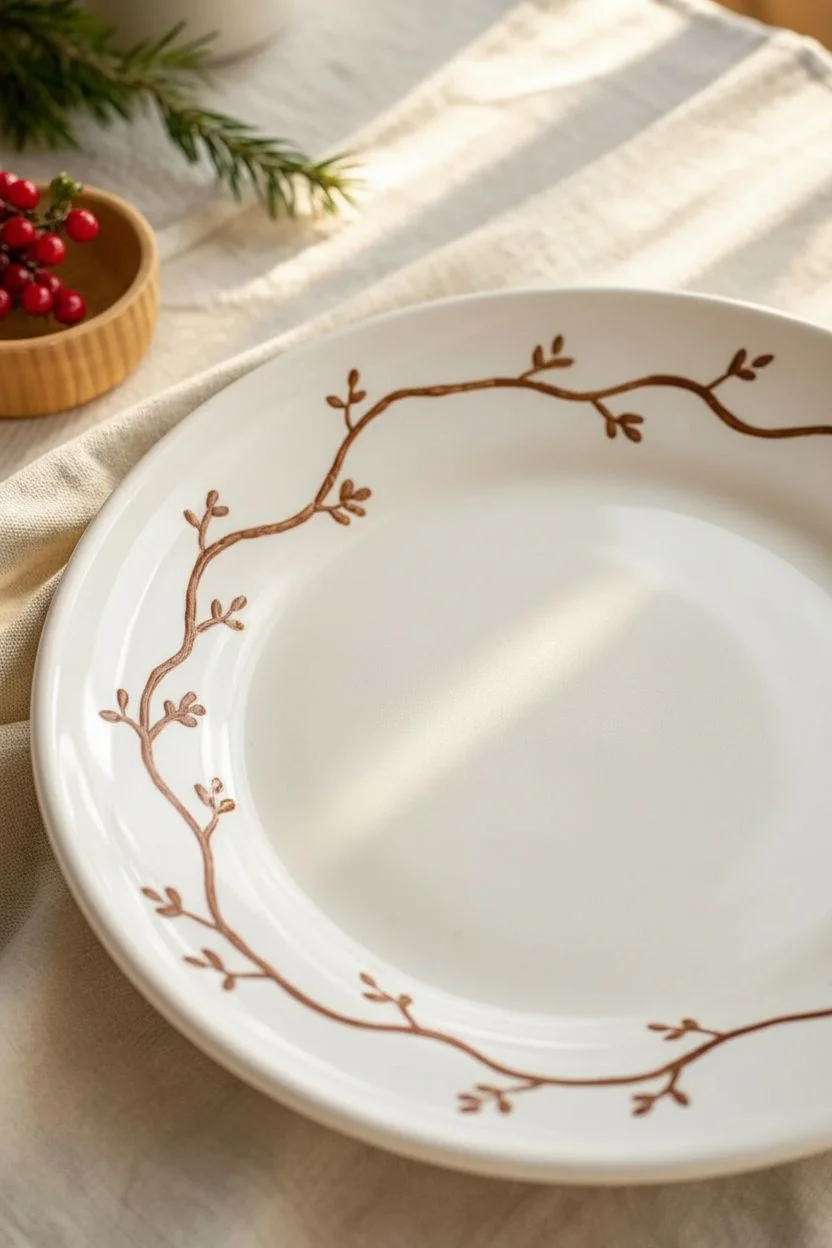
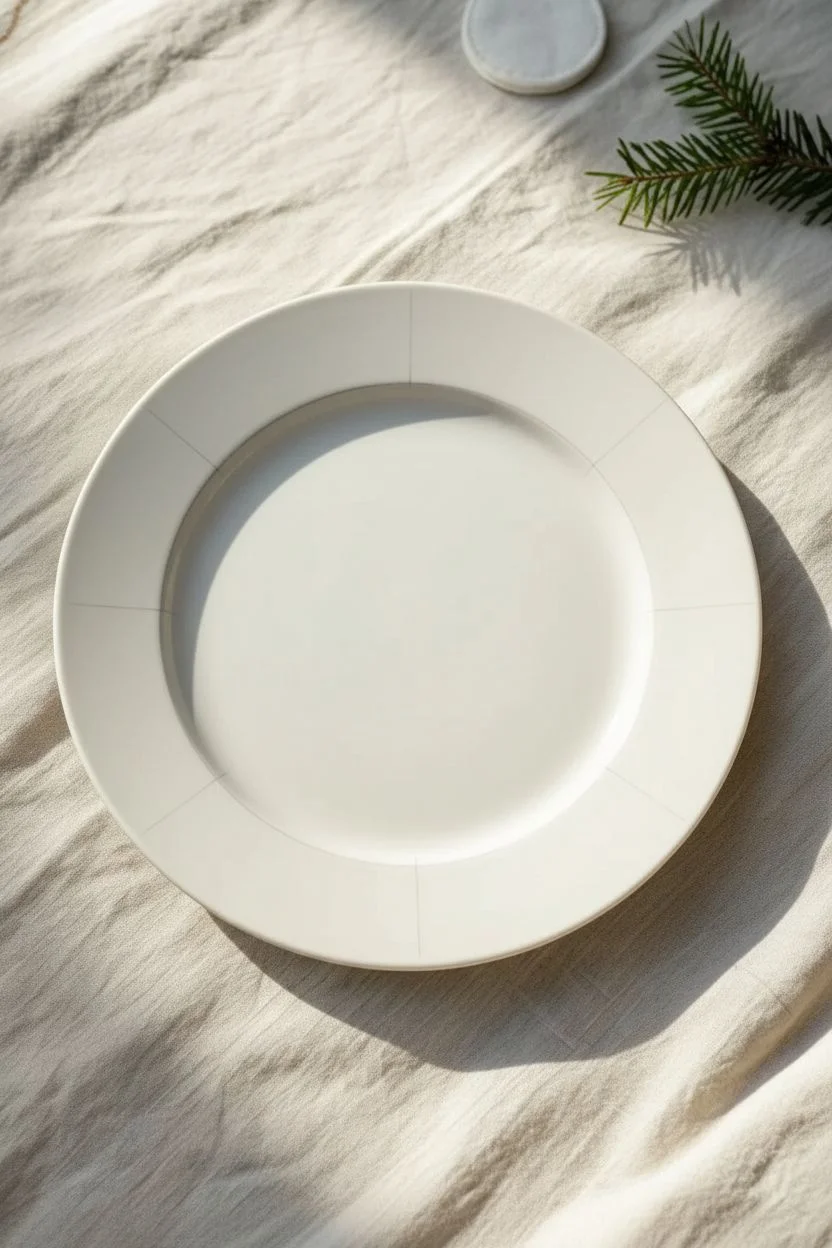
Classic Snowflake Center Plate
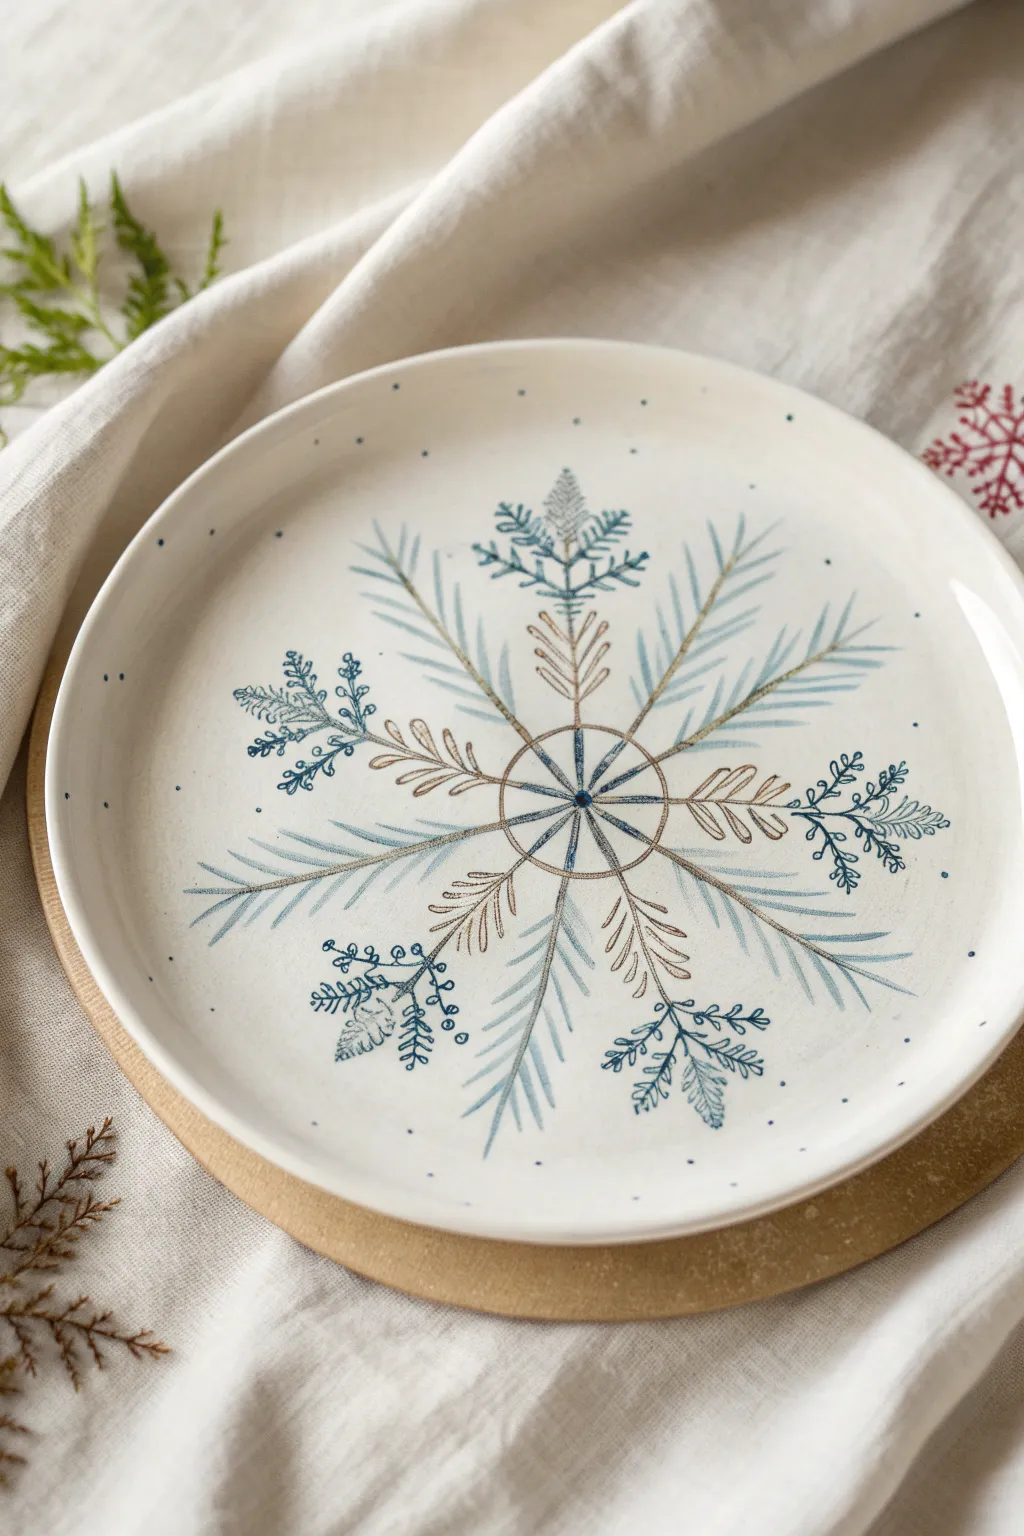
This elegant ceramic design captures the delicate symmetry of a snowflake using a mix of botanical fern-like patterns and geometric lines. The result is a sophisticated, rustic-chic holiday piece that feels hand-drawn and organic rather than perfectly machine-made.
Step-by-Step Tutorial
Materials
- White or cream ceramic plate (bisque or glazed)
- Ceramic paints or porcelain markers (Blue-grey, deep slate blue, metallic bronze/gold)
- Fine liner brush (size 0 or 00)
- Small round brush (size 1)
- Pencil (for sketching)
- Eraser
- Ruler
- Palette for mixing
- Paper towels
- Q-tips (for cleanup)
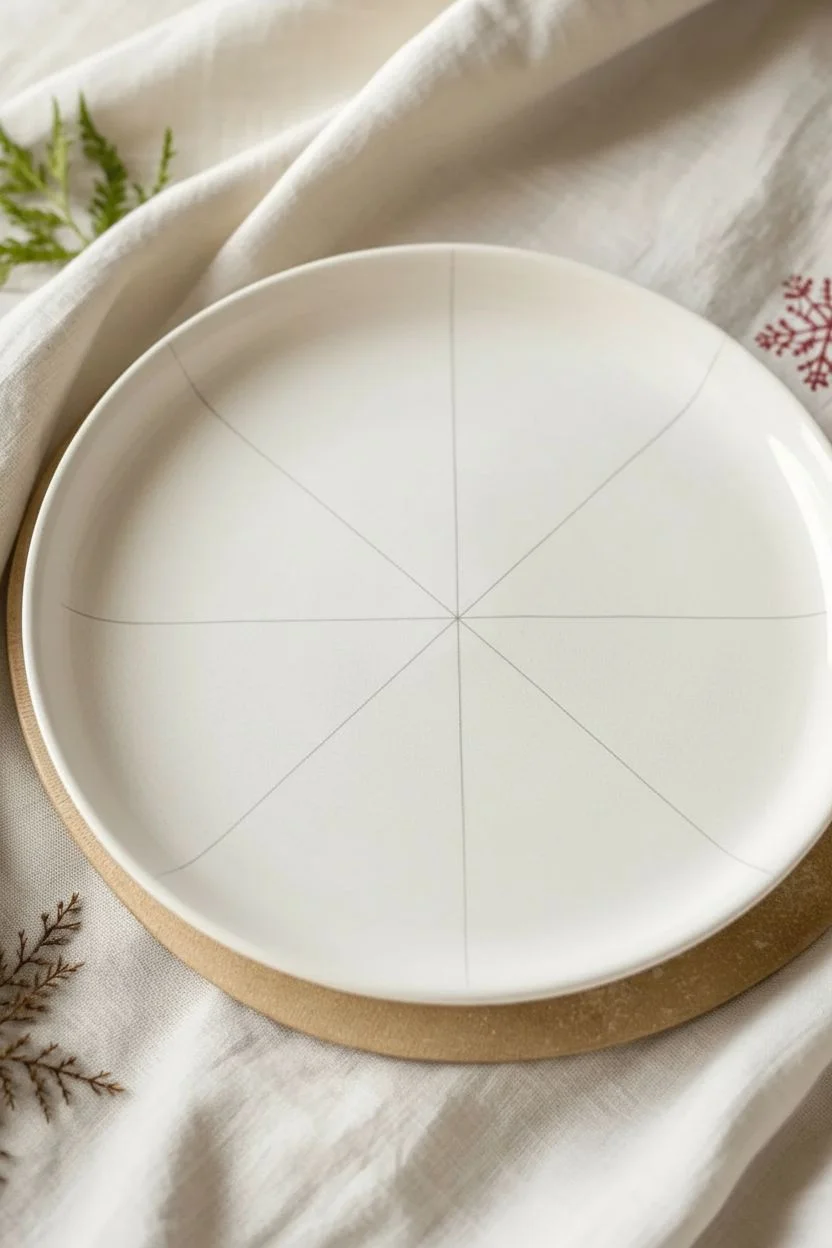
Step 1: Preparation & Structure
-
Clean the Surface:
Begin by thoroughly cleaning your plate with rubbing alcohol or soapy water to remove any oils or fingerprints. Dry completely before starting to ensure the paint adheres properly. -
Mark the Center:
Find the exact center of your plate. Using a pencil lightly observe the center point; this will be the anchor for your entire radial design. -
Create the Axes:
Lightly sketch a simple cross (vertical and horizontal lines) through the center point. Then, draw diagonal lines precisely between them to create an 8-point radial grid. These guide lines are crucial for symmetry.
Needle Precision
For the finest pine needle lines, thin your paint slightly with a drop of water. This helps the pigment flow smoothly off the liner brush without dragging.
Step 2: The Central Motif
-
Paint the Hub:
Using your darkest blue slate paint and a fine liner brush, paint a small dot right in the center. -
Draw the Inner Star:
From the central dot, paint eight short, straight lines radiating outward along your pencil guides. Connect the tips of these lines with slightly curved strokes to form a subtle flower-like shape. -
Add the Bronze Ring:
Mix a metallic bronze or gold color. Carefully paint a thin circular ring that intersects the radiating lines about an inch from the center. This ties the snowflake structure together. -
Detail the Inner Spokes:
On four of the alternating spokes (the diagonal ones), paint small, V-shaped fern fronds using the bronze color. Keeps the strokes swift and light to mimic pine needles.
Rustic Rim Upgrade
Sponge a light layer of the bronze or gold paint around the very edge of the plate rim to frame the snowflake and match the inner ring detail.
Step 3: Extending the snowflake
-
Paint the Main Pine Branches:
Switch to a lighter blue-grey shade. On the four main vertical and horizontal axes, extend a long, straight line almost to the rim of the plate. -
Add Pine Needles:
Along these long blue-grey lines, paint angled dashes on both sides. I find it helps to start from the tip and work backwards towards the center to keep the angle consistent. -
Create the Secondary Branches:
On the remaining four diagonal axes, paint slightly shorter lines using a darker slate blue color. These will become the botanical fern stems. -
Paint Fern Details:
Instead of simple straight needles, add tiny, rounded leaves or ‘fronds’ to these darker branches. Near the tips, create a cluster of three small botanical shapes to give it a flourished ending.
Step 4: Finishing Touches
-
Add Berry Accents:
Using the tip of your smallest brush or a dotting tool, place tiny blue dots at the ends of the fern fronds. These mimic small winter berries. -
Create the Speckled Effect:
Dilute your slate blue paint slightly with water. Load your brush, hold it over the plate, and tap the handle against a finger to gently splatter tiny dots across the surface for a snowy feel. -
Clean Up:
Use a damp Q-tip to wipe away any visible pencil marks or stray paint splatters that landed where you didn’t want them. -
Dry and Cure:
Let the paint dry for at least 24 hours. If using oven-bake ceramic paints, bake the plate according to the manufacturer’s instructions to make the design permanent.
Display your beautiful winter plate as a centerpiece or hang it on the wall to add a frosty touch to your decor


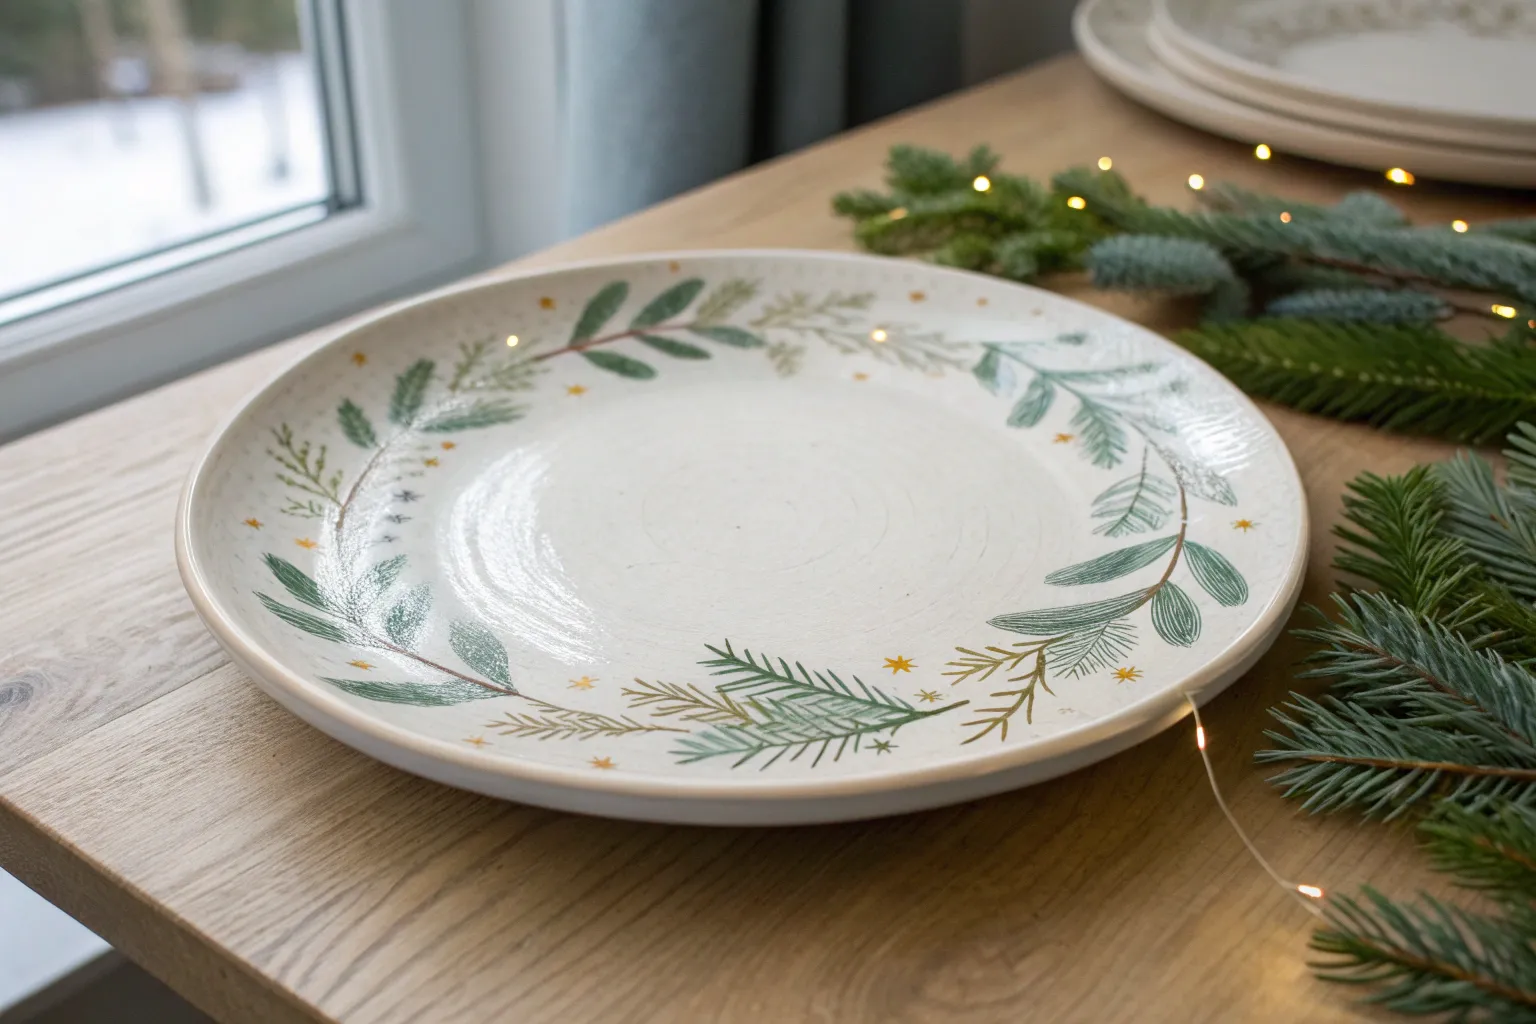
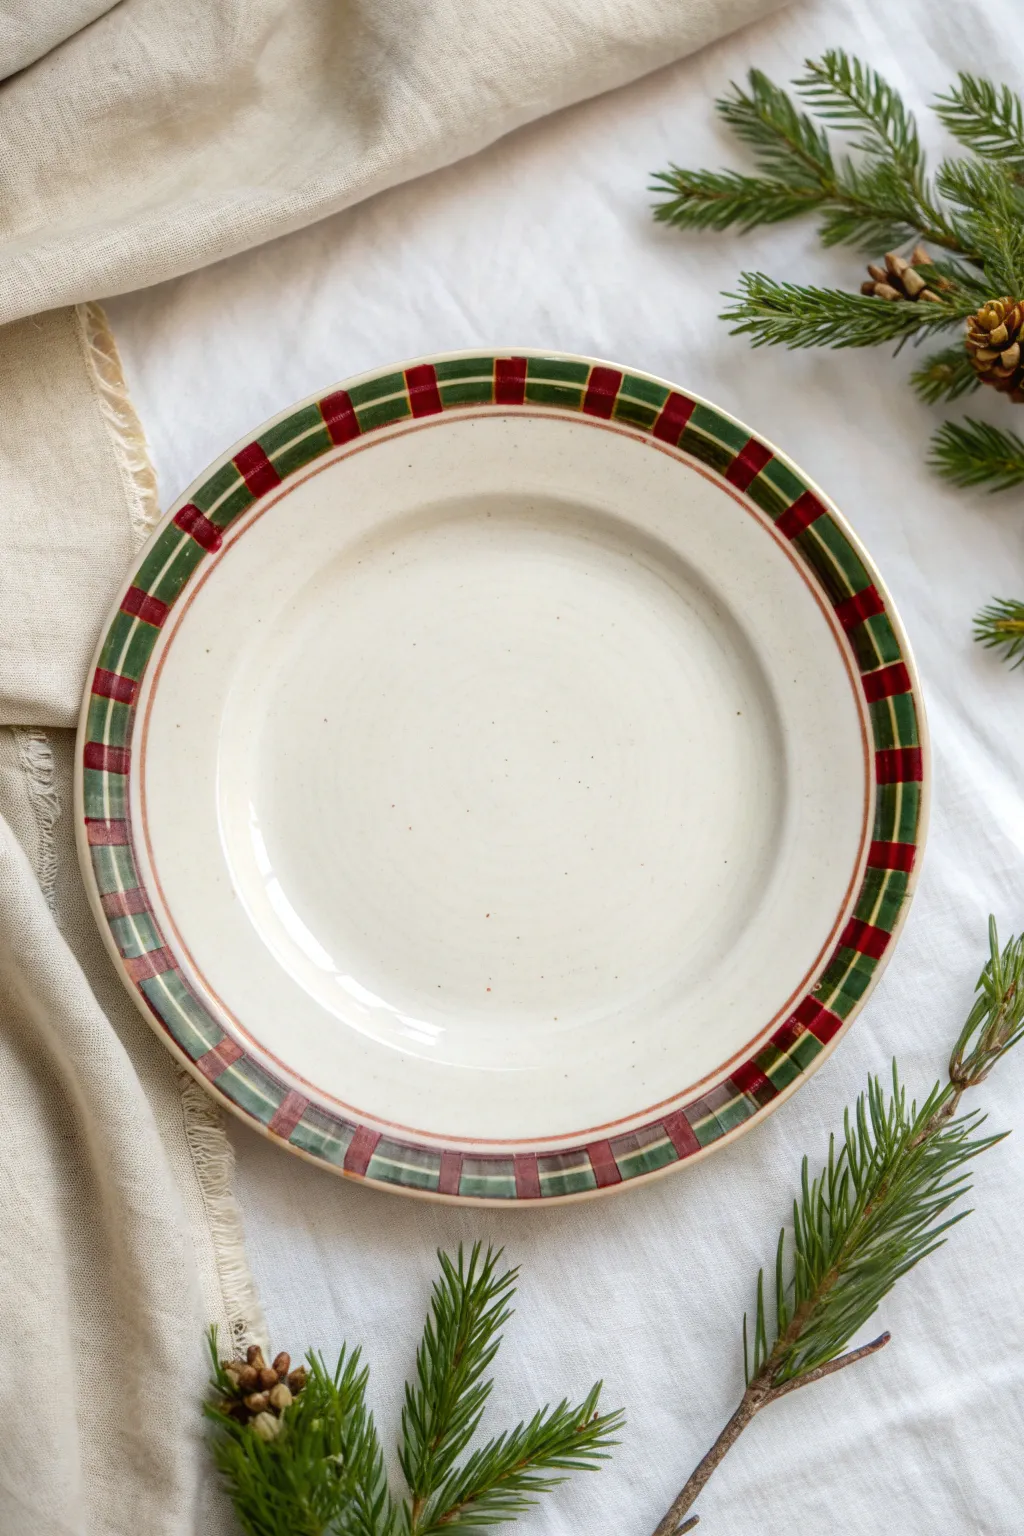
Holly and Berry Rim Border
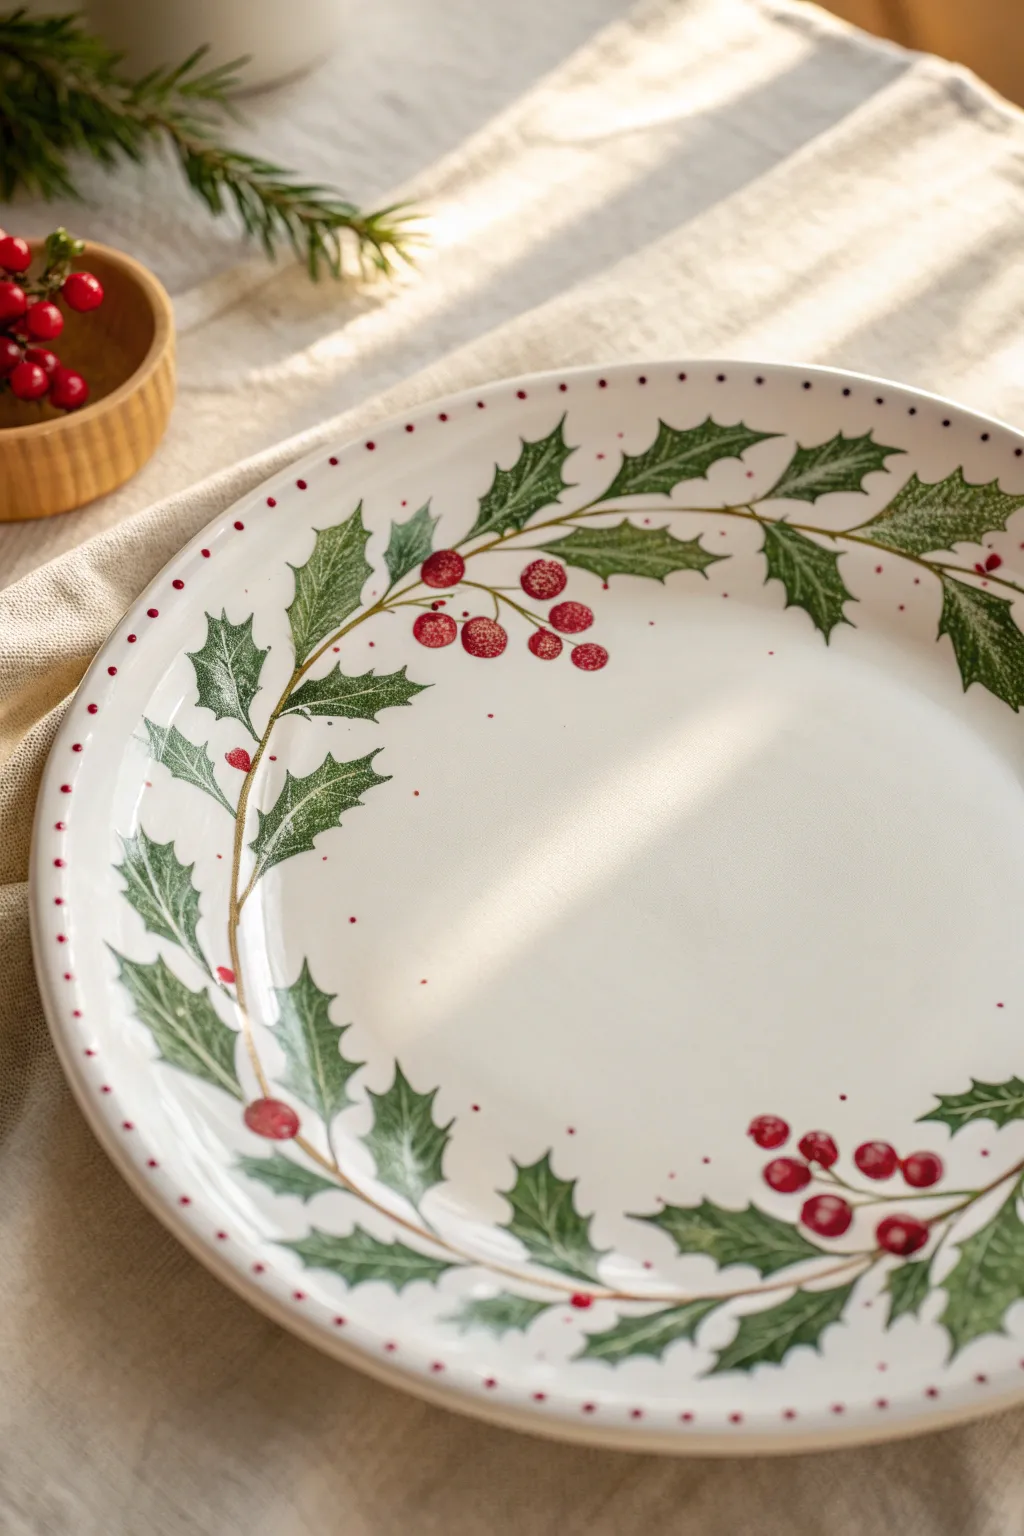
Capture the essence of a traditional Christmas with this elegant rim design, featuring a continuous vine of serrated holly leaves and clusters of bright berries. The look is soft and slightly rustic, achieved by layering greens and adding delicate speckles for a finished, professional touch.
Step-by-Step
Materials
- White ceramic plate (oven-safe if banking, or standard glazed)
- Ceramic or porcelain paints (Forest Green, Olive Green, Bright Red, Deep Burgundy, Brown)
- Small round brush (size 2 or 3)
- Fine liner brush (size 0 or 00)
- Glazing medium (optional, for translucency)
- Palette or small dish
- Paper towels
- Rubbing alcohol
- Old toothbrush (for speckling)
Step 1: Preparation & Vine Work
-
Clean surface:
Before you begin, wipe the entire rim of the plate with rubbing alcohol and a paper towel. This removes any oils or fingerprints that could prevent the paint from adhering properly. -
Plan spacing:
Visualize the circle as a clock face. You want your vine to travel roughly three-quarters of the way around, or create two sweeping curves that almost meet. Lightly mark your start and end points with a very faint pencil dot if needed. -
Paint the main vine:
Mix a small amount of brown paint with a tiny drop of water or medium to help it flow. Using the fine liner brush, paint a thin, wandering line following the curve of the rim. -
Add variation:
Don’t make the line perfectly smooth; let your hand wobble slightly to mimic a natural twig texture. I like to thicken the line in random spots to represent knots in the wood.
Step 2: Painting the Foliage
-
Outline the leaves:
Switch to your round brush and the Forest Green paint. Along the vine, paint the outlines of holly leaves. Remember the distinctive shape: a central vein line with sharp, curved spikes on the sides. -
Vary direction:
Ensure the leaves point in different directions and overlap slightly. Some should hug the vine closely, while others can stick out toward the plate’s center. -
First green layer:
Fill in the leaf shapes with Forest Green. Apply the paint somewhat thinly so the white of the plate glows through slightly, giving a lighter look. -
Add dimension:
While the green is still tacky, dip just the tip of your brush into Olive Green. Swipe this lighter color onto the side of the leaves facing the light source to create a highlight. -
Deepen shadows:
Mix a tiny bit of brown into your Forest Green. Paint a thin line down the center of each leaf for the vein, and darken the edges of leaves that are ‘underneath’ others. -
Create texture:
Use a nearly dry brush to feather the edges of the leaves slightly. This scratching motion mimics the spiky texture of real holly better than a solid block of color.
Uneven Coverage?
If your green paint looks too streaky, don’t panic. Let the first coat dry completely, then apply a second thin wash of color. This builds depth better than one thick, gloppy coat.
Step 3: Berries & Details
-
Paint berry clusters:
Using the round brush and Bright Red paint, dab small circles in clusters of three or five along the vine. Place them where leaves meet the stem to hide the connection points. -
Add berry shading:
While the red is wet, drop a tiny speck of Deep Burgundy onto the bottom edge of each berry. This adds roundness and weight to the fruit. -
Highlight the fruit:
Once the red layer is dry to the touch, use the smallest liner brush to add a tiny white or very pale pink dot on the top right of each berry for a shiny reflection. -
The speckled effect:
Dilute a small amount of reddish-brown paint with water until it’s very runny. Dip an old toothbrush into this mixture. -
Apply splatter:
Hold the toothbrush over the rim and run your thumb across the bristles to flick tiny specks onto the design. This integrates the painting with the ceramic and adds a vintage feel. -
Clean the edges:
If any speckles landed in the center of the plate where you want it clean, quickly wipe them away with a damp Q-tip.
Add Winter Frost
Mix a tiny amount of iridescent medium or pearl white paint. Lightly dry-brush this onto the tips of the holly leaves to make them look frosted with morning snow.
Step 4: Finishing
-
Paint the rim edge:
For a cohesive border, you can add tiny red dots or a thin red line on the very outer lip of the plate, framing your holly work. -
Air dry:
Let the plate sit undisturbed for at least 24 hours to allow the paint to fully cure on the surface. -
Bake to set:
Follow the instructions on your specific paint bottle. Typically, this involves placing the plate in a cold oven, heating to 300°F (150°C), baking for 30 minutes, and letting it cool inside the oven.
Now you have a stunning, festive piece of tableware ready to impress your holiday guests


Christmas Tree With Ornament Dots
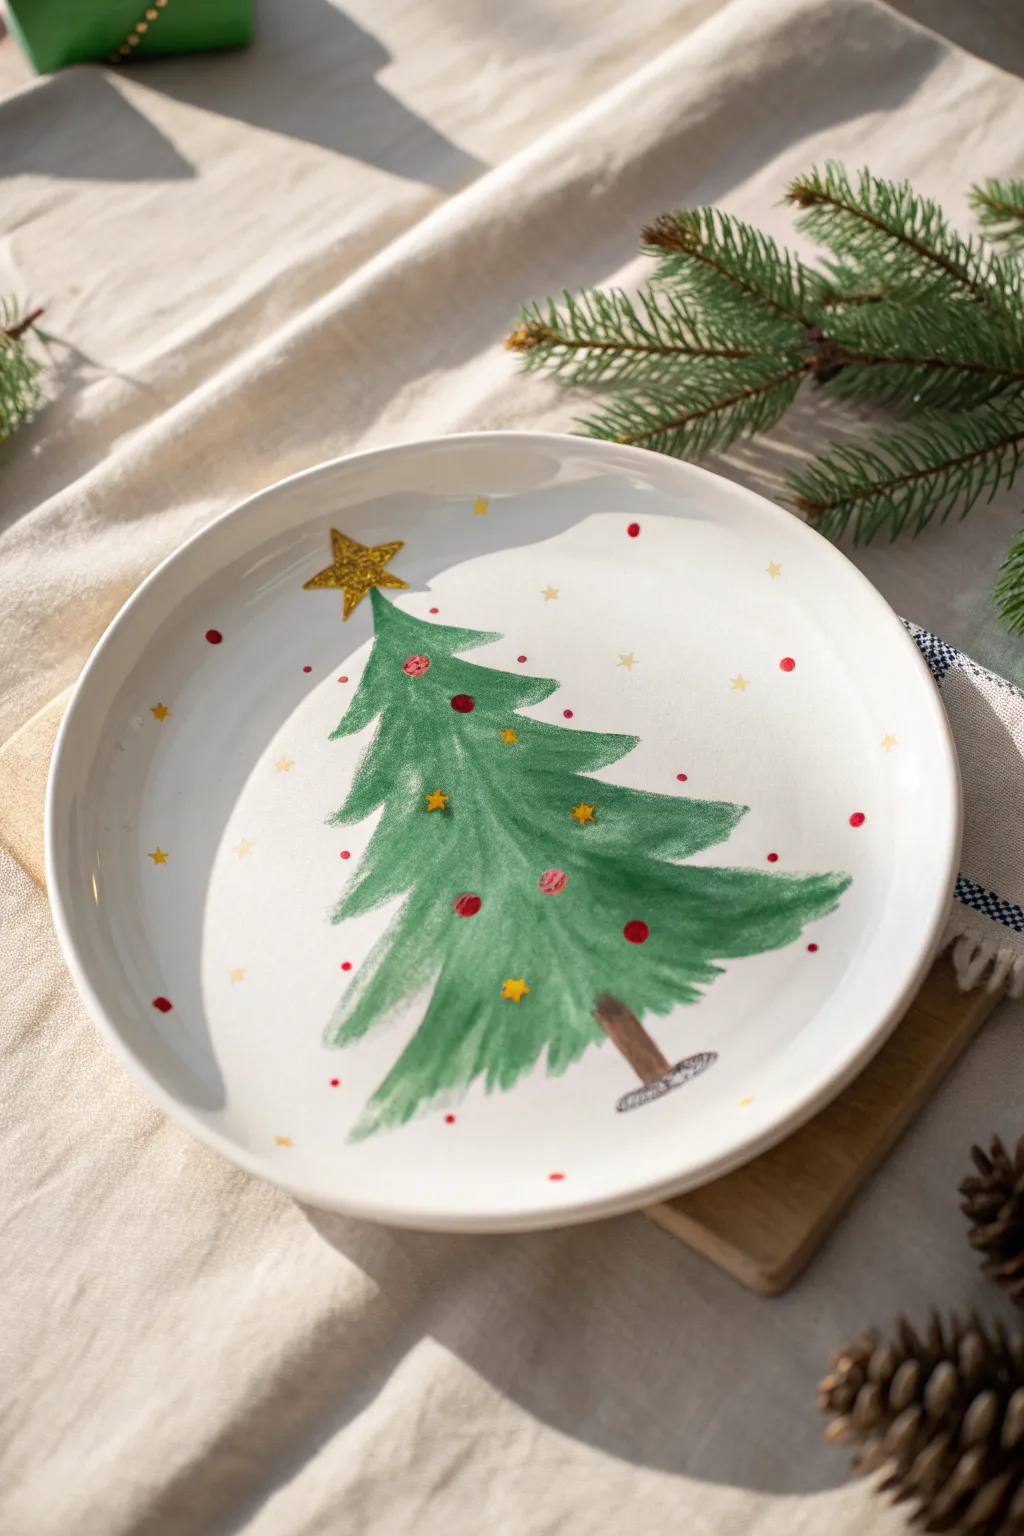
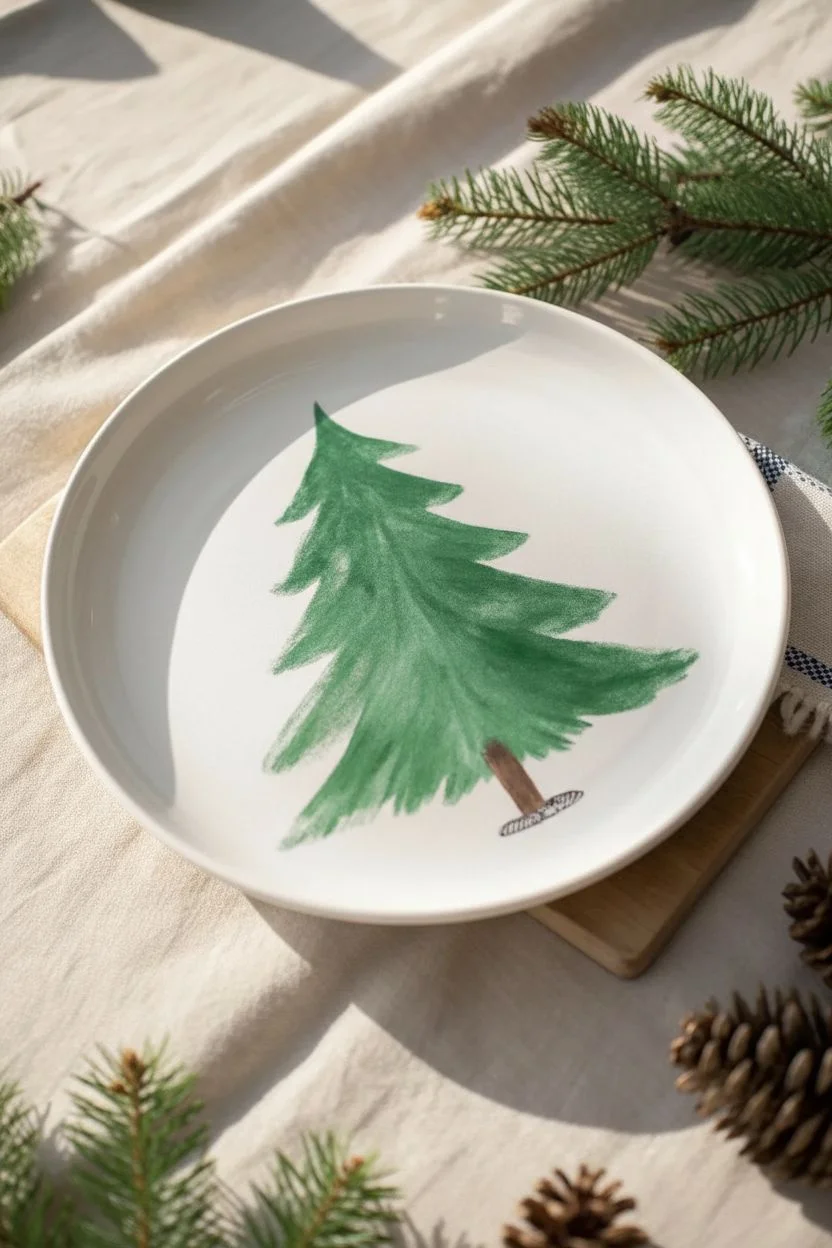
Capture the magic of the season with this charmingly imperfect Christmas tree design that mimics the soft, layered look of watercolors on ceramic. The loose brushstrokes and scattered confetti-like stars give this plate a festive, handmade warmth perfect for holiday treats.
Detailed Instructions
Materials
- plain white ceramic plate
- ceramic paints (green, dark green, red, brown, black, gold/yellow)
- medium flat brush
- small round detail brush
- pointed brush or stylus tool
- rubbing alcohol
- paper towels
- oven (for curing, if required by paint type)
Step 1: Preparation & Base Tree
-
Surface Prep:
Before dipping your brush, wipe the entire surface of the plate with rubbing alcohol and a paper towel. This removes invisible oils and fingerprints that could repel the paint. -
Start the Peak:
Using a medium flat brush loaded with green ceramic paint, create the very top peak of the tree. Use a downward, slightly flicking motion to form a small, jagged triangle shape. -
Build the Tiers:
Moving downward, paint the second tier of branches slightly wider than the first. Don’t aim for solid coverage; leave the edges feathery and uneven to mimic pine needles. -
Widen and Flow:
Continue painting progressively wider tiers until you reach the bottom of the tree. Keep your wrist loose—I find that painting quickly actually helps create that natural, organic look. -
Add Depth:
While the base green is still slightly tacky, take a darker green shade and lightly sweep it through the center and undersides of the branches to add volume and shadow. -
Anchor the Tree:
Switch to a small flat brush and brown paint to add a short, rectangular trunk at the base of the lowest branches. -
Create the Stand:
Beneath the trunk, sketch a small oval loop or line in black or dark grey to represent the tree stand or ground, giving the tree a place to sit.
Step 2: Decorations & Details
-
Paint the Topper:
Using a small detail brush and metallic gold or bright yellow paint, carefully draw a five-pointed star at the very top tip of the tree. -
Add Texture to the Star:
If you have glitter ceramic paint or a textured medium, dab a little onto the star to make it catch the light. -
Dot the Ornaments:
Load a small round brush or the back end of a paintbrush handle with red paint. Press gently onto the green branches to create perfectly round red ornaments. -
Scatter Yellow Accents:
Clean your detail brush and paint small yellow five-pointed stars within the tree branches, interspersed with the red ornaments. -
Fill the Sky:
Extend the whimsy by painting tiny yellow stars and red dots floating in the empty white space around the tree, creating a festive confetti effect. -
Final Inspection:
Clean up any stray smudges with a damp cotton swab while the paint is still wet. Check that your reds and greens haven’t muddied together. -
Dry and Cure:
Allow the plate to dry completely for at least 24 hours. Follow the specific baking instructions on your ceramic paint bottle to permanently set the design.
Brushstroke texture
Don’t overload your brush with green paint. The ‘dry brush’ look creates those lovely textured streaks that make the branches look like real needles.
Try gold leaf
Instead of yellow paint for the top star, apply adhesive size and real gold leaf after baking for an ultra-shimmering, luxurious finish.
Enjoy serving holiday cookies on your new heirloom-quality artwork


Sweet Reindeer Face Plate
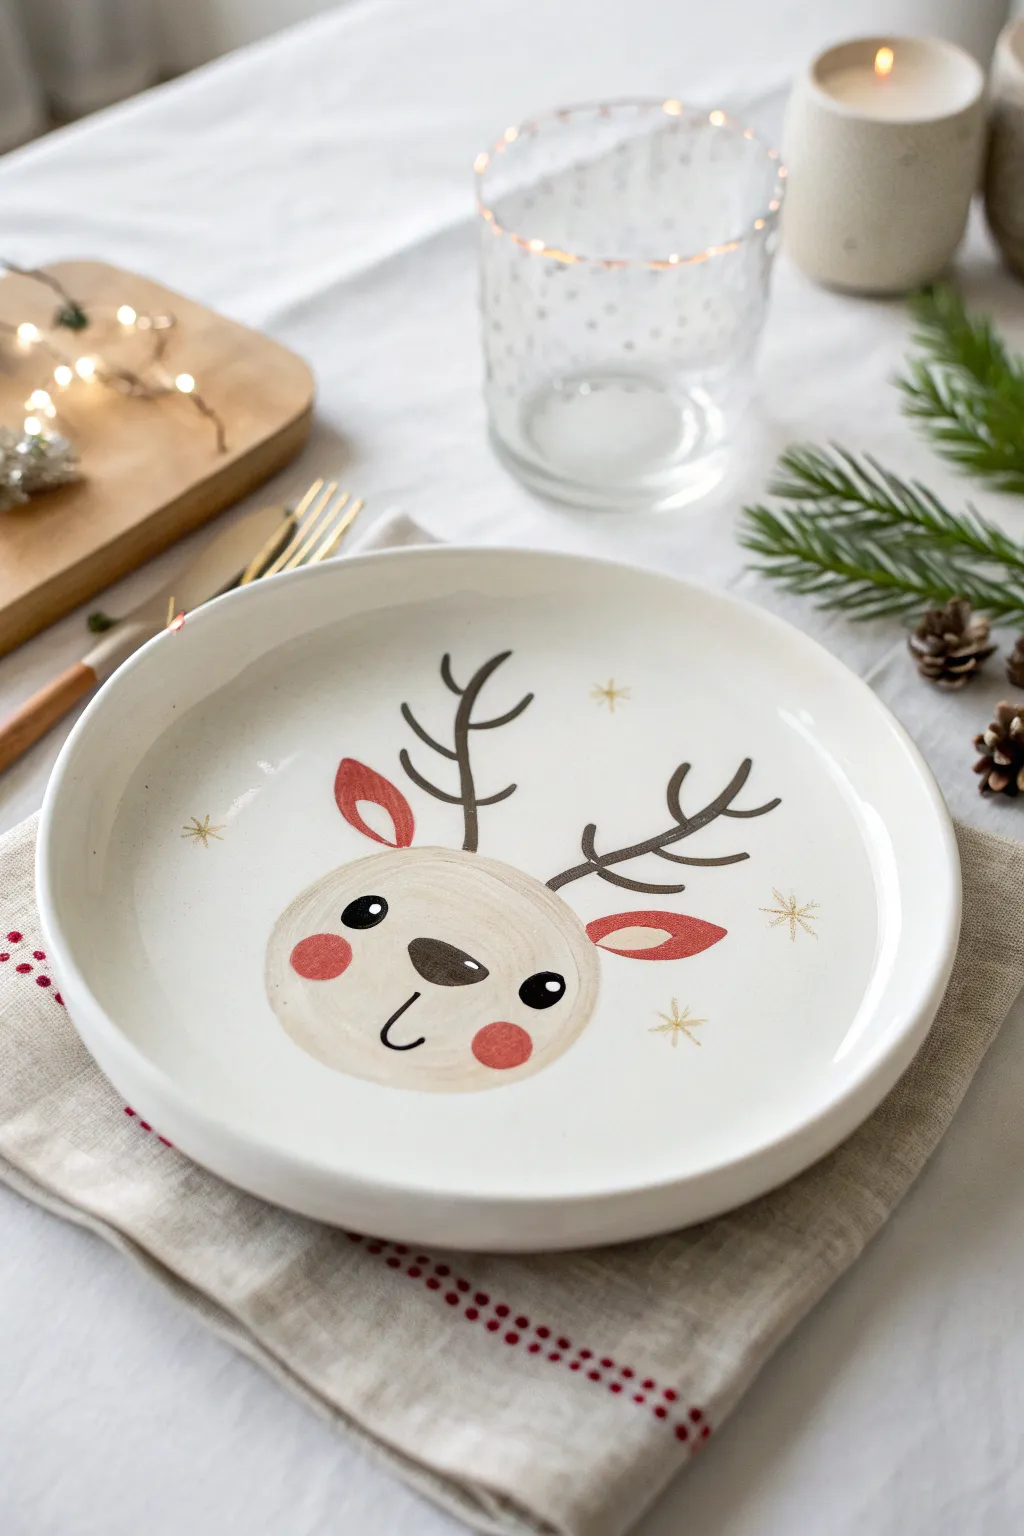
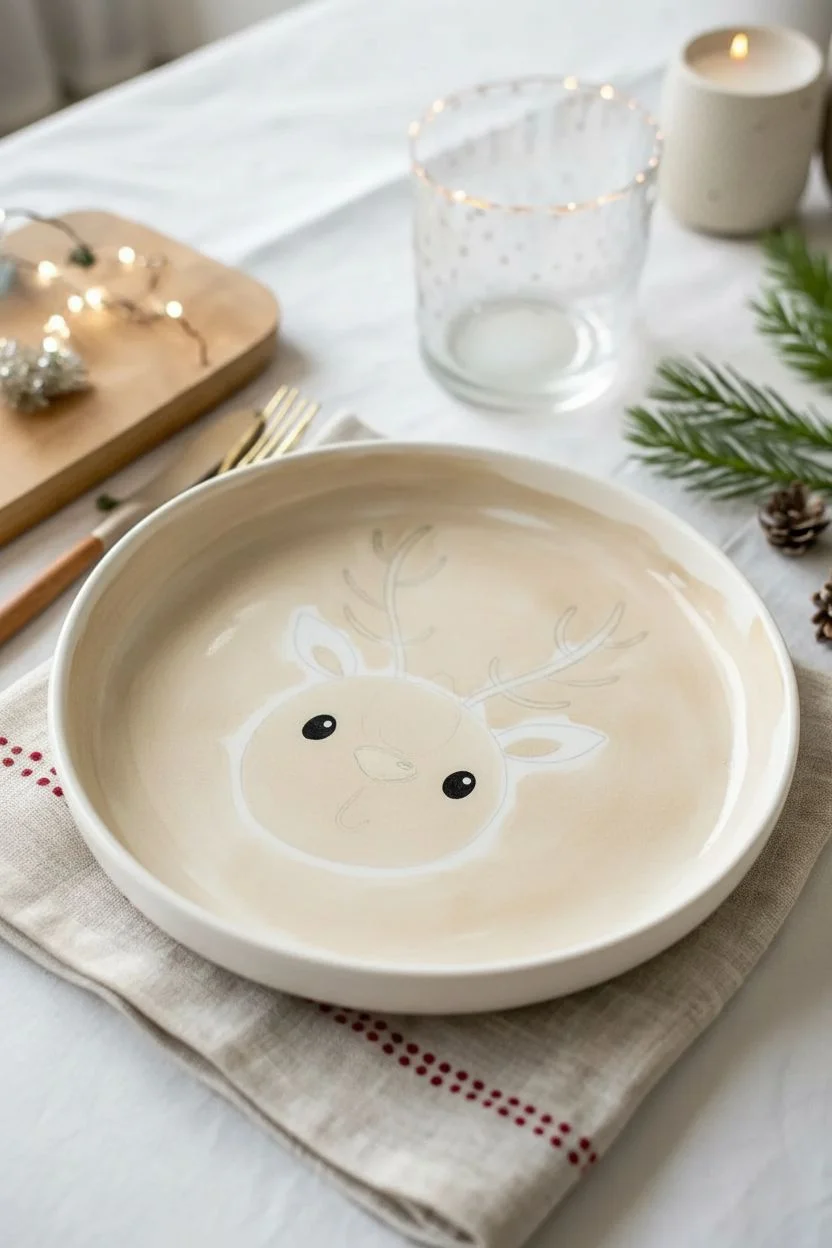
Bring a touch of woodland magic to your holiday table with this adorable hand-painted reindeer plate. Featuring gentle watercolor-style shading and charming golden accents, this sweet character design turns plain ceramic into a festive keepsake.
How-To Guide
Materials
- White ceramic plate (rimmed works best)
- Ceramic paints (tan/beige, reddish-brown, dark brown, black, gold, white)
- Medium round brush
- Fine liner brush
- Pencil for sketching
- Paper towel
- Water cup
- Oven (for curing, if required by paint type)
Step 1: Planning and Base
-
Clean surface:
Begin by washing the plate thoroughly with soap and water, then wiping it down with rubbing alcohol to remove any oils or fingerprints. This ensures the paint adheres perfectly. -
Sketch the face:
Lightly sketch a large oval shape for the reindeer’s face in the lower center of the plate using a pencil. Add two leaf-like shapes for ears on either side of the head. -
Outline features:
Mark the placement of the eyes, nose, and mouth within the oval shape to guide your painting process later. -
Mix the beige tone:
Mix a small amount of tan paint with a tiny drop of white and water to create a semi-translucent, watercolor-like beige wash. -
Paint the face:
Using a medium round brush, fill in the oval face area with your diluted beige mix. Apply it loosely to keep that soft, hand-painted look. -
Paint the ears:
Using the same beige mixture, fill in the outline of the ears, extending them outwards from the top sides of the head.
Paint Consistency
To get that soft, airy look for the face, don’t use the paint straight from the bottle. Water it down slightly so the brushstrokes are visible.
Step 2: Adding Details
-
Fill inner ears:
Switch to a reddish-brown paint. Carefully fill the interior shape of the ears, leaving a small border of the beige base visible around the edges. -
Paint rosy cheeks:
Mix a soft coral or pink shade. Dab two circular cheeks onto the face area just below where the eyes will go. -
Draw the antlers:
Load a fine liner brush with dark brown paint. From the top of the head, paint two main stems curving outward with smaller branches forking off. -
Add the nose:
Paint a soft, rounded triangle for the nose in the center of the face using dark brown or black paint. -
Define the eyes:
Using black paint and a small brush, paint two solid black circles for the eyes. I like to make them slightly wide-set for a cuter expression. -
Paint the mouth:
Below the nose, use the fine liner brush to paint a small hook shape for the mouth, curving upwards slightly.
Step 3: Finishing Touches
-
Add eye highlights:
Once the black eyes are completely dry, use a toothpick or the very tip of a brush to add a tiny white dot to each pupil for a spark of life. -
Paint snowflakes:
Dip a clean liner brush into metallic gold paint. Paint simple asterisk-style snowflakes scattered around the reindeer’s antlers. -
Add stardust:
Create tiny gold dots or smaller stars between the larger snowflakes to fill the empty white space. -
Clean up edges:
If you made any stray marks, use a damp cotton swab to gently wipe them away before the paint sets fully. -
Cure the paint:
Follow the instructions on your specific ceramic paint bottle. Most require baking the plate in a home oven to make the design permanent and dishwasher safe.
Make it a Set
Create a matching set by painting different expressions on other plates—maybe one winking, one with a red nose, or one looking sideways.
Now you have a charming custom plate ready to hold festive treats or decorate a shelf
BRUSH GUIDE
The Right Brush for Every Stroke
From clean lines to bold texture — master brush choice, stroke control, and essential techniques.
Explore the Full Guide
Candy Cane Stripe Swirl Plate
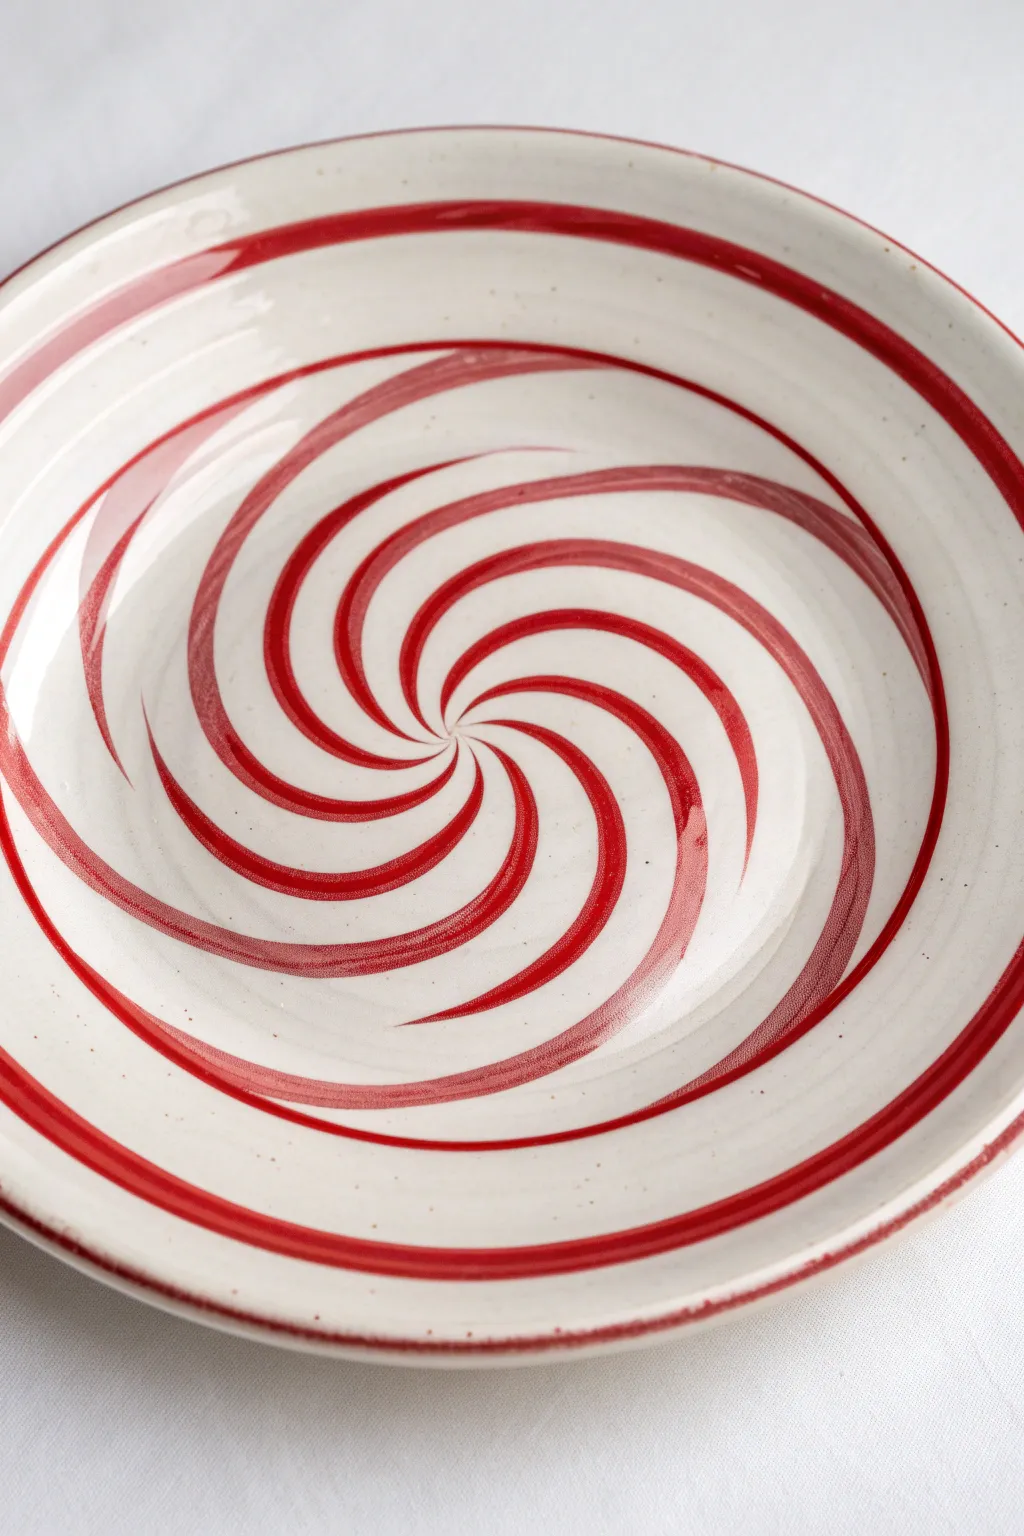
Capture the sweet nostalgia of holiday treats with this hypnotic candy cane design. The energetic red spiral creates a sense of movement on the plate, making it a perfect festive centerpiece for your Christmas cookie spread.
Detailed Instructions
Materials
- Bisque ceramic plate (dinner or salad size)
- Red underglaze (bright, fire-engine red)
- Clear dipping glaze
- Soft fan brush (for base coats)
- Medium round brush (size 6 or 8)
- Pencil
- Potter’s wheel or banding wheel (essential for smooth lines)
- Sponge
- Water container
Step 1: Preparation & Planning
-
Clean the bisque:
Wipe down your entire bisque plate with a damp sponge to remove any dust or oils from handling. This ensures the glaze adheres properly. -
Mark the center:
Find the exact center of your plate. Place it on your banding wheel and spin it slowly; hold a pencil steady to mark a tiny dot in the middle. -
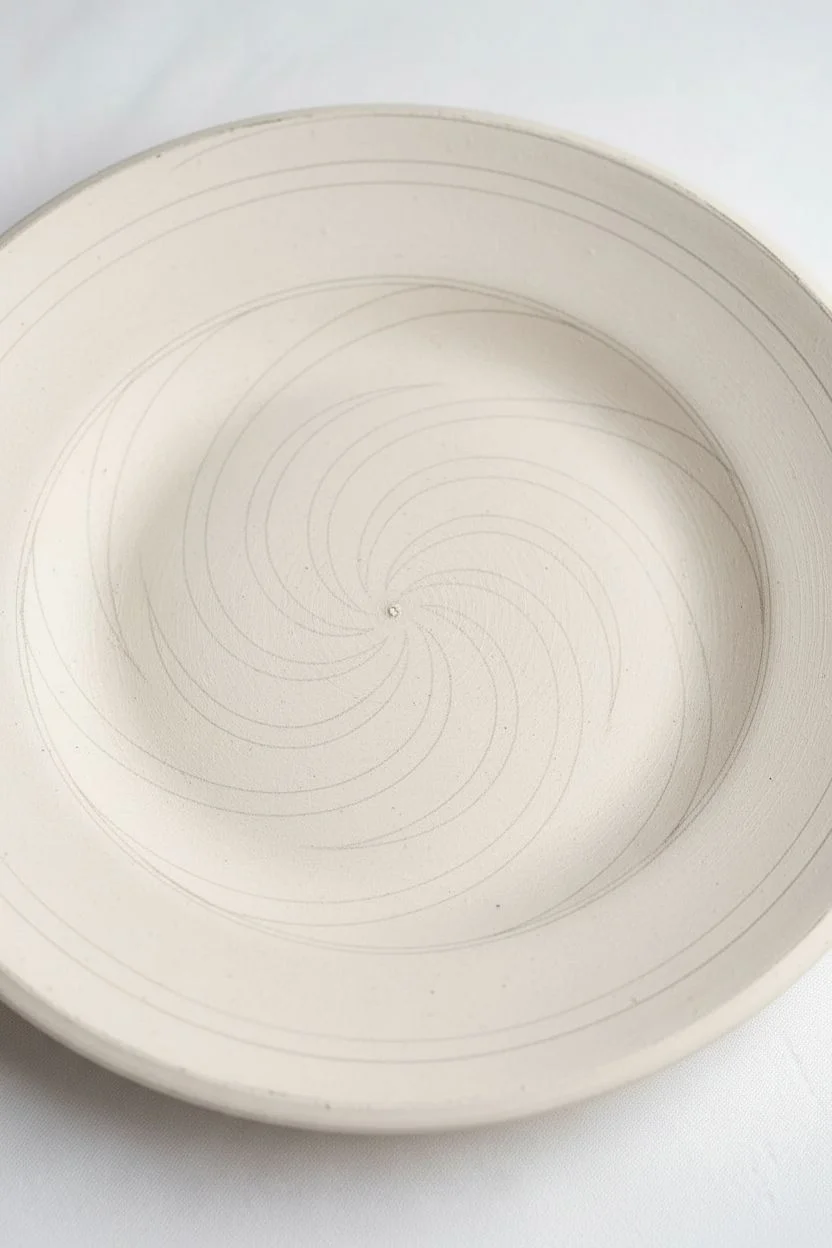
Sketch the spiral structure:
Lightly sketch the spiral pattern with a pencil. Start from the center dot and draw curved lines radiating outward like a pinwheel. Don’t worry about perfection; the pencil marks will burn off in the kiln. -
Define the rim:
While spinning the banding wheel, lightly trace where the rim stripes will go. You want a distinct border on the top edge and a secondary ring just inside the bowl area.
Uneven Swirls?
Don’t panic if your spacing is off. Use a damp stiff brush to ‘erase’ wet underglaze, or scrape dry paint away with a wooden tool to reshape the lines before glazing.
Step 2: Painting the Spiral
-
Load your brush:
Dip your medium round brush into the red underglaze. You want the paint to be fluid but not watery—flulike heavy cream is ideal. -
Start the center strokes:
Place your brush tip at the center dot. Apply gentle pressure to start thin, then press down slightly as you pull the stroke outward along your pencil curve to widen the line. -
Build the teardrop shape:
As you curve the stroke away from the center, let it naturally taper off. The shape should look like a long, curved teardrop or a comma. -
Space the spokes:
Continue adding these curved spokes around the center point. Aim for even spacing, leaving white gaps between the red strokes that are roughly equal in width to the painted lines. -
Thicken the outer curves:
Go back over the outer part of each spiral arm to thicken it. The swirl should look heavier towards the edges and very delicate at the absolute center. -
Refine the edges:
Smooth out any wobbles on your spiral edges. I find that spinning the wheel slowly while dragging the brush helps create those satisfyingly smooth curves. -
Apply second coat:
Once the first layer is dry to the touch, apply a second coat of red to the spiral arms to ensure a solid, opaque color after firing.
Level Up: Vintage Vibe
For an antique enamelware look, lightly sponge a tiny bit of darker red or brown iron oxide along the very edge of the rim to create a ‘chipped’ or rustic effect.
Step 3: Adding the Rims & Finishing
-
Paint the inner ring:
Load your brush and spin the banding wheel at a steady, moderate pace. Hold your hand very still and touch the brush to the plate just outside the spiral pattern to create a solid red ring. -
Paint the outer rim:
Move to the very edge of the plate. Spin the wheel again and paint a bold red stripe along the rim. This frames the whole design. -
Check density:
Inspect your red lines. If any look streaky or transparent, dab on a little extra underglaze. -
Clean up speckles:
If you accidentally splattered any red dots where they shouldn’t be, create a ‘speckled’ look intentionally or gently scrape them off with a crafting knife. -
Clear glaze application:
Once the underglaze is bone dry, dip the entire plate into a clear dipping glaze. Ensure an even coat and shake off excess drips. -
Fire the piece:
Place the plate in the kiln. If you aren’t firing it yourself, take it to your local studio for a standard clear glaze firing.
Now you have a stunning, professional-looking piece of holiday dinnerware ready for serving treats
Cookies for Santa Lettered Plate

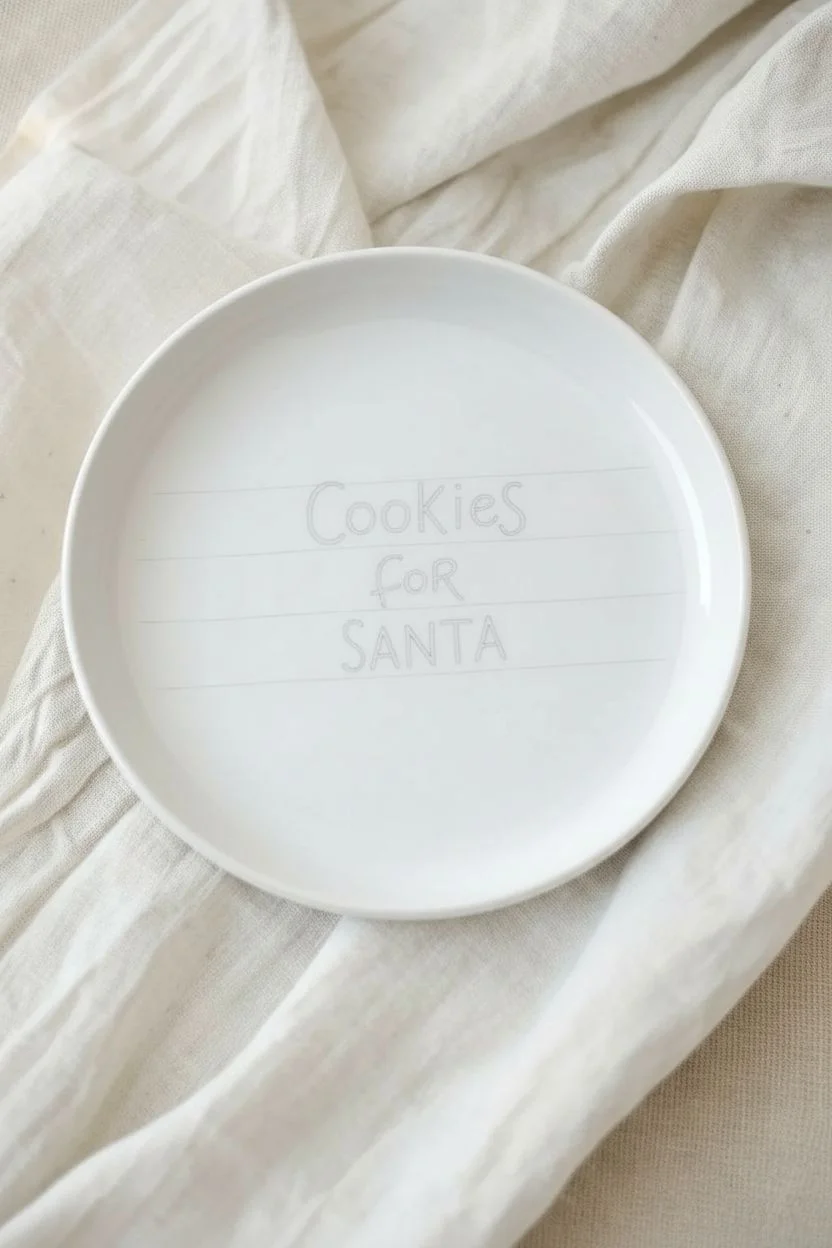
Transform a simple white dessert plate into a charming Christmas Eve tradition with this delicate, hand-lettered design. Featuring playful typography surrounded by gold stars, silver snowflakes, and minimal confetti dots, this piece feels modern yet cozy.
Step-by-Step
Materials
- White ceramic dessert plate (approx. 7-8 inches)
- Oil-based paint pens (Fine tip: Dark Brown, Metallic Gold, Metallic Silver)
- Rubbing alcohol
- Cotton pads or paper towel
- Pencil (HB or lighter)
- Cotton swabs
- Oven (for curing)
- Ruler or straight edge (optional)
Step 1: Preparation & Planning
-
Clean surface:
Begin by thoroughly wiping down your ceramic plate with rubbing alcohol and a cotton pad. This removes invisible oils or fingerprints that could prevent the paint from adhering properly. -
Dry completely:
Let the alcohol evaporate fully for a minute or two. Avoid touching the center of the plate with your bare hands from this point forward. -
Guideline placement:
Using a very light hand, sketch three horizontal guidelines in pencil near the center of the plate to help keep your text straight. -
Text spacing:
Lightly sketch the words ‘Cookies’, ‘FOR’, and ‘SANTA’ on your lines. Aim for a whimsical, bouncy alignment rather than perfection, mimicking the playful font in the image.
Step 2: Lettering
-
Shake pens:
Shake your dark brown oil-based paint pen vigorously to mix the pigment, then depress the nib on a scrap piece of paper until the paint flows smoothly. -
Write ‘Cookies’:
Trace over your pencil sketch for the word ‘Cookies’ using the brown pen. Notice how the ‘C’ and ‘s’ are slightly larger, framing the word. -
Write ‘SANTA’:
Skip the middle word for a moment and letter ‘SANTA’ at the bottom in all caps. Use a simple, clean sans-serif style similar to the reference. -
Add ‘FOR’:
Between the two main lines, write ‘FOR’ in smaller, slightly elongated capitals. This creates a nice visual hierarchy. -
Clean up mistakes:
If a line goes astray, dip a cotton swab in rubbing alcohol and quickly wipe away the wet paint. I find this works best while the paint is still fresh.
Uneven Paint Flow?
If the paint comes out blobby, press the tip onto a paper towel to offload excess paint. Too dry? Shake the pen and pump the nib again.
Step 3: Illustrating & Decorating
-
Draw focal stars:
Switch to your metallic gold pen. Draw three to four five-pointed stars scattered around the text. Vary their sizes slightly for interest. -
Solidify the stars:
Fill in the gold stars completely so they are solid silhouettes, not outlines. -
Create chocolate star:
Back with the brown pen, draw one solid brown star to the left of the word ‘FOR’ to tie the color palette together. -
Snowflake structure:
Using a silver metallic pen, draw simple asterisk shapes (*) in the empty spaces around the perimeter. -
Snowflake details:
Add tiny ‘v’ shapes to the end of each arm of your silver asterisks to transform them into delicate snowflakes. -
Add confetti dots:
Taking turns with all three pens (brown, gold, silver), make small taps to create tiny dots filling the white space. Keep them sparse so the design breathes. -
Mini star accents:
Draw a few extremely small, unfilled plus signs or tiny asterisks in gold near the rim for extra sparkle.
Make It Last
Hand wash only! Even after baking, harsh dishwasher cycles can chip hand-painted designs. Use a soft sponge and mild soap to preserve your art.
Step 4: Finishing Touches
-
Erase guidelines:
Wait at least one hour for the paint to be completely dry to the touch. Then, gently erase any visible pencil marks. -
Curing preparation:
Place the plate into a cold oven. Do not preheat the oven, as the sudden temperature change can crack the ceramic. -
Bake the design:
Set the oven to 350°F (175°C). Once the oven reaches temperature, set a timer for 30 minutes. -
Cool down:
Turn the oven off after 30 minutes, but leave the plate inside until the oven is completely cool. This gradual cooling ensures durability.
Your custom plate is now ready for cookies, carrots, and holiday magic

PENCIL GUIDE
Understanding Pencil Grades from H to B
From first sketch to finished drawing — learn pencil grades, line control, and shading techniques.
Explore the Full Guide
Kid Handprint Christmas Tree Keepsake Plate
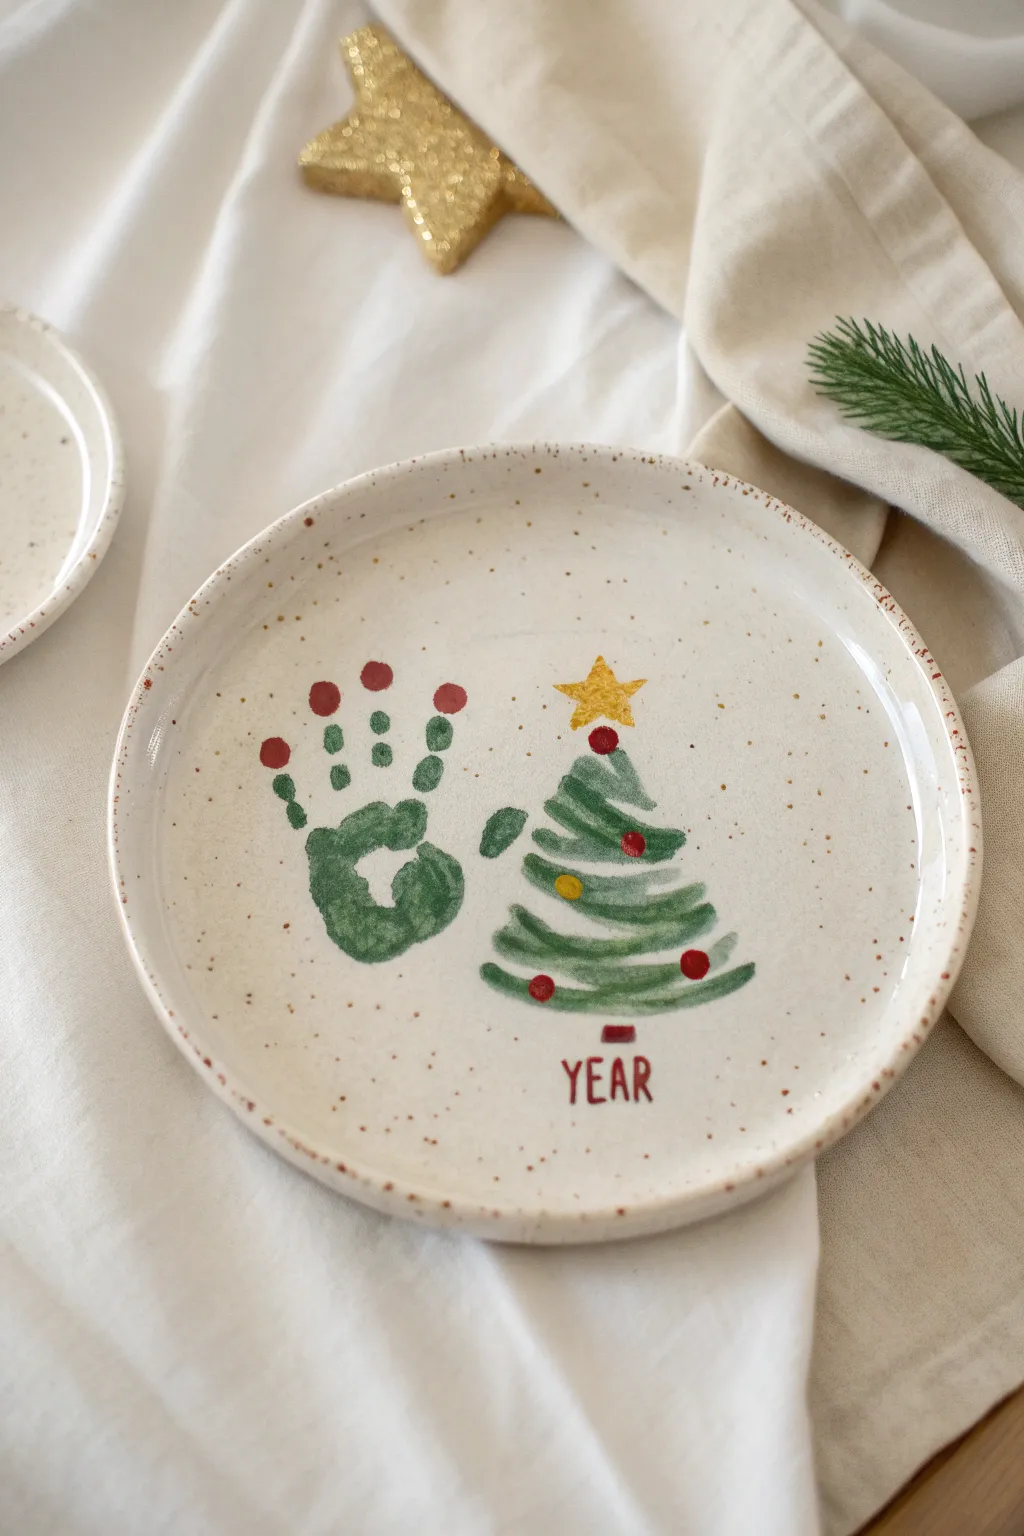
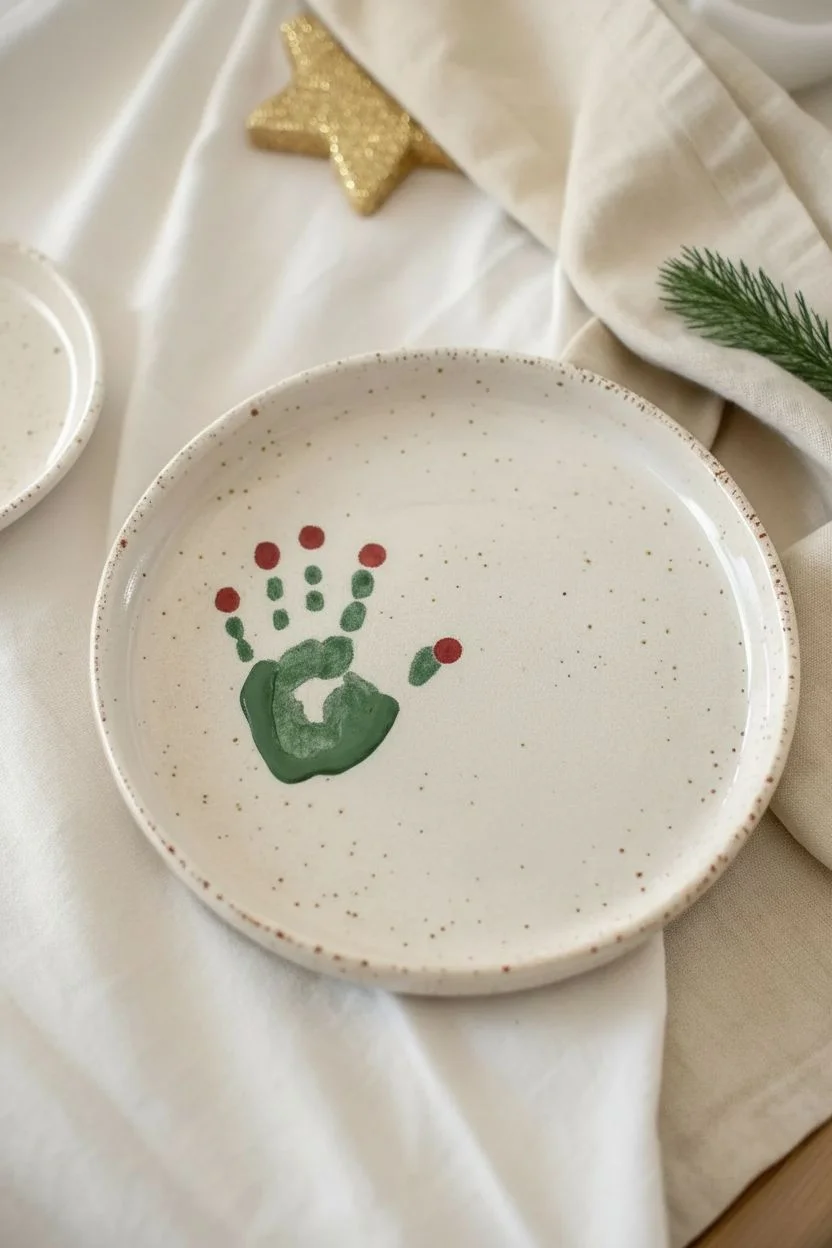
Capture a moment in time with this adorable ceramic keepsake that pairs a tiny green handprint with a whimsical painted Christmas tree. The speckled beige plate adds a lovely rustic charm, making the bright holiday colors truly pop.
How-To Guide
Materials
- Beige or speckled ceramic bisque dinner plate
- Non-toxic green ceramic glaze or acrylic enamel paint (for hand)
- White or light sage green ceramic paint (for mixing)
- Red ceramic paint
- Yellow/Gold ceramic paint
- Brown ceramic paint
- Fine detail paintbrush
- Medium flat paintbrush
- Foam brush/sponge applicator
- Paper towels
- Glaze clear coat (if firing)
- Ceramic oven or kiln (depending on paint type used)
Step 1: Preparation & Handprint
-
Clean the surface:
Begin by wiping down your ceramic plate with a barely damp sponge to remove any dust or oils. Let it dry completely. -
Prepare the hand paint:
Squeeze a generous amount of green ceramic paint onto a palette or paper plate. I like to mix just a touch of white into standard green to get that softer, slightly milky look seen in the photo. -
Coat the hand:
Using a foam brush, apply a thick, even coat of the green paint to your child’s left hand. Ensure the palm and all fingers are covered, but try to avoid big globs that might smear. -
Position the print:
Orient the plate so you can press the hand onto the left side. Guide the hand down firmly, pressing on the palm and each individual finger to ensure good contact with the ceramic. -
Lift and clean:
Lift the hand straight up carefully to avoid dragging the paint. Immediately wipe or wash the child’s hand while the paint is still wet. -
Touch up:
If there are any missing spots in the palm area where the skin didn’t touch, you can lightly fill them in with a brush, though keeping the texture natural looks best. -
Finger ornaments:
Dip the handle end of a paintbrush into red paint. Dot the tip of each finger on the handprint to create ‘ornaments’ or berries sitting on top of the fingertips.
Step 2: Painting the Tree
-
Start the tree top:
On the right side of the plate, align the top of your tree roughly with the top of the hand’s fingers. Use a medium brush with green paint to make a small, downward-curving brushstroke. -
Build the layers:
Work your way down, creating progressively wider horizontal swoops. Don’t make them solid triangles; leave gaps between the strokes to mimic pine branches. -
Add dimension:
While the green is still slightly wet, you can add a lighter green or white highlight to the top edge of each branch swoop to give it a snowy or dimensional effect. -
Paint the trunk:
Use a small square brush and brown paint to add a simple rectangular stump at the very bottom center of your tree. -
Add user the star:
Using a fine brush and yellow or gold paint, draw a five-pointed star sitting right on the tip of the tree. -
Decorate the tree:
Load a fine brush with red paint and add round ornaments scattered across the green branches. Add a few yellow ornaments as well for variety.
Smudged Print Rescue
If the hand slides, quickly wipe it off with a damp sponge before it dries. The ceramic bisque is porous, so let it dry fully before retrying.
Step 3: Finishing Details
-
Add the text:
Below the tree trunk, carefully write the word ‘YEAR’ or the actual date (e.g., 2023) using red paint and your finest detail liner brush. -
Create speckles (optional):
If your plate wasn’t pre-speckled, you can flick a stiff toothbrush dipped in thinned brown paint over the whole plate to get that rustic pottery look. -
Let it dry:
Allow the paint to dry completely. This usually takes 24 hours depending on the paint brand. -
Seal or fire:
If using kiln-fire glazes, dip the plate in clear glaze and have it fired. If using bake-at-home oven paints, follow the curing instructions on the bottle to set the design permanently.
Make It Personal
Instead of ‘YEAR,’ paint the child’s name in red script. You can also trace the star with a tiny bit of liquid gold leaf after firing for real shine.
Now you have a timeless holiday treasure that freezes a moment of childhood in beautiful ceramic
Footprint Reindeer Keepsake Plate
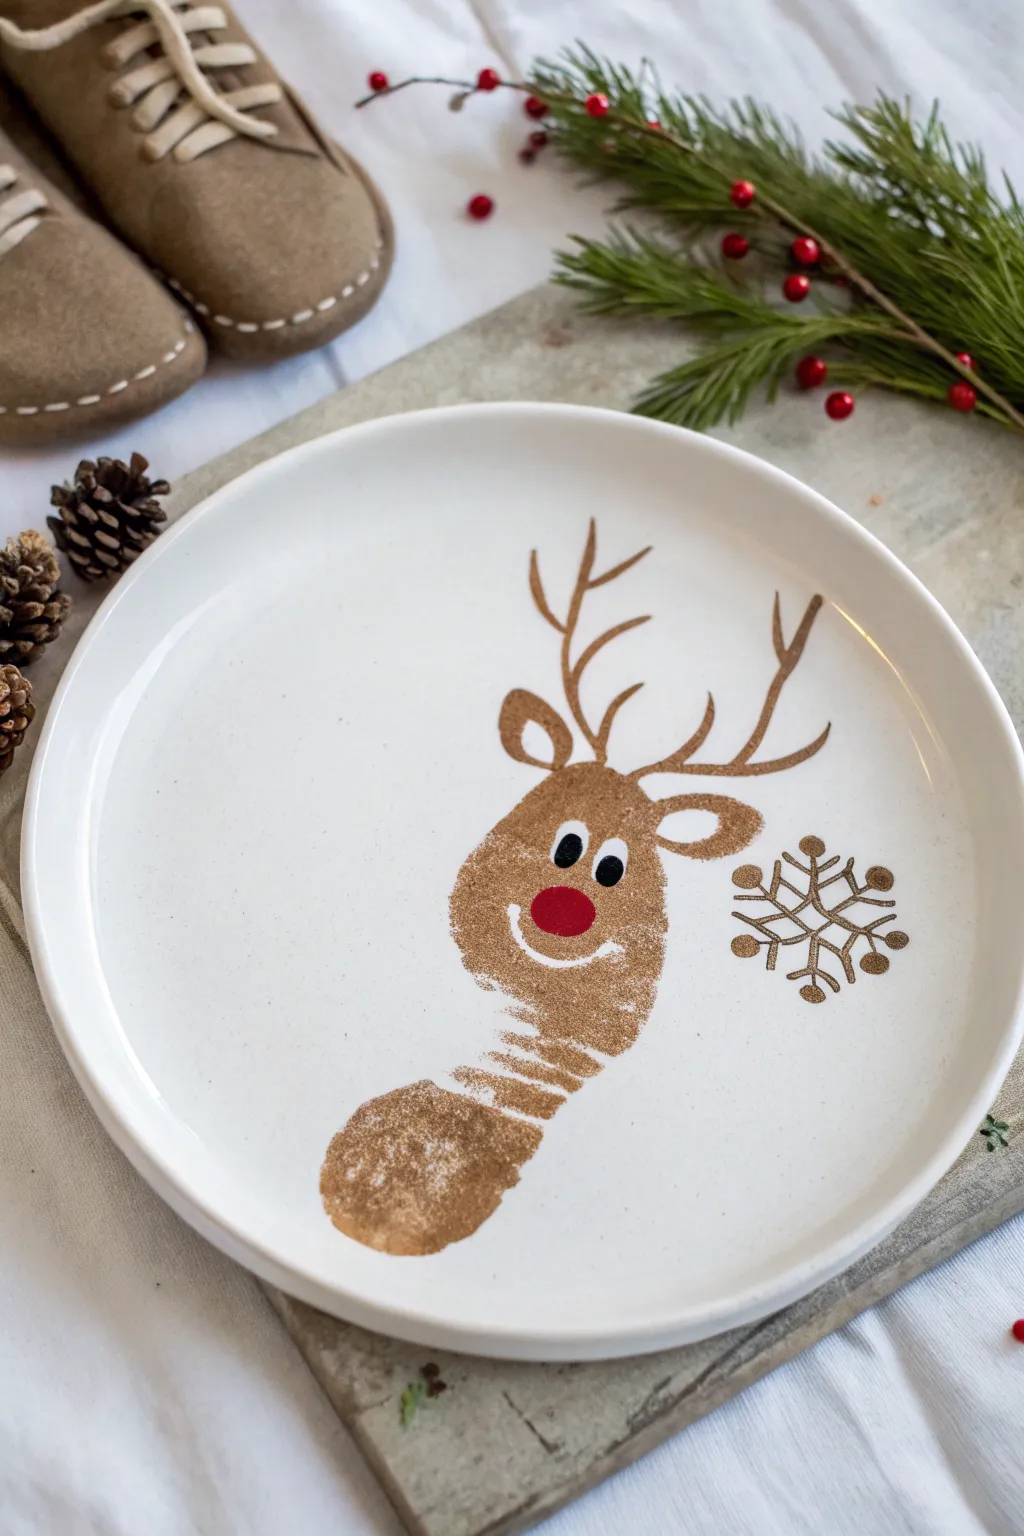
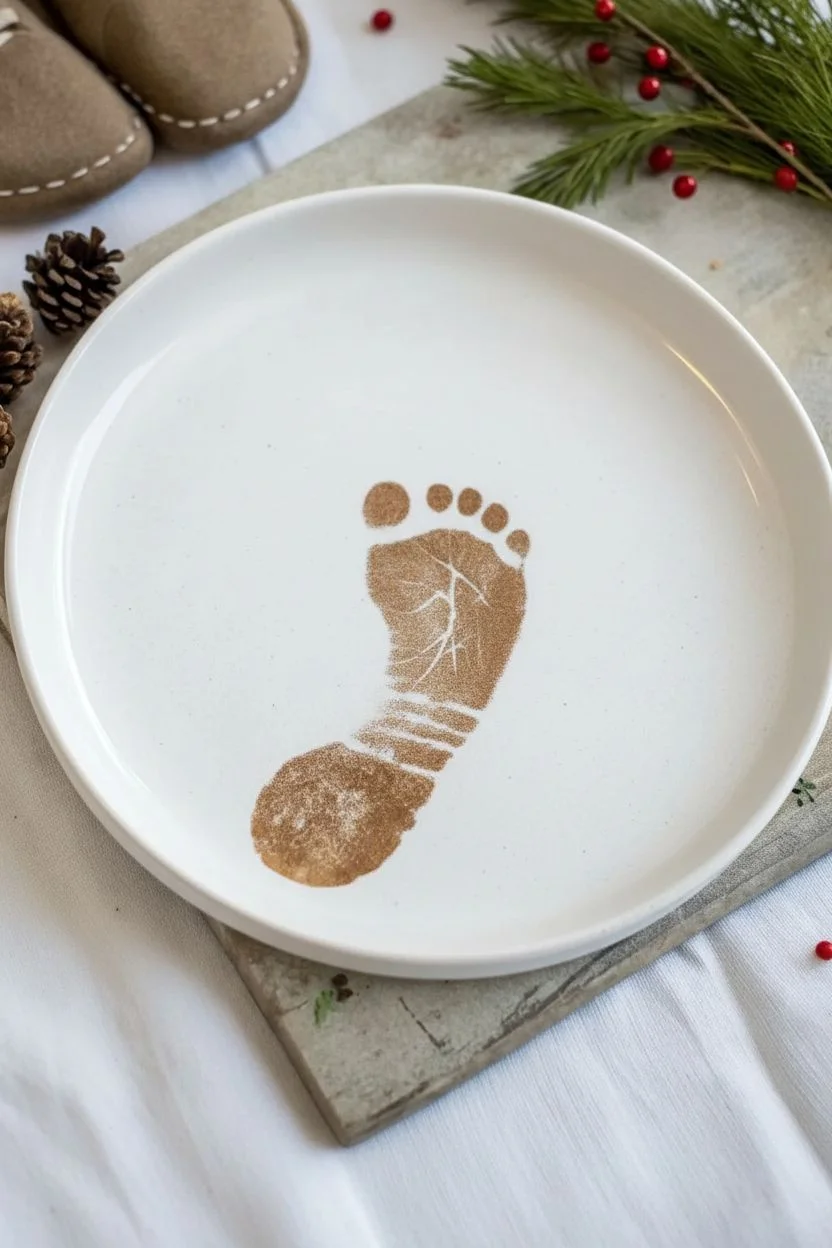
Turn a tiny footprint into a festive memory with this adorable reindeer plate design. Using the natural shape of a foot as the reindeer’s face and neck, this keepsake captures a moment in time that spreads holiday cheer year after year.
Detailed Instructions
Materials
- White ceramic plate (oven-safe if baking, or glazed ceramic)
- Non-toxic brown acrylic paint or enamel suitable for ceramics
- Dark brown or black ceramic paint
- Red ceramic paint
- White ceramic paint
- Gold or metallic bronze ceramic paint
- Fine detail paintbrush
- Medium flat paintbrush
- Sponge brush
- Water formatting and paper towels
- Baby wipes (essential for quick cleanups)
- Rubbing alcohol
Step 1: Preparation and The Print
-
Clean the Surface:
Before painting, wipe the entire plate surface with rubbing alcohol and a paper towel. This removes any oils or fingerprints that might prevent the paint from adhering properly. -
Prepare the Foot:
Sit comfortably with your child or the person whose footprint you are capturing. Ensure their foot is clean and dry before starting. -
Apply Brown Paint:
Using a sponge brush, apply a generous, even layer of the lighter brown paint to the bottom of the foot. You want coverage that is wet but not dripping. -
Position the Plate:
Place the plate on a stable, low surface. Orient it so the heel will be at the top (this becomes the head) and the toes will point down. -
Make the Imprint:
Gently but firmly press the painted foot onto the center of the plate. Press down on each toe and the heel to ensure a good transfer. -
Lift and Clean:
Lift the foot straight up to avoid smearing the print. Immediately clean the foot with baby wipes or warm soapy water. -
Initial Dry:
Allow the footprint to dry completely to the touch. This usually takes about 20-30 minutes, depending on how thick the paint application was.
Step 2: Adding Reindeer Features
-
Outline the Antlers:
Using a fine detail brush and dark brown paint, draw two main stems rising from the top of the heel (the reindeer’s head). These should curve slightly outward. -
Flesh Out the Antlers:
Add smaller branches coming off the main stems to create the look of fuller antlers. Keep the strokes fluid and branch-like. -
Add Ears:
Paint two small, teardrop-shaped ears on either side of the head, just below the antlers. Leave the centers unpainted or fill them with a slightly lighter shade if you wish. -
Paint the Eyes:
Dip the handle end of a paintbrush into white paint to create two perfect circles for the whites of the eyes. Place them in the upper middle area of the heel. -
Add Pupils:
Once the white circles are dry, add smaller black dots inside them. Placing the black dots slightly off-center or looking in one direction adds character. -
The Red Nose:
Paint a bright, round red nose below the eyes. I find a slightly larger circle makes the reindeer look friendlier and more distinctively like Rudolph. -
Draw the Mouth:
Use your finest brush and white paint to draw a simple, curved smile line under the nose.
Smudged Print?
If the footprint smears, wipe it off quickly with a wet paper towel before it dries. It’s better to re-do the print immediately than try to fix a blurry shape later.
Step 3: Decorative Details
-
Create a Snowflake:
To the right of the reindeer, use gold or metallic bronze paint to draw a snowflake. Start with a simple cross, then add an ‘X’ over it. -
Detail the Snowflake:
Add small ‘V’ shapes or dots at the ends of each line of the snowflake to give it an intricate, crystallized appearance. -
Final Inspection:
Check for any smudges or stray marks. You can scrape away dried mistakes gently with a toothpick or a damp Q-tip. -
Curing or Baking:
Follow the instructions on your specific paint bottle. Many ceramic paints require air drying for 24 hours, followed by baking in a home oven to set the design permanently.
Add a Date
Use a super-fine brush or paint pen to write the year and the child’s name on the back of the plate. It turns the craft into a true historical record.
Now you have a precious holiday heirloom that freezes time in the sweetest way possible


Fingerprint Christmas Lights Garland Plate
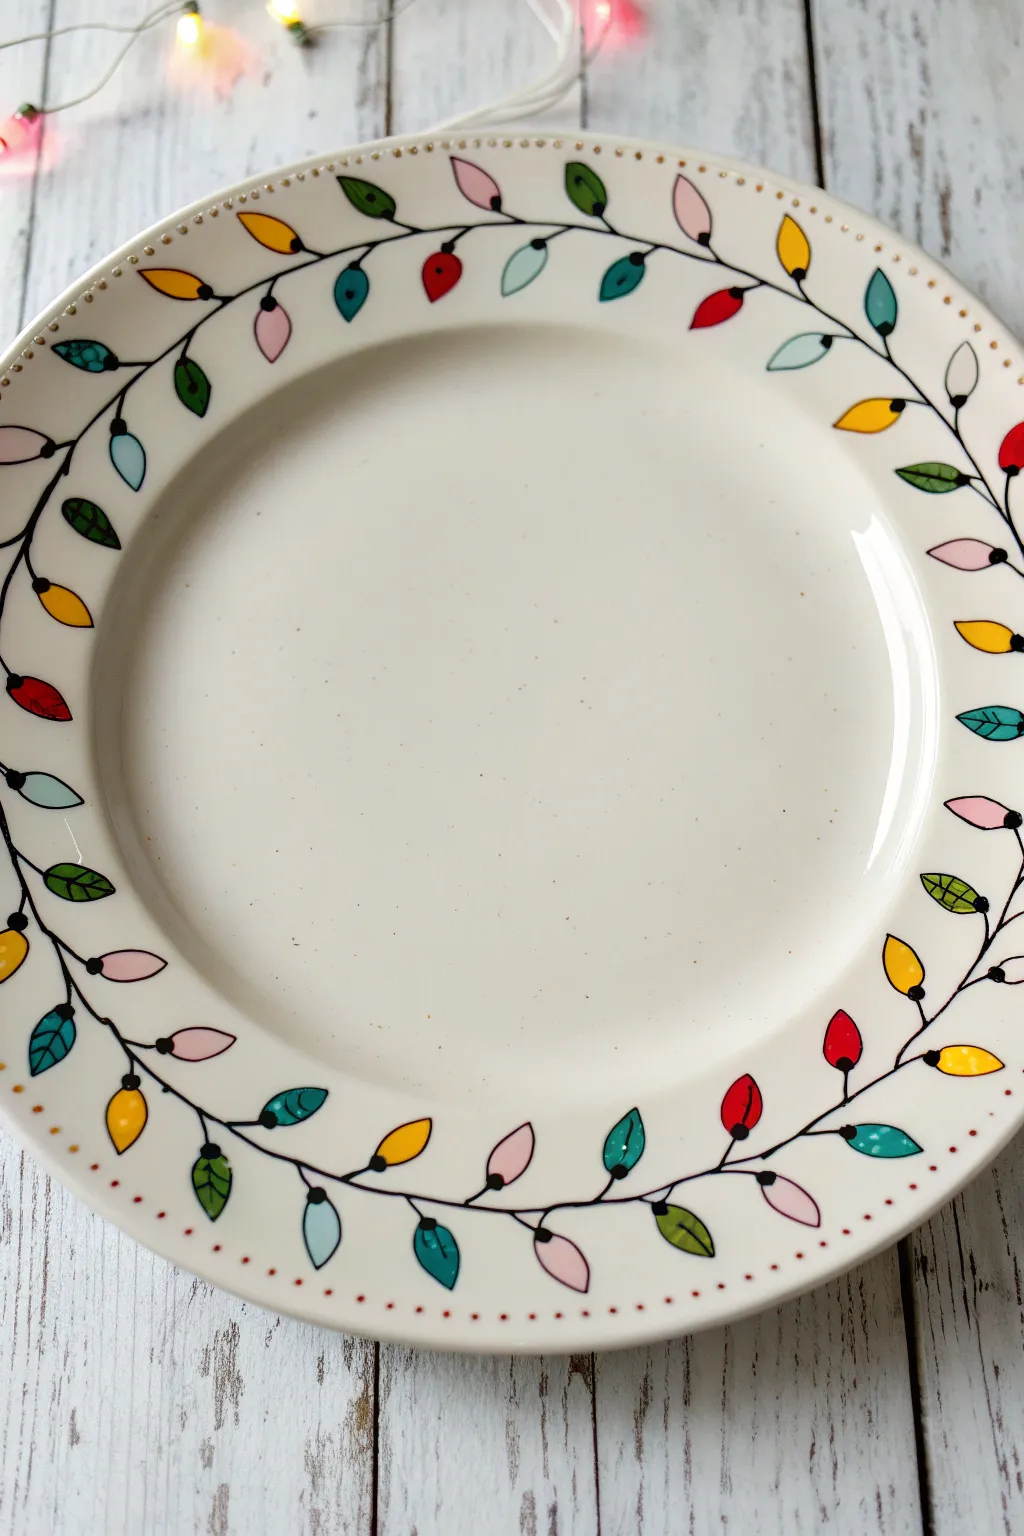
Brighten up your holiday table setting with this cheerful ceramic plate featuring a festive garland of colorful lights. By using fingerprints for the bulbs, you achieve a charming, organic shape that makes each light unique.
Step-by-Step Tutorial
Materials
- White ceramic plate (dinner or salad size)
- Pebeo Porcelaine 150 paints (or similar oven-bake ceramic paints)
- Black porcelain outliner tube or fine-tip porcelain marker
- Small flat brush
- Rubbing alcohol
- Paper towels or cotton balls
- Palette or small paper plate for paints
- Oven (for curing)
Step 1: Preparation & Planning
-
Clean the Surface:
Before painting, it is crucial to remove any invisible oils or fingerprints that could prevent paint adhesion. Wipe the entire rim of the plate thoroughly with rubbing alcohol on a paper towel and let it air dry completely. -
Plan the Vine:
Visualize a wavy, continuous vine that loops around the rim of the plate. You want the curves to be gentle and rolling rather than sharp zig-zags.
Clean Prints
Make sure your finger isn’t too overloaded with paint. A thin, even coat on your skin creates a perfect oval print without raised ridges that might peel off later.
Step 2: Creating the Garland
-
Draw the Wire:
Using your black porcelain outliner tube or a fine-tip paint marker, draw a continuous, undulating black line all the way around the rim. Try to keep the pressure steady for an even line thickness. -
Add Bulb Sockets:
Along the black wire, draw small black squares or rectangles at regular intervals. These will serve as the bases for your light bulbs. Vary the angle of these sockets so the bulbs will point in different directions for a natural look. -
Let the Outline Dry:
Allow the black linework to dry for at least 30-60 minutes to prevent smudging when you add the colorful bulbs.
Smudge Fixes
If you smudge a fingerprint or draw a crooked line, wipe it away immediately with a Q-tip dipped in rubbing alcohol, let it dry, and simply try again.
Step 3: Painting the Bulbs
-
Prepare Colors:
Squeeze small amounts of red, yellow, green, teal, and pink porcelain paint onto your palette. -
The Fingerprint Technique:
Dip your index finger or pinky finger (depending on the desired bulb size) into the first color. Dab off excess paint on a paper towel so it’s not gloppy. -
Apply the First Color:
Press your finger gently onto the plate right next to one of the black square sockets. Aim for an oval shape. Repeat this color randomly around the wreath, leaving plenty of empty sockets for other shades. -
Clean and Switch:
Wipe your finger completely clean with a damp paper towel or use a fresh finger, then move to the next color. -
Fill Remaining Sockets:
Continue the process with your yellows, greens, teals, and pinks until every black socket has a corresponding colorful fingerprint bulb attached to it. -
Add Highlights (Optional):
If you want extra dimension, I like to use a tiny detail brush to add a small white comma or dot on one side of each bulb once the color is dry, simulating a reflection.
Step 4: Leaf Accents & Details
-
Paint Leaves:
To break up the string of lights, paint small green leaves using a brush. Draw a simple oval shape with a pointed tip, attaching them directly to the black wire line in the gaps between bulbs. -
Outline the Leaves:
Once the green leaf paint is dry, use your black outliner or marker to carefully trace the edge of the leaf and draw a single vein down the center. -
Add the Dotted Border:
For a finishing touch, use the tip of a paintbrush handle or a dotting tool dipped in red or black paint to create tiny, evenly spaced dots along the very outer edge of the plate rim.
Step 5: Curing
-
Dry Time:
Allow the finished plate to dry for at least 24 hours. This ensures the moisture evaporates fully before baking. -
Bake to Set:
Place the plate in a cool oven. Set the temperature to 300°F (150°C) – or whatever your specific paint brand recommends. Once the oven reaches temperature, bake for 35 minutes. -
Cooling Down:
Turn the oven off and leave the plate inside to cool down gradually with the oven. Removing it too quickly can cause the ceramic to crack due to thermal shock.
Now you have a custom, durable holiday plate ready to serve cookies for Santa or display on your mantel
Cozy Snowman With Scarf and Buttons
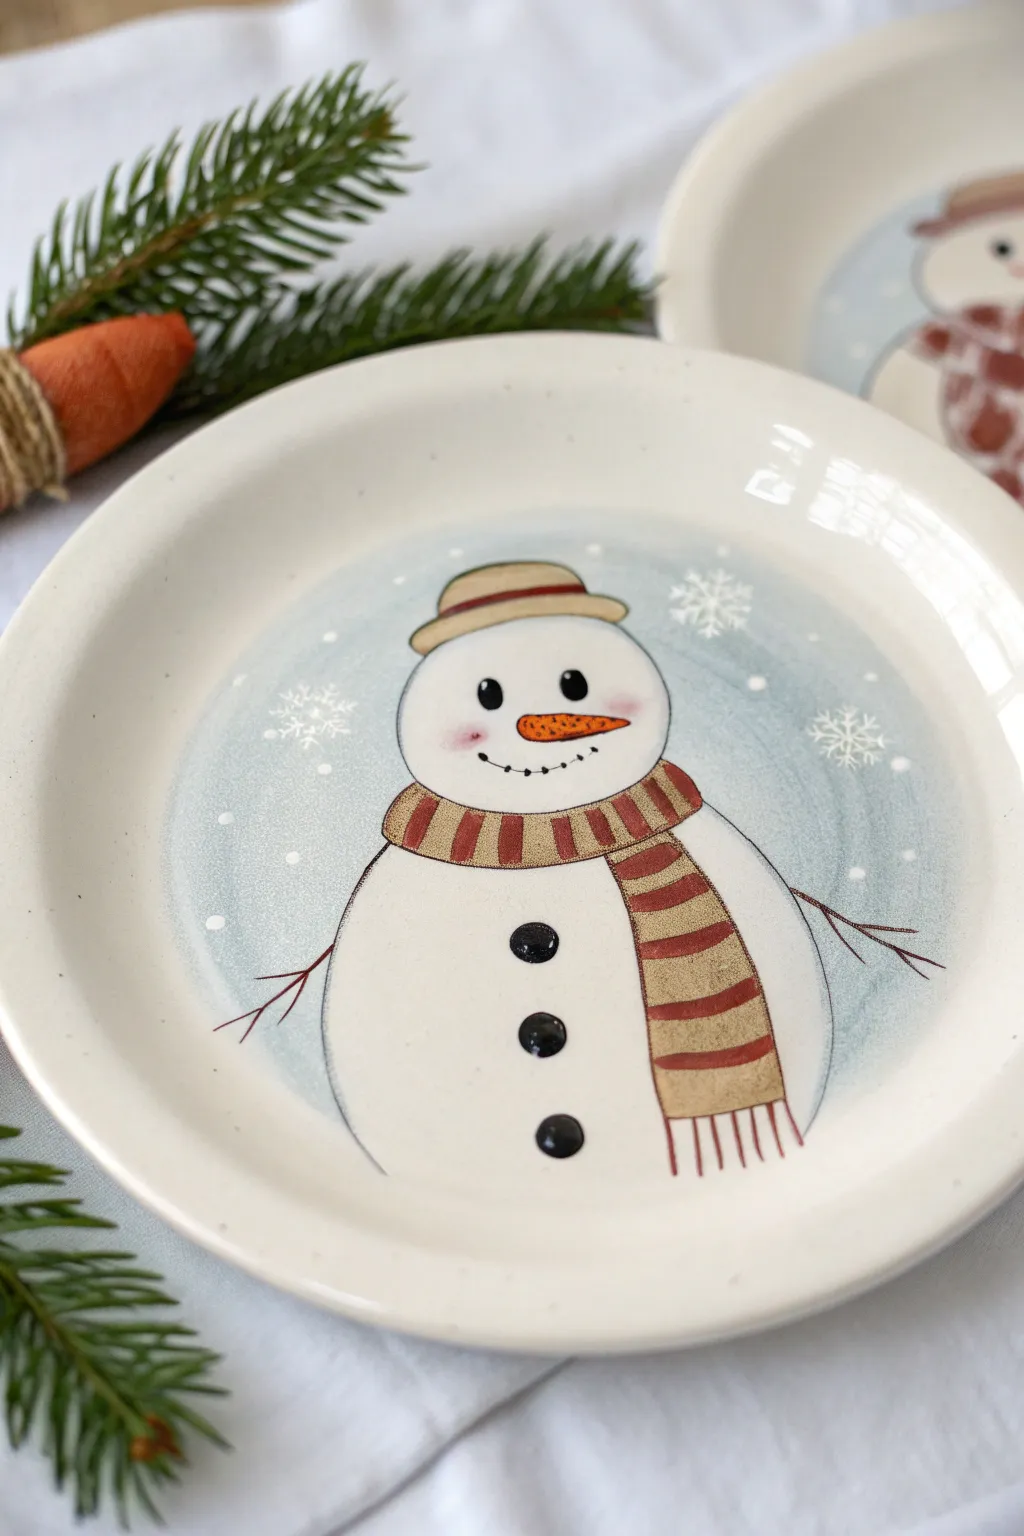
This charming, hand-painted ceramic plate features a friendly snowman bundled up in a striped scarf against a soft, wintery blue background. The illustrative style, complete with subtle snowflakes and visible brushstrokes, gives it a warm, pottery-studio feel perfect for serving holiday cookies.
Step-by-Step Guide
Materials
- Bisque ceramic plate (dinner or salad size)
- Underglaze paints (white, light blue, black, orange, tan/mustard, burgundy/dark red)
- Clear dipping or brush-on glaze
- Pencil for sketching
- Round brushes (sizes 4 and 8)
- Fine liner brush (size 0 or 00)
- Sponge or wide flat brush
- Palette or small cups for mixing
- Kiln for firing (or oven-bake ceramic paints if not using a kiln)
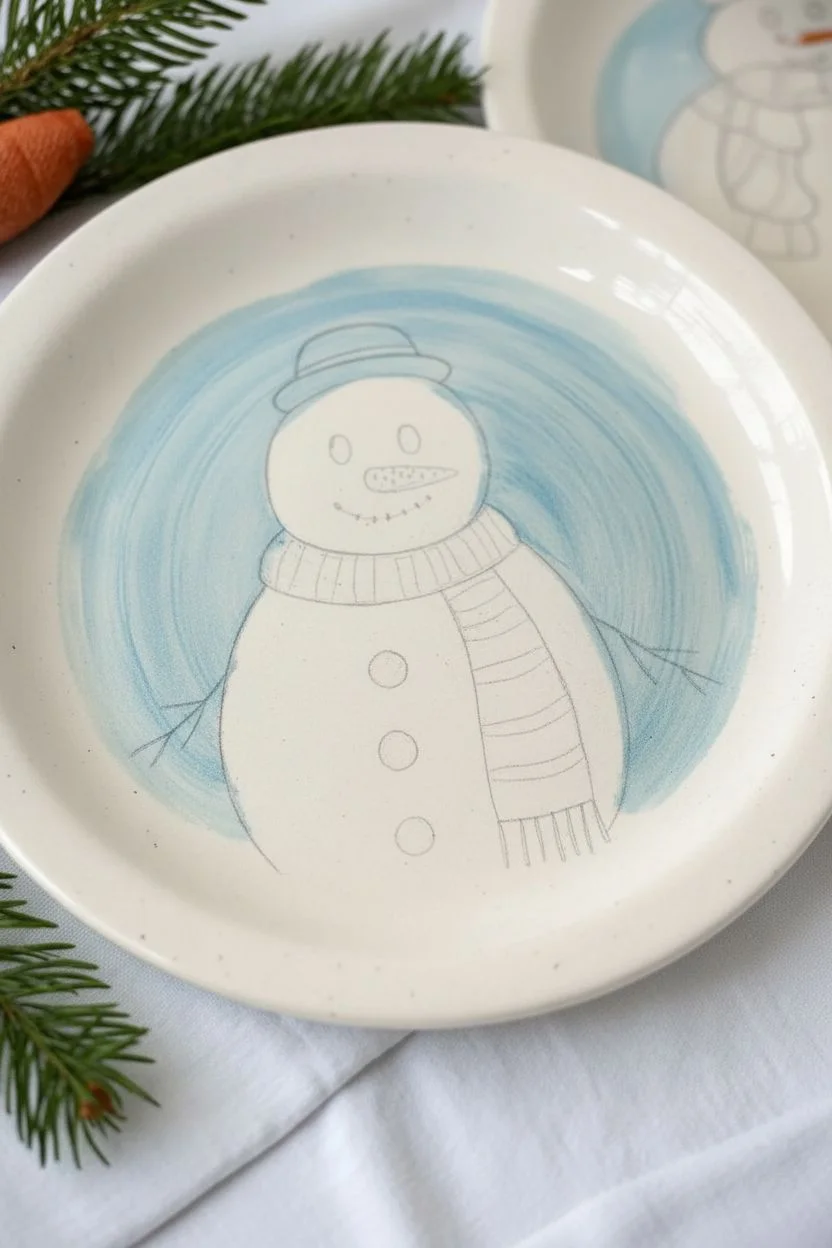
Step 1: Setting the Scene
-
Prepare the surface:
Wipe down your bisque plate with a slightly damp sponge to remove any dust. This ensures the underglaze adheres properly to the ceramic surface. -
Define the background area:
Using a pencil, lightly sketch a large circle in the center of the plate. This doesn’t need to be perfectly round; the organic shape adds to the charm. Leave a wide rim of unpainted ceramic around the edge. -
Apply the background wash:
Mix a small amount of light blue underglaze with water to create a semi-translucent wash. Using a wide brush or sponge, paint inside your circle with sweeping, circular strokes. Let these strokes remain visible to create a textured, swirling winter sky effect. -
Sketch the subject:
Once the blue background is dry to the touch, lightly sketch your snowman with a pencil. Draw a smaller circle for the head and a larger oval for the body. Add the outlines for the hat and scarf now as well. The pencil marks will burn off in the kiln, so don’t worry about erasing mistakes.
Step 2: Painting the Snowman
-
Fill the body:
Using a size 8 round brush, paint the snowman’s head and body with opaque white underglaze. You may need 2-3 coats for solid coverage, especially over the blue background. Let each coat dry before applying the next. -
Base coat the scarf:
Paint the entire scarf area with a tan or mustard yellow underglaze. Follow the curve of the neck for the wrapped portion and let the tails hang down naturally. -
Add the hat:
Paint the hat brim and the top of the hat with the same tan color used for the scarf. Leave a small gap for the ribbon later, or just paint the whole shape tan and layer the ribbon color on top once dry. -
Detail the nose:
use a small round brush to paint a carrot-shaped triangle in bright orange. I like to add tiny dots of brown or black on the orange once it’s dry to give the carrot some texture. -
Paint the scarf stripes:
Once the tan base is completely dry, use your burgundy or dark red underglaze to paint vertical stripes along the scarf. Follow the contour of the scarf fabric so the stripes look wrapped, not flat.
Pro Tip: Pencil Marks
Don’t stress about your initial sketch! Graphite burns off completely in the kiln, so you can sketch right on top of your dry background layers without ruining the final piece.
Step 3: Fine Details & Finishing
-
Add the face:
Using your fine liner brush and black underglaze, carefully paint two oval eyes and a dotted smile. Add a tiny white highlight dot inside each eye to bring the character to life. -
Create rosy cheeks:
Water down a tiny drop of red underglaze until it is very faint pink. Dab this gently onto the cheeks using a fairly dry brush or your finger for a soft blush effect. -
Outline the drawing:
With the liner brush and black underglaze, create thin, sketchy outlines around the snowman, hat, and scarf. Keep the lines loose and broken in places rather than solid and heavy; this maintains the illustrative style. -
Stick arms and buttons:
Paint three solid black circles down the chest for buttons. Using the same black liner brush, draw thin, branching stick arms extending from the sides of the body. -
Add snowflakes:
Using white underglaze and a small brush, paint simple asterisk shapes and dots scattered around the blue background to represent falling snow. -
Glaze and fire:
Allow your piece to dry completely (preferably overnight). Dip the plate in clear glaze or brush on a clear coat, then fire specifically according to your clay and glaze manufacturer instructions.
Troubleshooting: Smudged Lines
If you smudge a black outline, don’t wipe it—that spreads the pigment. Instead, gently scrape the mistake off with a crafting knife or needle tool once the paint is completely dry.
Once fired, you will have a durable, food-safe plate ready to bring winter cheer to your table.
Penguin Parade Winter Plate
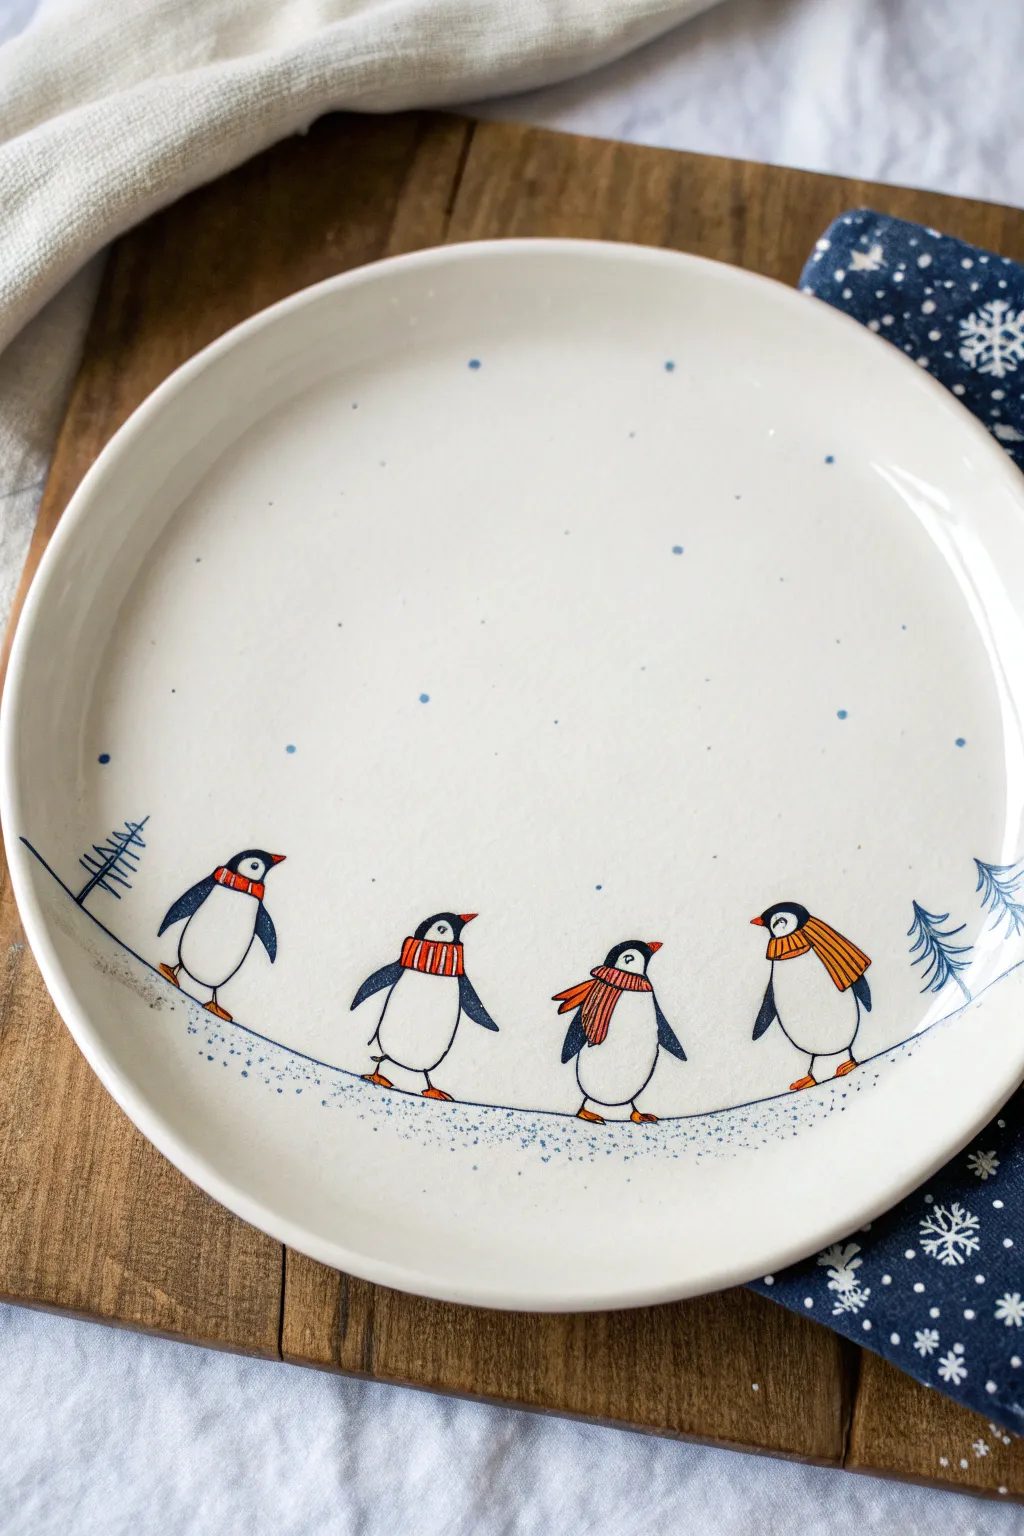
Bring a whimsical winter scene to your kitchen table with this cheerful hand-painted plate featuring a line of marching penguins bundled up in scarves. The simple, snowy design keeps the plate clean and modern while adding a festive touch to your holiday spread.
Detailed Instructions
Materials
- White ceramic plate (dinner or salad size)
- Porcelain paints (black, white, orange/red, blue/navy)
- Fine point detail brush (00 or 0)
- Small round brush (size 2)
- Graphite transfer paper (optional)
- Pencil and eraser
- Rubbing alcohol
- Cotton pads or paper towels
- Oven (for baking the paint)
- Palette or small dish for mixing paint
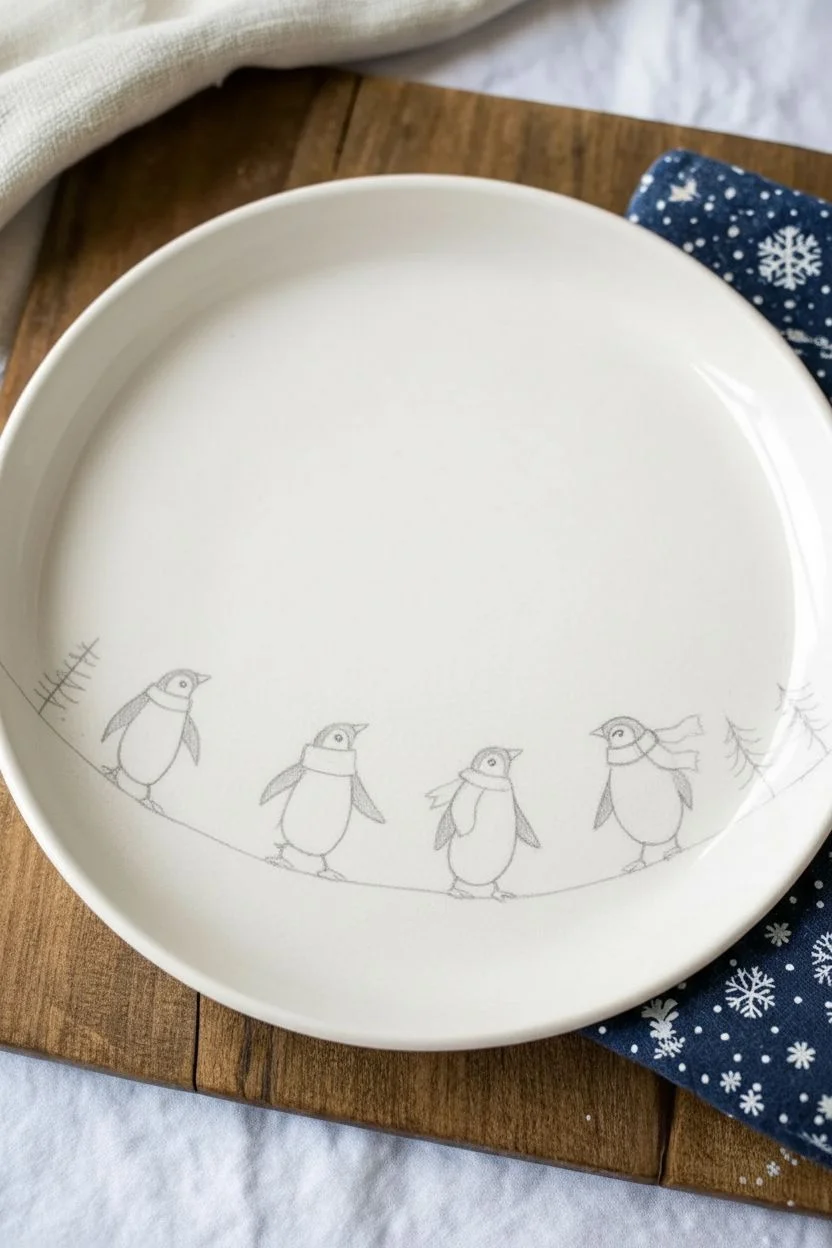
Step 1: Preparation and Sketching
-
Clean the Surface:
Before you begin, wipe the entire surface of the plate with rubbing alcohol and a cotton pad. This removes any oils or fingerprints that could prevent the paint from adhering properly. -
Establish the Ground Line:
Lightly draw a curved line across the lower third of the plate with a pencil to serve as the snowy hill. Make it slightly uneven to look natural, dipping lower in the middle. -
Position the Penguins:
Using your pencil, sketch the outline of four oval shapes along the curve. Space them out evenly so they aren’t touching, imagining they are waddling in a line. -
Add Details:
Draw the flippers, small triangular beaks, and feet on each oval. Sketch a scarf around the neck of each penguin, varying the way the scarf ends drape—some flying back, some hanging down. -
Sketch the Trees:
On the far left and right edges, draw simple stick-figure pine trees. Keep them loose and sketchy rather than filling them in completely.
Pro Tip: Practice First
Ceramic paint can be slippery. Practice your penguin shapes on a piece of paper or a glazed tile first to get a feel for how the paint flows.
Step 2: Painting the Penguins
-
Outline in Black:
Using your finest detail brush and black porcelain paint, carefully trace over your pencil lines for the penguin bodies. Keep the lines thin and delicate. -
Fill the Flippers:
Fill in the flipper shapes solidly with the black paint. You can leave the main body white (using the plate’s color) or paint it with white porcelain paint if your background isn’t pure white. -
Paint the Heads:
Paint the top section of the head black, carefully leaving a small white space for the eye area. Add a tiny dot for the pupil inside the white space. -
Add Beaks and Feet:
Switch to orange paint. Carefully dab in the beaks and the feet. A single small stroke usually works best for the feet to keep them looking simple and illustrative. -
Color the Scarves:
Paint the scarves with red or orange paint. You can paint them solid first, or paint stripes directly onto the white ceramic. -
Detail the Scarves:
Once the base scarf color is dry to the touch, use your black outliner to add stripes or outline the shape of the scarf to define it against the penguin’s white tummy.
Troubleshooting: Blobs
If you apply too much paint and it blobs, don’t wipe it instantly. Use the corner of a paper towel to wick away the excess, or let it dry slightly and scrape it off with a craft knife.
Step 3: Creating the Winter Scene
-
Outline the Snow:
Mix a tiny amount of blue into your white paint or use a very watered-down blue. Trace the original curved ground line you sketched earlier. -
Add Snowy Texture:
Using the tip of your brush, stipple small blue dots along and just below the ground line. This creates a speckled, snowy texture rather than a solid hard line. -
Paint the Trees:
Using a dark blue or diluted black, paint the trees on the edges. Use quick, short strokes that branch outward from a center line to mimic pine needles. -
Create Falling Snow:
Dip the non-brush end (the handle) of your paintbrush into blue or grey paint. Dot it randomly across the upper empty space of the plate to create falling snowflakes. -
Vary Dot Sizes:
I prefer to use a smaller tool, like a toothpick, to add tinier snow dots in between the larger ones for depth. -
Clean Up:
Check for any smudges or stray pencil marks. Use a damp cotton swab to clean up any painting mistakes while the paint is still wet, or an eraser for pencil lines once the paint is dry.
Step 4: Curing
-
Air Dry:
Allow the plate to sit undisturbed for at least 24 hours. This ensures the moisture evaporates from the paint before baking. -
Bake to Set:
Place the plate in a cool oven, then set the temperature to 300°F (150°C). Bake for 30 minutes, then turn the oven off and let the plate cool down completely inside the oven to prevent cracking.
Now your adorable penguin plate is ready to serve holiday treats or spark conversation at dinner
Mistletoe Corner Motif With Name and Year
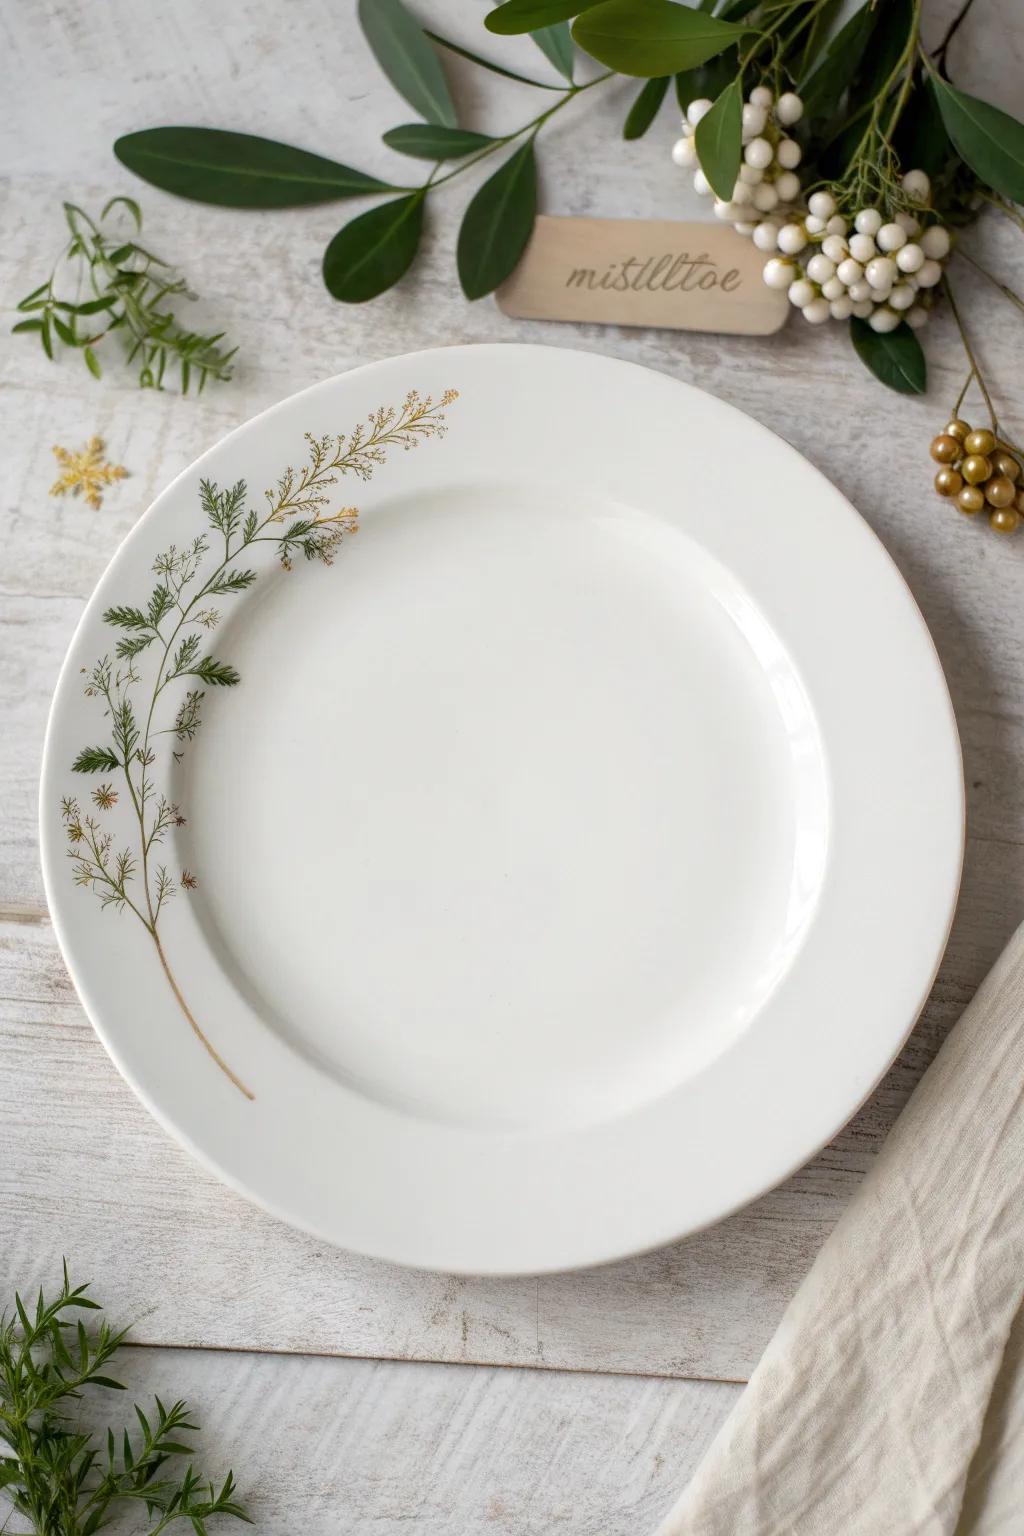
Bring a touch of minimalist elegance to your holiday table with this wispy, botanical-inspired design painted directly onto ceramic. The result is a refined piece that feels natural and airy, perfect for letting your culinary creations shine.
Step-by-Step Guide
Materials
- White ceramic plate (glazed dinner plate)
- Pebeo Porcelaine 150 paint (or similar oven-bake ceramic paint) in: Olive Green, Sepia (Brown), and Gold
- Fine liner brush (size 0 or 00)
- Rubbing alcohol
- Paper towels
- Soft graphite pencil
- Palette or small dish for mixing
- Cotton swabs
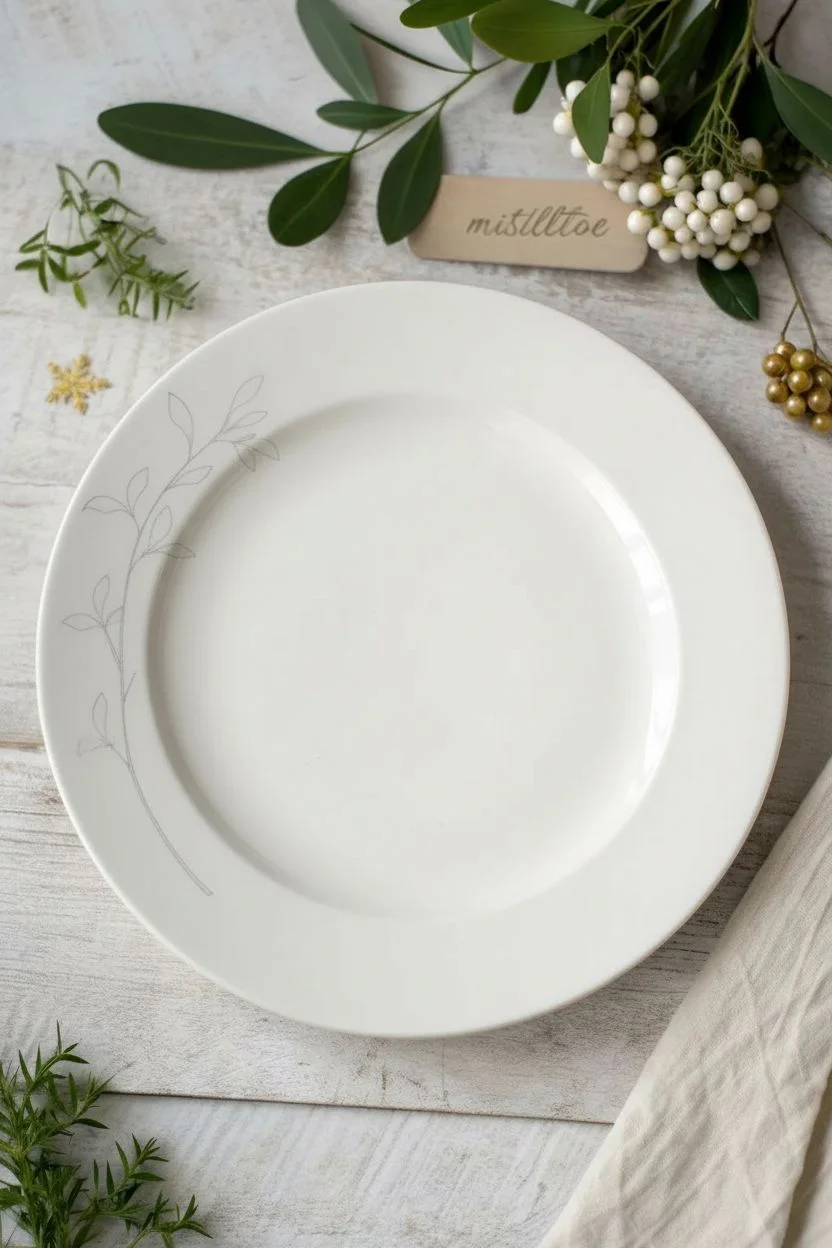
Step 1: Preparation & Planning
-
Clean surface:
Before you begin painting, it is crucial to ensure the ceramic is completely free of oils and dust. Wipe the entire rim of the plate thoroughly with rubbing alcohol and let it air dry for a few moments. -
Outline the stem:
Using a soft graphite pencil, lightly sketch the main curve of the stem. Start from the bottom left quadrant of the plate and sweep upwards in a gentle curve toward the top left, ending near the 11 o’clock position.
Steady Hand Trick
Rest your pinky finger on the dry part of the plate while painting. This anchors your hand, giving you much more control for creating those razor-thin, wispy fern lines without shaking.
Step 2: Painting the Structure
-
Paint the main stem:
Pour a small drop of Sepia (brown) porcelain paint onto your palette. Dilute it slightly with a tiny drop of water or thinner if the paint feels too thick. -
Fine line work:
Load your fine liner brush with the thinned brown paint. Following your pencil guide, paint a very thin, delicate line for the main stem. Keep your hand light; the stem should taper off as it reaches the top. -
Add secondary branches:
While the brown is on your brush, add small, alternating offshoot branches coming from the main stem. Keep these short and angled upwards to mimic natural growth.
Step 3: Adding the Foliage
-
Mix your greens:
Clean your brush. On your palette, place a drop of Olive Green. I like to mix a tiny speck of the Sepia into the green to mute it slightly, creating a more realistic, earthy tone rather than a bright artificial green. -
Create wispy leaves:
Start near the base of the stem. Using the very tip of your liner brush, flick quick, short strokes outward from the brown branches. These strokes should be feathery and distinct, resembling fern fronds or dill leaves. -
Vary the density:
Make the foliage denser near the bottom and middle of the design, and sparser as you move toward the top tip. This creates visual balance and keeps the design from feeling heavy. -
Layering color:
Once the first layer of green is semi-dry (wait about 5-10 minutes), mix a slightly darker shade of green and add a few accent strokes near the stem connections to create depth.
Personalize It
Once the botanical design is dry, use your finest brush to paint the year or a guest’s name in small, flowing gold cursive script just below the bottom curve of the stem.
Step 4: Golden Accents & Finishing
-
Introduce gold:
Clean your brush thoroughly. Squeeze a small amount of Gold ceramic paint onto the palette. This will add the festive shimmer seen at the top of the sprig. -
Paint the tips:
Focusing on the top third of the design, paint tiny, delicate clusters of dots or small fern-like strokes at the very ends of the branches. The gold represents the flowering or seeded part of the plant. -
Blend downward:
Allow a few tiny gold strokes to mingle with the green sections in the middle of the stem, integrating the two colors smoothly. -
Cleanup:
Check your wok for any mistakes. If a line is too thick, use a damp cotton swab or a toothpick to gently scratch or wipe away the excess wet paint to refine the shape. -
Dry time:
Allow the plate to dry for at least 24 hours. The paint needs to fully cure on the surface before baking. -
Bake to set:
Place the plate in a cool oven. Set the temperature to 300°F (150°C) or the specific temperature recommended by your paint manufacturer. turn the oven on and bake for 35 minutes once it reaches temperature. -
Cooling down:
Turn the oven off and leave the plate inside to cool down gradually with the oven. Removing it too quickly can cause the ceramic to crack due to thermal shock.
Your custom botanical plate is now ready to add a sophisticated, handmade charm to your winter festivities
Nordic-Inspired Christmas Folk Pattern Rim

Embrace the minimalism of Scandinavian winters with this striking red and white plate featuring a classic folk art border. The design relies on a steady repetition of geometric shapes, creating a rhythm that feels both traditional and modern.
Step-by-Step Tutorial
Materials
- White ceramic dinner plate (oven-safe if baking)
- Red porcelain or glass paint (e.g., Pebeo Porcelaine 150)
- Fine detail brush (size 0 or 00)
- Very fine detailing tool or toothpick
- Rubbing alcohol and cotton pads
- Pencil (optional for marking)
- Paper towel
- Oven (for setting the paint, if required)
Step 1: Preparation & Mapping
-
Clean surface:
Before you begin painting, it is crucial to remove any grease or fingerprints from the plate’s rim. Wipe the entire surface thoroughly with rubbing alcohol and a cotton pad, then let it air dry completely. -
Establish the zones:
Visually divide the rim into two main bands. The outer edge will hold a delicate dotted border, while the wider inner section of the rim will feature the main triangle display. -
Mark spacing (optional):
If you are worried about spacing, use a pencil to lightly mark faint tick marks around the inner circle of the rim where your main triangles will need to be centered. This helps ensure you don’t run out of room at the end.
Scratch Technique Tip
Work in batches of 3-4 triangles at a time. If the paint dries too much, the scratching technique won’t work cleanly.
Step 2: Painting the Main Triangles
-
Load the brush:
Dip your fine detail brush into the red porcelain paint. You want a creamy consistency—not too thick that it globs, but opaque enough to cover in one pass. -
Paint triangle outlines:
Start by painting the outlines of the large, downward-pointing triangles along the inner band of the rim. The point should aim toward the center of the plate, and the base should face the outer edge. -
Fill the shapes:
Once the outline is crisp, carefully fill in each triangle with red paint. Smooth out any brushstrokes immediately so the finish looks flat and even. -
Create the negative space:
Here comes the tricky part—the details inside the triangles. While the red paint is still wet, use a clean toothpick or a dry detailing tool to gently scratch away the paint to reveal the white ceramic underneath. -
Detail the motifs:
Inside each red triangle, scratch out a small pine tree or arrow shape. Aim for a central vertical line with tiny branches coming off it. -
Clean the tool:
Wipe your toothpick or tool on a paper towel after every single scratch to keep the lines clean and prevent dragging red paint back into the white areas.
Mix Up The Motifs
Alternate the designs inside the triangles! Try scratching out snowflakes, hearts, or simple stripes for variety.
Step 3: Adding the Outer Border
-
Paint the dividing line:
Paint a very thin, continuous red line connecting the bases of your triangles. This separates the main motif from the outer edge pattern. -
Start the outer band:
Moving to the very edge of the plate, paint a thin red circle around the entire circumference. -
Add micro-triangles:
Between the thin dividing line and the outer edge circle, paint a series of extremely small, solid red triangles pointing outward. -
Stipple the texture:
Using the very tip of your brush or a dotting tool, fill the remaining empty space in the outer band with tiny red dots. Keep them random but dense to create a textured, ‘sandy’ look. -
Review and refine:
Check your work for any accidental smudges. Dampen a cotton swab with alcohol to clean up any stray marks or wobbly edges while the paint is still workable.
Step 4: Finishing
-
Dry time:
Allow the plate to dry for at least 24 hours. The paint needs to fully cure on the surface before being handled or baked. -
Heat setting:
To make the design permanent and dishwasher safe (depending on your paint brand), place the cold plate into a cold oven. Set the temperature to 300°F (150°C) and bake for 35 minutes. Let it cool down inside the oven.
Now you have a festive, custom piece of tableware ready for your holiday hosting
Plaid Holiday Rim With Tiny Pine Sprigs

Capture the warmth of a rustic Christmas with this hand-painted ceramic plate design featuring a classic tartan-inspired rim. The alternating red and green blocks create a timeless holiday look that feels both festive and comfortably traditional.
Detailed Instructions
Materials
- White or cream ceramic plate (bisque or glazed)
- Ceramic paints (red, deep forest green, and darker maroon/brown)
- Flat shader brush (approx. 1/2 inch wide)
- Fine liner brush
- Pencil and flexible curve ruler (optional)
- Sponge for cleaning
- Clear glaze (if using bisque ware)
- Kiln or oven (depending on paint type)
Step 1: Preparing the Pattern
-
Clean surface:
Begin by thoroughly wiping down your plate with a damp sponge to remove any dust or oils that might prevent the ceramic paint from adhering properly. -
Mark the rings:
Using a pencil, lightly trace two concentric circles on the plate’s rim. One should be near the outer edge and one near the inner well where the food sits. These will serve as boundaries for your plaid pattern. -
Sketch the segments:
Lightly mark vertical dividers within your ring boundaries to create rectangular segments. Aim for roughly uniform spacing, though a little handmade irregularity adds charm.
Fixing Wobbly Lines
If your rim lines are shaky, wait for the paint to dry completely. Then, use a toothpick or a wooden skewer to gently scrape away the excess paint and straighten the edge.
Step 2: Painting the Green Blocks
-
Mix your green:
Prepare a deep forest green color on your palette. If the green is too bright, tone it down with a tiny touch of brown or black for a more rustic feel. -
Paint the base blocks:
Using the flat shader brush, fill in alternating rectangular segments with the green paint. Leave a gap between each green block for the red sections. -
Feather the edges:
As you paint these blocks, try not to make the edges too sharp. A slightly softer, brushed edge mimics the woven texture of fabric. -
Second coat:
Allow the first layer of green to dry to the touch, then apply a second coat if needed for opacity. I find that ceramic pigments often need two passes for richness.
Step 3: Adding the Red Accents
-
Mix the red:
Prepare a deep, warm red. Similar to the green, you want a shade that looks vintage, not neon. -
Paint the connecting blocks:
Fill in the empty rectangular spaces between your green blocks with the red paint. -
Create the overlap:
Where the red block meets the green block, gently drag the brush so the colors slightly kiss or overlap, creating that darker ‘mixed’ plaid look at the seams. -
Add texture lines:
Using a very fine liner brush and a slightly darker maroon shade, paint thin horizontal lines through the red blocks to imply the weave of the fabric.
Add Rustic Depth
Mix a translucent grey wash and paint very thin, faint lines crisscrossing over the entire pattern after the base colors dry. It mimics the thread texture of real wool fabric.
Step 4: Refining and Finishing
-
Outline the rim:
Dip your fine liner brush into a reddish-brown color. Carefully paint a thin, continuous line along the inner circle of the pattern to frame the design. -
Outer framing:
Repeat the outlining process on the very outer edge of the plate rim to encase the plaid pattern. -
Clean up:
Use a damp cotton swab or a clean, stiff brush to tidy up any paint that strayed outside your pencil guidelines or into the center of the plate. -
Dry completely:
Let the paint dry fully according to the manufacturer’s instructions, usually 24 hours. -
Glaze and fire:
If using traditional underglazes, apply a clear glaze over the entire plate and fire it in a kiln. For oven-bake paints, bake the plate at the specified temperature to set the design.
Your table is now ready for a warm holiday meal with this charming custom piece
Frosted Pine Silhouette Plate
Transform a plain ceramic dish into a serene winter landscape with this elegant pine tree design. Using a mix of bold strokes and delicate stippling, you’ll create depth and a frosty atmosphere perfect for holiday decor.
Step-by-Step Tutorial
Materials
- Plain white or cream ceramic plate
- Ceramic paints (deep emerald green, forest green, white, teal)
- Glazing medium or thinner (for transparency)
- Round brushes (sizes #2 and #4)
- Detail liner brush (size #0 or #00)
- Old stiff bristle brush or stippling sponge
- Rubbing alcohol and paper towels
- Oven (for curing, if using bakeable paints)
Step 1: Preparation & Base Composition
-
Clean surface:
Begin by wiping the entire plate surface with rubbing alcohol on a paper towel. This removes any invisible oils or fingerprints that might repel the paint. -
Plan the layout:
Visualize where your trees will go. The design works best if you vary the heights, with some trees wrapping slightly up the rim of the plate. -
Mix the main color:
On your palette, mix deep emerald green with a touch of teal to get that cool, wintery pine color. I like to keep a second puddle of this mix diluted with a little glazing medium for lighter areas.
Pro Tip: Dry Brushing
For the faint background trees, wipe most of the paint off your brush onto a paper towel first. The ‘dry brush’ leaves a scratchy, textured mark that perfectly mimics frost.
Step 2: Painting the Foreground Trees
-
Paint the first trunk:
Using your #2 round brush, paint a very thin, faint vertical line to establish the center of your first main tree. Don’t worry if it’s not perfectly straight; trees are organic. -
Start the branches:
Starting from the top of the line, use short, downward-curving strokes to create the needle clusters. Press the brush down and flick outward to taper the ends. -
Build the shape:
Work your way down the trunk, making the branches progressively wider. Leave small gaps of white space between layers so the tree doesn’t become a solid blob. -
Add color variation:
While the paint is still wet, drop tiny hints of darker green into the center of the tree near the trunk to create instant volume and shadow. -
Repeat for focal trees:
Paint 3-4 more of these bold, detailed trees around the plate. Vary their sizes and spacing to keep the composition interesting. -
Ground the trees:
At the base of each tree, use a damp brush to gently smudge the paint horizontally, creating a soft, misty look where the tree meets the ‘snow’.
Step 3: Adding the Frosted Background
-
Mix the ‘frost’ color:
Take your green mix and add a significant amount of white, or dilute it heavily with medium until it becomes a faint, watery wash. -
Create ghost trees:
Using a liner brush or a very dry stiff brush, sketch the faint outlines of trees in the background space behind your bold trees. -
Apply texture:
Instead of painting solid strokes, use a stippling motion (rapid dotting) with a worn-out dry brush to create the texture of snow-covered needles on these background trees. -
Check density:
These trees should look sparse and delicate, almost like pencil sketches, to give the illusion that they are further away in the fog.
Level Up: Splatter Snow
Load an old toothbrush with slightly watered-down white paint. Flick the bristles with your thumb to mist tiny white speckles over the trees for a falling snow effect.
Step 4: Finishing Touches
-
Paint the trunks:
Mix a tiny amount of brown or diluted black. Use your finest liner brush to add a thin, barely-there trunk at the very bottom of the boldest trees. -
Add snow drifts:
Mix a very watery teal-grey wash. With a wide brush, sweep a few translucent, organic curves along the bottom of the plate to suggest rolling snowbanks. -
Refine details:
Look for any gaps that feel too empty. You can add tiny, singular vertical strokes to suggest distant saplings peeking through the snow. -
Clean the edges:
If any paint smudged onto the rim where you didn’t intend, wipe it away cleanly with a damp cotton swab. -
Dry thoroughly:
Let the plate sit undisturbed for at least 24 hours to ensure the paint is fully dry before curing. -
Cure the paint:
Follow the specific instructions on your ceramic paint bottle. Usually, this involves placing the plate in a cold oven, heating it to 300-350°F, and letting it cool inside the oven.
Now you have a stunning piece of winter art that brings the quiet beauty of the forest to your table
Cozy Christmas Village Night Scene Plate
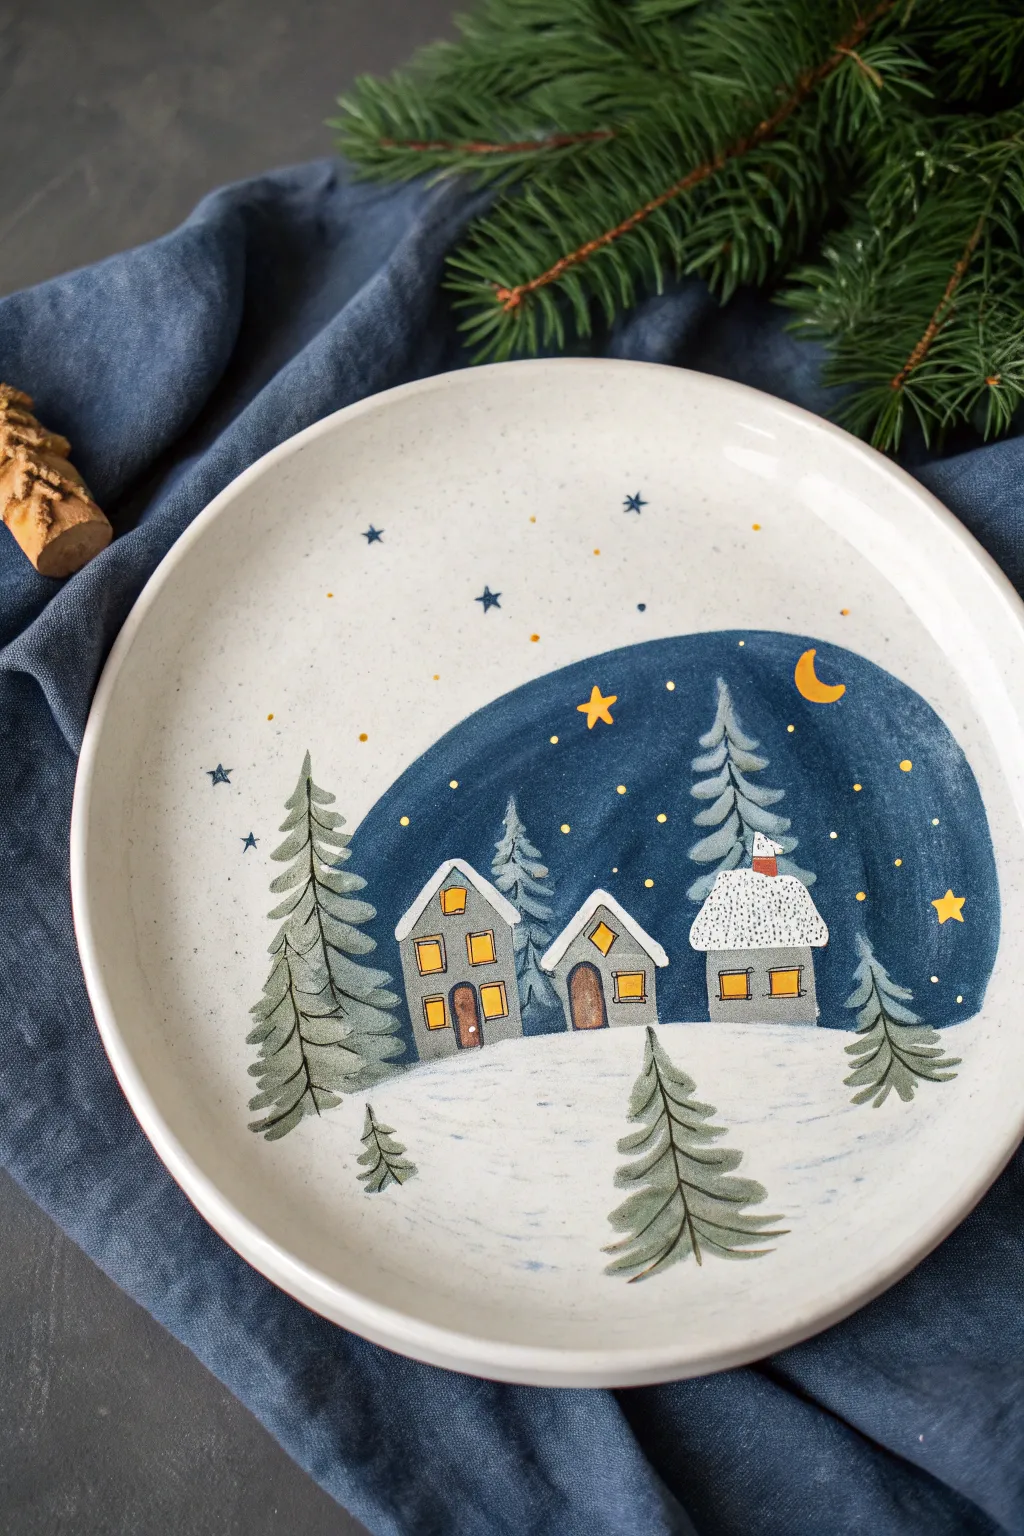
Capture the magic of a silent winter night with this charming painted plate design featuring snow-dusted cottages and towering evergreens under a starry sky. Using ceramic-safe paints, you’ll create a whimsical village scene that is perfect for holiday display or serving festive treats.
Step-by-Step
Materials
- White ceramic plate (dinner or salad size)
- Ceramic or porcelain paints (Navy Blue, Grey, White, Yellow, Brown/Bronze)
- Rubbing alcohol and cotton pads
- Pencil (for sketching)
- Fine liner paintbrush (size 0 or 00)
- Medium round paintbrush (size 2 or 4)
- Flat shader brush
- Oven (for curing, if required by paint type)
- Paper towels
- Palette or small dish for mixing
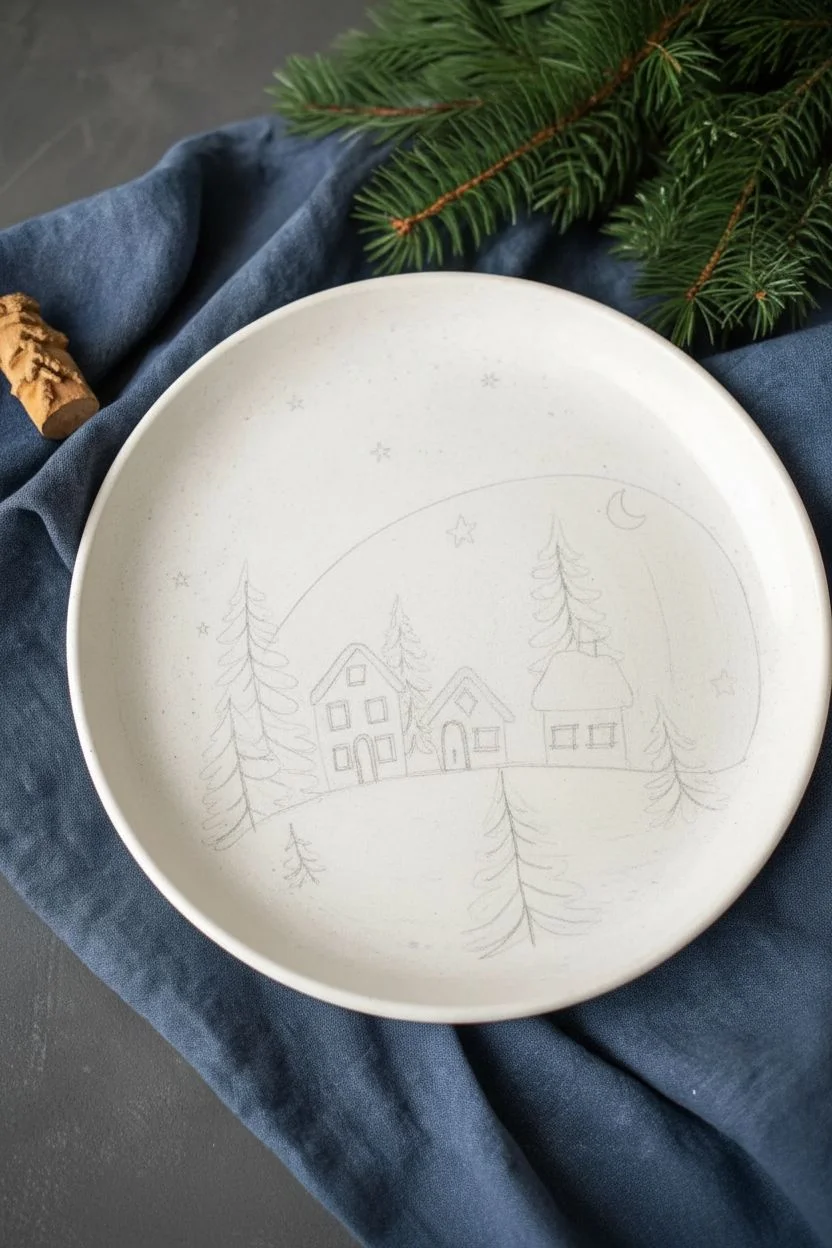
Step 1: Preparation and Sketching
-
Clean the Surface:
Before you begin, wipe the entire plate surface with rubbing alcohol on a cotton pad. This removes any oils or fingerprints that might prevent the paint from adhering properly. -
Establish the Horizon:
Lightly sketch a curved line across the lower third of the plate with a pencil to mark the snowy ground. Don’t worry about pencil marks; they typically burn off in the oven or can be wiped away later. -
Outline the Night Sky:
Sketch a large, irregular semi-circle or dome shape emerging from behind where your houses will be. This will be the dark blue night sky backdrop. -
Sketch the Village:
Draw three small house shapes nestled into the snowy hill. Vary their sizes and roof angles for a quaint, organic look. Add a chimney to the house on the far right. -
Place the Trees:
Sketch the skeletons of your evergreen trees. Place a tall one behind the houses on the right, a large one on the far left, and smaller ones scattered in the foreground and background.
Paint Slipping?
b’troubleshooting’: If paint beads up on the ceramic surface, the plate is likely too slick or oily. Clean it again thoroughly with alcohol and let it dry completely before reapplying paint.
Step 2: Painting the Background and Trees
-
Fill the Night Sky:
Using your medium round brush and navy blue paint, fill in the large dome shape behind the village. Apply the paint slightly unevenly to create texture and depth in the sky. -
Paint the Pine Trees:
Mix a small amount of grey with a touch of green (or use a muted grey-green). Using the fine liner brush, start from the top of your tree sketches and use short, downward strokes to create the pine needles. -
Layer the Branches:
As you move down the tree, make the branches wider. Leave some gaps between the layers of branches so the white background or blue sky peeks through. -
Add Small Saplings:
Don’t forget the tiny trees in the foreground. Use the very tip of your fine brush to create these delicate additions near the bottom edge of the plate.
Step 3: Constructing the Cottages
-
Paint the Facades:
Use a flat shader brush to fill in the house bodies with a soft grey paint. You can dilute the paint slightly for a watercolor effect, or keep it opaque for a solid look. -
Create Snowy Roofs:
Using thick white paint, dab onto the roof areas. I like to let this sit a bit thickly to mimic the texture of freshly fallen snow. -
Outline the Architecture:
Once the grey paint is dry, use your finest brush and a darker grey or black to outline the edges of the houses and the roofs for better definition. -
Add Doors and Details:
Paint small arched doors using brown or bronze paint. Add a tiny chimney pot on the rightmost house with rust-colored or red paint.
Add Golden Magic
b’level_up’: For extra sparkle, use a gold relief liner or metallic gold paint for the stars and window outlines. It will catch the light beautifully on a holiday table.
Step 4: Illuminating the Scene
-
Light the Windows:
Using a bright yellow paint, fill in small squares or rectangles on the houses to create glowing windows. This brings the village to life. -
Paint the Moon and Stars:
On the navy blue background, paint a small crescent moon and a few five-pointed stars using the same yellow. Add tiny dots scattered around for distant stars. -
Add Sky Details:
Include a few tiny navy blue stars or dots in the white space above the painted night sky area to extend the celestial theme upwards. -
Detail the Snow:
dilute a tiny drop of blue paint with water. Use this very sheer wash to add subtle shadows under the trees and houses, defining the slope of the snow. -
Final White Highlights:
Add tiny dots of white paint onto the navy sky and the trees to represent falling snow. -
Cure the Plate:
Follow the instructions on your specific paint bottle. Most require air drying for 24 hours, followed by baking in a home oven to make the design permanent and dishwasher safe.
Enjoy styling your table with this cozy winter scene that captures the peaceful spirit of the season
Gold Star Christmas Eve Sky Plate
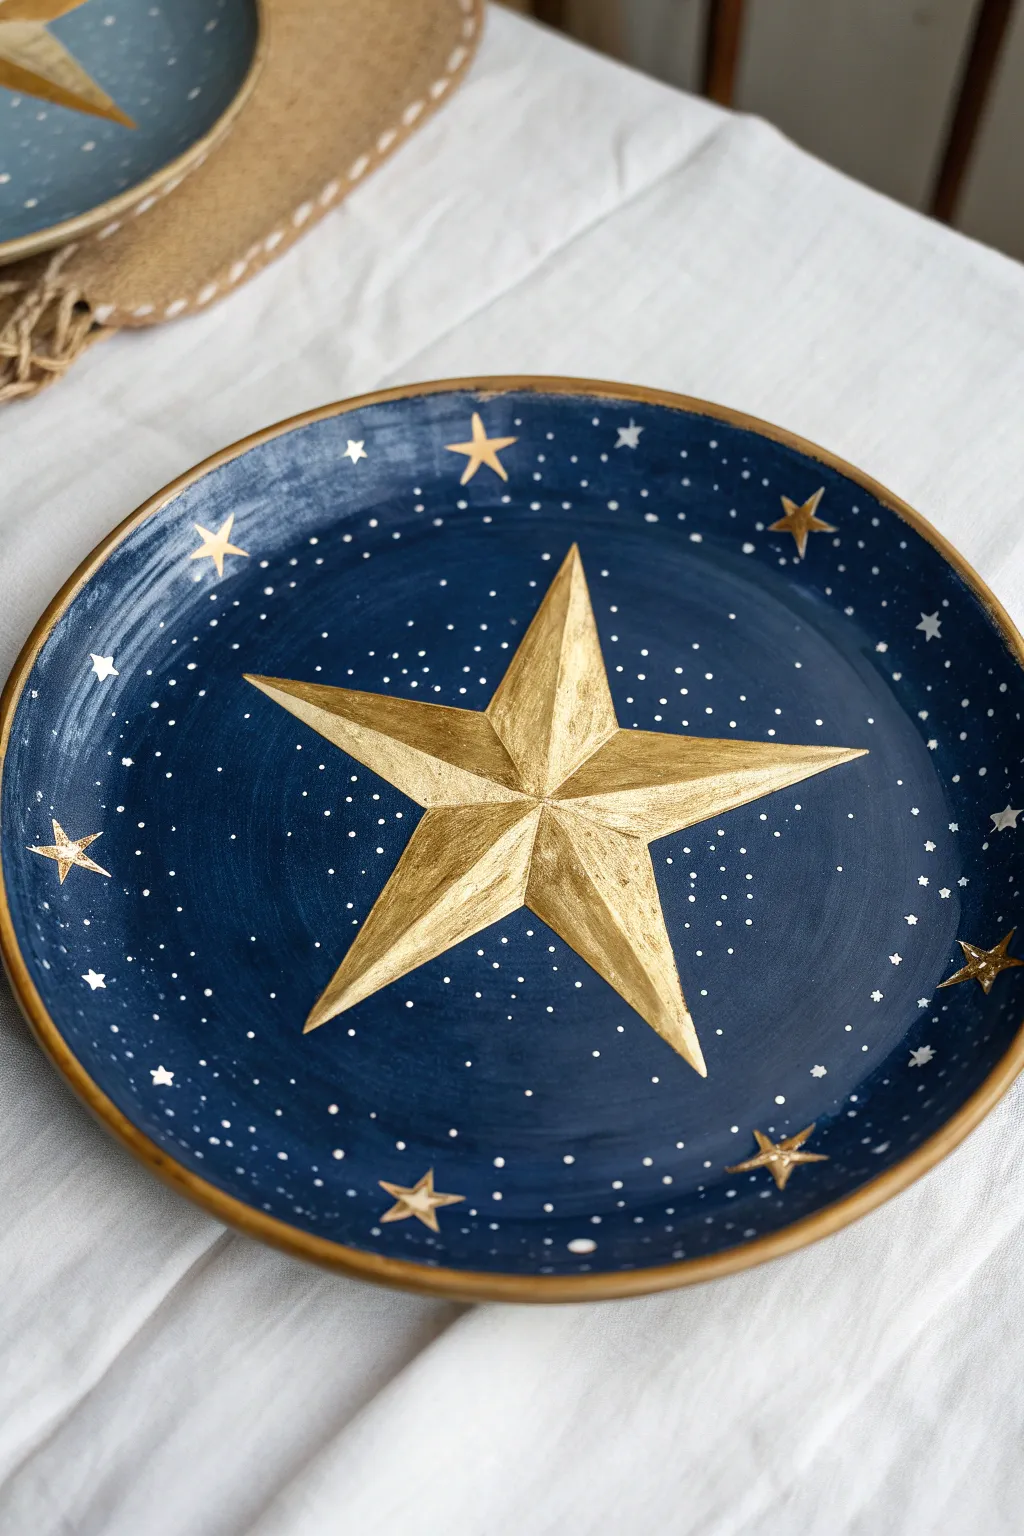
Capture the magic of a midnight sky on Christmas Eve with this stunning hand-painted plate project. Featuring a deep indigo background and a brilliant, dimensional gold star, it makes for an elegant addition to your holiday table setting or a thoughtful handmade gift.
Step-by-Step Tutorial
Materials
- White or light-colored ceramic plate (glazed or bisque)
- Deep midnight blue or indigo ceramic paint
- Metallic gold ceramic paint (high coverage)
- Metallic silver or pearl white ceramic paint
- Fine-grit sandpaper (optional)
- Rubbing alcohol and paper towel
- Wide flat paintbrush
- Fine detail paintbrush (round size 0 or 1)
- Pencil or chalk for sketching
- Ruler
- Toothbrush or splatter brush
- Ceramic sealant or glazing medium (if required by paint type)
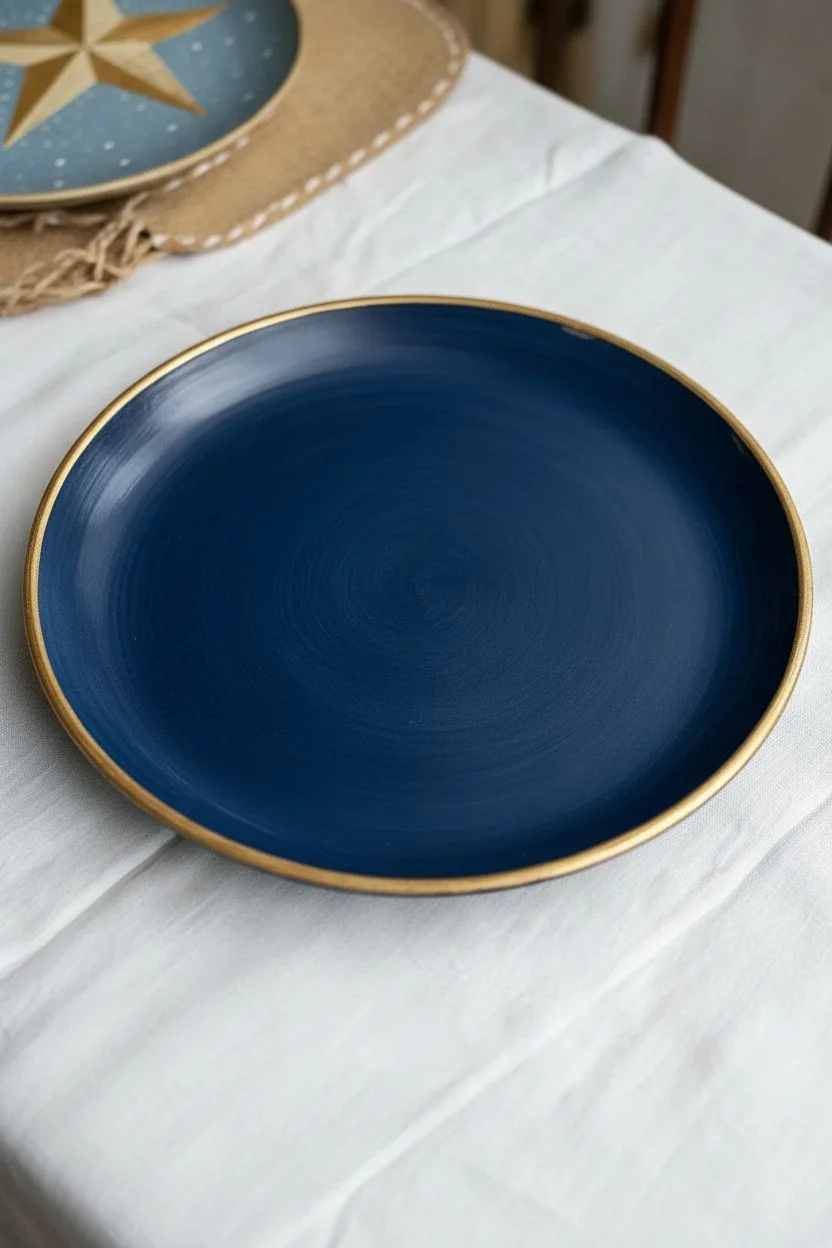
Step 1: Preparation & Base Coat
-
Clean surface:
Begin by thoroughly cleaning your ceramic plate with rubbing alcohol and a paper towel. This removes any oils or fingerprints that might prevent the paint from adhering properly. -
Apply base color:
Dip your wide flat brush into the deep midnight blue paint. Apply smooth, even strokes across the entire face of the plate, including the rim. Follow the curve of the plate to minimize brush marks. -
Rim detailing:
While you are painting the blue base, careful not to carry the blue paint over the very outer edge of the rim if you want a clean look, or intentionally paint the rim gold later. For this specific look, paint the blue all the way to the edge. -
Dry and repeat:
Allow the first coat to dry completely according to the paint bottle instructions. If the coverage looks streaky or translucent, apply a second coat of blue to achieve that deep, opaque night-sky look. -
Gilded rim:
Once the blue base is bone dry, use a steady hand and a smaller brush to paint a thin band of metallic gold along the very outer raised edge of the plate rim. This frames the artwork beautifully.
Clean Lines Hack
To get perfectly straight lines for your main star, apply strips of painter’s tape or washi tape to mask off the triangles. Paint inside the masked area, let it dry slighty, and peel for crisp edges.
Step 2: The Central Star
-
Mark the center:
Find the approximate center of the plate. You can use a ruler to lightly mark a small dot with a pencil or a piece of chalk, which wipes off easily later. -
Draft the star:
Using a ruler and pencil, lightly sketch a large five-pointed star in the center. I find it helpful to draw a light circle first to ensure the points are evenly spaced. -
Draw internal lines:
To give the star its 3D faceted look, draw straight lines from the center point of the star out to each of the five outer tips. Then, draw lines from the center to the inner valleys between the points. -
Paint the facets:
Load your fine detail brush with gold paint. Fill in the triangular facets of the star. To enhance the dimensional effect, you can mix a tiny drop of white into the gold for the ‘lit’ facets and a blooming of brown for the ‘shadowed’ facets, or simply rely on the metallic sheen and brush stroke direction. -
Directional strokes:
When painting the gold triangles, brush from the center outward toward the points. Keeping your brushstrokes uniform in direction helps the light catch the metallic paint realistically. -
Refine edges:
Go over the outline of the star with the gold paint to ensure the edges are crisp and sharp against the dark blue background.
Make It 3D
For a true faceted look, mix two shades of gold. Use a bright champagne gold for the left side of each star point and a deeper antique gold for the right side to simulate light and shadow.
Step 3: Starry Surroundings
-
Add larger stars:
Using the same fine brush, paint 6 to 8 medium-sized stars scattered around the rim area. Make these simple five-point stars, varying their orientation slightly so they look natural. -
Paint tiny stars:
Switch to your smallest detail brush. Dip it in silver or pearl white paint and add tiny four-point stars or small dots in the empty spaces between the larger gold stars. -
Create the galaxy:
Dilute a small value of white or silver paint with a drop of water. Dip an old toothbrush into this mixture. -
Splatter effect:
Hold the toothbrush over the plate and run your thumb across the bristles to flick tiny specks of paint onto the blue background. This creates the ‘Milky Way’ dust effect. Focus mainly on the outer rim area. -
Final cure:
Let the plate dry for at least 24 hours. Depending on your paint type, you may need to bake the plate in a home oven to set the paint permanently—check your specific paint label for temperature and timing.
Once baked and cooled, your celestial masterpiece is ready to bring a touch of starlight to your holiday decor
Modern Minimal Wreath Line-Art Plate
Embrace simplicity this holiday season with this stunningly minimalist plate design, featuring a delicate double-wreath pattern in striking black ink. The contrast between the clean white ceramic and the fine line work creates a modern, sophisticated look that’s surprisingly easy to achieve.
How-To Guide
Materials
- White ceramic plate (rimmed or coupe style)
- Black porcelain marker or ceramic paint pen (fine tip)
- Black porcelain marker or ceramic paint pen (medium tip)
- Rubbing alcohol
- Cotton pads
- Pencil (optional)
- Q-tips (for cleanup)
- Domestic oven (for baking the design)
Step 1: Preparation & Planning
-
Clean the surface:
Before you begin your artistry, thoroughly wipe down the entire surface of the plate with rubbing alcohol and a cotton pad. This removes invisible oils and fingerprints that could prevent the paint from adhering properly. -
Dry completely:
Allow the alcohol to evaporate completely; the surface must be bone dry before you touch it with a marker. -
Draft the circles (optional):
If you are nervous about free-handing, lightly trace two concentric circles using a pencil or by tracing around a small bowl and a larger bowl. These will serve as guidelines for your inner and outer wreaths.
Step 2: Drawing the Inner Wreath
-
Start the inner vine:
Using the fine-tip black porcelain pen, draw a thin, continuous circular line in the center of the plate (about 3-4 inches wide). This doesn’t need to be perfectly round; a slightly organic shape adds charm. -
Add tiny leaves:
Along this inner line, draw very small, short dashes or tiny leaf shapes protruding outward. Keep these marks consistent in size and spacing to create a delicate, thorny vine texture. -
Draw the bow:
Choose a spot on the upper-right side of the inner circle to add the focal point. Draw a simple, looped bow with loose tails hanging down. You can thicken the lines of the loops slightly to make the bow stand out. -
Detail the ribbon:
Add a few quick lines inside the bow loops to suggest fabric folds and movement.
Smudge Rescue
Made a mistake? Don’t panic. While the ink is wet, a damp Q-tip works like an eraser. If it dries, you can gently scratch it off with a toothpick before baking to fix minor errors.
Step 3: Creating the Outer Foliage
-
Draw the outer stems:
Moving to the larger perimeter (about 2 inches from the rim), draw two long, curved lines that meet at the bottom and curve upwards, almost touching at the top but leaving a small gap. -
Add main leaves:
Using the medium-tip marker, start adding almond-shaped leaves along the outer stems. Angle them forward in the direction the vine is growing. -
Fill in solid leaves:
Randomly select a few leaves on each side to fill in completely with black ink. I find that alternating filled and open leaves gives the design a nice visual rhythm. -
Draw open leaves:
For the remaining leaves, simply outline the almond shape and draw a single center vein line down the middle of each. -
Add berries:
In the spaces between the leaves or near the stem joints, add small solid black dots to represent berries. Vary the placement so it doesn’t look too uniform.
Ink Flow Tip
Store your ceramic pens horizontally or tip-down before starting. If the ink feels dry, press the nib on a scrap piece of paper a few times to get the flow consistent before touching the plate.
Step 4: Finishing Touches & Baking
-
Rim details:
To frame the artwork, add a border pattern. Draw small black dots spaced about a half-inch apart around the raised rim of the plate. -
Inner dot border:
Just a centimeter inside the first row of dots, add a second, finer ring of dots. Stagger these slightly relative to the outer ring for a delicate, jewelry-like effect. -
Cleanup:
Inspect your work. If you made a smudge or a line you don’t like, dampen a Q-tip with a little alcohol and gently wipe it away. Let that spot dry before redrawing. -
Dry time:
Let the plate sit for at least 24 hours to allow the paint to chemically settle before baking. -
Bake to set:
Place the plate in a cool oven, then turn the heat to 300°F (150°C). Once it reaches temperature, bake for 30–35 minutes. Turn the oven off and let the plate cool completely inside to prevent cracking.
Now you have a chic, custom piece of tableware ready to impress guests or gift to a loved one


Have a question or want to share your own experience? I'd love to hear from you in the comments below!