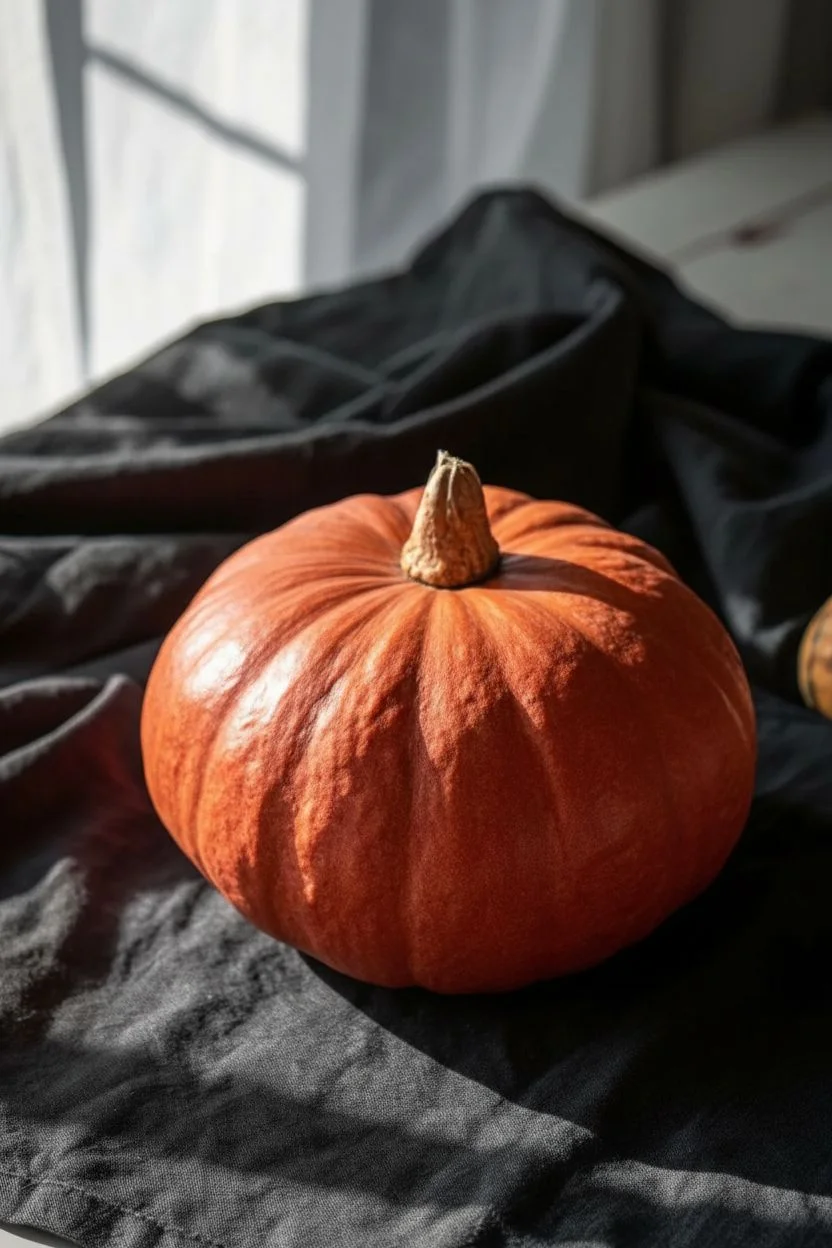
I love how red pumpkins instantly turn classic fall decor into something moodier, bolder, and way more you. Grab your paint and let’s play with red pumpkin ideas that feel equal parts art project and seasonal statement.
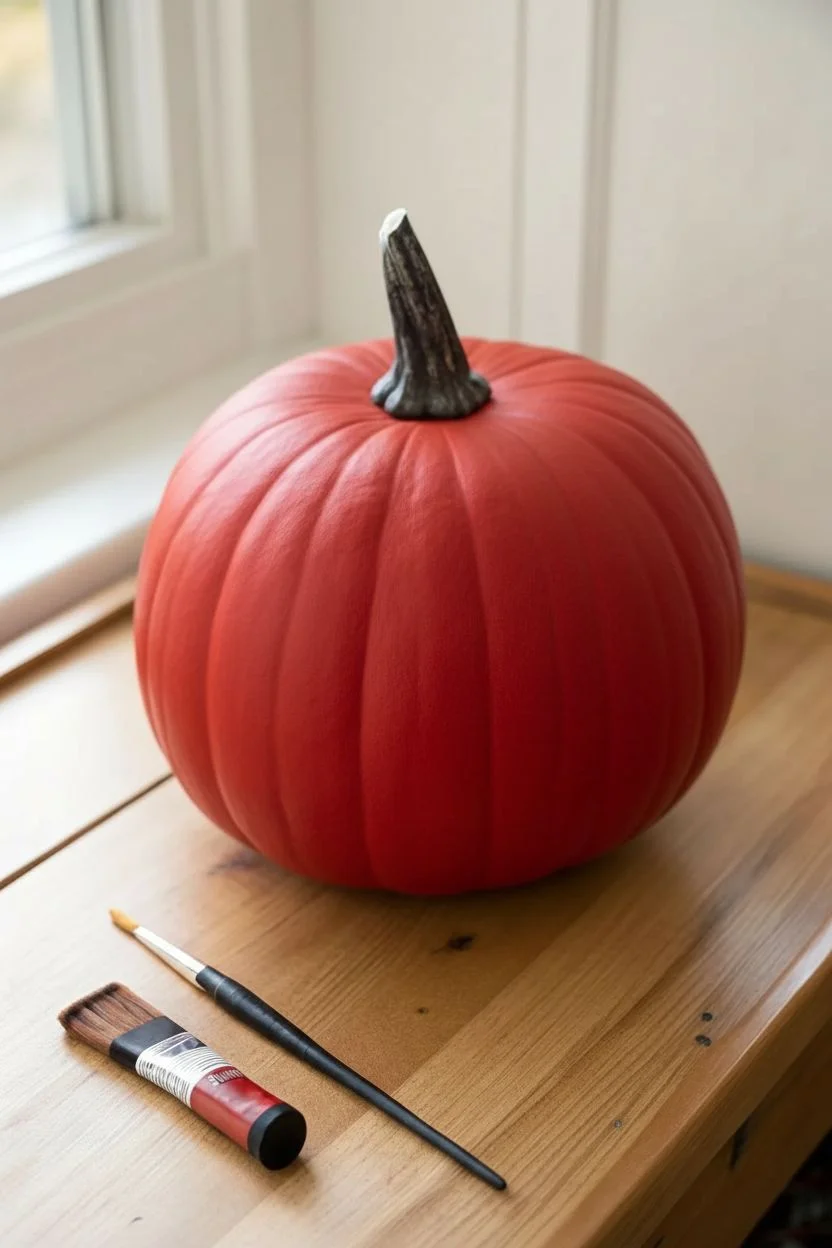
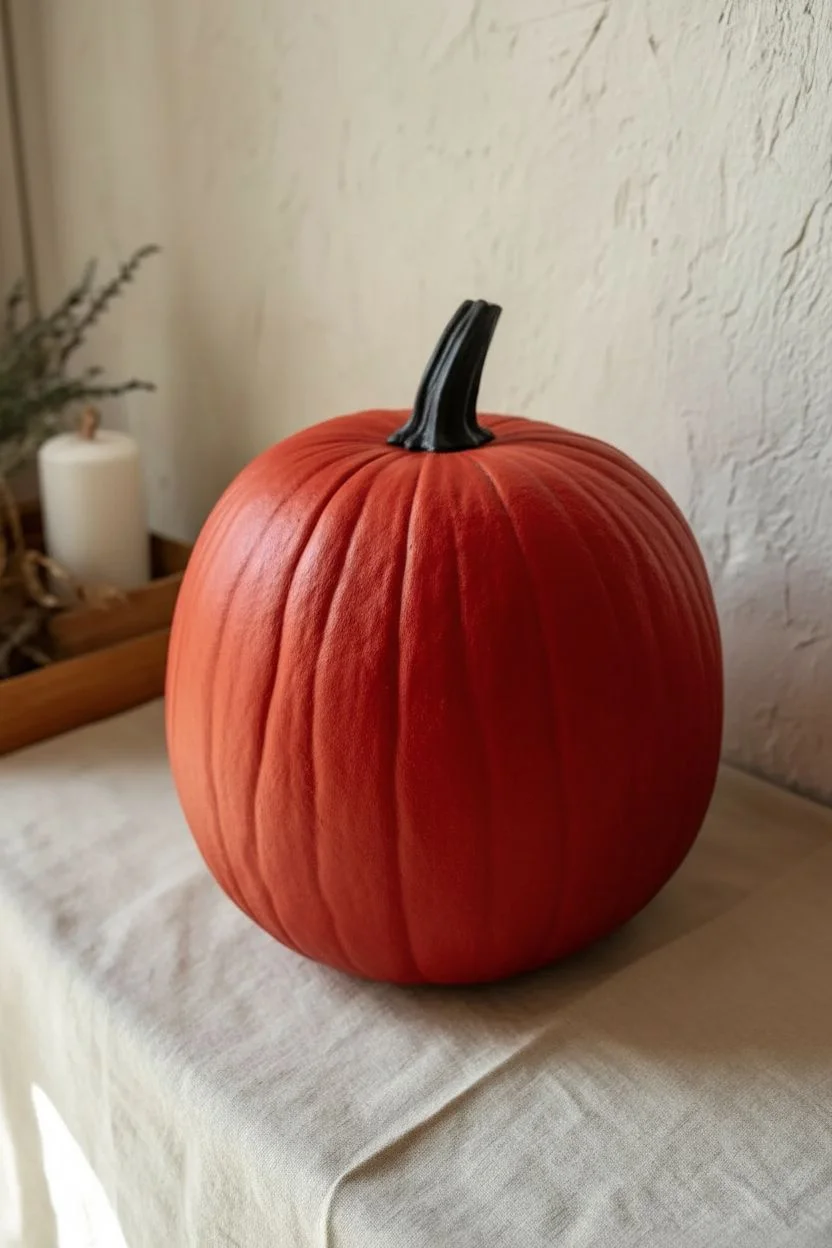
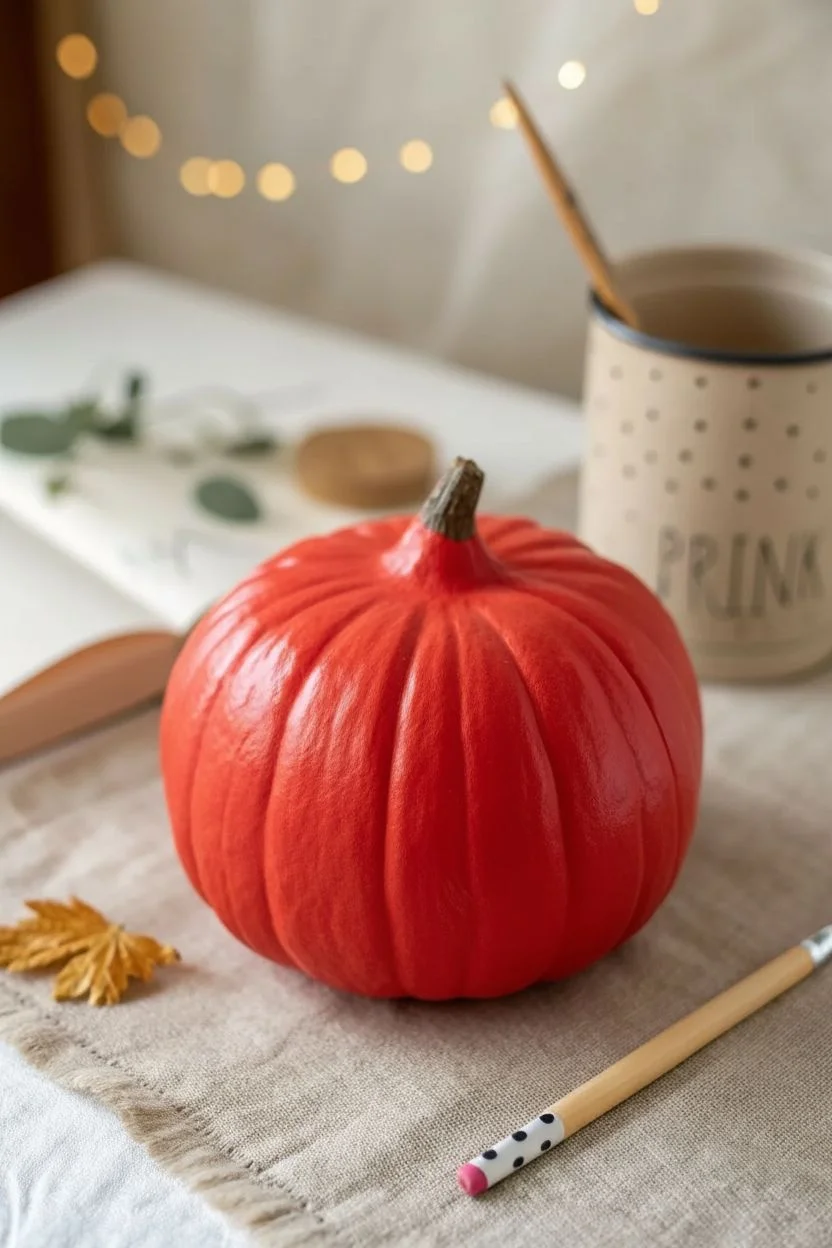
Classic Matte Red Painted Pumpkin
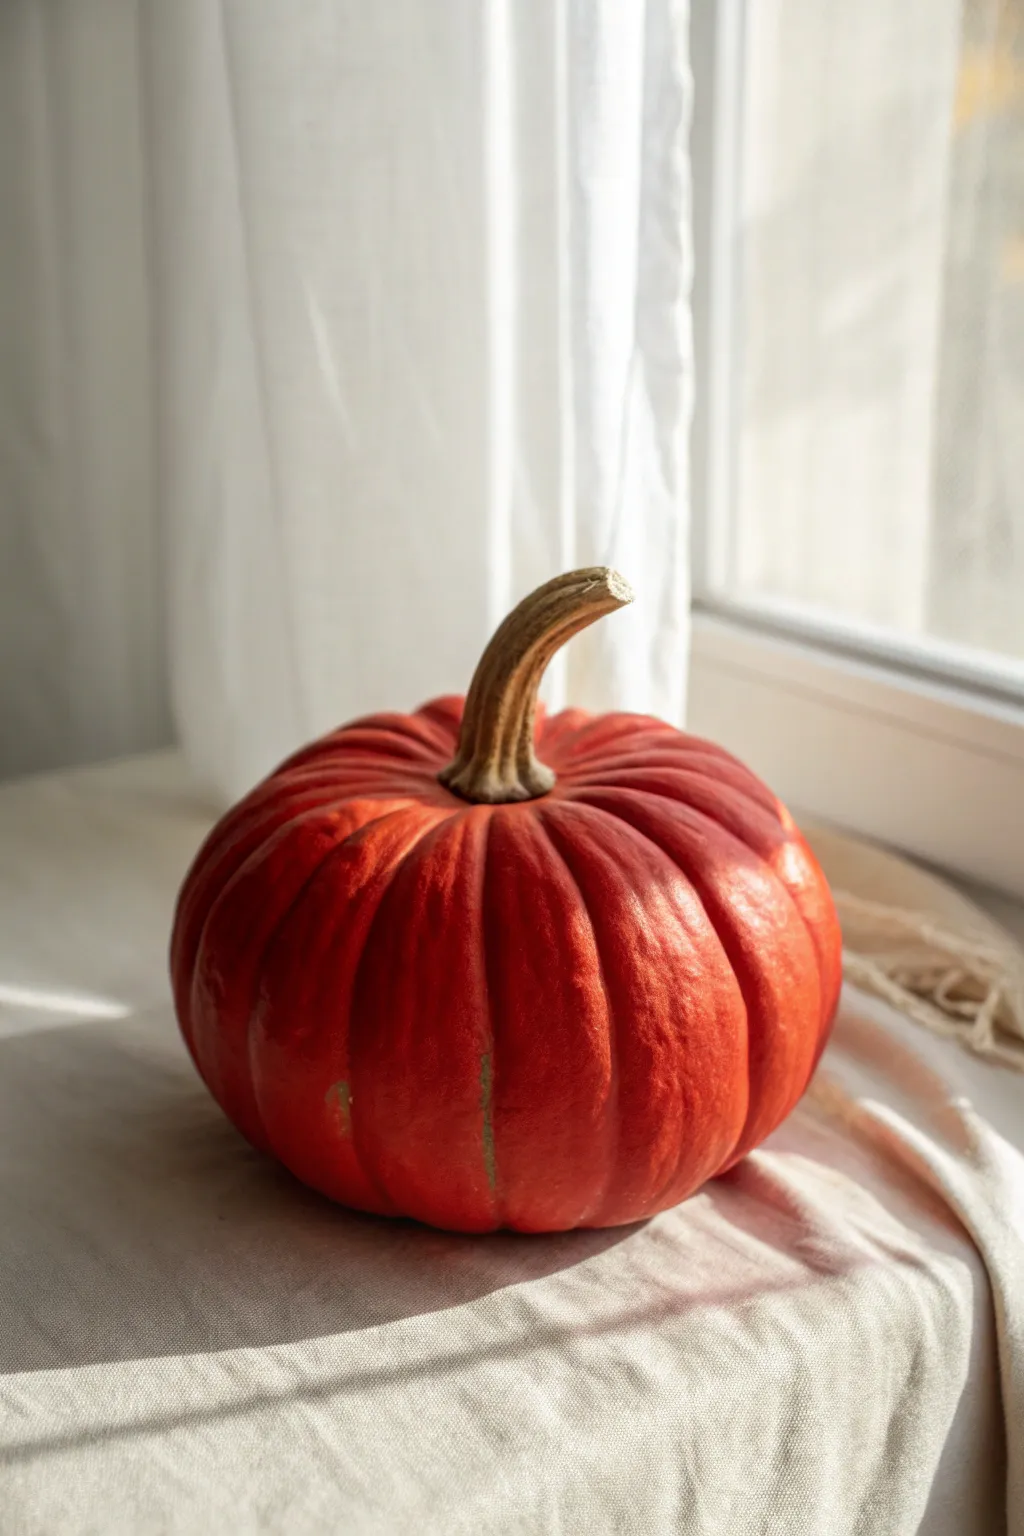
This project transforms a standard orange gourd into a statement piece with a deep, sophisticated red hue that mimics the look of heirloom varietals. By layering paint and protecting the natural stem, you achieve a seamless, velvety matte finish perfect for modern autumn decor.
How-To Guide
Materials
- Medium-sized pumpkin (real or high-quality faux)
- Deep red matte acrylic paint (e.g., Crimson or Barn Red)
- Burnt orange acrylic paint
- Painter’s tape
- Medium flated-edged paintbrush
- Small detail paintbrush
- Matte finish clear sealant spray
- Paper towels or cloth
- Mild soap and water
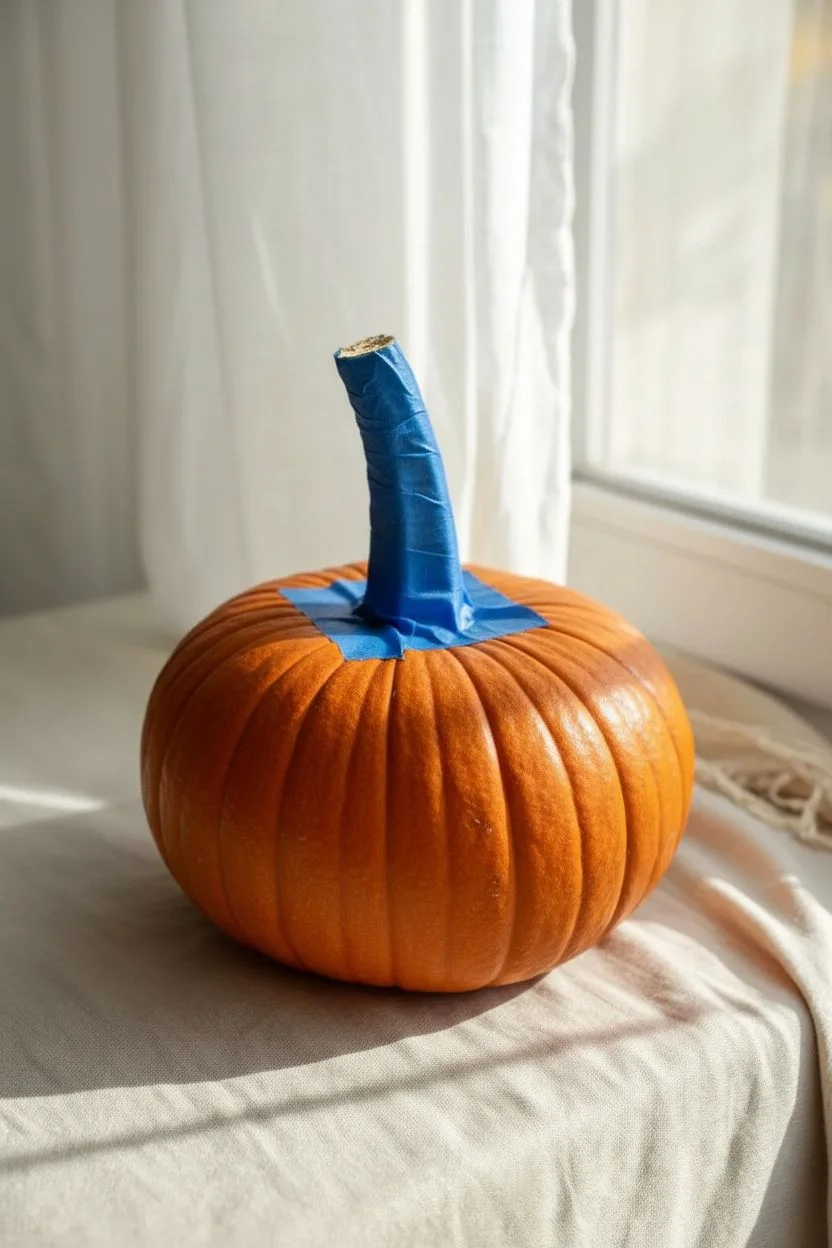
Step 1: Preparation
-
Clean surface:
Begin by thoroughly wiping down your pumpkin with mild soap and water to remove any dirt, wax, or field debris. Dry it completely with a clean cloth. -
Protect the stem:
Carefully wrap the entire stem with painter’s tape. -
Seal edges:
Press the tape firmly into the crease where the stem meets the pumpkin skin to ensure a crisp paint line later.
Natural Texture
Don’t sand the pumpkin beforehand. The natural bumps and ridges add character and catch the matte paint beautifully.
Step 2: Painting Base Layers
-
Mix your base color:
On a palette, mix a small amount of burnt orange into your deep red paint. This creates a warm undertone that helps cover the natural orange skin more naturally than straight red. -
Apply first coat:
Using the medium flat brush, apply a thin, even layer of the paint mixture. Start from the top near the taped stem and stroke downward toward the base. -
Follow the curves:
Paint with vertical strokes that follow the natural ribs of the pumpkin to enhance its shape rather than fighting against it. -
Initial dry:
Allow this first coat to dry completely for about 30 to 45 minutes; it will look streaky, but don’t worry. -
Apply second coat:
Apply a second coat using the same vertical stroke technique. -
Flip and paint:
Once the sides are dry to the touch, gently turn the pumpkin over to paint the very bottom, ensuring no original orange peeks through.
Step 3: Refining the Color
-
Pure red layer:
For the third coat, switch to your pure deep red acrylic paint without the orange mixture to achieve that rich, saturated crimson look. -
Stipple for texture:
If you want a more organic, skin-like texture, lightly stipple the wet paint with the tip of your brush in the deep crevices. -
Check coverage:
Inspect the pumpkin in good lighting. If you see any light spots, touch them up with the small detail brush. -
Extended drying:
I like to let this final color layer cure for at least an hour to ensure it’s durable before sealing.
Create Depth
Mix a tiny drop of brown into your red paint and apply it specifically in the deep vertical grooves for realistic shadowing.
Step 4: Finishing Touches
-
Remove tape:
Carefully peel away the painter’s tape from the stem. Do this slowly to avoid pulling up any dried paint near the base. -
Clean stem line:
If any paint bled onto the stem, gently scrape it off with a fingernail or use a damp cotton swab immediately. -
Touch up stem gap:
Use the small detail brush to carefully fill in any unpainted gaps right at the base of the stem where the tape was. -
Seal the work:
Take the pumpkin to a well-ventilated area and spray a light cost of matte clear sealant over the painted surface. -
Final cure:
Let the sealant dry fully according to the can’s instructions, resulting in a velvety, non-glossy finish.
Place your finished pumpkin near a window to let natural light highlight the rich, velvety texture you have created


Red-to-Black Ombre Fade Pumpkin
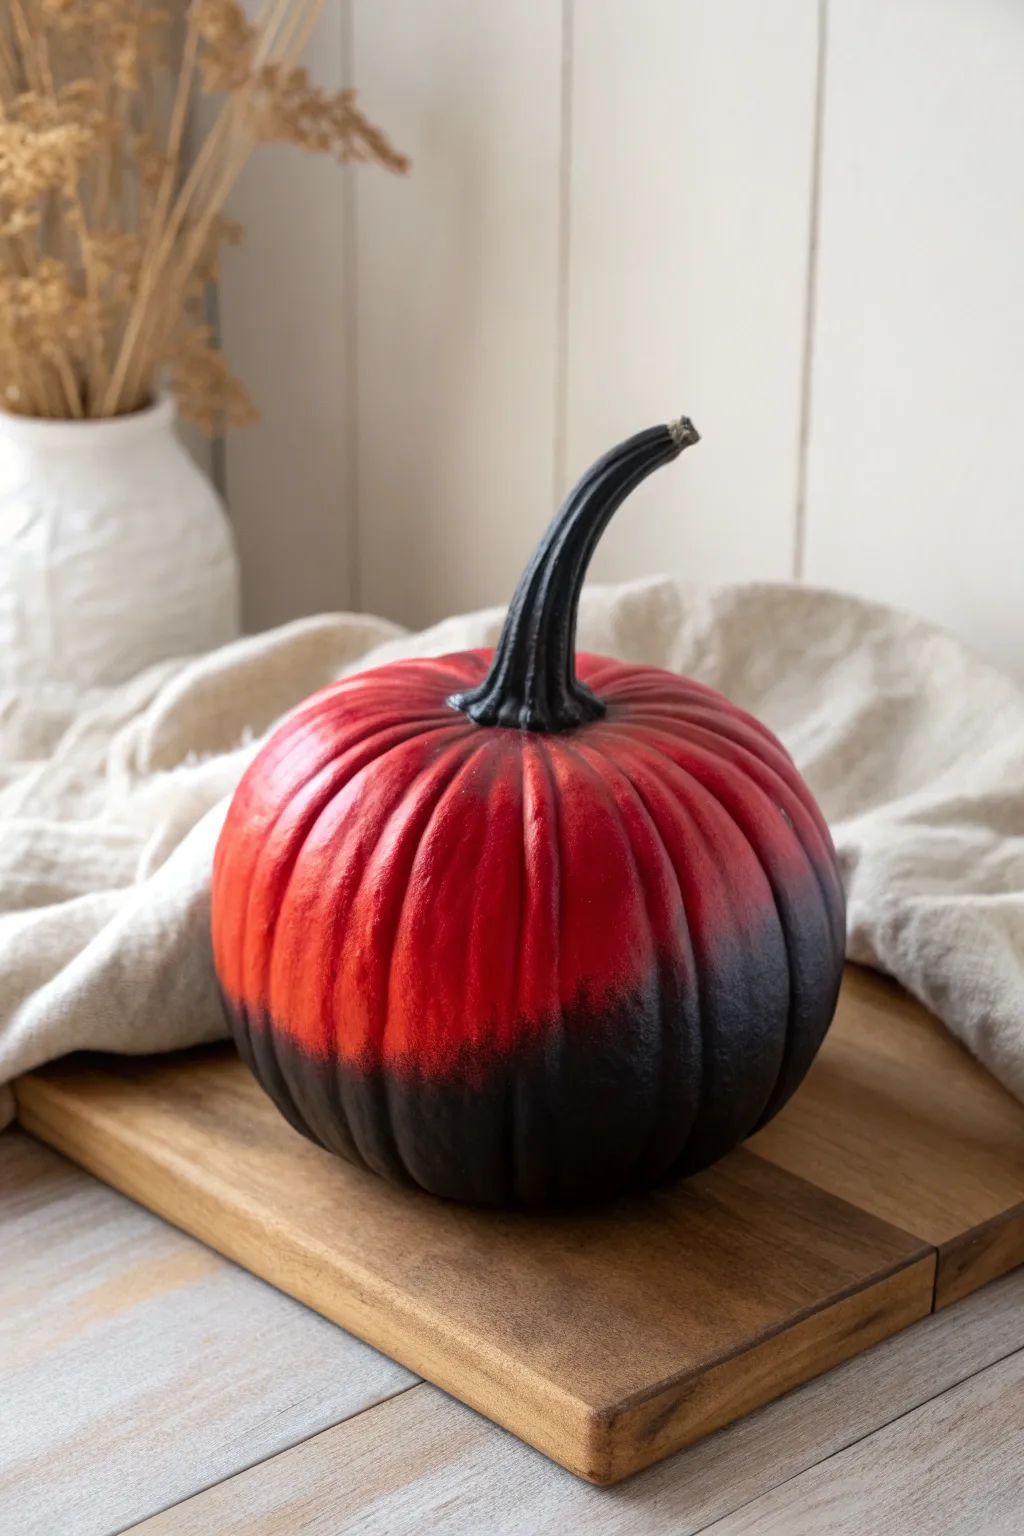
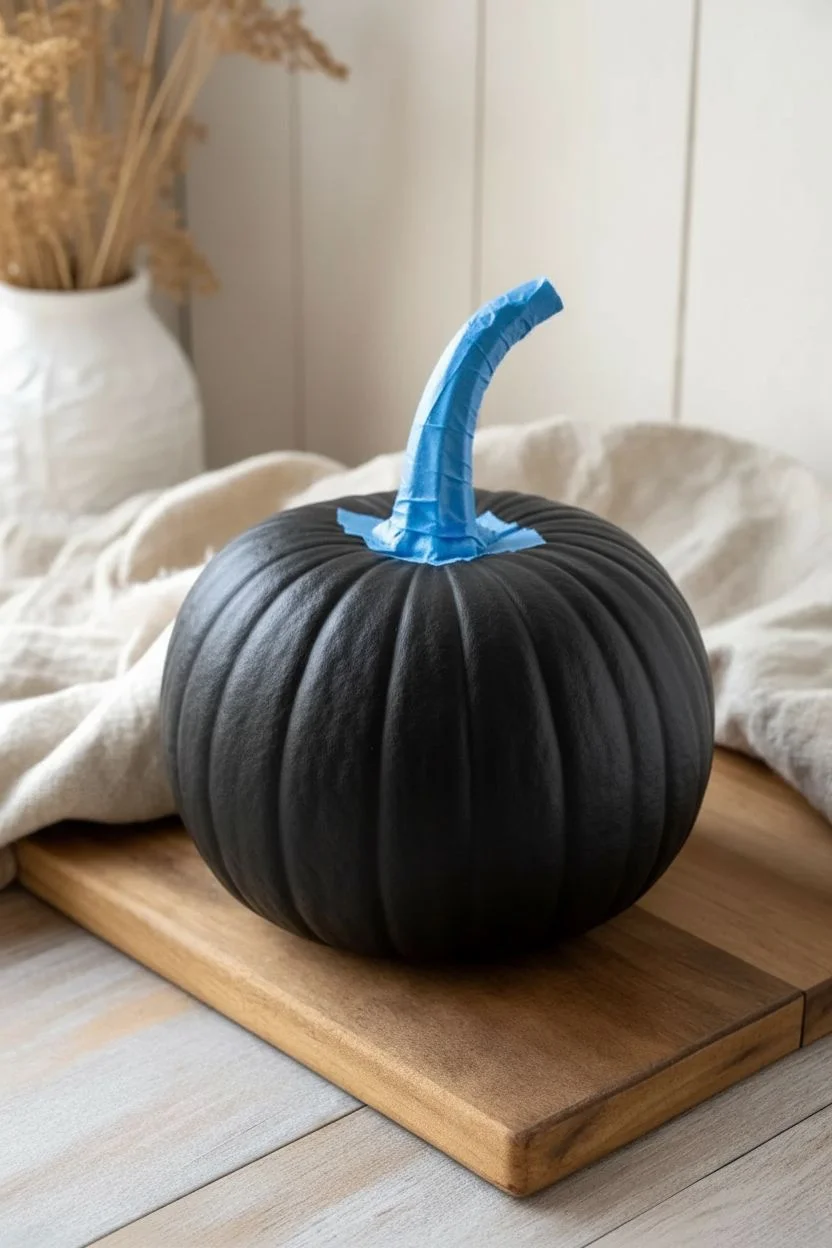
Transform a standard pumpkin into a striking gothic statement piece with this dramatic red-to-black gradient design. The seamless fade creates a moody, vampire-inspired aesthetic that stands out from traditional orange jack-o’-lanterns.
Step-by-Step
Materials
- Faux craft pumpkin or real pumpkin (cleaned and dried)
- Matte black spray paint (primer + paint combo covers best)
- Bright red acrylic craft paint (satin finish)
- Black acrylic craft paint
- Medium flat synthetic paintbrush
- Large sponge dauber or cosmetic sponge
- Small detail brush
- Painter’s tape or masking tape
- Disposable plate or palette
- Clear matte or satin sealant spray
Step 1: Preparation & Base Coat
-
Surface Prep:
Begin by wiping down your pumpkin with a damp cloth to remove any dust or dirt. If using a real pumpkin, ensure it is completely dry before proceeding. -
Tape the Stem:
Carefully wrap the entire stem with painter’s tape. We want to keep this area protected during the initial spray painting phase, although we will paint it later. -
Prime with Black:
In a well-ventilated area, spray the entire pumpkin with matte black spray paint. Hold the can about 10-12 inches away and use sweeping motions. -
Second Coat:
Allow the first coat to dry for about 15 minutes. Apply a second coat of black spray paint to ensure full opacity, especially in the deep crevices of the pumpkin ribs. -
Complete Drying:
Let the black base coat cure completely. I like to leave it for at least an hour to ensure the surface isn’t tacky before applying the acrylics.
Smooth Fade Secret
Keep your sponge slightly wet, not soaking. A dry sponge creates harsh textures, while a damp one helps the acrylic colors bleed together for that smoky fog effect.
Step 2: Painting the Gradient
-
Apply Red Base:
Remove the tape from the stem. Squeeze a generous amount of bright red acrylic paint onto your palette. -
Top Coverage:
Using a flat brush, paint the top 1/3 of the pumpkin red, starting right at the base of the stem and working outward. Don’t worry about a clean bottom edge yet. -
Into the Grooves:
Make sure you push the red paint deep into the vertical grooves so no black primer peeks through near the top. -
The Mid-Section:
Without cleaning your brush, pick up a tiny bit of black paint and mix it with red on your palette to create a deep maroon. -
Painting the Transition:
Apply this darker red mixture in a band just below your bright red section, roughly covering the middle third of the pumpkin. -
Sponge Technique:
Switch to your sponge dauber now. Dampen it slightly and dip it into the bright red paint, blotting off excess on a paper towel. -
Blending Down:
Gently dab over the line where the red meets the maroon mixture, softening the transition so there is no hard stripe. -
Blending Up from Black:
Dip a clean side of the sponge into black paint. Dab along the bottom edge where the maroon fade meets the original black base coat. -
Feathering:
Use a light, stippling motion to feather the black paint upward into the red zones. The goal is a smoky look where the red seems to disappear into shadow. -
Repeat Layers:
Acrylics can be translucent. Once the first layer is dry to the touch, repeat the sponge blending process with fresh red paint to punch up the brightness at the very top.
Step 3: Finishing Touches
-
Stem Work:
Using a small detail brush AND black acrylic paint, carefully paint the stem. The black spray paint might have missed spots, and this ensures a consistent texture. -
Stem Base Detailing:
Paint a very thin, jagged line of black right where the stem meets the pumpkin skin, reinforcing that dark, gothic contrast. -
Dry Time:
Allow the pumpkin to dry completely overnight. The thick layers of sponged paint take longer to cure than thin brushstrokes. -
Sealing:
Take the pumpkin back to your ventilated area and apply a light coat of clear sealant spray. This unifies the sheen between the spray paint and the acrylics.
Level Up: Glossy Contrast
Use a high-gloss varnish only on the red section and leave the black matte. This makes the top look like fresh candied apple while the bottom remains dull.
Place your finished ombre pumpkin on a rustic wooden board to contrast with the sleek paint work.


Dripping Crimson Paint Pumpkin

Transform a classic autumn gourd into a striking piece of gothic decor with this dramatic dripping effect. The rich, crimson rivulets running down the pumpkin’s textured skin create a beautifully unsettling aesthetic perfect for sophisticated Halloween displays.
Detailed Instructions
Materials
- Medium-sized pumpkin (heirloom or Cinderella variety preferable)
- Crimson red acrylic high-flow paint or pouring medium
- Dark red food coloring (gel based)
- Small squeeze bottle or syringe
- Clear gloss varnish (optional)
- Dark grey or black drop cloth/fabric
- Isopropyl alcohol and soft cloth
- Disposable cup for mixing
- Paper towels
Step 1: Preparation & Cleaning
-
Select the Gourd:
Choose a pumpkin with deep ridges and a slightly flattened shape if possible. The natural grooves act as perfect channels for the paint to travel down, enhancing the organic look. -
Clean the Surface:
Wipe the entire surface of the pumpkin with a soft cloth dampened with isopropyl alcohol. This removes natural oils and dirt, ensuring that your paint will adhere properly without beading up unexpectedly. -
Dry Completely:
Allow the pumpkin to air dry for at least 15 minutes. The surface must be bone-dry before you begin applying any liquid. -
Prepare the Workspace:
Lay down your dark fabric or drop cloth. Since this project involves intentional dripping, you’ll want to protect your table surface while creating a dramatic backdrop.
Natural Flow Tip
Don’t force the lines straight down. Let the paint follow the pumpkin’s unique curves and bumps naturally for the most realistic, organic “bleeding” effect.
Step 2: Mixing the “Blood”
-
Create the Base:
In your disposable cup, pour a generous amount of crimson red acrylic paint. I prefer using a high-flow variety because it drips naturally without needing too much thinning. -
Deepen the Color:
Add several drops of dark red gel food coloring to the paint. This deepens the hue and gives it a slight translucency that mimics organic fluids better than flat opaque paint. -
Check Consistency:
Stir the mixture. The consistency should be similar to heavy cream—thick enough to hold a shape but fluid enough to run down the sides. If it’s too thick, add a tiny splash of water or pouring medium. -
Load the Applicator:
Carefully pour your mixture into a squeeze bottle or draw it up into a syringe. This gives you precise control over where the drips begin.
Paint Too Runny?
If your drips are running too fast and looking thin, mix a small amount of clear school glue or corn syrup into your paint to thicken the viscosity immediately.
Step 3: The Drip Application
-
Start at the Crown:
Position your applicator right next to the base of the pumpkin stem. This is where the flow will naturally originate. -
Release the First Drip:
Gently squeeze a bead of paint into one of the natural vertical grooves of the pumpkin. Watch gravity take over as it travels downward. -
Vary the Pressure:
Move around the circumference of the stem, releasing vastly different amounts of paint. Some drips should be thin and stop halfway down, while others should be heavy enough to pool at the bottom. -
Connect the Top:
Apply a thin ring of paint connecting the tops of your drips around the stem base, blending them so it looks like the liquid is overflowing from the very top. -
Enhance the Flow:
If a drip gets stuck in a ridge, you can gently tilt the pumpkin to encourage it to slide further down. -
Create Pooling:
Allow the heaviest streams of paint to run all the way off the pumpkin and pool slightly onto the fabric below. This grounds the object in the scene.
Step 4: Finishing Touches
-
Check for Gaps:
Inspect the spacing of your drips. If there’s a large empty area that looks unbalanced, add a shorter, thinner drip in between two larger ones. -
Let it Set:
Leave the pumpkin undisturbed for at least 24 hours. Because the paint is applied thickly, the outer skin will dry first while the inside remains wet. -
Add Gloss (Optional):
Once fully dry, if your paint dried too matte, carefully brush a high-gloss varnish over just the red drip lines to make them look wet and fresh.
Once dry, place your beautifully macabre pumpkin in a spot with dramatic lighting to highlight the glossy texture of the drips


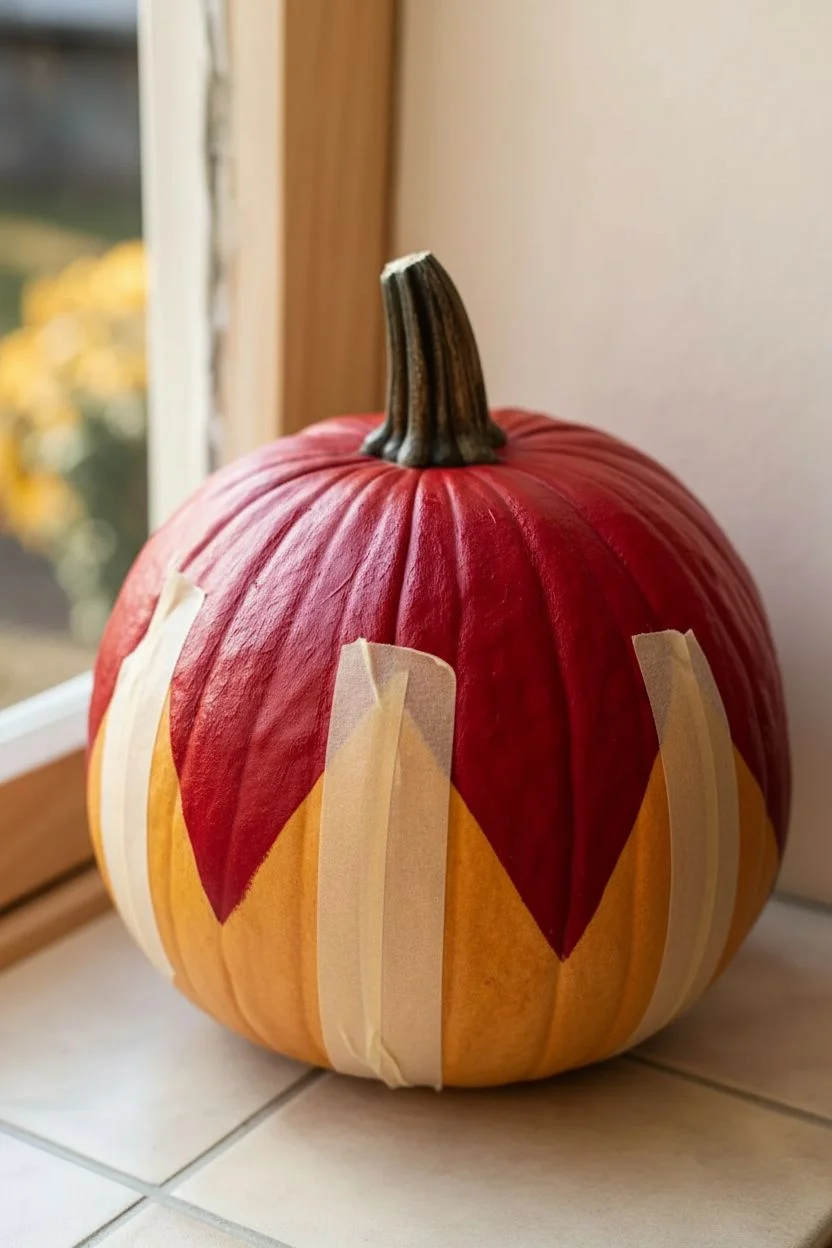
Red Buffalo Check Pumpkin
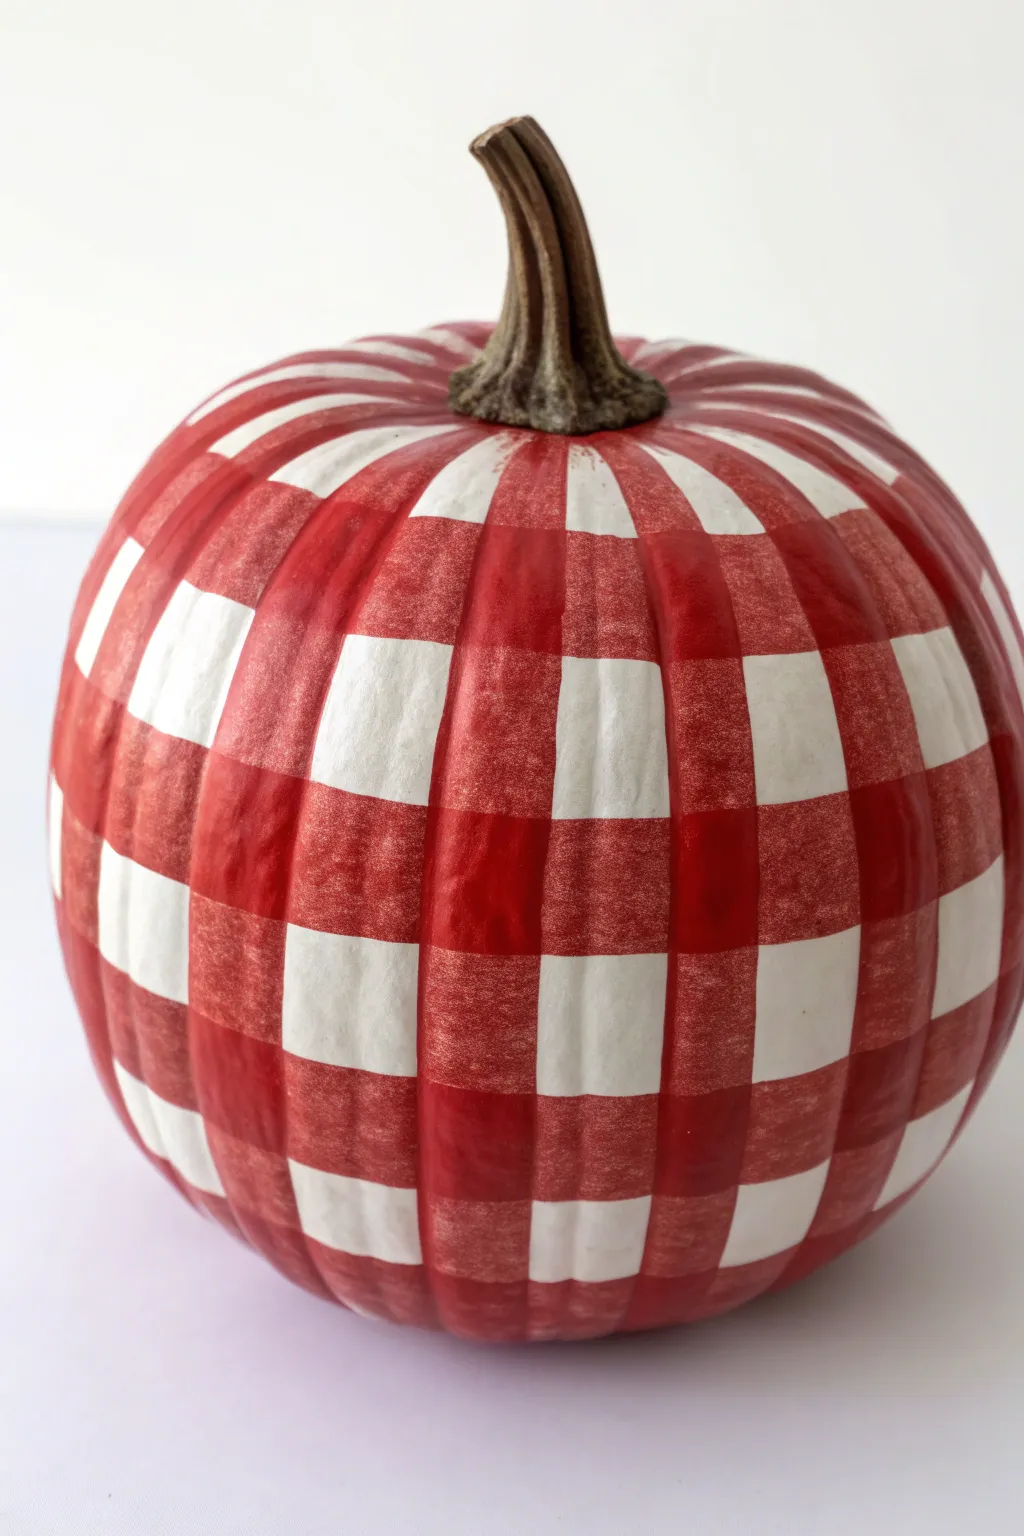
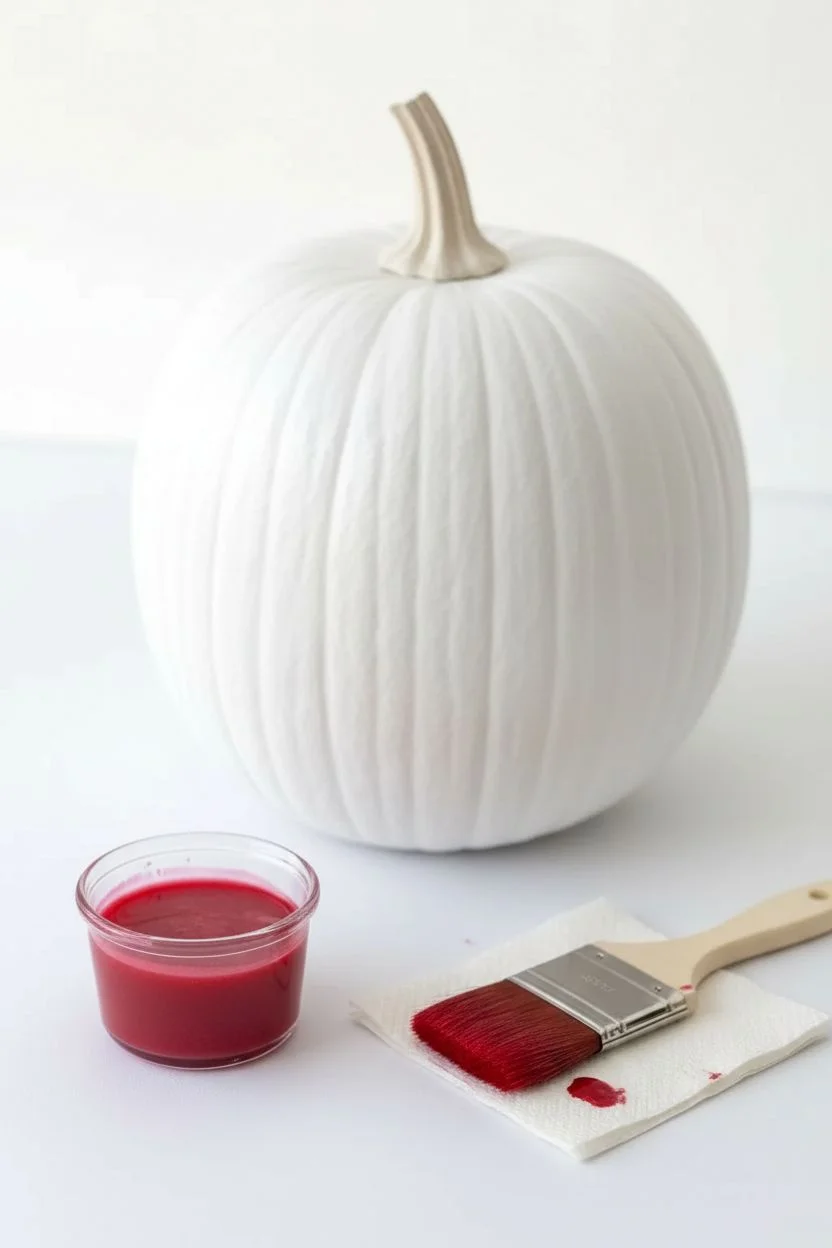
Give your autumn décor a cozy cottage vibe with this striking red buffalo check pumpkin. By layering translucent glazes over a white base, you can achieve that classic woven fabric look right on the surface of a realistic craft pumpkin.
Step-by-Step
Materials
- White faux pumpkin (or real pumpkin primed white)
- Red acrylic paint
- Clear glazing medium
- Flat shader brush (approx. 1 inch wide)
- Painter’s tape (low tack)
- Ruler or measuring tape
- Pencil
- Palette or small mixing cups
- Paper towels
Step 1: Preparation & Base Coat
-
Clean surface:
Wipe down your pumpkin with a damp cloth to remove any dust or manufacturing oils. If you are using a real pumpkin, ensure it is completely dry. -
Apply base color:
If your pumpkin isn’t already a bright, clean white, apply two coats of white acrylic paint. Let the first coat dry completely before adding the second to ensure solid coverage. -
Mix the glaze:
In a mixing cup, combine your red acrylic paint with the glazing medium. A 1:1 ratio is a good starting point, but you want it translucent enough that a single layer looks like a light wash, while two layers create a deep red.
Tape Trickery
To prevent paint bleeding under the tape on textured pumpkins, paint a thin layer of the base color (white) over the tape edges first to seal them.
Step 2: Vertical Striping
-
Mark vertical guides:
Using your pencil and following the natural ribs of the pumpkin where possible, mark off vertical sections. The width should match the width of your painter’s tape. -
Apply vertical tape:
Apply strips of painter’s tape vertically from the stem down to the base, leaving a tape-width gap between each strip. Press the edges down firmly with a fingernail to prevent bleed-through. -
Paint first stripes:
Using the flat shader brush, paint the exposed vertical areas with your red glaze mixture. Use long, smooth strokes from top to bottom. -
Remove and dry:
Carefully peel off the vertical tape strips while the paint is still slightly wet to avoid pulling up dry paint skins. Allow these stripes to dry completely before moving on.
Step 3: Horizontal Striping
-
Horizontal masking:
Once the vertical stripes are bone dry, begin applying horizontal bands of tape around the pumpkin’s circumference. Again, use the tape’s width as your spacing guide. -
Check alignment:
Walking the tape around a spherical object can be tricky; adjust the tape occasionally to keep the horizontal lines relatively level, even if they curve slightly with the pumpkin’s shape. -
Paint horizontal bands:
Paint the exposed horizontal rings with the same red glaze mixture. I prefer to apply this layer gently so I don’t disturb the dried paint underneath. -
Create the check:
Notice that where the horizontal paint crosses the vertical paint, the color becomes darker naturally because of the transparency. This creates the ‘buffalo check’ intersection effect automatically. -
Reveal the pattern:
Remove the horizontal tape carefully. You should now see a grid of white squares, light red rectangles, and dark red squares where the layers overlap.
Glaze Too Opaque?
If your ‘light red’ sections look too dark, add more glazing medium. Test the transparency on a piece of scrap paper; you should see text through one layer.
Step 4: Finishing Touches
-
Touch-ups:
Inspect the edges of your squares. If any white paint peeled or if red bled under the tape, use a small detail brush to fix those areas with the appropriate color. -
Stem work:
If the stem got any unwanted red paint on it, paint over it with a dark brown or grey acrylic to clean up the transition point. -
Seal (optional):
To protect your handywork, especially if the pumpkin will be displayed outdoors, apply a coat of clear matte spray sealer over the entire project.
Place your charming checkered pumpkin on the porch or mantel for instant farmhouse appeal
BRUSH GUIDE
The Right Brush for Every Stroke
From clean lines to bold texture — master brush choice, stroke control, and essential techniques.
Explore the Full Guide
Red Plaid Linework Pumpkin
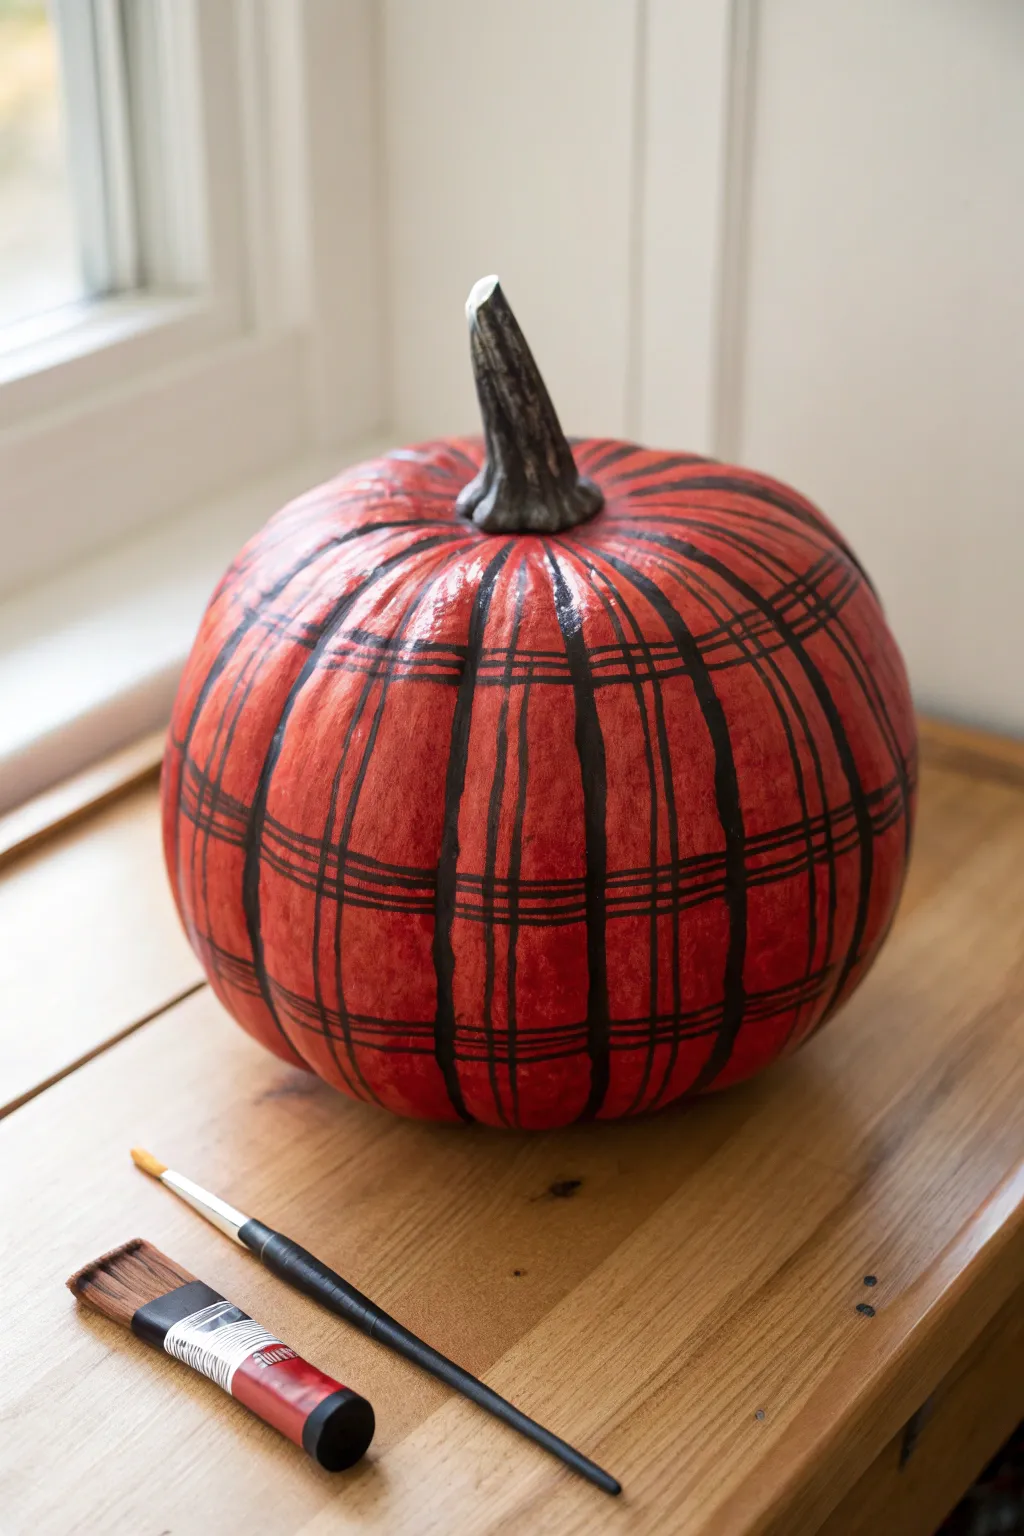
Transform a classic orange gourd into a rustic statement piece with this deceptively simple plaid design. By layering thin and thick black lines over a rich red base, you can create a charming textile look that feels warm and inviting.
Step-by-Step Tutorial
Materials
- Faux pumpkin (or real pumpkin, cleaned and dried)
- Red acrylic craft paint (matte finish recommended)
- Black acrylic craft paint
- Wide flat paintbrush (approx. 1 inch)
- Small round detail brush (size 1 or 2)
- Medium flat brush (approx. 1/4 inch)
- Paper plate or palette
- Water cup and paper towels
- Clear matte sealer spray (optional)
Step 1: Base Coat Application
-
Clean surface:
Begin by wiping down your pumpkin with a damp cloth to remove any dust or oils that might prevent the paint from adhering properly. -
First red layer:
Using the wide flat brush, apply a generous coat of red acrylic paint over the entire pumpkin surface, excluding the stem for now. -
Allow to dry:
Let this first coat dry completely to the touch; acrylics usually take about 20-30 minutes. -
Second red layer:
Apply a second coat of red paint to ensure full opacity, covering any streaks or orange spots showing through from the first layer. -
Final drying:
Allow the base color to cure fully for at least an hour before starting the line work.
Wobbly Lines?
Don’t stress about perfect straight lines! Bumps in the pumpkin make straight lines impossible. Embrace the organic, hand-painted look; it adds to the ‘fabric’ texture.
Step 2: Creating the Vertical Plaid
-
Planning the orientation:
Observe the natural ribs of the pumpkin; you will use these vertical grooves and ridges as guides for your vertical stripes. -
Thick vertical stripes:
With the medium flat brush and black paint, paint bold vertical stripes following every other rib of the pumpkin, starting from the stem base down to the bottom. -
Thin vertical accents:
Switch to your small round detail brush. Paint two very thin vertical lines on either side of the thick black stripes you just created. -
Spacing check:
Ensure there is still plenty of open red space between these vertical clusters to allow the horizontal lines to shine later. -
Drying vertical lines:
Let the vertical black lines dry completely so you don’t smudge them while working on the horizontal sections.
Step 3: Adding Horizontal Weave
-
Establish the horizon:
Visualize a ‘latitudinal’ line around the middle of the pumpkin to act as your central horizontal guide. -
Thick horizontal stripes:
Using the medium flat brush again, paint a continuous thick black band around the pumpkin’s equator. -
Secondary thick bands:
Add parallel thick bands above and below the center line, spacing them about 2-3 inches apart depending on your pumpkin’s size. -
Thin horizontal accents:
Using the small detail brush, paint sets of two thin lines parallel to your thick horizontal bands, mimicking the pattern you created vertically. -
Crossing points:
Pay attention to where lines cross; I find it helps to reload the brush frequently here to keep the black intersections opaque and sharp. -
Fill gaps:
If the pattern looks too open in any large red areas, add a single thin horizontal line to break up the space.
Metallic Twist
Swap the thin detail lines for gold or metallic bronze paint instead of black. This adds a sophisticated shimmer that catches the light beautifully.
Step 4: Finishing Touches
-
Paint the stem:
Carefully paint the stem using black or a dark brownish-grey to contrast with the bright red body. -
Dry rubbing:
Once the stem base coat is dry, lightly dry-brush a tiny bit of white or light grey over the textured ridges of the stem for a realistic weathered look. -
Clean up edges:
Use a clean, damp brush or a bit of red paint to tidy up any black lines that may have wobbled significantly. -
Seal the work:
If you plan to display this outdoors, spray the entire pumpkin with a clear matte sealer to protect your paint job from moisture.
Place your plaid masterpiece near a window or on a porch step to welcome the season with style
Red Pumpkin With Gold-Accented Stem
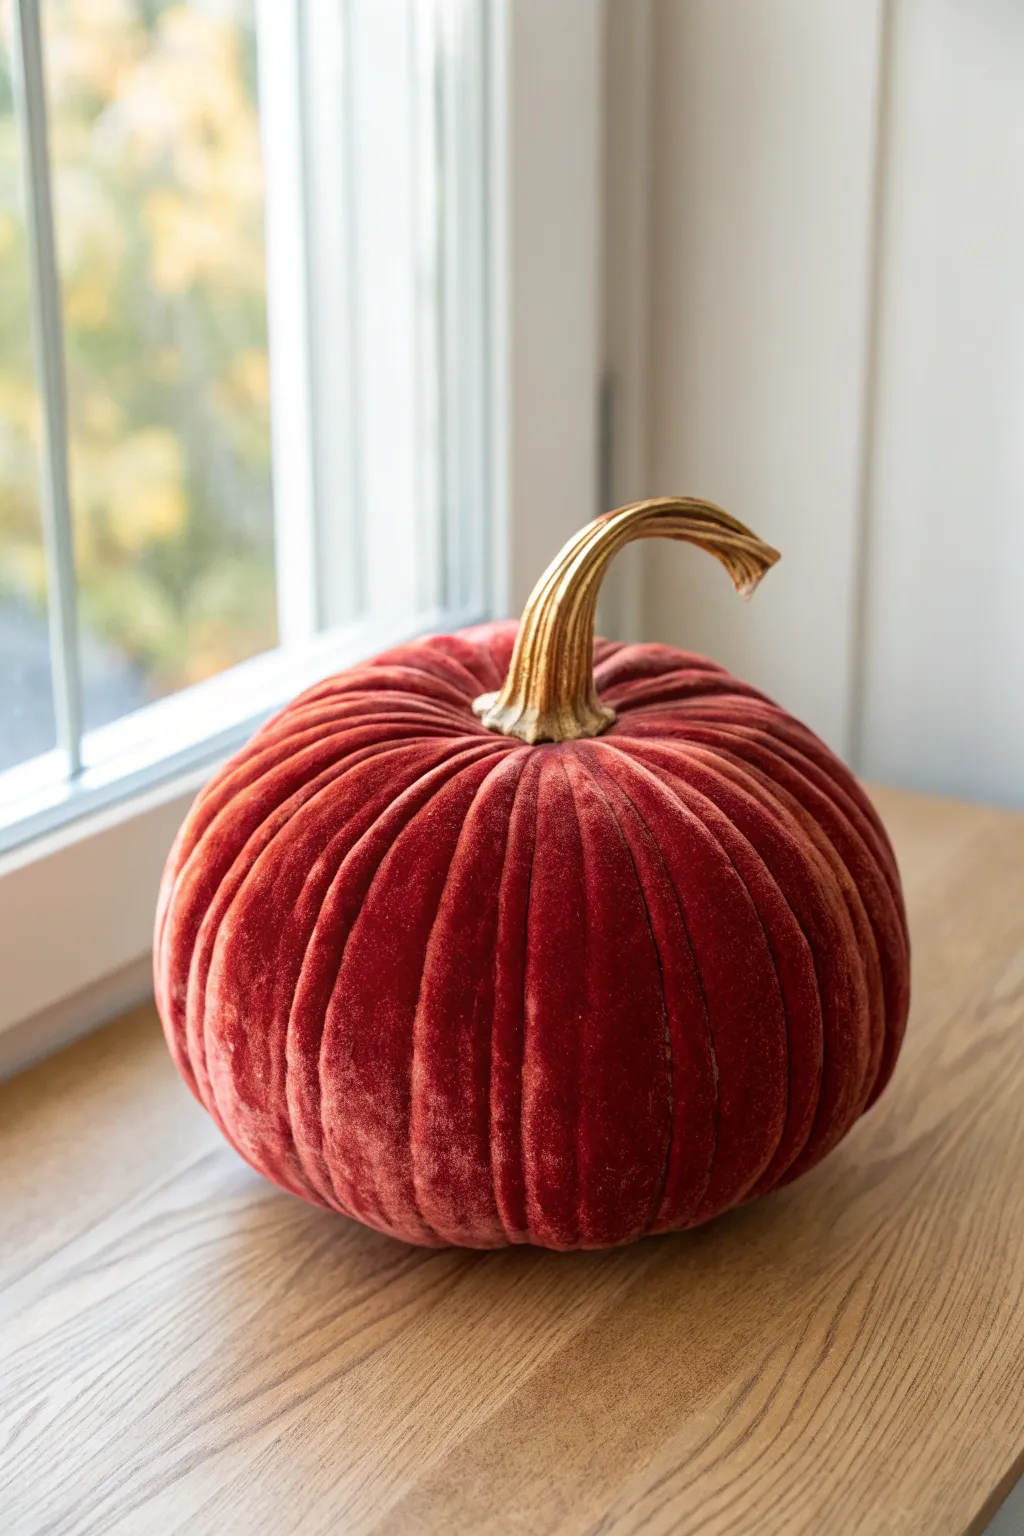

Transform ordinary craft supplies into sophisticated fall decor with this plush velvet pumpkin tutorial. The combination of deep rust-red fabric and a gilded stem creates an elegant, high-end look perfect for a mantelpiece or seasonal centerpiece.
How-To Guide
Materials
- Stretch velvet fabric in rust or deep red (approx. 1/2 yard)
- Polyester fiberfill stuffing
- Upholstery thread (strong, matching color)
- Long hand sewing needle
- Real dried pumpkin stem (or realistic resin stem)
- Gold metallic paint (Liquid Leaf or similar)
- Small paintbrush
- Cardstock or heavy felt (for stem base circle)
- Hot glue gun and glue sticks
- Scissors
- Rice, beans, or poly-pellets (for weight)
- Measuring tape
Step 1: Preparing the Fabric & Base
-
Measure and cut:
Begin by cutting a circle from your velvet fabric. For a medium-sized pumpkin like the one shown, a circle with a diameter of about 20-24 inches works well. Don’t worry if the circle isn’t perfectly round; the gathering process hides imperfections. -
Thread the needle:
Cut a long length of upholstery thread—you need something much stronger than standard thread to withstand the tension of gathering. Thread your needle and knot the end securely. -
Baste the edge:
Sew a long running stitch around the entire perimeter of the fabric circle, approximately 1/4 to 1/2 inch from the edge. Make your stitches about half an inch long. -
Loose gathering:
Once you’ve stitched all the way around, do not cut the thread. Leave the needle attached and gently pull the thread to start gathering the fabric slightly, creating a shallow bowl shape.
Loose Stitches?
If your gathering thread snaps, don’t unstuff. Simply re-thread your needle and sew a new running stitch just below the original line to cinch it closed again.
Step 2: Filling and Shaping
-
Add weight:
Pour about a cup of rice, dried beans, or plastic pellets into the bottom of your fabric ‘bowl.’ This gives the finished pumpkin stability so it doesn’t roll away. -
Add the stuffing:
Ideally, grab large handfuls of polyester fiberfill and place them on top of the weighted base. Fluff the stuffing as you pull it from the bag to ensure a smooth, lump-free finish. -
Close the pumpkin:
Pull the thread taut to close the opening. As the hole shrinks, use your fingers to push the raw edges of the fabric inside the pumpkin for a cleaner look. Pull as tight as possible. -
Secure the gather:
Once the opening is nearly closed, stitch across the gathered center several times in a crisscross pattern to lock it in place. Knot the thread securely and trim the excess. -
Create the ribs:
To achieve that classic pumpkin shape, take a very long piece of upholstery thread and anchor it at the bottom center of the pumpkin. Bring the thread up over the side, pulling it snugly into the stuffing to create an indentation. -
Stitch through the center:
Insert your long needle down through the top center of the pumpkin, pushing it all the way through to the bottom. Pull tight to deepen the groove. -
Repeat for all sections:
Bring the thread back up along the opposite side and repeat the process. Continue creating these segments around the pumpkin until you are happy with the ribbed appearance, tying off securely at the bottom.
Level Up: Ombré Effect
Before attaching the stem, lightly brush a darker shade of fabric paint into the grooves of the ribs to exaggerate the shadows and make the velvet look deeper.
Step 3: The Gilded Stem
-
Select your stem:
Choose a dried pumpkin stem with a nice curve. If using a real dried stem, ensure it is completely dry and free of debris. A resin replica works great here too. -
Apply the gold:
Shake your liquid gold leaf or metallic paint well. Using a small brush, apply the gold paint to the stem. I like to leave some of the natural brown showing in the deepest crevices for depth, rather than painting it perfectly solid. -
Dry completely:
Prop the stem up so it can dry without touching any surfaces. This usually takes about 15-30 minutes depending on the paint used. -
Prepare the attachment base:
Cut a small circle of heavy felt or cardstock, slight smaller than the base of your stem. Glue this to the gathered center of your pumpkin to create a flat platform. -
Adhere the stem:
Apply a generous amount of hot glue to the bottom of your painted stem. Press it firmly onto the felt platform and hold it in place for 30-60 seconds until the glue sets completely. -
Final fluff:
Give the pumpkin a gentle squeeze and adjust the stuffing to ensure the ribbed sections look uniform and the velvet catches the light beautifully.
Enjoy the rich texture and warm tones this handmade piece brings to your autumn display

PENCIL GUIDE
Understanding Pencil Grades from H to B
From first sketch to finished drawing — learn pencil grades, line control, and shading techniques.
Explore the Full Guide
Red Pumpkin With Hand-Painted Florals
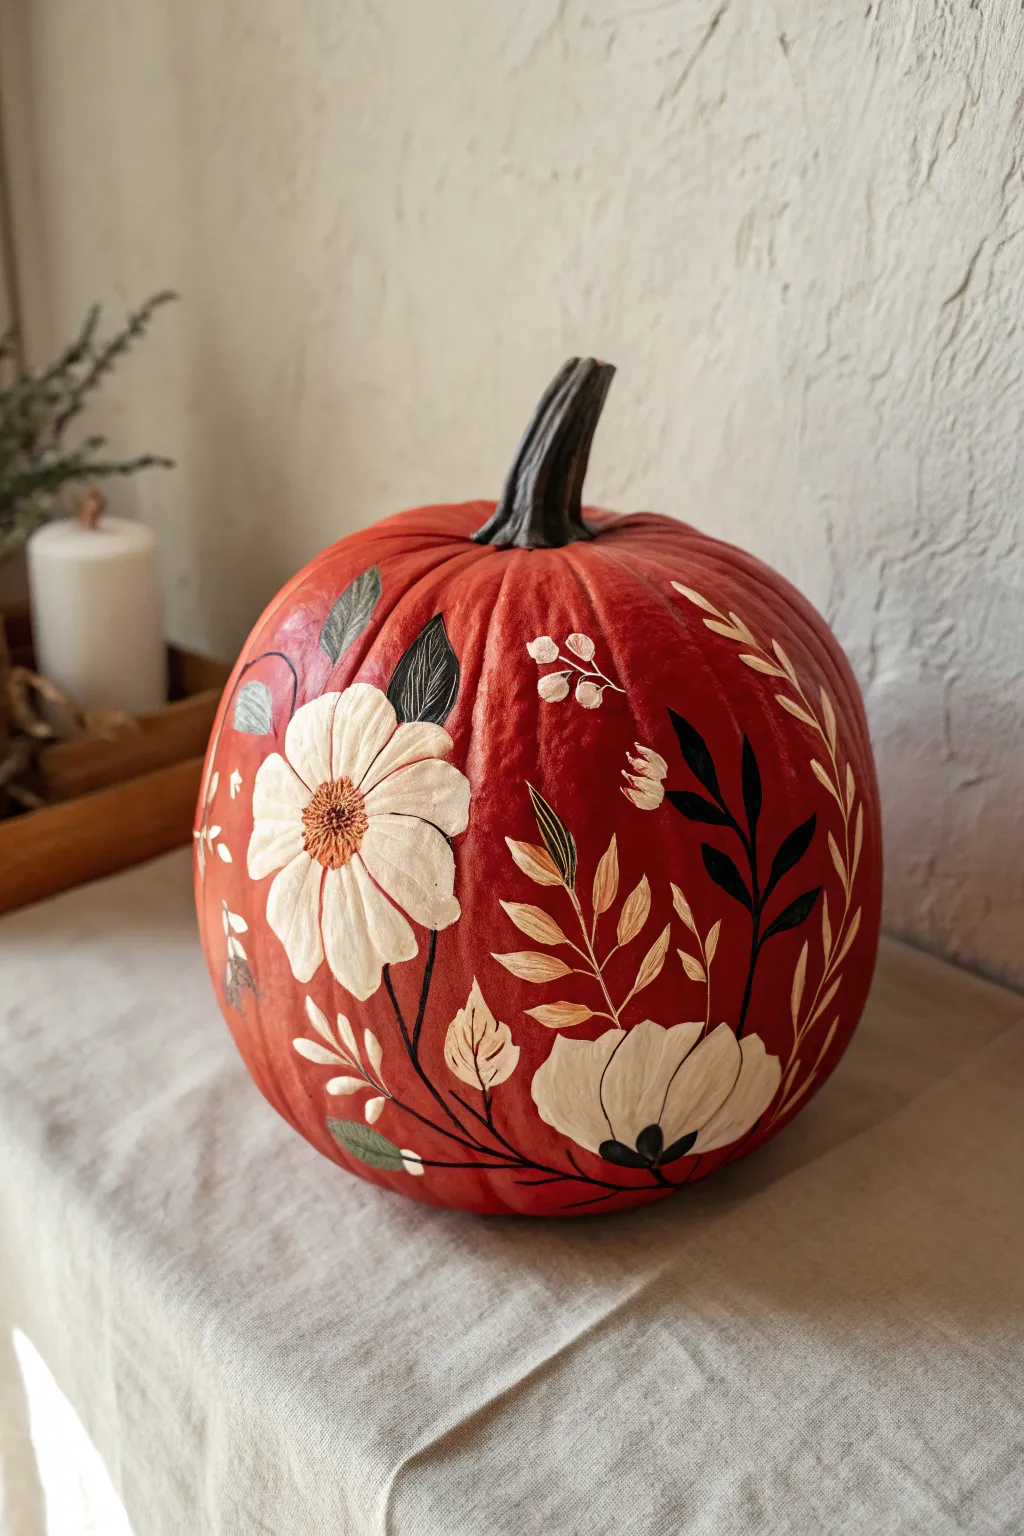
Transform a standard pumpkin into a sophisticated piece of fall décor with this rich, hand-painted design. The deep red base provides a stunning canvas for delicate white petals, golden foliage, and dramatic black stems.
Step-by-Step
Materials
- Medium-sized faux pumpkin (or real pumpkin, cleaned and dried)
- Matte red acrylic paint (brick red or deep coral shade)
- White acrylic paint (creamy off-white)
- Black acrylic paint
- Gold or tan acrylic paint
- Medium flat brush (for base coat)
- Small round brush (size 2 or 4)
- Fine liner brush (size 0 or 00)
- Water cup and paper towels
- Pencil or white chalk (optional for sketching)
- Matte spray sealer (optional)
Step 1: Base Preparation
-
Clean surface:
Begin by wiping down your pumpkin with a slightly damp cloth to remove any dust or oils, ensuring the paint adheres properly. -
Apply base color:
Using the medium flat brush, apply the matte red acrylic paint over the entire surface of the pumpkin. Don’t worry about painting the stem yet. -
Add second coat:
Allow the first layer to dry completely (about 20-30 minutes). I find that a second coat is usually necessary to achieve that rich, opaque finish seen in the photo. -
Paint the stem:
Carefully paint the stem with black acrylic paint, or a very dark brownish-grey if you prefer a slightly softer look. Let everything dry fully before starting the design.
Smooth Operator
To get super crisp edges on your flowers without multiple coats, prime the floral areas with a dab of white gesso before applying your final petal colors.
Step 2: Painting the Main Flowers
-
Outline placement:
Visually divide your pumpkin into thirds. You’ll want to place about three large floral focal points around the circumference so the design looks balanced from every angle. -
Paint first petals:
Load your small round brush with creamy white paint. Start with the large flower shown on the left: paint elongated teardrop shapes radiating from a central point. -
Layering petals:
Keep the petal edges slightly irregular for a natural look. Notice how the petals slightly overlap; don’t stress about perfect symmetry. -
Add the bottom flower:
Paint a second, semi-open flower form lower down (like the one near the bottom right). This shape is more like a wide cup or bowl profile. -
Define centers:
Once the white paint is dry, use a detail brush to dab a textured center. For the main flower, mix a tiny bit of brown into yellow/gold and stipple small dots in the middle. -
Add shadows:
Mix a very watery grey or tan wash. Very lightly sweep this along the inner edges of the white petals to give them dimension and separate the layers.
Step 3: Leaf and Stem Details
-
Draw grand stems:
Switch to your fine liner brush and black paint. Draw long, sweeping curves connecting your flowers. Let these lines flow naturally with the pumpkin’s ribs. -
Paint dark leaves:
Add solid black leaves branching off the main stems. Keep these slender and pointed, varying their direction. -
Add accent leaves:
Using a dark green or mixed grey-green color, paint a few textured leaves near the main flower. Add vein details with a dry brush or fine white lines. -
Create golden foliage:
Using gold or tan paint, add sprigs of lighter foliage. These contrast beautifully against the red background. Use the tip of the round brush to create small, leaf-like dashes. -
Add whimsical twigs:
Paint delicate, thin branches with the liner brush in tan or white. Add tiny dots at the ends to resemble buds or berries. -
Refine outlines:
Go back with your finest brush and add very thin black outlines around parts of the white flowers or gold leaves to make them pop. -
Final dry:
Allow the entire design to cure for at least an hour. If you plan to put this outside, apply a matte spray sealer to protect your artwork.
Gilded Touch
Use metallic gold leaf paint instead of standard matte gold acrylic for the accent leaves. It will catch the candlelight beautifully in the evening.
Now you have a stunning botanical centerpiece that adds an elegant touch to your autumn display
Red Pumpkin With Hand-Lettered Quote
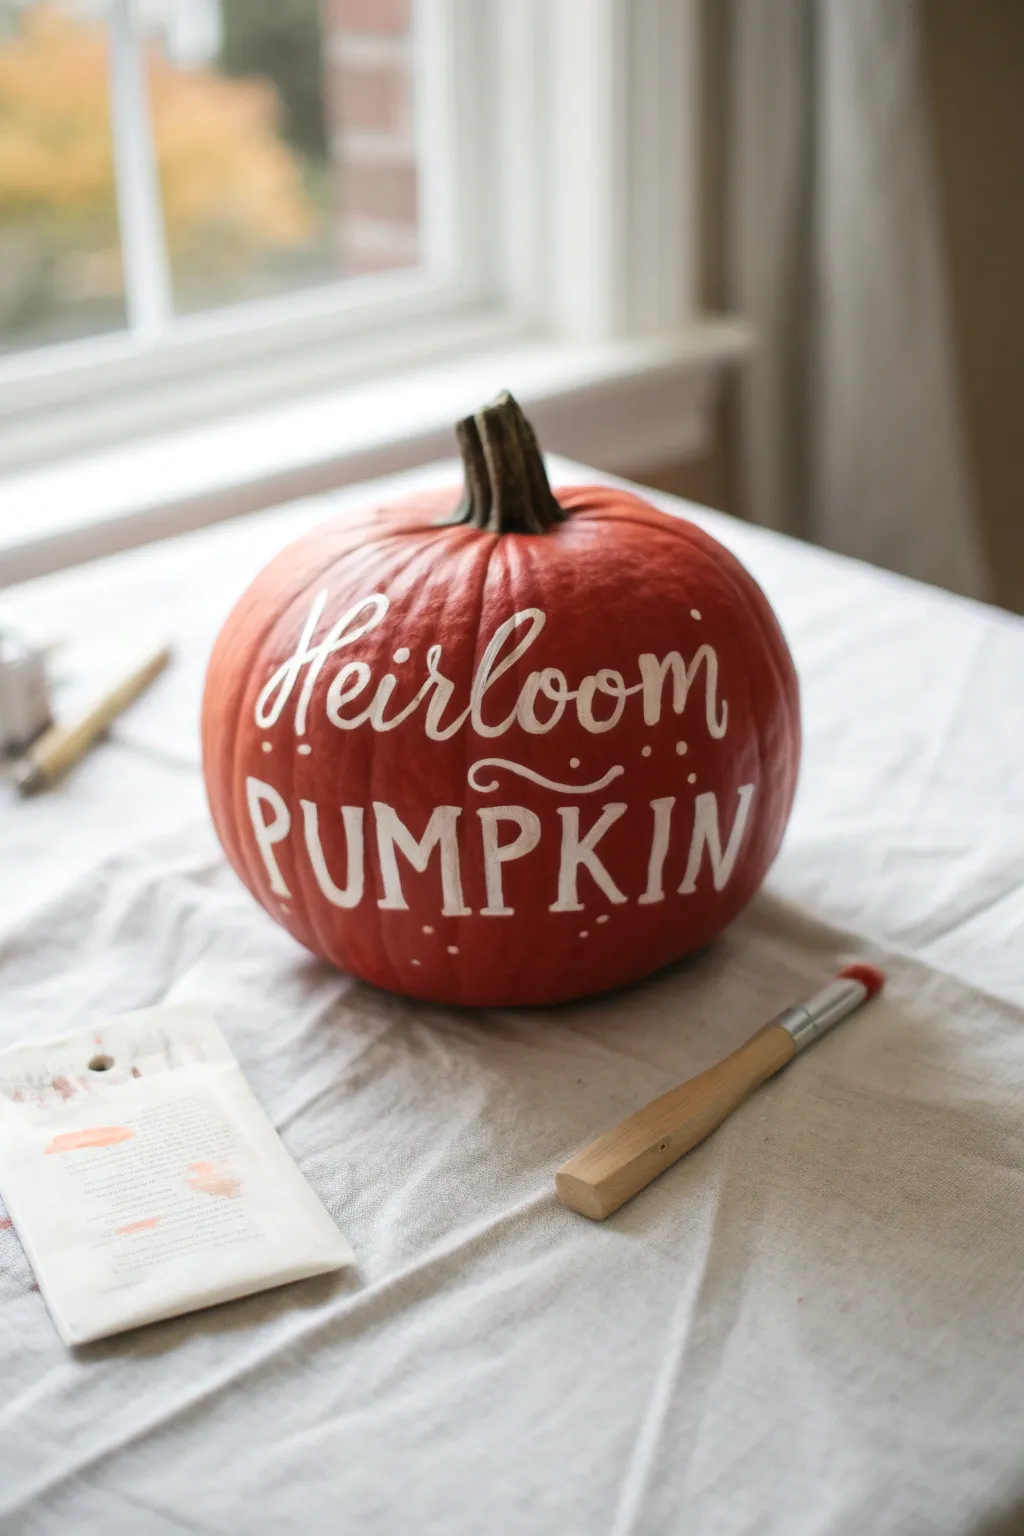
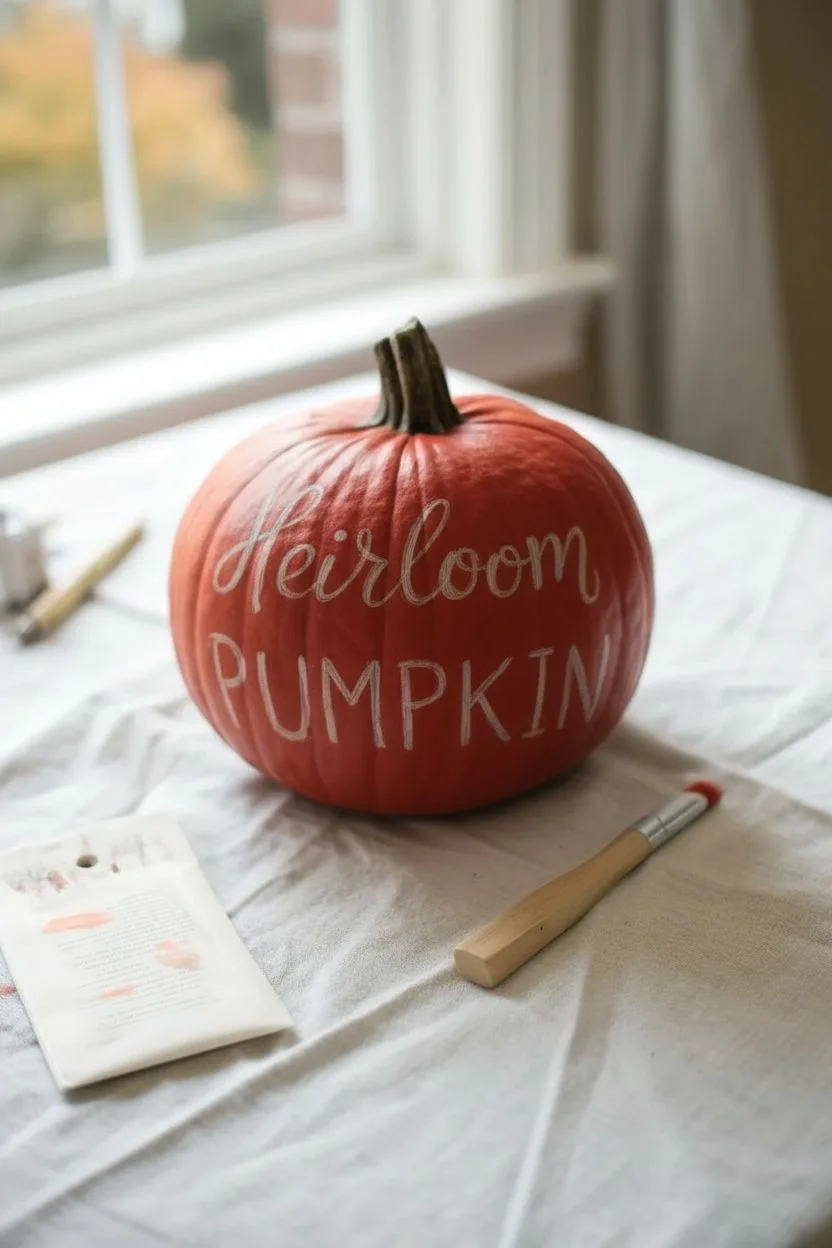
Elevate a simple red pumpkin into a charming piece of autumn decor with delicate hand-lettering. The crisp white script against the deep reddish-orange skin creates a sophisticated, bespoke look perfect for a centerpiece or porch display.
Step-by-Step Tutorial
Materials
- Medium-sized red or reddish-orange pumpkin (real or faux)
- White acrylic craft paint or white paint pen (medium tip)
- Small round paintbrush (size 1 or 2) if using bottled paint
- Soap and water for cleaning
- Soft cloth or paper towel
- Pencil or white chalk (for drafting)
- Damp cotton swabs (for corrections)
- Acrylic sealer spray (optional, matte finish)
Step 1: Preparation
-
Clean the surface:
Begin by thoroughly washing your pumpkin with mild soap and water. You need to remove any dirt, oil, or wax that might prevent the paint from adhering properly. -
Dry completely:
Wipe the pumpkin down with a soft cloth and let it air dry for at least 30 minutes to ensure no moisture remains in the crevices. -
Draft your design:
Using a pencil or a piece of white chalk, lightly sketch the words ‘Heirloom’ and ‘PUMPKIN’ onto the face of the pumpkin. Don’t press too hard; you just want a faint guide. -
Check spacing:
Step back and look at your drafting. Ensure the cursive ‘Heirloom’ is centered above ‘PUMPKIN’ and that the text follows the natural curve of the pumpkin rather than fighting against it.
Paint Slipping?
If the paint beads up or slips on a real pumpkin’s skin, lightly buff the area with fine-grit sandpaper or a scouring pad to create some ‘tooth’ for the paint to grip.
Step 2: Lettering
-
Prepare your paint:
Shake your paint pen vigorously or squeeze a small amount of white acrylic paint onto a palette. I like to test the flow on a scrap piece of paper first to ensure smoothness. -
Start the script:
Begin with the word ‘Heirloom’ in a loose cursive style. Use light pressure for the upstrokes to keep them thin. -
Add weight to downstrokes:
Go back over the downward strokes of your cursive letters, adding a little more thickness to create that classic calligraphy faux-brush look. -
Letter the bottom word:
Move on to the word ‘PUMPKIN’ below the script. Use tall, simple sans-serif block letters for contrast against the flowy script above. -
Thicken the block letters:
Go over the lines of ‘PUMPKIN’ a second time to make them bold and readable. Try to keep the line width consistent across all letters. -
Add the flourish:
Paint a small, wavy flourish or decorative swirl between the two words to visually connect them and fill the negative space. -
Dot details:
Using the tip of your brush or pen, add small dots scattered around the script and block letters to add texture and whimsy to the design.
Faux-Calligraphy Trick
Don’t know real calligraphy? Just write in cursive normally, then go back and manually thicken every single line that goes downward. It mimics the look perfectly.
Step 3: Finishing Touches
-
Clean up edges:
If any lines look shaky or uneven, use a damp cotton swab to gently wipe away the mistake while the paint is still wet, or touch up the edges with more paint once dry. -
Erase guide lines:
Once the paint is fully dry—give it a good hour—gently rub away any visible pencil or chalk marks with a clean, dry cloth or eraser. -
Assess opacity:
Check if the orange skin is showing through your white paint. If the white looks translucent, apply a second coat carefully over the existing letters for a solid, opaque finish. -
Seal the design:
If you plan to keep the pumpkin outside, lightly spray the painted area with a matte acrylic sealer to protect your detailed work from the elements.
Now you have a custom decorative pumpkin that adds a personal touch to your autumnal display


Cute Red Pumpkin Face With Rosy Cheeks
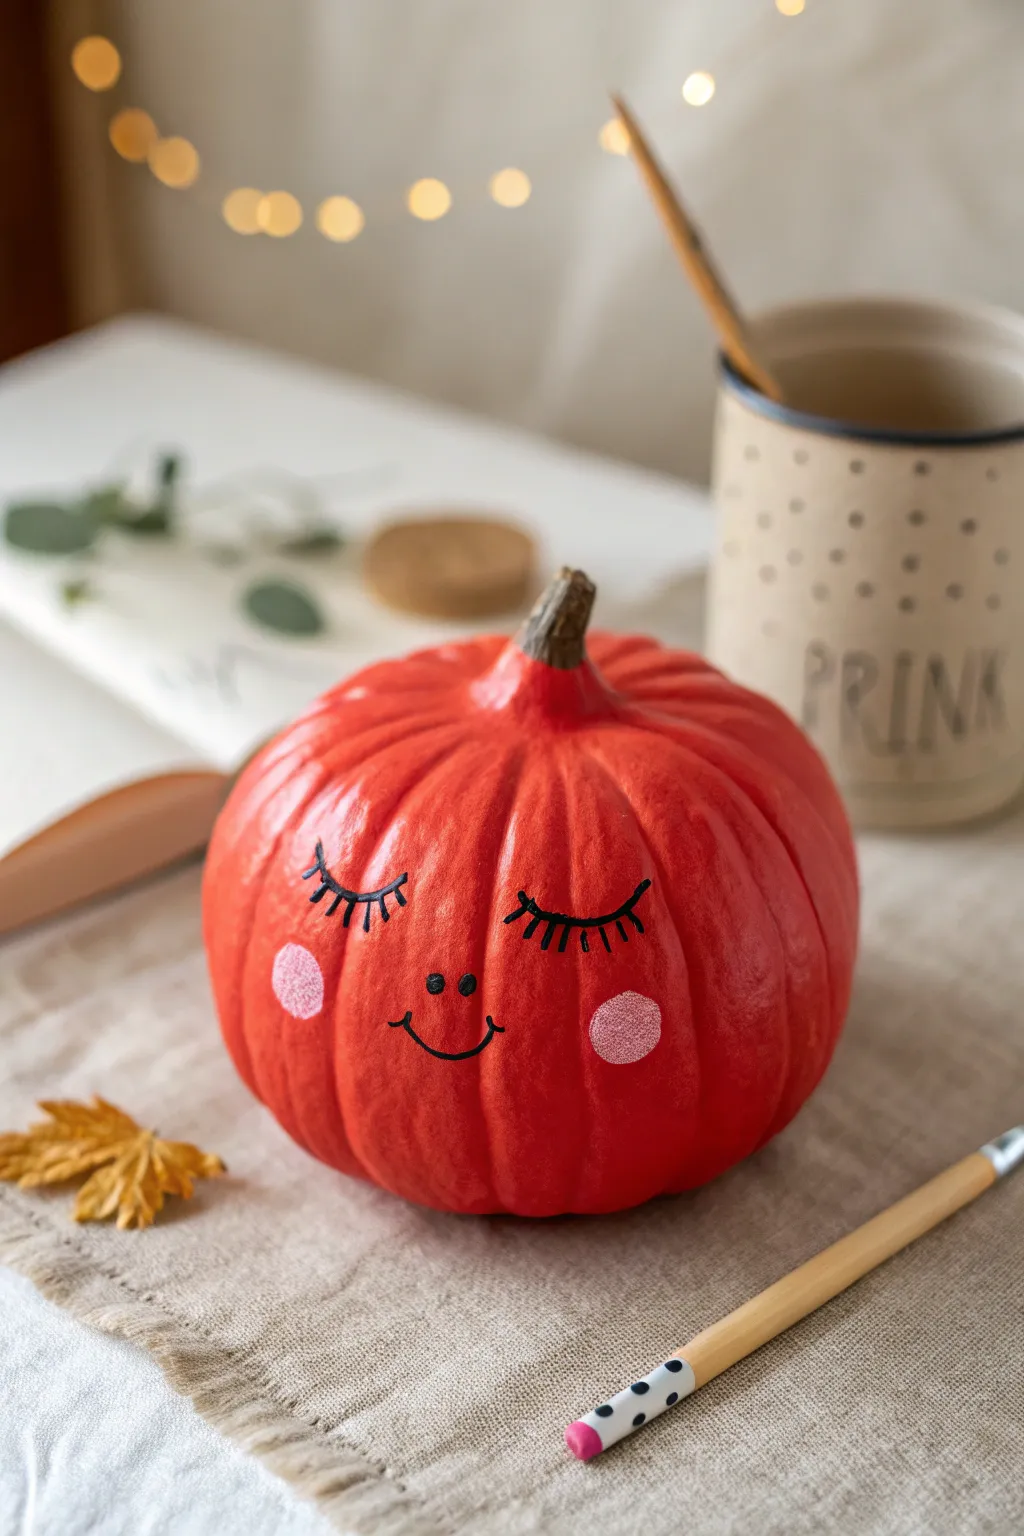
Transform a simple gourd into a charming character with this easy-to-create painted pumpkin project. The vibrant red base contrasts beautifully with delicate black features and soft pink cheeks, resulting in a sweet, sleeping visage.
Detailed Instructions
Materials
- Small to medium round pumpkin (real or faux)
- Bright red acrylic paint (matte or satin finish)
- Soft pink acrylic paint
- Black acrylic paint or a black paint pen
- Wide flat paintbrush
- Small detail paintbrush
- Small round paintbrush or foam pouncer
- Sealer spray (optional)
- Paper towel
- Water cup
Step 1: Base Coat
-
Clean surface:
Begin by wiping down your pumpkin with a damp cloth to remove any dirt or oils that might prevent the paint from sticking. Let it dry completely. -
First red layer:
Using your wide flat brush, apply a coat of bright red acrylic paint. Stroke in the direction of the pumpkin’s ribs for a natural look. -
Avoid the stem:
Carefully paint up to the base of the stem, but leave the stem natural brown for contrast. If you slip, just wipe the stem quickly with a damp paper towel. -
Dry thoroughly:
Allow the first coat to dry completely. This can take about 20-30 minutes depending on the thickness of your paint. -
Second coat:
Apply a second layer of red paint to ensure opaque coverage. Because bright red can conflict with an orange background, I find a second coat is almost always necessary for that true vibrant pop. -
Final drying:
Let the pumpkin sit until the red paint is fully dry to the touch before attempting to add face details.
Uneven Cheeks?
If one cheek circle is larger or lopsided, don’t wipe it! Let it dry, paint over it with your base red color to ‘erase’ it, and try again once dry.
Step 2: Facial Features
-
Cheek placement:
Imagine where the face should sit centered on the pumpkin’s smoothest side. Dip your small round brush or pouncer into the soft pink paint. -
Paint cheeks:
Dab two circular cheeks onto the lower third of the pumpkin face area. Try to keep the edges slightly soft rather than perfectly sharp circles. -
Let cheeks set:
Wait for the pink circles to dry. While you wait, practice drawing the closed eyes on a scrap piece of paper. -
Draw eye curves:
Using a very fine detail brush with black paint, or a black paint pen for easier control, draw two downward-curving crescents above the cheeks for closed eyelids. -
Add lashes:
Paint three to five small, delicate lashes extending outward from each eyelid curve. Vary the lengths slightly for a whimsical feel. -
Center smile:
Between the cheeks, slightly lower than the eyes, paint a small, simple ‘U’ shape for the mouth using the black paint. -
Smile details:
Add tiny perpendicular tick marks at the ends of the smile line to give it a stitched or dimpled appearance. -
Nose dots:
Just above the smile, add two tiny black dots for the nose/nostrils.
Step 3: Finishing Touches
-
Review and refine:
Step back and look at your pumpkin. If lines look faint, carefully retrace them with your black paint or pen. -
Seal (Optional):
If you plan to place this pumpkin outdoors, give it a light coat of clear matte sealer spray to protect your artwork.
Add Sparkle
Mix a tiny bit of iridescent glitter into your pink cheek paint before applying, or glue a tiny rhinestone at the corner of the eye.
Enjoy your cheerful new autumn friend as a bright spot in your seasonal decor
Red Pumpkin Disguised as a Giant Tomato
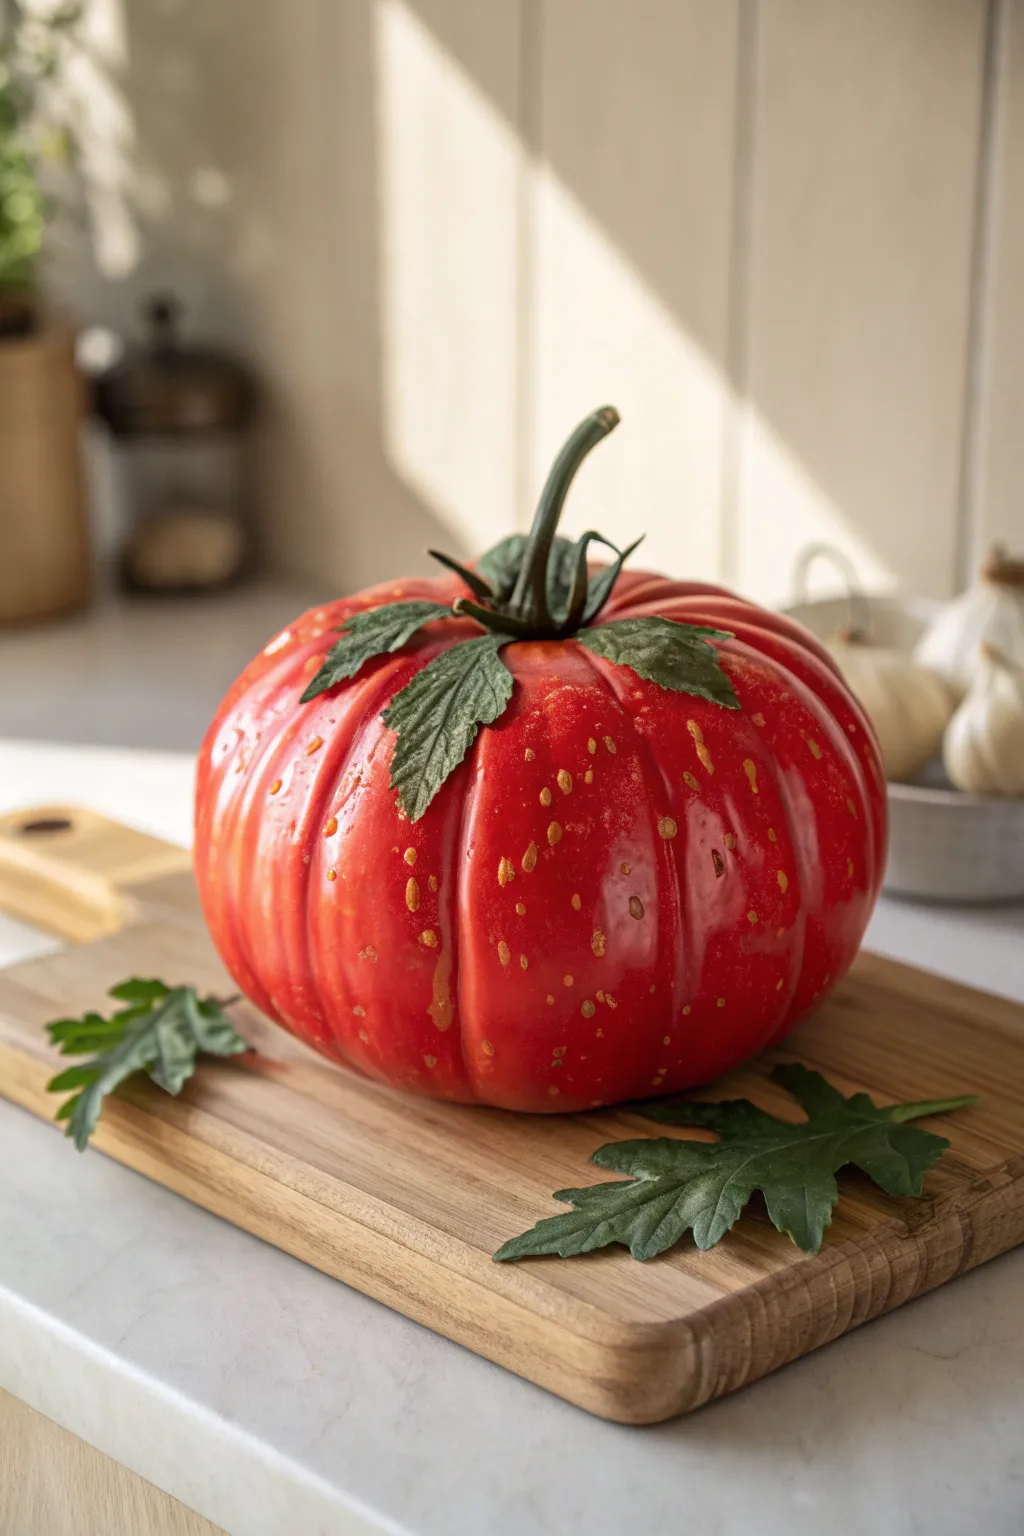
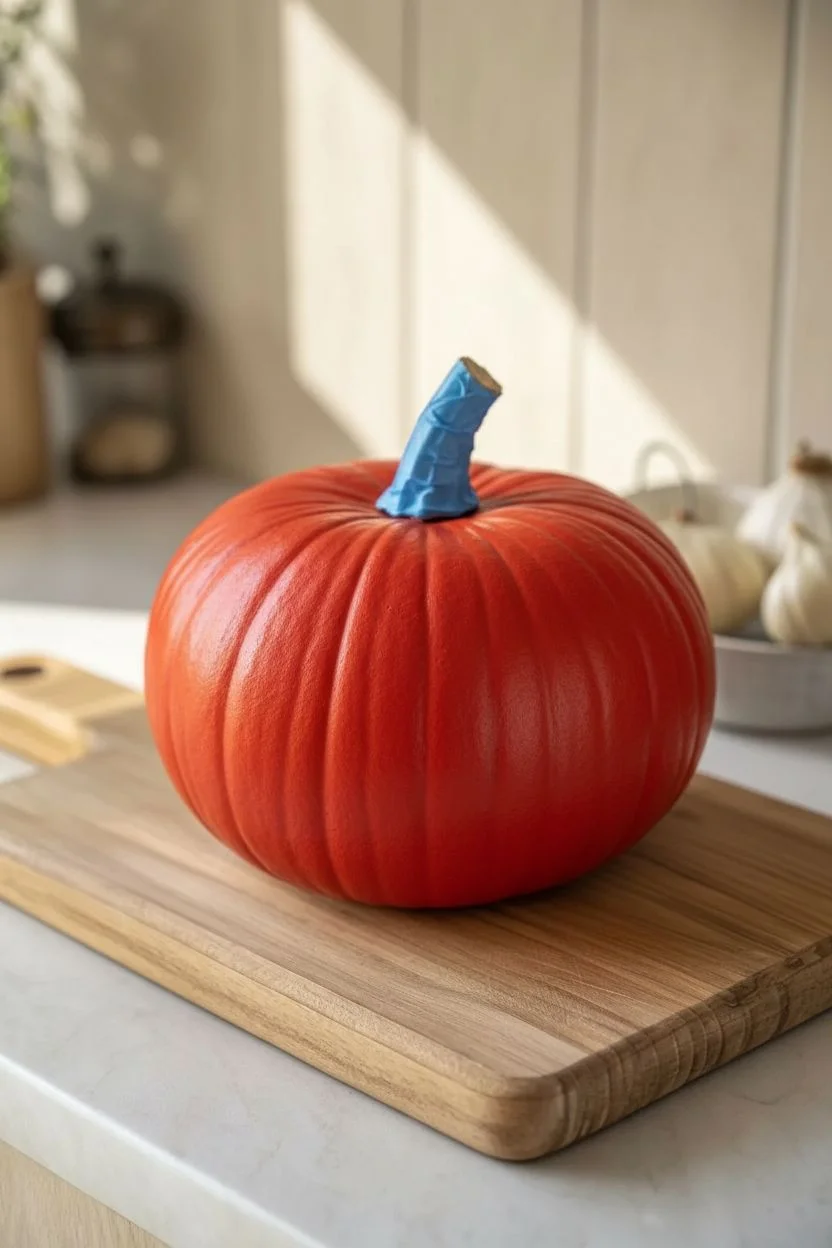
Transform a standard pumpkin into a strikingly realistic giant heirloom tomato with this clever trompe-l’œil painting project. By layering rich reds and subtle yellow speckles, you’ll create a garden-fresh centerpiece that warrants a double-take.
Step-by-Step
Materials
- Medium-sized pumpkin with deep vertical ribs (Cinderella or Fairytale varieties work best)
- Acrylic craft paint (bright tomato red, deep crimson, golden yellow, pale green)
- Matte finish spray sealant
- Glossy finish spray sealant (or clear gloss varnish)
- Faux tomato vine leaves or silk greenery
- Wide flat paintbrush
- Medium round paintbrush
- Old toothbrush or stiff bristle brush
- Hot glue gun and glue sticks
- Painter’s tape
- Paper palette or plate
Step 1: Base Preparation
-
Clean the surface:
Begin by wiping down your pumpkin with a damp cloth to remove any dirt or field debris. Dry it thoroughly with a paper towel to ensure the paint adheres properly. -
Prime the stem:
Wrap a piece of painter’s tape carefully around the base of the stem to protect it from the red paint. If the pumpkin’s natural stem is too thick or pumpkin-like, you might tape it off to paint green later, but preserving the natural brown stem often adds realism. -
Apply base coat:
Using your wide flat brush, apply a coat of bright tomato red acrylic paint over the entire surface of the pumpkin. Don’t worry about perfect opacity yet; just get the color down.
Uneven Coverage?
If the orange pumpkin skin shows through the red paint, don’t just pile on thick paint. Apply multiple thin layers, letting each dry fully, to build up a rich, opaque color without brushstrokes.
Step 2: Layering Color
-
Deepen the shading:
Once the base is dry to the touch, mix a small amount of deep crimson into your red paint. Apply this darker shade into the deep creases between the pumpkin’s ribs to exaggerate the “lobes” of the tomato. -
Add highlights:
Mix a tiny drop of golden yellow into your original bright red. Brush this lighter, warmer red onto the highest points of the ribs where light would naturally hit a round tomato. -
Blend the transitions:
While the paint is still slightly tacky, use a damp, clean brush to softly blend the dark creases into the lighter ridges. This gradient creates that plump, organic look essential for an heirloom variety. -
Create distinct discoloration:
Real heirloom tomatoes often have greenish or yellowish shoulders near the stem. Lightly dry-brush a mixture of pale green and yellow near the top center, just around where the stem meets the fruit. -
Let it cure:
Allow these layers to dry completely. I prefer to let this sit for at least an hour so the next step doesn’t muddy the carefully blended colors.
Step 3: Texturing and Details
-
Prepare the speckle mix:
Dilute a small amount of golden yellow paint with a few drops of water until it has an inky consistency. -
Splatter texture:
Dip an old toothbrush into the thinned yellow paint. Use your thumb to flick the bristles, spraying a fine mist of tiny yellow dots across the red skin. Focus these clusters randomly to mimic natural skin imperfections. -
Paint larger spots:
Using a fine-tip brush, manually paint a few slightly larger, irregular yellow-orange spots or ‘scars’ that tomatoes often develop as they grow. -
Seal the color:
Once all paint requires is fully dry, take the pumpkin to a well-ventilated area and apply a coat of glossy spray sealant. The high-gloss finish is crucial for mimicking the shiny, taut skin of a ripe tomato.
Heirloom Authenticity
Make it a ‘Zebralife’ tomato! Instead of just red, paint subtle vertical stripes of dark green and plum purple running down the ribs before adding the final gloss coat.
Step 4: The Greenery
-
Prepare the leaves:
Take your faux tomato leaves or similar jagged silk greenery. Trim them from their plastic stems so you have individual leaf clusters. -
Curve the leaves:
Gently bend the localized wire inside the faux leaves (if present) or crease the fabric so they curl downward, rather than sticking straight out. -
Attach the calyx:
Apply hot glue to the underside of the leaves and press them firmly onto the top of the pumpkin, radiating outward from the central stem. This creates the tomato’s calyx. -
Stem adjustment:
If your pumpkin stem looks too dry and brown, lightly paint it with a wash of dark sap green to make it look freshly picked.
Now place your giant garden imposter on a cutting board or in a rustic basket to confuse and delight your guests
Red Pumpkin With Modern Geometric Blocks
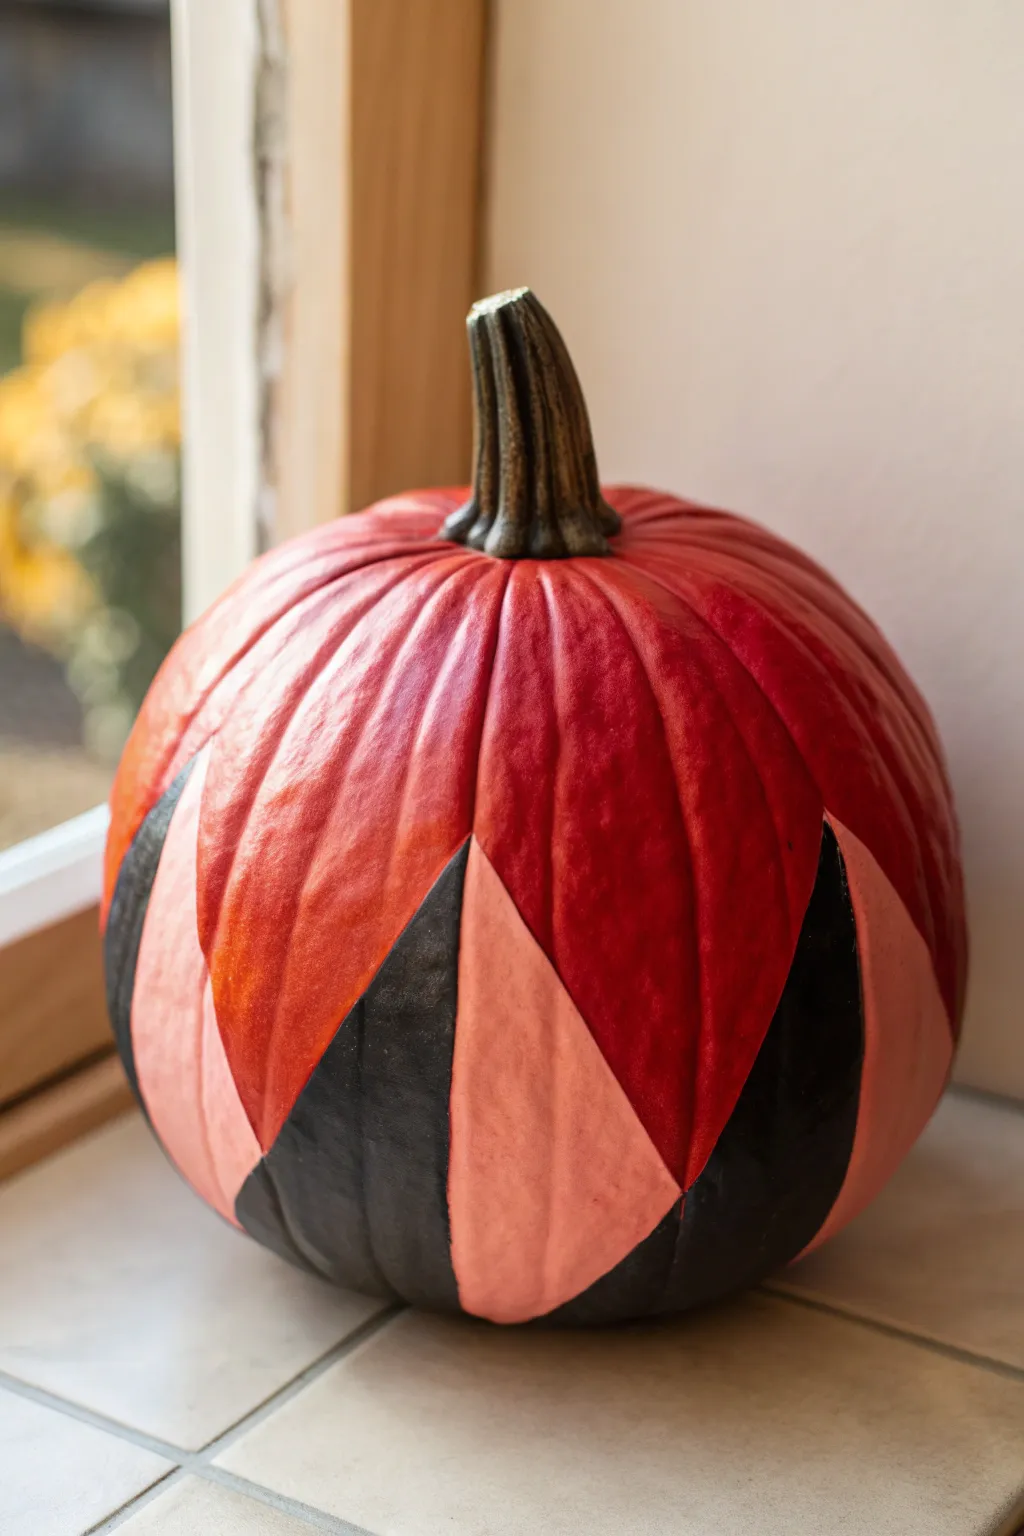
Give your autumn decor a sharp, modern edge with this strikingly painted pumpkin design. By combining deep red with bold black and soft coral triangles, you create a sophisticated geometric pattern that beautifully contrasts with the pumpkin’s natural curves.
Detailed Instructions
Materials
- Medium-sized round pumpkin
- Acrylic craft paint (deep red/crimson)
- Acrylic craft paint (black)
- Acrylic craft paint (soft pink or coral)
- Medium flat paintbrush (for filling large areas)
- Small angled shader brush (for crisp lines)
- Painter’s tape or masking tape (approx. 0.5 – 1 inch width)
- Pencil
- Damp cloth or paper towel
- Palette or paper plate
- Clear matte sealer spray (optional)
Step 1: Preparation and Base Layout
-
Clean the surface:
Before you begin, wipe your pumpkin down thoroughly with a damp cloth to remove any dirt or oils. A clean surface ensures the paint adheres properly and doesn’t flake later. -
Dry completely:
Allow the pumpkin to air dry fully. Applying painter’s tape to a damp surface will result in poor adhesion and potential paint bleeding. -
Plan the geometry:
Visualize where your colorful ‘spikes’ or triangles will go. The design relies on triangles rising from the base, alternating in height. You can lightly sketch these points with a pencil if you feel unsure about freehanding the tape. -
Apply the first tape lines:
Use your painter’s tape to create the first set of triangles. Place strips of tape starting from the bottom of the pumpkin angling upwards to a sharp point, then back down. These taped-off triangles will eventually become your colored blocks. -
Secure the edges:
Run your fingernail or a credit card firmly along the edges of the tape to seal it tightly against the pumpkin skin. This is crucial for achieving those crisp, geometric lines.
Tape Trick
Before painting, brush a thin layer of matte medium over the tape edges. This seals the tape and prevents color bleed perfectly.
Step 2: Painting the Red Canopy
-
Mix your red:
Squeeze out a generous amount of deep red acrylic paint. If the color looks too bright, mixing in a tiny dot of black can deepen it to a richer cranberry shade. -
Paint the upper section:
Using your medium flat brush, paint the entire top portion of the pumpkin above your taped triangles. Don’t worry about painting over the tape edges—in fact, painting slightly onto the tape helps create a sharper line later. -
Mind the stem:
Carefully paint around the base of the stem, but leave the stem itself natural for a rustic contrast. Using the small angled brush here helps get close without accidentally marking the stem. -
Apply a second coat:
Let the first layer of red dry to the touch, then apply a second coat for full opacity. The deep red needs to be solid to contrast effectively with the other colors. -
Remove tape for the red edge:
Once the red paint is tacky but not fully dry, carefully peel back the tape. This reveals the negative space where your geometric blocks will go.
Metallic Twist
Swap the soft pink paint for a metallic gold or copper. The shimmer adds a glamorous touch against the matte black and red.
Step 3: Adding the Geometric Blocks
-
Define the black triangles:
Now you will fill in specific open triangular spaces with black. You can re-tape the dried red edge if you have a shaky hand, but I generally prefer using a small angled brush to cut in the line carefully. -
Fill the black sections:
Paint select triangles black. In the design shown, the black triangles often sit lower or alternate with the lighter colors. Apply two thin coats rather than one thick one to avoid drips. -
Switch to coral:
Clean your brush thoroughly or switch to a fresh one. Dip into your soft pink or coral paint. -
Paint the pink triangles:
Fill the remaining triangular spaces with the coral paint. Be mindful where the pink meets the black or red; use the small angled brush to keep the boundary sharp and clean. -
Refine the edges:
Inspect the meeting points of your three colors. If any lines look wobble, use the edge of your angled brush with a tiny bit of paint to straighten them out. -
Let it cure:
Allow the entire pumpkin to dry for several hours. Acrylic paint dries fast on top but can remain soft underneath for a while. -
Seal the deal (Optional):
If you plan to display this pumpkin on a porch, give it a light misting of clear matte sealer to protect the paint from moisture.
Place your finished geometric masterpiece on a sunny windowsill or mantle to enjoy the modern pop of color.
Red Galaxy Pumpkin With Pinprick Stars
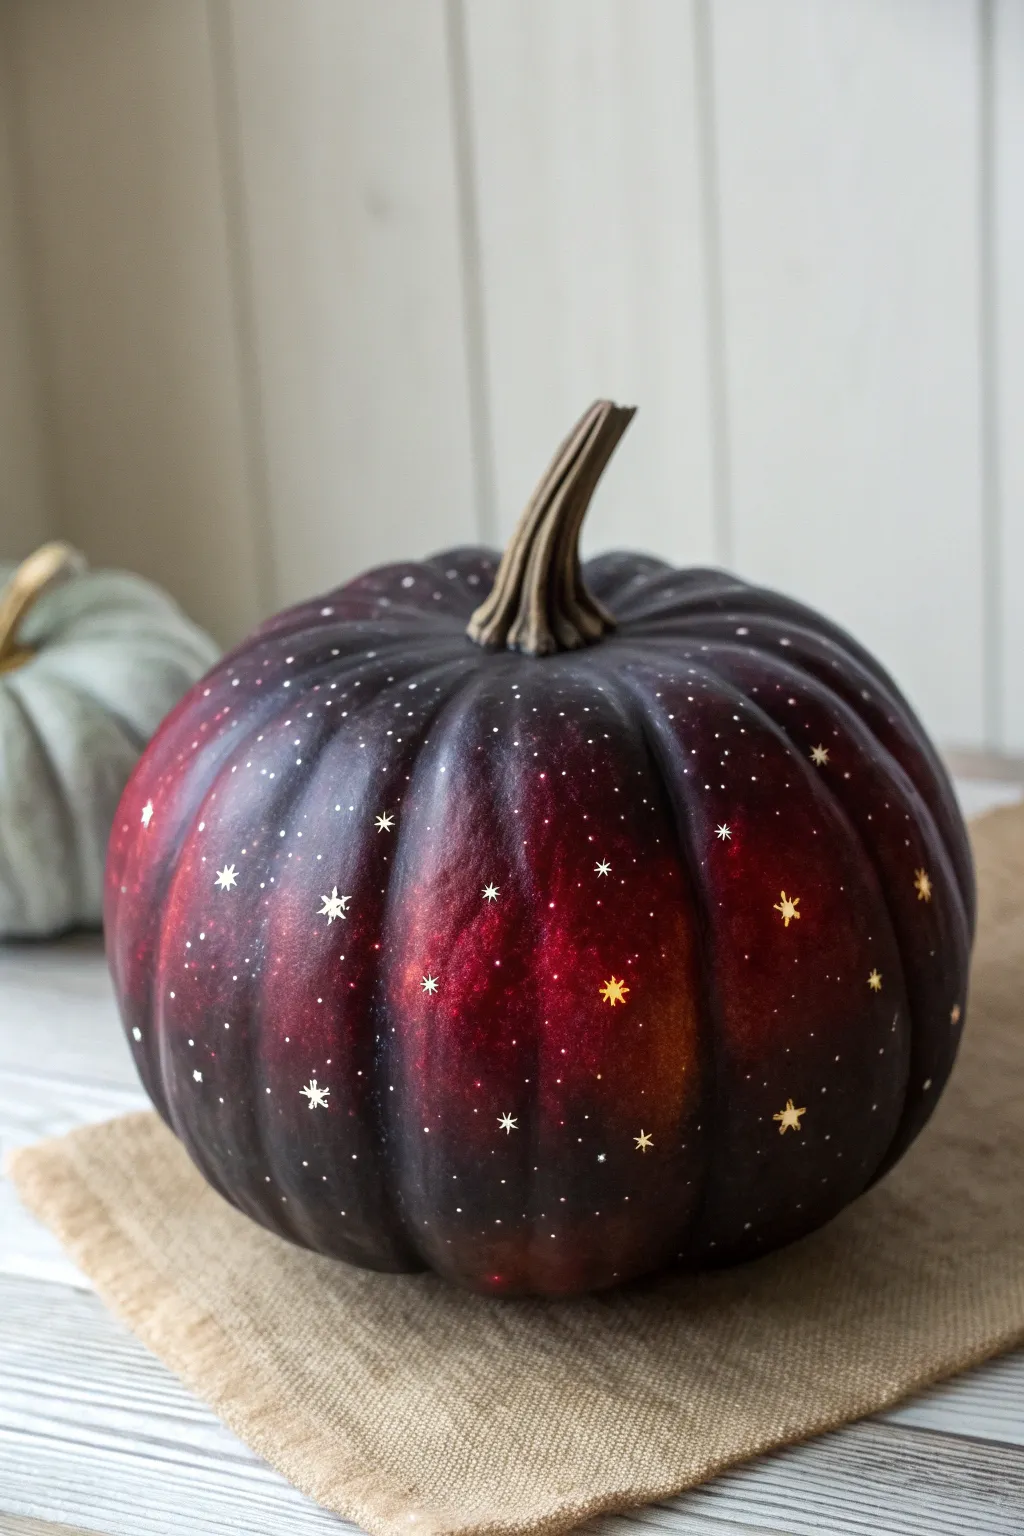
Transform a standard pumpkin into a deep space marvel with this galaxy-inspired design. By blending rich crimsons and midnight purples with illuminating pinpricks, you’ll create a glowing masterpiece that feels both cosmic and cozy.
How-To Guide
Materials
- Medium-sized pumpkin (real or carvable foam)
- Black acrylic paint
- Deep red acrylic paint (crimson or maroon)
- Purple acrylic paint
- Metallic gold paint pen
- Sponge applicators or sea sponge
- Drill with very small bit (1/16 or 1/8 inch)
- Awl or clay sculpting needle tool
- Battery-operated LED string lights
- Painter’s tape
- Clear matte sealant spray (optional)
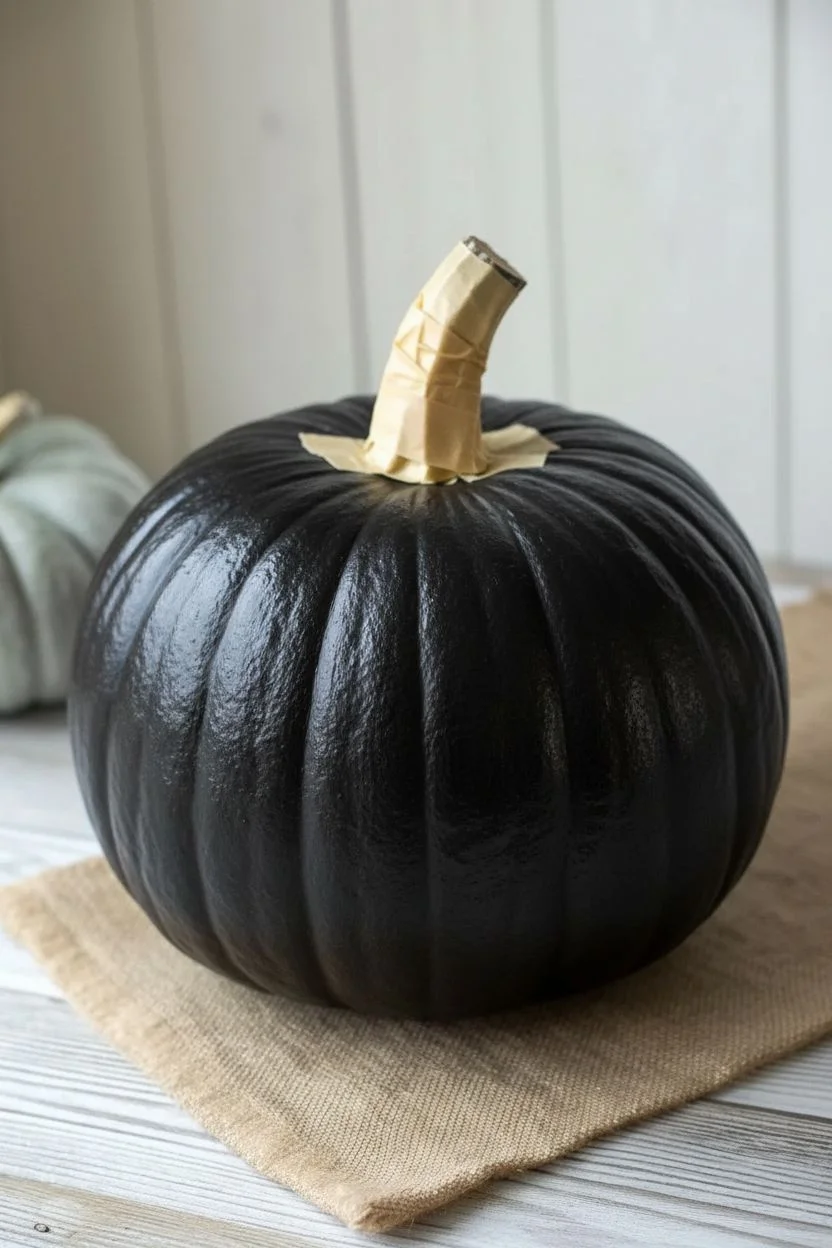
Step 1: Preparation and Base Coat
-
Clean the surface:
Wipe down your pumpkin with a damp cloth to remove any dirt or oils. Let it dry completely to ensure the paint adheres well. -
Protect the stem:
Wrap the stem carefully with painter’s tape. We want to keep that natural wood look to contrast with the dark galaxy colors. -
Apply the first dark layer:
Using a sponge applicator, dab a layer of black acrylic paint over the entire pumpkin. It doesn’t need to be perfectly opaque yet; a slightly textured base is actually better for the galaxy effect. -
Let it dry:
Allow the base coat to dry to the touch, usually about 20-30 minutes.
Step 2: Creating the Galaxy Effect
-
Sponge on the red:
Dip a sea sponge or textured sponge into your deep red paint. Blot off the excess on a paper towel so it’s relatively dry. -
Build the nebula clouds:
Lightly dab the red paint in irregular cloud-like patches around the pumpkin. Focus on the center of the rounded sections, leaving the deep grooves mostly black. -
Layer with purple:
While the red is still slightly tacky, dab small amounts of purple paint along the edges where the red meets the black. This creates a seamless transition between the colors. -
Add depth with black:
If you covered too much area, I like to go back in with a tiny bit of black on a clean sponge to darken the edges again, creating more contrast. -
Seal the paint:
Once you are happy with your galaxy blend, let it dry completely. You can spray a light coat of matte sealant now to protect the paint handling during the drilling phase.
Paint Lifting?
If the sponge pulls paint off the pumpkin during layering, you are pressing too hard or the bottom layer is too wet. Let it dry longer and use a lighter dabbing motion.
Step 3: Adding the Stars
-
Plot your constellations:
Using a white chalk pencil or just visualizing it, identify where you want your star clusters. Grouping them denser in the red ‘nebula’ areas often looks best. -
Drill the light holes:
Using a drill with a small bit, create holes scattered across the pumpkin. Drill randomly to mimic a natural night sky. -
Create tiny pinpricks:
For the tiniest stars, use an awl or a clay needle tool to poke small holes that don’t need the power drill. These add delicate texture. -
Clean the holes:
If any pumpkin flesh or paint clogs the holes, use a toothpick to push the debris through to the inside. -
Draw larger stars:
Take your metallic gold paint pen and hand-draw four-pointed stars and tiny dots randomly over the surface. Place some directly over drilled holes so they glow, and others on solid sections.
Cosmic Sparkle
Mix a tiny amount of fine gold glitter into your clear sealant spray for an all-over shimmer that catches the light even when the pumpkin isn’t lit from within.
Step 4: Final Assembly
-
Access the interior:
Cut a hole in the bottom of the pumpkin rather than the top. This preserves the look of the stem and upper paint job. -
Clean out the guts:
If using a real pumpkin, scoop out the seeds and flesh thoroughly. The thinner the wall, the better the light will shine through. -
Insert lighting:
Place a bundle of battery-operated LED string lights inside. String lights are better than a single candle because the multiple bulbs fill the pumpkin with an even glow. -
Remove tape:
Peel off the painter’s tape from the stem to reveal the natural finish.
Place your creation in a dimly lit corner and watch your personal galaxy come to life
Carved Silhouette Pumpkin With Red Backlight
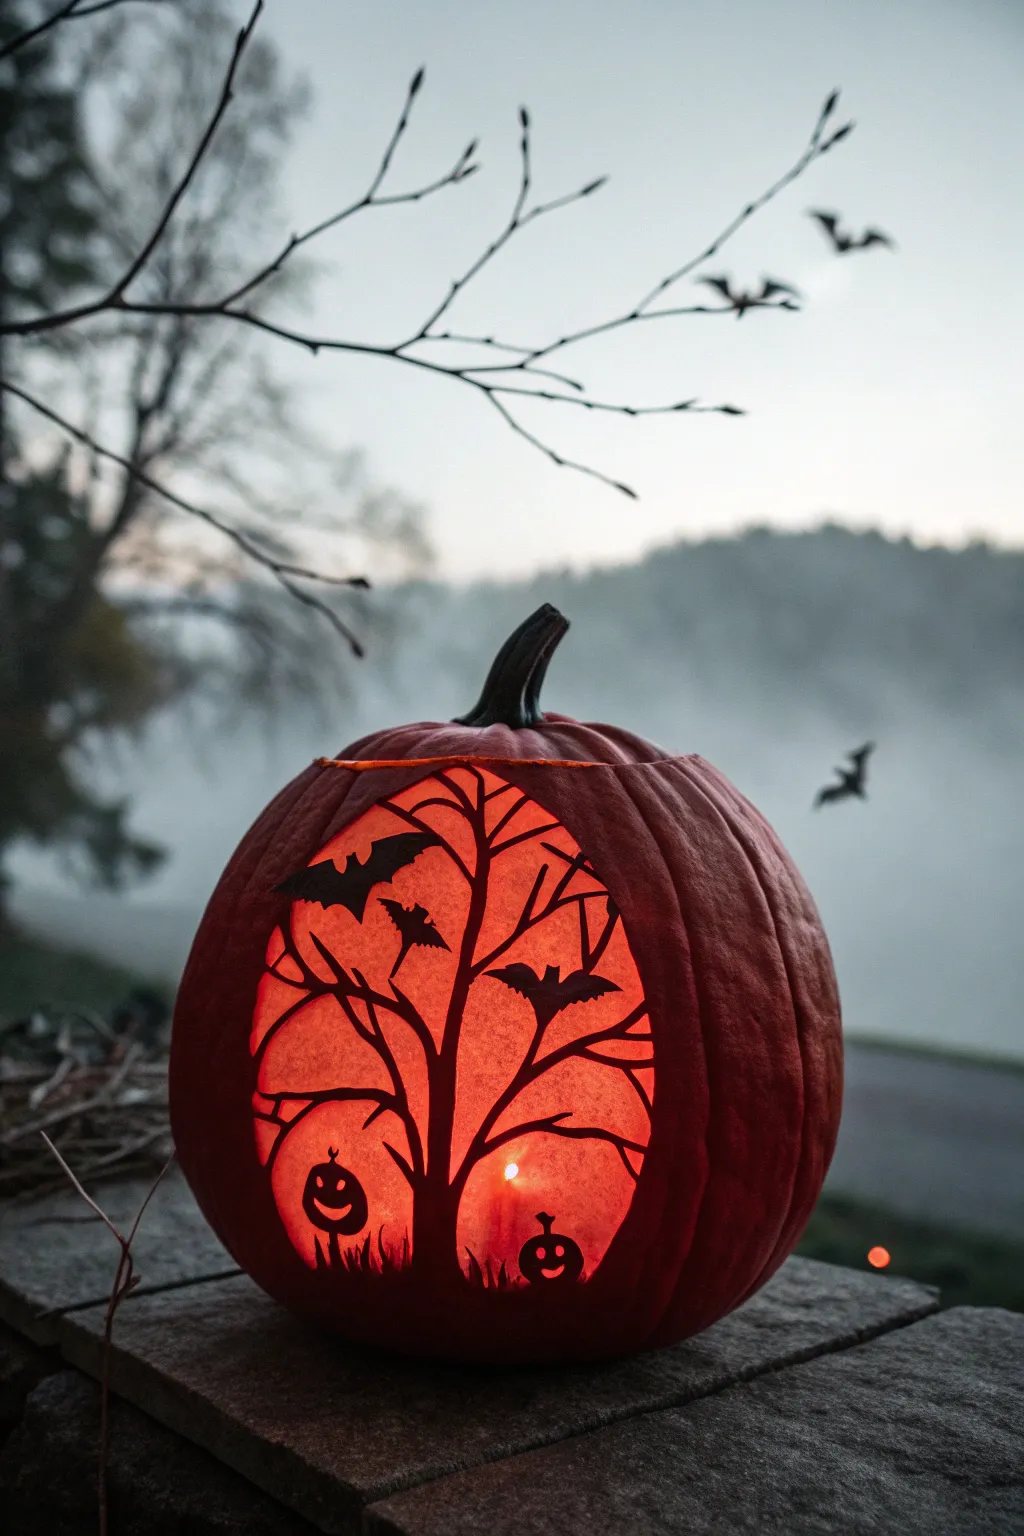
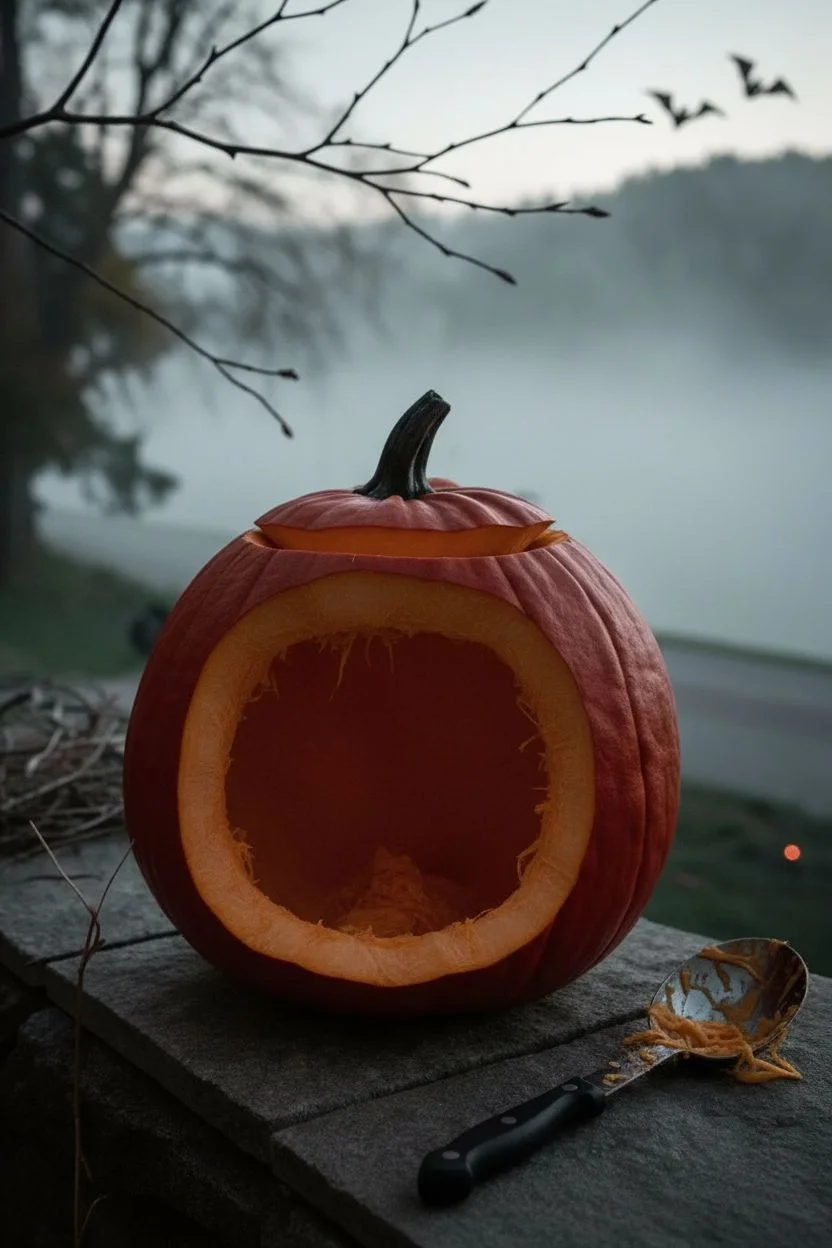
This striking pumpkin design swaps the traditional jack-o’-lantern face for a haunting scene of bare trees, bats, and tiny smiling pumpkins. By combining deep carving with surface shading, the warm orange glow creates a dramatic, atmospheric silhouette perfect for a foggy Halloween night.
Step-by-Step Guide
Materials
- Large, smooth-skinned pumpkin (preferably reddish-orange)
- Serrated pumpkin carving knife
- Linoleum cutter or clay loop tools
- Fine-point poking tool or awl
- Transfer paper and masking tape
- Scoop or large spoon
- Printed tree and bat silhouette template
- X-Acto knife or craft scalpel
- Red-tinted LED light or standard candle with red cellophane
- Petroleum jelly (optional)
Step 1: Preparation & Gutting
-
Open the top:
Begin by cutting a circular lid around the pumpkin’s stem. Angle your serrated knife inward at a 45-degree angle so the lid sits securely on top without falling in later. -
Clear out the interior:
Using your scoop or a large metal spoon, vigorously scrape out all the seeds and stringy pulp. Don’t be afraid to scrape hard; you want a clean interior surface. -
Thin the front wall:
For this design to glow properly, the wall needs to be thinner than usual. Scrape the inside of the ‘face’ side until the pumpkin wall is about 3/4 to 1 inch thick. I find checking the thickness by feeling it with both hands helps ensure it’s uniform.
Step 2: Transferring the Design
-
Secure the template:
Tape your printed tree silhouette pattern onto the flattest side of the pumpkin. You may need to cut small slits in the paper edges to help it conform to the pumpkin’s curve without wrinkling. -
Transfer the outline:
Use your poking tool or awl to prick holes along every line of the design—trace the tree branches, the hanging bats, and the small pumpkins at the bottom. Keep the holes about 1/8 inch apart. -
Connect the dots:
Remove the paper pattern. If the holes are hard to see, you can lightly connect them with a water-soluble marker or flour dusted over the surface.
Depth Trick
Shave the flesh behind the tree branches slightly thinner than the rest of the background. This creates a ‘halo’ effect that makes the dark silhouette stand out more sharply.
Step 3: Carving the Silhouette
-
Define the perimeter:
Using an X-Acto knife or small detail blade, cut just through the pumpkin skin along the outer oval shape that frames the scene. Do not cut all the way through the wall yet. -
Peel the background skin:
Carefully peel away the pumpkin skin inside the oval frame, leaving the skin intact for the tree trunk, branches, bats, and mini pumpkins. The goal is to expose the flesh of the background while keeping the silhouette objects covered in skin. -
Shave the background:
Use a linoleum cutter or clay loop tool to scrape away layers of the exposed flesh in the background areas. Go deeper near the center and slightly shallower near the edges to create a glowing gradient. -
Check the light transmission:
Periodically place a flashlight inside the pumpkin to check your progress. You want the background flesh thin enough to glow bright orange-red, but thick enough to maintain structural integrity. Shave more where dark spots remain.
Hanging Bats
Make the bats 3D! Instead of just leaving them as skin, partially undercut their wings with an X-Acto knife and gently pry them outward slightly for a cool relief effect.
Step 4: Adding Details & Lighting
-
Carve the mini pumpkins:
For the tiny pumpkins at the base of the tree, switch back to your small knife. Carefully cut out their eyes and mouths completely for a bright, sharp contrast. -
Refine the branches:
Go back over the tree branches and bats with your detail knife to clean up any ragged edges of skin. A sharp line makes the silhouette pop against the glowing background. -
Final cleaning:
Wipe the surface with a damp cloth to remove any marker lines or pumpkin debris. Apply a thin layer of petroleum jelly to the cut edges to keep them fresh longer. -
Light it up:
Insert your light source. To achieve the deep red hue seen in the image, use a red LED light puck or wrap a clear jar containing a tea light with red heat-safe cellophane.
Place your masterpiece on a darkened porch steps and watch the spooky silhouette come to life
Red Pumpkin With Painted Flame Gradient

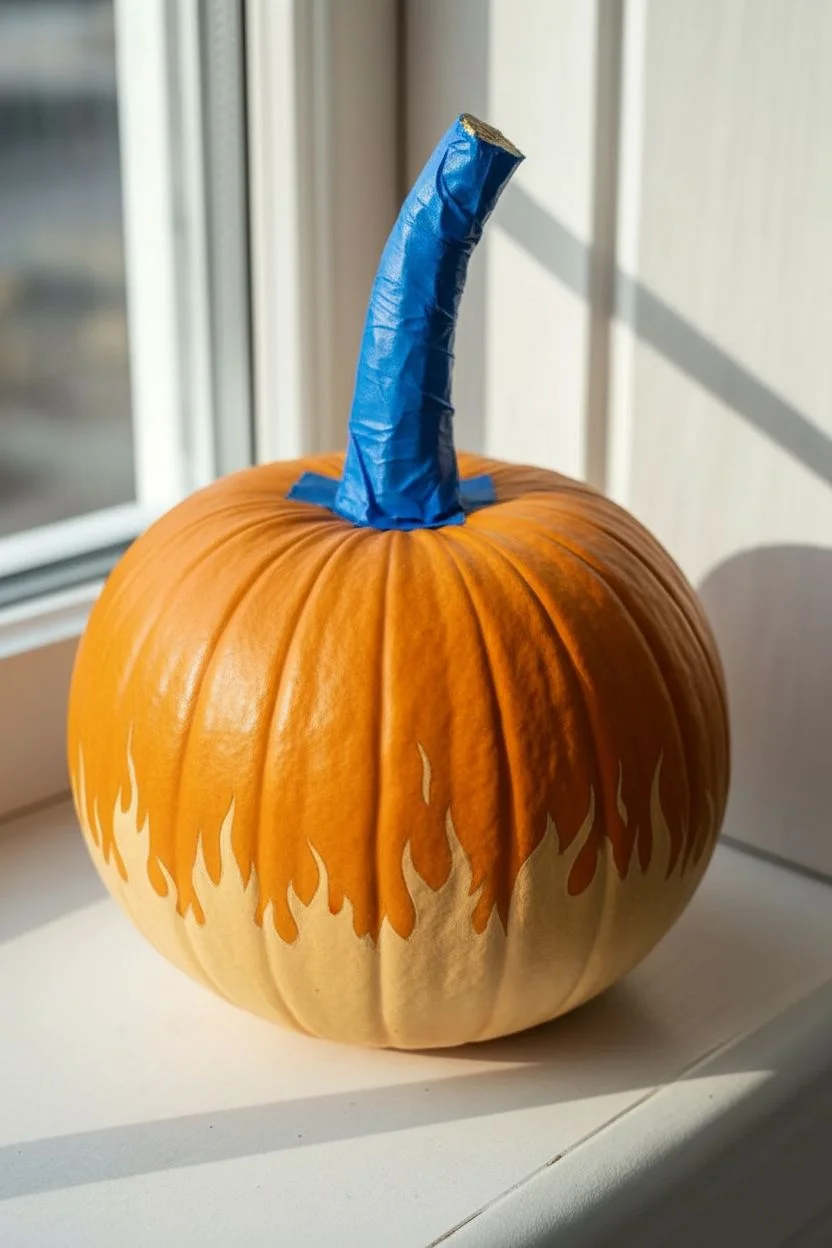
Transform a standard pumpkin into a blazing masterpiece with a stunning ombré effect. This project combines deep crimson hues with natural pumpkin tones, separated by stylized flame licks for a look that’s both elegant and fiery.
How-To Guide
Materials
- Medium-sized pumpkin (real or faux)
- Acrylic craft paint: Deep Red or Crimson
- Acrylic craft paint: Bright Orange
- Acrylic craft paint: Golden Yellow
- Acrylic craft paint: Cream or Pale Beige (optional, for base)
- Wide flat paintbrush (1-inch)
- Medium round paintbrush
- Small detail brush (0 or 1)
- Palette or paper plate
- Painter’s tape or masking tape (for stem protection)
- Damp cloth
- Matte clear acrylic sealer spray
Step 1: Preparation & Base Coat
-
Clean surface:
Begin by wiping down your pumpkin with a damp cloth to remove any dirt or oils. If using a real pumpkin, ensure it is completely dry before painting. -
Protect the stem:
Wrap the stem carefully with painter’s tape. This keeps the natural wood look intact while you work freely with the red paint around the top. -
Establish the horizon line:
Visualize a line about one-third of the way up from the bottom of the pumpkin. This is where your flame effect will begin; everything below this line will remain the natural pumpkin color. -
Base flame sketching:
Using a pencil or a very light wash of yellow paint, sketch the outline of the flames around the circumference. Draw curved, licking shapes that vary in height to create a dynamic fire effect.
Muddy Colors?
If your red and yellow blend into a murky brown, stop blending while wet. Let the red layer dry completely, then dry-brush the yellow flame tips over it.
Step 2: Painting the Flames
-
Yellow tip application:
Load your medium round brush with Golden Yellow paint. Carefully fill in the tips of your sketched flames, extending slightly downwards. -
Creating the transition:
Mix a small amount of Bright Orange with the Yellow. Paint the middle section of the flame shapes, blending it wet-into-wet with the yellow tips for a soft gradient. -
Defining the edges:
Switch to your small detail brush. Use pure Pale Beige or the natural pumpkin color to sharpen the bottom edges of the flames, ensuring the shape looks distinct against the unpainted bottom section.
Heat It Up
For a ‘hottest part of the fire’ look, add a tiny line of white paint right at the base of the yellow flames, then blend it upward slightly.
Step 3: The Crimson Gradient
-
Start from the stem:
Using the wide flat brush and your Deep Red paint, start painting from the top near the taped stem, working your way down the sides of the pumpkin. -
Work into the grooves:
Push the red paint deep into the vertical ribs of the pumpkin. The color should be solid and opaque at the top, so apply a second coat here if needed. -
Approaching the flames:
Stop the solid red application about an inch above your yellow flame tips. I find it helpful to leave a small gap where the blending will happen. -
Blending red to orange:
Mix a bit of Bright Orange into your Deep Red. Apply this transition color in the gap you left, pulling it downwards toward the flames. -
Connect to the flames:
Carefully paint around the yellow flame tips with the red-orange mix. You want the red to serve as the background ‘night sky’ or heat behind the flames.
Step 4: Refining & Sealing
-
Feather the edges:
Use a slightly damp, clean brush to gently feather the red paint where it meets the yellow flame tips. This softens the line so the fire looks like it’s glowing rather than pasted on. -
Highlighting:
Add tiny streaks of pure yellow or cream into the very center of the largest flame licks to increase the sense of heat and dimension. -
Review contrast:
Step back and check the contrast. If the flames get lost, darken the red paint immediately surrounding the flame tips to make them pop. -
Remove tape:
Once the paint is tacky but not fully cured, carefully peel off the painter’s tape from the stem to reveal the clean edge. -
Seal the work:
After the paint is completely dry (wait at least 2-3 hours), take the pumpkin outside and spray it with a light coat of matte clear acrylic sealer to protect the gradients.
Place your fiery creation on a windowsill or porch step to add a warm glow to your autumn decor
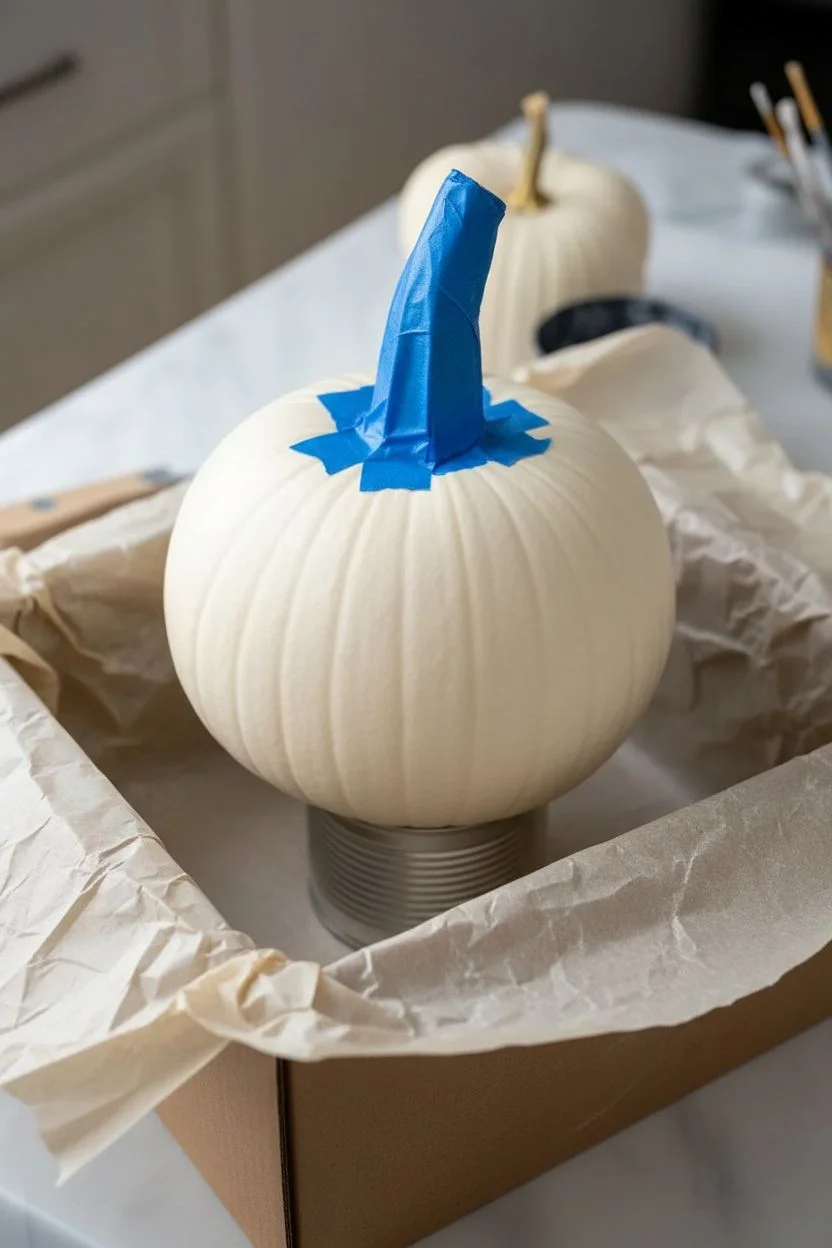
Marbled Red Pour-Paint Pumpkin
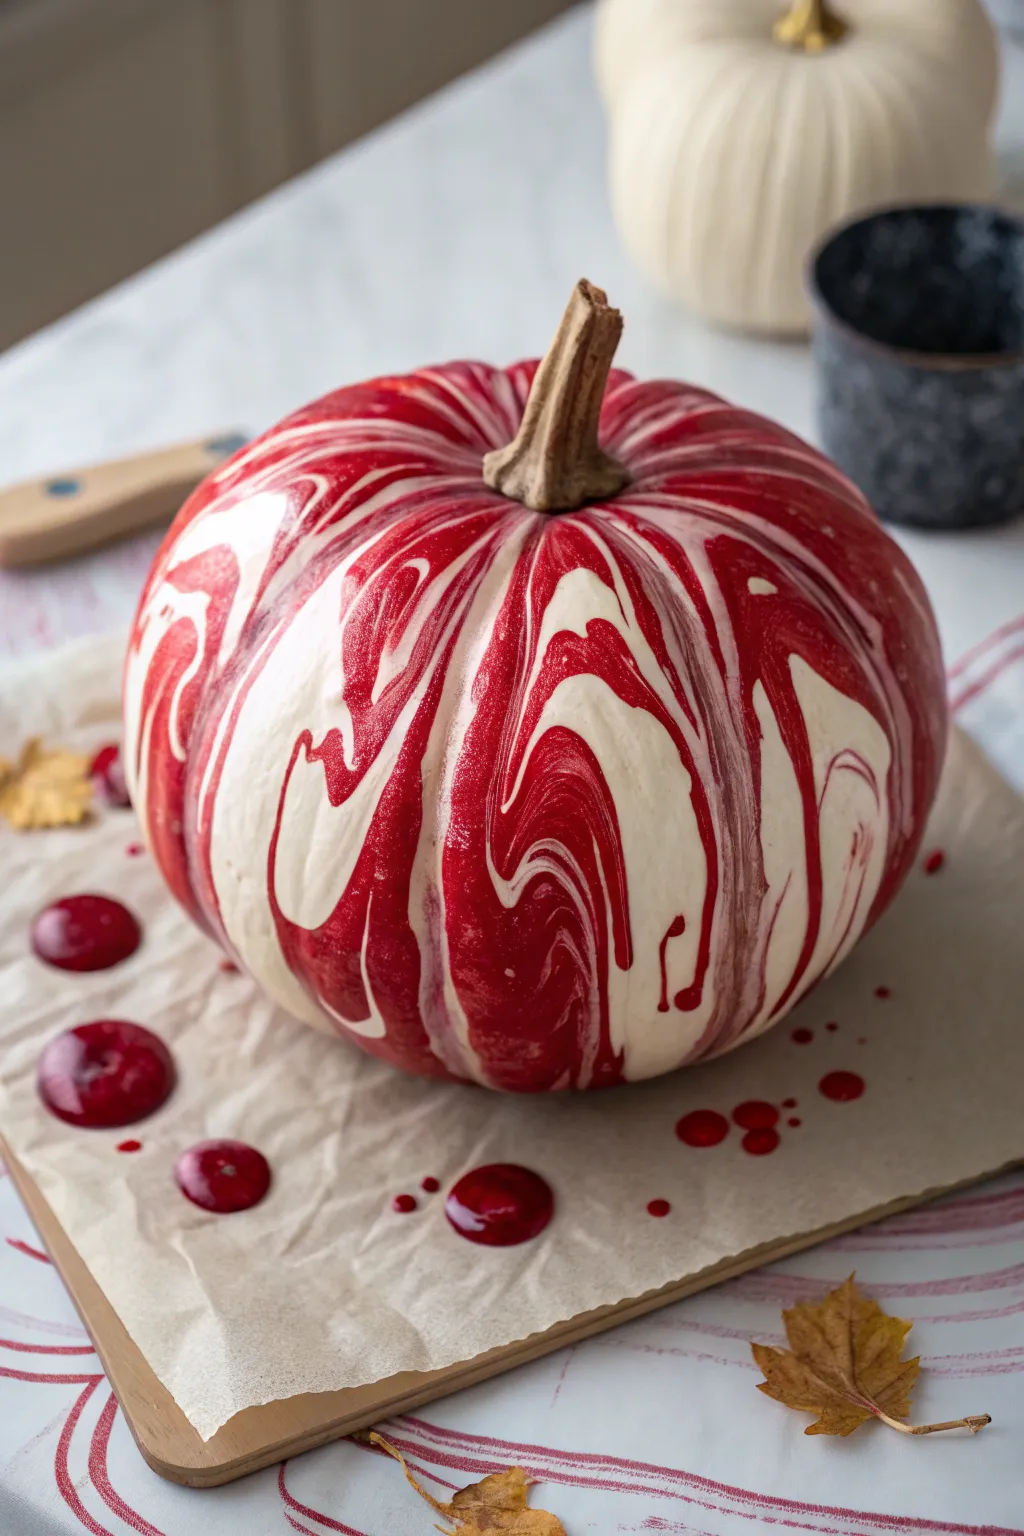
Capture the glossy elegance of a candy cane with this sophisticated pour-paint pumpkin. The mesmerizing swirls of deep cranberry red and creamy white create a high-end, marbled finish that looks like custom glass.
Detailed Instructions
Materials
- Medium-sized white pumpkin (real or faux)
- High-gloss red acrylic craft paint (cranberry or deep crimson)
- High-gloss cream or warm white acrylic craft paint
- Acrylic pouring medium
- Disposable plastic cups (2 large, 2 small)
- Wooden craft sticks for stirring
- Large cardboard box or baking sheet (to catch drips)
- Small can or jar (to elevate the pumpkin)
- Masking tape or painter’s tape
- Clear spray sealant (gloss finish)
Step 1: Preparation
-
Clean the surface:
Wipe down your pumpkin with a damp cloth to remove any dust or oils. If you are using a real pumpkin, ensure it is completely dry before proceeding. -
Mask the stem:
Carefully wrap the stem completely with masking tape or painter’s tape. Press the edges down firmly at the base to ensure no paint sneaks onto the natural stem texture. -
Create a workspace:
This project gets messy, so prepare your area well. Place a small can or jar in the center of a large cardboard box or baking sheet lined with parchment paper. This will serve as a pedestal. -
Elevate the pumpkin:
Balance the pumpkin carefully on top of the can. Ensure it is stable and won’t tip over when you start pouring. The bottom edge of the pumpkin should hang freely so paint can drip off.
Muddy colors?
If your red and white are turning pink, you are over-mixing or pouring too fast. Layer the paints gently and pour slowly to keep the colors distinct.
Step 2: Mixing the Pour
-
Prepare the paint mixture:
In separate plastic cups, mix your red and cream paints with the pouring medium. A standard ratio is often 1:1, but verify the instructions on your specific medium bottle. -
Check consistency:
Stir gently to avoid air bubbles. You want the consistency of warm honey. If the paint is too thick, add a few drops of water; if it’s too thin, add a bit more paint. -
Create the dirty pour cup:
Take a clean, empty cup. Pour a small amount of the cream paint into the bottom. Follow this with a layer of red paint, pouring it gently down the side or right into the center. -
Layer the colors:
Continue alternating layers of red and cream without stirring them. You can vary the amount in each layer to create different band widths in your final marble pattern. -
Do not mix:
Resist the urge to stir the layered cup. The magic of marbling happens when the distinct layers flow out together spontaneously.
Metallic Luxe
Add a thin layer of metallic gold paint between the red and white layers in your pour cup for a glamorous, veined marble effect.
Step 3: The Pouring Process
-
Begin the pour:
Position your layered cup directly over the center of the pumpkin, right near the taped stem. -
Pour with confidence:
Slowly but steadily pour the paint onto the top of the pumpkin. Move your hand in a slow, tight circular motion around the stem to encourage even coverage. -
Watch the flow:
Let gravity do the work. The paint will cascade down the ribs of the pumpkin, carrying the swirled pattern with it. I like to watch the ribbons separate naturally here. -
Touch up gaps:
If there are bare spots near the bottom, pick up some spillage from the tray with a craft stick and gently drip it over the exposed area to cover it. -
Tilt if necessary:
If the paint isn’t moving down fast enough, you can very gently tilt the pumpkin by holding the pedestal underneath, but be careful not to smudge the design.
Step 4: Finishing Touches
-
Let it drip dry:
Allow the pumpkin to sit undisturbed on its pedestal. The paint will continue to drip for a while, pulling the pattern thinner and more elegant. -
Remove drips:
After about 20 minutes, check the underside of the pumpkin. Run a craft stick along the bottom edge to wipe away hanging drips before they harden into bumps. -
Full drying time:
Leave the pumpkin to dry completely. Because the paint is thick, this can take 24 to 48 hours. A humidity-free room is best for this. -
Seal the deal:
Once fully dry to the touch, spray the pumpkin with a clear high-gloss sealant to protect the finish and give it that ‘wet paint’ look permanently. -
Reveal the stem:
Finally, peel away the masking tape from the stem to reveal the natural contrast against your glossy, marbled masterpiece.
Enjoy the striking, candy-like finish of your new centerpiece that looks good enough to eat


Have a question or want to share your own experience? I'd love to hear from you in the comments below!