A denim jacket is basically a ready-made canvas, and that big back panel is begging for a statement piece. If you’ve been craving a wearable art project that feels personal (but still totally doable), these denim jacket painting ideas will get your brush moving fast.
Soft Sunset Clouds Gradient

Transform a classic denim jacket into a wearable sunset with this soft, ethereal gradient technique. By blending warm peaches, lilacs, and pinks directly onto the fabric, you’ll create a glowing backdrop for fluffy, hand-painted clouds.
Step-by-Step Guide
Materials
- Light wash denim jacket
- Fabric medium
- Acrylic paints (Titanium White, Naples Yellow, peachy Orange, soft Pink/Magenta, Lilac/Purple)
- White Gesso (optional but recommended)
- Large flat brush or sponge brush
- Medium round brush
- Small detail brush
- Painter’s tape or masking tape
- Palette for mixing
- Cardboard insert just slightly larger than the back panel
- Water cup and paper towels
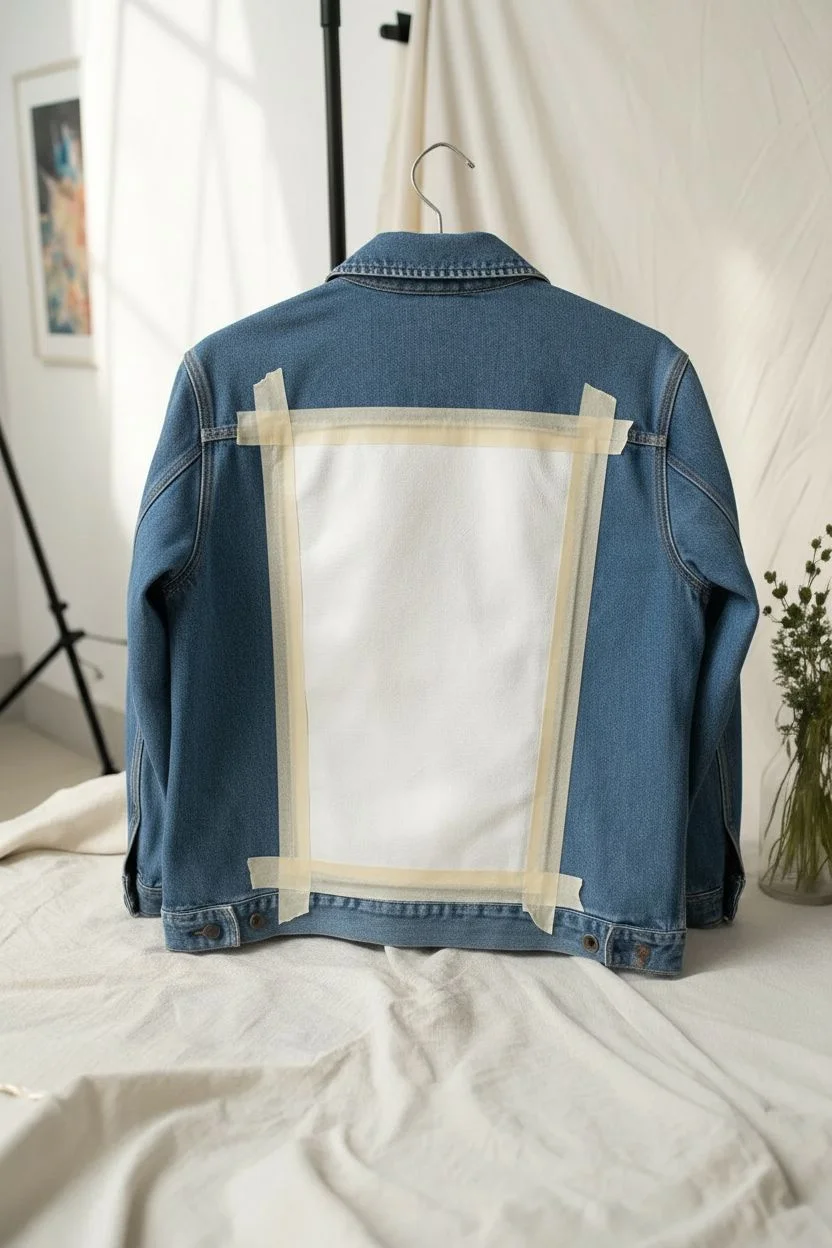
Step 1: Preparation and Base
-
Prepare your canvas:
Start by inserting a piece of cardboard inside the jacket to prevent any paint from bleeding through to the front. Smooth out the back panel where you’ll be painting. -
Tape the borders:
Using masking tape, carefully tape off the seams surrounding the center back panel of the jacket. Press the edges down firmly so paint doesn’t seep into the stitching or side panels. -
Prime the surface:
Mix equal parts white acrylic paint (or gesso) with fabric medium. Apply a thin, even coat across the entire taped-off square. This creates a bright base that helps the translucent sunset colors pop against the blue denim. -
Let it dry:
Allow this white base layer to dry completely. It should feel dry to the touch before you begin adding color.
Smooth Blending Trick
Keep a misting spray bottle of water handy. If acrylics dry too fast while blending the gradient, a tiny mist over the paint keeps it workable longer.
Step 2: Creating the Gradient
-
Mix your sunset palette:
On your palette, prepare your gradient colors: a warm peach/orange, a soft pink, and a lilac purple. Mix each color with fabric medium (about a 2:1 paint-to-medium ratio) to keep the fabric flexible. -
Apply the bottom layer:
Using a flat brush or sponge, start at the very bottom of the panel with your peach/orange mixture. Paint roughly the bottom third, using horizontal strokes. -
Add the middle tone:
While the orange is still slightly wet, pick up your pink shade. Apply this to the middle third of the panel, slightly overlapping with the orange. -
Blend the transition:
Clean your brush slightly (or use a fresh sponge) and gently rub the area where the pink and orange meet to create a seamless blur. -
Apply the top tone:
Paint the upper section with your lilac shade. As you near the very top, you can feather the paint out so it fades naturally into the denim blue, or keep it solid purple depending on your preference. -
Soften the horizon:
Work quickly to blend the lilac into the pink layer below it. I find that using a slightly damp brush helps drag the colors together without removing them. -
Final drying time:
Let this gradient layer dry fully. If the colors look too sheer, repeat the process with a second coat for vibrancy.
Step 3: Painting the Clouds
-
Start the cloud shapes:
Mix Titanium White with a small amount of fabric medium. Using a round brush, block in the general shapes of your largest clouds. Place a large formation near the top and smaller ones lower down. -
Build the fluff:
Use a stippling motion (dabbing the brush up and down) to create texture on the white clouds. Keep the edges soft and irregular rather than perfectly round. -
Add dimension with pink:
While the white is still wet, take a tiny amount of your pink or lilac mix on a detail brush. Gently dab this into the bottom shadows of the clouds to give them volume and make them sit within the atmosphere. -
Refine the highlights:
Once the cloud base is tacky, go back in with pure white on the very tops of the clouds to create bright highlights where the sun would hit them. -
Create distant clouds:
For the smaller clouds near the bottom orange section, use less paint and a dryer brush. These should look fainter and simpler than the big clouds at the top. -
Remove tape:
Carefully peel away the masking tape while the paint is still slightly flexible to reveal your crisp, clean edges along the seams. -
Heat set:
Once the jacket is 100% dry (wait 24 hours), place a thin cloth over the design and iron it on a medium setting without steam to permanently set the paint.
Add Some Magic
Mix a tiny bit of iridescent medium or fine holographic glitter into the white cloud paint for a subtle shimmer that catches the light outdoors.
Wear your new sunset masterpiece with pride and enjoy the warmth it brings to your outfit


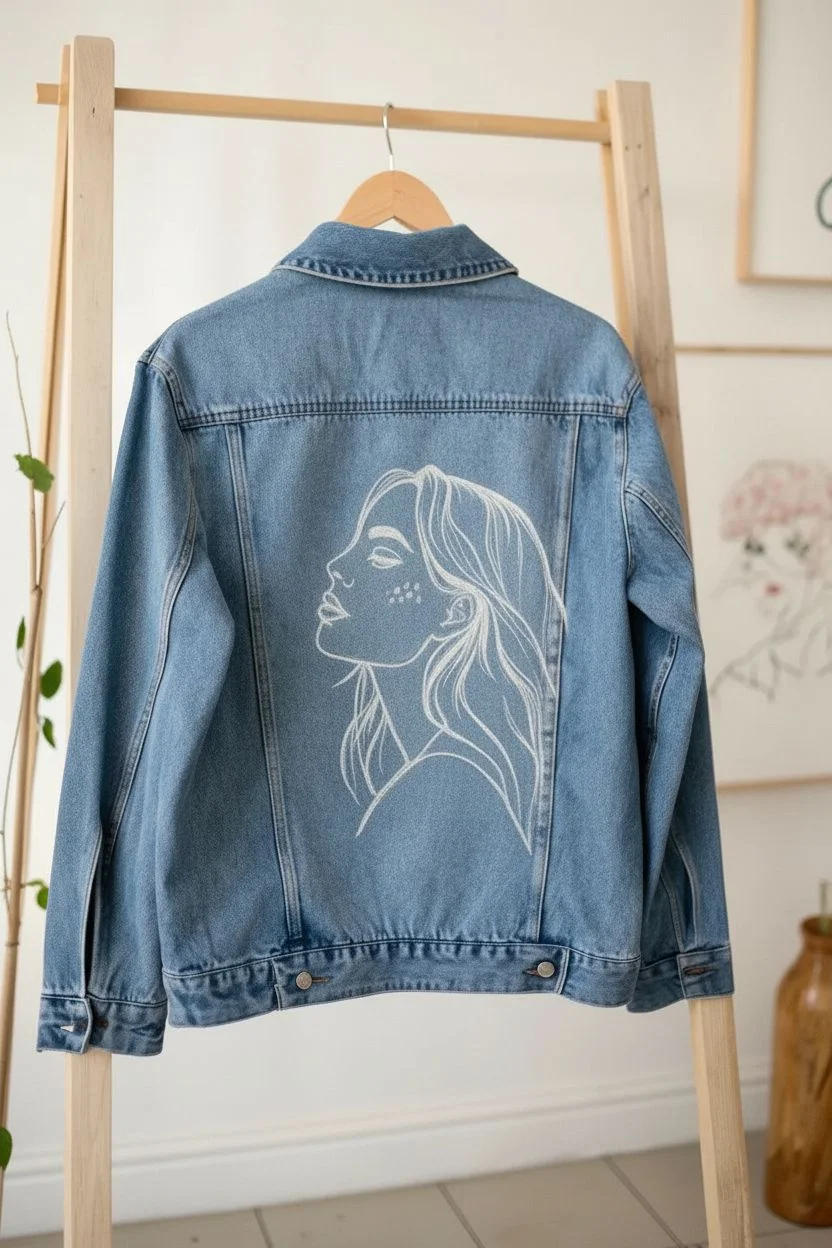
High-Contrast White Line Art on Dark Denim
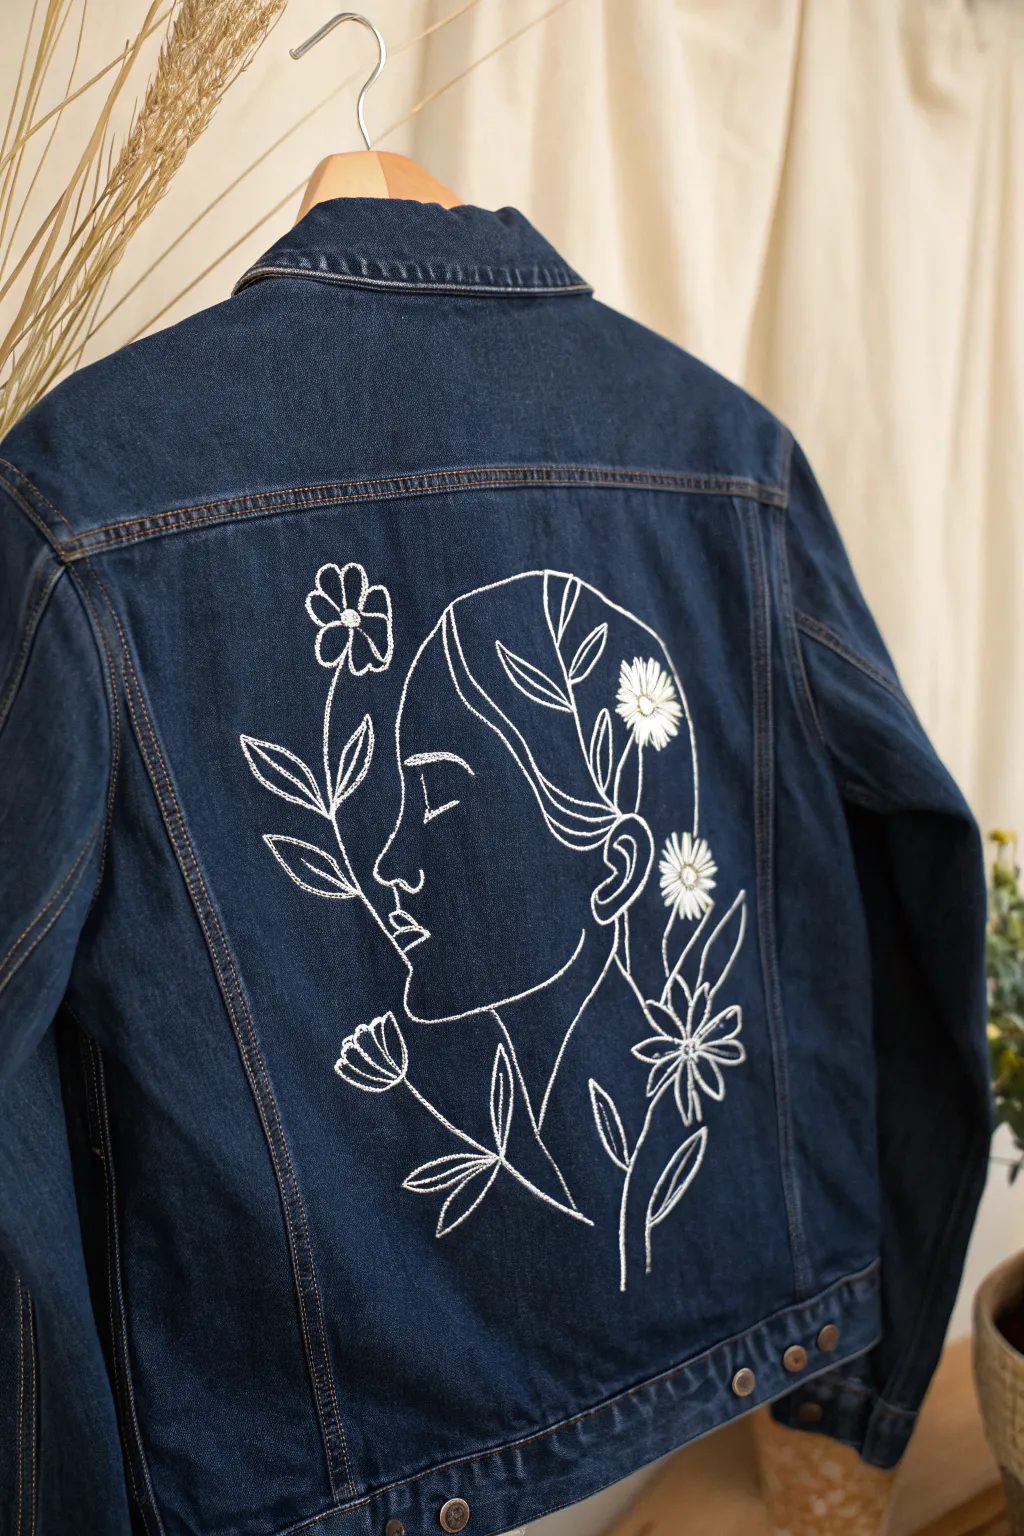
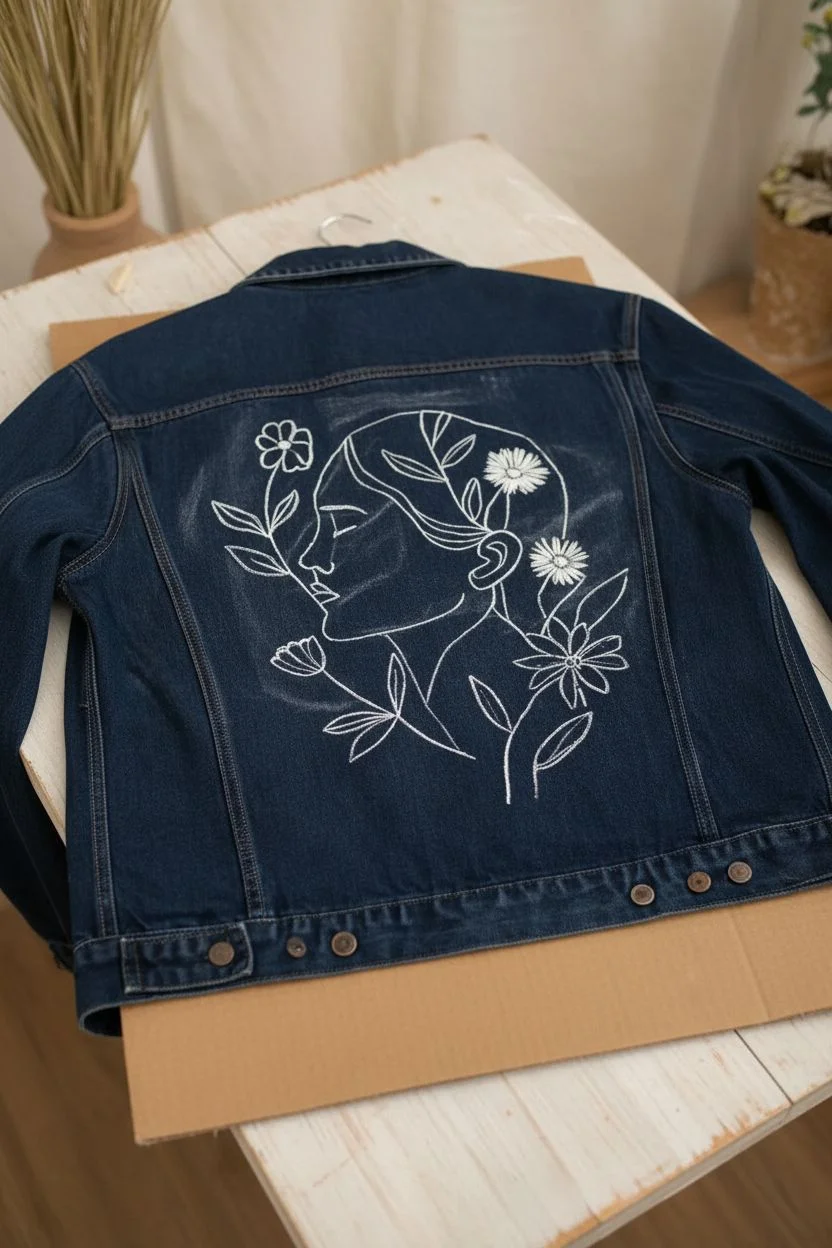
Transform a simple denim jacket into a wearable gallery piece with this elegant, high-contrast design. The striking white lines against indigo denim create a sophisticated, minimalist look featuring a serene female profile intertwined with delicate floral elements.
Step-by-Step
Materials
- Dark wash denim jacket (clean and dry)
- White fabric paint or white fabric ink (high opacity)
- Fine liner brush (size 0 or 00)
- Round brush (size 1 or 2)
- White tailor’s chalk or white transfer paper
- Printed design template (optional)
- Cardboard or plastic barrier
- Masking tape
- Iron and cloth (for heat setting)
Step 1: Preparation & Sketching
-
Prepare the surface:
Lay your jacket flat on a clean, hard table. Button the front so the back panel is taut and smooth. -
Insert a barrier:
Place a piece of thick cardboard or a plastic sheet inside the jacket, directly under the back panel. This is crucial to prevent paint from bleeding through to the front of the jacket. -
Plan the composition:
Visualize where the central figure will sit. The woman’s profile should be centered, with the floral elements expanding outward towards the seams, but keeping a margin of about an inch from the stitching lines. -
Sketch the outline:
Using white tailor’s chalk, lightly sketch the profile of the face first. Start with the forehead, moving down the nose, lips, and chin. Keep the lines loose; this is just a guide. -
Add floral details:
Sketch the hair shape and the surrounding flowers. Draw the vertical stems rising up the sides and the distinct daisy-like blooms near the hair and neck. Don’t worry about perfect details yet. -
Refine the sketch:
Step back and check the proportions. If you need to make corrections, a damp cloth can gently wipe away the chalk markings so you can redraw.
Smoother Lines
Mix a tiny drop of water into your fabric paint on the palette. Slightly thinner paint flows off the brush much easier, helping you create long, continuous lines without jagged breaks.
Step 2: Painting the Design
-
Load your brush:
Dip your fine liner brush (size 0) into the white fabric paint. You want the consistency to be like heavy cream; if it’s too thick, the lines will be jagged. Thin it slightly with water if necessary. -
Paint the face profile:
Start with the main profile line. Use confident, smooth strokes. I prefer to pull the brush toward me rather than pushing it away for better control over curves. -
Detail the features:
Carefully paint the closed eye and the small line of the mouth. These are delicate features where a light touch is essential to maintain the serene expression. -
Outline the hair:
Switch to a slightly larger round brush (size 1) if you want bolder lines for the hair outline. Paint the sweeping curves that define the hair shape behind the ear. -
Paint the stems:
Return to the fine liner brush for the floral stems. Create long, fluid lines for the main stalks on the left and right sides of the figure. -
Add the leaves:
Paint the leaves using a ‘press and lift’ technique. Start at the stem, press down slightly to widen the line for the leaf belly, and lift up as you reach the tip. -
Create the flowers:
For the daisy shapes, paint the petals radiating outward from a center point. Ensure separate, distinct strokes so the flowers look crisp against the dark denim. -
Reinforce opacity:
Let the first layer dry for about 15-20 minutes. Go back over any areas where the blue denim is showing through the white paint to make the lines bright and solid.
Step 3: Finishing Touches
-
Add highlights:
Add tiny dots or extra strokes to the flower centers or hair strands to give the illustration texture and depth. -
Clean up edges:
If you made any stray marks, use a stiff brush with a tiny bit of water to scrub them away, or cover small mistakes by turning them into extra leaves. -
Final dry:
Allow the jacket to dry completely flat for at least 24 hours. Don’t rush this, as denim absorbs a lot of moisture. -
Remove chalk marks:
Once totally dry, gently brush off any remaining chalk visibility with a soft, clean toothbrush. -
Heat set:
Place a thin cloth over the painted design and iron on a medium heat setting (no steam) for 3-5 minutes to seal the paint for washing durability.
Oops! Paint Splatter?
Keep a clean, damp Q-tip nearby. If you make a small mistake or a drop falls, immediately lift it straight up with the Q-tip without smearing it side-to-side.
Wear your new custom piece with pride, knowing you carry a unique work of art on your back


Big Centered Butterfly With Simple Shading
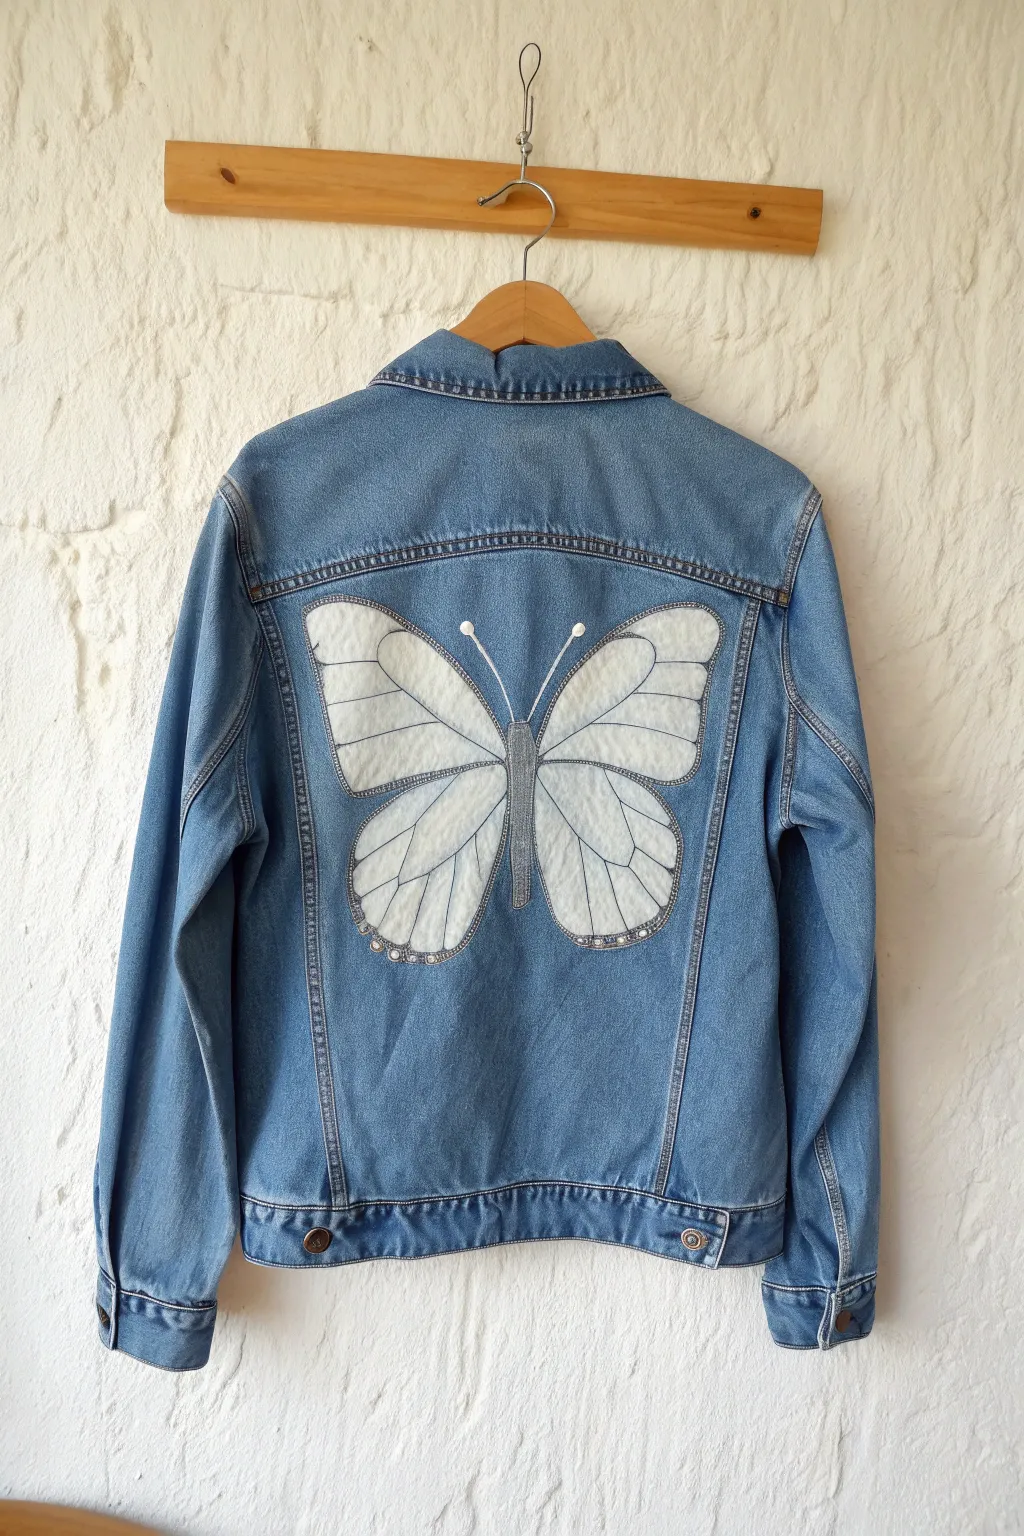
Transform an ordinary denim jacket into a statement piece with this elegant, oversized butterfly design. The artwork relies on thin, delicate linework and subtle grey shading against a bright white base to create a look that feels both light and substantial.
Detailed Instructions
Materials
- Denim jacket (clean and dry)
- White fabric paint (high opacity)
- Grey fabric paint (or black mixed with white)
- Black fabric paint or fine-tip fabric marker
- Silver or grey glitter fabric paint (optional for detailing)
- Flat shader brush (medium size)
- Detail liner brush (very fine)
- Chalk or disappearing fabric pencil
- Cardboard insert
- Paper palette
- Iron (for heat setting)
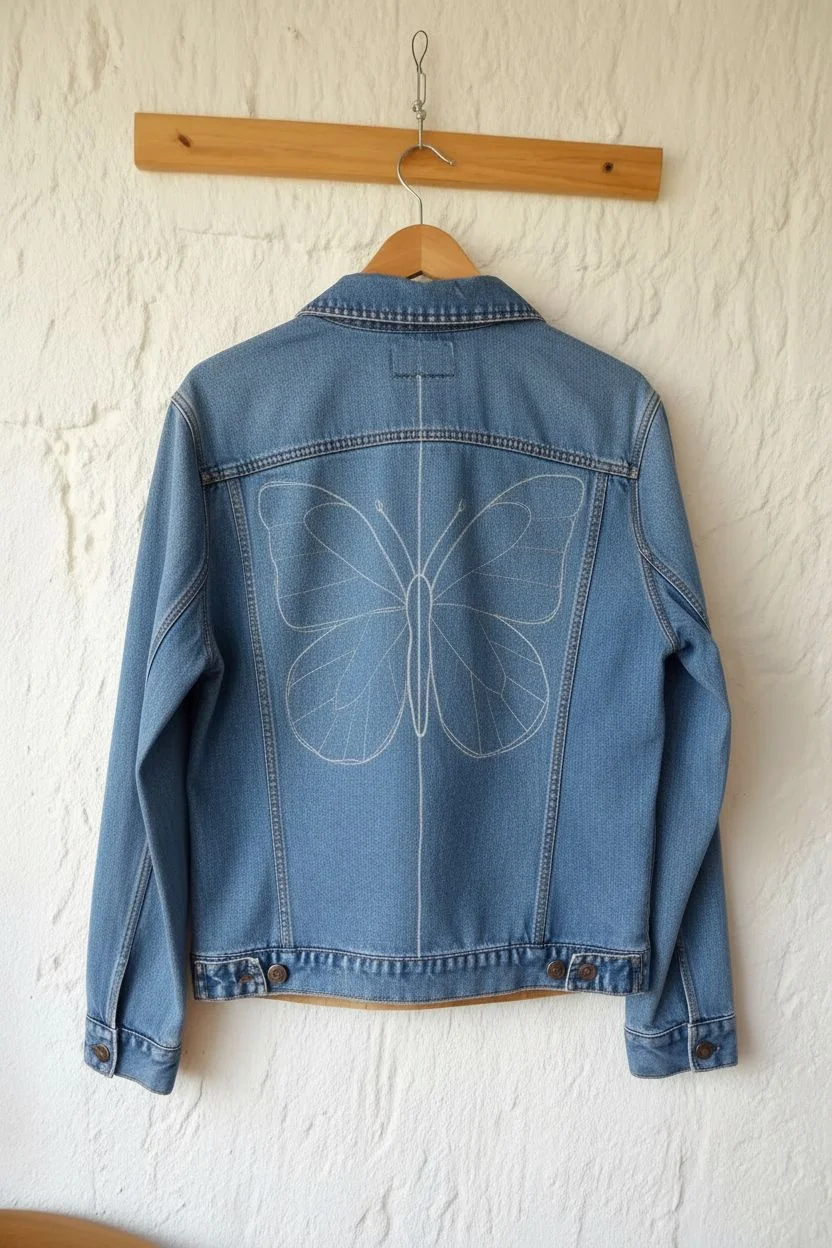
Step 1: Preparation and Sketching
-
Prepare the surface:
Before you start, slip a piece of sturdy cardboard inside the jacket. This is crucial—it keeps the paint from bleeding through to the front and provides a nice, flat surface to work on. -
Map out the center:
Using your chalk or disappearing ink pen, finding the vertical center of the back panel. Draw a faint line down the middle to help you keep the butterfly symmetrical. -
Draft the wings:
Sketch the outline of the four wings. Start with the top two wings, making them larger and reaching toward the shoulder seams. Then, draw the two bottom wings, curving them slightly inward. Keep the shapes organic and flowing rather than perfectly geometric. -
Define the body:
Draw a slender, elongated oval for the butterfly’s body right down your center line, connecting the four wings.
Step 2: Painting the Base
-
First white layer:
Using your flat shader brush, apply a coat of white fabric paint to the entire wing area. Don’t worry if the denim shows through a bit on this first pass; thin layers are better than one thick, gloppy one. -
Dry and repeat:
Let the first layer dry completely. This usually takes about an hour. Once dry, apply a second (and potentially third) coat of white until the wings are bright and opaque. -
Paint the body:
Fill in the central body shape using a dark grey paint. You can mix a tiny dot of black into your white paint to get the right shade if you don’t have pre-mixed grey.
Uneven Coverage?
If the white paint looks patchy on dark denim, apply a layer of white gesso primer first. It seals the fabric weave and creates a smoother surface for your topcoats.
Step 3: Detailing and Shading
-
Draft internal veins:
Once your white base is bone dry, lightly sketch the vein patterns on top of the white paint with a pencil. Use the reference photo to see how the lines fan out from the body toward the edges. -
Mix a shadow shade:
On your palette, water down a bit of grey paint. You want a semi-translucent wash, not a solid wall of color, to create that delicate diaphanous look. -
Apply shading:
With a smaller brush, gently run this watery grey wash along the pencil lines of the veins. I like to feather the edges slightly so the shadow looks soft, giving the wings dimension. -
Outline the veins:
Switch to your finest detail liner brush and black paint (or a fine-tip fabric marker). Carefully trace over the center of your shaded grey lines to create crisp, defined veins. -
Outline the wings:
Use the same fine brush or marker to outline the entire perimeter of the butterfly wings. A steady hand is key here, but slight variations add to the hand-painted charm. -
Add antennas:
Paint two thin, curving lines extending from the top of the body for antennas. Top each one with a small white dot.
Add Some Sparkle
Mix fabric medium with loose iridescent glitter and paint it over the white wing sections. It won’t change the color but will catch the light beautifully outdoors.
Step 4: Finishing Touches
-
Highlight the body:
Add a little texture to the grey body by stippling or dry-brushing a slightly lighter grey down the center to make it look rounded. -
Wing edge details:
If you look closely at the inspiration, there are tiny dots along the bottom edge of the lower wings. Use the tip of a brush handle dipped in white or silver paint to dot these details along the hemline. -
Final dry:
Allow the entire jacket to dry for at least 24 hours. Don’t rush this; the paint needs to cure. -
Heat set:
Place a clean pressing cloth over the design and iron it on the ‘Cotton’ setting (no steam) for 3-5 minutes to permanently set the paint.
Wear your new customized jacket with pride, knowing you’ve created a wearable work of art


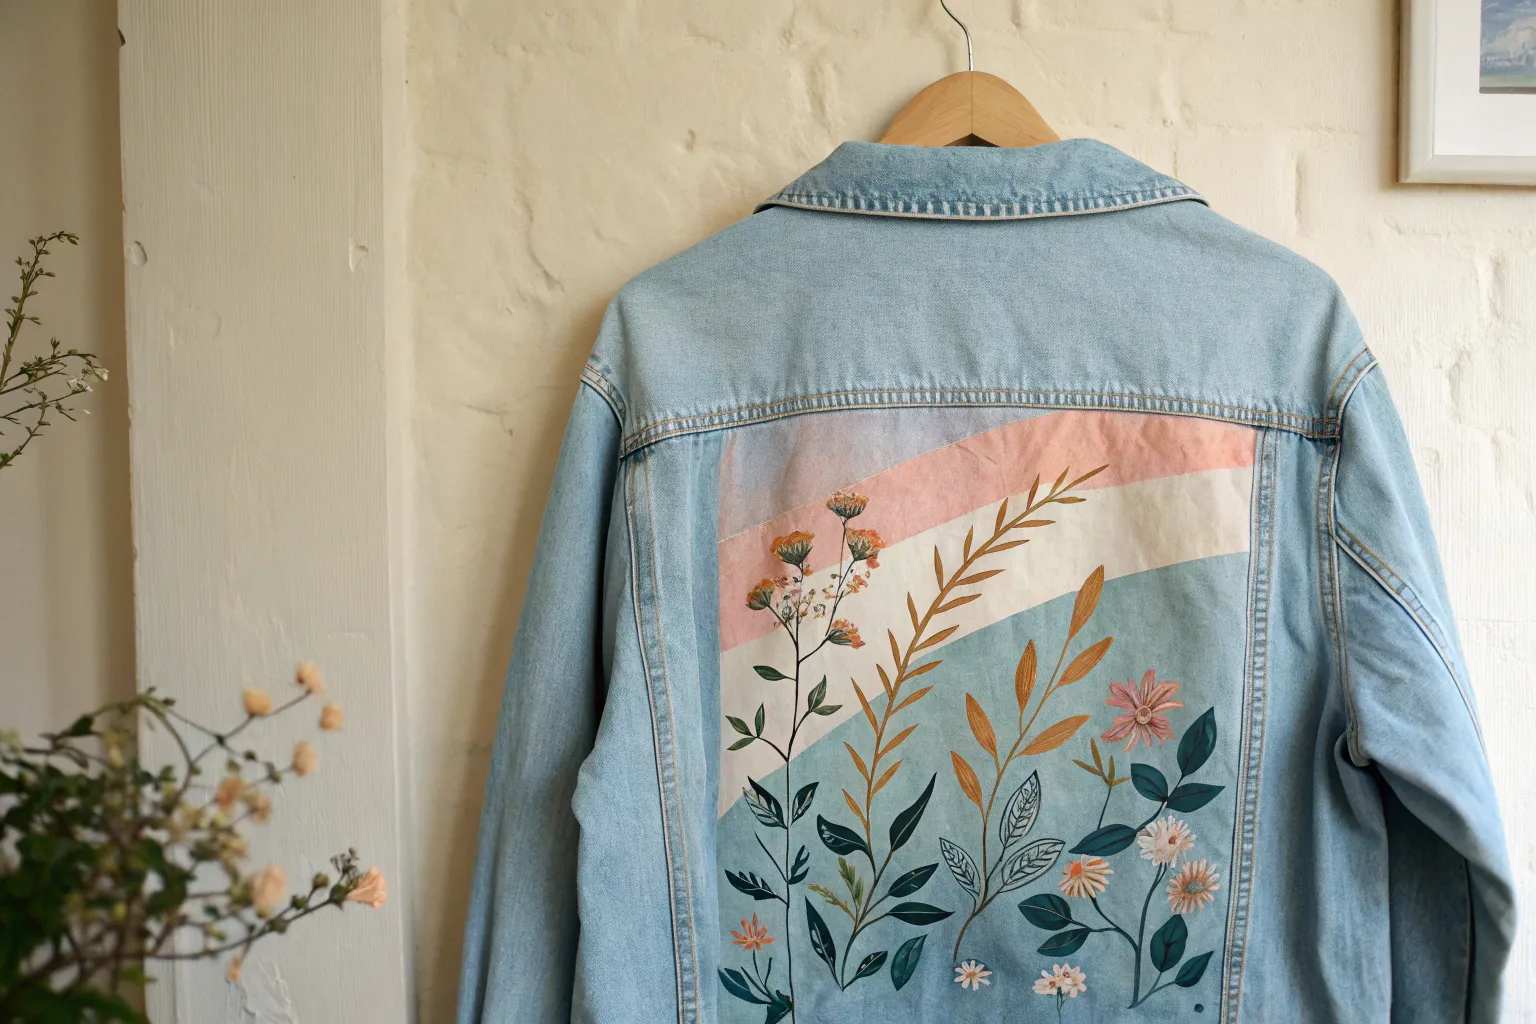
Wildflowers Climbing Over Seams and Shoulders
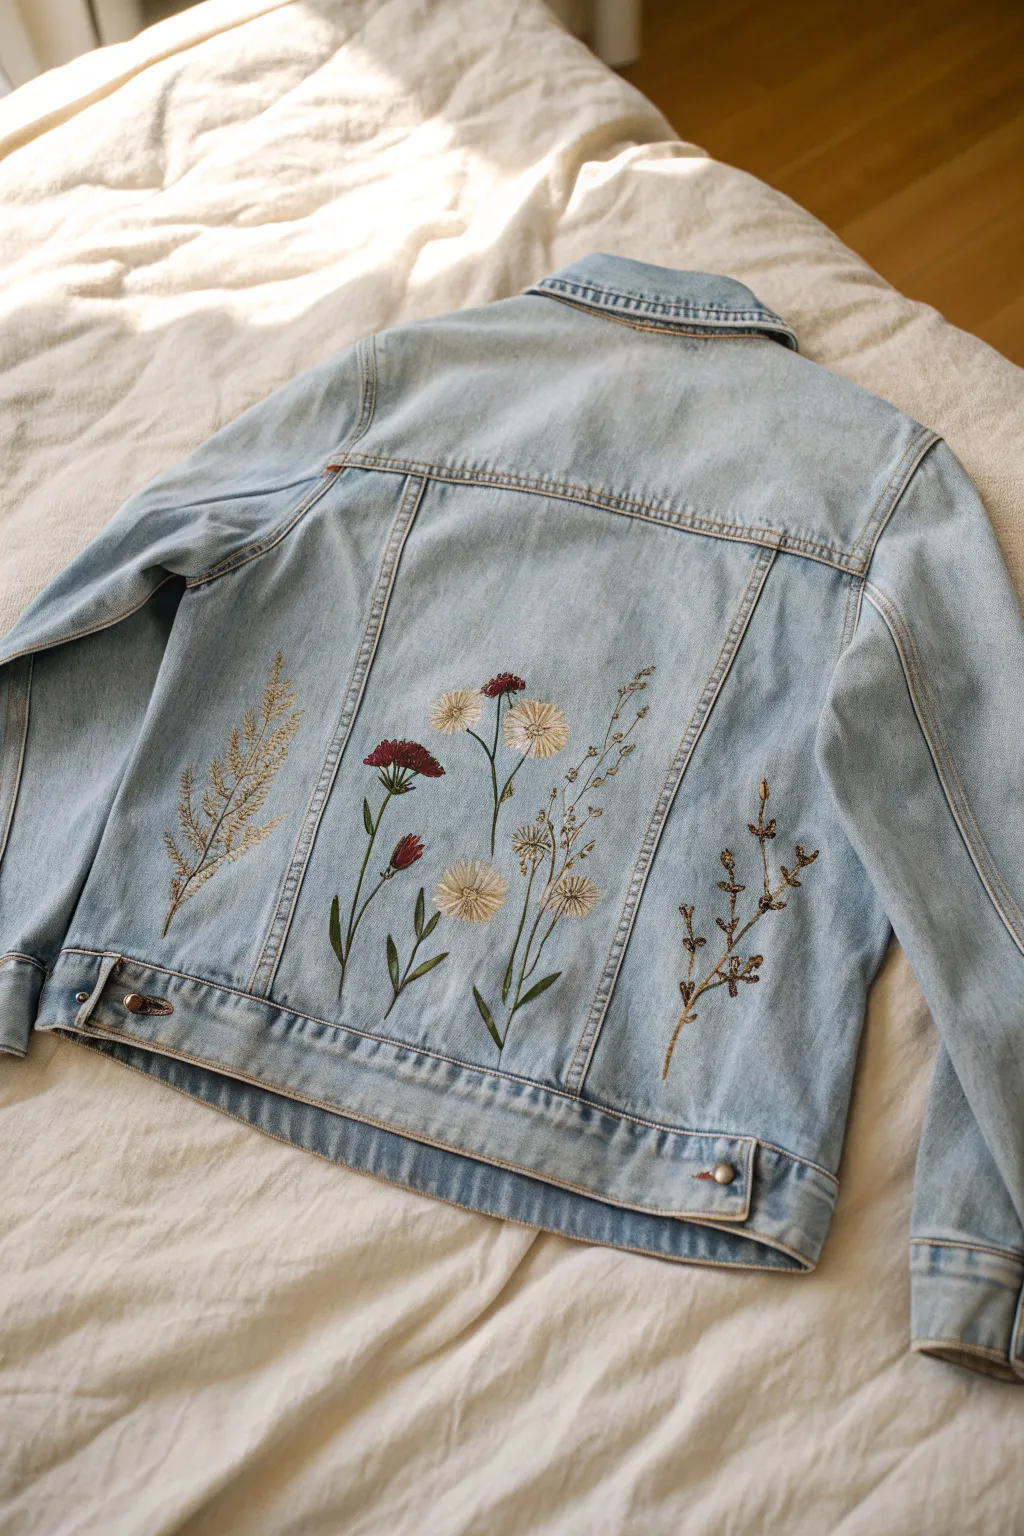
Transform the back of a classic denim jacket into a gentle garden scene with this whimsical botanical design. By painting delicate stalks and blooms that seem to grow right up the garment, you’ll create a soft, nature-inspired look that mimics the texture of vintage embroidery.
Step-by-Step Guide
Materials
- Light wash denim jacket
- Fabric medium
- Acrylic paints (Titanium White, Burnt Umber, Sap Green, Deep Red/Burgundy, Yellow Ochre)
- Fine liner brushes (sizes 00 and 0)
- Small flat brush (size 2)
- Air-erasable fabric pen or white chalk pencil
- Cardboard insert
- Palette for mixing
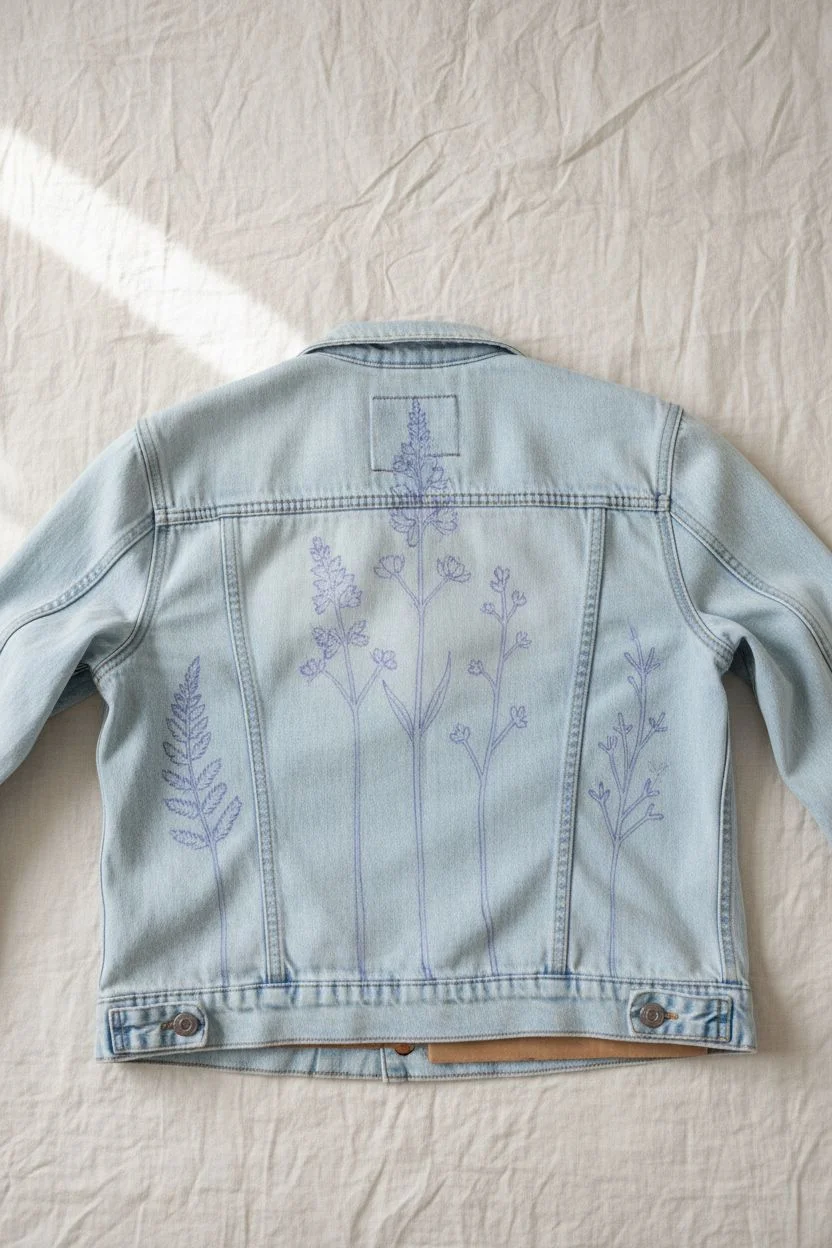
Step 1: Preparation and Sketching
-
Prepare the surface:
Before you begin, slip a piece of cardboard inside the jacket to prevent any paint bleeding through to the front. Smooth the back panel flat on your work surface. -
Mix your medium:
Mix your acrylic paints with fabric medium according to the bottle instructions (usually a 1:1 or 2:1 ratio). This ensures the design moves with the fabric and doesn’t crack. -
Plan the layout:
Using your air-erasable pen, lightly sketch the main vertical stems. Place the tallest central group in the middle panel, then add two smaller, simpler stem groupings in the side panels for balance.
Stiff Petals?
If your painted flowers feel too stiff after drying, you likely used too much paint. Sand lightly with high-grit sandpaper to soften the texture without removing the color.
Step 2: Painting the Greenery
-
Base stems:
Load your size 0 liner brush with a thin mixture of Sap Green and a tiny touch of Burnt Umber to dull the color. Paint the main stems using long, confident strokes, tapering them to be thinner at the top. -
Add leaves:
Along the main central stems, paint long, slender lance-shaped leaves. Use a ‘press and lift’ motion: touch the brush tip to the denim, press down slightly to widen the leaf body, and lift up to create a sharp point. -
Side panel foliage:
For the left side panel, sketch a fern-like structure. Mix Yellow Ochre with a bit of White and Brown for a dried-grass look. Paint tiny, feathery strokes branching off a central spine. -
Right panel structure:
On the right panel, create a woody stem using Burnt Umber. Keep the branches angular and sparse, unlike the flowing green stems in the center.
Faux-Embroidery Look
To really sell the ’embroidery’ effect, use slightly thicker paint blobs for the flower centers and add tiny, dashed lines in a lighter color on the leaves to mimic stitches.
Step 3: Blooming Details
-
White daisies base:
For the white flowers in the center, mix Titanium White with a drop of fabric medium. Use the size 00 brush to paint very thin, distinct petals radiating from a center point. Keep the paint slightly translucent to mimic embroidery thread. -
Daisy centers:
Once the white petals are dry, dot the centers with a mix of Yellow Ochre and Burnt Umber. Stipple the paint (light tapping) to create texture. -
Red clover painting:
Mix Deep Red with a touch of Umber. On the designated stems, paint small, tight clusters of brushstrokes to form the clover heads. Make the top edge slightly flattened and the bottom rounded. -
Adding clover details:
I like to highlight the top of the red flowers with a slightly lighter red mix while the base is still wet, adding depth to the bloom. -
Wheat accents:
Using a creamy off-white color, paint the whispy, seed-like details on the thin stems surrounding the daisies. Use quick, flicking motions.
Step 4: Finishing Touches
-
Right panel buds:
Return to the brown woody stem on the right. Add tiny dots of Yellow Ochre or Gold at the tips of the branches to simulate small buds or berries. -
Refining lines:
Check your stems and connections. If any lines look too thick, you can carefully use a clean damp brush to lift excess paint or paint over the edge with a color matching the denim. -
Erase guidelines:
Allow the paint to dry completely (at least 24 hours). If you see any remaining chalk or ink lines, dab them gently with a damp cloth or let them fade if using air-erasable ink. -
Heat setting:
Once fully cured, place a thin cloth over the design and iron on medium heat (no steam) for 3-5 minutes to permanently seal the paint into the fibers.
Wear your jacket proudly knowing you carry a little piece of an everlasting garden wherever you go
BRUSH GUIDE
The Right Brush for Every Stroke
From clean lines to bold texture — master brush choice, stroke control, and essential techniques.
Explore the Full Guide
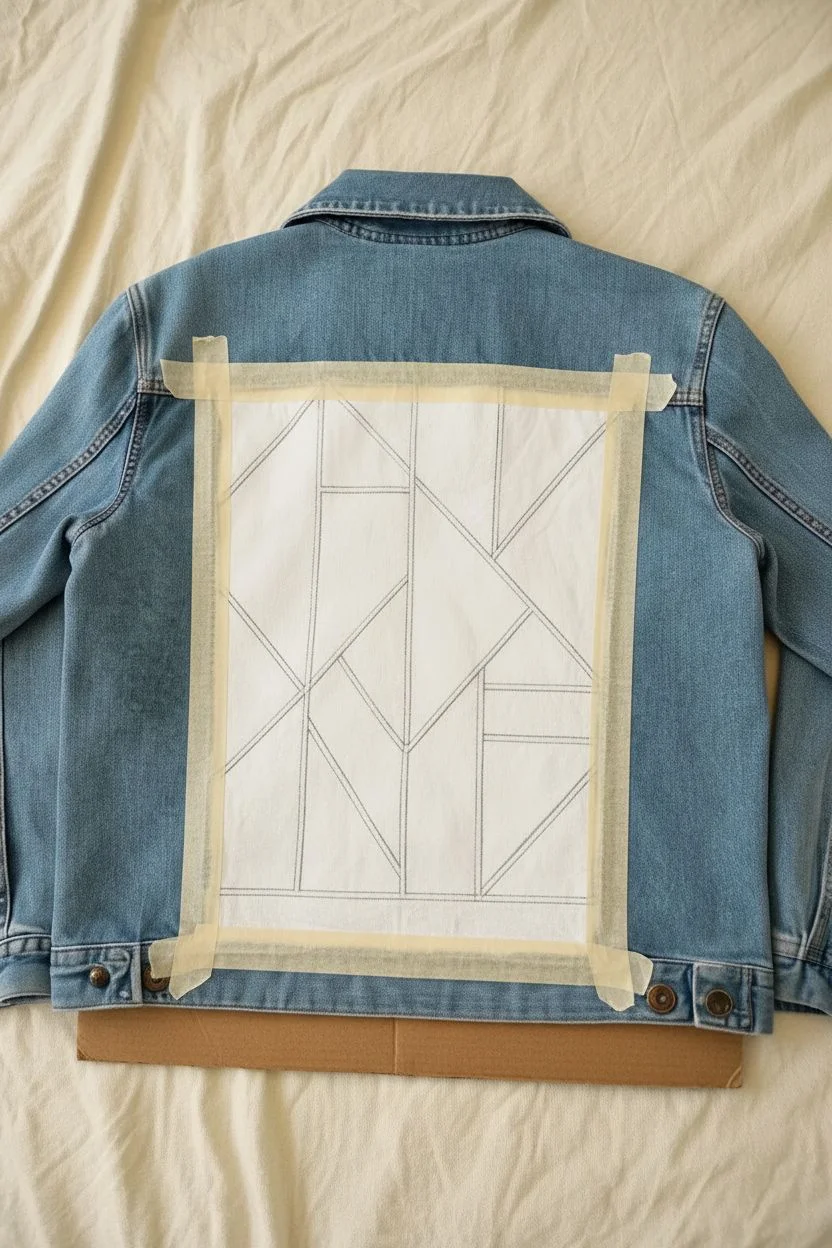
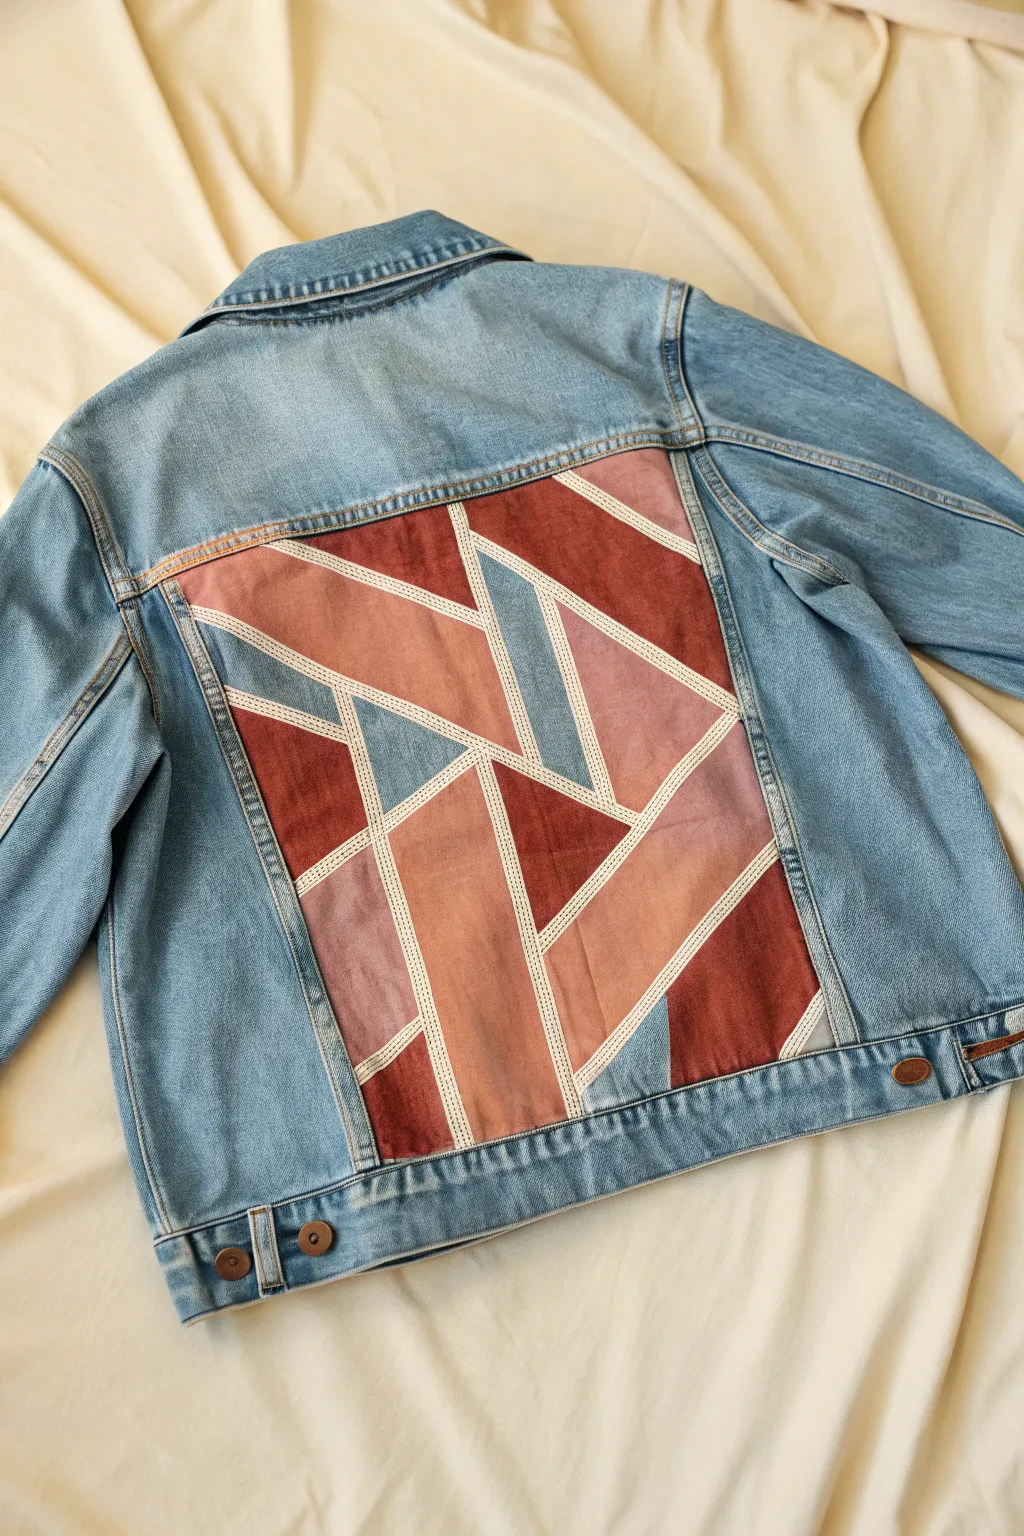
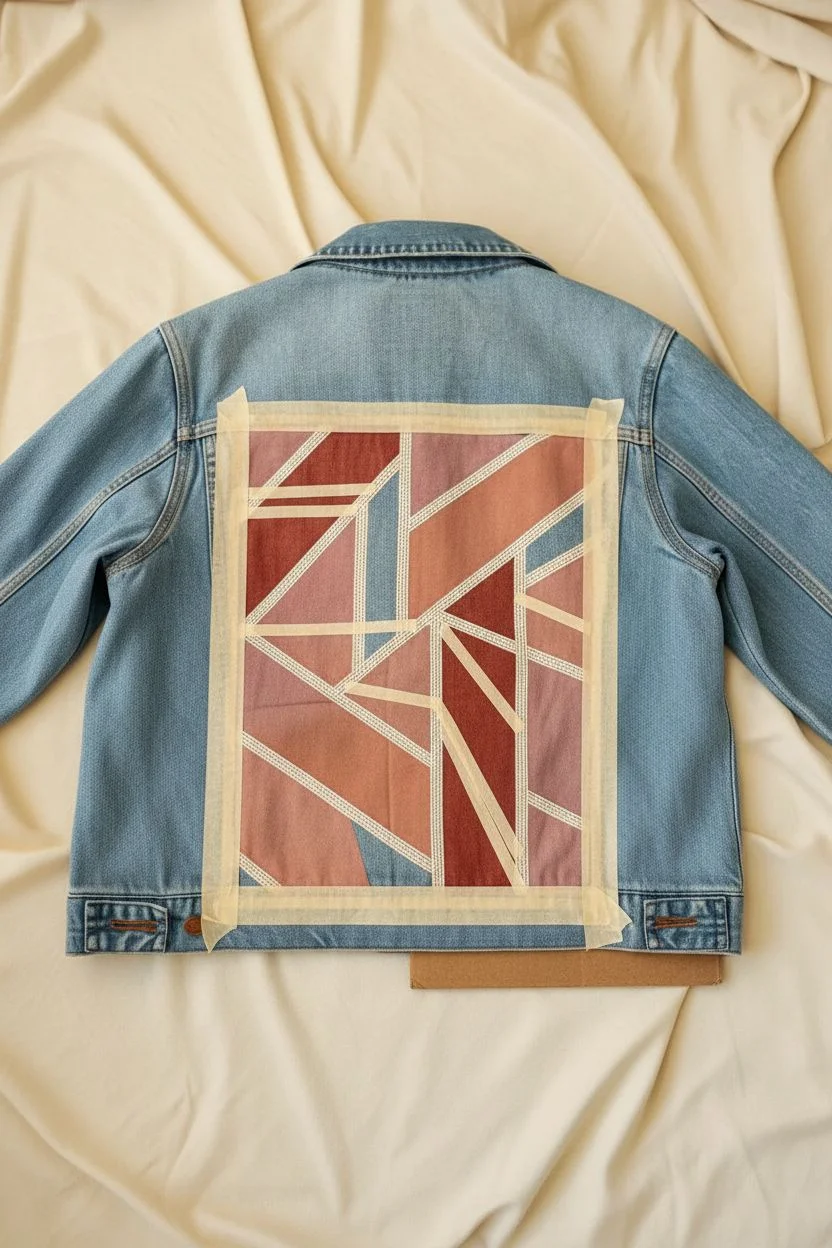
Stained-Glass Inspired Panel Using Black Outlines
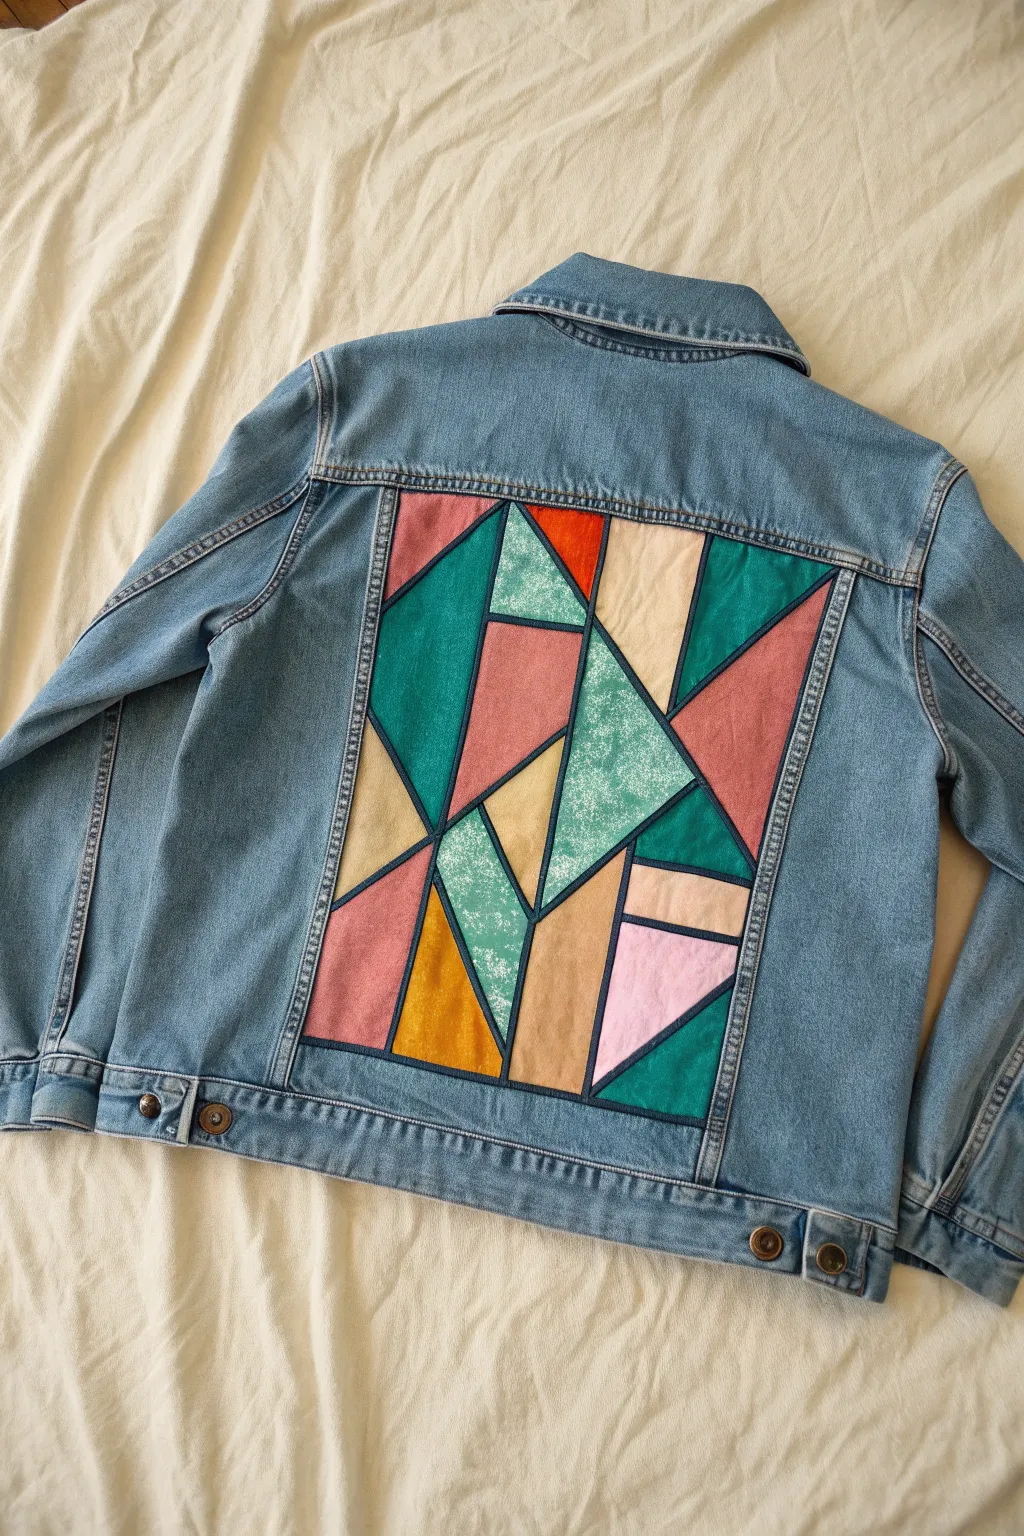
Transform the back panel of a denim jacket into a vibrant piece of wearable art with this stained-glass inspired design. The bold black outlines anchor a patchwork of teal, terracotta, mustard, and cream for a look that is both structured and wonderfully abstract.
How-To Guide
Materials
- Denim jacket (rigid denim works best)
- Fabric medium
- Acrylic paints (teal, terracotta, mustard yellow, light pink, cream, mint green, bright orange)
- Flat shader brushes (sizes 6 and 10)
- Fine liner brush (size 0 or 1)
- Masking tape or painter’s tape
- Ruler or straight edge
- Tailor’s chalk or white colored pencil
- Cardboard or wax paper (to prevent creating a mess)
- Iron (for heat setting)
Step 1: Preparation and Design
-
Protect your workspace:
Before laying down any color, verify that your jacket is clean and dry. Slip a piece of thick cardboard or wax paper inside the jacket, directly under the back panel area, to prevent paint from seeping through to the front. -
Define the boundaries:
Use masking tape to tape off the outer edges of the central back panel of the jacket. Press the tape edges down firmly to ensure a crisp, straight border for your painting. -
Mix your base:
Prepare white acrylic paint mixed with fabric medium in a 1:1 ratio (or according to your medium’s instructions). Apply a thin, even coat of this white mixture over the entire taped-off panel. This acts as a primer so the colors will pop against the blue denim. -
Sketch the geometry:
Once the white primer is completely dry, use a ruler and tailor’s chalk to draw your geometric design. Create intersecting lines to form varied triangles and quadrilaterals, referencing the photo for the specific layout.
Uneven Lines?
If your hand shakes while outlining, try using a black fabric marker instead of a brush for the lines. It offers more control and creates keen, sharp geometric edges.
Step 2: Painting the Color Blocks
-
Mix colors with medium:
For every color you intend to use, mix the acrylic paint with fabric medium. This ensures the design remains flexible and won’t crack when you wear the jacket. -
Start with the teal:
Using a flat shader brush, fill in the large prominent triangles with a deep teal color. Apply two thin coats rather than one thick one for the smoothest coverage. -
Add warmer tones:
Clean your brush and move on to the terracotta and light pink sections. Be careful to stay slightly inside your chalk lines, leaving a tiny gap between colors where the black outline will eventually go. -
Incorporate neutrals:
Paint the designated cream and beige sections. These lighter colors act as a visual breather between the more saturated hues. -
Create texture:
For the mint green sections, I like to create a slightly dappled effect. Dab the paint on gently with a drier brush to mimic the look of textured glass, rather than painting smooth strokes. -
Fill the accents:
Finish the color blocking by painting the remaining small shapes with mustard yellow and the bright orange accent triangle near the top. -
Dry completely:
Allow the painted blocks to dry fully. This usually takes at least an hour, depending on humidity and paint thickness.
Level Up: Embellish
Make it sparkle by adding clear fabric glitter over the textured mint green sections once dry to mimic the shine of real glass.
Step 3: Outlining and Finishing
-
Prepare the black outline:
Mix black acrylic paint with fabric medium. You want a consistency that flows smoothly like ink but is opaque enough to cover the denim edges. -
Line the shapes:
Using a fine liner brush, carefully paint the black lines between your color blocks. Keep a steady hand and aim for a consistent width, roughly 3-4mm, to replicate the ‘lead’ in stained glass. -
Border the panel:
Remove the masking tape carefully. Use your black paint and a ruler (if needed) to paint a clean border around the entire rectangle, cleaning up any rough edges left by the tape. -
Final dry:
Let the jacket dry for at least 24 hours. Don’t rush this step, as the paint needs to fully cure before heat setting. -
Heat set:
Place a scrap piece of cotton fabric over your design. Iron the painted area on a medium-high setting (no steam) for 3-5 minutes, moving the iron constantly to fix the paint permanently.
Wear your new custom jacket proudly knowing you have a totally unique piece of art on your back
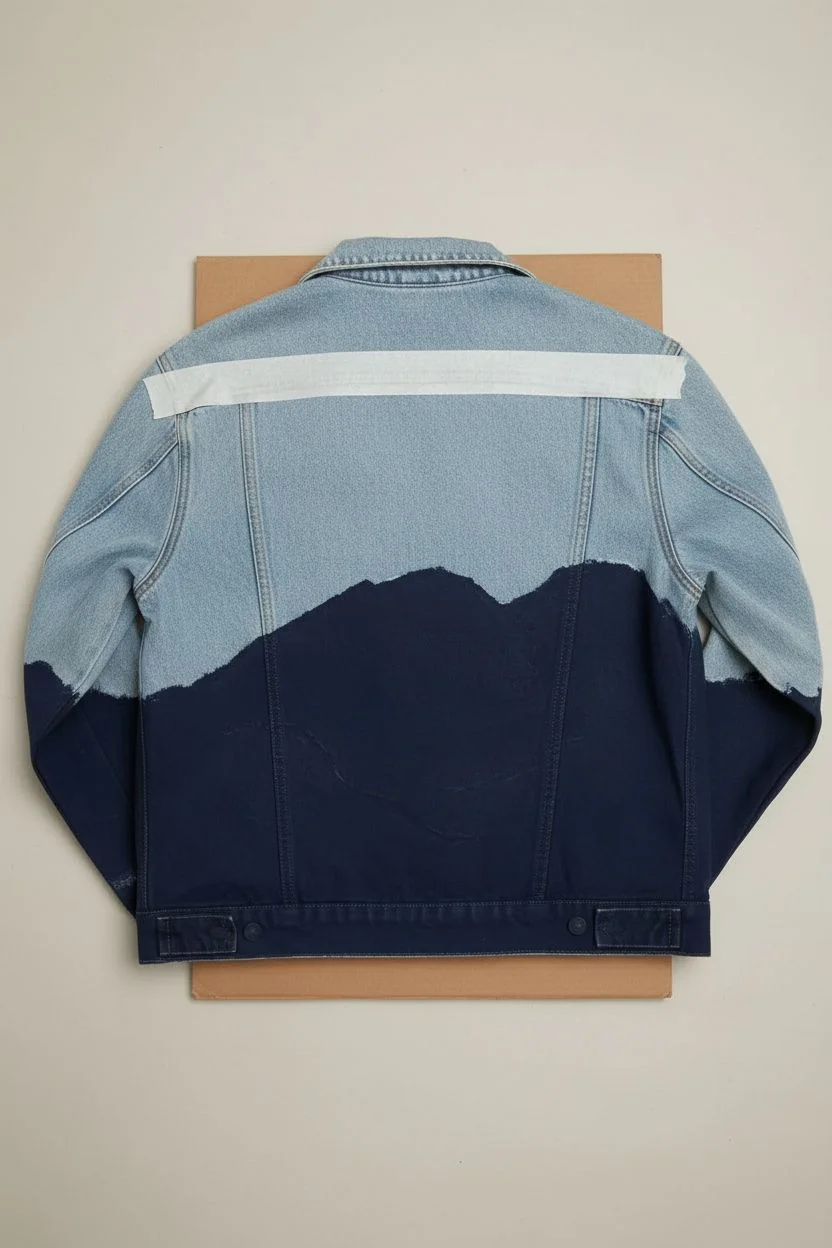
Cactus and Desert Motif With Warm Neutrals

Transform a plain light-wash denim jacket into a work of wearable art with this warm, minimalist desert scene. The design features soft, gradient skies meeting rugged mountains and saguaro cacti, perfectly capturing the serene spirit of the Southwest.
Step-by-Step Guide
Materials
- Light-wash denim jacket
- Fabric paint or acrylic paint mixed with fabric medium
- Colors: White, light blue, peach/soft orange, terracotta/muted pink, rust brown, dark brown/black
- Flat shader brushes (various sizes)
- Small round detail brush
- Painter’s tape or masking tape
- Cardboard insert
- Iron (for heat setting)
- Press cloth or parchment paper
- Chalk or pencil for sketching
Step 1: Preparation & Base
-
Prepare the surface:
Begin by sliding a piece of cardboard inside the jacket, directly behind the back panel where you’ll be painting. This prevents paint from bleeding through to the other side. -
Define the boundaries:
Use painter’s tape to mask off the side seams and the yoke seam at the top of the back panel. This ensures you get those crisp, clean edges that frame the artwork perfectly. -
Prime the area:
If your denim is very dark, you might want to paint a thin layer of white gesso or white fabric paint over the entire panel first. Since this is a light wash jacket, you can paint directly, but a thin white base coat helps colors pop significantly.
Smooth Blending Trick
Keep a spray bottle of water handy. A tiny mist over the sky area before painting helps the acrylics blend seamlessly for that perfect sunset fade.
Step 2: Painting the Landscape Layers
-
Sketch the layout:
Lightly sketch your horizon lines using chalk or a pencil. Draw a high line for the distant mountains, a middle ground for the rolling hills, and a lower line for the foreground ground. -
Paint the sky gradient:
Start at the very top with your lightest blue or white paint. As you work your way down towards the mountain line, blend in peach and soft orange tones while the paint is still wet to create a sunset gradient. -
Add cloud details:
Using a dry brush with a tiny bit of white or light peach paint, sweep horizontal strokes across the sky to create wispy, striated clouds. -
Create the distant mountains:
Mix a soft, muted pink or terracotta color. Paint the furthest mountain range with jagged peaks, ensuring the bottom of this layer overlaps slightly with where the next layer will begin. -
Paint the middle ground:
Using a rust or burnt orange color, paint the rolling hills in front of the pink mountains. I find that slightly uneven, organic brushstrokes help mimic the texture of the earth here. -
Paint the sun:
With an orange or terracotta shade, paint a semi-circle setting just behind the middle ground hills. Add a few curved lines inside it for texture. -
Fill the lower desert floor:
For the largest section at the bottom, use a lighter tan or sandy beige color. Blend it slightly wet-into-wet with the rust layer above so there isn’t a harsh line separating them. -
Add the ground strip:
At the very bottom hem of the panel, paint a dark brown or chocolate-colored strip to represent the immediate foreground shadow.
Step 3: Details & Finishing Touches
-
Paint the cacti:
Switch to a small round brush and dark grey or black paint mixed with a tiny bit of green. carefuly paint several saguaro cactus silhouettes of varying heights. -
Detail the cacti:
Add smaller arms to the cacti. Make sure the base of each cactus sits firmly on or near the dark ground strip. -
Add texture to the cacti:
Once the cactus silhouettes are dry, use a very fine brush or a white gel pen to add tiny dots or lines along the edges to suggest spines. -
Paint ground vegetation:
Using the same dark color as the cacti, flick tiny upward strokes near the dark ground strip to create small tufts of desert grass or yucca plants. -
Allow to dry:
Let the jacket dry completely for at least 24 hours. Don’t rush this step or the paint may smear during the heat setting process. -
Remove tape:
Carefully peel away the painter’s tape to reveal your clean, straight edges. -
Heat set the design:
Place a press cloth or parchment paper over the dry painted area. Iron on medium-high heat (no steam) for 3-5 minutes to permanently set the pigment into the fabric fibers.
Add Dimension
Use actual embroidery thread to stitch over the cactus spines or outline the sun for a cool mixed-media 3D texture effect.
Wear your new desert masterpiece with pride and enjoy the unique, handcrafted vibe it brings to your outfit

PENCIL GUIDE
Understanding Pencil Grades from H to B
From first sketch to finished drawing — learn pencil grades, line control, and shading techniques.
Explore the Full Guide
Skull and Botanical Combo for a Vintage Feel
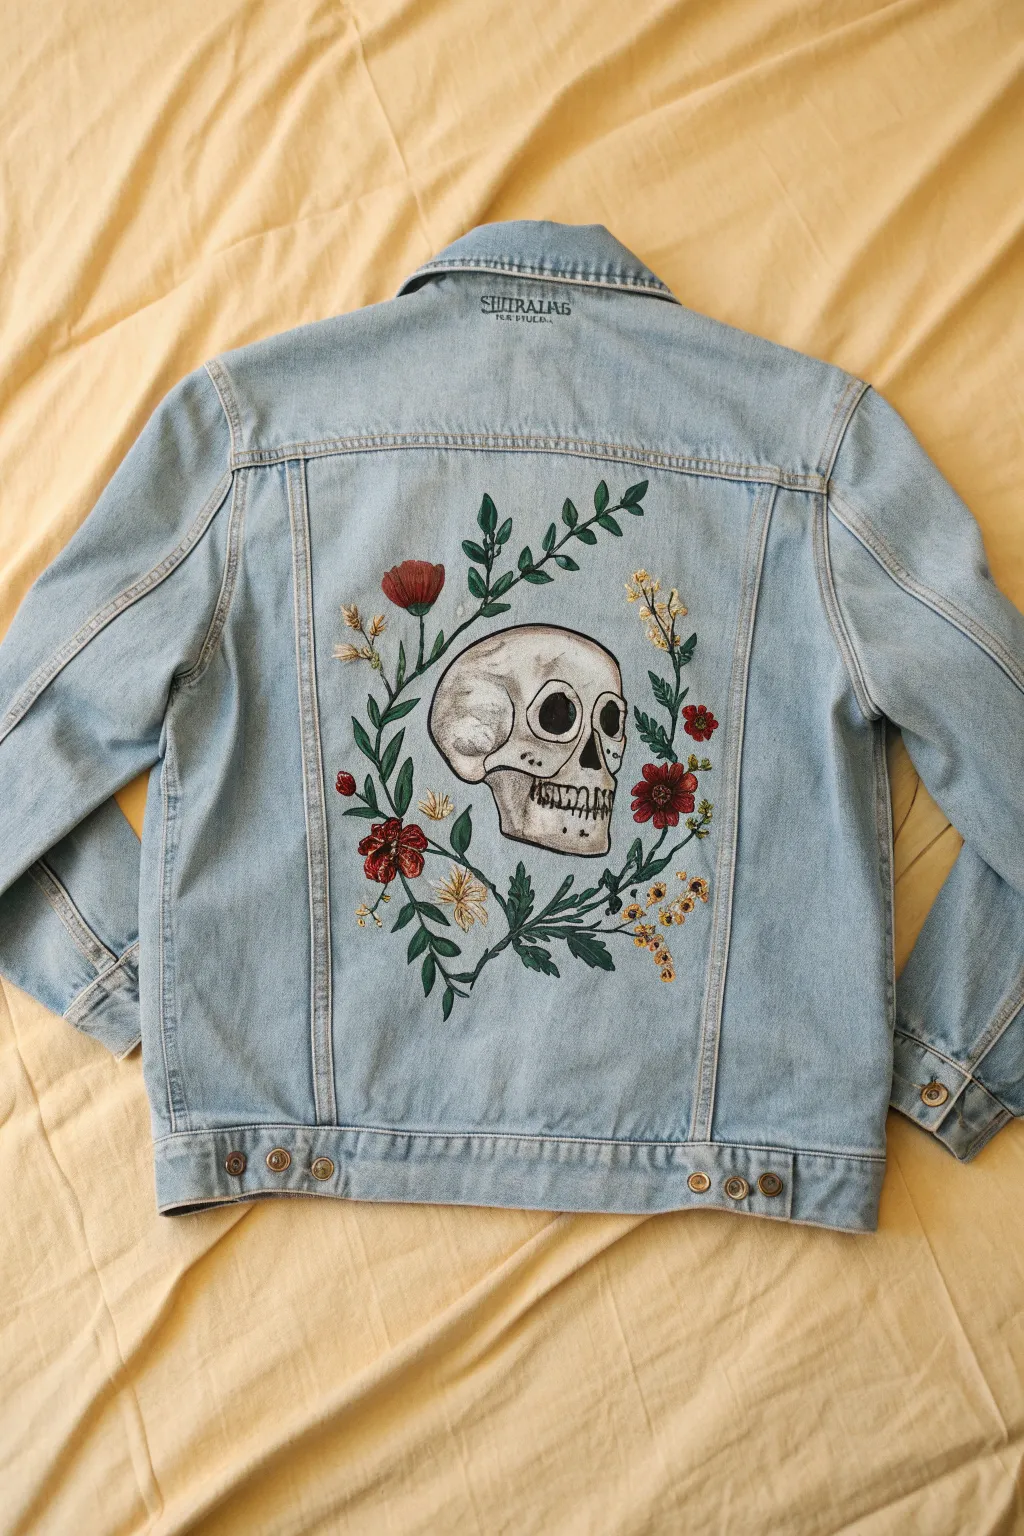
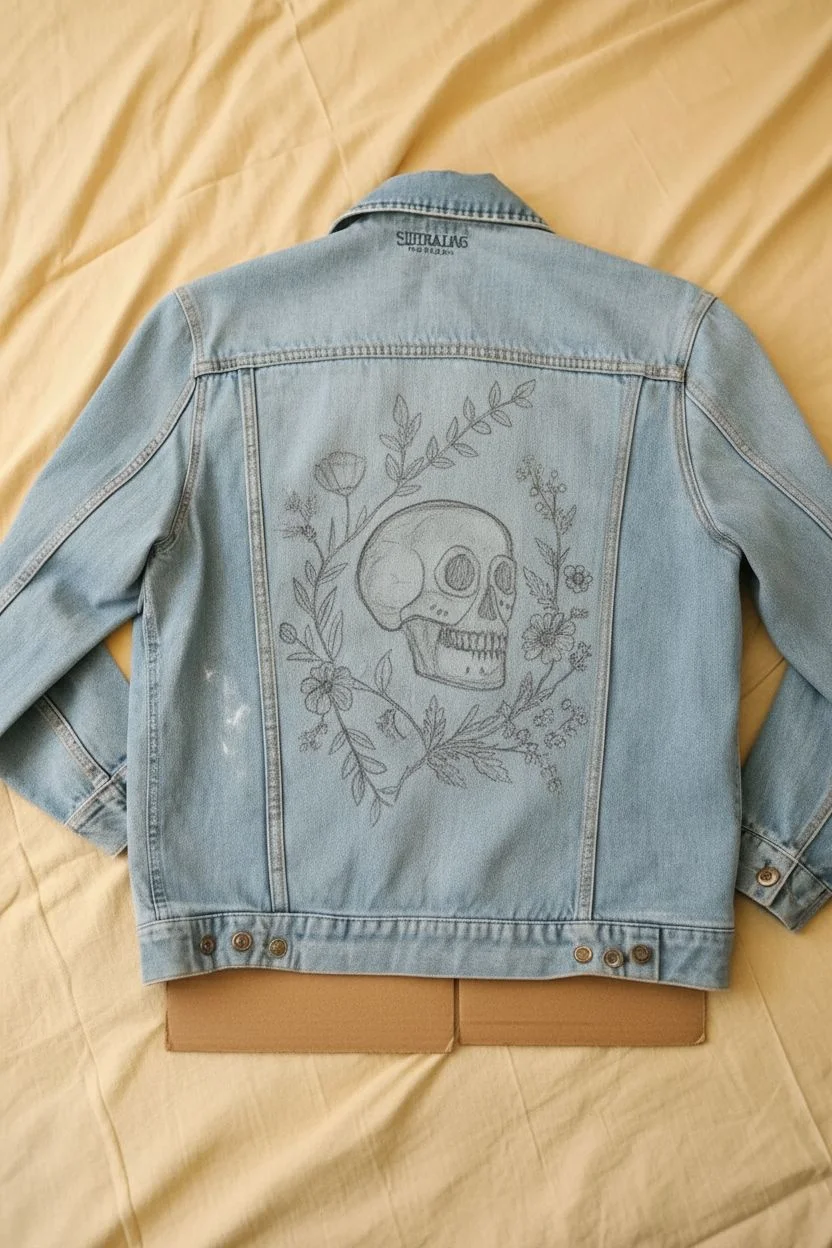
Transform a plain denim jacket into a statement piece with this vintage-inspired skull and botanical illustration. The contrast between the edgy skull and delicate wildflowers creates a balanced, timeless design perfect for the back panel.
Step-by-Step Tutorial
Materials
- Light wash denim jacket
- Fabric medium
- Acrylic paints (White, Black, Burnt Umber, Olive Green, Deep Red, Golden Yellow)
- Set of synthetic brushes (detail liner, small flat, medium round)
- White or light grey chalk pencil
- Painter’s tape or cardboard
- Palette or paper plate
- Iron and pressing cloth
Step 1: Preparation & Sketching
-
Prepare the surface:
Wash and dry your denim jacket without fabric softener to ensure the paint adheres properly. Lay the jacket flat on a hard surface and place a piece of cardboard inside the jacket, directly under the back panel, to prevent paint bleeding through to the other side. -
Sketch the skull outline:
Using a chalk pencil, lightly sketch the profile of a skull in the center of the back panel. Focus on the large rounded cranium and the jawline. Don’t worry about perfect details yet; just get the proportions right. -
Add the botanical framework:
Draw loose, flowing vines encircling the skull. Extend branches upwards and downwards on both sides, leaving some space for flowers to be added later. Keep the lines organic and curved. -
Block in floral placements:
Mark small circles or shapes where your main flowers will go—specifically the red poppies and yellow sprigs—interspersed among the leaves.
Paint looks stiff?
Using too much pure acrylic can make denim stiff. Ensure you mix enough fabric medium into every color (usually a 1:1 ratio) to keep the design flexible.
Step 2: Painting the Skull
-
Base coat:
Mix white acrylic paint with fabric medium (usually 1:1 or 2:1 depending on the brand). Paint the entire skull shape with a solid layer of white. Let this dry completely. You may need a second coat if the denim blue shows through strongly. -
Define the features:
Mix a small amount of black with fabric medium. Using a fine liner brush, carefully paint the large eye socket, the nasal cavity, and the teeth. The eye socket should be a deep, solid black. -
Create shadows:
Mix a very diverse grey wash (mostly water/medium with a tiny dot of black and brown). Gently shade the areas under the cheekbone, around the temple, and at the base of the skull to give it dimension. I like to keep this subtle to maintain that illustrative look. -
Detail the cracks and texture:
Using your thinnest brush and a dark grey or diluted black, add fine cracks on the skull’s surface, particularly near the sutures on the top of the head.
Add vintage texture
After the paint is fully dry, lightly sand the design with fine-grit sandpaper for a distressed, worn-in look that matches the vintage aesthetic.
Step 3: Painting the Botanicals
-
Greenery base:
Mix olive green with a touch of black for a vintage, moodier green. Paint the stems and leaves along your sketched vine lines. Vary the leaf shapes—some rounded, some pointed—to add interest. -
Leaf highlights:
While the green is still slightly tacky or just dry, mix a lighter green (olive + yellow/white) and add streaks to one side of the leaves to imply light hitting them. -
Paint the red flowers:
Using a deep red mixed with medium, fill in the larger flower shapes. These resemble poppies or wild roses. Apply the paint somewhat thickly for texture. -
Add yellow accents:
With a golden yellow, paint the small sprigs of wildflowers. Use stippling or small dabs to create the texture of pollen or tiny petals. -
Floral details:
Once the red flowers are dry, use a tiny bit of black or dark brown to add centers and stamens to them. Add white highlights to the tips of the yellow flowers for pop.
Step 4: Finishing Touches
-
Outline work:
This step makes the design pop. Use a fine liner brush with black paint (mixed with medium) to outline the skull and the major leaves and flowers. Keep the line weight consistent for a cohesive, tattoo-flash style. -
Clean up:
If any chalk lines are still visible, gently wipe them away with a damp cloth or Q-tip once the paint has fully dried. -
Heat set:
Allow the jacket to dry for at least 24 hours. Then, place a pressing cloth over the design and iron on medium heat (no steam) for 3-5 minutes to permanently set the paint.
Wear your new custom jacket with pride, knowing you’ve created a piece of wearable art that looks cool and classic all at once
Abstract Color Blocks That Ignore the Seams
Transform the back panel of a denim jacket into a stunning piece of wearable art featuring intersecting geometric shapes in a warm, muted palette. Despite looking intricate, this design uses simple masking techniques to achieve crisp white lines that separate blocks of rust, peach, mauve, and soft blue.
How-To Guide
Materials
- Denim jacket (light to medium wash works best)
- Fabric medium
- Acrylic paints (rust, terracotta, mauve, dusty pink, pale blue)
- White fabric paint or white acrylic paint mixed with medium
- Thin painter’s tape or graphic art tape (1/8 inch or 1/4 inch width)
- Flat shader brushes (medium size)
- Fine detail brush
- Cardboard insert
- Iron and parchment paper (for heat setting)
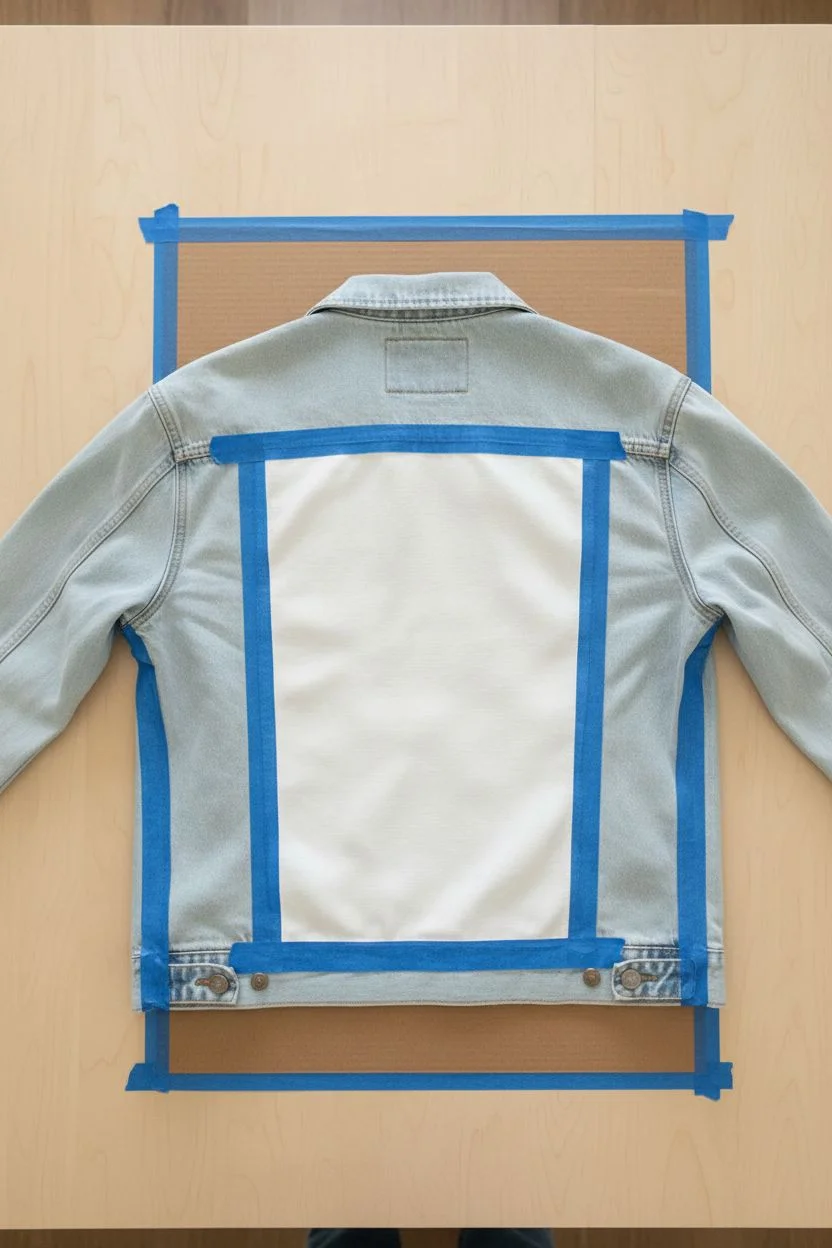
Step 1: Preparation & Masking
-
Prepare the surface:
Start by laying your jacket flat on a work surface. Insert a piece of cardboard inside the jacket, specifically under the back panel, to create a rigid painting surface and prevent any paint from bleeding through to the front. -
Define the boundaries:
Using your thin painter’s tape, tape off the four outer borders of the central back panel. Press the edges down firmly to ensure sharp lines along the seams. -
Create the geometric web:
Begin applying strips of tape across the panel to create your geometric design. Start with a few long, diagonal lines that intersect across the whole space. -
Subdivide the shapes:
Add smaller strips of tape connecting the main lines to create a variety of triangles, trapezoids, and irregular polygons. Aim for a balanced look with a mix of large and medium shapes. -
Seal the tape edges:
To ensure super crisp lines later, run your fingernail or a credit card firmly over all the tape edges. I sometimes like to brush a very thin layer of clear fabric medium over the tape edges to seal them completely.
Tape Sealing Trick
Paint the tape edges with white paint first before your colors. This acts as a barrier, effectively stopping any colored bleed-through.
Step 2: Painting the Blocks
-
Mix your colors:
Prepare your palette by mixing acrylic paints with fabric medium according to the bottle’s instructions (usually a 1:1 or 2:1 ratio). You want a creamy consistency that soaks slightly into the denim but remains opaque. -
Plan the color distribution:
Before painting, visualize where each color will go. Try to avoid having two identical colors touching each other. You can make a small sketch on paper first if that helps. -
Paint the first color: Rust:
Select a few scattered shapes and fill them with the deep rust color. Use a flat brush and stroke away from the tape edges toward the center of the shape to prevent paint from seeping under. -
Apply the second color: Terracotta/Peach:
Choose adjacent or nearby shapes and fill them with your mid-tone terracotta or peach shade. Apply a second coat if the denim weave is still showing through strongly. -
Add the cool tones: Pale Blue:
Intersperse the pale blue paint into a few selected geometric blocks. This cool tone provides a nice visual break from the warm earth tones. -
Finish with Mauve:
Fill in the remaining empty shapes with the mauve or dusty pink color. Check the entire design for any missed spots or uneven coverage. -
Let it dry completely:
Allow the paint to air dry until it is dry to the touch. This usually takes about an hour, depending on the thickness of your layers.
Add Texture
Mix a tiny amount of baking soda into the rust-colored paint for a suede-like texture that contrasts beautifully with the flat denim.
Step 3: The Reveal & Finishing Touches
-
Peel the tape:
This is the satisfying part. Slowly peel back the painter’s tape to reveal the unpainted denim lines underneath. Pull the tape at a 45-degree angle for the cleanest edge. -
Refine the lines:
Don’t worry if the denim lines look a bit dull. Using a fine detail brush and your white paint mixture, carefully hand-paint over the exposed denim lines where the tape used to be. -
Create the dashed effect:
To mimic the stitching look seen in the inspiration, paint the white lines with a slight texture or use a very fine brush to create small, evenly spaced dashes along certain intersections just like topstitching. -
Dry thoroughly:
Let the entire jacket dry for at least 24 hours to ensure the paint has fully cured. -
Heat set the design:
Cover the painted area with a piece of parchment paper. Iron on a medium-high setting (no steam) for 3-5 minutes, moving the iron constantly to heat set the paint and make it washable.
Now you have a completely unique, modernized denim jacket ready for your next outing


Expressive Brushstroke “Messy Pretty” Back Panel
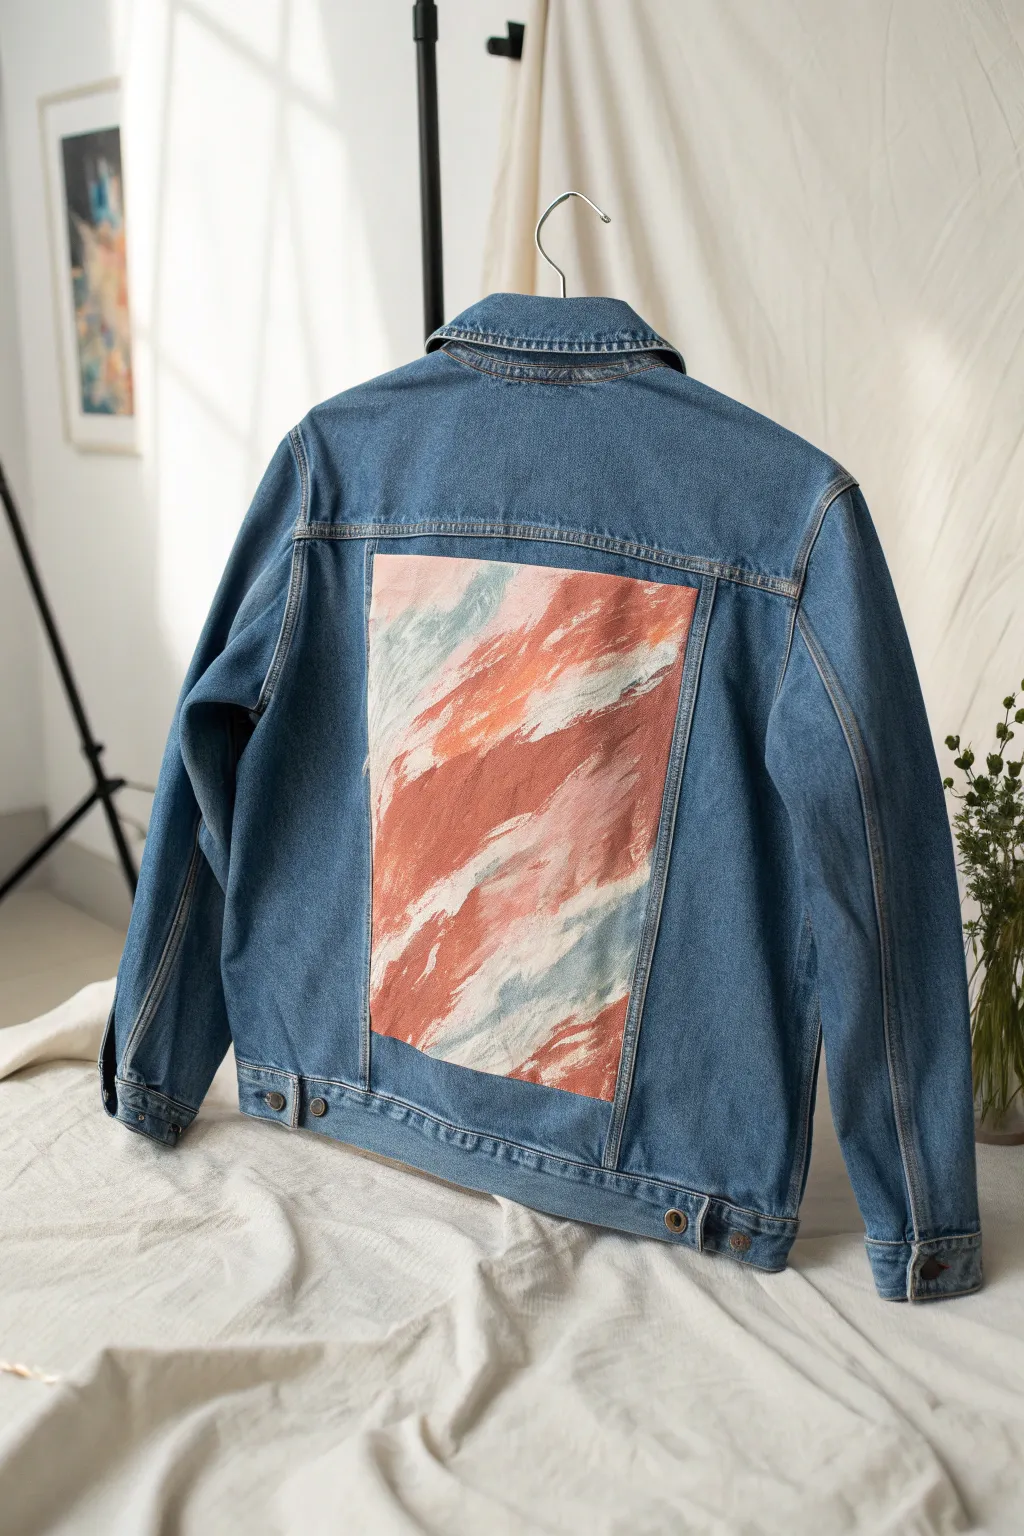
Transform a classic denim staple into wearable art with this abstract, painterly back panel design. The combination of warm terracotta rusts and cool, breezy blues creates a striking contrast that mimics a sunset sky or a desert landscape.
Step-by-Step Tutorial
Materials
- Denim jacket (clean and dry)
- White fabric paint or gesso (for priming)
- Fabric medium
- Acrylic paints: Burnt Sienna, Terracotta, Titanium White, Pale Blue-Grey, Unbleached Titanium
- Masking tape or painter’s tape
- Flat shader brushes (medium and large)
- Palette or paper plate
- Iron and thin cloth (for heat setting)
Step 1: Preparation & Priming
-
Define the canvas:
Lay your jacket flat on a hard surface. Locate the central rectangular panel on the back of the jacket, which is usually defined by the stitching seams. -
Tape the edges:
Apply masking tape carefully along the stitching lines surrounding this center panel. Press the tape down firmly to prevent paint from bleeding onto the rest of the denim. -
Mix the primer:
Mix white acrylic paint with fabric medium according to the bottle instructions. Alternatively, you can use specialized white fabric paint or a heavy gesso for a stiffer texture. -
Create a base layer:
Paint a solid white rectangle inside your taped area. This white base is crucial because denim absorbs pigment; without it, your colors will look dull and muddy. -
Let it cure:
Allow this white base layer to dry completely. It should be dry to the touch before you add any color.
Step 2: Painting the Abstract Strokes
-
Prepare the palette:
Squeeze out your Burnt Sienna, Terracotta, Pale Blue-Grey, and White paints onto your palette. Don’t mix them yet; we want distinct streaks of color. -
Start with dark warm tones:
Load a medium flat brush with the Burnt Sienna. Apply diagonal, sweeping strokes starting from the bottom left and moving toward the top right. -
Vary the pressure:
Press harder at the start of the stroke and lift off gently at the end to create a feathered, textured look. -
Introduce the terracotta:
While the first strokes are still slightly tacky, add the lighter Terracotta shade. Overlap some of the darker areas to create depth and mixing directly on the fabric. -
Add the cool contrast:
Switch to a clean brush. Dip into the Pale Blue-Grey and add strokes in the negative spaces, particularly near the top left and bottom right corners. -
Blend with white:
Here I prefer to take a brush loaded with a small amount of Titanium White and drag it through the wet edges where the blue and rust meet. -
Create the ‘messy’ texture:
Use a dry brush technique—wipe most of the paint off your brush and drag it quickly across the surface to get those scratched, distressed lines seen in the image. -
Layering for opacity:
If the denim texture is showing through too much, let the first layer dry slightly and repeat the diagonal strokes to build up opacity and color intensity. -
Diagonal flow check:
Step back and ensure the general flow of movement goes diagonally across the panel. It doesn’t need to be perfect; the energy of the stroke is what matters.
Paint feels stiff?
Using too much pure acrylic can make the panel stiff. Ensure you use fabric medium (usually a 1:1 or 2:1 ratio) to keep the finished art flexible and soft
Step 3: Finishing Touches
-
Remove the tape:
Carefully peel off the masking tape while the paint is still slightly tacky. This helps prevent the dried paint from cracking or lifting at the edges. -
Touch up edges:
If any paint seeped under the tape, use a small stiff brush dipped in water or rubbing alcohol to scrub it away gently, or cover it with a tiny bit of blue paint that matches the denim. -
Dry completely:
Allow the jacket to dry for at least 24 hours. The paint needs to fully cure before heat setting. -
Heat set the design:
Place a thin cotton cloth over the painted area. Iron on a medium-high setting (no steam) for 3-5 minutes to seal the paint into the fibers.
Gold leaf accents
Once dry, apply small flecks of gold leaf along the diagonal white streaks. The metallic shine looks incredible against the matte terracotta rust
Now you have a custom piece of outerwear that carries the beauty of a painted canvas wherever you go
Celestial Moon and Stars With Subtle Glow Effects
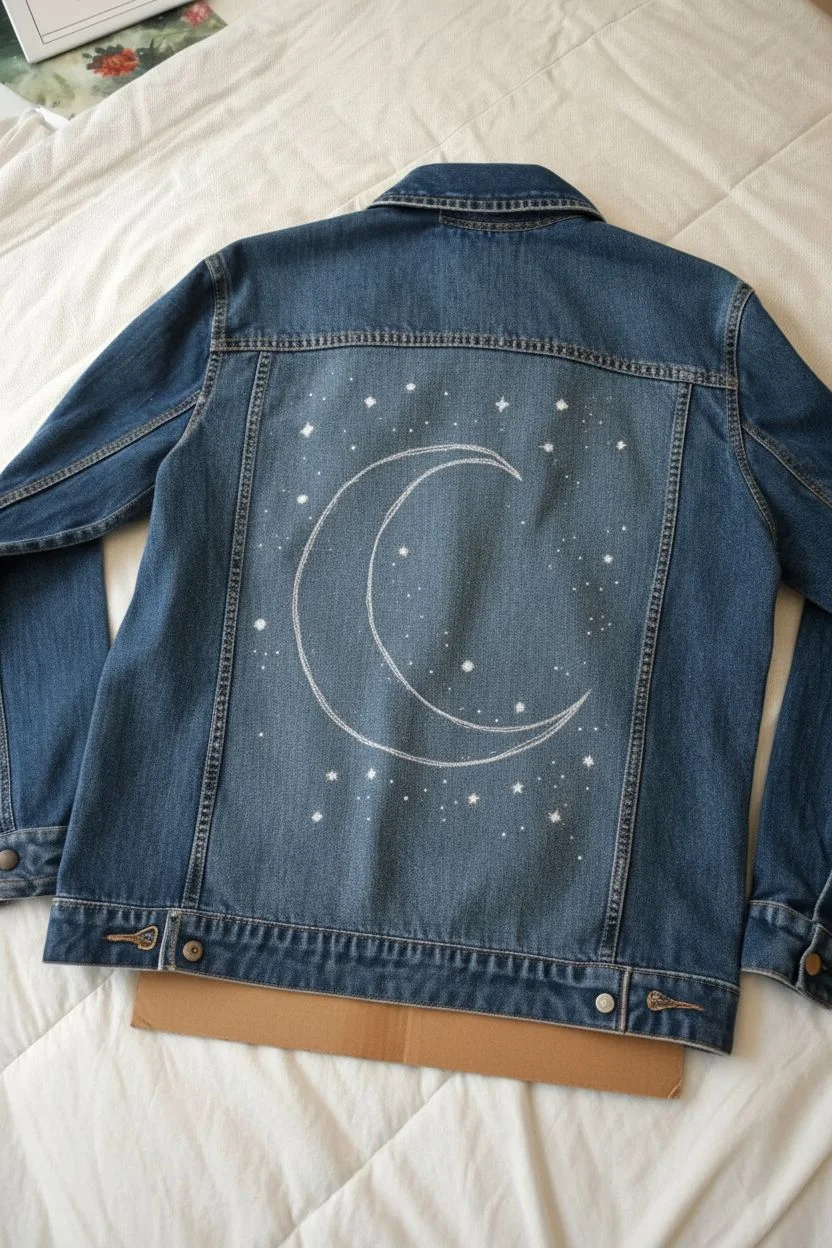
Transform a plain denim jacket into a starry night sky with this celestial painting project, featuring a textured crescent moon surrounded by twinkling stars. The subtle glow effects and metallic accents create a dreamy, wearable piece of art perfect for stargazers.
Detailed Instructions
Materials
- Denim jacket (clean and dry)
- Fabric medium
- Acrylic paint (Titanium White, Gold, Silver/Light Grey)
- Flat shader brush (medium size)
- Fine liner brush (size 00 or 000)
- Small round brush (size 1)
- Chalk or white fabric pencil
- Cardboard or plastic insert
- Paper plate or palette
- Iron (for heat setting)
- Press cloth or parchment paper
Step 1: Preparation & Sketching
-
Prep the Surface:
Begin by sliding a piece of stiff cardboard or a plastic placemat inside the jacket, directly under the back panel. This creates a stable surface for painting and prevents paint from bleeding through to the front of the jacket. -
Mix Fabric Medium:
Mix your acrylic paints with fabric medium according to the bottle instructions (usually a 1:1 or 2:1 ratio). This ensures the paint remains flexible and won’t crack on the denim. -
Sketch the Moon:
Using a piece of chalk or a white fabric pencil, lightly sketch a large crescent moon shape in the center of the back panel. Focus on getting a smooth, tapered curve at the top and bottom tips. -
Mark Star Locations:
lightly dot where you want your largest stars to go. Plot out a few key positions around the moon to ensure a balanced composition before you commit with paint.
Fixing Wobbly Lines
If a star point gets messy, let it dry completely. Then, use a stiff brush with a tiny bit of water to scrub the edge, or paint over the mistake with a dark blue mix that matches the denim.
Step 2: Painting the Moon
-
Base Coat:
Using the flat shader brush and your white paint mix, fill in the crescent moon shape. You likely won’t get full opacity on the first pass; apply a thin, even layer and let it dry. -
Build Opacity:
Once the first layer is dry to the touch, apply a second coat of white. This solid base is crucial for the textured effect later. -
Add Texture:
While the white is still slightly tacky or after it dries, I like to use a small round brush to dab on a mix of metallic gold and diluted grey or beige. Use a stippling motion to create crater-like textures and subtle discoloration typical of the moon’s surface. -
Highlight the Inner Edge:
Reinforce the inner curve of the moon with a crisper line of pure white or very light silver to give it dimension and make it pop against the blue denim.
Step 3: Adding the Stars
-
Paint Major Stars:
Switch to your fine liner brush. Paint the largest stars first using white. Create a four-point star shape: start with a vertical line, cross it with a horizontal line, and then curve the inner corners inward slightly to make them sharp. -
Create Golden Accents:
Paint several medium-sized four-point stars using the metallic gold paint. Place these randomly among the white stars to add warmth and variety. -
Layer Star Details:
For the largest white star (like the one inside the moon’s curve), add a tiny grey or silver center to give it a glowing core effect. -
Paint Minor Stars:
Using the small round brush, add smaller diamond shapes or simple dots in white and gold to fill in empty spaces.
Level Up: Rhinestones
For actual sparkle, glue small hot-fix rhinestones or crystals onto the centers of the largest stars once the paint is fully dry and heat-set.
Step 4: The Galaxy Effect
-
Add Tiny Specs:
Dip the very tip of your finest brush (or even a toothpick) into white paint. Dot hundreds of tiny ‘distant stars’ all over the back panel, concentrating them slightly near the moon. -
Vary the Sizes:
Ensure the dots aren’t uniform. Press a little harder for some, and barely touch the denim for others, creating depth in your starry field. -
Clean Up:
If chalk lines are still visible around the moon or stars, gently wipe them away with a barely damp cloth or brush once the paint is fully dry.
Step 5: Finishing Touches
-
Dry Completely:
Allow the jacket to dry flat for at least 24 hours. The thicker parts of the paint need time to cure fully. -
Heat Set:
To make the design washable, place a press cloth or parchment paper over the dry painting and iron on medium heat (no steam) for 3-5 minutes, keeping the iron moving.
Wear your new cosmic jacket with pride and enjoy the compliments on your handiwork
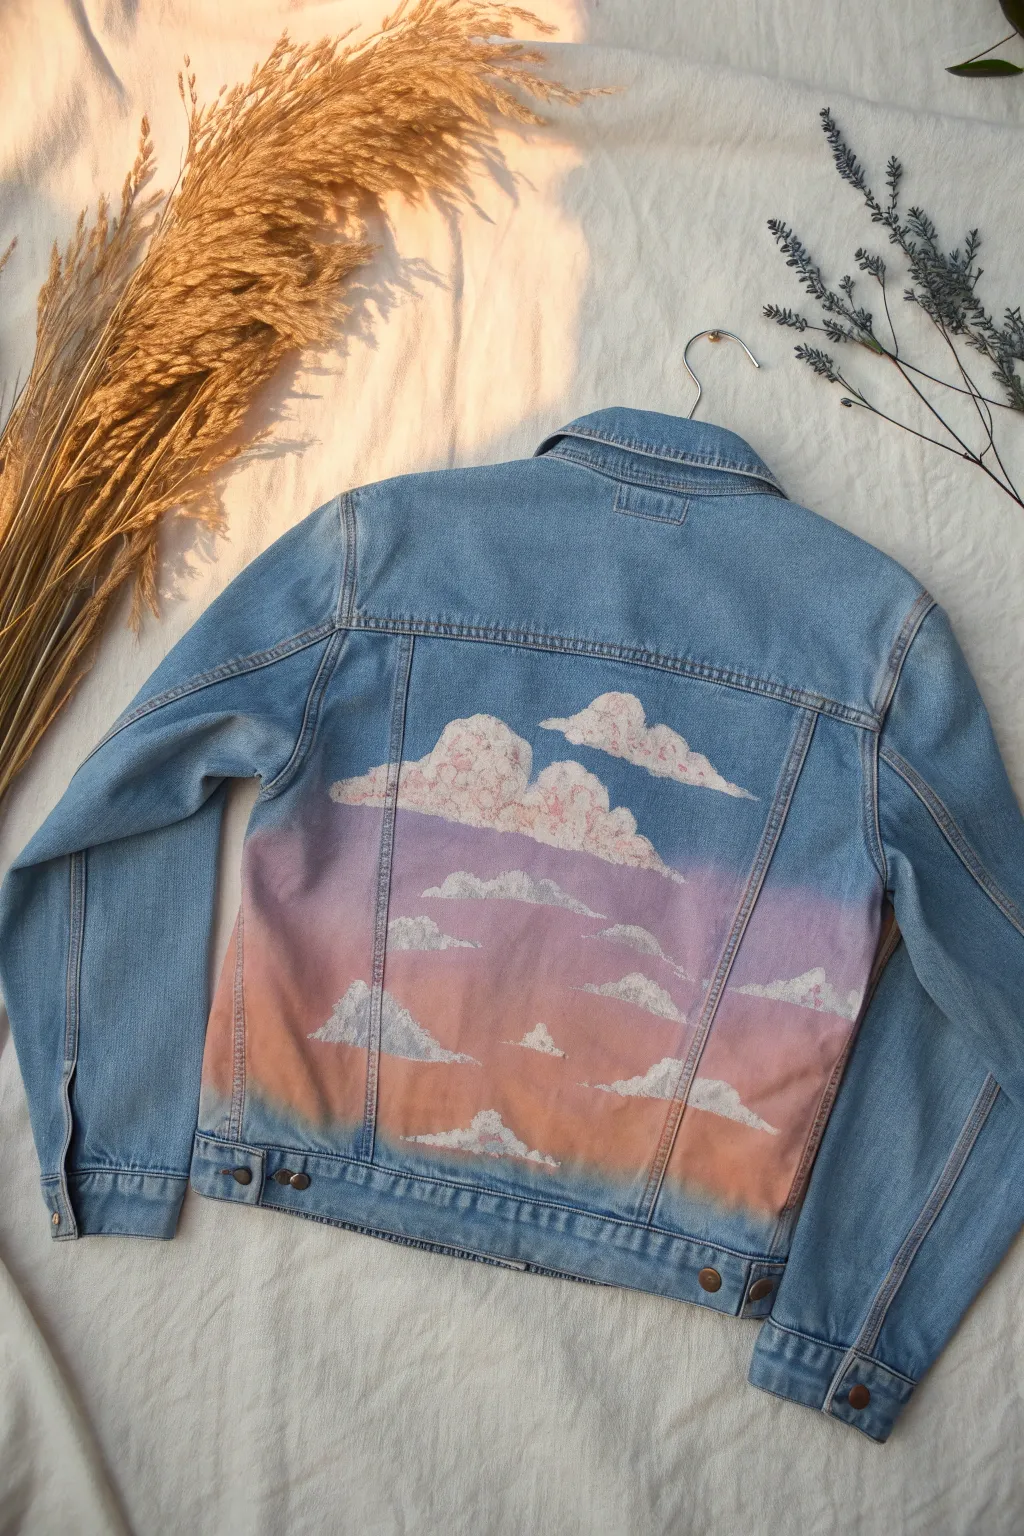
Ocean Waves With Foamy Highlights and Motion
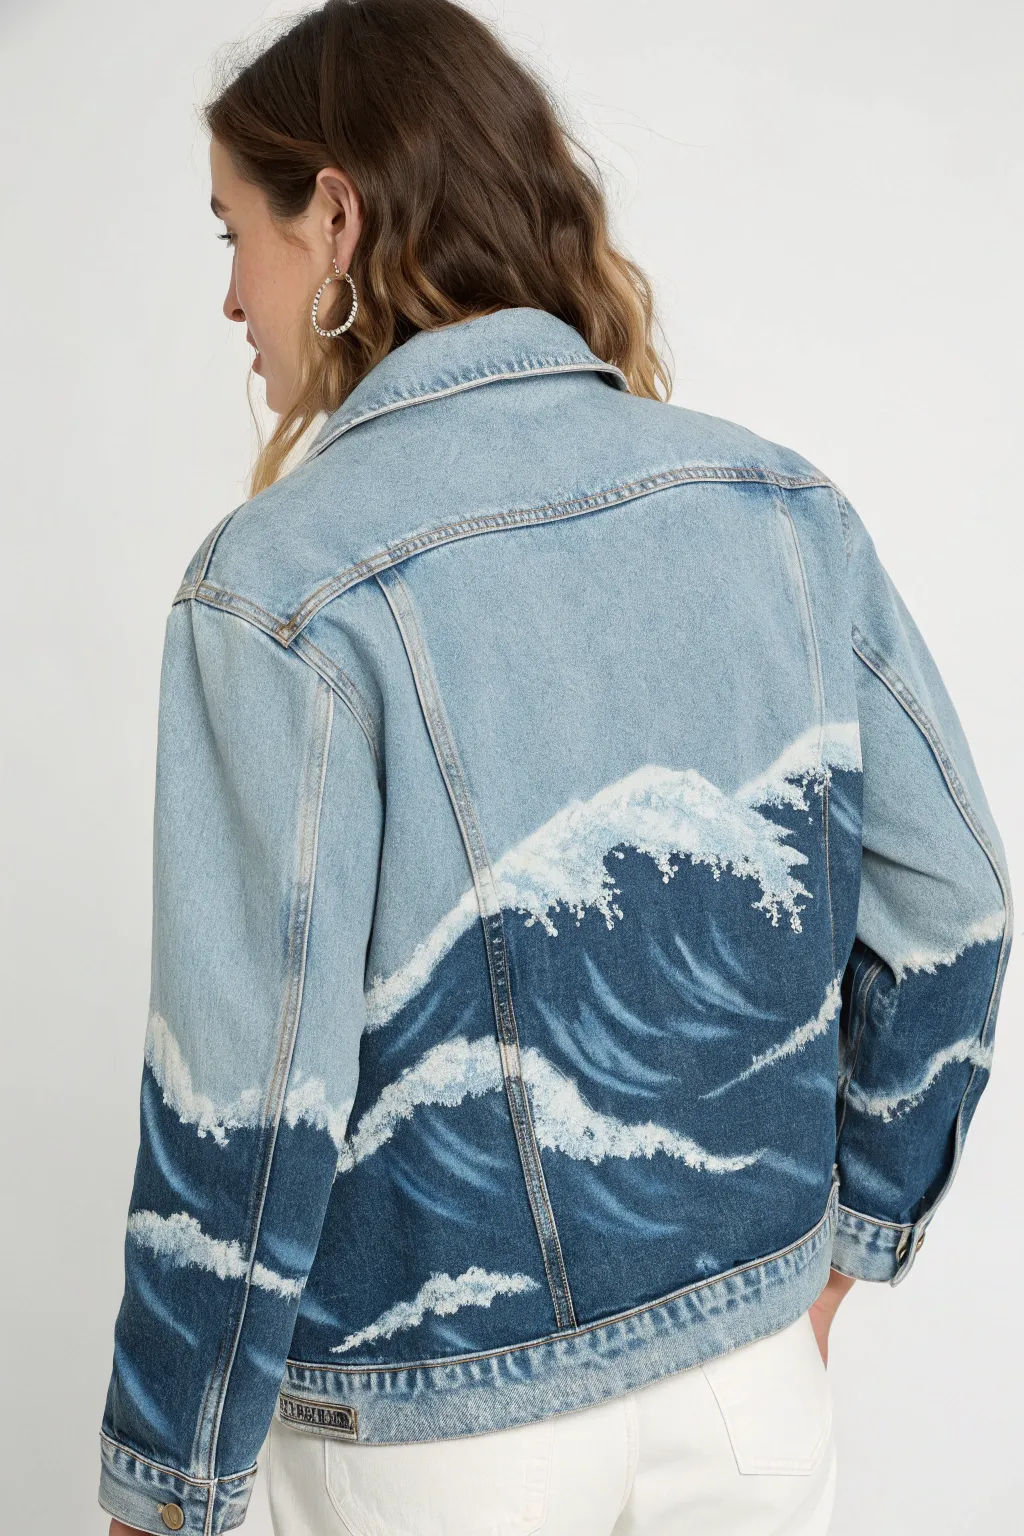
Transform a plain light-wash jacket into a wearable seascape with this dynamic ocean wave design. Using a limited palette of deep blues and stark whites, you’ll create depth, motion, and foamy highlights that make a powerful splash.
Step-by-Step Guide
Materials
- Light wash denim jacket
- Fabric medium or textile medium
- Acrylic paints: Phthalo Blue (or Navy Blue), Titanium White, Black
- Wide flat brush (approx. 1 inch)
- Medium round brush
- Small detail brush or liner brush
- Palette or paper plate
- Masking tape
- Cardboard (to place inside the jacket)
- Water cup and paper towels
- Hairdryer (optional, for speed)
Step 1: Preparation & Masking
-
Prepare the surface:
First, ensure your jacket involves a light wash denim, as this acts as the ‘sky’ color automatically. Wash and dry the jacket without fabric softener to remove any sizing chemicals that might repel paint. -
Insert backing:
Slip a large piece of cardboard inside the jacket, positioning it behind the back panel. This creates a sturdy surface for painting and prevents paint from bleeding through to the front of the jacket. -
Define the horizon:
Locate the horizontal yoke seam across the upper back of the jacket. This natural stitching line will serve as the top boundary of your wave design. -
Protect the unpainted area:
Apply a strip of masking tape directly above this seam to protect the upper denim panel from stray brushstrokes. Run your fingernail along the tape edge to ensure a tight seal.
Step 2: Painting the Deep Ocean Base
-
Mix your base color:
On your palette, mix a generous amount of Phthalo Blue with a touch of black to create a very deep, rich navy. Mix this customized color with fabric medium according to the bottle’s ratio (usually 1:1 or 2:1 paint to medium) to keep the paint flexible. -
Outline the main wave shape:
Using your medium round brush and the dark navy mix, sketch the irregular, undulating top edge of the waves. Start high on the right side and let the line swoop down and back up across the left panel, mimicking the natural flow of water. -
Fill the base layer:
Switch to your wide flat brush. Fill in the entire area below your sketched wave line with the dark navy mixture. Don’t worry about perfect coverage yet; denim is thirsty and might need a second coat later. -
Extend to the sleeves:
To create a continuous wraparound effect, put the jacket on a hanger or lay it flat to extend that dark blue horizon line onto the back of the sleeves where they naturally align with the back panel. -
Create the secondary wave:
Once the main block is filled, paint a second, lower wave shape near the bottom hem using the same dark color. This adds layers to the ocean scene. -
Let it dry:
Allow this base layer to dry completely. If the denim texture is still showing through too much, apply a second coat of the dark navy mix for a solid, opaque look.
Stiff Paint Correction
If your painted area feels like thick plastic after drying, gently sand the painted surface with very fine-grit sandpaper. This softens the fibers without removing the color.
Step 3: Creating Motion & Highlights
-
Mix a mid-tone blue:
Mix some of your original blue paint with a little white to create a medium ocean blue. Do not add black this time. Ensure you mix in your fabric medium. -
Add water movement:
Using the medium round brush, paint curved, sweeping strokes inside the dark wave bodies. Follow the curve of the wave crests. These lighter strokes suggest the translucent quality of water as it rises. -
Blend softly:
While the mid-tone paint is still slightly wet, I like to use a dry brush to gently feather the edges into the dark background, so the transition isn’t too harsh.
Sponge Technique
For realistic sea foam, skip the brush and use a torn piece of kitchen sponge. Dip it in white paint and dab it lightly along the wave crests for instant, organic texture.
Step 4: The Foamy Crests
-
Prepare the white:
Clean your brushes thoroughly. Squeeze out fresh Titanium White and mix it with fabric medium. You want this white to be thick and opaque. -
Stipple the crests:
Using a scruffy or old brush, tap (stipple) the white paint along the very top edge of your dark blue waves. Keep the texture rough and uneven to resemble splashing foam. -
Drag the foam down:
From the stippled edge, lightly drag dry, broken lines of white downwards into the curve of the wave. This mimics the foam sliding down the face of the water. -
Diffuse the edges:
Where the white meets the light denim sky at the top, allow the paint to break up and fade out, creating a misty spray effect rather than a hard line. -
Highlight the lower waves:
Repeat the stippling and dragging process on the lower wave sections near the hem and on the sleeves. Vary the thickness of the white lines to keep it organic. -
Enhance the brightest spots:
Once the first white layer is dry, go back with the detail brush and add pure, unmixed white to the very tips of the splashing crests for maximum contrast. -
Final cure:
Remove the masking tape carefully. Let the jacket dry for at least 24 hours. Heat set the paint by ironing the reverse side of the fabric (no steam) for 3-5 minutes to make it permanent.
Now you have a dynamic, custom piece of wearable art that captures the power of the ocean wherever you go
Painted Portrait Sketch in Loose Line and Wash
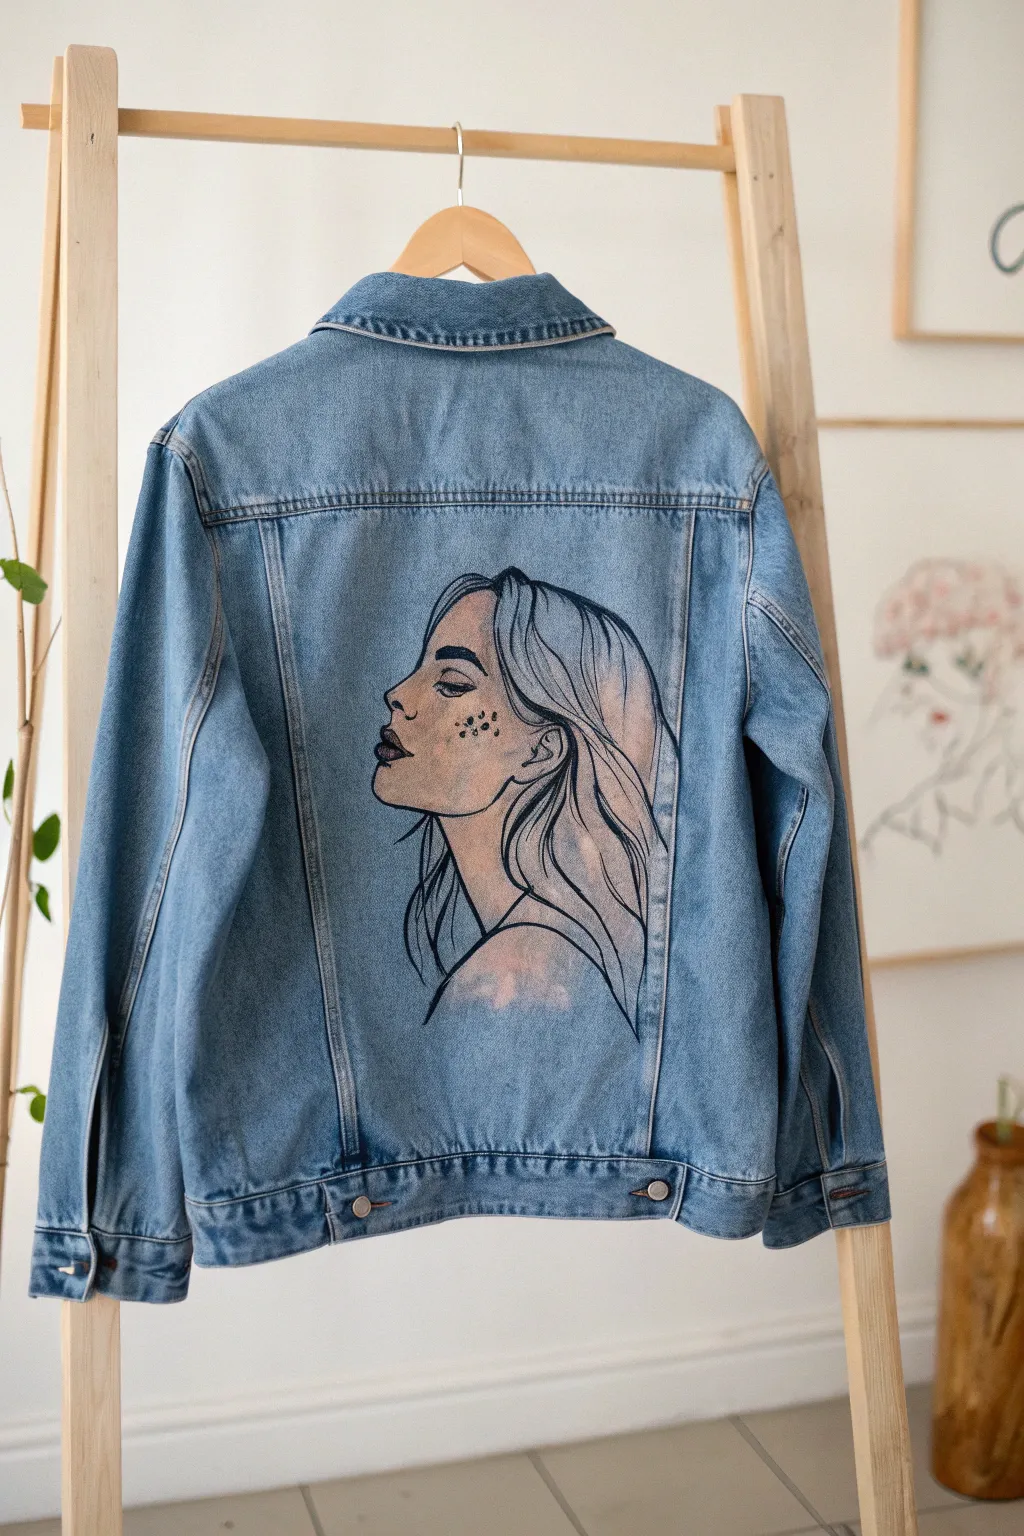
Transform a classic denim jacket into a wearable sketchbook page with this striking profile portrait. Using a combination of fabric markers and diluted fabric paints, you’ll achieve a trendy ‘loose line and wash’ aesthetic that feels modern, artistic, and effortlessly cool.
Step-by-Step Tutorial
Materials
- Denim jacket (light to medium wash works best)
- Black fabric marker (fine tip and medium tip)
- White fabric paint or gesso
- Flesh-tone or peach fabric paint
- Textile medium (mixing medium)
- Fine detail paintbrush (size 0 or 1)
- Flat shader brush (size 4 or 6)
- Tailor’s chalk or white colored pencil
- Cardboard insert for inside the jacket
- Iron and parchment paper (for heat setting)
- Reference photo of a side profile
- Pencil and paper for drafting
Step 1: Preparation & Sketching
-
Draft your design:
Before touching the denim, sketch your profile portrait on a piece of paper. Since the jacket’s back panel is usually rectangular, aim for a composition that fits comfortably between the vertical seams without being too cramped. -
Prep the surface:
Slip a sturdy piece of cardboard inside the jacket, positioning it directly behind the back panel. This creates a smooth drawing surface and prevents any ink or paint from bleeding through to the front of the jacket. -
Transfer the outline:
Using tailor’s chalk or a white colored pencil, lightly sketch the profile onto the denim. Focus on the major shapes first—the curve of the forehead, nose, lips, and chin—before adding the hair outline. Keep these lines faint so they can be easily removed later. -
Refine the placement:
Step back and look at your chalk sketch from a distance. Ensure the neck and shoulders flow naturally into the bottom edge of the panel. Adjust the proportions if the head looks too small or too large for the space.
Step 2: Inking the Lines
-
Start the linework:
Take your medium-tip black fabric marker. Begin tracing over your chalk lines, starting with the facial features. Use confident, sweeping strokes for the jawline and neck to maintain that ‘sketchy’ energy. -
Detail the face:
Switch to a fine-tip fabric marker for delicate areas like the eyelashes, nostrils, and lips. In the reference image, the lips have a bit of shading; you can achieve this by using short, hatched lines or stippling with the fine tip. -
The hair texture:
Draw the hair using long, flowing lines. Don’t try to draw every single strand. Instead, group locks of hair together and use the marker to suggest movement and volume. Let some lines trail off or overlap to keep the look loose. -
Add artistic elements:
If you look closely at the inspiration piece, you’ll see freckles on the cheek. Using the fine tip, dot a small cluster of uneven spots across the cheekbone and nose bridge for added character.
Smooth Operator
Denim has a rough texture that can make markers skip. Stretch the fabric taut against your cardboard insert and tape it down on the back to create a tighter, smoother surface for drawing lines.
Step 3: The Wash Technique
-
Mix your wash:
To get that subtle, watercolor-like shading seen in the image, mix a small amount of flesh-tone or peach fabric paint with textile medium and a drop of water. You want a translucent glaze, not an opaque layer. -
Apply the skin tone:
Using your flat shader brush, lightly sweep this diluted mix over the cheek, neck, and shoulder area. The denim texture should still show through the paint. I find it helpful to keep a paper towel handy to blot the brush if it’s too wet. -
Create shadows:
While the first layer is still slightly damp, add a tiny drop of brown or grey to your wash mix. Apply this slightly darker tone under the chin, behind the ear, and in the hollow of the neck to create depth. -
Highlighting:
Clean your brush thoroughly. Now, take a tiny bit of white fabric paint (diluted just slightly) and add highlights to the top of the nose, the brow bone, and the top of the shoulder. This pop of brightness brings the figure forward. -
Hair highlights:
Drag some dry-brush strokes of white or very pale peach through the hair strands. This separates the sections of hair and adds to that illustrative aesthetic without coloring everything in fully.
Level Up: Cosmic Touch
Instead of a plain skin-tone wash, use diluted metallic silver or gold fabric paint for the shading. It creates a subtle shimmer that catches the sunlight and adds a magical vibe.
Step 4: Finishing Touches
-
Re-define the black:
Once the paint washes are fully dry, you might notice some of your black lines look a bit faded where paint went over them. Go back in with your fabric marker and re-trace key outlines to restore contrast. -
Clean up:
Use a slightly damp cloth to wipe away any remaining visible chalk marks or colored pencil guidelines that weren’t covered by ink or paint. -
Dry time:
Let the jacket sit flat and dry completely for at least 24 hours. The ink needs to bond with the fibers before you seal it. -
Heat set the design:
Place a piece of parchment paper over your artwork. Set your iron to the cotton setting (no steam) and press firmly over the design for 3-5 minutes, moving constantly. This ensures your portrait survives the wash.
Now you have a completely custom, gallery-worthy piece of denim art ready to hit the streets


Have a question or want to share your own experience? I'd love to hear from you in the comments below!