There’s something instantly satisfying about building a whole little world inside a circular frame—it feels tidy, focused, and kind of magical. I pulled together my favorite circle drawing ideas that you can riff on for quick doodles, polished illustrations, or Pinterest-worthy mini compositions.
Moon and Stars Night Sky in a Circle
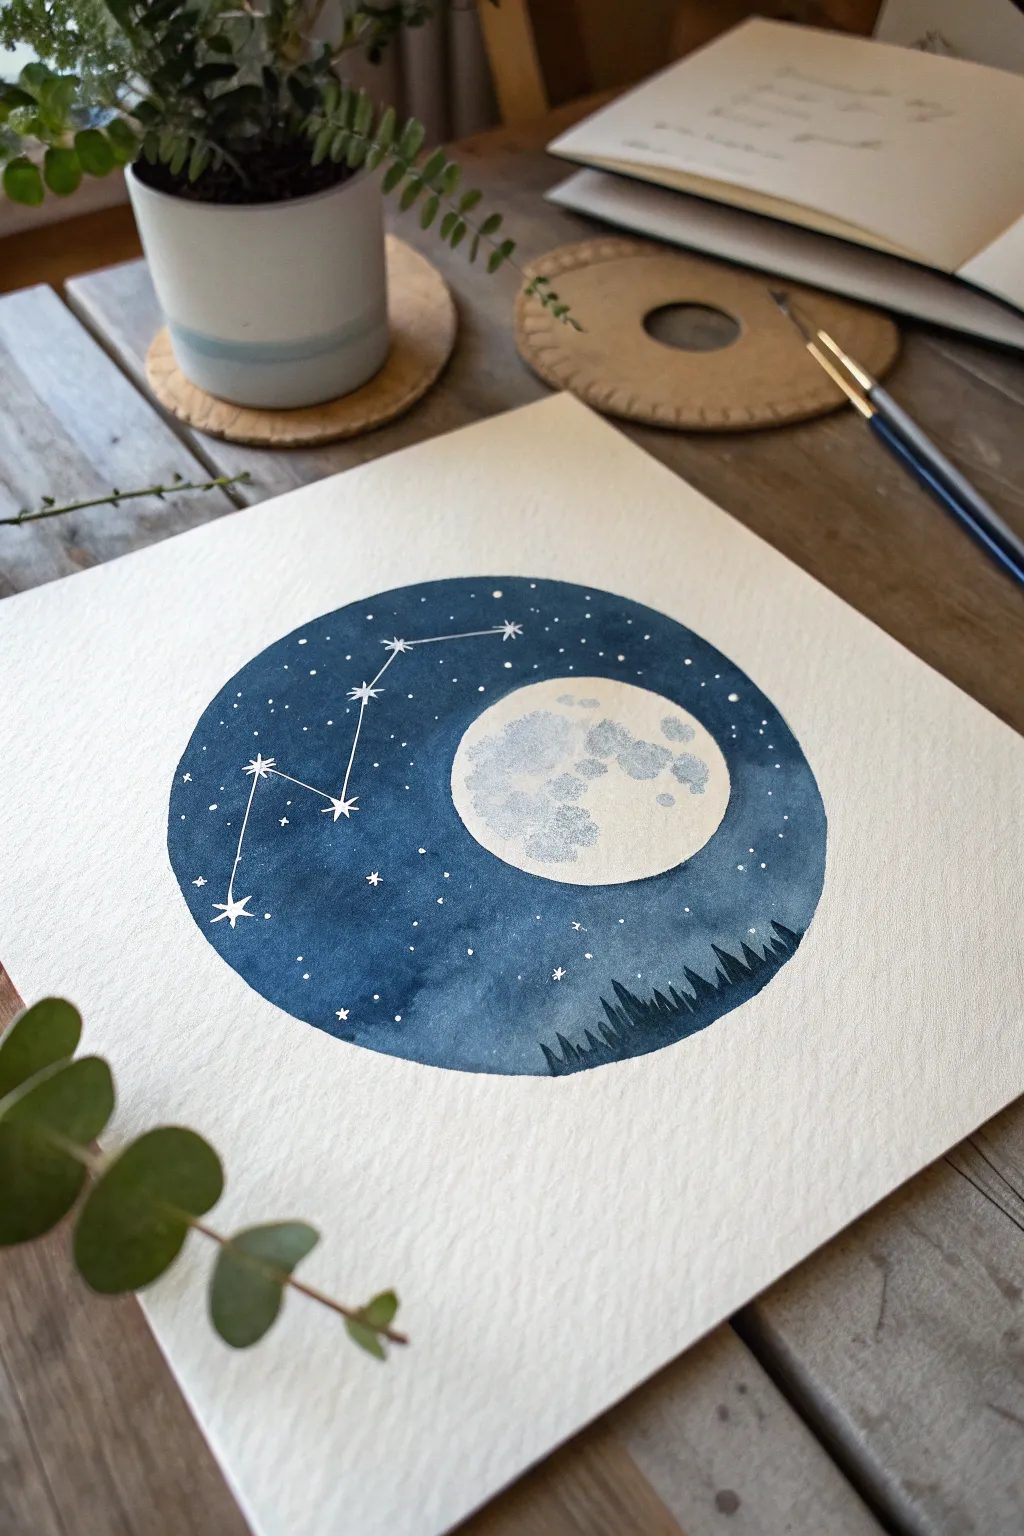
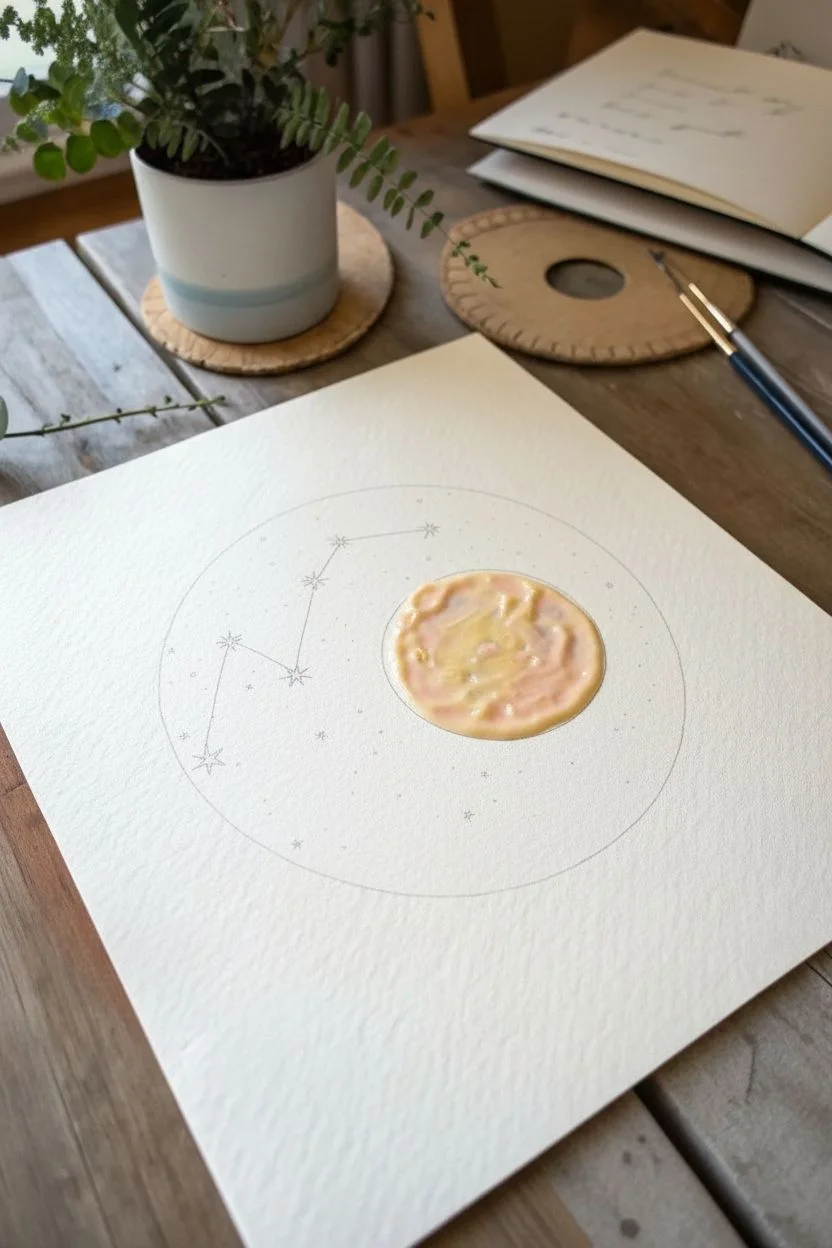
Capture the serene beauty of a midnight sky within a perfect circle, featuring a luminous moon, a delicate constellation, and a silhouette forest. This watercolor project relies on negative space and rich indigo hues to create a moody, magical atmosphere suitable for framing.
Step-by-Step Guide
Materials
- Cold press watercolor paper (300gsm/140lb)
- Circular object for tracing (bowl or lid) or compass
- Pencil and eraser
- Masking fluid (drawing gum) and old brush
- Watercolor paints: Indigo, Prussian Blue, Black
- White gouache or white gel pen
- Round watercolor brushes (sizes 6 and 2)
- Clean water and paper towels
Step 1: Preparation and Masking
-
Outline the circle:
Begin by lightly tracing a perfect circle onto your watercolor paper using a bowl, lid, or compass. Make sure your pencil lines are faint so they don’t show through the final paint. -
Draft the moon and stars:
Inside the circle, lightly sketch a smaller circle for the moon on the right side. On the left, mark small dots where your constellation stars will go. You can follow the Big Dipper pattern shown or choose your own zodiac sign. -
Apply masking fluid:
Using an old brush or a silicone applicator, carefully fill in the moon circle with masking fluid. This preserves the white of the paper. -
Mask the stars:
Dot masking fluid over your star sketches. For the larger stars, draw small twinkling ‘cross’ shapes with the fluid. Let everything dry completely until it’s tacky-free.
Soap Your Brush
Before dipping your brush in masking fluid, coat the bristles in dish soap. This creates a barrier that prevents the fluid from ruining the brush bristles permanently.
Step 2: Painting the Sky
-
Prepare your palette:
Mix a generous amount of deep blue wash. I like to combine Indigo with a touch of drawing Black to get that deep, midnight feel. You want it rich and saturated. -
Wet-on-dry technique:
Using your size 6 round brush, carefully paint around the inner edge of your main circle first to establish a crisp border. Work relatively quickly so the edge doesn’t dry. -
Fill the circle:
Continue filling the rest of the circle with your dark blue mix, painting right over the dried masking fluid. The fluid will protect the moon and stars, so don’t be afraid to cover them. -
Create depth:
While the wash is still wet, drop in concentrated pigment (less water, more paint) around the edges of the circle to create a vignette effect, making the center appear slightly lighter. -
Let it dry:
Allow the sky layer to dry completely. This is crucial—if the paper is damp, the next steps will bleed or tear.
Paper Peeling?
If the paper tears when removing masking fluid, either the paper wasn’t fully dry or it’s too soft. Use 100% cotton paper and ensure the paint is bone-dry before rubbing.
Step 3: Details and Unmasking
-
Paint the forest silhouette:
Mix a very thick, opaque black or dark grey watercolor. Using your smallest detail brush, paint a jagged tree line along the bottom curve of the circle. -
Refine the trees:
Pull small, vertical strokes upward from the tree line to mimic pine tree tips. Vary the heights to make the forest look natural. -
Remove the mask:
Once the black trees are bone dry, gently rub off the masking fluid with your clean finger or a rubber cement pickup tool. You will reveal bright white paper underneath for the moon and stars. -
Soften the moon:
The moon will look very stark white. Dilute a tiny bit of grey-blue paint with lots of water. Gently dab this pale wash onto parts of the moon to create shadowy craters. -
Add moon texture:
While the moon is damp, you can drop in tiny specks of darker grey for more texture, leaving some areas bright white for highlights.
Step 4: Final Celestial Touches
-
Connect the constellation:
Using a white gel pen or a fine brush with white gouache, draw very thin, straight lines connecting the star points of your constellation. -
Add distant stars:
Load a stiff brush or toothbrush with white gouache. Tap it against your finger over the painting to splatter tiny, mist-like stars across the dark sky. -
Enhance the sparkle:
Use your white gel pen to add tiny manual dots or extra sparks near the moon if the splatter missed any key areas. -
Clean up edges:
Inspect the outer rim of your circle. If you went outside the lines, you can carefully lift the mistake with a damp brush or cover it with opaque white gouache.
Step back and admire your personal window into a peaceful, starry universe


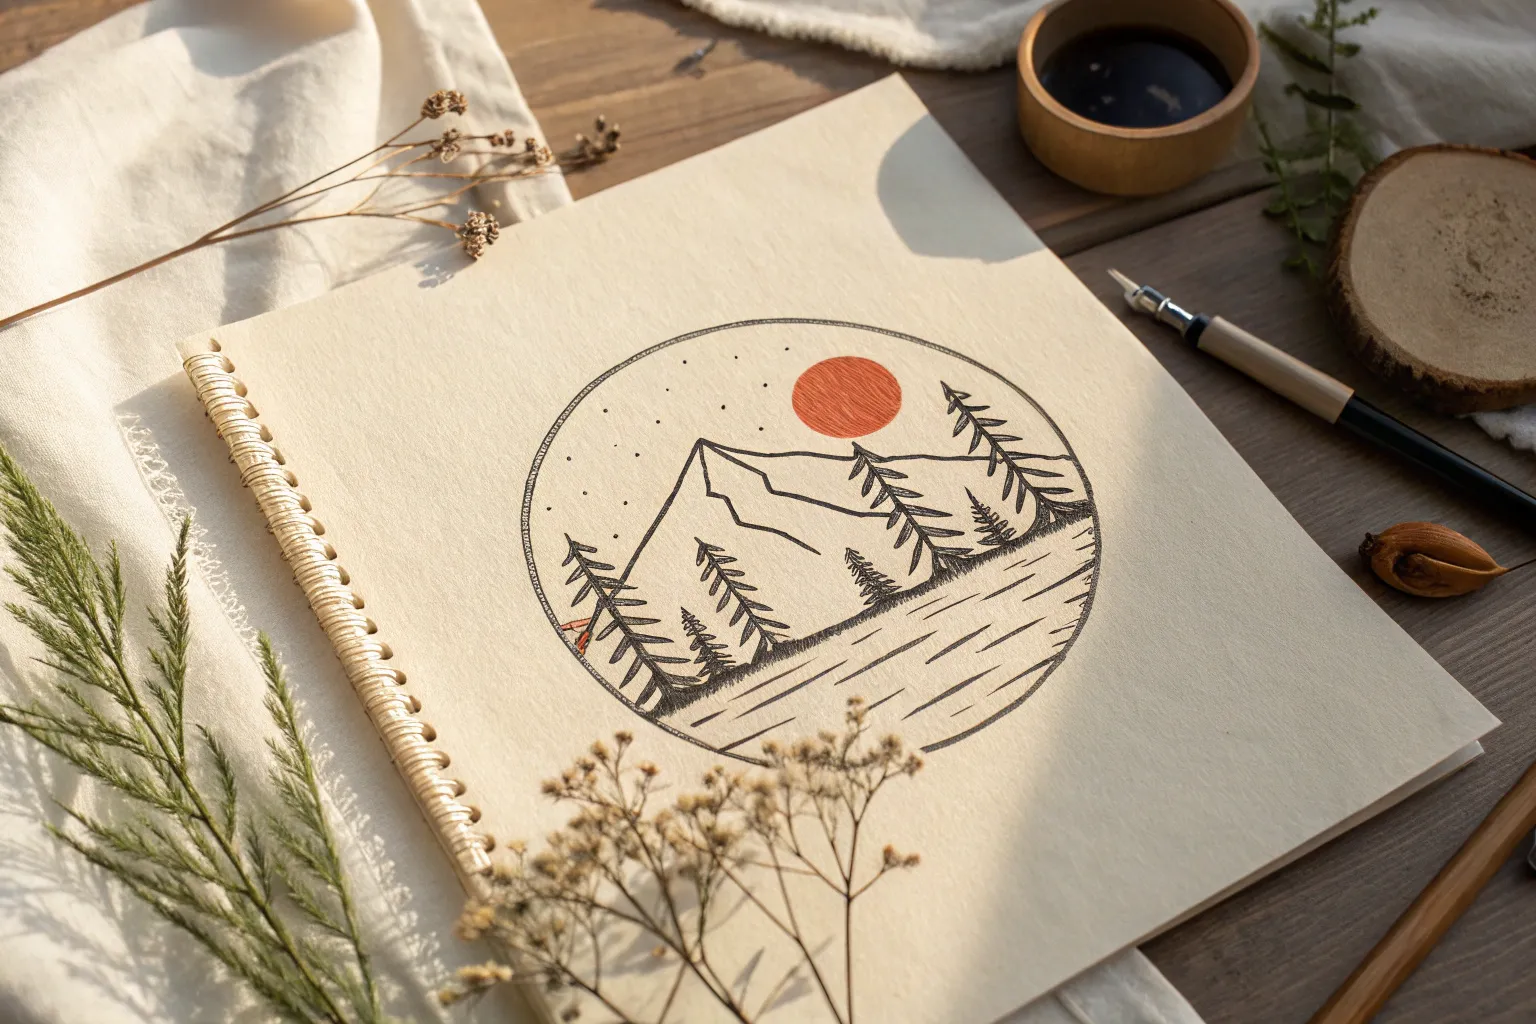
Mountain Silhouette Under a Full Moon Circle
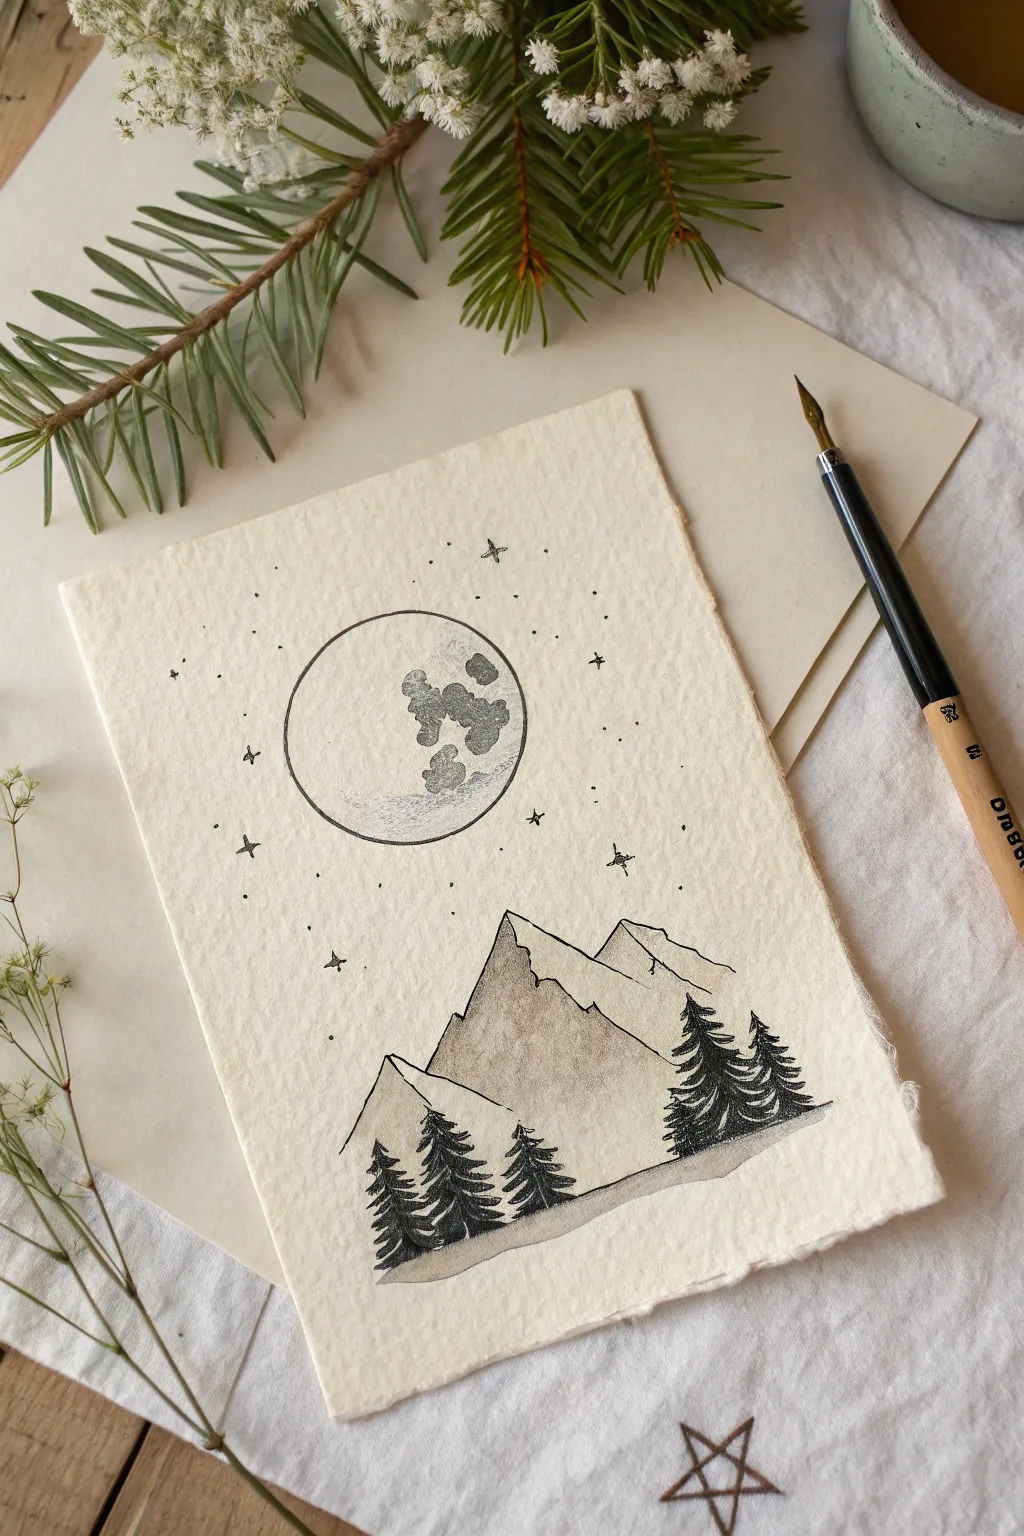

Capture the serene stillness of a mountain night with this fine liner illustration. The contrast between the rigid, stippled moon and the sweeping angular peaks creates a balanced composition that feels both minimal and majestic.
Detailed Instructions
Materials
- Textured heavy-weight drawing paper (cold press watercolor or handmade cotton rag paper)
- Black fine liner pens (sizes 0.1, 0.3, and 0.5)
- Dip pen and India ink (optional, for deeper blacks)
- Pencil (HB or H)
- Compass or a circular object to trace (approx. 2-3 inches diameter)
- Ruler
- Kneaded eraser
Step 1: Setting the Scene
-
Paper selection:
Begin with a piece of textured, heavy-weight paper. The rough surface shown in the photo adds essential character to the shading, so avoid perfectly smooth printer paper. -
Drafting the moon:
Using a compass or a small round object like a jar lid, lightly trace a perfect circle near the top center of your page with a pencil. -
Mapping the mountains:
Lightly sketch two primary mountain peaks below the moon. Create a large, dominant triangle shape in the center and a slightly lower, wider one to the right, overlapping them slightly. -
Adding tree outlines:
Mark the positions for your pine trees. Sketch faint vertical guide lines at the base of the mountains where the trees will stand—three on the left side and a cluster of two on the right.
Uneven Ink Lines?
If textured paper makes your lines shaky, embrace it. Sketchy lines look organic. If you need clean lines, place a smoother cardstock under your hand.
Step 2: Inking the Moon
-
Outline the circle:
Switch to a 0.3 fine liner. Carefully trace over your pencil circle. Go slowly to maintain a smooth, continuous curve. It’s okay if a little texture from the paper interrupts the line; it adds rustic charm. -
Creating craters:
Inside the moon, draw irregular, cloud-like blobs to represent lunar maria (craters). Focus these shapes towards the right side of the circle, leaving the left side mostly open. -
Stippling texture:
With a 0.1 or very fine pen, add texture to the craters using stippling (tiny dots). Concentrate the dots densely within the blob shapes and scatter them more loosely near the bottom edge of the moon for a gradient effect.
Step 3: Drawing the Mountains
-
Peak outlines:
Use a 0.3 or 0.5 pen to outline the mountain peaks. Make the lines slightly jagged and uneven to mimic rocky terrain, rather than using a ruler for perfectly straight lines. -
Defining the ridge:
Draw a jagged line down the center of the main mountain peak to separate the light side from the shadowed side. -
Shading the slopes:
I prefer using rapid, light diagonal hatching for the shadowed side of the mountain. Use a 0.1 pen and draw distinct, parallel lines on the right-facing slopes, leaving the left-facing slopes mostly white.
Gilded Moonlight
Use gold metallic watercolor or a gold gel pen to fill inside the moon’s craters or trace the stars for a magical, shining effect.
Step 4: Adding the Forest
-
Tree trunks:
Draw thin vertical lines for the trunks of your pine trees using a 0.5 pen or a dip pen if you have one. -
Building branches:
Start at the top of each trunk and work downward with short, zigzagging strokes. Make the branches wider as you move down the trunk to create that classic conical evergreen shape. -
Deepening values:
Go back over the trees to darken them. The trees should be the darkest element in the drawing to push them into the foreground. Fill in gaps between branches with solid black ink. -
Grounding the scene:
Draw uneven horizontal lines beneath the trees and mountains to suggest the uneven ground or snowbank they are resting on.
Step 5: Celestial Details
-
Scattered stars:
Using your finest pen, dot the sky around the moon. vary the pressure to create different sized dots. -
Tiny crosses:
Add a few small ‘plus’ signs or four-pointed stars sporadically among the dots to create twinkling stars. Keep these sparse to avoid cluttering the sky. -
Final cleanup:
Once you are absolutely certain the ink is dry (give it at least 15 minutes), gently erase the underlying pencil structure with your kneaded eraser.
Step back and admire your quiet, high-altitude landscape


Pine Tree Line Framing the Inner Curve

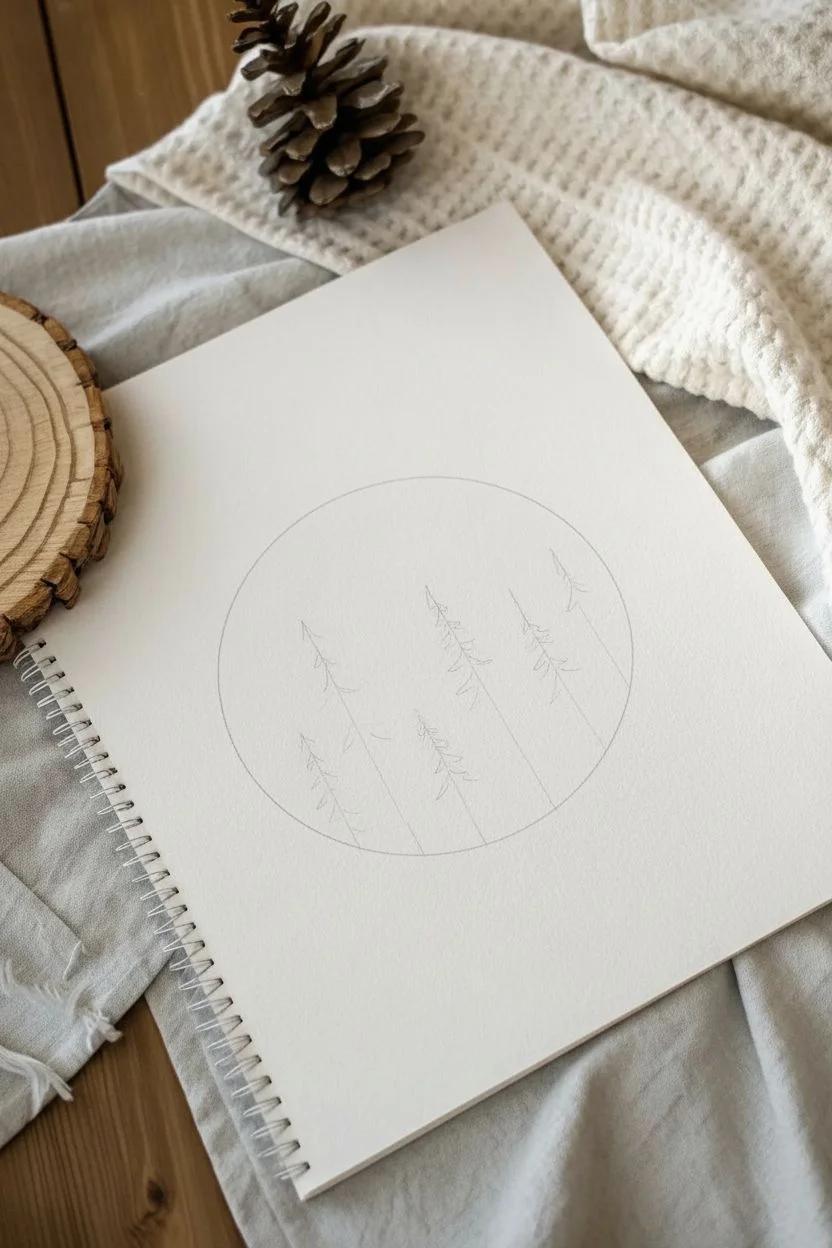
Capture the serene beauty of a foggy woodland with this atmospheric circle drawing. Using simple stippling and line work, you’ll create depth by layering bold, dark pines against fading, ghostly silhouettes.
Step-by-Step Tutorial
Materials
- Fine liner pens (sizes 0.05, 0.1, 0.3, and 0.5)
- Compass or circular object (approx. 4-5 inches)
- Pencil (HB or 2B)
- Quality drawing paper or sketchbook (smooth bristol or mixed media paper works best)
- Eraser
Step 1: Setting the Scene
-
Draw the boundary:
Begin by lightly tracing a perfect circle in the center of your page using a compass or a round object. Keep this pencil line faint so it can be easily erased or inked over later without smudging. -
Map the tree positions:
With your pencil, lightly sketch vertical lines to mark where your main trees will stand. Place three taller, prominent trees slightly off-center for a balanced composition, and mark a few shorter ones in the gaps. -
Ink the frame:
Take your 0.3 pen and carefully trace over the circle’s perimeter. You want a crisp, clean line to contain the organic shapes of the forest.
Uneven Ink Flow?
If your pen strokes look inconsistent, try holding the pen more vertically. Angled nibs can skip on textured paper, ruining the solid black look needed for the deep shadows.
Step 2: Creating the Background Layer
-
Sketch fading trees:
For the distant, misty trees, switch to your smallest 0.05 pen. These trees should be small and lack heavy detail to push them into the background. -
Apply light shading:
Use a very light stippling technique (tiny dots) or extremely faint hatching to fill in these background shapes. Do not make them solid black; leave plenty of white paper showing to simulate fog. -
Establish the horizon:
Lightly shade the bottom curve of the circle behind the main trees. This creates a ground plane and adds weight to the bottom of the composition so the trees aren’t floating.
Creating Depth
Atmospheric perspective is key. The closer the tree, the darker and thicker the lines. Keep background trees grey, thin, and wispy to push them far into the distance.
Step 3: Drawing the Foreground Pines
-
Start the main trunks:
Using a 0.1 pen, draw the central trunk lines for your three main foreground trees. Make the lines slightly jagged rather than ruler-straight to look more natural. -
Add top branches:
Starting at the very peak of the first tree, use short, downward-angled strokes to create the iconic triangular pine shape. Keep the top sparse. -
Broaden the strokes:
As you move down the tree, widen your strokes. Allow the branches to slightly curve upward at the tips, but keep the overall direction pointing down. -
Switch to a bolder pen:
For the lower half of the trees where shadows are deepest, switch to a 0.3 or 0.5 pen. This contrast is crucial for the 3D effect. -
Create density:
Fill in the lower branches with dense scribble textures. I find that using infinite loops or tight zig-zags creates the best needle texture here. -
Overlap the trees:
Where one tree stands in front of another, ensure the front tree is darker and distinct. Leave a tiny sliver of white space or use lighter shading on the tree behind to separate them visually.
Step 4: Finishing Touches
-
Grounding the forest:
Darken the very bottom of the circle where the tree trunks meet the ground. Use your 0.5 pen to create a solid, shadowy base that fades upward into the mist. -
Add atmospheric dots:
Take your 0.05 pen again and add random stipple dots in the upper empty space of the circle. These act as distant birds, stars, or floating dust motes. -
Erase guidelines:
Wait at least 10 minutes for the ink to fully cure. Gently erase all remaining pencil marks, being careful not to rub too hard over the dark inked areas. -
Final contrast check:
Step back and look at the drawing. If the background trees look too similar to the foreground, darken the foreground trees slightly more to ensure that distinct separation.
Now you have a tranquil miniature landscape perfect for framing or a bullet journal cover


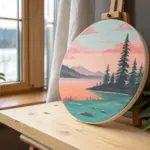
Ocean Waves and a Rising Sun Circle Scene
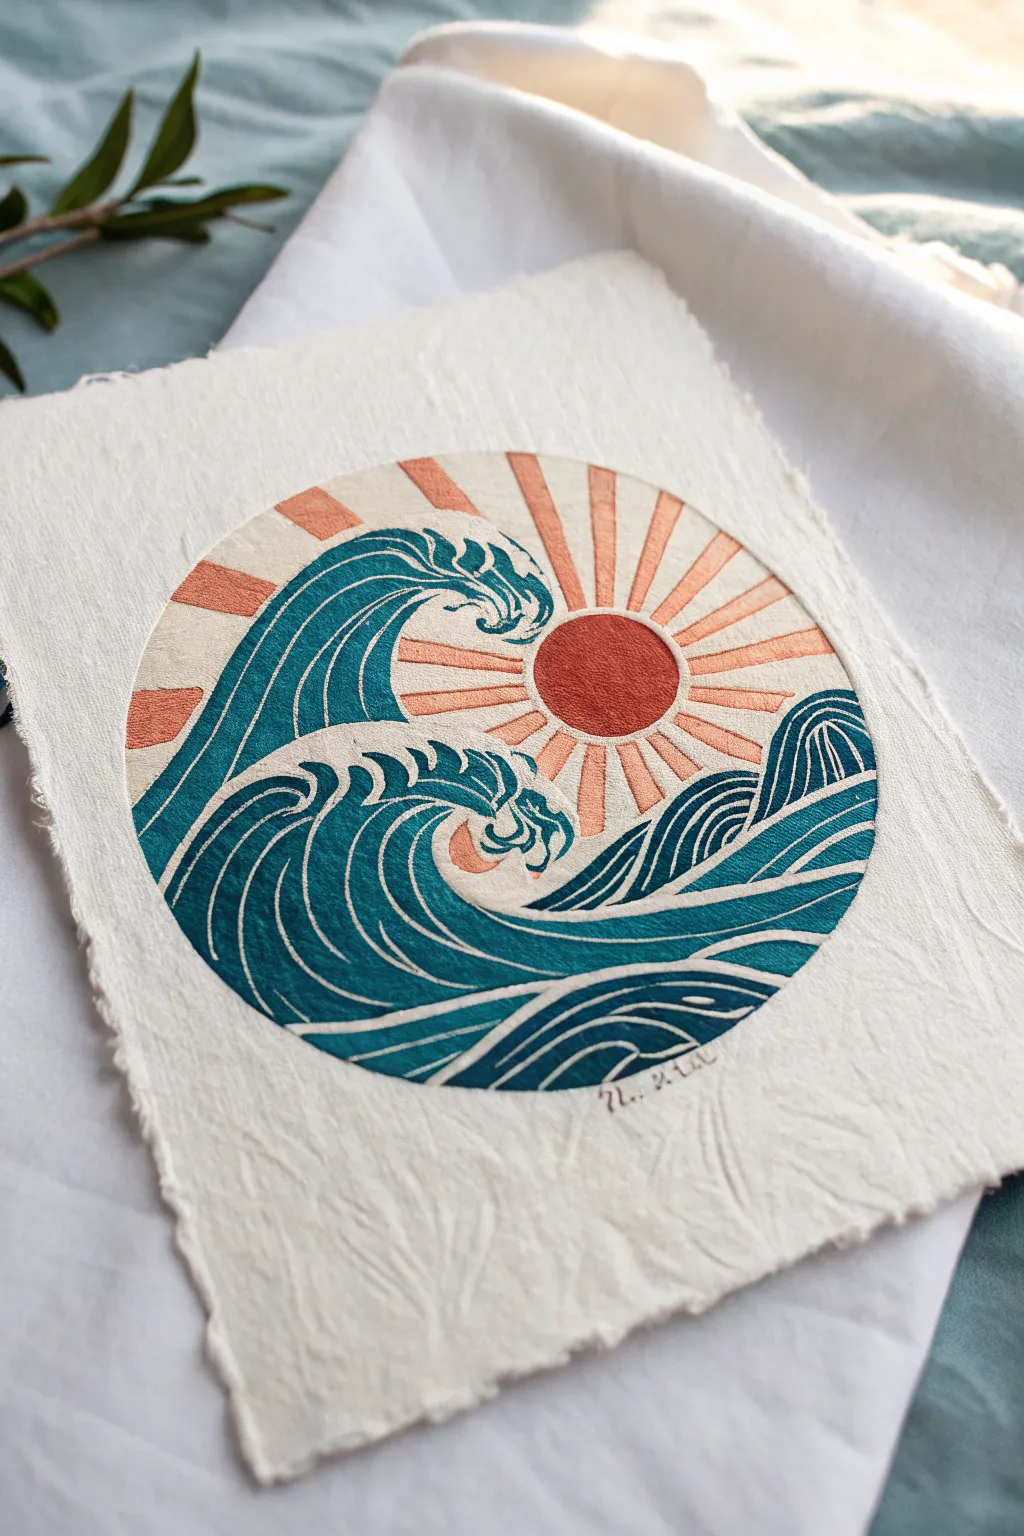
Capture the dynamic energy of the ocean and the warmth of a rising sun with this striking linocut print. The design uses traditional Japanese woodblock aesthetics, featuring stylized curling waves and radiating sun rays in a harmonious circular composition.
Step-by-Step Guide
Materials
- Soft linoleum block (at least 6×6 inches)
- Linoleum carving tools (V-gouge and U-gouge)
- Block printing ink (Teal/Blue-Green and Muted Orange/Salmon)
- Brayer (rubber roller)
- Barren or wooden spoon for burnishing
- Pencil and tracing paper
- Compass or circular template
- Handmade paper with deckle edge (preferred) or heavy printmaking paper
- Glass or acrylic sheet for rolling ink
- Craft knife
Step 1: Design and Transfer
-
Draft your circle:
Start by drawing a perfect circle on a piece of paper using a compass. This will define the boundary of your artwork and ensure the composition remains contained. -
Sketch the primary wave:
Draw the largest wave on the left side, letting it curve upwards and crest near the top center. Mimic the ‘claw’ shape of traditional Japanese prints for the foam. -
Add secondary waves:
Sketch a smaller, rolling wave below the primary one, and sweeping water lines at the bottom right to balance the composition. Ensure the flow follows the curve of the circle. -
Position the sun:
Draw a smaller circle for the sun slightly off-center to the right, nestled between the cresting wave and the horizon line. -
Draw the rays:
Use a ruler to draw straight rays extending from the sun to the edge of the main circle border. Keep the spacing relatively even, but variation adds character. -
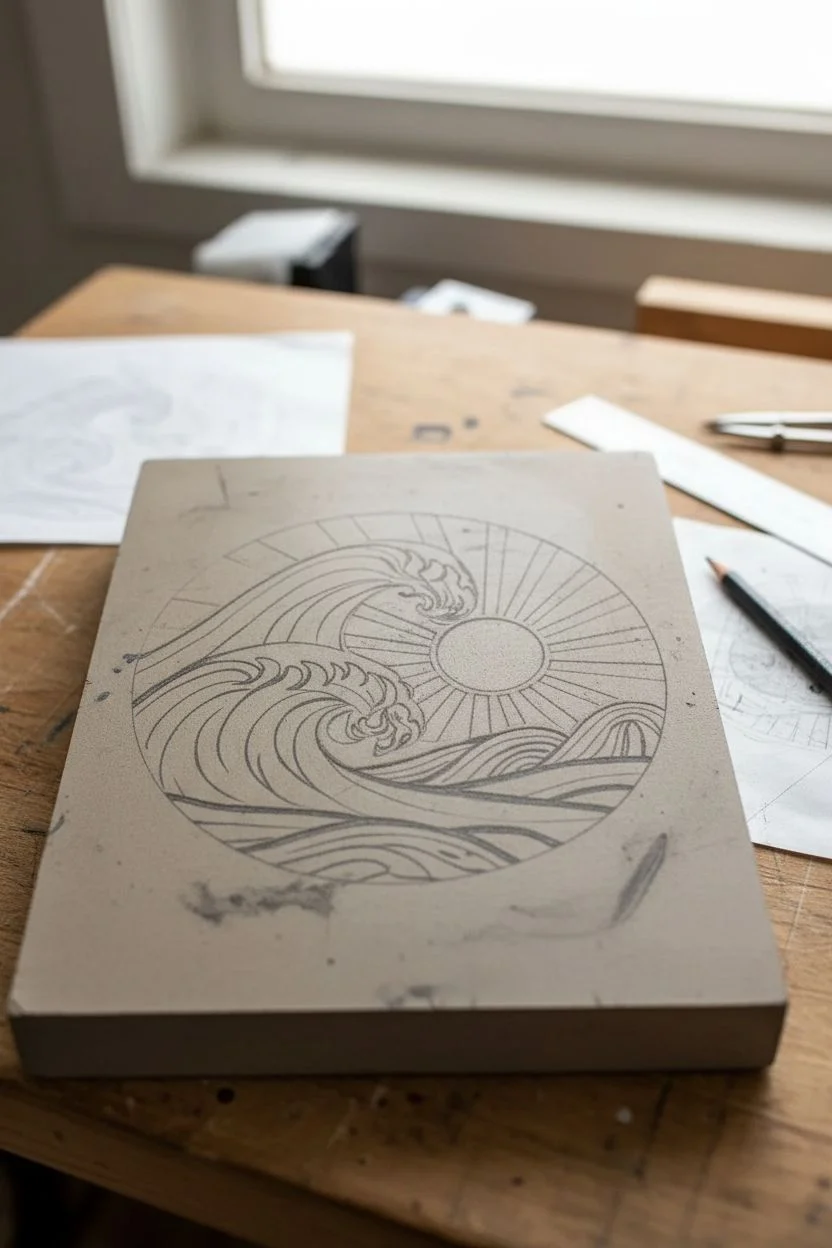
Transfer to block:
Trace over your final design with a soft pencil. Flip the tracing paper onto your linoleum block and rub the back firmly to transfer the graphite image. Remember, the final print will be a mirror image of your carving.
Patchy Ink Coverage?
If your print looks too speckled or faint, you likely didn’t use enough ink or pressure. Apply a slightly thicker layer to the block and press harder with your spoon creating small circles.
Step 2: Carving the Block
-
Outline the shapes:
Use a fine V-gouge tool to carve along the outline of every pencil mark. This ‘stop cut’ creates a barrier that helps prevent you from accidentally carving into the design areas later. -
Clear the negative space:
Switch to a wider U-gouge to clear away the large areas that should remain white, such as the foam tips of the waves and the sky between the sun rays. -
Carve the wave details:
Carefully carve the inner lines of the water. Leaving thin ridges of linoleum will create the white separating lines that give the waves their direction and volume. -
Define the sun rays:
Carve out the spaces between the sun rays. I like to cut away from the sun circle outward to ensure the edge of the sun remains crisp and round. -
Trim the border:
Using a craft knife or large gouge, cut away all the excess linoleum outside the main circle border so only the round design remains.
Step 3: Inking and Printing
-
Prepare the colors:
Squeeze a small amount of teal ink and orange ink onto your glass palette. Roll the brayer back and forth until the ink sounds ‘sticky’ like velcro. -
Apply the ink:
This is a reduction or multi-block process, but for simplicity, you can carefully ink specific areas. Use a small brayer or brush to apply orange to the sun and rays first. -
Ink the waves:
Carefully ink the wave sections with the teal color. If you are worried about mixing, you can use a piece of paper as a mask over the orange areas while you roll. -
Position the paper:
Gently place your handmade paper over the inked block. Once it touches the ink, do not shift or move the paper, or the image will blur. -
Burnish the print:
Using a barren or the back of a wooden spoon, rub the back of the paper in circular motions. Apply firm, even pressure over the entire design, paying special attention to the edges. -
The reveal:
Start at one corner and slowly peel the paper off the block. Hang the print to dry completely, which may take a day or two depending on if you used oil or water-based ink.
Clean Lines Pro-Tip
Warm your linoleum block slightly with a hairdryer or by sitting on it for a minute before carving. Warm lino cuts like butter, giving you smoother curves and less jagged edges.
Frame your beautiful maritime print or gift it to a friend who loves the sea

PENCIL GUIDE
Understanding Pencil Grades from H to B
From first sketch to finished drawing — learn pencil grades, line control, and shading techniques.
Explore the Full Guide
Lake Reflection Split: Sky Above, Mirror Below
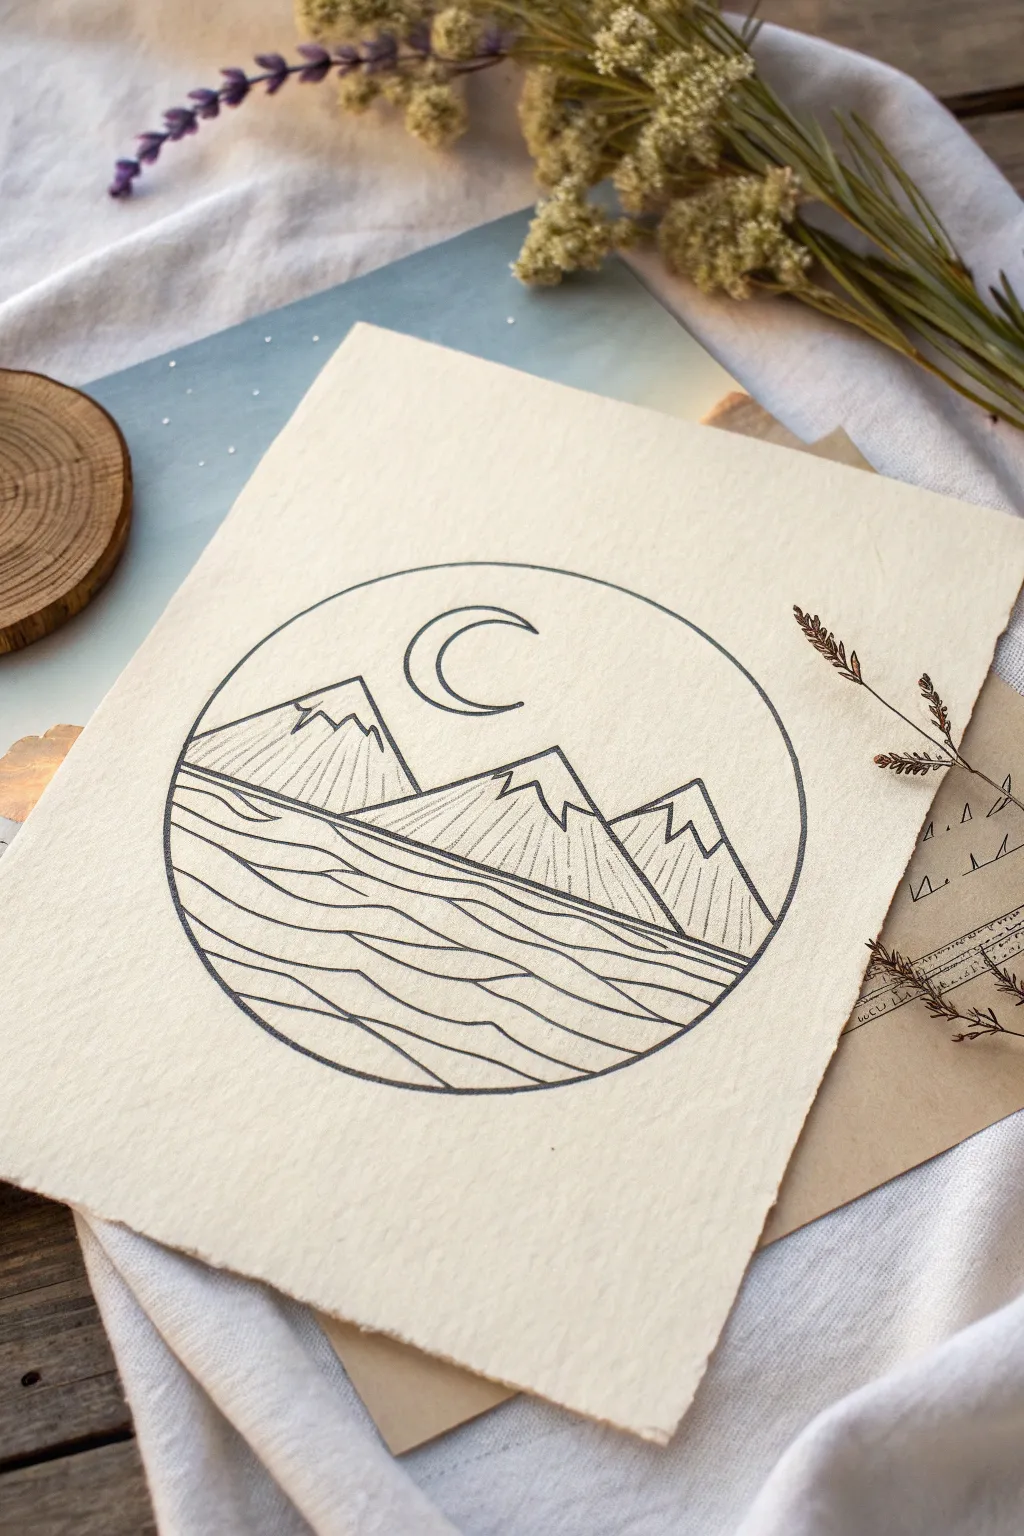
Capture the peaceful stillness of a mountain range under the moon with this clean line art design. The contrast between jagged peaks and flowing water lines creates a striking minimalist composition perfect for handmade cardstock.
How-To Guide
Materials
- Heavyweight textured paper (cotton rag or handmade paper works best)
- Fine liner pen (01 or 03 size, black)
- Compass or a circular object to trace (approx. 4-inch diameter)
- H pencil (hard lead for light sketching)
- Kneaded eraser
- Ruler
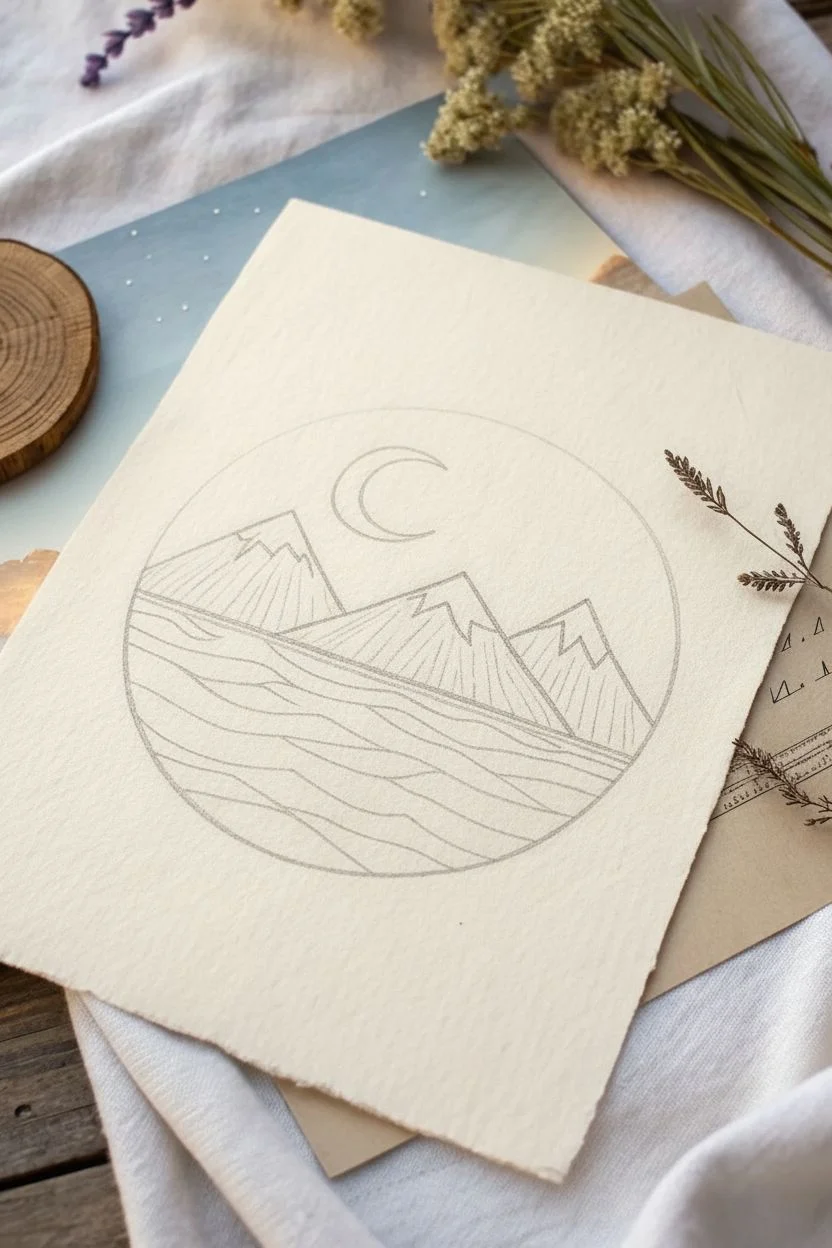
Step 1: Setting the Scene
-
Outline the boundary:
Begin by lightly tracing your circle in the center of the paper using your pencil and compass. Keep this line faint, as it will serve as your main compositional frame. -
Establish the horizon:
Using a ruler, draw a perfectly horizontal line straight through the middle of your circle. This splits your composition into the sky above and the lake below. -
Sketch the mountains:
Above the horizon line, sketch three triangular mountain peaks. Make the central peak slightly taller than the side ones to create balance. -
Add snow caps:
Draw jagged, uneven lines near the top of each triangle to define the snow-capped summits. These shouldn’t be straight; let them wander to mimic rocky terrain. -
Place the moon:
In the open sky space above the central and left peaks, sketch a simple crescent moon shape. Keep the curve smooth and consistent.
Uneven Circle?
If drawing the circle freehand is daunting, trace a roll of painter’s tape or a jar lid. Tracing gives you a reliable guide so you can focus on steady inking.
Step 2: Inking the Details
-
Ink the main frame:
Switch to your fine liner pen. Carefully trace over the circular border. It helps to rotate the paper as you draw to maintain a smooth curve without lifting your hand too often. -
Define the mountain outlines:
Ink the outer triangular shapes of the mountains. When you reach the horizon line, stop your pen exactly on the line for a crisp edge. -
Ink the snow lines:
Trace your jagged snow cap lines. These lines can be a little shaky or organic, which actually adds to the rocky texture. -
Add vertical shading:
Underneath the snow lines, draw thin, vertical hatching lines down the body of the mountains. vary the length slightly, but keep them generally parallel to suggest steep slopes. -
Ink the moon:
Trace the crescent moon outline carefully. A steady hand is key here, so breathe out slowly while drawing the curve.
Step 3: Creating the Reflection
-
Start the water lines:
Below the horizon line, you will fill the semi-circle with wavy horizontal lines to represent water. Start just under the horizon with your first ripple. -
Vary the waves:
Draw lines that stretch from the left edge of the circle to the right. Make them gently wavy, not zigzagged. Some lines can break or fork in the middle. -
Create depth with spacing:
As you move lower in the circle, space the wave lines slightly further apart. The lines near the horizon should be densely packed to show distance. -
Connect the edges:
Ensure every water line touches the outer circle boundary on both sides, creating a solid, enclosed look. -
Final clean up:
Allow the ink to dry completely for at least 15 minutes to prevent smudging. I usually wait a bit longer just to be safe. -
Erase pencil guides:
Gently gently rub the kneaded eraser over the entire design to lift away the graphite, leaving only your crisp black ink work.
Steady Hands Pro Tip
Rest your wrist on a clean scrap piece of paper while inking. This protects the textured paper from hand oils and prevents smudging your fresh lines.
Enjoy the calm satisfaction of seeing your simple lines transform into a rugged landscape
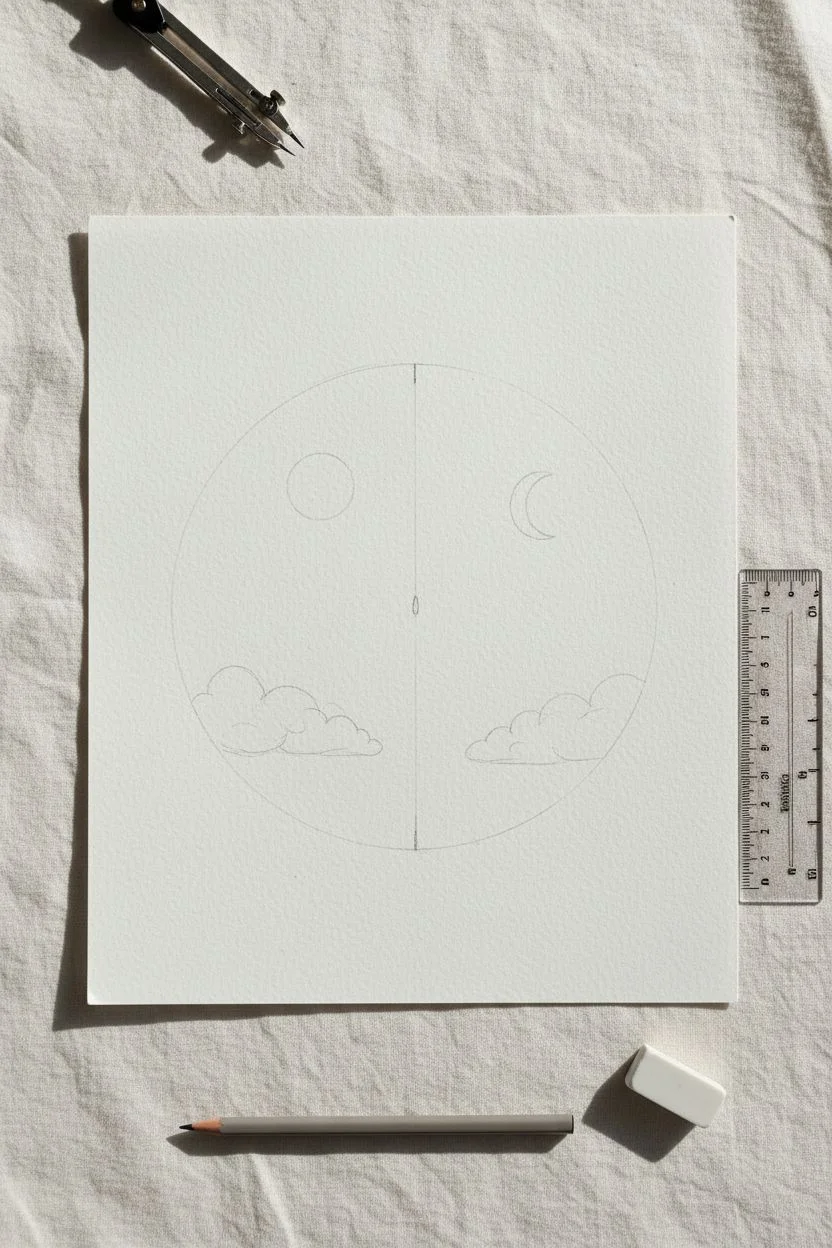
Day and Night Half-and-Half Circle
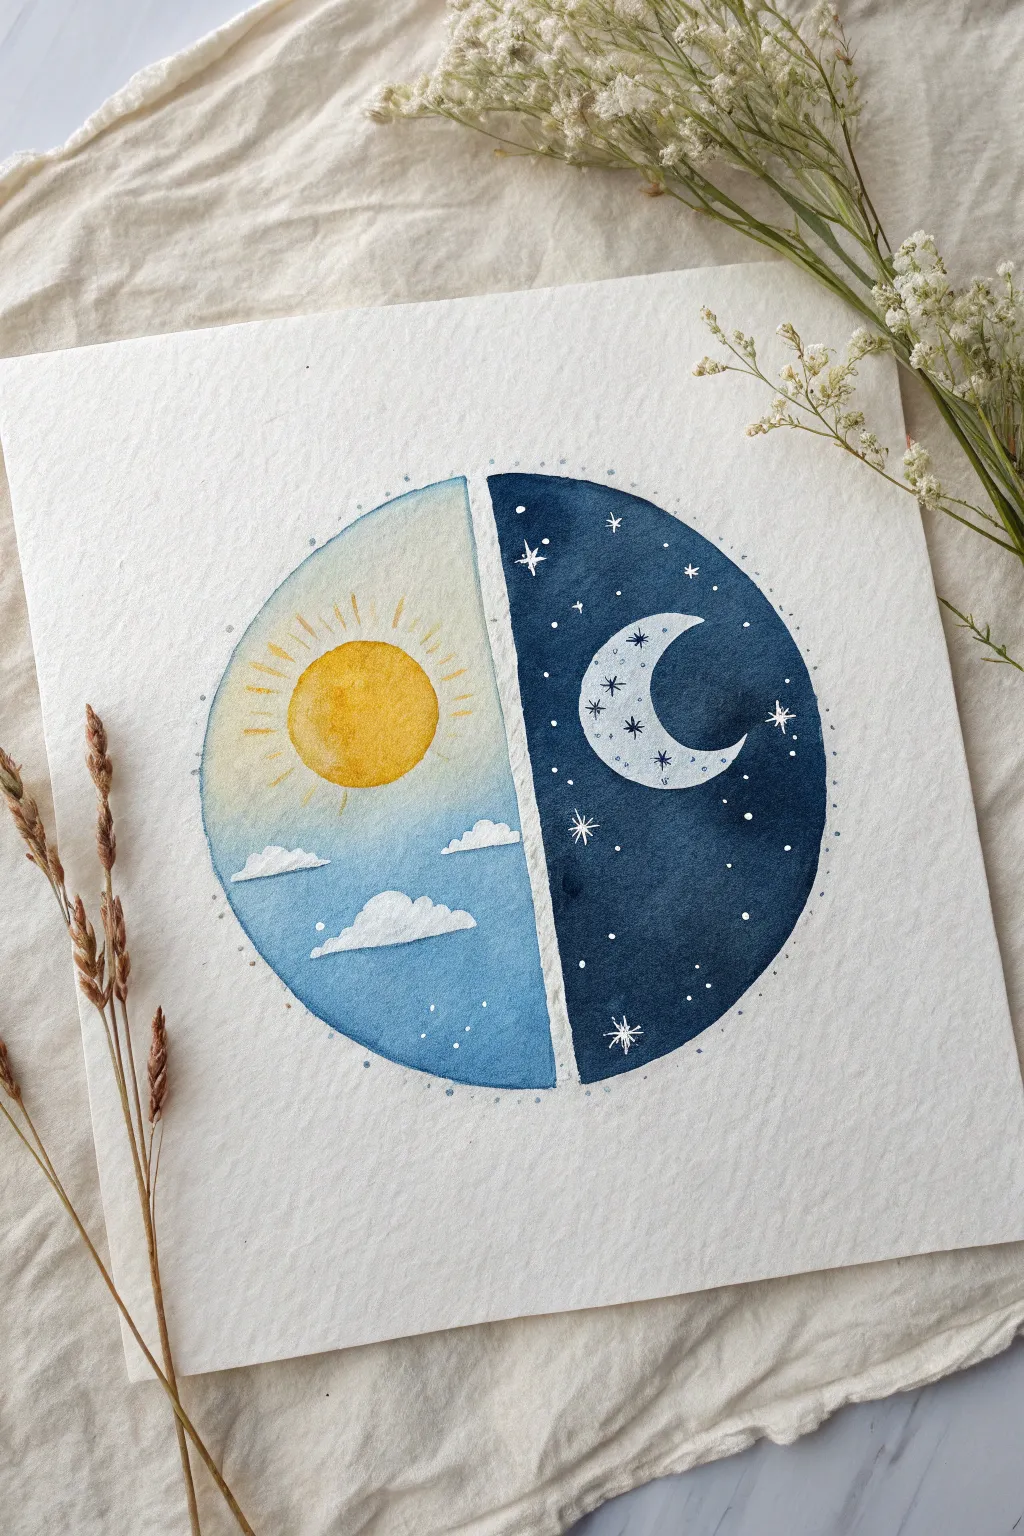
Capture the beauty of passing time with this serene split-circle composition. This beginner-friendly watercolor project contrasts a bright, cloud-filled day with a sparkling, starry night in a balanced, harmonious design.
Step-by-Step
Materials
- Square sheet of cold-press watercolor paper (approx. 6×6 or 8×8 inches)
- Pencil and eraser
- Compass or a circular object to trace (approx. 4-5 inches diameter)
- Ruler
- Watercolors (Cerulean Blue, Indigo/Payne’s Gray, Lemon Yellow, Golden Yellow)
- White opacity medium (White gouache, white gel pen, or acrylic ink)
- Round watercolor brushes (Size 4 and Size 0/detail brush)
- Masking fluid (optional)
- Clean water and paper towels
Step 1: Sketching the Layout
-
Draw the main circle:
Begin by finding the center of your paper. Use a compass or trace a circular object like a bowl to draw a perfect circle lightly in pencil. -
Divide the scene:
Place a ruler vertically down the center of the circle. Draw a straight line to split it exactly in half, separating the day side (left) from the night side (right). Leave a very small gap of whitespace between the two halves if you want that distinct separated look. -
Outline the details:
On the left side, lightly sketch a circle for the sun in the upper center and a few fluffy cloud shapes near the bottom. On the right side, sketch a crescent moon shape in the upper section.
Bleeding Colors?
If blue paint bleeds into the sun or moon, blot it immediately with a clean tissue. Wait for it to dry fully, then paint over the error with opaque white gouache to fix it.
Step 2: Painting the Day Side
-
Paint the sun:
Load your brush with a mix of Lemon and Golden Yellow. Fill in the sun circle, making the center slightly more saturated and the edges soft. Let this dry completely before moving to the sky. -
Start the sky wash:
Wet the ‘Day’ half of the circle with clean water, carefully painting around the sun and the cloud shapes. This wet-on-wet technique will help your colors blend smoothly. -
Add the blue gradient:
While the paper is damp, drop Cerulean Blue into the wet area. Concentrate the pigment at the bottom and outer edges, letting it fade into a very pale, watery blue as it gets closer to the sun. -
Define the clouds:
To make the clouds pop, paint the blue sky right up to your pencil lines, leaving the paper white for the clouds. If the edges form hard lines, soften them slightly with a damp brush for a fluffy look. -
Sun rays:
Once the background is 100% dry, mix a dilute yellow-orange. Using a fine detail brush, paint thin, straight lines radiating outward from the sun. -
Detailing the clouds:
Add very subtle shadows to the bottom of the white clouds using an extremely watered-down gray or blue-gray mix to give them volume.
Add Metallic Magic
Swap the yellow sun paint for metallic gold watercolor, or use silver ink for the stars on the night side to make your artwork shimmer in the light.
Step 3: Painting the Night Side
-
Base layer for the moon:
Paint the crescent moon a very pale, watery blue-gray. Let it dry. If you want a textured crater look, dab a little concentrated color while it’s still damp. -
Night sky wash:
Prepare a rich, dark mix using Indigo or Payne’s Gray. Carefully paint around the crescent moon shape. You want this wash to be deep and consistent, so don’t use too much water. -
Deepening the night:
While the night sky is still wet, drop in more saturated pigment near the bottom and outer edges to create depth. Allow the entire night side to dry completely—this is crucial before adding stars. -
Moon details:
Using a thin brush or a fine liner pen, add tiny decorative stars or crosses inside the crescent moon for a whimsical touch.
Step 4: Finishing Touches
-
Adding stars:
Using white gouache or a white gel pen, draw small stars on the dark night side. Vary the shapes: some simple dots, some four-pointed sparkles. -
Highlighting the border:
Add tiny dot accents around the outer perimeter of the main circle using a mix of blue or gray paint, creating a dotted frame effect. -
Cloud accents:
If your clouds feel too flat, use the white gel pen or thick gouache to add bright white highlights on the top curves of the clouds. -
Final review:
Erase any visible pencil lines that weren’t covered by paint, particularly around the sun rays or the gap between the two halves.
Now you have a balanced piece of art that beautifully illustrates the cycle of day and night
BRUSH GUIDE
The Right Brush for Every Stroke
From clean lines to bold texture — master brush choice, stroke control, and essential techniques.
Explore the Full Guide
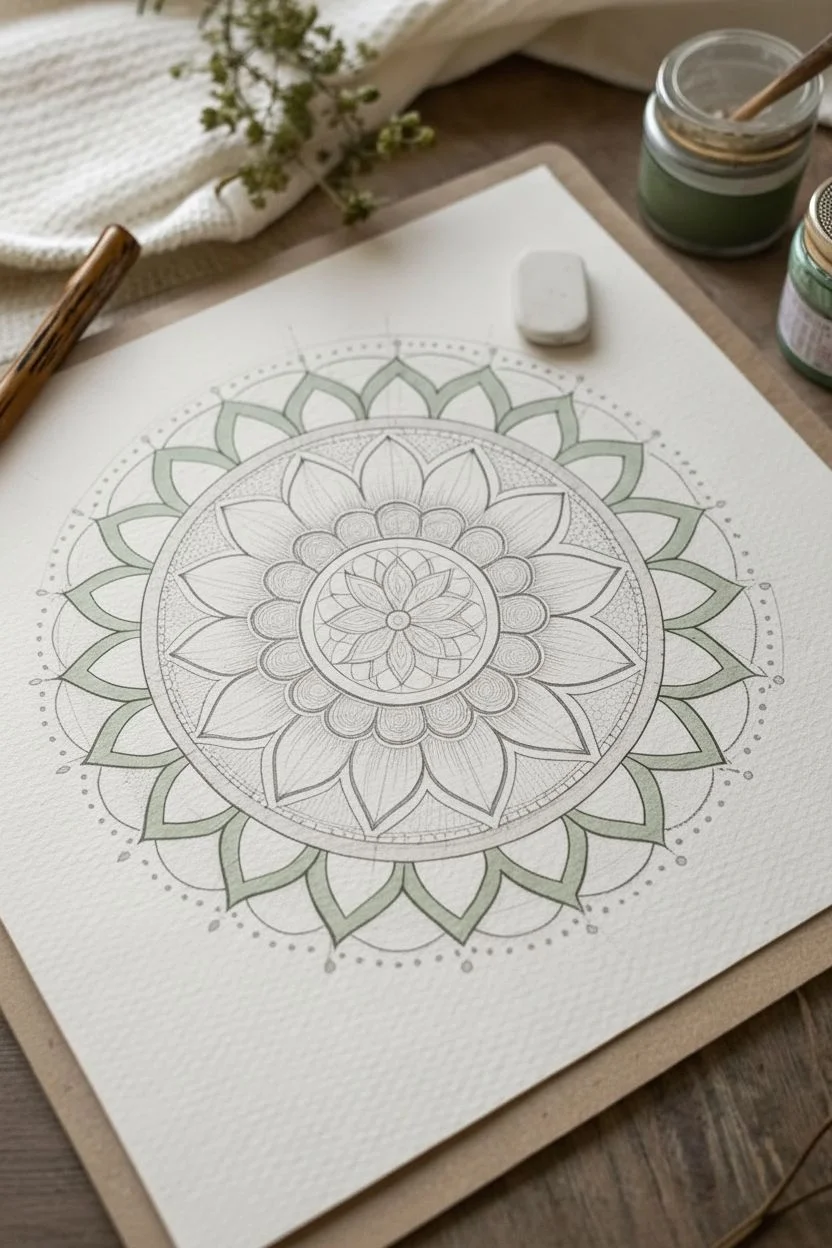
Mandala-Inspired Pattern Built From Concentric Circles
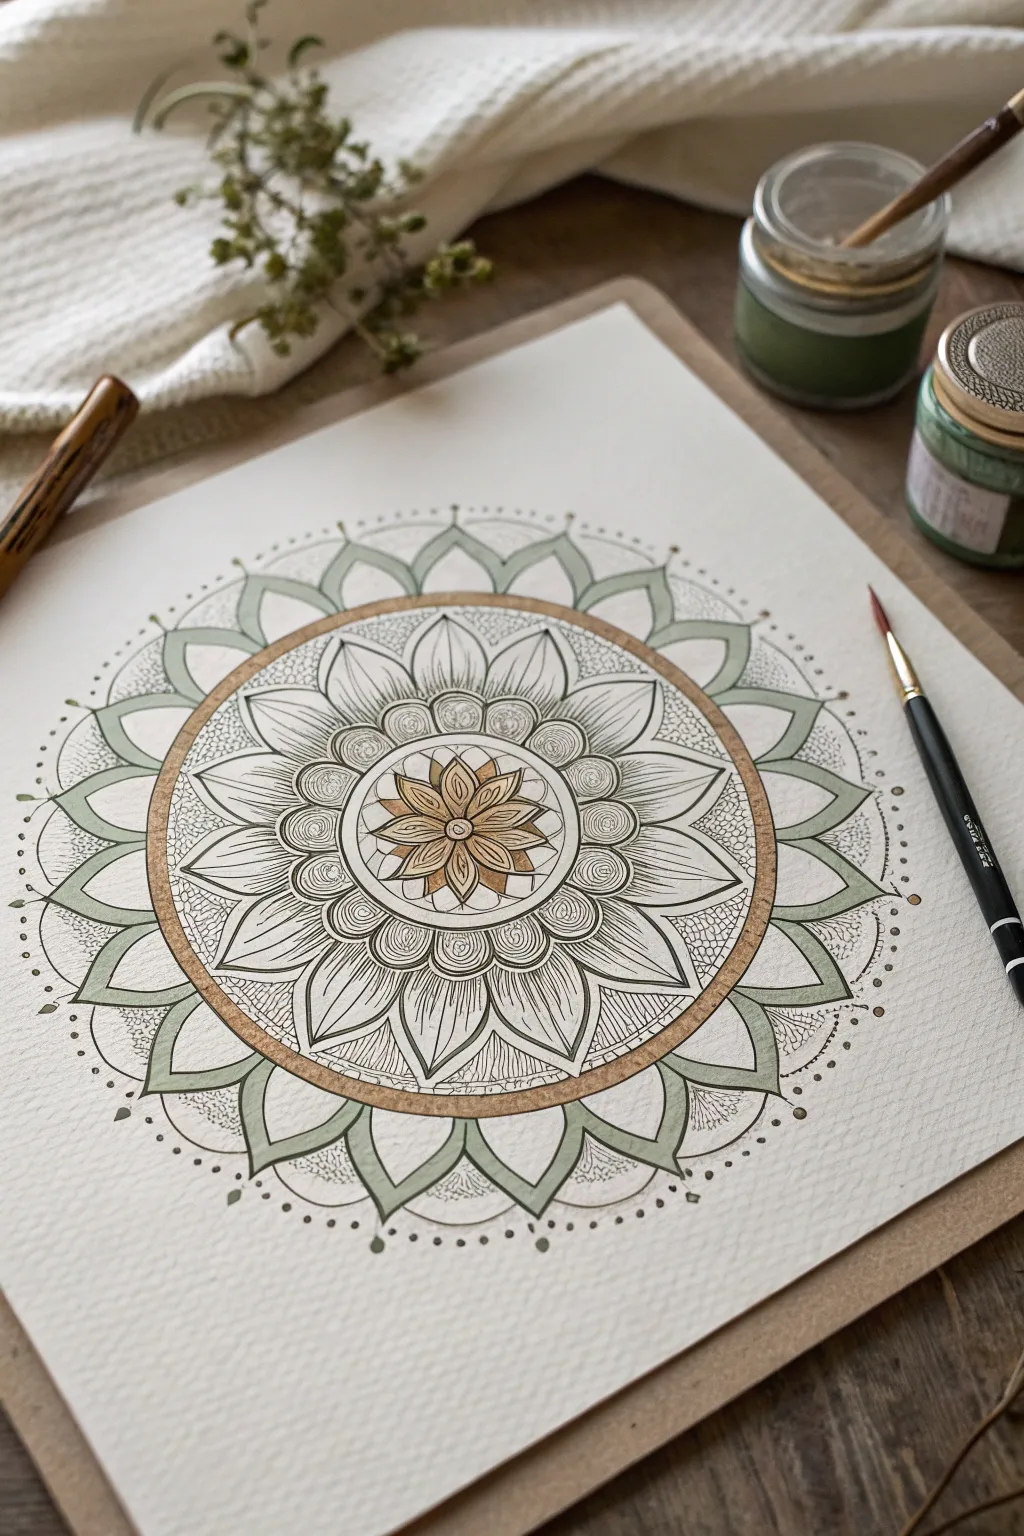
This soothing mandala design combines precise geometry with organic, leaf-like motifs in soft sage green and metallic gold. The detailed ink work adds texture and depth to the petals, creating a piece that feels both structured and naturally flowing.
Detailed Instructions
Materials
- Cold-press watercolor paper (300 gsm)
- Pencil and eraser
- Compass and ruler
- Fine liner pen (black, 0.1mm and 0.3mm)
- Watercolor paints or ink (sage green, sepia)
- Metallic gold ink or gouache
- Round watercolor brush (size 2 or 4)
- Dip pen (optional, for fine details)
Step 1: Setting the Foundation
-
Establish center point:
Begin by finding the exact center of your paper. Mark it lightly with your pencil, as every concentric circle will radiate from this single point. -
Draw primary circles:
Using your compass, draw a small circle (approx. 1 inch diameter) for the center flower. Draw a slightly larger circle around it for the second tier, then a medium circle leaving a wide band for the main petals, and finally a large outer circle for the sage green border. -
Mark subdivisions:
Use a protractor to divide your circle into 12 or 16 equal sections. Draw light guidelines from the center point out to the edge to help you keep your petals symmetrical. -
Sketch the center flower:
In the smallest circle, sketch an eight-petaled flower shape. The petals should be pointed and touch the edge of the first circle. -
Add petal layers:
Sketch the large, main petals in the middle band. These should be wide and leafy. For the outermost ring, sketch smaller, pointed petals that nest between the tips of the main petals. -
Create the golden ring:
Define the band that separates the inner flower section from the outer leaves. Draw two concentric circles fairly close together to create a ribbon-like border that will later be painted gold.
Uneven Petals?
If your hand-drawn petals look irregular, create a template. Draw one perfect petal on scrap cardstock, cut it out, and trace it around your circle.
Step 2: Inking and Detailing
-
Outline main shapes:
Switch to your 0.3mm fine liner. Carefully go over your pencil lines for the petals and circular borders, ensuring your strokes are smooth and continuous. -
Add petal veins:
Inside the large main petals, use the finer 0.1mm pen to draw a central vein line. From there, draw delicate, curved lines radiating outward to mimic the texture of a leaf. -
Texture the inner circles:
Between the center flower and the gold ring, draw small semi-circles or scallops. Fill these with tight, curved hatching lines to give them a rounded, dimensional look. -
Stipple shading:
For the areas between petals, use a stippling technique. Dot your pen repeatedly, clustering dots heavily near the corners where petals meet and fading them out as you move into open space. -
Refine the border:
Add tiny decorative dots or circles along the very outermost pencil line to frame the entire mandala softly. -
Erase guidelines:
Once the ink is completely dry—give it a few minutes to be safe—gently erase all your visible pencil marks.
Step 3: Adding Color
-
Paint the center:
Mix a watery sepia or light brown. Carefully paint alternate petals of the central flower, leaving the others white for contrast. -
Apply the gold band:
Using your metallic gold ink or paint, fill in the ring you created earlier. It helps to load the brush well so the metallic pigment flows smoothly in one go. -
Wash the outer leaves:
Dilute your sage green paint with plenty of water. Paint the outermost ring of pointed petals. I like to drop a little extra pigment at the base of each leaf while wet to create a natural gradient. -
Add gold accents:
Return to the center flower and add small touches of gold to the unpainted petals. You can also add a tiny dot of gold to the tips of the stippled areas for extra sparkle. -
Final touches:
Inspect your work for any uneven edges. You can use your fine liner to re-emphasize any lines that might have gotten lost under the paint.
Level Up: Texture
Instead of flat washes, try ‘wet-on-wet’ for the sage leaves. Wet the paper first, then drop in green and a touch of brown for a moody, organic bloom.
Step back and enjoy the calming symmetry of your handcrafted mandala pattern
Galaxy Swirl With Star Speckles in a Circle
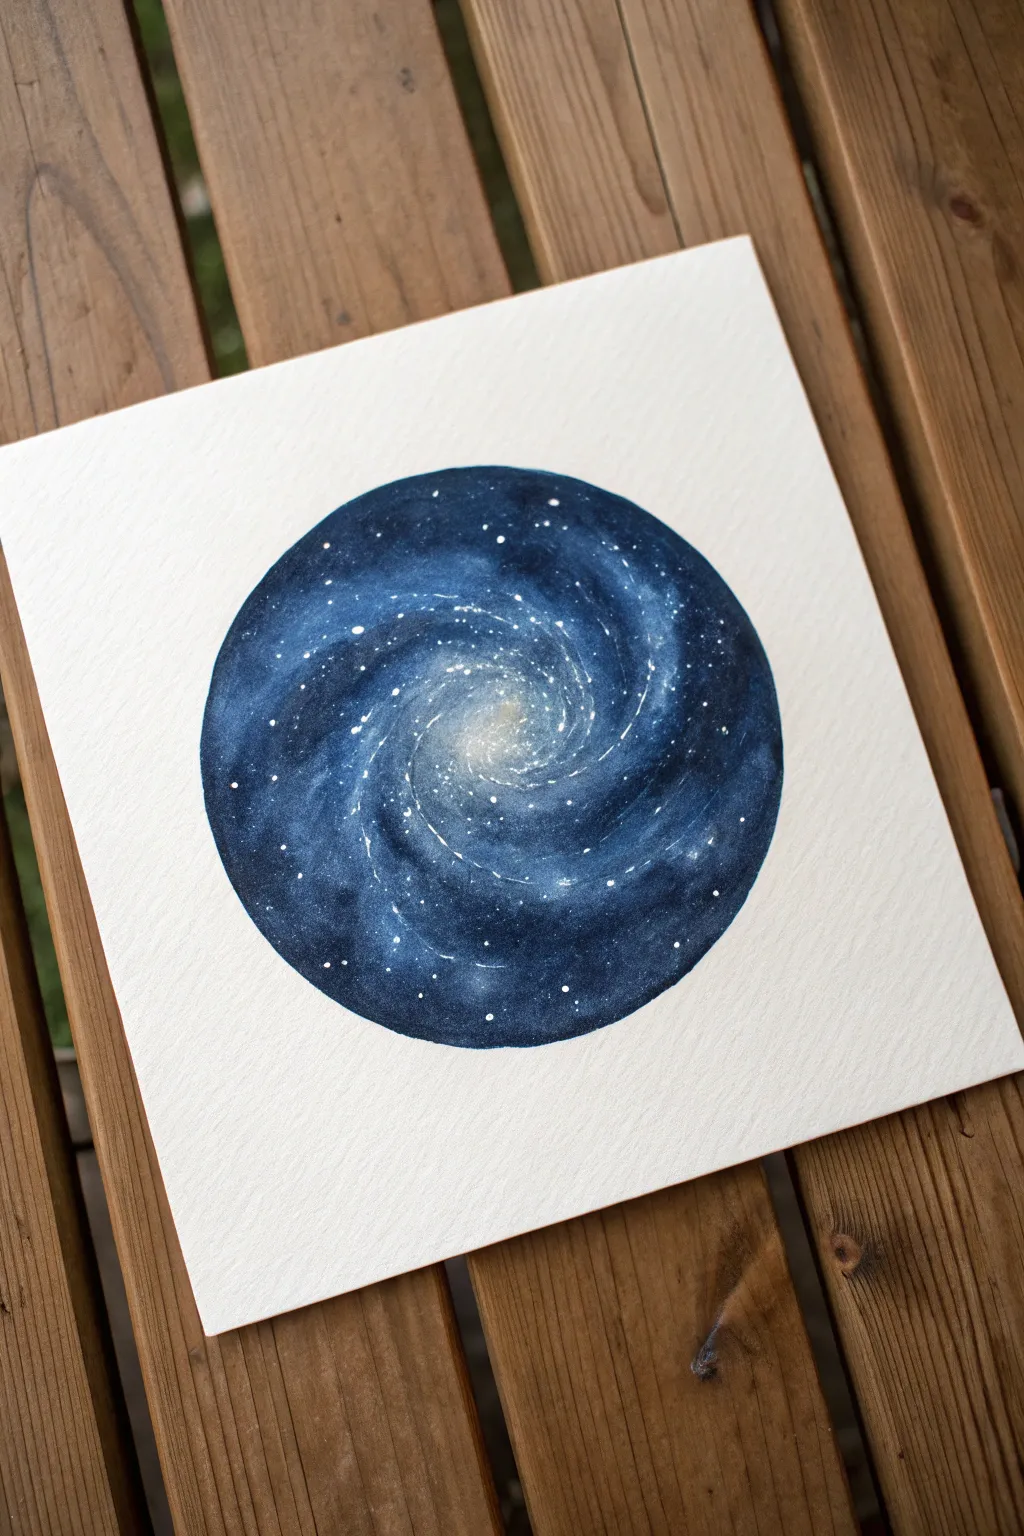
Capture the magic of the cosmos in a perfect geometric shape with this watercolor galaxy study. The deep swirling blues and bright star speckles create a mesmerizing miniature universe that looks stunning on heavy texture paper.
Step-by-Step
Materials
- Cold press watercolor paper (square format)
- Circular masking tape (or a bowl to trace and masking fluid)
- Watercolor paints (Indigo, Payne’s Grey, Prussian Blue, Titanium White)
- Round watercolor brushes (sizes 6 and 2)
- White gouache or white acrylic ink
- Old toothbrush or stiff bristle brush
- Pencil and eraser
- Clean water
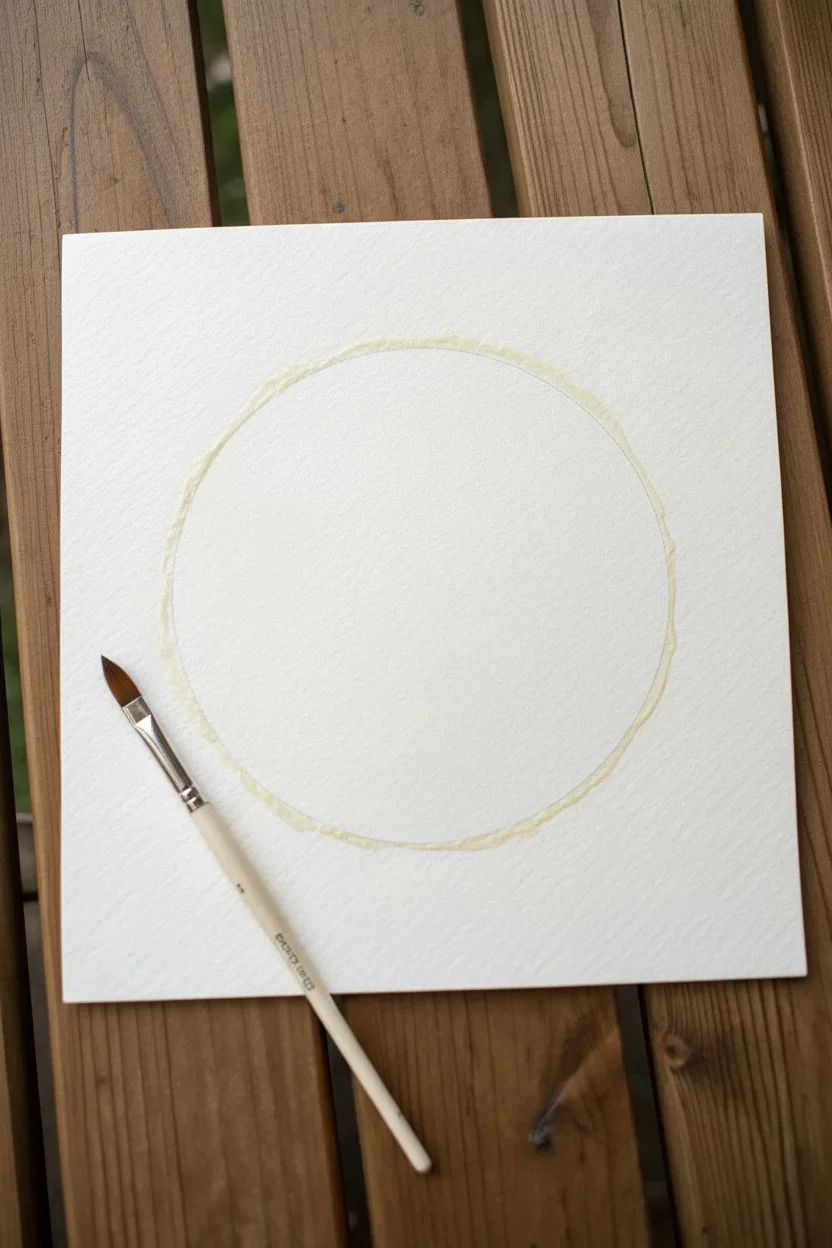
Step 1: Preparation and Outline
-
Trace the shape:
Begin by lightly tracing a perfect circle in the center of your square paper. Use a bowl, a roll of tape, or a compass to ensure the shape is exact. -
Define the boundary:
Carefully apply masking fluid over the pencil lines to preserve the sharp circular edge, or simply paint very carefully up to the line. If you are confident, you can just keep the pencil line faint as a guide. -
Wet the paper:
Using your larger round brush and clean water, apply a light wash over the entire inside of the circle. The paper should be glistering but not swimming in puddles.
Muddy colors?
If your blues look dull, you’re likely overworking the paper while it’s wet. Lay the pigment down, swirl it once or twice, and then let the water do the rest of the mixing work.
Step 2: Painting the Spiral
-
Base layer:
Load your brush with a diluted Prussian Blue. While the paper is still wet, drop the color in, leaving the very center of the spiral significantly lighter, almost white. -
Create the motion:
Using a sweeping, curved motion, drag the blue paint from the outer edges inward towards the center to establish the spiral arm structure. -
Deepen the darks:
Mix Indigo or Payne’s Grey to get a very dark, near-black blue. Apply this to the outer edges of the circle and the spaces between the spiral arms. -
Blend the transition:
Softly blend the dark outer edges into the lighter blue spiral arms using a damp, clean brush. You want the transition to look like gaseous clouds, not harsh lines. -
Add contrast:
If the center has become too dark, lift a little pigment out with a thirsty brush or paper towel to maintain that glowing core effect. -
Refine the swirls:
With a smaller brush (size 2) and concentrated dark blue, paint thin, curved streaks following the spiral direction to emphasize the movement of the galaxy.
Bleeding edges
To keep that circle perfectly crisp without masking fluid, let the painting dry completely, then use white gouache to carefully ‘cut back’ and clean up the outer rim.
Step 3: Stars and Details
-
First drying phase:
Let the painting dry completely. If you move to the next step while it’s wet, your stars will blur into undefined blobs. -
Prepare the stars:
Dilute a small amount of white gouache or white acrylic ink with a tiny drop of water. It needs to be fluid enough to splatter but opaque enough to show up against the dark blue. -
Create the splatter:
Dip an old toothbrush or stiff brush into the white mixture. Hold it over the painting and run your thumb across the bristles to flick tiny speckles onto the paper. -
Control the spread:
Focus the densest splatter near the lighter center of the spiral and the main spiral arms, letting it fade out slightly toward the darkest edges. -
Hand-painted stars:
Use your smallest detail brush or a white gel pen to manually place a few larger, brighter stars in key areas for visual interest. -
Connect the constellations:
I sometimes like to draw barely-visible thin lines between a few stars to suggest faint celestial connections or dust lanes. -
Final dry:
Allow the white splatter to dry completely before touching the paper again to avoid smearing. -
Cleanup:
If you used masking fluid on the edges, gently rub it away with your finger or a rubber cement pickup tool to reveal the crisp circular edge. -
Erase guides:
Gently erase any visible pencil marks remaining around the perimeter of the circle.
Frame your cosmic creation or scan it to use as a digital graphic element


Mini “Sticker Sheet” Grid of Tiny Circle Doodles

Transform a simple page into a collection of mini masterpieces by arranging hand-painted circles in a widely spaced grid. This project combines opaque gouache or acrylic shapes with delicate line work, featuring moon phases, sunbursts, and botanical doodles in a warm, earthy color palette.
Detailed Instructions
Materials
- Dotted or grid notebook (heavyweight paper preferred)
- Gouache or acrylic paints (Terracotta, Mustard Yellow, Teal, Navy Blue)
- Round paintbrush (size 4 or 6)
- White gel pen (fine tip)
- Black fine liner pen (0.3mm or 0.5mm)
- Circle stencil or compass (optional)
- Pencil and eraser
- Mixing palette
- Water jar and paper towel
Step 1: Planning the Layout
-
Map the grid:
Start by lightly visualizing a grid on your page. If you are using a dotted notebook, count the dots to ensure equal spacing between your circles. Aim for a layout of about 3 to 4 columns and 4 to 5 rows. -
Sketch the circles:
Using a pencil, lightly trace your circles. A circle stencil is perfect for consistent sizes, but freehand circles have a lovely organic charm if you prefer that look. Keep them around 1 to 1.5 inches in diameter.
Pro Tip: Opacity Hack
If your white gel pen skips over the paint, try a white acrylic paint marker instead. They handle textured surfaces better and provide much bolder, more opaque coverage in one pass.
Step 2: Painting the Base Shapes
-
Mix your palette:
Prepare your paints. You want muted, earthy tones: a deep terracotta, a warm mustard yellow, a dusty teal, and a dark navy. Add a tiny bit of white to your colors if you need them to be more opaque on the paper. -
Apply the first color:
Select 3-4 random circles scattered across the page and fill them in with the terracotta paint. Try not to place two of the same color directly next to each other. -
Add the yellow tones:
Next, fill another set of scattered circles with the mustard yellow. Use the tip of your round brush to carefully trace the pencil outline first, then flood the center with color. -
Paint the cool tones:
Continue the process with your teal paint, filling in the next group of circles. Ensure the paint consistency is creamy—too watery and the paper might buckle; too thick and it might crack. -
Finish the solid circles:
Fill the remaining circles with your darkest color, the navy blue. Leave everything to dry completely. The paint must be bone-dry before you use pens on top.
Troubleshooting: Warped Paper
If your notebook paper buckles from the paint moisture, let the page dry, then place a sheet of parchment paper over it and iron on a low, dry setting to flatten it back out.
Step 3: Adding the Line Art
-
Choose your themes:
Decide on a mix of motifs. Good options include crescent moons, sunbursts, simple flowers, stars, and geometric lines. Plan which motif goes on which color based on contrast. -
Draw white details:
Take your white gel pen. On the darker circles (navy, teal, gentle terracotta), draw your designs. A crescent moon with small dots for stars looks striking on teal or navy. -
Add botanical white lines:
On the terracotta circles, try drawing fine floral line art or a simple six-petaled flower design. The white ink pops beautifully against the warm rust background. -
Switch to black ink:
Move to your lighter circles, particularly the mustard yellow ones. Use the black fine liner to draw high-contrast designs like a radiant sun face or intricate floral silhouettes. -
Create floating elements:
Don’t restrict yourself to just the painted circles. Draw a few designs directly on the plain paper between the colored circles, like a large crescent moon or a wireframe sun, to break up the rigidity of the grid. -
Detail the sunbursts:
For sun motifs, draw a small circle in the center of a painted circle, then add rays radiating outward. Vary the ray lengths—short, long, short—for visual interest. -
Add a globe motif:
On a dark navy circle, use the white pen to draw latitude and longitude lines, creating a simple globe effect.
Step 4: Final Touches
-
Refine the lines:
Go back over any white gel pen lines that successfully dried but look a little faint. A second coat often makes the white opaque and crisp. -
Erase pencil marks:
Once you are absolutely certain all ink and paint is dry, gently erase any visible pencil guidelines around the edges of your circles.
Now you have a stunning page of celestial icons that looks like a curated sticker sheet
Moonlit Animal Silhouette in a Circle Spotlight
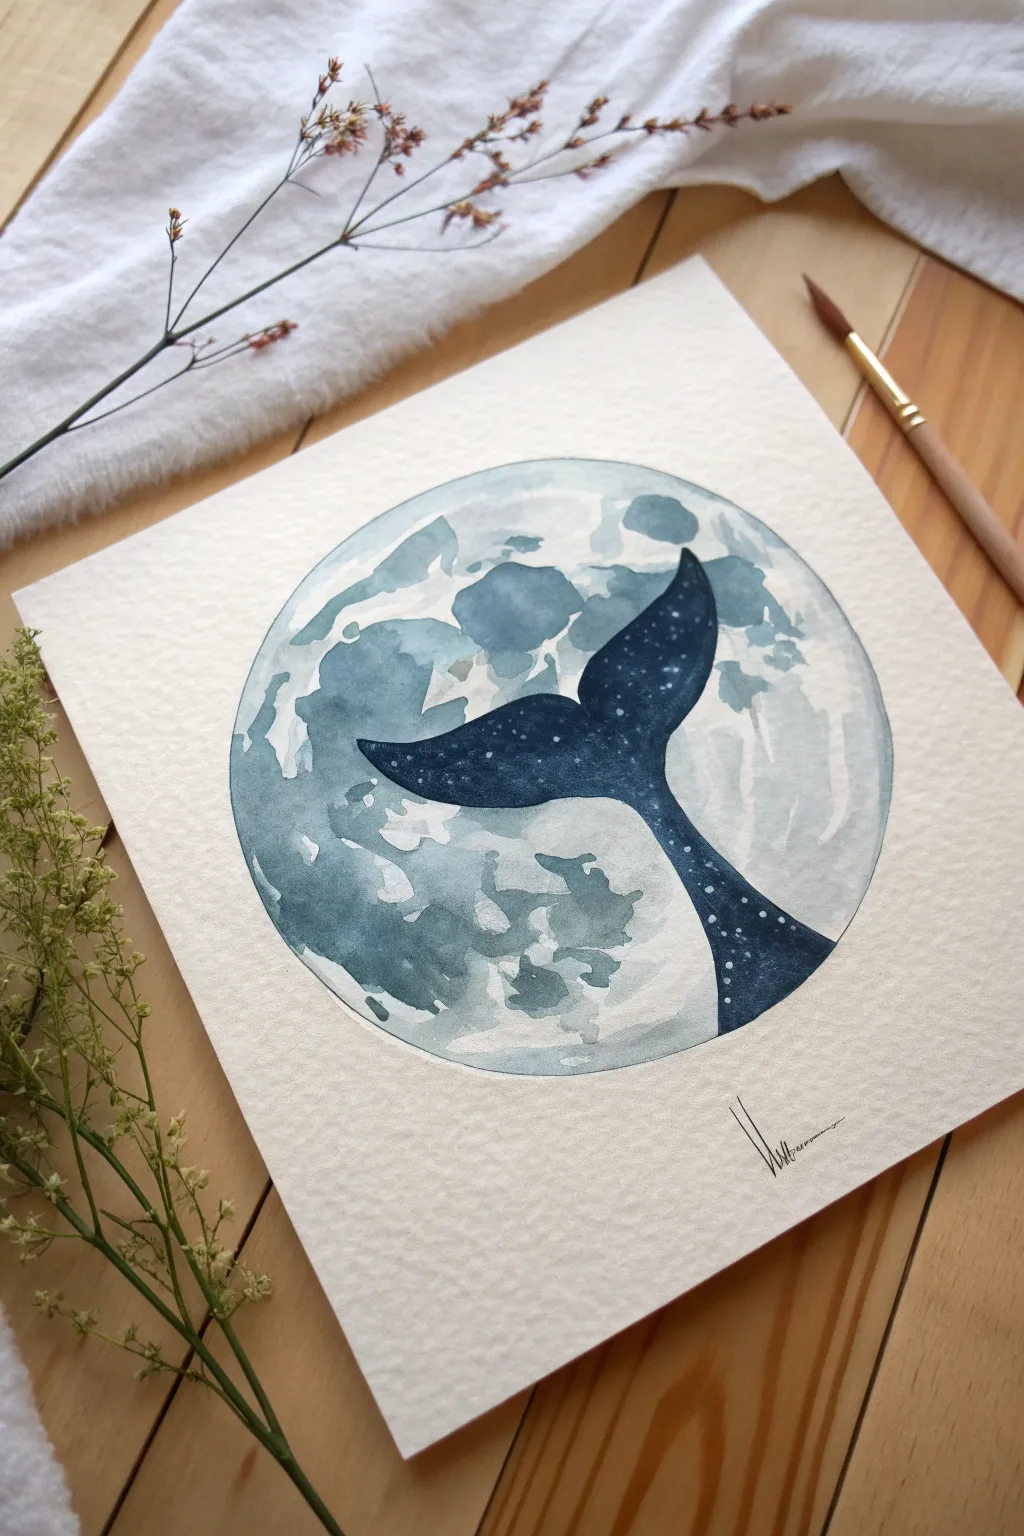
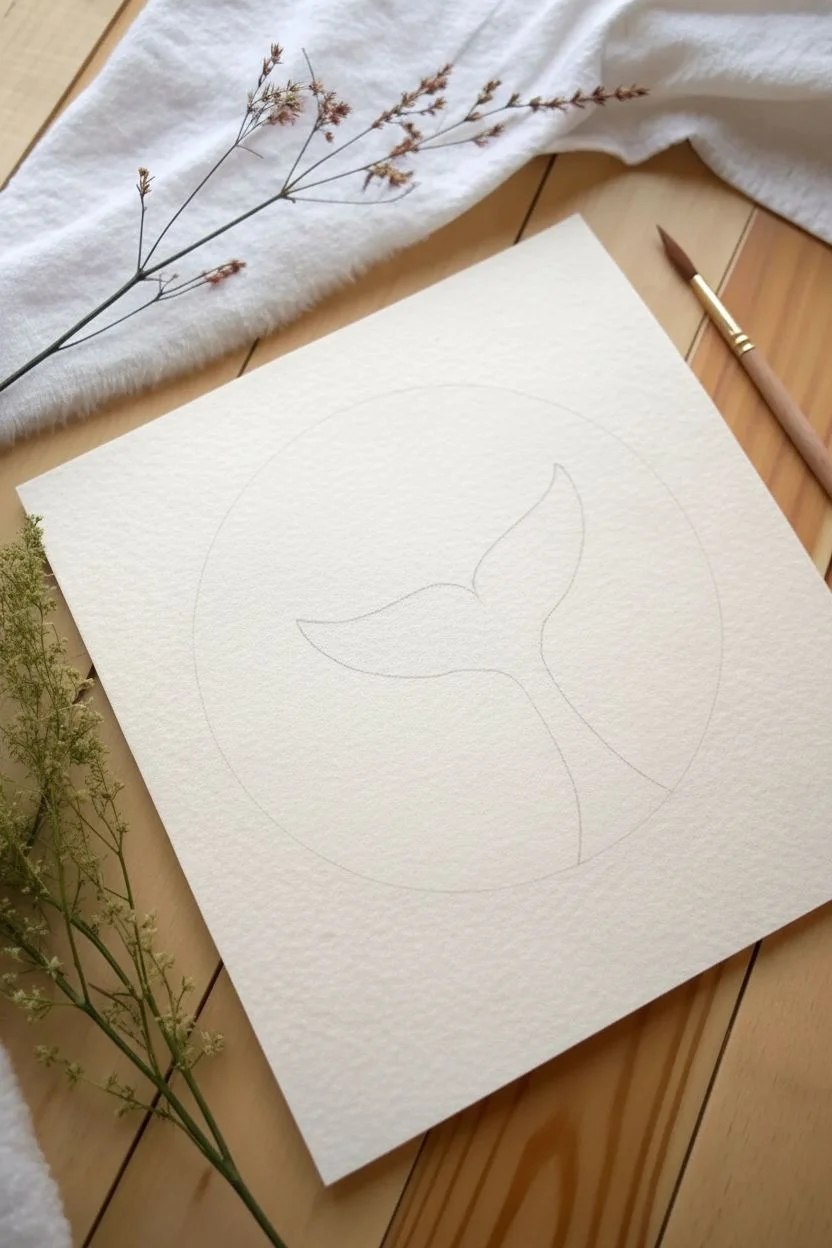
Capture the serene beauty of the ocean and the night sky in one circle with this elegant watercolor project. You will paint a textured, crater-filled moon as a backdrop for a sleek, star-speckled whale tail silhouette.
Step-by-Step
Materials
- Cold press watercolor paper (300 gsm)
- Watercolor paints (Indigo, Payne’s Grey, a touch of Teal)
- Circular object to trace or a compass
- Pencil and kneaded eraser
- Round watercolor brushes (Size 6 for washes, Size 0 or 2 for details)
- White opacity ink, gouache, or gel pen
- Clean water and paper towels
- Masking tape (optional)
Step 1: Preparation and Sketching
-
Trace the boundary:
Begin by lightly tracing a perfect circle in the center of your watercolor paper using a compass or a round household object like a bowl or roll of tape. Keep the line faint so it disappears later. -
Sketch the silhouette:
Inside the circle, sketch the outline of the whale tail. The tail should start from the bottom right edge of the circle and curve upward into the center. Focus on the graceful curve of the flukes. -
Refine the shape:
Clean up your sketch lines with a kneaded eraser. You want the graphite to be barely visible so it doesn’t muddy the paint later, especially in the lighter moon areas.
Uneven Moon Texture?
If your moon looks too flat, wait for it to dry, then re-wet specific areas and drop in clean water (called ‘blooming’) to force pigment to the edges for instant craters.
Step 2: Painting the Moon
-
Prepare your palette:
Mix a watery wash of Indigo with a tiny hint of Teal. You want a very pale, cool blue-grey color for the moon’s base. It should be quite transparent. -
Base layer:
Using your larger round brush, wet the entire area inside the circle *except* for the whale tail shape. Painting around the tail ensures we keep that paper dry for the silhouette later. -
Initial wash:
While the paper is damp, drop in your pale blue-grey mix. Don’t worry about making it perfectly even; the irregularities will help form the moon’s texture. -
Creating craters:
While the first layer is still slightly wet but losing its sheen, mix a slightly stronger, darker concentration of Indigo. -
Wet-on-wet texture:
Dab this darker color onto the moon in random, organic shapes to create ‘seas’ and craters. Focus these darker patches near the edges of the circle to create spherical dimension. -
Lifting highlights:
Rinse your brush and dry it on a paper towel. Use the thirsty brush to lift up pigment in some areas of the wet craters, softening hard edges and creating lighter highlights. -
Dry completely:
This is crucial: Let the moon layer dry 100%. If it feels cool to the touch, it’s still wet. Using a hairdryer on low heat can speed this up.
Step 3: The Whale Silhouette
-
Mix the darks:
Prepare a very concentrated mix of Indigo and Payne’s Grey. You want a deep, near-black blue with a creamy consistency, not too watery. -
Fill the tail:
Carefully paint inside your whale tail sketch using the size 2 or 0 brush for precision along the edges. Ensure the edges are crisp against the moon background. -
Gradual fade:
I like to make the bottom of the tail (where it exits the circle) slightly lighter or more textured, hinting that it’s disappearing into water, but solid black is also striking. -
Let it set:
Allow the dark silhouette to dry completely. This prevents the white stars we add next from bleeding into the blue and turning grey.
Make it Metallic
Swap the white stars for metallic gold or silver watercolor. Following the same steps, flick gold paint onto the tail for a luxurious, shimmering finish.
Step 4: Starry Details
-
Prepare white medium:
Get your white gouache, ink, or a reliable white gel pen ready. If using paint, mix it to a milky consistency. -
Add the constellations:
Gently tap or dot small white specks onto the dark whale tail. Vary the sizes—some tiny pinpricks, some slightly larger dots—to mimic a galaxy. -
Finishing touches:
Sign your work with a fine-liner pen below the circle for a professional finish.
Frame this piece in a square frame or scan it to create beautiful custom greeting cards
Tiny House on a Hill Inside a Circle

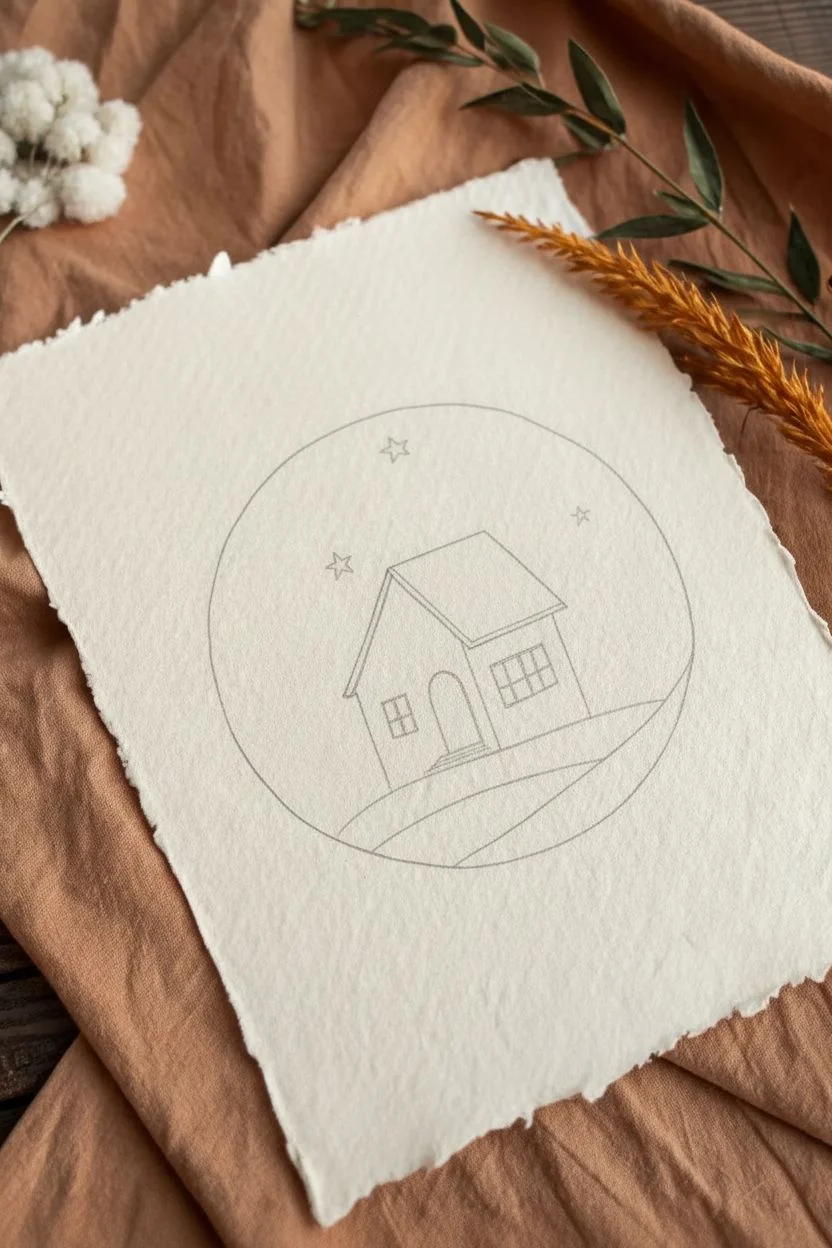
Capture the serenity of a quiet night with this charming line art illustration. Featuring a tiny house nestled under a starlit sky, this manageable project uses simple geometric shapes and confident pen strokes to create a delightful scene.
Detailed Instructions
Materials
- Deckle-edged or handmade paper (approx. 5×7 inches)
- Pencil (HB or 2H)
- Compass or a round object for tracing (approx. 3-4 inches diameter)
- Fine liner pen (black, 0.3mm or 0.5mm)
- Good quality eraser
Step 1: Setting the Scene
-
Circle Outline:
Begin by lightly tracing a perfect circle in the center of your paper using a compass or by tracing around a jar lid. This circle acts as the boundary for your entire scene. -
Ground Lines:
Draw two gentle, sweeping curves near the bottom of the circle to represent the hill. The top curve should start slightly higher on the left and dip down towards the right, while the second curve adds depth just below it. -
House Structure:
Sketch the basic box shape of the house sitting on the top hill line. Draw a rectangle for the main body, angling the right side slightly to create a 3D perspective. -
Roof Pitch:
Add a triangular shape on top of the left side of the rectangle for the front gable. Extend a parallel line backwards to form the roof ridge, connecting it down to the back of the house.
Step 2: Adding Details
-
Doors and Windows:
Sketch a small arched door in the center of the front face. To its left, add a small square window, and place a circle window in the gable triangle above. -
Side Window:
On the side wall of the house, draw a larger rectangular window divided into four panes. -
Roof Texture:
Lightly pencil in a grid pattern on the roof surface. I find that slightly waving the horizontal lines makes the shingles look more organic and cozy. -
Nature Elements:
Sketch two simple pine trees. Place a taller, detailed tree on the right side and a smaller, simpler one on the left. Use jagged, downward-pointing strokes for the branches. -
Foreground Flora:
Add small tufts of grass and a few leafy stems near the base of the house and along the hill line to ground the structure. -
Celestial Touch:
In the open sky area, draw a crescent moon near the top right. Scatter five-pointed stars of various sizes around the house.
Wobbly lines?
If your circle isn’t perfect, embrace it! Go over the line again loosely 2-3 times to create a purposeful “sketchy” style rather than a single mistake.
Step 3: Inking and Finishing
-
Main Circle:
Switch to your fine liner pen. Carefully trace over the main circle first. Don’t worry if the line isn’t machine-perfect; a little wobble adds to the hand-drawn charm. -
Inking the House:
Go over the house outlines with confident strokes. Define the window panes and the door frame clearly. -
Shingles and Texture:
Ink the roof tiles. You can fill in a few random tiles with black or shading lines to add visual interest and texture. -
Trees and Grass:
Ink the trees and plants. Use quick, flicking motions with your pen for the grass to make it look sharp and natural. -
Starry Sky:
Trace the moon and stars. Add tiny dots or specks between the stars to create a sense of a dense, sparkling galaxy. -
Erase Sketches:
Wait at least five minutes for the ink to dry completely. Gently erase all visible pencil marks, being careful not to crumple the textured paper edges.
Pro Tip: Depth trick
Make lines in the foreground (the bottom hill and grass) slightly thicker than the stars and moon to create subtle visual depth in your tiny landscape.
Display your miniature masterpiece in a small frame or use it as a thoughtful card front
Crystal or Geode Facets Framed by a Circle

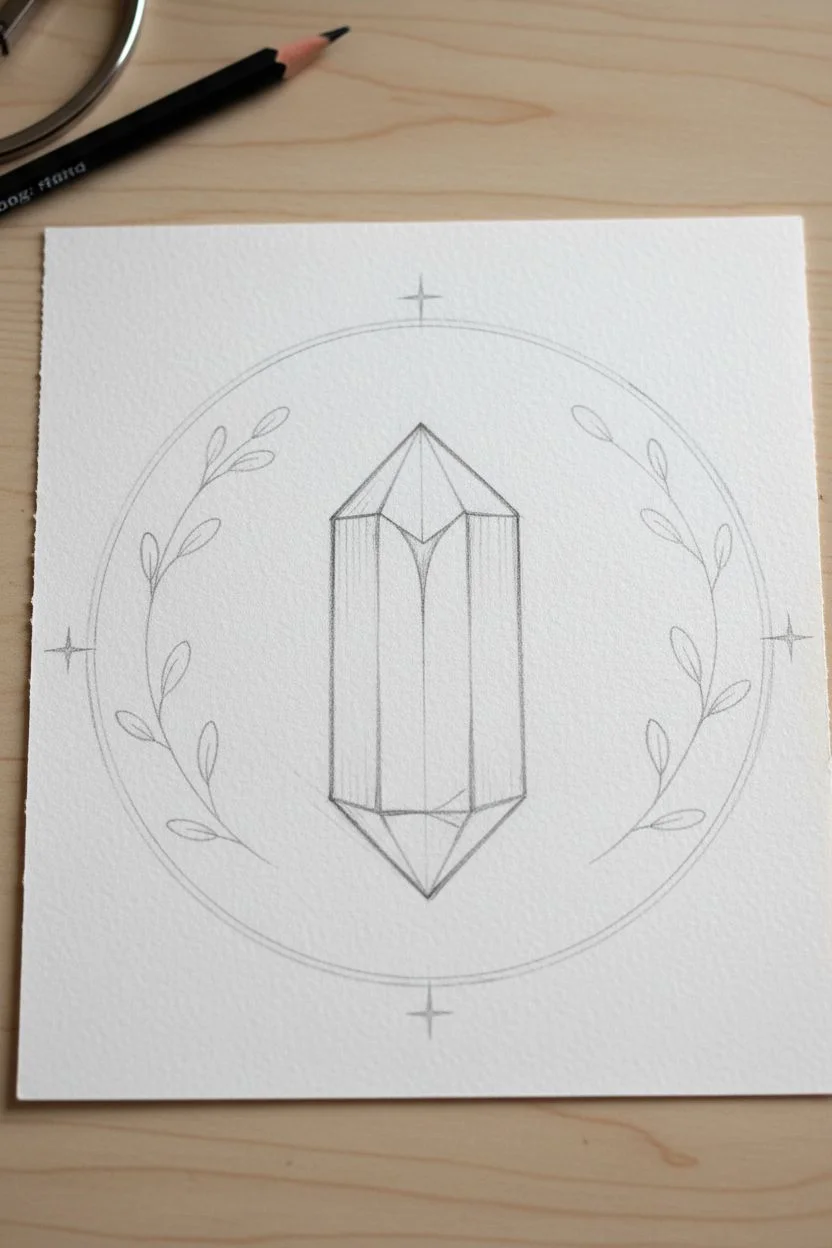
Capture the magic of nature with this delicate illustration featuring a faceted crystal point framed by a perfect circle. The soft gradient of pinks and sage greens, combined with botanical sprigs and tiny stars, creates a mystical yet modern aesthetic perfect for journaling or wall art.
Step-by-Step
Materials
- Cold press watercolor paper (textured)
- Pencil (HB or H)
- Compass or circular object for tracing
- Fine liner pens (0.1mm and 0.5mm, black waterproof ink)
- Watercolors (Sage Green, Dusty Pink, Paynes Grey)
- Small round paintbrush (size 2 or 4)
- White gel pen or gouache for highlights
- Eraser
Step 1: Drafting the Geometry
-
Draw the frame:
Begin by using a compass or tracing a round object (like a jar lid or tape roll) to draw a perfect circle in the center of your page. Keep your pencil pressure light so the graphite doesn’t indent the paper deeply. -
Outline the crystal shape:
In the center of the circle, sketch a tall, pointed hexagon shape. This will be the main body of your crystal. The bottom point should reach towards the lower curve of the circle, and the top point should aim for the upper curve. -
Add the facets:
Draw vertical lines inside the crystal shape to create facets. Start with a central vertical line that splits near the top into a ‘Y’ shape, defining the angled tip of the crystal. Add parallel vertical lines on either side to give it dimension. -
Sketch the foliage:
From the base of the crystal, draw two curving stems extending outwards and upwards on either side. Keep them inside the circle boundary. -
Add leaves:
Draw pairs of simple, small oval leaves along these stems. They should look like they are cradling the crystal.
Clean Circles
If you don’t have a compass, trace the inside of a roll of masking tape. It creates a perfect size for small journal illustrations like this.
Step 2: Inking the Design
-
Define the main lines:
Using your thicker fine liner (0.5mm), carefully trace over the circle and the main outline of the crystal. Using a specialized drawing pen here is crucial so the ink won’t bleed when we add paint later. -
Detail the crystal facets:
Switch to the thinner fine liner (0.1mm) to trace the internal facet lines of the crystal. A thinner line weight here helps the crystal look delicate and transparent. -
Ink the leaves:
Continue with the 0.5mm pen to outline the stems and leaves. -
Add celestial details:
Draw small four-pointed stars (diamonds with curved sides) just outside the circle at the four compass points. Add tiny dots or specks inside the circle for a dusty, magical texture. -
Prepare for color:
Allow the ink to dry completely (wait at least 5-10 minutes to be safe), then gently erase all your pencil sketches.
Add Some Glamour
Wait for the watercolor to dry fully, then paint over the white highlights with metallic silver or gold paint for a genuine crystal shimmer.
Step 3: Watercolor Wash
-
Paint the background:
Mix a very diluted, watery wash of dusty pink. Carefully paint the entire area inside the circle, avoiding the crystal and leaves for now. This creates a soft, glowing background. -
Gradient on the crystal:
For the crystal, we want a two-tone gradient. Start at the top with a watery grey or sage green. While that paint is still wet, introduce the pink color at the bottom, letting them blend naturally in the middle. -
Painting the leaves:
Fill in the leaves with a sage green color. I like to vary the intensity slightly between leaves to make them look organic. -
Deepening the facets:
Once the first crystal layer is dry, use a slightly darker mix of grey-green to paint just one or two side facets. This creates a shadow effect that emphasizes the 3D shape.
Step 4: Magical Touches
-
Splattering texture:
Load your brush with a small amount of darker paint and tap it against your finger over the paper to create tiny speckles inside the circle, adding to the magical atmosphere. -
Adding highlights:
Using a white gel pen or a fine brush with white gouache, add tiny dots or distinct lines along the edges of the crystal facets to simulate light reflection. -
Star details:
Use the fine liner to darken the tips of the external stars, giving them a sharp, twinkling appearance.
Now you have a serene little piece of geometric art ready to display
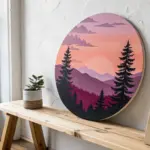
Layered “Tiny Planet” Landscape Using Concentric Bands
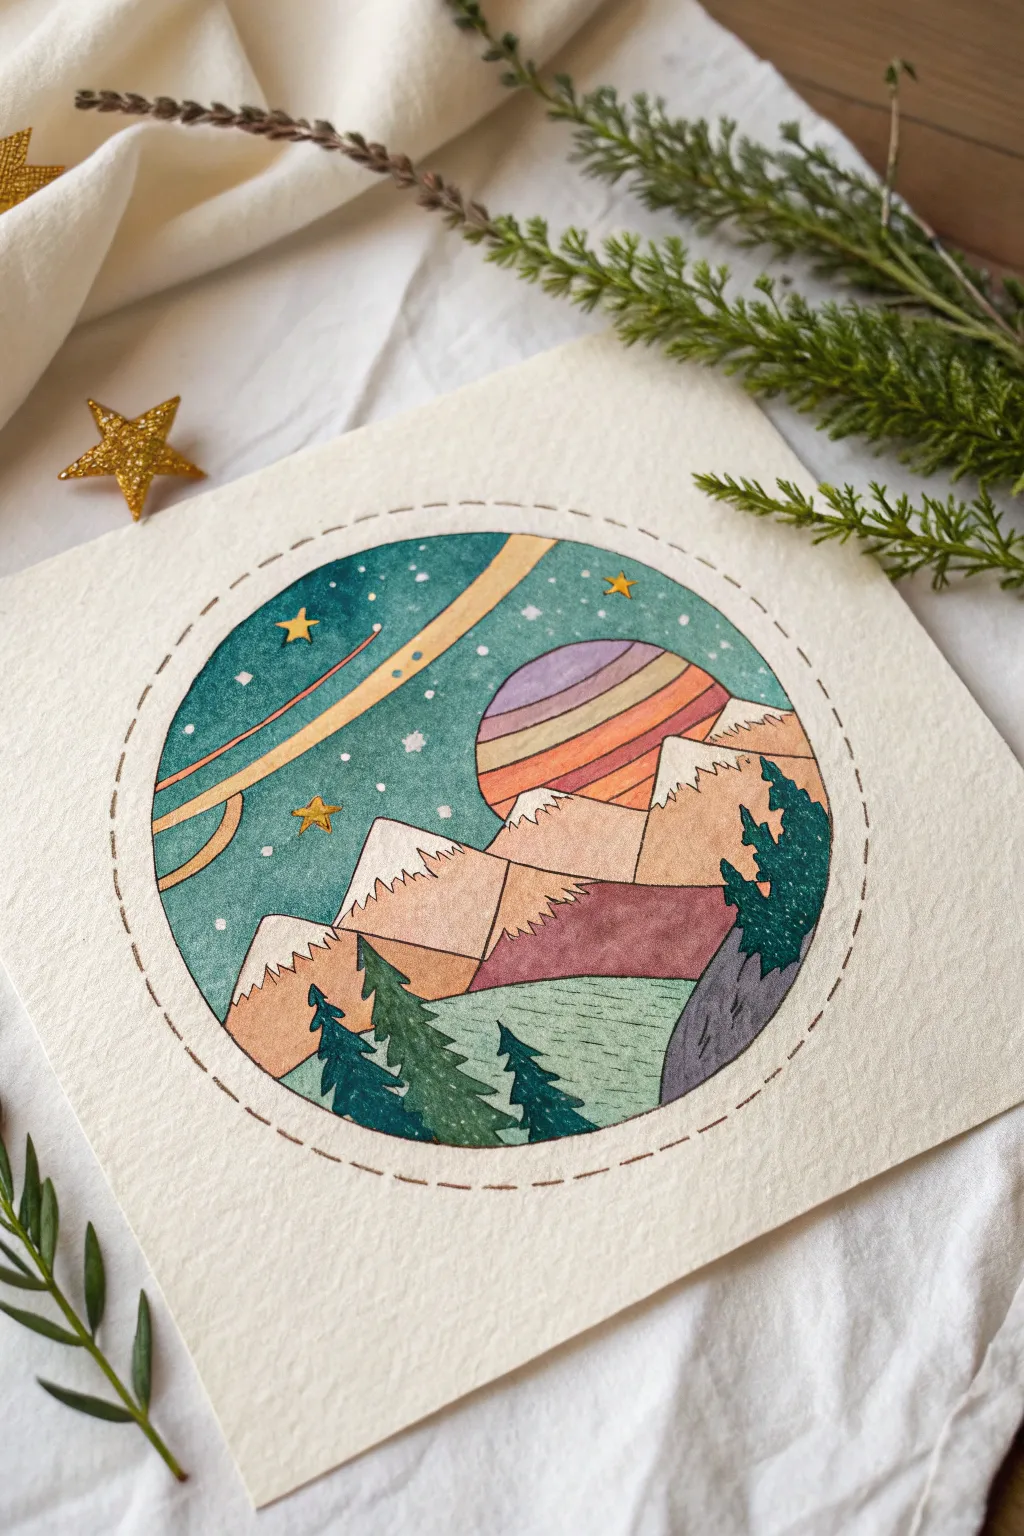
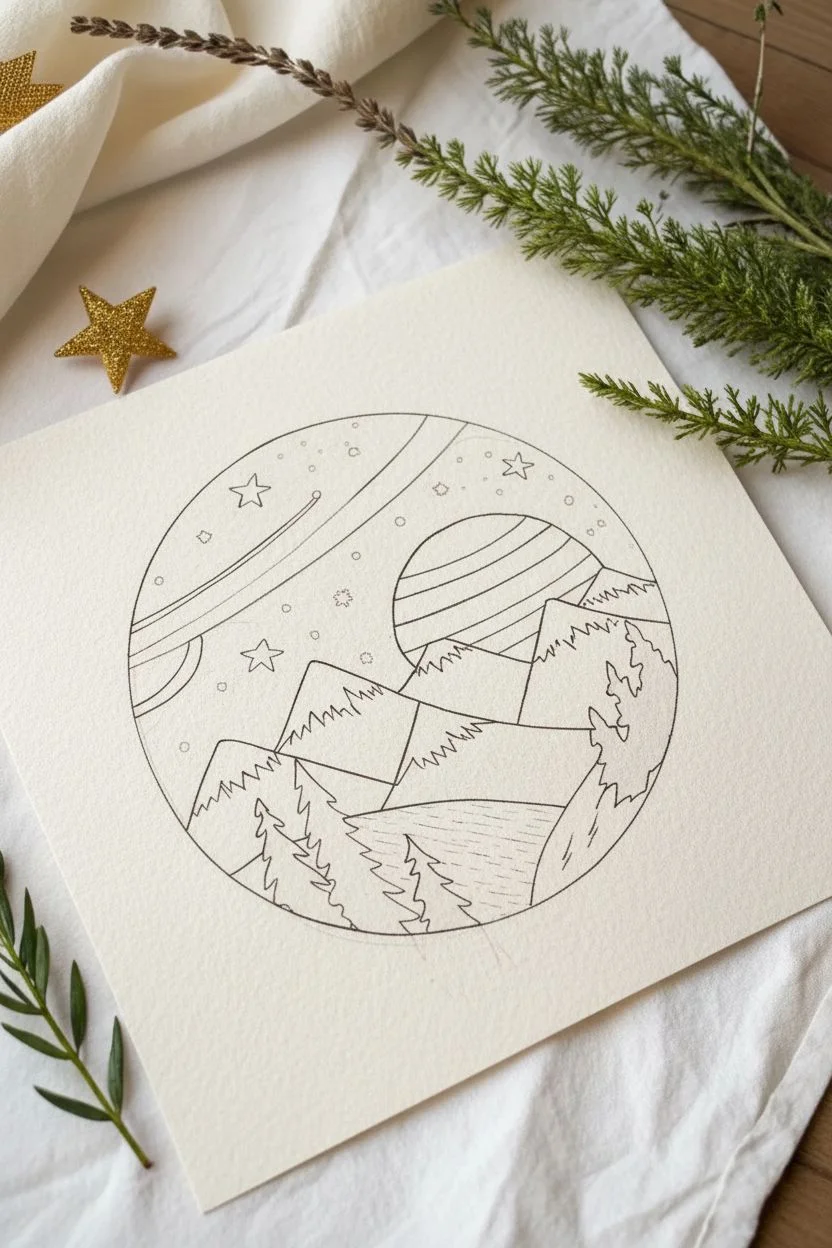
Create a charming window into a dreamy alpine night with this circular landscape illustration. Combining graphic liner work with watercolor washes creates a delightful contrast between structure and organic color blending.
Step-by-Step Guide
Materials
- Cold press watercolor paper (square sheet)
- Pencil and eraser
- Compass or circular template (approx. 4-5 inches)
- Waterproof fine liner pens (black, sizes 01 and 05)
- Watercolor paint set
- Small round brushes (size 2 and 4)
- Gold or metallic gel pen
- White gel pen (optional)
- Ruler
Step 1: Drafting the Design
-
Draw the boundary:
Begin by lightly tracing a perfect circle in the center of your paper using a compass or by tracing a bowl. This will be the viewport for your landscape. -
Sketch the mountains:
Starting near the bottom third, draw a jagged mountain range. Create three distinct layers: a foreground slope on the right, a middle range of peaks, and a taller, distant mountain on the left side. -
Add celestial elements:
In the upper right quadrant of the sky, draw a large partial circle tucked behind the mountains to represent a planet or moon. Add sweeping diagonal bands across the upper left sky to suggest a shooting star or cosmic rings. -
Place the trees:
Sketch stylistic pine trees in the foreground. I usually group three large ones at the bottom center and tuck a smaller one onto the right-hand slope for balance.
Clean Edges
If you struggle with painting inside the circle, lightly mask the outside area with masking fluid or painter’s tape before starting your sky wash.
Step 2: Inking the Lines
-
Outline the main shapes:
Using a 05 waterproof pen, trace over your pencil lines for the mountains, trees, and planet. Keep your hand steady but allow for a little character in the lines. -
Add details:
Switch to a thinner 01 pen to draw the jagged ‘snow caps’ on the mountains and the stripe details inside the planet. Don’t ink the outer circle border yet. -
Erase guidelines:
Once the ink is completely dry—give it a few minutes to be safe—gently erase all the pencil marks inside the design to prepare for painting.
Step 3: Applying Color
-
Paint the sky:
Mix a deep teal or turquoise watercolor. Carefully paint the sky area, working around the planet and shooting star bands. Let the color pool slightly for a textured, starry-night feel. -
Color the planet:
Use warm tones like purple, orange, and pale yellow for the stripes on the planet. Paint alternating bands, allowing each stripe to dry slightly before painting the neighbor to prevent bleeding. -
Fill the mountains:
Paint the mountain bodies in warm beige and terracotta tones. Leave the jagged tops unpainted (white paper) to represent snow caps. For the slope on the right, use a darker mauve or purple to suggest shadow. -
Paint the greenery:
Use a deep forest green for the pine trees. For the very bottom ground area, use a lighter, possibly sage or mint green wash to differentiate it from the trees. -
Add cosmic stripes:
Paint the shooting star trail in the sky with bright yellow and pale orange. Wait for the entire piece to dry completely.
Add Dimension
Use a slightly darker shade of paint to add shadows on the right side of the mountain peaks. This simple step instantly adds 3D depth to the flat design.
Step 4: Final Touches
-
Draw the dashed border:
Using a brown or dark grey fine liner, draw a dashed line completely around the outside of your artwork, roughly 1/4 inch away from the painted edge. This creates a ‘stitched’ patch look. -
Add stars:
With a gold gel pen or metallic paint, draw small five-point stars scattered in the teal sky. You can add tiny white dots with a gel pen for distant stars as well. -
Texture the water/ground:
Use a very fine pen to add horizontal hatching lines to the bottom green area, giving it a grassy or rippled water texture. -
Detail the trees:
Add tiny texture scribbles inside the dark green trees to give them volume and highlight the branches.
Step back and admire your little pocket universe, perfectly captured within its border


Have a question or want to share your own experience? I'd love to hear from you in the comments below!