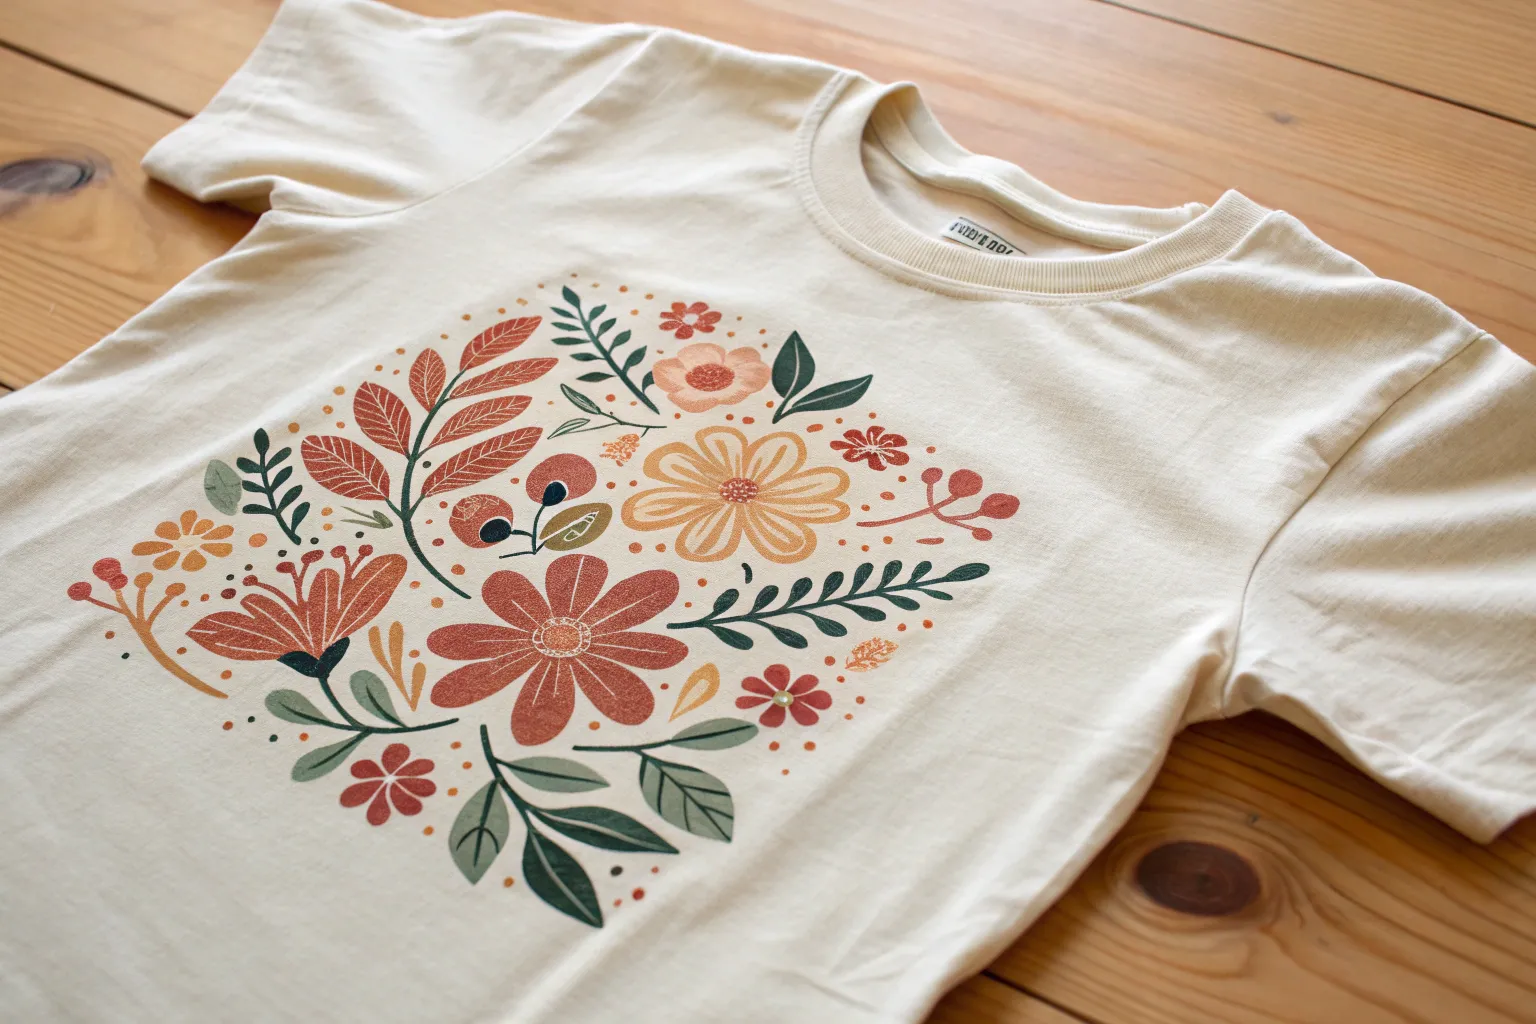
A plain tee is basically the best little canvas—low-pressure, wearable, and perfect for experimenting with color. Here are my favorite t-shirt painting ideas, starting with the classics everyone loves and ending with a few artsy curveballs for when you’re ready to play.
Easy Stencil Shapes for Clean, Crisp Graphics
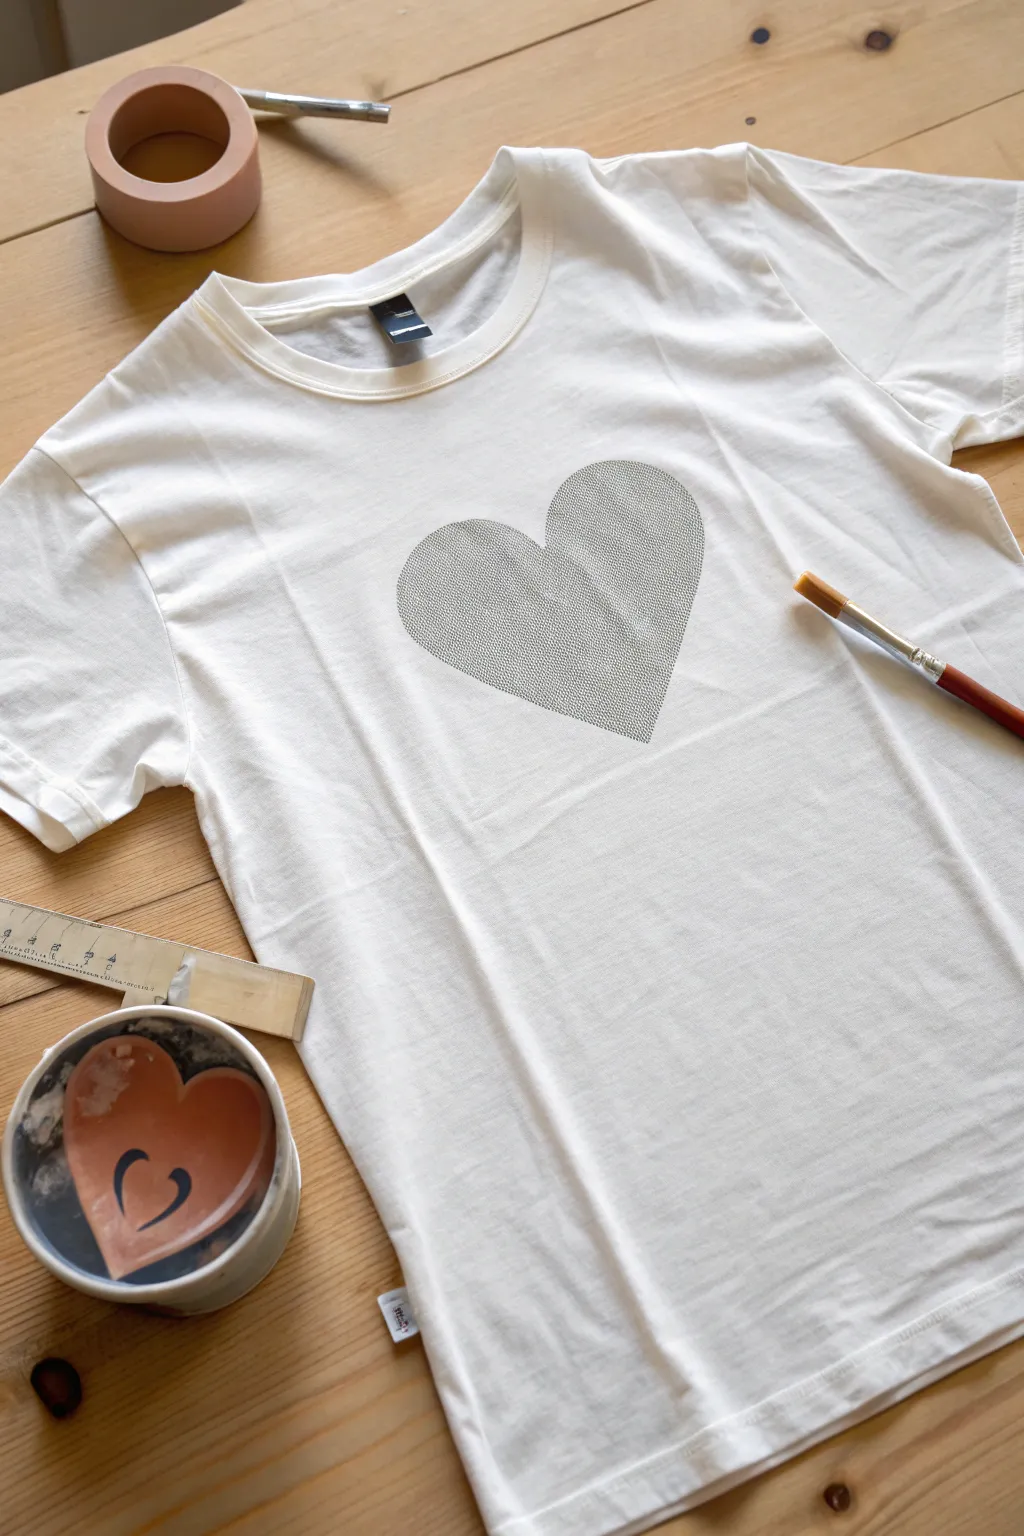
Transform a plain white t-shirt into a custom piece with this modern, textured heart design. Using a simple stencil and a stippling technique creates a professional, crisp graphic that feels soft to the touch rather than heavy and stiff.
How-To Guide
Materials
- White cotton t-shirt (pre-washed)
- Fabric paint (grey or silver)
- Freezer paper or stencil film
- Iron and ironing board
- Flat artist’s paintbrush or stencil brush
- Scissors or craft knife
- Pencil
- Ruler
- Cardboard or wax paper (to put inside the shirt)
Step 1: Preparing the Stencil
-
Create the Template:
Decide on the size of your heart. You can freehand draw half a heart on a folded piece of paper to ensure symmetry, or print a simple heart outline from your computer. -
Trace onto Freezer Paper:
Cut a piece of freezer paper slightly larger than your design. Place the paper shiny-side down over your template and trace the heart outline with a pencil. -
Cut the Stencil:
Using sharp scissors or a craft knife on a cutting mat, carefully cut out the heart shape. You will be using the ‘negative space’ (the outer paper with the hole), not the cutout heart itself. -
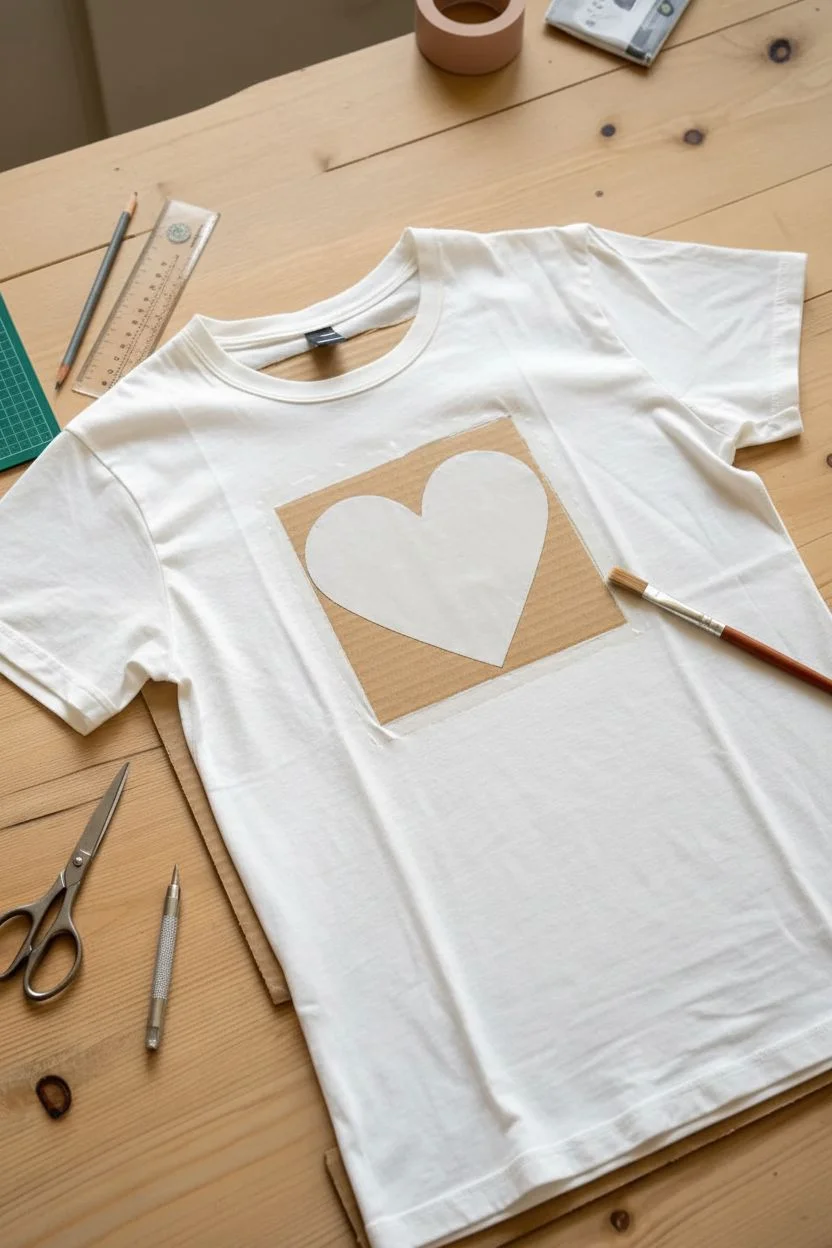
Prepare the Shirt:
Slide a piece of cardboard or wax paper inside the t-shirt. This is crucial as it prevents paint from bleeding through to the back layer of fabric. -
Position the Stencil:
Place the freezer paper stencil on the shirt, shiny-side down. Use a ruler to ensure it is centered on the chest, measuring specifically from the armpits to align it straight. -
Secure with Heat:
Run a hot iron (no steam) over the freezer paper. The heat will temporarily fuse the shiny side to the fabric, creating a tight seal that prevents paint from leaking under the edges.
Bleeding edges?
If paint seeps under the stencil, your iron wasn’t hot enough or you used too much paint. Use a tiny brush with white paint to touch up outside the lines.
Step 2: Applying the Design
-
Prepare Your Brush:
Dip just the tip of your flat brush or stencil brush into the fabric paint. Dab off excess paint onto a paper towel; you want a ‘dry brush’ feel. -
Paint the Edges First:
Start painting along the inside edges of the stencil first. Use an up-and-down tapping motion (stippling) rather than dragging the brush. This ensures the outline remains crisp. -
Fill the Center:
Continue the tapping or stippling motion to fill in the rest of the heart. Vary the density of your dots if you want a textured look, or tap consistently for a solid grey appearance. -
Check Coverage:
Lift the shirt up to the light briefly or step back to ensure the coverage is even. Apply a light second coat if necessary, but keep the paint application thin to maintain fabric softness. -
Initial Drying:
Let the paint sit for about 15 to 20 minutes. It should be dry to the touch but doesn’t need to be fully cured yet.
Texture secret
For the cool stippled texture shown in the image, use a stiff-bristled brush and hold it completely vertical while tapping quickly.
Step 3: Finishing Touches
-
Remove the Stencil:
Carefully peel back one corner of the freezer paper. Pull it away slowly at a 45-degree angle to reveal your crisp heart shape. -
Dry Completely:
Allow the shirt to dry completely flat for at least 24 hours. Don’t rush this step. -
Heat Set the Ink:
Once fully dry, place a thin cloth over the design and iron it on a med-high heat setting for 3-5 minutes. This locks in the color so it won’t wash out.
Enjoy your minimalist, stylish new tee that looks store-bought but was made by you.


Loose Watercolor Wash Background for a Dreamy Look

Capture the ethereal beauty of a sunset sky with this soft, watercolor-style fabric painting project. The seamless blend of coral pinks into deep indigo blues creates a calming, modern aesthetic right on your favorite tee.
Detailed Instructions
Materials
- White cotton t-shirt (pre-washed)
- Fabric medium
- Acrylic paints (Coral/Peach, Warm Pink, Indigo, White)
- Wide flat synthetic brush (1 inch)
- Medium round brush
- Masking tape or painter’s tape
- Cardboard or plastic insert (for inside the shirt)
- Water jar
- Paper towels
- Spray bottle with water (optional)
Step 1: Preparation
-
Prepare the fabric surface:
Iron your pre-washed t-shirt to ensure the painting area is perfectly smooth. Wrinkles will disrupt your clean lines. -
Insert protective barrier:
Slide a piece of cardboard or a plastic sheet inside the shirt. This is crucial to prevent the paint from bleeding through to the back of the fabric. -
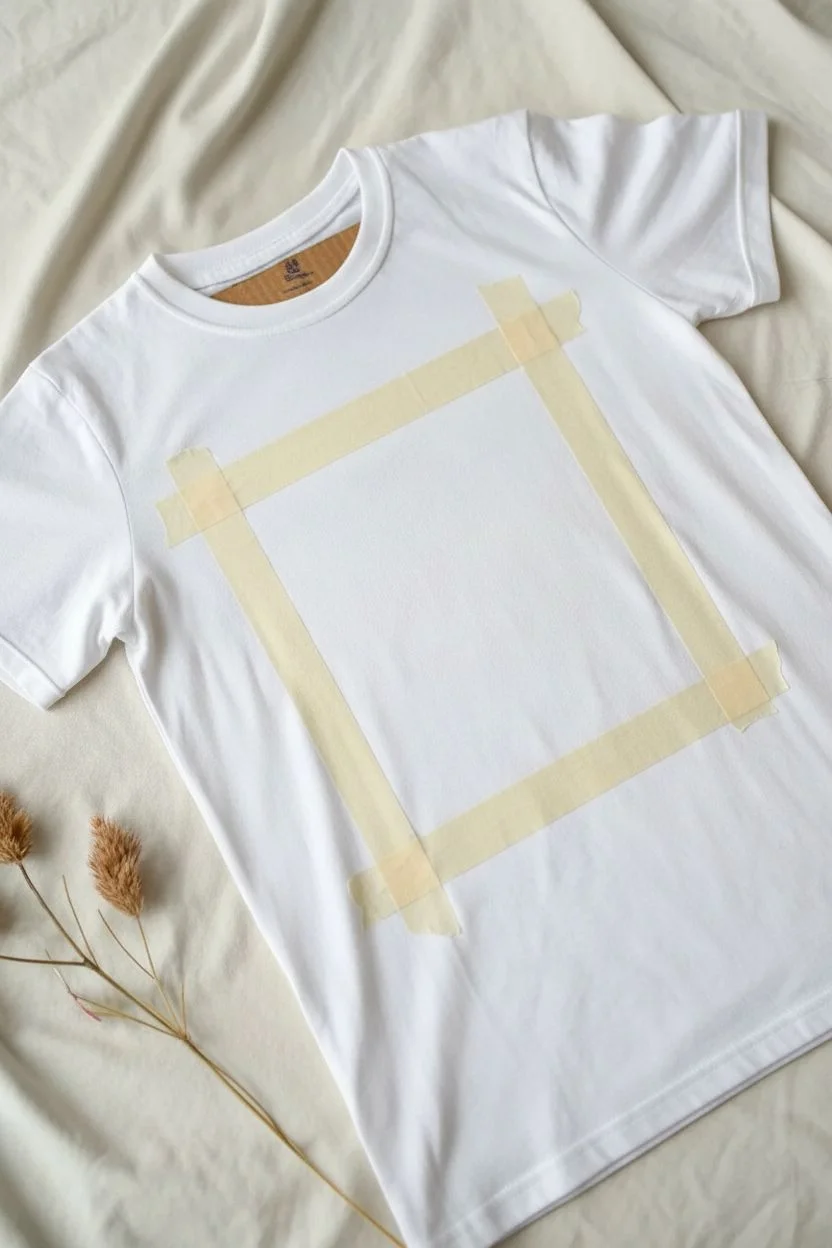
Tape boundaries:
Define your painting area by applying masking tape to create a clean rectangle in the center of the chest. Press the edges down firmly to stop paint from seeping under.
Wet-on-Wet Trick
Lightly misting the fabric with a spray bottle before painting helps the acrylics bleed and blend just like real watercolors.
Step 2: Mixing the Colors
-
Create the fabric paint mix:
On your palette, mix your acrylic paints with fabric medium. A standard ratio is usually 1:1, but check your bottle’s instructions. You want a consistency that is fluid but not drippy. -
Prepare the palette:
Mix three distinct puddles: a soft coral-pink for the sky, a transitional peach tone, and a deep indigo blue for the landscape base. Keep a puddle of white nearby for tinting.
Add Some Sparkle
Mix a tiny amount of gold fabric glitter or metallic medium into the peach transition layer for a subtle sunset shimmer.
Step 3: Painting the Gradient
-
Wet the area slightly:
Dip your wide flat brush in clean water and lightly dampen the fabric inside the tape square. I find this helps the paint flow more like real watercolor. -
Start with the sky:
Load your brush with the coral-pink mixture. Apply it to the top third of the rectangle using horizontal, sweeping strokes. Don’t worry about perfect coverage; some texture is good. -
Add cloud details:
While the pink is still wet, dip the corner of your brush into a little white mix. Dab it loosely into the pink area to create soft, fluffy cloud shapes that blend naturally. -
Introduce the peach transition:
Below the pink, paint a band of the peach tone. Use water on your brush to gently blur the line where the pink and peach meet, creating a soft gradient. -
Paint the horizon:
Switch to the indigo blue mixture. Apply this to the bottom third of the rectangle. Let the top edge of the blue meet the peach tone unevenly to suggest a distant mountain range or horizon line. -
Create the bleed effect:
Using a slightly damp clean brush, gently drag some of the blue pigment upward into the peach section. This mimics the ‘wet-on-wet’ watercolor technique and softens the transition. -
Deepen the foreground:
Add a second, more concentrated layer of indigo to the very bottom edge. This grounds the image and adds depth to the ‘mountains’ at the base. -
Refine the edges:
Check the edges near the tape. Make sure the paint has fully reached the tape line so you get a crisp square shape upon removal.
Step 4: Finishing Up
-
Peel the tape:
Wait until the paint is tacky but not fully dry—usually about 15-20 minutes. Carefully peel back the masking tape at a 45-degree angle to reveal your clean edges. -
Air dry completely:
Let the t-shirt sit flat for at least 24 hours to ensure the paint is completely cured. -
Heat set the design:
Once dry, place a thin cloth over the design and iron it on a medium-high setting (no steam) for 3-5 minutes. This locks the color into the fibers.
Enjoy wearing your piece of wearable art, knowing the soft gradient is completely unique to your hand

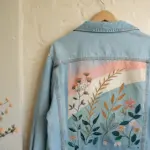


Big Floral Bouquet Centerpiece on the Front
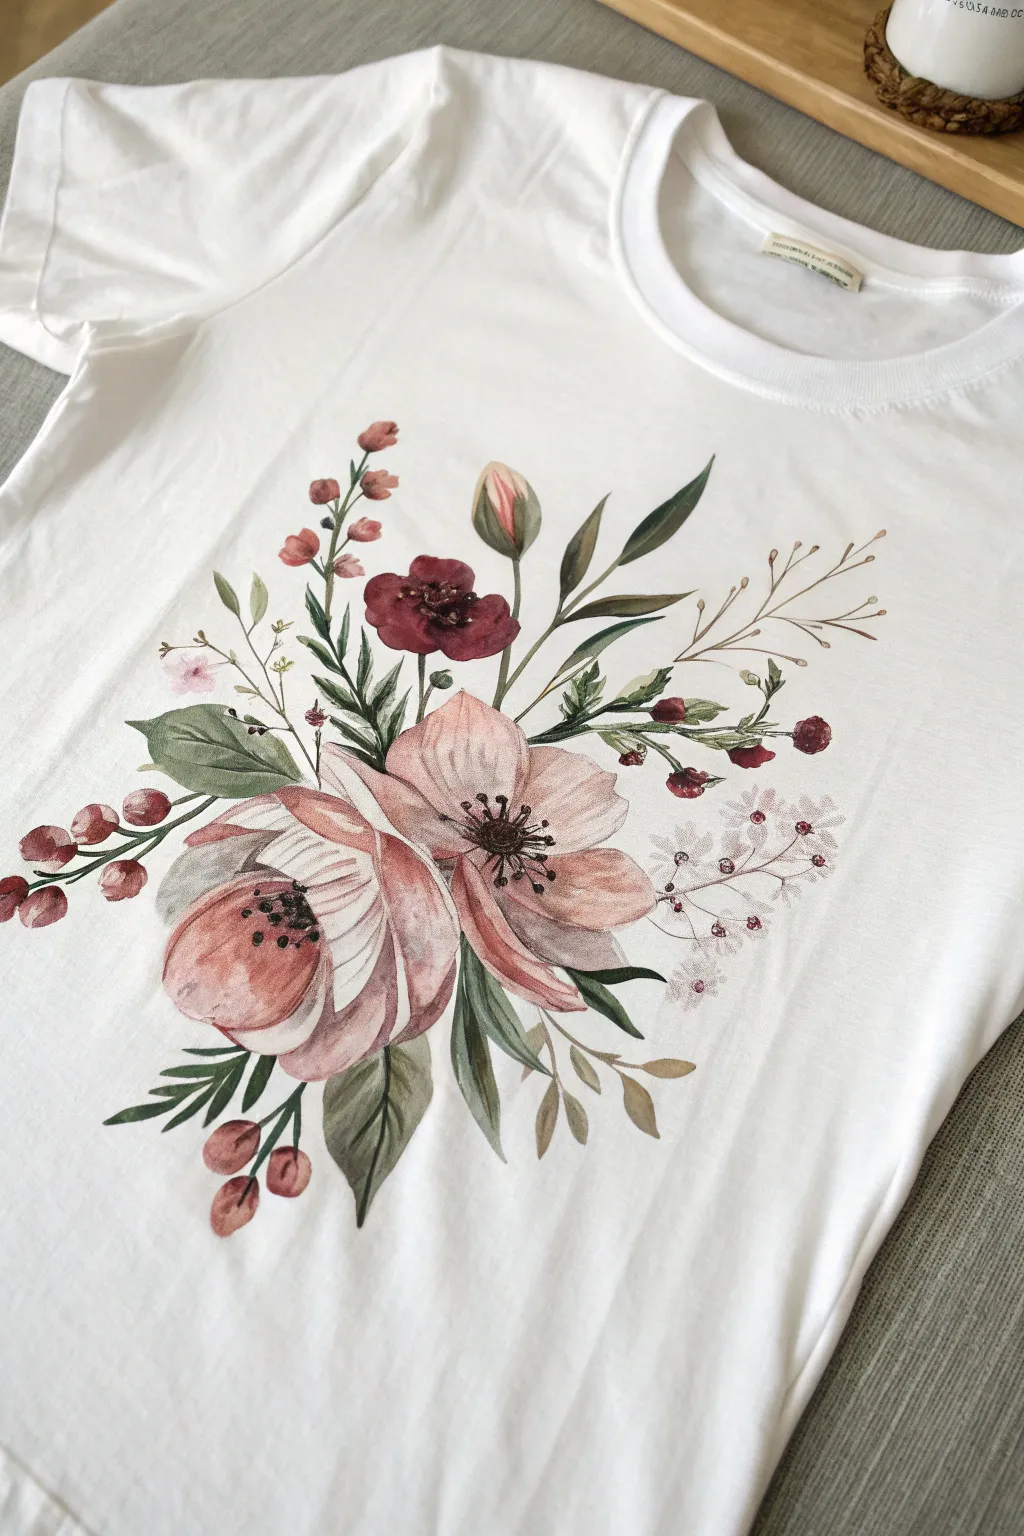
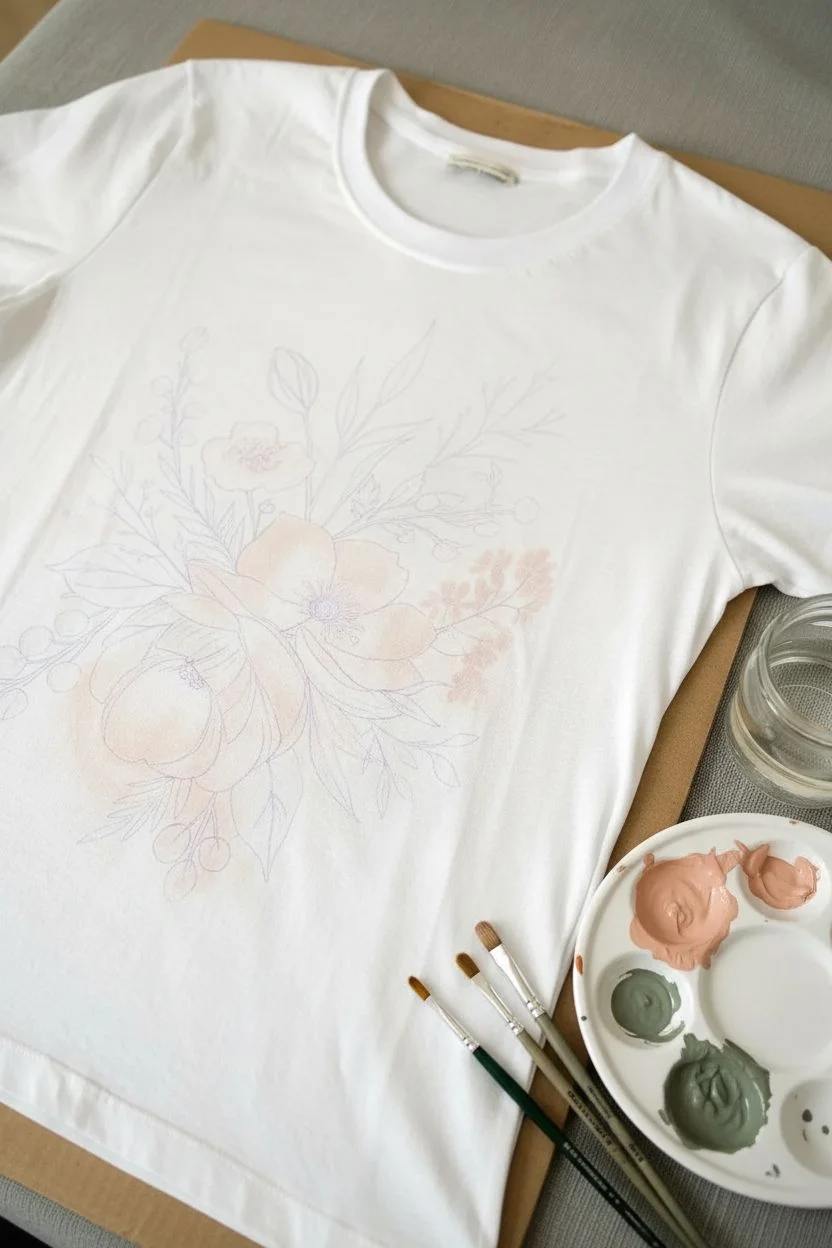
Transform a plain white tee into a wearable garden with this delicate floral centerpiece. By diluting fabric paints, you can achieve a soft, romantic watercolor effect that looks professionally printed.
Step-by-Step
Materials
- White 100% cotton T-shirt (pre-washed)
- Fabric medium
- Soft-body fabric paints (peach, mauve, deep red, sage green, forest green, warm brown, white)
- Water container for rinsing and diluting
- Paint palette or ceramic plate
- Round brushes (sizes 2, 4, and 6)
- Fine liner brush (size 0 or 00)
- Cardboard or plastic barrier (to put inside the shirt)
- Iron (for heat setting)
- Parchment paper or pressing cloth
Step 1: Preparation & Sketching
-
Prep the surface:
Begin by sliding a piece of cardboard or a plastic sheet inside your T-shirt. This is crucial to prevent paint from bleeding through to the back layer of the fabric. Smooth the fabric flat so there are no wrinkles in the center chest area. -
Plan the composition:
Lightly sketch the main floral shapes using a vanishing fabric marker or a very faint pencil. Draw two large circles for the main blooms slightly off-center and lower, and map out the general direction of the stems fanning upwards. -
Mix the base colors:
On your palette, mix your fabric paint with fabric medium and a touch of water. You want a consistency closer to heavy cream than paste. Mix a soft peach-pink for the main petals and a muted sage green for the larger leaves.
Bleeding Control
If paint spreads too fast, your brush is too wet. Blot it on a paper towel before touching fabric. For precise lines, use less water and more fabric medium in your mix.
Step 2: Painting the Main Blooms
-
Lay the petal foundation:
Using a size 6 round brush, paint the large petals of the two central flowers. Start with a very watery wash of the peach-pink to cover the petal shapes. Don’t worry about perfect edges; a little unevenness adds to the watercolor look. -
Add petal depth:
While the base layer is still slightly damp, dip your brush into a slightly darker mauve or concentrated pink. Touch this color to the center of the flowers and the base of the petals, letting it bleed outward naturally. -
Define the edges:
Once the first layer is mostly dry, use a size 4 brush with a mix of mauve and brown to paint thin, delicate lines defining the overlap of the petals. Keep these lines broken and organic, not solid outlines. -
Create the centers:
For the dramatic flower centers, use a dark brown or near-black mixture. Paint a small, rough circle in the middle, then use your fine liner brush to flick tiny lines outward like starbursts. -
Detail the stamens:
Dip the very tip of your liner brush or a toothpick into white or pale yellow paint. Dot tiny specks on the ends of the dark stamen lines you just painted to make the center pop.
Pro Tip: Soft Edges
To get that dreamy watercolor fade, dampen the fabric slightly with clear water using a clean brush just before applying your colored paint to that specific spot.
Step 3: Adding Foliage & Buds
-
Paint large leaves:
Switch to your sage green mixture. Using the size 6 brush, paint the broad, rounded leaves at the bottom and sides of the bouquet. Press the brush down to widen the stroke and lift up to create a point. -
Add accent leaves:
Mix a darker forest green. Paint slender, elongated leaves shooting upwards behind the main flowers. Vary the green shades by adding a little brown or yellow to your mix for realistic variety. -
Create the maroon buds:
Using a deep red or maroon paint, add the small, round bud shapes near the top left of the arrangement. Use a ‘wet-on-wet’ technique here, dropping a darker dot of color into the wet red paint for shadow. -
Draw stems and twigs:
With the liner brush and thinned brown paint, connect all your floating elements. Draw fine, spindly stems connecting the buds and leaves to the central cluster. Keep your hand loose to avoid stiff lines. -
Add berry accents:
Paint small clusters of reddish-brown berries on the lower left and right sides. Simple round dabs work best here. Connect them with very fine brown stems.
Step 4: Finishing Touches
-
Fill the gaps:
Look for empty white spaces that feel unbalanced. Add faint, wispy sprigs using a very diluted beige or pale grey paint. These ‘ghost’ leaves add volume to the bouquet without distracting from the main flowers. -
Final drying:
Let the shirt sit undisturbed for at least 24 hours. The paint needs to fully cure on the fabric fibers before heat setting. -
Heat set the design:
Once dry, place a piece of parchment paper over the painted area. Iron on a high cotton setting (no steam) for 3-5 minutes, moving the iron constantly to lock in the color.
Now you have a custom piece of wearable art that looks as gentle and lovely as a real bouquet


Minimal Line Art Portrait in Black and White
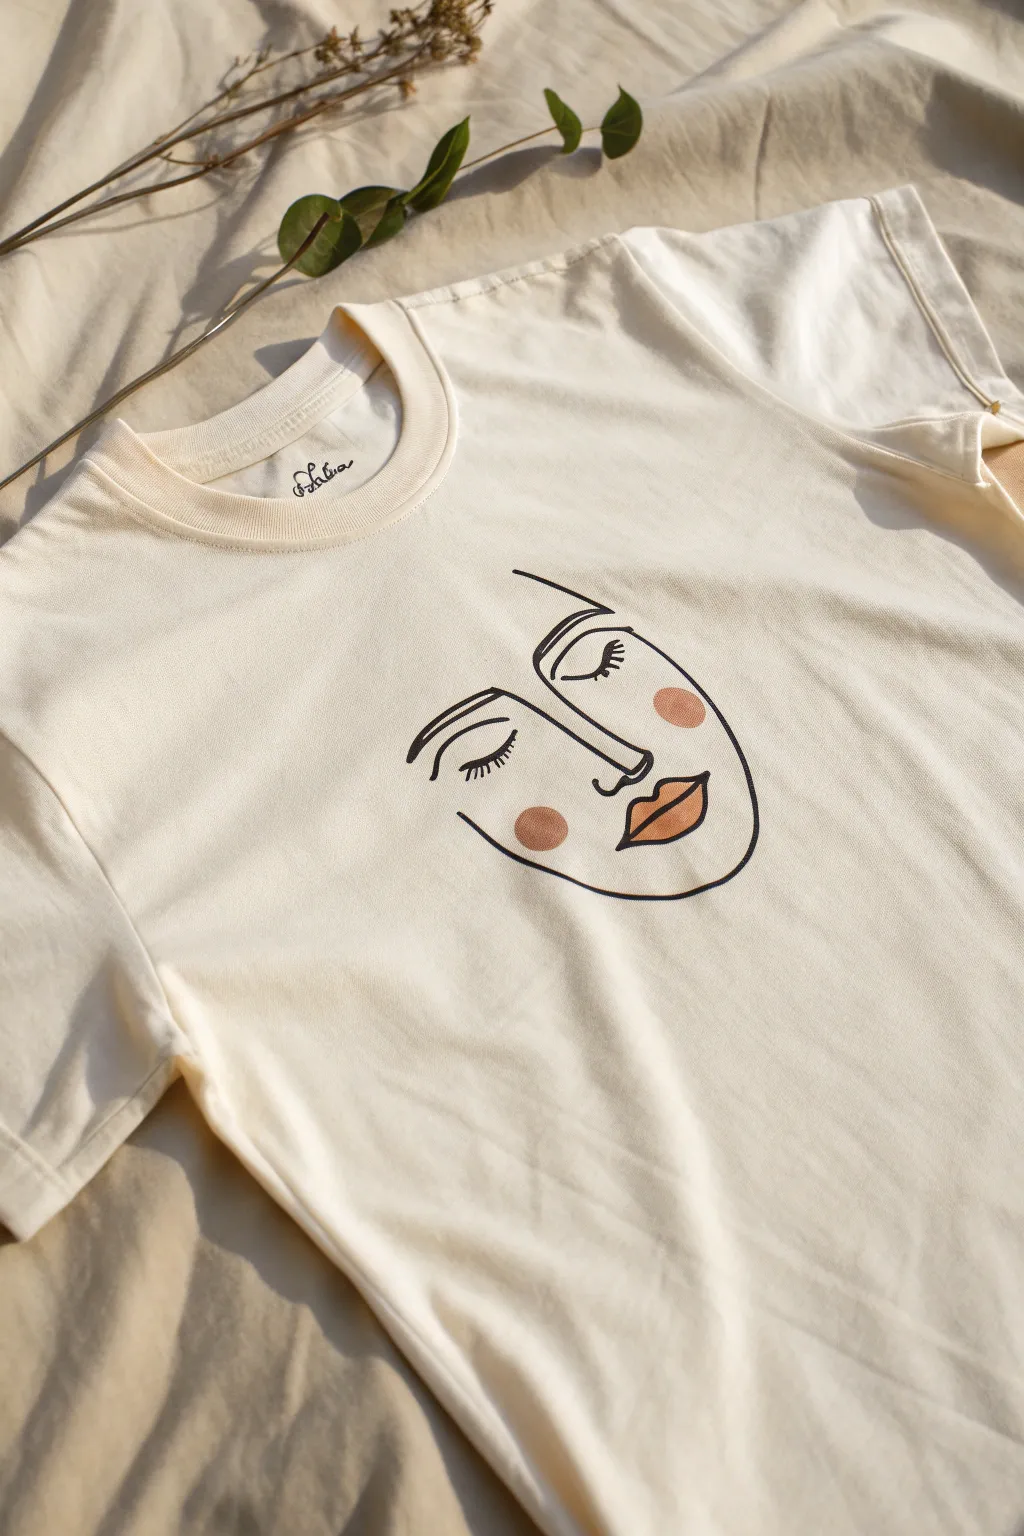
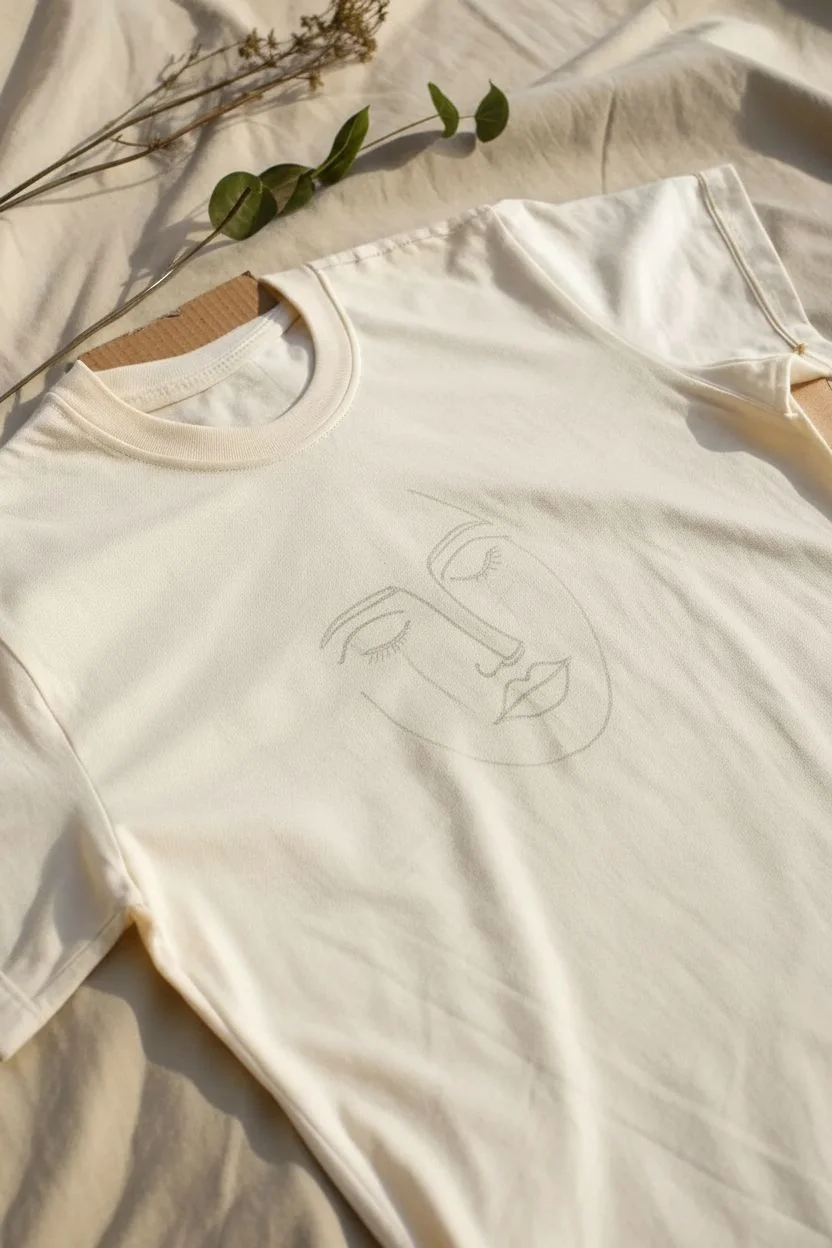
Transform a plain cream t-shirt into a trendy piece of wearable art with this minimalist face design. The combination of sleek black lines and warm terracotta accents creates an effortlessly stylish look that’s perfect for a relaxed, bohemian vibe.
Step-by-Step Tutorial
Materials
- Cream or off-white cotton t-shirt
- Cardboard or plastic insert (to prevent bleed-through)
- Black fabric paint or fabric marker
- Terracotta/burnt orange fabric paint
- Fine liner brush (size 0 or 1)
- Small round brush (size 4 or 6)
- Pencil or disappearing ink fabric pen
- Iron and ironing board (for setting paint)
- Paper plate or palette
- Reference image of face design
Step 1: Setting Up and Sketching
-
Prepare the workspace:
Begin by laying your cream t-shirt flat on a hard, stable surface. Smooth out any wrinkles with your hands to ensure a perfect canvas. -
Insert protective layer:
Slide a piece of cardboard or a plastic insert inside the shirt, positioning it directly under the chest area where you plan to paint. This is crucial to stop paint from soaking through to the back. -
Sketch the eyebrow:
Using your pencil or disappearing ink pen, lightly draw a curved line for the left eyebrow. Keep the arch soft and natural. -
Draw the eye:
Just below the brow, sketch a downward curve for the closed eye. Add three or four small ticks for the eyelashes to give it a sleepy, relaxed look. -
Outline the nose:
Draw a long, straight line starting near the inner corner of the right eye area, bringing it down to form the nose. Curve it slightly at the bottom for the nostril. -
Sketch the right eye:
Mirror the left eye on the right side of the nose line. Draw the matching eyebrow and closed eyelid with lashes, keeping the spacing balanced. -
Add the lips:
Centered beneath the nose, sketch the outline of the lips. Draw a defined cupid’s bow on top and a fuller curve for the bottom lip. -
Connect the face shape:
Starting from the right eyebrow, draw a continuous line down roughly parallel to the nose, curving it around the lips to suggest the jawline and chin. This abstract contour doesn’t need to close completely on the left side.
Step 2: Painting the Design
-
Prepare black paint:
Squeeze a small amount of black fabric paint onto your palette. If the paint is very thick, you might thin it slightly with water for smoother lines, but test consistency on a scrap fabric first. -
Paint the thin lines:
Load your fine liner brush with black paint. Carefully trace over your pencil sketches for the eyelashes and the detailed curves of the nose. -
Thicken the contours:
Go over the main face outline, eyebrows, and lip outline again, pressing slightly harder or using a second pass to make these lines bold and distinct. -
Dry the black lines:
Let the black outline dry completely before moving on. I usually give it about 20-30 minutes to ensure I don’t accidentally smudge the wet ink. -
Mix the cheek color:
Prepare your terracotta or burnt orange paint. If you only have bright orange and brown, mix them until you achieve that warm, earthy tone seen in the photo. -
Paint the cheeks:
Dip the small round brush into the terracotta paint. Dab a solid circle on the left cheek area and another on the right cheek area. These don’t have to be perfectly round; a slightly organic shape adds character. -
Fill the lips:
Using the same terracotta color, carefully fill in the bottom lip. Leave the top lip uncolored or just outlined for that distinct stylistic contrast.
Shaky Hands?
If you struggle with steady brush strokes, cheat a little! Use a broad-tip black fabric marker for the main lines instead of paint and a brush.
Step 3: Finishing Up
-
Final drying time:
Allow the entire shirt to dry undisturbed for at least 24 hours. This patience is key for durability. -
Heat set the design:
Once fully dry, turn the shirt inside out. Iron the design area on a cotton setting (no steam) for 3-5 minutes to permanently fix the paint into the fibers.
Pro Tip: Custom Colors
Mix a tiny drop of white into your terracotta paint for the cheeks to make the color more opaque and creamy on the fabric.
Now you have a custom, boutique-style tee ready to pair with your favorite jeans
BRUSH GUIDE
The Right Brush for Every Stroke
From clean lines to bold texture — master brush choice, stroke control, and essential techniques.
Explore the Full Guide
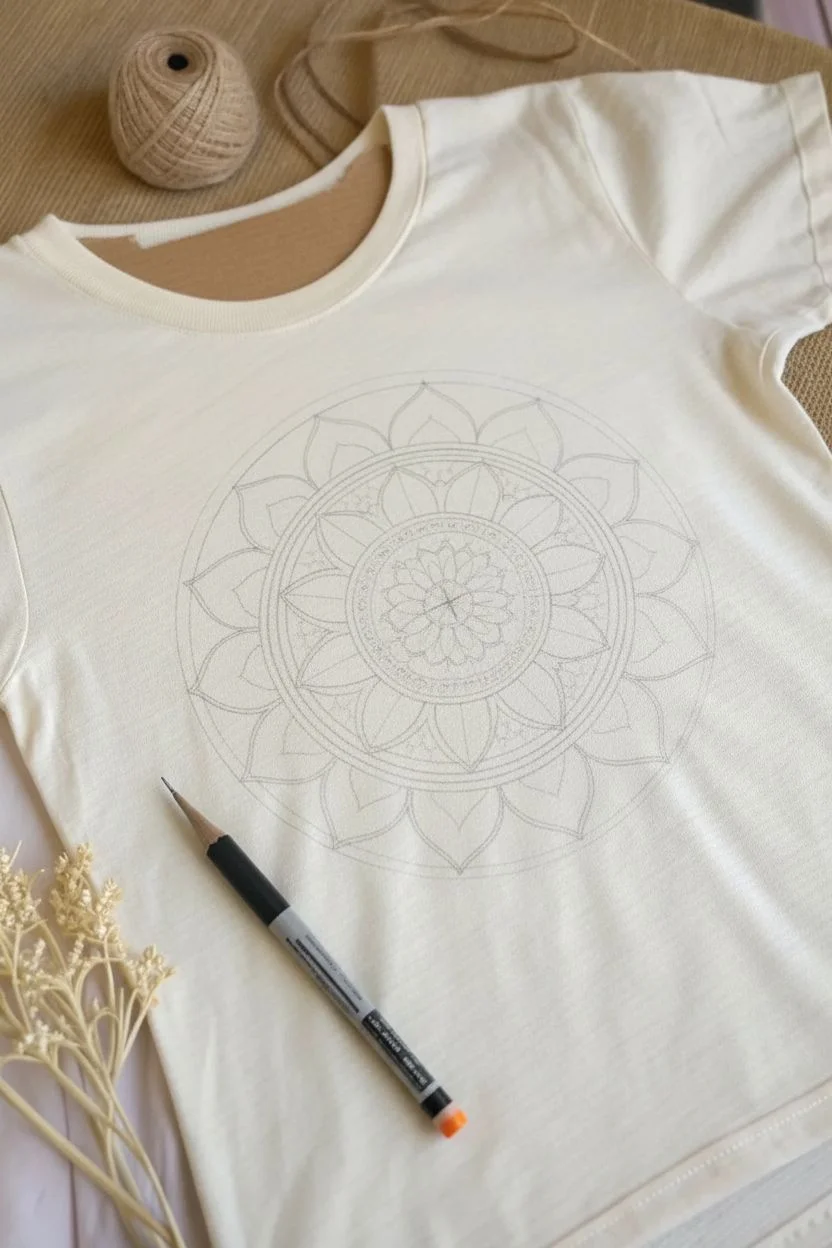
Mandala Medallion Design for a Meditative Vibe
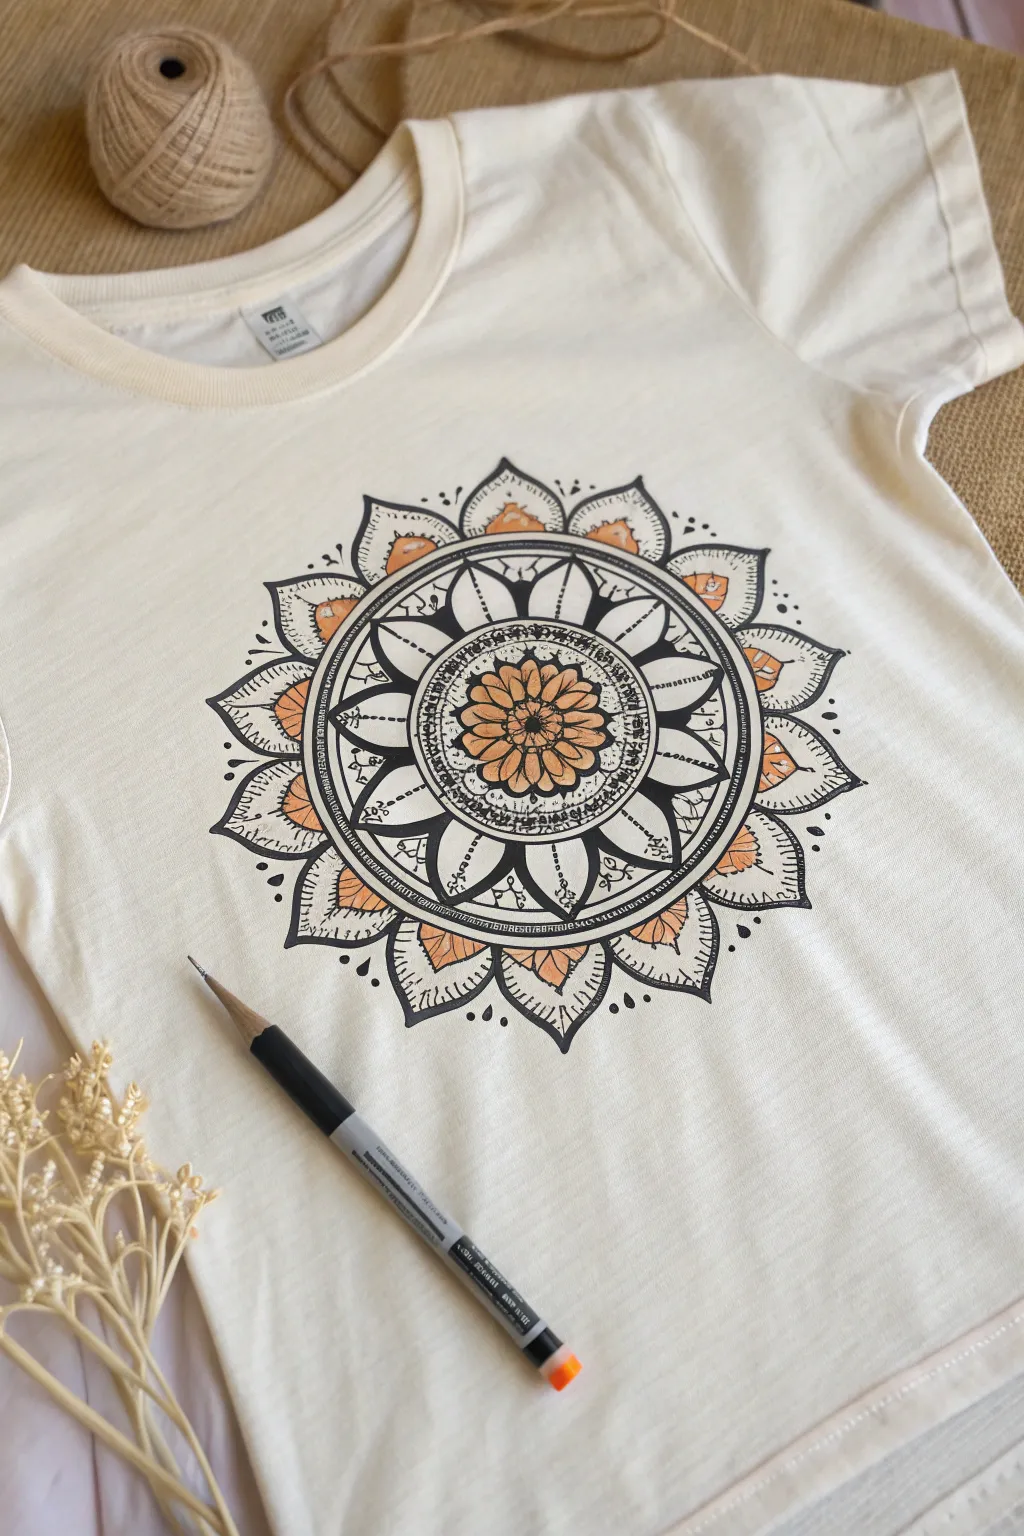
Transform a plain cream tee into a wearable piece of meditative art with this intricate mandala design. Featuring bold black outlines and subtle touches of earthy coral, this medallion pattern brings a centered, bohemian vibe to your wardrobe.
How-To Guide
Materials
- Cream or off-white cotton t-shirt
- Black fabric marker (fine tip)
- Black fabric marker (medium tip)
- Light coral or peach fabric paint or marker
- Protractor and compass set
- Pencil and eraser
- Cardboard insert or large piece of paper
- Iron (for heat setting)
Step 1: Preparation & Foundation
-
Prepare the surface:
Wash and dry your t-shirt without fabric softener to remove any sizing. Slide a piece of cardboard inside the shirt to prevent ink from bleeding through to the back. -
Find the center:
Lay the shirt flat and smooth out any wrinkles. Determine exactly where you want the medallion to sit on the chest and mark the center point lightly with a pencil. -
Draw guide circles:
Using your compass, draw a series of concentric circles radiating from your center point. Create about 4-5 rings of varying widths to serve as the skeleton for your different mandala petal layers.
Bleeding Lines?
If the fabric marker ink spreads into the cotton fibers (feathering), your pen tip might be too heavy. Switch to a finer tip or move the pen faster across the fabric.
Step 2: Designing the Core
-
Sketch the center flower:
Penciling lightly, draw a small, multi-petaled flower right in the center bullseye. Aim for about 12-16 small petals that look like a daisy. -
Add the first petal ring:
In the next ring outward, sketch a row of larger, pointed petals that frame the center flower. -
Create the decorative bands:
Move to the next concentric circle. Instead of petals, fill this thin band with tiny circles or dots to create a textured separation between layers. -
Draft the major petals:
In the largest ring, draw broad, leaf-shaped petals. Inside each of these large petals, draw a smaller matching shape to create a double-line effect. -
Detail the outer edge:
Finish the pencil sketch by adding small flourish details, like tiny triangles or dots, floating just off the tips of the outermost petals.
Step 3: Inking & Coloring
-
Outline the center:
Take your fine-tip black fabric marker and carefully trace over your pencil lines for the central flower. -
Fill the center petals:
Use the coral fabric marker (or paint with a fine brush) to color in the petals of the central daisy flower completely. -
Ink the structural rings:
Trace the main concentric circles with the medium-tip black marker to give the mandala a bold, defined structure. -
Detail the middle band:
Where you sketched the tiny circles or texture in the middle ring, ink this area with the fine tip. I find that stippling (lots of tiny dots) looks particularly good here for shading. -
Outline the outer petals:
Trace the large outer leaf shapes. Use the fine tip to add delicate hatching lines along one side of each petal to suggest shadow and depth. -
Add accents of color:
Using the coral color again, fill in just the small inner shapes of the outer petal ring. This creates a balanced rhythm of color without overwhelming the design. -
Final black details:
Add the final black flourishes, dots, and teardrop shapes around the perimeter of the mandala. -
Erase guidelines:
Allow the ink to dry completely—wait at least an hour to be safe. Once dry, gently erase any visible pencil guidelines. -
Heat set the design:
Follow the instructions on your fabric markers, which usually involves ironing the design (often with a cloth over it) to make the ink permanent and washable.
Go Metallic
Swap the coral accent color for a metallic gold or copper fabric paint. The shimmer adds a luxe, bohemian element that catches the light beautifully.
Enjoy wearing your custom-designed shirt that brings a sense of calm wherever you go
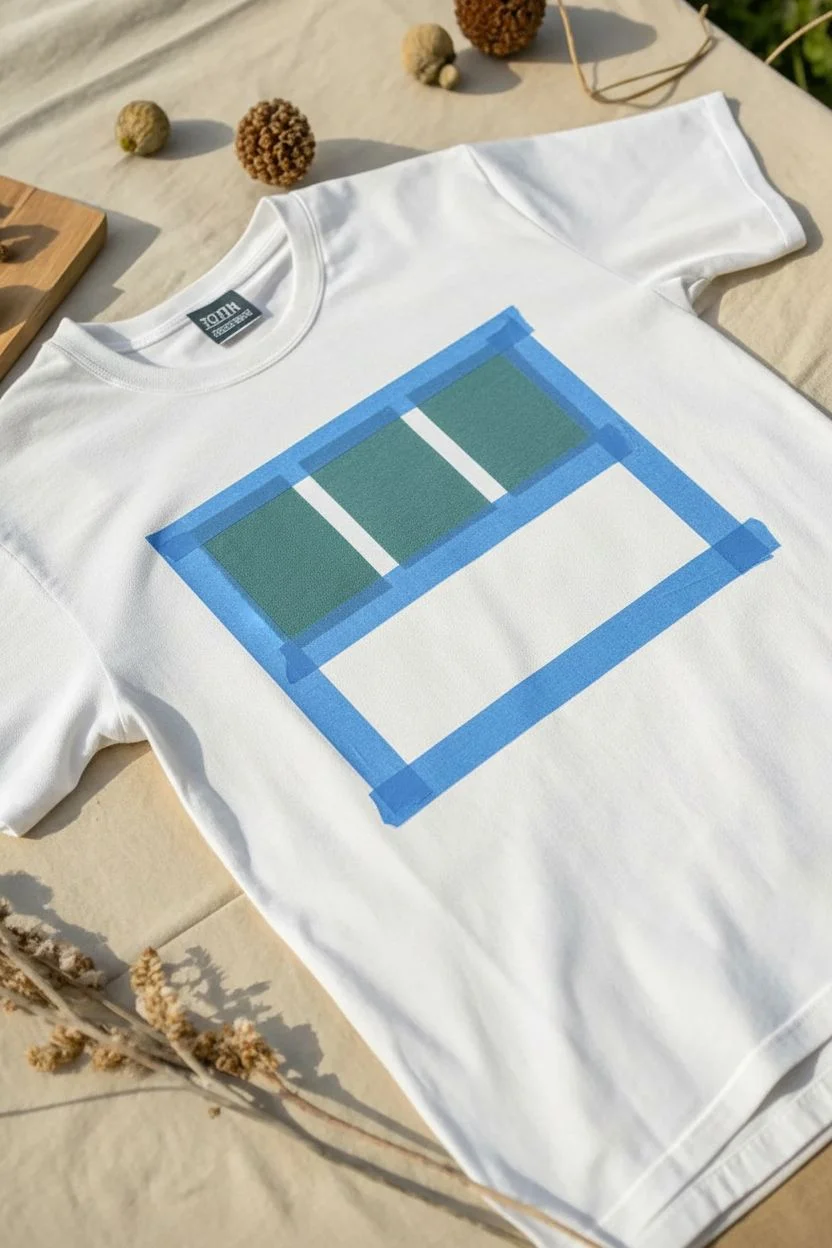
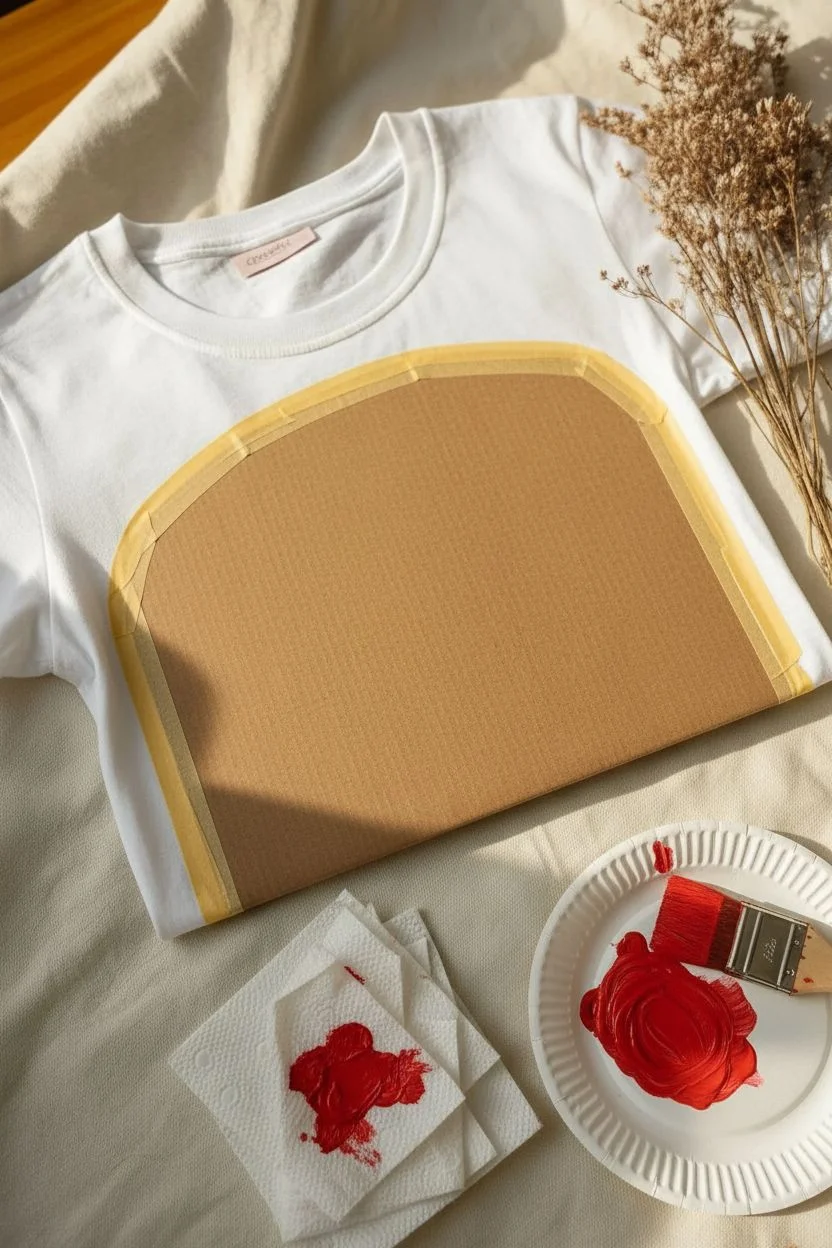
Crisp Geometric Pattern Using Tape Resist
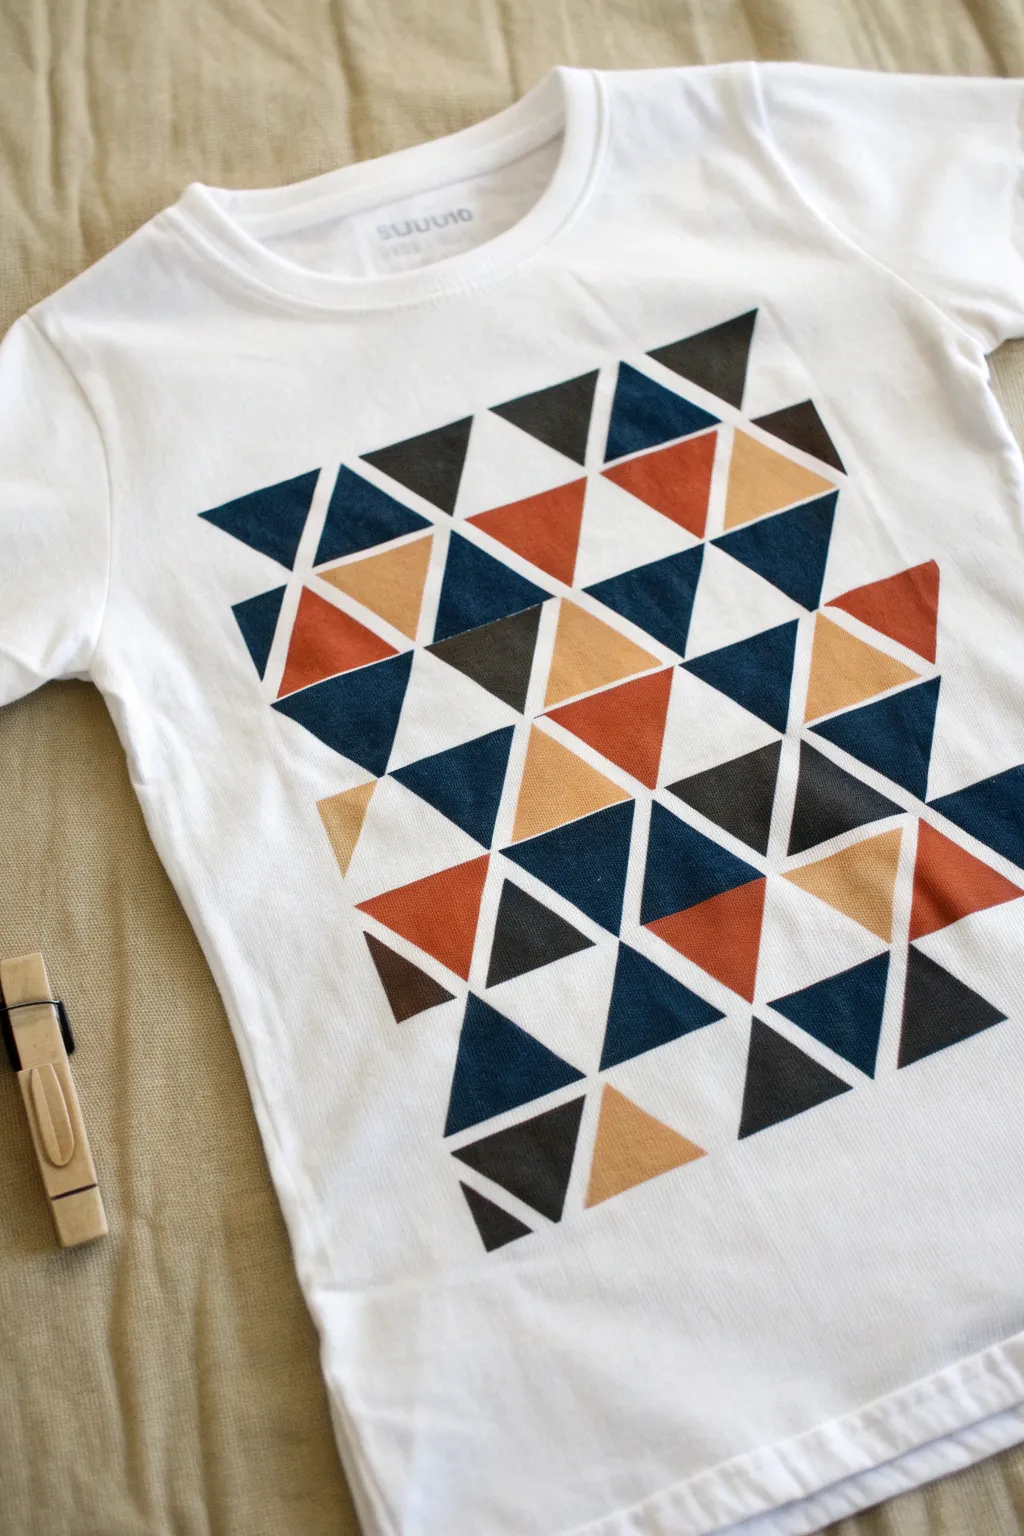

Transform a plain white t-shirt into a modern piece of wearable art with this crisp geometric design. Using a simple tape resist technique, you create a striking pattern of interlocking triangles in a sophisticated palette of navy, rust, and slate.
Step-by-Step Tutorial
Materials
- White cotton t-shirt (pre-washed)
- Fabric paints (Navy Blue, Burnt Orange/Rust, Light Tan, Dark Charcoal)
- Painter’s tape or masking tape (1/4 inch width is best)
- Cardboard insert or shirt board
- Small foam pouncers or flat brushes
- Iron and pressing cloth (for setting)
- Scissors
Step 1: Preparation and Mapping
-
Prep the Surface:
Before you begin, ensure your t-shirt has been washed and fully dried without fabric softener. This removes sizing chemicals and ensures the paint adheres properly. -
Insert the Barrier:
Slide a piece of thick cardboard inside the shirt. This is crucial to keep the paint from bleeding through to the back layer of fabric and provides a firm surface for taping. -
Establish the Grid:
Visualize a rectangular area on the front of the shirt where the pattern will live. You don’t need to mark the outer border yet, but keep the area centered in your mind. -
Create Diagonal Lines:
Start applying strips of tape diagonally across your designated area. Create a crisscross pattern to form diamonds or X shapes first. Press the tape down firmly, especially the edges. -
Subdivide into Triangles:
Add additional tape lines intersecting your initial diamonds to split them into smaller triangles of varying sizes. Don’t worry about perfect symmetry here; a random arrangement often looks more organic and interesting. -
Seal the Edges:
Once your tape grid is laid out, run your fingernail or a credit card firmly over all the tape edges. This step is the secret to getting those super crisp lines without seepage.
Clean Lines Secret
Before painting colors, dab a tiny bit of clear fabric medium (or white paint) along the tape edges. This seals the tape so any bleed is invisible.
Step 2: Painting the Triangles
-
Plan Your Palette:
Pour small amounts of your navy, rust, tan, and charcoal fabric paints onto a palette or paper plate. -
Start with Charcoal:
Select random triangles scattered across the grid to fill with the dark charcoal color. Use a foam pouncer or flat brush, dabbing gently rather than scrubbing to avoid pushing paint under the tape. -
Add the Navy:
Next, fill in another set of non-adjacent triangles with the navy blue. Try to balance the distribution so no single area is too dark. -
Apply the Rust:
Bring warmth to the design by painting remaining sections with the burnt orange or rust color. -
Finish with Tan:
Fill in the final empty triangles with the light tan shade. This lighter color helps break up the darker tones and adds visual dimension. -
Second Coat Check:
Scan your work. If the white fabric is showing through too much, apply a light second coat to any patchy areas while the first layer is still tacky.
Step 3: Reveal and Set
-
Wait, Then Peel:
Let the paint dry until it’s just barely dry to the touch, but not fully cured. Carefully peel off the tape strips at a 45-degree angle. This reveals the crisp white lines between your colorful shapes. -
Full Dry:
Allow the shirt to dry completely flat for at least 24 hours. Don’t move it too much while the paint is settling. -
Heat Set the Design:
Once fully dry, turn the shirt inside out or place a pressing cloth over the painted side. Iron on a high cotton setting (no steam) for several minutes to permanently set the pigment into the fibers.
Metallic Upgrade
Swap out the light tan paint for a metallic gold or copper fabric paint. The shimmer adds a trendy, high-end finish to the matte geometric look.
Wear your new custom-designed tee with pride, knowing those sharp lines are the result of your careful taping

PENCIL GUIDE
Understanding Pencil Grades from H to B
From first sketch to finished drawing — learn pencil grades, line control, and shading techniques.
Explore the Full Guide
Bold Color-Block Panels With Sponge Painting
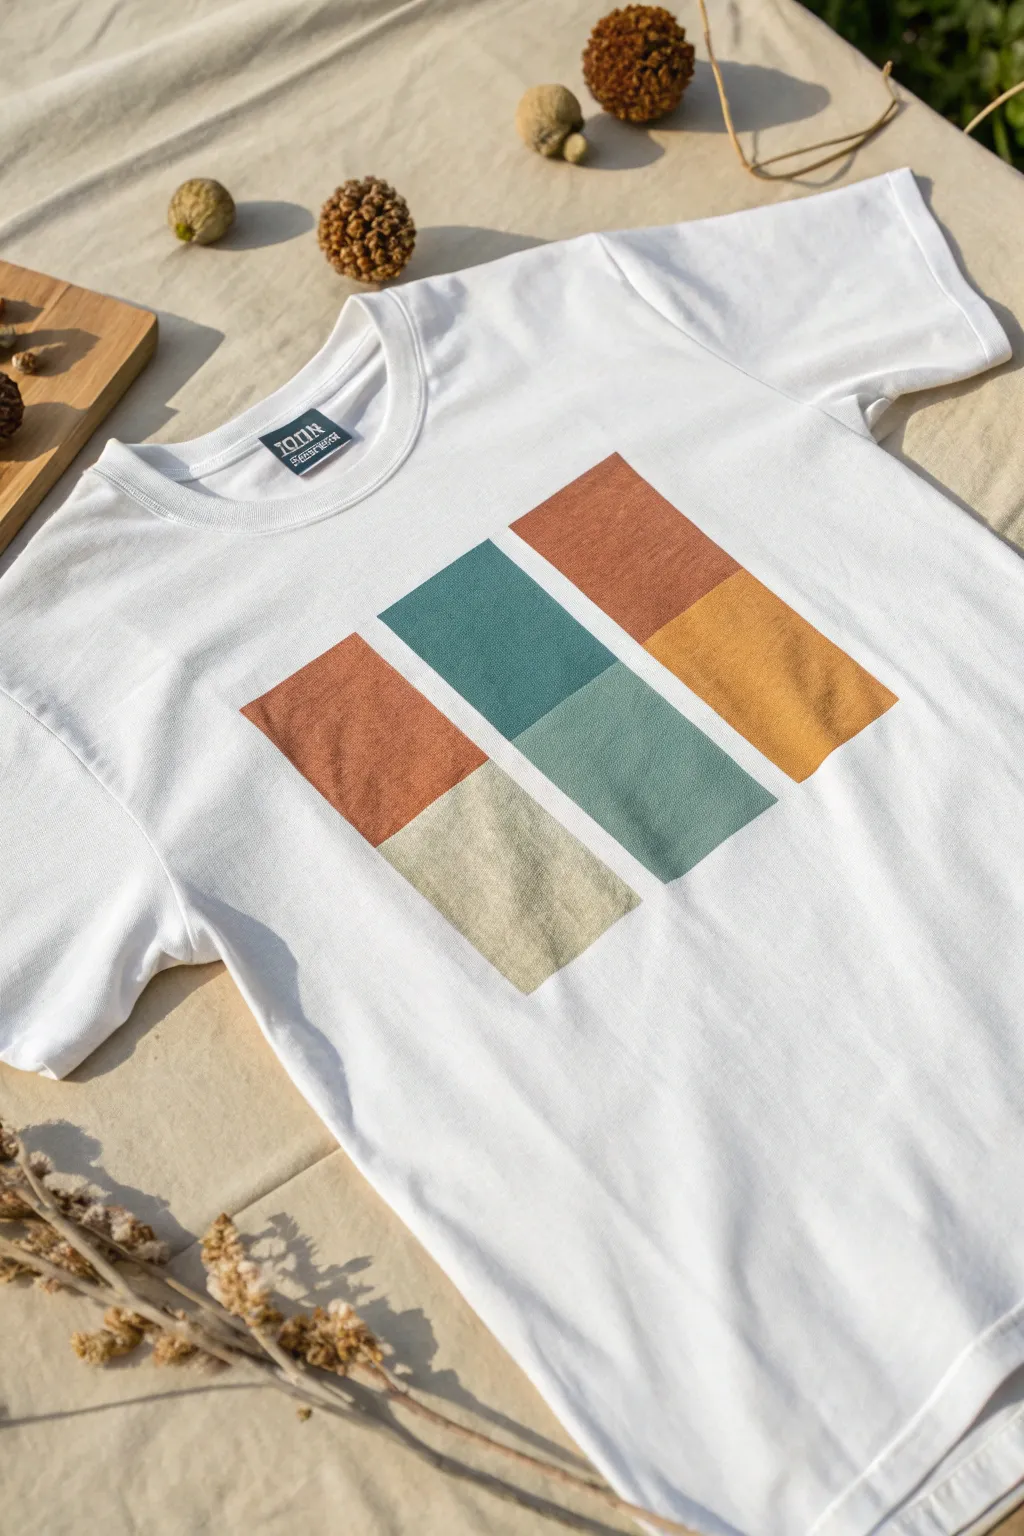
Embrace a minimalist, mid-century modern aesthetic with this simple color-blocking project. Using basic masking techniques and a sponge application, you’ll create soft, textured rectangular panels in a soothing palette of rust, teal, and sage tones.
Step-by-Step Guide
Materials
- White cotton t-shirt (pre-washed)
- Fabric paint (burnt orange, mustard yellow, teal blue, sage green, beige, seafoam)
- Painter’s tape or masking tape (1-inch width)
- Kitchen sponges or foam pouncers
- Cardboard insert or shirt board
- Paper plate or palette
- Ruler
- Iron (for setting)
Step 1: Preparation and Masking
-
Prep the shirt:
Begin by inserting a piece of cardboard inside the t-shirt to prevent paint from bleeding through to the back layer. Smooth out any wrinkles on the front surface. -
Plan the layout:
Decide on the placement of your design. The image shows three vertical columns centered on the chest. Using a ruler, lightly mark the center point to help you align your first column. -
Tape the first column:
Place two vertical strips of painter’s tape to define the width of your first column. A standard width of about 2-3 inches works well. -
Create the spacing:
Place a spacer strip of tape next to your first column to create the gap, then tape off the second and third columns. Remove the spacer tape so you have three open vertical channels separated by empty space. -
Define the top and bottom:
Apply horizontal tape strips across the top and bottom of your columns to create clean, sharp edges for the entire design block. -
Split the blocks:
Now, place a horizontal strip of tape across the middle of the columns. This will divide each vertical bar into an upper and lower segment, allowing for the two-tone effect seen in the photo.
Step 2: Painting the Panels
-
Mix your palette:
Squeeze your fabric paints onto a paper plate. Aim for an earthy palette: rust orange, deep teal, and golden yellow for the tops; light beige, sage green, and light blue for the bottoms. -
Prepare the sponge:
Cut a kitchen sponge into small cubes, one for each color, or use foam pouncers. Lightly dab the sponge into the paint, then blot excess onto the plate to ensure a thin, even coat. -
Paint the first block:
Start with the top-left rectangle. Gently steep/dab the rust orange paint inside the masked area. Avoid brushing, as dabbing creates that soft, printed texture. -
Complete the top row:
Moving to the right, paint the top middle rectangle with deep teal and the top right rectangle with golden yellow or darker rust, depending on your preference. -
Paint the bottom row:
Fill in the lower rectangles. Use beige for the bottom left, a seafoam/sage green for the middle, and a muted yellow or light rust for the bottom right. -
Check for coverage:
Look closely at your application. You want solid coverage, but a slightly imperfect, speckled texture is desirable for this style. I usually do a second light pass just to brighten the colors.
Bleeding Lines?
If paint bleeds under the tape, it’s likely too wet. Next time, press the tape edges down firmly with a fingernail or credit card before painting to seal them tight.
Step 3: Finishing Touches
-
Let it tack up:
Allow the paint to dry for about 10-15 minutes. It doesn’t need to be fully cured, but it shouldn’t be wet to the touch. -
Peel the tape:
Carefully peel away the painter’s tape. Pull slowly at a 45-degree angle away from the paint to ensure crisp, clean lines. -
Dry completely:
Let the shirt sit flat for at least 24 hours to ensure the fabric paint is completely dry all the way through. -
Heat set the design:
To make the shirt washable, heat set the paint. Place a thin cloth over the design and iron it on a medium heat setting (no steam) for about 3-5 minutes.
Level Up: Texture
For a vintage, distressed look, lightly sand the dried paint with fine-grit sandpaper before heat setting. This softens the stiff paint feel and adds retro character.
You now have a custom, geometric graphic tee ready to wear or gift.
Playful Polka Dot All-Over Print
Transform a plain white tee into a playful statement piece with this easy all-over polka dot print. Using a warm, earthy palette of rust, ochre, forest green, and slate grey creates a sophisticated yet fun garment that feels both handmade and polished.
Detailed Instructions
Materials
- White cotton t-shirt (pre-washed)
- Fabric paints (Rust/burnt orange, golden ochre, dark forest green, slate blue/grey)
- Round foam pouncers or daubers (approx. 1/2 inch to 3/4 inch diameter)
- Palette or paper plate
- Cardboard insert or thick paper
- Iron (for heat setting)
- Press cloth or parchment paper
Step 1: Preparation and Setup
-
Wash and dry:
Begin by washing and drying your t-shirt without fabric softener. This removes sizing chemicals and ensures the paint adheres properly to the fibers. -
Insert protection:
Slide a piece of cardboard or thick paper inside the shirt. This is crucial as it prevents the paint from bleeding through the front layer onto the back of the shirt. -
Smooth the surface:
Flatten the shirt out on your work surface, smoothing out any wrinkles with your hands so you have a nice, even canvas. -
Prepare the palette:
Squeeze a coin-sized amount of each fabric paint color—rust, ochre, forest green, and slate grey—onto your palette. Keep them spaced apart so they don’t accidentally mix.
Stamp Master Tip
Use different sized pouncers (e.g., the end of a pencil eraser vs. a large dowel) to create size variation for a more dynamic, bubbly effect.
Step 2: Painting the Dots
-
Load the tool:
Take your round foam pouncer and dip it into your first color, let’s start with the rust. Dab off excess paint on a clean part of the palette to ensure an even coat without globs. -
First color application:
Press the pouncer firmly onto the shirt to create your first dot. Twist slightly as you lift to get a crisp edge. Scatter these rust dots randomly across the shirt, leaving plenty of white space for the other colors. -
Spacing strategy:
Try not to create linear patterns; aim for a random ‘confetti’ look. I like to keep about 2-3 inches of space between dots of the same color. -
Second color: Ochre:
Clean your pouncer or switch to a fresh one. Load it with the golden ochre paint and fill in some of the empty spaces, placing these new dots between the rust ones. -
Third color: Forest Green:
Repeat the process with the forest green paint. As the shirt fills up, step back occasionally to see where the bare spots are. -
Fourth color: Slate Grey:
Finally, add the slate grey dots. Use these to fill the remaining gaps and balance the composition. Look for any areas that feel too heavy with one color and break them up. -
Check the edges:
Don’t forget to stamp some dots partially off the edge of seams, sleeves, and the collar line. This makes the fabric look like it was printed before it was sewn, rather than just painted in the center. -
Touch-ups:
Inspect your dots. If any look patchy or too light, carefully realign your pouncer and stamp again to build opacity.
Level Up: Texture
Mix a fabric medium or puff additive into one of your paint colors to give those specific dots a raised, velvety 3D texture.
Step 3: Finishing
-
Let it dry:
Allow the shirt to dry completely flat. Most fabric paints require at least 24 hours to cure fully. -
Heat set the design:
Once dry, place a press cloth or parchment paper over the painted areas. Iron on a high cotton setting (no steam) for several minutes to permanently set the pigment into the fabric. -
Wait to wash:
Wait at least 72 hours before washing the shirt again to ensure the design lasts through the laundry cycle.
Wear your new custom creation with pride knowing you have a truly one-of-a-kind piece


Hand-Painted Rainbow Stripes Across the Chest

Transform a plain white tee into a splash of optimism with this textural, painterly rainbow design. The charm of this project lies in its imperfection, using dry-brush strokes to create a vintage, worn-in look right from the start.
Step-by-Step
Materials
- White cotton t-shirt (pre-washed)
- Fabric medium
- Acrylic paints (Red, Orange, Yellow, Green, Blue)
- Flat bristle brushes (approx. 1/2 inch wide)
- Cardboard insert or shirt board
- Masking tape or painter’s tape
- Paper plate or palette
- Paper towels
- Iron (for heat setting)
Step 1: Preparation
-
Prep the shirt:
Begin by sliding a piece of cardboard inside your t-shirt. This is crucial as it prevents the paint from bleeding through to the back of the shirt and provides a firm surface for painting. -
Smooth the surface:
Smooth out the fabric with your hands to remove any wrinkles. You want the chest area to be completely flat so your arc doesn’t distort. -
Map out the curve:
Using thin masking tape, create a gentle guide line for your top red stripe. You don’t need to mask every single stripe, but having one main reference curve helps keep the overall rainbow shape consistent. -
Prepare your paints:
Mix your acrylic paints with fabric medium according to the bottle’s instructions (usually a 1:1 or 2:1 ratio). This ensures the paint stays flexible and doesn’t crack after washing.
Uneven Edges?
Don’t panic if lines are wobbly! The beauty of this design is the hand-painted feel. If a gap is too wide, dry-brush a tiny bit more color to bridge it gently.
Step 2: Painting the Rainbow
-
Load the red paint:
Dip your flat brush into the red paint mixture, but don’t overload it. We want a textured look. -
Blot the brush:
Dab the brush firmly onto a paper towel to remove excess wetness. I find this ‘dry brush’ technique is the secret to getting those rough, vintage-style edges seen in the photo. -
Paint the red stripe:
Follow your tape guide and paint the first red arc. Apply somewhat firm pressure, allowing the bristles to create scratchy, uneven edges rather than a solid, perfect block of color. -
Remove the guide:
Peel away your masking tape guide carefully while the paint is still wet to avoid pulling up dry flakes later. -
Switch to orange:
Clean your brush thoroughly and dry it, or grab a fresh brush. Load it with the orange mixture and blot it on a paper towel just like before. -
Paint the orange stripe:
Freehand the orange stripe directly below the red one. Leave a very tiny gap of white space between the colors to keep them distinct and prevent muddy blending. -
Add the yellow stripe:
Continue with the yellow paint. Try to mimic the curve of the previous lines, keeping your stroke quick and confident to maintain that painterly texture. -
Apply the green stripe:
Move on to the green layer. As you work your way down the rainbow, ensure you aren’t unconsciously straightening the line; keep that gentle arc flowing across the torso. -
Finish with blue:
Complete the rainbow with the final blue stripe. Let the ends of the stroke fade out naturally rather than trying to make a hard stop.
Step 3: Finishing Touches
-
Let it dry completely:
Allow the shirt to dry flat for at least 24 hours. The paint needs to fully cure before the next step. -
Heat set the design:
Turn the t-shirt inside out. Using an iron on a medium setting (no steam), press the design area for 3-5 minutes to lock the paint into the fibers. -
Final check:
Once cool, your shirt is ready to wear. The heat setting ensures it can survive the washing machine on a gentle cycle.
Add Sparkle
Mix a tiny amount of textile glitter medium into just one color stripe (like the yellow) for a subtle shimmer that catches the sunlight without being overwhelming.
Now you have a cheerful, customized piece ready for sunny days
Night-Sky Galaxy Blend With Speckled Stars

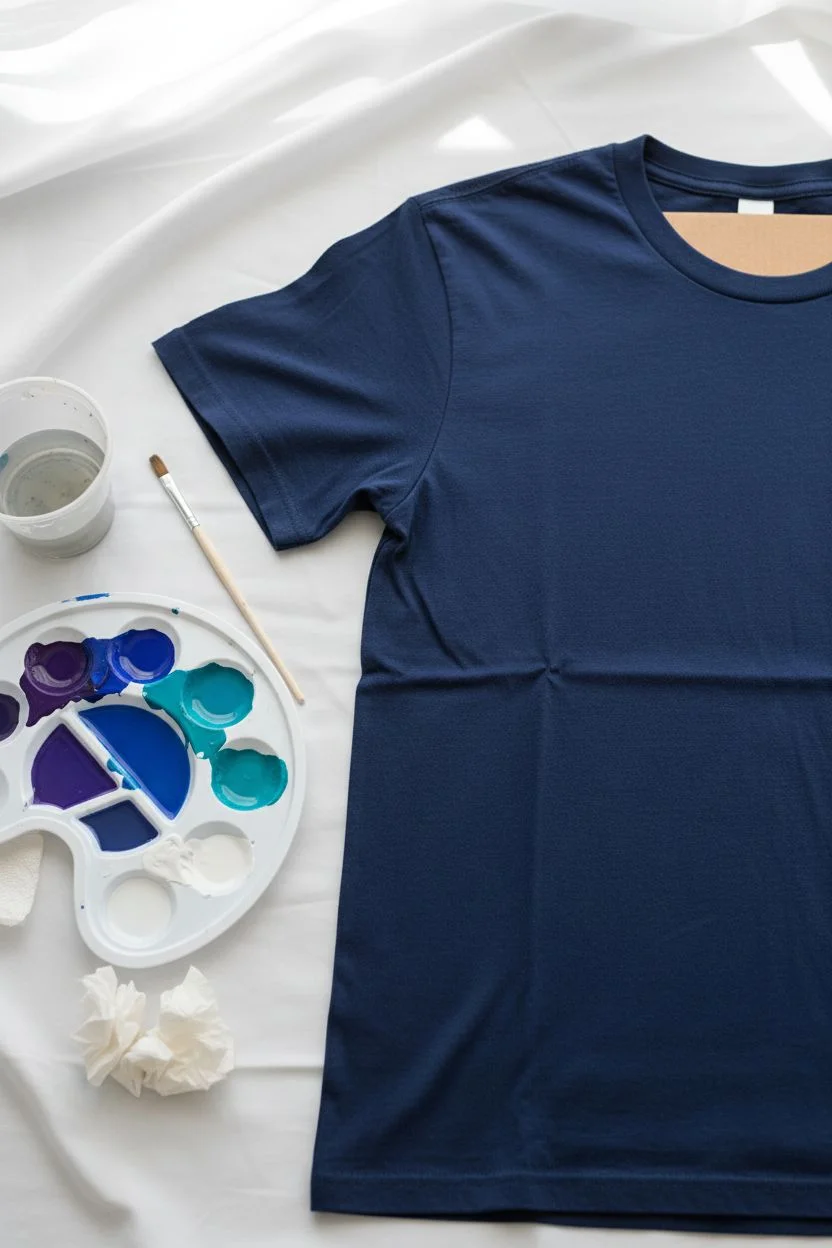
Transform a plain t-shirt into a breathtaking stellar landscape using this galaxy painting technique. By blending deep purples into lighter blues and finishing with a speckle of stars, you’ll create a celestial masterpiece that is truly out of this world.
Step-by-Step Tutorial
Materials
- Dark blue or black cotton t-shirt
- Fabric paints (Deep Purple, Indigo, Royal Blue, Teal, White)
- Small flat paintbrush
- Stiff-bristled toothbrush or fan brush
- Cardboard or plastic insert (to prevent bleed-through)
- Palette or paper plate
- Cup of water
- Paper towels
Step 1: Preparation and Base Layer
-
Pre-wash the shirt:
Before you begin, wash and dry your t-shirt without using fabric softener. This removes sizing chemicals and helps the paint adhere better to the fibers. -
Insert protection:
Slide a piece of cardboard or a plastic sheet inside the shirt. Smooth out the fabric so it’s flat and wrinkle-free; this is crucial to prevent the paint from soaking through to the back. -
Set up your palette:
Squeeze out your main galaxy colors onto the palette: deep purple, indigo, royal blue, and teal. Keep the white paint separate for later to avoid muddying the colors. -
Mix a watery consistency:
Slightly dilute your fabric paints with a tiny bit of water. You want a creamy consistency that spreads easily into the fabric but isn’t so thin that it runs.
Step 2: Creating the Galaxy Gradient
-
Start with the darkest tones:
Begin painting at the top of the shirt area (chest/shoulder level). Using your flat brush, apply the deep purple and indigo paint in roughly horizontal, cloud-like patches. -
Feather the edges:
As you paint, don’t make hard lines. Use a slightly dry brush to feather the edges of the purple section downwards, preparing it for the next color. -
Introduce the mid-tones:
Below the purple section, start applying the royal blue. Overlap it slightly with the purple area while the paint is still wet to create a seamless blend. -
Blend downward:
Continue painting downwards, transitioning from royal blue into teal or a lighter blue near the bottom of your design area. I find using a scumbling motion (scrubbing the brush in circles) helps mix the colors right on the fabric. -
Add lighter highlights:
While the blue section is wet, mix a tiny dot of white into your teal. Dab this lighter color randomly into the blue area to create ‘nebula’ gas cloudy effects. -
Darken the top corners:
Go back to the very top corners or edges with pure indigo or purple to add depth and contrast, making the center feel like it’s glowing. -
Let the base dry:
Allow your gradient background to dry completely. This is important so your white stars stay crisp and don’t bleed into the blue background.
Uneven Splatter?
If your stars are coming out as big blobs, your paint is likely too watery or your brush is overloaded. Dab the brush on a paper towel before flicking to control the droplet size.
Step 3: Adding the Stars
-
Prepare the star paint:
Mix a small amount of white fabric paint with water until it has the consistency of thin ink or heavy cream. Test the splatter on a piece of paper first. -
Flicking technique:
Dip a stiff toothbrush or a fan brush into the thinned white paint. Hold the brush over the shirt and run your thumb across the bristles to flick tiny specks of paint onto the fabric. -
Vary the density:
Concentrate your flicking motion more heavily over the darker purple areas to stimulate the Milky Way, letting the stars become sparser as they move down into the blue areas. -
Add larger stars manually:
Dip the handle end of a paintbrush into undiluted white paint. Gently dot it onto the shirt to create specific, prominent stars that stand out among the fine mist. -
Create distinct constellations:
If you wish, use a fine detail brush to connect a few of the larger stars with very thin lines, or paint small cross-shapes to make twinkling stars. -
Check for balance:
Step back and look at the overall distribution. Add a few more tiny flicks if certain areas look too empty compared to the rest of the galaxy.
Pro Tip: Depth trick
Add depth by doing two layers of stars. Splatter once with slightly watered-down gray paint, let dry, then splatter with bright white. The gray stars will look further away.
Step 4: Finishing Up
-
Dry thoroughly:
Let the painted shirt sit flat and dry for at least 24 hours. Don’t rush this, or the paint might crack. -
Heat set the paint:
Once fully dry, turn the shirt inside out. Iron the backside of the painted area on a medium heat setting (no steam) for about 3-5 minutes to permanently set the pigment into the fibers.
Enjoy wearing your new celestial creation and showing off your wearable art to the universe
Sunset Mountain Landscape With a Soft Gradient Sky

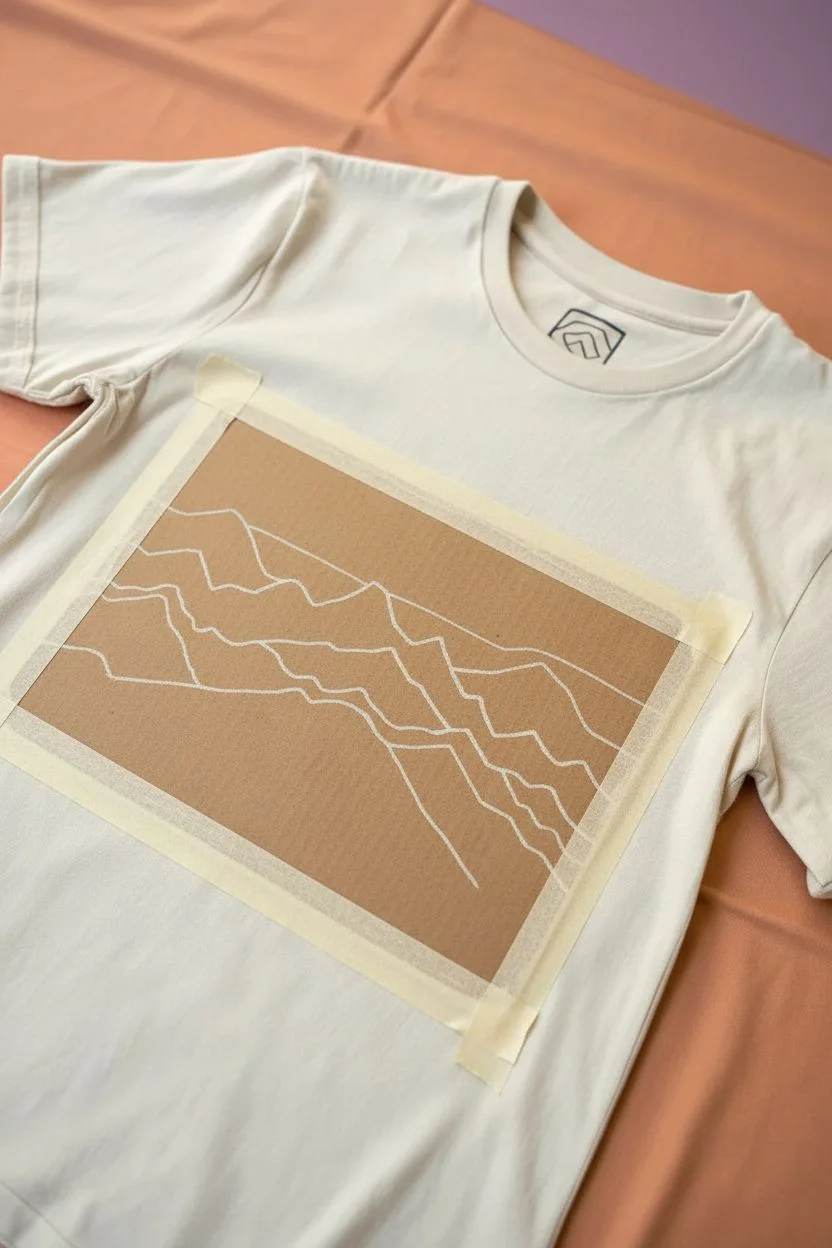
Transform a plain light-colored shirt into a wearable landscape with this layered mountain design. The graphic features crisp silhouettes ranging from a deep forest foreground to a soft, warm pastel sky.
Step-by-Step Tutorial
Materials
- Light beige or cream cotton t-shirt
- Fabric paints (navy blue, slate grey, dusty rose, terracotta orange, light peach)
- Fabric painting medium (if using acrylics)
- Painter’s tape or masking tape (various widths)
- Cardboard or shirt insert
- Flat shader brushes (medium and large)
- Fine liner brush
- Palette or paper plate
- Iron (for heat setting)
- Chalk or disappearing fabric pen
Step 1: Preparation and Mapping
-
Pre-wash the fabric:
Before you begin, wash and dry your shirt without using fabric softener. This removes any chemical sizing that might prevent the paint from adhering properly. -
Insert protective layer:
Slide a piece of thick cardboard or a shirt form inside the t-shirt to create a flat painting surface and prevent paint from bleeding through to the back layer. -
Define the boundaries:
Use painter’s tape to create a perfect rectangle on the chest of the shirt. This will frame your entire artwork. Press the edges of the tape down firmly to ensure crisp, clean lines. -
Sketch the layers:
Lightly draw the mountain ridges with chalk or a disappearing fabric pen. Start about three-quarters down the rectangle for the first ridge, making jagged, organic lines. create about four distinct layers rising upwards.
Crisp Lines Only
For ultra-sharp edges, paint a thin layer of the shirt’s base color along the tape edge first to seal it before applying the colored paints.
Step 2: Painting the Landscape
-
Mix the sky colors:
On your palette, prepare your lightest peach color. If needed, mix a tiny amount of water or fabric medium to ensure smooth spreadability, but keep it thick enough to be opaque. -
Paint the sky:
Fill the top section of your rectangle with the light peach tone, bringing it down just past where your highest mountain peak will start. Use a flat brush for an even coat. -
Create the highest peaks:
Using the terracotta or dusty rose paint, carefully fill in the furthest mountain range. Let the top edge be sharp against the sky, but drag the color down slightly past where the next layer will begin. -
Add middle ground layers:
Mix a slate grey tone. Paint the next range down, covering the bottom edge of the pink mountains. I find that slightly overlapping the wet paint helps blend the transition, though we want distinct shapes here. -
Darken the mountains:
For the lower mountain range (just above the forest), use a deeper blue-grey. Carefully specific the ridgeline with a fine brush first, then fill in the body of the mountain with a larger flat brush. -
Layer the foreground:
Switch to your darkest navy blue (almost black). Paint the bottom-most section, creating a silhouette of jagged tree tops or low hills. Ensure the bottom edge meets the tape line perfectly.
Step 3: Refining Details
-
Add tree texture:
Using your smallest fine liner brush and the dark navy paint, add tiny vertical dashes and triangular points along the top edge of the dark foreground to simulate a pine forest silhouette. -
Touch up edges:
Inspect the areas where color layers meet. If any background color is peeking through, carefully touch it up with the appropriate shade while the paint is still workable. -
Let it dry:
Allow the design to dry completely. This usually takes about 24 hours, depending on the thickness of your paint application. -
Reveal the edges:
Ideally once the paint is fully dry to the touch, slowly peel away the painter’s tape at a 45-degree angle to reveal your sharp rectangular border.
Retro Texture
Dab the wet paint with a dry sponge before it dries to give the mountain ranges a vintage, weathered texture rather than a smooth finish.
Step 4: Finishing
-
Heat set the design:
Turn the shirt inside out or place a thin cloth over the painted area. Iron on a high heat setting (no steam) for 3-5 minutes keeping the iron moving constantly. -
Final wash:
After waiting 72 hours from painting, you can wash the shirt inside out on a gentle cycle to soften the painted area.
Wear your new creation with pride knowing you captured a beautiful sunset right on your shirt
Animal Silhouette Filled With Pattern Instead of Solid Color
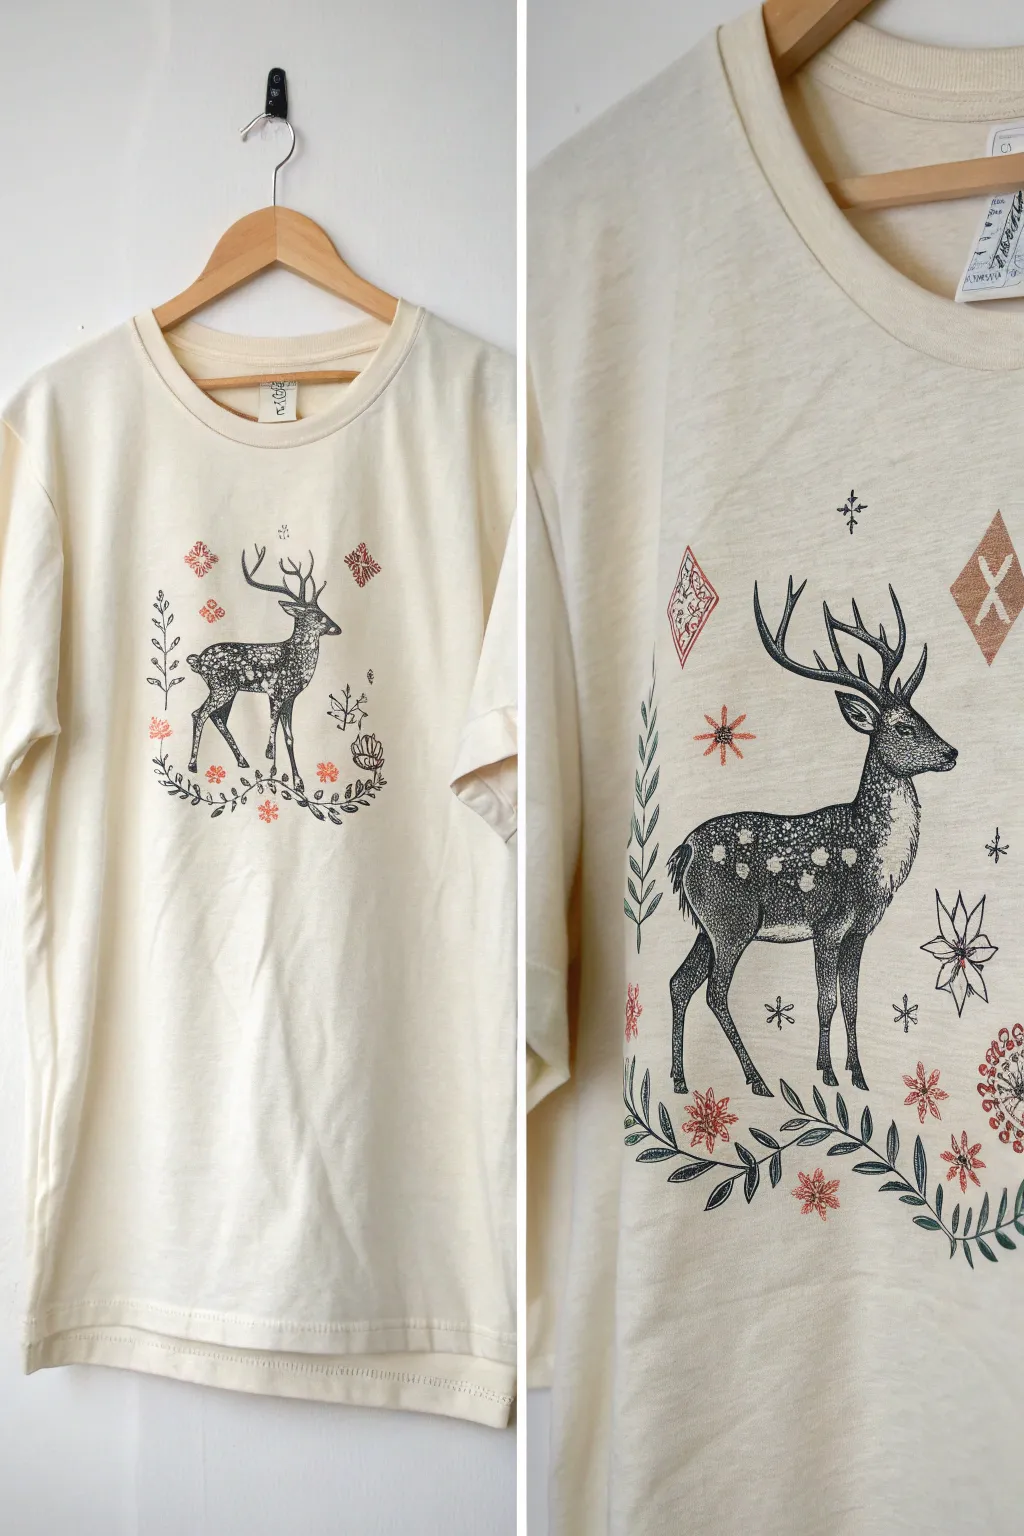
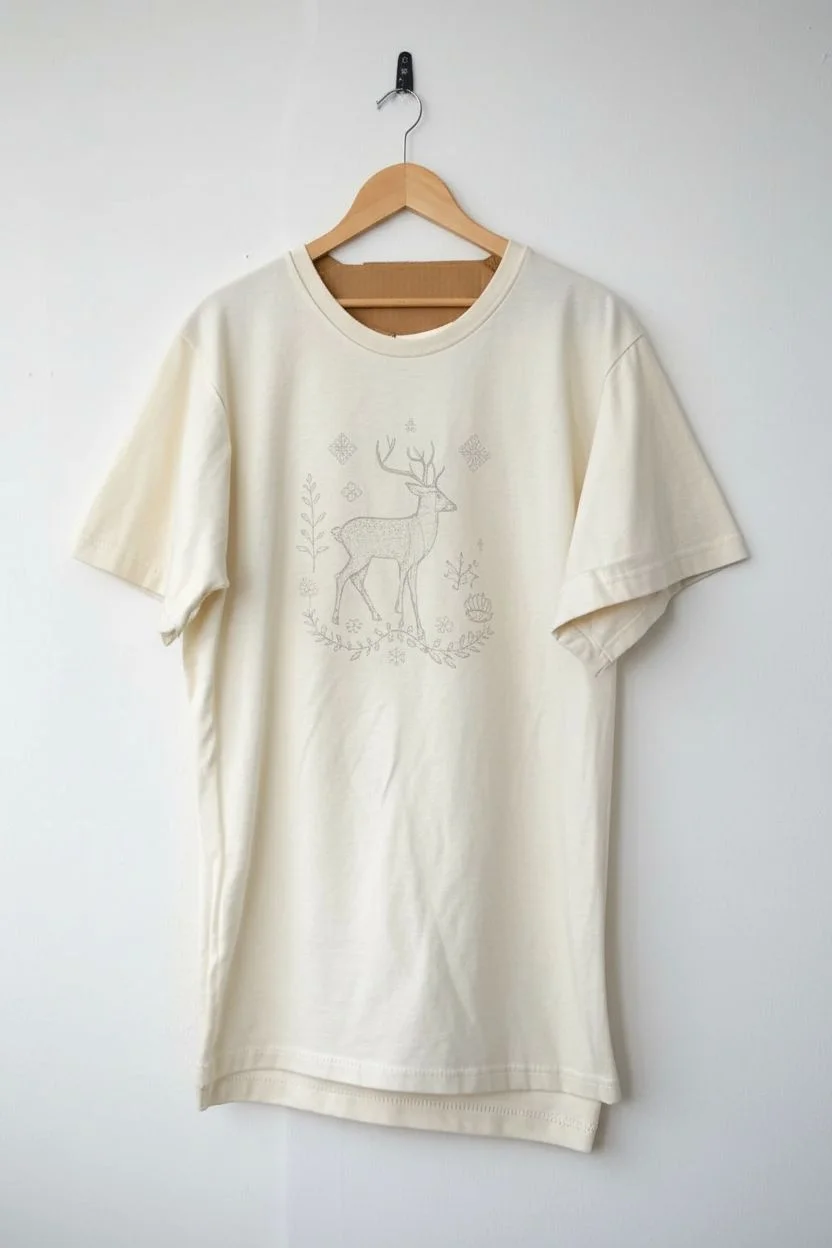
This project combines the elegance of a classic stag illustration with whimsical, folk-art inspired touches. By using a fine-tipped fabric marker or screen printing stencil, you can achieve delicate details like the spotted coat and surrounding flora that give this tee a vintage, handmade feel.
Step-by-Step
Materials
- Light-colored cotton t-shirt (cream or off-white)
- Black fabric ink or fine-tip black fabric markers
- Rust/terracotta fabric paint or marker
- Cardboard insert for the shirt
- Pencil and eraser
- Tracing paper (optional)
- Fine liner brush (if using paint)
- Iron for heat setting
Step 1: Preparation and Sketching
-
Prepare the surface:
Wash and dry your t-shirt without fabric softener to ensure the ink adheres properly. Slide a piece of cardboard inside the shirt to prevent any bleed-through to the back panel. -
Map out the stag:
Using a pencil, lightly sketch the outline of the stag in the center of the chest. Start with simple shapes: an oval for the body, a smaller oval for the head, and long lines for the legs. Don’t press too hard; you want these lines to be erasable. -
Add the antlers:
Draw the antlers extending upwards and slightly back. Keep the lines organic and branching. The antlers are a focal point, use reference photos of deer if you need help with the shape. -
Sketch surrounding elements:
Lightly pencil in the surrounding decorative elements. Add diamonds, snowflakes, and leafy sprigs around the stag to frame the central figure.
Ink Bleeding Issues?
If your markers bleed into the fabric grain, the cotton weave might be too loose. Stretch the fabric slightly tighter using an embroidery hoop or tape it taut to the cardboard.
Step 2: Inking the Stag
-
Outline the body:
Switch to your black fabric marker or fine liner brush with ink. Carefully trace the main outline of the stag’s body, legs, and head. Use short, wispy strokes on the neck and chest to simulate fur texture. -
Detail the face:
Fill in the eye, leaving a tiny white dot for a highlight to make it look alive. Shade the nose and add small lines inside the ears for depth. -
Create the spotted pattern:
This is the ‘pattern instead of solid color’ technique. Instead of filling the body with solid black, leave small circles of the shirt fabric showing through on the back and flank. Ink around these circles, using stippling (lots of small dots) to create a gradient from the dark back to the lighter belly. -
Refine the legs:
Color in the legs. You can keep the lower legs fairly solid black, but as you move up the thigh, transition back into a stippled or cross-hatched texture to show muscle definition. -
Ink the antlers:
Go over your antler pencil lines with confident, solid black strokes. Add a little thickening where the branches join the main beam.
Pro Tip: Stippling
For the deer’s body, don’t rush the dots! Varying the density of your dots creates shadow and volume. More dots = darker areas; fewer dots = highlights.
Step 3: Adding Decorative Flora
-
Draw the bottom wreath:
At the stag’s hooves, use the black ink to draw vine-like branches curving upwards. Add simple, pointed leaves along these stems. -
Add vertical foliage:
On the left side of the stag, draw a vertical leafy stem. Keep the leaves simple and open—just outlines with a central vein. -
Incorporate geometric shapes:
Draw the scattered stars and snowflake shapes in the background using the black ink. Keep some small and others slightly larger for variety.
Step 4: Adding Color Accents
-
Switch to rust color:
Using your rust or terracotta fabric paint/marker, locate the floral elements within the wreath. Color in small flowers or berries to break up the monochromatic look. -
Add diamond accents:
Find the diamond shapes you sketched earlier near the top. Fill these in with the rust color. You can add internal details like an ‘X’ or crosshatch pattern using the black liner once the color dries. -
Highlight the starbursts:
Add a few rust-colored starbursts or simpler flowers floating around the stag to balance the composition.
Step 5: Finishing Touches
-
Erase guidelines:
Wait until the ink is completely dry—I usually give it at least an hour to be safe. Then, gently erase any visible pencil marks. -
Heat set the design:
To make your artwork permanent and washable, place a thin cloth over the design and iron it on a cotton setting for 3-5 minutes (or follow your specific ink manufacturer’s instructions).
Wear your woodland creation with pride, knowing you’ve crafted a piece of wearable art
Foam Stamp Textures for an Easy Hand-Printed Look
Transform a plain white t-shirt into a boutique-style piece using simple foam shapes. This project achieves a beautiful, organic look by combining botanical motifs with celestial elements in earthy rust and deep teal tones.
Step-by-Step Guide
Materials
- Plain white cotton t-shirt (pre-washed)
- Fabric paint (Deep Teal, Rust/Terracotta, Soft Navy)
- Craft foam sheets (adhesive-backed preferred)
- Cardboard or acrylic block for mounting stamps
- Scissors or craft knife
- Pen or pencil
- Small foam pouncers or cosmetic sponges
- Paper plate or palette
- Piece of cardboard (to insert inside shirt)
- Iron (for heat setting)
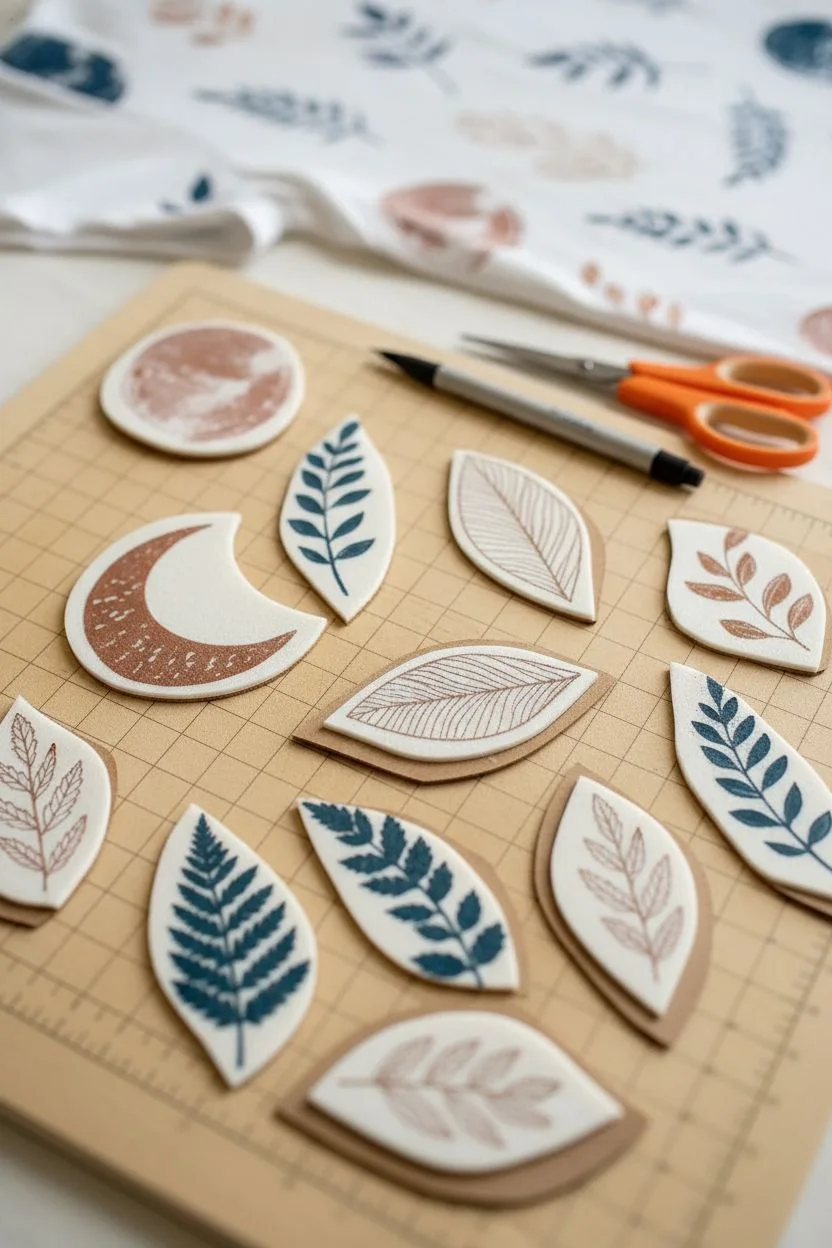
Step 1: Creating the Stamps
-
Draft your designs:
Begin by sketching your motifs on paper first. For this specific look, you’ll need three main categories: a crescent moon, a full circular moon, and several variations of leaves—some simple oval shapes and some with jagged, fern-like edges. -
Transfer to foam:
Once satisfied with the sketches, redraw them onto the foam sheet. Keep the designs roughly 2-3 inches in size so they show up well on the shirt without being overwhelming. -
Cut out the shapes:
Carefully cut along your lines using scissors or a craft knife. For the intricate fern leaves, take your time cutting the small notches to ensure they print clearly. -
Mount the stamps:
Peel the backing off the foam and stick your shapes onto small pieces of cardboard or an acrylic block. If using non-adhesive foam, use craft glue. This rigid backing creates a handle, making it much easier to apply even pressure. -
Add detail texture:
To mimic the specific look of the leaf veins or the craters on the moon seen in the image, use a dull pencil or empty ballpoint pen to press indentation lines directly into the foam surface. Do not cut all the way through; just compress the foam.
Step 2: Printing the Pattern
-
Prep the shirt:
Slide a piece of cardboard inside the t-shirt. This is a crucial step to prevent the paint from bleeding through to the back layer of fabric. -
Prepare the palette:
Squeeze a small amount of your Deep Teal and Rust paint onto a paper plate. Dab your foam pouncer into the paint, then tap it gently on a clean spot of the plate to ensure an even, thin coat on the sponge. -
Load the stamp:
Using the loaded pouncer, dab paint onto your first stamp. I prefer this method over dipping the stamp directly into the paint, as it prevents globs and keeps the intricate details (like the leaf veins) from filling in. -
Test print:
Always do a quick test stamp on a scrap piece of paper or fabric first. This helps you gauge how much pressure you need to get that slightly textured, vintage stamped look. -
Start stamping:
Begin stamping your main motifs. Start with the larger elements like the celestial moons (in rust) and the large teal moons to anchor the design. Place them randomly but with plenty of space in between. -
Add botanical variety:
Switch to your leaf stamps. Use the deep teal for the fern-like leaves and the rust color for the simpler, oval leaves. Orient them in different directions—some pointing up, some angled sideways—to create a unified but flowing pattern. -
Create variation:
For the skeleton leaf design (the one that looks like just veins), apply a very light layer of the rust paint. Press lightly to achieve a faint, delicate impression compared to the solid shapes. -
Fill the gaps:
Step back and look at the shirt from a distance to spot empty areas. Fill these gaps with smaller sprigs or tinier leaf stamps to balance the composition without overcrowding it. -
Add collar details:
Don’t forget the neckline and sleeve edges. Add partial stamps near the seams (like a leaf disappearing off the edge) to make the fabric look like professionally printed yardage.
Stamp Definition Issues?
If your prints look blobby and undefined, you are likely using too much paint. Use less pigment and apply it with a sponge pouncer rather than dipping the stamp directly.
Step 3: Finishing Up
-
Dry completely:
Let the shirt sit flat and undisturbed for at least 24 hours. The paint needs this time to cure properly before any heat is applied. -
Heat set the design:
Turn the shirt inside out. Set your iron to the cotton setting (no steam) and press the design area for 3-5 minutes, moving the iron constantly. This locks the color into the fibers so it’s laundry-safe.
Level Up: Dual Tones
Try loading your sponge with two colors (like teal and navy) before dabbing the stamp. This creates a subtle gradient or marbled effect on the leaves for extra depth.
Wear your new celestial creation with pride knowing it’s a completely unique piece of art
Top-Down Drip Art From Collar to Mid-Shirt
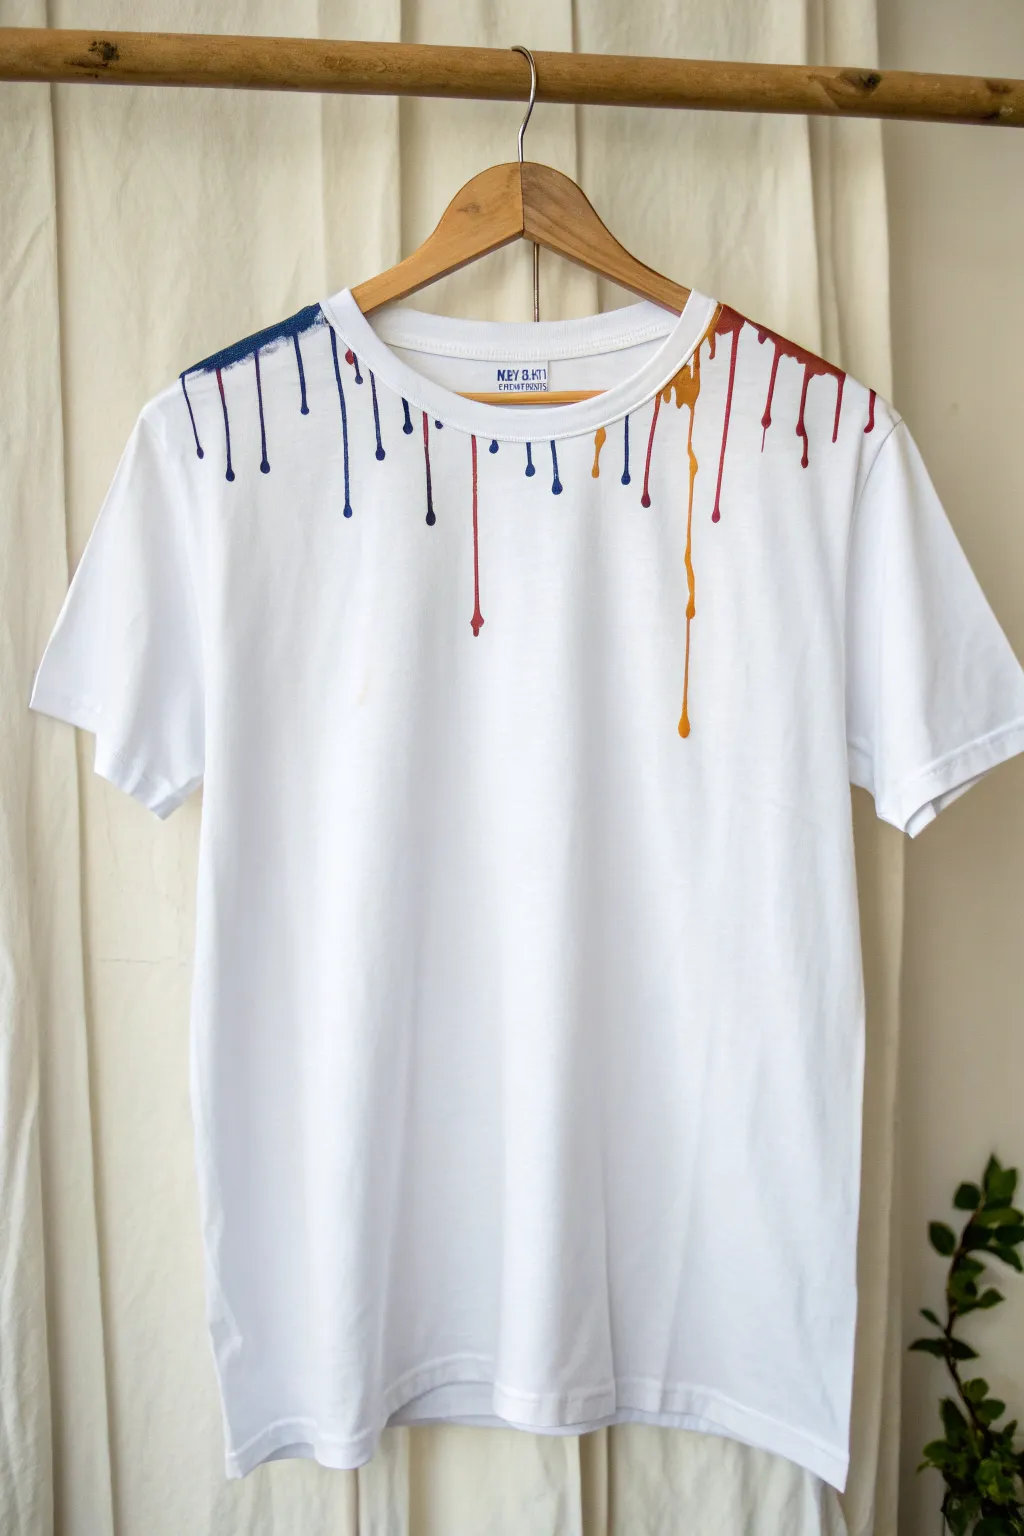
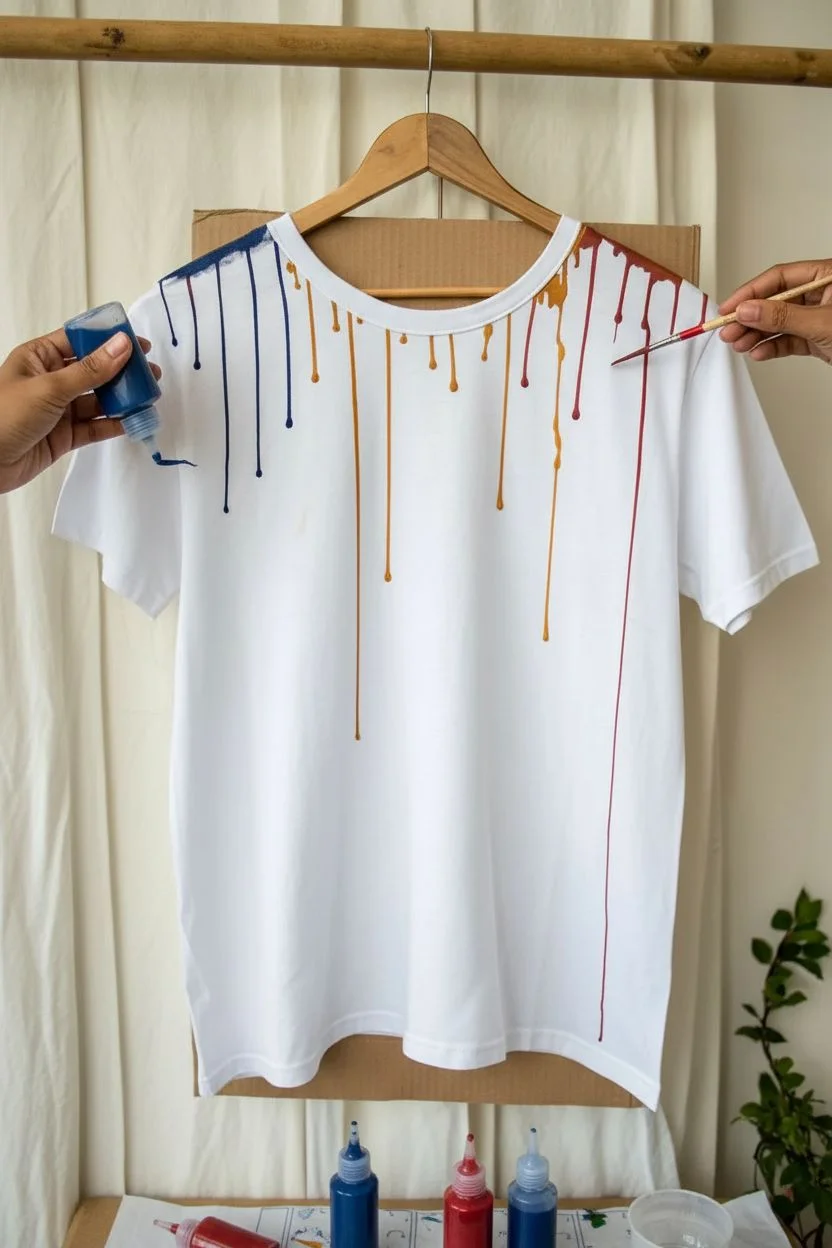
Transform a plain white tee into a gallery-worthy statement piece with this controlled drip effect. The design features pigment appearing to bleed naturally from the shoulder seams, creating a vibrant cascade of color that is both minimalist and eye-catching.
How-To Guide
Materials
- High-quality white cotton T-shirt (pre-washed)
- Fabric medium
- Acrylic paints (deep blue, classic red, golden yellow/ochre)
- Small squeeze bottles or pipettes
- Cardboard insert or T-shirt form
- Paintbrushes (small round)
- Water cup
- Iron (for heat setting)
- Parchment paper
Step 1: Preparation
-
Prep the Shirt:
Begin by washing and drying your T-shirt without fabric softener to ensure the paint adheres properly to the fibers. -
Insert Protection:
Slide a stiff piece of cardboard or a dedicated shirt form inside the body of the tee. This is crucial to prevent the paint from soaking through to the back panel. -
Mix the Medium:
Mix your acrylic paints with fabric medium according to the bottle instructions (usually 1:1 or 2:1 paint to medium). This makes the paint flexible and washable. -
Limit Water Usage:
Avoid adding too much water to thin the paint. While we want drips, too much water will cause the pigment to bleed horizontally into the fabric fibers (wicking) rather than forming clean vertical lines. -
Load Applicators:
Transfer your mixed paints into small squeeze bottles with fine tips or have pipettes ready. I find squeeze bottles give much better control over the flow rate.
Don’t Just Watch Paint Dry
To stop a drip exactly where you want it without smearing, use a hairdryer on a low, cool setting to freeze the movement instantly.
Step 2: Creating the Drips
-
Define the Source:
Using a brush, paint a slightly thick, solid line of deep blue along the very top shoulder seam on the left side. This creates the ‘source’ pool for your drips. -
Start the Flow:
While the shoulder line is wet, use your squeeze bottle or loaded brush to apply extra paint at specific points along that seam, encouraging gravity to take over. -
Guide the Paint:
If the paint is too thick to run on its own, gently guide the tip of a wet brush downward to lead the paint into a drip path. -
Vary the Lengths:
Create visual interest by making some drips stop just a few inches down, while letting others run almost to the chest area. Variation is key to a natural look. -
Switch Colors:
Move towards the collar area. Clean your tools and switch to the golden yellow or ochre paint. -
Overlap Slightly:
Apply the yellow near where the blue ends. It’s okay if they touch slightly at the source line, but keep the drips separate to avoid muddying colors. -
Create the Longest Drip:
For the dramatic long drip on the right side (the yellow one in the photo), apply significantly more paint at the start point and tilt the shirt board vertically to let it travel further. -
Add the Red Section:
Finish the right shoulder with the red paint, repeating the process of painting the seam line first and then adding volume for the drips. -
Refine the Ends:
Check the bottom of each drip. If they look too streaky, add a tiny dot of paint at the very end to simulate the pooling effect of a real liquid droplet.
Step 3: Finishing Up
-
Dry Completely:
Let the shirt dry flat for at least 24 hours. Don’t rush this, as the thicker parts of the drips need time to set fully. -
Heat Set:
Place parchment paper over the painted design and iron it on a medium setting (no steam) for 3-5 minutes to permanently fix the design.
Go Metallic
Swap the standard yellow for a metallic gold fabric paint. The shimmer adds a luxurious, high-end fashion feel to the drip effect.
Now you have a custom wearable art piece that brings a splash of color to any outfit


Have a question or want to share your own experience? I'd love to hear from you in the comments below!