Spring is basically nature’s way of handing you a color palette on a silver platter—fresh greens, punchy blooms, and those dreamy skies. These easy spring painting ideas are the kind you can finish in one cozy session and still feel super proud of.
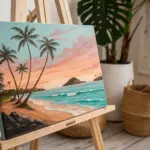
Easy Wildflower Meadow With Dot-and-Dash Blooms
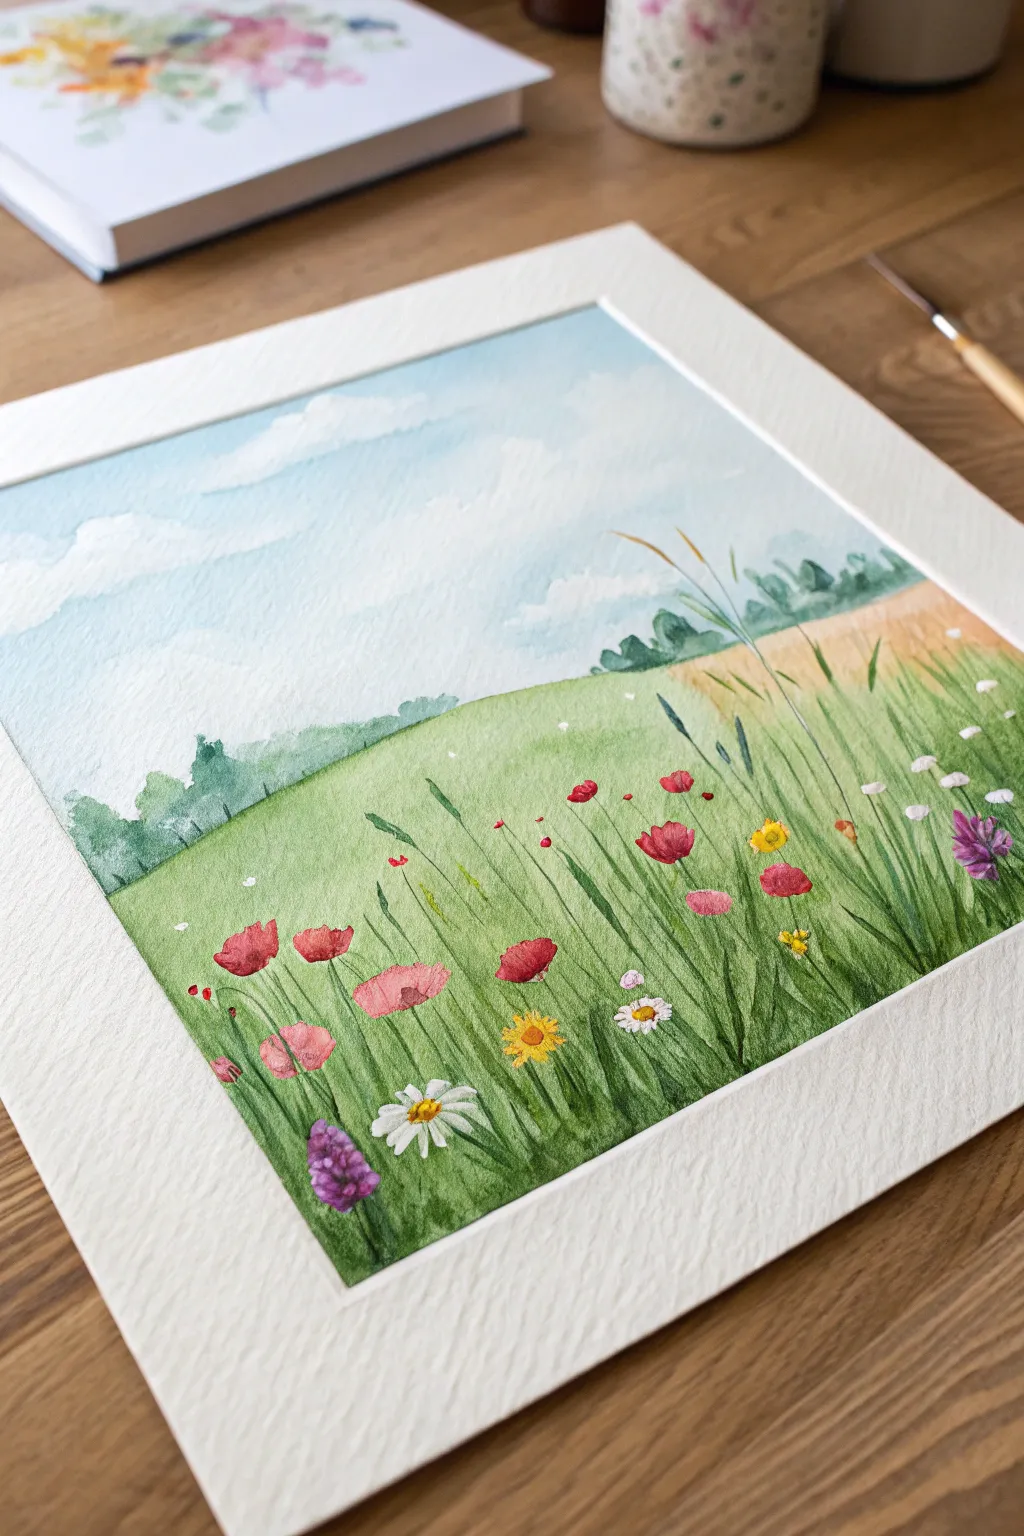
This serene watercolor landscape captures the essence of a spring meadow with gentle, rolling hills and a vibrant foreground. Using simple layering techniques and clever brushstrokes, you’ll create depth that travels from wispy clouds down to detailed grassy textures.
Detailed Instructions
Materials
- Cold press watercolor paper (square format)
- Masking tape or painter’s tape
- Watercolor paints (Cerulean Blue, Sap Green, Olive Green, Yellow Ochre, Burnt Sienna, Cadmium Red, Lemon Yellow, Magenta)
- Round brushes (size 8 for washes, sizes 2 and 0 for details)
- White opacity medium (white gouache or opaque white watercolor)
- Two jars of water
- Paper towels
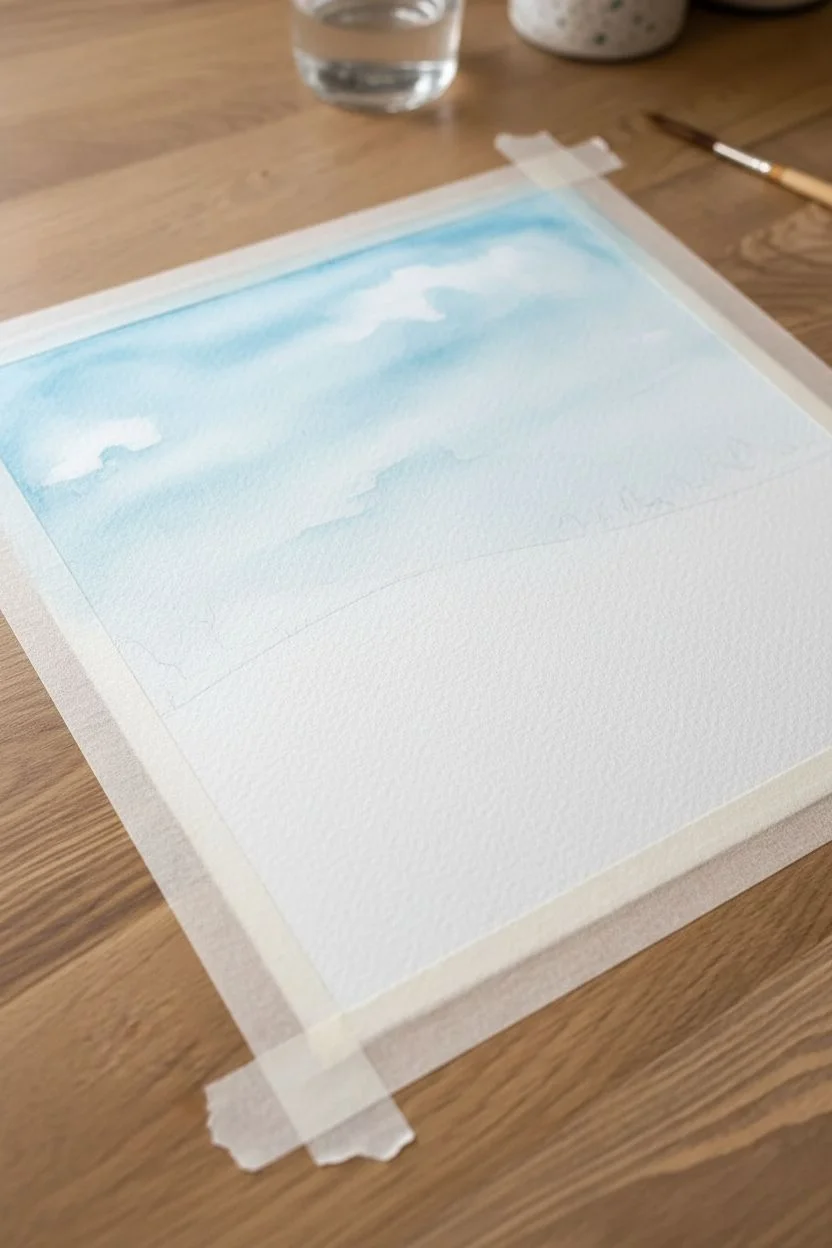
Step 1: Setting the Sky and Horizon
-
Prepare the paper:
Tape down your watercolor paper on a flat board to prevent buckling and create a clean white border once finished. -
Sketch the layout:
Lightly sketch a gentle, sloping horizon line about two-thirds down the page. Add faint shapes for the distant trees along this line. -
Paint a wet-in-wet sky:
Wet the sky area with clean water. Drop in diluted Cerulean Blue, leaving random gaps of white paper to suggest soft, drifting clouds. -
Soften the clouds:
While the sky is still damp, lift out a few more cloud shapes using a thirsty brush or clean tissue to keep edges soft and atmospheric. -
Dry partially:
Let the sky dry until it is no longer glistening but feels cool to the touch.
Pro Tip: Depth Perception
Make grass blades at the very bottom thicker and darker than those higher up. This change in scale forces the perspective, making the hill look like it’s receding.
Step 2: Middle Ground and Trees
-
Paint the distant treeline:
Mix a cool, muted green using Sap Green and a touch of blue. Paint the distant trees along the horizon line with soft, rounded strokes, letting the bottom edges bleed slightly into the hill below. -
Base layer for the hill:
Paint the large hill area with a light wash of Sap Green mixed with plenty of water. Keep this layer uneven to suggest uneven terrain. -
Add warmth to the right side:
While the hill wash is wet, drop in some Yellow Ochre and Burnt Sienna on the upper right slope to suggest a patch of dried wheat or sunlit field. -
Let it dry completely:
This step is crucial; wait for the green base layer to be bone dry before starting the detailed grass to avoid muddy textures.
Step 3: Foreground Grasses
-
Start the tall grass:
Using your size 2 brush and a mix of Olive Green and Sap Green, paint long, upward sweeping strokes from the bottom edge. Vary the pressure to make the blades taper at the top. -
Add variation:
Mix a darker green using Green and a tiny dot of Red or Brown. Paint shorter, darker clumps of grass near the bottom to create density and shadow. -
Incorporate wheat stalks:
Use a thin rigger brush or the tip of your round brush with Yellow Ochre to pull up tall, thin stalks throughout the meadow, especially near that golden patch on the right. -
Layer overlapping blades:
I like to cross some blades over others slightly; nature is chaotic, so don’t make them all perfectly parallel.
Level Up: Splatter Texture
Dip an old toothbrush in white gouache or dark green paint and flick it lightly over the foreground. This mimics tiny pollen specs, insects, or distant wildflower buds.
Step 4: Flower Details
-
Paint poppy shapes:
With Cadmium Red, paint small, irregular blob shapes for poppies. Keep edges loose and vary their heights. -
Add pink blooms:
Use diluted Magenta to add soft, petal-like dabs for smaller pink wildflowers nestled in the grass. -
Detail the yellow centers:
Once the red and pink spots differ, use opaque Lemon Yellow or Yellow Ochre to add tiny centers to some flowers. -
Create daisies with gouache:
Switch to white gouache (or opaque white). Paint tiny star-like shapes for daisies. Add a yellow dot in the center once the white is dry. -
Final purple accents:
Mix a small amount of purple and dab vertical, cone-shaped clusters to resemble lavender or lupines low in the grass. -
Add stems to flowers:
Carefully connect your floating flower heads to the ground with very thin green lines using your smallest brush.
Peel off the tape carefully to reveal those crisp white borders that make the colors pop


Cherry Blossom Tree With Q-Tip Blossoms

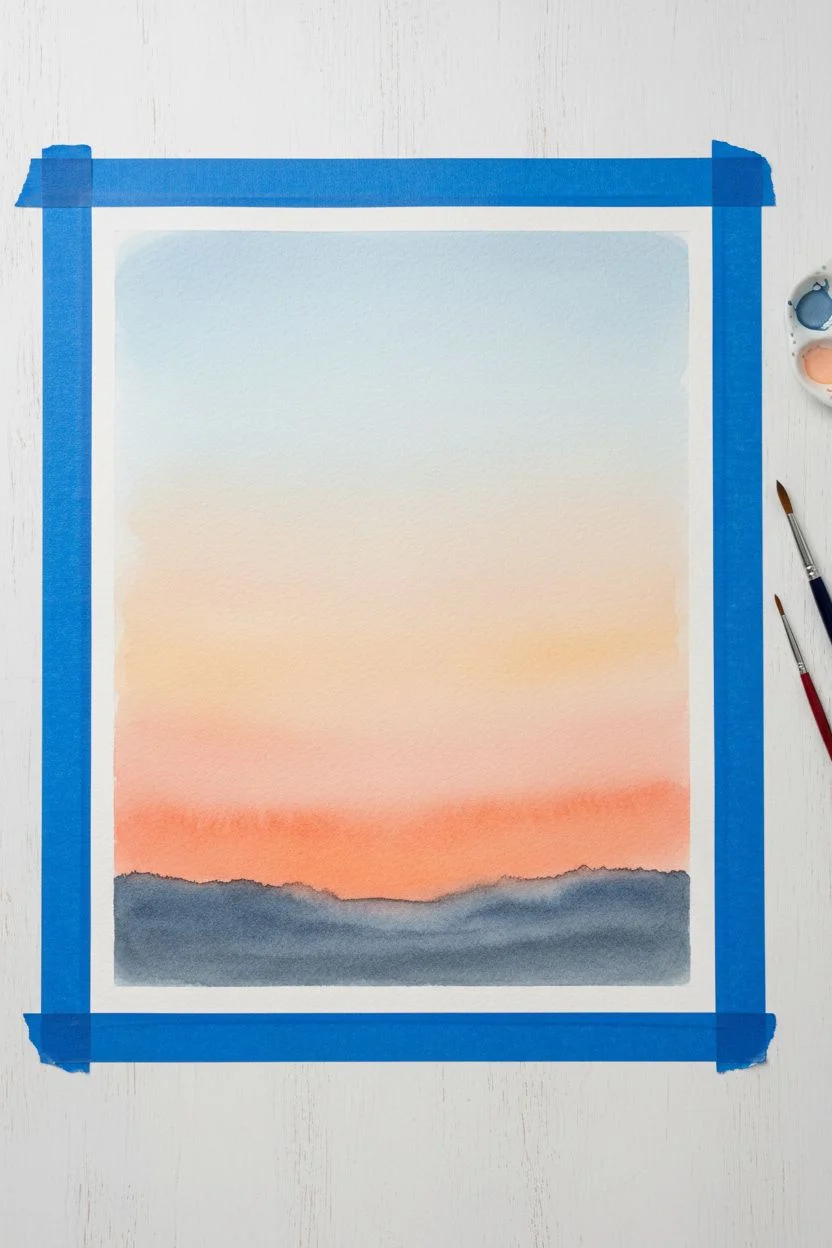
Capture the magic of a spring evening with this deceptively simple watercolor project that blends a vibrant sunset gradient with a stark tree silhouette. The result is a moody, atmospheric piece that looks beautiful on its own or framed by real blossoms.
Step-by-Step Guide
Materials
- Watercolor paper (cold press creates nice texture)
- Watercolor paints (blue, peach/orange, pink, black, indigo)
- Painter’s tape or masking tape
- Flat wash brush (large)
- Round liner brush (size 0 or 1)
- Small round brush (size 4 or 6)
- Clean water and paper towels
- Pencil (optional)
Step 1: Creating the Background Gradient
-
Prepare your paper:
Start by taping down all four edges of your watercolor paper to a hard board or table. This creates that crisp, clean white border you see in the final piece and prevents the paper from buckling when wet. -
Wet the sky area:
Using your large flat brush, apply a layer of clean water over the entire area where the sky will be painted. You want the paper glistening but not swimming in puddles. -
Apply the blue sky:
Load your brush with a diluted light blue. Paint horizontal strokes across the top third of the paper, letting the color fade naturally as you move downward. -
Blend in the sunset:
While the paper is still damp, switch to a soft peach or light orange color. Start painting from the middle section, blending upwards slightly into the fading blue to create a soft transition. -
Add the horizon glow:
Deepen the color near the bottom third with a touch of pink or stronger orange to simulate the intensity of the setting sun. -
Establish the ground line:
Mix a dark grey-blue or indigo color. While the sunset layer is still slightly damp but not soaking, paint a low, uneven horizon line at the very bottom to suggest distant hills or bushes. -
Dry completely:
This is crucial: let the painting dry completely before moving on. The paper must be bone-dry, or your tree silhouette will bleed into the sky.
Bleeding Lines?
If your black paint starts spreading into the sky, stop immediately! Your background is still too wet. Let it dry 10 more minutes or use a hairdryer on low.
Step 2: Painting the Silhouette Tree
-
Mix your black:
Create a rich, dark black. I prefer mixing black with a tiny bit of brown or burnt umber to give it an organic warmth rather than a flat, synthetic look. -
Paint the trunk:
Using your small round brush, start from the ground line and paint the main trunk. Make it wider at the base and taper it gradually as it reaches upward, ending about halfway up the page. -
Split into main branches:
Divide the trunk into two or three main directive branches. Keep your hand loose; nature isn’t perfectly straight. -
Add secondary branches:
Switch to your finer liner brush (size 0 or 1). From your main branches, pull out thinner, longer branches reaching up and out. -
Create the twig details:
This is where the realism happens. Use the very tip of your liner brush to add tiny, delicate twigs extending from the secondary branches. Vary the angles and lengths. -
Thicken connections:
Go back and slightly thicken the V-shapes where branches connect to the trunk or larger limbs to make the structure look sturdy. -
Refine the ground:
Use the black paint to add a solid shadow line right at the base of the tree trunk, grounding it so it doesn’t look like it’s floating. -
Final touches:
Take a step back and look at the balance of your tree. Add a few stray twigs on any side that looks too empty. -
Reveal the border:
Once dry, carefully peel away the painter’s tape at a 45-degree angle to reveal your clean white edges.
Realism Boost
For a 3D effect like the photo, glue actual dried twigs and small silk flowers over the painted tree once it’s dry.
Display your serene sunset landscape in a place where you can enjoy its calming vibes every day


Spring Sunrise Gradient Over Rolling Hills

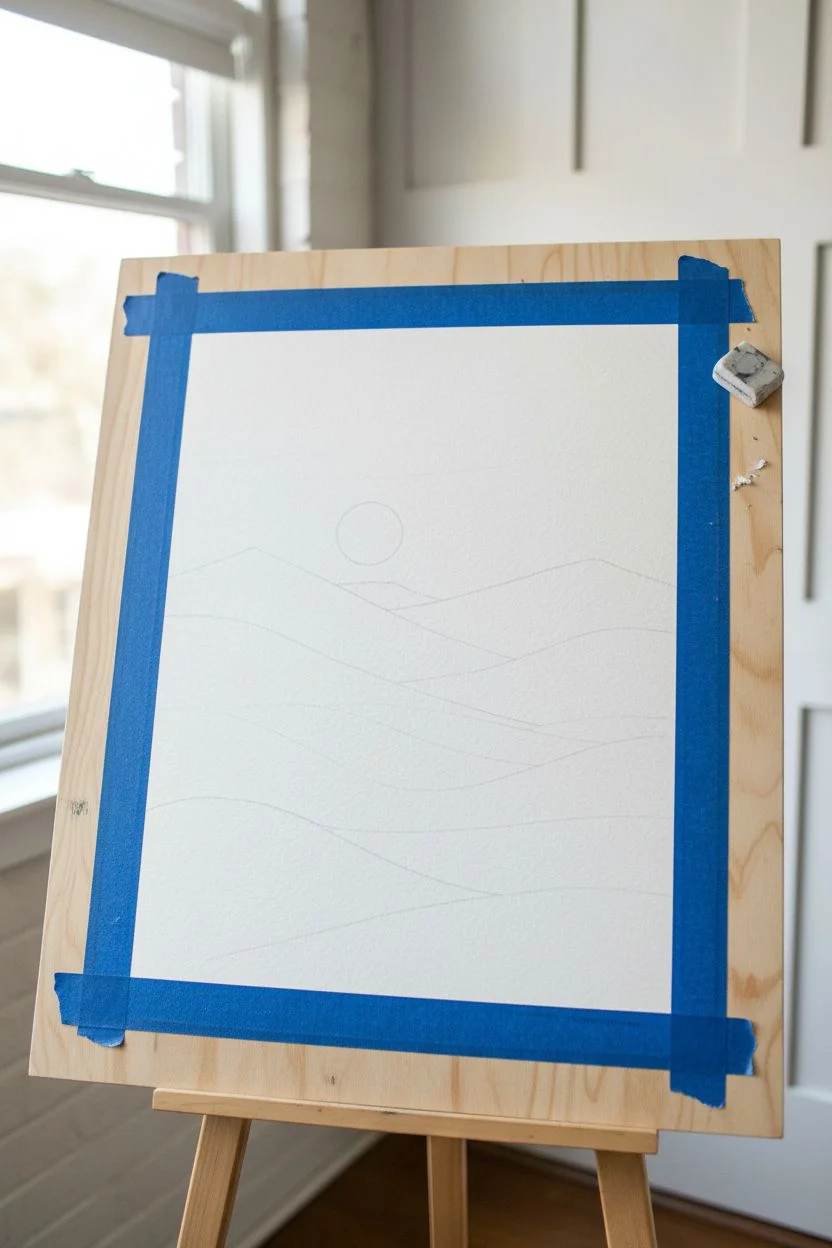
Capture the serene beauty of a crisp spring morning with this layered watercolor landscape. You will build depth using simple wash techniques, transitioning from a soft, glowing sky to rich, verdant rolling hills.
Detailed Instructions
Materials
- Cold press watercolor paper (140lb/300gsm)
- Watercolor paints (Cerulean Blue, Rose Madder or Pink, Cadmium Orange, Sap Green, Indigo)
- Large flat wash brush (1 inch)
- Round brushes (sizes 6 and 10)
- Painters tape or masking tape
- Clean water and mixing palette
- Pencil and kneaded eraser
- Paper towels
Step 1: Preparation and Sketching
-
Secure the paper:
Begin by taping down all four edges of your watercolor paper to a board or table. This creates a clean white border and prevents buckling when the paper gets wet. -
Sketch the horizon:
With a very light hand, sketch the outline of your hills. Start high on the page for the distant mountains and create overlapping, wavy lines coming down towards the bottom. Don’t press too hard, as you want the pencil lines to disappear under the paint. -
Outline the sun:
Draw a perfect circle for the sun just above the highest hill line. You can trace a small coin or bottle cap to get a clean shape.
Step 2: Painting the Sky
-
Wet the sky area:
Using your large flat brush, apply clean water to the entire sky area, stopping just at the hill line. Be careful not to paint water into the sun circle—keep that dry for now. -
Apply the blue gradient:
Load your brush with a watery mix of Cerulean Blue. Start at the very top edge and paint horizontally, letting the color fade naturally as you work your way down about a third of the sky. -
Blend in the warmth:
Rinse your brush and pick up a soft pink shade. While the blue is still slightly damp, start below it and brush upwards gently to blend where they meet, creating a soft purple transition. -
Finish the horizon glow:
Fade the pink into a very pale wash near the horizon line, keeping the area around the sun almost white. Let the sky dry completely.
Fixing Water Blooms
If cauliflower-like blooms appear in your smooth washes, your brush was too wet when you went back in. Correct it by lightly scrubbing with a damp brush and dabbing with a towel.
Step 3: The Sun and Distant Hills
-
Paint the sun:
Mix a warm orange-yellow. Carefully fill in the sun circle. While wet, drop a tiny bit of concentrated orange at the bottom curve of the sun to give it dimension. -
First hill layer:
Mix a pale, dusty pink. Paint the furthest range of hills (the ones seemingly touching the sun). Use plenty of water to keep the color transparent and atmospheric. -
Second hill layer:
Once the first range is dry, darken your pink mix slightly with a touch of purple or more pigment. Paint the next range of hills forward. -
Transition to green:
The third layer down should bridge the gap between sky and earth. I like to mix a very pale, milky sage green for this section, keeping the edges crisp.
Add Metallic Details
For a magical touch, use a gold metallic watercolor paint to outline the rim of the sun or trace the very top edge of the closest hill once everything is dry.
Step 4: Foreground Layers
-
Mid-ground greens:
Deepen your green mix with Sap Green. Paint the middle waves of hills, adding a slightly darker value to the bottom of each shape to suggest form and shadow. -
Adding teal tones:
For the next wave forward, mix a cooler green by adding a touch of blue to your Sap Green. Apply this wash, ensuring the top edge is sharp against the lighter hill behind it. -
Deepening the foreground:
As you reach the bottom of the paper, your greens should get progressively darker and richer. Mix Indigo into your green to create a shadowed forest color. -
Final hill layer:
Paint the closest hill at the very bottom with your darkest, most saturated green mixture. You can use a ‘wet-on-wet’ technique here by dropping in darker pigment while the shape is still filling to create texture. -
Dry and reveal:
Wait for the painting to be absolutely bone-dry. Slowly peel off the masking tape at a 45-degree angle to reveal the crisp white border.
Now you have a tranquil sunrise landscape ready to frame or gift to a friend


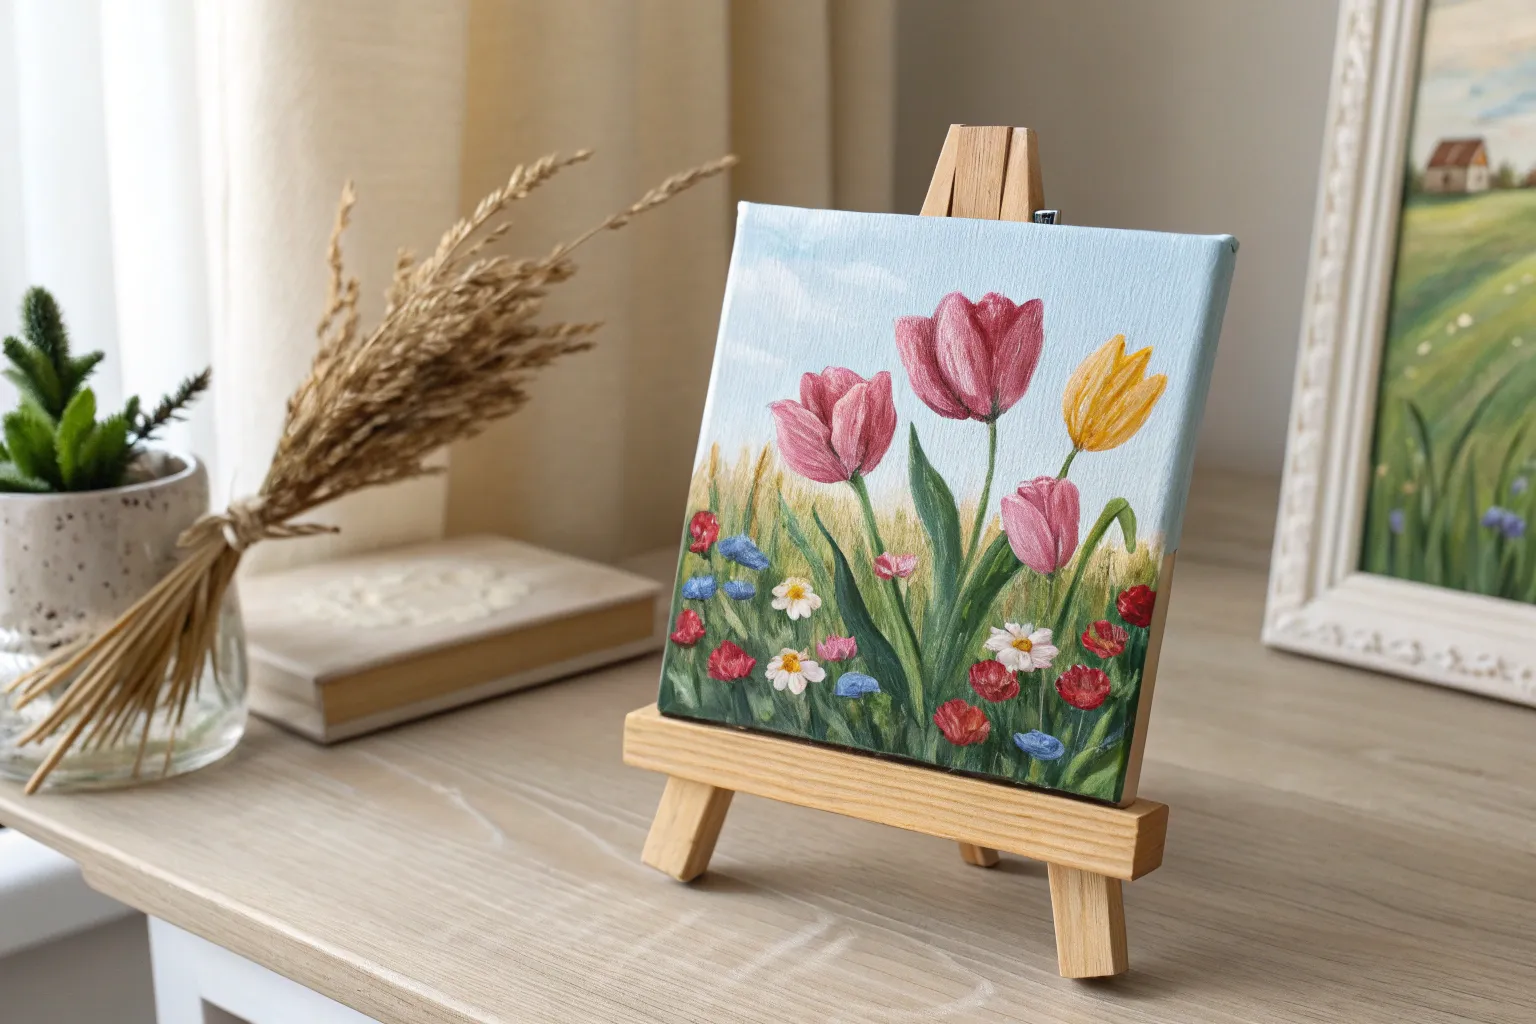
Big, Simple Daisies on a Sky-Blue Background

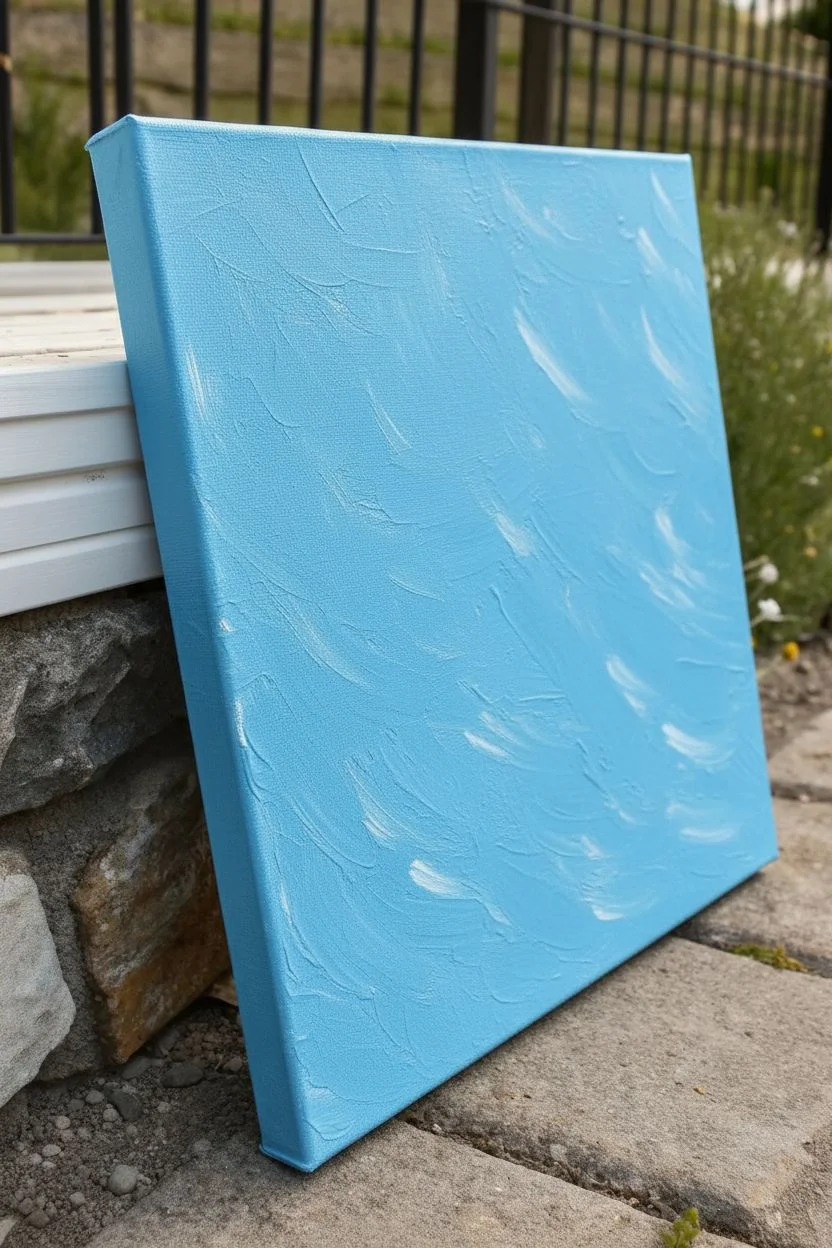
Capture the fresh energy of spring with this vibrant canvas painting featuring four large, cheerful daisies against a textured blue sky. The bold strokes and bright colors make this a forgiving and satisfying project for artists of any skill level.
Step-by-Step Guide
Materials
- Square canvas (10×10 or 12×12 inches)
- Acrylic paints: Light Blue, White, Golden Yellow, Ochre/Light Brown, optional Pale Green
- Large flat brush (1 inch)
- Medium round brush (size 6 or 8)
- Small round detail brush
- Palette or paper plate
- Cup of water and paper towels
- Chalk or light pencil for sketching
Step 1: Prepping the Sky
-
Lay the base color:
Squeeze a generous amount of light blue acrylic paint onto your palette. Using your large flat brush, cover the entire canvas surface. Don’t worry about making it perfectly smooth; visible brushstrokes add character to the sky. -
Paint the edges:
While you have the blue paint wet, remember to paint the sides, top, and bottom edges of the canvas. This gallery-wrap style gives the piece a finished look even without a frame. -
Add subtle texture:
While the blue is still wet, dip your brush lightly into a tiny bit of white paint without cleaning it first. Streak this into the blue background in diagonal motions to create a windswept, cloudy effect. -
Let it dry completely:
Allow the background to dry fully before moving on. This is crucial so your white flower petals remain crisp and don’t turn into a muddy light blue.
Petal Perfection
Use a round brush but press down firmly at the start of the stroke (petal tip) and lift up as you drag toward the center to get that teardrop shape easily.
Step 2: Drafting the Layout
-
Plan flower placement:
Visualize four large circles on your canvas. I like to place two near opposite corners and fill the gaps with the others to create a balanced composition. -
Sketch the centers:
Using a piece of chalk or a very light pencil, draw small circles where the yellow center of each daisy will be. Positioning them slightly off-center makes the flowers look more natural. -
Mark petal length:
Lightly sketch lines radiating from the centers to determine how long your petals will be. Ensure they don’t all end at the same length for variety.
Add Metallic Flair
Once the yellow centers are dry, dab a tiny bit of metallic gold paint over them. It adds a beautiful shimmer that catches the light.
Step 3: Painting the Daisies
-
Load the white paint:
Clean your medium round brush thoroughly and load it heavily with white acrylic paint. You want a thick consistency for good coverage. -
Paint the first layer of petals:
Start at the outer edge of a petal and stroke inward toward the yellow center circle. Lift the brush as you near the center to taper the stroke. -
Complete the flower shape:
Continue painting petals around the center circle. It’s okay if they overlap slightly or have gaps between them; real daisies aren’t perfect. -
Repeat for all flowers:
Paint the petals for the remaining three flowers. Rotate your canvas as needed to keep your hand from smudging wet paint. -
Apply a second coat:
Once the first layer of white is dry to the touch, go over the petals again. This ensures they are opaque and bright against the blue background.
Step 4: Adding Details
-
Paint the centers:
Use your round brush to fill in the flower centers with golden yellow paint. Dab the paint on rather than stroking it to create a bumpy, pollen-like texture. -
Add dimension to centers:
While the yellow is wet, pick up a tiny amount of ochre or light brown on a small detail brush. Dab it onto the lower edge of the yellow circle to create a shadow. -
Highlight the centers:
Clean the small brush and add a tiny dot or curved line of white near the top of the yellow center to suggest sunlight hitting it. -
Optional greenery:
If your background feels too empty, mix a very pale green and use a dry brush to add faint, wispy strokes between the flowers to suggest leaves or stems in the distance. -
Final touches:
Look for any blue showing through your white petals. Add a final thick stroke of white where needed to brighten the highlights.
Hang your new floral masterpiece in a sunny spot to enjoy spring vibes all year round
BRUSH GUIDE
The Right Brush for Every Stroke
From clean lines to bold texture — master brush choice, stroke control, and essential techniques.
Explore the Full Guide
Tulip Row Painting With Easy Leaf Strokes
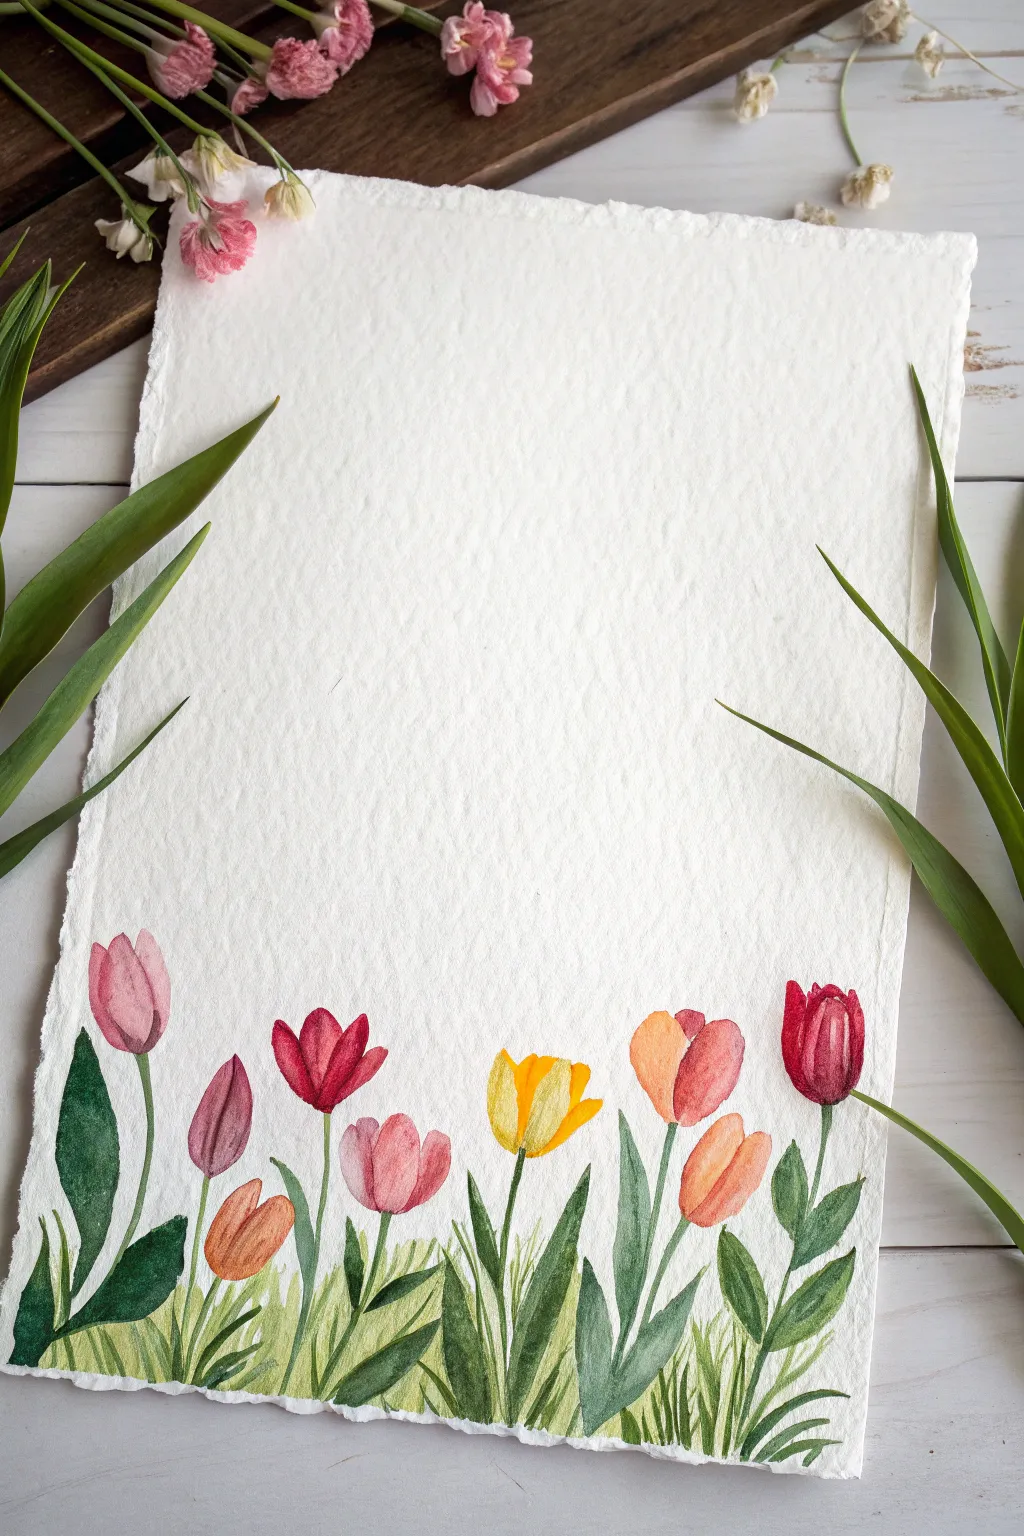
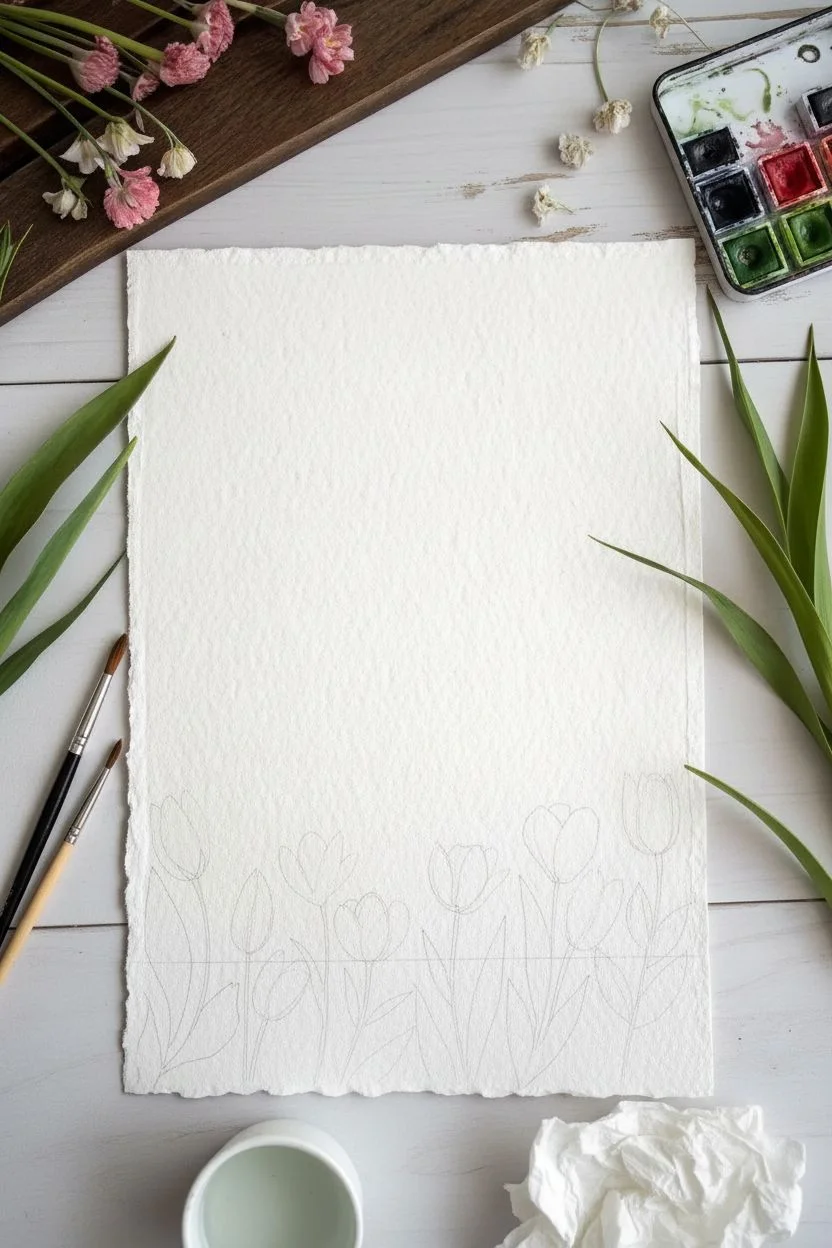
Capture the fresh energy of spring with this vibrant border of colorful tulips. Using simple shapes and wet-on-dry watercolor techniques, you’ll create a lively garden strip that leaves plenty of negative space above for calligraphy or journaling.
Detailed Instructions
Materials
- Cold press watercolor paper (with rough edge/deckle edge if possible)
- Watercolor paints (pinks, reds, oranges, yellows, greens)
- Round brushes (sizes 4 and 6)
- Small flat brush or rigger brush (optional for grass)
- Cup of water
- Paper towel
- Pencil (optional for light sketching)
Step 1: Planning the Garden
-
Prepare the paper:
Start with a high-quality sheet of watercolor paper. If you want to replicate the look in the photo, tear the edges of your paper against a ruler to create a soft, deckled effect. -
Visualize the layout:
Imagine a horizontal line about two inches from the bottom edge of your paper. This is where your flowers will sit. You can lightly sketch the positions just to space them out evenly, but freehanding keeps it organic.
Natural Petal Tip
Don’t outline the petals. Instead, build them using single, confident brushstrokes. Let the brush shape do the work for you to keep the flowers looking soft.
Step 2: Painting the Blooms
-
Start with pink:
Load your size 6 brush with a soft pink. Paint a simple U-shape for the base of the first tulip on the far left. Add two or three petals coming up from that base, keeping the top edges slightly uneven. -
Add a darker red:
While that first pink bloom is drying, move a few inches to the right and paint a deeper red tulip. Use a teardrop shape for the central petal, and flank it with two curved strokes for side petals. -
Create a yellow focal point:
Near the center of your row, paint a bright yellow bloom. For this one, try painting the petals slightly open, like a cup, to show variety in the stages of blooming. -
Mix vibrant oranges:
Mix your yellow with a touch of red to get a warm orange. Paint two orange tulips in the remaining gaps. I like to vary the heights slightly so they aren’t all perfectly aligned, making the row feel more natural. -
Add a two-tone effect:
For the last tulip on the right, dip your brush in red but touch the tip to a darker violet or crimson before painting. This creates a beautiful gradient as you lay down the stroke. -
Let the blooms dry:
Wait for about 5-10 minutes. The flower heads need to be dry so the green stems don’t bleed into the petals.
Fixing Bleeds
If green stem paint accidentally touches a wet flower petal, dab the area instantly with a clean, dry corner of a paper towel to lift the unwanted color.
Step 3: Adding Greenery
-
Paint the stems:
Using a thinner mix of sap green and a size 4 brush, draw a single line downward from the base of each flower head. Curve them slightly; perfectly straight lines look stiff. -
Create broad leaves:
Load your larger brush with a darker forest green. Press the belly of the brush down on the paper near the base of the stems and lift as you pull upward to create wide, tapered leaves. -
Overlap the foliage:
Don’t be afraid to let a leaf cross over a stem. Paint some leaves leaning left and some right to create a sense of movement in the garden. -
Vary the greens:
Mix a little yellow into your green for some leaves and a little blue for others. This variation adds depth and makes the foliage look sun-dappled. -
Fill the gaps:
Look for empty white spaces between the main plants. Add smaller, shorter leaves here to make the garden bed look lush and full.
Step 4: Final Grass Details
-
Mix a grassy shade:
Dilute a yellow-green paint with plenty of water so it is quite transparent. -
Add grassy spikes:
Using the tip of your smallest brush, flick upward quick strokes starting from the very bottom edge of the paper. -
Layer the texture:
Paint these grass blades over the bottoms of the stems and leaves. This grounds the flowers so they don’t look like they are floating in mid-air.
Once the paint is fully dry, your cheerful spring garden is ready to frame or gift
Butterfly Silhouette Over Soft Spring Washes
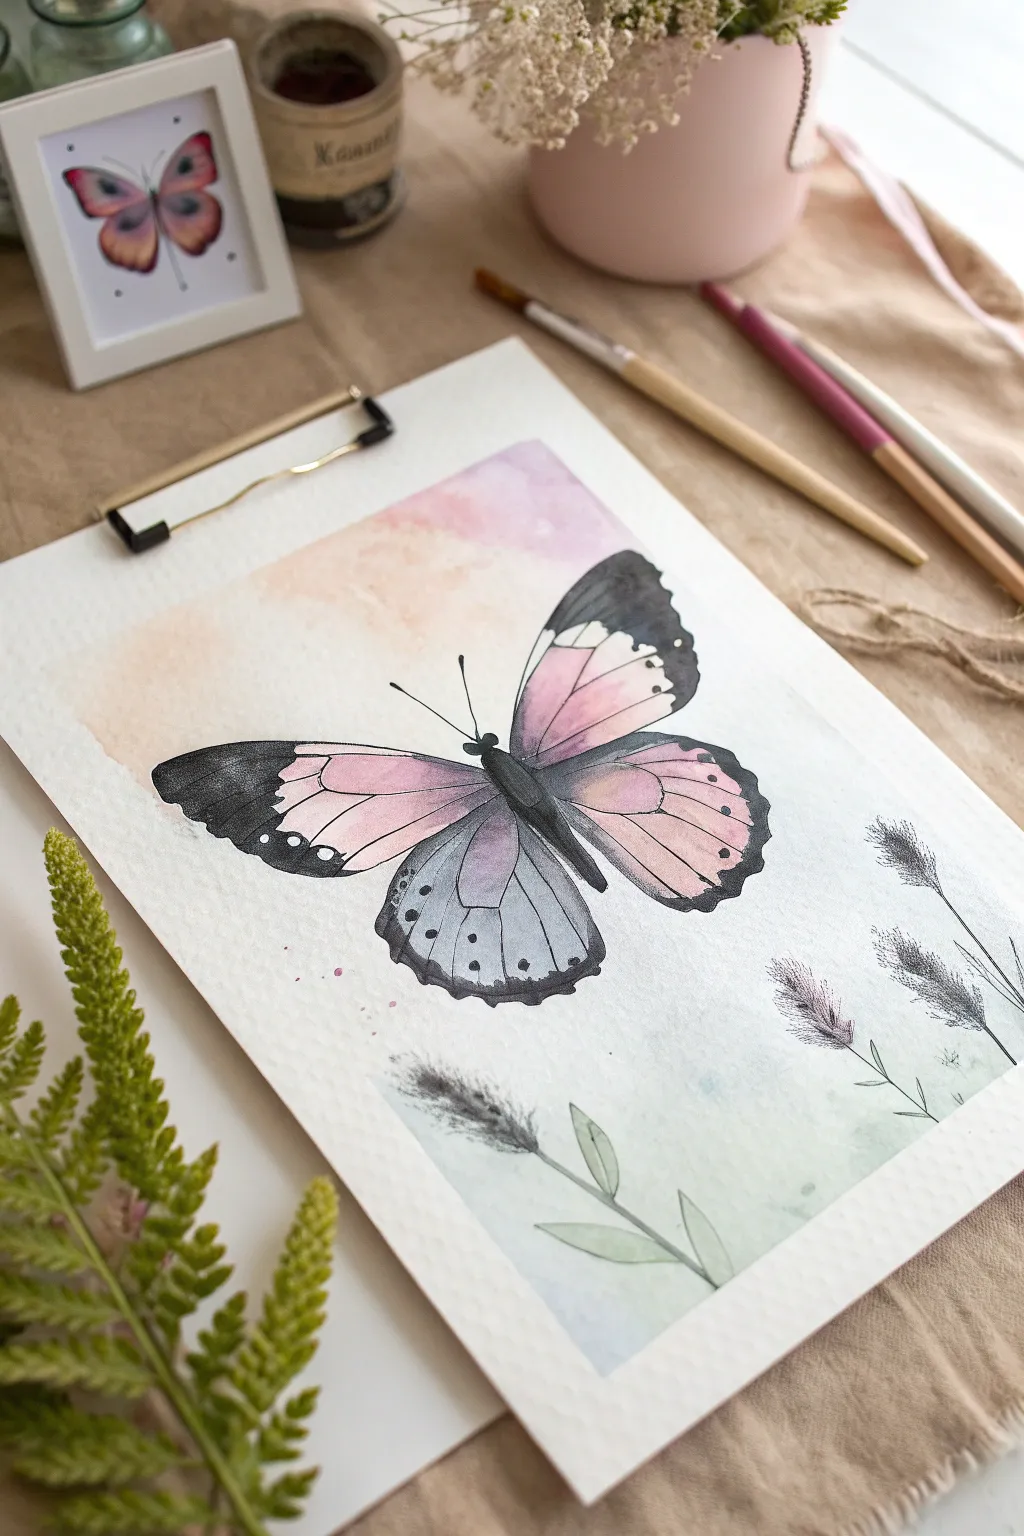
Capture the delicate beauty of spring with this soft and dreamy butterfly study. Using a loose wet-into-wet background combined with crisp ink details creates a lovely contrast that feels both organic and refined.
Step-by-Step
Materials
- Cold press watercolor paper (approx. 9×12 inches)
- Watercolor paints (Pink, Lavender, Indigo/Black, Burnt Sienna)
- Round watercolor brushes (Size 8 for washes, Size 2 or 4 for details)
- Fine liner pen (Black, waterproof) or very fine brush
- Pencil and eraser
- Masking tape or clipboard used in photo
- Clean water and paper towels
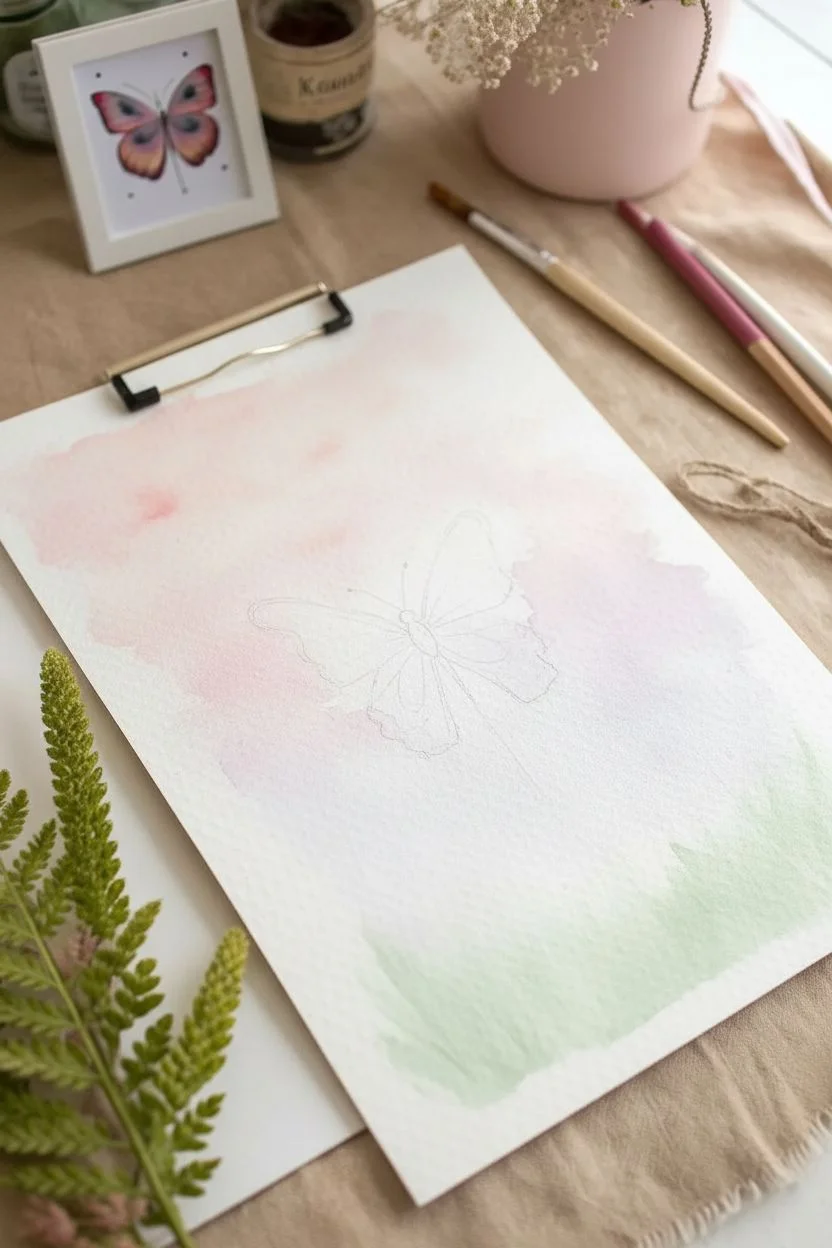
Step 1: Creating the Soft Background
-
Map the Composition:
Begin by lightly sketching the outline of your butterfly in the center of the page. Mark the wings, the central body, and the position where the grass will sit at the bottom. Keep pencil lines very faint so they do not show through the transparent paint later. -
Prepare the Paper:
Using your large round brush, apply clean water to the area surrounding the butterfly and inside the wing shapes, but avoid the very edges of the paper to keep a clean white border. The paper should be glisten, but not hold puddles. -
Apply the First Wash:
Load your brush with a very watery mix of soft pink and peach. Gently drop this color into the upper left quadrant of the background and parts of the upper wings. Let the color bloom naturally on the wet paper. -
Introduce Cool Tones:
While the paper is still damp, drop a watery lavender or pale violet mix into the lower right background area and the lower wings. Allow the pink and purple to meet and mix slightly on the page. -
Add Greenery Base:
Mix a very pale, watery green. Swipe this loosely across the bottom third of the paper to suggest a grassy field. Don’t worry about details yet; this is just the atmospheric underpainting. -
Let it Dry:
Allow this initial layer to dry completely. The paper must be bone dry before you add the crisp details on top to prevent bleeding.
Bleeding Lines?
If your black borders are bleeding too much into the pink wings, your base layer was too wet. Let the colorful wing sections dry completely before applying the dark charcoal outlines.
Step 2: Painting the Butterfly
-
Define the Top Wings:
Mix a stronger, more saturated pink. Paint the inner segments of the top wings, observing the shapes in the reference. Leave small white gaps or lighter areas near the center body for highlights. -
Paint the Lower Wings:
For the lower wings, use a mix of lavender and a touch of indigo to create a cool, dusty purple. Paint the inner sections, but keep the edges soft where they will meet the black borders. -
Create the Dark Borders:
Switch to your smaller brush and a concentrated mix of Indigo or Black. Carefully paint the outer edges of the wings. The top wings have a solid dark tip, while the bottom wings have a thinner, scalloped edge. -
Blend the Transitions:
While the black border is still slightly wet, use a clean, damp brush to soften the inner edge where the black meets the pink and purple. This creates that lovely gradient seen in nature. -
Add Wing Markings:
Once the wing colors are dry, use your fine brush or liner pen to add the specific details: the white spots on the upper wing tips (you can lift paint or paint around them) and the small black dots on the lower wings.
Pro Tip: Lifting Color
To get those bright white spots on the black wing tips, use a damp, stiff brush to ‘lift’ the black paint while it’s still semi-wet, revealing the white paper underneath.
Step 3: Details & Atmosphere
-
Paint the Body:
Using your darkest black mix, paint the thorax and abdomen of the butterfly. It should be a slender, segmented shape down the center. -
Draw Antennae:
With the very tip of your finest brush or a pen, draw two thin, curved lines extending from the head for the antennae. -
Illustrate Wild Grasses:
At the bottom right and left, paint wispy stems using a mix of black and green. Add feathery textures to the tops to resemble seeding grass heads. Keep these strokes quick and loose. -
Grounding Shadows:
Add a very faint wash of grey-green under the butterfly and near the grass stems to ground the composition and add depth. -
Splatter Texture:
Load a brush with watery pink or purple paint. Tap the handle against another brush to create tiny, subtle splatters around the butterfly wings for a magical, artistic effect. -
Final Assessment:
Step back and look at your contrast. If the wing veins need to be sharper, go over them one last time with your fine liner or smallest brush once the paper is totally dry.
Display your finished butterfly on a clipboard or in a simple white frame to let the soft colors shine

PENCIL GUIDE
Understanding Pencil Grades from H to B
From first sketch to finished drawing — learn pencil grades, line control, and shading techniques.
Explore the Full Guide
Bumblebee and Tiny Spring Flowers Close-Up
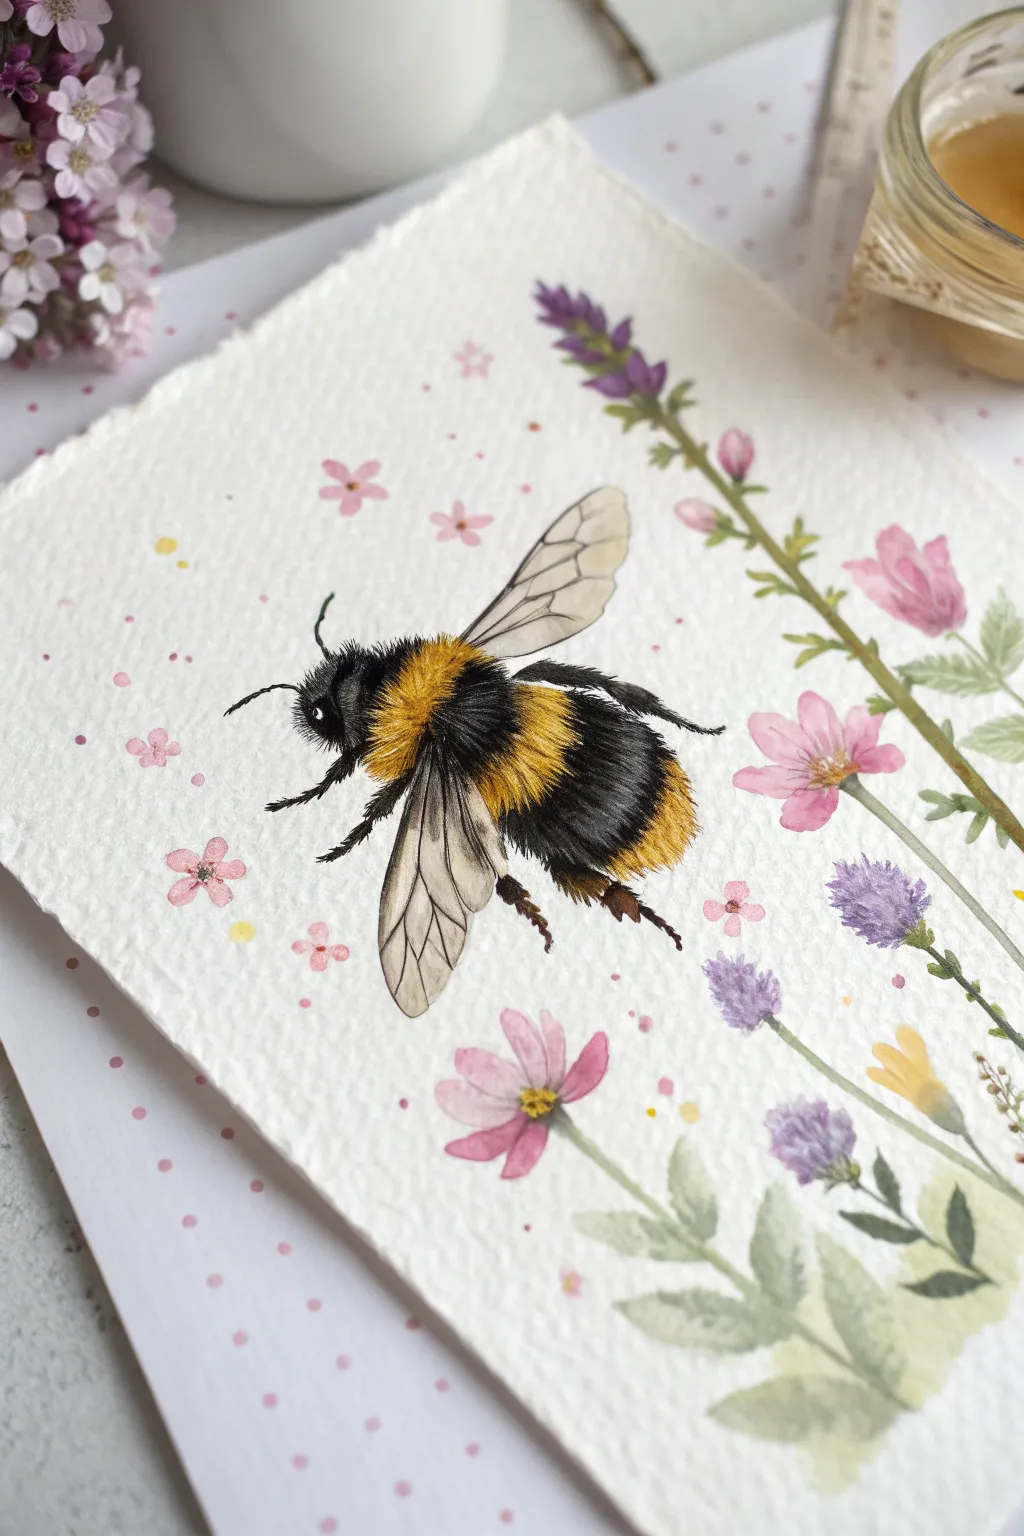
Capture the delicate hum of spring with this stunning watercolor and gouache study. You’ll layer soft floral washes around a highly detailed, fuzzy bumblebee using thick textured paper to enhance the realistic fur effect.
Step-by-Step Tutorial
Materials
- Heavyweight cold-press watercolor paper (300gsm or higher) with deckled edges
- Watercolor paints (Yellow Ochre, Burnt Umber, Lamp Black, Sap Green, Quinacridone Rose, Lavender)
- White Gouache (for opaque details)
- Round watercolor brushes (Size 4 and Size 0 or 00 for details)
- Pencil (HB or H for light sketching)
- Kneaded eraser
- Palette
- Two jars of water
- Paper towels
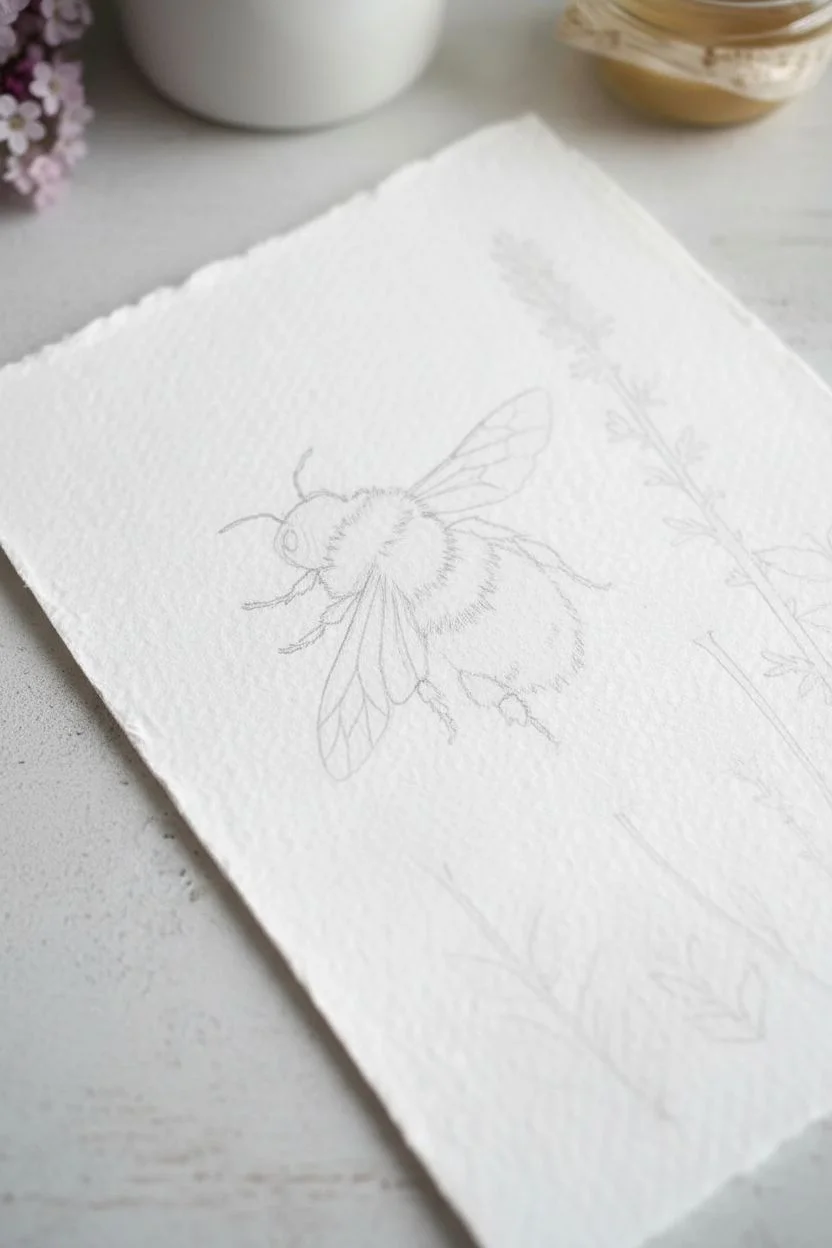
Step 1: Sketching the Layout
-
Outline the bee:
Begin by lightly sketching the oval shape of the bee’s body in the center of your page. Mark the division between the head, the fuzzy thorax (yellow part), and the abdomen. -
Add wings and legs:
Draw the two wings extending upwards and slightly back. Sketch the six legs: the front ones reaching forward and the back legs trailing behind, keeping the lines very faint. -
Map the flowers:
Loosely sketch the stems specifically on the right side, climbing upward. Add small circles and ovals around the bee to indicate where floating blossoms will go.
Muddy Fur?
If your black and yellow paints bleed into each other making green mud, ensure the first color is bone-dry before applying the next. Use a hairdryer to speed this up.
Step 2: Painting the Florals
-
First floral washes:
Mix a watery Sap Green. Paint the stems on the right side using a size 4 brush, keeping the pressure light to create thin, elegant lines. -
Adding pink blooms:
Dilute Quinacridone Rose to a soft pink. Dab in the petals for the wildflowers on the right and the scattered floating flowers on the left. -
Lavender touches:
Mix Lavender with a touch of blue. Paint the small, cone-shaped flower heads near the bottom right, using a stippling motion to suggest texture. -
Deepening the foliage:
While the green layer is dry, add a slightly darker green mix to the underside of the leaves on the right for shadow and dimension. -
Adding centers:
Use a tiny dot of yellow or dark pink in the center of your open flowers to give them focus. Let all floral elements dry completely before starting the bee.
Go 3D
Once the painting is dry, use a micron pen to outline just the undersides of the flower petals on the right. This adds a subtle illustrative quality and pop.
Step 3: The Bumblebee Body
-
Base yellow layer:
Mix a rich Yellow Ochre. Paint the thoracic band and the stripe on the bee’s abdomen. Use short, jagged brushstrokes at the edges to immediately suggest fur texture. -
Base black layer:
Fills in the head and the black stripes of the abdomen with Lamp Black. Again, keep the edges rough and uneven to mimic fuzziness. -
Painting the wings:
Use a very watery mix of black or grey to paint the transparent wings. Let the paper white influence the color; do not make this opaque. -
Wing veins:
Once the wing wash is dry, use your size 0 brush and a slightly darker grey to draw the delicate vein structure inside the wings.
Step 4: Detailing the Texture
-
Creating fur texture:
Load your smallest brush with concentrated black paint. Paint tiny, individual hairs flicking out from the black sections into the surrounding white paper and slightly overlapping the yellow zones. -
Adding lights:
Mix white gouache with a tiny bit of yellow. Paint fine hair strokes on top of the yellow sections to create volume and highlights. This makes the bee look round rather than flat. -
Grey fuzz:
Mix white gouache with a touch of black to make grey. Add subtle grey hairs on the black sections of the abdomen to show where the light hits the curve of the body. -
Defining the legs:
Paint the legs with solid black. Add tiny, thorn-like hairs to the legs for realism using the very tip of your detail brush. -
The eye:
Paint the small black eye on the head. Add a single, tiny dot of pure white gouache to the eye as a reflection highlight—this brings the creature to life.
Step 5: Final Atmosphere
-
Splatter effect:
Load a brush with watered-down pink or yellow. Tap the handle against another brush to gently splatter tiny droplets across the background for a magical pollen effect. -
Review and refine:
Step back and look at the composition. If the flowers seem too faint, add a second layer of translucent glaze to deepen the colors.
Your fuzzy friend is now ready to fly off the page
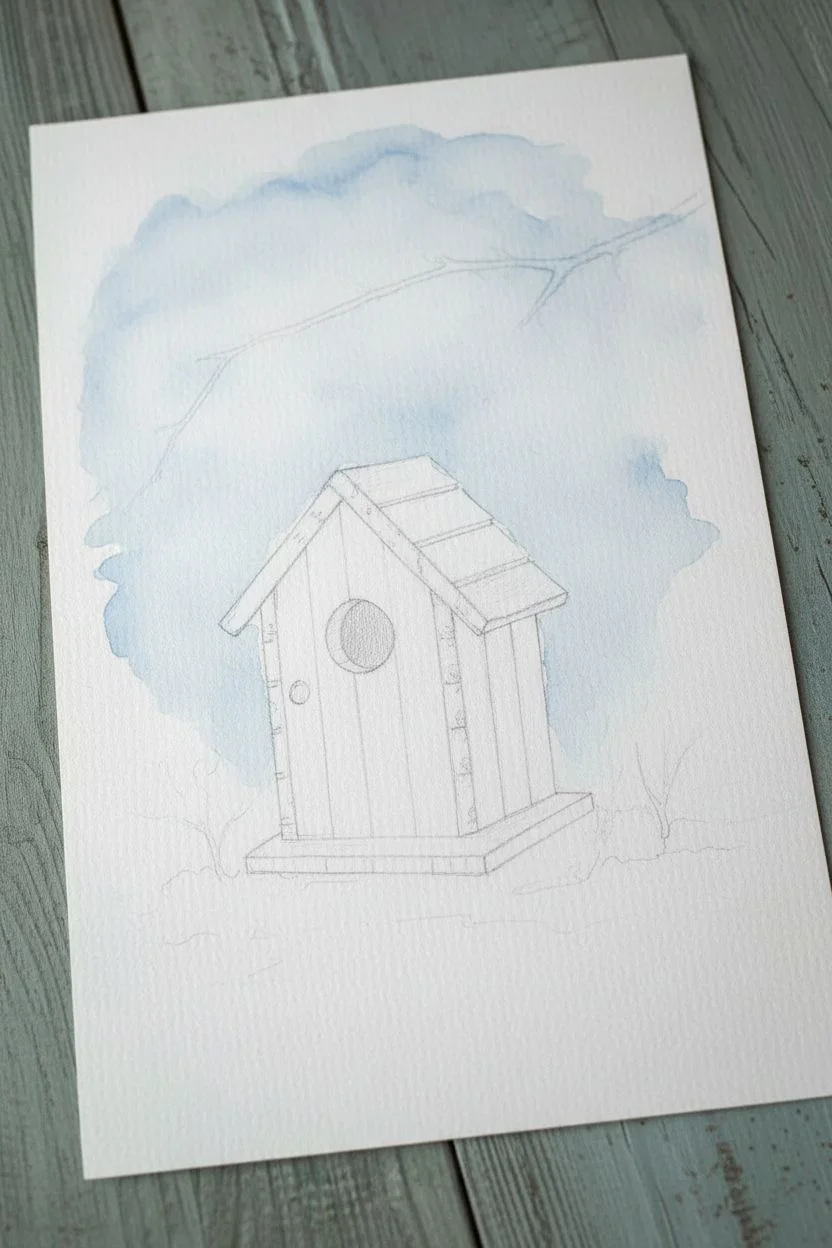
Easy Birdhouse With Wet-on-Wet Spring Sky
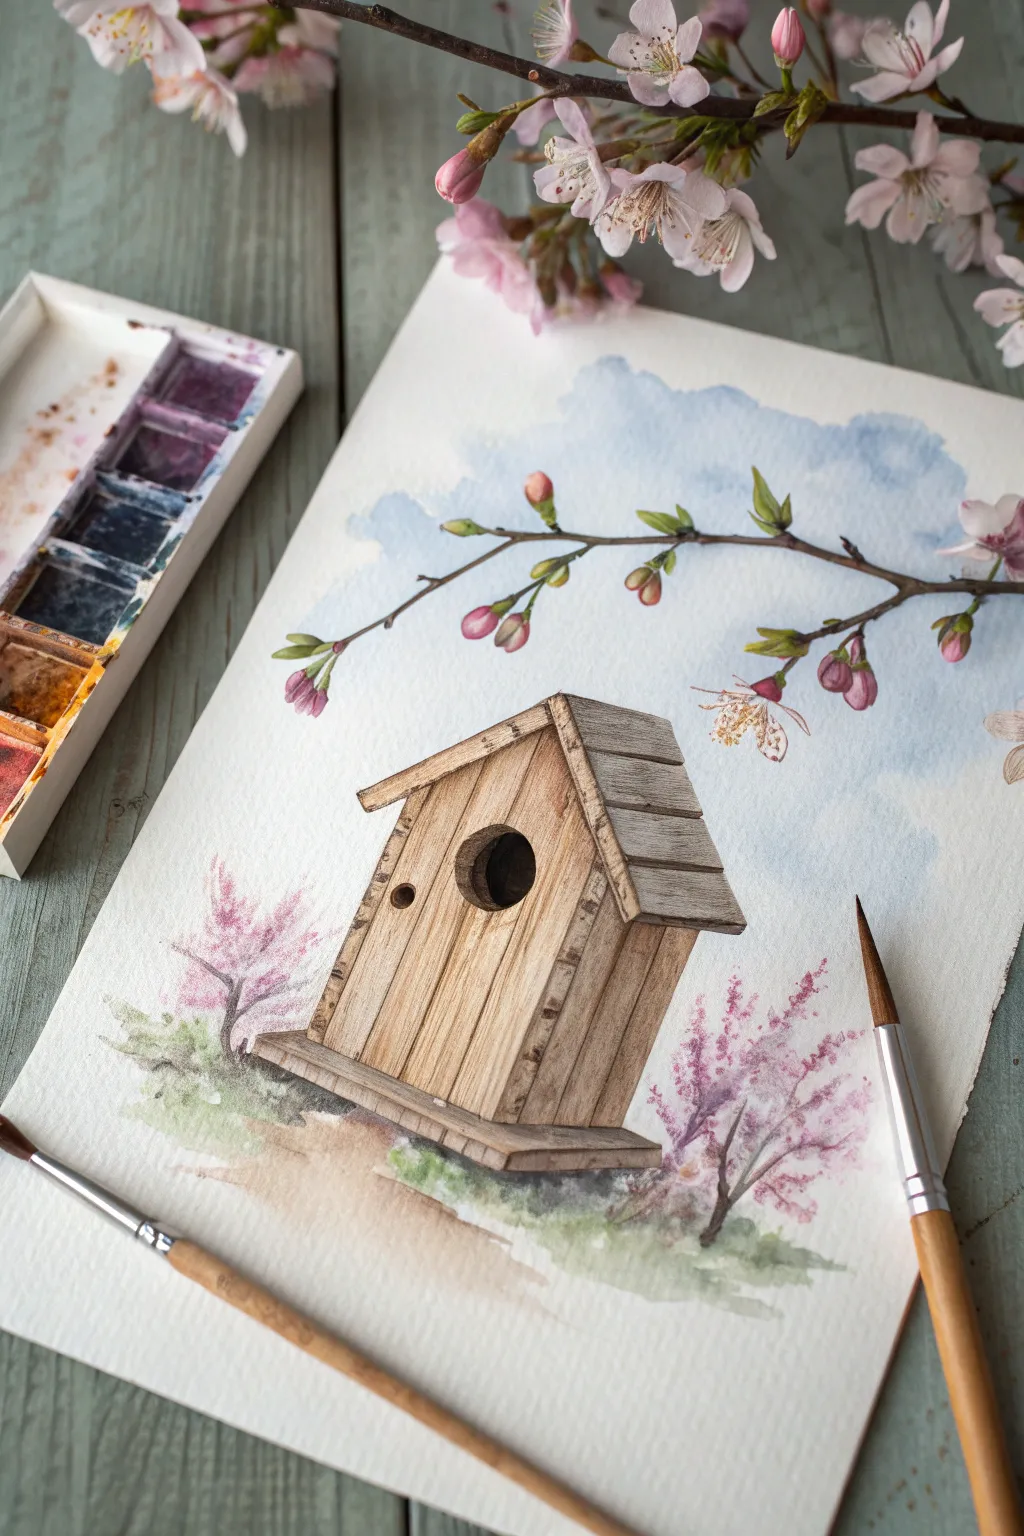
Capture the fresh feeling of spring with this charming watercolor birdhouse scene. By combining a loose, wet-on-wet sky with detailed wood textures and soft floral accents, you’ll create a piece that feels both rustic and airy.
Step-by-Step
Materials
- Cold press watercolor paper (300 gsm)
- Watercolor paints (Cobalt Blue, Burnt Sienna, Yellow Ochre, Sepia, Alizarin Crimson, Sap Green)
- Round brushes (flats for washes, size 2 or 4 for details)
- Pencil and eraser
- Clean water jar
- Paper towels
Step 1: Sketching and Sky
-
Draw the Outline:
Start by lightly sketching the birdhouse in the center of your paper. Draw a steeply pitched roof, a round entry hole, and a small peg below it. Keep your pencil lines faint so they disappear later. -
Add Nature Elements:
Sketch a long branch arching over the roof from the right side. Then, loosely indicate where the ground bushes will go on either side of the birdhouse base. -
Wet the Sky Area:
Using a larger clean brush, apply clear water to the sky area around the birdhouse and branch. Be careful not to get water inside your birdhouse sketch unless you want the paint to bleed. -
Wash in the Blue:
While the paper is glistening, drop in a diluted wash of Cobalt Blue. Let the color bloom and spread naturally rather than painting a solid block, leaving some white paper showing for a cloud-like effect. -
Let it Dry Completely:
Allow the sky layer to dry fully before moving on. The paper should feel room temperature to the touch, not cool.
Step 2: Painting the Wood Texture
-
Base Wood Tone:
Mix a light wash of Yellow Ochre and Burnt Sienna. Paint the entire face and side of the birdhouse with this warm, sandy color. -
Shadowing the Roof:
For the roof planks, use a slightly cooler mix by adding a touch of Sepia or gray to your brown. Paint the roof segments, leaving tiny gaps between the planks for definition. -
Creating Planks:
Once the base layer is dry, use a fine liner brush (size 0 or 2) and a darker mix of Burnt Sienna and Sepia to draw vertical lines down the front of the house, simulating individual wooden boards. -
Adding Wood Grain:
With the same dark mix but very little water on your brush (dry brush technique), gently drag rough, vertical streaks down the planks to mimic wood grain texture. -
Define the Shadow Side:
Glaze the right side and the shadowed area under the roof overhang with a transparent layer of Sepia to give the structure 3D form. -
The Entry Hole:
Paint the circular entry hole with a very dark, concentrated mix of Sepia or Payne’s Gray. Leave specific hard edges to show the thickness of the wood cut-out.
Fixing “Blooms”
If water pushes pigment into a dried area creating a cauliflower edge, soften it with a damp brush immediately. If dried, embrace it as texture.
Step 3: Blossoms and Branches
-
Paint the Upper Branch:
Use a mix of Burnt Sienna and Sepia to paint the main arching branch. Vary the pressure on your brush to make the branch thick in some spots and tapering in others. -
Add Green Buds:
Mix Sap Green with a little yellow. Paint small, teardrop-shaped leaflets emerging from the branch tips. -
Pink Blossoms:
Dip your clean brush into watery Alizarin Crimson or Rose. Touch the tip to the paper near the green buds to create soft, pink flower buds. -
Ground Bushes:
Wet the bottom corners of the paper slightly. Touch in spots of green for grass, then drop in touches of pink for the flowering bushes, letting the colors bleed softly together for a dreamy foreground. -
Final Contrast:
Once everything is bone dry, add the final tiny dark details: the nail heads on the wood planks and the darkest shadows under the eaves.
Level Up
Use a white gel pen to add tiny highlights to the birdhouse nail heads or to draw delicate stamens inside the larger pink blossoms.
Now you have a serene little spring sanctuary ready to frame


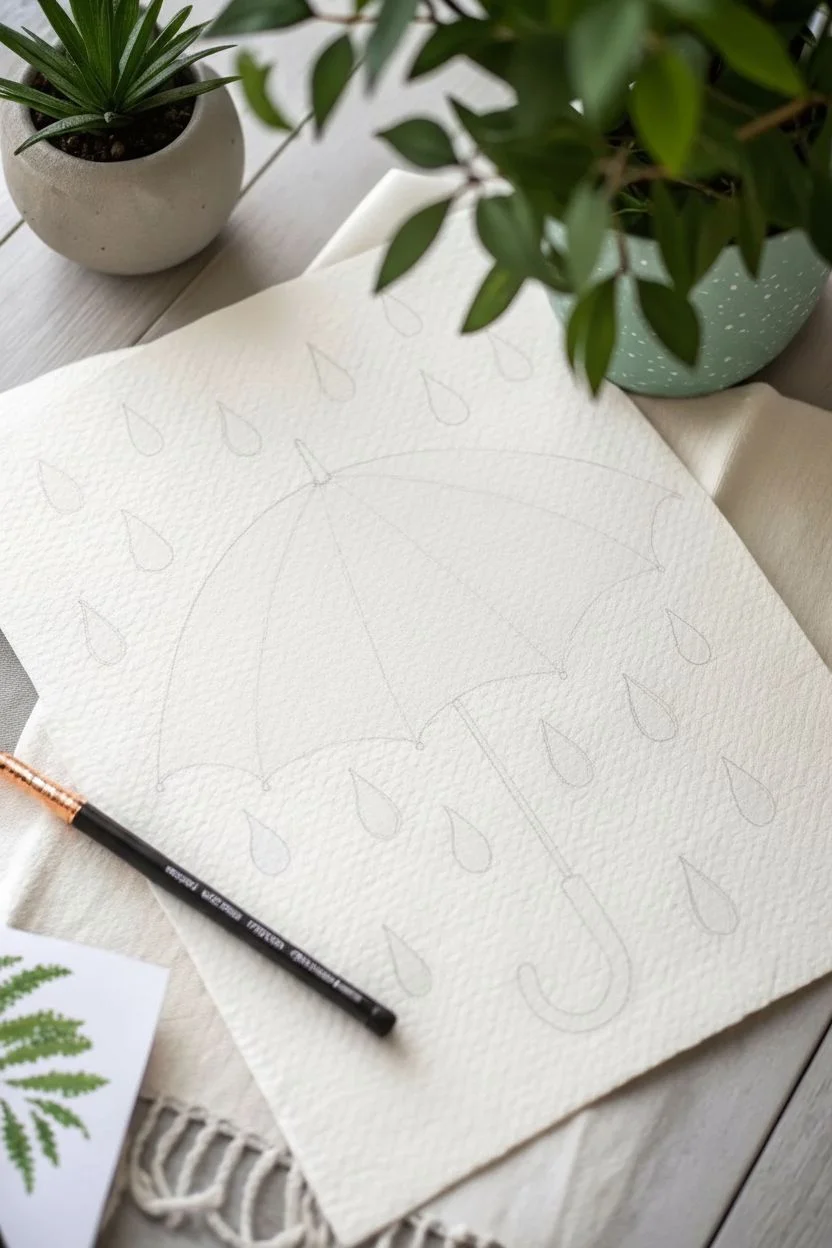
April Showers Umbrella With Raindrop Splatter
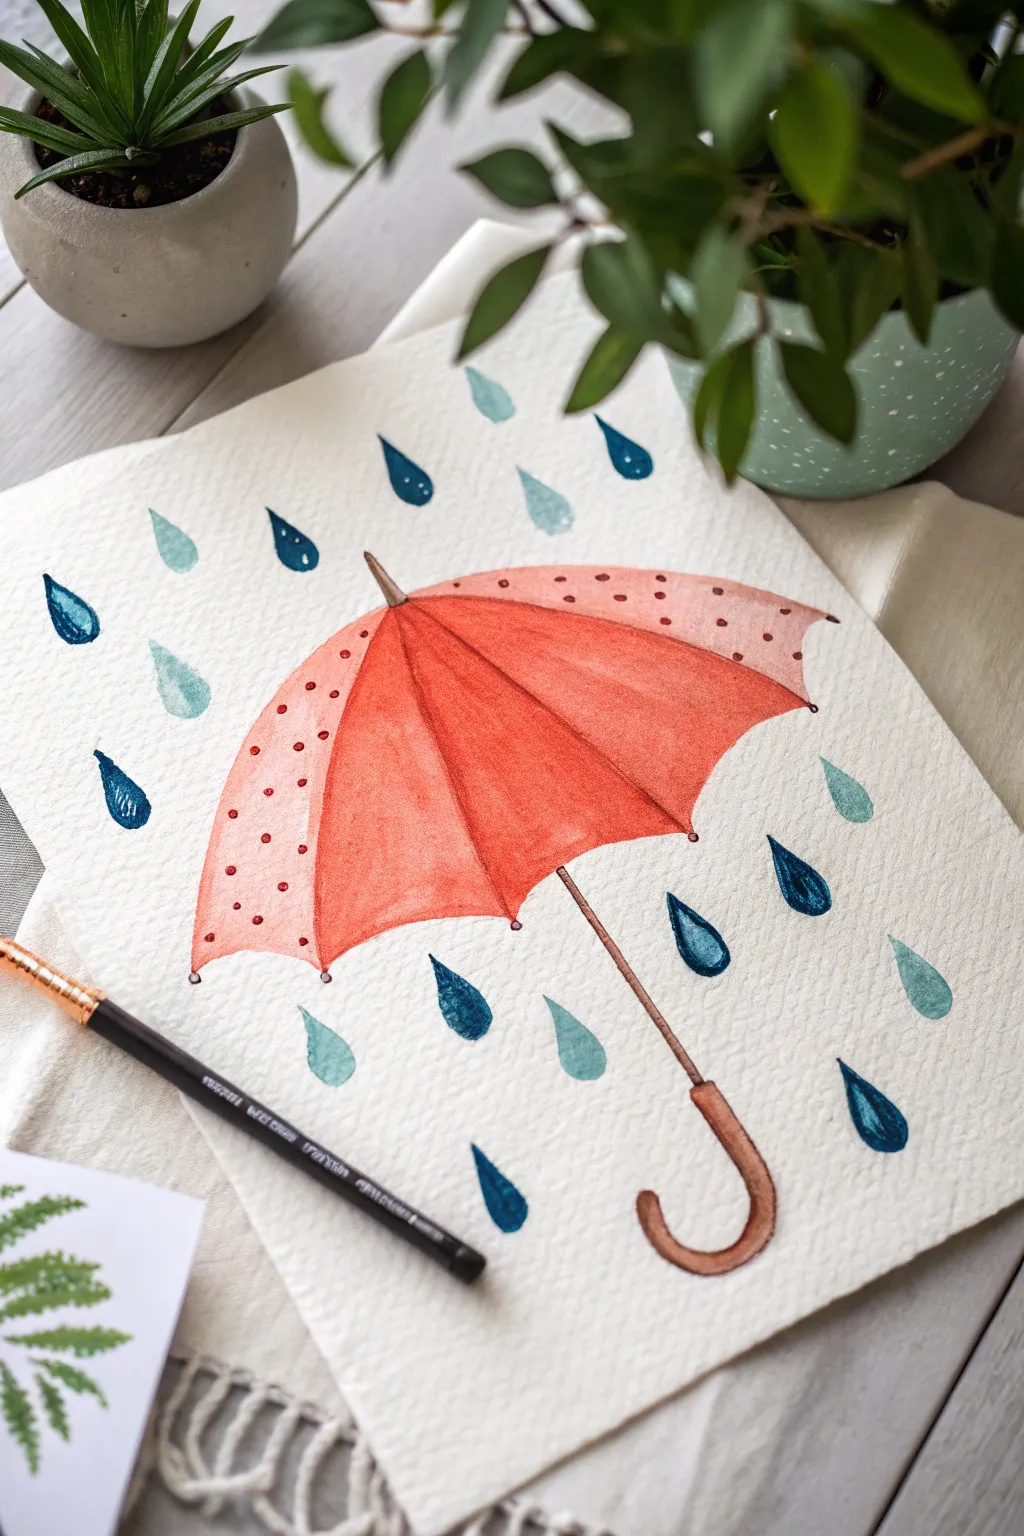
Capture the cozy essence of a rainy spring day with this charming watercolor illustration. Featuring a vibrant coral-red umbrella and playful raindrop patterns, this simple project is perfect for practicing wet-on-dry techniques and transparency control.
Step-by-Step Tutorial
Materials
- Cold press watercolor paper (approx. 140lb/300gsm)
- Watercolor paints (Coral/Cadmium Red, Indigo Blue, Teal/Turquoise, Brown/Burnt Sienna)
- Round watercolor brush (size 4 or 6)
- Fine detail brush (size 0 or 1)
- Pencil (HB or H)
- Kneaded eraser
- Jar of clean water
- Paper towel
Step 1: Sketching the Outline
-
Draw the main curve:
Start by lightly sketching a large, gentle arc in the center of your paper to form the top of the umbrella canopy. Sketching lightly is key here so pencil marks don’t show through the paint later. -
Add the scallops:
Connect the ends of your arc with a series of smaller, inverted curves (scallops) at the bottom. Aim for about six points or ribs along the bottom edge. -
Draw the ribs:
Draw curved lines extending from the very top center point of the umbrella down to each of the points on the scalloped edge. These distinct sections will give the umbrella its 3D form. -
Sketch the handle:
Add a small nub at the very top for the ferrule. Then, draw a long, slender stick coming from the center bottom, curving into a ‘J’ shape for the handle. -
Place the raindrops:
Lightly sketch teardrop shapes scattered randomly around the umbrella. Vary their orientation slightly so they look like they are falling naturally. -
Clean up the sketch:
Use your kneaded eraser to gently lift the graphite until the lines are just barely visible, preparing the paper for transparent washes.
Step 2: Painting the Umbrella
-
Mix your umbrella color:
Create a watery mix of coral red or cadmium red light. You want a nice, vibrant tone that isn’t too thick. -
Paint alternating panels:
To prevent colors from bleeding into each other, paint every other panel of the umbrella first (e.g., the far left, middle, and far right sections). Fill them in with a solid wash of your coral color. -
Let the first layer dry:
Wait for these panels to dry completely. This is crucial for crisp edges between the umbrella ribs. -
Fill remaining panels:
Paint the remaining white sections with the same coral mix. Because the adjacent sections are dry, you’ll get a nice hard edge that defines the structure. -
Add polka dots:
Once the base layer is 100% dry, mix a slightly more concentrated red-brown or deeper red. Using the tip of your brush, dab small dots onto the outer panels of the umbrella for a patterned effect. -
Paint the handle:
Switch to a brown or burnt sienna mix. Carefully paint the center rod and the curved handle with your fine detail brush. -
Add the ferrule:
Paint the small nub at the very top of the umbrella with the same brown shade.
Wet-Edge Wonder
To get that crisp ‘hard edge’ look on the raindrops, load your brush with plenty of water and pigment. Don’t rework the drop once painted; let the pigment settle naturally at the edges as it dries.
Step 3: Painting the Rain
-
Prepare two blue mixes:
On your palette, mix two puddles of paint: one utilizing a deep indigo blue and another using a brighter teal or turquoise. -
Paint teal drops:
Select several of your sketched raindrops and fill them in with the teal mix. I like to keep these washes quite watery to keep the feeling light. -
Paint indigo drops:
Fill the remaining raindrop shapes with the darker indigo blue. This variation in color creates depth and makes the composition more interesting. -
Add final details:
If you want sharp definition, you can add tiny little dark brown dots at the tips of the umbrella ribs (where the fabric points end).
Pattern Play
Instead of polka dots, try painting thin stripes, plaids, or tiny flowers on the umbrella panels once the base wash is dry for a totally unique seasonal style.
Allow your painting to dry flat completely before framing or gifting this sweet spring scene
Rainbow After Rain With Soft Cloud Blending
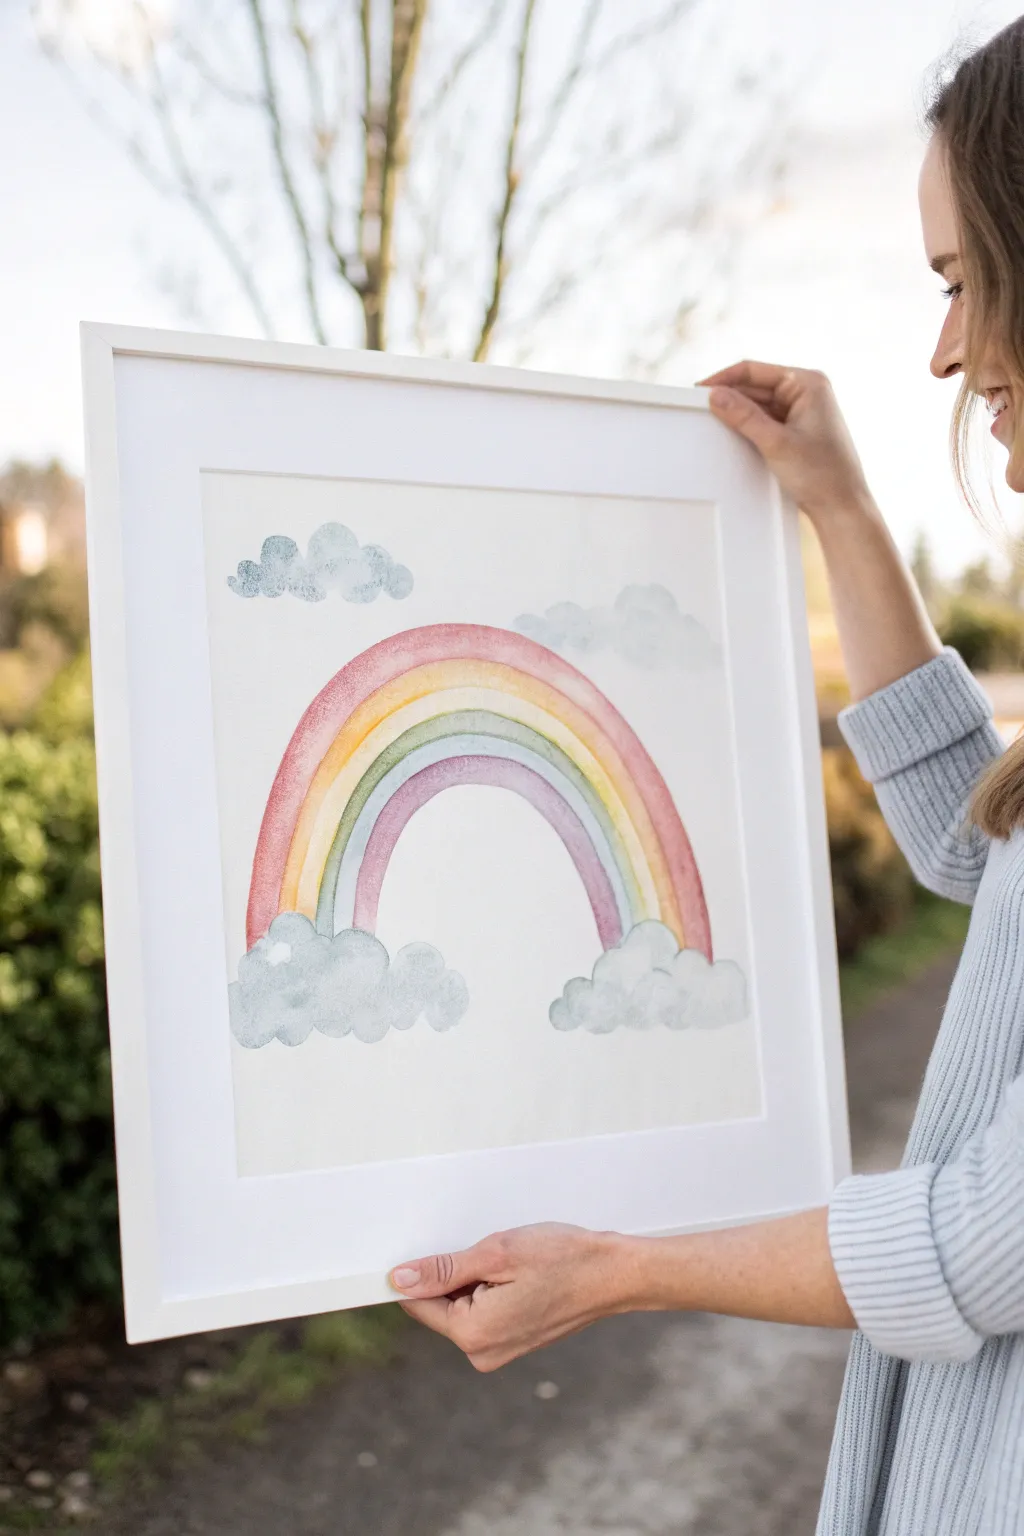

Capture the gentle hope of spring with this soft, pastel rainbow watercolor painting featuring airy, textured clouds. Using cold-press paper and delicate blending techniques creates a soothing piece perfect for a nursery or bright living space.
Detailed Instructions
Materials
- Cold-press watercolor paper (300gsm)
- Watercolor paints (Red, Orange, Yellow, Green, Blue, Indigo/Violet)
- Round watercolor brushes (Size 8 and Size 4)
- Pencil (HB or lighter)
- Clean water jar
- Paper towels
- Compass or round objects to trace
- Eraser
Step 1: Preparation & Sketching
-
Paper Setup:
Begin by securing your watercolor paper to a flat surface using masking tape around the edges. This prevents buckling when the paper gets wet and creates a crisp white border later. -
Mark the Base:
Lightly mark a horizontal line near the bottom third of your paper with a pencil. This will serve as the anchor point for your rainbow’s arches and the bottom clouds. -
Sketch the Arcs:
Using a compass or by carefully tracing concentric round objects, lightly sketch the rainbow arches. Start with the outermost arc and work inward, leaving about half an inch of space between each line for the distinct color bands. -
Outline Clouds:
Sketch fluffy, cloud-like shapes at the base of each side of the rainbow where the arcs meet your horizon line. Add two floating cloud clusters in the upper sky area to balance the composition. -
Lighten Guidelines:
Gently roll a kneaded eraser over your sketch lines. You want them to be barely visible so the graphite doesn’t show through the translucent watercolor paint later.
Clean Water Secret
Use two jars of water: one for rinsing dirty brushes and one strictly for clean water. This keeps your pastel yellow and white areas from turning muddy grey.
Step 2: Painting the Rainbow
-
Mix Your Palette:
Prepare your watercolor paints on a palette. Dilute the pigments with plenty of water to achieve soft, pastel hues rather than vibrant, saturated tones. Test the colors on a scrap piece of paper first. -
First Arc: Red:
Load your size 8 brush with watered-down red. Paint the outermost arc with a steady hand. If the color looks too uneven, quickly run a clean, damp brush over it to smooth the pigment. -
Second Arc: Orange & Yellow:
Wait for the red band to be touch-dry so colors don’t bleed. Paint the next inner band with pale orange, followed by a soft yellow band. It’s important to let each stripe dry completely before starting the next neighbor. -
Cool Tones:
Continue working inward with soft green, blue, and finally a violet or indigo center. Keeping the paint consistency watery ensures that lovely watercolor texture shines through. -
Softening Edges:
If any edge looks too harsh, I like to gently soften it with a clean, slightly damp brush while the paint is still wet, but be careful not to muddy the colors.
Bloom Control
If a darker color bleeds into a lighter one, quickly blot the mistake with a clean corner of a paper towel to lift the pigment, then smooth with a damp brush.
Step 3: Creating Fluffy Clouds
-
Wet-on-Wet Technique:
For the clouds at the base, pre-wet the outlined cloud shape with clean water until the paper has a slight sheen but no puddles. -
Drop in Color:
Load a size 4 brush with a diluted blue-grey mix. Gently touch the tip of the brush to the wet paper, letting the pigment bloom and spread naturally within the wet shape. -
Building Volume:
Add slightly concentrated dots of the blue-grey to the bottom edges of the ‘fluffs’ to create shadow and dimension, leaving the tops of the cloud bumps mostly white. -
Upper Clouds:
Repeat this wet-on-wet process for the floating clouds in the sky. Keeps these even lighter and airier than the base clouds for a sense of distance. -
Final Touches:
Once everything is fully dry (give it at least an hour), carefully peel off the masking tape at a 45-degree angle to reveal your clean edges.
Frame your beautiful new artwork behind glass to protect those delicate watercolors and enjoy the splash of color
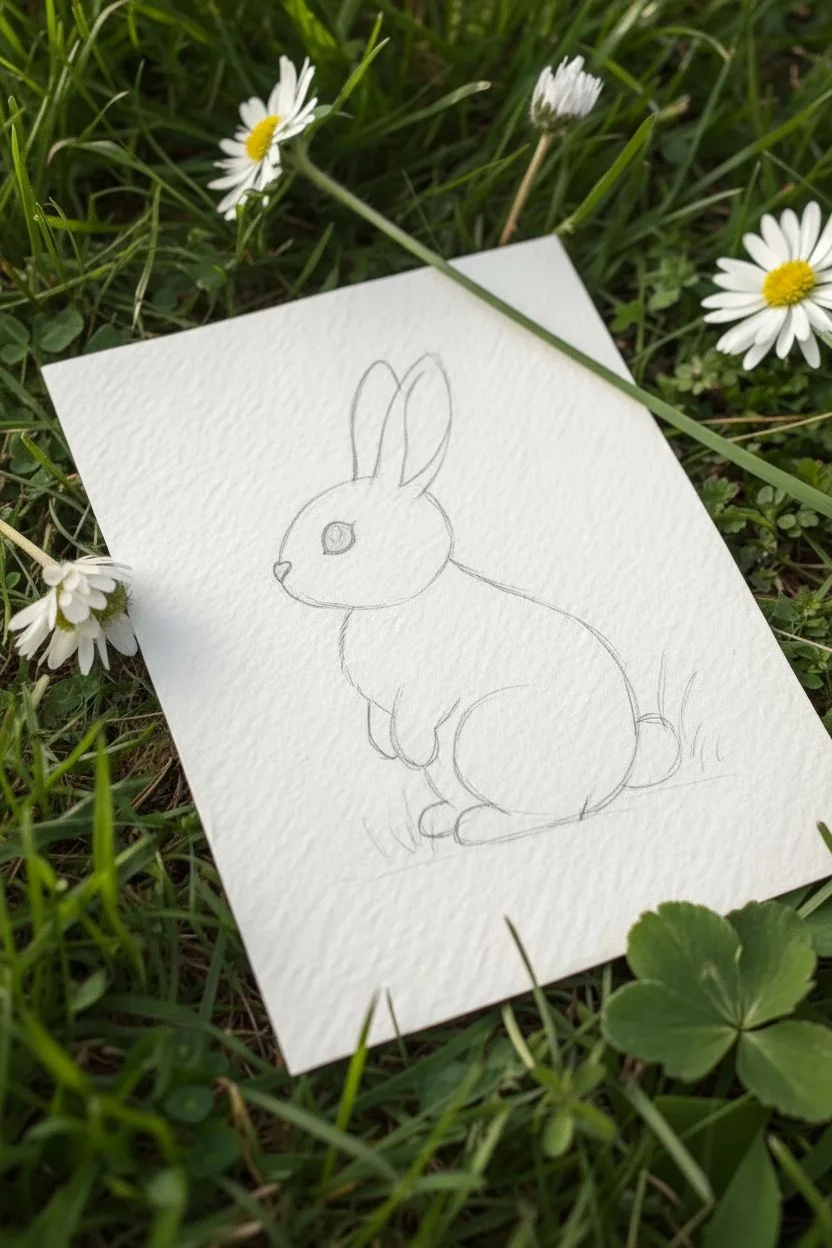
Baby Bunny in Spring Grass (Simple Shapes Only)
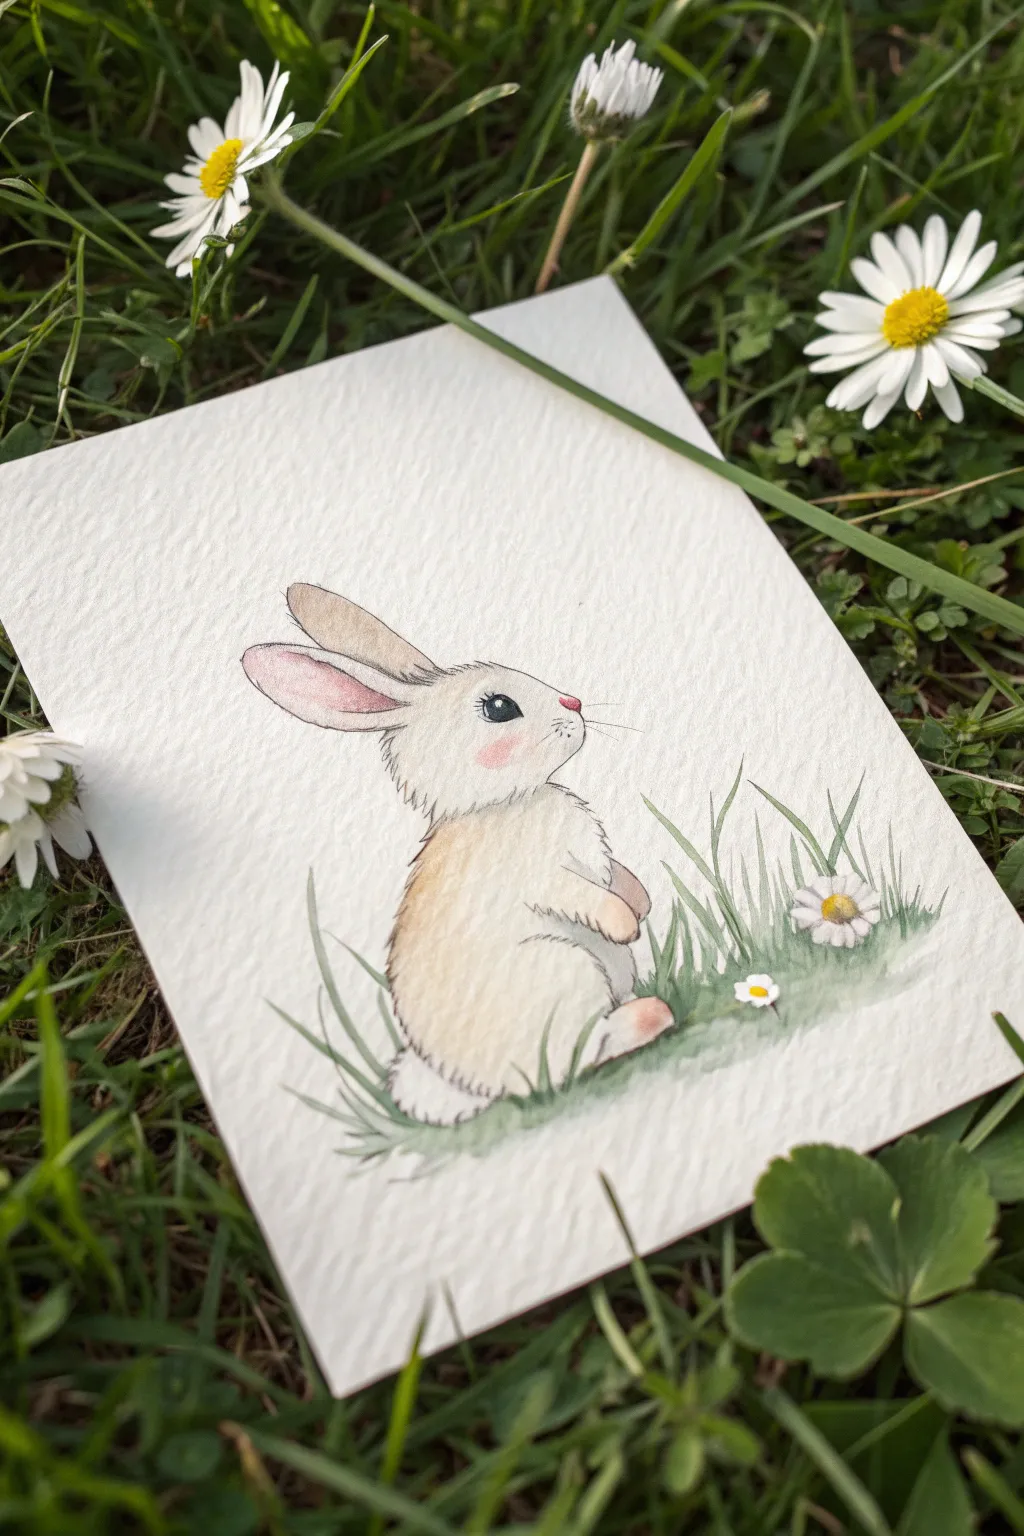
Capture the sweetness of spring with this darling bunny portrait, painted on textured watercolor paper for a lovely organic feel. By combining simple oval shapes with delicate pen outlines, you’ll create a soft, illustrative character nestled among daisies and grass.
How-To Guide
Materials
- Cold-press watercolor paper (300gsm/140lb)
- HB Pencil and kneaded eraser
- Watercolor paints (Yellow Ochre, Burnt Sienna, Alizarin Crimson, Sap Green, Indigo)
- Small round brushes (size 2 and 4)
- Fine liner pen (01 or 03, waterproof brown or grey ink)
- Paper towel
- Two jars of water
Step 1: Sketching the Basics
-
Head and Body:
Start lightly with your HB pencil. Draw a slightly flattened circle for the head. Just below and slightly behind it, draw a larger oval shape for the body, angling it slightly backward to suggest a sitting posture. -
Ears and Limbs:
Add two long, petal-like shapes for the ears extending back from the top of the head. Sketch a small, curved shape on the front of the body for the front paws and a larger, rounded haunch at the bottom for the back leg and tail. -
Refining Features:
Erase your internal guidelines gently. Define the profile of the face with a small nose bump and a large, almond-shaped eye. Sketch in a few wispy blades of grass around the bunny’s feet to ground the composition.
Furry Edges
If your fur looks too solid, try using a dry brush technique. Wipe most paint off your brush and drag it lightly over the paper’s texture.
Step 2: Inking the Outline
-
Fine Liner Work:
Using a waterproof brown or grey fine liner, trace over your pencil sketch. Instead of a solid continuous line, use short, broken strokes to mimic the texture of soft fur. -
Adding Details:
Be sure to add whiskers and small tufts of fur inside the ears. Ink the grass blades with quick, upward flickering strokes. Once the ink is totally dry, erase all remaining pencil marks.
Too Much Water?
Hard edges or ‘blooms’ happen if water pools. Dab excess water immediately with a corner of a paper towel to lift it before it dries.
Step 3: Painting the Bunny
-
Base Wash:
Mix a very dilute wash of Yellow Ochre with a tiny touch of Burnt Sienna. With a size 4 brush, paint the body and head, leaving the belly, tail, and muzzle white for highlights. -
Softening Edges:
While the paint is still damp, use a clean, slightly wet brush to soften the edges where the color meets the white paper, creating a fuzzy, blended look. -
Pink Accents:
Mix a watery Alizarin Crimson. Gently paint the inside of the ear, the nose tip, and add a soft blush circle on the cheek. I like to let this bleed slightly into the surrounding wet fur for a natural flush. -
The Eye:
Using a concentrated mix of Indigo or black, carefully paint the eye, leaving a tiny white unpainted speck for the catchlight to make the bunny look alive. -
Fur Texture:
Once the base layer is dry, use a drier brush with a slightly darker brown mix to flick tiny hair-like strokes on the back and ears to build depth.
Step 4: Painting the Surroundings
-
Grassy Greens:
Mix Sap Green with a little Indigo for a natural grass tone. Paint the individual blades of grass using upward strokes, varying the pressure to get tapered tips. -
Ground shadow:
Dilute your green mix significantly with water. Sweep a loose, horizontal wash under the bunny and grass blades to create a soft ground shadow, so the figure isn’t floating. -
Daisy Details:
If you sketched flowers, paint the centers with a dab of yellow. Use a very light grey wash to define the shadows on the white petals, giving them dimension without darkening them too much. -
Final White Touches:
If needed, use a white gel pen or opaque white gouache to reclaim any lost whiskers or add extra brightness to the tail and eye highlight.
Place this sweet painting in a small frame or use it as a heartfelt greeting card for a spring occasion


Have a question or want to share your own experience? I'd love to hear from you in the comments below!