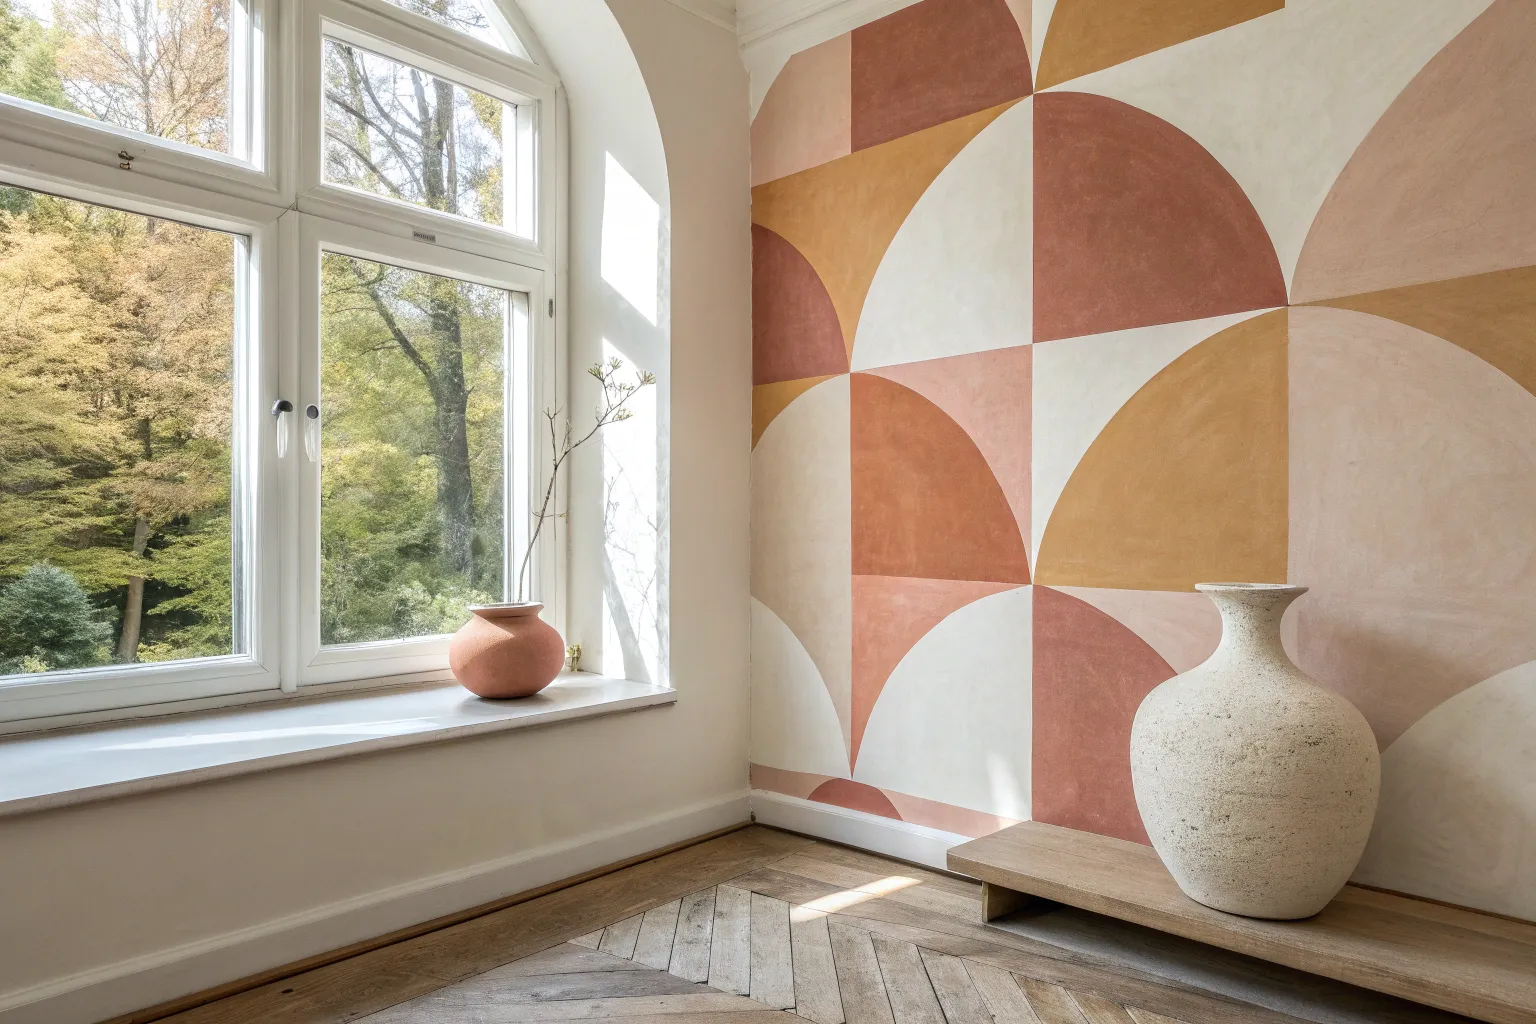
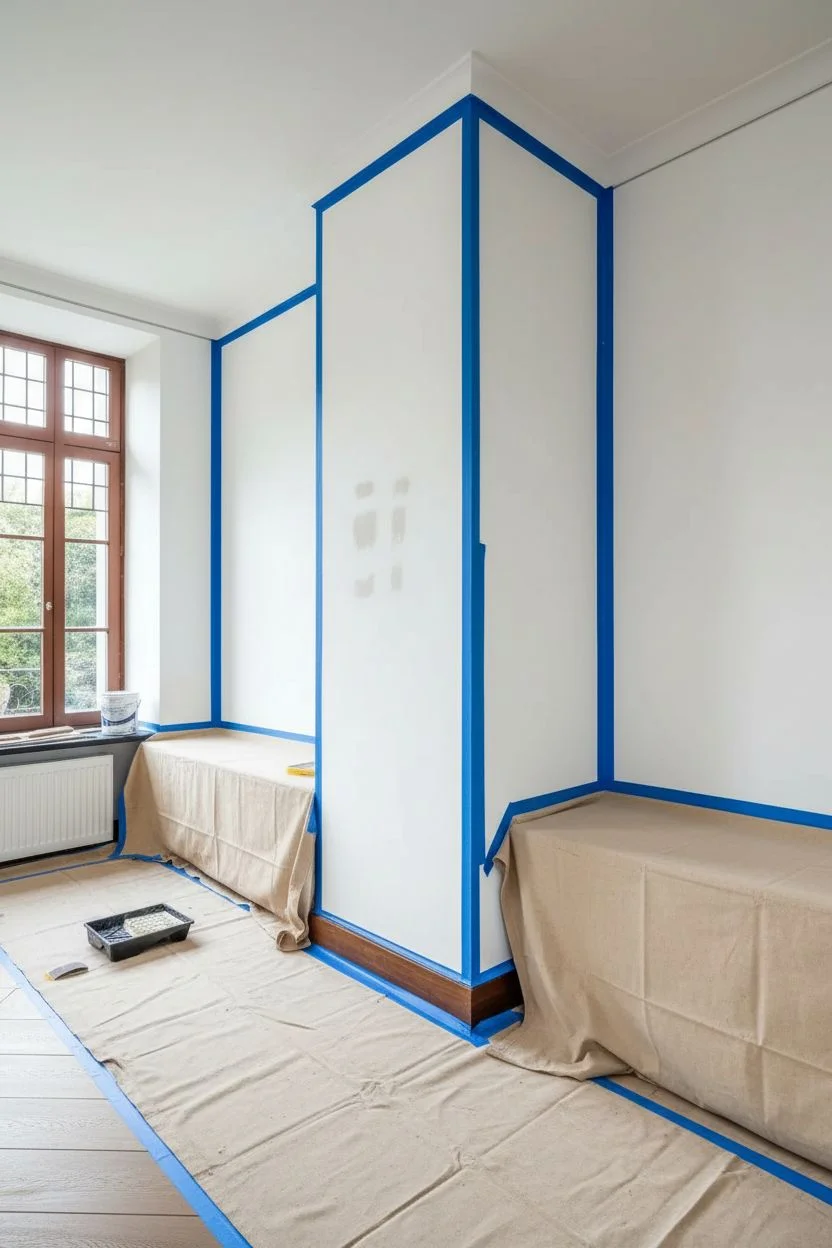
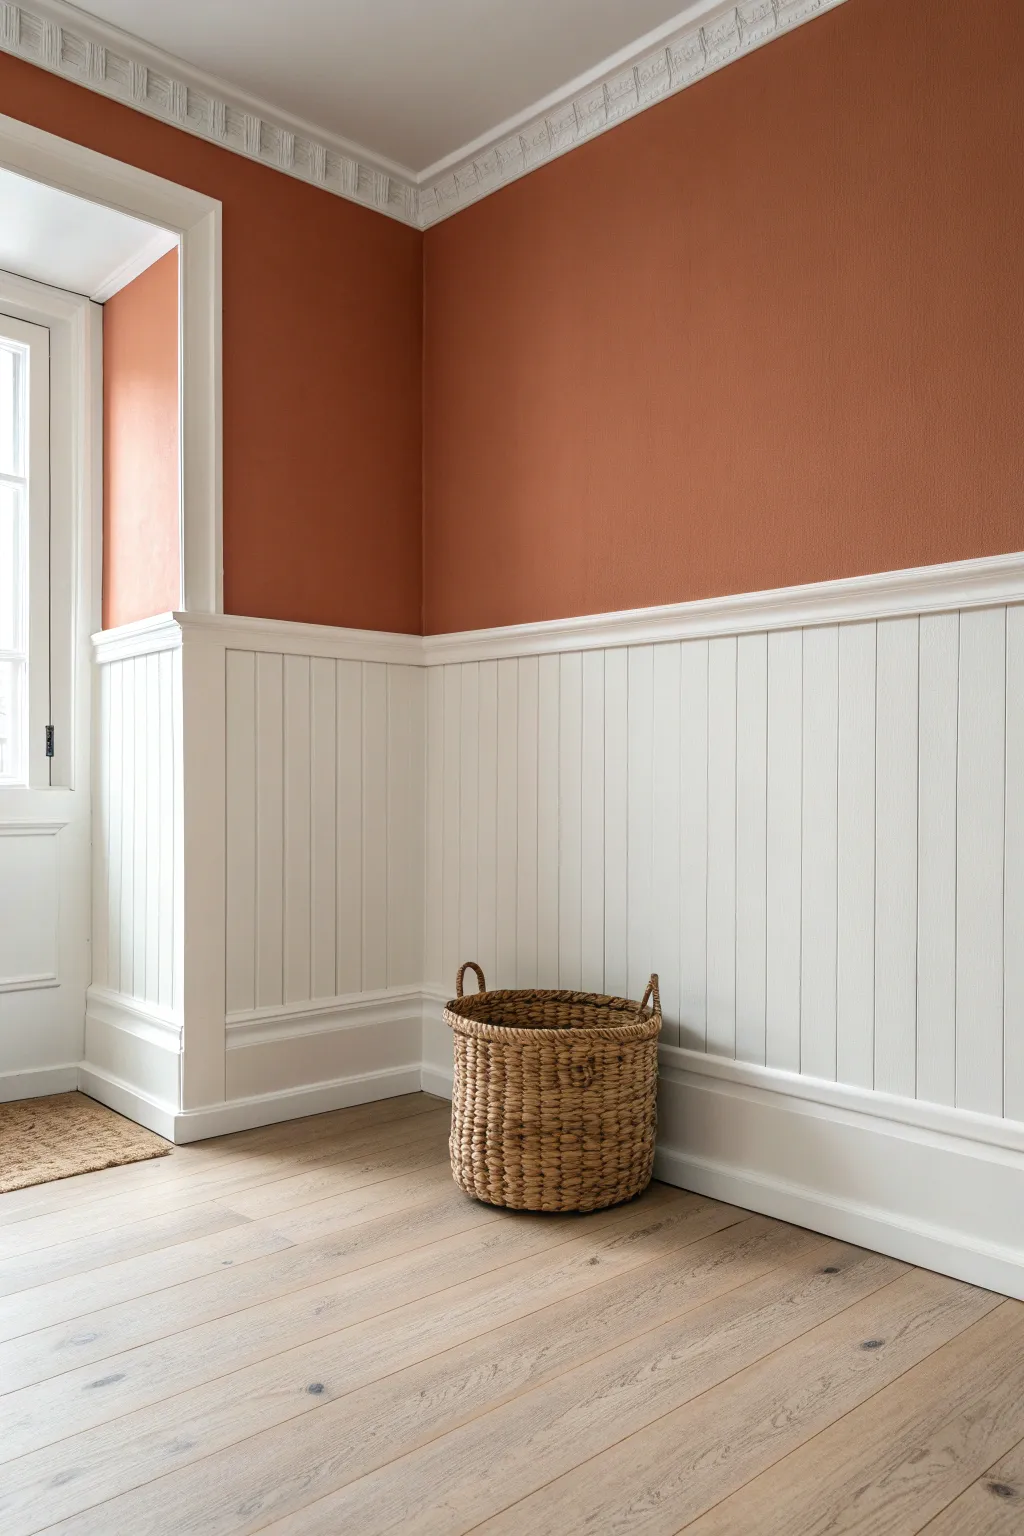
Corners are the sneaky little spots that can make a room feel styled on purpose—or totally forgotten. With the right corner wall painting approach, that sharp 90-degree angle becomes your favorite mini feature wall and a built-in zone maker.
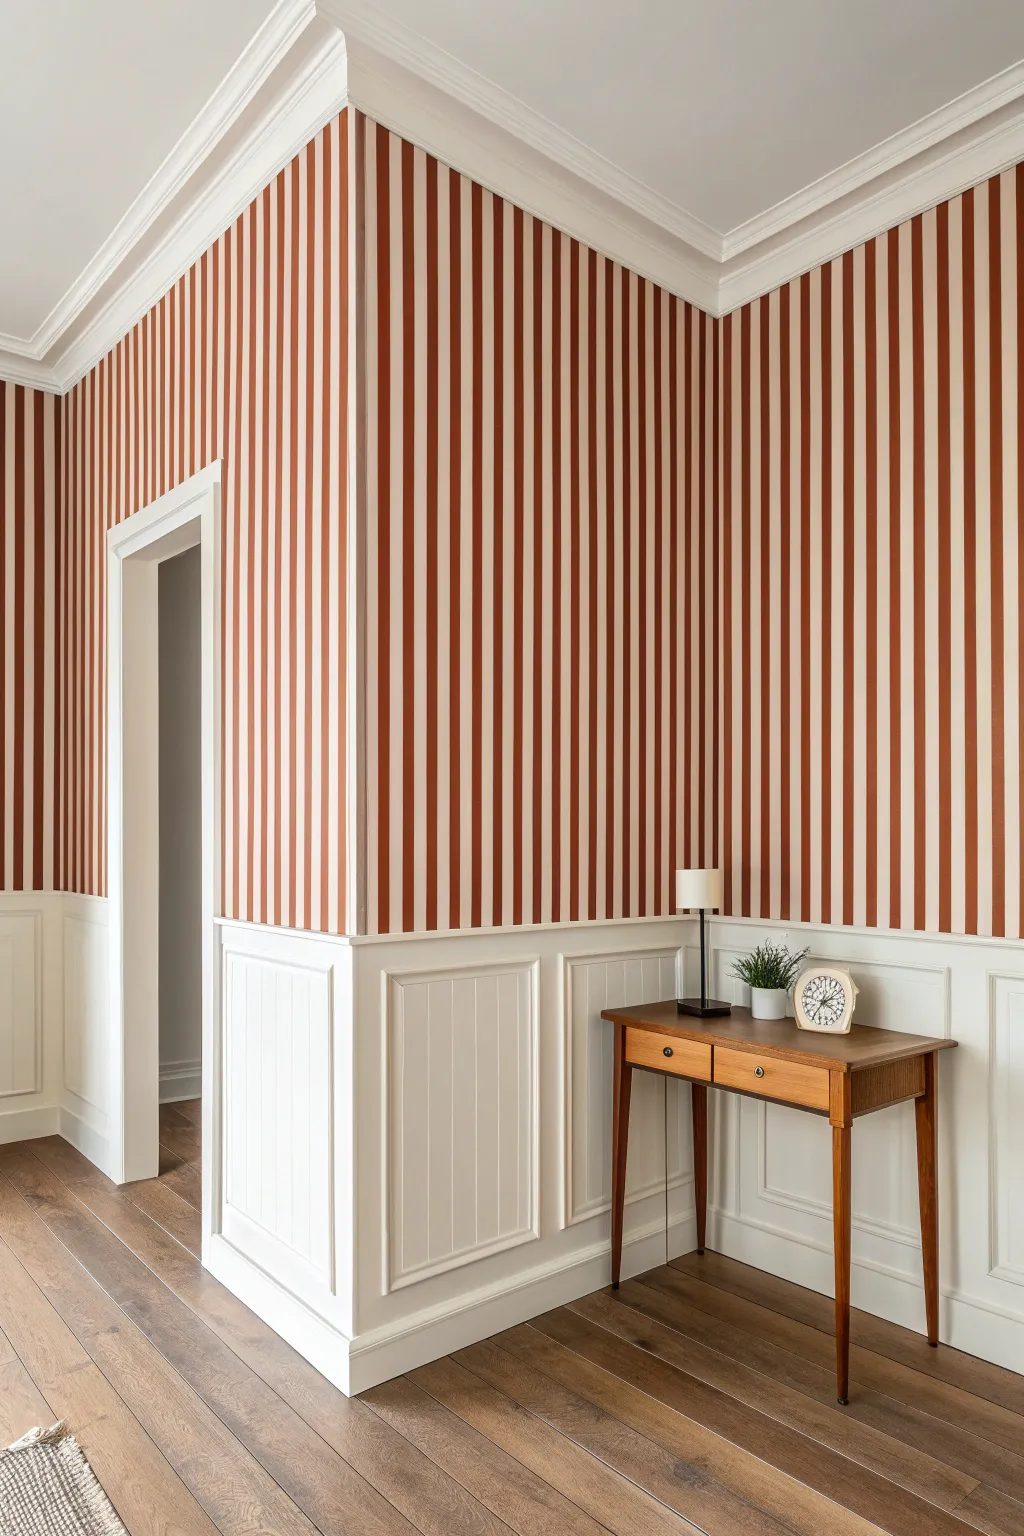
Two-Tone Corner Color Blocking
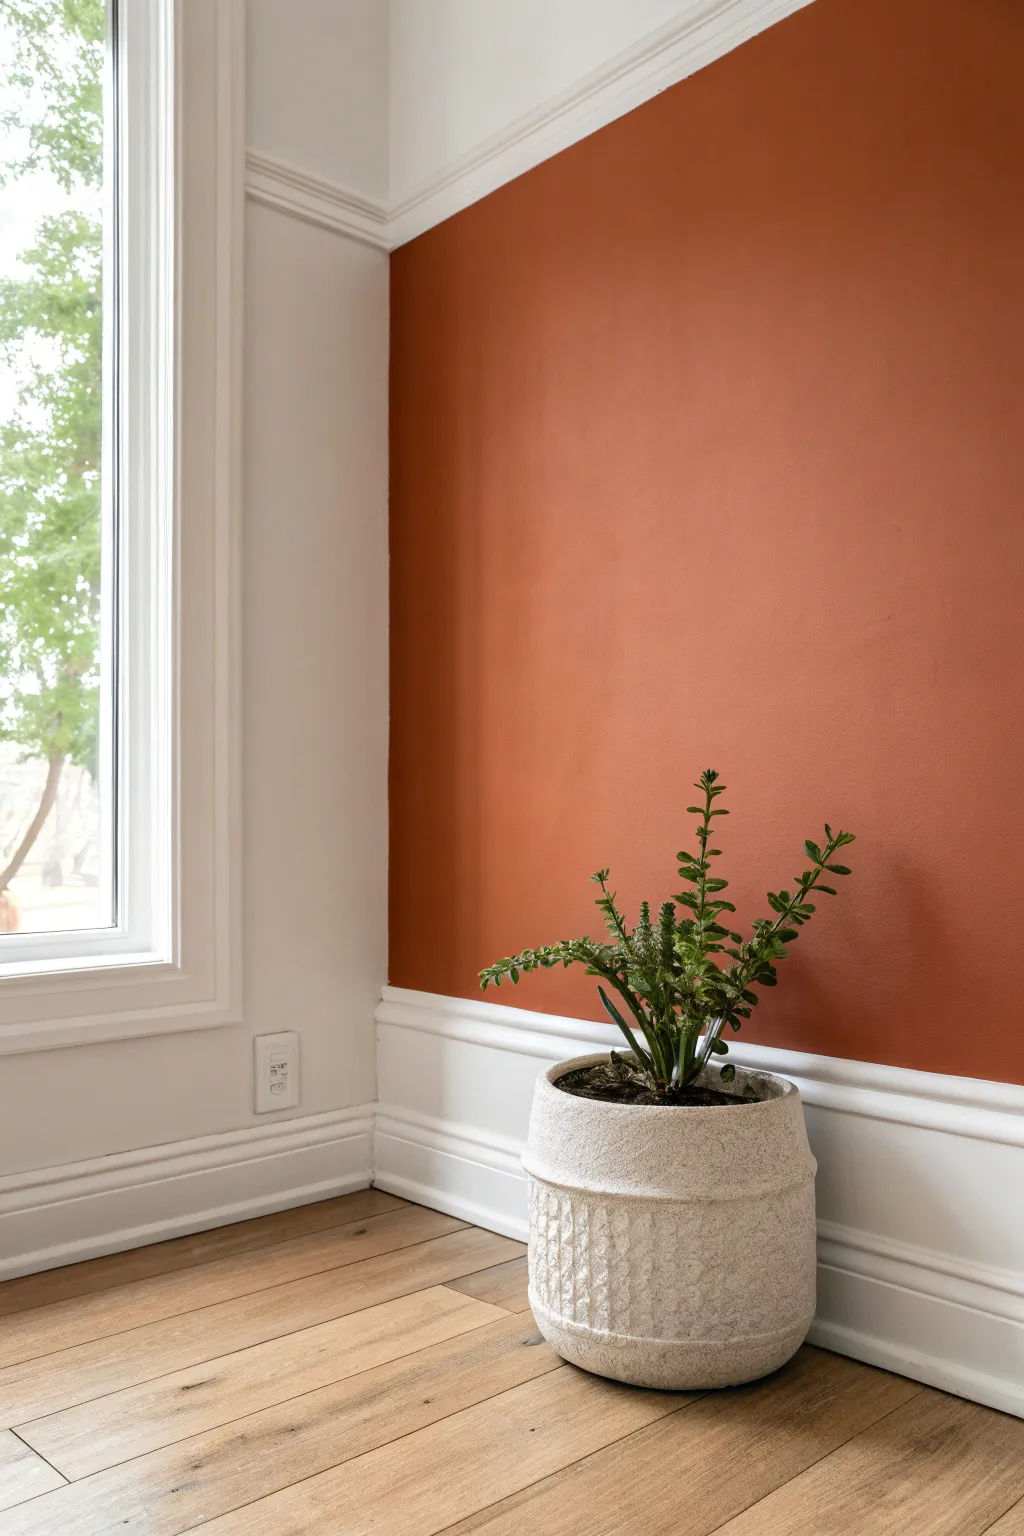
Transform a boring corner into a focal point by adding a bold splash of earthy color against crisp white molding. This two-tone color blocking technique adds height and warmth to your space without overwhelming the room.
How-To Guide
Materials
- Painter’s tape (high quality)
- Drop cloths
- Sanding sponge (fine grit)
- Spackle (if needed)
- Damp cloth
- Primer (white)
- Interior latex paint (Eggshell finish, Terracotta/Rust Orange)
- Interior latex paint (Semi-gloss finish, White for trim)
- 2-inch angled sash brush
- 4-inch mini roller frame and covers (medium nap)
- Paint tray
- Stepladder
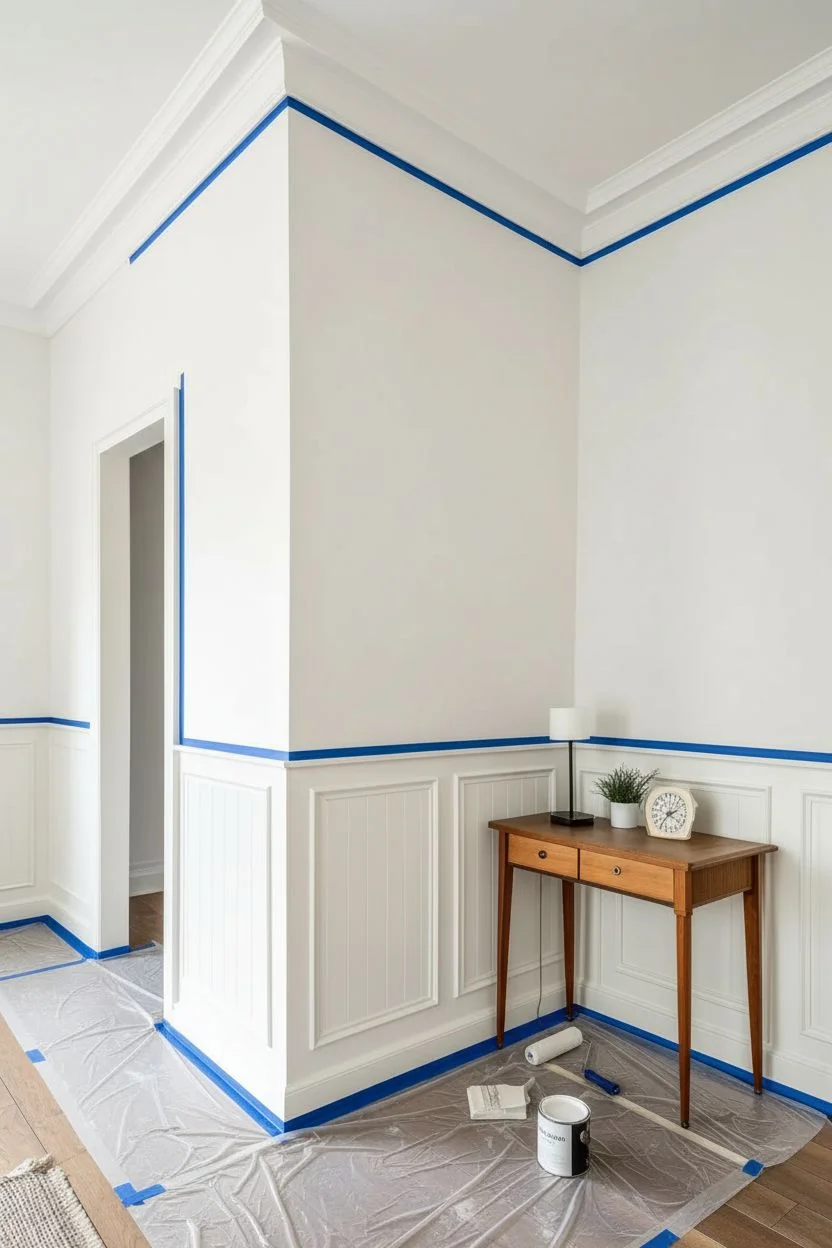
Step 1: Preparation
-
Clear the area:
Move furniture away from the corner wall. Lay down drop cloths to protect your beautiful hardwood floors from potential splatters. -
Prep the surface:
Inspect the wall for nail holes or imperfections. Fill them with a small amount of spackle, let dry, and sand smooth with a fine-grit sponge. Wipe away any dust with a damp cloth. -
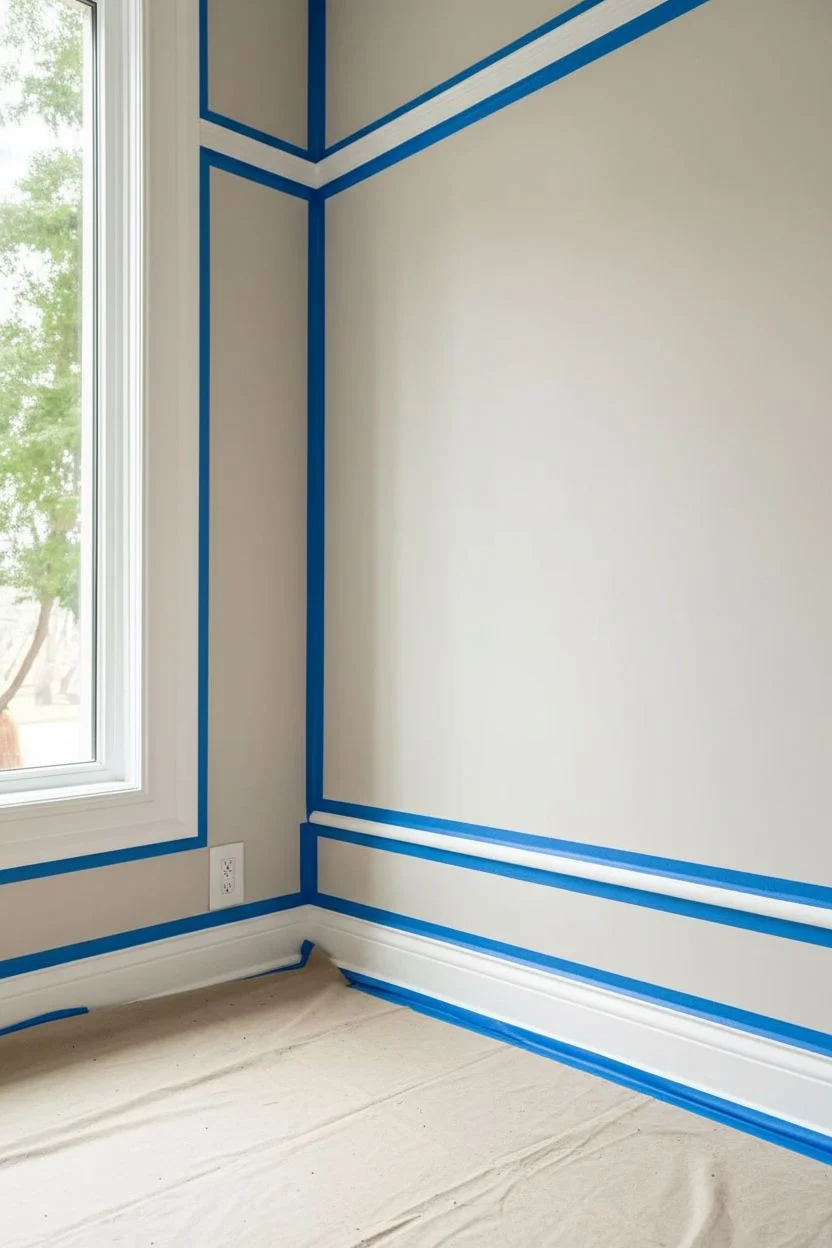
Create the boundary:
This look relies on sharp lines. Apply painter’s tape along the top edge of the baseboard molding. Ensure you press the edge of the tape down firmly to prevent bleed-through. -
Tape the ceiling and adjacent wall:
Run a line of tape along the ceiling edge where it meets the wall. Also, tape the vertical inner corner where the accent wall meets the white window wall.
Bleeding Lines?
If paint bled under the tape, wait for it to fully dry. Re-tape precisely over the line, then paint over the bleed with the correct color to cover the mistake.
Step 2: Painting the Trim
-
Prime the trim:
If your baseboards are unpainted or dark, apply a coat of primer. Let it dry completely according to the can’s instructions. -
Apply white trim paint:
Using your 2-inch angled sash brush, carefully paint the baseboard molding with white semi-gloss paint. Long, smooth strokes help minimize brush marks. -
Check for coverage:
Allow the first coat to dry. If the old color is showing through, apply a second coat for a crisp, clean finish. Let the trim cure fully before moving to the wall.
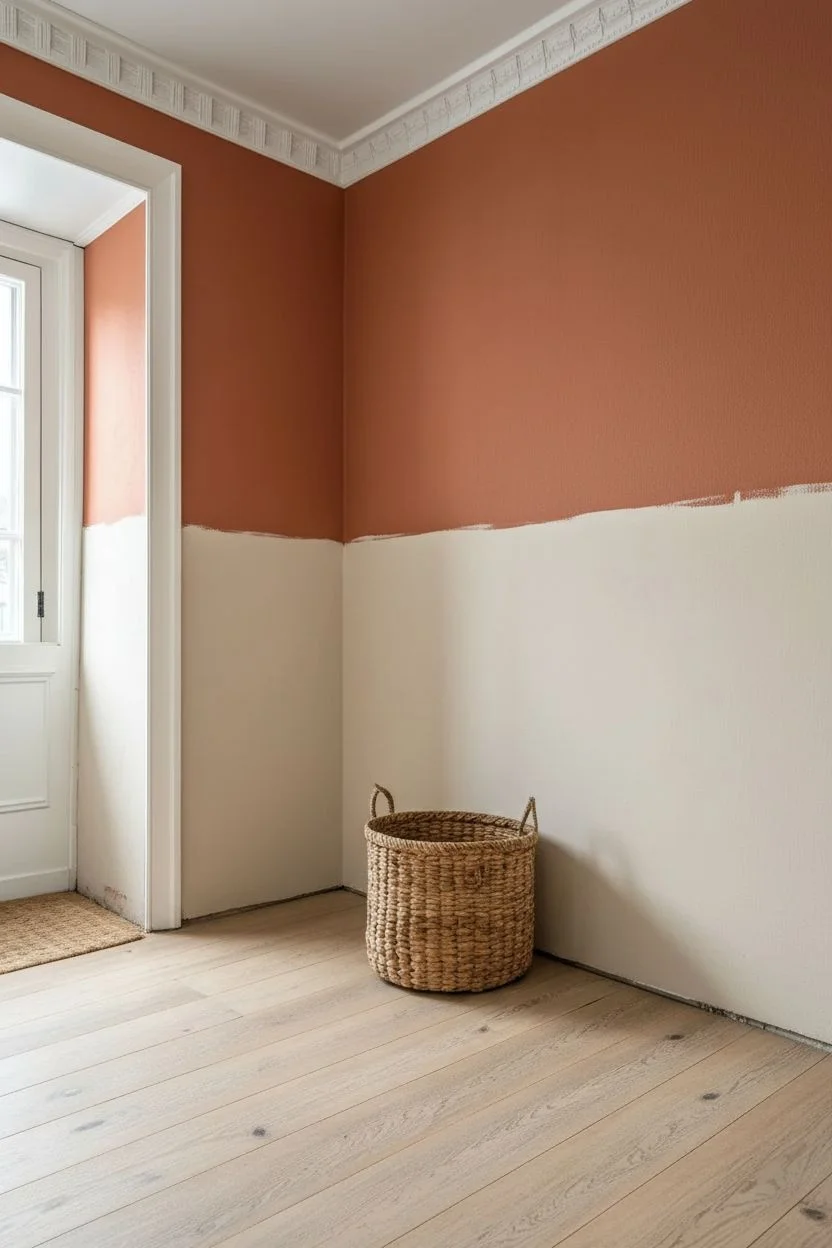
Step 3: Applying the Terracotta Color
-
Seal the tape edge:
Here is a trick I always use: paint a very thin layer of the *base* wall color (or white, in this case) over the edge of the tape on the wall side. This seals the tape so your terracotta line will be razor sharp. -
Cut in the edges:
Dip your angled brush into the terracotta paint. Carefully paint a 2-3 inch border along the tape lines at the ceiling, the corner, and above the baseboard. -
Roll the main section:
Load your 4-inch mini roller with the terracotta paint. A mini roller is perfect for smaller accent sections like this because it offers great control. -
Apply the first coat:
Roll the paint onto the wall using ‘W’ shapes to distribute it evenly, then smooth it out with vertical strokes. Don’t press too hard; let the roller do the work. Let this coat dry for at least 2-4 hours. -
Apply the second coat:
Terracotta and rust tones often need a second coat to achieve true depth. Repeat the cutting-in and rolling process to ensure rich, opaque coverage. -
Remove tape while damp:
Once the final coat is applied but still slightly tacky to the touch, slowly peel off the painter’s tape at a 45-degree angle. Pulling while damp prevents the paint film from ripping.
Add Texture
Instead of a standard flat wall, install a simple chair rail molding at the color transition line to add architectural interest and separate the zones.
Step 4: Styling
-
Clean up edges:
Inspect your lines. If any tiny bleeds occurred, use a small artist’s brush and a bit of the opposing color to touch them up once everything is fully dry. -
Add greenery:
Place a leafy green plant in a textured white pot in the corner. The green contrasts beautifully against the burnt orange wall, making the color pop even more.
Enjoy the warmth and visual interest this simple color block brings to your room


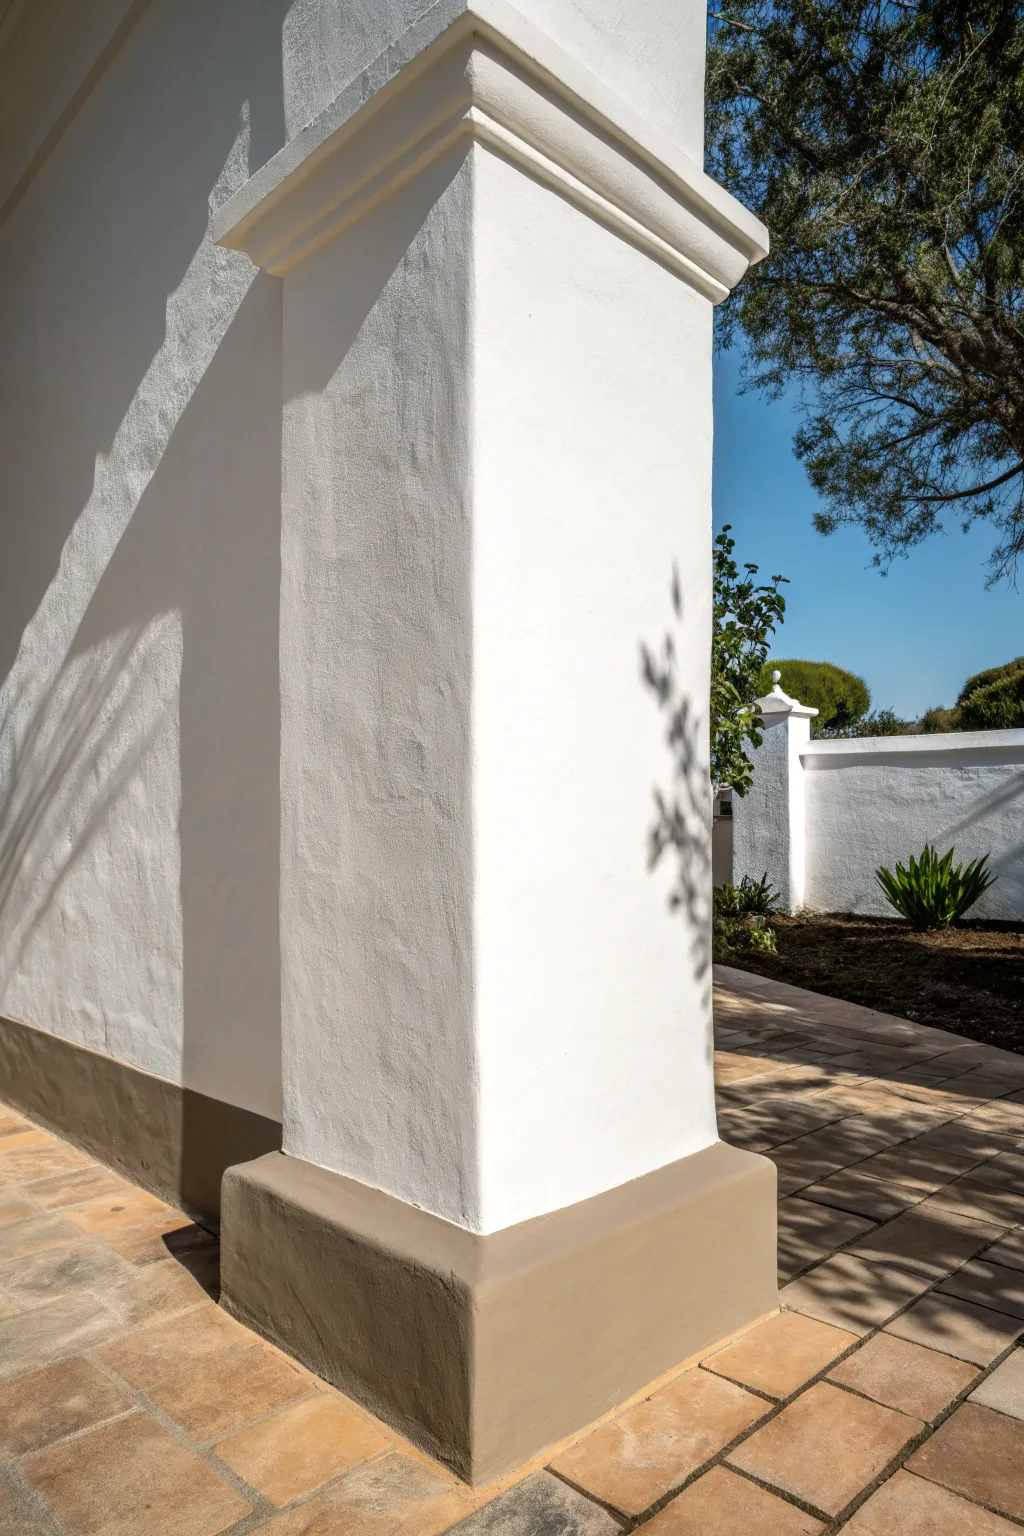
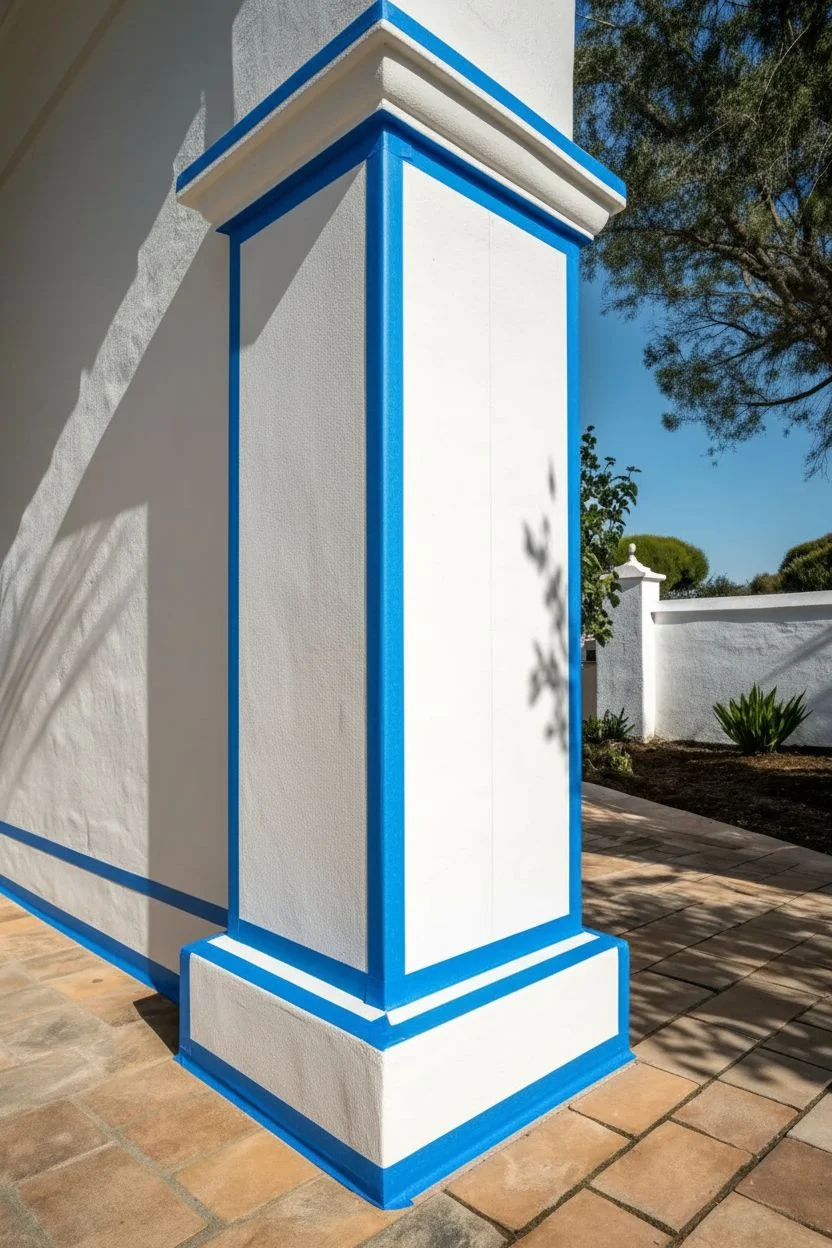
A Painted Corner Accent Panel That Frames the Nook
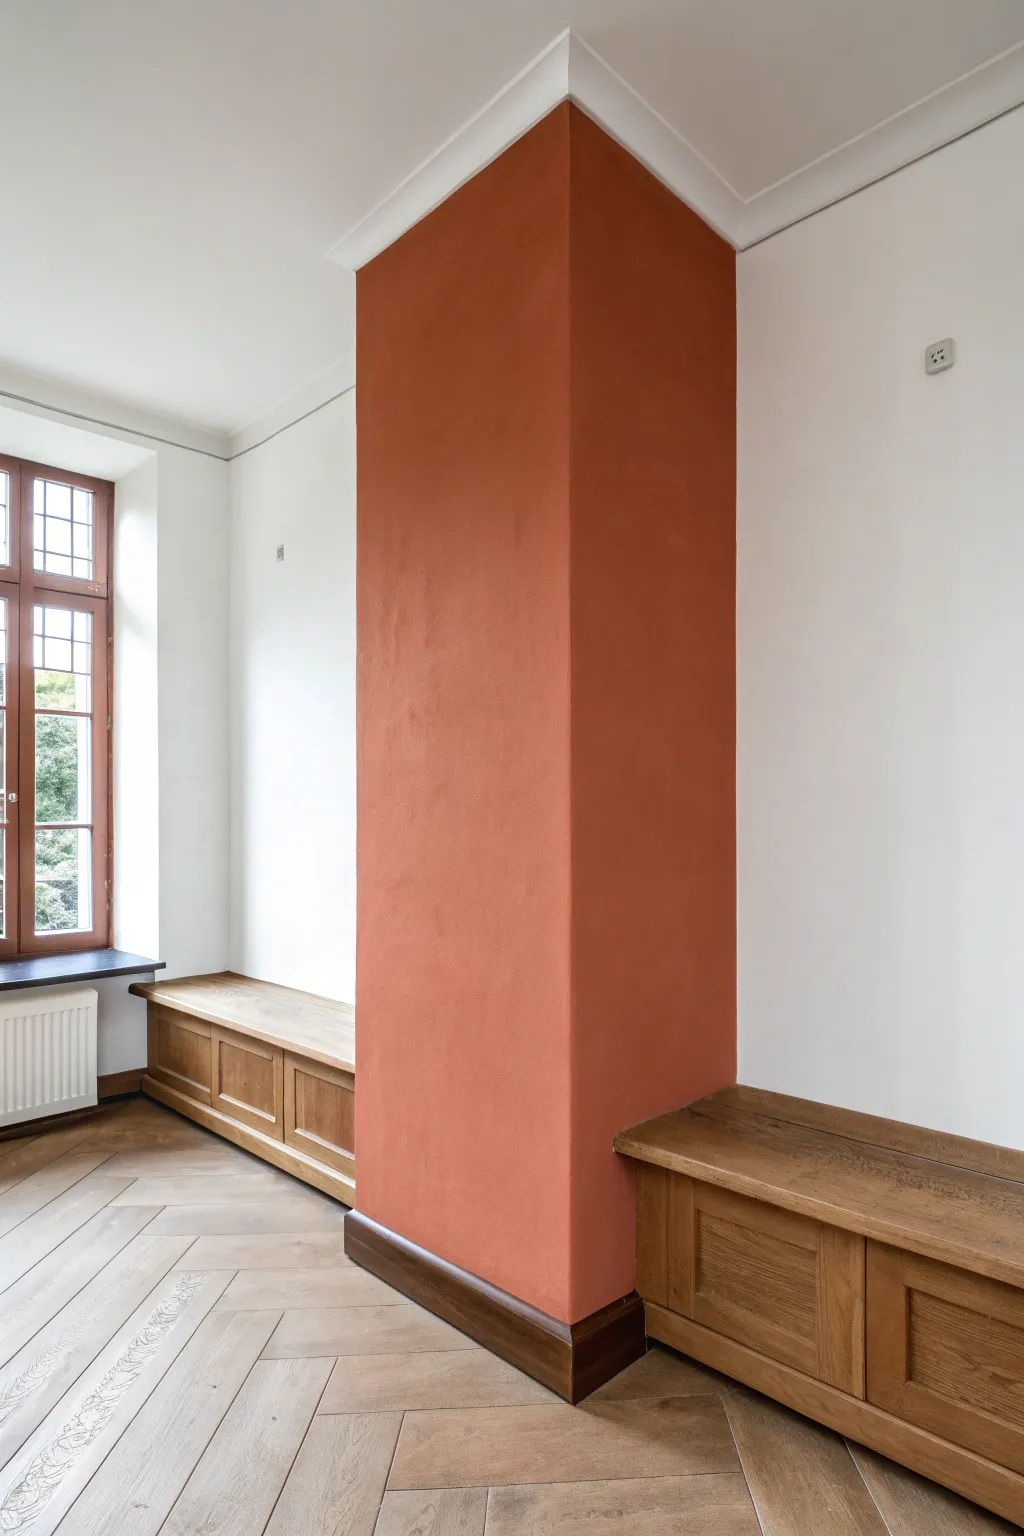
Transform a plain architectural column into a warm, grounding focal point with this bold color-blocking project. Using a rich, earthy terracotta hue, you will define the space creating a sophisticated backdrop for built-in seating or a cozy nook.
Step-by-Step
Materials
- High-quality interior latex paint (matte or eggshell finish)
- Color suggested: Burnt orange or deep terracotta
- Painter’s tape (high adhesion for crisp lines)
- Drop cloths or plastic sheeting
- Mild detergent and sponge
- Spackle (optional, for repairs)
- Sandpaper (fine grit)
- Angled sash brush (2-inch)
- Paint roller (9-inch)
- Roller cover (3/8-inch nap for smooth walls)
- Paint tray and liner
- Extension pole (optional)
Step 1: Preparation
-
Clear the area:
Before you begin, remove any furniture or cushions from the immediate area. In this specific setup, clear off the wooden bench tops to ensure you have unobstructed access to the wall surface. -
Protect your surfaces:
Lay down drop cloths to cover the beautiful parquet flooring and the wooden benches. Secure the edges of the cloth with tape if necessary to prevent them from shifting while you work. -
Clean the wall:
Wipe down the column surface with a sponge dipped in mild soapy water to remove dust, grease, or fingerprints. A clean surface ensures the paint adheres properly and lasts longer. -
Inspect and repair:
Check the wall for any nail holes or dings. Fill these imperfections with spackle, let it dry completely, and then sand the area smooth with fine-grit sandpaper so it blends seamlessly. -
Tape the edges:
Apply painter’s tape along the ceiling line, the adjacent white walls, and the baseboard trim. Press the tape edge down firmly with a putty knife or your finger to prevent paint bleed.
Step 2: Painting
-
Cut in the edges:
Open your terracotta paint and stir it thoroughly. Dip your angled sash brush into the paint and carefully ‘cut in’ along the taped edges at the ceiling, corners, and baseboards where the roller can’t reach. -
Feather out the brushwork:
As you paint the edges, feather the paint out slightly toward the center of the wall. This prevents hard ridges of paint from forming, which can show up through the rolled texture later. -
Load the roller:
Pour paint into your tray. load your roller until it is saturated but not dripping. I find that rolling it back and forth on the ribbed part of the tray helps distribute the paint evenly. -
Apply the first coat:
Roll the paint onto the main faces of the column using a ‘W’ or ‘V’ motion to spread the paint, then fill in the gaps with vertical strokes. Work in manageable sections to keep a wet edge. -
Let it dry:
Allow the first coat to dry completely according to the manufacturer’s instructions, usually about 2 to 4 hours. Don’t rush this step, or you might pull up the first layer when applying the second. -
assess and recoat:
Once dry, inspect the coverage. Terracotta colors often need a second coat for full depth and richness. Cut in the edges again if necessary, then roll on the second coat just like the first.
Crisp Line Secret
b: After taping, paint over the tape edge with the EXISTING wall color first. This seals the gap, so any bleed is invisible, leaving a perfect line for the new color.
Step 3: Finishing Touches
-
Remove tape while wet:
Carefully peel off the painter’s tape while the second coat is still slightly tacky. Pull the tape away from the painted edge at a 45-degree angle to get the sharpest possible line. -
Check for bleeds:
Inspect your edges for any tiny spots where paint might have seeped under the tape. If you find any, use a small artist’s brush and the original wall color to touch them up once everything is dry. -
Reinstall fixtures:
If you removed any outlet covers or switch plates on the column, screw them back into place once the paint has fully cured (usually 24 hours). -
Clean up:
Wash your brushes and roller covers immediately with warm soapy water. Fold up your drop cloths and reveal your newly defined architectural feature.
Texture Play
For an old-world plaster look, try Lime Wash instead of latex paint. It creates subtle movement and depth that mimics authentic masonry.
Enjoy the warmth and visual structure this simple color change brings to your room


Wraparound Arch to Create a Cozy Corner Zone
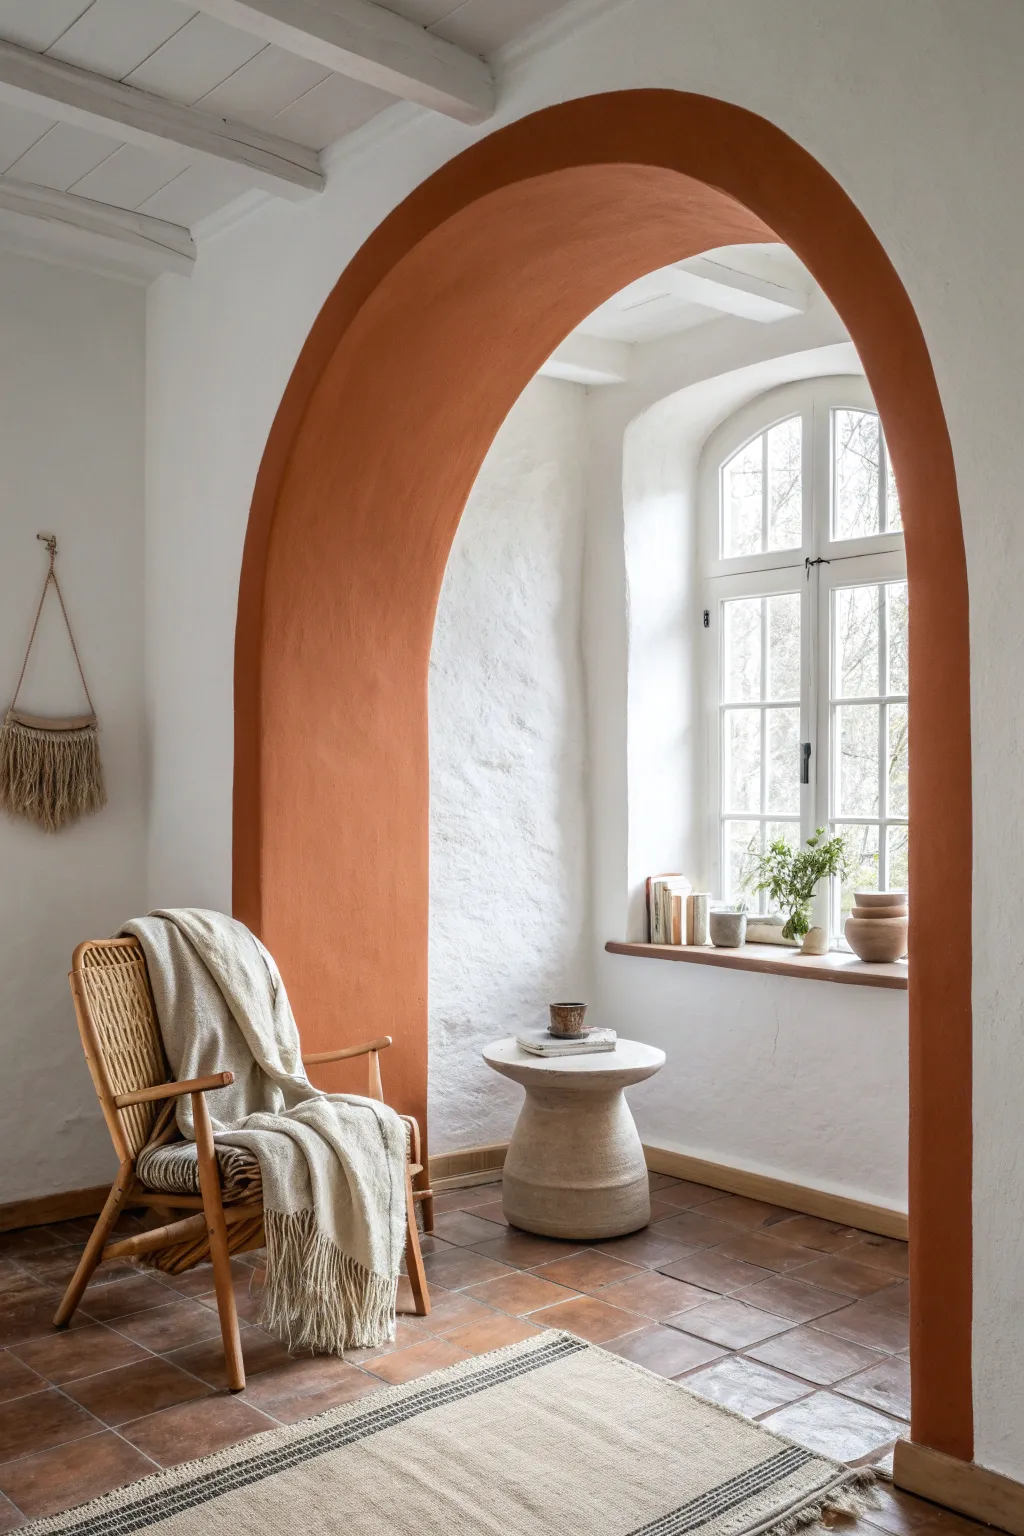
Transform a plain white corner into a stunning architectural feature with this painted arch illusion. By wrapping a deep terracotta hue around a window or nook, you create depth and warmth without the need for structural renovations.
Step-by-Step Guide
Materials
- High-quality painter’s tape (multi-surface)
- Pencil
- String or twine
- Measuring tape
- Push pin or small nail
- Terracotta or rust-orange latex wall paint (matte or eggshell finish)
- White wall paint (for touch-ups)
- 2-inch angled sash brush
- 4-inch foam roller or small nap roller
- Roller tray
- Drop cloth
- Damp rag
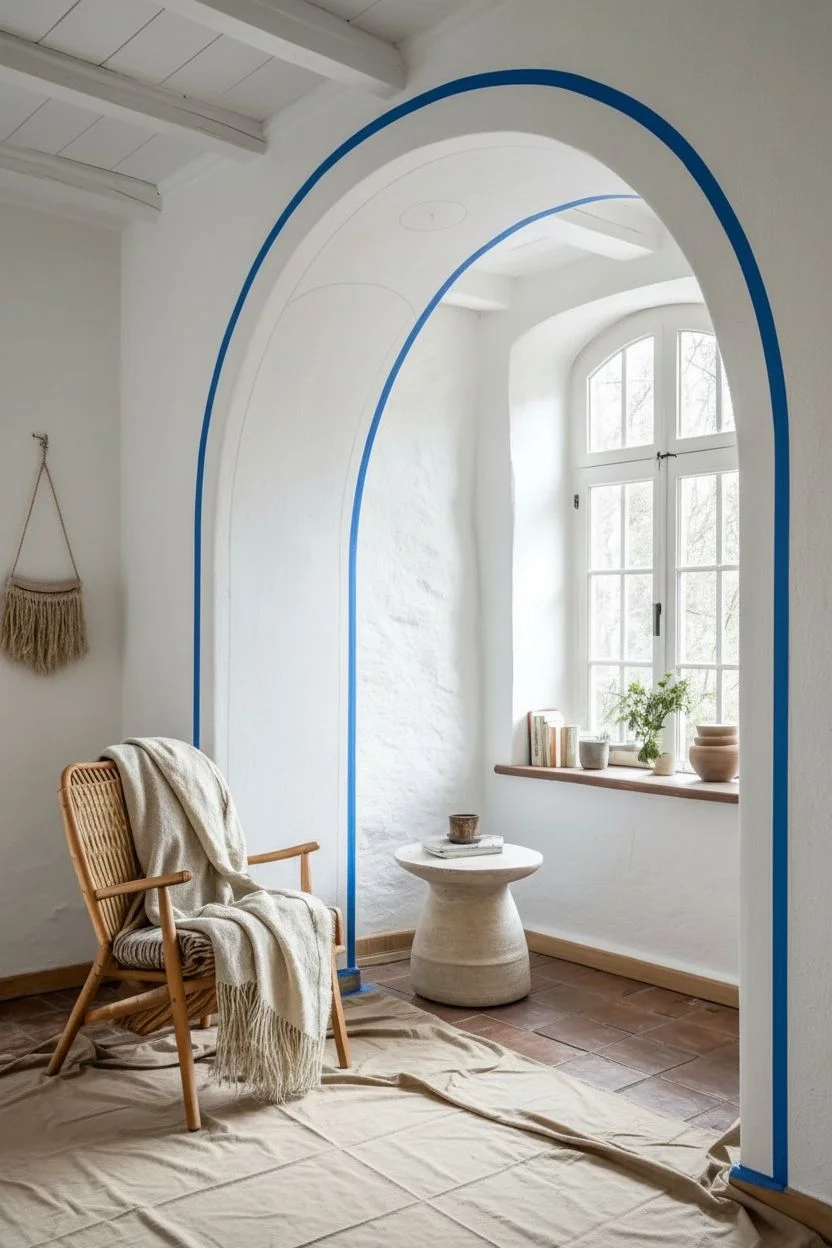
Step 1: Preparation and Mapping
-
Clean the surface:
Begin by wiping down the wall area with a damp rag to remove dust or cobwebs. A clean surface ensures crisp lines and better paint adhesion. -
Clear the area:
Move furniture away from the wall and lay down your drop cloth to protect those beautiful tiled floors from potential splatters. -
Measure the width:
Decide how wide you want the vertical legs of your arch to be. In the inspiration image, the arch spans wider than the window frame, hugging the corner. Find the center point of where your arch will span. -
Mark the vertical lines:
Using a level and pencil, lightly draw two long vertical lines up the wall to mark the sides of your arch. Stop these lines where you want the curve to begin.
Wobbly Arch Top?
If you struggle with freehand painting, sketch the curve, then use short, overlapping strips of flexible painter’s tape to approximate the curve. Paint over it, then refine the jagged edge with a small artist brush.
Step 2: Drawing the Arch
-
Create a compass:
To get a perfect semi-circle, tie a piece of string to a pencil. The length of the string should equal exactly half of the total width of your arch. -
Anchor the pivot point:
Place a push pin or hold a nail firmly at the exact center point between your two vertical lines, right at the height where the straight lines end. -
Trace the curve:
Pull the string taut and swing the pencil upwards to connect the top of the left vertical line to the top of the right vertical line. Keep consistent tension for a smooth arc. -
Review the shape:
Step back and look at your pencil outline. It should look symmetrical and centered around the window or corner feature.
Pro Tip: Texture Match
Walls usually have texture from previous roller applications. Use a mini roller, not just a brush, as close to the edge as possible to match the stipple texture, avoiding a ‘picture frame’ effect.
Step 3: Taping and Outline
-
Tape the straight edges:
Apply painter’s tape along the *outside* edge of your pencil marks for the vertical straight sections. Press the tape edges down firmly with your fingernail or a credit card to prevent bleeding. -
Hand-paint the outline:
For the curved top, tape is difficult to maneuver. Instead, use your 2-inch angled sash brush to carefully cut in the curve by hand. Load the brush moderately and move slowly along the pencil line. -
Seal the tape (optional):
I like to brush a very thin layer of the existing white wall color over the edge of the tape first. This seals the gap, meaning any bleed-through will be white-on-white, leaving your final terracotta line razor sharp.
Step 4: Painting the Color
-
Cut in the edges:
Once your outline is prepped, use the angled brush to paint a 2-inch border of terracotta paint inside the entire shape (both against the tape and along your hand-painted curve). -
Fill the center:
Switch to your small roller. Fill in the large central areas of the arch, working in ‘W’ shapes to distribute the paint evenly. Don’t worry about perfect opacity on this first pass. -
Handle the corner return:
Paint the inside face of the wall return (the thickness of the wall leading to the window) with the brush to ensure the color wraps completely around the architectural corner. -
Let it dry:
Allow the first coat to dry for at least 2-4 hours, or according to your can’s instructions. It will likely look slightly streaky at this stage. -
Apply the second coat:
Repeat the cutting-in and rolling process. This second layer provides that rich, opaque depth seen in the photo. A third coat might be necessary for very deep pigments.
Step 5: Finishing Touches
-
Remove tape:
The most satisfying part: peel off the painter’s tape while the final coat is still slightly tacky (not fully dry, not wet). Pull at a 45-degree angle away from the painted area. -
Touch up curves:
If your hand-painted curve wobbled slightly, use a small artist’s brush and your original white wall paint to tidy up the outer edge. -
Style the space:
Once fully cured (Wait 24 hours before leaning anything against it), move your chair back in and style the window ledge with ceramics to complement the warm tones.
Step back and admire how a simple shape and bold color have completely redefined the atmosphere of your room


Soft Ombre Fade That Turns the Corner Into Depth
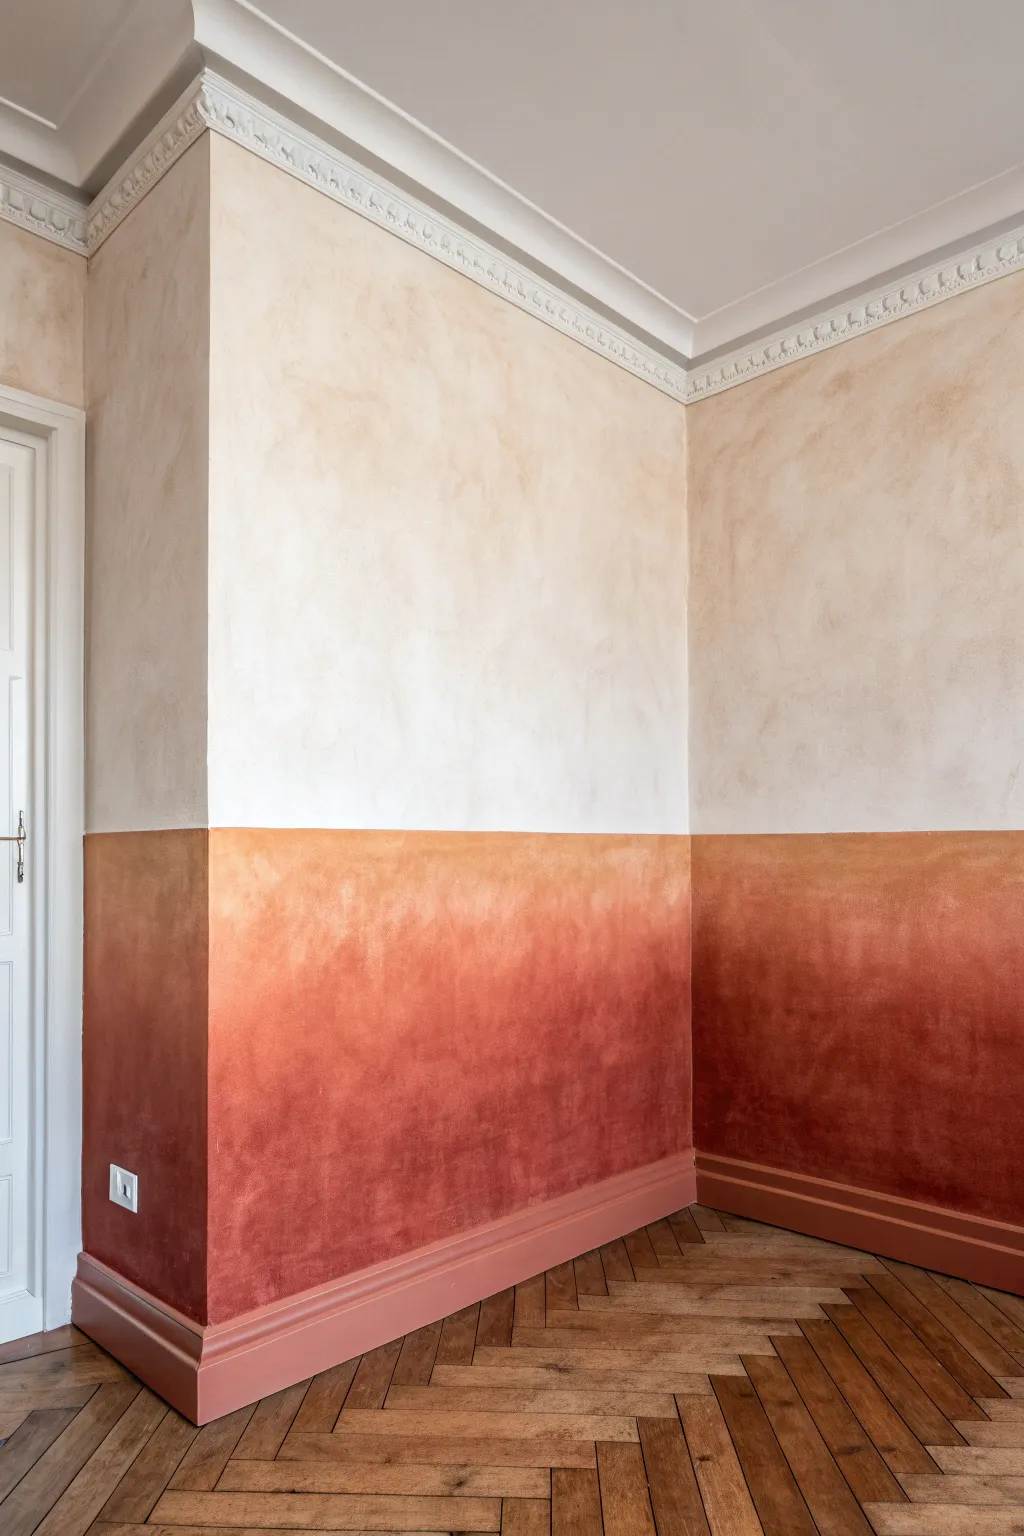
Transform a plain corner into an architectural feature with this stunning two-tone ombre wall. Using textured limewash paint creates a cloudy, romantic transition from deep rust to creamy beige that mimics an aged fresco.
How-To Guide
Materials
- Limewash paint (Dark Terracotta/Rust color)
- Limewash paint (Cream/Off-White color)
- Block brush (large masonry brush)
- Painter’s tape
- Drop cloths
- Primer suitable for limewash (mineral printer)
- Mixing stick
- Two paint trays or buckets
- Spray bottle with water
- Clean rags
Step 1: Preparation & Base Coat
-
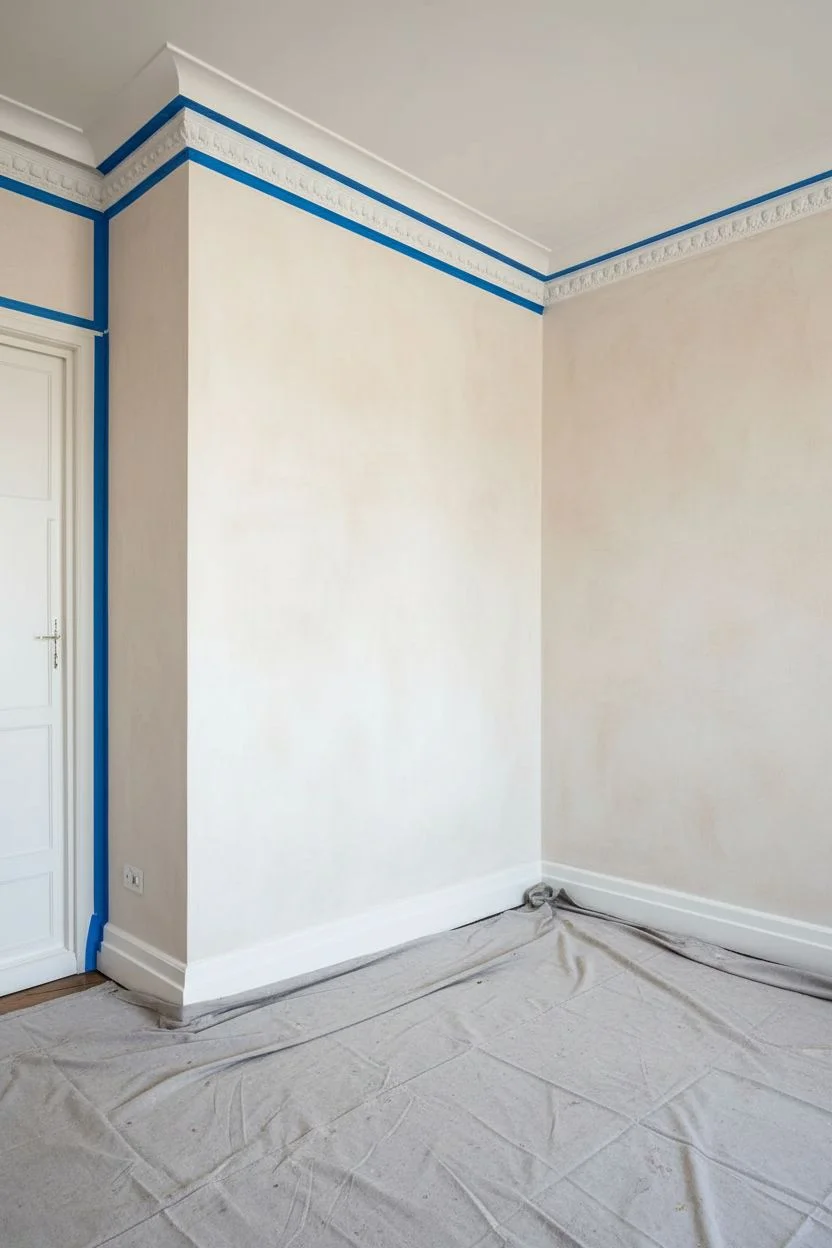
Protect the space:
Clear the corner completely. Lay down drop cloths to protect your beautiful chevron floors. Use painter’s tape to mask off the ceiling molding and door frames with precision. -
Prime the walls:
Applying a mineral primer is crucial for limewash because it creates a grippy surface. Roll it on evenly over the entire wall area you plan to paint and let it dry according to the can’s instructions. -
Mix the limewash:
Limewash separates quickly. Open your Cream and Terracotta cans and stir them thoroughly with a mixing stick until the pigments are fully incorporated and the texture is consistent. -
Determine the horizon line:
Decide where you want the color fade to happen. In the image, it’s roughly waist-height (about 36-40 inches up). You don’t need a pencil line, just a mental marker.
Step 2: Applying the Colors
-
Start with the top color:
Dip your block brush into the Cream paint. Apply it to the upper portion of the wall using chaotic, criss-cross brushstrokes (X-shapes). -
Work down towards middle:
Bring the Cream color down slightly past your mental horizon line. Don’t create a straight edge; keep the bottom edge ragged and uneven. -
Apply the bottom color:
Switch to a clean block brush (or wash the first one thoroughly). Dip into the Terracotta paint and start at the baseboards, working your way up using the same X-shaped strokes. -
Approach the transition zone:
Paint the Terracotta color up until it is just a few inches away from the wet Cream edge. Leave a small gap of unpainted planted wall between them for a moment.
Fixing Hard Lines
If you accidentally created a visible stripe where the colors meet, re-wet the area heavily with your spray bottle and use a clean brush to vigorously scrub the boundary until it softens.
Step 3: Creating the Ombre Fade
-
Mist the transition area:
If the paint has started to dry, lightly spritz the meeting point of the two colors with water from your spray bottle to reactivate the lime. -
Blend the wet edges:
Using a slightly damp brush (I like to use a dedicated blending brush here), drag the Terracotta up into the Cream and the Cream down into the Terracotta using rapid, light cross-hatching motions. -
Feather the mix:
Continue working the overlap until you see a soft, cloudy gradients. Avoid overworking it, or you’ll create a completely new third color stripe instead of a fade. -
Let the first coat dry:
Allow the entire wall to cloudy over and dry completely. Limewash looks much darker when wet, so don’t panic if it looks patchy right now.
Maintain Movement
Keep your wrist loose! The beauty of limewash comes from random, multi-directional strokes. If you start painting in straight lines or uniform squares, you lose the cloudy, organic texture.
Step 4: Second Coat & Details
-
Repeat the process:
Limewash relies on layering for depth. Apply a second coat of Cream on top and Terracotta on the bottom, following the same cross-hatch technique. -
Refine the blend:
Pay extra attention to the transition line on this second pass. Use the water spritzer again to keep the paint movable as you feather the colors together for that seamless, smoky look. -
Paint the baseboards:
To match the reference image perfectly, paint the skirting boards in the same Terracotta shade. You may need a wood primer first if they were previously glossed. -
Address the corners:
Ensure the corner joint relies getting plenty of paint. Jam the bristles into the corner crack to ensure no white gaps appear when looking from different angles. -
Final dry:
Let the final coat cure for at least 24 hours. The colors will lighten significantly and the limestone ‘bloom’ (the cloudy white effect) will appear fully. -
Remove tape:
Carefully peel away your painter’s tape from the ceiling and doorframes while the paint is still slightly tacky to avoid chipping the brittle limewash.
Step back and admire the soft, old-world warmth you’ve brought to your modern space
BRUSH GUIDE
The Right Brush for Every Stroke
From clean lines to bold texture — master brush choice, stroke control, and essential techniques.
Explore the Full Guide
Geometric Triangles That Point Into the Corner
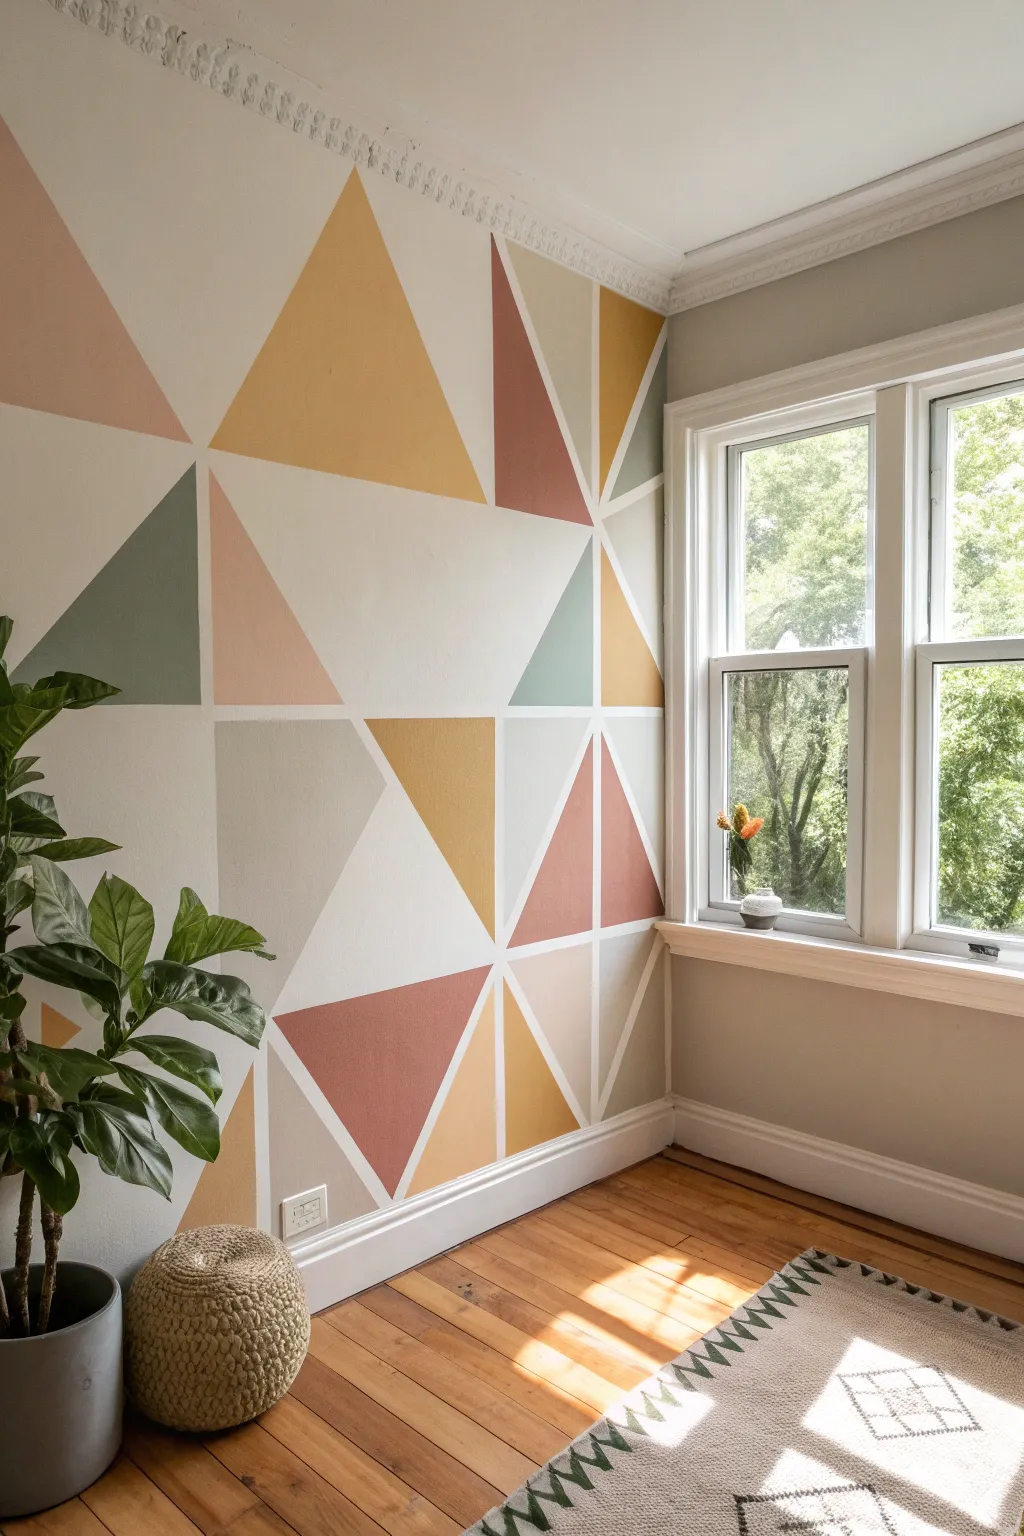
Transform a boring corner into a stunning focal point with this geometric mural featuring interlocking triangles in warm earth tones. The crisp white lines between shapes add a modern, structural element that brightens the room while uniting two adjacent walls.
Detailed Instructions
Materials
- Painter’s tape (1-inch width, delicates surface)
- Interior latex paint (white base + 5-6 accent colors)
- Small foam rollers (4-inch)
- Small angled sash brush (1.5-inch)
- Plastic paint tray liners
- Drop cloths
- Pencil and eraser
- Level or straight edge
- Damp rag
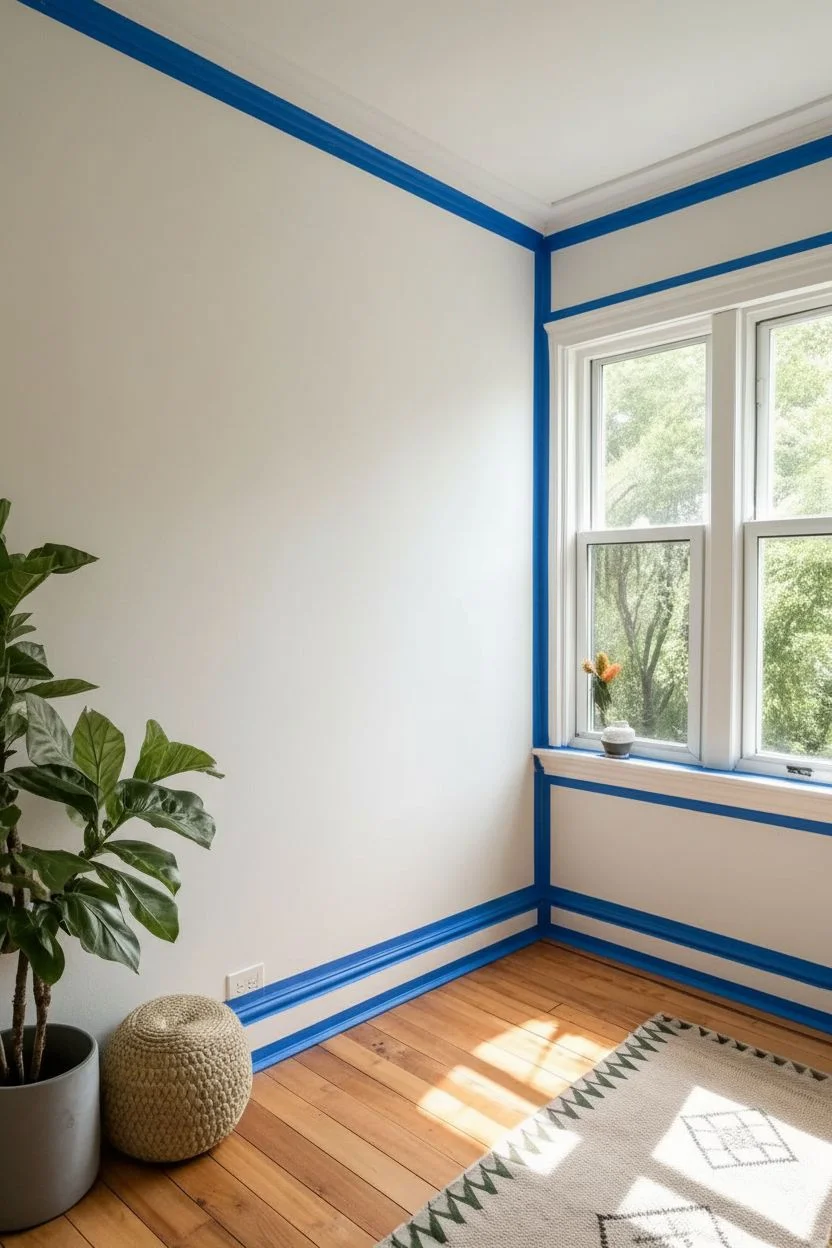
Step 1: Preparation & Base Coat
-
Clear and clean:
Remove any furniture, plants, or decor near the corner. Wipe down the walls with a damp rag to remove dust, ensuring a clean surface for the tape to adhere to. -
Apply base color:
Paint the entire corner area with your base white color. This will be the color of the lines between your triangles. Apply two coats if necessary and let it cure for at least 24 hours so the tape doesn’t peel it off later. -
Protect the trim:
Apply painter’s tape along the baseboards, ceiling molding, and window casing to protect them from stray brush strokes.
Tape Sealing Trick
Don’t skip painting the base color over your tape edges! It creates a barrier that guarantees razor-sharp lines when you peel the tape away.
Step 2: Mapping the Design
-
Establish the corner line:
Since the corner is the anchor, visualize the vertical seam where the walls meet as a central line. Your tape design will branch off from here. -
Mark focal points:
Using a pencil, lightly mark a few strategic points where multiple triangles will meet. I find it helpful to place one major intersection at eye level to ground the design. -
Apply the first major lines:
Apply long strips of painter’s tape diagonally across the walls, stretching from floor to ceiling or wall to wall. Create large ‘X’ shapes or ‘V’ shapes that intersect. -
Subdivide into triangles:
Add smaller strips of tape connecting the larger lines to form distinct triangles. Vary the sizes—some large and impactful, some smaller as fillers—to keep the pattern dynamic. -
Seal the tape edges:
Run a credit card or putty knife firmly over all tape edges. This is crucial for achieving those crisp, professional lines. -
Lock in the lines:
Paint a very thin layer of your *base white paint* over the edges of the tape. This seals the tape; if any paint bleeds under, it will be white on white tailored, preventing the colored paint from seeping through.
Step 3: Adding Color
-
Plan your palette:
Step back and plan which triangle gets which color. Mark each section lightly with a small pencil initial (e.g., ‘M’ for Mustard, ‘G’ for Green) to avoid painting two adjacent shapes the same color. -
Use the brush for edges:
Start with your first accent color (e.g., terracotta). Use the angled sash brush to carefully cut in along the tape edges and corners of the triangle. -
Fill with the roller:
Use a small foam roller to fill in the center of the triangle. The foam texture minimizes brush strokes and provides a smooth finish. -
Repeat for all colors:
Move through your palette, painting all triangles of one color before switching to the next. Rinse your brush and use a fresh tray liner or roller cover for each hue. -
Apply second coats:
Allow the first coat to dry to the touch (usually 1-2 hours) and apply a second coat to ensure rich, opaque coverage, especially for lighter shades like the blush pink or pale grey.
Metallic Accent Upgrade
For a touch of glam, paint one or two small accent triangles in metallic gold or copper. It catches the light beautifully near a window.
Step 4: The Big Reveal
-
Remove tape while damp:
This is the most satisfying part. Peel off the tape slowly at a 45-degree angle while the final coat of paint is still slightly tacky. This prevents the dried paint film from ripping. -
Touch ups:
Inspect the lines. If there are any tiny bleeds, use a small artist’s brush and your base white paint to carefully correct the edges.
Once dry, move your furniture back in and enjoy the dynamic energy this geometric feature brings to your space
Corner Stripes That Visually Stretch the Walls
Transform a plain corner into a stately focal point with crisp vertical stripes that draw the eye upward, creating an illusion of height and sophisticated structure. This project combines classic wainscoting with a bold, rusty-red striped pattern to add architectural interest to any room.
How-To Guide
Materials
- Painter’s tape (multi-surface and delicate surface)
- Laser level or plumb bob
- Measuring tape
- Pencil
- White latex wall paint (semi-gloss or eggshell)
- Rust-red latex wall paint (matte or flat finish)
- Paint rollers (smooth surface nap) and tray
- Angled sash brush (2-inch)
- Pre-primed wainscoting panel kits (chair rail, baseboard, and molding)
- Construction adhesive
- Finishing nails and hammer (or nail gun)
- Wood filler
- Sandpaper (220-grit)
- Caulk and caulk gun
- Drop cloths
Step 1: Preparation and Base Coat
-
Clear and Clean:
Remove all furniture, such as side tables and lamps, from the corner area. Thoroughly clean the walls with a mild detergent solution to ensure proper paint adhesion, then wipe dry with a clean cloth. -
Protect the Area:
Lay down drop cloths to protect your flooring. Tape off the ceiling line and any adjacent trim or door frames with painter’s tape to keep lines sharp. -
Apply the Base White:
Paint the entire upper wall section (where the stripes will go) with your base white paint color. I prefer applying two thin coats rather than one thick one for the smoothest finish. Allow this to dry completely for at least 24 hours before taping.
Step 2: Installing the Wainscoting
-
Measure and Mark:
Determine the height of your wainscoting. A standard chair rail height is about 32-36 inches from the floor. Mark a level horizontal line across both walls at this height. -
Attach the Panels:
Cut your pre-primed wainscoting panels to fit. Apply construction adhesive to the back and press them firmly onto the lower wall section. Secure them with finish nails into the studs. -
Add Decorative Molding:
Install the interior box molding (picture frame molding) inside the panels to create the dimension seen in the photo. Use a spacer block to ensure the distance from the panel edge is consistent on all sides. -
Finish the Trim:
Install the baseboard at the floor and the chair rail at the top edge of the paneling. Fill nail holes with wood filler and caulk all seams where the wood meets the wall for a seamless, built-in look. -
Paint the Wainscoting:
Once the filler dries and is sanded smooth, paint the entire lower section, including trim, with the white semi-gloss paint. This adds durability and a subtle contrast to the matte walls above.
Bleed-Through Blues?
If paint bleeds under the tape, wait for it to fully dry. Then, use a small artist’s brush and the base color to carefully touch up the line. A steady hand fixes everything.
Step 3: Creating the Stripes
-
Calculate Stripe Width:
Measure the total width of the wall. Divide this number by an odd number to ensure you start and end with the same color stripe, or adjust so the stripes look proportional. A width of 3-4 inches usually looks best. -
Mark Vertical Guidelines:
Using a laser level or a plumb bob, lightly mark vertical pencil lines along the wall at your determined intervals. Accurate verticals are crucial here; crooked stripes are very noticeable. -
Tape the Stripes:
Apply painter’s tape along your pencil lines. Remember to tape on the *outside* of the stripes that will stay white. Place a small piece of tape inside the ‘keep white’ zones so you don’t accidentally paint the wrong stripe. -
Seal the Tape Edges:
To prevent bleeding, lightly brush a small amount of the *base white paint* over the edge of the tape. This seals the tape line and ensures the red stripes will be razor-sharp. -
Paint the Red Stripes:
Once the seal is dry, paint the exposed stripes with the rust-red color. Use a small roller for the main areas and an angled brush for cutting in near the ceiling and corners. -
Second Coat:
Apply a second coat of the rust-red paint if necessary to achieve full opacity and rich color depth. -
The Reveal:
This is the satisfying part. Remove the tape while the paint is still slightly tacky—pulling it slowly at a 45-degree angle away from the painted edge to ensure a clean line.
Level Up: Mix Finishes
Make the stripes dynamic by using the same color for both stripes but changing the sheen—alternate between matte and high-gloss paint for a subtle, luxurious texture.
Step back and admire how the vertical lines and classic paneling completely elevate the architectural feel of your space

PENCIL GUIDE
Understanding Pencil Grades from H to B
From first sketch to finished drawing — learn pencil grades, line control, and shading techniques.
Explore the Full Guide
Painted Corner “Headboard” Wrap for a Bed in the Corner

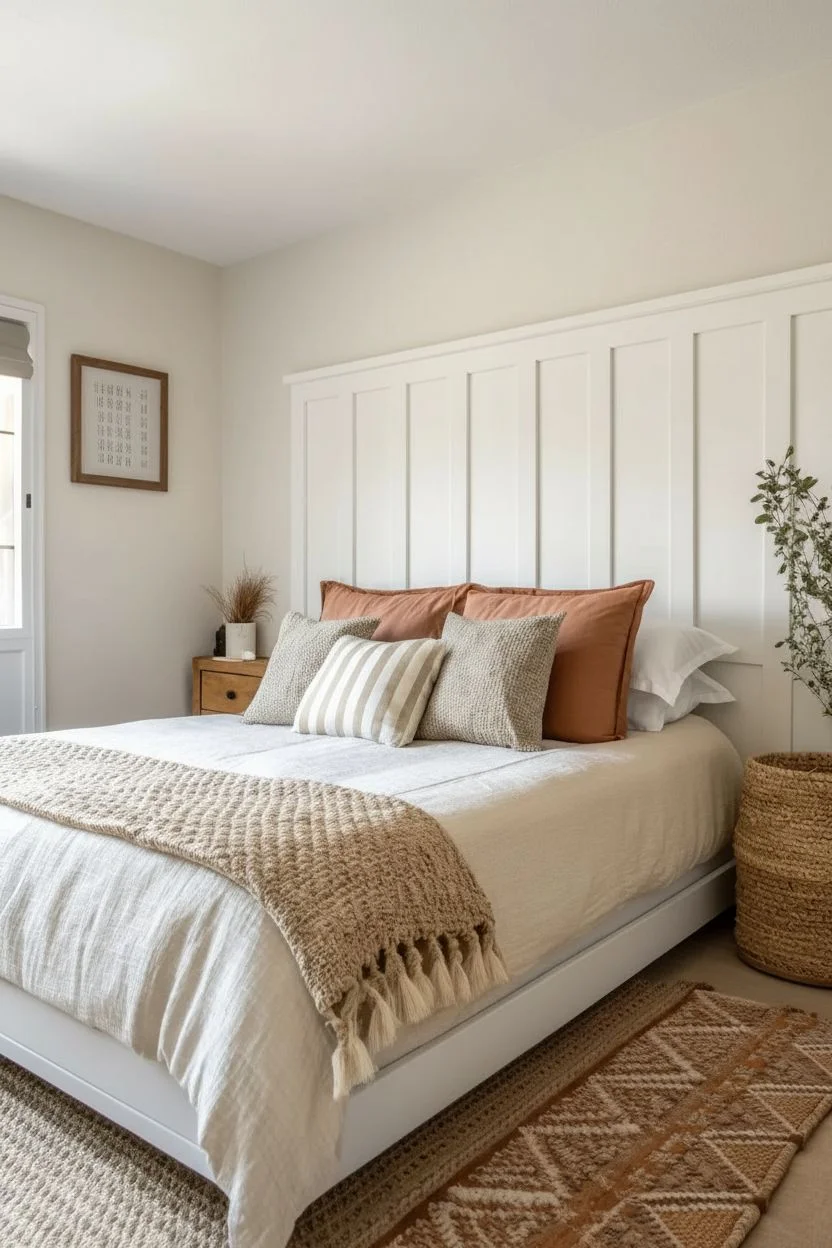
Transform a bedroom corner into a restful retreat by combining structural board-and-batten paneling with the earthy, organic texture of a limewash-style paint treatment. This project creates a stunning visual anchor that wraps around the bed, adding warmth and depth to plain white walls.
Step-by-Step Guide
Materials
- 1×3 inch MDF or pine boards (for battens and top rail)
- Construction adhesive (e.g., Liquid Nails)
- Brad nailer and 1.5-inch brad nails
- Bubble level or laser level
- Paintable caulk and caulk gun
- Wood filler
- Sanding block (medium grit)
- White semi-gloss interior paint (for paneling)
- Terracotta or Clay-colored paint (matte finish)
- Glaze medium or water (to create the wash)
- Large block brush or staining brush
- Painter’s tape
- Roller and tray
- Measuring tape
Step 1: Planning and Paneling
-
Determine dimensions:
Measure the width of your bed and decide how much wider you want the distinct ‘headboard’ section to be. A good rule of thumb is to extend it past the nightstands. Also, decide the height—here, it sits at about 5 feet. -
Mark layout lines:
Using a laser level or a long bubble level, draw a horizontal line across the wall representing the top of your paneling. Mark vertical lines where each batten will go, spacing them evenly (about 12-16 inches apart). -
Install top rail:
Cut your 1×3 board to the full length of the headboard wall. Apply construction adhesive to the back, place it along your level line at the top, and secure it into the studs with a brad nailer. -
Install vertical battens:
Measure the distance from the floor (or baseboard) to the bottom of the top rail. Cut your vertical 1×3 battens to this length. Adhere and nail them over your vertical pencil marks, ensuring they are perfectly plumb. -
Fill and sand:
Fill all nail holes with wood filler and let dry. Sand the filler smooth until it is flush with the wood. Use caulk to seal the seams where the boards meet the wall for a seamless, built-in look. -
Paint the woodwork:
Once the prep work is dry, paint the entire paneling section (boards and the drywall between them) with a crisp white semi-gloss paint. Two coats are usually best for full coverage.
Step 2: Creating the Clay Wash Wall
-
Tape boundaries:
Apply painter’s tape strictly along the top edge of your new board-and-batten rail. Tape off the ceiling line and the vertical edge where you want the color to stop on the corner wall. -
Mix the wash:
To achieve that clouded, textured look, mix your terracotta latex paint with a glaze medium (or simply dilute it with water—about 70% paint to 30% water). I find glaze gives you more working time. -
Cut in edges:
Use a standard brush to paint the edges near the ceiling, corners, and taped lines first. Don’t worry about being too neat with brush strokes, as texture is the goal. -
Apply base color:
Using a large block brush, apply the paint mixture to the wall in a crisscross ‘X’ pattern. Work in patches of about 3×3 feet at a time. -
Feather and blend:
While the paint is still wet, go back over your X strokes to soften edges. Don’t overwork it; let some areas be slightly more opaque and others distinctively sheer to mimic plaster. -
Wrap the corner:
Continue the same X-stroke technique onto the adjacent wall. This ‘zoning’ effect envelops the bed space. Ensure the transition at the corner is fully coated without paint dripping. -
Layer depth:
Once the first coat is dry to the touch, assess the texture. For more depth, apply a second, lighter coat using the same crisscross method, focusing on empty or flat-looking spots. -
Remove tape:
Carefully peel away the painter’s tape while the final coat is still slightly tacky to ensure a sharp, clean line against the white woodwork.
Pro Tip: Seamless Edges
Before painting the terracotta color, brush a thin layer of the white base color over the tape edge. This seals the tape and prevents the dark clay paint from bleeding underneath.
Step 3: Styling the Space
-
Reassemble furniture:
Push the bed frame back against the newly paneled wall. The white structure now functions as an architectural headboard. -
Add lighting:
Install simple black sconces directly onto the drywall just outside the paneling or between battens if space allows, creating a functional reading nook. -
Layer textiles:
Mimic the wall colors in your bedding. Use rust or clay-colored accent pillows mixed with neutrals and a heavy knit throw to tie the color palette together.
Level Up: Shelf Ledge
Use a 1×2 board laid flat on top of the 1×3 top rail to create a narrow picture ledge. This caps off the wainscoting and gives you a tiny shelf for art prints.
Step back and admire how this dual-texture wall treatment completely redefines the feeling of space in your room
Nature-Inspired Wraparound Mural (Leaves, Branches, Florals)
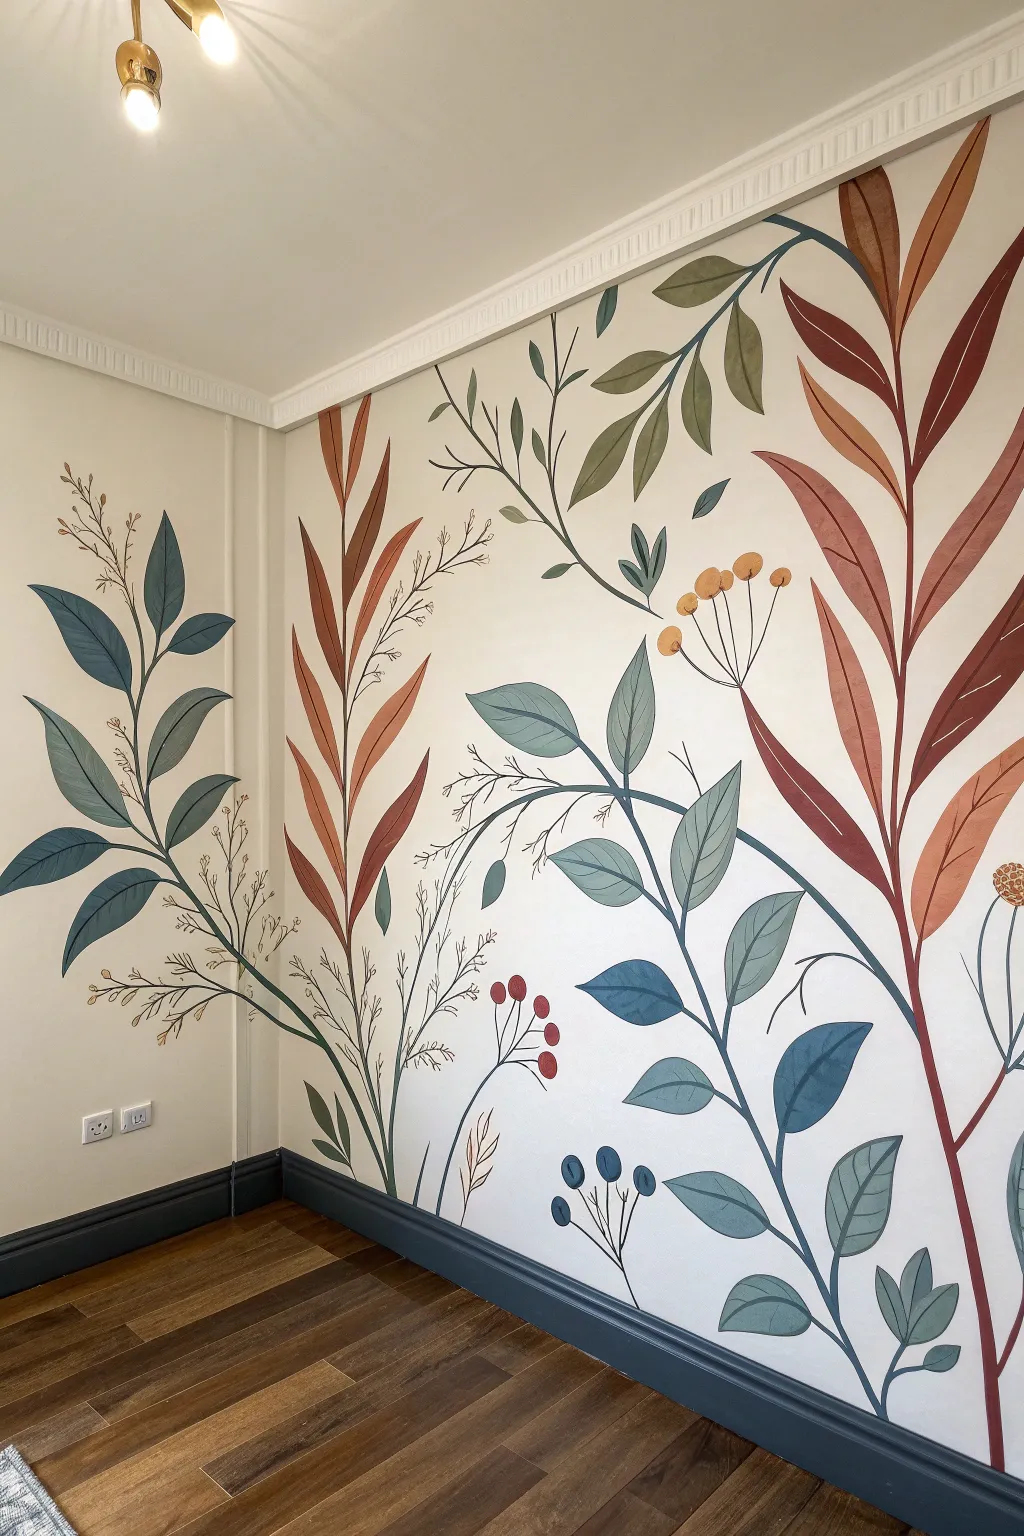
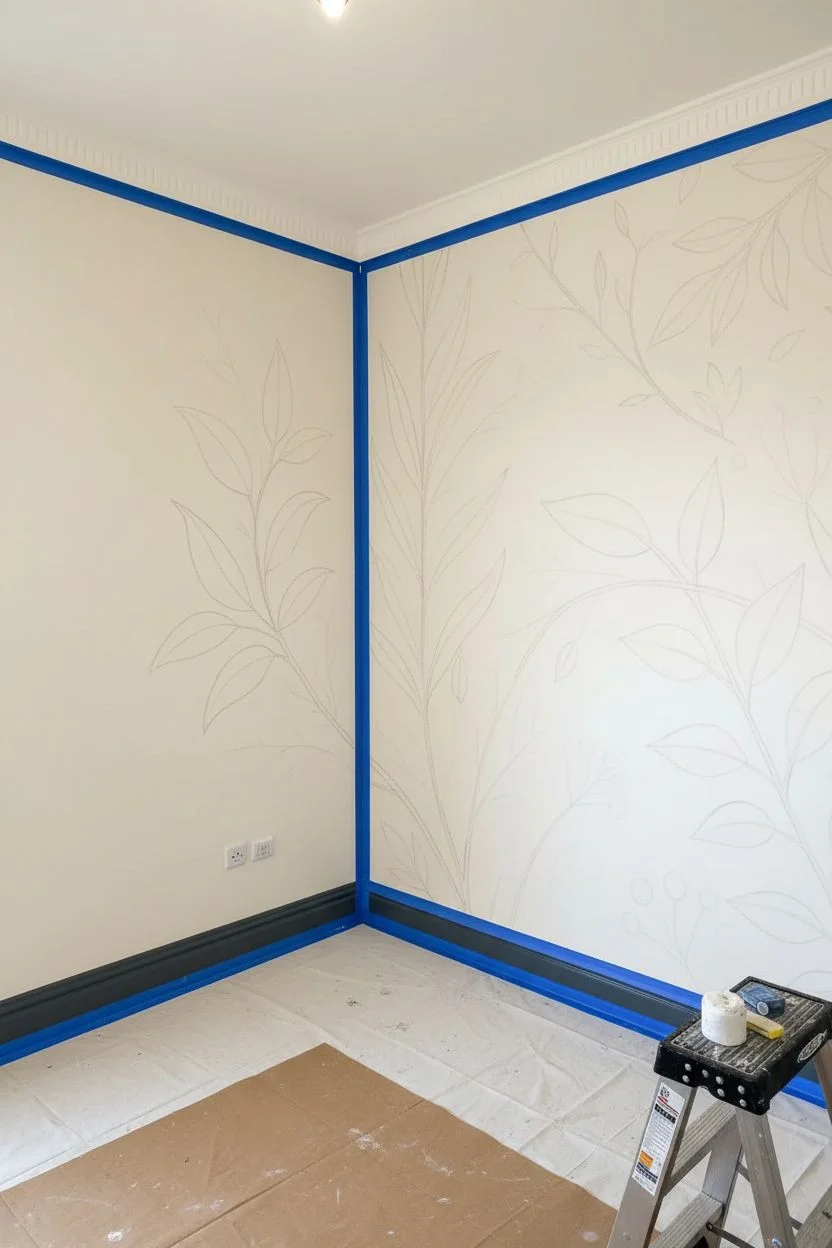
Transform an awkward corner into a serene focal point with this elegant, nature-inspired mural. Featuring sweeping branches and oversized leaves in a calming palette of sage, rust, and teal, this wraparound design adds depth and organic movement to any room.
Step-by-Step
Materials
- Interior latex paint (cream/off-white for base)
- Acrylic paints or sample pots (deep teal, sage green, rust orange, ochre, muted red, dark blue-grey)
- Pencil and large eraser
- Assorted paintbrushes (1-inch flat brush, medium filbert, fine liner brush)
- Painter’s tape
- Drop cloth
- Step ladder
- Chalk or pastel (light color)
Step 1: Preparation and Mapping
-
Prep the space:
Clear the corner area and lay down a drop cloth to protect your flooring. If the current wall color isn’t the desired cream background, apply two coats of your base color and let it cure for at least 24 hours. -
Taping the perimeter:
Apply painter’s tape to the baseboards, ceiling molding, and surrounding wall edges to ensure crisp lines where the mural ends. This framing is crucial for a polished look. -
Sketch main stems:
Using a light-colored chalk or pastel (which is easier to wipe off than pencil), lightly sketch the primary ‘spines’ of the plants. Start from the bottom corner or baseboard and sweep upwards and outwards, allowing the lines to cross the corner seam naturally. -
Flesh out the foliage:
Go back over your stem lines and sketch in the large leaf shapes. Vary the sizes—some large and sweeping, others small and clustered. Don’t worry about perfection; organic irregularities make the plants look more real. -
Refine the sketch:
Once you are happy with the composition across both walls, lightly define the final lines with a pencil. Gently wipe away the chalk guidelines with a dry cloth.
Corner Continuity
When painting over the corner seam, don’t stop the brush. Paint straight through the crease to ensure the branch looks continuous.
Step 2: Painting the Foliage
-
Mix your palette:
Pour your acrylic colors onto a palette or paper plate. I like to mix a little bit of the wall’s base color into my leafy greens and rusts; this helps the mural feel cohesive with the room rather than like a sticker sitting on top. -
Paint the rust stems:
Start with the large, reddish-brown plant structures. Using a medium filbert brush, paint the long central stems first to establish the flow. Use smooth, confident strokes. -
Fill rust leaves:
Fill in the corresponding leaves on the rust-colored branches. Keep the paint relatively flat, but you can add a touch of water for a watercolor-like transparency if desired. -
Add teal elements:
Switch to your deep teal paint. Focus on the large, darker leaves on the left wall and the lower sections of the right wall. Use a 1-inch flat brush for these broader shapes to get good coverage. -
Layer in sage greens:
Paint the lighter green leaves that appear to sit ‘behind’ the darker ones. The variation in green tones creates visual depth without needing complex shading. -
Detail branches:
Use a fine liner brush and dark blue-grey paint to create the thin, delicate stems that weave between the larger leaves. These should be graceful and wiry.
Step 3: Details and Finishing
-
Add berries and buds:
Dip a small round brush into ochre or muted red paint. Dab circles onto the ends of the thin, wiry stems to create clusters of berries or flower buds. -
Create leaf veins (shading):
For a dimensional look, mix a slightly darker version of your leaf colors. Paint a central vein line down the middle of the large leaves, and gently feather the paint outward to suggest texture. -
Add highlights:
Mix a lighter tint of your teal and rust colors (add white or cream). Apply subtle highlights to the upper edges of the leaves where light would naturally hit. -
Refine fine lines:
Check the thin stems and smaller branches. If the paint dragged or skipped, re-load your liner brush and smooth out those connections. -
Clean up edges:
Inspect the outline of your leaves. If you went outside the lines or have shaky edges, use a small brush with your wall base color to ‘erase’ and sharpen the shapes. -
Remove tape:
Once the paint is dry to the touch (usually 1 hour), carefully peel away the painter’s tape at a 45-degree angle to reveal your crisp borders. -
Final erase:
Check for any visible pencil marks that weren’t covered by paint and gently erase them with a gum eraser.
Metallic Accent
Paint the small berries or the thin central veins of the leaves with gold leaf paint for a luxurious, light-catching shimmer.
Step back and enjoy the calming, natural atmosphere your new hand-painted garden brings to the room


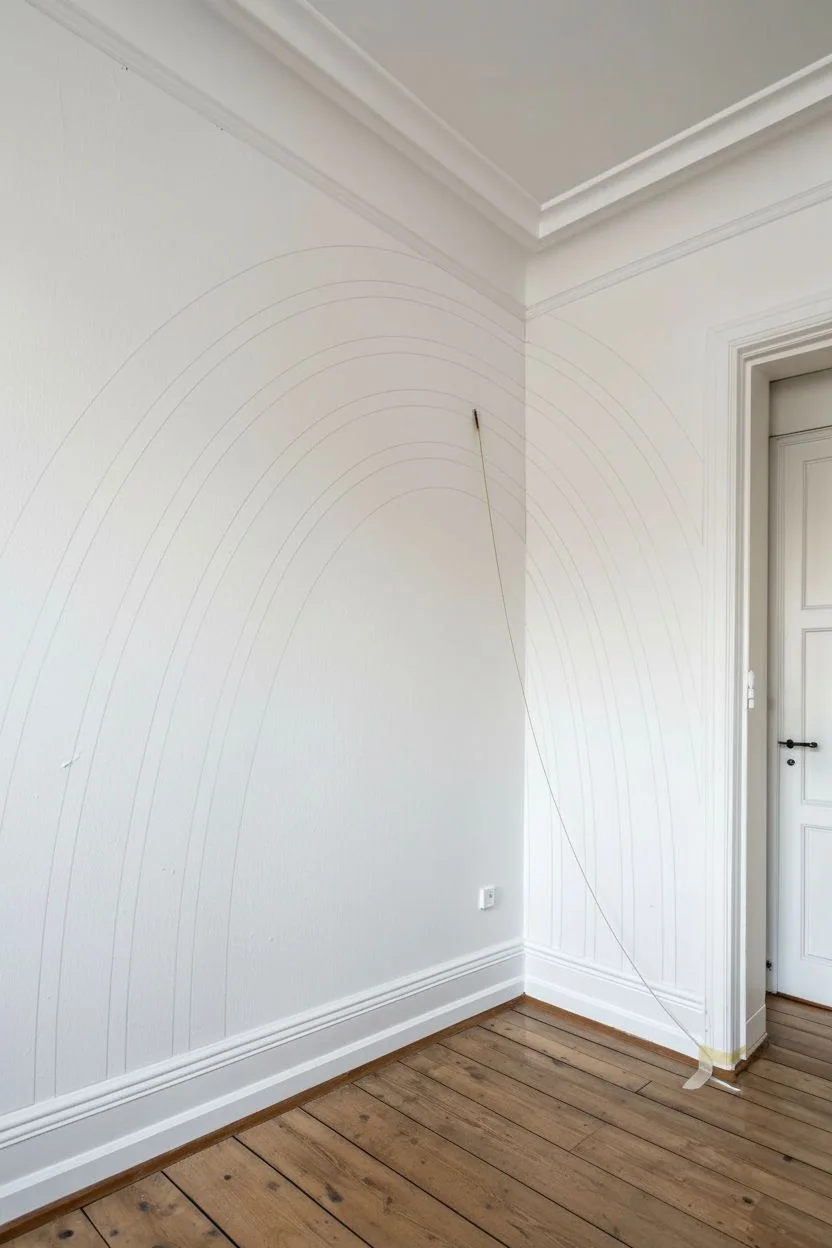
Corner Rainbow Bands That Curve Over the Seam
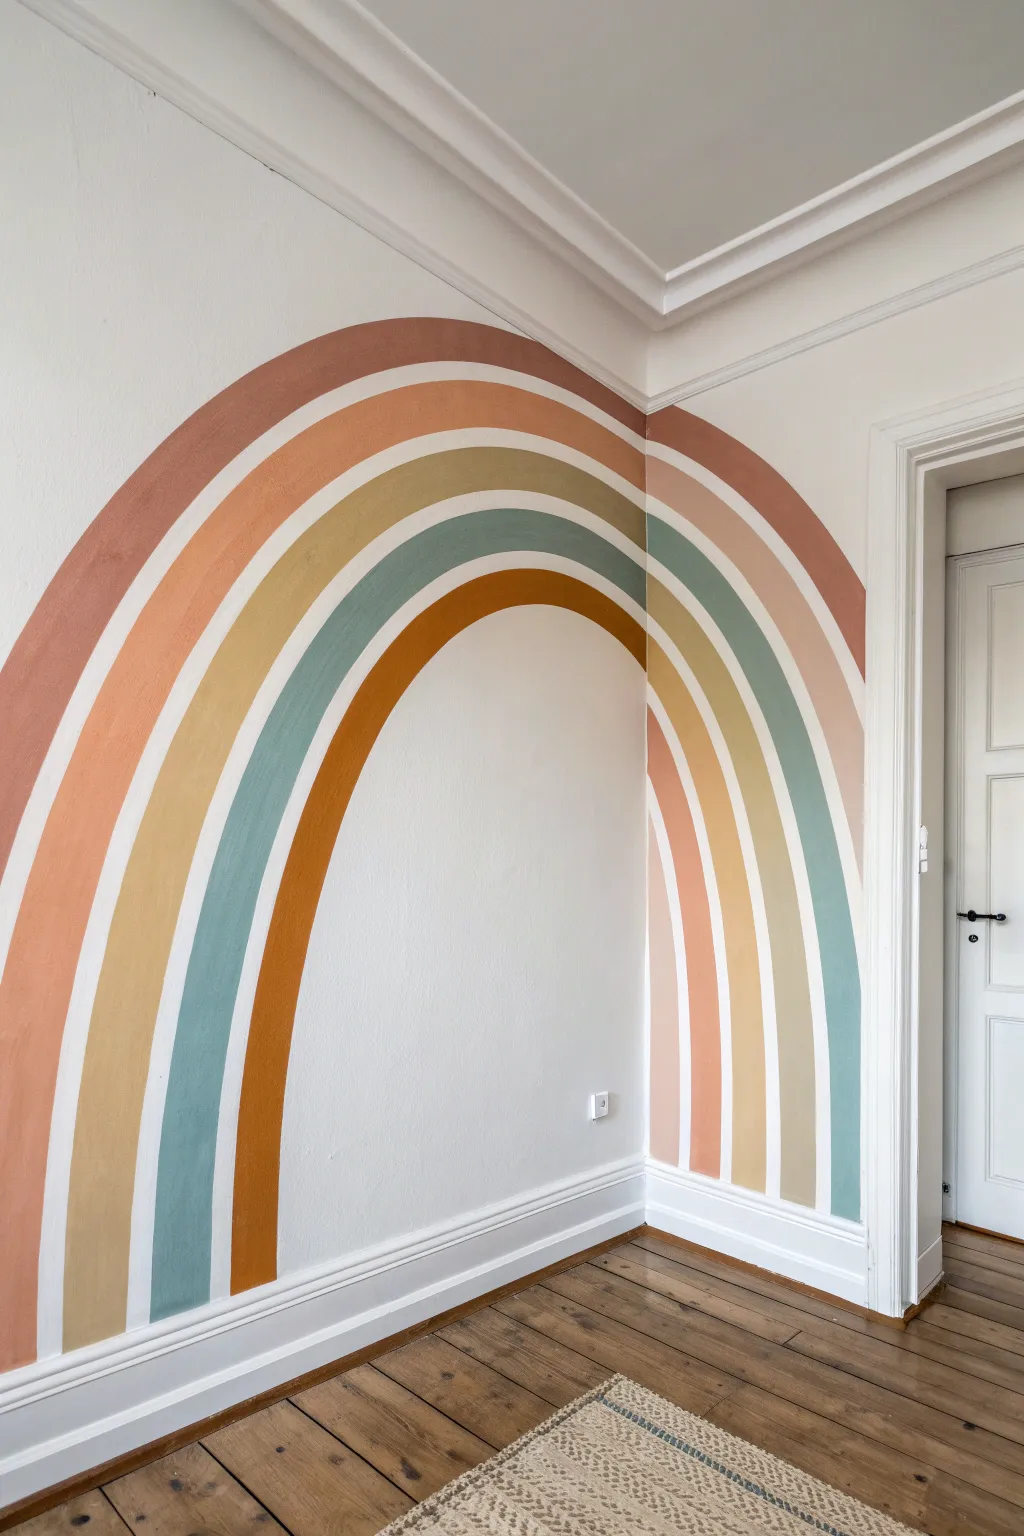
Transform a boring nook into a whimsical focal point with this earthy, bohemian-inspired wall mural. The clever design uses the corner’s natural seam to curve the rainbow bands, creating a cozy and enveloping effect perfect for a nursery or reading corner.
Detailed Instructions
Materials
- Latex wall paint in 5 earthy colors (rust, terracotta, mustard, sage, orange)
- White latex paint (for touch-ups)
- Pencil
- String or twine
- Push pin or tape
- Measuring tape
- 1.5-inch angled sash brush
- Small artist brush or liner brush
- Painter’s tape (optional)
- Level
- Eraser
Step 1: Planning and Sketching
-
Determine the center point:
Decide how high you want your rainbow to arch. This project works best if the center of your circle—the pivot point— is actually on the floor or baseboard right at the corner seam. Mark this point lightly. -
Create your compass:
Tie a piece of non-stretchy string to a pencil. Secure the other end to your pivot point at the corner baseboard using a strong piece of tape or a tack (if your flooring allows). -
Draw the first outer arch:
Extend the string to your desired maximum height. Keeping the string taut, swing the pencil from the left wall, across the corner seam, to the right wall to draw the top arch. -
Mark the first band width:
Shorten the string by approximately 4-5 inches (or your desired band width) and draw the second line to create the top band. -
Create the spacing:
Shorten the string again by about 1 inch. Draw an arch. This gap will remain the white wall color between your colored stripes. -
Continue spacing:
Repeat this process—marking a wide band, then a narrow gap—until you have outlined all five bands. You should have a total of 10 arched pencil lines. -
Check the corner transition:
Examine where the pencil lines cross the corner seam. If the wall isn’t perfectly square (which is common!), you might need to manually adjust the curve slightly with a freehand sketch so the lines appear to meet smoothly.
Wobbly Lines?
If freehand painting is too hard, use flexible painter’s tape for the curves. Seal the tape edge with white paint first to prevent the color from bleeding underneath.
Step 2: Painting the Bands
-
Prepare the first color:
Stir your outermost color (the rusty red shade) thoroughly. Pour a small amount into a manageable container. -
Cut in the edges:
Using the 1.5-inch angled sash brush, carefully paint the top edge and bottom edge of the first band. I find it helpful to hold my breath slightly on the long strokes to keep my hand steady. -
Fill the band:
Once the outlines are crisp, fill in the center of the band. Apply two thin coats rather than one thick one to avoid drips. -
Paint the second band:
Skip the white gap area and move to the second band (the terracotta/peach shade). Repeat the outlining and filling process. -
Continue with remaining colors:
Work your way inward, painting the mustard yellow, sage green, and finally the burnt orange inner arch. Take breaks between bands if your hand gets tired to maintain precision. -
Handle the corner joint:
When painting over the corner seam, dab the brush gently into the crack to ensure full coverage so no white gaps peek through the fold of the wall. -
Refine the edges:
Once the main bands are dry, inspect your lines. Use a small artist brush to sharpen any wobbly edges or fill in textured spots of the wall that the larger brush missed.
Step 3: Finishing Touches
-
Erase guidelines:
Wait until the paint is completely cured (at least 24 hours). Gently erase any visible pencil marks in the white gaps. -
Touch up with white:
If eraser marks are stubborn or you accidentally painted into a gap, use a small brush and your original white wall paint to crisp up the negative space. -
Clean up baseboards:
Check where the rainbow meets the baseboard. Use painter’s tape or a straight edge to ensure the colors end cleanly in a straight line at the bottom.
Level Up: Texture
Mix a texture additive like sand or baking soda into your paint for the rainbow bands. This gives the mural a tactile, plaster-like finish that feels more organic.
Enjoy the warmth and character this simple curved design adds to your room
Paint a Corner “Spotlight” Triangle for Instant Drama

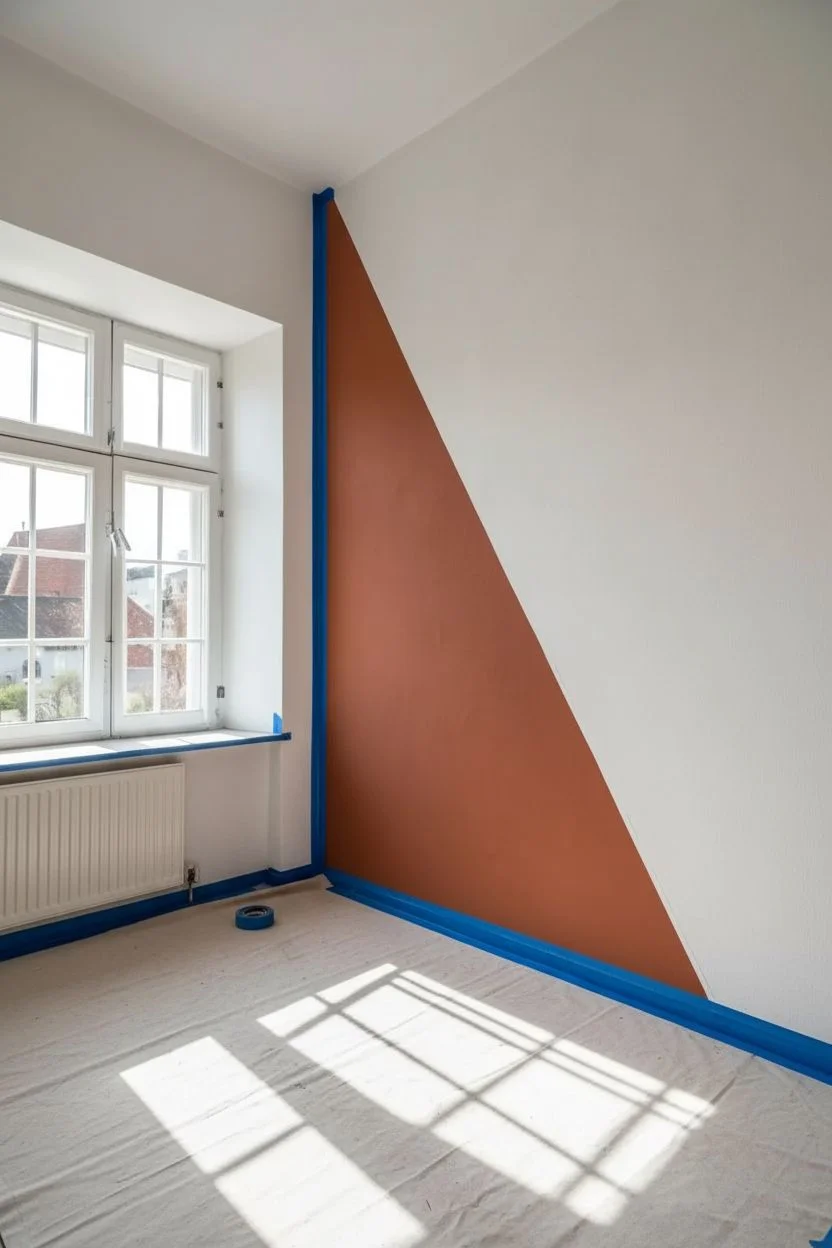
Dramatically alter the architecture of a room without structural changes by painting a bold geometric triangle in a warm, earthy tone. This technique creates a modern focal point that adds depth and highlights specific decor elements like large floor vases.
Step-by-Step Tutorial
Materials
- Terracotta or burnt orange interior latex paint (matte finish)
- White or existing wall color paint (for touch-ups)
- Painter’s tape (high quality, sharp lines)
- Measuring tape
- Pencil
- Long straight edge or laser level
- Ladder or step stool
- Drop cloth
- Small angled sash brush (1.5 – 2 inch)
- Medium paint roller (4-6 inch) and tray
- Damp rag
Step 1: Preparation and Mapping
-
Clear and clean:
Begin by removing all furniture and decor from the corner area. Wipe down the walls with a damp cloth to remove dust, ensuring the tape will adhere properly. -
Protect the area:
Lay down your drop cloth to protect the wooden flooring. Use painter’s tape to mask off the baseboard in the corner where you will be painting. -
Determine the height:
Decide how high your triangle peak should be. In the image, the peak hits the adjacent wall near the ceiling. Mark this spot lightly with a pencil. -
Mark the width:
Measure along the floor (or just above the baseboard) to decide how wide the base of the triangle will be on the main wall. Mark the endpoint. -
Draw the diagonal:
Connect your top mark to your bottom mark. Ideally, use a laser level to project the straight line, or use a long straight edge and a pencil to lightly draw the diagonal boundary.
Step 2: Taping and Sealing
-
Apply the diagonal tape:
Carefully apply painter’s tape along the outside of your pencil line. This means the tape is on the ‘white wall’ side, not the ‘terracotta’ side. -
Press firmly:
Run your finger or a specialized smoothing tool along the tape edge to ensure there are no air bubbles where paint could bleed under. -
Tape the vertical corner:
Apply a strip of tape vertically along the inner corner crease, but only on the *adjacent* wall that won’t be painted. This gives you a crisp vertical line. -
The sealing trick:
I usually brush a very thin layer of the *existing wall color* (white) over the edge of the tape first. This seals the tape edge so any bleed-through matches the background, keeping the final color crisp. -
Let the seal dry:
Wait about 20-30 minutes for this sealing coat to dry completely before opening your main color.
Seal the Deal
To prevent textured wall bleed, run a thin bead of clear paintable caulk along the tape edge. Wipe it almost completely away before painting.
Step 3: Painting the Triangle
-
Cut in the edges:
Using your angled sash brush and the terracotta paint, carefully paint along the taped diagonal line, the taped corner crease, and the masked baseboard. -
Fill the center:
Pour your paint into the tray and load your roller. Apply the paint to the main body of the triangle, using “W” motions to distribute it evenly. -
Check for coverage:
Deep earthy tones often need two coats. Allow the first coat to dry according to the can’s instructions (usually 2-4 hours). -
Apply second coat:
Repeat the cutting-in and rolling process for a rich, opaque finish. Ensure you don’t overload the roller near the tape edge this time.
Metallic Accent
Before removing the tape, paint a thin gold or copper stripe right along the diagonal edge for a luxurious, gilded border effect.
Step 4: The Reveal
-
Remove tape while damp:
The secret to a perfect line is removing the tape while the second coat is still slightly tacky, not fully cured. Pull the tape slowly away from the paint at a 45-degree angle. -
Inspect and touch up:
Once the tape is gone, check for any tiny imperfections. Use a small artist’s brush for minor corrections if necessary. -
Style the corner:
Once fully dry (give it 24 hours to cure), place a large woven floor vase with pampas grass or a sculptural ceramic jug in front for contrast.
Step back and enjoy the striking modern dimension you’ve added to your room with just a quart of paint and some geometry
Corner Checkerboard for a Graphic, Modern Pop
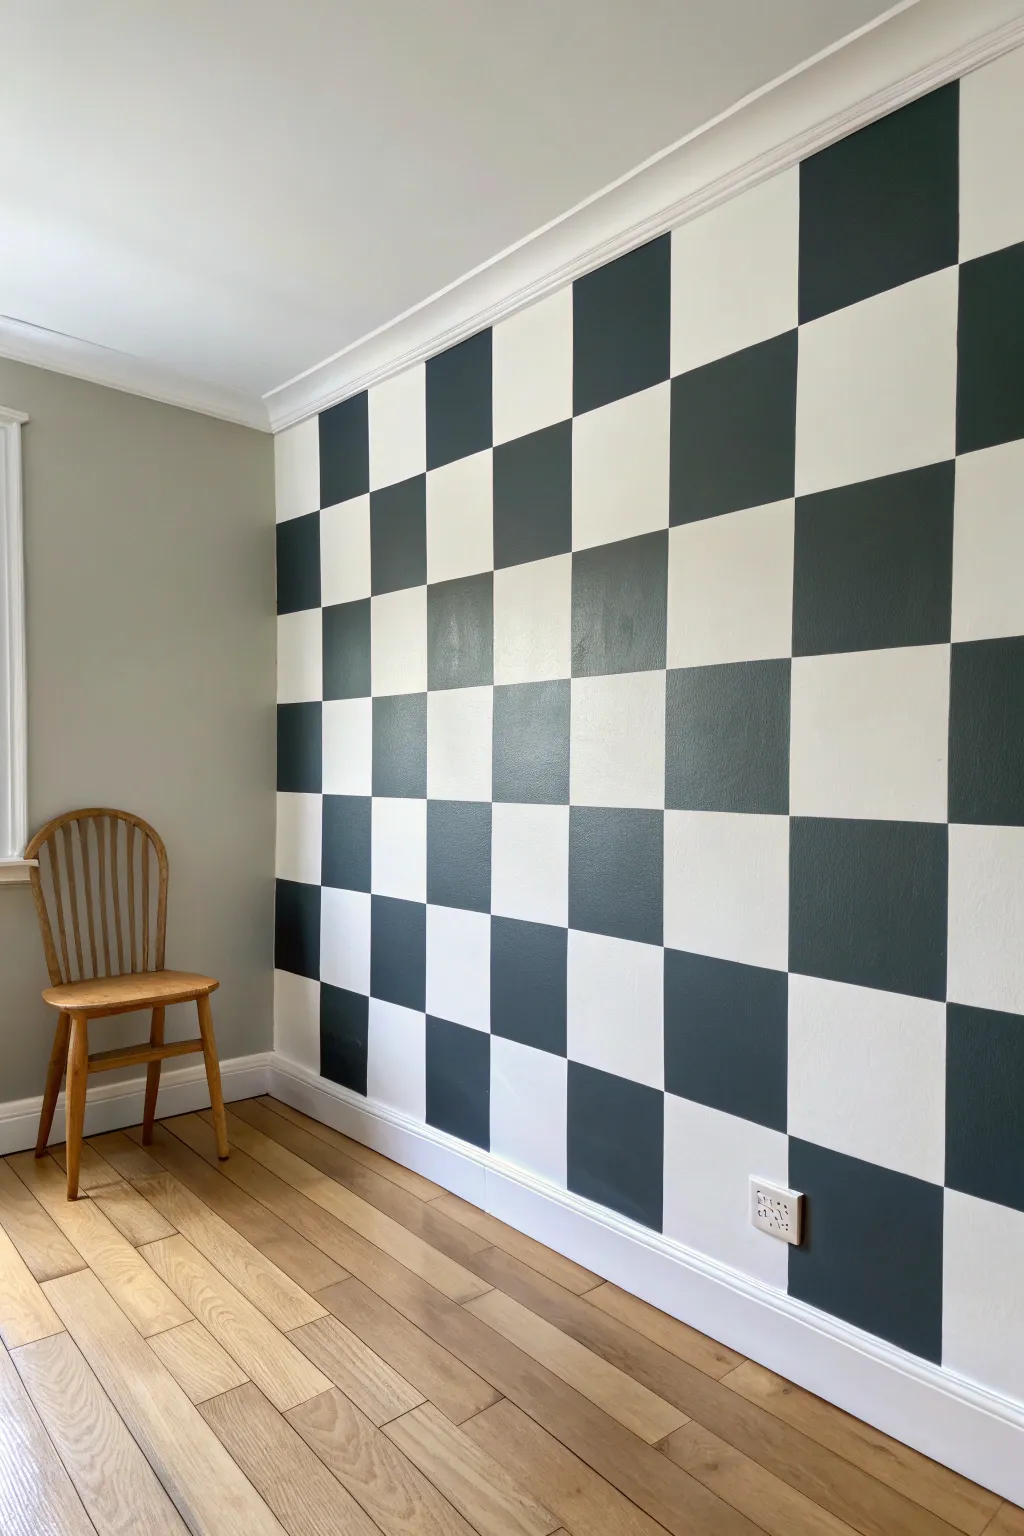
Transform a plain corner into a bold statement piece with this oversized graphic checkerboard pattern. The contrast between deep forest green and crisp white creates a playful yet sophisticated modern pop that completely redefines the space.
Detailed Instructions
Materials
- High-quality painter’s tape (FrogTape is recommended for sharp lines)
- Laser level (or a long spirit level and chalk line)
- Measuring tape
- Pencil and eraser
- Base wall color (White or Off-White interior latex paint)
- Deep accent color (Dark Green/Teal interior latex paint)
- Small foam roller and tray
- Angled sash brush (2-inch)
- Drop cloth
- Utility knife or box cutter
- Damp rag for mistakes
Step 1: Preparation & Base Coat
-
Clear the area:
Move furniture away from the corner to give yourself ample working space. Lay down a drop cloth to protect your beautiful wooden floors from potential splatters. -
Clean the surface:
Wipe down the wall with a damp cloth to remove dust or grease. Cleaner walls ensure better tape adhesion, which is critical for this geometric design. -
Paint the base color:
If your wall isn’t already the desired lighter shade (white in this case), paint the entire wall with your base color. Apply two coats for even coverage. -
Allow specifically long drying time:
Let the base coat cure for at least 24 to 48 hours. This might feel like a long wait, but painting tape over fresh paint can peel it right off, ruining your hard work.
Seal Avoids Bleeds
Always paint over your tape edge with the BASE wall color first. This seals the tape so the darker color can’t bleed underneath.
Step 2: Mapping the Grid
-
Determine square size:
Measure the total width and height of your wall. For the look in the photo, aim for large, impactful squares—roughly 12 to 14 inches wide works well for a standard room height. -
Mark the vertical lines:
Starting from the corner outward, use your tape measure to mark intervals for your vertical grid lines along the baseboard and ceiling. -
Draw vertical guides:
Using a laser level to ensure perfectly straight lines, lightly draw the vertical lines with a pencil connecting your top and bottom marks. -
Mark the horizontal lines:
Mark the intervals for your horizontal lines up the wall. Ensure the height of your rows matches the width of your columns to create perfect squares. -
Draw horizontal guides:
Connect your horizontal marks using the laser level and pencil, creating a full grid across the wall. -
Identify the pattern:
Before taping, place small pieces of tape or light ‘X’ marks inside the squares that will stay *white*. This prevents the common mistake of painting the wrong square once you get in the zone.
Step 3: Taping & Sealing
-
Tape the vertical outside edges:
Apply painter’s tape along the *outside* of the pencil lines for the squares you intend to paint. This is tricky: think about preserving the shape of the square you are painting. -
Tape the horizontal outside edges:
Complete the taping for the horizontal lines. You will tape off individual squares rather than long continuous strips to ensure sharp corners. -
Seal the tape edges:
This is the most important step for crisp lines: Paint a thin layer of your *base* color (white) over the edge of the tape. This fills any tiny gaps so the green paint won’t bleed under.
Go Retro or Bold
Swap the forest green for a pastel pink or mustard yellow for a retro vibe, or use high-gloss over matte paint for a subtle textural grid.
Step 4: Painting the Accent Color
-
Cut in the edges:
Use your angled sash brush to carefully paint the green accent color around the perimeter of the taped squares and along the ceiling/baseboard trim. -
Roll the squares:
Using a small foam roller for a smooth finish, fill in the squares with your dark green paint. Apply a thin, even coat. -
Apply the second coat:
Once the first coat is dry to the touch, apply a second coat of the green paint to ensure rich, opaque coverage without streaks. -
Remove tape while wet:
Peel off the painter’s tape slowly and at a 45-degree angle while the second coat is still slightly wet. I find this creates the sharpest lines and prevents the paint from chipping. -
Touch up:
Inspect your work closely. Use a tiny artist’s brush to fix any small bleeds or uneven corners with the appropriate color.
Step back and admire how this simple geometric change has added depth and architectural interest to your room
Painted Corner Frame to Highlight Shelves or Decor
Transform a standard built-in or wall niche into a stunning focal point by framing it with a bold, earthy color. This project uses a terracotta hue to highlight architectural details, painting both the surrounding wall frame and the shelf surfaces while leaving the inner trim crisp white for high contrast.
Step-by-Step Tutorial
Materials
- Terracotta or rust-orange interior latex paint (satin or semi-gloss finish)
- White semi-gloss trim paint
- 2-inch angled sash brush
- 4-inch foam roller and handle
- Painter’s tape (multi-surface)
- Drop cloth
- Sanding sponge (220-grit)
- Tack cloth
- Screwdriver (if removing existing hardware)
- Mild cleaner or TSP substitute
Step 1: Preparation & Cleaning
-
Clear and clean:
Remove all decor, books, and plants from the shelves. Wipe down the entire area—shelves, trim, and the surrounding wall—with a mild cleaner or TSP substitute to remove dust and oils. -
Sand surfaces:
Lightly scuff the surfaces you plan to paint using a 220-grit sanding sponge. This is crucial for the shelves and trim to ensure the new paint adheres properly without peeling later. -
Remove dust:
Wipe away all sanding dust with a tack cloth or a slightly damp rag. Let everything dry completely before moving on.
Bleeding Lines?
If paint bleeds under tape, don’t panic. Let it dry fully, scrape gently with a razor blade to remove the excess, then touch up with the original base color using a tiny brush.
Step 2: Taping for Precision
-
Tape the inner edges:
Apply painter’s tape along the inner edge where the white casing meets the wall surface you intend to paint. This separates the white interior trim (which stays white) from the outer ‘frame’ we are creating. -
Tape the shelf edges:
Carefully tape off the front vertical face of the shelves if you want them to remain white, or tape the inner niche walls where the shelves meet them to keep your lines sharp. -
Seal the tape:
Press the tape edges down firmly with a credit card or putty knife. I like to run a very thin bead of white paint along the tape line first—this seals the tape and prevents the colored paint from bleeding under.
Step 3: Painting the Color Block
-
Cut in the edges:
Dip your 2-inch angled sash brush into the terracotta paint. Carefully cut in along the tape lines on the wall frame and around any detailed molding on the baseboard. -
Paint the baseboard:
Extend the color down to the baseboard directly under the niche. Paint the baseboard section that aligns with your wall frame to create a grounded, continuous look. -
Roll the flat areas:
Use the 4-inch foam roller to apply paint to the flat sections of the wall frame. The roller provides a smoother finish than a brush on these wider surfaces. -
Paint the shelf tops:
Brush paint onto the tops of the shelves. Work from the back corner outward to avoid leaning into wet paint. Use long, smooth strokes to minimize brush marks. -
Let dry and recoat:
Allow the first coat to dry for the time recommended on your paint can (usually 2-4 hours). Apply a second coat to ensure rich, opaque color coverage.
Add Texture
For an old-world plaster look, mix a texture additive into your terracotta paint or try a ‘limewash’ style paint application on the outer frame for subtle movement.
Step 4: Finishing Touches
-
Remove tape:
While the second coat is still slightly tacky (not fully cured), slowly peel off the painter’s tape at a 45-degree angle. This prevents the dried paint form bridging and peeling up with the tape. -
Touch up:
Inspect your lines. If any color bled onto the white interior, wait for it to dry completely, then use a small artist’s brush and white paint to correct it. -
Cure time:
Let the paint cure for at least 24-48 hours before placing heavy objects like pots or stacks of books back onto the shelves to prevent sticking. -
Style the shelves:
Reintroduce your decor. Use neutral items like cream ceramics, terracotta pots, and green plants to complement the new warm frame.
Step back and admire how a single bold color choice completely redefines the character of your space
Painted “Wainscot” Wrap That Grounds the Corner
This project transforms a plain corner into a textured, architectural feature by combining warm, earthy paint tones with classic beadboard wainscoting. The contrast between the terracotta upper wall and the crisp white paneling ground the space, adding instant character and depth to any room.
How-To Guide
Materials
- Beadboard paneling sheets or tongue-and-groove planks
- Top cap molding (chair rail)
- Baseboard molding
- Construction adhesive (Liquid Nails)
- Finishing nails or brad nailer
- Wood filler
- Caulk and caulk gun
- Fine-grit sandpaper (220-grit)
- Painter’s tape
- Primer (bonding primer recommended)
- Interior semi-gloss or satin paint (White)
- Interior matte or eggshell paint (Terracotta/Burnt Orange)
- Paint rollers (foam for smooth finish, nap for walls)
- Angled sash brush
- Level and measuring tape
- Miter saw or hand saw with miter box
Step 1: Painting the Upper Wall
-
Prepare the workspace:
Clear the corner area and lay down drop cloths to protect your flooring. Remove any existing baseboards carefully if you plan to reuse them, though installing new, taller baseboards usually looks best with wainscoting. -
Clean and patch:
Wipe down the walls with a damp cloth to remove dust. Fill any holes or imperfections in the upper wall section with spackling paste, let dry, and sand smooth. -
Edge the ceiling:
Using painter’s tape, mask off the ceiling or crown molding. Use an angled sash brush to ‘cut in’ a clean line of your terracotta paint along the top edge and corners. -
Roll the color:
Apply the matte terracotta paint to the upper portion of the wall. Since you will be covering the lower half, you don’t need a perfect bottom edge, but make sure to paint slightly lower than where your chair rail will sit to avoid gaps. I usually aim for about 3-4 inches below the intended rail line. -
Apply second coat:
Allow the first coat to dry according to the can’s instructions, then apply a second coat for a rich, saturated finish.
Gaping Corners?
Walls are rarely perfectly square. If your corner miter joint has a gap, don’t force it. Use a paintable acrylic caulk to fill the space before painting—it disappears completely under paint.
Step 2: Installing the Beadboard
-
Establish the height:
Decide on the height of your wainscoting—typically about one-third of the wall height. Use a level to draw a horizontal line across the wall at this height to guide your installation. -
Cut panels to size:
Measure and cut your beadboard sheets or planks to fit from the floor to your marked line. Remember to account for outlets or switches by carefully measuring and cutting out openings with a jigsaw. -
Adhere the panels:
Apply construction adhesive to the back of the beadboard panel in a zig-zag pattern. Press it firmly against the wall. -
Secure with nails:
Use a brad nailer or finishing nails to secure the panel, nailing into the studs where possible. For beadboard sheets, also nail along the top and bottom edges where trim will cover the heads. -
Handle the corner:
When you reach the corner, measure precisely. You may need to butt one piece into the corner and scribe the adjacent piece for a tight fit if your walls aren’t perfectly square.
Step 3: Trim and Molding
-
Install baseboards:
Measure and cut your baseboard molding. For the corner, cut the ends at a 45-degree angle (miter) for a seamless join. Nail these into place at the bottom of the beadboard. -
Add the top rail:
Place the chair rail or cap molding along the top edge of the beadboard. This hides the raw cut edge. Miter the corner joint just like the baseboards and secure with nails. -
Fill and seamless finish:
Fill all nail holes with wood filler. Once dry, sand them flush. This small step is crucial for that built-in, professional look. -
Caulk the gaps:
Run a thin bead of printable caulk along all seams: where the trim meets the beadboard, where the baseboard meets the floor, and crucially, the vertical corner seam. Smooth with a wet finger.
Add a Picture Ledge
For added functionality, use a deeper piece of molding for the top cap (2-3 inches). This creates a shallow shelf suitable for leaning framed art or small decor items along the perimeter.
Step 4: Final White Finishes
-
Prime the wood:
If your beadboard and trim aren’t pre-primed, apply a coat of high-quality bonding primer. This ensures your topcoat adheres effectively and looks uniform. -
Paint the grooves:
Using a brush, paint inside the vertical grooves of the beadboard first. Rollers often miss these deep recesses, leaving dark shadows. -
Roll the flat surfaces:
Use a small foam roller or short-nap roller to paint the flat faces of the beadboard and the trim. The foam roller helps achieve a sprayed-on look free of brush marks. -
Final touch-ups:
Check the line where the top rail meets your terracotta wall. If paint got onto the wall, use a small artist’s brush to touch up the terracotta for a crisp, perfect boundary.
Enjoy the instant warmth and architectural elegance this classic two-tone treatment brings to your home.
Half-and-Half Diagonal Split That Slices Through the Corner

Transform a standard room corner into a striking architectural feature with this precise half-and-half paint technique. By extending the lower wall color around a corner and grounding it with crisp white molding, you create a sophisticated, modern look that highlights the room’s geometry.
Step-by-Step Guide
Materials
- High-quality painter’s tape (frog tape recommended)
- Terra-cotta or warm tan interior latex paint (satin finish)
- Crisp white interior latex paint (semi-gloss for trim, eggshell/matte for upper walls)
- Chair rail molding (primed wood or polyurethane)
- Baseboard molding matching existing profile
- Miter saw or hand saw with miter box
- Construction adhesive or nail gun with finishing nails
- Paintable latex caulk and caulk gun
- Wood filler
- Fine-grit sandpaper (220 grit)
- Quality angled sash brush (2.5 inch)
- Medium nap paint roller and tray
- Drop cloths
- Measuring tape and pencil
- Level
Step 1: Preparation and Molding Installation
-
Assess the Space:
Begin by cleaning the corner walls thoroughly to remove dust and grease, which ensures better tape adhesion. Measure the height where you want your chair rail to sit; typically, this is about 30-36 inches from the floor, or slightly below the window sill as shown in the inspiration. -
Mark the Level Line:
Using your measuring tape and a long level, draw a light horizontal pencil line around the corner at your determined height. This line will guide the top edge of your chair rail molding. -
Cut the Molding:
Measure the lengths of wall on both sides of the corner. Set your miter saw to 45 degrees to cut the inside corner joints for both the chair rail and baseboard pieces. Test the fit dry before attaching anything. -
Install the Trim:
Apply a bead of construction adhesive to the back of your chair rail molding or use a nail gun to secure it to the wall, aligning the top edge perfectly with your pencil line. Repeat this process for the baseboards if they aren’t already installed. -
Fill and Caulk:
Fill any nail holes with wood filler and let it dry. Run a thin bead of paintable caulk along the top and bottom edges of the molding where it meets the wall to create a seamless, professional transition. Smooth the caulk with a wet finger.
Bleeding Lines?
If paint bleeds under the tape, let it dry fully. Re-tape precisely over the line, then seal the edge with the existing base color before applying the touch-up color.
Step 2: Painting the Base and Detail
-
Sand and Prime:
Once the filler is dry, lightly sand the wood filler spots until flush. If you installed raw wood, apply a coat of primer to the molding. If it’s pre-primed, you can skip this, but a quick scuff sand always helps adhesion. -
Tape the Boundaries:
Apply painter’s tape carefully along the floor edge and along the wall just above the chair rail. Press the tape edges down firmly with a putty knife or fingernail to prevent bleed-through. -
Paint the Upper Wall:
Before tackling the color feature, refresh the upper wall with your crisp white paint. Use a roller for the main areas and an angled brush to cut in near the ceiling and top of the tape line. Two coats usually give the best coverage. -
Paint the Trim:
Paint the chair rail and baseboards with your semi-gloss white paint. I prefer to do this before the lower wall color so I can easily tape off the trim later for a super sharp line. -
Protect the White Trim:
Allow the white trim paint to cure for at least 24 hours. Then, apply delicate-surface painter’s tape (often yellow or purple) over the bottom edge of the chair rail and the top edge of the baseboard. -
Seal the Tape Edge:
Lightly brush a tiny amount of the white trim color over the edge of the tape that faces the area you will paint terra-cotta. This seals the tape and ensures that any paint that bleeds under is white, keeping your final line razor-sharp.
Step 3: Applying the Color Block
-
Cut in the Color:
Open your terra-cotta or warm tan paint. Using your angled sash brush, carefully cut in around the edges of the lower wall section—along the taped chair rail, the taped baseboard, and the vertical corner itself. -
Roll the Field:
Use a small or medium roller to fill in the rest of the lower wall section. Apply the paint in a ‘W’ pattern to distribute it evenly, then smooth it out with vertical strokes. Don’t overload the roller to avoid texture buildup. -
Apply Second Coat:
Let the first coat dry completely according to the can’s instructions. Apply a second coat to ensure a rich, opaque color that hides any brush strokes. -
The Reveal:
While the second coat is still slightly tacky (not fully dry), slowly peel away the painter’s tape at a 45-degree angle. Removing it whilst wet prevents the paint skin from pulling away with the tape. -
Final Touch-ups:
Inspect your edges. If any tiny bleeds occurred, wait for the paint to fully harden, then use a small artist’s brush and the appropriate color to touch up the line for perfection.
Add Dimension
Install vertical picture frame molding boxes on the adjacent wall below the chair rail. Paint them the same white as the upper wall for a classic wainscoting contrast.
Step back and admire how a simple band of color creates a completely new architectural feel in your room
Faux Brick or Stone Corner for Texture Without Tile
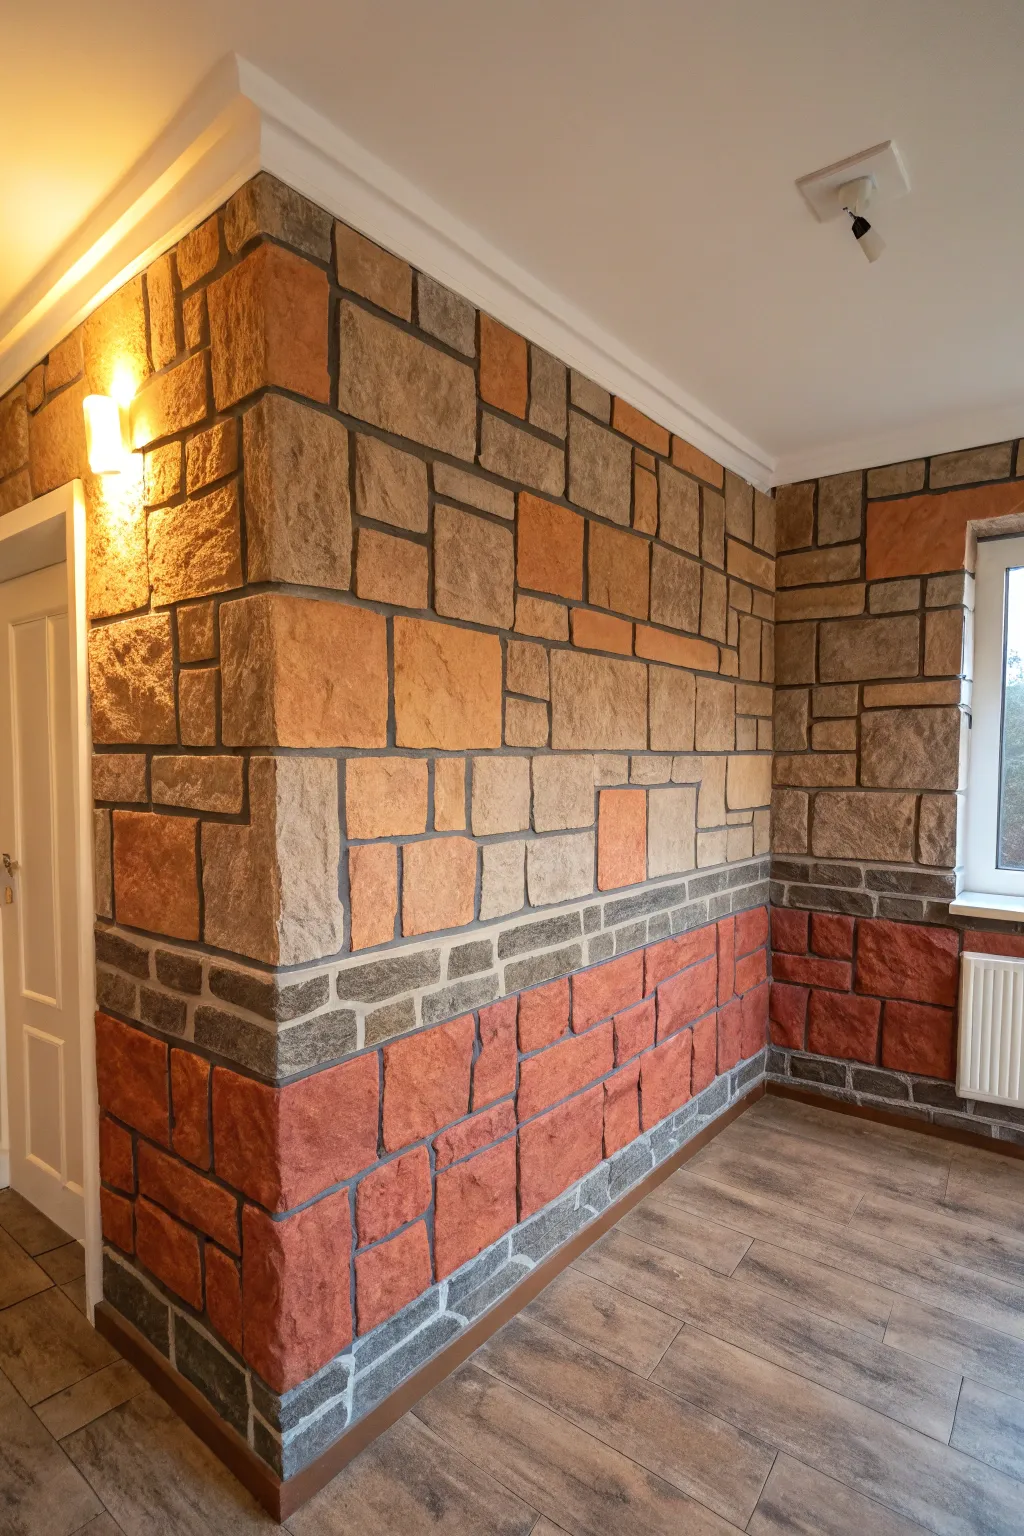

Transform a plain drywall corner into a rustic stone masterpiece using nothing but joint compound and paint. This trompe l’oeil technique creates convincing depth and texture, giving your room the cozy feel of a mountain lodge without the weight of real rocks.
How-To Guide
Materials
- Lightweight joint compound or texture paste
- Wide painters tape (1-inch and 2-inch)
- Putty knife (various sizes)
- Trowel
- Pencil and level
- Sandpaper (medium grit)
- Latex paint (base coat: dark gray/grout color)
- Acrylic paints (terracotta, beige, tan, charcoal, warm gray)
- Sea sponge or texturing sponge
- Medium and fine paintbrushes
- Matte clear sealer (water-based)
Step 1: Planning and Prep
-
Clean and prime:
Start with a clean, dry wall surface. If the wall is glossy, give it a light sanding. Apply a coat of primer to ensure your joint compound adheres properly. -
Sketch your design:
Lightly sketch your stone layout directly on the wall using a pencil. For this specific look, organize the design into distinct horizontal bands: a main middle section of large varied square/rectangular stones, bordered by thinner gray bands, and a bottom wainscoting section of reddish stones. -
Tape the grout lines:
Apply painter’s tape over your pencil lines. The tape represents the grout. Use wider tape for the horizontal separation bands and thinner strips for the vertical gaps between individual ‘stones’. tearing the tape edges slightly can give a more organic, aged grout line.
Stone-Cold Pro Tip
Mix a little bit of fine sand into your base coat paint for the stones only. This adds gritty, realistic texture that flat paint and plaster alone can’t quite mimic.
Step 2: Creating Texture
-
Apply the compound:
Scoop out lightweight joint compound with a trowel. I like to apply it roughly about 1/4 to 1/2 inch thick over the entire taped area. Don’t try to make it smooth; the goal is texture. -
Texturize the surface:
While the compound is wet, press a crumpled plastic bag or a sea sponge into the surface to create pits and peaks resembling rough-hewn stone. For the bottom red section, you might want a slightly smoother, flatter texture compared to the rougher upper stones. -
Clean the edges:
Run a putty knife gently around the edges of where your stones will be to knock down excessive peaks that might look unnatural later. -
Reveal the grout:
This is the crucial step: gently peel away the painter’s tape while the compound is still damp but not wet. If you wait until it’s fully dry, the tape might chip the ‘stones’. Pulling it now reveals the recessed grout channels. -
Let it cure:
Allow the compound to dry completely, usually overnight or up to 24 hours depending on humidity and thickness. It will turn stark white when dry.
Step 3: Painting the Stones
-
Base coat the grout:
Using a small brush, paint the recessed grout lines with a dark charcoal or deep gray paint. Extend this color slightly onto the edges of the stones to create simulated shadows. -
Base coat the stones:
Apply a base color to each section. Use a warm beige for the upper large stones, a dark slate gray for the thin divider bands, and a deep terracotta red for the bottom wainscoting area. -
Sponge on variety:
Dip a sea sponge into a lighter tan and dab it onto the beige upper stones to highlight the texture. Repeat with a darker brown sparingly to add age. -
Detail the red section:
For the bottom red stones, sponge on hints of burnt orange and dark brown. Focus the darker colors near the edges of each stone to make the center visually pop forward. -
Re-define grout lines:
If you got any stone color into the grout lines, meticulously touch them up with your dark gray grout paint. This high contrast is essential for the 3D illusion. -
Dry brushing highlights:
Take a dry brush with a tiny amount of off-white or light cream paint. Lightly whisk it over the highest peaks of the texture. This catches the light and emphasizes the roughness. -
Protect the finish:
Once fully dry, apply a matte water-based sealer. This protects the plaster from chipping and makes the wall wipeable, which is important for high-traffic corners.
Level Up: Color Wash
Use a diluted glaze (paint mixed with water) for your top layers. A translucent wash settles into the plaster pits, creating instant, realistic depth and shadows.
Step back and enjoy the incredible depth of your new feature wall that looks distinctively expensive
Painted Shadow-Line “3D Column” Illusion in the Corner
Transform a plain, flat interior or exterior corner into a stately, architectural pillar using nothing but clever shading and color blocking. This trompe-l’œil technique tricks the eye into seeing a protruding structural column where there is only a flat wall join.
Step-by-Step Guide
Materials
- High-quality painter’s tape (frog tape recommended)
- Laser level or long spirit level
- Measuring tape
- Pencil
- Base wall color (bright white)
- Shadow color (soft cool grey or taupe, 2-3 shades darker than base)
- Accent base trim color (dark tan or warm brown)
- Angled sash brush (2-2.5 inch)
- Small foam roller and tray
- Drop cloth
Step 1: Planning and Taping
-
Assess the corner:
Choose a clean 90-degree corner that is currently flat or unassuming. Clean the surface thoroughly to ensure crisp tape adhesion. -
Measure the column width:
Decide on the width of your faux column face. For a realistic look, measure about 12-16 inches out from the corner on one wall only—this will act as the ‘front’ face of the column. -
Mark vertical guide lines:
Using your laser level or spirit level, draw a faint vertical pencil line from floor to ceiling at your chosen width mark. -
Create the top capital:
To mimic the crown molding or capital seen in the photo, measure down about 12 inches from the ceiling (or soffit). Draw a horizontal line connecting the corner to your vertical line, and extend it slightly beyond the vertical line to create a sense of overhang. -
Tape the main vertical edge:
Apply painter’s tape along the *outside* of your vertical pencil line. This protects the rest of the wall while you paint the column face. -
Tape the base perimeter:
Measure about 6-8 inches up from the ground for the column’s base block. Apply horizontal tape to define the top edge of this darker base section.
Bleed-Proof Lines
To get razor-sharp lines on textured walls, seal the tape edge with a thin layer of the existing wall color first before applying your new color.
Step 2: Painting the Structure
-
Apply the column face color:
Paint the area inside your vertical tape lines with your bright white base color. This creates the ‘lit’ side of the column. You may need two coats for full opacity. -
Define the shadow side:
On the adjacent wall (meeting at the corner), measure a strip about 4-6 inches wide. This represents the side of the column cast in shadow. -
Tape the shadow strip:
Apply tape vertically to define this narrower strip. This strip pushes visually backward, enhancing the 3D effect. -
Paint the shadow:
Use your soft grey or taupe paint for this narrow strip. The contrast between the bright white face and this shadowed side creates the dimensional pop. -
Feather the shadow edge (optional):
For a softer look, you can remove the outer tape of the shadow strip while wet and dry-brush the edge to fade it into the existing wall color, though a hard line looks more architectural.
Faux Finish Texture
Mix a handful of clean sand or specific texture additive into the base paint to give the ‘column’ a realistic stucco or stone feel.
Step 3: Detailing the Base and Crown
-
Paint the base block:
Once the white column paint is dry, mask off the area for the bottom footing. Use the dark tan or warm brown paint here. -
Wrap the base:
Ensure the dark base color wraps around the corner to the shadow side as well, maintaining the same height on both walls. -
Create the upper molding illusion:
At the top of your column, paint a horizontal band (about 2-3 inches thick) that matches your base or shadow color to simulate a capital detail. -
Add high-contrast highlights:
I like to use a tiny brush with pure white paint to add a thin line on the top edge of the base block. This simulates light hitting the ledge. -
Peel and reveal:
Carefully remove all tape while the paint is still slightly tacky to prevent peeling the dried film. Pull the tape away from the painted edge at a 45-degree angle. -
Touch up:
Use a small artist’s brush to correct any paint bleed or uneven lines, ensuring the corner crispness is perfect.
Step back and admire how a simple paint job has added structural grandeur and architectural interest to your space
Two-Point Perspective Cityscape That Wraps the Corner
Bring the sophisticated charm of a European streetscape into your home with this stunning pair of large-scale architectural sketches. This project creates a cohesive diptych that transforms a corner or open wall into a gallery-worthy focal point using crisp lines and striking contrast.
How-To Guide
Materials
- Two large sheets of hot-press watercolor paper or smooth Bristol board (approx. 24×36 inches)
- Two large, simple black gallery frames with mats (to fit paper size)
- Graphite pencils (HB and 2H)
- Large T-square or architectural ruler
- Fine liner pens (sizes 0.05, 0.1, 0.3, 0.5, and 0.8mm) – archival ink
- Kneaded eraser
- Artist tape
- Reference photos of classic European architecture (Parisian or Haussmann style)
- Light table or projector (optional but helpful)
Step 1: Planning the Composition
-
Select your subject matter:
Choose two architectural reference photos that complement each other. For the left piece, look for a building with a strong vertical corner element. For the right piece, choose a street view that recedes into the distance to create depth. -
Prepare the paper:
Tape your large paper sheets securely to a flat work surface or drafting table using artist tape on the corners. This prevents slipping while you work on the precise perspective lines. -
Establish the horizon line:
Using your T-square and 2H pencil, lightly draw a horizon line across both sheets at roughly the same height. This ensures the two separate images feel like existing in the same world when hung together. -
Map the vanishing points:
Mark your vanishing points on the horizon line. For the street scene (right image), the point will likely be on the paper. For the corner building (left image), the points might actually be off the page, so use your ruler to estimate the convergence angles.
Straight Edge Secret
Don’t ink every single line with a ruler. Free-handing the smaller details like bricks or shingles adds organic character that prevents the drawing from looking like a CAD blueprint.
Step 2: Drafting the Architecture
-
Block in major shapes:
With the HB pencil, sketch the main rectangular volumes of the buildings. Focus on the big shapes first—the main facades and rooflines—before worrying about windows or balconies. -
Divide the floors:
Draw vertical lines to mark where the building corners are, then horizontal lines to separate the stories. Keep checking these against your vanishing points to maintain accurate perspective. -
Add architectural details:
Lightly pencil in the rows of windows, balcony railings, rooftop chimneys, and storefronts. Don’t press too hard, as you want these graphite lines to be easily erasable later. -
Refine the sketch:
Go over your pencil work one last time to firm up the details. I find it helpful to take a step back here and look at both drawings side-by-side to ensure the scale of the windows and doors matches between the two pieces.
Wash it Up
For a softer, vintage look, apply a very dilute wash of gray watercolor or ink over the shadowed sides of the buildings after the main line work is completely waterproof and dry.
Step 3: Inking the Drawing
-
Outline structural main lines:
Start with a 0.5mm or 0.8mm pen. Carefully ink the main vertical corners of the buildings and the primary rooflines. These stronger lines will anchor the drawing. -
Define windows and arches:
Switch to a 0.3mm pen to outline the window frames, arched doorways, and balcony platforms. Be deliberate with your strokes; architectural drawings benefit from steady, confident lines. -
Add texture and shadow:
Use the 0.1mm and 0.05mm pens for fine details like brickwork, roof tiles, and iron railing intricacies. Use closer hatching lines to create darker values inside open windows or under awnings. -
Create atmospheric depth:
For buildings further in the background reduce the pen size and detail level. This ‘atmospheric perspective’ technique helps push those elements back visually. -
Ground the scene:
Sketch the sidewalk lines and curb details loosely. Add simple silhouettes of cars or street lamps near the bottom to give the buildings a sense of scale.
Step 4: Finishing Touches
-
Erase the graphite:
Allow the ink to dry fully—wait at least an hour to be safe. Then, gently use the kneaded eraser to lift all remaining pencil lines, revealing the crisp black ink. -
Clean up the edges:
Inspect the white space around the drawing. If there are any smudges, you can carefully use a white gouache or correction fluid to touch them up. -
Mount and frame:
Place your finished artworks into the mats and secure them into the slim black frames. Ensure the glass is clean on the inside before sealing the back.
Hang your new architectural masterpieces side by side to instantly add height and metropolitan class to your room
Giant Corner Mandala Centered Right on the Seam
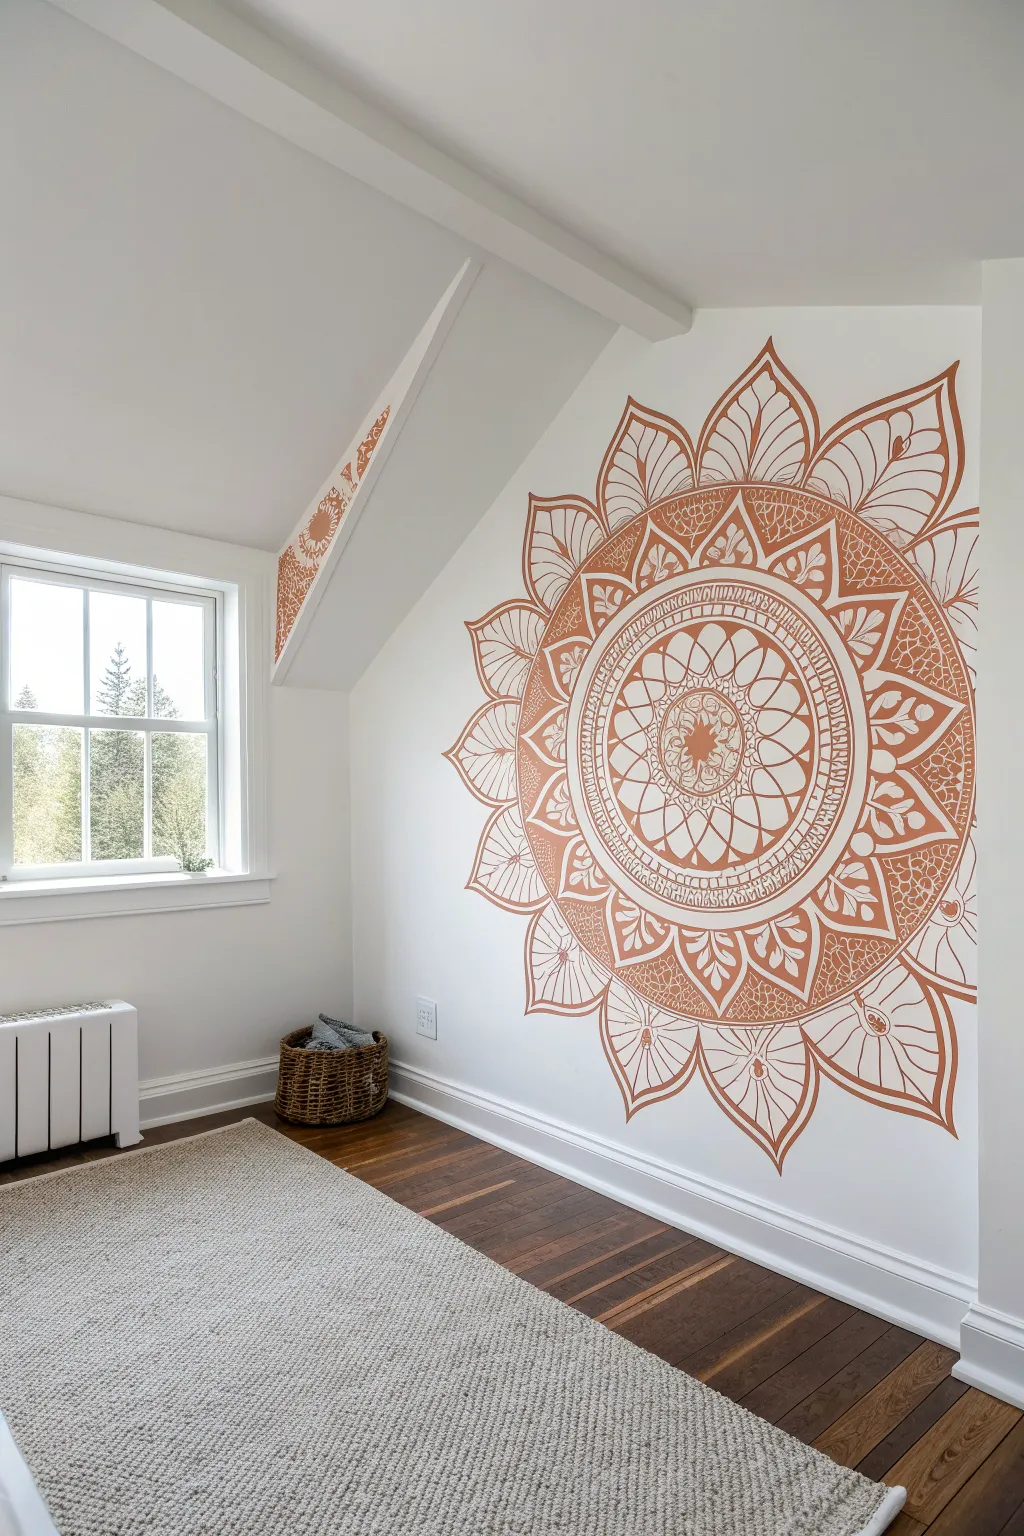
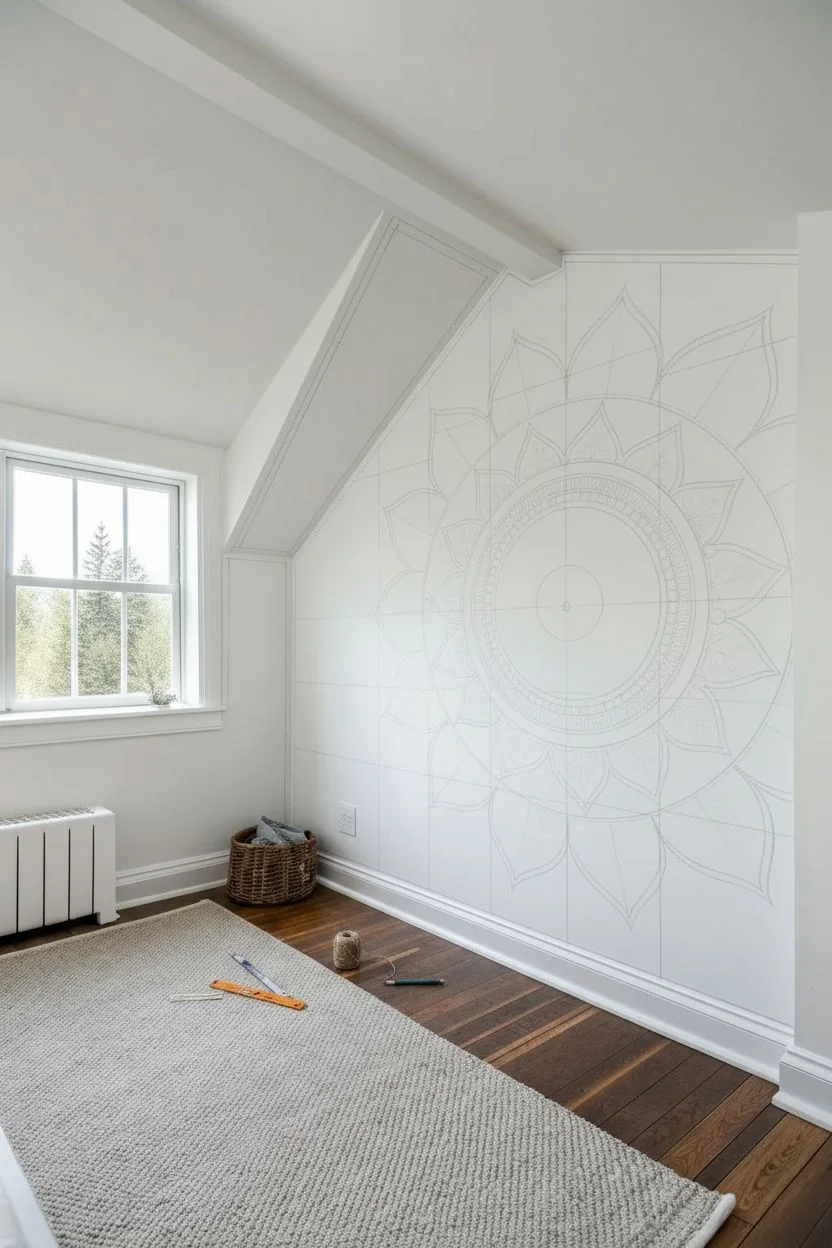
Transform an awkward corner into a stunning focal point with this large-scale mandala mural that flows seamlessly across the wall junction. The warm, terracotta hue creates an inviting atmosphere while the intricate linework adds depth and visual interest to a minimalist room.
Detailed Instructions
Materials
- Latex interior wall paint (terracotta/rust color)
- Pencil
- String or twine
- Push pin or painter’s tape
- Yardstick or long ruler
- Large circular object (like a dinner plate) for center
- Assorted round brushes (sizes 2, 4, and 6)
- Small flat brush (1/2 inch)
- Clean eraser
- Rag or paper towels
- Step ladder
Step 1: Planning and Grid Work
-
Mark the center:
Identify the exact corner seam where you want the center of your mandala to sit. Mark a small dot about 4-5 feet up from the floor to serve as your anchor point. -
Draw the primary circle guides:
Using the string method (tie a pencil to one end and pin the other to your center dot), draw several concentric circles. Start with a small inner circle, then expand outward in roughly 4-inch increments until your largest circle spans about 5-6 feet in diameter. The pencil lines should cross the corner seam onto both walls. -
Create radial guidelines:
Use your yardstick to draw straight lines radiating from the center point outward like pizza slices. I find that dividing the circle into 16 or 32 equal sections helps keep the intricate petals symmetrical later on. -
Sketch the petal shapes:
Lightly sketch the large outer petals within the outermost ring. Use the radial lines to ensure each petal peak hits the same height and width. Allow the design to naturally warp slightly as it crosses the corner; this distortion corrects itself visually.
Paint Bleeding at Seam?
If paint pools in the corner crack, use a dry brush to wick it out immediately. For textured walls, press the brush firmly rather than dragging to get clean lines.
Step 2: Inner Details and Outlining
-
Establish the core:
Using the smallest circle guide, trace a solid ring in paint. Inside this, freehand a small starburst or floral motif to anchor the heavy center. -
Paint the first intricate band:
Move to the next concentric ring outward. Using a size 2 round brush, paint a delicate chain pattern or small dots. Keep your hand steady by resting your pinky finger against the wall. -
Create the structural rings:
Use the 1/2 inch flat brush to paint the thicker, bolder rings that separate the design sections. Apply one thick coat, let it dry for 10 minutes, and apply a second for opacity. -
Draft the lattice section:
In the middle band of the mandala, pencil in a crisscross or lattice net pattern. Paint over these lines carefully with your size 4 brush, ensuring the intersections are clean.
Step 3: Painting the Large Petals
-
Outline the main petals:
Take your size 6 round brush and paint the bold outlines of the large, lotus-style leaves on the outer edge. Load the brush fully so you can make long, sweeping strokes without lifting. -
Add leaf veining:
Switch back to the size 2 brush. Inside each large petal, paint a central vein and smaller branching veins. Leave plenty of negative white space to keep the design feeling airy. -
Fill detailed sections:
Look for the bands between the center and the outer petals. Fill these with repetitive motifs like small tear-drops or triangles. Repetition is key here; even if one looks imperfect, the whole pattern will look cohesive. -
Manage the corner seam:
When painting over the actual corner crack, dab the paint into the crevice rather than dragging the brush across it. This prevents the brush from skipping and maintains a solid line.
Add Subtle Dimension
Mix a tiny drop of black into your rust paint to create a darker shade. Use this to add shadow lines on just one side of the major rings for a 3D effect.
Step 4: Extension and Cleanup
-
Assess the ceiling beam:
If your room has architectural features like the slanted beam shown, continue a fragment of the pattern there. Use a simple repeated floral motif from your main mandala to tie the space together. -
Check for symmetry balance:
Step back about 6 feet. Look for areas that feel too ‘white’ or empty compared to the rest. Add small dots or dashes of rust paint to balance the visual weight. -
Erase guide lines:
Once the paint is completely dry (wait at least 4 hours to be safe), gently use a clean eraser to remove any visible pencil marks. -
Touch up edges:
Use a tiny brush and your original wall color (white) to clean up any slips or smudges on the outside of the design, crisping up the lines.
Now you have a custom piece of meditative art that perfectly hugs the architecture of your room
Ceiling-Wrap Corner Paint That Makes the Nook Feel Immersive
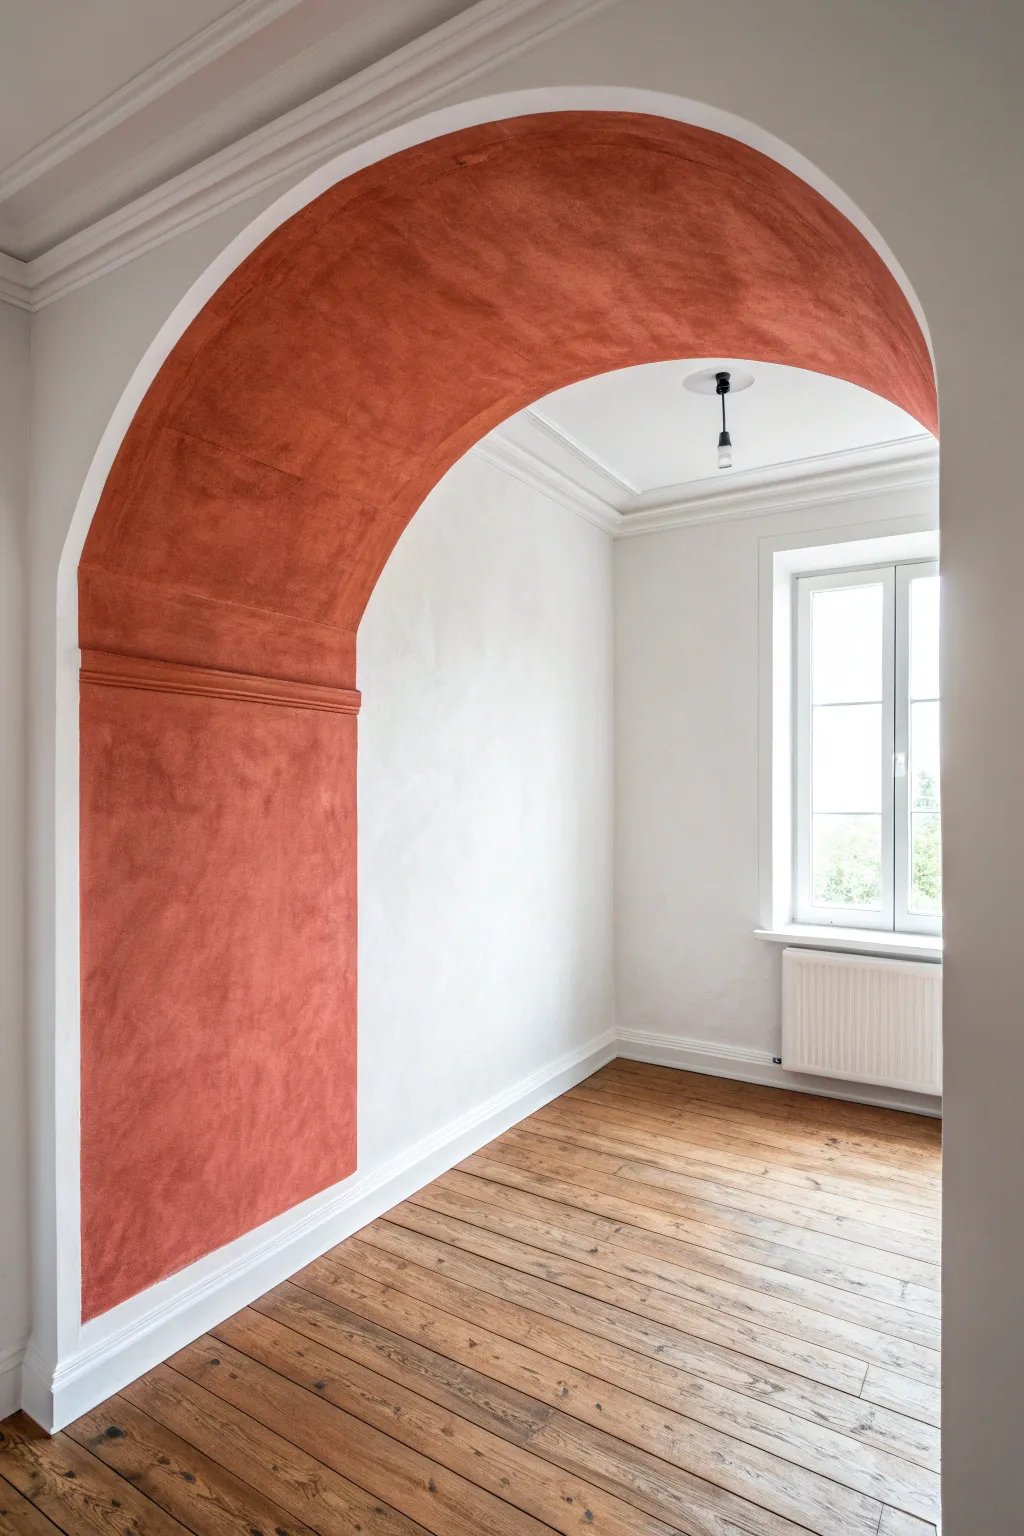
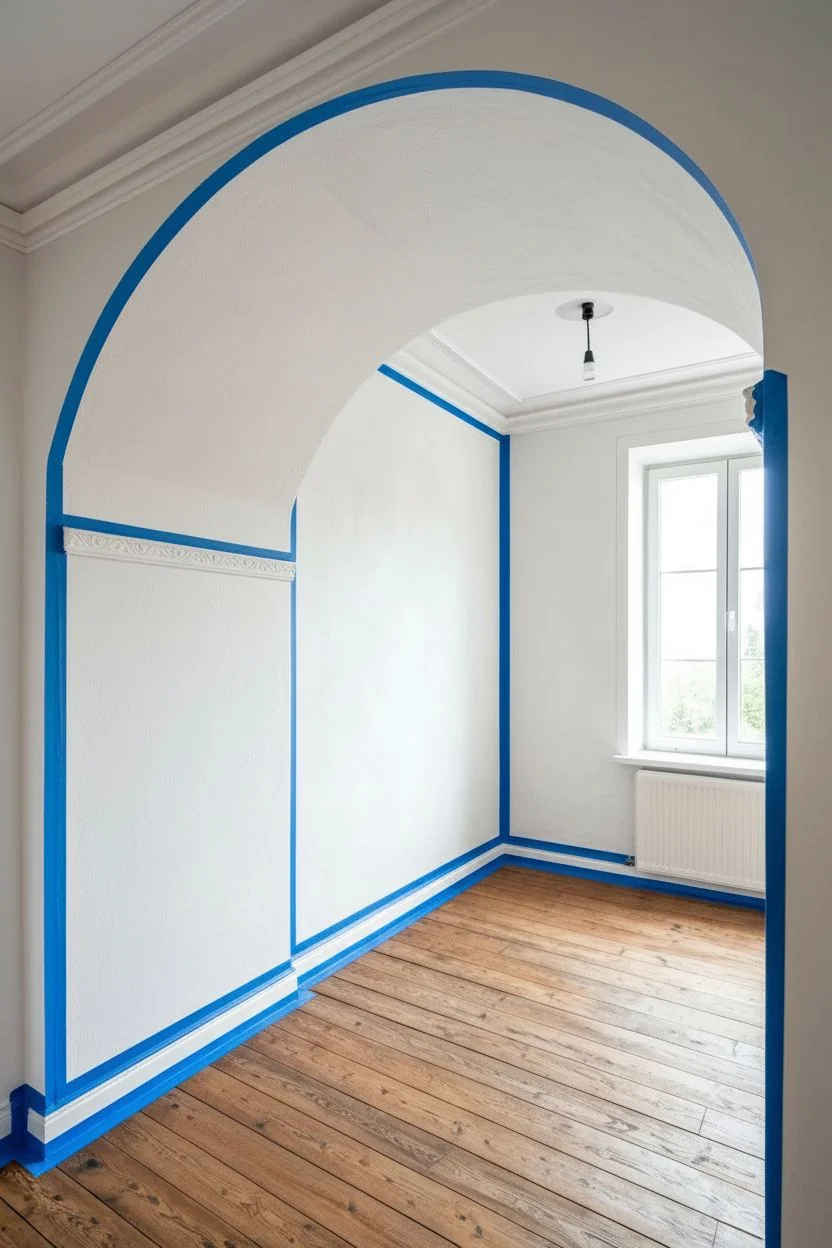
Transform a standard doorway into an architectural statement by wrapping the jamb and corner in a rich, textured color. This project uses lime wash paint to create a velvety, old-world depth that instantly adds warmth and character to a stark white room.
Step-by-Step Guide
Materials
- High-quality painter’s tape (frog tape recommended)
- Terracotta or Burnt Sienna lime wash paint
- Lime wash primer (mineral primer)
- Large block brush (masonry brush)
- Wide putty knife or smoothing tool
- Drop cloths
- Sanding block (medium grit)
- Stir stick
- Small angled sash brush
- Clean water for misting
Step 1: Preparation
-
Assess the surface:
Begin by inspecting the archway and the adjacent wall section you intend to paint. Ensure the existing drywall or plaster is clean, dry, and free of peeling paint. -
Clean and sand:
Wipe down the entire area with a damp cloth to remove dust. Once dry, lightly scuff the surface with a sanding block to help the primer adhere, paying attention to the curved ceiling of the arch. -
Tape the boundaries:
This is the most critical step for a crisp look. Apply painter’s tape along the outer edge of the arch where it meets the white wall in the next room. Run another vertical line of tape down the main wall to define where the color block will end. -
Protect the trim:
Tape off the baseboards carefully. If your arch has a decorative molding strip like the one in the photo, tape above and below it initially if you plan to paint it, or tape over it if it will remain white.
Cloudy Technique
Keep a wet edge always! If the lime wash dries mid-wall, you’ll get a harsh line. Mist the wall lightly with water if it’s drying too fast while you work.
Step 2: Priming
-
Apply mineral primer:
Lime wash requires a specific base to bond correctly. Roll or brush on a coat of mineral primer over the entire masked area. This gritty primer ensures the movement of the lime wash shows up later. -
Detail the edges:
Use your small angled brush to cut in the primer along the tape lines and around the molding detail. Let the primer cure for at least 4-6 hours, or per the manufacturer’s suggested time.
Step 3: Painting the Base
-
Mix the lime wash:
Lime wash separates quickly. Stir your terracotta paint vigorously until the pigments are fully incorporated and the texture is consistent. -
Cut in the first coat:
Start with the small sash brush again. Carefully paint the perimeter, cutting in against the tape lines and around the arch molding. Keep this edge wet as you move to the larger areas. -
Apply the first layer:
Switch to the large block brush. Apply the paint in random, crisscross strokes (X-patterns). Don’t try to make it smooth; the visible brushstrokes create the signature clouded effect. -
Let it dry:
Allow the first coat to dry completely. It will lighten significantly as it dries, so don’t panic if it looks too dark initially.
Make It Pop
Add a hidden LED strip inside the lip of the molding or along the floor edge. The grazing light will catch the texture of the lime wash dramatically.
Step 4: Building Texture
-
Start the second coat:
Once dry, begin the second coat using the same crisscross motion. I find that working in smaller sections helps maintain a wet edge. -
Create the movement:
As the paint begins to set but is still damp, you can lightly drag the brush over high spots to create more variation. This enhances the suede-like appearance. -
Paint the molding:
If you are painting over the decorative molding to match the wall (as shown in the inspo), dab the brush into the crevices rather than dragging, ensuring full coverage without losing the texture. -
Check for consistency:
Step back to view the arch from a distance. If any areas look too flat, add a quick, light layer of product in a stippling motion to build up texture.
Step 5: Finishing Touches
-
Remove tape while damp:
Carefully peel away the painter’s tape while the final coat is still slightly tacky. Pulling the tape at a 45-degree angle away from the painted edge helps prevent peeling. -
Touch up edges:
Inspect the crisp lines. If a little lime wash bled under the tape, use a tiny artist’s brush and white wall paint to tidy it up once the terracotta is fully dry. -
Seal (Optional):
If this is a high-traffic hallway, consider applying a matte sealer over the lime wash after 24-48 hours to protect the finish from scuffs and water.
Enjoy the enveloping warmth of your new architectural feature every time you walk through the room
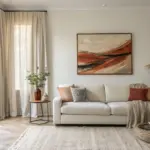


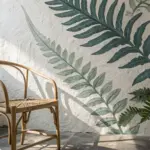
Have a question or want to share your own experience? I'd love to hear from you in the comments below!