If you’re craving easy Christmas face painting ideas that look super festive without taking forever, you’re in the right place. I’m sharing quick, beginner-friendly designs that read “Christmas” instantly, even if you’re working with simple shapes and a small color palette.
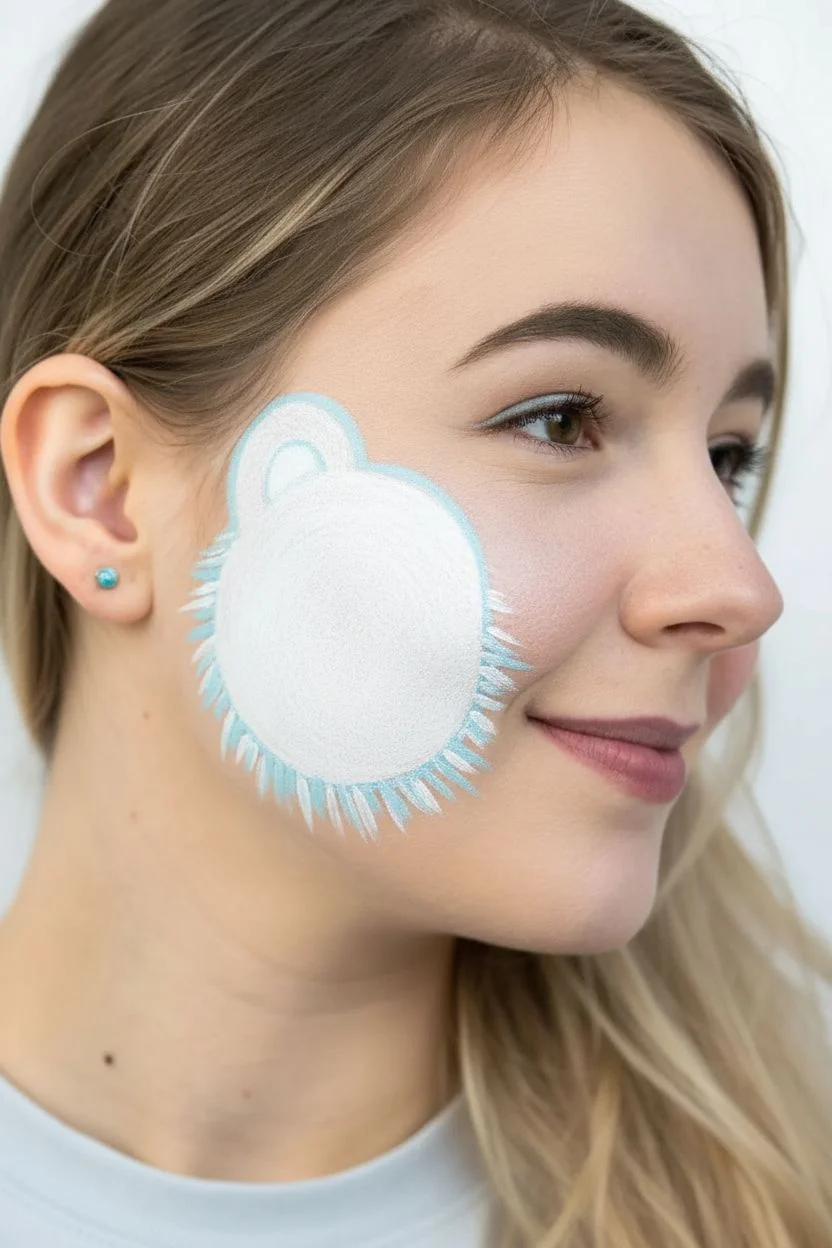
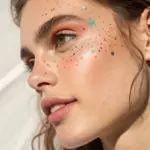
Tiny Holly Leaves and Red Berries on the Cheek
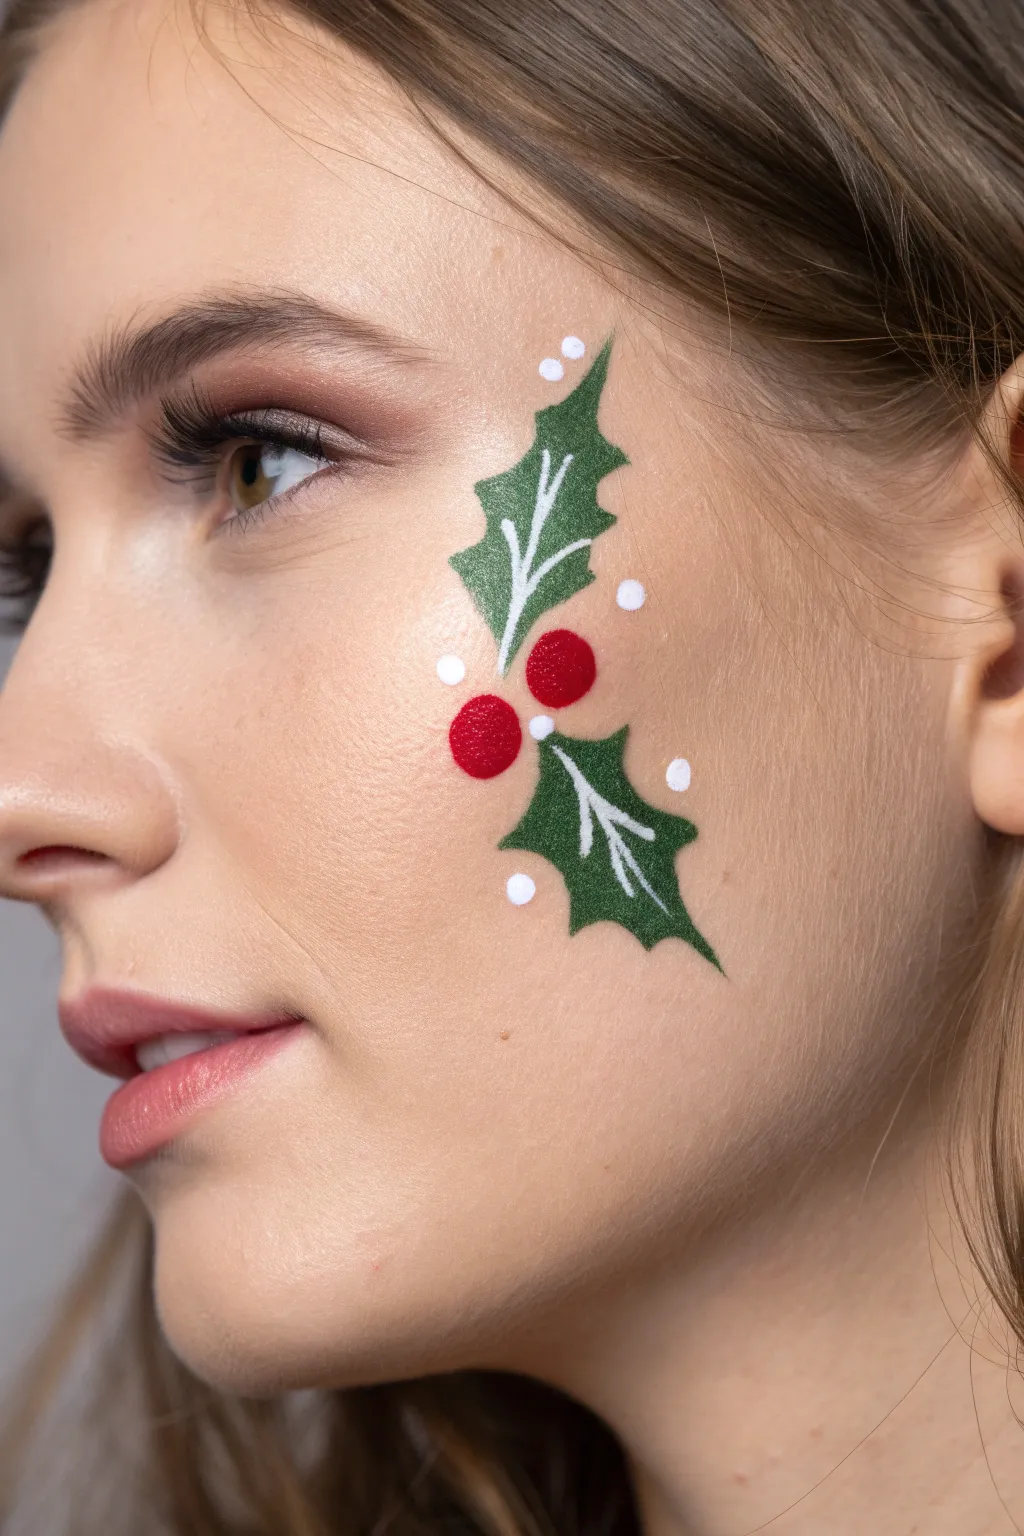
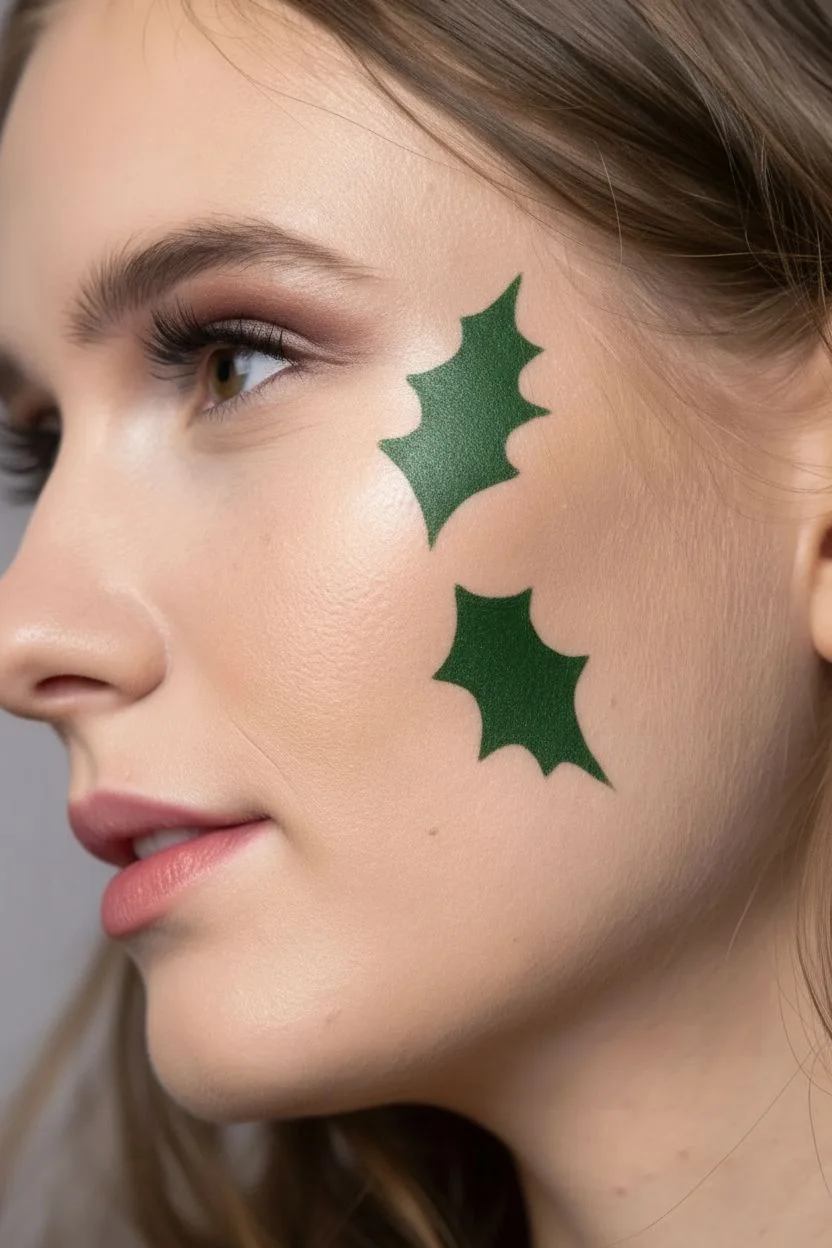
This elegant face painting design brings a subtle touch of Christmas cheer without covering the entire face. It features two festive holly leaves framing bright red berries, all accented with delicate snowy dots.
Step-by-Step
Materials
- High-quality face paint (dark green)
- High-quality face paint (bright red)
- High-quality face paint (white)
- Small round brush (size 2 or 3)
- Fine liner brush (size 0 or 00)
- Cup of water
- Paper towels or sponge
Step 1: Painting the Holly Leaves
-
Load the green paint:
Start by activating your dark green face paint with a little water. Swirl a small round brush (size 2 or 3) into the cake until you have a creamy consistency, not too watery or it might drip. -
Position the first leaf:
Visualize where the center of the design will be on the cheekbone. Place your brush tip above this imaginary center point, angled slightly outward towards the hairline, to mark the top tip of the upper leaf. -
Outline the upper leaf shape:
Using the tip of the brush, draw a curved, jagged line descending from that top point. Holly leaves have sharp points, so make two or three ‘C’ curve dips inwards as you move down. -
Complete the upper outline:
Repeat the jagged line on the other side of the leaf, mirroring your first side so they meet at the bottom point. It should look like a teardrop with prickly edges. -
Fill in the green:
Use the belly of the round brush to fill in the shape completely with the dark green paint. If the paint looks streaky, wait a moment for it to dry and add a second thin layer. -
Paint the second leaf:
Now, create the second leaf below the center point. Angle this one downwards and slightly towards the jawline. Draw the same jagged outline and fill it in, ensuring the tips of the two leaves point away from the center gap.
Step 2: Adding the Berries
-
Switch to red:
Rinse your round brush thoroughly or grab a clean one. Load it with bright red face paint, aiming for that same creamy texture. -
Paint the first berry:
Place the brush tip right in the gap between the two green leaves. Press down gently and rotate the brush slightly to form a perfect circle. This will be your top berry. -
Paint the second berry:
Create a second red circle slightly overlapping or just touching the first one, positioned slightly below and to the left of the top berry.
Paint Too Sheer?
If the green or red looks transparent, your brush is too wet. Blot it on a paper towel, swirl it in the paint cake again until it feels creamy/tacky, then reapply.
Step 3: Highlights and Details
-
Prepare the white paint:
Switch to a very fine liner brush (size 0 or 00). Activate your white face paint until it is opaque and ink-like. -
Draw the central veins:
Starting from the base of the top leaf (near the berries), draw a thin, curved white line extending about three-quarters of the way up the leaf’s center. Repeat for the bottom leaf, curving downward. -
Add side veins:
From the central vein, flick very short, delicate white lines outward towards the jagged points of the leaves. I like to keep these quite subtle so they don’t overpower the green. -
Add snowy dots:
Using the tip of the liner brush or the back handle of a brush dipped in white, stamp small white dots around face design. Vary the sizes slightly for a natural, snowy effect. -
Highlight the berries:
Finally, add a tiny white speck or ‘comma’ shape on the upper side of each red berry to make them look shiny and round.
Pro Tip: Sharp Points
For super sharp holly leaf tips, press the brush down for the wide part of the curve, then lift it rapidly as you drag outward to flick the point into a taper.
You have now created a festive and sophisticated holiday look perfect for any Christmas party


Candy Cane Hook With Quick Stripes
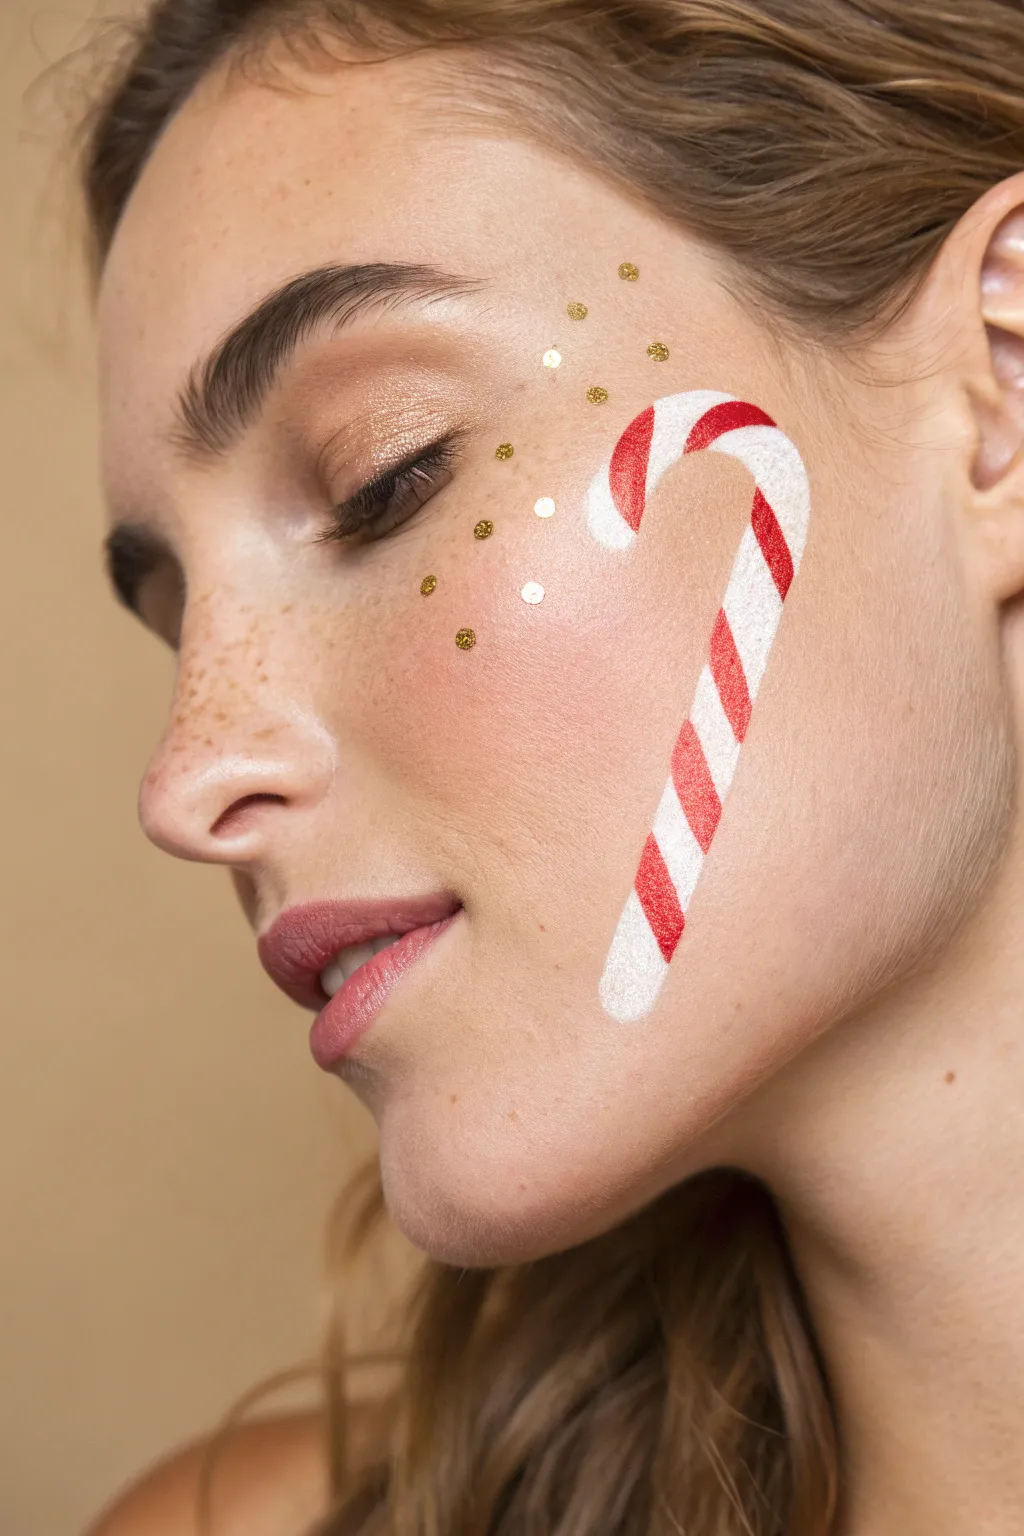
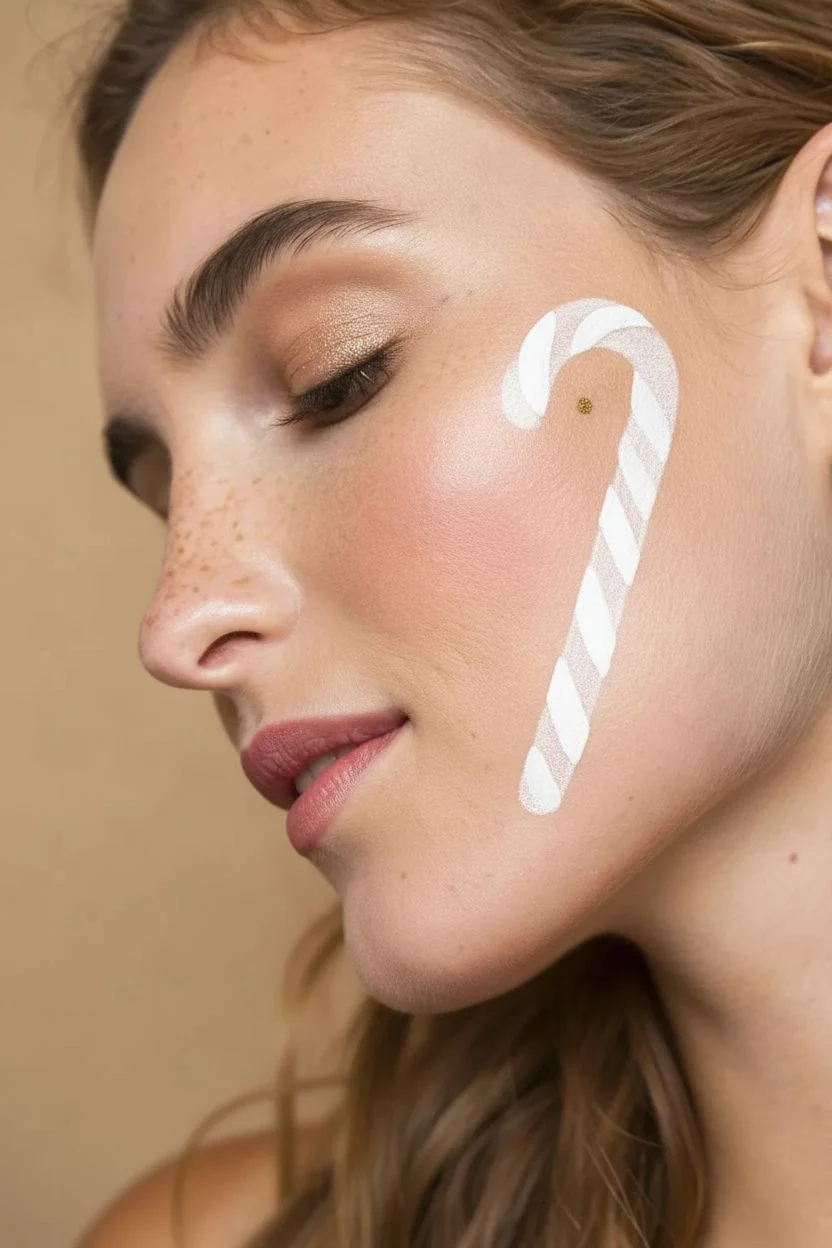
Embrace the festive spirit with this sweet and simple candy cane design that curves elegantly down the cheek. Paired with a sprinkle of golden glitter, it creates a cheerful holiday look that’s perfect for parties but subtle enough for everyday wear.
Detailed Instructions
Materials
- White face paint (water-activated)
- Red face paint (water-activated)
- Medium round brush (size 4 or 6)
- Small round detail brush (size 1 or 2)
- Cosmetic glitter gel or loose cosmetic glitter (gold)
- Chunky gold cosmetic sequins (optional)
- Skin-safe adhesive (like lash glue) for sequins
- Setting spray (optional)
- Small cup of water
- Paper towels
Step 1: Base Preparation
-
Clean the canvas:
Start with a clean, dry face. If the subject is wearing foundation or concealer, ensure it is set with powder so the paint doesn’t slide around. -
Visualize the placement:
Imagine the candy cane starting near the temple, hooking over the top of the cheekbone, and the stem running down the jawline towards the corner of the mouth.
Red smear fix
If red paint smudges onto the white, wait for it to dry completely. Then, paint a layer of white over the mistake. Do not try to wipe it while wet, or you’ll get pink mud.
Step 2: Painting the Cane
-
Load the white paint:
Dip your medium round brush into water and swirl it into the white face paint until you have a creamy consistency, similar to melted ice cream. -
Create the hook:
Start the stroke just above the cheekbone (near the outer eye). Press the brush down firmly to get a full width, then curve upwards and inwards to create the top arch of the candy cane. -
Paint the stem:
Continuing from that arch, pull the brush downwards in a straight or slightly curved line following the cheek’s contour. Taper the pressure slightly at the very end to round off the bottom tip. -
Refine the shape:
If the edges look a little ragged, I clean off my brush and re-load it with fresh white paint to carefully smooth out the outline, ensuring the cane is an even thickness throughout. -
Let it dry:
Allow the white base layer to dry completely. This is crucial; if the white is wet, the red stripes will turn pink.
Add dimensional shine
Paint a very thin white highlight line along the right side of the red stripes. It makes the candy cane look glossy, rounded, and 3D.
Step 3: Adding the Stripes
-
Load the red paint:
Using a smaller round detail brush, load up your red face paint. You want this consistency to be slightly thinner than the white so it glides smoothly over the dry base. -
Plan your angles:
Visualize diagonal lines running across the cane. The stripes should follow the curve of the hook, changing angle slightly as they go around the bend. -
Paint the main stripes:
Paint short, diagonal dashes across the white base. Keep the spacing consistent—leave a white gap roughly the same width as your red stripe. -
Navigate the curve:
As you paint stripes on the curved hook, pivot the angle of your brush strokes so they fan out slightly, maintaining perpendicularity to the edges of the cane. -
Refine the edges:
Check that the red stripes don’t bleed past the white outline; tidy up any overpainting with a damp cotton swab if necessary.
Step 4: Glitter & Details
-
Prepare the adhesive:
Squeeze a tiny dot of skin-safe adhesive onto the back of your hand or a palette. -
Place the sequins:
Dip the back end of a brush into the glue, tap it onto the skin around the temple and eye area, and press a gold sequin or chunky glitter flake onto usually three or four scattered spots. -
Vary the sizes:
Mix smaller glitter flecks with larger sequins for a more organic, starry effect. -
Add a touch of shimmer:
If you have fine glitter gel, dab tiny amounts around the sequins or lightly over the white parts of the candy cane for extra sparkle. -
Set the look:
A quick mist of setting spray will help keep the design intact through holiday festivities.
Now you have a festive holiday accent that is both elegant and fun to wear


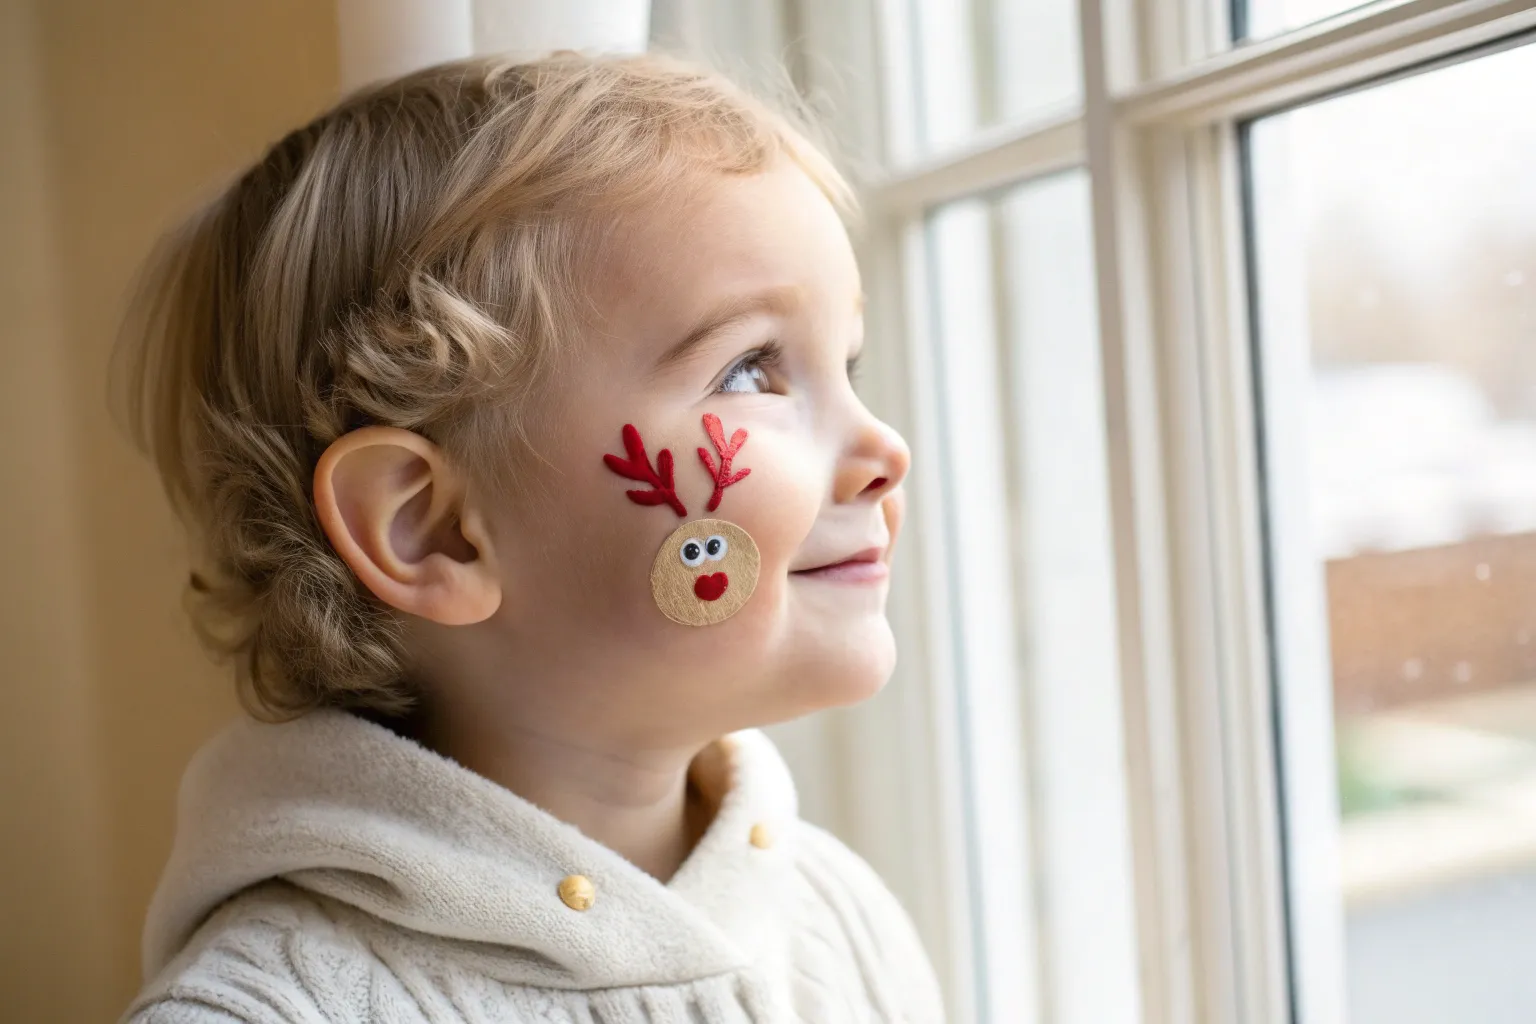
Easy Rudolph Nose With Simple Antlers
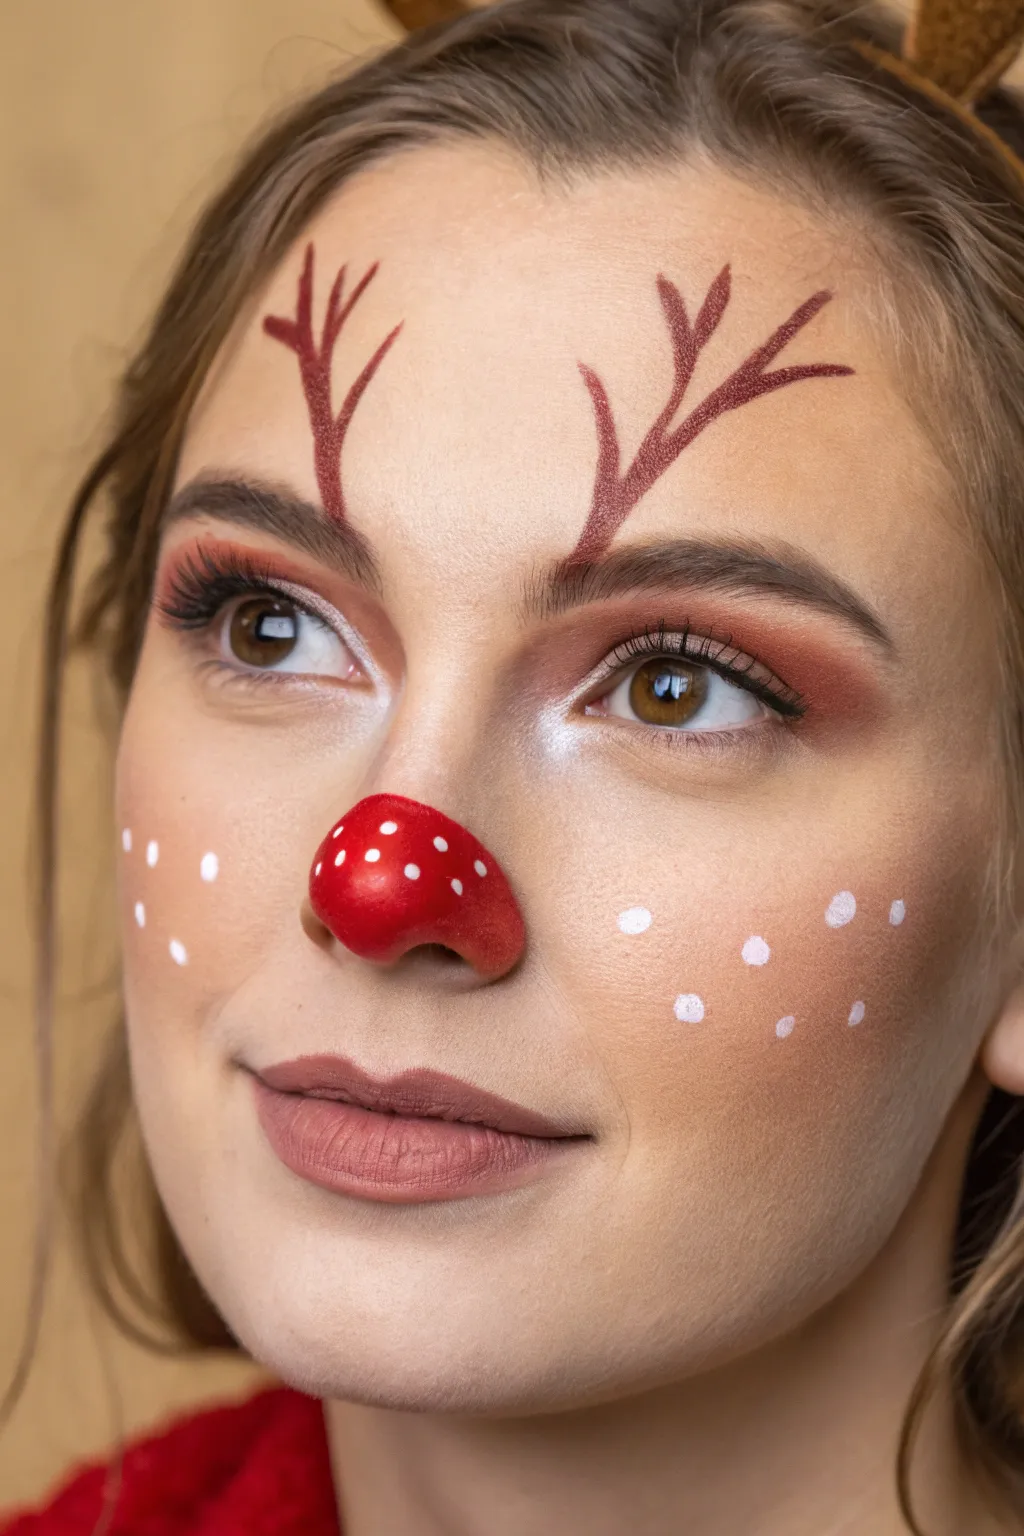
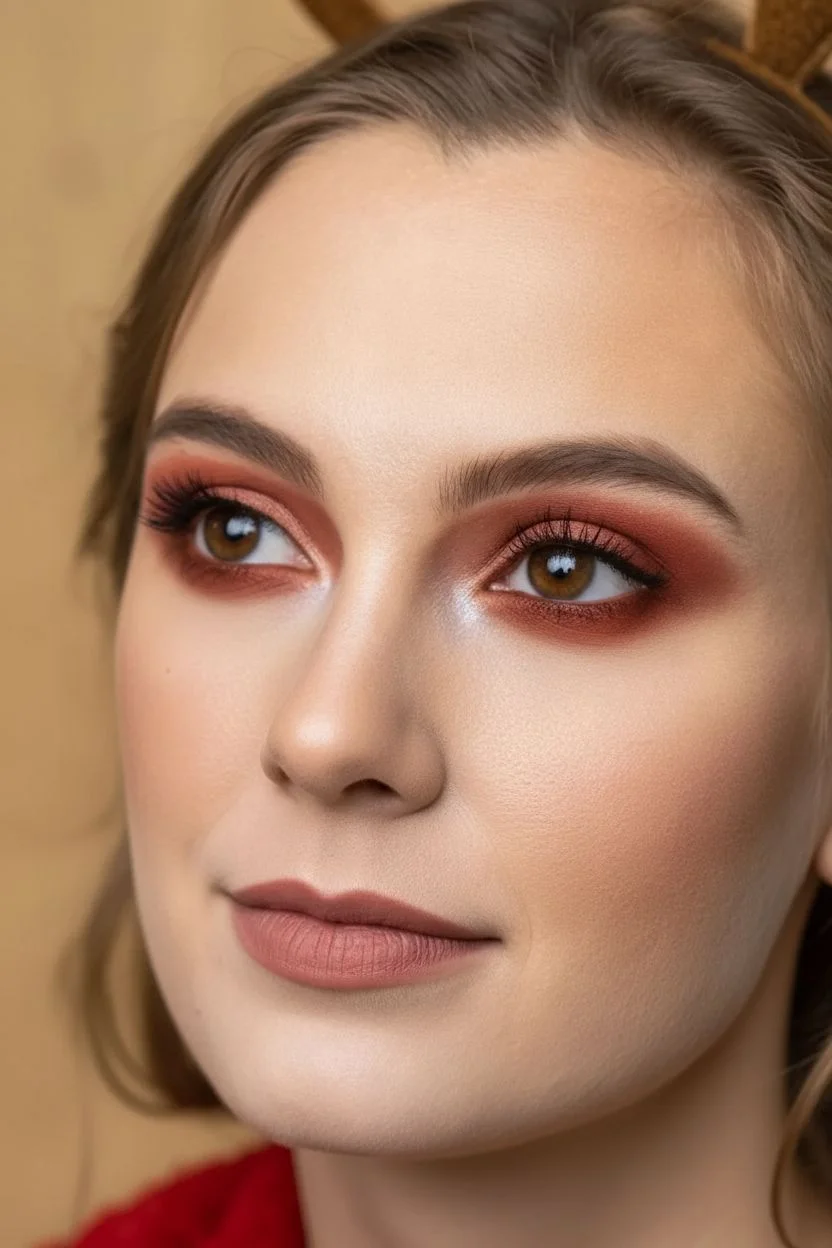
Transform into the most famous reindeer of all with this elegant, minimal makeup look. Featuring a playful polka-dotted red nose and dainty forehead antlers, this design balances festive cheer with soft, wearable beauty.
Step-by-Step Tutorial
Materials
- Warm brown eyeshadow palette (matte and shimmer)
- White face paint or cream makeup
- Red face paint or cream makeup
- Brown face paint or eyeliner/brow pencil
- Small detail brush
- Fluffy eyeshadow blending brush
- Flat shader brush
- Mascara
- Mauve-brown lipstick
Step 1: Setting the Base
-
Prep the canvas:
Begin with your regular foundation and concealer routine to create a smooth, even complexion. Since the eye makeup is warm-toned, ensure your under-eye area is brightened to prevent any tired appearance. -
Warm the crease:
Using a fluffy blending brush, sweep a medium matte terracotta or warm brown eyeshadow through your crease. Blend it outwards and slightly upwards towards the tail of your brow for a soft, diffused look. -
Deepen the outer corner:
Dip a smaller brush into a darker chocolate brown shadow. Focus this color on the outer third of your eyelid, blending it gently into the crease shade to add dimension without harsh lines. -
Add inner corner glow:
Apply a shimmering champagne or pale gold eyeshadow to the inner corner of your eyes. I like to drag this slightly onto the lower lash line to really open up the eyes. -
Define the lashes:
Apply a generous coat of black mascara to both top and bottom lashes. If desired, you can add falsies, but a good curling mascara works perfectly for this sweet look.
Paint Consistency
Mix just a drop of water into your face paint. You want a creamy, ink-like consistency—too much water makes it drip, too little makes it crack.
Step 2: The Signature Nose
-
Outline the shape:
Take a small round brush loaded with bright red face paint. Carefully outline a rounded shape that covers just the tip and front of your nose, extending slightly down the sides of the nostrils. -
Fill with color:
Fill in the outlined area with the red paint. Use patting motions to build up opacity rather than dragging, which might create streaks. -
Let it set:
Allow the red paint to dry for a minute or two. If it looks shiny or wet, wait a bit longer before moving to the next step to prevent colors from muddying. -
Add the spots:
Dip the very tip of a fine detail brush or a dotting tool into white face paint. Gently press small, scattered dots onto the red nose to create a cute mushroom-like texture. -
Vary dot sizes:
Make sure some dots are slightly tinier than others for a natural, whimsical effect.
Step 3: Antlers & Details
-
Position the antlers:
Using a fine liner brush with brown face paint (or a steady hand with a brown eyeliner pencil), locate the starting point just above the inner start of your eyebrows. -
Draw the main branch:
Paint a curved line extending upward and slightly outward onto your forehead. Keep the line thicker at the base and taper it to a thin point at the end. -
Add fork details:
From the main branch, draw two or three smaller offshoot branches. Angle them upwards to mimic the natural growth of antlers. -
Create faux freckles:
Reload your detail brush with white paint. Dot a constellation of ‘freckles’ across your cheeks and the bridge of your nose, right above the red tip. -
Balance the face:
Apply more white dots on the outer cheeks, making them slightly larger than the nose dots but still delicate. -
Finish the lips:
Complete the look with a matte mauve or rosy-brown lipstick. This keeps the focus on the eyes and creative painting while complementing the warm tones.
Smudged the Red?
If the red nose paint travels outside the lines, don’t wipe it! Let it dry completely, then use a Q-tip with a tiny bit of concealer to clean the edge.
Now you are ready to guide the sleigh with style and festive charm


Two-Circle Snowman Cheek Art
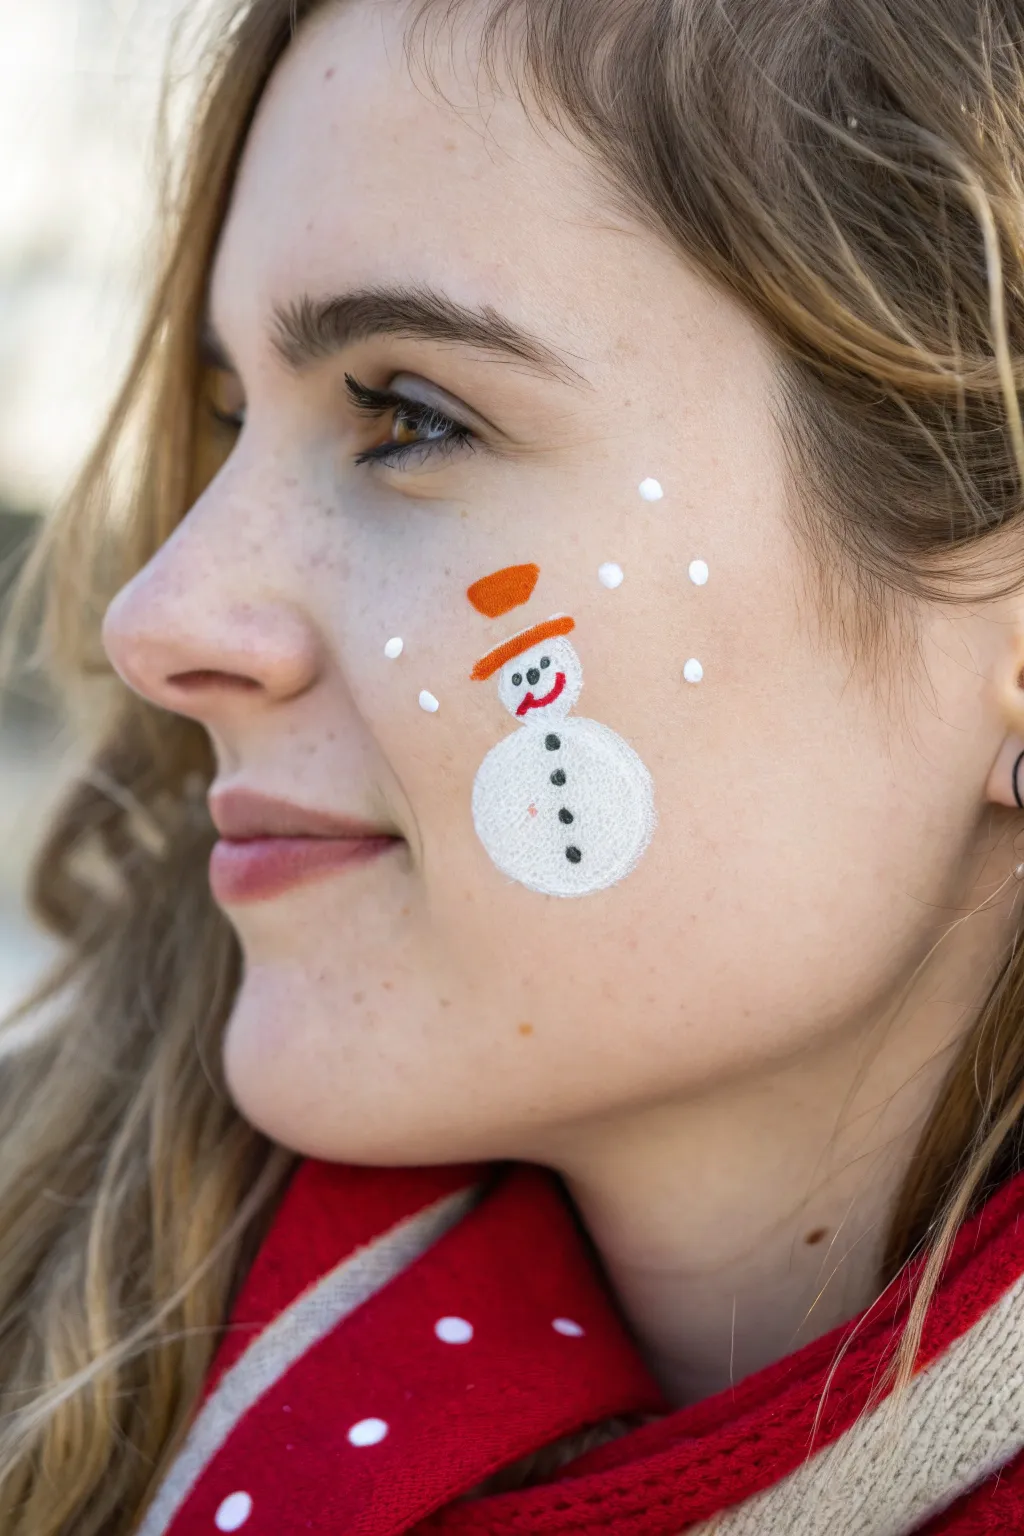
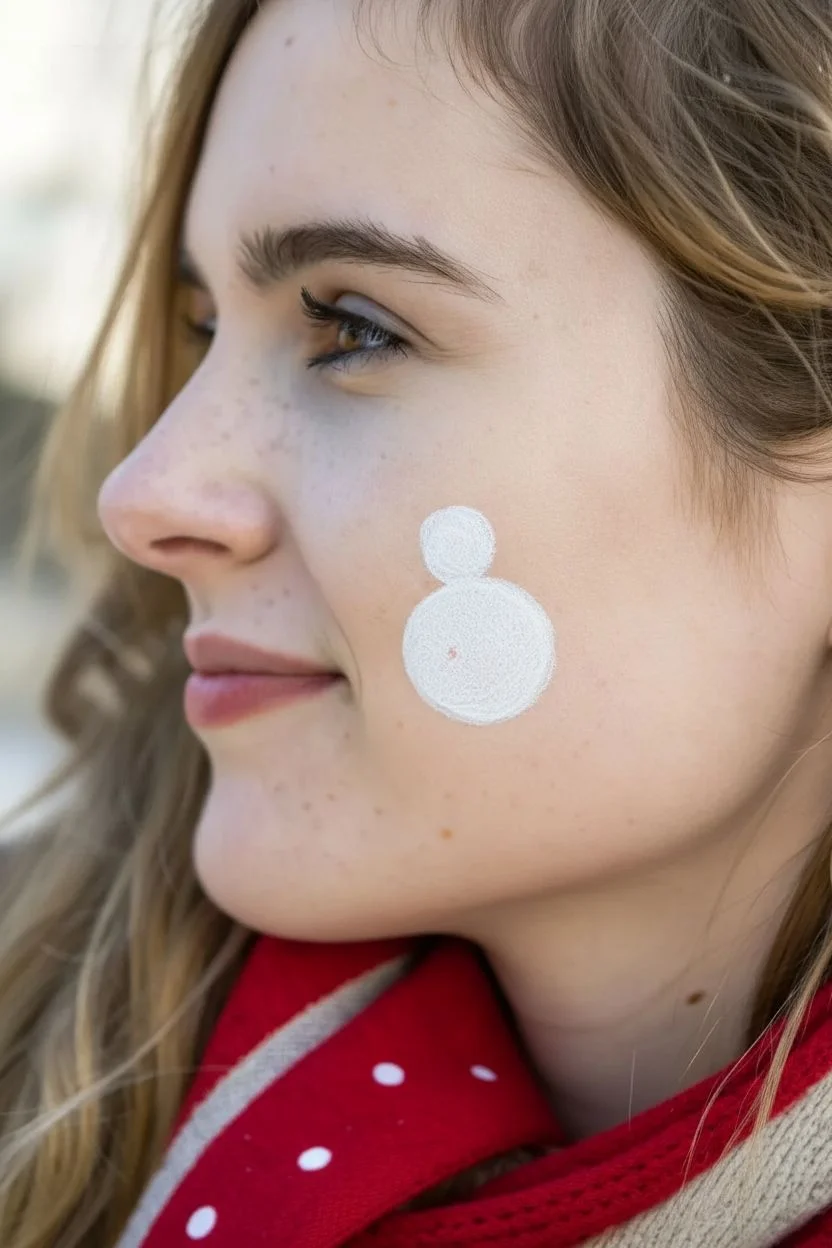
For a fast yet festive look, this simple cheek art design captures the spirit of winter without requiring a full face of makeup. The cheerful snowman features a classic carrot nose and falling snow dots, making it a perfect quick design for holiday parties or school fairs.
Step-by-Step Guide
Materials
- White face paint
- Orange face paint
- Black face paint
- Red face paint
- Small round brush (size 2 or 3)
- Fine liner brush (size 0 or 00)
- Cup of water
- Paper towels or sponge
Step 1: Painting the Body
-
Load the white paint:
Begin by activating your white face paint with a little water until it reaches a creamy consistency. Load your small round brush fully, ensuring the bristles are coated but not dripping. -
Paint the head:
Position your brush on the upper part of the cheekbone. Paint a small circle for the snowman’s head, filling it in completely with smooth, swirling motions. -
Create the body:
Directly beneath the head, paint a second, slightly larger circle for the snowman’s body. I find that slightly overlapping the top circle helps them look connected rather than floating apart. -
Smooth the texture:
While the paint is still damp, lightly dab the surface with your brush or a sponge tip to give it a slightly fluffy, snowy texture rather than being perfectly flat.
Smudged edges?
If the white circles bleed into the skin texture, use a damp cotton swab to clean up the perimeter before the paint dries completely.
Step 2: Adding the Details
-
Load the orange paint:
Rinse your brush thoroughly and load it with bright orange paint. You want a sharp consistency for definition. -
Draw the hat brim:
Paint a short, horizontal line right across the top of the snowman’s head to serve as the brim of the hat. Angle it slightly for a jaunty look. -
Finish the hat:
Above the brim, paint a rectangular or trapezoidal shape filled with orange to complete the hat. -
Paint the nose:
Using the very tip of your round brush or switching to a liner brush, paint a small carrot nose pointing to the left so the snowman looks towards the nose.
Step 3: Features and Flourishes
-
Switch to black liner:
Load a fine liner brush with black paint. Ensure the paint is thin like ink for precision work. -
Add the eyes:
Carefully dot two tiny black eyes just above the nose on the white head circle. -
Add the buttons:
Moving down to the larger body circle, place three distinct black dots in a vertical row to represent coal buttons. -
Paint a smile:
Clean your fine liner brush and pick up a tiny amount of red paint. Draw a small, curved smile under the nose to give him a friendly expression. -
Add falling snow:
Go back to your white paint and small round brush. Dot random white specks of varying sizes around the snowman on the cheek to simulate falling snow. -
Highlight the eyes:
If you have a very steady hand, add an infinitesimal speck of white inside the black eyes to bring them to life. -
Set the design:
Allow the paint to dry completely for a minute before touching or adding any glitter spray if desired.
Sparkle finish
While the white paint is still slightly tacky, tap cosmetic-grade iridescent glitter onto the snowman’s body for a magical frosty effect.
Enjoy showing off your frosty new friend to everyone you meet
BRUSH GUIDE
The Right Brush for Every Stroke
From clean lines to bold texture — master brush choice, stroke control, and essential techniques.
Explore the Full Guide
Simple Christmas Tree Triangle With Dot Ornaments
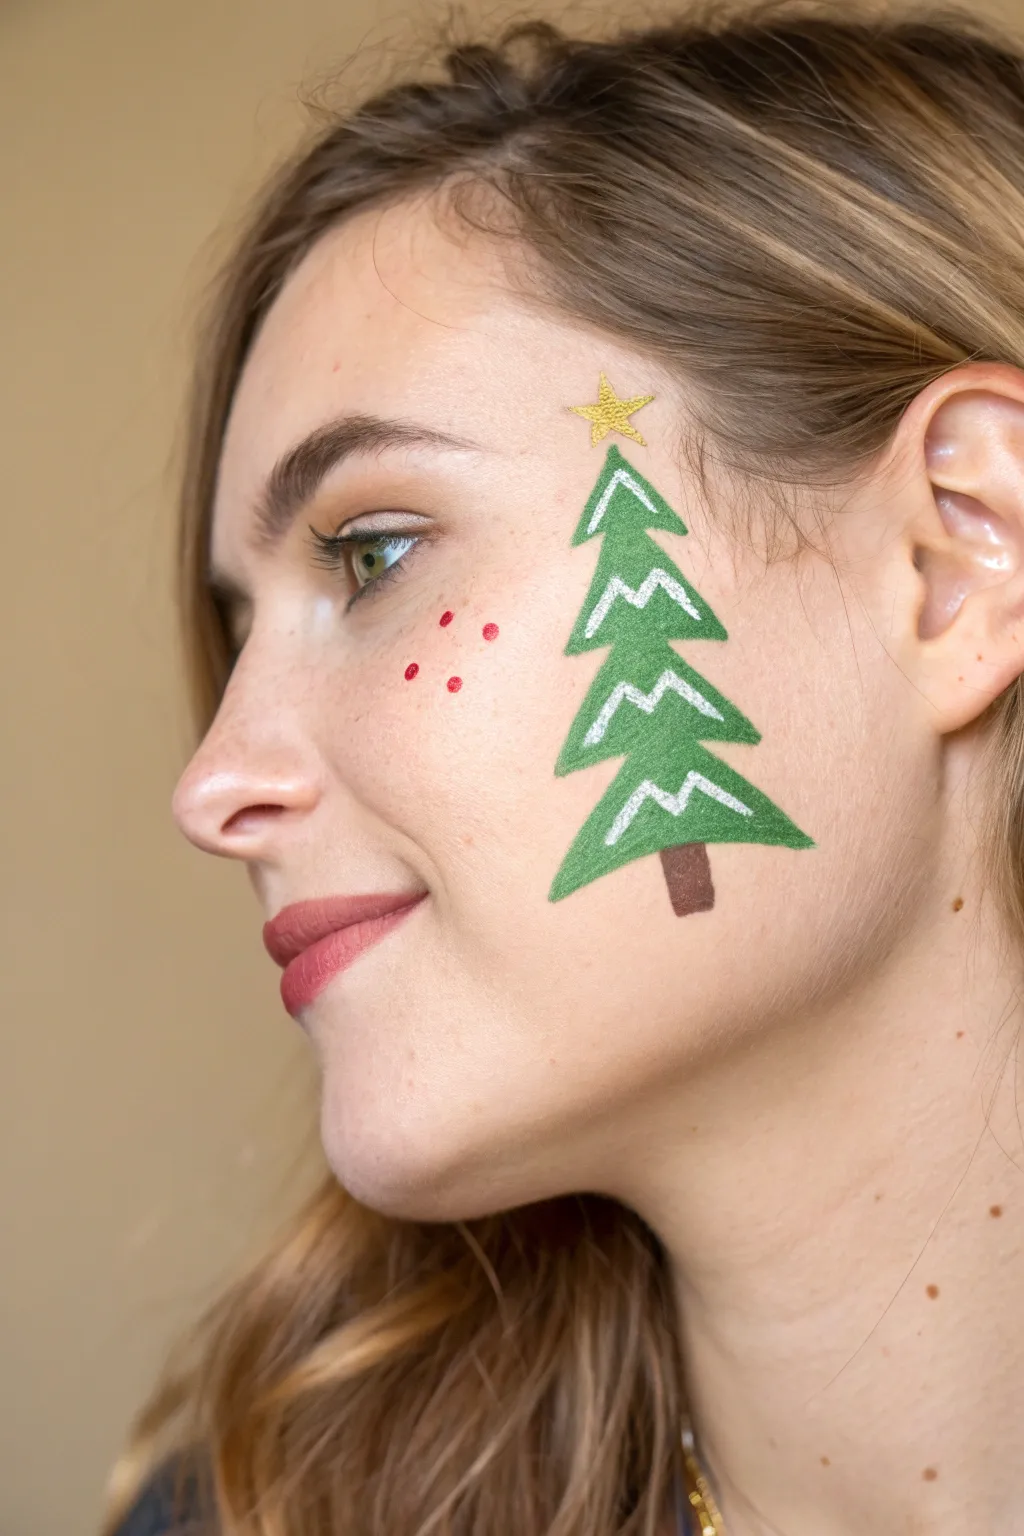
Transform your holiday look with this charming and minimalist Christmas tree face paint design. It features clean lines, white snowy accents, and a golden star to bring festive cheer right to your cheek.
Detailed Instructions
Materials
- Green face paint (medium shade)
- White face paint
- Brown face paint
- Gold face paint (metallic or shimmer)
- Red face paint
- Small flat brush (size 2 or 4)
- Fine liner brush (size 0 or 00)
- Small round brush (size 1)
- Cup of water
- Paper towels
Step 1: Painting the Tree Base
-
Outline the top tier:
Start with your small flat brush and green paint. Near the cheekbone, paint a small triangle shape for the top of the tree, keeping the edges slightly jagged to mimic pine branches. -
Add the middle tier:
Just below the first triangle, paint a slightly wider second tier. Make sure the top of this shape connects seamlessly with the bottom of the first one. -
Paint the bottom tier:
Create the widest triangle at the bottom to complete the main body of the tree. Extend the jagged ‘branches’ outwards slightly more than the sections above. -
Fill in the green:
Go back over your three connected triangles and ensure the green is opaque and solid. If the paint looks streaky, let it dry for a few seconds and add a second thin coat. -
Add the trunk:
Switch to a small round brush loaded with brown paint. Draw a small, simple rectangle extending down from the center of the bottom green tier.
Step 2: Adding Details & Highlights
-
Create the snow line:
Clean your fine liner brush thoroughly and load it with white paint. Draw squiggly, zig-zag lines across the middle of each green tier to represent snow resting on the branches. -
Highlight the edges:
Using the same fine liner brush and white paint, carefully trace just the top edges of the green triangles. This crisp outline makes the tree pop against the skin. -
Paint the star:
With a clean small round brush and metallic gold paint, draw a five-pointed star at the very peak of your tree. Make the top point slightly longer for an elegant look. -
Sharpen the star:
Use the tip of the brush to refine the points of the star, ensuring they are sharp and distinct.
Stay Steady
Rest your pinky finger gently against the chin or jawline while painting. This anchors your hand and gives you much better control for the fine white lines.
Step 3: Finishing Touches
-
Add festive dots:
Dip the handle end of a brush or a detail tool into red face paint. Gently press three or four small dots onto the cheek near the tree to suggest floating ornaments or berries. -
Check symmetry:
Take a step back and look in the mirror. If any white lines look too faint, lightly retrace them to ensure high contrast. -
Clean up edges:
If any green paint went outside your desired ‘jagged’ shape, use a slightly damp cotton swab to wipe away the excess for a clean finish. -
Let it set:
Allow the entire design to dry completely for about two minutes before touching your face to prevent smudging.
Sparkle Upgrade
While the gold star paint is still wet, press a small amount of cosmetic-grade loose glitter over it. It adds a magical textured shine that catches the light.
Enjoy wearing your handcrafted holiday art throughout your festive celebrations
Mini Wreath Ring With a Bow
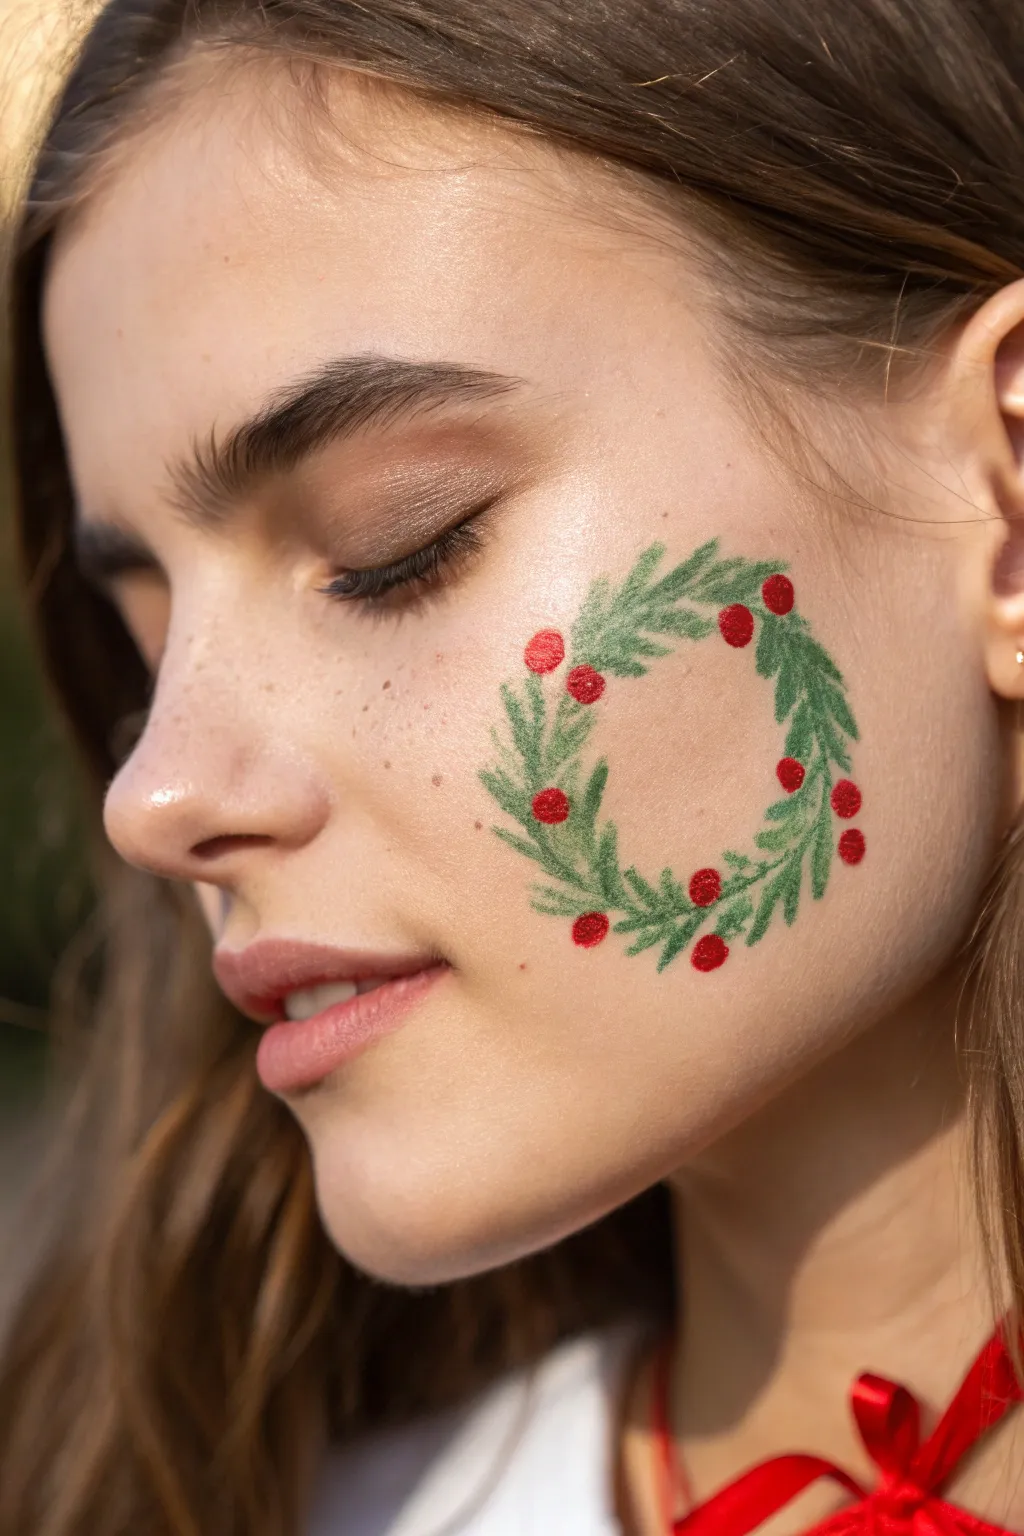
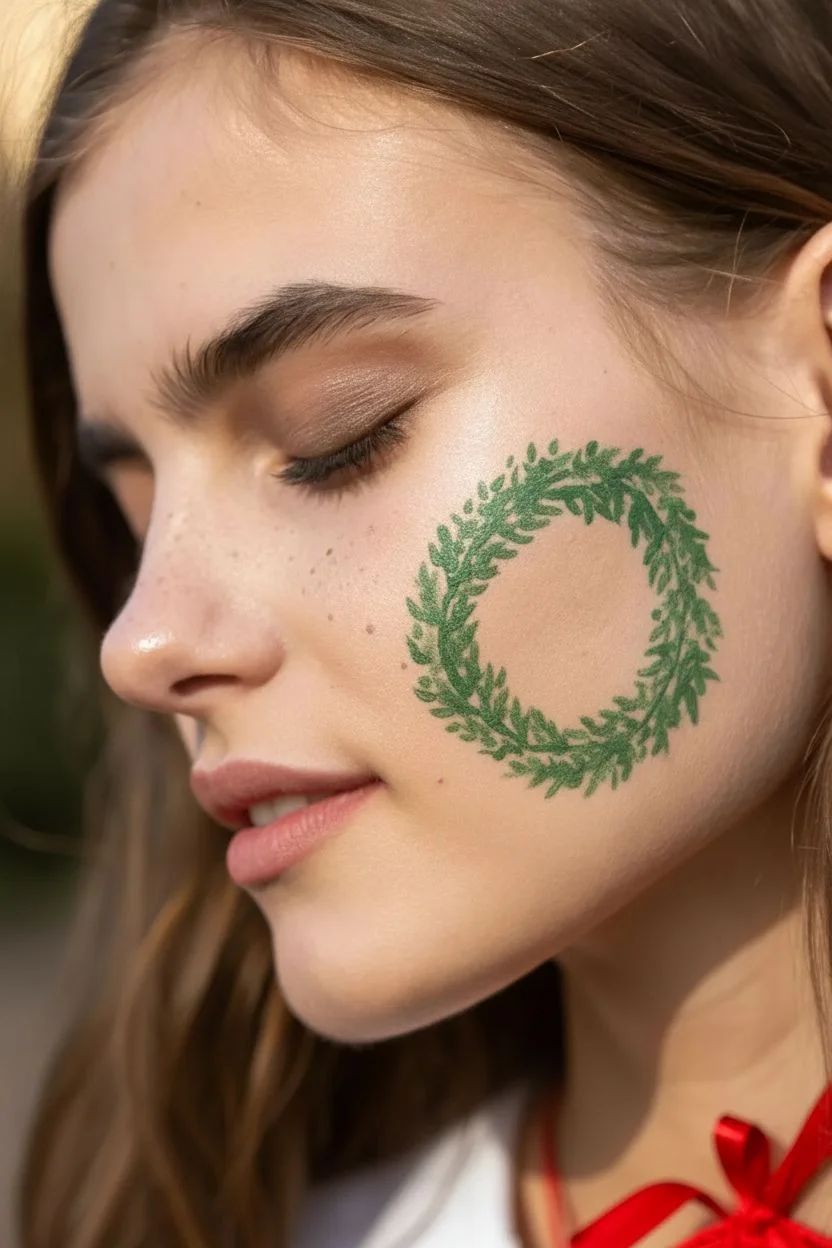
This delicate face paint design features a simple yet elegant holiday wreath perfectly positioned on the cheek. Its soft, textured greenery and bright red berries create a sophisticated seasonal look that’s surprisingly quick to achieve.
How-To Guide
Materials
- Face paint (Sage Green or Forest Green)
- Face paint (Bright Red)
- Small round brush (Size 2 or 3)
- Fine detail brush (Size 0 or 1)
- Cup of water
- Paper towels or cloth
- Optional: Cosmetic glitter
Step 1: Planning and Foundation
-
Clean the canvas:
Begin with a clean, dry face. Use a gentle cleanser or micellar water to remove any oils or lotions from the cheek area, as this helps the paint adhere better and last longer. -
Visualize the placement:
Look at the cheekbone area. You want to center the wreath right on the apple of the cheek. You can lightly tap the area with a clean finger to mark the center point in your mind before starting. -
Load your green:
Wet your small round brush and load it with your green face paint. Ensure the consistency is creamy but not too watery, as you want the bristly texture to show through slightly for a natural foliage look.
Step 2: Painting the Greenery
-
Start the circle:
Imagine a circle about 2-3 inches in diameter. I like to start at the top of this imaginary circle to anchor the shape. -
Paint the first leaves:
Using the tip of your round brush, press down gently and flick outward to create small, leaf-like strokes. These should curve slightly, following the arc of your imaginary circle. -
Establish direction:
Paint the leaves generally pointing in a clockwise or counter-clockwise direction—whichever feels more natural to your hand. Stick to this direction for the whole wreath. -
Build the texture:
Continue adding short, sweeping strokes around the circle. Don’t worry about making them perfectly solid; leaving small gaps adds to the realistic, bristly texture of pine needles. -
Layering tones:
If you have a slightly lighter or darker green, mix it in now while the first layer is damp to add depth. Just add a few strokes over your existing leaves. -
Close the loop:
Work your way all the way around until the ends meet. Step back for a second to check if the circle looks balanced. -
Fixing the shape:
If one side looks thin, add a few more leaf strokes to bulk it up. The beauty of this design is that ‘messy’ edges look like natural branches.
Paint too watery?
If your green strokes look like blobs rather than pine needles, your brush is too wet. Blot it on a paper towel and reload with dryer paint to get that distinct bristly texture.
Step 3: Adding the Berry Details
-
Switch to red:
Clean your brush thoroughly or switch to a fine detail brush. Load it with bright red face paint. You want a thick, opaque consistency for the berries so they pop against the skin and green paint. -
Placement strategy:
Don’t place berries randomly; group them in clusters of two or three, or space them out evenly like ornaments. Seven to nine berries usually look best for this size. -
Painting the berries:
Gently press the tip of the brush down to create a perfect circle. You can swirl it slightly to enlarge the dot if needed. -
Varying sizes:
Make some berries slightly smaller and others larger to keep the design dynamic and organic. -
Refining edges:
If any berries overlap the green leaves, ensure the red paint is thick enough to cover the green without muddying the colors. -
Optional texture:
To give the berries a bit of dimension, you can add a tiny white highlight dot to each one once the red is dry, though the reference image keeps them matte. -
Final check:
Look at the design from a distance. If any areas look sparse, you can carefully add a tiny green leaf stroke underneath a berry to fill the gap.
Pro Tip: Stencil Hack
For a super uniform circle, lightly press the rim of a small cup onto the skin to leave a faint guide ring before you start painting your leaves.
Now you have a charming holiday accent ready for any Christmas party

PENCIL GUIDE
Understanding Pencil Grades from H to B
From first sketch to finished drawing — learn pencil grades, line control, and shading techniques.
Explore the Full Guide
Snowflake Cluster at the Temple
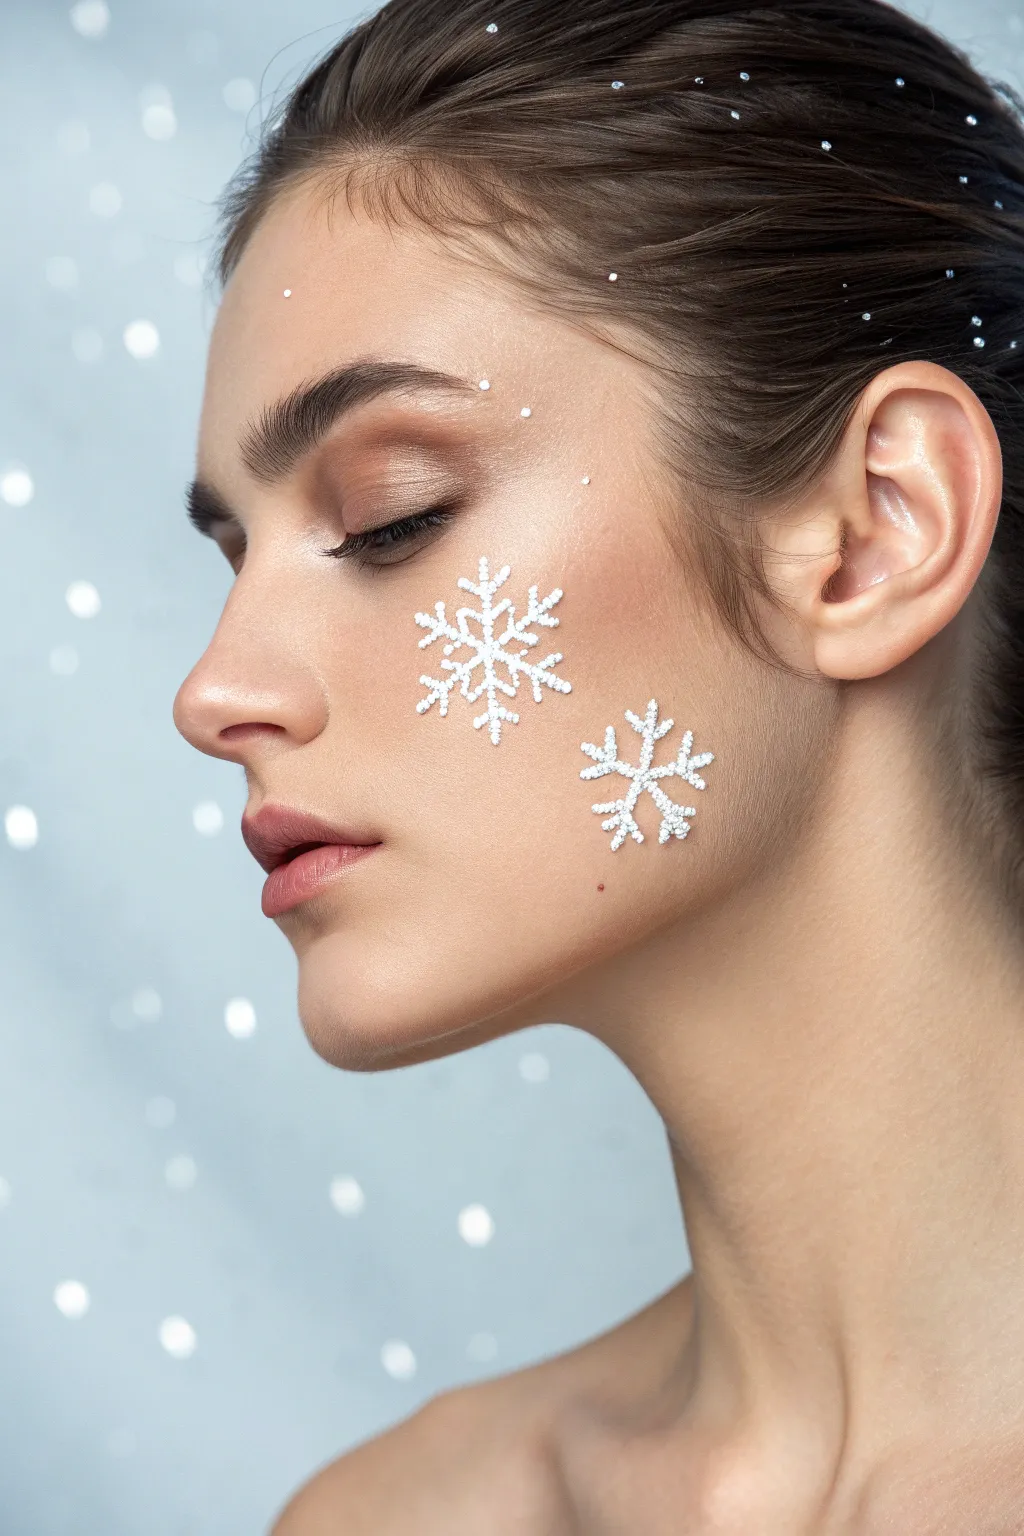
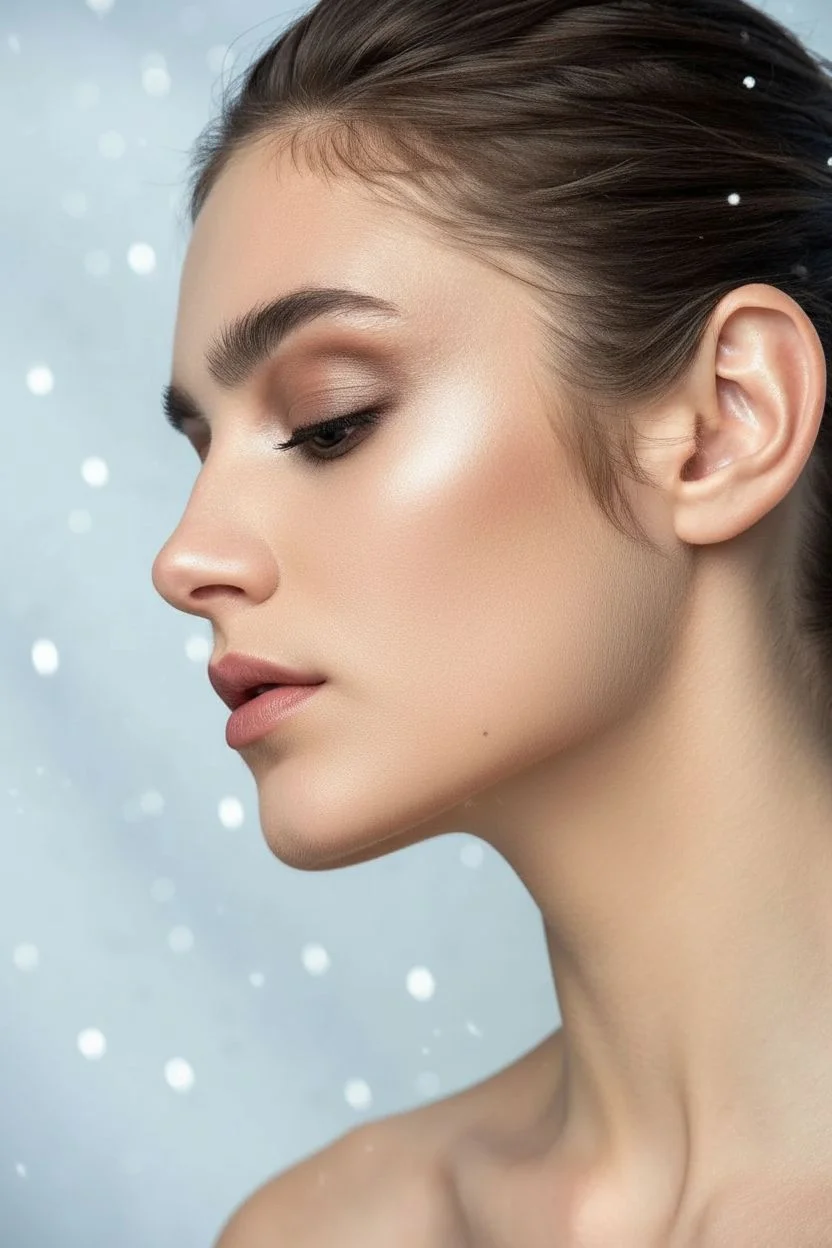
Achieve an ethereal winter queen aesthetic with this stunning yet surprisingly simple face art design. By combining delicate 3D snowflake sequins with scattered gems, you create a frosty, high-fashion look perfect for holiday parties.
Step-by-Step Guide
Materials
- Matte foundation (skin tone match)
- Neutral eyeshadow palette (soft browns/taupes)
- Black mascara
- Brow gel
- Large white snowflake flat-back appliques or sequins (approx. 1 inch)
- Medium white snowflake flat-back appliques or sequins (approx. 0.5 inch)
- Small clear rhinestones or silver glitter specks
- Skin-safe adhesive (spirit gum or eyelash glue)
- Tweezers
- Setting spray
Step 1: Base Preparation
-
Prime the canvas:
Begin with a clean, moisturized face. Apply a matte foundation to create an even, flawless base that will make the white snowflakes pop. Keep the finish velvety rather than dewy to ensure the adhesive sticks well. -
Groom the brows:
Brush the eyebrows upward using a clear brow gel for a feathery, natural look. For this specific style, fill them in lightly with a powder if needed, but keep the focus on the texture rather than a sharp arch. -
Soft eye definition:
Sweep a soft taupe or neutral brown eyeshadow across the upper eyelid, blending well into the crease. You want a ‘barely there’ shadow that adds depth without competing with the cheek art. -
Lash enhancement:
Apply a single coat of black mascara to the upper lashes only. Keep the lower lash line clean to maintain the fresh, wintry appearance. -
Contour lightly:
Add a very subtle contour under the cheekbone to give the face structure, but avoid heavy blush. The skin should look pale and wintry.
Adhesive Issues?
If the flakes are heavy and won’t stick with lash glue, switch to Spirit Gum. Apply it to the skin, tap until tacky, then press the snowflake on.
Step 2: Applying the Snowflakes
-
Plan placement:
Hold the larger snowflake against your cheekbone without glue first to find the best angle. It should sit high on the cheek, roughly aligned with the outer corner of the eye. -
Adhere the main snowflake:
Apply a small dot of skin-safe adhesive (like eyelash glue) to the back of the largest snowflake. Wait 15-20 seconds for it to get tacky, then press it firmly onto the high cheekbone. -
Place the secondary snowflake:
Take the medium-sized snowflake and apply adhesive. Position this one slightly lower and further back towards the ear, creating a diagonal line that draws the eye upward. -
Secure the edges:
Gently press the edges of the snowflakes down with the back of your tweezers or a clean finger to ensure they lay flat against the skin and won’t lift when you smile.
Frosty Finish
Dust a tiny amount of iridescent white highlighter over the cheekbones and collarbones for an extra icy, frozen skin effect.
Step 3: Adding the Sparkle
-
Forehead glimmers:
Using tweezers, pick up tiny individual rhinestones or large glitter flakes. Dip them lightly in adhesive. -
Create a scatter effect:
Place 3-4 small gems on the forehead above the eyebrow on the same side as the snowflakes. Keep the spacing random and organic, like falling snow. -
Hair accents:
Don’t stop at the hairline. I love to carry the theme upward by sticking a few small gems or tech-specks directly onto the hair near the temple. -
Final check:
Look at the design from different angles. If any spacing looks too uniform, add a tiny speck of glitter to break up the pattern. -
Lock it in:
Mist the entire face lightly with a setting spray, being careful not to soak the paper snowflakes if that is what you used.
You are now ready to sparkle at your next holiday gathering with this elegant snowy look
Poinsettia Bloom Corner Accent
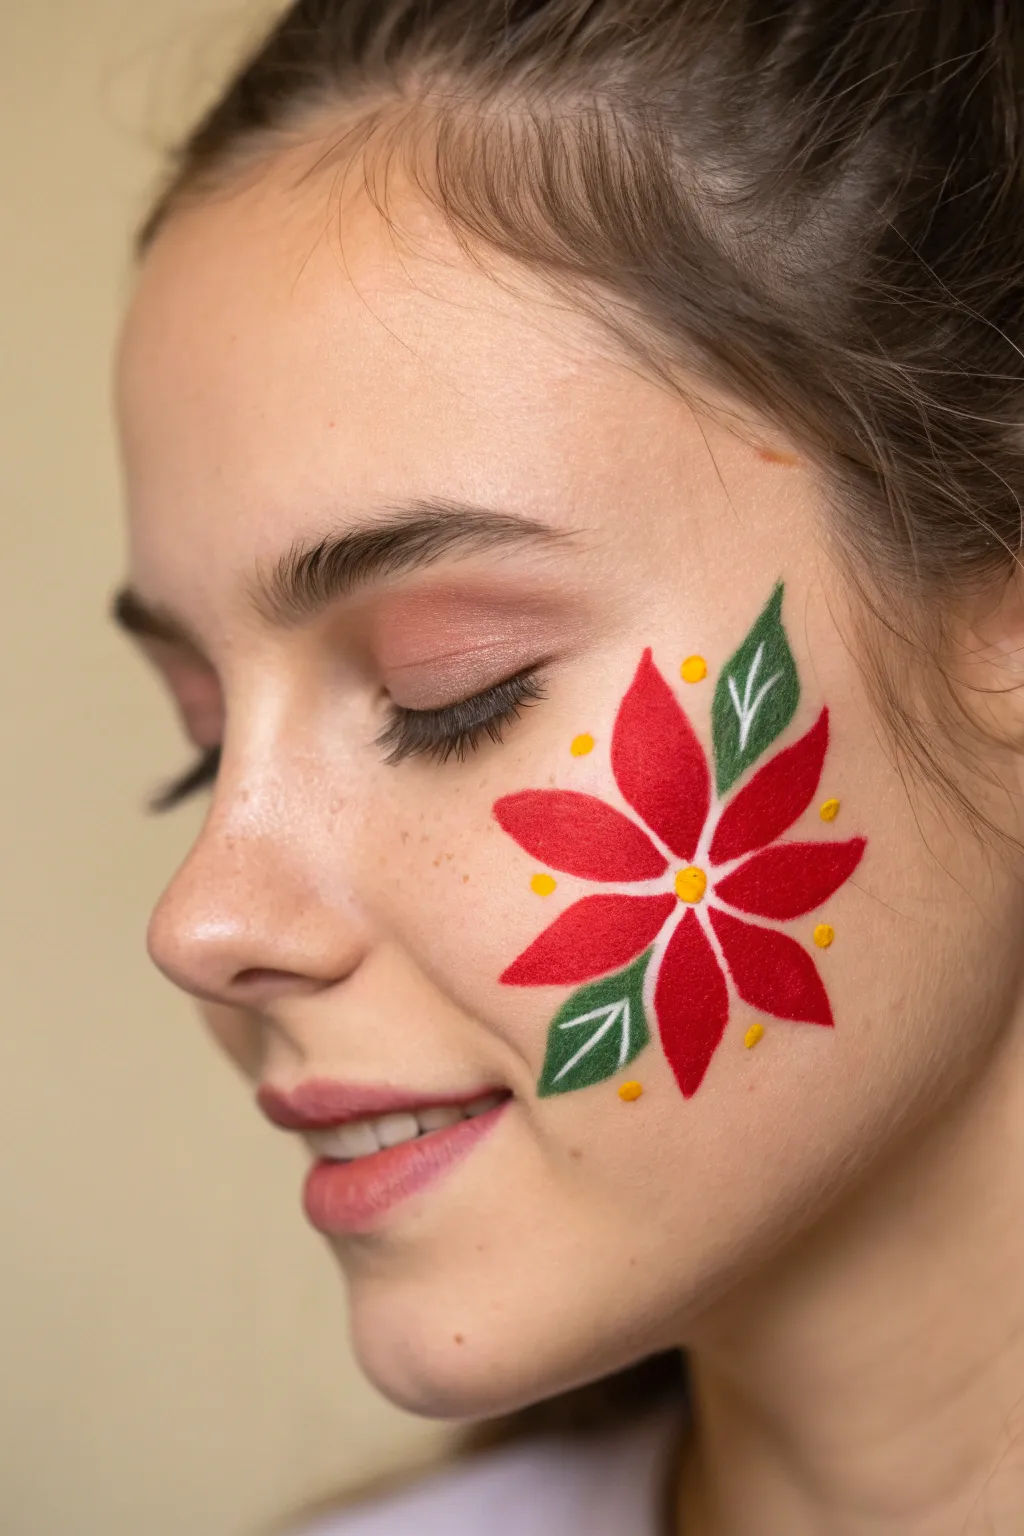
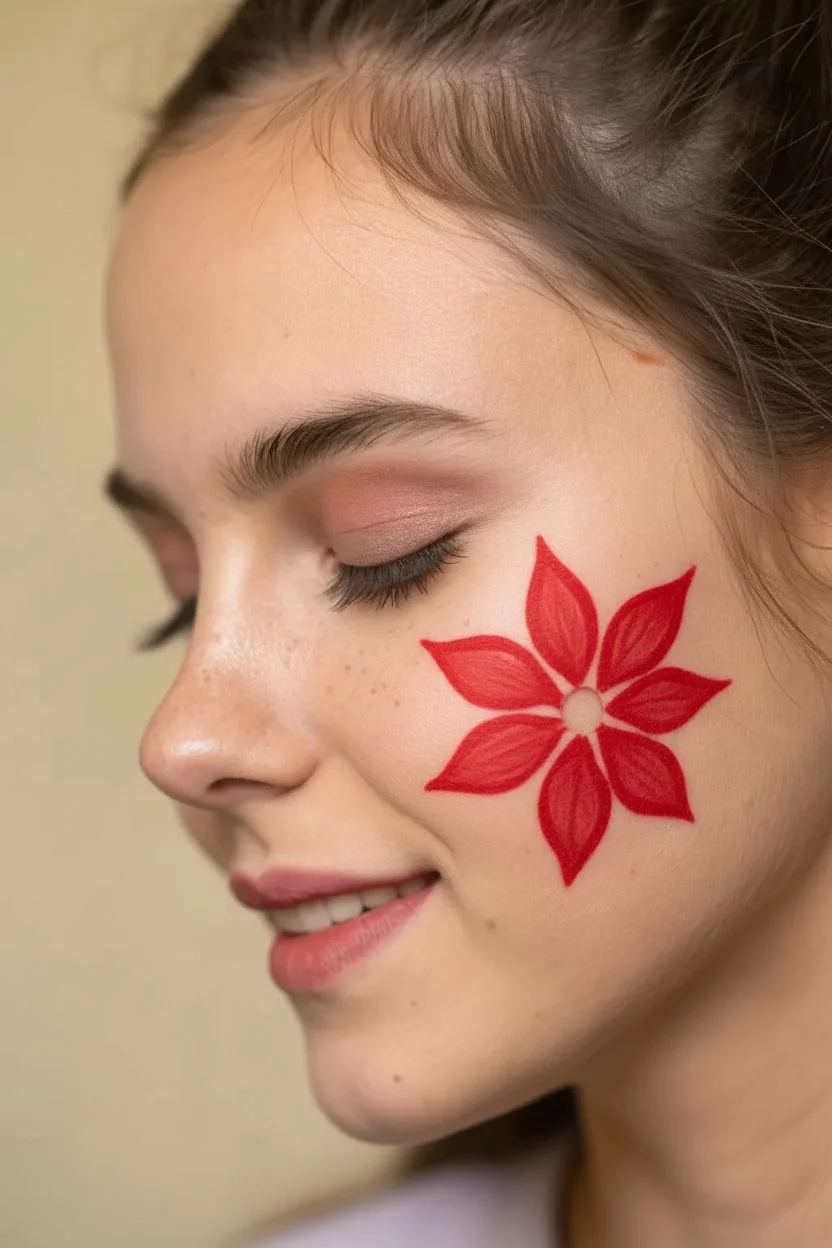
Transform a simple cheek accent into a festive statement with this elegant poinsettia design. The vibrant red petals and crisp green foliage create a classic holiday look that sits beautifully on the cheekbone without requiring a full-face mask.
How-To Guide
Materials
- Red face paint (high pigmentation recommended)
- Dark green face paint
- Bright yellow face paint
- Round brush (size 4 or 6)
- Fine liner brush (size 1 or 2)
- Small cup of water
- Paper towel or sponge
- Setting spray (optional)
Step 1: Planning and Base Petals
-
Find the placement:
Visualize the center of your flower just below the outer corner of the eye, resting on the high point of the cheekbone. This ensures the design lifts the face. -
Load your brush:
Wet your medium round brush and load it thoroughly with bright red paint. You want a creamy consistency, not too watery, to ensure the petals are opaque. -
Paint the first petal:
Starting from the imagined center point, press the brush down to create width and pull outward, lifting at the end to form a sharp point. Aim this first petal towards the temple. -
Create the top cluster:
Paint two more petals adjacent to the first one, fanning them slightly upwards. Keep the bases of the petals close together but not necessarily touching yet. -
Complete the flower shape:
Continue adding petals in a radial pattern. You’ll need about 5 to 7 petals total. Make the bottom petals slightly shorter to contour nicely with the jawline. -
Refine the centers:
If the center of the flower looks a bit messy, that’s okay. Use the tip of your red brush to ensure the inner points of the petals meet near the middle, leaving a small gap for the yellow pollen.
Petal Perfection
To get that sharp petal tip, twist the brush slightly as you lift it off the skin. This gathers the bristles into a fine point every time.
Step 2: Adding Foliage and Details
-
Switch to green:
Rinse your round brush completely or switch to a clean one. Load it with dark green face paint. -
Paint the top leaf:
Tuck a leaf between two of the top red petals. Use the same press-and-pull technique, but try to make the leaf shape slightly wider and shorter than the petals. -
Add the bottom leaf:
Place a second leaf on the opposite side, towards the bottom of the design near the jawline. This balances the composition. -
Create leaf veins:
Take your fine liner brush with white paint (or a very light green). Carefully draw a thin line down the center of each green leaf. -
Detail the veins:
Add tiny V-shapes branching off the center vein line to give the leaves a realistic texture. Keep these lines very delicate. -
Highlight the petals:
Clean your fine liner brush and load it with white face paint again. Add a single, thin tear-drop stroke down the center of each red petal to create a highlight and separate them visually.
Step 3: The Final Flourishes
-
Paint the center pollen:
Load a clean round brush or the back of a brush handle with bright yellow paint. Do five or six small dots right in the center where the petals meet. -
Add accent dots:
Using the same yellow, place scattered dots around the outer edges of the flower. I like to group them in threes or place single dots between petal tips for a magical effect. -
Check symmetry:
Take a step back and look at the design. If any petal edges look rough, smooth them out with a slightly damp liner brush. -
Let it set:
Allow the paint to dry completely for a minute. If the subject will be active, a light mist of setting spray helps it last.
Add Some Sparkle
While the red paint is still slightly tacky, tap a cosmetic-grade red or gold glitter onto the center of the petals for a festive shimmer.
This charming holiday accent is ready to brighten up any Christmas party or winter gathering


Penguin Belly Patch With a Santa Hat
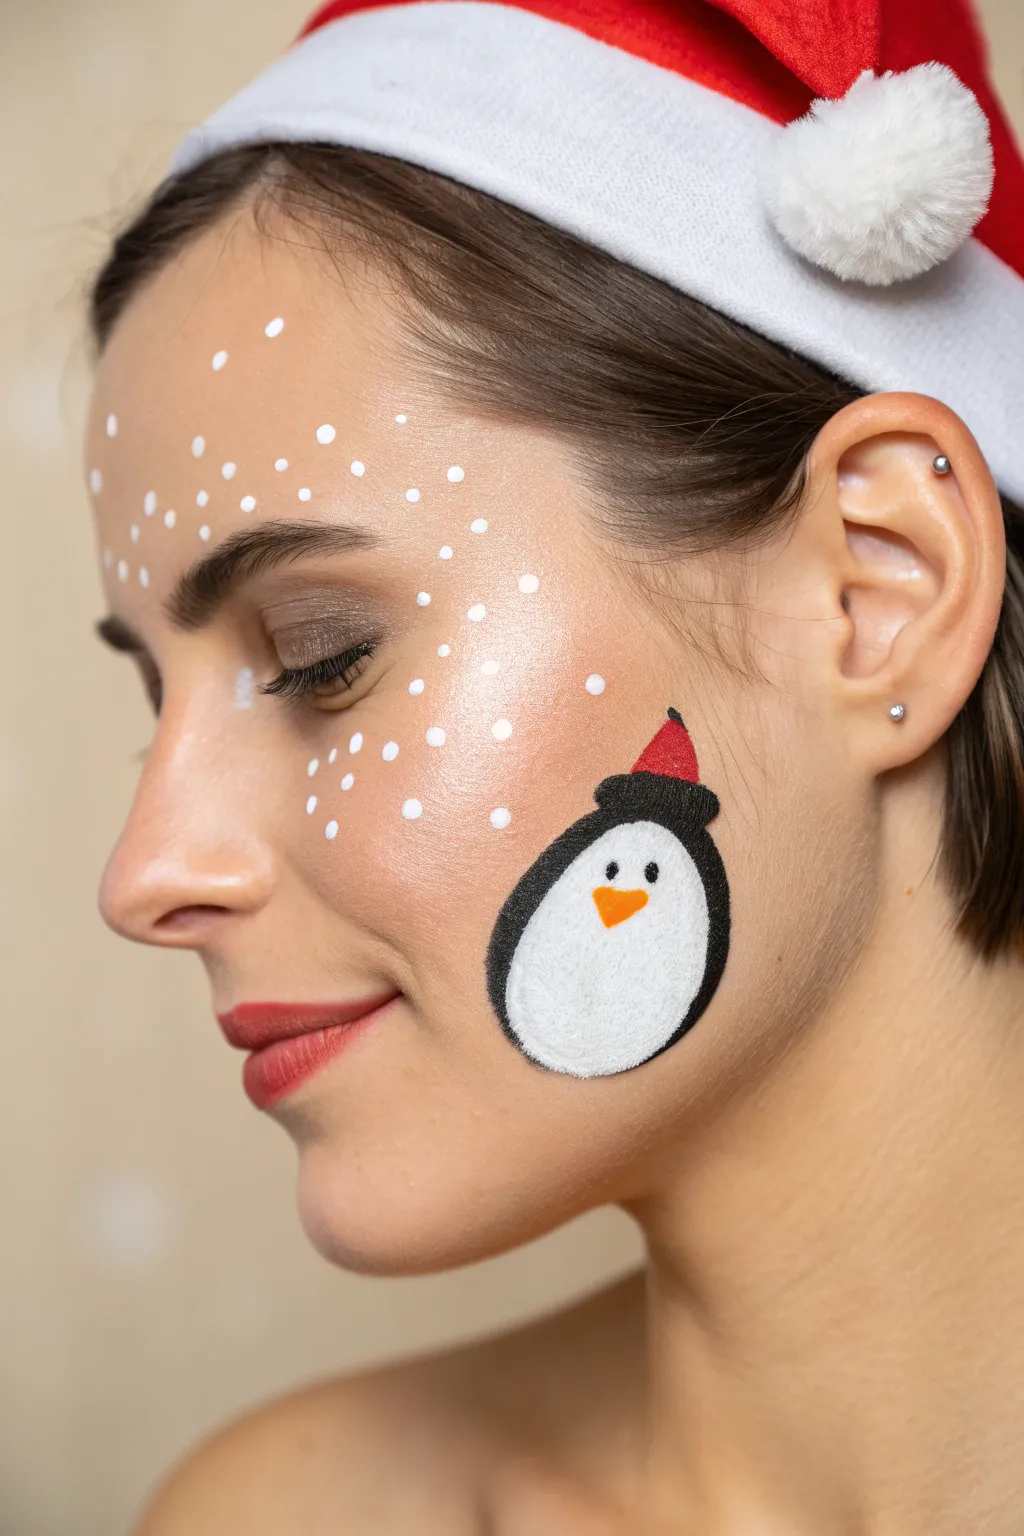
Bring festive cheer directly to your look with this adorable, minimalist penguin face paint design. Featuring a plump little penguin wearing a Santa hat and a dusting of delicate snowflakes, it’s a perfect choice for holiday parties where you want a touch of whimsy without a full-face mask.
Detailed Instructions
Materials
- White face paint (water-activated or cream)
- Black face paint (water-activated preferred for crisp lines)
- Bright red face paint
- Orange face paint
- Small round brush (size 2 or 3)
- Fine liner brush (size 0 or 00)
- Medium round brush
- Cotton swabs or makeup sponge (optional for cleanup)
- Setting spray (optional)
Step 1: The Wintry Base
-
Prep the canvas:
Start with clean, dry skin. If you have oily skin, a light dusting of translucent powder on the cheek and temple can help the paint grip better and last longer. -
Mix your snow white:
Load a small round brush with white face paint. You want a creamy milky consistency—not too watery, so it stays opaque, but fluid enough to make perfect dots. -
Map the snowfall:
Begin placing small white dots starting from the temple and drifting down towards the cheekbone. Vary the pressure on your brush to create dots of different sizes for a natural, falling snow effect. -
Create density:
Concentrate more dots near the hairline and upper temple, spacing them out more as you move down the cheek. This creates a scattered, organic look rather than a rigid pattern. -
Add tiny flakes:
Switch to your fine liner brush or just barely touch the tip of your small brush to the skin to add very tiny specks of snow in between the larger dots.
Step 2: Painting the Penguin
-
Outline the body:
Using your medium round brush and white paint, create an oval shape on the apple of the cheek. This will be the penguin’s white belly. -
Fill the belly:
Fill in the oval completely with white paint. I like to pat the paint on gently to build opacity without streaking. Let this base layer dry for a minute or two. -
Draft the outline:
Load a small round brush with black paint. Carefully outline the white oval, keeping your hand steady to draw a smooth, continuous curve. -
Form the head:
At the top of the white oval, paint a thicker black curve that caps the top excessively, slightly wider than the body. This forms the penguin’s head and flippers in one graphic shape. -
Refine the shape:
Thicken the black line on the sides of the white oval to suggest the penguin’s wings tucked against its body. The black border should be bold and distinct.
Smudge Control
If black bleeds into the white belly, wait for it to dry fully. Then, paint a layer of white over the mistake. Do not try to wipe it while wet, or it will turn grey.
Step 3: Festive Details
-
Base of the hat:
Using the red face paint and a clean small brush, paint a small triangle sitting slightly askew on top of the black head area. -
Add the brim:
Before the red dries completely, take a tiny bit of red paint to round out the bottom of the triangle so it looks like it’s resting on the penguin’s head, not floating above it. -
The hat’s pom-pom:
Clean your small brush and load it with white paint again. Dab a small white dot at the very tip of the red triangle for the fluffy pom-pom. -
Facial features:
Switch to your finest liner brush and black paint. Carefully place two small dots in the upper third of the white belly area for the eyes. Position them close together for extra cuteness. -
The beak:
Load a small brush with orange paint. Paint a small, inverted triangle right between and slightly below the eyes. -
Set the look:
If you plan on wearing this for a long party, a quick spritz of setting spray (eyes closed tight!) will help lock the design in place.
Sparkle Upgrade
While the white snow dots are still slightly damp, gently press cosmetic-grade iridescent glitter onto them. This makes the snow catch the light beautifully.
Now you have a festive, frosty little friend to accompany you to all your holiday celebrations
Polar Bear Cub With Snow Dots
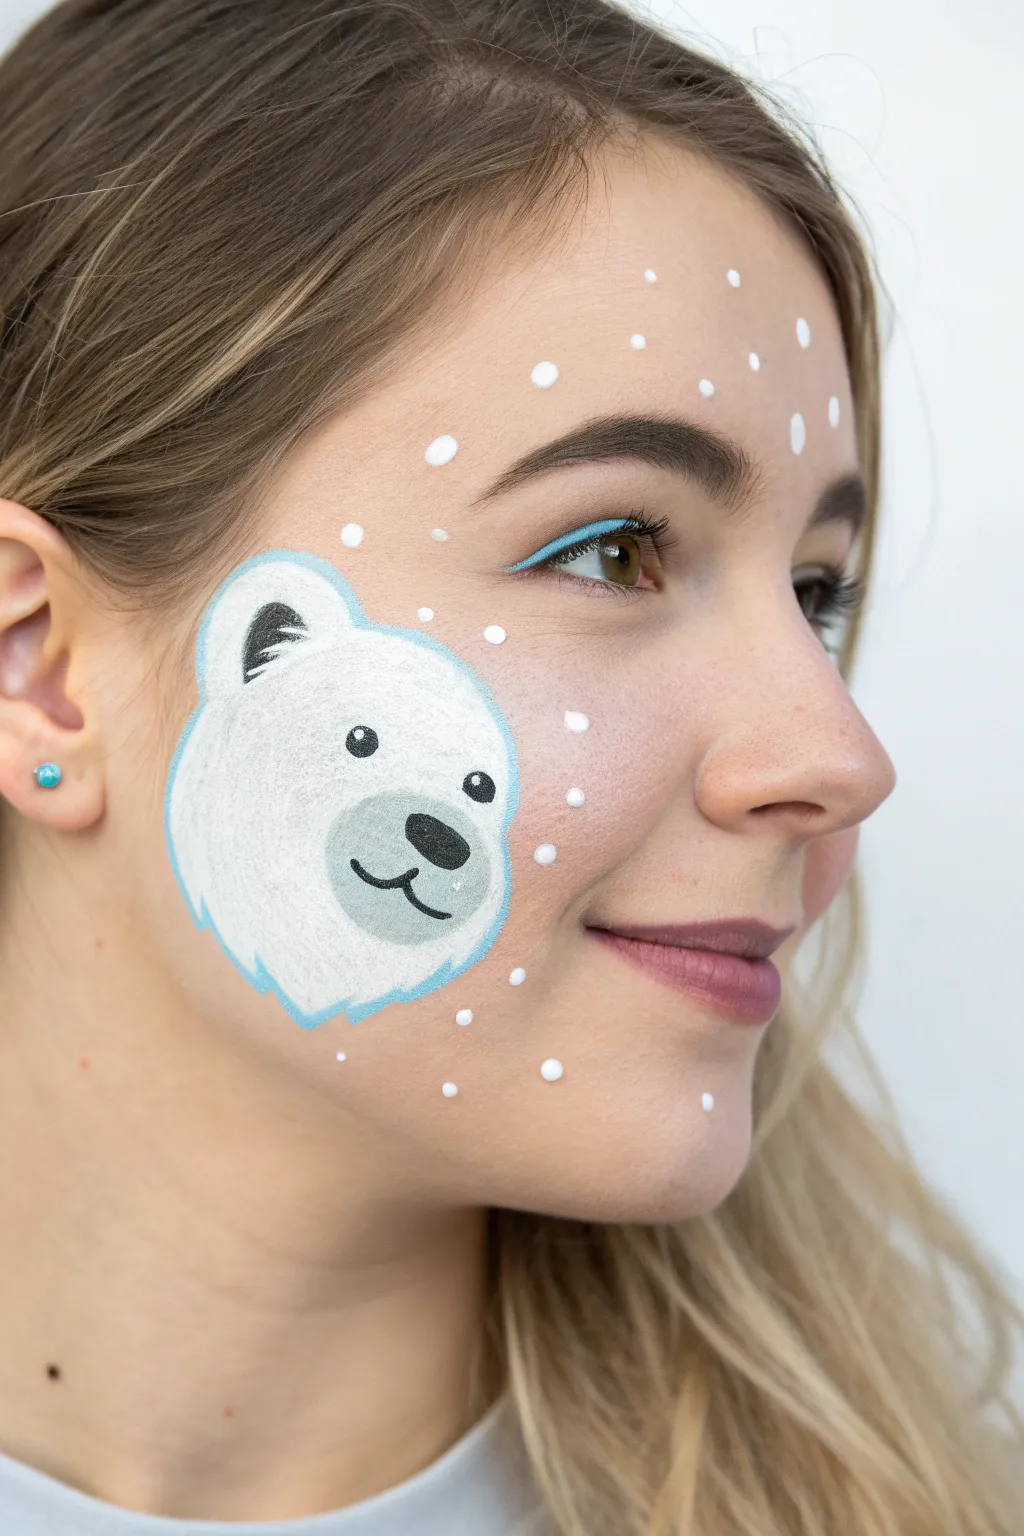
Transform a cheek into a frosty winter wonderland with this adorable and simple polar bear cub design. The soft white fur texture and playful snow dots make this a perfect look for holiday parties or snowy days.
How-To Guide
Materials
- White face paint
- Light blue face paint
- Black face paint
- Grey face paint
- Round brush (medium size)
- Small detail brush or liner brush
- Dotting tool or the back of a brush handle
- Sponge (optional for base)
- Blue eyeliner pencil (optional)
- Cup of water
- Paper towels
Step 1: Painting the Bear Base
-
Outline the head:
Start by loading a medium round brush with light blue paint. On the apple of the cheek, paint a soft, rounded outline for the bear’s head, adding two small semi-circles at the top for ears. -
Create the fur texture:
Using the same blue paint, gently flick distinct, short lines outward along the bottom edge of the outline to mimic shaggy neck fur. -
Fill in the white:
Clean your brush thoroughly and load it with bright white paint. Fill in the entire shape inside the blue outline. -
Blend the edges:
While the white is still slightly damp, carefully blend it right up to the inner edge of your blue outline so there isn’t a harsh gap, keeping the blue visible as a distinct border.
Uneven Dots?
If your snow dots look messy or streaky, your paint might be too watery. Mix the white paint until it has a creamy precision, so it stands up slightly on the skin without dripping.
Step 2: Adding Facial Features
-
Paint the muzzle:
Load a clean brush with grey paint. Paint a wide, horizontal oval shape in the lower center of the white face area to create the muzzle. -
Add the nose:
Switch to a small detail brush with black paint. Draw a soft, upside-down rounded triangle at the top of the grey muzzle for the nose. -
Draw the mouth:
From the bottom of the black nose, paint a small vertical line downwards, then curve it outwards to the left and right to create a happy smile. -
Paint the eyes:
Using the tip of your detail brush and black paint, add two small, solid black circles above the muzzle for eyes. Place them fairly wide apart for a cute, innocent look. -
Highlight the eyes:
Once the black paint is dry, use a tiny dot of white paint to add a ‘catchlight’ reflection in the upper right corner of each eye. -
Detail the ears:
Paint the inner ear shapes using black or dark grey. Create a small, curved triangle inside the left ear and a simple curved line inside the right ear to suggest depth.
Step 3: Snowy Scene Details
-
Add eyeliner:
To tie the look together, apply a streak of bright blue eyeliner or face paint along the upper lash line of the model’s actual eye. -
Create large snowflakes:
Dip the handle of a brush or a dotting tool into white paint. Press gently onto the forehead and around the bear to create larger snow dots. -
Add medium snow dots:
Reload your tool with a slightly lighter touch to create medium-sized dots scattered across the cheek and bridge of the nose. -
Sprinkle tiny flurries:
Use the very tip of your smallest brush to tap tiny white specks filling in the gaps between the larger dots for a magical, flurry effect. -
Add a blue earring detail:
If painting on someone without pierced ears, you can paint a tiny blue dot on the earlobe to mimic a coordinating earring.
Add Some Sparkle
Before the white snow dots dry completely, gently press some cosmetic-grade iridescent white glitter onto the larger dots. It catches the light just like real snowflakes.
Now you have a frosty friend ready to celebrate the season on your cheek
Christmas Light String Along the Cheekbone
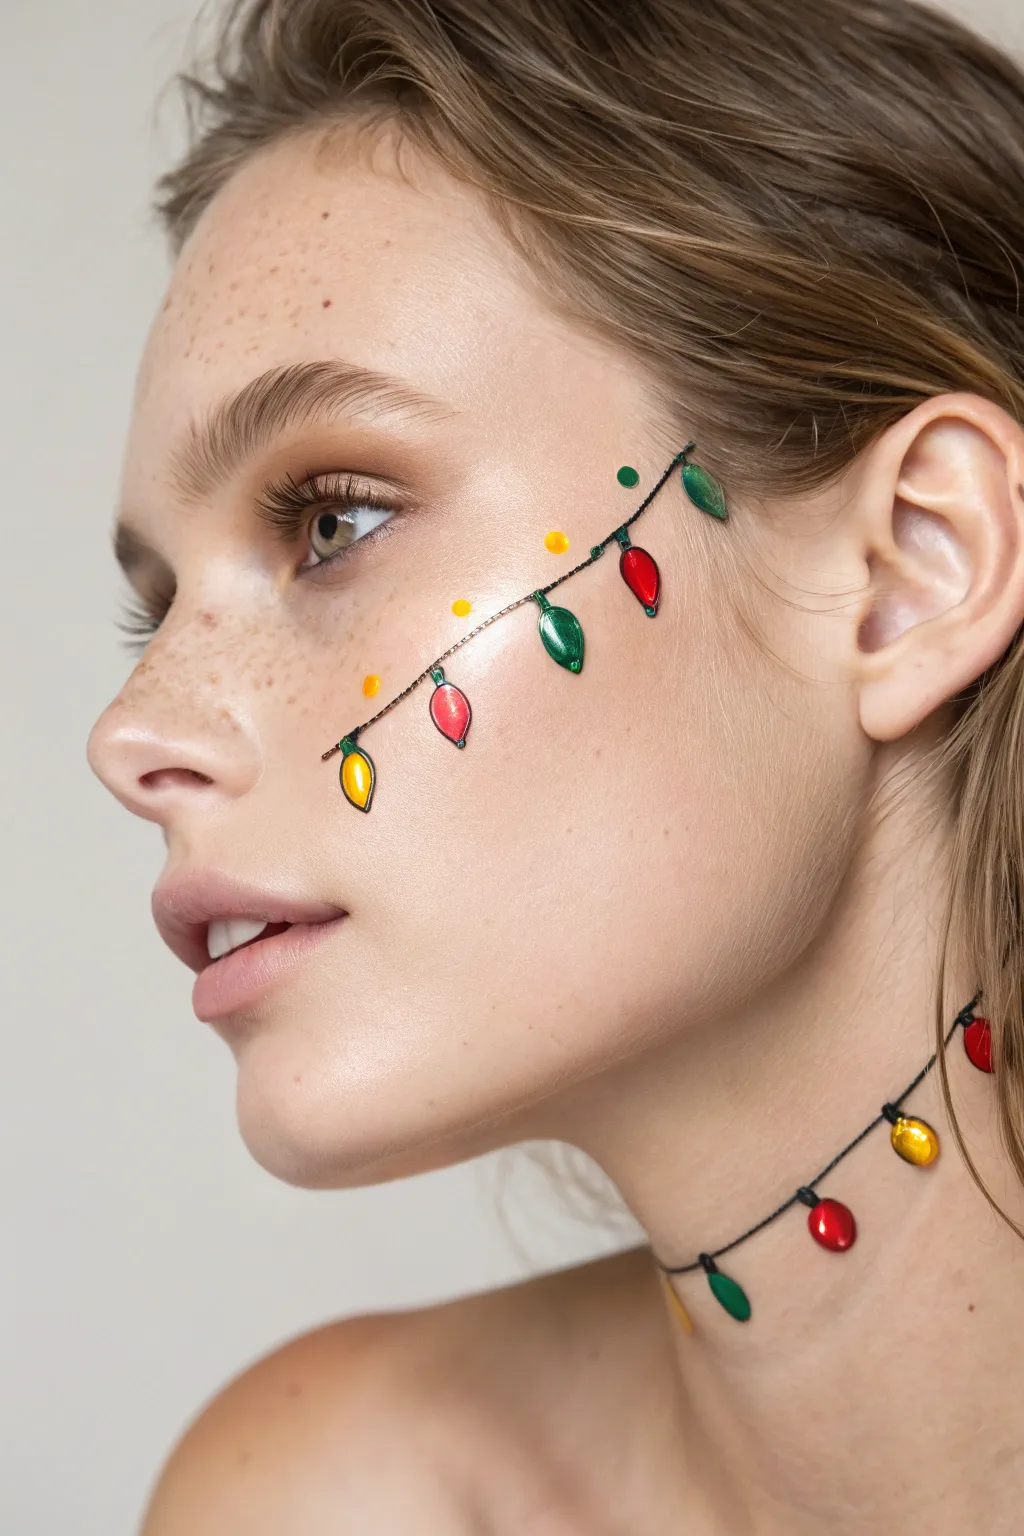
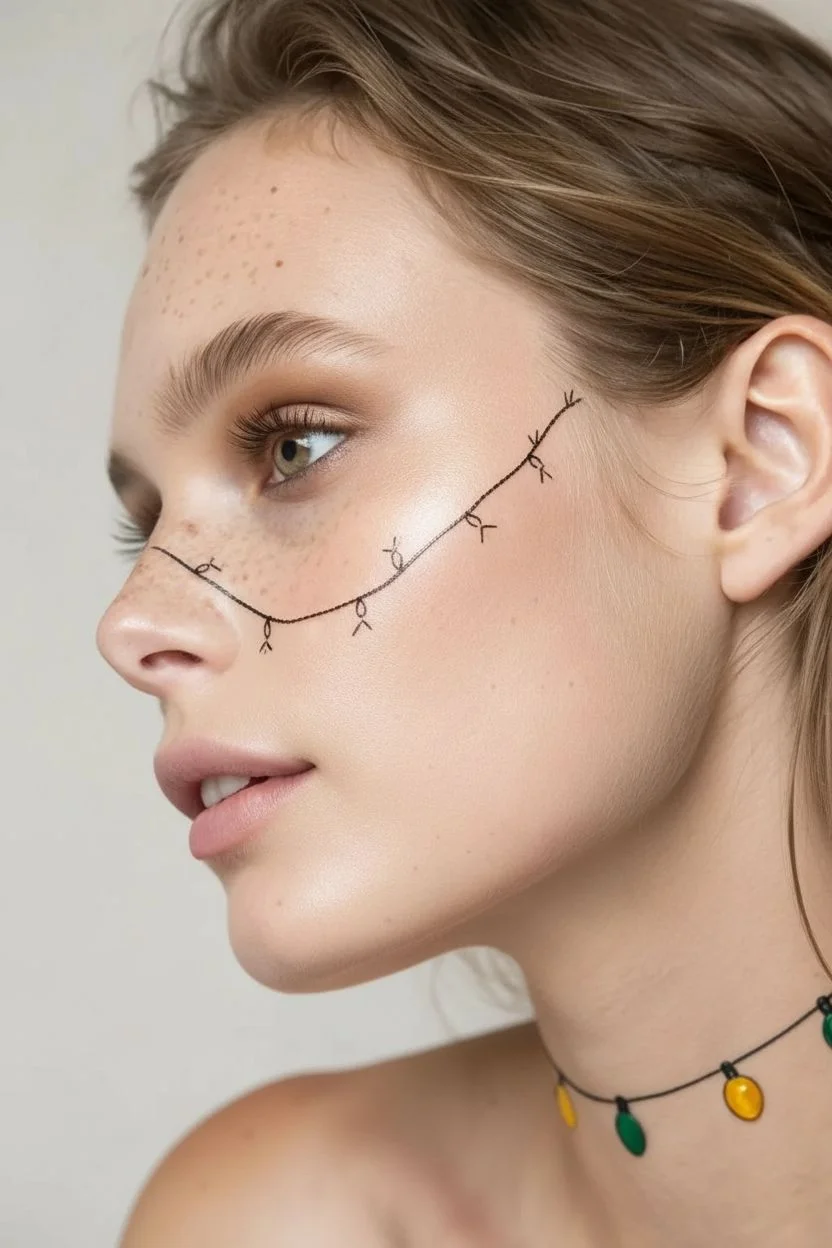
Illuminate your holiday look with this minimalist yet festive string of lights design that follows the natural contour of your cheekbone. The combination of black liner and glossy, bright paints creates a deceptively realistic effect that mimics tiny glass bulbs on a wire.
Detailed Instructions
Materials
- Fine-tip black liquid eyeliner or water-activated face paint
- Red face paint (creamy or water-activated)
- Green face paint (emerald shade)
- Yellow face paint (bright)
- Small round detail brush (size 0 or 1)
- White liquid liner or white face paint for highlights
- Cotton swabs for cleanup
- Optional: Setting spray
Step 1: Planning the String
-
Map the Curve:
Before painting, visualize where the string will sit. Start from just below the outer corner of your eye and imagine a gentle, sweeping curve that drapes down across the cheekbone towards the nose. -
Draw the Wire:
Using your fine-tip black liquid eyeliner or a liner brush loaded with black face paint, draw a continuous, thin line. Start near the hairline or temple area and pull the stroke diagonally downwards across the cheek. -
Add Texture:
To make the wire look twisted like real light strings, go back over the line and add very tiny, diagonal hash marks or small breaks in a second layer of twisting black ink.
Keep it Glossy
Mix a tiny drop of clear lip gloss into your face paint specifically for the bulbs. This gives them a permanent wet look that mimics real glass lights.
Step 2: Painting the Bulbs
-
Outline the Sockets:
Along the black wire, space out about 5 or 6 small black rectangles or tiny trapezoids. These serve as the plastic sockets that hold the bulbs. -
Vary the Angles:
Don’t place all sockets pointing straight down. Let some dangle slightly to the left or right to mimic gravity’s effect on a loose string. -
Start with Yellow:
Load your small round brush with bright yellow paint. Pick a socket near the bottom of the strand and paint a teardrop shape coming out of the black base. -
Add Green Bulbs:
Clean your brush and switch to emerald green. Paint two green teardrop bulbs, perhaps one near the top by the temple and one right in the middle of the cheek. -
Fill in the Red:
Finish the sequence with red paint for the remaining empty sockets. Keep the teardrop shape consistent—rounded at the bottom and tapered at the top. -
Refine the Shapes:
I like to go back and carefully smooth out the edges of each bulb while the paint is still damp, ensuring the teardrops look plump and glass-like. -
Add Floating Dots:
For extra whimsy, dip the back end of your brush into yellow or green paint and dot a few tiny circles floating above the string, creating a ‘bokch’ or glow effect. -
Dry Time:
Allow the colored bulbs to set for about a minute. This prevents smudging when we add the definition details in the next phase.
Glow Up
After painting the bulbs, lightly dust a matching shimmery eyeshadow over each color (red shadow on red bulb) to make them look like they are actually lit up.
Step 3: Highlights and Details
-
Define the Edges:
Using the very tip of your black eyeliner, draw an incredibly thin outline around each colored bulb. This helps them pop against the skin tone and look like distinct objects. -
Connect to Sockets:
Ensure the black outline connects seamlessly to the black socket bases you painted earlier so the bulbs don’t look like they are floating detached. -
Create the Glint:
This is the most crucial step for realism: take a white liquid liner or white paint on a detail brush. -
Apply Highlights:
Paint a tiny, curved white dash on the upper right side of each bulb. This small reflection makes the paint look like shiny glass. -
Add a Second Reflection:
If you have space, add a mere pinpoint dot of white on the bottom left of the bulb, opposite your first highlight, for added dimension. -
Neck Accessory:
To complete the full look shown in the image, repeat the process on your neck, drawing a ‘choker’ style string of lights. -
Check the Flow:
Step back and look in the mirror. Connect any gaps in the main wire or darken the sockets if the color paint accidentally overlapped them. -
Set the Look:
If you plan to wear this for a long party, lightly mist a setting spray over your face, holding the bottle at arm’s length to avoid creating run marks.
Now you have a dazzling, jewelry-like accessory painted right onto your skin perfect for any holiday gathering
Christmas Bow Tie Cheek Accent

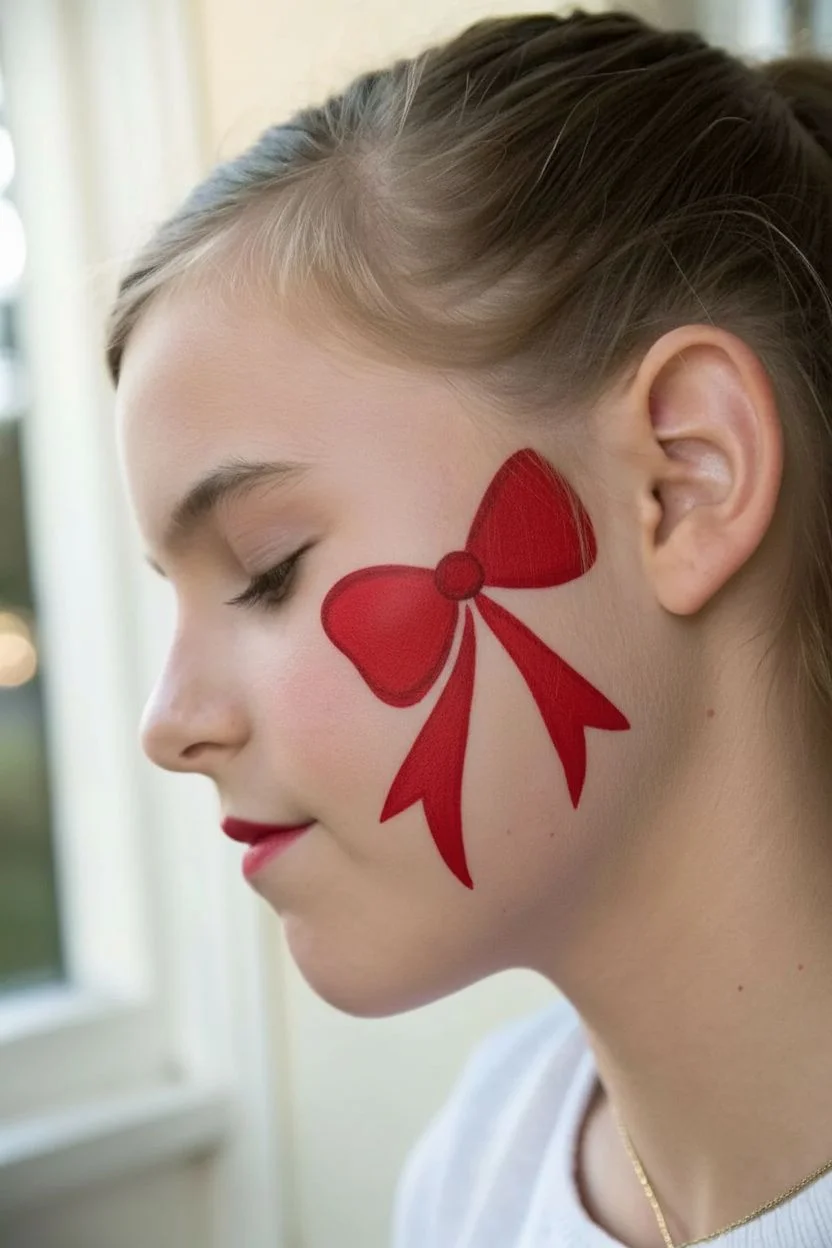
This elegant face painting design features a classic red bow accented with festive holly leaves, perfect for a subtle yet spirited holiday look. It sits beautifully on the cheekbone, using clean lines and bright highlights to create a dimensional, sticker-like effect.
Step-by-Step Tutorial
Materials
- Face paint: Bright Red, Dark Red (or Burgundy)
- Face paint: Hunter Green, light Sage Green
- Face paint: White
- Face paint: Dark Brown or Black
- Medium round brush (size 4 or 6)
- Fine liner brush (size 0 or 1)
- Small flat brush (optional for blending)
- Water container
- Sponge or paper towels
Step 1: Painting the Bow Base
-
Position the Center:
Load your round brush with bright red paint. Locate the high point of the cheekbone, roughly below the outer corner of the eye. Paint a small, solid circle here to serve as the knot of the bow. -
Create the Top Loops:
From the center knot, paint two teardrop shapes extending upwards and outwards diagonally. Think of these as bunny ears that connect back to the knot. Keep the edges smooth. -
Add the Ribbons:
Paint two flowing ribbon tails extending downwards from the knot. The left tail should curve slightly toward the mouth, and the right tail extends back toward the jawline. Taper the ends to sharp points for elegance. -
Fill the Shapes:
Ensure all red areas are filled in solidly. If the paint looks streaky, let it dry for a few seconds and apply a second coat for vibrant opacity.
Step 2: Adding the Holly Leaves
-
Outline the Leaves:
Switch to a clean round brush loaded with light sage green paint. Draw the outline of a holly leaf tucked behind the top left loop of the bow. Use small, C-shaped strokes to create the spiky leaf edges. -
Draft the Second Leaf:
Paint a second, hanging holly leaf nestled between the two red ribbon tails. The point should face downward. -
Fill and Define:
Fill the inside of the leaf outlines with the sage green. While the paint is still slightly damp, take a tiny bit of hunter green on the tip of your brush and blend it into the center vein area for depth. -
Vein Detailing:
Using your fine liner brush and the dark hunter green, paint a thin central line down the middle of each leaf, adding tiny V-shapes branching off for veins.
Wobbly Lines?
If your outlines feel shaky, try resting your pinky finger against the model’s cheek (use a dry sponge as a barrier) to stabilize your hand while painting details.
Step 3: Shading and Definition
-
Deepen the Bow:
Load a liner brush with dark brown or burgundy paint. Carefully outline the bottom edges of the bow loops and ribbon tails to create a shadow effect. -
Add Inner Shadows:
Paint small, curved lines inside the bow loops, close to the knot, to show where the fabric bunches. Add a shadow line on the ribbon tails right where they emerge from under the knot. -
Define the Knot:
Outline the bottom half of the center circle knot with the dark shade to make it look round and raised. -
Sharpen the Leaves:
Use a very thin wash of the dark green to outline the prickly edges of the holly leaves, giving them a crisp finish against the skin.
Add Sparkle
While the red paint is still slightly wet, tap a small amount of cosmetic-grade red or iridescent glitter onto the center knot of the bow for extra holiday magic.
Step 4: Highlights and Finishing Touches
-
White Highlights:
Load a fine liner brush with stark white paint. Add thin, curved strokes to the top of the bow loops and the upper edge of the knot. This mimics light hitting satin fabric. -
Ribbon Shine:
Paint a long, thin streak of white along the upper edge of the ribbon tails. Keep the line fluid and tapering. -
Leaf Accents:
Add tiny ticks of white to the tips of the holly leaf points for a crisp, fresh look. -
The Lips:
Carefully paint the lips with the bright red used for the bow. Use a small brush for precision around the cupid’s bow and corners. -
Beauty Mark:
Dip the back end of a small brush into black paint and gently press a dot onto the skin just below the corner of the mouth for a vintage beauty mark accent. -
Final Check:
Stand back and check for symmetry and clean lines. Use a slightly damp cotton swab to clean up any smudged edges if necessary.
Now you have a classic holiday design that looks professional and festive


Have a question or want to share your own experience? I'd love to hear from you in the comments below!