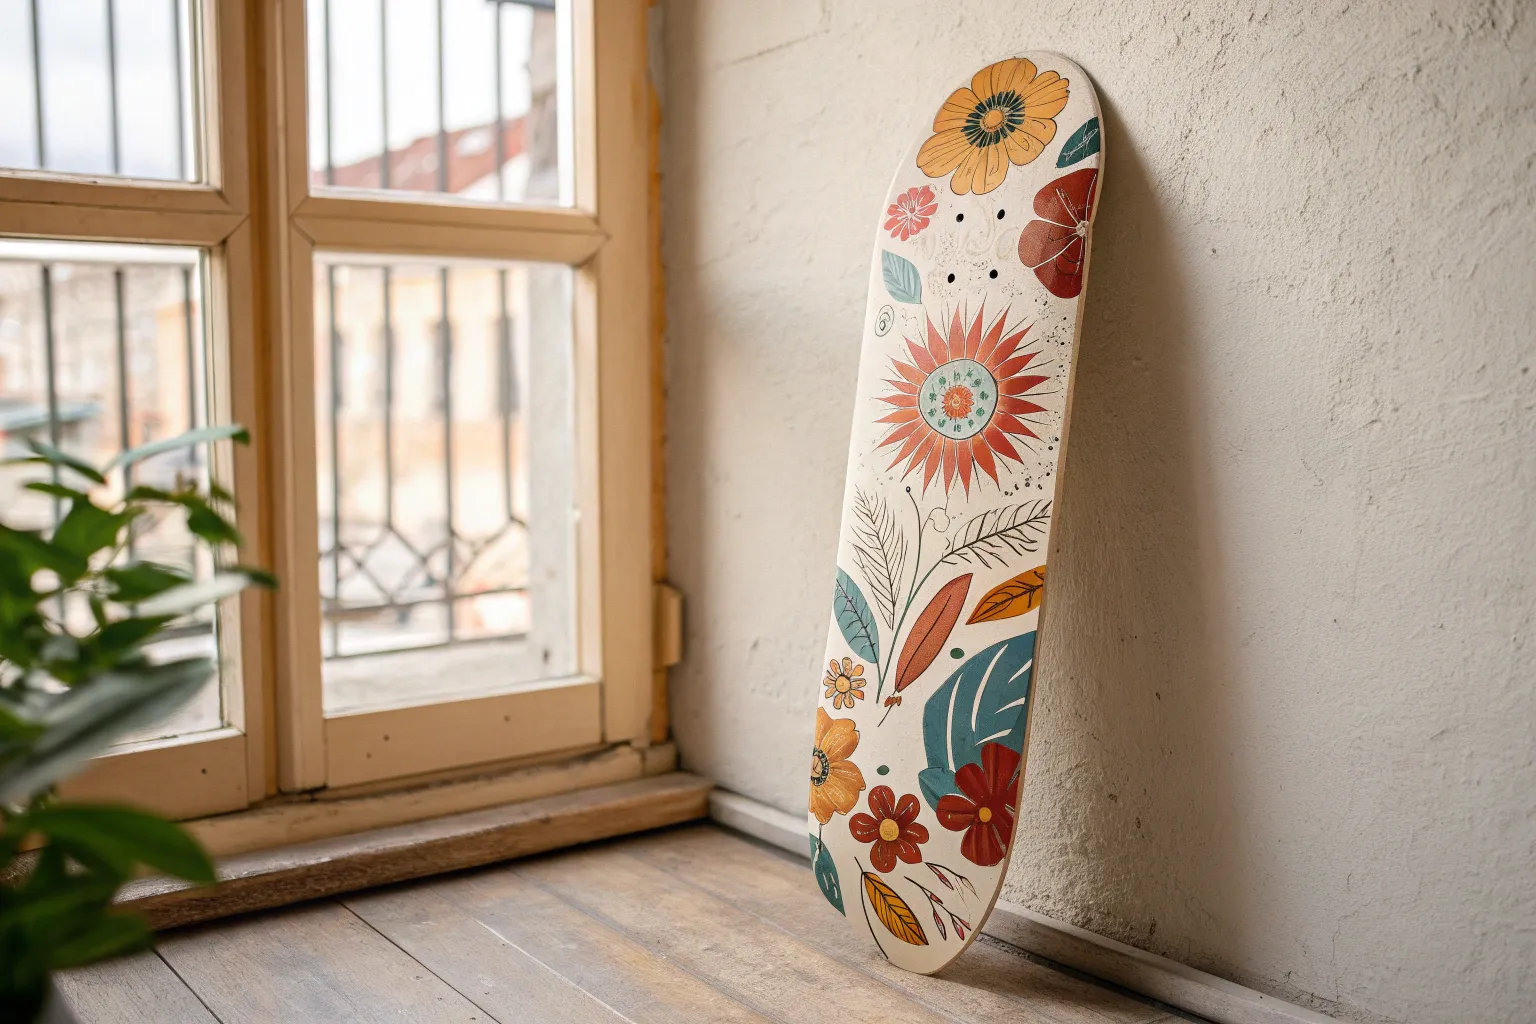
A skateboard deck is basically the most satisfying long, skinny canvas you’ll ever paint on—built-in curves, instant attitude, and tons of room for a bold idea. Here are my favorite skateboard painting ideas, starting with the classic crowd-pleasers and sliding into the weirder, artsy experiments once you’re warmed up.
Bold Checkerboard With a Pop Color Twist
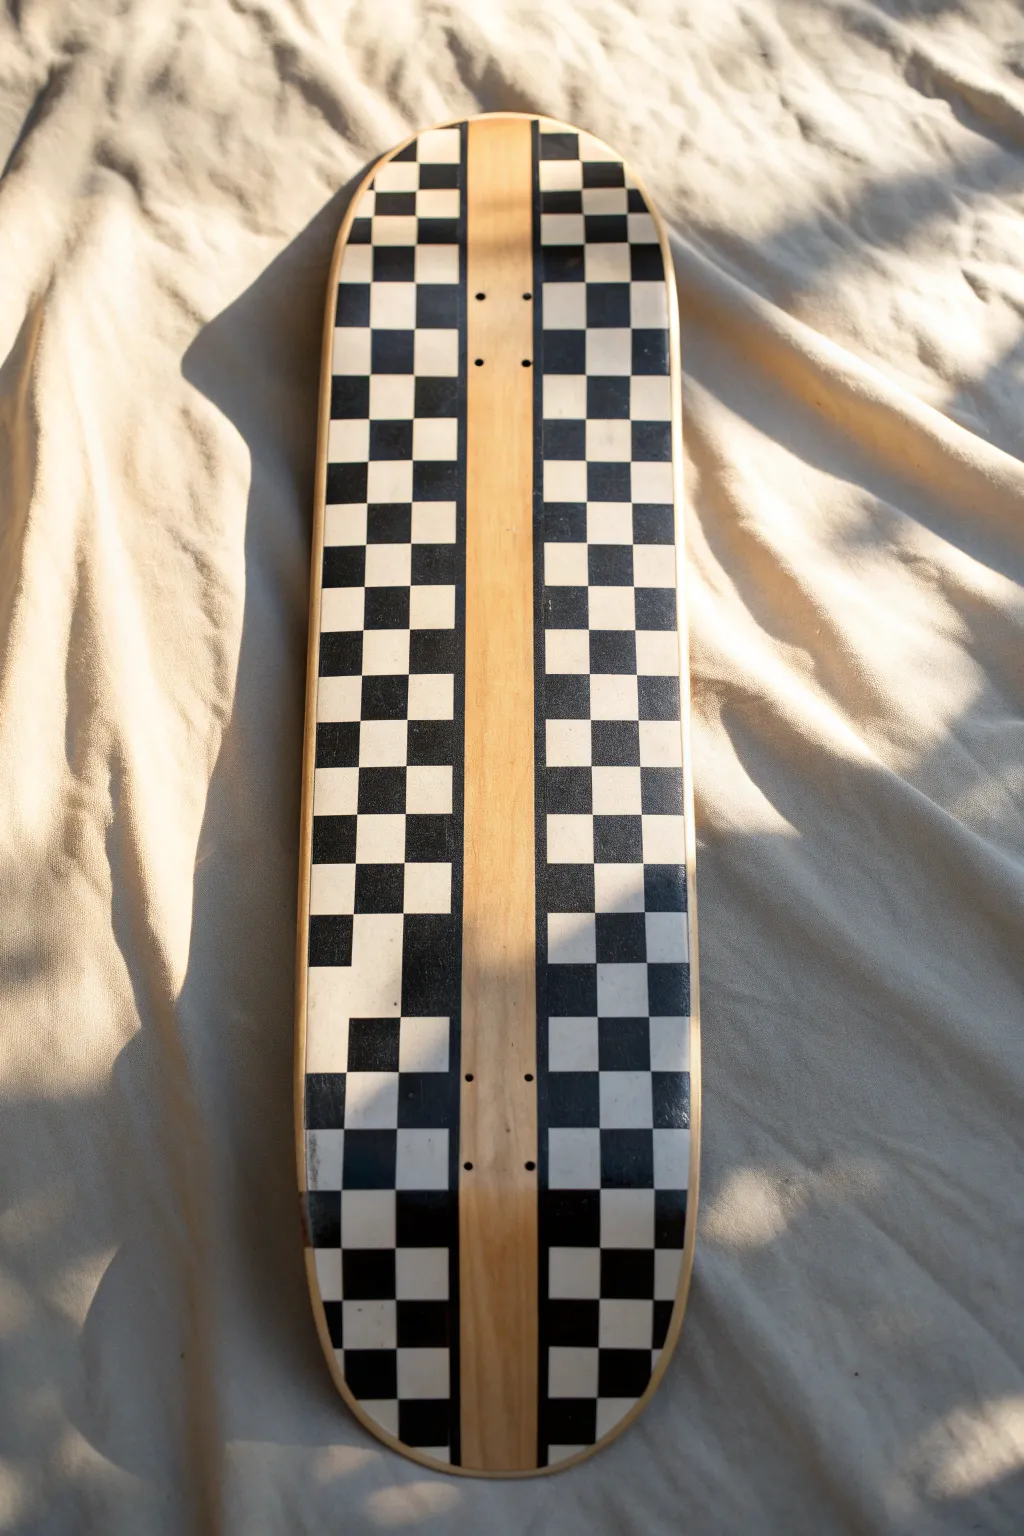
Give your skateboard a classic, ska-inspired makeover with this sharp checkerboard design. By leaving a bold stripe of natural wood down the center, you create a striking contrast that keeps the board looking customized yet professional.
Detailed Instructions
Materials
- Blank wooden skateboard deck
- Fine-grit sandpaper (220-grit)
- Painter’s tape (1-inch width works best)
- Ruler or tape measure
- Pencil
- X-Acto knife or sharp craft blade
- White acrylic paint or spray paint (matte)
- Black acrylic paint or spray paint (matte)
- Clear coat sealant (spray lacquer or polyurethane)
- Paint brushes (flat, small and medium) if using liquid paint
- Damp cloth
- Cutting mat (optional)
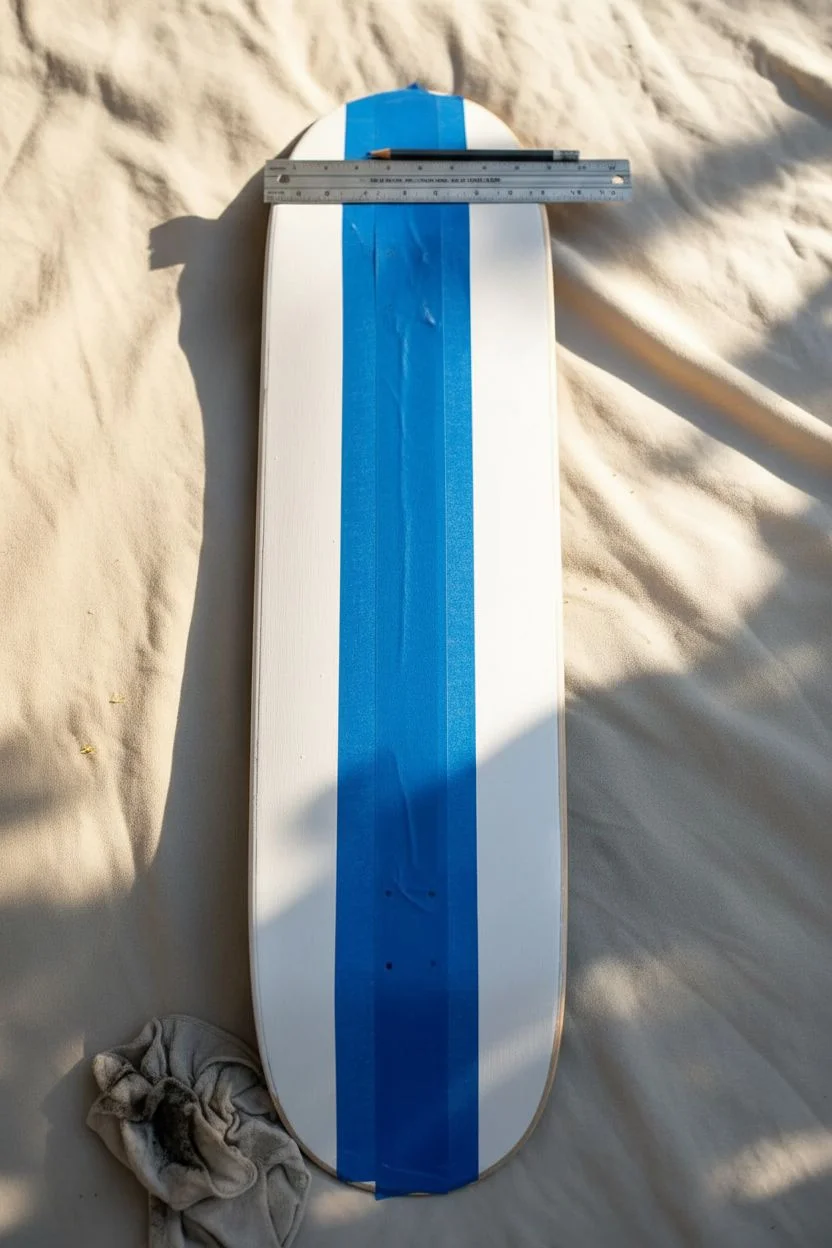
Step 1: Preparation and Center Masking
-
Sand the surface:
Start by lightly sanding the entire bottom of the deck with 220-grit sandpaper. You just want to scuff the factory seal slightly so the paint adheres better, not strip it completely. -
Clean the dust:
Wipe the board down thoroughly with a damp cloth to remove all sawdust. Let it dry completely before moving to the tape. -
Mark the center:
Measure the width of your board at the trucks and the waist. Mark the exact center line lightly with a pencil at the top, middle, and bottom. -
Define the wood stripe:
Decide how wide you want your natural wood stripe to be—about 2 to 3 inches looks balanced. Measure out from your center line to mark the left and right boundaries of this stripe. -
Mask the center:
Apply long strips of painter’s tape to cover the entire center section you just marked. This area will remain unpainted. -
Seal the tape edges:
Press down firmly along the edges of the tape with your fingernail or a credit card. This prevents paint from bleeding under the tape and ruining your crisp lines.
Bleed Prevention
Before painting the black layer, paint a thin layer of WHITE over your tape edges. This seals the tape, meaning any bleed is white-on-white and invisible!
Step 2: Painting the Checkerboard
-
Apply the white base:
Paint the exposed sides of the board (left and right of the taped center) with white paint. If using spray paint, do light, even coats. If brushing, use smooth strokes. -
Layer for opacity:
Let the first coat dry, then apply a second or third coat until the wood grain is completely hidden and the white is solid. Allow this base layer to cure fully—I recommend waiting overnight or at least several hours so tape won’t peel it up later. -
Grid the sides:
Once the white paint is bone dry, use your ruler and pencil to lightly draw a grid on the white sections. You’ll want 2 or 3 columns of squares per side. -
Mark the horizontal lines:
Make sure your horizontal grid lines are perpendicular to the center stripe so the checkers look straight, even if the board curves. -
Mask the white squares:
Now, carefully place squares of painter’s tape over the spots that need to remain white. This is the checkerboard pattern essentially in reverse. -
Cut precise squares:
It helps to lay a strip of tape on a cutting mat, cut it into perfect squares with your X-Acto knife, and then transfer those tape squares onto the board. -
Apply black paint:
Paint over the exposed white grid areas with black paint. Again, use light coats to avoid buildup near the tape edges. -
Let it dry:
Wait until the black paint is tacky but not fully hardened before starting the peeling process. If it’s too dry, it might chip; too wet, and it smears.
Step 3: Finishing Touches
-
The big reveal:
Slowly peel off the small checkerboard tape squares first. Pull the tape away at a 45-degree angle. -
Remove the center strip:
Next, gently remove the long strip of tape covering the natural wood center. Reveal that beautiful contrast between the clean maple and the graphic print. -
Tidy up:
If there was any minor bleed-under, lightly scratch it away with your craft knife or touch it up with a tiny bit of paint on a fine brush. -
Seal the deal:
Apply a clear coat sealant over the entire bottom of the deck. This protects your hard work from scratches and moisture. -
Final cure:
Let the clear coat cure for at least 24 hours before setting up your trucks and wheels.
Peeling Paint?
If paint lifts when removing tape, your base layer wasn’t dry enough or you pulled too fast. Scuff the spot with fine grit sandpaper and carefully touch up with a small brush.
Now you have a custom deck that looks as good on the wall as it does at the skatepark.


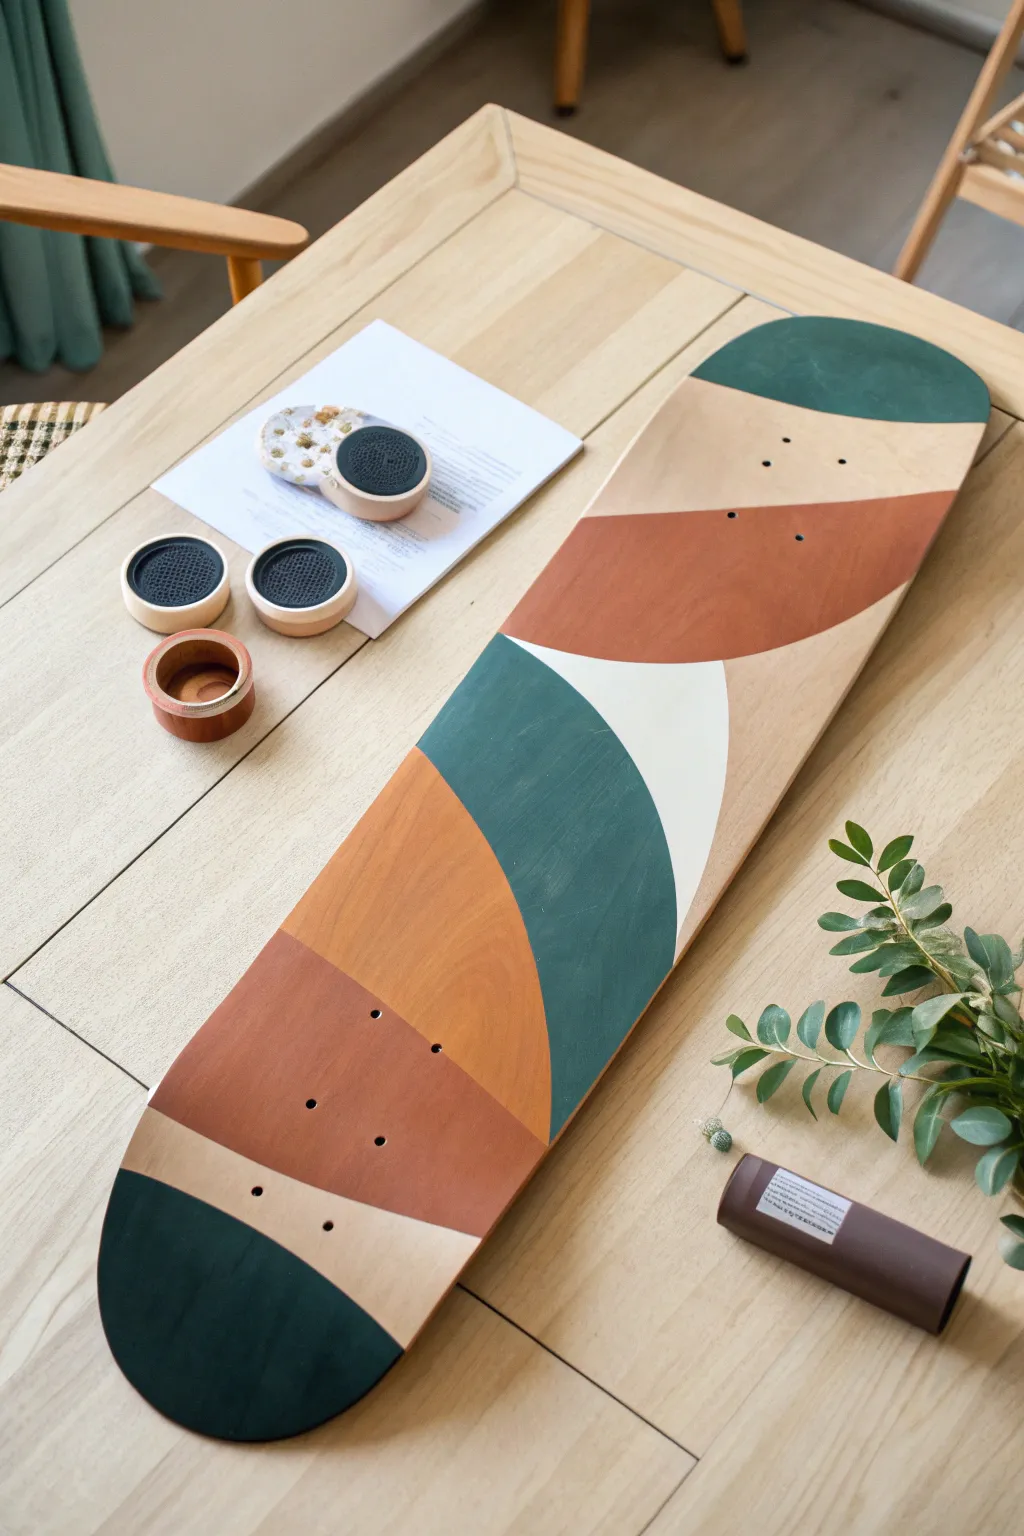
All-Over Psychedelic Swirls and Melting Lines
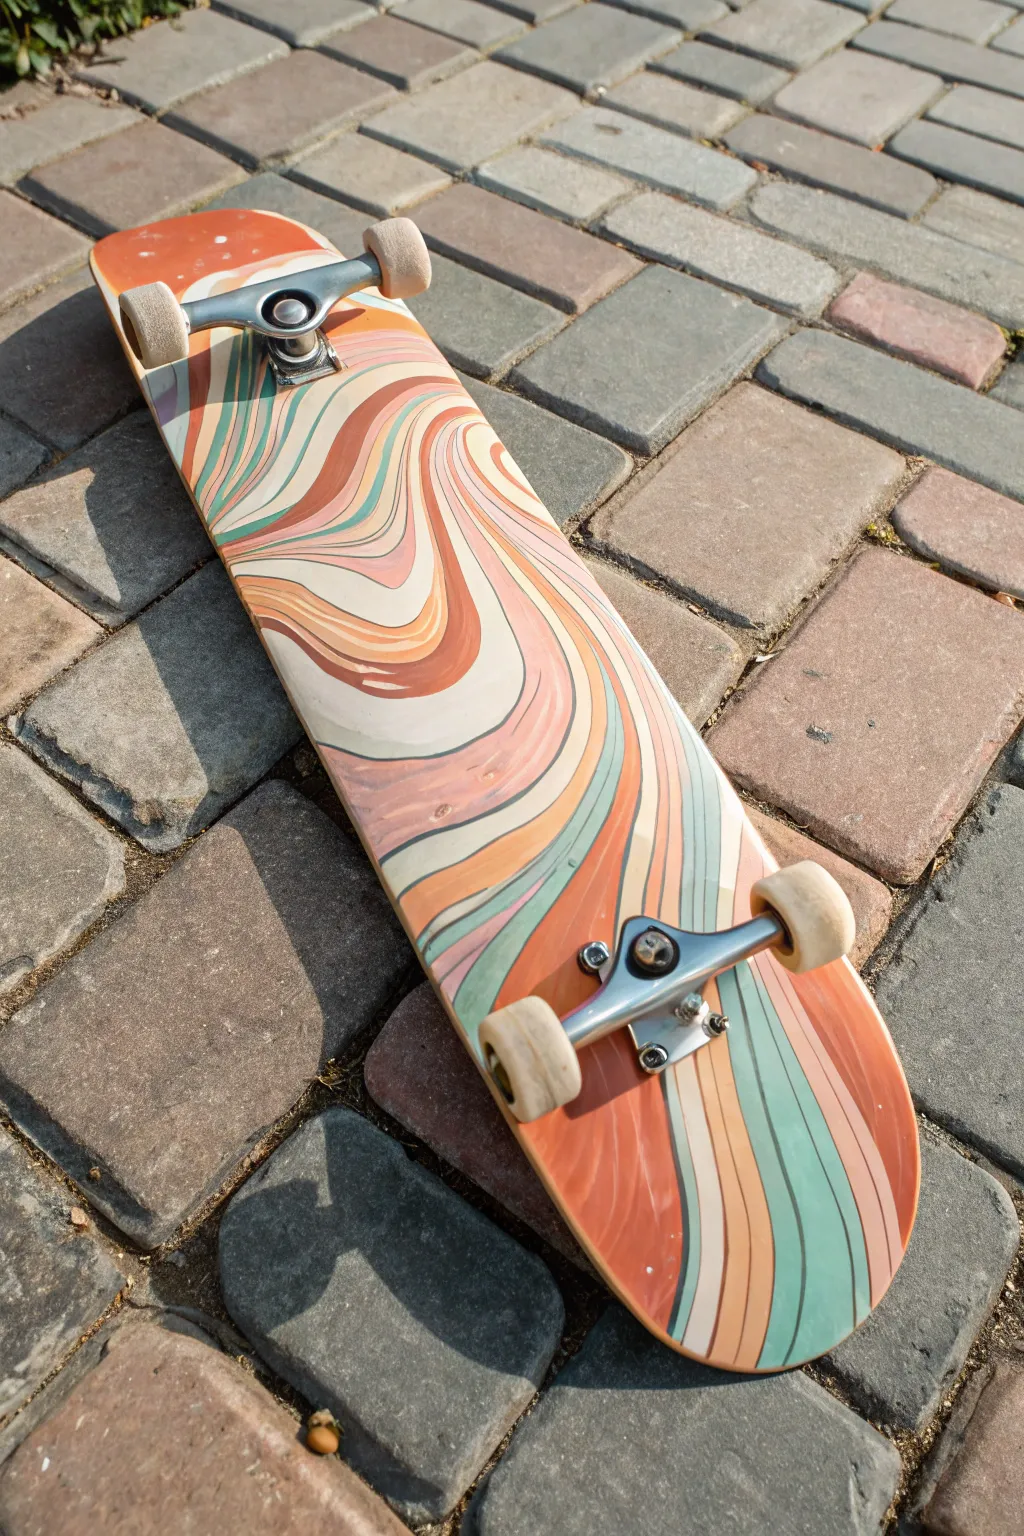
Transform a plain deck into a retro masterpiece with these flowing, psychedelic lines. This design uses a muted, vintage-inspired palette of greens, creams, corals, and rusty browns to create a mesmerizing visual rhythm that looks great cruising or hanging on a wall.
Step-by-Step Guide
Materials
- Blank skateboard deck (or an old one, sanded down)
- Sandpaper (medium and fine grit)
- Painter’s tape or masking tape
- Acrylic paints (Cream, Teal/Sage Green, Coral/Peach, Rust Orange, Burnt Sienna)
- Light pencil
- Various paintbrushes (Medium flat brush and fine detail brush)
- Clear spray sealant (matte or glossy)
- Skateboard hardware (trucks and wheels) for reassembly
- Screwdriver and skate tool
Step 1: Preparation & Base Coat
-
Disassemble the board:
Before you can unleash your creativity, you need a blank canvas. Remove the trucks and wheels using your skate tool and screwdriver. Keep all the hardware in a safe bowl or baggie so nothing rolls away. -
Sand the surface:
If you are repurposing an old deck, you need to remove the glossy finish. Use medium-grit sandpaper to scuff up the entire bottom surface. Even if it’s new, a light sanding helps the paint adhere better. -
Clean the dust:
Wipe the board down thoroughly with a damp cloth or tack cloth to remove every speck of sanding dust. Let it dry completely. -
Apply the base color:
Paint the entire bottom of the deck with your lightest cream color. This will act as the background for your swirls. -
Dry and repeat:
Let the first coat dry fully. If the wood grain is still showing through, apply a second coat of cream until you have a solid, opaque surface.
Smoother Swirls
To get super clean lines without a shaky hand, slightly water down your paint. Fluid paint flows off the brush easier, making long curves seamless.
Step 2: Drafting the Design
-
Sketch the primary flow:
Using a light pencil, draw a large, wavy line that runs diagonally from one end of the board to the other. This will be the spine of your design. -
Add echo lines:
Sketch parallel lines that follow the curves of your first line. Vary the width slightly—some sections can be wider and others narrower to create that melting, organic look. -
Create distinct zones:
Introduce a few diverging swirls. For example, near the nose (front) of the board, let the lines fan out into a wider curve rather than just running straight off the edge. -
Check density:
Step back and look at your pencil marks. Ensure you have about 10-15 distinct stripes sketched out to accommodate your five-color palette without it looking too crowded.
Step 3: Painting the Swirls
-
Start with the darkest tones:
I prefer to tackle the boldest colors first. Load a medium flat brush with your Rust Orange or Burnt Sienna and paint the designated stripes. Use the flat edge to keep your lines relatively crisp. -
Move to the greens:
Switch to your Teal or Sage Green paint. Identifying the stripes adjacent to the orange, carefully fill them in. Try to maintain a steady hand for smooth curves. -
Fill in the corals:
Apply the Coral/Peach tones to the remaining empty stripes. These lighter, warm tones bridge the gap between the dark rust and cool green. -
Refine the edges:
Once the main blocks of color are dry to the touch, use a fine detail brush and your Cream paint to clean up any messy borders where colors might have accidentally touched. -
Add separation lines (optional):
For a crisper look, you can paint very thin lines of Cream between each colored stripe if you want them to feel more distinct from one another. -
Let it cure:
Allow the entire painting to dry for at least 24 hours. Acrylic needs time to harden properly before sealing.
Grip Tape Art
Don’t stop at the bottom! Use paint markers to draw a single matching swirl line on the top grip tape to tie the whole design together.
Step 4: Finishing Touches
-
Apply the sealant:
Take your board to a well-ventilated area. Apply a thin, even coat of clear spray sealant. A matte finish looks very authentic for this retro style, but gloss is durale too. -
Sand lightly between coats:
If you want a truly professional smooth finish, very lightly sand the sealant with fine-grit paper once dry, then wipe clean. -
Final seal:
Apply a second or third coat of sealant to ensure the artwork is protected against pavement scrapes and moisture. -
Reassemble:
Once the sealant is fully cured (check the can for cure times), bolt your trucks and wheels back onto the deck.
Now you have a rolling piece of art that channels the best laid-back vibes of the 1970s.


Ocean Wave Scene That Uses the Deck’s Curves
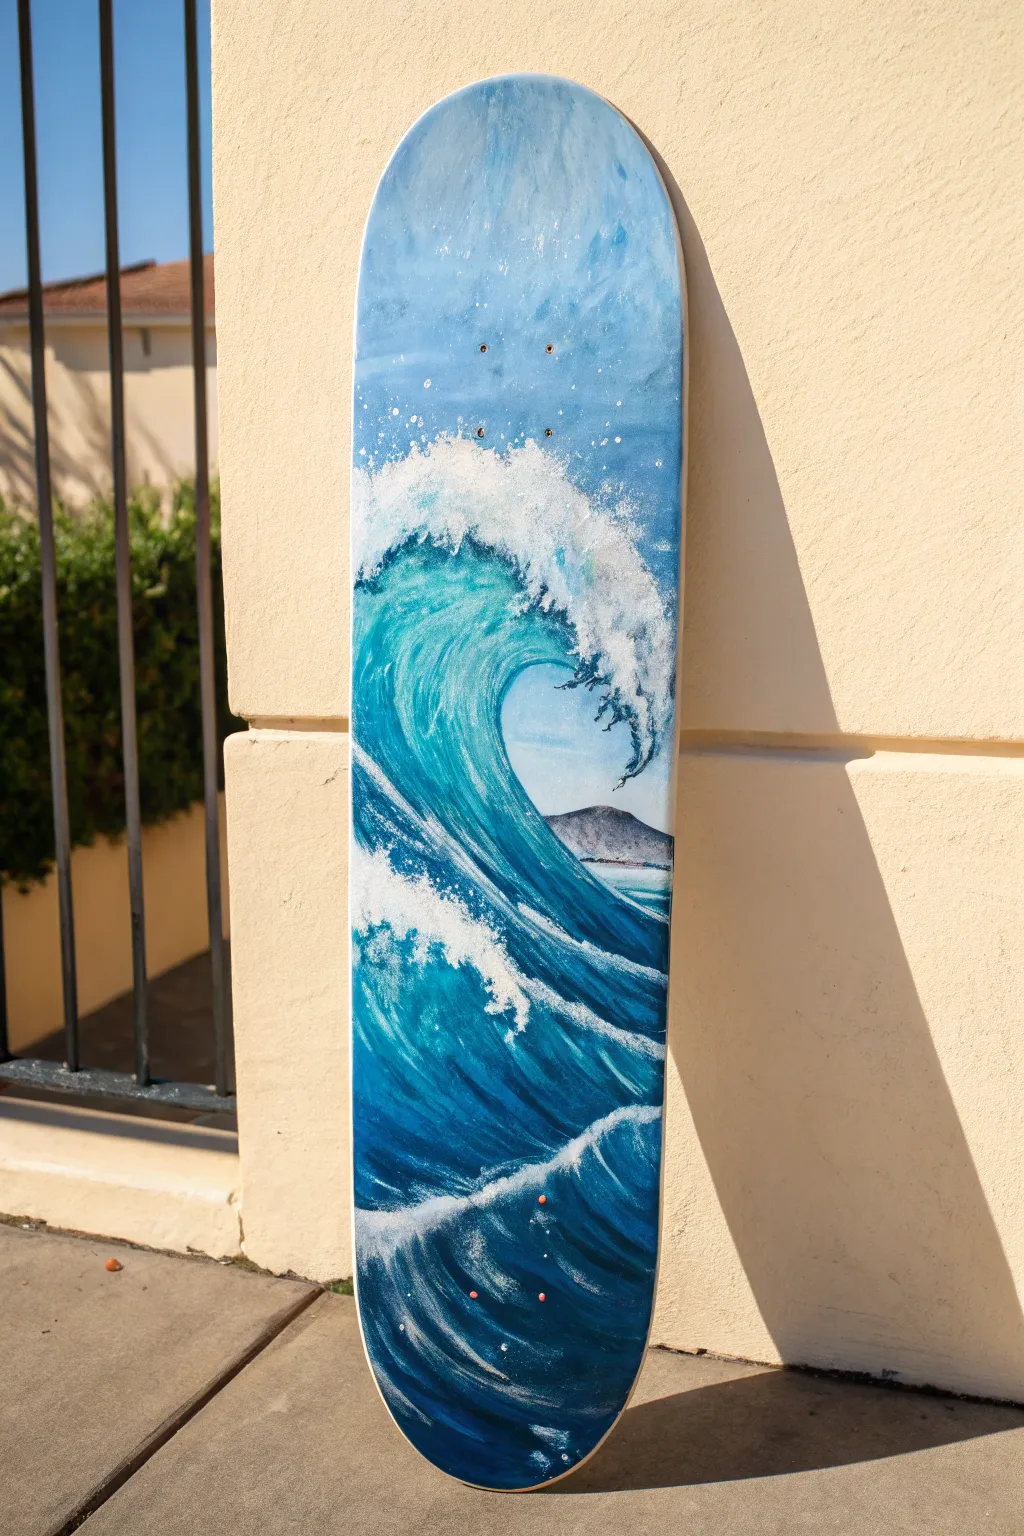
Transform a plain skateboard deck into a dynamic seascape with this realistic wave painting tutorial. The natural vertical shape of the board perfectly frames a towering, curling wave that seems ready to crash right off the wood.
How-To Guide
Materials
- Blank wooden skateboard deck (sanded and primed)
- Acrylic paints (Phthalo Blue, Ultramarine Blue, Turquoise, Titanium White, Burnt Umber, Yellow Ochre)
- Gesso primer
- Wide flat brush (for background)
- Medium filbert brush (for wave body)
- Small round detail brush (for foam)
- Old toothbrush (optional for spray)
- Masking tape
- Palette and water cup
- Clear acrylic varnish spray (gloss finish)
Step 1: Preparation and Sky Base
-
Prime the deck:
Ensure your deck is clean and sanded. Apply two even coats of white gesso to creating a gripping surface for your paint. Let it dry completely between coats. -
Map the horizon:
Lightly sketch a horizon line about one-third of the way up from the bottom tail. Sketch the large C-shape curve of the wave dominating the center of the board. -
Paint the sky gradient:
Mix a very light blue using Titanium White and a tiny dot of Phthalo Blue. Start painting from the top nose of the board, gradually adding more white as you move down toward the horizon line to create an atmospheric fade.
Step 2: Building the Wave Form
-
Block in the deep water:
At the very bottom of the board, use a mix of Ultramarine Blue and a touch of Phthalo Blue to create the darkest, deepest part of the ocean. Paint upward using broad, sweeping strokes that follow the curve of the water. -
Establish the wave face:
For the translucent face of the wave where the light hits, mix Turquoise with a little Titanium White. Paint the inner curve of the wave, blending it slightly into the darker blue below but keeping the color vibrant and teal-like. -
Add the shadow detail:
Under the curling lip of the wave, paint a dark shadow using deep navy. This contrast is crucial for giving the wave its 3D ‘barrel’ shape. -
Paint the distant land:
On the horizon line to the right of the wave, paint a small, hilly landmass. Use a mix of Burnt Umber, White, and a tiny bit of blue to push it into the distance. It should look hazy, not sharp.
Wave Looking Flat?
Deepen your shadows under the wave’s curl. High contrast between the dark navy shadow and the bright white foam is the secret to 3D volume.
Step 3: Creating Texture and Foam
-
Start the main crest:
Load a medium brush with pure Titanium White. Stipple (dab repeatedly) the paint along the top edge of the wave to create the exploding crest. -
Drag the foam down:
Dry brush some of that white paint downward from the crest onto the face of the wave. Follow the curve of the water to simulate gravity pulling the foam down the face. -
Create surface foam trails:
In the dark blue water at the bottom, use a thin round brush to paint webbing patterns of sea foam. These should look like stretched diamonds or warped ovals that follow the water’s flow. -
Refine the whitewash:
Add a second layer of thick white specifically on the brightest parts of the crashing lip where the water is most turbulent. This creates actual physical texture on the board. -
Add spray and mist:
Dip an old toothbrush in watered-down white paint. Use your thumb to flick the bristles, spraying a fine mist over the crest of the wave and the sky area behind it to mimic sea spray.
Pro Tip: Translucency
Glaze a thin layer of yellow ochre mixed with glazing medium over the teal part of the wave to simulate sunlight shining through the water.
Step 4: Final Touches and Sealing
-
Enhance highlights:
Mix a very pale teal (almost white) and add subtle highlights to the middle of the wave face to make the water look glassy and wet. -
Check the truck holes:
If paint has clogged the mounting holes for the trucks, gently clear them out with a toothpick or small drill bit while the paint is still slightly workable. -
Let it cure:
Allow the painting to dry for at least 24 hours. Acrylic needs to be completely moisture-free before sealing. -
Varnish the deck:
Apply 2-3 coats of gloss acrylic spray varnish. This protects your artwork from scratches and gives the water a permanent ‘wet’ look.
Hang your new masterpiece on the wall or assemble your trucks to ride the wave on your next skate session


Sunset Palm Trees With a Soft Gradient Sky
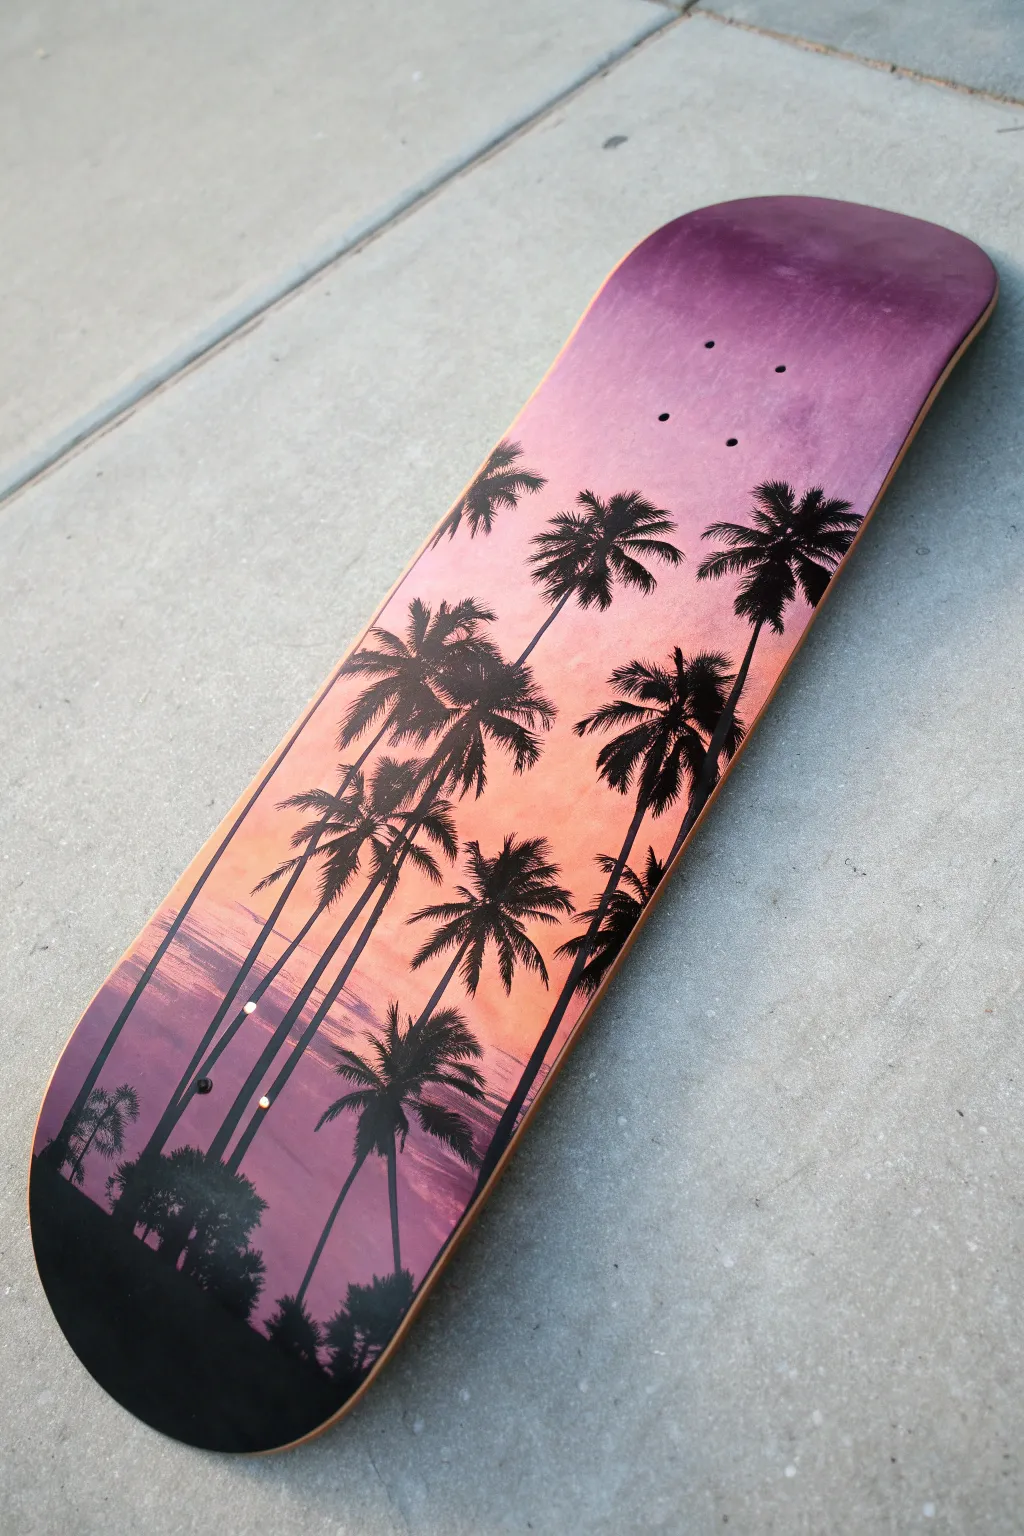
Transform a plain skateboard deck into a slice of coastal paradise with this gradient sunset design. The soft blend of purples and peaches creates the perfect backdrop for stark, clean palm tree silhouettes, capturing the vibe of an endless summer evening.
Step-by-Step
Materials
- Blank wooden skateboard deck (natural or primed)
- Fine-grit sandpaper (220-grit)
- White acrylic gesso or primer
- Acrylic paints: Deep Violet, Magenta, Peach/Coral, and Carbon Black
- Painter’s tape
- Synthetic sponges (for blending)
- Wide flat brush (approx. 2 inch)
- Medium round brush (size 6 or 8)
- Fine liner brush (size 0 or 1)
- Clear spray sealant (matte or gloss)
- Pencil (optional)
Step 1: Preparation & Base Coat
-
Surface Prep:
Begin by removing any plastic packaging or stickers from your deck. Lightly sand the entire top surface with 220-grit sandpaper to create a ‘tooth’ for the paint to grip. -
Masking Off:
If you want to keep the rails or the bottom of the board clean, carefully apply painter’s tape along the edges. Run a fingernail firmly along the tape edge to prevent paint bleed. -
Priming:
Apply an even coat of white acrylic gesso or primer using your wide flat brush. This white base is crucial because it makes the sunset colors pop much more vibrantly than painting directly on wood. -
Drying Time:
Allow the primer to dry completely. If it feels rough after drying, give it another very light pass with the sandpaper and wipe away the dust.
Step 2: Creating the Sunset Gradient
-
Top Section:
Squeeze out your Deep Violet paint. Using a sponge or the wide brush, cover the nose (top part) of the deck, fading it out as you reach the area just above the front truck holes. -
Middle Transitions:
While the violet is still slightly wet, introduce the Magenta paint right below it. Blend the two where they meet to create a smooth transition. -
The Golden Hour:
Apply the Peach/Coral shade in the center of the board. Blend it upwards into the Magenta. I find that using a damp sponge and a dabbing motion creates a smoother, cloud-like transition than brushing. -
Bottom Gradient:
Mirror the top by reversing the colors as you move down the tail. Blend from the Peach back into Magenta, and finally into a deep purplish-black at the very bottom tail. -
Refining the Blend:
Look at your gradient as a whole. If any lines look too harsh, take a clean, slightly damp sponge and gently tap over the transition lines to soften them. -
Full Cure:
Let this background gradient dry completely before moving on. It needs to be dry to the touch so your hand doesn’t smudge it while painting trees.
Gradient Master Tip
Keep a spray bottle of water nearby. misting your paints very lightly while blending keeps acrylics open longer, allowing for that seamless, airbrushed look without harsh lines.
Step 3: Painting the Silhouettes
-
Ground Level:
On the bottom tail where the sky is darkest, paint an uneven, solid black horizon line to represent the ground. Add some low, bushy shapes to suggest shrubs. -
Tree Trunks:
Using your medium round brush and Carbon Black paint, draw long, slender lines for the palm trunks. Curve them slightly; real palm trees are rarely perfectly straight. -
Varying Heights:
Make sure your trunks vary in height and thickness. Place some taller ones reaching near the nose and some shorter ones lower down for perspective. -
Frond Structure:
Switch to your fine liner brush. At the top of each trunk, paint 5 to 7 curved lines radiating outward like a firework to serve as the main spine of the palm leaves. -
Leaf Details:
Along each curved spine, make quick, short flicking brushstrokes to create the individual leaflets. Let the ends feather out to look natural. -
Layering Foliage:
Don’t be afraid to overlap the trees. Painting a tree in front of another creates depth. Just ensure distinct separation between the fronds so it doesn’t become a black blob. -
Final Retouches:
Check the opacity of your black paint. If the sunset shows through the trees, carefully apply a second coat of black over the silhouettes once the first layer is dry.
Shaky Hands?
If you struggle painting thin straight lines for the trunks, use a strip of painter’s tape as a guide, or lightly sketch the line with a soft pencil first before committing with paint.
Step 4: Finishing Up
-
Remove Tape:
Slowly peel off your painter’s tape at a 45-degree angle. Doing this while the paint is fully dry ensures a crisp, clean edge. -
Sealant Application:
Take the board to a well-ventilated area. Apply 2-3 light coats of clear spray sealant to protect your artwork from scratches and UV fading. -
Hardware Montage:
If you plan to ride the board, poke through the truck holes with a screwdriver or awl to clear any paint that may have clogged them.
Mount your trucks or hang it on the wall to enjoy those sunset vibes all year round
BRUSH GUIDE
The Right Brush for Every Stroke
From clean lines to bold texture — master brush choice, stroke control, and essential techniques.
Explore the Full Guide
Bright Cityscape Packed From Top to Bottom
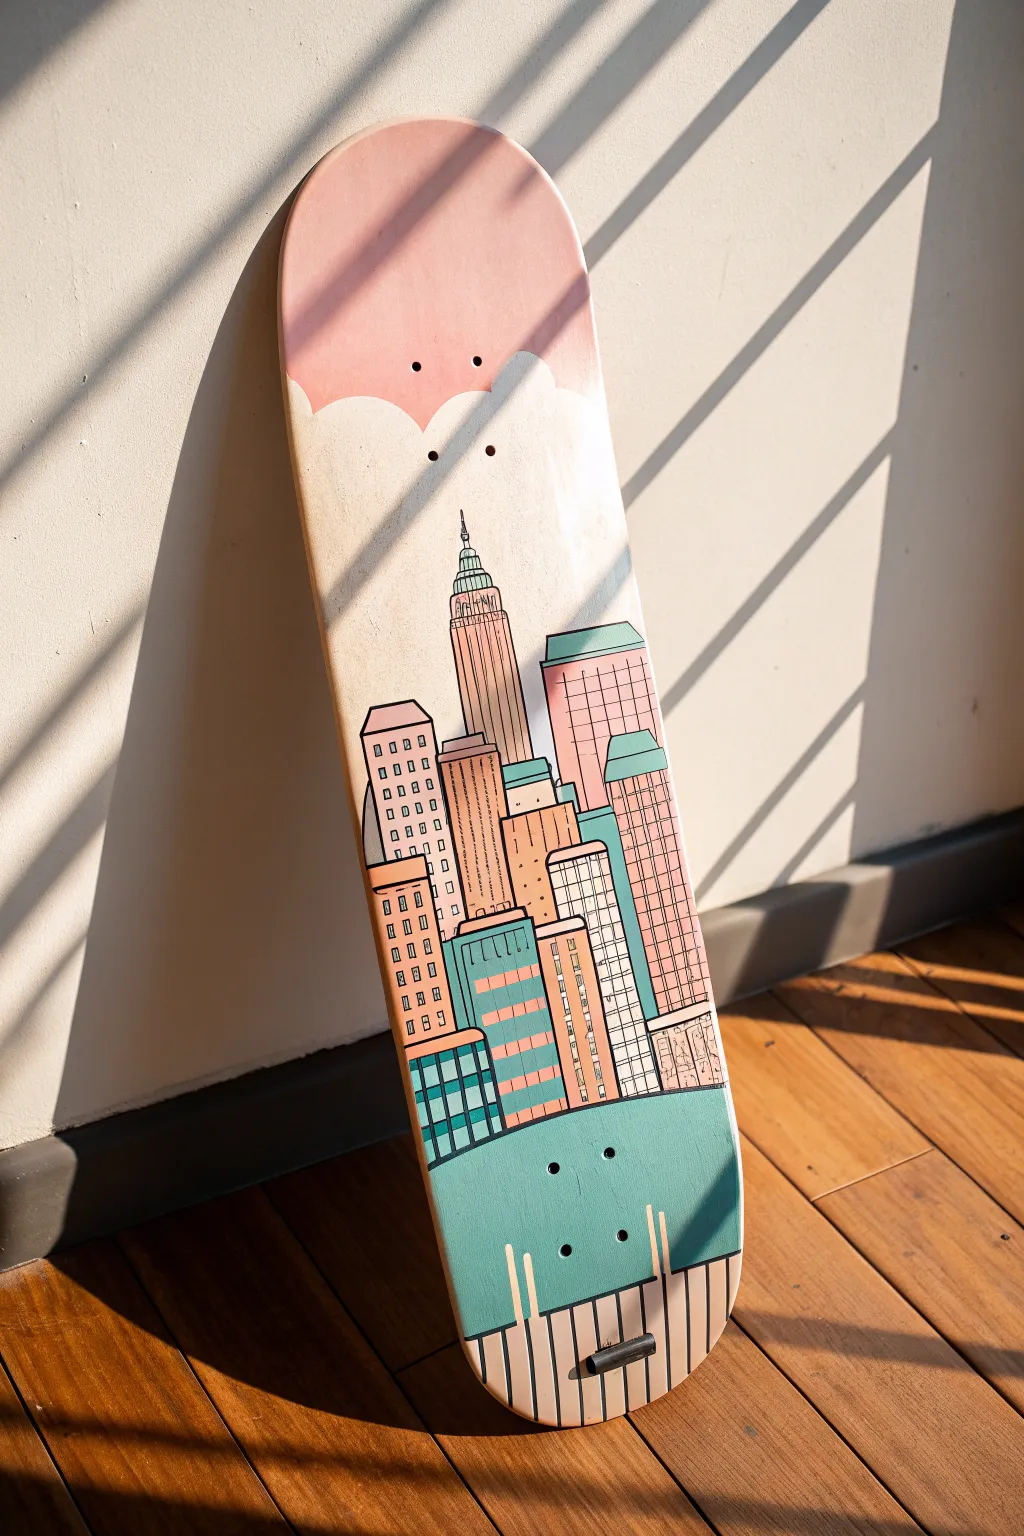
Transform a plain wooden deck into a dreamy urban panorama with this illustrative painting project. The design uses soft pinks, minty teals, and the natural wood grain to create a warm, nostalgic cityscape that looks great hanging on a wall or hitting the streets.
Detailed Instructions
Materials
- Blank wooden skateboard deck (natural finish)
- Sandpaper (fine grit, 220-320)
- Acrylic paints (Soft Pink, Mint Green, Teal, White, Burnt Sienna, Black)
- Black paint marker (fine tip) or liner brush
- Painter’s tape or masking tape
- Pencil and eraser
- Ruler
- Flat shader brushes (various sizes)
- Round detail brushes
- Clear acrylic spray sealer (matte or satin finish)
Step 1: Preparation and Sky Layer
-
Prep the surface:
Begin by lightly sanding the entire face of the skateboard deck. You want to remove any factory gloss or rough spots without sanding away the beautiful wood grain texture, which is a key part of this design’s aesthetic. Wipe away all dust with a damp cloth. -
Protect the hardware holes:
If you want to keep the mounting holes perfectly clean, place small pieces of tape on the underside, or just paint carefully around them. This design incorporates them naturally, but it helps to be aware of their placement. -
Tape the horizon line:
Decide where your sky ends and the buildings begin. This design has a large sky section at the nose. You won’t need a hard tape line for the clouds, but you might want to mark the general top area. -
Paint the pink sky:
Mix a soft, warm pink using acrylics. Paint the top rounded nose of the board, bringing the color down about one-third of the way. Don’t worry about a straight bottom edge here; we will add clouds later. -
Create the cloud layer:
Mix a very pale cream or off-white. Using a round brush, paint scalloped, fluffy cloud shapes overlapping the bottom edge of your pink sky. This transition helps blend the painted sky into the unpainted wood section below.
Clean Lines
If your paint marker skips over the wood grain, lightly sand the painted area with fine paper before drawing your final outlines.
Step 2: Drafting the Cityscape
-
Sketch the skyline:
Once the sky is fully dry, use a pencil to lightly sketch your buildings. Start with a central focal point like the tall skyscraper shown here. Let the buildings overlap and vary in height. -
Draw foreground elements:
Sketch a lower tier of buildings in the foreground. At the very bottom tail of the board, mark out a distinct horizontal block that will serve as the ground or water level. -
Add architectural details:
Lightly rule in the vertical lines for windows and the horizontal lines for floors. Sketch the striped pattern for the bottom tail section now so you don’t forget it.
Step 3: Painting the Architecture
-
Block in building colors:
Select your pastel palette: mint green, soft peach, terra cotta, and light teal. Begin filling in the shapes of the buildings. Leave some buildings unpainted (raw wood) to maintain that organic look. -
Paint the bottom section:
Fill the large block at the tail of the board with a solid teal or mint color. Let this base coat dry completely before adding any details on top. -
Add detail color:
Go back into your painted buildings and add secondary colors—like teal roofs on pink buildings or darker peach accents on the central tower. -
Create the bottom stripes:
At the very bottom tip of the board (below the large teal block), paint vertical off-white stripes or leave the wood natural, creating a boardwalk effect.
Transparency Trick
Mix a tiny drop of water into your acrylics for the buildings. This creates a semi-transparent wash that lets the wood grain show through.
Step 4: Line Work and Finishing
-
Outline the structures:
This is the most critical step for the illustrative style. Using a fine-tip black paint marker (or a liner brush with thinned black paint), carefully outline every building, roof, and the main cloud shapes. -
Draw windows and textures:
Use the marker to draw the grid of windows on the buildings. Add vertical lines on the tall central tower to emphasize its height. Vary your stroke weight—thicker for outlines, thinner for interior windows. -
Detail the nose and tail:
Add vertical lines to the bottom ‘boardwalk’ section. Ensure the transition between the pink sky and the clouds has a clean black outline to make it pop. -
Let the ink cure:
Give the paint marker plenty of time to dry. If you seal it too soon, the ink might smear. I usually wait at least an hour or use a hairdryer on a cool setting. -
Seal the deck:
Finish by applying 2-3 coats of clear acrylic spray sealer. A matte finish looks best with this illustration style. Spray in light, even coats to avoid drips.
Mount your trucks or hang it up to admire your colorful urban masterpiece.
Big Central Character With Background Patterning
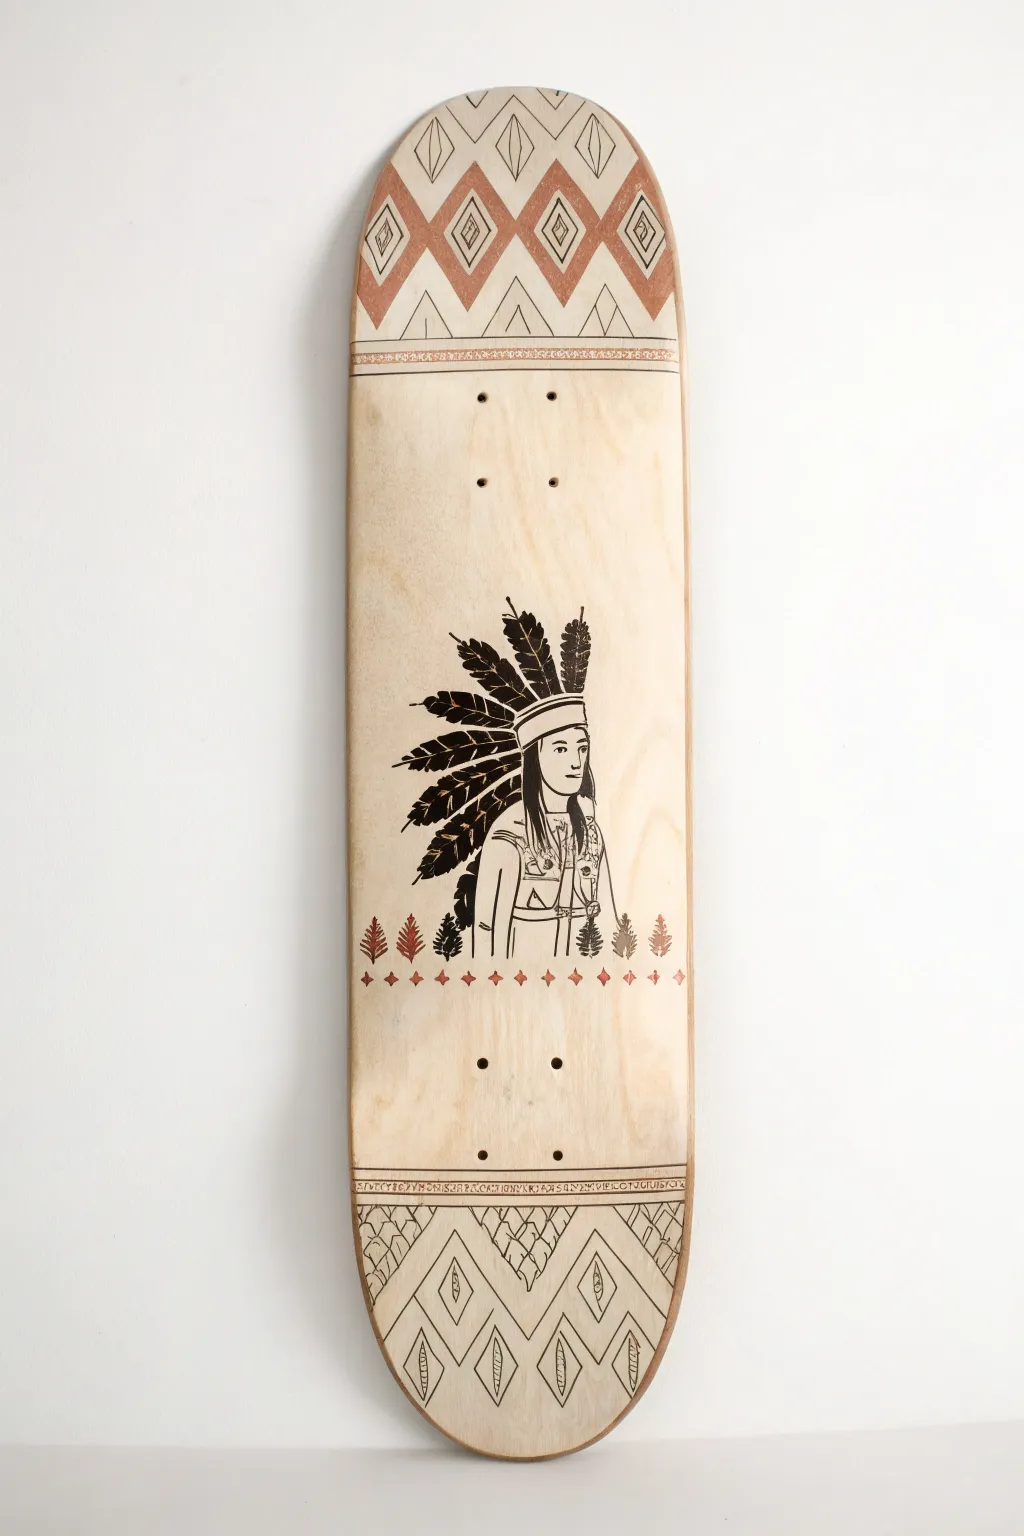
This project combines the rustic charm of pyrography with precise geometric design to create a striking centerpiece for your wall or wheels. Using a raw maple deck as your canvas, you’ll burn intricate details of a Native American chief and frame him with classic diamond patterns.
How-To Guide
Materials
- Unfinished maple skateboard deck (blank)
- Sandpaper (220 and 400 grit)
- Pencil (HB or lighter)
- Eraser
- Ruler or straight edge
- Protractor (optional for angles)
- Wood burning tool (pyrography pen) with universal and shading tips
- Carbon transfer paper
- Masking tape
- White acrylic paint or paint pen (optional highlights)
- Terracotta or reddish-brown wood stain (for top pattern)
- Small detail paintbrush
- Clear spray sealant (matte or satin)
Step 1: Preparation and Layout
-
Prepare the canvas:
Begin by sanding the entire raw wood deck with 220 grit sandpaper to remove any manufacturing rough spots. Wipe away all dust with a tack cloth or slightly damp rag. A smooth surface is crucial for the burning tip to glide easily. -
Mark the center lines:
Using your ruler and pencil, lightly mark a vertical manufacturing line down the clearer center of the board. This will help align the figure and the geometric patterns symmetrically. -
Design the top border:
Measure about 4-5 inches down from the nose. Draw a horizontal band. Inside this area, sketch a repeating diamond pattern. Use the ruler to ensure the angles are consistent. -
Design the bottom border:
Repeat the process on the tail, measuring a similar distance up. Sketch a zigzag or chevron pattern here to mirror the geometric feel of the top without copying it exactly.
Clean Lines Hack
If your wood grain is catching the pen tip, try using a spoon shader tip instead of a sharp point. It glides over grain variations much smoother.
Step 2: Drawing the Central Character
-
Draft the figure:
In the middle of the board, sketch the outline of the chief. You can draw this freehand if you are comfortable, or print a reference image to size and use carbon paper to transfer the main contour lines onto the wood. -
Refine the headdress:
Pay special attention to the feathers. Sketch individual feathers fanning out backwards, ensuring they follow a natural curve. Add the headband detail across the forehead. -
Add facial details:
Lightly pencil in the facial features. Keep the lines simple and clean; wood burning works best with defined, high-contrast lines rather than subtle shading. -
Include decorative elements:
Draw the small pine tree motifs near the bottom of the figure’s clothing and the small row of diamonds underneath the main illustration.
Mistake Fixer
Burn line went rogue? Don’t panic. Let it cool, then gently scrape the error away with a sharp X-Acto knife or sand it down with 400 grit paper.
Step 3: The Burning Process
-
Outline the main figure:
Heat your wood burning tool to a medium-high setting. Using a universal or fine point tip, carefully burn the outline of the face, hair, and clothing. Pull the pen towards you for smoother lines. -
Burn the headdress:
Switch to a shading tip or turn up the heat slightly to fill in the dark sections of the feathers. Create texture by using quick, repetitive strokes to mimic the barbs of the feathers. -
Pattern work:
Move to the top and bottom geometric borders. Burn the outlines of the diamonds and zigzags. Use a ruler as a guide for your pen tip if you have a steady hand, or just go slow freehand for a more organic look. -
Add texture to the borders:
Inside the bottom geometric section, add small hatch marks or stippling to give the triangles depth and interest.
Step 4: Color and Finishing
-
Apply stain accents:
Dip a small detail brush into the terracotta or reddish-brown wood stain. Carefully fill in specific diamonds in the top border pattern to create the two-tone argyle effect shown. -
Add red details:
Use a tiny amount of the stain or a dark red paint to fill in the small pine tree shapes and the diamond row beneath the central figure. -
Clean up sketch lines:
Once the board is completely cool and the stain is dry, use a soft eraser to remove any visible graphite lines from your initial sketch. -
Seal the artwork:
Take the board to a well-ventilated area. Apply 2-3 light coats of clear matte spray sealant. I prefer to let each coat dry for about 20 minutes before applying the next to avoid drips.
Mount your trucks or hang it on the wall to display your hand-etched masterpiece

PENCIL GUIDE
Understanding Pencil Grades from H to B
From first sketch to finished drawing — learn pencil grades, line control, and shading techniques.
Explore the Full Guide
Pet Parade: Repeating Cats and Dogs in Graphic Shapes


Transform a plain skateboard deck into a stylish piece of wall art or a rideable masterpiece with this repeating graphic print. Featuring abstract cat faces and geometric textures, this design uses a vintage color palette to create a playful yet sophisticated look.
Step-by-Step
Materials
- Blank wooden skateboard deck
- Sandpaper (medium grit and fine grit)
- White primer spray paint
- Acrylic paints (Teal, Rust Orange, Mustard Yellow, Black)
- Painters tape (various widths)
- Self-healing cutting mat
- X-Acto knife with fresh blades
- Clear matte sealant spray
- Pencil and ruler
- Small flat synthetic brushes
- Fine detail brush
Step 1: Prep and Prime
-
Sand the surface:
Begin by sanding the entire top surface of the skateboard deck. Even if it’s new, a quick sand with medium grit followed by fine grit ensures the primer adheres perfectly. Wipe away all dust with a damp cloth. -
Apply the base coat:
Spray the deck with an even coat of white primer. Move the can in sweeping motions past the edges to avoid drips. Let it dry completely, then add a second coat for a solid, opaque white background. -
Mark the grid:
Once the white base is cured (give it at least 24 hours just to be safe), use a pencil and a long ruler to lightly draw a vertical center line down the board. Then, mark horizontal guidelines every 3-4 inches to space out your rows of cats.
Step 2: Designing the Stencil
-
Draft the cat shape:
On a piece of cardstock or heavy paper, draw a simple geometric cat head—essentially a wide hexagon with two triangles at the top for ears. Keep it angular and stylized. -
Create the ‘collar’ shape:
Draft a trapezoid shape or a ‘V’ shape that sits directly below the cat head. This will become the textured collar or body section. Cut these shapes out to use as tracing templates. -
Trace the pattern:
Using your pencil grid as a guide, trace your templates onto the board. I like to alternate the angles slightly—ticking some heads left and others right—to give the pattern dynamic movement.
Bleeding Lines?
If paint bleeds under your tape, scrape it away gently with an X-Acto knife once dry, or use a white paint pen for crisp touch-ups.
Step 3: Painting the Solids
-
Block in the colors:
Start painting the solid cat heads first. Use your flat synthetic brush to fill in the shapes. Plan your color distribution so no two identical colors touch; alternate between black, rust orange, and teal. -
Paint the solid collars:
For the collars that will remain solid (like the mustard yellow ones in the middle), fill those in now. Keep your edges crisp. A second coat might be needed for the lighter colors like yellow or teal. -
Add the face details:
Once the head shapes are fully dry, paint three small white triangles on each face for the eyes and nose. The nose triangle points down, and the eye triangles point up or sideways for expression. -
Dot the eyes:
Use the very tip of a detail brush or a toothpick to add a tiny black pupil inside the white eye triangles. Varied placement of these dots gives each cat a unique personality.
Level Up: Gold Accents
Replace the mustard yellow paint with a metallic gold leaf or gold acrylic for the solid collars to add a shimmering, high-end finish.
Step 4: Adding Geometric Texture
-
Tape the grid pattern:
This step requires patience. For the textured collars (rust and teal), paint the base color first and let it dry. Then, use very thin strips of masking tape (or cut wider tape into strips) to create a diamond cross-hatch pattern over the shape. -
Reveal the white lines:
Actually, an easier method to get white lines is to leave the area white initially, apply your thin tape grid causing the diamond shapes, and then paint your rust or teal color *over* the tape. -
Peel carefully:
While the paint is tacky but not fully wet, carefully peel back the tape strips. This reveals the white background underneath, creating a perfect geometric lattice effect. -
Clean up edges:
If any paint bled under the tape, use your detail brush and a little white paint to tidy up the lines. The crispness of these grid lines is key to the mid-century aesthetic.
Step 5: Finishing Touches
-
Erase guidelines:
Double-check that all paint is bone dry, then gently erase any visible pencil marks from your initial grid layout. -
Seal the deck:
Take the board outside and spray it with a clear matte sealant. Apply 2-3 thin coats, allowing proper drying time between each, to protect your artwork from scratches and sun damage.
Mount your new graphic art on the wall or add trucks and wheels to show off your custom style at the park
Storybook Animal in a Tiny Outfit (Yes, Really)
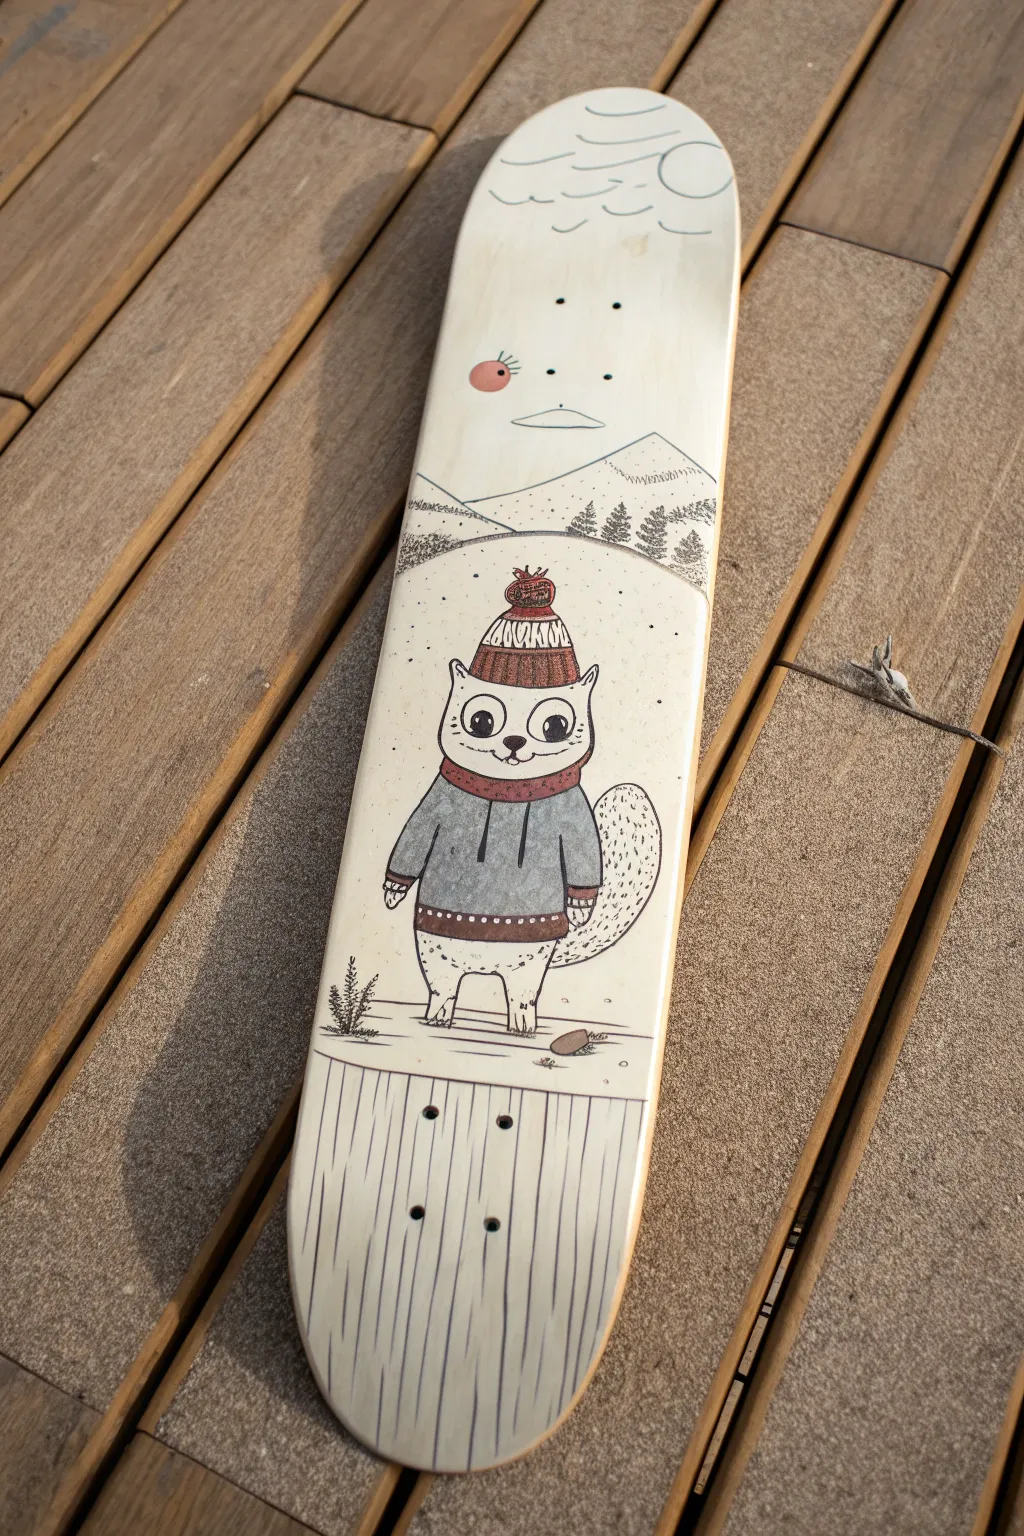
Transform a plain skateboard deck into a whimsical winter scene featuring a charming cat in a knit hat. This illustrative style uses fine linework and muted colors to create a cozy, storybook feel on natural wood.
Step-by-Step Tutorial
Materials
- Blank maple skateboard deck (sanded)
- Pencil and eraser
- Fine-grit sandpaper (220 grit)
- Acrylic paints (White, Grey, Burgundy, Soft Pink)
- Fine-point permanent marker or illustration pen (Black)
- Small round paintbrushes (Sizes 0, 2, and 4)
- Matte spray varnish or clear coat sealer
- Ruler or straight edge
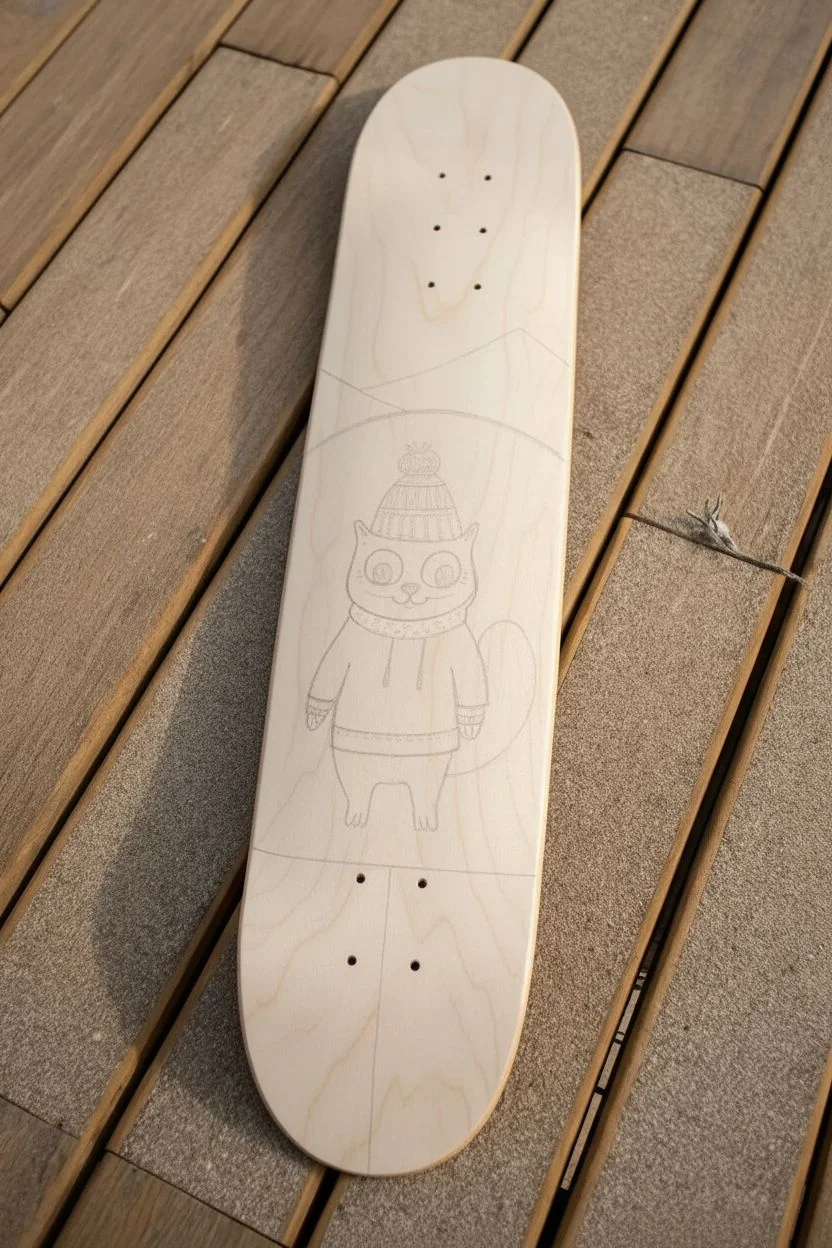
Step 1: Preparation and Mapping
-
Prepare the surface:
Before you begin drawing, lightly sand the entire top surface of the deck with 220-grit sandpaper to remove any factory sheen and create a ‘tooth’ for the paint. -
Wipe clean:
Use a tack cloth or slightly damp rag to remove all sawdust. The surface needs to be perfectly clean for the fine ink lines to adhere properly. -
Sketch the horizon lines:
Using a pencil, lightly draw a curved horizon line across the middle of the board to separate the distant mountains from the foreground snow. Add a straight vertical section at the tail (bottom) to represent the wooden deck floor. -
Draft the character:
In the center of the lower section, sketch the main character: a cat with large eyes, a rounded body, and a fluffy tail curving upward. Don’t press too hard with the pencil.
Step 2: Base Layers and Background
-
Paint the sky:
Mix a very watery white or off-white acrylic wash. Paint the upper third of the deck, allowing the wood grain to show through slightly for that organic look. -
Block in the snow:
Paint the middle section (where the cat stands) using a more opaque white. This area represents the snow and needs to be solid enough to make the character pop. -
Define the foreground floor:
For the bottom tail section, use a wash of very pale grey or simply leave it bare wood, but paint a thin white strip separating it from the snow area above. -
Add mountain details:
With a fine brush and slightly diluted black or dark grey paint, outline the distant mountain peaks just below the sky area. Fill their bases with tiny stippled dots to suggest texture. -
Draw the trees:
Using your fine-point illustration pen, carefully draw varied pine trees along the horizon line. Vary their heights and use quick, jagged strokes for foliage.
Clean Lines Tip
If your illustration pen skips over the painted areas, the acrylic might be too glossy. Lightly buff the painted spots with ultra-fine sandpaper to help the ink flow smoothly.
Step 3: Character Painting
-
Fill the coat:
Paint the cat’s jacket with a cool grey shade. Use two coats if necessary to get a smooth, flat finish without visible brushstrokes. -
Add the knit accessories:
Use burgundy or deep red paint for the scarf, the waistband of the sweater, and the main body of the beanie hat. Let this dry completely before adding patterns. -
Paint the face and tail:
Fill in the face and the fluffy tail with white paint. If you want a textured look on the tail, you can use a dry-brush technique with a tiny bit of grey. -
Add the sun:
Near the nose of the board (top), paint a small, soft pink circle for the winter sun. I like to keep this color sheer so it feels distant.
Enhance the Hat
Make the beanie pop by adding a tiny actual pom-pom glued to the top, or use puff paint on the knit patterns for a tactile, 3D sweater texture.
Step 4: Inking and Details
-
Outline the character:
Once all paint is 100% dry, use your black illustration pen to outline the entire cat. Use a slightly thicker line for the outer silhouette and a thinner line for interior details. -
Texture the knitting:
Draw the zig-zag patterns on the hat and the vertical ribbing on the sweater’s waistband with the fine pen. Ink the ‘LOVED’ text or any pattern you prefer on the hat’s brim. -
Detail the fur:
Add small, broken lines or ‘u’ shapes on the tail and the cat’s leggings to mimic the texture of fur. Draw the large, expressive pupils and the nose. -
Draw the wood planks:
At the bottom tail of the board, use a ruler and pen to draw vertical lines representing floorboards. Add squiggly wood grain lines between the straight lines. -
Final whimsical touches:
Add the cloud swirls near the top, the bird tracks near the cat’s feet, and the tiny falling snow dots in the background. -
Seal the artwork:
Finish by spraying the entire deck with a matte clear coat. Apply 2-3 light layers, letting each dry in between, to protect your illustration from scuffs.
Hang this charming piece on your wall or assemble the trucks and wheels to take your winter companion for a ride


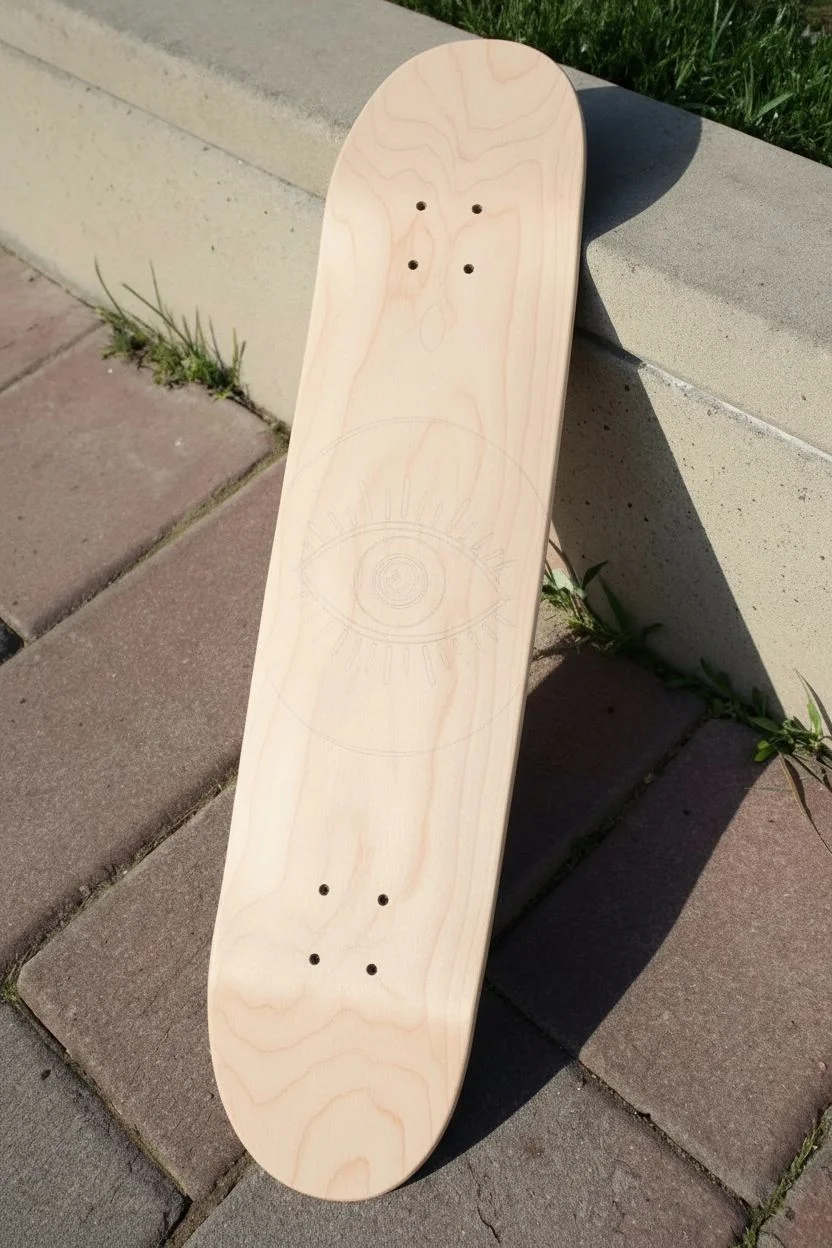
Giant Eye Motif With Intricate Patterns Inside
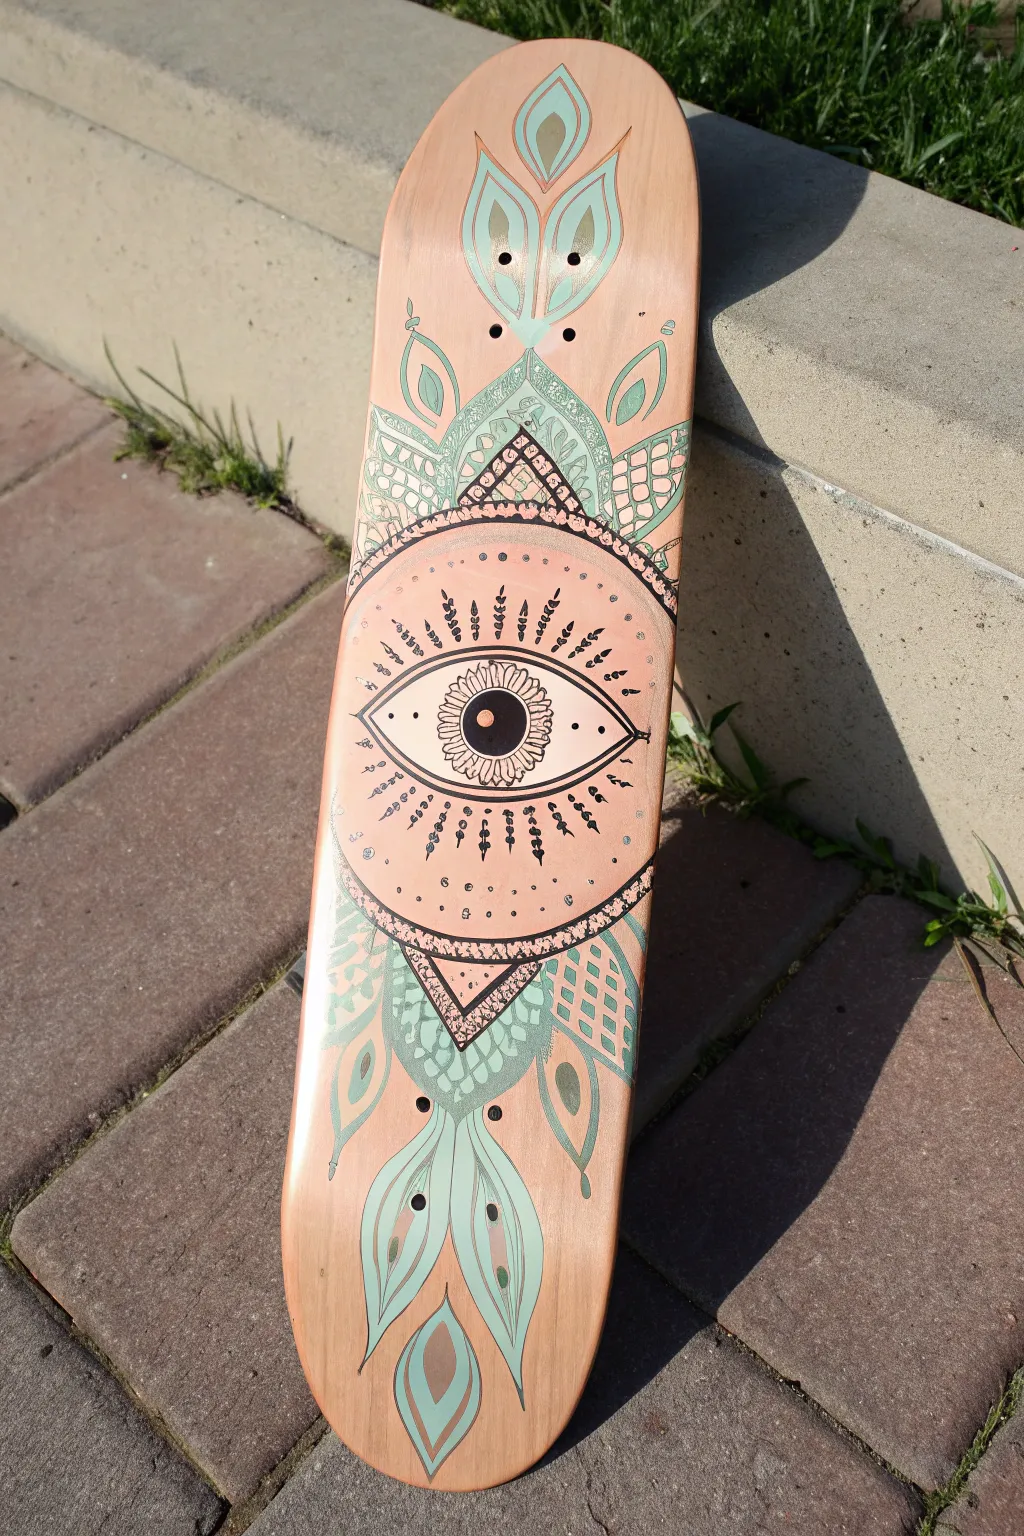
Transform a plain wooden deck into a mesmerizing piece of art featuring a central eye motif surrounded by flowing, mandala-inspired patterns. This design balances natural wood grain with striking teal and bronze accents for a truly spiritual aesthetic.
How-To Guide
Materials
- Blank maple skateboard deck
- Sandpaper (320 and 400 grit)
- Painter’s tape or masking tape
- Gesso (clear or white)
- Acrylic paints (Teal/Mint, Black, White, Metallic Bronze/Copper)
- Fine liner brushes (sizes 0, 00, and 1)
- Black fine-tip paint pen or permanent marker
- Compass and ruler
- Pencil and eraser
- Spray varnish or clear coat sealer (matte or satin finish)
Step 1: Preparation & Layout
-
Prep the surface:
Begin by lightly sanding the entire face of the skateboard deck with 320-grit sandpaper to remove any factory finish or roughness. Wipe it clean with a tack cloth or slightly damp rag to ensure no dust remains. -
Prime the wood:
Apply a thin layer of clear gesso if you want to preserve the natural wood color as the background, which adds a lovely warmth. Let this dry completely before moving forward. -
Find the center:
Use a ruler to find the exact vertical center line of the board. Mark a point in the middle of the deck where the pupil of the eye will sit. -
Establish the circles:
Using a compass, draw the concentric circles that form the main iris and the outer decorative ring. Keep your pencil pressure light so these lines are easy to erase later. -
Sketch the eye shape:
Freehand the almond shape of the eye around the central circles. Extend the corners of the eye slightly to give it an elegant, stylized look.
Symmetry Hack
Make a paper template for one half of the mandala design (top or bottom). Trace it, flip it, and trace again to ensure perfect vertical symmetry.
Step 2: Painting the Eye
-
Fill the pupil:
Paint the innermost circle solid black. While the black is still wet, add a tiny dot of bronze or copper in the center for a reflective glint. -
Detail the iris:
Around the pupil, use your finest brush or a black paint pen to draw small petal-like shapes radiating outward, creating a sunflower-like iris pattern. Fill the spaces between petals with tiny stippled dots. -
Outline the lids:
Go over your pencil sketch of the eye shape with a bold black line. Thicken the upper lash line slightly to add weight and definition to the gaze. -
Add radiating patterns:
In the large outer circle surrounding the eye, use black ink or paint to draw stick-and-dot rays. Alternate the lengths of the rays to create a dynamic, vibrating effect.
Step 3: Mandala Flourishes
-
Sketch symmetry:
Lightly sketch triangular and teardrop shapes radiating from the top and bottom of the eye’s outer circle towards the nose and tail of the board. Mirror the designs vertically. -
Apply the teal wash:
Mix your teal acrylic paint with a tiny bit of water to increase transparency. Fill in the large teardrop shapes at the nose and tail, allowing the wood grain to peek through slightly. -
Add intricate lacework:
Within the triangular sections above and below the eye, paint a teal background and let it dry. Then, use white paint or a white pen to draw a delicate grid or fishnet pattern over the teal. -
Bronze accents:
Paint the smaller triangular borders and decorative dots with metallic bronze paint. I find this warmth really helps bridge the gap between the teal and the natural wood. -
Final linework:
Use your black paint pen to outline every shape—the teal leaves, the bronze triangles, and the outer rim of the eye circle. Add flourishes like small dots or swoops inside the teal leaves for extra detail.
Level Up: Gold Leaf
Instead of metallic bronze paint, use gold leaf size and real gold leaf sheets on the triangular accents for an incredibly high-end, reflective finish.
Step 4: Finishing Touches
-
Clean up:
Once the paint is fully dry—give it a good hour—gently erase any remaining visible pencil marks. Be careful not to scrub over the painted areas. -
Seal the artwork:
Apply a spray varnish in light, even coats. Do one coat, let it dry for 15 minutes, and apply a second coat to ensure durability against scratches and moisture. -
Drill hole check:
If paint has pooled in the truck mounting holes, use a small tool or toothpick to clear them out before the varnish hardens completely.
Mount your trucks and wheels or hang it on the wall to display your mystical creation
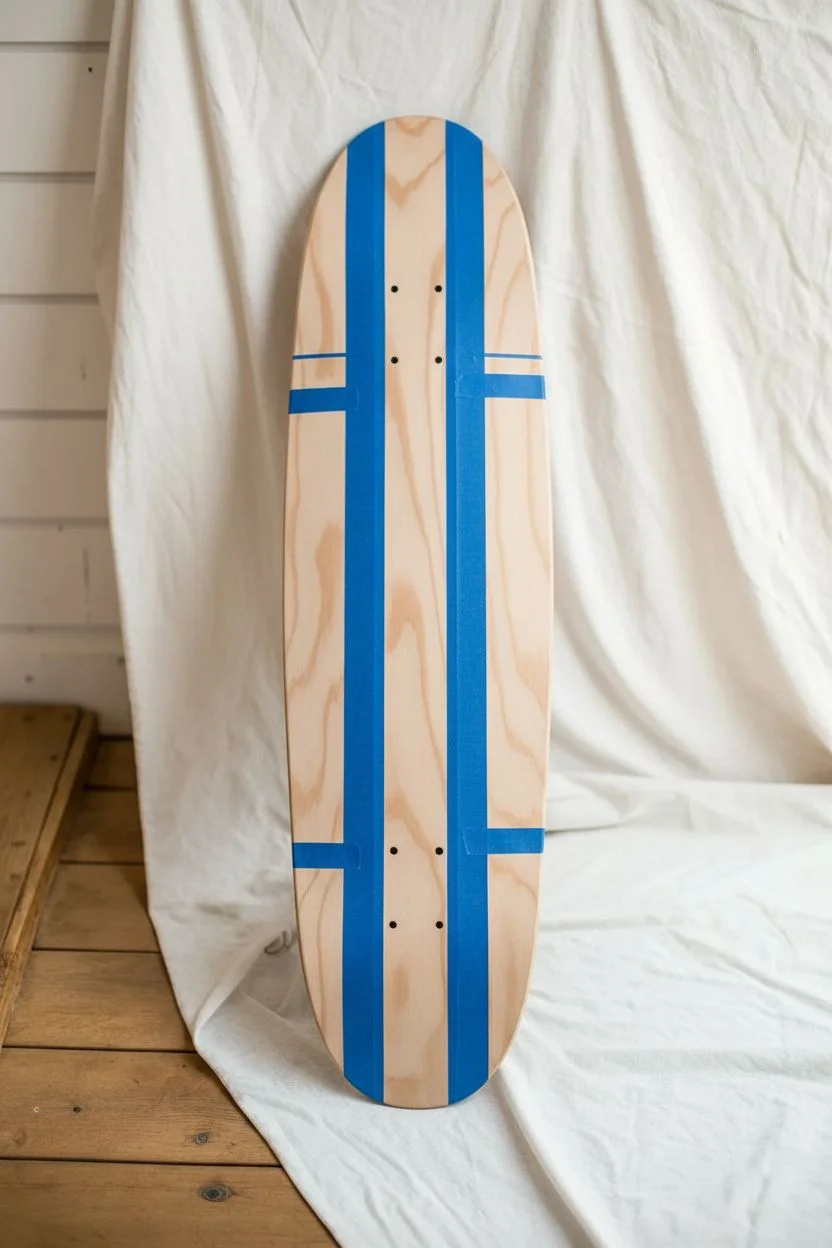
Acrylic Pour Effect for a One-of-a-Kind Abstract Deck
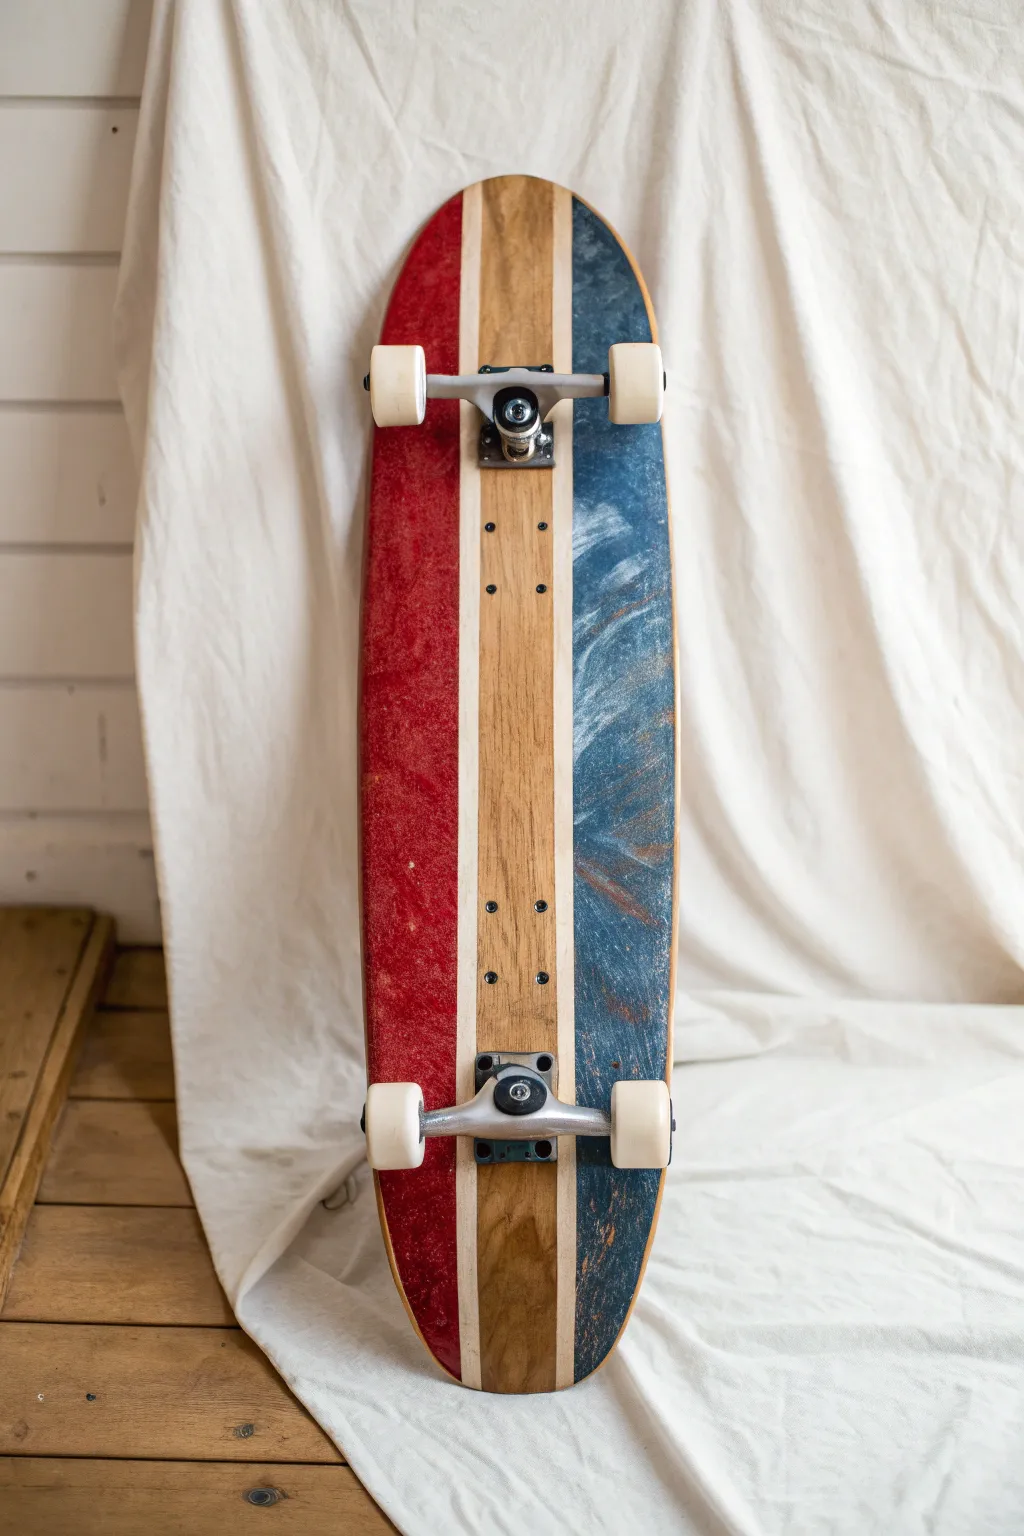
This striking skateboard design combines the raw beauty of natural wood grain with the chaotic elegance of acrylic pouring techniques. By sharply masking off geometric sections, you create a sophisticated contrast between clean lines and organic textures.
Detailed Instructions
Materials
- Unfinished wooden skateboard deck
- Painter’s tape (high quality, medium width)
- Sandpaper (220 grit and 400 grit)
- Red acrylic paint
- Deep blue acrylic paint
- Grey acrylic paint
- Gold or metallic copper acrylic paint (optional highlight)
- Pouring medium
- Plastic cups and stirring sticks
- Clear polyurethane sealant (spray or brush-on)
- Plastic drop cloth
- Exacto knife or razor blade
Step 1: Preparation & Masking
-
Sand the deck:
Begin by sanding the entire face of the skateboard deck with 220-grit sandpaper to smooth out any rough patches and prepare the surface for adhesion. Wipe away all dust with a tack cloth or slightly damp rag. -
Plan the stripes:
Visualize the central wood panel. For this look, you want a wide central strip of exposed wood, flanked by two very thin pin-stripes of exposed wood. -
Apply the main mask:
Run a long strip of painter’s tape vertically down the exact center of the board to protect the wood that will remain unpainted. Press the edges down firmly. -
Create the pin-stripes:
Place two additional thin strips of tape parallel to the center strip, leaving about a 1-inch gap of exposed wood on either side of the center tape. This exposed area is what will separate the poured paint from the central wood grain. -
Actually, reverse that masking:
Looking at the reference image, the wood is preserved in the center *and* the thin stripes. So, tape over the areas you want to keep as *wood*. Tape the wide center column and the two thin vertical lines flanking it. Everything else should be exposed for painting. -
Seal the tape edges:
I usually run a fingernail or a credit card firmly along every edge of the tape. This is crucial to prevent paint from bleeding under and ruining the crisp lines.
Tape Sealing Trick
To get perfect lines on wood, paint a thin layer of clear matte medium over the tape edges first. This seals the gap so any bleed is clear, keeping the colored paint perfectly sharp.
Step 2: The Acrylic Pour
-
Mix the red paint:
In a plastic cup, mix your crimson red acrylic paint with pouring medium according to the bottle’s instructions (usually 1:1). It should have the consistency of warm honey. -
Mix the blue blend:
In a separate cup, mix the deep blue paint with pouring medium. In a third cup, mix a small amount of grey and perhaps a touch of metallic gold for the marbling effect. -
Apply the red side:
Prop the board up slightly so it is level. Pour the red mixture onto the left side of the taped-off area. Gently tilt the board or use a popsicle stick to guide the paint to the edges, ensuring full coverage without crossing over the tape barrier. -
Apply the blue side:
On the right side, pour the blue mixture primarily. Then, drizzle small amounts of the grey/gold mixture over the wet blue paint. -
Create the texture:
Use a straw to blow air onto the wet blue and grey paint, or tilt the board slightly to swirl the colors together. You want a stormy, marbled look rather than a solid color. -
Add texture to the red:
If the red looks too flat, you can dab it lightly with a crumpled plastic bag or sponge while wet to create a subtle, stone-like texture similar to the reference. -
Let it cure:
Allow the paint to dry completely. Acrylic pours are thick, so this may take 24 to 48 hours. Keep it in a dust-free environment.
Add Grip Tape Art
Don’t cover your art! Use clear grip tape over the entire board, or cut strips of black grip tape that match the pattern underneath to maintain the geometric aesthetic.
Step 3: Finishing Touches
-
Remove the tape:
Once the paint is fully dry to the touch, carefully peel back the painter’s tape at a 45-degree angle. Move slowly to ensure distinct, razor-sharp lines. -
Clean up edges:
If there is any minor bleed-through, gently scrape it away with an Exacto knife or lightly sand it off with fine-grit sandpaper. -
Sand the paint ridges:
There will likely be a raised ridge where the paint met the tape. Very gently sand this transition with 400-grit sandpaper so the board feels smooth from rail to rail. -
Apply clear coat:
Spray or brush a clear polyurethane sealant over the entire face of the deck—both the painted sections and the exposed wood. This protects the art and creates a uniform sheen. -
Final drying:
Apply 2-3 coats of sealant, letting each coat dry according to the manufacturer’s directions, before attaching your trucks and wheels.
Once the sealant has fully cured, you will have a rideable piece of art that perfectly balances rustic texture with modern color
Stencil-Style Layers for Crisp Shapes and Fast Coverage
Transform a plain skateboard deck into a piece of modern art using crisp, intersecting geometric shapes. This design leverages the natural wood grain as a negative space element, balancing warm terracotta hues with deep teal and cool cream.
How-To Guide
Materials
- Blank wooden skateboard deck (natural wood veneer top)
- Sandpaper (220-grit and 400-grit)
- Painter’s tape (multi-width pack)
- Adhesive stencil film or cardstock for curves
- Compass or large circular objects (plates/bowls) for tracing
- Pencil
- Acrylic paints (Deep Teal, Terracotta, Burnt Sienna, Cream/Off-White)
- Flat synthetic paintbrushes (medium and large)
- Clear polyurethane sealant (matte or satin finish)
- Lint-free cloth
- X-Acto knife or craft blade
- Self-healing cutting mat (optional)
Step 1: Preparation & Design
-
Sand the Deck:
Begin by lightly sanding the entire top surface of the deck with 220-grit sandpaper. This removes the factory gloss and gives the wood enough ‘tooth’ for the paint to grip securely without damaging the beautiful grain. -
Clean the Surface:
Wipe away every speck of sanding dust using a slightly damp, lint-free cloth. Let the wood dry completely for about 10 minutes. -
Plan the Geometry:
Sketch your design lightly on paper first. The key to this look is large, swooping intersected curves. Decide which areas will remain natural wood and which will be painted. -
Mark Curve Guidelines:
Using a pencil and either a compass or various circular household objects (like the bowls shown in the photo), lightly trace your main arcs directly onto the wood. Don’t press too hard; you just need a faint guide.
Clear Gel Trick
Before painting color, brush a clear matte medium over your tape edges. This seals the gap, ensuring any bleed is clear and invisible
Step 2: Masking & Painting
-
Create Stencil Masks:
For the crispest curved lines, cut your traced shapes out of adhesive stencil film. If you don’t have film, you can carefully tape over an area and cut the curve gently with an X-Acto knife, but be extremely careful not to slice into the wood. -
Apply the First Mask:
Block off the areas that will remain natural wood or will be painted a different color later. Press the edges of your tape or film down firmly with your thumbnail to prevent paint bleed. -
First Color: Deep Teal:
Paint the large teal sections first. Use a flat brush and apply the paint in thin, even layers. Brush away from the stencil edge inward to further reduce the chance of bleeding. -
Dry and Repeat:
Let the teal layer dry to the touch (about 15-20 minutes). If the wood grain still shows through too much for your liking, apply a second coat. -
Second Color: Terracotta:
Once the teal is fully dry, mask off the teal section to protect it. Expose the area for the warm terracotta shape and apply your paint. I find that earth tones often need two coats to look rich and opaque. -
Third Color: Cream Accent:
Mask off the neighboring sections and apply the cream/off-white paint. This high-contrast color acts as a breaker between the darker tones and the wood, so keep your edges very sharp here. -
Fourth Color: Burnt Sienna:
Apply the final burnt sienna sections. These darker brown-red tones anchor the design, often placed near the center or bottom of the composition. -
Remove Masking:
Perform the most satisfying step: peeling off the tape. Do this while the final coat is barely dry to the touch but not fully cured, pulling the tape away at a 45-degree angle.
Grip Tape Art
If riding this board, use clear grip tape over the painted design, or cut standard black grip tape into matching geometric shapes
Step 3: Finishing Touches
-
Touch Ups:
Inspect your lines. If any paint bled under the tape, use a very small detail brush to correct it, or gently scrape distinct drips away with your craft knife. -
Clear Coat Application:
Once the paint has cured for at least 24 hours, apply a thin layer of matte polyurethane sealant over the entire top of the deck to protect your artwork. -
Final Sanding:
After the first coat of sealer dries, do a very light pass with 400-grit sandpaper to knock down any bumps, then wipe clean. -
Final Seal:
Apply one final, smooth coat of sealant. This ensures the deck is durable enough for wall display or cruising.
Hang your new geometric masterpiece on the wall or add trucks to take your art to the streets
Topographic Map Lines That Flow From Nose to Tail
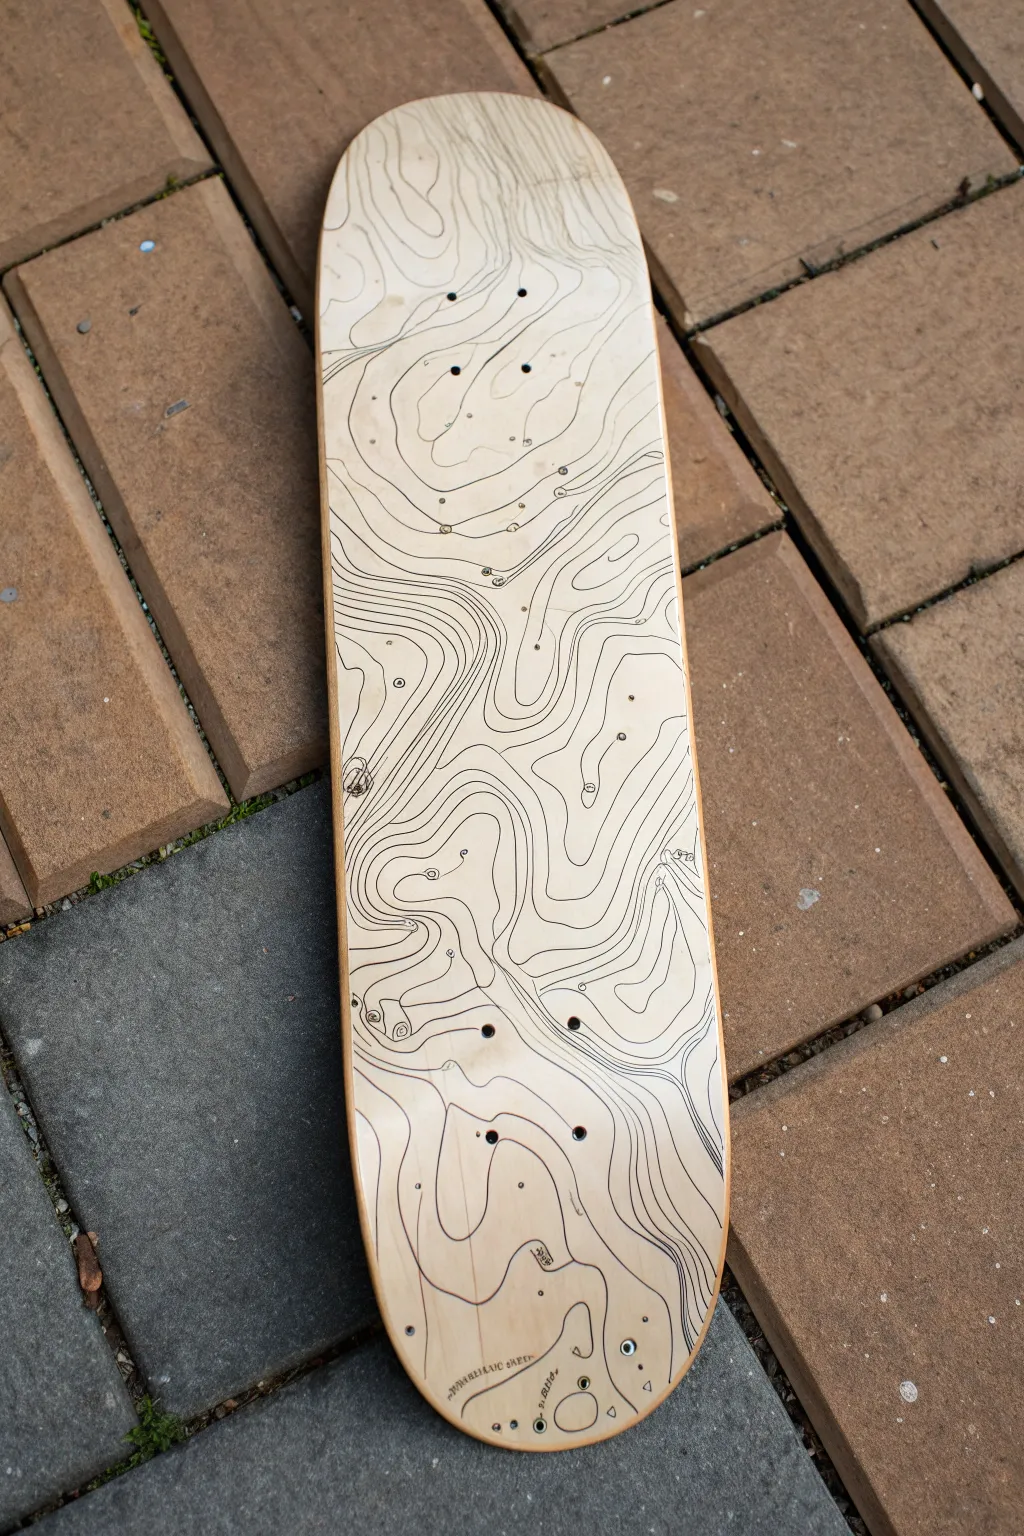
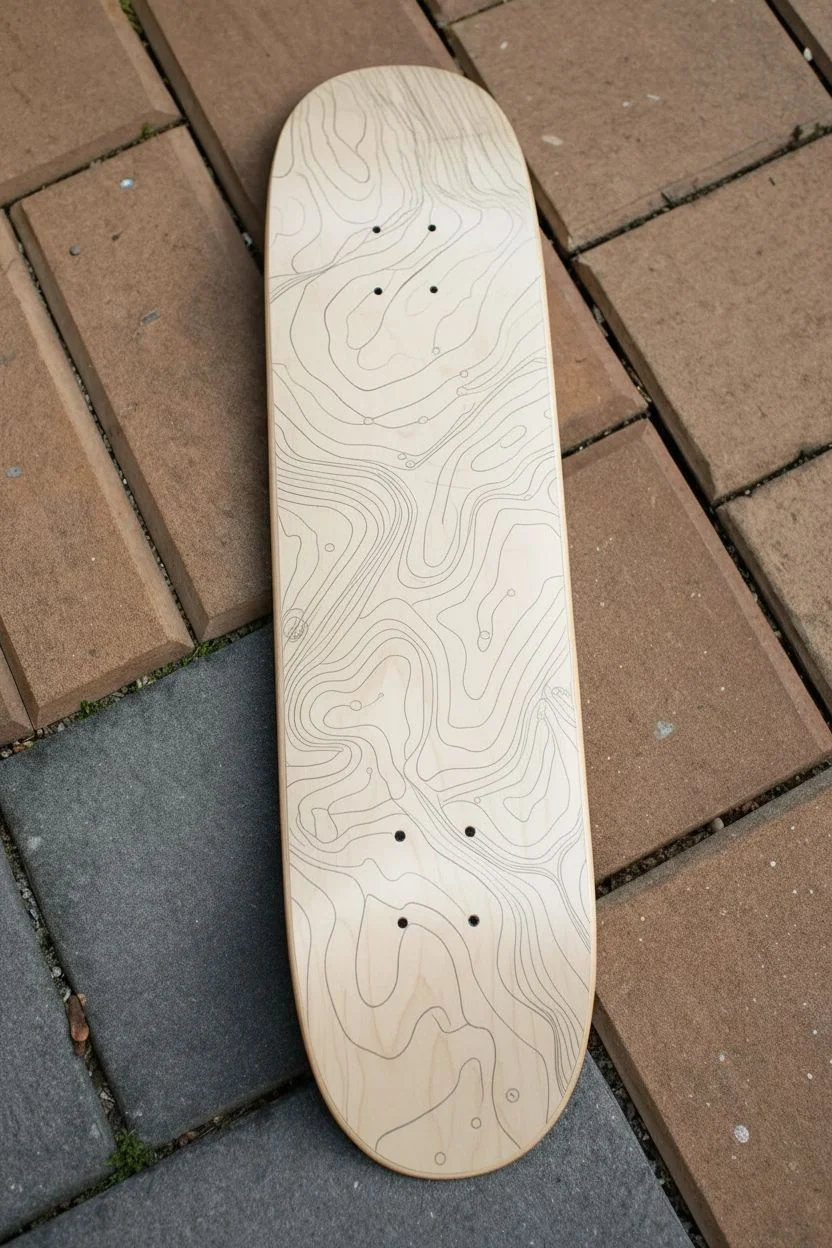
Embrace the natural beauty of the maple deck by turning wood grain into a rugged landscape with this topographic map design. The minimalist black lines on raw veneer create a sophisticated, tailored look that flows organically from nose to tail.
Step-by-Step Tutorial
Materials
- Blank maple skateboard deck (natural veneer)
- Fine-grit sandpaper (220 grit)
- Pencil (HB or lighter)
- Eraser
- Fine-point permanent marker or Posca pen (Black, 0.5mm – 0.7mm tip)
- Clear spray sealant (matte or satin finish)
- Microfiber cloth
Step 1: Preparation & Layout
-
Prep the surface:
Before you draw a single line, give the entire deck a light sanding with 220-grit sandpaper. This removes any factory oil or rough spots that might snag your pen later. Wipe away every speck of dust with a microfiber cloth. -
Establish elevation points:
Visualize where the ‘high points’ or peaks of your map will be. Lightly pencil in 3-5 small, irregular circles or kidney bean shapes scattered across the deck to serve as your summits. -
Draft the initial contours:
Using your pencil, draw rings around those initial summit shapes. Keep the lines wavy and organic, avoiding perfect circles. Think about how water creates ripples. -
Connect the peaks:
As your rings get wider, start letting them merge. If two peaks are close, draw a line that wraps around both of them, creating a saddle shape between the summits. This creates the flow.
Step 2: Inking the Landscape
-
Test your pen Flow:
On a scrap piece of wood or paper, test your black fine-point marker. Ensure the ink flows smoothly without bleeding too much, as raw wood can sometimes act like a sponge. -
Start from the center:
Begin inking the central-most contour lines first. This helps prevent your hand from smudging wet ink as you work outward toward the edges of the board. -
Maintain line consistency:
Trace over your pencil lines carefully. Try to keep a confident, steady speed; if you move too slowly, the ink might pool and bleed into the wood grain. -
Vary line proximity:
To create visual interest, place some lines very close together (indicating steep terrain) and others further apart (indicating flat areas). This variance gives the map depth and realism. -
Add character details:
Draw tiny circles or small loops within the larger lines occasionally to simulate small hills or depressions. You can also add very small dots near peaks for texture. -
Handle the truck holes:
When your lines approach the pre-drilled truck mounting holes, allow the lines to flow naturally around them or simply disappear into them. Don’t force awkward sharp turns just to avoid them. -
Fill the negative space:
Continue drawing concentric waves until you reach the edges of the nose and tail. The lines don’t need to touch the very edge; leaving a little breathing room looks intentional.
Bleed Blocker
If you find your ink is feathering into the grain, spray a layer of clear matte varnish on the bare wood *before* inking. It seals the pores for crispy lines.
Step 3: Finishing Touches
-
Let it cure:
Allow the ink to dry completely. Since wood is porous, I usually give it at least an hour just to be safe before erasing anything. -
Remove pencil marks:
Gently erase any visible pencil guidelines. Be careful not to rub too hard over the inked areas if your marker isn’t fully permanent. -
Sign your work:
Add a small signature or a mock ‘elevation’ note near the tail in a tiny font to add to the cartographic aesthetic. -
Apply the first clear coat:
Take your clear spray sealant and apply a very light mist coat. Do not spray heavily, or the ink might run. Let this mist coat dry for 20 minutes. -
Seal for durability:
Apply 2-3 heavier coats of the clear sealant, allowing proper drying time between each layer according to the can’s instructions. This protects the wood and your art from moisture and dirt.
Elevation Hues
Make the design pop by adding a single color. Use a light wash of watercolor or diluted acrylic to fill between every fifth line for a shaded relief map effect.
Now you have a custom deck that celebrates the journey as much as the destination
Glow-in-the-Dark Constellations on a Deep Night Sky
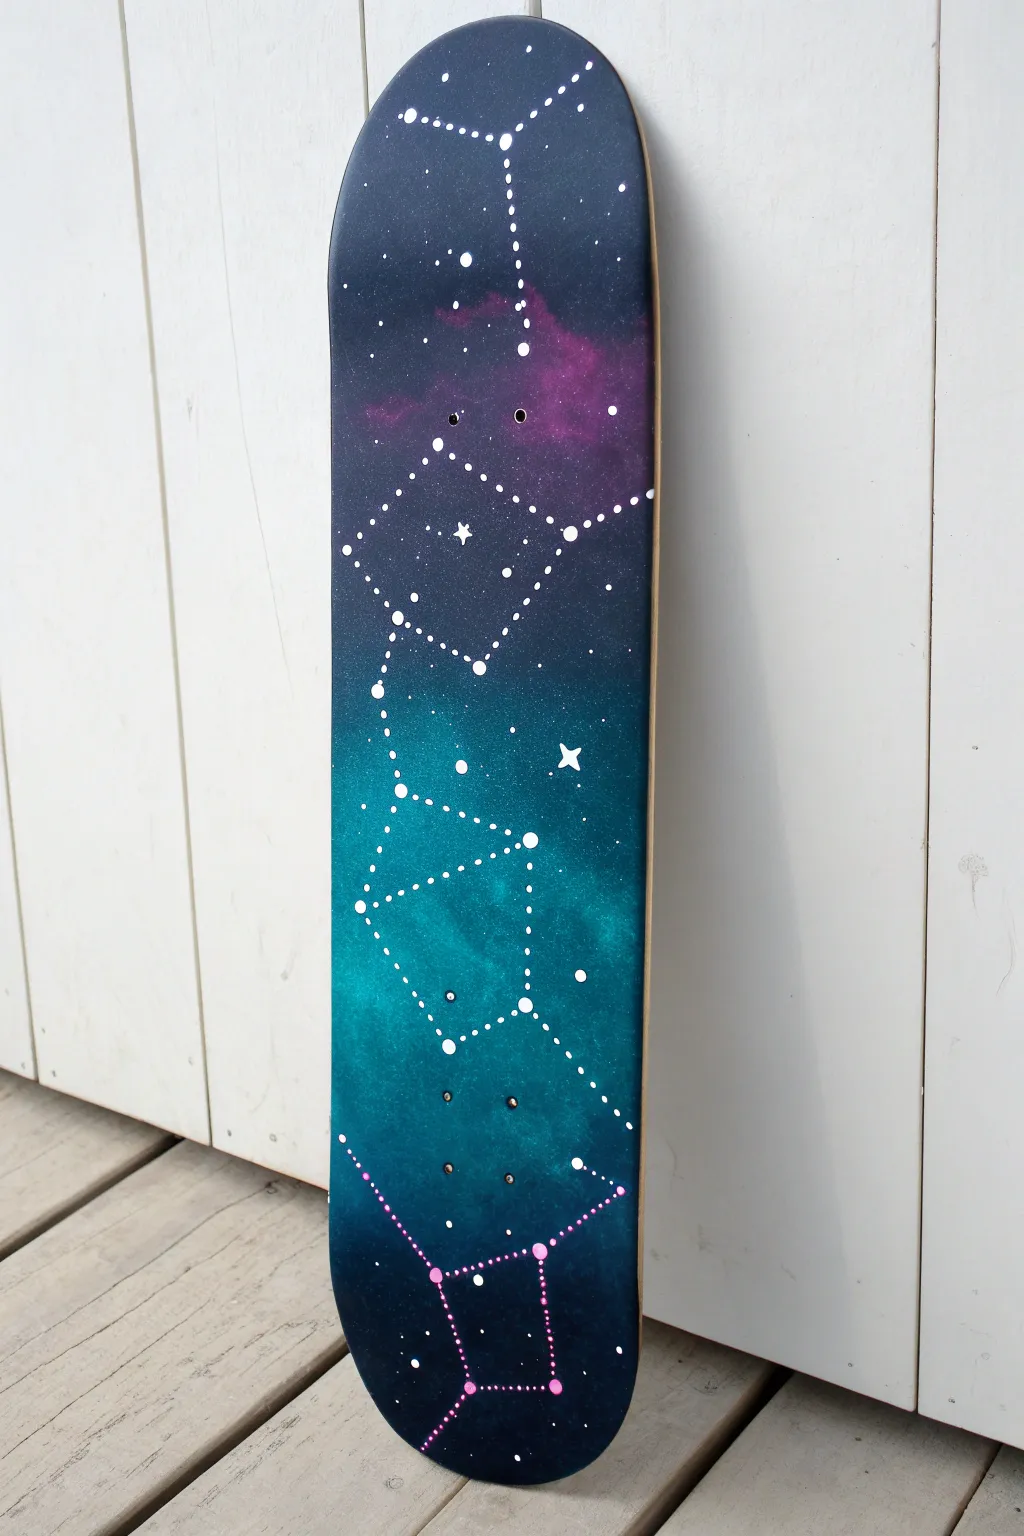

Transform a plain wooden deck into a window to the cosmos with this stunning galaxy painting. Featuring deep blues, vibrant teals, nebula clouds, and crisp white constellations, this project turns your skateboard into a rideable piece of stardust art.
Step-by-Step
Materials
- Blank wooden skateboard deck
- Sandpaper (medium and fine grit)
- Painter’s tape
- Acrylic paints (Titanium White, Mars Black, Phthalo Blue, Dioxazine Purple, Teal or Turquoise, Magenta)
- Sponge applicators or sea sponge
- Assorted paintbrushes (wide flat brush, fine liner brush, old toothbrush)
- White paint marker (fine tip)
- Glow-in-the-dark acrylic paint (optional)
- Clear spray sealant (matte or glossy)
Step 1: Prepping the Canvas
-
Sand the surface:
Begin by sanding the entire top surface of the deck. If your deck has a glossy finish, you need to scuff it up so the paint adheres. Start with medium grit and finish with fine grit for a smooth touch. -
Clean the dust:
Wipe the board down thoroughly with a damp microfiber cloth or tack cloth to remove every speck of sawdust. Any dust left behind will create bumps in your galaxy. -
Protect the edges:
Apply painter’s tape carefully along the side edges of the plywood (the ply layers) if you want to keep that raw wood look visible. This frames the artwork beautifully.
Starry Splatter Tip
Test your toothbrush splatter technique on a piece of cardboard first. The distance and speed of your thumb flick determine if you get a fine milky way mist or big, chunky planetary blobs.
Step 2: Creating the Galaxy Base
-
Establish the background:
Mix a small amount of black into your deep blue paint to create a midnight navy color. Use a wide flat brush to coat the entire face of the board. This dark base is essential for making the colors pop later. -
Create the gradient:
While the base is still slightly tacky or just dry, sponge on pure black unevenly at the top and bottom tail ends to deepen the ‘space’ effect. -
Add the teal nebula:
Load a sponge with teal or turquoise paint. Dab off the excess onto a paper towel until the sponge is almost dry. Lightly sponge a cloud-like shape across the middle section of the board, blending the edges softly into the dark background. -
Layer the purple clouds:
Using a fresh sponge, apply purple and magenta heavily near the top nose of the board, creating a second nebula cluster. Keep the sponging irregular to mimic organic gas clouds. -
Blend for depth:
Go back with a bit of the midnight blue on a sponge and dab over the transition areas where the teal and purple meet the black. This helps push the colored clouds ‘back’ into space rather than sitting on top.
Level Up: Color Shift
Mix a tiny amount of iridescent mixing medium into your teal and purple paints. This gives the nebula clouds a subtle shimmer that changes as you tilt the board in the light.
Step 3: Stars and Constellations
-
Splatter the stars:
Water down a small amount of white acrylic paint until it’s inky. Dip an old toothbrush into it and run your thumb across the bristles to spray fine mist droplets over the board. Focus heavier splatters near the nebula clouds. -
Add larger stars:
Use the handle end of a paintbrush, dip it in white paint, and dot a few larger, distinct stars randomly across the darker areas. -
Plot your constellations:
Once the background is bone dry, lightly sketch your constellation design with a pencil or chalk. You can copy the ones from the image (like Orion or Ursa Major) or look up star charts. -
Connect the dots:
Using a fine tip white paint marker or a liner brush, draw the lines connecting your star points. Use a ruler if you want precise geometry or freehand it for a sketched look. -
Highlight the main stars:
Paint solid white circles over the connection points (the ‘stars’) of your constellations. Make these significantly larger than the background splatter stars. -
Add the stardust effect:
Using the very tip of your liner brush, create tiny, controlled dotted lines along the main constellation lines. This gives the drawing that navigational chart aesthetic visible in the reference image. -
The glow factor (optional):
Carefully paint over just the white constellation stars and lines with a layer of glow-in-the-dark medium. It will dry clear but shine bright when the lights go out. -
Draw a few glints:
Select two or three major stars and paint a small four-pointed cross or ‘lens flare’ shape over them to make them twinkle.
Step 4: Sealing
-
Remove tape:
Carefully peel off the painter’s tape from the edges. Do this slowly at a 45-degree angle to ensure a crisp line. -
Apply clear coat:
Take your board to a well-ventilated area. Spray a thin, even layer of clear sealant over the entire painted surface. I usually let this sit for about 20 minutes before checking it. -
Final protection:
Apply two to three more coats of sealant, allowing proper drying time between each. This protects your galaxy from skuffs and scratches.
Now your deck is ready to cruise through the streets like a comet streaking across the night sky


Have a question or want to share your own experience? I'd love to hear from you in the comments below!