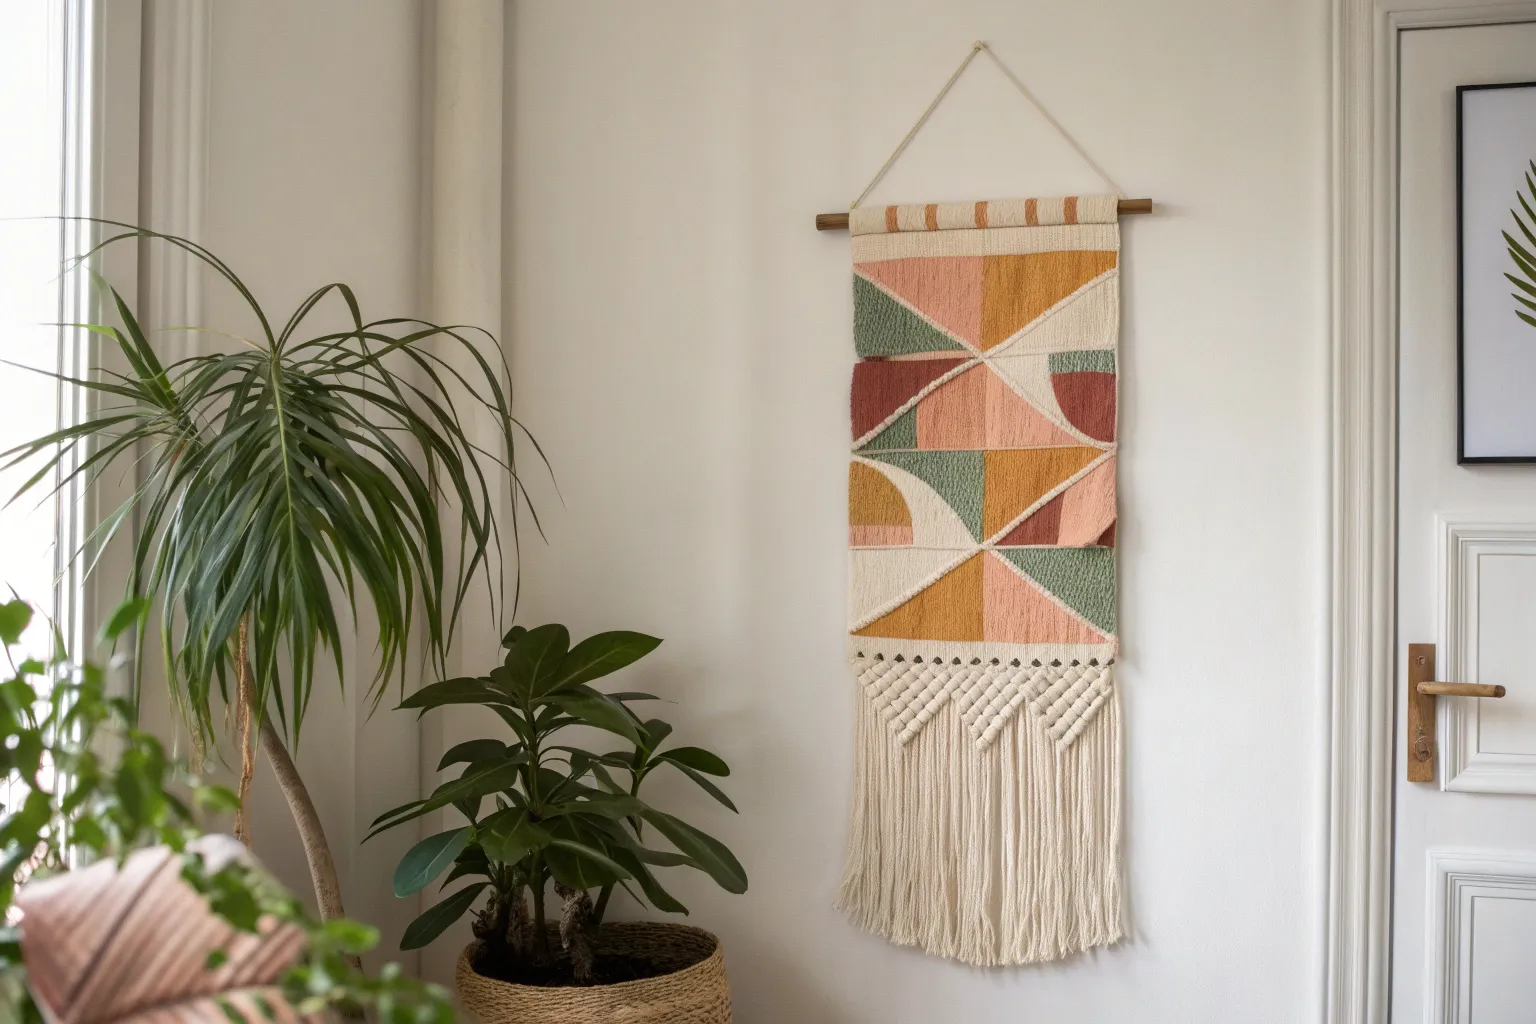
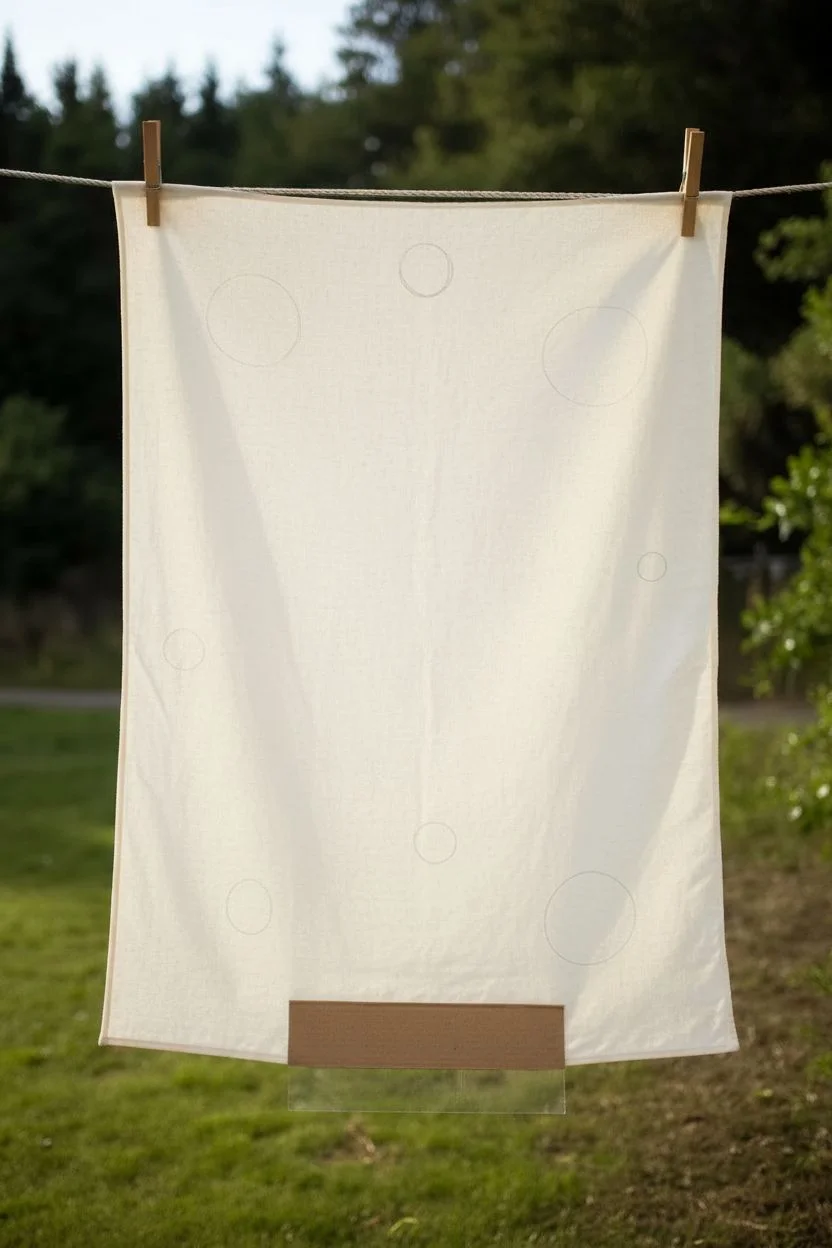
Fabric art is one of my favorite ways to make color feel extra alive—because you’re not just looking at it, you’re touching texture, pattern, and stitch. If you’ve got a stash of scraps (or even one great piece of cloth), these fabric art ideas will help you turn it into wall-worthy work.
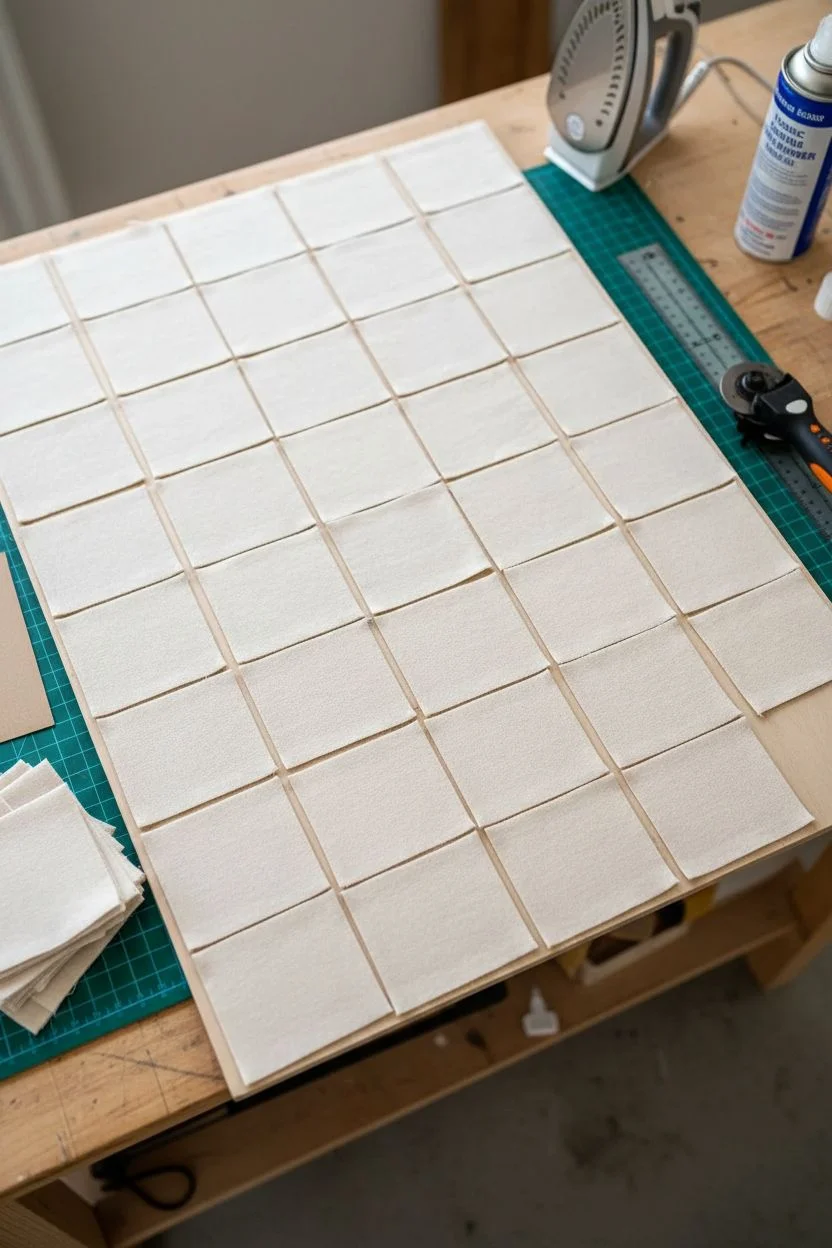
Framed Fabric Swatches as Mini Gallery Prints
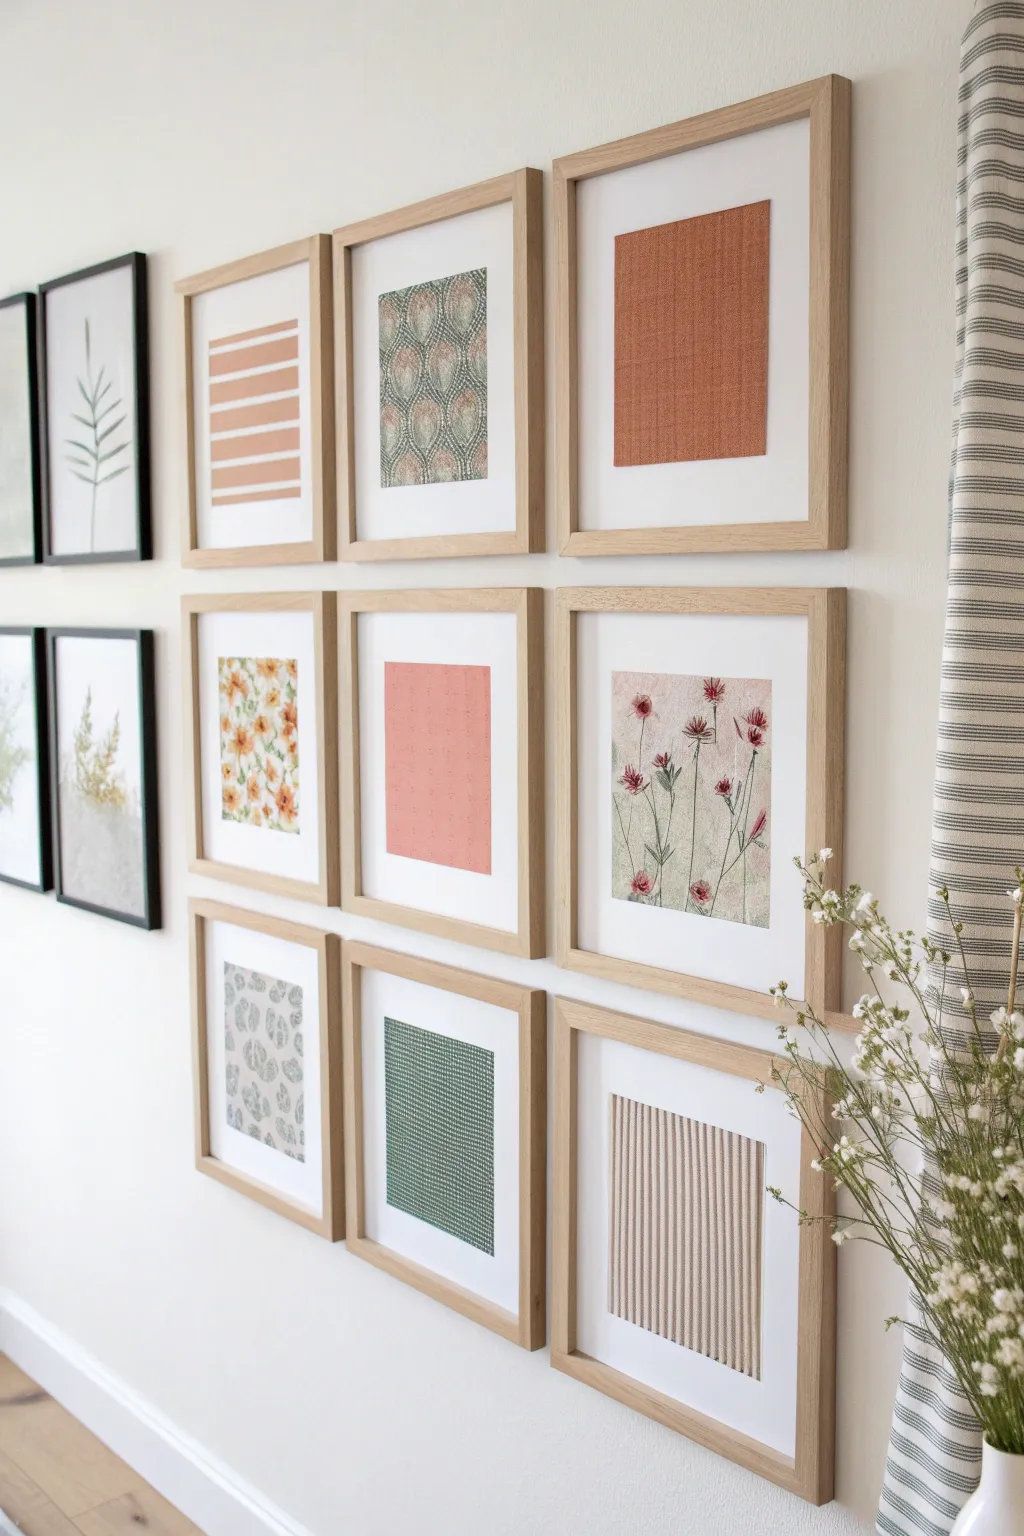
Transform your leftover fabric scraps into a sophisticated gallery wall with this simple DIY project. By framing textural swatches in matching light wood frames, you create a cohesive and high-end art installation that adds warmth and pattern to any room.
Step-by-Step
Materials
- 9 matching light wood picture frames (8×10 or similar size)
- 9 pre-cut photo mats (white, to fit frame size)
- Assorted fabric scraps (cotton, linen, canvas)
- Fabric scissors or rotary cutter
- Self-healing cutting mat
- Iron and ironing board
- Acid-free artist tape or masking tape
- Ruler or measuring tape
- Pencil
- Lint roller
- Wall hanging hardware (nails, level, hammer)
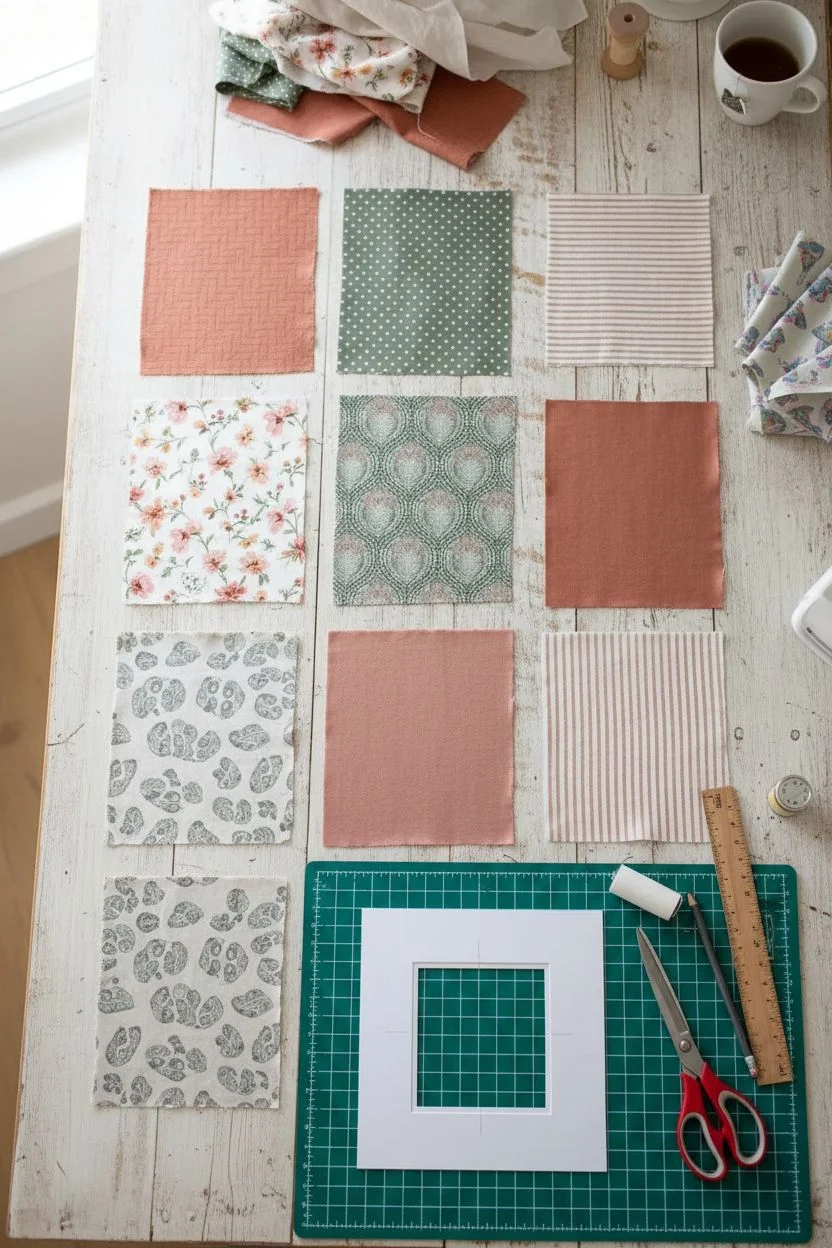
Step 1: Selecting and Prepping Fabric
-
Curate your palette:
Gather a variety of fabric scraps. Look for a mix of patterns (florals, geometrics, stripes) and solids in a cohesive color story—like the terracotta, sage green, and cream tones shown in the example. -
Check for texture:
Ensure your fabrics have some visual weight. Linens, thick cottons, and woven textures look much more expensive behind glass than thin synthetics. -
Iron everything flat:
Using the appropriate heat setting for your material, press every scrap until it is perfectly smooth. Any wrinkle will be magnified once framed. -
Remove debris:
Run a lint roller over the front of each fabric piece to pick up loose threads or dust.
Step 2: Cutting and Mounting
-
Measure the mat opening:
Take one of your photo mats and measure the exact size of the window opening. Your fabric piece needs to be slightly larger than this opening. -
Calculate cutting size:
Add at least 1 inch to both the height and width of the window measurement to ensure you have enough overlap for taping. -
Cut the fabric:
Using sharp fabric scissors or a rotary cutter on a mat, cut your nine fabric squares to the calculated size. -
Position the fabric:
Place the fabric face down on a clean flat surface. Place the photo mat face down on top of it. -
Align the pattern:
Lift the mat carefully to check the front. If using a stripe or geometric pattern, ensure it runs perfectly straight and is centered how you like it. -
Secure the top edge:
Once aligned, place a strip of acid-free tape along the top edge of the fabric, securing it to the back of the mat board. -
Pull taut and secure:
Gently pull the fabric taut (but not so tight that it warps the mat) toward the bottom. Tape the bottom edge. -
Tape the sides:
Repeat the tensioning process for the left and right sides, taping them securely. I usually double-check the front one last time before pressing the tape down firmly.
Wrinkles Reappearing?
If fabric loosens after framing, use a small piece of double-sided avid-free tape directly between the mat and fabric front to keep it taut.
Step 3: Framing and Hanging
-
Clean the glass:
Clean both sides of the frame glass with glass cleaner and a microfiber cloth to remove streaks and fingerprints. -
Assemble the frame:
Place your mounted fabric mat into the frame, add the backing board, and secure the clips or tabs. -
Plan your layout:
Arrange your nine frames on the floor first. Move the patterns around until you find a balance—try not to put two similar colors or patterns right next to each other. -
Measure the grid:
Measure the total width and height of your 3×3 grid, including the spacing between frames (2-3 inches is standard). -
Mark the wall:
Use a level and pencil to lightly mark where the top center nail should go. It helps to start with the center frame of the grid and work outward. -
Hang the frames:
Install your hardware and hang the frames, using a spacer (like a block of wood or cut cardboard) to ensure the gap between every frame is identical.
Pattern Play
Mix scale for interest. Combine a large-scale floral with a tight pinstripe and a solid texture to keep the eye moving across the gallery.
Step back and admire how a simple grid layout creates a stunning focal point from basic materials


Classic Patchwork Quilt Panel Wall Hanging
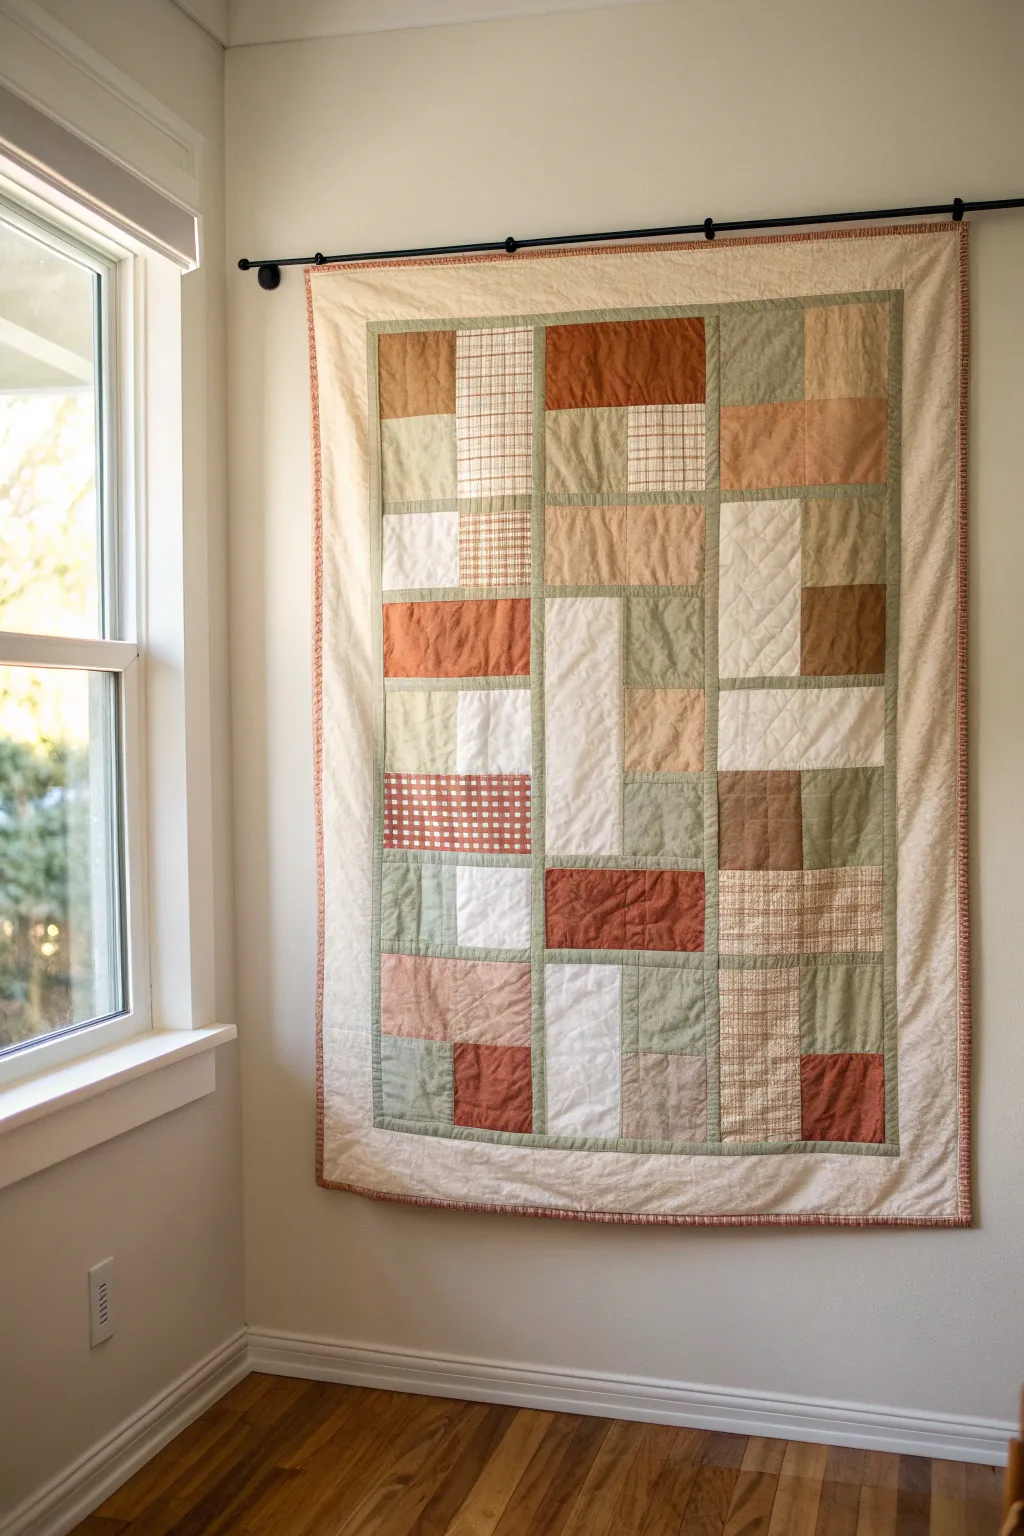

Bring warmth and texture to any blank wall with this cozy, earth-toned patchwork quilt panel. Featuring a soothing palette of rust, sage, cream, and beige, this hanging art piece combines the comfort of traditional quilting with modern home decor.
Step-by-Step Guide
Materials
- Cotton fabric assortment (solids and simple prints in rust, sage green, tan, cream, and gingham checks)
- Cream or off-white solid fabric for borders and sashing
- Backing fabric (cotton or muslin)
- Low-loft cotton batting
- Rotary cutter, self-healing mat, and acrylic ruler
- Sewing machine with walking foot
- Neutral thread (cream or light beige)
- Iron and ironing board
- Curtain rod with clips (black metal) for hanging
- Fabric shears and pins or wonder clips
Step 1: Cutting and Preparation
-
Select your palette:
Gather your fat quarters or fabric scraps. Focus on an autumnal mix: deep rust oranges, soft sage greens, various shades of beige/tan, and creamy whites. Include a mix of solids and subtle patterns like small gingham checks for visual interest. -
Cut the main blocks:
Cut your colored fabrics into varying rectangles. Aim for a mix of sizes to create the randomized look, but keep them modular. A good base unit is 4.5″ x 8.5″ rectangles and 4.5″ squares. You will need approximately 40-50 pieces depending on your desired final size. -
Cut sashing strips:
From your sage green or neutral sashing fabric, cut narrow strips, roughly 1.5″ wide. These will act as the grid that separates your main color blocks. -
Prepare the border:
Cut wider strips from your cream solid fabric for the outer border. You’ll want these about 4″ to 5″ wide to frame the central patchwork generously.
Fabric Selection Pro-Tip
Mix textures as well as colors! Incorporating a few linen-blend scraps alongside standard quilting cotton adds a wonderful, tactile dimension to the wall hanging.
Step 2: Piecing the Top
-
Plan the layout:
Clear a floor space or use a design wall to arrange your cut rectangles. Group them into larger vertical columns. Try to balance the colors so no two identical fabrics touch. I like to take a quick photo with my phone to check the balance before sewing. -
Sew blocks into units:
Begin sewing your smaller rectangles together to form larger block units. Use a consistent 1/4″ seam allowance throughout. Press seams to the darker side as you go. -
Add vertical sashing:
Sew the narrow 1.5″ sashing strips between your block units. This creates the vertical lines of the grid. -
Join the columns:
Once your block units are sashed vertically, join them together horizontally, adding horizontal sashing strips where needed to complete the grid look seen in the photo. -
Attach the outer border:
Sew your wide cream border strips to the sides of the finished patchwork center first, then to the top and bottom. Press the seam allowances toward the border.
Level Up: Hanging Sleeve
Instead of clips, sew a fabric tube (sleeve) on the back top edge. Slide a wooden dowel through it for a completely invisible hanging method that keeps the top perfectly straight.
Step 3: Quilting and Finishing
-
Baste the quilt sandwich:
Lay your backing fabric face down (taped to the floor), place the batting on top, and center your patchwork top face up. Use safety pins or basting spray to secure the three layers together. -
Quilt the layers:
Using a walking foot, quilt the layers together. The example uses diagonal straight-line quilting (cross-hatching) through the blocks to add texture. Keep lines spaced about 1.5″ to 2″ apart. -
Square up:
Once quilting is complete, trim the excess batting and backing fabric so the edges are perfectly square and even with your quilt top. -
Make the binding:
Cut 2.5″ wide strips of fabric for binding (a rust or patterned fabric works great for contrast). Sew strips together, fold in half lengthwise, and press. -
Attach binding:
Sew the binding to the front perimeter of the quilt, mitering the corners as you go. Fold the binding over the edge to the back and hand stitch or machine stitch it down for a clean finish. -
Install hanging hardware:
Mount your black curtain rod to the wall. Attach curtain clips to the top edge of your finished quilt, spacing them evenly to prevent sagging. -
Hang and enjoy:
Slide the rings onto the rod and hang your artwork. Adjust the clips if necessary to ensure the quilt hangs straight and flat against the wall.
Now you have a custom piece of fiber art that adds instant softness and color to your room


Fabric Collage Landscape Made From Scraps
Transform your fabric scrap bin into a serene mountain vista with this appliquéd textile art project. Using bold blocks of color and layered textures, you’ll build a charming scenic quilt that captures the warmth of a sunny day overlooking rolling hills.
Detailed Instructions
Materials
- Various cotton or linen fabric scraps (teal, aquamarine, dark blue, mustard yellow, beige, rust red, bright orange, white)
- White or cream canvas/heavy cotton fabric (background base)
- Fusible webbing (Lite Steam-A-Seam 2 or similar)
- Fabric scissors (or rotary cutter and mat)
- Iron and ironing board
- Embroidery floss (yellow or gold)
- Embroidery needle
- Sewing machine (optional, for securing layers)
- Paper and pencil for sketching template
Step 1: Planning and Preparation
-
Sketch the Design:
Begin by drawing your landscape design on a piece of paper the same size as your intended artwork. Mark distinct zones: the lower rust hill, the beige mid-ground, the mustard ridge, the dark blue mountains, the teal sky, and the orange sun. -
Create Templates:
Cut your paper sketch apart along the drawn lines to create individual pattern pieces for each section of the landscape. Label them so you remember which fabric color goes where. -
Prepare the Base:
Cut a piece of heavy white canvas or cotton to serve as your foundation. It should be slightly larger than your final design to allow for hemming or framing later.
Step 2: Cutting and Venturing
-
Apply Fusible Webbing:
Iron your fusible webbing onto the *wrong* side of your chosen fabric scraps. This stabilizes the fabric and makes it act like a sticker. -
Trace and Cut:
Trace your paper templates onto the paper backing of the fusible webbing. Remember to flip your template if your design is directional, though for abstract hills, it’s forgiving. Cut out each fabric shape carefully. -
Cut the Sky Section:
For the sky, cut a large rectangle of light blue fabric. You can piece together two shades of teal diagonally (as seen in the photo) to suggest depth or atmospheric perspective. -
Prepare the Sun:
Cut a circle from bright orange fabric. Then, cut a slightly larger gear-shape or serrated edge circle for the sun’s rays. -
Craft the Clouds:
Using white fabric (textured cotton or felt works beautifully here), cut out loose, organic cloud shapes with flat bottoms.
Wrinkle Rescue
If fabric bubbles after ironing, the steam might be trapped. Poke a tiny pinhole in the bubble and press again with a dry iron to flatten it perfectly.
Step 3: Assembling the Landscape
-
Layer the Sky:
Peel the backing off your sky pieces and place them at the top of your canvas base. Iron them in place to fuse them permanently. -
Build from Back to Front:
Start placing your landscape layers, working from the furthest mountains (dark blue) forward. I find it helpful to lay everything out dry first to check the overlap before committing with the iron. -
Add the Middle Ground:
Position the mustard yellow strip and the beige field section, ensuring they slightly overlap the bottom edge of the blue mountains to avoid gaps. -
Place the Foreground:
Add the large rust-red hill shape at the very bottom. This anchors the composition and provides a rich contrast to the cool sky tones. -
Attach Details:
Position the sun in the upper right corner and scatter the clouds across the sky. Once you are happy with the arrangement, press the entire piece thoroughly with a hot iron to fuse everything.
Make It 3D
Don’t fully fuse the clouds! Stitch them only along the bottom edge, leaving the fluffy tops loose. This adds tactile dimension and shadow to your sky.
Step 4: Stitching and Texture
-
Secure Edges (Optional):
For extra durability, you can straight stitch or zigzag stitch around the raw edges of each appliqué piece using a sewing machine, though raw edge appliqué has a lovely charm on its own. -
Add Embroidered Trees:
Thread an embroidery needle with yellow or gold floss. Along the ridge of the dark blue and mustard hills, make small straight stitches or ‘fly stitches’ to represent tiny pine trees. -
Detail the Sun:
Consider adding a simple running stitch around the inner circle of the sun to give it more definition against the sky. -
Hem the Edges:
Fold the excess white canvas border to the front (or back) twice to create a clean hem. Stitch it down to frame your textile painting.
Hang your finished textile landscape on the wall or stitch it onto a tote bag for a portable piece of art you can carry everywhere


Raw-Edge Appliqué Florals for Bold Texture
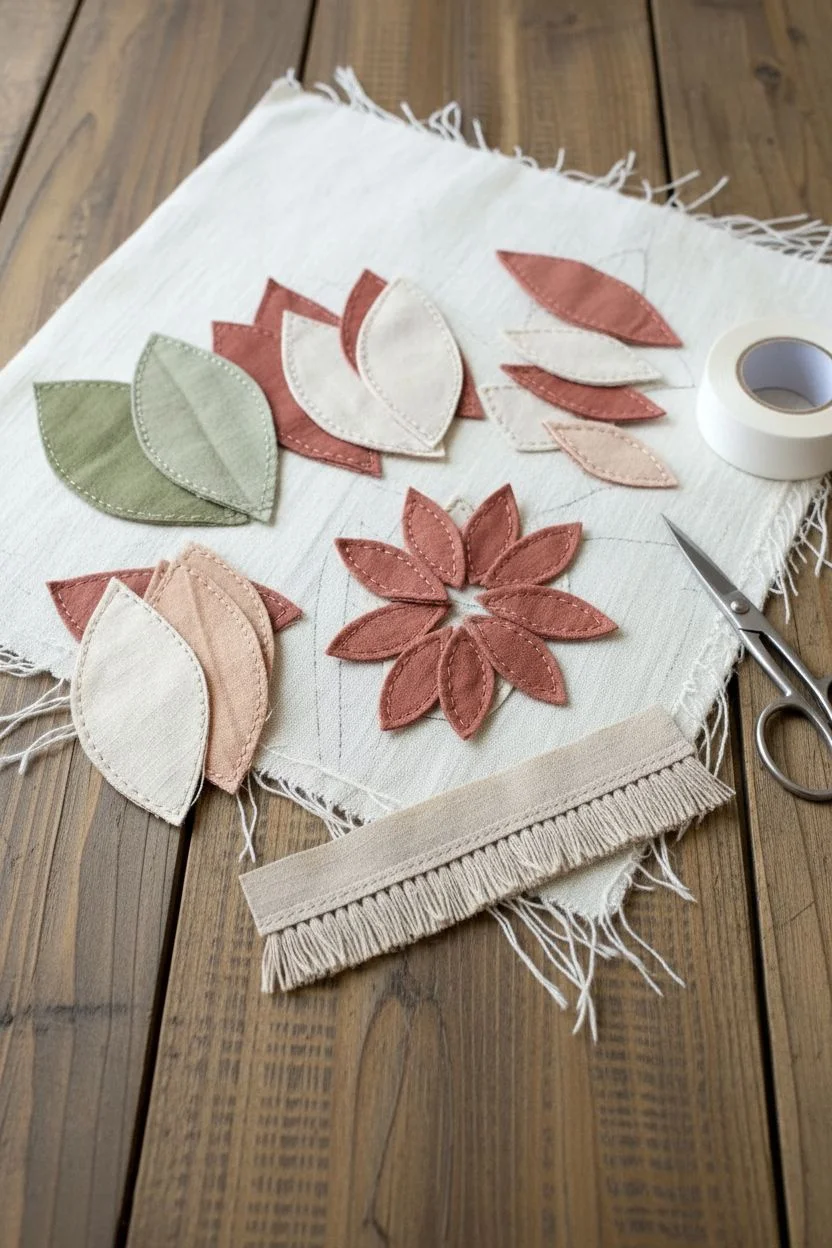
This project transforms simple fabric scraps into a dimensional, textured masterpiece through the charm of raw-edge appliqué. By layering earthy tones like terracotta, sage, and cream, you’ll create a flower that feels both vintage and refreshingly modern.
Step-by-Step Guide
Materials
- Cotton or linen scraps in muted earth tones (terracotta, blush, cream, sage green)
- Cream linen or canvas fabric for the background base (approx. 8×8 inches)
- Embroidery floss in cream and contrasting rust/brown
- Embroidery needle
- Iron-on adhesive (lightweight fusible web)
- Small scissors (fine-tip for precision)
- Fabric glue (optional)
- Small wooden button or fabric-covered button center
Step 1: Preparation & Cutting
-
Choose your palette:
Select 4-5 shades of fabric that harmonize well. For this look, stick to muted, desaturated colors like dusty rose, rust, olive green, and natural linen. -
Prepare the base:
Cut your cream background fabric to size. Gently fray the outer edges by pulling loose threads until you have about a quarter-inch of fringe for a rustic border. -
Fuse the fabrics:
Apply lightweight fusible web to the wrong side of your scrap fabrics according to the manufacturer’s instructions. This stabilizes the fabric and makes cutting precise shapes much easier. -
Cut the outer petals:
Cut 5-6 large, pointed leaf shapes from your green and blush fabrics. These should be roughly 2 inches long. -
Cut the middle layers:
Cut 6-8 medium-sized petal shapes (teardrop style) from your cream and light blush colored fabrics. -
Cut the inner petals:
From your darkest terracotta or rust fabric, cut 8 smaller, narrower petal shapes. -
Prepare the center:
Cut a strip of beige fabric about 0.5 inches wide and 3 inches long. Fringe one long edge with scissors, making tiny cuts very close together, stopping just before the bottom edge.
Fraying too much?
If your raw edges are fraying beyond control while stitching, dab a tiny amount of fray-check liquid on the edges or use a tighter blanket stitch to bind them.
Step 2: Layering & Stitching
-
Arrange the base layer:
Peel the paper backing off your large, outer leaves. Arrange them in a loose circle on the background fabric. I like to overlap them slightly to avoid gaps. -
Iron in place:
Press the base layer with an iron to fuse it to the background. -
Stitch the base:
Using 2 strands of cream embroidery floss, sew a blanket stitch around the edge of the green leaves. Keep stitches fairly wide and organic looking. -
Add the middle ring:
Arrange the medium cream/blush petals on top of the base layer, offsetting them so they sit between the leaves below. Fuse them in place with the iron. -
Stitch the middle ring:
Switch to a running stitch (simple up-and-down dash) for these petals using cream thread. Stitch about 1/8th inch inside the edge. -
Add the dark center ring:
Place the small terracotta petals in the center. Fuse them down. -
Detail the dark petals:
Using a contrasting cream thread, stitch a running stitch around the perimeter of these dark petals to make them pop against the lighter background. -
Create the 3D center:
Take your fringed beige strip and roll it tightly into a spiral. Hand stitch the bottom edge to secure the roll. -
Refine the center:
Fan out the fringe slightly with your thumb to create a stamen effect. -
Attach the button:
Sew a small button or fabric-covered bead directly onto the middle of your fringed spiral. -
Final assembly:
Using strong thread or a dab of fabric glue followed by stitching, attach the finished 3D center piece firmly to the middle of your appliqué flower.
Make it a brooch
Add a stiff felt backing and a pin clip to the reverse side to turn this floral appliqué into a wearable accessory for a denim jacket or tote bag.
Now you have a wonderfully textured floral piece ready to be framed or stitched onto a pillow cover
BRUSH GUIDE
The Right Brush for Every Stroke
From clean lines to bold texture — master brush choice, stroke control, and essential techniques.
Explore the Full Guide
Simple Embroidery Line Art on Linen
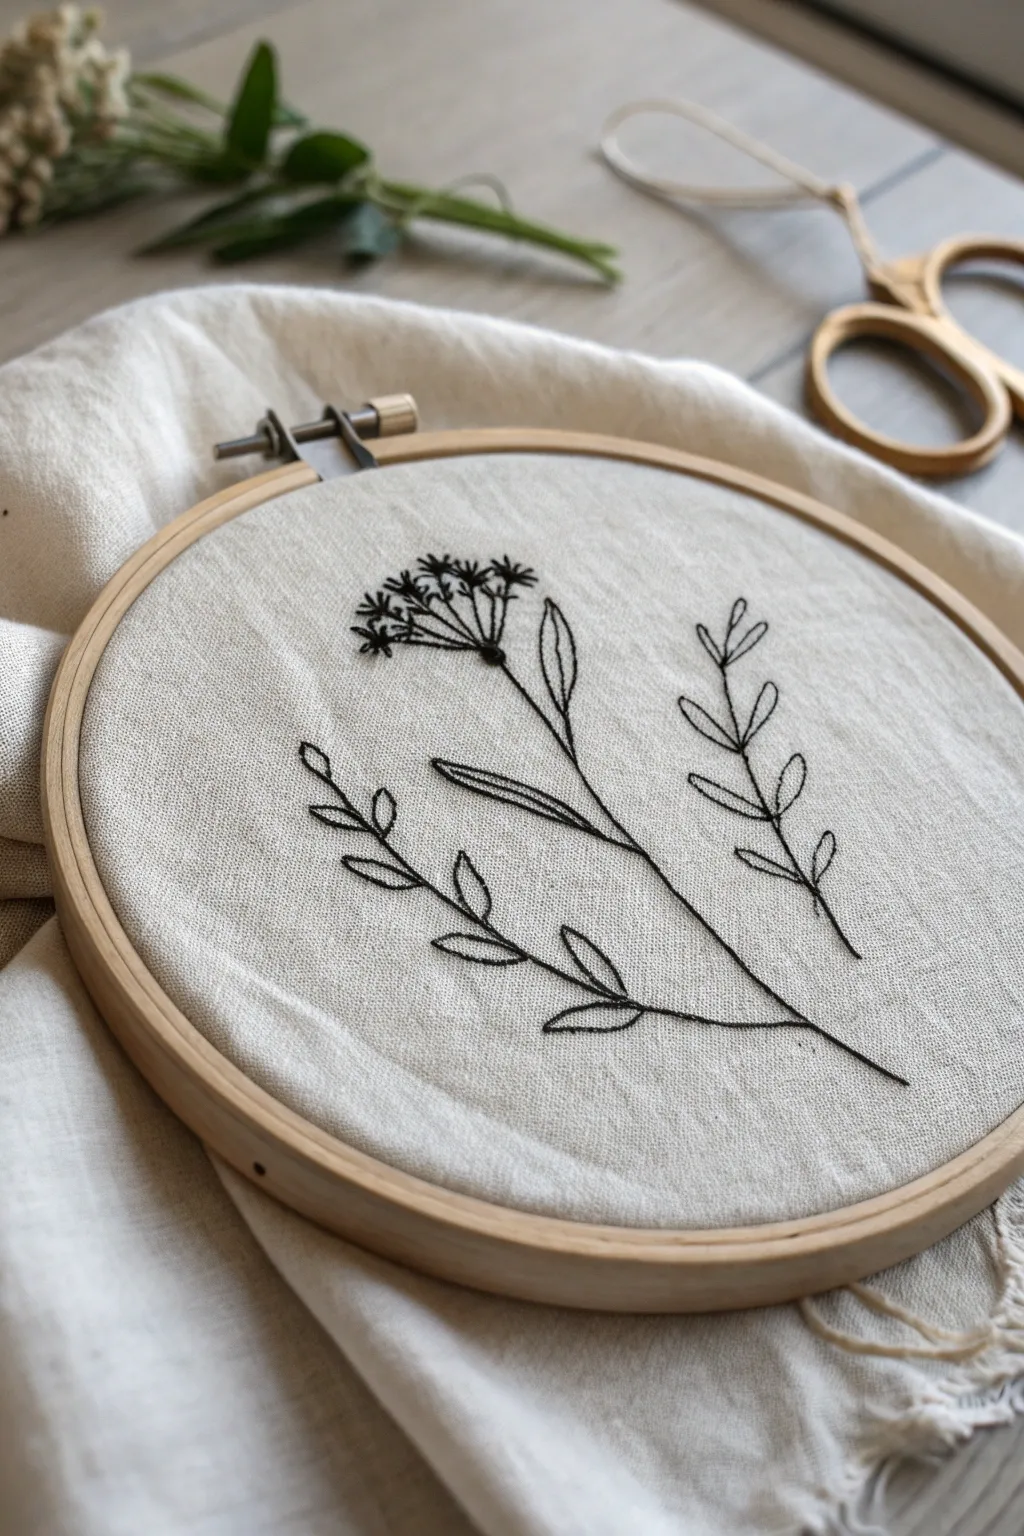
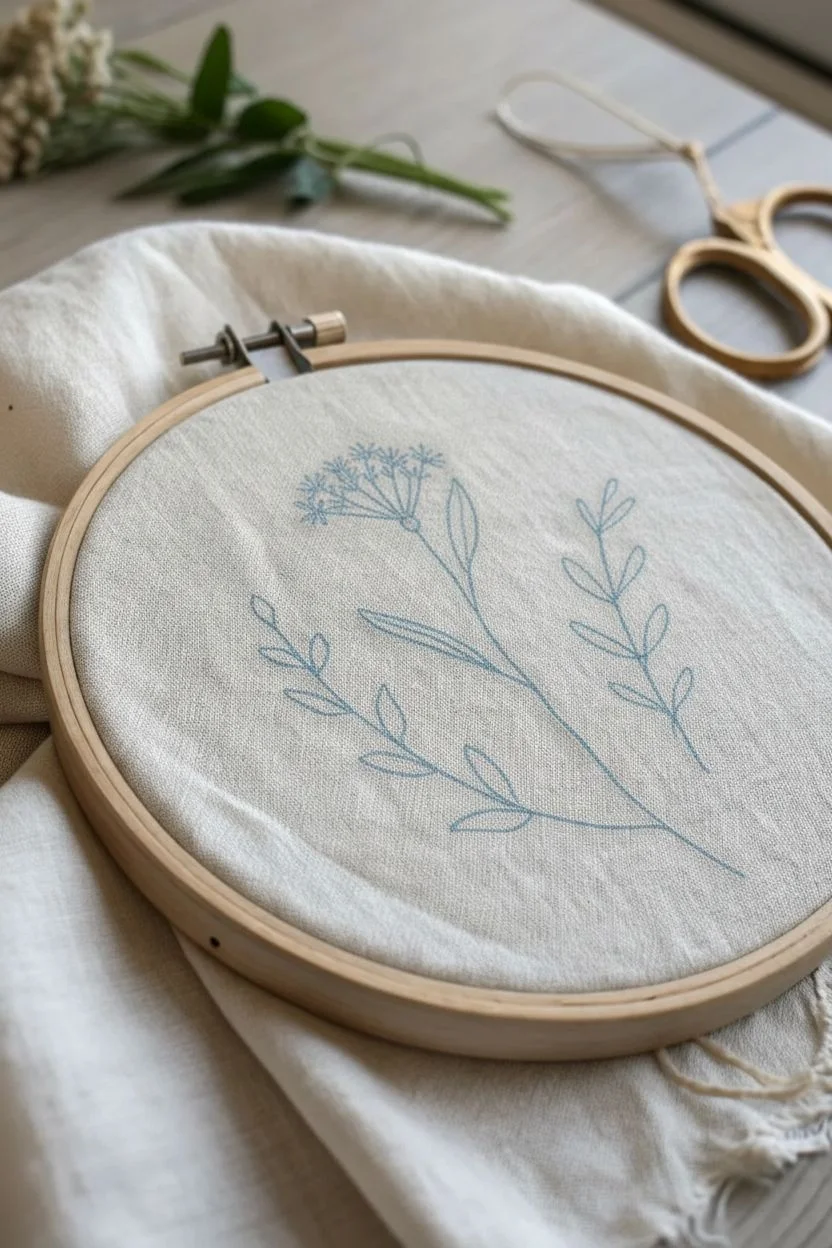
This elegant embroidery project features three delicate plant stems rendered in simple black line work on a textured linen background. The negative space and sparse design create a modern, calming aesthetic perfect for beginner stitchers.
How-To Guide
Materials
- 6-inch wooden embroidery hoop
- Beige or oatmeal-colored linen fabric (fat quarter)
- Black cotton embroidery floss (DMC 310 or similiar)
- Size 5-7 embroidery needle
- Water-soluble fabric marker or transfer paper
- Small sharp embroidery scissors
- Backing felt (optional)
Step 1: Preparation & Transfer
-
Prepare the fabric:
Iron your piece of linen to remove any creases. Linen can be stubborn, so use the steam setting or a spray bottle to ensure it is perfectly flat before transferring your design. -
Hoop the fabric:
Loosen the screw on your wooden hoop and separate the rings. Place the inner ring under the fabric and the outer ring on top. Press down firmly and tighten the screw, pulling the linen taut like a drum skin. -
Draft the stems:
Using a water-soluble marker, lightly draw the three main stem lines. The central stem should be the longest, leaning slightly right. Draw a shorter curved stem on the left and a separate leafy sprig on the right. -
Add leaf details:
Sketch the leaves. For the left stem, draw small, pointed ovals in pairs. For the right sprig, draw rounded, tear-drop shaped leaves. On the central stem, add two long, slender leaves near the middle. -
Draft the floral head:
At the top of the central stem, draw a flattened umbrella shape. Sketch several straight lines radiating from a single point, topped with tiny clusters of dots or small circles to represent the flower buds.
Step 2: Stitching the Design
-
Thread the needle:
Cut a length of black embroidery floss about 18 inches long. I separate the floss and use just two strands for this project to keep the lines crisp and delicate. -
Stitch the central stem:
Begin with a stem stitch or a split stitch for the main central line. Start from the bottom and work your way up to where the flower head begins. -
Create the long leaves:
Switch to a backstitch for the two long, slender leaves on the central stem. Keep your stitch length consistent, around 3-4mm, to handle the gentle curves smoothly. -
Stitch the flower umbel:
Use a single straight stitch for each of the radiating lines at the top of the flower. They should fan out from the top of the main stem like spokes on a wheel. -
Add french knots:
At the end of each radiating spoke, create a small French knot. Loop the thread twice around the needle before pulling it through to create a distinct, textured bud. -
Stitch the left branch:
Move to the curved branch on the left. Use a stem stitch for the main line to give it a slightly twisted, rope-like appearance that looks great on curves. -
Outline the left leaves:
Use a simple backstitch to outline the pointed leaves on the left branch. Do not fill them in; the open line work is key to the minimalist style. -
Stitch the right sprig:
For the separate sprig on the right, use a backstitch for the entire form. Start at the bottom of the stem and work upward. -
Complete the right leaves:
Continue backstitching the rounded leaves on the right sprig. Ensure the points where the leaves meet the stem are sharp by ending a stitch exactly at the junction before starting the leaf curve.
Uneven Tension?
If your fabric puckers inside the hoop while stitching, you are likely pulling the thread too tight. Loosen the thread slightly or re-hoop the fabric to be tighter before continuing.
Step 3: Finishing Touches
-
Secure the threads:
Flip the hoop over. Weave your thread tail under existing stitches on the back to secure it, then snip off the excess. Do not knot the thread, as this can create lumps visible from the front. -
Remove markings:
Dip a cotton swab in water or use a spray bottle to gently wet the fabric where the marker lines are visible. The blue or purple ink should dissolve and vanish. -
Final tightening:
Allow the fabric to dry completely. If the linen loosened during the wetting process, gently tug the edges to regain that drum-tight tension and fully tighten the top screw. -
Trim excess fabric:
You can trim the excess linen to about 1 inch around the hoop and glue it to the inner ring, or gather it with a running stitch to cinch it flat against the back.
Pro Tip: Thread Choice
For a bolder, thicker line that resembles a marker drawing, use three strands of floss instead of two. This works particularly well if your linen has a very heavy, noticeable weave.
Hang your finished hoop on a gallery wall for a touch of handmade botanical charm
Hand-Stitched Fabric Banner With Quote or Word
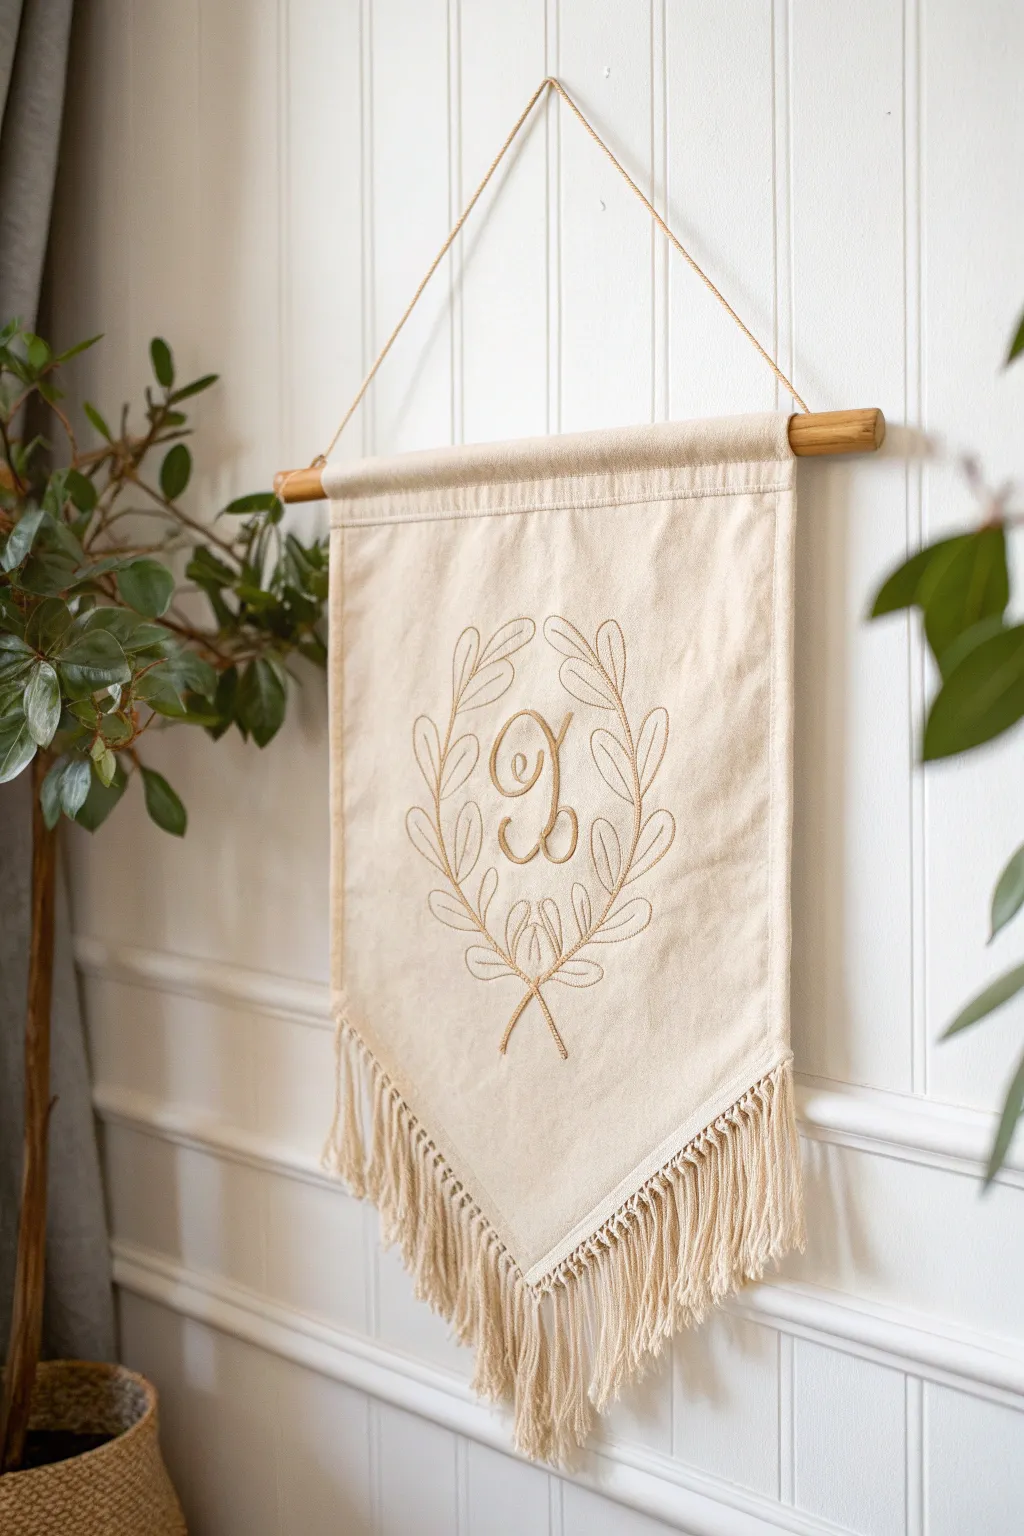
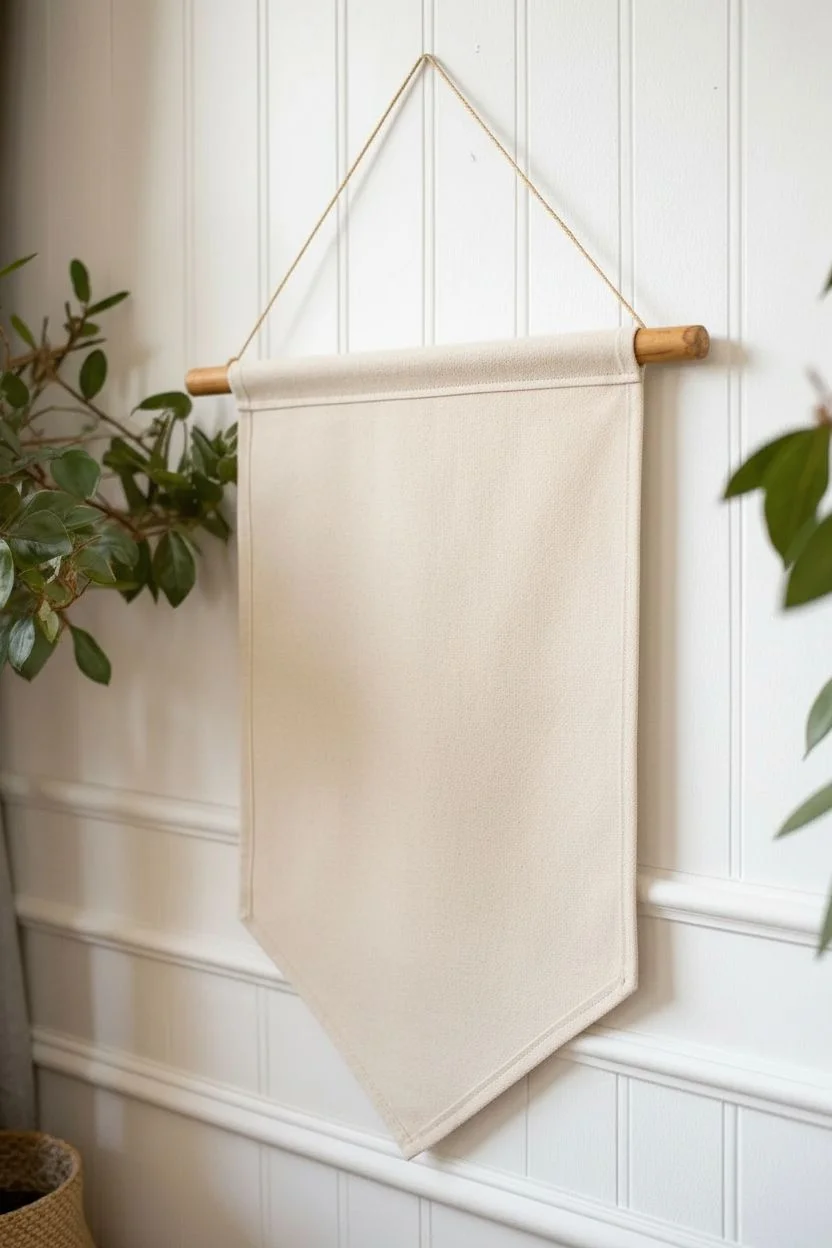
Add a touch of timeless elegance to your walls with this neutral, texturally rich fabric banner. Featuring a delicate chain-stitched monogram surrounded by a leafy wreath and finished with lush fringe, this project perfectly blends rustic warmth with sophisticated design.
Step-by-Step
Materials
- Heavyweight cotton canvas or linen fabric (natural/beige)
- Cotton fringe trim (natural color, 3-4 inches long)
- Wooden dowel (1/2 inch diameter)
- Embroidery floss or pearl cotton thread (golden brown)
- Embroidery needle
- Jute twine or cotton rope
- Fabric glue or sewing machine
- Iron and ironing board
- Water-soluble fabric marker
- Scissors
- Ruler
Step 1: Preparing the Banner Base
-
Cut the fabric:
Begin by deciding on the size of your banner. For the look in the image, cut a rectangle approximately 12 inches wide by 18 inches long. You will also need to cut a point at the bottom center. Find the center of the bottom edge, measure up about 4-5 inches on each side, and cut diagonal lines to meet at the center point. -
Hem the edges:
Fold the side edges and the pointed bottom edges over by 1/2 inch towards the back. Press firmly with an iron to create a crisp crease. -
Secure the hems:
Stitch these hems down using a straight stitch on your sewing machine or a strong fabric glue. If using glue, apply a thin, even bead to avoid bleed-through and weigh it down while it dries. -
Create the rod pocket:
Fold the top edge of the fabric down about 1.5 to 2 inches towards the back. This needs to be wide enough to accommodate your wooden dowel easily. -
Sew the pocket:
Sew a straight line across the bottom of this fold to create the channel for the dowel. Double-stitch the ends for extra durability.
Pucker Prevention
If your fabric puckers while embroidering, use an embroidery hoop. Just be sure to move it gently so you don’t crush previous stitches or the hemmed edges.
Step 2: Adding the Design
-
Sketch the wreath:
Lay your banner flat. Using a water-soluble fabric marker, lightly draw two curved branches stemming from a central bottom point, creating an open oval shape. Add simple leaf shapes along the branches. -
Draw the monogram:
In the center of the wreath, sketch your chosen initial in a cursive, script font. I find it helps to look at calligraphy examples online for inspiration before committing ink to fabric. -
Prepare your thread:
Cut a length of embroidery floss—using all six strands will give you the raised, visible texture seen in the photo. Thread your needle and knot the end. -
Stitch the stems:
Use a stem stitch or a backstitch to outline the main branches of the wreath. Keep your stitches small and even to navigate the curves smoothly. -
Outline the leaves:
Follow your markings to stitch the outline of each leaf. For the central vein of the leaf, a single long straight stitch works beautifully. -
Embroider the letter:
Stitch the monogram using a chain stitch or a heavy backstitch. The chain stitch is particularly effective for mimicking the thick, rope-like look of the letter in the example. -
Clean up markings:
Once the embroidery is complete, dab the fabric with a damp cloth or spray lightly with water to dissolve the marker lines.
Pro Tip: Fluffier Fringe
To get that lush, full look on the fringe, gently comb through the strands with a clean fine-tooth comb after attaching it. It separates the fibers nicely.
Step 3: Assembly and Finishing
-
Attach the fringe:
Measure the two diagonal sides of the bottom point. Cut your fringe trim to match these lengths. -
Secure the trim:
Sew or glue the header of the fringe trim to the back side of the banner’s bottom edges, ensuring the fringe hangs freely from the point. -
Insert the dowel:
Slide the wooden dowel through the top pocket you created earlier. It should extend about an inch beyond the fabric on both sides. -
Add hanging twine:
Cut a piece of jute twine to your desired hanging length (about 24 inches usually works well). Tie each end securely to the exposed ends of the wooden dowel using a simple double knot.
Hang your new banner in an entryway or gallery wall to enjoy the customized charm it brings to your space

PENCIL GUIDE
Understanding Pencil Grades from H to B
From first sketch to finished drawing — learn pencil grades, line control, and shading techniques.
Explore the Full Guide
Fabric Painting for Brushy, Painterly Cloth Art
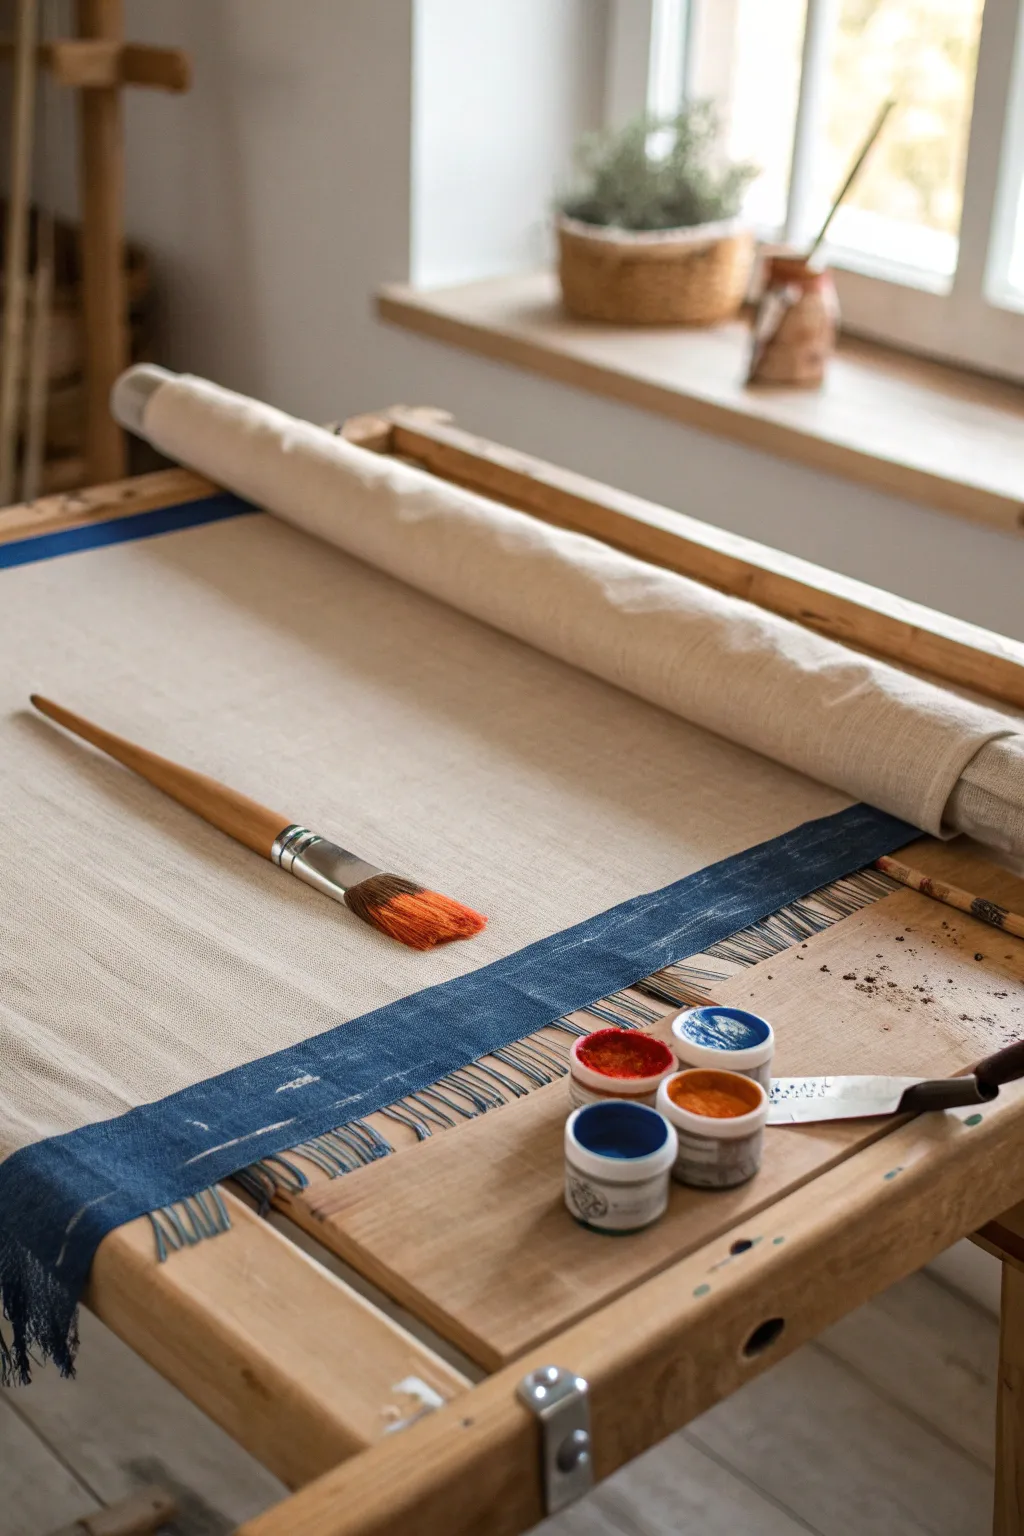
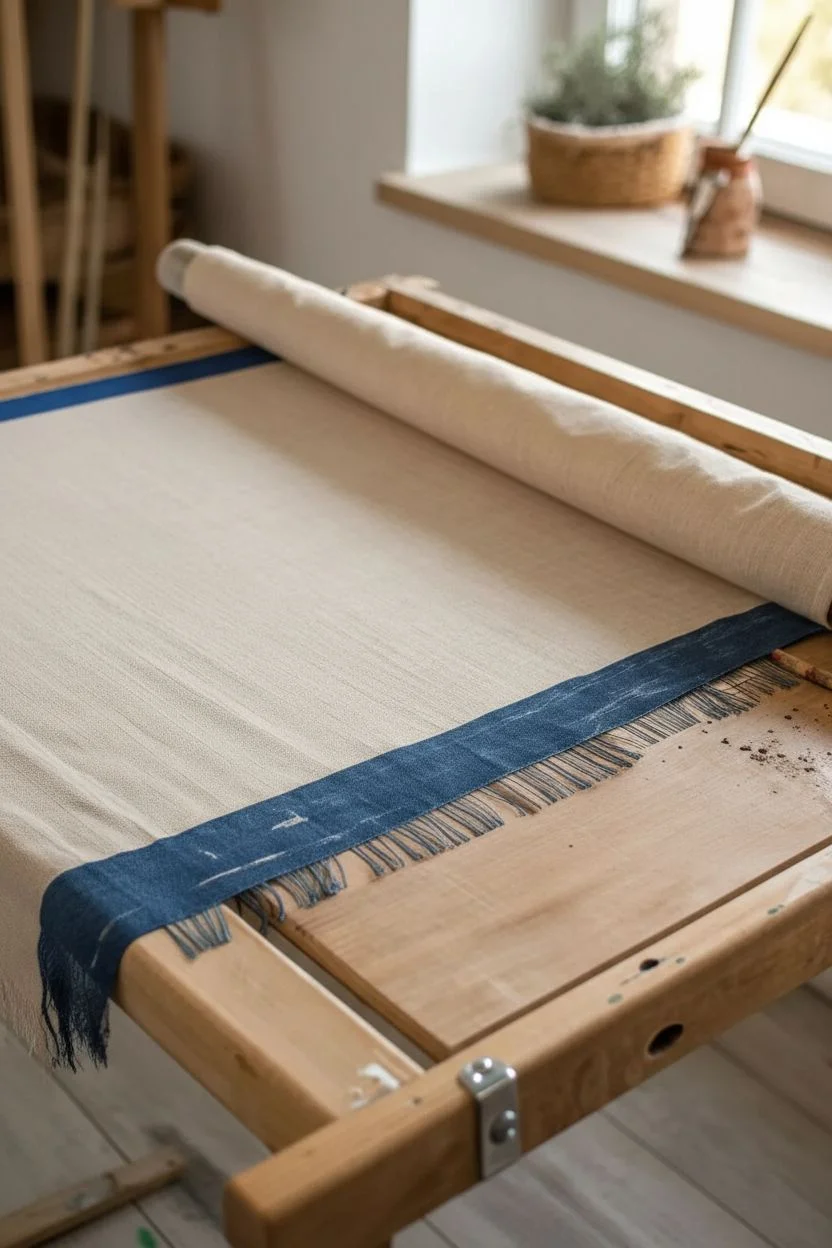
Learn to prepare a classic painterly surface using heavy linen and a raw, artistic stretching method. This project results in a durable, textured canvas with a decorative frayed edge detail, perfect for large-scale acrylic or oil painting.
How-To Guide
Materials
- Heavyweight linen or cotton duck canvas (unprimed)
- Wooden stretcher frame (adjustable or fixed)
- Blue painter’s tape
- Staple gun and heavy-duty staples
- Fabric scissors
- Large flat paintbrush (boar bristle or synthetic)
- Gesso (white or clear)
- Small jars of acrylic paint (blue, orange, red for testing)
- Palette knife
- Canvas pliers (optional but helpful)
Step 1: Stretching the Canvas
-
Measure and cut:
Begin by rolling out your linen fabric. Measure a piece that is at least 6-8 inches larger than your wooden frame on all sides to allow for wrapping and the decorative fringe detail. -
Create the frayed edge:
Before attaching anything, decide which two opposing sides will feature the decorative fringe. On these ends, make a small snip about 2 inches from the edge and tear the fabric strip off. Tearing follows the grain, ensuring a perfectly straight line. -
Establish the fringe:
Using a needle or the tip of your scissors, gently tease out the horizontal threads along your torn edges until you have a nice, consistent fringe about 1-2 inches long. -
Initial placement:
Lay the fabric flat and center your wooden frame on top of it. Ensure the weave runs square to the frame bars. -
Secure the decorative ends:
Fold the fringed ends over the frame bars. Because we want to show off that raw edge, staple the fabric to the *back* or *side* of the frame, but leave the fringe visible along the front edge or just slightly wrapping around. -
Add painter’s tape:
Run a strip of blue painter’s tape across the fabric, right where the fringe begins. This protects the fringe from paint and gesso, keeping that nice raw blue-thread look clean.
Clean Lines
Burnish the edge of your painter’s tape with a spoon or fingernail before painting. This seals the adhesive and prevents the gesso or blue paint from bleeding into your raw fringe.
Step 2: Creating Tension
-
Anchor the center:
Moving to the non-fringed sides, pull the fabric taut in the center of one side and place a single staple. Repeat on the exact opposite side, pulling firmly to create tension. -
Work outward:
Continue stapling from the center moving toward the corners, alternating sides as you go. I usually place staples about 2 inches apart. -
Check the drum:
Tap the center of the canvas; it should sound slightly like a drum. If it’s loose, you may need to remove a few staples and pull tighter using canvas pliers. -
Fold corners:
Neatly fold the corners (hospital corners work best) and secure them flat against the back of the frame.
Step 3: Priming and Initial Color
-
Prepare the gesso:
Open your gesso container. If it feels too thick, you can thin it slightly with a tiny amount of water to help it penetrate the heavy linen weave. -
Apply first coat:
Using your large flat brush, apply the gesso in horizontal strokes across the main body of the canvas. Stop exactly at the blue tape line. -
Sand and repeat:
Let the first coat dry completely (about an hour). Lightly sand it for a smoother finish, then apply a second coat using vertical strokes for even coverage. -
Paint the border:
Once the gesso is bone dry, carefully peel back the blue tape. With a smaller brush, you can now paint a thick band of blue (or your chosen accent color) right along the edge where the fringe meets the primed area. -
Test your colors:
While your canvas is ready, use your palette knife to mix a small amount of orange and red paint. Test the vibrancy on a scrap piece of your cut-off linen.
Dip-Dye Effect
Instead of painting the border stripe, try dip-dyeing just the fringe threads in ink or watercolor before you stretch the canvas for a softer, organic gradient look.
Now you have a professional-grade, custom-stretched surface ready for your next masterpiece
Fabric Marker Doodles Turned Into Wall Art
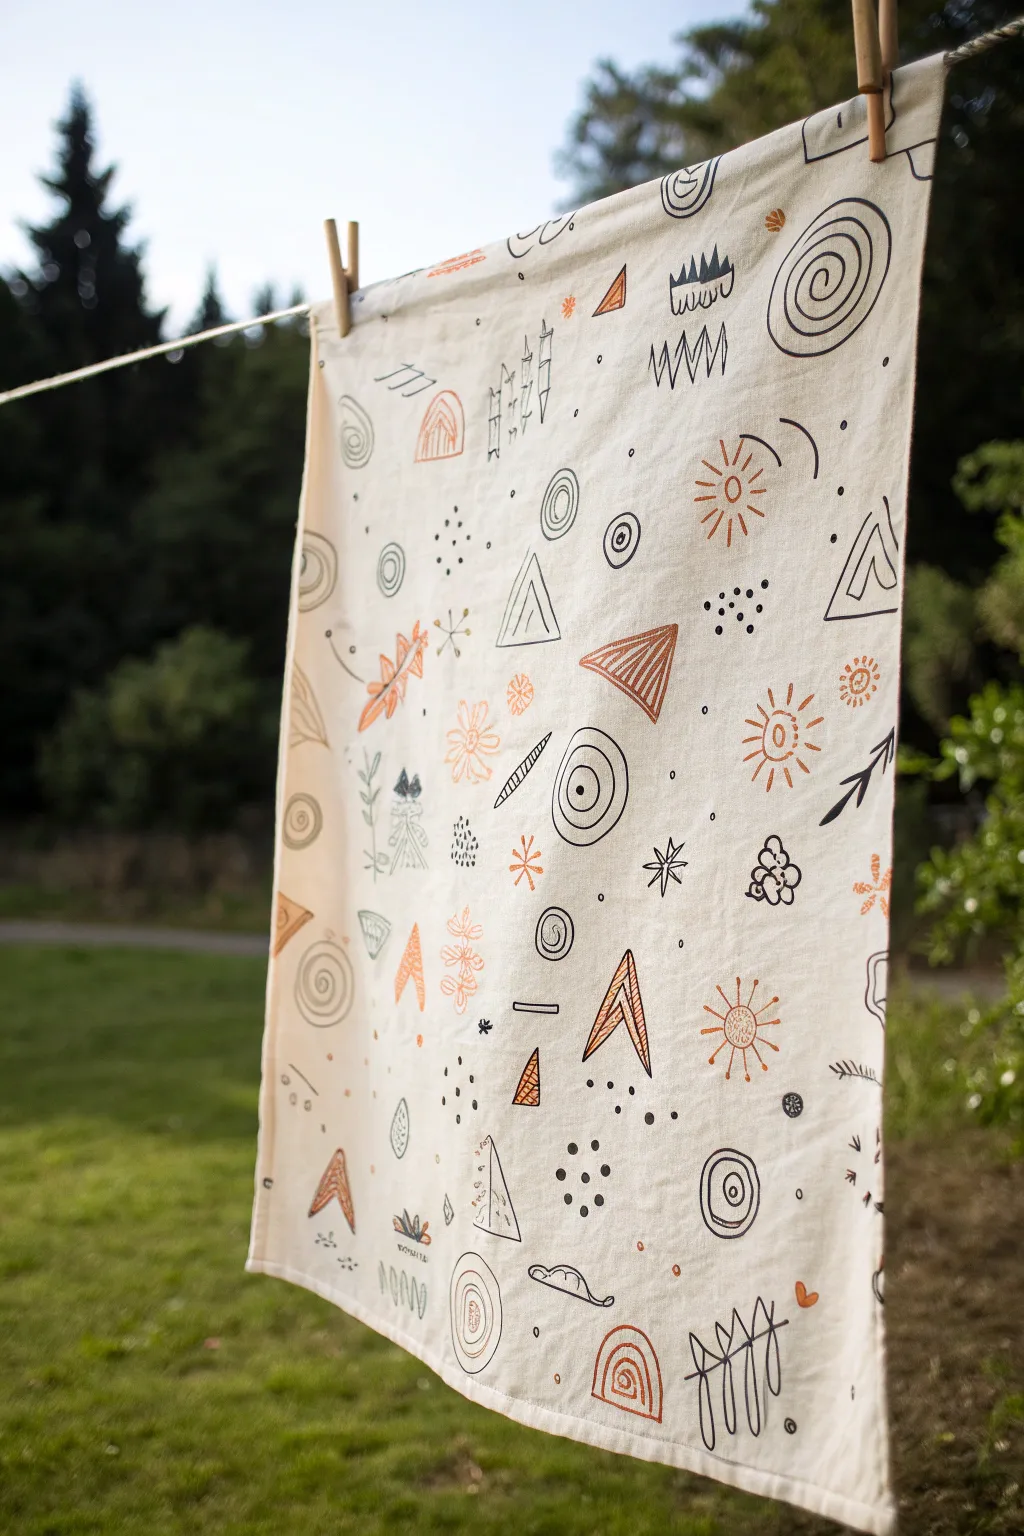
Transform a plain piece of cotton or canvas into a modern art piece using nothing but fabric markers and your imagination. This project features freeform geometric shapes and organic lines in a minimal color palette of black and terracotta, creating a trendy bohemian aesthetic.
Detailed Instructions
Materials
- Rectangle of unbleached cotton fabric or canvas (hemmed or raw edge)
- Black fabric marker (fine tip)
- Black fabric marker (medium or brush tip)
- Terracotta or rust-orange fabric marker
- Iron and ironing board
- Cardboard or protective mat
- Pencil (optional)
Step 1: Preparation
-
Prepare the fabric:
Start by washing and drying your chosen fabric to remove any sizing chemicals that might repel the ink. If the fabric is wrinkled, give it a quick press with an iron to ensure a smooth drawing surface. -
Protect your workspace:
Lay down a piece of cardboard or a protective mat underneath your fabric. Fabric markers can sometimes bleed through the weave, especially on lighter cottons, and you want to keep your table clean. -
Map out the space (optional):
If you are nervous about going straight in with ink, lightly sketch a few placement circles with a pencil to ensure your doodles are evenly distributed. However, the beauty of this style is its spontaneity, so freehand is encouraged.
Ink Control
Work slowly with fabric markers. If you pause with the tip on the fabric, the ink will bleed outward, creating a blotch. Keep the pen moving!
Step 2: Drawing the Base Doodles
-
Start with large geometric shapes:
Using the fine-tip black marker, draw several large, open triangles and circles scattered randomly across the fabric. Avoid placing them too close together; leave plenty of breathing room. -
Add spiral elements:
Draw large, loose spirals in black. Vary the sizes, making some tight like a snail shell and others loose and open. These add movement to the composition. -
Create distinct sun motifs:
Switch to your terracotta/rust marker. Draw several sun shapes—simple circles with radiating lines. Mix it up by making some solid circles with rays, and others just outlined circles. -
Introduce triangular details:
Draw small clusters of triangles. Use both the black and terracotta markers. Fill some of these triangles with lines (stripes) to add texture rather than coloring them in solidly. -
Draw organic leaf shapes:
In the open spaces, sketch simple botanical elements. Think of single stems with small, alternating leaves, or abstract pine tree shapes using jagged lines.
Go Big
Stretch this fabric over a wooden frame to create instant gallery-worthy canvas art, or sew a loop at the top to hang it from a dowel.
Step 3: Adding Texture and Filler
-
Detail the large shapes:
Go back to your initial large black triangles and circles. Add concentric lines inside them. For example, draw a smaller triangle inside a larger one, or add ringing circles around a center point. -
Incorporate wavy lines:
Draw short segments of zig-zag lines or squiggles (like a frequency wave) in black. These fill awkward gaps nicely and add energy to the piece. -
Add ‘confetti’ dots:
Using the medium-tip black marker, dot clusters of small spots in the empty areas. Group them in threes or fives for a pleasing, organic look. -
Draw starbursts:
Create little asterisks or six-pointed stars using simple crossed lines. Scatter these like constellations throughout the design. -
Create rainbow arches:
Draw small arch shapes (rainbows) using the terracotta marker. You can nestle lines inside them or keep them simple. These echo the larger spiral shapes.
Step 4: Finishing Up
-
Balance the colors:
Step back and look at your fabric from a distance. If an area looks too heavy with black, add a small terracotta detail there to balance the warmth. -
Fill remaining gaps:
Look for any large white spaces that feel empty. Fill them with tiny circles, single dash lines, or small ‘v’ shapes to maintain a consistent density across the fabric. -
Heat set the ink:
Once the ink is completely dry (wait at least an hour), iron the fabric on the reverse side according to the marker manufacturer’s instructions. This locks in the color so it won’t fade during washing.
Hang your new patterned fabric to enjoy a custom piece of art that looks professionally printed


Glue-Resist Batik Look Without Wax
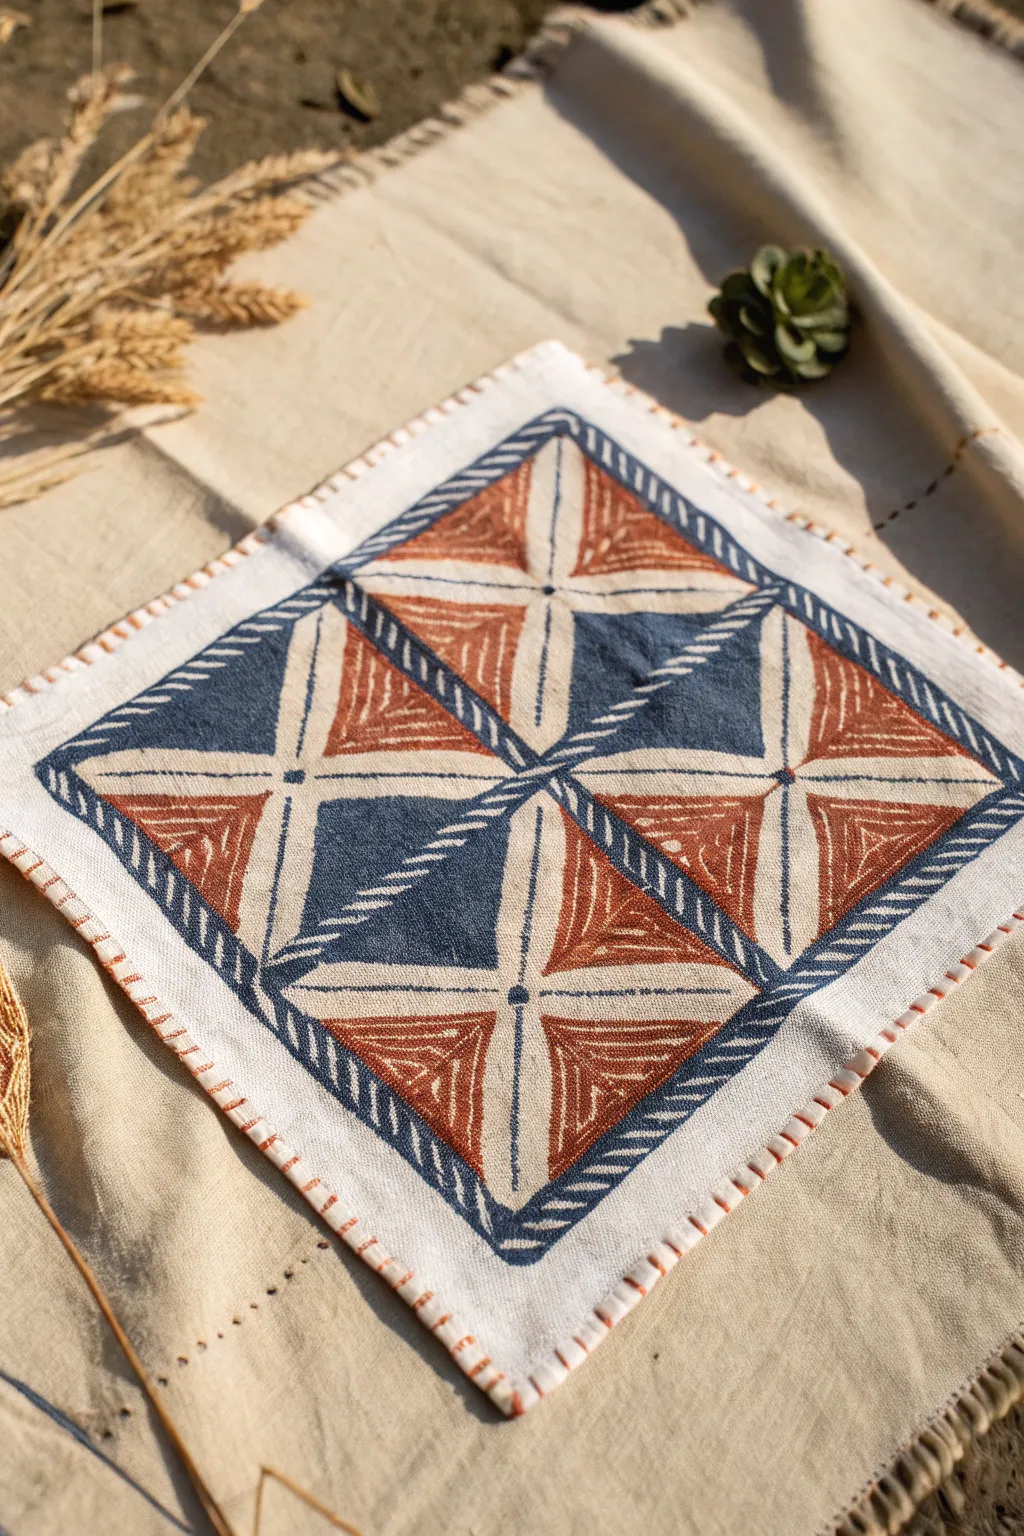
Recreate the intricate beauty of batik without the hassle of hot wax by using everyday blue gel glue as a resist. This project results in a stunning geometric napkin featuring earthy rust and indigo tones, finished with a charming hand-stitched border.
Step-by-Step Tutorial
Materials
- White cotton fabric square (pre-washed and ironed)
- Blue gel glue (washable school glue)
- Fabric paints (indigo blue and rust/terra cotta)
- Paintbrushes (small detail brush and medium flat brush)
- Embroidery floss (rust or orange)
- Embroidery needle
- Pencil or fabric marker
- Ruler
- Cardboard or plastic sheet (to protect work surface)
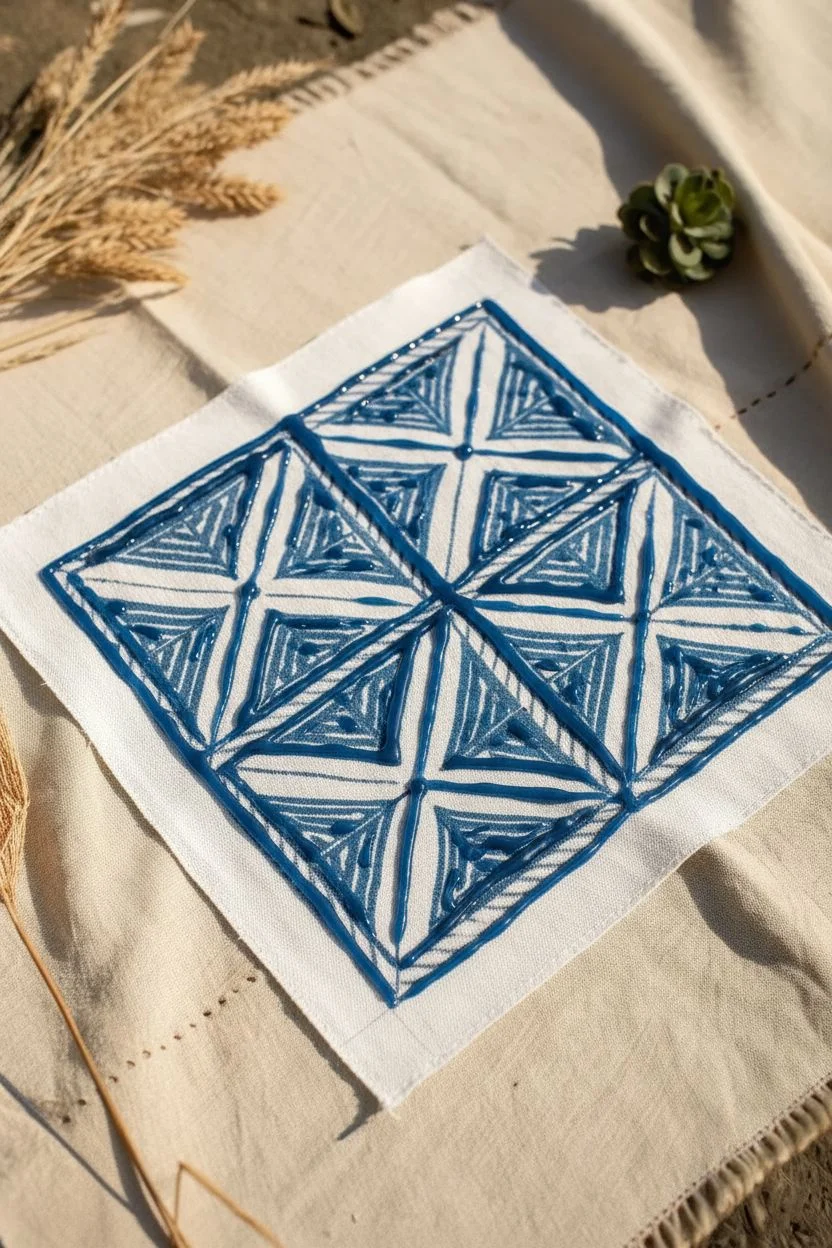
Step 1: Creating the Resist Design
-
Prepare the fabric:
Lay your white cotton square flat on a protected surface. It helps to tape the corners down slightly to keep the fabric taut while you draw. -
Draft the grid:
Using a ruler and a light pencil, lightly mark out a large square in the center of your fabric, leaving a generous white border around the edges. -
Divide the square:
Draw intersecting lines to divide that large square into four equal smaller squares. Then, draw diagonal lines connecting the corners of the main square to create an ‘X’ shape through the center. -
Sketch the inner patterns:
Inside each of the four triangular sections formed by the ‘X’, lightly sketch smaller triangles and starburst lines radiating from the center point. Don’t worry about perfection; organic lines look more authentic. -
Apply the glue resist:
Take your blue gel glue and carefully trace over your pencil lines. The blue tint helps you see exactly where you are drawing. Use a steady hand to create consistent lines. -
Add texture details:
Within the larger lines, add small dashes or ‘hatch marks’ using the glue. Specifically, add the diagonal hash marks along the main dividing lines to mimic the look of stitched binding found in traditional textiles. -
Let it dry completely:
Allow the glue to dry fully. This is crucial—it must be hard to the touch. I usually let mine sit overnight to be absolutely safe, as wet glue will smear your paint later.
Sticky Situation?
If glue resist isn’t washing out easily, soak the fabric in very warm water for another 20 minutes. Avoid scrubbing too hard, which can pill the fabric; patience with soaking is key.
Step 2: Painting and Revealing
-
Prepare your paints:
Dilute your fabric paints with a tiny bit of water. You want them to be fluid enough to soak into the fabric but not so watery that they bleed uncontrollably. -
Paint the indigo sections:
Referencing the design, paint alternating triangular sections with the indigo blue paint. Paint right up to and slightly over the dried glue lines—the glue will protect the white fabric underneath. -
Paint the rust sections:
Fill in the remaining geometric shapes with the rust or terra cotta color. The contrast between the cool blue and warm earth tone is what gives this piece its distinctive character. -
Dry the paint:
Let the paint dry completely according to the manufacturer’s instructions. Keep the fabric flat during this time to prevent pooling. -
Soak the fabric:
Fill a sink or basin with warm water. Submerge the painted fabric and let it soak for about 15-20 minutes to soften the glue. -
Remove the resist:
Gently rub the fabric against itself or use a soft brush to scrub away the gel glue. You’ll see the crisp white lines appear where the glue was. -
Rinse and dry:
Rinse the fabric under running water until the water runs clear. Hang it to dry or lay it flat.
Natural Texture
Use unbleached linen instead of bright white cotton for a more vintage, earthy look. The paint colors will appear slightly more muted and organic on the natural beige background.
Step 3: Finishing Touches
-
Iron the piece:
Once dry, press the fabric with a hot iron to set the paint (if required by your specific brand) and to smooth out wrinkles. -
Prep edges for stitching:
Fold the raw edges of the fabric inward about a quarter-inch, then fold again to hide the fraying. Press these hems flat with your iron. -
Start the blanket stitch:
Thread your embroidery needle with rust-colored floss. Start at one corner and begin a simple blanket stitch or whip stitch around the entire perimeter. -
Space the stitches:
Keep your stitches evenly spaced, roughly a quarter-inch apart. This contrasting thread adds a lovely rustic texture that frames the painted design perfectly. -
Secure and finish:
When you reach the end, knot off your thread securely on the back side and trim any excess threads.
Now you have a beautiful, hand-painted textile that looks like an authentic artisan treasure ready for your table
Stamped Nature Bunting on Fabric Triangles
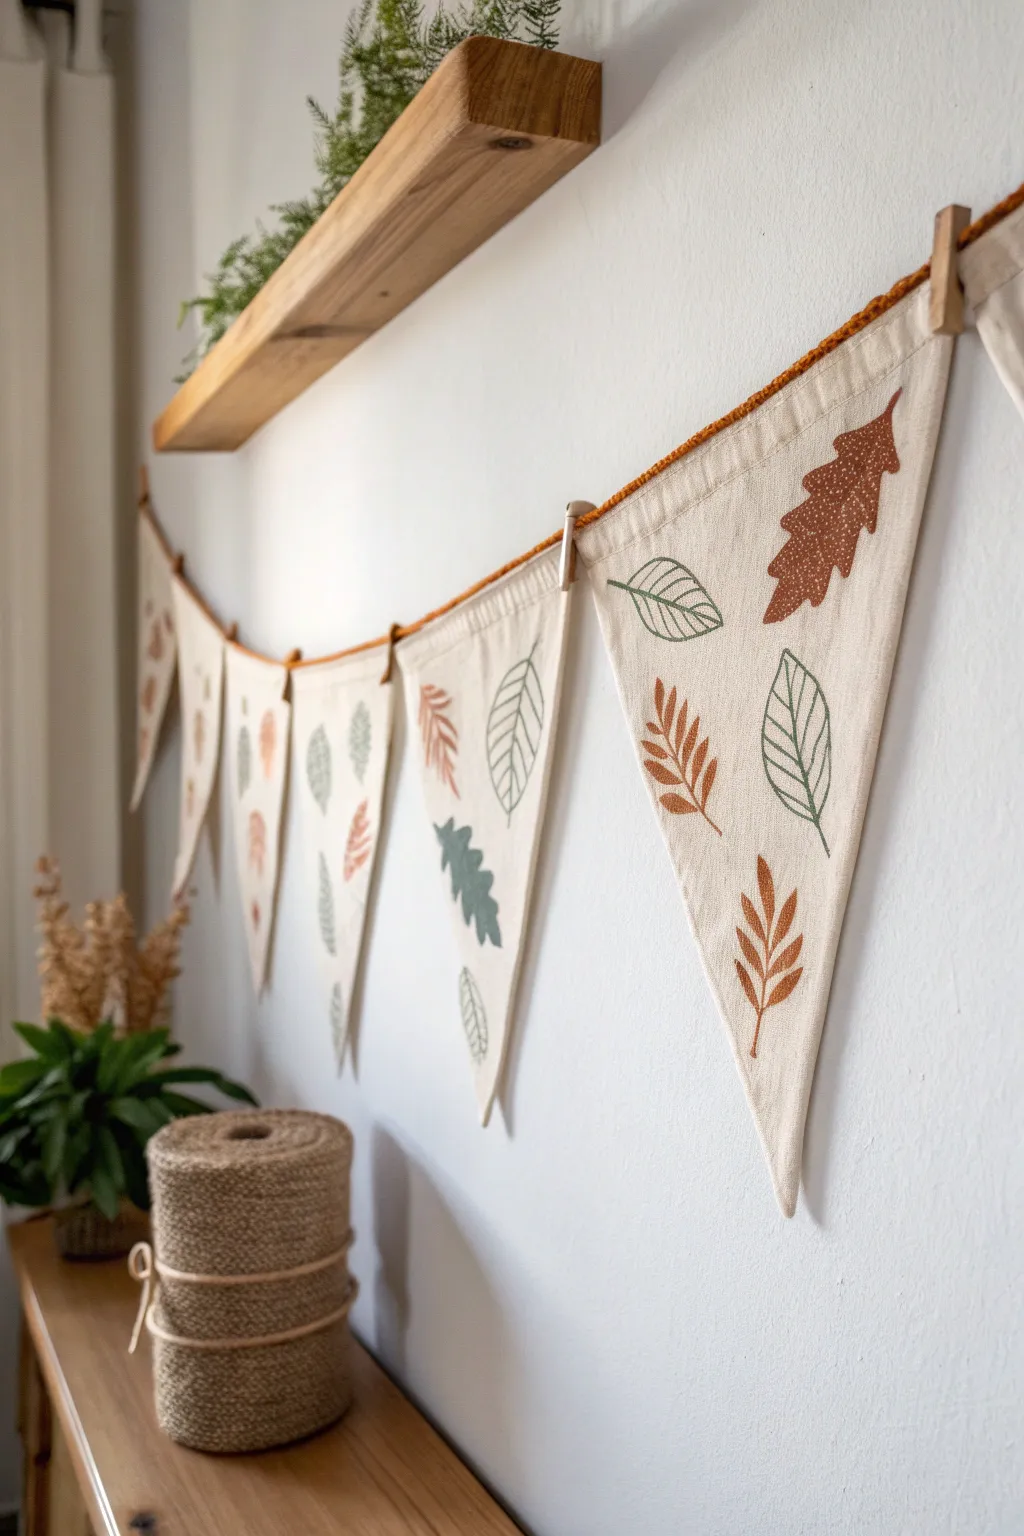
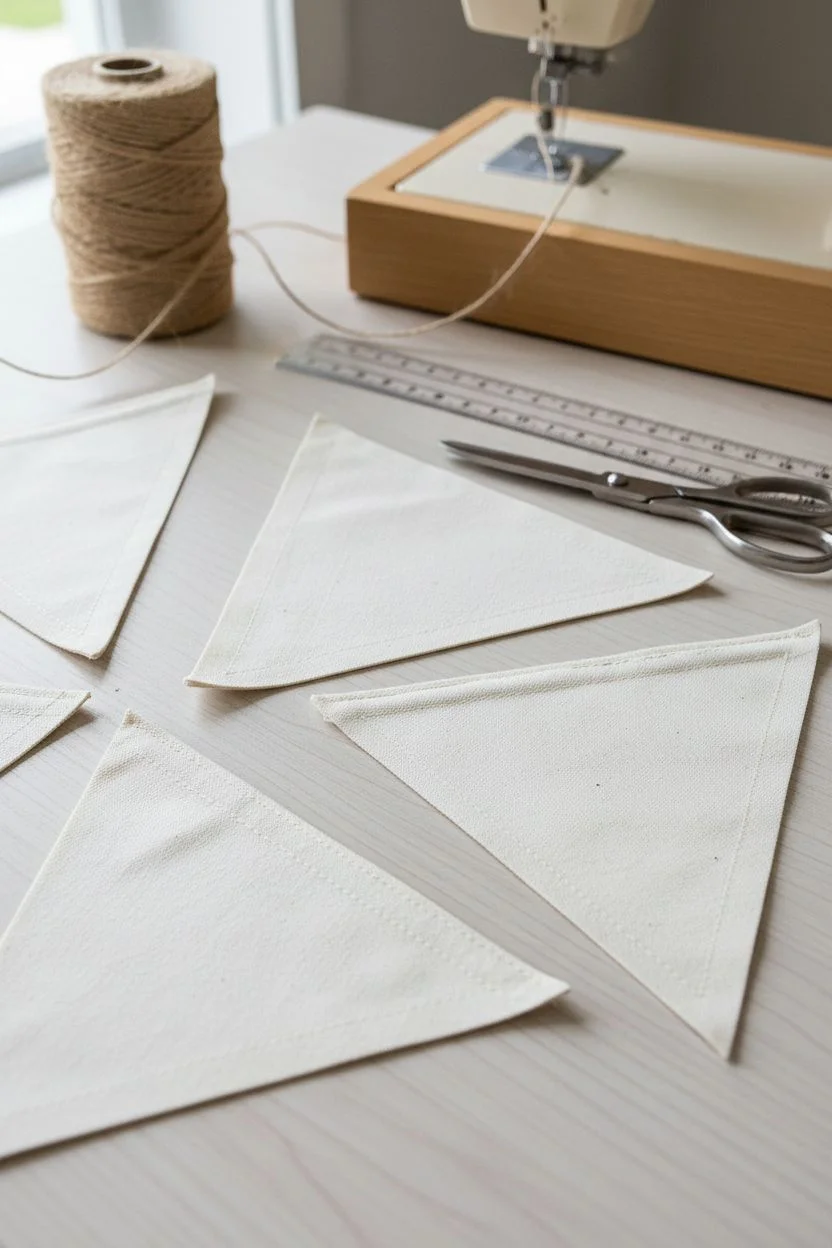
Bring the cozy charm of an autumn walk indoors with an earthy, leaf-stamped bunting that adds warmth to any wall. Using simple stamps and natural canvas, you’ll create a timeless piece of decor perfect for seasonal transitions.
Detailed Instructions
Materials
- Heavyweight cream canvas or cotton drop cloth fabric
- Fabric paint or screen printing ink (rust, olive green, mustard yellow, dark green)
- Foam brayer or sponge daubers
- Leaf stamps (commercial or homemade from lino blocks/EVA foam)
- Pinking shears (optional) or rotary cutter
- Sewing machine with cream thread
- Rust or mustard-colored chunky yarn or braided cord
- Mini wooden clothespins
- Iron and ironing board
- Ruler/straight edge
Step 1: Fabric Preparation
-
Wash and press:
Begin by pre-washing your canvas to remove any sizing chemicals that might prevent the paint from adhering properly. Dry it thoroughly and give it a rigorous press with a hot iron to ensure a perfectly flat stamping surface. -
Measure triangles:
Create a simple cardboard template for your flags to ensure consistency. A classic pennant shape works best—try an isosceles triangle about 6 inches wide at the top and 8 inches long. -
Cut the flags:
Trace your template onto the fabric. Using a rotary cutter and ruler creates the sharpest lines, though pinking shears can add a nice rustic texture to the edges if you prefer to prevent fraying. -
Create the rod pocket:
Fold the top (short edge) of each triangle over by about 1 inch toward the back side. Press this fold flat with your iron to create a clean crease. -
Sew the hem:
Stitch straight across the folded top edge using a standard running stitch on your sewing machine. Backstitch at the start and end to secure it. This channel is usually where string goes, but we are using it for structure and stability for the clips.
Fixing Smudges
Smudged a print? Don’t panic. Turn that accidental blotch into an abstract background shape, or overlay a darker, more opaque leaf print on top to hide it.
Step 2: Stamping the Design
-
Plan your palette:
Select earthy tones for your leaves. I like to squeeze small amounts of rust, mustard, and varying greens onto a flat palette or paper plate. -
Load the stamps:
Instead of dipping the stamp directly into paint, use a foam dauber or roller to apply a thin, even layer of fabric paint onto the raised design of your stamp. This prevents globs and ensures crisp lines. -
Test prints:
Before committing to the bunting, stamp onto a scrap piece of canvas. This helps you gauge how much pressure is needed and if your paint layer is too thick or thin. -
Stamp the focal leaves:
Start with your largest leaf design (like the oak leaf). Place it slightly off-center on a few flags. Press firmly and lift straight up to avoid smudging. -
Add variety:
Rotate between different leaf shapes—ferns, birch leaves, or simple ovals. Alternate the orientation of the stamps so some leaves point up, some tilt left, and others tilt right for a natural, scattered look. -
Layering colors:
Don’t be afraid to mix colors slightly on the stamp for a mottled, fall-leaf effect. Ensure you wipe the stamp clean between distinct color changes to keep the hues muddy. -
Outline details:
If your stamps are solid shapes, you can go back in with a fine-tip fabric marker once the paint is dry to add delicate veins or stems, mirroring the outline style seen on some of the leaves.
Raw Edge Texture
For a vintage farmhouse look, gently pull at the loose threads on the long sides of your triangles to create a soft, purposeful fringe effect before hanging.
Step 3: Assembly
-
Heat set the ink:
Once the paint is completely dry to the touch (usually 24 hours), run a hot iron over the designs to heat-set the fabric paint. This makes the artwork permanent. -
Prepare the cord:
Measure the length of the space where you’ll hang the bunting and cut your chunky yarn or braided cord accordingly, leaving about 15 inches of slack on each end for tying. -
Attach the clips:
Lay your cord out flat. Space your triangles evenly along the cord. -
Final securement:
Use mini wooden clothespins to clip the top corner of each flag directly to the cord. Place the clip vertically so it pinches the hemmed top edge and the yarn together securely.
Now hang your woodland-inspired garland high and enjoy the cozy autumn vibes it brings to your space
Leaf Printing on Cloth for Botanical Fabric Art
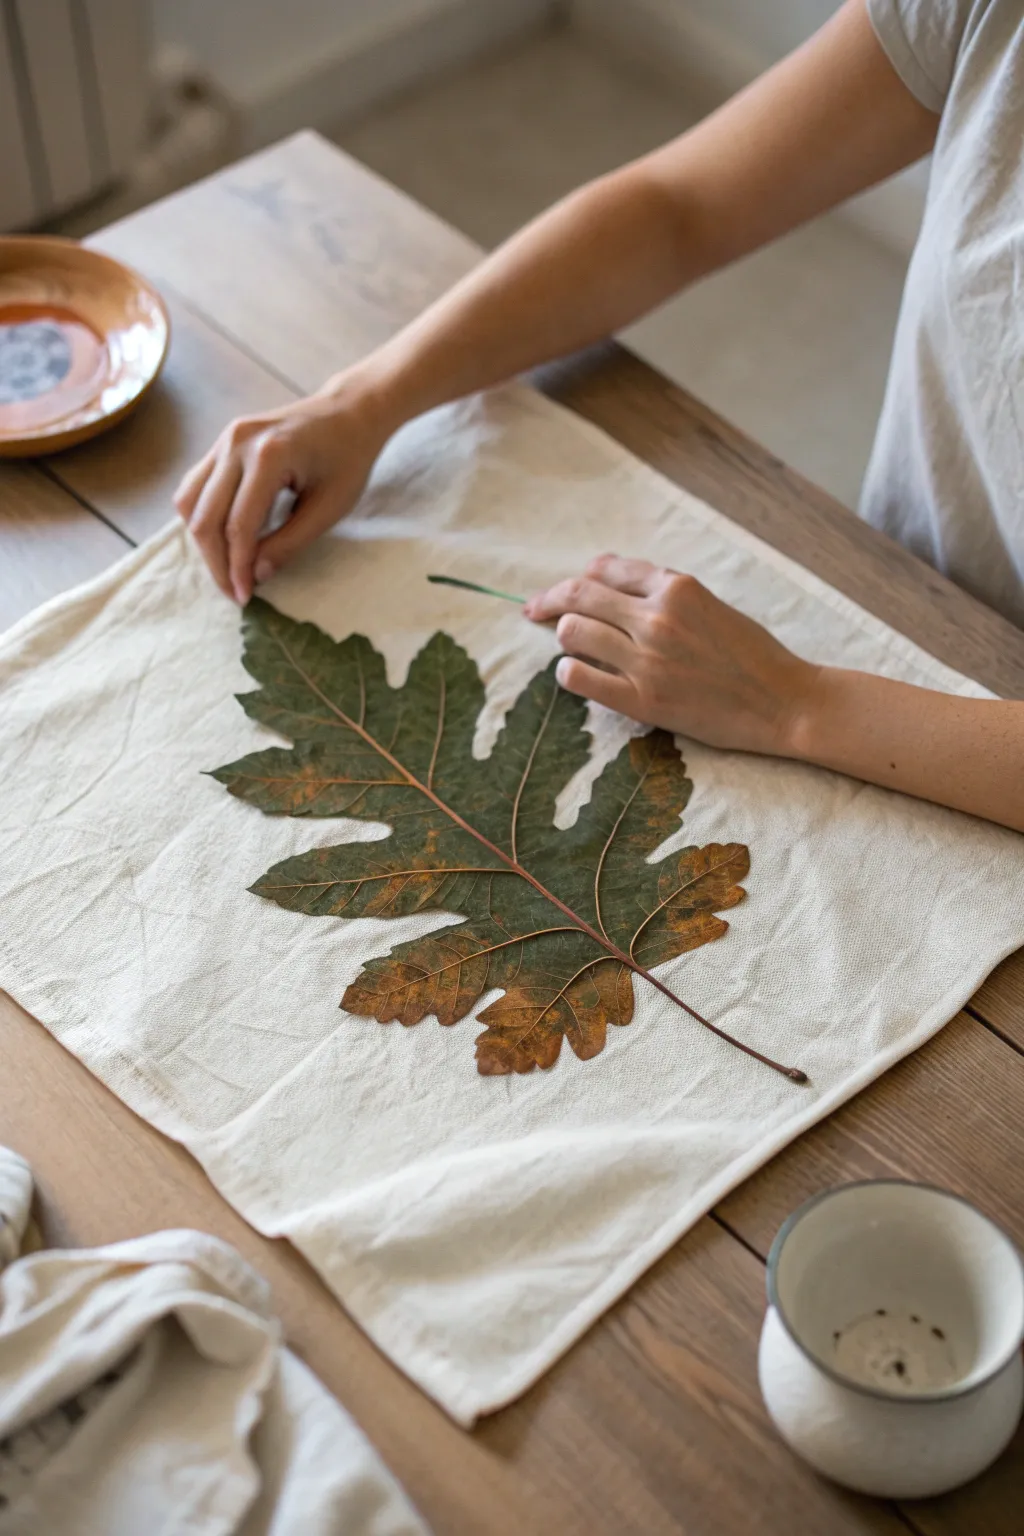
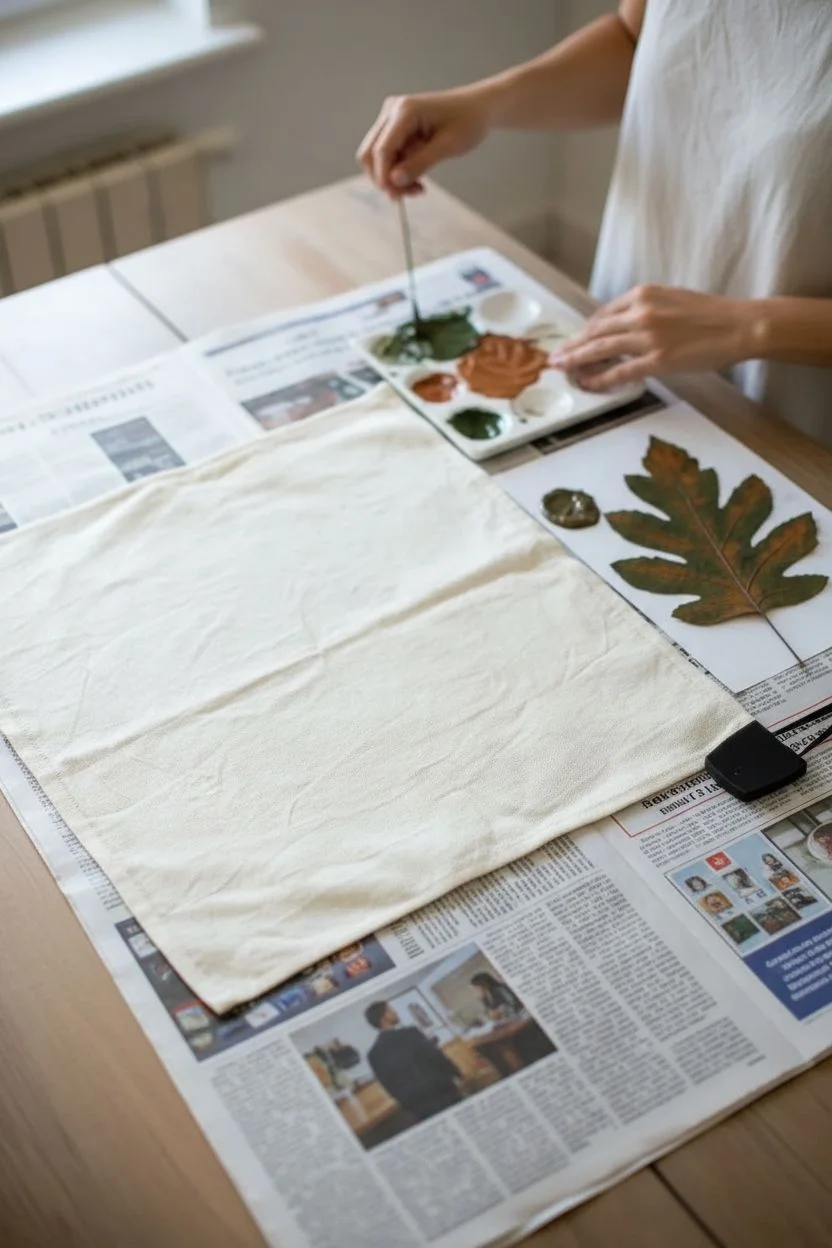
Capture the fleeting beauty of nature with this direct leaf printing project that transforms a simple cotton cloth into a botanical masterpiece. Using a large, textured leaf as your stamp, you will create a rustic, earth-toned impression that highlights delicate veins and organic imperfections.
Step-by-Step Tutorial
Materials
- Large, fresh leaf with prominent veins (e.g., fig, oak, or maple)
- Plain cotton or linen fabric square (white or cream)
- Fabric paint or acrylic paint mixed with textile medium (dark green, brown, rust)
- Foam brush or sponge applicator
- Brayer or rolling pin (optional)
- Scrap paper or newspaper
- tweezers
- Small paintbrush (for touch-ups)
- Iron (for heat setting)
Step 1: Preparation
-
Fabric Prep:
Begin by washing and drying your fabric to remove any sizing chemicals that might prevent the paint from absorbing properly. Iron it completely flat to ensure a crisp print surface. -
Workspace Setup:
Lay down a protective layer of newspaper or a drop cloth on your sturdy work table. Place your clean fabric on top, smoothing out any remaining wrinkles with your hands. -
Leaf Selection:
Choose a leaf that is not too dry or brittle; it needs to be flexible enough to flatten but sturdy enough to hold paint. A large, deeply lobed leaf creates the most dramatic focal point. -
Paint Mixing:
Prepare your palette by mixing earthy tones. I like to blend a deep forest green with a touch of burnt sienna to mimic the natural discoloration seen in autumn leaves.
Step 2: Applying the Paint
-
Vein Side Up:
Place your chosen leaf on a scrap piece of paper with the veiny underside facing up. The veins are the stamp’s texture, so this is the side we need to ink. -
Inking the Leaf:
Dip your foam brush or sponge into the paint mixture. Dab the paint onto the leaf surface gently but thoroughly. -
Even Coverage:
Ensure the entire leaf surface is coated, paying special attention to the outer edges and the stem. Avoid globs of paint, as these will smudge the final print. -
Color Variation:
For a more realistic look, dab a bit of lighter brown or rust color onto the tips of the leaf lobes while the green paint is still wet, blending them slightly on the leaf surface.
Clean Edges
Before flipping the leaf, wipe any paint off the very edge of the leaf perimeter. This prevents a messy ‘halo’ effect and keeps the silhouette crisp.
Step 3: Printing Process
-
Placement:
Carefully pick up the painted leaf by the stem or edges. hovering over your fabric to align it centrally or diagonally, depending on your desired composition. -
The Drop:
Commit to the placement and gently lower the leaf, paint-side down, onto the fabric. Do not shift or slide the leaf once it touches the cloth. -
Cover and Protect:
Place a clean sheet of scrap paper or a paper towel directly over the leaf. This protects your hands and prevents the leaf from moving during the pressing phase. -
Applying Pressure:
Using a brayer, rolling pin, or the heel of your hand, press firnly over the entire covered leaf area. Ensure you press down on the stem and the very tips of the lobes. -
Burnishing Details:
Remove the cover paper. Use a small, smooth tool handle or your fingertips to gently run along the main veins of the leaf, pressing the fabric into the texture for a sharper impression.
Vintage Look
Use tea-dyed muslin instead of white cotton for the base fabric. The sepia tone creates an instant antique botanical chart aesthetic.
Step 4: Finishing Touches
-
The Reveal:
Slowly peel the leaf away from the fabric, starting at the stem and pulling upwards. Reveal your print and let out that breath you’ve been holding. -
Drying:
Allow the fabric to dry flat for at least 24 hours. Don’t rush this step, as fabric paint needs time to cure on the fibers. -
Heat Setting:
Once dry, heat set the image according to your fabric paint’s instructions. Usually, this involves ironing the back of the fabric on a cotton setting for 3-5 minutes.
Your permanent botanical print is now ready to be framed or sewn into a unique pillow cover
Textured Fabric Weaving on a Simple Loom Frame
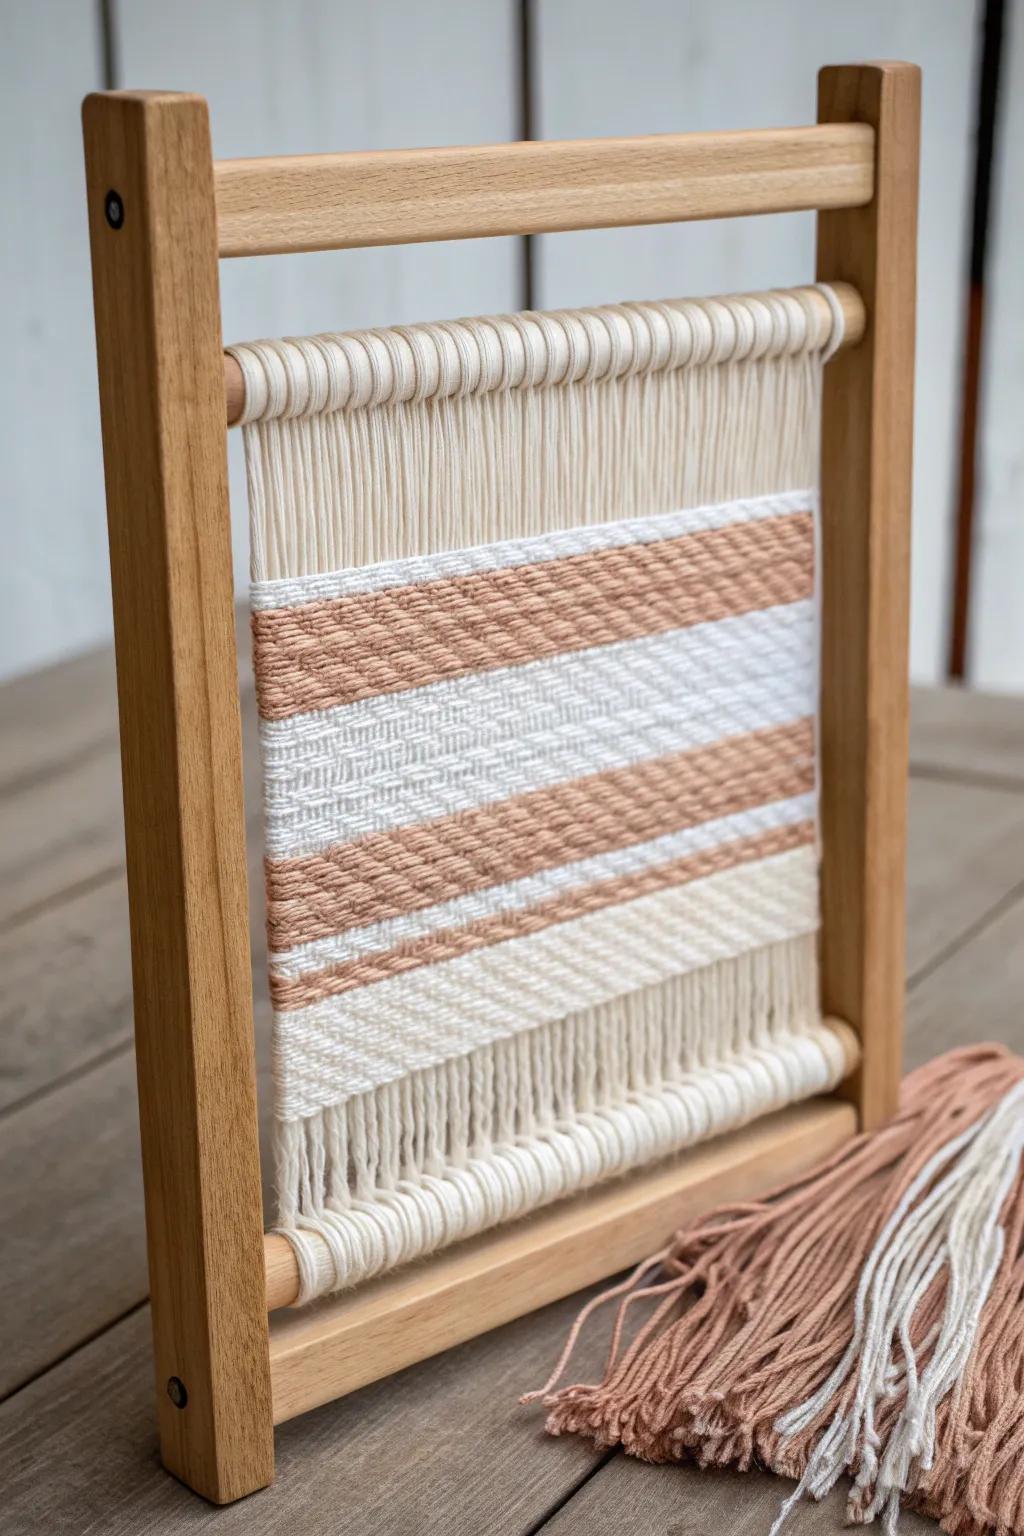
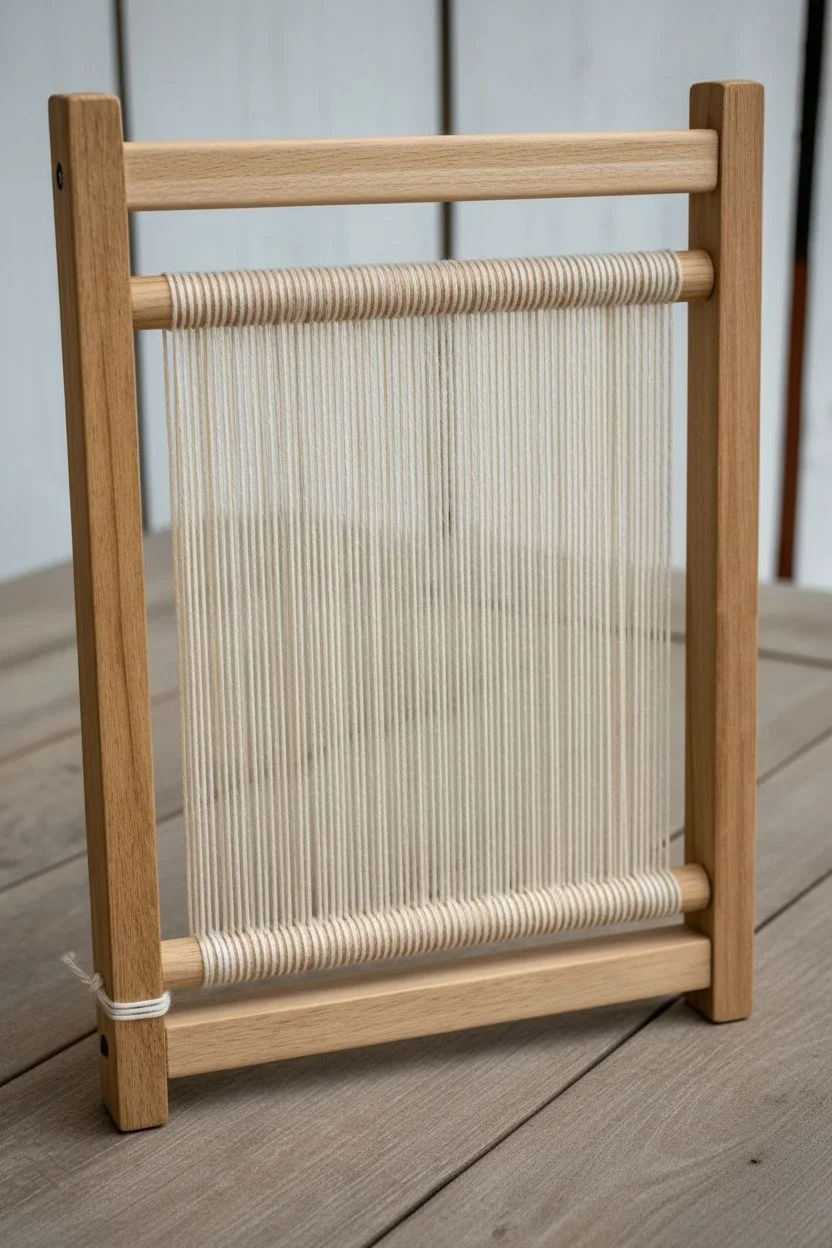
Create a stunning piece of textured wall art using a simple wooden frame loom and luscious cotton cord. This project alternates between creamy white and earthy terracotta tones, showcasing how basic weaving techniques can build intricate visual rhythms.
Step-by-Step Guide
Materials
- Small wooden frame loom (approx. 10×14 inches)
- Natural cotton warp thread
- 4mm twisted cotton macrame cord (Cream)
- 4mm twisted cotton macrame cord (Terracotta/Salmon)
- Weaving needle or tapestry needle (large eye)
- Comb or weaving beater
- Scissors
- Wooden dowel or shed stick (optional)
Step 1: Warping the Loom
-
Secure the start:
Begin by tying your cotton warp thread to the bottom left side of the lower dowel on your frame loom. Make a secure double knot to ensure consistent tension throughout the project. -
Wrap vertically:
Bring the thread up and over the top dowel, then down and under the bottom dowel. Continue this motion, keeping the threads evenly spaced and taut but not ready to snap. -
Finish the warp:
Once you have filled the width of the frame (leaving about an inch of wood on each side), tie off the final warp thread on the bottom right side. Ensure all vertical strings have equal tension.
Step 2: Weaving the Base
-
Prepare the cream cord:
Cut a generous length of the 4mm cream cotton cord—about 2 yards is manageable. Thread your weaving needle. -
Start the hemstitch:
To secure the bottom edge, you can weave a few rows of plain weave (over-under-over-under) and then perform a simple hemstitch, or simply leave a 3-inch tail to weave in later for a fringe effect. -
Create the fringe base:
For this design, weave about 1.5 inches of plain weave with the cream cord at the very bottom. Pack it down tightly with your comb or fork so the warp threads are completely hidden.
Beat It Down
Use a kitchen fork or a specialized weaving comb to pack the weft threads down firmly after every few rows. This hides the warp and makes the fabric sturdy.
Step 3: Building Texture and Stripes
-
Introduce the terracotta:
Switch to your terracotta cord. Instead of a standard plain weave, try a soumak weave or a twill pattern (over 2, under 1) to create the diagonal texture seen in the reference image. -
Weave the thick stripe:
Build up a substantial block of this terracotta color, aiming for a band about 2 inches high. Be sure to bubble the yarn (create an arc) before beating it down to prevent the weaving from hourglassing. -
Switch back to cream:
Cut the terracotta cord (leave a tail on the back) and thread the cream cord again. Create a thinner band using a standard plain weave or a basket weave (over 2, under 2) for contrast. -
Add a thin accent stripe:
Return to the terracotta cord for a single, narrow stripe. This acts as a visual separator. Weave just 2-4 rows, packing them tightly. -
Repeat the cream texture:
Add another band of cream, matching the width of your previous cream stripe. Consistency here helps the design look intentional and polished. -
Final terracotta block:
Finish the patterned section with another wide block of terracotta, mirroring the first one you created. This symmetry frames the central lighter stripes beautifully.
Texture Twist
Try adding Rya knots (fringe knots) in the middle of the weave instead of just at the bottom for a 3D, shag-rug effect in your wall hanging.
Step 4: Finishing Touches
-
Top plain weave:
Complete the weaving area with a final 2-inch section of plain weave using the cream cord. This mirrors the bottom section and provides visual balance. -
Secure the top:
Once you reach the top, you can finish with another row of hemstitching to lock the weft in place, or simply weave the tail end back into the previous rows on the reverse side. -
Clean up the back:
Flip the loom over. Take all those loose tail ends from your color changes and weave them vertically into the warp channels on the back using a smaller needle. -
Trim the fringe:
If you left fringe at the bottom, trim it now to be uniform. I find that combing fast strands out with a pet brush before trimming makes them fluffy and full.
Hang your finished loom on the wall as is, or remove the piece to mount on a driftwood branch for a more organic feel
3D Fabric Origami or Folded Fabric Relief Art
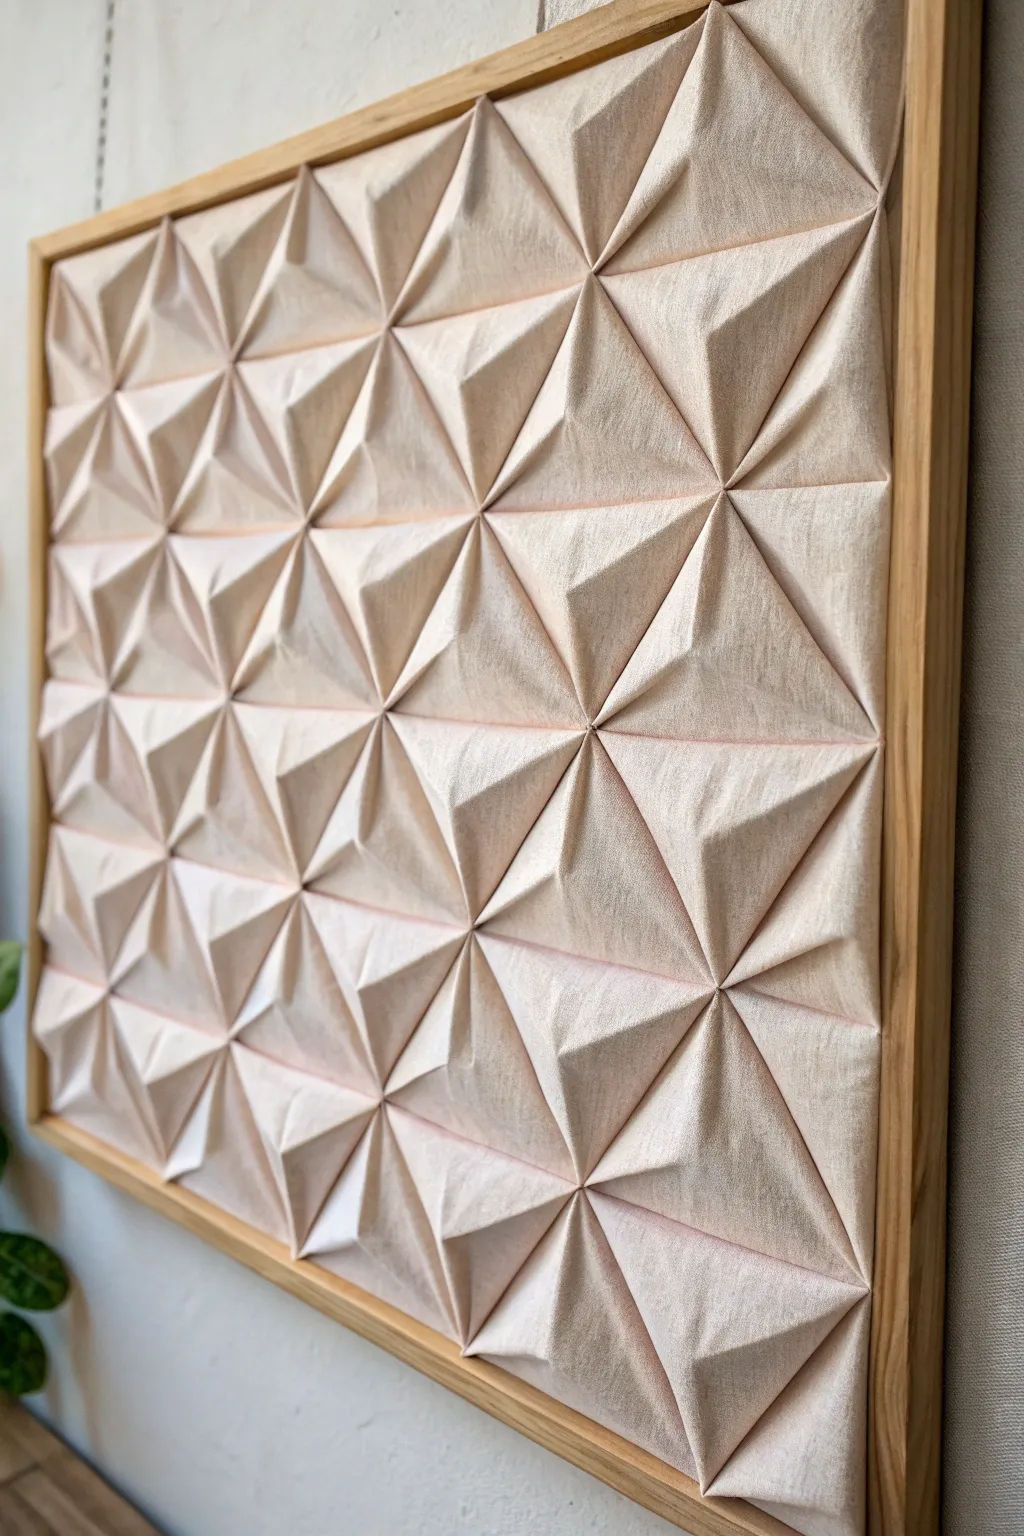
This striking wall art transforms simple fabric into a sophisticated architectural relief using precise folding techniques. The interplay of light and shadow across the faceted pyramids creates a dynamic, modern focal point that softens the acoustics of any room.
Step-by-Step
Materials
- Stiff fabric (cotton canvas, linen, or heavy muslin)
- Fabric stiffener spray or heavy starch
- Cardstock or thin plastic for templates
- Iron and ironing board
- Fabric glue or a hot glue gun
- Plywood backing board (cut to desired frame size)
- Wooden frame moulding
- Rotary cutter and self-healing mat
- Ruler and pencil
- Staple gun
Step 1: Preparation & stiffening
-
Prepare the fabric:
Begin by washing and drying your chosen fabric to remove any sizing, as this ensures your stiffener will absorb evenly. Iron it completely flat. -
Apply stiffener:
Lay the fabric on a protected surface and apply a generous coat of fabric stiffener or heavy starch. You want the fabric to feel almost like paper once dry, allowing it to hold crisp creases. -
Dry and press:
Let the fabric dry completely. Once dry, give it another press with a hot iron to lock in that stiffness and ensure a perfectly smooth surface. -
Create a template:
Determine the size of your geometric modules. For the pattern shown, a square base works best. Cut a square template from cardstock (e.g., 4×4 inches) to use as your guide. -
Cut fabric squares:
Using your rotary cutter and template, cut out as many fabric squares as you need to cover your plywood backing board. Precision is key here; exact squares make for perfect points.
Crisp Creases
Use a bone folder tool instead of just your fingers to press the folds. This creates razor-sharp edges that dramatically improve the final 3D effect.
Step 2: Folding the modules
-
First diagonal fold:
Take one fabric square and fold it in half diagonally to form a triangle. Press this crease sharply with your iron. -
Second diagonal fold:
Unfold, then fold in half diagonally the other way. Unfold again. You should now have an ‘X’ creased into your square. -
Pinch the center:
FLip the square over. Push the center point upwards so it rises like a tent. This establishes the peak of your pyramid. -
Form the pyramid legs:
Pinch the four corners inward. Depending on the specific tesselation, you may need to fold the corners into the center on the back side to lock the shape, or maintain the open pyramid form shown here. -
Secure the shape:
I find a tiny dot of glue on the underside of the folds helps maintain the structural integrity of the pyramid shape before assembly.
Add Color Depth
Before stiffening, try dip-dyeing the fabric corners. This creates a subtle ombre effect that enhances the shadows of the pattern.
Step 3: Assembly & framing
-
Prepare backing:
Lay your plywood backing board flat. You might want to cover it with a flat layer of the same fabric first so no wood shows through any potential gaps. -
Dry fit the layout:
Arrange your folded pyramids on the board without glue first. Ensure the points align creating that star-like intersection where corners meet. -
Glue the center row:
Start gluing from the center of the board and work your way outwards. This prevents pattern drift that can happen if you start from a corner. -
Secure edges:
Apply fabric glue to the base flanges of each pyramid and press firmly onto the backing board. Hold for a few seconds to let the bond set. -
Trim overhang:
Once all modules are glued and dry, use your rotary cutter to trim any fabric overhanging the edges of the plywood board. -
Attach the frame:
Measure and cut your wooden frame moulding to fit around the plywood. Miter the corners for a professional finish. -
Final assembly:
Nail or glue the frame sides to the plywood backing. Using a light-colored wood like oak or pine complements the natural fabric beautifully.
Hang your new textured masterpiece where sidelighting can hit it to truly show off the dimension
Soft Sculpture Wall Art With Stuffed Fabric Forms
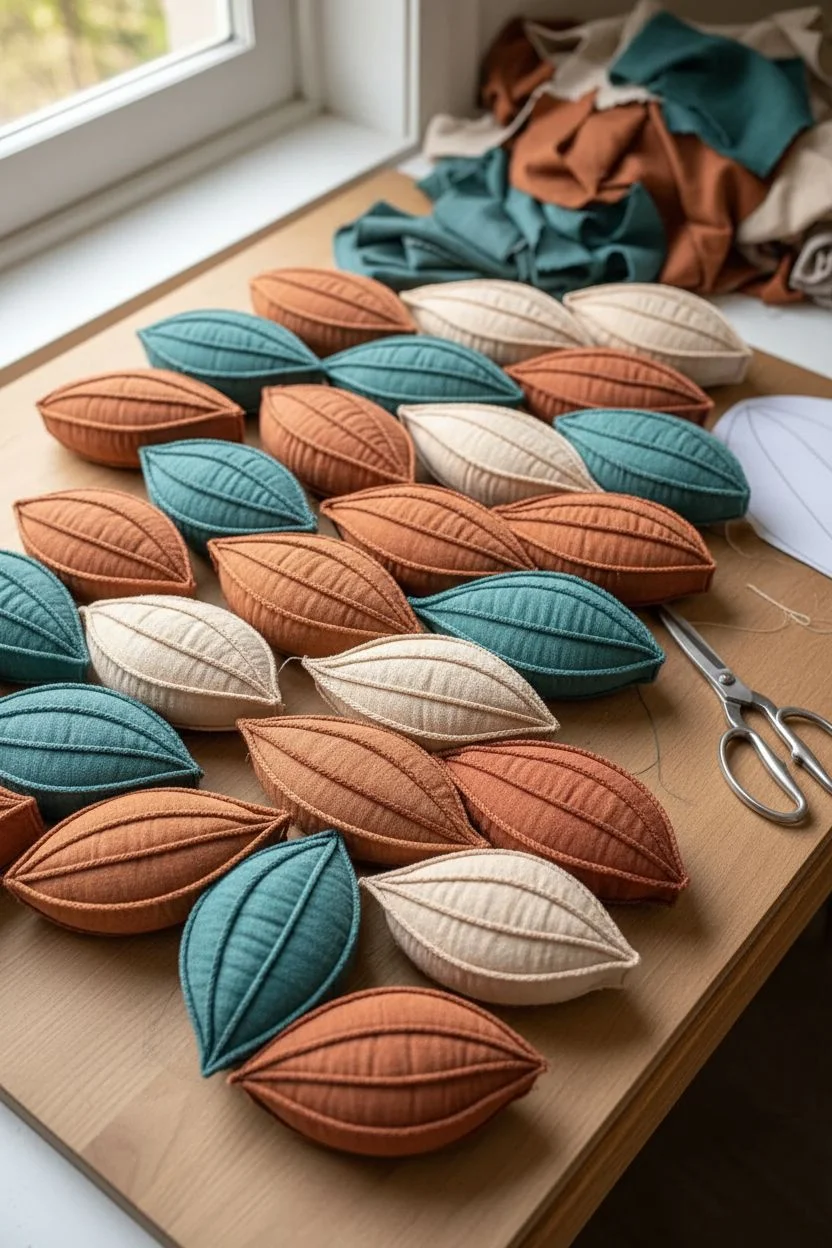
Bring warmth and texture to your walls with this vertical garland of stuffed fabric pods. Reminiscent of cacao pods or oversized leaves, these soft sculptures combine earthy linens and plush filling to create a striking, three-dimensional fiber art piece.
Step-by-Step Guide
Materials
- Medium-weight linen or cotton fabric (terracotta, teal, beige)
- Polyester fiberfill stuffing
- Matching or contrasting embroidery floss
- Embroidery needle
- Sewing machine (optional, but speeds up assembly)
- Fabric scissors
- Iron and ironing board
- Paper for template making
- Pins or fabric clips
- Sturdy backing fabric or felt strip (approx. 3 inches wide)
Step 1: Designing and Cutting
-
Create the pod template:
Sketch a long, tapered oval shape on paper, roughly 8-10 inches long and 4-5 inches wide at the center. It should resemble a cacao pod or a pointed leaf. -
Cut the template:
Cut out your paper shape to use as a master pattern for all your fabric pieces. -
Trace onto fabric:
Lay out your linen fabrics. You will need two pieces of fabric for each pod. Trace the template until you have enough pairs for your desired length (the example shows about 10-12 pods). -
Cut fabric pieces:
Cut out all the fabric shapes, leaving a small seam allowance if you didn’t include it in your template sketches.
Clean Edges Pro Tip
For sharper ribs, iron the fabric where you plan to stitch the vertical lines before sewing. This creates a crisp guide and helps the ribs ‘pop’ more when stuffed.
Step 2: Assembling Individual Pods
-
Sew the perimeter:
Place two matching fabric pieces right sides together. Sew around the edge, leaving a 2-inch gap on one side for turning and stuffing. -
Turn and press:
Turn the sewn shape right side out through the gap. Use a chopstick or point turner to gently push out the tip and bottom curves, then iron flat. -
Add vertical definition:
To create the ribbed look, sew curved vertical lines running from the top tip to the bottom point. I find sewing 3 evenly spaced lines gives the best dimension. -
Stuff the channels:
Push small amounts of fiberfill into each channel created by your stitching. Use a dowel to push stuffing all the way to the tips. -
Close the gap:
Once the pod is plump and shaped to your liking, hand stitch the turning gap closed using a ladder stitch for an invisible finish.
Level Up: Exposed Seams
Try sewing the pods with wrong sides together and use rough, raw-edge seams or a decorative blanket stitch on the outside for a rustic, deconstructed look.
Step 3: Creating the Arrangement
-
Mock up the layout:
Lay your finished pods on the floor. Arrange them in a vertical column, alternating the angles slightly left and right to mimic a braid or vine. -
Mix colors:
Play with the color order. Notice how the example groups teracotta tones together and intersperses teal and beige for balance. -
Prepare the backing strip:
Cut a strip of sturdy felt or canvas that is slightly shorter than your final arrangement length and about 3 inches wide. This will be the hidden spine.
Step 4: Final Assembly
-
Attach first pod:
Baste or pin the top-most pod onto the top of your backing strip. -
Layer downwards:
Place the next pod slightly overlapping the bottom of the first one, tilted in the opposite direction. Pin it through the backing strip. -
Secure with heavy stitching:
Using strong thread or doubled embroidery floss, tack the pods firmly to the backing strip where they overlap. Ensure the stitches are hidden between the pod layers. -
Add a hanging loop:
Sew a sturdy loop of fabric or a metal D-ring to the very top of the backing strip. -
Fluff and shape:
Hang the piece on the wall and gently massage the stuffing to redistribute it if any pods became flattened during assembly.
Now you have a stunning, tactile piece of wall art that adds softness and modern design to your space


Have a question or want to share your own experience? I'd love to hear from you in the comments below!