Any time I’m craving a little peace (or a little drama), I paint the ocean—it’s basically endless inspiration in one subject. Here are my favorite ocean painting ideas that range from super beginner-friendly horizons to fun, quirky twists when you want something unexpected.
Sunset Glow Reflections on the Water
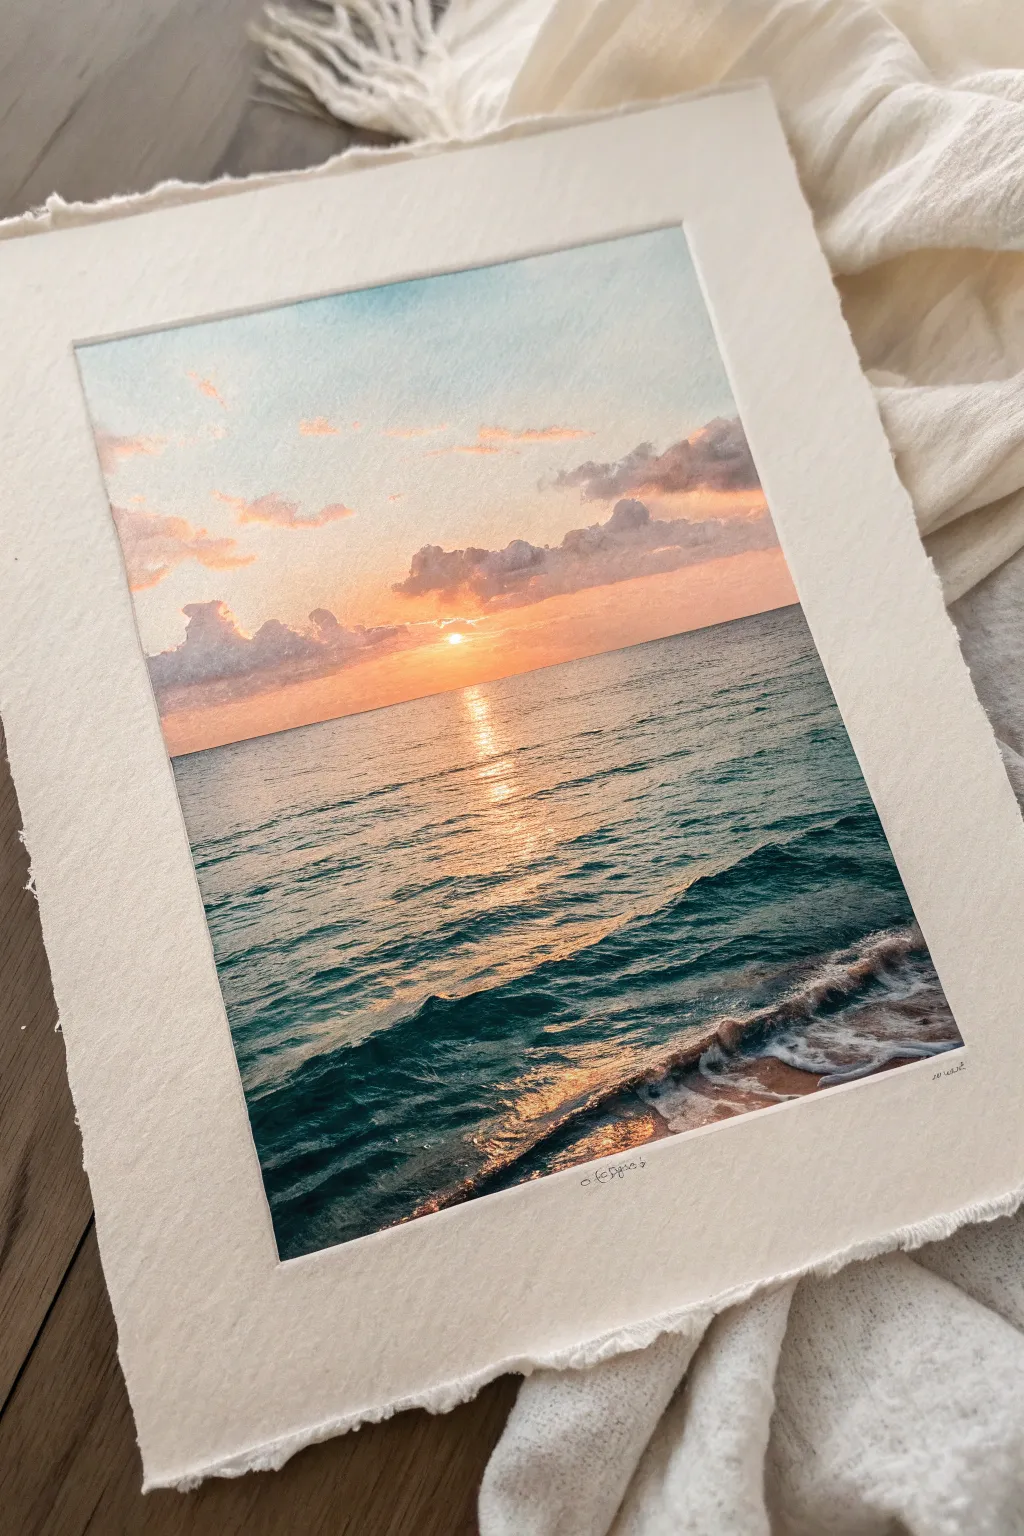

Capture the serene beauty of a setting sun casting a warm path of light across cooling ocean waters in this detailed watercolor project. The high-contrast deckled paper adds an organic, fine-art feel to the soft gradients and energetic wave details.
Step-by-Step Guide
Materials
- Cold press watercolor paper (deckled edge preferred, 300gsm)
- Watercolor paints (Indigo, Phthalo Blue, Burnt Sienna, Opera Pink, Lemon Yellow, Titanium White)
- Masking fluid or white gouache
- Flat wash brush (3/4 inch)
- Round brushes (sizes 4, 8, and 2 for details)
- Palette for mixing
- Two jars of water
- Paper towels
- Artist tape (optional for mounting)
Step 1: Setting the Sky and Horizon
-
Prepare the paper:
If you are not using pre-deckled paper, you can tear the edges of a standard sheet against a ruler to create that soft, organic border seen in the image. Tape the back of the paper to your board if you want to keep the rough edges visible. -
Wet-on-wet sky base:
Brush clean water across the top half of your paper, stopping exactly at your horizon line. You want the sheen to be even but not pooling. -
Paint the upper sky:
Start with a very pale wash of Phthalo Blue mixed with plenty of water for the uppermost corners of the sky, letting it fade as you move down. -
Add warmth:
While the paper is still damp but losing its sheen, introduce a soft blend of Opera Pink and Lemon Yellow near the horizon. Be careful not to let the yellow touch the wet blue directly, or you may get unwanted green tones. -
Define the sun:
While the area is damp, lift out a small circle for the sun using a thirsty brush or clean paper towel, or preserve it initially with masking fluid if you prefer crisp edges.
Step 2: Clouds and Sunset Colors
-
Layering clouds:
Mix a muted violet using Phthalo Blue and a touch of Opera Pink. Using a size 8 round brush, dab in horizontal irregular shapes for the clouds, keeping the bottoms flatter and the tops fluffier. -
Intensify the horizon:
Once the first layer is dry, glaze a stronger orange (Yellow + Burnt Sienna) right along the horizon line to create that deep sunset glow. -
Shadowing the clouds:
Add darker undersides to the clouds using a thicker mix of purple and indigo to give them volume, ensuring the light source from the setting sun is respected.
Fixing Green Skies
If your blue sky and yellow sunset mix into green, let the layers dry completely between applications. Use a pale pink transition zone as a buffer between the two colors.
Step 3: Painting the Ocean
-
Base ocean layer:
Switch to your flat brush. Mix a rich teal using Phthalo Blue and a tiny bit of Yellow. Paint horizontal strokes starting at the horizon, getting darker and more saturated as you move down the paper. -
Create the sun path:
As you paint the water, leave a vertical column in the center unpainted or very pale yellow. This negative space will become the sun’s reflection. I like to dry brush slightly here to mimic sparkling water. -
Deepen the foreground:
Mix Indigo with Phthalo Blue for a deep, dark ocean color. Apply this to the bottom third of the painting, using wavy, choppy strokes to suggest the movement of near-shore waves. -
Texture the water:
Using a size 4 brush and dark teal, add thin, repetitive horizontal lines across the mid-ground water to simulate ripples.
Level Up: Salt Texture
Sprinkle a pinch of table salt onto the wet sand area or the deep blue water foreground while it’s drying. Brush it off later for an authentic, grainy ocean texture.
Step 4: Highlights and Shoreline Details
-
Sun reflection details:
Take a mix of pure Lemon Yellow and a little White gouache. Paint small, horizontal dashes across the light path you preserved earlier. Make the dashes smaller near the horizon and wider as they come closer. -
Forming the crashing wave:
Near the bottom right using the dark indigo mix, paint the distinct curve of a wave beginning to crest. Leave the paper white or lift pigment where the foam will be. -
Painting the sand:
For the very bottom corner, apply a wash of Burnt Sienna. While wet, drop in darker brown spots to create the texture of wet sand. -
Shoreline foam:
Use thick titanium white gouache or white ink to stipple the sea foam where the water meets the sand. Let the white drag slightly over the brown sand to show transparency. -
Final highlights:
Add tiny pristine white dots on the crests of the ripples within the sun’s path for maximum sparkle. -
Sign and finish:
Once completely dry, sign your work with a fine liner pen at the bottom edge, keeping it small and unobtrusive.
Now you have a tranquil seascape that glows with warmth, perfect for framing in a floating frame to show off those beautiful deckled edges.


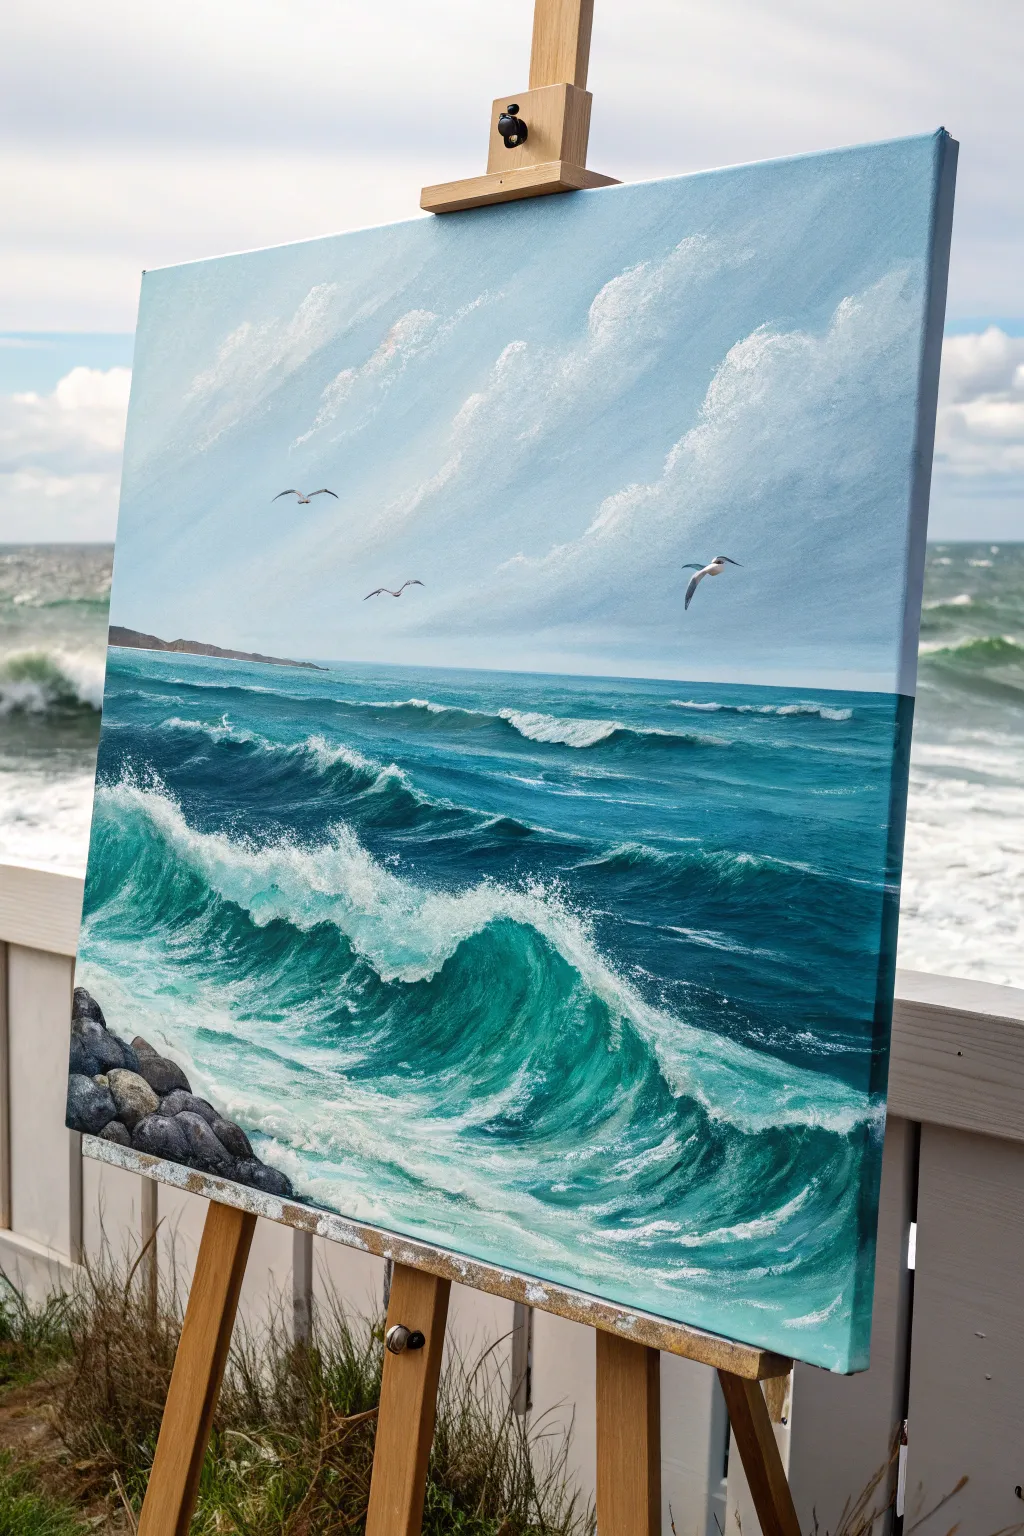
Crashing Wave With Whitecaps
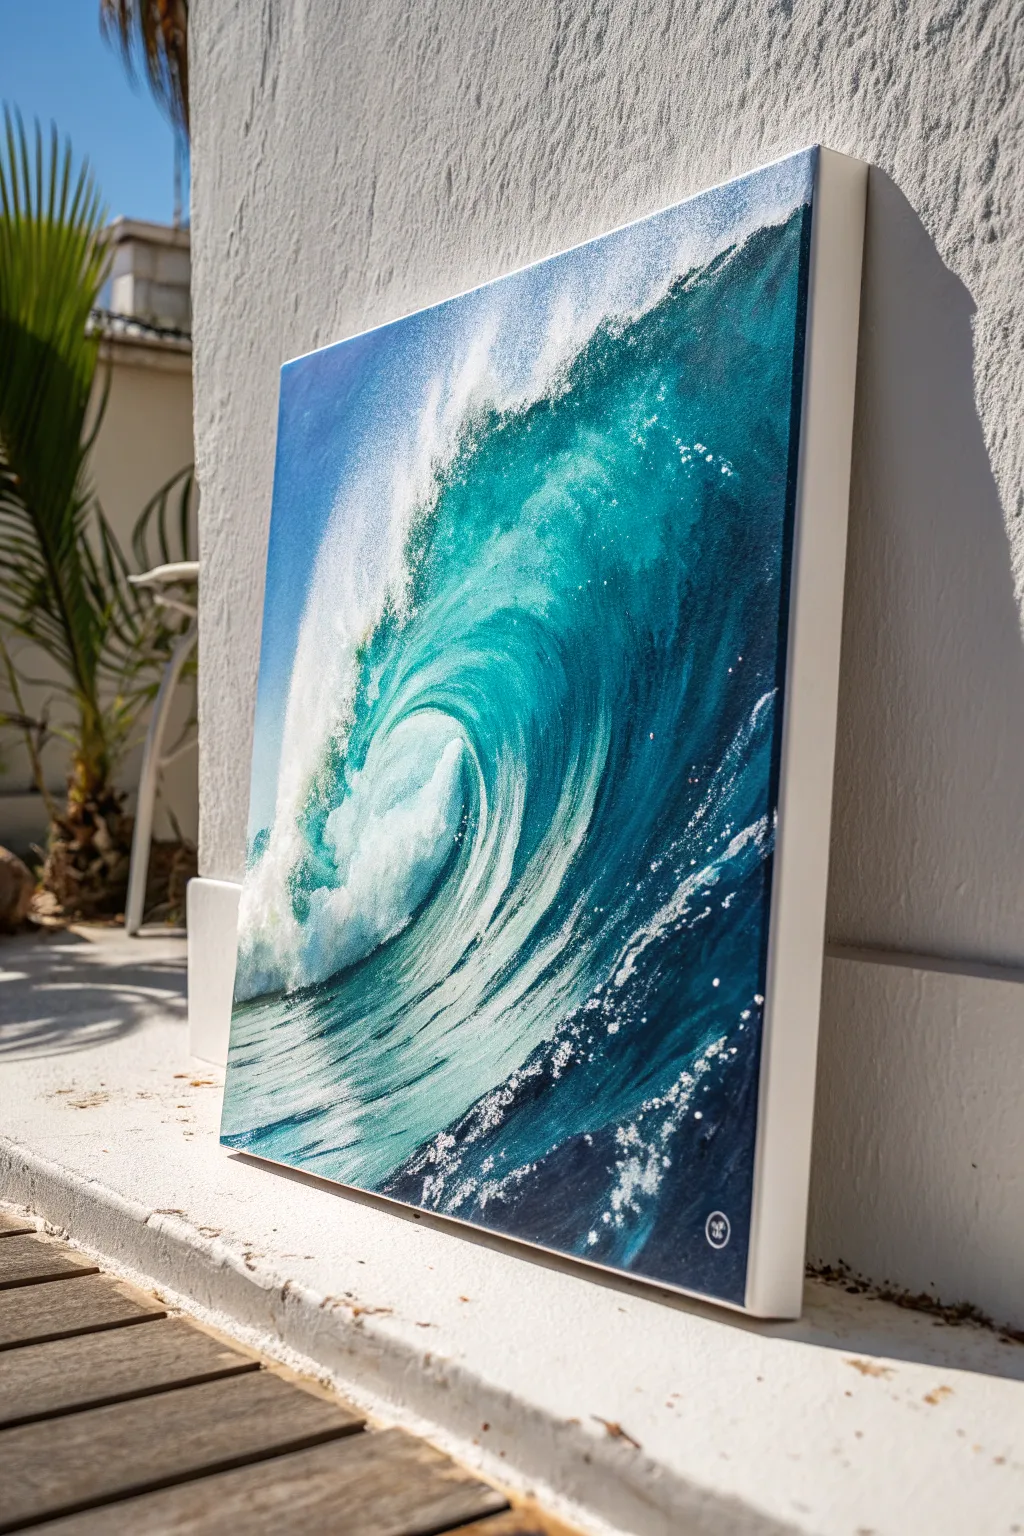
This stunning painting captures the sheer power and beauty of a blue-green wave curling into a perfect barrel. With its dynamic whitecaps and deep teal shadows, this project will help you master the art of painting moving water and dramatic light on a large canvas.
Step-by-Step
Materials
- Large square stretched canvas (e.g., 24×24 inches or larger)
- Acrylic paints: Phthalo Blue, Phthalo Green, Titanium White, Ultramarine Blue, burnt umber (for depth)
- Glazing medium or slow-drying medium
- Large flat brushes (1-2 inch)
- Medium filbert brushes
- Small round detail brushes
- Fan brush (optional for spray)
- Palette knife and mixing surface
- Water container and paper towels
Step 1: Setting the Composition
-
Prime the canvas:
Ensure your stretched canvas is primed with gesso. If you want a smoother surface for water details, you can lightly sand a second coat of gesso once dry. -
Map the wave shape:
Using a thin wash of Ultramarine Blue and a small round brush, sketch the large diagonal curve of the wave. Start from the top right quadrant and sweep down towards the bottom left, creating the ‘C’ shape of the barrel. -
Block in the sky:
Mix Titanium White with a tiny touch of Phthalo Blue. Paint the upper left corner representing the sky, blending it softly so it’s lighter near the horizon line.
Muddied Colors?
If your blues and greens turn muddy, let the layer dry completely before adding highlights. Wet-on-wet blending can sometimes overmix into grey.
Step 2: Establishing Depth and Color
-
Create the deep water base:
Mix Phthalo Blue, Phthalo Green, and a touch of Ultramarine Blue. Apply this dark teal mixture to the shadowed inside of the wave (the right side) and the deep trough at the bottom. -
Define the mid-tones:
Take your teal mix and add a little Titanium White to create a vibrant turquoise. Paint the face of the wave where the light would be hitting it, just before it curls over. -
Blend the transition:
While the paint is still wet (or using a glazing medium), blend the boundary between the deep shadow water and the lighter turquoise face. You want a smooth gradient that suggests the curvature of the water. -
Darken the deepest shadows:
Mix a small amount of Burnt Umber into your dark blue mix to create a near-black navy. Apply this sparingly into the deepest crevasses of the wave on the bottom right to maximize contrast.
Pro Tip: Translucency
To get that glowing green eye in the wave, use transparent paints (like Phthalo) rather than opaque ones, letting the white canvas shine through slightly.
Step 3: Sculpting the Wave Details
-
Add directional strokes:
Using a dry flat brush and a lighter turquoise mix, brush horizontally along the curve of the tunnel. These streaks mimic the stretching of the water surface as the wave pulls upward. -
Paint the foam base:
Mix a light grey-blue (White + tiny dot of Blue). Block in the shape of the crashing foam on the left side where the wave hits the surface, and the lip of the wave breaking at the top. -
Highlight the barrel:
I like to use pure white mixed with a little glazing medium here. Paint the brightest part of the curve inside the barrel to show the light shining through the translucent water. -
Refine the lip:
Using a filbert brush, sharpen the edge of the wave’s lip. Add jagged, irregular strokes along the top edge to represent water beginning to shatter into droplets.
Step 4: Texture and Sea Spray
-
Create ocean spray:
Load a stiff bristle brush or a toothbrush with slightly watered-down Titanium White. Use your thumb to flick the bristles, spraying fine white dots over the crest of the wave and deep into the barrel. -
Add foam texture:
With a palette knife or a thick round brush, dab generous amounts of pure Titanium White onto the crashing foam on the left. Leave the texture rough and raised (impasto style) to mimic churning water. -
Sea foam patterns:
Using a small detail brush, paint delicate, lace-like webbing of foam on the surface of the water in the foreground. These lines should follow the contour of the wave, curving upward. -
Enhance sparkle:
Add tiny, sharp dots of pure white on the highest points of the water ripples and where the spray catches the most sun. This makes the water look wet and glistening. -
Final glaze:
Once everything is completely dry, apply a very thin glaze of Phthalo Green over the translucent part of the wave to intensify that glowing, jewel-tone effect.
Hang your masterpiece in a bright room to let the natural light enhance the translucent effect of the water


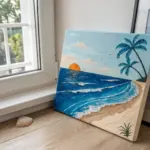
Tropical Framing With Palm Fronds
Capture the serenity of a secluded island getaway with this acrylic landscape painting, featuring a pristine turquoise shoreline framed by lush palm fronds. This project focuses on layering techniques to create depth between the distant horizon and the detailed foreground foliage.
Step-by-Step Guide
Materials
- Large square canvas (approx. 24×24 inches)
- Acrylic paints: Titanium White, Phthalo Blue, Turquoise, Sap Green, Burnt Umber, Yellow Ochre, Cadmium Yellow, Raw Sienna
- Large flat brush (1-2 inch) for sky and water
- Medium filbert brush for clouds and land
- Small round brush (size 2-4) for details
- Fan brush (optional for palm textures)
- Palette and water cup
- Paper towels
- Easel or flat working surface
Step 1: Planning and Sky
-
Map the composition:
Begin by lightly sketching your horizon line about one-third of the way up from the bottom. Mark the curve of the shoreline sweeping from the left foreground towards the center-right. Sketch a rough vertical line on the left for the main palm tree trunk. -
Mix the sky gradient:
Create a pale blue by mixing a large amount of Titanium White with a tiny touch of Phthalo Blue. Paint the upper half of the sky with this mix, blending it down towards the horizon. -
Soften the horizon:
As you reach the horizon line, add even more white to your brush to create a hazy, atmospheric look. Ensure the transition from the blue top to the white horizon is smooth and seamless. -
Form the clouds:
Using a medium filbert brush and pure Titanium White, scumble in fluffy cumulus clouds just above the horizon. Keep the bottoms of the clouds somewhat flat and the tops rounded. I find that softening the edges with a clean, dry brush helps them look more natural.
Cloud Softening Tip
If your clouds look too stiff, use a dry, clean makeup sponge to dab the edges while the paint is still wet. This creates an instant misty effect.
Step 2: Ocean and Shoreline
-
Paint the deep water:
Mix Phthalo Blue with a touch of Turquoise for the deep ocean water near the horizon. Apply this in horizontal strokes, ensuring a sharp, straight line against the sky. -
Transition to shallows:
Clean your brush and pick up pure Turquoise mixed with plenty of White. Paint the water closer to the shore, blending it wet-into-wet with the deeper blue to create a gradient. -
Create the shoreline:
For the sandy beach, mix White with a very small amount of Yellow Ochre and a dot of Burnt Umber. Paint the curved beach area, keeping the paint lighter near the water’s edge to simulate wet sand. -
Add distant land:
Using a mix of Sap Green and a little Phthalo Blue (to desaturate it for distance), paint the small headland jutting out into the water on the left side. Keep the details minimal here.
Step 3: Foreground Foliage
-
Block in the palm trunk:
Mix Burnt Umber and White to get a soft grey-brown. Paint the tall, slender trunk on the left side, curving slightly as it rises. Add horizontal texture lines with darker brown to mimic bark rings. -
Paint main frond structures:
Switch to a liner or small round brush with Sap Green. Draw the arched spines of the palm fronds stemming from the top of the trunk. Make them swoop gracefully downwards. -
Add palm leaves:
Using the same green, flick rapid strokes outward from each spine to create individual leaves. Let the ends taper off sharply. -
Highlight the fronds:
Mix Cadmium Yellow with your green to create a lighter shade. Apply highlights to the top edges of the palm leaves where the sun would hit them. -
Create lower vegetation:
At the bottom left corner, paint upward-sweeping, spiky leaves using a mix of Sap Green and Turquoise. Vary the lengths to create a wild, bushy appearance. -
Detail the lower plants:
Add depth to the bottom plants by painting darker green shadows between the leaves and brighter yellow-green highlights on the distinct tips.
Level Up: Texture
Mix a small amount of fine sand or texture gel into your beach-colored paint before applying it. This adds physical grit to the shore for realism.
Step 4: Final Touches
-
Add water movement:
Use a small brush with watered-down white paint to add thin, subtle lines near the shore where the water meets the sand, suggesting gentle foam. -
Refine light and shadow:
Check the sand for shadows cast by the palm tree. Glaze a very sheer wash of cool grey-blue over the sand at the bottom left to ground the foliage.
Step back and enjoy the permanent vacation vibes your new artwork brings to the room


Coastal Lighthouse Over Choppy Water
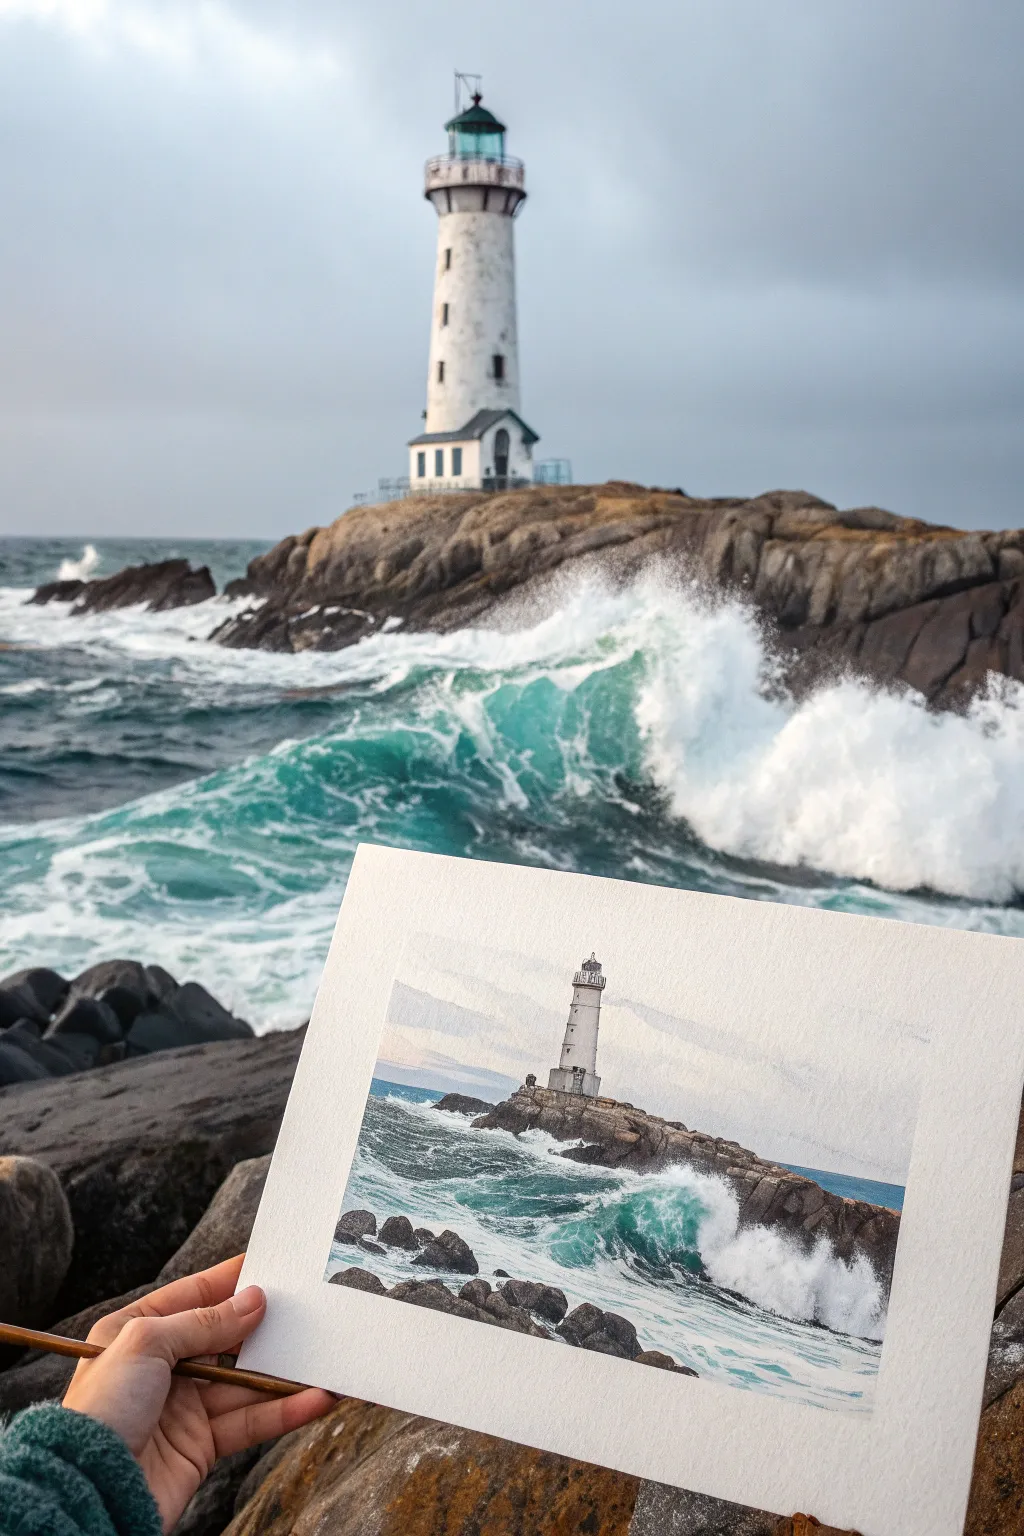
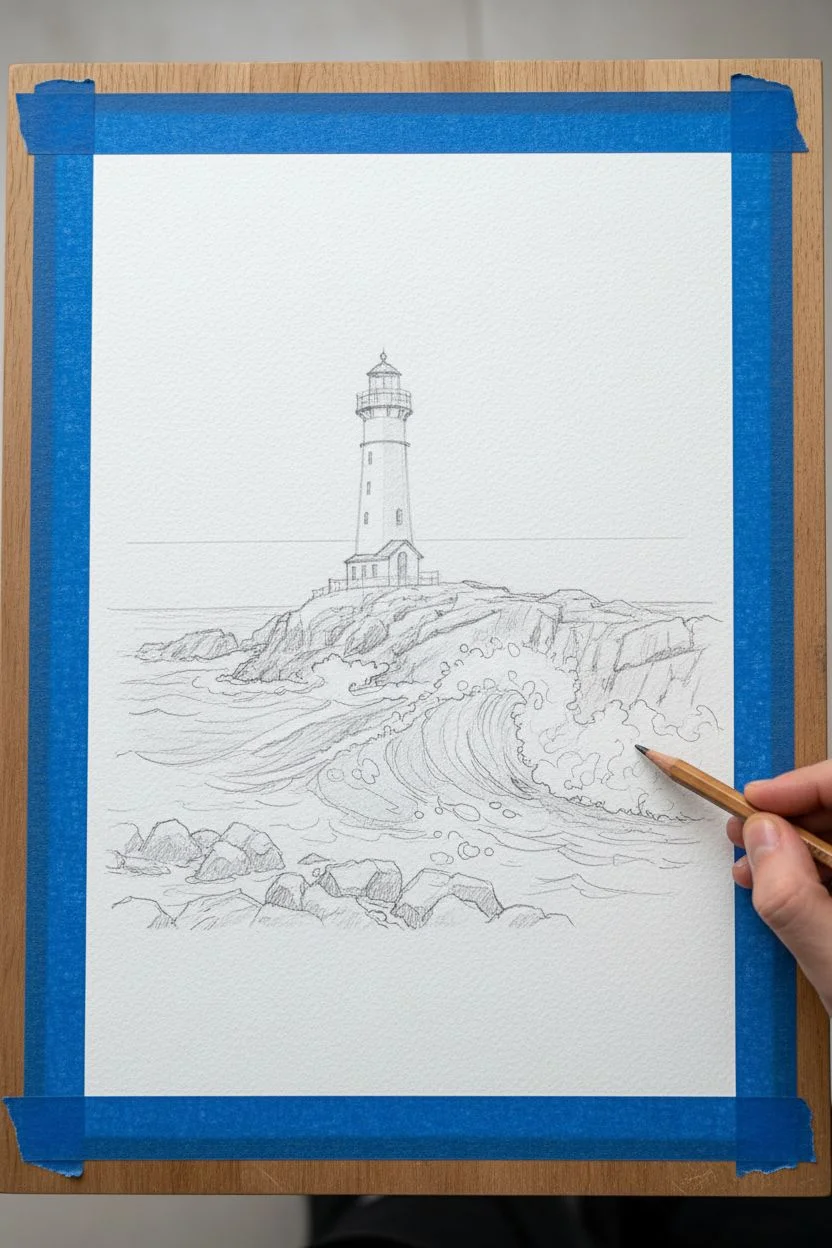
Recreate the raw energy of the sea with this dynamic watercolor painting featuring a steadfast lighthouse amidst choppy turquoise waves. This project balances the solidity of rocky cliffs with the fluid, unpredictable nature of ocean foam.
Step-by-Step
Materials
- Cold press watercolor paper (300 gsm)
- Watercolor paints (Phthalo Green, Indigo, Ultramarine Blue, Burnt Sienna, Yellow Ochre, Paynes Gray)
- White Gouache or White Gel Pen
- Round brushes (sizes 4, 8, and 12)
- Fine liner brush or rigger brush
- Pencil (HB) and kneaded eraser
- Masking tape
- Two jars of water
- Paper towels
Step 1: Planning and Sketching
-
Prepare your surface:
Tape down your watercolor paper to a board on all four sides. This prevents buckling when the paper gets wet and creates a crisp white border for the finished piece. -
Map out the horizon:
Lightly draw a horizon line about one-third of the way up the page. Keep it straight, but remember the waves will break over it in the foreground. -
Sketch the lighthouse:
Place the lighthouse slightly off-center on the rocky outcrop. Draw the cylindrical structure, the lantern room at the top, and the small attached building at the base. -
Outline rocks and waves:
Sketch the jagged shapes of the rocks leading up to the lighthouse. Then, lightly indicate the flow of the major crashing wave in the foreground, marking where the white foam will be.
Step 2: Building the Background and Lighthouse
-
Paint the sky:
Wet the sky area with clean water. Drop in a very pale wash of Ultramarine Blue and a touch of Paynes Gray for a moody, overcast feel. Keep it light near the horizon. -
Base coat the lighthouse:
While the sky dries, paint the lighthouse body. Use a dilute mix of Paynes Gray to create shadows on the right side, leaving the paper white for the sunlit left side. -
Detail the lantern room:
Once the lighthouse base is dry, use your small round brush and a darker mix of Paynes Gray and Indigo to paint the lantern room windows and the railing. -
Paint the distant rocks:
Mix Burnt Sienna with a little Indigo to create a dark, warm grey. Paint the rocks directly underneath the lighthouse, keeping the edges rugged.
Muddy Water Warning
If your turquoise waves look dull, change your water jar. Green is easily sullied by dirty rinse water. Keep one jar for warm colors (rocks) and one for cool colors (ocean).
Step 3: Painting the Turbulent Ocean
-
Mix your ocean greens:
Create a vibrant turquoise mix using Phthalo Green and a touch of Cerulean or Ultramarine. Create a second, darker mix by adding Indigo for the deeper water. -
Establish the wave body:
Using the size 12 brush, paint the main body of the wave. I like to sweep the brush upwards in the direction the water is moving, leaving gaps of white paper for the foam. -
Deepen the shadows:
While the green paint is still damp, drop the darker Indigo mix into the trough of the wave and underneath the white foam crests to add volume and depth. -
Foreground rocks:
Paint the large rocks in the foreground using a mix of Burnt Sienna and Paynes Gray. Vary the tone, making cracks and crevices darker to show texture. -
Connect sea and stone:
Where the water meets the rocks, soften the edges with a clean, damp brush or add splashes of dark green to show water rushing over the stone.
Level Up: Salt Texture
While the ocean wash is still wet, sprinkle a pinch of table salt onto the green paint. When dry, brush it off to create organic, blooming textures resembling sea foam.
Step 4: Foam and Finishing Touches
-
Create crashing foam:
This is the crucial step for energy. Use white gouache straight from the tube on a dry brush. Scumble it over the crest of the wave and where the water hits the rocks. -
Add sea spray:
Load a stiff brush with watery white gouache and flick the bristles with your finger to splatter tiny droplets of ‘spray’ over the rocks and base of the lighthouse. -
Refine the water texture:
Use a fine liner brush with white gouache to paint thin, veins of foam trailing along the surface of the green water. -
Final contrast check:
Step back and look at the painting. If the rocks look too flat, add pure Paynes Gray to the deepest crevices. If the water looks too uniform, glaze a little more Phthalo Green into the mid-tones. -
Remove the tape:
Wait until the painting is bone dry. Peel the masking tape away slowly at a 45-degree angle to reveal your crisp edges.
Now you can almost hear the roar of the waves crashing against the shore in your completed seascape
BRUSH GUIDE
The Right Brush for Every Stroke
From clean lines to bold texture — master brush choice, stroke control, and essential techniques.
Explore the Full Guide
Seagulls and Windy Ocean Sky
Capture the raw energy of a turbulent sea meeting a blustery sky in this dynamic acrylic landscape. You will learn to layer turquoise waters, build crashing foam textures, and add graceful seagulls to bring your seascape to life.
How-To Guide
Materials
- Large stretched canvas (e.g., 18×24 inches or similar)
- Acrylic paints: Titanium White, Phthalo Blue, Phthalo Green, Burnt Umber, Ultramarine Blue, Mars Black, Yellow Ochre
- Large flat brush (1-2 inch) for sky and water base
- Medium filbert brush for waves
- Small round detail brush (size 0 or 1) for birds
- Fan brush (optional, for spray)
- Palette knife
- Water cup and paper towels
- Easel
Step 1: Setting the Scene: Sky & Horizon
-
Trace the horizon:
Begin by drawing a faint pencil line across your canvas about one-third of the way down from the top. This will be your horizon line. -
Mix the sky base:
Create a pale blue by mixing a large amount of Titanium White with a tiny touch of Phthalo Blue. Using your large flat brush, cover the entire sky area with horizontal strokes. -
Add sweeping clouds:
While the blue is still slightly wet, pick up pure Titanium White on the corner of your brush. Sweep in diagonal, feathery strokes moving from the upper right towards the lower left to mimic wind-blown clouds. -
Create the distant headland:
Mix a muted grey-brown using Burnt Umber, Ultramarine Blue, and White. Paint a small, low landmass on the left side of the horizon line, making sure the bottom edge is flat against the water line.
Foam Fixer
If your white sea foam looks too flat or grey, wait for it to dry completely and apply a second layer of pure Titanium White. Thick paint equals bright whites.
Step 2: Deep Waters & Rolling Swells
-
Block in the deep water:
For the distant ocean, mix Phthalo Blue, a touch of Phthalo Green, and White to create a medium teal. Paint horizontal bands just below the horizon, getting darker as you move down. -
Paint the main wave body:
Mix a vibrant, translucent teal using Phthalo Green and Phthalo Blue (omit the white for depth). Apply this to the middle section of the canvas where the large wave will curl. -
Add shadow to the trough:
Darken your teal mixture with a tiny bit of Burnt Umber or Ultramarine Blue. Paint the deep trough (the bottom curve) of the wave in the foreground, creating a recessed shadow area. -
Blend the transitions:
Use a clean, damp brush to gently blend the boundaries between your deep teal wave and the lighter horizon water, keeping the strokes horizontal to maintain the look of movement.
Level Up: Glazing
Once the painting is dry, mix a tiny drop of Phthalo Green with glazing medium. Brush it over the wave’s curve to make the water look transparent and gem-like.
Step 3: The Crash & Foam
-
Form the crashing lip:
Load a medium filbert brush with heavy body Titanium White. Dab paint aggressively along the top crest of the main wave to create the explosion of foam. -
Pull the foam down:
From that white crest, drag irregular, jagged lines of white paint down the face of the translucent teal wave. These lines follow the curve of the water, showing how the foam cascades. -
Create sea spray:
Use an old, splayed brush or a fan brush with watered-down white paint. Flick or stipple dots above the crashing wave lip to mimic mist and spray flying into the air. -
Detail the foreground churn:
In the bottom right foreground, use swirling, circular strokes with white and light blue to paint the messy, turbulent water left behind after a wave breaks. -
Highlight the water surface:
Add thin, horizontal streaks of pale blue or white on the distant water to suggest small caps and light reflection.
Step 4: Final Details: Rocks & Birds
-
Paint the rock foundation:
In the bottom left corner, block in smooth, rounded shapes using dark grey (mix Black + White). Vary the sizes to look like a natural pile of boulders. -
Highlight the rocks:
Mix a lighter grey and add highlights to the tops of the rocks where the sun hits them. I like to let the dark undercoat peek through for volume. -
Position the seagulls:
Plan the placement of your three birds: two higher up on the left, and one swooping lower on the right. Keeping the sizes different creates depth. -
Detail the wings:
Using your smallest round brush and dark grey paint, create the ‘M’ or ‘V’ shape of the wings. Add white to the bodies and the leading edges of the wings for contrast. -
Add final touches:
Paint tiny black beaks and faint wingtips on the gulls. Step back and check if you need a few more bright white highlights on the wave crests.
Now you have a breathtaking coastal view that captures the wild beauty of the ocean right on your canvas
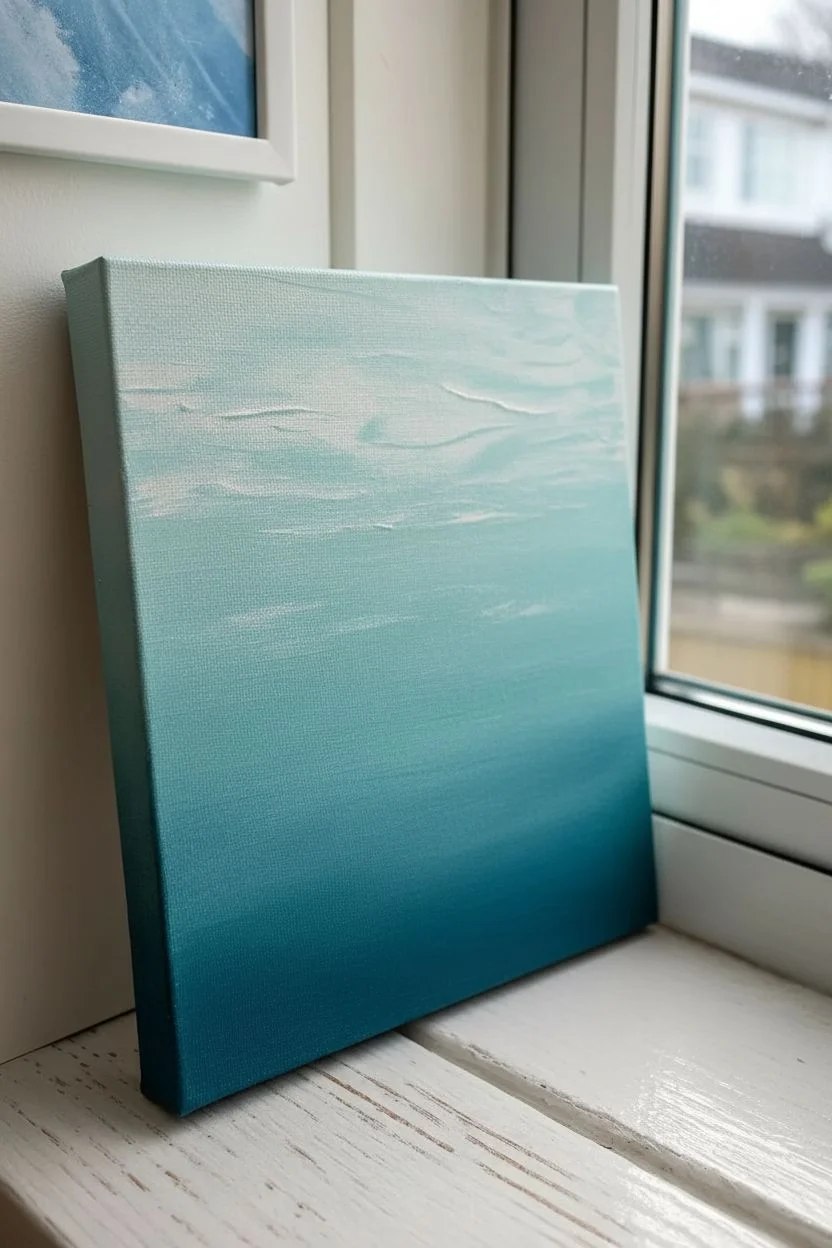
Misty Morning Over a Gray-Blue Sea
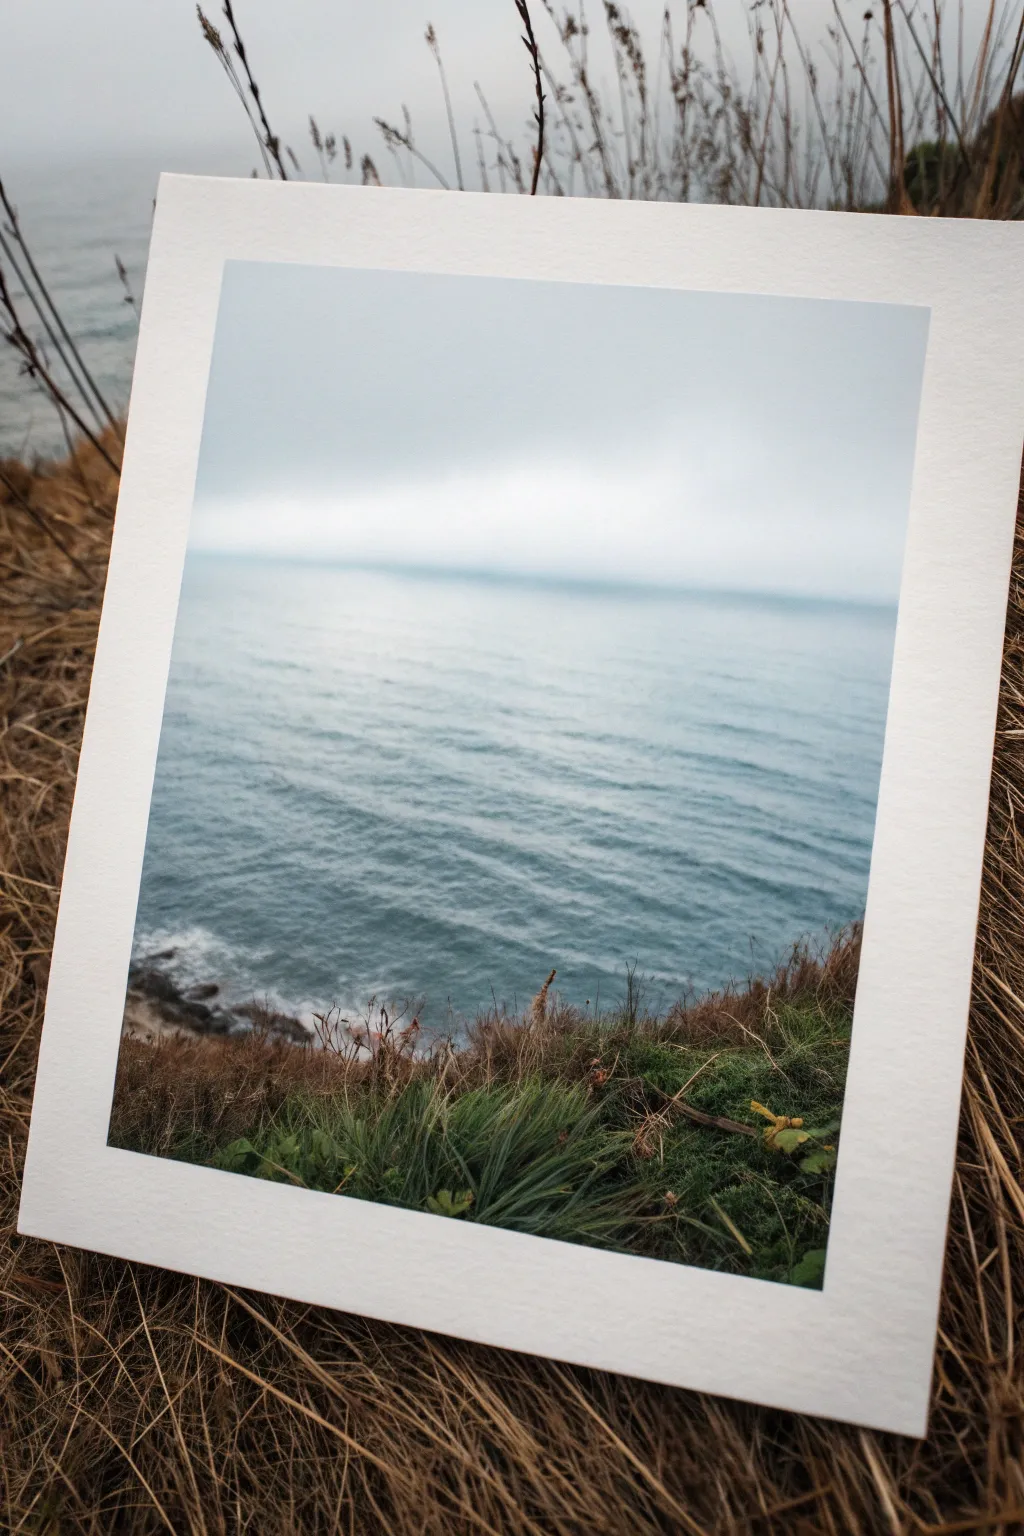
Capture the serene solitude of a foggy coastline with this soft, atmospheric watercolor painting. You will learn to balance the gentle blur of a distant horizon with crisp, detailed foreground grasses to create a stunning sense of depth.
How-To Guide
Materials
- Cold Press Watercolor Paper (140lb/300gsm)
- Watercolor Paints (Indigo, Payne’s Gray, Cerulean Blue, Sap Green, Burnt Umber, White Gouache or opaque white watercolor)
- Large Flat Wash Brush (3/4 inch or 1 inch)
- Round Brush (Size 6)
- Fine Liner or Rigger Brush (Size 0 or 1)
- Masking Tape
- Pencil (2H or HB)
- Two Cups of Water
- Paper Towels
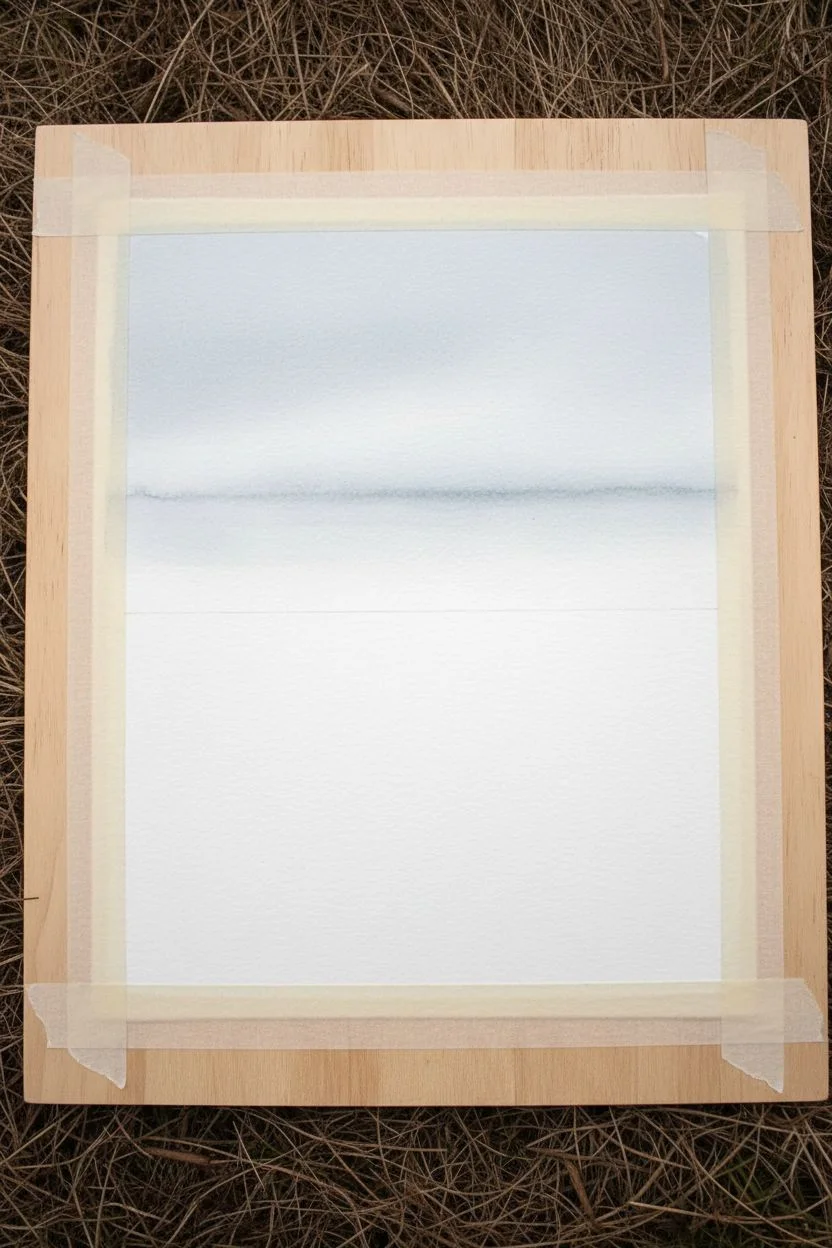
Step 1: Preparation and Sky
-
Tape the Edges:
Secure your watercolor paper to a board using masking tape on all four sides. This creates that clean, crisp white border seen in the example and keeps the paper buckle-free. -
Sketch the Horizon:
Lightly draw a horizontal line roughly one-third of the way down from the top. Don’t press hard; you want this line to disappear eventually. -
Wet the Sky Area:
Using your large flat brush, apply clean water to the entire sky area, from the top edge down to just slightly past your horizon line. -
Paint the Overcast Sky:
Mix a very dilute wash of Indigo and Payne’s Gray. While the paper is still wet, sweep this pale gray-blue across the top, letting it fade almost to white as it nears the horizon to simulate thick fog.
Horizon Haze
To get that perfect foggy horizon, lift lifting a tiny bit of paint away with a dry brush just after painting the water line. It creates a soft ‘lost edge’ effect.
Step 2: The Ocean
-
Base Ocean Layer:
While the sky is drying (but slightly damp near the horizon), mix Cerulean Blue with a touch of Payne’s Gray. Paint the water area, starting lighter near the horizon and gradually darkening as you move downward. -
Soften the Horizon:
Take a clean, damp brush and gently run it along the horizon line. This blends the sky and sea together, creating that misty, indistinct look where you can’t tell exactly where the water ends. -
Add Water Ripples:
Using the round brush and a slightly darker mix of Indigo, paint horizontal streaks across the water. Keep them thin and faint near the horizon, making them wider and more distinct as they come closer to the bottom. -
Create Depth:
Strengthen the blue tones in the lower third of the water. This darker value helps pull the foreground closer to the viewer. -
Initial Drying Time:
Let the entire painting dry completely. The paper must be bone-dry before you start the sharp foreground details to prevent bleeding.
Step 3: the Foreground Cliff
-
Paint the Land Mass:
Mix Burnt Umber with a little Indigo for a dark, earthy tone. Blocking in the cliff edge along the bottom, creating an uneven, jagged contour. -
Add Texture to the Cliff:
While the brown paint is still wet, drop in hints of darker pigment to suggest rocks and shadows, and blot slightly with a tissue to create rough texture. -
Painting Waves Breaking:
Where the water meets your dark cliff, use a small amount of white gouache (or very thick white watercolor) to stipple little white foam patterns against the rocks.
Removing Tape Safely
If your paper tears when removing tape, stop immediately. Use a hairdryer to warm the tape for a few seconds; the heat softens the adhesive for a clean release.
Step 4: Grasses and Details
-
Mix Green Tones:
Prepare a few puddles of green: a dark shadow green (Sap Green + Indigo), a mid-tone green, and a yellow-green for highlights. -
Base Grass Layer:
Using the size 6 brush, dab the dark green along the top edge of your cliff to establish the dense vegetation base. -
Paint Individual Blades:
Switch to your rigger or fine liner brush. Using a ‘flicking’ motion from bottom to top, paint long, thin grass blades rising from the cliff edge. Vary the direction so they look windswept. -
Layering the Grass:
I like to wait for the first grass layer to dry, then add lighter yellow-green blades on top. This layering creates volume and realism. -
Final Touches:
Add a few dry, brown stalks using Burnt Umber to break up the green. Once fully dry, carefully peel off the tape at a 45-degree angle to reveal your crisp border.
Step back and admire the peaceful, misty atmosphere you’ve captured on paper

PENCIL GUIDE
Understanding Pencil Grades from H to B
From first sketch to finished drawing — learn pencil grades, line control, and shading techniques.
Explore the Full Guide
Sea Turtle or Fish Silhouettes in Blue Water
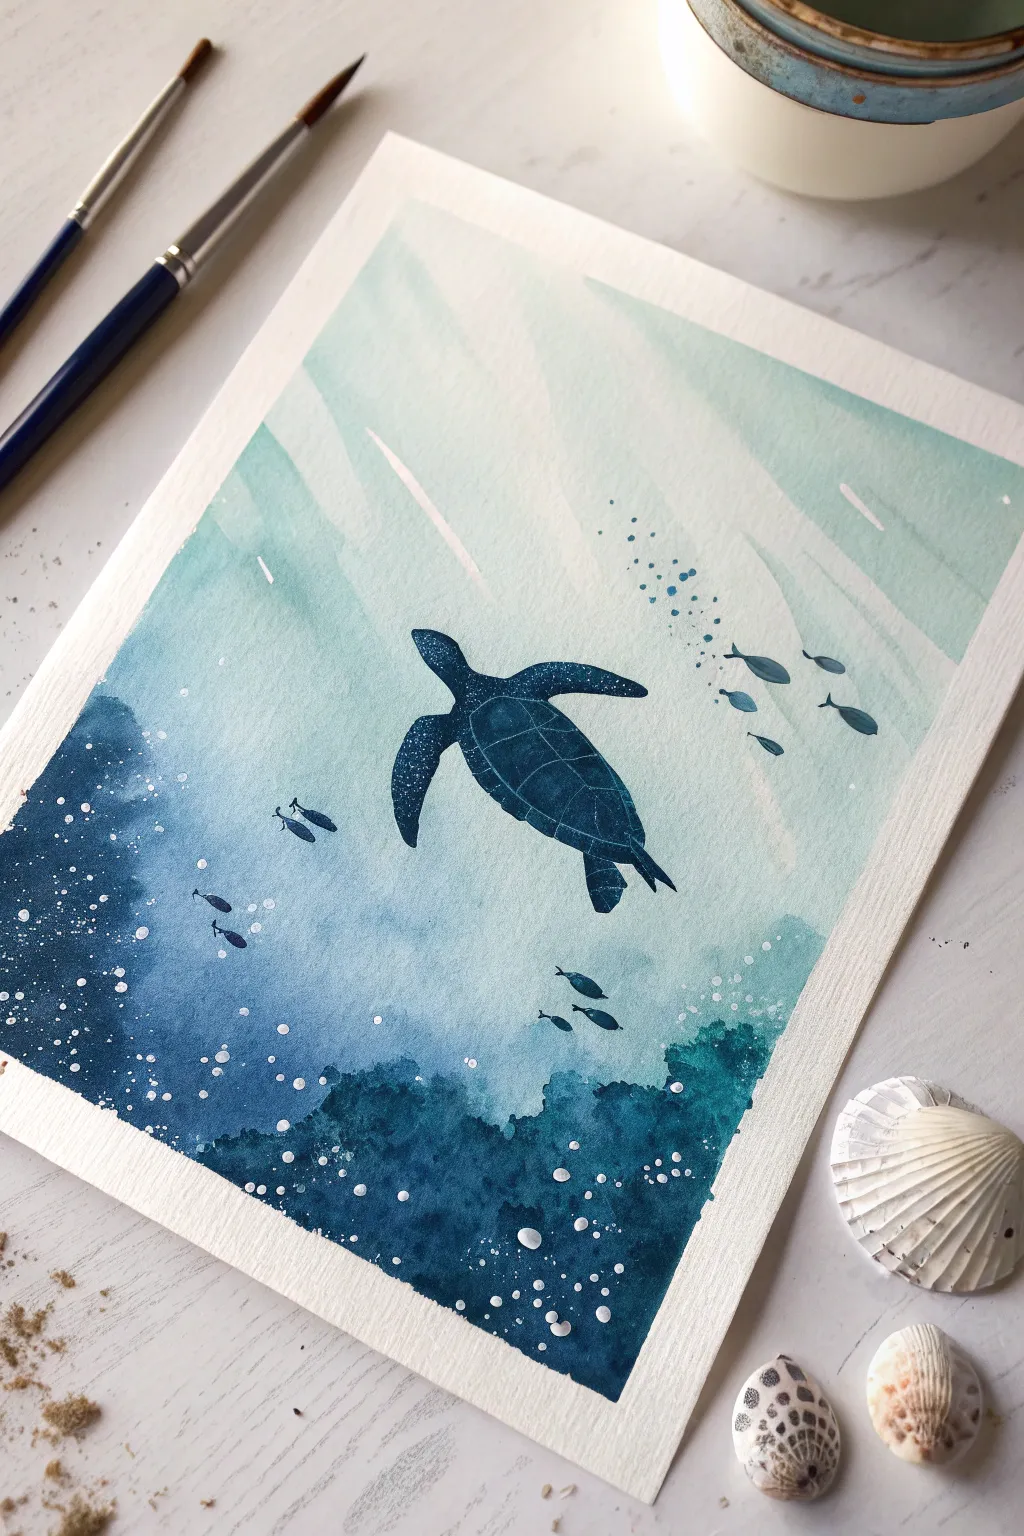
Capture the serene beauty of the deep ocean with this monochromatic watercolor project. Using varying shades of indigo and teal, you will create a sense of depth and movement around a majestic sea turtle silhouette.
Step-by-Step Guide
Materials
- Cold press watercolor paper (300 gsm)
- Painter’s tape or masking tape
- Watercolor paints (Indigo, Prussian Blue, Teal/Turquoise)
- Round brushes (sizes 8 and 2)
- White gouache or white gel pen
- Pencil and eraser
- Jar of clean water
- Paper towels
- Sea salt (optional for texture)
- Hairdryer (optional for speed)
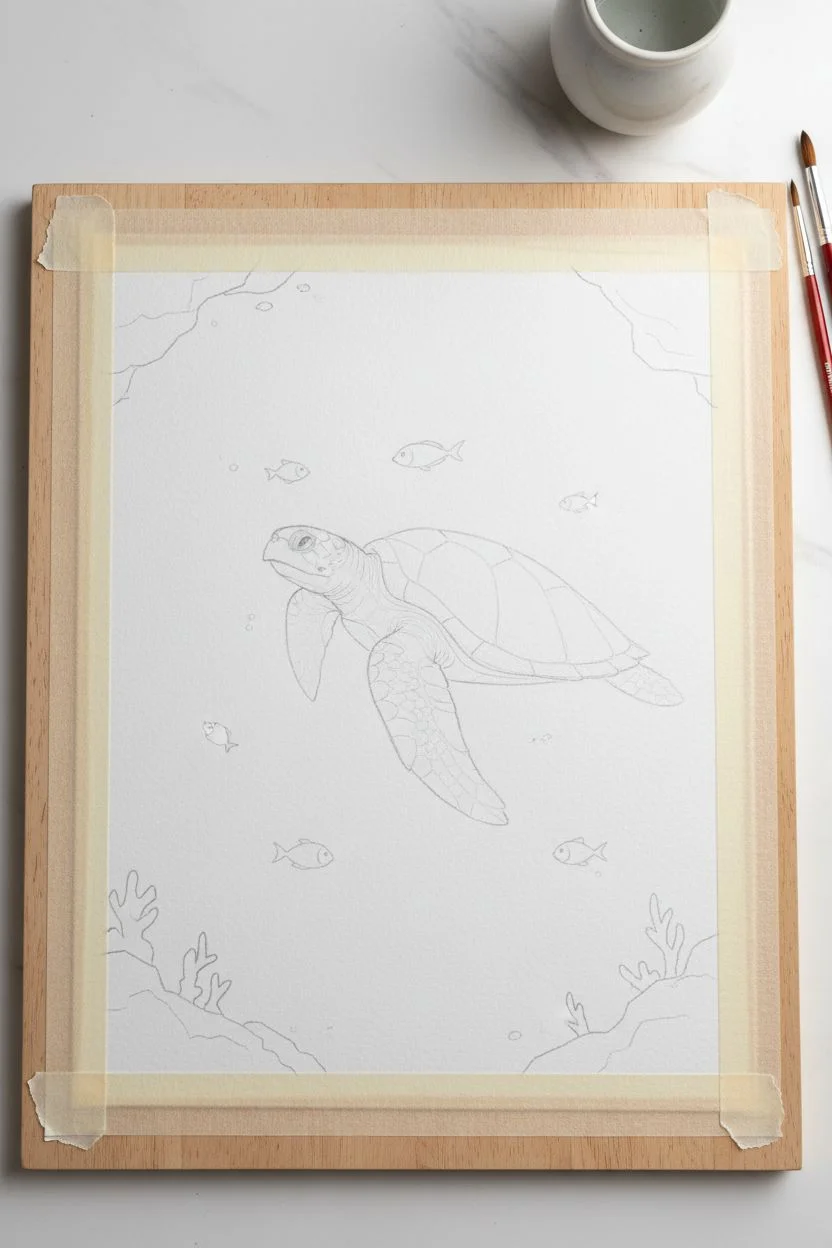
Step 1: Preparation and Sketching
-
Secure the paper:
Tape down all four edges of your watercolor paper to a hard board or your work surface. This prevents buckling when the paper gets wet and creates that crisp, professional white border shown in the image. -
Sketch the focal point:
Lightly sketch the outline of the sea turtle in the center of the paper. Keep your pencil lines very faint so they don’t show through the final paint. -
Sketch the schools of fish:
Add small, simple shapes for the groups of fish. Place a few larger ones near the turtle and smaller, more distant ones near the edges. -
Outline the seabed:
Draw faint, jagged lines at the bottom left and right corners to indicate where the dark coral or rock formations will be.
Pro Tip: Masking Fluid
For a pure white turtle or bubbles, apply masking fluid before painting the background wash. Rub it off at the end for the brightest whites.
Step 2: Creating the Background Wash
-
Mix your colors:
Prepare a watery mix of Teal or Turquoise for the upper water, and a slightly stronger mix of Prussian Blue for the middle depths. -
Wet the paper:
Using your largest brush, apply clean water to the entire paper surface, avoiding the turtle shape if possible, though painting over it is okay since the silhouette will be dark. -
Apply the light wash:
Start at the top with your light Teal mix. Use broad, diagonal strokes to simulate sun rays filtering down. -
Deepen the color:
While the paper is still damp, drop in the Prussian Blue in the middle section, letting it bleed naturally into the lighter top layer. -
Create the sun rays:
Lift out pigment while the paint is wet using a clean, thirsty brush to create distinct diagonal beams of light coming from the top left. -
Let it dry completely:
Wait for the background to be bone dry. If the paper feels cool to the touch, it’s still wet.
Level Up: Salt Texture
Sprinkle coarse sea salt into the wet background wash in the corners. As it dries, it creates stunning crystalline patterns that look like coral.
Step 3: Painting the Foreground Elements
-
Mix the darkest shade:
Create a concentrated mix of Indigo and Prussian Blue. This should be thick and opaque, like heavy cream. -
Paint the turtle silhouette:
Carefully fill in your turtle sketch with the dark blue mix. Use the size 2 brush for the delicate tips of the flippers. -
Add shell details:
While the turtle silhouette is drying but still slightly damp, you can lift a tiny bit of color or add a slightly lighter blue line to suggest the shell segments. -
Paint the fish:
Using the same dark blue, paint the small fish silhouettes. Vary their sizes to create a sense of distance and perspective. -
Create the coral base:
At the bottom corners, dab in your darkest Indigo paint to form the rocky seabed. Use an irregular stippling motion to suggest rough coral texture. -
Add watercolor blooms:
While the bottom rocks are wet, drop in tiny amounts of clean water or sprinkle a pinch of salt. This pushes the pigment away and creates natural, bubbly textures.
Step 4: Final Details and Highlights
-
Add the bubbles:
Once the painting is totally dry, use white gouache or a gel pen to add rising bubbles. Make them different sizes—tiny dots near the bottom and slightly larger circles as they rise. -
Texture the turtle:
I like to add very subtle white stippling on the turtle’s flippers to mimic their scaly texture. -
Add light rays:
Enhance the sun rays if needed by using a very dilute white gouache to paint faint diagonal lines near the surface. -
Reveal the border:
Carefully peel away the masking tape at a 45-degree angle to reveal your clean, crisp edges.
Frame your deep-sea masterpiece and enjoy the calming blue vibes it brings to your space
Stormy Sea With Dramatic Clouds
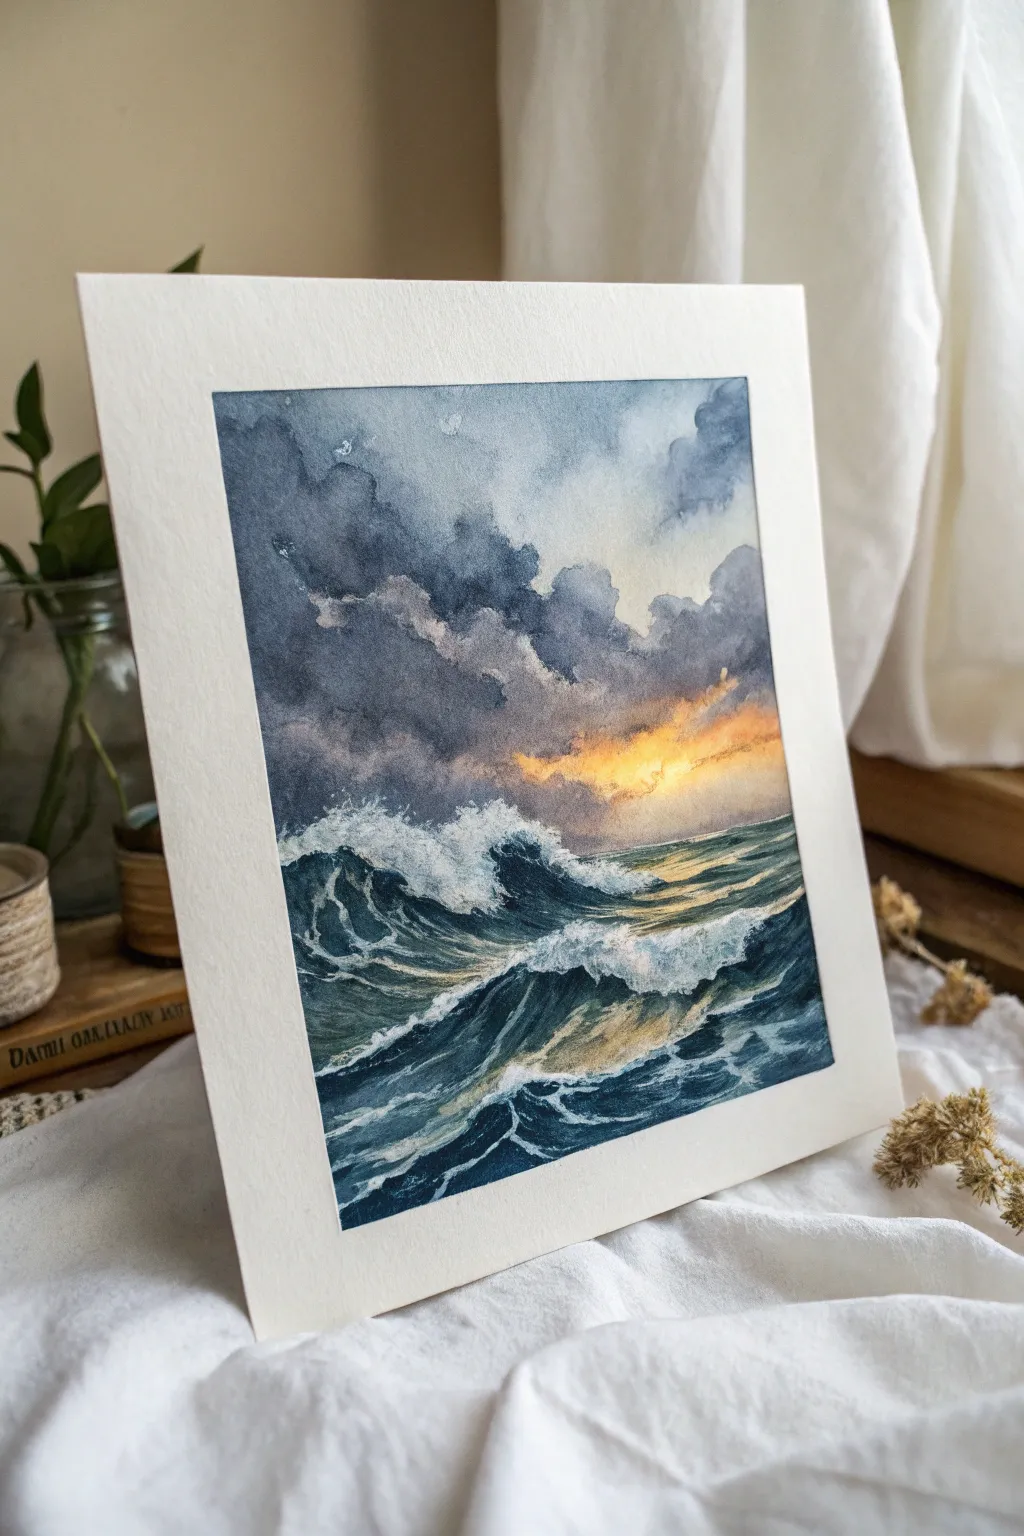
Capture the raw power of the ocean with this dramatic watercolor study featuring a turbulent sea and a brooding sky illuminated by a sunset. This project focuses on balancing deep indigo shadows with warm glowing light to create intense contrast and movement.
Step-by-Step Tutorial
Materials
- Cold Press watercolor paper (140 lb/300 gsm or heavier)
- Watercolor paints (Indigo, Payne’s Gray, Prussian Blue, Burnt Sienna, Yellow Ochre, Cadmium Orange)
- Masking fluid or white gouache
- Large wash brush (flat or mop)
- Medium round brush (size 8 or 10)
- Small detail brush (size 2 or 4)
- Clean water jars
- Paper towels
- Painter’s tape and board
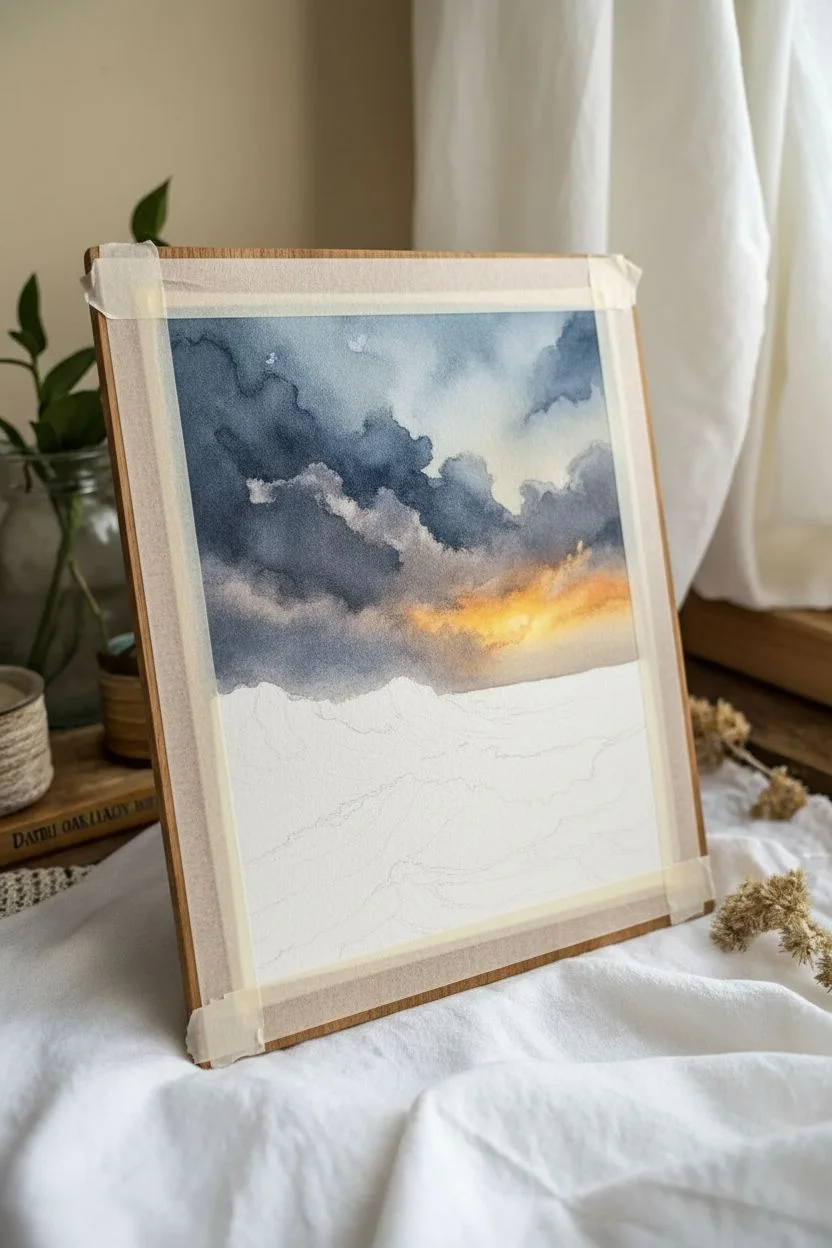
Step 1: Preparation & Sky
-
Secure the paper:
Tape your watercolor paper down firmly to a drawing board on all four sides. This prevents buckling and creates that crisp white border seen in the reference image. -
Initial sketch:
Lightly sketch the horizon line about one-third of the way up from the bottom. Mark the general shapes of the largest wave crests, but keep the pencil lines very faint. -
Wet-on-wet sky base:
Wet the entire sky area with clean water using your large wash brush until the paper has a gentle sheen. -
Painting the glow:
Drop in a mix of Yellow Ochre and a touch of Cadmium Orange right above the horizon line in the center right. Let the color bleed outwards naturally, keeping the edges soft. -
Building the storm clouds:
While the paper is still damp, mix a heavy wash of Indigo and Payne’s Gray. Load your medium round brush and paint the upper corners, working diagonally down towards the light source. -
Softening edges:
Soften the edges where the dark clouds meet the orange light. Use a clean, slightly damp brush to blur the transition so the clouds look fluffy rather than hard-edged. -
Deepening contrast:
Add a second, more concentrated layer of Indigo into the darkest parts of the clouds at the top left while the first layer is still semi-damp to create volume.
Step 2: The Turbulent Ocean
-
Base ocean layer:
Once the sky is dry, wet the ocean area (avoiding the white foam shapes if you’re skilled at negative painting, otherwise wash over light areas with very pale blue). -
Establish the horizon:
Paint a sharp, dark line of Prussian Blue mixed with a little Burnt Sienna across the horizon. This separates the sky from the sea clearly. -
Mapping the waves:
Using the medium brush, paint the ‘backs’ of the waves with a mix of Prussian Blue and Indigo. Leave large, ragged shapes of white paper untouched for the sea foam. -
Adding wave shadows:
Mix a dark, greenish-blue using Indigo and a touch of Yellow Ochre. Paint the deep troughs under the curving wave crests to give them height and dimension. -
Reflecting the sunset:
I like to glaze a very thin wash of Yellow Ochre over the top surfaces of the waves near the horizon. This reflects the warm sky light onto the water. -
Defining the foreground:
Switch to your smaller brush. Use pure Indigo to paint the sharp, jagged details of the foreground water, carving out the shapes of the whitewater foam.
Use a thirsty brush
To create fluffy cloud edges or mist, rinse your brush, dry it on a towel, and lift pigment off the damp paper.
Step 3: Final Details & Highlights
-
Creating spray:
If you masked the whites, remove the fluid now. If not, use white gouache on a dry brush to scumble (lightly drag) paint over the wave crests to simulate crashing spray. -
Splatter texture:
Load a toothbrush or stiff brush with white gouache and flick tiny droplets over the crashing parts of the waves for a misty, chaotic effect. -
Refining foam patterns:
Use the small detail brush with diluted blue-grey paint to add subtle shadows inside the white foam areas, giving the splashes 3D form. -
Final dry check:
Let everything dry completely. Check for contrast—if the darks have dried too light, glaze another layer of Indigo over the deepest shadows. -
The reveal:
Carefully peel off the painter’s tape at a 45-degree angle to reveal the clean frame around your stormy seascape.
Scratch distinct highlights
Use an exacto knife to gently scratch thin white lines into dry dark waves for sharp, bright highlights.
Step back and admire the powerful atmosphere you’ve captured in this small window to the sea


Top-Down View of Waves Meeting Sand
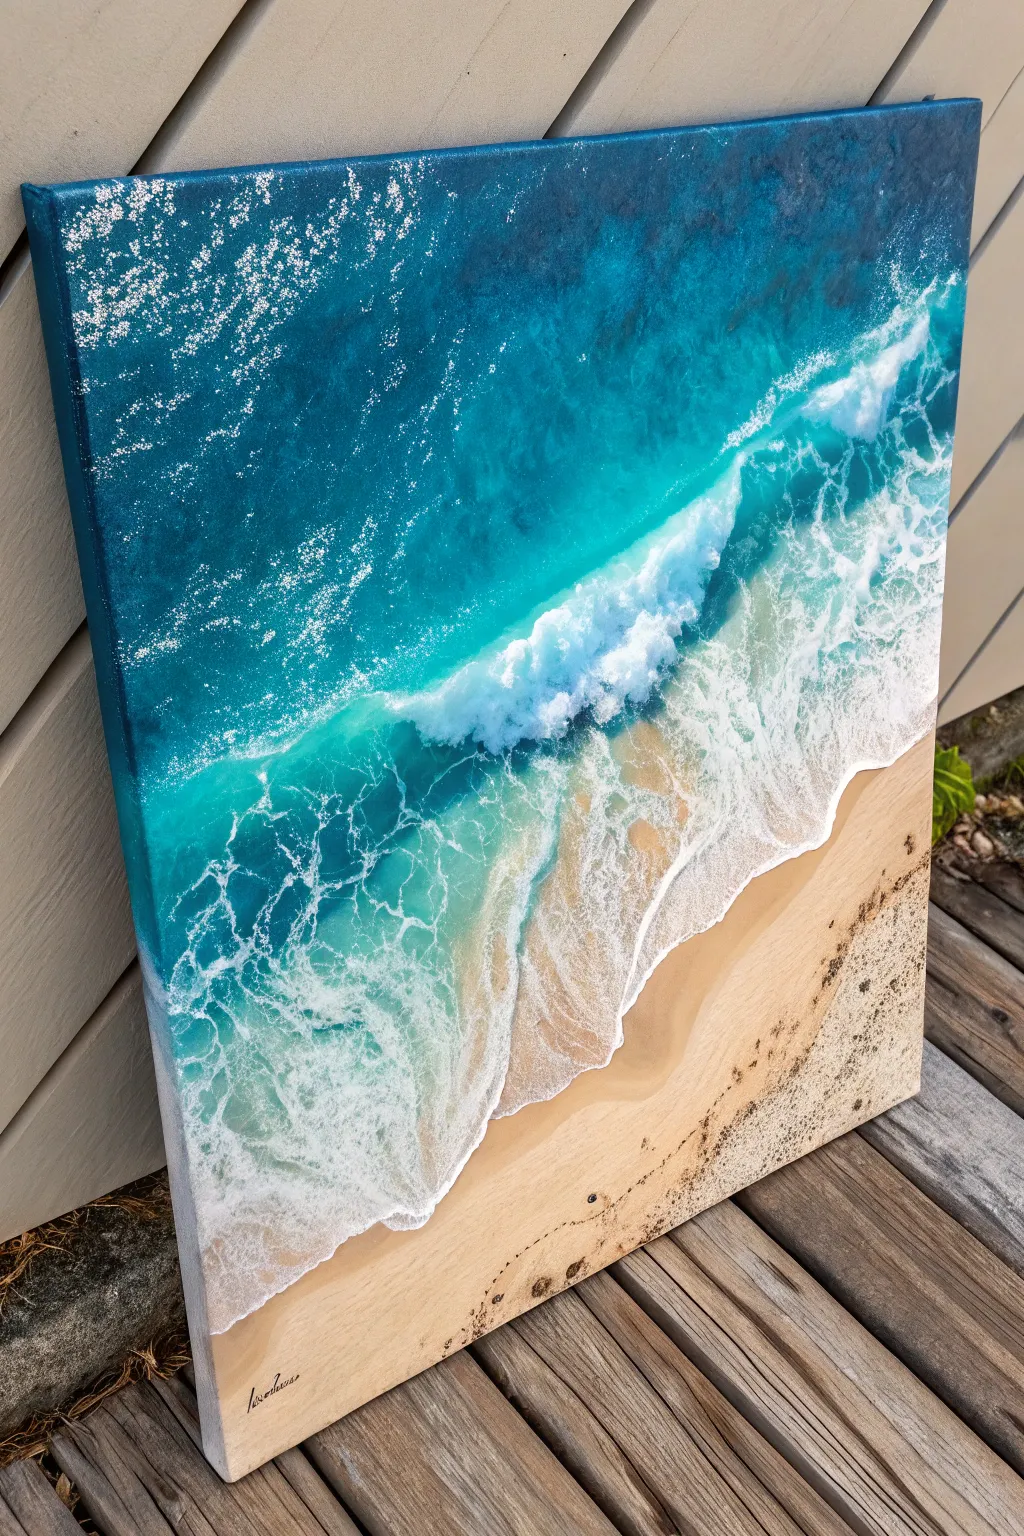
Capture the mesmerizing depth of the ocean meeting the shore with this stunning resin art project. By layering pigmented epoxy resin and using a heat gun to manipulate the waves, you’ll create a realistic, glossy seascape that looks like a drone photograph come to life.
Step-by-Step
Materials
- Rectangular wooden panel or gallery-wrapped canvas
- Art resin (two-part epoxy)
- Acrylic paints or resin pigments (Deep Blue, Turquoise, White, Sand/Beige)
- Real sand or sand-texture gel
- Heat gun or embossing tool
- Propane torch (for popping bubbles)
- Plastic cups and stir sticks
- Nitrile gloves
- Masking tape
- Level
- Isopropyl alcohol (91% or higher) in a spray bottle or dropper
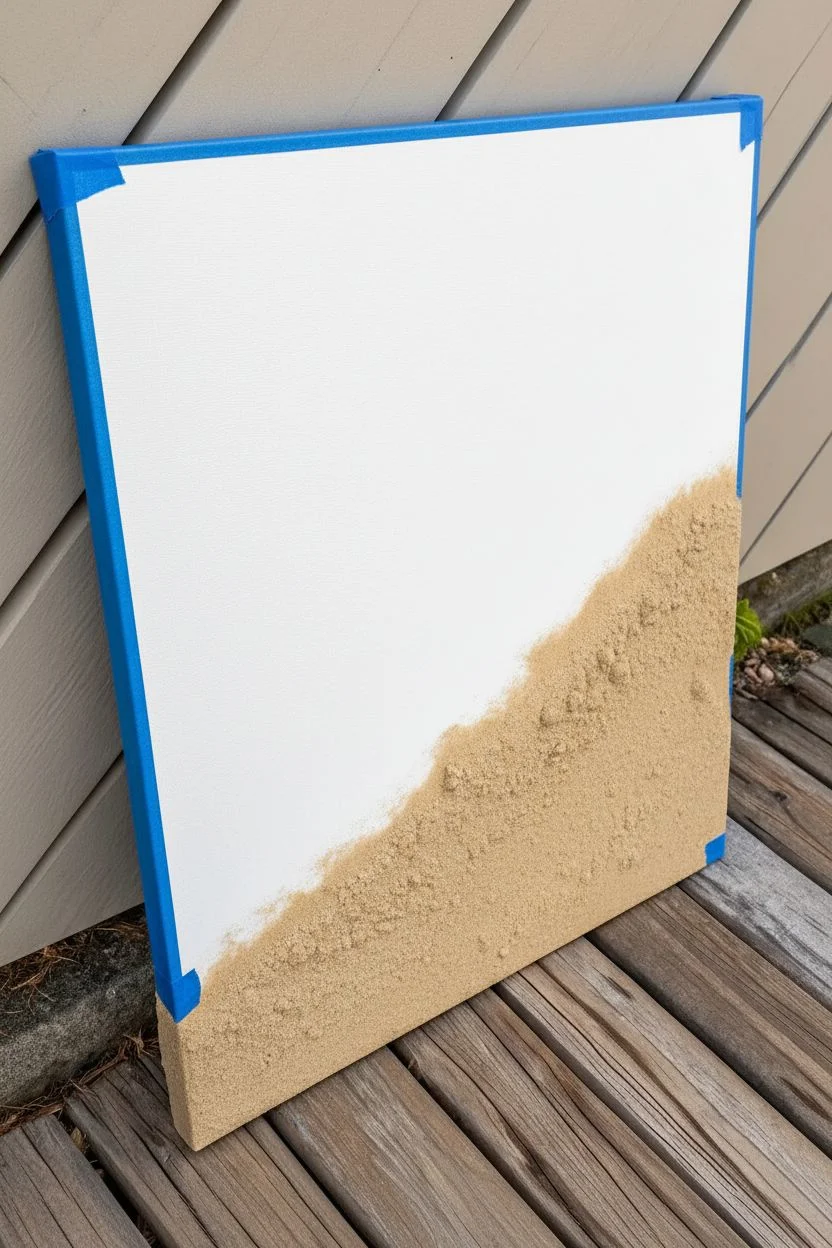
Step 1: Preparation & Sand Layer
-
Prep the Surface:
Tape the back edges of your canvas or wood panel with masking tape to catch drips. Ensure your workspace is perfectly level so the resin doesn’t slide off one side. -
Mix the Sand Base:
In a small cup, mix a small amount of resin with beige pigment. Stir in real sand until you have a gritty, textured paste. If you prefer a painted look, just mix sand-colored acrylic paint with a texture medium. -
Apply the Beach:
Spread your sand mixture across the bottom third of the canvas, angling it diagonally to mimic a natural shoreline. I like to tap it down to ensure good adhesion while keeping the texture rough. -
Dry Time:
Allow this initial sand layer to cure fully (usually 24 hours) or dry completely if using acrylics before moving on to the liquid resin pour.
Making Cells Pop
Add 1-2 drops of silicone oil to your white resin cup before pouring. This interacts with the heat to create those stunning ‘lacy’ foam cells effortlessly.
Step 2: The Ocean Pour
-
Mix Main Resin Batch:
Mix a large batch of clear resin according to the manufacturer’s ratios. Stir slowly for at least 3 minutes to minimize bubbles. -
Tint the Cups:
Divide the resin into four cups. Tint them: Deep Blue (largest amount), Turquoise, White (opaque pigment specifically for cells), and leave one cup Clear. -
Pour the Deep Water:
Pour the Deep Blue resin at the top of the canvas, furthest from the sand. Spread it down to cover the top third. -
Pour the Shallows:
Pour the Turquoise resin in the middle section, blending it slightly into the Deep Blue where they meet to create a gradient. -
Add Clear Transition:
Pour the Clear resin over the edge of the sand and partially into the turquoise area. This mimics wet sand and shallow, transparent water. -
Pop Bubbles:
Briefly pass a propane torch or heat gun over the wet resin to pop any surface bubbles.
Add 3D Texture
Embed tiny crushed shells, small rocks, or dried moss onto the sand section during the first phase for realistic, tactile beach debris.
Step 3: Creating Waves
-
Lay the Foam Line:
Drizzle a thin line of the opaque White resin right where the turquoise water meets the clear section. -
Push the Waves:
Using a heat gun on high heat but low air, push the white line back over the blue water. The heat will thin the resin and create wispy, lacy cells. -
Add a Second Wave:
For depth, add a second thin line of white further back in the deep blue section and repeat the heat gun technique, pushing it slightly to feather the edges. -
Detailing:
Use a toothpick to drag tiny tendrils of white foam or to swirl the colors slightly for a more organic look. -
Final Torch:
Do one last quick pass with the torch to remove bubbles created during the wave blowing process, being careful not to scorch the resin.
Step 4: Finishing
-
Protect While Curing:
Cover the piece with a large box or dust cover to prevent dust particles from settling in the sticky surface. -
Remove Tape:
Once the resin is tacky but not fully hard (typically 4-6 hours), peel off the masking tape from the back to remove hardened drips cleanly. -
Full Cure:
Let the artwork sit undisturbed for 24-72 hours until fully hardened.
Hang your glossy seascape where it can catch the light and transport you to the beach every time you look at it
Textured Waves With Thick Paint and Scraping
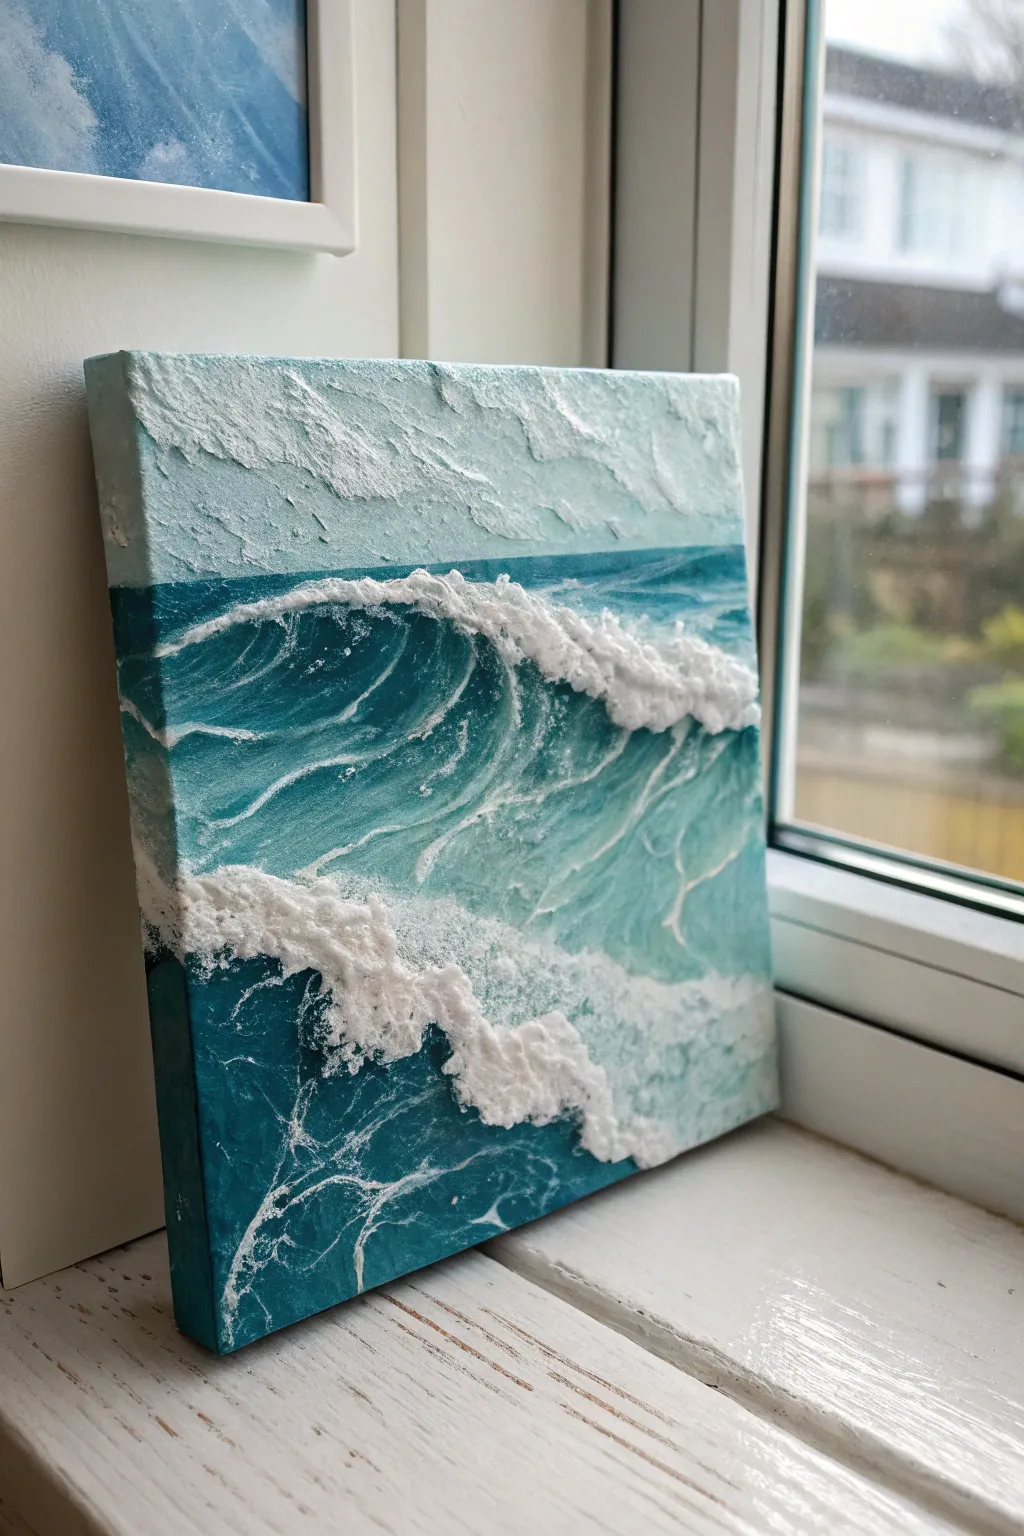
Capture the raw power of the ocean with this highly tactile approach, where thick modeling paste meets heavy-body acrylics. The result is a 3D seascape with frothy whitecaps that actually physically rise off the canvas, begging to be touched.
How-To Guide
Materials
- Small square canvas (e.g., 8×8 or 10×10 inches)
- Heavy body acrylic paints (Phthalo Blue, Turquoise, Titanium White, Paynes Grey)
- Modeling paste (heavy or high viscosity)
- Palette knives (one large trowel shape, one smaller diamond shape)
- Stiff bristle fan brush
- Old credit card or plastic scraper
- Spray bottle with water
Step 1: Building the Base
-
Prime the Surface:
Even if your canvas is gessoed, apply a thin coat of white acrylic mixed with a tiny drop of turquoise to get rid of the stark white weave. This creates a unifying undertone for your water. -
Block in the Gradient:
Mix a dark teal using Phthalo Blue and a touch of Paynes Grey. Apply this to the bottom third of the canvas. As you move upward, mix in more Turquoise and White to create a lighter, misty blue-green for the sky area. -
Initial Texture Layer:
While the paint is still wet, take your palette knife and scrape horizontally across the sky area. This creates a distressed, windy look, revealing bits of the canvas grain which adds instant atmosphere.
Step 2: Sculpting the Waves
-
Mix the Paste:
On your palette, mix modeling paste with about 20% Titanium White paint. The paint helps the paste remain flexible and opaque when dry. Leave some paste uncolored for maximum translucency later. -
Establish the Big Wave:
Load a large palette knife with a generous glob of the white paste mixture. Lay it down across the middle of the canvas in a curved, diagonal swoop to form the crest of the main wave. -
Create the Barrel:
Using the edge of the knife, carve into the bottom of that thick white swoop, pulling downward and to the right. This creates the hollow ‘barrel’ of the wave where the water is thinnest and most turquoise. -
Add Deep Water Color:
While the paste is wet, define the shadow under the crest. Use a small brush to tuck deep Phthalo Blue right underneath the heavy white ridge you just sculpted. -
Scrape the Face:
Use your plastic scraper or old credit card to drag the dark blue paint through the wet paste on the wave’s face. The scraping motion mimics the striated look of water being pulled up the wave.
Cracking Paste?
If your thick peaks crack while drying, don’t panic. Mix a loose glaze of white paint and fill the fissures. It looks like natural foam separation.
Step 3: Froth and Foam
-
Stipple the Foam:
Load the tip of a stiff fan brush or a small palette knife with pure modeling paste. Tap it repeatedly along the very top edge of your wave to create rough, spiky texture that looks like spraying foam. -
Add Foreground Chaos:
In the bottom third of the painting, apply patches of modeling paste randomly. Use a palette knife to messily swirl them into the dark blue background, creating the choppy ‘whitewater’ effect left after a wave crashes. -
Enhance Translucency:
Mix a glaze of water and Turquoise. Gently brush this over the middle section of the wave face (below the white foam but above the deep shadow). This creates that glowing, sunlit water effect. -
Dry Brushing:
Once the main ridges are tacky or semi-dry, lightly drag a brush with pure Titanium White over the textured blue areas. The paint will catch only on the raised bumps, highlighting the water’s surface tension. -
Final Peaks:
Go back to your purest white paste. Add one final layer of high relief to the very top of the crashing wave and the foreground foam piles. I like to let these peaks stand out at least a quarter-inch from the canvas. -
Clean the Edges:
Before everything hardens, run a clean finger or cloth along the sides of the canvas to remove any overhanging paste, or purposely wrap the texture around the sides for a sculptural feel.
Pro Tip: Gravity Assist
Turn the canvas upside down while sculpting the wave crest. Gravity will pull the paste into a natural ‘curling over’ shape as it begins to set.
Allow the piece to dry flat overnight to ensure the heavy peaks hold their shape perfectly
Mixed-Media Ocean With Sand and Natural Texture

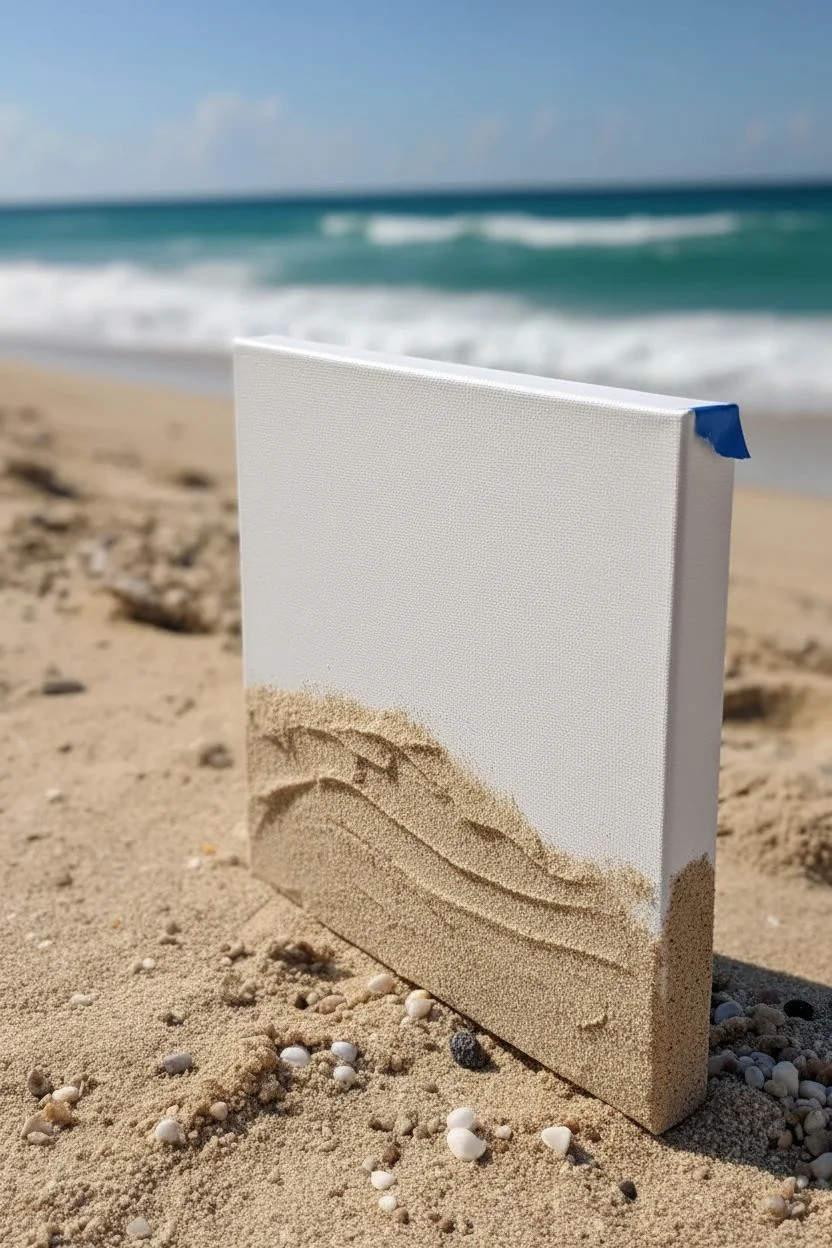
Capture the magic of the shoreline by combining real sand with layers of acrylic and resin for a dimensional, hyper-realistic effect. This mixed-media canvas blends soft textures with glossy, water-like finishes to create a piece that feels like a window to the ocean.
Step-by-Step Guide
Materials
- Deep-edge gallery wrapped canvas (10×10 or similar)
- Acrylic paints (Titanium White, Phthalo Blue, Turquoise, Ultramarine, Sand/Beige)
- Real fine beach sand
- Gloss gel medium or Mod Podge
- Art resin (two-part epoxy)
- Heat gun or torch
- Palette knives
- Flat paint brushes
- Silicone oil (optional for cells)
- Painter’s tape
- Plastic cups and stir sticks
Step 1: Setting the Sandy Foundation
-
Prep the canvas:
Begin by taping off the back edges of your canvas with painter’s tape. This is crucial as resin drips are very hard to remove later, and it leaves your finished piece looking professional. -
Mix the sand paste:
In a cup, mix a generous amount of gloss gel medium with your acrylic sand color. Once blended, pour in your real beach sand until you have a thick, gritty paste. -
Apply the beach:
Using a palette knife, spread the sand mixture onto the bottom third of the canvas. Don’t worry about being perfectly smooth; slight ridges mimic natural dunes. -
Create the shoreline:
Where the sand will meet the water, thin the mixture slightly so it tapers off. Let this layer dry completely, usually overnight, until it’s rock hard.
Step 2: Painting the Ocean Base
-
Paint the horizon:
Start at the very top of the canvas with a mix of Titanium White and a tiny drop of Blue for the sky. Blend this downwards into a deeper Ultramarine Blue for the horizon line. -
Gradient the water:
As you move down from the horizon toward the sand, transition your colors from deep blue to bright Turquoise, and finally to a pale, watery blue right over the edge of your textured sand. -
Paint the sides:
Don’t forget the edges! Carry your gradient colors over the sides of the deep canvas so the image wraps around seamlessly. -
Add depth:
While the paint is wet, use a clean, dry brush to softly blend the transition lines so there are no harsh stripes between the deep water and the shallow areas. -
Dry time:
Allow the acrylic layer to dry completely before introducing resin.
Sticky Situation
If your resin remains sticky after 24 hours, the ratios were likely off. You can’t fix the tacky layer, but you can scrape it off if it’s liquid, or pour a fresh, correctly mixed layer on top to seal it.
Step 3: The Resin Pour
-
Mix the resin:
Combine your two-part epoxy resin according to the manufacturer’s instructions. Stir slowly for at least 3 minutes to minimize bubbles. -
Clear coat:
Pour a thin layer of clear resin over the entire ocean area (not the sky, unless you want a glossy sky too) and the sand area to seal it. Spread it to the edges with a spreader or gloved finger. -
Tint the waves:
Pour a small amount of mixed resin into a separate cup and add opaque Titanium White pigment paste or heavy body acrylic. You want this white to be very dense. -
Pour the wave line:
Pour a thin line of the white resin where the shallow water meets the sand texture. The resin will naturally want to spread. -
Blow the waves:
Using your heat gun on a low setting, gently blow the white resin line back toward the ocean area. I find holding the heat gun at a 45-degree angle helps create that lacy, foamy sea-spray effect. -
Pop bubbles:
Pass the heat gun or a torch quickly over the clear sections to pop any trapped air bubbles. -
Protect and cure:
Cover the artwork with a large box to prevent dust from settling on the sticky surface and let it cure for 24 hours. -
Remove tape:
Once the resin is solid but perhaps slightly soft (around the 12-18 hour mark depending on brand), peel off the painter’s tape from the back for clean edges.
Lacing Secret
For better ‘cells’ or lacing in your white seafoam, try adding just one drop of silicone oil to your white resin cup before pouring. The oil repels the resin, creating natural-looking holes in the foam.
Now you have a permanent slice of the beach to enjoy anywhere in your home


Have a question or want to share your own experience? I'd love to hear from you in the comments below!