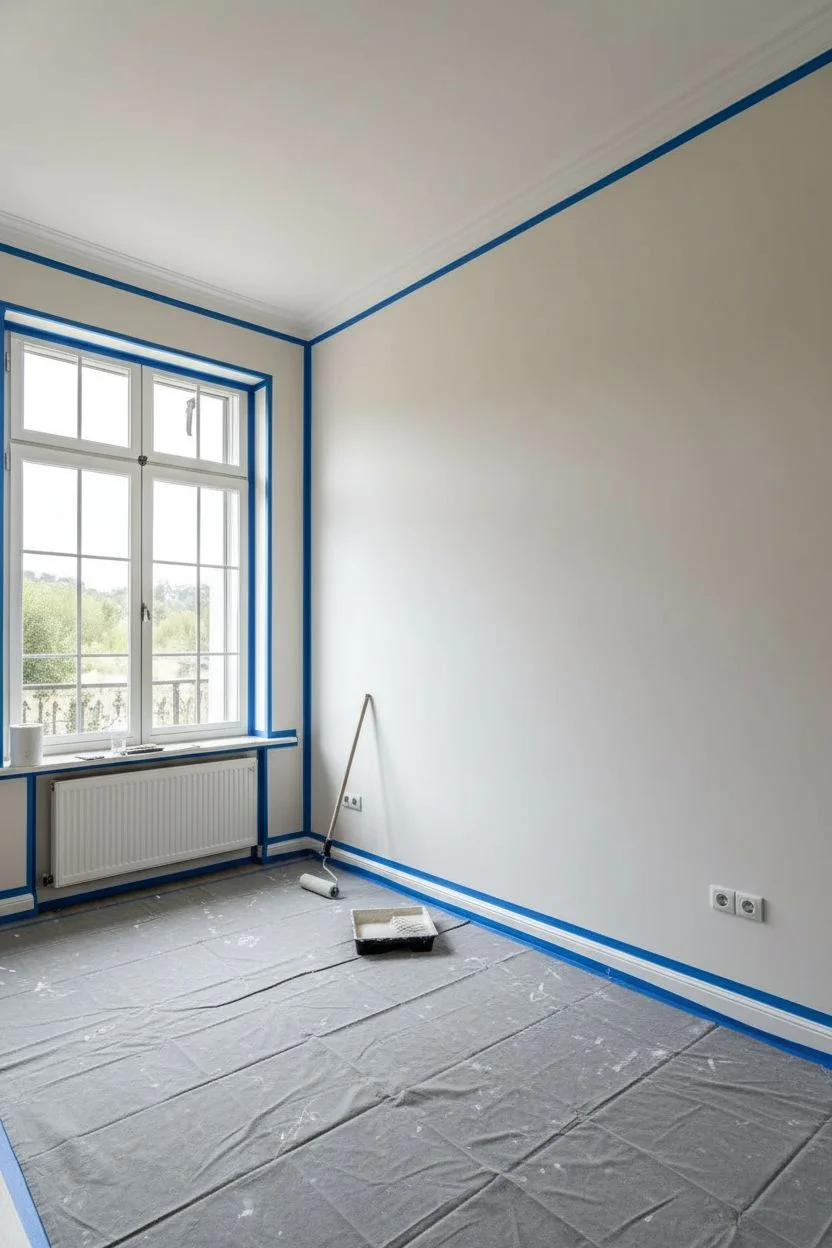
A good wall mural can change the whole vibe of a room in one shot—like flipping the mood switch from “blank wall” to “instant personality.” Here are my favorite wall mural ideas (from classic to delightfully unexpected) that you can adapt to your space, your style, and your comfort level with paint.
Misty Mountain Landscape Feature Wall
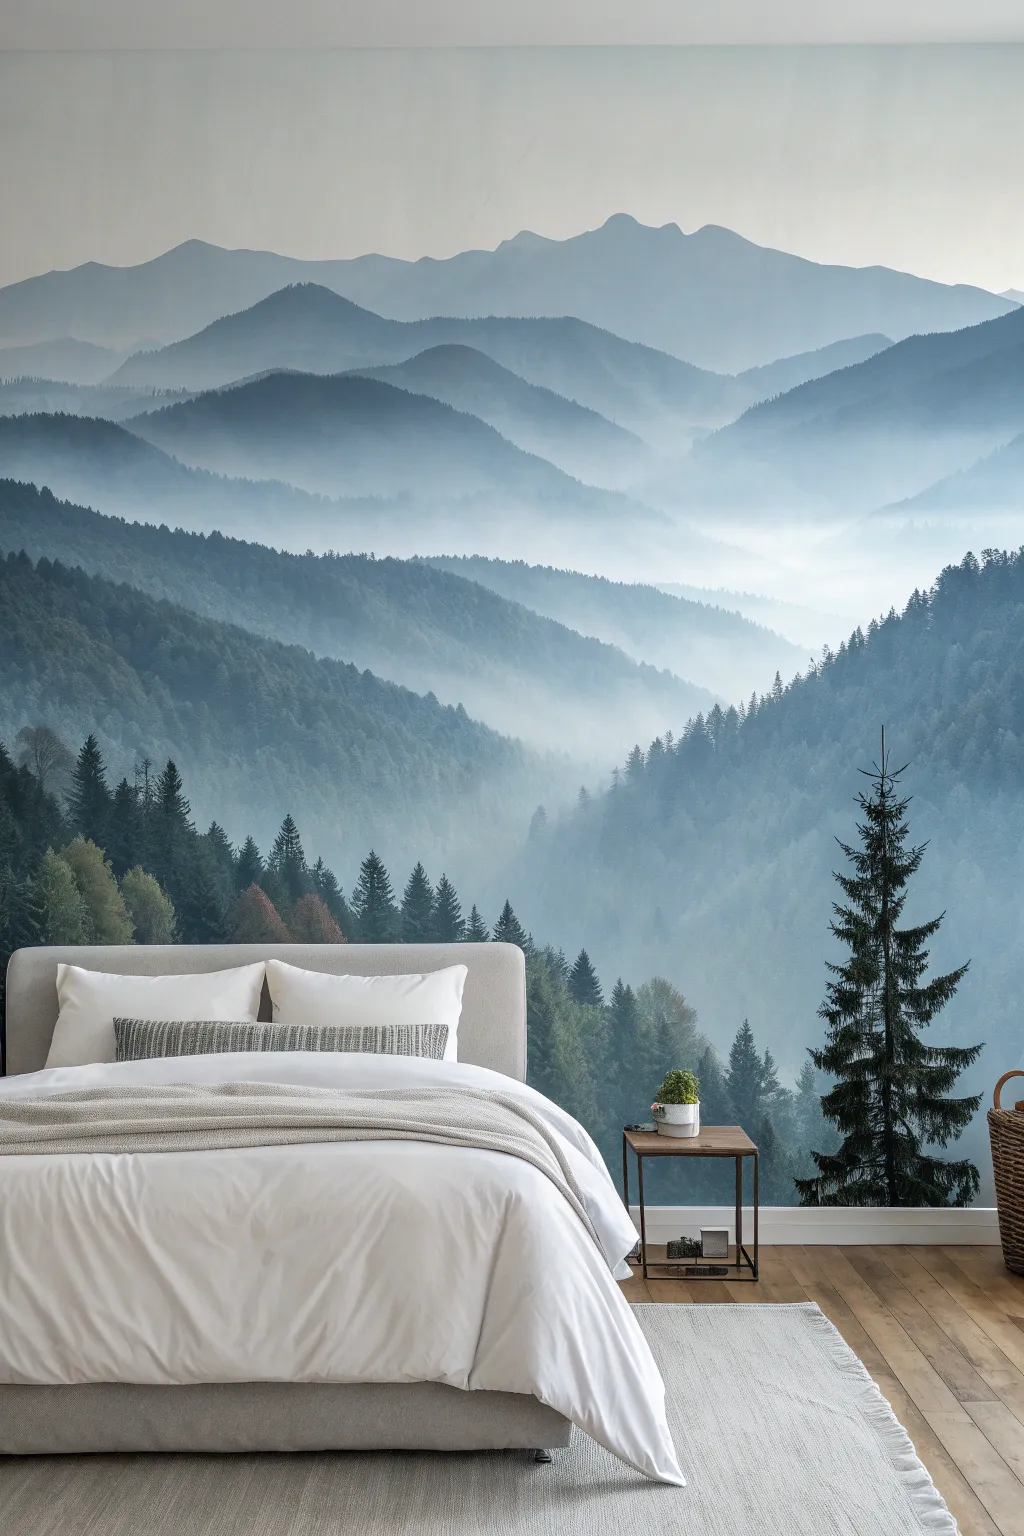
Transform your bedroom into a tranquil retreat with this breathtaking feature wall that captures the depth and mystery of a foggy mountain range. The soft, monochromatic blue palette creates an almost dreamlike atmosphere perfect for relaxation.
Step-by-Step Tutorial
Materials
- High-quality custom wall mural (vinyl or non-woven paper)
- Wallpaper paste (heavy-duty is best for murals)
- Roller and tray
- Pasting brush
- Smoother tool or plastic squeegee
- Sharp snap-off utility knife
- Metal straight edge or trim guide
- Plumb line or spirit level
- Tape measure
- Step ladder
- Sponge and bucket of clean water
- Seam roller (optional)
Step 1: Preparation & Planning
-
Assess the Surface:
Begin by inspecting your chosen wall. It needs to be completely smooth, clean, and dry. Fill any holes and sand down bumps, as imperfections will show through the mural material. -
Clean and Prime:
Wash the wall with sugar soap or a mild detergent solution to remove grease and dust. If you have freshly plastered or dark-colored walls, apply a coat of primer-sealer to ensure an even base color and proper adhesion. -
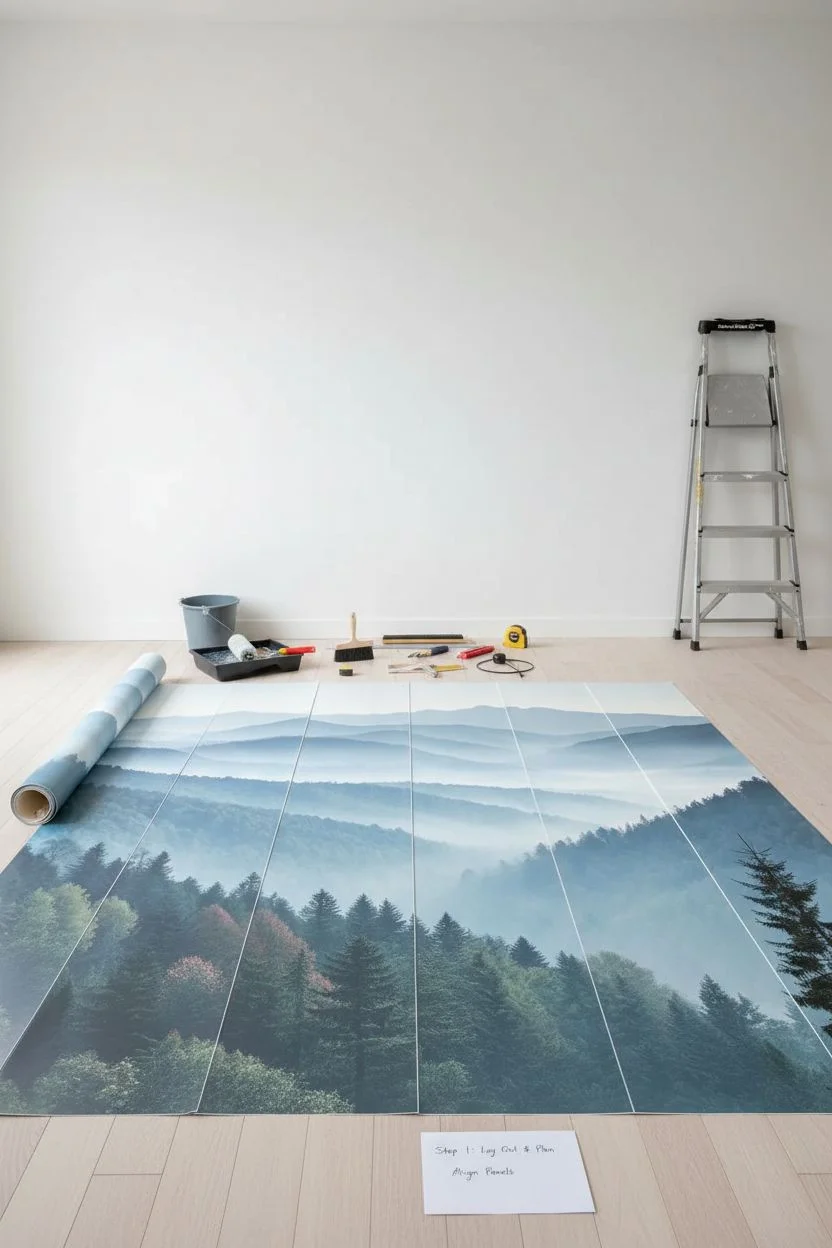
Lay Out the Mural:
Unpack your mural panels on a clean floor. Arrange them in order to visualize the full mountain scene and double-check that the panels align perfectly before you start pasting. -
Mark the Starting Point:
This is crucial: don’t rely on the corner of the room being straight. Measure out from the left corner the width of one panel (minus an inch for trimming). Use a plumb line or spirit level to draw a strictly vertical line at this mark to guide your first panel.
Seamless Success
Paint the wall behind the seams with a color matching the mural (light grey-blue) before hanging. If a seam opens slightly later, the white wall won’t show through.
Step 2: Application
-
Paste the Wall:
If you are using ‘paste-the-wall’ paper, use a roller to apply a generous, even layer of adhesive directly to the wall area for the first panel. Extend the paste slightly beyond your pencil line so the edges are fully covered. -
Hang First Panel:
Carefully lift the first panel and align its right edge with your vertical pencil line. Allow about 2 inches of excess paper at the top and bottom for trimming later. -
Smooth Out Bubbles:
Using your smoothing tool, gently press the paper against the wall. Work from the center outward, pushing air bubbles to the edges. I find that using sweeping, consistent strokes prevents creasing the paper. -
Apply Second Panel:
Paste the next section of the wall. Bring the second panel up and butt the edges tightly against the first. The pattern (the mountain ridges and tree lines) must match perfectly. Avoid overlapping unless the manufacturer specifically instructs it. -
Check Seams:
Run your finger or a seam roller gently down the join to ensure it’s flat. If paste squeezes out, wipe it immediately with a damp sponge—don’t rub, just dab. -
Continue the Process:
Repeat this method across the wall. Step back occasionally to ensure the misty layers of the mountains remain level and the perspective looks correct. -
Handle Corners:
When you reach the final corner, smooth the paper into the angle. Use your smoothing tool to create a sharp crease where the wall meets the adjacent wall.
Step 3: Finishing Touches
-
Trim Excess Material:
Once all panels are up, use your metal straight edge and a very sharp utility knife to trim the excess paper at the ceiling and baseboard. Change the blade frequently to avoid tearing the damp paper. -
Trim the Sides:
Trim the excess paper on the far left and right sides of the wall, ensuring a clean line where the mural meets the adjacent walls. -
Final Wipe Down:
Inspect the entire surface for any residual paste. Wipe the whole mural gently with a deeply damp sponge to remove any sticky spots that could turn shiny when dry. -
Dry Slowly:
Avoid the temptation to speed up drying. Keep windows closed and radiators off for the first 24 hours to prevent the paper from shrinking and opening up the seams.
Create Depth
Install LED strip lighting along the ceiling edge or behind a headboard to illuminate the top peaks, enhancing the atmospheric ‘misty’ effect at night.
Enjoy the calming view of your new mountain range every time you walk into the room


Oversized Botanical Wall Mural in Line Art
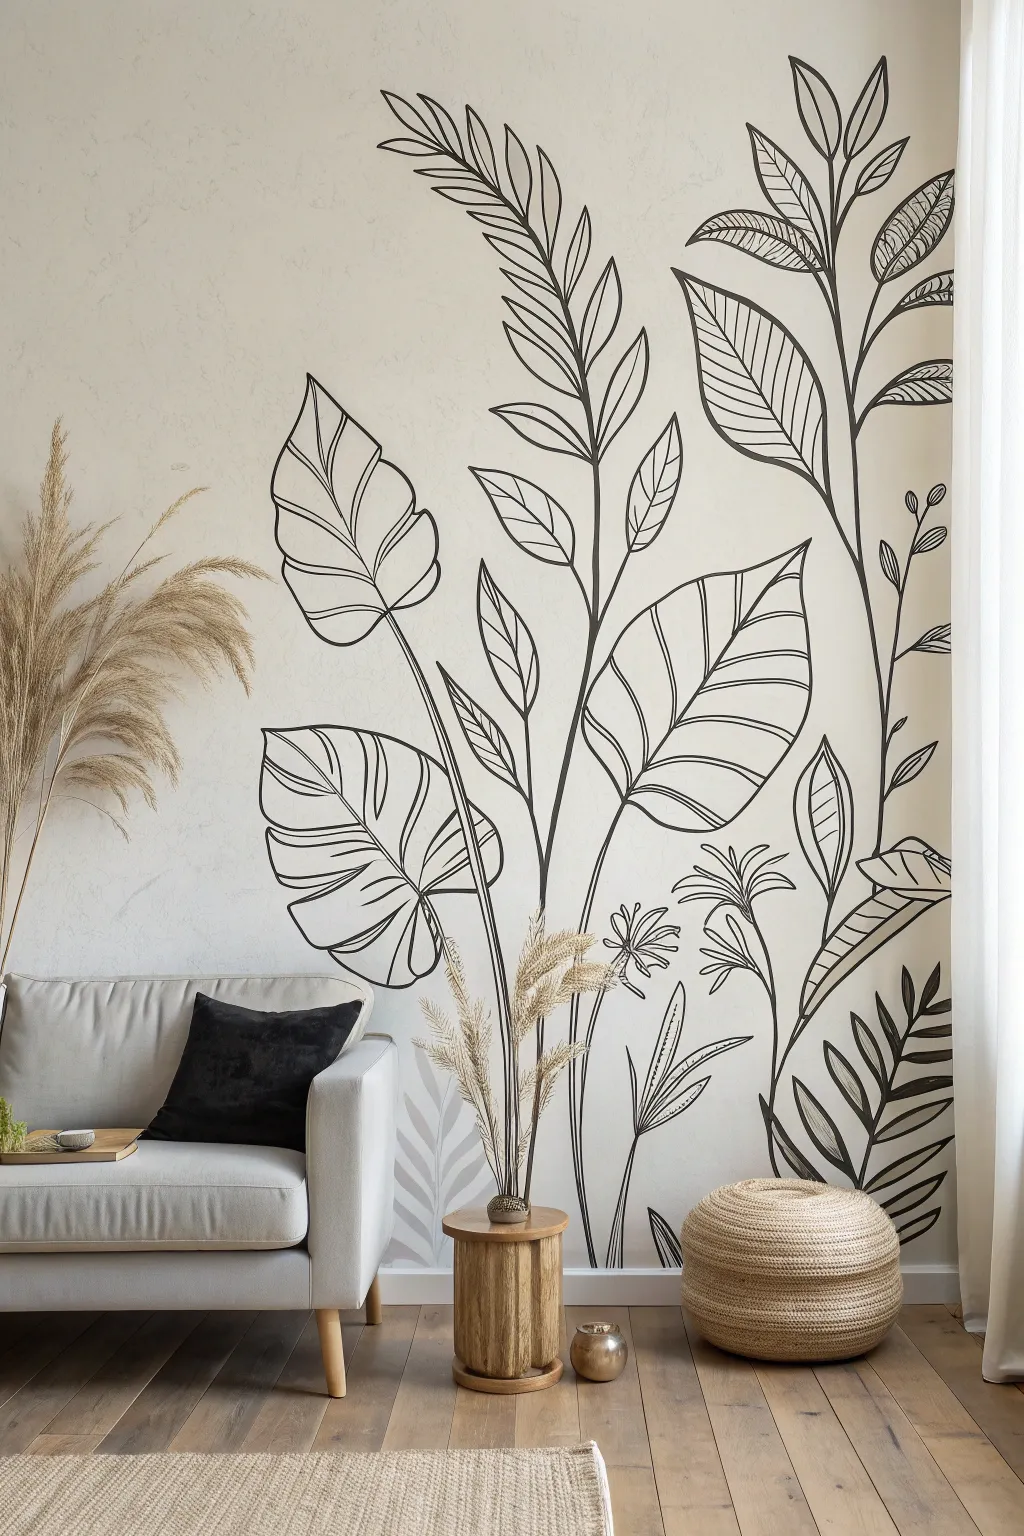
Transform a plain wall into a serene statement piece with this elegant, oversized line art mural. Using simple black strokes against a creamy background, this project achieves a sophisticated, organic look that feels like a giant sketchbook page brought to life.
How-To Guide
Materials
- Interior latex paint (matte or eggshell finish) in a warm cream or off-white for the base
- High-quality black acrylic paint or latex wall paint (satin finish)
- Painter’s tape
- Drop cloth
- Pencil (HB or lighter)
- Large eraser
- Overhead projector (optional but recommended)
- Transparency film (if using projector)
- Digital botanical line art design
- Round artist brushes (sizes #4, #8, and #12)
- Small flat brush (for touch-ups)
- Ladder or step stool
- Rags and water container
Step 1: Preparation and Base Coat
-
Clear and clean:
Begin by removing all furniture, artwork, and outlet covers from the wall. Wipe the surface down with a damp cloth to remove dust and grease, which ensures your refreshing base coat adheres perfectly. -
Protect the area:
Lay down your drop cloth to cover the floor completely. Apply painter’s tape along the baseboards, ceiling, and adjacent walls to create crisp edges. -
Apply the background:
Roll on two coats of your warm cream or off-white interior paint. Allow the first coat to dry for at least 2-4 hours before applying the second. Let the final coat cure overnight so you have a solid canvas for your line work.
Step 2: Drafting the Design
-
Choose your motif:
Select a botanical line drawing you love. You can purchase a digital design or draw one yourself on a tablet or paper. Look for designs with long, sweeping stems and large, open leaves like monstera or palm shapes. -
Set up the projection:
Place your projector on a stable surface or heavy stack of books. Adjust the distance until the image fills the wall space appropriately. The design should feel ‘oversized,’ so don’t be afraid to let some leaves go off the edges or touch the ceiling. -
Trace lightly:
Using a light pencil, gently trace the projected lines onto the wall. Keep your hand steady but light; you only need a faint guide. Start from the bottom stems and work your way up to the leaf tips. -
Step back and check:
Turn off the projector and step back to view the pencil sketch. This is the time to make adjustments. If a leaf looks unbalanced or a stem is too thick, simply erase and redraw it by hand.
Pro Tip: Better Flow
Add a texturizing additive or ‘Floetrol’ to your black latex paint. This extends the drying time slightly and eliminates brush drag, allowing for much smoother, longer lines.
Step 3: Painting the Line Art
-
Practice your stroke:
Before hitting the wall, practice painting long, fluid lines on a piece of cardboard using your round brushes. Experiment with varying pressure—pressing harder creates a thicker line, while lifting creates a tapered tip. -
Mix your paint:
Pour your black acrylic or latex paint into a small container. If the paint feels too thick or drags, dilute it with a tiny splash of water to improve flow, creating an ink-like consistency. -
Start with the main stems:
Use your largest round brush (size #12) for the thickest vertical stems. Start from the bottom (near the floor/baseboard) and pull the brush upward in long, confident strokes. I find it helpful to exhale slowly as I pull the brush to keep the line steady. -
Outline the leaves:
Switch to a medium brush (size #8) to outline the large leaf shapes. Focus on smooth curves. Don’t worry if the line isn’t perfectly uniform; subtle variations in thickness add to the hand-drawn, organic charm. -
Add veining details:
For the interior veins of the leaves, switch to your smallest brush (size #4). Paint these lines slightly thinner than the outlines. Start from the center vein and flick outward toward the leaf edges for a natural look. -
Incorporate cross-hatching:
Some leaves in the design feature shading textures. Create these by painting small, parallel diagonal lines inside specific sections of the leaves. Keep the spacing relatively consistent, but avoid mechanical perfection. -
Refine the edges:
Go back over any areas where the black paint looks transparent or streaky and apply a second coat if needed. Use your small flat brush with a bit of the background wall color to ‘erase’ any major mistakes or drips.
Troubleshooting: Shaky Hands?
If you struggle with long straight lines, use a mahl stick (or a yardstick) to rest your hand against the wall for stability while keeping your palm out of the wet paint.
Step 4: Finishing Touches
-
Erase guide lines:
Once the black paint is completely dry (wait at least 4 hours), gently erase any visible pencil marks. Be sure the eraser is clean so you don’t smudge the wall. -
Clean up:
carefully peel away the painter’s tape at a 45-degree angle. Remove the drop cloths and replace your furniture. -
Style the space:
Arrange your furniture to complement the mural without hiding the best parts. Low-profile sofas or chairs work best to show off the height of your new botanical artwork.
Enjoy the calm and artistic atmosphere your new hand-painted mural brings to the room


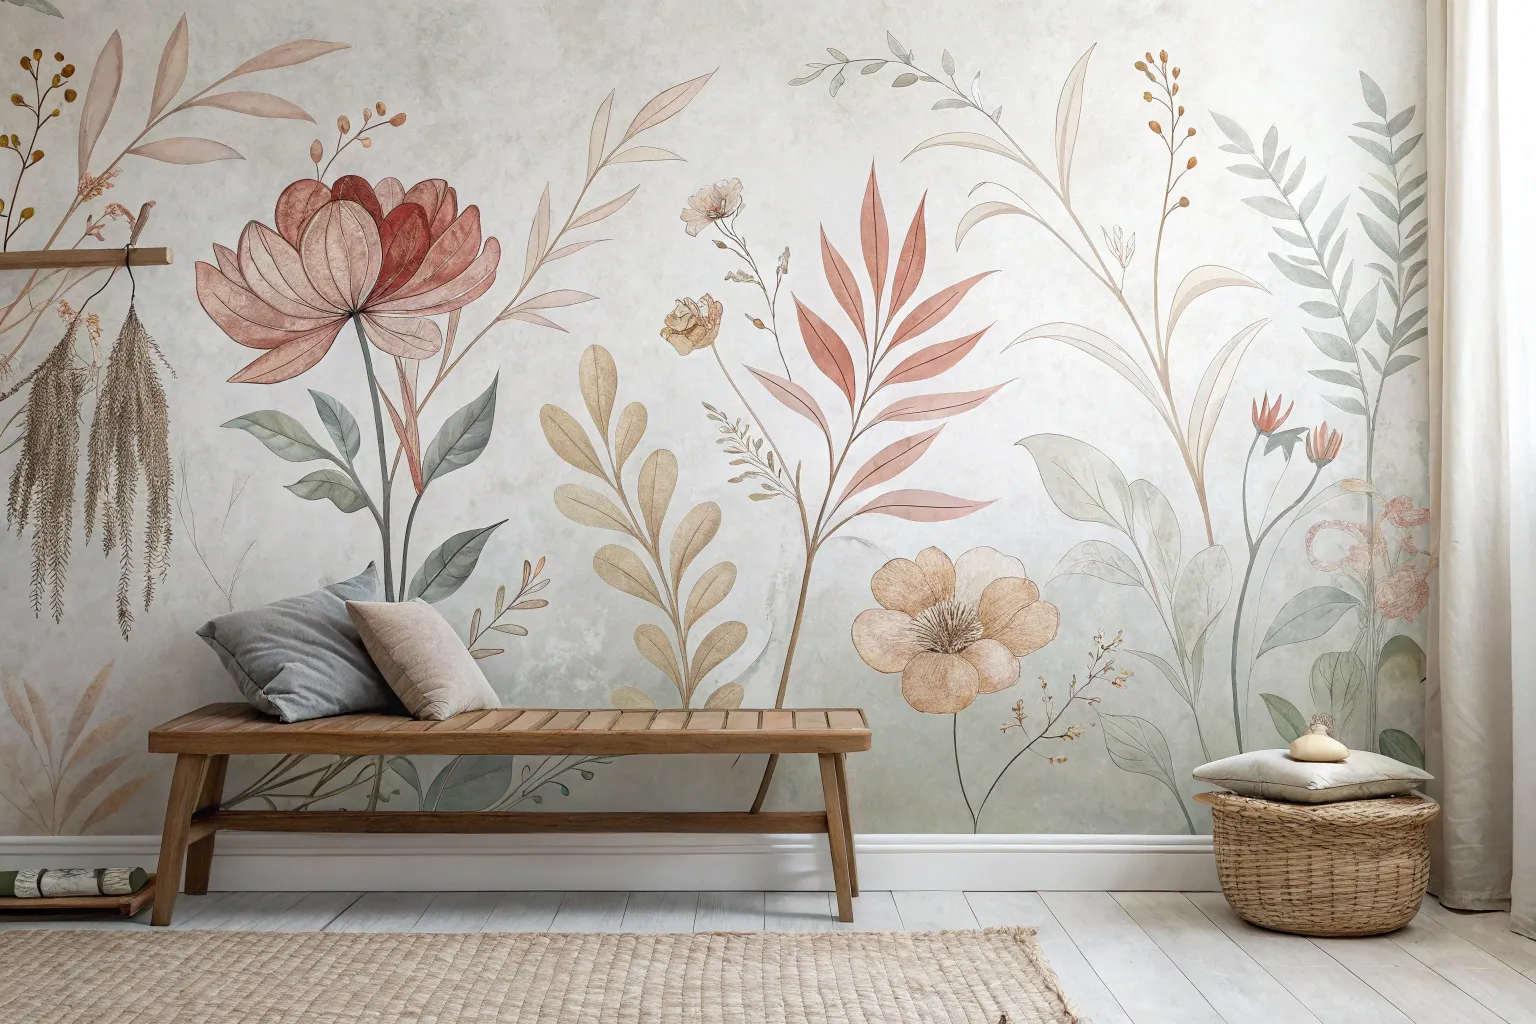
Maximalist Floral Wall Mural With Giant Blooms
Transform a plain wall into a breathtaking garden with this maximalist floral mural featuring oversized, vintage-style blooms. This project layers shades of dusty pink, terracotta, and deep green to create a dramatic, painterly effect that mimics classic botanical illustrations.
Detailed Instructions
Materials
- Interior latex paint (eggshell or satin finish): White (base), Dark Green, Sage Green, Terracotta, Burgundy, Dusty Pink, Cream, Yellow Ochre
- Acrylic glazing medium
- Pencil and eraser
- Projector (optional but recommended)
- Painter’s tape
- Drop cloths
- Assorted brushes: 2-inch angular sash brush, 1-inch flat brush, various round detail brushes (sizes 4-8)
- Mixing cups or palette layout
- Ladder or step stool
- Rags or paper towels
Step 1: Preparation & Sketching
-
Prep the canvas:
Begin by cleaning your wall thoroughly to remove dust and grease. Tape off the baseboards, ceiling edges, and any adjacent walls not being painted with painter’s tape. Lay down drop cloths to protect the flooring. -
Establish the background:
The background in the reference has a soft, varied texture rather than a flat color. Mix your white base paint with a tiny drop of grey or sage green to off-set the brightness. Apply two coats to the entire wall and let dry completely. -
Subtle texture (optional):
For that slightly aged, cloudy look seen behind the flowers, mix a clear glaze with a hint of grey paint. Use a rag or a wide dry brush to scumble this loosely over the solid background in random patches. This adds depth without stealing focus. -
Outline the composition:
If you are confident in drawing, sketch the large flowers directly onto the wall with a light pencil. Start with the largest central pink bloom to anchor the design, then add the burgundy chrysanthemum and terracotta peony. If you prefer precision, project your reference image onto the wall and trace the main outlines lightly.
Uneven Blending?
If your acrylics are drying too fast to blend smoothly, mix in a slow-drying medium or retarder. This keeps the paint workable longer for those soft petal gradients.
Step 2: Blocking Colors
-
Base coat the darks:
Start with the darkest foliage. Mix your dark green with a touch of blue or black to get those deep shadow tones. Fill in the leaf shapes that sit furthest back in the composition. Don’t worry about details yet; just get the solid shapes down. -
Base coat the blooms:
Using a 1-inch flat brush, fill in the silhouette of each flower with its mid-tone color. Use dusty pink for the large central flower, terracotta for the upper bloom, and a deep burgundy for the side flower. This acts as a primer for your shading layers. -
Add lighter foliage:
Paint the remaining leaves with the sage green. Ensure these leaves slightly overlap the darker ones to create a sense of depth and layering.
Step 3: Adding Dimension & Detail
-
Shadows on the pink bloom:
Mix the dusty pink with a little burgundy to create a shadow tone. Using a round brush, paint the inner base of each petal where it meets the center. Feather the strokes outward so the shadow fades into the mid-tone. -
Highlights on the pink bloom:
Mix the dusty pink with plenty of cream or white. Paint the tips and outer edges of the petals. I find using a dry brush technique here helps blend the highlight softly back into the pink base. -
Detailing the terracotta flower:
For the orange-red bloom, use a smaller round brush to define the ruffled petal edges with a darker rusty orange. Highlight the tops of the ruffles with a mix of terracotta and yellow ochre. -
Developing the burgundy bloom:
The dark purple-red flower needs high contrast to show texture. Use a very dark purple (almost black) to define the spaces between the petals. Use a lighter mauve mix to streak highlights down the center of each individual petal. -
Leaf veining:
Return to your leaves. Use a liner brush or a size 4 round brush to paint the central veins. Use a lighter green mixture for veins on dark leaves, and a darker green for veins on light leaves.
Gilded Edge
For a luxe twist, apply gold leaf to the very center stamens of the main flower or outline a few key petals with metallic gold paint for a shimmering effect.
Step 4: Finishing Touches
-
Paint the flower centers:
The center of the large pink flower is a focal point. Use yellow ochre stippled with a small stiff brush to create a pollen texture. Add tiny dots of white and brown to give it volume. -
Refine the edges:
Step back and look at the wall from a distance. Use your background wall color and a small brush to clean up any messy outlines or smooth out petal shapes that look jagged. -
Add final stems and buds:
Don’t forget the smaller details like the slim stems connecting the floating buds. Use a steady hand and a long liner brush with a mix of brown and green paint for these delicate lines. -
Seal the work (optional):
If this mural is in a high-traffic area like a dining nook, consider applying a clear, water-based matte varnish over the painted areas once they have cured for at least 48 hours.
Enjoy the dramatic, blooming atmosphere your new mural brings to the space.


Soft Watercolor Wash Cloud Mural
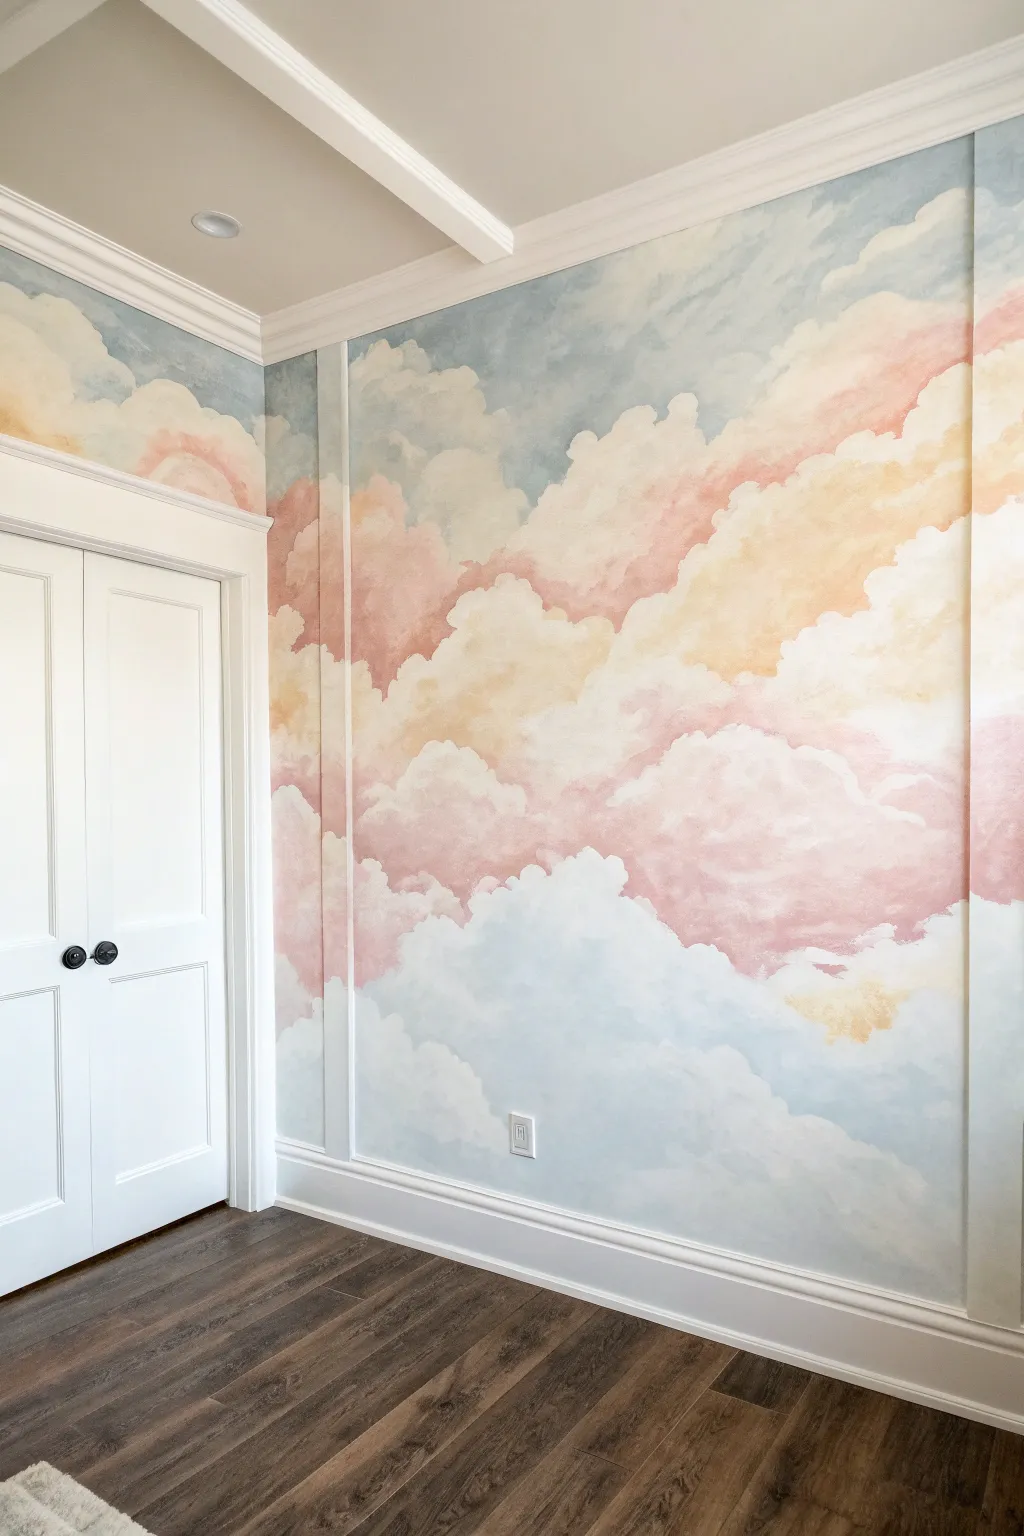
Transform an entire room into an ethereal skyscape with this soft, billowing cloud mural. Using a layered wash technique, you’ll blend pastel blues, peaches, and pinks to create a calming, dreamy atmosphere that mimics a sunset sky.
Step-by-Step Guide
Materials
- Matte latex wall paint (White base)
- Acrylic glazing medium
- Tinting colors or sample pots (Sky Blue, Soft Pink, Peach/Apricot, Cream)
- Clean water containers
- Large sea sponges (natural)
- Wide softness-bristle brushes (3-4 inch)
- Round blending brushes (large)
- Painter’s tape
- Drop cloths
- Lint-free rags
- Step ladder
Step 1: Preparation & Base Coat
-
Protect the perimeter:
Begin by thoroughly taping off all trim, crown molding, baseboards, and door frames with high-quality painter’s tape. Lay down drop cloths to protect your flooring, as the watery glazes can drip easily. -
Prime the surface:
Apply a solid coat of flat or matte white paint to the entire wall. This acts as your canvas and ensures the translucent colors you add later appear true and bright. -
Mix your glazes:
In separate containers, mix your paint colors with the acrylic glazing medium and a splash of water. You want a ratio of roughly 1 part paint to 4 parts glaze for translucency. Prepare a blue, a pink, a peach, and a creamy white mixture. -
Test transparency:
Before hitting the wall, test your glaze mixtures on a scrap piece of cardboard. The color should look like a watercolor wash—see-through but tinted—rather than opaque paint.
Fixing Harsh Lines
If a paint edge dries hard before you blended it, mist it lightly with water from a spray bottle. Wait 30 seconds, then scrub gently with a damp sponge to reactivate and soften the line.
Step 2: Creating the Sky Structure
-
Start with the blue base:
Using a large sea sponge or rag, dab the blue glaze primarily into the areas you want to be the background sky, leaving large organic gaps where the clouds will live. Keep the edges extremely irregular. -
Soften the blue edges:
While the blue glaze is still wet, take a clean, slightly damp rag and dab the edges to feather them out, ensuring there are no harsh lines. -
Apply the warm tones:
Dip a fresh sponge into your pink glaze. Start creating cloud shapes in the middle and lower sections of the wall, overlapping slightly with the blue areas to create soft purples. -
Layer in the peach:
Add the peach glaze near the pink sections, focusing on the ‘highlights’ of where the sun might be hitting the clouds. I find working in patches of 3-4 feet helps keep the paint workable. -
Blend the transition zones:
Use a large, dry blending brush to gently sweep over the areas where colors meet. Use a cross-hatch motion (X-strokes) to blur the colors together seamlessly.
Step 3: Defining the Clouds
-
Mix the cloud white:
For the main cloud bodies, use a mixture that is slightly more opaque—perhaps 1 part white paint to 2 parts glaze. You want this to stand out against the colored background. -
Build the cloud shapes:
Using a round brush, scumble (scrub lightly) the white mixture in a circular motion to form the billowing tops of the clouds. Focus on the upper edges of your pink and peach shapes. -
Soften the bottoms:
As you work down the body of a cloud, add a little water to your brush to fade the white paint into the underlying colors, making the bottom of the cloud look misty rather than solid. -
Add dimension:
Go back with your peach glaze and lightly dab it onto the lower-left or lower-right undersides of the white clouds to create shadow and volume. -
Refine the edges:
For the crispest cloud tops, use a smaller brush with nearly undiluted white paint to trace just the very rim of the fluffiest clouds.
Add a Golden Hour Glow
Mix a tiny amount of metallic gold acrylic paint into your final peach glaze layer. Scumble this sparingly on the highest cloud tops for a shimmering sunset effect.
Step 4: Final Blending & Touches
-
Step back and assess:
Walk to the other side of the room. Look for any areas that feel too heavy or areas where the transition is too abrupt. -
Dry brush blending:
With a completely dry, soft bristle brush, very lightly whisk over the entire surface of the mural. This ‘unifies’ the texture and softens any brush marks that still look too deliberate. -
Check for drips:
Scan the lower wall and baseboards for any glaze that may have run down. Wipe them away immediately with a damp cloth if found. -
Remove tape:
Once the wall is tacky but not fully cured, carefully peel away your painter’s tape at a 45-degree angle to reveal your crisp white borders.
Enjoy the peaceful ambiance of your own private sky painted right onto your walls
BRUSH GUIDE
The Right Brush for Every Stroke
From clean lines to bold texture — master brush choice, stroke control, and essential techniques.
Explore the Full Guide
Modern Arch “Headboard” Mural Behind the Bed
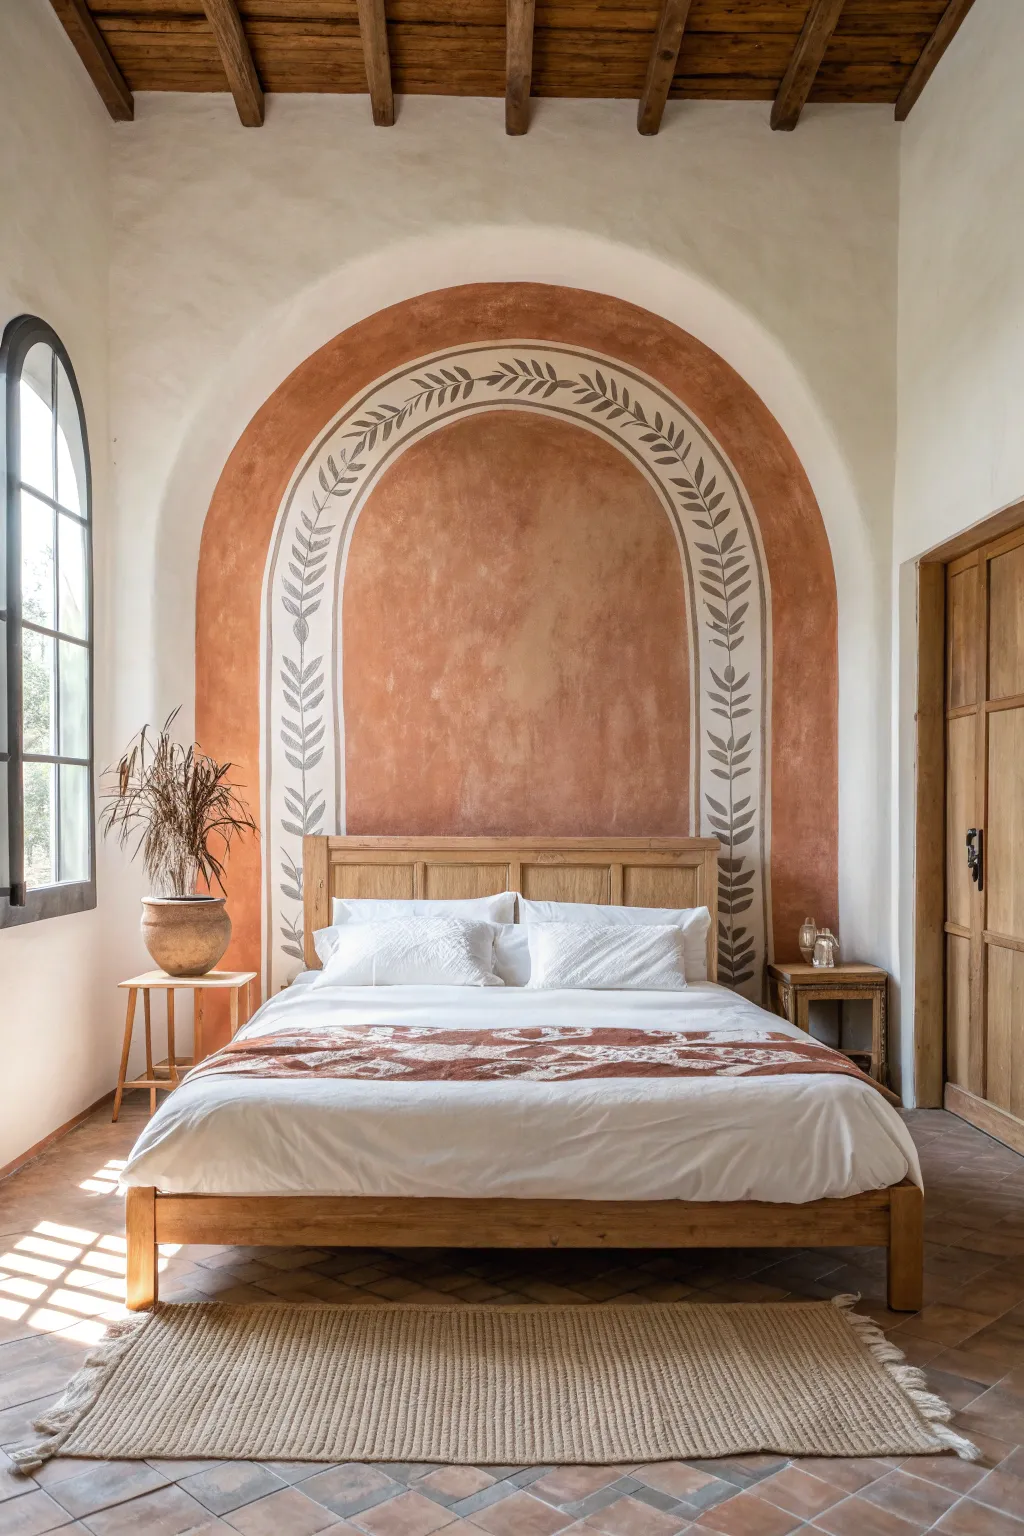
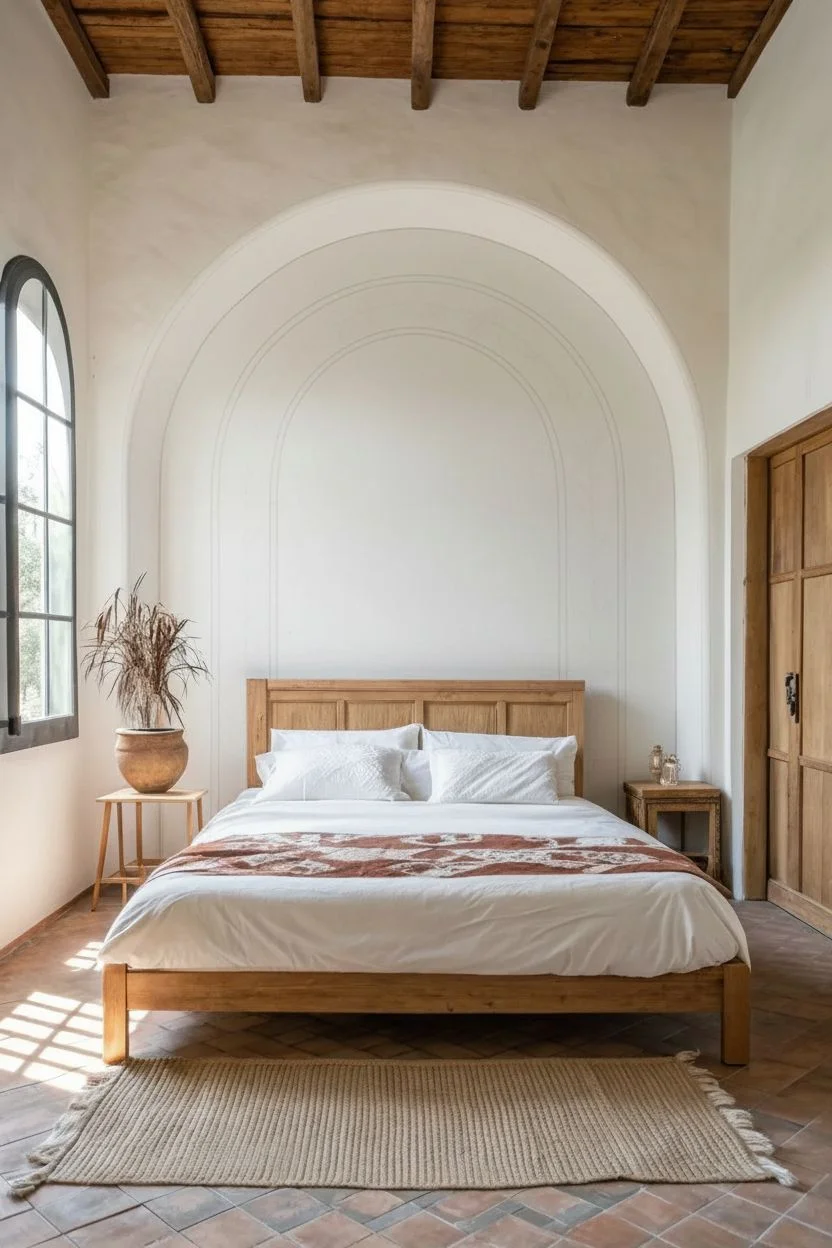
Transform your bedroom with this stunning faux-alcove mural that brings the warmth of the Mediterranean indoors. Using earthy terracotta tones and a delicate hand-painted vine motif, this project creates a dramatic focal point that perfectly frames your bed.
How-To Guide
Materials
- Latex wall paint (Terracotta/Rust color)
- Latex wall paint (Cream/Off-white for the vine band)
- Pencil
- String and thumb tack (or tape measure)
- Painter’s tape
- Small angled sash brush (1.5-2 inch)
- Medium paint roller and tray
- Artist’s round brush (size 6 or 8 for leaves)
- Artist’s liner brush (size 2 for stems)
- Dark grey or muted olive acrylic paint (for the vine)
- Level
- Drop cloth
Step 1: Planning and Outlining
-
Find the center:
Measure the width of your bed or headboard to determine where the center of your mural should be. Mark this center point on the wall at the height you want the top of the straight vertical lines to end and the curve to begin. -
Draw the outer arch:
Tie a string to a pencil. Pin the other end of the string to your center mark. Adjust the string length to reach the desired outer width of your arch. Pulling the string taut, trace a semi-circle on the wall to create the top curve. -
Draw the vertical lines:
Use a long level and your pencil to drop straight lines down from the widest points of your semi-circle all the way to the floor (or baseboard). This completes the outline of the main arch shape. -
Create the inner decorative band:
Now, shorten your string by about 4-5 inches and draw a second, smaller semi-circle inside the first one using the same center point. Drop vertical lines down from this inner curve as well. -
Define the center panel:
Shorten the string one final time—another 4-5 inches inward—to create the innermost arch. Drop veritcal lines down from here. You should now have three concentric arch outlines on your wall.
Uneven Arches?
If your pencil skipped or the arch looks wonky, don’t freehand the fix. Re-pin your string to the center point and re-trace the line heavily before cutting in with paint.
Step 2: Painting the Base Layers
-
Tape the edges:
Apply painter’s tape along the very outside edge of your largest arch line to protect the surrounding white wall. Press the edges of the tape down firmly to prevent bleeding. -
Paint the outer color:
Using your terracotta paint, fill in the outermost band (the space between the largest and second-largest arch lines). You’ll also paint the large central area (inside the smallest arch line) with this same color. Use the angled brush for edges and the roller for the middle. -
Apply texture (optional):
If you want that plaster-like look shown in the photo, dab your wet paint with a dry brush or rag while it’s still tacky to create subtle movement. -
Paint the middle band:
Fill the remaining empty band (the middle track) with your cream or off-white paint. This will be the canvas for your vine illustration. Apply two coats if necessary for full coverage. -
Dry thoroughly:
Allow all paint layers to dry completely, ideally overnight. The surface must be dry before you start the detailed hand-painting.
Pro Tip: Vintage Texture
To mimic the limewash look in the photo, mix a little beige paint into your terracotta color and apply it unevenly with a sea sponge over the dry base coat.
Step 3: Painting the Vine Motif
-
Sketch the vine spine:
Lightly sketch a central line running through the middle of your cream band. This doesn’t need to be perfectly straight; a slight organic wobble makes it look more natural. -
Draft the leaves:
Using your pencil, lightly sketch pairs of leaves climbing up the vine. Angle them upwards as if they are reaching toward the top of the arch. Keep the spacing consistent but not rigid. -
Paint the stems:
Mix your dark grey or olive paint. Using the liner brush, carefully trace over your center vine line. I find it easiest to work from the floor upward to keep my hand from smudging the work. -
Paint the leaves:
Switch to the round brush. Press down at the base of the leaf and lift up as you drag the brush to create a tapered point. This one-stroke technique creates beautiful, organic leaf shapes. -
Add details:
Go back with your liner brush to connect any floating leaves to the main stem or add tiny off-shoots for extra detail. -
Clean up:
Once the vine details are fully dry, gently erase any visible pencil marks and peel away the painter’s tape slowly at a 45-degree angle.
Step back and admire how this elegant architectural illusion completely redefines the atmosphere of your room
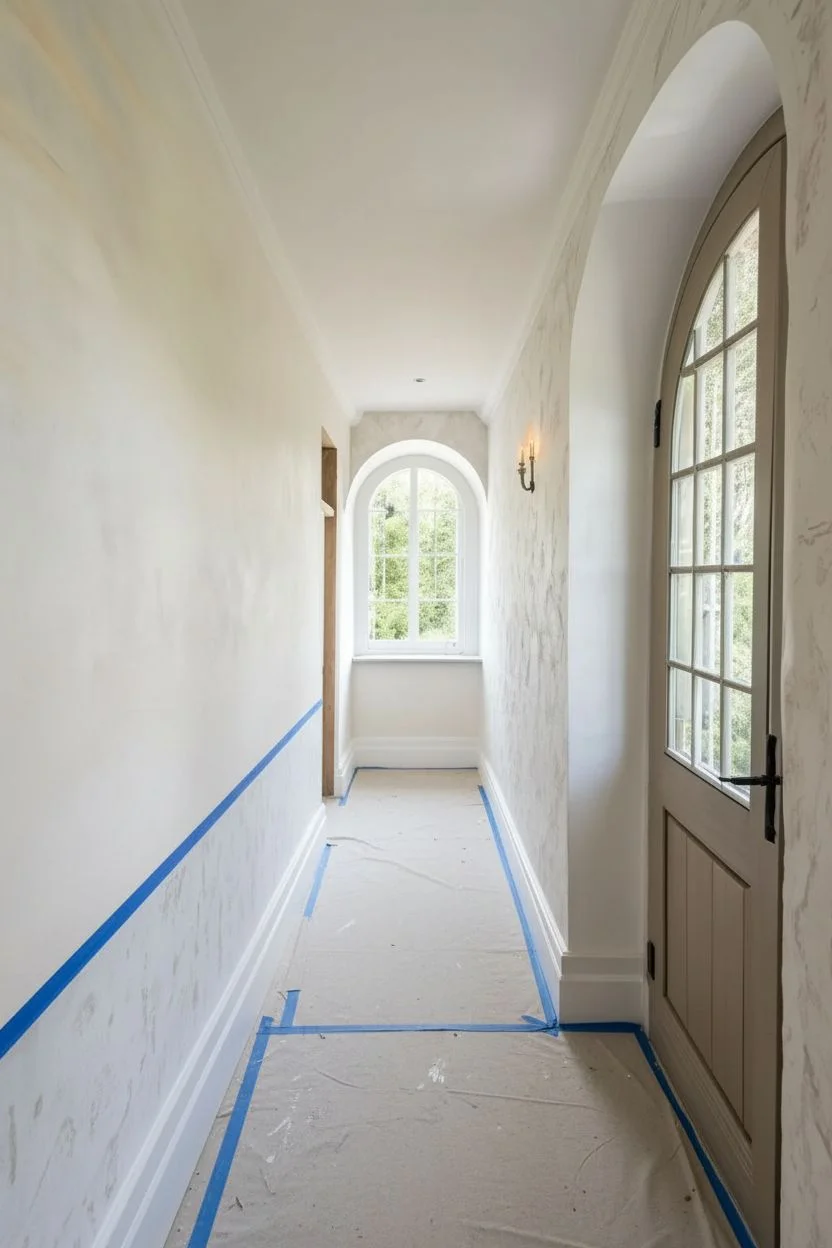
Forest Doorway Mural for Hallways and Transitions
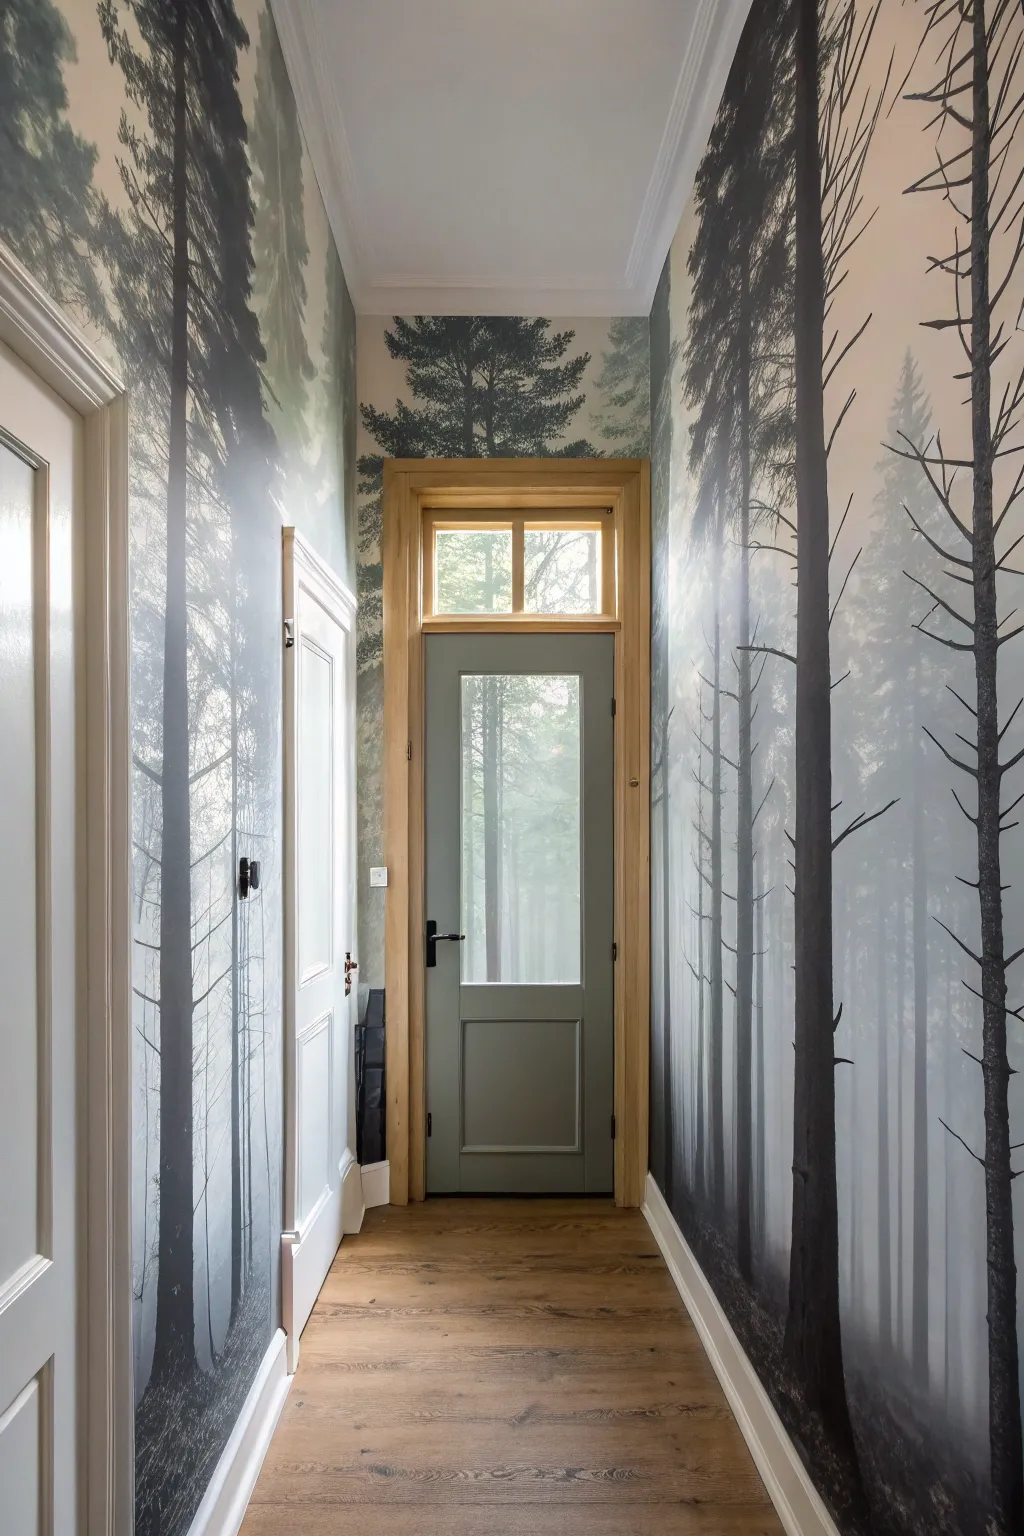
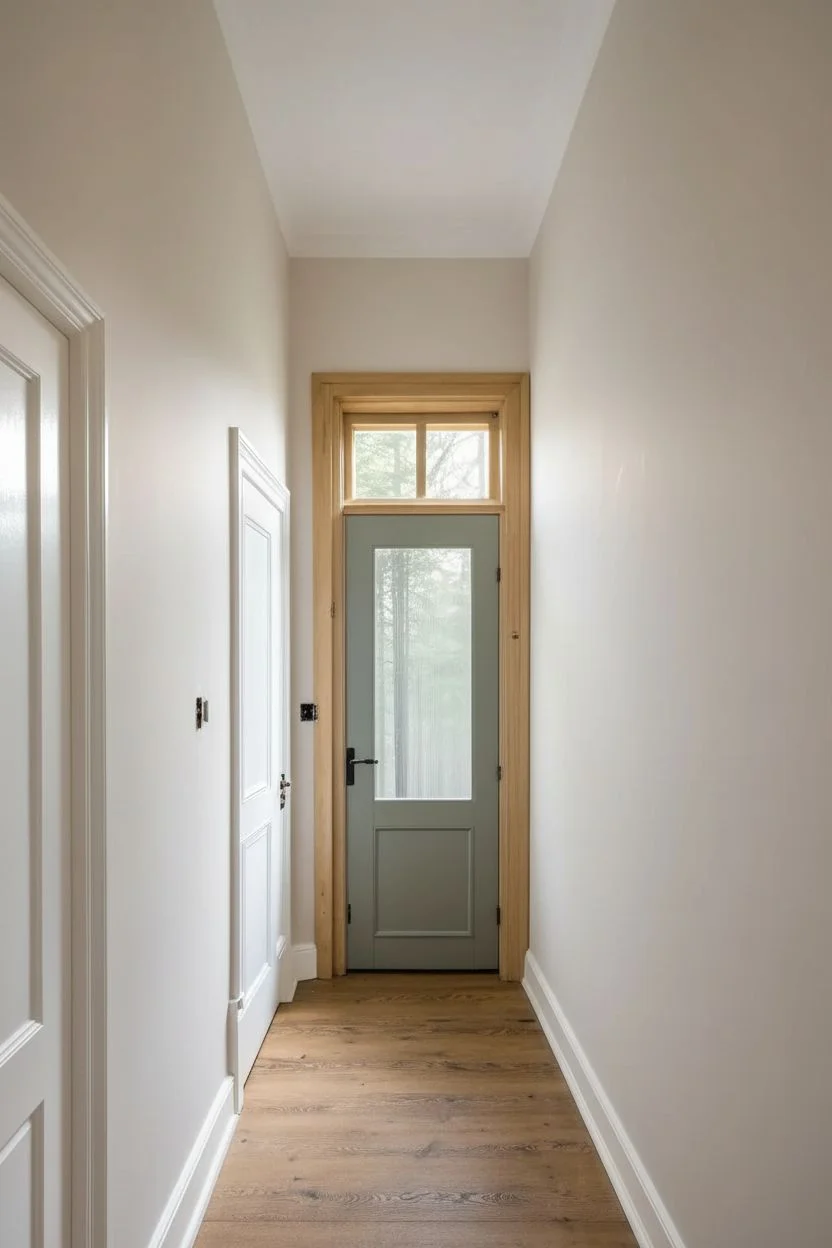
Transform a narrow hallway into a misty woodland escape using a panoramic forest mural. This project creates an immersive atmosphere where the trees seem to stretch endlessly upward, blurring the lines between indoors and nature.
Step-by-Step Guide
Materials
- Custom-sized peel-and-stick or paste-the-wall forest mural
- Measuring tape
- Level or plumb line
- Sharp utility knife with extra snap-off blades
- Plastic smoothing tool/squeegee
- Step ladder
- Sponge and mild soapy water
- Wallpaper paste (if not using peel-and-stick)
- Painter’s tape
- Metal straight edge or ruler
- Screwdriver (to remove outlet covers)
- Seam roller
Step 1: Preparation and Planning
-
Measure the space:
Measure the height and width of every wall in your hallway, including the small sections above the door frames. Add at least 2-3 inches of buffer to both height and width when ordering your mural to account for uneven walls. -
Prepare the surface:
Remove any light switch covers, outlet plates, or wall fixtures. Fill any holes or deep scratches with spackle and sand them smooth once dry. -
Clean thoroughly:
Wipe down all walls with a sponge and mild soapy water to remove dust and grease. I find that skipping this step is the number one reason for peeling later, so take your time here. Let the walls dry completely. -
Plan the layout:
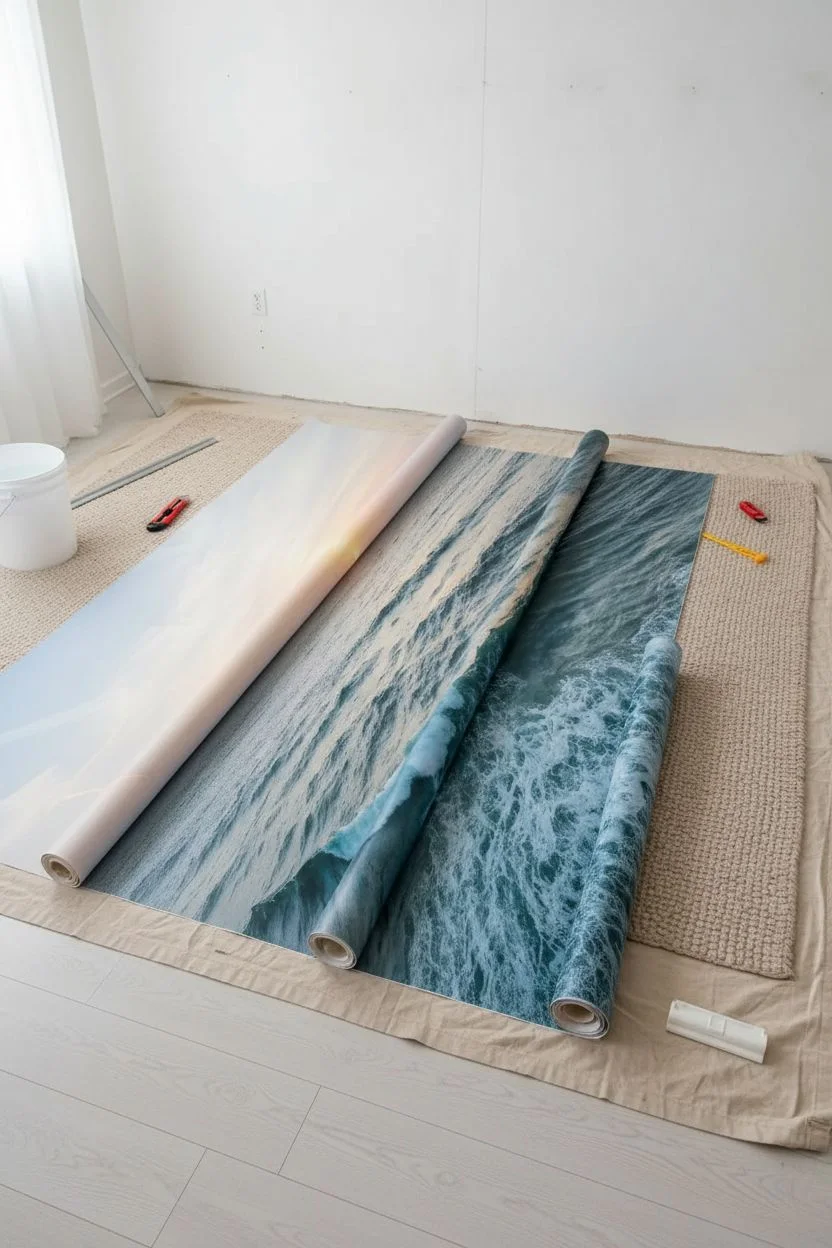
Unroll your mural panels on a clean floor to check the pattern alignment. Decide where you want the darkest, most prominent tree trunks to fall—avoiding corners where they might get distorted is usually a safe bet.
Step 2: Application: The Main Walls
-
Draw a plumb line:
Starting on the largest unobstructed wall (like the left wall in the image), measure out the width of your first panel from the corner. Use a level to draw a perfectly vertical pencil line here as your guide. -
Apply the first panel:
Peel back the top 12 inches of backing (or paste the wall for traditional paper). Align the edge of the panel with your plumb line, allowing a couple of inches of excess paper at the ceiling. -
Smooth it down:
Use your plastic smoothing tool to press the paper against the wall, working from the center outward to push out air bubbles. Continue peeling the backing slowly as you work your way down to the floor. -
Hang subsequent panels:
Align the pattern of the second panel perfectly with the first. Most murals are designed to butt firmly against each other, though some require a slight overlap—check your manufacturer’s instructions. -
Trim the excess:
Once a whole wall is done, guide your utility knife along the ceiling and baseboard using the straight edge. Make sure you have a fresh blade snapped off for crisp, clean cuts.
Bubble Trouble?
If a stubborn air bubble appears after hanging, prick it gently with a sewing needle or the tip of your knife to release the trapped air, then smooth it flat.
Step 3: Complex Areas: Corners and Doorways
-
Handle the corners:
When you reach a corner, smooth the paper into the crease firmly. Wrap the excess onto the next wall by about an inch to ensure no gaps appear if the house shifts or walls aren’t square. -
Overlap the next wall:
Apply the first panel of the adjacent wall right over that small wrap-around strip. You can leave it overlapped for security or double-cut through both layers for a seamless flush joint. -
Approach the door frame:
Let the wallpaper hang loosely over the door frame initially. Keep the pattern alignment perfect with the previous panel on the main wall. -
Relief cuts:
Make a diagonal relief cut from the waste paper toward the top corner of the door frame. This releases tension and allows you to smooth the paper flat against the wall around the trim. -
Trim around woodwork:
Use your smoothing tool to jam the paper tight against the edge of the door casing. Run your knife carefully along this crease to trim away the waste paper covering the door. -
Paper above the door:
For the small header space above the door, continue the pattern from the side walls. It’s crucial to match the vertical tree lines here so the forest looks uninterrupted.
Level Up: Painted Trim
Paint your door and skirting boards in a muted sage green or charcoal grey pulled directly from the mural print to make the architectural elements disappear into the forest.
Step 4: Finishing Touches
-
Roll the seams:
Go back over every vertical seam with a seam roller. Pressing these edges down firmly prevents them from curling up over time. -
Replace hardware:
Locate your outlet or switch boxes by feeling through the paper. Cut a small X, trim away the excess flaps, and screw your covers back on. -
Final wipe down:
Depending on the material, gently wipe off any excess paste residue with a damp sponge immediately, or buff out fingerprints on vinyl papers.
Step back and enjoy the serene depth your new forest corridor brings to your home

PENCIL GUIDE
Understanding Pencil Grades from H to B
From first sketch to finished drawing — learn pencil grades, line control, and shading techniques.
Explore the Full Guide
Ocean Horizon Mural for a Calming Bedroom Retreat
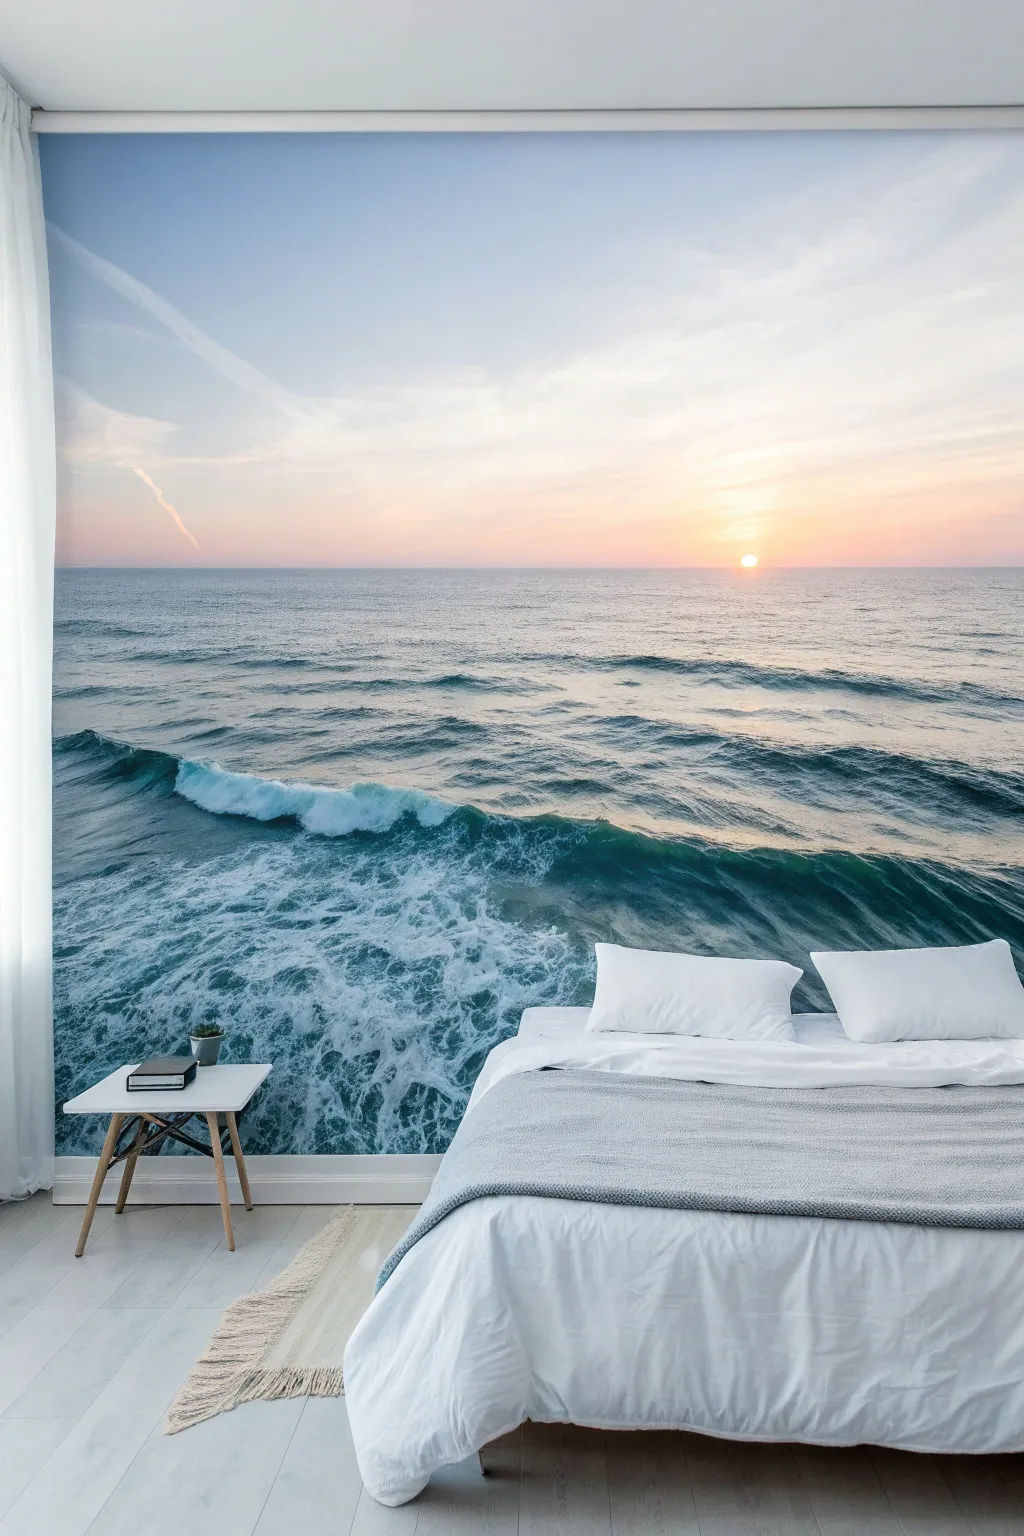
Transform your bedroom into a tranquil seaside escape with this breathtaking floor-to-ceiling ocean mural installation. The crashing waves and sunset hues create an immersive focal point that instantly expands the visual space of the room.
How-To Guide
Materials
- Custom-sized ocean mural wallpaper (non-woven or vinyl)
- Wallpaper paste (heavy-duty adhesive)
- Roller and tray
- Paintbrush (2-inch)
- Plumb line or laser level
- Smoother tool or plastic squeegee
- Sharp utility knife (with extra blades)
- Metal straight edge or trim guide
- Seam roller
- Stepladder
- Drop cloth
- Sponge and bucket of clean water
Step 1: Preparation & Planning
-
Assess the Wall Surface:
Begin by ensuring the wall is completely smooth, clean, and dry; fill any holes or cracks with spackle and sand them flat, as imperfections will show through the mural material. -
Clear the Area:
Move the bed and side tables away from the wall to give yourself plenty of working room, and lay down a drop cloth to protect your flooring from adhesive drips. -
Layout the Mural Panels:
Unroll all your mural panels on the floor in the correct order to double-check the image alignment and ensure no panels are damaged or missing before you start.
Bubble Trouble?
If a stubborn air bubble appears after drying, prick it gently with a fine needle to release the air, then use a syringe to inject a tiny bit of paste and smooth it flat.
Step 2: Setting the First Panel
-
Establish a Vertical Line:
Using a plumb line or laser level, draw a faint vertical pencil line on the wall where the edge of your first panel will sit; this crucial step ensures the horizon line stays perfectly straight. -
Apply Paste to Wall:
Pour your heavy-duty wallpaper adhesive into a tray and use a roller to apply a generous, even coat directly to the wall area for the first panel, slightly overshooting the width. -
Cut In Edges:
Use a 2-inch brush to apply paste carefully along the ceiling line, skirting board, and corners where the roller couldn’t reach. -
Hang the First Strip:
Align the top of the first panel with the ceiling, allowing about 2 inches of overhang at the top and bottom, and gently press the side edge against your pencil guideline. -
Smooth Out Bubbles:
Using your smoothing tool, work from the center of the panel outwards to push out air bubbles and ensure firm adhesion to the wall.
Step 3: Continuing the Scene
-
Apply Paste for Panel Two:
Roll paste onto the next section of the wall, ensuring you get close to the edge of the first installed panel without getting adhesive on the front of the print. -
Match the Pattern:
Carefully position the second panel next to the first, sliding it gently until the ocean waves and horizon line match up perfectly; usually, a butt joint (edges touching) is preferred over overlapping. -
Check Seams:
Once aligned, smooth out the second panel and run a seam roller lightly over the join to ensure the edges don’t lift later. -
Clean Excess Paste:
Immediately wipe away any adhesive that squeezes out of the seams with a damp sponge and clean water; dried paste can leave a shiny residue on the matte finish. -
Repeat the Process:
Continue pasting the wall and hanging subsequent panels, always checking alignment at eye level before smoothing down the rest of the strip.
Focus on the Horizon
The most critical alignment point is the horizon line. Always match this perfectly first; minor misalignments in the churning water or clouds are far less noticeable.
Step 4: Finishing Touches
-
Trim Top and Bottom:
Once all panels are up, use your metal straight edge and a very sharp utility knife to trim the excess paper at the ceiling and floorboard. -
Change Blades Often:
I recommend snapping off a fresh blade segment for every couple of cuts to prevent the wet paper from tearing or dragging. -
Install Socket Cutouts:
If you have outlets, make a small X cut over them, peel back the flaps, unscrew the faceplate, trim the excess, and reattach the plate for a flush finish. -
Final Wipe Down:
Do one last pass with a clean, damp sponge over the entire mural to remove any lingering glue residue. -
Dry and Reset:
Allow the mural to dry slowly at room temperature (avoid heaters) for 24 hours before moving your bed and furniture back into place.
Enjoy waking up to a peaceful beach sunrise every morning with your new bedroom view
Playful Kids’ Wall Mural With Whimsical Shapes
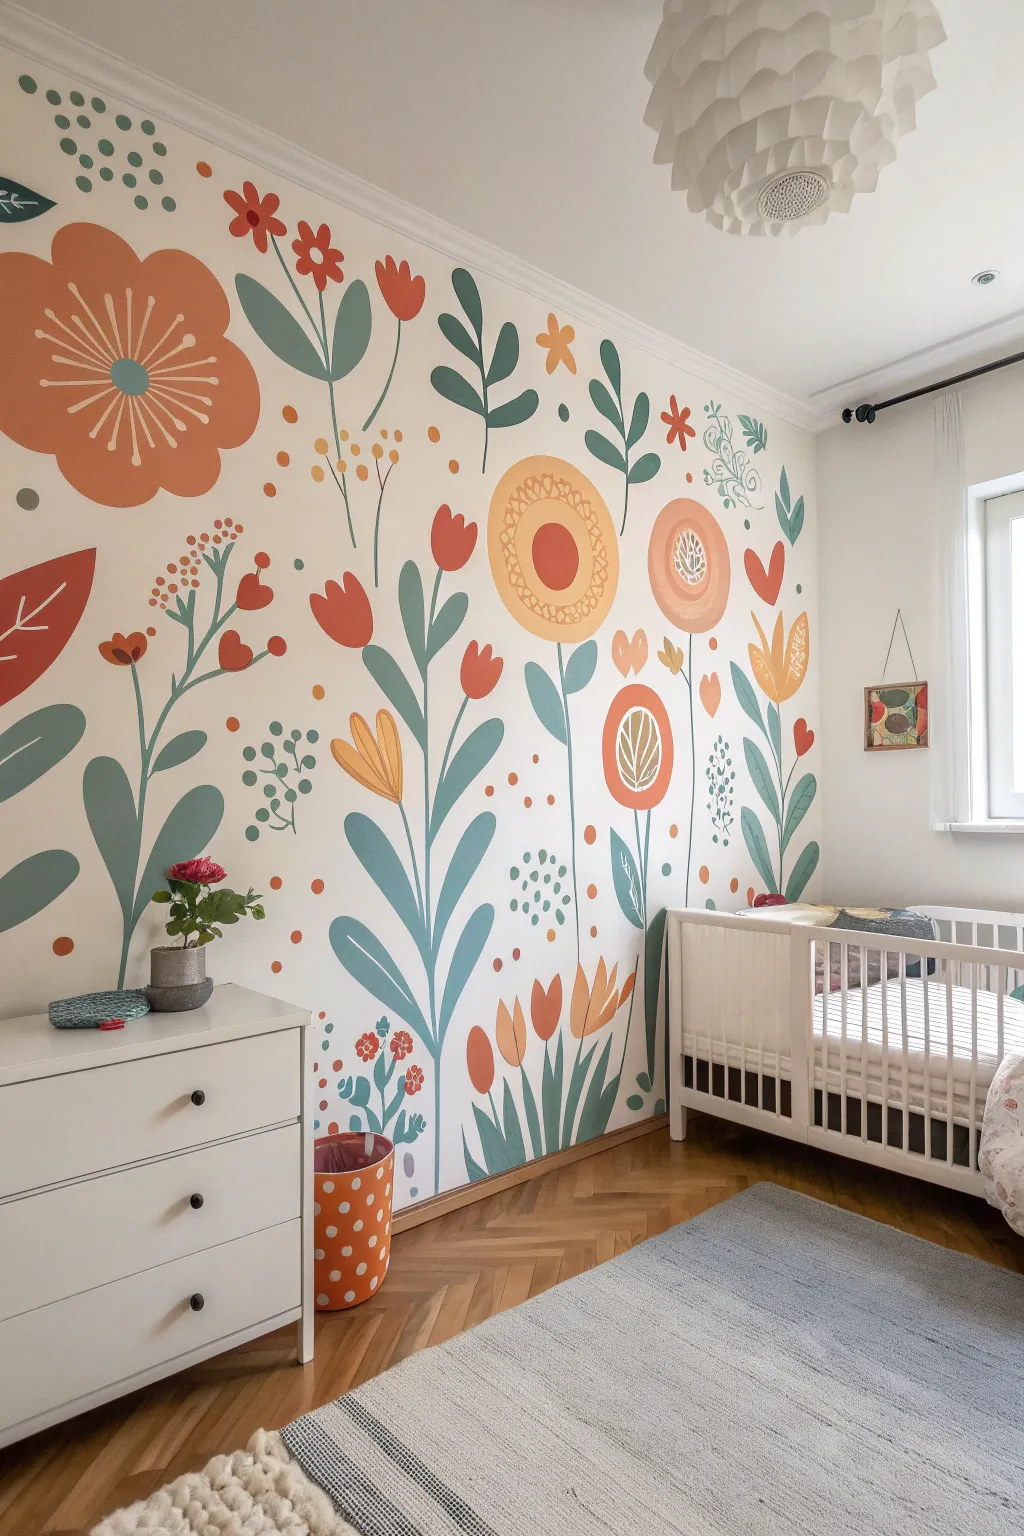
Transform a plain nursery wall into a blooming meadow with this oversized floral mural that combines Scandinavian simplicity with retro charm. Using a warm, earthy palette of terracottas, muted teals, and soft yellows, this project creates a playful yet soothing backdrop perfect for a child’s imagination.
Step-by-Step Tutorial
Materials
- Interior latex paint (Eggshell finish)
- Colors: Pale cream (base), Terracotta/Rust, Muted Teal/Sage, Golden Yellow, Soft Peach
- Assorted paintbrushes (1-inch angle sash, round detail brushes, filbert brushes)
- Pencil and eraser
- Painter’s tape
- Drop cloth
- Ladder or stepstool
- Reference image or sketch
- Small foam roller (for base coat)
Step 1: Preparation & Base
-
Prep the surface:
Begin by clearing the wall area completely. Remove any outlet covers and patch small holes with spackling paste. Wipe the wall down with a damp cloth to remove dust and let it dry completely. -
Apply the background color:
Cut in the edges of the wall with a pale cream paint using an angled sash brush. Roll the rest of the wall with a foam roller for a smooth finish. Apply two coats if necessary to ensure fully opaque coverage, allowing adequate drying time between coats. -
Map out the composition:
Before painting any flowers, lightly sketch the main stems and large flower heads directly onto the wall using a pencil. Start with the largest elements—like the big terracotta flower on the left and the sunflowers in the middle—to anchor your composition. Keep the pencil pressure extremely light so it doesn’t show through later.
Use a Projector
Can’t draw freehand? Project the digital image onto the wall and trace the shapes lightly with a pencil before painting for perfect proportions.
Step 2: Painting the Foliage
-
Paint the main stems:
Load a medium round brush with your muted teal or sage green paint. Follow your pencil lines to create the long, curving stems that rise from the floor. Keep your hand steady but allow for natural, organic wobbles to give it a hand-drawn feel. -
Add large leaves:
Using the same teal color, paint the large, rounded leaves attached to the stems. I find it easiest to outline the leaf shape first and then fill it in. Vary the leaf shapes—some long and slender, others broad and rounded—to create visual interest. -
Create floating foliage:
Add standalone sprigs and smaller leafy branches in the upper sections of the wall to fill empty space. Use a smaller detail brush for these delicate floating elements.
Step 3: Adding the Blooms
-
Block in large flower heads:
Switch to your terracotta paint and a larger filbert brush. Paint the solid shapes of the biggest flowers, such as the oversized poppy-like bloom on the far left. Focus on the silhouette first, ignoring interior details for now. -
Paint secondary flowers:
Using the golden yellow and soft peach colors, paint the medium-sized blooms. Creates circles for the center sunflowers and tulip shapes for the stems on the right side. Ensure the paint is applied evenly to avoid streakiness. -
Detail the flower centers:
Once the main flower shapes are dry to the touch, add contrasting centers. For example, paint a solid teal circle inside the large terracotta flower, or a rust-colored center inside the yellow sunflowers. -
Add petals and stripes:
Use a fine liner brush with cream or contrasting paint to add details like the radiating lines on the large left flower or the scalloped petals on the yellow blooms. These graphic lines are key to the whimsical style.
Paint Bleeding?
If paint bleeds under tape or lines look fuzzy, wait for it to fully dry, then touch up the edges using a small angled artist brush and your background wall color.
Step 4: Whimsical Accents
-
Scatter small buds:
dipping a small round brush into the terracotta or red paint, dab small clusters of berries and tiny buds near the tops of the stems. These shouldn’t be perfect circles; slightly irregular shapes look more organic. -
Fill with confetti shapes:
Look for empty white space in your composition and add small, floating elements like dots, tiny crosses, or small hearts. Use various colors from your palette to tie the whole wall together. -
Layer transparency:
If you want a softer look, you can mix a little glazing medium with your paint for some of the background leaves, allowing them to look slightly translucent where they overlap with other shapes. -
Clean up edges:
Step back and check your work. If any pencil lines are still visible, gently erase them. Use a small brush with the background cream color to tidy up any wobbly flower edges that need sharpening.
Now you have a stunning, hand-painted garden that brings warmth and joy to the room all year round


Tonal Ombré Gradient Wall Mural
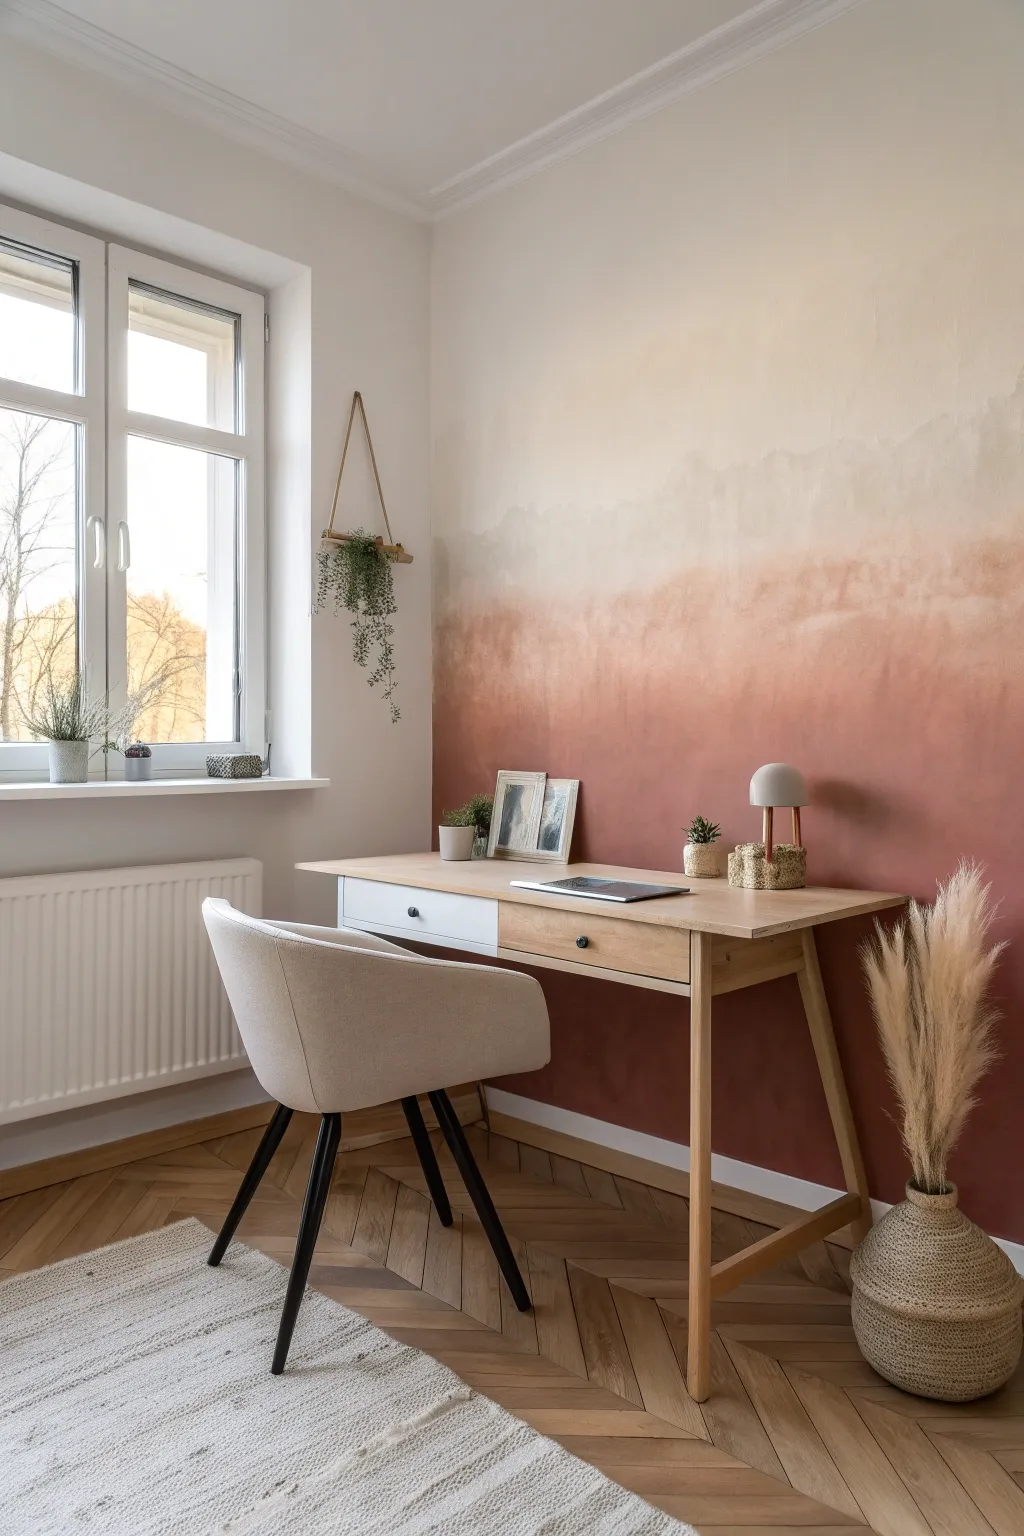
Bring the warmth of a desert sunset into your workspace with this stunning tonal gradient wall treatment. This project transforms a flat surface into a soft, dreamlike canvas by blending rich terracotta hues upward into creamy whites for a sophisticated, calming effect.
How-To Guide
Materials
- Interior latex paint (Deep Terracotta)
- Interior latex paint (Medium Rust/Peach)
- Interior latex paint (White or Cream – wall base color)
- Paint rollers (3) and roller tray
- Painter’s tape
- Drop cloth
- Spray bottle with water
- Large blending brush (dry)
- Small sponges or rags
- Step ladder
- Mixing buckets (optional)
Step 1: Preparation and Base Coat
-
Clear and Protect:
Start by removing all furniture from the wall area. Lay down your drop cloth to protect that beautiful herringbone floor, and tape off the skirting boards, window frames, and the adjacent walls strictly with painter’s tape. -
Prime the Surface:
If your wall isn’t already white or cream, roll on a fresh coat of your lightest color (the top color) over the entire wall. Let this base coat dry completely overnight to ensure a clean slate. -
Map Your Horizons:
Lightly mark the wall with a pencil to divide it into three rough horizontal sections. These don’t need to be straight lines; a little waviness helps the organic look. The bottom third is for the darkest color, the middle for the medium tone, and the top for the lightest.
Step 2: Applying the Color Blocks
-
Apply the Darkest Tone:
Pour your deep terracotta paint into a tray. Using a roller, paint the bottom section of the wall solidly. Don’t worry about a crisp top edge yet; just get good coverage up to your first pencil mark. -
Apply the Medium Tone:
Switch to a fresh roller and apply your medium rust/peach color in the middle section. Leave a gap of about 4-6 inches between this wet paint and the dark terracotta below. -
Refresh the Top:
For the top section, quickly roll a fresh layer of your white or cream paint down to meet the medium tone area, again leaving a small gap. You want all three sections of paint to be wet at the same time for the next steps.
Uneven Blending?
If the blending looks patchy, don’t panic. Wait for it to dry, then apply a very watered-down ‘glaze’ of the lighter color over the harsh area with a sponge to soften the transition.
Step 3: The Blending Process
-
Create the Transitional Mixes:
While the wall is wet, mix a small amount of your dark terracotta with the medium peach in a separate bucket. This 50/50 mix is your ‘bridge’ color. -
Fill the Lower Gap:
Using a brush or a smaller roller, apply this bridge color into the gap between the bottom and middle sections. Overlap slightly onto both the dark and medium areas. -
Mix the Upper Bridge:
Repeat this mixing process for the upper transition, combining the medium peach with the cream paint. Apply this lighter mix to the gap between the middle and top sections. -
Start Wet Blending:
Now comes the magic. Take your large, dry blending brush. Starting at the bottom transition line, use crisscross ‘X’ motions to blur the line where the colors meet. Work quickly while the paint is still tacky. -
Mist for Fluidity:
If the paint starts dragging or drying too fast, lightly spritz the wall with your water bottle. A fine mist helps the latex paint move and blend more like watercolors. -
Soften the Upper Haze:
Move to the upper transition line (peach to cream). Clean your brush or grab a fresh dry one to avoid dragging dark pigment up too high. Use soft, feathery strokes to pull the color upwards until it disappears into the white. -
Correcting Harsh Lines:
Step back and squint at the wall. If you see stripes instead of a fade, dab a damp sponge gently along the harsh line to lift and move the pigment. -
The Final Softening:
I find that using a slightly damp, lint-free rag bunched up in my hand works wonders for the final pass. Gently pat areas that look too heavy to create that clouded, atmospheric texture.
Add Texture
For a plaster-like old-world feel, mix a texture additive or fine sand into the bottom terracotta paint layer before applying. It adds tactile depth to the heavy base color.
Step 4: Finishing Touches
-
Let it Dry:
Allow the wall to dry undisturbed for at least 24 hours. The colors may lighten slightly as they dry, revealing the true gradient softness. -
Remove Tape:
Carefully peel away the painter’s tape at a 45-degree angle. If any paint bridged the tape, score it lightly with a utility knife first to prevent peeling your new mural. -
Style the Space:
Reassemble your workspace. Natural wood tones and dried grasses, as seen in the photo, complement the earthy palette perfectly.
Now you have a serene, custom backdrop that brings warmth to your daily tasks
Faux Limewash Texture Wall Mural Look
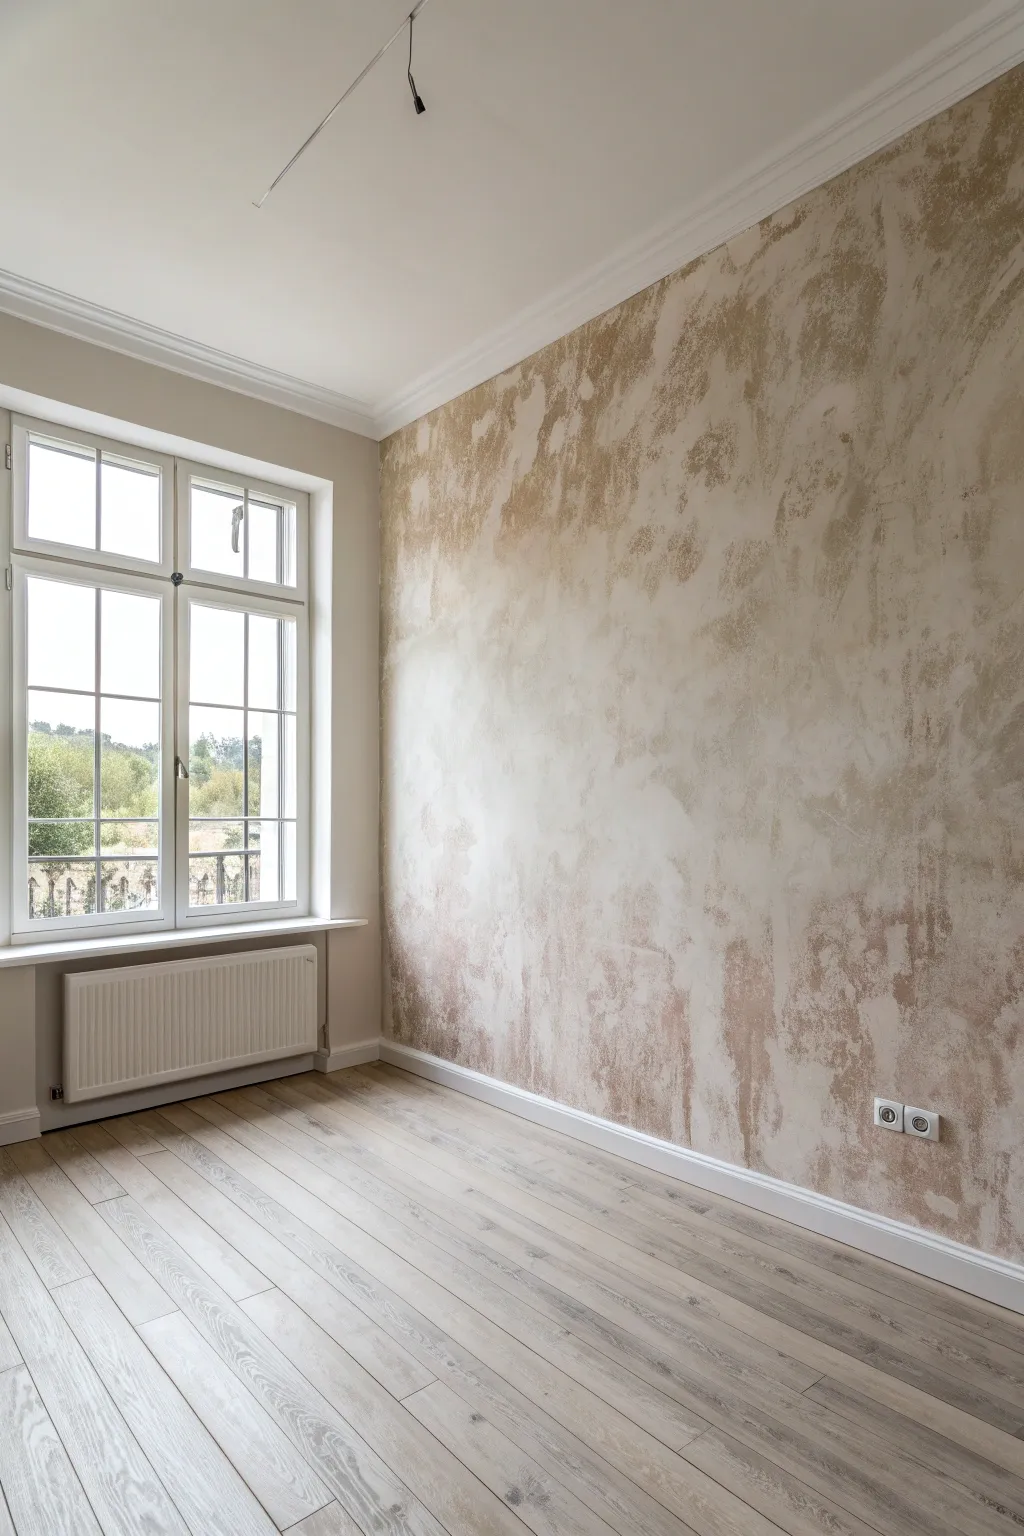
Bring the timeless, earthy charm of old-world plaster into your home with this faux limewash technique. This soft, clouded effect adds incredible depth and warmth to a space without the expense or labor of traditional lime plaster application.
Step-by-Step Tutorial
Materials
- Matte latex paint (base wall color, off-white or cream)
- Matte latex paint (accent color, light beige or taupe)
- Glaze medium (clear)
- Large block brush or stain brush (4-5 inches wide)
- Clean lint-free rags
- Painter’s tape
- Drop cloths
- Mixing bucket or tray
- Paint roller and tray (for base coat)
- Water spray bottle
Step 1: Preparation & Base Coat
-
Clear and protect:
Begin by removing all furniture from the wall area or pushing it to the center of the room. Lay down drop cloths to protect your flooring, ensuring they are flush against the baseboards. -
Tape edges:
Apply painter’s tape carefully along the ceiling line, baseboards, window trim, and any adjacent walls you don’t intend to paint. Press the tape edges down firmly to prevent bleed-through. -
Prepare the surface:
Inspect the wall for holes or imperfections. Fill any nail holes with spackle and sand smooth once dry. Wipe the entire wall down with a damp cloth to remove dust, ensuring a clean surface for adhesion. -
Roll the base coat:
Pour your base color (the lighter off-white or cream shade) into a roller tray. using a standard roller, apply an even coat over the entire wall. This acts as the background for your cloudy texture. -
Let it cure:
Allow this base coat to dry completely, following the manufacturer’s recommended time—usually at least 4 hours. A fully dry base is crucial so the glaze doesn’t lift previous layers.
Brush Technique Tip
Hold the brush by the ferrule (the metal part), not the handle. This gives you better control over pressure changes, helping create naturally varied textures.
Step 2: Creating the Glaze Mixture
-
Measure the ratio:
In a mixing bucket, combine your accent paint (the beige/taupe color) with the clear glaze medium. A starting ratio of 1 part paint to 4 parts glaze works well for a subtle, translucent look. -
Add water:
To increase workability and create that watercolor-like fluidity, add a splash of water to the mixture. Stir thoroughly until the consistency is uniform, resembling a thin cream. -
Test the wash:
Find a scrap piece of cardboard or a hidden corner near the baseboard to test your mixture. If it’s too opaque, add more glaze; if it’s too runny, add a touch more paint.
Patchy Problems?
If you see harsh lap lines where sections dried, dampen a rag with warm water and gently rub the line to reactivate the glaze, then blend it out with a dry brush.
Step 3: Applying the Faux Texture
-
Dampen the brush:
Dip your large block brush into clean water and shake off the excess. A slightly damp brush helps the glaze glide smoothly rather than dragging on the matte base. -
Begin the ‘X’ motion:
Dip the brush tips into your glaze mixture and start in a top corner. Apply the paint using large, random ‘X’ or crisscross strokes. Keep the movement loose and organic rather than grid-like. -
Work in sections:
Focus on a manageable section, roughly 3 by 3 feet, at a time. The goal is to keep a ‘wet edge’ so you don’t end up with visible seam lines where dry and wet paint meet. -
Soften the edges:
As you move from one section to the next, overlap your brushstrokes into the previous wet area. I like to feather out the edges of my current section so they fade into nothingness, ready for the next patch. -
Create cloudy patches:
Deliberately vary the pressure on your brush. Press harder in some spots to deposit more pigment (creating darker clouds) and lighter in others to let the base coat shine through. -
Mist for blending:
If a section starts drying too fast or looks too harsh, spritz it lightly with your water spray bottle. Use a clean, dry rag to gently dab or wipe the wet glaze, softening the transition. -
Check your progress:
Step back frequently—at least every 10 minutes—to view the wall from a distance. This helps you spot repetitive patterns or areas that are too heavy with pigment. -
Layer for depth:
Once the first pass covers the wall, you might notice it looks a bit flat. While it’s still slightly tacky or just dry, go back in with a darker concentration of glaze in random areas to add that rich, aged dimension. -
Final softening:
Use a clean, dry block brush to whisk over the entire wall very lightly. This final ‘dry brushing’ blurs any remaining harsh brush marks into soft, ethereal clouds. -
Reinstall fixtures:
Wait for the wall to dry fully (overnight is best) before removing the painter’s tape. Carefully score the edge of the tape with a utility knife if the paint feels thick, then peel away and replace outlet covers.
Step back and admire the sophisticated, organic atmosphere you’ve created.
Painted “Wallpaper Pattern” Repeating Motif Mural
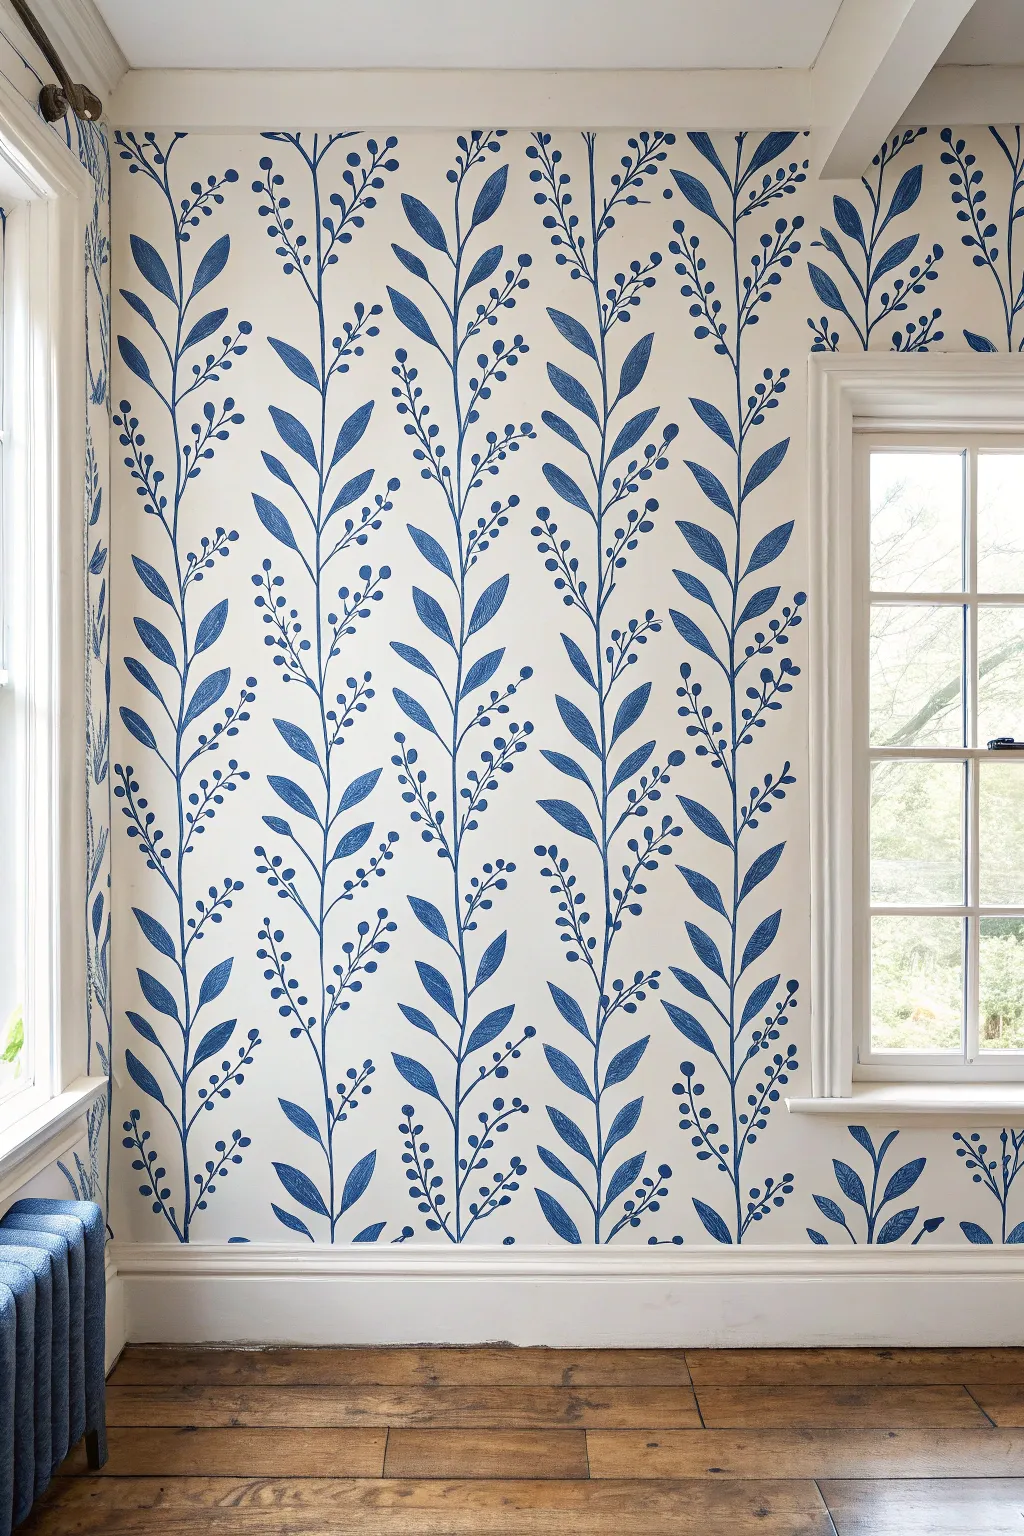
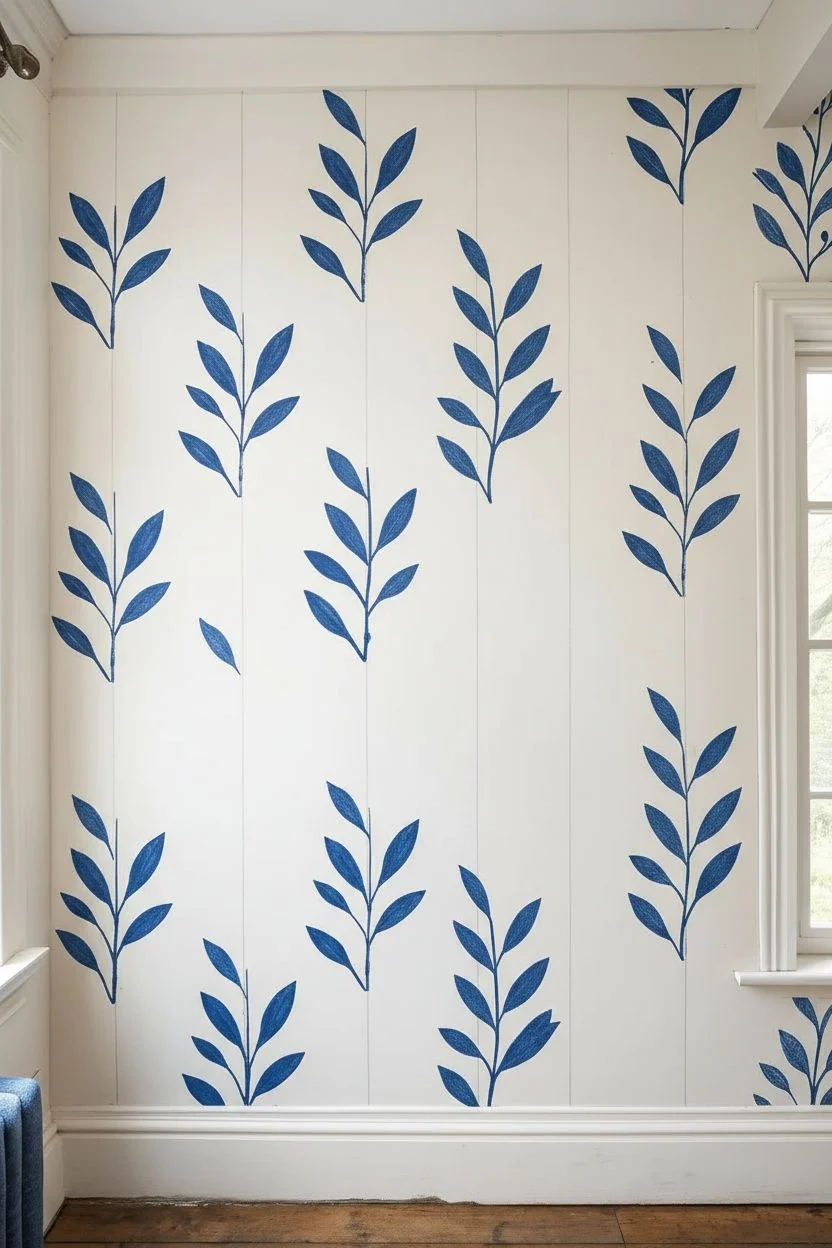
Transform a plain white wall into a charming botanical feature without the hassle of hanging actual paper. This hand-painted mural mimics the look of traditional block-printed vines, featuring a repeating vertical pattern of blue leaves and berries that adds varying height and organic movement to any room.
Detailed Instructions
Materials
- Interior latex paint (Eggshell finish, white/cream base)
- Interior latex paint or acrylic paint (Deep ultramarine or navy blue)
- Cardstock or Mylar heavy-duty stencil sheets
- X-Acto knife with fresh blades
- Cutting mat
- Pencil and large eraser
- Long spirit level or laser level
- Stencil brushes (various sizes)
- Small round artist brush (size 4 or 6)
- Painter’s tape
- Measuring tape
- Paper plate or palette
- Rags for cleanup
Step 1: Planning and Template Creation
-
Analyze the motif:
Study the reference image. The pattern consists of vertical meandering vines. Notice there are two distinct leaf shapes: larger, pointed oval leaves attached directly to the main stem, and clusters of small round berries on delicate off-shoot stems. -
Draft the master stencil:
On a large sheet of cardstock or Mylar, draw one full repeat of the vine. This should be about 2-3 feet tall. Draw a central wavy line for the stem, then add your leaves and berry branches symmetrically on either side. -
Cut the stencil:
Place your material on a cutting mat. I like to carefully cut out the leaf shapes and the main stem line, but I leave the delicate berry stems uncut—we will freehand those later to keep the stencil sturdy. -
Mark vertical guides:
Using a laser level or a spirit level and pencil, lightly mark vertical plumb lines on your wall floor-to-ceiling. Space them equally, about 12-18 inches apart depending on how dense you want your ‘forest’ of vines to be.
Step 2: Painting the Base Structure
-
Position the first repeat:
Tape your stencil to the wall, aligning the center stem with your first pencil guide line. Start at the bottom, just above the skirting board. -
Load the brush:
Pour a small amount of deep blue paint onto a plate. Dip the tip of a stencil brush in, then offload most of the paint onto a paper towel until the brush is almost dry. This prevents paint from bleeding under the stencil edges. -
Stipple the leaves:
Apply the paint through the leaf cutouts using a straight up-and-down pouncing motion. Don’t brush side-to-side. Aim for a slightly imperfect, textured coverage to mimic a block print. -
Move and repeat:
Remove the stencil and move it up the wall, aligning the bottom of the new stem with the top of the section you just painted. Continue until you reach the ceiling. -
Complete all columns:
Repeat this process for every vertical guide line you marked. Don’t worry if the spacing feels uniform; the organic details coming next will break that up.
Bleeding Edges?
If paint seeps under the stencil, ‘cut in’ narrowly with the wall’s base color (white) using a tiny liner brush to conceal the fuzzy edge and sharpen the leaf shape.
Step 3: Adding Detail and Finishing
-
Freehand the berry stems:
Switch to your small round artist brush. Using the same blue paint, hand-paint fine, curved lines extending from the main vine where you want your berry clusters to be. -
Add the berries:
Dip the back end (the handle) of your paintbrush into the paint. Dot it onto the wall at the ends of your hand-painted stems to create perfect round berries. Group them in threes or fives. -
Connect the leaves:
Use the small brush to refine the connections where the leaves meet the main stem if the stencil left any awkward gaps. This makes the vine look continuous. -
Refine the edges:
Check the corners, baseboards, and ceiling line. You may need to hand-paint partial leaves to make the pattern look like it naturally disappears behind the trim. -
Erase guidelines:
Once the paint is completely dry (wait at least 4 hours just to be safe), gently erase any visible pencil plumb lines from the wall. -
Add texture (Optional):
If the paint looks too flat, take a very dry brush with a tiny bit of white paint and lightly whisk it over a few leaves to simulate a ‘faded fabric’ texture.
Stencil Longevity
Paint builds up on stencils quickly. Wipe your Mylar tool clean with a damp rag every 3-4 repeats to prevent dried clumps from messing up your crisp outlines.
Step back and admire how a simple repeated motif creates a sophisticated, custom wallpaper effect for a fraction of the cost.
Optical Illusion Trompe L’Oeil Mural for Added Depth
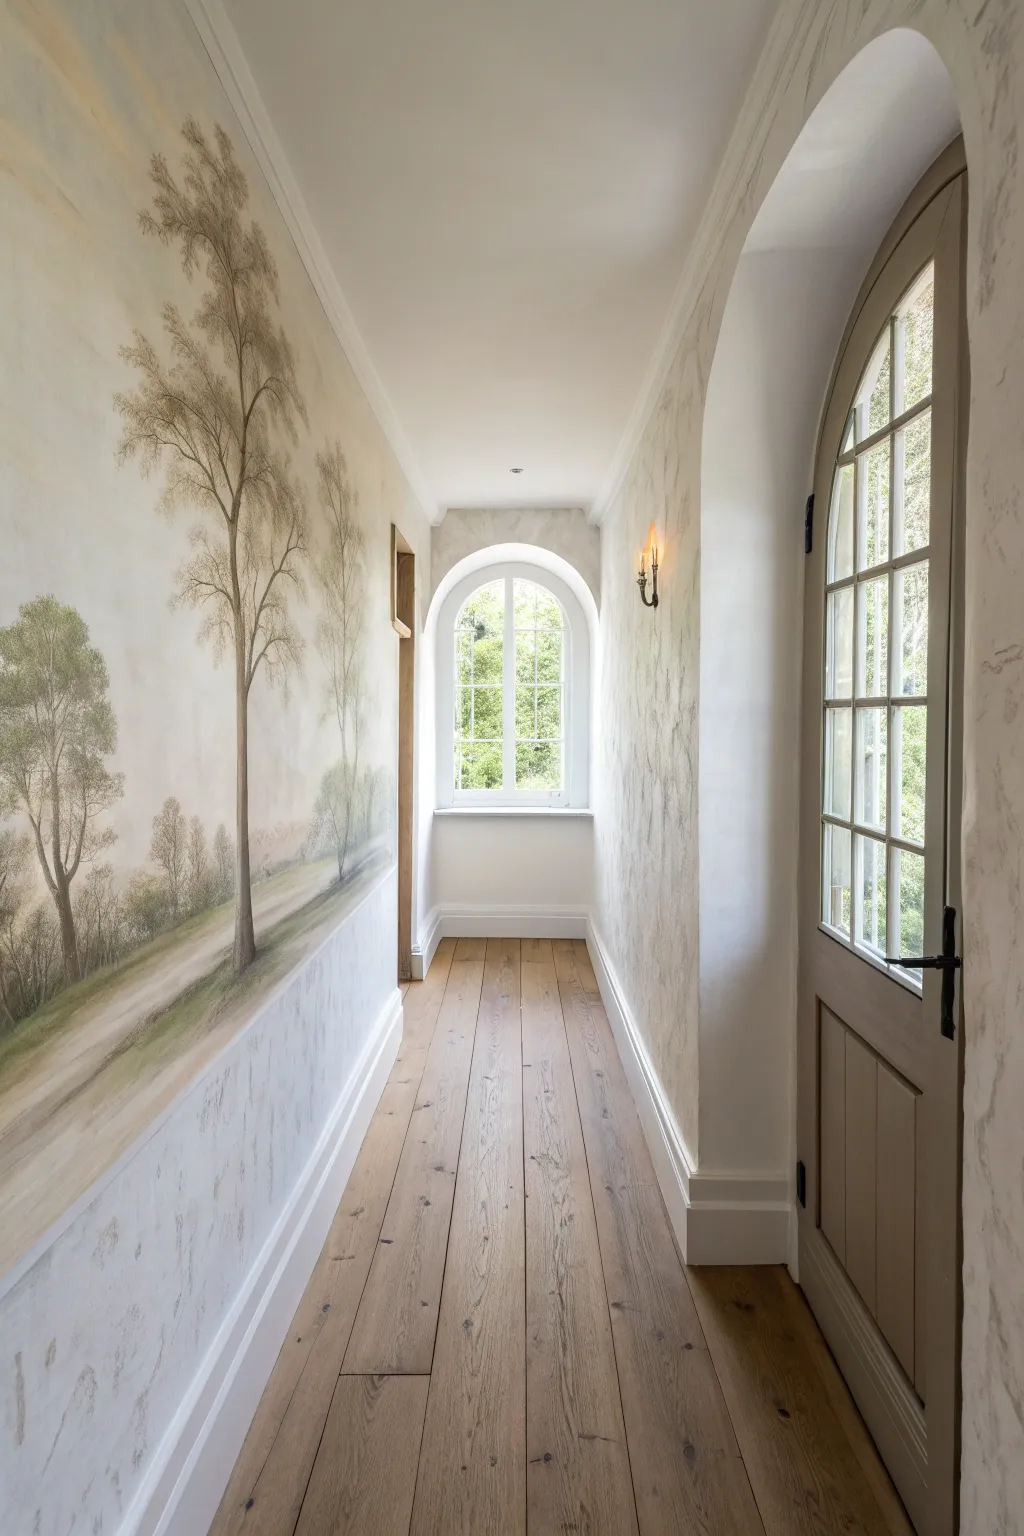
Transform a narrow hallway into a serene, expansive woodland walk with this trompe l’oeil landscape. By painting a receding path and tall, slender trees in muted, hazy tones, you push back the wall visually and create a stunning sense of depth.
Detailed Instructions
Materials
- Interior latex wall paint (white or off-white base)
- Acrylic paints (olive green, warm brown, burnt umber, raw sienna, grey, white)
- Wide painter’s tape
- Large foam roller and tray
- Assorted synthetic brushes (2-inch flat, 1-inch angled, fine liner)
- Sea sponge
- Glaze medium
- Pencil and eraser
- Ladder
- Drop cloths
- Long ruler or straight edge
Step 1: Preparation and Base
-
Prep the surface:
Clear the hallway and lay down drop cloths to protect that beautiful wood flooring. Ensure the wall is clean, dry, and free of dust. If the current wall color is dark, prime it first. -
Define the wainscoting:
Determine the horizon line height for your mural. Measure about 30 inches up from the floor (or match existing baseboard height if preferred) and run a strip of painter’s tape horizontally across the entire length of the wall to separate the mural area from the faux wainscoting area below. -
Apply the sky base:
Mix a very pale, creamy off-white color. Roll this over the entire upper section of the wall above your tape line. This serves as the ‘sky’ and the light source behind the trees. -
Create the atmospheric haze:
While the base is still slightly tacky, mix a tiny amount of warm grey with glaze medium. Using a large brush or rag, lightly wash this into the upper corners and random patches in the center to create a cloudy, antique paper effect. Keep it subtle.
Misty Mistakes?
If a tree looks too dark or ‘stuck on,’ mix a thin glaze of the wall’s sky color and lightly brush it over the dried tree. This pushes it back into the fog.
Step 2: Drafting the Design
-
Sketch the horizon:
Using a pencil, lightly sketch a horizon line just above your tape. It doesn’t need to be perfectly straight; a little undulation suggests rolling hills. -
Draft the perspective path:
Draw the path starting wide at the bottom edge (near your tape) and narrowing significantly as it moves toward the horizon. This diagonal line is crucial for the trompe l’oeil depth effect. -
Outline the trees:
Sketch the vertical trunks of the trees. Place the largest, thickest tree in the foreground (closest to the viewer) and make trees progressively thinner and paler as they move deeper into the ‘distance’ of the painting.
Step 3: Painting the Landscape
-
Block in the ground:
Mix olive green with a lot of glaze and white. Paint the grassy areas using horizontal brushstrokes. The color should be more saturated at the bottom and fade into a misty grey-green near the horizon line. -
Paint the path:
Use a mix of raw sienna, white, and glaze to fill in the path. Use horizontal strokes again to simulate the texture of dirt, blending the edges softly into the grass so it doesn’t look like a hard cutout. -
Paint the main trunks:
Mix burnt umber with a little black. Using a 1-inch angled brush, paint the main trunk of the foreground tree. I like to keep the edges slightly ragged to mimic bark texture. -
Add secondary trees:
For trees further away/smaller in the composition, mix more white and grey into your trunk color. This atmospheric perspective makes them look distant. Paint these trunks thinner. -
Create branches:
Switch to a liner brush. Extend branches from the trunks, tapering them to fine points. Allow the branches to reach high up into the ‘sky’ area, arching gracefully.
Level Up: Faux Texture
Before painting the lower wainscoting, use a feather or fine brush to add faint grey veining. This mimics the look of solid marble blocks anchoring your mural.
Step 4: Foliage and Finish
-
Sponge on foliage:
Dampen a sea sponge and dip it into a mix of olive green and grey. Lightly dab clusters of leaves onto the branches. Keep the foliage sparse and airy to maintain the etching style; don’t make it a solid block of green. -
Add distant shrubbery:
Along the horizon line, dab very pale, grey-green paint to suggest a distant tree line or bushes. These should be very soft and out of focus. -
Paint the wainscoting:
Remove the long horizontal tape strip. Paint the lower section of the wall (below the mural) in a solid, clean white or a soft faux-marble finish if you’re feeling adventurous. -
Border detail:
To frame the mural, use a straight edge to paint a thin, crisp line of beige or pale grey right where the mural meets the lower wall section, acting as a painted chair rail. -
Final glaze:
Once everything is fully dry, you can apply a clear matte sealer to protect the artwork, especially in a high-traffic hallway.
Step back and enjoy the feeling of walking into a countryside dream every time you pass through your hall
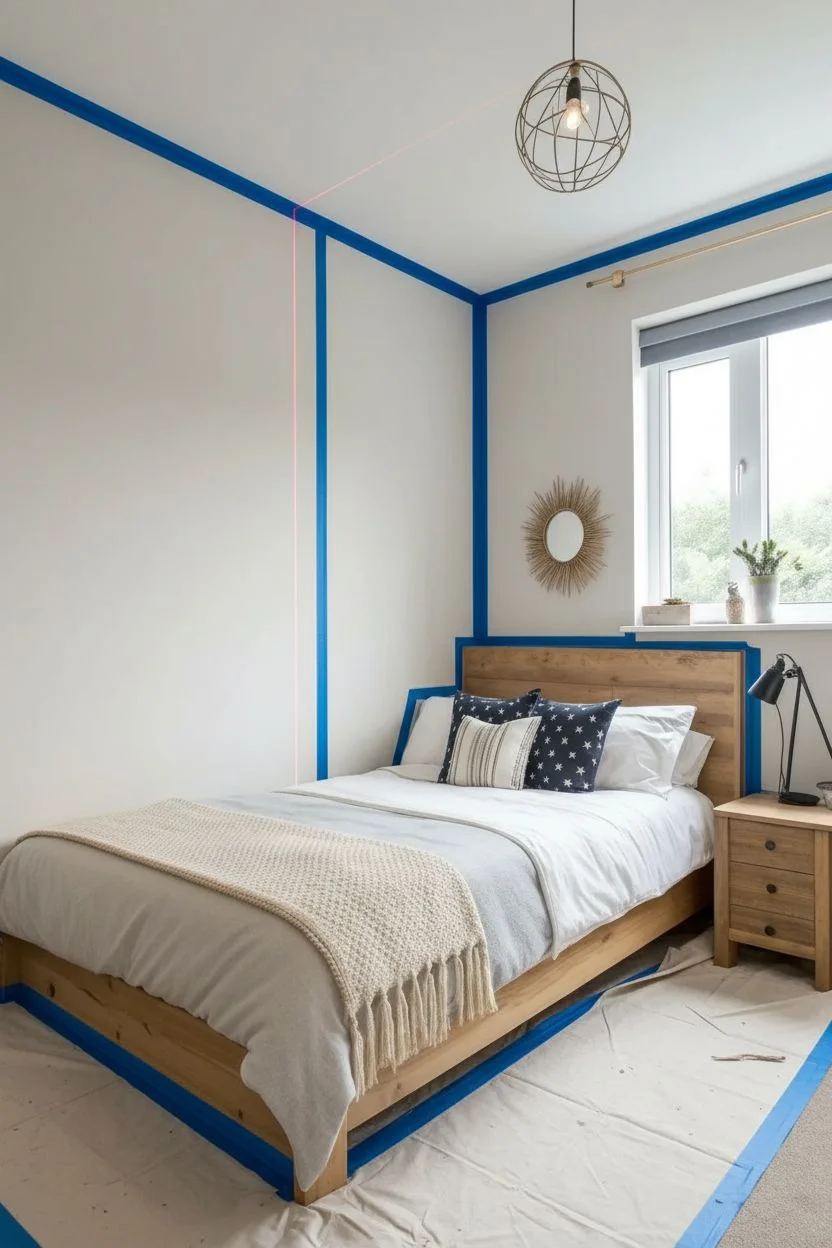
Glow-in-the-Dark Celestial Wall Mural Surprise
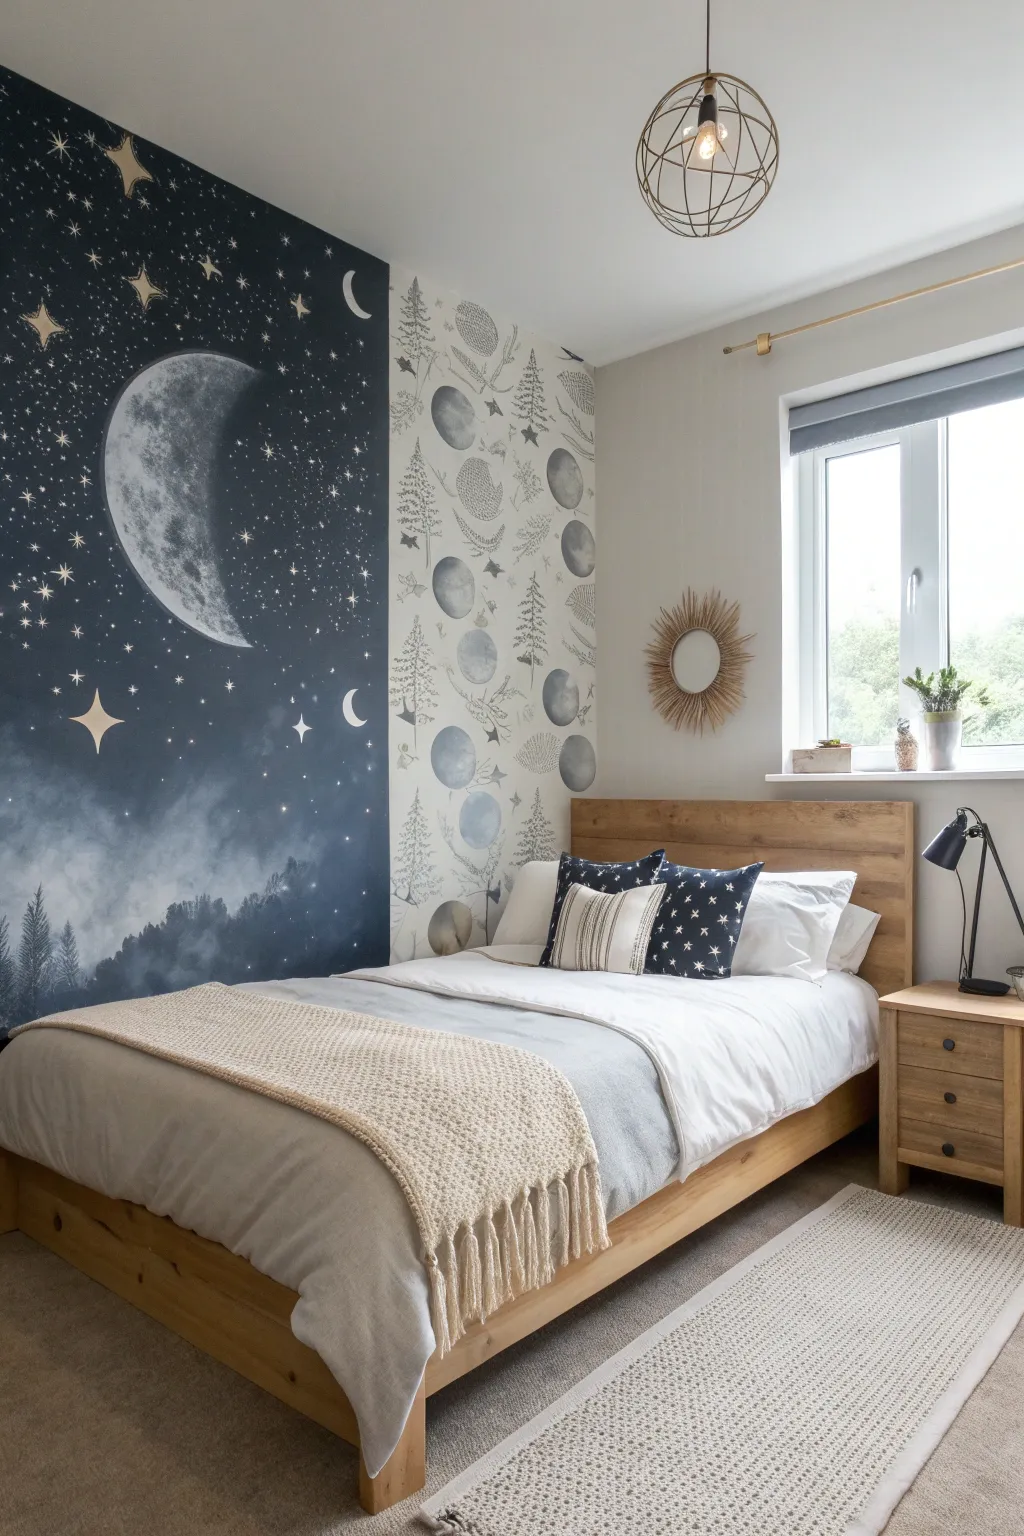
Transform an ordinary bedroom into a stargazing sanctuary with this two-part mural project that pairs a dramatic midnight sky with dreamy lunar illustrations. The result is a striking corner feature that creates depth and wonder, perfect for drifting off to sleep under the stars.
Step-by-Step Tutorial
Materials
- Dark navy or midnight blue matte wall paint
- Light grey or off-white wall paint (base color)
- White acrylic paint
- Glow-in-the-dark paint (translucent or off-white)
- Painter’s tape (wide and narrow)
- Large sponge or sea sponge
- Detail brushes (sizes 0, 2, and 4)
- Medium flat brush
- Large circular stencil (or DIY cardboard circle)
- Star stencils (optional)
- Pencil and eraser
- Drop cloths
- Laser level or long straight edge
- Matte clear topcoat (optional)
Step 1: Planning and Preparation
-
Measure and mask:
Begin by deciding where your mural divider line will be. This design uses a vertical split not in the corner, but slightly onto the adjacent wall, creating a layering effect. Use a laser level to mark a crisp vertical line about 2-3 feet from the corner on the lighter wall. -
Apply tape:
Apply painter’s tape firmly along your pencil line. Press the edges down hard with a credit card or fingernail to prevent bleed-through later. -
Protect the area:
Lay down drop cloths to protect your flooring and skirting boards. Tape off the ceiling line and baseboards to ensure sharp edges.
Celestial Pro-Tip
Mix a tiny amount of silver metallic paint into your white star paint. It catches natural light during the day, making the stars shimmer before the glow effect takes over at night.
Step 2: Painting the Midnight Sky
-
Base coat application:
Roll on your deep navy or midnight blue paint on the designated ‘night sky’ section. This dark background needs to be rich and opaque, so plan for two coats. Let the first coat dry completely before applying the second. -
Create the atmospheric fog:
While the blue paint is still slightly tacky or just dry, mix a small amount of white paint with your blue base to create a lighter, misty shade. Using a damp sea sponge, lightly dab this mixture near the bottom third of the wall to create the cloudy, ethereal fog effect seen near the treeline. -
Paint the silhouette trees:
Mix a darker shade (black mixed with navy) for the trees. Using a small flat brush, paint vertical lines along the bottom edge within the fog, flicking the brush upward to create pine tree silhouettes. Keep them loose and varying in height.
Step 3: Celestial Details
-
Outline the giant moon:
Position your large circular stencil or cardboard template on the upper half of the blue wall. Trace the crescent shape lightly with a pencil. It should be prominent and tilted slightly. -
Texture the moon:
Fill in the moon shape with white paint mixed with a tiny drop of grey. I prefer using a dry brush technique here—dip your brush, wipe most of it off, and stipple the paint on to create craters and uneven lunar texture. -
Adding major stars:
Using a size 2 detail brush and pure white paint, create the larger, four-pointed ‘North Star’ shapes scattered randomly. A few larger stars balance the composition. -
Sprinkle the galaxy:
Dip an old toothbrush or stiff bristle brush into watered-down white paint. Run your thumb across the bristles to flick tiny speckles of paint across the upper wall, creating distant galaxies and star clusters.
Wobbly Lines?
If paint bleeds under your tape, wait for it to dry completely. Then, use a small angled artist brush and the base wall color to carefully touch up the line for a razor-sharp edge.
Step 4: The Moon Phase Panel
-
Peel and reveal:
Carefully remove the vertical tape line to reveal the crisp edge between your dark sky and the lighter wall section. -
Sketch the pattern:
On the lighter wall section (the white strip), lightly pencil in a vertical pattern of circles representing moon phases. Intersperse these with delicate botanical sketches like pine branches or ferns as seen in the reference. -
Paint the illustrative details:
Using a diluted grey or soft charcoal paint and a size 0 brush, paint the illustrations. Keep the style illustrative and sketchy—almost like a pen-and-ink drawing—rather than solid blocks of colour. -
Connect the themes:
Ensure the style of the trees in your moon phase panel mirrors the silhouette trees on the dark wall to tie the two zones together visually.
Step 5: The Glow-in-the-Dark Surprise
-
Trace over the stars:
Once all white paint is bone dry, take your glow-in-the-dark medium. Use a fine detail brush to trace directly over the white stars you painted earlier. This makes them invisible by day but radiant by night. -
Highlight the moon:
Apply a thin wash of glow paint to the crescent moon’s highlighted edge. Don’t cover the whole moon; just highlighting the curve adds a realistic 3D effect when the lights go out. -
Hidden constellations:
For an extra fun touch, paint tiny dots connecting some stars to form real constellations. Since the glow paint is translucent drying, these lines will only appear in the dark.
Now turn off the lights and watch your personal galaxy come to life!


Have a question or want to share your own experience? I'd love to hear from you in the comments below!