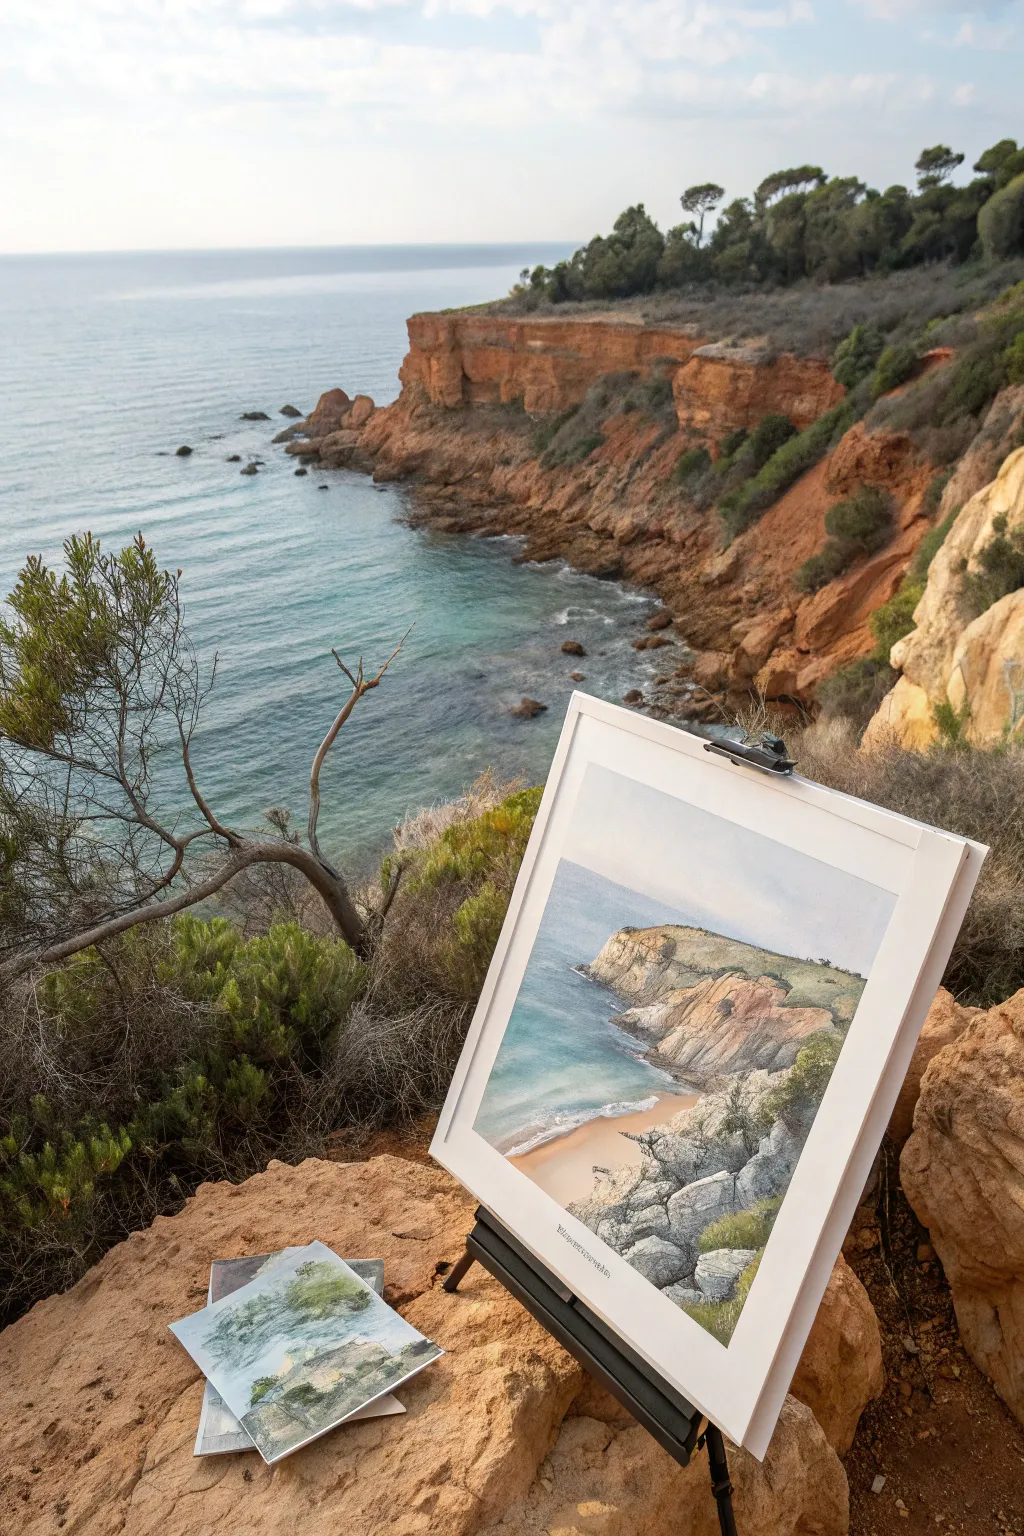
When I’m craving that peaceful, outdoorsy vibe but I’m stuck inside, I reach for watercolor and paint a little world of my own. These watercolor landscape ideas are meant to be doable, Pinterest-friendly, and packed with that dreamy watercolor atmosphere we all love.
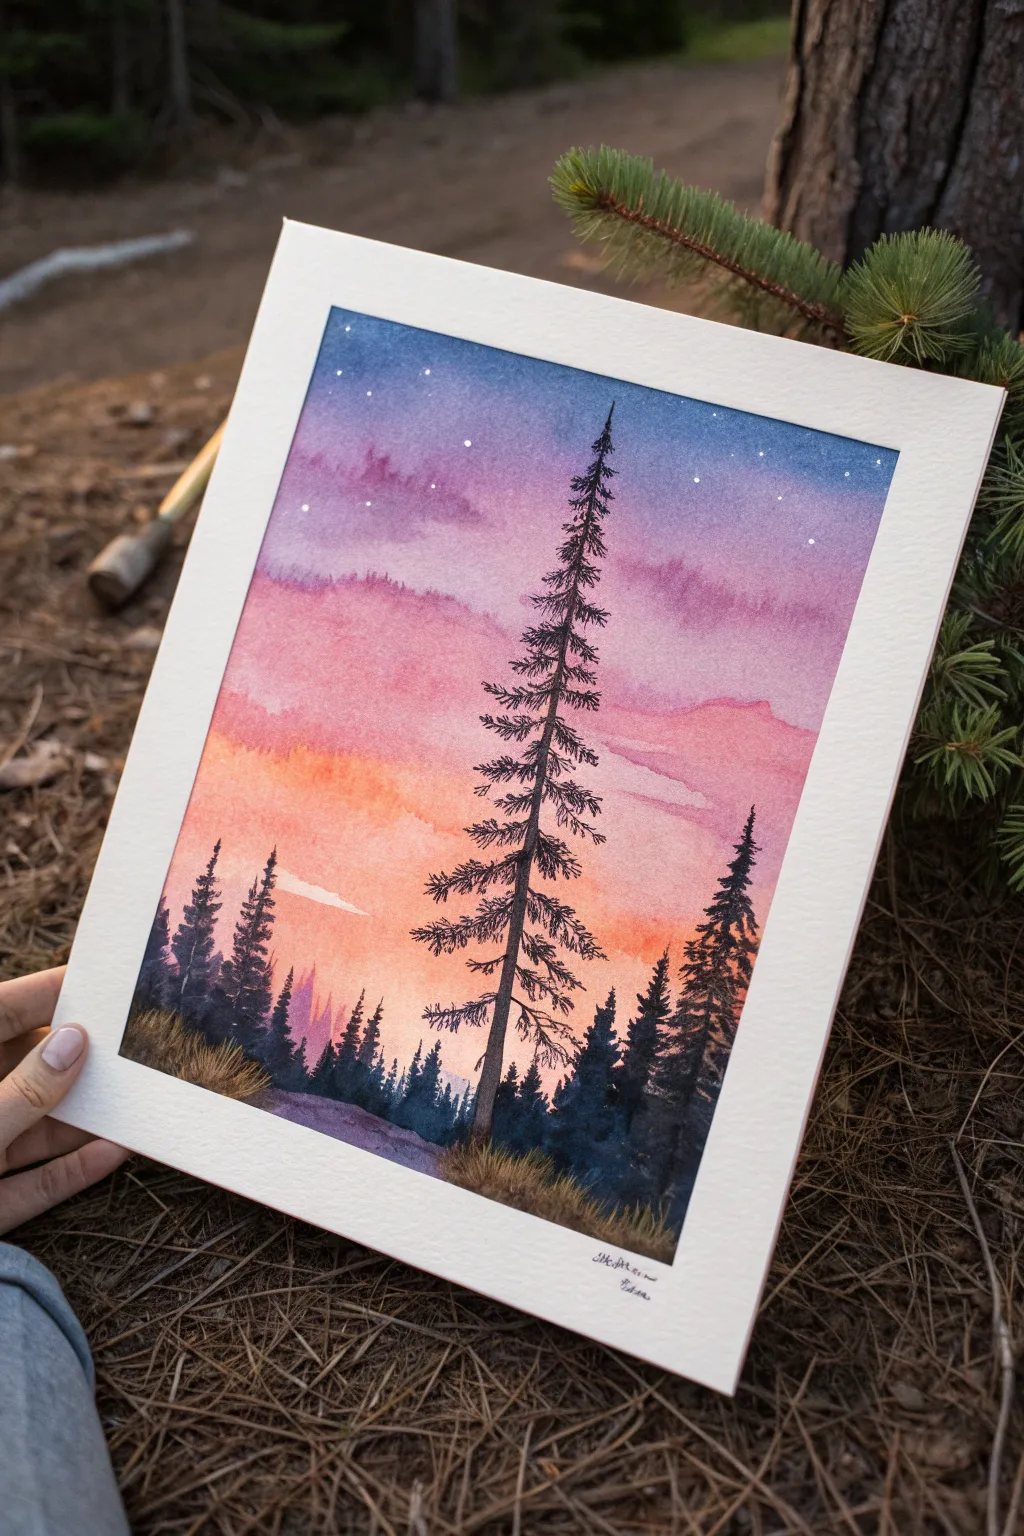
Sunset Gradient Sky Over A Simple Horizon
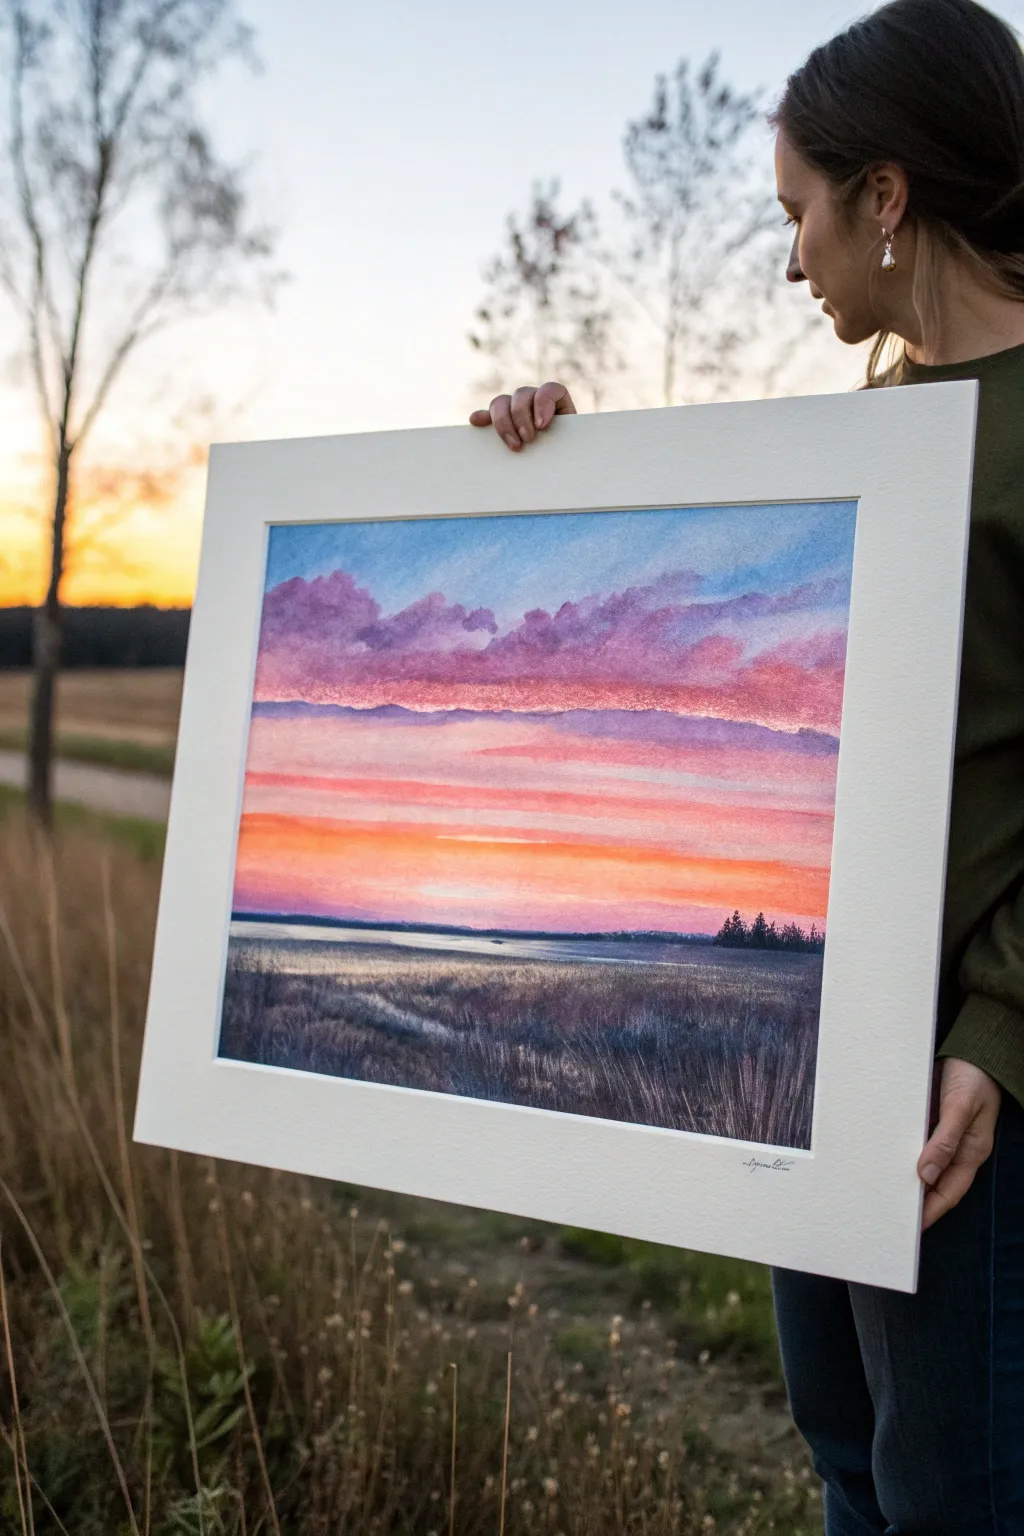
Capture the fleeting beauty of a sunset with this striking watercolor landscape, featuring soft, rolling purple clouds and a fiery horizon line. By combining wet-on-wet sky techniques with a detailed, dry-brush foreground, you’ll create a powerful contrast between the ethereal light above and the textured shadows below.
Step-by-Step Guide
Materials
- Cold press watercolor paper (140lb/300gsm)
- Watercolor paints (Ultramarine Blue, Alizarin Crimson, Cadmium Red, Cadmium Yellow, Payne’s Grey, Burnt Umber)
- Wide flat wash brush (1 inch)
- Round brushes (sizes 4, 8, and 12)
- Rigger or liner brush for fine details
- Masking tape
- Drawing board
- Two jars of water
- Paper towels
- White gouache (optional for highlights)
Step 1: Planning and Sky Foundation
-
Secure your paper:
Tape your watercolor paper firmly to a board on all four sides. This ensures a clean white border like the one in the photo and prevents buckling during heavy washes. -
Establish the horizon:
Draw a faint pencil line about one-third of the way up from the bottom of result. This seemingly low horizon line emphasizes the dramatic sky. -
Pre-wet the sky area:
Using your large flat brush, wet the entire sky area with clean water. The paper should be glisten evenly but not harbor puddles. -
Paint the upper blue sky:
Mix a watery wash of Ultramarine Blue. Apply this to the very top section of the paper, letting it unintentionally diffuse downwards but keeping the color strongest at the top edge. -
Create the heavy clouds:
While the paper is still damp, mix Alizarin Crimson with a touch of Ultramarine Blue to create a moody purple. Drop this color into the upper third of the sky to form the heavy, horizontal cloud bank seen in the reference, allowing the edges to soften naturally.
Muddy Clouds?
If your purple clouds turn grey or muddy, stop brushing! Overworking damp paint destroys freshness. Let it dry completely, then try glazing a thin layer of pure color over the top to revive it.
Step 2: The Sunset Gradient
-
Introduce the pinks:
Below the heavy purple clouds, brush in a band of diluted Alizarin Crimson or a cool pink. Gently blend the top edge of this band into the purple cloud area so there are no hard lines. -
Warm up the horizon:
Mix Cadmium Red and water, applying a horizontal stripe below the pink. Immediately follow this with a stripe of Cadmium Yellow right at the horizon line where the sun is setting. -
Smooth the transition:
Using a clean, slightly damp brush, gently run back and forth horizontally between the red and yellow bands to create that glowing orange transition. -
Dry completely:
This is crucial. Let the entire sky section dry completely before moving on. The paper must be bone dry to keep a sharp horizon line later.
Step 3: Water and Distant Land
-
Paint the water reflection:
Wet the narrow strip of water just below the horizon line. Drop in a pale wash of your sky colors—soft purple and orange—mimicking the sky but much lighter. -
Define the far shore:
Once the water is damp (not soaking), use a small round brush with a mix of Payne’s Grey and purple to paint a thin, dark line separating the water from the sky. This is your distant landmass. -
Add tiny trees:
On the right side of the horizon, use the very tip of your brush to stipple tiny vertical shapes, suggesting a cluster of pine trees silhouetted against the bright sunset.
Pro Tip: Scratching Out
For realistic bright grass stalks in the foreground, use a credit card edge or a palette knife to scrape into the dark paint while it’s still wet. This reveals the lighter paper underneath instantly.
Step 4: Textured Foreground
-
Base wash for the field:
Mix a dark, earthy shadow color using Payne’s Grey, Burnt Umber, and a touch of the purple from the sky. Apply a wash over the entire foreground field area. -
Create textural direction:
Before the base wash dries, use a dry brush to lift out some pigment in sweeping, diagonal motions towards the center, suggesting paths or flattened grass. -
Darken the shadows:
While damp, drop concentrated dark mixtures (Payne’s Grey and Umber) into specific areas of the foreground to create depth and contrast. -
Paint individual grass blades:
Switch to your rigger or fine liner brush. I find it helpful to mix a thick, creamy consistency of dark paint for this. Flick the brush upward quickly to create sharp, individual blades of tall grass in the immediate foreground. -
Final highlights:
If desired, mix a tiny bit of white gouache with pale orange and add subtle highlights to the tips of a few grass blades where the sunset light catches them. -
Reveal the border:
Once the painting is 100% dry, carefully peel away the masking tape at a 45-degree angle to reveal your crisp, clean edges.
Step back and admire how the warm glow of the horizon balances perfectly with the cool shadows of the field.


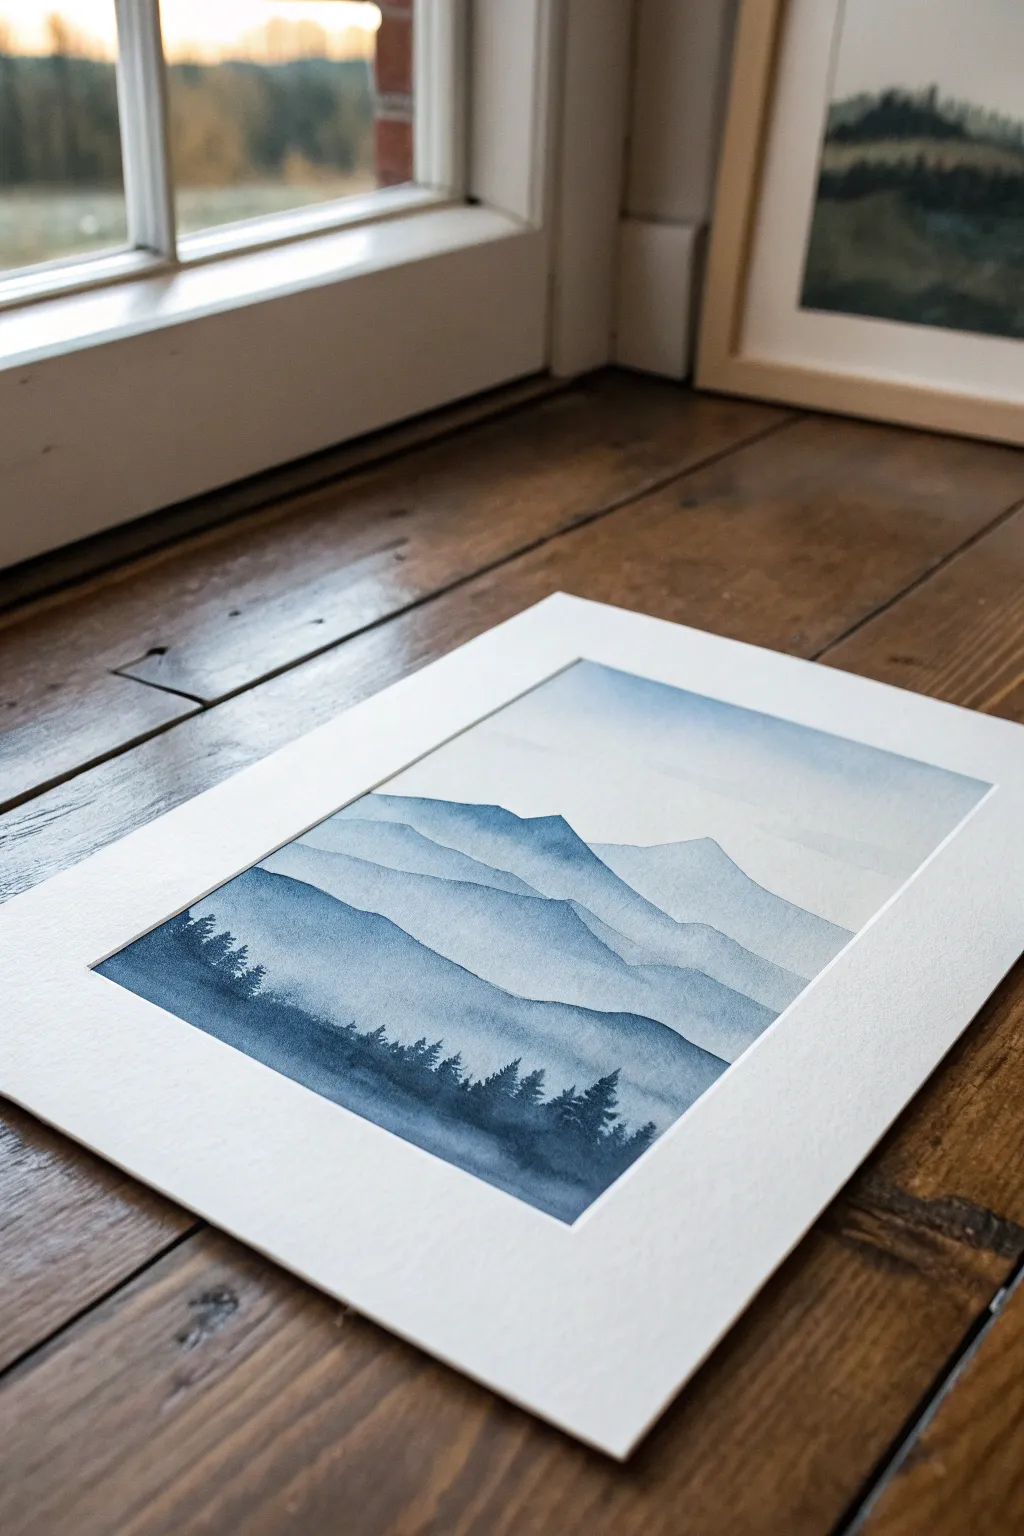
Mountain Layers Using Atmospheric Perspective
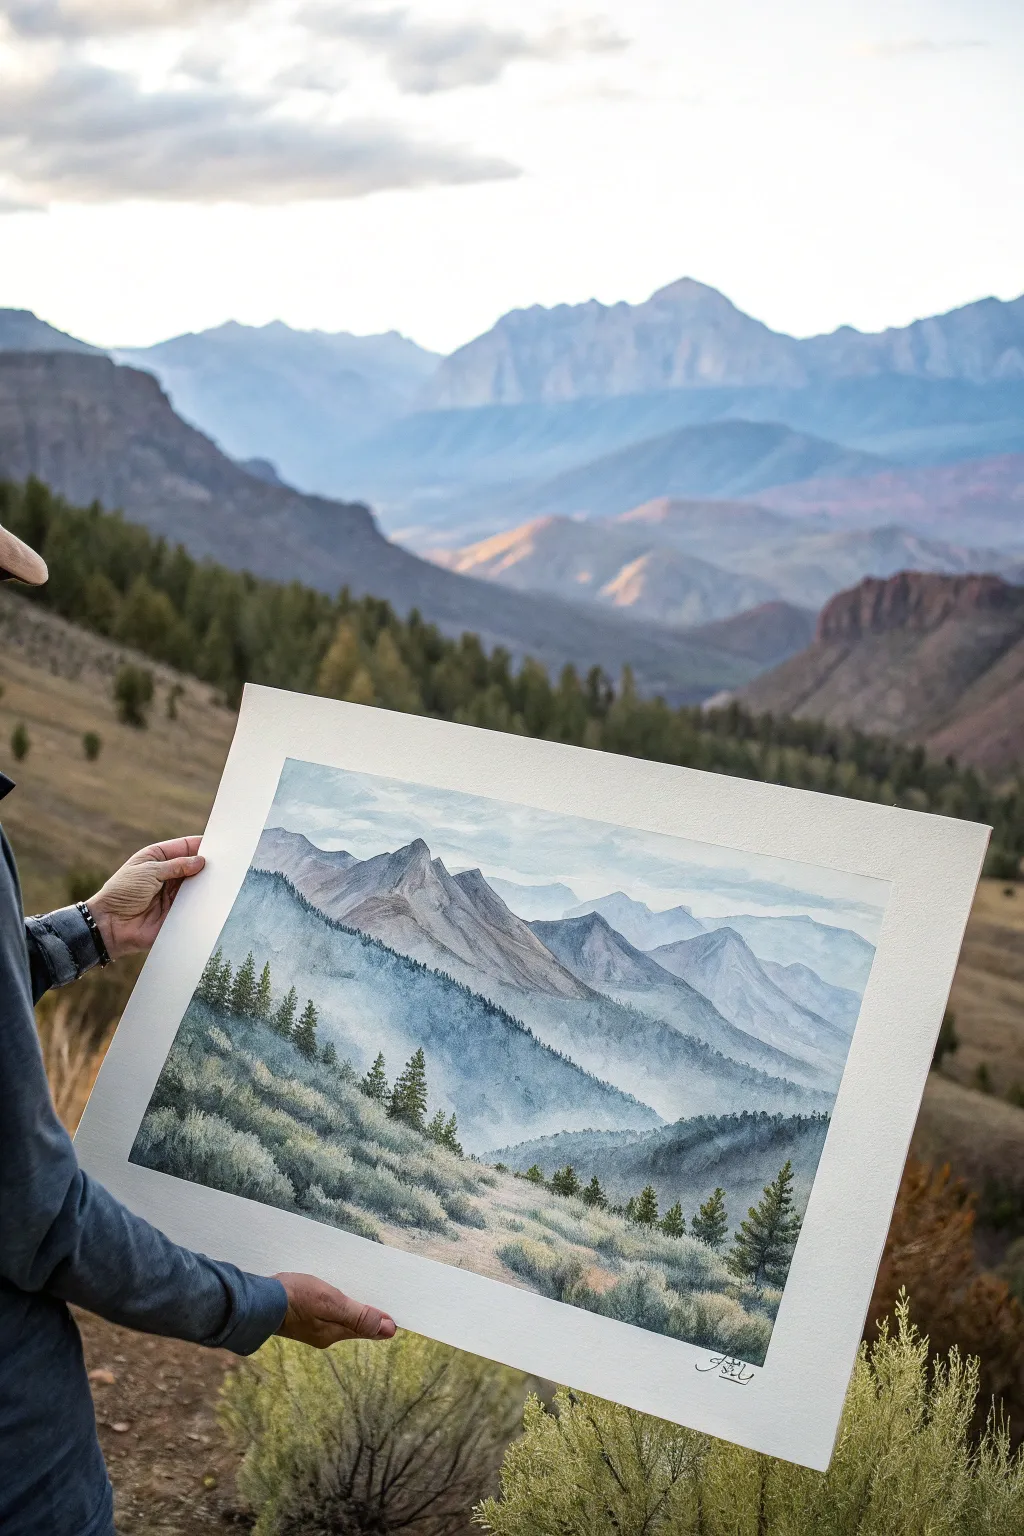

Capture the breathtaking depth of a mountain range with this watercolor landscape that masters atmospheric perspective. You’ll layer soft, misty blue peaks in the distance against crisp, detailed pine trees and sagebrush in the foreground to create a sense of vast space.
Step-by-Step Tutorial
Materials
- Cold press watercolor paper (140lb/300gsm), taped to a board
- Watercolor paints: Indigo, Burnt Sienna, Payne’s Grey, Sap Green, Ultramarine Blue, Yellow Ochre
- Large flat brush or hake brush for clear water washes
- Medium round brush (size 8 or 10)
- Small rigger or detail brush (size 2)
- Two jars of water
- Paper towels
- HB pencil and kneaded eraser
Step 1: Atmospheric Sketch & Sky
-
Light pencil framework:
Begin by lightly sketching the major shapes of your mountain ranges. Draw the furthest peaks very faintly and increase the pressure slightly for the jagged peak in the mid-ground and the sloping hill in the foreground. -
Wet the sky area:
Using your large flat brush, apply clean water to just the sky portion of the paper, stopping carefully at the edge of the furthest mountain range. -
Soft cloudy sky:
While the paper is wet, drop in a very dilute mix of Ultramarine Blue and a touch of Payne’s Grey. Let the pigment bloom softly to suggest faint clouds, keeping the horizon area almost white to enhance the misty effect.
Hard Lines in the Mist?
If your misty transitions dry with hard edges, re-wet the area with clear water and gently scrub the edge with a thirsty brush to soften it back into a fog.
Step 2: Building Distance Layers
-
Furthest ghost mountains:
Once the sky is bone dry, mix a watery, pale wash of Indigo and Ultramarine. Paint the most distant mountain silhouettes, keeping the edges soft. These should be barely visible, like a whisper on the paper. -
Second mountain tier:
After the first layer dries, mix a slightly stronger version of your blue-grey wash. Paint the next range of mountains, allowing the bottom edge to fade into nothingness with a clean, damp brush to create a rising mist effect. -
The rocky mid-ground peak:
For the prominent, sharp peak in the center, mix Burnt Sienna with Ultramarine to get a rocky grey-brown. Paint the peak shape, using the side of your brush to drag the paint (dry brush technique) to suggest craggy rock texture. -
Defining shadows:
While the rocky peak is still damp, drop in cooler purple-grey shadows on the side away from the light source to give it dramatic three-dimensional form.
Step 3: The Forested Slopes
-
Mid-ground ridge wash:
Mix a cool, dark green using Sap Green and Indigo. Paint the large sloping ridge directly below the rocky peak. Use vertical strokes along the top edge to suggest distant pine trees. -
Creating mist separation:
As you move down this ridge, rinse your brush and soften the bottom edge with clean water again. This transition from dark ridge to white mist separates it clearly from the foreground. -
Adding ridge texture:
Once the ridge shape is dry, take a smaller brush with a darker green-black mix and stipple tiny tree shapes along the crest to refine the silhouette.
Pro Tip: Atmospheric Depth
Remember the golden rule: objects become cooler (bluer) and lighter in value the further away they are. Keep warm browns and darks strictly in the foreground.
Step 4: Foreground Detail
-
Base wash for foreground:
Mix Yellow Ochre with a touch of Burnt Sienna and Olive Green. Apply a loose, textural wash for the nearest grassy slope, leaving plenty of white paper showing for highlights. -
Scrub brush texture:
While the foreground is damp but not soaking, drop in thicker dabs of sage green and grey-green to create the soft, bushy shapes of sagebrush and low vegetation. -
Painting the pine trees:
Switch to your rigger or small detail brush. Mix a rich, dark evergreen color (Sap Green + Payne’s Grey). Paint the distinct pine trees on the right and left sides, starting with a thin trunk line and dabbing outwards for branches. -
Refining the scrub:
Use a dry brush technique with a mix of opaque-ish green (add a tiny bit of white gouache if needed, or just heavy pigment) to add definition to the tops of the sagebrush. -
Final shadows:
Add cast shadows under the pine trees and larger bushes using a cool purple-grey glaze to ground them to the slope. -
Splatter texture:
I like to finish by covering the sky area with scrap paper and gently tapping a brush loaded with clean water or faint brown paint over the foreground to create natural grittiness.
Now step back and admire how simple washes of color have transformed into a grand, sweeping vista


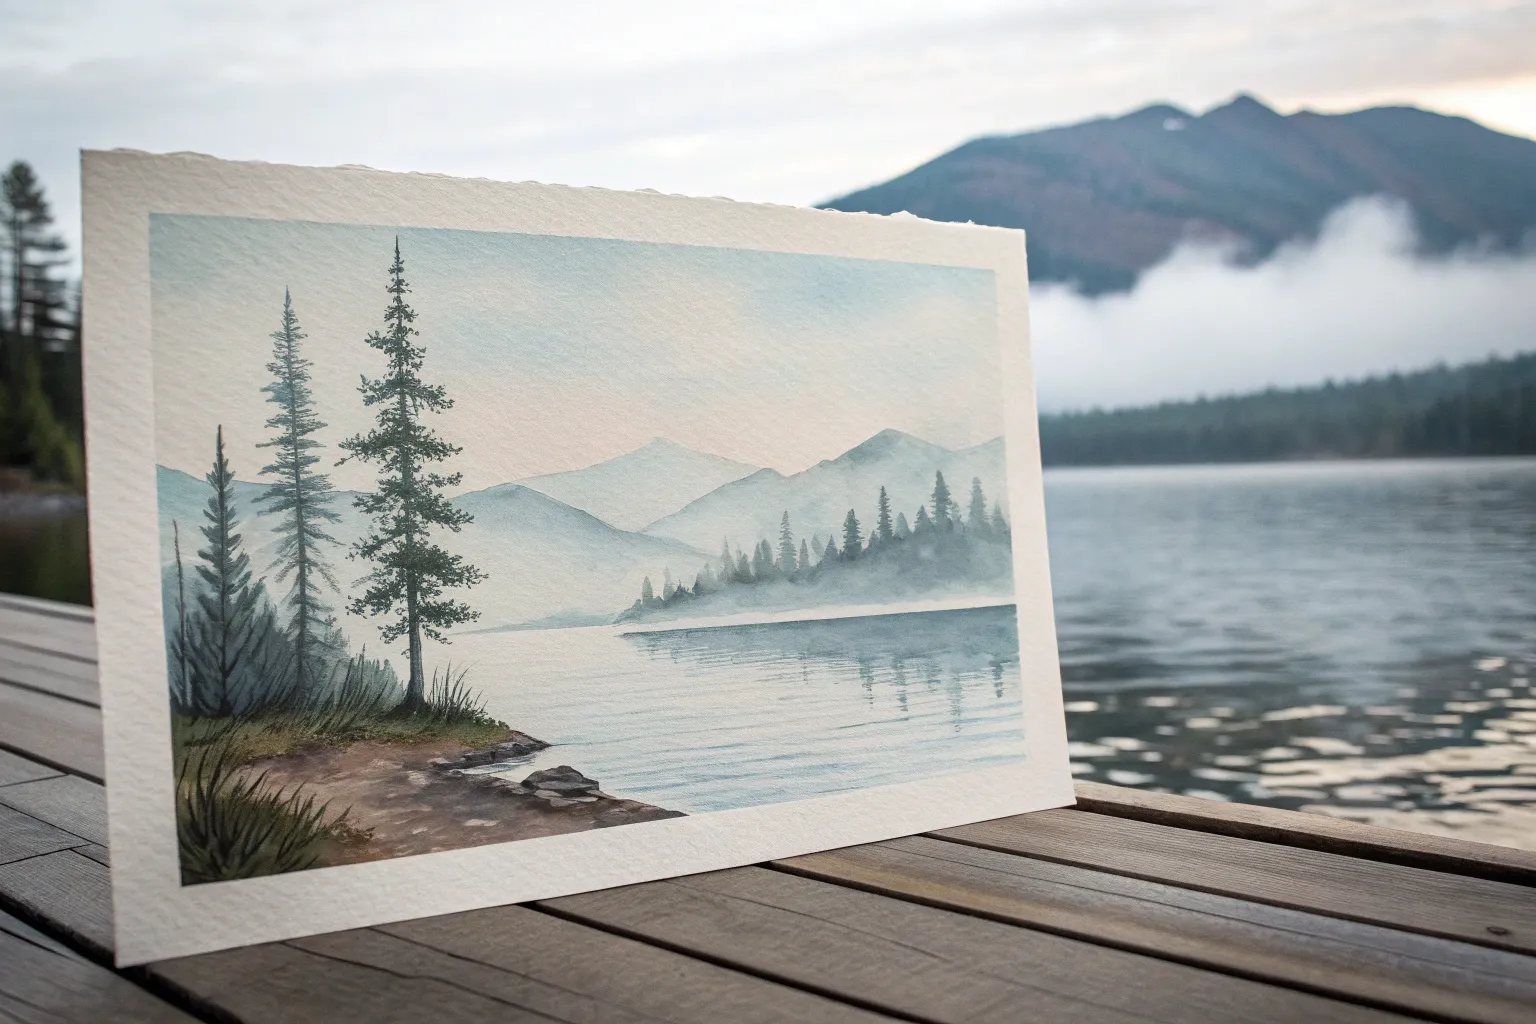
Calm Lake Reflection With Mirror Symmetry
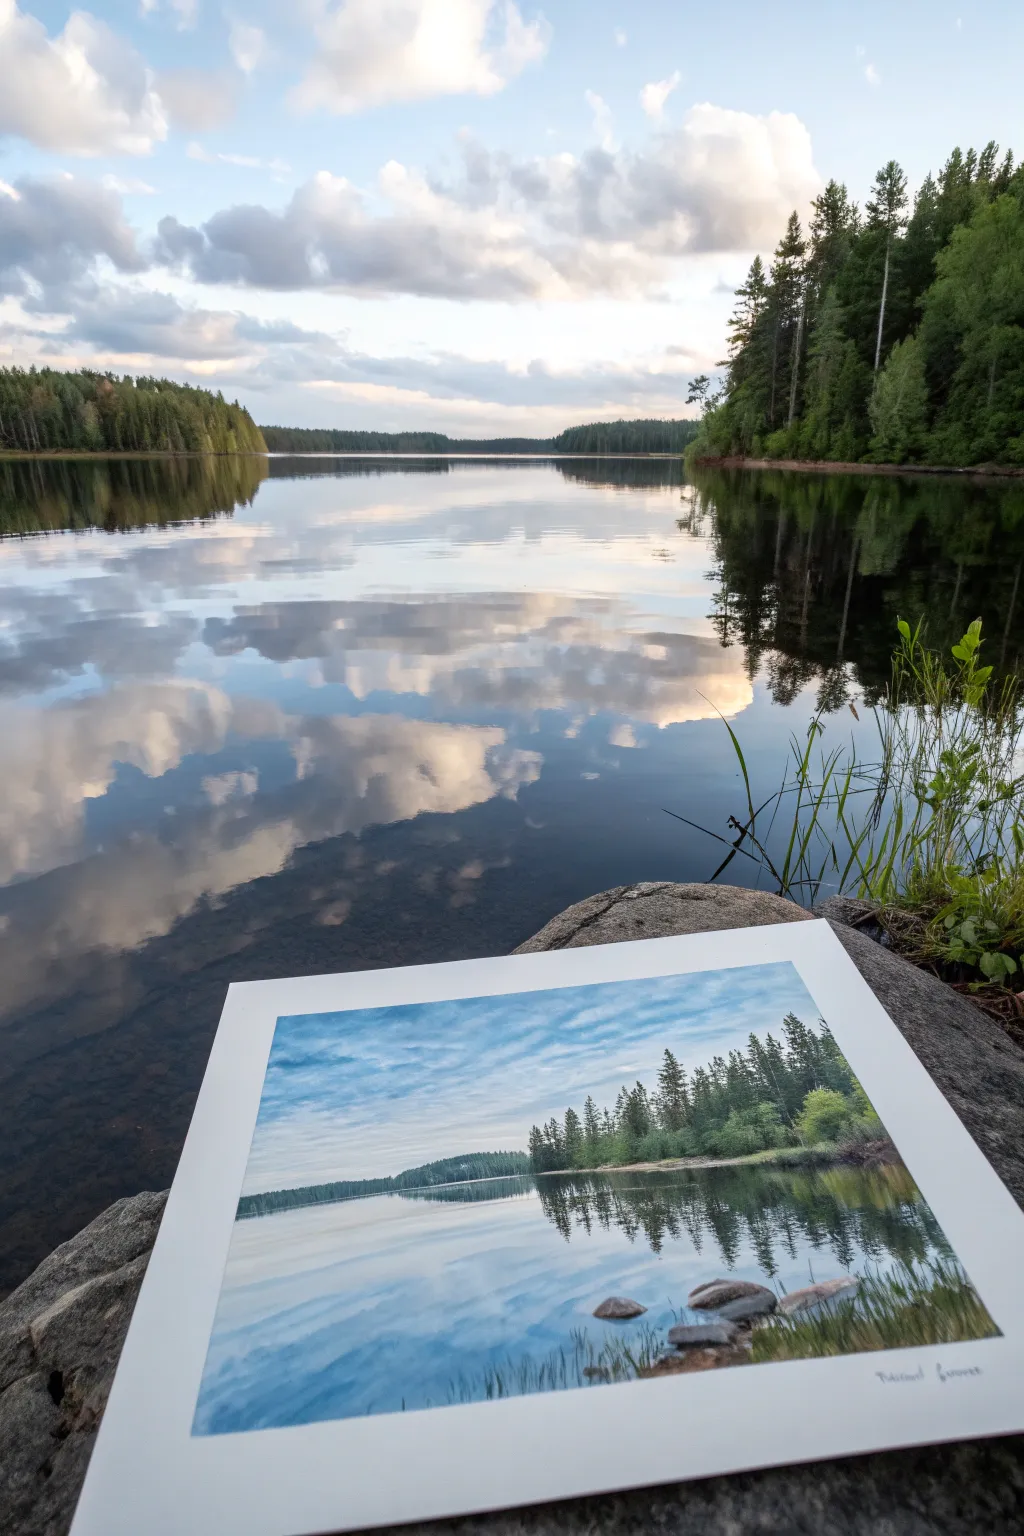
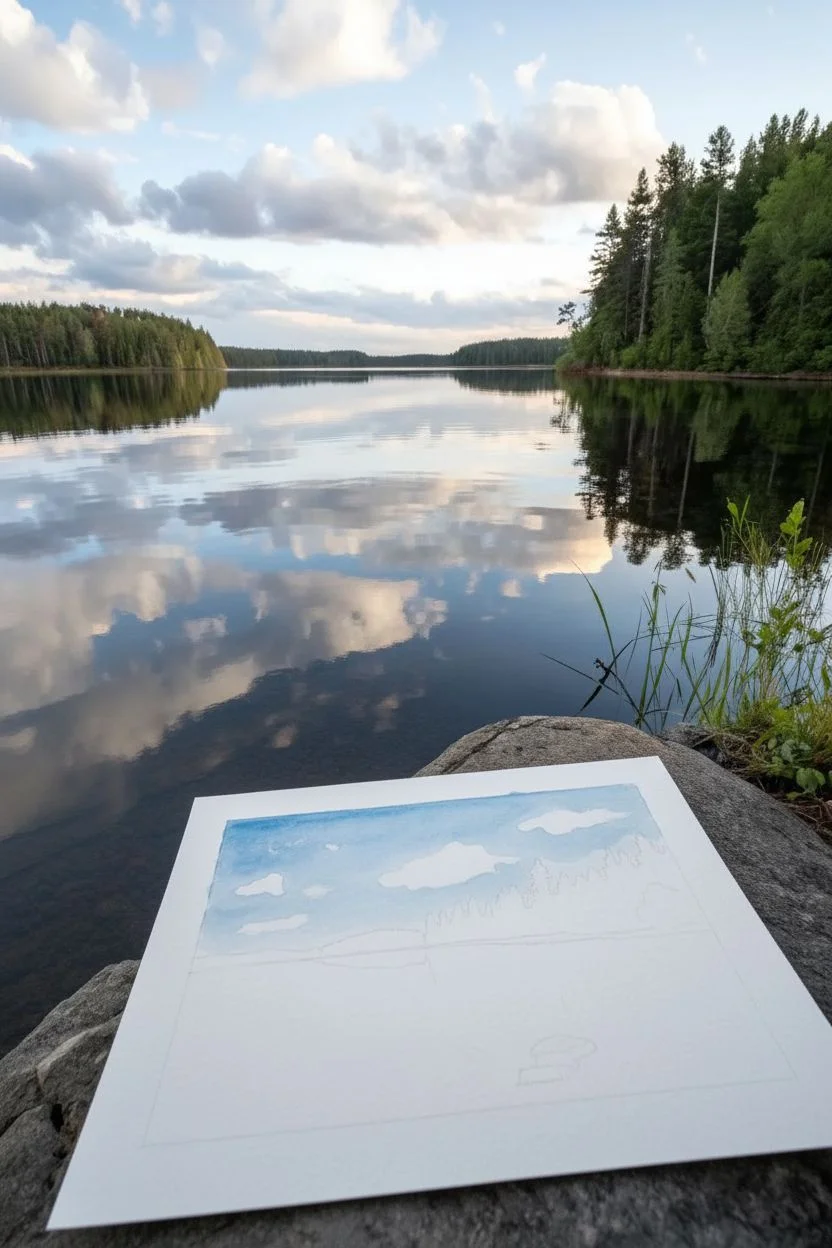
Capture the breathtaking stillness of a northern lake with this watercolor study emphasizing mirror-like symmetry and calm waters. You will learn to use soft washes for the sky and precise brushwork for the coniferous tree line, creating a peaceful scene where nature doubles its beauty.
Detailed Instructions
Materials
- Cold press watercolor paper (block or taped sheet)
- Watercolor paints: Ultramarine Blue, Prussian Blue, Sap Green, Burnt Umber, Payne’s Gray, Alizarin Crimson
- Round brushes: Size 8 (for washes), Size 4 (for trees), Rigger or liner brush
- Flat brush: 1/2 inch or 3/4 inch
- Masking fluid (optional)
- Clean water container
- Paper towels
- Pencil (HB) and kneaded eraser
Step 1: Planning and Sky Wash
-
Light Sketching:
Begin by lightly sketching the horizon line just below the middle of the paper. Gently outline the shape of the right-hand tree line and the distant left bank, keeping your pencil marks faint so they don’t show through the sky later. -
Wet-on-Wet Sky:
Using your large flat brush, wet the entire sky area with clean water down to the horizon line. Avoid puddles; the paper should just glisten. -
Sky Gradient:
While the paper is wet, drop in a mix of Ultramarine Blue and a touch of Payne’s Gray near the top. As you move downward, dilute the paint with more water to create a fade. Leave irregular white shape gaps to suggest clouds. -
Softening Clouds:
Rinse your brush and gently soften the bottom edges of your blue cloud shapes so they look fluffy rather than harsh. Let this sky layer dry completely.
Step 2: The Distant Landscape
-
Distant Bank:
Mix a pale, cool green using Sap Green neutralised with a tiny bit of Alizarin Crimson. Paint the distant left bank with a flat wash. Because it’s far away, keep detail minimal. -
Right Bank Base Layer:
For the prominent right-hand bank, mix a stronger Sap Green with Burnt Umber. Paint the ground shape where the trees will stand, establishing the shoreline. -
Vertical Tree Trunks:
Switch to your size 4 round brush. Paint thin vertical lines for the tree trunks using a dark mix of Burnt Umber and Prussian Blue. Vary the heights to create a natural, unkempt rhythm. -
Building Foliage:
Using the tip of the round brush, stipple dark green foliage onto the tree trunks. Start narrow at the top and widen the branches as you go down, leaving small gaps of sky showing through the branches for realism.
Muddy Reflections?
If your water reflection looks muddy, you likely overworked it while it was drying. Lay down the colors with confidence and let them fuse on their own without restroking.
Step 3: Reflections and Foreground
-
Mirroring the Sky:
Wet the water area below the horizon significantly. Inverting the sky colors you used earlier, paint the water’s reflection. Remember, reflections are often slightly darker than the object being reflected. -
Tree Reflections:
While the water wash is still damp (but not soaking), drop in vertical strokes of your dark green tree mix directly below the real trees. Let the wet paper soften these edges naturally to create that ‘shimmering’ look. -
Adding Ripples:
Once the reflection layer is mostly dry, take a clean, slightly damp flat brush and gently lift out horizontal lines across the reflections to suggest surface tension and calm ripples. -
Foreground Rocks:
Mix a gray-brown using Burnt Umber and Ultramarine. Paint the few stones submerged in the near foreground. Let the paint be denser at the bottom of the rocks for shadow. -
Foreground Grasses:
Using a rigger or liner brush with thick Sap Green paint, flick quick, upward strokes in the bottom right corner. These grasses anchor the viewer in the scene. -
Final Touches:
Use a white gouache or heavy white watercolor to add tiny highlights on the foreground rocks and water ripples if the paper white was lost. Sign your work delicately in the corner.
Level Up: Texture
Sprinkle a pinch of salt onto the damp paint of the foreground rocks. As it dries, the salt absorbs pigment, creating a fantastic, grainy mineral texture.
Now you have a tranquil lakeside view that brings a moment of calm to any room


Seaside Waves And Seafoam Texture Washes
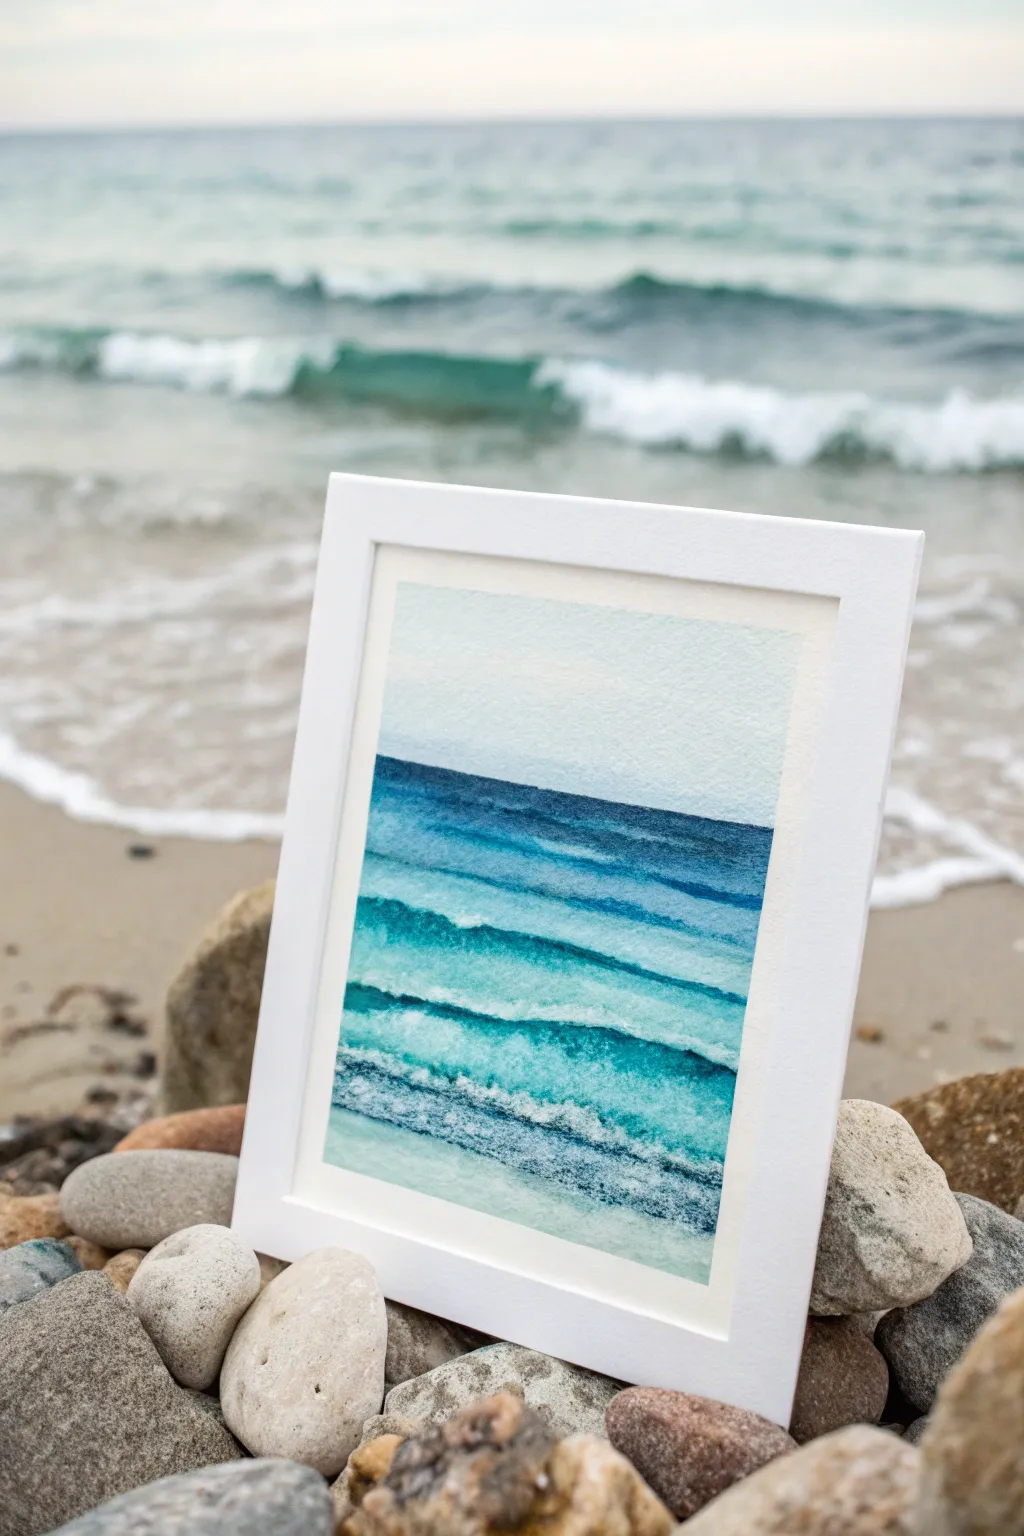
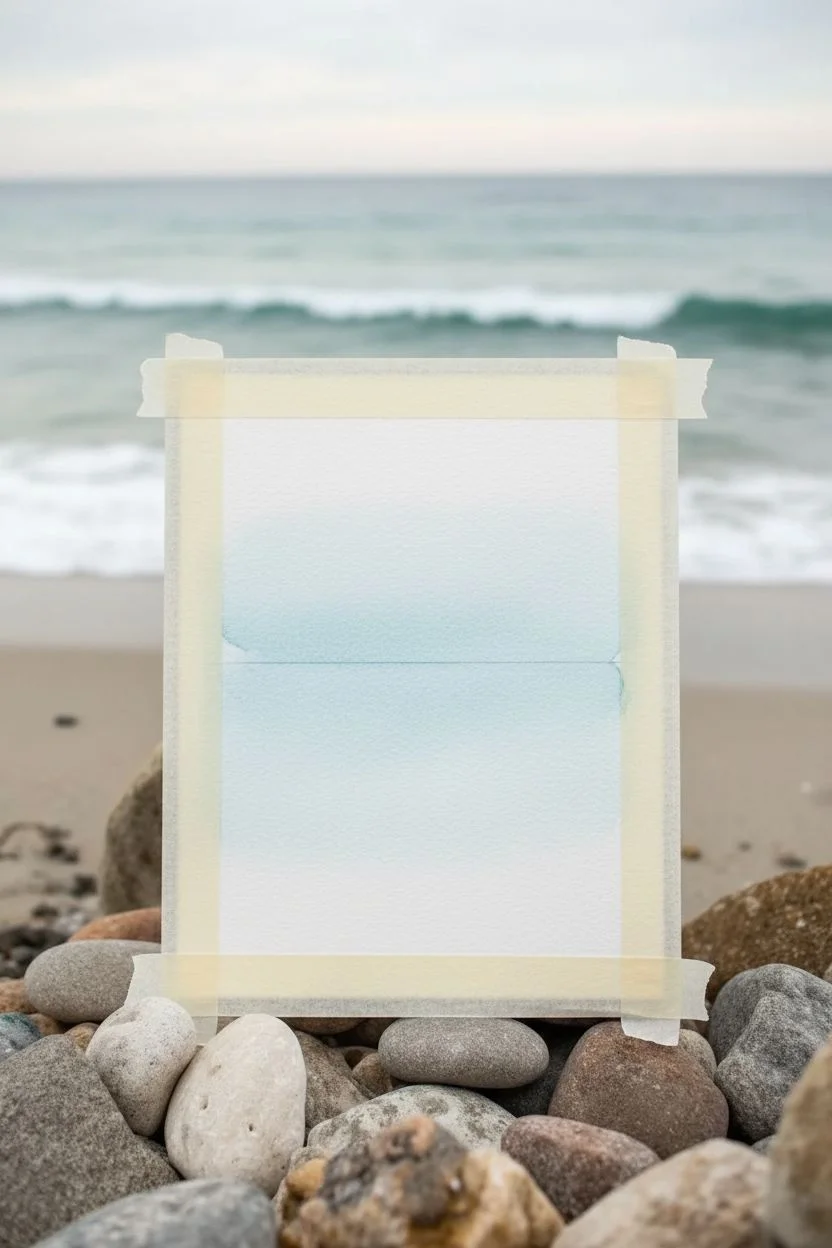
Capture the rhythmic beauty of breaking waves with this soothing watercolor study that focuses on gradients and negative space. By layering transparent washes of teal, indigo, and cerulean, you’ll build depth and movement while leaving the stark white of the paper to represent crashing foam.
Step-by-Step Guide
Materials
- Cold press watercolor paper (140 lb/300 gsm or heavier)
- Masking tape or painter’s tape
- Drawing board or hard surface
- Watercolor paints: Indigo, Prussian Blue, Phthalo Turquoise, Cerulean Blue, Viridian Green
- Flat brush (3/4 inch or 1 inch)
- Round brush (size 6 or 8)
- Small round brush (size 2 or 4) for details
- Two jars of water (one for clean, one for rinsing)
- Paper towels or cotton rag
- Sea salt (optional for texture)
Step 1: Preparation and Sky Layer
-
Secure the paper:
Tape your watercolor paper down firmly to your board on all four sides. This creates a clean white border and prevents buckling when we apply heavy washes. -
Establish the horizon line:
Using a ruler and a very light pencil stroke, draw your horizon line about one-third of the way down from the top. Keep it perfectly straight. -
Paint the sky:
Mix a very dilute wash of Cerulean Blue. Wet the sky area with clean water first, then drop in the pigment, fading it out to almost clear water as you reach the horizon line for an atmospheric effect. Let this dry completely.
Pro Tip: Masking Fluid
Can’t save the whites? Use masking fluid applied with an old brush or toothpick to preserve the foam lines before painting. Rub it off only after the paper is totally dry.
Step 2: Building the Deep Ocean
-
Mix the darkest blue:
Prepare a strong, saturated mix of Indigo and Prussian Blue. This needs to be your darkest value to create depth at the horizon. -
Paint the horizon band:
Using your flat brush or larger round brush, paint a distinct, straight strip of the dark blue mix directly under your pencil line. This is the deep sea. -
Start the gradient:
While the bottom edge of that dark strip is still wet, rinse your brush slightly and pull the color downward, adding a touch of Phthalo Turquoise. -
First wave crest:
Stop the paint abruptly to leave a thin, jagged horizontal strip of white paper. This unpainted negative space represents the top edge of the furthest wave.
Level Up: White Gouache
If you lost too much white paper, load a toothbrush with white gouache and flick it over the dried painting to create realistic sea spray and mist.
Step 3: Layering the Waves
-
Mix the mid-tones:
For the middle waves, switch to a mix of Phthalo Turquoise and a hint of Viridian. You want a bright, jewel-toned teal. -
Paint the second band:
Start a new band of color below the white strip you just left. Make the top edge of this new band crisp and hard against the white space. -
Soften the bottom edge:
As you paint downwards within this band, use a clean, damp brush to soften the bottom edge, letting it fade slightly before stopping to create the next white foam line. -
Vary the wave shape:
As you move closer to the foreground (bottom of paper), make your wave lines slightly irregular and curvy rather than perfectly straight. This mimics the natural movement of water. -
Intensify shadows:
I like to add a thin line of darker blue (Indigo mix) right underneath the white crest of each wave. This emphasizes the shadow cast by the foam.
Step 4: Foreground and Foam Details
-
Lightest foreground water:
For the closest waves at the bottom, use your most water-diluted Turquoise or Cerulean. These areas should be much lighter than the horizon. -
Create texture with dry brush:
Load your brush with pigment and blot it on a paper towel until it’s semi-dry. Drag it horizontally across the white foam areas to create a broken, sparkly texture that looks like sea spray. -
Salt texture (optional):
While a wash on a lower wave is still damp (not soaking wet), sprinkle a tiny pinch of sea salt. This pushes the pigment away and creates star-burst patterns that resemble bubbles. -
Refine the edges:
Use your smallest round brush to tidy up the white caps. You can paint tiny dots or dashes of blue breaking into the white areas to show how the water churns. -
Final shadow accents:
Look at the painting as a whole. If the waves look flat, glaze a very transparent layer of Indigo at the base of the nearest waves to ground them. -
Remove tape:
Wait until the paper is bone dry—touch it with the back of your hand to check for coldness. Peel the tape away slowly at a 45-degree angle to reveal your crisp white border.
Frame your finished seascape in a simple white frame to let those turquoise hues truly shine
BRUSH GUIDE
The Right Brush for Every Stroke
From clean lines to bold texture — master brush choice, stroke control, and essential techniques.
Explore the Full Guide
Golden Hour Field With A Winding Path
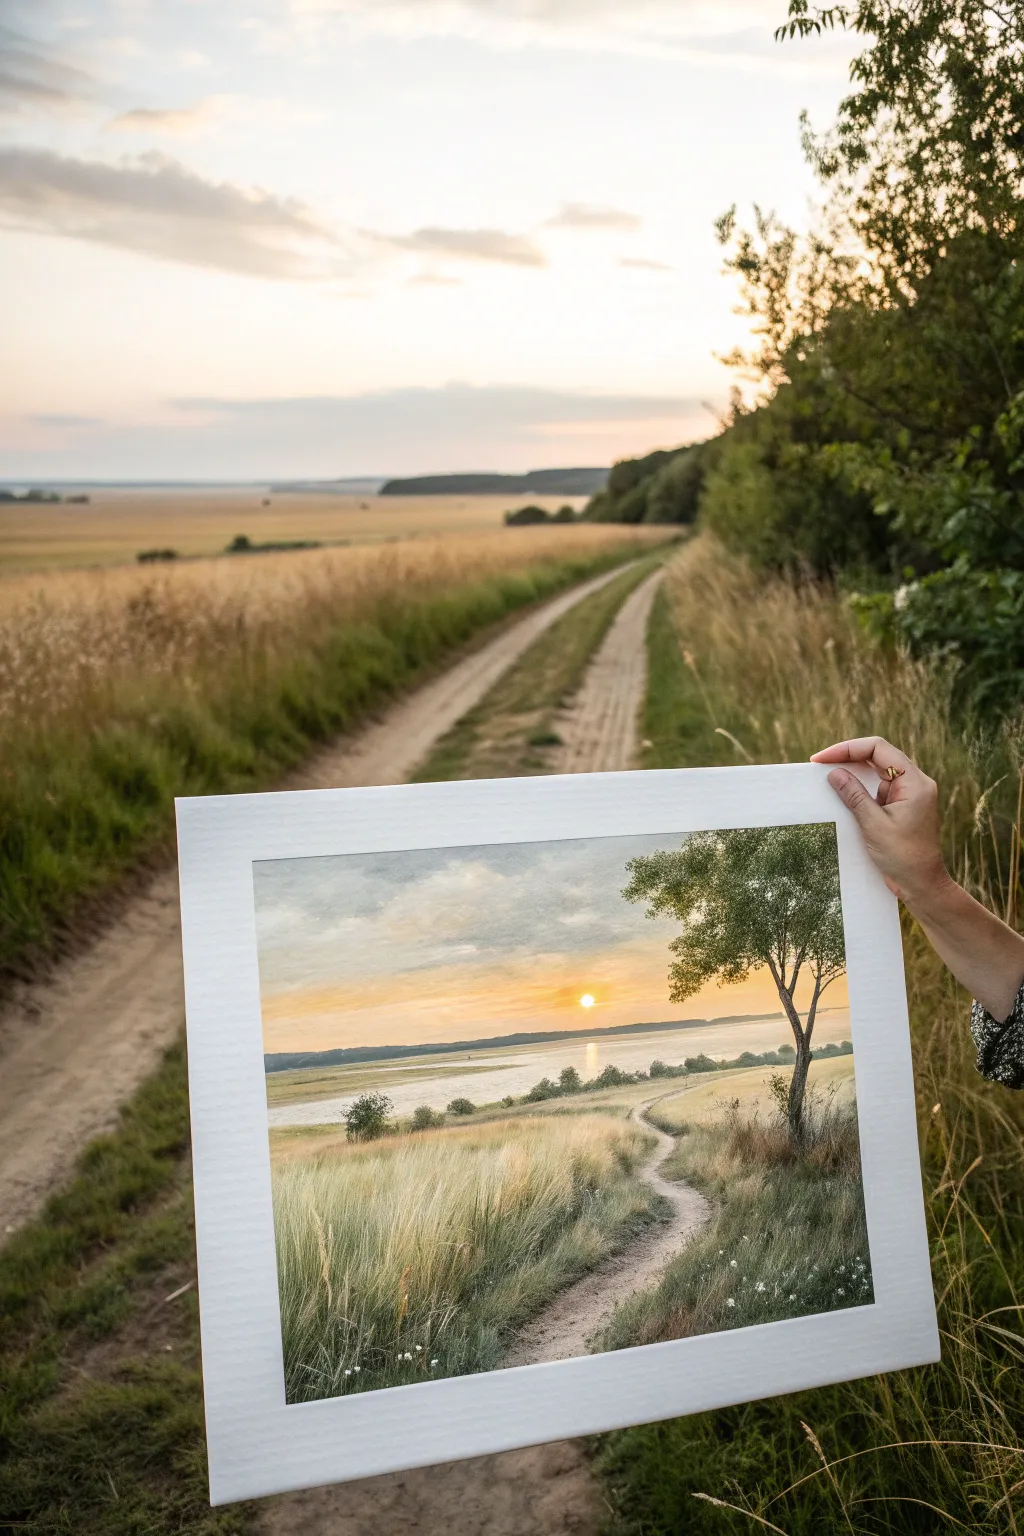
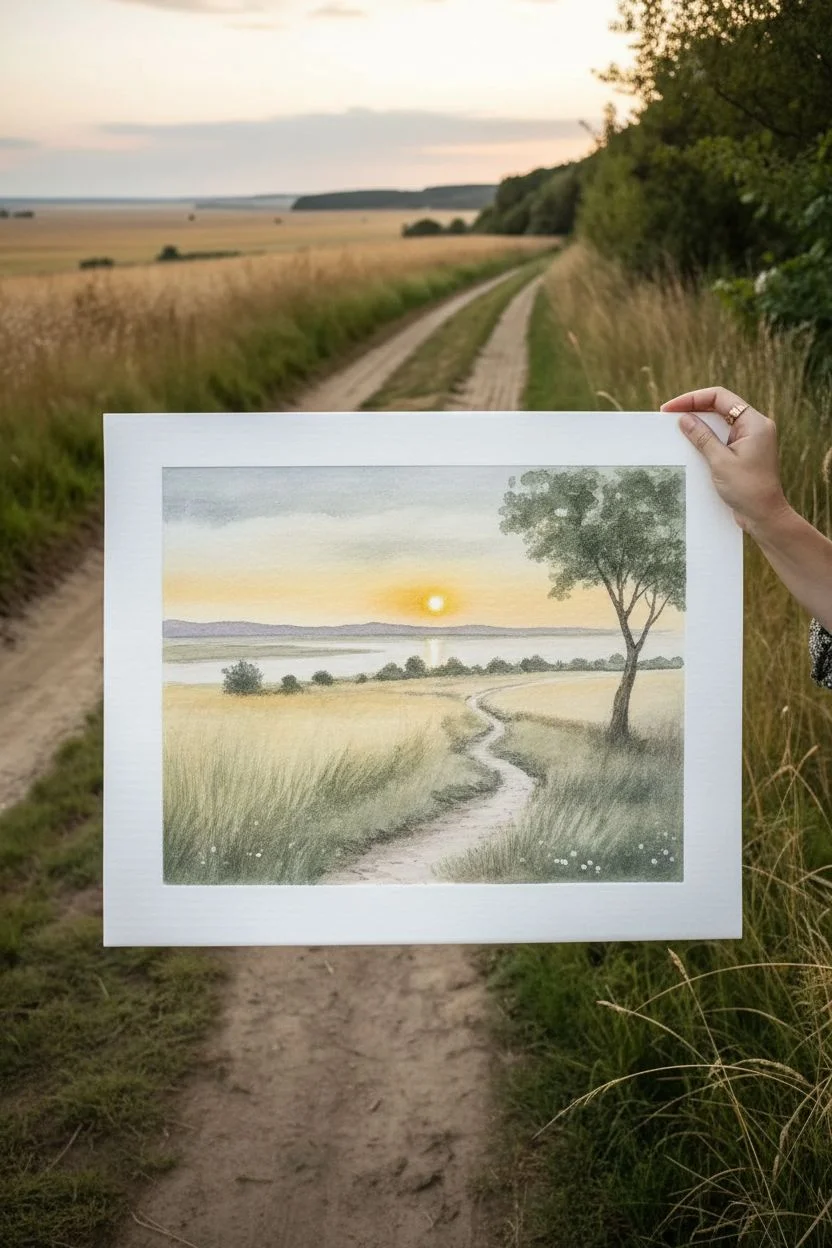
Capture the serene warmth of the golden hour with this watercolor landscape featuring a winding dirt path leading toward a tranquil sunset. This project focuses on soft blending for the sky and creating textural depth in the foreground grasses.
Detailed Instructions
Materials
- Cold-pressed watercolor paper (140lb/300gsm)
- Painter’s tape or masking fluid
- Watercolor paints: Burnt Sienna, Yellow Ochre, Cadmium Yellow, Ultramarine Blue, Sap Green, Burnt Umber
- Flat wash brush (large)
- Round brushes (sizes 4, 8, and 12)
- Rigger or liner brush for fine details
- Paper towels
- Two jars of water
- Mixing palette
Step 1: Planning and Sky Wash
-
Sketch the Composition:
Begin by lightly sketching the horizon line just below the halfway point of your paper. Draw the winding path starting wide at the bottom right and narrowing as it snakes toward the center horizon. Mark the position for the prominent tree on the right. -
Mask Highlights (Optional):
If you want to preserve pristine white for the sun or water reflections, apply a tiny dot of masking fluid. Let it dry completely before painting. -
Wet-on-Wet Sky Base:
Wet the entire sky area with clean water using your large flat brush. The paper should glisten but not have standing puddles. -
Painting the Sun Glow:
Drop in Cadmium Yellow around the sun area while the paper is still wet, letting it bloom softly outward. Surround this with a mix of Yellow Ochre and a touch of Burnt Sienna to create warmth. -
Adding the Sky Colors:
For the upper sky, mix a soft grey-blue using Ultramarine Blue and a touch of Burnt Sienna. Apply this to the top corners, blending it downwards into the warmer yellow tones without creating green streaks. -
Distant Horizon:
While the paper is still slightly damp, paint the distant hills across the horizon using a pale, cool purple-grey mix. The dampness will keep the edges soft, pushing the hills into the distance.
Muddy Sky Fix
If your blue sky turns green when hitting the yellow sun area, let the yellow dry first. Then, apply the blue carefully around it, or use a neutral grey transition tone.
Step 2: Middle Ground and Water
-
Water Reflection:
Once the sky is dry, paint the water area. Use horizontal strokes, reflecting the sky colors—warm yellow in the center and cool blue-greys towards the edges. Leave slight gaps of white paper to suggest ripples. -
Defining the Path:
Mix Burnt Sienna with a little Yellow Ochre and a lot of water. Paint the dirt path, ensuring your strokes follow the curve of the road. Add touches of slightly darker brown on the shadowed edges of the path. -
Field Base Layer:
Apply a light wash of Yellow Ochre and Sap Green for the grassy fields. Keep this layer very pale and loose, as you will add texture on top later.
Scratch for Texture
While the foreground paint is still wet, use the back of your brush handle or a credit card edge to scrape out light-colored grass blades for instant texture.
Step 3: Foreground Textures and Details
-
Building Grass Texture:
Switch to your medium round brush. Use a ‘dry brush’ technique with thicker Sap Green and Burnt Umber paint to create the texture of tall grasses alongside the path. Flick the brush upward to mimic grass blades. -
Adding Depth to Shadows:
Mix a darker green using Sap Green and Ultramarine. Paint the shadows at the base of the grass clumps and the darker foliage on the distant strip of land. -
Painting the Tree Trunk:
Using a smaller round brush and a mix of Burnt Umber and Ultramarine Blue, paint the trunk and main branches of the tree on the right. Keep the lines organic and slightly broken. -
Tree Foliage:
Stipple the leaves on the tree using the side of your brush with a mix of Sap Green and the dark brown mixture. Leave plenty of ‘sky holes’ so the tree doesn’t look like a solid blob. -
Foreground Details:
I prefer using a rigger brush here for the very closest grass blades in the bottom foreground. Use quick, confident upward strokes to create individual stalks. -
Final Highlights:
If you used masking fluid, remove it gently now. Soften any harsh edges with a damp brush if necessary. -
Review and Refine:
Step back and check your contrast. If the path looks too flat, add a slightly darker glaze of brown to the shadowed side to enhance the winding effect. Add tiny dots of white gouache for wildflowers if desired.
Frame your finished piece with a wide white mat to really make those sunset colors glow
River Bend With Leading Lines Into The Distance
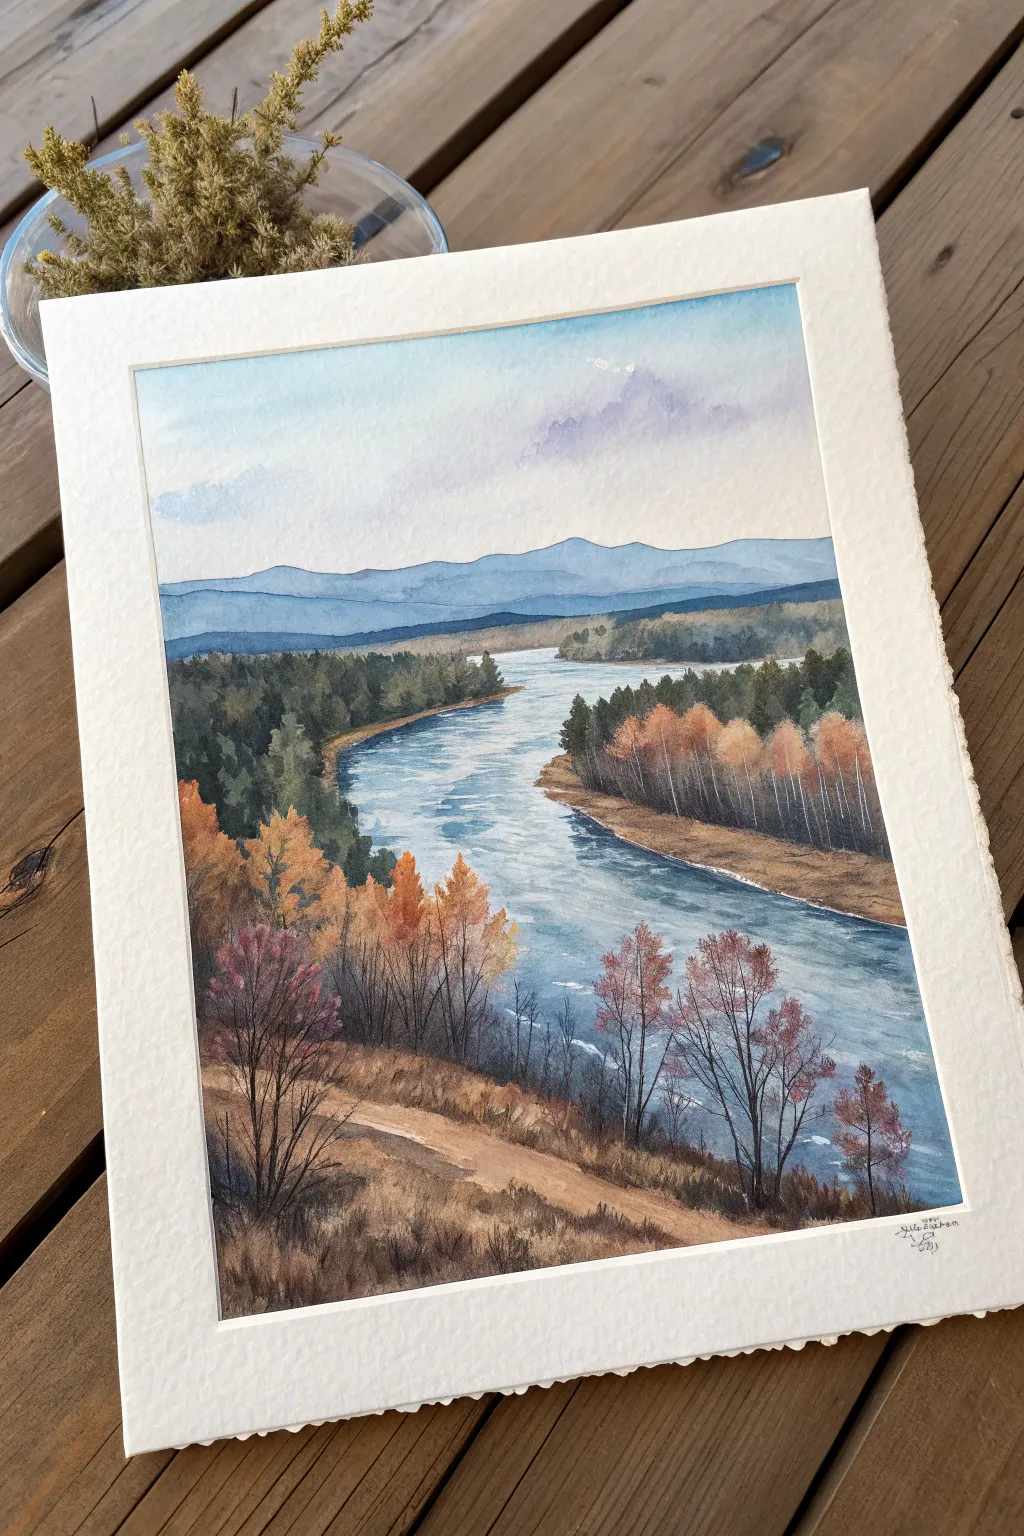
Capture the serene beauty of a winding river cutting through an autumn forest in this detailed watercolor project. You’ll layer distant mountains, vibrant fall foliage, and rushing water to create a sense of vast depth and seasonal change.
How-To Guide
Materials
- Cold press watercolor paper (minimum 140lb)
- Watercolor paints (Indigo, Burnt Sienna, Yellow Ochre, Sap Green, Payne’s Gray, Ultramarine Blue, Alizarin Crimson)
- Set of watercolor brushes (large broad brush, medium round size 8 or 10, small rigger or detail brush)
- Masking fluid (optional, for water highlights)
- Pencil (HB) and kneaded eraser
- Two jars of water
- Paper towels
- Masking tape and painting board
Step 1: Sketch and Sky
-
Tape and structure:
Begin by taping your paper securely to a board to prevent buckling. Lightly sketch the horizon line about 2/3rds up the page. Draw the winding S-shape of the river, ensuring it gets wider as it approaches the foreground to create perspective. Mark the simple outlines of the mountains and the foreground path. -
Wet-on-wet sky:
Wet the entire sky area with clean water using your large brush. While the paper is glistening, drop in a very diluted wash of Ultramarine Blue mixed with a touch of Alizarin Crimson for a soft purple-blue hue. Leave irregular white spaces for the clouds. -
Cloud shadows:
While the sky is still damp, mix a slightly stronger purple-grey. Paint the undersides of the cloud shapes to give them volume, softening the edges with a clean, damp brush so they blend somewhat into the blue.
Step 2: Distant Elements
-
First mountain layer:
Once the sky is bone dry, mix a sheer wash of Ultramarine Blue and Payne’s Gray. Paint the furthest range of mountains. The color should be flat and light to push it into the distance. -
Closer mountain range:
Let the first range dry completely. Mix a slightly darker, more saturated blue-grey and paint the lower, closer mountain range that sits just behind the treeline. This layering builds atmospheric perspective. -
Distant treeline:
Using a medium round brush and a mix of Sap Green and Indigo, paint the dense forest line on the far bank of the river. Keep the tops uneven to mimic tree shapes, but don’t worry about individual details yet.
Muddy Waters?
If your river reflections look muddy, wait for the base blue layer to dry completely before glazing the darker reflection color on top. Wet-on-wet can sometimes mix too much.
Step 3: The Water
-
River base layer:
For the water, use a clean wet-on-dry technique. Paint the river surface with horizontal strokes using horizontal sweeps of diluted bright blue. Leave small slivers of white paper exposed, particularly in the center of the bend, to represent sparkling light on the current. -
Reflections and depth:
While the blue wash is still wet, drop in darker blue-green (match your distant tree color) along the edges of the riverbanks. Let this color bleed slightly toward the center to create reflections of the trees. -
Riverbank edge:
Once the water is dry, use a mix of Yellow Ochre and Burnt Sienna to paint the narrow strip of sandy bank on the right side of the curve.
Add Texture
Splatter clean water or a tiny bit of salt onto the foreground hill while the paint is still wet. This creates a rough, earthy texture perfect for dried grass and dirt.
Step 4: Foreground Foliage
-
Evergreen structure:
On the left bank, mix a deep, dark green using Sap Green and Payne’s Gray. Paint the mass of pine trees, focusing on the jagged silhouettes. Keep the color dense to anchor the mid-ground. -
Right bank autumn colors:
On the right bank, switch to warm tones. Use inconsistent dabs of Burnt Sienna combined with Yellow Ochre to create the canopy of the deciduous trees. Vary the saturation to show light hitting different trees. -
Trunks and branches:
Using your smallest rigger or detail brush and a dark brown mix, paint fine vertical lines through the autumn foliage to suggest white birch or aspen trunks. These white trunks can be lifted out with a damp brush or painted around if you have steady hands.
Step 5: Closest Foreground
-
Grassy hill base:
Paint the large foreground hill with a wash of Yellow Ochre and Burnt Sienna. Keep your strokes directional, following the slope of the land from top-left to bottom-right. -
The dirt path:
While the hill is damp, lift out the color for the path using a thirsty brush (a clean, damp brush) or paint around it originally with a paler cream color. This path leads the viewer’s eye into the scene. -
Foreground trees:
Mix vibrant oranges and reds. Paint the distinct, leafless or semi-leafless trees in the immediate foreground on the left. These should be taller than the mid-ground trees to emphasize proximity. -
Final dark details:
Use your darkest brown-black mix and the rigger brush to add the fine branches of the foreground bushes and the darker grasses along the bottom edge of the paper. Add quick, upward flicking strokes to suggest tall dry grass.
Remove the tape carefully to reveal your crisp, beautiful river landscape border

PENCIL GUIDE
Understanding Pencil Grades from H to B
From first sketch to finished drawing — learn pencil grades, line control, and shading techniques.
Explore the Full Guide
Silhouette Trees Against A Colorful Sky Wash
Capture the magic of dusk with this vibrant watercolor landscape featuring a solitary, towering pine against a gradient sky. The contrast between the soft, bleeding colors of the sunset and the crisp, dark silhouette creates a stunning depth that looks far more complex than it actually is.
Step-by-Step Tutorial
Materials
- Cold press watercolor paper (140lb/300gsm)
- Masking tape
- Watercolor paints (Indigo, Purple/Violet, Quinacridone Rose or Magenta, Cadmium Orange)
- White gouache or white gel pen
- Large flat wash brush
- Medium round brush (size 6 or 8)
- Small liner or detail brush (size 0 or 1)
- Two jars of water
- Paper towels
Step 1: Painting the Sky Gradient
-
Secure the paper:
Tape down all four edges of your watercolor paper to a board or table. This creates that crisp white border seen in the photo and prevents the paper from buckling during the heavy wash. -
Pre-wet the sky area:
Using your large flat brush and clean water, wet the entire paper surface evenly. You want it glistening with a sheen, but not so wet that puddles form. -
Apply the top layer:
Load your brush with indigo or a deep blue mixed with a touch of purple. Apply this to the top third of the paper, using horizontal strokes and letting the paint flow downwards slightly. -
Transition to purple:
While the blue is still wet, clean your brush slightly and pick up a rich purple. Blend this into the bottom edge of the blue band, pulling the color down into the middle section of the paper. -
Add the sunset pinks:
Clean your brush and switch to a vibrant rose or magenta. Paint horizontal organic strokes below the purple, allowing the colors to bleed together naturally. Leave some uneven edges to suggest cloud formations. -
Finish with orange warmth:
For the horizon line (the bottom third), paint a bright, warm orange. Blend it upwards into the pink. Let the orange fade out slightly near the very bottom where the land will be. -
Create cloud texture:
While the paper is still damp but losing its sheen (the matte stage), distinct cloud lines can be added. Load a thirsty brush with slightly thicker purple paint and tap in horizontal streaks across the pink and orange sections. -
Dry completely:
This is crucial: let the background dry 100%. If the paper is cold to the touch, it’s still damp. Using a hairdryer on a low setting can speed this up.
Pro Tip: Better Branches
When painting pine branches, hold your brush loosely near the end of the handle. Use a shaky, vibrating hand motion rather than smooth strokes to create natural, organic-looking pine needles.
Step 2: Creating the Foreground & Silhouettes
-
Mix the shadow color:
Create a very dark mix for your silhouettes. Avoid straigh black; instead, mix indigo with burnt umber or a tiny bit of red to create a rich, deep chromatic black. -
Outline the main tree trunk:
Using a liner brush or small round brush, paint a thin, vertical line slightly right of center. Make it thicker at the base and taper it to a needle-point at the top, reaching almost to the painting’s edge. -
Build the branches:
Switch to your detail brush. Starting from the top of the tree, paint branches extending outward and downward. Use a flicking motion and keep the strokes jagged and irregular to mimic pine needles. -
Fill out the tree shape:
Work your way down the trunk, making the branches progressively wider. Leave gaps between branch layers so the colorful sky peeks through. -
Paint the background forest:
On the left and right sides, paint smaller, simpler triangular tree shapes. Use a slightly more watered-down version of your dark mix for the furthest trees to create atmospheric depth. -
Darken the foreground:
Paint the bottom strip of the paper with your darkest mixture to create the ground. Use upward flicking strokes along the top edge of this shape to simulate tall grass blades. -
Add foreground details:
While the ground layer is damp, drop in touches of burnt sienna or yellow ochre near the base of the trees to suggest dried grass caught in the last light. -
Deepen the shadows:
Once the first layer of trees is dry, go back over the nearest trees (especially the main central one) with your darkest pigment to ensure they stand out sharply against the bright sky.
Step 3: Final Touches
-
Add stars:
Using a white gel pen or a fine brush with white gouache, dot tiny stars into the blue and purple sections of the sky. Keep them random and sparse. -
The reveal:
Wait until the painting is bone dry, then carefully peel away the masking tape at a 45-degree angle to reveal your clean edges.
Level Up: Glowing Stars
Make a few stars shine brighter. After placing a white dot, dampen a clean brush and gently soften the area immediately around the dot to create a faint, glowing halo effect in the night sky.
Frame your twilight masterpiece and enjoy the peaceful atmosphere it brings to the room
Rainy Day Landscape With Moody Value Shifts
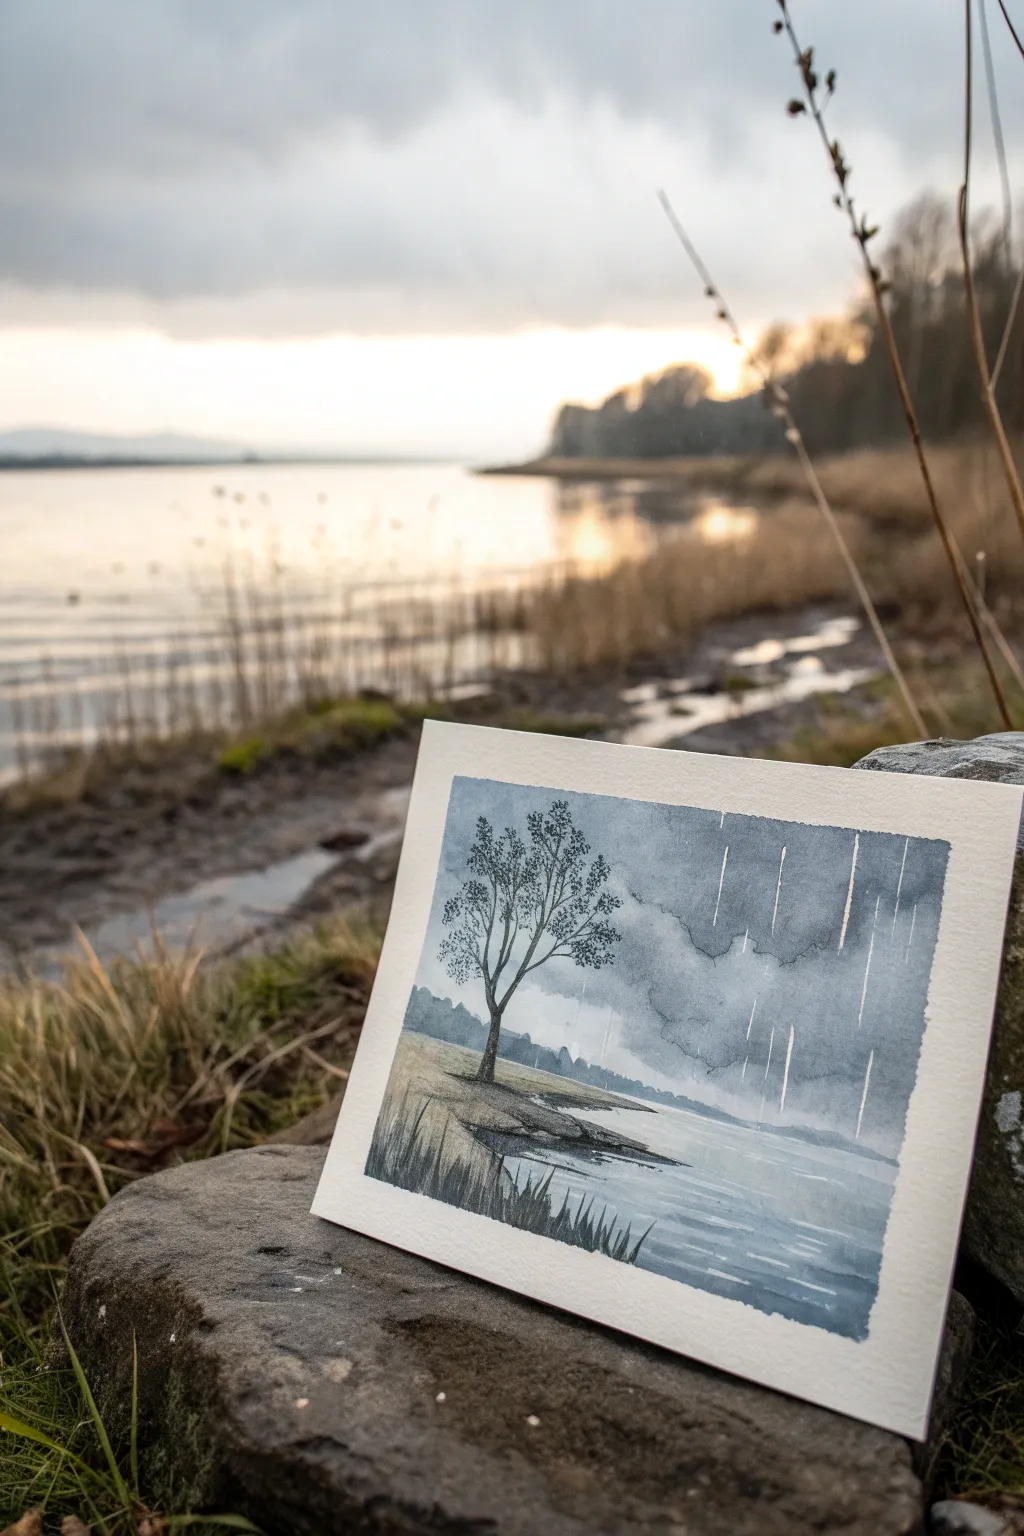

Capture the atmospheric mood of a rainy afternoon by exploring dramatic value shifts and simple masking techniques. This painting focuses on monochromatic blues and grays to create a stormy sky that contrasts beautifully with a solitary silhouette tree.
Detailed Instructions
Materials
- Cold Press Watercolor Paper (approx. 5×7 inches)
- Masking Fluid or White Gouache
- Pencil (HB)
- Painter’s Tape
- Watercolor Paints (Payne’s Gray, Indigo, Yellow Ochre, Burnt Umber)
- Round Brushes (Size 4 and 8)
- Small Detail Brush or Liner Brush
- Paper Towels
- Water Container
Step 1: Preparation & Sketching
-
Prepare the paper:
Begin by taping down all four edges of your paper to a hard board. This creates the crisp white border seen in the reference and prevents buckling during heavy washes. -
Establish the horizon:
Lightly sketch a low horizon line about one-third of the way up from the bottom. It doesn’t need to be perfectly straight; a slight undulation looks more natural. -
Outline the focal point:
Sketch the silhouette of the main tree on the left side. Keep the branches delicate and reaching upward. Also, mark out the distant shoreline and the jagged foreground bank. -
Add rain resist:
If using masking fluid, apply thin, vertical streaks in the sky area now to reserve the white paper for the rain. If you don’t have masking fluid, skip this—we can add them with white gouache later.
Muddy colors?
Wait for layers to dry completely! If you paint the dark clouds into a sky that is half-dry, you’ll get ‘cauliflowers’ instead of smooth gradients. Patience is key.
Step 2: Painting the Stormy Sky
-
Mix your sky wash:
Prepare a large puddle of a moody blue-gray using Payne’s Gray and a touch of Indigo. You want enough water so it flows, but enough pigment to look stormy. -
Wet-in-wet sky:
Wet the entire sky area with clean water. While it’s glistening, drop in your gray mixture, starting darker at the top and letting it fade slightly as you approach the horizon. -
Create cloud forms:
Crumple a small piece of paper towel and gently blot out shapes in the wet paint to create soft, billowing white clouds. This lifting technique adds instant texture. -
Define the cloud bellies:
While the paper is still damp, mix a darker, more saturated gray/blue. Paint the undersides of the lifted cloud shapes to give them volume and a threatening storm look. -
Let it dry completely:
Allow the sky to bone dry. This is crucial before moving to the crisp details of the horizon.
Step 3: Land & Water
-
Paint the distant trees:
Mix a medium-value gray. Using the tip of your size 4 brush, paint the distant treeline along the horizon. Keep the shapes simple and slightly jagged. -
Establish the foreground bank:
Mix Yellow Ochre with a tiny bit of Payne’s Gray to get a dull, grassy color. Paint the foreground land area, sweeping your brush horizontally. -
Add depth to the ground:
While the ochre wash is damp, drop in darker brown (Burnt Umber) near the bottom edge and under where the tree will stand to create shadows. -
Paint the water:
Mix a very watery, pale blue-gray wash. Drag your brush horizontally across the water area, leaving thin slivers of unpainted white paper to represent ripples reflecting the light. -
Darken the shoreline:
Add a concentrated line of dark gray right where the land meets the water to ground the composition.
Level Up: Reflections
Paint a faint, mirrored reflection of the main tree in the water. Use horizontal, broken brushstrokes directly below the tree trunk to mimic the movement of the water.
Step 4: Details & Rain effect
-
Paint the main tree:
Load your liner or small round brush with a thick, creamy mix of Payne’s Gray or Black. Paint the trunk and branches of the main tree. I find rolling the brush slightly helps create organic, knobby branches. -
Add foliage texture:
Stipple the ends of the branches with a dryer brush to suggest leaves without painting individual ones. -
Foreground grasses:
Use quick, upward flicking motions with your smallest brush to paint the dark, spiky grasses in the immediate bottom foreground. -
Finalize the rain:
If you used masking fluid, rub it off gently now to reveal the white rain streaks. If you didn’t, use opaque white gouache and a fine brush (or a ruler edge) to paint thin white lines over the dry sky. -
The Reveal:
Once everything is perfectly dry, carefully peel away the painter’s tape at a 45-degree angle to reveal your clean borders.
Step back and admire how a limited color palette can create such a strong emotional impact in your landscape


Winter Snow Landscape Using Negative Space
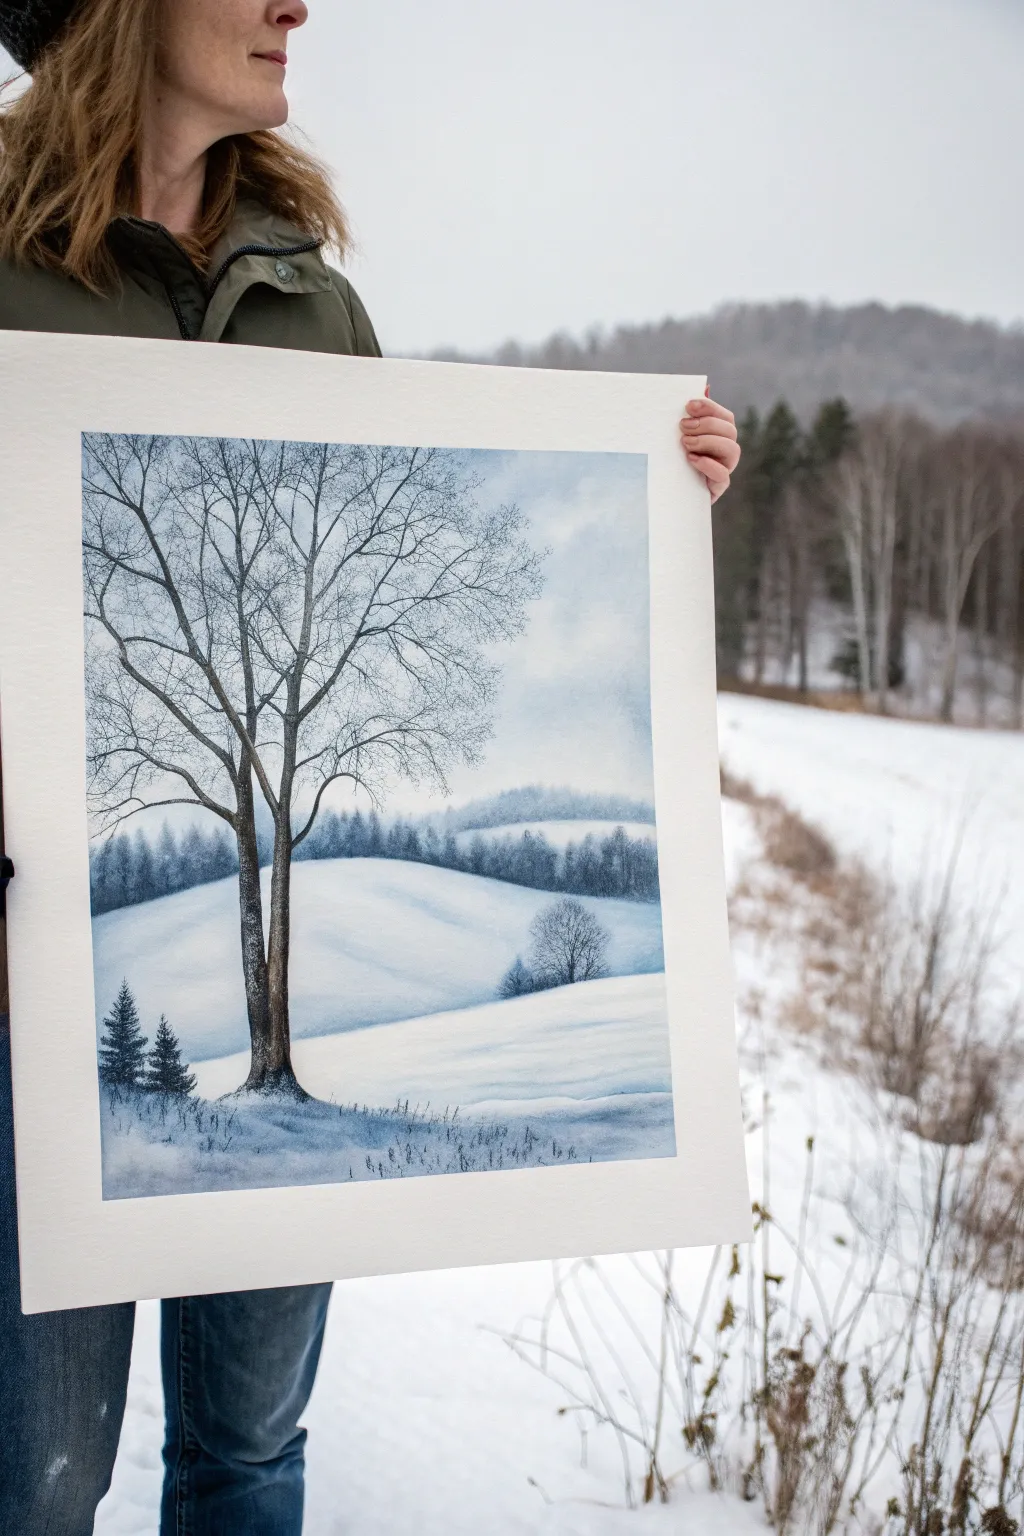
Capture the stillness of a winter morning with this monochromatic watercolor study that balances stark realism with soft, snowy negative space. You’ll master the art of painting distinct, twiggy branches against a backdrop of distant fog and rolling white hills.
Detailed Instructions
Materials
- Cold Press Watercolor Paper (140 lb or 300 lb, large format)
- Watercolor Paints: Paynes Gray, Indigo, Ultramarine Blue, Burnt Umber (or Sepia)
- Masking fluid (drawing gum) and old brush
- Round brushes (sizes 4, 8, and a very fine size 0 or rigger brush)
- Large flat wash brush (1 inch)
- Board and masking tape
- Pencil (HB or similar light graphite)
- Two jars of water
- Paper towels
Step 1: Planning and Sky
-
Secure your surface:
Begin by taping your watercolor paper securely to a board on all four sides. This ensures the paper stays flat during washes and leaves a clean, crisp white border when finished. -
Light sketching:
Using an HB pencil, very lightly sketch the main horizon line for the hills and the vertical placement of the large foreground tree. Keep lines faint so they don’t show through the snow later. -
Masking the snow:
Apply masking fluid carefully with an old brush to any tiny highlights you want to preserve on the tree trunk or foreground grasses. Let this dry completely before touching it with paint. -
Wet-on-wet sky:
Pre-wet the sky area with clean water using your large flat brush. The paper should be glistening but not forming puddles. -
Soft clouds:
Drop in a very diluted mix of Ultramarine Blue and a touch of Paynes Gray for the sky. Tilt the board slightly to let the pigment drift naturally, leaving large areas of white paper untouched to represent clouds.
Muddy Snow?
If your snow shadows look dirty instead of crisp, you likely reworked the paint while it was damp. Let layers dry completely! Clean your water jar often; dirty water makes dull snow.
Step 2: Distant Hills and Forests
-
First hill wash:
Once the sky is dry, mix a watery, pale blue-grey. Paint the curve of the furthest hill, softening the bottom edge with clean water so it fades into white mist. -
Distant treeline:
While the hill wash is still slightly damp (but not soaking), dab in a darker mix of indigo and grey to suggest a distant forest line. Use the tip of a #4 round brush to create tiny vertical irregularities that look like tree tops. -
Middle ground shadows:
Paint the shadows of the rolling hills using a very pale, cool blue. The white of the paper acts as the sunlit snow, so only paint the depressions and slopes away from the light source. -
Softening edges:
Immediately after painting a hill shadow, run a clean, damp brush along the edge to soften it. Snow has soft transitions, not hard lines. -
Layering the evergreens:
For the darker band of trees in the middle distance, use a stronger concentration of Indigo. Paint loose, vertical shapes, allowing them to blur together slightly at the base to form a dense forest.
Level Up: Salt Texture
While the foreground snow wash is still wet, sprinkle a pinch of table salt into the blue shadow areas. When it dries and you brush it off, it creates a magical crystallized ice effect.
Step 3: The Foreground Tree
-
Mixing bark color:
Create a dark, neutral mix using Burnt Umber and Paynes Gray. You want a color that looks almost black but retains warmth. -
Base trunk:
Start painting the main trunk of the large tree. I find it helpful to start from the bottom and pull the brush upward, lifting pressure as the trunk narrows. -
Primary branches:
Extend the main branches outward. Remember that trees split: branches get thinner as they move away from the trunk. Use a #8 brush for these thicker limbs. -
Fine details:
Switch to your rigger brush or size 0 liner. With a very inky consistency of paint, add the thousands of tiny twigs. Use quick, flicking motions and cross some lines over each other for a natural, tangled look. -
Adding texture to the bark:
While the trunk is drying, lift out a tiny bit of color on the sunlit side using a thirsty (clean, dry) brush to create roundness. -
Foreground evergreens:
Paint the small pine trees on the left side of the hill using a dry-brush technique to mimic the texture of needles. Keep them dark to push the pale hills backward.
Step 4: Final Touches
-
Grass textures:
Using the tip of your rigger brush, flick upward strokes at the base of the tree and in the immediate foreground to suggest dried winter weeds poking through the snow. -
Shadow casting:
Glaze a cool blue shadow extending from the base of the tree across the snow to the right. This grounds the tree so it doesn’t look like it’s floating. -
Remove masking:
Ideally, wait several hours or overnight to ensure the paper is bone dry. Then, gently rub away the masking fluid to reveal the crisp white highlights. -
Final assessment:
Step back and check your values. If the distant trees look too pale, add a second glaze to deepen them, but maintain the atmospheric perspective.
Peel off the tape to reveal your crisp borders and enjoy the quiet beauty of your winter scene.
Night Sky Landscape With Stars And Soft Glows
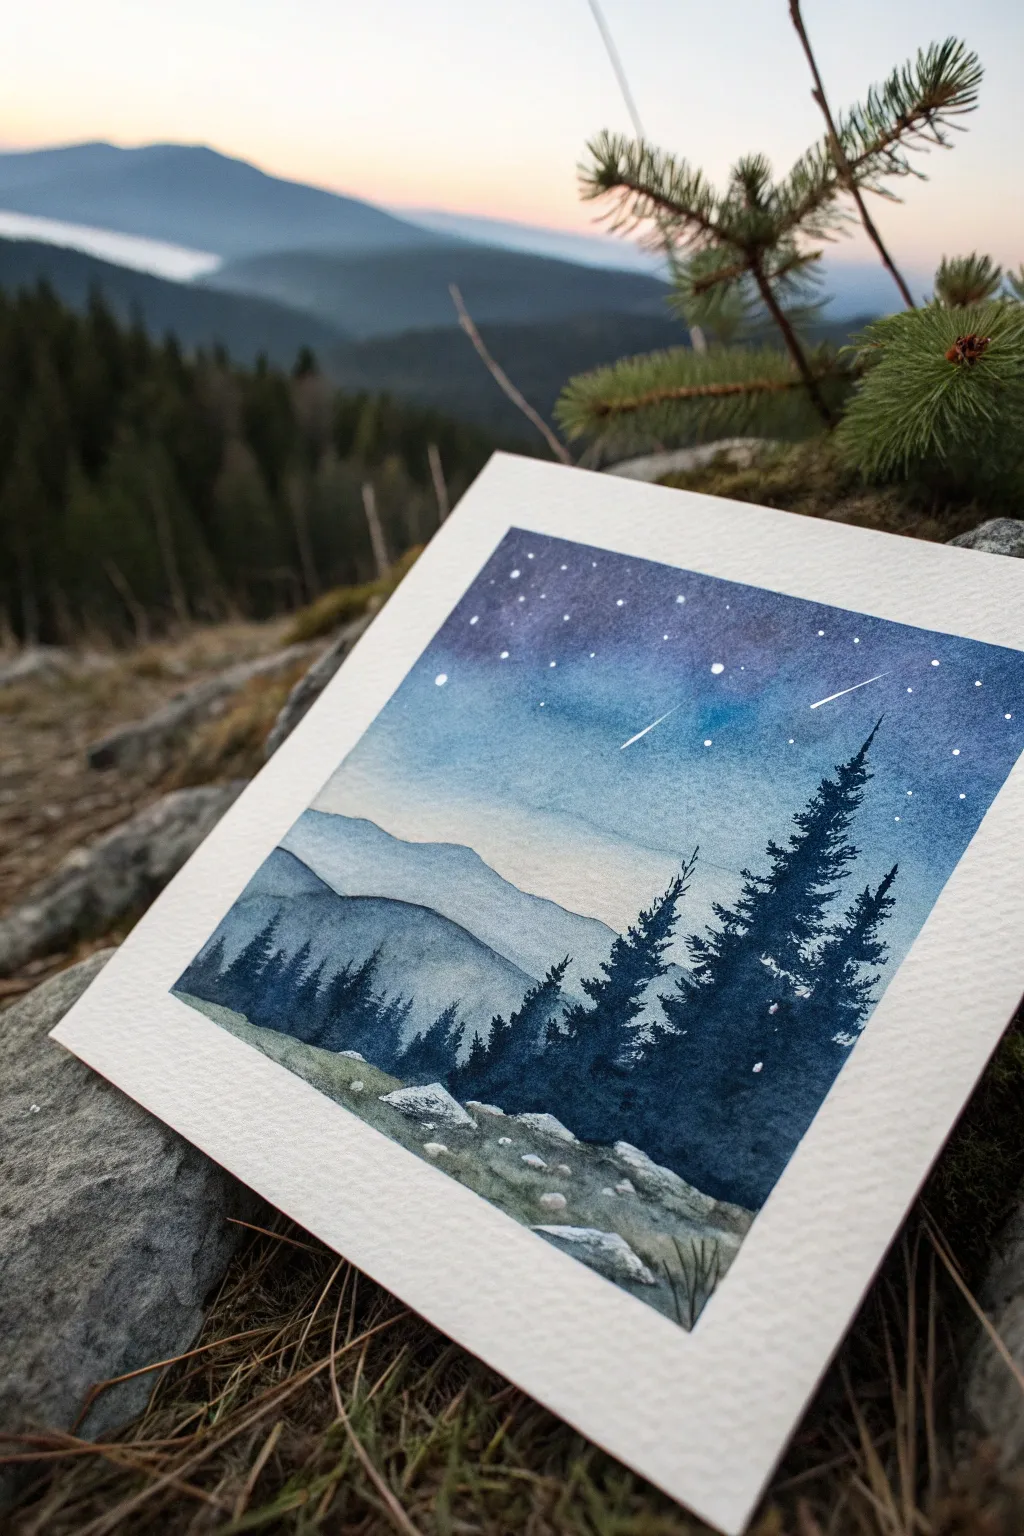
Capture the serene beauty of a mountain night with this layered watercolor landscape. You’ll create a seamless gradient sky filled with stars, mysterious misty mountains, and silhouetted pines that bring depth to the foreground.
Step-by-Step Tutorial
Materials
- Cold press watercolor paper (300gsm, 100% cotton recommended)
- Watercolor paints: Indigo, Prussian Blue, Paynes Grey, Sap Green, Burnt Umber
- White gouache or white gel pen
- Masking tape
- Flat wash brush (3/4 inch)
- Round brushes (size 6 and size 2)
- Clean water and mixing palette
- Paper towels
Step 1: Setting the Scene
-
Tape it down:
Begin by taping all four edges of your watercolor paper to a board or table. Press the tape down firmly to ensure you get those crisp, clean white borders shown in the photo. -
Light sketch:
Using a pencil, very lightly sketch the horizon line about one-third of the way up from the bottom. Add faint, jagged outlines for the two mountain ranges, but keep them subtle so graphite doesn’t show through later.
Soften the edges
To prevent a hard line where the sky glow meets the mountains, soften the bottom edge of your sky wash with a clean, damp brush before it dries.
Step 2: The Night Sky
-
Prepare the sky wash:
Mix a generous amount of Indigo with a touch of purple for the top of the sky, and a lighter Prussian Blue for the middle. Keep a clean water brush nearby. -
Wet-on-wet technique:
Brush clean water over the entire sky area, stopping just above your pencil line for the mountains. The paper should be glisten, but not hold puddles. -
Applying the gradient:
Start at the very top edge with your darkest Indigo mix. paint horizontally across, then immediately switch to the Prussian Blue as you move down. Let the colors bleed naturally. -
The horizon glow:
As you near the mountain line, clean your brush and use just damp water to pull the blue pigment downwards, fading it out to almost clear paper. This creates that soft atmospheric glow behind the peaks. -
Let it dry completely:
This is crucial—wait until the sky is bone dry. If the paper feels cool to the touch, it’s still wet.
Cauliflower blooms?
If you see water splotches/blooms in your smooth sky, you likely added water to a section that was already half-dry. Don’t touch it; let it dry.
Step 3: Mountains and Mist
-
First mountain layer:
Mix a very watery wash of Indigo and Paynes Grey. Paint the distant mountain range with this pale mix. The translucency is key to making it look far away. -
Second mountain layer:
Once the first range is dry, darken your mix slightly by adding less water. Paint the closer mountain range below the previous one. The overlapping layers create instant atmospheric perspective. -
Adding texture:
While the second mountain layer is still damp, you can drop in tiny touches of darker pigment near the bottom edge to suggest distant tree lines or shadows.
Step 4: The Foreground
-
Painting the pines:
Mix a thick, dark pigment using Indigo and Paynes Grey—almost black but richer. Switch to your size 2 round brush. Paint the tall pine trees on the right side first. -
Tree technique:
Draw a thin vertical line for the trunk, then use a stippling motion to add branches. Start narrow at the top and get wider and denser as you move down. -
Distant trees:
Use a slightly lighter wash (more water) to paint the smaller treeline on the left side. This variation in value helps push them into the mid-ground. -
Ground cover:
Mix Sap Green with a little Burnt Umber and Paynes Grey to get a muted, earthy green. Paint the grassy slope at the very bottom, working around white spaces where rocks will go. -
Adding rocks:
Paint the rocks using a diluted grey. While wet, drop darker grey on their bottom edges for shadow. Leave the tops unpainted or very pale to look like they are catching starlight.
Step 5: Finishing Touches
-
Stars:
Cover the bottom part of your painting with scrap paper. Load a stiff brush with white gouache and flick the bristles to splatter various sizes of stars across the sky. -
Shooting stars:
Use a white gel pen or a very fine detail brush with gouache to draw a few crisp lines for shooting stars, fading the tail slightly. -
Highlights:
Add tiny dots of white on the tips of the pine trees and edges of the rocks to simulate frost or reflected moonlight. -
Peel the tape:
Once absolutely everything is dry, slowly peel your masking tape away at a 45-degree angle to reveal the clean border.
Enjoy the peaceful atmosphere your new starry landscape brings to the room
Loose Abstract Forest Using Wet-Into-Wet Blooms

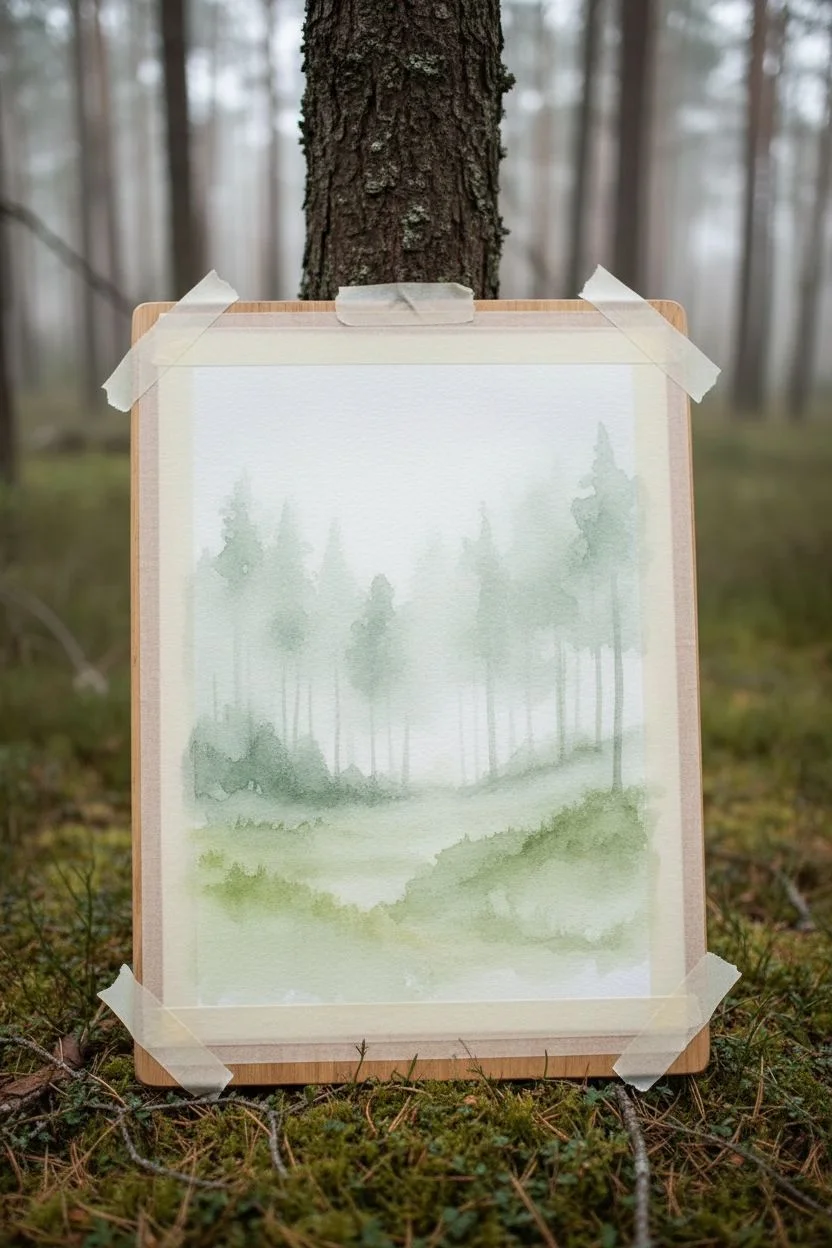
Capture the serene silence of a fog-laden woodland with this atmospheric watercolor tutorial. By combining wet-into-wet techniques for the distant haze with sharp, dry-brush details for the foreground, you’ll build incredible depth that draws the viewer straight into the trees.
Step-by-Step
Materials
- Cold press watercolor paper (300 gsm/140 lb)
- Watercolor paints: Sap Green, Hooker’s Green, Paynes Grey, Burnt Umber, Yellow Ochre
- Large round brush (size 10 or 12)
- Medium round brush (size 6)
- Small detail brush (size 0 or 2)
- Masking tape
- Clean water and jar
- Paper towels
Step 1: Setting the Atmosphere
-
Prepare the paper:
Tape down all four edges of your watercolor paper to a board to prevent buckling. Using your large brush, wet the entire upper two-thirds of the paper with clean water until it glistens. -
Create the misty background:
Mix a very watery, pale wash of Paynes Grey and a touch of Sap Green. Gently drop this into the wet paper, focusing more color near the horizon line (about 1/3 up from the bottom) and fading it out almost completely as you go up towards the sky. -
Ghost trees:
While the paper is still damp but not puddling (the satin stage), mix a slightly thicker, tea-consistency green-grey. Use the medium brush to paint vertical lines for distant trees. Let the wet paper soften the edges, creating that foggy illusion. -
Ground layer foundation:
For the forest floor, mix Sap Green with a little Yellow Ochre. Apply this directly beneath your ghost trees while the paper is still slightly damp, allowing the bottom of the trees to bleed naturally into the ground.
Control the Bleed
For the misty background trees, start the stroke at the bottom and lift your brush as you go up. This deposits more pigment where the tree is anchored and fades it naturally into the mist.
Step 2: Building the Mid-Ground
-
First crisp layer:
Allow the paper to dry completely. This is crucial for creating depth. Mix a darker green using Hooker’s Green and a touch of Burnt Umber. -
Mid-ground trees:
Paint a few slender tree trunks that are slightly darker than your background ‘ghost’ trees. These should have distinct edges but remain fairly light in value to keep them appearing somewhat distant. -
Adding foliage clumps:
Using the side of your brush, dab loose, organic shapes near the tops of these mid-ground trees to suggest pine needles or leafy canopies. -
Grassy textures:
Use the same mix to add horizontal strokes and small tufts of grass in the middle section of the painting to bridge the gap between the blurry background and the detailed foreground.
Backruns & Blooms?
If you get cauliflower-like blooms in the sky, don’t panic. In a foggy forest scene, these accidental textures actually look like shifting mist patches. Embrace them as part of the atmosphere.
Step 3: Foreground Details
-
The main trunks:
Mix a concentrated, creamy mixture of Burnt Umber and Paynes Grey. With your medium round brush, paint the prominent tree trunks on the right side. Keep the lines somewhat jagged and broken to mimic bark texture, rather than perfectly straight poles. -
Adding branches:
Switch to your small detail brush (size 0-2). Pull thin, angled branches out from the main trunks. I like to twist the brush slightly as I paint these lines to give them a natural, gnarly look. -
Bark texture:
Once the main trunks are dry, take a nearly dry small brush with dark Paynes Grey and scumble it across the trunk to create horizontal markings and rough bark patches, typical of birch or aspen. -
Foreground foliage:
Mix your darkest green yet (Hooker’s Green + Paynes Grey). Stipple heavy patches of leaves or needles on the closest branches, leaving some gaps for the sky to show through.
Step 4: Finishing Touches
-
Deepening the grass:
Strengthen the bottom foreground with strokes of deep green and brown. Use upward flicking motions to simulate wild grass blades growing near the viewer. -
Negative painting:
If you want white flowers or highlights in the grass, paint dark green shadows *around* small shapes at the bottom, leaving the white paper untouched. -
Softening harsh lines:
Take a clean, slightly damp brush and gently rub any hard edges in the grassy area that distract from the focal point, blending them slightly into the layer below. -
Final assessment:
Step back and check your values. If the foreground trees don’t pop enough, darken their right-hand shadow side with a glaze of Paynes Grey.
Once the paper is fully dry, peel off the tape to reveal the crisp border around your finished misty woodland
Textured Cliffside Or Rocky Shore With Dry Brush
Capture the rugged beauty of a seaside cliff with this detailed watercolor project that emphasizes rocky textures and calm waters. You will learn to balance the softness of the ocean with the harsh, dry-brushed details of the shoreline geography.
Detailed Instructions
Materials
- Cold press watercolor paper (300 gsm)
- Watercolor paint set (Ultramarine Blue, Phthalo Blue, Burnt Sienna, Yellow Ochre, Sap Green, Burnt Umber)
- H or HB pencil for sketching
- Kneaded eraser
- Round brushes (sizes 4, 8, and 12)
- Small rigger or liner brush for details
- Old, scruffy flat brush for dry brushing
- Masking fluid (optional)
- Palette for mixing
- Two containers of water
- Paper towels
Step 1: Planning and Sketching
-
Analyze the composition:
Begin by studying your reference photo or live scene. Notice how the cliff moves diagonally across the page, creating a strong division between land and sea. -
Light pencil outline:
Using your H pencil, lightly sketch the main contours of the cliff face, the horizon line, and the foreground rocks. Keep your lines faint so they don’t show through the transparent watercolor later. -
Mark significant details:
Lightly indicate areas of heavy shadow or specific vegetation clumps, but avoid drawing every single rock; let the paint handle the texture.
Step 2: The Sea and Sky
-
Sky wash:
Wet the sky area with clean water. Mix a very dilute wash of Ultramarine Blue and sweep it across the top, fading it out to almost clear water as you reach the horizon line. -
Base ocean layer:
While the sky dries, mix Phthalo Blue with a touch of Sap Green for turquoise waters. Apply this as a graded wash, starting darker at the bottom and getting lighter near the shore. -
Preserve the foam:
Leave the white of the paper untouched where the waves meet the sand to create the look of sea foam. If you prefer more control, you could apply masking fluid here before painting.
Muddy colors?
If your rock shadows look muddy, stop mixing on the palette. Let the colors mix on the paper by dropping pure colors (blue and brown) into wet areas side-by-side.
Step 3: Painting the Cliffs
-
First earth tones:
Mix Yellow Ochre and a tiny bit of Burnt Sienna. Apply a variegated wash over the cliff area, letting the colors mix on the paper to create a warm, sandy base. -
Building rock volume:
Once the base is damp but not soaking, drop in stronger mixtures of Burnt Sienna and Burnt Umber into the shadowed crevices of the cliff face to start suggesting 3D form. -
Foreground sand:
Wash a pale, warm beige (heavily diluted Burnt Sienna) across the beach area, ensuring a soft transition into the white foam edge you preserved earlier.
Add life!
Use an opaque white gouache or a white gel pen to add sparkling highlights on the water or crashing wave tips to bring dynamic movement to the calm scene.
Step 4: Texturing and Details
-
Dry brush technique:
This is the crucial step for rocky textures. Take your scruffy brush with relatively dry, thick pigment (Burnt Umber/Blue mix). Drag it lightly over the rough paper tooth to create the jagged look of the cliff rocks. -
Adding vegetation:
Mix Sap Green with Ultramarine for a natural, dull green. Stipple this color onto the top of the cliffs and in pockets down the slope to represent scrubby coastal bushes. -
Deepening shadows:
Mix a dark grey using Burnt Umber and Ultramarine Blue. Paint the deepest cracks and the underside of the foreground rocks to give the scene weight and contrast. -
Foreground rocks:
For the large grey rocks in the foreground, use a cool grey mix. As the paint dries, splatter a tiny bit of clean water or darker paint to create a granite-like texture. -
Defining the water edge:
Using your liner brush and a diluted blue-grey, add subtle shadows under the white foam of the waves to make them look like they are sitting on top of the sand. -
Final scratches:
If needed, use the back of a brush or a palette knife to scratch out thin lines in damp rock paint for sharp highlights or grass blades.
Once dry, verify your contrast values and sign your beautiful coastal landscape
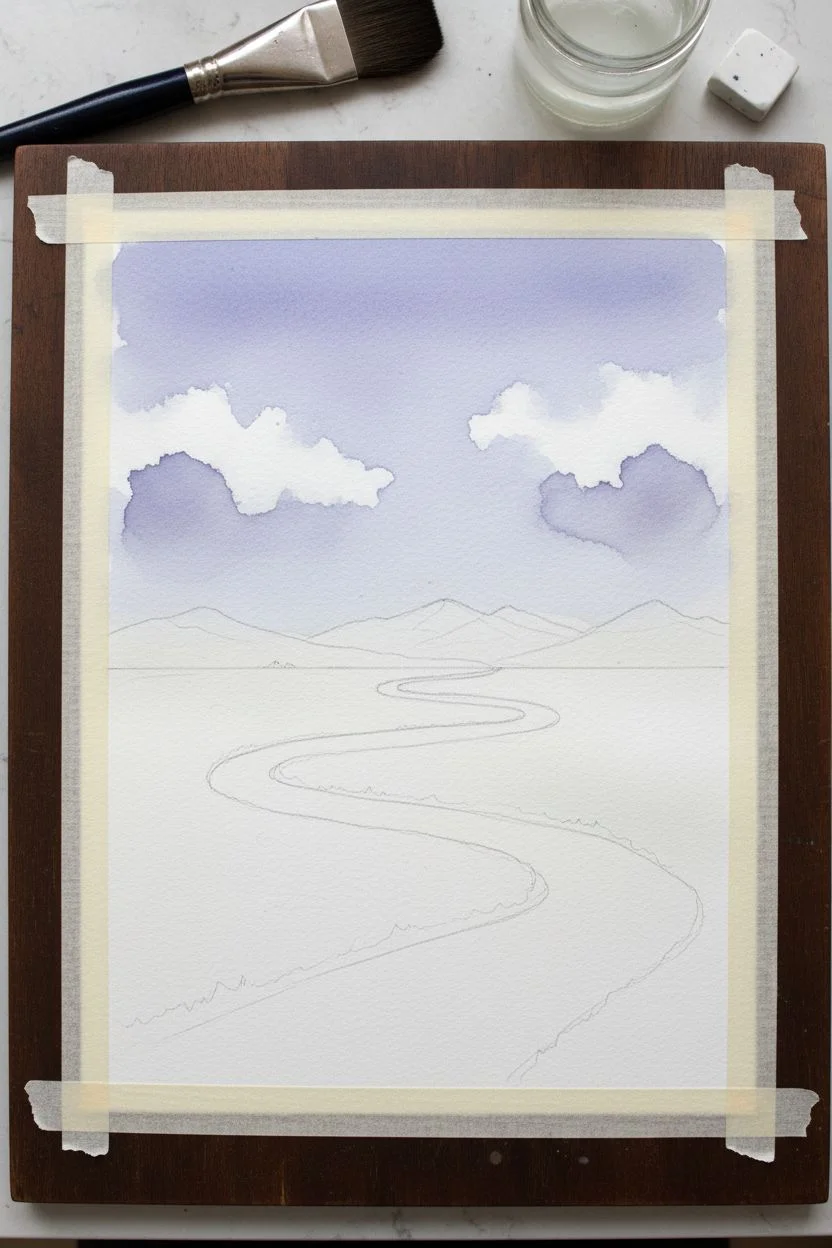
Minimal Monochrome Landscape In One Color Family
This serene landscape relies on a single color family to create depth and atmosphere through value changes. By starting light and progressively darkening your washes, you’ll build stunning atmospheric perspective that makes the mountains feel vast and distant.
How-To Guide
Materials
- Cold Press Watercolor Paper (140lb/300gsm)
- Indigo Watercolor Paint (or Prussian Blue mixed with a touch of Black)
- Round Watercolor Brushes (Size 8 and Size 4)
- Painter’s Tape or Washi Tape
- Clean Water (two jars)
- Paper Towels
- Pre-cut Mat Board (optional for framing)
Step 1: Preparation and First Wash
-
Secure the paper:
Tape your watercolor paper down to a board or table on all four sides. This prevents buckling and creates a clean white border when finished. -
Mix your lightest value:
Prepare a very dilute mixture of Indigo paint. You want plenty of water and just a hint of pigment to create the sky and furthest mountains. -
Wet the sky area:
Using your larger brush and clean water, gently wet the top third of your paper. -
Paint a gradient sky:
Apply your lightest wash to the top of the wet area, letting it fade almost to white as you move downward. -
Initial drying:
Let this sky layer dry completely before moving on.
Pro Tip: The Mist Trick
To get that foggy look between mountains, lift pigment with a clean, thirsty brush at the bottom of a wet wash before it dries.
Step 2: Building the Middle Ground
-
Define the furthest peak:
Mix a slightly stronger wash of Indigo. It should still be transparent but visibly darker than the sky. -
Paint the first silhouette:
Paint a jagged, organic line across the paper, about a third of the way down, representing the most distant mountain ridge. -
Fade the bottom edge:
Immediately rinse your brush and use clean water to soften the bottom edge of this shape, dragging the pigment downward so it fades out. This creates a mist effect. -
Dry completely:
Allow this layer to dry fully. If the paper feels cool to the touch, it’s still wet. -
Add the second ridge:
Mix a slightly darker value of Indigo. Paint a new mountain shape below the first one, overlapping it slightly to show depth. -
Soften the transition:
Just like before, use a clean, damp brush to pull the color downwards from the bottom edge of this new shape, creating a smooth gradient. -
Repeat for depth:
Continue this process for 2-3 more layers, making your paint mixture progressively darker and more concentrated with each new ridge.
Level Up: Starry Night
Before removing the tape, flick a stiff toothbrush loaded with white gouache over the dry sky area for subtle stars.
Step 3: Foreground and Details
-
Mix the darkest value:
For the foreground, use your Indigo paint with very little water. It should be a deep, rich navy, almost black. -
Paint the closest hill:
Create a rolling hill shape at the very bottom of the composition using this concentrated pigment. -
Switch to a smaller brush:
Use your size 4 brush to have more control over the fine details. -
Create tree silhouettes:
While the bottom hill is still wet or just starting to dry, dab tiny vertical strokes along the ridge line to suggest pine trees. -
Vary tree heights:
Make some trees taller than others to keep the landscape looking natural and roughly textured. -
Add texture:
I prefer to use the very tip of the brush to add tiny dots and irregular marks within the tree line for a dense forest look. -
Final dry:
Let the painting dry completely, ideally overnight to ensure the heavy pigment settles. -
Reveal the border:
Carefully peel away the tape at a 45-degree angle to reveal your crisp white edges.
Place your finished piece in a clean white mat to emphasize the beautiful simplicity of the monochrome palette
Double-Frame Landscape Cutout With A Soft Border Fade
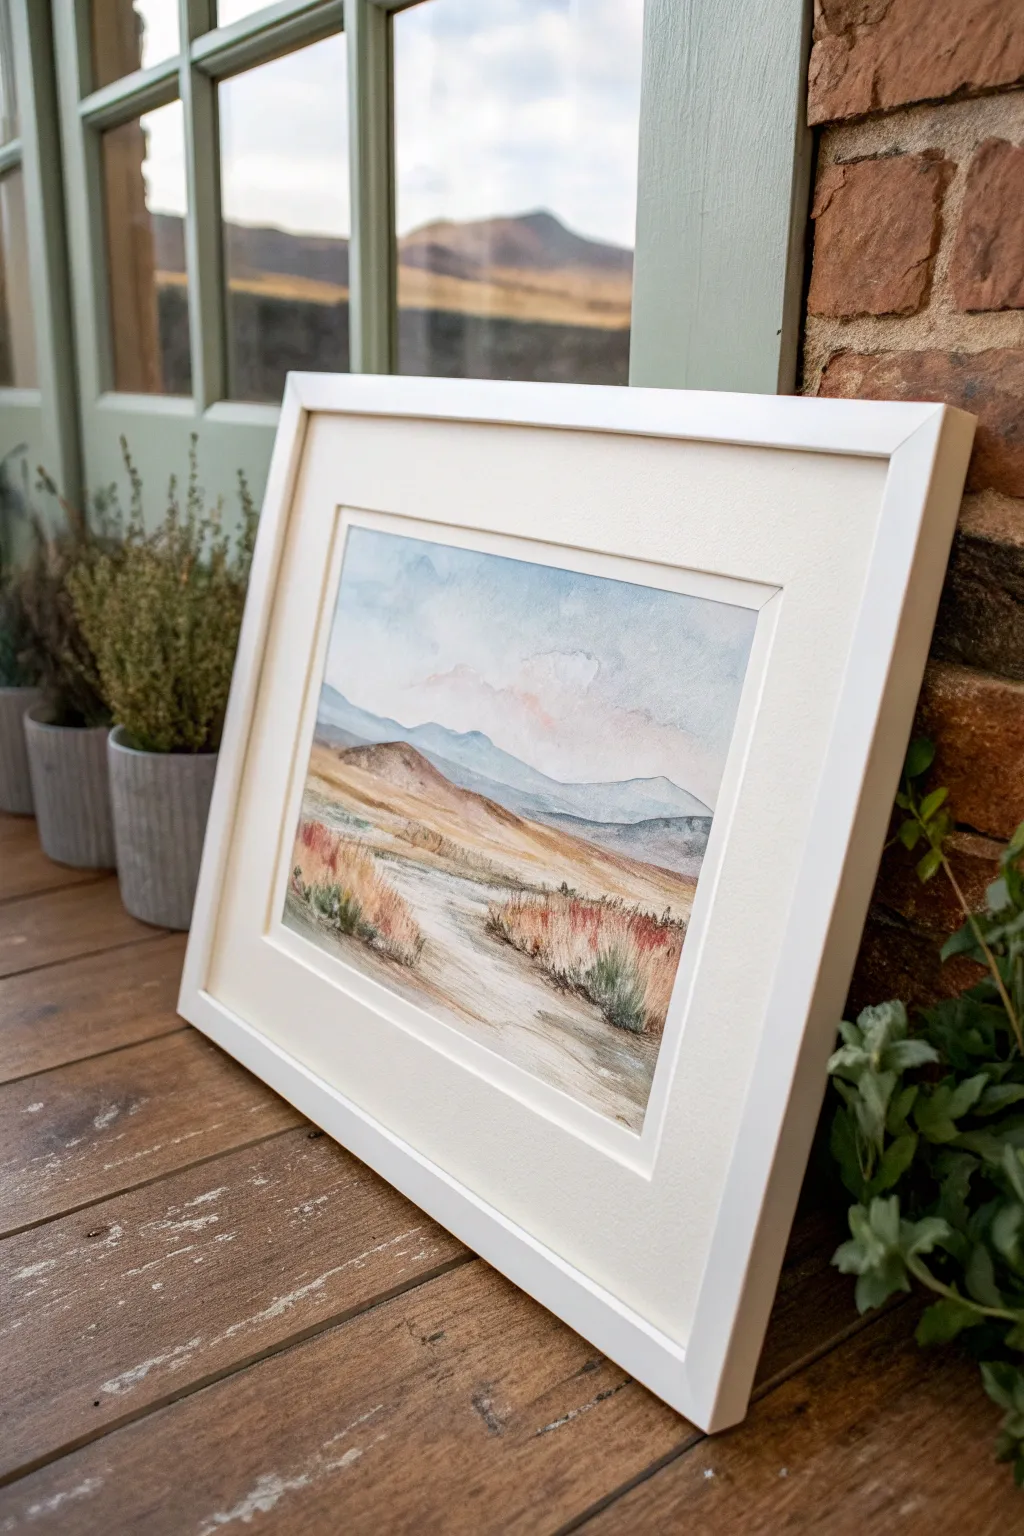
Capture the quiet beauty of rolling moorlands and distant peaks with this gentle watercolor landscape. By combining wet-on-wet washes for soft skies with textured dry brushing for the foreground, you’ll create a scene that feels both expansive and intimate.
Detailed Instructions
Materials
- Cold press watercolor paper (300gsm/140lb)
- Watercolor paints (Cerulean Blue, Alizarin Crimson, Yellow Ochre, Burnt Sienna, Sap Green, Paine’s Gray)
- Soft round brushes (size 8 and 12)
- Detail round brush (size 2 or 4)
- Mixing palette
- Two jars of water
- Masking tape
- Paper towels
- White or cream picture mount/mat
- White wooden frame
Step 1: Preparation and Sky
-
Secure the paper:
Tape your watercolor paper down firmly to a board on all four sides. This prevents buckling and creates a clean edge, though the mat will cover it later. -
Sketch the horizon:
Using a hard pencil (like an H or HB), very lightly sketch the rolling hill lines. Keep the horizon low—about the bottom third of the paper—to emphasize the big sky. -
Wet the sky area:
With your largest clean brush, apply a coat of clean water to the entire sky area, stopping just short of your pencil lines for the hills. -
Create the blue wash:
Load a size 12 brush with a watery mix of Cerulean Blue. Sweep it across the top of the paper, letting it diffuse downward naturally into the damp paper. -
Add soft clouds:
While the sky is still wet, drop in hints of very diluted Alizarin Crimson mixed with a touch of Yellow Ochre near the horizon. This creates that soft, warm ‘sunset’ glow. -
Lift out highlights:
I like to take a crumpled paper towel and gently blot a few areas in the wet sky to lift the paint, creating fluffy white cloud shapes.
Moisture Control
Keep separate water jars: one for rinsing dirty brushes and one that stays crystal clear for wetting your paper. Dirty water will ruin the pristine look of that pale sky wash.
Step 2: Mountains and Mid-Ground
-
Paint the distant mountains:
Once the sky is bone dry, mix a cool, pale grey-blue using Cerulean Blue and a tiny dot of Paine’s Gray. Paint the silhouette of the furthest mountains. The coolness pushes them into the distance. -
Layer the middle hills:
While the distant mountains are drying, mix a warmer, earthier tone using Yellow Ochre and a touch of Burnt Sienna. Paint the rolling hills in the middle ground, overlapping the blue mountains slightly if dry. -
Add shadow depth:
While the yellow-brown hill wash is still damp, charge in a slightly darker mix of Burnt Sienna on the shadow sides (usually the right side) of the slopes to give them form. -
Create the path:
Leave a winding strip of paper mostly white or very pale ochre in the foreground to represent a worn dirt path or stream bed leading the eye into the scene.
Sparkle Effect
Sprinkle a tiny pinch of table salt onto the wet foreground paint before it dries. The salt absorbs pigment, creating a stunning, mottled texture perfect for rocky, uneven ground.
Step 3: Foreground Texture
-
Start the grassy base:
For the immediate foreground, use a mix of Sap Green and Burnt Sienna. Use a jagged, upward stroke to simulate uneven terrain. -
Dry brush grasses:
Switch to a smaller brush (size 4) with creamy, less watery paint. Use quick, upward flicking motions to paint individual blades of grass and dried reeds. -
Introduce reddish tones:
Mix Alizarin Crimson with Burnt Sienna to get a rusty red. Flick this color into the foreground clumps to mimic heather or dried autumn foliage. -
Add dark accents:
Mix a dark green-brown using Sap Green and Paine’s Gray. Add tiny dark accents at the base of the grass clumps to ground them. -
Texturize the path:
Dry brush a very faint, watery brown horizontally across parts of the path to suggest uneven dirt texture without filling it in completely.
Step 4: Finishing and Framing
-
Review and refine:
Step back. a few feet. If the foreground needs more punch, add a few more dark grass flicks. If the sky looks too empty, a very faint glaze of blue can be added to the top corners. -
Final dry:
Let the painting dry completely—overnight is best to ensure no moisture is trapped. -
Mount the artwork:
Center your painting behind the window mount. Use acid-free tape to secure the top edge of the paper to the back of the mount. -
Frame it up:
Clean the glass of your white wooden frame meticulously. Place the mounted artwork inside and secure the back. The white frame keeps the look airy and modern.
Place your framed landscape near a window to let the natural light enhance those delicate watercolor layers


Have a question or want to share your own experience? I'd love to hear from you in the comments below!