Two-tone furniture painting is my favorite kind of makeover because it looks intentional, modern, and totally doable in a weekend. With the right color blocking and a few clean lines, even a tired old dresser can turn into the piece everyone asks about.
Painted Body With Natural Wood Top
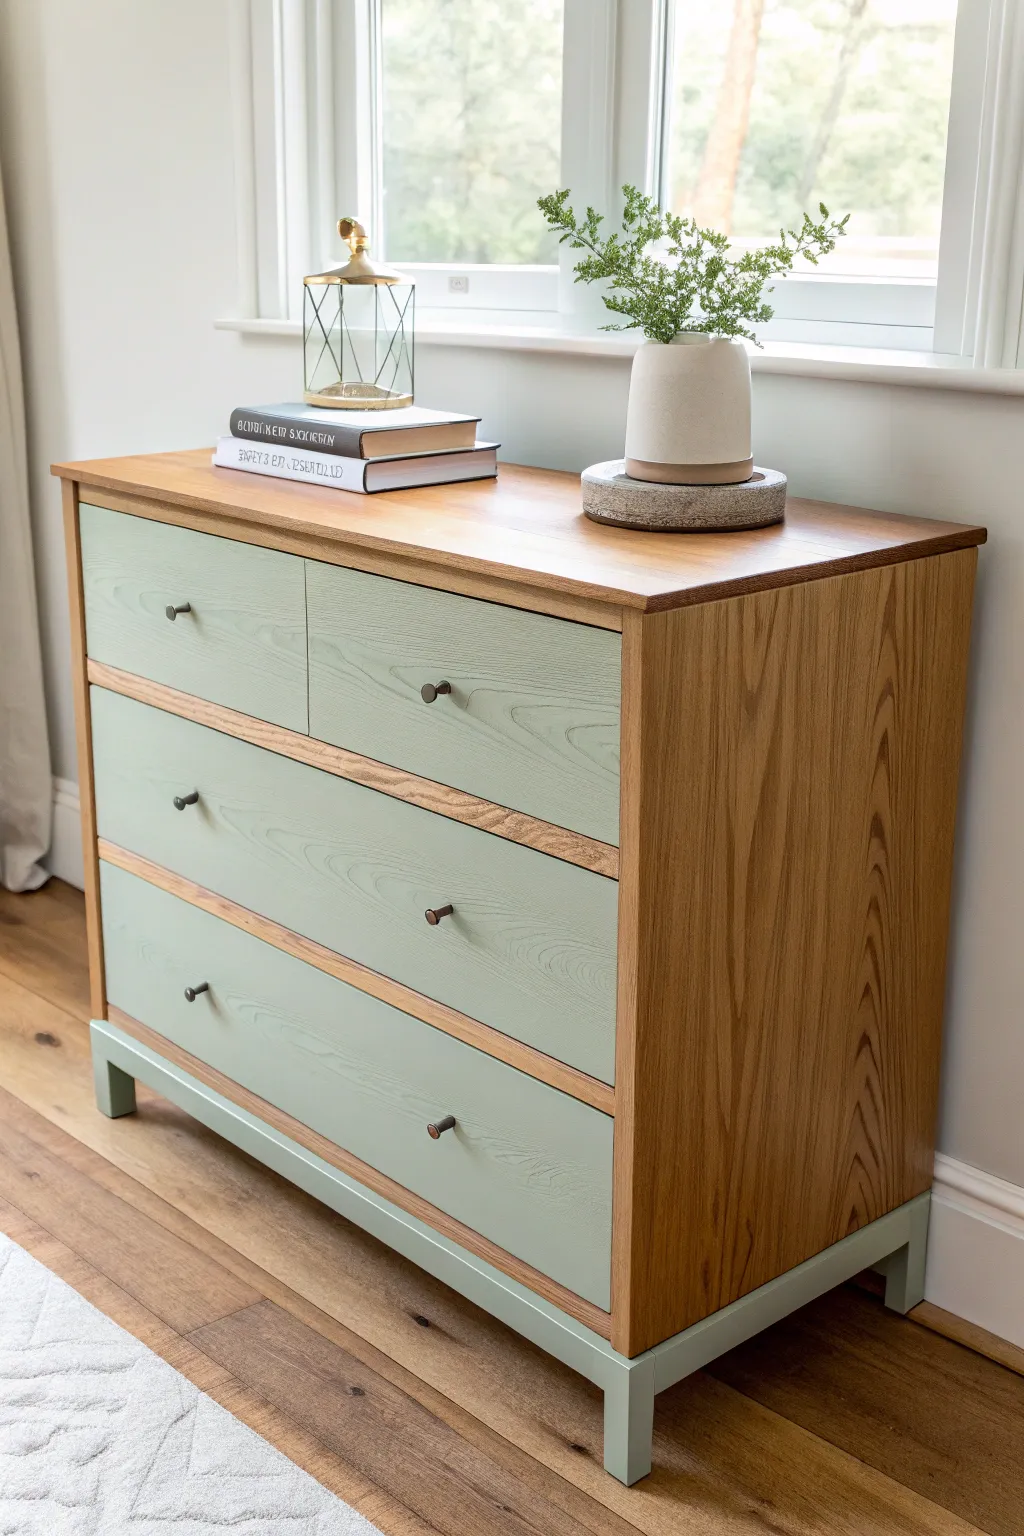
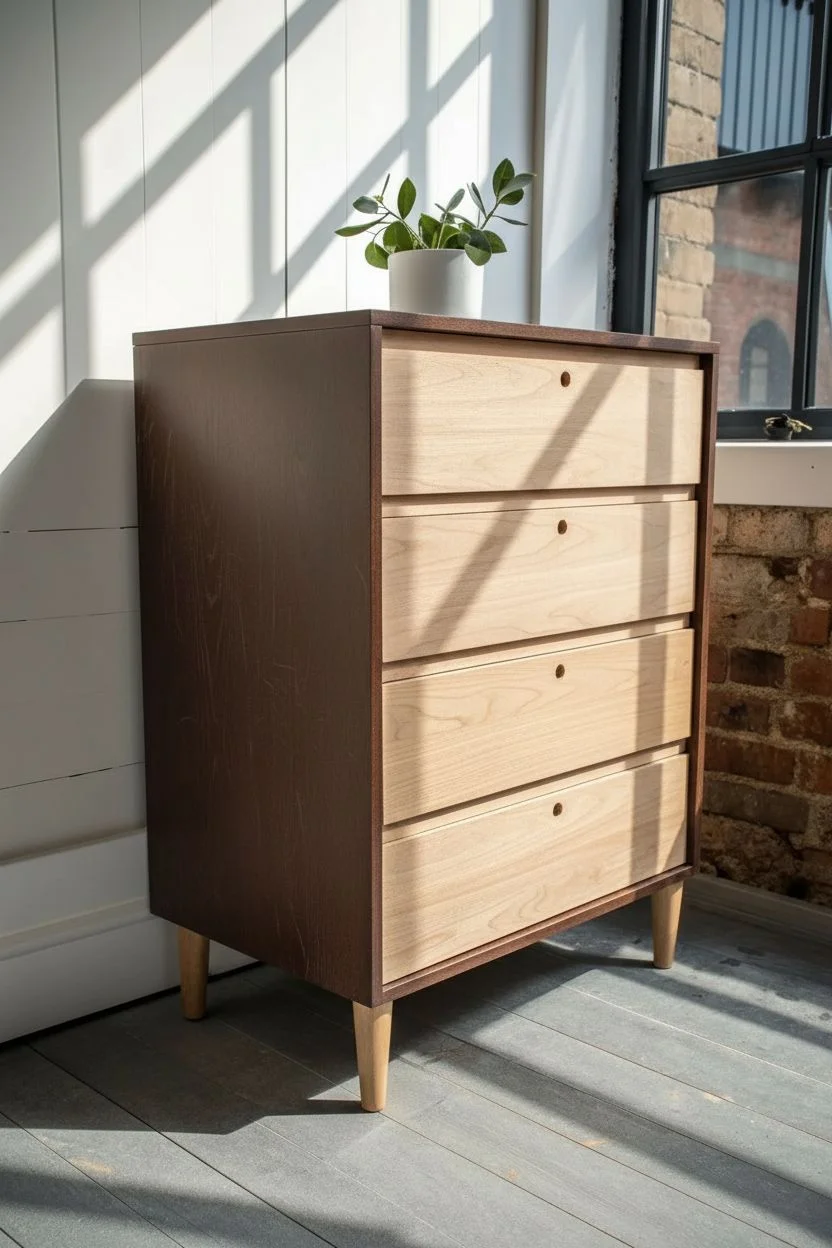
This project breathes fresh life into a classic wooden dresser by pairing the warmth of natural oak with a calming sage green. The result is a modern, two-tone piece that highlights the beautiful wood grain while adding a soft pop of colour to your space.
Step-by-Step
Materials
- Solid wood dresser (oak or pine works best)
- Orbital sander
- Sandpaper discs (80, 120, 220 grit)
- Painter’s tape (high quality)
- Sage green furniture paint (mineral or chalk paint)
- High-density foam roller
- Angled sash brush (2 inch)
- Matte clear topcoat or furniture wax
- Tack cloths
- Screwdriver
- Wood filler (if repairs are needed)
- Drop cloth
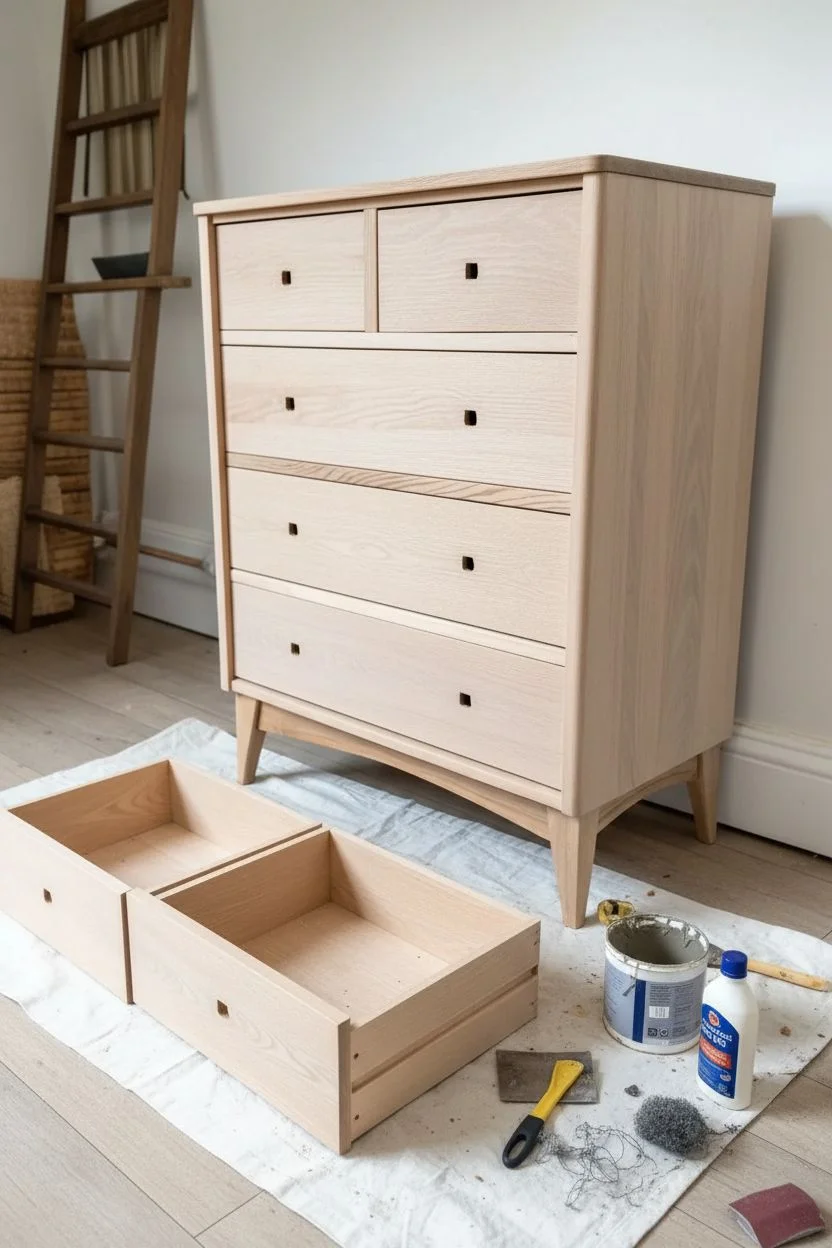
Step 1: Preparation & Sanding
-
Remove hardware:
Begin by removing all the drawers from the dresser. Unscrew any knobs or handles and set them aside in a labelled bag so you don’t lose the screws. -
Clean the piece:
Wipe down the entire dresser with a damp cloth and mild degreaser to remove years of dust, oil, and furniture polish. Let it dry completely. -
Sand the top and sides:
Using your orbital sander with 80-grit paper, sand the top surface and the side panels down to bare wood. This is crucial for revealing that beautiful natural grain we want to preserve. -
Refine the surface:
Switch to 120-grit and then 220-grit sandpaper on the bare wood areas (top and sides) to get a perfectly smooth, scratch-free finish. Wipe away dust frequently. -
Scuff sand the paint zones:
For the areas you plan to paint—specifically the drawer fronts and the bottom leg base—lightly scuff sand with 120-grit paper. You don’t need to strip these to bare wood, just create a key for the paint to stick to. -
Dust removal:
Vacuum up all the sanding dust from the piece and the workspace. Finish by wiping everything down with a tack cloth to ensure a debris-free surface.
Grain Enhancement Secret
To make the oak grain really pop on the natural sections, wipe on a clear hemp oil before your topcoat. It deepens the contrast beautifully.
Step 2: Masking & Painting
-
Tape off the wood frame:
This design features a unique detail where the horizontal bars between the drawers remain natural wood. carefully apply painter’s tape to the top edge, side panels, and those horizontal divider bars to protect them from paint. -
Prime the paint areas:
If your original finish was dark or glossy, apply a coat of stain-blocking primer to the drawer fronts and the leg base. Let it dry according to the can’s instructions. -
Paint the first coat on drawers:
Apply your sage green paint to the drawer fronts. I find using a small foam roller gives the smoothest finish on flat surfaces, while a brush helps get into the edges. -
Paint the base:
Paint the legs and the bottom plinth structure in the same sage green. Ensure you get coverage on the inside edges of the legs. -
Light sanding between coats:
Once the first coat is fully dry, very lightly sand with fine-grit (320 or higher) sandpaper to knock down any bumps. Wipe away the dust. -
Apply second coat:
Apply a second coat of sage green for full opacity and depth of colour. Check for any drips along the edges and smooth them out immediately.
Bleed-Through Blues
If paint bleeds under your tape onto the natural wood, don’t panic. Wrap a putty knife in a damp rag and gently scrape the wet paint away.
Step 3: Sealing & Assembly
-
Remove tape:
While the paint is still slightly tacky (not fully cured), carefully peel off the painter’s tape at a 45-degree angle to ensure crisp, clean lines. -
Seal the natural wood:
Apply a clear matte topcoat or furniture wax to the exposed natural wood areas (top, sides, and frame dividers). Apply 2-3 coats for durability, lightly sanding between coats if using poly. -
Seal the painted areas:
If you used a chalk paint that requires sealing, apply the same clear topcoat or wax over the sage green parts to protect the finish from scratches. -
Reinstall hardware:
Once everything has cured for at least 24 hours, screw the original knobs back onto the drawers. If you want a modern update, you could swap them for matte black or brass pulls. -
Reassemble:
Slide the drawers back into their tracks. Step back and check that the alignment looks correct and the natural wood dividers pop against the sage fronts.
Enjoy styling your refreshed dresser knowing you’ve created a custom piece that balances modern colour with timeless timber.


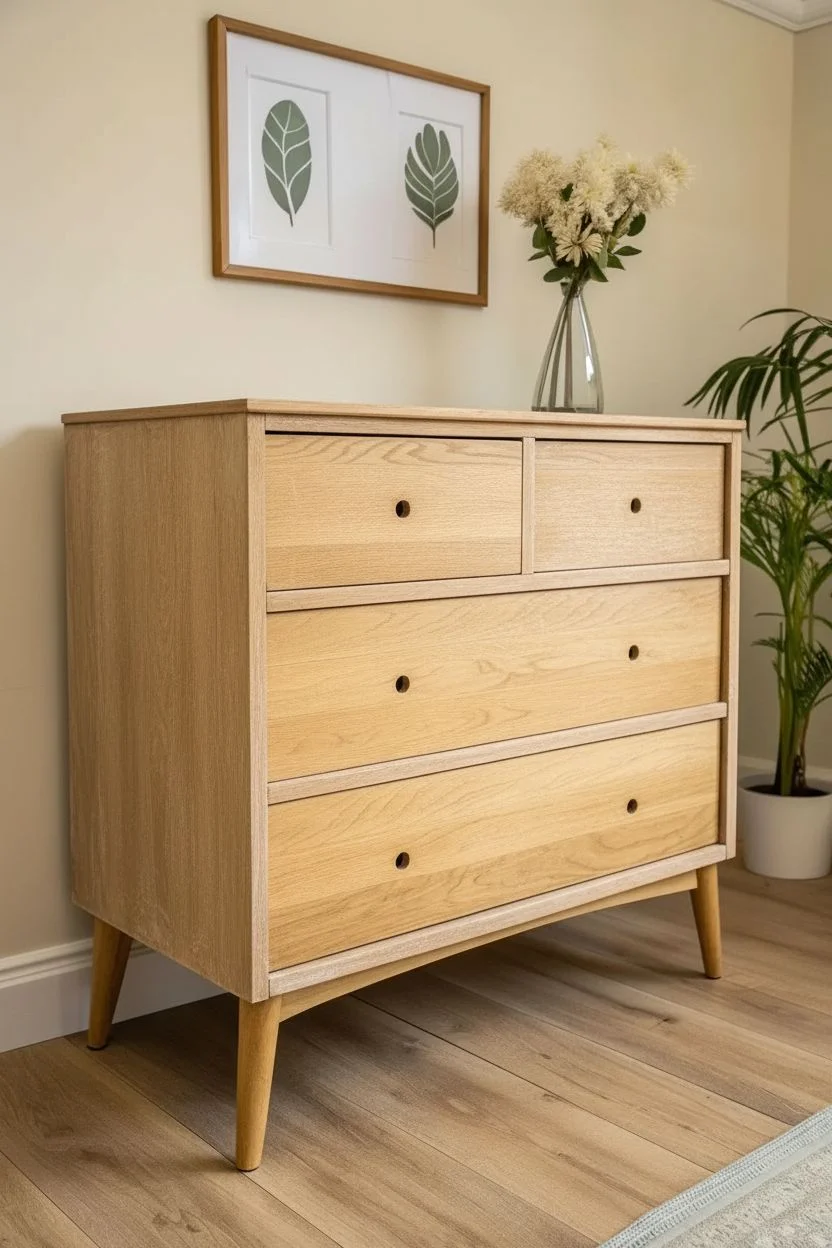
Painted Drawer Fronts With a Natural Wood Frame
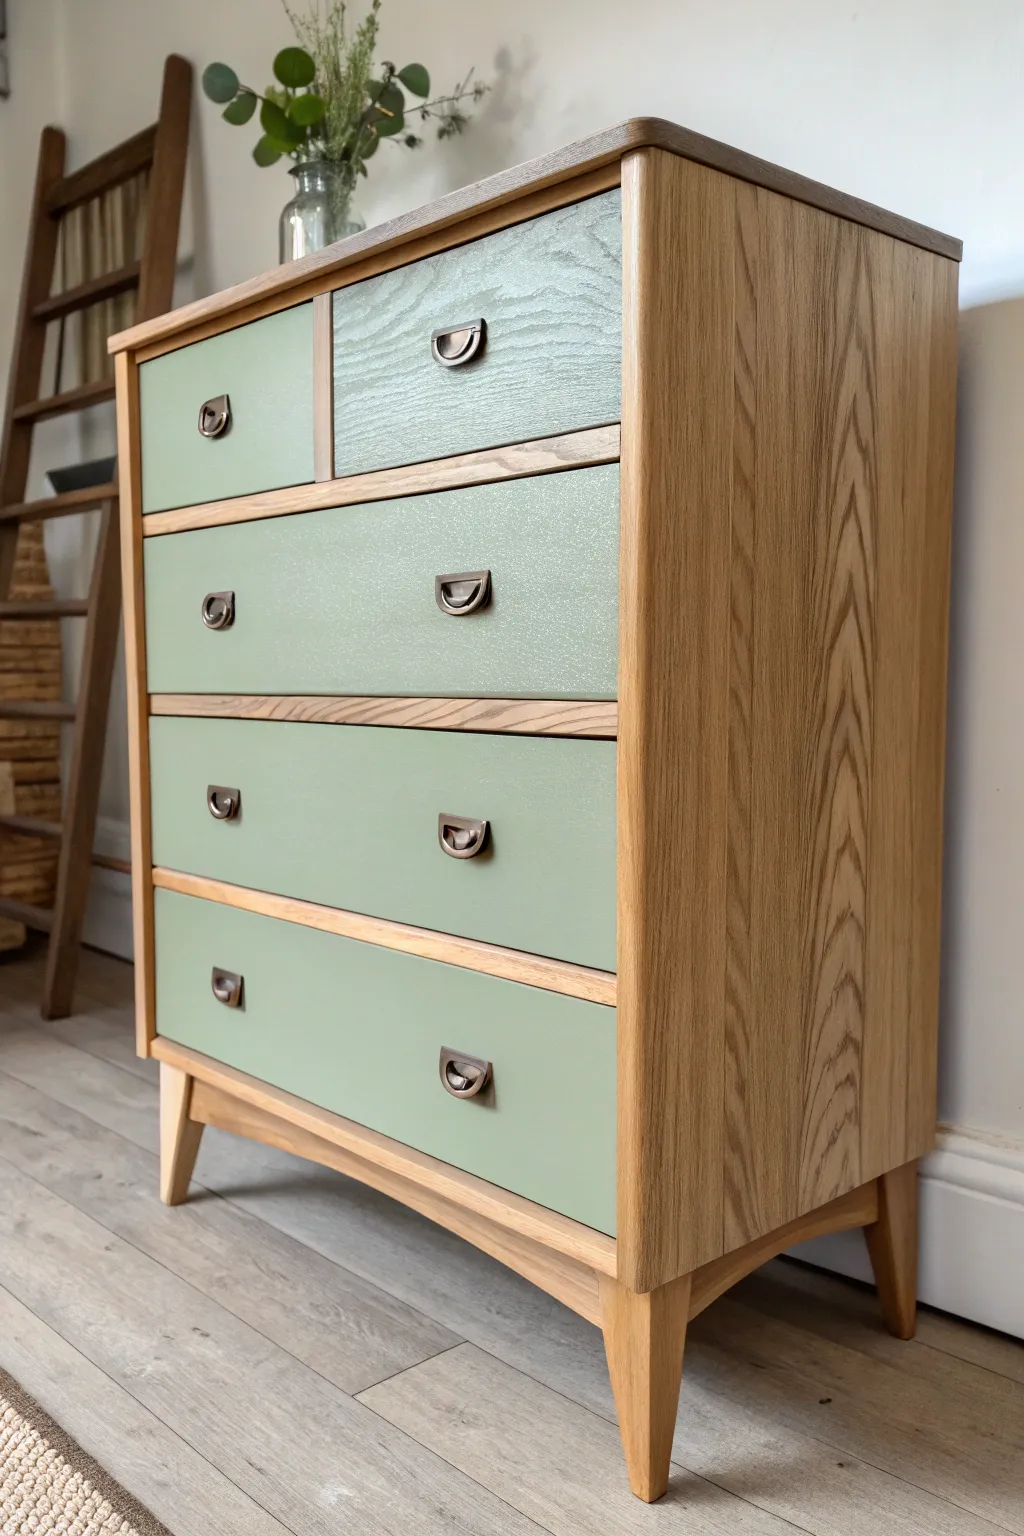
This project transforms a tired wooden dresser into a modern statement piece by pairing the warmth of natural oak with a calming sage green. The result highlights beautiful grain patterns while adding a fresh pop of color that feels undoubtedly contemporary.
Detailed Instructions
Materials
- Wooden chest of drawers
- Orbital sander with 80, 120, and 180-grit discs
- Detail sander or sanding block
- Painters tape (delicate surface)
- Wood furniture stripper (optional)
- Mineral spirits or degreaser
- Tack cloth
- Sage green furniture paint (mineral or chalk paint)
- High-quality synthetic bristle brush (2-inch)
- Small foam roller
- Clear matte or satin polycrylic topcoat
- Danish oil or clear furniture wax (for wood parts)
- Screwdriver for hardware removal
- New cup pull hardware (antique brass finish)
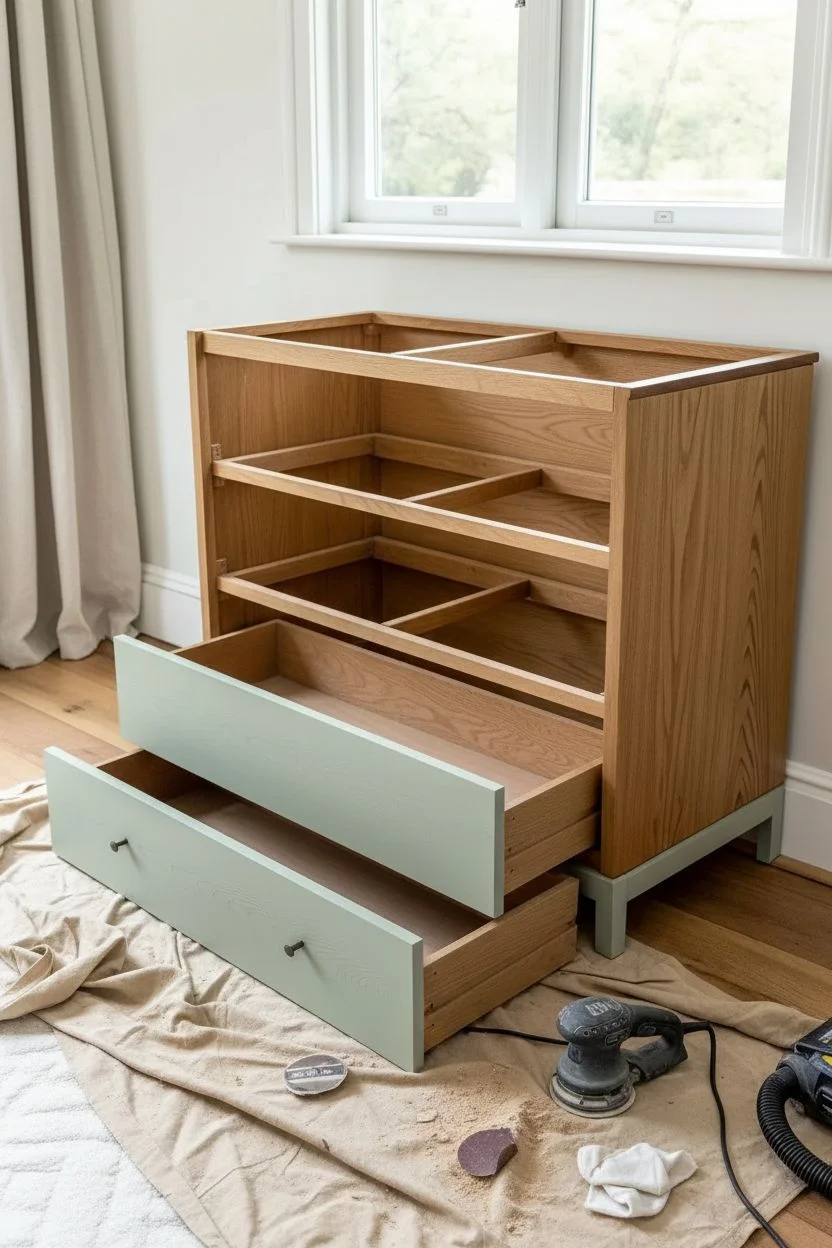
Step 1: Preparation & Stripping
-
Clear the decks:
Remove all the drawers from the frame. Using your screwdriver, carefully take off all existing handles or knobs and set them aside if you plan to reuse them, though new hardware often makes the biggest impact. -
Assess the finish:
Examine the existing finish on the frame and drawer fronts. If the old varnish is thick or flaking, apply a chemical wood stripper according to the manufacturer’s instructions to lift the bulk of the old finish. -
Scrape and clean:
Use a plastic scraper to remove the sludge created by the stripper. Once the bulk is gone, wipe the entire piece down with mineral spirits and steel wool to remove any residue.
Sticky Drawers?
If drawers stick after painting, sand the sides where paint may have dripped. Rub regular candle wax or a bar of soap along the runners for an instant smooth glide.
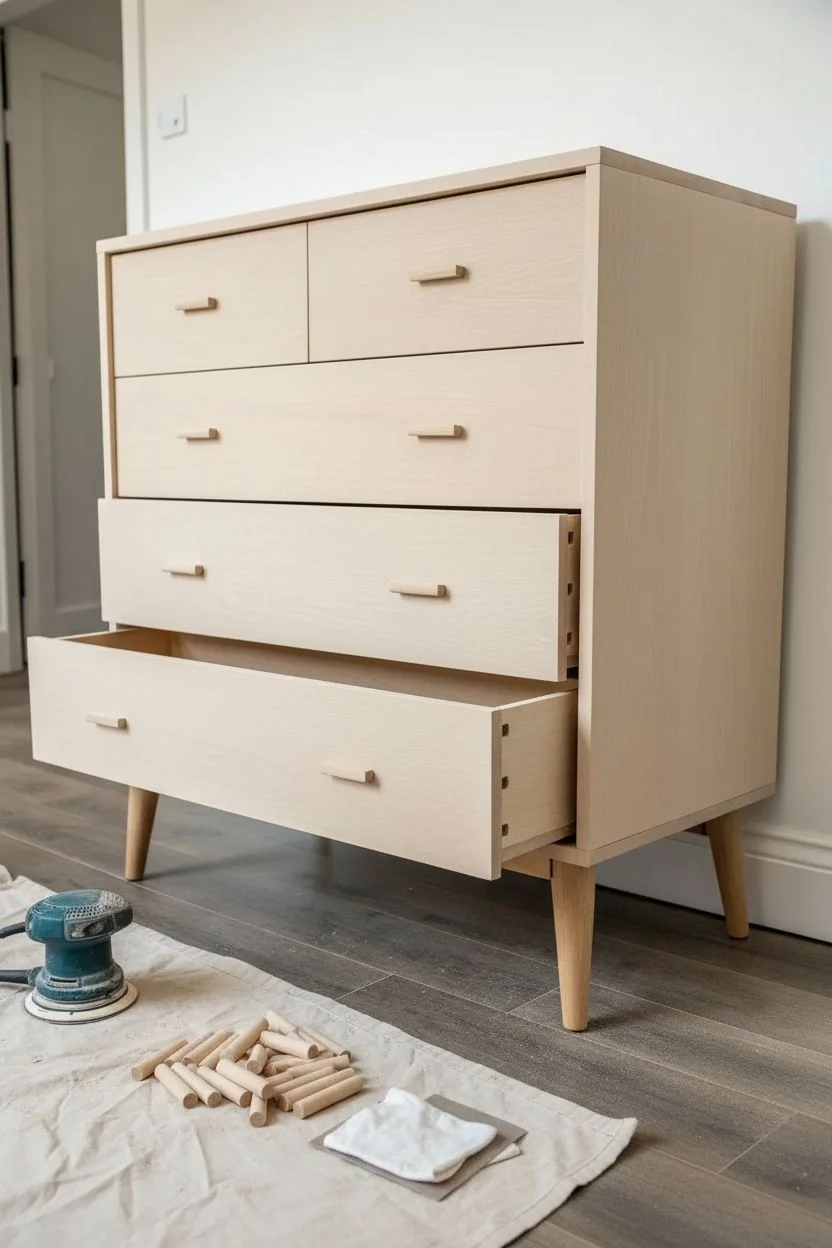
Step 2: Sanding to Bare Wood
-
Initial rough sanding:
Using an orbital sander with 80-grit paper, sand the top, sides, legs, and drawer fronts. The goal is to reveal the raw, natural wood underneath any remaining stain or yellowed varnish. Move the sander slowly with the grain. -
Refining the surface:
Switch to 120-grit paper to smooth out the scratches from the rough sanding. Pay special attention to the frame edges and legs, which might require hand sanding with a block to maintain their shape. -
Final polish:
Finish the sanding process with 180-grit paper. This prepares the wood pores to accept the new finish evenly. Wipe everything down thoroughly with a tack cloth to remove every speck of dust.
Step 3: Painting the Drawers
-
Tape off the edges:
If your drawers have a lip or side edge that you want to keep natural wood, apply painter’s tape precisely along those lines. I find pressing the tape edge down with a credit card ensures no paint bleeds under. -
First coat application:
Stir your sage green furniture paint well. Using a synthetic brush, paint the recessed areas or details first, then use a small foam roller for the flat surfaces to ensure a smooth, stroke-free finish. -
Dry and assess:
Let the first coat dry completely according to the can’s instructions. If the grain is raising slightly, lightly sand with a fine worn sanding sponge before the next step. -
Second coat coverage:
Apply a second coat of green paint. This usually provides full opacity, but thin coats are better than thick ones to avoid drips. Remove the tape while the paint is still slightly tacky to get a crisp line. -
Seal the paint:
Once fully cured (wait at least 24 hours), apply a clear matte polycrylic topcoat over the painted fronts if your paint isn’t self-sealing. This protects against scratches and fingerprints.
Level Up: Drawer Liners
Line the inside of the drawers with a patterned wallpaper or fabric that complements sage green. A vintage floral or geometric print adds a hidden surprise.
Step 4: Finishing the Wood Frame
-
Nourish the wood:
For the main body of the chest and the legs, you want to enhance the natural tone. Applies a coat of Danish oil or a clear furniture wax with a lint-free cloth. Rub it in following the direction of the grain. -
Buff to a sheen:
Let the oil penetrate for about 15 minutes, then wipe off any excess. If using wax, wait for it to haze over and then buff it vigorously to a soft, satin sheen. -
Repeat for durability:
Apply a second or third coat of oil or wax to the top surface, as this area sees the most wear. Allow adequate drying time between coats.
Step 5: Assembly
-
Install hardware:
Attach your new antique brass cup pulls. Ensure they are centered perfectly on the drawer fronts. You may need to drill new holes if the spacing differs from original handles. -
Reinsert drawers:
Slide the drawers back into their corresponding slots on the frame. Check that they glide smoothly; apply a little beeswax to the wooden runners if they stick.
Step back and admire how the fresh sage paint breathes new elegance into the classic wood structure


Classic Dipped Effect on the Bottom Third
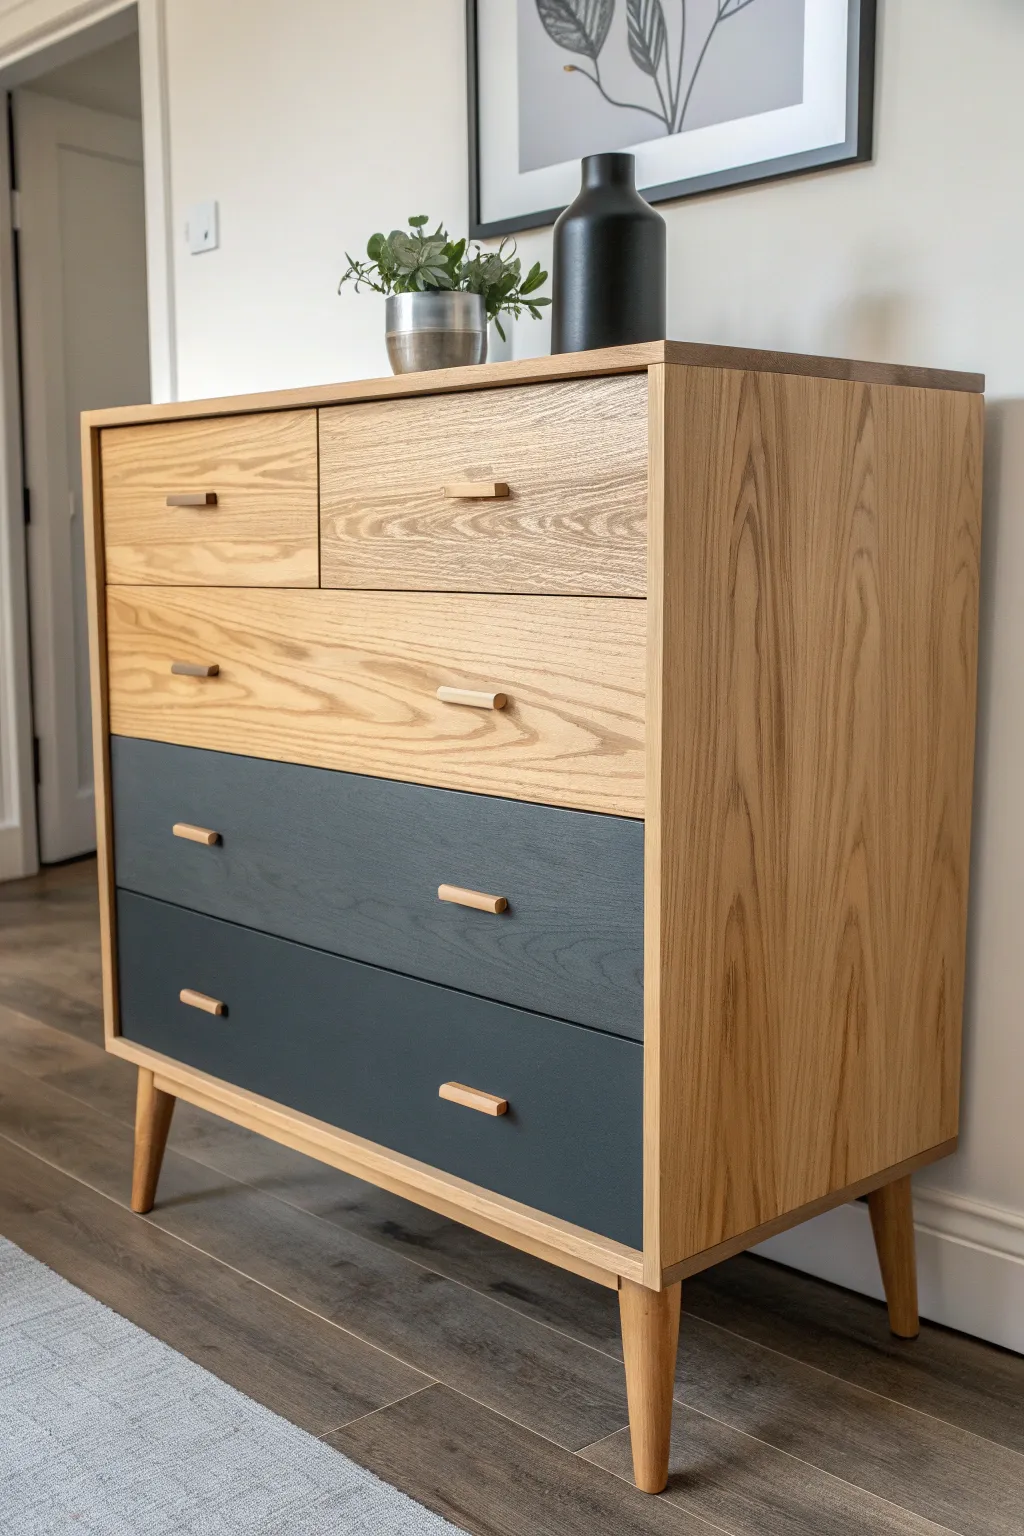
This project transforms a standard wooden dresser into a contemporary statement piece by painting only the bottom drawers in a deep, moody charcoal. The result is a sophisticated ‘dipped’ look that highlights the natural grain of the wood while adding a grounding pop of color.
Step-by-Step Guide
Materials
- Solid wood or veneer dresser (raw or needing stripping)
- Orbital sander
- Sandpaper discs (80, 120, 220 grit)
- Tack cloths
- Painter’s tape (high quality)
- Zero-VOC primer
- Deep charcoal or slate blue latex paint (matte or eggshell finish)
- Clear matte polyurethane or furniture wax
- High-density foam roller and tray
- Small angled sash brush
- Screwdriver
- Wood filler (if repairing old hardware holes)
- Drop cloth
Step 1: Preparation & Sanding
-
Disassemble the piece:
Begin by removing all drawers from the dresser shell. Use a screwdriver to detach the original handles or knobs and set the hardware aside if you plan to reuse it. -
Assess the surface:
Check the wood for any existing varnish or damage. If the dresser has a thick, shiny clear coat, you will need to be thorough with the sanding phase. -
Rough sanding:
Using an orbital sander with 80-grit paper, sand the entire exterior casing, top, and drawer fronts to strip away the old finish. Move in the direction of the wood grain to avoid scratches. -
Smooth the surface:
Switch to 120-grit sandpaper for a second pass to smooth out the roughness. Finish with 220-grit sandpaper for a silky, touchable surface ready for finishing. -
Clean thoroughly:
Vacuum up the bulk of the sawdust, then wipe every nook and cranny with a tack cloth. Any remaining dust will ruin your paint finish later, so be diligent here.
Step 2: Planning the Design
-
Select paint areas:
For this dipped look, identify exactly which drawers will be painted. In our example, the bottom two large drawers receive paint, while the top drawers and the entire outer casing remain natural wood. -
Protect the handles:
If your handles are wood and you want them to match the unpainted sections (as shown in the photo), sand them gently now. If painting the drawer fronts but keeping handles natural, ensure the handles are removed before painting.
Wood Grain Pro-Tip
For a truly professional finish on the painted drawers, gently run a damp sponge over the raw wood before your first sanding. This ‘pops’ the grain for a smoother final result.
Step 3: Painting & Sealing
-
Prime the bottom drawers:
Apply a thin coat of primer to the fronts of the bottom two drawers only. This ensures true color coverage, especially with dark pigments like charcoal. -
Dry and light sand:
Let the primer dry completely. I usually give it a very light hand-sand with 220-grit paper to knock down any raised grain before applying color. -
First coat of color:
Using a high-density foam roller, apply your deep charcoal paint to the primed drawer fronts. Rolled thin layers are better than one thick layer to avoid drips. -
Cut in the edges:
Use a small angled sash brush to carefully paint the edges of the drawer fronts that the roller missed, ensuring the sides (that slide into the dresser) remain clean. -
Apply second coat:
Once the first coat is dry to the touch, apply a second coat for full opacity. A third coat might be necessary for very deep shades to eliminate streakiness. -
Seal the natural wood:
While the paint cures, apply a clear matte polyurethane to the unpainted top drawers and the entire dresser casing. This protects the raw wood without yellowing it or adding unwanted shine. -
Seal the handles:
Don’t forget to apply the same clear matte finish to the wooden handles so they match the dresser body perfectly. -
Protective topcoat on paint:
Once the charcoal paint has cured (at least 24 hours), apply the same clear matte poly over the painted drawers to protect against scuffs and scratches.
Geometric Level Up
Instead of a horizontal split, use painter’s tape to create a diagonal line across the middle drawers, painting only the bottom triangle for an edgy geometric twist.
Step 4: Assembly
-
Reattach hardware:
Once everything is fully dry and not tacky, screw the wooden handles back onto the drawer fronts. -
Reassemble drawers:
Slide the drawers back into their designated slots. The contrast between the warm oak casing and the cool, dark bottom drawers should now be striking. -
Final inspection:
Check for any paint that might have accidentally gotten on the casing side rails and wipe it off if it’s fresh, or gently scrape it if dry.
Now you have a stunning, custom furniture piece that perfectly balances rustic warmth with modern color


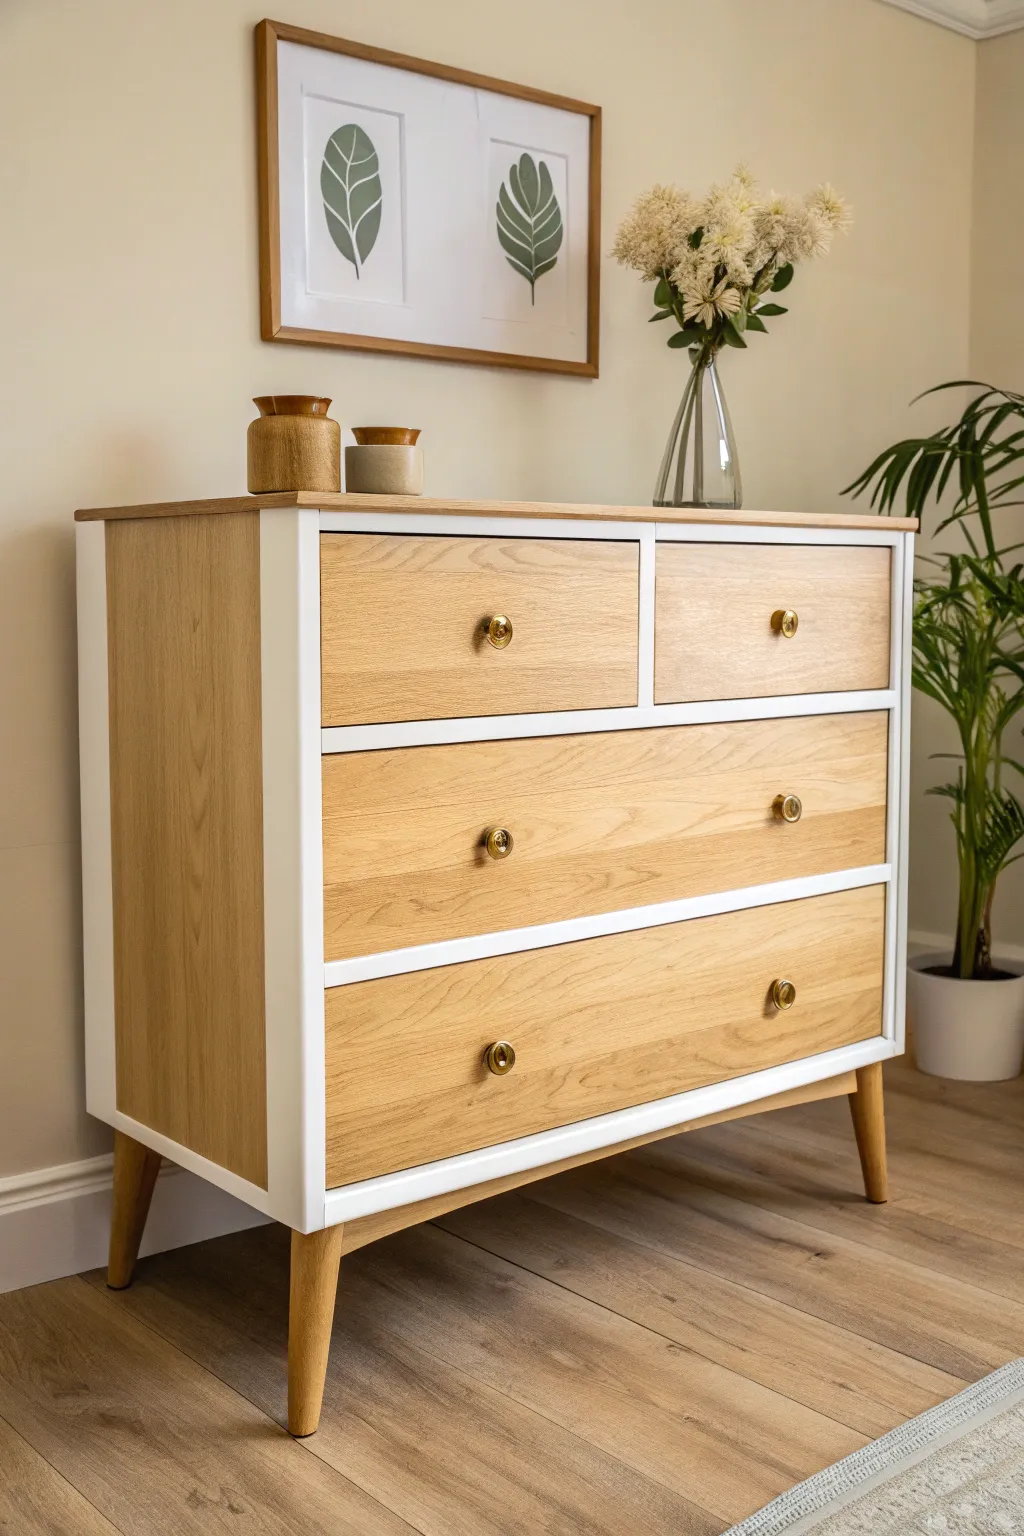
Drawer-by-Drawer Alternating Two-Tone Pattern

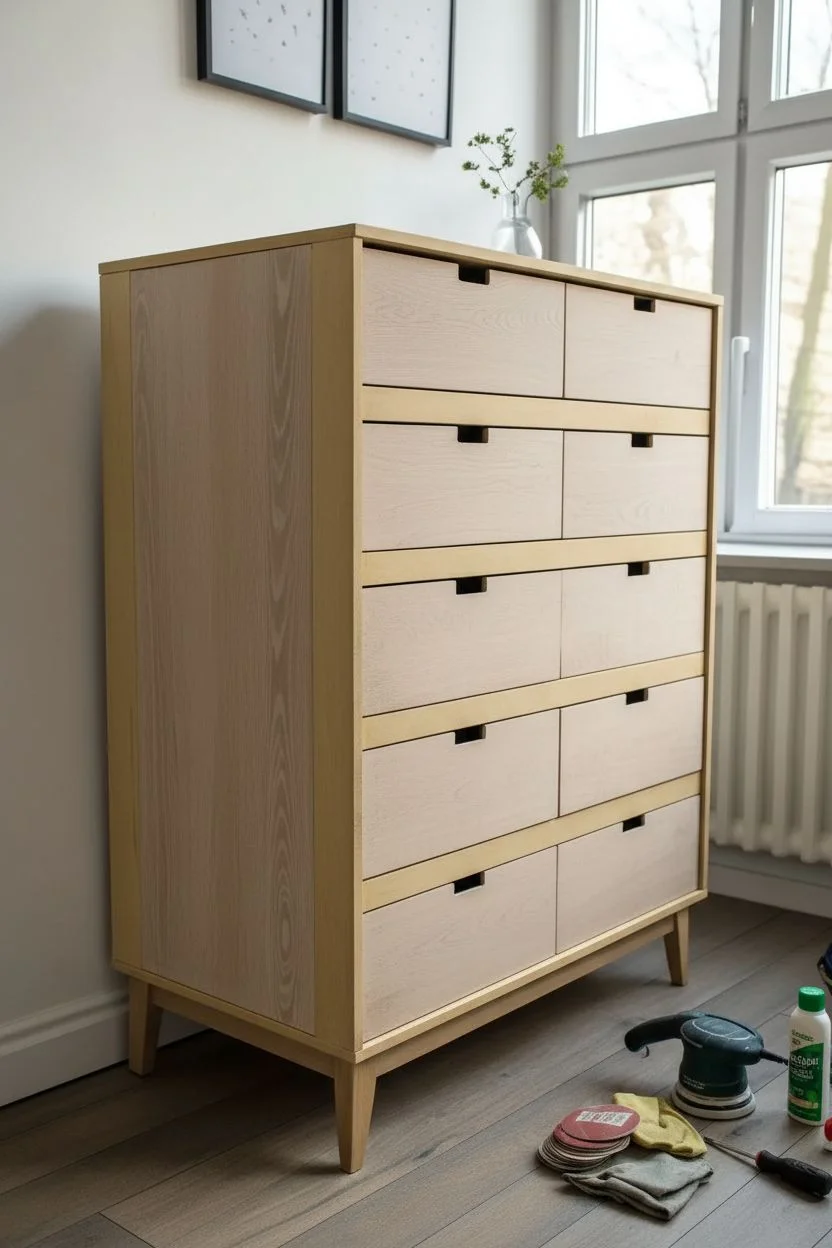
This project transforms a standard dresser into a sleek, Scandinavian-inspired statement piece by highlighting the contrast between crisp white lines and warm, natural wood grain. The design frames the organic texture of the timber with a clean, painted grid for a sophisticated two-tone look.
How-To Guide
Materials
- Solid wood or wood veneer dresser
- Orbital sander with 80, 120, and 220 grit discs
- High-quality painter’s tape (frog tape recommended)
- White semi-gloss furniture paint
- Clear matte polyurethane topcoat
- Synthetic angled brush (2 inch)
- Foam roller and tray
- Screwdriver for hardware removal
- Wood filler (if repairing old holes)
- Tack cloth
- Degreaser cleaner
Step 1: Preparation & Sanding
-
Dissassemble the furniture:
Begin by removing all drawers from the dresser shell. Use your screwdriver to take off all existing handles and knobs. If you plan to change the hardware style to the sleek black tabs shown, fill the old holes with wood filler now and let it dry. -
Clean surfaces thoroughly:
Wipe down the entire piece with a degreaser to remove oils, wax, or furniture polish. This ensures your sanding is effective and doesn’t just push grime into the wood grain. -
Strip the old finish:
Using an orbital sander with 80-grit paper, sand down the drawer fronts and the large side panels where you want the wood grain exposed. You need to get down to raw wood here. -
Refine the wood surface:
Switch to 120-grit and then 220-grit sandpaper on the raw wood areas. This will smooth out any swirl marks from the coarser paper and prepare the grain for sealing. -
Scuff sand paintable areas:
For the parts that will be painted white (the frame, legs, and horizontal dividers between drawers), a light scuff sanding with 120-grit is sufficient to help the primer adhere. You don’t need to strip these to bare wood.
Step 2: Taping & Painting
-
Mask off the side panels:
This is the most crucial step for crisp lines. Apply painter’s tape precisely along the inner edge of the side panel frame, protecting the wood rectangle in the center that you just sanded. -
Seal the tape edges:
I like to run a fingernail or a credit card firmly along the edge of the tape to ensure a tight seal. This prevents fresh paint from bleeding onto your beautiful raw wood. -
Prime the frame structure:
Apply a coat of stain-blocking primer to the main body of the dresser, focusing on the outer edges and the horizontal strips between the drawer slots. Use a foam roller for smooth, flat areas to avoid brush marks. -
Paint the first coat of white:
Once dry, apply your white semi-gloss furniture paint. Use the angled brush to cut in around the corners and the foam roller for the long flat stretches of the frame. -
Apply subsequent coats:
Let the first coat dry according to the can’s instructions, then lightly sand with 220-grit paper before applying a second coat for full opacity. -
Remove tape promptly:
Peel off the painter’s tape while the final coat of paint is still slightly tacky. Pulling it away at a 45-degree angle helps ensure a razor-sharp line between the white frame and the wood side panel.
Bleeding Lines?
If paint sneaks under your tape onto the wood, don’t panic. Wrap 220-grit sandpaper around a sharp block and carefully sand away the bleed once the paint is fully dry.
Step 3: Sealing & Assembly
-
Clean the wood grain:
Wipe down all the exposed raw wood surfaces (drawer fronts and side panels) with a tack cloth to remove every speck of dust. -
Apply clear coat:
Using a clean synthetic brush or a lint-free rag, apply a matte polyurethane topcoat to the wood sections. This protects the wood without adding an artificial shine, keeping that modern organic look. -
Sand between topcoats:
After the first layer of poly dries, the wood grain might ‘raise’ slightly. Smooth it down with very fine sandpaper (320-grit or higher) before applying a second and third coat for durability. -
Install new hardware:
Measure and mark the center top edge of each drawer front. Pre-drill small pilot holes if necessary, then screw in the matte black tab pulls. -
Reassemble the dresser:
Slide the drawers back into their designated slots. Step back and check that the wood grain patterns look balanced—sometimes swapping two drawers can improve the overall flow of the grain.
Level Up: Whitewash
For a lighter, beachier wood tone, apply a diluted white paint wash (1 part paint to 4 parts water) to the raw wood before sealing it with clear poly.
Now you have a stunning, custom piece that balances clean modernism with natural warmth
BRUSH GUIDE
The Right Brush for Every Stroke
From clean lines to bold texture — master brush choice, stroke control, and essential techniques.
Explore the Full Guide
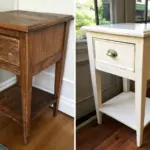
Two-Tone Nightstands: Painted Base With Wood Drawer
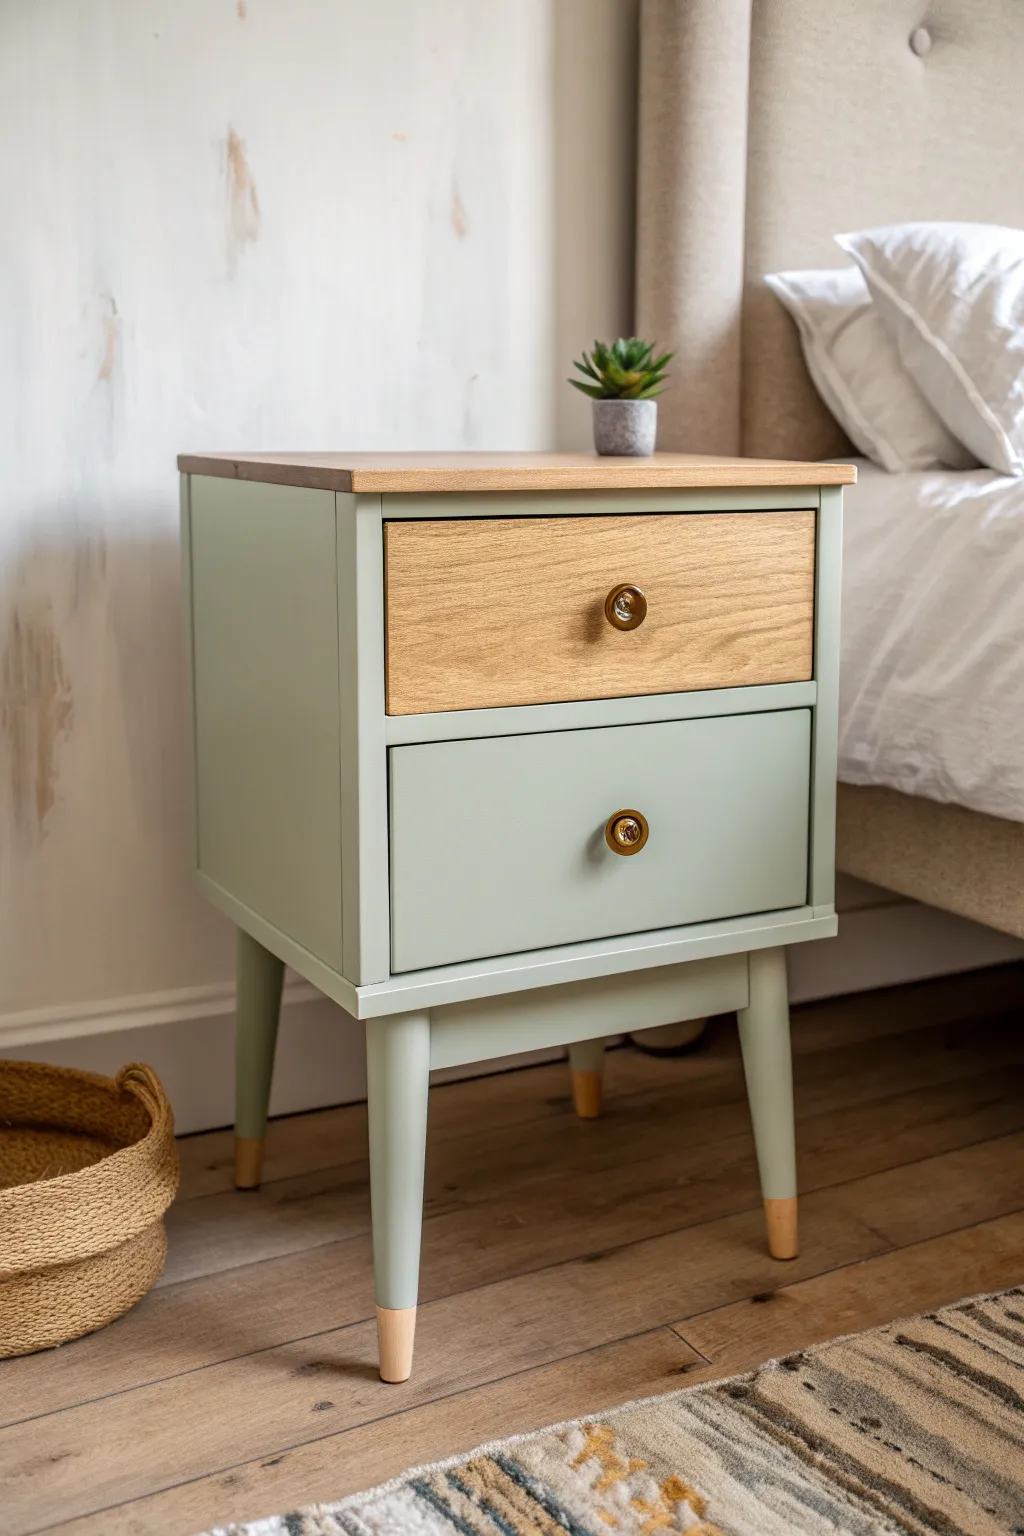
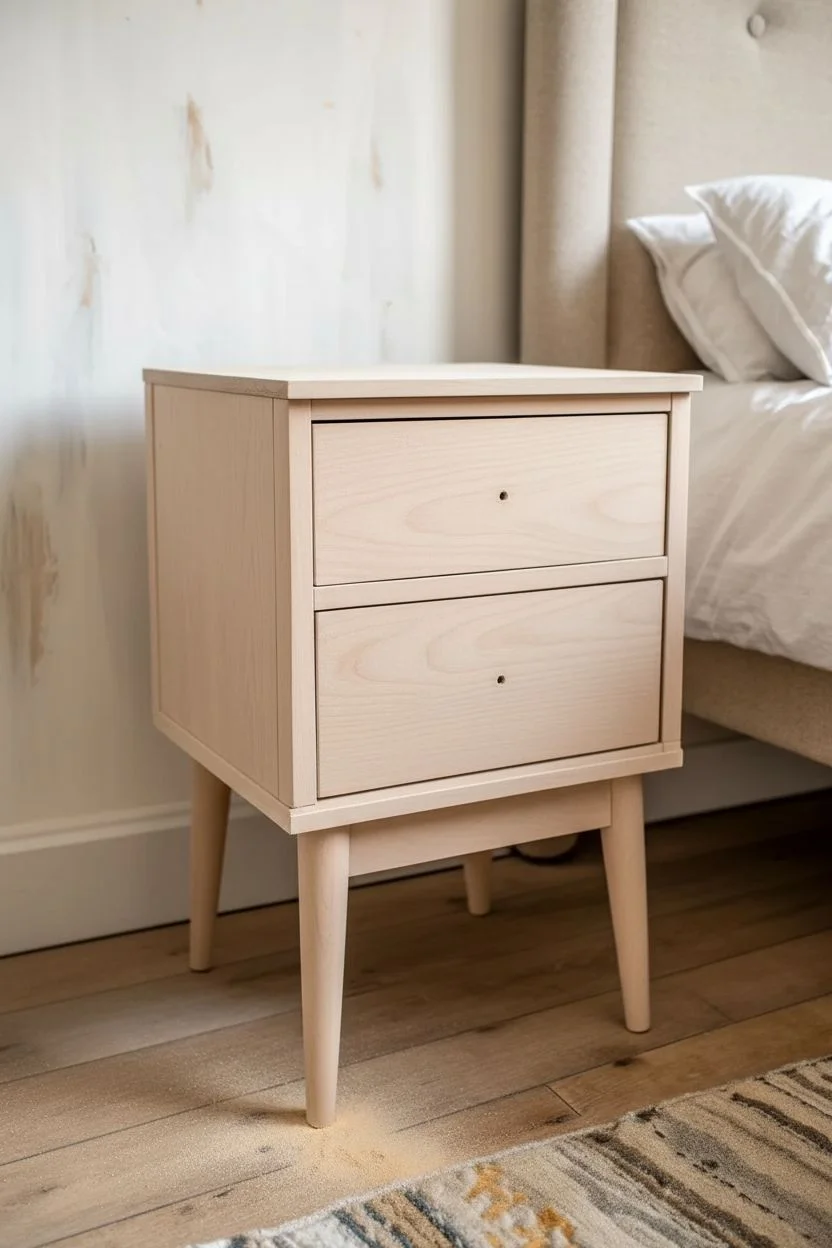
Give a simple wooden nightstand a fresh, modern update by combining soft sage green paint with natural exposed wood grain. This project highlights the beauty of contrast, letting the top drawer and leg tips shine in warm oak while the body gets a sleek, matte finish.
Step-by-Step Tutorial
Materials
- Wooden nightstand (unfinished or stripped)
- Sandpaper (120, 220, and 320 grit)
- Orbital sander (optional, for larger flat surfaces)
- Painter’s tape (high quality)
- Wood stain (light oak or natural tone)
- Primer (stain-blocking)
- Sage green furniture paint (satin or matte finish)
- Polyurethane topcoat (matte or satin)
- Foam roller and tray
- Synthetic bristle sash brush (2-inch)
- Lint-free rags
- Screwdriver
- Tack cloth
- Drop cloth
Step 1: Preparation & Sanding
-
Remove hardware:
Begin by removing the drawers from the nightstand body. Unscrew the knobs or handles from each drawer and set all hardware aside in a labeled bag so nothing gets lost. -
Clean surfaces:
Wipe down the entire piece with a damp cloth or a mild degreaser if the furniture is second-hand, ensuring there is no dust, oil, or sticky residue. -
Initial sanding:
Using 120-grit sandpaper, thoroughly sand the entire nightstand. If you have an existing finish, your goal is to break the seal; if it’s unfinished wood, simply smooth it out. -
Refine the wood grain:
Switch to 220-grit sandpaper to smooth out the surfaces that will remain unpainted—specifically the top drawer front, the top surface of the nightstand, and the bottom tips of the legs. These areas need to be extra smooth for staining. -
Clean dust:
Vacuum up the sanding dust and wipe the piece down with a tack cloth to ensure a perfectly clean surface for the next steps.
Bleed-Through Blues
If paint bleeds under tape on the legs, don’t panic. Wait for it to dry fully, then use a small craft knife to gently scrape away the excess paint, or lightly sand it off with a folded piece of 320-grit paper.
Step 2: Staining & Taping
-
Stain exposed wood:
Apply your chosen wood stain to the top drawer front, the top surface of the nightstand, and the bottom 3 inches of the legs using a lint-free rag. Wipe away excess stain immediately for an even tone. -
Dry and seal wood:
Allow the stain to dry completely according to the manufacturer’s instructions. Once dry, apply a thin coat of polyurethane to these stained areas to protect them from paint bleed later. -
Tape the legs:
Measure exactly 3 inches up from the bottom of each leg (or your desired height for the ‘dipped’ look). Wrap painter’s tape tightly around the leg at this mark, ensuring the edge is firmly pressed down to prevent paint from seeping under. -
Tape the top edge:
Carefully apply painter’s tape along the underside of the top wooden surface. You want to protect that freshly stained wood top while you paint the sides and frame.
Design Twist
For a subtle surprise, line the inside of the drawers with a botanical or geometric patterned wallpaper that matches the green tone. It adds a pop of personality every time you open the drawer.
Step 3: Painting Process
-
Prime the paintable areas:
Apply a coat of stain-blocking primer to the main body, the sides, the bottom drawer front, and the upper portion of the legs. Avoid the top drawer and the taped-off leg tips. -
Sand primer:
Once the primer is fully dry, lightly scuff it with 320-grit sandpaper to knock down any raised grain or brush strokes, then wipe clean with a tack cloth. -
First coat of green:
Stir your sage green furniture paint well. Use a foam roller for the large flat sides and top of the drawer to get a smooth, texture-free finish. -
Detail work:
For the legs and corners where the roller won’t fit, use the synthetic sash brush. I find that long, unidirectional strokes help minimize brush marks on these narrower parts. -
Second coat:
Allow the first coat to dry for the time recommended on your paint can (usually 2-4 hours). Apply a second coat for full opacity and rich color depth. -
Remove tape:
While the second coat is still slightly tacky (not fully dry), carefully peel off the painter’s tape from the legs and the top edge. Pulling while wet helps ensure a crisp, clean line without chipping paint.
Step 4: Finishing Touches
-
Topcoat application:
Once the paint has cured (give it at least 24 hours), apply a clear matte or satin polyurethane topcoat over the painted surfaces to protect them from chips and scratches. -
Reattach hardware:
Screw the knobs back onto the drawer fronts. For this look, vintage brass or gold knobs complement the green and wood tones perfectly. -
Final assembly:
Slide the drawers back into their tracks, placing the unpainted wood drawer on top and the painted green drawer on the bottom to complete the two-tone design.
Step back and admire your custom piece that perfectly balances natural warmth with modern color
High-Contrast Dark-and-Light Two-Tone for Drama
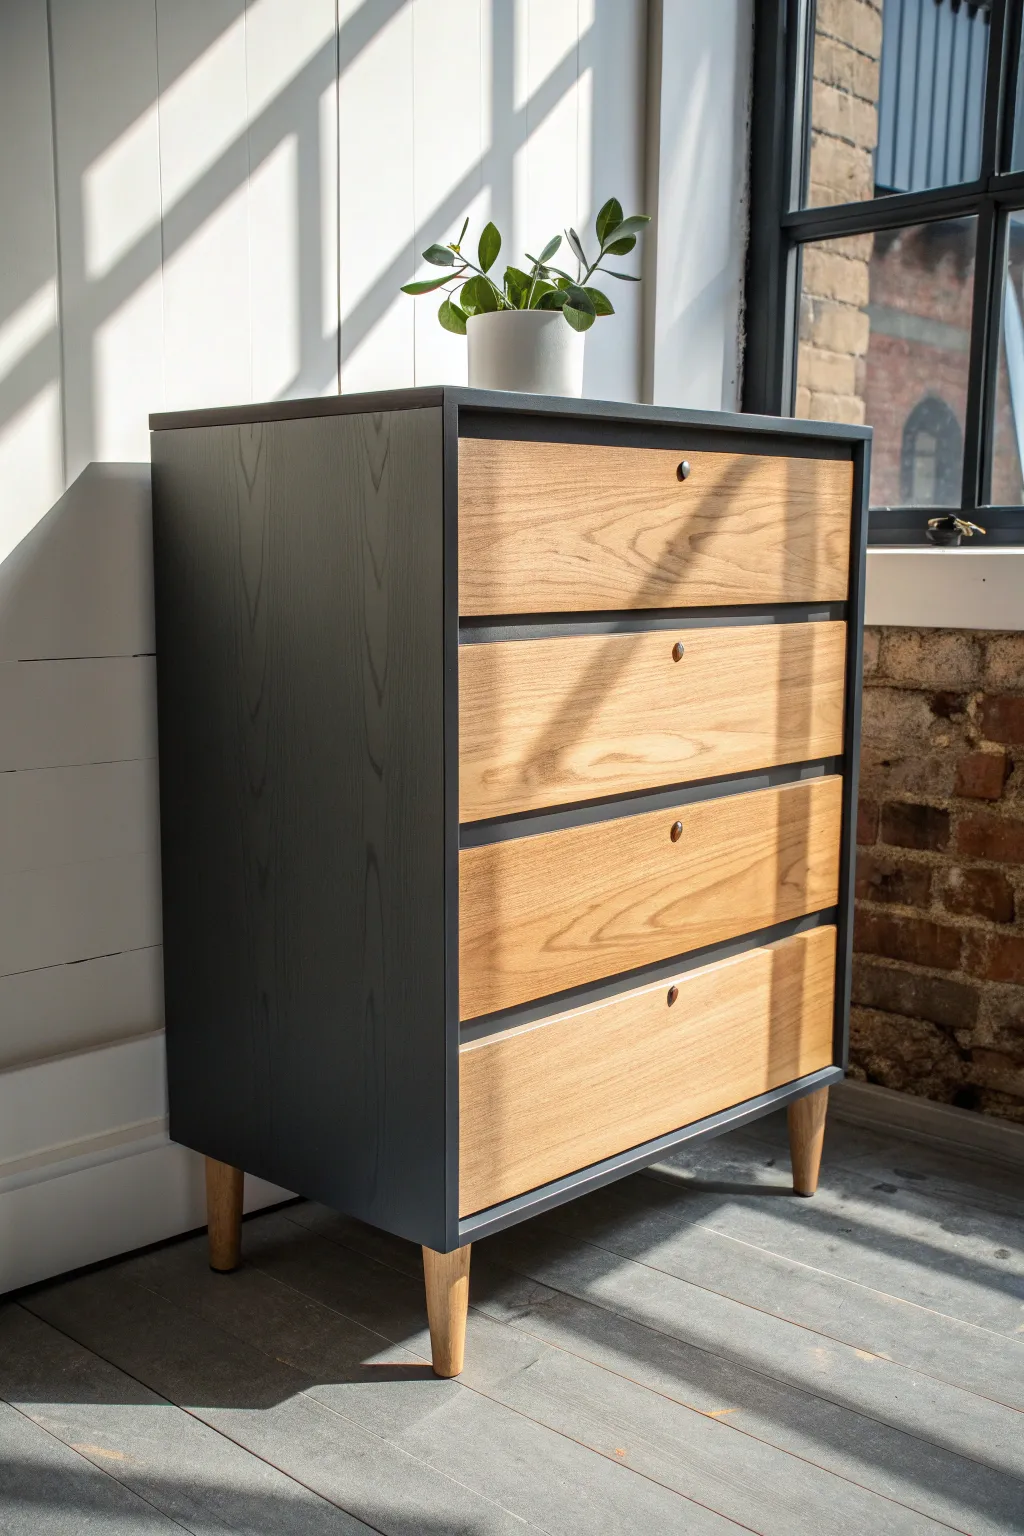
This project creates a striking modern look by pairing a deeply saturated charcoal frame with the warmth of exposed natural wood grain. It turns an ordinary dresser into a high-contrast statement piece that feels both mid-century inspired and completely contemporary.
Step-by-Step Tutorial
Materials
- Dresser with solid wood drawers
- Medium-grit sandpaper (120-grit)
- Fine-grit sandpaper (220-grit)
- Orbital sander (optional but recommended)
- Painter’s tape (high quality)
- Wood stain (Natural or Light Oak)
- Satin polyurethane topcoat
- Dark charcoal chalk or mineral paint
- Paint primer (if using latex paint)
- Small foam roller
- Angled sash brush (2-inch)
- Tack cloth
- Screwdriver
- Wood filler (if needed for repairs)
Step 1: Preparation & Sanding
-
Remove hardware:
Begin by removing all the drawers from the dresser. Unscrew the knobs or pulls and set them aside in a labeled bag so you don’t lose any screws. -
Identify the zones:
Evaluate your piece. For this look, the outer casing (top and sides) will be painted dark, while the drawer fronts will be stripped to raw wood. The legs can match the drawers for a cohesive look. -
Clean everything:
Wipe down the entire dresser with a degreaser or mild soap and water solution to remove years of furniture polish, oil, and dust. -
Sand the drawer fronts:
Using an orbital sander with 120-grit paper, sand the drawer fronts down to bare wood. You need to remove the existing finish completely to get that uniform light tone. Move to 220-grit for a final smooth pass. -
Sand the legs:
If the legs are wood, sand them down to match the drawers. This connects the design visually from top to bottom. -
Scuff sand the frame:
For the outer casing that will be painted, you don’t need to strip to bare wood. Just scuff sand with 120-grit paper to create ‘tooth’ for the paint to grip. -
Remove dust:
Use a vacuum with a brush attachment to remove sawdust, then wipe everything down thoroughly with a tack cloth.
Clean Lines Secret
When painting the frame edge near the drawer openings, paint a slight bit ‘inside’ the cabinet. This ensures no unpainted wood peeks out when drawers are closed.
Step 2: Staining & Sealing the Wood
-
Test your stain:
Test your stain on a small, inconspicuous area (like the back of a drawer front) to ensure the color matches your vision. -
Apply stain:
Apply the stain to the drawer fronts and legs using a clean rag or foam brush. Wipe off excess stain quickly to keep the tone light and natural. -
Seal the wood:
Once dry, apply two coats of clear satin polyurethane to the drawers and legs. Sand very lightly with super-fine grit between coats for a professional factory finish.
Step 3: Painting the Body
-
Tape off edges:
If there are any inner rails or edges near the drawer openings you want to protect, mask them carefully with painter’s tape. -
Prime (if necessary):
If your paint requires it, apply a stain-blocking primer to the casing. I find this step crucial if the original wood had a red undertone that might bleed through. -
Cut in the corners:
Use your angled brush to paint the corners, edges, and tricky spots of the main frame with your dark charcoal paint. -
Roll the flat surfaces:
While the brushed edges are still wet, use a small foam roller to paint the large flat sides and top. This eliminates brush strokes and creates that sleek, modern texture. -
Second coat:
Let the first coat dry completely according to the can’s instructions, then apply a second coat for full opacity and depth. -
Seal the paint:
If using chalk paint, apply a wax or matte polycrylic topcoat to protect that deep charcoal color from scuffs and fingerprints.
Texture Play
Consider using a ‘wire brush’ technique on the raw drawer fronts before staining to open the grain deeply, giving the wood a more tactile, rustic-modern feel.
Step 4: Assembly
-
Reinstall hardware:
Screw the original knobs back on, or consider swapping them for minimal brass or matte black pulls to modernize the piece further. -
Reassemble:
Slide the drawers back into their tracks. Step back and ensure everything aligns correctly and the contrast line is sharp.
Now step back and admire how contrast completely transforms the character of your furniture

PENCIL GUIDE
Understanding Pencil Grades from H to B
From first sketch to finished drawing — learn pencil grades, line control, and shading techniques.
Explore the Full Guide
Two-Tone With a Framed Front Face (Painted Border + Center)

This tutorial transforms a standard wooden dresser into a sophisticated statement piece by highlighting its geometry with a crisp, painted frame. The contrast between the bright white borders and the warm, natural wood grain creates a clean, architectural look that feels both retro and fresh.
Step-by-Step
Materials
- Wooden dresser (solid wood or veneer)
- White furniture paint (satin or semi-gloss finish)
- Painter’s tape (high-quality, gentle release)
- Sandpaper (120, 180, and 220 grit)
- Orbital sander (optional, but speeds up the process)
- Tack cloth
- Primer (bonding primer highly recommended)
- Small foam roller
- Angled sash brush (1.5 – 2 inch)
- Clear matte or satin polyurethane topcoat
- Screwdriver
- Wood filler (if repairs are needed)
- Clean rags
- Mineral spirits or degreaser
Step 1: Preparation & Sanding
-
Disassemble the hardware:
Begin by removing all the drawers from the dresser carcass. Use your screwdriver to detach the gold knobs and any other hardware, placing them in a labeled bag so nothing gets lost. -
Clean surfaces thoroughly:
Wipe down the entire piece with a degreaser or mineral spirits to remove years of furniture polish, oils, and dust. This ensures your sanding and finishing steps will adhere properly. -
Sand the wood areas:
Focusing on the drawer fronts and side panels that will remain natural, sand away the old finish using the orbital sander or sanding block. Start with 120 grit to remove the varnish, then move to 180 grit for a smoother surface. Be careful not to sand through the veneer. -
Scuff sand the paint areas:
For the areas you intend to paint white—specifically the front face frame and the strips between drawers—you only need to scuff sand with 180 grit to give the paint something to grip. You don’t need to strip this back to raw wood entirely. -
Dust removal:
Vacuum up the bulk of the sawdust, then wipe everything down with a tack cloth to catch the fine particles. A dust-free surface is critical for a smooth finish.
Seal Your Tape
For perfect lines, paint a thin layer of clear matte sealer over the tape edge before applying your white paint. This blocks paint bleed-under.
Step 2: Taping & Priming
-
Tape the natural wood zones:
This is the most crucial step for achieving that crisp border. Carefully apply painter’s tape to the side panels where they meet the front frame. Ensure the edge is perfectly flush with the corner. -
Protect the drawer interiors:
While the drawers are out, you might want to tape off the inner edges of the drawer cavities on the main body to prevent paint drips inside. -
Apply bonding primer:
Using your sash brush for corners and a foam roller for flat areas, apply a coat of bonding primer to the front face frame. I like to let this dry for at least an hour longer than the can suggests to ensure maximum adhesion. -
Light send between coats:
Once the primer is fully dry, lightly run a 220-grit sanding sponge over it to smooth out any brush strokes or raised grain. Wipe away the dust.
Luxe Hardware Upgrade
Swap standard knobs for heavy, brushed brass finger pulls or T-bar handles. The modern metallic accent elevates the simple wood-and-white combo instantly.
Step 3: Painting & Sealing
-
First coat of white paint:
Stir your white furniture paint thoroughly. Apply the first coat to the primed frame sections using the foam roller for a smooth, spray-like finish. Use the brush to get into the tight corners where the horizontal and vertical dividers meet. -
Second coat application:
After the first coat dries completely, apply a second coat for full opacity. If the white still looks thin, a third light coat is better than one heavy, dripping coat. -
Remove tape promptly:
Peel off the painter’s tape while the final coat of paint is still slightly tacky. Pull the tape away from the painted edge at a 45-degree angle to ensure a razor-sharp line. -
Seal the natural wood:
Turn your attention to the raw wood drawer fronts and side panels. Apply a clear polyurethane topcoat to bring out the grain’s warmth. Use long, even strokes with a clean brush or lint-free rag. -
Sand between topcoats:
Allow the first layer of polyurethane to dry, then sand very lightly with 220 grit or a brown paper bag to knock down any raised grain. Wipe clean. -
Final sealing coat:
Apply a second and final coat of polyurethane to the wood areas for durability. If you want extra protection on the painted white frame, you can lightly clear coat that as well, though many furniture paints generally don’t require it. -
Reassembly:
Once everything has cured for at least 24 hours (soft cure), reattach your gold knobs to the drawer fronts and slide the drawers back into their designated spots.
Enjoy the refined, custom look of your newly refreshed dresser knowing you created those crisp lines yourself


Have a question or want to share your own experience? I'd love to hear from you in the comments below!