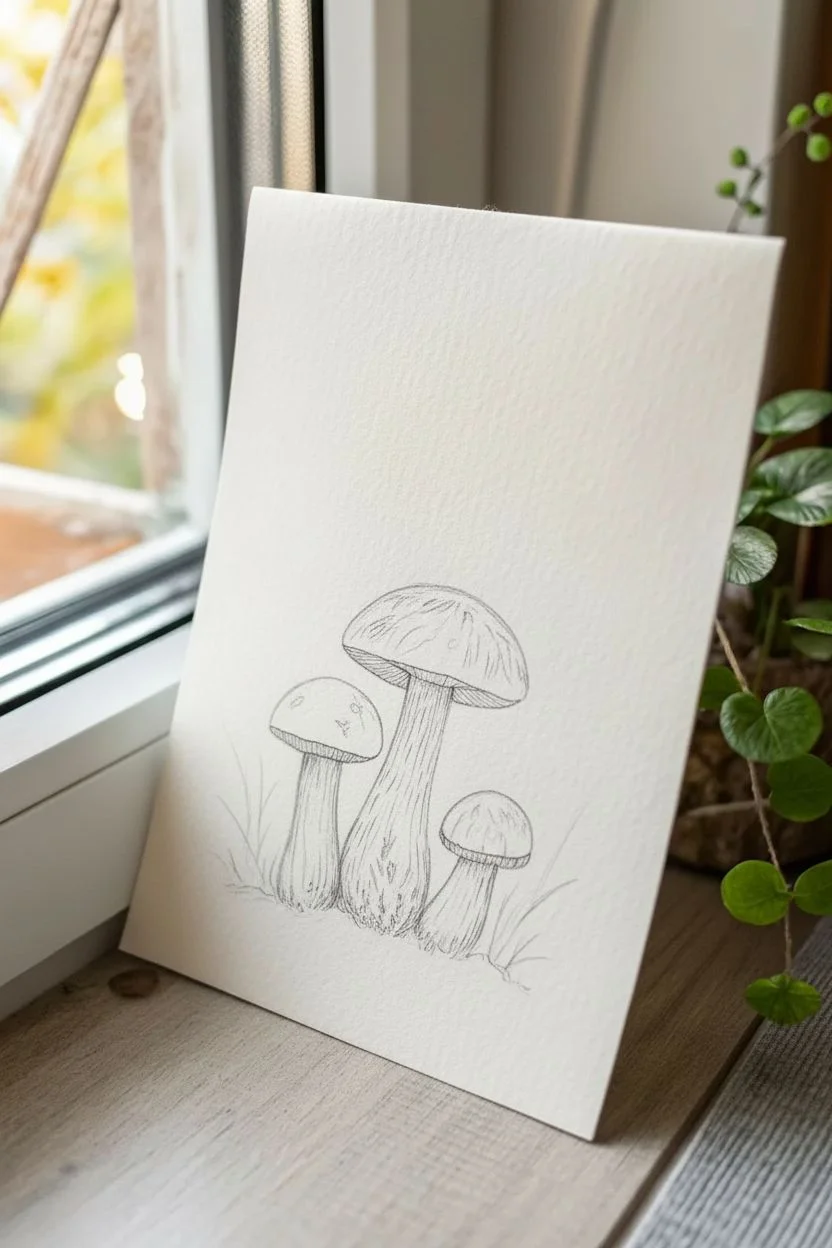
If you’ve been craving a cute, easy subject that looks charming fast, mushroom painting is it. I love how a simple cap-and-stem shape can turn into something magical with just a few bold colors and playful details.
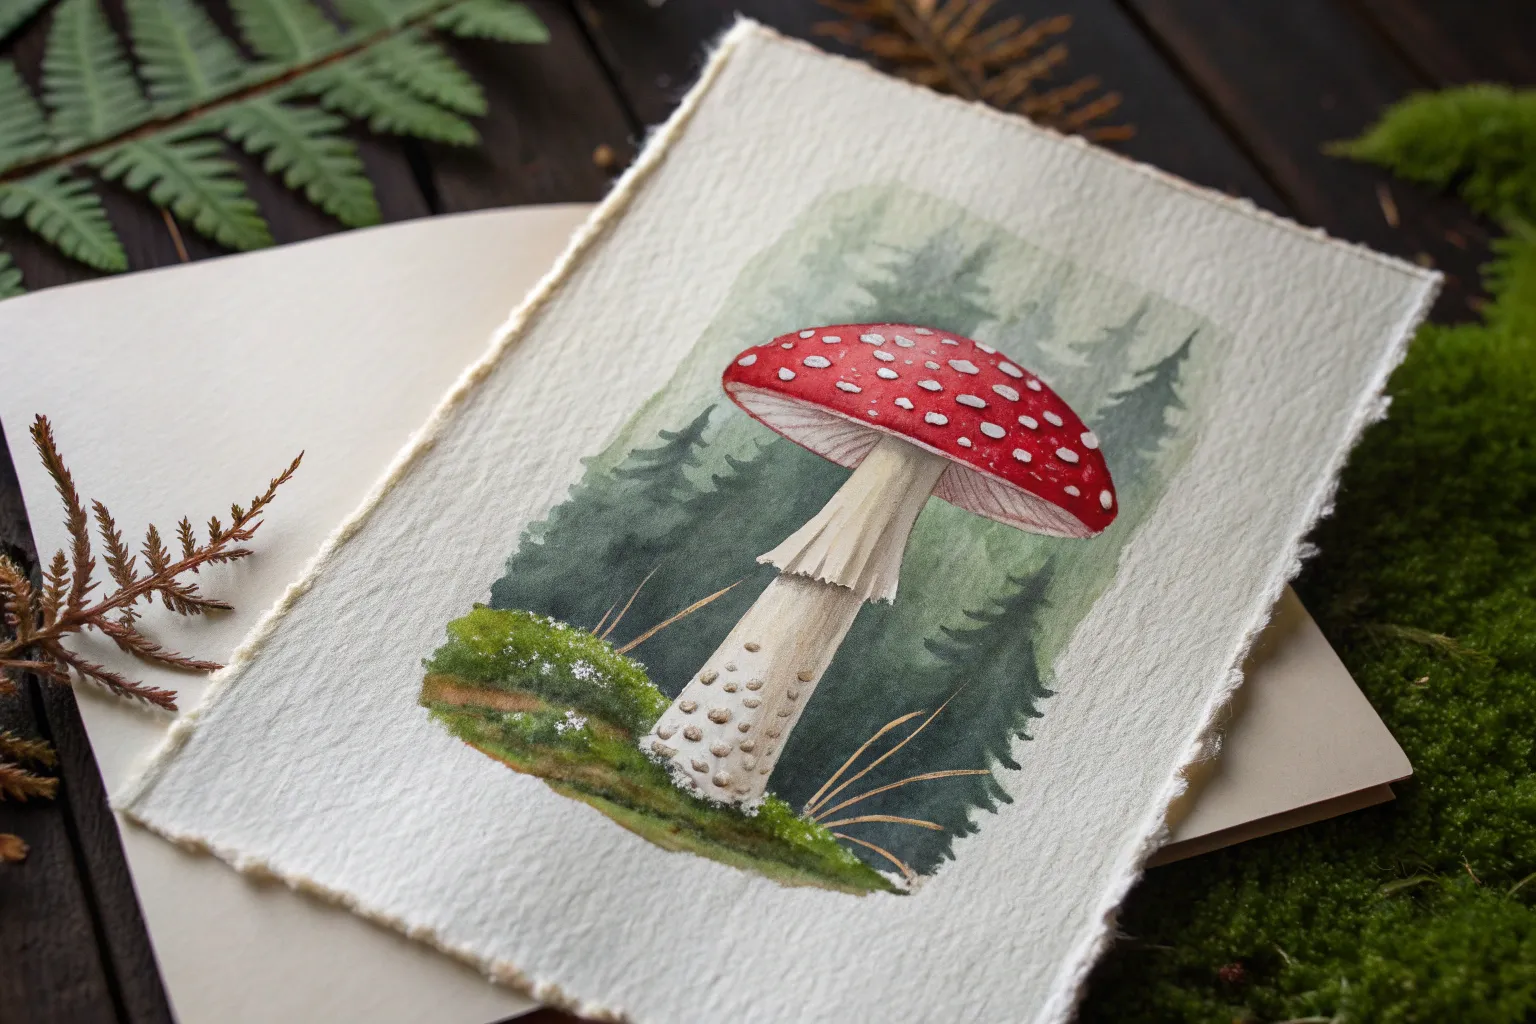
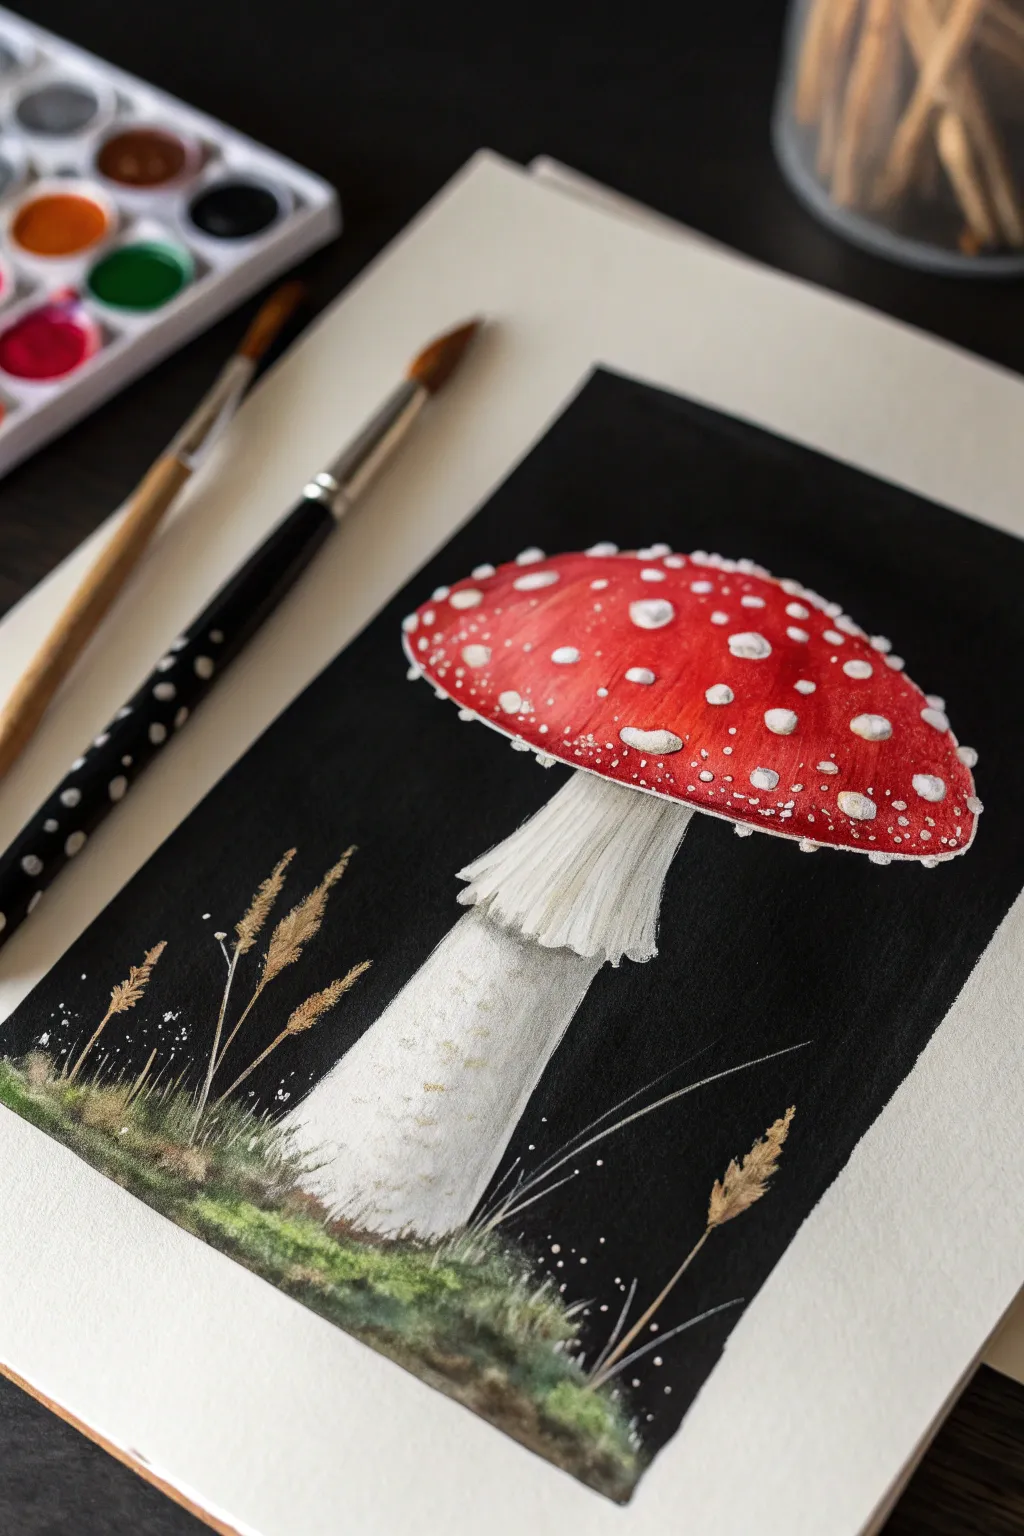
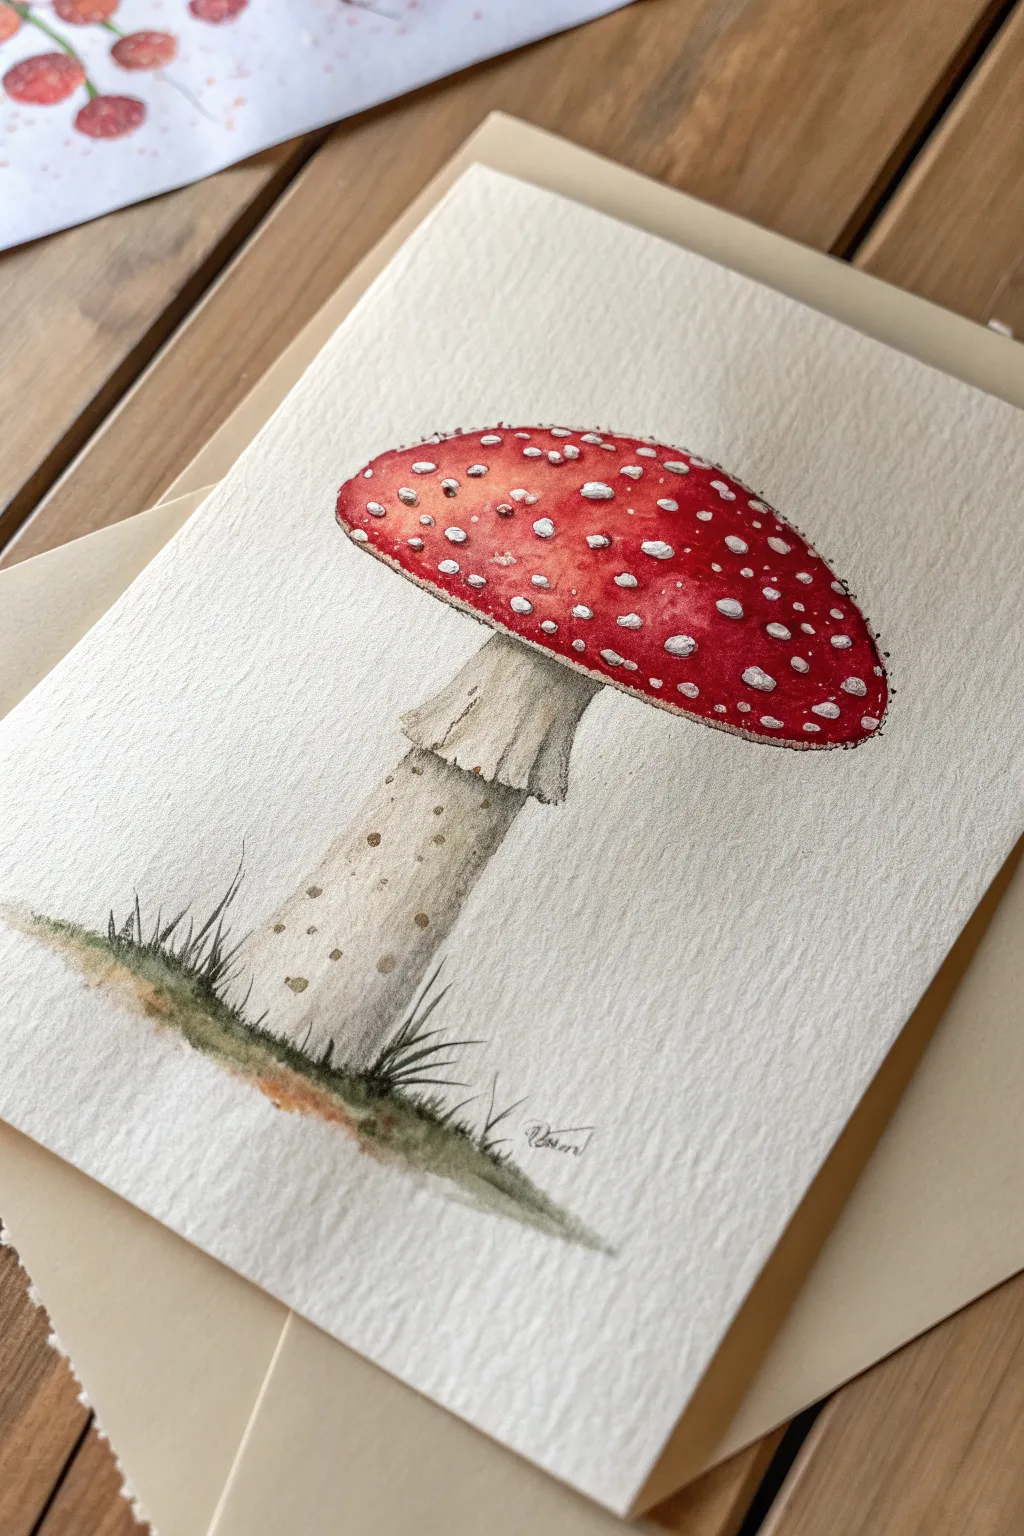
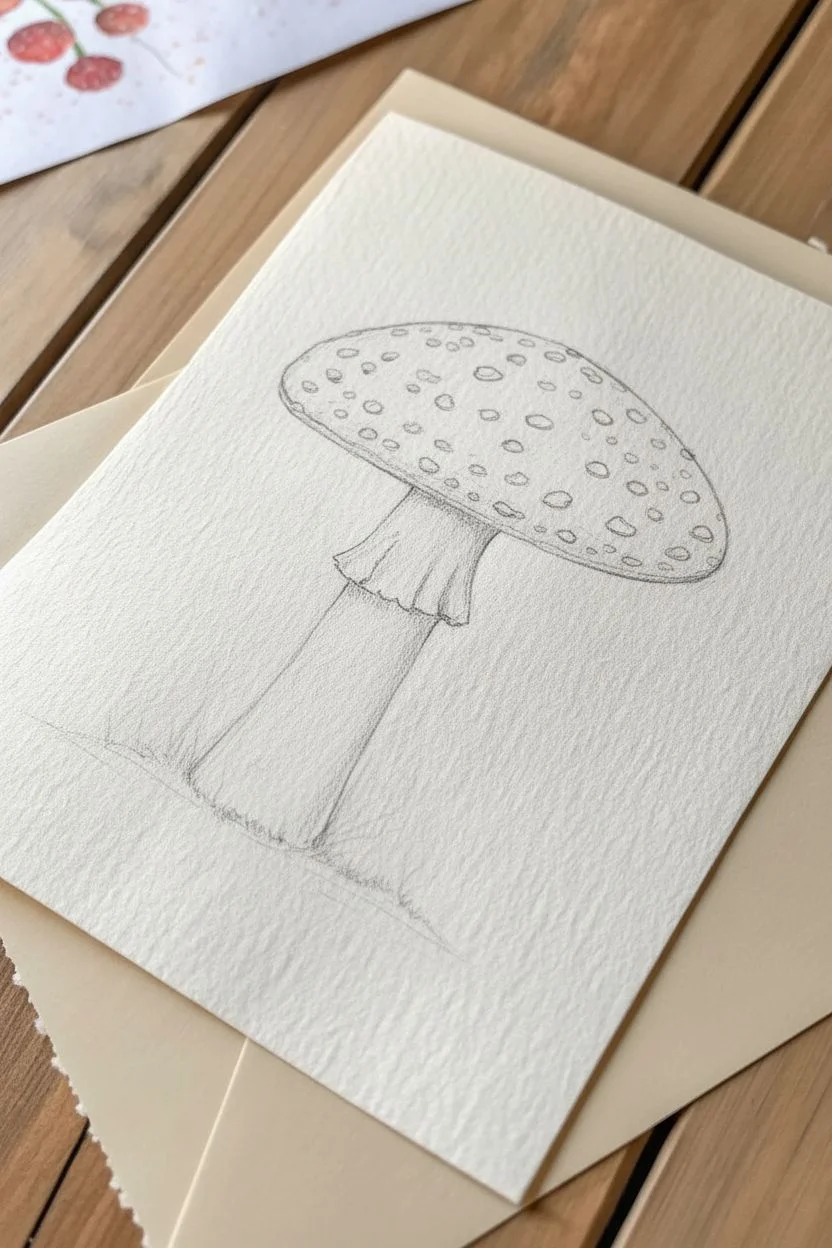
Classic Red Toadstool With White Spots
Capture the magic of the forest floor with this charming and classic red toadstool study. Using watercolor techniques on textured paper, you’ll build up vibrant reds and earthy tones to create a botanical illustration that feels timeless and handmade.
How-To Guide
Materials
- Cold-press watercolor paper (300gsm, highly textured)
- Watercolor paints (Alizarin Crimson, Cadmium Red, Yellow Ochre, Burnt Umber, Sap Green)
- White gouache or white gel pen
- Round watercolor brushes (Size 4 and Size 00 detailer)
- HB Pencil
- Kneaded eraser
- Jar of clean water
- Paper towels
- Painter’s tape or a drawing board
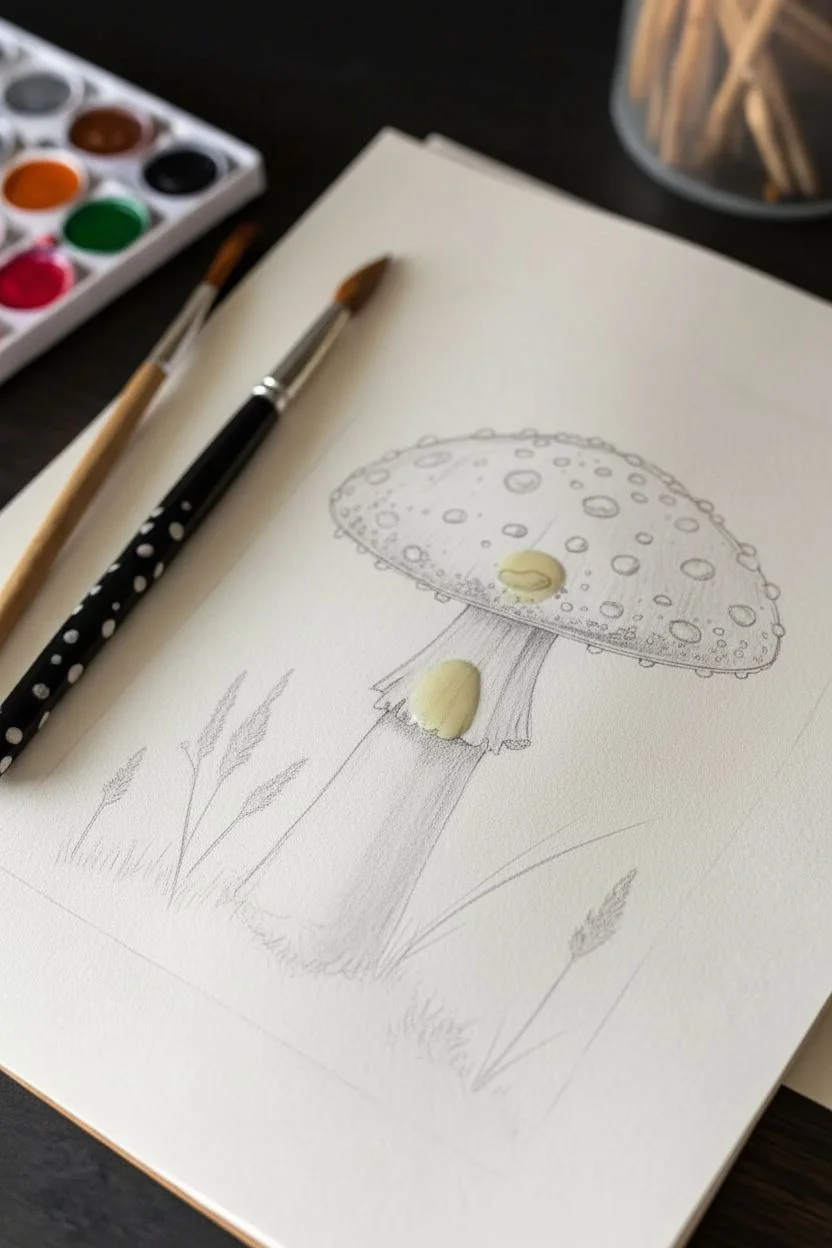
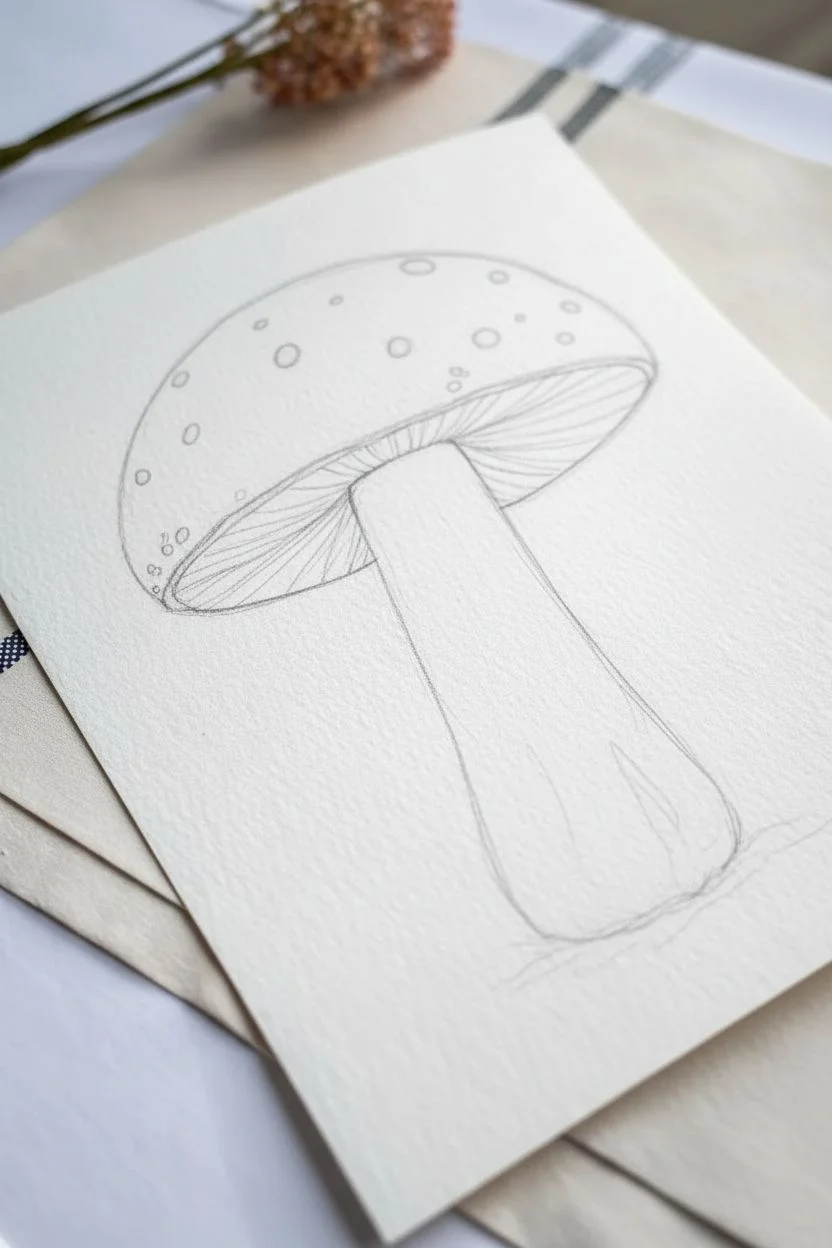
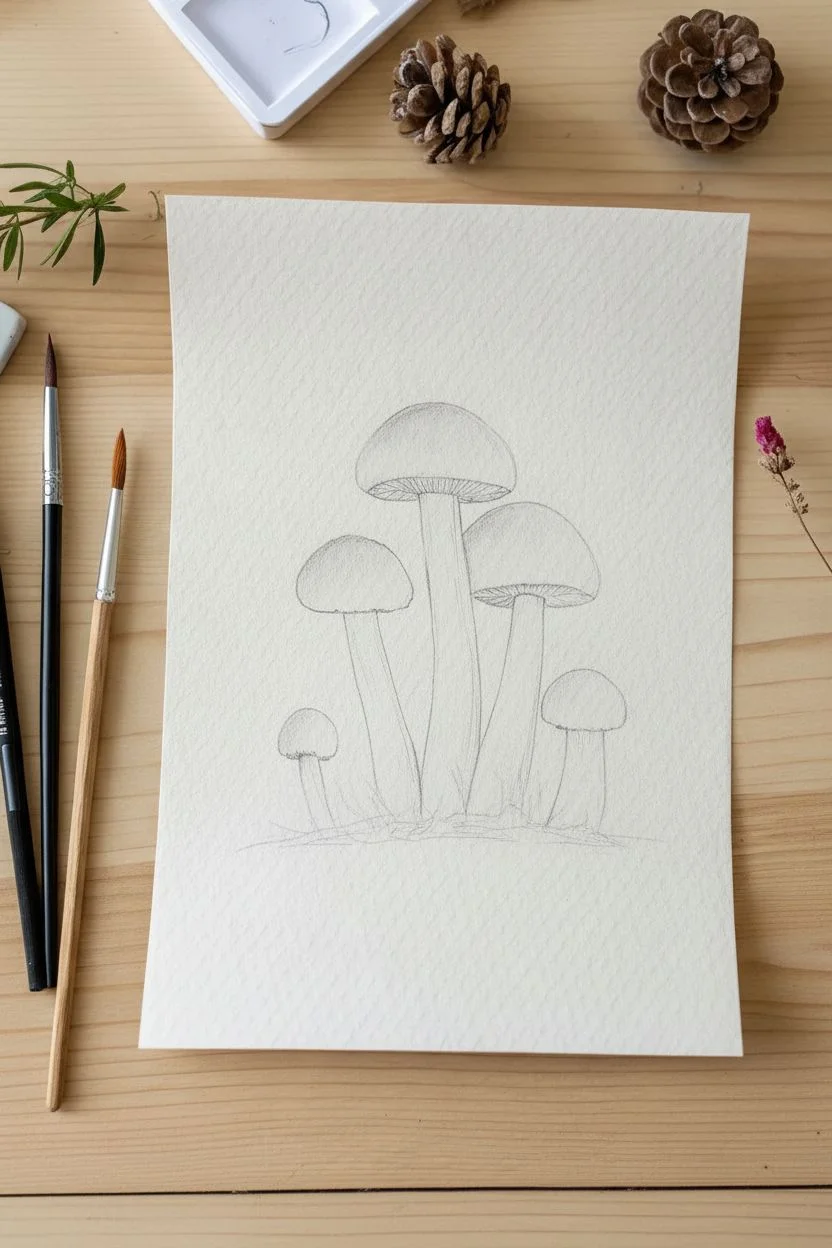
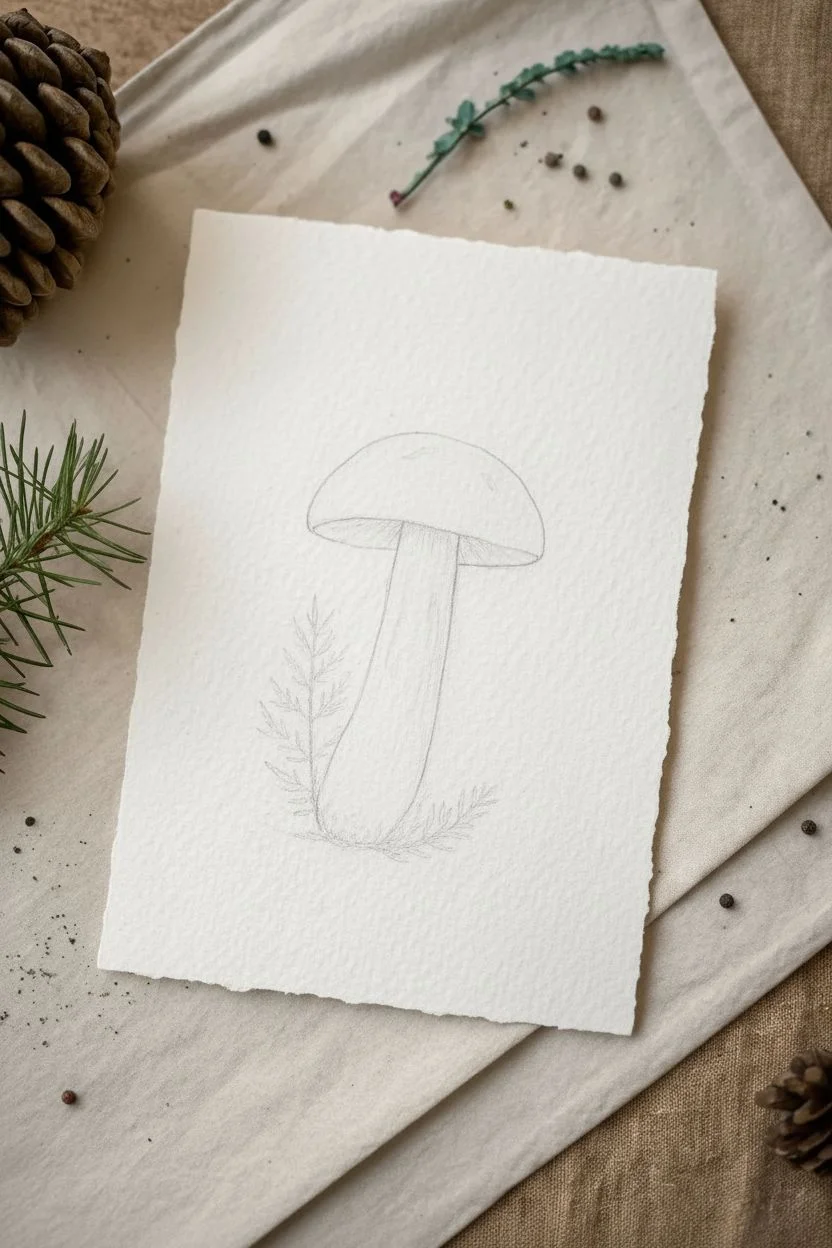
Step 1: Sketching the Outline
-
Define the cap shape:
Start lightly with your HB pencil in the center of the paper. Draw a wide, slightly flattened dome shape for the mushroom cap. The top curve should be generous, while the bottom line is nearly straight but curves slightly downward at the edges. -
Add the stalk:
Drawing downward from the center of the cap’s underside, sketch a sturdy stalk. Make it wider at the base where it meets the ground, giving it a slightly bulbous, rooted look. -
Indicates the gills:
Draw a thin, curved line parallel to the bottom edge of the cap to create a rim where the gills will be peeking out. Keep these lines very faint so they don’t show through the paint later. -
Suggestion of greenery:
Sketch very loose, short strokes at the base of the stalk to indicate grass and small leaves. Don’t overdo the detail here; the paint will do most of the work.
Bleeding Colors?
If your red cap bleeds into the white spots, don’t panic. Let it dry completely, then paint over the mistake with opaque white gouache to reclaim the crisp white shape.
Step 2: Painting the Cap
-
First red wash:
Mix a watery vibrant red using Cadmium Red. Paint the entire cap shape, carefully avoiding small circular areas where the white spots will be. Painting around them now keeps the paper white, though we can refine them later. -
Deepening the shadows:
While the first layer is still slightly damp, drop in a darker mix of Alizarin Crimson and a touch of Burnt Umber along the bottom edge of the cap and the sides. This creates a 3D rounded effect. -
Highlighting the top:
Lift a little pigment from the very top center of the cap using a clean, damp brush to suggest a light source hitting the dome. -
Drying time:
Let the red cap dry completely. If you move on too soon, the red might bleed into the stalk.
Pro Tip: Masking Fluid
For perfectly crisp white spots without painting around them, apply liquid masking fluid dots before you start painting. Rub them off once the red paint is totally dry.
Step 3: The Stalk and Gills
-
Base tone for the stalk:
Create a very dilute mix of Yellow Ochre and water—it should be a pale cream color. Wash over the entire stalk area. -
Adding texture:
Once the base wash is dry, use your small detail brush (size 00) with a mix of Burnt Umber and plenty of water. Paint thin, vertical, broken lines up the stalk to mimic fibrous texture. -
Painting the gills:
Under the rim of the cap, use a slightly darker brown-grey mix to paint tiny vertical lines representing the gills. Keep them tight together and short. -
Shadowing the skirt:
Add a slightly darker wash of the brown mix just under the cap where the stalk connects, as the cap casts a shadow there.
Step 4: Ground and Details
-
Washing the ground:
Mix Sap Green with a little brown to desaturate it. Paint a loose, horizontal wash at the base of the mushroom, letting the color fade out at the edges into the white paper. -
Defining grass blades:
While the ground wash is damp but not soaking, use the tip of your brush to flick upward strokes of more concentrated green to create tufts of grass behind and around the stalk. -
Refining the white spots:
I like to use white gouache for this step to make the spots really pop. Paint opaque white onto the reserved spots on the cap. Make them irregular shapes—perfect circles look unnatural. -
Final stalk highlights:
Use the white gouache or a white gel pen to add tiny touches of texture near the bulbous base of the stalk, suggesting the rough, peeling skin often found there. -
Deckling the edge (Optional):
To mimic the handmade paper look in the photo, you can carefully tear the edges of your paper against a ruler to create a rough, ‘deckled’ edge.
Let your painting dry fully and admire your little piece of woodland art


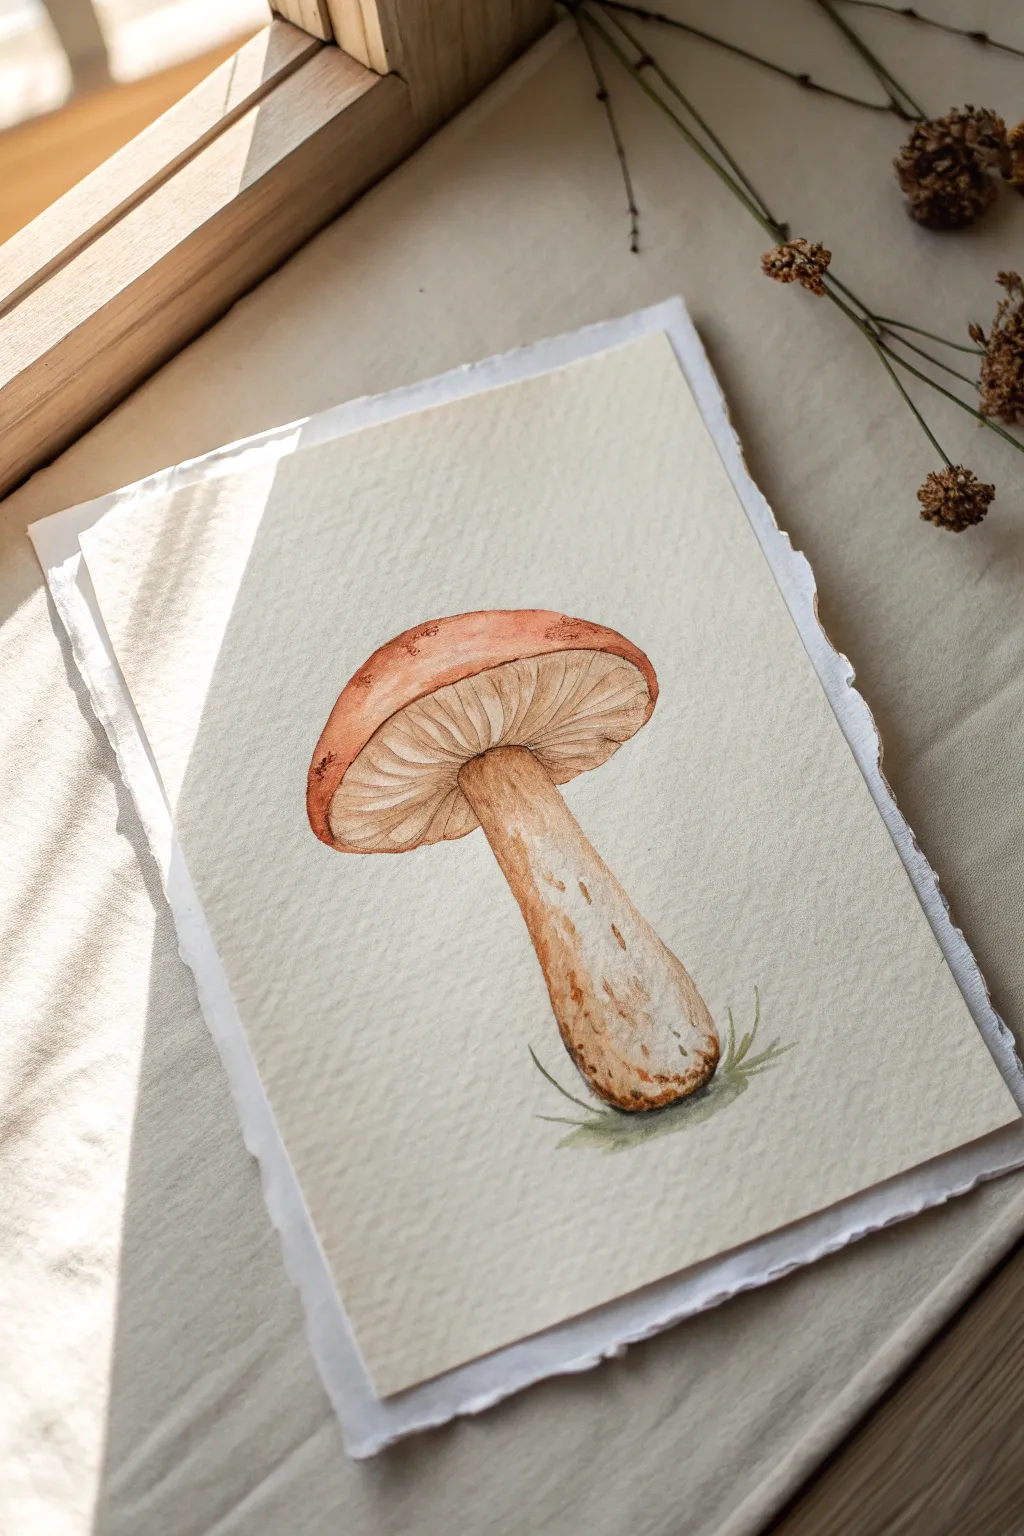
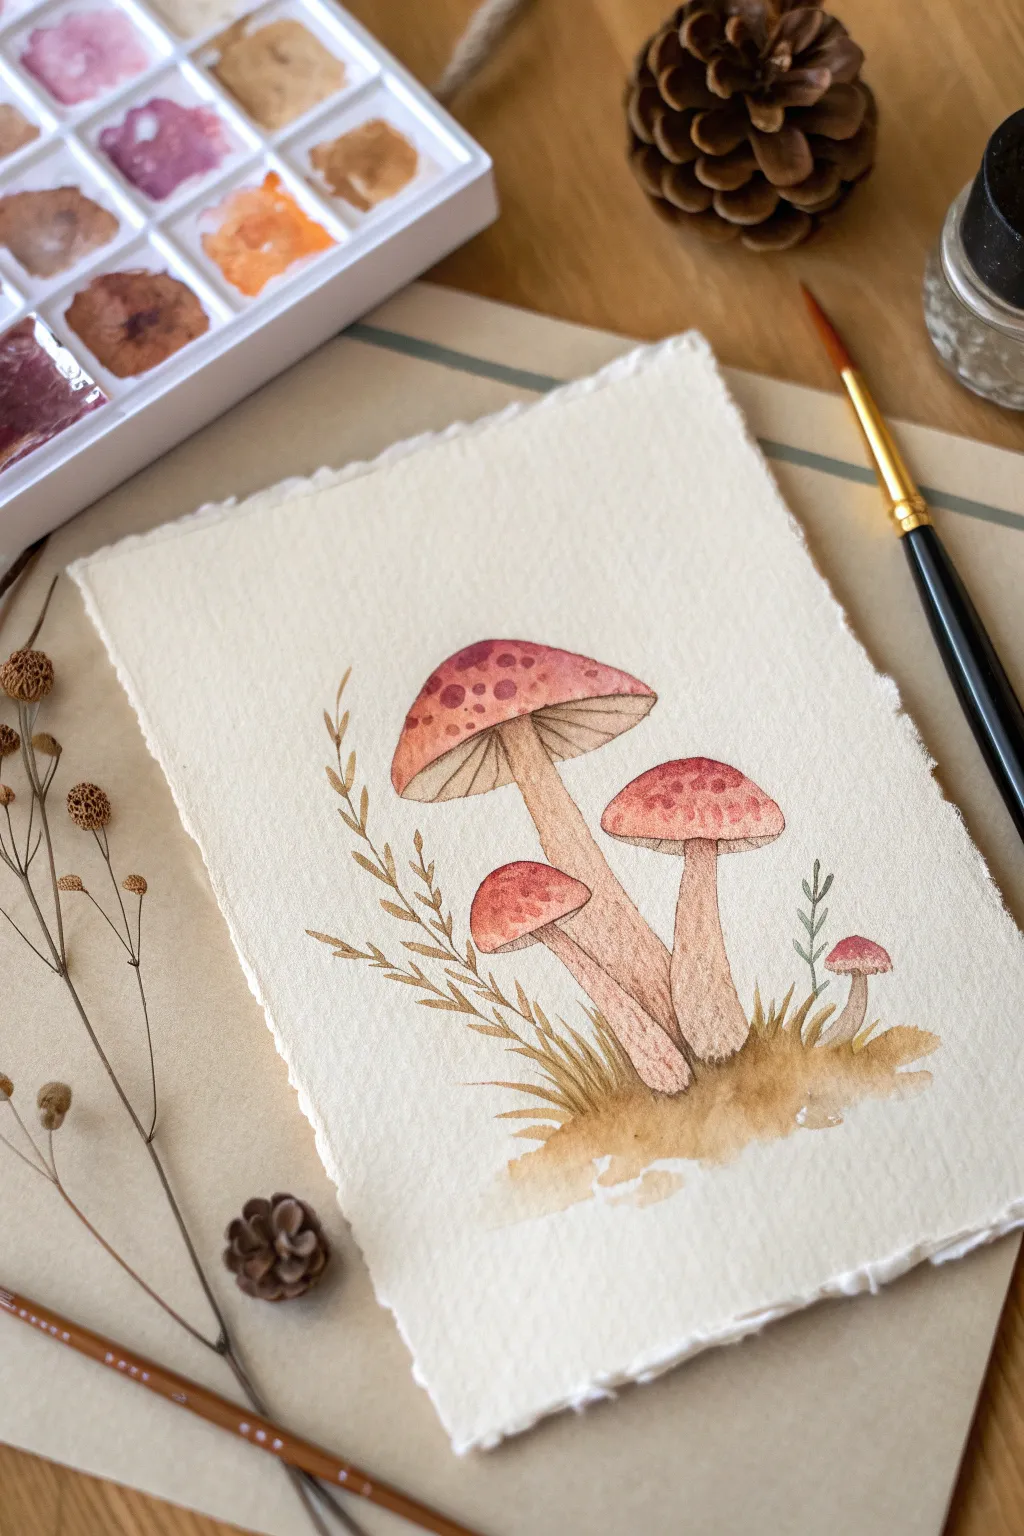
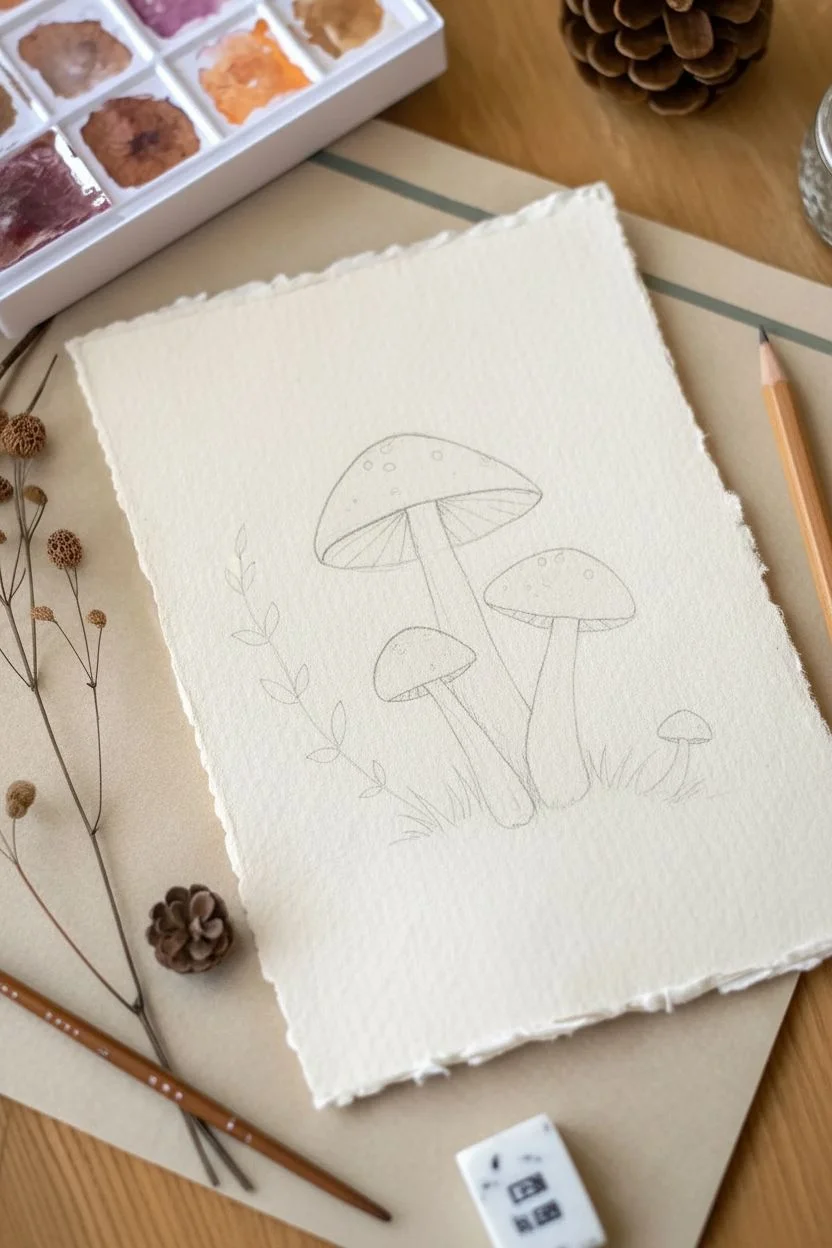
Two Mushrooms in a Simple Grass Patch

Capture the delicate textures of nature with this charming watercolor study featuring three boletus-style mushrooms rising from a patch of grass. The painting balances rich, warm orange tones in the caps with detailed, textural work on the stems for a realistic yet accessible result.
Step-by-Step
Materials
- Cold press watercolor paper (300 gsm)
- Watercolor paints (Burnt Sienna, Yellow Ochre, Sepia, Sap Green, Payne’s Grey)
- Round brush (size 6 or 8) for washes
- Fine liner or detail brush (size 0 or 1)
- HB pencil and kneadable eraser
- Jar of clean water
- Paper towels
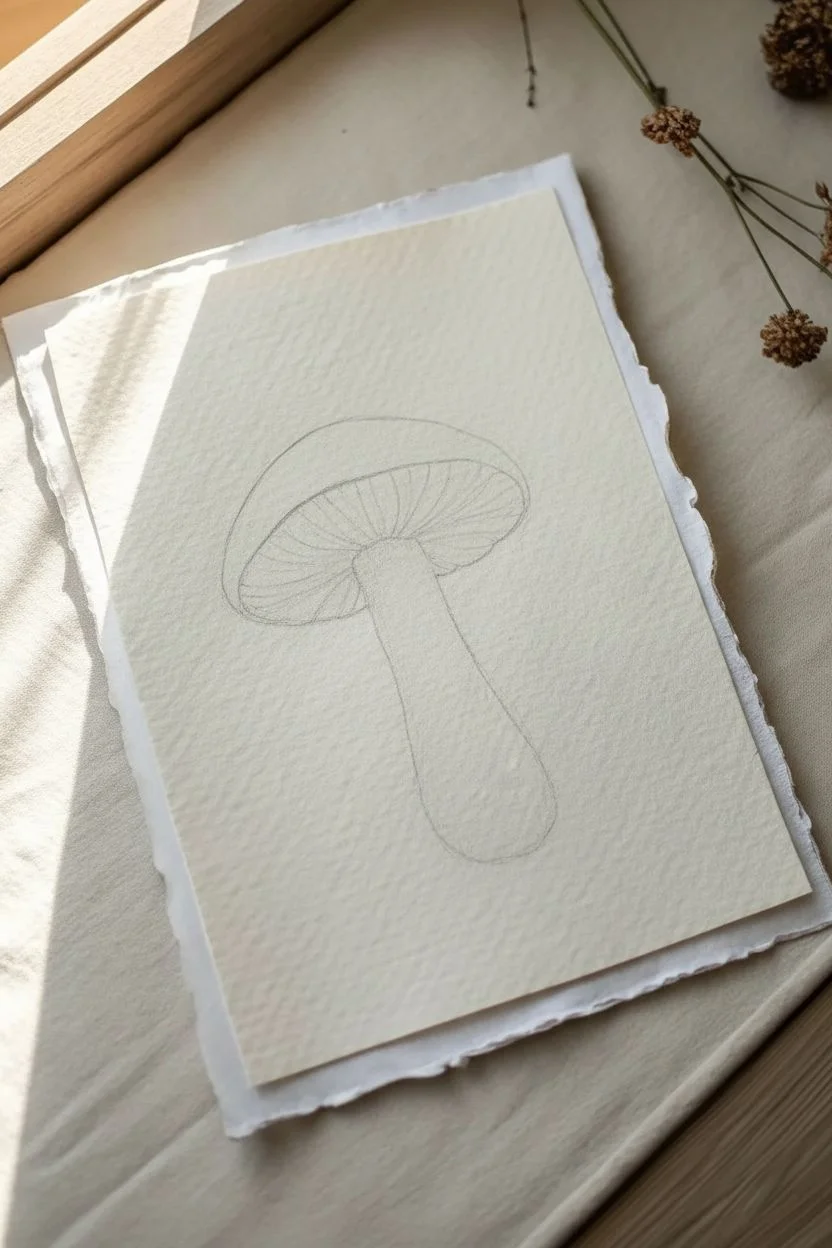
Step 1: Sketching and Base Layers
-
Lightly sketch the composition:
Begin by drawing the outlines of three mushrooms: a large central one with a wide cap, a medium one to its right, and a tiny ‘baby’ mushroom on the lower left. Keep your pencil lines extremely faint so they don’t show through the transparent paint later. -
First wash on the caps:
Mix a watery wash of Yellow Ochre with a touch of Burnt Sienna. Apply this pale golden-orange mix to the caps of all three mushrooms, leaving the stems completely white for now. -
Deepen the cap color:
While the first layer is still slightly damp but not soaking, drop in concentrated Burnt Sienna along the tops and left sides of the caps to suggest roundness and shadow. Let the colors bleed naturally. -
Define the stem base:
Mix a very pale wash of Sepia and Payne’s Grey. Paint the stems with this translucent beige-grey tone, keeping the color uneven to mimic organic texture. Leave the very top of the stems (under the caps) slightly lighter. -
Paint the undersides:
For the spongey underside of the caps, use a diluted mix of Yellow Ochre and a tiny dot of green. Paint the crescent shape under the cap, ensuring a clean edge where it meets the colorful top.
Muddy colors?
If your mushroom caps are turning muddy, you likely didn’t let the first yellow wash dry enough before adding the darker browns. Patience is key with layering glazes.
Step 2: Adding Texture and Detail
-
Darken the cap edges:
Once the caps are bone dry, take a smaller brush with concentrated Burnt Sienna or even a bit of reddish-brown. Carefully outline the rim of the caps and add small dappled spots on the top to create a bumpy, organic surface. -
Create stem texture:
This is a crucial step for realism. Using your finest brush and a mix of Sepia and water, paint fine, broken vertical lines down the length of the stems. I find that lifting the brush pressure randomly creates that classic ‘netted’ mushroom stalk look. -
Enhance the shadows:
Add a darker shadow under the rim of the caps where they overhang the stems using a Sepia mix. This casts a shadow and separates the cap from the stalk visually. -
Detail the baby mushroom:
Don’t forget the small one on the left. Give it the same texturing treatment but keep the lines finer and more delicate to match its scale.
Step 3: Grounding the Scene
-
Base for the grass:
Mix a watery Sap Green with a touch of brown. Paint a soft, undefined wash casually around the base of the stems to anchor them to the ground. -
Flicking grass blades:
Load your detail brush with darker, more pigmented green. Plant the heel of your hand on the table for stability, and use quick, upward flicking motions to create individual blades of grass overlapping the base of the stems. -
Varying greens:
Mix a bit of blue into your green for a cooler shadow tone. Add a few more blades in this darker color to create depth within the grass patch. -
Final touches:
Assess the painting for contrast. If the mushrooms look too flat, add a final glaze of sheer brown on the shadowed side of the stems.
Go Botanical
For a scientific illustration field, add tiny handwritten labels in pencil next to each mushroom, noting the species name or the date you painted them.
Allow the entire piece to dry completely before erasing any visible pencil marks to avoid smearing the paint


Mushrooms on a Black Background for Instant Pop
This project creates a stunning, high-contrast effect by placing a vibrant red-capped mushroom against a deep, dramatic black background. The dark negative space instantly makes the colors pop and gives the painting a clean, illustrative quality.
Step-by-Step Tutorial
Materials
- Heavyweight watercolor paper or mixed media paper
- Watercolor paints (Cadmium Red, Alizarin Crimson, Sap Green, Burnt Umber, Yellow Ochre)
- Black gouache or opaque black ink
- White gouache or white gel pen
- Round brushes (size 2, 4, and 8)
- Small detail brush (size 0 or 00)
- Pencil and eraser
- Masking fluid (optional)
- cup of water
- Paper towels
Step 1: Sketching and Masking
-
Outline the mushroom:
Start by lightly sketching the mushroom shape in the center of your paper. Draw a wide, domed cap and a thick, sturdy stem that widens slightly at the base. Add the ‘skirt’ or ring just under the cap. -
Add details:
Refine the sketch by drawing small, varying circles on the cap for the famous white warts. Sketch in a few wispy blades of grass and wheat-stalk shapes at the bottom. -
Protect the white:
If you are using masking fluid, apply it carefully to the dots on the cap and the main body of the stem. This keeps the paper pristine white while we work on the surroundings. If not, just paint carefully around these areas later.
Step 2: Painting the Cap
-
Base red layer:
Load your size 4 round brush with a bright Cadmium Red. Paint the entire cap surface, carefully avoiding the white dots if you didn’t mask them. Keep the color saturated. -
Add shading:
While the red is still slightly damp, drop in a darker red or Alizarin Crimson along the bottom edge of the cap and strictly under the rim. This creates a rounded, 3D form. -
Highlighting:
Lift a tiny bit of color from the top center of the cap using a clean, damp brush to create a soft highlight where the light hits. -
Defining the rim:
Use a darker red mixed with a touch of brown to create a thin shadow line right at the very bottom edge of the cap to separate it from the gills underneath.
Uneven Background?
If your black background looks streaky, don’t overwork it while wet. Let it dry completely, then apply a second coat of black gouache for a velvet-smooth finish.
Step 3: Stem and Base
-
Stem shadows:
The stem is white, but it needs shadow to look round. Mix a very watery grey or diluted Burnt Umber. Paint the left and right sides of the stem, leaving the center bright white. -
Texture the skirt:
Use your smallest brush with the grey mix to paint vertical lines on the skirt (the frilly part under the cap). These lines should follow the drape of the veil. -
Grassy base:
Mix Sap Green with a little brown. Using short, upward flicking strokes, paint the mossy ground at the base of the stem. -
Wheat stalks:
Use Yellow Ochre to paint the thin, wheat-like stalks rising from the grass. Use the tip of the brush to create the seed heads with small dabbing motions.
Add Magical Spores
Flick an old toothbrush loaded with white gouache over the bottom area to create a magical, dusty spore effect hovering over the grass.
Step 4: The Background & Final Details
-
Fill the black:
This is the most critical step. Using opaque black gouache or ink (watercolor black is often too transparent), carefully paint the negative space around the mushroom and plants. -
Refine edges:
I prefer using my smallest brush here to get crisp lines right up against the mushroom stem and cap. Take your time; neat edges make the illustration look professional. -
Remove masking:
Once everything is completely bone dry, rub away the masking fluid if you used it. -
Enhance white dots:
If your white dots got messy or aren’t bright enough, use white gouache or a gel pen to repaint them. Add a tiny shadow on the bottom of some dots to give them height. -
Final textures:
Add tiny white or cream stippling on the lower stem to suggest dirt or texture. You can also add a few tiny white spatters at the bottom for a magical spore effect.
Now you have a vibrant botanical illustration with a modern, high-contrast look


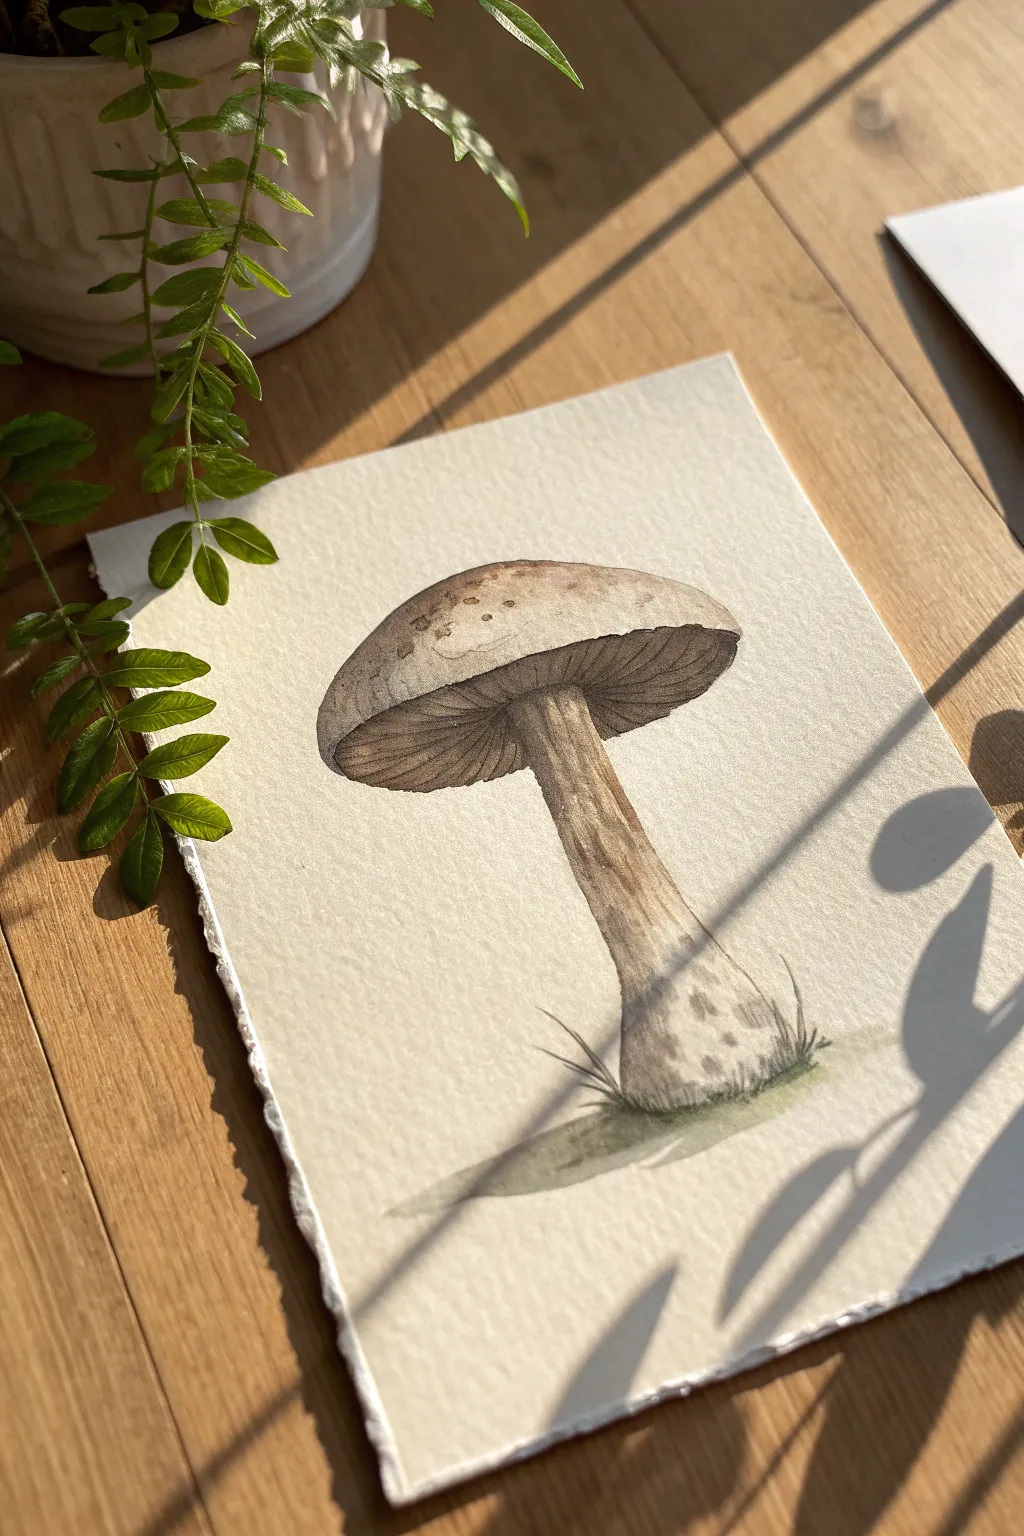
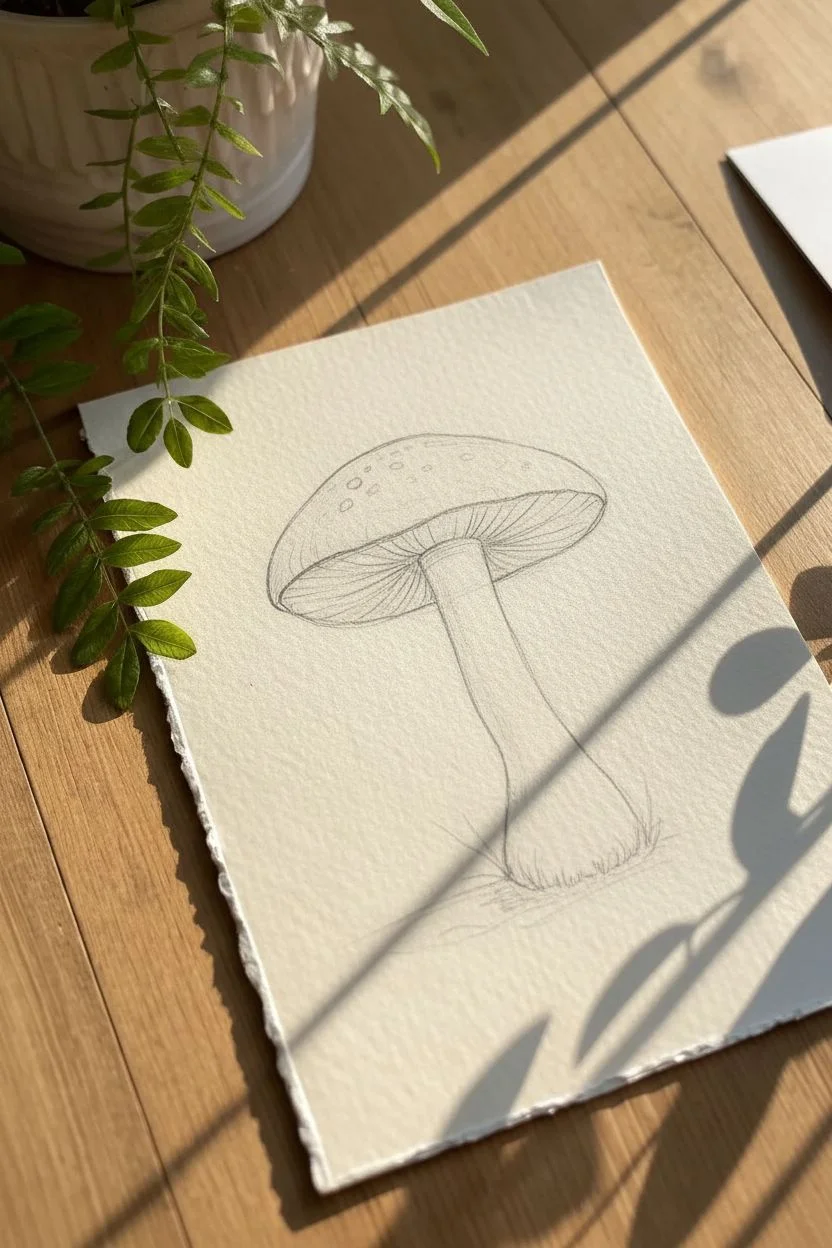
One Big Mushroom as a Centerpiece Study

Capture the earthy elegance of the forest floor with this detailed watercolor study of a single mushroom. By focusing on just one subject, you’ll learn to build rich textures in the stem and vibrant, spotted gradients on the cap.
Detailed Instructions
Materials
- Cold press watercolor paper (300 gsm)
- Watercolor paints (Burnt Sienna, Scarlet Red, Yellow Ochre, Sepia/Dark Brown)
- Small round brush (size 2 or 4)
- Fine liner brush (size 0 or 00)
- HB pencil for sketching
- Kneaded eraser
- Clean water
Step 1: Sketching the Form
-
Outline the cap:
Start by lightly sketching a wide, rounded dome shape for the mushroom cap. Keep the bottom edge slightly curved downward to give it volume. -
Add the stem:
Draw the stem extending from the center of the cap. Make it thick and robust, widening slightly at the base where it meets the ground. -
Define the gills:
Lightly mark the area underneath the cap where the gills or pores would be. This should look like a sliver or crescent shape just under the cap’s rim. -
Plan the dots:
Sketch small, irregular circles on the cap to preserve white space for the iconic spots. This acts as a map so you don’t accidentally paint over them.
Use masking fluid
For perfectly crisp white dots on the cap, apply masking fluid over your pencil circles before painting. Rub it off only after the red paint is fully dry.
Step 2: Applying the First Washes
-
Paint the cap base:
Mix a watery wash of Yellow Ochre and lightly brush it over the entire cap, carefully painting around your sketched dots to keep them white. -
Add red tones:
While the ochre is still damp, drop in Scarlet Red near the top and center of the cap. Let the colors bleed naturally for a soft gradient. -
Deepen the edges:
Mix a touch of Burnt Sienna into your red and apply it to the outer edges of the cap to create roundness and dimension. -
First stem wash:
Apply a very pale wash of diluted Sepia or diluted Burnt Sienna to the stem. Leave the paper white in a few vertical streaks to suggest highlighted texture.
Step 3: Building Texture and Depth
-
Shadow the stem:
Once the base layer is dry, mix a darker brown (Sepia). Paint a distinct shadow shape on the upper part of the stem, directly under the cap, to show where the light is blocked. -
Detail the gills:
Using a small brush and a mix of Yellow Ochre and a tiny bit of grey or brown, paint fine, vertical lines in the gill area. I like to keep these loose rather than perfectly straight. -
Enhance stem texture:
Switch to your fine liner brush. With a semi-dry brush and dark brown paint, make quick, short vertical flicks and stippling marks down the stem to mimic rough fibers. -
Darken the dots:
If the white spots look too stark, glaze them with a very faint tint of yellow or dirty water so they sit naturally on the cap. -
Define the rim:
Use a darker red-brown mix to carefully trace the bottom rim of the cap, separating the red skin from the spongy underside.
Add an ink outline
After the paint is completely dry, use a 0.1mm waterproof micron pen to outline the mushroom and add cross-hatching to the shadowed areas for a botanical illustration feel.
Step 4: Finishing Touches
-
Grounding the mushroom:
Mix a dark, earthy brown and paint the very bottom of the stem essentially ‘dirty.’ Irregular blotches work best here. -
Adding grass:
With the finest brush and a muted green or grey-green, flick upward rapidly from the base to create thin, wispy blades of grass. -
Final contrast check:
Look at the shadow under the cap again. If it dried too light, add another layer of Sepia to ensure the cap really pops forward.
Now step back and admire how a simple subject can hold so much character and detail
BRUSH GUIDE
The Right Brush for Every Stroke
From clean lines to bold texture — master brush choice, stroke control, and essential techniques.
Explore the Full Guide
Easy Underside Gills With Loose Lines
This tutorial guides you through painting a charming, realistic mushroom with a focus on capturing the delicate texture of the gills and the earthy tones of the stem. The soft lighting and deckled edge paper give this piece a timeless, botanical illustration feel.
How-To Guide
Materials
- Cold press watercolor paper (deckled edge optional but recommended)
- Pencil (HB or 2H)
- Kneaded eraser
- Watercolor paints (Burnt Sienna, Yellow Ochre, Burnt Umber, a touch of Sap Green)
- Round watercolor brushes (Size 2, 4, and 6)
- Masking tape
- Clean water
- Paper towels
Step 1: Sketching the Shape
-
Outline the cap:
Begin by lightly sketching a wide, rounded crescent shape for the mushroom cap. The top curve should be gentle, while the bottom line connects the two corners with a slight upward arch. -
Add the stem:
Draw the stem extending downwards from the center of the cap. Make it thicker at the base and slightly tapered where it meets the cap, giving it a sturdy, organic look. -
Define the gills:
Lightly trace the area underneath the cap where the gills will be. Draw curved lines radiating from the top of the stem outward toward the edge of the cap to guide your painting later. -
Refine and lighten:
Use your kneaded eraser to gently lift up the excess graphite. You want faint ghost lines that won’t show through the transparent watercolor layers.
Keep it Loose
Don’t try to paint every single gill perfectly straight. Slight wobbles and broken lines make the mushroom look organic rather than manufactured.
Step 2: Painting the Cap
-
First wash:
Mix a watery wash of Burnt Sienna with a touch of Yellow Ochre. Using your size 6 brush, fill in the top of the cap, keeping the edges crisp. -
Adding dimension:
While the paint is still damp, drop in slightly more concentrated Burnt Sienna along the left edge and the very top rim to create a sense of rounded volume. -
Texture spots:
Allow the initial wash to dry until just slightly damp, then dab tiny dots of Burnt Umber near the edges to suggest natural imperfections and texture on the mushroom’s skin. -
Let it dry completely:
Wait for the cap to be completely dry to the touch before moving on to avoid colors bleeding into the white areas.
Step 3: Creating the Gills
-
Base tone for gills:
Mix a very pale, diluted wash of Burnt Umber with a hint of red. Apply this wash to the entire underside area of the cap. -
Drawing the lines:
Switch to your size 2 brush. Using a mix of Burnt Umber and Sienna, paint thin, delicate lines radiating from the stem to the cap’s edge. -
Varying line weight:
Keep your hand loose. Some lines should be prominent and connect fully, while others can be broken or faint to create depth and shadow within the gills. -
Darkening the connection:
Add a slightly darker shadow right where the stem meets the underside of the cap to emphasize that the stem is tucked underneath.
Coffee Stain Effect
For a vintage look, lightly stain your paper with strong tea or watered-down coffee and let it dry before you start your sketch.
Step 4: Painting the Stem
-
Base stem wash:
Paint the stem with a mix of Yellow Ochre and a lot of water. Leave small patches of white paper showing through for highlights. -
Shadowing the stem:
While the base is wet, drop Burnt Sienna along the right side of the stem to create a cylindrical shadow effect. -
Adding texture details:
Once the stem is semi-dry, use the tip of a small brush to stipple small dashes and dots of Burnt Umber, particularly near the base, to mimic dirt and rough texture. -
Darkening the base:
Concentrate darker brown tones at the very bottom of the bulbous stem base to ground the mushroom.
Step 5: Finishing Touches
-
Grounding grass:
Mix a muted Sap Green. Using quick, upward flicking motions, paint tiny blades of grass around the foot of the mushroom stem. -
Soft shadow underneath:
Add a very faint wash of grey-green under the mushroom base to anchor it to the ground so it doesn’t look like it’s floating. -
Assess and refine:
Step back and look at contrast. If the gills need more definition, add a few crisp, dark lines with the finest brush tip once the paper is bone dry.
Frame your mushroom art on a desk or by a window to enjoy a bit of nature indoors
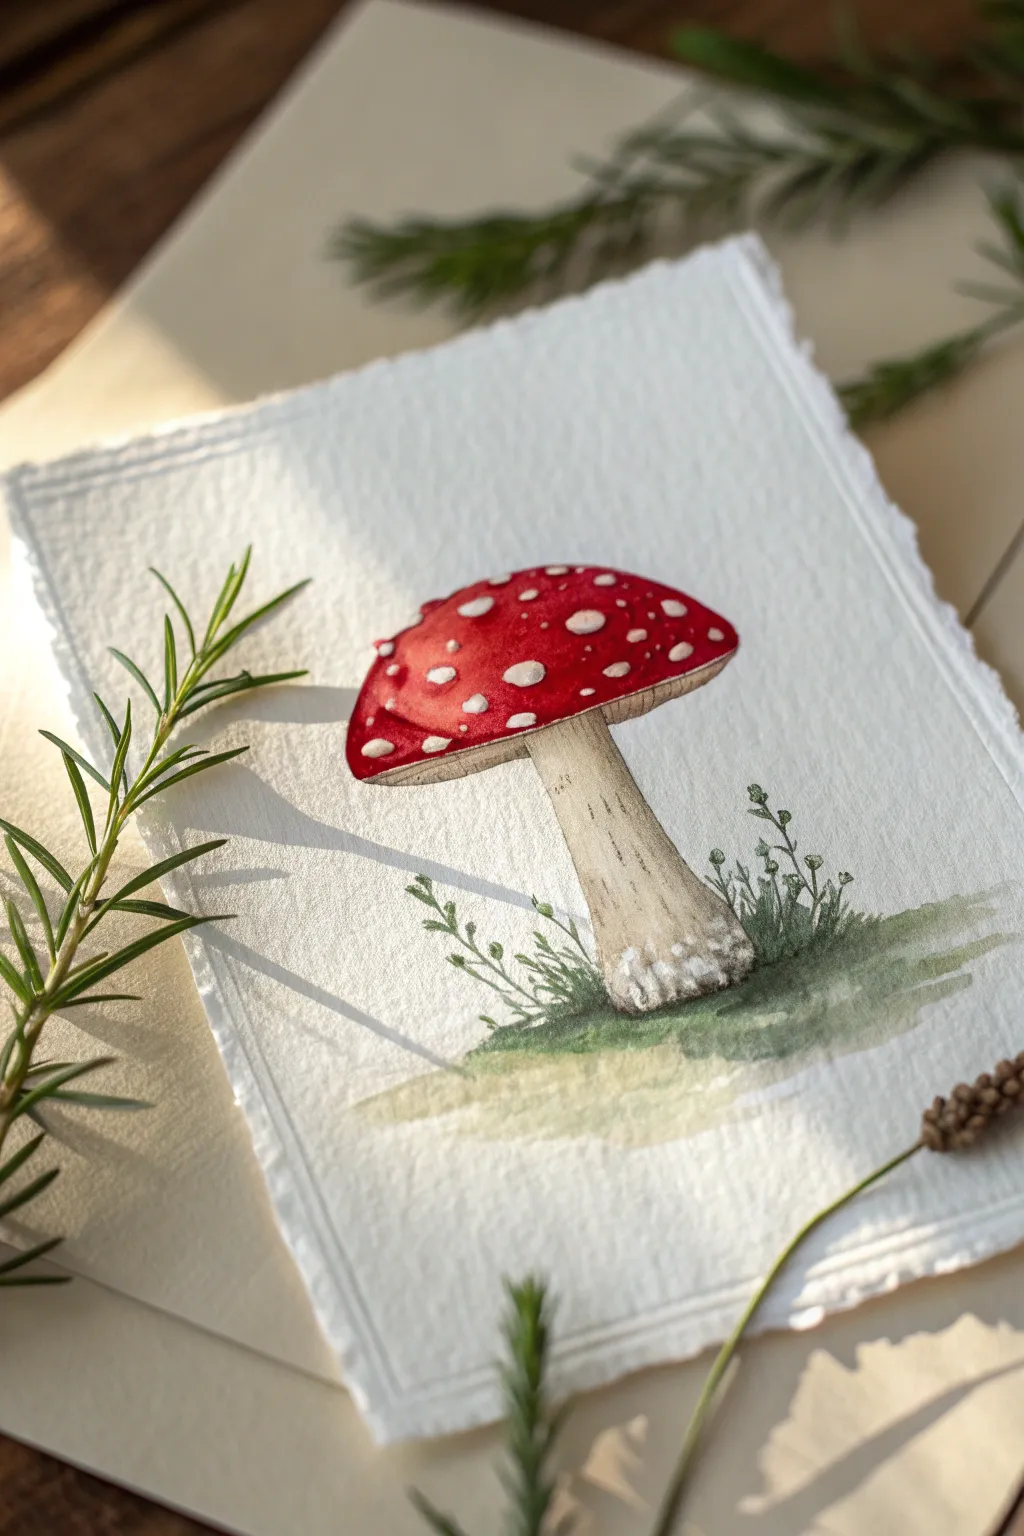
Polka-Dot Variety: Spots in Different Sizes
Capture the charm of the forest floor with this realistic yet approachable watercolor study of a fly agaric mushroom. By focusing on varied spot sizes and gentle shading on the stem, creating a dimensional, texture-rich illustration is easier than you might think.
Step-by-Step Tutorial
Materials
- Cold-press watercolor paper (300 gsm)
- Watercolor paints (Cadmium Red, Alizarin Crimson, Yellow Ochre, Burnt Umber, Sap Green)
- Small round brushes (size 2 and 4)
- Fine liner brush (size 00 or 0)
- White gouache or white gel pen
- HB pencil and kneadable eraser
- Two jars of water
- Paper towels
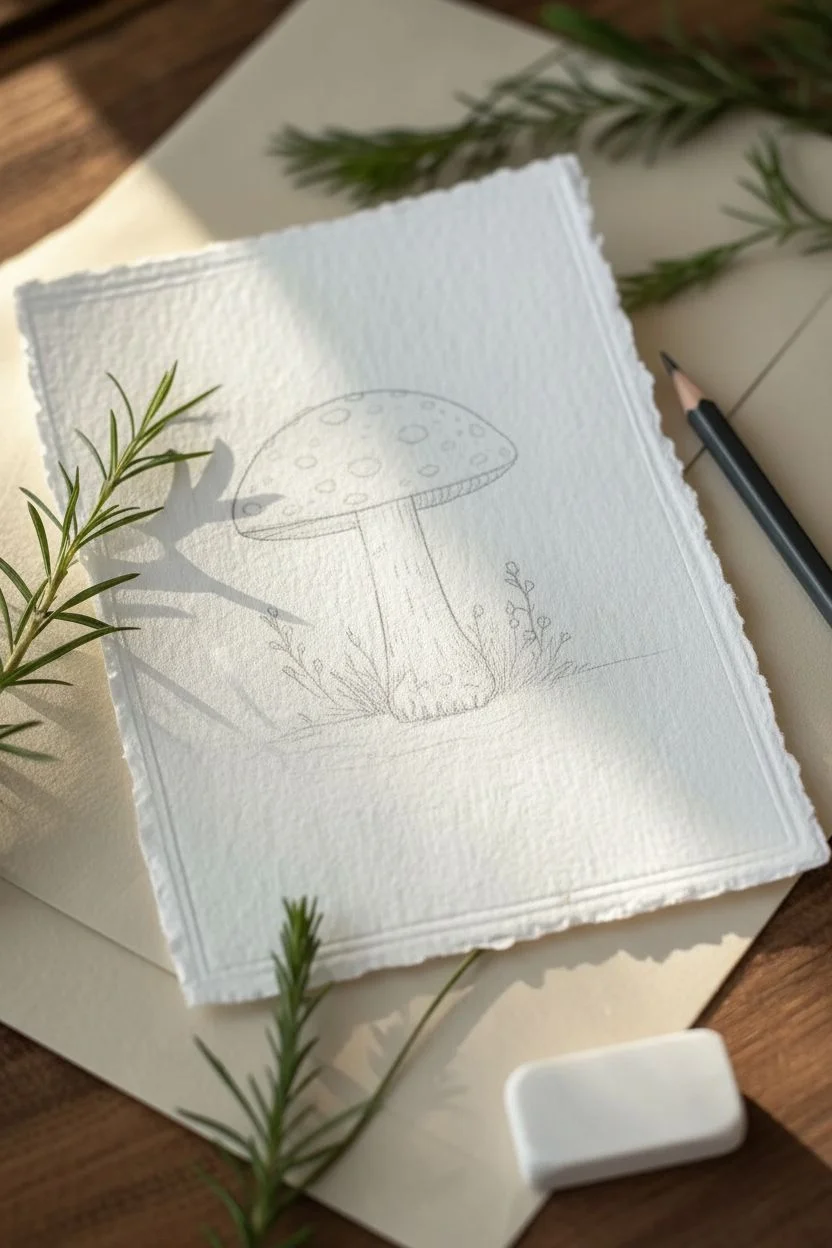
Step 1: Sketching the Shape
-
Outline the cap:
Start by lightly sketching a wide, flattened oval for the mushroom cap. Tilt it slightly to the right for a natural look, rather than making it perfectly symmetrical. -
Add the stem and skirt:
Draw the stem descending from the center of the cap, making it slightly thicker at the base. Just under the cap, sketch the ‘skirt’ or annulus—this should look like a ruffled piece of fabric draping down the stem. -
Refine the details:
Lightly mark where the grass will sit at the base to ground the mushroom. Then, sketch varied irregular circles on the cap for the spots; keeping them random in size and spacing makes the final painting look organic rather than patterned.
Bleeding Red Paint?
If red paint bleeds into your white spots, wait for it to fully dry. Then, paint over the mistake with opaque white gouache to restore the crisp spot.
Step 2: Painting the Iconic Red Cap
-
First red wash:
Mix a vibrant Cadmium Red. Carefully paint around the spots you sketched, leaving the white paper showing through. If you accidentally paint over one, don’t worry—we can fix it later with gouache. -
Deepening the color:
While the first layer is still slightly damp, drop in a darker mix of Alizarin Crimson along the bottom edge of the cap and strictly under the rim to create volume. -
Adding warmth:
For the top center of the cap where the light hits, lift a little pigment with a thirsty (clean, damp) brush or mix in a touch of yellow to suggest a sunlit highlight. -
Defining the edges:
Once the red completely dries, take a fine brush with a very concentrated, dark red mix to outline the rim of the cap cleanly, sharpening the boundary between the red top and the pale underside.
Add Magic Dust
For a fairy-tale vibe, lightly splatter diluted white gouache or gold watercolor around the mushroom cap using an old toothbrush.
Step 3: Texturing the Stem
-
Base tone for the stem:
Mix a very watery wash of Yellow Ochre with a tiny speck of Burnt Umber. Apply this pale beige across the entire stem and the skirt, keeping it very transparent. -
Shadowing the skirt:
Using a slightly darker mix of Burnt Umber, paint vertical, wiggly lines on the skirt to mimic the folds and ruffles of the membrane. -
Stippling the stem texture:
I like to create that earthy texture by using the tip of a small round brush to dab small, faint brown dots (stippling) on the main stem, concentrating them toward the bottom and sides. -
Shadow underneath:
Paint a deeper shadow right where the stem meets the underside of the cap using a cool grey or a diluted brown-blue mix to push the stem back in space.
Step 4: Finishing Details
-
Grounding the mushroom:
Mix Sap Green with a little brown for an earthy olive tone. Paint short, upward flicks at the base of the stem to create blades of grass. -
Softening the grass:
Add a little water to fade the green paint outwards horizontally, creating a soft, soil-like shadow beneath the grass clumps. -
Enhancing the spots:
If your reserved white spots look too flat, dab a tiny amount of diluted yellow ochre onto the bottom edge of some larger spots to give them a 3D, wart-like appearance. -
High-contrast highlights:
Use white gouache or a gel pen to clean up the edges of your white spots or add tiny, bright specks on the red cap for extra texture diversity. -
Final dark accents:
Use a liner brush with dark brown or black to add very fine, sparse outlines to the darkest grass blades and the very bottom edge of the ruffled skirt for definition.
Now you have a charming woodland specimen ready to frame or turn into a greeting card

PENCIL GUIDE
Understanding Pencil Grades from H to B
From first sketch to finished drawing — learn pencil grades, line control, and shading techniques.
Explore the Full Guide
Pastel Mushrooms for a Soft, Cute Look
Create a charming, rustic scene featuring a family of red-capped mushrooms nestled in soft grasses. This tutorial focuses on building gentle layers of watercolor to achieve a warm, illustrative style that feels straight out of a fairy tale.
How-To Guide
Materials
- Cold press watercolor paper (deckled edge preferred for that antique look)
- Watercolor paints (Alizarin Crimson, Burnt Sienna, Yellow Ochre, Sap Green, Sepia)
- Round watercolor brushes (Size 4 for details, Size 8 for washes)
- Pencil (HB) and kneaded eraser
- Jar of clean water
- Paper towel or cloth
Step 1: Sketching the Composition
-
Outline the caps:
Begin by lightly sketching three main mushroom caps near the center of your page. Draw the largest cap on the left as a broad, curved dome, a slightly smaller one to its right, and a tiny one tucked beneath the large one. -
Add the stems:
Extend stems downwards from the center of each cap. Make the stems slightly thick and textured, curved gently to give them character rather than perfectly straight lines. -
Sketch the baby mushroom:
On the far right, sketch a very small fourth mushroom poking out of the ground, shorter than the grass line will be. -
Underdrawing details:
Lightly indicate the gills under the caps with faint curved lines and sketch a few wispy sprigs of grass and a branch-like plant on the left side.
Deckled Edge Effect
To mimic the paper in the photo, tear your watercolor paper against a ruler instead of cutting it. This creates a rustic, handmade deckled edge.
Step 2: Painting the Caps
-
Base wash:
Mix a watery wash of Alizarin Crimson with a touch of Burnt Sienna to get a muted reddish-pink. Paint the top surface of the mushroom caps, leaving the very edges soft. -
Adding texture:
While the paint is still damp but not soaking wet, drop in slightly more concentrated pigment of the same red mix into the center of the caps to create a rounded 3D effect. -
Spot details:
Once the caps are fully dry, mix a deeper red using Alizarin Crimson and a tiny dot of Sepia. Carefully paint small, irregular spots across the top of the caps. -
Painting the gills:
For the underside of the caps, use a very dilute mix of Sepia and yellow ochre. Paint fine lines radiating from the stem to the edge of the cap to suggest gills.
Muddy Colors?
If your reds and greens look brown where they touch, ensure the first layer is 100% bone dry before painting adjacent wet areas.
Step 3: Stems and Ground
-
Stem base color:
Mix a pale, creamy beige using Yellow Ochre and a lot of water. Wash this over the stems, keeping the color light to contrast with the caps. -
Stem shading:
Once dry, use a slightly darker brown mix to shade the right side of the stems and right underneath the caps, giving them cylindrical form. -
Painting the earth:
Mix Burnt Sienna and Sepia for the ground. Apply a loose, organic wash at the base of the stems, letting the water create natural blooms that look like soil. -
Grassy textures:
While the ground wash is damp, use your smaller brush to flick upward strokes of Sap Green and Sepia to create grass blades growing around the mushroom bases.
Step 4: Botanical Accents
-
Leafy sprigs:
On the left side, paint the long, branch-like plant using a mix of Yellow Ochre and Sepia. Paint small, alternating leaves up the stem. -
Green details:
Add a small, distinct green plant on the right side using a fresh Sap Green mix, keeping the leaves small and pointed. -
Final defined lines:
Use your smallest brush with a concentrated dark brown (Sepia) to add final definition lines where the stems meet the ground and to sharpen the edges of the gills. -
Check balance:
Step back and see if the ground needs more weight. I usually add a second glaze of brown at the very bottom to anchor the mushrooms firmly.
Enjoy the peaceful process of watching these little forest dwellers come to life on your paper
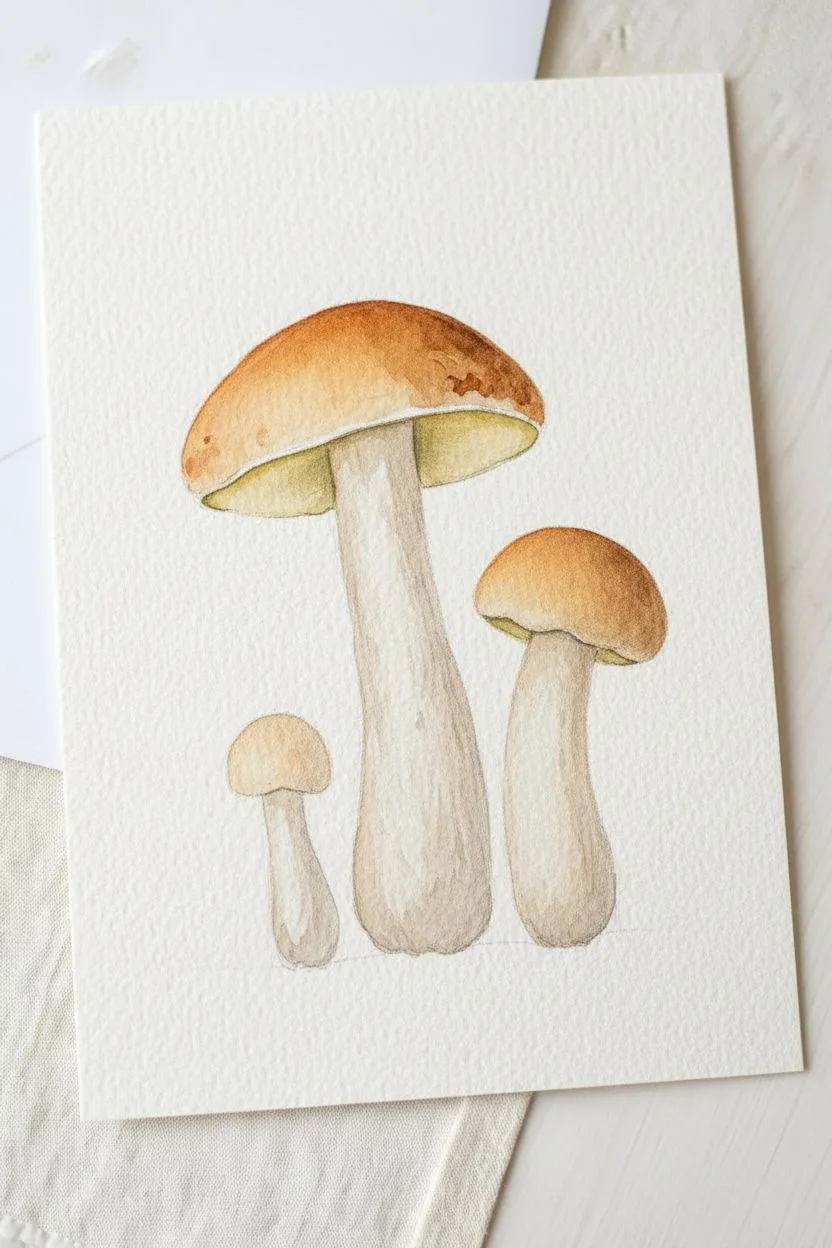
Mini Mushroom Cluster in Odd Numbers
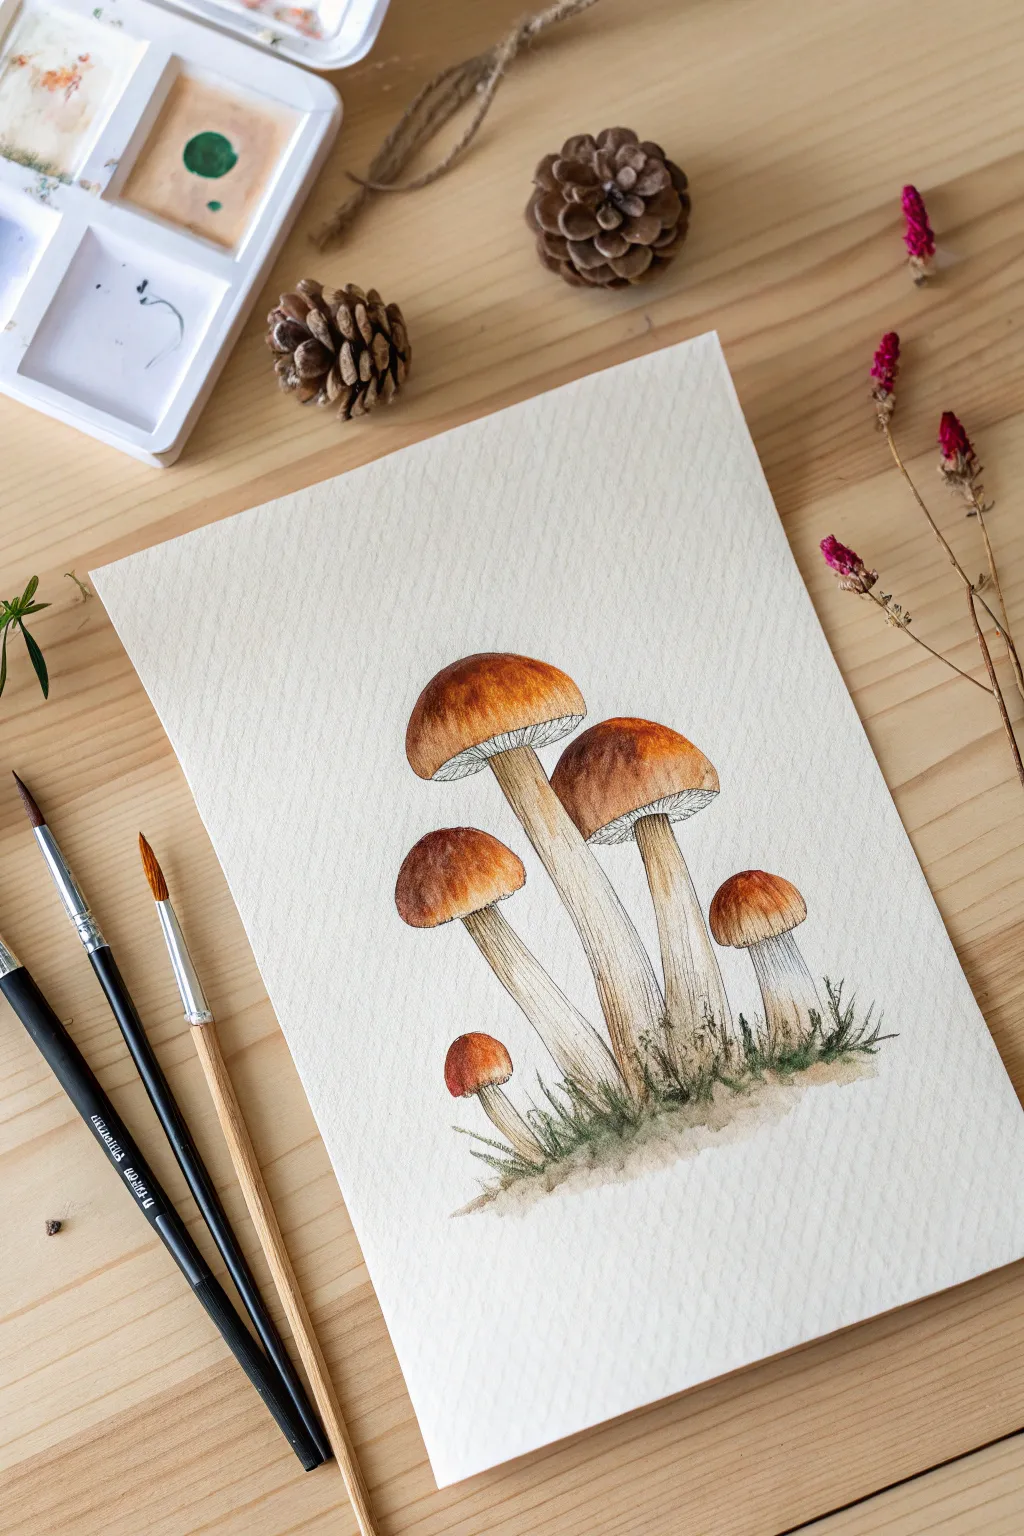
Capture the delicate charm of the forest floor with this detailed study of five tawny-capped mushrooms. Combining precise fine-liner work with soft watercolor washes creates a delightful contrast between texture and form.
Step-by-Step Tutorial
Materials
- Cold press watercolor paper (300 gsm)
- Watercolor paints (Burnt Sienna, Yellow Ochre, Raw Umber, Sap Green, Payne’s Grey)
- Round watercolor brushes (sizes 2 and 4)
- Fine-liner pen (black, 0.1mm or 0.3mm)
- Graphite pencil (HB) and eraser
- Clean water and paper towels
Step 1: Sketching the Composition
-
Map out the shapes:
Begin by lightly sketching the five mushroom caps. Place the largest one centrally, slightly higher than the others. Add a medium cap to its right and another to its left. Finally, place the two smallest mushrooms—one on the far right and a tiny button mushroom at the bottom left. -
Draw the stems:
Extend the stems downwards from the center of each cap. Notice how the stems curve gently rather than standing perfectly straight; drawing them slightly thicker at the base adds stability and realism to the cluster. -
Refine the caps:
Go back over your cap shapes to give them more character. Unlike perfect semicircles, these caps should look organic, with slightly uneven rims that curve inward. -
Add gill details:
Sketch a small, curved line underneath the rim of each cap to indicate where the gills connect to the stem. This ‘skirt’ area is crucial for the 3D effect later.
Highlight Hack
If you accidentally painted over your highlights on the caps, use a white gel pen to add tiny dots or lines at the top after the paint is fully dry.
Step 2: Inking the Outline
-
Trace the main lines:
Switch to your waterproof fine-liner pen. Carefully trace the outline of the caps and stems. Use a broken, organic line for the grass at the base rather than a straight line. -
Texture the gills:
Underneath the caps to the stems, draw vertical hatching lines. These lines should be very close together and follow the curve of the cap to mimic the fine texture of mushroom gills. -
Detail the stems:
Add subtle vertical striations along the length of the stems. Don’t draw solid lines; instead, use broken, faint flicks of the pen to suggest fibrous texture without overpowering the drawing. -
Erase pencil marks:
Before painting, ensure the ink is totally dry. Gently erase all visible graphite sketches so the watercolor stays translucent and clean.
Step 3: Applying Watercolor Washes
-
Base wash for caps:
Mix a watery wash of Yellow Ochre. Paint the top of each mushroom cap, leaving the very top center slightly lighter or unpainted to act as a highlight. -
Deepen the cap color:
While the first layer is still damp, drop in Burnt Sienna concentrated near the edges and bottom rim of the caps. Let the colors bleed naturally towards the center for a rounded, dimensional look. -
Darken the rims:
Add a tiny touch of Raw Umber or diluted Payne’s Grey right at the lower edge of the caps where they curve under. This shadow emphasizes the overhang. -
Paint the stems:
Using a very diluted Raw Umber or a creamy off-white mix, wash over the stems. Keep this layer pale, as the white of the paper does a lot of the work here. -
Shadowing the stems:
Once the base stem layer is dry, use a slightly darker mix of Raw Umber to paint narrow shadows down the sides of the stems, reinforcing the cylindrical shape.
Fixing Muddy Colors
If the colors on the cap bleed too much into the stem, let it dry completely. Then, re-line the separation with your fine-liner to
Step 4: Grounding and Final Details
-
Paint the grass:
Creating a mix of Sap Green and a touch of Burnt Sienna to dull it down, use short, upward flicking strokes at the base of the stems to create tufts of grass. -
Add ground shadows:
Dilute your green mix with more water and a little brown to create a soft, blurry shadow underneath the grass tufts, grounding the cluster so it doesn’t look like it’s floating. -
Enhance stem texture:
I like to take a nearly dry brush with Raw Umber and gently dry-brush over the stems’ ink lines to add a bit of grit and earthiness. -
Final contrast check:
Look at your painting from a distance. If the caps need more punch, add a final glaze of pure Burnt Sienna to the darkest areas to make the golden tones pop.
Now you have a charming woodland study ready to be framed or gifted to a nature lover


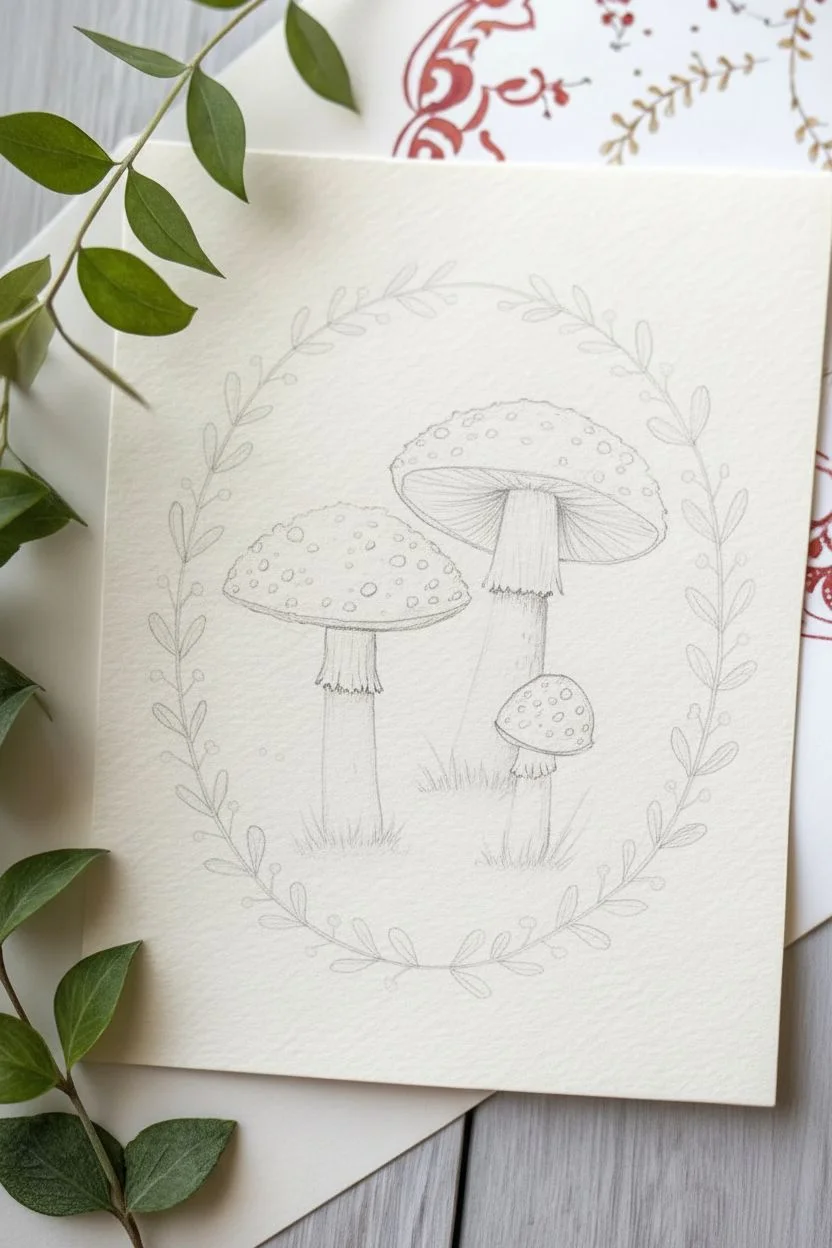
Whimsical Fairy Garden Mushrooms With Swirly Vines
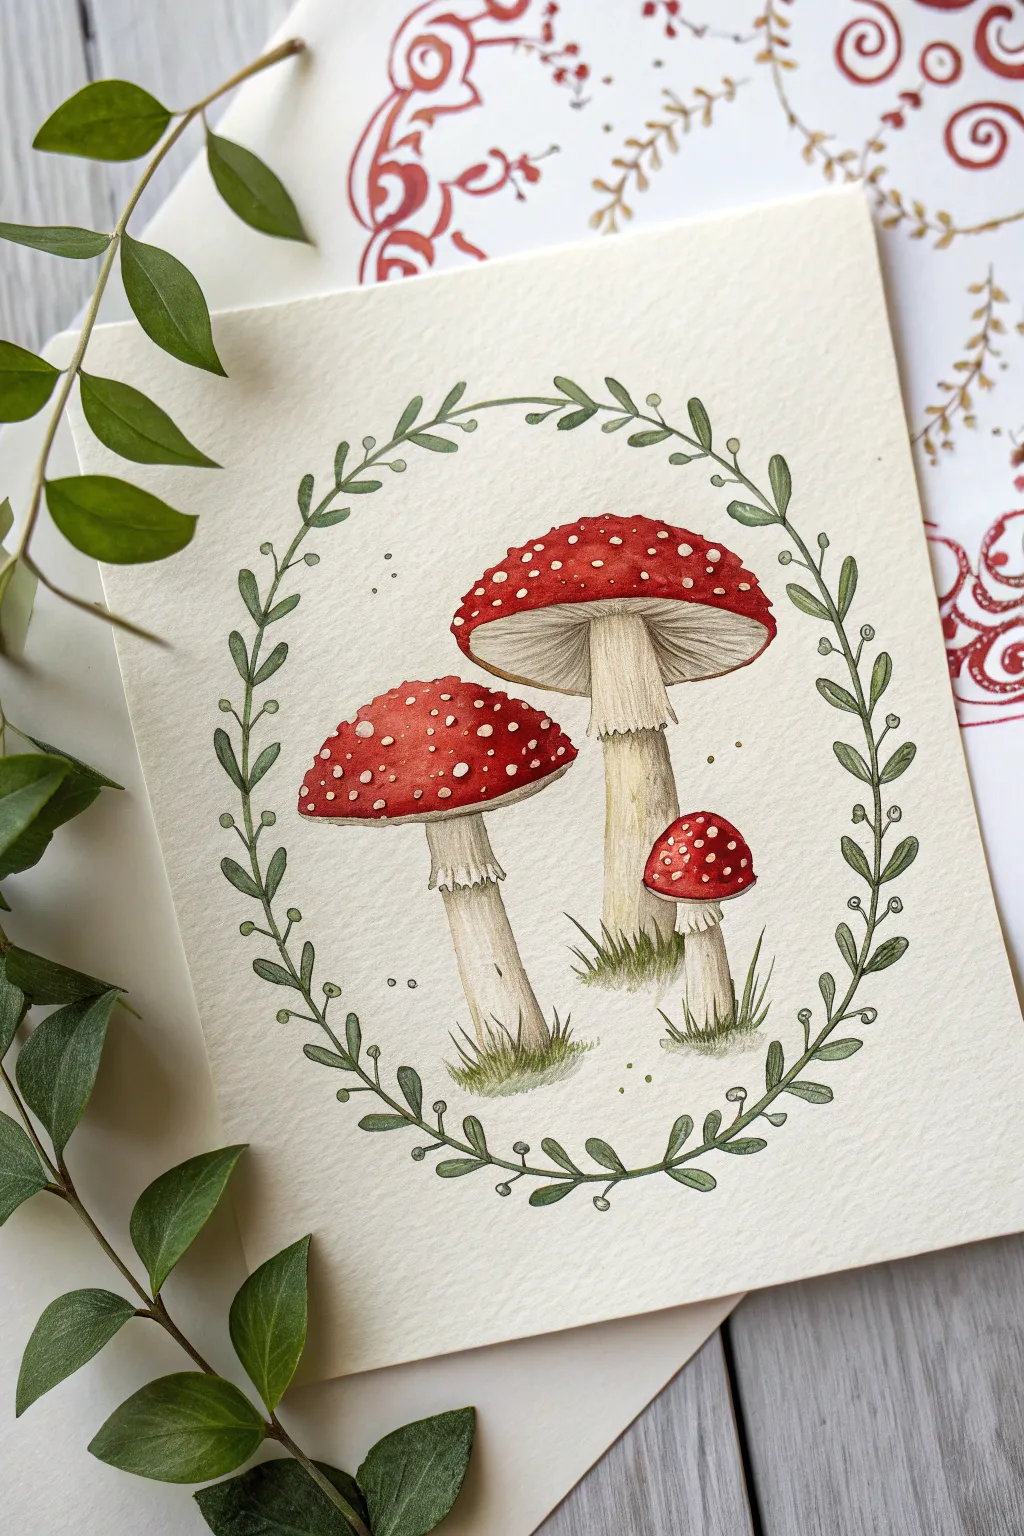
Capture the charm of the forest floor with this delightful watercolor illustration featuring three classic red-capped mushrooms framed by a delicate leafy border. The combination of vibrant reds and soft earthy greens creates a timeless botanical look perfect for greeting cards or journal pages.
Detailed Instructions
Materials
- Cold press watercolor paper (300 gsm)
- Pencil (HB or H) and kneaded eraser
- Watercolor paints (Alizarin Crimson, Sap Green, Yellow Ochre, Burnt Umber)
- Round watercolor brushes (Size 4 for fills, Size 0 or 00 for details)
- White gouache or white gel pen
- Jars of water
- Paper towel
Step 1: Sketching the Composition
-
Outline the wreath shape:
Begin by lightly tracing an oval shape on your paper to serve as a guide for the wreath. Keep this line extremely faint, as you will erase it later. -
Draft the mushrooms:
Inside the oval, sketch three mushrooms of varying sizes. Place the largest one slightly off-center to the right, a medium one on the left, and a tiny baby mushroom tucked near the base of the large one. -
Add cap details:
Draw the recognizable dome shapes for the caps. Underneath, lightly indicate the gills and the delicate skirts (annulus) on the stems. -
Sketch the vines:
Along your oval guide, draw a continuous vine. Add small, paired leaves at regular intervals, ensuring the vine overlaps naturally at the bottom center. -
Prepare for paint:
Use a kneaded eraser to roll over your sketch, lifting up most of the graphite until only faint ghost lines remain.
Keep Your Reds Clean
Red paint can easily bleed into wet stems. Ensure the red caps are 100% bone dry before painting the nearby stems or gills to prevent muddiness.
Step 2: Painting the Mushrooms
-
Base coat the stems:
Mix a very watery wash of Yellow Ochre with a tiny touch of Burnt Umber. paint the stems, leaving the skirts white for now. While wet, drop a slightly darker mix at the base for shading. -
Paint the red caps:
Load your size 4 brush with a rich Alizarin Crimson. Carefully fill in the mushroom caps. I like to leave tiny irregular white spots unpainted for the dots, but you can also paint solid red and add white later. -
Define the gills:
Once the red caps are dry, use a diluted gray-brown mix to paint fine lines under the caps representing the gills. Curve your strokes to match the dome shape. -
Detail the skirts:
Paint the skirts on the stems using a pale cream color. Use a rigger or size 0 brush to add tiny vertical lines to show the texture of the veil remnant. -
Deepen the contrast:
Add a second layer of deeper red to the sides of the caps to make them look round and three-dimensional, blending softly into the center.
Step 3: Painting the Greenery
-
Paint the vine stem:
Using a size 0 brush and a mix of Sap Green and a touch of brown, trace the main vine line carefully. -
Fill the leaves:
Paint the small leaves along the vine. vary the green slightly by adding more water for some leaves and more pigment for others to create depth. -
Add grass tufts:
At the base of the mushroom stems, flick upward with your smallest brush using green paint to create tiny patches of grass, grounding the mushrooms. -
Outline the leaves:
Once the green leaves are dry, use a very fine brush or a fine-tip green pen to outline them and add a central vein to each leaf for a crisp, illustrative style.
Blooms on the Caps?
If your red paint dries with uneven watermarks (cauliflowers), don’t panic. Gently scrub the area with a damp, clean brush to soften the edge, then re-glaze.
Step 4: Final Details
-
Brighten the dots:
If you painted around the dots earlier, tidy them up now. If you painted solid red caps, use opaque white gouache or a white gel pen to add the signature fly agaric spots. -
Add distinct specks:
Sprinkle a few tiny dots of black or dark brown ink around the mushrooms and within the wreath to emulate spores or magical dust. -
Enhance texturing:
Use a colored pencil or dry brush with dark brown paint to add subtle texture to the mushroom stems, making them look fibrous. -
Final check:
Erase any remaining pencil marks that might be visible outside the paint, ensuring the paper is completely dry before doing so.
Now step back and admire your charming woodland scene, ready to be framed or gifted.
Firefly Dots Around Mushrooms for Instant Magic
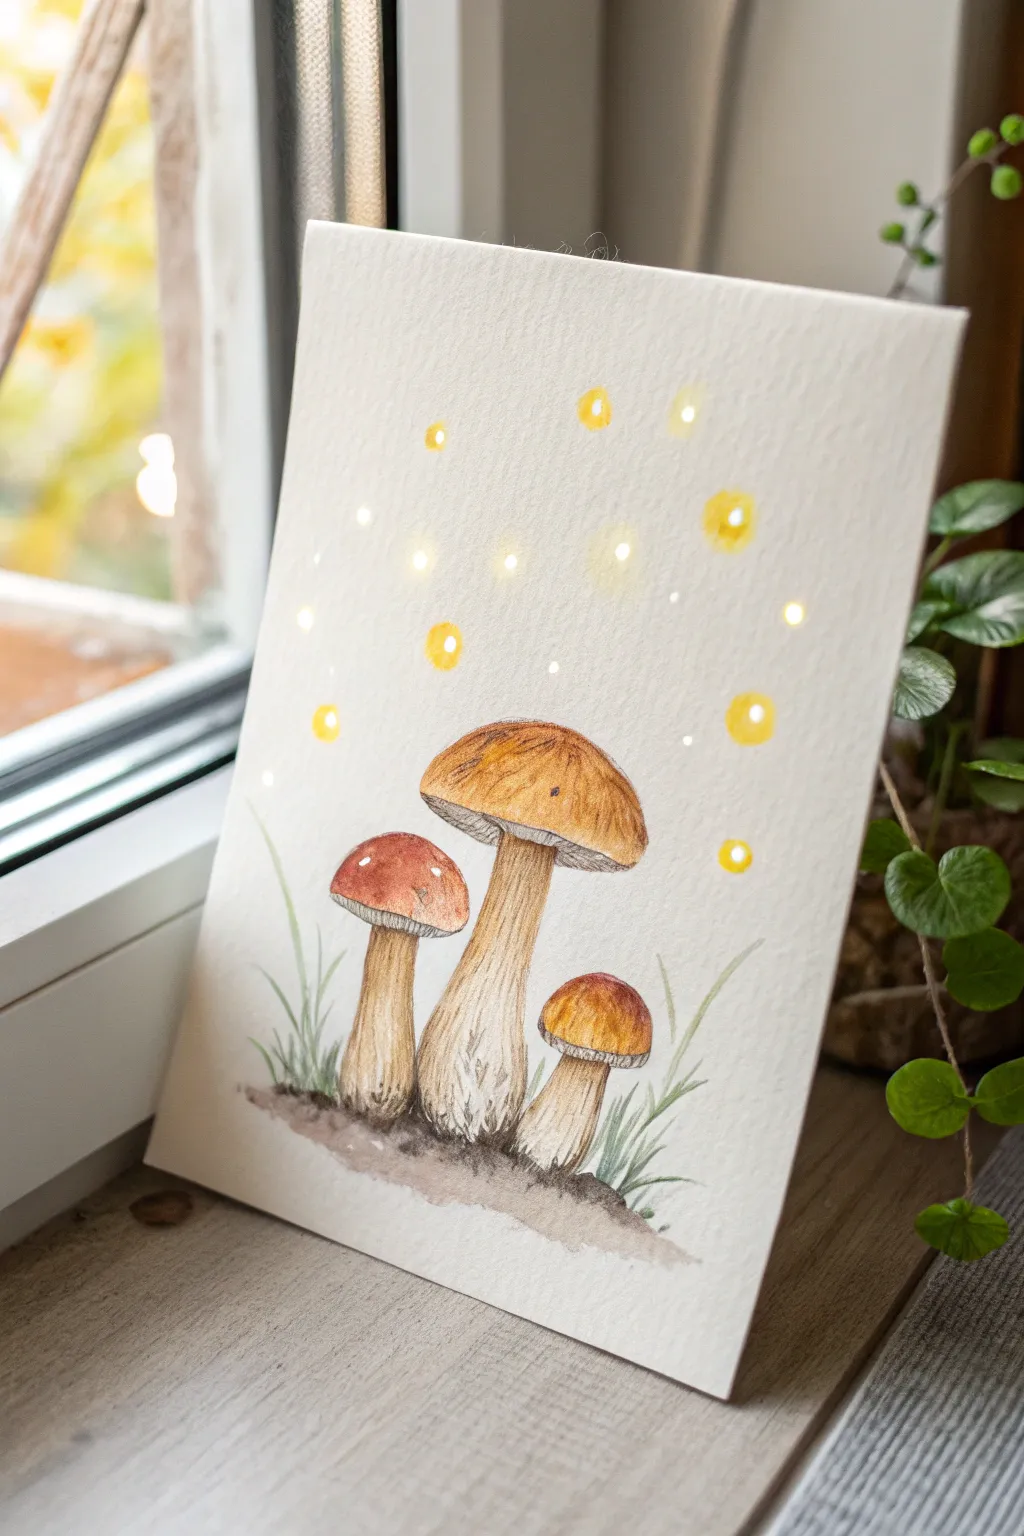
Transform a simple mushroom study into an enchanting evening scene using minimal supplies. This watercolor and ink project uses strategic dots of gouache or acrylic to create the illusion of magical fireflies hovering around earthy fungi.
Step-by-Step
Materials
- Cold press watercolor paper (300 gsm)
- Watercolor paints (burnt sienna, yellow ochre, raw umber, sap green, lamp black)
- White gouache or white acrylic paint
- Yellow gouache or yellow watercolor
- Waterproof fine liner pens (0.1mm and 0.3mm)
- Small round brushes (size 2 and 4)
- Detail brush (size 0/0 or spotter)
- Light pencil (HB or 2H)
Step 1: Sketching & Inking
-
Map out the shapes:
Start with a very light pencil sketch. Draw a large central mushroom slightly off-center. Flank it with a medium mushroom on the left and a small button mushroom on the right. -
Refine the caps:
Define the rounded cap shapes. The central mushroom cap should be wide and umbrella-like, while the smaller ones can be more dome-shaped. -
Add stems and ground:
Draw thick, sturdy stems for each mushroom that widen slightly at the base. Gently sketch a mounded earth texture beneath them and add a few vertical blades of grass. -
Ink the outlines:
Once happy with your sketch, trace over your pencil lines with a 0.1mm waterproof fine liner. Use broken, feathery lines for the stems to suggest texture rather than a solid hard outline. -
Add linear details:
Use the pen to draw vertical striations on the stems and small gills underneath the caps where visible.
Glow Like a Pro
For the softest glow, wet the paper slightly in a circle shape with clean water first, then drop your yellow paint into the wet center and let it bleed outward.
Step 2: Watercolor Layers
-
Paint the caps:
Mix a warm burnt sienna with a touch of yellow ochre. Paint the caps, keeping the color darker at the top and lifting a little pigment near the edges to create a highlight. -
Create stem texture:
Dilute raw umber significantly with water to get a pale beige. Wash this over the stems. While still damp, drop in slightly darker brown at the base and under the cap for shadow. -
Ground the scene:
Mix raw umber and a tiny bit of black for the earth. Dab this around the base of the stems using a stippling motion to mimic soil texture. -
Paint the grass:
Use a diluted sap green to paint the grass blades. Keep these strokes quick and flick the brush upward to get tapered tips. -
Deepen the shadows:
Once the first layers are completely dry, use a slightly more concentrated brown to deepen the shadows under the mushroom caps to make them pop.
Make it Sparkle
After the paint dries, add minuscule dots of metallic gold watercolor or a gold gel pen to the centers of the fireflies for a subtle shimmer that catches the light.
Step 3: The Firefly Effect
-
Prepare the glow color:
Mix a bright, creamy yellow using gouache or opaque watercolor. You want a consistency that covers the paper well without being too thick. -
Place the main lights:
Using your smallest brush, paint several small yellow circles scattered in the open space above the mushrooms. Vary the sizes slightly for a natural look. -
Soften the edges:
With a clean, slightly damp brush, gently blur the outer edges of your yellow dots to create a soft, glowing halo effect around the light. -
Add the bright centers:
Mix white gouache with just a hint of yellow. Paint a tiny, concentrated dot right in the center of your previous yellow circles. This creates the ‘hot spot’ of the light. -
Create distant lights:
For background magic, add extremely small white or pale yellow dots in the distance. These don’t need the halo effect; simple pinpricks of light work best. -
Final touches:
Check your grass and ground. If the base looks too light, add one final glaze of dark brown to anchor the mushrooms firmly.
Now you have a charming woodland scene that brings a cozy glow to any room
Add a Snail Friend on the Mushroom Cap
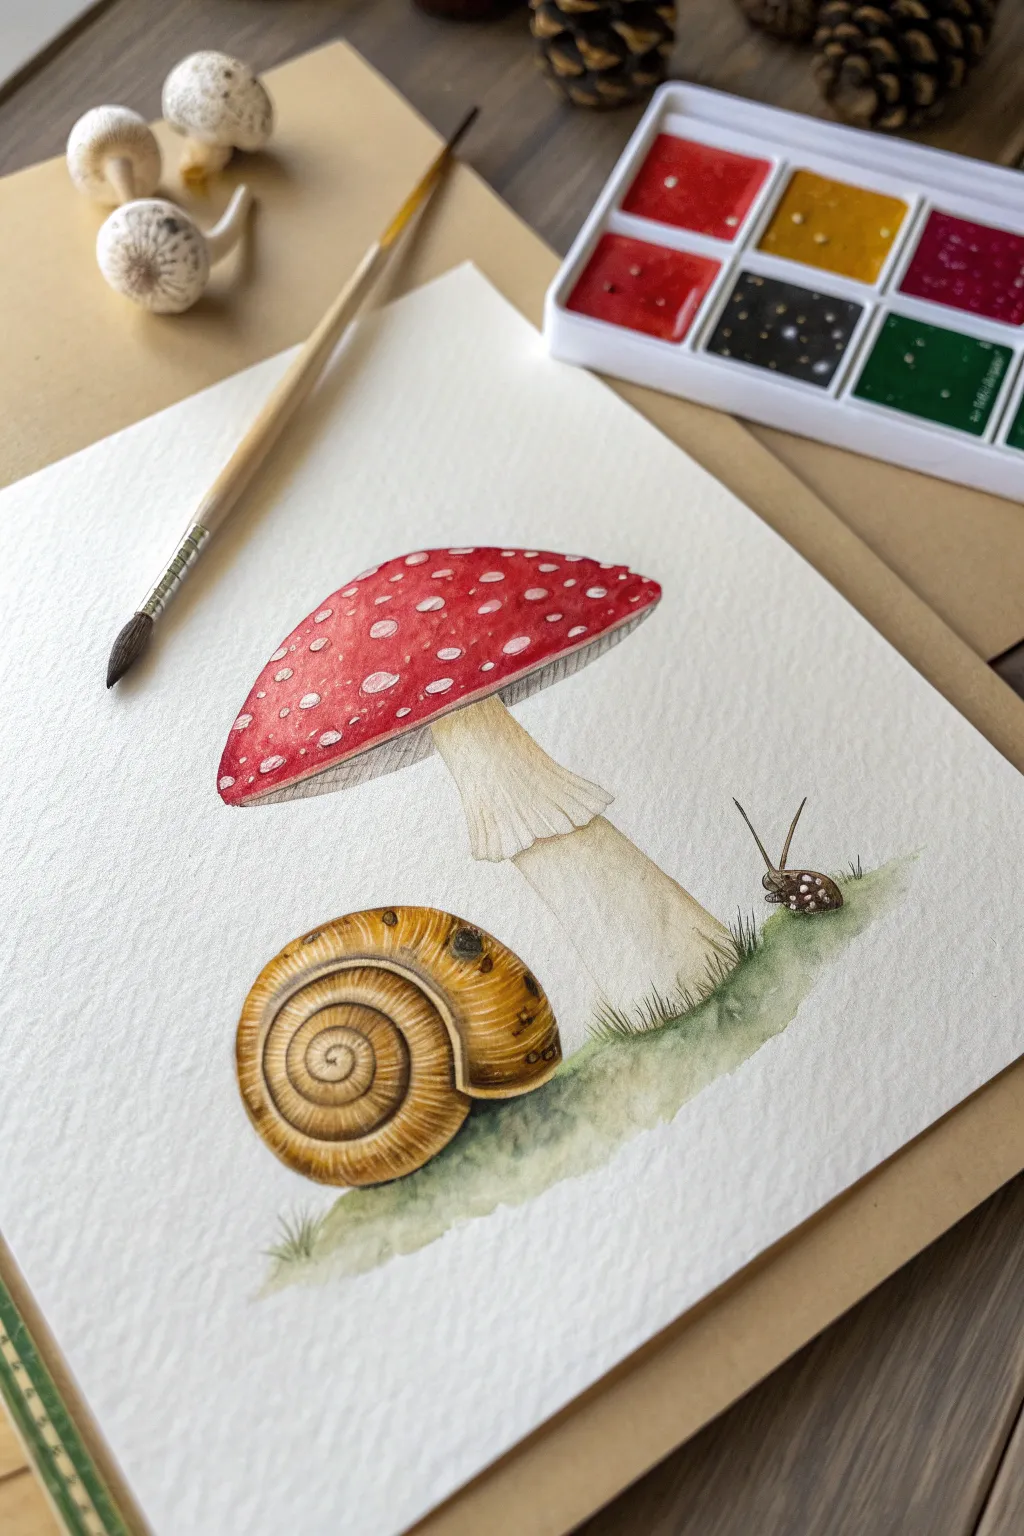
Capture the magic of the forest floor with this detailed watercolor illustration featuring a classic red toadstool alongside a textured snail shell and a tiny crawling friend. The soft blending and fine brushwork create a cozy, naturalist style perfect for a quiet afternoon of painting.
How-To Guide
Materials
- Cold press watercolor paper (300 gsm)
- Round watercolor brush (size 4 or 6)
- Fine liner or detail brush (size 0 or 1)
- Watercolor paints: Scarlet Red, sap green, burnt umber, yellow ochre, and sepia
- Pencil (HB or 2B) and eraser
- Jar of clean water
- Paper towels or cloth
- Small white gouache or a white gel pen (optional)
Step 1: Sketching the Composition
-
Outline the mushroom cap:
Begin by lightly sketching a wide, slightly flattened dome shape for the mushroom cap. Ensure the bottom edge has a gentle curve to show volume. -
Add the stem and skirt:
Draw the stem centering under the cap, making it thicker at the base. Add the ‘skirt’ or annulus just below the cap with jagged, hanging lines to represent the delicate membrane. -
Draft the shell and snail:
Below and to the left of the mushroom, sketch a large, spiral snail shell. To the right, draw a very small snail with antennae climbing a blade of grass. -
Prepare the spots:
Lightly draw irregular circles on the mushroom cap. These will remain white, so sketching them now helps you avoid painting over them later.
Preserve Your Whites
For the crispest white spots on the red cap, use masking fluid before you start painting. Rub it off only after the red paint is 100% dry.
Step 2: Painting the Mushroom
-
First wash on the cap:
Load your brush with a watery scarlet red. Carefully paint around the white spots you sketched earlier, filling in the rest of the cap. -
Deepen the red shadows:
While the paint is still damp or just after drying, add a more concentrated red mixed with a touch of brown to the bottom edge and right side of the cap to create a 3D effect. -
Paint the stem base:
Use a very diluted wash of yellow ochre and burnt umber for the stem. Keep the top near the skirt almost white, graduating to a warmer tan at the bulbous base. -
Detail the skirt:
With a fine brush and a pale grey-brown mix, paint delicate vertical lines on the skirt and the underside of the cap to suggest gills.
Step 3: Rendering the Snail Shell
-
Base layer for the shell:
Apply a wash of yellow ochre over the entire spiral shell shape. Let this dry completely before moving to the next step. -
Define the spiral:
Using burnt umber, paint the thin lines that separate the segments of the shell, following the spiral inward to the center. -
Add texture and ridges:
Switch to your smallest brush. Using sepia or dark brown, paint fine, curved distinct lines across the shell segments to mimic ridges and growth lines. -
Deepen shell contrast:
Add darker brown shadows where the shell curls under itself to enhance the sense of depth and roundness.
Muddy Colors?
If your ground wash turns muddy, you likely mixed too many colors or overworked it. Let layers dry fully before glazing.
Step 4: The Tiny Snail & Ground
-
Paint the crawling snail:
Use a dark sepia mix to fill in the small snail body on the right. Leave tiny specks of white on its shell for highlights, or add them later with white gouache. -
Add the antennae:
With the tip of your finest brush, draw two delicate lines extending from the snail’s head for the antennae. -
Create the grassy base:
Mix sap green with a little brown for a natural earth tone. Paint a loose, uneven wash beneath the mushroom and shell to ground them. -
Suggest grass blades:
While the ground wash is still wet, use a slightly drier brush with darker green to flick upward, creating soft grass blades around the base of the stem. -
Final touches:
Check your white spots on the mushroom. If you accidentally painted over any, gently lift the color with a clean, damp brush or dab on a tiny bit of white gouache.
Once dry, frame your woodland study or use it as a charming handmade engaging card for a nature lover
Mushroom House: Door and Window on the Stem
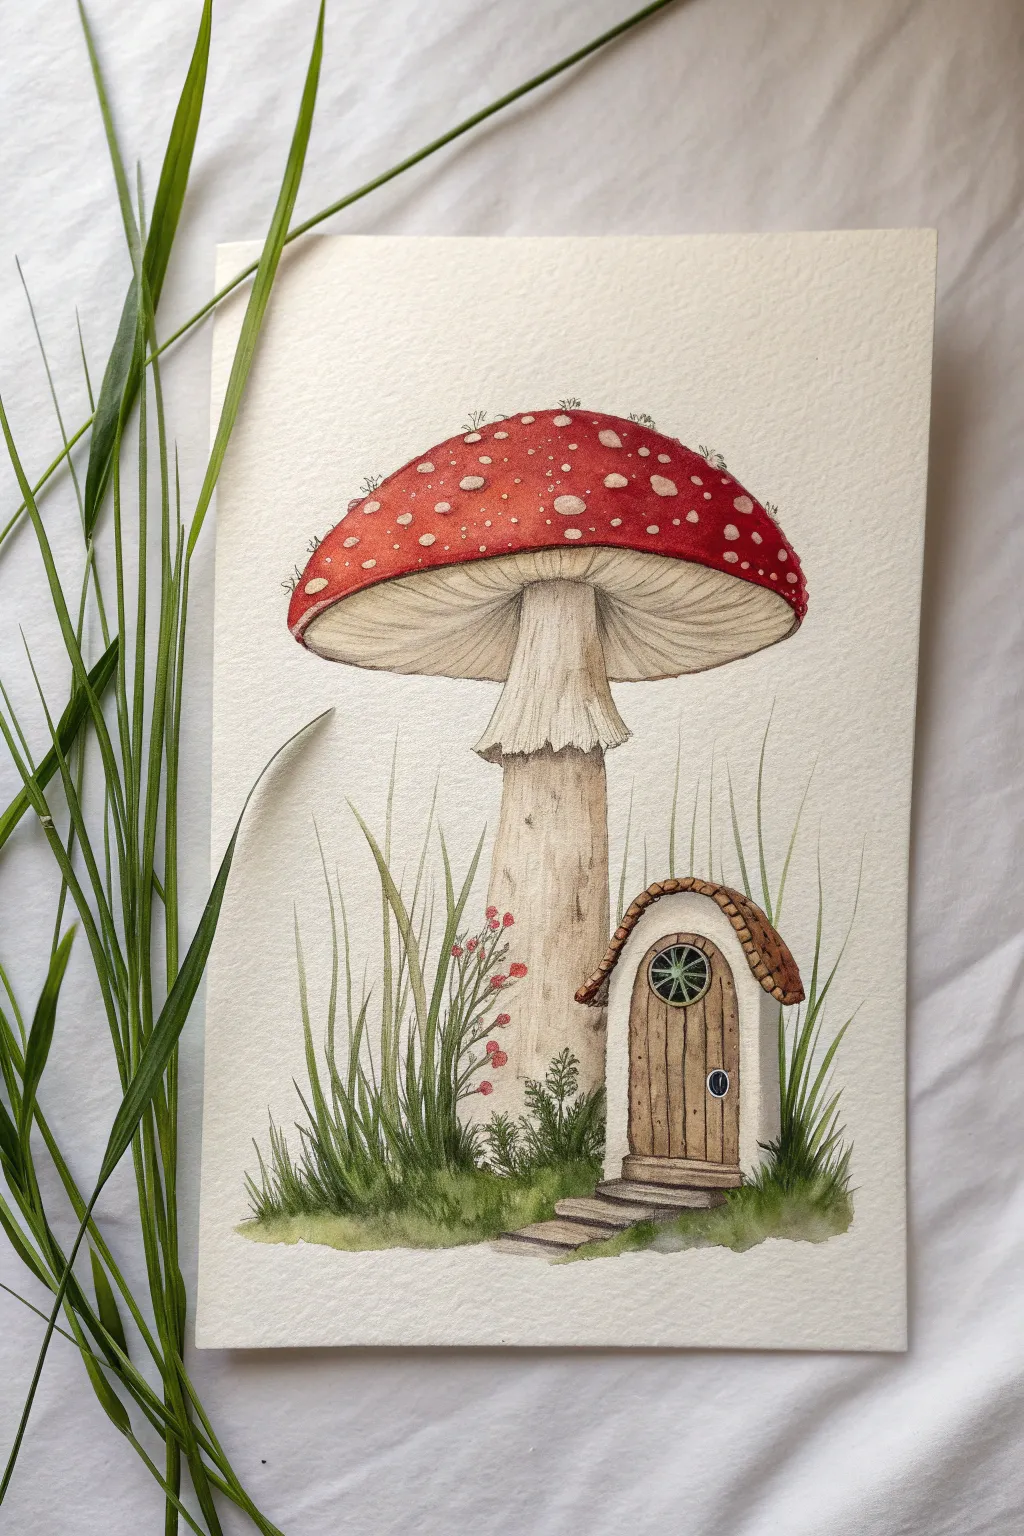
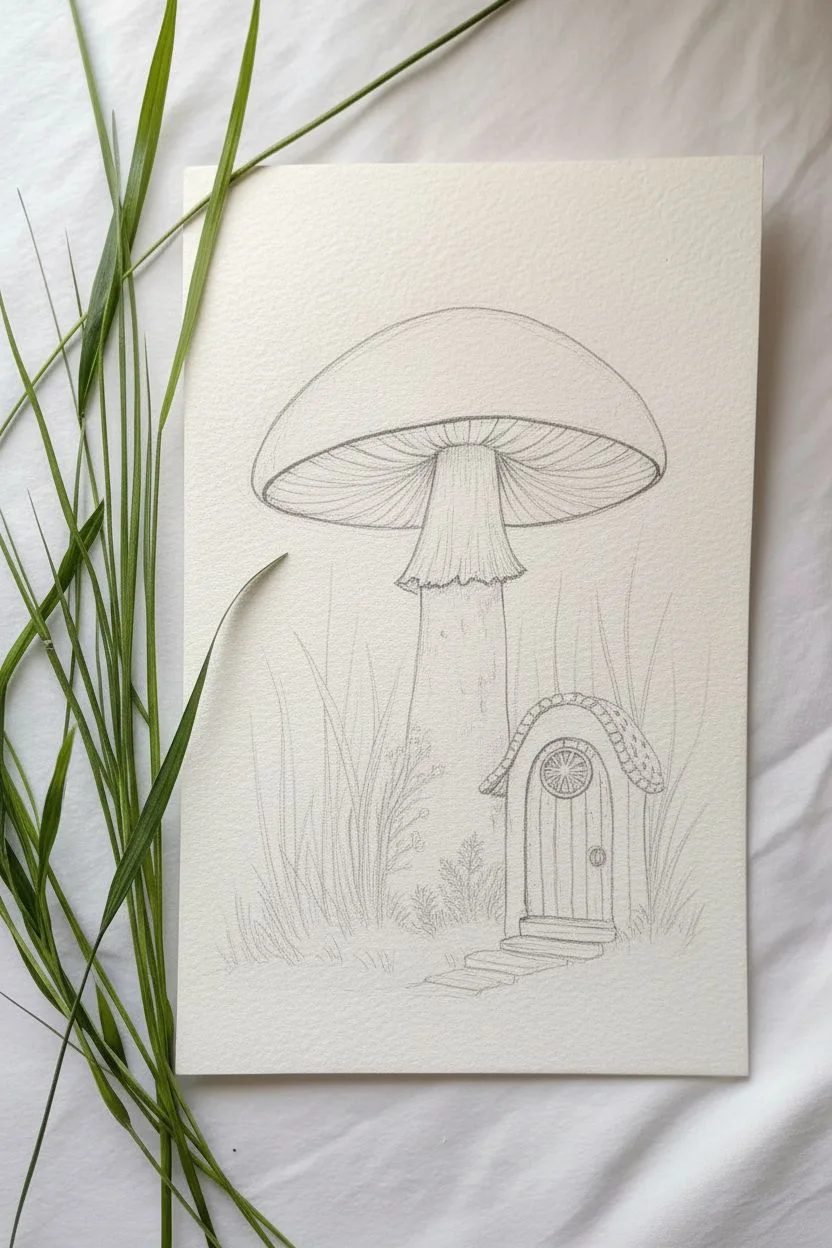
Transform a classic red-capped mushroom into a cozy fairy dwelling with this charming watercolor project. By adding a tiny wooden door and window, you’ll create a storybook scene nestled in gentle greenery.
Step-by-Step Guide
Materials
- Cold press watercolor paper (300 gsm)
- Pencil (HB or H)
- Kneaded eraser
- Watercolor paints (Alizarin Crimson, Cadmium Red, Yellow Ochre, Burnt Umber, Sap Green, Indigo)
- Fine liner brush (size 0 or 00)
- Round brush (size 4 or 6)
- Chalk pastel or white gouache (for highlights)
- Water cups and paper towels
Step 1: Sketching the Structure
-
Outline the mushroom cap:
Begin lightly with your pencil, drawing a large, rounded dome shape for the cap. Keep the top slightly flattened and curve the edges downward to create that classic umbrella look. -
Draw the stem and gills:
Sketch a thick stalk descending from the center of the cap. Just under the cap’s rim, draw faint curved lines radiating inward to mark where the gills will be. Add the ‘skirt’ or ring of skin hanging loosely around the upper stem. -
Add the cottage details:
To the right side of the stem base, draw a small arched door with a stone step leading up to it. Sketch a tiny round window in the upper part of the door and a small roof overhang above the arch. -
Sketch the foliage:
Lightly pencil in varied blades of grass pushing up around the base of the mushroom and the door, ensuring some blades overlap the stem for depth.
Uneven Wash?
If your red cap dries with unwanted ‘cauliflower’ blooms, wait for it to fully dry, then apply a second, slightly thicker layer of red paint to smooth it out.
Step 2: Painting the Mushroom
-
First wash on the cap:
Mix a vibrant red using Cadmium Red with a touch of Alizarin Crimson. Paint the cap carefully, avoiding small irregular circles—these will be the white spots. If you accidentally paint over one, don’t worry; we can fix it later. -
Deepening the red:
While the red is still damp, drop in slightly darker crimson near the edges and bottom rim to create volume and roundness. Let this dry completely. -
Painting the gills:
Use a very diluted wash of Yellow Ochre and a tiny bit of brown for the underside of the cap. Use your fine liner brush to paint delicate, thin lines for the gills, leaving white paper between them. -
Stem texture:
Paint the stem with a pale wash of watered-down brown. While wet, drop in a slightly darker brown on the right side to indicate shadow. Use the liner brush to add faint vertical texture lines once dry.
Level Up
Add tiny ink stippling or cross-hatching over the dry watercolor on the stem and door to give the illustration a vintage, botanical print aesthetic.
Step 3: Bringing the House to Life
-
Wood grain on the door:
Paint the door with a base of Yellow Ochre. Once dry, use your finest brush and Burnt Umber to draw vertical wood grain lines. Paint the hardware (hinges/knob) with a dark grey or black. -
Roof and window:
Dab small spots of reddish-brown on the door’s roof to resemble shingles. Fill the round window with a dark greenish-black to suggest a glass reflection. -
Painting the steps:
Use a light grey wash for the stone steps, adding a darker shadow line underneath the edge of each stone to make them look distinct.
Step 4: Finishing Touches
-
Base greenery:
Mix Sap Green with a touch of Indigo for a natural grass color. Using upward flicking motions, paint the grass blades at the base, varying the height and density. -
Adding wildflowers:
For a pop of detail, use a tiny amount of red or pink to dot small flowers on some of the grass stems near the mushroom’s skirt. -
Refining the white spots:
If your reserved white spots on the cap look dull, touch them up with a bit of white gouache or a gel pen to make them pop against the red. -
Cast shadows:
Finally, add a sheer glaze of cool grey or purple under the mushroom cap on the stem to clearly separate the cap from the stalk.
Step back and admire your little mushroom home, ready for a fairy to move in
Cute Cartoon Mushrooms With Simple Faces

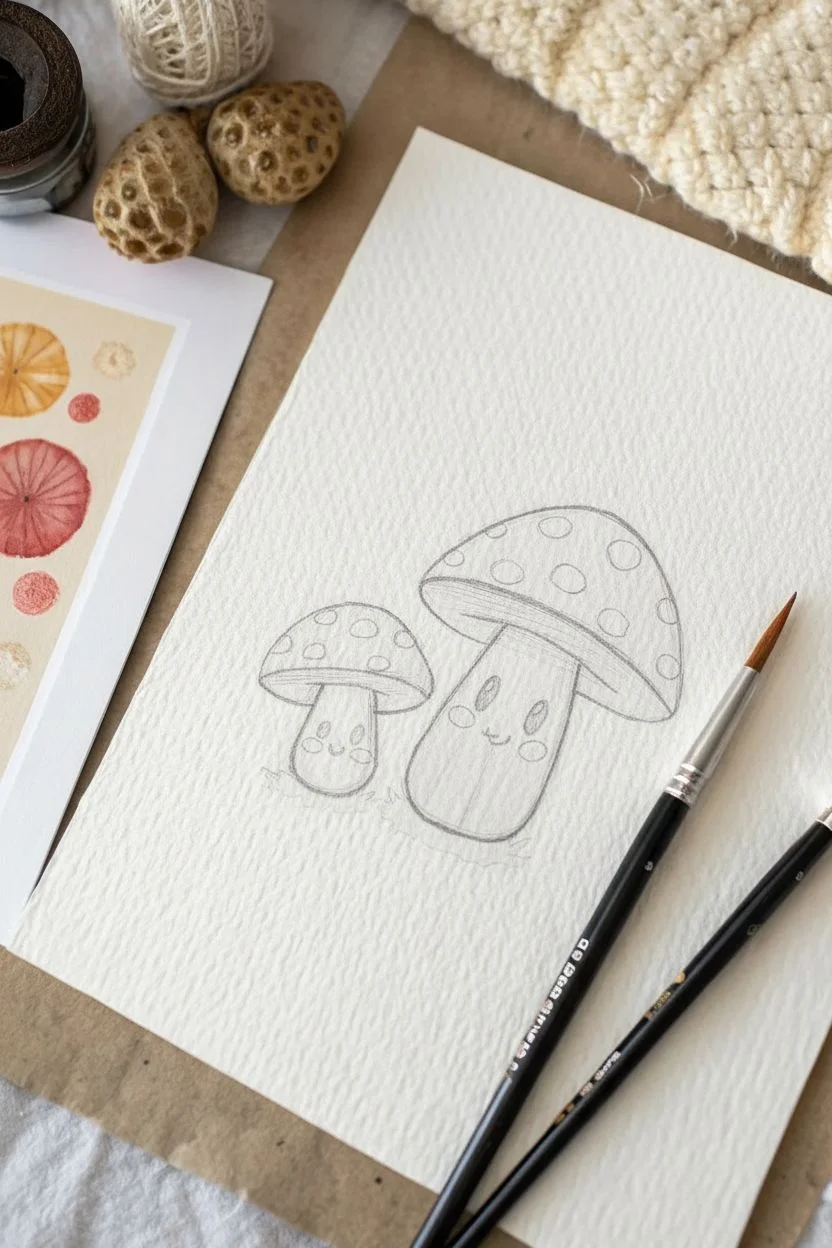
Capture the charm of the forest floor with this adorable duo of mushrooms, featuring expressive faces and vibrant red caps. This project combines simple sketching with classic watercolor techniques to create a sweet, textured illustration perfect for greeting cards or nursery art.
Detailed Instructions
Materials
- Cold-press watercolor paper (300gsm is ideal)
- Watercolor paints (Red, Burnt Umber or Sepia, Sap Green)
- Pencil (HB) and eraser
- Waterproof fine liner pen (black, 0.3mm or 0.5mm)
- Round watercolor brushes (size 2 and size 6)
- White gel pen or white gouache (optional highlights)
- Paper towel and water jar
Step 1: Sketching the Shapes
-
Map out the large mushroom cap:
Start on the right side of your paper. Draw a large, curved dome shape for the top of the big mushroom cap. Connect the bottom with a slightly curved horizontal line that dips down at the edges. -
Add the large stem:
Beneath the cap, sketch a thick, sturdy stem. It should flare out slightly at the bottom to give it a grounded look. Add a curved line near the top of the stem to indicate the underside of the cap. -
Sketch the small companion:
To the left, draw a smaller version of the mushroom. Make the cap slightly flatter and the stem shorter and stubbier so it looks like a cute sidekick. -
Place the facial features:
Lightly sketch large oval eyes on the stems. Position them fairly low for maximum cuteness. Add a small ‘w’ shape between the eyes for a mouth. -
Add the spots:
Draw various sizes of circles and ovals on the mushroom caps. Keep some near the edges to show the curvature of the dome.
Bleeding Colors?
If your red paint bleeds into the white spots, blot it immediately with a clean tissue. Wait for it to dry, then use white gouache or a gel pen to reclaim the spot.
Step 2: Inking the Outline
-
Trace the main lines:
Using your waterproof fine liner, carefully trace over your pencil lines. I prefer to use a slightly broken or varying line weight to keep it feeling hand-drawn rather than mechanical. -
Fill in the eyes:
Color in the oval eyes with the black pen, leaving a tiny white circle in the corner of each eye for a highlight. This brings them to life instantly. -
Erase pencil marks:
Wait for the ink to be completely dry—give it a full minute—then gently erase all visible pencil sketches underneath.
Level Up
Try painting the background a very pale blue or adding tiny floating pollen specks with yellow paint to give the scene a magical, fairytale atmosphere.
Step 3: Painting the Caps
-
Prepare the red wash:
Mix a vibrant red watercolor. Ensure you have a good amount mixed so you don’t run out halfway through a cap. -
Paint around the spots:
Using your smaller brush, carefully paint the red onto the caps, working strictly around the circular spots you drew. The spots should remain the white of the paper. -
Soften the edges:
While the red paint is still damp, you can drop in a slightly darker red near the bottom rim of the cap to create a subtle shadow.
Step 4: Painting the Stems and Details
-
Wash the stems:
Dilute a brown or sepia tone with plenty of water to make a very pale beige. Wash this over the entire stem area of both mushrooms. -
Add stem texture:
Once the base beige is dry, use a slightly less diluted brown and a fine brush to paint thin, vertical striations up the stem. This mimicks the fibrous texture of a real mushroom stalk. -
Shadow the underside:
Paint the underside of the caps (the area visible right above the stem) with a darker beige or light brown to create depth. -
Paint rosy cheeks:
Mix a watery pink or coral color. Paint small oval blushes right under the eyes of both characters. -
Ground the mushrooms:
Mix a muted green (Sap Green with a touch of brown). Paint jagged, uneven strokes at the base of the stems to represent grass. Let the color fade out casually at the edges.
Now you have a heartwarming pair of mushroom friends ready to brighten up your sketchbook
Monochrome Mushrooms Using Only Two Values
Capture the delicate textures and organic form of a classic mushroom with this simple watercolor study. Using a limited palette of warm browns and soft greys, you’ll create a piece that feels both scientific and whimsical.
Step-by-Step Tutorial
Materials
- Cold press watercolor paper (deckle edge optional)
- Pencil (HB or H for light lines)
- Kneaded eraser
- Watercolor paints (Burnt Umber, Sepia, Raw Sienna, Payne’s Grey)
- Round watercolor brushes (Size 4 and Size 0 or 1 for details)
- Cup of water
- Paper towels
Step 1: Sketching the Structure
-
Outline the cap:
Begin by lightly sketching a wide, convex dome shape for the top of the mushroom cap. Keep the bottom edge fairly flat but slightly curved upwards at the ends. -
Draft the stem:
Draw the stem (stipe) extending downward from the center of the cap. Make the base bulbous and slightly wider than the middle section, giving it a sturdy, organic look. -
Define the gills:
Lightly sketch a curved line beneath the cap rim to indicate where the gills connect to the stem. This creates that classic umbrella-like underside structure. -
Add texture and ground:
Mark a few irregular spots on the cap surface and sketch some wispy grass blades at the very base to ground the subject.
Step 2: The First Wash
-
Mix your base tone:
Create a watery mix of Raw Sienna with a tiny touch of Burnt Umber. You want a very pale, warm beige color. -
Paint the cap:
Apply this pale wash to the top of the cap, leaving a few tiny areas white for highlights if you wish, or lift them out later with a paper towel. -
Wash the stem:
Paint the stem with the same pale mix. While it’s wet, I like to drop in a slightly darker brown near the bottom bulb and right under the cap for instant volume.
Muddy colors?
If your browns look muddy, let layers dry completely before adding new ones. Avoid overworking wet paper, which can dull the vibrancy.
Step 3: Building Depth and Gills
-
Mix the gill shadow:
Combine Sepia with a touch of Payne’s Grey to get a cool, dark brown. -
Paint the gill area:
Fill in the underside area of the cap with this dark mix. Let the edges be crisp against the pale stem. -
Add gill lines:
Once the dark underside is barely damp or dry, use your smallest brush to pull very fine, curved lines radiating from the stem toward the cap’s edge to mimic the gill texture. -
Darken the rim:
Add a thin, concentrated line of dark brown along the very bottom edge of the cap to separate it from the gills.
Deckle Edge Trick
If you don’t have fancy paper, create a faux deckle edge by painting a line of water along the paper edge and gently tearing it while wet.
Step 4: Refining Textures
-
Texture the stem:
Using a slightly dry brush technique with Burnt Umber, drag vertical strokes down the stem. This mimics the fibrous nature of the mushroom stalk. -
Defining the cap details:
Return to the cap and paint small, irregular spots using a diluted Separ or Burnt Umber. Soften their edges with a clean, damp brush so they don’t look like polka dots. -
Enhance the bulb:
Darken the bottom of the stem where it meets the ground, adding some stippled dots for dirt and texture.
Step 5: Finishing Touches
-
Paint the grass:
Use a mix of Payne’s Grey and a bit of green or yellow ochre to flick quick, upward strokes at the base for grass blades. -
Cast the shadow:
Mix a watery grey wash. Paint a horizontal shadow stretching out to the left of the base to anchor the mushroom to the page. -
Final assessment:
Step back and check your values. If the gills need to be darker to contrast with the stem, add a smooth glaze of Sepia over them now.
Now you have a charming botanical study ready to be framed or gifted to a nature lover
Texture Trick: Speckled Paint for Foresty Mushroom Vibes

Capture the earthy essence of a forest floor with this charming mushroom illustration that combines precise detail with loose, organic splashes. The textured, deckle-edged paper creates a rustic foundation for the warm terracotta tones of the cap and the delicate fern accents.
Step-by-Step
Materials
- Heavyweight cold-press watercolor paper (300gsm or higher)
- Pencil (HB or H)
- Kneaded eraser
- Watercolor paints (Burnt Sienna, Yellow Ochre, Burnt Umber, Sap Green, Sepia)
- White gouache or white gel pen
- Round brushes (size 4 and size 0/00 detail brush)
- Old toothbrush or stiff bristle brush
- Ruler for tearing paper (optional)
- Paper towels
Step 1: Preparing the Base
-
Prepare the paper:
Start by creating that lovely deckle-edged look. If your paper doesn’t have it naturally, place a ruler against the edge of your paper. Wet the paper along the ruler’s edge with a clean brush, let it soak for a minute, and gently tear the excess strip away to create a soft, fibrous border. -
Sketch the outline:
Lightly sketch the basic mushroom shape in the center of the page. Draw a wide, domed cap and a sturdy, slightly bulbous stem. Keep your pencil pressure very light so the graphite doesn’t show through the transparent watercolor later. -
Add botanical details:
Sketch a simple, curved fern frond specifically around the base of the stem. Imagine the fern cupping the mushroom, with small, individual leaflets extending outward.
Splatter Control
Cover your main mushroom subject with a scrap piece of paper before flicking paint. This ensures the speckles create a background atmosphere without making the mushroom itself look dirty.
Step 2: Painting the Mushroom
-
Wash the cap:
Mix a vibrant Burnt Sienna with a touch of Yellow Ochre. Using your size 4 brush, apply a wet wash to the entire cap area. Let the color pool naturally, perhaps dropping in slightly more concentrated pigment near the edges for roundness. -
Lift a highlight:
While the cap paint is still damp but not soaking wet, use a clean, thirsty brush to lift a small sliver of paint near the top left. This creates a soft, diffused highlight indicating the light source. -
Paint the pores:
For the underside of the cap (the hymenium), mix a very pale, watery wash of Yellow Ochre with a tiny dot of green. Paint a thin strip beneath the cap rim, ensuring it’s clearly distinct from the reddish top. -
Base layer for the stem:
Using a very diluted mix of Burnt Umber and Sepia, paint the stem. Keep this layer pale to represent the white flesh of the mushroom, leaving the bottom area almost white. -
Add stem texture:
Once the stem is dry to the touch, switch to your detail brush (size 0). Mix a darker Sepia tone and paint fine, vertical, broken lines down the length of the stem to mimic the fibrous reticulation found on bolete mushrooms. -
Deepen the shadows:
Glaze a transparent layer of Burnt Umber right under the cap where it meets the stem to cast a shadow and anchor the shapes together.
Step 3: Ferns and Finishing Touches
-
Greenery base:
Mix a muted Sap Green. Using the tip of your round brush, paint the central spine of the fern fronds you sketched earlier. -
Leaflet details:
With delicate, flicking strokes, paint the small leaflets coming off the spine. Keep the paint somewhat transparent to maintain that illustration style. -
Pencil accents:
I like to go back in with a sharpened pencil once the paint is bone dry to outline the fern leaves. This adds a specific botanical study aesthetic to the piece. -
Add the splatters:
Load an old toothbrush or stiff brush with watery Burnt Sienna and some Sap Green. Hold it over the paper and run your thumb across the bristles to flick tiny specks of paint across the background. This is the ‘forest floor’ texture. -
Final highlights:
Use white gouache or a gel pen to add the tiniest, sharpest highlight on the cap’s brightest point, and perhaps a few small specks on the stem if it looks too flat.
Pro Tip: Color Harmony
To make the piece cohesive, mix a tiny amount of your cap color (Burnt Sienna) into your green fern mix. This links the two elements visually and creates a warm, natural palette.
Once the speckles are dry, your rustic mushroom study is ready to be framed or gifted.
Mushrooms on a Painted Rock for a Quick Mini Project
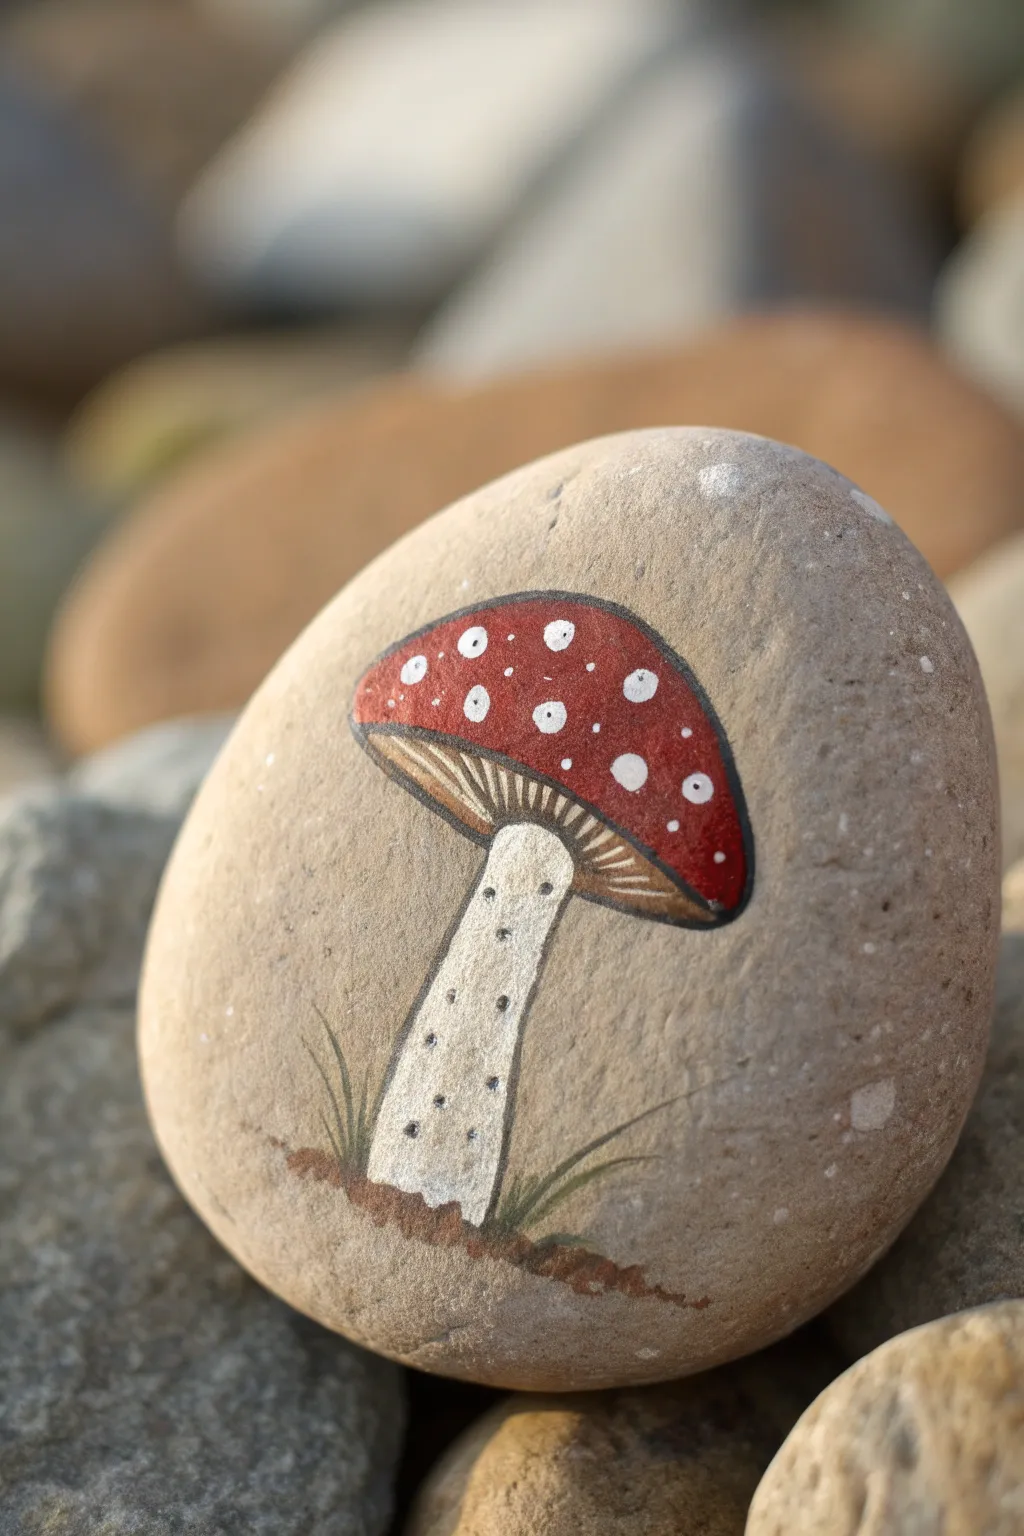
Transform a simple garden stone into a charming piece of mini art with this classic red toadstool design. The natural texture of the rock provides the perfect rustic canvas for the vibrant red cap and delicate stem details.
Detailed Instructions
Materials
- Smooth, oval-shaped river rock (cleaned and dried)
- Acrylic paints (Red, White, Warm Beige/Cream, Dark Brown, Black)
- Fine detail paintbrush (size 0 or 00)
- Small flat shader brush (size 2-4)
- Pencil for sketching
- Matte or satin spray sealant
- Cup of water
- Paper towel
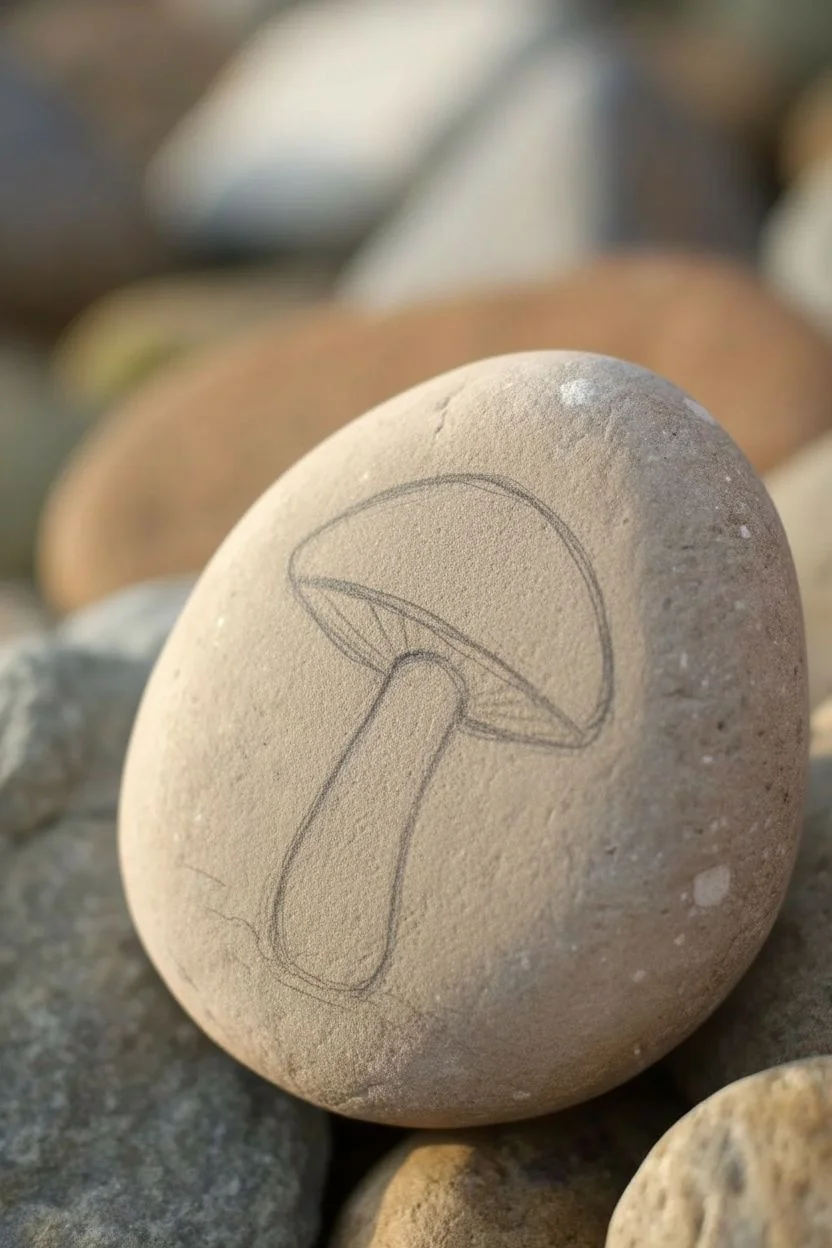
Step 1: Preparation and Sketching
-
Clean the canvas:
Begin by scrubbing your rock with soap and warm water to remove any dirt or oils. Let it dry completely in the sun or with a hair dryer to ensure the paint adheres well. -
Outline the cap:
Using a pencil, lightly sketch a semi-circle or curved dome shape near the upper middle of the rock. Tilt the cap slightly to the right to give the mushroom some character. -
Draw the stem:
Below the center of the cap, sketch a thick stalk that widens slightly at the bottom. The top of the stalk should disappear under the cap’s rim. -
Add the gills:
Sketch a narrow, curved band underneath the red cap part, connecting the cap edges to the stem. This area will become the gills.
Uneven dots?
If your paintbrush handle creates messy dots for the cap, try using a dotting tool or even a toothpick dipped in white paint for more precision.
Step 2: Color Blocking
-
Paint the cap base:
Fill in the main dome shape with a deep crimson red paint using your flat shader brush. It may need two thin coats for full opacity; let the first coat dry before adding the second. -
Fill the stem:
Mix a tiny amount of warm beige with white to create an off-white cream color. Paint the entire stem area with this mixture. -
Base the gill area:
Using a dark brown diluted slightly with water, paint the curved band under the cap. This dark base will help the lighter gill details pop later. -
Outline the shape:
Once the base colors are dry to the touch, use a very fine liner brush and black paint to carefully outline the entire mushroom shape. Keep the line thin and steady.
Level Up: Glossy Finish
Make the red cap look freshly rained on by applying a coat of high-gloss varnish just to the red area, leaving the stem matte.
Step 3: Adding Details
-
Create the gills:
Switch back to your cream color. Paint thin, curved lines radiating from the stem outward toward the edge of the cap within that dark brown band. These lines represent the mushroom’s gills. -
Dot the cap:
Dip the handle end of a paintbrush into pure white paint to stamp distinct white dots onto the red cap. Make them various sizes—some large, some tiny—for a natural look. -
Texture the stem:
Using your finest brush and black paint, add tiny stippling dots and very short vertical dashes up and down the stem. This mimics the rough texture of a real mushroom stalk. -
Add stem shading:
Mix a very watery grey or light brown wash and glaze it slightly on the left side of the stem to create a subtle shadow suitable for a cylindrical object. -
Ground the mushroom:
Paint a small, uneven patch of dark brown at the very base of the stem to represent soil. -
Paint grass blades:
Using a flicking motion with your fine liner brush, add a few wispy strands of mossy green or greyish-green grass rising from the soil patch. -
Final dry:
Allow the entire painting to dry completely, preferably overnight, to ensure no moisture is trapped under the sealant. -
Seal the rock:
Take the rock outside and spray it with a light coat of matte or satin sealant to protect your artwork from weather and scratches.
Place your finished stone in a flower pot or on a desk for a lovely touch of nature that lasts forever


Have a question or want to share your own experience? I'd love to hear from you in the comments below!