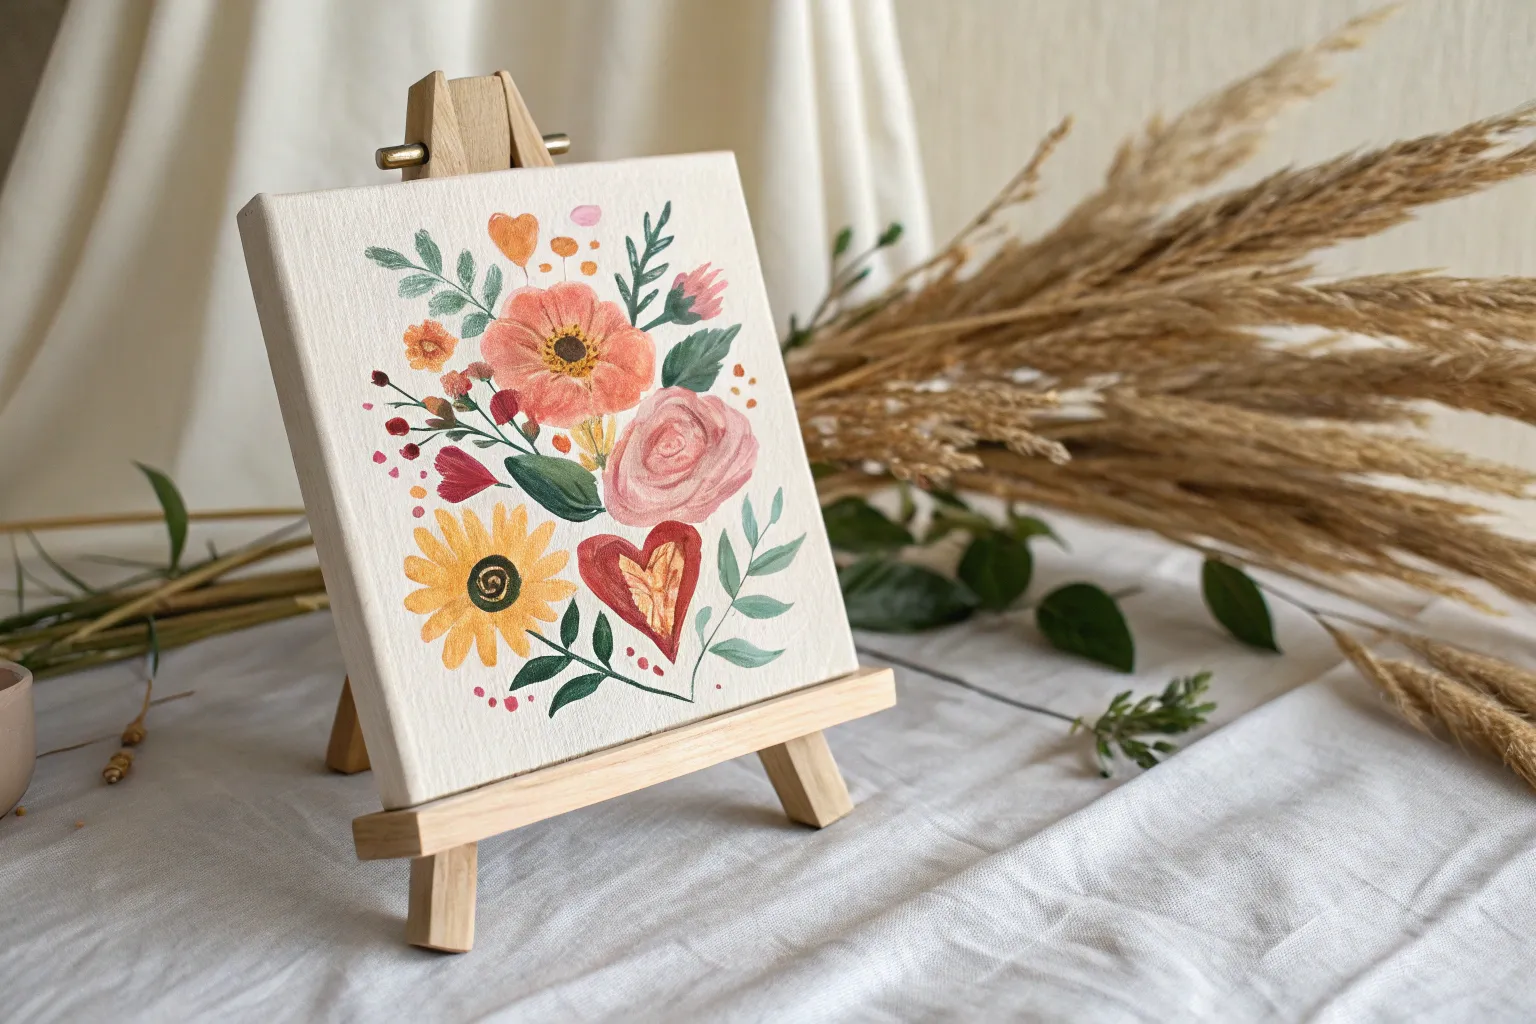
If you want a Mother’s Day gift that feels genuinely personal, a painting beats anything store-bought every single time. Here are my favorite Mother’s Day painting ideas that look beautiful on a pin and feel even better to hand to your mom (or any mother figure you love).
Watercolor Floral Bouquet With a Sweet “Mom” Tag
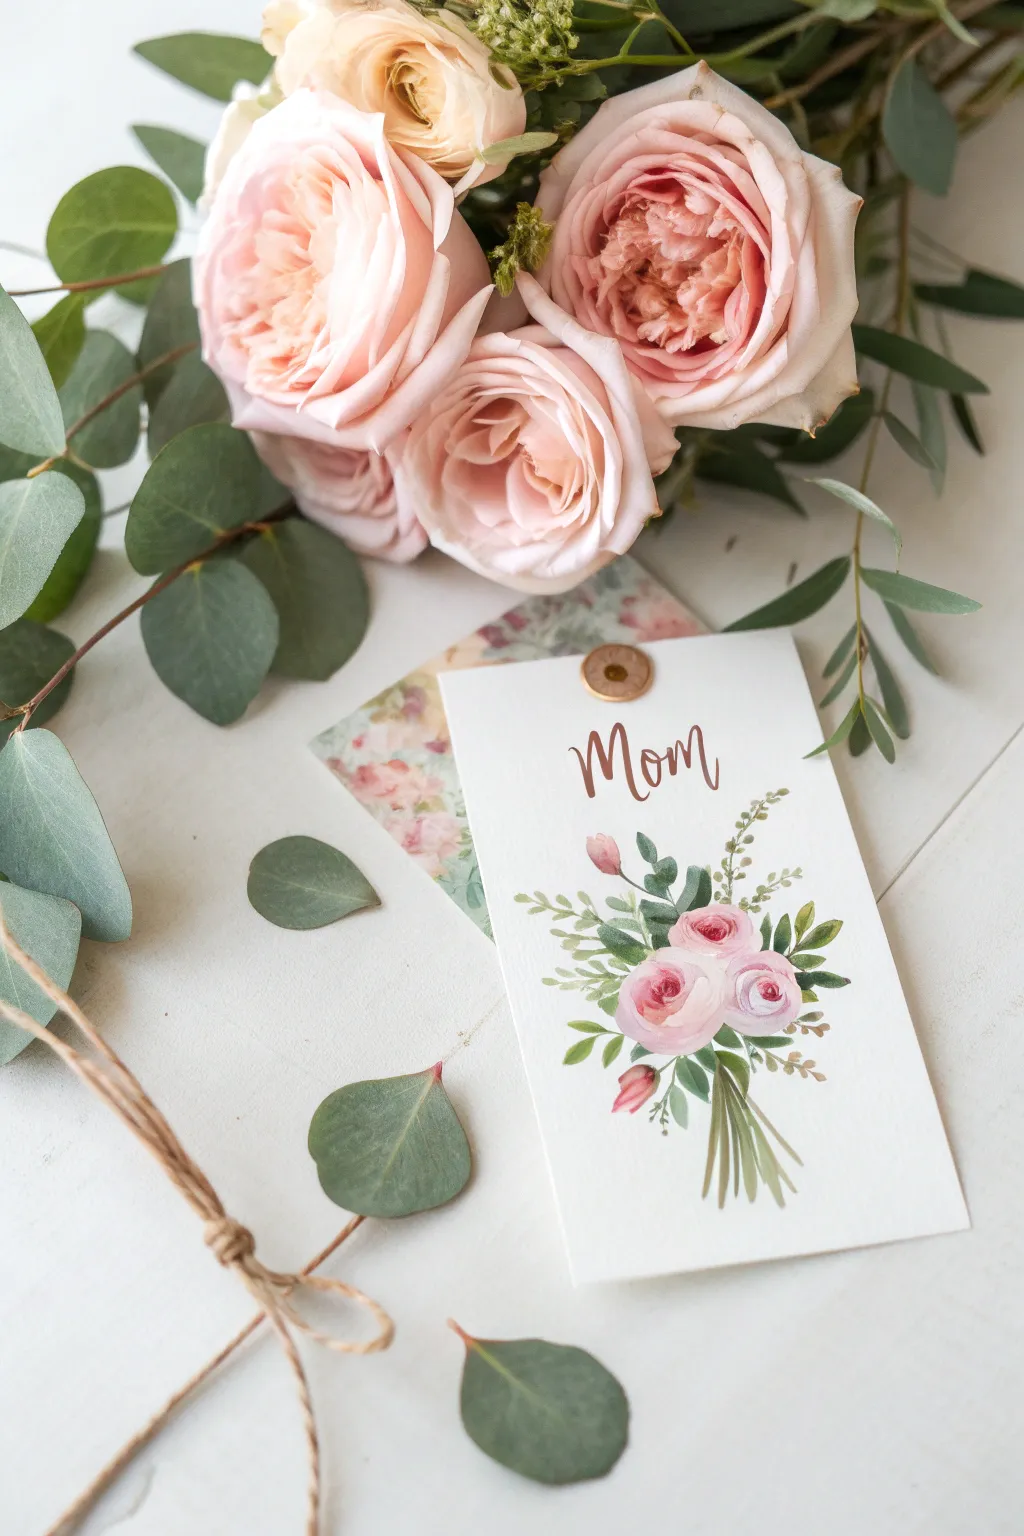
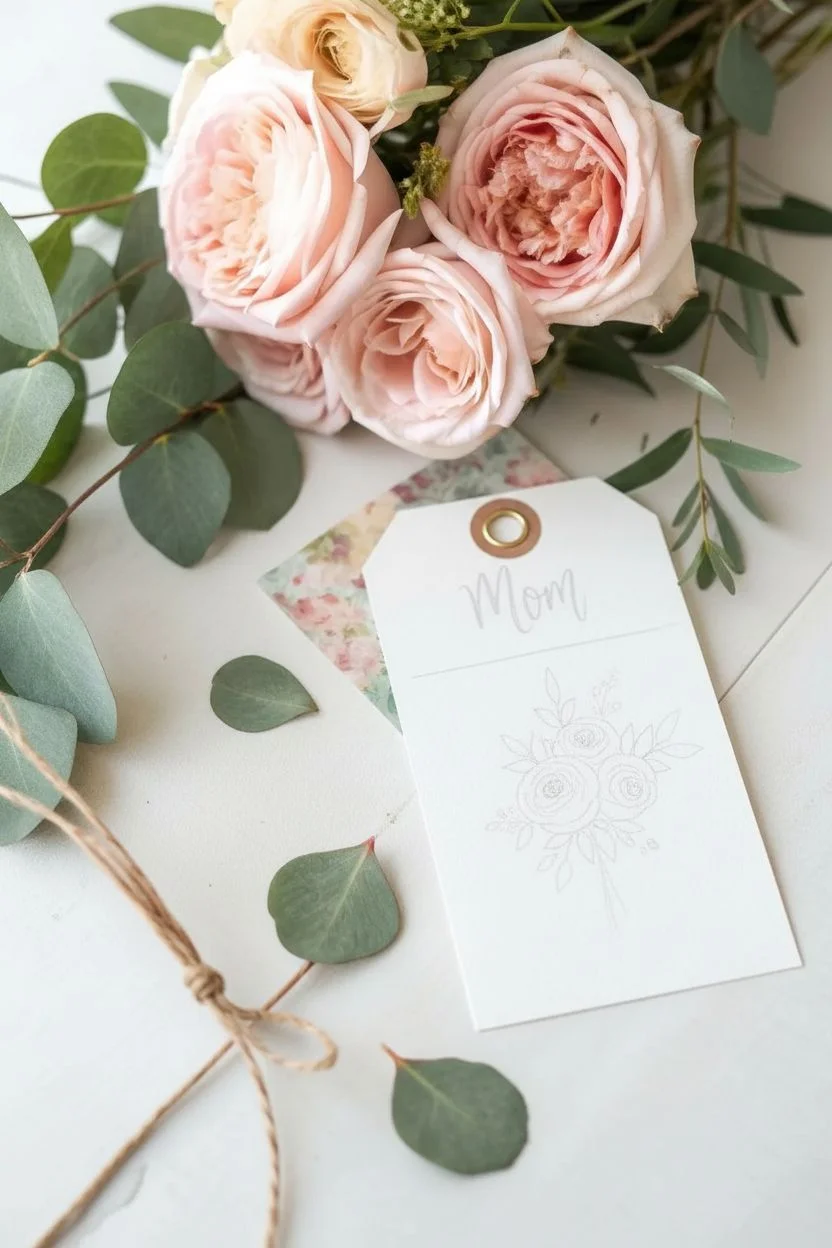
Create a heartfelt keepsake with this lovely hand-painted gift tag featuring soft blush roses and graceful greenery. The combination of loose watercolor florals and elegant script adds a personalized touch that perfectly complements a fresh bouquet for Mother’s Day.
How-To Guide
Materials
- Cold press watercolor paper (300 gsm)
- Watercolor paints (Alizarin Crimson, Sap Green, Burnt Umber, Yellow Ochre)
- Round watercolor brushes (sizes 2 and 6)
- Pencil and eraser
- Gold or copper metallic watercolor or ink
- Ruler
- Scissors or craft knife
- Hole punch
- Jute twine or ribbon
- Paper towel and water cup
Step 1: Preparing the Tag
-
Cut the base:
Measure and cut a rectangle from your watercolor paper, approximately 2.5 inches wide by 5 inches tall. -
Create the shape:
Using a ruler, lightly mark the top corners and snip them off at an angle to create the classic tag shape. -
Sketch the layout:
Very lightly sketch the placement of your floral bouquet near the bottom third of the tag and mark a faint line where the word ‘Mom’ will sit above it. -
Add the hole reinforcement:
Punch a hole in the top center. Then, sketch a small ring around the hole which we will paint gold later to mimic a metal eyelet.
Muddy colors?
Wait for the pink flowers to be 100% dry before painting the green leaves next to them. If they touch while wet, the red and green will mix into brown.
Step 2: Painting the Roses
-
Mix your base pink:
Dilute Alizarin Crimson with plenty of water to create a very pale, watery pink wash on your palette. -
Paint the first center:
Using the size 6 brush, paint the center of the main rose with a few tight, C-shaped strokes that don’t quite touch. -
Expand the petals:
Rinse your brush and use mostly clear water to pull pigment from the center strokes outward, creating larger, fluffier petals for the outer layers. -
Add depth:
While the paint is still damp, drop a slightly more concentrated crimson into the very center of the rose to create shadow and dimension. -
Paint companion blooms:
Repeat this process for two smaller roses nearby, ensuring they slightly overlap or touch the main bloom for a cohesive cluster. -
Add buds:
Paint one or two small, teardrop-shaped buds extending upward or downward from the main cluster using the same pink mix.
Softer Petals
Keep a clean, damp brush handy. Use it to soften the outer edges of your rose petals immediately after painting them for a dreamy, faded look.
Step 3: Adding Greenery and Details
-
Mix green variations:
Create a natural green by mixing Sap Green with a touch of Burnt Umber for deeper leaves, and Sap Green with Yellow Ochre for brighter stems. -
Paint main leaves:
Tuck larger, oval-shaped leaves around the roses using the deeper green mix to help define the pale flower shapes. -
Add delicate stems:
Switch to your size 2 brush to paint thin, wispy stems extending upward and downward, mimicking eucalyptus branches. -
Create filler foliage:
Dab small dots or tiny leaves along the thinner stems using the lighter yellow-green mix to add texture and lightness. -
Paint the stems:
Draw a cluster of gathered stems at the very bottom of the bouquet, making them look as if they are tied together. -
Let it dry:
This is crucial—allow the floral painting to dry completely before attempting the lettering to prevent bleeding.
Step 4: Lettering and Finishing
-
Letter the word:
Load your small brush with a concentrated Burnt Umber or a copper metallic paint. Carefully letter the word ‘Mom’ in a flowing, modern script. -
Paint the eyelet:
Use the metallic gold or copper paint to fill in the ring you sketched around the punched hole earlier. -
Attach the twine:
Once everything is perfectly dry, erase any visible pencil marks gently. Thread a piece of jute twine through the hole and tie it in a loose loop.
Now you have a charming, hand-painted tag ready to tie onto a gift or bouquet for a wonderful surprise


Fingerprint Heart With a Short Mother’s Day Message
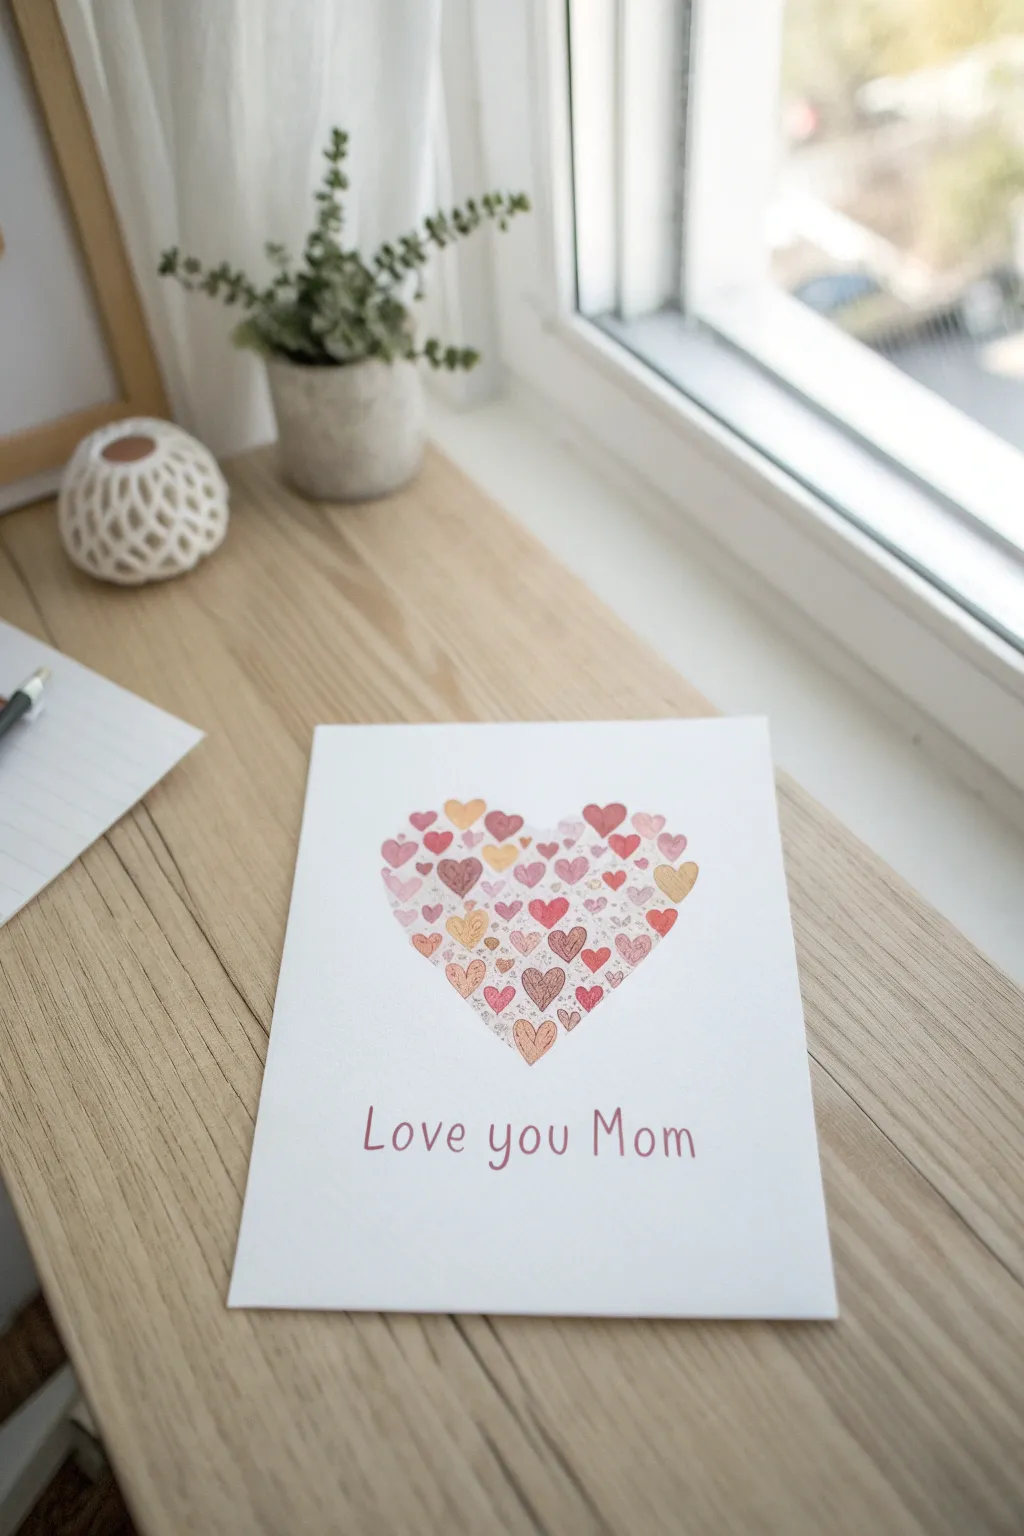
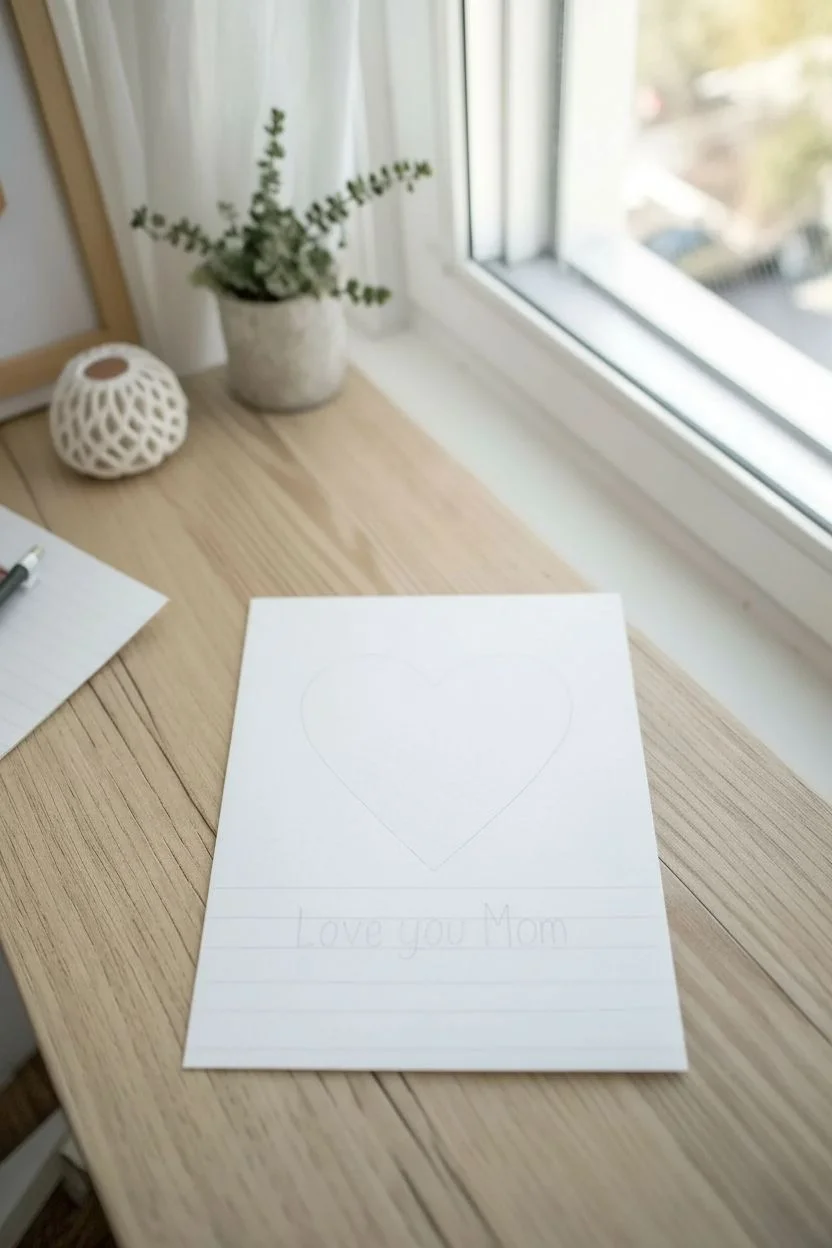
Create a heartfelt and artistically stunning card that looks professionally printed but is filled with your own loving touches. This project arranges dozens of tiny, uniquely painted hearts into one large heart shape, combining watercolor textures with delicate pen details for a truly special Mother’s Day greeting.
Detailed Instructions
Materials
- Heavyweight cold-press watercolor paper (A5 size folded or cut)
- Watercolor paint set (pinks, reds, corals, oranges)
- Small round watercolor brush (size 2 or 4)
- Fine-point black fineliner pen (0.1mm or 0.3mm)
- Water cup and paper towels
- Pencil and eraser
- Scrap paper for sketching
Step 1: Planning the Heart Shape
-
Prepare your paper:
Begin with a clean sheet of heavyweight watercolor paper. You can use a pre-folded card or a flat sheet that you intend to frame later. Ensure the surface is free of dust. -
Pencil the outline:
Using a pencil, very lightly draw a large, symmetrical heart shape in the center of the paper. This line will serve as a boundary for your smaller hearts, so make sure it’s centered but keep the lines faint enough to erase later. -
Plan the text spacing:
Measure a space at the bottom of the card for your message to ensure you don’t paint too low. Leave about two inches of white space at the bottom for the ‘Love you Mom’ lettering.
Step 2: Painting the Mosaic
-
Mix your palette:
Prepare puddles of paint in varying shades of romance: deep red, soft pink, coral, peach, and blush. Having 5-6 distinct shades ready helps create depth and visual interest. -
Paint the anchor hearts:
Start by painting 5-7 medium-sized hearts scattered randomly within your pencil boundary. Do not let them touch yet. Vary the colors so you don’t have two red hearts right next to each other. -
Add variance in size:
Now, paint smaller hearts around the medium ones. Try to make some tall and skinny, and others shorter and wider, to mimic the organic feel of rock tumbling or sea glass. -
Fill the edges:
Carefully paint small hearts right up against your pencil outline. This step defines the large heart shape, so be precise with placement here to maintain that crisp outer edge. -
Fill the gaps:
Look for empty white spaces between the existing hearts. Mix a very light wash of peach or pink and paint tiny ‘filler’ hearts to close these gaps, creating a dense, mosaic look. -
Let it dry completely:
Pause here and let the artwork dry fully. If the paper feels cool to the touch, it’s still damp. Wait until it is bone dry before proceeding to the pen details.
Smudged Paint?
If a painted heart bleeds into a neighbor, don’t panic. Turn it into one large, bi-colored heart, or wait for it to dry and use the pen phase to outline them separately.
Step 3: Adding Details and Text
-
Erase the boundary:
Once you are absolutely certain the paint is dry, gently erase the pencil outline you drew in the first phase. The hearts should now stand alone in the shape of a larger heart. -
Add texture with pen:
Take your fine fineliner pen and draw patterns over specific dry hearts. I usually pick about one in every four hearts to decorate. -
Create variety:
Draw tiny polka dots on a light pink heart and fine diagonal stripes on a darker red one. You can even outline a few hearts entirely if you want them to pop. -
Draft the lettering:
Using a ruler to keep your line straight, lightly pencil in ‘Love you Mom’ centered below the heart art. Use a simple, airy sans-serif style for a modern look. -
Ink the message:
Carefully trace over your pencil letters with a pen or a thin brush dipped in reddish-pink watercolor paint. The image uses a soft red that matches the hearts. -
Final clean up:
Wait for the lettering to dry completely before erasing any remaining pencil guides. Check the card for any stray marks and clean them up with a quality eraser.
Level Up: Metallic Pop
Swap one of your paint colors for metallic gold watercolor. Painting just 3-5 scattered gold hearts adds a beautiful shimmer that catches the sunlight.
This charming collection of hearts is ready to bring a smile to your mom’s face


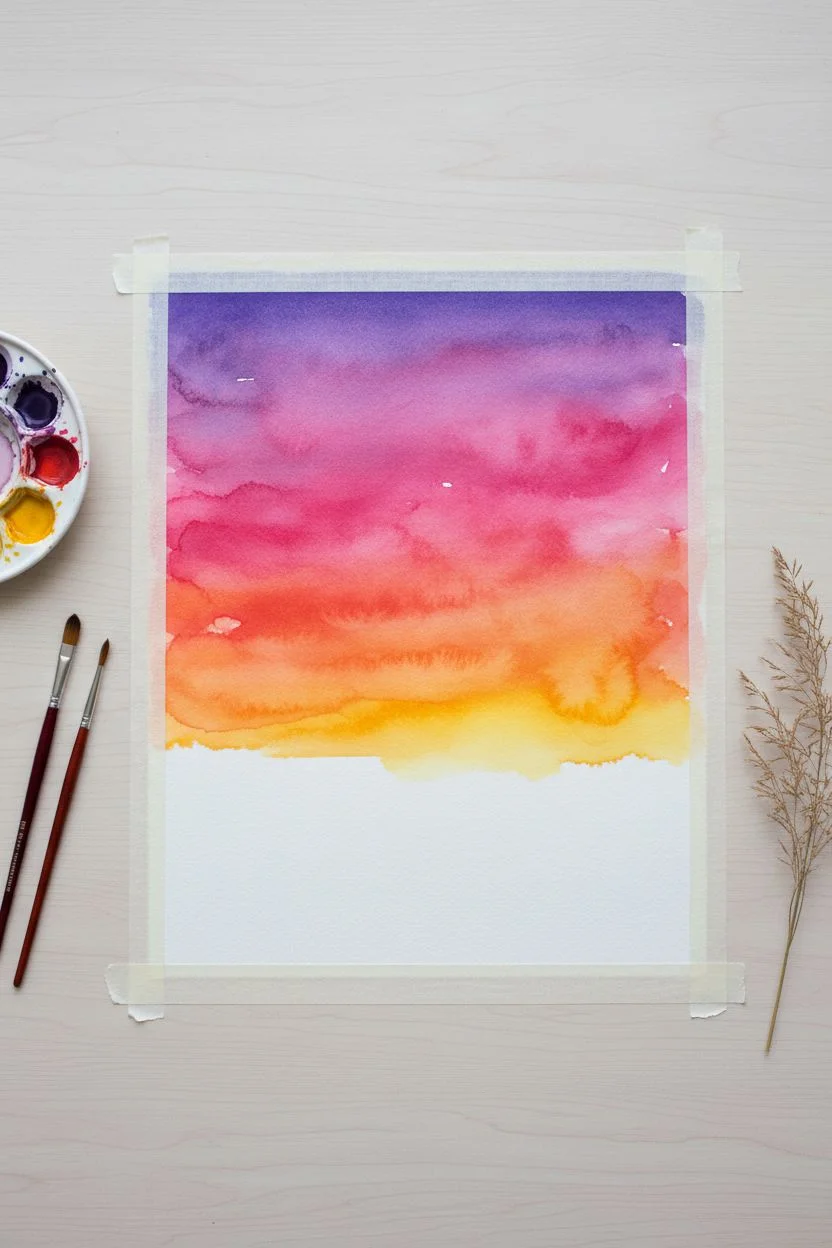
Simple “I Love You, Mom” Lettering Painting
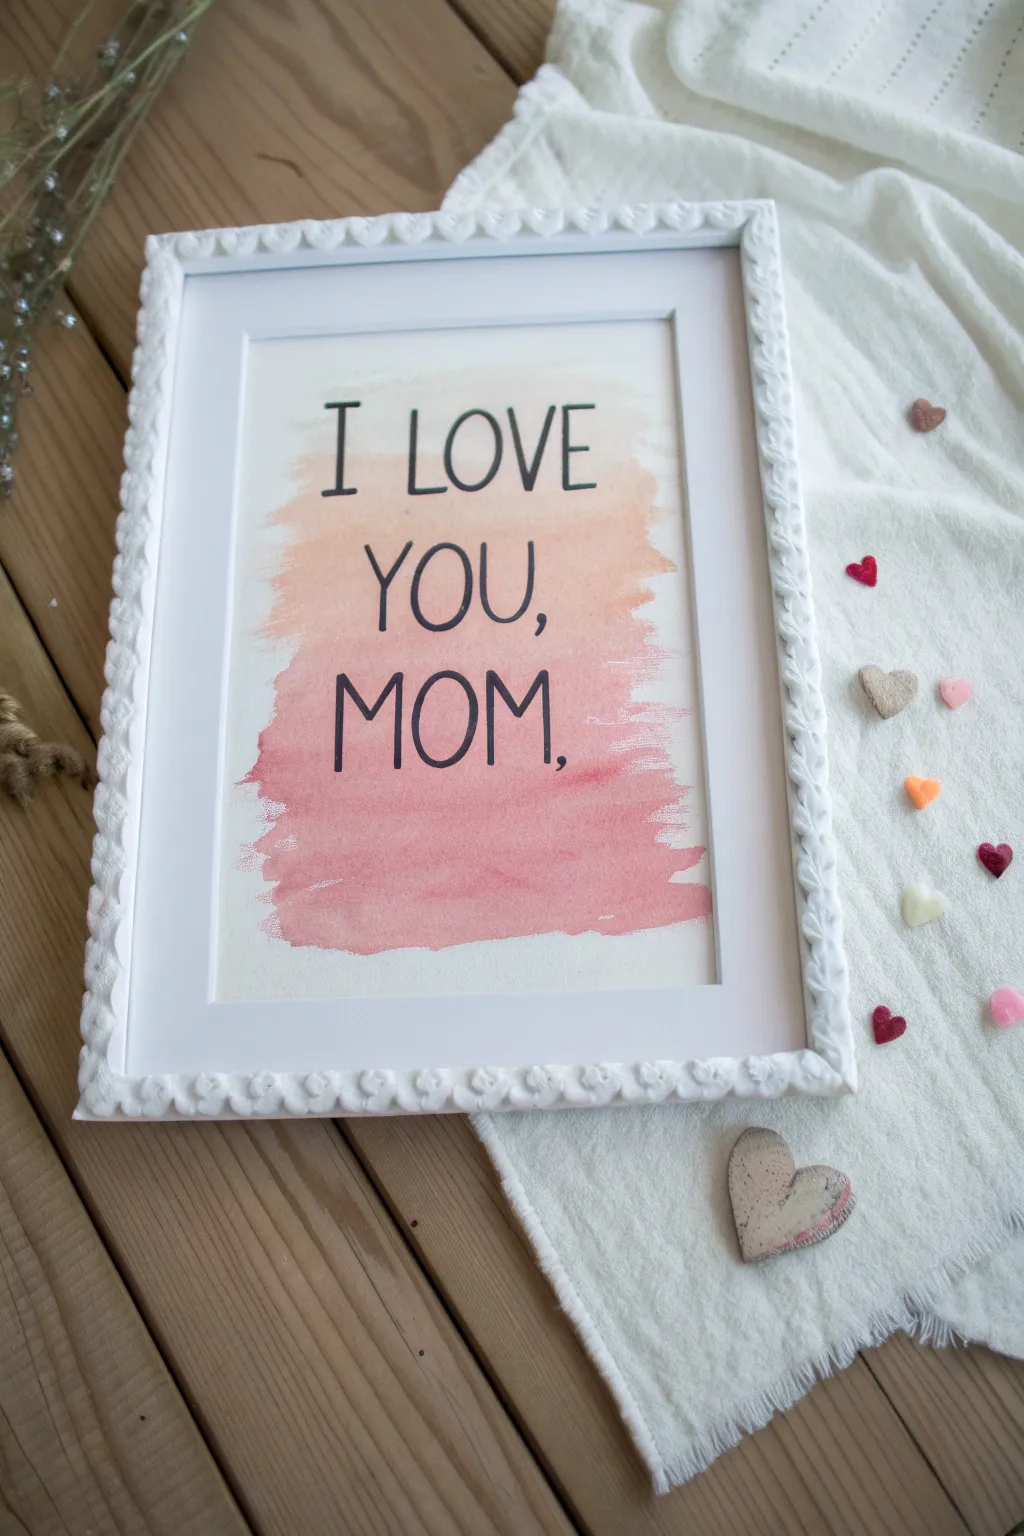
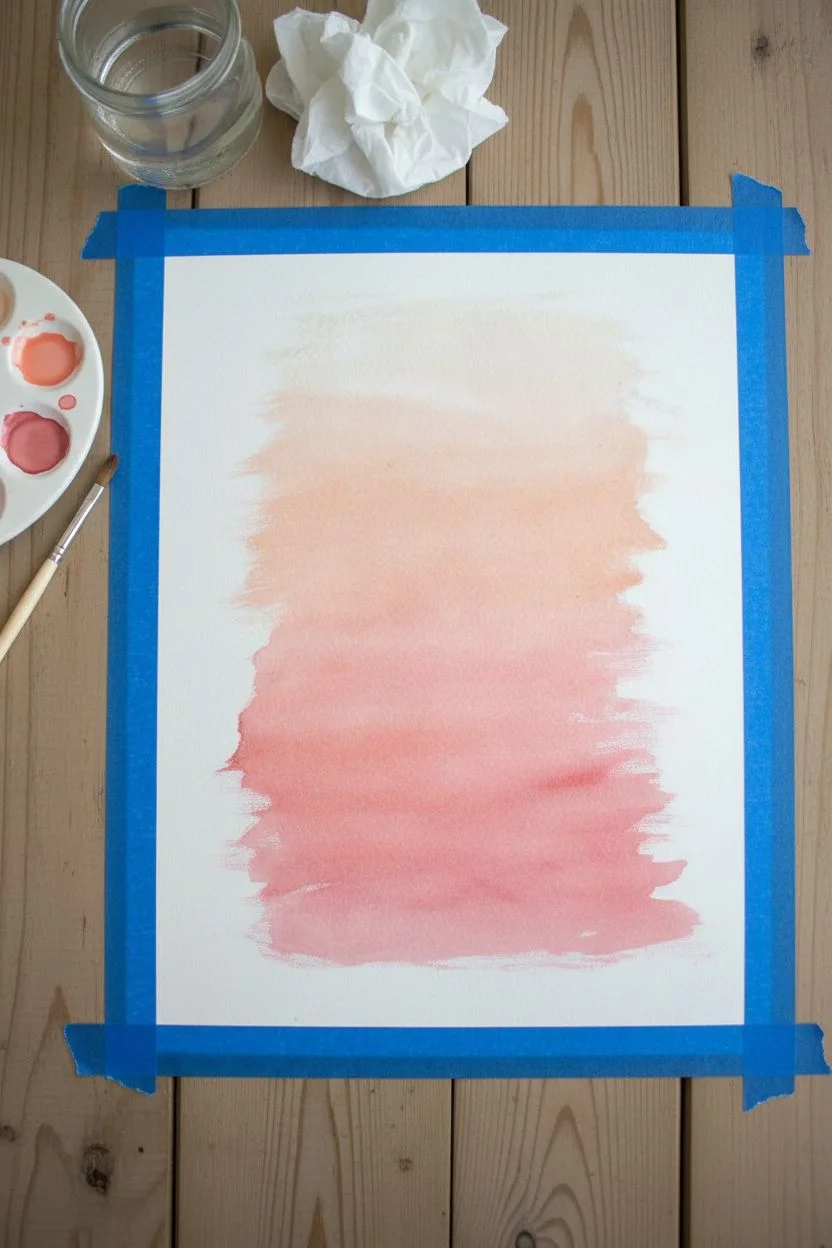
This elegant yet simple project combines a soft, warm watercolor wash with bold typography to create a heartfelt message. The gradient background mimics a sunset, providing a lovely, glowing canvas for your personalized note to Mom.
Step-by-Step Guide
Materials
- Cold press watercolor paper (A4 or 8×10 size)
- Wide flat watercolor brush
- Medium round watercolor brush (optional for blending)
- Watercolor paints (Peach, Coral, and Rose Pink)
- Black brush pen, fine liner, or India ink
- Painter’s tape or masking tape
- Clean water jar
- Paper towels
- Pencil and eraser
- White or light-colored picture frame (approx 8×10 inset)
Step 1: Creating the Sunset Wash
-
Prepare your paper:
Begin by securing your watercolor paper to a flat surface using painter’s tape; this prevents buckling and keeps the paper steady while you work. -
Mix your palette:
On your palette, prepare three distinct puddles of color: a soft peach, a medium coral, and a deeper rose pink. Dilute them generously with water so they are translucent and flow easily. -
Start the top layer:
Dip your wide flat brush into the peach mixture. Apply a broad, horizontal stroke across the paper, starting about one-third of the way down from the top edge. Keep the edges ragged and natural rather than perfectly straight. -
Add the middle tone:
While the peach layer is still wet, clean your brush slightly and pick up the coral color. Apply this directly below the peach, allowing the wet edges to touch and bleed into one another naturally. -
Blend the transition:
If the line between colors looks too harsh, dip a clean, damp brush into water and gently run it along the seam where the colors meet to encourage a softer gradient. -
Apply the bottom layer:
Load your brush with the deepest rose pink shade. Paint the bottom section of your wash, overlapping slightly with the coral section above it. -
Create the rough edge effect:
To achieve that artistic ‘brushed’ look seen in the photo, create dry brush strokes at the very bottom and sides. Blot excess moisture from your brush and drag the remaining pigment lightly so the paper texture shows through. -
Let it dry completely:
This is crucial: allow the paint to dry fully before moving on. The paper should be flat and warm to the touch. Using a hairdryer on a low setting can speed this up.
Uneven Blending?
If your gradient creates ‘hard lines’ as it dries, your paper was likely too dry between colors. Rewet the whole area lightly with clean water to soften edges.
Step 2: Lettering the Message
-
Draft the layout:
Identify the center of your painted area. Using a pencil and very light pressure, sketch out ‘I LOVE’, ‘YOU,’, and ‘MOM,’ stacking them vertically. Aim for a simple, tall sans-serif style. -
Check alignment:
Step back and look at your pencil marks. Ensure the text block feels centered within the color wash, leaving some breathing room at the top and bottom. -
Prepare your ink:
Get your black marker or brush pen ready. I prefer testing the pen on a scrap piece of watercolor paper first to ensure the ink doesn’t bleed into the fibers too aggressively. -
Ink the first line:
Trace over your pencil lines for ‘I LOVE’ carefully. Use consistent pressure to create thin, uniform strokes. The letters should be tall and narrow. -
Continue lettering:
Move onto ‘YOU,’ and ‘MOM,’, maintaining the same stroke width. Notice how the ‘O’s are slightly elongated ovals rather than perfect circles. -
Detail the punctuation:
Add the commas after ‘YOU’ and ‘MOM’. Make them distinct but small. -
Let the ink set:
Give the ink a few minutes to dry completely to avoid smudging. -
Erase guidelines:
Gently erase any visible pencil marks. Hold the paper taut with one hand while erasing to prevent wrinkling the page.
Step 3: Framing the Artwork
-
Trim to size:
If you painted on a larger sheet, trim the paper down to fit your frame dimensions, ensuring the painted area remains centered. -
Assemble the frame:
Place the artwork into your white frame. A frame with a white mount (mat board) creates a professional gallery look and gives the watercolor space to breathe.
Add Some Sparkle
Once the paint is totally dry, splatter tiny droplets of gold watercolor or metallic ink over the background for a magical, shimmering finish.
Wrap this beautiful framed piece with a nice ribbon and get ready to see Mom smile


Mother-and-Child Silhouette Against a Sunset Sky
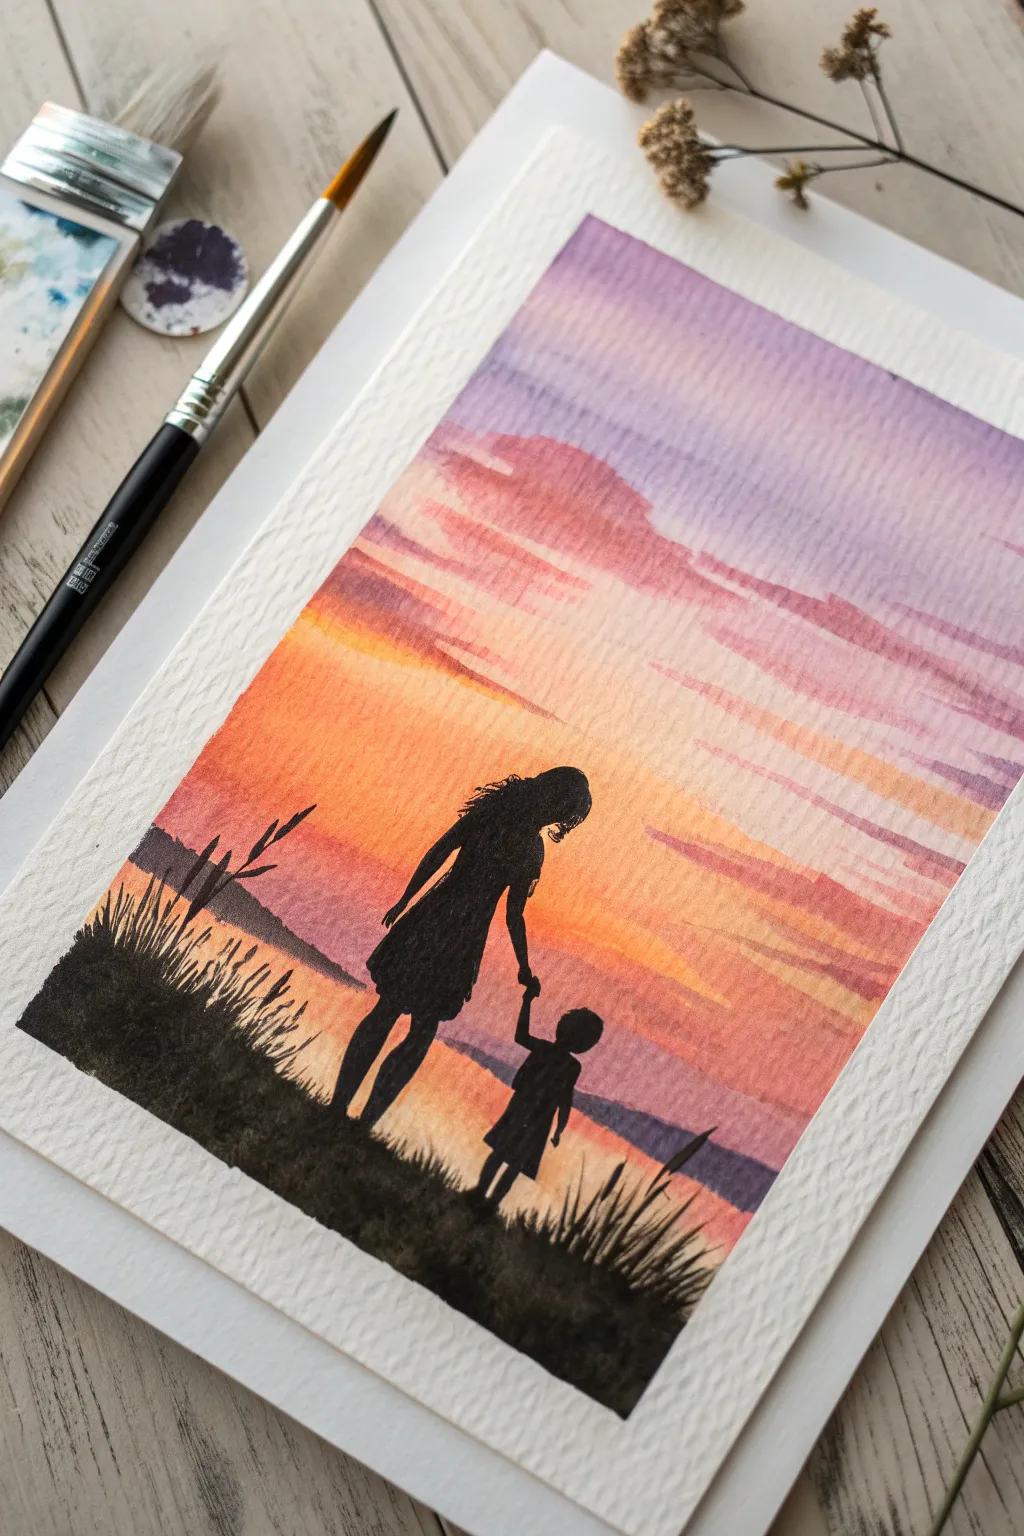
Capture the tender bond between mother and child with this striking silhouette painting set against a vibrant, glowing sunset. The contrast between the brilliant wash of warm sky colors and the crisp black figures creates an emotional and timeless Mother’s Day gift.
Step-by-Step Tutorial
Materials
- Cold press watercolor paper (300 gsm)
- Watercolor paints (Purple, Magenta, Orange, Yellow)
- Black India ink or very opaque black watercolor/gouache
- Wide flat brush or wash brush
- Medium round brush (size 6 or 8)
- Small detail brush (size 0 or 1)
- Masking tape
- Pencil
- Two jars of water
- Paper towels
Step 1: Painting the Sunset Sky
-
Prepare the workspace:
Begin by taping down all four edges of your watercolor paper to a hard board or table. This creates a clean white border and prevents the paper from buckling when wet. -
Wet the paper:
Using a clean wide flat brush, apply a generous layer of clear water to the entire upper three-quarters of the paper, stopping just where the horizon line will be. The paper should glisten but not have puddles. -
Start with purple:
Load your medium round brush with a soft violet or purple. While the paper is still wet, paint horizontal strokes across the very top, letting the pigment bleed and soften naturally. -
Add pink tones:
Rinse your brush slightly and pick up a magenta color. Paint horizontal strokes just below the purple, allowing the colors to touch and merge. Leave some gaps of white paper to suggest cloud highlights. -
Introduce orange and yellow:
Transition into a bright orange as you move further down the page. Finally, blend a warm yellow near the hypothetical horizon line to simulate the sun’s fading glow. The transition should be seamless from cool purple to warm yellow. -
Create cloud textures:
While the sky wash is damp but losing its sheen, use a thirsty (semi-dry) brush to lift out some pigment or dab in slightly more concentrated purple/pink paint to define the cloud shapes. -
Let it dry completely:
This is crucial—allow the sky to dry completely before touching the page again. If the paper feels cool to the touch, it’s still damp. Using a hairdryer on a low setting helps speed this up.
Bleeding Lines?
If your black ink bleeds into the sky, the background wasn’t fully dry. Let it dry completely, then carefully reshape the edge with thick black gouache to cover the fuzzy bleed.
Step 2: Creating the Silhouette
-
Sketch the outline:
Lightly sketch the outline of the mother and child figures with a pencil. Keep the drawing simple, focusing on the shapes rather than internal details since they will be filled in black. -
Outline the figures:
Switch to your smallest detail brush and load it with black India ink or heavy black gouache. Carefully trace the outline of your pencil sketch, keeping your hand steady for crisp edges. -
Fill the figures:
Once the outline is secure, switch to a slightly larger round brush to fill in the bodies. Ensure the black remains opaque and solid; apply a second coat if the sunset colors show through. -
Paint the ground:
Beneath the figures, paint a solid black undulating hill. Use the tip of your brush to flicker upward strokes along the top edge of this hill to mimic blades of grass. -
Refine the details:
Use the detail brush again to refine intricate areas like the hair, fingers, and the child’s dress hem. Small, wispy strokes for the hair add a wonderful sense of realism and movement. -
Add foreground grasses:
On the far left and right sides of the foreground, paint longer, taller grasses reaching up into the colorful sky area. Vary the angle and thickness of these blades to make them look organic. -
Connect the hands:
Double-check the connection point between the mother and child’s hands. It should look like a gentle clasp, defining the emotional core of the painting.
Step 3: Final Touches
-
Assess opacity:
Look at the black areas under good light. If any part looks patchy or grey as it dries, carefully layer more black ink over it for a true silhouette effect. -
Reveal the border:
Wait until the black ink is 100% dry to avoid smudging. Gently peel away the masking tape at a 45-degree angle, pulling away from the painting to reveal crisp white edges.
Make it Sparkle
Once dry, flick a tiny amount of diluted white gouache or acrylic onto the upper purple sky area with a stiff brush to create faint, early evening stars.
Now you have a serene, heartfelt tribute ready to frame and gift
BRUSH GUIDE
The Right Brush for Every Stroke
From clean lines to bold texture — master brush choice, stroke control, and essential techniques.
Explore the Full Guide
Painted Mason Jar Full of Mother’s Day Flowers
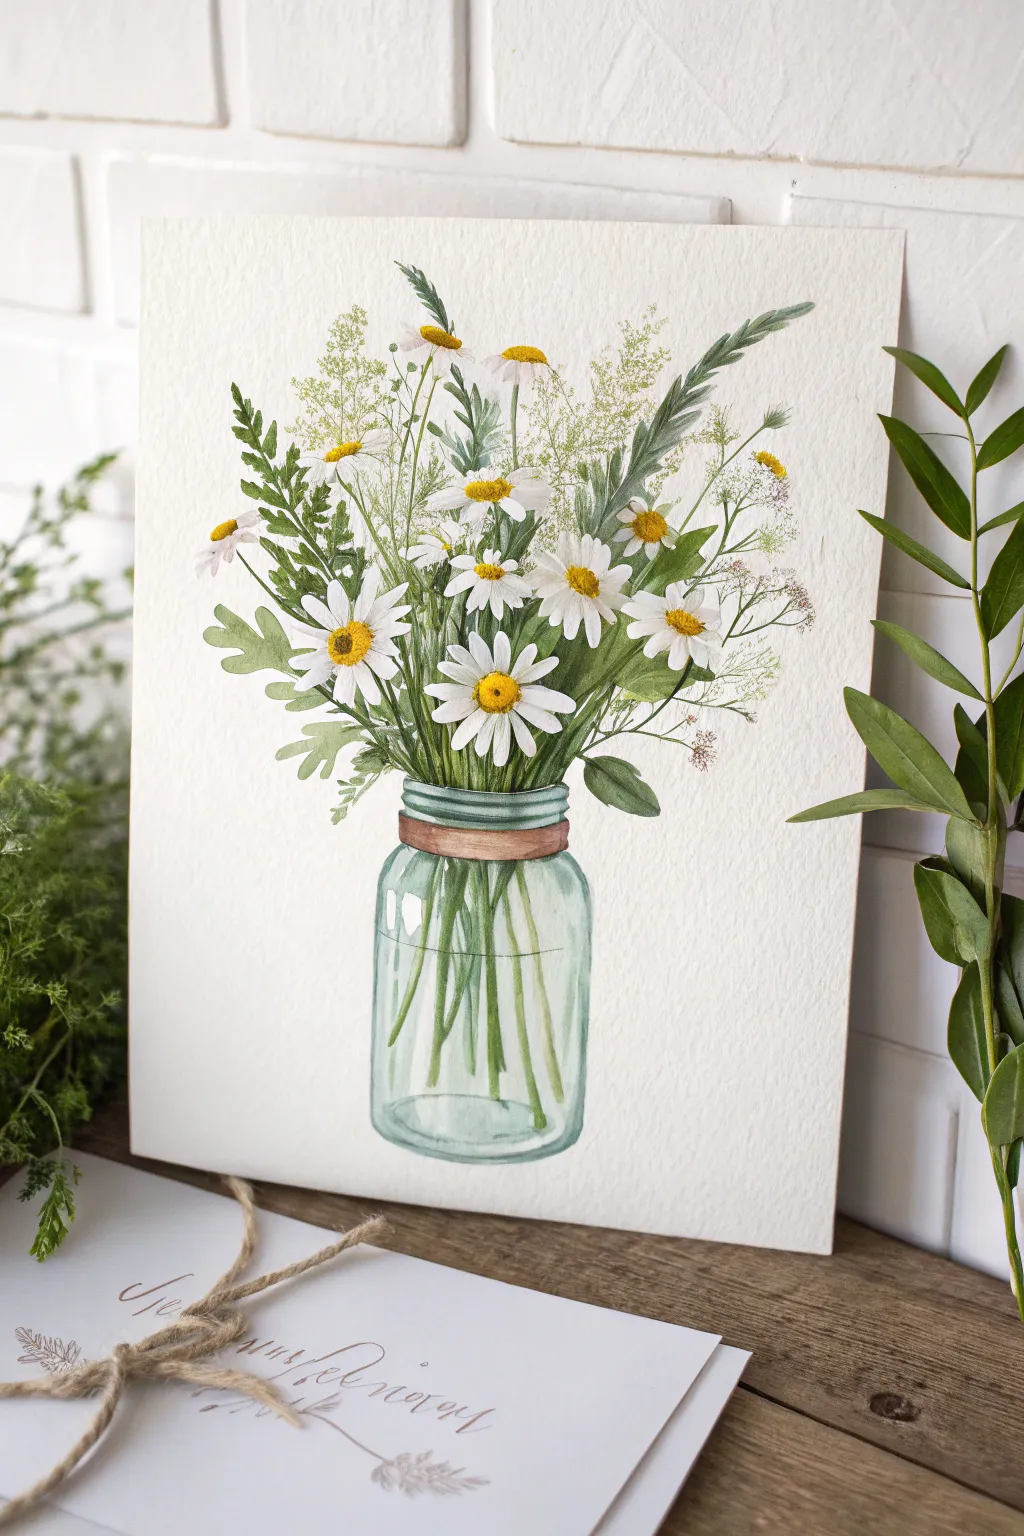
Capture the fresh feeling of spring with this delicate watercolor painting featuring cheerful daisies spilling out of a vintage blue mason jar. This charming artwork makes a perfect heartfelt Mother’s Day gift, showcasing soft botanical details and transparent glass effects.
Step-by-Step Guide
Materials
- Cold press watercolor paper (300 gsm)
- Watercolor paints (Cerulean Blue, Sap Green, Olive Green, Lemon Yellow, Burnt Sienna, Payne’s Gray)
- Round watercolor brushes (Size 2, 4, and 6)
- Fine liner brush (Size 0 or 00)
- Pencil (HB or 2B) and kneaded eraser
- Jar of clean water
- Paper towels
- Masking tape (for securing paper)
- White gouache or white gel pen (optional for highlights)
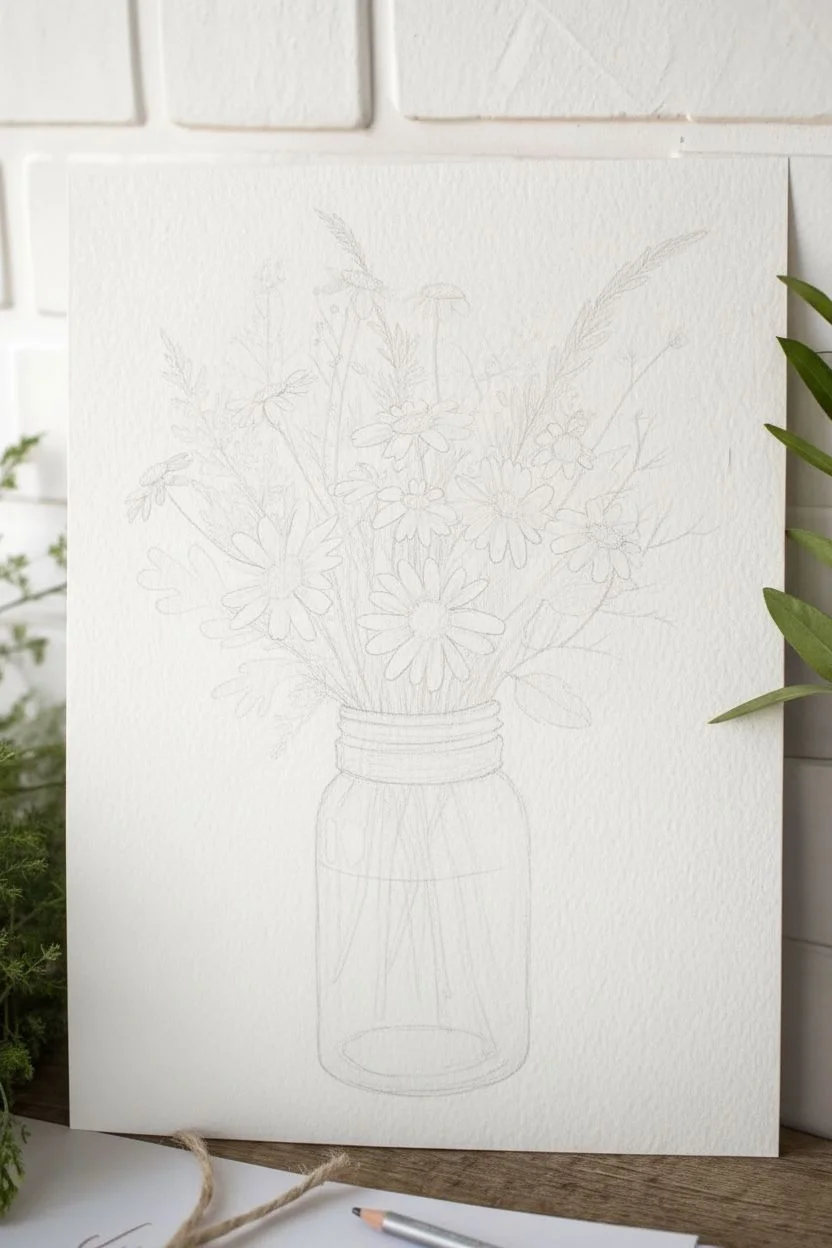
Step 1: Sketching the Composition
-
Outline the jar:
Begin by lightly sketching the mason jar shape in the bottom center of your paper. Draw the rounded shoulders, the threaded rim area, and the slightly curved bottom to give it dimension. -
Map out the flowers:
Lightly draw oval shapes where the daisy heads will go. Vary their angles—some facing forward, some sideways, and some pointing up—to create a natural bouquet look. -
Sketch stems and filler:
Draw thin lines connecting the flower heads to the jar rim. Add sketched lines for the fern-like greenery and taller grass sprigs extending beyond the main flowers. Keep these lines faint so they disappear under the paint.
Step 2: Painting the Flowers & Greens
-
Paint daisy centers:
Using a size 4 brush, paint the centers of the daisies with Lemon Yellow. While damp, dab a tiny bit of Burnt Sienna on the bottom edge of each yellow center to create a shadow and 3D dome effect. -
Create the greenery base:
Mix Sap Green with a touch of yellow for a fresh spring green. Paint the larger serrated leaves peeking out from the bouquet, using the tip of the brush to create the jagged edges. -
Add wispy filler plants:
Switch to your size 2 brush and a diluted Olive Green. Paint the delicate, airy filler plants with quick, dabbing motions to mimic tiny seed heads or baby’s breath textures. -
Define the stems:
Paint the stems inside the bouquet area with various shades of green, ensuring they lead visually into the jar opening. -
Detail the fern fronds:
Using a darker green mix (Olive Green + Payne’s Gray), paint the more structured fern leaves on the left side, using short, rhythmic strokes for the leaflets. -
Shade the petals:
The daisy petals are white, so we paint the shadows rather than the petals themselves. Mix a very watery, pale gray-blue. Lightly paint thin strokes where petals overlap or curve away from the light to define their individual shapes.
Muddy Greens?
If your flower stems inside the jar look messy, let the first glass layer dry completely before painting the green stems over it. Wet-on-wet can cause bleeding.
Step 3: Glass & Water Effects
-
First glass wash:
Mix a very watery wash of Cerulean Blue with a hint of green (teal). Paint the entire body of the jar, carefully painting *around* the stems you see inside. Leave a few vertical strips purely white to represent strong reflections on the glass. -
Define the water line:
Once the first wash is dry, mix a slightly stronger teal color. Paint a horizontal elliptical line near the top of the jar body to indicate the water level. -
Paint stems in water:
Paint the stems inside the jar using a green that is slightly blurred or distorted compared to the stems above. I like to offset them slightly from the top stems to mimic the refraction of water. -
Deepen glass shadows:
Add darker teal shading to the sides and bottom curve of the jar to emphasize its roundness. Paint the threaded rim area with horizontal strokes of focused color. -
Add the rim detail:
Use Burnt Sienna to paint the ‘rusty’ or copper-colored band often found on vintage jar lids. Keep the color uneven to look textured and aged.
Pro Tip: Refraction Magic
To make the glass look realistic, paint the stems inside the water slightly thicker and lighter than the stems above the water line to mimic optical distortion.
Step 4: Final Details
-
Sharpen the details:
Use your fine liner brush and a dark green mix to add crisp lines to the leaves and stems where needed for definition. -
Add final highlights:
If your white paper highlights got lost, use white gouache or a gel pen to bring back the sparkle on the glass jar shoulder and the water line.
Now display your beautiful botanical creation in a frame or gift it to Mom to brighten her special day
Watercolor Wreath Around the Word “Mom”
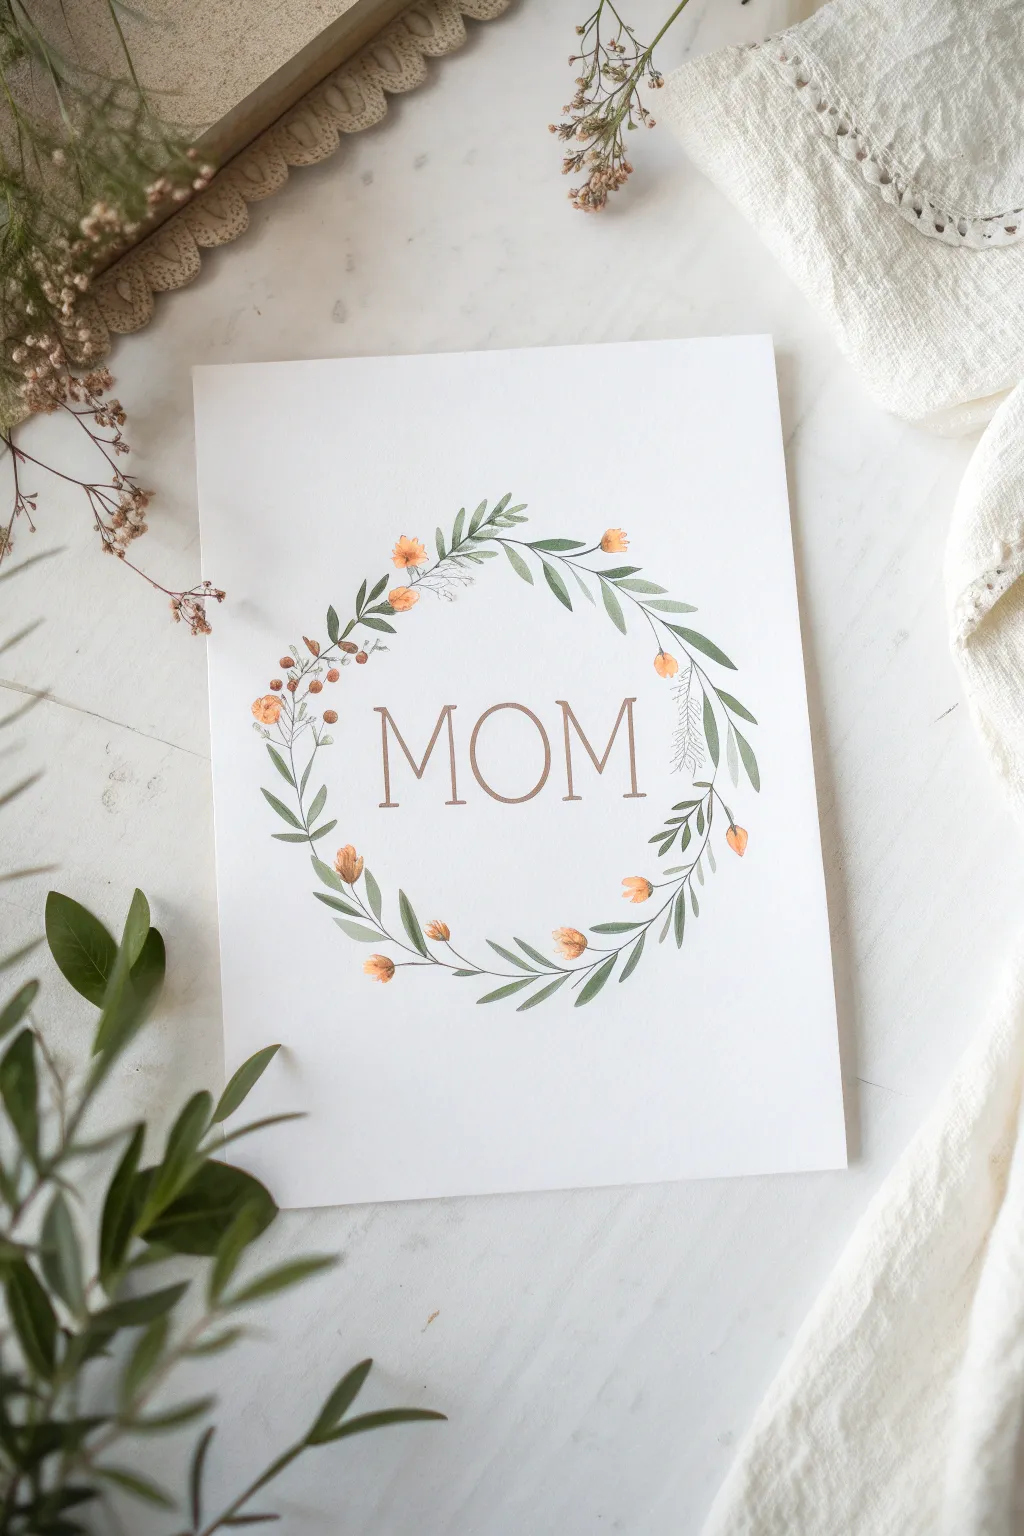
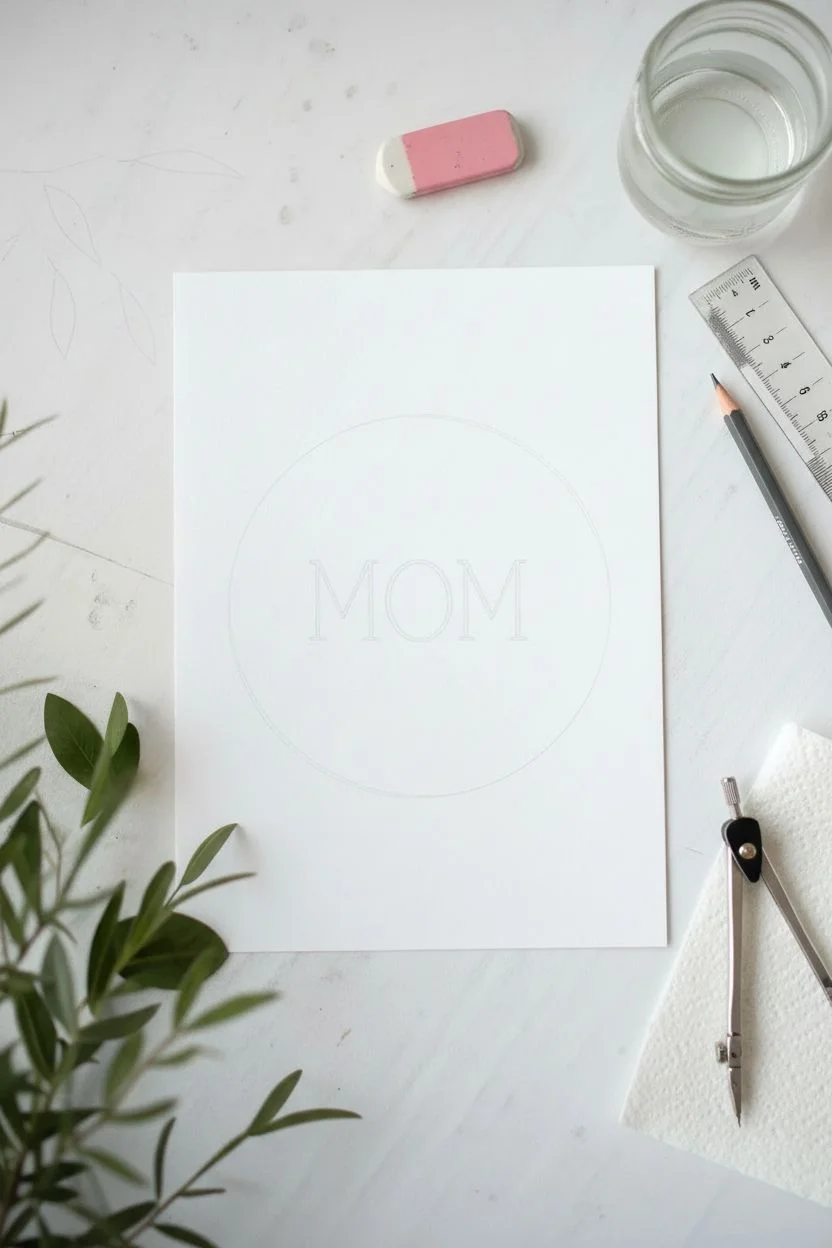
This elegant floral wreath uses soft watercolor techniques to frame the word “MOM” with natural charm. The mix of delicate greenery and small orange accents creates a warm, timeless gift that looks professional yet is surprisingly simple to paint.
Step-by-Step Tutorial
Materials
- Cold press watercolor paper (A4 or letter size)
- Watercolor paints (Sap Green, Olive Green, Burnt Sienna, Yellow Ochre)
- Round watercolor brushes (size 2 and size 6)
- Pencil (HB or lighter)
- Eraser
- Ruler
- Jar of clean water
- Paper towels
- Gold or brown fine liner pen (optional)
- Compass or a round bowl for tracing
Step 1: Planning and Sketching
-
Center the Layout:
Begin by finding the center of your watercolor paper. Use a ruler to lightly mark the middle point, ensuring you have equal margins on all sides. -
Draw the Circle Guide:
Using a compass or by tracing a circular object like a bowl, draw a very faint circle in the middle of the page. This will serve as the spine for your wreath. -
Letter the Text:
In the center of the circle, lightly sketch the word “MOM” in a classic serif font. Keep the letters evenly spaced and tall, allowing them to breathe within the circle. -
Refine the Letters:
Go over your sketched letters to ensure straight lines and consistent thickness. If you prefer a mixed media look, you can ink these outlines now with a waterproof pen, or leave them for later to paint.
Keep it Loose
Don’t try to make the leaves symmetrical. Nature is imperfect! Varying pressure on your brush creates organic shapes that look more realistic.
Step 2: Painting the Greenery
-
Mix Your First Green:
Load your size 6 brush with a mix of Sap Green and a touch of water to create a semi-transparent, fresh green shade. It shouldn’t be too dark yet. -
Paint the Main Stems:
Following the curve of your pencil circle, paint long, sweeping stems. Don’t close the circle completely; overlap some stems slightly for a natural, woven look. -
Add Large Leaves:
Using the same brush, press down and lift up to create simple leaf shapes attached to the main stems. Vary the angle of the leaves so they don’t look too uniform. -
Mix a Darker Green:
Add a tiny bit of blue or brown to your green mix to create a darker Olive shade. Switch to the smaller size 2 brush for finer details. -
Layer Smaller Leaves:
Paint smaller, thinner leaves in between the larger ones using the darker green. This creates depth and makes the wreath look lush. -
Add Wispy Vines:
With the very tip of your size 2 brush, draw incredibly thin, curving lines extending outward from the main wreath to add movement and airiness.
Step 3: Adding Florals and Finishing
-
Mix the Floral Color:
Combine Yellow Ochre with a dot of Burnt Sienna to create a warm, muted orange tone. Dilute it slightly so it isn’t opaque. -
Paint Flower Buds:
Scatter small, teardrop-shaped buds around the wreath. Place some on the tips of the wispy vines and others tucked near the main stems. -
Add Berry Clusters:
On the left side of the wreath, paint a few tiny clusters of orange dots to represent berries. Keep them grouped in threes or fours. -
Connect the Flowers:
Once the flower heads are dry, use your smallest brush and pale green paint to draw tiny stems connecting them back to the main branches. -
Paint the Text:
Carefully fill in your “MOM” sketch. You can use a brown watercolor mix for a soft look, or a metallic gold paint to make it shine. -
Erase Guidelines:
Wait until the painting is bone dry—I usually give it at least 20 minutes—then gently erase any visible pencil marks from your initial circle guide.
Metallic Magic
Once dry, trace over the word “MOM” with a gold gel pen or metallic watercolor. The subtle shimmer adds an elegant touch perfect for a gift.
Frame this lovely piece in a simple wood frame to create a heartfelt Mother’s Day gift she will cherish

PENCIL GUIDE
Understanding Pencil Grades from H to B
From first sketch to finished drawing — learn pencil grades, line control, and shading techniques.
Explore the Full Guide
“Reasons I Love You, Mom” Mini Painting Set
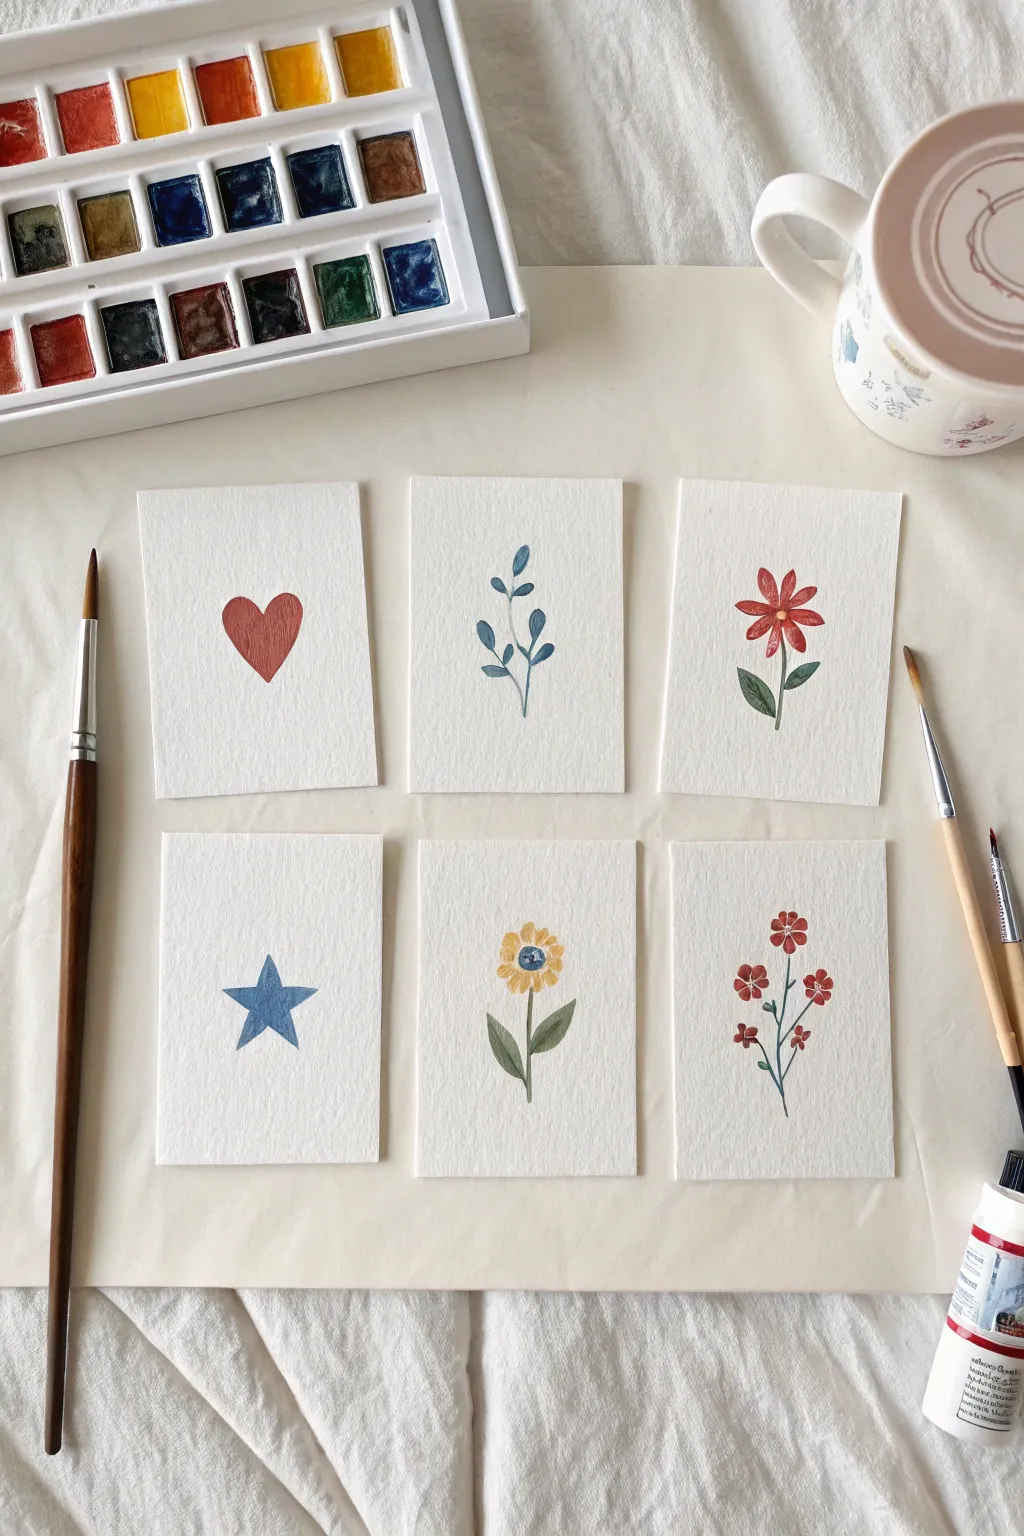
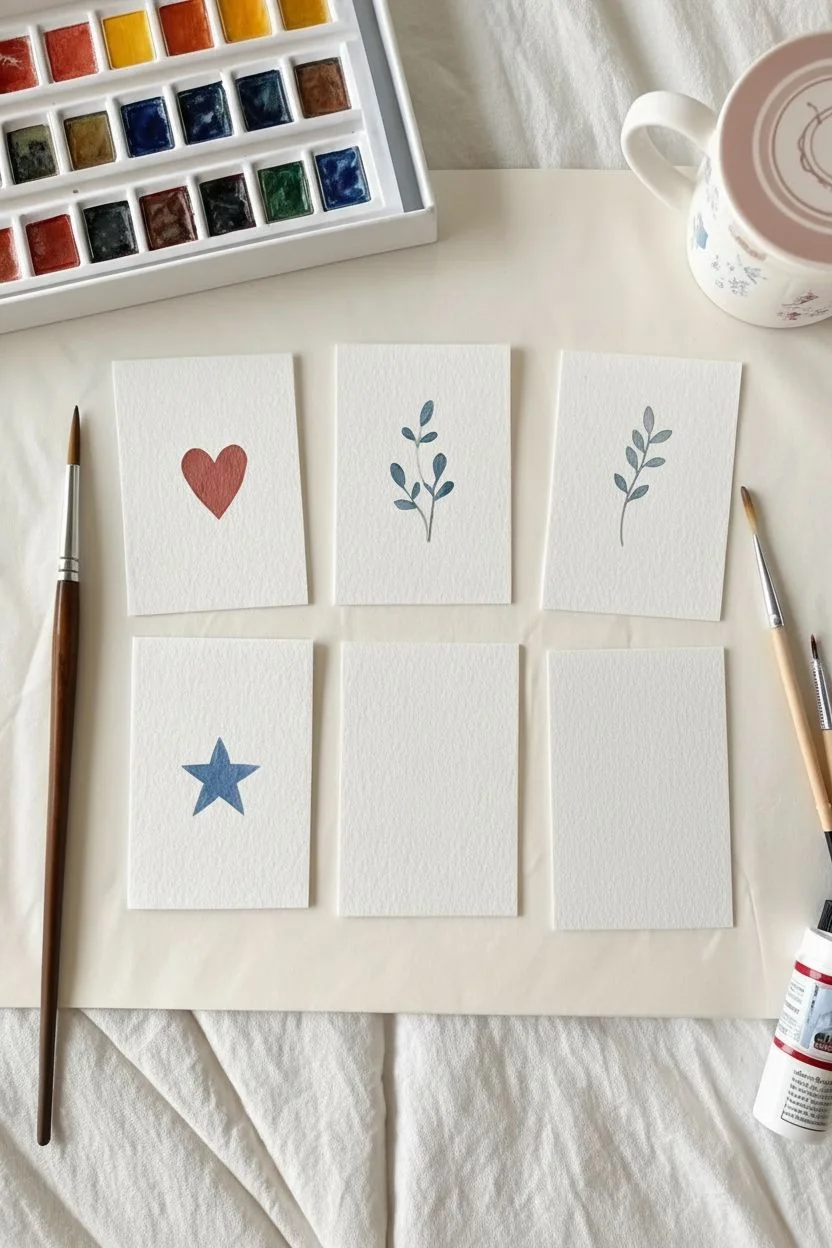
These charming miniature paintings transform simple watercolor paper into a heartfelt gallery of affection perfect for Mother’s Day. With six delicate motifs ranging from a classic heart to cheerful florals, this set is designed to be tucked into cards, framed together, or hidden as sweet surprises.
Detailed Instructions
Materials
- Cold press watercolor paper (cut into six 2.5″ x 3.5″ rectangles)
- Watercolor paint set or pan palette (Essential colors: Red, Blue, Yellow, Green)
- Round watercolor brush (Size 2 or 4)
- Fine detail brush (Size 0 or 00 for stems)
- Cup of clean water
- Paper towel or cloth
- Pencil (optional for light sketching)
- Kneaded eraser
Step 1: Preparation & First Wash
-
Prepare your canvas:
Begin by cutting your watercolor paper into six equal-sized rectangles, roughly the size of trading cards. Tape them down to a board with artist tape if you want crisp edges, or work freely for a more organic look. -
Activate classic red:
Wet your red paint pan with a drop of clean water to wake up the pigment. You want a creamy, saturated consistency rather than a watery wash for the first card. -
Paint the classic heart:
On the first card, paint a simple, centered heart shape. Use the tip of your round brush to outline the curves, then fill it in. Don’t overwork it; let the natural texture of the paper show through the paint. -
Mix a soft blue-grey:
For the leafy branch card, mix a small amount of dark blue with a touch of green or grey to get a muted, stormy blue color. -
Paint the leafy branch:
Draw a very thin vertical line for the main stem using your smallest brush. Then, using the ‘press and lift’ technique, add small, teardrop-shaped leaves extending outward in pairs up the stem.
Fixing Blooms
If colors bleed into each other unexpectedly (like on the flower centers), dab the area quickly with a clean, dry paper towel corner to lift the excess water, then let it dry fully before trying again.
Step 2: Simple Shapes & Florals
-
Create the red daisy:
On the third card, paint five or six elongated red petals radiating from a central point. Leave a tiny white gap in the center where the yellow pollen will go later. -
Add stem and leaves:
Once the red petals are mostly dry, use a dark green mix to paint a slender stem and two simple leaves at the base of your red flower. -
Draft the star:
For the blue star card, you might want to lightly sketch a five-pointed star with pencil first to ensure symmetry. Mix a vibrant ultramarine blue for this motif. -
Fill the star shape:
Carefully fill in your star sketch. I find it helpful to start painting from the center outward to the points to keep them sharp. -
Form the yellow bloom:
On the fifth card, mix a warm ochre or sunflower yellow. Paint a round flower shape with slightly scalloped edges to mimic petals, leaving the center open. -
Paint the flower center:
While the yellow paint is still slightly damp (but not puddling), drop a tiny dot of blue or brown into the center for a soft, bled effect. -
Ground the yellow flower:
Add a straight green stem and two large, oval-shaped leaves on either side of the stem near the bottom.
Write a Message
Turn these into a functional gift by writing a specific reason you love your mom on the back of each card, numbering them 1 through 6 for a touching reveal.
Step 3: Detailing & Finishing Touches
-
Compose the wildflower sprig:
For the final card, imagine a small spray of tiny flowers. Paint a thin, branching green stem first that forks in several directions. -
Dot the tiny blooms:
Using a small detail brush dipped in red, add clusters of 4-5 tiny dots at the end of each branch tip to resemble small blossoms. -
Add flower centers:
Return to your red daisy (card 3). If the red paint is fully dry, add a small dot of opaque yellow or white gouache to the center to make it pop. -
Refine edges:
Check all your shapes. If any edges look ragged, use a slightly damp, clean brush to gently smooth them out, or add a second layer of paint to deepen the color if needed. -
Erase pencil marks:
Once every card is completely bone-dry, use a kneaded eraser to gently lift any visible pencil sketches, especially around the star. -
Final assessment:
Lay out all six cards together. If any seem too light compared to the others, add a final glaze of color to balance the set’s visual weight.
Stack these lovely mini-prints and tie them with a ribbon for a handmade gift that speaks volumes
Mother’s Day Card With Loose Abstract Flowers
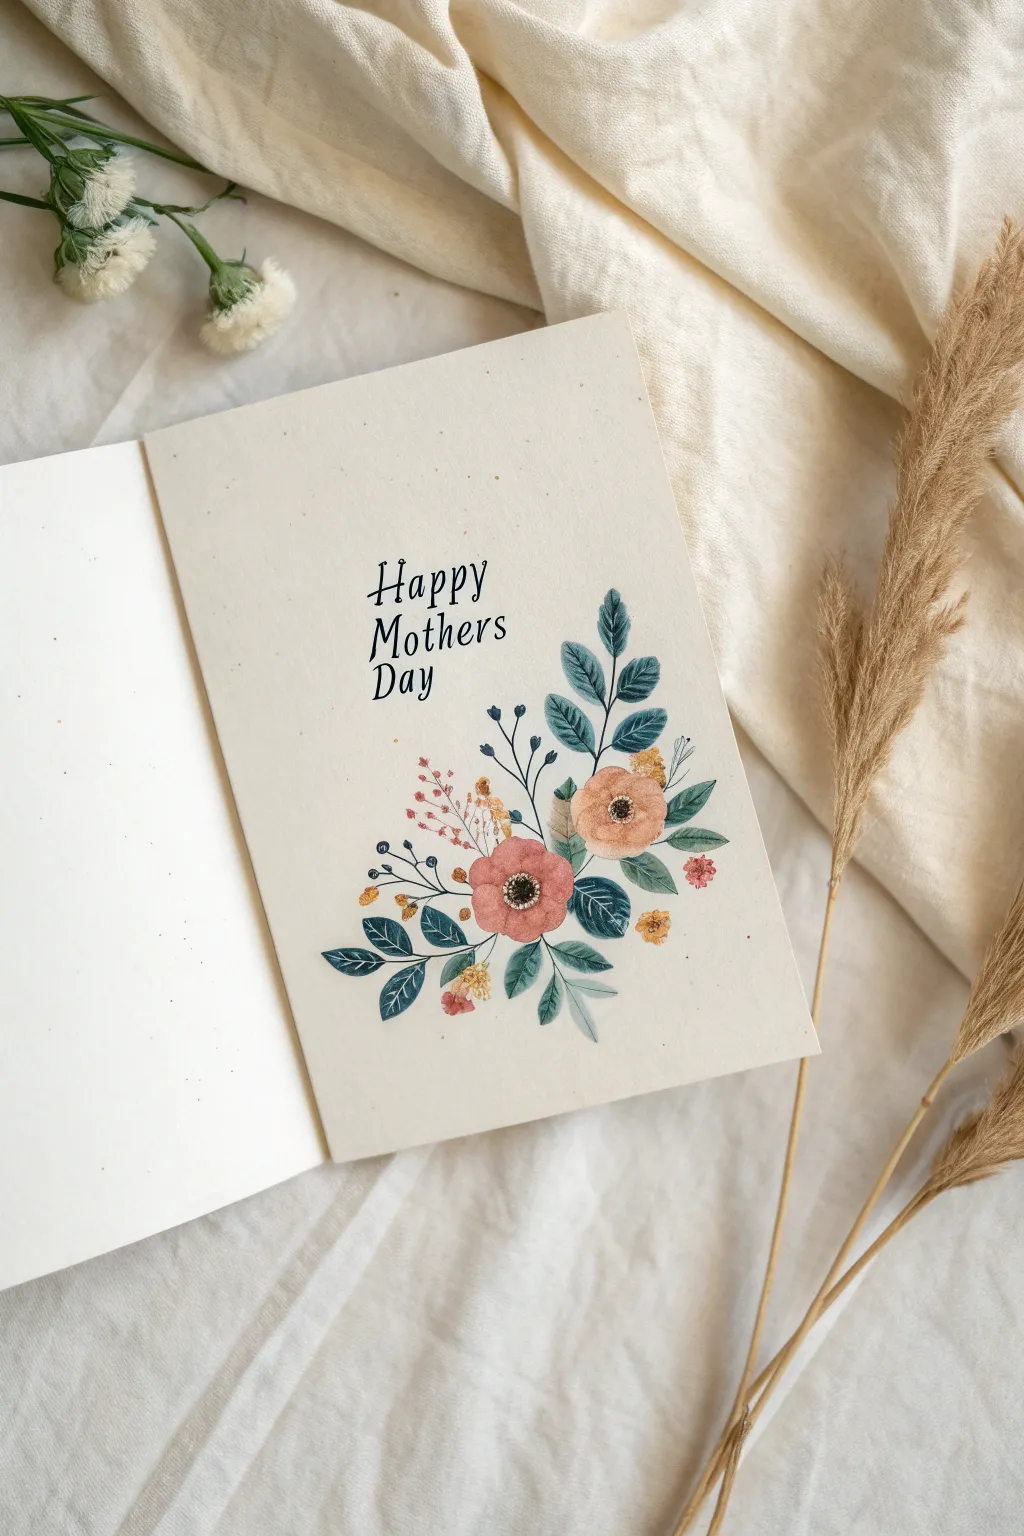
This elegant Mother’s Day card features a refined botanical illustration with a vintage touch. The design combines precise ink work with soft watercolor washes to create a memorable keepsake that feels both classic and handmade.
Step-by-Step Guide
Materials
- High-quality watercolor paper (cold press, roughly 140lb/300gsm)
- Watercolor paints (shades of muted pink, peach, sage green, and teal)
- Fine liner pen (black, waterproof, size 0.1 or 0.3)
- Small round watercolor brushes (sizes 2 and 4)
- Pencil and eraser
- Ruler
- Bone folder (optional)
- Paper trimmer or scissors
Step 1: Preparing the Card Base
-
Cutting the paper:
Begin by cutting your watercolor paper to your desired size. A standard A5 size (when unfolded) works well, folding down to A6. Ensure your edges are clean and straight. -
Scoring the fold:
Measure the varying center of your paper. Use a ruler and a bone folder (or the back of a butter knife) to score a line down the center. This compresses the paper fibers and ensures a crisp, professional fold without cracking the thick paper. -
Initial fold:
Gently fold the card along your score line. Press firmly along the edge to flatten it, then unfold it so you can paint on a flat surface.
Use Speckled Paper
To get the exact vintage look in the photo, use ‘natural’ or ‘flecked’ cardstock. The tiny impurities in the paper add instant texture.
Step 2: Drawing the Layout
-
Positioning the text:
Lightly sketch guidelines for your text in the upper center of the front panel. Using your finest pen or a calligraphy nib, carefully write ‘Happy Mothers Day’ in a narrow, condensed serif or script style. Let the ink dry completely before erasing guide lines. -
Sketching the composition:
Using a hard pencil (like an H or 2H) for faint lines, lightly sketch the floral arrangement. Place the two main blooms first—one slightly higher and to the right, the other lower and central. Then, map out the sweeping curves of the stems and leaves. -
Adding details:
Refine your sketch by adding small sprigs of filler flowers and berries that extend outward, creating an asymmetrical, organic shape.
Step 3: Painting the Florals
-
Mixing the palette:
Prepare your colors. You’ll need a soft salmon pink for the main blooms, a muted yellow for accents, and two shades of green: a dark teal-blue and a lighter, dusty sage. -
First wash on blooms:
Using your size 4 brush, apply a watery wash of the salmon pink to the two main flower shapes. Keep the edges slightly uneven to mimic natural petals. I like to leave tiny slivers of white paper showing to create highlights. -
Painting the dark leaves:
Switch to the teal-blue mixture. Carefully fill in the larger, serrated leaves that frame the flowers. Use the tip of the brush to get sharp points on the leaves. -
Painting the light leaves:
Use the sage green mix for the smaller, smoother leaves and stems. This variation in greenery adds depth to the illustration. -
Adding filler flowers:
With a detail brush or size 2, dab small dots of muted yellow and dusty pink to create the clusters of tiny berries and wildflowers surrounding the main bouquet.
Ink Smudging?
Watercolor paper takes longer to dry than regular paper. Wait at least 15-20 minutes, or use a hairdryer, before doing any ink work over paint.
Step 4: Defining Contrast
-
Adding flower centers:
Once the pink paint is fully dry, paint a dark brown or black ring in the center of the main flowers. While that is still slightly damp, drop in a tiny dot of yellow for texture. -
Reviewing saturation:
Check your colors. If the leaves dried too light, add a second layer of glazing to deepen the teal tones.
Step 5: Ink Detailing
-
Outlining the leaves:
This step requires a steady hand. Using your fine waterproof pen, draw veins on the teal leaves. You don’t need to outline the entire leaf; sometimes just a central line and a few veins look best. -
Stem work:
Trace over your pencil lines for the main stems. Keep the lines thin and delicate, breaking the line occasionally for a more illustrative look. -
Flower details:
Add tiny stippling dots nicely around the dark centers of the main flowers to suggest pollen and depth. -
Final touches:
Connect your filler flowers with thin ink lines. Erase any remaining visible pencil marks gently to ensure you don’t smudge the ink or paint.
Now you have a beautifully handcrafted card ready to share your appreciation


Heart-Shaped Negative Space Floral Painting for Mom
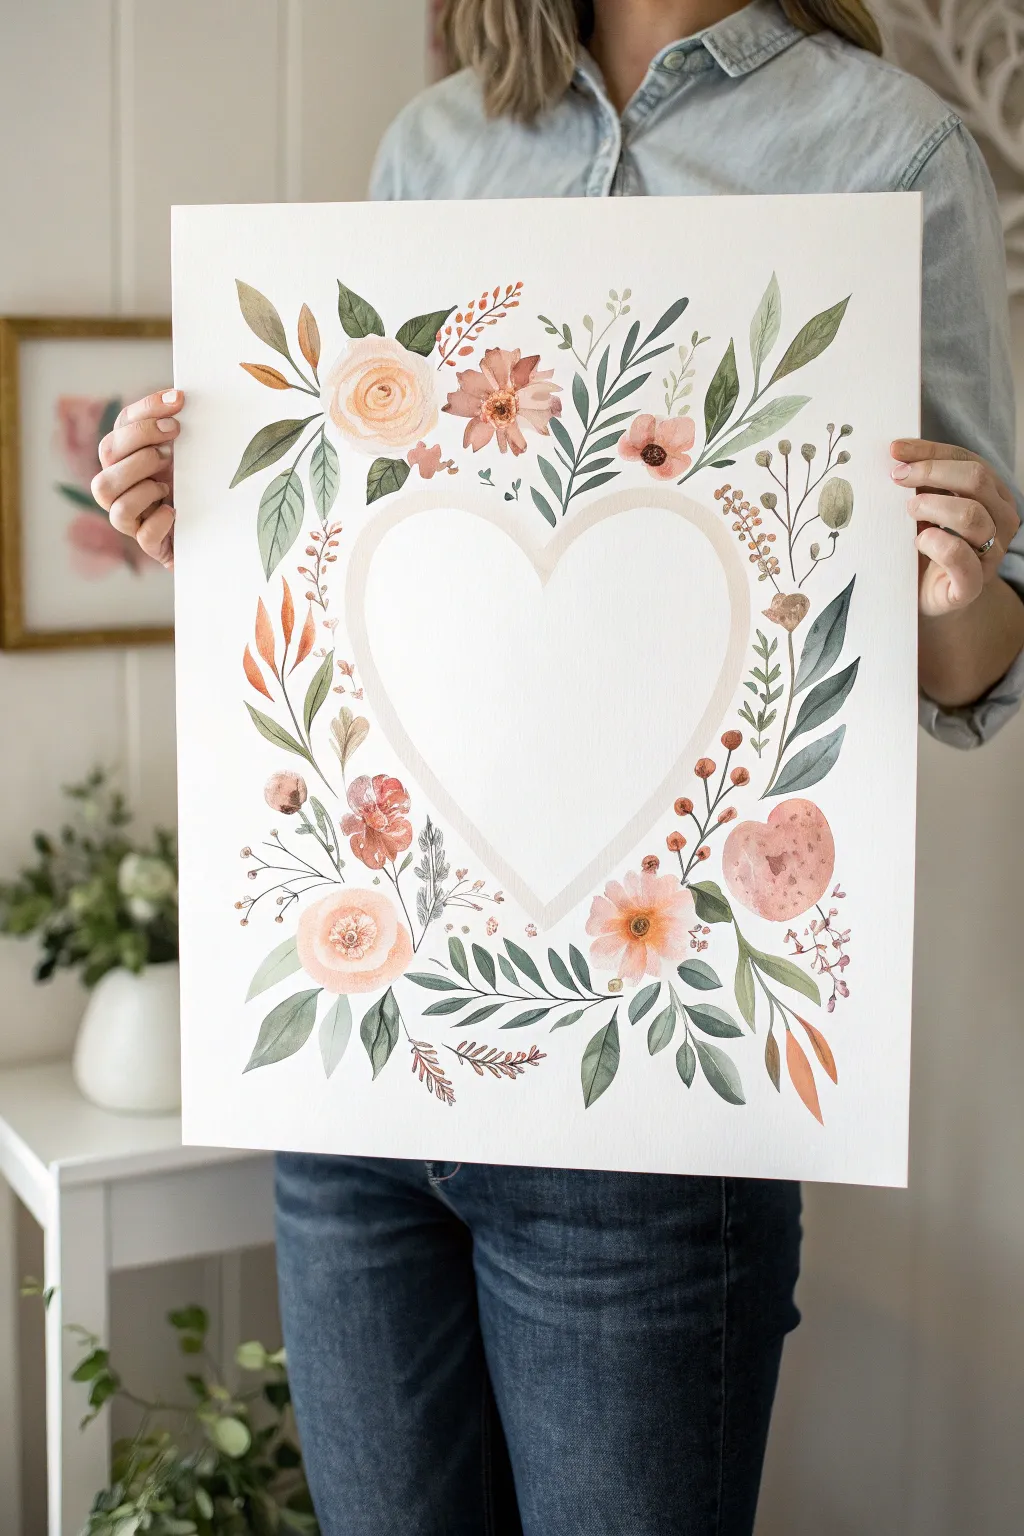
This elegant watercolor project uses negative space to create a stunning, soft heart surrounded by a lush garden of painted blooms. It’s a sophisticated yet approachable way to show Mom some love with a customized piece of lasting art.
How-To Guide
Materials
- Large sheet of cold-press watercolor paper (at least 140lb)
- Watercolor paints (shades of peach, coral, sage green, deep forest green, and brown)
- Round watercolor brushes (sizes 2, 6, and 8)
- Pencil and eraser
- Large heart template or contact paper (optional)
- Masking fluid (optional)
- Palette for mixing
- Jars of clean water
Step 1: Preparation & Layout
-
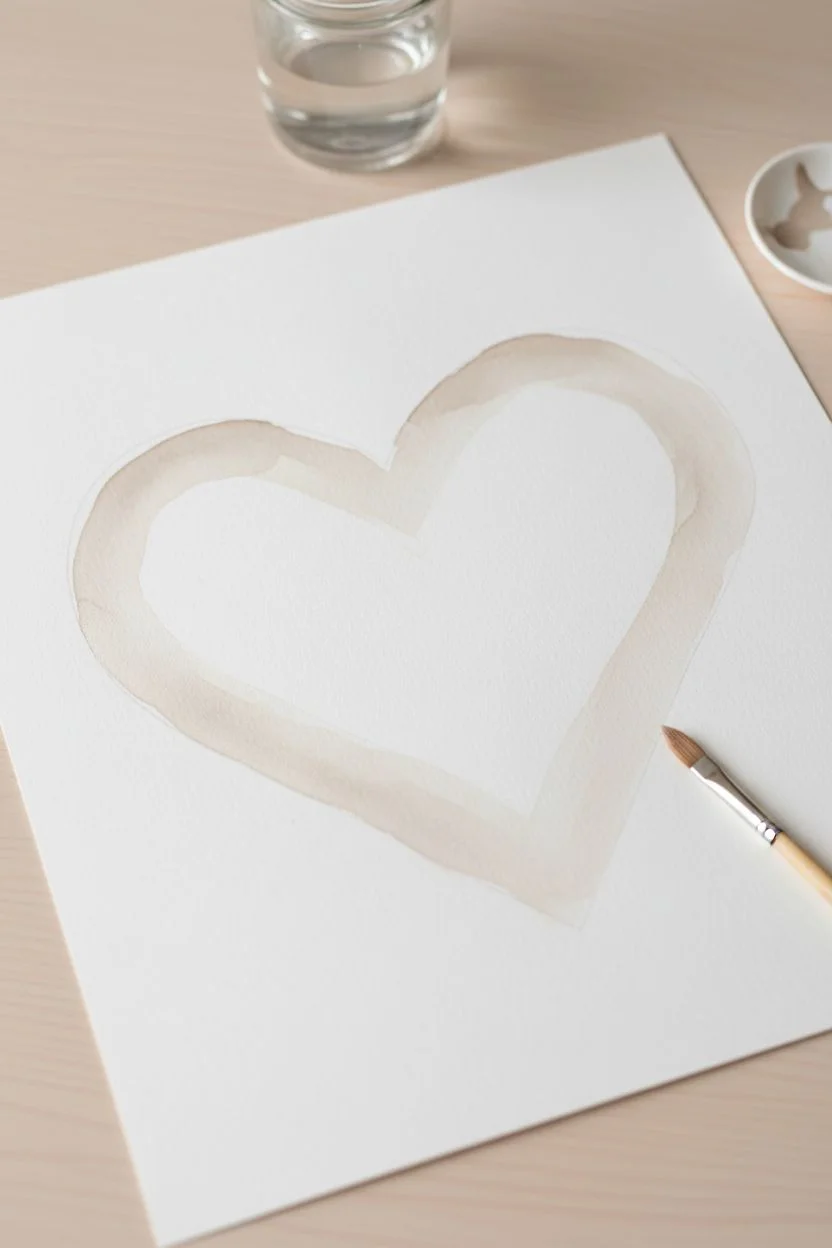
Plan the heart shape:
Begin by lightly tracing a large heart in the center of your paper using a pencil. You can freehand this if you feel confident, but tracing a paper cutout ensures perfect symmetry. Keep your pencil lines extremely faint so they disappear later. -
Mask the negative space (optional):
For easier painting, lightly cover the heart interior with masking fluid or place a low-tack adhesive heart shape over it. If you prefer a softer edge, you can skip this and simply paint carefully around your pencil line. -
Paint the heart outline:
Mix a very watery, pale beige or taupe color. Using your size 6 brush, paint a thick, soft band directly over your pencil line to define the heart’s border. This border serves as the ‘container’ for your empty space.
Step 2: Painting the Main Blooms
-
Start with the focal flowers:
Identify three or four spots around the heart border to place your largest flowers—peach-colored roses and coral daisies work beautifully. I usually start near the bottom left and top right to balance the composition. -
Paint the roses:
For the roses, start with a tight, darker center swirl in peach or soft pink. Rinse your brush slightly and pull the color outward in C-shaped strokes to create larger, lighter petals. Leave tiny slivers of white paper between strokes for highlights. -
Add secondary flowers:
Fill in the gaps with smaller blooms like open-faced daisies or anemones. Use a coral or rust mix for the petals and remember to leave a small gap in the center for the dark seeds, which you’ll add later. -
Create soft buds:
Towards the outer edges of your floral clusters, paint small, tight buds using a single stroke of color. These help transition the design from the dense flowers to the lighter foliage.
Clean Edges Secret
If you struggle with symmetry, cut a heart from contact paper, stick it to the paper, paint over the edges, and peel it off when dry for a crisp line.
Step 3: Creating Foliage & Depth
-
Mix your greens:
Prepare two shades of green on your palette: a light, warm sage green and a deeper, cool bluish-green. This variety will give your wreath depth and realism. -
Add flowing vines:
Using your size 2 or 6 brush, paint long, sweeping stems that curve along the shape of the heart. Let some stems stray outwards towards the paper’s edge for a wild, organic feel. -
Paint varying leaf shapes:
Attach leaves to your stems. Use the ‘press and lift’ technique: touch the tip of the brush to the paper, press down to widen the belly of the brush, and lift up again to create a pointed tip. -
Incorporate contrasting foliage:
Switch to your deeper blue-green paint. Add distinct sprigs of leaves that tuck behind the lighter flowers. These darker values help the pastel flowers pop forward visually. -
Integrate autumnal sprigs:
Mix a reddish-brown shade and paint delicate, fern-like sprigs or small clusters of berries. These warm earth tones compliment the peach flowers and add texture to the layout.
Add Some Sparkle
Mix a tiny amount of gold gouache or metallic watercolor into your final layer of berries or leaf veins to give the piece a subtle, shimmering finish.
Step 4: Details & Final Touches
-
Add flower centers:
Once the main flower petals are fully dry, use a size 2 brush with concentrated dark brown or black paint to stipple tiny dots into the centers of your daisies and anemones. -
Enhance with fine lines:
With your smallest brush, paint very thin stems connecting any floating buds or leaves back to the main arrangement. Adding tiny veins to a few larger leaves can also add a nice detailed touch. -
Review and refine:
Step back to look at the overall balance. If one side looks too sparse, add a few more green leaves or small berries to even out the visual weight around the heart. -
Erase guidelines:
Wait until the painting is completely bone-dry—this is crucial to avoid smudges. Gently erase any visible pencil marks from your initial heart tracing. -
Write a message (optional):
The empty space inside the heart is perfect for calligraphy. Use a fine liner or brush pen to write ‘Mom’ or a short dedication, or simply leave it blank for a clean, modern look.
Frame this lovely piece in a simple wood frame to let the delicate colors shine on their own
Mother’s Day Handprint Poem Painting
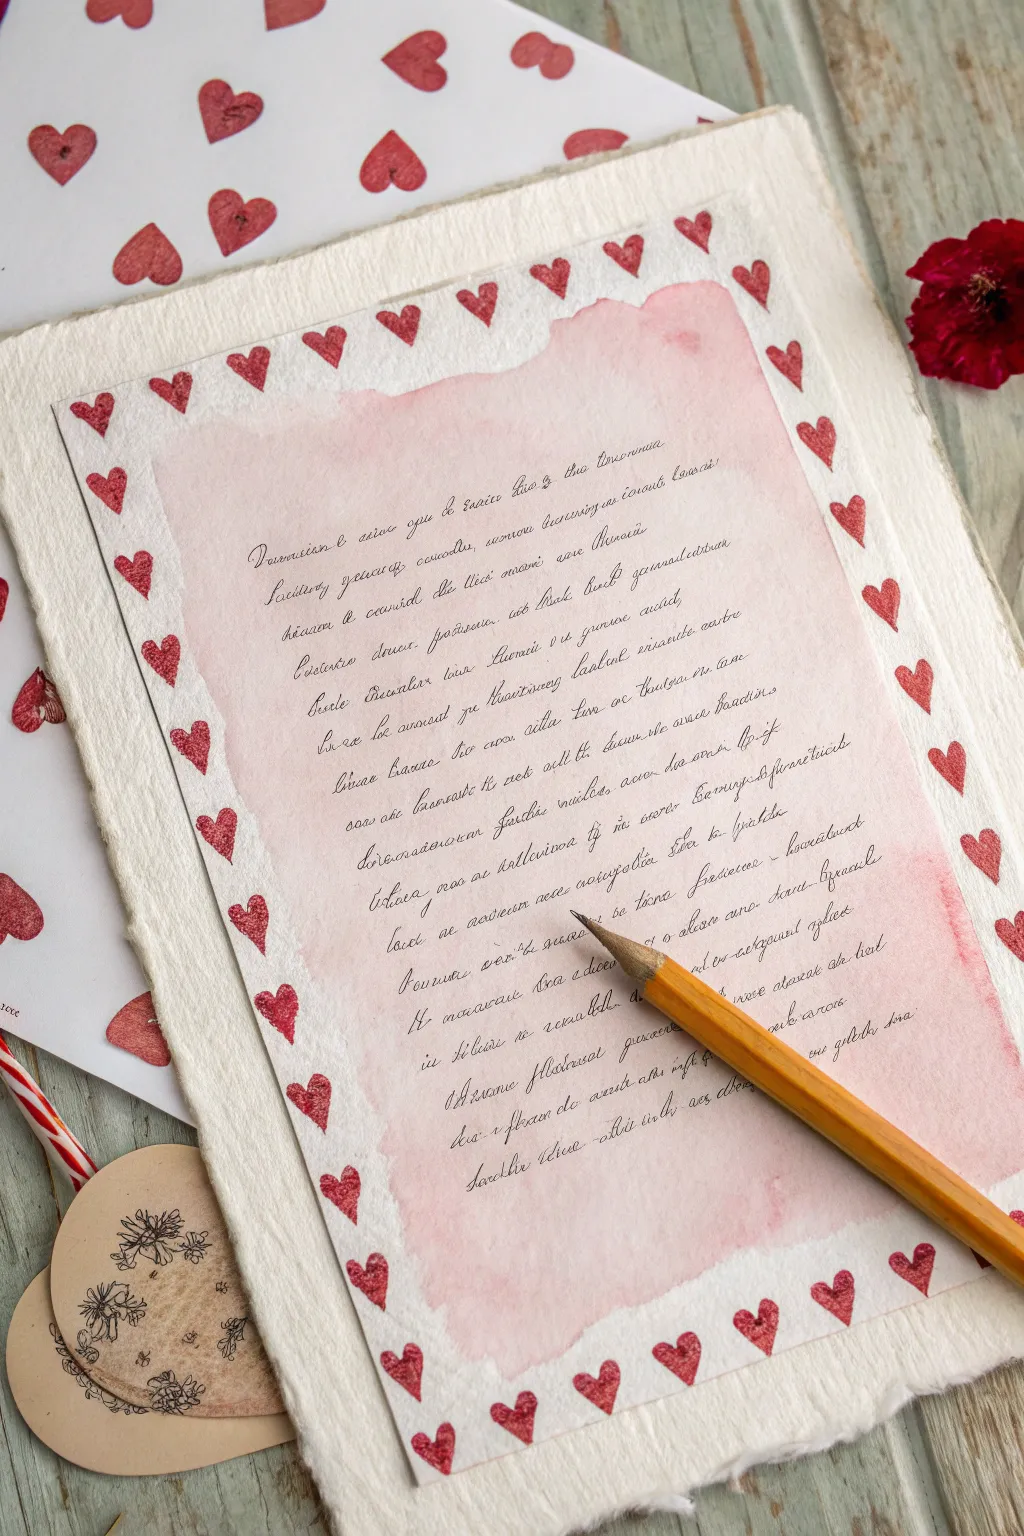
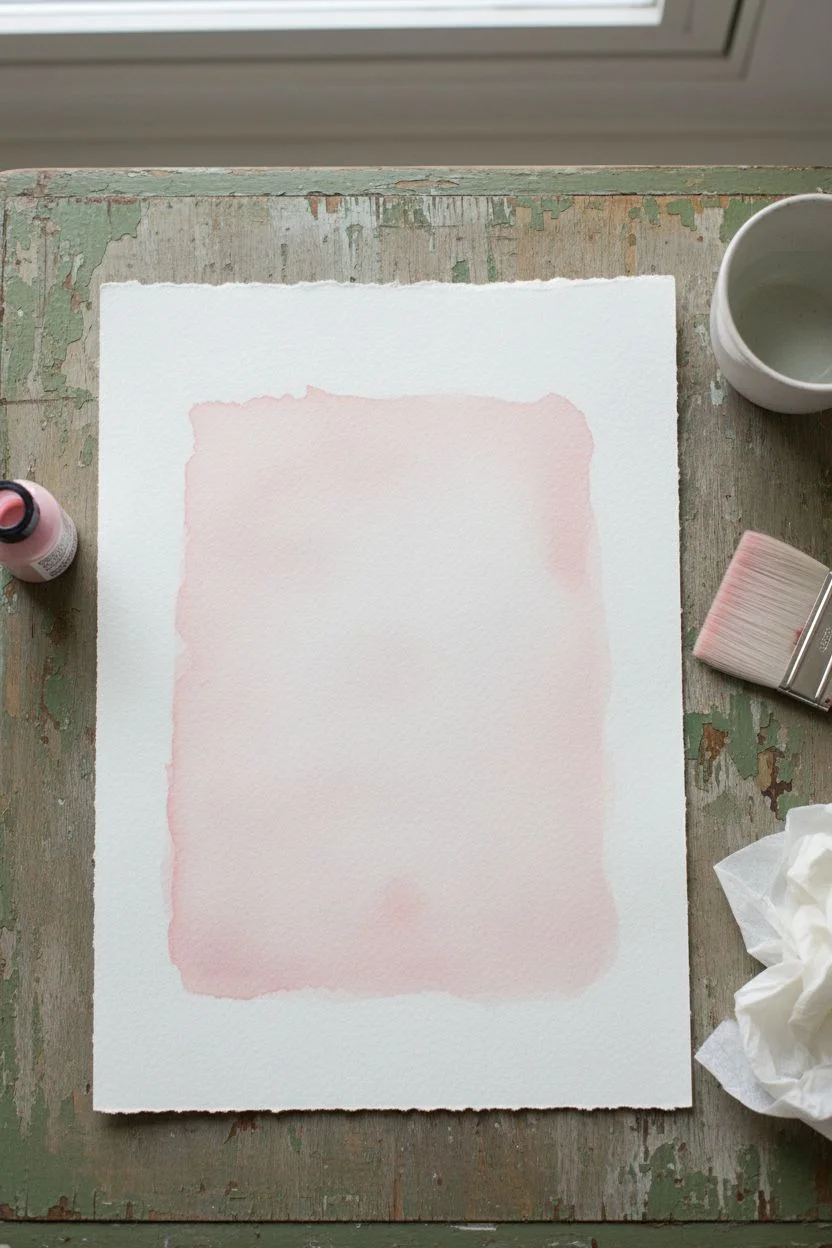
Transport Mom back in time with this elegant, vintage-inspired love letter featuring a delicate watercolor wash and a charming hand-stamped heart border. The soft pink hues and cursive script on textured paper create a timeless keepsake that feels both personal and artistic.
Detailed Instructions
Materials
- Heavyweight textured watercolor paper (cold press creates the best vintage look)
- Pink watercolor paint (liquid or pan)
- Wide flat wash brush (1 inch)
- Small heart rubber stamp
- Red or deep pink ink pad (pigment ink works best)
- Fine-point black ink pen or calligraphy pen
- Pencil (for light guidelines)
- Ruler
- Paper towels
- Water cup
Step 1: Preparing the Vintage Background
-
Prepare your paper:
Start by tearing the edges of your watercolor paper instead of cutting them. This deckled edge adds an authentic, old-world charm to the final piece. -
Mix the wash:
Dilute a small value of pink watercolor paint with plenty of water. You want a very pale, translucent ‘blush’ color rather than a solid opaque pink. -
Apply the center wash:
Using a wide flat brush, paint a large rectangle in the center of the paper, leaving about a 1.5-inch border of white paper all around. The edges of the paint should be somewhat uneven and organic, not perfectly straight. -
Create texture:
While the paint is still wet, you can blot a few areas gently with a crumpled paper towel to create subtle clouds or variations in the pink tone. -
Let it dry completely:
Allow the paper to dry fully. If the paper buckles slightly, you can place it under a heavy book once it is bone dry to flatten it out before writing.
Smudge Alert
Watercolor paper has texture that can trap graphite or wet ink. Always test your eraser on a scrap piece first, and ensure ink has dried for a full hour before erasing pencil lines.
Step 2: Stamping the Border
-
Ink the stamp:
Press your small heart stamp firmly into the red or deep pink ink pad. Ensure the entire design is covered but not gloopy. -
Start the corners:
Stamp a heart in each of the four corners of the white border first. This anchors your design and ensures spacing works out evenly. -
Fill the edges:
Working from corner to corner, stamp hearts along the border. Angle them slightly outward or vary their rotation just a tiny bit to make the frame look handmade and whimsical. -
Assess the spacing:
Aim for about half an inch of space between each heart. They don’t need to be mathematically perfect; the slight irregularities add to the charm.
Level Up: Tea Staining
For an even more antique look, lightly brush strong brewed black tea over the white border of the paper before stamping to give it an aged, parchment-like beige tone.
Step 3: Writing the Poem
-
Draft the text:
On a separate scratch paper, write out your poem or letter to check the length and spacing. -
Draw guidelines:
Very lightly use a ruler and pencil to draw horizontal lines across the pink painted area. This ensures your cursive handwriting stays straight. -
Pencil in the text:
I always recommend writing the full text lightly in pencil first. This lets you center the lines and correct spelling mistakes before committing to ink. -
Ink the letters:
Trace over your pencil lines with a fine-point black pen or a calligraphy pen. Use a loose, flowing cursive style to match the romantic feel of the artwork. -
Vary line weight:
If using a calligraphy pen, press slightly harder on downstrokes to create thicker lines, letting up for thin upstrokes. -
Erase guidelines:
Wait at least 30 minutes to ensure the ink is completely dry. Then, gently erase the pencil guidelines with a clean, soft eraser to avoid smudging.
Place your beautiful letter in a rustic frame or slide it into an envelope to present a heartfelt gift Mom will cherish forever
Umbrella Silhouette: Mom Protecting Her Little One
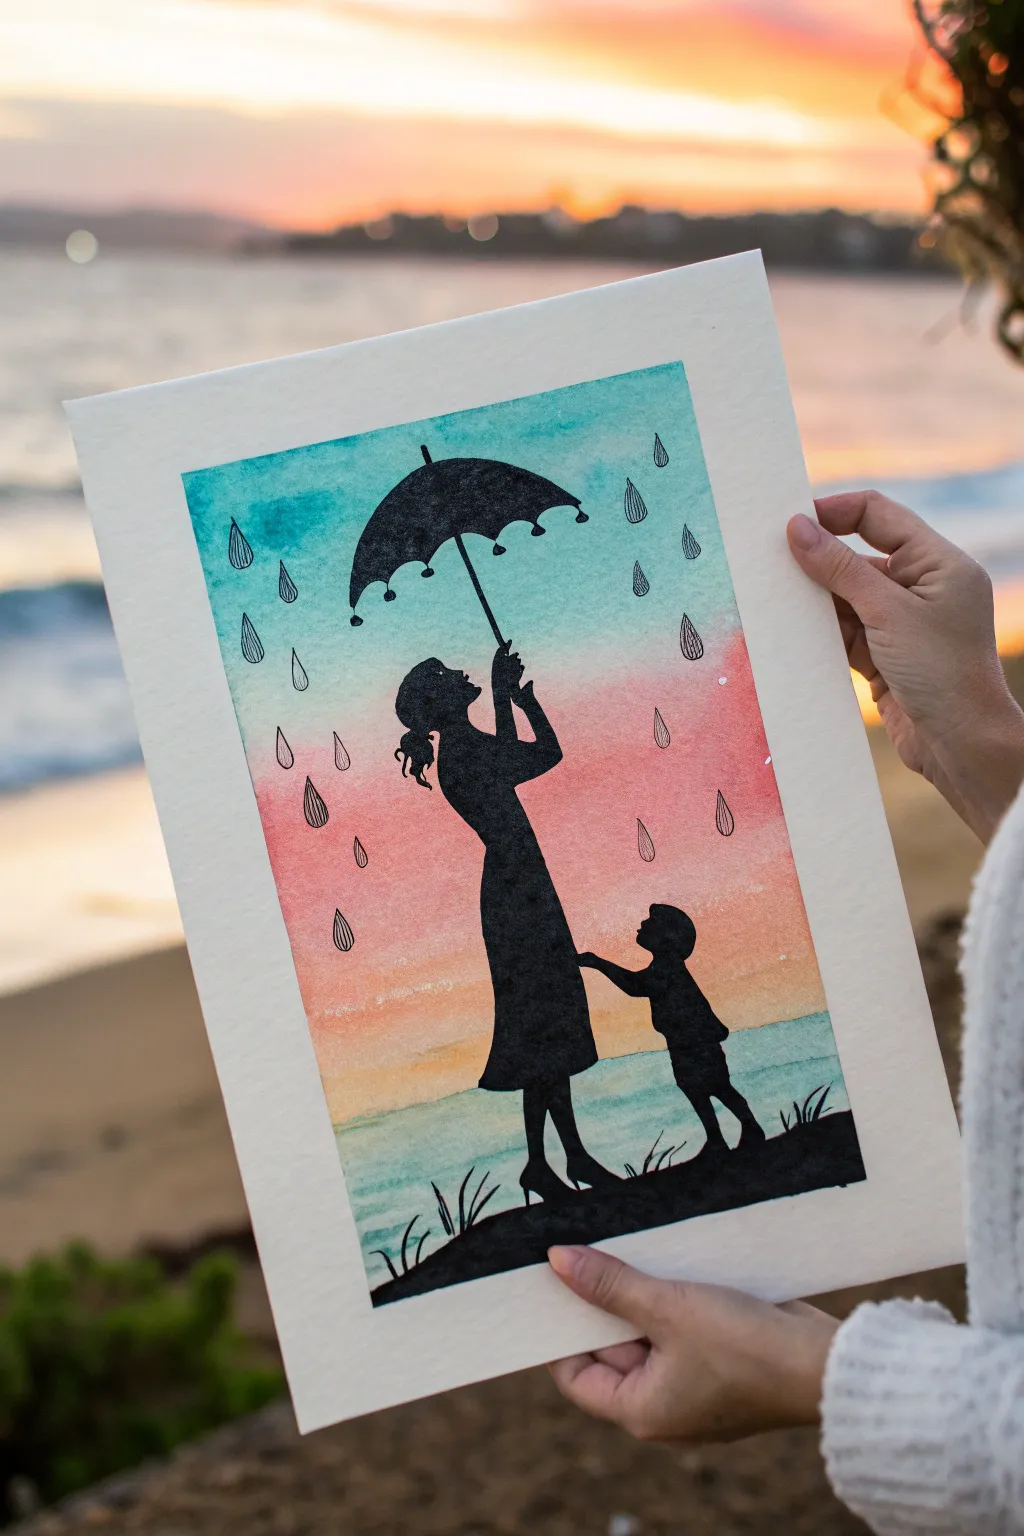
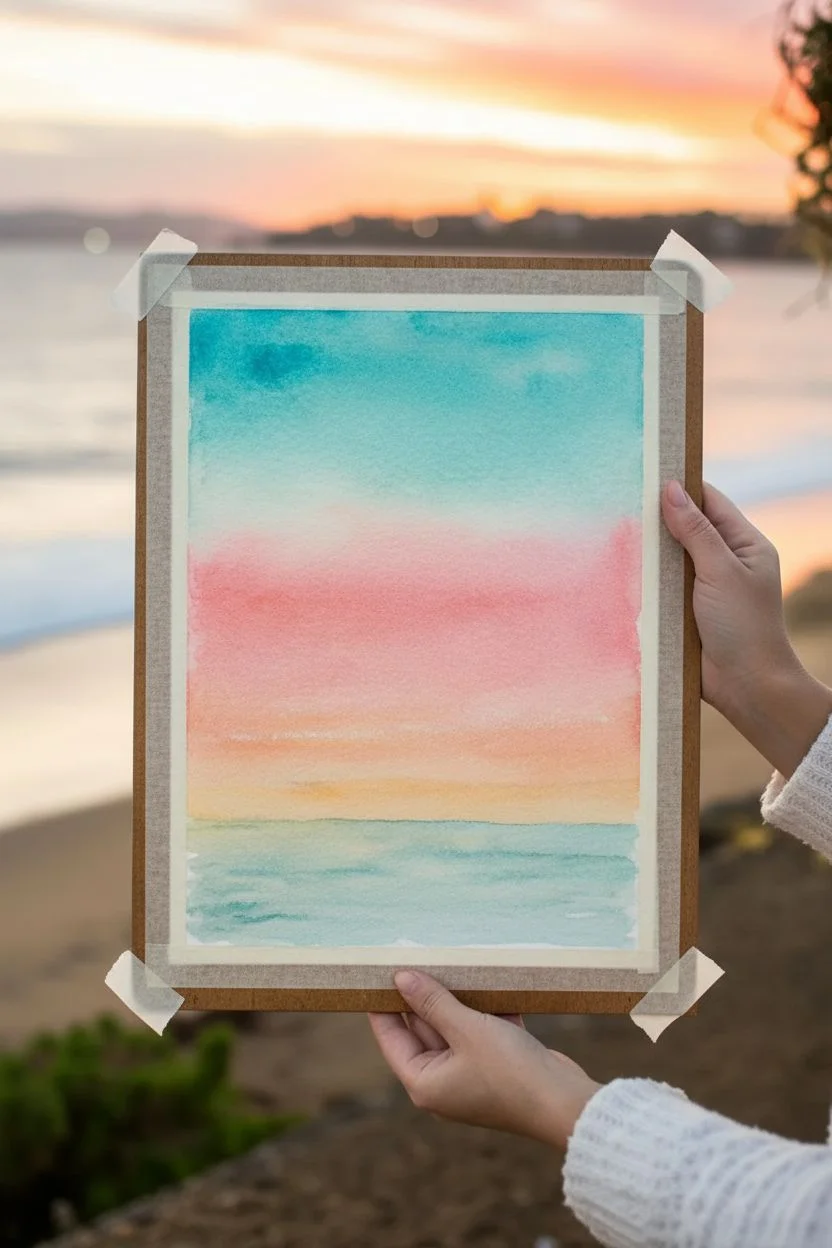
Capture the tender bond between mother and child with this vibrant watercolor and ink silhouette. The colorful, dreamy sunset background contrasts beautifully with the sharp black figures, symbolizing a mother’s constant protection.
Step-by-Step Guide
Materials
- Cold-press watercolor paper (A4 or slightly smaller)
- Painter’s tape or masking tape
- Watercolor paints (Turquoise, Rose/Pink, Warm Yellow)
- Large flat brush or wash brush
- Pencil and eraser
- Black waterproof fine liner pen (0.5mm)
- Black acrylic paint or black gouache
- Small round detail brush (size 0 or 1)
- Jar of clean water
- Paper towels
Step 1: Creating the Sunset Sky
-
Prepare your canvas:
Tape down all four edges of your watercolor paper to a hard board or table. This creates that crisp white border seen in the photo and prevents the paper from buckling when wet. -
Apply the top layer:
Load your large flat brush with a watery turquoise mixed with plenty of water. Paint a horizontal band across the top third of the paper, keeping the stroke relatively loose at the bottom edge. -
Add the middle tones:
Rinse your brush thoroughly. Pick up a watery rose or soft pink color and paint the middle section, slightly overlapping the bottom of the turquoise while it is still damp to create a soft blend. -
Paint the horizon:
Rinse again and pick up a warm yellow. Paint the bottom third of the sky, blending it upward into the pink. Don’t worry about the very bottom strip yet. -
Ground the scene:
At the very bottom, paint a thin strip of watered-down turquoise or light blue to suggest water or the distant ground, blending it slightly with the yellow above. -
Let it dry completely:
This is crucial. The paper must be bone-dry before you sketch or paint the black silhouette, otherwise the ink will bleed. I usually wait at least 30 minutes or use a hairdryer on a low setting.
Bleeding Lines?
If your black ink feathers into the background, the watercolor wasn’t dry enough. Wait 24 hrs for paper to cure, or use acrylic paint which sits on top better than ink.
Step 2: Sketching and Shading
-
Sketch the figures:
Using a light pencil, gently outline the shape of the mother holding the umbrella and the child reaching up. Focus on the overall shapes rather than tiny details. -
Outline the umbrella:
Draw the umbrella’s canopy high above the mother’s head, ensuring the handle is aligned with her hand. Add the small scalloped edges to the umbrella rim. -
Add the ground:
Sketch a simple, uneven mound at the bottom for them to stand on, adding a few stray blades of grass. -
Fill the silhouette:
Using your small round brush and opaque black acrylic paint (or gouache), carefully fill in the bodies of the mother and child. Keep your hand steady and ensure the paint is solid black without streaks. -
Refine the edges:
Once the main fills are done, use the very tip of your brush to sharpen the nose, ponytail, and fingers. Sharp edges make the silhouette readable. -
Paint the umbrella:
Fill in the umbrella shape with the black paint. Use the fine liner pen for the thin umbrella shaft if your brush isn’t fine enough. -
Ground the figures:
Paint the ground mound in solid black, anchoring the feet of the figures so they don’t look like they are floating. Flick the brush upward quickly to create grass blades.
Make it Personal
Customize the child’s silhouette to match yours! Change a ponytail to short hair, add a second child, or even a small dog silhouette next to the figures.
Step 3: Final Rain Details
-
Draw the raindrops:
Switch to your black waterproof fine liner pen. Draw teardrop shapes scattered randomly across the sky background. -
Add texture to the rain:
Inside each teardrop, draw 2-3 tiny vertical lines. This gives the rain a stylized, illustrative look rather than just being empty outlines. -
Detail the umbrella:
Add small dangling beads or drops to the points of the umbrella’s scalloped edge using the pen. -
Clean up:
Once dry, gently erase any visible pencil marks that weren’t covered by the black paint. -
Reveal the border:
Slowly peel away the painter’s tape at a 45-degree angle to reveal your clean white frame.
Frame this piece or gift it as is for a heartfelt handmade present
Butterfly Made From Handprints or Footprints for Mother’s Day
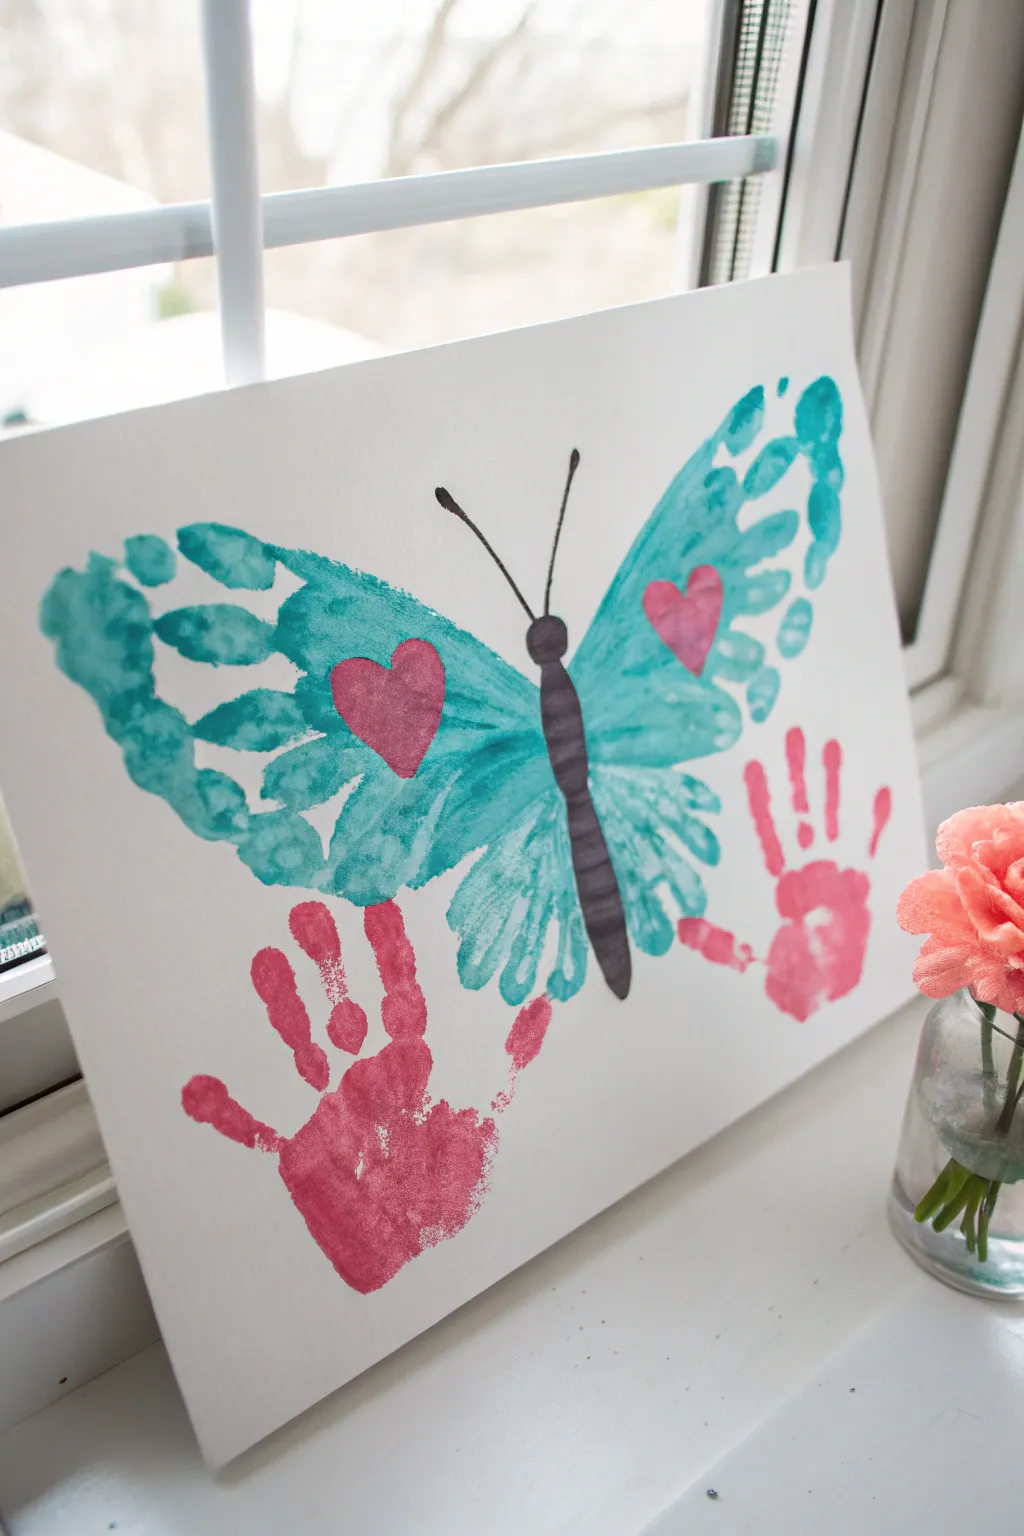
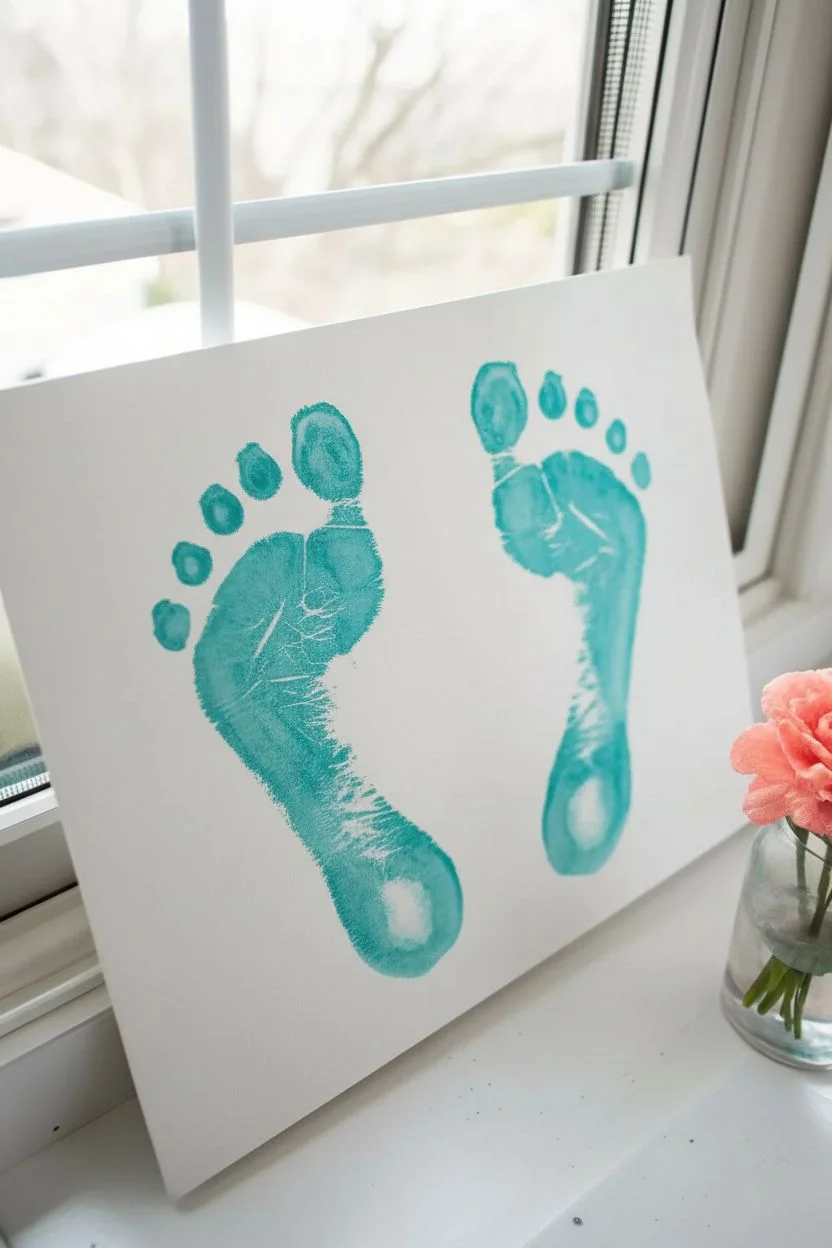
This whimsical keepsake transforms tiny feet into the wings of a bright teal butterfly, accented with sweet pink handprints below. It’s a charming way to capture a child’s growth and makes for a heartfelt piece of art that moms will cherish forever.
Detailed Instructions
Materials
- White stretched canvas (8×10 or larger)
- Teal acrylic paint
- Pink acrylic paint
- Black acrylic paint
- Foam paintbrush
- Small round paintbrush
- Paper plates (for paint palettes)
- Baby wipes or damp paper towels
- Pencil (optional)
Step 1: Creating the Footprint Wings
-
Prepare the paint:
Squeeze a generous amount of teal acrylic paint onto a paper plate. You want a puddle large enough to coat a child’s foot. -
Paint the right foot:
Using a foam brush, coat the bottom of the child’s right foot completely with teal paint. Ensure even coverage from heel to toes, but avoid heavy globs. -
Print the left wing:
Press the painted right foot onto the left side of the canvas. Position it at a slight diagonal, with the heel pointing inward toward the center and toes pointing outward and upward. -
Lift and clean:
Gently lift the foot straight up to avoid smearing the print. Immediately wipe the foot clean with baby wipes before the paint dries. -
Paint the left foot:
Repeat the process by coating the bottom of the child’s left foot with the teal paint. -
Print the right wing:
Press the left foot onto the right side of the canvas to create the second wing. Aim to mirror the position of the first print, keeping the heels close together near the center. -
Dry the wings:
Allow the teal footprints to dry completely before moving on. This usually takes about 15-20 minutes depending on paint thickness.
Print Perfection Tip
For the clearest toe and finger details, place the canvas on the floor and have the child stand or press down firmly, rather than bringing the canvas to them.
Step 2: Adding the Body and Details
-
Paint the body segment 1:
Using a small round paintbrush and black paint, draw a long, segmented oval shape between the two heels. Start slightly below the heels and extend upwards. -
Fill the body:
Fill in the body shape with solid black paint. You can add small horizontal lines across the body for extra texture if desired. -
Add the head:
Paint a small black circle at the top of the body segment to represent the butterfly’s head. -
Draw antennae:
With the very tip of your small brush, paint two thin, curved lines extending outward from the head. I like to add tiny dots at the ends for a cute finish. -
Paint heart details:
Using pink paint and a clean small brush, paint a simple heart shape in the middle of each teal wing. Make sure the teal paint is fully dry first so the colors don’t muddy.
Fixing Smudges
If a print smudges, don’t panic. Let it dry completely, paint over the error with white acrylic, let that dry, and then try the print again.
Step 3: Adding the Handprints
-
Prepare pink paint:
Clean off your foam brush or grab a new one. Squeeze pink acrylic paint onto your palette. -
Coat the hand:
Paint the child’s palm and fingers with a smooth layer of pink paint. -
Place first handprint:
Press the painted hand onto the canvas below the butterfly wings. Angle the fingers outward slightly for a playful look. -
Re-coat and print:
Re-apply paint to the hand and create a second print on the other side, balancing the composition. -
Final drying:
Set the completed canvas in a safe place to dry overnight before wrapping or displaying.
Now you have a captured moment in time that transforms little prints into a beautiful butterfly garden


Have a question or want to share your own experience? I'd love to hear from you in the comments below!