
Painting wine glasses is one of my favorite ways to turn an everyday object into something that feels totally personal and gift-worthy. The curved, see-through surface is a little quirky at first, but once you lean into simple shapes and clean patterns, it’s ridiculously fun.
Confetti Polka Dots for Instant Party Vibes
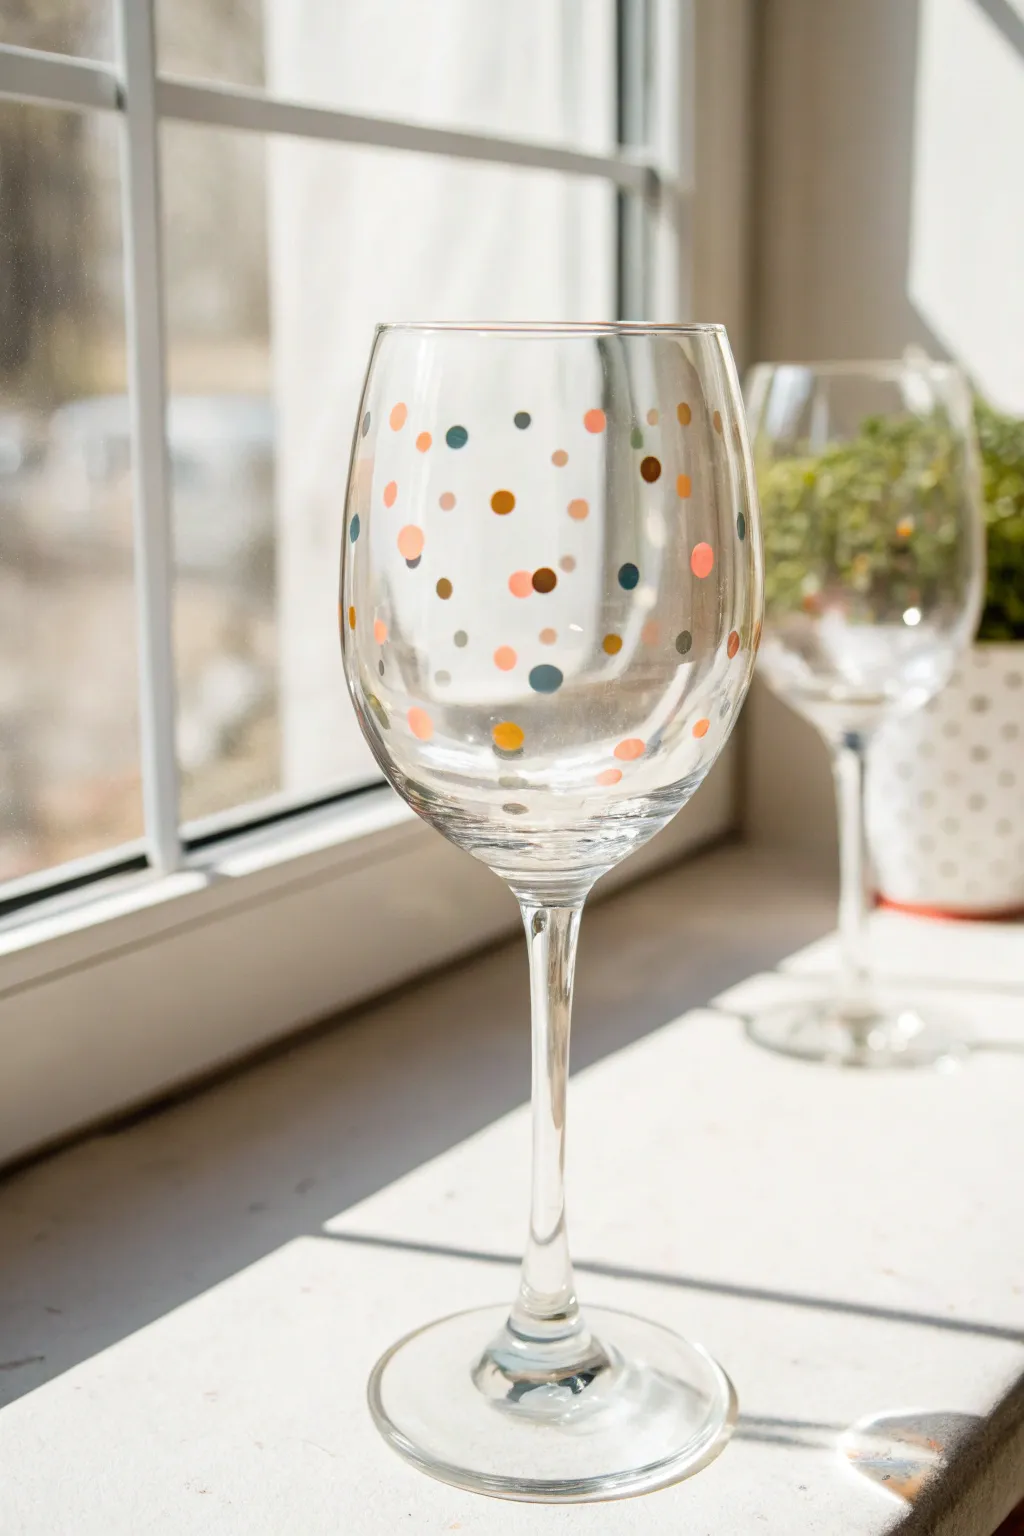
Transform plain glassware into a celebration in a cup with this simple yet festive confetti design. Using a mix of warm metallics, soft corals, and deep teals, you’ll create a scattered, playful look that feels effortlessly bubbly.
Step-by-Step Guide
Materials
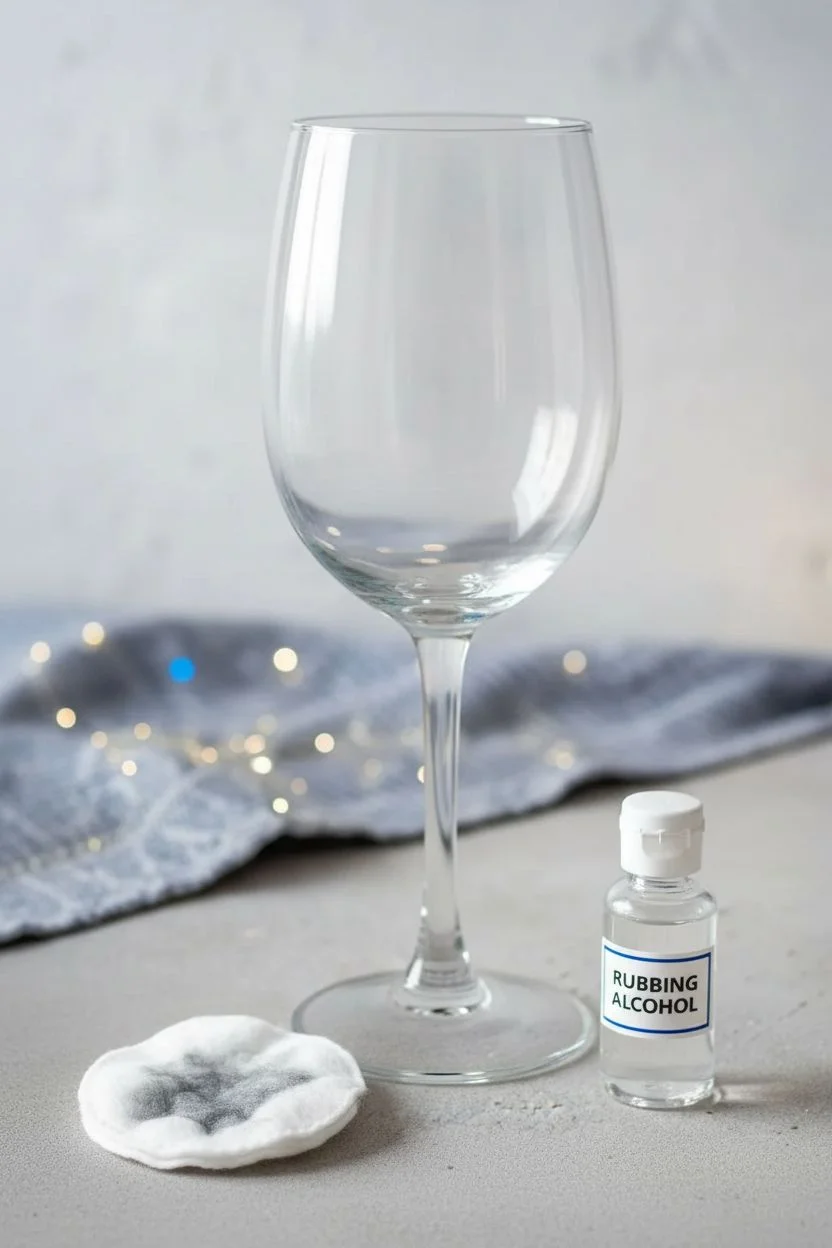
- Clear stemmed wine glass
- Rubbing alcohol
- Cotton pads or paper towels
- Enamel glass paints in Coral, Metallic Gold, Deep Teal, White, and Pastel Pink
- Dauber sponges (small round)
- Cotton swabs (Q-tips)
- Wait, no brushes? Actually, the cotton swabs work best here!
- Paper plate or palette
- Baking sheet (for curing)
- Oven (for curing)
Step 1: Preparation
-
Clean the surface:
Before you even open a paint bottle, thoroughly wipe down the exterior of the wine glass with rubbing alcohol on a cotton pad. This removes invisible oils and fingerprints which are the main enemy of paint adhesion. -
Dry completely:
Let the alcohol air dry for a minute or two. Do not touch the glass cup area with your bare hands after cleaning; try to hold it by the stem or base to keep the surface pristine. -
Set up your palette:
Squeeze a dime-sized amount of each enamel paint color onto your paper plate. Keep the puddles separate so they don’t mix unintentionally.
Uneven Dots?
If your cotton swabs are leaving fuzzy edges, lightly twist the swab between your fingers to tighten the cotton fibers before dipping in paint.
Step 2: Painting the Confetti
-
Start with common dots:
Dip the end of a clean cotton swab or a very small round dauber into your first color—let’s start with the Coral. Press it gently onto the glass to create a perfect circle. -
Space them out:
Continue adding coral dots randomly around the glass. Leave plenty of empty glass space between them; remember you have four other colors to fit in. -
Vary the sizes:
For a more organic confetti look, I like to create slight size variations. You can double-tap a spot to make a slightly larger dot, or just touch the glass lightly for a tiny speck. -
Add Metallic Gold:
Switch to a fresh cotton swab and dip it into the Metallic Gold paint. Place these dots in the gaps left by the coral, allowing some to sit higher on the glass and some lower near the curve. -
Incorporate Teal:
Using the Deep Teal, add a few accent dots. Use this color more sparingly than the others to keep the overall look light and airy. These darker spots add depth to the design. -
Layer in light shades:
Now come in with your White and Pastel Pink dots. Fill in the remaining larger gaps. It’s okay if a few dots are close together, but try to avoid them touching while wet. -
Check the rim:
Ensure there is about an inch of paint-free space at the top rim of the glass where lips will touch. This is much more pleasant for drinking and safer for the paint longevity. -
Inspect the density:
Step back and look at the glass as a whole. The pattern should look scattered and random, not like a grid. If you see a large empty patch, add a small gold or white dot to balance it. -
Clean up edges:
If any dots look smeared or uneven, use a clean, damp cotton swab to wipe them away while the paint is still wet, then re-apply a fresh dot.
Make it Stick
Don’t skimp on the alcohol wipe-down step! Even natural oils from clean hands can prevent enamel paint from adhering properly during the bake.
Step 3: Curing the Paint
-
Air dry first:
Let the glass sit undisturbed for at least 1 hour (24 hours is often recommended by manufacturers) to ensure the surface is dry to the touch. -
Prepare for baking:
Place the wine glass upside down on a cold baking sheet. Put the sheet into a cold oven. It is crucial the oven is not preheated to prevent glass breakage. -
Bake carefully:
Set the oven temperature to 350°F (or per your paint bottle’s instructions). Once the oven hits that temperature, set a timer for 30 minutes. -
Cool down slowly:
After the timer goes off, turn the oven off but do not open the door. Leave the glass inside to cool down gradually with the oven which prevents thermal shock cracking. -
Final cure:
Once completely cool, remove the glasses. While most are dishwasher safe after curing, hand washing will keep your confetti crisp for years.
Now you have a cheerful set of glasses ready for your next toast


Mini Hearts for a Sweet, Minimal Look
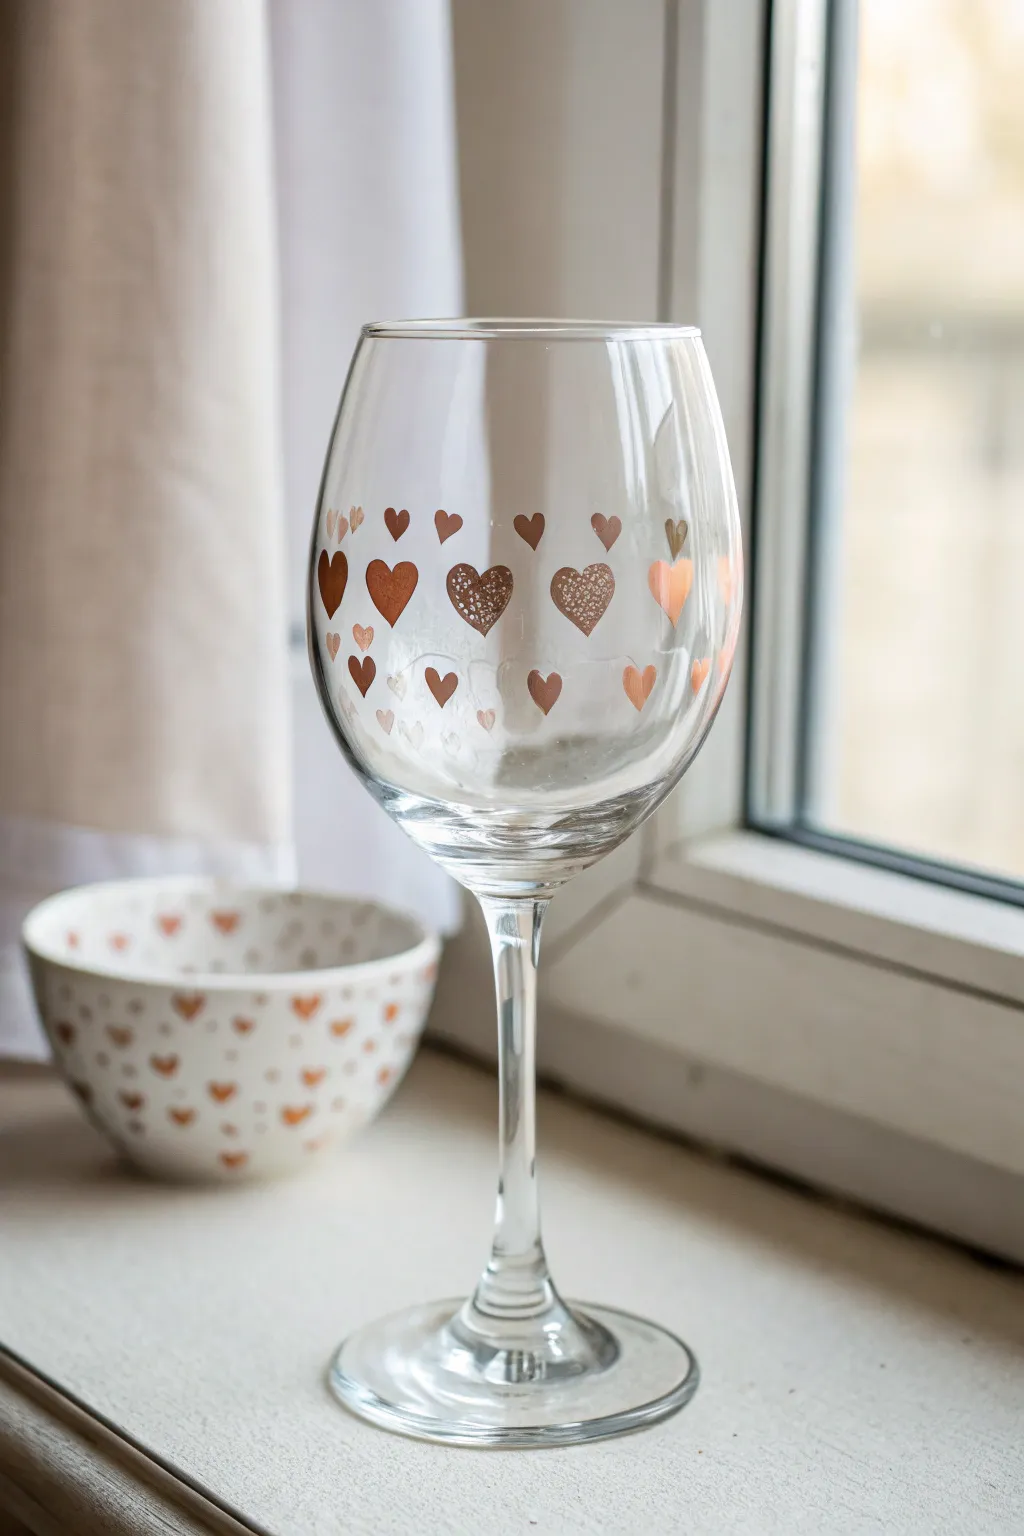
Add a touch of romance to your stemware with this elegant and minimalist design featuring rows of delicate hearts. Using metallic rose gold hues and varied textures creates a sophisticated look that is perfect for Valentine’s Day or a chic brunch.
Step-by-Step Tutorial
Materials
- Clear wine glass (thoroughly cleaned)
- Rubbing alcohol
- Cotton pads
- Glass paint (metallic rose gold or copper)
- Glass paint marker (fine tip, rose gold)
- Fine detail paintbrush (size 0 or 00)
- Small heart stencil (optional, approx. 0.5 inch)
- Painter’s tape or washi tape
- Paper plate or palette
- Oven (for curing, check paint instructions)
Step 1: Preparation & Planning
-
Clean surface:
Begin by washing your wine glass with warm soapy water to remove any dust or sticker residue. -
Degrease glass:
Wipe the exterior surface of the glass with rubbing alcohol on a cotton pad. This is crucial for ensuring the paint adheres properly and doesn’t slide off. -
Mark guidelinse:
To ensure your hearts stay in straight rows, place two strips of painter’s tape horizontally around the bowl of the glass. The space between these strips will be your canvas area. -
Plan spacing:
Visualize roughly three rows of hearts within your taped area. You want them to be staggered, like a brick pattern, rather than stacked directly on top of each other.
Step 2: Painting the Base Hearts
-
Load paint:
Squeeze a small amount of metallic rose gold glass paint onto your paper plate. -
Paint center row:
Using your fine detail brush, paint the middle row first. Create hearts that are slightly larger than the others, about the size of a thumbnail. -
Outline technique:
If you are struggling with the shape, use two small strokes that meet at the bottom to form a ‘V’, then round out the tops. -
Fill solid hearts:
Fill in every other heart on this main row completely with the metallic paint for a solid, shiny look. -
Create texture:
For the alternating hearts in the middle row, use a stippling technique. Dip just the tip of your brush (or a toothpick) in paint and dot the inside of the heart outline to create a glittery, textured effect.
Uneven Coverage?
If the metallic paint looks streaky, let the first coat dry for an hour. Apply a second thin coat rather than one thick glooped layer.
Step 3: Adding Details
-
Top row:
Using a smaller brush or a fine-tip glass paint marker, create a row of tiny solid hearts above your main row. -
Stagger placement:
Place these smaller hearts in the gaps between the larger hearts below to balance the design. -
Bottom row:
Repeat the previous step to create a third row of tiny hearts below the main band, mirroring the top row’s placement. -
Remove tape:
Carefully peel away your painter’s tape while the paint is still wet to avoid pulling up any dried edges. -
Refine edges:
I like to use a cotton swab dipped in rubbing alcohol or water to quickly tidy up any smudged edges or wonky heart shapes before they set.
Use a Stencil Trick
Can’t freehand hearts? Use a hole punch on painter’s tape to create a perfect negative stencil. Stick it to the glass and dab paint inside.
Step 4: Finishing Touches
-
Dry thoroughly:
Allow the glass to dry completely according to the manufacturer’s instructions. This usually takes at least 24 hours. -
Cure the paint:
Most glass paints require baking to become dishwasher safe. Place the glass in a cool oven, set the temperature to 350°F (175°C), and bake for 30 minutes. Turn the oven off and let the glass cool inside completely.
Enjoy your beautiful new custom glassware at your next gathering


Bold Vertical Stripes That Flatter the Curve
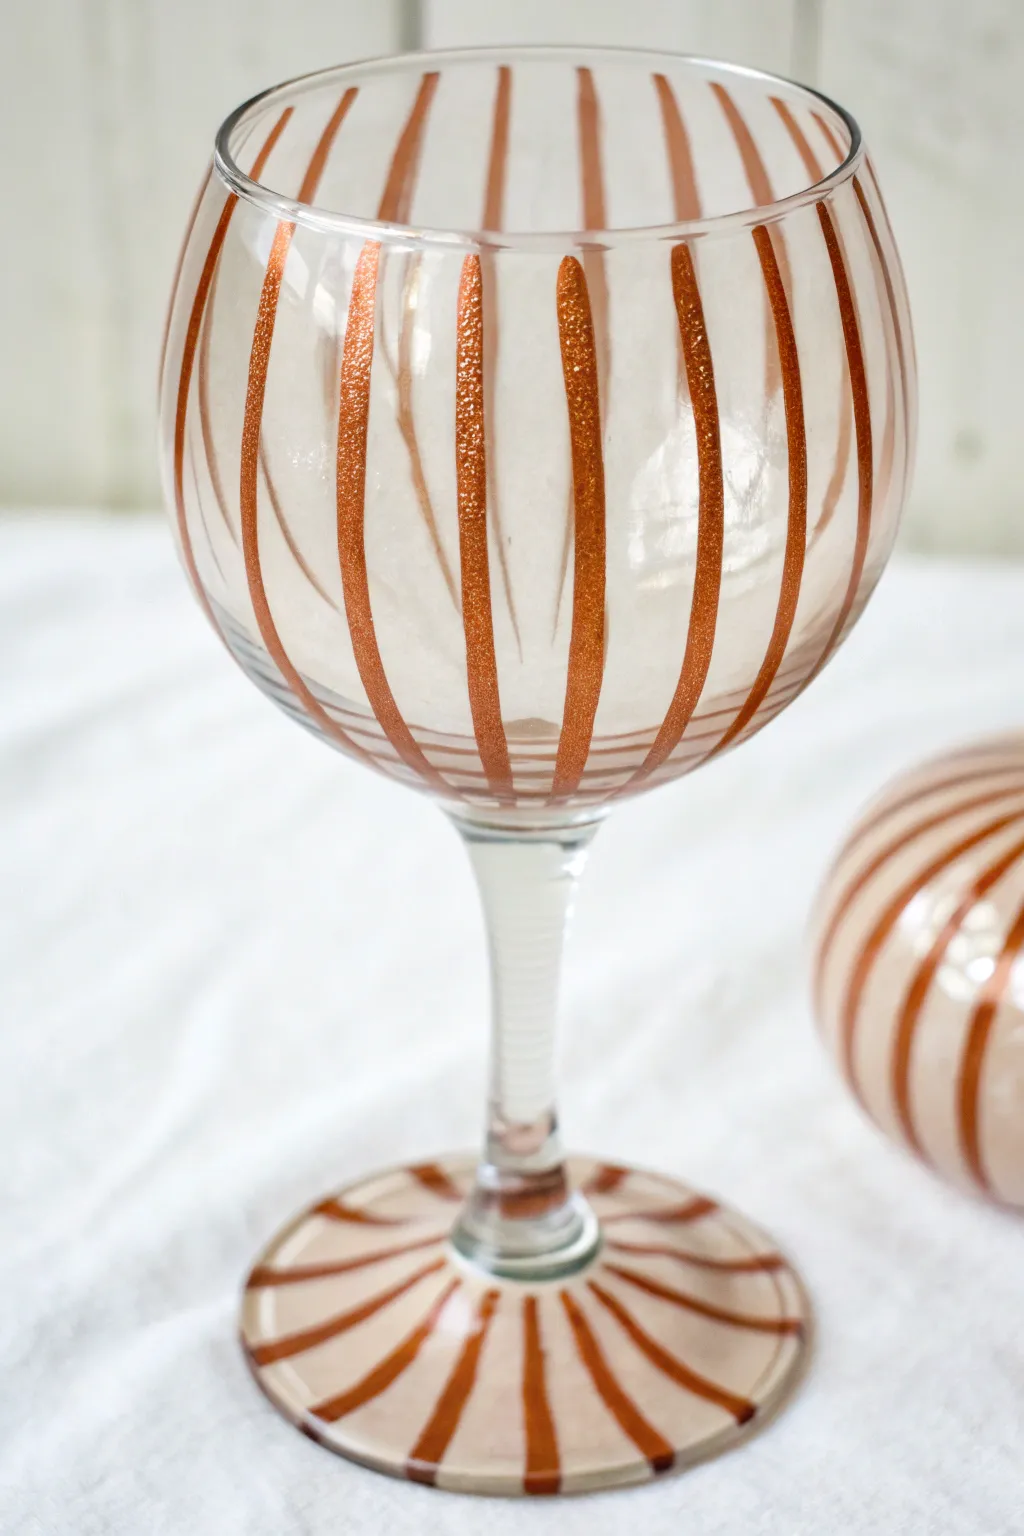
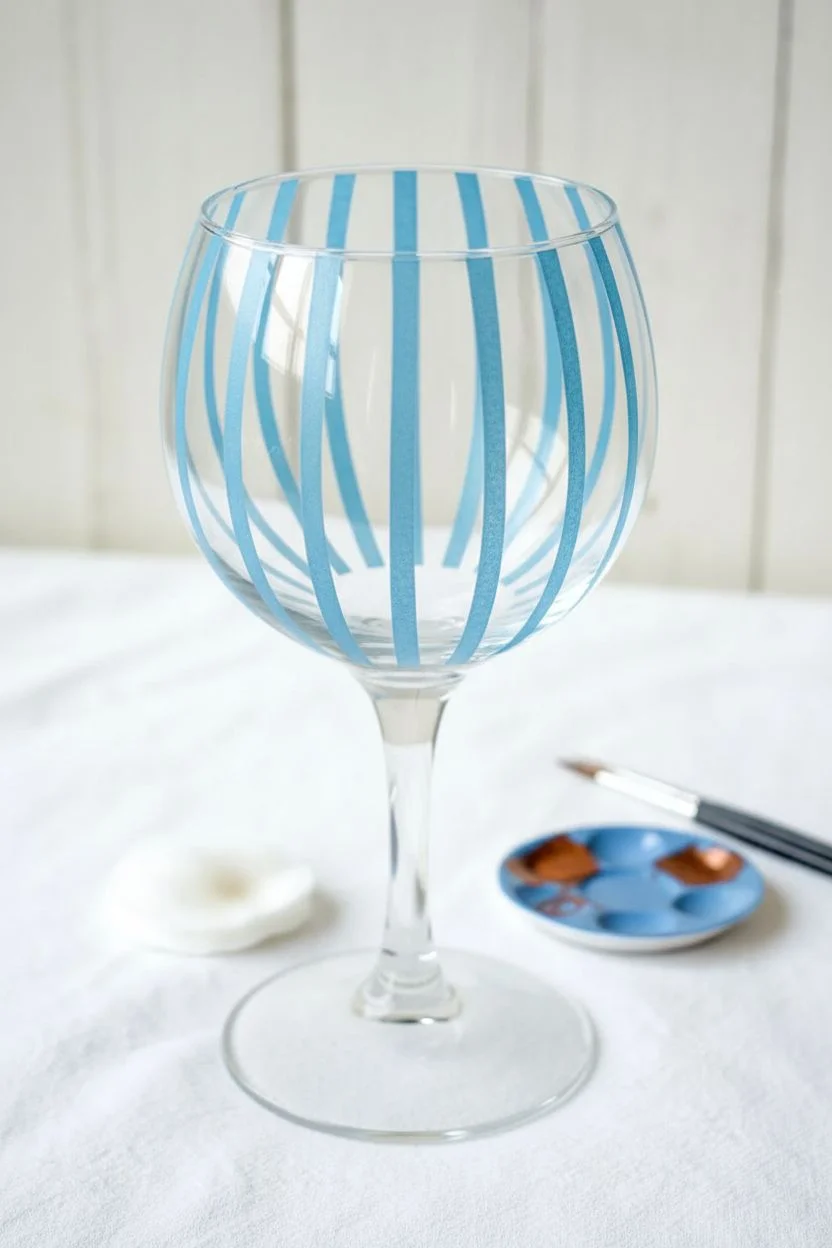
Transform a plain wine glass into a statement piece with these bold, rhythmic stripes that accentuate the natural curves of the glass. The warm copper tones and vertical lines create a sophisticated, modern look perfect for festive toasts or everyday elegance.
Step-by-Step Guide
Materials
- Wine glass (thoroughly cleaned)
- Rubbing alcohol
- Cotton pads or paper towel
- Copper or rust-colored glass paint (metallic or glitter finish recommended)
- Flat shader brush (size 4 or 6)
- Thin liner brush (size 0 or 1)
- Painter’s tape or masking tape (1/4 inch width)
- Palette or small dish
- Oven (for curing, if paint requires)
- Q-tips (for cleanup)
Step 1: Preparation
-
Clean the surface:
Begin by washing your wine glass with warm soapy water to remove any dust or sticker residue. Dry it completely with a lint-free cloth. -
Degrease with alcohol:
Wipe down the entire outer surface of the glass—specifically the bowl and the base where you will be painting—with rubbing alcohol on a cotton pad. This step is crucial for paint adhesion. -
Plan your spacing:
Visually divide the glass bowl into vertical sections. If you aren’t confident freehanding, apply strips of painter’s tape vertically from the rim to the stem, leaving equal gaps between them where the paint will go.
Straight Line Secret
Rest your painting hand’s pinky finger on the glass surface for stability. This acts as an anchor, stopping your hand from shaking as you pull those long vertical strokes.
Step 2: Painting the Bowl
-
Load your brush:
Squeeze a small amount of copper glass paint onto your palette. Load your flat shader brush moderately; you want enough paint to glide but not so much that it drips. -
Start the first stripe:
Starting just below the rim of the glass (leaving a tiny clear space for lip comfort is usually a good idea), pull the brush downward in a single, confident stroke toward the stem. -
Follow the curve:
As you move down the bowl, let the brush follow the natural curve of the glass. The stripe will naturally appear wider at the belly of the glass and taper slightly as it reaches the stem. -
Refine the edges:
If your stroke looks uneven, use the thin liner brush to carefully neaten the edges while the paint is still wet. I find it easier to fix mistakes immediately rather than waiting for them to dry. -
Continue around the bowl:
Rotate the glass and paint the next stripe on the opposite side to help maintain symmetry. Continue filling in the remaining stripes until the bowl is complete. -
Check opacity:
Hold the glass up to the light. If the copper/glitter paint looks too sheer, wait for the first coat to dry to the touch (usually 15-20 minutes) and apply a second coat over the existing lines.
Mix It Up
Alternate the copper stripes with a thinner line of gold or white pearl paint in the gaps for a more complex, multi-tone design.
Step 3: Painting the Base
-
Align the base stripes:
The stripes on the base should visually connect with the stripes on the bowl. Locate a stripe on the bowl and imagine a line running down the stem to the base. -
Paint outward strokes:
Using your flat brush, start at the center of the base (where the stem meets the foot) and pull the paint outward toward the edge of the base. -
Taper the design:
Since the center is small, the stripes will start very narrow near the stem and fan out wider as they reach the edge of the base. -
Clean up the rim:
Use a damp Q-tip to wipe away any paint that may have smeared onto the very bottom edge of the glass where it sits on the table.
Step 4: Finishing
-
Remove tape:
If you used painter’s tape for guides, carefully peel it off while the paint is still slightly tacky to ensure crisp lines. -
Let it cure:
Allow the glass to air dry for at least 24 hours, or follow the specific curing instructions on your paint bottle. -
Bake to set:
Most glass paints require baking to become dishwasher safe. Place the glass in a cool oven, set the temperature to 350°F (or as directed), bake for 30 minutes, and let it cool down inside the oven.
Your shimmering new glassware is now ready to add a warm glow to your table setting


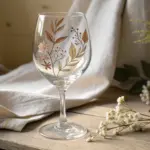
Classic Daisies That Always Work
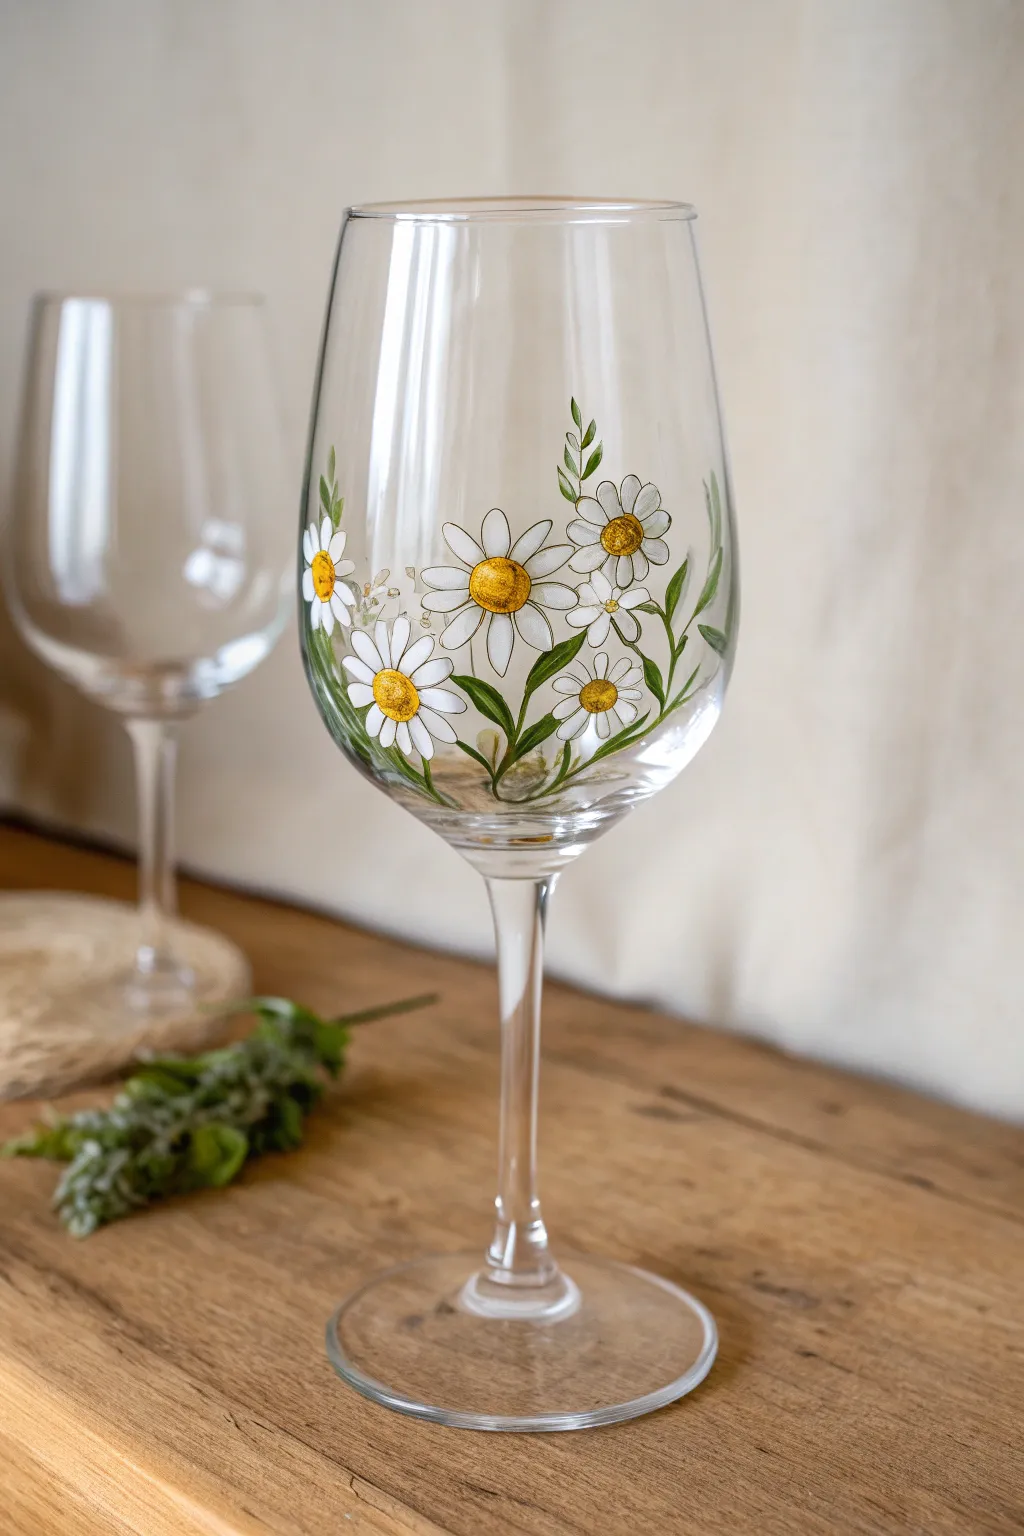
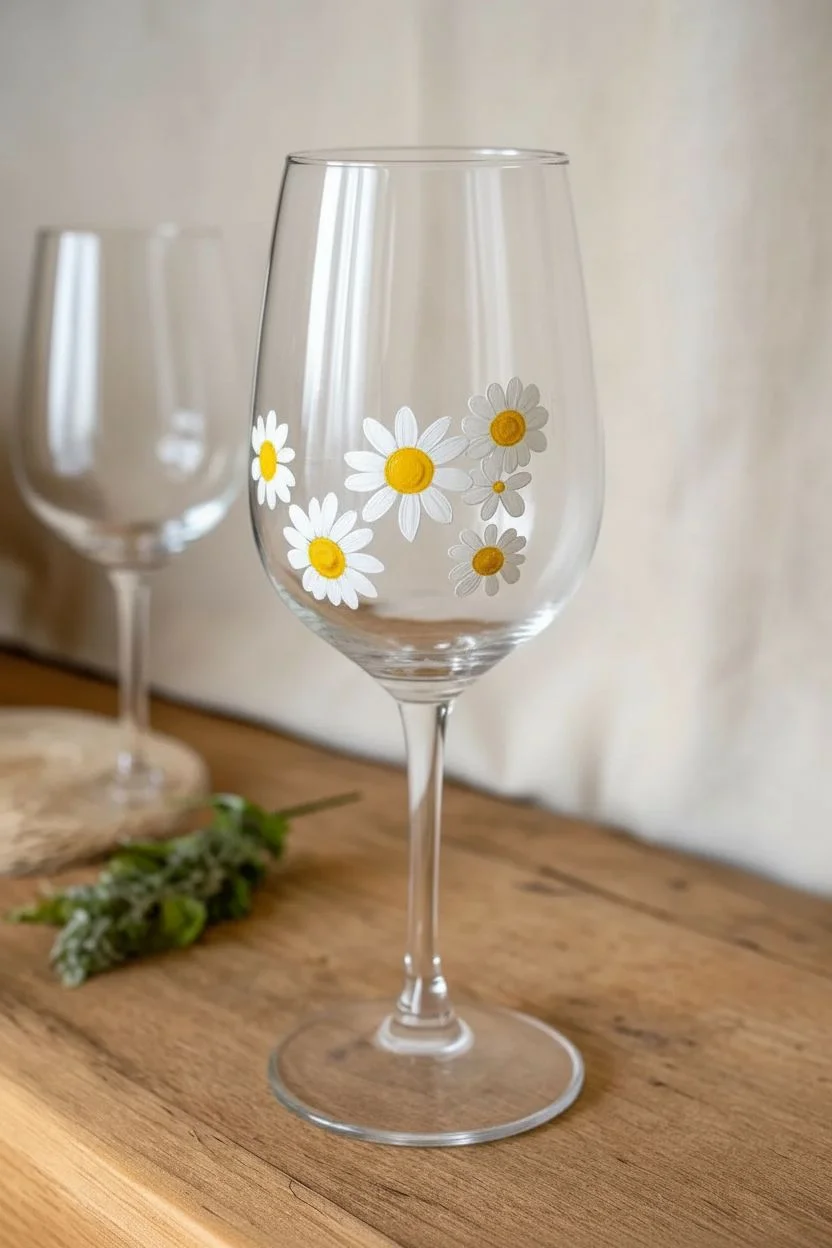
Brighten up your stemware with a pattern that never goes out of style—cheerful white daisies with golden centers. This project results in a delicate, hand-painted look that feels fresh, airy, and perfect for spring gatherings or cozy dinners.
Step-by-Step Tutorial
Materials
- Clear wine glass (stemmed or stemless)
- Rubbing alcohol
- Cotton pads or paper towel
- Multi-surface acrylic enamel paint (White, Primary Yellow, Antique Gold/Ochre, Olive Green, Dark Green)
- Small flat brush (size 2 or 4)
- Round detail liner brush (size 0 or 00)
- Palette or paper plate
- Q-tips (for cleanup)
- Oven (for curing, optional)
Step 1: Preparation & Base Layers
-
Clean the surface:
Before you even open a paint bottle, wipe the entire outer surface of the wine glass with rubbing alcohol on a cotton pad. This removes oils and fingerprints, ensuring your paint sticks perfectly. -
Map out the flowers:
Visualize where your main daisies will sit. Aim for about 5-7 flowers clustered around the lower-middle section of the bowl. You don’t need to draw them first; just keep a mental map of their spacing. -
Paint the first petals:
Dip your small flat brush into white enamel paint. Press the brush tip gently against the glass and pull inward toward a central point to create a petal shape. Repeat this in a radial pattern to form your first flower. -
Vary the sizes:
As you move around the glass, make some daisies smaller than others. For side-facing flowers, paint shorter petals on the top and longer ones on the bottom to force a bit of perspective. -
Second coat for opacity:
Glass paint can be translucent. Once your first layer of white petals is dry to the touch, go back over them with a second coat. I find this extra step makes the white pop much more against colored beverages. -
Add the centers:
Load a round brush with primary yellow. Dot a generous circle in the center of each fully open daisy. For side-facing blooms, make the yellow center more oval-shaped.
Streaky Petals?
If your white paint looks streaky, don’t overload the brush. Apply multiple thin layers rather than one thick glob, allowing partial drying time in between layers.
Step 2: Detailing & Greenery
-
Shadow the centers:
While the yellow paint is still slightly tacky, take a tiny amount of antique gold or ochre on the very tip of your detail brush. Dab it onto the bottom edge of the yellow center to create a simple 3D shadow effect. -
Stipple for texture:
Use the tip of your detail brush to lightly stipple (tap repeatedly) the yellow centers. This mimics the fuzzy, pollen-rich texture of a real flower. -
Start the stems:
Mix a bit of olive green with a tiny drop of dark green. Using your liner script brush, paint thin, flowing lines extending downward from each flower head toward the stem of the glass. -
Add main leaves:
Switch back to your small flat brush for the leaves. Load it with green, press down at the base of a stem, and pull outward and upward, lifting the brush at the end to create a pointed leaf tip. -
Small filler foliage:
To fill empty spaces between flowers, paint tiny ‘v’ shapes or single sprigs of greenery sticking up. These don’t need to attach to a flower; they just add lushness to the bouquet. -
Outline the petals:
This is the most crucial step for the illustrative look. Thicken your dark green paint or use a dedicated glass paint marker. Use a liner brush to paint very thin, wispy outlines around just *part* of each white petal, not the whole thing. -
Define the centers:
Using that same dark green or a dark grey, add tiny dots or a thin partial outline around the base of the yellow centers to separate them visually from the white petals. -
Highlight the leaves:
Mix a little white into your green paint to make a pale mint shade. Add a single quick stroke on the upper curve of your largest leaves to simulating light hitting the foliage.
Step 3: Finishing
-
Clean up edges:
If any lines went astray, dip a Q-tip in rubbing alcohol or water (depending on if the paint is dry or wet) and gently wipe away the mistake. -
Let it cure:
Allow the glass to air dry for at least 1 hour before handling. For full durability, follow the manufacturer’s instructions on your paint bottle, which usually involves air drying for 21 days or baking in the oven. -
Baking instructions:
If baking, place the glass in a *cold* oven. Set temp to 350°F (175°C), bake for 30 minutes, then turn the oven off and let the glass cool down completely inside before removing.
Pro Tip: Perspective
Don’t paint every daisy facing forward. Tilt some flowers sideways or upwards to make the composition feel organic and naturally arranged.
Once baked and cooled, your new floral garden is ready for a toast
BRUSH GUIDE
The Right Brush for Every Stroke
From clean lines to bold texture — master brush choice, stroke control, and essential techniques.
Explore the Full Guide
Trailing Flower Vines Around the Rim
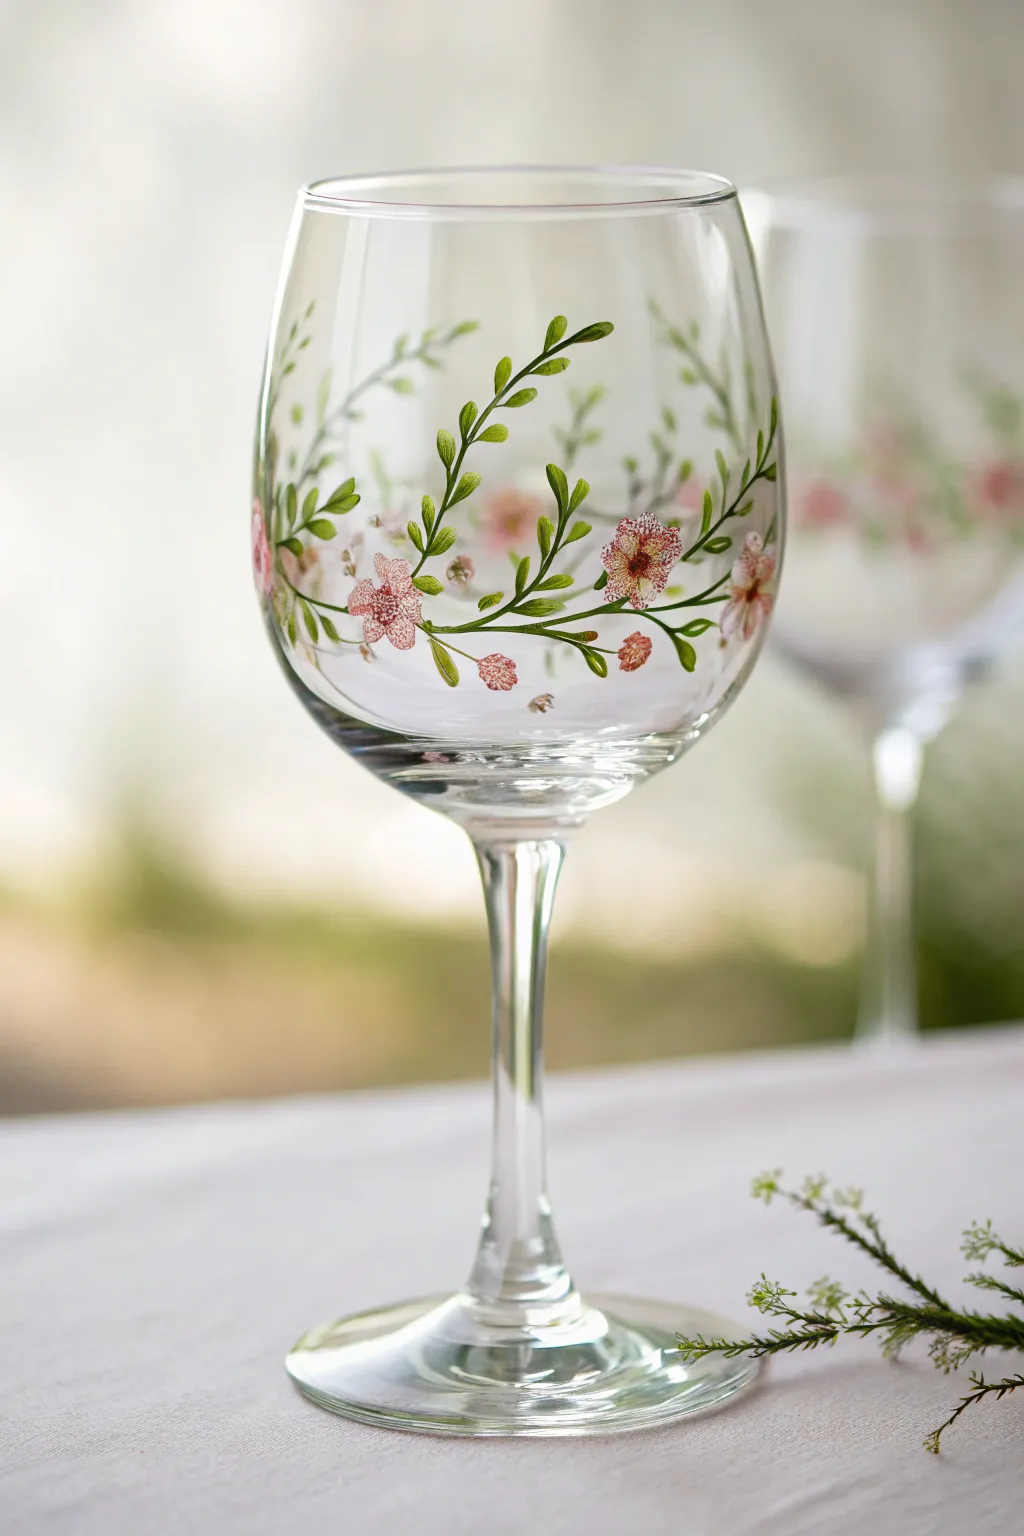
Capture the elegance of a spring garden with this delicate wine glass design featuring trailing vines and soft pink blooms. The transparent nature of the glass allows the winding greenery to overlap visually, creating a lovely sense of depth and movement around the bowl.
Step-by-Step Guide
Materials
- Wine glass (washed and dried)
- Rubbing alcohol
- Cotton rounds
- Enamel glass craft paints (Olive Green, Sage Green, Pale Pink, White, Dark Rose)
- Fine liner brush (size 0 or 00)
- Small round brush (size 2)
- Paper plate or palette
- Water cup and paper towels
- Oven (for curing)
Step 1: Preparation & Foundation
-
Clean the surface:
Before you begin, wipe down the entire exterior of the glass bowl with rubbing alcohol on a cotton round to remove any oils or fingerprints, ensuring the paint adheres perfectly. -
Plan the flow:
Visualize a sweeping ‘S’ curve or a gentle wave pattern traveling horizontally around the middle of the glass bowl; this will be the main path for your vines. -
Load the liner brush:
Dip your fine liner brush into the Olive Green enamel paint, thinning it with the tiniest drop of water if the paint feels too thick to drag smoothly. -
Paint the main stems:
Using a light hand, paint long, fluid lines wrapping around the glass, allowing them to branch off occasionally. Vary your pressure to make the stems slightly thicker in some areas and whisper-thin at the ends.
Transparency Trick
Don’t load your brush too heavily for the petals. Letting the paint stay somewhat sheer allows light to pass through, giving the flowers a delicate, stained-glass appearance.
Step 2: Adding Greenery
-
Paint the leaves:
Using the same liner brush, start adding small, tear-shaped leaves along the stems. Use a ‘press and lift’ motion: touch the brush tip to the glass, press down slightly to widen the leaf body, and lift sharply to create a pointed tip. -
Create variation:
Mix a small amount of Sage Green with your Olive Green on the palette to create a subtle variation in tone. -
Add lighter foliage:
Paint a few additional leaves with this lighter mixture, placing them slightly behind the darker vines or near the top of the design to suggest younger growth. -
Detail the leaf stems:
Connect every leaf to the main vine with tiny, hair-thin stems using just the very tip of your brush. -
Dry the greenery:
Allow the green layer to dry for about 15-20 minutes so you don’t accidentally smudge your vines while adding the flowers.
Step 3: Blooming Details
-
Mix the petal color:
On your palette, mix White with a small drop of Pale Pink. You want a very soft, almost translucent blush color. -
Paint petal shapes:
Using the small round brush, dab 5 small, rounded shapes in a circle to form each flower. Place them sporadically along the vines, grouping some in pairs and leaving others solitary. -
Add buds:
For variety, paint tiny single pink dots or tear shapes at the very tips of some vines to represent closed flower buds. -
Create the flower centers:
Once the pink base is tacky or dry, dip the tip of your liner brush into Dark Rose or a deeper pink shade. -
Stipple the details:
Gently stipple small dots in the center of each open flower. I like to concentrate the dots in the middle and let them fade outward slightly to create a realistic pollen effect. -
Highlight the centers:
Add three to four tiny dots of Pale Pink or White right in the darkest part of the center to make the flower look three-dimensional. -
Cleanup edges:
If any paint went astray, use a damp cotton swab or a toothpick to gently scrape away the mistake before it fully cures.
Metallic Accent
Once the flowers are dry, add tiny dots of metallic gold paint to the very centers of the flowers or brush a thin line of gold along one side of the main vine for a luxurious finish.
Step 4: Finishing Touches
-
Final drying time:
Let the glass sit undisturbed for at least 1 hour until the paint is dry to the touch, or follow the specific manufacturer instructions on your paint bottle (often 21 days for air cure). -
Bake to cure:
For dishwasher safety (top rack), place the glass in a *cold* oven. Set temperature to 350°F (175°C), bake for 30 minutes, then turn the oven off and let the glass cool down completely inside before removing.
Once baked and cooled, your custom glassware is ready to make your next dinner party feel exceptionally elegant
Monogram Lettering With a Painted Wreath Accent
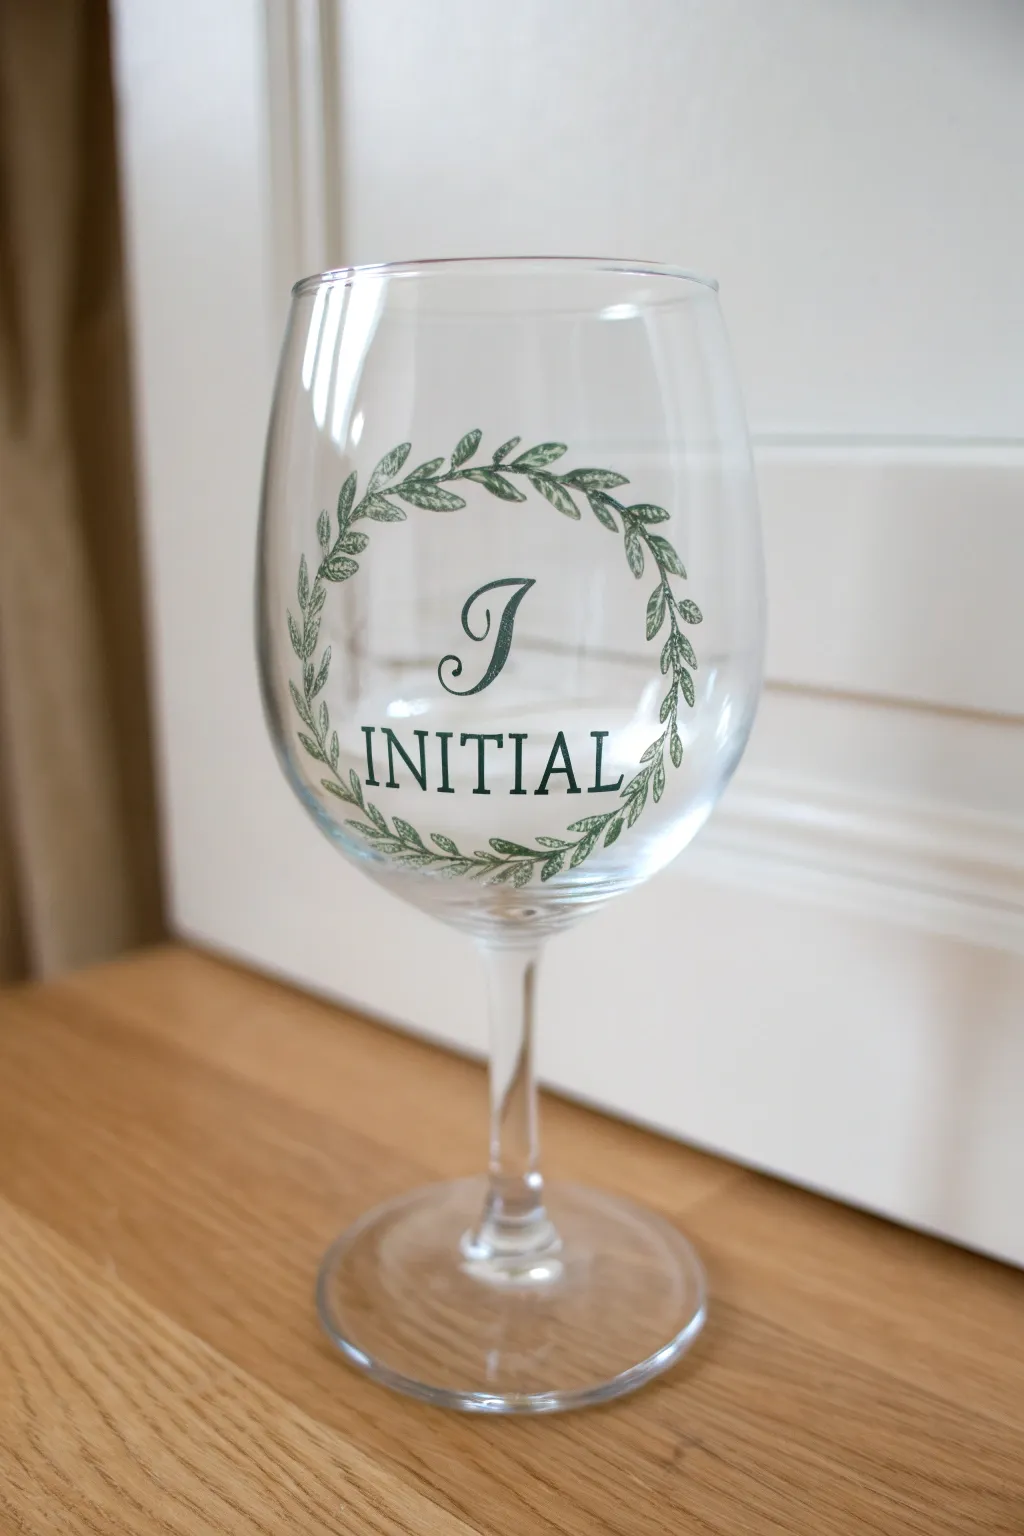
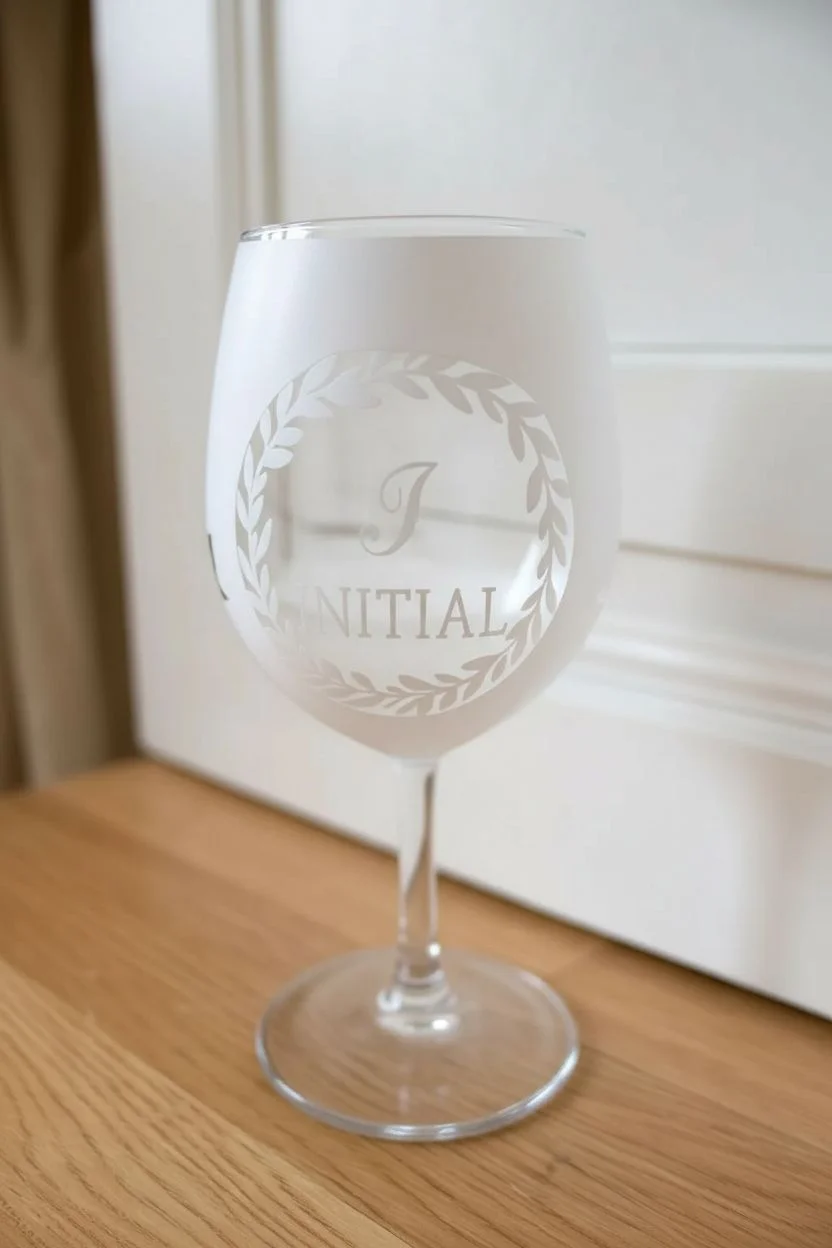
Transform a plain wine glass into a personalized gift or keepsake with this sophisticated monogram design. The project combines a delicate painted wreath with crisp lettering for a timeless, professional look.
Detailed Instructions
Materials
- Wine glass (white wine style preferred)
- Rubbing alcohol
- Cotton pads
- Adhesive vinyl or contact paper
- Die-cutting machine (Cricut/Silhouette) or craft knife
- Transfer tape
- Dark green enamel glass paint
- Small sponge pouncer or cosmetic wedge
- Fine-point detail brush (optional for touch-ups)
- Oven for curing (if using bake-to-set paint)
Step 1: Preparation and Stencil Design
-
Clean the surface:
Before doing anything else, wipe the entire bowl of the wine glass with rubbing alcohol and a cotton pad. This removes oils and fingerprints that could prevent the stencil or paint from adhering properly. -
Design your stencil:
Using your design software, create a circle of leaves or vines. In the center, choose a serif font for a large single initial and a smaller sans-serif font for the full name or word underneath. -
Size the design:
Measure the face of your wine glass to ensure the design fits comfortably without wrapping too far around the curve, which can cause the stencil to buckle. A width of 2.5 to 3 inches is usually ideal. -
Cut the stencil:
Cut the design out of adhesive vinyl. Remember, for this project, you want to use the ‘negative’ space—weed out the letters and the leaf shapes, leaving the background intact.
Pro Tip: Curved Surfaces
Cut the transfer tape apart between the separate elements (like cutting between the wreath and the text) before applying. Applying three smaller stencils is easier than one large one on a curve.
Step 2: Applying the Stencil
-
Apply transfer tape:
Place a piece of transfer tape over your weeded vinyl stencil and burnish it firmly with a scraper tool to ensure the vinyl lifts cleanly. -
Position on the glass:
Determine the center point of the glass bowl. I find it helpful to look straight down from the top to align the stencil with the stem. -
Adhere the center first:
Press the center of the design onto the glass first, then gently smooth the vinyl outward toward the edges. -
Managing curves:
Because the glass is curved, the flat vinyl might want to crease. Make small slits in the outer edges of the vinyl (away from the cut-out design) to allow the material to overlap and lay flat against the glass. -
Seal the edges:
Go over every edge of the cut-out letters and leaves with your fingernail or a tool to ensure a tight seal. This prevents paint from bleeding underneath.
Step 3: Painting and Curing
-
Load the sponge:
Dip a small sponge pouncer or cosmetic wedge into your dark green enamel paint. Dab off most of the excess paint onto a paper towel; you want very little paint on the tool. -
Start stenciling:
Lightly dab the paint over the stencil openings using an up-and-down motion. Do not brush side-to-side, as this can force paint under the stencil edges. -
Apply thin layers:
The first coat will look splotchy and transparent. Let it dry for about 10-15 minutes, then apply a second thin coat stippling in the same manner. -
Remove the stencil:
While the final coat is still slightly tacky (not fully wet, but not rock hard), carefully peel away the vinyl. Pulling it off while slightly wet helps keep the paint lines crisp. -
Weeding small pieces:
Use a weeding tool or a pin to carefully lift out the small vinyl centers of letters like ‘A’ or the loops in the leaves. -
Clean up:
If there remain any ragged edges or stray dots of paint, use a toothpick dipped in water or rubbing alcohol to scrape them away gently before the paint cures. -
Allow to cure:
Let the glass sit undisturbed for at least 24 hours (or per your paint manufacturer’s instructions). -
Bake to set:
For permanent dishwasher-safe finish, place the glass in a cool oven. Turn the oven to 350°F (175°C) and bake for 30 minutes from the time it reaches temperature, then let it cool completely inside the oven.
Troubleshooting: Bleeding Paint
If paint bled under the vinyl, don’t wipe it while wet! Wait for it to dry completely, then gently scratch the excess away with a craft knife or toothpick for a clean edge.
Now you have a beautifully personalized piece of stemware ready for your next gathering

PENCIL GUIDE
Understanding Pencil Grades from H to B
From first sketch to finished drawing — learn pencil grades, line control, and shading techniques.
Explore the Full Guide
Citrus Slice Motifs for a Fresh Summer Set
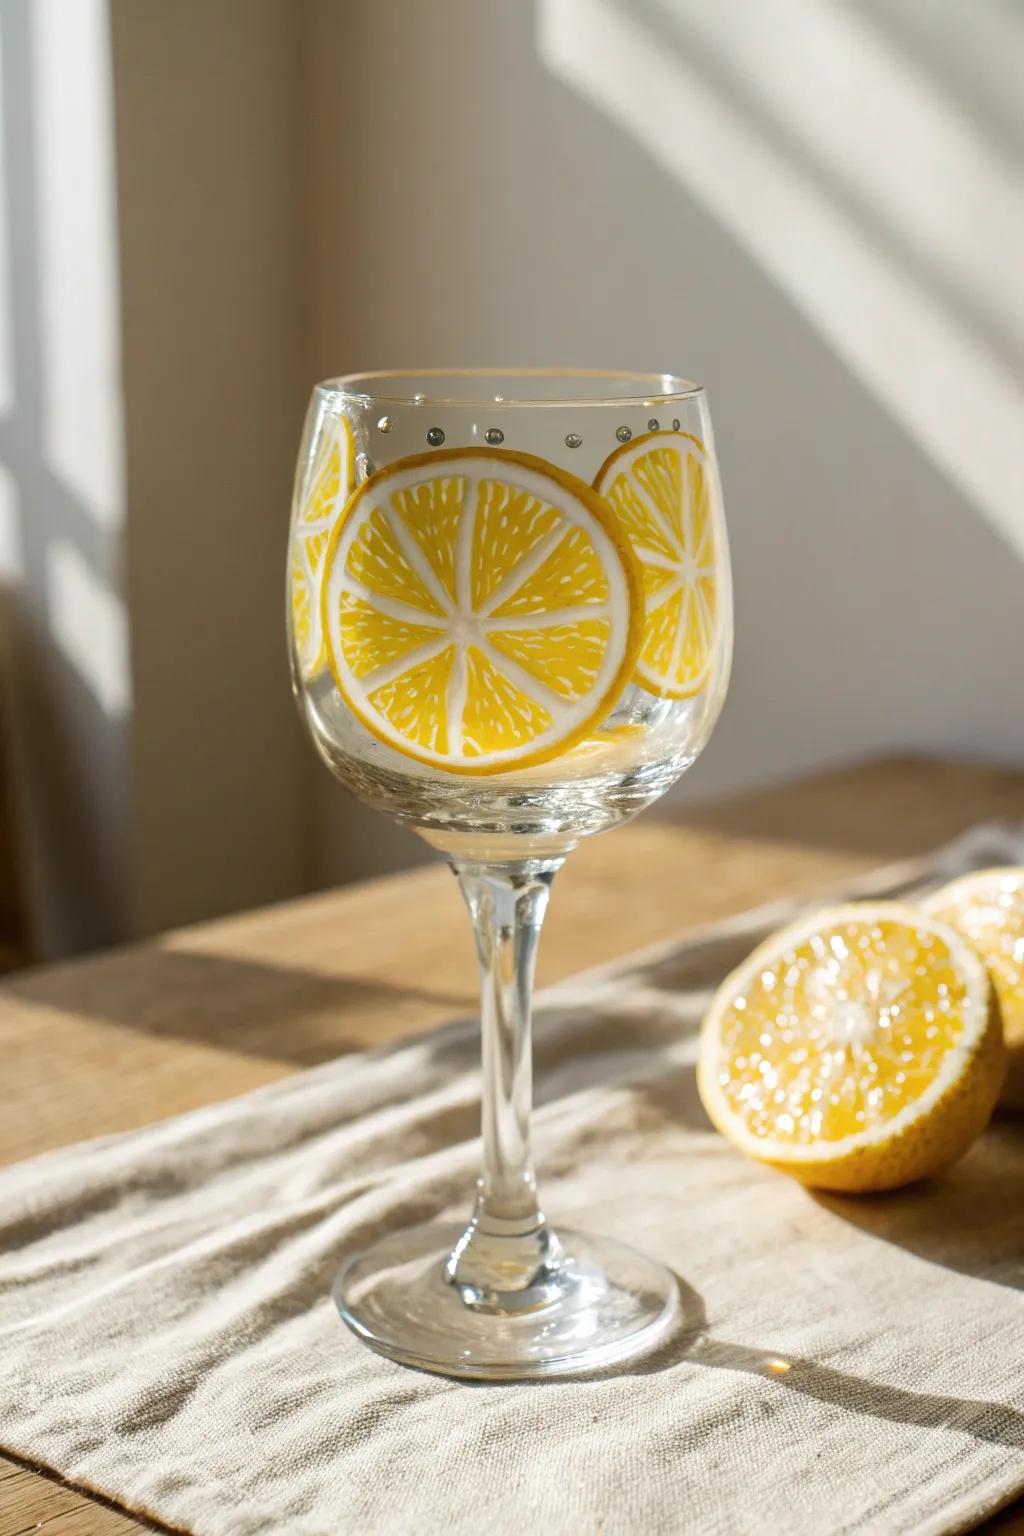
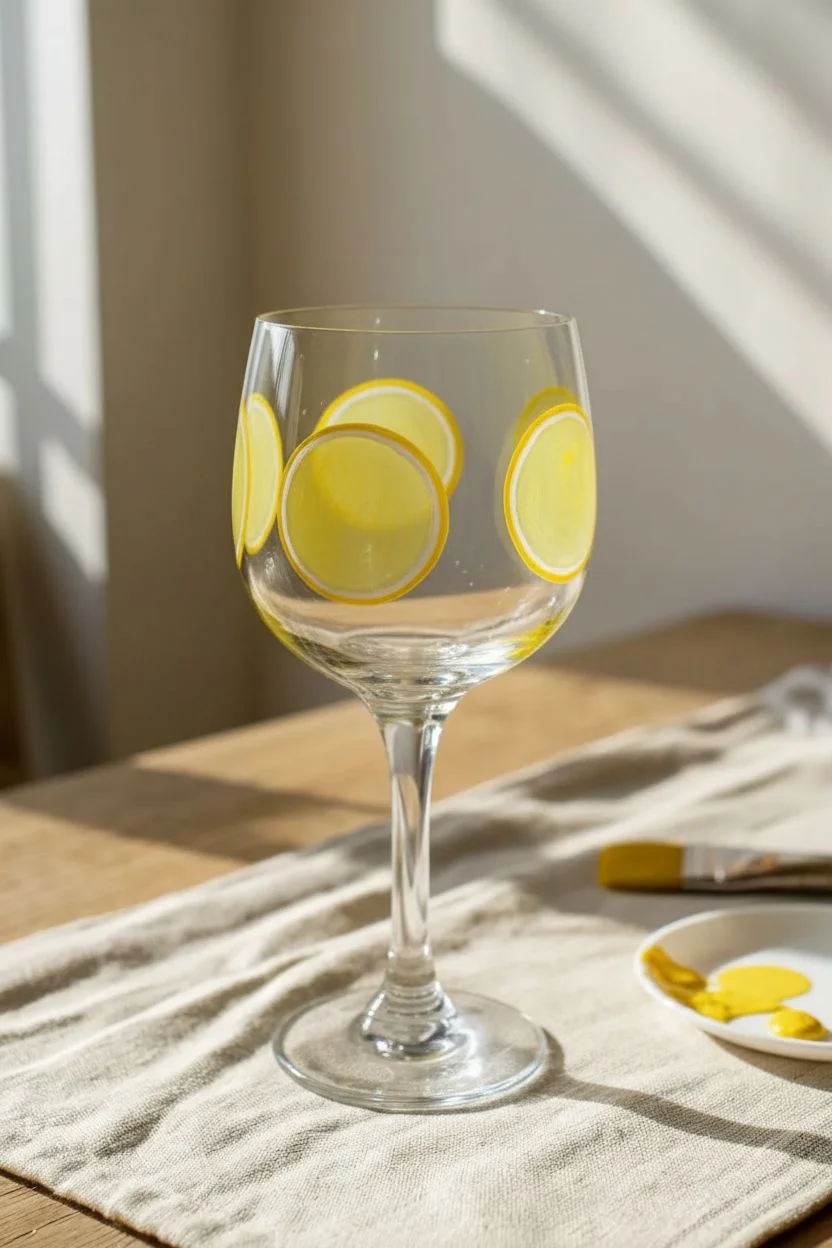
Brighten up your table setting with these perpetually fresh lemon slices that seem to float right on the glass. The translucent yellow paint catches the light beautifully, mimicking the juicy texture of real citrus for a summery, refreshing look.
How-To Guide
Materials
- Clear stemmed wine glass
- Rubbing alcohol
- Cotton rounds or paper towels
- Enamel glass paint (transparent yellow)
- Enamel glass paint (opaque white)
- Small flat brush (size 2 or 4)
- Fine liner brush (size 0 or 00)
- Dotting tool or toothpick
- Palette or small plate
- Oven (for curing)
Step 1: Preparation & Base Shapes
-
Clean surface:
Before start, wipe the entire exterior of the wine glass bowl with rubbing alcohol. This removes oils and fingerprints that could prevent the paint from adhering properly. -
Plan placement:
Visualize where you want your three major lemon slices to sit. They should be spaced evenly around the bowl, roughly centered vertically. -
Paint the yellow circles:
Using your flat brush and the transparent yellow enamel paint, create three large circles on the glass. These don’t need to be perfectly opaque; a slightly sheer application helps mimic fruit flesh. -
Smooth the edges:
While the paint is wet, refine the outer curve of your circles to ensure they are round. If you make a mistake, quickly wipe it away with a damp cotton swab. -
Initial drying:
Let these yellow base circles dry for about 15-20 minutes until they are tacky but not completely wet. This prevents the next layers from muddying.
Pro Tip: Translucency
Don’t overwork the yellow base layer. Streaks in the transparent paint actually help the final result look more organic, like real fruit pulp fibers.
Step 2: Adding Detail & Rind
-
Mix a lighter yellow:
On your palette, mix a small amount of white enamel into your yellow to create a creamy, opaque pale yellow. This will be used for the pith and segments. -
Paint the outer rind:
With your fine liner brush and the pale yellow mix, carefully outline the yellow circles you painted earlier. Keep this line steady but thin. -
Create the center point:
Place a small dot of the pale yellow mixture in the absolute center of one lemon circle to act as your guide. -
Draw dividing lines:
Paint thin lines radiating from the center dot to the outer rind, dividing the circle into 8 or 10 equal wedges, like pizza slices. -
Round the corners:
Inside each triangular wedge, use the liner brush to round off the corners near the rind. This creates the characteristic ‘segment’ shape of a citrus fruit rather than sharp geometric triangles. -
Add texture lines:
Dip your fine brush into the transparent yellow again. Inside each segment, add tiny, faint strokes or flecks to simulate the juice vesicles and pulp texture. -
Highlighting:
I like to add very tiny touches of pure white to the top of a few pulp segments to make them look wet and glistening.
Step 3: Finishing Touches
-
Add rim details:
Using a dotting tool or the back of a brush, dip into metallic silver or grey paint (or mix black and white). Create a spaced row of small dots just below the rim of the glass. -
Clean up:
Check your work for any stray smudges. Use a toothpick to gently scrape away any dry paint that ended up where it shouldn’t be. -
Air cure:
Allow the glass to dry undisturbed for at least 24 hours (or follow your specific paint brand’s instructions for air curing time). -
Bake to set:
Place the glass in a cool oven. Set the temperature to 350°F (176°C) and bake for 30 minutes. Turn the oven off and let the glass cool completely inside before removing.
Troubleshooting: Runny Paint
If your paint drips down the curved glass, it’s too thick. Apply thinner coats and rotate the glass upside down occasionally while drying to gravity-balance it.
Once baked and cooled, your refreshing citrus glassware is ready for your next summer brunch
Pineapple Texture Using Easy Dotting
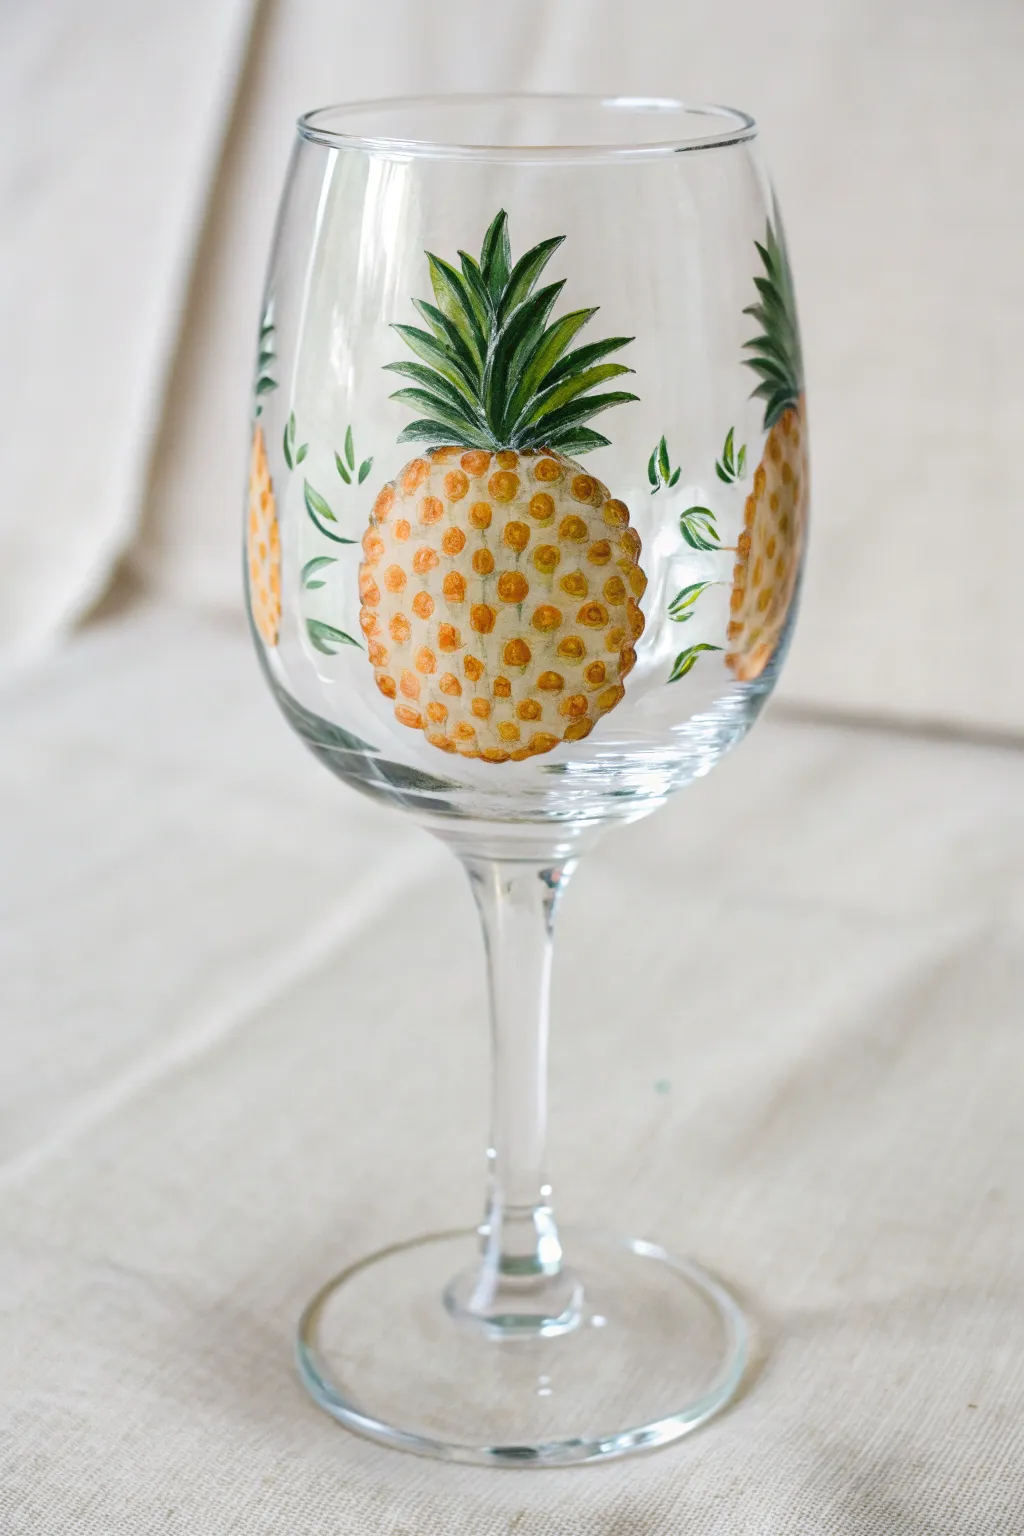
Bring a splash of summer to your glassware with this fun pineapple design that relies on simple dotting techniques for amazing texture. The combination of warm yellows and cool greens creates a vibrant contrast that looks delightful against clear glass.
Detailed Instructions
Materials
- Clear stemmed wine glass (washed with rubbing alcohol)
- Enamel glass paints (Golden Yellow, Deep Orange, Leaf Green, Dark Green, White)
- Small round paintbrush (size 1 or 2)
- Fine liner brush (size 0 or 00)
- Small dotting tool or the handle end of a paintbrush
- Paper plate or palette
- Paper towels
- Rubbing alcohol
- Cotton swabs
- Oven for curing (optional, depending on paint brand)
Step 1: Painting the Base Shape
-
Clean surface:
Before dipping your brush, wipe the glass surface thoroughly with rubbing alcohol and a paper towel to remove any oils or fingerprints. This step is crucial for paint adhesion. -
Mix base color:
On your palette, mix a small amount of Golden Yellow with a tiny touch of White to create a creamy, opaque base color for the fruit. -
Outline the oval:
Using your small round brush, paint a vertical oval shape on the side of the glass. It doesn’t need to be perfect; pineapples are organic shapes. -
Fill in the fruit:
Fill in the oval with your yellow mixture. You want semi-opaque coverage, but keep the layer relatively thin so it doesn’t drip. -
Repeat the pattern:
Paint 2 or 3 more yellow ovals around the glass, spacing them evenly. Leave plenty of room between them for the leaves and side accents. -
Initial drying:
Let this yellow base layer dry to the touch, usually about 15-20 minutes. If the coverage looks too sheer, adding a second thin coat now will make the colors pop later.
Fixing drippy dots
If your orange dots are sliding down the glass, your paint is too thick. Let it sit on the palette for 5 minutes to thicken slightly, or use less paint on the tool.
Step 2: Adding the Crown and Details
-
Start the leaves:
Switch to your fine liner brush and load it with Dark Green paint. Starting just below the top edge of your yellow oval, pull quick, tapered strokes upward and outward. -
Build the crown:
Continue adding green strokes, making the central ones the tallest and the side ones curve slightly outward. Vary the lengths to mimic natural growth. -
Add highlights:
While the dark green is still slightly wet, pick up a tiny bit of Leaf Green or White on your liner brush. Add thin streaks inside the dark leaves to create dimension and light. -
Create the texture dots:
Now for the fun part: dip your dotting tool (or paintbrush handle) into the Deep Orange paint. Press gently onto the dry yellow base to create rows of evenly spaced dots. -
Refine the dots:
Ensure the dots aren’t too thick or drippy. I like to stagger the rows slightly, like a honeycomb pattern, rather than stacking them in a perfect grid. -
Connect the pattern:
Using a very clean liner brush with faint traces of diluted orange or a light brown, you can lightly sketch faint diagonal lines connecting the dots to enhance the diamond pattern, though the dots alone work great for a simpler look. -
Add side flourishes:
In the empty spaces between the pineapples, use the liner brush and Leaf Green paint to create small, floating V-shaped sprouts or curved leafy accents. -
Curved strokes:
Give these floating leaves a slight curve, mimicking the motion of the main pineapple crowns to tie the whole design together.
Step 3: Finishing Up
-
Check for errors:
Look closely at your work. If you have any smudges or jagged edges, dip a cotton swab in rubbing alcohol and carefully wipe them away. -
Long drying:
Allow the glass to dry for at least 24 hours (or follow your specific paint manufacturer’s instructions for air curing time). -
Bake to cure:
For dishwater resistance, place the glass in a *cold* oven. Set the temperature to 350°F (175°C) and bake for 30 minutes. Turn the oven off and let the glass cool completely inside before removing.
Go for gold
Add a touch of metallic gold paint to the center of each orange dot or streak it through the green leaves for a glamorous, shimmering finish.
Enjoy sipping your favorite summer white wine from your custom tropical creation


Watermelon Color Blocking That Looks Graphic and Fun
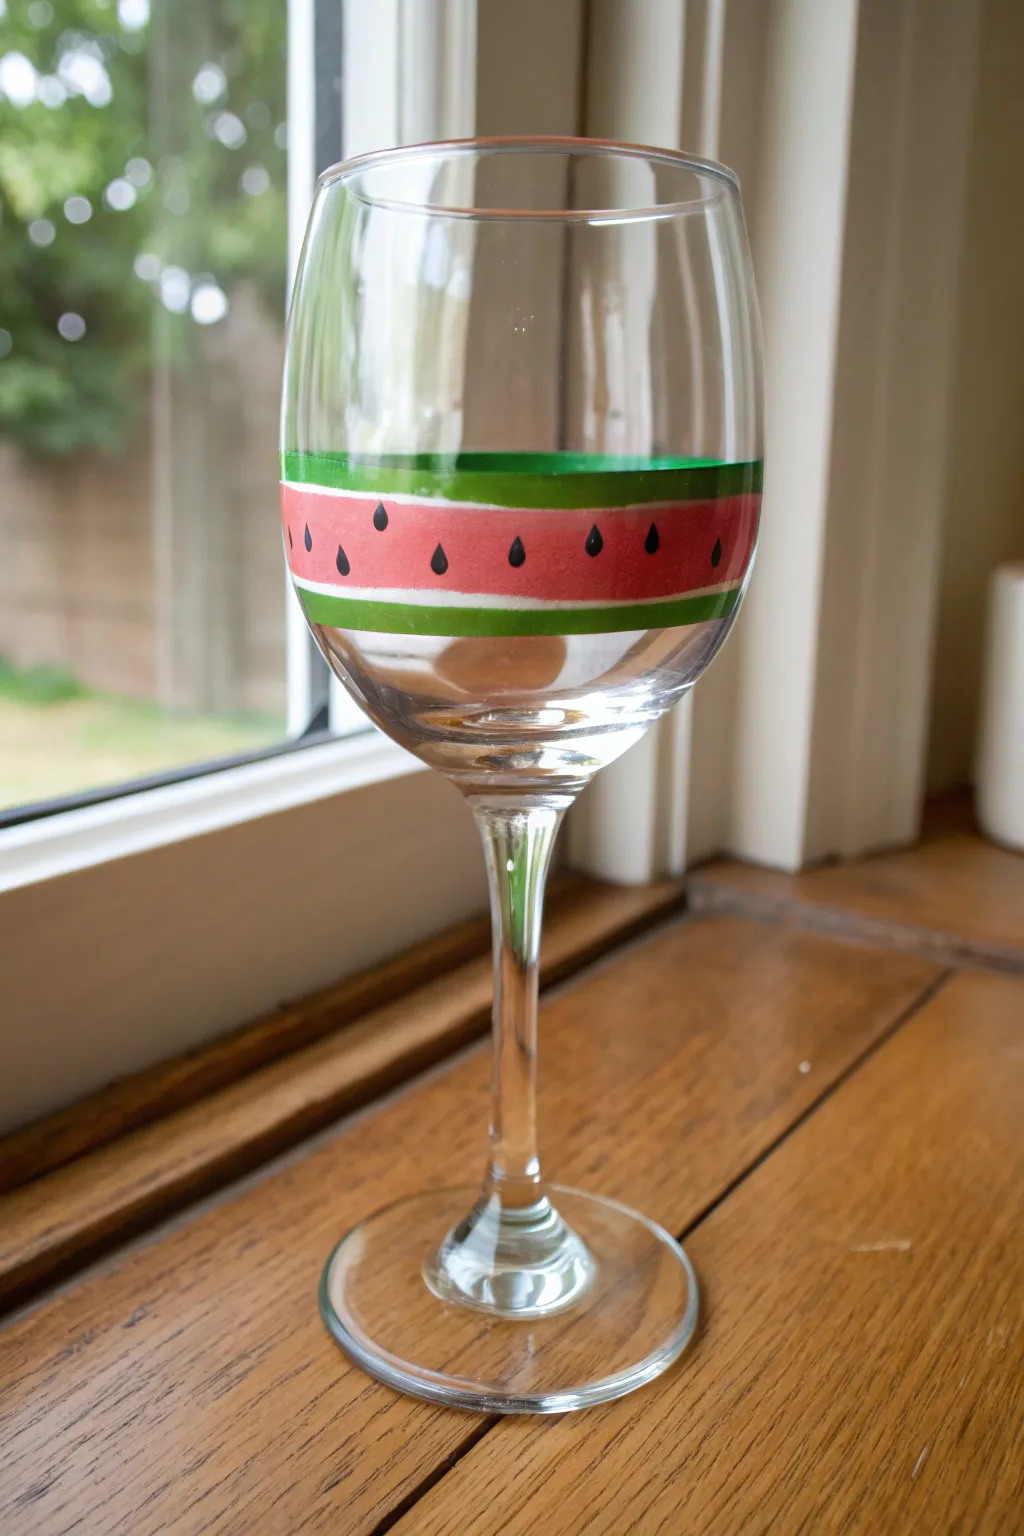
This project creates a graphic, playful look by transforming a simple band of color into a recognizable watermelon slice. The clean lines and bold color blocking make this design feel modern while retaining a summery charm.
Step-by-Step Guide
Materials
- Wine glass (cleaned with rubbing alcohol)
- Enamel craft paint (Red or dark pink)
- Enamel craft paint (Green)
- Enamel craft paint (White)
- Enamel craft paint (Black)
- Flat shader brush (medium size)
- Fine detail brush or dotting tool
- Painter’s tape or masking tape (approx. 1/4 inch width helpful)
- Alcohol wipes
- Q-tips (for cleanup)
- Oven (for curing)
Step 1: Preparation & Masking
-
Clean the surface:
Begin by thoroughly wiping down the exterior of your wine glass with rubbing alcohol or an alcohol wipe. This removes any oils or fingerprints that could prevent the paint from adhering properly. -
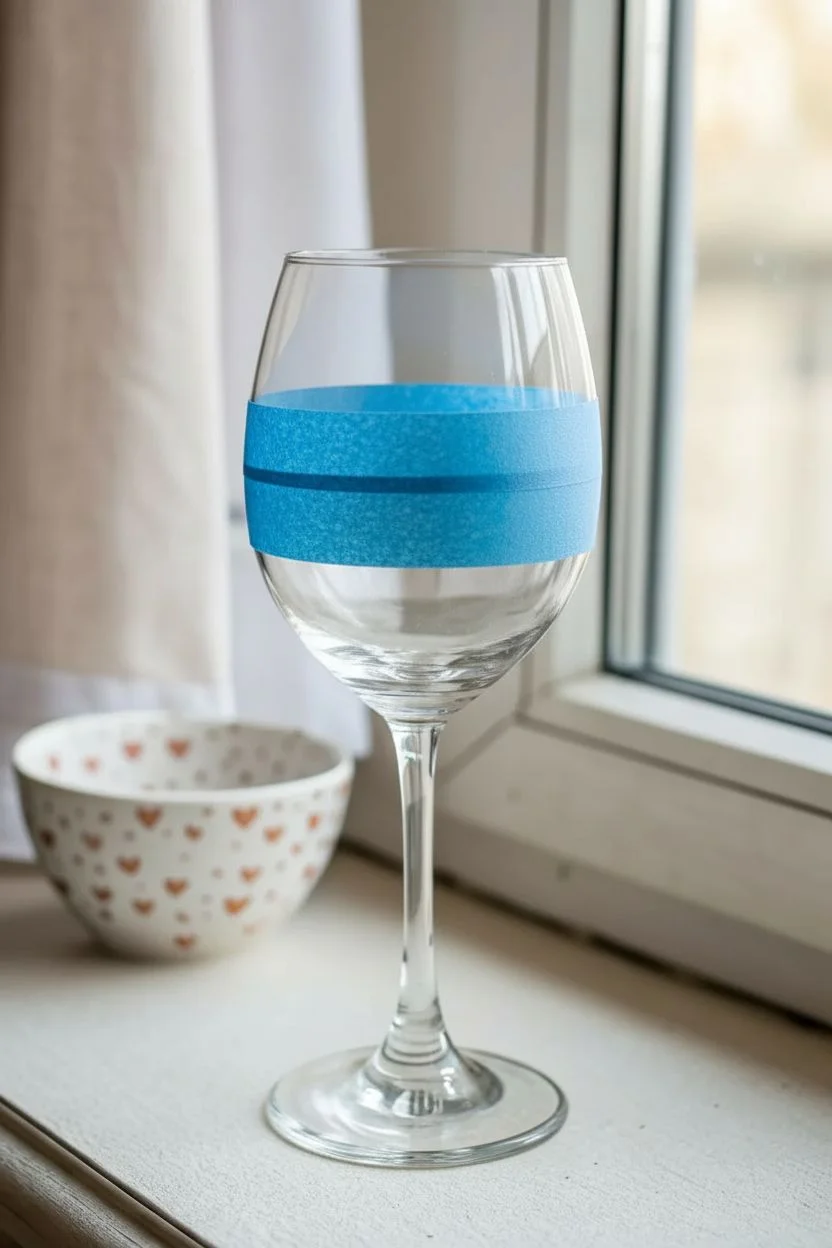
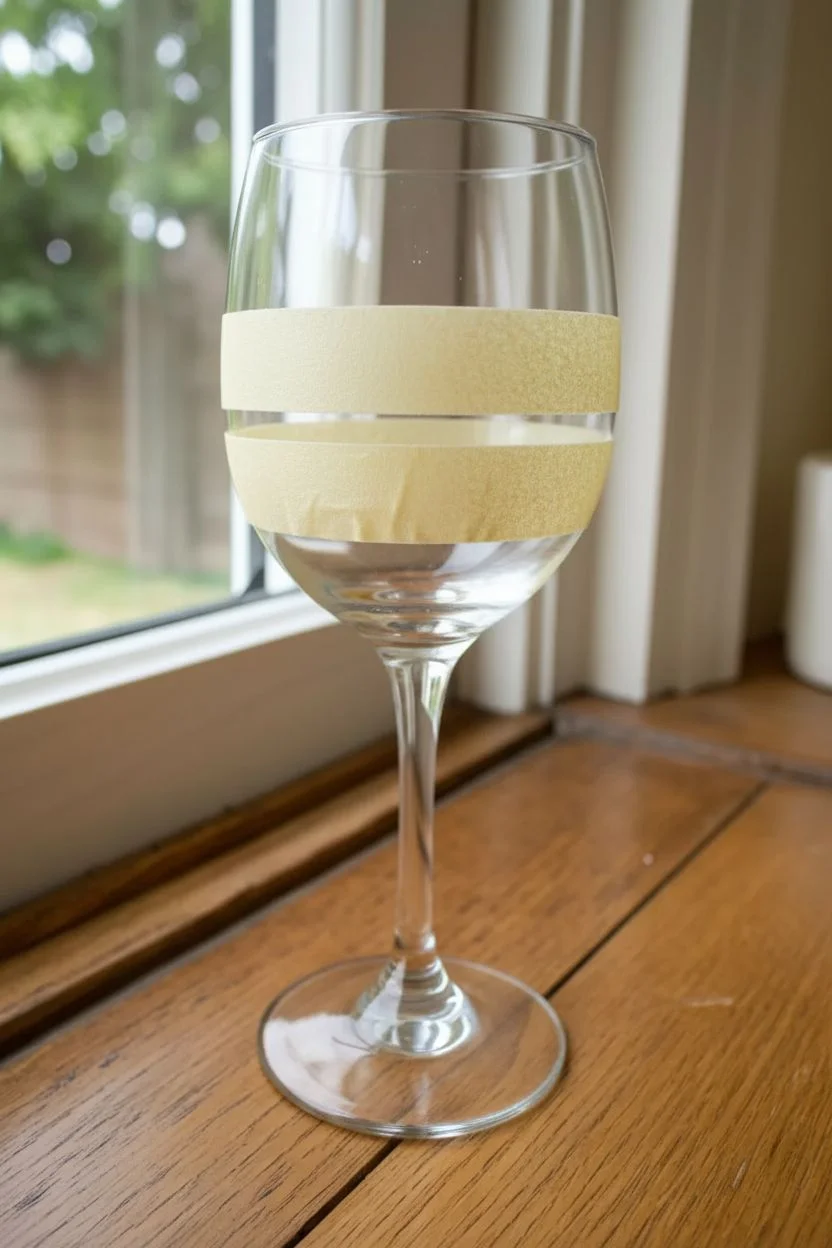
Mask the top edge of the band:
Decide how wide you want your watermelon band to be. Place a strip of painter’s tape horizontally around the glass to mark the top edge of your design. Ensure it is level all the way around. -
Mask the bottom edge:
Place a second strip of painter’s tape parallel to the first, leaving a gap of about 1.5 to 2 inches (or your desired width). Press the edges of the tape down firmly to prevent paint bleed.
Uneven tape lines?
If the tape is hard to apply straight on a curved glass, use thinner electrical tape or ‘graphic art tape’. Its flexibility handles curves better than rigid masking tape.
Step 2: Painting the Fruit Flesh
-
Paint the pink center:
Using a flat shader brush, apply your red or dark pink enamel paint within the taped area. I like to leave a small gap near the tape edges, painting mostly the center thick band first. -
Create the white rind line:
Using a smaller brush, carefully paint a thin white line right next to the pink band on both the top and bottom edges. It’s okay if this white line touches the tape slightly, but try to keep it distinct from the pink. -
Add transparency check:
Glass paint can be translucent. If your pink looks streaky, let the first coat dry for about 20 minutes (or per bottle instructions) and apply a second coat for opacity. -
Apply the green rind:
Once the white and pink sections are touch-dry, paint a band of green right over the white lines, but leave a sliver of white showing between the pink and green. The green should go right up to the tape edge. -
Remove tape promptly:
While the final coat of paint is still slightly wet, carefully peel back the painter’s tape. Pulling it away at an angle helps ensure a crisp line without lifting dried paint chips. -
Correct edges:
If any paint seeped under the tape, use a damp Q-tip or a toothpick to gently scrape away the excess while it is still fresh to sharpen your lines.
Seed placement pro-tip
Don’t overthink the seed pattern. Random placement looks better than perfect rows. Try grouping two seeds close together occasionally for an organic feel.
Step 3: Details & Curing
-
Add the seeds:
Dip a fine detail brush or the tip of a toothpick into black enamel paint. Paint small teardrop shapes scattered across the pink section. Varying the angle of the seeds makes it look more natural. -
Consider the stem area:
For continuity, you can paint a matching thin green ring around the base of the glass stem, though this is optional and not shown here. -
Allow to air dry:
Let the painted glass sit undisturbed for at least 1 hour to ensure the surface is dry to the touch, and ideally 24 hours before baking. -
Prepare for baking:
Place the cold glass into a cold oven. Do not preheat the oven, as the temperature shock can break the glass. -
Cure the paint:
Set the oven to 350°F (175°C). Once the oven reaches temperature, bake for 30 minutes. -
Cool down slowly:
Turn the oven off and leave the door closed. Let the glass cool down completely inside the oven before removing it.
Now you have a refreshing piece of glassware ready for your next summer gathering
Mandala Dot Art That Feels Fancy but Forgiving
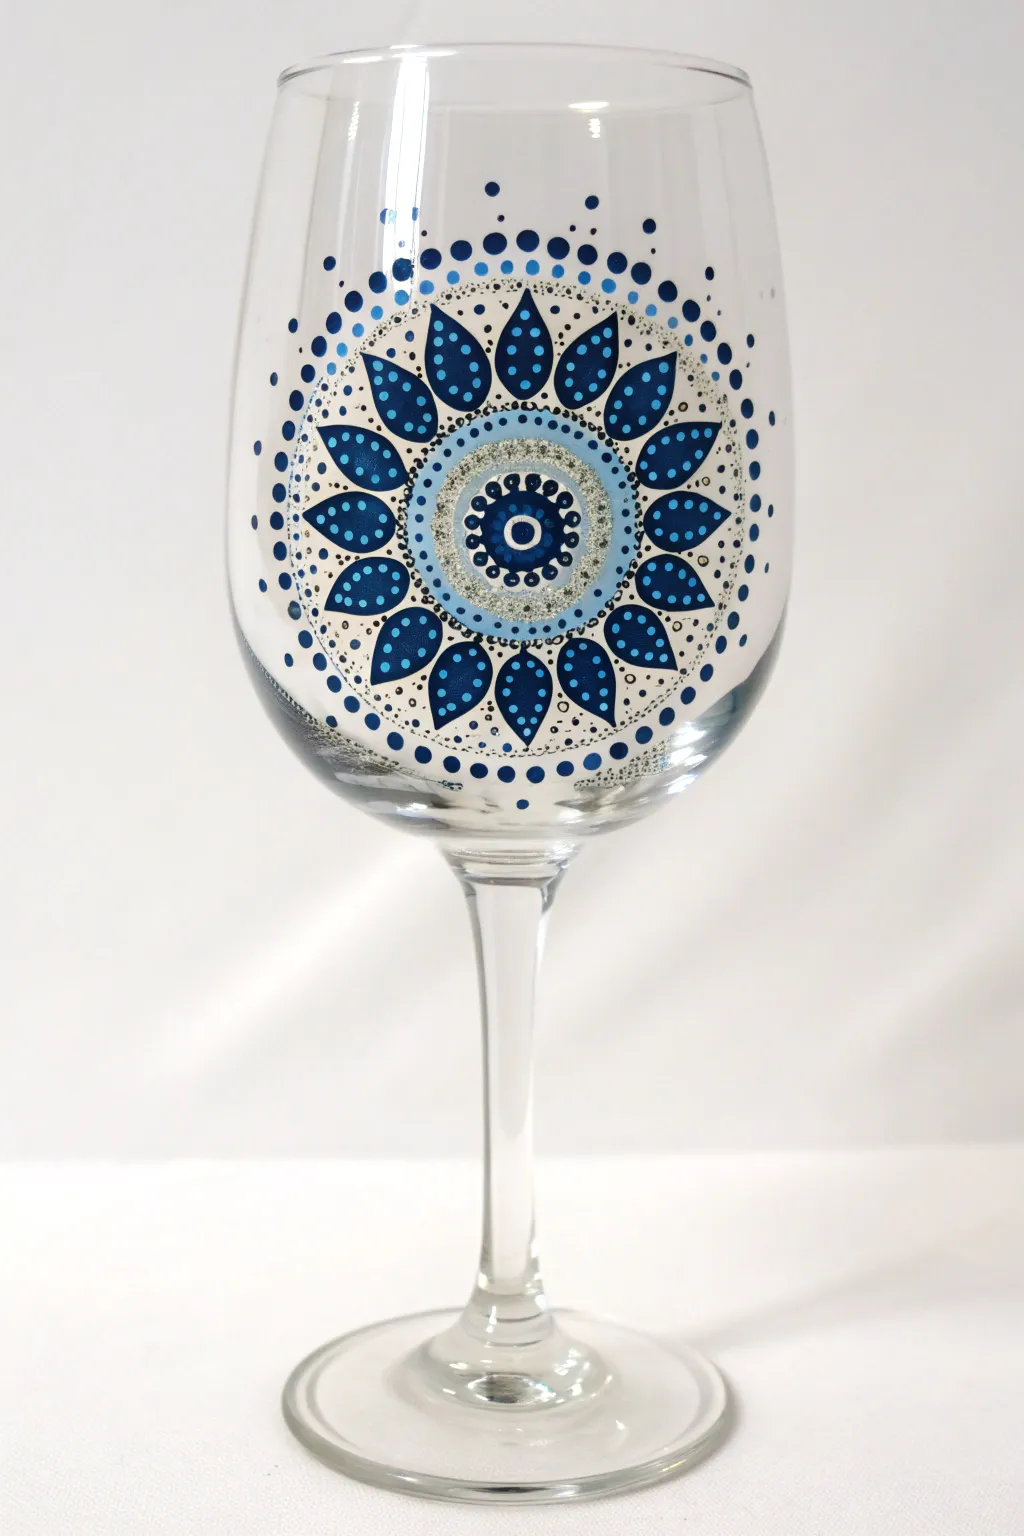
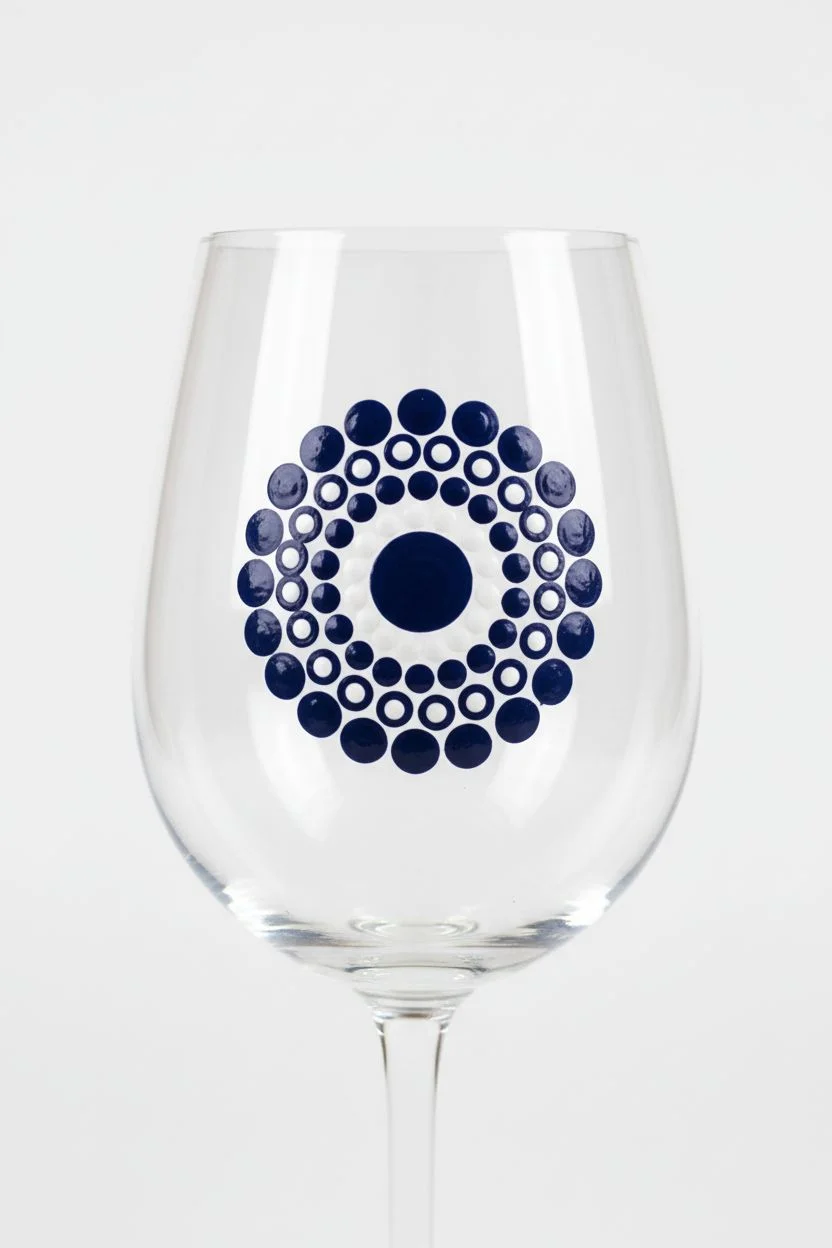
Transform a plain wine glass into an elegant centerpiece using classic dot art techniques in soothing blues and silvers. This radiate mandala design looks intricate, but breaking it down into concentric circles makes it a meditative and achievable project for beginners.
Step-by-Step
Materials
- A clear wine glass (standard size)
- Rubbing alcohol and paper towel
- Enamel glass paints in: Navy Blue, Light Blue, White, and Silver Glitter
- Dotting tools (various sizes, or improvised tools like pencil erasers, drill bits, and toothpick ends)
- Fine-point paintbrush
- Q-tips (for cleanup)
- Oven (for curing)
Step 1: Preparation & Center
-
Clean surface:
Before dipping into any paint, thoroughly wipe down the outside of your wine glass with rubbing alcohol. This removes oils and fingerprints that could prevent the paint from sticking. -
Find the center:
Load a medium-sized dotting tool with Navy Blue paint. Eye-ball the vertical center of the glass bowl and place a single, solid dot. This is the anchor for your entire mandala. -
The first ring:
Using a smaller dotting tool and White paint, create a ring of small dots directly around the central navy dot, keeping them tightly spaced. -
The second ring:
Switch to Navy Blue again. Create a slightly larger ring of dots around the white ones. Try to place these dots in the gaps between the white dots of the previous row for a honeycomb effect.
Step 2: Building the Silver Halo
-
Apply the glitter band:
Dip a larger tool or the end of a paintbrush into Silver Glitter paint. Create a thick, solid ring surrounding your center cluster. Don’t worry if it looks sheer; glitter paint often dries clearer than it looks wet. -
Add inner details:
While the glitter ring is drying, or once it’s tacky, take a very fine dotting tool (or toothpick) with Light Blue paint. Place tiny dots inside the glitter band, spacing them evenly. -
Border the halo:
Define the outer edge of the silver glitter ring by placing a circle of medium-sized Light Blue dots all the way around it to create a crisp border.
Uneven Dots?
If a dot looks misshapen or smears, don’t panic. Use a damp Q-tip to wipe that single spot away immediately, dry the area with a towel corner, and re-dot.
Step 3: Creating the Petals
-
Draft the petal shapes:
This is the main feature. Using Navy Blue and a small brush or a large dotting tool, paint teardrop shapes pointing outward from the Light Blue ring. Imagine a clock face to help space them evenly—start at 12, 6, 3, and 9, then fill in the gaps. -
Dot the petals:
Once the navy teardrops are semi-dry, dip a small tool in Light Blue paint. Place a single dot near the rounded tip (inside the navy shape) of each petal. -
Add petal highlights:
I like to add a tiny white dot on top of the light blue dot while it’s still wet to create a little dimension. -
Detail the petal interiors:
Using your smallest tool and Light Blue paint, add three tiny dots descending towards the pointed base of each navy petal.
Level Up: 3D Effect
On the largest navy petals, let the paint fully dry, then add a second, smaller layer of clear or glitter paint on top to build a raised, tactile texture.
Step 4: Outer Radiance & Finishing
-
Surround the petals:
Switch to white paint. Follow the curve of the navy petals and place a line of graduating dots in the empty spaces between them. Start with larger dots near the center and get smaller as you move outward. -
Expand the pattern:
Create an outer circle of widely spaced Navy Blue dots beyond the petal tips to frame the mandala. -
Fading out:
Add smaller Light Blue or White dots moving vertically away from the mandala towards the rim and stem, giving the impression that the design is dissolving into bubbles. -
Oven curing:
Allow the glass to air dry for at least 24 hours. Then, place the glass in a cool oven, set to 350°F (176°C), bake for 30 minutes, and let it cool completely in the oven before removing to permanentize the bond.
Now you have a stunning, dishwasher-safe piece of art ready for your next dinner party
Autumn Leaves and Berries for Cozy Seasonal Glasses

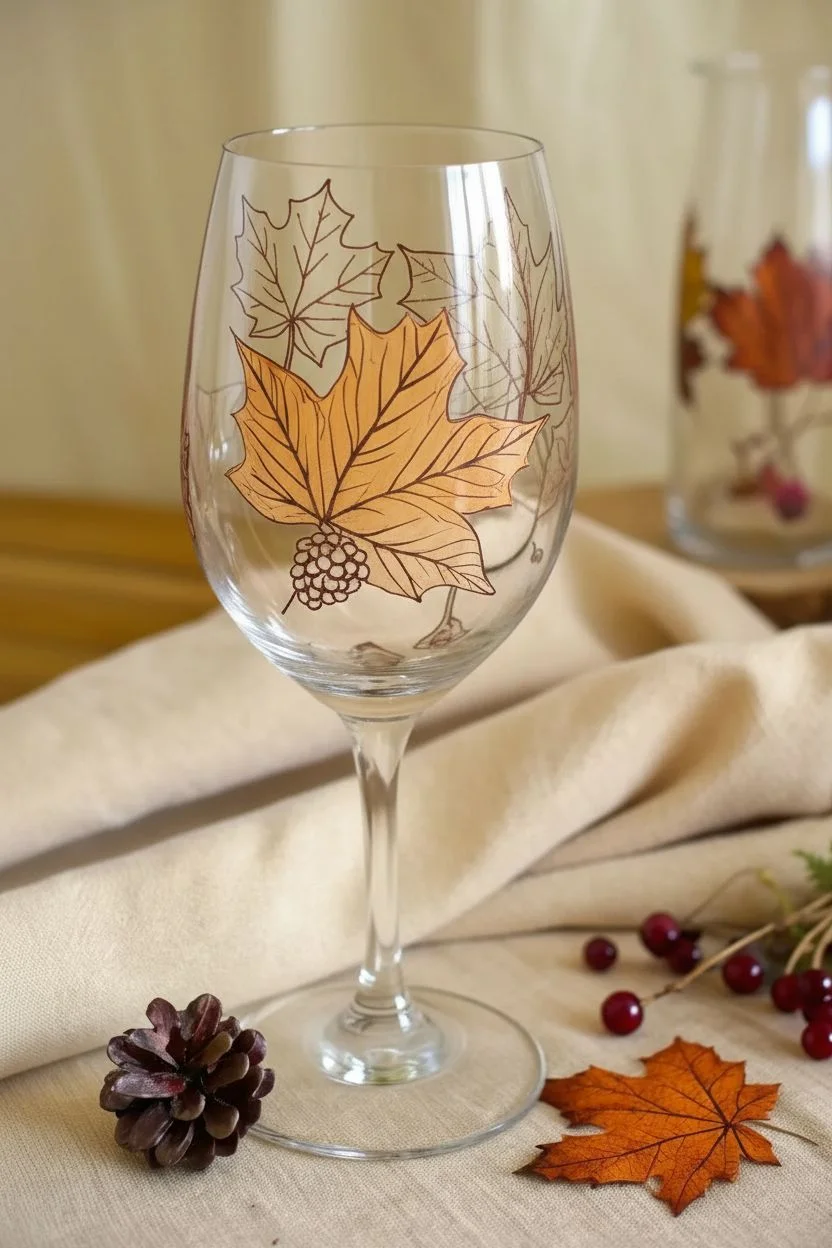
Capture the crisp beauty of autumn with this elegant wine glass design featuring vibrant orange and burgundy maple leaves accented by deep red berry clusters. The translucent layers of glass paint create a stunning stained-glass effect that glows warmly against candlelight or a light tablecloth.
Step-by-Step
Materials
- Clear wine glass (washed and dried)
- Rubbing alcohol and cotton pads
- Enamel glass paints (Golden Yellow, Burnt Orange, Burgundy, Deep Red, Brown)
- Fine liner brush (size 0 or 00)
- Small round brush (size 2)
- Clean sponge or foam pouncer (optional)
- palette or ceramic tile
- Paper towels
- Oven (for curing, check paint instructions)
Step 1: Preparation & Leaf Outlines
-
Clean the Surface:
Before painting, wipe the entire outer surface of the wine glass with rubbing alcohol on a cotton pad. This removes oils and fingerprints that prevent paint adhesion. -
Plan Your Composition:
Visualize where your leaves will fall. I like to place one large focal leaf near the center and a couple of darker, smaller leaves drifting near the rim or base. -
Mix Outline Color:
On your palette, mix a small amount of Brown paint with a tiny drop of Black or Burgundy to create a dark, organic outline shade. -
Outline the Main Leaf:
Using your fine liner brush and the dark mixture, paint the outline of a large maple leaf. Start with the central vein, then draw the five pointed lobes extending outward. -
Add Secondary Leaves:
Paint outlines for 2-3 additional leaves in the background. Varry their sizes and angles to make them look like they are naturally falling. -
Detailed Veining:
With the same liner brush, add the delicate internal veins to each leaf. Keep these lines very thin and feathery, tapering them as they reach the leaf edges. -
Let Outlines Set:
Allow these outline layers to dry for about 15-20 minutes so they don’t smear when you fill them in.
Step 2: Adding Color & Detail
-
Fill the Golden Leaf:
Load your round brush with Golden Yellow mixed with a touch of Burnt Orange. Gently fill in the large focal leaf, working carefully around the dark veins you painted. -
Create Depth:
While the yellow paint is still slightly wet, dab a little pure Burnt Orange key spots—like near the stem or the tips of the lobes—to create a natural gradient. -
Paint Background Leaves:
For the secondary leaves, use Burgundy and Deep Red paints. These darker tones push them visually into the background and add richness. -
Paint the Berry Cluster:
Near the base of the main yellow leaf, use the round brush to dab small, connecting circles in Deep Red or Burgundy to form a tight cluster of berries. -
Highlighting Berries:
Once the berries are tacky, add a tiny dot of white or light pink to the top left of each berry sphere to simulate a shiny reflection. -
Refine the Veins:
If your fill color covered the veins too much, go back over the main structural lines with your fine liner brush and the dark brown mix to make them pop again. -
Clean Up Edges:
Dip a toothpick or cotton swab in rubbing alcohol to wipe away any stray paint marks or to sharpen the points of your maple leaves. -
Dry and Cure:
Follow the manufacturer instructions for your specific paint. Most require air drying for 24 hours, followed by baking the glass in a cool oven that heats to 350°F (175°C) for 30 minutes.
Paint Slipping?
If paint streaks or lifts, the glass is too slick. Lightly sand the area with fine-grit sandpaper or apply a clear glass primer before painting.
Gilded Edges
For a glamorous touch, outline the edge of the large yellow leaf with metallic gold outliner paint instead of brown to make it catch the light.
Once baked and cooled, your beautiful autumn glassware is ready to grace your Thanksgiving table or serve as a thoughtful seasonal gift
Winter Snowflakes With Crisp Negative Space
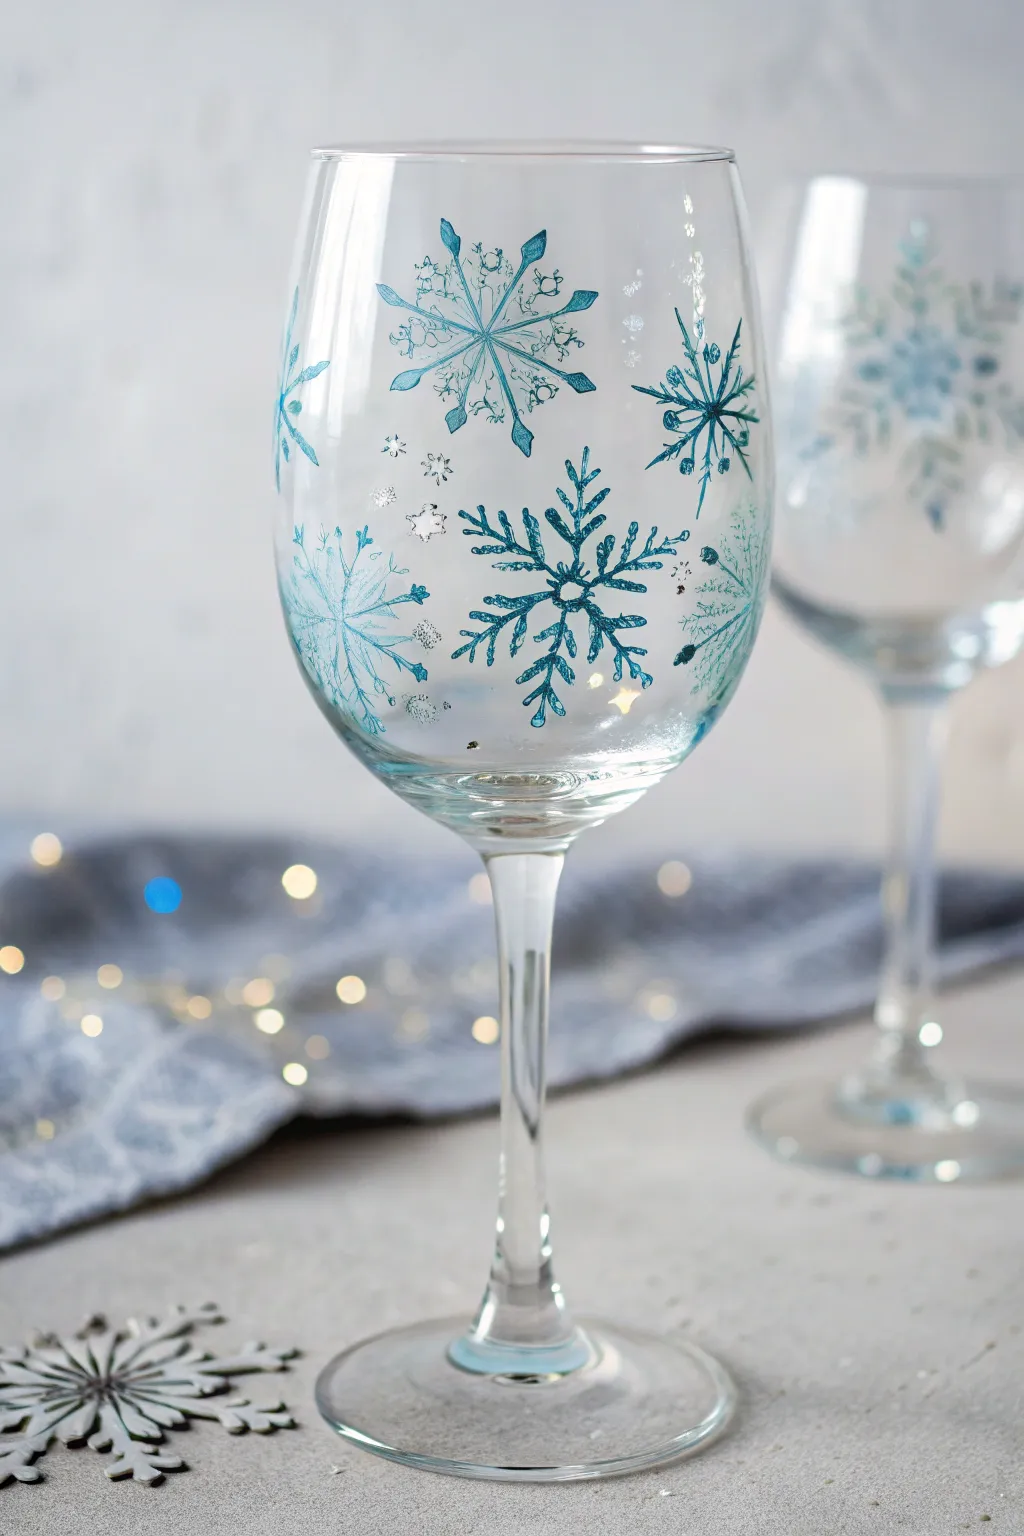
Capture the delicate beauty of a winter flurry on your stemware with these intricate hand-painted snowflakes. Using a mix of metallic blues and crisp whites, this design creates a frosty, elegant look perfect for holiday gatherings.
How-To Guide
Materials
- Clear stemmed wine glasses
- Rubbing alcohol and cotton pads
- Enamel glass paint (metallic blue, teal, white, silver)
- Fine detail paintbrushes (size 0 and 00)
- Small dotting tool or toothpick
- Paper plate or palette
- Oven (for curing, check paint instructions)
Step 1: Preparation and Planning
-
Clean the Glass Surface:
Before adding any paint, wipe down the entire exterior of the wine glass bowl with rubbing alcohol on a cotton pad. This removes oils and fingerprints that could prevent the paint from adhering properly. -
Plan Your Snowflake Placement:
Mentally map out where your largest snowflakes will go. Aim for 3-4 large focal snowflakes spaced unevenly around the glass, leaving room for medium and small fillers in between.
Step 2: Painting Large Snowflakes
-
Start the Center Axis:
Load a size 0 brush with metallic teal paint. For your first large flake, paint a simple vertical line about an inch long, then cross it with a horizontal line to form a ‘plus’ sign. -
Add Diagonal Spines:
Paint an ‘X’ shape through the center of your ‘plus’ sign, creating an eight-pointed star asterisk. Keep your pressure light to ensure thin, delicate lines. -
Embellish the Arms:
For this particular style, add small ‘V’ shapes or little branching lines extending from each of the eight main arms. Vary the direction—some pointing inward, some outward—to mimic natural crystal formation. -
Detail the Tips:
At the very end of each arm, add a tiny dot or a small diamond shape to finish the flake. This adds a polished look to the radiants. -
Repeat with Variation:
Create the next large snowflake using a slightly different blue shade, perhaps mixing the teal with a touch of white. Vary the embellishment pattern so no two flakes look exactly alike.
Pro Tip: Steady Hands
To steady your hand while painting curved surfaces, rest your pinky finger on the glass as an anchor, or nestle the glass into a folded towel so it doesn’t roll.
Step 3: Adding Depth and Texture
-
Paint Medium Flakes:
Using a lighter blue or silver, paint slightly smaller six-pointed asterisks in the empty spaces. Keep these simpler than the large focal points. -
Create ‘Ghost’ Snowflakes:
Mix a tiny amount of paint with a drop of thinning medium (or water, if using water-based enamels) to create a translucent wash. Paint faint, simple star shapes in the background to create depth, making them look further away. -
Incorporate Silver Accents:
Using your finest brush (size 00), highlight parts of the dark blue snowflakes with thin strokes of metallic silver. This creates a shimmering, icy effect when the light hits the glass.
Troubleshooting: Paint Drips
If your paint starts to drip down the curve, your brush is overloaded. Wipe excess paint onto a paper towel and work in thinner layers, allowing slight drying time in between.
Step 4: Finishing Touches
-
Add Falling Snow:
Dip a dotting tool or the blunt end of a toothpick into white or silver paint. Dot small specks randomly around the heavy snowflakes to simulate falling snow. -
Micro-Details:
For extra texture, add clusters of three tiny dots near the tips of the larger snowflake arms. I find this really helps fill awkward negative spaces without crowding the design. -
Inspect and Correct:
Hold the glass up to a light source to check for patchy coverage. If you made a mistake, you can scrape it off with a fingernail or wipe it with a damp Q-tip while the paint is still wet. -
Dry the Glasses:
Let the glasses sit undisturbed for at least 1 hour until dry to the touch. Follow the manufacturer’s instructions for full cure time, which is usually 21 days for air drying. -
Baking the Design:
For dishwasher safety, place the cold glasses into a cold oven. Set the temperature to 350°F (176°C) and bake for 30 minutes. Turn the oven off and let the glasses cool completely inside before removing.
Once baked and cooled, your new winter glassware is ready to sparkle at your next dinner party
Under-the-Sea Scenes That Wrap Around the Bowl
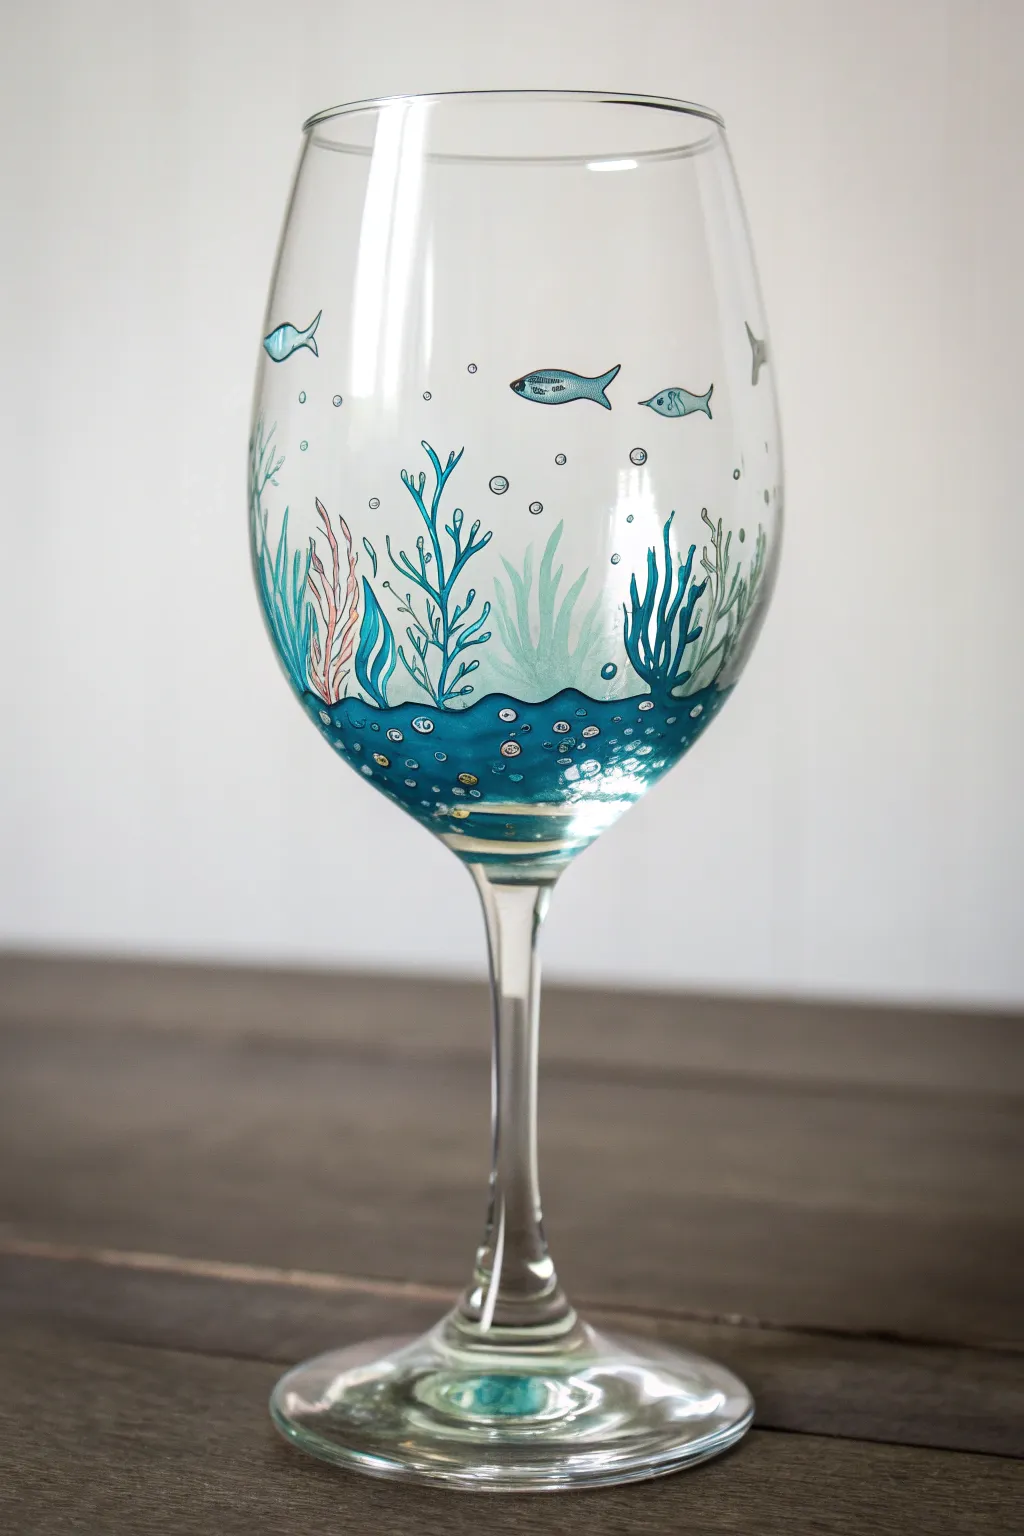
Transform a plain piece of glassware into a serene underwater viewing tank complete with swaying seaweed and gentle fish. The transparency of the glass mimics water perfectly, allowing your painted seabed and coral details to create a stunning, dimensional effect that looks beautiful from every angle.
Step-by-Step Guide
Materials
- Large-bowl wine glass (red or white style)
- Rubbing alcohol and cotton pads
- Enamel paint for glass (Teal, Navy Blue, Light Aqua, Coral Pink, Grey/Silver)
- Small fine-point paintbrush
- Medium flat paintbrush
- Gold or silver metallic glass paint (for accents)
- Paper plate or palette
- Cotton swabs (for mistakes)
- Oven (for curing, if required by paint type)
Step 1: Preparation and Base Layer
-
Clean surface:
Begin by thoroughly wiping down the outside of the wine glass with rubbing alcohol on a cotton pad. This removes oils and fingerprints, ensuring the paint adheres properly. -
Establish the seabed:
Mix a blend of teal and navy blue enamel paint to create a deep ocean color. Using your medium flat brush, paint a wavy, uneven band around the very bottom of the bowl, just above where the stem connects. -
Add texture bubbles:
While the blue seabed layer is still wet, dip a fine-point brush handle or a dotting tool into white or light silver paint. Gently tap small dots into the wet blue paint to create the illusion of bubbles rising from the sand. -
Let it set:
Allow this bottom layer to dry to the touch, usually about 15-20 minutes, before moving on to the vegetation. This prevents the colors from muddying.
Fixing Smudges
Work quickly if you make a mistake! A cotton swab dipped in rubbing alcohol acts like an eraser for wet glass paint, allowing you to reshape coral branches instantly.
Step 2: Painting the Ocean Floor
-
Paint tall coral:
Load a fine linear brush with bright teal paint. Starting from your dark blue seabed, paint vertical, branching lines that extend upward about halfway up the glass, varying their heights for a natural look. -
Add contrasting seaweed:
Rinse your brush and switch to a softer, diluted aqua shade. Paint thicker, leafy seaweed shapes behind the teal coral. I find making these slightly more transparent helps simulate depth. -
Introduce warm tones:
Using a coral or soft pink shade, paint delicate, spindly coral branches interspersed among the green vegetation. This pop of warm color breaks up the cool palette. -
Darken the seaweed base:
Go back to the bottom of your seaweed strands with a tiny amount of navy blue to blend them seamlessly into the seabed floor.
Step 3: Adding Life and Details
-
Paint the fish bodies:
Using silver or grey paint, outline small football shapes floating in the upper open space of the glass. Fill them in with a soft blue or keep them semi-transparent. -
Define fish details:
Once the fish bodies are dry, use your finest brush or a black fine-point paint pen to add tiny eyes, gills, and tail fins. -
Create floating bubbles:
Dip the non-brush end of your paintbrush into white or silver paint. Dot groups of bubbles rising from the seaweed and trailing behind the fish. -
Add highlights:
Using a tiny bit of white, add thin highlight lines to the edges of the coral and the tops of the fish to make them look wet and shiny. -
Paint seabed gems:
Add small dots of gold or metallic silver within the dark blue seabed area to look like hidden pearls or shimmering stones.
Make it Sparkle
While the paint is wet, sprinkle ultra-fine cosmetic glitter onto the seabed area. Once baked/cured, the bottom of the glass will shimmer beautifully under lights.
Step 4: Finishing Up
-
Clean edges:
Inspect the rim of the glass. It should be completely free of paint for comfortable drinking. If any stray paint went too high, wipe it away with alcohol. -
Dry thoroughly:
Let the glass sit undisturbed for at least 24 hours (or as directed by your specific paint brand) before handling. -
Bake to cure:
If your enamel paint requires heat setting, place the glass in a cool oven. Turn the heat to 350°F (175°C) and bake for 30 minutes, then turn the oven off and let the glass cool completely inside.
Enjoy your customized, dishwasher-safe seascape glass at your next dinner party
Galaxy Ombre With Splattered Stars for a Wow Finish
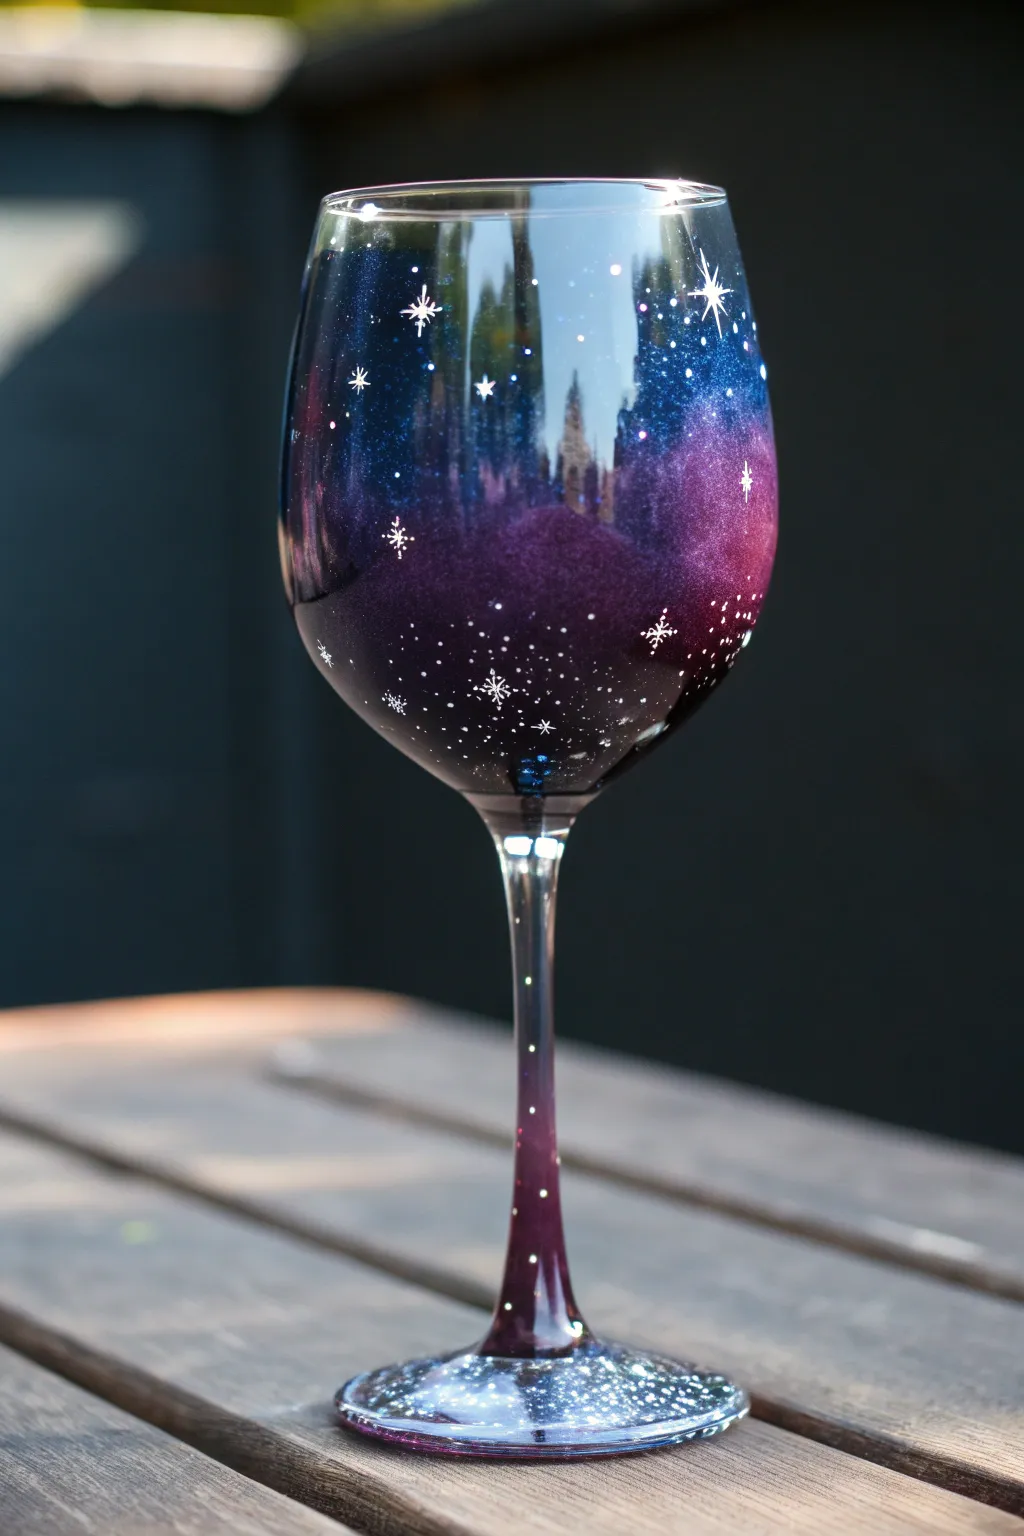
Transform plain glassware into a piece of the night sky with this mesmerizing galaxy design. Using a simple sponge ombre technique and delicate splatter effects, you’ll create a deep, starry expanse that looks far more complex than it actually is.
Detailed Instructions
Materials
- Large wine glass
- Rubbing alcohol
- Cotton pads
- Multi-surface acrylic enamel paints (Midnight Blue, Violet, Magenta, Black, White)
- Makeup sponges or sea sponges
- Old toothbrush
- Fine liner brush (size 00 or 000)
- Palette or paper plate
- Gloss sealant or Mod Podge (dishwasher safe formula recommended)
Step 1: Prepping the Surface
-
Clean the glass:
Before any paint touches the surface, wash the wine glass thoroughly with warm soapy water and dry it completely. -
Degrease with alcohol:
Wipe down the entire exterior surface—bowl, stem, and base—with rubbing alcohol on a cotton pad to remove any oils or fingerprints that could prevent paint adhesion. -
Protect the rim:
Tape off the top 2 centimeters of the rim if you plan to drink from the glass, as paint should generally be kept away from where your mouth touches.
Nebula Cloud Effect
To add those bright, cloudy nebula spots, dab a tiny bit of white paint onto a sponge and lightly tap it over the purple sections before adding stars. It creates a glowing depth.
Step 2: Creating the Galaxy Ombre
-
Load the sponge:
Squirt penny-sized amounts of Midnight Blue, Violet, and Black onto your palette. Dab a makeup sponge into the Midnight Blue and Black mixture. -
Start at the top:
Begin sponging the paint onto the upper portion of the glass bowl. Use a dabbing motion rather than dragging to create a textured, cloudy look. -
Transition to purple:
While the first layer is still tacky, load a fresh side of the sponge with Violet and Magenta. Dab this into the middle section of the bowl, slightly overlapping the blue area to blend them. -
Cover the base and stem:
Continue sponging the Violet/Magenta mixture down the stem. For the base, return to your darker Midnight Blue mix to ground the design. -
Deepen the colors:
Allow the first layer to dry for about 20 minutes. Go back with a second layer of sponging to make the colors opaque and rich, ensuring no glass shows through. -
Smooth the transitions:
While the second coat is wet, use a clean, slightly damp sponge to lightly tap over the lines where colors meet, softening the gradient into a seamless ombre.
Uneven Sponging fix
If you lift the paint while sponging, you’re pressing too hard or the paint is too tacky. Let it dry fully, then lightly dab a fresh layer over the bare spot.
Step 3: Adding the Stars
-
Prepare the splatter paint:
Mix a small amount of white enamel paint with a tiny drop of water. You want a creamy consistency that flicks easily but isn’t drippy. -
Flick the stars:
Dip an old toothbrush into the thinned white paint. Hold it near the glass and run your thumb across the bristles to spray a fine mist of ‘distant stars’ all over the ombre background. -
Paint major stars:
Using your fine liner brush and un-thinned white paint, dot larger stars randomly among the mist. Vary the sizes for depth. -
Add starbursts:
Select a few of the larger white dots to turn into twinkling stars. Paint a thin cross (+) through the center, then a smaller ‘x’ over that to create an eight-point flare. -
Details on the base:
Don’t forget to continue the star pattern down the stem and onto the base of the glass so the entire piece feels cohesive. -
Optional snowflakes:
If you want a wintery galaxy vibe like the photo, use your liner brush to draw tiny, delicate snowflakes interspersed with the stars.
Step 4: Sealing and Curing
-
Dry thoroughly:
Let the paint dry completely for at least 24 hours. This is crucial before applying any topcoat. -
Apply sealant:
Brush on a layer of dishwasher-safe gloss sealant or Mod Podge over the painted areas to protect your work and add a glassy shine. -
Bake to cure:
Follow the instructions on your specific enamel paint bottle. Most require placing the glass in a cool oven, heating to 350°F (175°C) for 30 minutes, and letting it cool inside the oven.
Now you have a stunning piece of galactic art ready to sparkle at your next dinner party
Faux Stained-Glass Panels Using Outlined Shapes
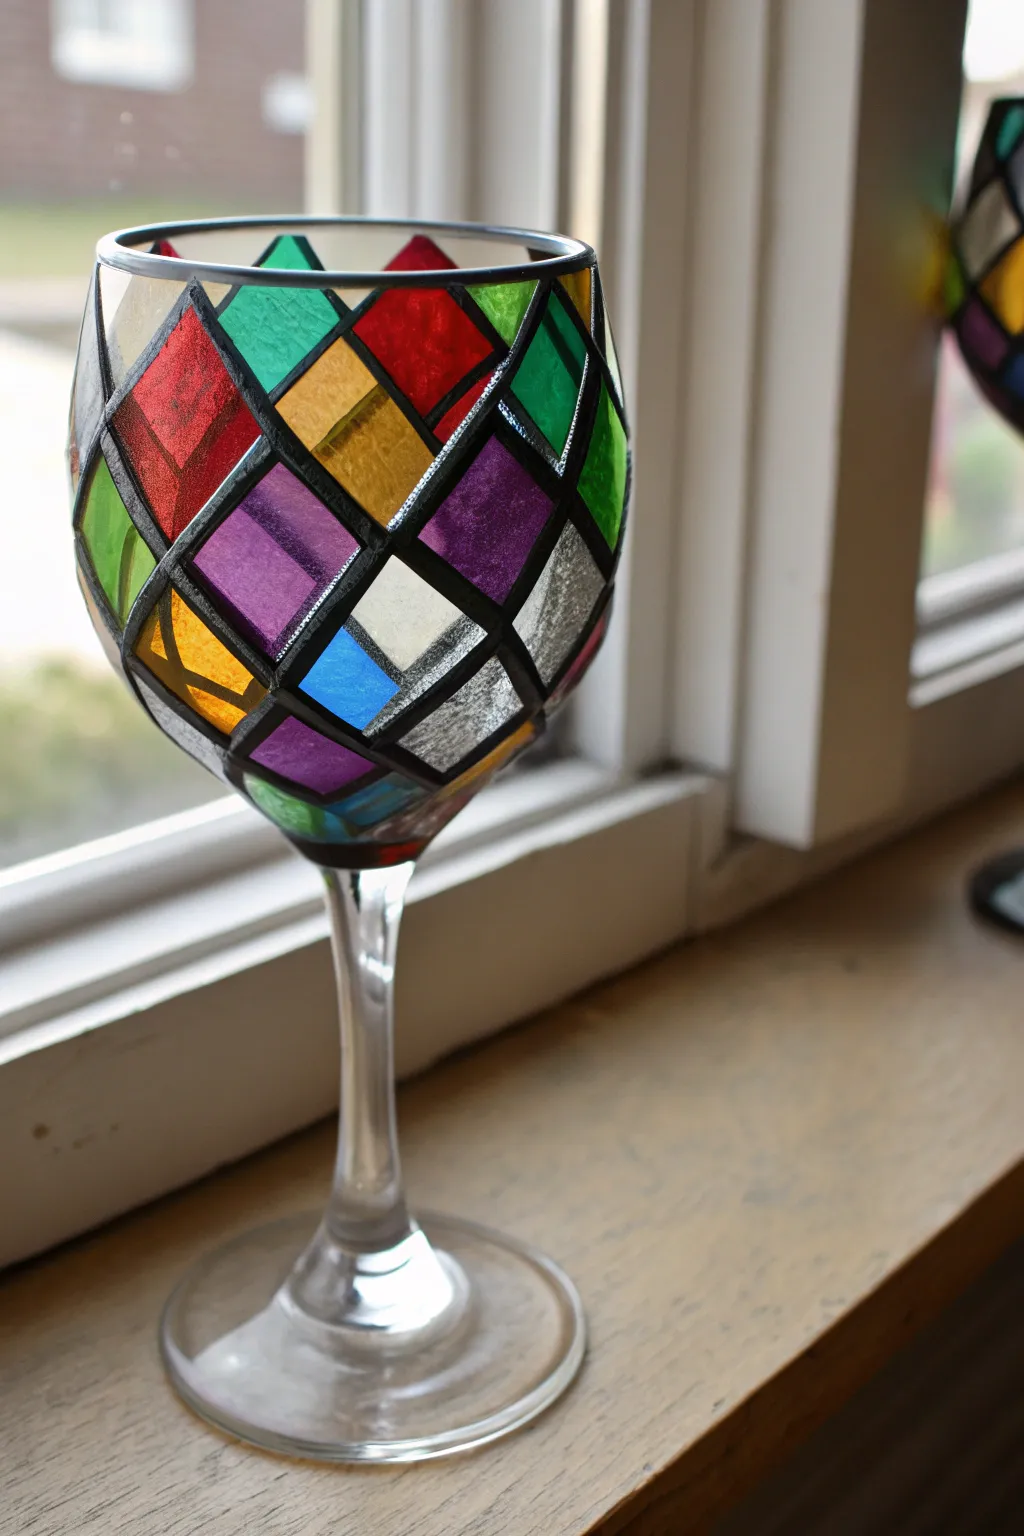

Transform a simple wine glass into a glowing work of art with this faux stained-glass technique. By using bold black outlining paint and vivid, transparent fillers, you can mimic the soldered look of traditional leaded glass.
Step-by-Step Guide
Materials
- Large-bowl wine glass
- Rubbing alcohol
- Paper towels
- Liquid leading or 3D puffy paint (black)
- Glass paints (transparent varieties in red, green, purple, yellow, blue, clear)
- Small round paintbrush
- Toothpicks
- Cotton swabs
- Painter’s tape (optional)
Step 1: Preparation & Mapping
-
Clean surface:
Thoroughly clean the outside of your wine glass with rubbing alcohol and a paper towel. This removes any oils or fingerprints that could prevent the paint from adhering properly. -
Plan the rim:
Decide how far up the glass you want the design to go. Since this is a drinking vessel, leave the top half-inch clear for a comfortable lip feel. You can mark this line with painter’s tape or just eyeball it. -
Establish the grid:
Using your black liquid leading bottle, draw a continuous horizontal line around the top boundary of your design. Repeat this with a horizontal line near the bottom where the bowl meets the stem.
Keep it Raised
Work with the glass surface horizontal as much as possible. Gravity helps the liquid paint settle into a smooth, even pool within your black outline walls.
Step 2: Creating the Lead Lines
-
Draw primary diagonals:
Start drawing diagonal lines from the top rim line down to the bottom line. Keep the pressure steady on the bottle to create a raised, consistent bead of paint. -
Cross the lines:
Now, draw diagonal lines in the opposite direction, crossing over your first set. This will create a grid of diamond shapes around the bowl of the glass. -
Subdivide shapes:
To match the intricate look of the example, pick several larger diamonds and draw a horizontal or vertical line through them to create smaller triangles or smaller squares. Variation is key here. -
Check connections:
Inspect your grid closely. Every single line needs to connect fully to another line; if there are gaps, the liquid glass paint will leak out later. -
Clean up edges:
If a line went crooked, wipe it away immediately with a darker paper towel involved. If it’s just a small smudge, let it dry slightly and scrape it off with a toothpick. -
Allow to cure:
This is the hardest part—waiting. Let the black outline drying completely for at least 8 to 24 hours depending on your product instructions. It must be hard to the touch before filling.
Leaking Paint?
If color bleeds under a black line, let it dry completely. Then, use a craft knife or razor blade to carefully slice and scrape the escaped paint off the glass.
Step 3: Applying Color
-
Prepare palette:
Shake your glass paints gently to avoid creating bubbles. If using pots rather than applicator tips, pour small amounts onto a palette. -
Start filling cells:
Choose a color like deep red and select a few random diamond shapes to fill. Load your brush generously; you want to ‘drop’ the paint into the well rather than brush it on thin. -
Work in sections:
Rotate the glass carefully. I find it easiest to prop the glass on a crumpled towel to keep it horizontal while painting, preventing drips. -
Distribute colors:
Continue painting with different colors—purple, emerald green, sunny yellow, and blue. Try not to put two identical colors right next to each other. -
Add texture:
For the ‘frosted’ look seen in some segments of the example, apply clear glass medium or white pearl paint. Dab it slightly with a sponge or stiff brush while wet to create a textured, icy finish. -
Pop bubbles:
Keep a sharp toothpick handy. If tiny air bubbles appear in your wet paint, pop them immediately or drag them to the edge so the finish remains smooth. -
Dry and cure:
Let the glass sit undisturbed for at least 48 hours. Most glass paints require either a long air-cure (21 days) or oven baking (usually 350°F for 30 mins) to become dishwasher safe.
Place your finished glass near a window to see the light illuminate your colorful design


Have a question or want to share your own experience? I'd love to hear from you in the comments below!