Whenever I need a quick, satisfying reset in a room, I reach for paint and a tired old furniture piece. These furniture painting ideas are the kind you can actually picture in your own space—simple first, then we’ll get delightfully bold.
Classic Solid-Color Furniture Makeover

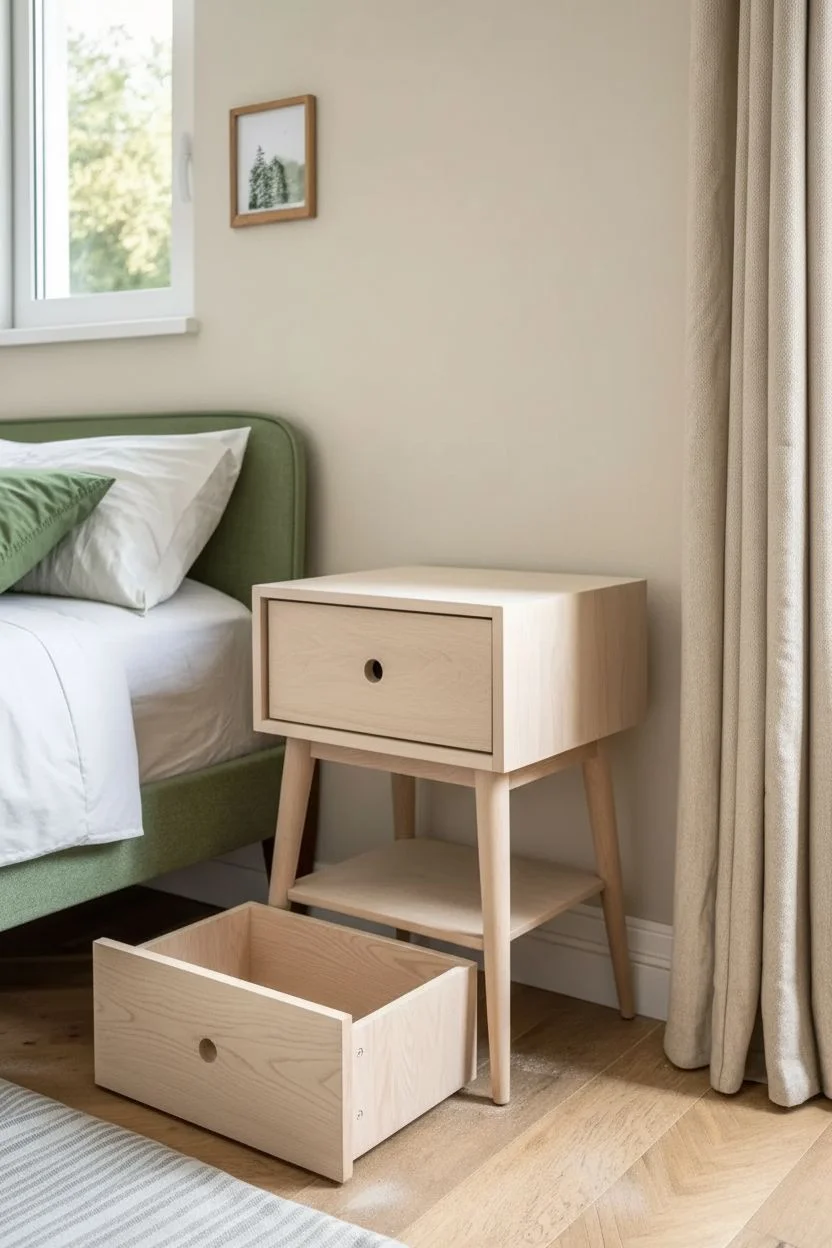
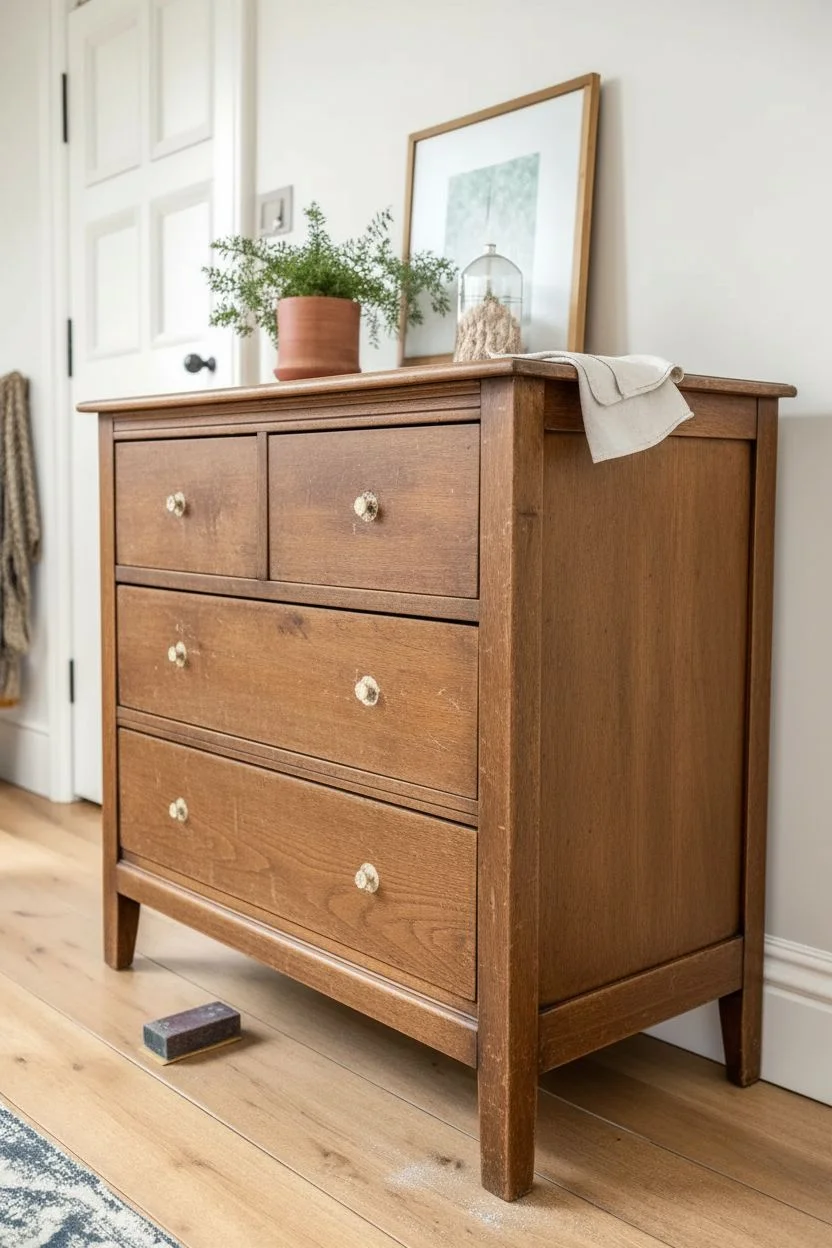
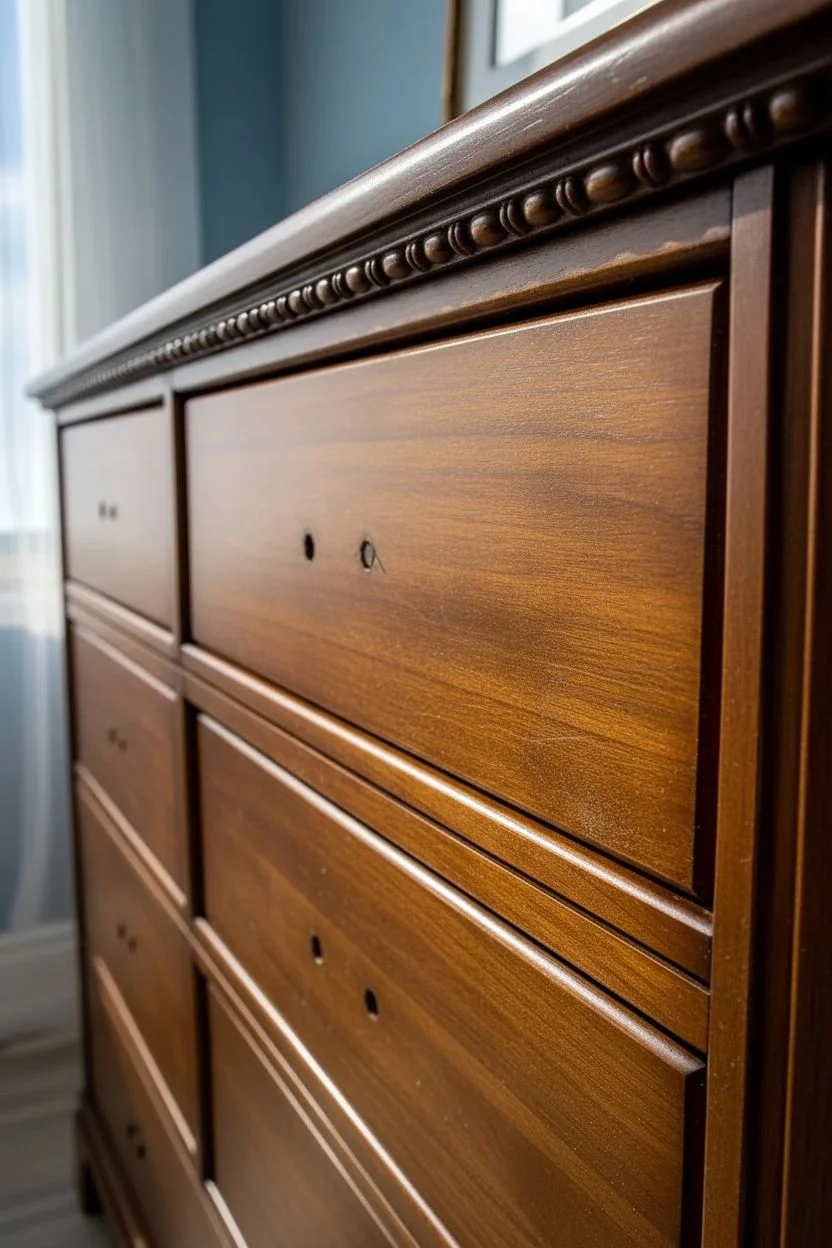
Embrace the natural beauty of wood grain with this sophisticated makeover that transforms tired furniture into a mid-century modern masterpiece. Instead of hiding the surface under opaque paint, this project uses a rich, warm stain to highlight the organic textures while keeping the look clean and updated.
Step-by-Step
Materials
- Solid wood nightstand (mid-century style preferred)
- Orbital sander
- Sandpaper discs (80, 120, 180, and 220-grit)
- Pre-stain wood conditioner
- Oil-based wood stain (Warm Walnut or similar tone)
- Clean lint-free rags or staining pads
- Matte or satin polyurethane topcoat
- High-quality synthetic bristle brush
- Tack cloth
- Painter’s tape
- Screwdriver
- New hardware (matte black knob)
Step 1: Preparation & Stripping
-
Remove Hardware:
Begin by removing any existing knobs, pulls, or handles from the drawer using your screwdriver. Set these aside if you plan to reuse them, though for this look, we will be swapping them out later. -
Remove the Drawer:
Pull the drawer completely out of the unit. This ensures you can access all the nooks and crannies of the frame and prevents stain from pooling in the tracks. -
Initial Rough Sanding:
Using an orbital sander with 80-grit paper, sand down the flat surfaces to remove the old finish. Move slowly and steadily to avoid gouging the wood. -
Medium Grit Sanding:
Switch to 120-grit sandpaper. Go over the entire piece again to smooth out the scratches left by the rough sanding phase. Don’t forget the legs, which might require hand-sanding if they are round or tapered. -
Fine Sanding:
Progress to 180-grit paper for a smoother finish. I find that taking the time here really makes the final stain look professional. -
Final Polishing Sand:
Finish the sanding process with 220-grit sandpaper by hand. This closes the grain slightly and ensures a surface as smooth as glass. -
Clean the Surface:
Wipe the entire piece down thoroughly with a tack cloth to remove every speck of sawdust. Dust is the enemy of a smooth finish.
Sticky Drawer Fix
If the drawer sticks after staining, rub a plain candle or a bar of soap along the wooden runners. The wax acts as a dry lubricant to help it glide.
Step 2: Staining & Finishing
-
Apply Conditioner:
Brush on a generous coat of pre-stain wood conditioner. This is crucial for preventing blotchiness, especially on soft woods. Let it penetrate for about 10-15 minutes, then wipe off the excess. -
Apply the Stain:
Stir your chosen walnut stain well. Using a staining pad or clean rag, apply the stain in the direction of the wood grain. Work in manageable sections so the stain doesn’t dry before you can wipe it. -
Wipe Excess Stain:
After letting the stain sit for 5-10 minutes (depending on how dark you want the tone), wipe away all excess liquid with a clean lint-free rag. Ensure no puddles remain in corners. -
Dry Time:
Allow the stain to dry completely according to the manufacturer’s instructions. This usually takes at least 24 hours. Don’t rush this step or your topcoat may not cure properly. -
First Topcoat Layer:
Using a high-quality synthetic brush, apply a thin, even layer of matte polyurethane. Brush with the grain using long, smooth strokes to minimize brush marks. -
Light Sanding:
Once the first coat is dry (usually 4-6 hours), lightly hand-sand the surface with ultra-fine 320-grit sandpaper to knock down any raised grain or bubbles. -
Clean and Recoat:
Wipe away the sanding dust with a tack cloth and apply a second coat of polyurethane. Two coats are usually sufficient for a nightstand, but a third adds extra durability to the top surface. -
Curing:
Let the piece cure for a full 48-72 hours before placing any heavy objects or lamps on top.
Step 3: Assembly
-
Install New Hardware:
Once cured, attach your new matte black knob to the drawer front. This offers a modern contrast to the warm wood tone. -
Reinsert Drawer:
Slide the drawer back into the glides, ensuring it moves smoothly. -
Style and Enjoy:
Place your nightstand in position. Add a simple ceramic lamp and some greenery to complete the organic, mid-century vibe.
Add a Accent Pop
For a hidden surprise, paint the *sides* of the drawer box (not the front) in a muted sage green or charcoal. It adds a custom touch only seen when opened.
Now you have a beautifully restored piece that highlights the natural elegance of wood in your bedroom


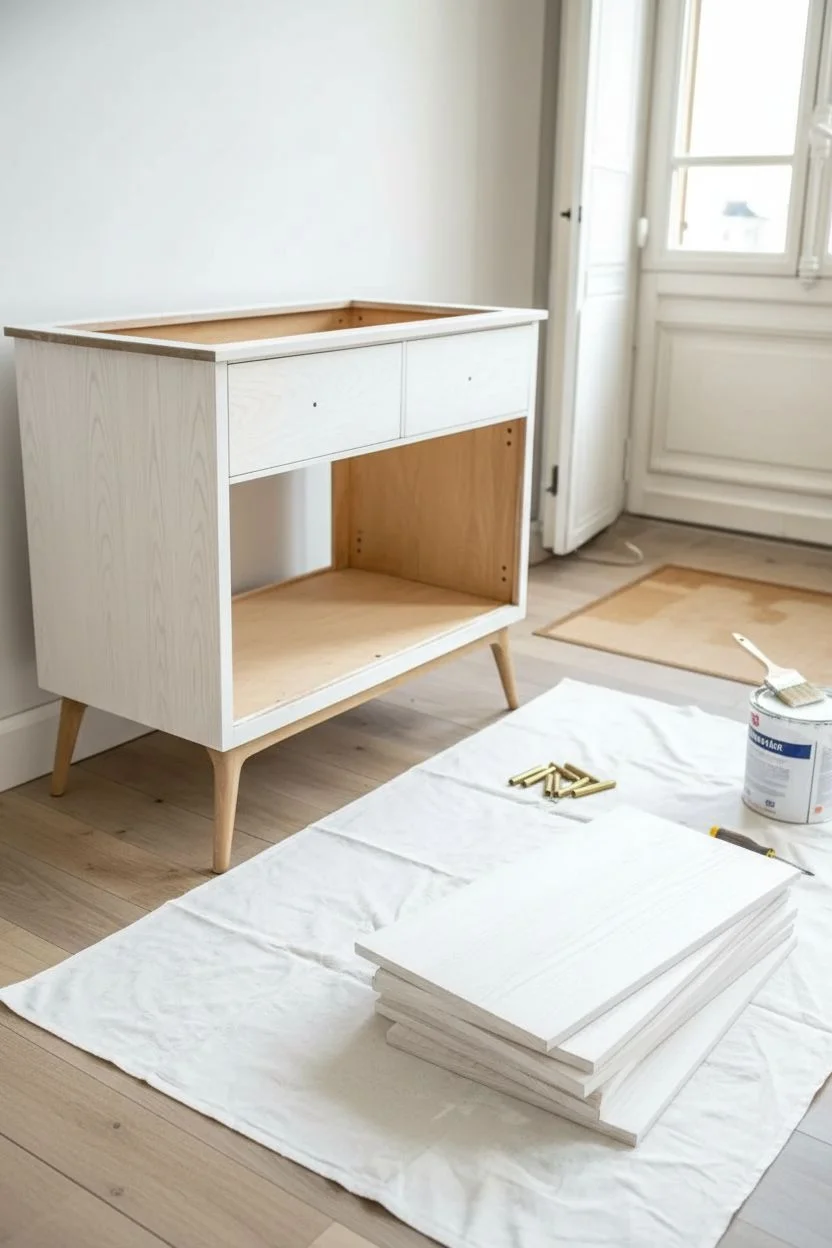
Crisp White Painted Furniture for a Clean, Airy Look

Transform a tired, dark dresser into a beacon of Scandinavian-inspired calm with a crisp white makeover. This project focuses on achieving a smooth, professional finish that highlights beautiful moulding details without distressing.
Detailed Instructions
Materials
- Wooden dresser with moulding details
- TSP substitute or degreasing cleaner
- Medium-grit sandpaper (120-150 grit)
- Fine-grit sandpaper (220 grit)
- Tack cloths
- Stain-blocking primer (water-based or shellac)
- High-quality white acrylic latex or chalk-style paint (bright white)
- Small foam roller
- 2-inch angled synthetic bristle sash brush
- Water-based polyurethane topcoat (matte or satin finish)
- Screwdriver
- Drop cloths
- Painter’s tape
Step 1: Preparation & Cleaning
-
Remove hardware:
Begin by removing all drawers from the dresser shell. Use your screwdriver to take off all knobs, handles, and pulls. Store these screws in a labeled baggie so they don’t get lost. -
Clean thoroughly:
Mix your degreasing cleaner according to the package instructions. Scrub the entire piece, focusing on areas near the handles where oils accumulate. A clean surface is critical for adhesion. -
Rinse and dry:
Wipe down the furniture with a cloth dampened with fresh water to remove any cleaner residue, then let the wood dry completely. -
Scuff sand:
Using the 120-grit sandpaper, thoroughly scuff the entire surface. You aren’t trying to strip the old finish, just creating ‘tooth’ for the primer to grab onto. -
Remove dust:
Vacuum up the sanding dust. Follow up by wiping everything down with a tack cloth to catch those microscopic particles that could ruin your smooth finish. -
Tape off areas:
If there are areas you don’t want painted, such as the friction rails for the drawers or the inside of the cabinet, apply painter’s tape now.
Step 2: Priming the Surface
-
Apply primer:
Stir your stain-blocking primer well. Apply a consistent coat using the roller for flat surfaces and the brush for the corners and decorative indentations on the drawers. -
Wait and assess:
Let the primer dry according to the can’s instructions. Look for any bleed-through (tan or pink stains). If you spot any, apply a second coat of primer to those specific spots. -
Smooth the primer:
Once fully dry, lightly run your 220-grit sandpaper over the primed surface. This knocks down any brush strokes or raised grain. Wipe away the dust with a tack cloth.
Sticky Drawers?
If painted drawers stick, rub a plain candle or dedicated furniture wax along the wooden runners and glides to restore smooth movement without damaging the paint.
Step 3: Painting & Protection
-
First coat application:
Open your bright white paint. Start with the intricate moulding on the drawer fronts using your angled brush. Work the paint into the crevices, watching for drips. -
Roll the flat areas:
Immediately smooth out the brush work and cover the flat centers of the drawers and the dresser body with the foam roller. This wet-edge technique helps eliminate brush marks. -
Let it cure:
Allow this first coat to dry completely. White paint often needs more time to become opaque, so patience is key here. -
Second coat:
Apply a second coat using the same method: brush the details first, then roll the flats. I usually find that two coats are sufficient, but a third thin coat might be needed for full coverage. -
Final sand:
After the final paint coat is dry (give it at least 24 hours), very gently pass over the flat surfaces with worn high-grit sandpaper to make it feel buttery smooth. -
Seal the piece:
Apply a water-based polyurethane topcoat. Use a high-quality synthetic brush and apply thin, even strokes to avoid clouding. A matte finish gives that modern, airy look seen in the photo. -
Reassemble:
once the topcoat has cured for at least 48 hours, remove the tape, reinstall the drawers, and screw the hardware back into place.
Hardware Upgrade
Swap old knobs for antique bronze ring pulls or matte black cup pulls. Hardware is the jewelry of the piece and completely changes the final vibe.
Enjoy the fresh, bright energy this new focal point brings to your room


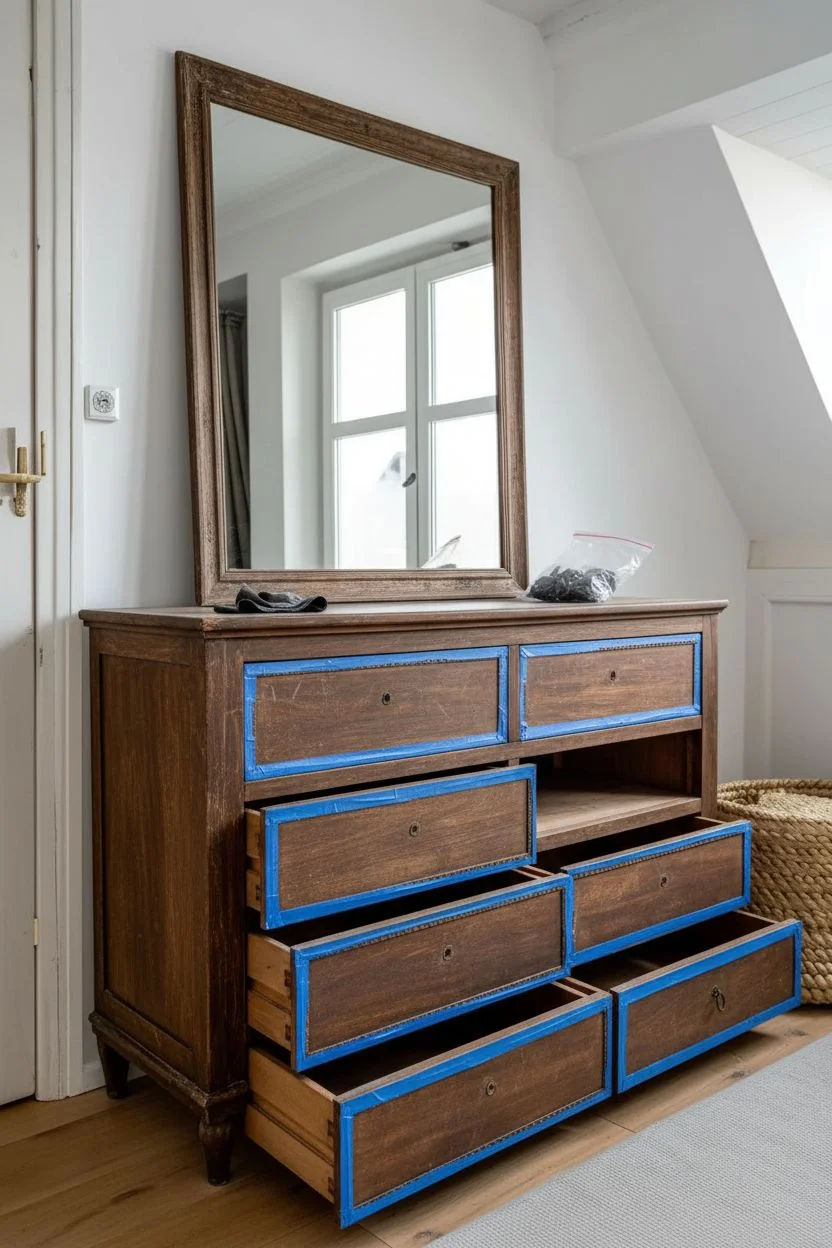
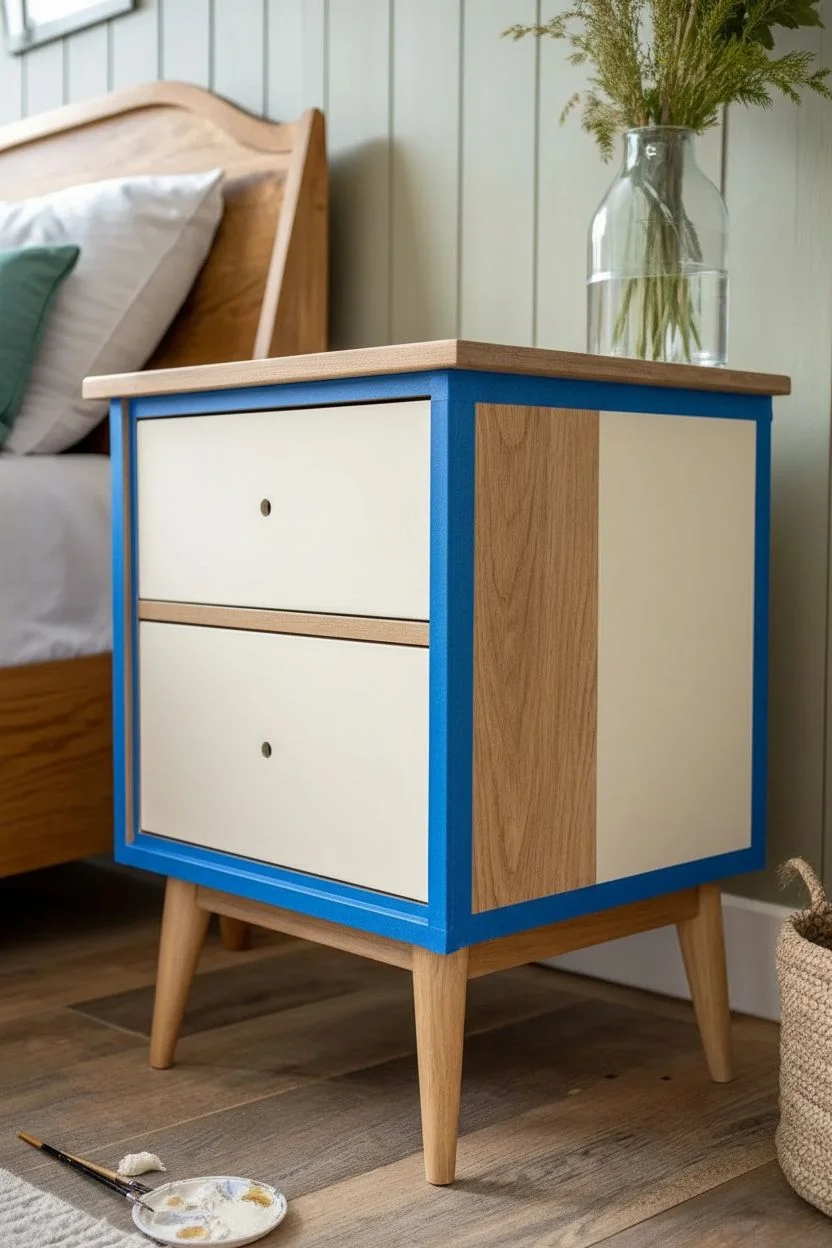
Moody Blue Painted Dresser That Feels Modern and Cozy
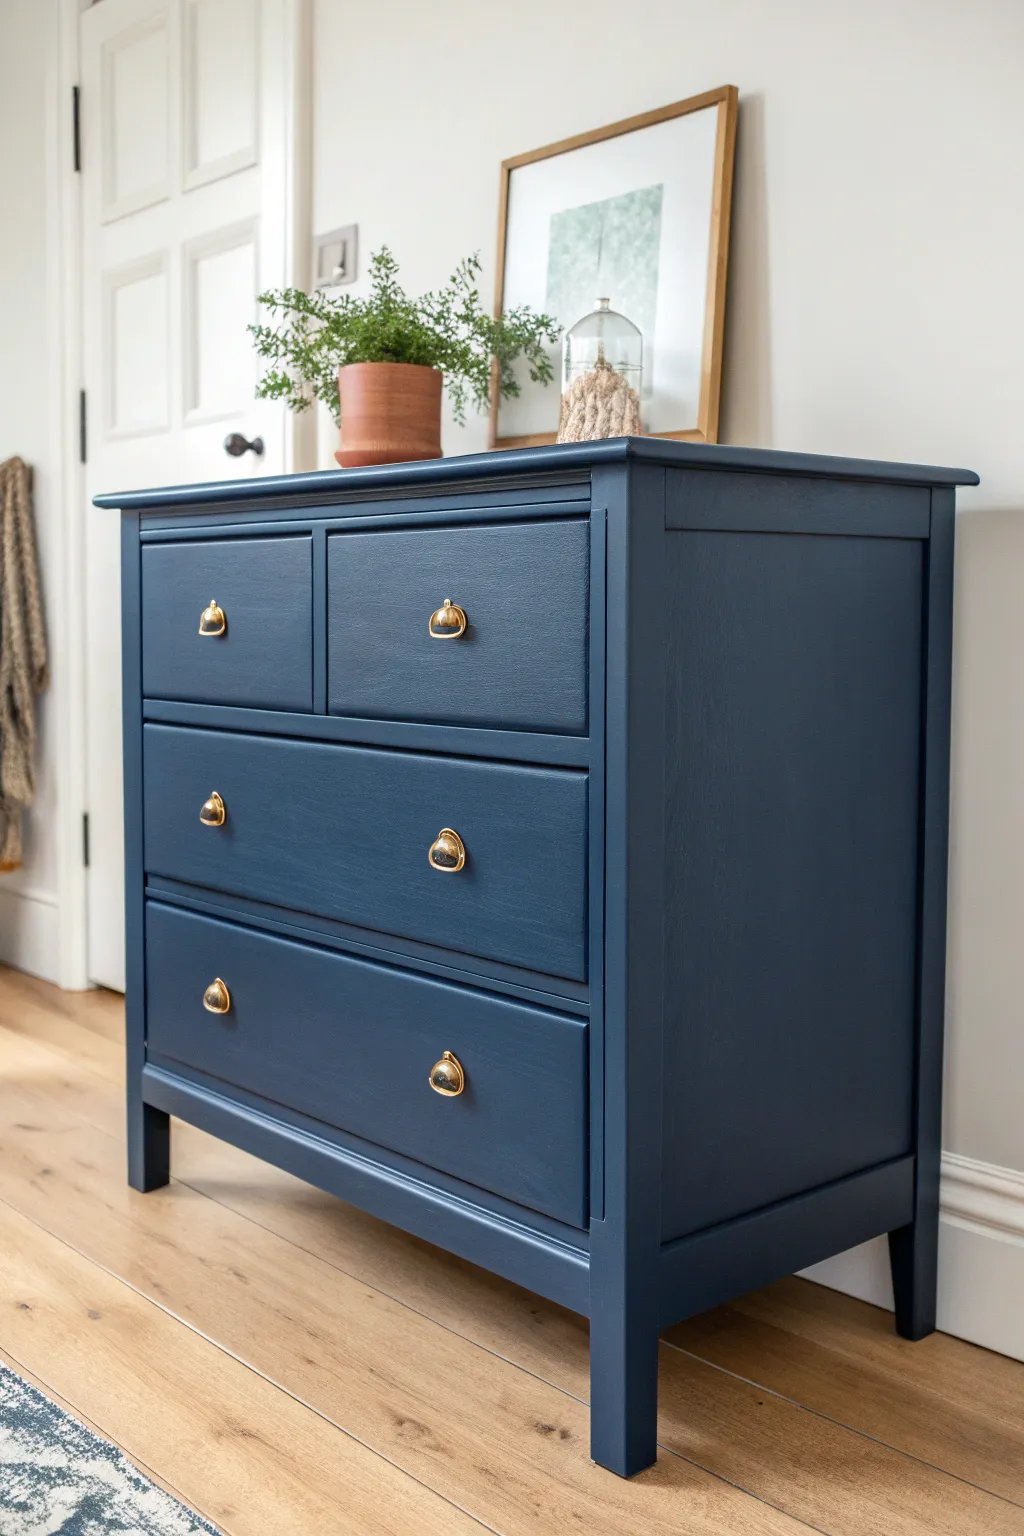
Transform a tired wooden chest into a striking statement piece with this deep, moody blue finish. The combination of rich navy paint and gleaming gold hardware creates a look that balances modern sophistication with cozy warmth.
How-To Guide
Materials
- Wooden dresser
- Sanding blocks (120 and 220 grit)
- Orbital sander (optional)
- Clean lint-free cloths
- High-quality bonding primer (grey tinted)
- Navy blue furniture paint (satin or matte finish)
- Synthetic bristle paint brush (2-inch angled)
- Small foam roller and tray
- Gold cup pulls (2)
- Gold knobs (4)
- Wood filler
- Putty knife
- Screwdriver or chill driver
Step 1: Preparation
-
Remove Hardware:
Begin by removing all the old knobs and pulls using your screwdriver. If you plan to reuse the old holes, keep the screws; otherwise, set everything aside. -
Clean Thoroughly:
Wipe down the entire dresser with a degreasing cleaner to remove years of furniture polish, oil, and dust. This step is crucial for paint adhesion. -
Fill Holes:
If your new hardware requires different spacing than the old set, fill the old screw holes with wood filler. Overfill slightly, as the filler shrinks when drying. -
Sand the Surface:
Once the filler is dry, scuff sand the entire piece with 120-grit sandpaper. You don’t need to strip it to bare wood, just remove the glossy sheen to give the primer something to grip. -
Remove Dust:
Vacuum up the sanding dust and follow up with a tack cloth or a damp lint-free rag to ensure a perfectly clean surface.
Step 2: Prime and Paint
-
Apply Primer:
Brush or roll on a coat of bonding primer. Since we are going for a dark blue finish, I prefer to use a grey-tinted primer to help with coverage. -
Sand the Primer:
After the primer has dried completely, lightly sand it with 220-grit sandpaper to smooth out any brush strokes or texture. -
First Coat of Blue:
Cut in the corners and detailed areas with your angled brush first. Then, use the foam roller on the flat surfaces (top, sides, and drawer fronts) for a smooth, factory-like finish. -
Watch for Drips:
Immediately check edges and corners for paint drips and smooth them out with your brush before the paint begins to tack up. -
Dry Time:
Allow the first coat to dry according to the manufacturer’s instructions, usually at least 2-4 hours. -
Light Sanding:
Very lightly run a fine-grit sanding sponge over the dry paint to knock down any dust nibs. -
Second Coat:
Apply the second coat of navy blue using the same method (brush for details, roller for flats). This coat should provide full, opaque coverage. -
Protective Topcoat (Optional):
If your furniture paint doesn’t have a built-in topcoat, apply a clear matte or satin polycrylic to protect the finish from scratches.
Priming Secret
Get your primer tinted grey at the paint store. A white base underneath dark navy can make scratches painfully obvious later, but grey hides them well.
Step 3: Adding the Sparkle
-
Measure for Hardware:
If you filled the old holes, measure and mark the center points for your new gold cup pulls and knobs. Use a template or measuring tape to ensure perfect alignment. -
Drill New Holes:
Carefully drill holes at your marked points. Place a piece of painters tape over the mark while drilling to prevent the wood from splintering. -
Install Hardware:
Screw in your new gold hardware. The contrast between the brass tones and dark blue paint is what really makes this piece sing. -
Reassemble:
Slide the drawers back into their tracks and check that they close smoothly without rubbing against the freshly painted frame.
Level Up: Drawer Liners
Line the interior of the drawers with a peel-and-stick wallpaper in a botanical print or a soft vintage velvet liner for a luxurious surprise when opening.
Step back and admire how this simple color change has created a sophisticated focal point for your room


Sage Green Painted Cabinet for a Calm, Earthy Vibe

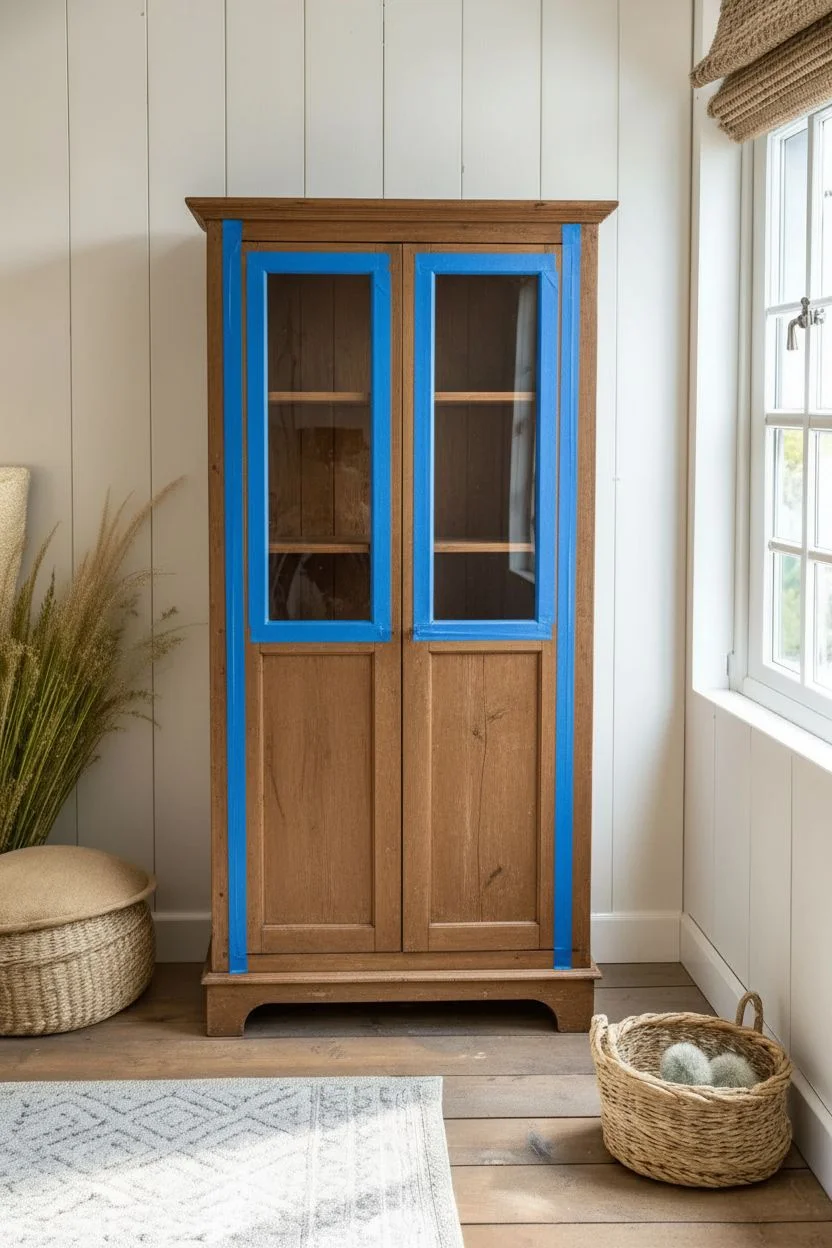
Transform a tired wooden hutch into a serene focal point using a calming sage green hue. This project balances modern paint trends with rustic warmth by preserving the natural wood interior to create subtle, earthy depth.
Detailed Instructions
Materials
- Tall wooden display cabinet with glass doors
- Medium-grit sandpaper (120-grit)
- Fine-grit sandpaper (220-grit)
- Painter’s tape (high-quality)
- Wood filler
- Screwdriver (for hardware removal)
- High-quality primer (bonding primer recommended)
- Sage green mineral or chalk paint
- Clear wax or matte polycrylic topcoat
- 2-inch angled synthetic brush
- Small foam roller
- Tack cloth
- Mild degreaser solution
Step 1: Preparation & Cleaning
-
Clean the surface:
Before you start sanding, wipe down the entire cabinet with a mild degreaser or TSP alternative to remove years of furniture polish, dust, and oils. -
Remove hardware:
Unscrew all hinges, knobs, and latches. Place them in labeled bags so you don’t lose any tiny screws during the process. -
Remove or tape glass:
If the glass panes are removable, carefully take them out. If not, tape off the glass edges with extreme precision using high-quality painter’s tape to ensure crisp lines. -
Mask the interior:
Since we are keeping the interior wood natural, use painter’s tape to mask off the inside edges where the interior meets the face frame.
Paint Bleeding?
If paint seeped under the tape onto the glass, don’t panic. Wait for it to dry fully, then gently scrape the excess off with a fresh razor blade held at a 45-degree angle.
Step 2: Sanding & Repairs
-
Scuff sand the exterior:
Using 120-grit sandpaper, thoroughly scuff the exterior surfaces. You don’t need to strip it to bare wood, but you must degloss the existing finish to help the paint stick. -
Fill imperfections:
Inspect the frame for deep scratches or dents. Apply a small amount of wood filler, let it dry, and then sand it flush with the surface. -
Smooth the surface:
Do a final pass with 220-grit paper to smooth out the sanding scratches, then wipe away all dust with a tacky cloth.
Step 3: Priming & Painting
-
Apply primer:
Roll or brush on a coat of high-quality bonding primer. This is crucial for preventing bleed-through and ensuring durability. -
Sand the primer:
Once the primer is fully dry, lightly sand it with fine-grit paper to knock down any bumps. This is a step I always advise for a professional-feeling finish. -
First coat of sage:
Cut in the corners and detailed molding with your angled brush first. Then, use the foam roller on the flat panels and sides for a smooth application. -
Allow to dry:
Let the first coat dry completely according to the manufacturer’s instructions. Do not rush this, or the paint may drag. -
Second coat:
Apply the second coat of sage green paint. This coat should provide full, opaque coverage and richness of color.
Interior Upgrade
For added visual interest, apply a peel-and-stick wallpaper with a botanical print to the back panel of the cabinet instead of leaving it plain wood.
Step 4: The Interior & Finishing
-
Refine the interior wood:
While the exterior paint dries, lightly sand the unpainted interior wood shelves and back panel to freshen them up. -
Seal the interior:
Apply a clear hemp oil or matte wax to the interior wood. This nourishes the dry wood and highlights the grain contrast against the green exterior. -
Remove tape:
Carefully peel away the painter’s tape while the final coat of green paint is still slightly tacky to prevent peeling. -
Topcoat protection:
Seal the painted sage green exterior with a clear matte wax or polycrylic. Two thin coats are better than one thick one. -
Reassemble:
Once everything is cured (give it at least 24 hours), screw the hardware back into place and reinsert any glass panels.
Now step back and appreciate how this soothing color breathes new life into your space
BRUSH GUIDE
The Right Brush for Every Stroke
From clean lines to bold texture — master brush choice, stroke control, and essential techniques.
Explore the Full Guide
Bold Black Painted Furniture for Instant Drama
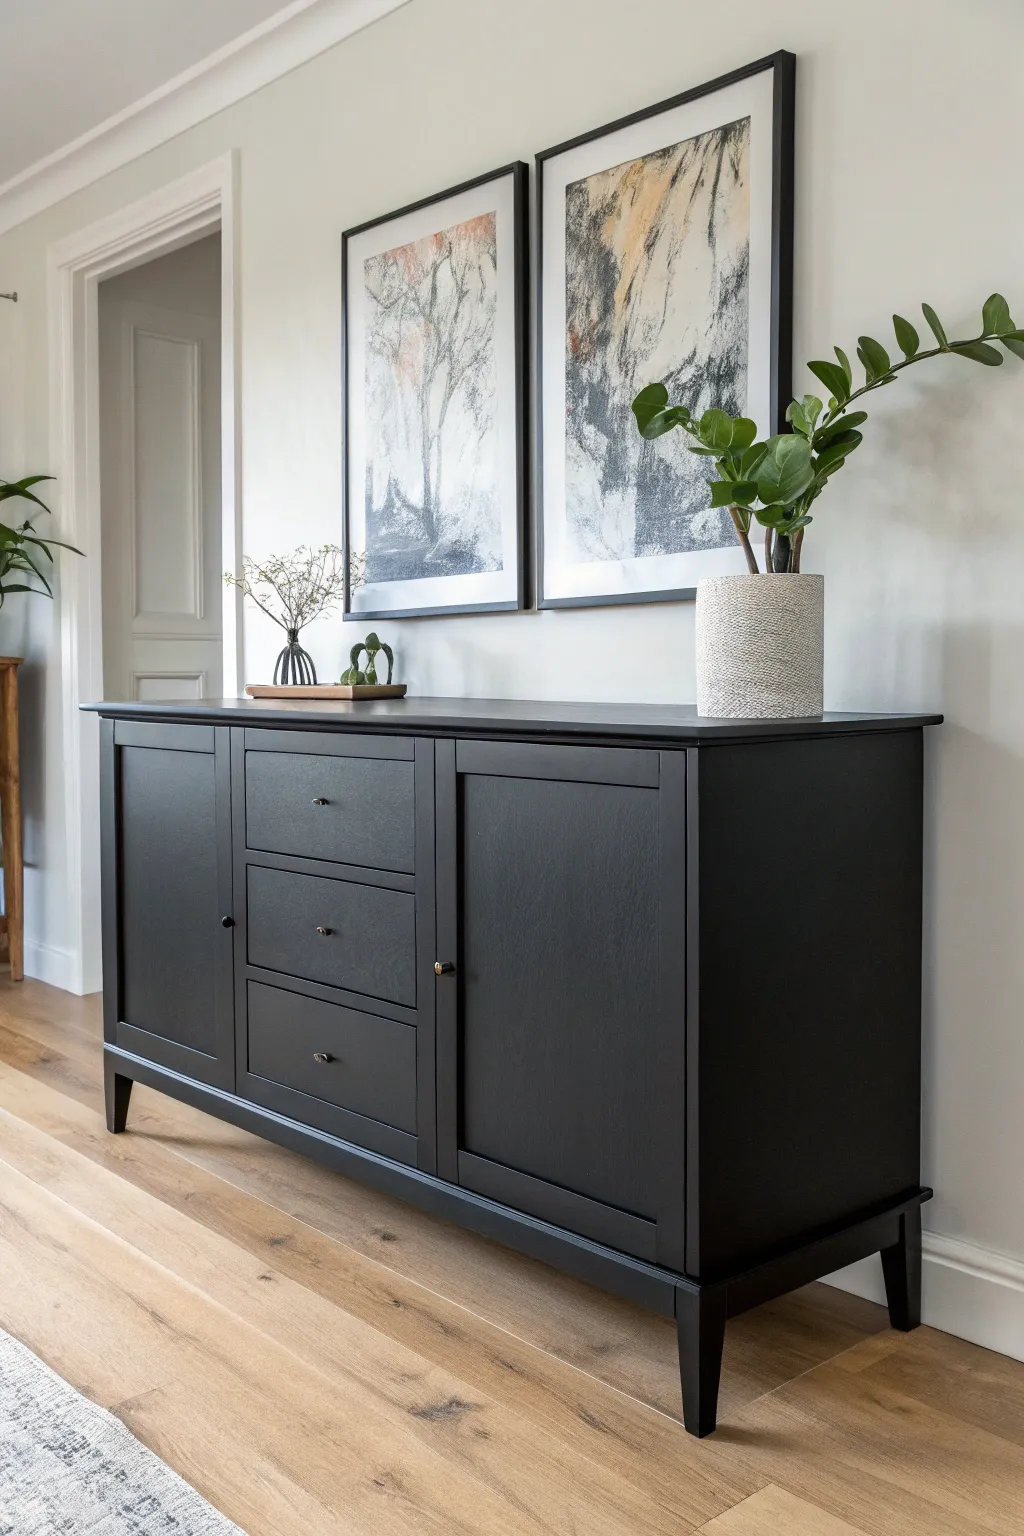
Transform a tired wooden sideboard into a sophisticated statement piece with a rich, matte black finish. This project proves that sometimes the simplest color choice creates the most dramatic impact, giving old furniture a sleek, contemporary edge.
How-To Guide
Materials
- Wooden sideboard or buffet
- Sanding block (medium and fine grit)
- Electric sander (optional)
- TSP cleaner or degreaser
- Lint-free cleaning cloths
- Wood filler
- Putty knife
- Painter’s tape
- High-quality bonding primer (grey tinted recommended)
- Matte black furniture paint (chalk or mineral style)
- Synthetic bristle angled brush (2 inch)
- Foam roller or velour roller for smooth finishes
- Water-based polyurethane topcoat (matte finish)
- New hardware (knobs or pulls)
- Screwdriver
Step 1: Preparation & Repairs
-
Remove hardware:
Begin by removing all old knobs, handles, and hinges using a screwdriver. Keep the screws in a labeled baggie so you don’t lose them. -
Clean the surface:
Wipe down the entire piece with TSP or a strong degreaser. This step is crucial because old furniture often has unseen wax or oil buildup that repels paint. -
Fill imperfections:
Inspect the wood for deep scratches or old hardware holes you want to cover. Apply wood filler with a putty knife, slightly overfilling the hole as it shrinks when drying. -
Sand thoroughly:
Once the filler is dry, sand the entire piece. Start with medium grit to scuff up the old finish, then switch to fine grit to smooth out the filler. You don’t need to strip it to bare wood, just create a “toothy” surface. -
Remove dust:
Vacuum up the sanding dust, then wipe everything down with a tack cloth or a damp lint-free rag to ensure a perfectly clean surface.
Smooth Finish Secret
Between coats of black paint, lightly sand with a super-fine finishing pad or a crumpled brown paper bag. It polishes the paint without removing distinct layers.
Step 2: Priming for Durability
-
Tape off areas:
Use painter’s tape to protect the inside of drawers or any areas you want to keep unpainted. -
Apply primer:
Apply a coat of high-quality bonding primer. Since we are going for black, I recommend using a grey-tinted primer if possible, as it makes achieving full coverage with the black paint much easier. -
Sand the primer:
Once the primer is fully dry, very lightly sand it with fine-grit paper to knock down any brush strokes or raised grain. Wipe away the dust.
Step 3: Painting & Sealing
-
Cut in corners:
Open your matte black paint. Use the angled synthetic brush to paint the corners, detailed edges, and recessed panels where a roller can’t reach. -
Roll the flat surfaces:
Immediately following the brush work, use a velour or high-density foam roller to paint the flat surfaces (top, sides, drawer fronts). This technique minimizes brush strokes for a factory-like finish. -
Apply second coat:
Let the first coat dry completely according to the can’s instructions. Apply a second coat using the same method. Black paint can sometimes look patchy after one coat, but the second usually creates that deep, solid richness. -
Check for coverage:
Inspect the piece in good lighting. If you see any streaks, a light third coat might be necessary, but usually two is sufficient for high-quality furniture paint. -
Apply topcoat:
To protect that beautiful matte finish without adding unwanted shine, apply a water-based matte polyurethane. Use a clean synthetic brush and apply in long, even strokes, avoiding overworking the product to prevent milkiness. -
Wait for cure:
Allow the topcoat to dry overnight before touching it, but remember that full curing takes significantly longer. -
Reattach hardware:
Once dry to the touch, install your new hardware. For a modern look like the image, choose simple, small metal knobs that won’t distract from the black finish.
Level Up: Hardware
For a luxe touch, use ‘Rub ‘n Buff’ in Antique Gold on old hardware instead of buying new. The visible contrast against the flat black is stunning.
Enjoy the dramatic elegance your newly painted sideboard brings to the room
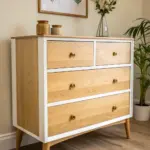
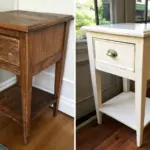
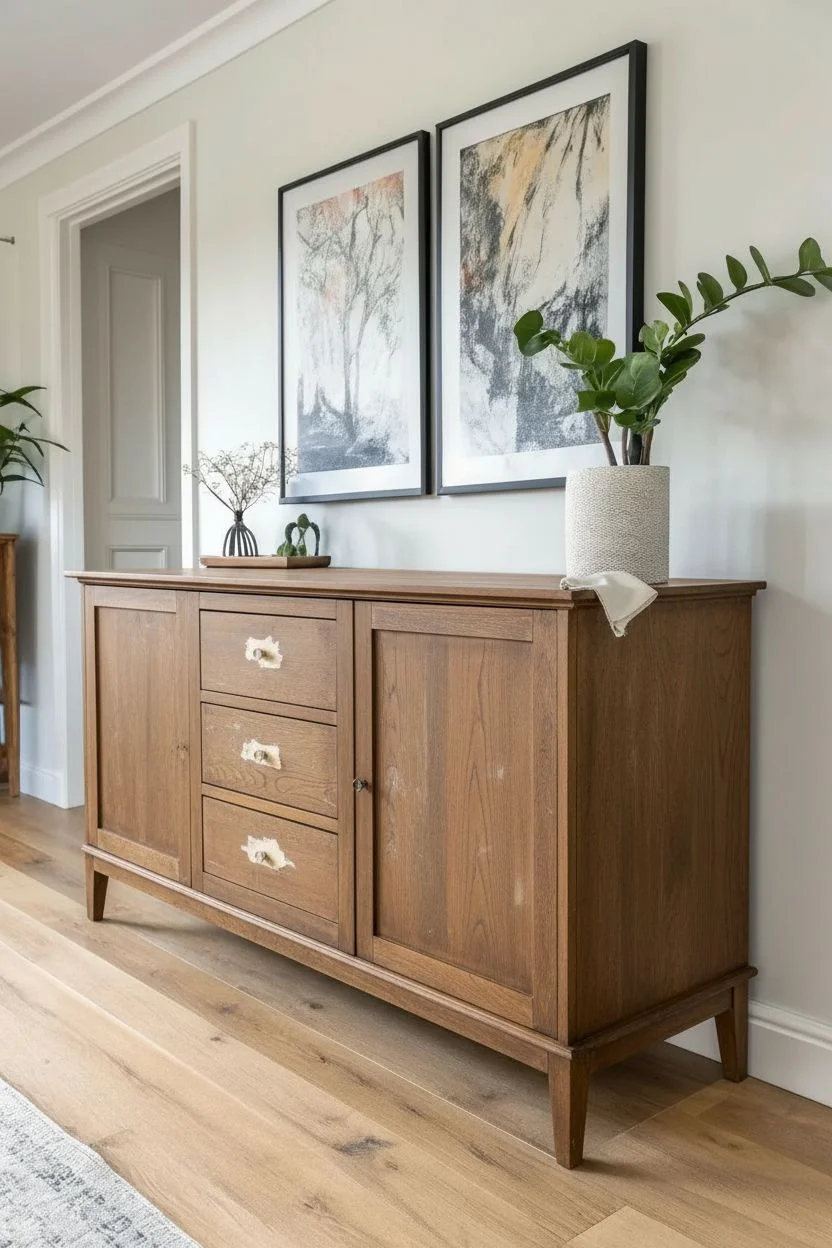
Two-Tone Furniture Painting with a Natural Wood Top

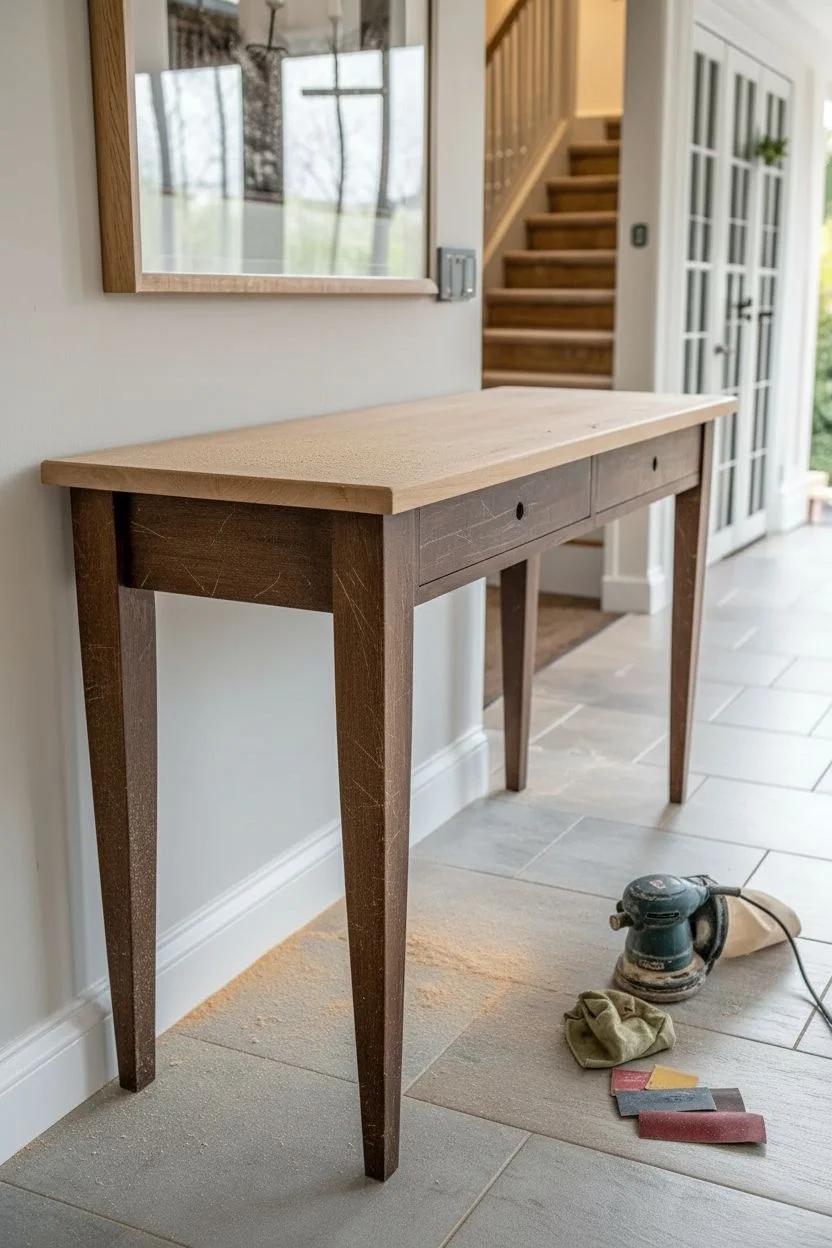
Achieve a sophisticated, farmhouse-inspired entryway with this timeless two-tone makeover. By preserving the natural grain on top and contrasting it with a crisp, creamy base, you create a piece that feels both grounded and airy.
Detailed Instructions
Materials
- Solid wood console table (existing or thrifted)
- Orbital sander with 80, 120, and 220 grit discs
- Chemical paint stripper (optional, for heavy finishes)
- Painter’s tape and plastic drop cloth
- Stain-blocking primer (shellac-based recommended)
- Cream or Off-White furniture paint (satin finish)
- Clear matte polyurethane or furniture wax
- High-quality synthetic angled brush
- Small foam roller
- Tack cloth
- Brass knobs (if replacing hardware)
Step 1: Preparation & Stripping
-
Hardware removal:
Begin by unscrewing all existing knobs or pulls from the drawers. Store them safely in a labeled bag if you plan to reuse them, but for this specific look, aim for simple antique brass replacements. -
Assess the top:
Examine the tabletop finish. If it has a thick, glossy varnish, apply a chemical stripper according to the manufacturer’s instructions to scrape off the bulk of the old finish before sanding. -
Sand the top to raw wood:
Using an orbital sander, start with 80-grit sandpaper to remove the remaining finish from the tabletop only. Work your way up to 120-grit, then finish with 220-grit for a silky smooth, raw wood surface. -
Scuff sand the base:
The legs and body don’t need to be stripped to raw wood since they will be painted. Simply scuff sand them by hand with 120-grit sandpaper to create a ‘tooth’ for the primer to grip. -
Deep clean:
Vacuum up all the sawdust from the piece and the surrounding area. Wipe the entire table down with a tack cloth or a rag dampened with mineral spirits to remove every speck of dust.
Clean Lines
Burnish down the edge of your painter’s tape with an old credit card before painting. This prevents paint from bleeding under the tape.
Step 2: Treating the Top
-
Protect the base:
Before working on the top, I like to run a line of painter’s tape just under the lip of the table top to protect the apron from any accidental drips. -
Apply clear coat:
To keep that light, natural oak look shown in the image, skip the stain. Apply a coat of water-based matte polyurethane directly to the raw wood. Water-based formulas won’t yellow over time like oil-based ones. -
Sand between coats:
Once the first coat is dry (usually 2 hours), lightly hand-sand with 320-grit paper to knock down any raised grain. Wipe away dust. -
Final top coat:
Apply two to three more thin coats of polyurethane for durability, allowing proper drying time between each layer. This ensures the entryway table can handle keys and mail without scratching.
Step 3: Painting the Base
-
Tape off the top:
Once the top is fully cured (give it at least 24 hours), apply painter’s tape along the edge of the wood top to protect your beautiful new finish from paint. -
Prime the base:
Apply a coat of stain-blocking primer to the legs and drawer fronts. This is crucial for preventing old wood tannins from bleeding through your light cream paint. -
Painting tight spots:
Use your angled synthetic brush to cut in corners, details around the legs, and the edges of the drawers. Keep your strokes smooth to avoid brush marks. -
Roll the flat surfaces:
For the flat sides of the legs and the drawer fronts, a small foam roller works wonders to achieve a factory-smooth finish without brushstrokes. -
Second coat:
Allow the first coat to dry completely. Lightly sand any drips, then apply a second coat of your cream paint for full, opaque coverage. -
Install hardware:
Once the paint is fully cured, install your small brass knobs. The contrast of the gold tone against the cream paint finishes the look perfectly.
Level Up: Drawer Liners
Line the inside of the drawers with a botanical or striped wallpaper scrap for a hidden pop of pattern when you reach for your keys.
Step back and admire how this simple contrast has completely refreshed the energy of your entryway

PENCIL GUIDE
Understanding Pencil Grades from H to B
From first sketch to finished drawing — learn pencil grades, line control, and shading techniques.
Explore the Full Guide
Painted Hardware and Matching Details for a Finished Look
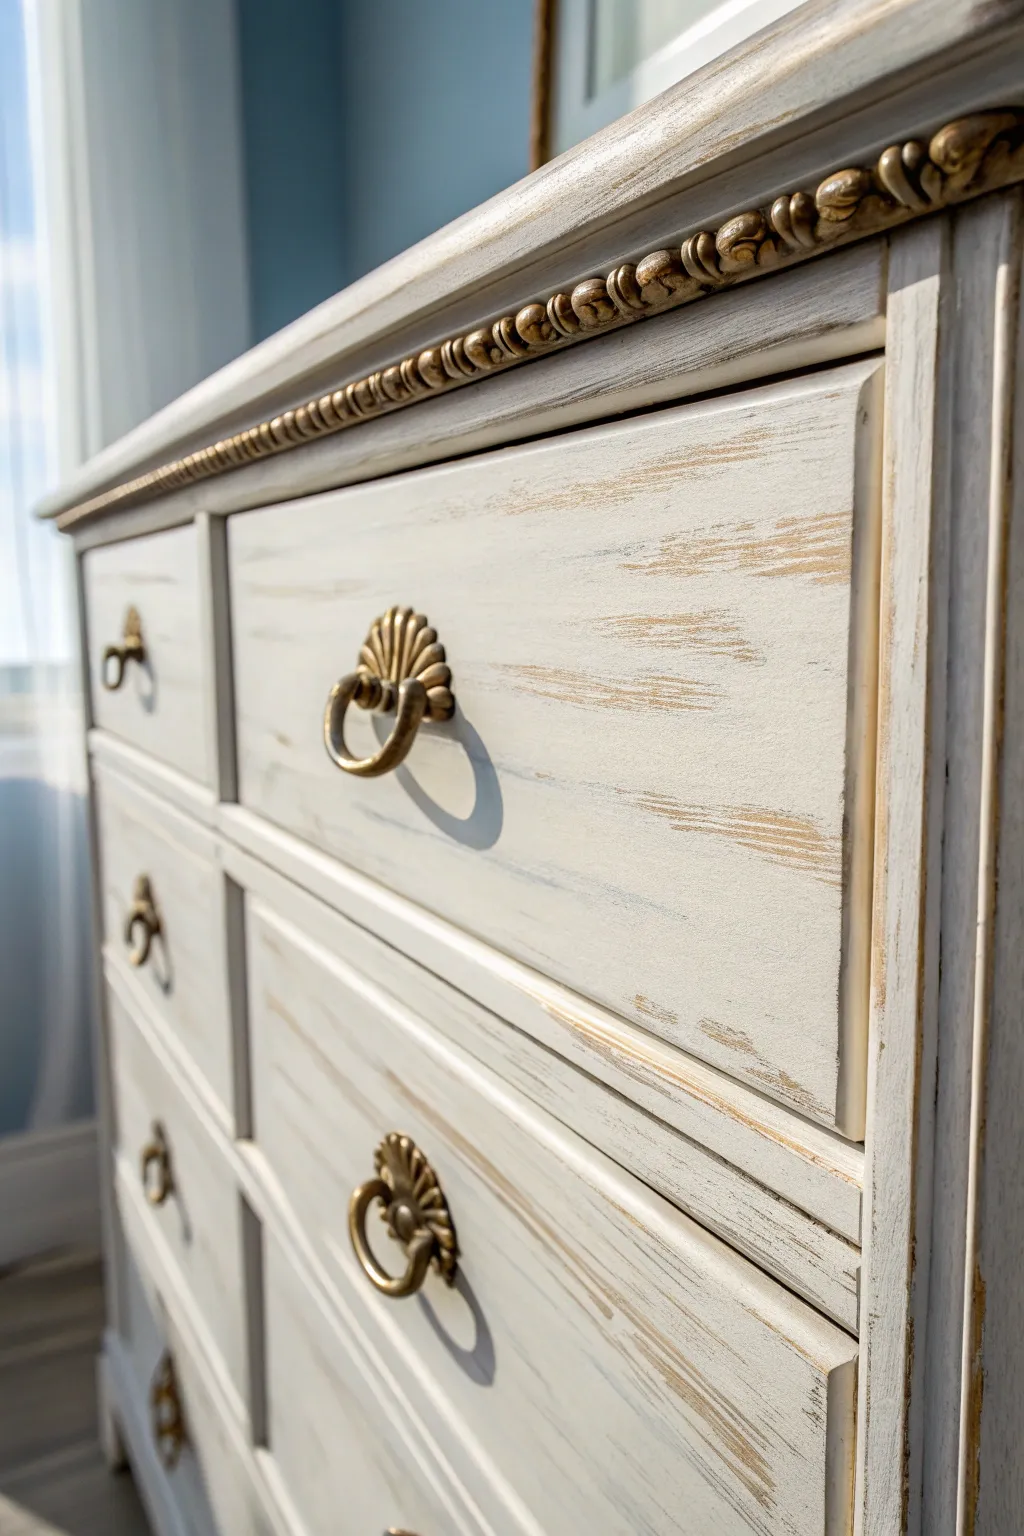
Transform a standard wooden dresser into a piece of French Provincial luxury with this layered paint and wax technique. The look features a creamy white base that allows warm wood tones and metallic gold accents to peek through for an authentic, aged appearance.
Step-by-Step Tutorial
Materials
- Wooden dresser (previously finished or raw wood)
- Medium and fine grit sandpaper (120 and 220 grit)
- Tack cloth
- Chalk-style paint in creamy antique white
- Gold gilding wax or metallic gold paint
- Clear furniture wax
- Dark antique wax (brown tone)
- Paintbrushes (synthetic oval brush recommended)
- Small artist brushes for detailing
- Clean lint-free rags
- Screwdriver for hardware removal
Step 1: Prep and Prime
-
Remove hardware:
Begin by unscrewing all drawer pulls, knobs, and decorative hardware. Place them in labeled bags so you know exactly where each piece goes later. -
Clean thoroughly:
Scrub the entire piece with a degreasing cleaner to remove years of furniture polish, oil, and dust. This is crucial for adhesion. -
Scuff sanding:
Lightly sand the existing finish with 120-grit sandpaper. You don’t need to strip it to bare wood, just create enough ‘tooth’ for the new paint to grab. -
Dust removal:
Wipe away every speck of sanding dust using a sticky tack cloth. Any leftover dust will ruin your smooth finish.
Wet Distressing Tip
If you hate sanding dust, use a damp kitchen sponge to wipe away paint on edges while it’s still slightly tacky. It creates a softer, more naturally worn edge.
Step 2: The Base Coat
-
First coat application:
Apply your creamy white chalk-style paint using an oval brush. Chalk paint is thick, but try to brush in the direction of the wood grain for a natural look. -
Dry time:
Allow the first coat to dry completely. This usually takes about 1-2 hours depending on humidity, but check the manufacturer’s instructions. -
Second coat:
Apply a second coat of white paint for full opacity. Pay special attention to the recessed areas of the drawer fronts, ensuring full coverage. -
Final dry:
Let this second coat dry overnight. Chalk paint hardens as it cures, making the distressing step much cleaner if you wait.
Step 3: Distressing and Weathering
-
Heavy distressing:
Using 220-grit sandpaper, purposefully sand away the white paint in areas where natural wear would occur—edges of drawers, corners, and raised moldings. You want the original wood color to show through. -
Surface weathering:
For the flat drawer fronts, create horizontal sanding scratches. I like to use a coarser blocks here to create those ‘scuffed’ white lines that reveal the wood tone beneath the main surface, mimicking aged cracked paint. -
Clean up dust:
Vacuum or wipe the piece down again to remove all paint dust created by the distressing process.
Too Much Dark Wax?
If the antique wax looks too muddy or dark, apply a dollop of clear wax directly over it. The clear wax acts like an eraser, lifting the excess pigment.
Step 4: Hardware and Gold Detailing
-
Refresh hardware:
While the dresser settles, clean the old hardware. If it’s too shiny or mismatched, apply a layer of gold gilding wax with your finger or a small brush to give it a muted, antique brass look. -
Highlight the molding:
Using a small artist brush or your fingertip, rub gold gilding wax lightly over the beaded molding along the top edge of the dresser. Don’t aim for perfection; a staggering application looks more convincingly antique. -
Drawer accents:
Lightly dry-brush a tiny amount of gold wax onto the distressed edges of the drawer fronts to catch the light.
Step 5: Sealing and Aging
-
Apply clear wax:
Brush a layer of clear furniture wax over the entire piece. This seals the chalk paint and provides a workable base for the dark wax. -
Apply dark wax:
Work the dark antique wax into the corners, recessed crevices, and over the beaded trim. The clear wax underneath allows you to manipulate this dark layer easily. -
Wipe back:
Immediately wipe away the excess dark wax with a clean rag. The dark pigment should remain only in the grooves and texture, adding depth to the white paint. -
Reattach hardware:
Once the wax has cured (usually 24 hours to be safe to handle), screw the hardware back into place to complete the transformation.
Step back and admire how layer upon layer of paint, distress, and metallic wax created a piece with genuine history and charm
Antiqued Glaze Over Paint to Highlight Carved Details
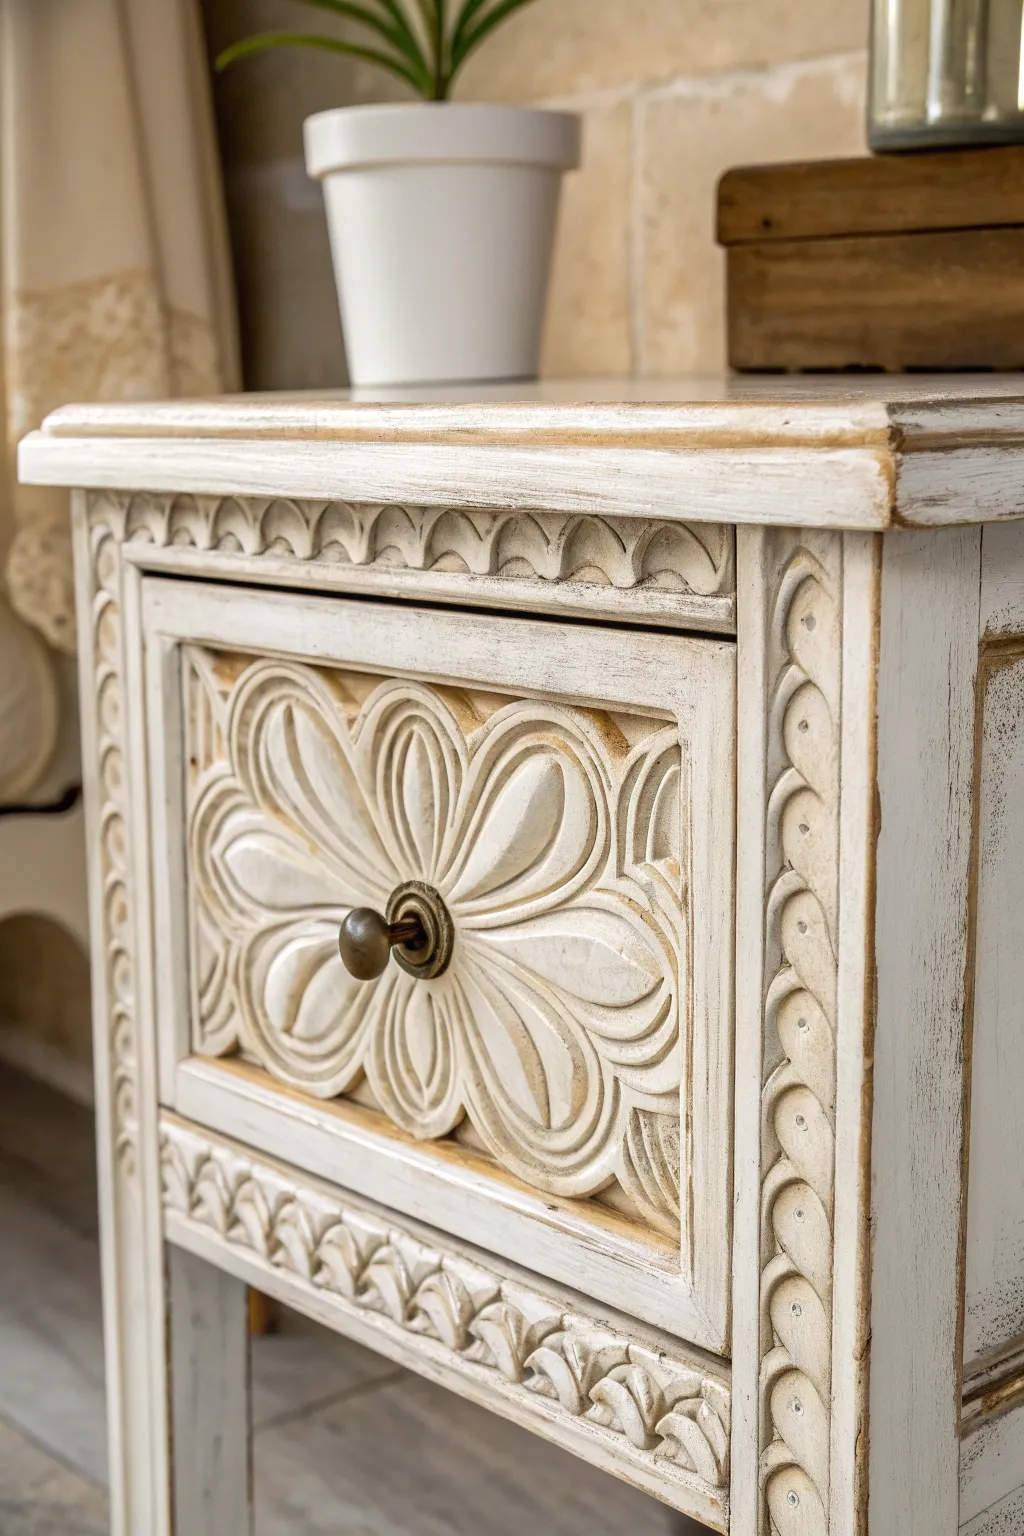
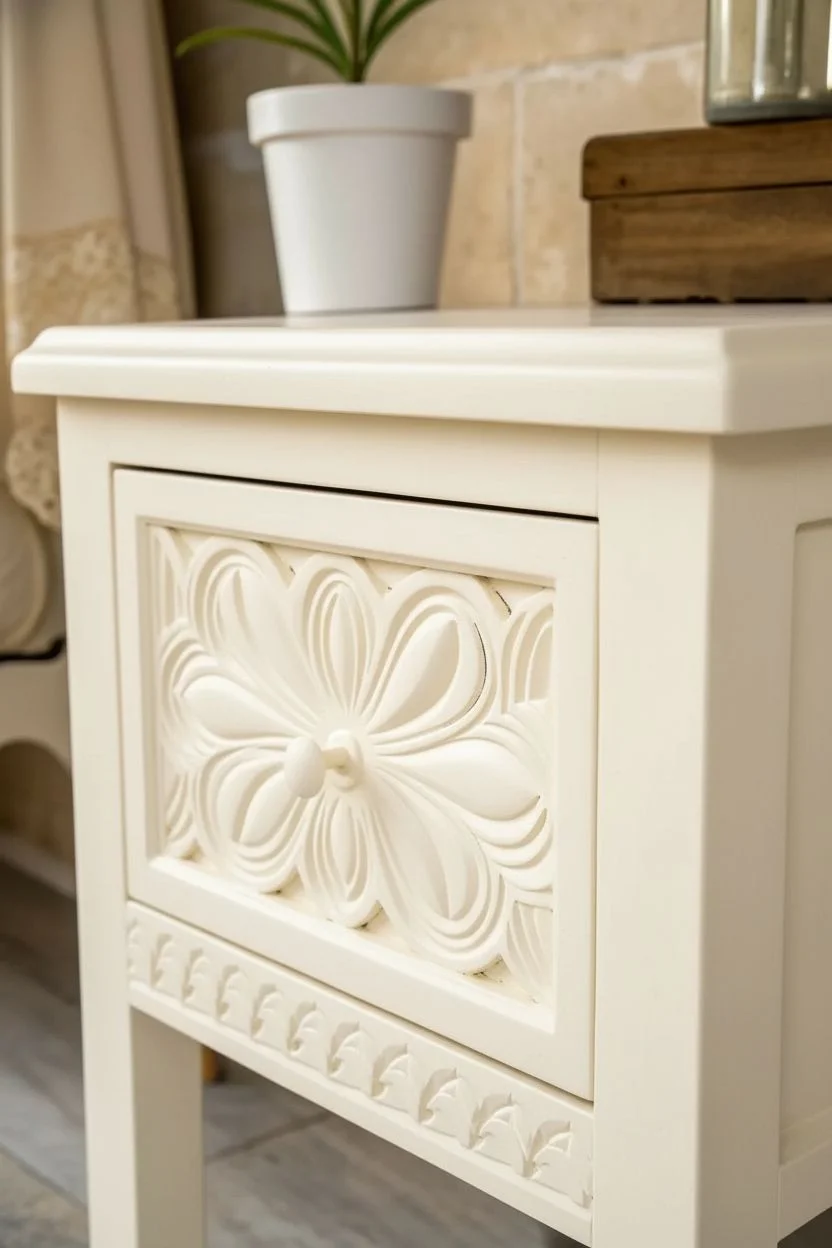
Transform a heavily carved furniture piece into a stunning vintage focal point by mastering the art of antiqued glazing. This technique uses dark wax or glaze to settle into reliefs, instantly adding centuries of character and highlighting intricate craftsmanship.
Step-by-Step Guide
Materials
- Furniture piece with carved details (nightstand or side table)
- Chalk-style paint (Warm White or Cream)
- Clear furniture wax
- Dark antiquing wax (Brown or Espresso)
- Medium-grit sanding block
- Lint-free cotton rags
- Round wax brush
- Synthetic oval paint brush
- Mild degreaser or TSP alternative
Step 1: Preparation & Base Coat
-
Clean surface:
Begin by thoroughly cleaning your furniture piece with a mild degreaser or TSP alternative to remove oils and dirt. A clean surface ensures the paint adheres properly without peeling later. -
Light scuff sand:
Run a medium-grit sanding block over the entire piece to roughen the existing finish slightly. You don’t need to strip it to bare wood, just create some ‘tooth’ for the paint. -
Remove dust:
Wipe away all sanding dust with a damp rag or tack cloth. -
Apply first coat:
Using a synthetic oval brush, apply your first coat of warm white chalk-style paint. Brush in the direction of the wood grain, but don’t worry about perfect coverage yet. -
Dry completely:
Allow the first coat to dry for at least 1-2 hours. -
Apply second coat:
Apply a second coat of paint for full opacity. Pay special attention to the carved areas, stippling the brush vertically to ensure paint gets into every crevice. -
Final dry:
Let the paint cure fully, preferably overnight or for at least 4-6 hours, so it hardens enough to withstand the distressing process.
Step 2: Distressing & Glazing
-
Distress edges:
Take your sanding block and gently distress high points, edges, and raised carvings. Sand until the natural wood just begins to peek through, mimicking natural wear patterns. -
Dust off:
Use a dry brush or vacuum attachment to remove all sanding dust from the crevices. This is crucial so your wax doesn’t turn into mud. -
Clear wax layer:
Brush a thin layer of clear furniture wax over the entire piece with a wax brush. This barrier prevents the dark wax from staining the white paint too heavily and allows you to erase mistakes. -
Apply dark wax:
Working in small sections, brush the dark antiquing wax directly over the clear wax. Focus heavily on the carved flower reliefs and recessed grooves. -
Push into crevices:
Use a stabbing motion with your brush to jam the dark wax deep into the carved details. I find this technique ensures the deepest shadows get the most definition. -
Wipe back:
Immediately take a clean, lint-free rag and wipe away the excess dark wax from the raised, flat surfaces. The goal is to leave the darkness only in the grooves. -
Adjust contrast:
If a section looks too dark, add a little more clear wax to your rag and wipe the area again. The clear wax acts like an eraser for the dark wax. -
Buff to finish:
Once you are happy with the look, let the wax harden for 24 hours. Finally, buff the surfaces briskly with a clean soft cloth to create a soft, protective sheen.
Don’t Hesitate
Work in small sections (like one drawer front at a time). Dark wax dries quickly, and it’s much harder to manipulate once it sets up.
Add Hardware
Swap standard knobs for oil-rubbed bronze or vintage brass hardware. The dark metal finish ties perfectly into the dark wax shadows.
Enjoy the elegant depth and history this techinque brings to your space


Color-Washed Furniture That Lets the Wood Grain Glow Through
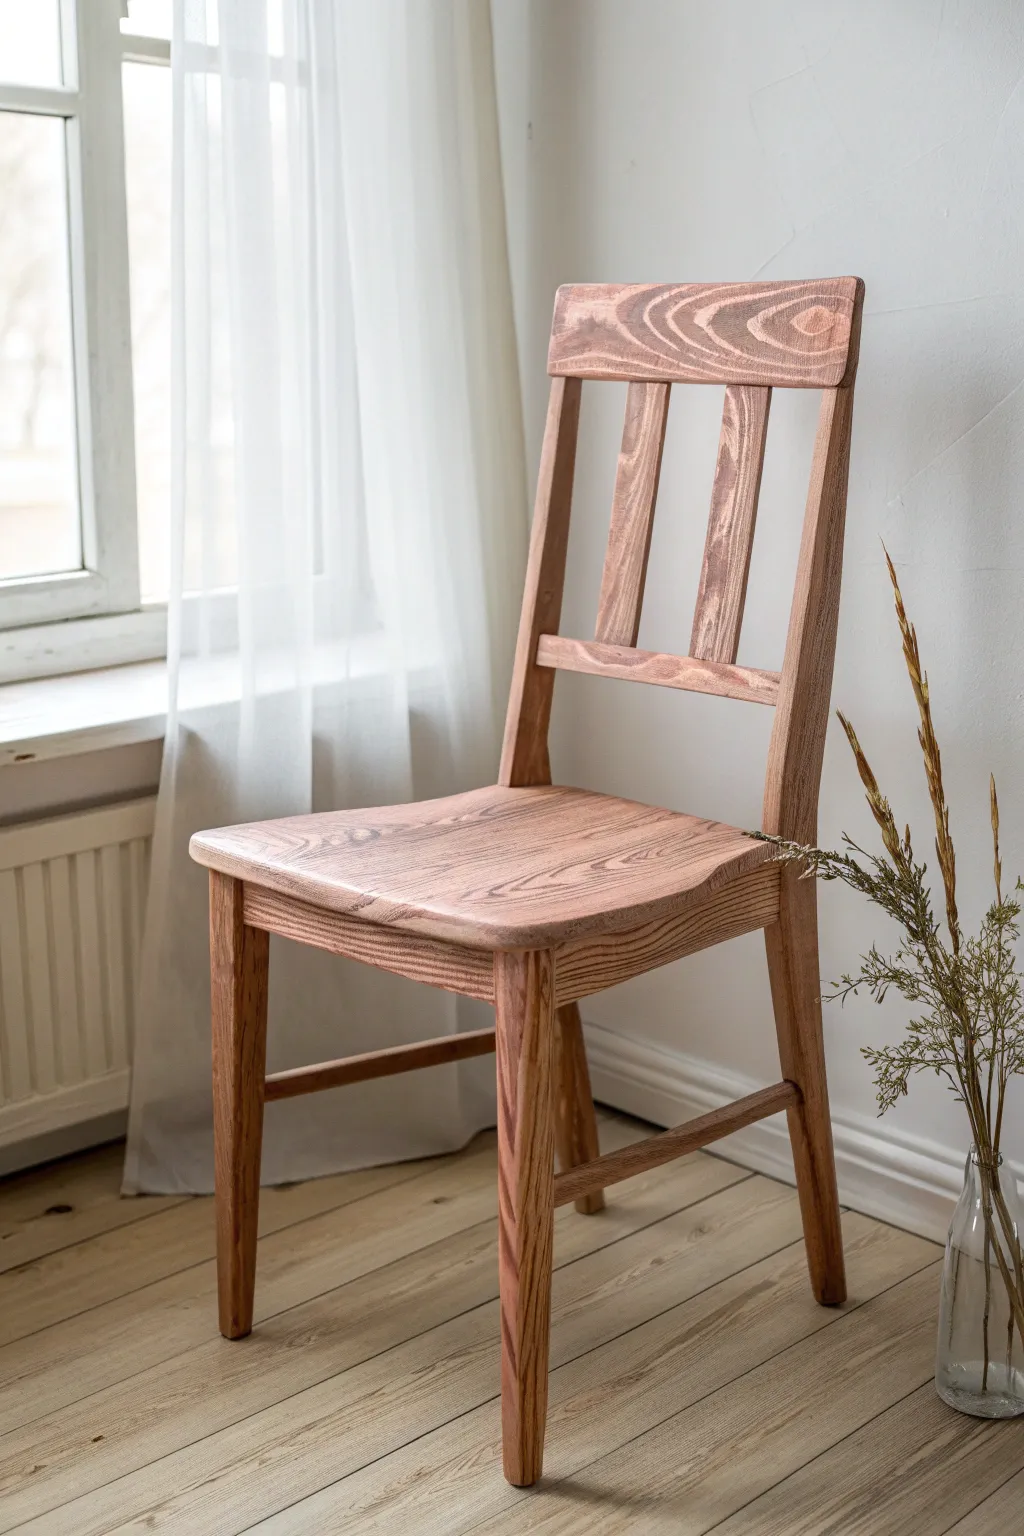

This project transforms a simple wooden chair into a warm, character-filled piece by using a color wash technique. Instead of hiding the beautiful wood grain under heavy opaque paint, this method enhances distinct patterns with a soft, reddish-brown hue that feels both vintage and fresh.
Detailed Instructions
Materials
- Unfinished wooden chair (ash or oak works best)
- Sandpaper (120, 180, and 220 grit)
- Tack cloth
- Water-based latex or chalk paint (terracotta or reddish-brown color)
- Plastic container for mixing
- Water (for diluting paint)
- Wide synthetic bristle brush
- Lint-free cotton rags
- Clear matte polycrylic sealer
- Stir stick
- Drop cloth
Step 1: Prepping the Wood
-
Strip old finish:
If your chair isn’t raw wood, you must strip any existing varnish or paint completely. A chemical stripper followed by scraping gets you back to the bare wood necessary for the wash to soak in. -
Initial sand:
Begin sanding with 120-grit sandpaper to remove any remaining stubborn finish or rough spots. Always sand in the direction of the wood grain to avoid unsightly scratches. -
Refine the surface:
Switch to 180-grit sandpaper for a smoother pass, paying special attention to the curved back slats and legs. -
Final smoothing:
Finish the sanding process with 220-grit sandpaper. This ensures the wood is incredibly smooth but the pores remain open enough to accept the color wash. -
Clean dust:
Vacuum the chair thoroughly to remove sawdust. Follow up by wiping the entire piece with a tack cloth to catch fine particles that could clump in your paint.
Pro Tip: Grain Popping
For deeper contrast, lightly wet the wood with plain water before painting. This ‘pops’ the grain, allowing the darker wash pigment to settle deeper into the wood fibers.
Step 2: Creating the Wash
-
Mix paint and water:
In your plastic container, combine your terracotta-colored paint with water. I generally start with a 1:1 ratio—one part paint to one part water. -
Test consistency:
Stir until the mixture is completely smooth. It should have the consistency of heavy cream or milk. If it’s too thick, add water in small increments. -
Perform a spot test:
Brush a small amount of the wash onto the underside of the seat. If the color is too opaque, add more water; if it’s too faint, add a little more paint.
Troubleshooting: Blotchy Color
If the wash looks uneven or blotchy, wet your rag slightly before wiping. This reactivates the paint edges and helps blend the transition lines for a smoother look.
Step 3: Applying the Color
-
Work in sections:
Start with the legs or the rungs. Apply the wash generously with your synthetic brush, ensuring you get into the crevices where the joinery meets. -
Wipe back immediately:
Before the wash dries, take a lint-free cotton rag and wipe the surface in the direction of the grain. This removes excess pigment and reveals the wood pattern underneath. -
Control the intensity:
The harder you wipe, the more translucent the finish becomes. Keep a consistent pressure across the whole chair to ensure the color looks uniform. -
Tackle the back:
Move to the backrest slats. Brush the wash vertically along the slats and wipe downwards to prevent pooling at the bottom. -
Finish the seat:
Do the seat last, as it’s the largest surface. Long, continuous brush strokes followed by long wipes with the rag will prevent start-and-stop marks in the middle of the seat. -
Check for drips:
Scan the chair for any drips, especially on the underside of the seat and rungs, wiping them away before they harden. -
Let it dry:
Allow the chair to dry completely for at least 4-6 hours. The color may lighten slightly as the water content evaporates.
Step 4: Sealing and Finishing
-
Light scuff sand:
Once fully dry, very gently run the 220-grit sandpaper over the surface to knock down any raised grain fibers caused by the water. -
Apply sealer:
Stir your clear matte polycrylic (don’t shake, as bubbles are the enemy here). Apply a thin, even coat over the entire chair. -
Dry and recoat:
Wait about two hours for the first coat to dry. Apply a second coat for durability, particularly on the seat where wear is highest. -
Final cure:
Let the chair cure for at least 24 hours before use to ensure the finish hardens completely.
Now you have a beautifully revived chair that celebrates natural textures with a gentle kiss of color
Paint the Inside of Drawers for a Hidden Pop of Color
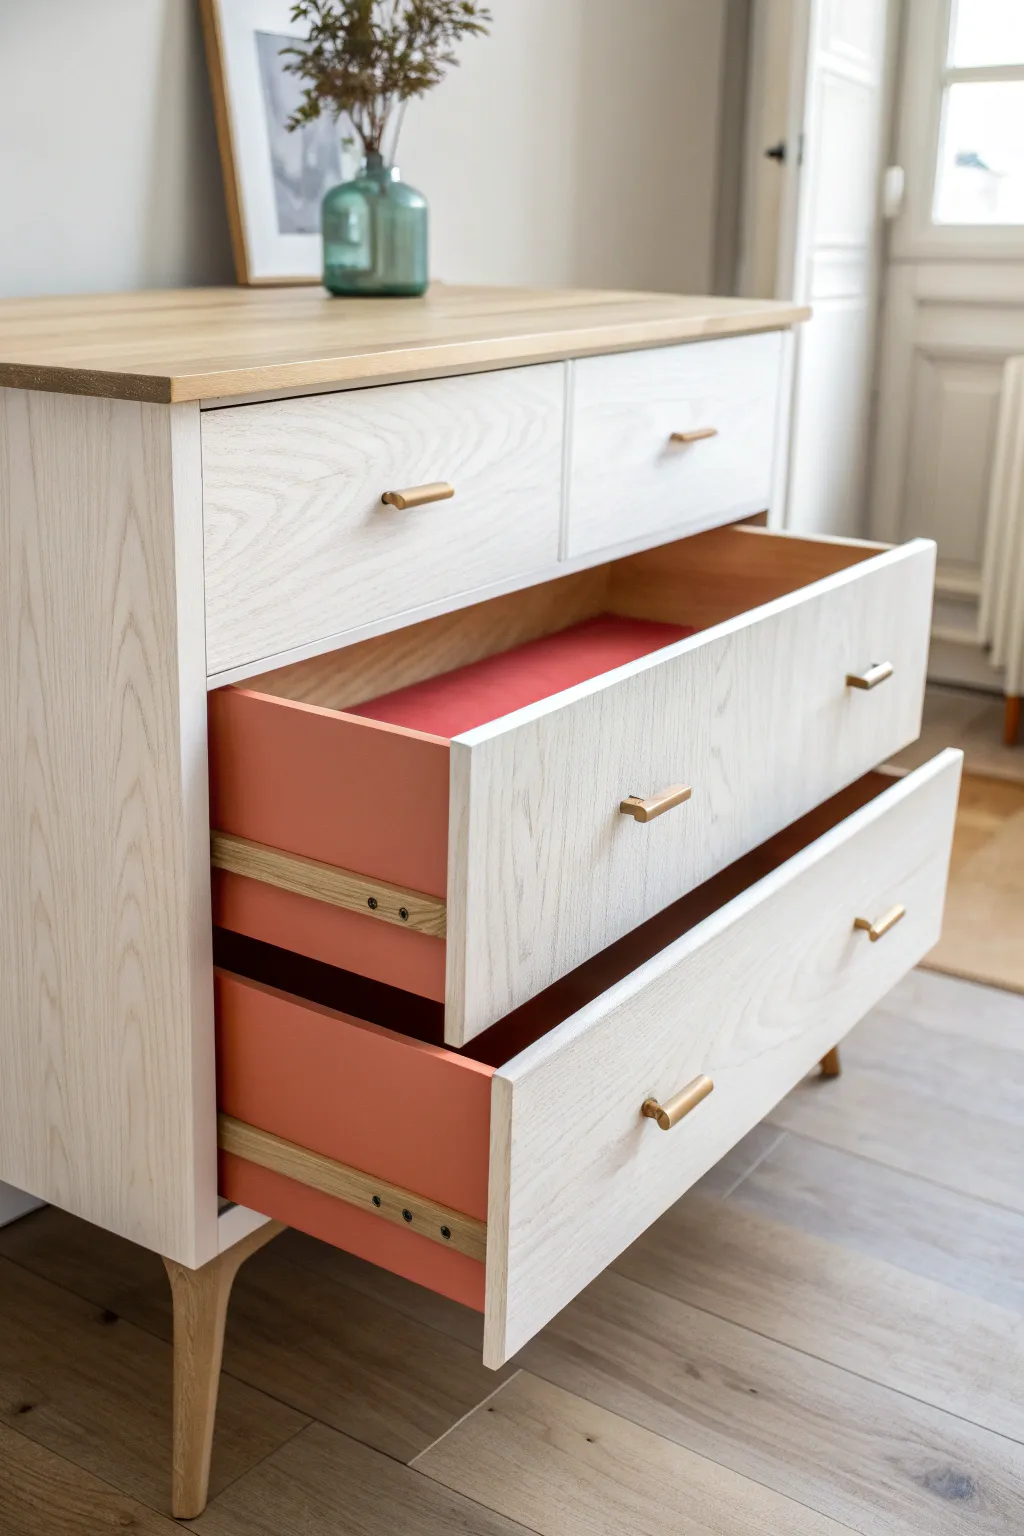
Transform a plain dresser into a delightful surprise by adding a vibrant pop of coral pink to the interior drawers while keeping the exterior light and airy. This project combines a sophisticated whitewash technique on the outside with a bold, playful color hidden inside for a unique, custom look.
Step-by-Step Tutorial
Materials
- Wooden dresser (unfinished or stripped)
- Sandpaper (120 and 220 grit)
- Tack cloth
- Painter’s tape
- Whitewash stain or watered-down white latex paint
- Coral/Salmon pink interior paint (satin or semi-gloss finish)
- Clear matte polyurethane topcoat
- Synthetic bristle paintbrush (2-inch)
- Small angled sash brush
- Foam roller and tray
- Screwdriver
- Drop cloth
Step 1: Preparation and Whitewashing
-
Hardware Removal:
Begin by removing all the drawers from the dresser frame. Use a screwdriver to carefully detach all knobs, handles, and any metal runners you don’t want to paint over. Identify which hardware belongs to which drawer if they vary in size. -
Surface Sanding:
Sand the entire exterior of the dresser and the drawer fronts with 120-grit sandpaper to remove any glossy finish or rough spots. Follow up with 220-grit for a smooth finish perfectly prepped for stain. -
Dust Removal:
Thoroughly wipe down every surface with a tack cloth. Dust is the enemy of a smooth finish, especially when whitewashing where the grain shows through. -
Create the Whitewash:
If you aren’t using a pre-mixed whitewash stain, mix water and white latex paint in a 1:1 ratio. I like to test the consistency on a hidden spot first; you want it thin enough to show the wood grain but opaque enough to brighten the tone. -
Apply Whitewash:
Brush the whitewash mixture onto the dresser frame and drawer fronts in long strokes following the wood grain. Work in small sections. -
Wipe Back:
Immediately after applying a section, gently wipe off the excess paint with a clean, lint-free rag. The harder you wipe, the more wood grain will show through. -
Dry Time:
Allow the whitewashed surfaces to dry completely, ideally overnight, to ensure the moisture has evaporated from the wood.
Clean Lines
Before painting, run a credit card firmly over the edge of your painter’s tape. This seals the edge tight and prevents the coral paint from bleeding onto your pristine white front.
Step 2: The Hidden Pop of Color
-
Tape the Edges:
Apply painter’s tape to the top edges of the drawer sides and the back of the drawer front. You want a crisp, clean line where the whitewashed front meets the painted interior. -
Protect the Runners:
If your drawers have wooden runners on the sides, tape over them precisely. Painting the runners can cause the drawers to stick later. -
Cut In Corners:
Using your small angled sash brush, paint the coral color into the corners and seams of the drawer interior where a roller can’t reach. -
Roll the Interior:
Use a small foam roller to apply the coral paint to the bottom and sides of the drawer interior. This ensures a smooth, streak-free finish. -
Second Coat:
Once the first coat is dry to the touch, apply a second coat of coral paint for full, rich opacity. This color needs to be bold to contrast with the white exterior. -
Remove Tape:
Carefully peel off the painter’s tape while the second coat is still slightly tacky. This helps prevent the paint from peeling up with the tape.
Pattern Play
Take it up a notch by lining just the bottom of the drawer with a geometric wallpaper or contact paper that matches your paint color instead of painting the floor.
Step 3: Finishing Touches
-
Seal the Exterior:
Protect your whitewashed finish by applying a coat of clear matte polyurethane. Use a high-quality synthetic brush to avoid brush marks. -
Seal the Interior:
For extra durability against items sliding around, broaden your protection by applying a coat of poly over the dried coral paint inside the drawers. -
Reassemble:
Once everything has cured for at least 24 hours, reattach your hardware. Brass or gold knobs look particularly stunning against the whitewash and coral combination. -
Drawer Insertion:
Slide the drawers back into the frame. Tip: Rub a little candle wax on the wooden runners to help them glide smoothly.
Now you have a piece that looks deceptively simple until you open a drawer to reveal that joyful burst of color
Stenciled Drawer Fronts for Easy Patterned Furniture
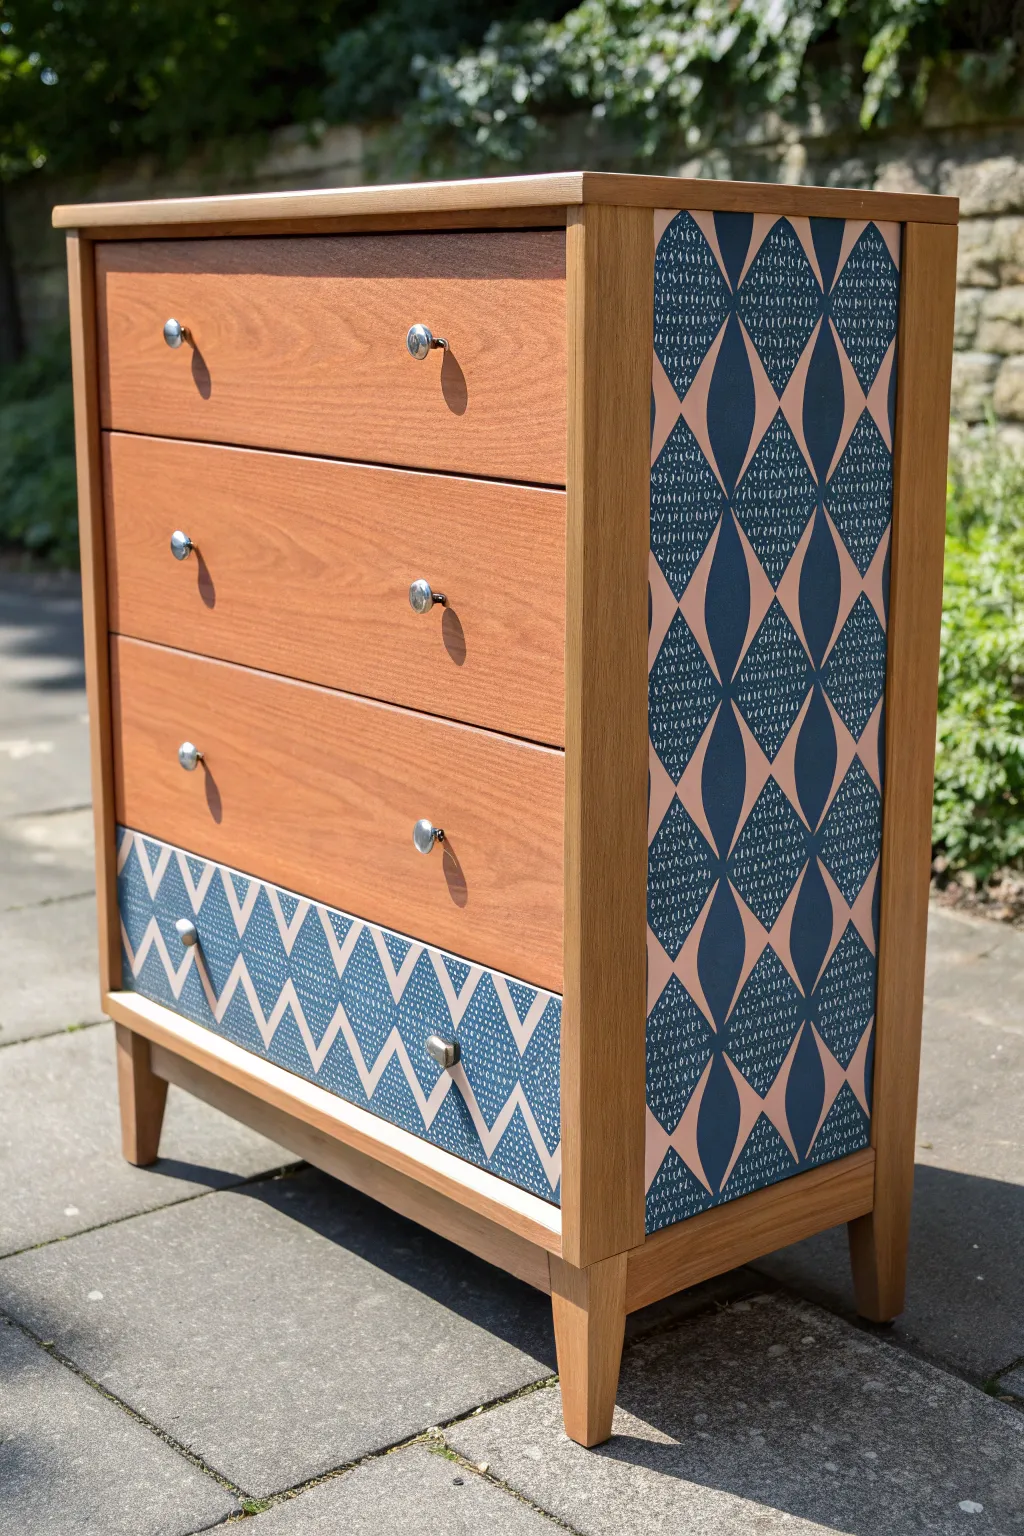
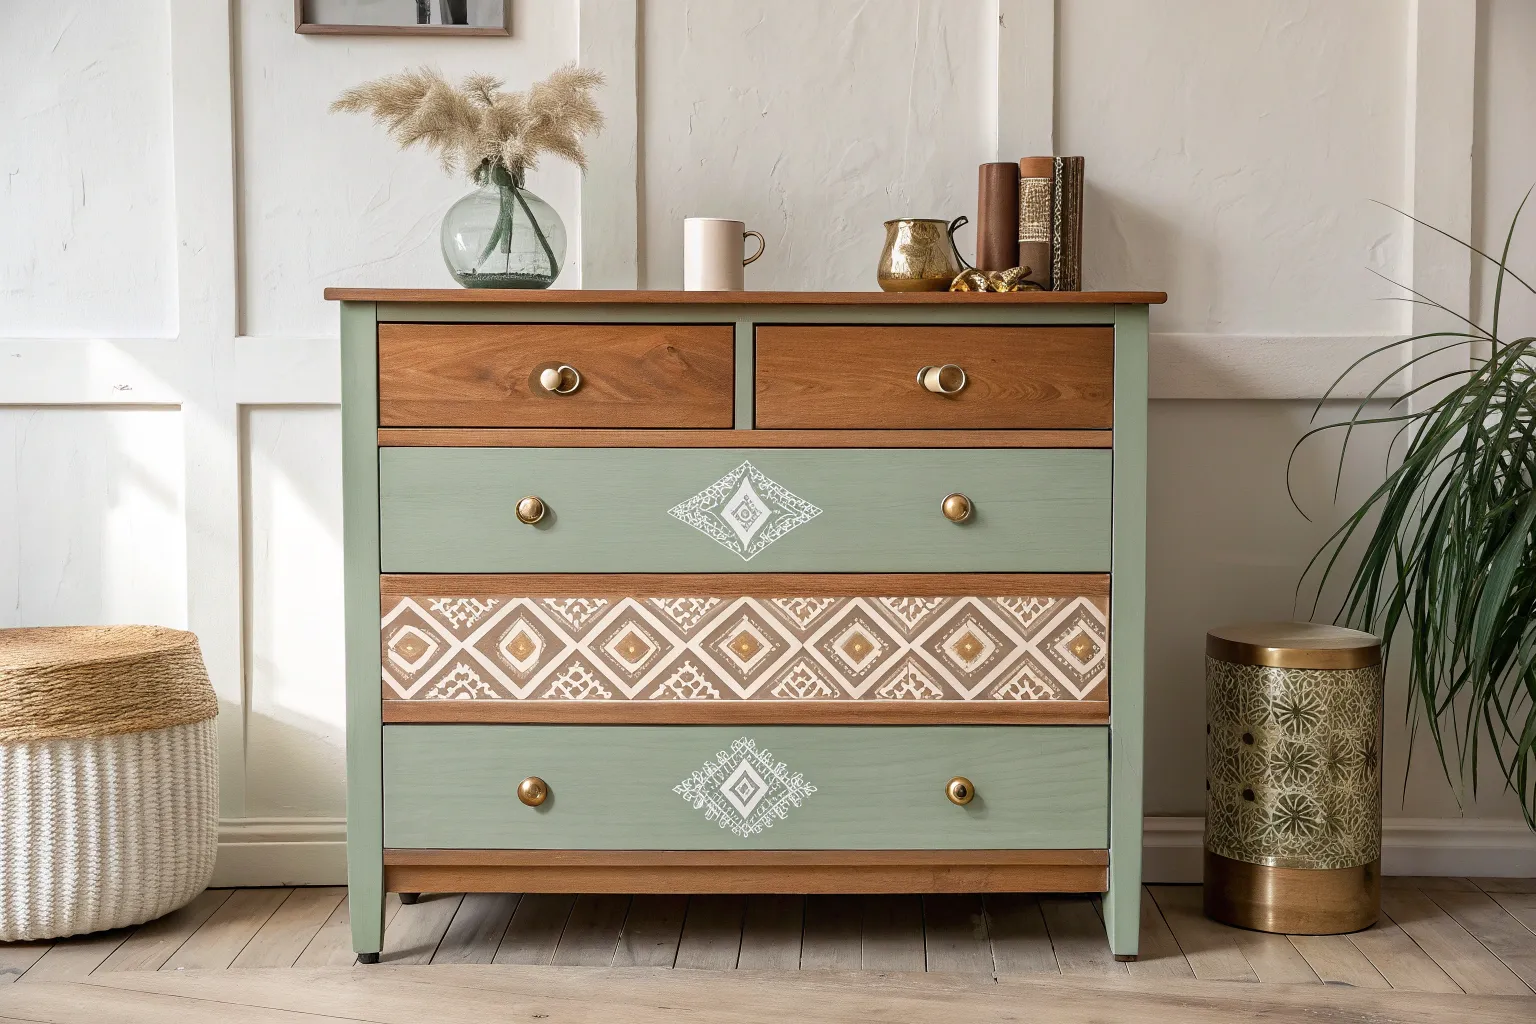
This project breathes new life into a standard wooden chest by combining warmth with pattern. Featuring refinished wood grain alongside bold, stenciled geometric designs in deep navy and crisp white, it creates a striking mid-century modern aesthetic.
Step-by-Step
Materials
- Wooden dresser (vintage or new)
- Orbital sander with 80, 120, and 220 grit sandpaper
- Painter’s tape (high quality)
- Wood stain (warm oak or teak tone)
- Polyurethane topcoat (satin or matte)
- Chalk paint or acrylic furniture paint (Deep Navy Blue)
- Chalk paint or acrylic furniture paint (Warm White/Cream)
- Flat artist brushes and small foam rollers
- Geometric stencil (diamond/argyle pattern)
- Geometric stencil (zig-zag/chevron pattern)
- Spray adhesive for stencils
- New cabinet knobs (chrome or brushed nickel)
- Screwdriver
- Clean lint-free rags
- Wood filler (if needed for repairs)
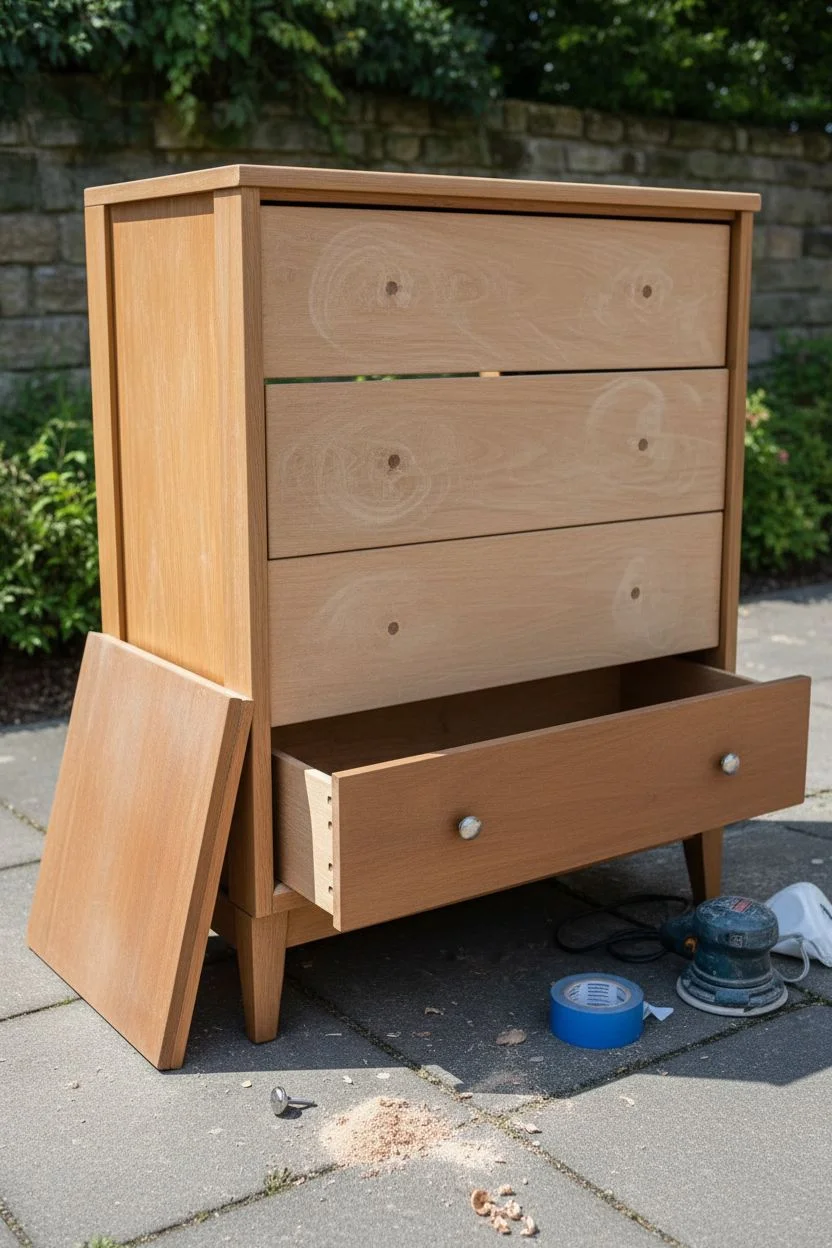
Step 1: Preparation and Sanding
-
Remove Hardware:
Begin by removing all existing drawers from the dresser. Unscrew and remove the old knobs or handles and set them aside if you plan to reuse them, though new hardware really updates the look. -
Clean Surfaces:
Wipe down the entire piece with a damp cloth and mild detergent to remove years of dust, grime, or furniture wax. Let it dry completely. -
Sand the Drawers:
Using an orbital sander, sand the front faces of the top three drawers down to raw wood. Start with 80-grit to strip the old finish, move to 120-grit, and finish with 220-grit for a super smooth surface. -
Sand the Frame and Bottom Drawer:
Lightly scuff sand the sides of the dresser frame and the front of the bottom drawer. You don’t need to strip these to bare wood since they will be painted or wallpapered, but you need ‘tooth’ for adhesion.
Clean Lines Pro-Tip
For ultra-crisp stencil lines, paint a thin layer of the *base* color over the stencil first. This seals the edges so the top color won’t bleed underneath.
Step 2: Staining the Wood Elements
-
Apply Stain:
On the three stripped top drawers and the thin front frame borders, apply your warm oak or teak wood stain using a clean rag. Wipe with the grain, let it penetrate for 5-10 minutes, and wipe away excess. -
Seal the Wood:
Once the stain is fully dry (check manufacturer times), apply two thin coats of satin polyurethane. Sand lightly with high-grit sandpaper between coats for a professional factory finish.
Step 3: Applying the Geometric Side Panels
-
Base Coat the Sides:
Paint the recessed side panels of the dresser with a specific base color. In this design, a soft peach or nude tone works as the background for the blue diamonds. Apply two coats. -
Position the Side Stencil:
Spray the back of your diamond/argyle stencil with a light mist of spray adhesive. Wait a moment for it to get tacky, then press it firmly onto the side panel. -
Stipple the Pattern:
Load a stencil brush or foam roller with Deep Navy Blue paint. Offload most of the paint onto a paper towel until the brush is almost dry, then gently dab over the stencil. This prevents bleeding. -
Add Detail (Optional):
To achieve the textural look seen in the photo, you can go back with a fine white paint pen or a tiny brush and add small scribbles or dots inside the blue diamonds once they are dry.
Level Up: Fabric Inlay
Instead of stenciling the complicated side pattern, use patterned fabric or wallpaper! Cut it to size and adhere it to the side panels with Mod Podge for instant texture.
Step 4: The Feature Drawer
-
Base Coat the Bottom Drawer:
Paint the entire face of the bottom drawer with your Deep Navy Blue paint. You will likely need two coats to get full, opaque coverage. -
Align the Zig-Zag Stencil:
Secure your chevron or zig-zag stencil over the dried blue drawer front. Use painter’s tape to ensure the pattern is perfectly level. -
Paint the Secondary Pattern:
Using the Cream/White paint, stipple the paint through the stencil. I prefer using a pouncing motion rather than brushing side-to-side to keep lines crisp. -
Detail the Diamonds:
Notice the pattern isn’t solid white; it has blue dots/diamonds inside. If your stencil is solid, go back after the white dries and use a small circular sponge or brush to add the blue texture back into the white areas.
Step 5: Final Assembly
-
Protect the Paint:
Apply a clear wax or matte polycrylic over the painted sections (sides and bottom drawer) to protect your artwork from chips and scratches. -
Install Hardware:
Once everything is cured, attach the new chrome knobs. Center them carefully on the drawer fronts. -
Reinsert Drawers:
Slide the drawers back into their tracks, stepping back to admire how the wood grain balances perfectly with your new geometric stenciling.
Place your revived dresser in a well-lit spot to show off that beautiful contrast between natural wood and modern design
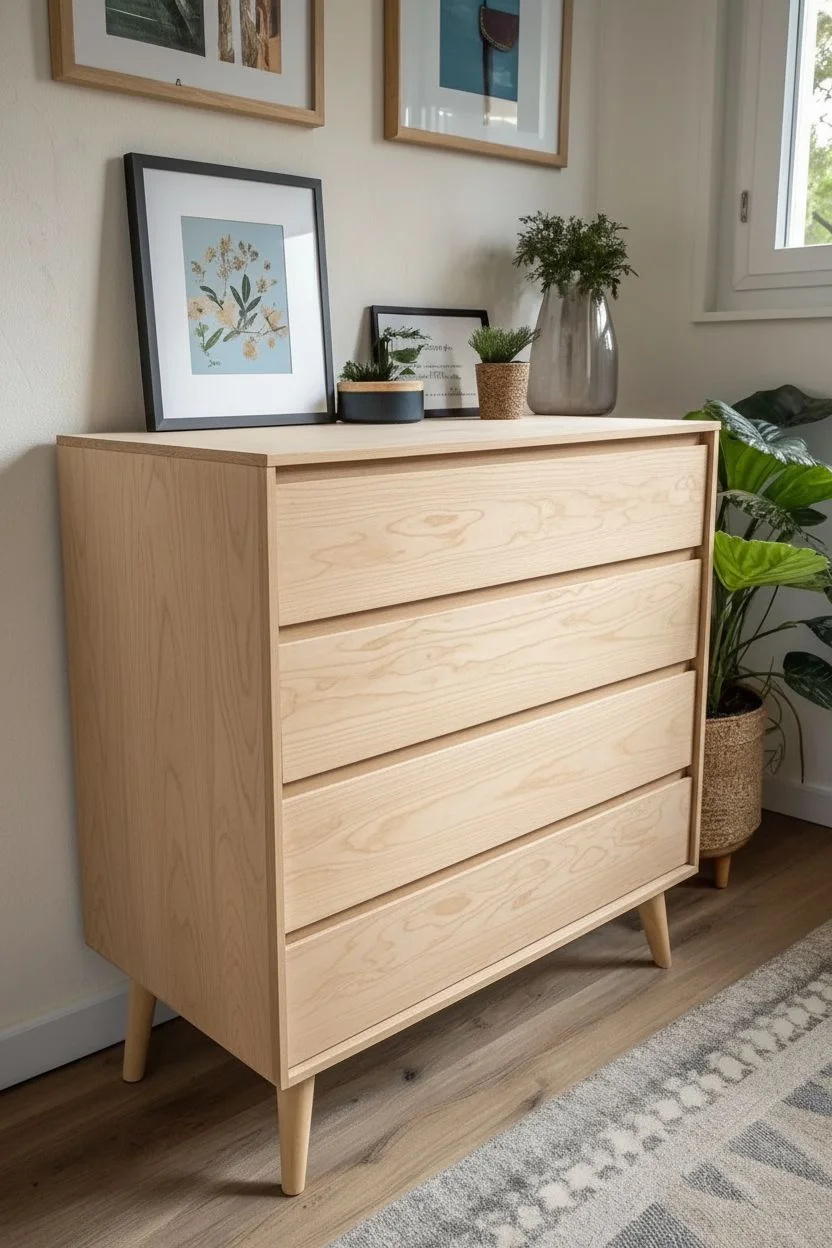
Ombre Blended Painted Furniture for a Soft Gradient Effect
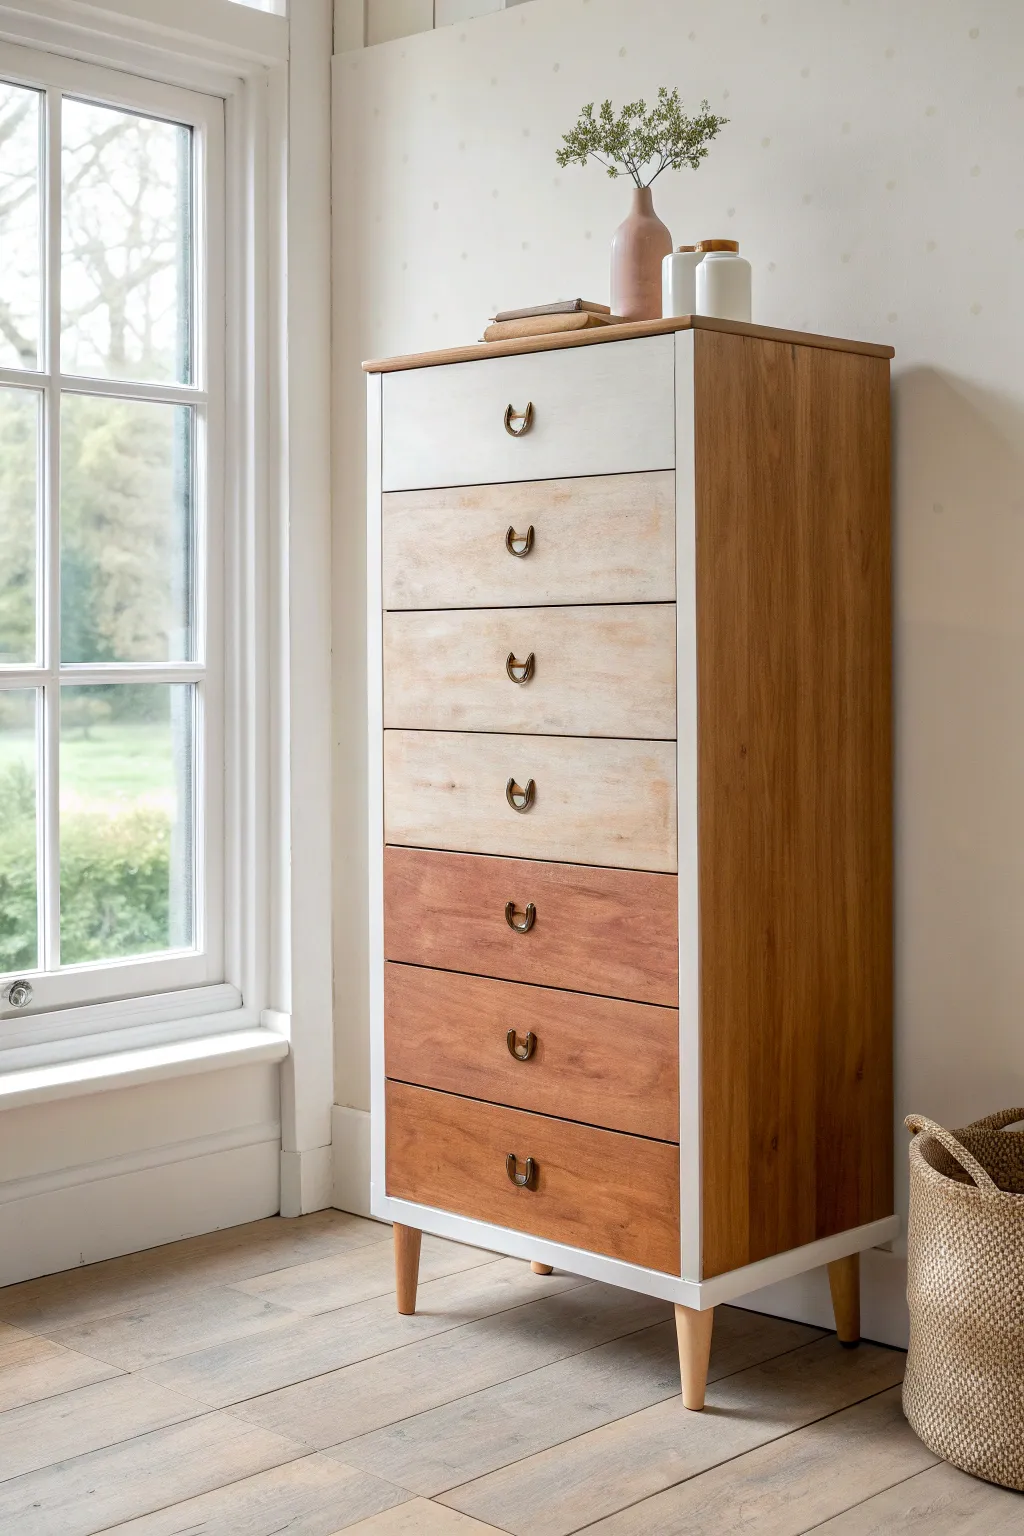
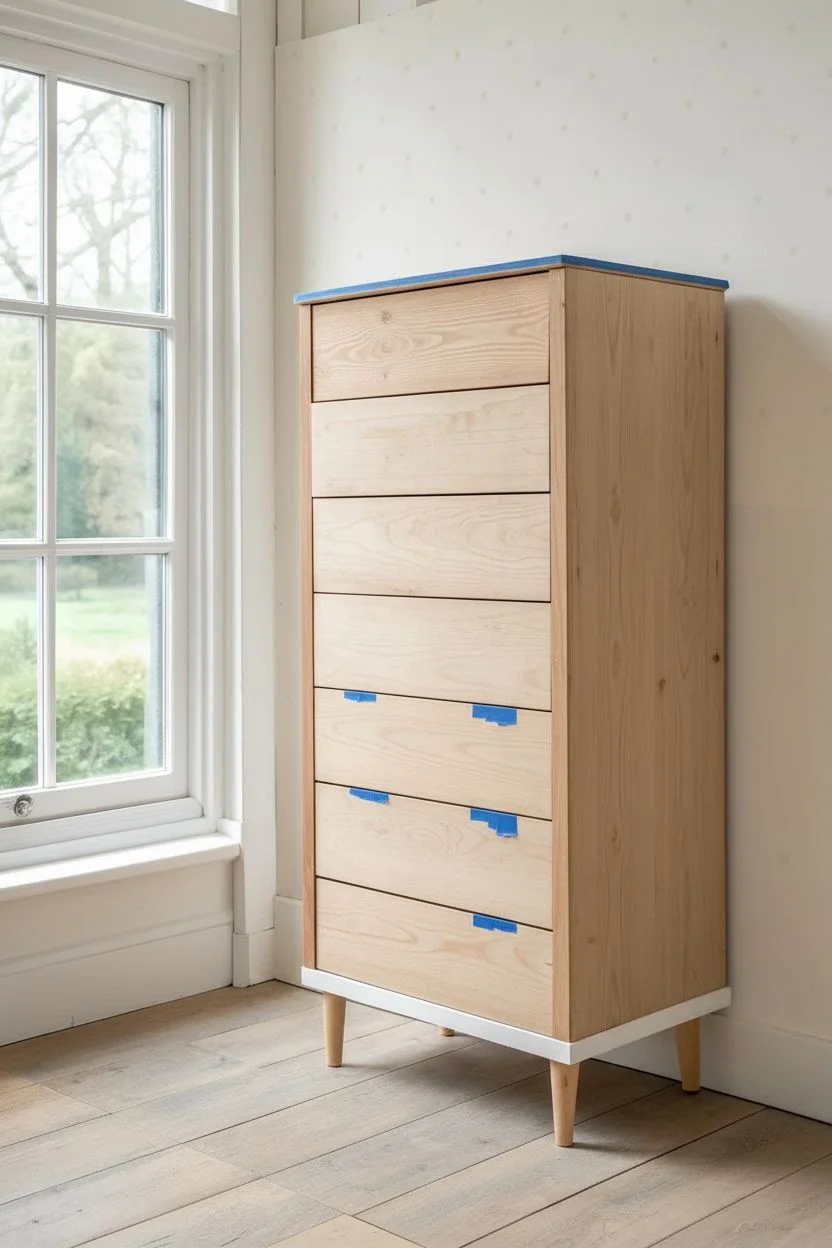
Transform a plain tallboy dresser into a stunning statement piece with this gentle, organic ombre effect. By blending custom tinted washes, you create a seamless gradient from creamy white to rich, warm timber tones that feels both modern and grounded.
Step-by-Step Tutorial
Materials
- Tall wooden chest of drawers (unfinished or stripped)
- White chalk paint or mineral paint
- Water-based wood stain (medium walnut or pecan shade)
- Clear matte polycrylic sealer
- Sandpaper (120, 220, and 400 grit)
- Painter’s tape
- Lint-free rags or staining sponges
- Small mixing cups (at least 7)
- High-quality synthetic brush (angled)
- Small measuring spoons or syringe
- Half-moon metal drawer pulls
Step 1: Preparation & Framework
-
Remove hardware:
Begin by removing all the old drawer pulls. If the existing holes don’t match your new half-moon pulls, fill them with wood filler, let dry, and drill new holes now. -
Sand the surface:
Since we are staining the wood, the surface must be raw. Sand the entire piece down to bare wood using 120-grit paper, finishing with 220-grit for a smooth base. Wipe away all dust with a damp cloth. -
Tape the frame:
Remove the drawers and set them aside. Use painter’s tape to protect the interior glide rails and the wooden top surface, as we want to keep the top natural wood to match the sides. -
Paint the carcass:
Paint the face frame and the bottom apron of the dresser with your white chalk paint. Apply two to three thin coats, sanding lightly with high-grit paper between coats for a flawless finish. Let this cure fully.
Swatch Smartly
Number the back of each drawer front with pencil before you start painting so you don’t accidentally mix up the order while they are drying.
Step 2: Mixing the Gradient
-
Create the base wash:
In a main container, dilute your white paint with water (about 50/50 ratio) to create a white wash. In a separate container, have your wood stain ready. -
Set up mixing cups:
Line up one mixing cup for each drawer. Label them 1 (top) through 7 (bottom). This organization is crucial for a smooth gradient. -
Mix the top tier:
For Cup 1 (top drawer), pour in your white wash mixture. Add just a tiny drop of stain—barely enough to warm it up, keeping it 95% white. -
Mix the middle transition:
For Cups 2 through 4, gradually decrease the amount of white wash and increase the stain. I like to use a measuring spoon here to ensure the steps are even (e.g., Cup 2 is 80% white/20% stain, Cup 3 is 60/40). -
Mix the darker tones:
For Cups 5, 6, and 7, switch to primarily stain diluted with just a splash of water, adding only a tiny bit of white paint to keep the finish opaque enough to match the upper texture. Cup 7 should be the darkest, nearly pure stain.
Too Opaque?
If your white wash hides too much wood grain, quickly mist the wood with water before applying the paint mixture. This helps the wash glide and stay sheer.
Step 3: Application & Finishing
-
Test the swatch:
Test your seven mixtures on a piece of scrap wood or the back of a drawer to ensure the transition looks smooth before committing to the fronts. -
Apply the washes:
Working one drawer at a time, apply the mixture using a lint-free rag or staining sponge. Wipe in the direction of the grain. If the top drawers look too opaque, wipe them back immediately with a clean, damp cloth to let some grain show through. -
Blend if necessary:
If a drawer looks too starkly different from the one above it, lightly dip your rag into the previous cup’s mixture and feather it over the current drawer while still wet to soften the jump. -
Seal the drawers:
Once the drawer fronts are completely dry (wait at least 4 hours), apply a clear matte polycrylic sealer. This protects the ombre finish without adding shine. -
Seal the body:
Don’t forget to seal the white painted frame and the natural wood sides and top with the same matte polycrylic. -
Install hardware:
Attach your half-moon metal pulls to the center of each drawer. -
Reassemble:
Slide the drawers back into their tracks, ensuring the darkest drawer is at the bottom and they grade upwards to the lightest.
Step back and admire how this subtle color shift brings a peaceful, structured rhythm to your room styling
Decoupage Panels Paired with Painted Frames for Statement Pieces
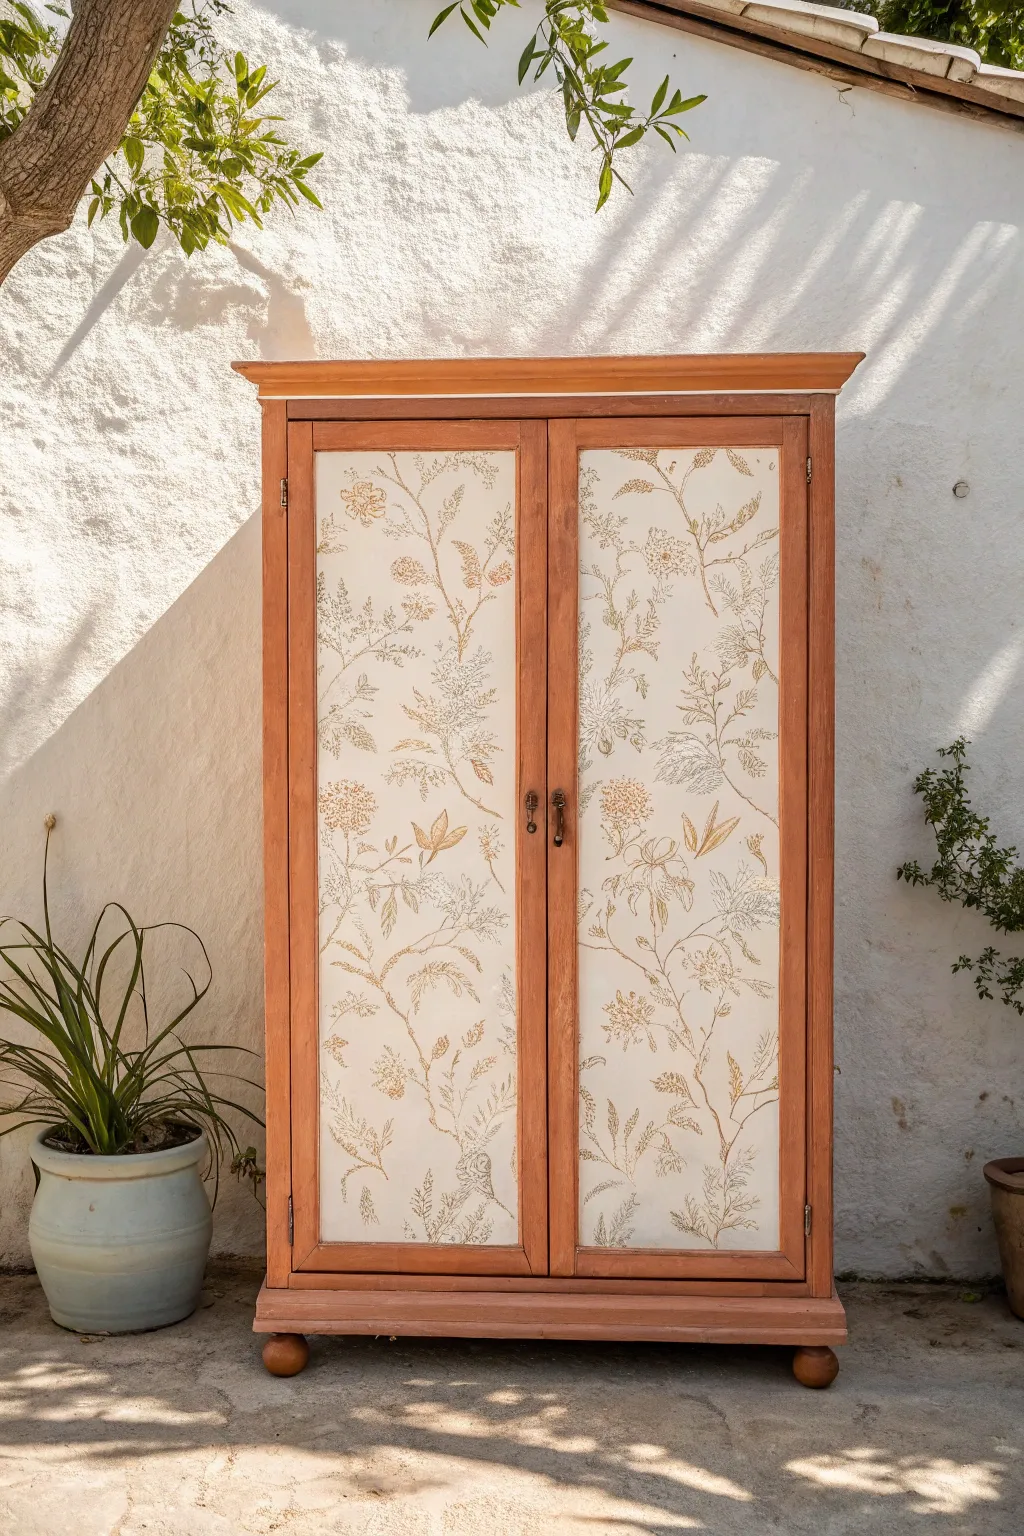
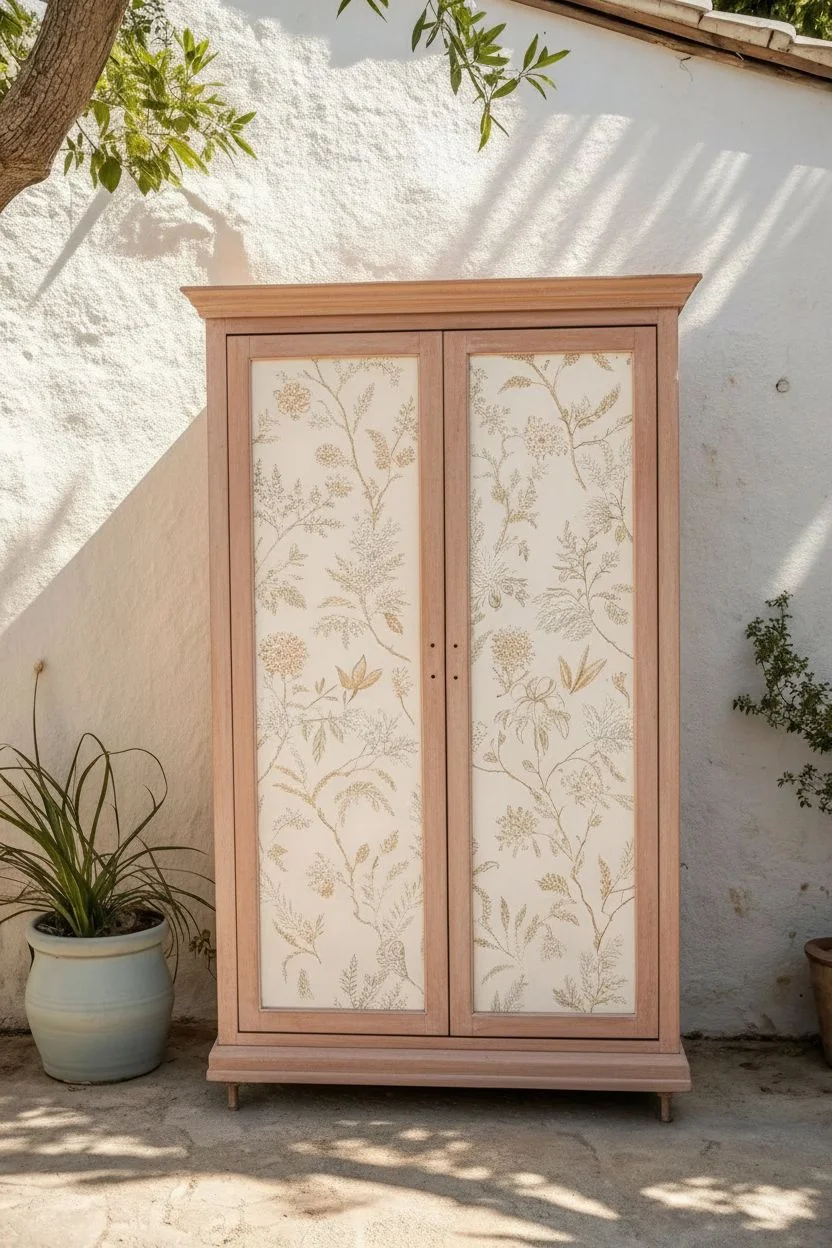
Transform a dated wooden wardrobe into a soft, romantic statement piece by combining a washed paint effect with delicate floral decoupage. This project perfectly balances rustic charm and refined detail, making it an ideal focal point for a bedroom or sunroom.
Step-by-Step
Materials
- Wooden wardrobe with panel doors
- Sanding block (medium and fine grit)
- Milk paint or chalk paint (Terracotta or Peach color)
- White or cream chalk paint (for base of panels)
- Floral wallpaper or large decoupage sheets
- Mod Podge or decoupage medium
- Clear matte wax or polycrylic sealer
- Paintbrushes (natural bristle and synthetic)
- Foam roller
- Exacto knife or sharp scissors
- Clean lint-free rags
- Screwdriver (for hardware removal)
- Smoothing tool or brayer
Step 1: Preparation
-
Remove Hardware:
Begin by unscrewing all knobs, handles, and hinges. Place these small pieces in a labeled bag so nothing gets lost during the renovation process. -
Clean Surfaces:
Wipe down the entire wardrobe with a degreasing cleaner or a mixture of vinegar and water to remove decades of dust, oils, or furniture polish. -
Scuff Sanding:
Use a medium-grit sanding block to lightly scuff the entire exterior. You don’t need to strip it to bare wood, just create enough ‘tooth’ for the paint to adhere effectively. -
Dust Removal:
Vacuum up the sanding dust and follow with a tack cloth or damp rag to ensure a perfectly clean surface before painting.
Bubbles in your paper?
Don’t panic! Use a fine sewing needle to prick the center of the air pocket, then gently press the air out with your finger to flatten it.
Step 2: Painting the Frame
-
Mix the Frame Color:
If you are using milk paint, mix your powder with water to create a terracotta or warm peach hue. If using chalk paint, dilute it slightly with water (about 10%) to create a wash effect rather than an opaque coat. -
Paint the Body:
Apply the wash to the frame, sides, and trim of the wardrobe. Brush in the direction of the wood grain. The goal is to let some of the original wood character show through for a rustic look. -
Wipe Back:
While the paint is still slightly tacky, I like to gently wipe specific areas with a lint-free rag to distress the finish naturally, highlighting edges and corners. -
Paint Panel Base:
Paint the recessed flat panels of the doors with a solid coat of white or cream chalk paint. This ensures the floral design pops and isn’t muddied by the dark wood underneath. -
Let it Dry:
Allow all paint layers to dry completely, usually for at least 4-6 hours, before moving on to the paper application.
Add Antique Age
Mix a tiny amount of dark wax into your clear wax for the frame corners. This emphasizes the molding and gives an authentic aged patina.
Step 3: Decoupaging the Panels
-
Measure and Cut:
Measure the painted interior panels precisely. Cut your floral wallpaper or decoupage paper to size, leaving about half an inch of excess on all sides for adjustments. -
Apply Medium:
Using a foam brush or roller, apply a thin, even layer of decoupage medium directly onto the white-painted door panel. -
Position the Paper:
Carefully align the top edge of your paper with the top of the panel. Slowly smooth it down, working from the center outwards to push out air bubbles. -
Smooth Imperfections:
Use a specialized smoothing tool or a soft brayer to ensure complete contact. Work gently to avoid tearing the paper, especially if it has become saturated with glue. -
Trim Excess:
Once dry to the touch, use a sharp Exacto knife to trim the excess paper flush against the molding of the door frame for a crisp, professional edge. -
Seal the Paper:
Apply a top coat of decoupage medium over the paper to seal it. This protects the design from moisture and peeling.
Step 4: Finishing Touches
-
Wax the Frame:
Apply a clear matte wax over the terracotta painted frame. Buff it gently with a clean cloth to cure the paint and add a subtle sheen. -
Reinstall Hardware:
Clean your original hardware or paint it if desired. Reattach the knobs and hinges carefully. -
Final Cure:
Let the piece sit undisturbed for 24 hours to allow the wax and adhesives to fully cure before heavy use.
Step back and admire how fresh paper and a simple paint wash have completely reinvented a classic piece of furniture
Faux Marble Painted Tabletop for a High-End Look
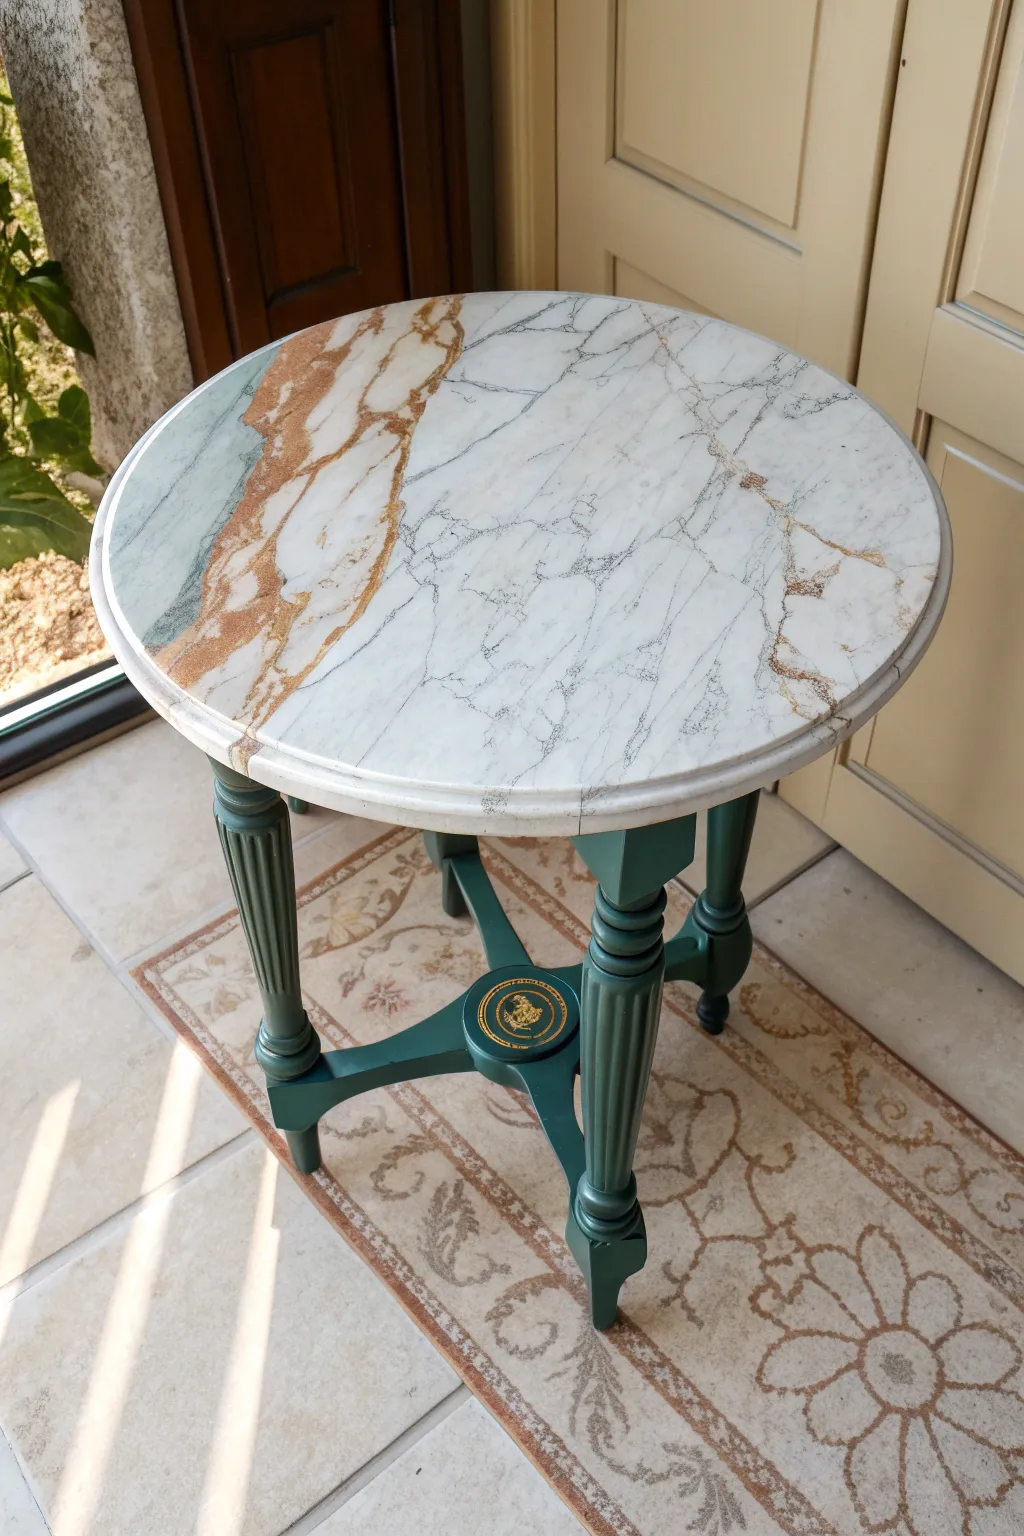
Transform a plain or dated accent table into a high-end statement piece with this faux marble technique. By combining a realistic stone-effect top with deep, elegant green legs and gold accents, you can achieve a sophisticated furniture flip that looks like a genuine antique.
Step-by-Step Guide
Materials
- Round wooden side table
- Sandpaper (120 and 220 grit)
- Primer (oil-based or shellac-based for bleed-through)
- White satin or semi-gloss paint (acrylic or latex)
- Dark Hunter Green chalk or mineral paint
- Grey acrylic paint (soft charcoal shade)
- Metallic Gold acrylic paint or liquid leaf
- Burnt Sienna or Tan acrylic paint (for veining)
- Glazing medium
- Sea sponge
- Feather or fine liner brush
- Soft blending brush (makeup brushes work well)
- Glossy polyurethane topcoat
- Gold wax or gilding wax
- Painter’s tape
Step 1: Base Preparation & Painting
-
Clean and sand:
Begin by thoroughly cleaning the entire table with a degreaser to remove old wax or oils. Scuff sand the entire piece with 120-grit sandpaper to give the primer something to grip. -
Prime the surface:
Apply a coat of high-quality primer. If you are painting over wood with heavy tannins (like mahogany or cherry), use a shellac-based primer to prevent bleeding. -
Paint the legs:
Paint the legs and the apron of the table with your dark Hunter Green paint. This deep, rich color provides a classic contrast to the white marble. Apply two coats for full coverage, letting it dry completely between layers. -
Add gold details:
Once the green paint is dry, use a small detail brush or your finger to apply gold gilding wax to the fluted details of the legs and the central medallion.
Veins Looking Fake?
If your veins look too stiff, spray a light mist of water over them while wet. This causes the paint to disperse naturally into organic, unpredictable fractal patterns.
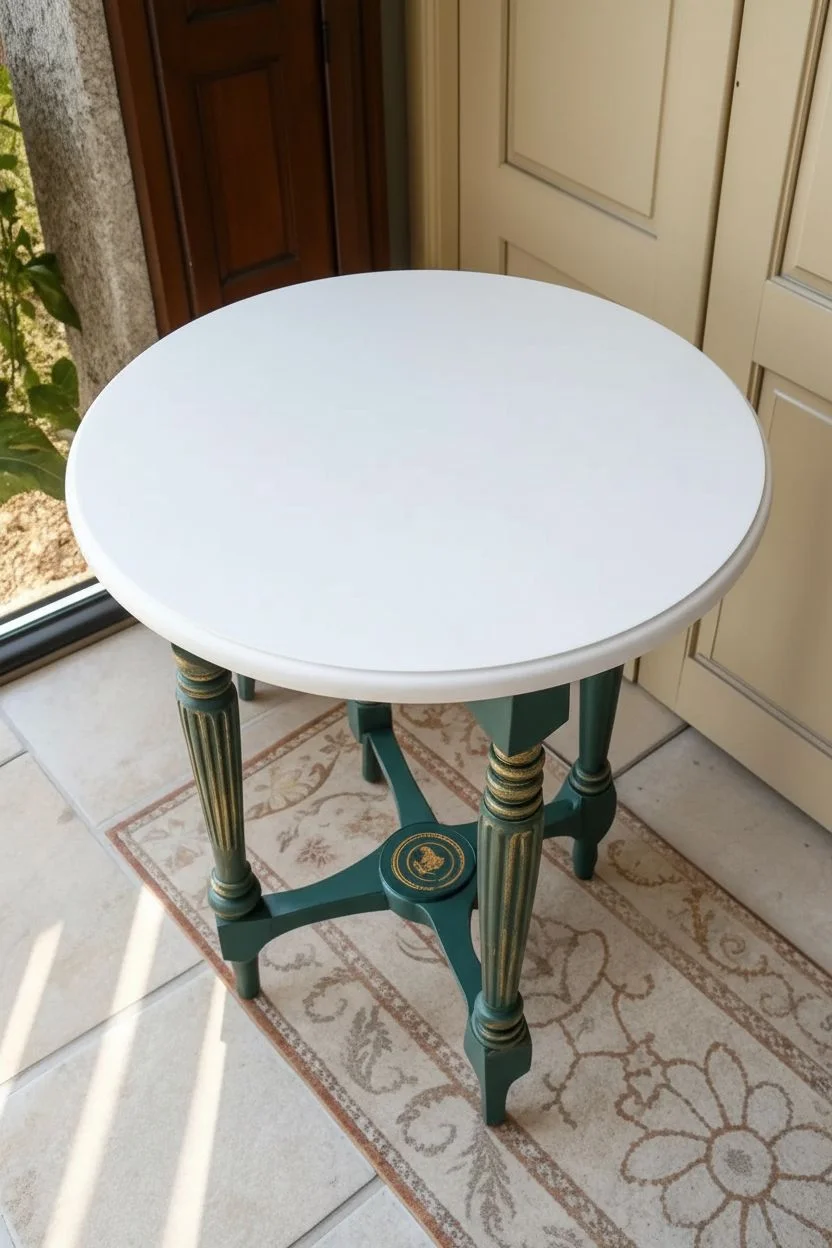
Step 2: Creating the Faux Marble Top
-
Base coat:
Apply two coats of white satin paint to the tabletop. Ensure the surface is perfectly smooth; light sanding with 220-grit paper between coats helps achieve that stone-like finish. -
Create the grey glaze:
Mix a small amount of grey acrylic paint with glazing medium (about a 1:4 ratio). You want this mixture to be translucent and flow easily. -
Sponge texture:
Dip a dampened sea sponge into the grey glaze and offload most of the paint onto a paper towel. Lightly dab random, cloudy patches across the white surface to create depth. Keep it subtle—this is just the background noise of the stone. -
Soften the texture:
Before the glaze dries, use a dry, soft blending brush to gently pounce over the sponged areas. This blurs the hard edges and makes the grey look like it’s under the surface. -
Drafting the veins:
Mix a slightly darker grey with a tiny bit of water. Using a feather or a fine liner brush, drag shaky, irregular lines across the table. Twisting the brush as you pull creating the most natural ‘nervous’ line quality. -
Softening the veins:
Use your dry blending brush to gently sweep over the wet veins in one direction. This feathers the edges so they don’t look like harsh marker lines. -
Adding the feature vein:
To recreate the specific look in the photo, create a bold, rusty-tan section. Mix Burnt Sienna with glaze. Paint a wider, more jagged band diagonally across one section of the table. -
Enhancing the rust vein:
While the rust glaze is wet, drop in tiny bits of darker brown or grey into the wet paint to add dimension. Gently blot this area with your sponge to create organic texture within the vein. -
Final fine veins:
Go back in with a very fine liner brush and un-thinned dark grey paint to add tiny, sharp cracks that run through and alongside your softer veins. These should be crisp and distinct.
Gloss Like Glass
For the ultimate stone look, finish with a pour-on epoxy resin instead of polyurethane. It creates a thick, mirror-like depth that mimics polished slab marble perfectly.
Step 3: Refining and Sealing
-
Add gold marbling:
For a touch of luxury, mix metallic gold paint with a drop of water. Use your fine liner brush to trace along the edges of the rust-colored vein, highlighting the mineral deposit look. -
Rim detail:
Paint the rim of the tabletop white to match the surface, or for a defined edge, carefully paint a thin line of grey around the perimeter. -
First topcoat:
Allow the paint to cure for at least 24 hours. Apply a coat of glossy polyurethane. A gloss finish is essential here significantly tricks the eye into seeing polished stone. -
Sand and recoat:
Lightly sand the dry topcoat with a high-grit paper (like 400) to remove dust nibs, then wipe clean. Apply a second or even third coat of gloss for that deep, glass-like shine.
Now step back and admire how a customized paint job has turned a simple table into an elegant conversation piece
Coastal Weathered Layers for Driftwood-Inspired Painted Furniture
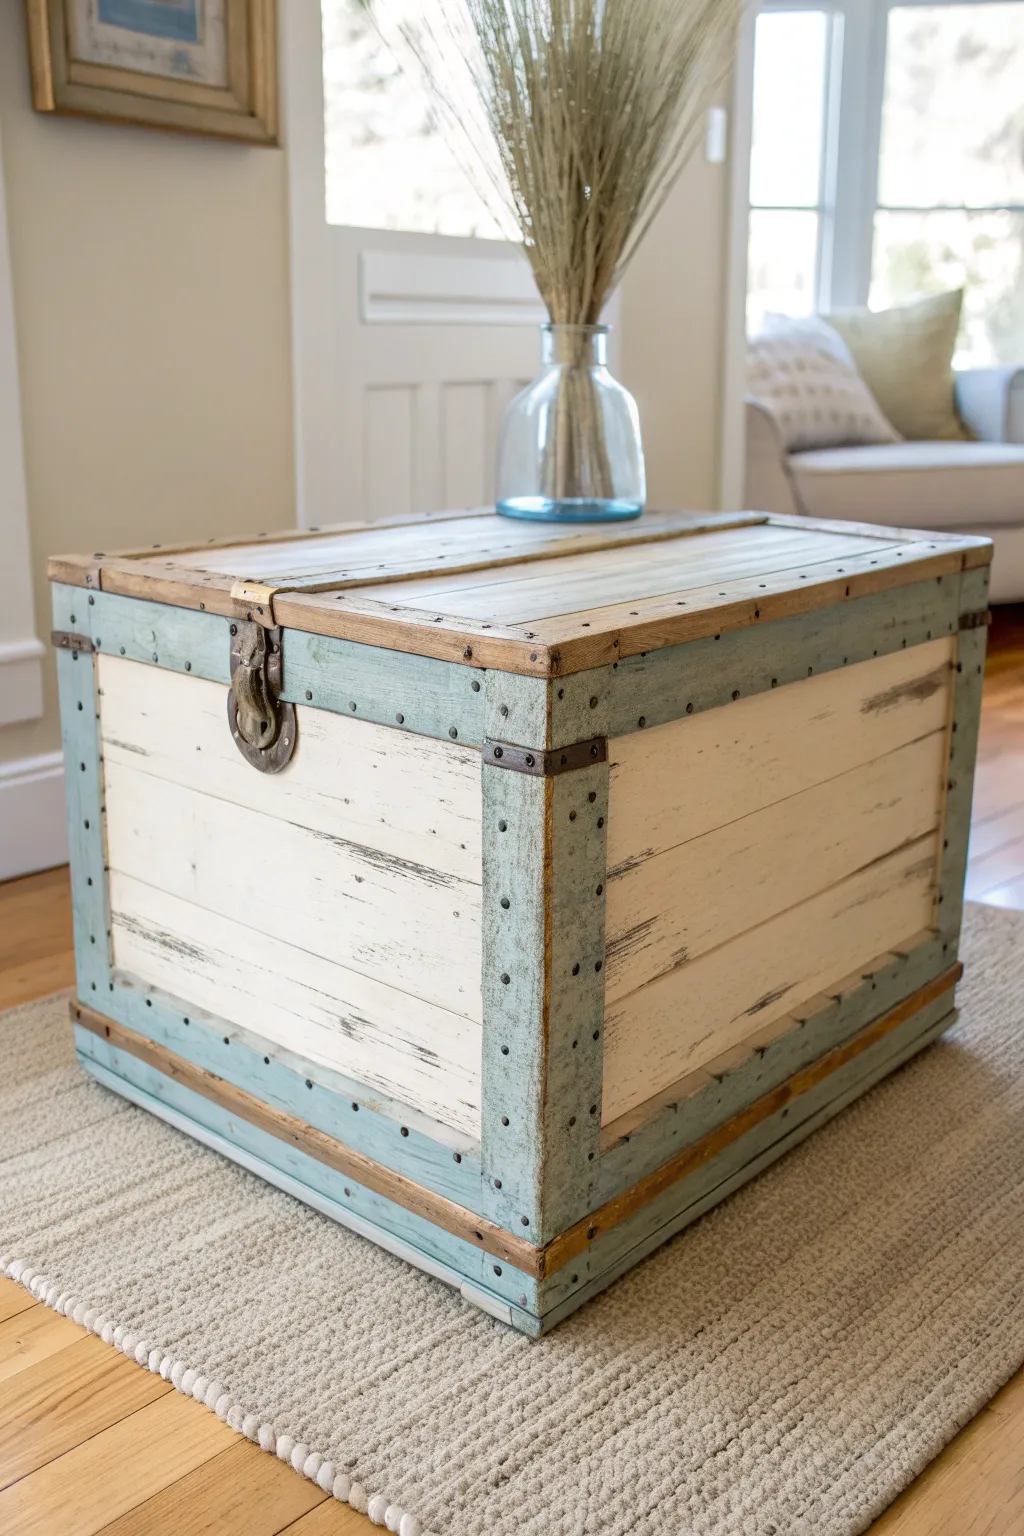
Transform an ordinary wooden trunk into a beach-house staple with this layered, weathered paint technique. By combining creamy whites with muted teal accents and heavy distressing, you’ll achieve that authentic driftwood look that feels both rustic and refined.
How-To Guide
Materials
- Unfinished wooden trunk or chest
- Sandpaper (80-grit and 220-grit)
- Orbital sander (optional)
- Clean tack cloths
- Milk paint or chalk paint (Cream/Off-White)
- Milk paint or chalk paint (Muted Teal/Sea Glass)
- Dark antique wax or glaze
- Clear furniture wax
- Paintbrushes (natural bristle)
- Small detail brush
- Wax brush or lint-free rags
- Painter’s tape
- Steel wool (optional)
- Screwdriver (for hardware removal)
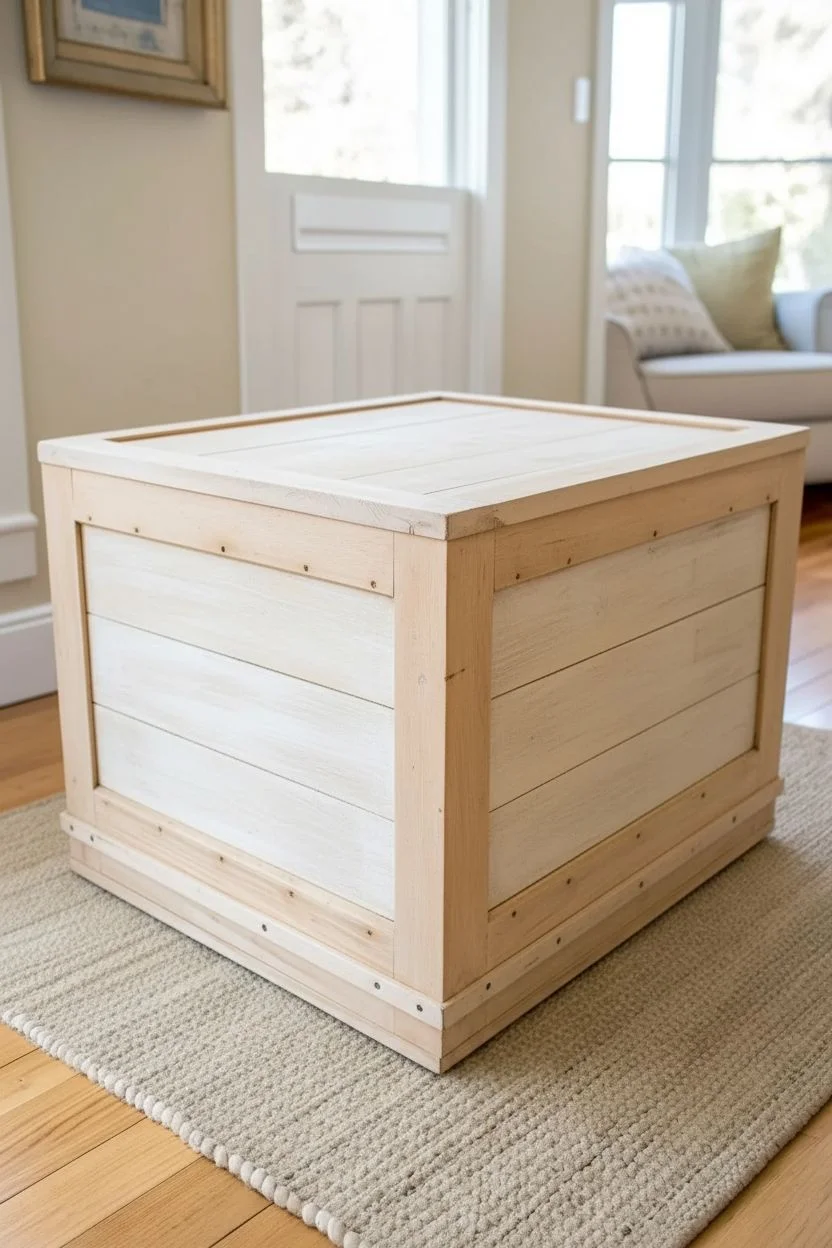
Step 1: Preparation and Base Layer
-
Remove Hardware:
Before touching a paintbrush, use a screwdriver to carefully remove the front latch and hinges if possible. If the corner brackets and studs are permanently fixed, you will just paint carefully around or over them. -
Sand the Surface:
Give the entire trunk a thorough sanding with 220-grit sandpaper to scuff up any existing finish. If the wood is rough, start with 80-grit and work your way up. Wipe away all dust with a tack cloth. -
Plan Your Zones:
Visualize the design: the main center panels will be white, while the thick framing boards, corners, and lid edges will be teal. Use painter’s tape to mask off the framing areas if you don’t trust your freehand skills. -
Paint the Center Panels:
Apply a coat of the cream or off-white paint to the large recessed panels on the front and sides. Don’t worry about perfect opacity; a little wood showing through adds character. -
Adding Depth:
Once dry, apply a second, thinner coat of white. I like to dry-brush this layer slightly so the first coat and potential wood grain create texture right from the start.
Uneven Paint?
Don’t panic if your paint looks streaky or uneven. For this weathered coastal style, imperfections actually enhance the final look. The patchy areas will sand down beautifully later.
Step 2: Adding the Coastal Color
-
Paint the Framework:
Dip your brush into the muted teal or sea glass paint. Apply this color to all the framing wood—the vertical corner posts, the horizontal bottom rails, and the top lid borders. -
Tackle the Details:
Use a smaller detail brush to work the teal paint around the metal studs and corner brackets. If you get paint on the metal, wipe it off quickly with a damp rag or leave it for a very rustic look. -
Second Teal Coat:
Apply a second coat of teal to the frames for better coverage, but keep your brush strokes loose to mimic the irregularity of aged wood. -
Dry Completely:
Allow the entire piece to dry for at least 4-6 hours, or overnight if using true milk paint, to ensure the finish is hard enough for sanding.
Rope Handles
Add thick jute or manila rope handles to the sides of the trunk for an extra nautical touch. Drill holes in the side panels, thread the rope through, and knot securely on the inside.
Step 3: Distressing and Finishing
-
Heavy Distressing:
Use 80-grit sandpaper to aggressively distress the edges where the wood would naturally wear. Focus on the sharp corners of the lid and the vertical edges of the teal frame. -
Reveal the Grain:
Sand flat areas of both the white and teal sections sporadically to reveal raw wood underneath. This ‘driftwood’ effect relies on seeing the layers of paint and timber. -
Clean the Dust:
The sanding will create a lot of fine powder. Thoroughly vacuum the trunk and wipe it down with a clean tack cloth to ensure no grit remains. -
Apply Dark Wax:
Work a small amount of dark antique wax into the crevices, corners, and around the hardware studs. Wipe it back almost immediately with a clean rag so it settles only in the textured areas. -
Sealing the Piece:
Cover the entire trunk with a coat of clear furniture wax to protect the paint and give it a soft, satiny sheen. Buff it gently once dry. -
Final Hardware Touch:
Reattach the main latch. If your metal hardware looks too shiny and new, dab a little dark wax or black paint on it to patina the metal so it matches the aged wood.
Enjoy styling your new centerpiece with a vase of dried sea grass or a stack of vintage books
Abstract Paint-Pour Drawer Fronts for Artsy Furniture Accents
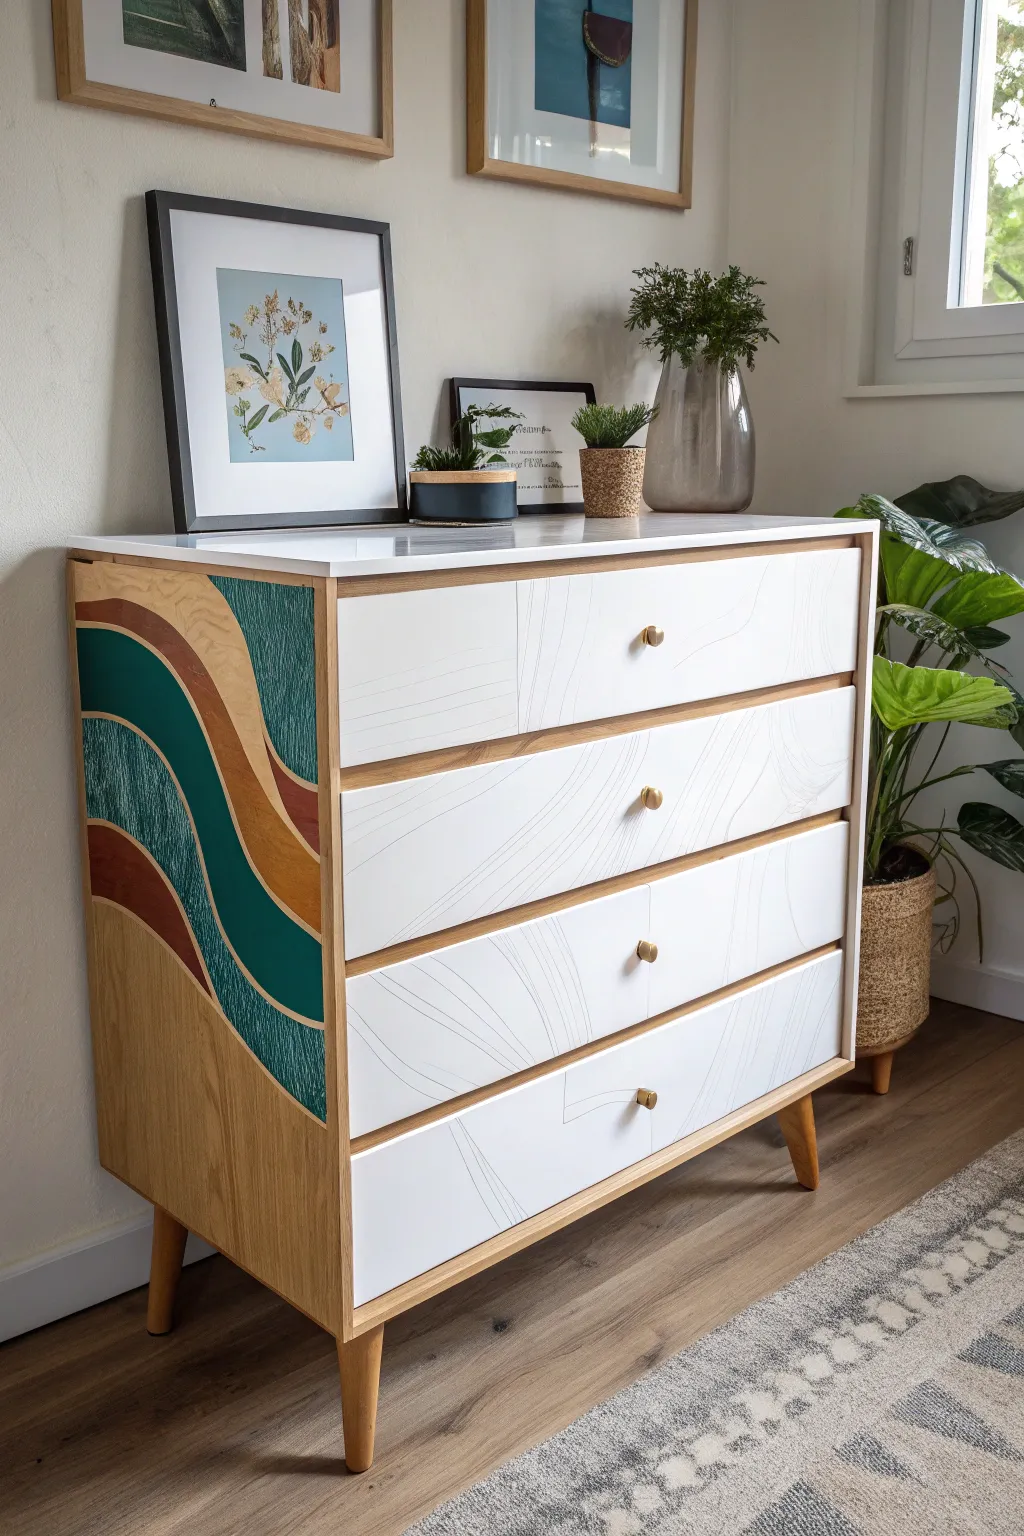
Transform a plain chest of drawers into a statement piece with this dual-technique makeover featuring crisp white drawer fronts and a bold, organic wave mural on the side. The combination of minimal line art on the front and rich earthy tones on the side creates a perfectly balanced modern boho aesthetic.
Step-by-Step
Materials
- Wooden 4-drawer dresser (raw or sanded to bare wood)
- Painter’s tape (high quality)
- White furniture paint (satin or eggshell finish)
- Acrylic paints (Teal, Burnt Orange, Mustard Yellow)
- Fine grit sandpaper (220-320 grit)
- Pencil and eraser
- Gold or brass drawer knobs
- Fine liner brush or gold paint pen
- Clear matte polycrylic sealer
- Small foam roller
- Detail artist brushes
- Ruler or straight edge
Step 1: Prep & Prime
-
Disassemble the piece:
Begin by removing all drawers from the dresser unit. Unscrew and set aside any existing hardware. If the legs are removable, take them off to make painting the body easier. -
Sand the surfaces:
Using an orbital sander or sanding block with medium grit paper, sand the entire piece down to raw wood. This step is crucial for the side panel design where natural wood grain needs to show through. -
Clean thoroughly:
Wipe away all sanding dust with a tack cloth or a slightly damp rag. Ensure the surface is completely dry and free of debris before moving to the design phase.
Seal Tape Edges
Before painting a color section, brush a tiny amount of clear sealer over the tape edge. This seals the tape and ensures crisp, razor-sharp lines.
Step 2: Designing the Side Panel
-
Sketch the wave pattern:
On the side of the dresser, lightly sketch out your organic wave design with a pencil. Aim for flowing, curvy lines that mimic topographical maps or ocean waves. Leave gaps between the shapes where the raw wood will remain visible as a separator. -
Mask the first color sections:
Apply painter’s tape carefully along the pencil lines for your first color. Press the edges of the tape down firmly with a credit card or fingernail to prevent bleed-under. -
Apply the teal waves:
Using a small brush, paint the sections designated for the deep teal color. Apply two thin coats rather than one thick one for a smooth finish, letting the paint dry between coats. -
Paint the accent colors:
Once the teal sections are dry and tape is removed, re-mask for the next color. Paint your burnt orange and mustard yellow curves in their respective sections. I like to work from the largest shapes to the smallest to keep the balance right. -
Reveal the wood lines:
Carefully peel away all remaining tape. Use an eraser to remove any visible pencil marks from the exposed wood strips. You should now have colorful waves separated by clean lines of natural wood grain.
Step 3: Drawer Fronts & Assembly
-
Paint the drawer fronts:
Using a foam roller, paint the faces of the drawers with your white furniture paint. Apply 2-3 coats for full opacity, sanding lightly with fine-grit paper between coats for a professional smoothness. -
Sketch the line art:
Once the white paint is fully cured, lightly sketch a flowing, abstract line pattern across the drawer fronts. You can make the lines continuous across multiple drawers for a cohesive look. -
Detail the lines:
Go over your pencil sketches with a very fine liner brush and grey paint, or for easier control, use a fine-tip paint pen. Keep the lines thin and delicate to contrast with the bold side panel. -
Seal the entire piece:
Apply a clear matte polycrylic sealer over the entire dresser—painting the side mural and the white drawers. This protects your artwork from scratches and wear. -
Reattach hardware:
Screw the legs back onto the base. Install your new brass or gold knobs on the drawer fronts to complete the modern look. -
Final assembly:
Slide the drawers back into their tracks. Step back and check that the line art flows visually from one drawer to the next.
Router the details
Instead of painted lines on the drawers, consider using a Dremel or wood carving tool to physically engrave the lines before painting for texture.
Place your newly refreshed furniture against a simple wall to let those custom artistic details really shine
Hand-Painted Mural Details on Furniture for a One-of-a-Kind Heirloom

Transform a plain wooden nightstand into a stunning heirloom piece with delicate, hand-painted botanical motifs. This project combines natural wood tones with soft cream panels and wispy wildflowers for a look that is both organic and artistic.
How-To Guide
Materials
- Unfinished or sanded wooden nightstand
- Cream or off-white chalk paint
- Painter’s tape
- Fine-grit sandpaper (220-grit)
- Acrylic craft paints (olive green, muted pink, ochre, brown, sage)
- Small round paintbrushes (sizes 0, 2, and 4)
- Clear matte polycrylic sealer
- Pencil
- Palette or paper plate
- Clean lint-free rags
Step 1: Prep and Base Coat
-
Prepare the surface:
Begin by removing the drawer knobs and setting them aside. Lightly sand the entire nightstand with 220-grit sandpaper to ensure a smooth surface for adhesion, then wipe away all dust with a tack cloth or damp rag. -
Map out the design:
Decide which areas will be painted and which will remain natural wood. For this look, we are keeping the top, legs, and front frame natural, while painting the drawer fronts and the side inset panel. -
Tape off wood areas:
Carefully apply painter’s tape to the edges of the wood frame that surround the drawer fronts and side panel. Press the tape edges down firmly to prevent paint bleed. -
Apply base color:
Using a flat brush, apply a smooth coat of cream or off-white chalk paint to the drawer fronts and the side panel. Don’t worry if it looks slightly streaky on the first pass; thin layers are better. -
Layer up opacity:
Let the first coat dry completely, usually about an hour. Apply a second coat to achieve a solid, opaque background. If you prefer a slightly weathered look, you can leave it a bit thinner in spots. -
Sand for smoothness:
Once the base coat is fully dry, very lightly run your fine-grit sandpaper over the painted areas. This isn’t to distress it, but just to knock down any brush ridges so your detailed painting surface is perfectly smooth.
Natural flow tip
For realistic wildflowers, never paint stems perfectly straight. Give them a slight S-curve or bend so they look like they are swaying in a breeze.
Step 2: Painting the Botanicals
-
Sketch the composition:
Lightly sketch your floral interaction with a pencil directly onto the painted dry surface. Aim for ‘growing’ compositions—stems rising from the bottom edge and reaching upward at varying heights. -
Mix your greens:
Squeeze out olive green, sage, and a little brown. Mix a few shades of green so your stems don’t look flat. I find that adding a tiny touch of water makes the paint flow better for long, thin lines. -
Paint main stems:
Using your size 2 brush, paint the primary vertical stems. Use a steady hand and vary the pressure—press down for the base and lift up as you reach the tip for a tapered effect. -
Add grassy leaves:
Switch to the liner brush (size 0) for the grass blades. Use quick, flicking motions to create long, arching leaves that cross over the main stems, creating depth and movement. -
Create fern textures:
For the fern-like plants, paint a central stem first. Then, add tiny, short dashes along both sides of the stem using a darker green, getting smaller as you reach the top. -
Dab the flower heads:
Using ochre and muted pink, paint the flower heads. For the pink spikes, use small dotting motions or short dashes. For the umbrella-shaped flowers (like Queen Anne’s Lace), paint tiny clusters of dots at the top of a stem. -
Detail with fine lines:
Once the flower heads are tacky or dry, use a very fine brush with brown paint to add minimal details, like the center of a bloom or tiny connecting stems within a flower cluster.
Step 3: Finishing Touches
-
Remove the tape:
Before sealing, carefully peel off the painter’s tape at a 45-degree angle. Check for any paint bleed on the natural wood and gently scrape it away with a fingernail or light sanding if found. -
Seal the artwork:
Protect your handiwork by applying a clear matte polycrylic sealer over the entire piece—both the painted sections and the natural wood. This unifies the sheen and protects the raw timber. -
Reattach hardware:
Once the sealer has cured (check the can for cure times, usually 24 hours for light use), screw the knobs back onto the drawer fronts.
Level Up: Hardware Swap
Replace standard wooden knobs with vintage brass or ceramic pulls. A floral or botanical-shaped knob can subtly reinforce the theme without overpowering the painting.
Now you have a serene, nature-inspired bedside table that brings the garden indoors


Have a question or want to share your own experience? I'd love to hear from you in the comments below!