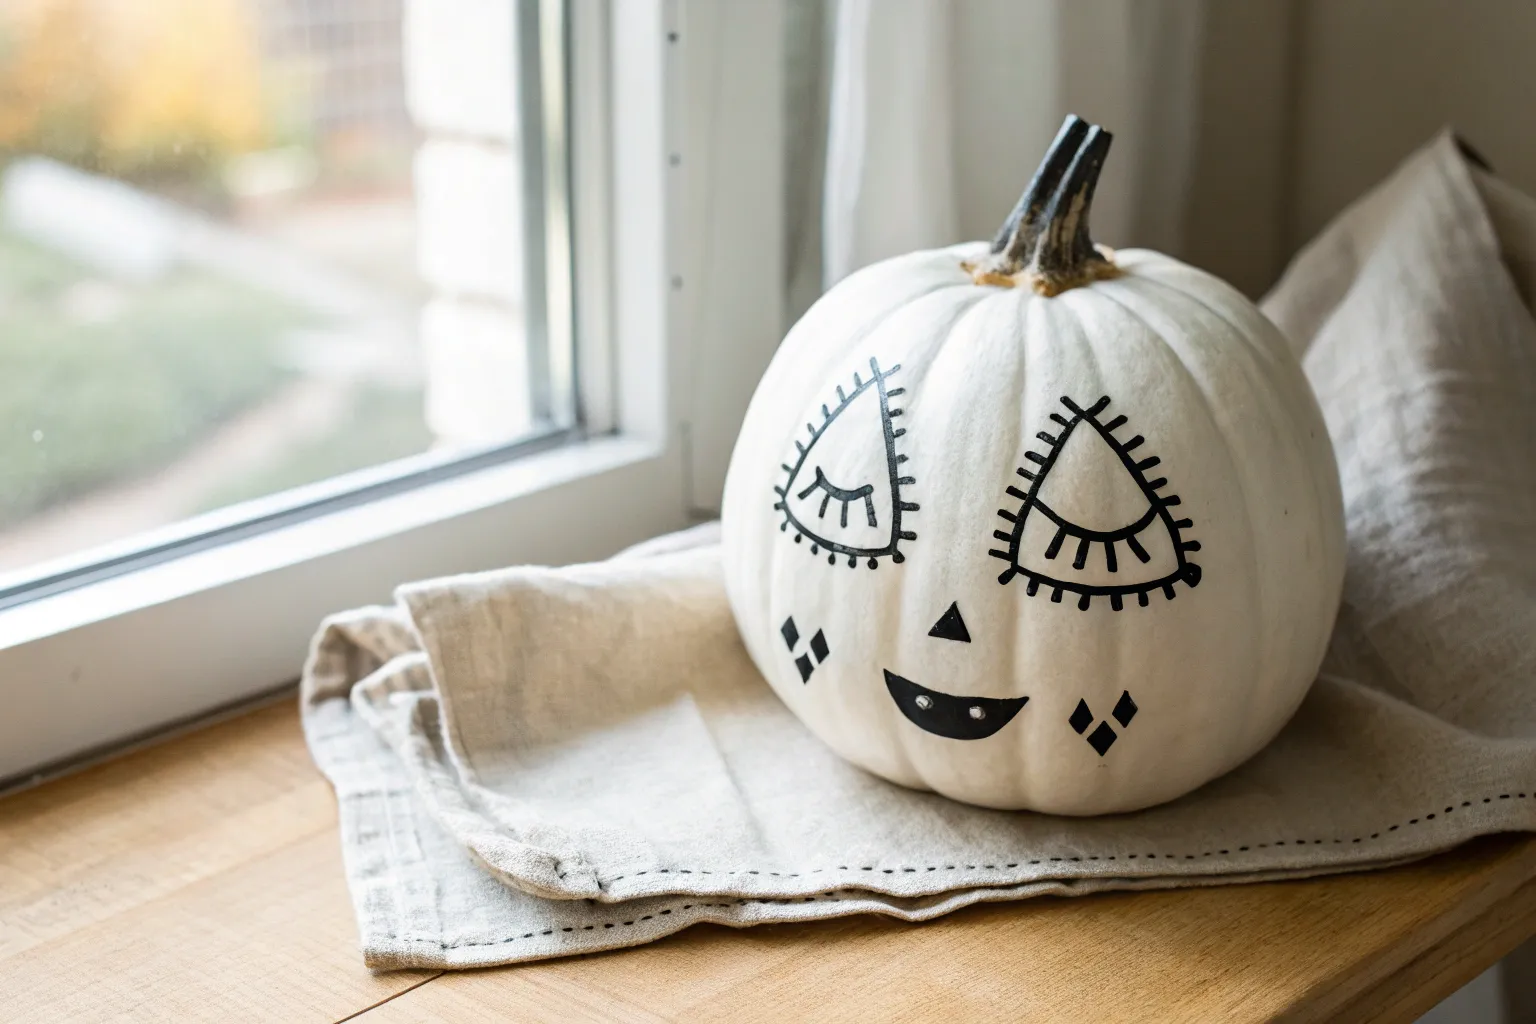
I love how a white pumpkin gives you a clean, bright canvas that makes every mark look crisp—especially high-contrast designs. If you’re in the mood for no-carve decor that feels equal parts cozy and creative, these ideas will keep your paintbrush happily busy.
Classic Black-and-White Ghost Faces
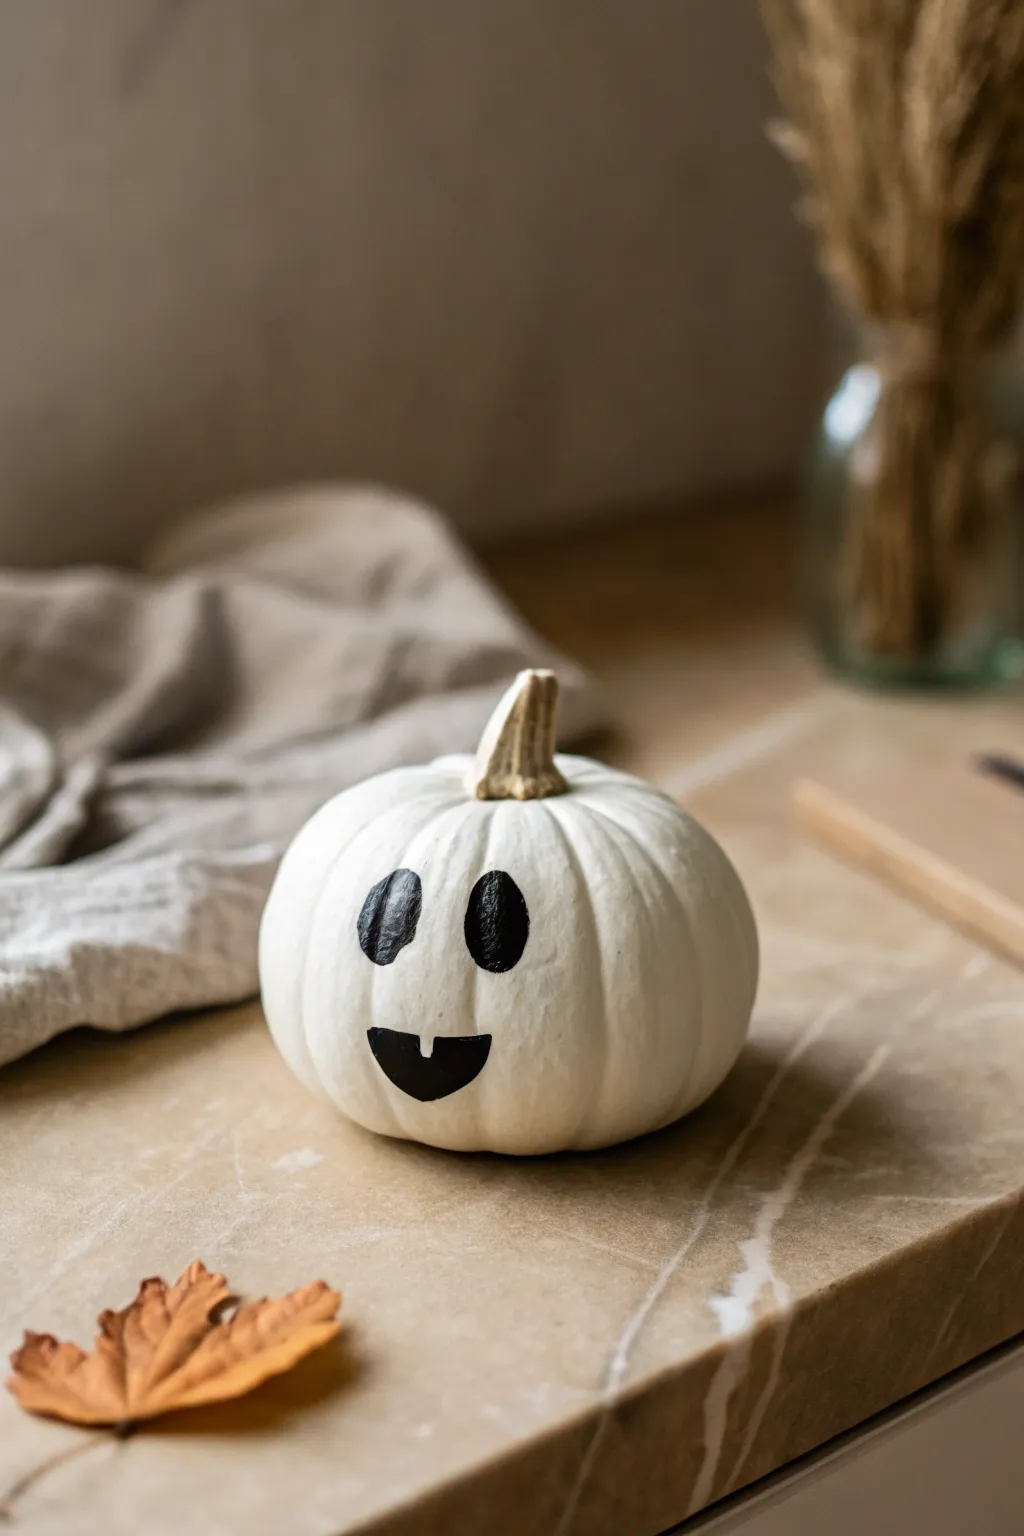
Transform a simple white pumpkin into a charming spectral friend with minimal fuss and maximum personality. This black-and-white design relies on clean, bold shapes to create a playful ghost expression acting as the perfect minimalist Halloween accent.
Step-by-Step Guide
Materials
- Small white pumpkin (real or faux)
- Black acrylic paint (matte finish recommended)
- Small round paintbrush (size 2 or 4)
- Pencil (soft lead like 2B)
- Paper towel or rag
- Palette or paper plate
- Cotton swabs (for cleanup)
- Matte spray sealant (optional)
- Damp cloth
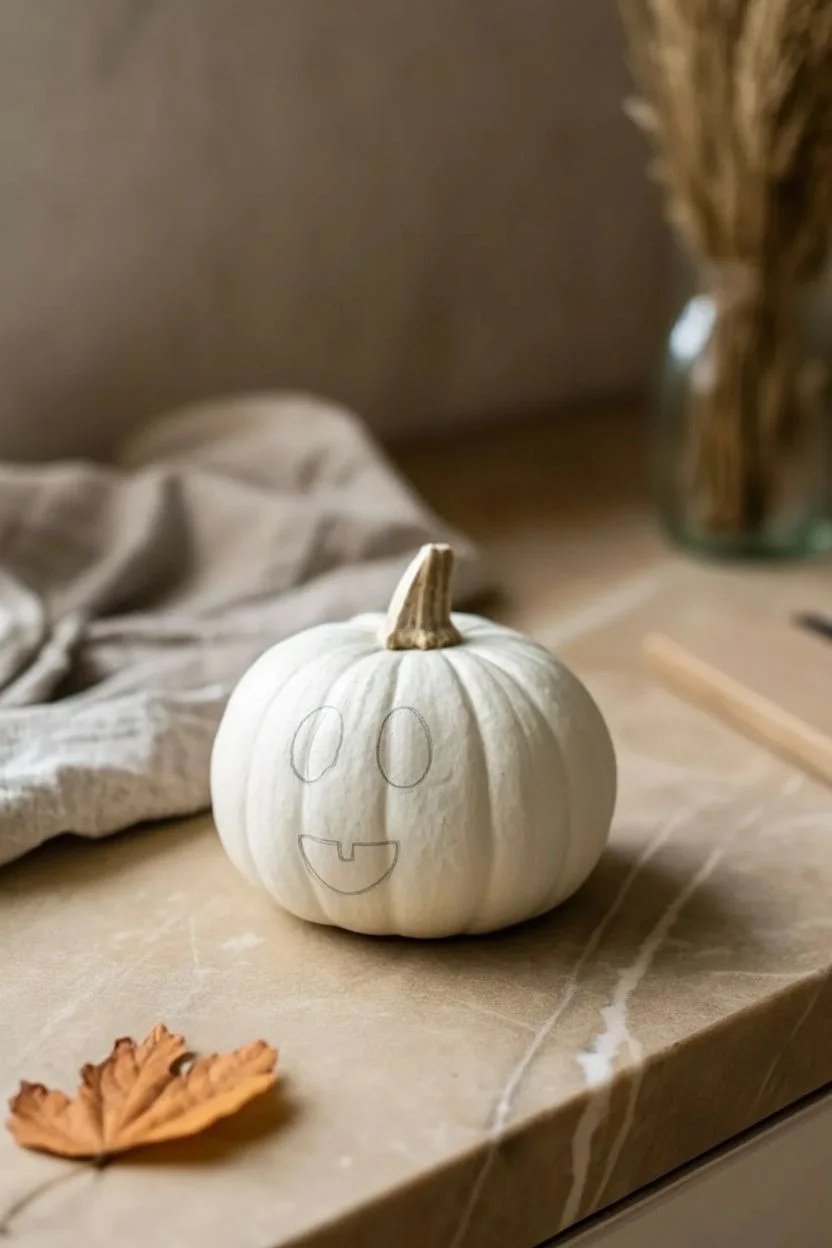
Step 1: Preparation and Sketching
-
Surface Prep:
Begin by wiping down your pumpkin with a damp cloth to remove any dirt or oils that might prevent the paint from sticking. If you are using a real pumpkin, ensure the stem is firmly attached and the skin is dry before proceeding. -
Position Finding:
Hold the pumpkin in your hand and rotate it to find the ‘face’ side—you want a section that is relatively smooth and symmetrical, without deep blemishes that might distort the painted features. -
Eye Placement:
Take your pencil and very lightly sketch the placement of the eyes. Aim for the upper third of the pumpkin’s vertical height. -
Sketching the Ovals:
Draw two vertical ovals for the eyes. Don’t worry about making them perfectly identical; a little variation adds character. Space them about an inch apart, depending on your pumpkin’s size. -
Adding the Smile:
Sketch a gentle, upward-curving ‘U’ shape roughly an inch below the eyes. This will form the bottom of the mouth. -
Forming the Mouth:
Draw a straight line connecting the top points of your ‘U’ shape to close the mouth. It should look like a semi-circle. -
The Tooth Detail:
Inside the mouth shape, draw a small, square tab dropping down from the top straight line. This little negative space will become the single tooth, which is essential for this cute look.
Clean Lines Hack
Use a black posca paint pen instead of a brush for the initial outlining. It gives you marker-like control, then you can just fill in the centers with regular paint.
Step 2: Painting the Features
-
Loading the Brush:
Squeeze a dime-sized amount of black acrylic paint onto your palette. Dip your small round brush in, ensuring the bristles are coated but not dripping. -
Outlining the Eyes:
Carefully trace the pencil outline of the left eye. Use the very tip of the brush for better control over the curve. -
Filling the Left Eye:
Fill in the center of the left eye with smooth, vertical strokes. I prefer to work from the center outward to the edges to avoid creating a raised ridge of paint on the outline. -
Painting the Right Eye:
Repeat the outlining and filling process for the right eye. Step back for a moment to check that they look balanced. -
Defining the Mouth:
Outline the outer shape of the mouth, being extremely careful to go around the small square you marked for the tooth. The tooth needs to remain unpainted white. -
Filling the Smile:
Fill in the rest of the black mouth area. Go slowly around the corners of the mouth to keep them sharp. -
Refining Edges:
Look closely at your painted shapes. If any edges look ragged, use a mostly dry brush with a tiny amount of paint to smooth them out. -
Cleaning Up:
If you slipped up or have a stray mark, dampen a cotton swab and quickly wipe away the mistake before the acrylic dries fully.
Step 3: Finishing Touches
-
Erasing Sketches:
Allow the black paint to dry completely—usually about 15 to 20 minutes. Once dry, gently erase any visible pencil marks remaining around the edges of the paint. -
Sealing (Optional):
If this pumpkin will be displayed outdoors or handled frequently, give it a light misting of matte spray sealant to protect the paint from chipping.
Level Up: Glow Time
Paint the ‘tooth’ area with glow-in-the-dark paint instead of leaving it plain white. When the lights go out, your little ghost will have a single glowing snaggletooth.
Place your adorable ghostly pumpkin on a mantle or table to add a touch of friendly spookiness to your decor


Simple Bat Silhouettes on a White Pumpkin
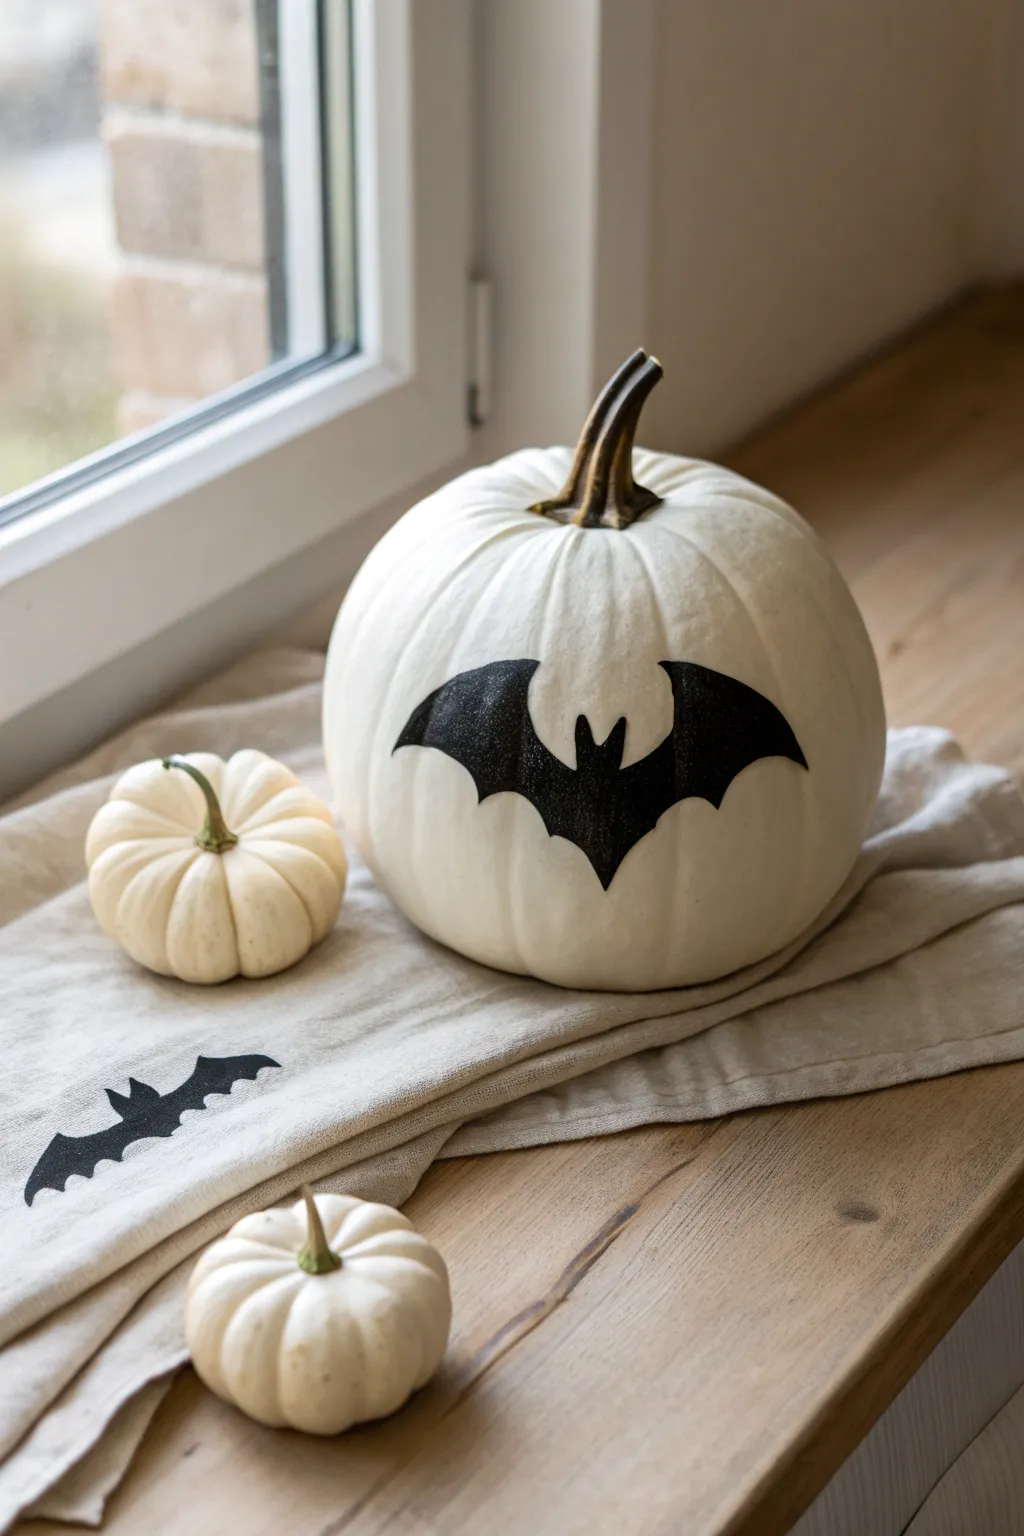
Embrace the spooky elegance of Halloween with this stark, high-contrast design featuring a matte black bat on a pristine white pumpkin. This project proves that sometimes the simplest ideas make the boldest statements, perfect for a modern farmhouse or minimalist aesthetic.
Step-by-Step
Materials
- Medium-sized white pumpkin (real or faux)
- Black acrylic paint (matte finish works best)
- Small round paintbrush (size 2 or 4)
- Medium flat paintbrush
- Pencil
- Paper bat template (printed or hand-drawn)
- Scissors
- Painter’s tape or masking tape
- Paper towel
- Q-tips (for cleanup)
Step 1: Preparation and Design
-
Clean the surface:
Begin by thoroughly cleaning your white pumpkin. If it’s real, wipe it down with a damp cloth and a mild soap solution to remove any dirt or field debris. Dry it completely with a paper towel. -
Create your template:
Draw a classic bat shape with spread wings on a piece of paper, or find a simple clipart silhouette online to print. The bat should be sized proportionally to your pumpkin—aim for about 5-6 inches wide for a medium pumpkin. -
Cut out the bat:
Carefully cut out your paper bat shape using scissors. Take your time around the pointed ears and the scalloped edges of the wings to get a crisp outline. -
Position the template:
Hold the cutout against the pumpkin to find the best placement. Look for a relatively smooth side of the pumpkin without deep ridges or blemishes, as this will make painting easier. -
Secure the template:
Once you’re happy with the position, use a small loop of painter’s tape on the back of the template to stick it gently to the pumpkin’s surface.
Step 2: Tracing the Silhouette
-
Trace the outline:
Using a sharp pencil, lightly trace around the entire edge of your paper template. Press lightly so you don’t indent the pumpkin skin, but make sure the line is visible. -
Check the symmetry:
Remove the paper template and step back to look at your penciled outline. If the wings look uneven due to the pumpkin’s curve, sketch light corrections now to balance them out. -
Refine the points:
Sharpen up the points of the ears and the wing tips with your pencil if the tracing was a bit rounded. Clean lines are crucial for this graphic look.
Pro Tip: Smoother Curves
For steadier hands when outlining the bat’s curves, rest your pinky finger against the pumpkin surface as an anchor while you paint.
Step 3: Painting the Bat
-
Outline with black paint:
Take your small round brush and dip it into the black acrylic paint. Carefully paint over your pencil lines first, creating a distinct border for your shape. -
Navigate the ridges:
When painting over the pumpkin’s vertical ribs, I find it helpful to dab the paint into the crevices rather than dragging the brush, ensuring a solid line even in the dips. -
Fill in the center:
Switch to the medium flat brush to fill in the body and larger wing areas of the bat. Use smooth strokes to minimize texture. -
Apply a second coat:
Allow the first layer to dry for about 10-15 minutes. It will likely look streaky. Apply a second coat of black paint to achieve that solid, opaque block of color. -
Refine the edges:
Go back with your smallest brush and touch up the very edges of the wings and ears to make them razor-sharp. Crisp edges are the secret to a professional look. -
Clean up mistakes:
If you accidentally paint outside the line, quickly use a damp Q-tip to wipe away the mistake before it dries. -
Let it cure:
Set the pumpkin aside in a safe spot to dry completely for at least an hour before moving or displaying it.
Level Up: Glitter Wings
While the black paint is still wet, sprinkle fine black glitter over the bat silhouette for a subtle shimmer that catches the light.
Step 4: Optional Fabric Accent
-
Extend the theme:
To match the photo perfectly, use a similar bat stencil on a piece of light linen fabric. You can dab black fabric paint lightly through the stencil for a softer, textured look.
Place your striking creation by a window or on a mantle to enjoy its sophisticated, spooky charm all season long


Spiderweb Corners With a Tiny Spider Detail
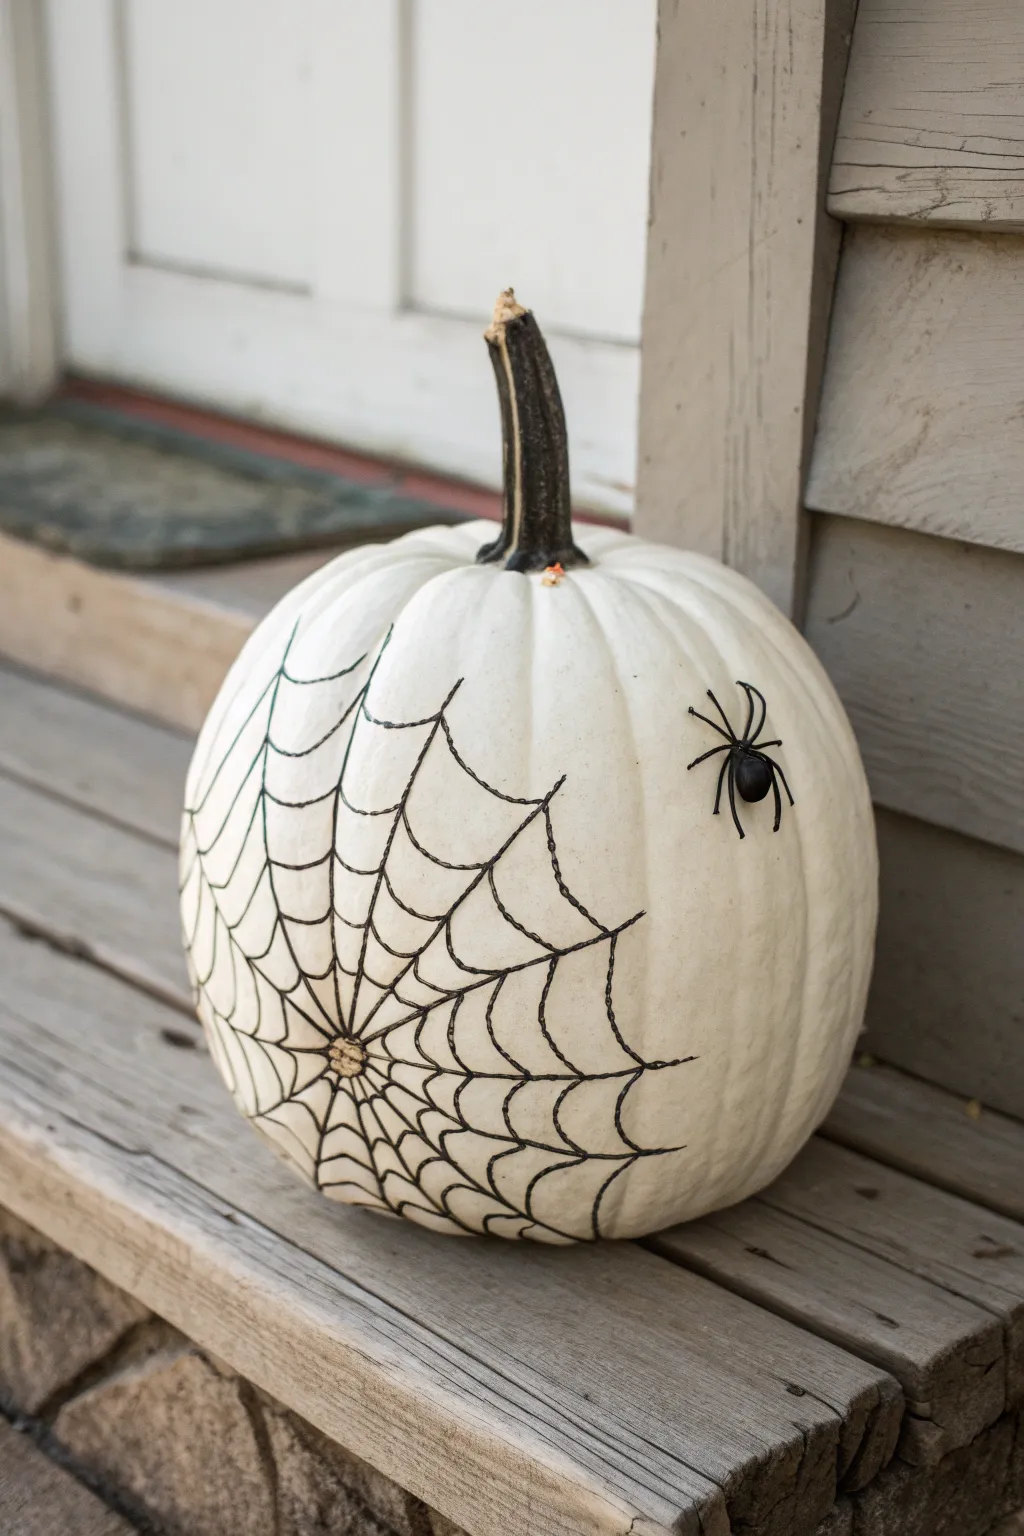
Transform a simple white pumpkin into an elegant Halloween decoration with just a few strokes of paint and a creepy-crawly friend. This minimalist design uses stark contrast to create a bold spiderweb pattern that looks intricate but is surprisingly easy to freehand.
Detailed Instructions
Materials
- White pumpkin (real or faux)
- Black acrylic paint or paint pen (fine tip)
- Small round paintbrush (size 0 or 1, if using paint)
- Pencil (light H grade)
- Plastic toy spider
- Hot glue gun and glue sticks
- Damp cloth or paper towel
Step 1: Preparation
-
Clean surface:
Before starting, wipe down the surface of your pumpkin with a damp cloth to remove any dust or dirt, ensuring a clean canvas for your paint. -
Dry completely:
Allow the pumpkin to air dry fully so the paint or marker adheres properly without smearing. -
Choose placement:
Decide where you want the center of your web to be. For this look, aim for the lower-left quadrant of the pumpkin rather than dead center for a more dynamic, asymmetrical composition.
Steady Hands
Rest your pinky finger on a dry part of the pumpkin while painting. This anchors your hand, giving you better control for drawing clean, thin lines.
Step 2: Drawing the Base Structure
-
Mark the center:
Using your pencil, make a small dot where all the web lines will converge. -
Sketch radial lines:
Lightly sketch straight lines radiating distinctively outward from your central dot like spokes on a wheel. Extend them quite far up the side of the pumpkin. -
Space the lines:
Aim for uneven spacing between the spokes to make the web look organic and natural rather than perfectly geometric. -
Trace with paint:
Once happy with your pencil guide, trace over these radial lines using your black paint pen or fine brush. Use a steady hand, but remember that wiggly lines add to the spooky effect. -
Paint the center:
Thicken the lines slightly right at the convergence point to create a solid anchor for your web.
Step 3: Weaving the Web
-
Start the webbing:
Beginning near the center, draw curved, scalloped lines connecting the radial spokes. The curve should dip inward towards the center point. -
Work outward:
continue adding concentric rings of these scalloped lines, moving further away from the center with each new layer. -
Vary the spacing:
I like to increase the distance between the webbing rows as I get further from the center, creating a sense of expansion. -
Follow the form:
Pay attention to the natural ridges of the pumpkin. Allow your lines to ride over the bumps, which adds a nice 3D dimension to the drawing. -
Vary line thickness:
Occasionally press a little harder on your pen or brush to create thicker segments in the web for a textured, realistic look. -
Connect the edges:
Ensure the ends of your scalloped lines touch the radial spokes cleanly. If gaps appear, just dab a little extra paint to bridge them. -
Review and refine:
Step back and look at the overall shape. If a section looks too empty, you can add an extra partial line or extend a spoke further.
Add Glitz
Before the black paint fully dries, lightly sprinkle fine silver glitter over the wet web lines to make it look like morning dew caught in the web.
Step 4: Finishing Touches
-
Dry time:
Let the paint dry completely. Acrylic paint markers usually dry fast, but give it 15 minutes to be safe so you don’t smudge your hard work. -
Erase guidelines:
If any pencil marks are still visible beneath or next to your paint, gently erase them now. -
Position the spider:
Take your plastic spider and test a few spots on the pumpkin surface. Placing it away from the web center, as if it’s crawling toward it, creates movement. -
Glue the spider:
Apply a small dot of hot glue to the underside of the spider’s body and press it firmly onto the chosen spot for a few seconds. -
Clean up threads:
Remove any wispy strings of hot glue that might have formed while attaching the spider.
Place your creation on the porch or a mantle for a touch of elegant fright this season


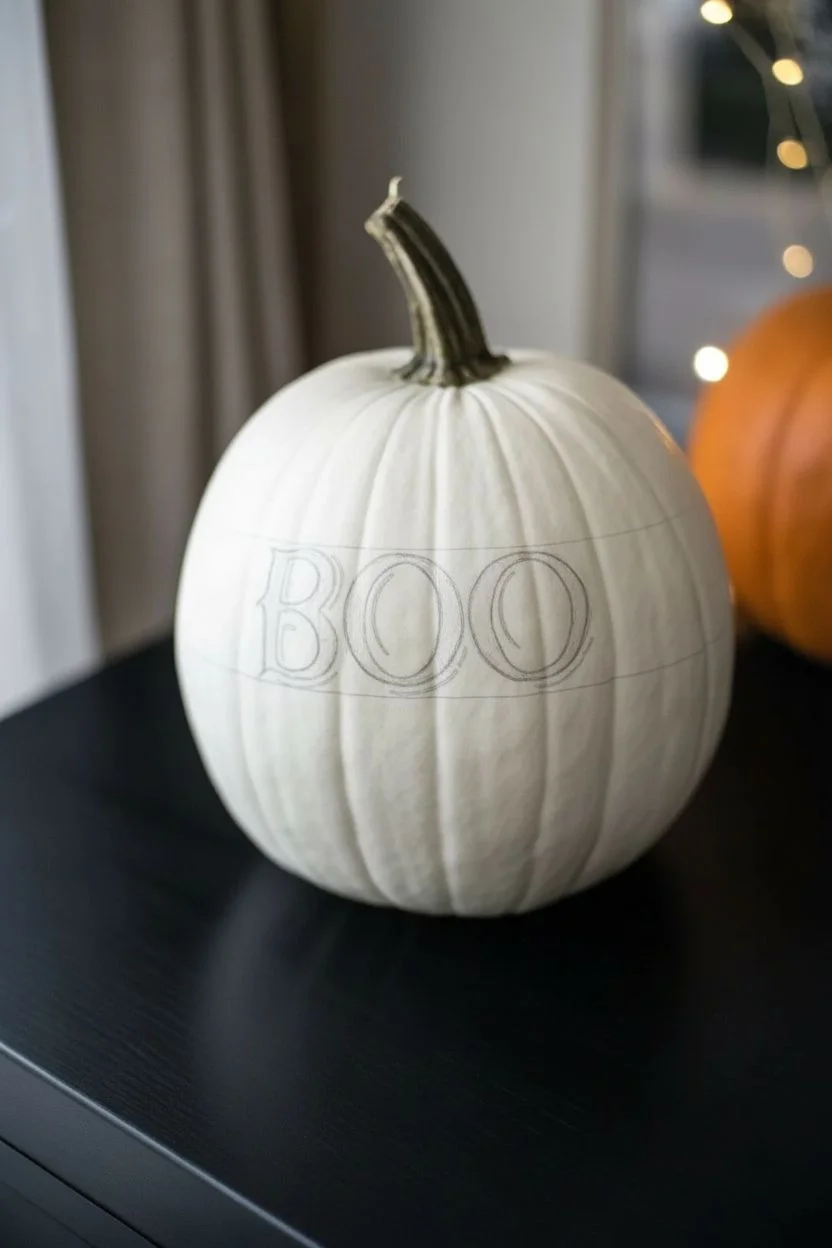
Moody Gothic Lettering (Names, Quotes, or “Boo”)
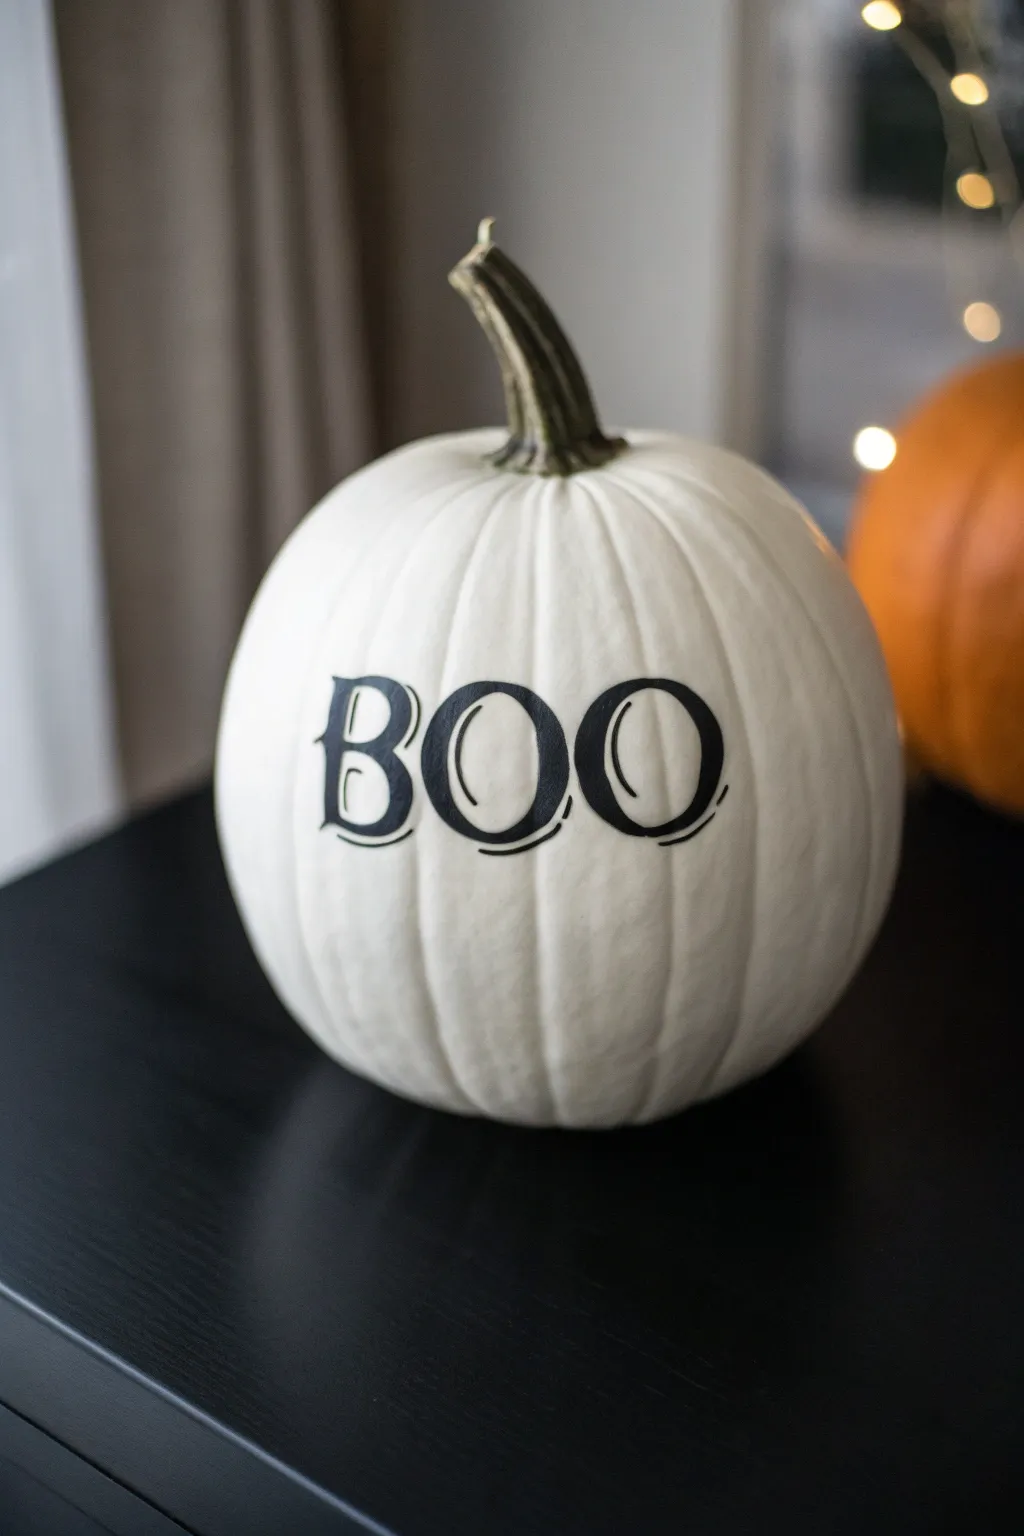
Achieve a sophisticated Halloween look with this minimalist white pumpkin featuring dramatic black lettering. The high-contrast design uses classic typography and subtle highlights to create a dimensional, professional finish that elevates any autumn vignette.
How-To Guide
Materials
- Medium-sized faux or real white pumpkin
- Black acrylic paint (matte or satin)
- White or light gray paint pen (fine tip)
- Pencil
- Eraser
- Small flat shader brush (size 2 or 4)
- Fine liner brush (size 00 or 0)
- Measuring tape (optional)
- Gothic typeface reference sheet
Step 1: Preparation & Lettering Layout
-
Select your pumpkin surface:
If using a real pumpkin, wash it thoroughly with mild soap and water to remove dirt and oils. For a faux pumpkin, a quick wipe with a damp cloth ensures the paint adheres properly. -
Find the center point:
Locate the “face” of your pumpkin—the smoothest side with the fewest deep ridges. Use a measuring tape to find the vertical center if you want precision, or eyeball it for a more organic feel. -
Choose your font style:
Search online for a serif font with a slightly Gothic or ‘bookish’ feel—look for letters with thick vertical strokes and thin horizontal ones (like Bodoni or Didot). You can print this out as a reference. -
Sketch the baseline:
Lightly sketch a horizontal line across the center of the pumpkin face using your pencil. This ensures your letters won’t slope upwards or downwards. -
Draft the letters roughly:
Sketch the letters ‘B’, ‘O’, and ‘O’ lightly in pencil. Don’t worry about thickness yet; just focus on spacing. Since pumpkins are round, spacing the letters slightly closer together helps them appear visually connected. -
Define the typography weight:
Go back over your skeleton sketch and add weight to the vertical strokes. Draw the outline of where the thick parts of the letters will be, creating that classic serif contrast. -
Check your proportions:
Take a step back and look at the pumpkin. Usually, the middle ‘O’ needs to be adjusted slightly to match the width of the outer letters.
Fixing Wobbly Lines
Painting over ridges is tricky. If lines get bumpy, use the side of a flat brush rather than the tip to bridge the gap over the ridge valleys.
Step 2: Painting & Detailing
-
Fill the thick strokes:
Dip your flat shader brush into the black acrylic paint. Carefully fill in the wide, vertical parts of the letters. Use smooth, downward strokes to minimize texture. -
Paint the serifs and thin lines:
Switch to your fine liner brush for the delicate horizontal lines and the small ‘feet’ (serifs) of the letters. These lines should be significantly thinner than your main strokes. -
Refine the edges:
I usually find that going back over the edges with the fine liner brush helps sharpen any fuzzy lines where the brush might have slipped into a pumpkin ridge. -
Clean things up:
If you made any mistakes, use a damp Q-tip to wipe away wet paint, or wait for it to dry and touch up with white paint. -
Let the black paint cure:
Allow the black lettering to dry completely. This usually takes about 20-30 minutes, or you can speed it up with a hair dryer on a cool setting. -
Plan the highlights:
Visualize a light source coming from the top left. The highlights will generally fall on the left side of the vertical strokes and the top of the curves. -
Draw the shadow lines:
Take your fine-tip white or light gray paint pen. Draw a thin line *inside* the black letter forms, hugging the left edge of the thickest parts of the ‘B’ and ‘O’s. -
Add secondary accents:
Add small curved strokes on the bottom left of the round parts of the letters. This ‘inline’ highlight technique gives the flat letters a carved, dimensional look. -
Erase guidelines:
Once absolutely everything is dry, gently erase any visible pencil marks from the sketching phase using a soft white eraser.
Glossy Finish
Apply a coat of high-gloss clear varnish over just the black letters once dry. This makes them look like fresh ink or vinyl decal work.
Place your sleek new pumpkin on a dark console table or porch to let the high-contrast lettering really shine
BRUSH GUIDE
The Right Brush for Every Stroke
From clean lines to bold texture — master brush choice, stroke control, and essential techniques.
Explore the Full Guide
Polka Dots and Dashes for a Modern Neutral Look
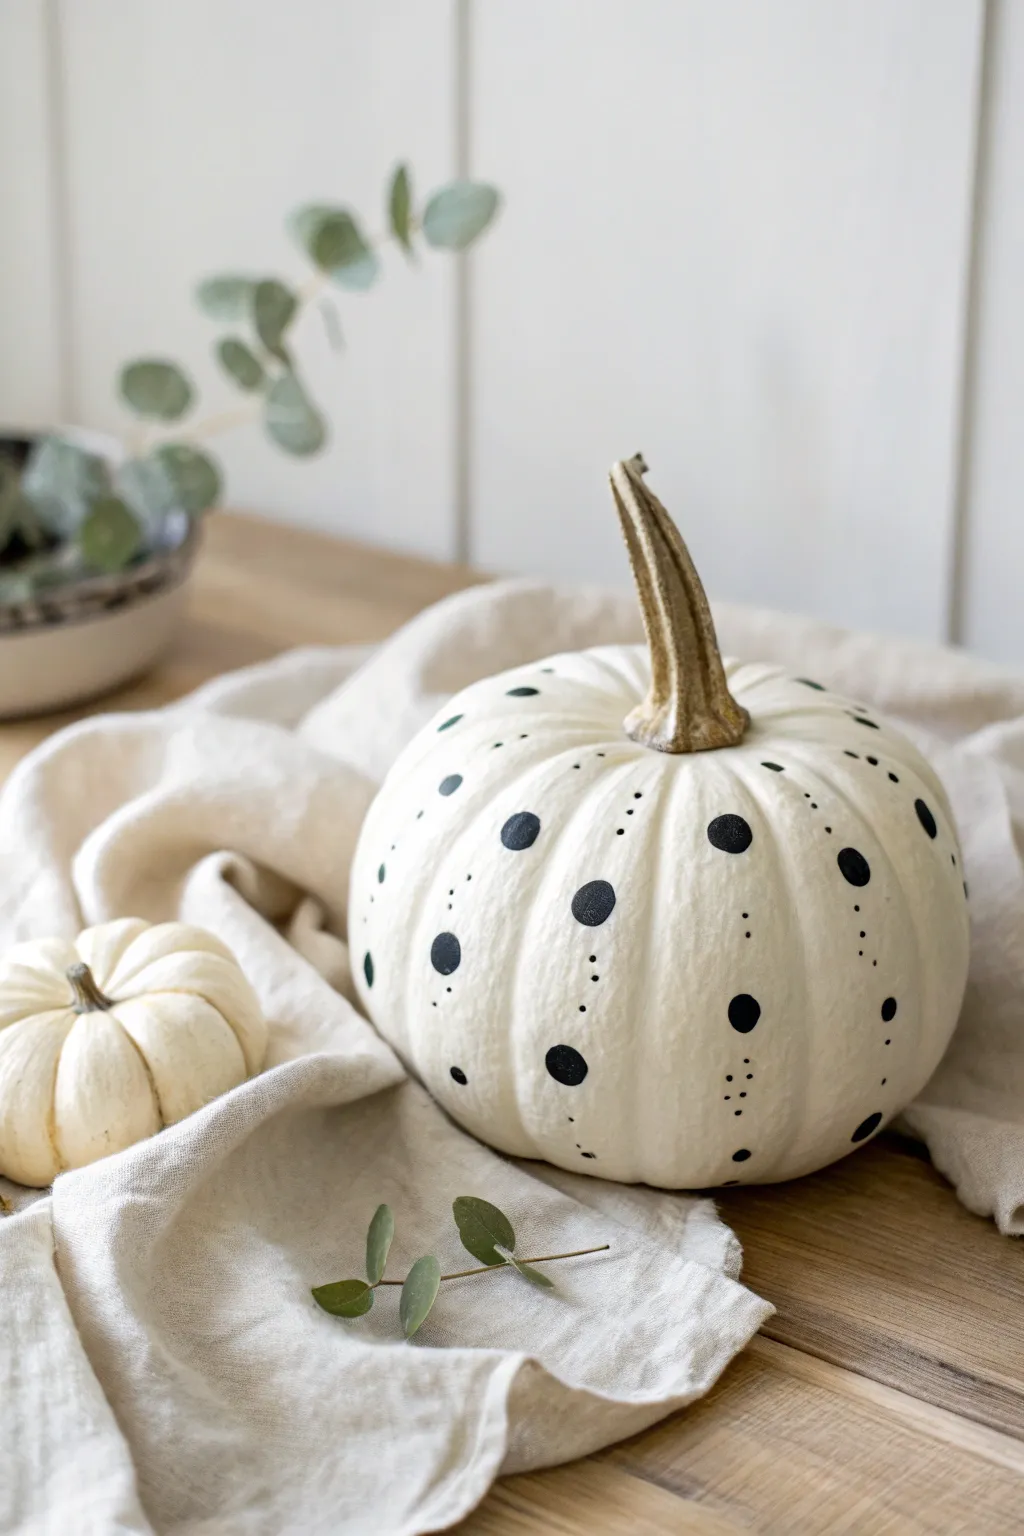

Embrace a modern, understated aesthetic this autumn with a simple yet striking painted pumpkin design. By combining large polka dots with delicate stippled accents along the natural ribs, you can transform a plain white gourd into a sophisticated piece of seasonal decor.
Step-by-Step Tutorial
Materials
- Medium-sized white pumpkin (real or faux)
- Black acrylic paint (matte finish recommended)
- Round foam pouncer (approx. 1/2 inch or 1.5 cm)
- Fine detail paintbrush (size 0 or 00)
- Paper plate or paint palette
- Damp cloth or paper towel (for mistakes)
- Clean dry cloth
Step 1: Preparation & Planning
-
Clean surface:
Begin by thoroughly wiping down your white pumpkin with a clean, dry cloth to remove any dust or dirt. If using a real pumpkin, you can use a slightly damp cloth but ensure it is completely dry before painting. -
Study the ribs:
Rotate your pumpkin and observe the natural vertical ribs. These indentations will serve as the guides for your design placement, helping you decide where the main polka dots will sit versus the smaller details. -
Prepare paint:
Squeeze a small amount of black matte acrylic paint onto your paper plate or palette. Using a palette allows you to control the amount of paint on your brushes better than dipping directly into a bottle.
Step 2: Painting the Polka Dots
-
Load the pouncer:
Dip your round foam pouncer into the black paint. Press it a few times on a clean spot of the palette to ensure the paint is evenly distributed across the foam surface and to remove excess drips. -
First main dot:
Choose a prominent rib section and press the pouncer firmly onto the pumpkin surface to create your first large polka dot. Lift straight up to keep the edges crisp and circular. -
Create a pattern:
Continue adding large dots around the pumpkin. Aim for a somewhat random but balanced distribution—place some high near the stem, some low near the base, and some right in the middle. -
Vary vertical alignment:
Avoid placing the dots in perfect horizontal rows. Staggering them up and down creates a more organic, modern look that complements the natural shape of the gourd. -
Check spacing:
Leave plenty of white space between your large dots. You need room for the smaller details later, and the negative space is key to this minimalist style. -
Touch up edges:
If any of your circles have rough edges or light spots, use your fine detail brush to carefully fill them in or smooth the perimeter while the paint is still wet. -
Let dry:
Allow the large dots to dry completely to the touch. This usually takes about 10–15 minutes depending on the thickness of your paint.
Smudge Alert
Make a mistake? Since the pumpkin skin is slick, you can usually wipe away wet acrylic paint instantly with a damp Q-tip without ruining the whole design.
Step 3: Adding Delicate Details
-
Switch tools:
Pick up your fine detail paintbrush (size 0 or 00). Check that the bristles are clean and form a sharp point. -
Load the brush:
Dip just the tip of the brush into the black paint. You want enough paint to make a mark, but not a glob that will drip. -
Start marking:
Identify the vertical spaces between your large dots or along the deeper grooves of the pumpkin ribs. -
Create varying sizes:
Apply tiny dots by barely touching the brush tip to the surface. Vary the pressure slightly to create a mix of microscopic specks and slightly larger small dots. -
add vertical flow:
Arrange these tiny dots in loose vertical lines that follow the pumpkin’s ribs. Imagine they are trickling down the side like sand. -
Cluster for effect:
Group 3-4 small dots together near a large polka dot to create visual interest. This connects the large and small elements so they don’t look like two separate designs. -
Fill the gaps:
Rotate the pumpkin and look for any large empty areas that feel unbalanced. Add a few more tiny specks there, keeping the touch light and delicate. -
Final review:
Step back and look at the pumpkin as a whole. Ensure the ‘randomness’ feels balanced and that no single area is too cluttered with black paint. -
Final dry:
Let the entire project dry undisturbed for at least an hour before moving or styling it.
Pro Tip: Practice Run
Test your foam pouncer on a piece of scrap paper first. This helps determine how much pressure you need to get a solid, opaque circle.
Place your stylish new creation on a linen cloth or wooden table to instantly elevate your fall decor
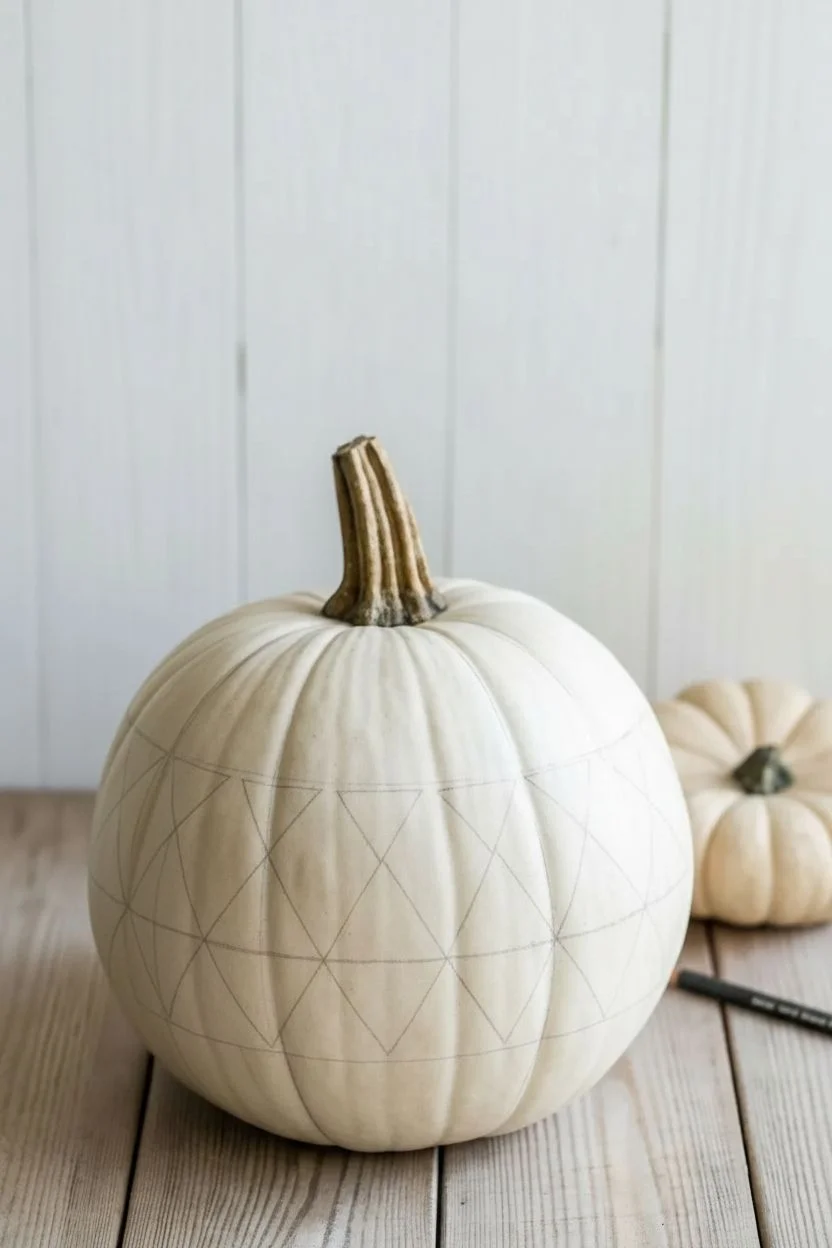
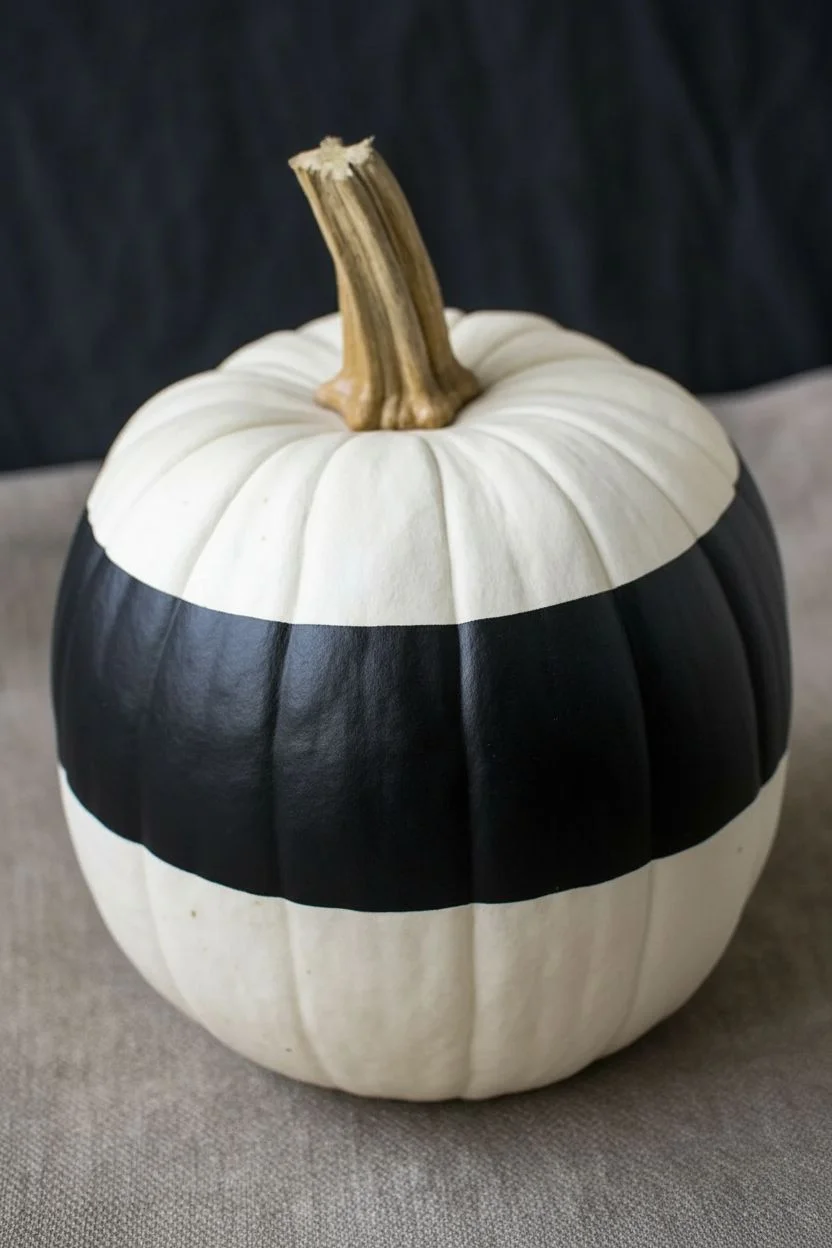
Clean Geometric Color Blocking on a White Pumpkin
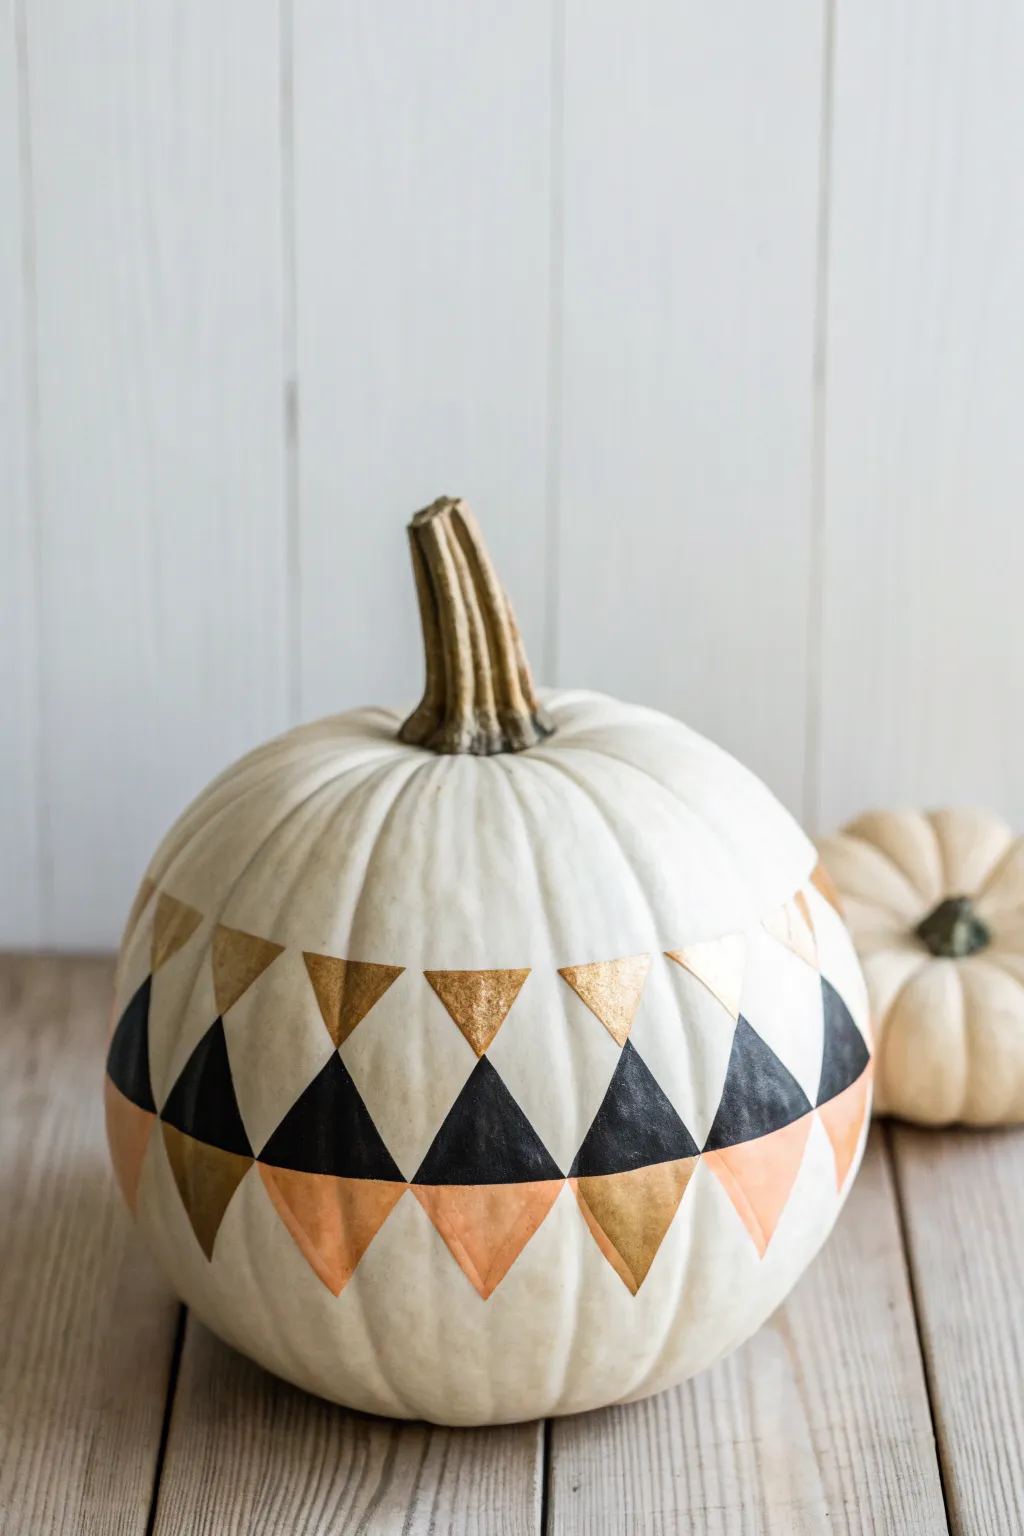
Elevate a simple white pumpkin with this modern, geometric design featuring a chic color palette of black, gold, and soft peach. The sharp, alternating triangles create a striking band around the pumpkin’s center that feels both festive and sophisticated.
Step-by-Step Tutorial
Materials
- Medium-sized white pumpkin (real or faux)
- Acrylic craft paint: Black
- Acrylic craft paint: Metallic gold
- Acrylic craft paint: Peach or soft copper
- Painter’s tape or masking tape (1/4 inch width is ideal)
- Small flat angled paint brush (1/4 inch or similar)
- Pencil
- Ruler or flexible measuring tape
- Paper plate or palette
- Cup of water
- Paper towels
Step 1: Planning the Pattern
-
Clean surface:
Begin by wiping down your pumpkin with a damp cloth to remove any dirt or oils. If you are using a real pumpkin, ensure it is completely dry before starting. -
Measure the circumference:
Use a flexible measuring tape to find the widest part of the pumpkin’s belly. This center line will serve as the base for your main row of triangles. -
Mark the triangle base:
Lightly mark a faint pencil line around the entire circumference where you measured. This ensures your pattern stays level and doesn’t wander up or down. -
Draft the central triangles:
Along this center line, mark points at even intervals (about 1.5 to 2 inches apart). Connect these points to peak points above the line to form upward-pointing triangles. Try to keep them roughly the same size, though the pumpkin’s natural ridges might require slight adjustments. -
Draft the top and bottom rows:
Now, sketch the downward-pointing triangles. For the top row, place a triangle in the gap between each upward-pointing one. Repeat this process for the bottom row, mirroring the position of the top row.
Wobbly Lines?
If freehand painting is too hard, use thin washi tape or painter’s tape to mask off the triangle shapes. Press edges down firmly to prevent bleed-under.
Step 2: Painting the Design
-
Start with black:
Dip your flat angled brush into the black acrylic paint. Carefully outline the edges of the central, upward-pointing triangles first to get crisp lines. -
Fill the centers:
Once outlined, fill in the center of each black triangle. Apply a second coat if the first layer looks streaky or translucent. -
Paint the gold accents:
Wash your brush thoroughly. Move to the metallic gold paint and fill in the top row of downward-pointing triangles. I find that metallic paints often need a little extra stirring to get the shimmer evenly distributed. -
Add the peach tone:
Clean your brush again. Paint the bottom row of downward-pointing triangles with your peach or soft copper shade. This adds a lovely warmth to balance the stark black. -
Touch up edges:
Inspect your work closely. Use the sharp edge of your angled brush to fix any wobbly lines or accidental smudges. If you made a mistake on the white pumpkin skin, you can often gently scratch it off with a fingernail once dry. -
Optional outlining:
If you want an ultra-crisp look and have a steady hand, you can define the edges of the triangles with a very fine gold paint pen, though the handmade brush look is part of the charm.
Level Up: Texture
For a mixed-media 3D effect, skip the paint for the gold triangles and use geometric triangle stickers or gold leaf sheets applied with sizing adhesive.
Step 3: Finishing Touches
-
Let it cure:
Allow the pumpkin to sit undisturbed for at least an hour until the paint is completely dry to the touch. -
Seal (Optional):
If this pumpkin will be sitting on a porch exposed to humidity, consider brushing a clear matte sealer over the painted areas to prevent peeling.
Place your sleek new pumpkin on a mantel or dining table to enjoy modern autumn vibes

PENCIL GUIDE
Understanding Pencil Grades from H to B
From first sketch to finished drawing — learn pencil grades, line control, and shading techniques.
Explore the Full Guide
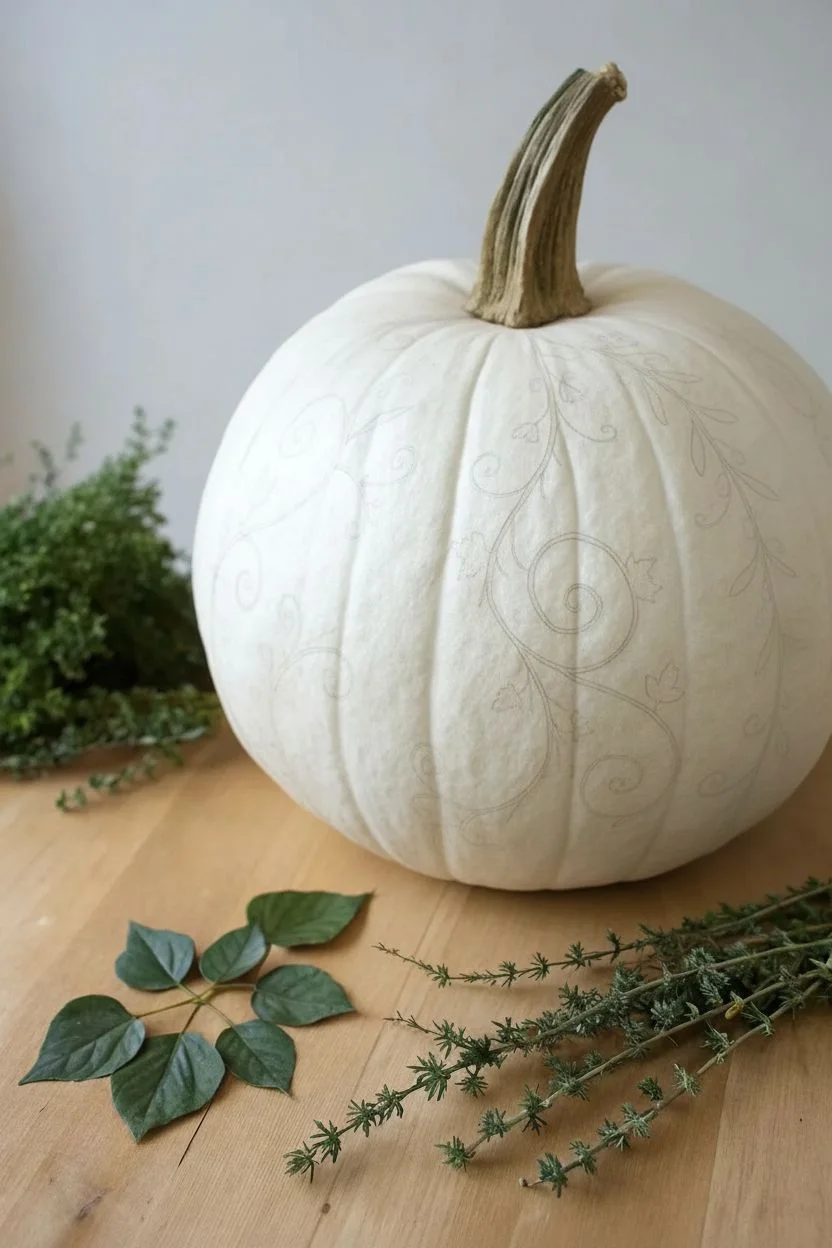
Delicate Botanical Vines and Leaves Wrapped Around
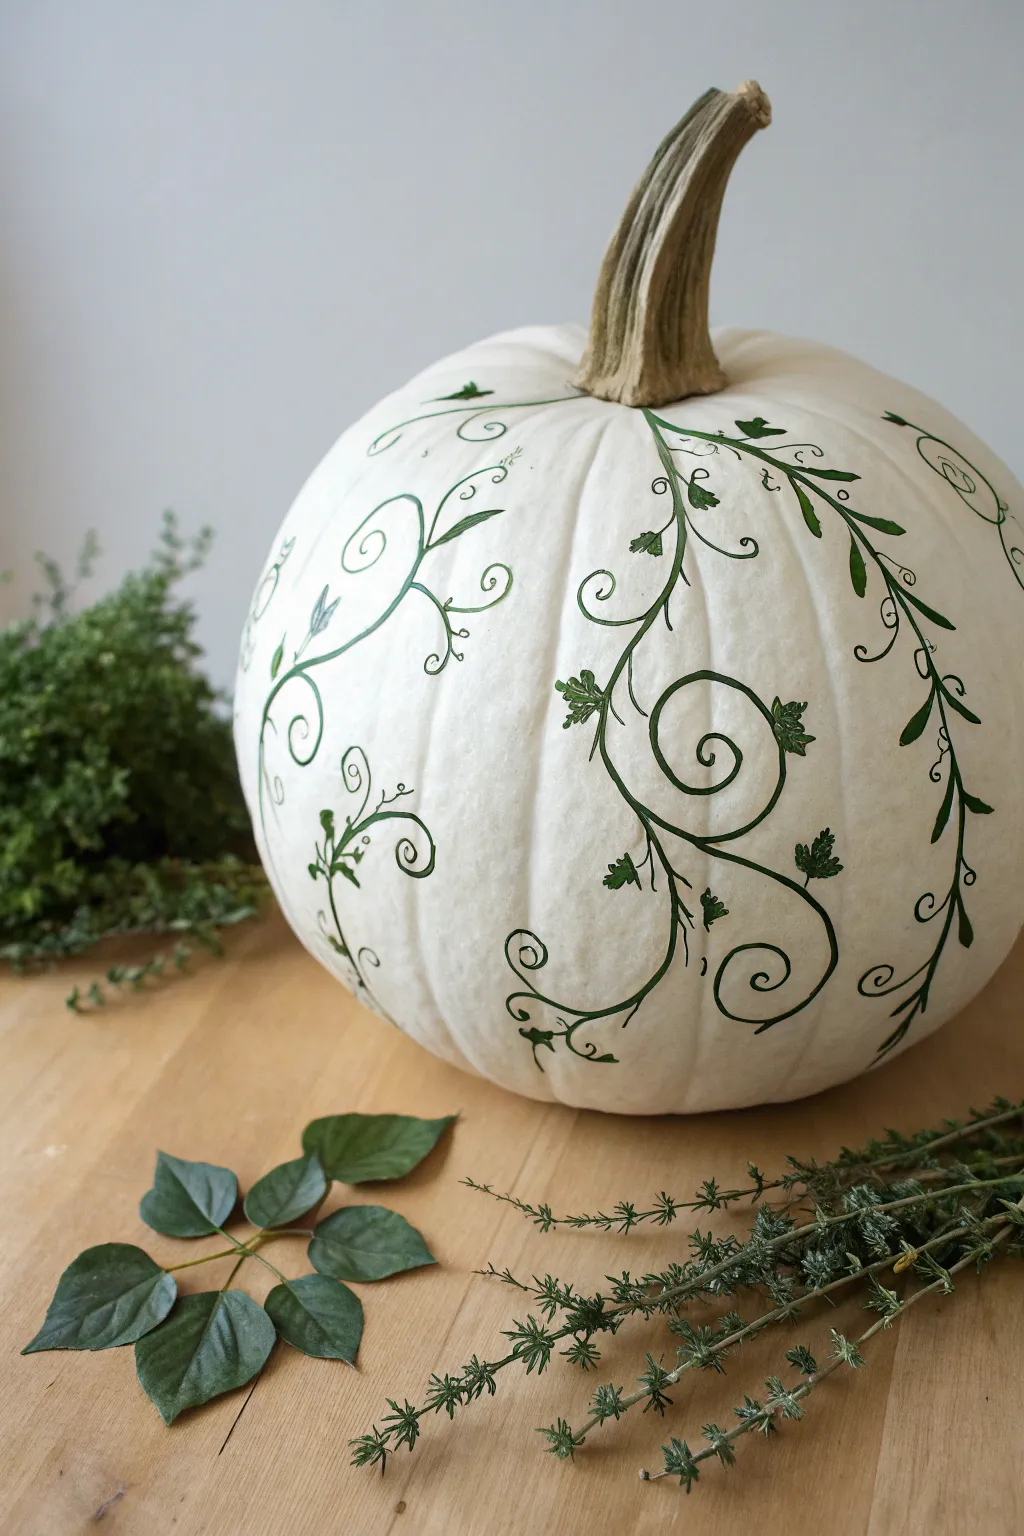
Transform a simple white pumpkin into an elegant botanical centerpiece with this delicate vine design. The dark green illustration style mimics the look of a vintage field guide, creating a sophisticated and natural autumn accent.
Step-by-Step
Materials
- Medium-sized faux or real white pumpkin
- Dark green permanent marker (fine and medium tip) OR dark green acrylic paint pen
- Pencil (HB or lighter)
- Eraser
- Damp cloth
- Reference images of ivy or vines (optional)
- Small round paintbrush (size 0 or 1, if using bottled paint instead of pens)
- High-quality dark green acrylic paint (if not using pens)
- Clear matte sealant spray
Step 1: Preparation and Planning
-
Clean the surface:
Before starting, wipe down your pumpkin with a damp cloth to remove any dust, dirt, or oils. If you are using a real pumpkin, ensure it is completely dry before proceeding. -
Establish the focal points:
Visualize where the main vines will flow. The design looks best when it originates from the stem and cascades downwards, following the natural vertical ribs of the pumpkin. -
Sketch the main stems:
Lightly use your pencil to draw the primary vine structures. Create flowing S-curves that wander down the sides, occasionally crossing over the pumpkin’s ribs for a natural look. Don’t press too hard, as graphite can be tricky to erase from white skin.
Natural Flow Tip
Follow the pumpkin’s ribs! Let your main vines run down the grooves (valleys), and allow the leaves and tendrils to curve up over the ridges for a 3D effect.
Step 2: Drawing the Botanicals
-
Outline the main vines:
Using your medium-tip green marker or paint pen, trace over your main pencil lines. Keep your hand steady but allow for slight variations in line thickness to mimic organic stems. -
Add secondary branches:
Draw shorter, thinner stems branching off the main vines. Aim optimally for alternating sides rather than perfect symmetry to keep the look organic. -
Draw the leaves:
At the ends of some branches, sketch small, jagged ivy-like leaves. A simple three-point or five-point leaf shape works perfectly for this style. I prefer to vary the sizes, keeping larger leaves near the top and smaller ones near the bottom. -
Fill in the leaves:
Carefully color in the leaves with your green marker. You can color them solidly dark, or leave tiny slivers of white space near the veins to suggest light reflection. -
Add the curly tendrils:
This is the signature detail. Using the fine-tip marker, draw tight spirals and loose curls coming off the main stems. These tendrils should look like they are reaching out and grasping. -
Incorporate bud details:
Along the thinner stems, add tiny circles or dots to represent small buds or berries. These add texture and break up the heavy lines.
Step 3: Refining and Sealing
-
Check for balance:
Step back and look at the pumpkin from all angles. If a section looks too empty, add a loose, floating curl or a small sprig of leaves to fill the void. -
Thicken select lines:
Go back over the base of the main stems to thicken them slightly. This adds visual weight and makes the plant look grounded near the pumpkin stem. -
Clean up sketches:
Once the ink or paint is completely dry (give it at least 20 minutes), gently erase any visible pencil marks. Be gentle to avoid smearing the green pigment. -
Seal the design:
To protect your artwork, take the pumpkin to a well-ventilated area and apply a light coat of clear matte sealant spray. This prevents the marker from fading or smudging over time.
Level Up: Gold Accent
Add sophistication by tracing a very thin line of gold paint or metallic marker along one edge of the main vine stems to create a glowing highlight.
Place your finished botanical pumpkin on a wooden table with fresh greenery to complete the organic autumn vignette
Wildflower Doodles on a White Pumpkin Canvas
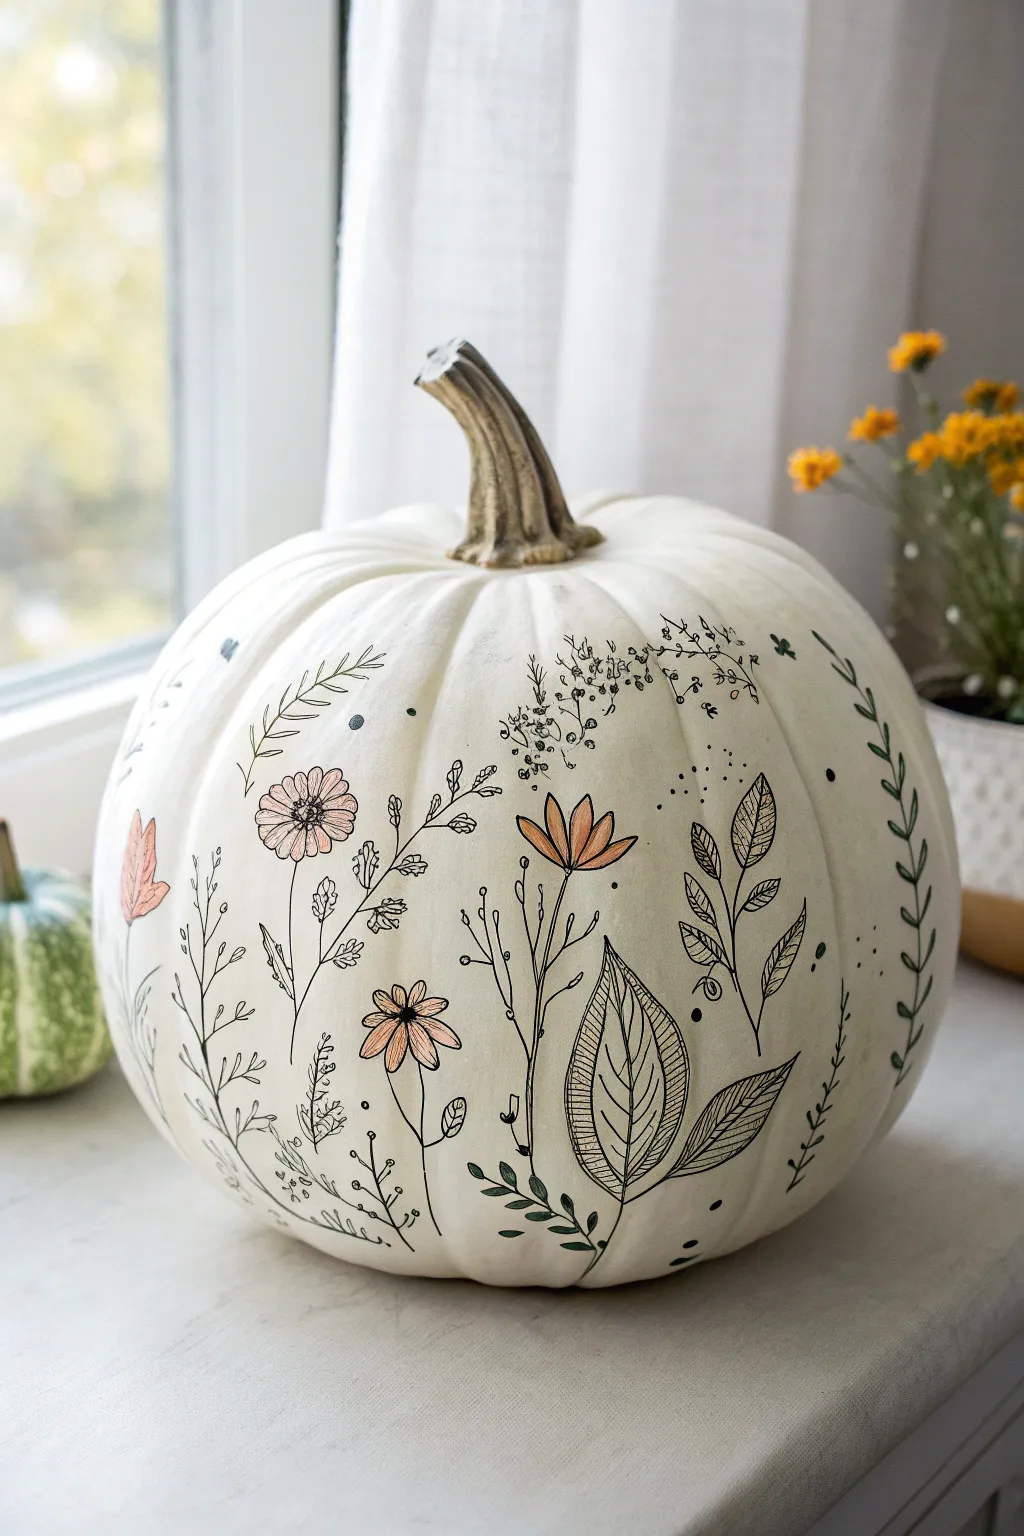
Transform a simple white pumpkin into an elegant botanical display using fine liners and soft washes of color. This delicate doodle style captures the effortless beauty of a wildflower meadow, perfect for modern farmhouse or cottagecore autumn decor.
Step-by-Step Guide
Materials
- White pumpkin (faux or real with a smooth surface)
- Fine point archival ink pens (black, sizes 01 and 05)
- Pencil and white eraser
- Watercolor paints or diluted acrylics (peach, sage green, blush pink)
- Small round detail brush (size 2 or 3)
- Paper towel
- Matte spray sealer (optional)
Step 1: Planning and Sketching
-
Clean surface:
Begin by wiping down your pumpkin with a slightly damp cloth to remove any dust or oils that might repel the ink. If it’s a real pumpkin, dry it thoroughly. -
Plan groupings:
Visualize three to five main focal points around the pumpkin where your largest flowers will sit. This ensures the design looks balanced from every angle. -
Sketch stems:
Using a pencil very lightly, draw thin, curved lines rising from the bottom of the pumpkin. Vary their heights so the ‘meadow’ feels natural and organic. -
Outline main blooms:
Lightly sketch the shapes of your primary flowers—think simple daisies, coneflowers, or tulips—anchored on the stems you just drew.
Ink Smearing?
Work from top to bottom and rotate the pumpkin frequently so your hand rests on clean, dry areas. If you’re left-handed, work from right to left to avoid dragging your palm through wet ink.
Step 2: Inking the Outlines
-
Start the stems:
Switch to your thicker (05) black pen. Trace over your main stem lines, keeping your hand loose to allow for slight wobbles that mimic natural growth. -
Ink the focal flowers:
Draw the petals of your main flowers. For the daisy-like blooms seen in the example, create overlapping petal shapes rather than perfect ovals. -
Add texture marks:
Use the finer (01) pen to add tiny details inside the flower centers and small lines on the petals to suggest shading and dimension. -
Draw large leaves:
Create the larger, veined leaves near the base. Draw a central line for the spine, then enclose the leaf shape, filling the interior with diagonal hatching lines for a vintage botanical illustration look. -
Add filler sprigs:
Look for empty spaces between the main flowers. In these gaps, draw delicate sprigs of baby’s breath or tiny berries using the fine pen. -
Incorporate leafy vines:
Draw a few trailing vines that curve horizontally across the pumpkin’s ribs, adding small, simple leaves in pairs along the vine. -
Add floating details:
Scatter tiny dots, floating seeds, or single petals around the upper sections of the design to create a sense of movement and airiness. -
Erase guidelines:
Wait at least 15 minutes for the ink to fully set. Gently erase any visible pencil marks, being careful not to smudge the ink.
Step 3: Adding Soft Color
-
Prepare the wash:
Mix a very small amount of peach or blush paint with plenty of water. You want a translucent wash, not opaque coverage. -
Tint the petals:
Touching your brush lightly to the paper towel first to remove excess water, dab color onto the flower petals. It’s okay if the color doesn’t fill the lines perfectly; the ‘messy’ look adds charrm. -
Paint greenery:
Mix a muted sage green wash. Apply this selectively to just a few leaves or vines, leaving others strictly black and white for contrast. -
Deepen centers:
Drop a slightly more concentrated dot of yellow or brown into the center of the daisy shapes while they are still slightly damp to create a soft bleed effect. -
Final drying:
Let the pumpkin sit undisturbed for an hour until the paint is bone dry. -
Seal (optional):
If you plan to place this pumpkin outdoors or want to protect the watercolor from moisture, spray a light coat of matte sealer over the entire surface.
Pro Tip: Pen Choice
Use waterproof artist pens like Microns. Standard gel pens often smear when you apply the watercolor wash over them, ruining the crisp black lines.
Now you have a stunning, hand-illustrated centerpiece that celebrates the subtle beauty of autumn flora


Gold Stem Accents With Subtle Drips
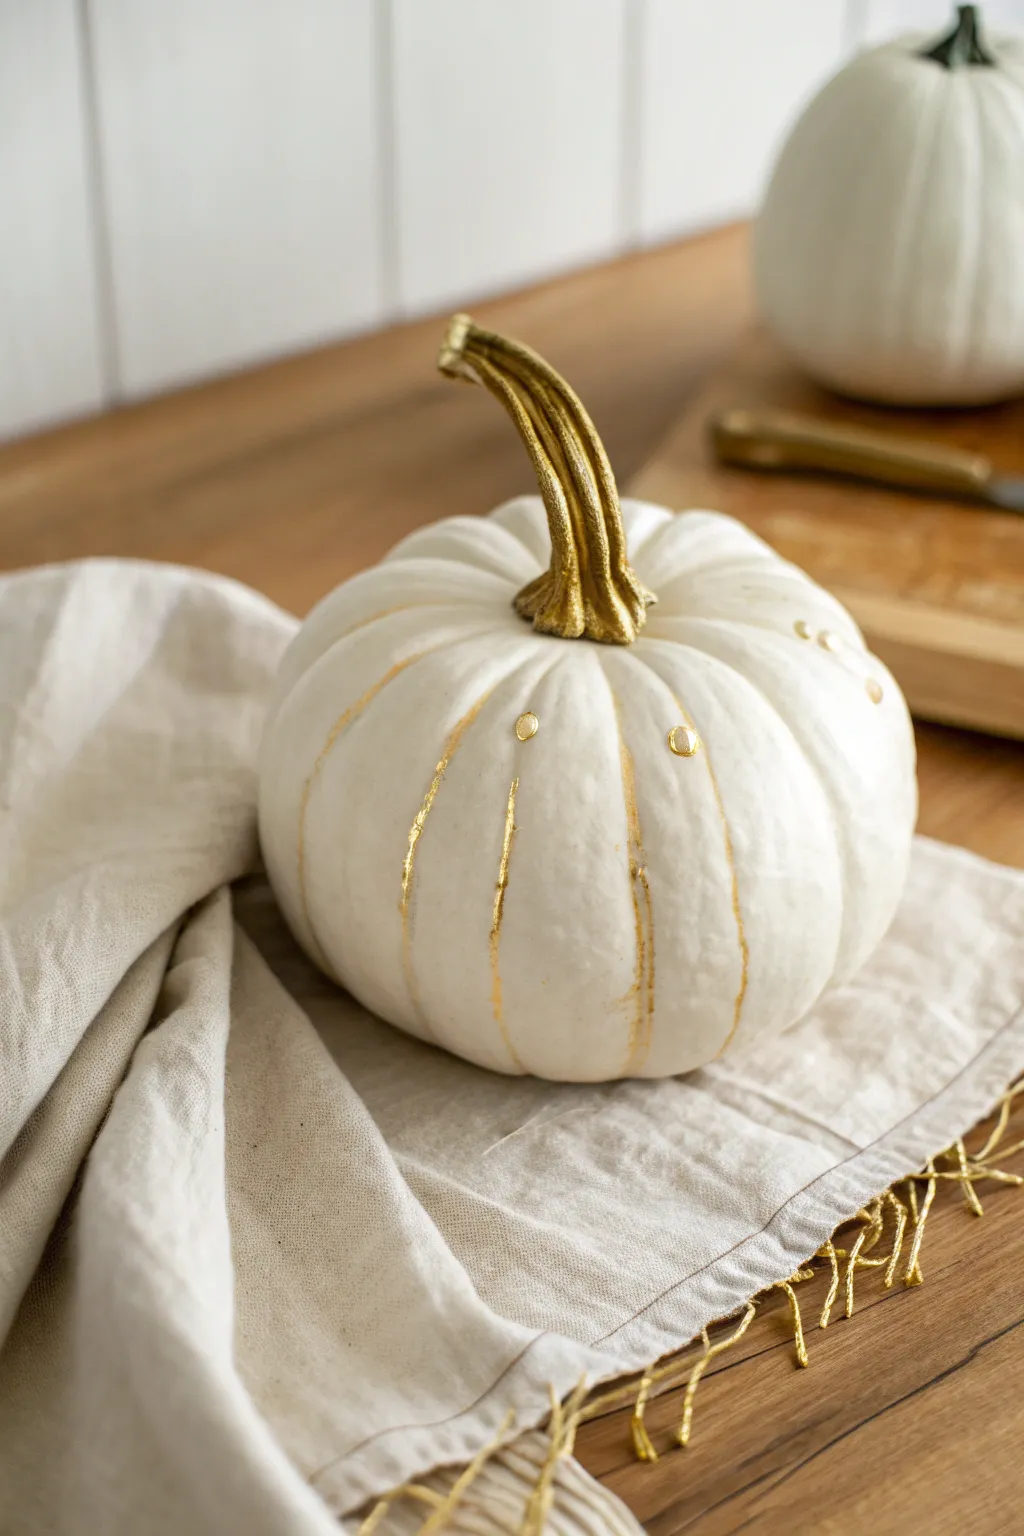
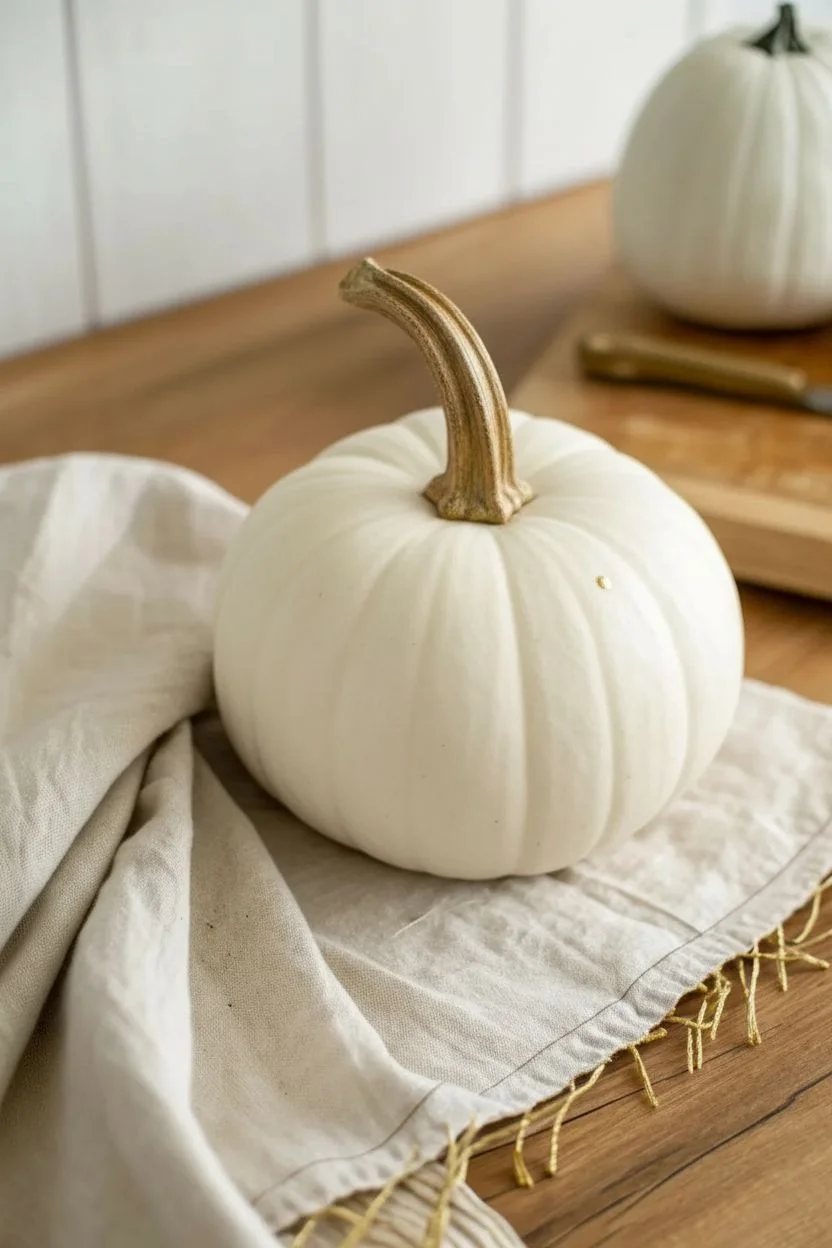
Elevate a simple white pumpkin into a sophisticated centerpiece with touches of metallic elegance. By painting the stem gold and tracing the natural ribs with delicate accents, you create a look that feels both organic and luxurious.
Detailed Instructions
Materials
- Small to medium white pumpkin (real or faux)
- Liquid gold leaf or high-shine gold metallic paint
- Small flat paintbrush (size 4 or 6)
- Fine liner paintbrush (size 0 or 00)
- Cotton swabs (for cleanup)
- Palette or small dish
- Drop cloth or scrap paper
- Q-tips or toothpicks (optional for dots)
Step 1: Preparation & Base
-
Clean surface:
Begin by thoroughly wiping down your pumpkin with a damp cloth to remove any dirt or dust. If using a real pumpkin, wash it with a mild soap solution and dry completely to ensure the paint adheres well. -
Set up workspace:
Lay down your drop cloth or scrap paper to protect your table. Creating a stable base is key, so if your pumpkin is wobbly, you might want to place it on a small ring of tape. -
Prepare the gold:
Shake your liquid gold leaf or metallic paint vigorously. Since metallic pigments tend to settle at the bottom, shaking ensures you get that brilliant, solid shine rather than a watery wash. Pour a small amount onto your palette.
Clean Lines Pro-Tip
For the crispest stem edge, slip a small piece of paper under the stem base as a shield while painting the difficult bottom rim. This prevents accidental gold smudges on the white skin.
Step 2: Gilding the Stem
-
Outline the base:
Using your small flat brush, carefully paint a ring around the very base of the stem where it meets the pumpkin skin. Be precise here to create a crisp line between the white and the gold. -
Fill in texture:
Work your way up the stem, painting into all the nooks and crannies. I find that dabbing the brush into deep crevices first helps cover the texture more effectively than long strokes. -
Coat the top:
Continue painting until the entire stem is covered, including the cut top. Check from different angles to ensure no raw stem color is peeking through. -
Let it firm up:
Allow the stem to dry for about 10-15 minutes. Liquid gold leaf dries quickly, but acrylic metallic paint may need a bit longer before you handle the pumpkin again to paint the sides.
Step 3: Adding Rib Accents
-
Identify the grooves:
Locate the natural vertical indentations (ribs) on your pumpkin. These are nature’s guide lines for your painting. -
Load the liner brush:
Switch to your fine liner brush (size 0 or 00). Dip it into the gold paint, rolling it slightly on the palette to keep the bristles formed into a sharp point. -
Start the trace:
Starting near the top (but not touching the stem gold), gently drag the brush down the center of a rib indentation. Use a very light hand; you want a thin, varied line rather than a thick stripe. -
Create organic breaks:
As you pull the brush down, lift it occasionally to break the line. The goal is an imperfect, organic look—like natural wear or veins of gold—rather than a perfect pinstripe. -
Vary the pressure:
Apply slight pressure in some spots to widen the line, then release to make it whisper-thin. This variation mimics the look of the gold leaf visible in the reference. -
Repeat around the pumpkin:
Continue tracing down each major rib section. Don’t worry if the lines aren’t identical; the asymmetry adds to the charm. -
Refine edges:
If any line looks too heavy, you can gently scrape excess paint away with a clean toothpick while it’s still wet, or wipe with a damp cotton swab.
Level Up: Texture
While the gold stem paint is still wet, sprinkle a tiny pinch of extra-fine gold glitter onto it. It adds depth and ensures the stem catches the candlelight beautifully.
Step 4: Final Details
-
Add gold dots:
Dip the handle end of a paintbrush or a Q-tip into the gold paint. Apply 2-3 small dots randomly near the upper half of the pumpkin sections for extra sparkle. -
Check continuity:
Step back and look at the flow. If a line feels too disconnected, add tiny dashes of gold to bridge the gap without making it a solid line. -
Final dry:
Let the entire project sit undisturbed for at least an hour. If you used liquid leaf, ensure the area is well-ventilated during this drying phase. -
Seal (optional):
If you plan to keep this pumpkin for years or use it outside, apply a clear spray sealant. For indoor seasonal decor, the paint should hold up fine on its own.
Place your shimmering creation on a linen napkin or wood board to enjoy the warm metallic glow all season long
Paint-Splatter Studio Style on White Pumpkins
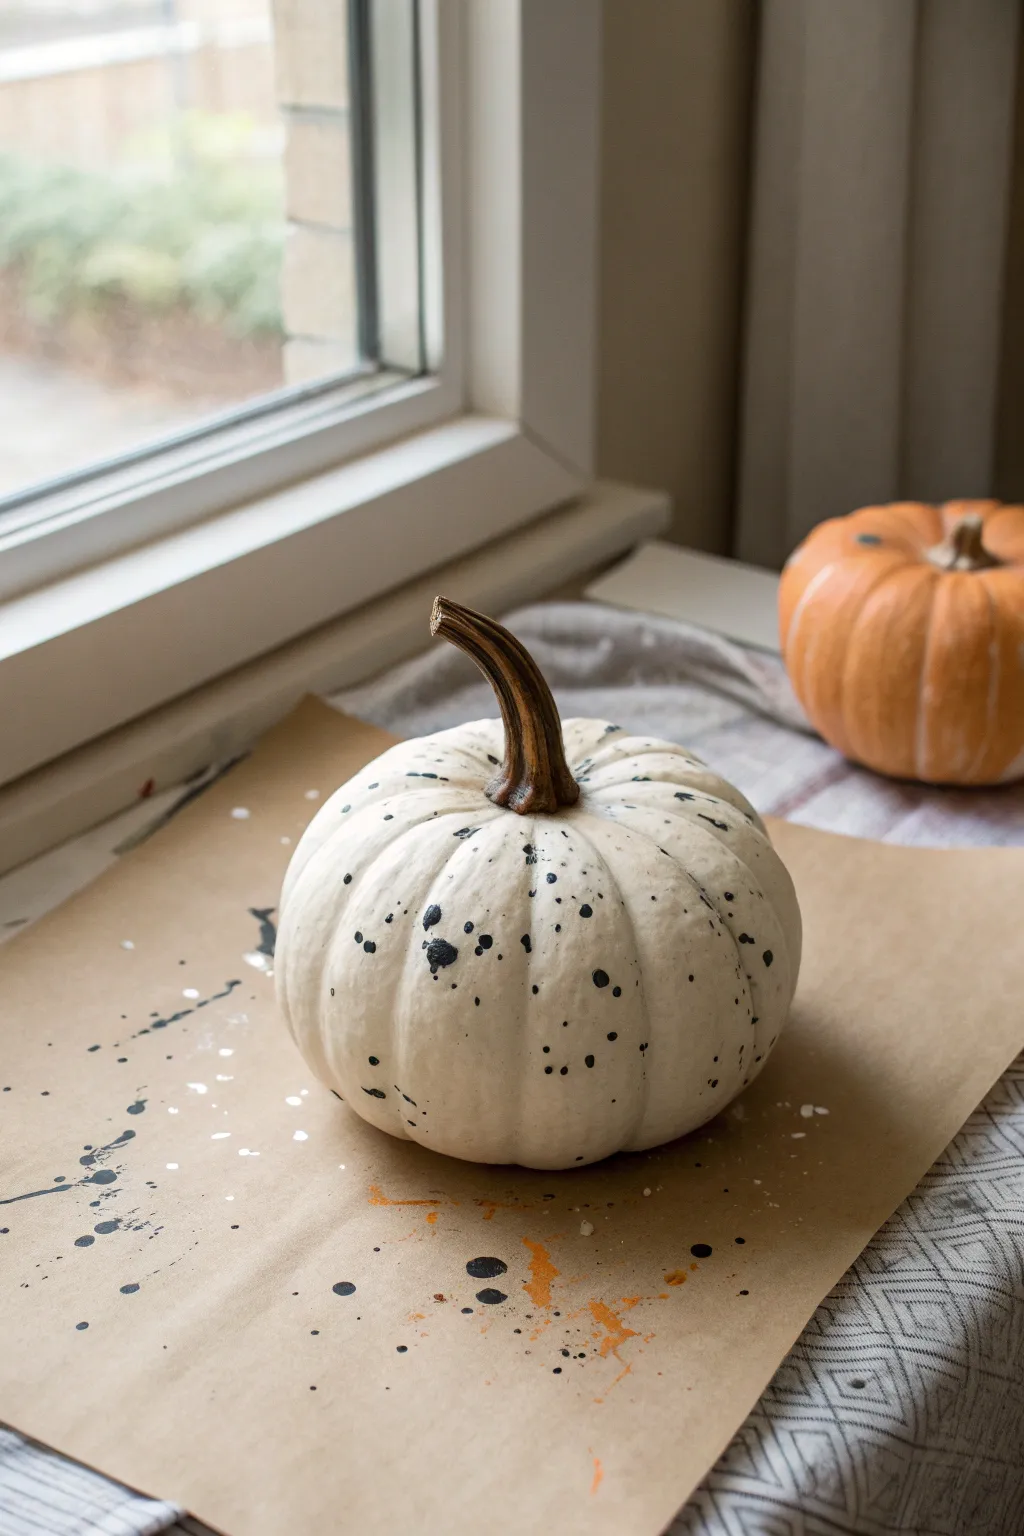
Embrace the messy joy of abstract art with this minimalist yet striking splatter-paint pumpkin. The crisp white background paired with dynamic black ink droplets creates a sophisticated studio look that’s surprisingly easy to achieve.
How-To Guide
Materials
- Small to medium white pumpkin (real or faux)
- Black liquid acrylic paint or acrylic ink
- Orange acrylic paint (optional, for subtle accents)
- Small, stiff-bristled paintbrush or old toothbrush
- Large sheet of brown craft paper or butcher paper
- Cup of water
- Paper towels
- Protective workspace mat (canvas drop cloth works too)
- Clear matte sealer spray (optional)
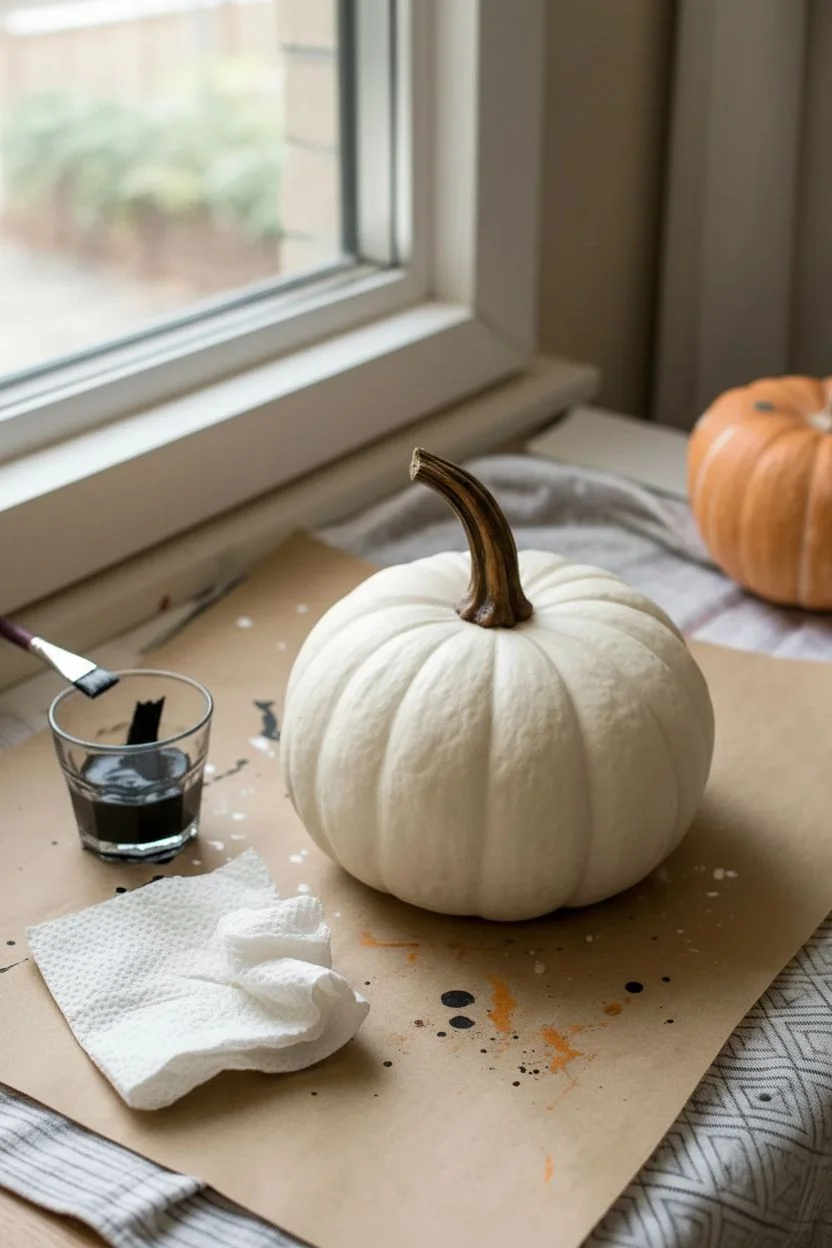
Step 1: Preparation
-
Clean surface:
Begin by thoroughly wiping down your pumpkin with a damp paper towel to remove any dirt or oily residue. This ensures the paint adheres properly. -
Dry completely:
Allow the pumpkin to air dry for at least 15 minutes, or speed up the process by buffing it dry with a lint-free cloth. -
Protect your zone:
Lay down your brown craft paper on a flat surface near natural light if possible. This paper will serve as both your workspace and the backdrop for the final aesthetic, so crinkle it slightly for texture if you like. -
Check paint consistency:
Pour a small amount of black acrylic paint into a container. If it’s too thick (like heavy cream), thin it with a few drops of water until it has the consistency of whole milk. Ink usually works straight from the bottle.
Paint Too Runny?
If drops are running down the sides too fast, your paint is too thin. Dab the drip gently with a tissue and thicken your mix with a bit more raw paint.
Step 2: The Splatter Technique
-
Load the brush:
Dip your stiff-bristled brush or toothbrush into the black paint. You want it saturated but not dripping excessively. -
Test the flick:
Before hitting the pumpkin, do a test flick onto a corner of your craft paper to gauge how much force you need for the perfect droplet size. -
First application:
Hold the brush about 6-8 inches away from the pumpkin. Run your thumb firmly across the bristles, flicking the spray toward the top near the stem. -
Adjust distance:
For larger, more dramatic droplets like the ones shown on the side, load the brush heavily and tap the handle against your other hand (or a pencil) over the pumpkin rather than flicking the bristles. -
Rotate and repeat:
Turn the pumpkin slightly to reach the sides, but keep the concentration of splatter heavier on one side for an organic, asymmetrical look. -
Create variety:
Mix up your technique: some quick flicks for fine mist, and some gravity-assisted drops for larger spots. I find this variation is key to making it look artistic rather than uniform.
Control Freak Tip
For ultra-precise placement of the larger black dots, don’t rely on luck. Use the rounded handle end of a paintbrush to stamp perfect dots exactly where you want them.
Step 3: Finishing Details
-
Add subtle color (Optional):
If you want to mimic the subtle warmth seen on the craft paper in the photo, dip a clean brush into watered-down orange paint and add just a few tiny flicks near the base. -
Handle the stem:
Wipe off any large accidental splatters that landed on the stem with a damp Q-tip if you prefer the stem to look natural and clean. -
Let it sit:
Allow the paint to dry completely undisturbed. Because the larger droplets are thicker, this might take 30-60 minutes. -
Preserve the look:
If you plan to keep this pumpkin outdoors or for several weeks, give it a light misting of clear matte sealer once the paint is bone dry. -
Final styling:
Arrange your finished pumpkin on the paint-spattered craft paper near a window to capture that artsy, sunlit studio vibe shown in the image.
Now you have a chic, speckled centerpiece that bridges the gap between Halloween decor and modern art
Swirled Marble Pour Over a White Pumpkin

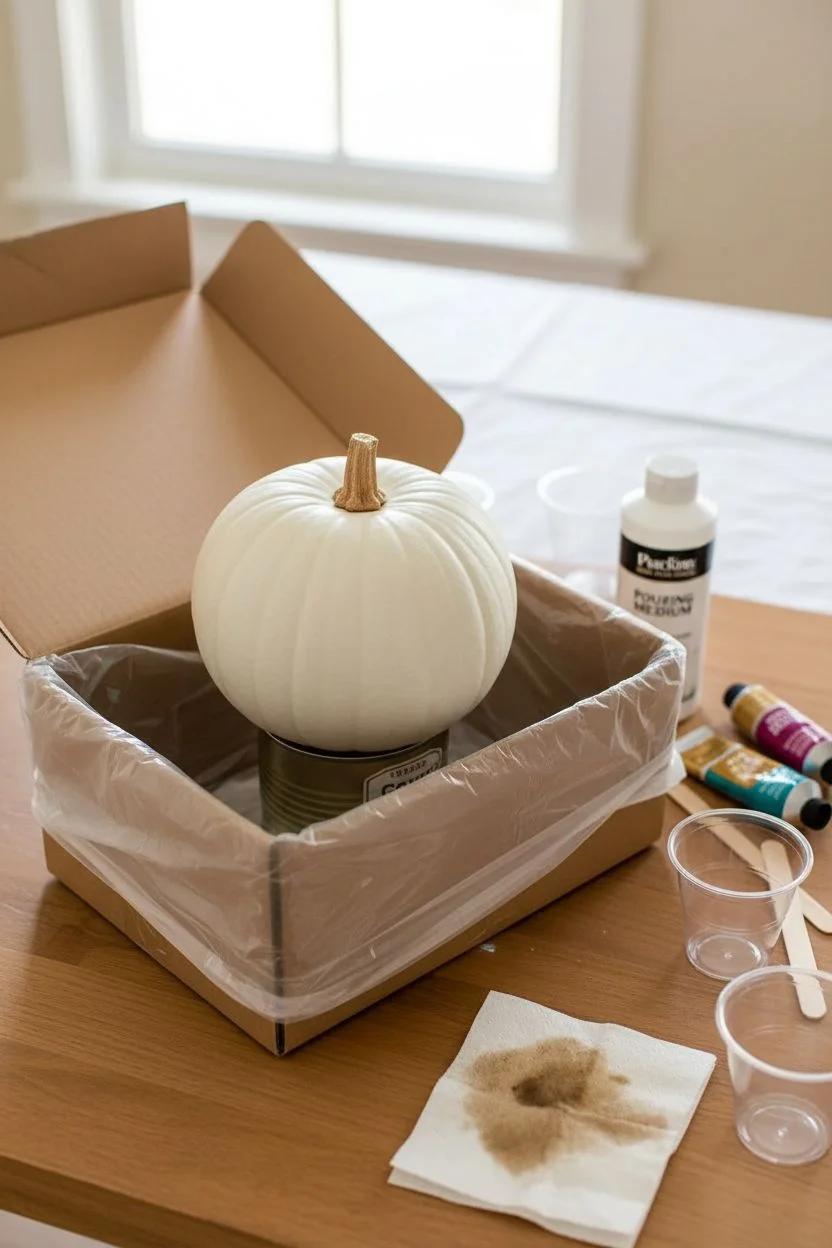
Transform a simple white gourd into a sophisticated centerpiece with this elegant marble pour technique. The mesmerizing swirls of teal, magenta, and metallic gold create a luxe, fluid effect against the crisp white pumpkin skin.
Step-by-Step Tutorial
Materials
- Medium-sized white pumpkin (real or faux)
- Acrylic craft paints (Teal, Dark Magenta/Burgundy, Metallic Gold)
- Pouring Medium
- Small plastic cups (one for each color)
- Craft stir sticks or popsicle sticks
- Cardboard box or large tray (to catch drips)
- Small object to elevate pumpkin (like a soup can or small bowl)
- Gold liquid gilding or gold acrylic paint (for the stem)
- Small detail paintbrush
- Paper towels
- High-gloss varnish (optional)
Step 1: Preparation
-
Prepare the workspace:
Since this is a pour project, creating a safe drying zone is critical. Set up a large cardboard box or a tray lined with plastic to catch the runoff paint. -
Clean the pumpkin:
Wipe down your white pumpkin with a damp cloth to remove any dirt or oils. If you are using a real pumpkin, make sure it is completely dry before starting. -
Elevate the pumpkin:
Place your pumpkin on top of a soup can or unneeded bowl inside your catch-tray. The pumpkin needs to be lifted off the surface so the paint can drip freely off the bottom without pooling around the base.
Step 2: Mixing the Paint
-
Mix teal paint:
In one of your small plastic cups, mix your teal acrylic paint with pouring medium. A standard ratio is usually 1:1, but check your medium’s bottle. Stir gently until it reaches a consistency like warm honey. -
Mix magenta paint:
Repeat the process in a separate cup for the magenta or deep burgundy shade. Ensure there are no lumps in the mixture. -
Mix gold paint:
Prepare the metallic gold acrylic in a third cup with the pouring medium. Metallic pigments can be heavier, so give this one an extra thorough stir. -
Layer the cup:
Take a fresh, clean cup. Pour a small amount of teal into the bottom. Do not stir. -
Add secondary colors:
Gently pour some magenta right on top of the teal, followed by the gold. Repeat these layers—teal, magenta, gold—until the cup is about half full. Do not mix them; let them sit layered.
Muddy Colors?
If your colors are blending into brown instead of staying distinct, your paint is too thin or you stirred the cup. Layer gently and don’t mix.
Step 3: The Pour
-
Position the pour:
Hold the layered cup near the top of the pumpkin, right next to the base of the stem. You want to control the flow so it runs down the deep grooves of the pumpkin. -
Pour slowly:
Tilt the cup slowly, allowing a ribbon of paint to spill over the pumpkin’s shoulder. Move your hand slightly to guide the stream down a specific vertical section. -
Create spacing:
Instead of covering the whole pumpkin, pour distinct ‘rivers’ of color. Leave significant white space between the pours to maintain that elegant, high-contrast look shown in the photo. -
Refine the drips:
If a drip stops halfway down, you can gently tilt the pumpkin itself to encourage gravity to pull the paint all the way to the bottom edge. -
Wait for settling:
Allow the pumpkin to sit undisturbed for about 10-15 minutes. The paint will continue to move and slide slowly, creating those thin, delicate veins.
Cell Creation
Add 1-2 drops of silicone oil to your paint cups before layering. This interacts with the medium to create cool circular ‘cells’ in the marble pattern.
Step 4: Finishing Touches
-
Paint the stem:
While the body dries, carefully paint the stem using your small brush and the gold liquid gilding. This creates a luxe cap to the project. I like to be very precise here to avoid dripping gold onto the fresh pour. -
Clean the bottom drips:
Once the paint flow has mostly stopped but is still wet, run a craft stick underneath the bottom curve of the pumpkin to ‘cut’ the drips hanging off. This prevents bumps from forming as it dries. -
Allow to cure:
This is the hardest part—let the pumpkin dry completely. Because pouring medium is thick, this can take 24 to 48 hours. Do not touch the surface while it feels tacky. -
Seal (Optional):
If you plan to display this outdoors or want extra shine, brush on a coat of high-gloss varnish once the paint is fully cured.
Once fully dry, your artful pumpkin is ready to bring a touch of modern luxury to your seasonal decor
Soft Ombré Gradient That Starts With White
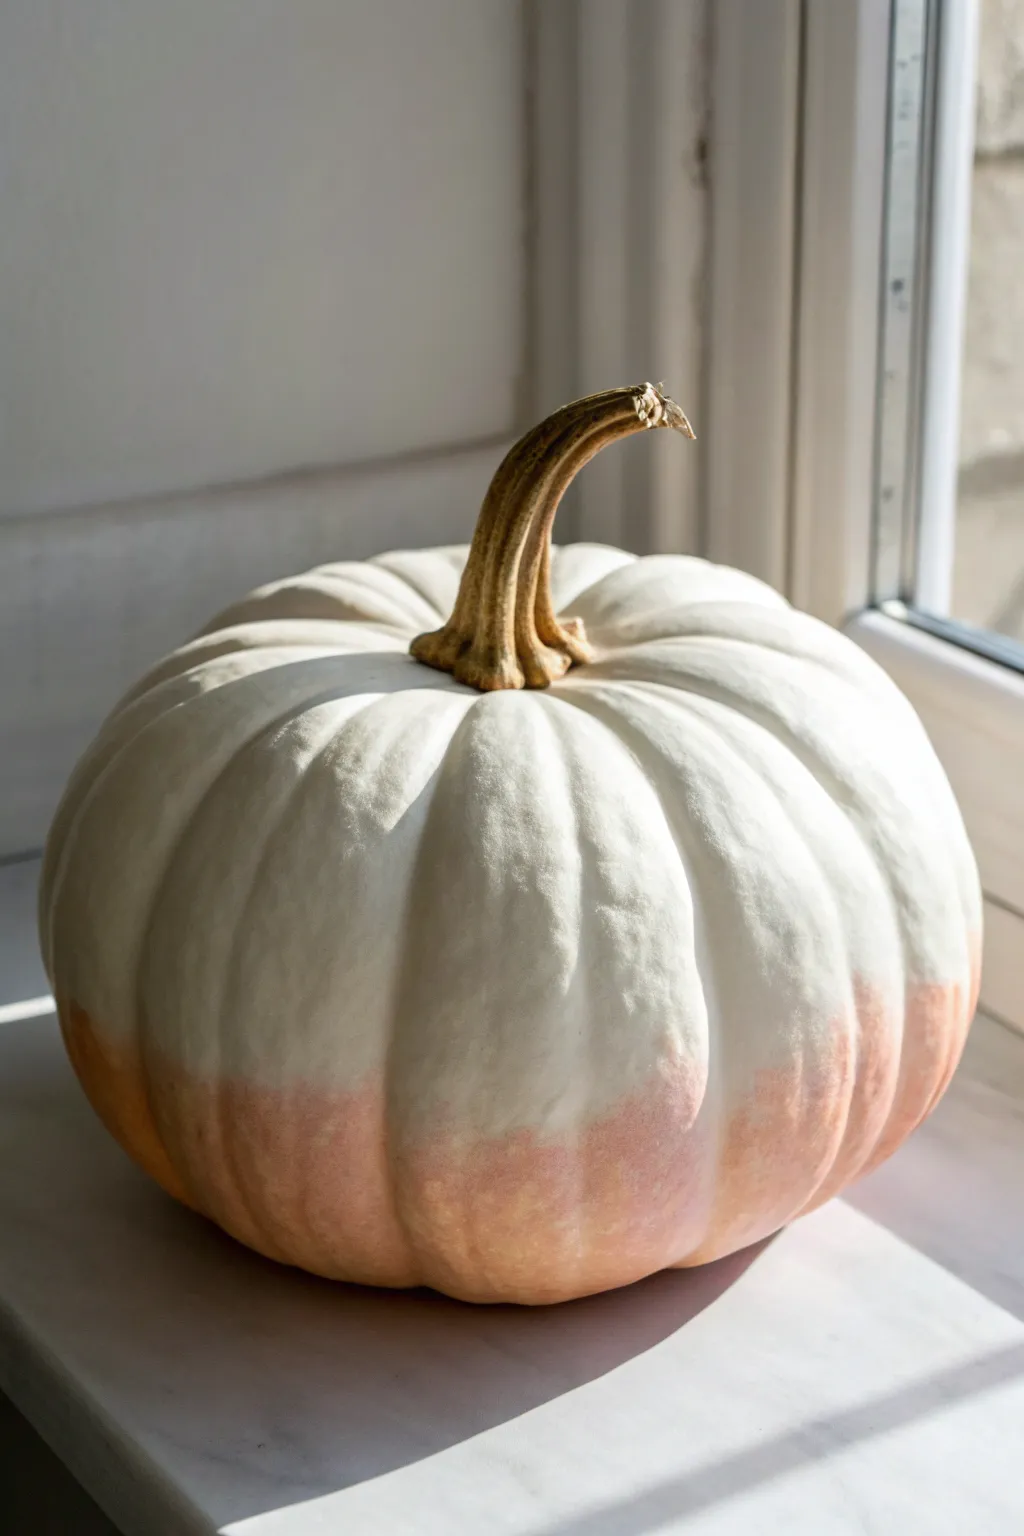
Master the art of the ‘barely there’ gradient with this sophisticated pumpkin makeover. By blending a soft peach hue into a creamy white base, you create a seamless transition that looks elegant and modern.
How-To Guide
Materials
- Medium-sized pumpkin (real or faux)
- White matte acrylic paint or chalk paint
- Peach or soft coral acrylic paint
- Medium flat synthetic brush
- Small foam pouncing sponge or makeup sponge
- Paper palette or paper plate
- Painter’s tape (optional for stem)
- Water cup and paper towels
Step 1: Base Coat Preparation
-
Clean the Surface:
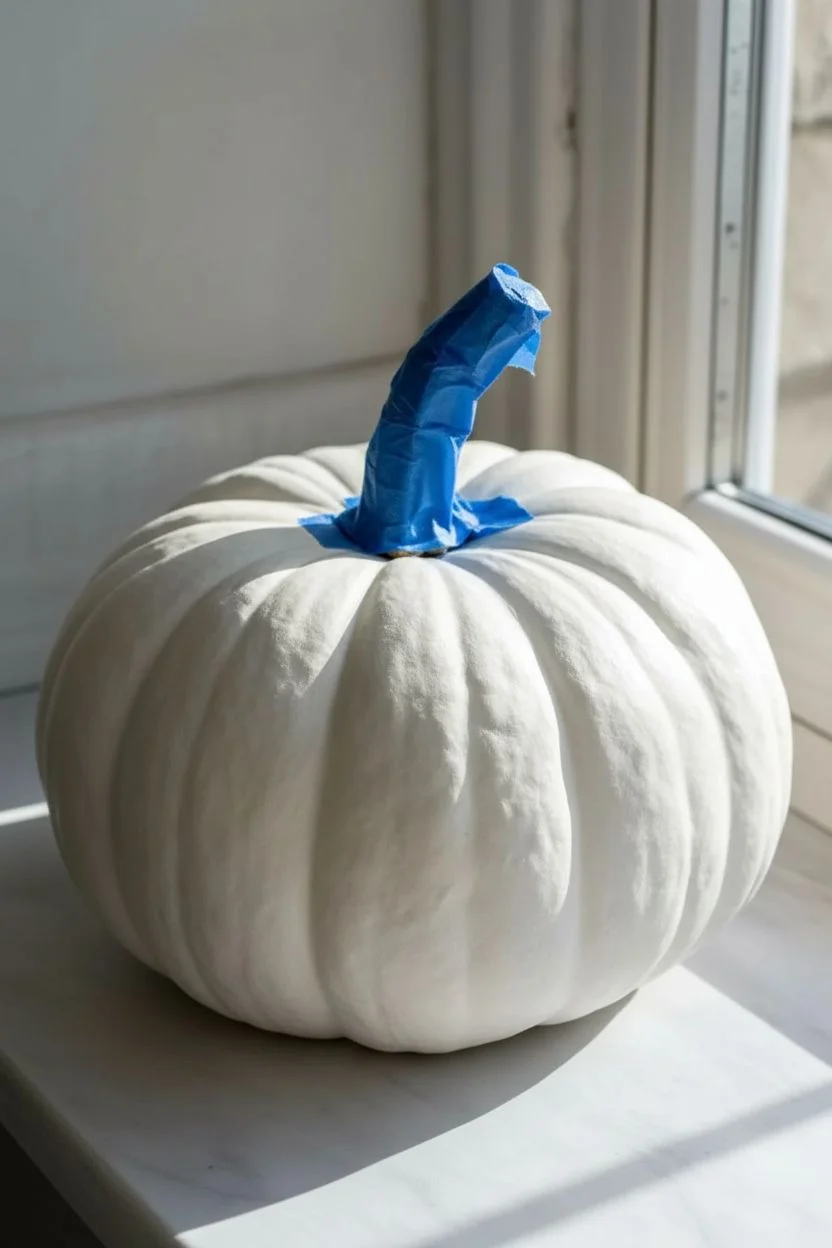
Begin by wiping down your pumpkin with a damp cloth to remove any dirt or oils. If you are using a real pumpkin, ensure it is completely dry before moving forward. -
Protect the Stem:
Because we want that rustic, natural stem to contrast with the paint, carefully wrap it in painter’s tape. I find tearing small strips of tape helps conform to the bumpy texture at the base of the stem. -
First White Layer:
Squeeze a generous amount of white matte acrylic paint onto your palette. Using your flat brush, apply a comprehensive coat over the entire pumpkin. -
Work into Crevices:
Pay special attention to the deep vertical grooves; jam the bristles in gently to ensure no orange skin shows through. -
Dry and Repeat:
Let this first coat dry for about 20-30 minutes. Apply a second coat of white to ensure full, opaque coverage and a smooth, porcelain-like finish.
Sponge Technique Tip
Don’t drag the sponge! Vertical tapping (stippling) is key. Dragging smears the colors together muddy, while tapping creates a soft, pixelated diffusion.
Step 2: Creating the Ombré Effect
-
Mix Your Gradient Color:
While your white base is fully dry, prepare your peach tone. If your peach paint is too vibrant, mix in a tiny drop of white to soften it. -
Apply the Bottom Band:
Flip the pumpkin upside down or hold it carefully. Paint the bottom-most section (about 2-3 inches up from the base) with the solid peach color using your flat brush. -
Create a Mid-Tone:
On your palette, mix equal parts of your peach paint with the white base color to create a lighter transitional shade. -
Apply the Transitional Band:
Paint this lighter mix directly above the solid peach band, overlapping slightly while both are still wet. -
Start Blending:
Switch to your foam sponge. Dampen it slightly and squeeze out excess water. Gently dab or ‘pounce’ over the seam where the peach connects to the lighter mix to blur the line. -
Fade Upward:
Dip your sponge lightly into pure white paint. Dab this along the top edge of your peach section, working upwards into the white body of the pumpkin. -
Smooth the Gradient:
Use a clean, semi-dry sponge to tap repeatedly over the transition area. This stippling motion eliminates brush strokes and creates that misty, airbrushed look. -
Evaluate the Fade:
Step back and look at the pumpkin from a distance. If the line looks too harsh, add a tiny bit more white to your sponge and tap lightly to soften the edge further.
Step 3: Finishing Touches
-
Dry Completely:
Allow the gradient work to dry undisturbed for at least an hour. The thick layers of blended paint may take longer to cure than the base coat. -
Remove Tape:
Gently peel the painter’s tape off the stem. If any white paint seeped under, you can carefully scratch it off with a fingernail or use a damp Q-tip to clean it. -
Optional Sealer:
If this pumpkin will live on a porch, lightly spray it with a matte clear coat to protect your beautiful gradient from humidity.
Metallic Twist
Once the peach ombré is dry, dry-brush a tiny amount of gold paint just on the ribs of the pumpkin near the stem for a glamorous highlight.
Place your finished pumpkin near a window to let the natural light highlight your smooth blending work
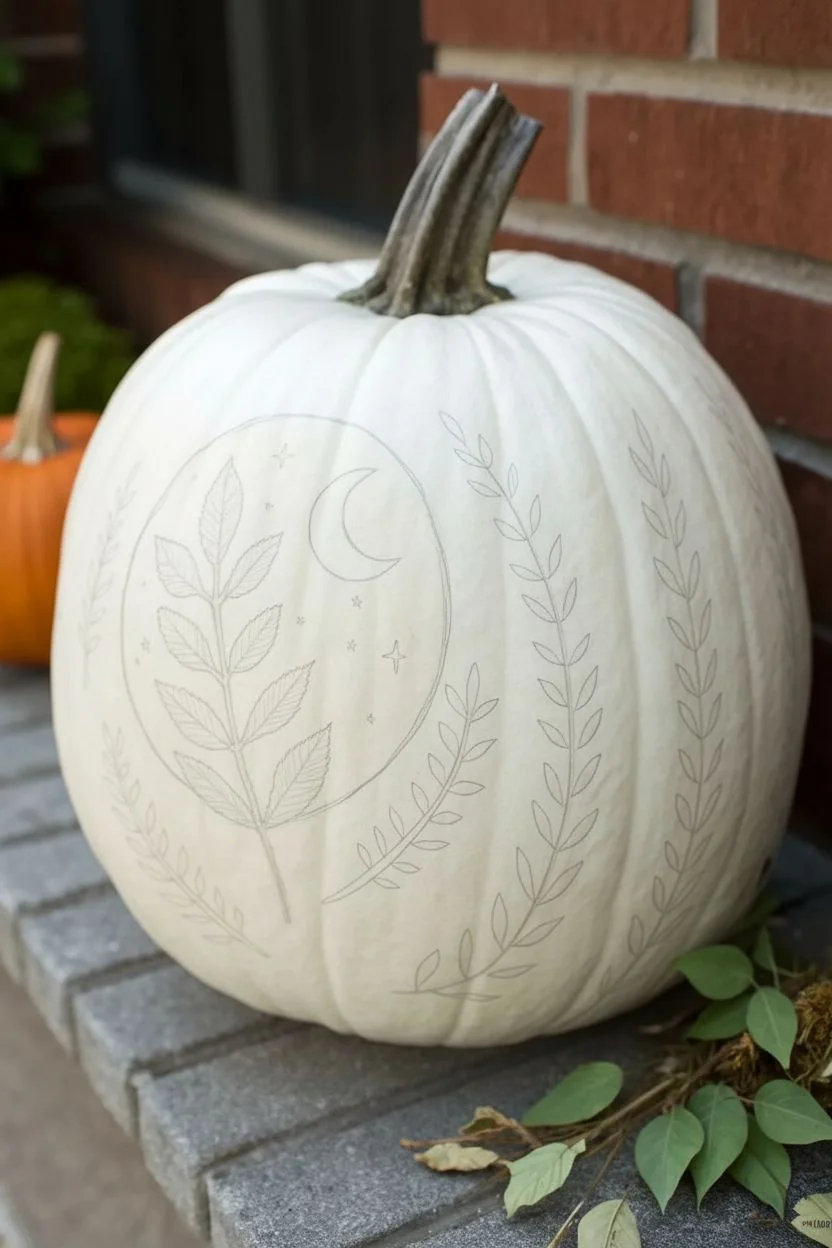
Constellation Night Sky on a White Pumpkin
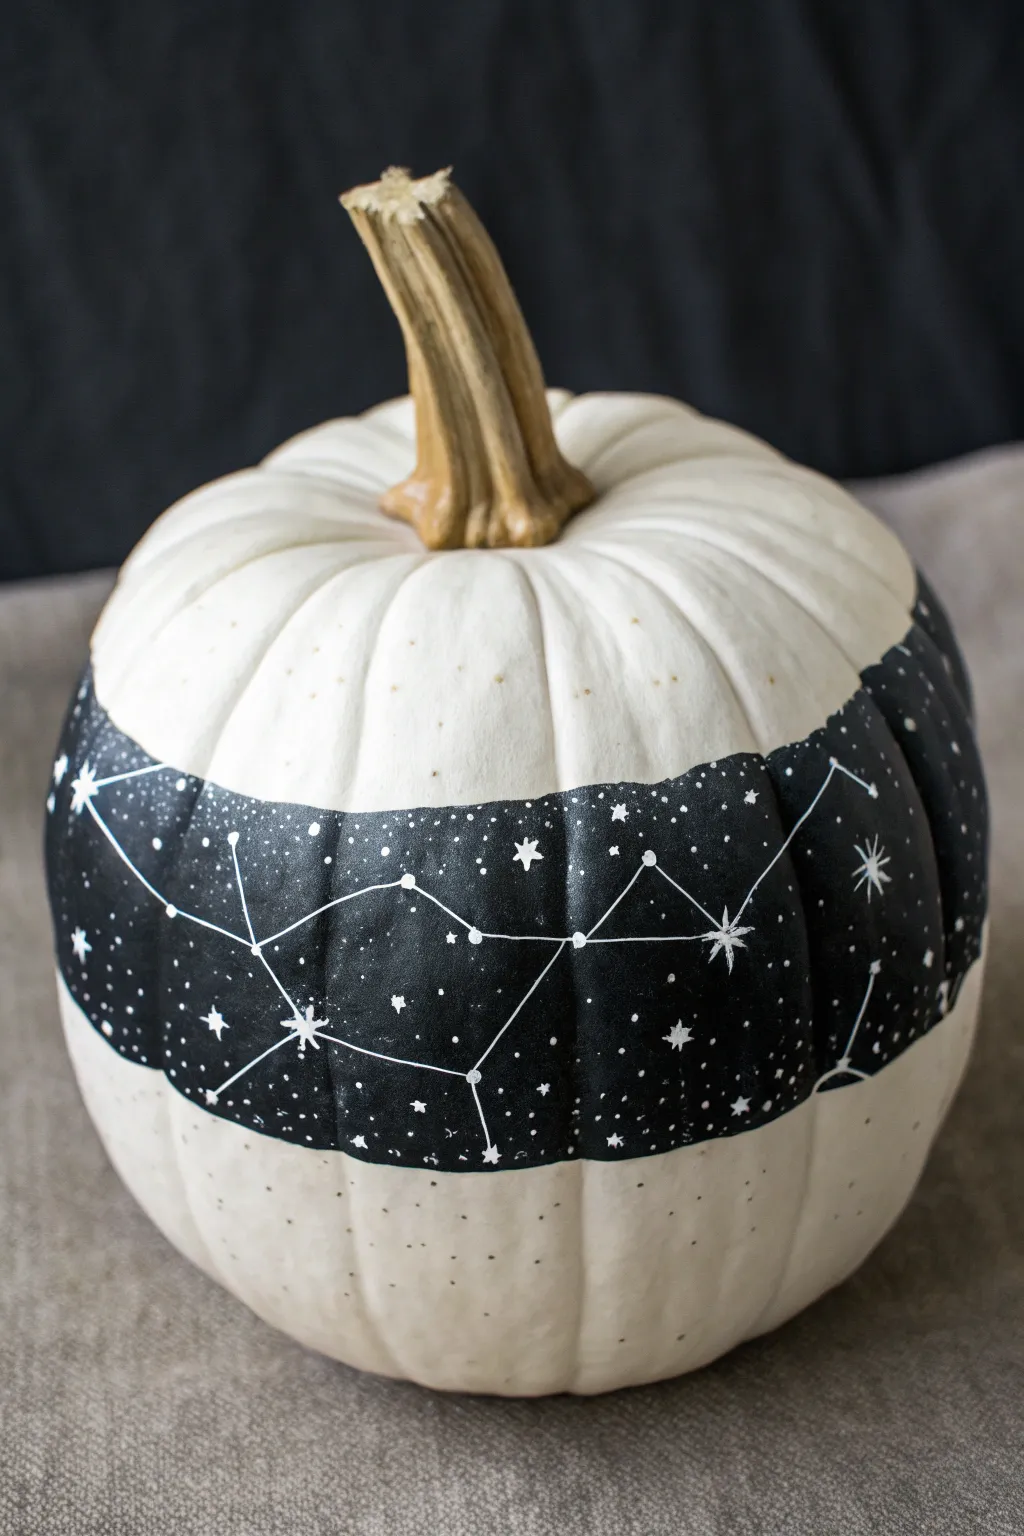
Bring the magic of a starry night sky to your autumn decor with this elegant constellation pumpkin. The crisp white rind contrasts beautifully with a hand-painted black canvas, creating a sophisticated centerpiece that looks stunning all season long.
Step-by-Step Guide
Materials
- Medium-sized white pumpkin (real or faux)
- Black acrylic craft paint (matte finish)
- White paint pen (fine tip) or fine liner brush with white acrylic paint
- Painter’s tape or masking tape (1 inch width)
- Flat paintbrush (medium size)
- Small round brush (optional, for touch-ups)
- Old toothbrush (for splattering)
- Cup of water and paper towels
- Pencil or white chalk pencil
Step 1: Preparing the Canvas
-
Clean the surface:
Begin by thoroughly wiping down your pumpkin with a damp cloth to remove any dirt or oils. If using a real pumpkin, ensure it is completely dry before proceeding. -
Mark the center band:
Visualize a wide band wrapping horizontally around the middle of the pumpkin. You want this band to be roughly 3 to 4 inches tall. -
Tape the top border:
Using painter’s tape, create the upper boundary of your band. Press the tape firmly into the vertical grooves of the pumpkin to prevent paint bleed. -
Tape the bottom border:
Repeat the taping process for the lower boundary, ensuring the band width stays relatively consistent all the way around the circumference. -
Seal the edges:
Run your fingernail or a credit card along the edges of the tape, paying extra attention to the dipped ridges where the pumpkin curves inward. Good adhesion here is key to a crisp line.
Seal the ridges
Before painting black, brush a tiny bit of clear matte medium or white paint along the tape edge. This seals the gap, ensuring the black line is razor-sharp.
Step 2: Painting the Night Sky
-
Apply the first coat:
Dip your flat paintbrush into the black acrylic paint. Apply a smooth layer between the two tape lines, brushing horizontally with the curve of the pumpkin. -
Fill the ridges:
Make sure to push paint gently into the vertical grooves so no white spots remain visible inside the band area. -
Let it dry:
Allow the first coat to dry for about 15-20 minutes. It should be dry to the touch before adding another layer. -
Apply the second coat:
Paint a second layer of black to ensure full opacity. A matte finish paint works best here to absorb light like a true night sky. -
Remove the tape:
While the second coat is still slightly tacky (not fully dry, to prevent peeling), carefully peel away the painter’s tape. Pull slowly at a 45-degree angle. -
Touch up edges:
If any paint bled under the tape, use a damp cotton swab or a small brush with white paint to clean up the lines once the black is fully dry.
Metallic Magic
For extra shimmer, swap the white paint pen for a metallic gold or silver one. It catches the light beautifully, making the constellations pop against the black.
Step 3: Detailing the Galaxy
-
Plan your constellations:
Use a pencil or white chalk pencil to lightly dot where your major stars will go. You can follow real constellations like the Big Dipper or Cassiopeia, or invent your own geometric patterns. -
Draw the stars:
Using your fine-tip white paint pen, draw small 5-point stars or simple asterisks over your marked dots. Vary the sizes—some large and bright, some tiny dots. -
Connect the dots:
Draw thin, straight lines connecting your main star clusters to form the constellation shapes. Use a light hand so the lines don’t overpower the stars. -
Add background stars:
Fill the empty black spaces with tiny random dots to represent distant stars, creating depth in your galaxy band. -
Splatter texture:
Dilute a tiny amount of black paint with water. Dip an old toothbrush into it, and running your thumb over the bristles, gently flick tiny speckles onto the white sections of the pumpkin (above and below the band) for an integrated, starry look.
Place your celestial creation on a mantel or porch to enjoy a touch of stargazing right at home
Blue-and-White Porcelain Inspired Florals
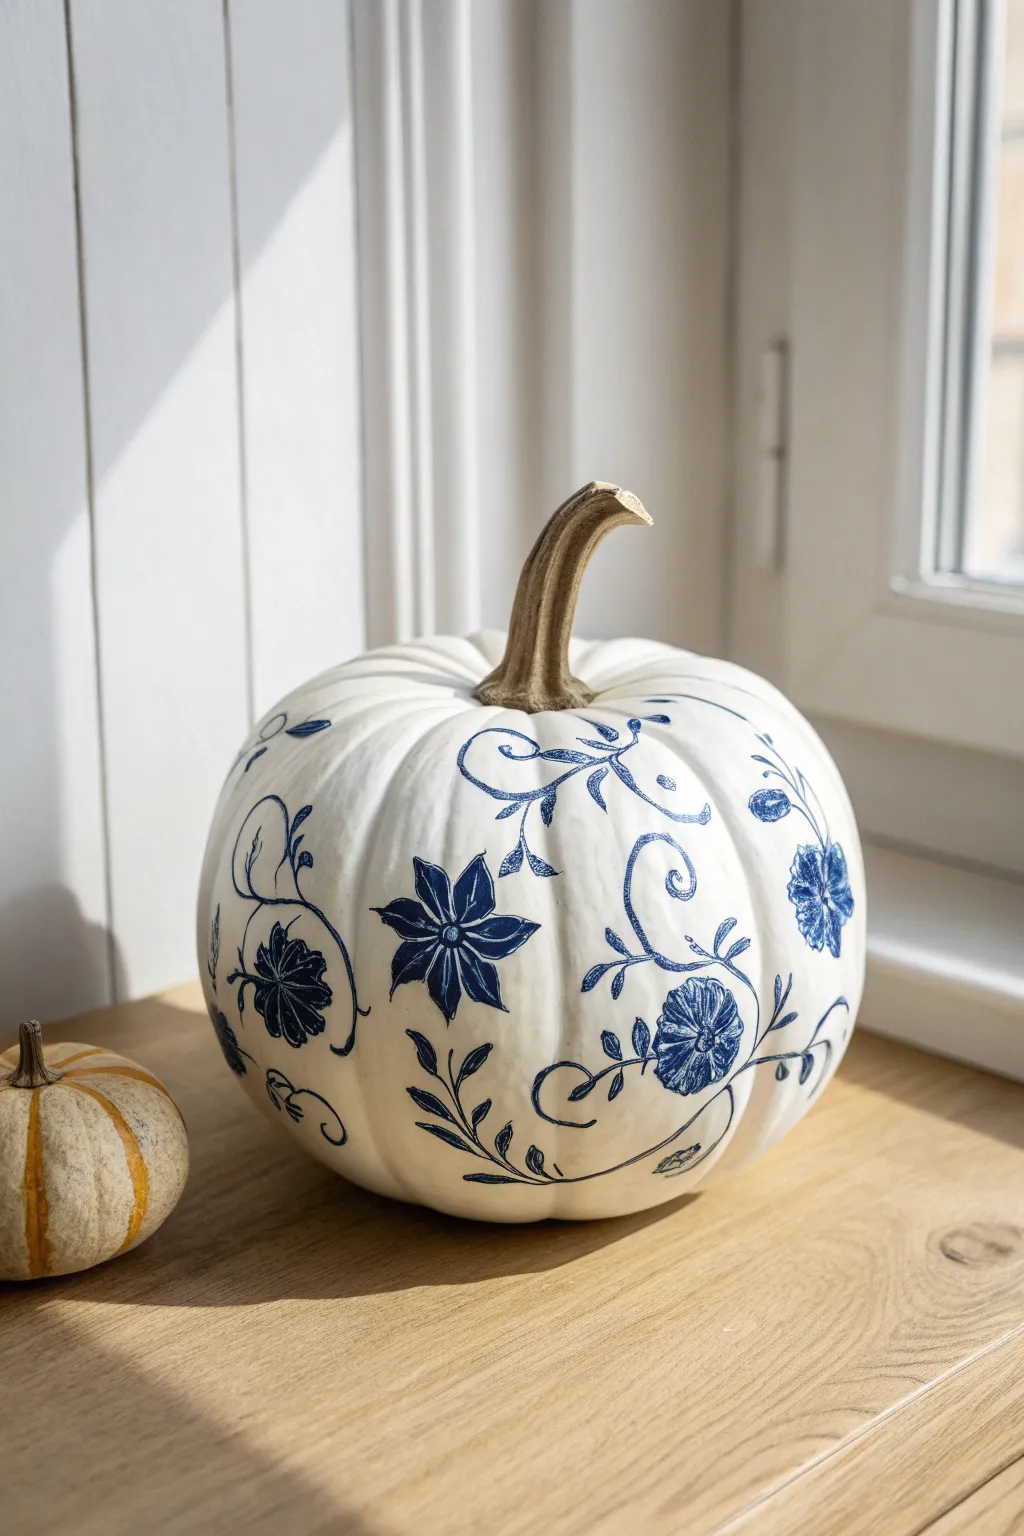

Transform a simple white pumpkin into an elegant piece of decor mimicking the timeless beauty of blue-and-white porcelain. This project uses delicate floral motifs and trailing vines to create a sophisticated centerpiece that stands out from traditional autumnal orange.
Detailed Instructions
Materials
- Large real or faux white pumpkin
- Fine tip blue paint pen (oil-based works best)
- Medium tip blue paint pen (for filling)
- Fine detail paintbrush
- Dark blue acrylic paint (navy or cobalt)
- Pencil or white chalk pencil (for sketching)
- Paper towel
- Cotton swabs
- Rubbing alcohol
- Matte or satin clear sealant spray
Step 1: Preparation & Planning
-
Clean the surface:
Begin by wiping down your pumpkin thoroughly. If using a real pumpkin, wash it with a mild soap solution and dry completely. For a faux pumpkin, a quick wipe with rubbing alcohol removes any manufacturing oils. -
Study the form:
Observe the natural ribs of the pumpkin. The dips and curves will guide where your vines flow. I like to imagine the stem as the central growth point where the main vines originate. -
Sketch the main vines:
Using a pencil or chalk pencil, lightly draw sweeping S-curves that trail down from the top and wrap around the sides. Keep these lines loose and organic, avoiding rigid symmetry.
Step 2: Drawing the Floral Elements
-
Outline the large blooms:
Pick three or four focal points along your sketched vines to place the large, multi-petaled flowers. Draw a small circle for the center, then sketch five to six pointed petals radiating outward. -
Add secondary flowers:
In the negative spaces between the large blooms, sketch smaller, rounded distinct flowers. These look like small wild roses or peonies, adding variety to the botanical pattern. -
Connect with leaves:
Along the main vine lines, sketch small, teardrop-shaped leaves. Group them in pairs or alternate them along the stem to fill in gaps without overcrowding the design. -
Inking the outlines:
Take your fine tip blue paint pen and carefully trace over your pencil sketches. Start from the top and work your way down to avoid smudging wet ink with your hand.
Pro Tip: Steady Hand
To keep your lines smooth on the curved surface, rest your pinky finger on a dry part of the pumpkin while drawing. Essentially, use your hand as a compass anchor.
Step 3: Adding Detail & Depth
-
Fill the dark centers:
Use the medium tip paint pen or a small brush with acrylic paint to fill in the centers of the large pointed flowers. A solid dark center anchors the flower visually. -
Hatch shading techniques:
To mimic the look of etched porcelain, use the fine tip pen to draw tiny, closely spaced lines (hatching) inside the petals. Concentrate these lines near the center of the flower, fading out toward the tips. -
Detail the leaves:
Draw a central vein in each small leaf. Add very delicate shading on one side of the leaf vein to create a sense of dimension and curvature. -
Create vine tendrils:
Add whimsical, curly flourishes branching off the main vines. These thin, spiral tendrils mimic the delicate brushwork found on antique china. -
Thicken main lines:
Go back over the main vine stems (not the tendrils) to slightly thicken them. This line variation between the thick stems and thin tendrils is crucial for an authentic hand-painted look.
Level Up: Gold Accents
Trace just the very edges of the large flower petals with a metallic gold paint pen. The subtle shimmer adds a luxurious, high-end finish to the porcelain look.
Step 4: Finishing Touches
-
Clean up sketches:
Once the blue ink is fully dry—give it at least an hour—gently erase any visible pencil marks. Be gentle to avoid scratching the paint off the pumpkin skin. -
Check for gaps:
Rotate the pumpkin and look for any large white spaces that feel unbalanced. Add a small floating leaf or a tiny bud to these areas to harmonize the overall pattern. -
Seal the artwork:
Take the pumpkin to a well-ventilated area. Spray a light, even coat of matte or satin clear sealant over the entire surface. This protects the design from moisture and handling. -
Style the stem:
If the natural stem looks too dried out, you can lightly dry-brush it with a touch of gold or copper paint to complement the elegance of the blue and white design.
Now you have a stunning, sophisticated pumpkin decoration that perfectly bridges the gap between summer elegance and autumn cozy
Negative Space Designs Using the White Pumpkin as the Highlight

This elegant design uses the natural creaminess of a white pumpkin to create a striking contrast against matte black paint. By painting around your subject rather than painting the subject itself, you create a glowing moonlight effect that feels magical yet modern.
How-To Guide
Materials
- Large white craft pumpkin or fresh white pumpkin (cleaned)
- Black acrylic craft paint (matte finish)
- Pencil or light-colored chalk pencil
- Round template (like a bowl or large lid, approx. 5-6 inches)
- Small flat brush (for edges)
- Medium flat brush (for filling)
- Fine liner brush (0 or 00 size)
- White paint marker (optional, for touch-ups)
- Matte sealer spray
Step 1: Planning and Sketching
-
Clean the surface:
Ensure your pumpkin is completely dirt and oil-free by wiping it down with a damp cloth and a drop of dish soap. Let it dry completely before starting. -
Position the circle:
Choose the smoothest side of your pumpkin for the focal point. Hold your circular template against this spot and lightly trace around it with a pencil. -
Sketch the negative space leaf:
Inside the circle, lightly sketch a large, single frond or fern leaf. Draw a central stem that runs diagonally from bottom-left to top-middle. Add leaves coming off both sides of the stem. -
Add the moon and stars:
To the right of the leaf tip, within the circle boundary, sketch a small crescent shape. Add tiny dots or small 4-point stars floating around the leaves. -
Sketch exterior vines:
Outside the circle, lightly draw long, curved lines following the vertical ribs of the pumpkin. Add small almond-shaped leaves along these lines to create trailing vines framing the central moon design.
Step 2: Painting the Negative Space
-
Outline the inner elements:
Load your fine liner brush with black acrylic paint. Very carefully paint inside the circle, tracing *around* your leaf sketch, moon, and stars. You are painting the background, leaving the sketched shapes unpainted white. -
Define the circle edge:
Switch to a small flat brush to sharpen the outer edge of your main circle. A steady hand is key here to keep that curve smooth. -
Fill the background:
With the intricate edges defined, use a medium flat brush to fill in the rest of the black circle. Apply the paint smoothly to avoid texture buildup. -
Check for opacity:
Let the first coat dry for about 10-15 minutes. If streaks are visible, apply a second thin coat of black for a solid, opaque look. -
Refine the stars:
If your negative space stars got a bit messy, don’t worry. Once the black is dry, you can use a fine liner brush with a tiny dab of white paint (or a white paint pen) to crisply redefine them.
Brush Control Tip
For the sharpest points on your negative-space leaves, verify your liner brush is slightly damp before loading paint. This helps the bristles snap together specifically for fine detail work.
Step 3: Adding Exterior Details
-
Paint the side vines:
Using your fine liner brush again, paint the vines you sketched on the outside of the circle. Start with the central stem line, moving from the bottom up. -
Add the leaves:
Paint the small almond-shaped leaves along the exterior vines. Press down at the base of the leaf and lift up as you pull away to get a nice tapered point. -
Painting the faint vines:
For the lighter, beige-colored vines seen on the far left, mix a tiny drop of brown or gold paint into white acrylic. Paint a similar vine pattern on the side of the pumpkin for a subtle, ghostly effect. -
Clean up sketch lines:
Once all paint is bone dry, take a soft eraser and gently remove any visible pencil marks remaining on the unpainted white sections. -
Seal the work:
To protect your design from chipping, take the pumpkin outdoors and lightly mist it with a matte clear sealer spray.
Level Up: Metallic Pop
Instead of leaving the negative space plain white, fill the moon and stars with metallic gold liquid leafing paint to make the night sky theme truly shimmer.
Now you have a sophisticated autumn decoration that proves sometimes what you don’t paint is just as important as what you do
Mixed-Media Character Pumpkins on a White Base
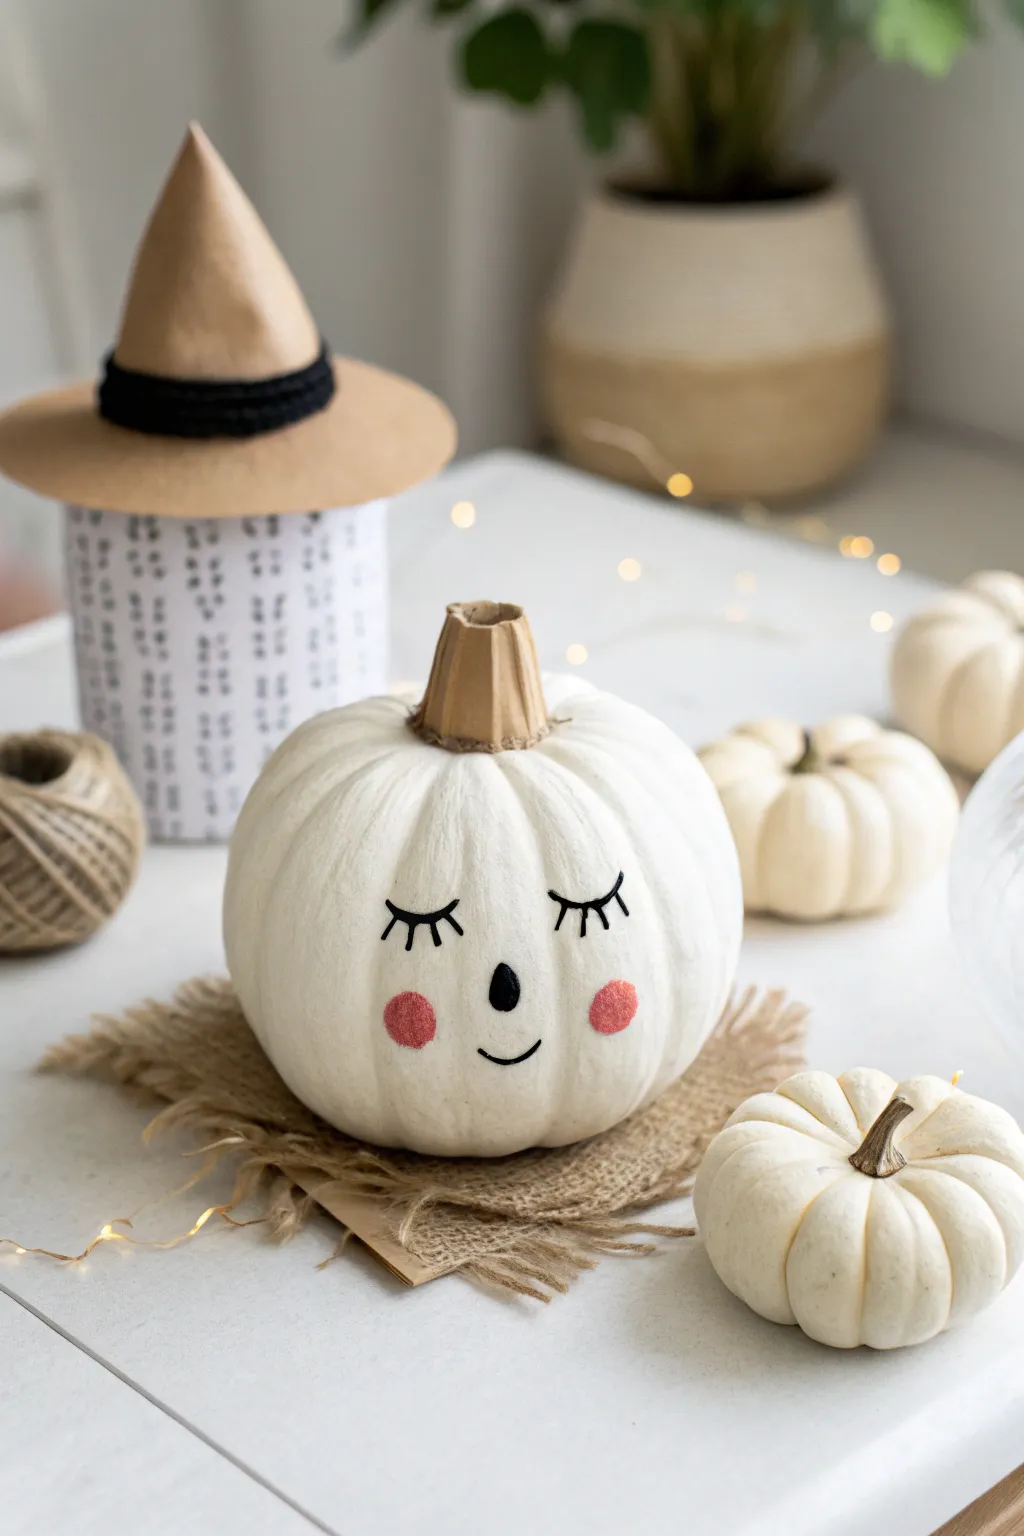

Transform a plain white pumpkin into an adorable sleeping character using mixed media elements. This gentle design combines simple painted features with textural touches like felt cheeks and a custom cardboard stem for a cozy, handcrafted look.
Step-by-Step
Materials
- White craft pumpkin (or painted real pumpkin)
- Black acrylic paint or fine brush-tip marker
- Pink felt sheet
- Kraft paper or thin corrugated cardboard (brown)
- Small piece of burlap fabric
- Hot glue gun and glue sticks
- Scissors
- Fine round paintbrush (size 1 or 2)
- Pencil (light H grade)
Step 1: Prepping the Canvas
-
Clean the surface:
Before starting, wipe down your pumpkin with a slightly damp cloth to remove any dust or oils. Let it dry completely so the paint adheres properly. -
Remove the original stem:
If you are using a faux pumpkin with a plastic stem, carefully twist or cut it off. You need a flat or slightly recessed area at the top to attach the new cardboard stem later. -
Sketch the face:
Using a pencil with a very light hand, map out the facial features. Mark two curved arches for closed eyes about midway down the pumpkin, a small oval for the nose, and a gentle U-curve for the smile.
Step 2: Creating the Features
-
Paint the eyelashes:
Dip your fine round brush into black acrylic paint. Carefully trace over your arched pencil lines. Add three small, wispy lashes sticking up from the outer corner of each eye. -
Add the nose:
Paint a small, solid black teardrop or oval shape right in the center of the face, slightly below the eye line. Keep it small to maintain the cute factor. -
Paint the mouth:
Using the very tip of your brush, paint a thin, delicate smile line. I find it helps to anchor your pinky finger on the pumpkin surface while painting to keep your hand distinctive. -
Cut the cheeks:
While the paint dries, take your pink felt sheet. Cut out two small circles, roughly the size of a dime or slightly larger depending on your pumpkin’s size. -
Attach the cheeks:
Apply a small dot of hot glue to the back of each felt circle. Press them onto the pumpkin cheeks, positioning them just outside and slightly below the corners of the smile.
Paint Blobs?
If you make a mistake painting the thin lines, let the paint dry completely, then gently scrape it off with a craft knife or paint over it with white acrylic before trying again.
Step 3: Crafting the Stem
-
Cut cardboard strip:
Cut a strip of kraft paper or thin corrugated cardboard. The strip should be about 1.5 to 2 inches wide and 4 inches long. -
Fold the texture:
Create vertical creases or accordion folds along the length of the strip to mimic the ribbed texture of a real pumpkin stem. Don’t worry about perfect regularity; organic shapes look better. -
Form the cylinder:
Roll the folded strip into a slightly tapered cylinder shape, making the bottom slightly wider than the top. -
Secure the shape:
Use a dab of hot glue to secure the roll so it holds its shape. You can trim the bottom edge with scissors if it isn’t sitting flat. -
Attach the stem:
Apply a generous ring of hot glue to the bottom rim of your new cardboard stem. Press it firmly onto the top center of the pumpkin over the spot where the old stem was. -
Add finishing detail to stem:
For a polished look, you can wrap a single strand of jute twine around the very base of the cardboard stem where it meets the pumpkin, gluing it in place to hide any seams.
Witchy Upgrade
Make a tiny cone hat from black cardstock and felt to sit askew on the pumpkin’s head for a Halloween-specific version that still keeps the sweet character vibe.
Step 4: Final Presentation
-
Prepare the base:
Cut a rough square or rectangle of burlap fabric. Keep the edges raw and frayed for a rustic texture that contrasts nicely with the smooth pumpkin. -
Fray the edges:
Pull out a few horizontal and vertical threads from each side of the burlap piece to exaggerate the frayed look. -
Final assembly:
Place your finished character pumpkin on top of the burlap mat to complete the cozy display.
Now you have a charming, peaceful pumpkin character ready to add a soft touch to your seasonal decor


Have a question or want to share your own experience? I'd love to hear from you in the comments below!