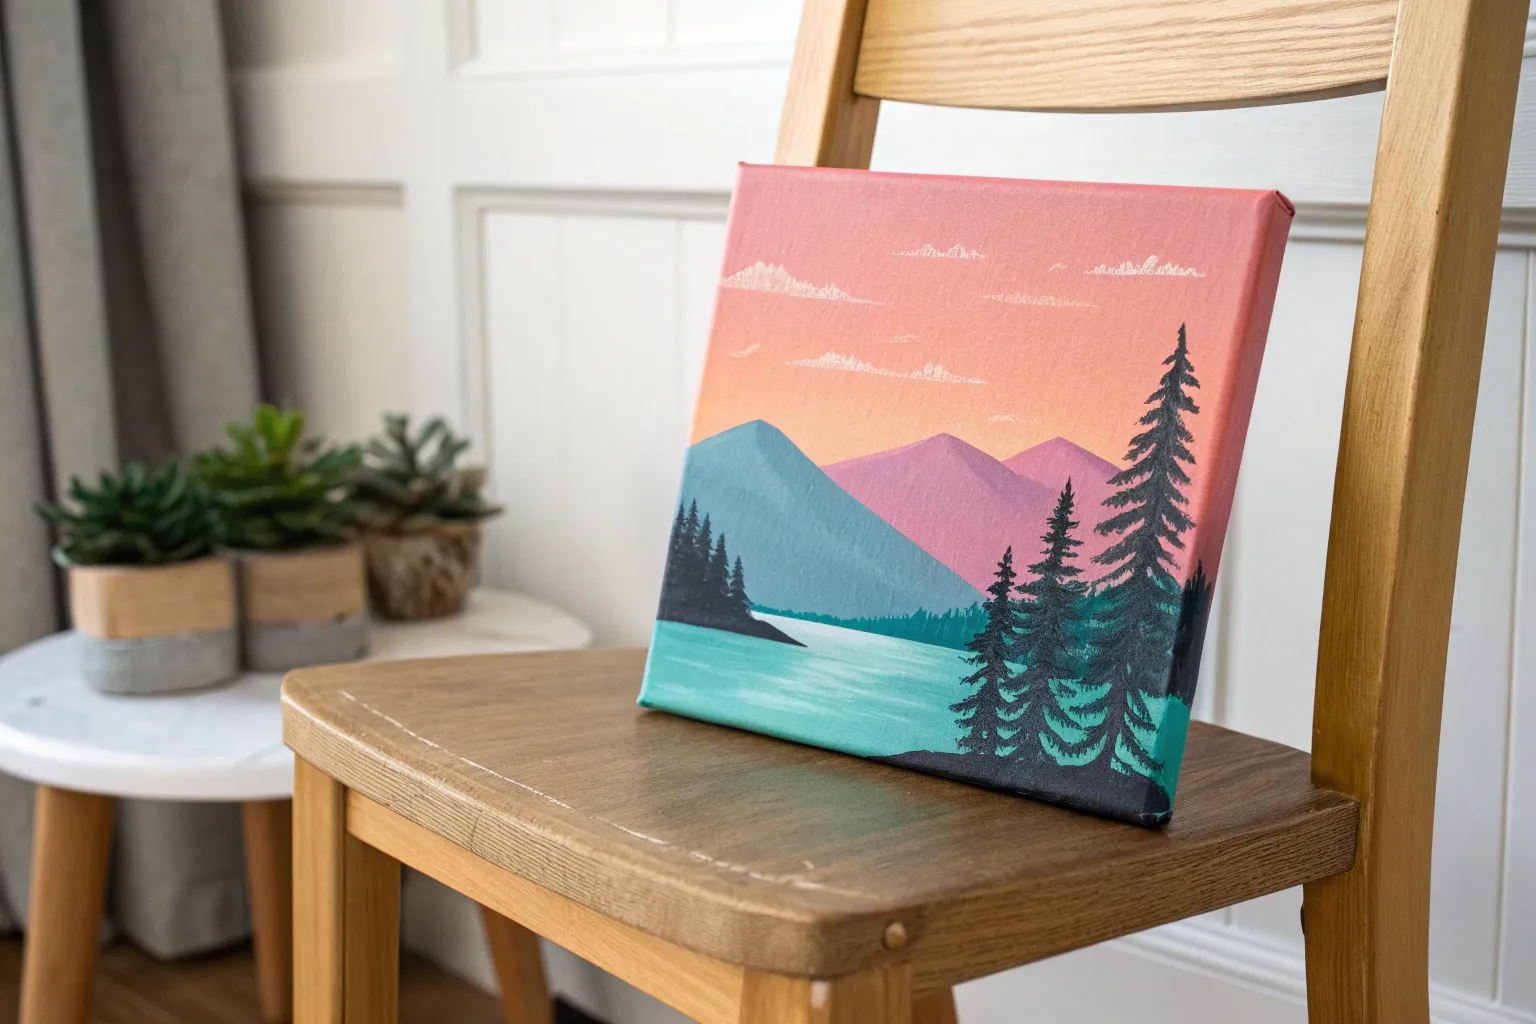
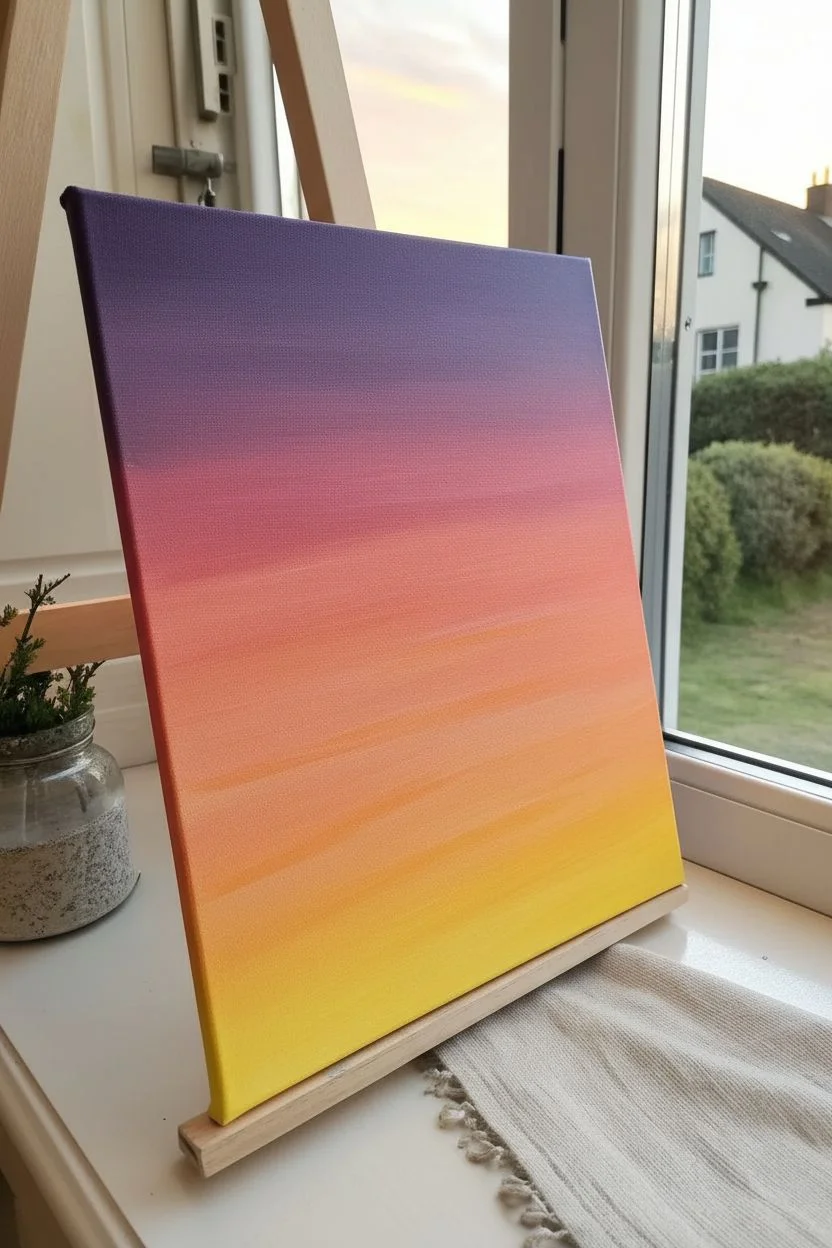
When I’m craving quick, satisfying color, acrylics are my favorite way to get something bold on the canvas without overthinking it. Here are some acrylic painting ideas I love teaching because they’re approachable, flexible, and still look seriously impressive when you’re done.
Sunset Gradient With a Black Tree Silhouette
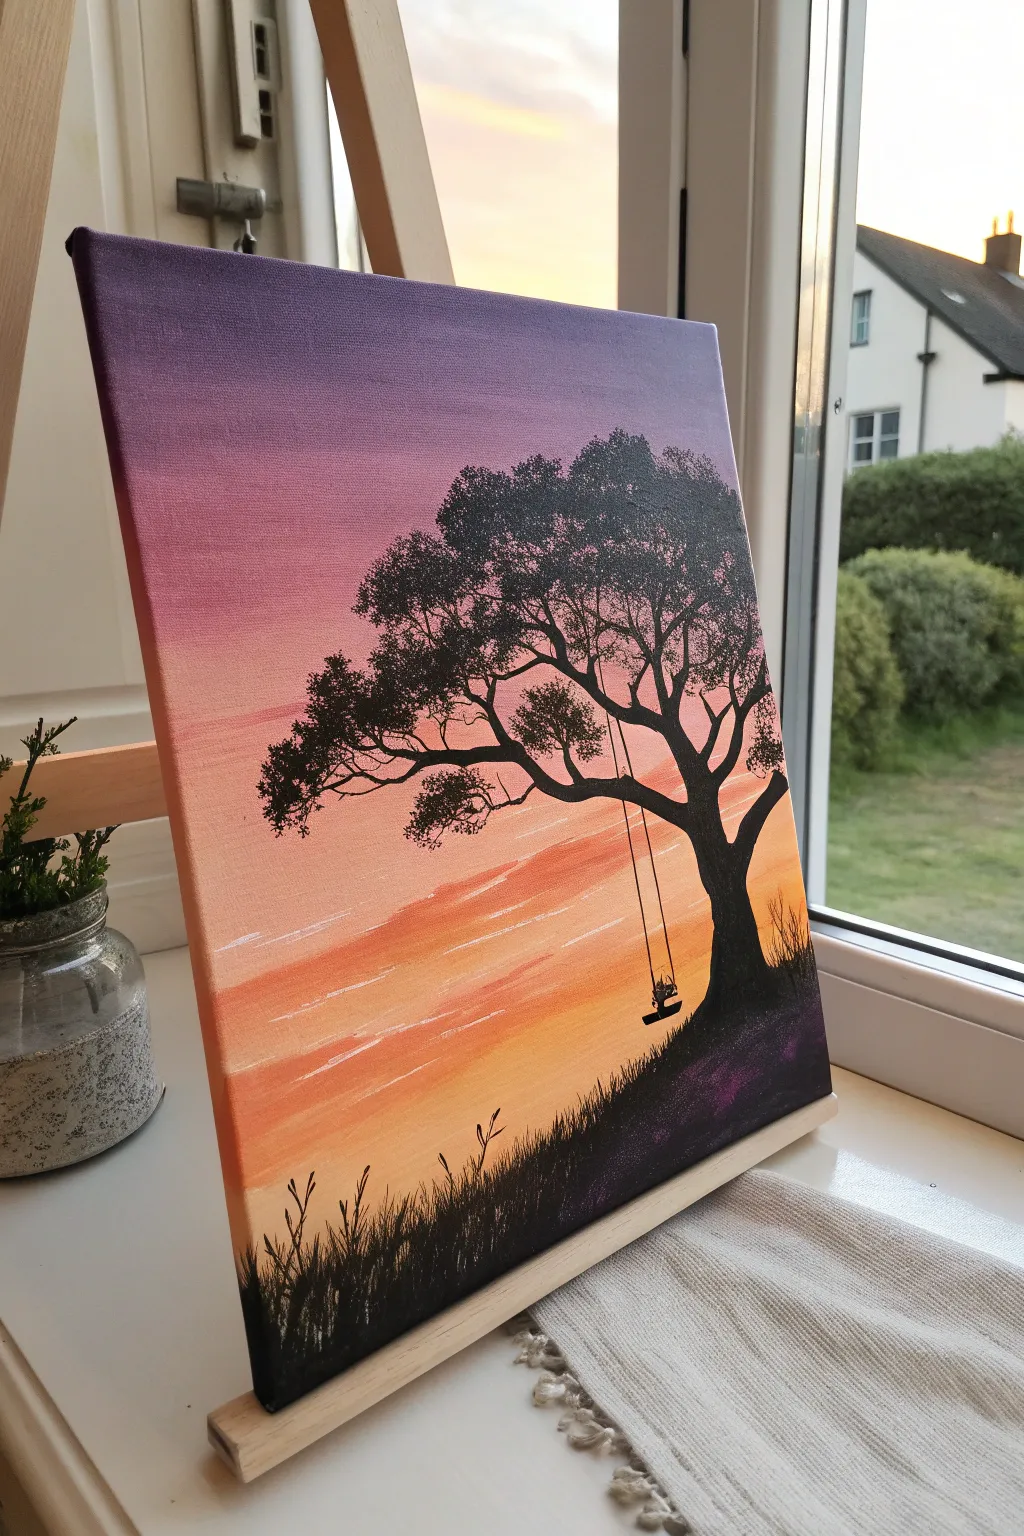
Capture the serene beauty of dusk with this vibrant acrylic landscape. You’ll master a seamless three-color gradient sky and learn to layer a detailed black silhouette that pops against the warm glow.
Step-by-Step Tutorial
Materials
- Stretched canvas (e.g., 10×12 inches)
- Acrylic paints: Deep Purple, Magenta/Pink, Orange, Bright Yellow, Titanium White, Mars Black
- Large flat brush or sponge brush (for blending)
- Small round brush (size 0 or 1)
- Medium round brush (size 4 or 6)
- Fan brush (optional, for grass)
- Palette
- Water cup and paper towels
Step 1: Creating the Sunset Gradient
-
Prime the top:
Begin by applying a band of Deep Purple across the very top fourth of your canvas using a large flat brush. Bring the paint down slightly further than you plan the purple section to end to help with blending later. -
Add the mid-tone:
Clean your brush thoroughly. Mix a small amount of Magenta with Titanimum White if your pink is too dark, or use it straight for vibrancy. Apply this color directly below the purple, brushing horizontally back and forth. -
Blend the upper sky:
While both paints are still wet, work the brush right at the seam where purple meets pink. Use long, horizontal strokes to blur the line until the transition looks soft and seamless. -
Introduce the warmth:
Clean the brush again. Apply a bright Orange band below the pink section. Repeat the blending technique at the seam, merging the pink down into the orange to create a warm coral transition. -
Finish the horizon:
Fill the remaining bottom portion of the canvas with Bright Yellow, blending it upward into the orange. If the yellow seems too transparent, let it dry and apply a second coat for opacity before blending the edge. -
Add subtle clouds:
While the background is dry to the touch but not fully cured, mix a tiny bit of white with watered-down orange. Use a clean, dry brush to lightly streak in faint, horizontal cloud lines across the lower sky for texture.
Step 2: Painting the Silhouette
-
Outline the hill:
Switch to a medium round brush and Mars Black paint. Paint a sloping hill starting from the bottom right corner, rising steeply and then leveling off slightly as it moves toward the left side. -
Fill the ground:
Fill in the entire area below your hill line with solid black paint. Ensure this layer is opaque; if you can see the sunset colors through it, let it dry and add another coat. -
Sketch the trunk:
Using the tip of your medium round brush, paint the main trunk of the tree rising from the right side of the hill. Make the base thick and sturdy, tapering it as it reaches upward into the purple zone. -
Branch out:
Switch to a smaller round brush (size 0 or 1). Extend primary branches from the trunk, keeping them jagged and organic rather than perfectly straight. Remember, tree limbs generally get thinner the further they grow from the trunk. -
Add foliage texture:
To create the leaves, load a medium round brush with black paint, but don’t add water. Dab or stipple the brush vertically against the canvas at the ends of your branches. Group these dabs into clusters to simulate clumps of leaves. -
Detail the canopy:
Continue stippling leaf clusters across the top of the tree, leaving gaps of sky showing through. I like to keep the leaf clusters denser near the center of the tree and sparser at the edges. -
Paint the swing:
With your finest detail brush, paint two very thin, parallel vertical lines hanging from a sturdy lower branch. Connect them at the bottom with a small, slightly curved rectangle for the seat. -
Add a passenger:
Carefully dab a tiny silhouette of a figure sitting on the swing. Keep it simple—just a suggestion of a shape is often more effective than trying to paint detailed limbs. -
Create the grass:
Using a fan brush or a small liner brush, flick short, quick strokes upward along the top edge of the black hill. Vary the direction and length of these strokes to make the wild grass look natural. -
Final touches:
Look for any lighter patches in your black silhouette and touch them up. Adding a few taller, individual grass blades or a small bird silhouette in the distance can add extra depth.
Keep it Wet
Gradients only blend well when the paint is wet. If your acrylics are drying too fast, lightly mist the canvas with water or use a ‘slow drying’ medium.
Starry Night
Wait for the sky to dry completely, then flick a toothbrush loaded with watered-down white paint over the purple section to create distant stars.
Now step back and admire the peaceful evening moment you’ve captured on canvas


Pink Sky With a Simple Moon and Soft Clouds
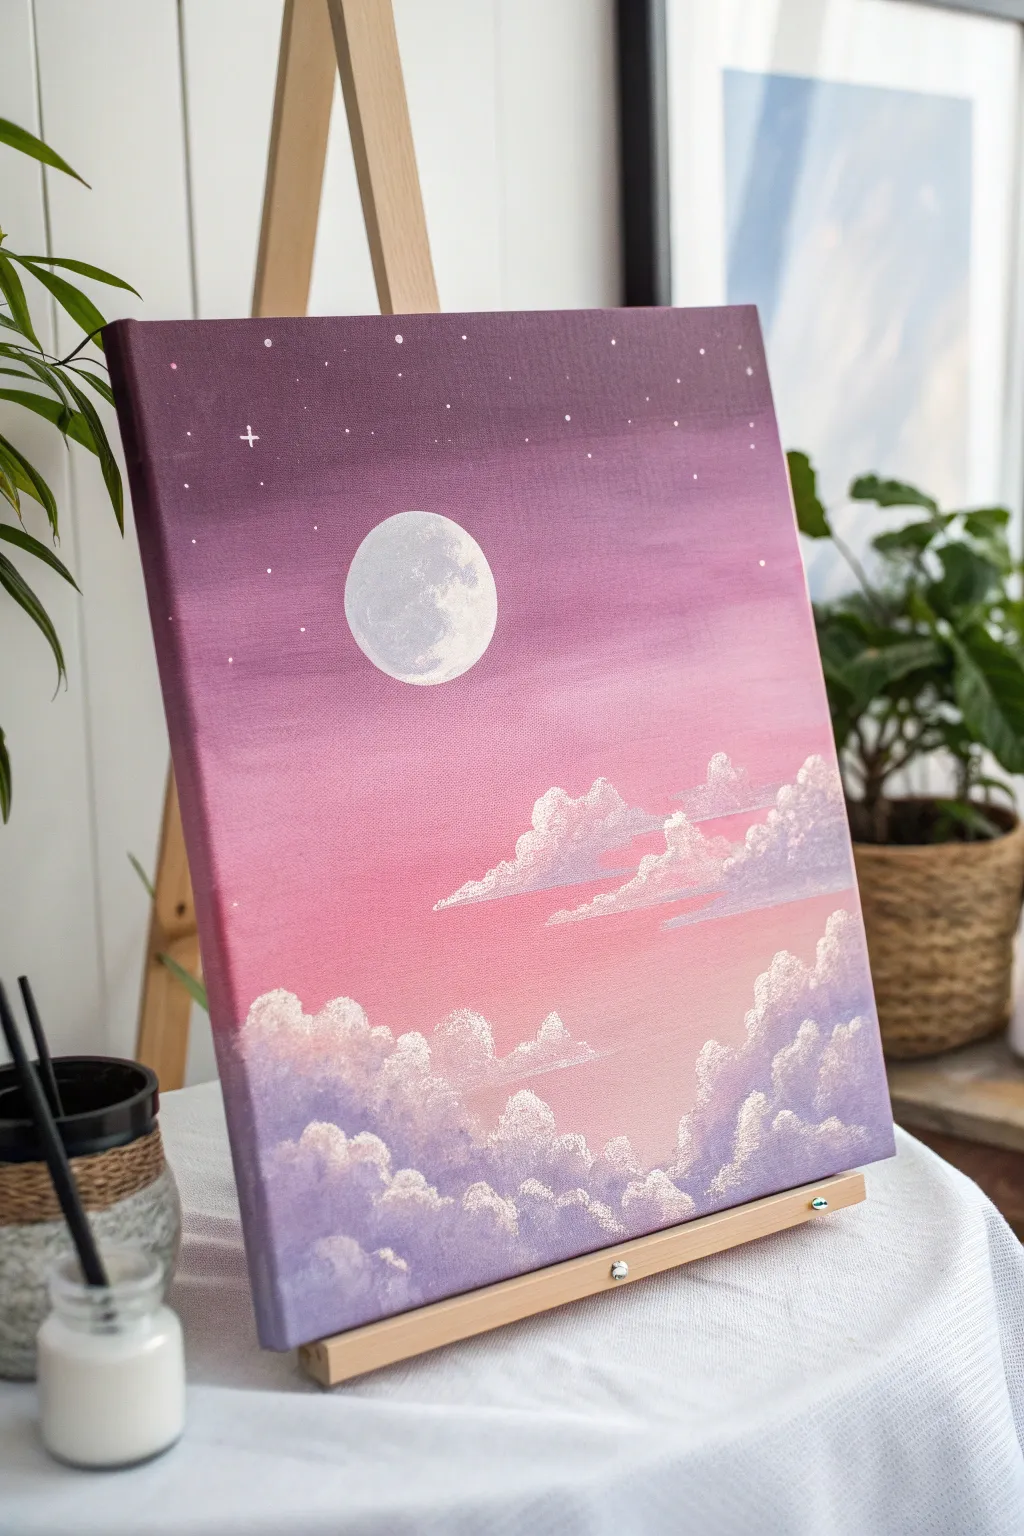
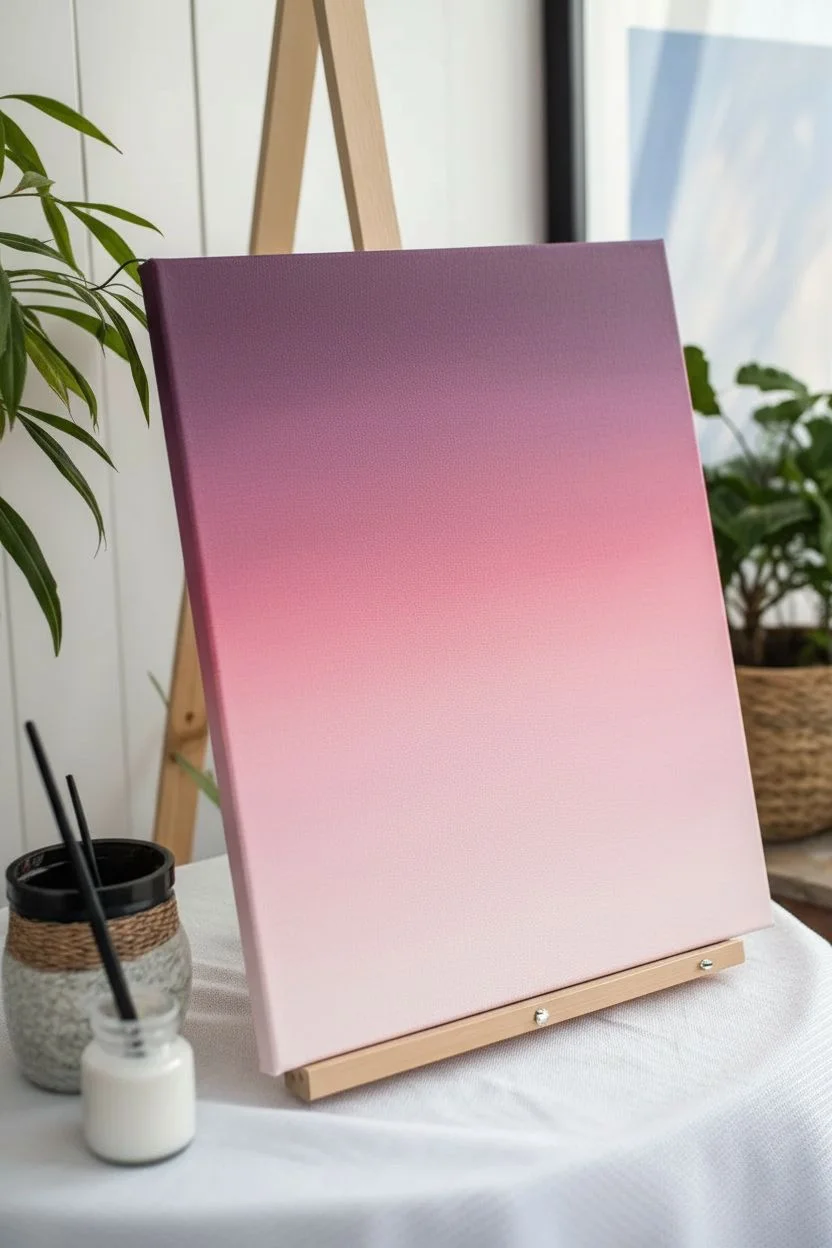
Capture the magic of twilight with this serene acrylic painting, featuring a soft gradient sky that fades from deep purple to blush pink. Fluffy, textured clouds and a glowing moon make this a perfect project for mastering blending and cloud building techniques.
Detailed Instructions
Materials
- Square stretched canvas (e.g., 10×10 or 12×12 inches)
- Acrylic paints: Titanium White, Magenta/Fuschia, Dioxazine Purple, Ultramarine Blue
- Large flat brush (1 inch)
- Medium filbert brush
- Small round brush (size 2 or 4)
- Old scruffy brush or fan brush for texture
- Palette
- Cup of water and paper towels
- Circular object for tracing (optional)
Step 1: Creating the Gradient Sky
-
Mix your colors:
Prepare three main pools of color on your palette: a deep violet mixed from purple and a touch of magenta, a medium pink mixed from magenta and white, and a pale pink that is mostly white with a drop of magenta. -
Apply the top layer:
Using your large flat brush, apply the darkest violet mixture in horizontal strokes across the top one-fourth of the canvas. Keep the paint wet and workable. -
Add the mid-tone graphic:
Pick up the medium pink tone without fully cleaning your brush. Blend this into the bottom edge of the purple section, painting down to the halfway point of the canvas. -
Fade to the horizon:
Switch to your palest pink mixture. Paint the bottom half of the canvas, brushing upward into the medium pink section to create a seamless Ombré effect from dark to light. -
Smooth the transition:
While the paint is still slightly damp, take a clean, dry brush and run it lightly back and forth horizontally across the entire sky to soften any harsh lines between the colors. -
Let it set:
Allow the background gradient to dry completely before moving on to the next phase to prevent muddying your cloud colors.
Step 2: Painting the Glowing Moon
-
Outline the shape:
Mix a tiny bit of white with water to create a fluid consistency. Use your small round brush (or trace a circular object) to outline a circle in the upper-left quadrant of the sky. -
Fill the base:
Fill in the circle with solid Titanium White. You might need two coats to ensure it is opaque against the dark purple background. -
Add craters and texture:
Mix a very pale grey using white and a speck of purple or blue. Dab this color unevenly onto the moon’s surface, concentrating on the edges to create a cratered, dimensional look. -
Refine the edges:
Clean up the moon’s edges with fresh white paint to make it look crisp and bright.
Cloud Control
If your clouds look too stiff, dip your brush in a tiny bit of water and soften the bottom edges. Keep the top edges crisp and textured for that fluffy ‘cumulus’ look.
Step 3: Building Fluffy Clouds
-
Mix cloud colors:
Prepare a lavender shade for the shadow areas of the clouds by mixing white, purple, and a tiny dot of ultramarine blue. Keep pure white aside for highlights. -
Establish the cloud base:
Using a filbert brush, map out the large cloud formations at the very bottom of the canvas. Use the lavender mixture to create a rolling, uneven foundation. -
Add mid-air floaters:
Paint a few smaller, thinner cloud wisps floating in the middle pink section of the sky using a mix of pale pink and lavender. These should look lighter and airier than the bottom mass. -
Texture technique:
Switch to a dry, scruffy brush or use the tip of your filbert. Dip into thick white paint and dab along the top edges of your lavender clouds to create fluffy, rounded ‘heads’. -
Blend the bodies:
Softly blend the bottom of the white highlights into the lavender shadow base so the clouds look voluminous rather than flat. -
Highlighting:
Add extra thick touches of pure white to the very tops of the clouds nearest the light source to make them pop.
Add a Glittery Touch
Once the painting is totally dry, paint a thin layer of clear holographic glitter glaze over the moon and the white tops of the clouds for a magical sparkle effect.
Step 4: Final Stars and Details
-
Prepare splatter paint:
Dilute a small amount of white paint with water until it has the consistency of fluid ink or milk. -
Create the stars:
Dip a small brush or toothbrush into the thinned paint and tap the handle against a finger to speckle tiny stars across the purple upper section of the sky. -
Detail larger stars:
Use your smallest round brush to manually paint a few distinct dots or tiny cross-shapes for larger, twinkling stars.
Step back and admire your dreamy sky—it’s ready to brighten up any wall


Starry Night Sky With Splatter Stars
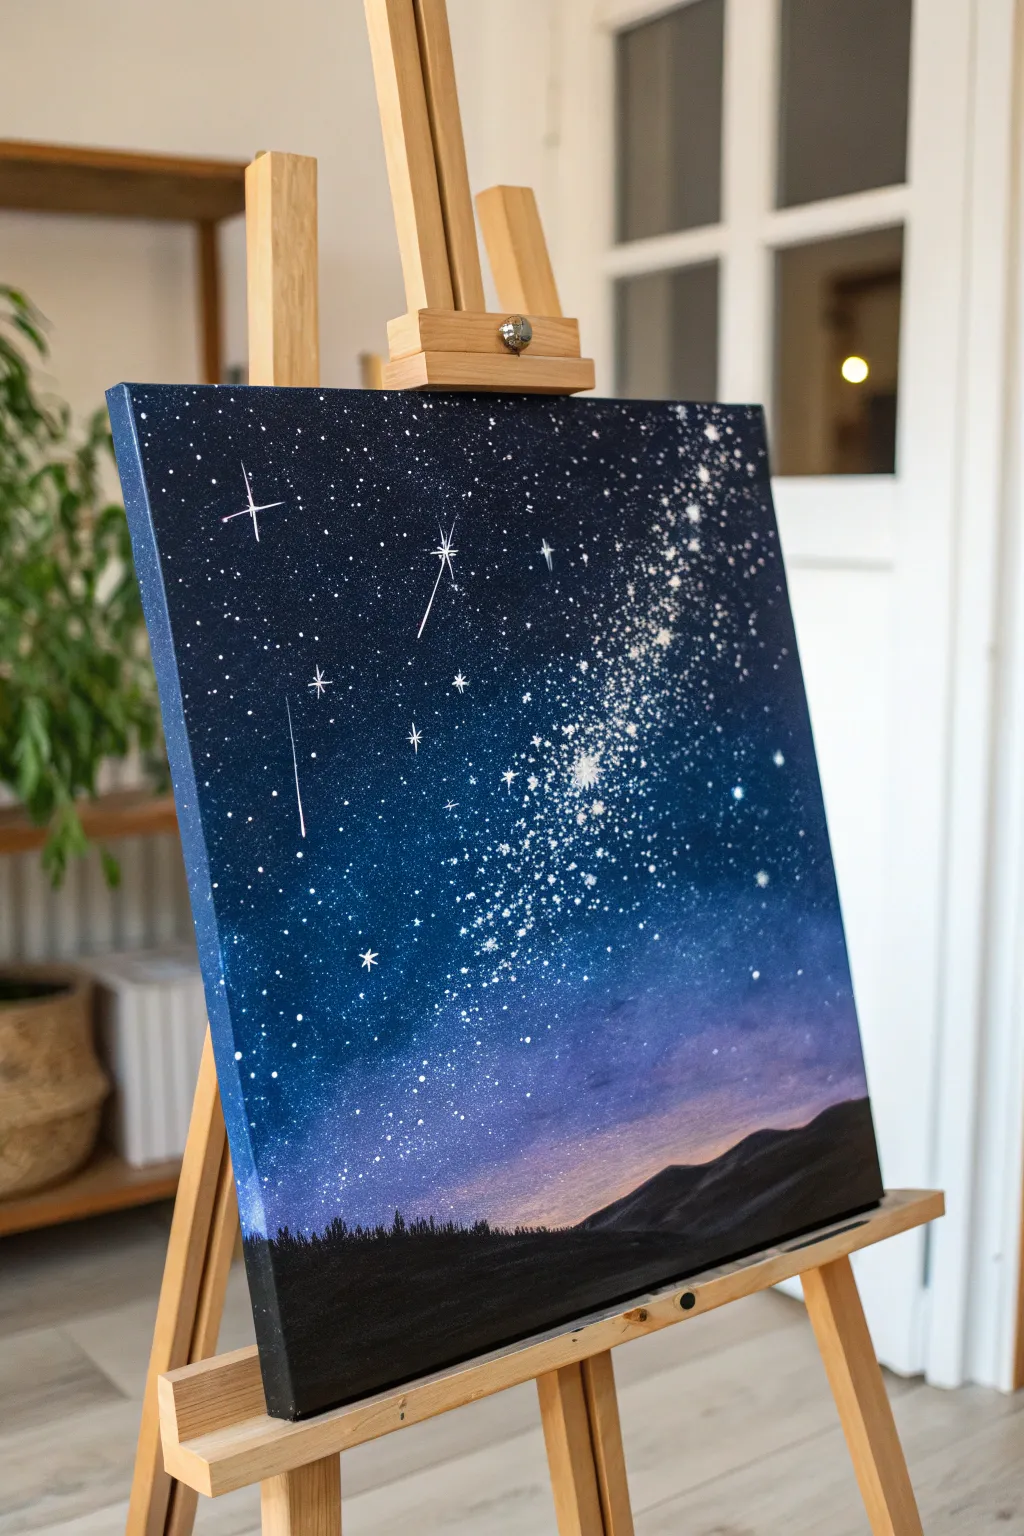
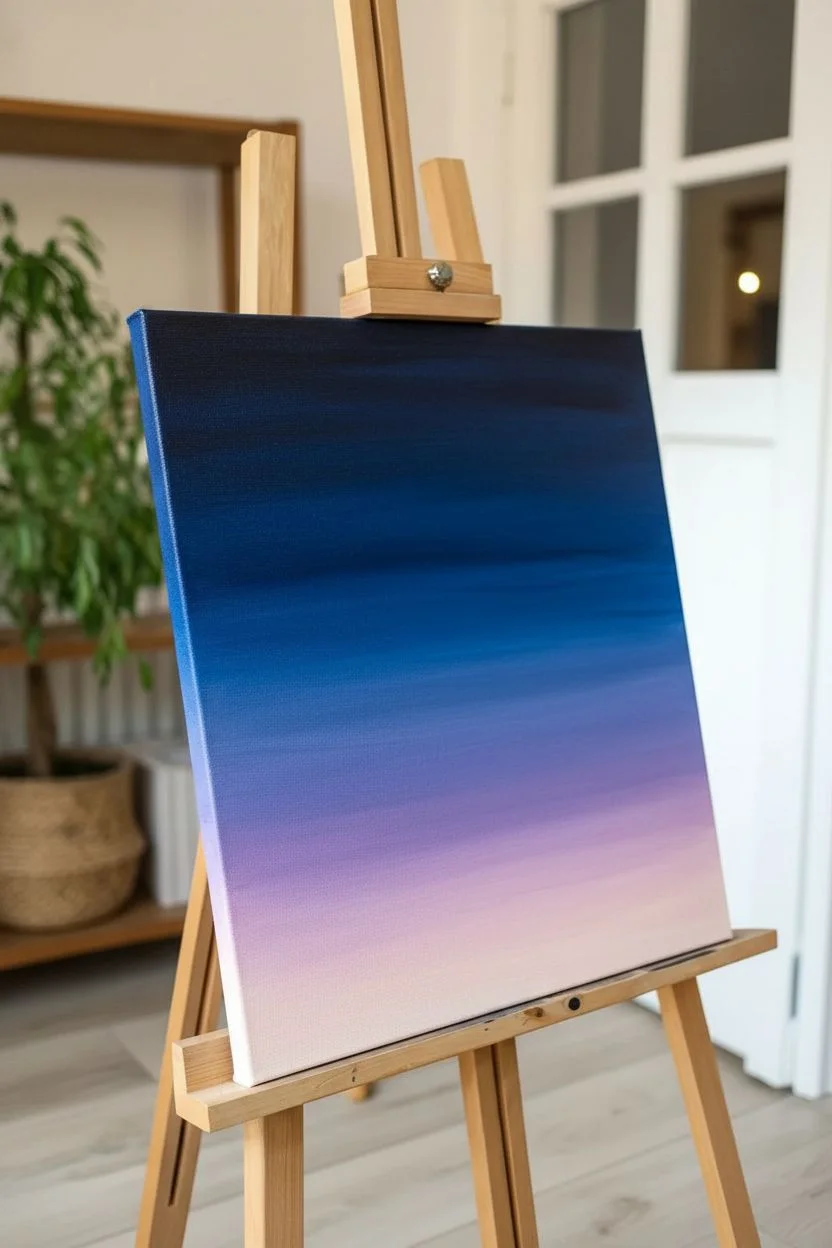
Capture the infinite beauty of the cosmos with this stunning acrylic project featuring a vibrant Milky Way and a delicate horizon glow. Using easy blending techniques and a fun splatter method, you’ll create a depth-filled night sky that looks incredibly professional.
Step-by-Step
Materials
- Square canvas (e.g., 12×12 or 16×16 inches)
- Acrylic paints: Black, Prussian Blue, Ultramarine Blue, Violet, Magenta/Pink, White
- Large flat wash brush
- Medium flat brush
- Old toothbrush (for splattering)
- Small round detail brush (size 0 or 1)
- Fan brush (optional, for blending)
- Palette for mixing paint
- Cup of water and paper towels
Step 1: Creating the Gradient Base
-
Prepare the Horizon:
Start near the bottom quarter of your canvas. Mix a small amount of Magenta or Pink with White to create a soft, pale twilight color. Paint a horizontal band across the canvas, blending it slightly upward. -
Transition to Purple:
Immediately above the pink band, apply a strip of Violet paint. Use your medium flat brush to blend the wet violet edge into the wet pink edge below it, creating a seamless transition. -
Deepen the Blue:
Moving upward, switch to Ultramarine Blue. Paint a wide band across the middle section of the canvas, blending it down into the violet layer while both paints are still workable. -
Darken the Zenith:
For the top third of the canvas, use Prussian Blue mixed with a touch of Black. Following the darker reference in the image, apply this dark mixture to the top and upper corners, blending down into the Ultramarine Blue. -
Smooth the Gradient:
Take a clean, slightly damp large brush (or a dry fan brush) and lightly sweep it horizontally across the transition zones to smooth out any harsh lines. I like to work quickly here before the acrylics dry completely.
Step 2: Painting the Milky Way
-
Mix a Milky Haze:
Create a very translucent wash by mixing a tiny bit of White paint with a lot of water or glazing medium. Alternatively, use a dry brush with a very small amount of undiluted white paint. -
Map the Galaxy:
Identify a diagonal path from the top right to the bottom left. Gently sponge or dry-brush this hazy white mixture along that path to create the cloudy backbone of the Milky Way. -
Build Intensity:
Add a slightly brighter, more concentrated white layer in the center of your galaxy band, particularly in the middle clustering area shown in the reference image. Keep the edges soft and irregular.
Galaxy Glow Tip
Before splattering stars, dab a tiny bit of lighter blue or purple on the Milky Way path with a sponge. This adds subtle color variation beneath the white stars.
Step 3: Adding the Stars
-
Prepare for Splatter:
Mix white acrylic paint with a few drops of water until it has the consistency of heavy cream or ink. It needs to be fluid enough to fly off bristles but thick enough to stay opaque. -
Test the Splatter:
Dip an old toothbrush into the thinned white paint. Test on a scrap piece of paper by running your thumb across the bristles. -
Create the Star Field:
Hold the toothbrush over the canvas. Focus the heaviest splatter along the diagonal Milky Way band you painted earlier. Use lighter splatters for the rest of the dark blue sky. -
Add Distant Stars:
For variety, you can dip a stiff brush in the paint and tap the handle against another brush to create slightly larger droplets scattered randomly across the darkest parts of the sky.
Make It 3D
Mix a tiny amount of silver glitter into your white paint for the largest stars. When the light hits your finished painting, the galaxy will actually twinkle.
Step 4: Details & Landscape
-
Paint Major Stars:
Using your smallest round detail brush and pure white paint, add a few specifically placed larger dots. Focus on the bright cluster in the galaxy center. -
Add Twinkling Spikes:
Select 3-5 of your largest stars. Using the very tip of your detail brush, paint a thin vertical line and a thin horizontal line through the center of the dot to create a cross shape. Extend the bottom line slightly longer for a dramatic flair. -
Create Shooting Stars:
If desired, verify the reference image for shooting stars. Paint a tiny dot and quickly drag a very faint, tapering tail downwards using a dry brush technique. -
Block in the Silhouette:
Once the sky is fully dry, mix pure Black paint. Paint a rolling hill shape at the very bottom of the canvas, covering the lowest part of your pink horizon. -
Detail the Trees:
Along the top edge of the black hill, use the tip of a small flat brush or fan brush held vertically to dab tiny, uneven vertical lines. This simulates a distant forest line.
Step back and admire your personal window into the universe, complete with a breathtaking galactic core


Beach Horizon With Palm Silhouettes
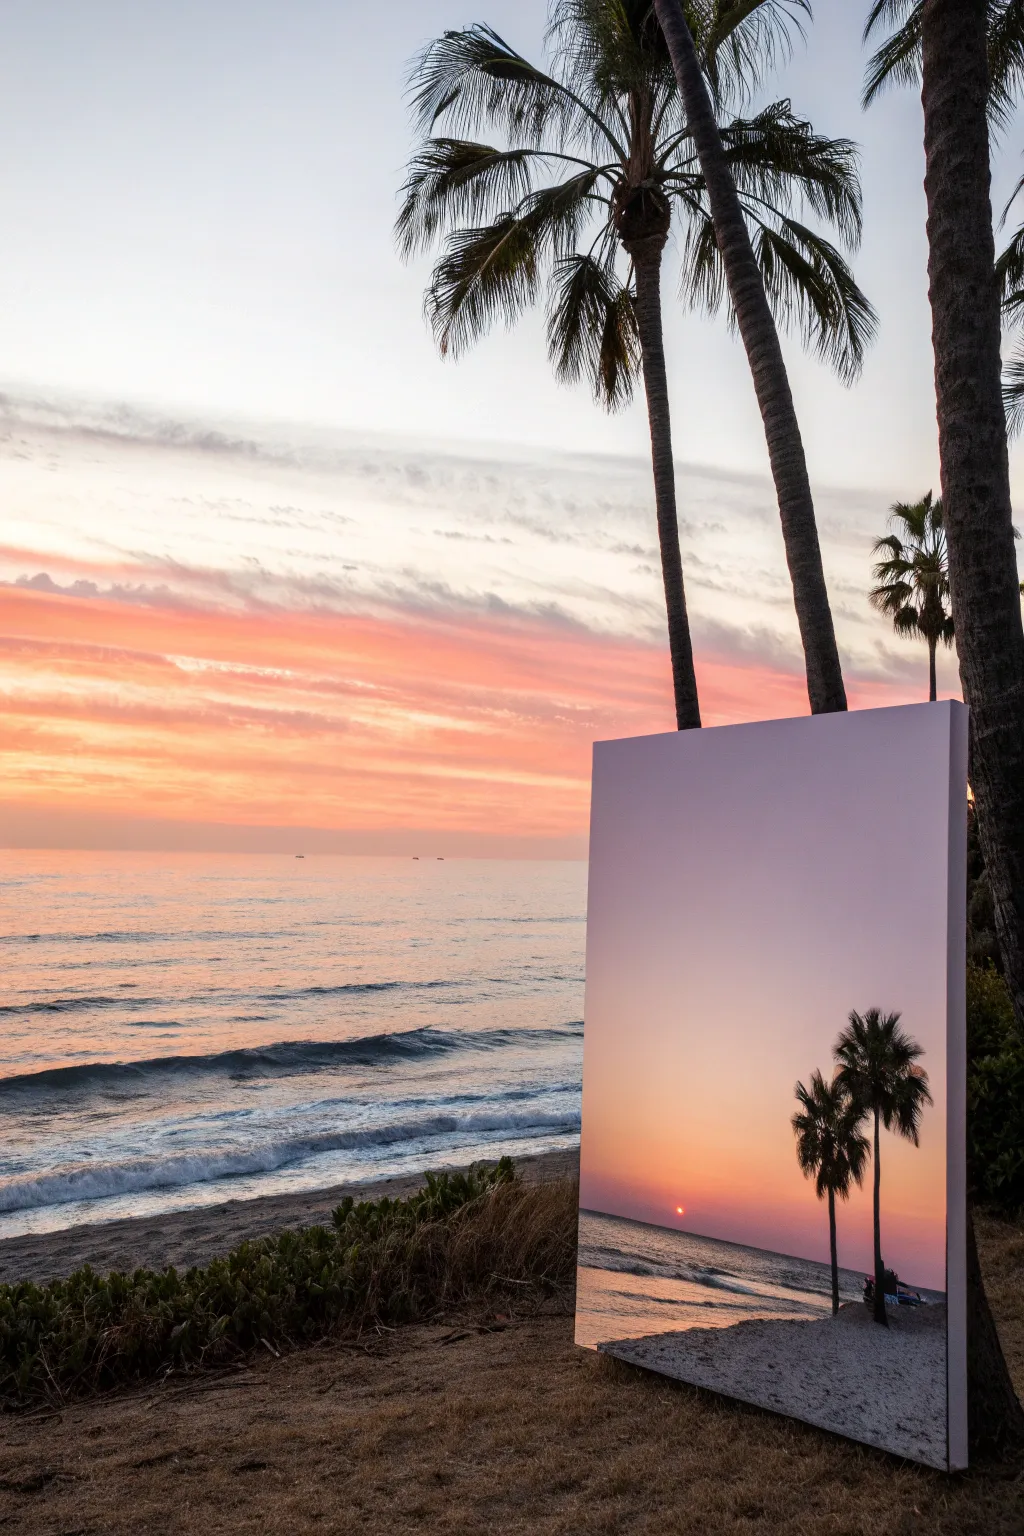
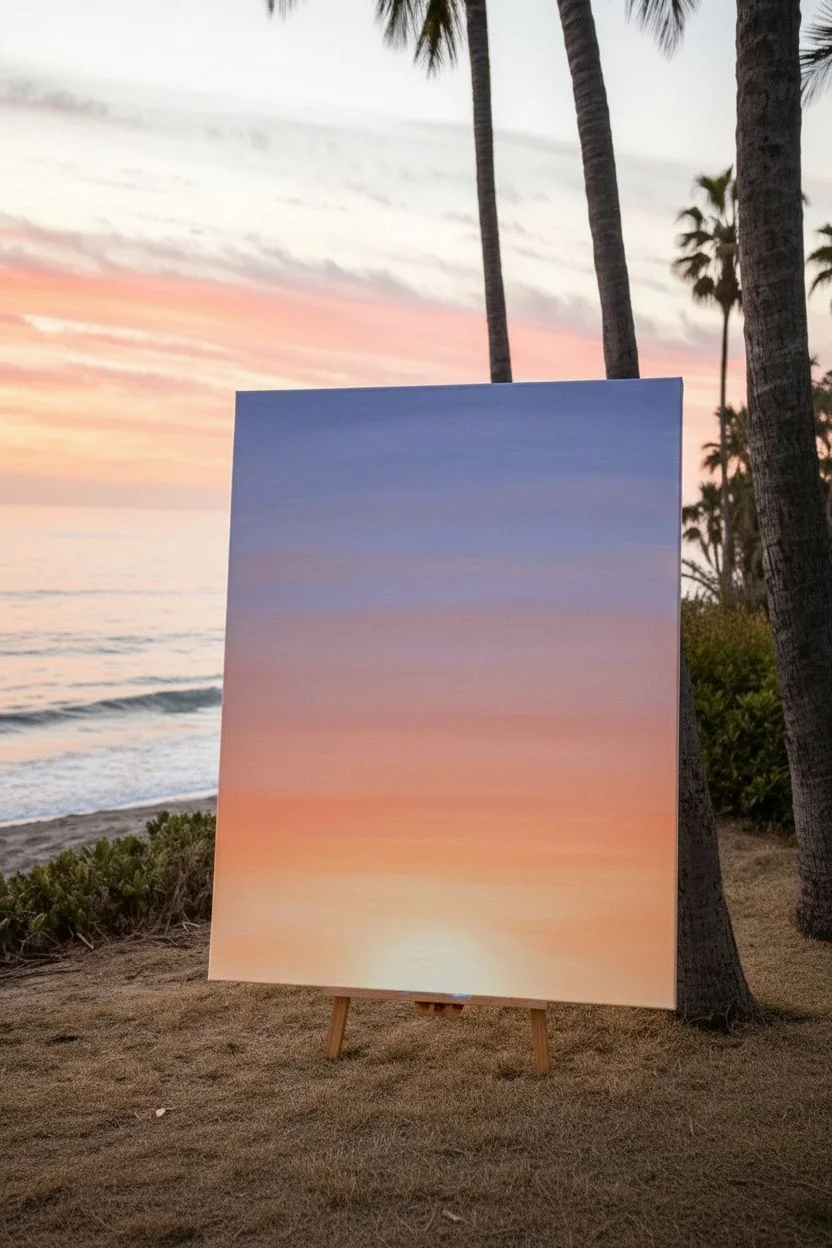
Capture the magic of golden hour with this vertical canvas painting that features a soft, gradient sky melting into a gentle ocean. The striking black contours of palm trees against a glowing sun create a classic tropical vibe that brings warmth to any room.
Step-by-Step Tutorial
Materials
- Rectangular stretched canvas (vertical orientation, e.g., 18×24 or 24×36 inches)
- Acrylic paints: Titanium White, Cadmium Yellow, Napthol Crimson (or bright red), Ultramarine Blue, Mars Black, Burnt Sienna
- Large flat brush (2-inch) for blending
- Medium flat brush (1-inch)
- Small round brush (size 2 or 4) for palm fronds
- Palette knife (optional for texture)
- Water cup and paper towels
- Easel or flat working surface
Step 1: Painting the Gradient Sky
-
Prime the horizon:
Begin by marking a horizon line about one-third of the way up from the bottom of your canvas. It doesn’t need to be perfectly straight yet, but it helps to establish your composition. -
Apply the sun’s glow:
Mix Titanium White with a small amount of Cadmium Yellow. Using your large flat brush, paint a semi-circle shape centered just above the horizon line where the sun will sit. This creates the brightest focal point. -
Blend the sunset orange:
Without cleaning your brush, pick up more Cadmium Yellow and a touch of Napthol Crimson to create a soft orange. Paint horizontal strokes moving upward from the sun, blending wet-on-wet into the pale yellow below. -
Add the lavender transition:
Mix a light purple using Ultramarine Blue, Napthol Crimson, and plenty of White. Apply this above the orange section, using long, smooth horizontal strokes to blend the transition so there are no harsh lines. -
Finish the upper sky:
For the very top of the canvas, use a slightly darker mix of blue and purple with less white. Blend this downward into the lavender area to complete the sky gradient. I like to keep the strokes loose here to mimic soft clouds.
Uneven Gradients?
If your sky colors aren’t blending smoothly, your paint is drying too fast. Mist the canvas lightly with water or add a slow-drying medium to keep the acrylics workable longer.
Step 2: Creating the Ocean and Sand
-
Block in the water:
Mix Ultramarine Blue with a touch of Burnt Sienna (to dull it) and White. Paint the ocean area from the horizon line down, leaving space at the bottom for the sand. Ensure the horizon line is now perfectly straight. -
Add water reflections:
While the blue is still slightly wet, take a clean brush with the pale yellow/white mix from the sun. Gently streak horizontal lines across the water directly under the sun to create the sparkling reflection path. -
Paint the shoreline:
Mix Burnt Sienna with White and a tiny dot of Black to create a warm grey-beige sand color. Fill in the bottom section of the canvas, curving the line where it meets the water to look like a shoreline. -
Detail the waves:
Using a smaller brush and pure Titanium White, paint thin, rolling lines where the water meets the sand to suggest foam. You can also add a few faint white lines further out in the water for distant waves.
Step 3: Silhouettes and Final Details
-
Paint the sun:
Once the sky is dry, use a small amount of bright orange or red-orange to paint a small, distinct circle right at the horizon line for the setting sun. -
Draft the palm trunks:
Switch to Mars Black paint slightly thinned with water for better flow. Using a medium brush, paint two vertical, slightly curved lines on the right side of the canvas. Make the base slightly wider than the top. -
Add the frond structure:
At the top of each trunk, paint 5-7 curved lines radiating outward like fireworks. These will be the spines of your palm leaves. -
Flesh out the leaves:
Using your small round brush, use a ‘flicking’ motion to pull distinct strokes downward from each spine line. These flicks represent the individual leaves hanging down. -
Create beach texture:
Mix a darker grey-brown and stipple (tap) it along the bottom right corner near the trees to suggest texture and shadow on the sand. -
Final touches:
Step back and check your contrast. If the water highlights faded while drying, re-apply a few crisp white lines on the wave crests for extra sparkle.
Detailed Fronds
When painting palm leaves, make the paint inky consistency with a drop of water. This helps the small brush glide smoothly for sharp, tapered points rather than blunt ends.
Hang your new tropical landscape in a spot where it can catch the light and remind you of warm summer evenings
BRUSH GUIDE
The Right Brush for Every Stroke
From clean lines to bold texture — master brush choice, stroke control, and essential techniques.
Explore the Full Guide
Colorful Birch Trees With Quick Vertical Strokes
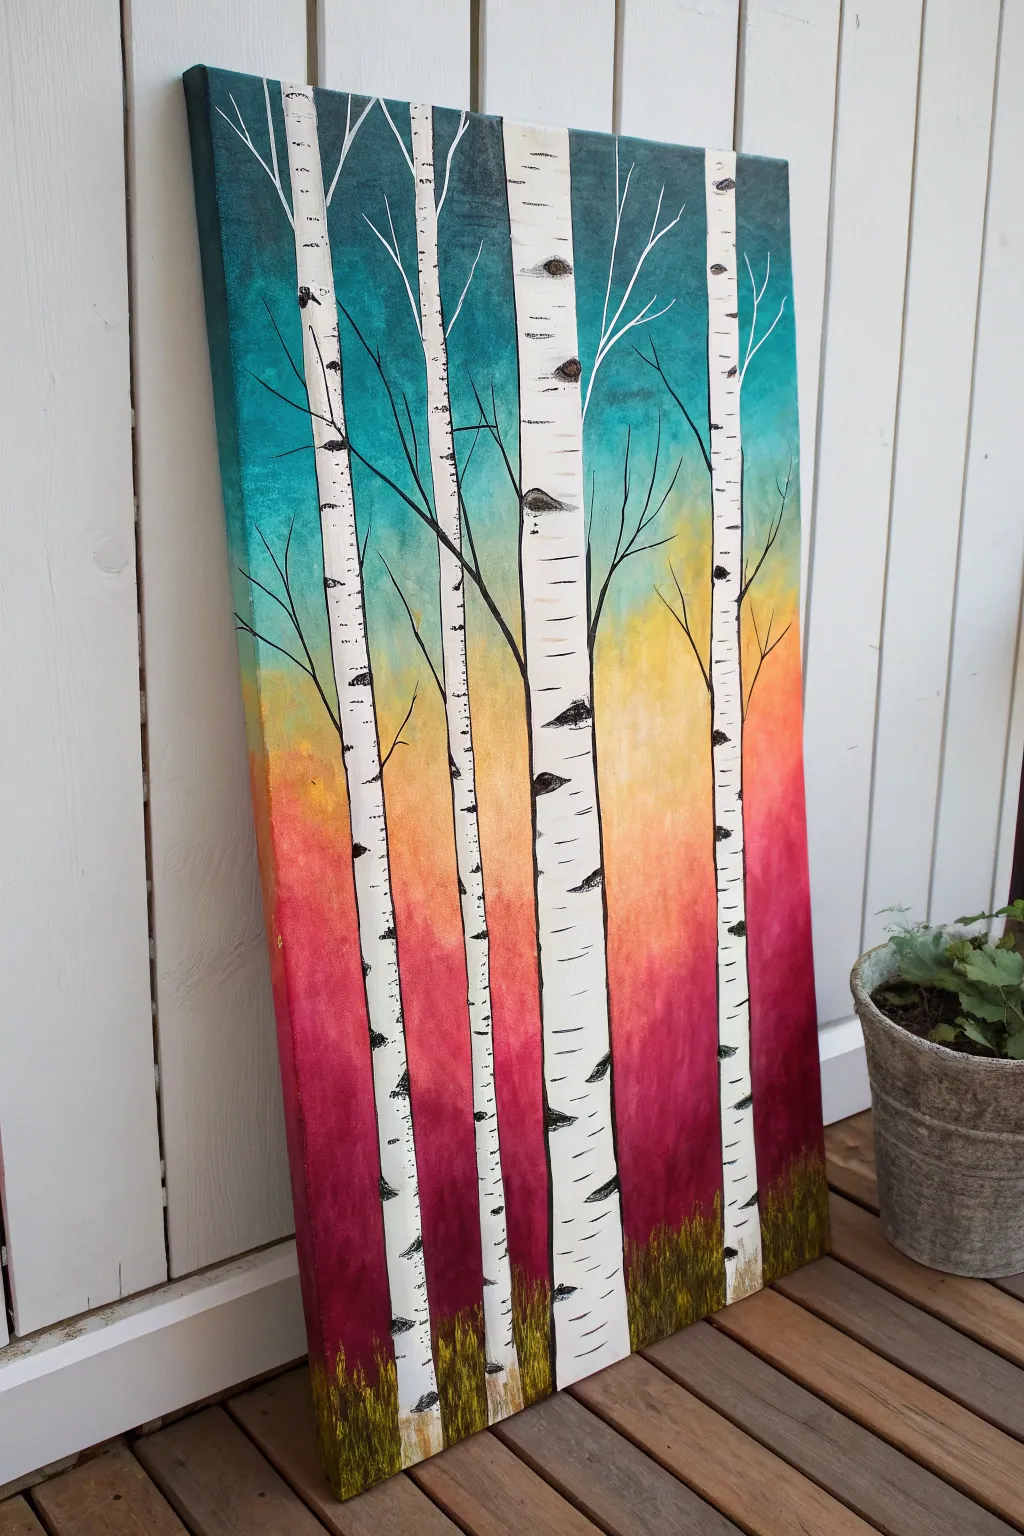
Capture the stark beauty of white birch trees set against a vibrant, glowing sunset gradient. This acrylic project combines smooth blending techniques for the background with crisp, bold detailing for the trees, creating a stunning piece of vertical wall art.
Step-by-Step Guide
Materials
- Rectangular stretched canvas (vertical orientation)
- Acrylic paints: Teal/Turquoise, Titanium White, Bright Yellow, Orange, Magenta/Deep Red, Black, Sap Green, Yellow Ochre
- Large flat brush (for background blending)
- Medium flat or filbert brush (for tree trunks)
- Small round brush (for branches)
- Small flat brush or palette knife (for bark details)
- Low-tack masking tape/painter’s tape
- Palette for mixing
- Cup of water and paper towels
Step 1: Creating the Ombré Background
-
Prepare the canvas:
Set your canvas vertically. Decide on your horizon line, although this abstract landscape relies more on color zones. Ensure your canvas is clean and ready. -
Paint the bottom crimson layer:
Using a large flat brush, paint the bottom third of the canvas with a deep magenta or red color. Use long, horizontal strokes to ensure even coverage. -
Blend in the orange sunset:
While the red is still slightly wet (or by keeping your brush damp), introduce orange paint just above the red section. Brush back and forth where they meet to create a smooth transition. -
Add the yellow glow:
Continuing upward, blend bright yellow into the wet orange edge. This will be the brightest part of your ‘sunset’ located just below the center of the canvas. -
Transition to teal:
Clean your brush thoroughly. Mix a bit of white with teal to soften it, then paint the top third of the canvas. Carefully blend the lower edge of the teal into the yellow, likely creating a faint greenish transition zone. -
Let the background cure:
Allow the entire background layer to dry completely. This is crucial because you will be applying tape over it in the next phase.
Bleeding Tape Lines?
If paint bleeds under your tape, wait for it to dry, then use an angled brush to touch up the edge with the original background color.
Step 2: Blocking in the Birch Trees
-
Tape the trunks:
Tear off strips of painters tape that run the full height of the canvas. Place 3-5 strips vertically to act as masks for your trees. Vary the spacing and slight angles so they don’t look like fence posts. -
Paint the tree trunks:
Load a medium brush with Titanium White. Paint heavily inside the taped lines. You may need two coats to fully cover the colorful background, especially over the dark red areas. -
Remove the tape:
The satisfying part: gently peel off the tape while the white paint is still slightly tacky to reveal crisp, straight tree trunks. -
Refine the edges:
Birch trees aren’t perfectly straight rulers. Take a small brush with white paint and manually wobble the edges of the trunks slightly to make them look more organic.
Smoother Blends
Keep a spray bottle of water nearby. mist the canvas lightly while blending the sunset gradient to keep acrylics workable longer.
Step 3: Adding Details and Texture
-
Add the ‘eyes’ and markings:
Using black paint and a small flat brush, add horizontal dashes and curved triangular shapes up and down the trunks. These represent the iconic birch bark scars. -
Detail the bark edges:
I like to run a very thin line of black paint along bits of the trunk edges, specifically on one side, to give the trees a sense of shadow and dimension. -
Paint fading branches:
Switch to your smallest round brush or a liner brush. Paint thin, spindly branches extending from the trunks into the teal sky. Some should be black (lower down) and some white (higher up) to show light hitting them. -
Create the grassy base:
Mix Sap Green, Yellow Ochre, and a touch of Black. At the very bottom of the canvas, use quick, upward flicking strokes to create tall grasses that partially cover the base of the trees. -
Blend the grass colors:
Layer lighter yellow-green flicks over darker green ones to create depth in the foliage. -
Final touches:
Check for any areas where the background color shows through the white trunks too much and touch up. Add a few stark white highlights to the black bark markings for contrast.
Step back and enjoy the glowing warmth of your new birch forest landscape
Big, Loose Bouquet Using Bold Color Blocking
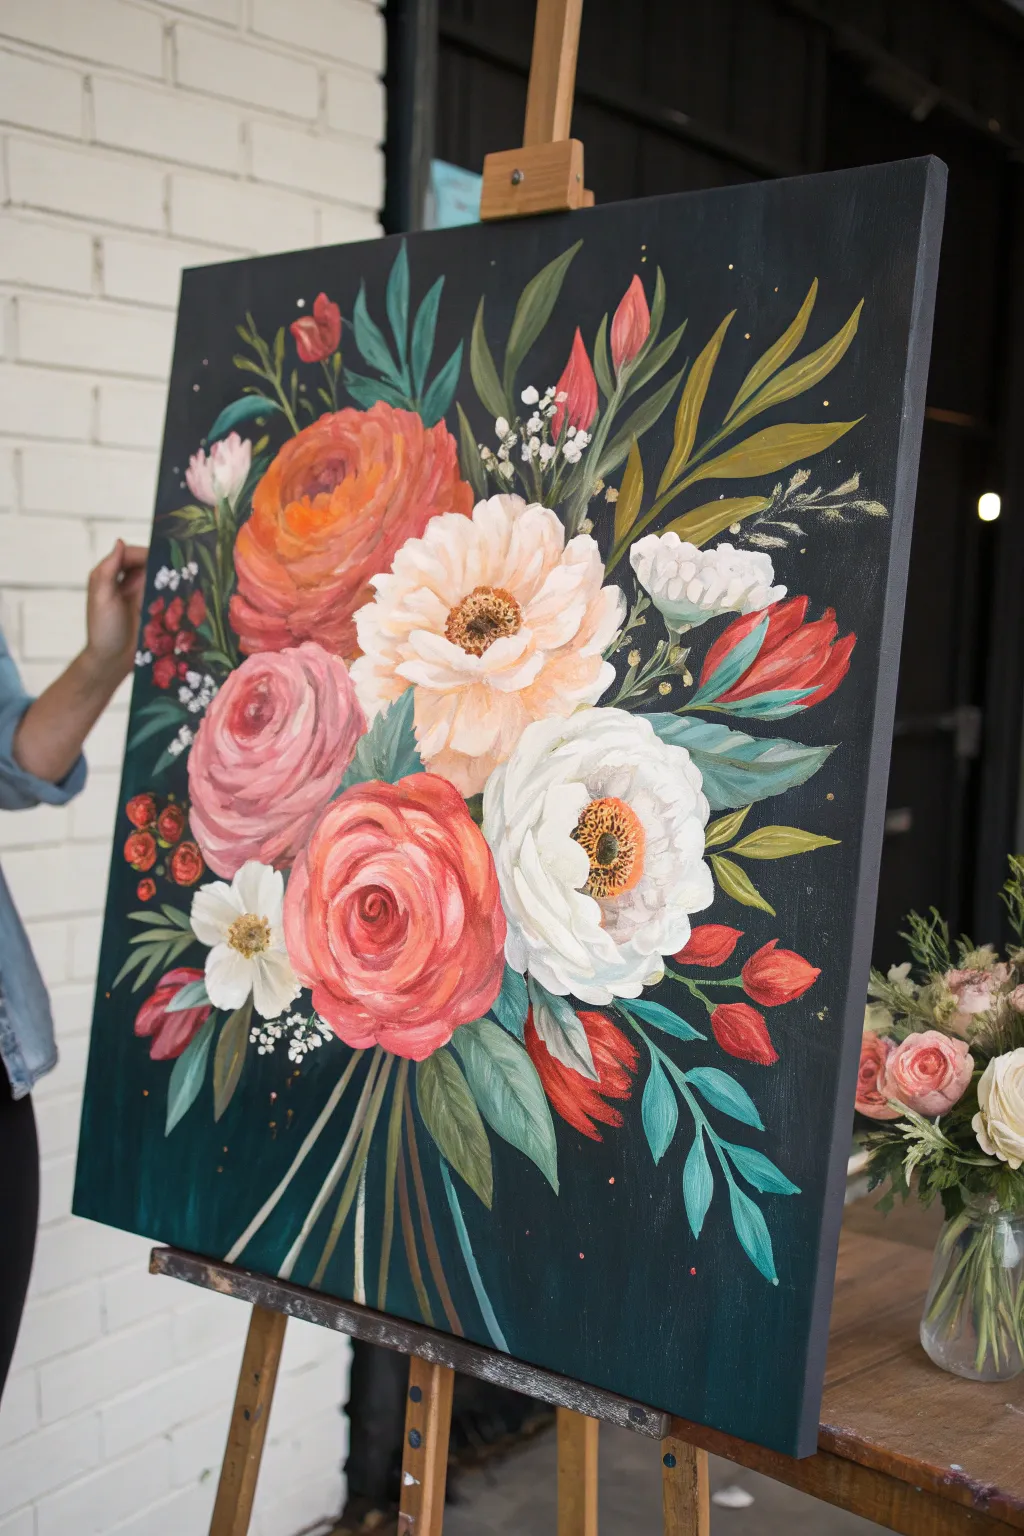
Create a stunning, dramatic statement piece with this loose floral bouquet set against a moody background. By using bold color blocking and layering, you’ll build up vibrant blooms that seem to pop right off the canvas with illustrative charm.
Step-by-Step Tutorial
Materials
- Large stretched canvas (at least 16×20 inches)
- Heavy body acrylic paints (Deep Teal, Mars Black, Titanium White, Cadmium Red, Alizarin Crimson, Cadmium Orange, Yellow Ochre, Sap Green, Phthalo Green)
- Assorted synthetic brushes (large flat wash, medium filbert, small round)
- Palette knife (optional for mixing)
- Water cup and paper towels
- Chalk or pastel pencil for sketching
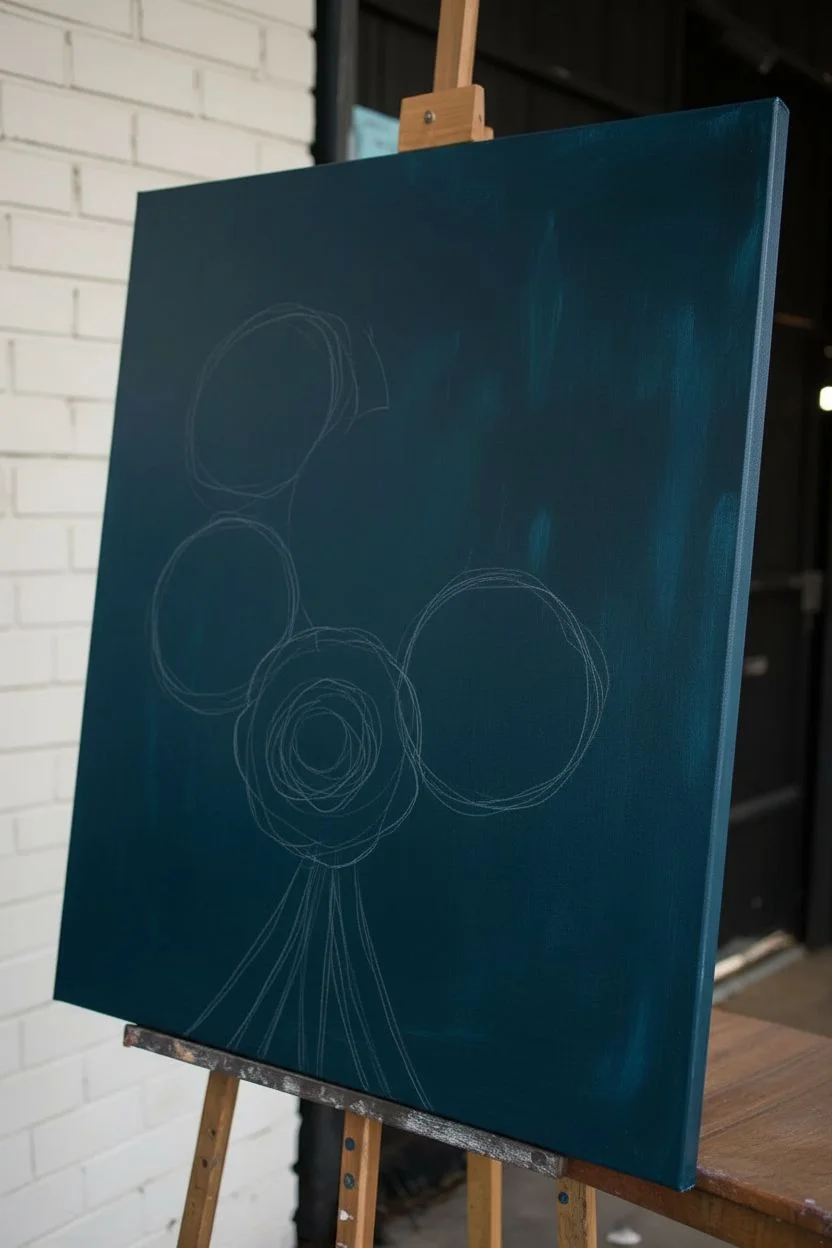
Step 1: Setting the Stage
-
Prep the Background:
Mix a large volume of paint for your background color. Combine Mars Black with a generous amount of Deep Teal and a touch of Phthalo Green to create a rich, velvety dark blue-green. Using your large flat wash brush, cover the entire canvas evenly, painting the sides as well for a finished look. -
Establish the Composition:
Once the background is completely dry, use a white chalk or light pastel pencil to lightly sketch the placement of your main flowers. Draw three large circles for the main blooms—a large one top-left, a central one lower down, and one to the right. Add rough lines for the stems gathering at the bottom.
Step 2: Blocking in Blooms
-
Base Coat the Orange Rose:
Mix Cadmium Orange with a little Red and White to get a muted terracotta. Using a medium filbert brush, fill in the circle for the top-left rose with broad, curved strokes. Don’t worry about petals yet; just establish the overall shape and color mass. -
Base Coat the Pink & Red Roses:
For the lower-left pink rose, mix Alizarin Crimson with Titanium White. Paint a solid shape. For the bright red focal flower in the lower center, mix Cadmium Red with a touch of Alizarin Crimson for depth and fill in its circle. -
Block in White Flowers:
Mix Titanium White with a tiny dot of Yellow Ochre to warm it up. Paint the shapes for the center poppy-like flower and the white rose on the right. Keep the paint relatively thin here, as you’ll layer opaque white on top later. -
Add Filler Shapes:
Using the dark red mix, dab in triangular bud shapes around the periphery. Add smaller white blobs for the filler flowers near the top right.
Wet-on-Wet Blending
For softer petals, don’t let the base coat dry completely. Apply the highlight color while the base is tacky to get a smooth, buttery gradient.
Step 3: Layering Petals & Detail
-
Define the Orange Rose:
Reload your filbert brush with a lighter orange (add more white and yellow). Starting from the outer edge, paint C-shaped strokes curbing inward. As you move toward the center, make the strokes smaller and tighter, leaving some of the darker base coat visible between layers. -
Sculpt the Pink Rose:
Mix a pale pink highlight color. Apply curved strokes to the pink base shape, creating a spiral effect. Imagine a cup shape for the center and wrap ‘arms’ of paint around it to suggest unfolding petals. -
Detail the Red Rose:
Use a mix of pure Titanium White and a little pink to add highlights to the edges of the red rose petals. Keep these strokes crisp to show the swirl of the bloom. Let the deep red base act as the shadow. -
Creating the Poppy Center:
For the creamy central flower, paint distinct, wide petals radiating from a center point. Use pure white for the tips. Once dry, dab a dark brown/black mix in the very center, then dot yellow ochre on top of the dark center for pollen texture. -
Finishing the White Rose:
On the white flower to the right, paint broad, loose petals with thick Titanium White. In the center, paint a small yellow and black eye similar to the poppy, giving it an open, wild look.
Level Up: Metallic Pop
Use metallic gold acrylic paint for the pollen dots and the ‘floating’ specks in the background. It catches the light beautifully against the dark paint.
Step 4: Greenery & Flourishes
-
Dark Leaves First:
Mix Sap Green with a little Black. Use a round brush to paint the stems radiating from the bouquet base. Add large, dark leaf shapes tucked behind the flowers to create depth. -
Teal and Mint Leaves:
Mix your Phthalo Green with White to create a sea-foam or mint green. Paint long, slender leaves extending outward from the bouquet. I find that varying the green tones adds a modern, illustrative quality to the piece. -
Olive Accents:
Mix Yellow Ochre with Sap Green for an olive tone. Add smaller, pointed leaves and fern-like fronds, especially near the top right, to balance the cool greens. -
Small Floral Details:
Using a small round brush, add stems to the red buds. Paint tiny white dots in clusters for ‘baby’s breath’ or small filler flowers. -
Final Highlights:
Add tiny dashes of gold or yellow ochre floating around the bouquet like pollen or fireflies. Check your contrast—if any flower needs to pop more, add a final touch of pure white highlight to the petal tips.
Hang your new masterpiece and enjoy the everlasting bloom of these vibrant flowers

PENCIL GUIDE
Understanding Pencil Grades from H to B
From first sketch to finished drawing — learn pencil grades, line control, and shading techniques.
Explore the Full Guide
Simple Ocean Wave Study With White Highlights
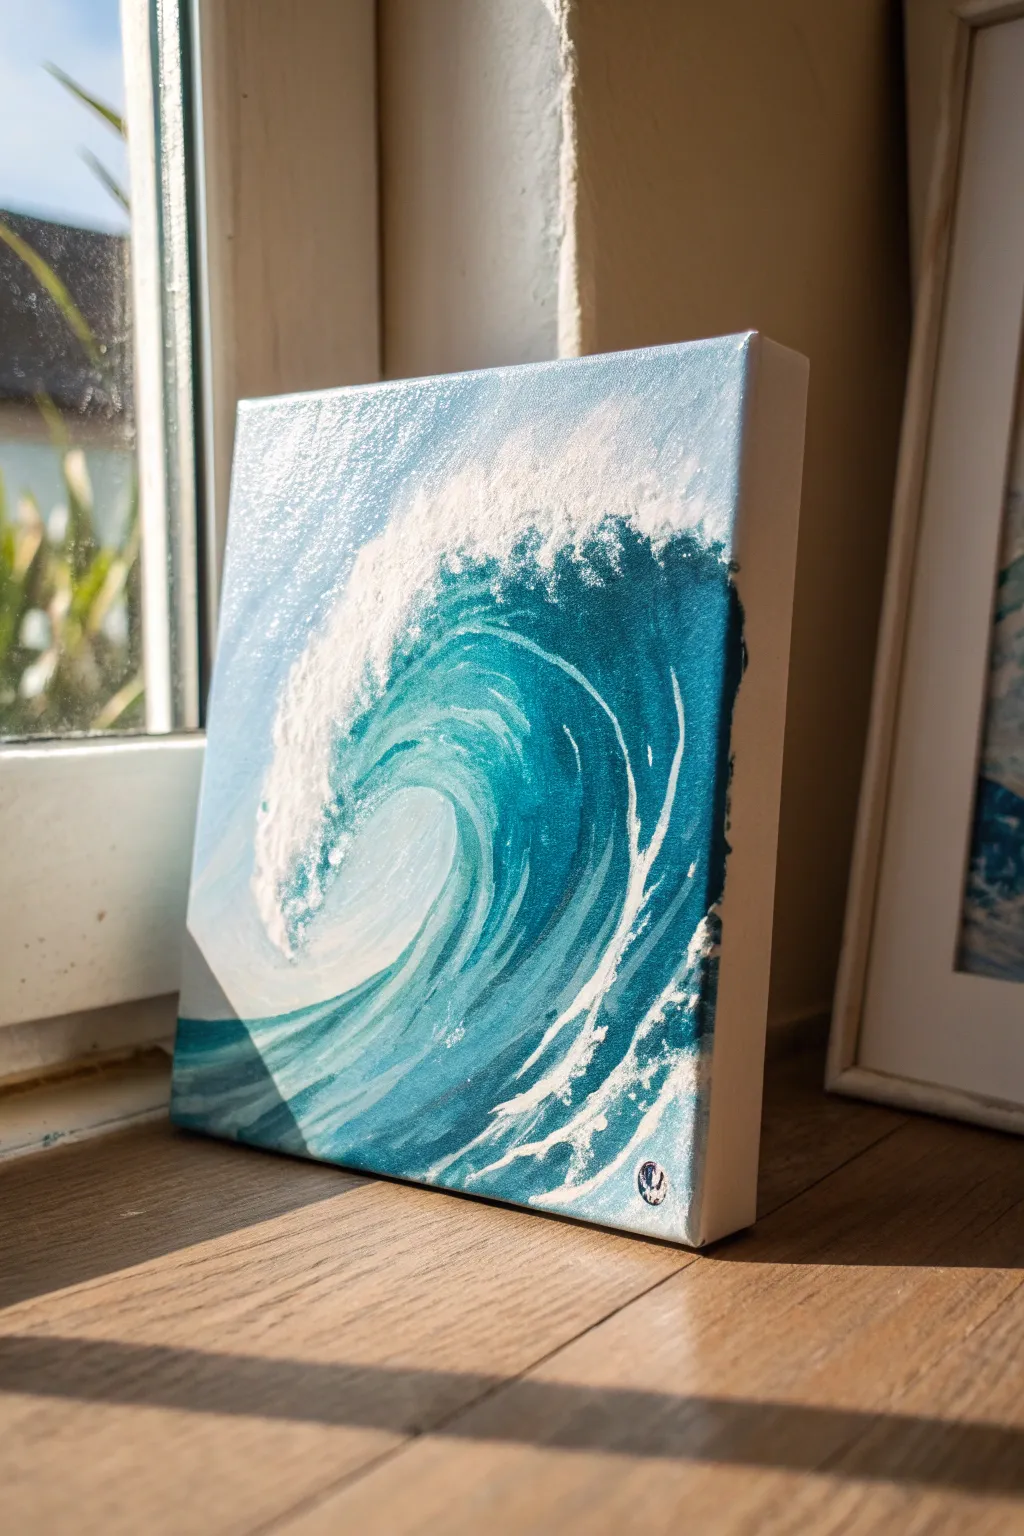
Capture the raw power of the ocean with this dynamic study of a crashing wave, featuring bold teal hues and striking white sea foam. This project creates a sense of movement on a compact canvas, making it a perfect weekend afternoon study.
Detailed Instructions
Materials
- Square stretched canvas (approx. 8×8 or 10×10 inches)
- Acrylic paints (Phthalo Blue, Phthalo Green, Titanium White, Ultramarine Blue, maybe a touch of Burnt Umber)
- Flat brushes (various sizes: large for blocking, medium for curves)
- Small round detail brush or liner brush
- Palette knife (optional, for mixing or texture)
- Cup of water and paper towels
- Palette for mixing
Step 1: Setting the scene
-
Prepare your palette:
Squeeze out your paints. Mix a primary teal by combining Phthalo Blue and Phthalo Green with a generous amount of Titanium White to create a light, sky-like blue for the background. You want a range of blues: a pale background blue, a mid-tone teal, and a deep, dark ocean blue. -
Paint the background gradient:
Start by brushing the lightest blue mixture across the top left corner of the canvas. As you move diagonally toward the bottom right, gradually mix in a slightly darker blue to create a subtle gradient. This establishes the atmosphere behind the wave. -
Construct the wave shape:
Using a thinned-down mid-tone blue and a small brush, lightly sketch the outline of the curling wave. Draw a large C-shape starting from the right side, curling over towards the left, leaving space at the bottom for the water surface.
Muddy Waters?
If your white foam is turning blue quickly, let the underlying teal layer dry completely before applying the white. Acrylics dry fast, so a 10-minute break usually solves this.
Step 2: Blocking in the colors
-
Define the deep shadow:
Mix your darkest color using Phthalo Blue, a touch of Ultramarine, and the tiniest bit of Burnt Umber to deepen it without making it black. Paint the inside of the wave’s curve, right under the lip where the curl happens. This is the ‘cave’ of the wave. -
Paint the wave’s body:
Using a rich teal (Phthalo Blue + Green), paint the main body of the wave. Allow this color to meet your dark shadow color, but don’t over-blend them yet. The transition should be somewhat visible to show depth. -
Add the translucent lip:
At the very top of the curl, before the water breaks, the wave is thinnest and light shines through. Mix a lighter, brighter turquoise and apply it to this top curve, blending it downward into the darker body of the wave. -
Fill the foreground water:
Paint the bottom section of the canvas with sweeping strokes that mimic the movement of the water rushing forward. Use a mix of your mid-tone blue and white, following the curve of the wave. -
Paint the canvas edges:
Don’t forget to wrap your painting around the sides of the deep-edge canvas. Extend the background sky color and the deep blue wave colors onto the respective sides for a professional, finished look.
Make it Sparkle
Mix a tiny pinch of iridescent medium or glitter glaze into your white paint for the final highlights. It gives the water a glistening, sun-kissed effect.
Step 3: Creating movement and texture
-
Strengthen the flow lines:
Using a liner brush and a lighter teal shade, add thin, sweeping lines inside the curve of the wave. These lines should follow the C-shape, reinforcing the idea that the water is being pulled upward and over. -
Begin the foam splash:
Load a medium brush with pure Titanium White. Use a dry-brush technique or stippling motion to dab white paint along the very top crest of the wave. This represents the aerated water just beginning to crash. -
Add the falling spray:
Drag some of that white paint downward from the crest in broken, jagged lines. Imagine gravity pulling the foam down as the wave tumbles. Keep the paint thick so it stands out against the dark teal. -
Texture the inner curl:
Add smaller dabs of white and very light blue inside the dark ‘cave’ area you painted earlier. This suggests foam that has been trapped inside the rolling wave. -
Create foreground foam:
Paint irregular, web-like patterns on the water surface at the bottom of the canvas. These lines should look like sea foam stretching and breaking as the water moves.
Step 4: Final highlights and details
-
Refine the major crash:
Go back to the top crest with thick, heavy body white paint. I prefer to pile it on a bit here to create physical texture. Dab heavily where the wave is breaking most violently to mimic the chaos of the splash. -
Add mist and spray:
Use an old, frayed brush with a tiny amount of watery white paint to gently scumble (scrub) around the edges of the crash. This creates a misty effect, softening the harsh edges of the foam. -
Highlights on the flow lines:
Reinforce the light-catching curves on the face of the wave with thin strokes of your lightest turquoise mix. This emphasizes the glossy, wet surface of the water. -
Check the light source:
Ensure the brightest whites are on the top and left side of the foam, suggesting sunlight hitting the spray from above. -
Sign your work:
Once the painting is fully dry, use a fine liner brush or a paint pen to add your signature or logo in the bottom corner.
Step back and admire the powerful motion you’ve captured in your own slice of the ocean
Birds on a Wire Minimal Silhouette Painting
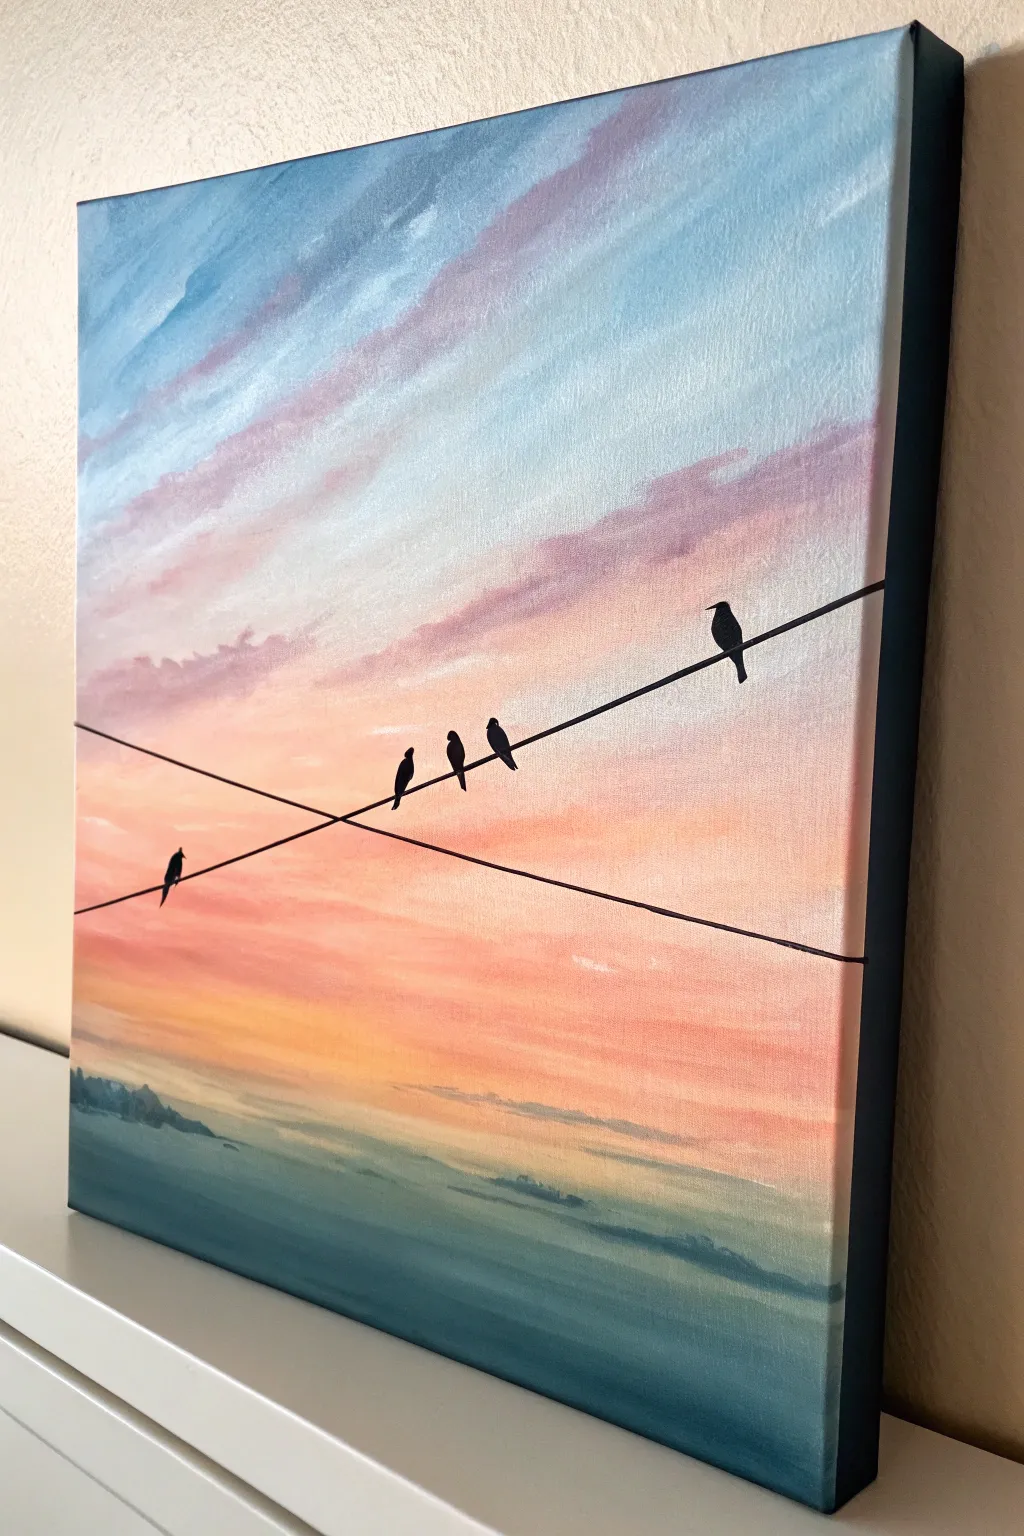
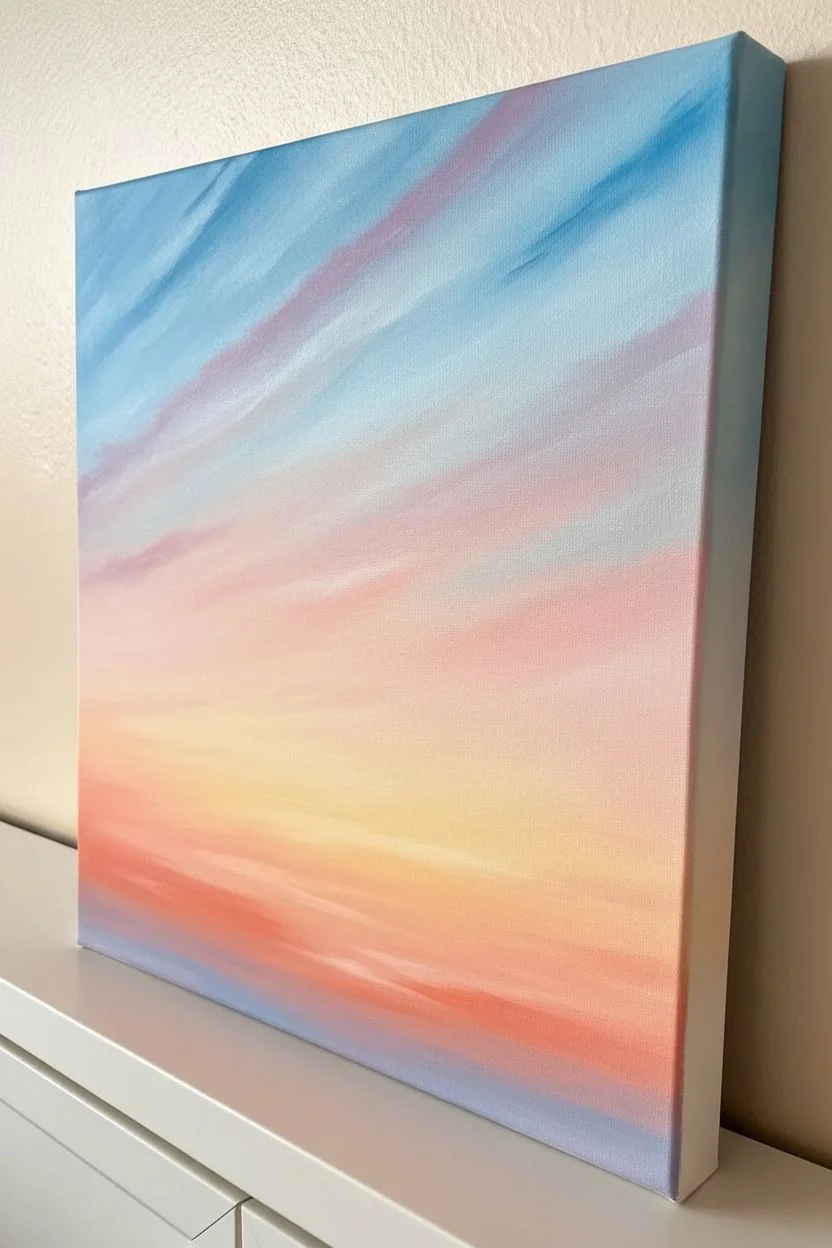
Capture the serene beauty of a pastel sunset with this accessible acrylic painting project. You will learn to blend soft gradients for a dreamy sky and use bold, minimal silhouettes to create striking contrast and depth.
How-To Guide
Materials
- Stretched canvas (square or rectangular)
- Acrylic paints: Titanium White, Cerulean Blue, Ultramarine Blue, Magenta (or Crimson), Cadmium Yellow, Orange, Deep Teal, Black
- Large flat wash brush (1-inch)
- Medium round brush
- Small liner brush (for fine details)
- Palette or paper plate
- Cup of water
- Paper towels
- Ruler or straight edge (optional)
Step 1: Painting the Sky Gradient
-
Prepare the canvas:
Start with a clean, dry canvas. If your canvas isn’t pre-primed, apply a coat of gesso and let it dry completely. -
Mix upper sky colors:
On your palette, mix Cerulean Blue with a touch of White to create a soft, airy blue. Prepare a separate mix of Ultramarine Blue with a tiny drop of Magenta for the deeper, darker clouds. -
Apply the top blue layer:
Using your large flat brush, paint the top left corner and upper edge with your Cerulean Blue mix using diagonal, sweeping strokes. Keep the paint somewhat wet to allow for blending. -
Add violet cloud streaks:
While the blue is still tacky, pick up the Ultramarine/Magenta mix. Add diagonal streaks pointing from the top right down toward the left, blending the edges softly into the lighter blue. -
Transition to pinks:
Clean your brush thoroughly. Mix White with a small amount of Magenta to create a soft pastel pink. Apply this below the blue zone, blending the meeting point gently so there are no harsh lines. -
Create the horizon glow:
Mix Cadmium Yellow and White for a pale sunlight color, adding a speck of Orange for warmth. Paint this across the middle-lower section, blending it upwards into the pink layer to create a glowing sunset effect. -
Deepen the sunset:
Near the horizon line (about one-quarter from the bottom), enhance the intensity by painting a band of pure Orange mixed with a little Pink, ensuring the gradient remains smooth.
Keep Edges Soft
Use a soft, dry mop brush to gently sweep over the transitions between sky colors while the paint is wet. This removes brushstrokes and creates that airbrushed look.
Step 2: Creating the Ocean & Clouds
-
Establish the water base:
For the water, mix Deep Teal with White and a touch of Ultramarine Blue. Paint the bottom section of the canvas with horizontal strokes, keeping the horizon line relatively straight but soft. -
Add depth to the water:
Darken your teal mix with more Blue and a tiny bit of Black. Use this darker shade at the very bottom edge and corners of the canvas to anchor the composition. -
Paint low mist and islands:
Using a smaller round brush and a misty grey-blue (Blue + White + tiny touch of Black), dab in some distant landforms or low clouds just above the water on the left side. Keep these shapes vague and soft. -
Layer lower clouds:
With a dry brush and a very pale orange-pink mix, scumble (lightly scrub) some faint horizontal cloud lines just above the horizon to separate the sky from the distant water. -
Dry completely:
Allow the entire background to dry completely. If the canvas is cold to the touch, it’s still wet. The next step requires a bone-dry surface for crisp lines.
Fixing Wobbly Lines
If your power lines look shaky, wait for the black paint to dry completely. Then, use the background sky color to carefully ‘cut in’ and straighten the edge of the line.
Step 3: Adding the Silhouettes
-
Draw the wires:
Thin down your Black acrylic paint with a few drops of water until it has an ink-like consistency. Using your liner brush (or a ruler if you are unsteady), paint two diagonal lines crossing the canvas. -
Angle the wires:
Notice the perspective; one wire should slope slightly down from left to right, and the other can cross underneath. Varying the angles slightly makes the composition more dynamic. -
Outline the first bird:
Pick a spot on the wire for your first bird. Using the small round brush and black paint, create a simple teardrop shape for the body, with the tapered end representing the tail hanging below the wire. -
Refine the bird shape:
Add a small circle for the head on top of the teardrop. Add a tiny beak pointing sideways. I find it helpful to look at the bird as three simple shapes: circle head, oval body, stick tail. -
Add the flock:
Paint the remaining four birds. Vary their spacing—group two closer together and leave others solitary. Change their sizes slightly to suggest different distances or bird types. -
Check silhouettes:
Go back over your black shapes. If the background color is showing through, apply a second coat of black to ensure the silhouettes are opaque and solid. -
Paint the edges:
Finish the piece by painting the four outer edges of the canvas with black or deep teal to give it a framed, professional gallery look without needing an actual frame.
Hang your new peaceful landscape on the wall and enjoy the calm atmosphere it brings to the room


Cherry Blossom Branches With Dabbing Petals
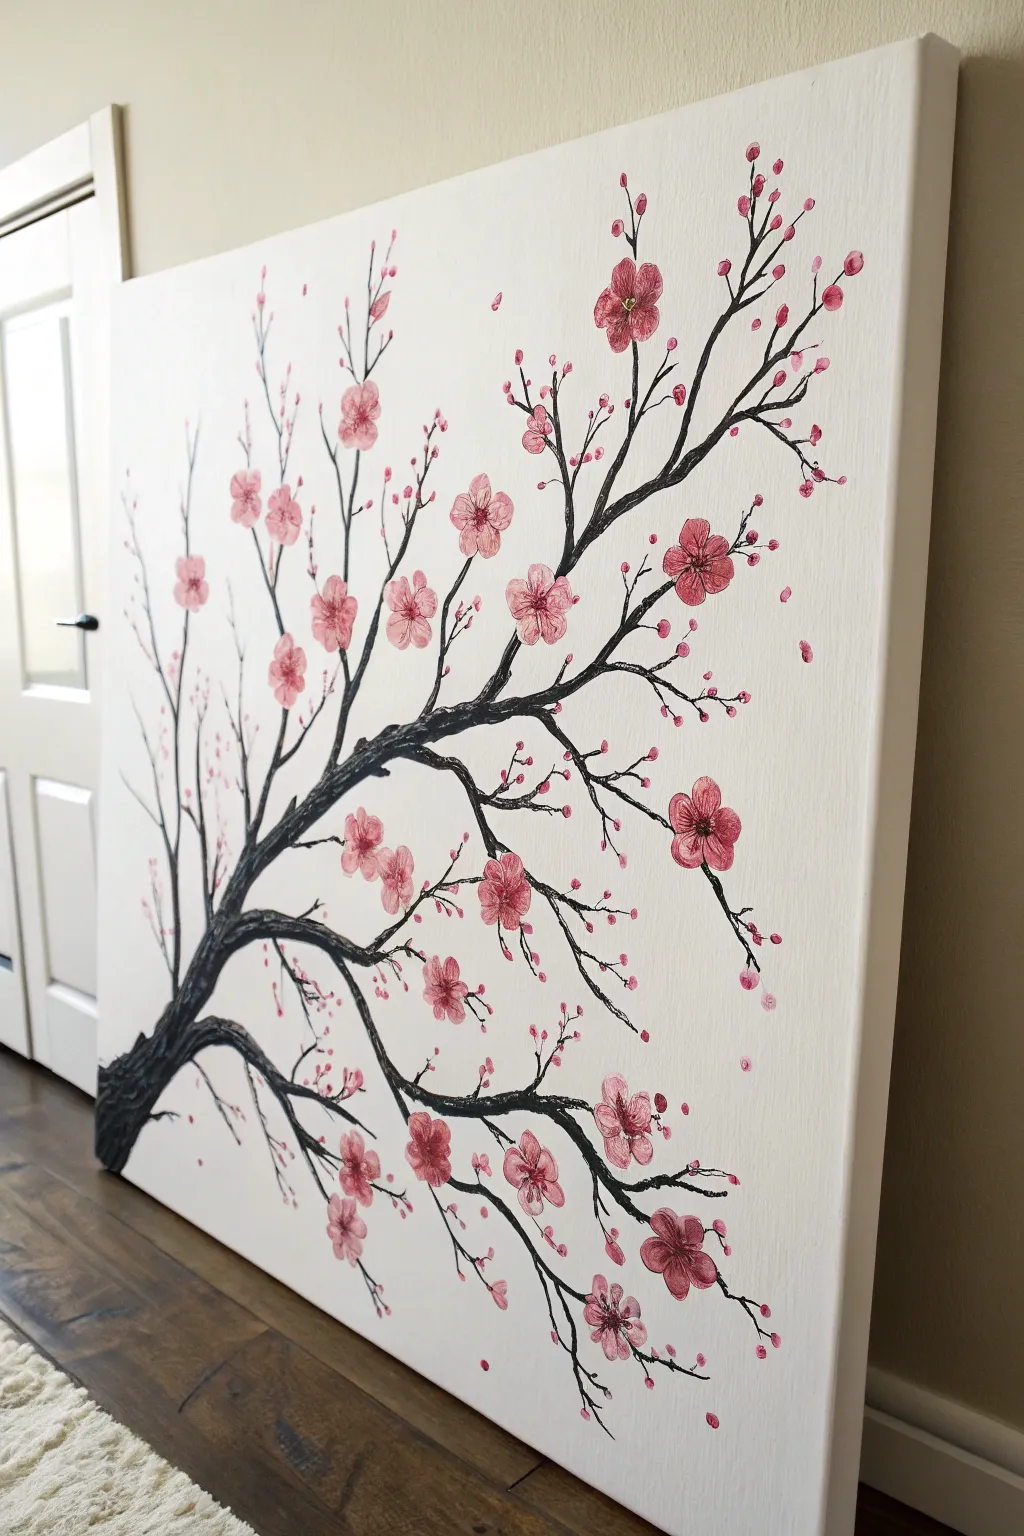
This elegant painting captures the delicate beauty of spring with a sweeping black branch design contrasting against a stark white background. The soft pink blossoms are created using a layering technique that gives them a gentle, translucent quality.
Detailed Instructions
Materials
- Large stretched canvas (square or rectangular)
- White gesso or white acrylic paint (for base)
- Black acrylic paint
- Burnt umber or dark brown acrylic paint
- Various shades of pink acrylic paint (light, medium, dark)
- Small round brushes (sizes 2, 4, and 6)
- Fine liner brush (size 0 or 00)
- Flat brush (1-inch for background)
- Palette
- Cup of water and paper towels
Step 1: Setting the Stage
-
Prepare the canvas:
Even if your canvas is already primed, start by applying a fresh coat of white acrylic paint or gesso across the entire surface. This ensures a clean, bright background that will make your dark branches pop. -
Plan the composition:
Visualize a sweeping curve starting from the bottom left corner. The main trunk should arc upward and reach towards the top right, with smaller branches fanning out to fill the negative space.
Uneven Petals?
Don’t worry if your petals aren’t identical shapes! Real cherry blossoms are organic and irregular. Slightly watery paint can help create softer, more transparent petal edges.
Step 2: The Trunk and Branches
-
Mix the branch color:
create a deep, near-black shade by mixing black with a touch of burnt umber. This adds warmth and makes the tree look more organic than using pure black. -
Paint the base trunk:
Using a size 6 round brush, paint the thickest part of the trunk starting at the bottom left. Apply more pressure at the base and lift pressure as you move up to taper the line. -
Create texture:
While the trunk paint is still wet, use short, overlapping strokes to simulate bark texture on the main trunk. You can add a tiny bit of plain black here for shadow depth. -
Extend main branches:
Switch to a size 4 brush to pull the main branches outward from the trunk. Focus on creating natural, uneven curves rather than straight lines. -
Add intricate details:
Use your fine liner brush to add the delicate, spindly twigs at the ends of the branches. Mix a little water into your paint to help it flow smoothly for these thin lines.
Add Metallic Life
Mix a tiny amount of gold metallic paint into your pinks, or use gold for the flower centers. It catches the sunlight beautifully.
Step 3: Blossoming Flowers
-
Mix pink shades:
Prepare three puddles on your palette: a pale baby pink, a medium rose, and a deeper magenta. Keep them distinct but close enough to blend slightly. -
Paint the first petals:
With a clean size 4 brush, load the pale pink. Press the brush down gently and lift to create teardrop-shaped petals. Arrange 5 petals in a circle to form a flower. -
Vary the sizes:
Paint largers clusters of flowers on the thicker branches and smaller, single buds on the thin twig ends. I find random placement looks much more natural than perfect spacing. -
Layer with medium pink:
Once the base petals are tacky but not fully dry, add strokes of medium rose pink near the centers of the flowers to create depth. -
Add the centers:
Using the tip of a small brush or the back end of a brush handle, dot the deep magenta into the very center of each open flower. -
Detail the stamens:
Switch back to your fine liner brush with tiny amounts of black or dark brown. Carefully draw tiny lines radiating from the flower centers for the stamens. -
Add falling petals:
Paint single petals ‘floating’ in the empty white spaces around the branches. This creates a sense of movement and breeze in the artwork. -
Final highlights:
If you want extra dimension, add a tiny dot of white or yellow to the very center of a few select flowers to make them sparkle. -
Review and refine:
Step back from the canvas to check the balance. If a spot looks too empty, add a small twig or a drifting petal to fill it.
Allow the painting to dry fully before hanging it to bring a touch of eternal spring to your room
Desert Dunes at Dusk With Smooth Blends
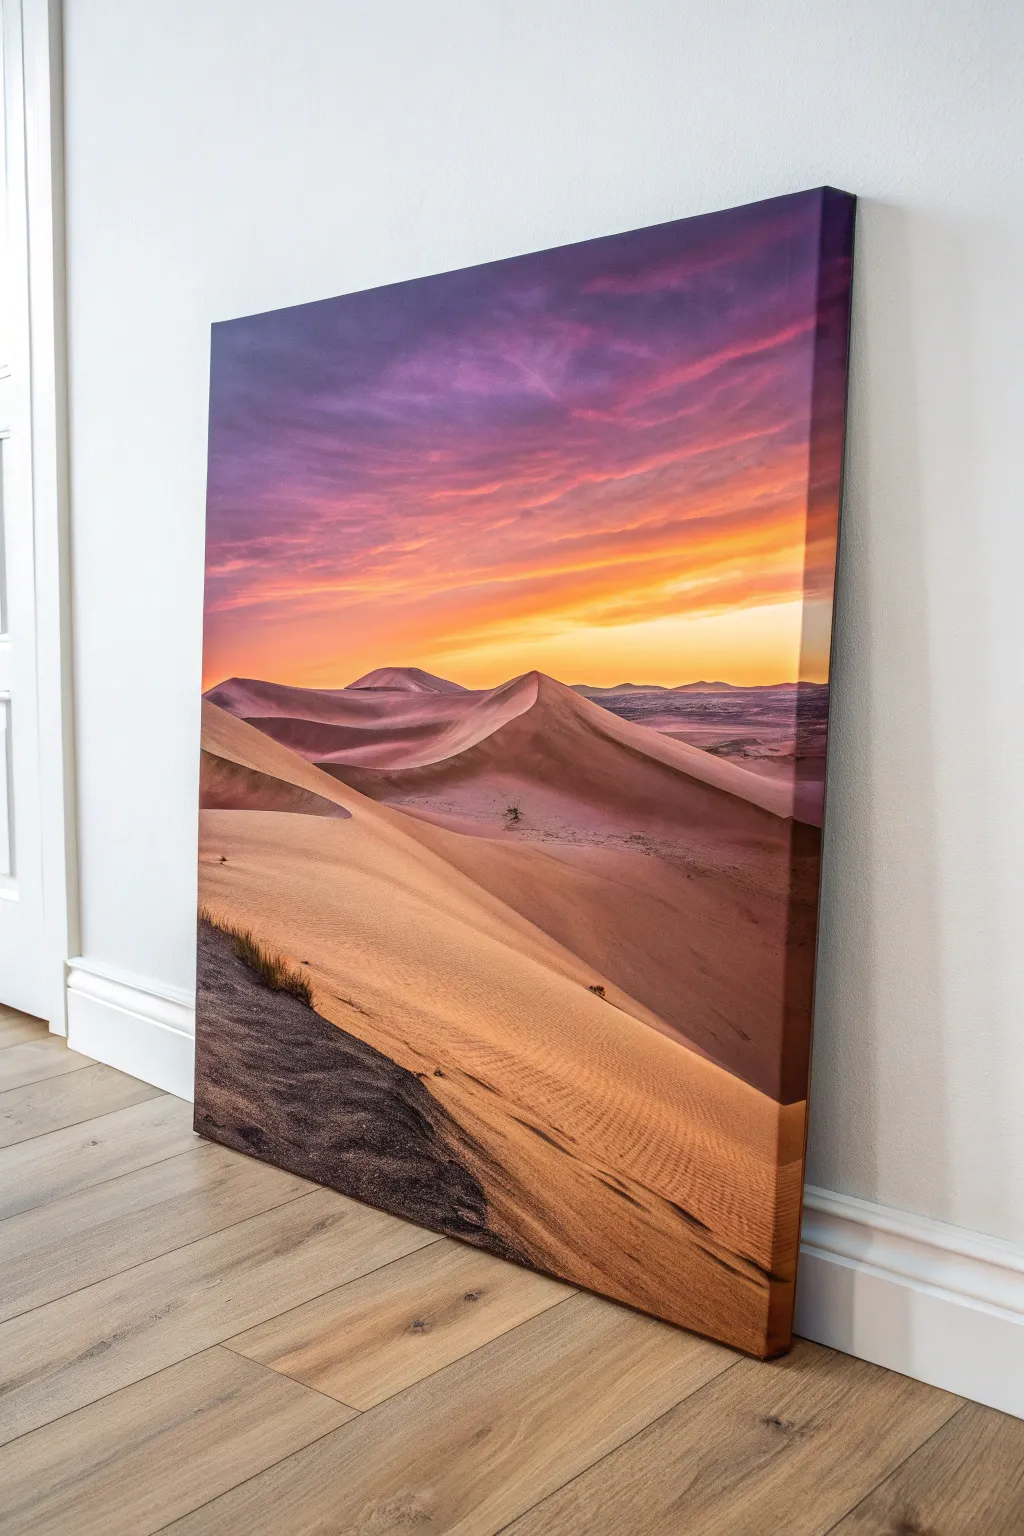
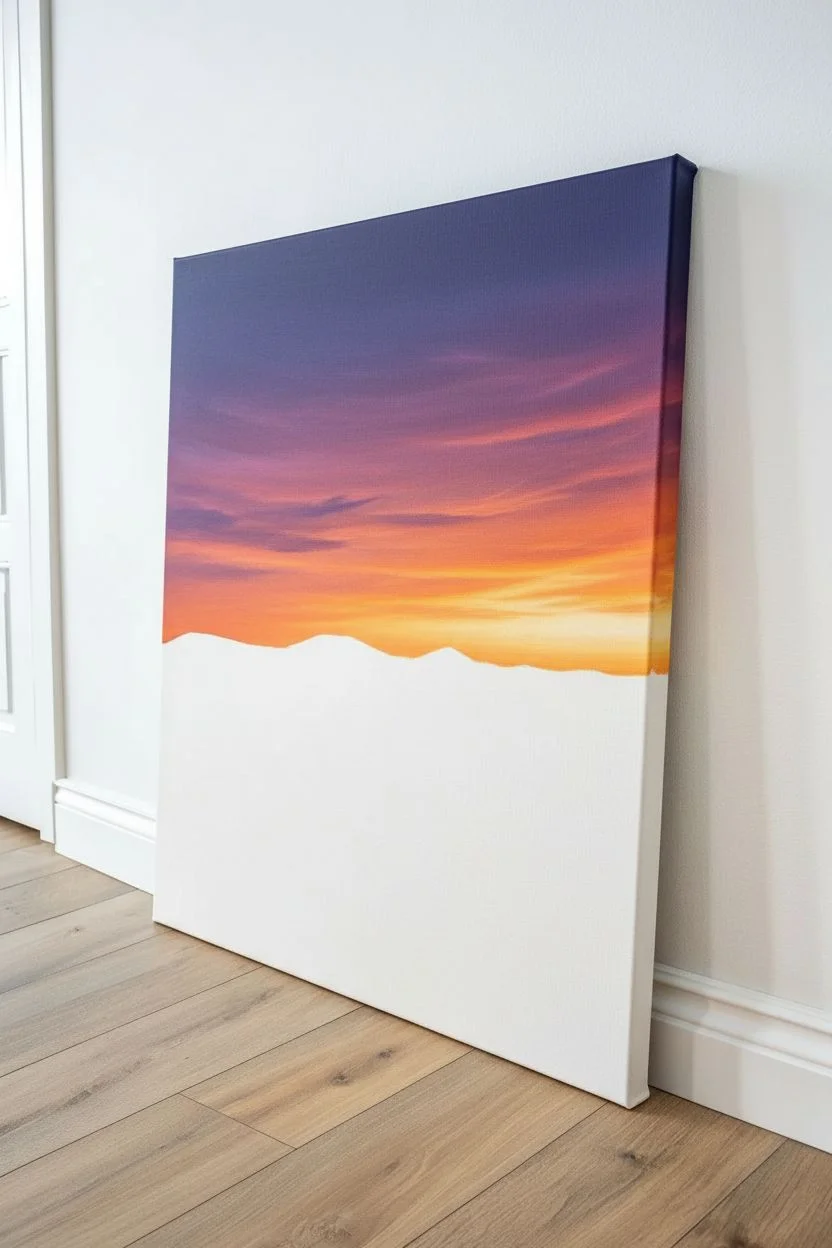
Capture the breathtaking serenity of a desert sunset with this acrylic painting project, featuring vibrant gradients and sweeping organic lines. You’ll master the art of smooth color blending to create a sky that glows against the dramatic, shadowed contours of rolling sand dunes.
Step-by-Step
Materials
- Canvas (rectangular, portrait orientation)
- Acrylic paints: Titanium White, Cadmium Yellow, Cadmium Orange, Alizarin Crimson, Dioxazine Purple, Ultramarine Blue, Burnt Umber, Burnt Sienna, Carbon Black
- Large flat brush or blending mop brush
- Medium filbert brush
- Small round or detail brush
- Palette and palette knife
- Water cups and paper towels
- Slow-drying medium or retarder (optional but recommended)
Step 1: Painting the Gradient Sky
-
Prime the sky area:
Begin by deciding where your horizon line will be—roughly two-thirds down the canvas. Dampen your large flat brush slightly and apply a thin layer of white or a very pale yellow over the entire sky area to help your subsequent colors glide smoothly. -
Apply the deepest purple:
Mix Dioxazine Purple with a touch of Ultramarine Blue for the very top edge of the canvas. Apply this dark mixture in broad horizontal strokes across the top, ensuring full coverage. -
Transition to magenta:
Clean your brush and pick up Alizarin Crimson. Blend this directly into the bottom edge of the wet purple, moving downwards. The overlap will create a rich transitional violet hue. -
Add the glowing warmth:
Switch to Cadmium Orange mixed with a little Cadmium Yellow. Paint this band below the crimson, working quickly while the paint is still wet to soften the line where the cool and warm tones meet. -
Paint the horizon light:
Near the horizon line, use pure Cadmium Yellow heavily mixed with Titanium White. This should be the brightest part of the painting, representing the setting sun’s glow. -
Create cloud textures:
While the sky layers are still tacky, use a smaller dry filbert brush to gently scumble lines of purple and pink across the orange sections. This creates wispy, illuminated clouds that catch the sunset’s light.
Step 2: Blocking in the Dunes
-
Sketch the dune outlines:
Once the sky is dry, use a thinned mixture of Burnt Sienna to sketch the sweeping curves of the dunes. Focus on creating distinct ridges—sharp lines where light meets shadow. -
Mix the shadow colors:
Create a deep, cool shadow tone by mixing Burnt Umber, Dioxazine Purple, and a tiny bit of Carbon Black. The shadows in this scene are rich and colorful, not just plain gray. -
Fill the background dunes:
Paint the distant mountain range and far dunes using a lighter, hazier version of your shadow mix (add a touch of white and blue) to simulate atmospheric perspective. -
Establish the main shadows:
Using the dark shadow mix, fill in the sides of the large dunes that are facing away from the light source. Keep the edges sharp along the dune ridges but softer near the base.
Extended Blending Time
Mix a few drops of retarder medium into your sky colors. This keeps acrylics wet longer, allowing for that seamless, professional gradient without panic
Step 3: Adding Light and Texture
-
Paint the sunlit slopes:
Mix Burnt Sienna, Cadmium Orange, and Titanium White. Apply this warm tone to the tops and light-facing sides of the dunes. I like to use a filbert brush here to mimic the soft curve of the sand. -
Refine the ridges:
Use a small round brush to sharpen the dividing line between the light and dark sides of the dunes. This sharp contrast is crucial for that crisp, desert look. -
Add reflected light:
Mix a soft, dusty purple-pink and glaze it lightly over parts of the shadow areas, especially near the bottom of the dunes. This simulates light bouncing off the sand. -
Create sand ripples:
Take a small detail brush with a slightly darker version of your sunlit color. Paint tiny, rhythmic lines across the foreground dune to suggest wind-blown ripples in the sand. -
Paint the foreground rocks:
In the bottom left corner, use Carbon Black and Burnt Umber to paint the dark, rocky texture. Stipple or dab the paint heavily to create rough contrast against the smooth sand. -
Final highlights:
Add touches of pure White mixed with a sliver of Yellow to the very peaks of the dunes where the sun hits hardest. This pop of brightness brings the whole scene into focus.
Textured Foreground
Mix coarse modeling paste or actual fine sand into your foreground paint. This adds real physical grit to the rocky bottom corner for a 3D effect
Step back and admire how the warm glow of the horizon transforms your canvas into a peaceful evening escape
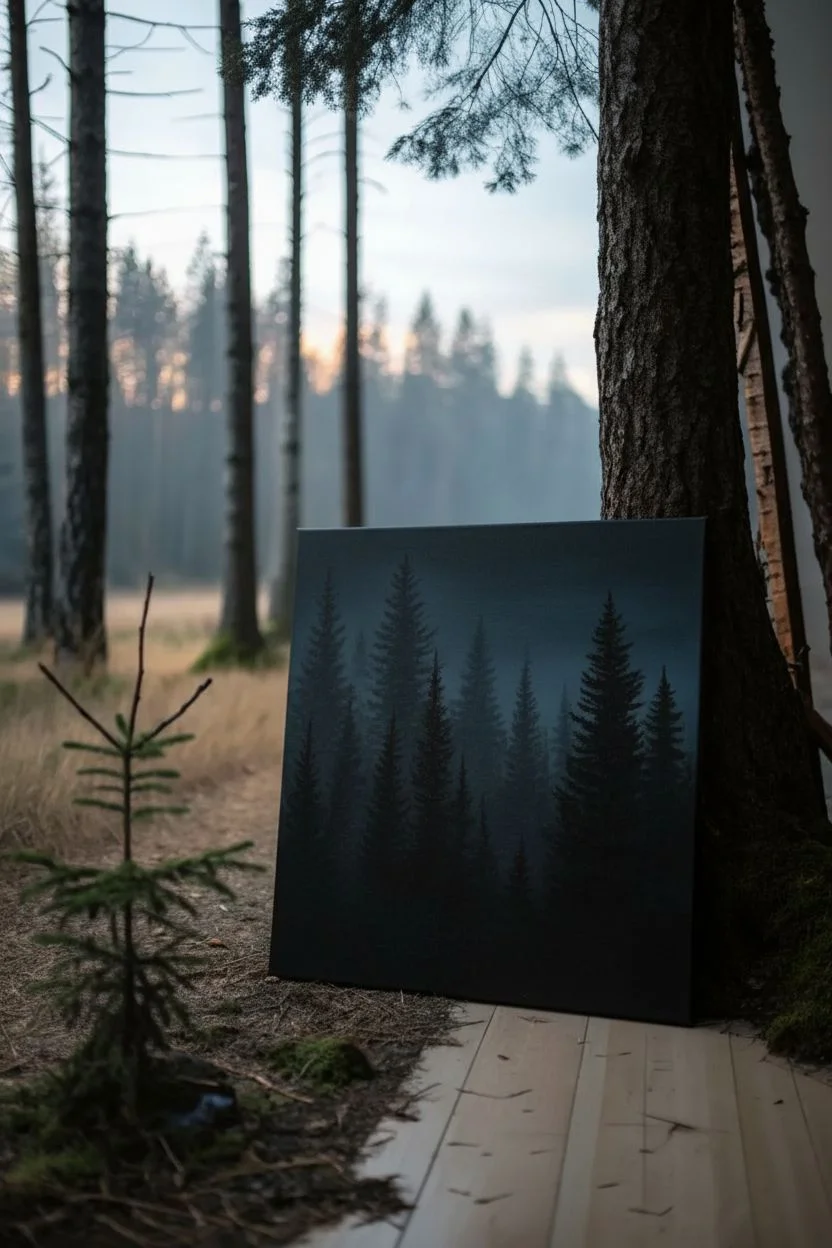
Cozy Campfire Glow in a Dark Forest Scene
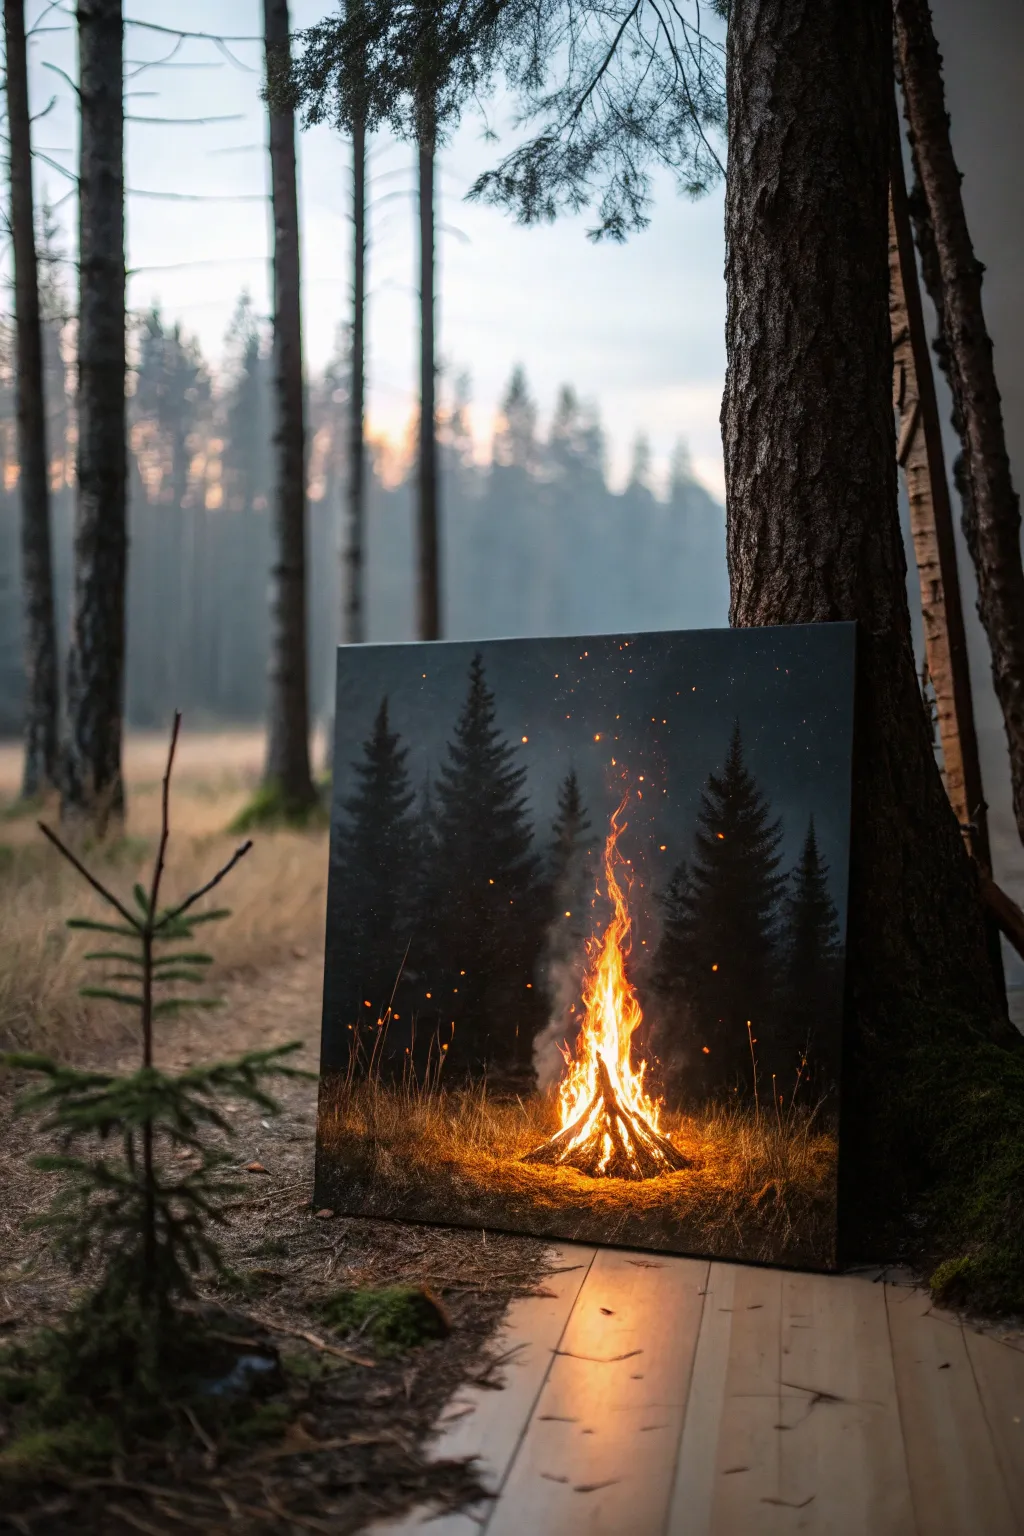
Capture the magic of a fireside night with this striking acrylic project. You will learn to use high-contrast lighting to make the flames leap off the dark canvas, creating a mood that is both warm and mysterious.
How-To Guide
Materials
- Stretched canvas (16×20 or similar)
- Acrylic paints: Mars Black, Phthalo Blue (or Prussian Blue), Burnt Umber, Cadmium Orange, Cadmium Yellow, Titanium White, and Bright Red
- Large flat brush (1-2 inch)
- Medium filbert brush
- Small round brush
- Fan brush (optional)
- Palette knife
- Cup of water and paper towels
Step 1: Setting the Night Atmosphere
-
Prime the background:
Begin by covering the entire canvas with a mix of Mars Black and a tiny touch of Phthalo Blue. You want a very deep, cool black, not a flat black. -
Add subtle moonlight:
While the black is still slightly wet, blend a very faint amount of dark grey-blue into the upper corners to suggest a faint night sky glow, keeping it extremely subtle. -
Block in tree silhouettes:
Mix Mars Black with a little Burnt Umber. Using a medium filbert brush or a fan brush held vertically, tap in the shapes of tall pine trees. Keep the edges soft and feathery to mimic pine needles. -
Layer the forest depth:
Paint the trees in the foreground darker and sharper, while making the trees in the background slightly lighter (more greyish-blue) and softer to create atmospheric perspective. -
Dry completely:
Let this background layer dry fully before moving on. I like to use a hairdryer on a cool setting if I’m impatient, as moisture here will muddy your bright fire colors later.
Muddy Flames?
If your fire looks dull, your background paint was likely still wet. Let it dry completely, then repaint the fire with pure white first, let that dry, and glaze yellow/orange over it.
Step 2: Igniting the Fire
-
Establish the fire base:
With a small round brush, paint the basic structure of the logs at the bottom center using Burnt Umber mixed with black. Keep it loose; these will mostly be silhouetted. -
First glow layer:
Mix Burnt Umber with a little Cadmium Orange to make a translucent glaze. Scumble this gently around the base of the logs and slightly up the tree trunks nearby to establish the reach of the heat. -
Building the core heat:
Using pure Cadmium Orange, start painting the main body of the flame. Use vertical, flickering strokes that taper at the top. -
Adding intensity:
Mix Cadmium Yellow with a touch of Titanium White. Paint this into the very center of the fire to create the blindingly hot core. -
Creating the sparks:
Load a toothbrush or stiff bristled brush with watered-down orange and yellow paint. Protect the rest of your painting with paper, then flick the bristles to spray tiny sparks rising upward into the dark trees. -
Painting individual embers:
Use your smallest detail brush to dot specific bright yellow and orange larger sparks floating higher up in the composition.
Step 3: Detailing the Light Effects
-
Highlighting the grass:
Mix a warm golden-brown color. Using a fan brush or an old, splayed bristle brush, flick upward strokes around the base of the fire to create illuminated tall grass. -
Intensifying the grass:
Add touches of pure yellow and white to the tips of the grass closest to the fire source for high contrast. -
Rim lighting the trees:
Take a thin round brush with diluted orange paint. Trace very thin, broken lines along the inner edges of the pine trees facing the fire to show the reflected glow. -
Smoke effects:
With a very dry brush and a tiny amount of grey-blue paint, lightly scumble some smoke rising from the top of the flames, blending it into the darkness. -
Final brights:
Add the absolute brightest highlights—pure Titanium White mixed with a speck of yellow—right at the base of the flames where the wood is burning hottest. -
Final check:
Step back and check your contrast. If the darks look washed out, re-glaze the outer edges with pure black to frame the firelight effectively.
Level Up: Texture
Use a palette knife to apply the final bright yellow and white strokes in the center of the fire. This thick impasto paint adds physical texture capturing the light.
Now step back and admire how your canvas actually seems to emit warmth into the room
Whimsical Planets on a Deep-Space Background
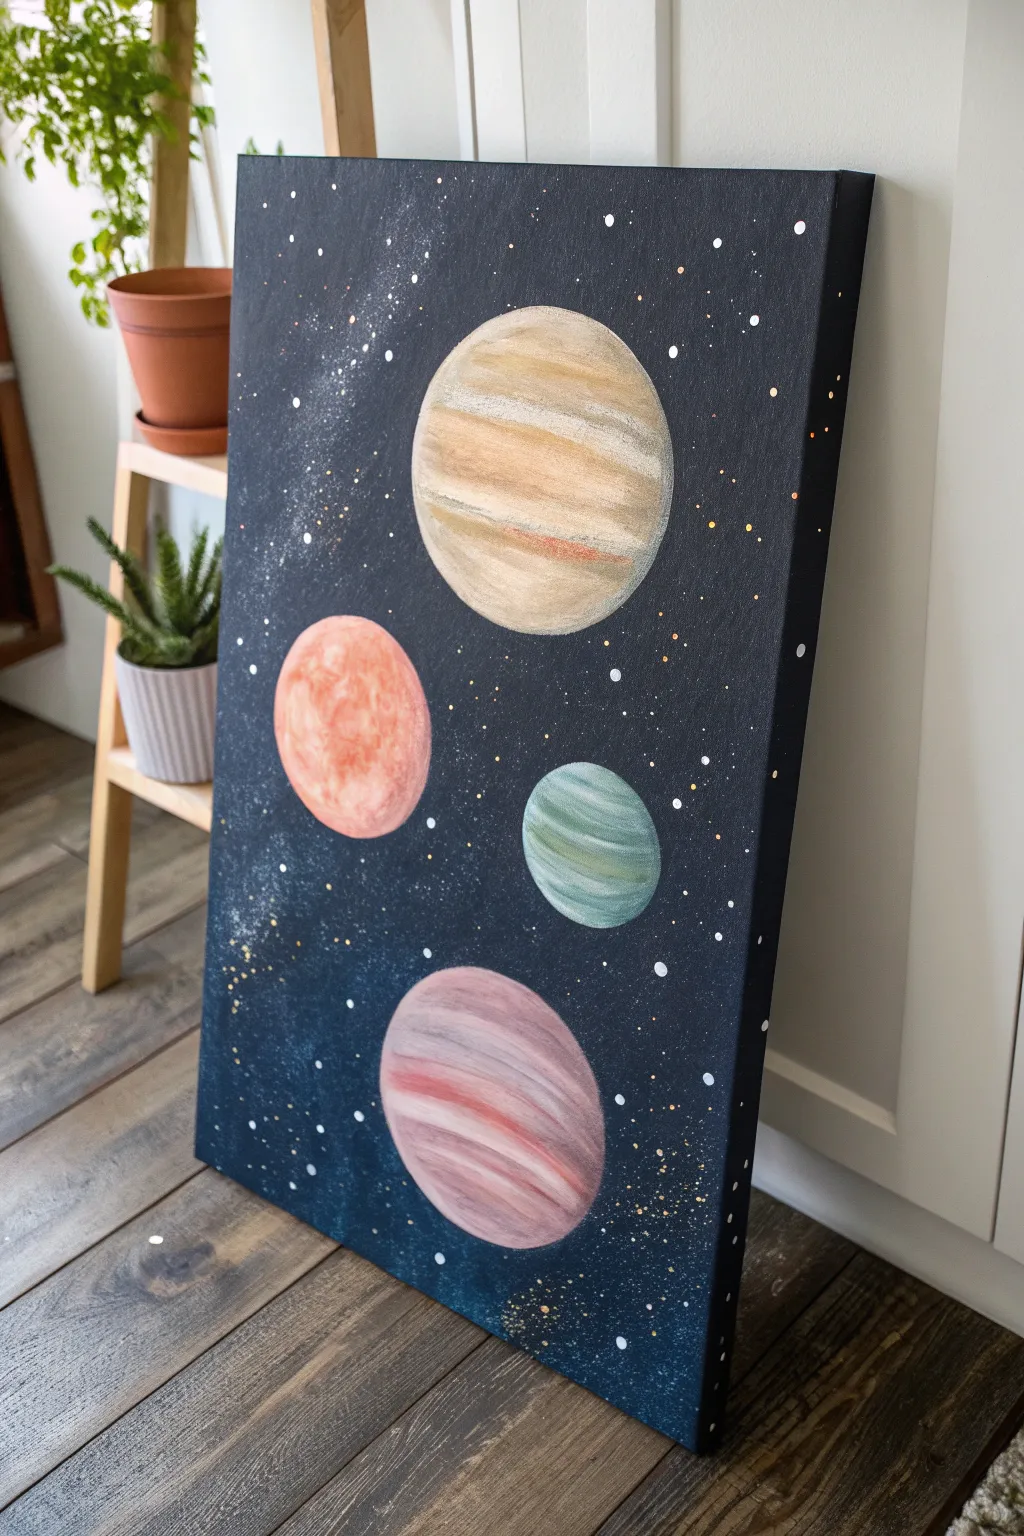
Bring the cosmos into your home with this serene composition of four stylized planets floating in deep space. The contrast between the rich, dark background and the soft, textured surfaces of the celestial bodies creates a captivating piece of wall art.
Step-by-Step
Materials
- Stretched canvas (rectangular, e.g., 16×24 inches)
- Acrylic paints (Mars Black, Titanium White, various browns/tans, oranges, teal/green, red)
- Wide flat brush for background
- Round brushes (sizes 4 and 8) for planets
- Small liner brush or toothbrush (for stars)
- Circular objects (bowls, caps) for tracing or a compass
- Pencil
- Palette for mixing
- Cup of water and paper towels
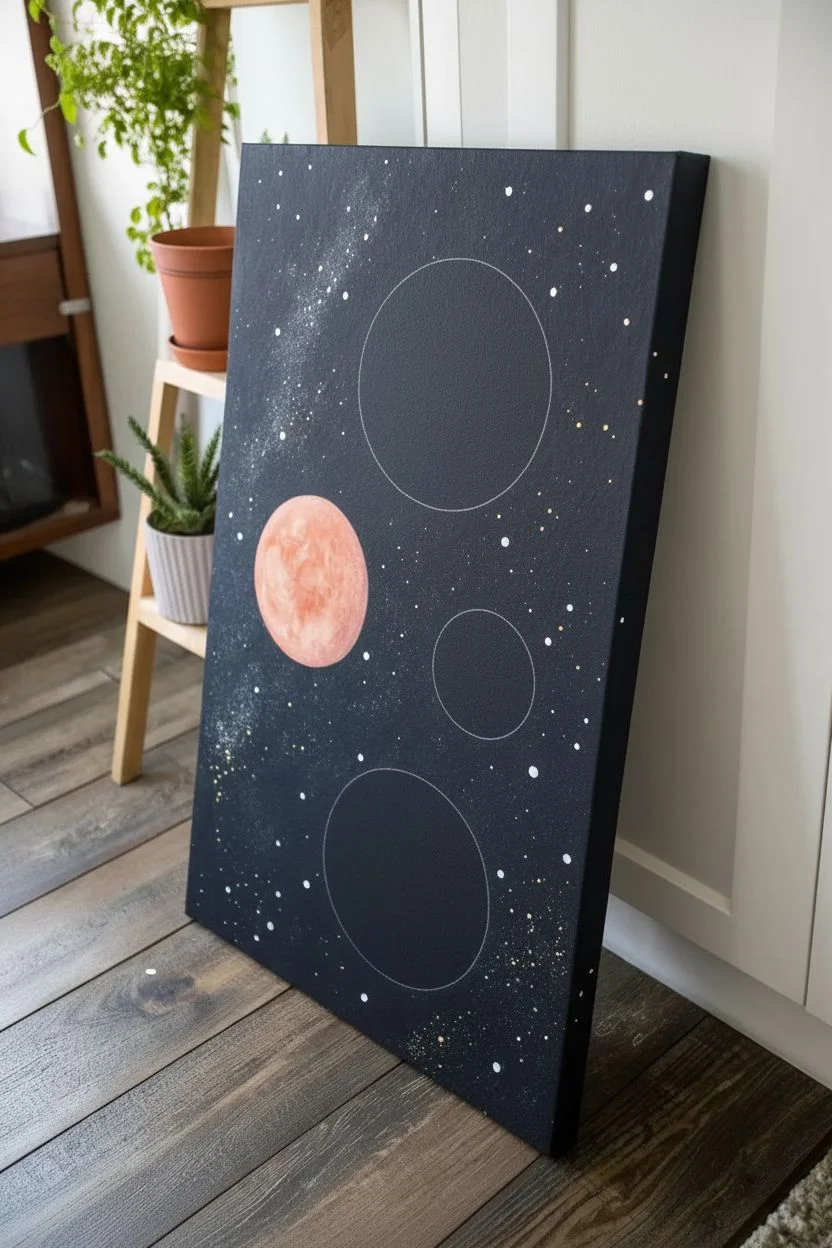
Step 1: Setting the Stage
-
Prepare the canvas:
Start with a clean, dry canvas. Using your wide flat brush, paint the entire surface with a solid coat of Mars Black. Ensure you cover the white canvas completely, including the sides for a finished look. -
Create the starry background:
While the black base is completely dry, mix a small amount of Titanium White with a drop of water to make it fluid. Dip a toothbrush or stiff brush into this mixture and use your thumb to flick fine misty sprays of ‘stars’ across the galaxy. -
Add distinct stars:
Using a fine liner brush or the handle end of a small brush, dot specific, larger white stars and perhaps a few golden ones randomly throughout the black space to create depth. -
Trace the planets:
Once the background is fully dry, arrange your circular objects on the canvas to plan your composition. Use a pencil to lightly trace four circles: a large one near the top right, a medium one mid-left, a smaller one mid-right, and a large one at the bottom center.
Cosmic Depth Trick
Add a tiny drop of metallic gold or silver paint to your white star mixture. It makes the galaxy shimmer subtly as you walk past the canvas.
Step 2: Designing the Planets
-
Base coat the top planet:
For the large top planet (resembling Jupiter), fill the circle with a creamy beige or light tan color. Don’t worry about bands yet; just get solid coverage. -
Add bands to the top planet:
While the base is slightly tacky, mix a darker brown and a soft orange. Use a flat brush to sweep horizontal, slightly curved bands across the planet’s surface to mimic gas giant storms. -
Refine the gas giant:
Highlight the upper edges of the bands with white mixed with a touch of yellow to give the sphere a rounded, 3D shape. -
Paint the red planet:
Moving to the middle-left circle, paint a base coat of coral or muted orange. Sponge or dab darker terracotta paint in random blotches to create a rocky, cratered texture. -
Highlight the rocky surface:
Dry brush a very light peach or white on the left side of this red planet to suggest a light source coming from the left. -
Create the teal planet:
For the small middle-right planet, mix a beautiful teal or sage green. Paint the circle solid, then add subtle horizontal streaks of lighter mint green and darker forest green to suggest atmosphere.
Fixing Wobbly Circles
If your planet edges get messy, don’t panic. Wait for the paint to dry, then use opaque black paint to carefully ‘cut back’ into the circle’s edge to reshape it.
Step 3: Finishing Touches
-
Paint the bottom planet:
For the final large planet at the bottom, use a dusty rose or mauve base. I like to keep lines loose here, creating a swirl effect rather than perfect bands. -
Detail the rose planet:
Layer streaks of white and darker burgundy across the pink surface, following the curve of the sphere to reinforce the roundness. -
Create drop shadows:
To make the planets pop, mix a transparent black glaze (plenty of water with a tiny dot of black). Very gently glaze the bottom-right curve of each planet to deepen the shadow side. -
Enhance the highlights:
Conversely, ensure the top-left area of each planet has the brightest highlights, reinforcing that the light source is consistent across the galaxy. -
Final star check:
If you painted over too many stars while making the planets, add a tiny bit of ‘stardust’ (white splatter) near the edges of the planets so they feel integrated into the space. -
Seal the artwork:
Allow the painting to dry for at least 24 hours. Once cured, apply a coat of satin or gloss varnish to protect the paint and make the dark background look deep and rich.
Now step back and admire how a few simple circles can transform into a window looking out into the universe
Abstract Geometric Shapes With Crisp Tape Lines
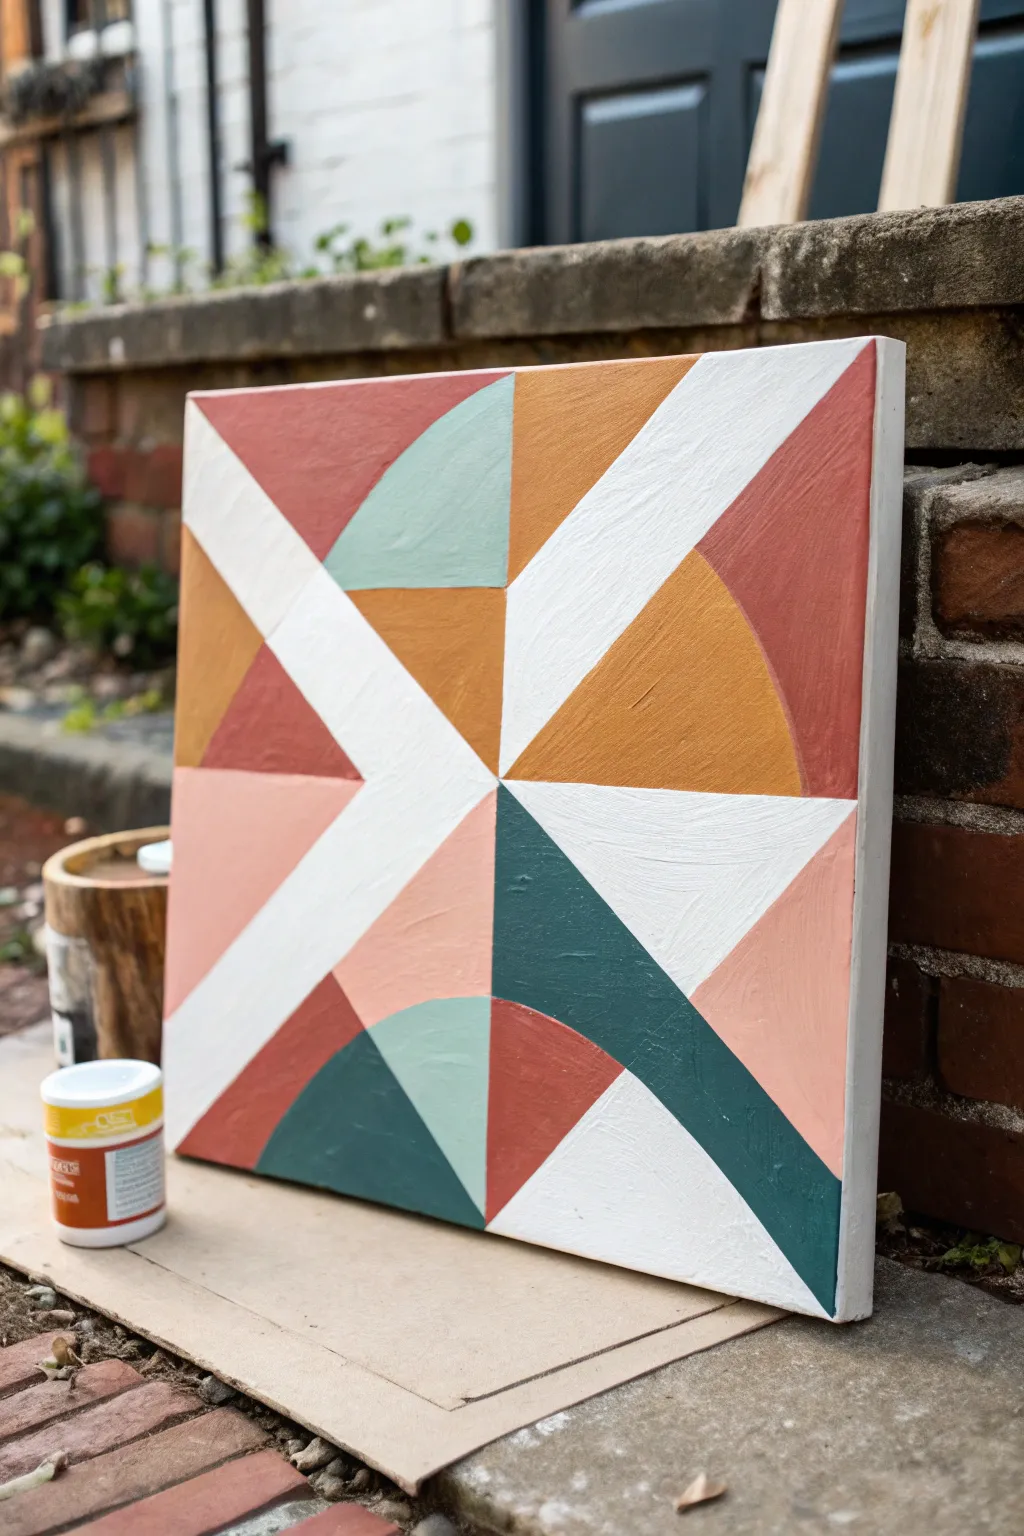
Embrace the crisp lines and warm, grounding tones of this geometric painting that plays with negative space and arc shapes. The striking balance of terracotta, mustard, teal, and peach creates a modern statement piece perfect for a mantle or bookshelf display.
Step-by-Step Guide
Materials
- Square stretched canvas (approx. 12×12 or 16×16 inches)
- Acrylic paints (Titanium White, Terracotta/Burnt Sienna, Mustard/Yellow Ochre, Teal/Dark Green, Peach/Flesh Tint)
- Painter’s tape or masking tape (1 inch width)
- Compass or round objects for tracing (bowls, lids)
- Pencil and eraser
- Ruler or straight edge
- Flat synthetic paintbrushes (medium and small)
- Palette or paper plate
- Cup of water and paper towels
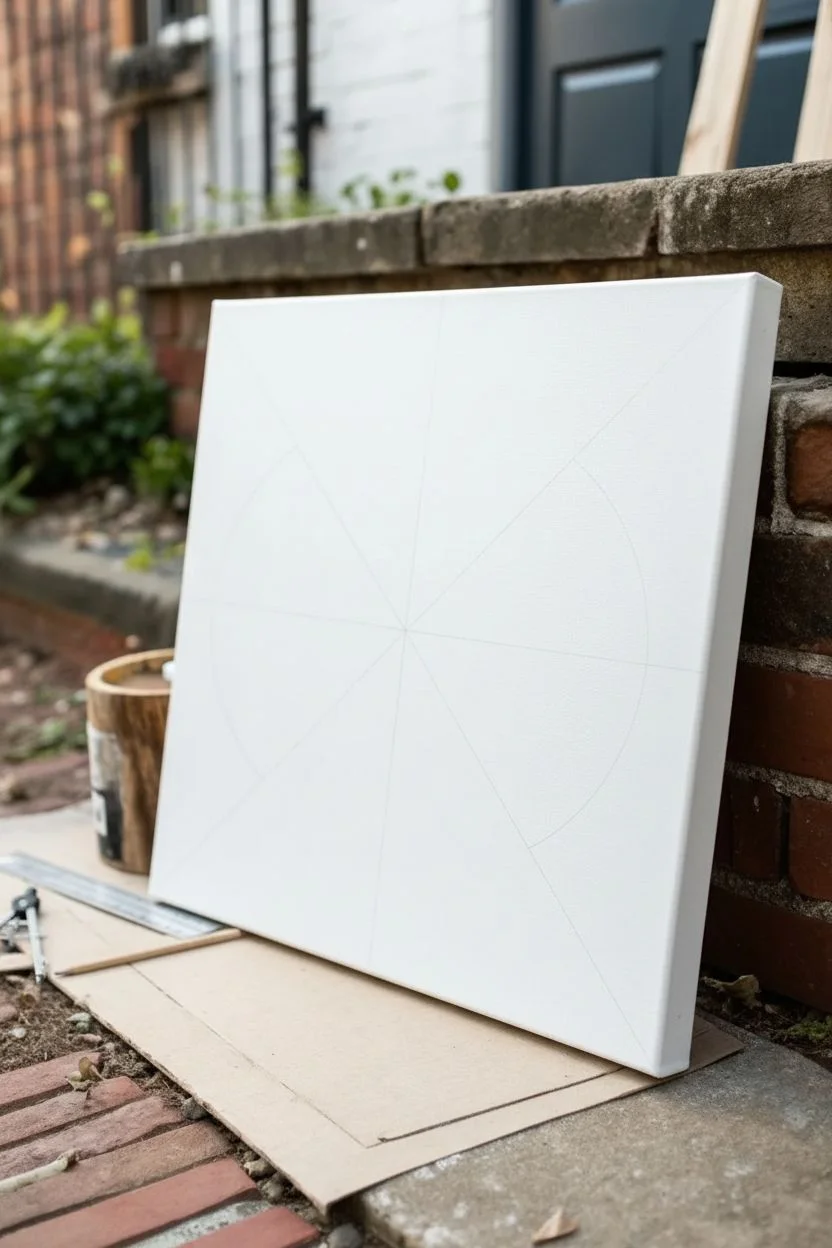
Step 1: Planning and Layout
-
Prime the Surface:
Start by giving your canvas a solid base coat. I like to apply two coats of Titanium White to ensure the background strips remain bright and crisp later on. Let this dry completely before moving forward. -
Mark the Grid:
Using your ruler and pencil, lightly find the exact center of the canvas. Draw a light vertical line and a horizontal line through the center to divide the canvas into four equal quadrants. -
Draw the Main Diagonals:
Draw two diagonal lines from corner to corner, crossing through the center point. This creates eight triangular sections radiating from the middle. -
Sketch the Arcs:
Now, use your compass or a round object to draw the curved elements. Place the point of your compass in the center of the canvas and draw arcs within specific triangular sections to create the quarter-circle shapes seen in the reference. You can vary the radius for different sections to match the design.
Seal Avoids Bleed
Always seal your tape edges with a layer of the base color (white) or clear medium before applying the colored paint for perfect lines.
Step 2: Taping for Precision
-
Strategy for Taping:
To get perfectly straight lines, you’ll paint this in stages. Apply painter’s tape along the long diagonal divisions first. Decide which white stripes you want to preserve—specifically the large ‘X’ shape—and place tape over those zones to protect the white base coat. -
Seal the Edges:
Here is a crucial trick: Paint a very thin layer of Titanium White (or clear matte medium) over the edges of your tape. This seals the tape and prevents colored paint from bleeding underneath, ensuring razor-sharp lines.
Step 3: Color Blocking
-
Painting the Terracotta:
Mix your Terracotta shade. Identify the triangular sections in the upper right and lower left that feature this rust-red color. Paint these sections using a flat brush, being careful to stay within your pencil guidelines for the curves. -
Adding Mustard Yellow:
Switch to your Mustard or Yellow Ochre paint. Fill in the arc shapes adjacent to the white diagonal stripes. You may need two coats for opaque coverage, especially with yellow pigments. -
Introducing Peach:
Apply the soft Peach tone to the designated lower-left and lower-right triangular sections. This lighter color helps balance the heavier, darker tones. -
Deep Teal Accents:
Mix a deep Teal or dark green. Paint the sharp triangular wedge in the bottom center and the small arc section in the top left quadrant. This cool tone provides a necessary contrast to the warm palette. -
Refining the Curves:
Since tape is hard to use on curved lines, use a small flat brush or an angled brush to carefully paint the edges of the arcs freehand. Rest your hand on a dry part of the canvas or a bridge for stability.
Add Texture
Mix a little modeling paste or baking soda into your paint for the colored sections to give the artwork a tactile, stone-like texture.
Step 4: Finishing Touches
-
The Reveal:
Once the paint is dry to the touch but not fully cured, carefully peel away the painter’s tape. Pull it at a 45-degree angle away from the painted area to avoid lifting any paint. -
Touch Ups:
Inevitably, some lines might need correcting. Use a small detail brush with white paint to clean up any bleeds, or colored paint to sharpen wobbly curved edges. -
Paint the Sides:
Don’t forget the edges of the canvas. I prefer to continue the design wrapping around the sides for a sculptural look, or paint them a solid white for a framed appearance. -
Final Varnish:
After letting the painting cure overnight, apply a coat of matte or satin varnish to protect the surface and unify the sheen of the different paint colors.
Hang your new geometric creation in a well-lit spot to enjoy the interplay of color and form
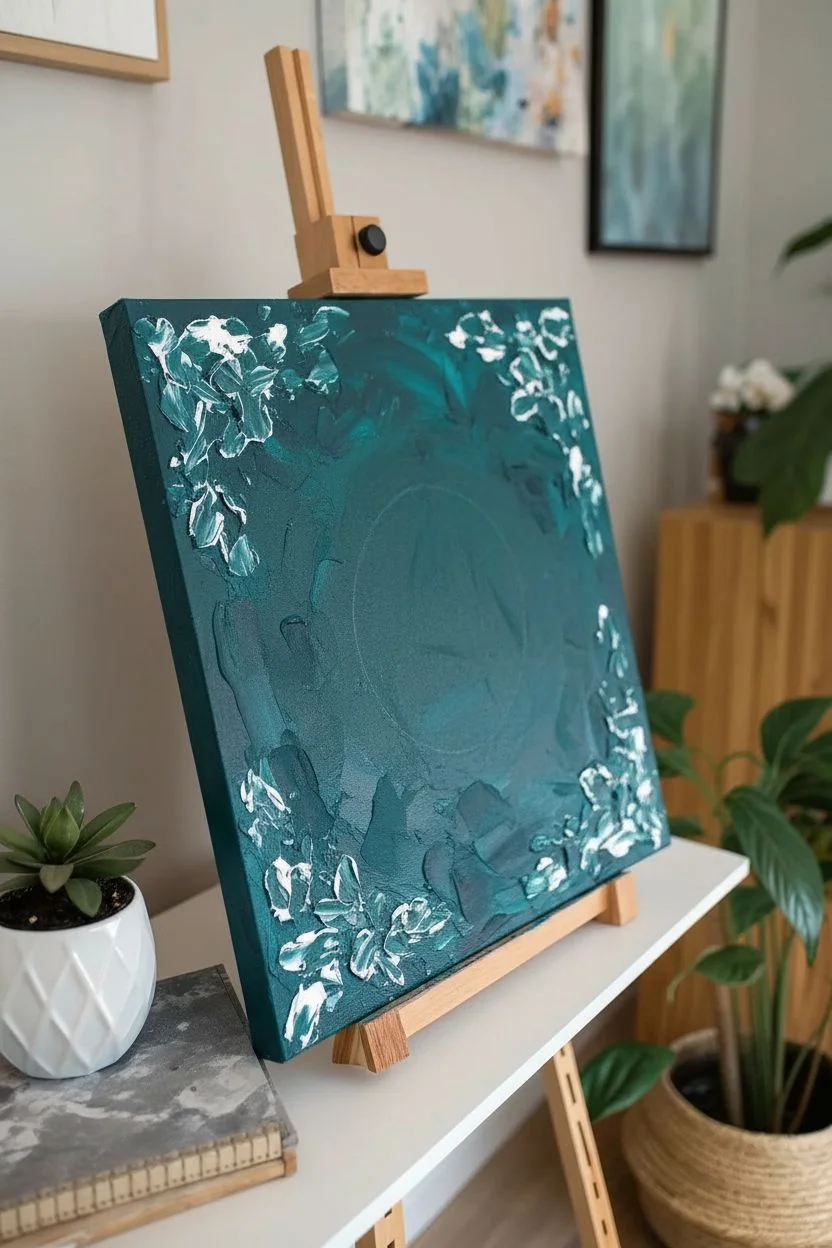
Palette-Knife Florals With Thick Impasto Texture
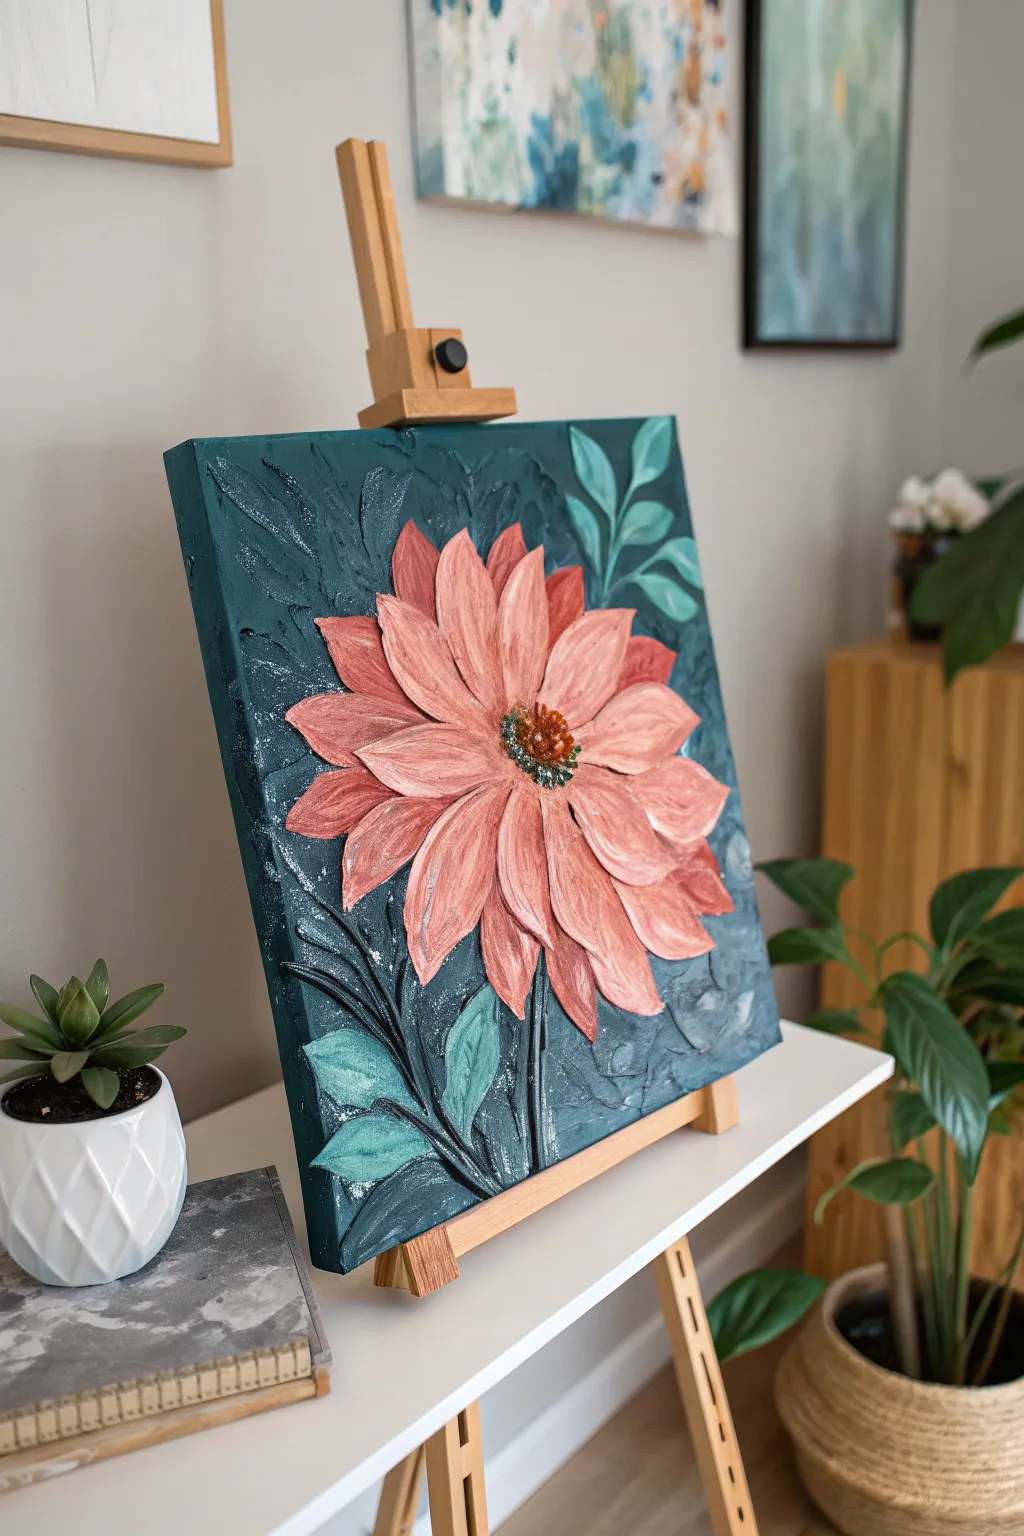
This striking project combines deep, moody backgrounds with the sculptural beauty of impasto techniques to create a flower that literally jumps off the canvas. By using modeling paste and palette knives, you’ll sculpt a three-dimensional dahlia that is as fun to touch as it is to look at.
Step-by-Step
Materials
- Square stretched canvas (approx. 12×12 or 16×16 inches)
- Acrylic modeling paste or heavy gel medium
- Acrylic paints: Deep Teal, Phthalo Green, Black, Titanium White, Coral/Salmon Pink, Burnt Sienna, and Metallic Gold
- Palette knives (assorted shapes: trowel, diamond, and detailing knife)
- Wide flat paintbrush (approx. 1-2 inches)
- Small round detail brush
- Disposable palette or paper plate
- Pencil for sketching
Step 1: Setting the Scene
-
Prepare the background mix:
Begin by squeezing out a generous amount of Deep Teal, a touch of Phthalo Green, and a small bead of Black onto your palette. Mix these to create a rich, dark turquoise base color that will contrast beautifully with the pink flower later. -
Apply the base coat:
Using your wide flat brush, cover the entire canvas with this dark turquoise mixture. Don’t worry about being too perfect; a little visible brushstroke adds to the painterly feel. Ensure you paint the sides of the canvas for a finished look. -
Add background texture:
While the base coat is still tacky, mix about 30% modeling paste with your remaining teal paint. Use a palette knife to scrape this mixture randomly across the background, creating rough, raised patches. I like to focus this texture around the corners and edges to frame the center. -
Incorporate leaf shadows:
Before the background dries completely, use the edge of your palette knife to carve or ‘draw’ faint outlines of leaves into the wet texture around the perimeter. This creates subtle, recessed details that will add depth behind the main subjects.
Step 2: Sculpting the Floral Structure
-
Sketch the layout:
Allow the background to dry completely—this may take an hour or more depending on thickness. Once dry, lightly sketch a large circle in the center for the flower head and draw stem lines extending downward with a pencil. -
Mix the petal paste:
On your palette, mix a large amount of modeling paste with your Coral or Salmon Pink paint. Keep the ratio high on the paste side to ensure the mixture holds its peaks. You want a consistency similar to stiff frosting. -
Form the outer petals:
Load the underside of a trowel-shaped palette knife with the pink paste. Starting from the outer edge of your sketched circle, press the knife down and pull inward toward the center, lifting off as you reach the middle to leave a tapered point. -
Layer the petals:
Repeat this process around the circle to create the bottom layer of petals. Once the first ring is done, add a second layer of slightly shorter petals on top of the first, filling in the gaps. Building height here is key for that impasto look. -
Sculpt the center petals:
Switch to a smaller diamond-shaped knife for the innermost petals. Make these strokes short and punchy, radiating outward from the absolute center. If the paste starts to sag, let the outer layers firm up for 15 minutes before adding these. -
Create the flower center:
Mix a small amount of modeling paste with Burnt Sienna and a dot of Black. Scoop a dollop into the very center of the flower. Use the tip of a detailing knife or a toothpick to poke and stipple this blob, creating a rough, seed-like texture.
Keep Your Peaks Sharp
If your modeling paste feels too soft or runny, mix it with the paint and let it sit on your palette for 10-15 minutes before applying. This partial drying allows it to stiffen up for sharper petal edges.
Step 3: Leaves and Details
-
Mix leaf colors:
Clean your palette and mix modeling paste with Phthalo Green and a significant amount of Titanium White to create a soft, minty seafoam green. This lighter color helps the foreground leaves pop against the dark background. -
Sculpt the stems:
Using the edge of a palette knife loaded with the mint green mixture, drag thin lines over your pencil marks to create raised stems. Connect them to the base of the flower and extend them to the bottom of the canvas. -
Form the leaves:
Just like the petals, load a knife with the mint paste. Press and pull to create leaf shapes attached to your stems. Place a few larger leaves at the bottom and some smaller, delicate ones floating near the top right corner. -
Add vein details:
While the leaf paste is wet, use the sharp edge of a clean knife to gently score a central vein line down the middle of each leaf.
Level Up: Metallic Edges
For a glamorous twist, wait until the flower is 100% dry, then carefully outline just the very tips of the pink petals with metallic copper or rose gold paint using a fine liner brush.
Step 4: Highlighting and Finish
-
Dry time is crucial:
Let the entire painting dry thoroughly. Because the impasto is thick, this is best left overnight. The outside may feel dry while the inside is still soft, so patience is required. -
Dry brush highlights:
Once fully cured, dip a dry flat brush into a tiny amount of Titanium White. Wipe almost all the paint off on a paper towel, then lightly graze the tops of the highest petals and background textures to catch the raised ridges. -
Enhance the leaves:
Repeat the dry brushing technique on the mint green leaves, perhaps adding a tiny touch of silver or pearl white if you have it, to give them a frosty texture. -
Adding the golden touch:
Using a small detail brush, dab tiny spots of Metallic Gold onto the rough brown center of the flower. This mimics pollen and adds a sophisticated shimmer to the focal point. -
Final heavy glaze (optional):
If you want the background to recede even more, dilute a little black paint with water (finish glazing liquid is better) and brush it over the background texture, wiping it back with a rag so it stays only in the deep crevices.
Hang your dimensional masterpiece in a spot with good lighting to let those shadows and highlights truly shine.


Have a question or want to share your own experience? I'd love to hear from you in the comments below!