A painted pumpkin can be so much more than a quick seasonal craft—it can be a legit little art piece that fits your home style. Here are my favorite pumpkin painting ideas that feel grown-up, polished, and still really fun to make.
Classic Black-and-White Striped Pumpkins

Transform a simple gourd into a sophisticated modern decor piece with this high-contrast design. The crisp black lines following the pumpkin’s natural curves create an elegant, minimalist look that stands out beautifully.
Step-by-Step
Materials
- Faux or real pumpkin (medium-large)
- White acrylic craft paint (matte or satin finish)
- Black acrylic craft paint
- Wide flat brush (1-2 inch)
- Small round detail brush or liner brush
- Pencil (optional)
- Clear matte sealer spray
- Paper towels
- Water cup
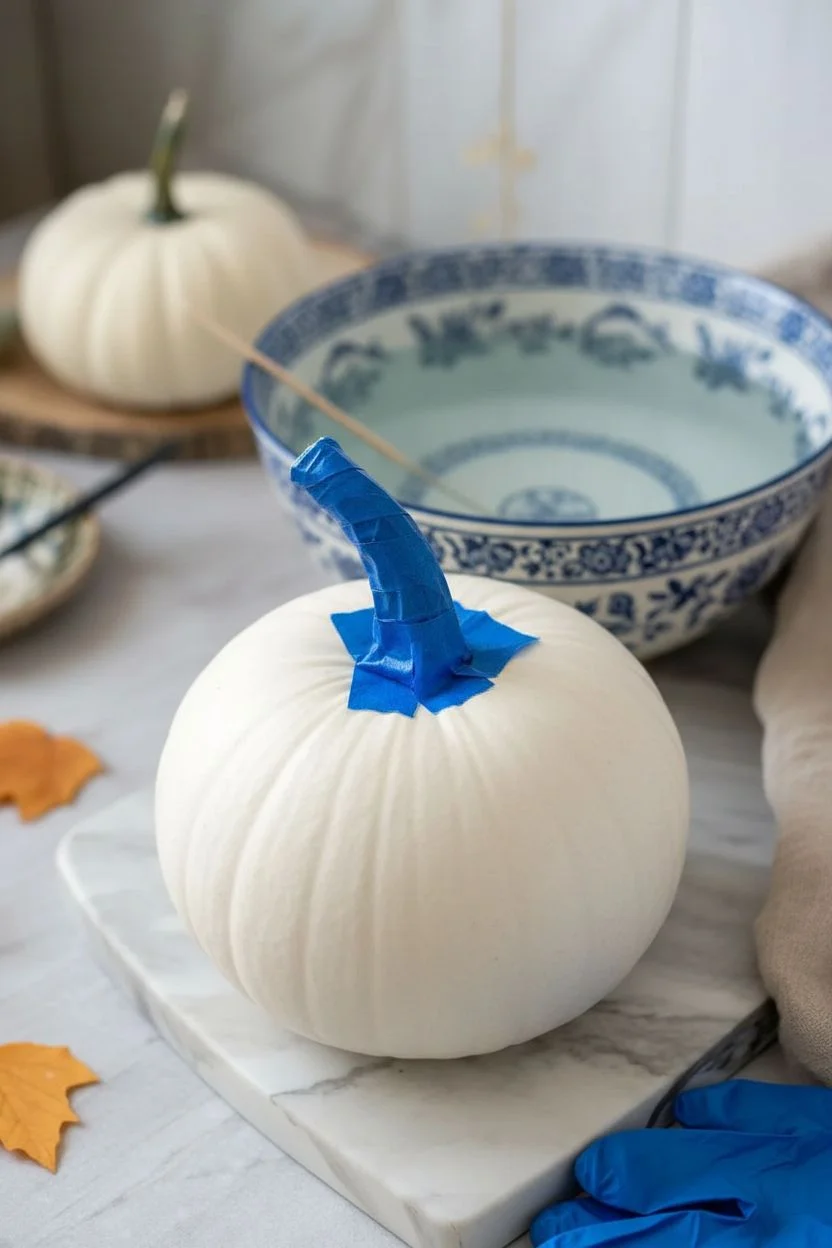
Step 1: Preparing the Base
-
Clean surface:
Begin by wiping down your pumpkin with a damp cloth to remove any dust, dirt, or oils that might prevent the paint from adhering properly. -
Initial base coat:
Using your wide flat brush, apply a generous layer of white acrylic paint over the entire surface of the pumpkin, avoiding the stem for now. -
Let it dry:
Allow the first coat to dry completely. This usually takes about 15-20 minutes, depending on the humidity and paint thickness. -
Apply second coat:
Apply a second layer of white paint to ensure full opacity. If you are using an orange pumpkin, you might even need a third coat to prevent the original color from bleeding through. -
Check coverage:
Inspect the pumpkin for any streaks or thin spots. Touch up these areas and let the final white base cure fully before moving on.
Fixing Wobbly Lines
If your hand shakes, use a white paint pen to clean up the edges of your black stripes. It’s much easier to control than a brush for corrections.
Step 2: Adding the Stripes
-
Identify the ribs:
Look closely at your pumpkin to find its natural vertical indentations or ‘ribs.’ These will serve as your guides for the stripes. -
Load the detail brush:
Dip your small round brush or liner brush into the black acrylic paint. You want the paint to have an inky consistency, so mix in a tiny drop of water if it feels too thick. -
Start from the top:
Place your brush tip right at the base of the stem within one of the natural grooves. I find it easiest to pull the brush downward toward myself. -
Paint the stroke:
Drag the brush down the length of the groove in a single, confident motion if possible. If you need to lift your hand, try to feather the stroke back in to avoid a harsh stopping point. -
Thicken the line:
Go back over the line to achieve your desired thickness. The image shows stripes that are slightly imperfect and organic, so don’t stress about laser precision. -
Rotate and repeat:
Turn the pumpkin and repeat this process for every natural groove around the entire circumference. -
Refine the edges:
Inspect your stripes. If any look too shaky, you can tidy them up carefully with a clean damp brush or touch them up with white paint later.
Mix It Up
Try using gold leaf paint for the stripes instead of black for a glamorous twist, or paint the stem in metallic gold for extra pop.
Step 3: Finishing Touches
-
Paint the stem:
Using a smaller flat brush or your detail brush, carefully paint the entire stem black. Get right into the crevices where the stem meets the pumpkin body for a clean look. -
Dry completely:
Let the black stripes and stem dry fully. This is crucial to prevent smudging during the sealing phase. -
Seal the work:
Take the pumpkin to a well-ventilated area and spray it lightly with a clear matte sealer. This protects the paint from chipping and gives it a unified finish. -
Final inspection:
Once the sealer is dry, check for any missed spots on the stem or bottom edge and do any final touch-ups if necessary.
Place your striking striped pumpkin on a mantle or table runner to instantly elevate your seasonal display


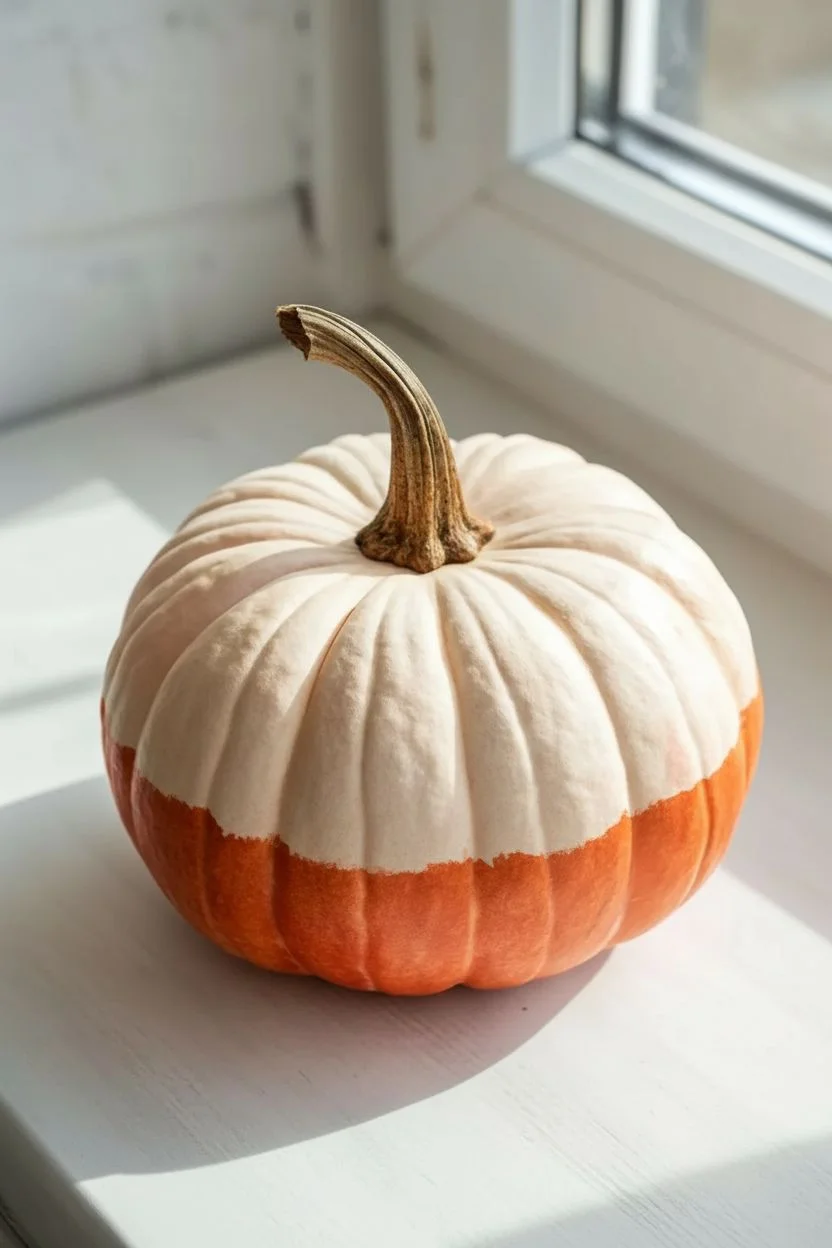
Elegant Metallic-Dipped Pumpkins
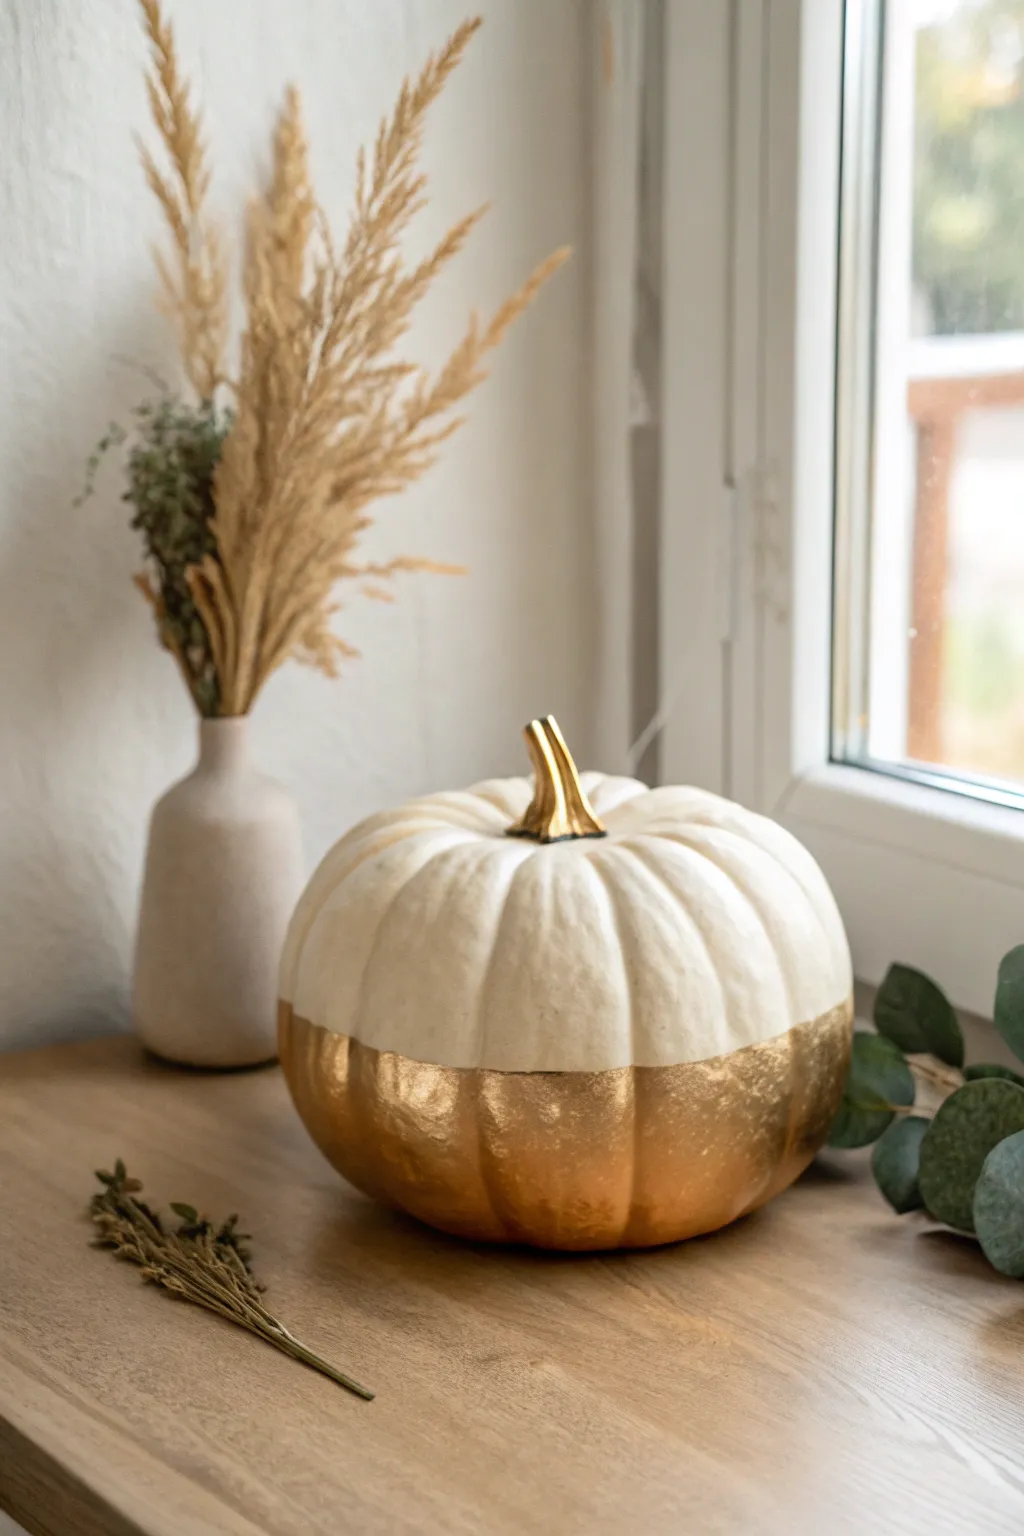
For a sleek, modern update to traditional fall decor, this half-painted pumpkin combines matte white with luxurious metallic gold. The sharp dividing line creates a striking dipped effect that looks effortless yet undeniably high-end.
How-To Guide
Materials
- Medium-sized pumpkin (real or faux)
- Matte white acrylic paint
- Liquid gold leaf or high-gloss metallic gold acrylic paint
- Wide, flat paintbrush
- Small detail brush
- Painter’s tape or masking tape
- Measuring tape or ruler
- Pencil
- Old newspaper or drop cloth
Step 1: Base Preparation
-
Clean surface:
Begin by thoroughly wiping down your pumpkin with a damp cloth to remove any dirt or residue. If you are using a real pumpkin, ensure it is completely dry before proceeding. -
Apply base coat:
Using your wide flat brush, paint the entire pumpkin with matte white acrylic paint. You don’t need to be perfect around the stem yet, but cover the main body completely. -
Dry and repeat:
Let the first coat dry fully. Apply a second or third coat until the original orange or cream color of the pumpkin is no longer visible and you have an opaque, smooth finish. -
Paint the stem:
While the white body dries, carefully paint the stem with your metallic gold paint using the small detail brush. Get into all the crevices of the stem for a solid metal look.
Clean Lines Secret
Before painting gold, brush a thin layer of white paint over the tape edge first. This seals the gap, so any bleed-through matches the base color.
Step 2: Creating the Dipped Effect
-
Measure the line:
Decide how high up you want the gold section to go—typically about one-third to one-half of the way up looks best. Use a measuring tape to mark this height with small pencil dots around the circumference. -
Apply tape guide:
Firmly press your painter’s tape around the pumpkin, connecting your pencil marks. Run your fingernail along the bottom edge of the tape to ensure a tight seal, which prevents paint from bleeding under. -
Check level:
Step back and look at the tape from eye level to ensure the line looks straight all the way around before you start painting the metallic section. -
Start the gold layer:
Dip your wide flat brush into the liquid gold leaf or metallic paint. Begin painting the bottom section below the tape line, using vertical strokes that follow the curve of the pumpkin. -
Paint the bottom:
Don’t forget to flip the pumpkin over gently to paint the very bottom base so no white shows when it sits on a table. -
Refine the edge:
When painting near the tape, brush away from the tape edge rather than towards it. This technique helps minimize paint seepage under the adhesive. -
Apply second coat:
Metallic paints can be semi-transparent. Allow the first gold layer to dry to the touch, then add a second coat to achieve that rich, reflective finish seen in the photo. -
Wait for tackiness:
Allow the final gold coat to dry until it is tacky but not completely hardened. If you wait until it’s bone dry, lifting the tape might peel the paint.
Step 3: Finishing Touches
-
Remove tape:
Slowly peel off the painter’s tape at a 45-degree angle. Pull gently and steadily to reveal your crisp, clean dividing line. -
Inspect the line:
Check the border between white and gold. If there are tiny spots where paint bled through, I like to use a small brush with a bit of white paint to touch up the edge carefully. -
Seal (optional):
If this pumpkin will be placed outside or handled frequently, apply a clear acrylic spray sealer over the entire piece to protect the finish. -
Style carefully:
Place your finished pumpkin on a mantel or windowsill, pairing it with dried florals or neutral ceramics to complete the organic modern aesthetic.
Uneven Tape Line?
Pumpkins are bumpy! If tape won’t sit flat in the grooves, skip the tape. Instead, rest your hand on a stack of books to steady it and freehand the line.
This sophisticated two-tone design brings a warm, metallic glow to your autumn display


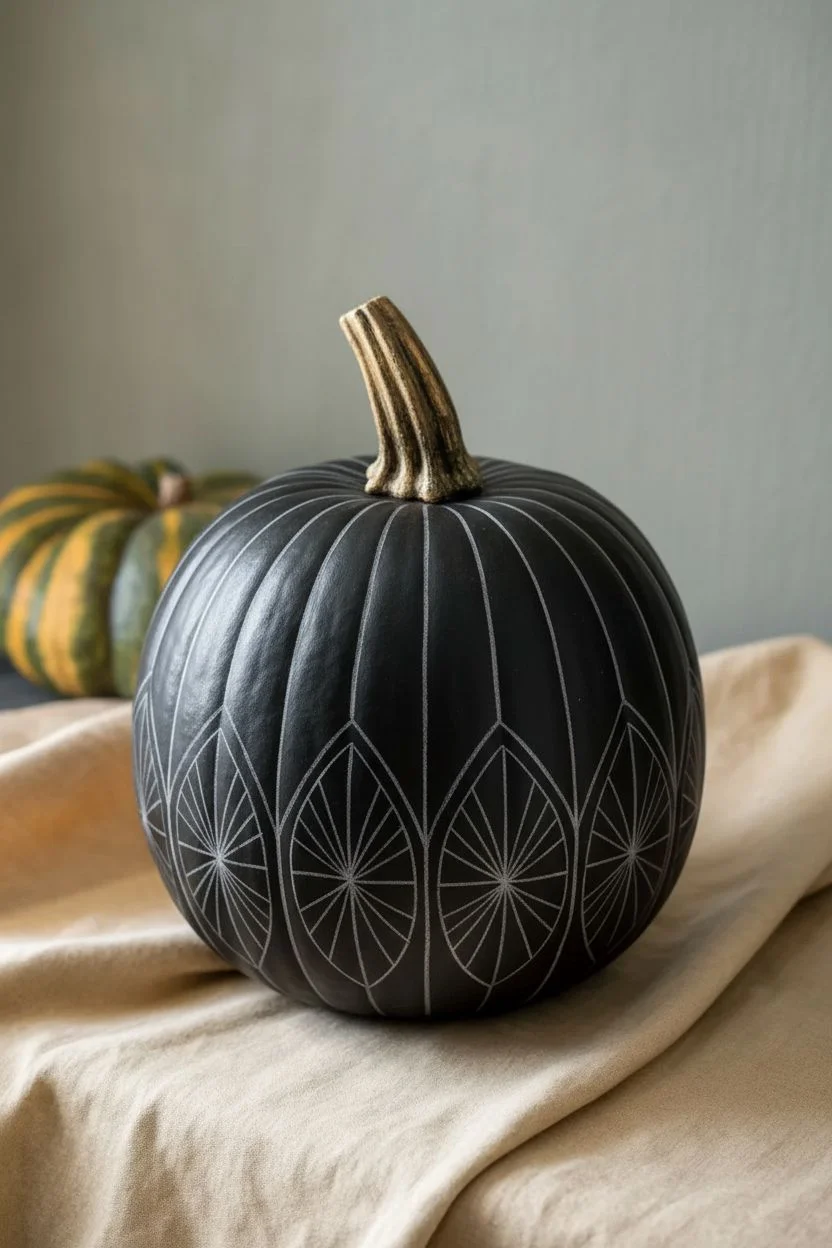
Matte Monochrome Pumpkins With Subtle Highlights
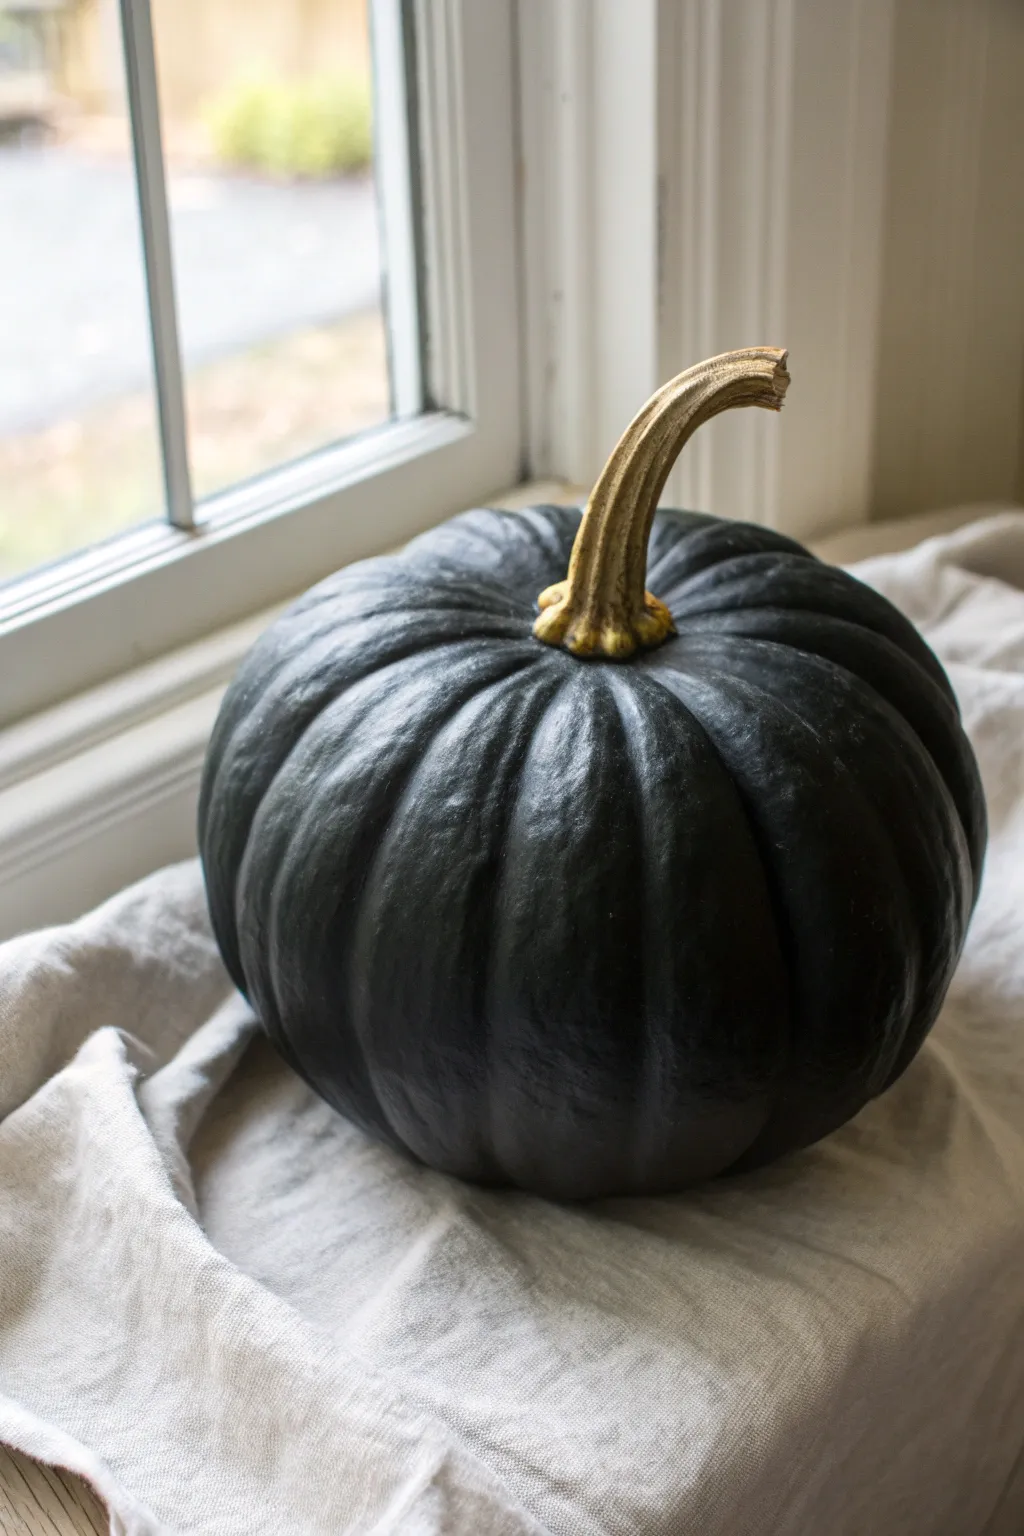
Transform a regular pumpkin into a sophisticated piece of décor with this deep, monochromatic finish that mimics the look of honed slate or dark charcoal. The subtle play of light on the matte surface brings out the natural texture of the pumpkin’s ribs.
Step-by-Step Guide
Materials
- Medium-sized pumpkin (real or high-quality faux)
- Black acrylic paint (matte finish)
- Dark grey acrylic paint (or white to mix)
- Soft synthetic flat brush (1-inch width)
- Small round brush for details
- Painter’s tape or masking tape
- Clean cloth or rag
- Matte spray sealer (optional but recommended)
- Palette for mixing
- Water cup and paper towels
Step 1: Preparation & Base Coat
-
Clean the Surface:
Begin by thoroughly cleaning your pumpkin. Wipe it down with a damp cloth to remove any dirt, dust, or oils, and let it dry completely to ensure the paint adheres properly. -
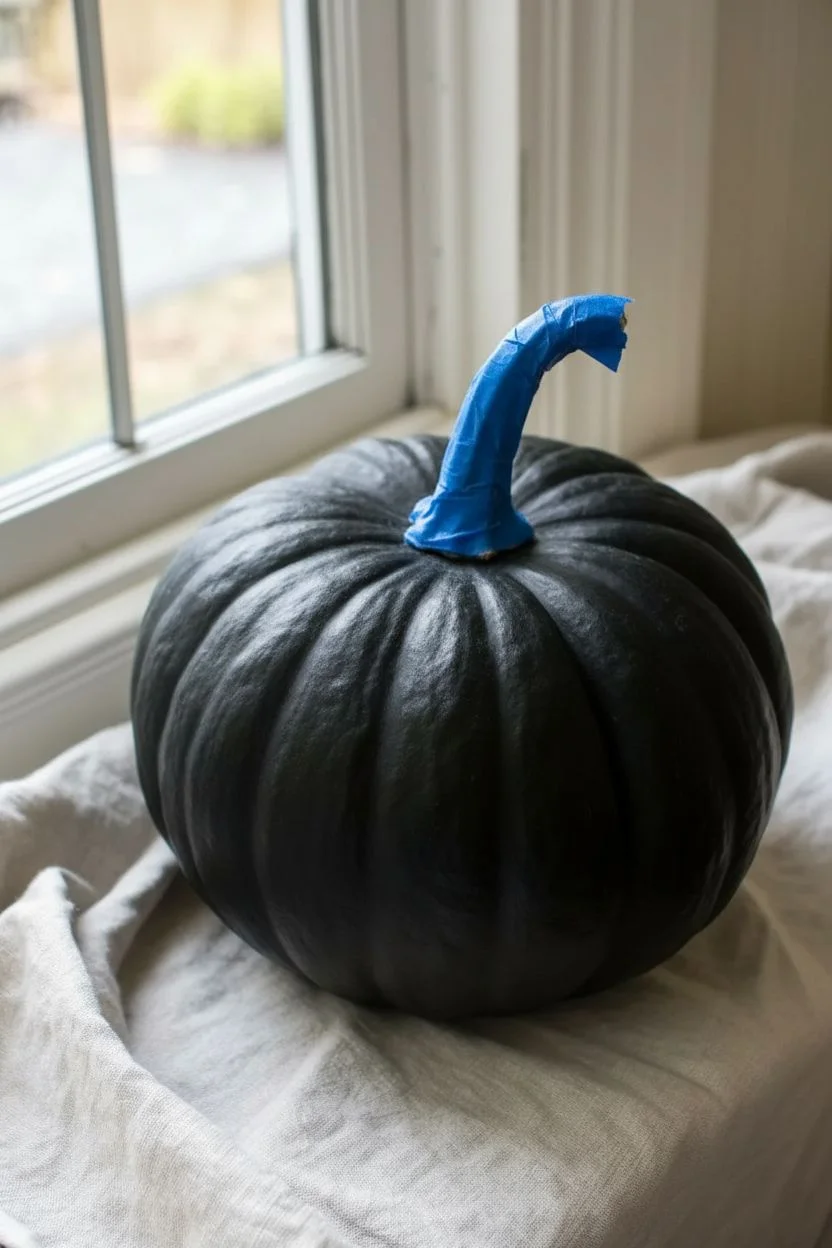
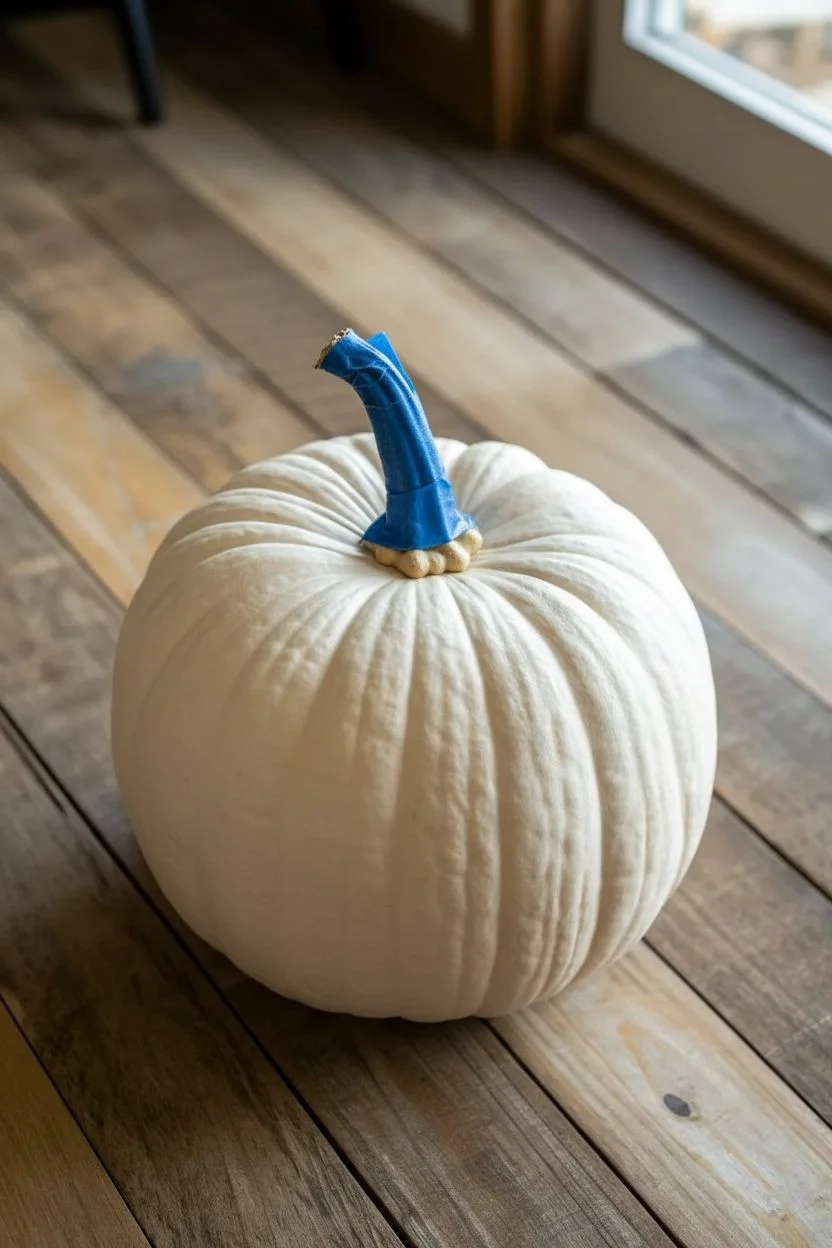
Protect the Stem:
Carefully wrap the entire stem with painter’s tape. We want to preserve that beautiful natural wood tone as a contrast against the dark paint. -
Pour Your Base Color:
Squeeze a generous amount of matte black acrylic paint onto your palette. If your black paint is slightly glossy, mix in a tiny drop of matte medium to dull the sheen. -
Apply the First Layer:
Using your 1-inch flat brush, apply the first coat of black paint. Work from the top near the stem down to the base in smooth, vertical strokes following the pumpkin’s natural curve. -
Check Coverage:
Don’t worry if the orange skin peeks through a bit on the first pass. This layer is just for establishing a gripping surface for the subsequent coats. -
Let it Dry:
Allow this first coat to dry fully, which usually takes about 20–30 minutes depending on humidity. It should be dry to the touch before moving on. -
Apply the Second Coat:
Apply a second, thicker coat of pure black paint. Ensure you get into the crevices between the ribs for solid, opaque coverage. -
Inspect and Touch Up:
Once dry, inspect the pumpkin under good light. If you see any streaks or thin spots, dab a little extra paint on those areas to make the finish perfectly solid.
Paint Peeling?
If paint peels off a real pumpkin’s waxy skin, lightly sand the surface with fine-grit sandpaper before painting to give it ‘tooth’ for better adhesion.
Step 2: Highlighting & Finishing
-
Mix a Highlight Shade:
Create a very dark charcoal grey by mixing a tiny dot of white or grey paint into your black pile. You want a color that is just a shade or two lighter than the base. -
Prepare for Dry Brushing:
Dip strictly the tip of your brush into this charcoal mix, then wipe almost all of the paint off onto a paper towel until the brush is nearly dry. -
Highlight the High Points:
Gently whisk the dry brush over the raised parts of the pumpkin’s ribs. Use a feather-light touch to deposit just a hint of the lighter color on the texture. -
Focus on the Curve for Depth:
I like to concentrate these subtle highlights on the ‘shoulder’ of the pumpkin—the rounded upper part where light would naturally hit. -
Remove the Tape:
Carefully peel away the painter’s tape from the stem. If any black paint seeped under, use a damp Q-tip or a hobby knife to gently scrape it away. -
Optional Stem Enhancement:
If the natural stem looks dull, you can dry brush it lightly with a brown-gold ochre paint to make it pop against the black body. -
Seal the Deal:
For longevity, especially if displaying outdoors, spray the entire painted surface (shielding the stem if desired) with a clear matte sealer.
Gothic Glam Twist
Mix a tiny amount of ultramarine blue or deep purple into your black base coat. It creates a richer, ‘midnight’ black that looks incredible in dim lighting.
Place your moody masterpiece near a window to let the natural light emphasize its elegant, velvety texture


Gingham and Plaid Pumpkin Patterns

Embrace a warm, minimalist aesthetic with this checkerboard pumpkin that trades traditional orange for a sophisticated terracotta and cream pairing. This hand-painted design mimics the cozy look of a soft gingham blanket or classic checkered tile, bringing a touch of modern farmhouse charm to your autumn display.
Step-by-Step Guide
Materials
- Medium-sized pumpkin (real or faux)
- White or cream matte acrylic paint
- Terracotta or warm burnt orange matte acrylic paint
- Painter’s tape or masking tape (1/2 inch or 1 inch width)
- Measuring tape (flexible sewing type)
- Pencil
- Medium flat paintbrush
- Small flat touch-up brush
- Matte clear sealant spray (optional)
- Paper towels
Step 1: Base Preparation
-
Clean surface:
Begin by wiping down your pumpkin with a damp paper towel to remove any dirt or oils. If you are using a real pumpkin, ensure it is completely dry before proceeding. -
Stem taping:
Because we want that natural stem to pop against the plaid, carefully wrap painter’s tape around the base of the stem to protect it from stray paint strokes. -
Base coat application:
Apply a generous coat of your matte white or cream paint over the entire pumpkin. Use long vertical strokes that follow the natural grooves of the pumpkin for a smooth finish. -
Second coat:
Once the first layer is dry to the touch, apply a second coat of the cream paint. This ensures full opacity so that no natural orange rind shows through. -
Full dry:
Allow the base coat to dry completely. I prefer to let it sit for at least an hour, or use a hairdryer on a low cool setting to speed up the process.
Wobbly Lines?
Don’t panic if lines aren’t straight. The pumpkin’s curved surface makes perfection impossible. Step back three feet; minor wobbles vanish from a viewing distance.
Step 2: Mapping the Grid
-
Vertical guidelines:
Using your flexible measuring tape, lightly mark vertical line segments with a pencil from the stem to the base. Follow the pumpkin’s natural ribs where possible, as they provide a built-in guide. -
Horizontal guidelines:
Starting near the top, mark horizontal rings around the pumpkin. Space these marks roughly the same width as your vertical sections to create squares rather than rectangles. -
Connect the dots:
Lightly sketch the full grid lines connecting your marks. Don’t worry if the lines aren’t geometrically perfect; the curvature of the pumpkin naturally warps the grid, adding character. -
Marking filling zones:
To avoid confusion while painting, place a tiny ‘X’ or dot lightly inside every other square on the grid. This creates the checkerboard pattern and stops you from accidentally painting two adjacent squares.
Step 3: Painting the Pattern
-
First color pass:
Load your medium flat brush with the terracotta paint. Begin filling in the marked squares at the top of the pumpkin near the stem. -
Defining edges:
Use the edge of your flat brush to carefully create sharp lines along the pencil marks. This outlines the square before you fill in the center. -
Working smoothly:
Continue painting the marked squares, working your way down the pumpkin side by side or row by row. Be mindful of where you place your hand to avoid smudging wet squares. -
Bottom section:
Flip the pumpkin gently onto its side (on a towel) to access the very bottom squares easily. Fill these in to ensure the pattern looks continuous. -
Let it dry:
Allow the terracotta paint to dry completely. Matte acrylics usually dry fast, but check that there is no tackiness.
Pro Tip: Sheer Effect
Mix a tiny drop of water into your terracotta acrylic. This creates a slightly translucent finish that lets the brush texture show, mimicking woven fabric.
Step 4: Refinements
-
Touch-ups:
Inspect your lines. If any terracotta paint bled into a white square, use your small detail brush and a bit of cream paint to clean up the edges. -
Pencil removal:
Once absolutely dry, you can gently erase any visible pencil lines that weren’t covered by paint, though usually, the paint hides them well enough. -
Remove tape:
Peel away the painter’s tape from the stem. If the edge between the paint and stem is ragged, smooth it out with a tiny bit of paint on a fine brush. -
Sealing:
For longevity, especially if placing outdoors, give the pumpkin a light mist of matte clear sealant spray.
Place your finished pumpkin near a window or fireplace to let those warm earth tones really shine this season
BRUSH GUIDE
The Right Brush for Every Stroke
From clean lines to bold texture — master brush choice, stroke control, and essential techniques.
Explore the Full Guide
Chic Terrazzo Speckled Pumpkins
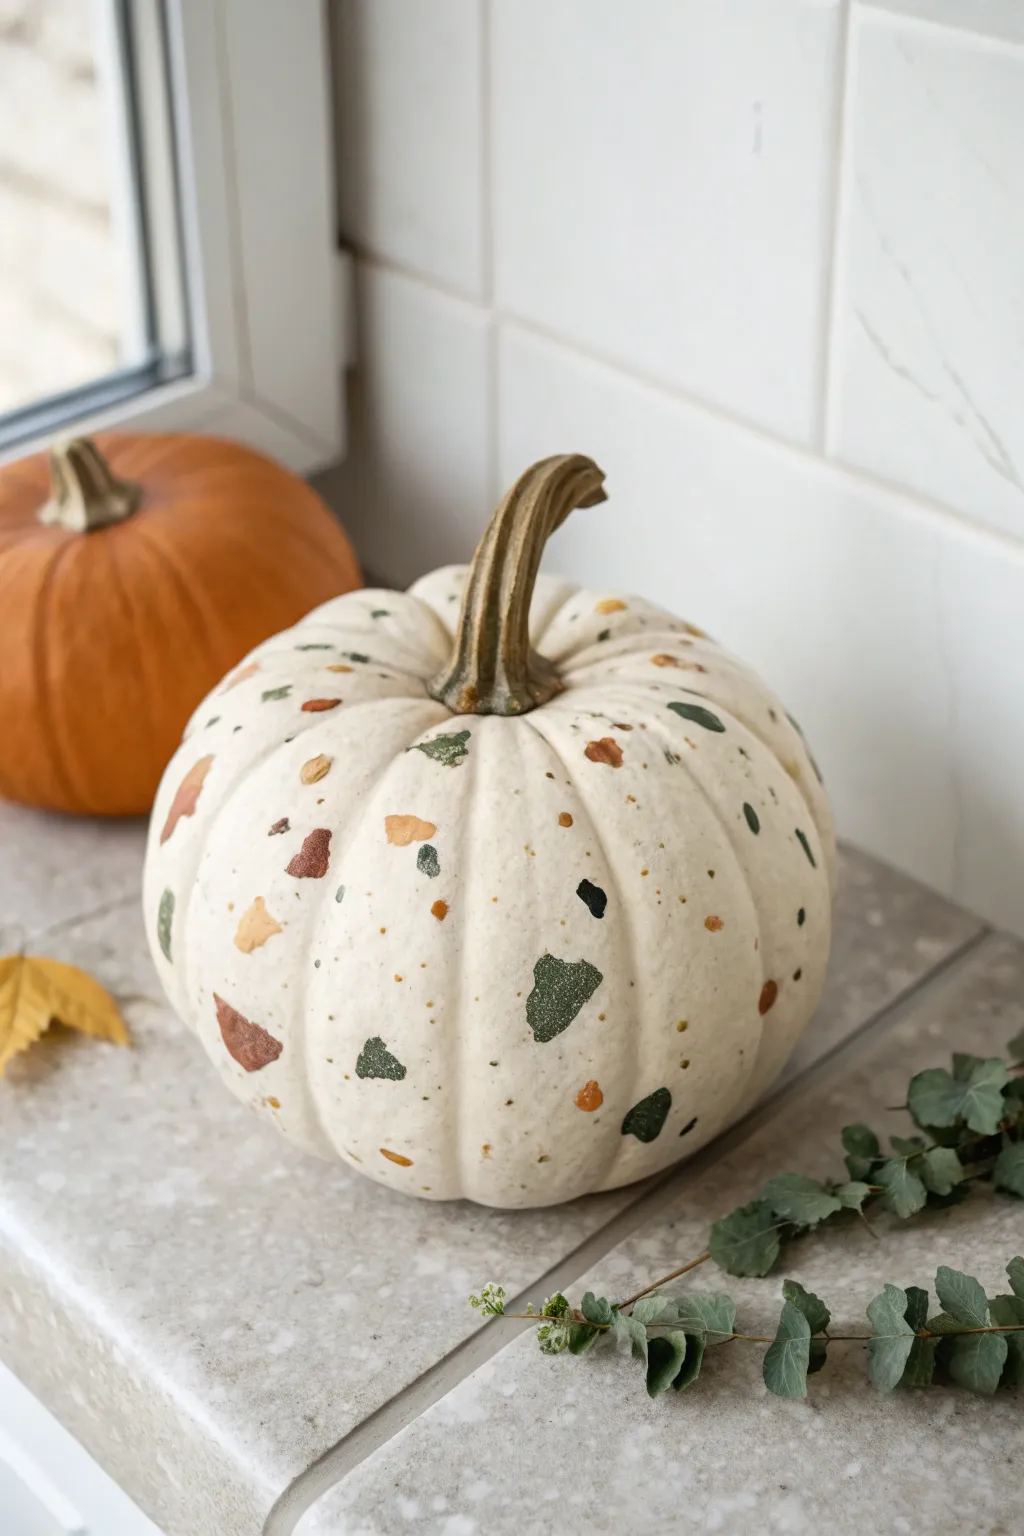
Bring the timeless elegance of Italian terrazzo floors to your fall decor with this sophisticated painted pumpkin project. The design uses earthy, muted tones and irregular speckles on a creamy white base for a modern, minimalistic look that works beautifully on a mantel or table centerpiece.
Detailed Instructions
Materials
- Medium-sized faux or real pumpkin (white or cream)
- Acrylic craft paints (rust orange, mustard yellow, forest green, black, white/cream)
- Small flat tip paintbrush (size 2 or 4)
- Small round tip detail brush (size 0 or 1)
- Old toothbrush (optional for speckling)
- Paper plate or palette
- Paper towels
- Water cup
- Matte clear sealer spray (optional)
Step 1: Base Preparation
-
Clean the surface:
Before you begin, wipe down your pumpkin with a damp cloth to remove any dirt or oils. If you are using a real pumpkin, ensure it is completely dry. A clean surface mimics a canvas and helps the acrylic paint adhere smoothly without peeling later. -
Apply base coat:
If your pumpkin isn’t already the perfect creamy white, apply two coats of a warm white or light cream acrylic paint. Let the first coat dry completely before adding the second to ensure solid coverage. I like to leave the stem unpainted for a natural contrast, so use painter’s tape around the base of the stem if you have a shaky hand.
Shape Variety
Real terrazzo is random. Ensure your painted shapes have sharp angles, flat sides, and differ in size. Avoid ovals or soft blobs to keep the look architectural rather than organic.
Step 2: Painting the Terrazzo Shapes
-
Mix your palette:
Squeeze dime-sized amounts of your earth-toned paints (rust, mustard, forest green, and black) onto your palette. It helps to have a reference image of real terrazzo stone nearby to inspire your color choices. -
Start with the largest shapes:
Using your flat tip brush, paint irregular, jagged shapes using the forest green paint. Think of these as broken shards of stone; they shouldn’t be perfect circles or squares. Place them randomly around the pumpkin, leaving plenty of white space between them. -
Add the secondary color:
Rinse your brush and switch to the rust orange color. Paint similar jagged shapes, perhaps slightly smaller than the green ones. Try to nestle some near the green shapes without touching them, creating a scattered effect. -
Incorporate the lighter tone:
Now introduce the mustard yellow. These ‘chips’ can be a mix of medium and small sizes. Look for large gaps in your pattern and fill them in, keeping the distribution balanced across the pumpkin’s ribs. -
Add high-contrast accents:
Switch to the black paint. Use a lighter touch here to create smaller, sharper fragments. These act as dark mineral deposits in the terrazzo look and help anchor the other colors visually. -
Create dimension:
If any shapes look too flat, you can dab a tiny bit of a lighter or darker shade of the same color onto them while wet to add a stone-like texture, though flat colors work perfectly for this graphic style.
Metallic Upgrade
For a glam twist, add a fifth color using liquid gold leaf or metallic copper paint. Add just a few small metallic shards to catch the light.
Step 3: Detailing and Speckling
-
Switch brushes:
Move to your small round detail brush. This phase is about adding the ‘grit’ that makes terrazzo look authentic. -
Paint tiny fragments:
Using all four of your colors, paint very small dots, dashes, and tiny triangles around the larger shapes. These should look like crumbs or dust from the larger stones. -
Cluster the details:
Try clustering a few tiny dots near a large shape of a different color. For example, place a few tiny yellow specs next to a large green shard. -
The toothbrush techniques:
For an even finer texture, dip an old toothbrush into slightly watered-down black or brown paint. Test it on a paper towel first by running your thumb over the bristles. -
Apply the splatter:
Gently flick the bristles to spray a fine mist of speckles over the pumpkin. Control the direction carefully so you don’t overdo it; you just want a subtle dusting of texture. -
Review the balance:
Step back and look at the pumpkin from a distance. If you see a large empty area of white space, add a medium-sized shard or a cluster of small specks to balance the composition.
Step 4: Finishing Touches
-
Let it dry:
Allow the paint to dry completely. Acrylics dry fast, but since some of the ‘shards’ might be thick, give it at least an hour. -
Protective sealing:
To protect your artwork, especially if the pumpkin will be outside on a porch, spray a light coat of matte clear sealer over the entire surface. This unifies the sheen and prevents the paint from scratching off.
Place your trendy terrazzo pumpkin near a window or with greenery to highlight its modern, artistic flair
Abstract Brushstroke Statement Pumpkins
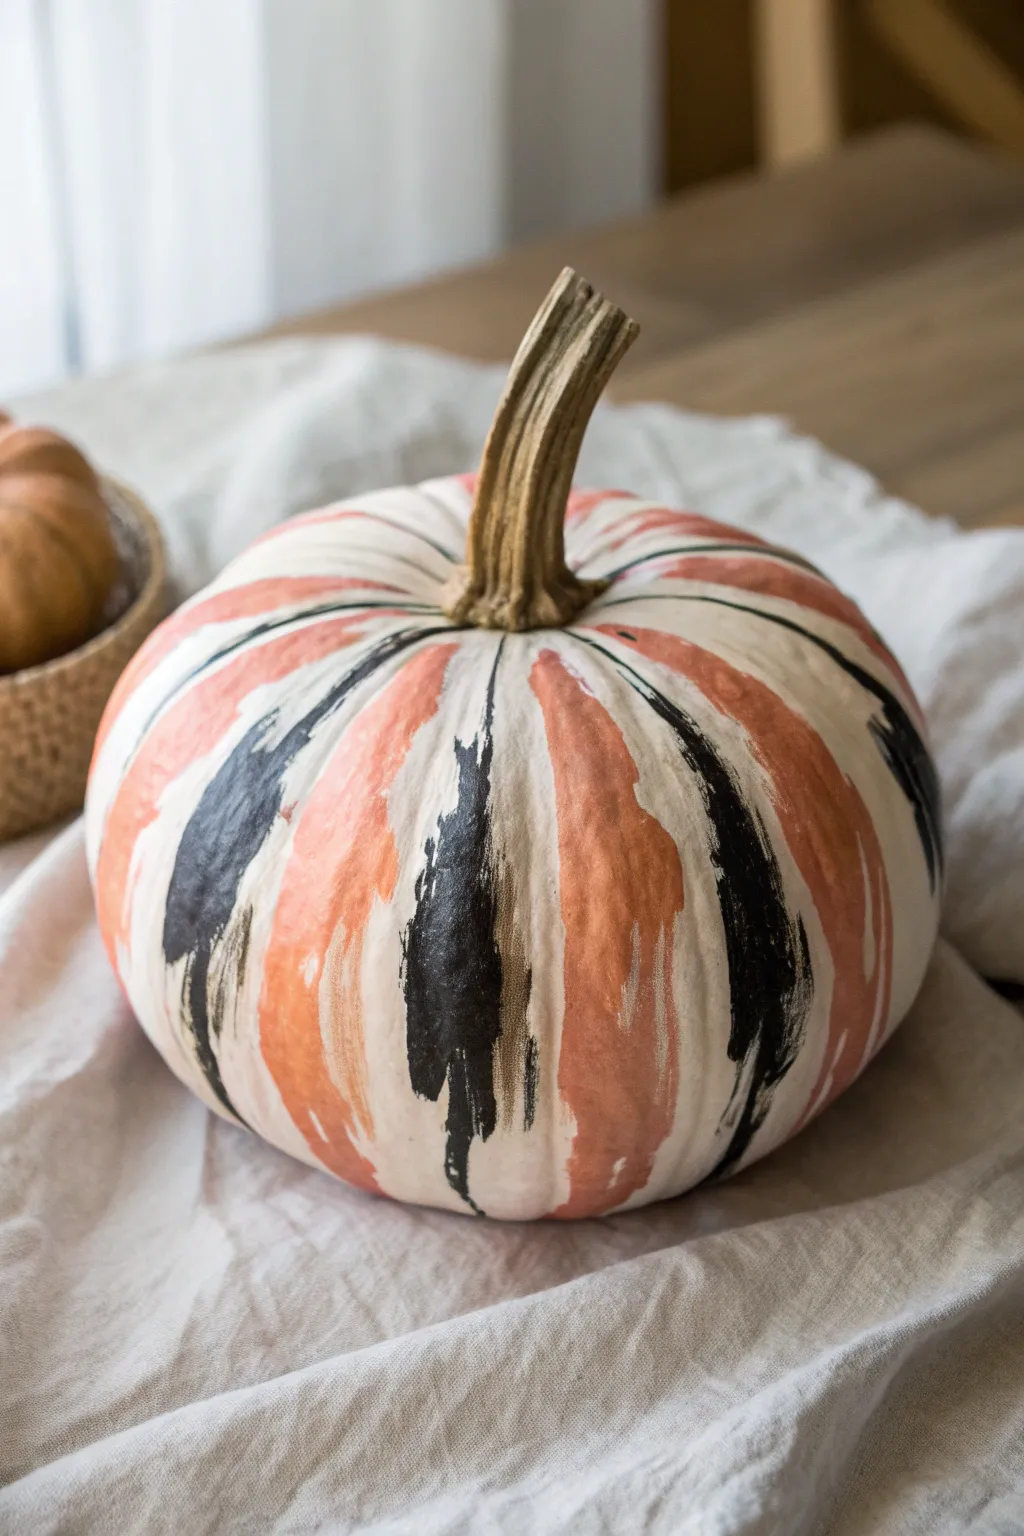
Embrace the natural curves of your pumpkin with this modern, abstract design that turns simple brushstrokes into high art. By layering bold swipes of coral and black against a pale background, you create a sophisticated centerpiece that feels both organic and intentionally styled.
Step-by-Step
Materials
- Medium-sized white pumpkin (real or faux)
- White acrylic craft paint (if using an orange pumpkin)
- Coral or salmon pink acrylic paint
- Black acrylic paint
- Flat shader brush (approx. 1 inch width)
- Medium round brush
- Paper plate or palette
- Cup of water and paper towels
- Matte finish clear sealant spray (optional)
Step 1: Preparation & Base Coat
-
Clean the surface:
Wipe down your pumpkin thoroughly with a damp cloth to remove any dirt or oils. If using a real pumpkin, ensure it is completely dry before you begin painting. -
Prime the canvas:
If you are starting with a bright orange pumpkin, apply two coats of white acrylic paint to the entire surface, avoiding the stem. Let the first coat dry completely before applying the second to ensure opaque coverage. -
Prepare your palette:
Squeeze a generous amount of coral pink and black paint onto your palette. I like to keep a little extra white nearby just in case I need to clean up any edges later.
Step 2: Painting the Coral Layers
-
Load the flat brush:
Dip your wide flat brush into the coral paint. You want the brush fairly loaded but not dripping. -
First vertical stroke:
Choose a natural rib on the pumpkin and place your brush near the top, about an inch or two down from the stem. Pull the brush downward in a single, confident motion, letting the stroke taper off as you reach the bottom curve. -
Create variation:
Leave the next one or two ribs empty. This negative space is crucial for the abstract look. Paint another coral stroke on a subsequent rib, perhaps starting slightly lower or ending higher than your first one. -
Imperfection is key:
Don’t try to make the edges of your stroke perfectly straight. The charm lies in the visible brush texture and slightly ragged edges where the paint ran dry. -
Continue the pattern:
Work your way around the entire pumpkin, painting coral stripes intermittently. Aim to cover roughly half of the pumpkin’s ribs with this color, leaving gaps for the black accents and white space. -
Dry time:
Allow the coral paint to dry completely. This usually takes about 15-20 minutes depending on how thick your application was.
Fixing “Blobs”
If a paint blob forms at the end of a stroke, dry your brush on a paper towel and gently drag it through the wet blob to spread the excess paint downward into a tapered texture.
Step 3: Adding Contrast
-
Switch to black:
Clean your brush thoroughly or switch to a fresh flat brush for the black paint. -
Strategic placement:
Identify the white gaps you left between the coral strokes. Paint black vertical strokes in these spaces, following the same technique: start below the stem and sweep downward. -
Layering effect:
It is okay—and actually encouraged—if your black strokes slightly overlap the edges of the coral ones. This layering adds depth and makes the design feel cohesive rather than rigid. -
Vary the stroke length:
Make some black marks shorter and punchier, perhaps starting mid-pumpkin and ending near the base. This dry-brush look mimics the texture of modern canvas art. -
Feather the ends:
As you lift the brush at the end of a stroke, flick your wrist slightly to create a feathered, uneven tail rather than a blunt stop. -
Review and balance:
Step back and look at the pumpkin from a distance. If a section feels too empty, add a small, thin black mark to break up the white space.
Metallic Luxe
Add a third layer of metallic gold dry-brushing over the black strokes. Just a few wisps of gold will catch the light and add instant glamour to your harvest decor.
Step 4: Finishing Touches
-
Clean the stem:
If you accidentally got paint on the stem, wipe it off quickly with a damp paper towel or use a small bit of brown paint to touch it up. -
Seal the artwork:
Once all paint is fully dry, take the pumpkin to a well-ventilated area. Spray it lightly with a matte clear coat to protect the paint from chipping and to give it a finished, professional look.
Place your new modern masterpiece on a linen runner or wooden tray to let the bold colors really pop

PENCIL GUIDE
Understanding Pencil Grades from H to B
From first sketch to finished drawing — learn pencil grades, line control, and shading techniques.
Explore the Full Guide
Minimal Geometric Line Art Pumpkins
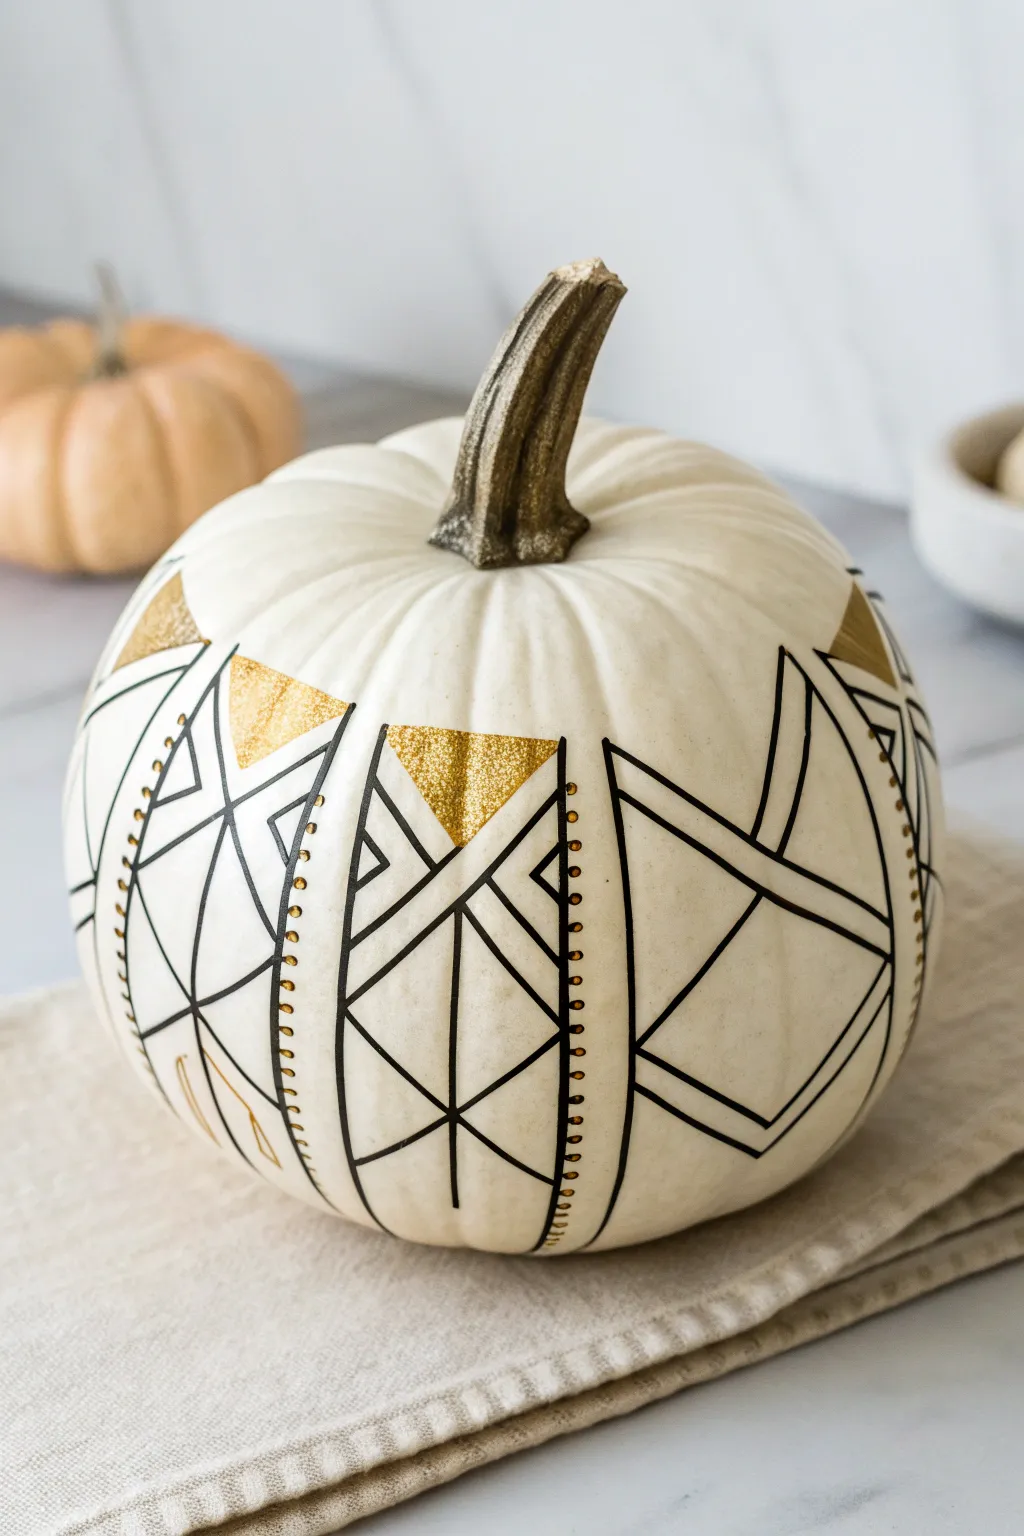
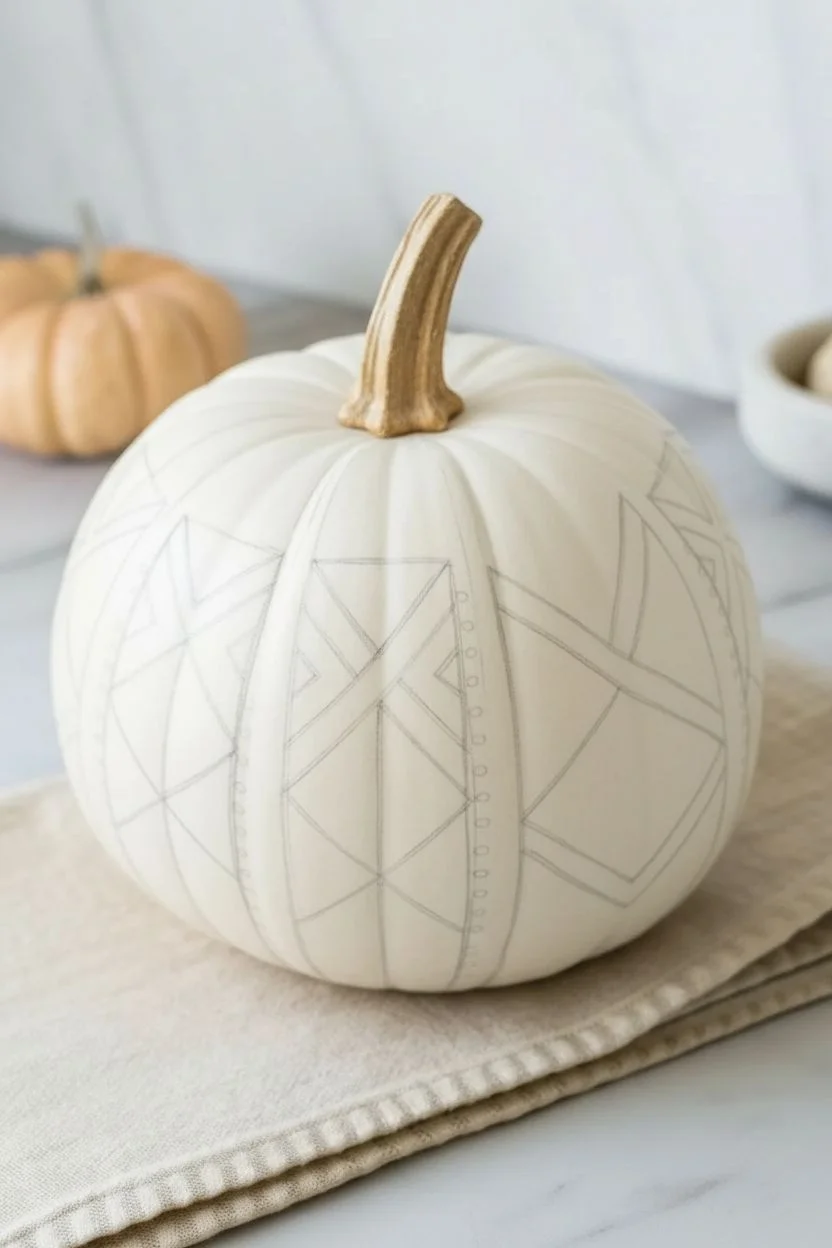
Elevate your Halloween decor with this stunning minimalist geometric pumpkin featuring bold black lines and glamorous gold accents. This Art Deco-inspired design transforms a simple white pumpkin into a sophisticated centerpiece perfect for modern fall styling.
Step-by-Step Guide
Materials
- White faux pumpkin (or real pumpkin spray-painted white)
- Black paint pen (medium or broad tip)
- Black paint pen (fine tip)
- Gold leaf paint pen or liquid gold leaf
- Pencil and eraser
- Ruler or flexible measuring tape
- Small paintbrush (if using liquid gold)
- Clear sealant spray (optional)
Step 1: Preparation & Planning
-
Clean surface:
Begin by wiping down your pumpkin with a damp cloth to remove any dust or oils. If you are using a real pumpkin that isn’t white, apply 2-3 coats of white matte spray paint and let it cure completely for at least 24 hours. -
Define segments:
Observe the natural ribs of the pumpkin. These vertical indentations will act as the boundaries for your pattern panels. If your pumpkin is perfectly smooth, lightly draw vertical lines with a pencil to divide the surface into 6-8 even sections. -
Sketch the primary diamond:
Within one of your vertical sections, lightly sketch a large diamond shape using a pencil. The points of the diamond should align centrally within that specific pumpkin rib. -
Add intersecting lines:
Inside your main diamond, draw a smaller, inverted triangle at the top. From the bottom point of that triangle, extend two diagonal lines downward to create an ‘X’ shape or intersecting geometry. -
Mirror the pattern:
Repeat this sketching process on alternating panels around the pumpkin. I find it helpful to leave every other panel blank or use a simplified linear design for visual balance, though the image shows a repeating motif.
Clean Lines Hack
Use flexible washi tape or painter’s tape to mask off your triangle shapes before painting the gold. It creates razor-sharp edges without a steady hand.
Step 2: Creating the Gold Accents
-
Fill gold triangles:
Identify the triangular sections at the top of your geometric design. Use your gold leaf paint pen or a small brush with liquid gold leaf to fill these areas completely. -
Layering gold:
Gold paint can sometimes appear streaky on the first pass. Allow the first layer to dry for about 15 minutes, then apply a second coat for a rich, opaque metallic finish. -
Painting the stem:
While your gold shapes are drying, tackle the stem. Using a dry-brush technique, lightly brush gold paint onto the ridges of the stem to highlight its texture without covering it entirely.
Fixing Smudges
If you smudge black ink on the white pumpkin, dip a Q-tip in a tiny bit of rubbing alcohol (for faux pumpkins) to gently lift the mistake away.
Step 3: Lining & Detailing
-
Outline main shapes:
Once the gold is fully dry, take your medium-tip black paint pen. Carefully trace over your pencil lines for the main diamond shape and the primary internal intersecting lines. -
Thicken the lines:
Go over your main structural lines a second time to thicken them. Creating bolder lines helps the geometric pattern pop against the white background. -
Create borders:
Draw vertical border lines along the natural ribs of the pumpkin, framing your geometric panel on the left and right sides. -
Add decorative curves:
Between the straight geometric lines and your vertical borders, add curved lines that follow the roundness of the pumpkin, connecting the design to the borders. -
Detail work:
Switch to your fine-tip black pen to sharpen any corners where lines meet the gold triangles. Clean, sharp intersections are key to that Art Deco look. -
Let ink set:
Allow the black ink to dry completely to avoid smudging. This usually takes about 10-15 minutes depending on the brand of pen used.
Step 4: Final Embellishments
-
Add gold dots:
Along the vertical black border lines you drew earlier, use the tip of your gold pen to create a column of small, evenly spaced dots. -
Erase guidelines:
Check the entire pumpkin for any visible pencil marks. Once you are 100% sure the paint is dry, gently erase these stray marks with a soft white eraser. -
Seal (Optional):
If you plan to place this pumpkin outdoors, apply a clear acrylic spray sealant in a matte or satin finish to protect your design from moisture.
Place your sleek geometric masterpiece on a mantel or dining table to enjoy its modern elegance all season long
Moody Botanical Silhouettes on Pumpkins
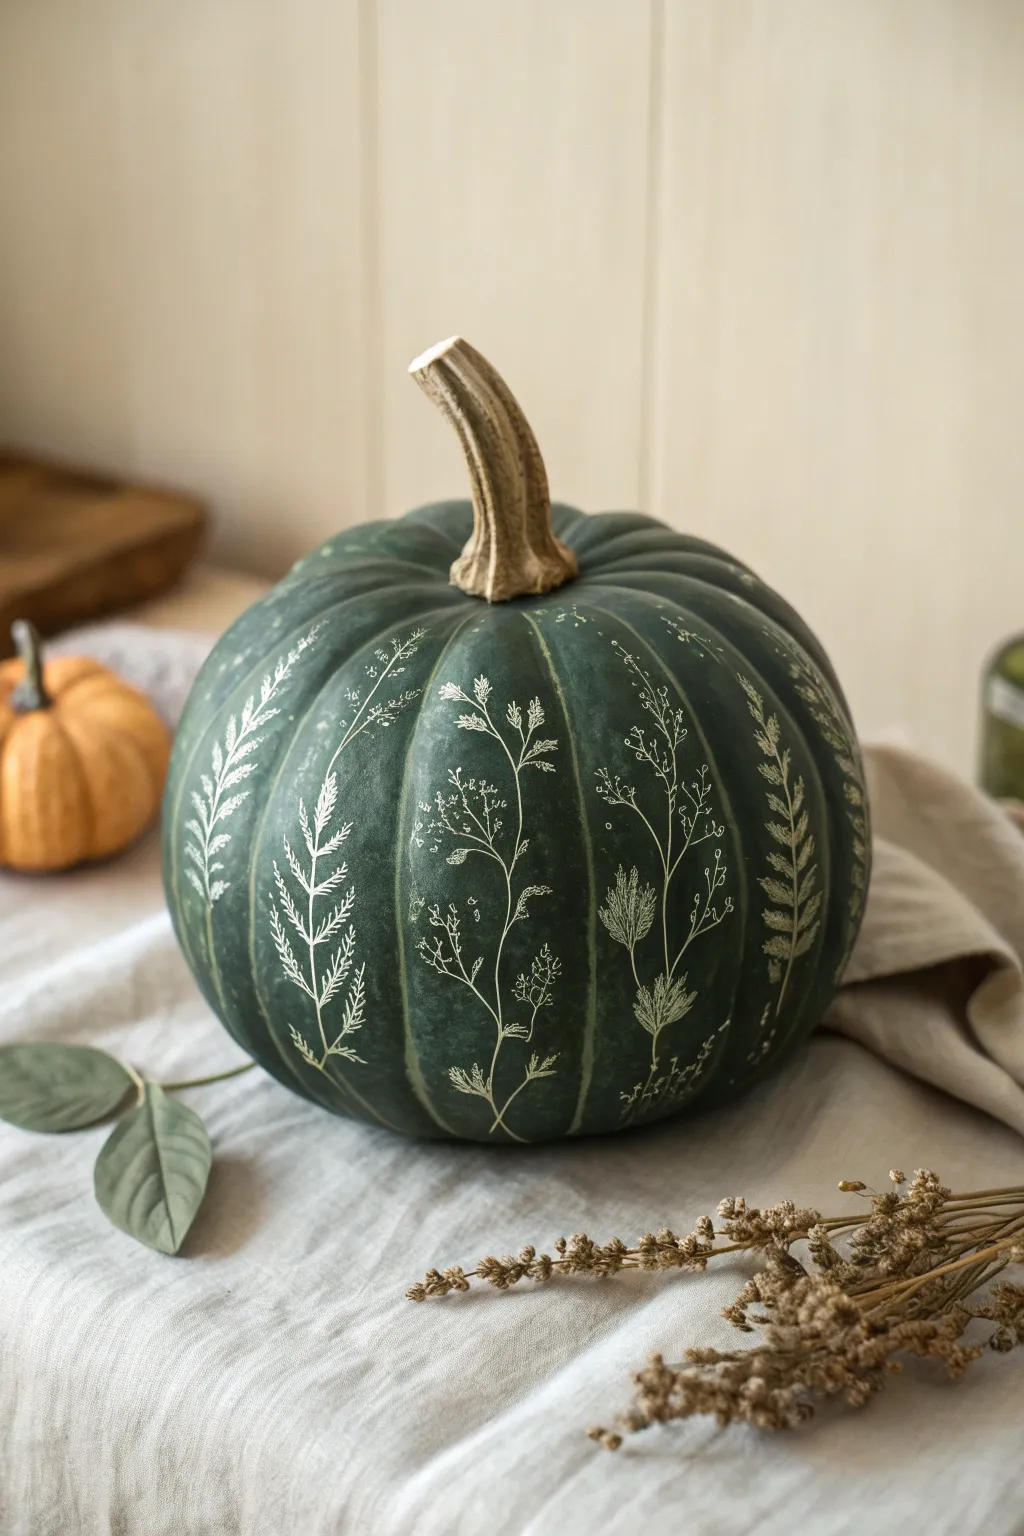
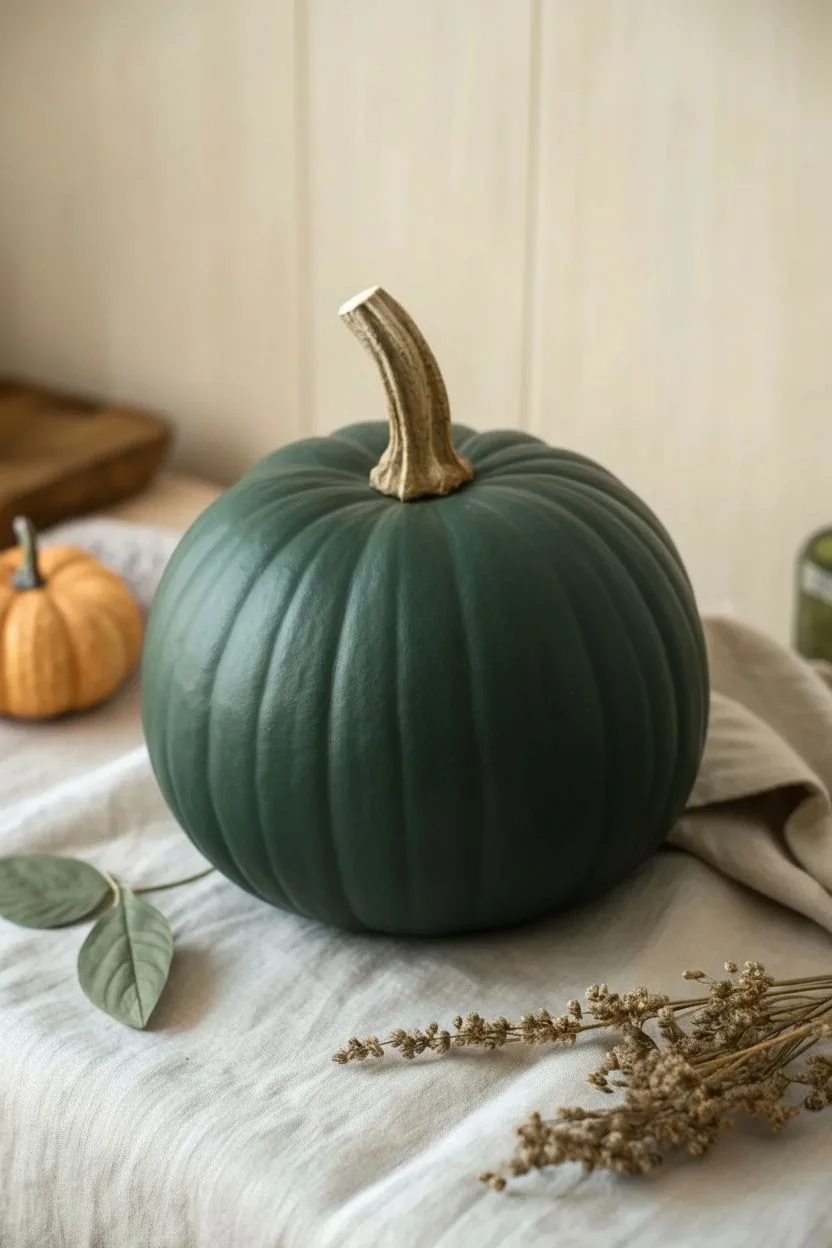
Transform a simple dark squash into an elegant centerpiece using delicate line work and negative space. This project captures the quiet beauty of dried autumn grasses against a moody, deep green backdrop, perfect for a sophisticated seasonal display.
How-To Guide
Materials
- Large pumpkin (heirloom varieties like Jarrahdale or a faux pumpkin)
- Deep hunter green or forest green acrylic paint (matte finish)
- Wide flat paintbrush
- Fine-point white paint pen (or silver for a metallic touch)
- Extra-fine round paintbrush (size 0 or 00)
- White or cream acrylic paint (fluid or ink consistency)
- Pencil (optional)
- Matte spray sealer
- Paper towels and water cup
Step 1: Preparing the Canvas
-
Clean the surface:
If using a real pumpkin, wash the exterior thoroughly with mild soapy water to remove any dirt or field debris. Dry it completely with a clean cloth. For faux pumpkins, a quick wipe with rubbing alcohol helps paint adhere. -
Apply the base coat:
Identify the natural ridges of your pumpkin. Using your wide flat brush, apply a smooth, even coat of deep hunter green paint. Brush vertically from the stem down to the base, following the pumpkin’s natural curves. -
Build opacity:
Let the first coat dry for about 20-30 minutes. Apply a second coat to ensure rich, opaque coverage where the orange skin doesn’t peek through. I like to let this dry fully overnight to ensure a hard surface for the fine details. -
Matte finish check:
Once dry, assess the sheen. The goal is a velvety, matte look. If your paint is too glossy, you can lightly mist it with a matte spray sealer before drawing, which also gives the surface a bit of ‘tooth’ for the pens.
Control the flow
If using a paint pen, test it on paper frequently. If the tip dries out, the lines will skip; if it’s too wet, it might pool on the curved surface. Keep a consistent flow.
Step 2: Designing the Botanicals
-
Plan your composition:
Observe the segments of the pumpkin. The natural ribs make excellent frames for individual botanical stems. Plan to place one major stem centered within each rib, or alternate ribs for a less crowded look. -
Sketch lightly:
Using a soft pencil, extremely lightly sketch the main spine of your plants. Keep these lines curved and organic, mimicking how grass bends in the wind. Don’t worry about the tiny leaves yet; just get the flow right. -
Start with the stems:
Taking your fine-point white paint pen or a liner brush with fluid white acrylic, trace over your main pencil lines. Start from the bottom and flick your wrist upward so the line tapers off naturally at the top.
Step 3: It’s all in the Details
-
Draw fern-like fronds:
On one of your main stems, create a fern pattern. Draw short, quick dashes extending outward from the center spine. These should be longer at the bottom of the stem and get progressively shorter near the tip. -
Create seeded grasses:
For a different texture, try a seeded grass look. Draw a thin stem that branches out into tiny Y-shapes near the top. Add minuscule dots or speckles at the ends of these Y-branches to represent seeds. -
Add gentle curves:
Avoid straight lines. When adding branches or leaves, give them a slight droop or curve. This organic movement is what gives the finished piece its gentle, ‘moody’ aesthetic. -
Vary the density:
Don’t make every botanical identical. I prefer to alternate between a dense fern-like drawing and a sparse, airy grass drawing on adjacent ribs to keep the eye interested. -
Refine with a brush:
If your paint pen feels too uniform, dip your 00 brush into slightly watered-down white paint. Go over some of the thicker areas or add extremely fine, wispy tendrils that a pen tip can’t achieve. -
Check for balance:
Step back and look at the pumpkin from a distance. If an area looks too dark or empty, add a small, floating sprig or a few drifting ‘seeds’ (dots) to fill the negative space without cluttering it. -
Clean up errors:
If you make a mistake, dampen a Q-tip with a tiny bit of water (or alcohol if the base paint is fully cured) and gently lift the white paint while it’s still wet. Paint over with green if necessary. -
Seal the artwork:
Once the white details are completely dry (give it at least an hour), spray the entire pumpkin with a light coat of matte sealer. This protects your delicate line work from moisture and handling.
Go metallic
Swap the matte white paint for a subtle champagne hold or antique silver. The metallic sheen against the dark matte green creates a stunning, high-end luxury look.
Place your masterpiece on a linen runner or near a window to let the delicate silhouettes shine


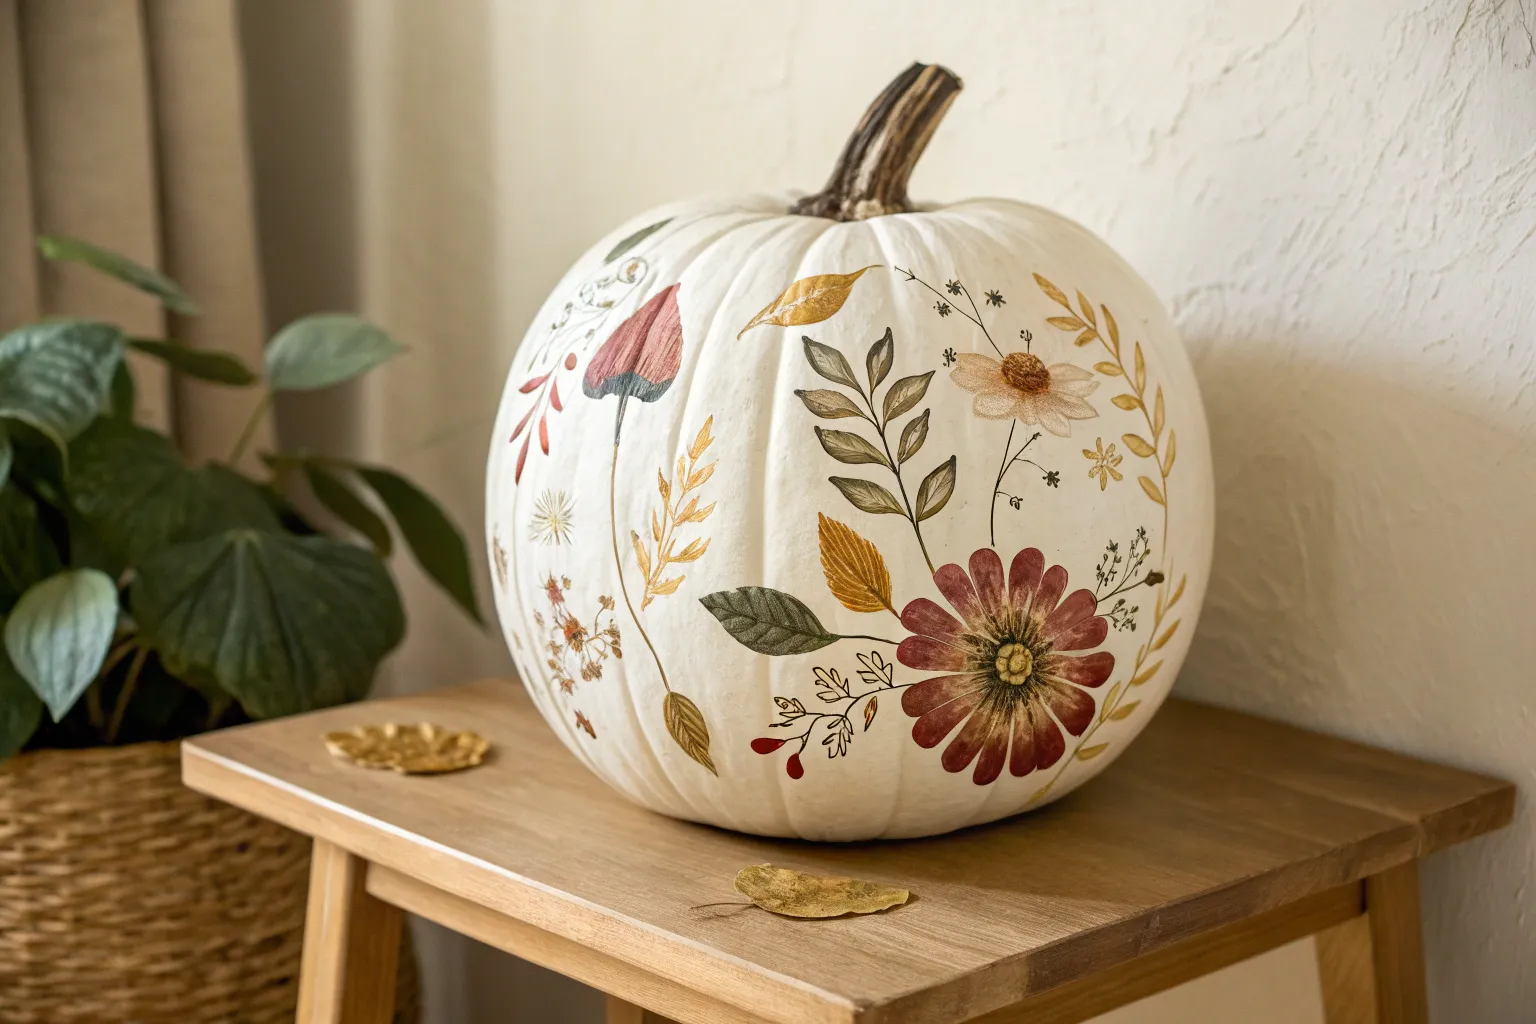
Detailed Floral Garland Pumpkins
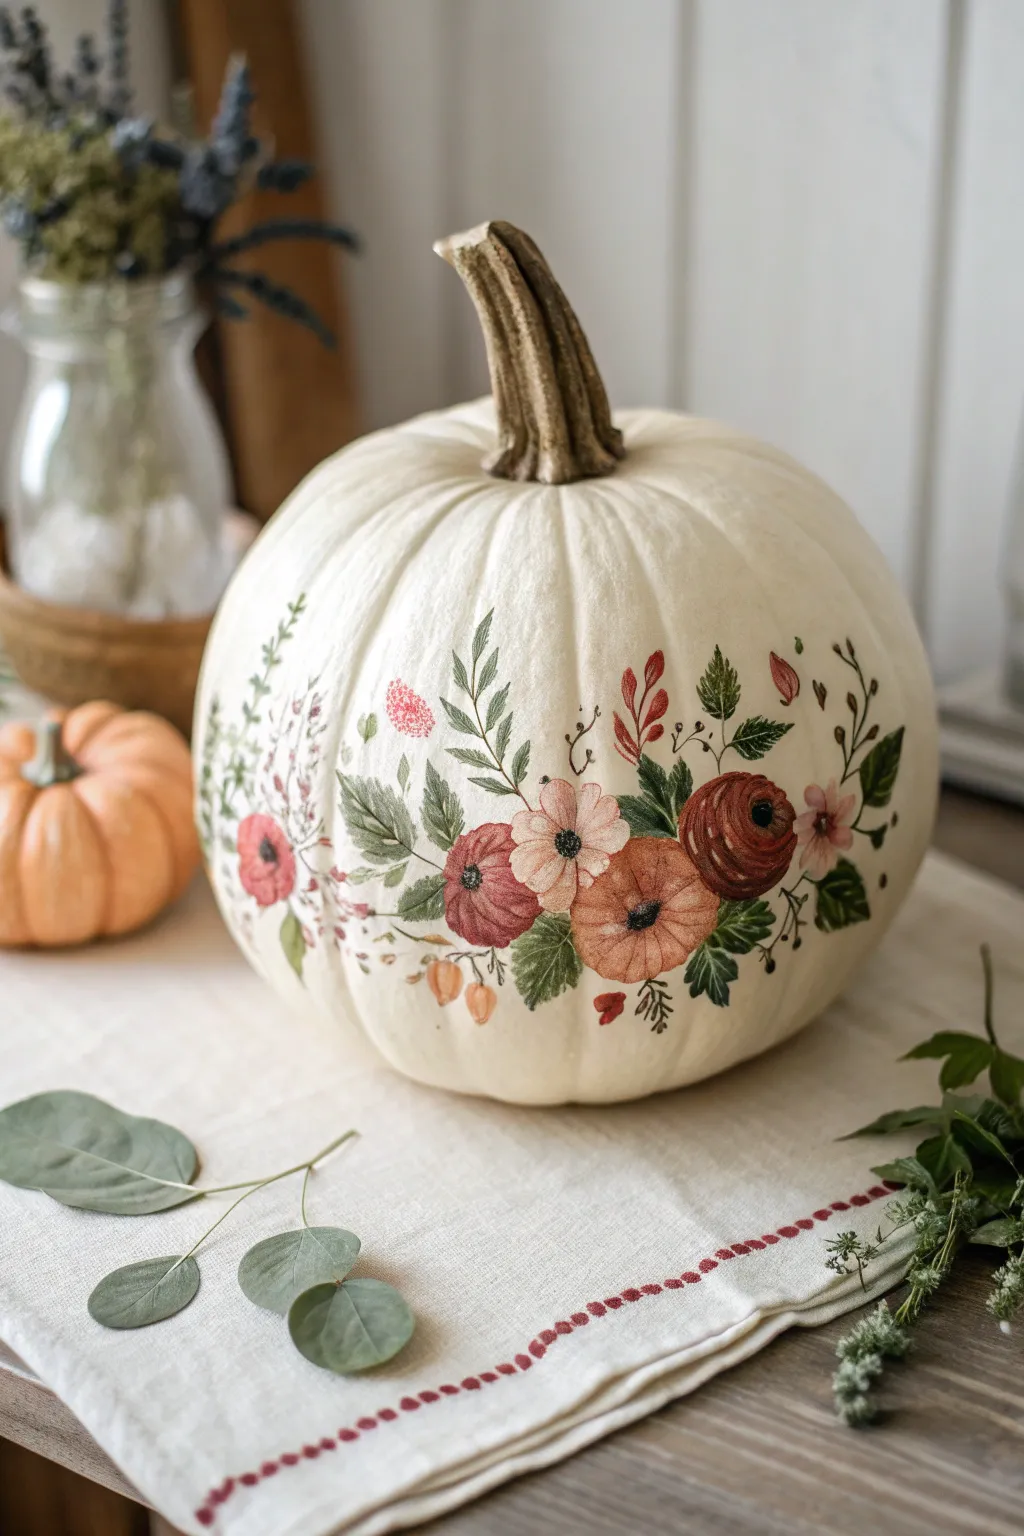
Transform a simple faux white pumpkin into a stunning autumn centerpiece with this delicate floral garland design. Using decoupling or hand-painting techniques, you can achieve this soft, vintage botanical look that brings a touch of elegance to your seasonal decor.
Step-by-Step Tutorial
Materials
- White or cream faux pumpkin (medium size)
- Botanical temporary tattoos OR watercolor floral decoupage paper
- Matte Mod Podge or decoupage medium
- Soft synthetic paintbrushes (flat and detail sizes)
- Wet sponge or cloth
- Acrylic paints (sage green, muted red, burnt orange, soft pink)
- Clear matte sealant spray
- Paper towels
- Water cup
Step 1: Preparation & Planning
-
Clean surface:
Begin by wiping down your faux pumpkin with a damp cloth to remove any dust or oils. If the surface is very slick, you might lightly scuff it with fine-grit sandpaper to help the design adhere better. -
Plan your composition:
Visualize a curving ‘smile’ line specifically on the lower half of the pumpkin where the garland will sit. The design should look like it’s cradling the pumpkin’s curve rather than sitting straight across. -
Select your botanicals:
If using temporary tattoos or decoupage paper, cut out your individual flower and leaf elements now. Arrange them on a flat surface first to finalize your layout before applying anything to the round object.
Wrinkle Rescue
If your decoupage or tattoo wrinkles on the curved surface, don’t panic. Dip a finger in water and gently smooth it out, or use a craft knife to make a tiny slit in the decal so it lays flat.
Step 2: Applying the Main Florals
-
Center focal point:
Start with the largest bloom (the rust-colored ranunculus or rose) and place it slightly off-center on the front of the pumpkin. This anchors your design. -
Apply the transfer:
If using a temporary tattoo, peel the clear plastic, place the image face down, and hold a wet sponge against the backing paper for 30 seconds. Gently slide the paper off to reveal the design. -
Decoupage alternative:
For decoupage paper, apply a thin layer of Mod Podge to the back of the cutout, press it onto the pumpkin, and gently smooth out air bubbles with your brush, working from the center outward. -
Add supporting blooms:
Position the medium-sized flowers (like the peach and soft pink ones) next to your focal flower. Slightly overlap the edges to create a cluster effect rather than isolated floating flowers. -
Extend the line:
Work your way outward to the left and right, adding smaller buds and vertical sprigs. Keep the design slightly asymmetrical; note how the left side in the image climbs higher with airy greenery than the right side.
Vintage Patina
For an aged look, mix a drop of brown paint with glazing medium. Lightly brush it over the entire dry pumpkin and wipe it back immediately with a cloth, leaving color in the grooves only.
Step 3: Hand-Painting Details
-
Blend edges:
Once your transfers are dry, mix a tiny amount of acrylic paint to match your flower colors. Use a small brush to touch up any edges where the transfer might look shiny or like a sticker, blending it into the pumpkin’s texture. -
Add extra leaves:
Mix a muted olive or sage green paint. Using a fine detail brush, hand-paint small leaves tucked behind the main flowers to add depth that the transfers might lack. -
Vines and wisps:
Dilute your green paint slightly with water to make it flow better. Paint very thin, curving stems extending from the floral clusters, mimicking the delicate sprigs seen on the left side of the design. -
Deepen shadows:
I like to take a very watered-down brown or dark red paint and add tiny shadows underneath the petal clusters. This grounds the artwork and makes it look less like a flat sticker. -
Connect the garland:
Use the detail brush to paint thin stems connecting your separated transfer elements. This unifies the composition into a single, flowing garland.
Step 4: Finishing Touches
-
Refine the stem:
Check the pumpkins original stem. If it looks too plastic, dry brush some tan and dark brown acrylic paint over it to give it a realistic, woody texture. -
Check for gaps:
Step back and look at the pumpkin from a distance. Fill any awkward white spaces within the garland with tiny painted berries or small dots of color to balance the weight. -
Dry time:
Allow all paint and adhesive to dry completely. This usually takes about an hour, but check your specific product instructions. -
Seal the work:
Take the pumpkin to a well-ventilated area. Apply a light, even coat of clear matte sealant spray. This protects the design and knocks back any glossy shine from the decal edges.
Place your finished floral masterpiece on a linen runner or rustic wood slice to enjoy the cozy autumn vibes you’ve created.
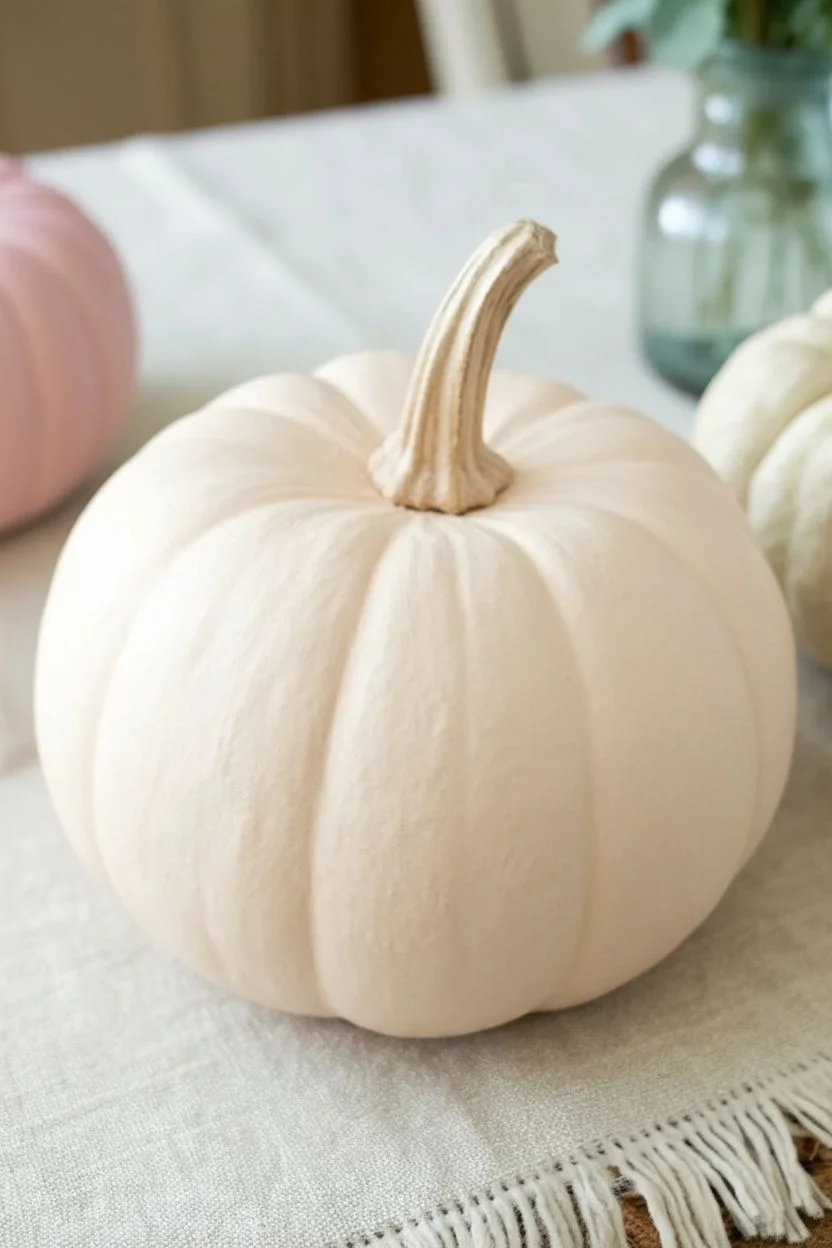
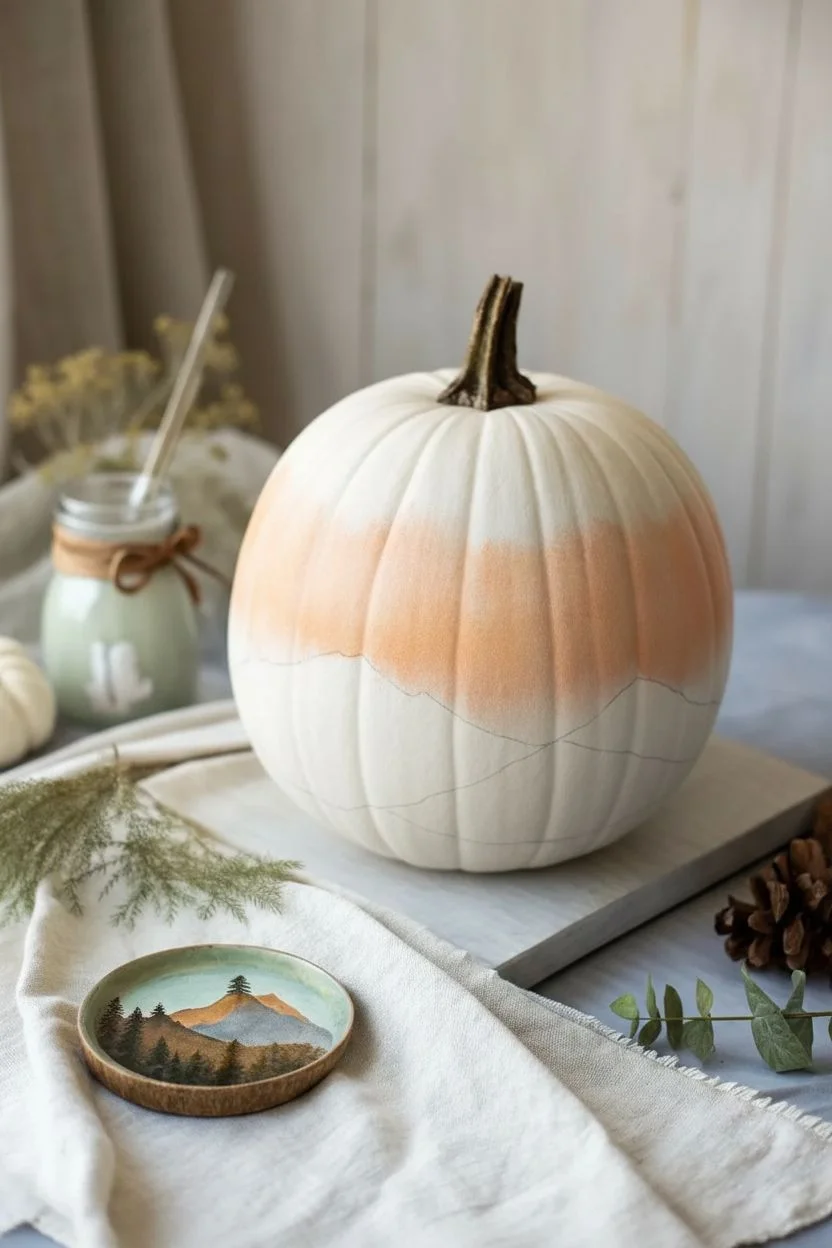
Watercolor-Wash Ombre Pumpkins
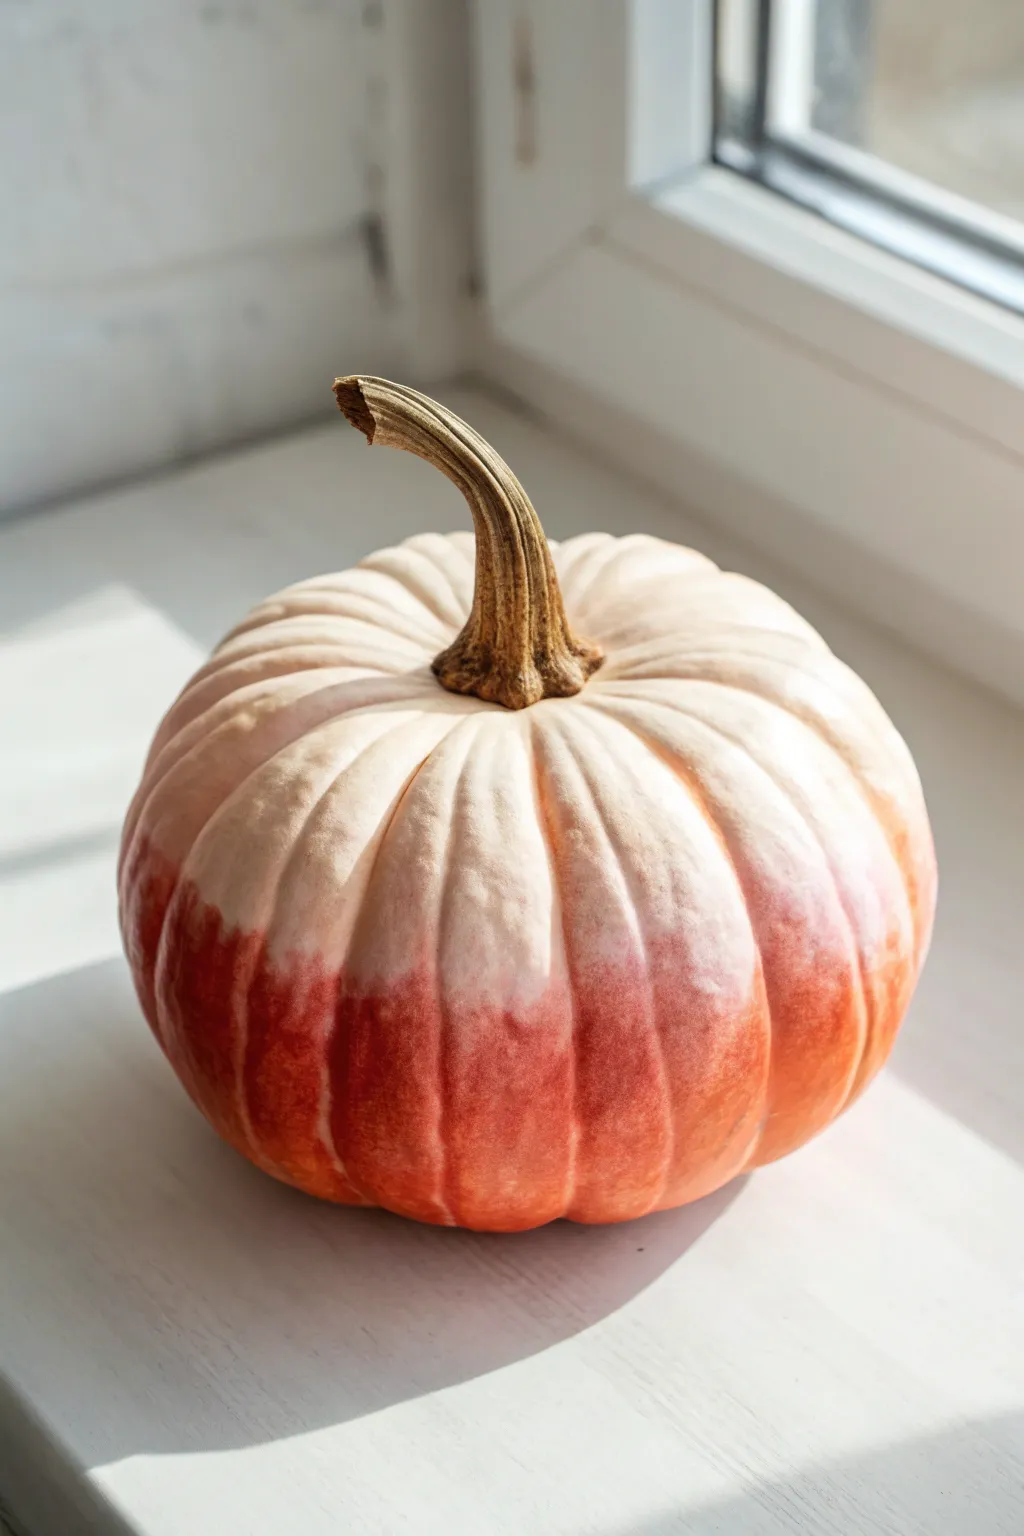
This elegant project transforms a simple white gourd into a piece of autumnal art with a delicate ombre fade. By blending a warm, rust-colored wash upwards, you achieve a soft, translucent effect that mimics the glow of a setting sun.
Detailed Instructions
Materials
- Small white pumpkin (real or faux)
- Red-orange watercolor paint or diluted acrylic
- Medium soft-bristle paintbrush
- Small bowl of water
- Paper towels or soft cloth
- Palette or small plate
- Painter’s tape (optional, to protect stem)
Step 1: Preparation & Base Coat
-
Clean surface:
Begin by gently wiping down your pumpkin with a damp cloth to remove any dirt or oils, ensuring a clean surface for the paint to adhere to. -
Protect the stem:
If you want to keep the stem completely natural, carefully wrap a small piece of painter’s tape around its base where it meets the pumpkin skin. -
Mix the pigment:
Squeeze a dime-sized amount of red-orange paint onto your palette. If using acrylics, mix heavily with water until it reaches a milky, ink-like consistency. -
Initial application:
Dip your brush into the paint mixture and apply a concentrated band of color around the very bottom third of the pumpkin.
Step 2: Creating the Ombre
-
Wet the brush:
Rinse your brush in the water bowl and tap it lightly on a paper towel so it is damp but not dripping. -
Drag the color up:
Starting at the top edge of the painted section you just applied, use the damp brush to pull the pigment upwards into the unpainted white area. -
Work in sections:
Move around the pumpkin, pulling the color up into the grooves and ridges. I like to work one ridge at a time to maintain control over the fade. -
Add more water:
Dip your brush in clean water again and blend the upper edge of the paint further up the pumpkin, thinning the pigment until it disappears into the white. -
Soften harsh lines:
If you see any distinct lines where the paint stops, use a very wet brush to gently scrub the edge until it blurs softly. -
Deepen the base:
While the upper section is still damp, go back to the very bottom of the pumpkin with undiluted or less diluted paint to darken the base. -
Blend downward:
Blend this darker pigment slightly upward into the previous layer, reinforcing the gradient from dark at the bottom to light at the top.
Use a Sponge
For an even softer gradient without brush strokes, daub the initial paint on with a damp sea sponge and blot upwards lightly.
Step 3: Finishing Touches
-
Check the ridges:
Inspect the deep vertical grooves; watercolor tends to pool there, so use a dry brush to soak up excess liquid if you want a uniform look. -
Dry completely:
Allow the pumpkin to sit undisturbed for at least an hour. The color may lighten slightly as the water evaporates. -
Remove tape:
Once fully dry, peel away the painter’s tape from the stem carefully. -
Optional splatter:
For added texture, you can flick a toothbrush with slightly darker paint droplets near the bottom, though the smooth wash is beautiful on its own.
Metallic Fade
Once the base ombre is dry, dry-brush a tiny amount of gold leaf paint just on the raised ridges for a shimmering highlight.
Place your ombre pumpkin near a window where the natural light can highlight the delicate transition of colors
Marbled Pumpkins With Swirled Paint Effects
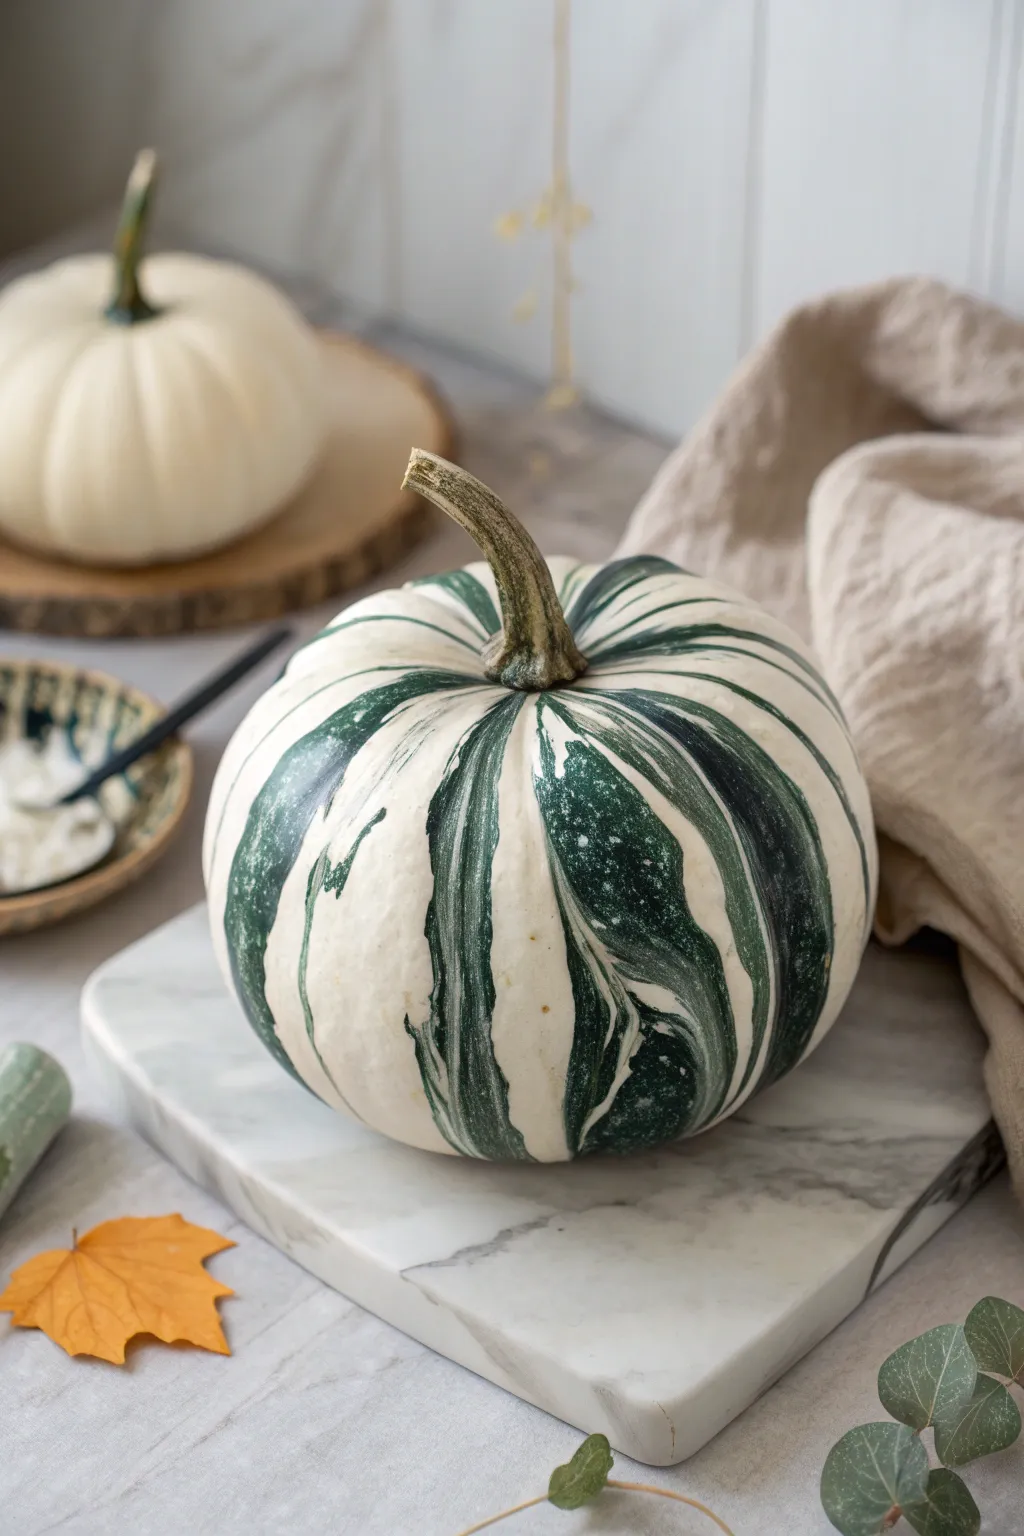
This elegant pumpkin project transforms a simple white gourd into a sophisticated piece of fall decor using a classic marbling technique. The mesmerizing swirls of deep forest green against creamy white look high-end, but the process is surprisingly fun and accessible.
How-To Guide
Materials
- Faux or real white pumpkin (medium size)
- Deep green nail polish or enamel marbling paint
- Large disposable bowl or bucket (deep enough to dip the pumpkin)
- Tepid water
- Toothpick or skewer
- Painter’s tape or masking tape
- Latex or nitrile gloves
- Drop cloth or old newspapers
- Paper towels
- Clear acrylic sealer spray (optional)
Step 1: Preparation
-
Clean surface:
Begin by wiping the pumpkin down with a damp cloth to remove any dust or dirt that might prevent the paint from adhering properly. -
Dry thoroughly:
Ensure the pumpkin is completely dry before proceeding; any moisture on the shell can repel the marbling medium. -
Protect the stem:
Wrap the pumpkin stem tightly with painter’s tape. Since the marbling process involves dipping, you want to keep that beautiful natural wood or plastic stem clean and free of green paint. -
Set up your station:
Cover your workspace with a drop cloth or newspapers. This process can get a little messy, so it’s best to be prepared. -
Prepare the water bath:
Fill your large bowl or bucket with room-temperature water. The water needs to be deep enough to submerge at least half of the pumpkin, but leave a few inches at the top to prevent overflow.
Paint Clumping?
If the nail polish sinks or clumps immediately, your water is likely too cold. Empty the bowl and refill with slightly warmer (tepid) water to help the polish spread thinly.
Step 2: Marbling Process
-
Pour the paint:
Put on your gloves. Unscrew the green nail polish or marbling paint and hold it close to the water’s surface. Gently pour or drip the paint onto the water. -
Watch the spread:
You will see the paint start to spread out into a thin film across the top of the water. If it sinks, your water might be too cold or the paint too heavy. -
Create the swirl:
Quickly take your toothpick or skewer and gently drag it through the layer of floating paint. Create swirls, figure-eights, or lines to break up the color. -
Don’t overmix:
Work fast and avoid over-stirring, as this can cause the paint to clump or dry on the water’s surface before you dip. -
The dip:
Firmly hold the pumpkin by the bottom and the taped stem. In one smooth motion, dip the pumpkin into the water. You can dip it on its side to get the vertical striping effect shown in the photo. -
Rotate if needed:
If you are using a smaller container, you may need to rotate the pumpkin slightly in the water to pick up the paint on all sides, but a single straight dip often yields the cleanest lines. -
Clear surface removal:
Before pulling the pumpkin out, blow on the remaining surface paint to push it aside, or use a paper towel to skim the leftover paint from the water surface so it doesn’t double-coat the design. -
Lift and drip:
Lift the pumpkin out of the water and hold it over the bucket for a few seconds to let excess water drip off.
Step 3: Finishing Touches
-
Initial drying:
Set the pumpkin on your prepared drying surface. Avoid touching the wet paint, which will be tacky. -
Pat dry:
If there are large water droplets sitting on unpainted sections of the pumpkin, very gently dab them with a paper towel, being careful not to smudge the green swirls. -
Remove tape:
Once the paint is dry to the touch—usually about 20 to 30 minutes—carefully peel the painter’s tape off the stem. -
Seal (optional):
To make the shine last longer and protect the design, take the pumpkin outside and give it a light coat of clear acrylic sealer spray. -
Final cure:
Let the pumpkin sit for a full 24 hours to ensure the paint and sealer are fully hardened before arranging it in your display.
Add Metallic Flair
Mix a few drops of gold or copper nail polish into the green swirls before dipping. The metallics will separate slightly, creating stunning, shimmering veins.
Place your finished marbled masterpiece on a tray or mantel for a striking modern autumn display
Fashion-Inspired Leopard Print Pumpkins
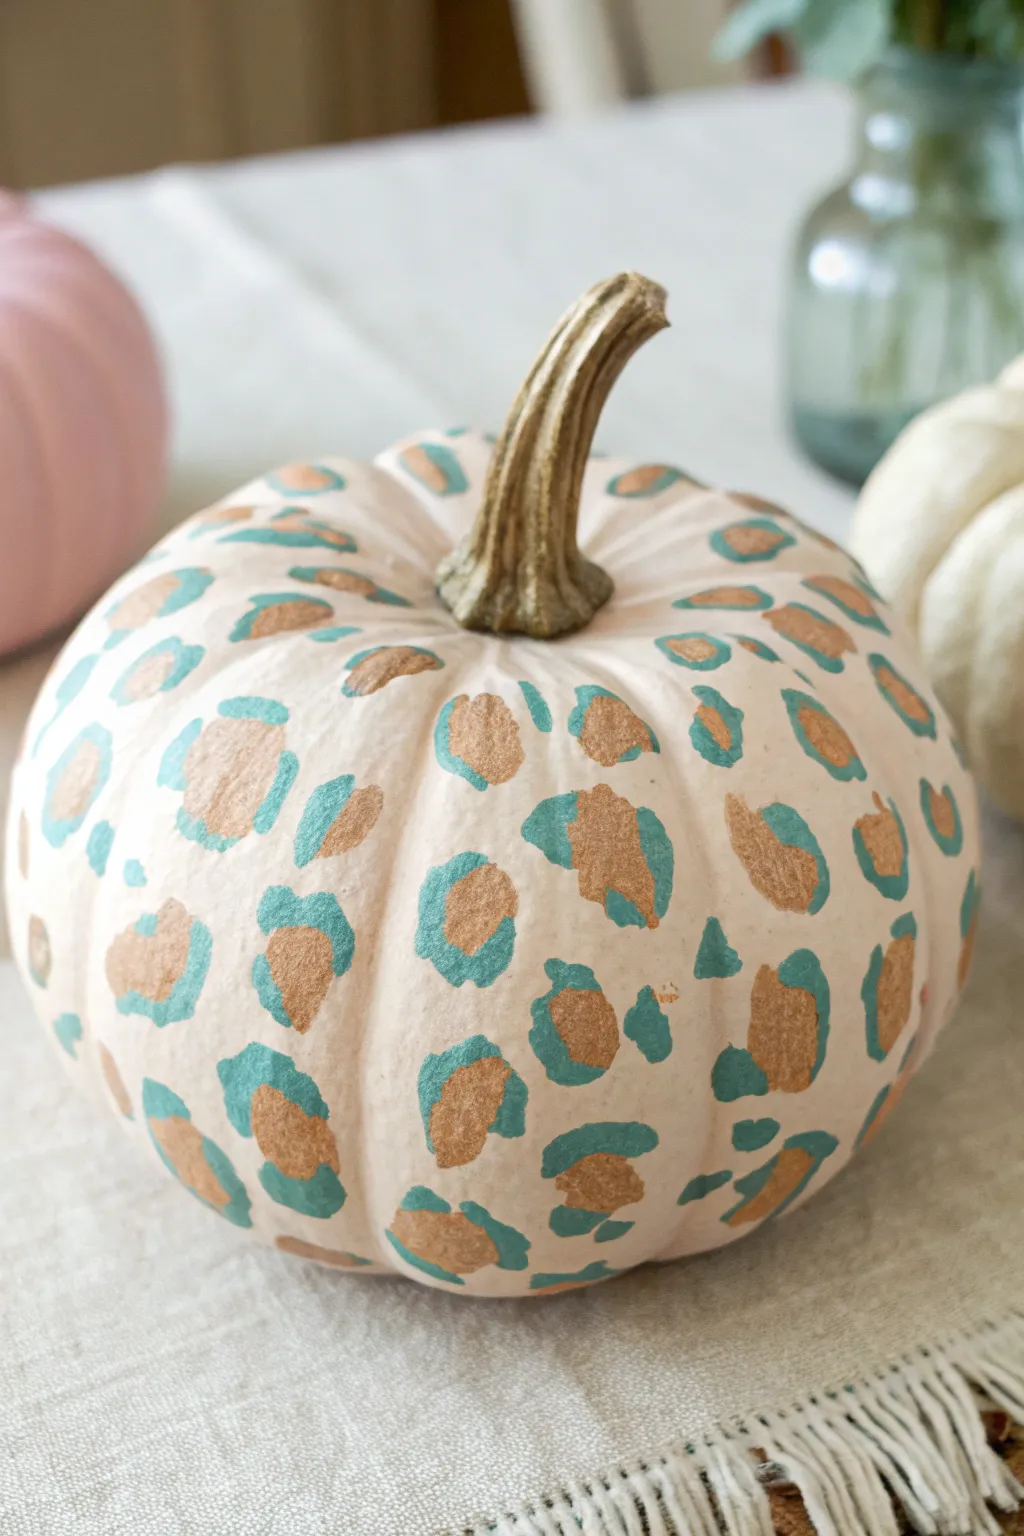
Bring high fashion to your fall decor with this stylish leopard print pumpkin project. The soft color palette of cream, teal, and gold gives the classic animal print a modern, sophisticated twist that stands out from traditional spooky themes.
Step-by-Step Guide
Materials
- Faux pumpkin (white or cream)
- Acrylic craft paint or chalk paint (light cream/blush base)
- Metallic gold acrylic paint
- Teal or turquoise acrylic paint
- Small round paintbrush (size 2 or 4)
- Fine detail paintbrush (size 0 or 1)
- Paper plate or palette
- Cup of water
- Paper towels
- Clear matte sealer spray (optional)
Step 1: Painting the Base
-
Prepare your pumpkin:
Start with a clean, dry pumpkin. If you are using a bright orange pumpkin, prime it first with a white primer to ensure your lighter colors show up vibrantly. -
Apply the base coat:
Using a larger brush, paint the entire pumpkin with your cream or soft blush acrylic paint. A chalky finish paint works wonderfully here for a matte look. -
Let it dry completely:
Allow the first coat to dry fully. This usually takes about 20-30 minutes. -
Second coat:
Apply a second coat of your base color to ensure full, opaque coverage where no original pumpkin color peeks through. -
Protect the stem:
As you paint near the top, carefully cut in around the stem with a smaller brush to keep it natural. I like to leave the stem unpainted for a nice textural contrast.
Natural Variation
Don’t stress about perfection. Real leopard spots are messy and irregular. Shaky hands actually make for better, more realistic animal print patterns.
Step 2: Creating the Leopard Spots
-
Load the gold paint:
Squeeze a dollop of metallic gold paint onto your palette. Using your small round brush, pick up a moderate amount of paint. -
Paint organic shapes:
Dab irregular, blob-like shapes onto the pumpkin surface. These will be the centers of your leopard spots. -
Vary the sizes:
Create spots of different sizes—some large, some medium, and tiny dots in between—to keep the pattern looking random and natural. -
Space them out:
Leave ample space between your gold blobs. Remember that you’ll be adding a teal outline, which will increase the size of each spot. -
Work in sections:
Paint a few gold spots at a time, turning the pumpkin as you go, rather than trying to do one whole side at once. -
Allow gold to dry:
Let the gold spots dry until they are no longer tacky to the touch. Metallic paints can sometimes take a little longer to set.
Glam Upgrade
While the paint is wet, sprinkle ultra-fine glitter over just the gold spots for extra sparkle, or use gold leaf instead of paint for a luxurious texture.
Step 3: Adding the Teal Accents
-
Prepare the teal paint:
Switch to your teal or turquoise acrylic paint. You want a color that contrasts sharply but pleasingly with the gold. -
Start the outlines:
Using the fine detail brush, paint around the edges of your dried gold spots. You aren’t circling them completely. -
Bracket technique:
Paint two or three ‘brackets’ or ‘C’ shapes around each gold center. Leave gaps between the teal strokes so the base color shows through. -
Keep edges distinctive:
Don’t make your lines too smooth. A slightly jagged, wiggly stroke mimics the texture of real fur much better than a perfect line. -
Fill empty spaces:
Identify any large gaps between your main spots. Use the teal paint to add small, lone dots or tiny squiggles in these empty areas to balance the pattern. -
Check density:
Step back and look at the pumpkin from a distance. If one area looks sparse, add a few more small teal marks. -
Final dry time:
Let the entire pumpkin sit undisturbed for at least an hour to ensure the thickest parts of the paint are fully cured. -
Seal the deal:
If you plan to display this outdoors or want extra durability, mist the finished pumpkin lightly with a clear matte sealer in a well-ventilated area.
Now you have a stunning, fashion-forward pumpkin that adds a touch of wild elegance to your table setting
Art Deco Fan Motifs and Bold Borders
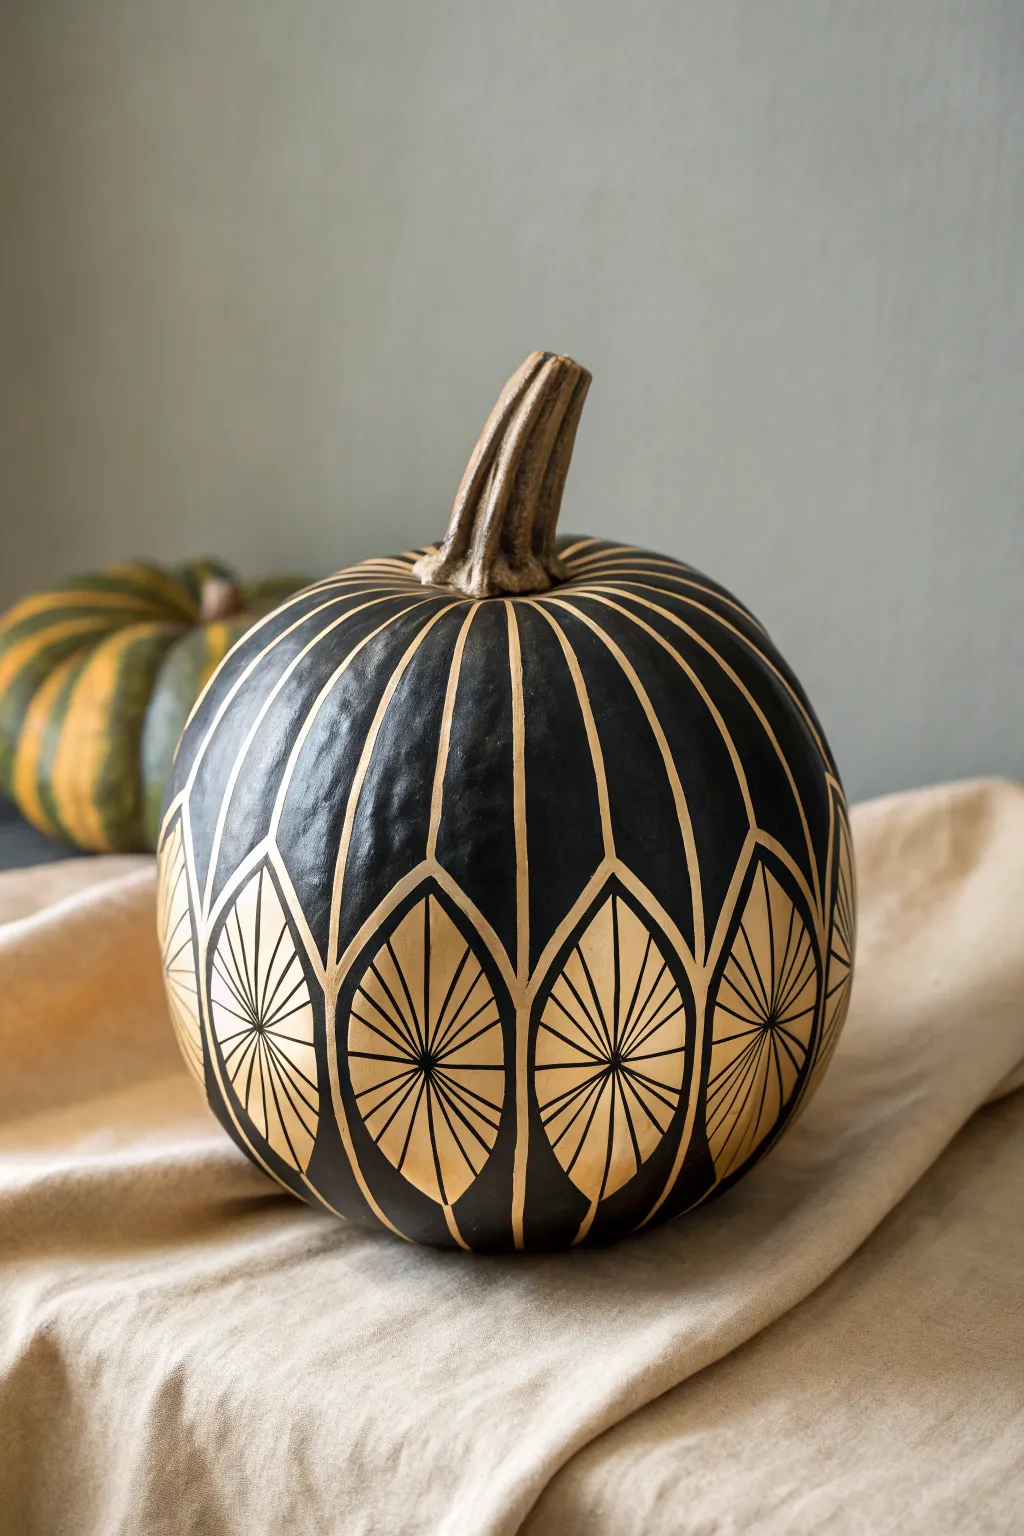
Transform a simple pumpkin into a sophisticated centerpiece featuring stark black contrast and shimmering gold geometric lines. This Art Deco-inspired design uses clean, repeating fan motifs to create a luxurious look perfect for an upscale autumn display.
Detailed Instructions
Materials
- Medium or large artificial craft pumpkin (black preferred, or orange)
- Matte black spray paint (if starting with an orange pumpkin)
- Metallic gold paint pen (fine tip 0.7mm)
- Metallic gold paint pen (medium tip 2-3mm)
- Metallic gold acrylic paint
- Small flat paintbrush
- Soft measuring tape
- White or yellow chalk pencil
- Circular stencil or a small round object (like a jar lid, approx. 2-3 inches wide)
- Damp cloth (for mistakes)
- Clear matte sealant spray
Step 1: Base Preparation
-
Clean and Prep:
Wipe down your pumpkin with a damp cloth to remove any dust or oils that might repel the paint. If you are using a real pumpkin, ensure it is fully dry. -
Apply the Base Coat:
If your pumpkin isn’t already black, take it to a well-ventilated area and apply two even coats of matte black spray paint. Let the first coat dry for 20 minutes before applying the second to ensure solid coverage. -
Paint the Stem:
Using your gold acrylic paint and a small flat brush, paint the entire stem. I find that brushing vertically from the base of the stem upwards emphasizes its natural ridges. -
Stem Detailing:
Once the base gold on the stem is dry, you can dry-brush a tiny bit of black paint into the deepest crevices of the stem to add depth and make it look more realistic.
Paint Pen Troubleshooting
If the gold ink skips or looks sheer, press the tip on scrap paper to re-saturate it. Don’t press hard purely on the pumpkin surface, or you might dent the foam or drag the base paint
Step 2: Drafting the Design
-
Mark Vertical Ribs:
Identify the natural vertical recessed lines (ribs) of the pumpkin. Using your chalk pencil, lightly trace these lines from the stem down to the base to establish your primary vertical guides. -
Establish the Fan Height:
Decide where the top of your leaf-shaped fans will sit. Measure up about 4-5 inches from the bottom center of the pumpkin and make a small mark on every other vertical rib. -
Sketch the Ovals:
Using a jar lid or freehanding with the chalk pencil, draw pointed oval shapes (like a marque shape) at the bottom. The top point of the oval should align with the vertical rib line, and the bottom point should reach toward the base of the pumpkin. -
Check Symmetry:
Take a step back and look at your chalk sketches. Adjust any ovals that look lopsided or too close together before you commit with permanent ink.
Step 3: Painting the Gold Lines
-
Outline the Fans:
Shake your medium-tip gold paint pen well. Carefully trace over the chalk outlines of your leaf/fan shapes at the bottom creating a bold, solid border. -
Draw Vertical Spines:
Draw the main vertical stripe running from the stem down to the top point of each fan shape. For the ribs without a fan at the bottom, draw the line all the way down to the base. -
Add Fan Sines:
Switch to the fine-tip gold pen. Inside each oval shape, draw a straight vertical line down the center, connecting the top point to the bottom point. -
radiating Lines:
Find the center point of that vertical line inside the oval. From this central hub, draw radiating lines outward to the edge of the oval, similar to the veins of a leaf or spokes of a wheel. -
Upper Radiating Lines:
Now move to the top section. Between the main vertical stripes, draw additional gold lines that start at the stem and curve gently outward, terminating just above where the fan shapes begin. -
Refine Connections:
Use the medium pen to thicken any intersections where lines meet, creating distinct ‘nodes’ or arched connections between the vertical lines just above the fan shapes. -
Clean Up:
Once the gold ink is completely dry (give it at least 30 minutes), gently wipe away any visible chalk marks with a slightly damp cloth or a cotton swab. -
Seal the Work:
Finish by spraying a light coat of clear matte sealant over the entire pumpkin to protect the gold finish from scratching or fading.
Level Up: Crystal Accents
For added glamour, glue a small flat-back Swarovski crystal or gold rhinestone at the center point of each fan motif where the radiating lines intersect
Place your finished masterpiece on a neutral linen cloth to let the black and gold contrast truly shine
Spooky Tree Silhouettes for Grown-Up Halloween Style
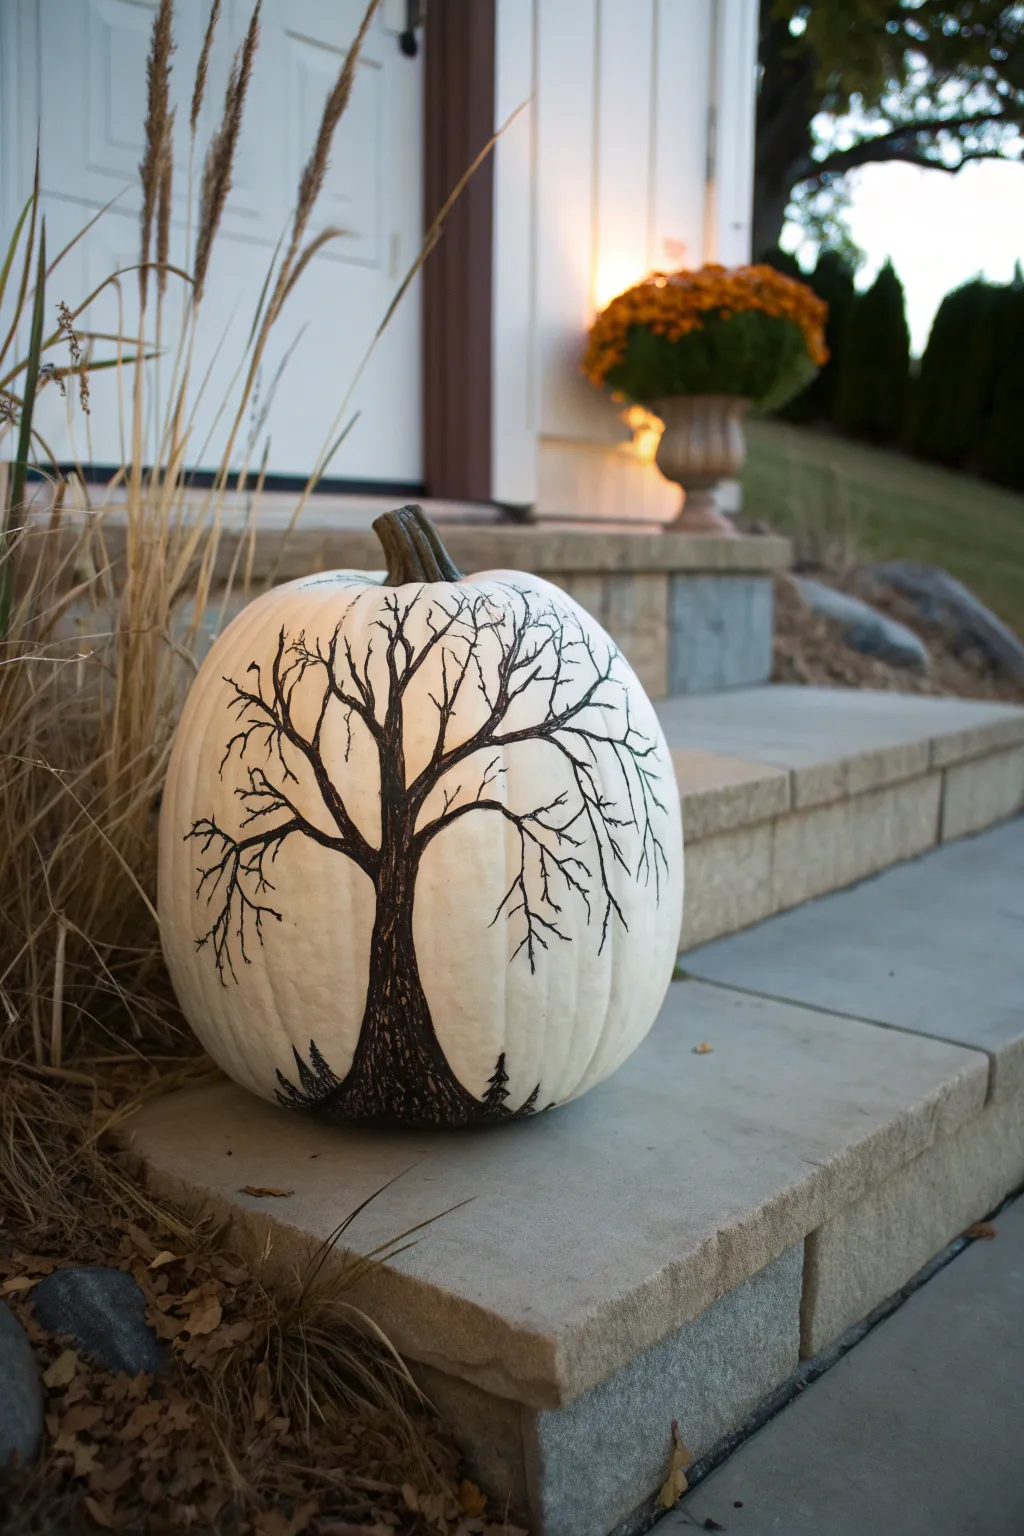
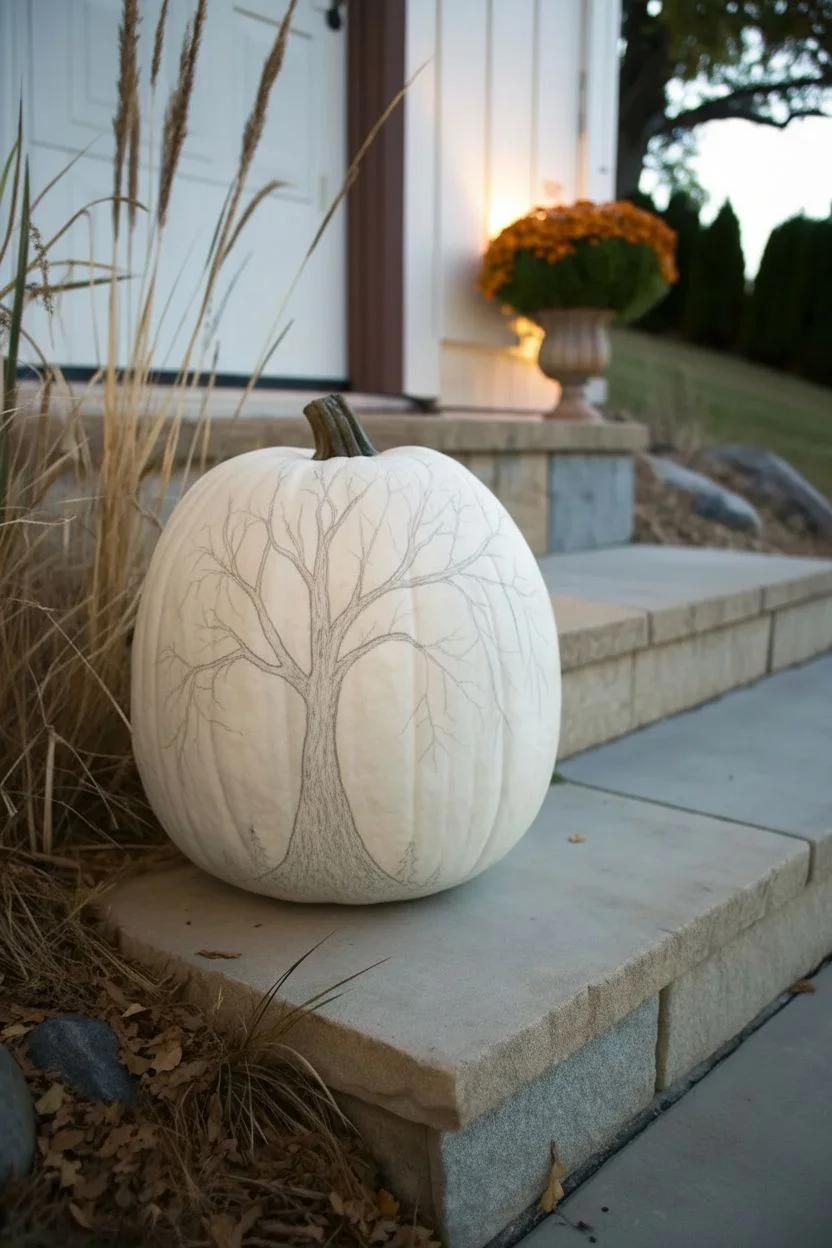
Embrace a minimalist and sophisticated Halloween aesthetic with this striking black-and-white design. The stark contrast of a gnarled, leafless tree against a pristine white pumpkin creates an eerie yet elegant decoration perfect for a modern porch display.
Step-by-Step
Materials
- Large faux white pumpkin (or real white pumpkin)
- Black fine-point permanent marker (like a Sharpie)
- Black ultra-fine point permanent marker
- Soft graphite pencil
- Kneaded eraser
- Black acrylic paint (optional, for filling large areas)
- Small round detail paintbrush (size 0 or 1)
- Damp cloth
- Clear matte acrylic sealer spray
Step 1: Preparation and Sketching
-
Clean the surface:
Before you begin, wipe down your pumpkin with a damp cloth to remove any dust or oils. If you are using a real pumpkin, ensure it is completely dry before proceeding. -
Plan the placement:
Visualize the tree’s position. The trunk should be centered near the bottom third, allowing the branches to sprawl upward and outward across the pumpkin’s rounded belly. -
Draft the trunk:
Using your soft graphite pencil, lightly sketch the main trunk. Start wide at the base and taper it gently as you move up towards the center of the pumpkin. -
Sketch primary branches:
Draw three or four main branches splitting off from the top of the trunk. Let them curve naturally, following the contours of the pumpkin’s ridges. -
Add secondary branches:
Branch off from your main limbs with smaller lines. Keep these lines jagged and somewhat erratic to mimic the spooky look of an old, dead tree. -
Detail the base:
At the very bottom of the trunk where it meets the ground, sketch a slightly uneven mound to represent earth or roots, grounding the tree visually.
Step 2: Inking the Silhouette
-
Outline the trunk:
Take your black fine-point permanent marker and carefully trace over the pencil lines of the main trunk. I like to use short, sketchy strokes here to give the bark a bit of rough texture. -
Fill in the trunk:
Color in the entire trunk area with the marker. If the area is quite large, you can speed this up by using a small brush and black acrylic paint instead. -
Define the main limbs:
Trace the thicker primary branches with the fine-point marker. Ensure the transition from the trunk to the branches is smooth and organic, not angular. -
Switch to ultra-fine marker:
For the delicate upper branches, switch to the ultra-fine point marker. This tool offers the precision needed for those wispy, twig-like ends. -
Create twiggy details:
Draw many tiny, lightning-bolt shaped twigs extending from the branch ends. Don’t overthink this; rapid, confident marks often look more natural than slow, deliberate ones. -
Add texture marks:
Go back over the trunk and thicker branches, adding a few vertical squiggles or lines blank space inside the black areas isn’t necessary, but adding slightly jagged edges to the silhouette enhances the gnarly feel. -
Ground the image:
Fill in the base mound with solid black. You can add tiny vertical flicks at the edges to suggest wild grass growing around the roots. -
Include tiny landscape details:
To add depth, draw two very small, simple pine tree silhouettes on either side of the main trunk base. This plays with scale and makes the main tree look enormous.
Marker Mastery
If using permanent marker, work from top to bottom if you’re right-handed (or left to right) to prevent your hand from smudging fresh ink.
Step 3: Finishing Touches
-
Check for gaps:
Inspect your black fill. If you see streaks where the white pumpkin shows through, go over them with a second layer of marker or paint. -
Clean up sketch lines:
Once the ink is fully dry (give it some time to avoid smearing), gently dab the surface with a kneaded eraser to lift any visible pencil marks. -
Seal the design:
In a well-ventilated area, spray a light coat of clear matte acrylic sealer over the painted side. This protects the marker from fading or running if the pumpkin gets damp outdoors.
Add a Visitor
Enhance the spooky vibe by drawing a tiny silhouette of an owl perched on one of the horizontal branches or a few bats flying near the top.
Now you have a stunning, high-contrast piece of fall decor that looks great day or night
Creepy Realistic Cat Eye Illusion Pumpkins
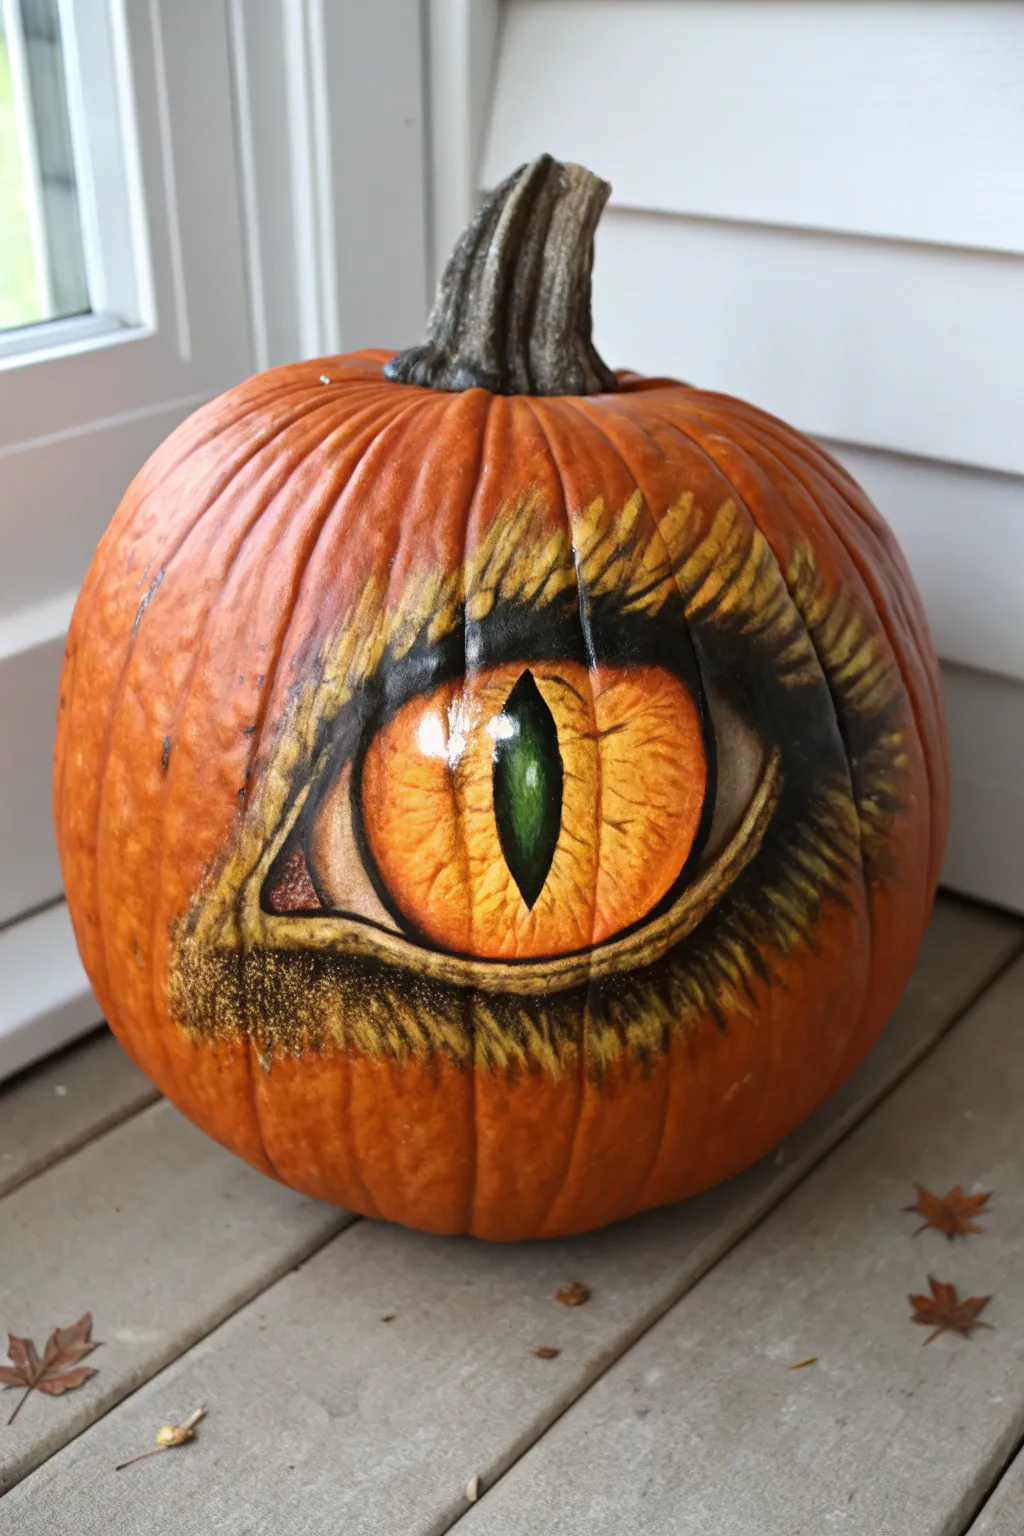
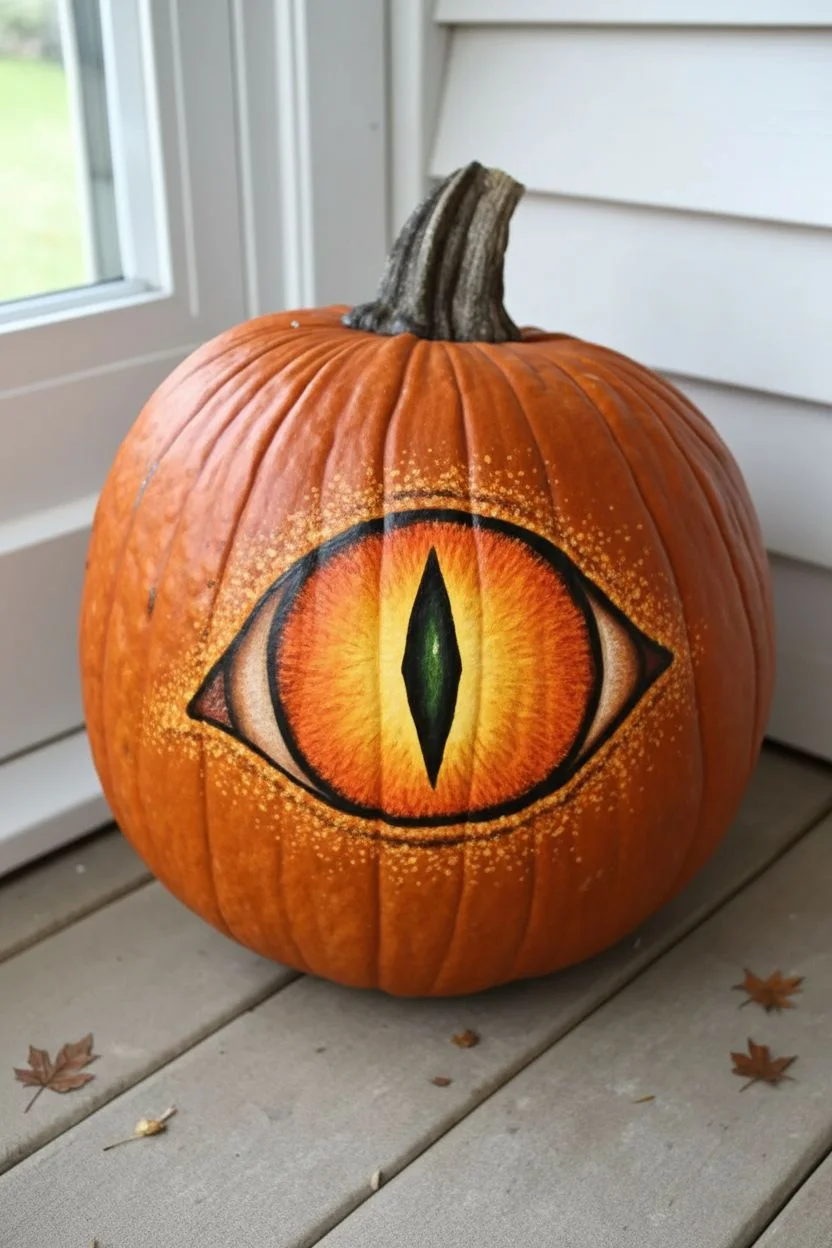
Transform a standard pumpkin into a mythical beast with this strikingly realistic dragon eye tutorial. The illusion relies on careful shading and high-contrast highlights to make the eye appear deep, wet, and incredibly lifelike.
Step-by-Step Tutorial
Materials
- Large orange pumpkin (with a smooth surface)
- Acrylic craft paints (Black, White, Bright Orange, Deep Yellow, Dark Green, Metallic Gold)
- Wide flat brush (1 inch)
- Medium round brush
- Small fine liner brush
- High-gloss varnish or polyurethane
- Palette or paper plate
- Water and paper towels
- Pencil or chalk
Step 1: Sketching and Base Layers
-
Clean and prep:
Begin by washing your pumpkin with mild soapy water to remove dirt and oils. Dry it thoroughly; paint adheres best to a clean, room-temperature surface. -
Outline the eye shape:
Using a pencil or a piece of white chalk, lightly sketch a large almond shape on the flattest side of the pumpkin. Don’t worry about perfection; organic shapes look more realistic. -
Block in the iris background:
Fill the center of your almond shape with a solid coat of Deep Yellow acrylic paint. You may need two coats for full opacity, letting that first layer dry completely in between. -
Add the orange gradient:
While the yellow is dry, use your medium round brush to sponge or stipple Bright Orange paint around the outer edges of the yellow circle, blending it slightly inward to create a glowing gradient effect. -
Paint the pupil:
With black paint and a steady hand, paint a sharp, vertical diamond shape or slit in the exact center of the iris. -
Add the pupil highlight:
Mix a tiny bit of Dark Green into the center of your black pupil, or add a thin vertical stroke of green, to give the pupil depth and that reptilian feeling.
Make it Pop
Use neon or glow-in-the-dark acrylics for the yellow iris base. When lit by a porch light or blacklight, the eye will seem to glow aggressively in the dark.
Step 2: Adding Details and Texture
-
Create the iris texture:
Using a fine liner brush and watered-down Bright Orange or a reddish-brown, paint thin, wiggly lines radiating from the pupil toward the edge of the iris, mimicking the muscle fibers of an eye. -
Define the eye outline:
Take your black paint and outline the entire almond shape. Make the line thicker at the top and bottom corners to define the ‘lid’ area. -
Shadow the upper lid:
Mix a wash of black paint with a little water. Paint a translucent shadow across the top third of the yellow/orange iris to simulate the shadow cast by the upper eyelid. -
Paint the surrounding darks:
Using the wide flat brush and black paint, cover the pumpkin skin immediately surrounding the eye. Don’t make a hard edge; feather the brushstrokes outward. -
Simulate fur or scales:
Load your brush with Metallic Gold mixed with a little yellow over the dried black surround. Use quick, flicking motions to create texture that resembles scales or fur pulling away from the eye. -
Deepen the contrast:
I like to go back in with pure black and deepen the crevices between the gold ‘scales’ to make the texture pop. -
Add the tear duct:
In the inner corner of the eye (near the nose area), use a mix of pink or light orange to paint a small, triangular tear duct for anatomical realism.
Fixing Streakiness
If your yellow paint looks streaky, don’t keep brushing wet paint. Let it dry fully, then sponge on the second coat rather than brushing it for better coverage.
Step 3: Highlights and Finishing Touches
-
The reflection highlight:
This step is crucial. Paint a bright, crisp white square or rectangle overlapping both the pupil and the iris on the upper left side. This creates the ‘wet’ look. -
Add secondary reflections:
Add a few smaller, softer dots of white on the opposite side of the iris to balance the reflection. -
Highlight the ridges:
Take your white paint and gently dry-brush the very tops of the pumpkin’s natural ridges surrounding the painted eye to integrate the painting with the pumpkin’s form. -
Apply gloss varnish:
Once all paint is 100% dry, apply a high-gloss varnish ONLY over the eyeball decoration. Leave the surrounding pumpkin skin matte. -
Let it cure:
Allow the varnish to dry completely in a dust-free area before displaying your creation outdoors.
Now you have a watchful guardian for your porch that looks startlingly alive
Pumpkin Landscape Paintings Like Tiny Curved Canvases

Transform a smooth white pumpkin into a serene window onto a mountain landscape. This project uses soft watercolor-like washes and stark silhouettes to create depth and atmosphere on a unique curved canvas.
How-To Guide
Materials
- White craft pumpkin or real white pumpkin (smooth surface is best)
- Acrylic paints: white, sky blue, muted teal, slate blue, warm orange, peach, black
- Paintbrushes: wide flat brush, medium round brush, fine liner brush
- Water cup and paper towels
- Palette or paper plate
- Matte spray sealant (optional)
- Pencil (light H grade)
Step 1: Preparation and Sky Layer
-
Clean the surface:
Wipe down your pumpkin with a damp cloth to remove any dust or oils. If you are using a real pumpkin, ensure it is completely dry. -
Mix the sunset colors:
On your palette, prepare a soft peach color by mixing white with a tiny dot of orange. You want this to be very pale and airy. -
Paint the upper gradient:
Using a wide flat brush, paint a band of the peach color around the upper-middle section of the pumpkin. Keep the strokes horizontal and somewhat loose. -
Add warmth:
While the peach layer is still slightly wet, blend in a very small amount of warm orange just below it. Use a dry brush technique to fade the edges upward into the white of the pumpkin for a foggy effect. -
Let the sky set:
Allow these background wash layers to dry completely. Acrylics dry fast, but since we are layering landscapes over this, it needs to be touch-dry so colors don’t mud.
Step 2: Creating the Mountain layers
-
Sketch the horizon:
Lightly sketch a rolling, uneven horizon line around the circumference of the pumpkin with a pencil. This doesn’t need to be perfect; mountains are naturally irregular. -
Mix the distant mountain color:
Create a pale, misty blue by mixing plenty of white with a drop of sky blue and a hint of slate grey. It should look like mountains far in the distance. -
Paint the first range:
Fill in the mountain shape defined by your pencil line. I like to keep the bottom edge of this layer somewhat jagged to suggest rugged terrain. -
Create the mid-ground color:
Mix a slightly darker, greener teal color. It should be distinct from the first layer but still muted. -
Paint the second range:
Paint a second range of mountains overlapping the first one, sitting slightly lower on the pumpkin. Ensure the peaks of this new layer don’t perfectly align with the ones behind it. -
Add a third layer (optional):
For extra depth, mix a darker slate blue and add a third, lower layer of hills. This creates that classic atmospheric perspective where things get darker as they get closer. -
Dry thoroughly:
This is crucial: allow the mountain layers to dry completely before starting the trees, otherwise the black paint will bleed into the wet blue.
Uneven Coverage?
If the mountain paint looks streaky, don’t keep brushing wet paint. Let the first coat dry fully 10 minutes, then apply a second thin coat for opacity.
Step 3: Silhouettes and Details
-
Load the liner brush:
Thoroughly wet your fine liner brush and load it with opaque black acrylic paint. The paint should be inky but not dripping. -
Paint the tree trunks:
Start painting vertical lines for the pine trees. Place the tallest ones in the foreground (lowest on the pumpkin) and shorter ones slightly higher up to mimic distance. -
Stipple the foliage:
Using the very tip of the brush, create the pine branches. Start narrow at the top and tap the brush in a zig-zag motion, getting wider as you move down the trunk. -
Vary the density:
Paint some trees dense and full, and others a bit sparse. Group some trees closely together in a clump, and leave gaps elsewhere to let the mountains show through. -
Anchor the forest:
Where the trees meet the bottom of your painted area, dab black paint horizontally to create a dark forest floor, blending the base of the trunks together. -
Paint the birds:
Using your finest brush, add tiny ‘V’ shapes in the peach sky area. Make some smaller than others to show a flock flying at different distances. -
Seal (optional):
If you plan to keep this pumpkin for years (if artificial) or want to protect it from moisture, apply a light coat of matte spray sealant once fully dry.
Golden Hour Glow
Mix a tiny amount of metallic gold paint into your peach sky color for a subtle shimmer that catches the light like a real sunset.
Place your masterpiece on a mantle or table to bring a breath of fresh mountain air into your home


Have a question or want to share your own experience? I'd love to hear from you in the comments below!