Painting a rug is one of my favorite ways to turn a plain floor covering into something that looks totally custom without spending a fortune. If you’ve got a tired rug (or a boring blank one), these rug painting ideas will help you map out a design that feels like you and actually works on a textured surface.
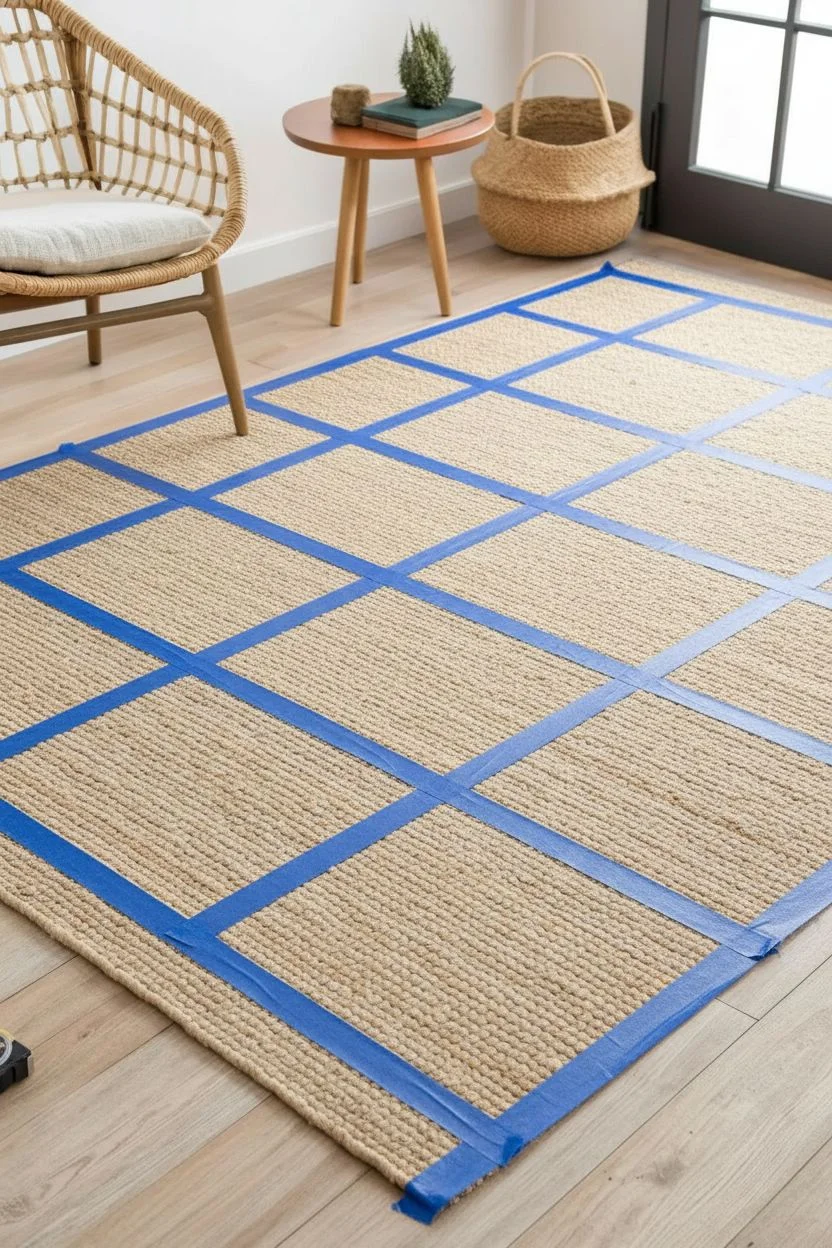
Classic Painted Rug Stripes With Painter’s Tape
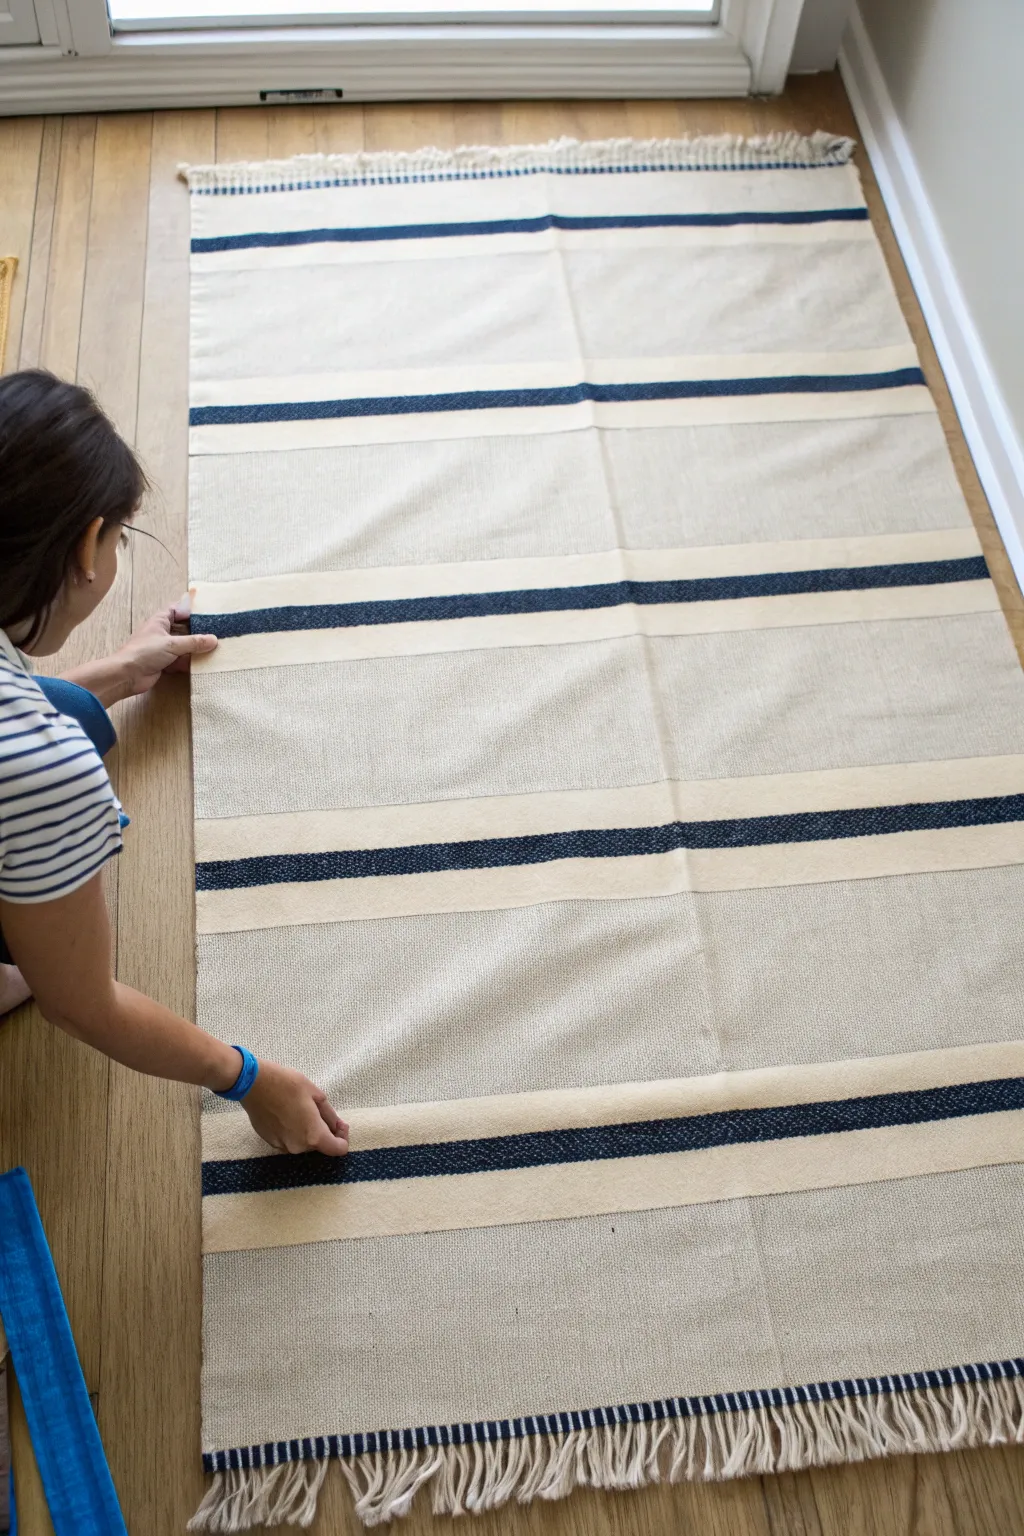
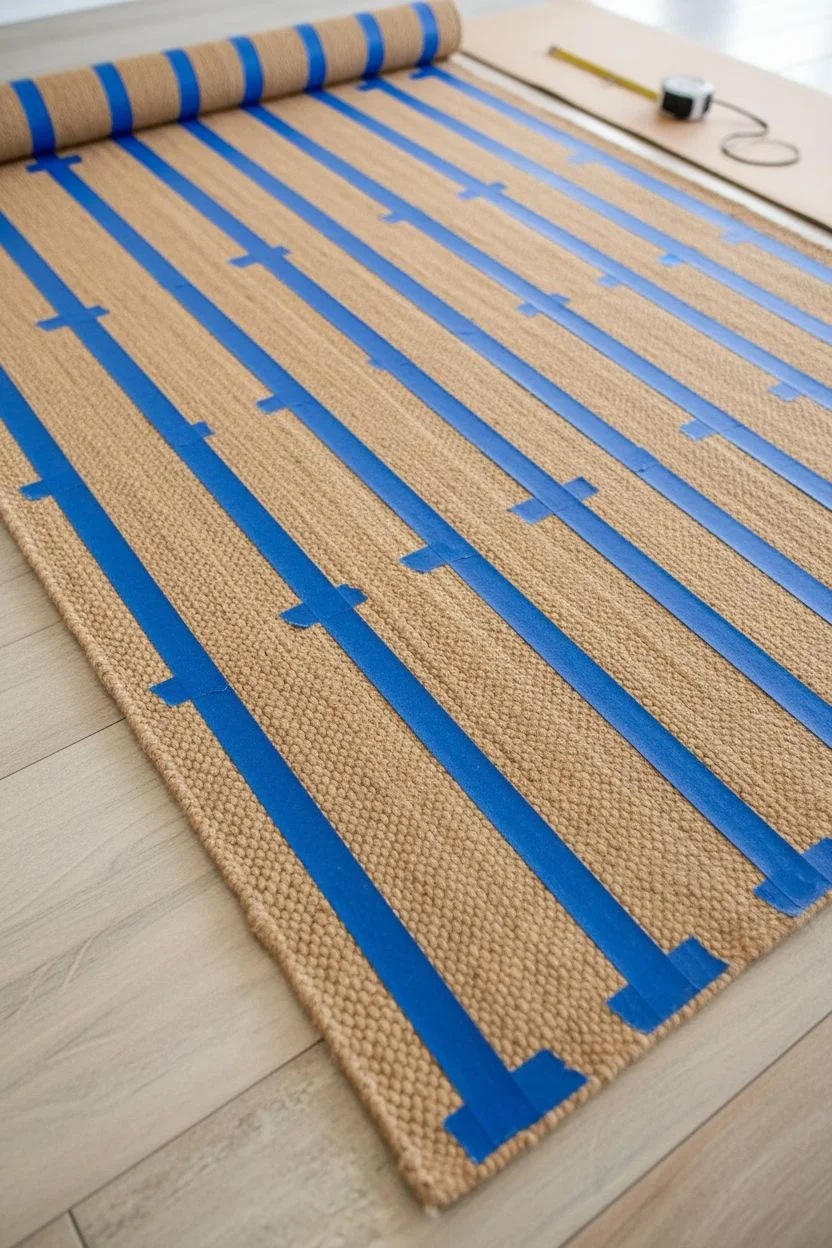
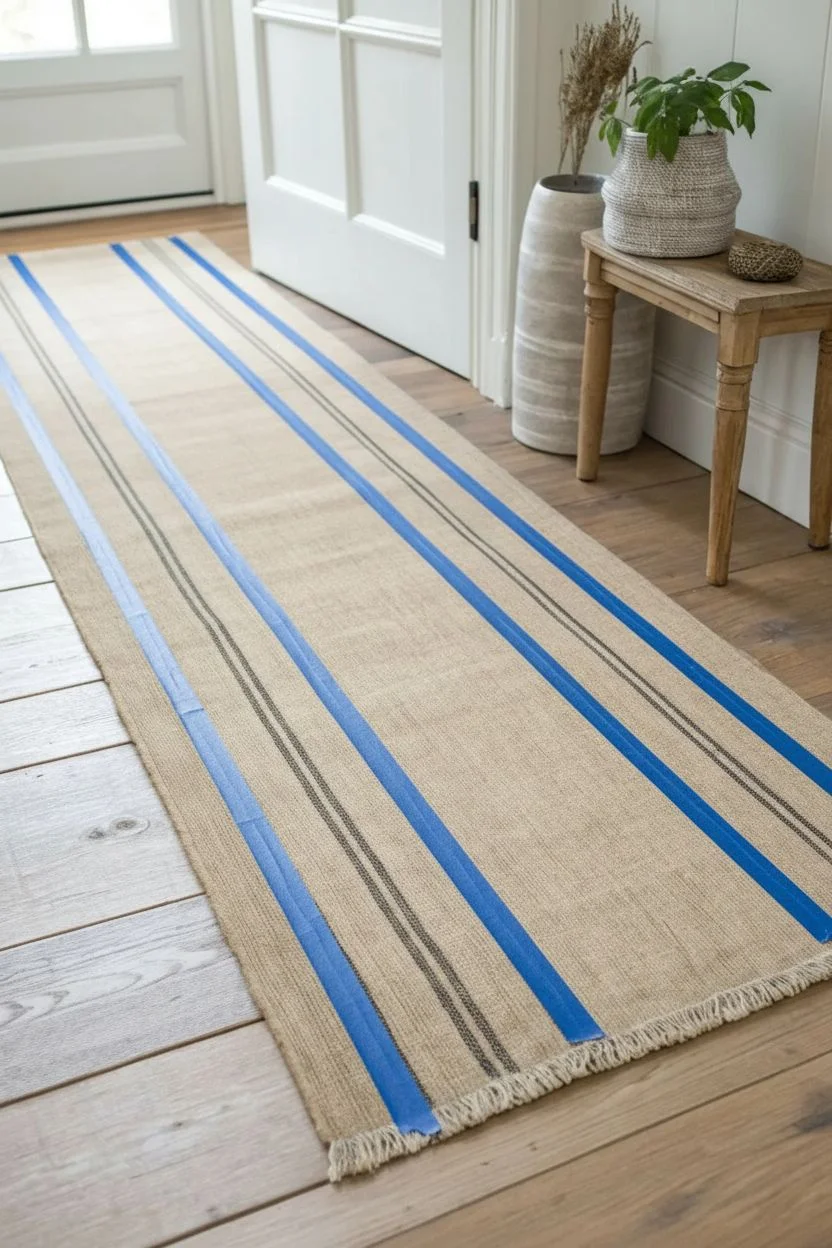
Transform a plain, inexpensive flatweave rug into a coastal-inspired accent piece using just paint and tape. This project creates distinct bands of navy and cream that add instant structure and style to any hallway or living space.
Detailed Instructions
Materials
- Flatweave cotton or jute runner rug (plain)
- Fabric paint or acrylic paint mixed with fabric medium
- Navy blue paint
- Painter’s tape (various widths, preferably 1-inch and 2-inch)
- Measuring tape
- Foam roller or stencil brush
- Drop cloth or cardboard to protect the floor
- Pencil or chalk for marking
Step 1: Preparation and Layout
-
Prepare the workspace:
Lay down a drop cloth or large piece of cardboard on a flat surface to protect your flooring from any paint bleed-through. -
Unroll and flatten:
Unroll your plain runner rug completely. If it has been rolled up for a while, you might need to weigh down the corners with heavy books for a few hours to ensure it lies perfectly flat before you begin. -
Plan the stripe pattern:
Decide on your repeating pattern. For the look in the image, you will want wide sections of the original rug showing, punctuated by a pattern of ‘stripe-gap-stripe’. -
Mark groupings:
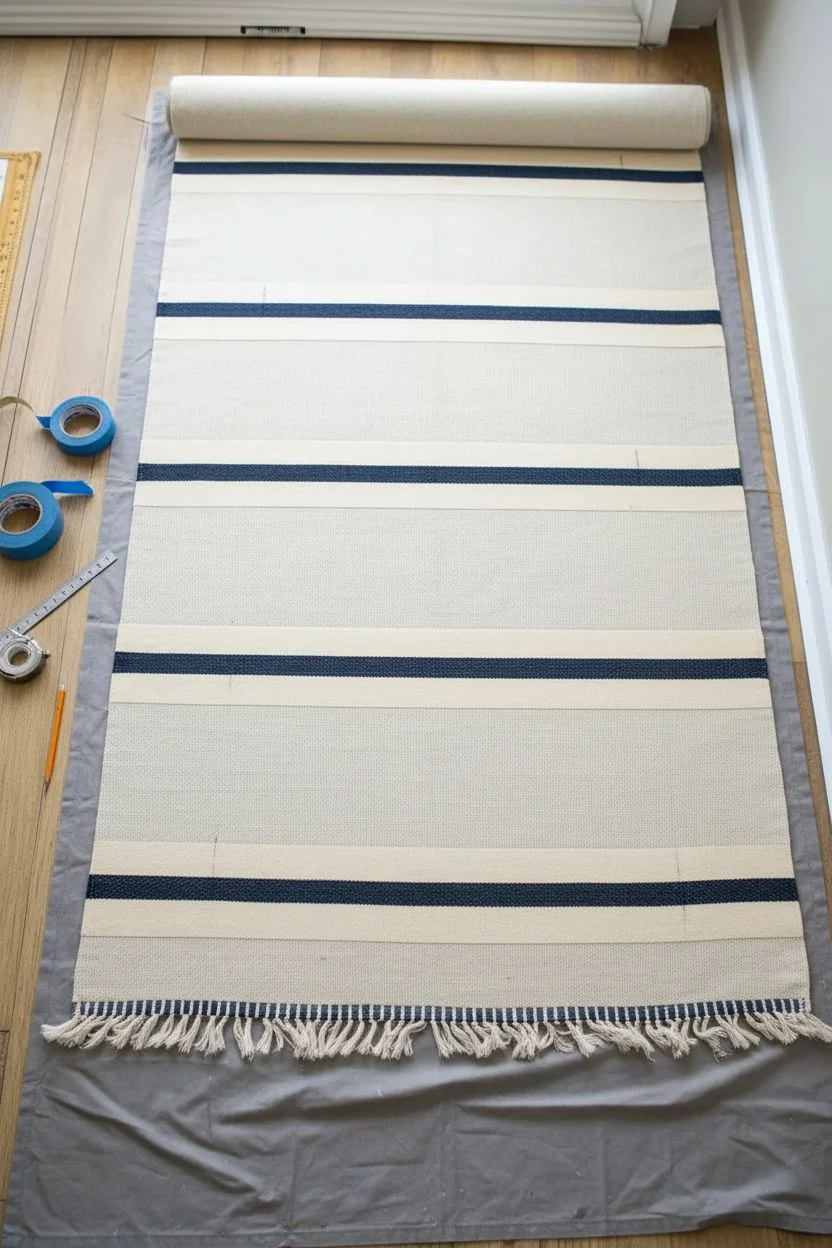
Using a measuring tape and a pencil or light chalk, make small marks along the edge of the rug to denote where each stripe grouping will sit. Space these groupings evenly—about 12 to 18 inches apart looks balanced.
Seal the Deal
Before painting the navy color, paint a thin layer of the *original* rug color (or clear medium) over the tape edges. This blocks gaps so the blue lines stay crisp.
Step 2: Taping the Design
-
Apply the first tape line:
Apply a strip of painter’s tape across the width of the rug at your first mark. Press it down firmly to adhere it to the fabric fibers. -
Create the spacer:
Place a second strip of tape directly adjacent to the first one. This isn’t for painting borders, but rather to act as a spacer to ensure your painted stripes are perfectly parallel and evenly width-spaced. -
Define the first paintable stripe:
Place a third strip of tape next to the spacer tape. Now, remove that middle ‘spacer’ piece. You are left with two pieces of tape with a perfect gap between them—this gap will become your painted stripe. -
Seal the edges:
Once your tape lines are set, run a credit card or the back of a spoon firmly along the edges of the tape. This is crucial for preventing paint from bleeding under the tape on textured rugs. -
Repeat the pattern:
Continue this taping process down the entire length of the rug. You can vary the widths by using different sizes of painter’s tape to create thick and thin line pairings.
Pattern Play
Switch up the visual rhythm by grouping stripes in sets of three (thin-thick-thin) or experimenting with gradient blues for an ombré stripe effect.
Step 3: Painting and Finishing
-
Prepare the paint:
Mix your acrylic paint with fabric medium according to the bottle’s instructions. This ensures the paint stays flexible and doesn’t crack when the rug is walked on. -
Load the roller:
Pour the navy blue paint mixture into a tray. Load your foam roller evenly, ensuring it’s not dripping wet—too much paint causes bleeding on fabric. -
Apply the first coat:
Roll the paint over the exposed rug sections between your tape lines. I find it works best to roll away from the tape edge initially to avoid forcing paint underneath. -
Dab for texture:
If the rug has a heavy weave, use a stencil brush or the tip of the roller to gently dab paint into the lower crevices of the fabric weave. -
Apply a second coat:
Let the first coat dry to the touch (usually 20-30 minutes), then apply a second coat for a deep, saturated navy color. -
Remove the tape:
While the paint is still slightly tacky (do not wait for it to fully cure), carefully peel back the painter’s tape at a 45-degree angle to reveal your crisp lines. -
Let it cure:
Allow the rug to dry undisturbed for at least 24 hours. Check your fabric medium instructions to see if heat setting with an iron is required.
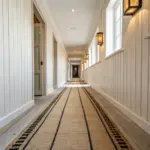
Place your newly stripe-painted rug in the hallway and enjoy the custom coastal vibe you created for a fraction of store-bought prices


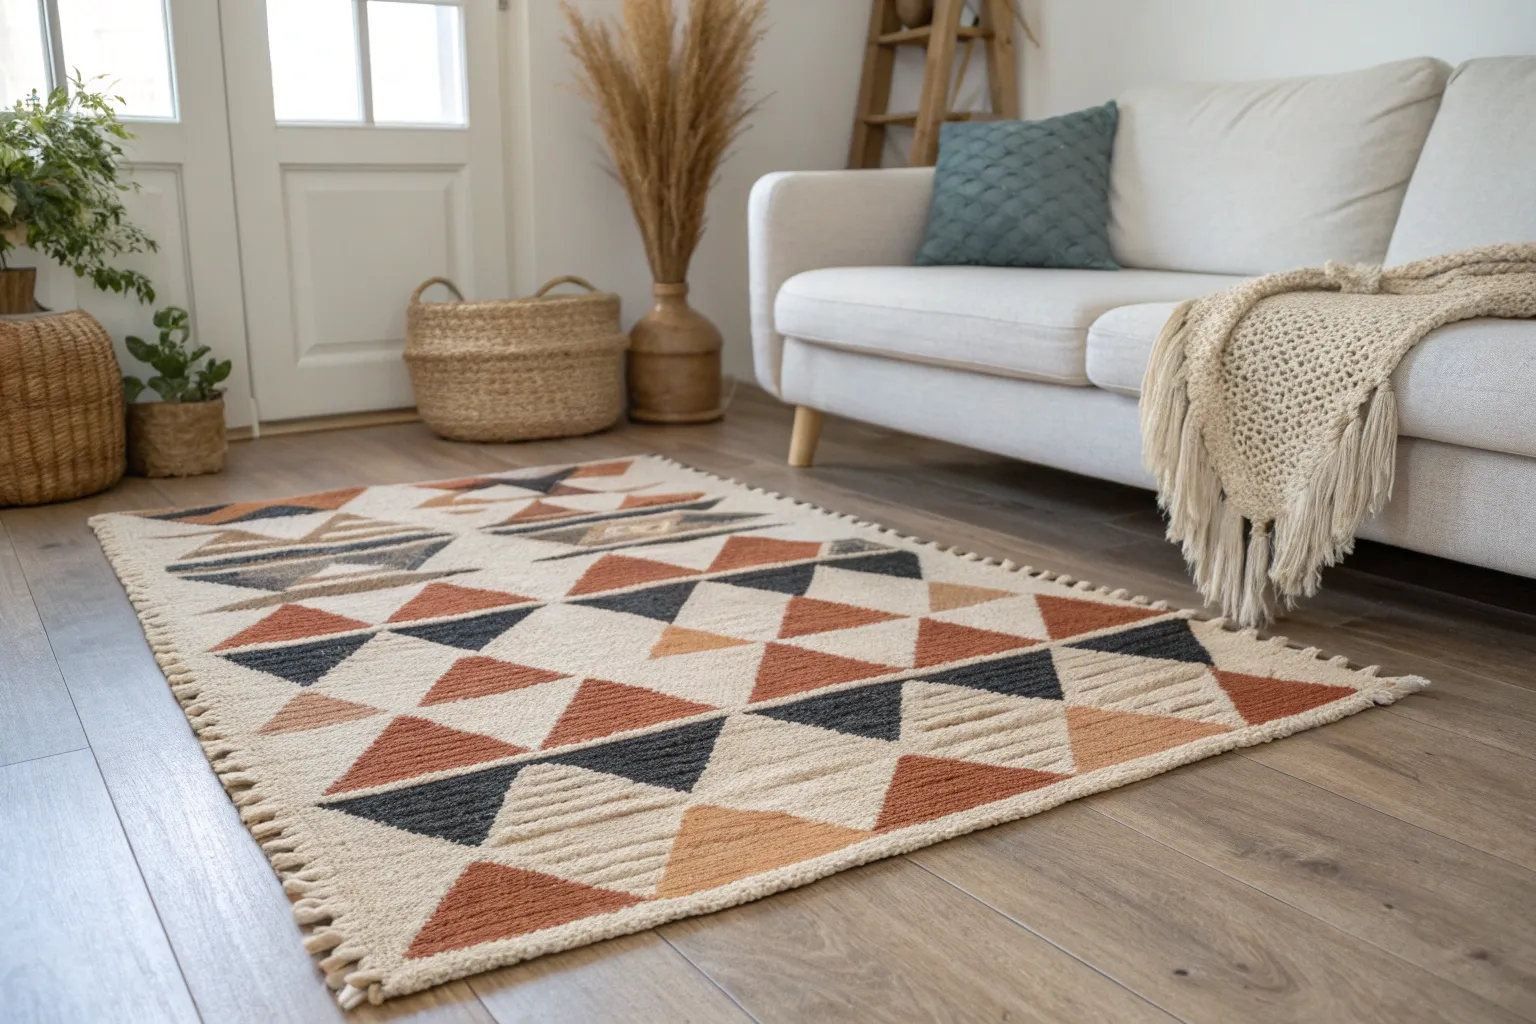
Bold Color-Block Rectangle Rug
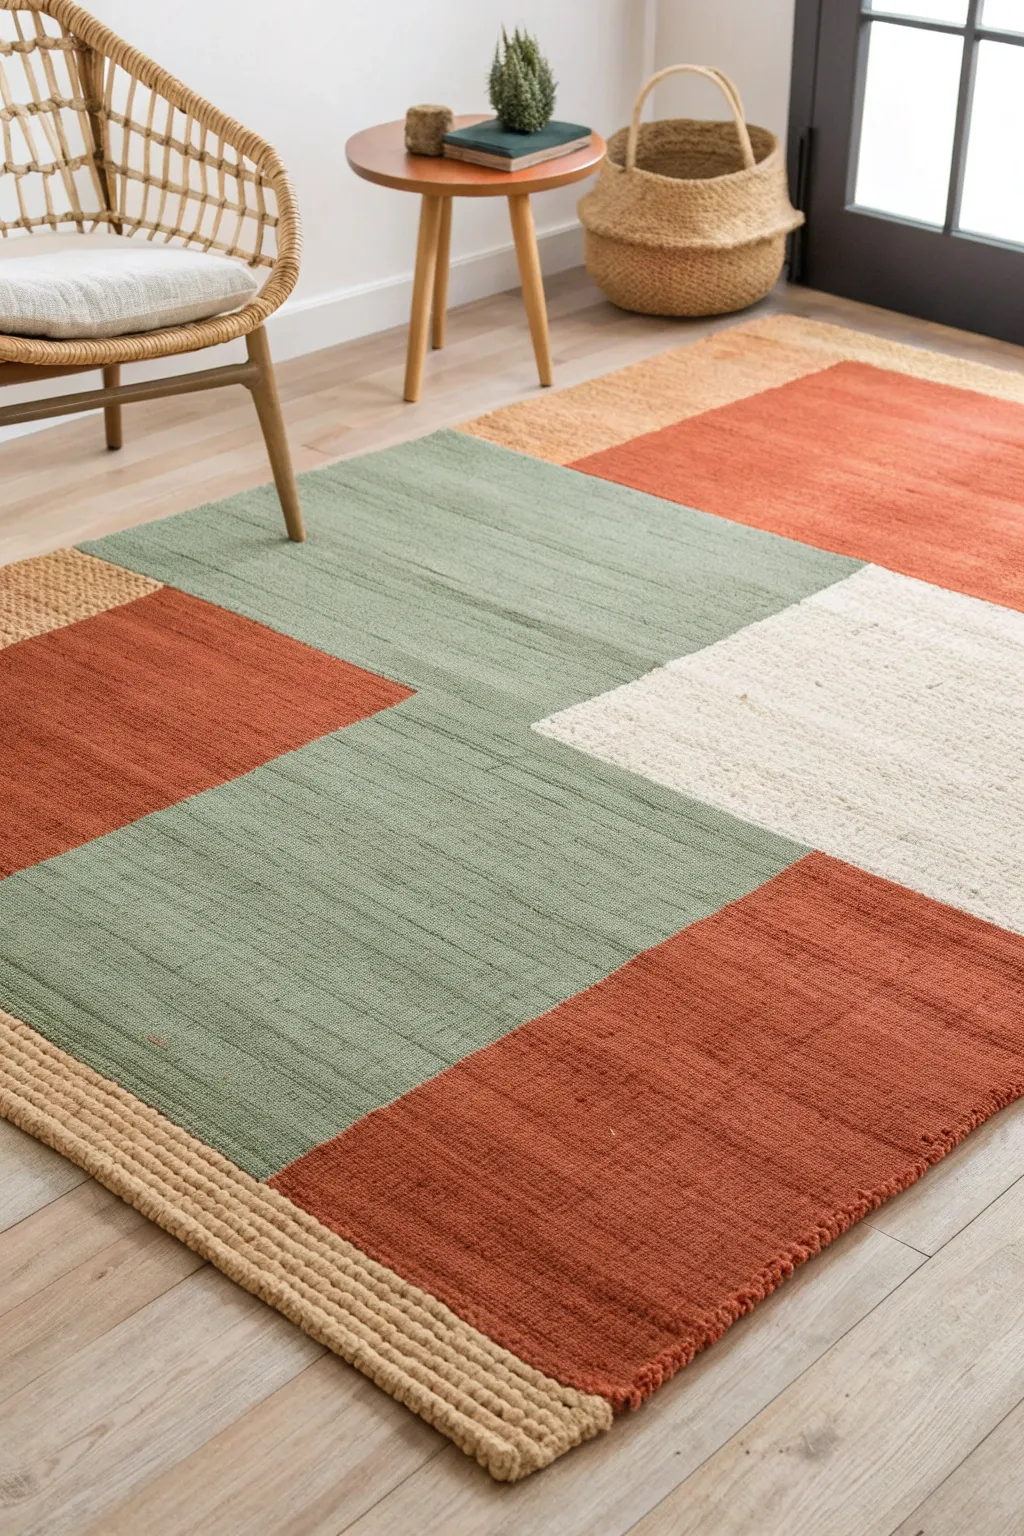
Transform a plain, flat-woven rug into a stunning statement piece with this bold geometric design. The distinct blocks of terracotta, sage, and cream create a mid-century modern vibe that brings warmth and structure to any room.
Step-by-Step Tutorial
Materials
- Large, plain jute or sisal rug (flat weave works best)
- Painter’s tape (2-inch width)
- Fabric medium
- Acrylic latex paint (Terracotta, Sage Green, Cream)
- Small foam roller
- Angled paintbrush (2-inch)
- Drop cloth
- Measuring tape
- Chalk or pencil
Step 1: Planning and Taping
-
Clean the surface:
Start by vacuuming your base rug thoroughly to remove any loose fibers or dust that could interfere with paint adhesion. -
Measure the grid:
Decide on your layout. For this look, you want large, intersecting rectangles. Use a measuring tape to find the center, then mark out your quadrants with chalk or a light pencil. -
Tape the borders:
Leave a wide border around the entire perimeter unpainted to mimic the natural fiber edge shown in the inspiration. Place a strip of tape about 3-4 inches in from the edge. -
Create the sections:
Apply tape along your chalk lines to separate the color blocks. Press the tape down firmly, especially on textured rugs, to prevent bleeding. -
Seal the edges:
I like to run a credit card or a spoon edge over the tape lines to ensure a tight seal against the rough texture of the rug.
Tape Sealing Trick
Paint a thin layer of the rug’s original base color (or clear matte medium) over the tape edges first. This seals the gap, so your colored lines turn out razor-sharp.
Step 2: Painting the Blocks
-
Mix the paint:
In separate containers, mix your latex paint with fabric medium according to the bottle instructions. This keeps the rug soft and prevents cracking. -
Start with the lightest color:
Begin with the cream section. Pour some paint into a tray and load up your foam roller. Use a ‘W’ motion to work the paint deep into the fibers. -
Refine the edges:
Use the angled brush to carefully paint along the tape lines where the roller might miss, dabbing the paint into the weave rather than brushing across it. -
Allow to dry:
Let the cream section dry to the touch before moving on, just to avoid accidental smudges. -
Apply the sage green:
Move to the large L-shaped or rectangular green sections. You may need a second coat here to fully cover the natural fiber color. -
Paint the terracotta:
Fill in the remaining blocks with the rusty orange color. This bold hue usually covers well, but watch out for missed spots in the rug’s texture. -
Double-check coverage:
Stand back and look at the rug from different angles. Texture tends to hide unpainted spots, so dab extra paint into any deep crevices.
Add Faux Texture
To mimic the thick border of the original, glue thick jute rope or braided wool yarn along the outer edge of your painted rectangle for a high-end, 3D finish.
Step 3: Finishing Touches
-
Remove tape carefully:
While the final coat is still slightly tacky (not fully dry), slowly peel back the painter’s tape at a 45-degree angle. -
Touch up lines:
If any paint bled under the tape, use a small artist’s brush and a tiny bit of the base rug color or water to scrub it out while fresh. -
Dry completely:
Let the rug dry flat for at least 24-48 hours. Consider placing a fan nearby to circulate air and speed up the deep drying process. -
Heat set (optional):
If your fabric medium requires it, run a hot iron over a scrap cloth placed on top of the painted sections to set the color permanently.
Place your newly revitalized rug in a high-traffic area to show off your custom color blocking


Crisp Chevron Pattern Painted Rug
Transform a plain, inexpensive woven rug into a high-end designer piece with nothing but paint and patience. This bold chevron pattern adds a modern, graphic punch to any room, creating a custom look for a fraction of the retail price.
Step-by-Step Guide
Materials
- Large flat-woven rug (cotton or jute blend)
- Black latex or fabric paint
- Painter’s tape (multiple widths: 1-inch and 2-inch)
- Measuring tape
- Long straight edge or yardstick
- Pencil or chalk
- Small foam roller
- Paint tray
- Stiff stencil brush (for touch-ups)
- Drop cloth
Step 1: Planning and Taping
-
Prep the workspace:
Lay out a protective drop cloth on a hard, flat surface. While working on a carpeted floor is possible, a hard floor ensures your lines stay straighter and firmer when taping. -
Secure the rug:
Unroll your flat-woven rug completely. If the corners form curls, weigh them down with heavy books for an hour to ensure the surface is perfectly flat before you begin measuring. -
Create the border:
Decide on the width of your outer border. Run a continuous strip of painter’s tape around the entire perimeter of the rug, about 2 to 3 inches from the bound edge, to create a clean frame for your pattern. -
Mark the center line:
Find the exact center width of the rug and run a piece of tape vertically from top to bottom. This will serve as your anchor line to ensure the chevron ‘V’ shapes are symmetrical. -
Measure the horizontal grid:
Using your measuring tape and a pencil, mark horizontal intervals up the side of the rug. For a large-scale look like the photo, mark every 10 to 12 inches. -
Connect the diagonals:
Start at the bottom center mark. Place your tape diagonally upwards to hit the first 10-inch mark on the right edge. Repeat on the left side to create your first ‘V’ shape. -
Tape the master chevrons:
Continue creating these large ‘V’ shapes all the way up the rug, connecting your center marks to the side marks. This initial set of tape lines establishes the rhythm of the pattern. -
Create the stripe width:
To make the actual painted stripes, place a second piece of tape parallel to your first set of diagonal lines. The distance between these two pieces of tape determines the thickness of your black stripe. -
Block off negative space:
At this point, you should have pairs of tape lines running diagonally. Apply small pieces of tape to mark which sections will stay white (unpainted) so you don’t get confused once the painting starts. -
Seal the edges relative to weave:
Press down firmly on all tape edges. I like to run the back of a spoon or a credit card along the tape edges to ensure they adhere deep into the woven texture, which prevents paint bleed.
Bleed-Through Blues?
If paint seeps under the tape, don’t panic. Use a small brush and diluted white acrylic paint to carefully ‘erase’ the black smudges once they are dry.
Step 2: Painting and Finishing
-
Load the roller:
Pour your black paint into the tray. Load a small foam roller, but roll off the excess on the texture of the tray; you want the roller damp, not dripping wet. -
Apply the first coat:
Roll the paint onto the exposed fabric stripes. Use a gentle touch and try to roll away from the tape edge initially, rather than pushing paint under it. -
Work into the texture:
Because woven rugs have nooks and crannies, you may need to apply a bit more pressure on subsequent passes to get the paint into the weave. Just be careful not to saturate it. -
Check for gaps:
Use a stiff stencil brush to dab paint into any deep recesses of the weave that the roller missed. A dabbing motion works better here than brushing, which can force bristles under the tape. -
Let it dry completely:
Allow the first coat to dry to the touch. Depending on the absorbency of your rug, you might need a second coat to get an opaque, jet-black finish. -
Peel the tape:
This is the satisfying part. Once the final coat is dry to the touch (but not fully cured), slowly peel back the painter’s tape at a 45-degree angle to reveal your crisp lines. -
Touch up edges:
Inspect your lines. If there was any minor bleeding, use a tiny artist’s brush and white paint (or the original rug color) to gently correct the edges. -
Add a protective seal (optional):
If this rug will be in a high-traffic area, you can spray a clear fabric protector or clear matte sealer over the painted areas once they have cured for 24 hours. -
Final cure:
Let the rug sit undisturbed in a well-ventilated area for at least 24 to 48 hours to ensure the paint is fully hardened before walking on it.
Seal the Tape First
For ultra-crisp lines on textured rugs, paint a layer of the base rug color (white/cream) over the tape edges first. This seals the gap so black paint can’t sneak under.
Enjoy the dramatic flair your new custom rug brings to your space


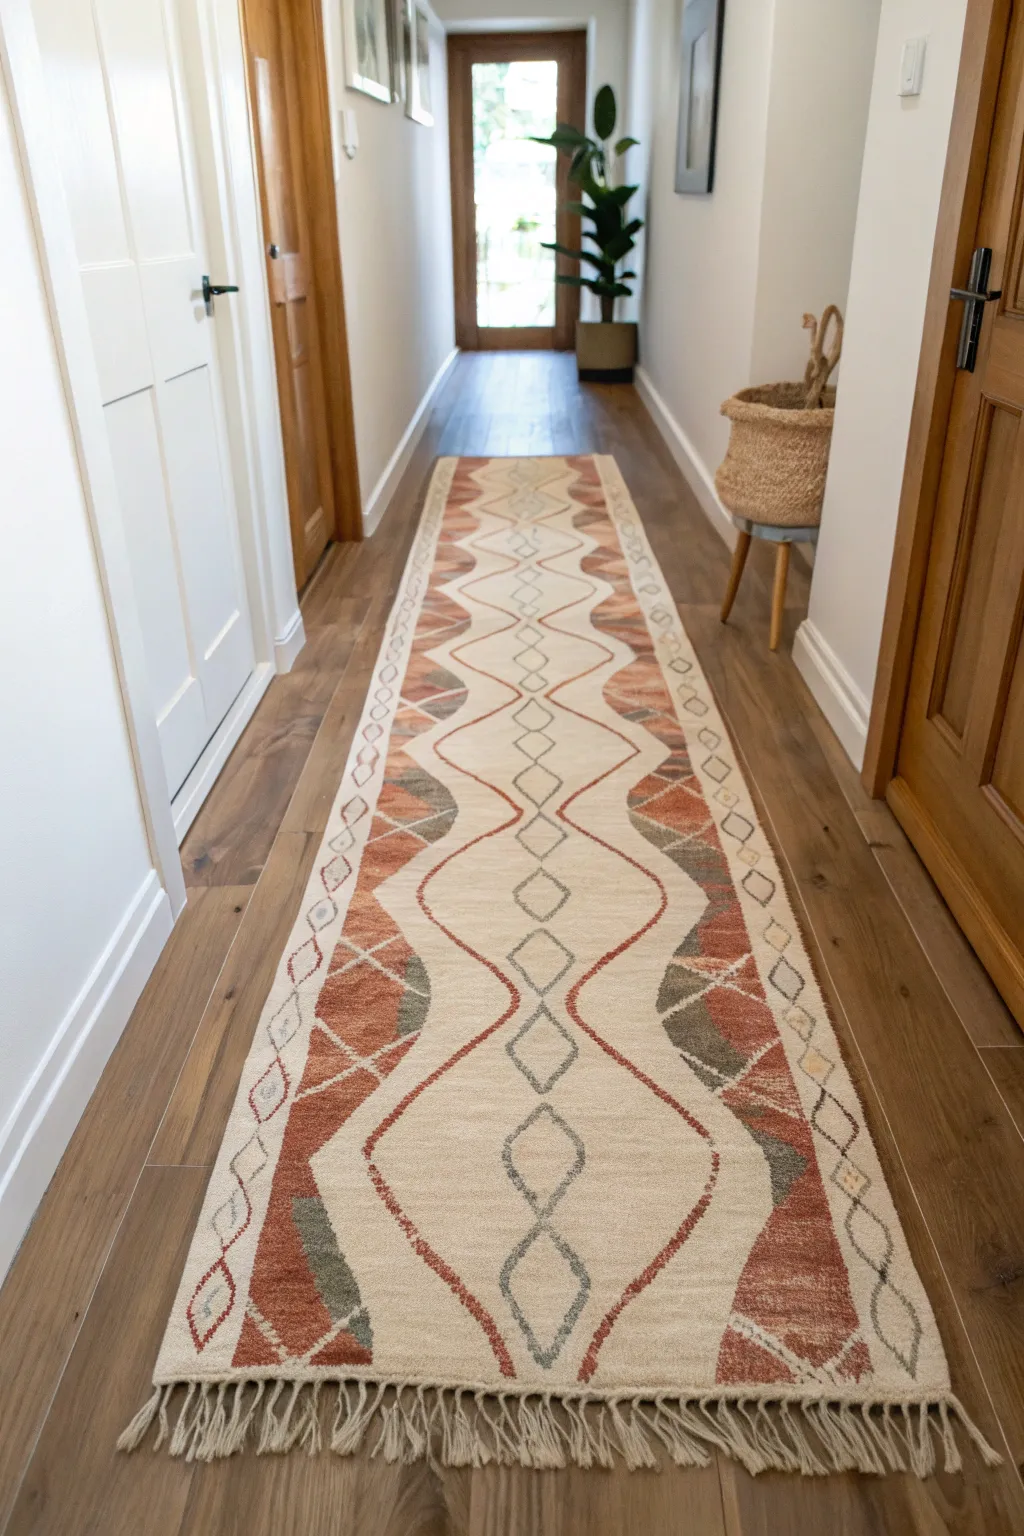
Diamond Trellis Painted Rug
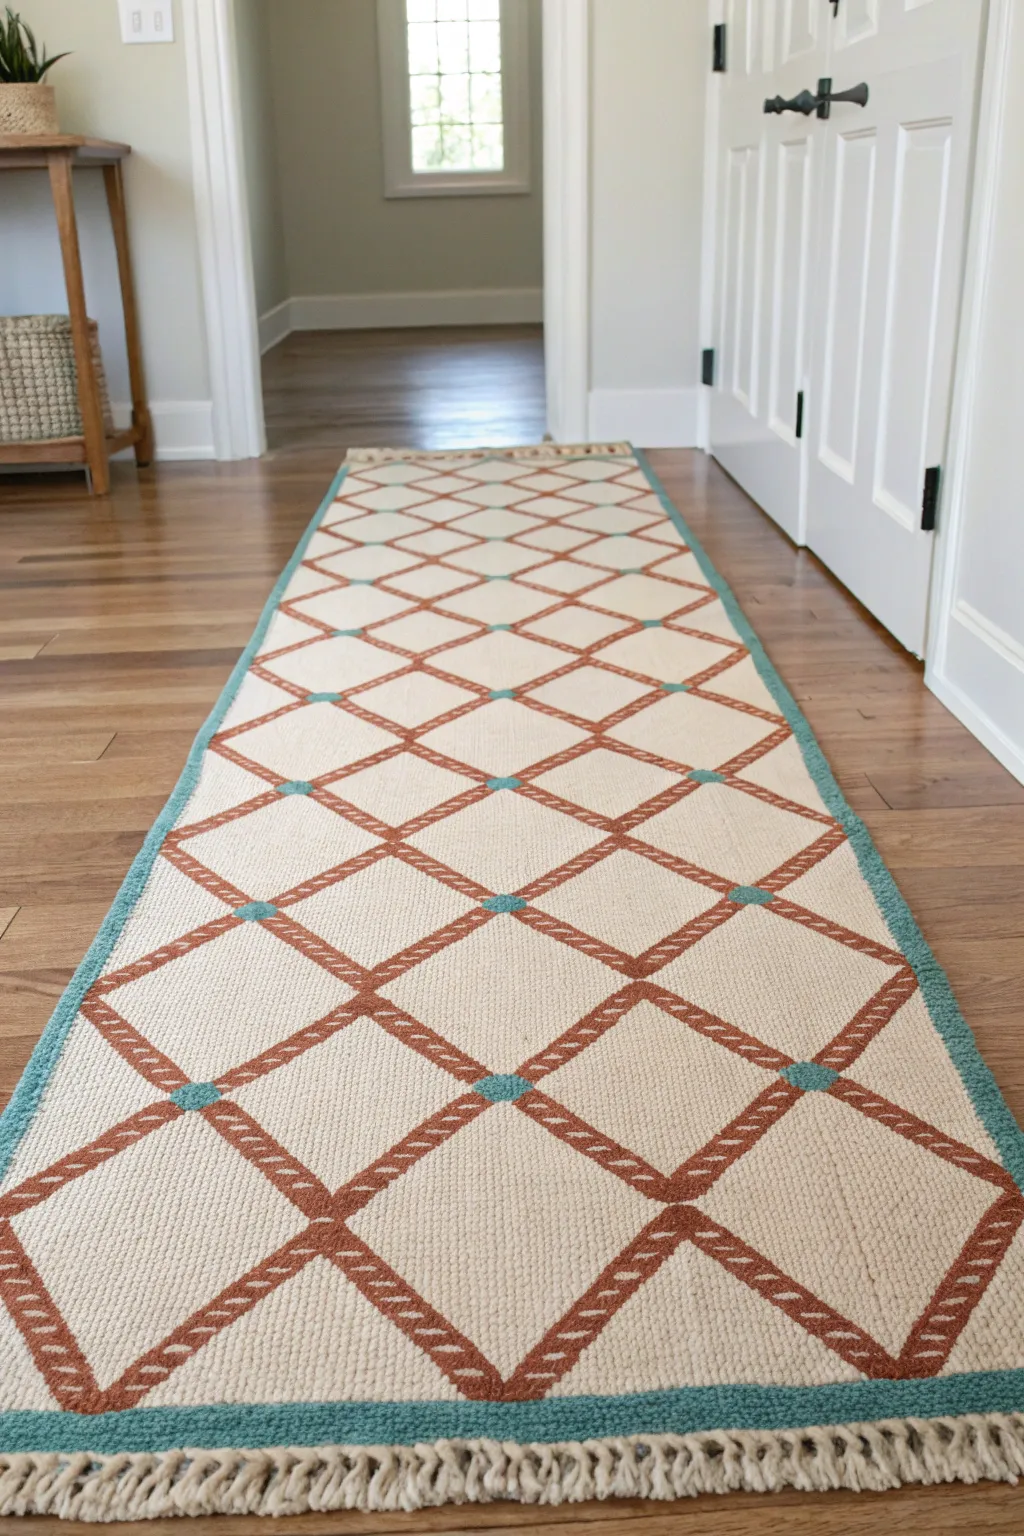
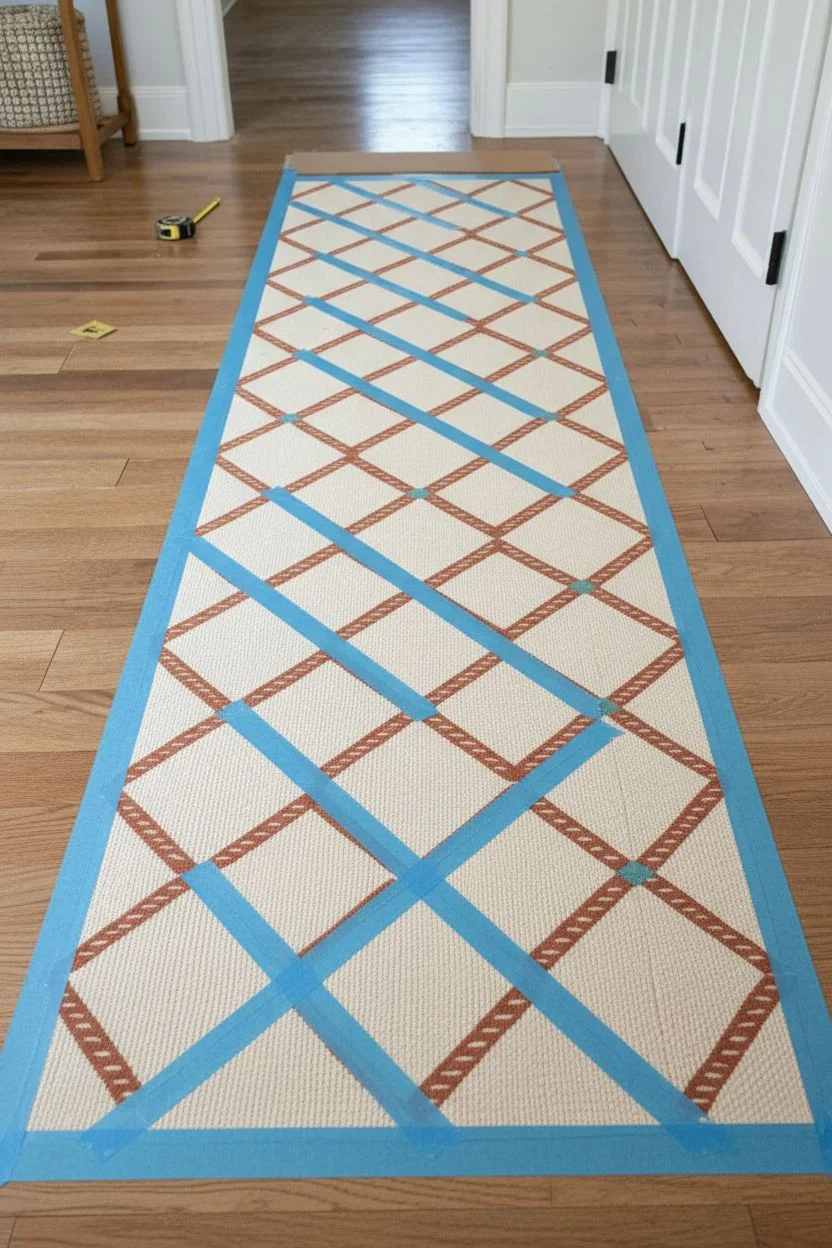
Transform a plain, inexpensive runner into a high-end statement piece with this painted diamond trellis design. The combination of warm terracotta lines and cool teal accents creates a sophisticated rope-like effect that adds instant character to any hallway.
Step-by-Step
Materials
- Plain woven runner rug (natural or cream)
- Painter’s tape (1-inch width for lines, 2-inch for borders)
- Acrylic craft paint or fabric paint (terracotta/rust color)
- Acrylic craft paint or fabric paint (teal/turquoise color)
- Fabric medium (if using acrylic paint)
- Stencil brush or stiff bristle brush
- Small round detail brush
- Measuring tape
- Long straight edge or yardstick
- Chalk or pencil
- Cardboard or drop cloth
Step 1: Planning and Taping
-
Prepare the workspace:
Lay your rug flat on a protected surface like a drop cloth or cardboard. Vacuum it thoroughly to remove any loose fibers or dust that might interfere with paint adhesion. -
Measure the center:
Find the exact center width of your rug and mark it lightly with chalk at both ends. Snap a chalk line or use your straight edge to create a faint guide line down the entire length if needed. -
Mark the diamond points:
Decide on the height of your diamonds (e.g., 12 inches). Starting from one end, measure and mark intervals along the center line and along both long edges. Refer to your center marks to ensure symmetry. -
Create the grid:
Connect your marks to form a diamond grid pattern using your straight edge and chalk. Don’t worry about perfection yet; these are just guides for your tape. -
Tape the main lines:
Apply painter’s tape along your chalk lines. To create the trellis thickness, place two strips of tape parallel to each other, leaving about a 3/4-inch gap in between where you will paint the terracotta lines. -
Tape the border:
Run a strip of tape along the long edges of the rug, leaving about an inch of space from the edge exposed for the teal border. Press all tape edges down firmly to prevent bleeding.
Seal Those Edges
Before applying your colored paint, brush a thin layer of the rug’s base color (or clear matte medium) over the tape edges. This blocks voids and ensures razor-sharp lines.
Step 2: Painting the Design
-
Mix the paint:
If you are using acrylic paint, mix it with fabric medium according to the bottle’s instructions. This keeps the paint flexible and soft once dry. Prepare your terracotta color first. -
Paint the trellis lines:
Using a stencil brush, dab the terracotta paint into the gaps between your tape strips. Use a pouncing motion rather than brushing back and forth to work the paint deep into the fibers and get crisp lines. -
Paint the borders:
While the trellis lines are drying, mix your teal paint with fabric medium. Apply this to the long outer edges of the rug using the same pouncing technique. -
Let it dry completely:
Allow the paint to dry fully. I usually leave it overnight to be safe, as peeling tape off wet paint can cause smudges. -
Remove the tape:
Carefully peel away all the painter’s tape to reveal your clean terracotta grid and teal borders.
Rug Refresh
Add fabric tassels to the short ends of the runner using hot glue or a simple stitch for an extra layer of texture and a true bohemian finish.
Step 3: Adding Details
-
Paint the intersections:
Using a small brush and your teal paint mixture, carefully paint small circles or dots at every point where the terracotta diamond lines intersect. This mimics the ‘knots’ in a trellis. -
Create the rope effect:
To achieve the rope look on the terracotta lines, use a small detail brush with a lighter version of your terracotta (mix in a bit of white or cream) or the original rug color. -
Paint the dashes:
Paint small, diagonal hash marks along the terracotta lines. Keep the spacing consistent to simulate twisted rope texture. -
Seal the deal:
Heat set the paint if your fabric medium requires it (usually by ironing with a cloth barrier), or simply let the rug cure for a few days before heavy foot traffic.
Place your new runner in the hall and enjoy the custom pop of color every time you walk by
BRUSH GUIDE
The Right Brush for Every Stroke
From clean lines to bold texture — master brush choice, stroke control, and essential techniques.
Explore the Full Guide
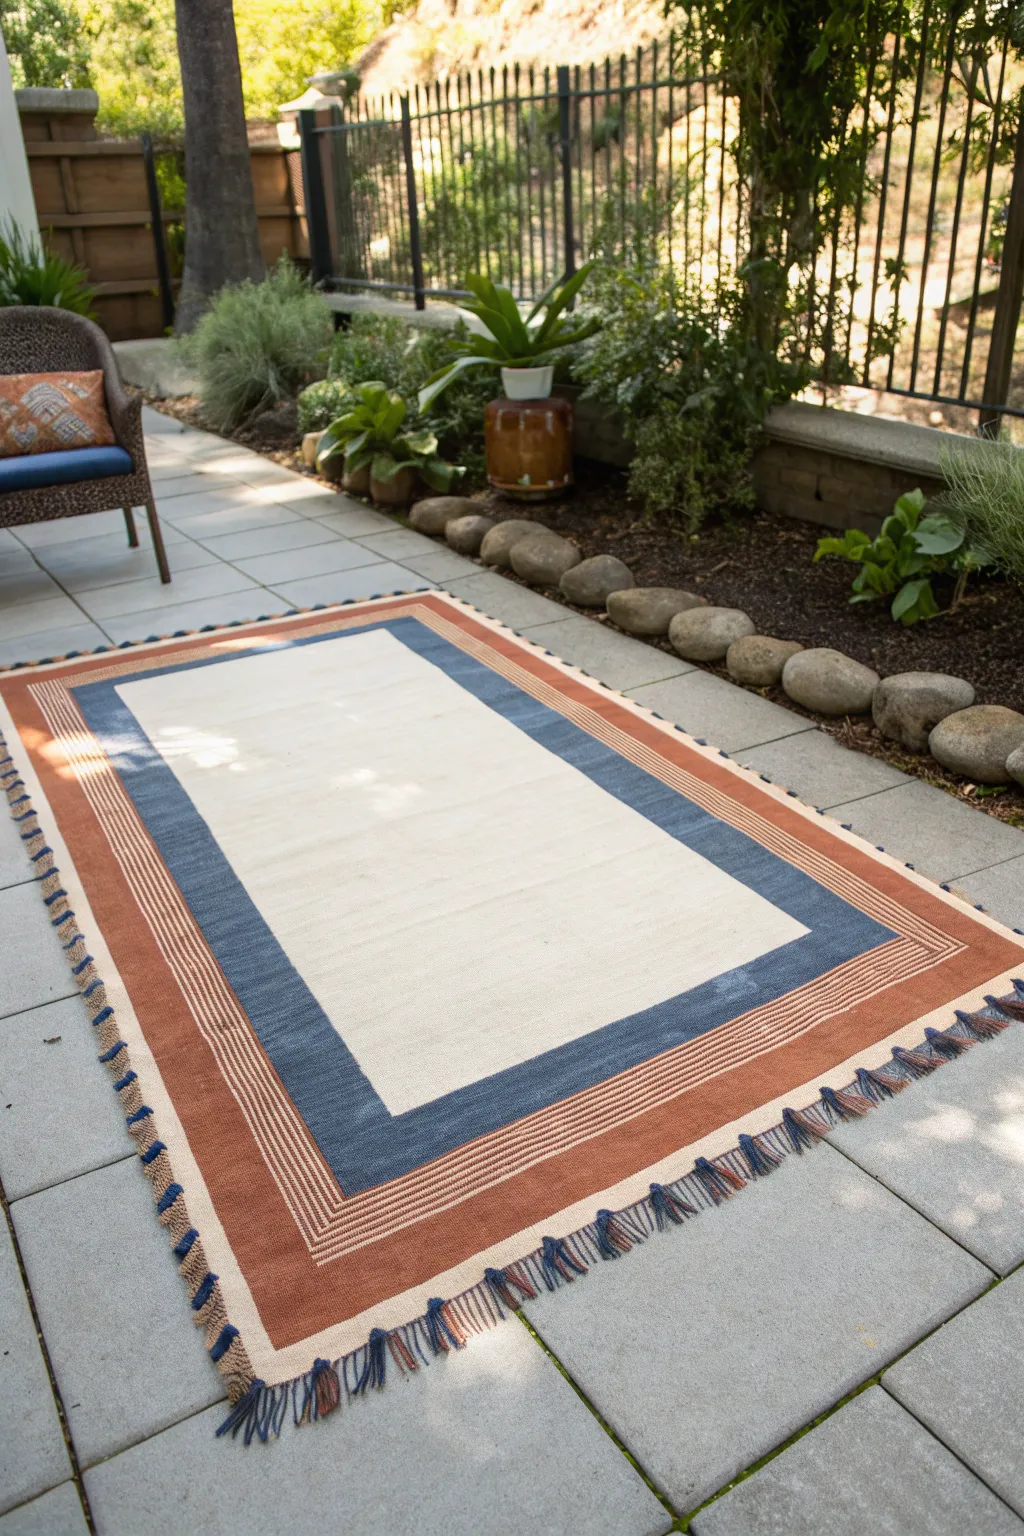
Simple Border Frame Painted Rug
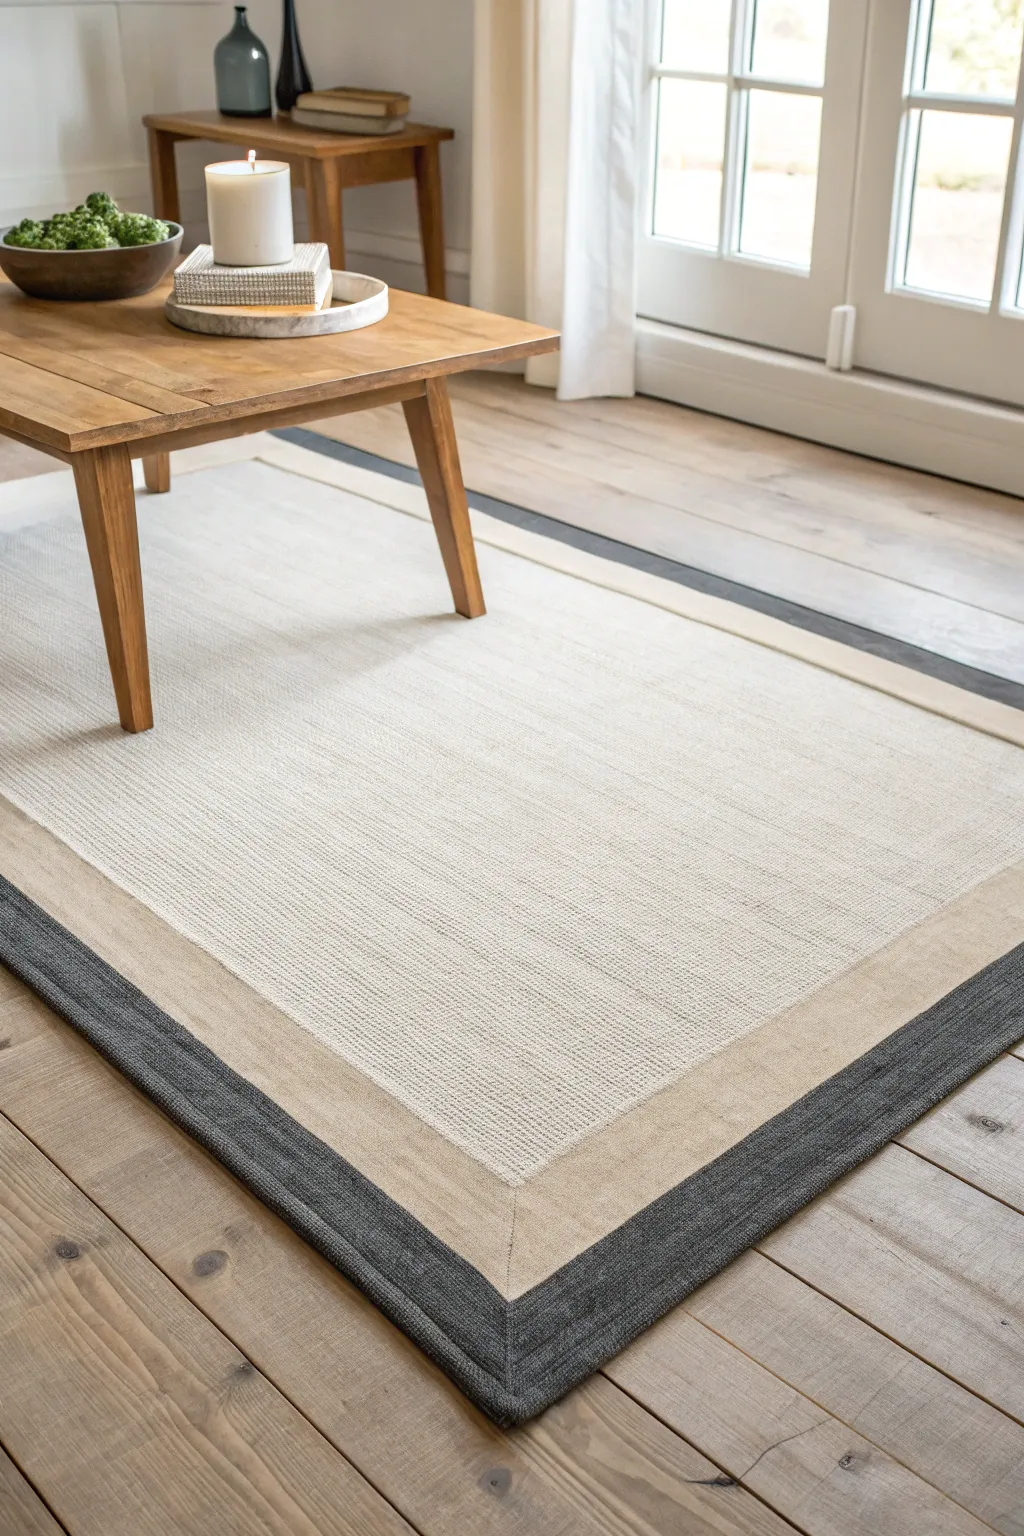
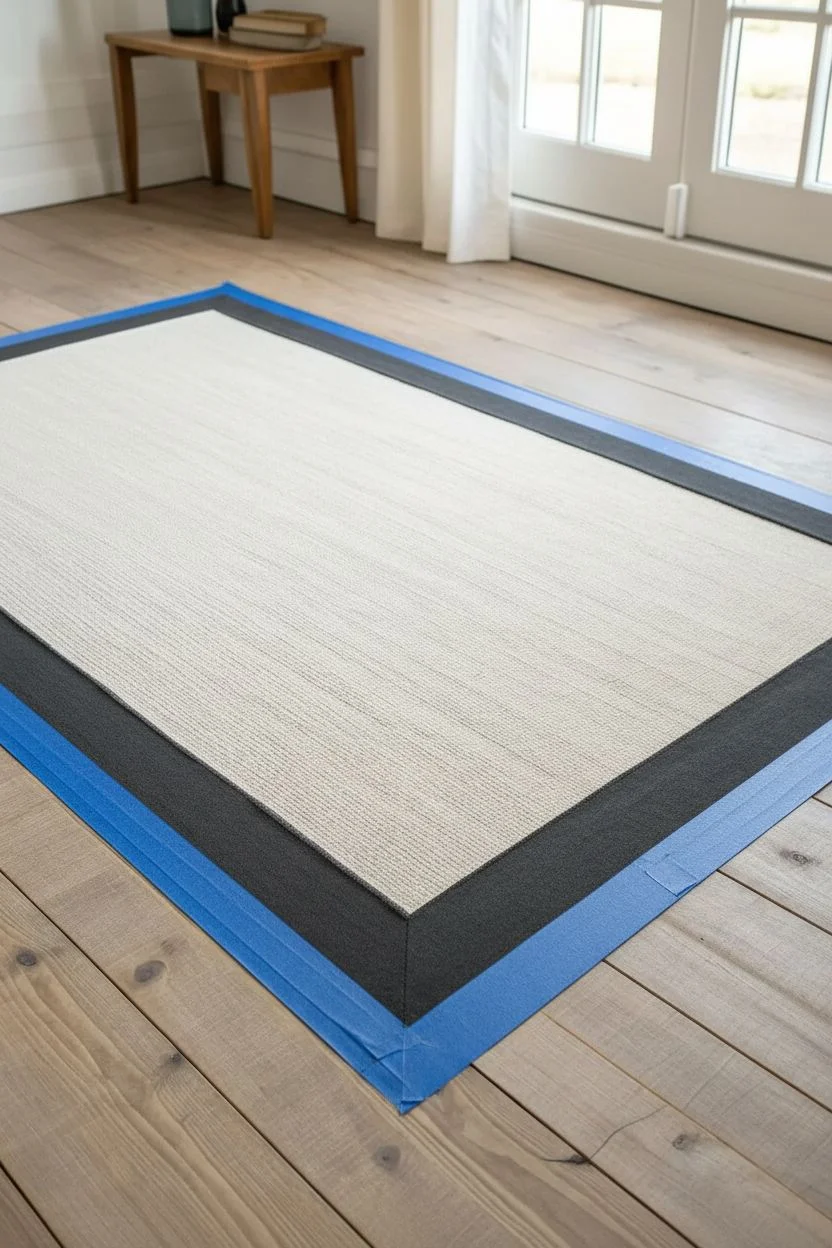
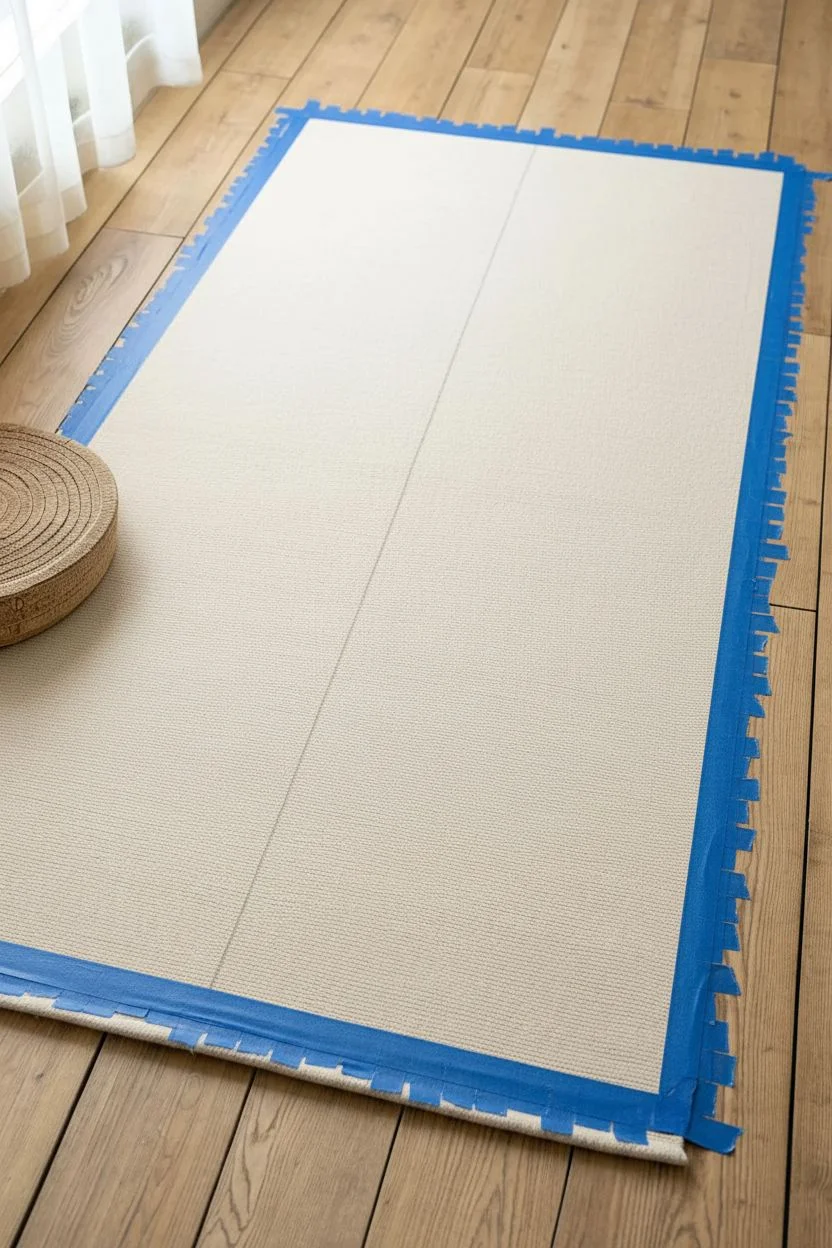
Transform a plain, inexpensive area rug into a custom designer piece with this clean-lined project. The dual-border design adds sophistication and structure to any room, mimicking the look of high-end binding without the cost.
Step-by-Step Guide
Materials
- Plain flat-weave rug (synthetic, jute, or sisal)
- Fabric paint or acrylic paint mixed with fabric medium
- Painter’s tape (2-inch width)
- Painter’s tape (1-inch width for spacing)
- Tape measure or ruler
- Stiff stencil brush or foam roller
- Drop cloth or plastic sheeting
- Pencil or chalk
- Dark charcoal or black paint (for outer border)
- Beige or tan paint (for inner border)
Step 1: Preparation and Layout
-
Prepare the workspace:
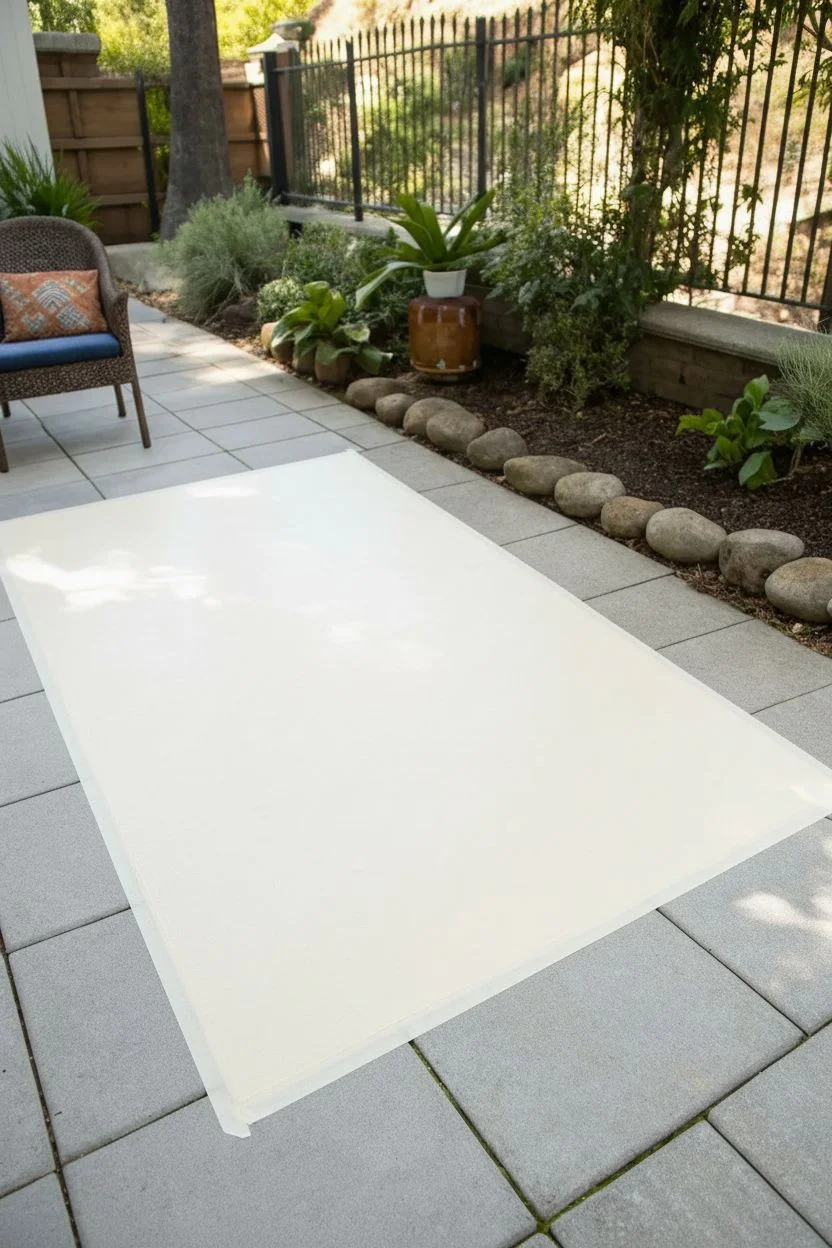
Lay down your drop cloth in a large, well-ventilated area. Unroll your plain rug completely flat on top, ensuring there are no curled corners; you might need to weigh them down with books overnight if the rug is new. -
Clean the surface:
Vacuum the rug thoroughly to remove any loose fibers, dust, or debris. This ensures the tape adheres properly and the paint lines stay crisp. -
Measure the outer border:
Decide on the width of your dark outer border. For the look in the photo, measure approximately 3 to 4 inches in from the edge of the rug on all four sides. -
Mark the perimeter:
Using your tape measure and pencil (or chalk), make small tick marks every foot along the perimeter to guide your taping line. -
Apply the first tape line:
Run a continuous line of 2-inch painter’s tape along your pencil marks. This tape line separates the dark outer border from the lighter inner border. -
Seal the edges:
Press the tape down firmly with your fingers or the edge of a credit card. This is crucial on textured rugs to prevent paint from bleeding underneath.
Seal Prior to Painting
For ultra-crisp lines on textured rugs, paint a thin layer of the rug’s clear base coat or mod podge along the tape edge first. This fills the gaps so the colored paint won’t bleed.
Step 2: Painting the Dark Outer Border
-
Mix the dark paint:
Prepare your dark charcoal or black fabric paint. If using regular acrylics, mix them with fabric medium according to the bottle’s instructions to keep the painted surface flexible. -
Start painting the edge:
Begin painting the area between the tape line and the physical edge of the rug. I prefer a stiff stencil brush here to really work the paint into the weave. -
Vertical pouncing method:
Use an up-and-down pouncing motion rather than sweeping strokes. Sweeping sideways forces paint under the tape, while pouncing keeps the line sharp. -
Apply a second coat:
Textured rugs absorb a lot of pigment. Once the first coat is dry to the touch (usually 20-30 minutes), apply a second coat for full, opaque coverage. -
Let it dry slightly:
Allow the dark paint to dry until strictly tacky, then carefully peel up the tape. Pulling the tape while the paint is slightly wet prevents it from cracking or pulling up the dried film.
Blurred Lines?
If paint bleeds under the tape, use a small stiff brush and a tiny bit of water (or paint remover for dried oil paint) to scrub the excess. You can also touch it up with the base rug color.
Step 3: Creating the Inner Contrast Border
-
Allow full drying time:
Wait until the dark border is completely dry before moving on. This usually takes at least 4 to 6 hours, though overnight is safest. -
Define the inner border width:
Measure inwards from your painted dark line. For the pictured look, measure a wider band, approximately 5 to 6 inches. -
Apply new tape lines:
Apply two new lines of tape. One line goes directly over the very edge of your dried dark paint to protect it. The second tape line goes on the unpainted interior of the rug to define the inner edge of the beige band. -
Seal the new tape:
Again, press these tape lines down aggressively to ensure a tight seal against the rug’s texture. -
Paint the beige band:
Fill in the space between the tape lines with your beige or tan paint. This simulates the look of a natural fiber binding. -
Work paint into the fibers:
Use the stiff brush or a small roller to saturate the area. Since this is a lighter color, you may need three light coats to cover the rug’s original color if it’s dark. -
Remove tape and cure:
peel off all tape immediately after the final coat. Let the rug cure for at least 24-48 hours before walking on it or placing furniture.
Step back and admire how a simple paint job has given your space a grounded, custom-designed feel
Repeating Dot Grid Painted Rug
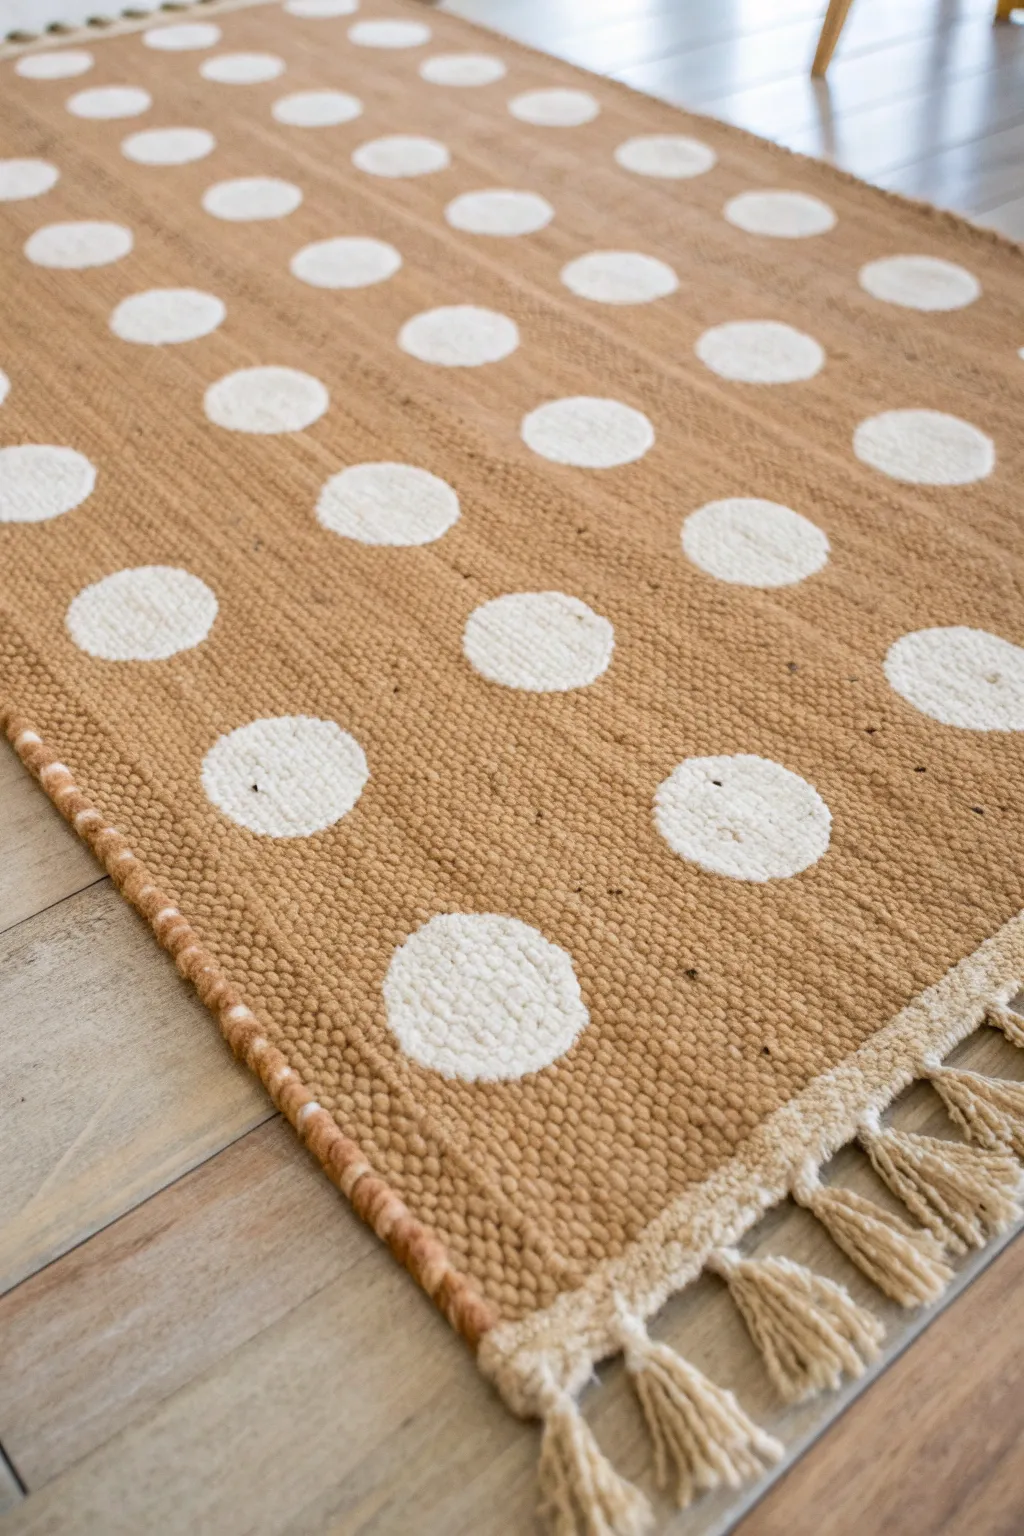
Transform a plain woven rug into a playful statement piece with a repeating grid of crisp white dots. This simple painting technique adds just the right amount of whimsy and texture to a standard jute or sisal runner, giving it a custom designer look for a fraction of the cost.
Detailed Instructions
Materials
- Flatwoven jute or sisal rug (tan/natural color)
- White fabric paint or flat latex paint
- Round foam pouncer (1.5 to 2 inch diameter)
- Measuring tape or ruler
- Painter’s tape or masking tape
- Small artist brush (for touch-ups)
- Paper plate or painting palette
- Drop cloth or cardboard (to protect floor)
- Chalk or pencil (optional)
Step 1: Preparation & Layout
-
Prepare your workspace:
Lay down a drop cloth or large piece of cardboard on a flat surface. Unroll your rug fully, smoothing out any bumps or curled edges so it lies perfectly flat before you begin. -
Clean the surface:
Vacuum the rug thoroughly to remove loose fibers, dust, and dirt. A clean surface ensures the paint adheres properly to the woven texture without grabbing lint. -
Determine spacing:
Decide on your grid pattern. For the diagonal look shown, you will be creating staggered rows. I usually aim for about 3-4 inches of space between dots within a row, but verify what looks best on your specific rug size. -
Mark vertical guides:
Using painter’s tape, place long vertical strips down the length of the rug to act as guides for your columns. Space these tape lines evenly apart to keep your columns straight. -
Mark horizontal spacing:
Place small pieces of tape or light chalk marks along your vertical tape guides to indicate exactly where each dot should land. This creates a reliable map so you don’t have to eyeball the spacing while painting.
Uneven Paint Coverage?
Jute is very absorbent. If your dots look patchy, switch from stamping to stippling with a stiff-bristle brush. Dab the paint vertically into the weave rather than brushing across it.
Step 2: Painting the Dots
-
Load your tool:
Pour a generous amount of white paint onto a paper plate. press your round foam pouncer into the paint, rotating it slightly to ensure the entire foam surface is evenly coated but not dripping. -
Test your technique:
On a scrap piece of cardboard or paper, practice stamping a few dots. You want to determine how much pressure is needed to get the paint into the rug’s crevices without creating messy, bleeding edges. -
Stamp the first row:
Starting at one corner, press the pouncer firmly onto your first marked spot. Hold it in place and wiggle it very slightly to help the paint penetrate the woven fibers. Lift straight up to avoid smearing. -
Continue the pattern:
Move to the next mark and repeat the stamping process. Reload your foam pouncer with fresh paint after every single dot to ensure consistent opacity across the entire rug. -
Stagger the rows:
Once your first column or row is done, move to the next. Ideally, for a diagonal grid, shift the starting point of the next row down by half the distance between dots so they sit in the ‘windows’ of the previous row. -
Check for consistency:
Periodically stand up and step back to look at the rug from a distance. This helps you spot any dots that might look faint or uneven compared to the others.
Step 3: Refining & Finishing
-
Touch up edges:
Because woven rugs are textured, the foam pouncer might miss deep crevices. Use a small artist brush to manually fill in any empty spots within the circles, dabbing paint gently into the weave. -
Sharpen the shapes:
If any dot edges look ragged, use the small brush to carefully round them out. A crisp edge makes the design look much more professional. -
Apply a second coat:
Let the first layer dry for about an hour. If the white looks too transparent against the dark tan jute, go back and carefully stamp or brush a second layer of paint over each dot. -
Remove guides:
Once you have finished painting all the dots, gently peel away your painter’s tape guides. Do this slowly to avoid disturbing any wet paint. -
Dry completely:
Allow the rug to dry undisturbed for at least 24 hours. Depending on the humidity and paint thickness, it might need a bit longer before it’s ready for foot traffic. -
Set the paint (optional):
For extra durability, you can lightly spray a clear matte sealer over the painted areas, though fabric paint generally holds up well on its own.
Go for Color
Swap the white paint for navy blue, charcoal, or mustard yellow for a totally different vibe. You can even alternate colors for every other dot for a playful, confetti-like effect.
Place your newly patterned rug in an entryway or kitchen for an instant dose of handmade charm

PENCIL GUIDE
Understanding Pencil Grades from H to B
From first sketch to finished drawing — learn pencil grades, line control, and shading techniques.
Explore the Full Guide
Stenciled Tile-Inspired Painted Rug
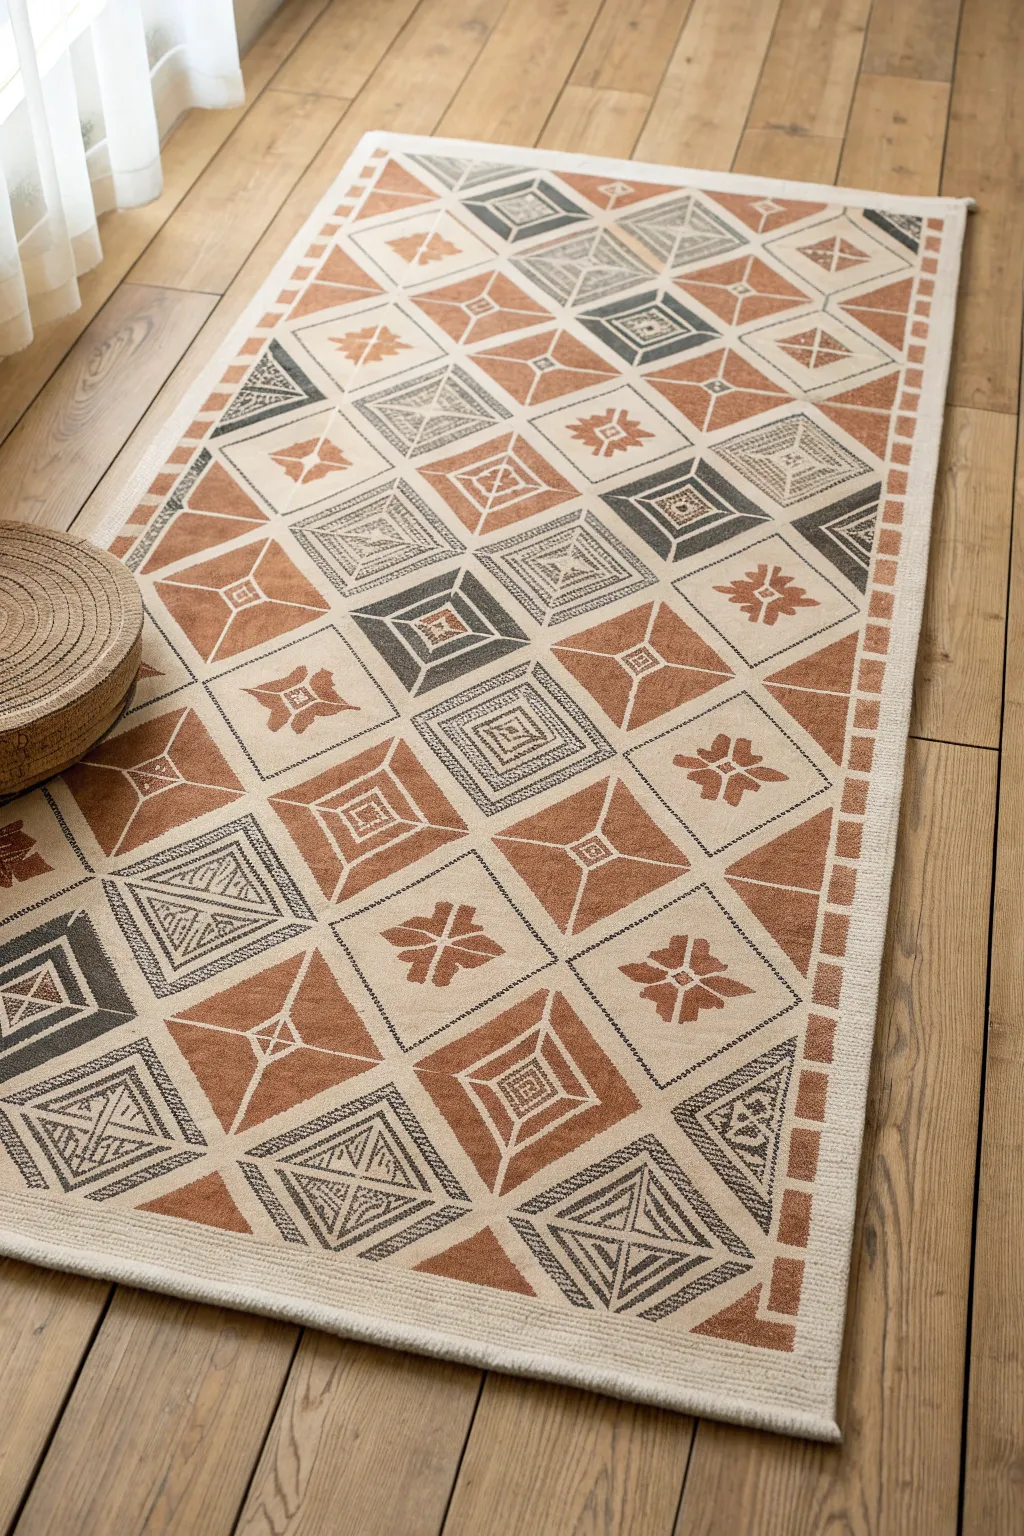
Transform a plain, flat-woven rug into an artisanal masterpiece with this stenciled tile technique. Using a warm palette of terracotta and charcoal against a cream background, you’ll create a sophisticated geometric pattern that mimics the look of high-end woven textiles.
How-To Guide
Materials
- Flat-woven rug (cream/beige cotton or jute blend)
- Fabric paint or soft-body acrylics (Terracotta/Rust, Charcoal Grey)
- Textile medium (if using acrylics)
- Tile stencil (approx. 8×8 or 10×10 inches, geometric/diamond motifs)
- Stencil brushes (stiff bristle)
- Painter’s tape (1-inch width)
- Measuring tape
- Pencil or chalk
- Paper towels
- Cardboard or drop cloth
Step 1: Preparation and Layout
-
Prepare the surface:
Lay your rug flat on a protected surface like a drop cloth or cardboard to prevent paint bleed-through. Vacuum it thoroughly to remove loose fibers. -
Mark the center:
Find the exact center of the rug with your measuring tape. Mark a faint vertical line down the middle using chalk or a pencil to serve as your guide for the main pattern. -
Create the border grid:
Before painting the center, tape off a border. Measure about 2 inches from the edge entirely around the rug and apply a strip of painter’s tape to define the outer rim. -
Tape the inner border:
Create the dashed border effect by placing small pieces of tape perpendicular to your main border tape, spacing them evenly (about 1.5 inches apart) to create a ‘tooth’ pattern.
Bleeding Lines?
If paint bleeds under the stencil, your brush is too wet. Offload more paint onto a towel before stenciling. Fix wet mistakes immediately with a damp Q-tip.
Step 2: Painting the Tile Motifs
-
Mix your paints:
In a palette, mix your acrylic paints with textile medium according to the bottle instructions (usually 2:1). This keeps the rug soft and durable. -
Start the center stencil:
Position your stencil in the very center of the rug on your chalk line. Secure it firmly with painter’s tape on all four sides. -
Load the brush:
Dip your stencil brush into the charcoal paint, then offload almost all the paint onto a paper towel until the brush feels dry. This is crucial for crisp lines. -
Paint the first motif:
Apply the charcoal paint using a vertical dabbing motion (stippling) over the stencil openings. Alternate with the terracotta color for specific geometric sections within the stencil to match the reference. -
Lift and repeat:
Carefully lift the stencil straight up. Move the stencil directly adjacent to the first square, aligning the edges seamlessly. Repeat the stippling process. -
Alternate colors:
To recreate the specific look in the photo, alternate primarily charcoal squares with primarily terracotta squares in a checkerboard or diagonal pattern. -
Fill the field:
Continue moving the stencil outward from the center until the entire main field of the rug is covered in the tile pattern, stopping just before your taped border.
Step 3: Detaling and Finishing
-
Paint the border:
Using a small flat brush, fill in the exposed rectangular spaces in your border tape with the terracotta paint to create the dashed edge. -
Dry brush texture:
I like to take a mostly dry brush with a tiny amount of charcoal paint and lightly drag it over some solid terracotta areas to give them a weathered, woven appearance. -
Remove tape:
Once the paint is tacky but not fully wet, carefully peel back all painter’s tape at a 45-degree angle. -
Fix imperfections:
Use a tiny artist’s brush and your base cream paint (or plain water if the paint is fresh) to clean up any bleed marks. -
Heat set:
Allow the rug to dry for at least 24 hours. Once dry, place a thin cloth over the design and iron on a high, non-steam setting to permanently set the fabric paint.
Add Dimension
After the main colors dry, lightly stencil a thin layer of metallic bronze or gold over the terracotta sections to catch the light and add depth.
Place your new custom runner in a hallway or kitchen to instantly warm up the space with its hand-painted charm
Neutral Grain-Sack Stripe Rug
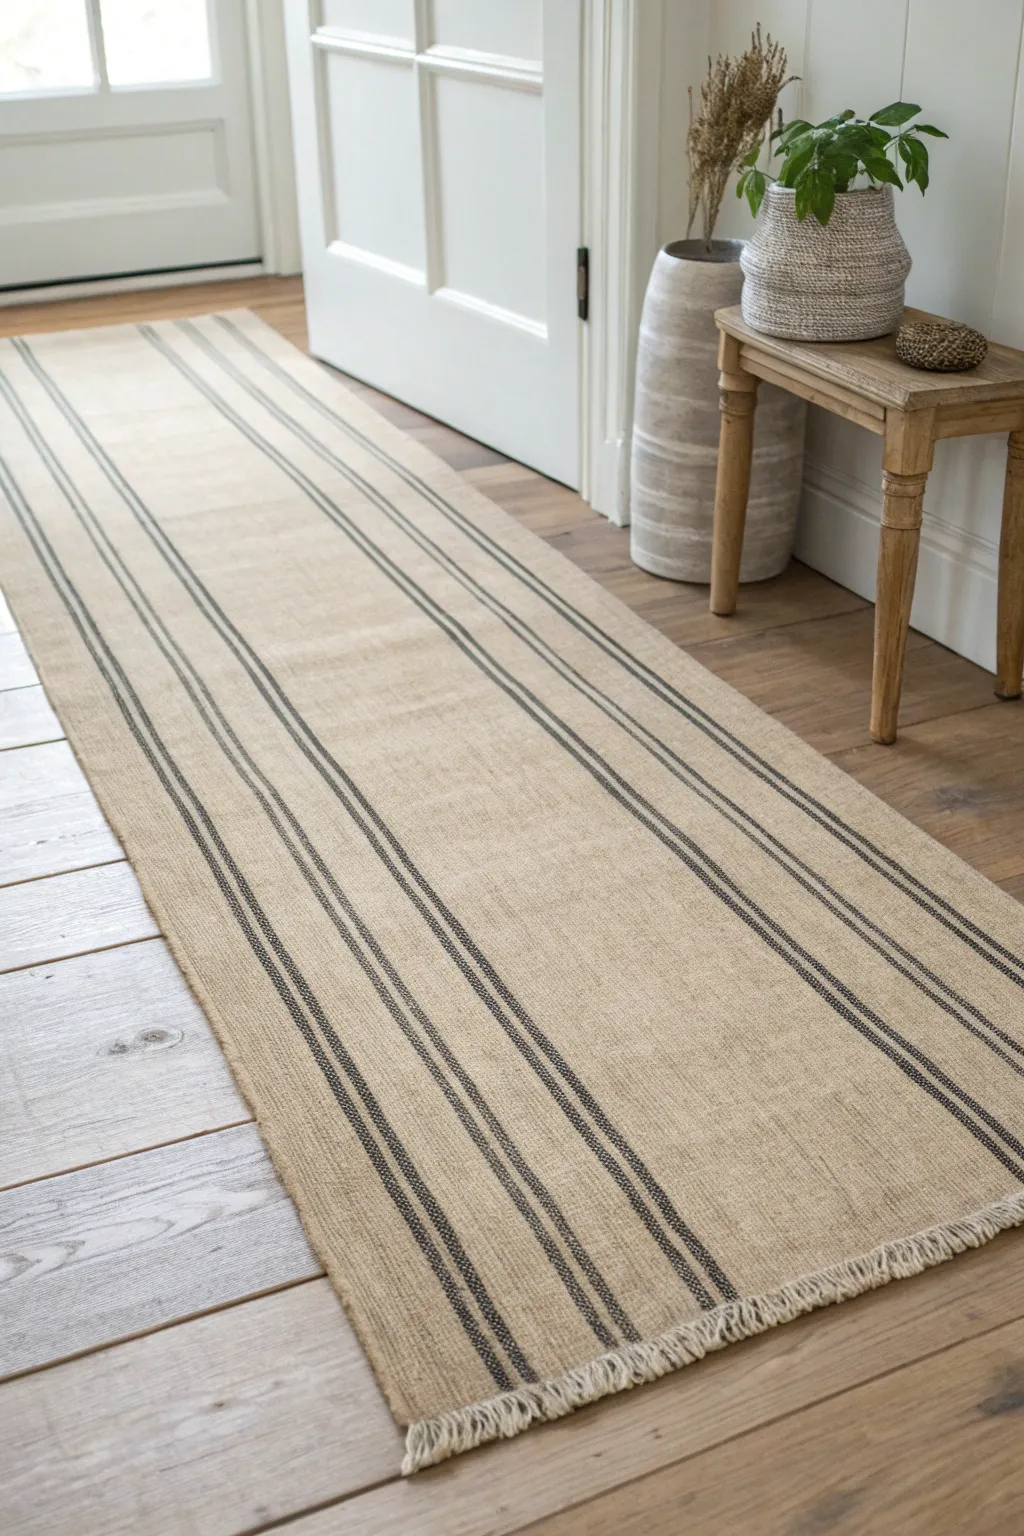
Transform a plain, inexpensive runner into a high-end farmhouse staple with nothing but paint and tape. This DIY mimics the texture of vintage European grain sacks, adding varying widths of soft charcoal stripes to a neutral textured base for a look that is both timeless and understated.
Detailed Instructions
Materials
- Plain flat-weave runner rug (jute, sisal, or cotton blend)
- Painter’s tape (1-inch width)
- Painter’s tape (2-inch width)
- Fabric medium
- Acrylic craft paint or latex paint (charcoal or soft black)
- Stiff stencil brush or flat-bristled brush
- Measuring tape
- Drop cloth or cardboard
- Paper plate or paint tray
Step 1: Preparation & Layout
-
Prep the Surface:
Lay your runner out flat on a drop cloth or protected floor surface. Vacuum it thoroughly to remove loose fibers or dust that might interfere with paint adhesion. -
Measure the Center:
Decide where you want your stripes to sit. For this grain-sack look, the stripes run parallel to the long edges. Measure about 3 to 4 inches in from the long edge and make a small mark with a pencil or piece of chalk to guide your first tape line. -
Lay the First Tape Line:
Apply a strip of 2-inch painter’s tape down the entire length of the rug at your marked position. This tape will serve as a spacer between your stripes, not a painted area. -
Create the Central Stripe:
Place two strips of tape parallel to your first piece of tape, leaving a gap of approximately 1/2 inch to 3/4 inch in between them. This gap will become the central, slightly thicker stripe. -
Define the Outer Stripes:
Now, measure outward about 1/4 inch from the tape edges you just laid down. Place new strips of tape here. These narrower gaps will create the thin ‘pinstripes’ that flank the center stripe. -
Secure the Tape:
Press all tape edges down firmly. I like to run the back of a spoon or a credit card along the edges to really seal them against the rug’s texture, which prevents paint bleed. -
Repeat on the Other Side:
Repeat the entire taping process on the opposite long side of the runner, ensuring your spacing matches the first side for symmetry.
Bleeding Lines?
Work the paint in very light layers. On highly textured rugs like jute, heavy paint application is the enemy. Less paint equals cleaner lines.
Step 2: Painting & Finishing
-
Mix the Paint:
In your paint tray, mix your charcoal acrylic paint with fabric medium according to the bottle’s instructions (usually a 2:1 or 1:1 ratio). The medium keeps the paint flexible so it won’t crack when walked on. -
Offload the Brush:
Dip your stiff brush into the paint mixture, then dab most of it off onto a paper towel. You want a ‘dry brush’ effect rather than a gloopy, saturated coat. -
Start Stippling:
Apply the paint to the exposed rug gaps using a vertical stippling (pouncing) motion. Avoid brushing side-to-side, as this can push paint under the tape. -
Work in Sections:
Move down the length of the rug, maintaining consistent pressure. The goal isn’t solid, opaque coverage; you want the rug’s natural texture to show through slightly for that woven, vintage look. -
Check for Consistency:
Stand back occasionally to ensure the color intensity looks even from one end to the other. Add a very light second coat if certain areas look too faded. -
Remove Tape While Damp:
Carefully peel back the painter’s tape while the paint is still slightly tacky. Pull the tape away at a 45-degree angle to get the crispest lines. -
Touch Up:
If any paint bled under the tape, use a small craft knife to gently scrape it away, or dab a tiny bit of beige paint over the mistake. -
Dry Completely:
Let the rug dry undisturbed for at least 24 hours. If the fabric medium instructions suggest it, you may need to heat set the paint with an iron (using a pressing cloth) once fully dry.
Custom Colors
Don’t just use black! Mix a touch of raw umber into your charcoal paint. This warms up the grey and makes it look like aged woven fabric.
Enjoy the classic charm your new custom runner brings to your hallway


Boho Mandala Centerpiece Rug
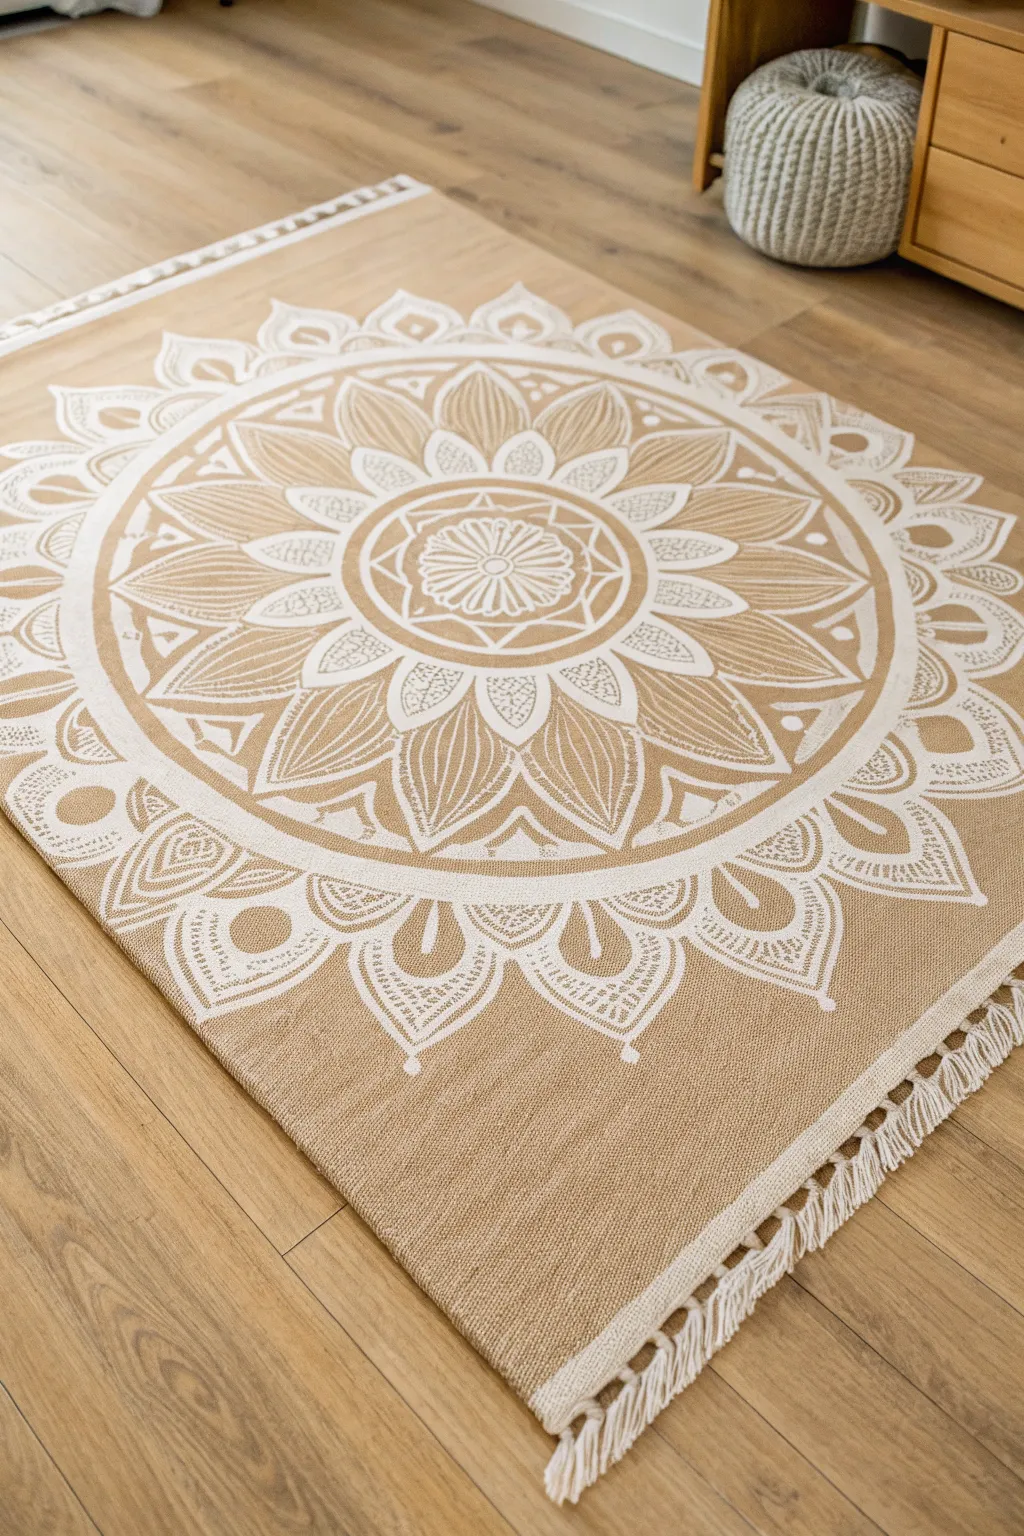
Transform a plain flatweave rug into a stunning bohemian statement piece with this intricate mandala design. Using simple white fabric paint, you’ll create a layered, geometric floral pattern that looks like an expensive artisan find.
Step-by-Step Guide
Materials
- Large flatweave rug (jute, sisal, or beige cotton blend)
- White fabric paint (generous amount)
- Fabric painting medium (optional, to soften paint)
- Stiff stencil brushes (various sizes)
- Round synthetic brushes (sizes 4 and 8)
- Chalk or masking tape for guidelines
- Large mandala stencil (approx. 24-36 inch diameter)
- Or: String, pushpin, and pencil (for freehand drafting)
- Painter’s tape
- Paper plate or palette
Step 1: Preparation and Mapping
-
Prep the surface:
Lay your rug flat on a hard surface or drop cloth. Vacuum it thoroughly to remove any loose fibers or dust that might interfere with paint adhesion. -
Find the center:
Measure the width and length of your rug to locate the exact center point. Mark this spot lightly with a piece of chalk or a small piece of painter’s tape. -
Create radial guidelines:
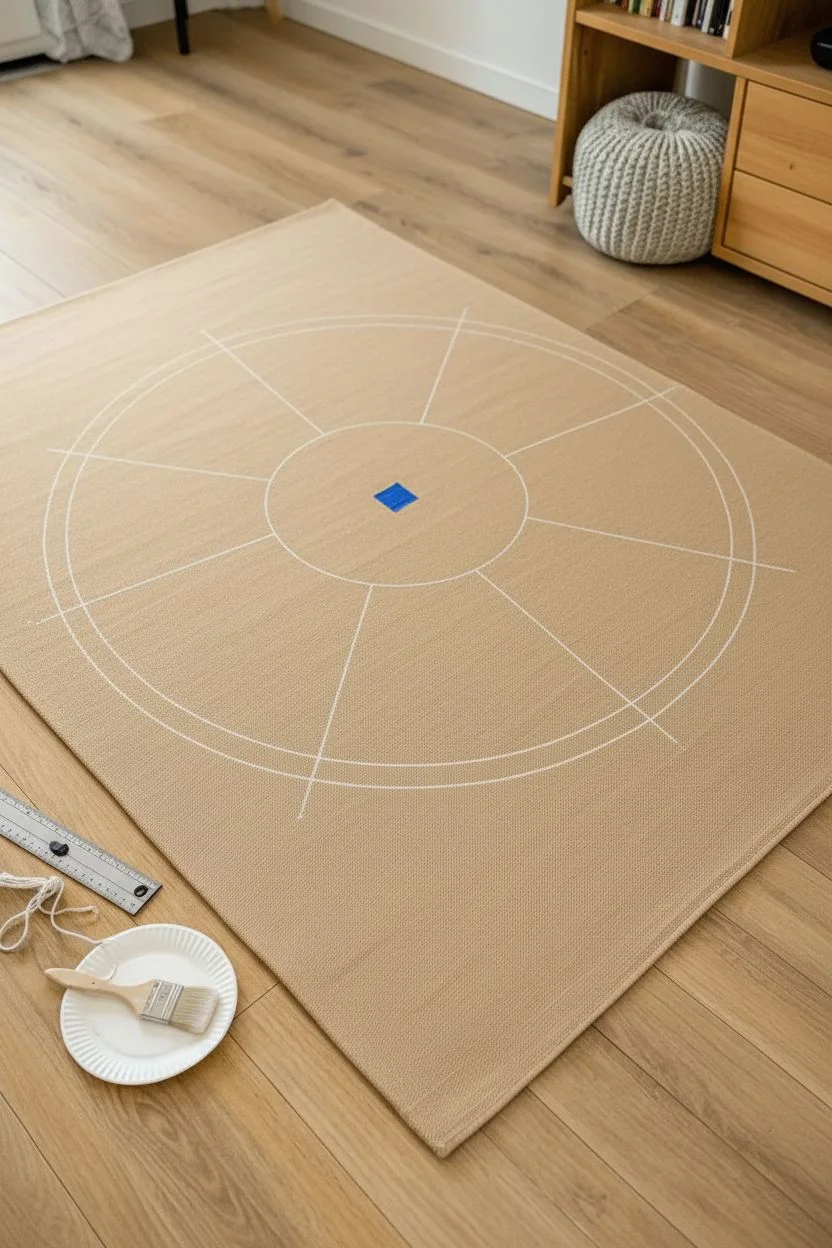
If you are freehanding or using partial stencils, use a string tied to a pencil and anchored at the center to lightly draw concentric circles. I suggest drawing circles at 6-inch intervals to keep your mandala symmetrical. -
Divide the pie:
Use a straight edge or yardstick to draw faint chalk lines radiating from the center, dividing your circle into 8 or 16 equal ‘pie slices’. These will guide your petal placement.
Uneven Paint?
If the texture makes clean lines difficult, dab paint vertically into the weave rather than dragging the brush. This “stamping” motion fills gaps better.
Step 2: Painting the Core
-
Start the center rosette:
Begin at the very center point. Use a small round brush loaded with white fabric paint to paint a central flower or circle, roughly 4-5 inches wide. -
Build the first ring:
Moving outward into your first concentric zone, paint a ring of small, simple petals around the core. Keep the spacing consistent using your chalk guidelines. -
Add the geometric border:
Around this central floral motif, paint two parallel circles about an inch apart. Fill the space between them with a zigzag or triangle pattern to create a crisp geometric border.
Level Up: Faux Fade
Lightly sand dried paint with fine-grit sandpaper to give your mandala a vintage, distressed look so it doesn’t appear freshly painted.
Step 3: Expanding the Mandala
-
Draft the large petals:
For the main visual impact, sketch large, sweeping petal shapes in the next available ring. These should be substantial—about 8-10 inches long—and pointed at the tips. -
Outline and fill:
Outline these large petals with a size 8 round brush. I like to fill the interiors with fine lines or stippling (dots) rather than solid paint, which mimics the woven texture seen in the reference. -
Create the outer scallop:
Move to the outer edge of your design. Paint a series of wide, scalloped semi-circles that connect the tips of your large petals. -
Detail the scallops:
Inside each scallop, paint a smaller, teardrop shape. Use a smaller brush to add delicate hash marks or veins inside these teardrops for visual interest.
Step 4: Refining and Sealing
-
Add corner details (optional):
If your mandala design extends near the corners of a rectangular rug, add small corner flourishes that echo the central shapes to balance the composition. -
Clean up edges:
Check the symmetry of your outer edges. Use a smaller brush to sharpen any petal tips or lines that look fuzzy against the rug’s texture. -
Strengthen the white:
Rug fibers soak up paint quickly. Go back over the primary outlines and brightest white sections with a second coat of paint to ensure high contrast against the tan background. -
Let it cure:
Allow the rug to dry completely flat for at least 24-48 hours. Avoid walking on it during this time. -
Heat set:
Once fully dry, place a thin cloth over the painted areas and iron on a medium setting (no steam) to heat set the fabric paint, making it more durable for foot traffic.
Place your newly decorated rug in a sunroom or entryway to show off your custom handiwork
Floral Vine Border Painted Rug
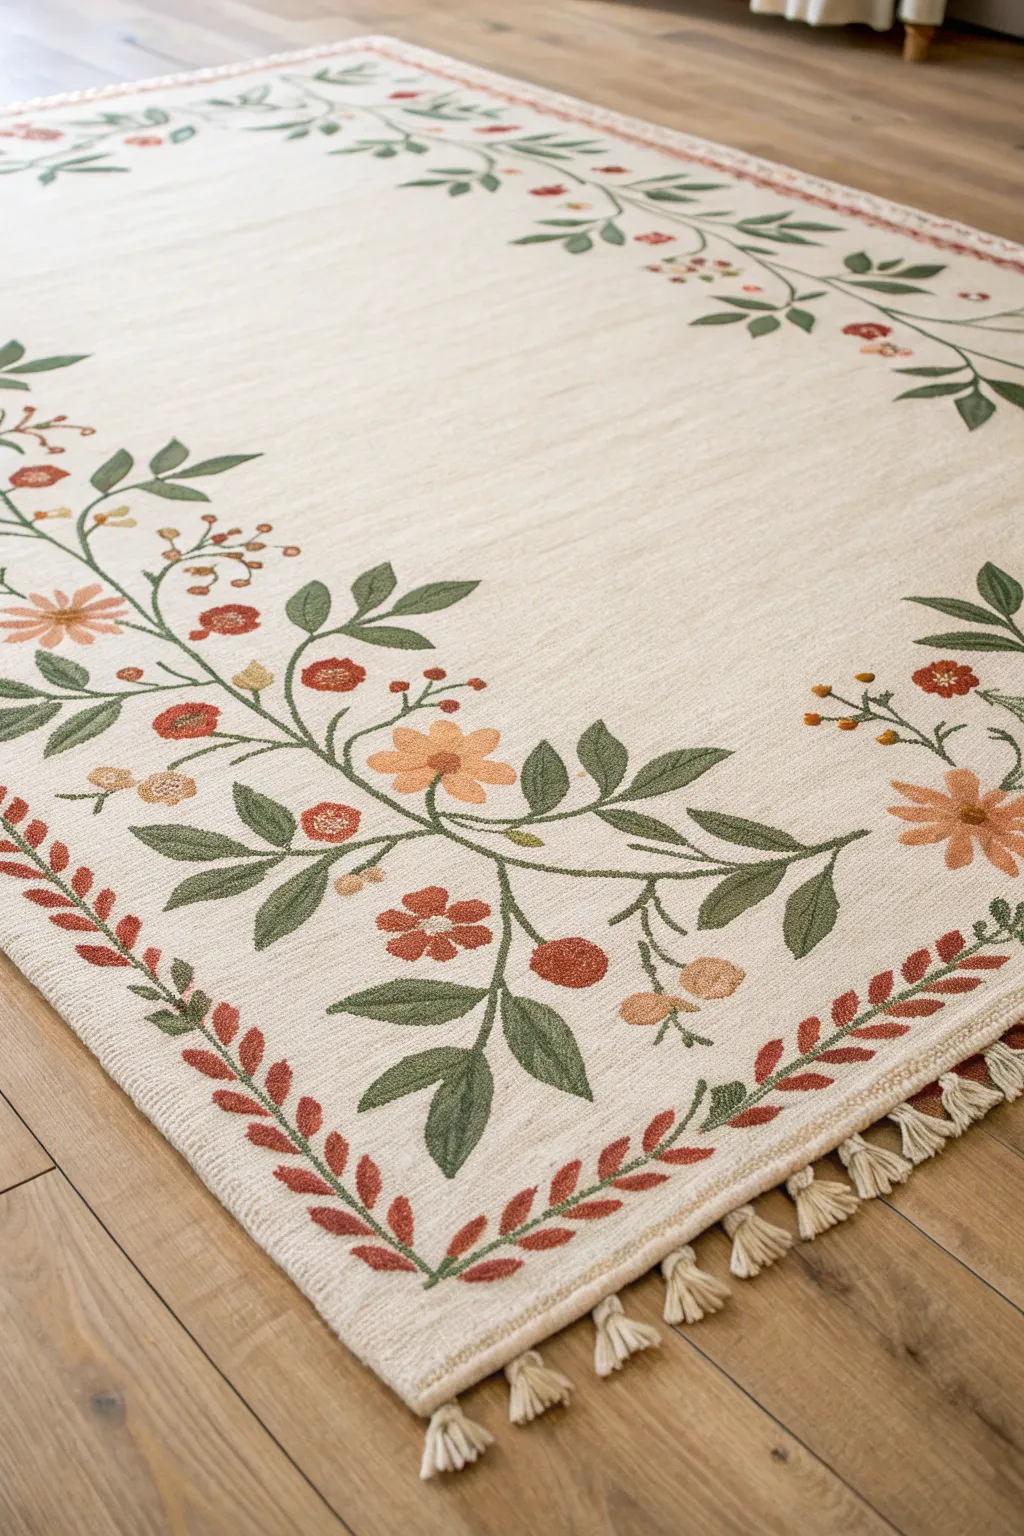
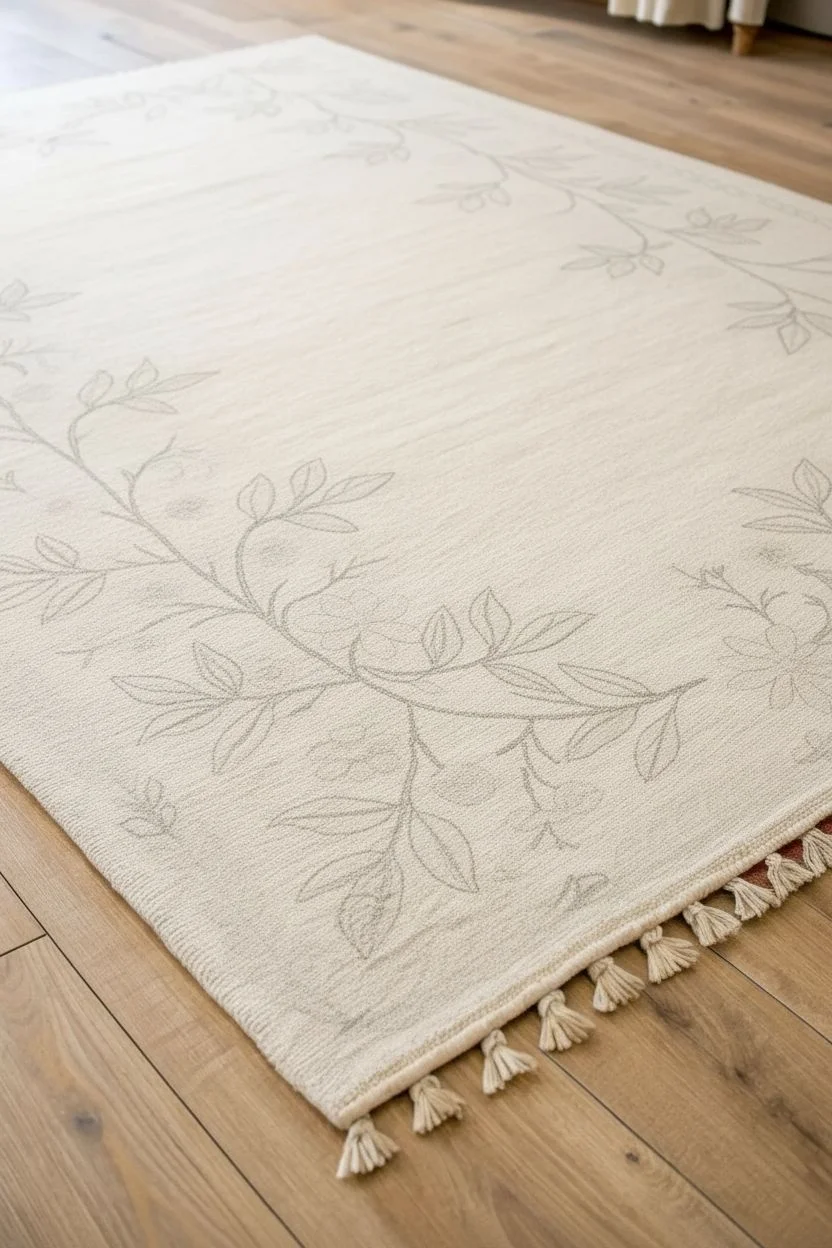
Transform a plain flatwoven rug into a botanical masterpiece with this charming floral border design. The vintage-inspired palette of muted greens, terracotta, and soft peach brings warmth and life to any bare floor space.
Step-by-Step
Materials
- Plain, light-colored flatwoven rug (low pile)
- Fabric paint or acrylic paint mixed with fabric medium
- Paintbrushes (small round for details, medium flat for leaves)
- Pencil or disappearing fabric marker
- Cardstock or stencil film (optional)
- Painter’s tape
- Palette or small containers for mixing
- Drop cloth or plastic sheeting
Step 1: Preparation & Planning
-
Prepare your workspace:
Lay down plastic sheeting or a drop cloth to protect your floor. Unroll your rug flat, ensuring it is clean and free of loose debris. If the rug has been rolled tightly, you might need to weigh down the corners for a few hours. -
Visual mapping:
Study the design in the reference image. Notice how the main vine undulates gently around the border rather than being perfectly straight, and how the large corner clusters anchor the pattern. -
Sketch the primary vine:
Using a pencil or disappearing fabric marker, lightly sketch the central serpentine vine line. Keep it roughly 4-6 inches inward from the rug’s edge, allowing it to curve naturally.
Stiff Bristle Secret
Use a stiff-bristled stencil brush rather than a soft watercolor brush. The stiff bristles help work the paint down into the textured fibers of the rug for better coverage and durability.
Step 2: Painting the Greenery
-
Mix your greens:
Prepare a muted olive green for the stems and leaves. I like to mix a little brown or yellow ochre into standard green fabric paint to get that natural, vintage look. -
Paint the main stems:
With a round brush, follow your sketched vine line with the olive green paint. Keep the pressure steady but don’t worry about perfect uniformity; slight variations add to the hand-painted charm. -
Add leaf outlines:
Along the vine, sketch or freehand leaf shapes. Alternate the direction of the leaves, placing larger clusters near the corners. Use a mix of single leaves and groups of three. -
Fill the leaves:
Using a small flat brush, fill in the leaves with your olive green. For visual interest, you can make half of the leaf slightly darker to suggest a shadow or vein.
Make It 3D
After painting, use a punch needle or embroidery thread to stitch over center details of the flowers. This mixed-media approach adds incredible texture and a high-end feel.
Step 3: Adding the Florals
-
Create the color palette:
Mix three distinct floral colors: a deep terracotta red, a soft peach-orange, and a golden mustard yellow. Ensure each is mixed thoroughly with fabric medium to prevent cracking later. -
Paint the large blossoms:
Identify the spots for the largest peach-colored daisy flowers. Paint the petals radiating outward from a center point using the peach mixture. Let the brushstrokes create the petal texture. -
Add red accents:
Using the terracotta red, paint the smaller, five-petal flowers scattered along the vine. Also, create small round berries or buds near the tips of the finer branches. -
Detail with mustard yellow:
Use the mustard yellow for the centers of the peach flowers and for tiny filler buds. These small pops of yellow brighten the entire composition. -
Second coat:
Rug fibers can be thirsty. Once the first layer is touch-dry, go back over the flowers and leaves with a second coat to ensure the colors are opaque and vibrant.
Step 4: The Outer Border Details
-
Mark the outer rim:
Sketch a simple repeating leaf pattern along the extreme outer edge of the rug, parallel to your floral vine but much closer to the binding. -
Paint the laurel border:
Using the terracotta red, paint small, simple leaf shapes in a ‘laurel wreath’ style—pairs of leaves branching off a center line. This frames the more complex inner floral design.
Step 5: Finishing Touches
-
Add vein details:
Once the base green leaves are fully dry, take a very fine liner brush and a slightly darker green shade to paint thin central veins on the larger leaves for added definition. -
Clean up edges:
Check for any uneven edges or spots where the paint didn’t penetrate the weave. Touch up these areas carefully with the appropriate color. -
Heat setting:
Allow the rug to dry for at least 24-48 hours. If your fabric paint requires it, heat set the design by running a hot iron over it with a protective cloth barrier in between.
Place your newly painted rug in a cozy corner and enjoy the custom botanical flair you’ve added to your home.
Southwestern-Inspired Zigzag Rug

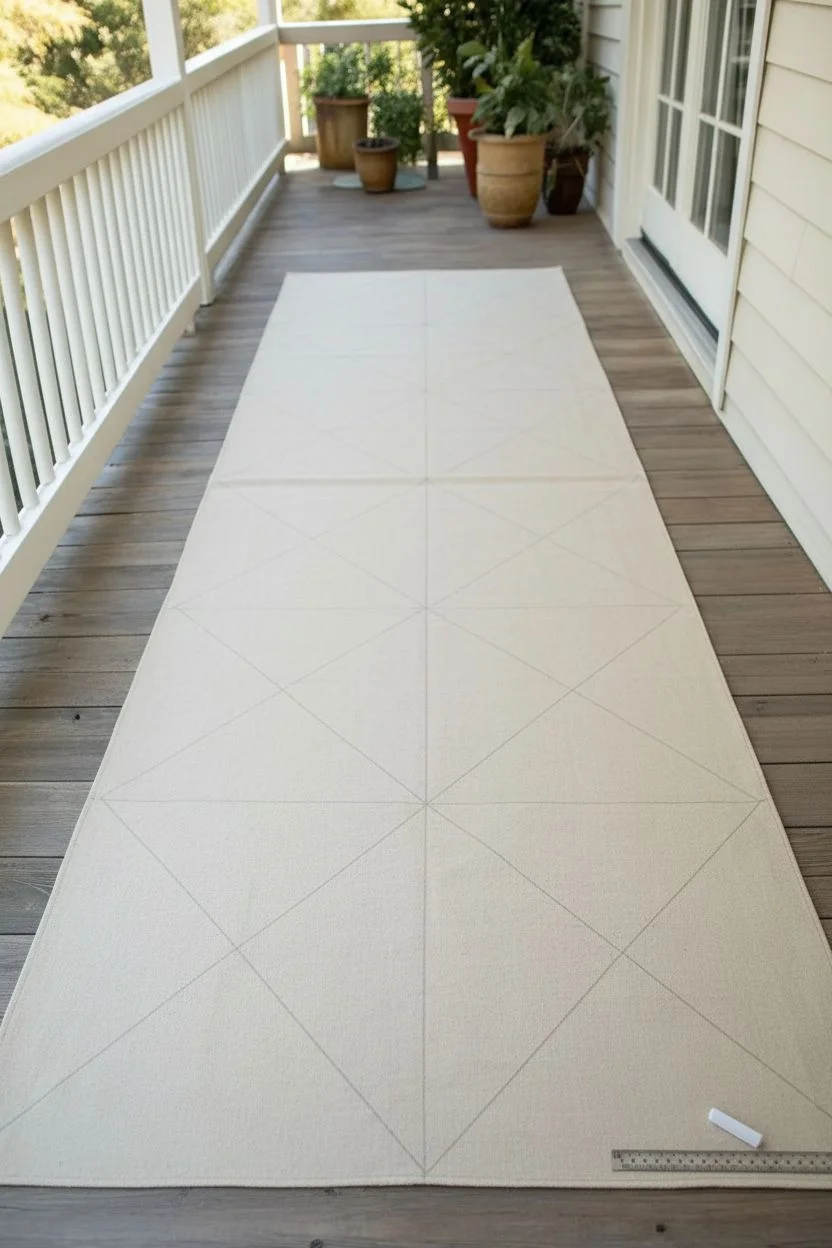
Transform a plain canvas drop cloth or basic runner into a high-end decor piece with this geometric Southwestern design. The jagged, ikat-style diamond pattern brings a beautifully textured, hand-woven look to your porch or hallway using earthy tones of rust, sage, and charcoal.
Detailed Instructions
Materials
- Heavy-duty canvas drop cloth or plain beige cotton runner
- Fabric medium
- Acrylic latex paint (Rust/Terracotta, Sage Green, Charcoal Black, Cream/Beige)
- Painter’s tape (various widths: 1-inch, 2-inch)
- Ruler or yardstick
- Chalk or pencil
- Stencil brushes or stiff-bristled brushes
- Small angled shader brush
- Drop cloth (for protection underneath)
- Iron (optional, for setting)
- Fabric sealant spray (for outdoor use)
Step 1: Preparation & Mapping
-
Prep the rug surface:
Lay your canvas runner flat on a protected surface. If it’s wrinkly, give it a quick iron to ensure your measurements will be accurate. -
Create a center line:
Find the exact center of the rug’s width and mark it lightly with chalk all the way down the length. This axis will help keep your diamond shapes symmetrical. -
Mark the diamond spacing:
Decide on the height of your main diamonds. Measuring from the bottom edge, place tick marks every 12 to 18 inches along that center line to denote the center point of each large diamond. I like to leave a little breathing room between motifs. -
Outline the main shapes:
Using a ruler, connect your center points to the outer edges to create a basic diamond grid. Don’t worry about the jagged edges yet; just lightly sketch the large diamond outlines in pencil or chalk as your guide.
Step 2: Creating the Zigzag Edges
-
Tape the ‘steps’:
This is the trickiest part but worth the effort. Instead of taping a straight diagonal line for the diamond edges, use small strips of painter’s tape to create a stair-step effect. Apply short horizontal and vertical pieces of tape along your chalk lines to build that jagged, ikat-style border. -
Create inner concentric shapes:
Repeat this taping process inside your main diamonds. You want to create bands of space for different colors—an outer ring, a middle ring, and a center diamond. -
Seal the tape edges:
Firmly press down all tape edges. To prevent bleeding on textured fabric, apply a very thin layer of your base cream color or clear matte medium over the tape edges first and let it dry.
Clean Lines Pro Tip
On rough canvas, paint acts like a stencil. Always ‘seal’ your tape edges with a coat of the background color first. This fills gaps so your colored paint won’t bleed under.
Step 3: Painting the Design
-
Mix the fabric medium:
Mix your acrylic paints with fabric medium according to the bottle instructions (usually 2 parts paint to 1 part medium). This keeps the rug flexible and prevents cracking. -
Paint the dark accents:
Start with the Charcoal Black paint. Apply this to the outer jagged rings of the diamonds or the ‘shadow’ areas of the pattern. Use a stippling motion (up and down) rather than brushing side-to-side to work the paint into the weave. -
Add the terracotta tones:
Next, fill in the large diamond bands with your Rust/Terracotta color. Be careful near the taped edges, but ensure full coverage. -
Fill in the sage details:
Apply the Sage Green paint to the smaller, inner diamond shapes or alternating motifs. The contrast between the cool green and warm rust is essential for this look. -
Paint the centers:
Fill the very center of each diamond with a lighter Beige or Cream color to create a focal point. -
Remove tape while damp:
Carefully peel off the painter’s tape while the paint is still slightly tacky. Pulling it away slowly at a 45-degree angle helps keep those stepped jagged lines crisp.
Level Up: Faux Fade
For a vintage, sun-bleached look, mix a tiny bit of water into your paint and dry-brush the final layer. It makes the rug look authentically woven rather than freshly painted.
Step 4: Finishing Touches
-
Touch up freehand:
Once the tape is off, you might see small gaps where the tape overlapped. Use a small angled shader brush to carefully fill these in, sharpening the ‘stair steps’ if needed. -
Paint the border triangle:
Don’t forget the triangular shapes along the long edges of the rug. Use your stair-step taping method to add these half-diamond shapes in rust along the perimeter to frame the design. -
Add the fringe (optional):
If your runner doesn’t have fringe, you can sew on a pre-made cotton fringe trim to the short ends for an authentic finished look. -
Heat set the design:
Allow the rug to cure for at least 24 hours. Then, place a thin cloth over the painted areas and run a hot iron (no steam) over it to heat-set the fabric medium. -
Seal for protection:
If this rug is going on a porch, mist it with a fabric sealant or effortless waterproofing spray to protect your hard work from moisture and dirt.
Step back and admire how a simple canvas has transformed into a stunning geometric statement piece for your home
Faux Kilim Medallion Painted Rug

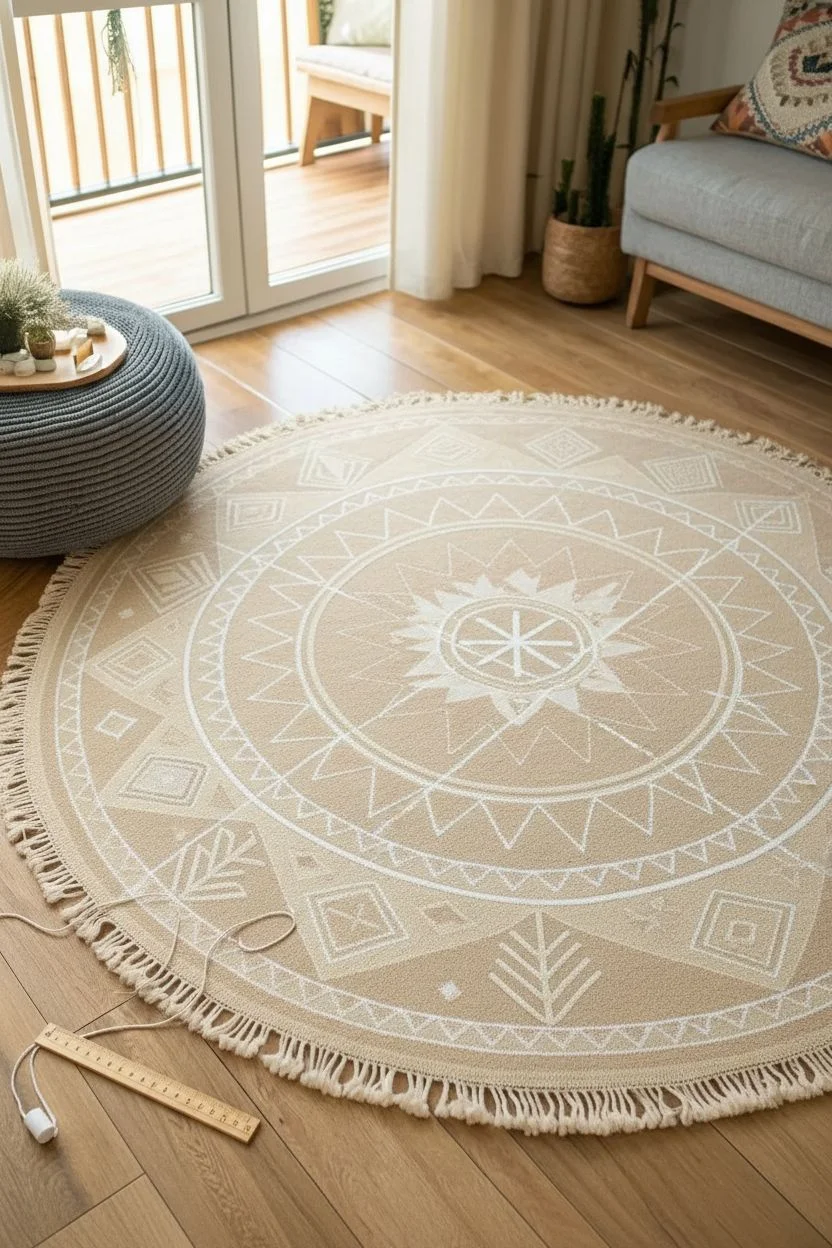
Transform a plain round rug into a stunning statement piece with this faux kilim medallion design. Featuring warm terracotta tones, geometric tribal motifs, and a striking central sunburst, this painted rug mimics the intricate look of a woven textile at a fraction of the cost.
Step-by-Step
Materials
- Round low-pile rug or canvas drop cloth tailored to a circle
- Fabric medium
- Acrylic craft paints (Terracotta, Navy Blue, Cream, Beige, Charcoal)
- Painter’s tape (various widths: 1-inch and 1/4-inch)
- String and chalk (for drawing circles)
- Flat angled brushes (1-inch and 1/2-inch)
- Small detail brush
- Ruler or yardstick
- Cardstock or stencil acetate
Step 1: Planning and Mapping
-
Prep the Surface:
Begin by vacuuming your rug thoroughly to remove any loose fibers. If you are using a canvas cloth instead of a rug, iron it flat. Mix your acrylic paints with fabric medium according to the bottle instructions; this ensures the paint stays flexible and doesn’t crack underfoot. -
Mark the Center:
Find the exact center of your rug by measuring the diameter in two directions forming a cross. Mark this spot clearly with a piece of chalk. -
Draw Concentric Rings:
Creating perfectly round guide lines is crucial. Tie a piece of string to your chalk. Hold the string end at the center point and extend the chalk to draw your concentric circles. You’ll need rings for the center medallion, the main sunburst area, the triangle border, and the outer decorative band. -
Segment the Circle:
Use a long straight edge or yardstick to divide the rug into equal pie slices. Lightly chalk lines crossing through the center to create 8 or 16 equal sections. These lines will guide the placement of your geometric points and repeating patterns.
Bleeding Lines?
If paint bleeds under your tape, don’t panic. Wait for it to dry completely, then use a small stiff brush with the background color to touch up and ‘erase’ the blurry edge.
Step 2: Painting the Central Medallion
-
Base Coat the Center:
Paint the innermost circle with a terracotta shade. Let it dry slightly, then paint a navy blue ring just outside of it. The fabric medium tends to extend drying time, so handle wet areas carefully. -
Add the Star Motif:
Using a small detail brush and cream paint, create the simple eight-pointed star in the very center. I like to paint a vertical line, then a horizontal one, and fill in the diagonals to keep it symmetrical. -
Create the Sunburst Points:
In the large middle ring, use your chalk pie-slice lines as peaks for the starburst. Tape off V-shapes radiating from the center ring outward. Paint these alternating large triangles in beige and cream to create depth. -
Fill the Background:
Once the starburst points are dry, carefully remove tape and fill the negative space between them with your terracotta mix. This creates that warm, rich background color typical of kilim styles.
Vintage Fade
Once the rug is fully dry, lightly sand the painted areas with fine-grit sandpaper. This distresses the paint, giving it a soft, time-worn antique kilim appearance.
Step 3: The Geometric Borders
-
Stencil the Sawtooth Ring:
Move to the next ring outward. Cut a simple triangle template from cardstock that fits the width of this band. Trace this template repeatedly around the circle to create a sawtooth pattern. -
Paint the Charcoal Triangles:
Fill in every other triangle with the charcoal or dark navy paint. Ensure the points face inwards towards the center. Use an angled brush for sharp tips. -
Structure the Outer Band:
The widest outer band features distinct blocks of pattern. Use painter’s tape to section off large trapezoids around the perimeter, using your initial chalk guide lines to keep spacing even. -
Paint Tribal Motifs – Trees:
In alternating large sections of the outer band, paint a stylized ‘tree’ or fern branch using cream paint over a terracotta base. A simple vertical line with three V-shapes branching off it works perfectly. -
Paint Tribal Motifs – Diamonds:
In the remaining sections, paint geometric diamond or square outlines. Use navy blue for the outline and add a small accent dot or cross in the center. These small details mimic hand-woven embroidery. -
Add the Final Perimeter Detail:
Finish the painted design by adding a thin charcoal ring around the very outer edge of the pattern, just before the fringe starts. This acts as a frame for your artwork. -
Heat Set the Design:
Allow the rug to dry for at least 24-48 hours. Once fully dry, you can heat set the paint by hovering a hot iron (no steam) over the design or using a blow dryer on high heat, which helps bond the paint permanently to the fibers.
Place your new masterpiece in a cozy corner and enjoy the warmth it brings to your space
Ombre Gradient Painted Rug
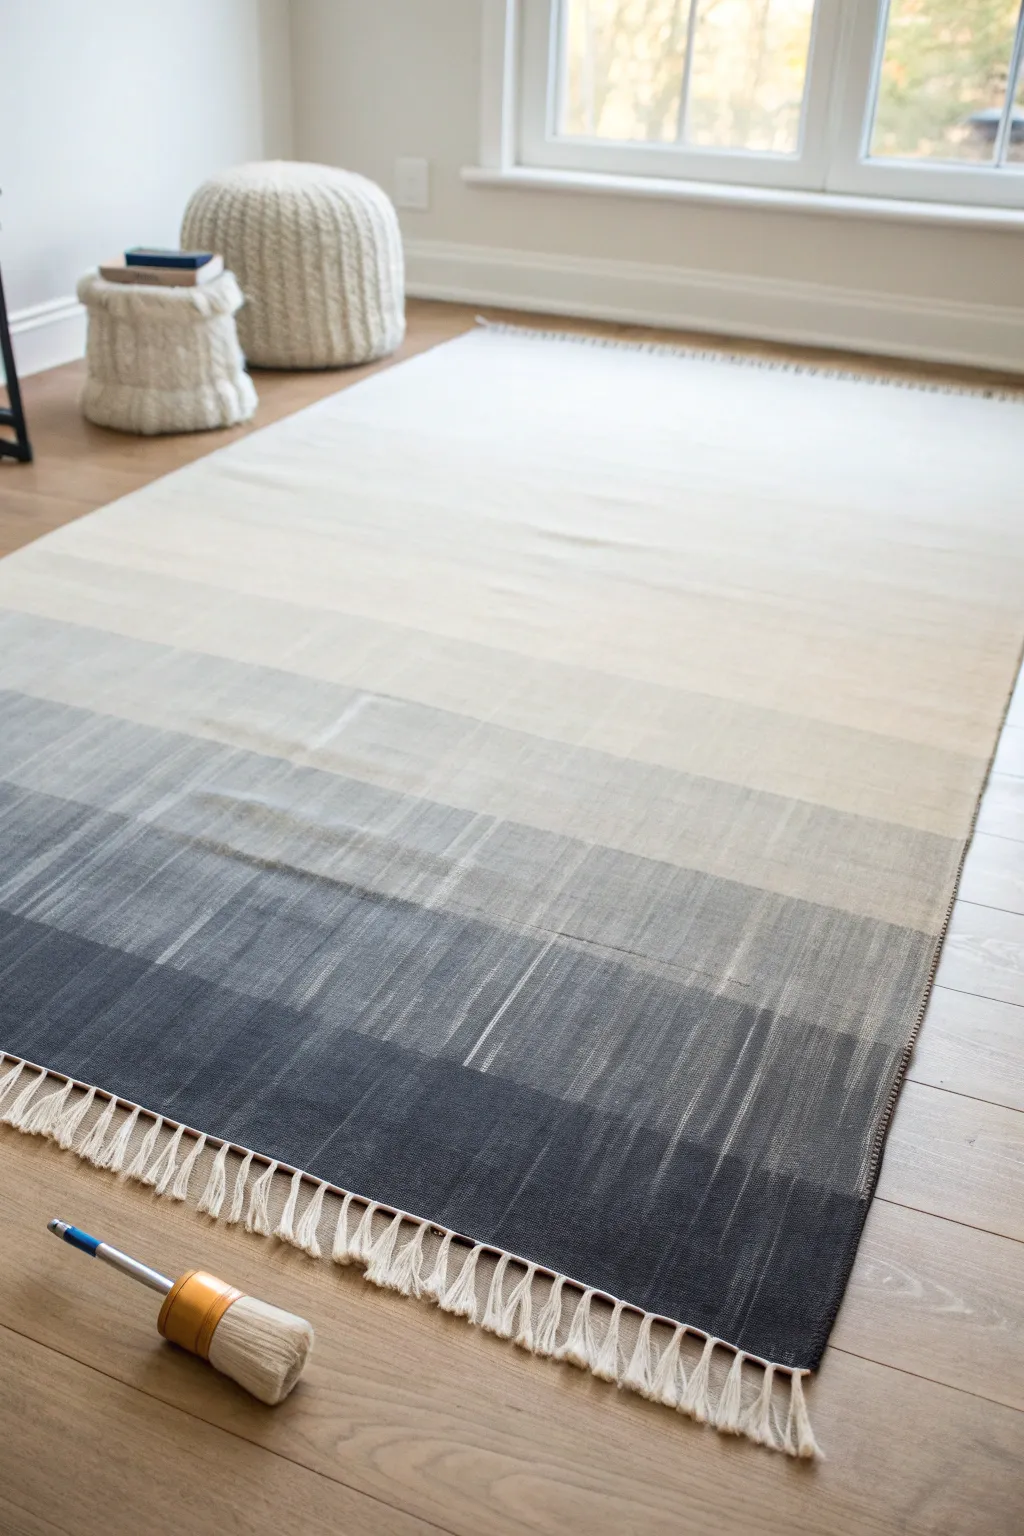
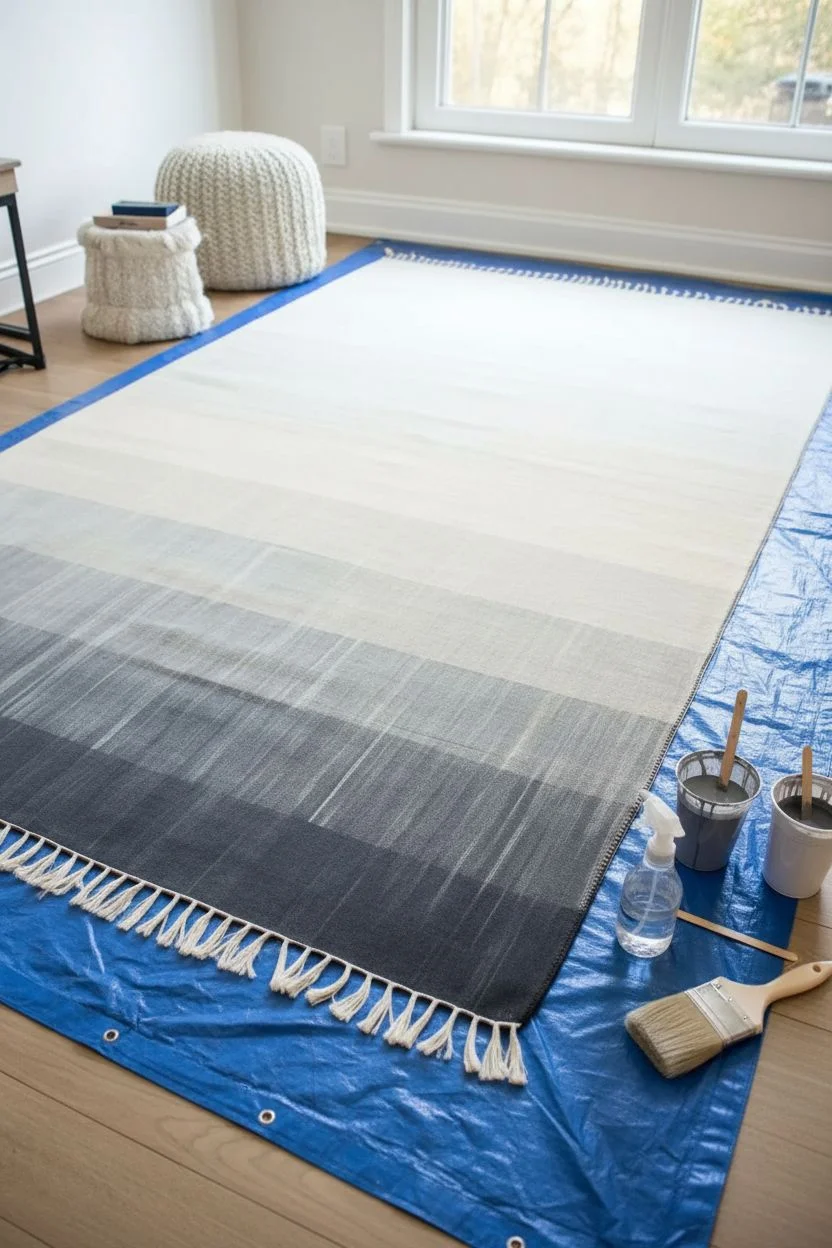
Transform a plain flat-weave rug into a modern statement piece with this sophisticated monochromatic gradient. This project creates a seamless transition from deep charcoal to airy cream, adding depth and a custom designer touch to your floor space.
How-To Guide
Materials
- Flat-weave cotton or natural fiber rug (cream or off-white)
- Fabric medium
- Acrylic paint or latex paint (Black, Dark Grey, White)
- Large paintbrush (2-3 inch width)
- Water spray bottle
- Measuring tape
- Painter’s tape or chalk (optional)
- Mixing containers or plastic cups
- Drop cloth or tarp
- Stir sticks
Step 1: Preparation & Planning
-
Prepare your workspace:
Lay down a large drop cloth or tarp on a flat, hard surface. Place your rug on top and smooth it out completely, ensuring there are no wrinkles or folds. -
Map out the gradient:
Visualize or lightly mark horizontal sections on your rug. For this look, you want about 5-6 distinct bands of color that will eventually blend together. You can use small pieces of tape on the very edge of the rug to mark these zones. -
Prepare the paint mixture:
Mix your acrylic or latex paint with a generous amount of fabric medium according to the bottle’s instructions. This is crucial for keeping the rug soft rather than crunchy. -
Dampen the fiber:
Lightly mist the bottom section of the rug—where the darkest color will go—with your water spray bottle. Damp fibers absorb pigment more evenly and help with blending.
Uneven Blending?
If a paint line dries too hard before you can blend it, re-wet the area with your spray bottle and add a tiny bit of fresh paint to reactivate the edge.
Step 2: Painting the Gradient
-
Start with the darkest shade:
Begin at the very bottom edge with your darkest black mixture. Use long, horizontal strokes, working the paint well into the weave. Paint a band that is roughly 12-18 inches wide. -
Create the first transition tone:
In a separate container, take some of your black mix and add a splash of dark grey or white to lighten it slightly. Apply this directly above your black band. -
Blend the first seam:
While both bands are still wet, mist the border where they meet with water. Use your brush to feather the lighter color down into the dark color using quick, vertical flicking motions to erase the hard line. -
Mix the mid-tone grey:
Create a true medium grey. Apply this as the third band, repeating the horizontal application technique. -
Soften the transition:
Again, spray the meeting point of the dark grey and medium grey with water. Use a clean, dry brush or a rag to drag the wet paints into each other, creating that soft, striated look seen in the photo. -
Lighten the mixture:
Add significantly more white to your grey mix now for the fourth band. This should be a pale, misty grey. Paint this section, ensuring you leave the top portion of the rug unpainted. -
Creating the fade effect:
For the area where the pale grey meets the original rug color, dilute your paint with a bit more water. Apply it thinly so the original cream rug color starts to show through the paint strokes. -
Dry brush the final edge:
For the very top edge of the painted area, use an almost-dry brush with the palest grey. Feather the strokes upward into the unpainted cream section so the color seems to evaporate.
Step 3: Finishing Touches
-
Check for consistency:
Stand back and look at the rug from a distance. If any transitions look too harsh, mist them lightly and dab with a damp cloth to soften the line. -
Let it dry completely:
Allow the rug to dry undisturbed for at least 24-48 hours. The thicker sections of paint will take longer to cure. -
Heat set the paint:
Once dry, you may need to heat set the fabric medium to make it permanent. Place a scrap cloth over the painted areas and run a hot iron (no steam) over it, or follow your specific fabric medium’s instructions. -
Fluff the fibers:
Vacuum the rug thoroughly once the paint is cured to help soften the fibers and break up any stiffness.
Level Up: Dyed Fringe
Dip-dye just the tips of the fringe on the darkest end of the rug into black dye or diluted paint for a fully integrated, high-end look.
Now you have a custom, gallery-worthy floor piece that perfectly anchors your room
Outdoor “Painted Rug” on Concrete or Deck
Transform a plain concrete patio into a cozy outdoor living space with this clever trompe l’oeil painted rug. Featuring warm terracotta tones, a deep denim border, and realistic-looking fringe, this durable floor design adds texture without the worry of soggy fabrics.
Step-by-Step
Materials
- Concrete porch and floor paint (Cream, Denim Blue, Terracotta/Rust)
- Painter’s tape (1-inch and 2-inch widths)
- Roller frame and covers (3/8-inch nap)
- Extension pole (optional but saves your back)
- Small angled sash brush (1.5 or 2-inch)
- Fine detail brush or small flat artist brush
- Measuring tape
- Chalk line or straight edge with pencil
- Concrete cleaner/degreaser
- Scrub brush
- Clear concrete sealer (matte finish)
Step 1: Preparation & Base Coat
-
Clean the Surface:
Before painting, the concrete needs to be spotless. Scrub the area thoroughly with a concrete cleaner or degreaser to remove dirt, mildew, and any oily residue. Rinse well and let it dry completely—ideally for 24 hours. -
Measure and Mark:
Decide on the overall dimensions of your rug. Using a measuring tape and a chalk line (or a pencil and long straight edge), mark the outer perimeter of the rug directly onto the pavers. -
Tape the Perimeter:
Apply painter’s tape along the *outside* edge of your chalk lines. This tape will define the crisp outer boundary of your rug. Press the tape edges down firmly to prevent bleed-under. -
Roll the Base Layer:
Using a roller, fill in the entire taped rectangle with your chosen cream or off-white base color. This acts as both the center panel and the primer for the other colors. Apply two coats if necessary for solid coverage, allowing proper drying time between them.
Step 2: Creating the Borders
-
Mark the Inner Rectangle:
Once the cream base is fully dry (give it at least 4-6 hours), measure inward from the outer edge to define your borders. For this look, measure about 12-14 inches in for the start of the central cream block. -
Tape the Blue Border:
Apply tape to mark off the wide blue stripe. This band sits between the outer terracotta section and the inner cream center. Ensure your tape lines are parallel and straight. -
Paint the Blue Band:
Using a smaller roller or a wide brush, fill in this section with your deep denim blue paint. I find that brushing in the direction of the ‘weave’ (lengthwise) helps simulate a fabric texture. -
Reveal and Dry:
Carefully peel up the tape around the blue section while the paint is still slightly tacky to keep edges sharp. Let this blue layer dry completely before moving to the next step. -
Define the Terracotta Zone:
Now, tape off the innermost edge of the rug (next to the blue) to protect it. You will be painting the outer border now. Apply your terracotta or rust-colored paint to the wide outer band.
Bleeding Lines?
If paint bleeds under the tape, don’t panic. Wait for it to dry completely, then use a small artist brush and the base color to touch up and straighten the line manually.
Step 3: Adding Detail & Pinstripes
-
Tape the Pinstripes:
This step makes the design pop. Once the terracotta border is dry, use thin painter’s tape (or standard tape cut into strips) to mask off narrow lines within that border. You want to expose the cream base layer or paint new cream lines over the terracotta. -
Paint the Stripes:
Lightly brush cream paint over these thin exposed areas. Use a ‘dry brush’ technique here—wiping most paint off the brush first—to give the stripes a woven, slightly imperfect look. -
Remove Tape:
Remove all the striping tape to reveal the detailed multi-line border effect.
Level Up: Texture
For a slip-resistant surface, mix a designated anti-slip additive into your final coat of sealer. This adds grit, making the rug safer to walk on when the patio gets wet.
Step 4: The Faux Fringe
-
Sketch the Fringe:
At the two short ends of the rug, lightly pencil in short, vertical dashes extending from the rug’s edge onto the unpainted concrete. These will be your fringe tassels. -
Paint the Base Strands:
Using a fine artist brush and the cream paint, paint individual lines over your pencil marks. Vary the pressure slightly so the lines taper at the ends like real thread. -
Add Shadow and Color:
To create dimension, mix a tiny drop of black into your blue paint to make a shadow color. Paint very thin lines along one side of each cream tassel strand. Then, add small dashes of blue and terracotta at the ‘knots’ where the fringe meets the rug. -
Seal the Deal:
Allow the entire project to cure for at least 24-48 hours. Finally, roll on two thin coats of clear outdoor matte concrete sealer. This protects your artwork from UV rays and foot traffic.
Now you have a stunning, permanent textile effect that anchors your outdoor furniture perfectly
Painted Runner With Loose Abstract Brushstrokes
Transform a plain drop cloth or blank runner into a high-end designer statement piece using simple geometric shapes and warm, earthy tones. This project mimics the look of a woven kilim rug with distinct wave patterns and diamond motifs.
Step-by-Step Guide
Materials
- Heavyweight canvas drop cloth or plain woven runner rug
- Fabric medium
- Acrylic craft paints (terra cotta/rust, dark grey-green, cream/off-white)
- Painter’s tape (1-inch and 2-inch widths)
- Pencil or fabric marker
- Long straight edge (yardstick or framing square)
- Cardboard or stencil acetate (for template making)
- Scissors
- Small roller and tray
- Assorted brushes (angle brush for edges, liner brush for diamonds)
- Iron and pressing cloth
Step 1: Preparation & Base Design
-
Prepare the fabric surface:
If using a drop cloth, cut it to your desired runner dimensions (e.g., 2.5′ x 8′) plus hem allowance. Iron the fabric completely flat to ensure your paint lines stay crisp, and hem the edges if necessary. -
Mix the paint:
Combine your acrylic paints with fabric medium according to the bottle’s ratio (usually 2:1 paint to medium). This makes the paint flexible so it won’t crack when walked on. -
Create the central guide:
Using your yardstick, lightly mark a centerline down the entire length of the runner with a pencil. This will help keep your geometric pattern symmetrical. -
Make the wave template:
Cut a piece of cardboard into a gentle, elongated ‘S’ curve or wave shape. Make it roughly 18-24 inches long. This will serve as the stencil for the main central motif. -
Trace the central waves:
Place your wave template along the center line and trace. Flip the template vertically to create a mirror image on the opposite side, forming an hourglass-like shape in the middle. -
Repeat the pattern:
Move the template down the runner, connecting the waves end-to-end to create a continuous, undulating chain down the center.
Faux Weaving Effect
When filling large shapes, brush only in one direction (horizontally). This mimics the weft threads of a real woven kilim rug.
Step 2: Painting the Borders & Motifs
-
Outline the side motifs:
Along the outer edges of the runner, lightly sketch large, inward-facing triangles that align with the widest parts of your central wave pattern. -
Fill the rust sections:
Using your rust/terra cotta paint mixture and an angled brush, fill in the large side triangles. Don’t worry about perfect opacity; a slightly streaky look mimics woven textures. -
Add the grey accents:
Once the rust paint is dry to the touch, paint smaller, varying triangle or diamond segments within the rust shapes using the dark grey-green mixture for contrast. -
Paint the central waves:
Use a thin liner brush loaded with rust paint to carefully go over your penciled wave lines in the center. Keep the line consistent but organic. -
Create the diamond chain:
Inside the central wavy channel, hand-paint a vertical chain of simple diamonds using a grey-green tone. I find that free-handing these adds to the authentic, handmade aesthetic. -
Add detail to the borders:
Paint a thin, continuous border line down both long sides of the runner, leaving about an inch of negative space between the paint and the rug edge. -
Embellish the side strips:
In the narrow white space between your painted shapes and the edge, paint a delicate chain of small, open diamonds using a very fine brush.
Rug Won’t Lay Flat?
If the paint causes curling, iron the underside heavily with steam after curing. Using a non-slip rug pad underneath also helps keep it grounded.
Step 3: Finishing Touches
-
Add texture marks:
To simulate a woven look, use a nearly dry brush with a tiny amount of cream or white paint to add subtle cross-hatching or scratches over the solid painted blocks. -
Let it cure:
Allow the runner to dry undisturbed for at least 24 hours. The fabric medium needs time to bond properly with the fibers. -
Heat set the design:
Place a pressing cloth over the painted areas and iron on a medium-high setting (no steam) for 3-5 minutes per section to permanently set the paint. -
Attach the fringe:
Purchase pre-made cotton fringe trim and sew or use heavy-duty fabric glue to attach it to the two short ends of your runner for that final rug look.
Place your new custom runner in the hallway and enjoy the warmth it brings to your space
Terrazzo Speckle Painted Rug
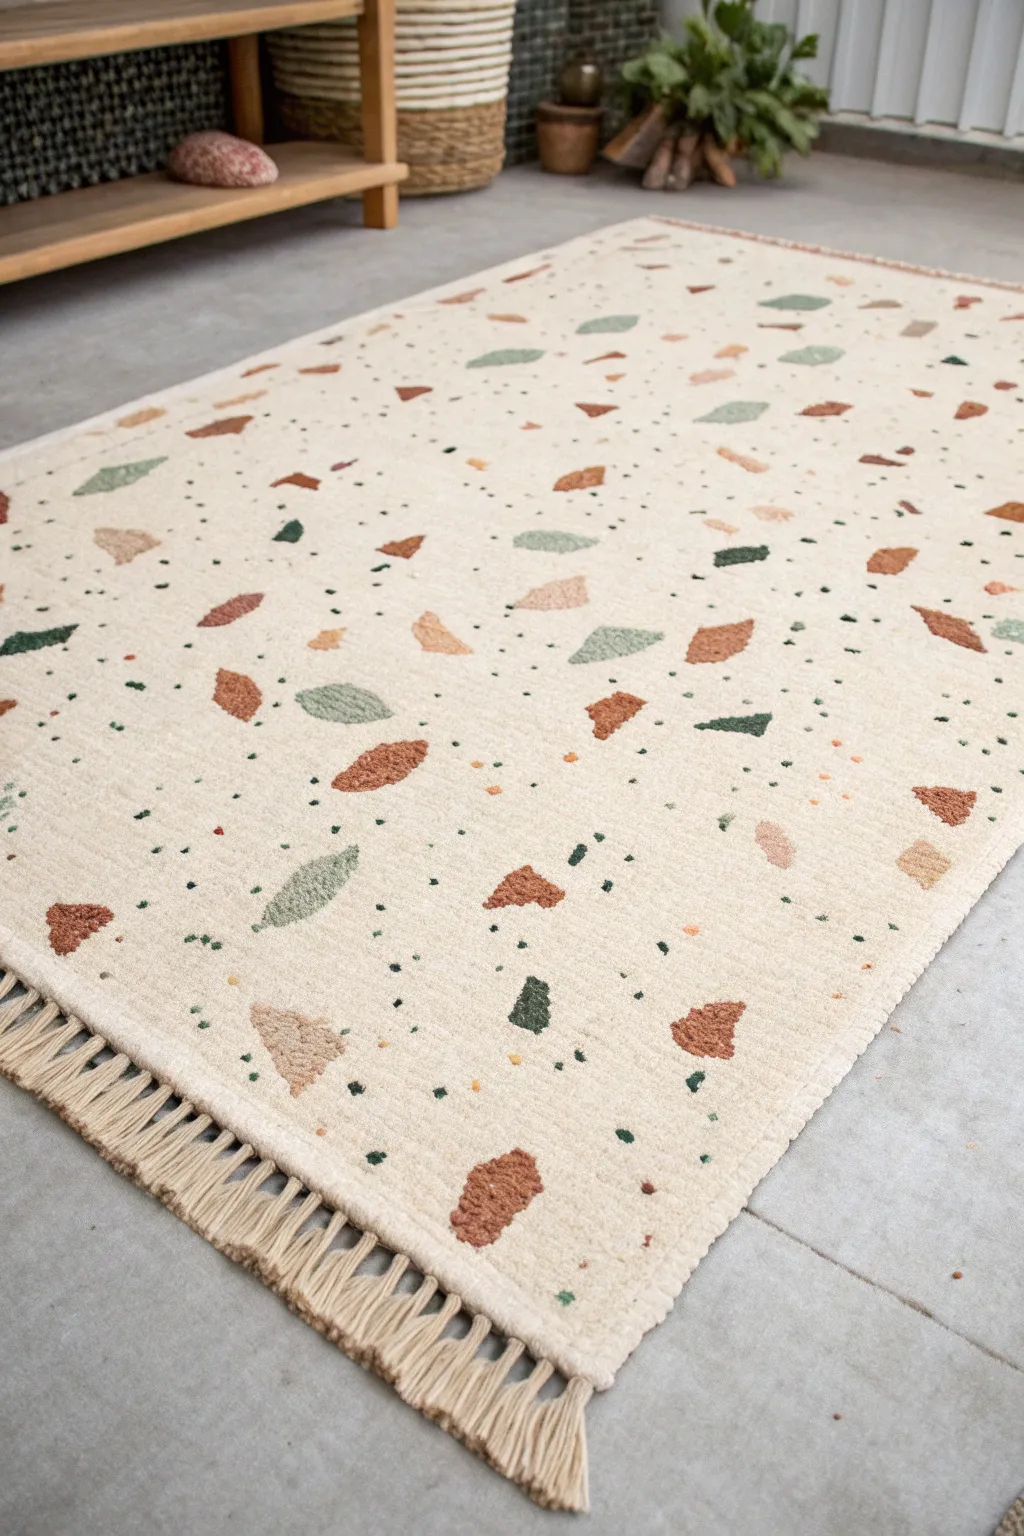

Bring the timeless elegance of Italian terrazzo flooring into your living space with this simple yet striking textile project. By layering organic shapes in distinct earth tones and adding fine speckles, you can transform a plain flat-weave rug into a modern statement piece.
Step-by-Step Tutorial
Materials
- Plain, low-pile or flat-weave rug (cream or off-white cotton)
- Fabric medium
- Acrylic paints (terracotta, sage green, forest green, warm beige, chocolate brown)
- Assorted flat paintbrushes (medium and large sizes)
- Small round detail brush
- Cardboard or scrap paper for practice
- Drop cloth
- Painter’s tape or stencil (optional)
- Small mixing cups or palette
Step 1: Preparation and Planning
-
Prepare your workspace:
Lay down a drop cloth in a well-ventilated area. Because paint can sometimes bleed through fabric, place a layer of plastic or cardboard directly underneath the rug to protect your floor. -
Clean the surface:
Vacuum the rug thoroughly to remove any loose lint or dust. A clean surface ensures the paint adheres properly to the fibers. -
Mix your paints:
In separate cups, mix your acrylic paints with the fabric medium. I usually follow the ratio on the bottle, which is typically 1 part medium to 2 parts paint. This blend keeps the paint soft and flexible rather than crunchy. -
Test the consistency:
Dab a small amount of your mixed paint onto a scrap piece of fabric or a hidden corner of the rug. You want a consistency that soaks into the fibers slightly without bleeding outwards excessively.
Shape Variety Tip
Avoid painted ‘blobs’ by making shapes with straight edges and corners. Think triangles, trapezoids, and jagged shards to mimic real stone chips.
Step 2: Painting the Terrazzo Shapes
-
Start with the largest shapes:
Choose your first main color, perhaps the terracotta or warm beige. Using a medium flat brush, paint random, geometric shard-like shapes. Keep them angular but irregular, like broken stone. -
Space them out:
Distribute these first large shapes sparsely across the rug. Leave plenty of open space for the other colors to breathe. -
Add secondary colors:
Switch to your sage green mix. Paint similar irregular shapes in the gaps, varying the sizes. Some should be quite small, while others can be medium-sized chunks. -
Introduce darker accents:
Using the forest green or chocolate brown, add smaller, sharper fragments. These darker tones act as anchors for the design, giving it depth. -
Vary the direction:
Ensure your shapes are rotated in different directions. Terrazzo is random, so avoid creating identifiable rows or patterns. -
Refine the edges:
Go back over your painted shapes. If the rug texture makes the edges look fuzzy, dab a little extra paint along the perimeter to sharpen the silhouette of each ‘stone’.
Level Up: Texture
Mix a small amount of puffy paint into your lighter colors before applying. The paint will rise slightly when heat-set, giving your terrazzo actual 3D texture.
Step 3: Adding the Speckles
-
Select your speckle colors:
Pick two or three of your darkest colors for the tiny dots. Forest green and deep grey-brown work beautifully for high contrast. -
Apply large dots:
Dip the handle end of a paintbrush or a small round brush into the paint. Dot the rug randomly in the empty spaces between the large shapes. -
Create fine speckles:
For the tiniest specks, you can flick the bristles of a toothbrush or use a very fine detail brush to tap tiny points of color throughout the design. -
Check density:
Step back frequently to look at the overall balance. Add more dots to areas that feel too empty, treating the rug as one large canvas.
Step 4: Finishing Touches
-
Allow to dry completely:
Let the rug sit undisturbed for at least 24 to 48 hours. Acrylic paint needs to cure fully, especially when mixed with fabric medium. -
Heat set the design:
Once dry, heat set the paint to make it permanent. Place a scrap cloth over the painted areas and iron on a medium heat setting without steam for a few minutes per section. -
Fluff carefully:
If the painted areas feel stiff, gently massage the fabric or run a vacuum over the rug to soften the texture slightly.
Place your new custom rug in your entryway or kitchen for an instant artisanal upgrade
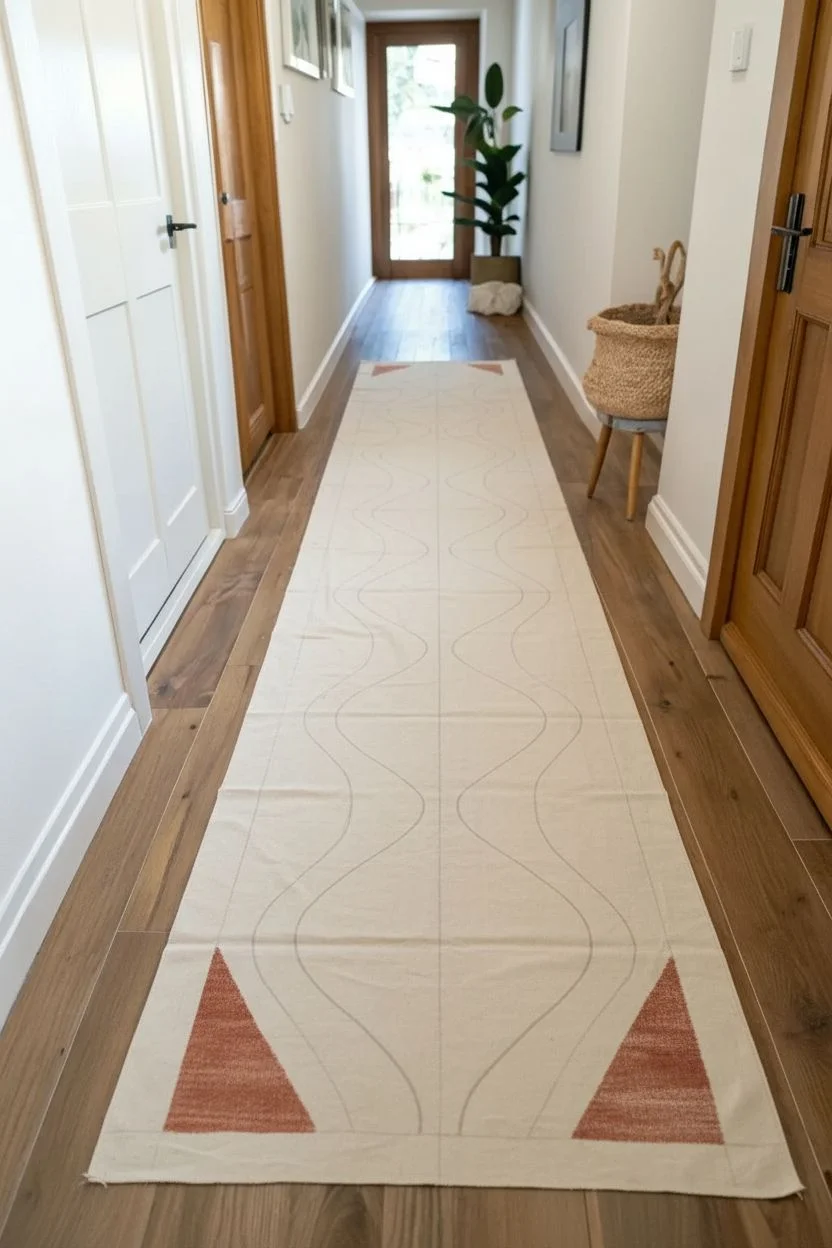
Topographic Linework Painted Rug
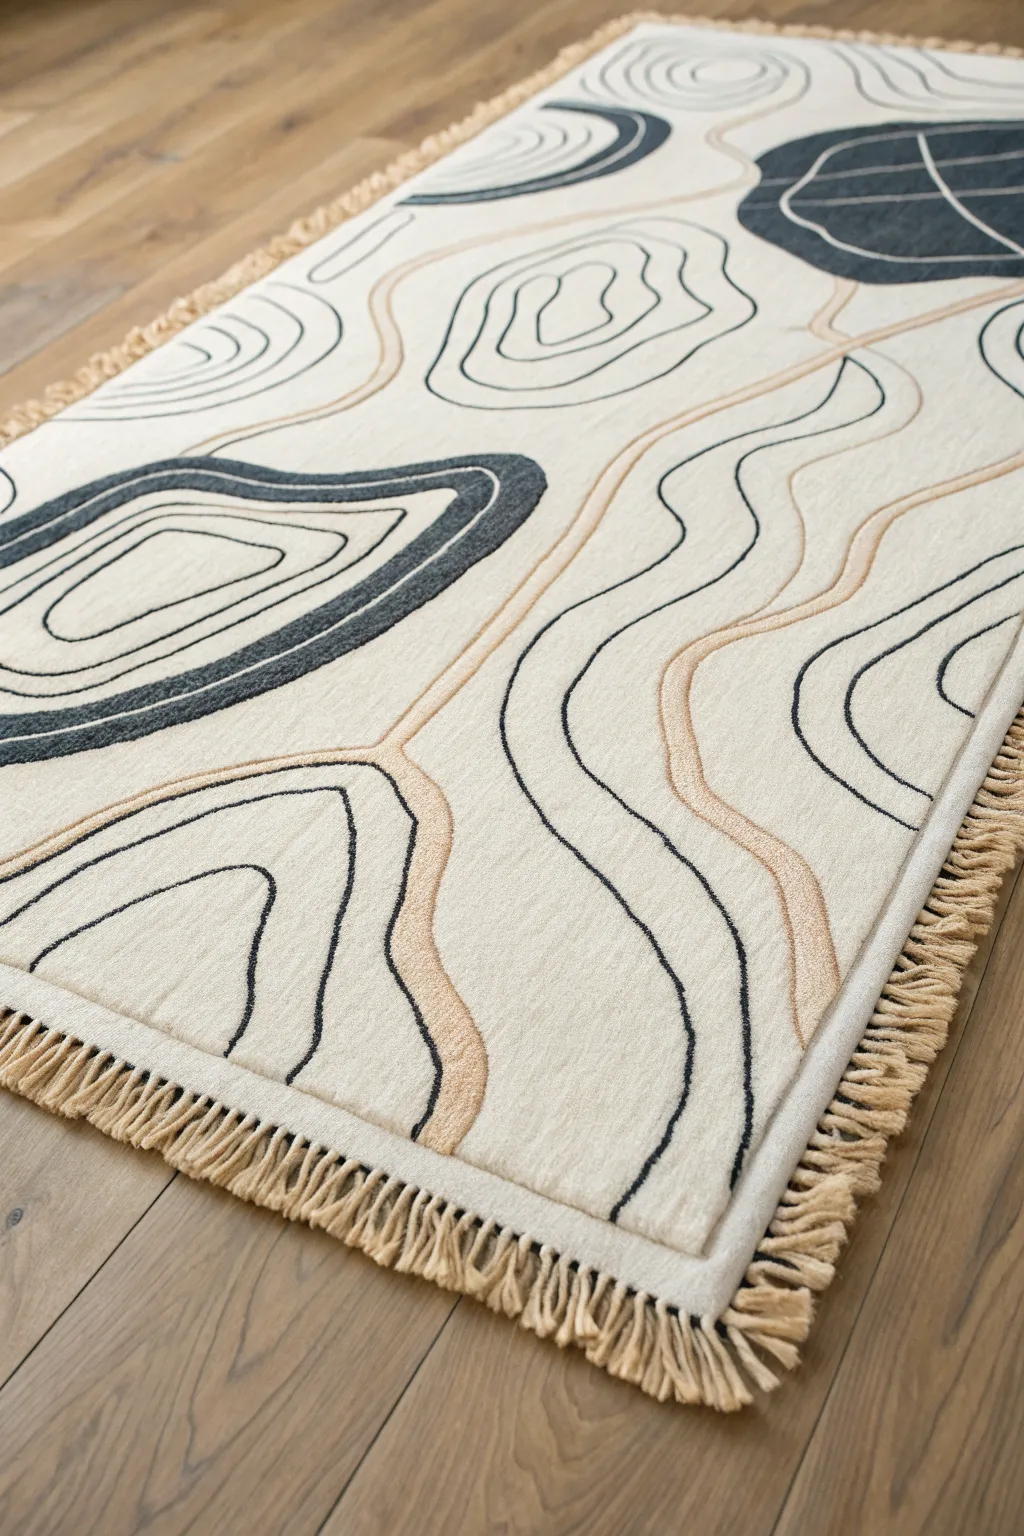
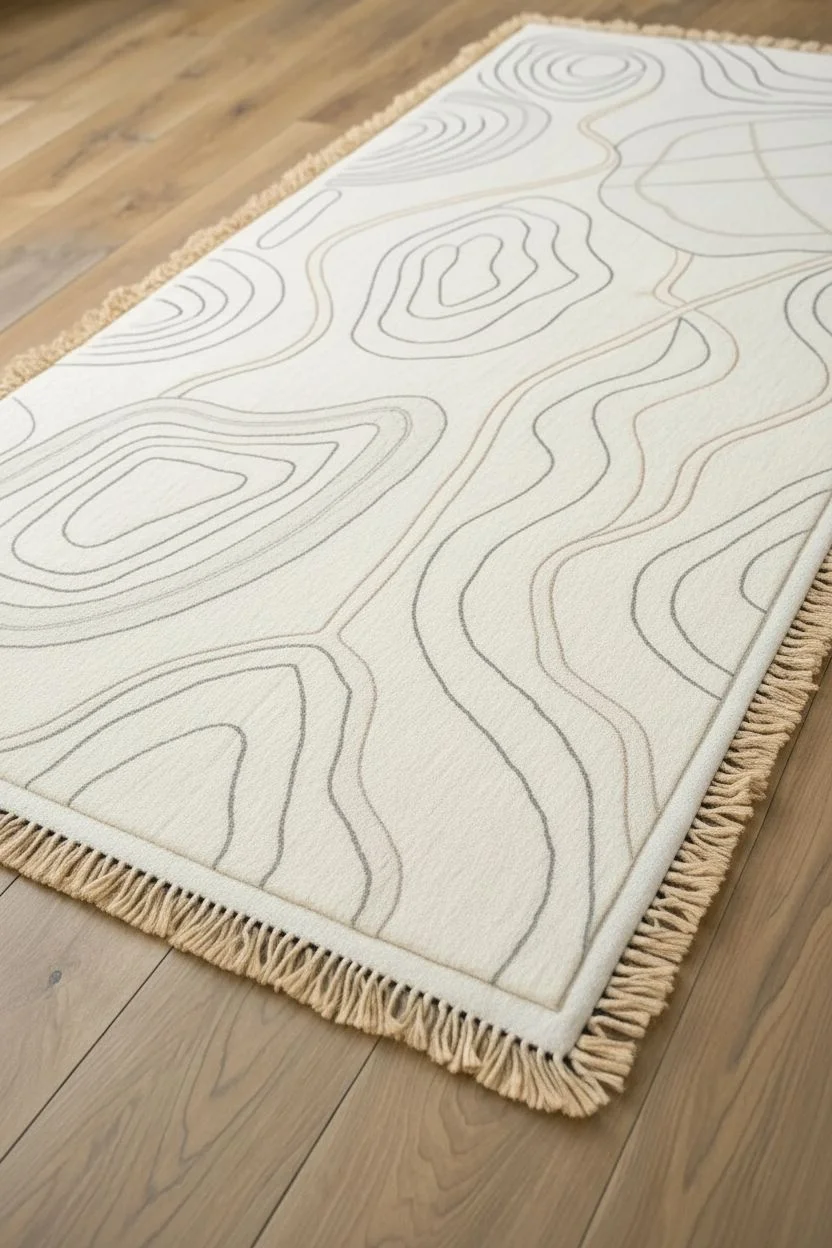
Transform a plain, flat-weave rug into a modern art piece featuring organic, flowing lines inspired by topographic maps. This continuous line design uses contrasting black and warm tan tones to create depth and movement on your floor.
Step-by-Step Guide
Materials
- Flat-weave rug (cream or off-white base)
- Fabric paint or soft-body acrylics mixed with fabric medium
- Colors: Carbon Black, Warm Beige/Tan
- Assorted round brushes (sizes 4, 8, and 12)
- Pencil or chalk for sketching
- Drop cloth or cardboard
- Painter’s tape (optional)
- Small mixing cups
Step 1: Preparation & Sketching
-
Prepare your workspace:
Lay down a drop cloth or large piece of cardboard to protect your floor. Unroll your flat-weave rug and smooth out any creases or bumps to ensure an even painting surface. -
Plan the flow:
Look at the rug as a landscape. You want to create organic shapes that look like islands or elevation lines on a map. These shapes rarely have straight edges, so keep everything fluid. -
Sketch main focal points:
Using a pencil or light chalk, lightly sketch two or three large, irregular ‘island’ shapes. These will be your primary focal points where the lines are densest or where you might add solid blocks of color. -
Draft the connecting lines:
Draw wavy, parallel lines that ripple out from your focal points. Let some lines run off the edge of the rug and others meander through the middle. Vary the spacing—some lines should be close together, others wider apart. -
Review the composition:
Step back and look at your sketch from a distance. The design should feel balanced but not symmetrical. Adjust any lines that look too stiff or rigid.
Smooth Operator
If the rug texture is very nubby, use a ‘stippling’ motion (tapping the brush down vertically) to get paint into the deep weaves rather than just dragging it across the surface.
Step 2: Painting the Linework
-
Mix the black paint:
Combine your black acrylic paint with fabric medium according to the bottle instructions. This ensures the paint stays flexible and doesn’t crunch underfoot after drying. -
Start with the thin lines:
Load a size 4 or 6 round brush with the black mixture. Begin tracing your sketched pencil lines. Keep your wrist loose and let the brush glide over the texture of the rug. -
Vary the line weight:
As you paint, press down slightly harder in the curves to thicken the line, and lift up on straighter sections for a thinner look. This modulation mimics natural topography. -
Create the solid shapes:
Identify the center of your ‘island’ shapes. Switch to a larger brush (size 12) and fill these central areas with solid black. I like to leave a tiny sliver of unpainted space between the solid fill and the first enclosing ring to keep it airy. -
Add secondary details:
Go back in with your thin brush and add smaller, enclosed loops inside larger open spaces. These look like little peaks or valleys on your map. -
Let the black dry:
Allow the black paint to dry to the touch, usually about 30-60 minutes, before introducing the second color to avoid smudging.
Step 3: Adding Warmth & Texture
-
Mix the beige tone:
Prepare your warm beige or tan paint with fabric medium. You want a color that contrasts gently with the cream rug but isn’t as harsh as the black. -
Paint the accent lines:
Select specific ‘rivers’ or pathways between your black lines to highlight. Paint these lines with the beige mixture using a medium round brush (size 8). -
Follow the black contours:
Keep the beige lines generally parallel to the black ones, but don’t be afraid to let them deviate slightly. Organic inconsistency adds to the hand-drawn charm. -
Add a wash effect (optional):
For a softer look, water down a small amount of the beige paint slightly. Use this to create a very subtle shadow along one side of the thickest topographic lines. -
Check edges and fringe:
Ensure your lines extend neatly to the binding edge of the rug but stop before hitting the fringe. Clean up any accidental drips with a damp cloth immediately. -
Final cure:
Let the entire rug dry for at least 24 hours. Depending on your fabric medium, you may need to heat set the design with an iron (refer to manufacturer instructions) before walking on it.
Textured Tufting
Use a punch needle or embroidery floss to actually tuft over some of the painted beige lines. This creates real tactile 3D texture that matches the visual topography.
Once fully cured, place your new statement piece in living room to ground the space with organic elegance
Hand-Lettered Doormat-Style Rug
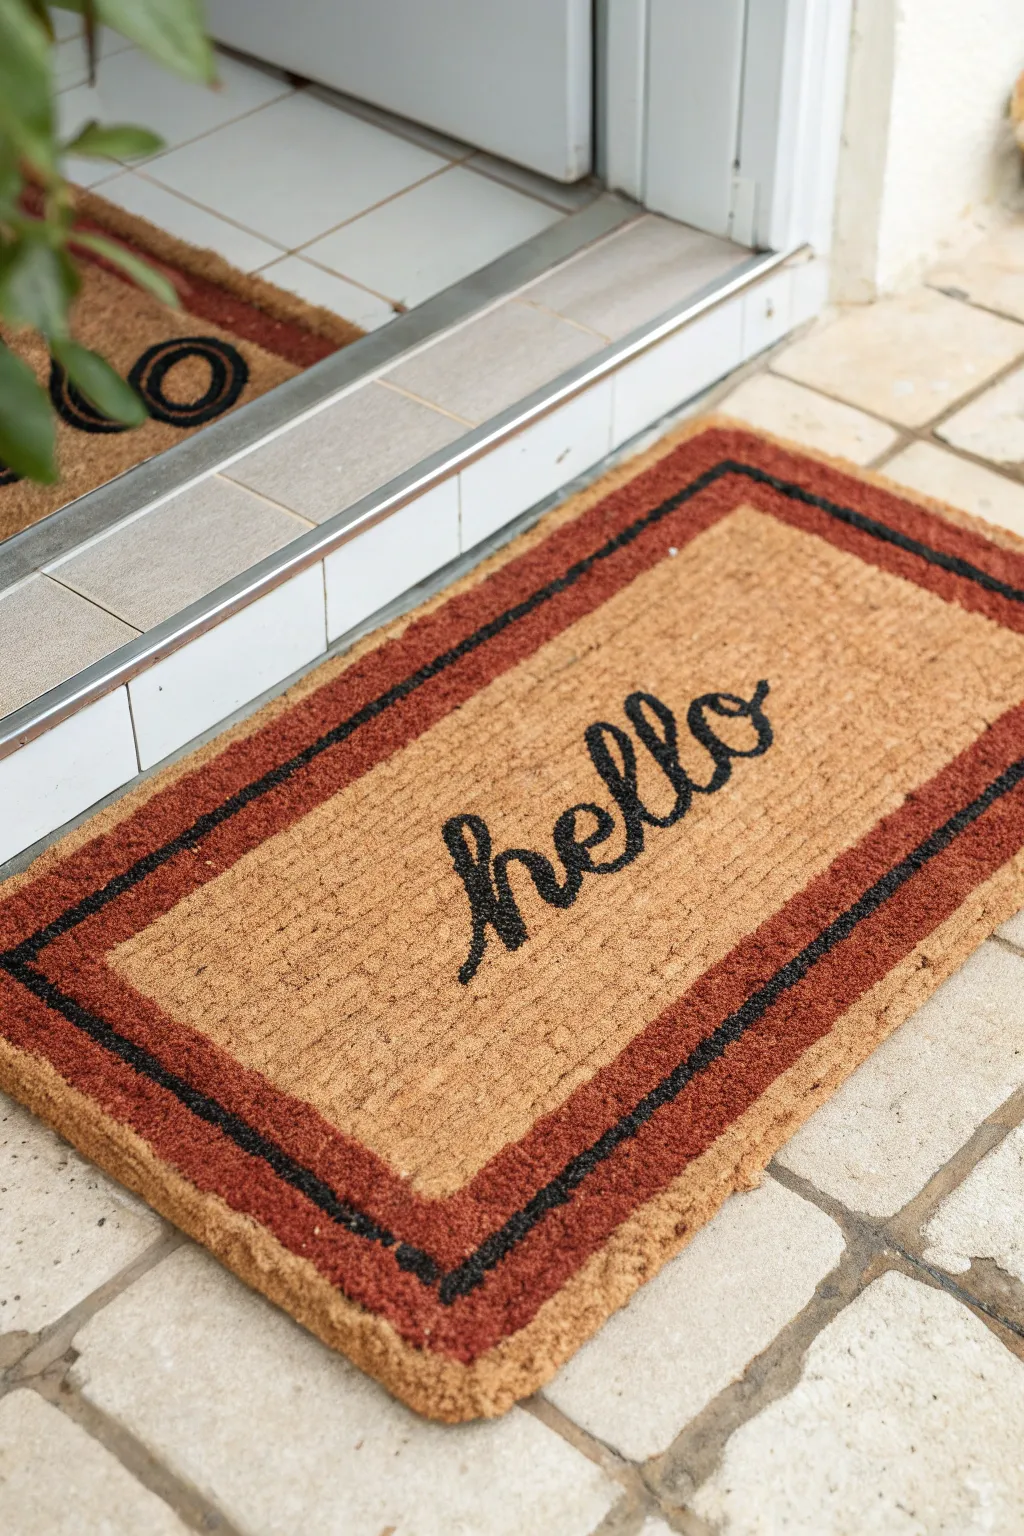
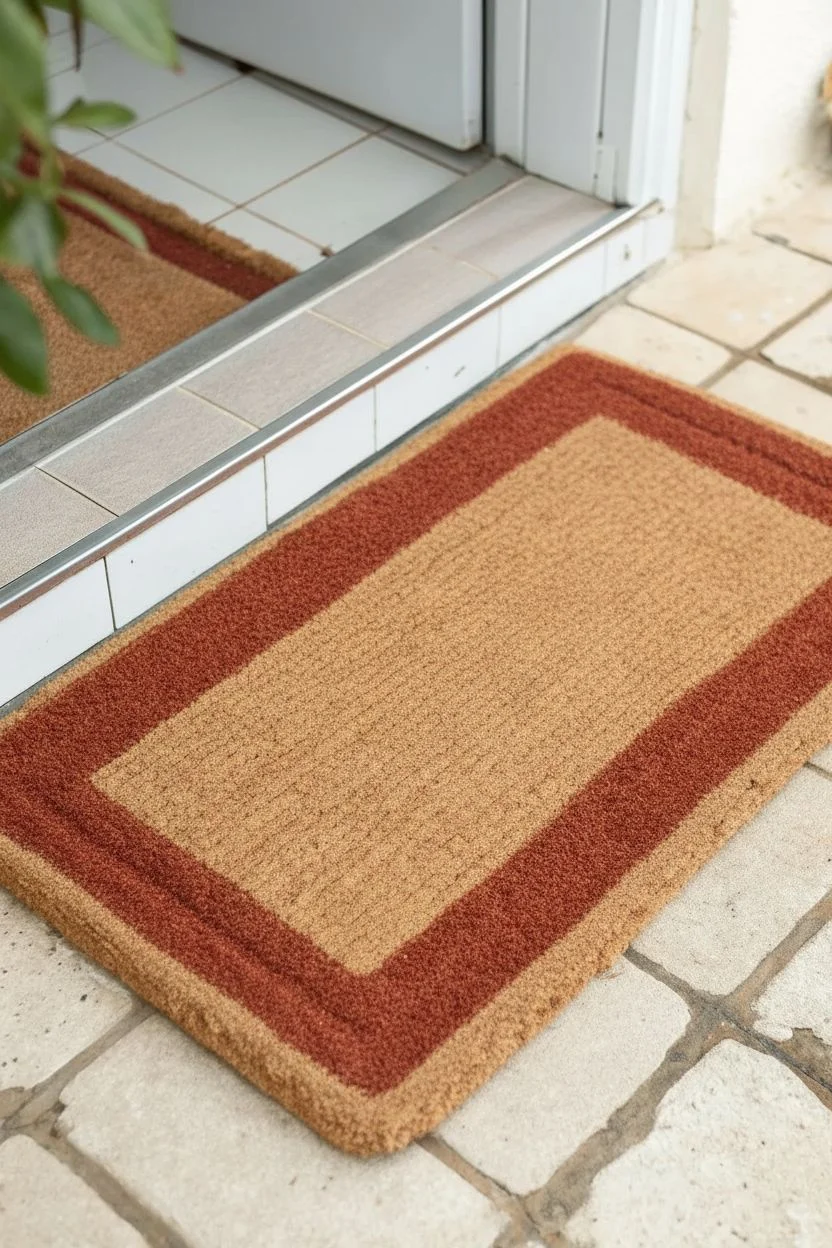
Transform a plain coir doormat into a warm, inviting entryway piece with distinct hand-lettered charm. This durable, rustic project combines a classic border design with casual script for a high-end look on a budget.
How-To Guide
Materials
- Plain coir doormat (standard size)
- Black outdoor acrylic paint or latex paint
- Rust/terracotta outdoor acrylic paint
- 1-inch flat stencil brush or stiff bristle brush
- Small/medium round artist brush (for lettering details)
- Painter’s tape (wide width recommended)
- Measuring tape or ruler
- Cardstock or paper for creating stencils (optional)
- Utility knife or scissors (if stenciling)
- Permanent marker or chalk
- Clear weather-resistant sealer spray
Step 1: Creating the Border
-
Clean the Surface:
Begin by taking your plain coir mat outside and giving it a good shake. Remove any loose fibers or debris, as these can get caught in your paintbrush and ruin clean lines. -
Measure the Outer Margin:
Use your measuring tape to determine the spacing for the outer painted band. Measure about 2 inches in from the edge of the mat on all four sides. -
Tape the First Line:
Apply strips of painter’s tape along the marks you just made. Press the tape down firmly, especially into the coarse texture of the coir, to prevent paint bleed. -
Define the Inner Border Edge:
Create the inner edge of the colored border by placing a second line of tape parallel to the first. Leave a gap of approximately 2 inches between the tape strips; this exposed area will become your rust-colored rectangle. -
Paint the Base Color:
Dip your stiff bristle brush into the rust/terracotta paint. Use a vertical dabbing motion—rather than sweeping strokes—to push the paint deep into the fibers. -
Build Coverage:
Wait about 20 minutes for the first coat to soak in, then apply a second layer. Coir is very absorbent, so you need plenty of paint for a vibrant color. -
Remove Tape:
Carefully peel away the painter’s tape while the paint is still slightly tacky to reveal your sharp rectangular border. Let this dry completely before moving to the next step.
Step 2: Adding the Black Pinstripe
-
Mask the Pinstripe:
Once the rust paint is dry, you will create the thin black inner line. Place tape along the inner edge of the painted rust border, covering the paint slightly to protect it. -
Create the Stripe Gap:
Place another line of tape parallel to the previous one, leaving a very narrow gap (about 1/4 to 1/2 inch) of exposed coir fibers. -
Paint the Black Line:
Using black outdoor paint and a smaller stiff brush, dab paint into this narrow channel. Be meticulous here to keep the line consistent. -
Reveal the Line:
Remove the tape immediately. You should now have a thick rust border followed by a thin gap of natural coir, and then a thin black pinstripe.
Bleeding Lines?
If paint bleeds under the tape, wait for it to dry completely. Then, use a small sharp scissors to carefully snip away the stained coir fibers for a clean edge.
Step 3: Lettering the Greeting
-
Draft Your Design:
Decide on your cursive ‘hello’ script. If you aren’t confident freehanding, type the word on a computer using a font like ‘Great Vibes’ or ‘Allura’ and print it out to scale. -
Transfer the Guide:
Center your paper template on the mat. You can cut the letters out to create a stencil, or heavily chalk the back of the paper and trace over the letters to transfer a faint white guide onto the rug. -
Outline the Text:
Using your small round brush and black paint, carefully trace the outline of your script. I find it helpful to start with the middle letters to ensure perfect centering. -
Thicken the Downstrokes:
To mimic calligraphy, go back and thicken the downward strokes of each letter while keeping the upward connecting lines thin. -
Saturate the Letters:
Switch to a slightly larger brush if needed to fill in the body of the letters. Use that same dabbing motion to ensure the black is solid and dark against the brown background. -
Refine Edges:
Inspect your letters for any rough edges where the bristles might have strayed. Use a tiny brush with a bit of black paint to sharpen any curves or loops. -
Final Drying:
Allow the entire mat to dry for at least 24 hours. The thick paint on coir takes longer to cure than on flat surfaces. -
Seal the Deal:
Take the mat to a well-ventilated area and spray it evenly with a clear weather-resistant sealer. This locks in the color and protects your hard work from muddy boots.
Style Upgrade
Layer your finished doormat over a larger, black-and-white buffalo check rug. This ‘layered look’ adds incredible texture and frames your artwork beautifully.
Place your new custom creation at the front door to greet guests with handmade style and personality
Trompe L’Oeil Fringe and Shadow Rug
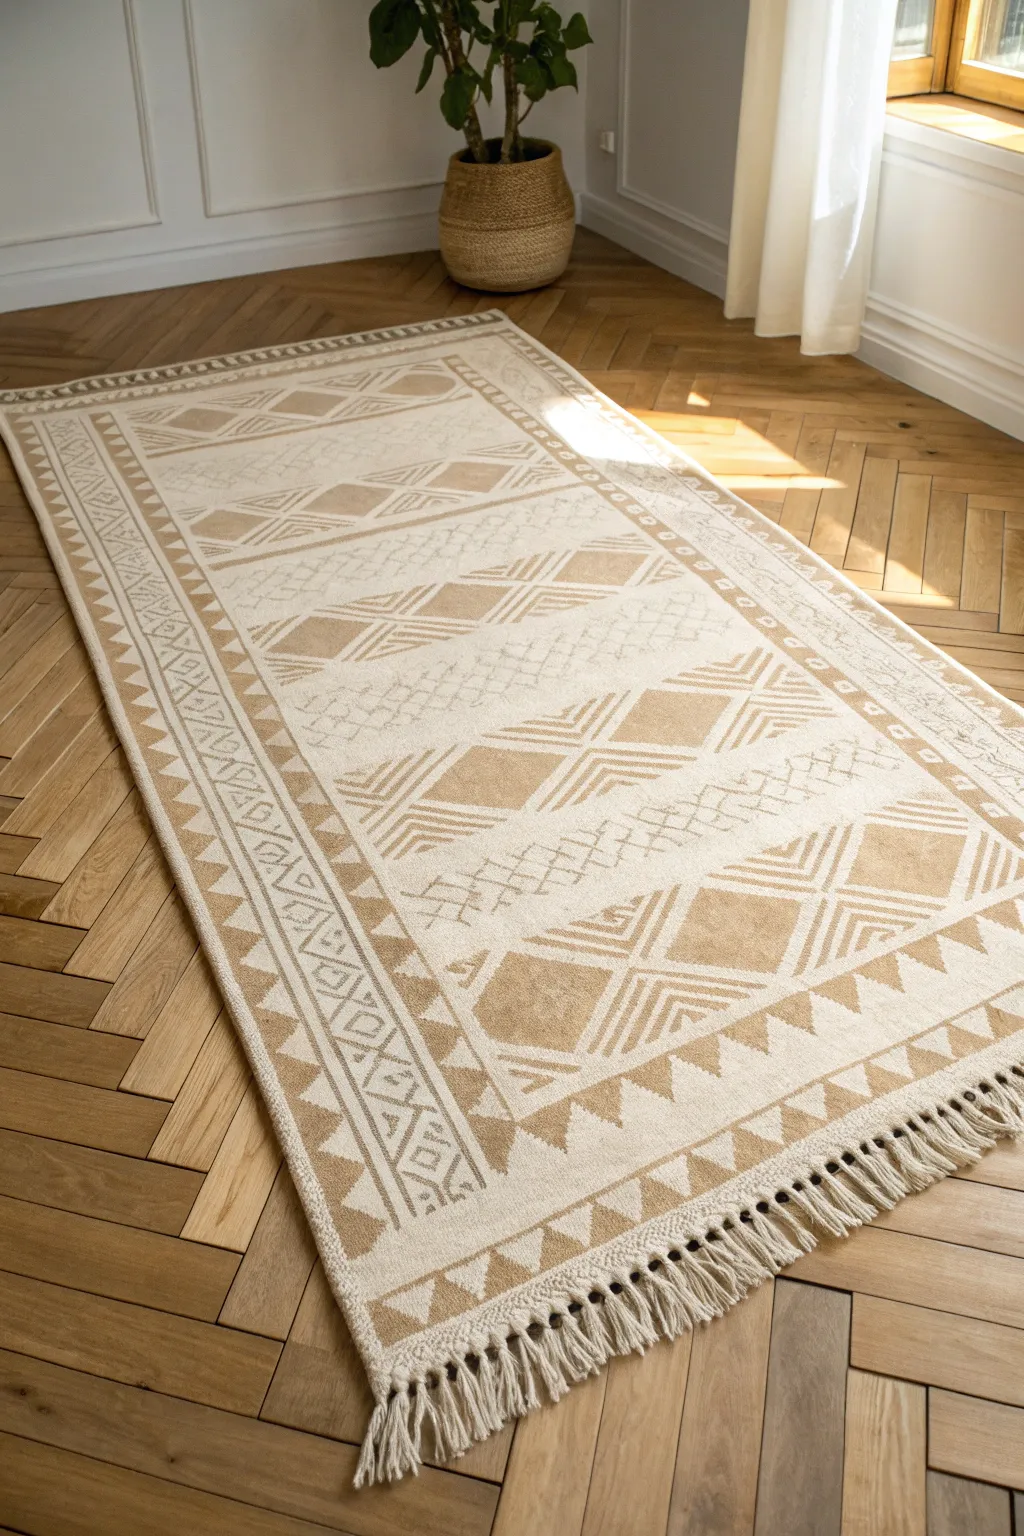
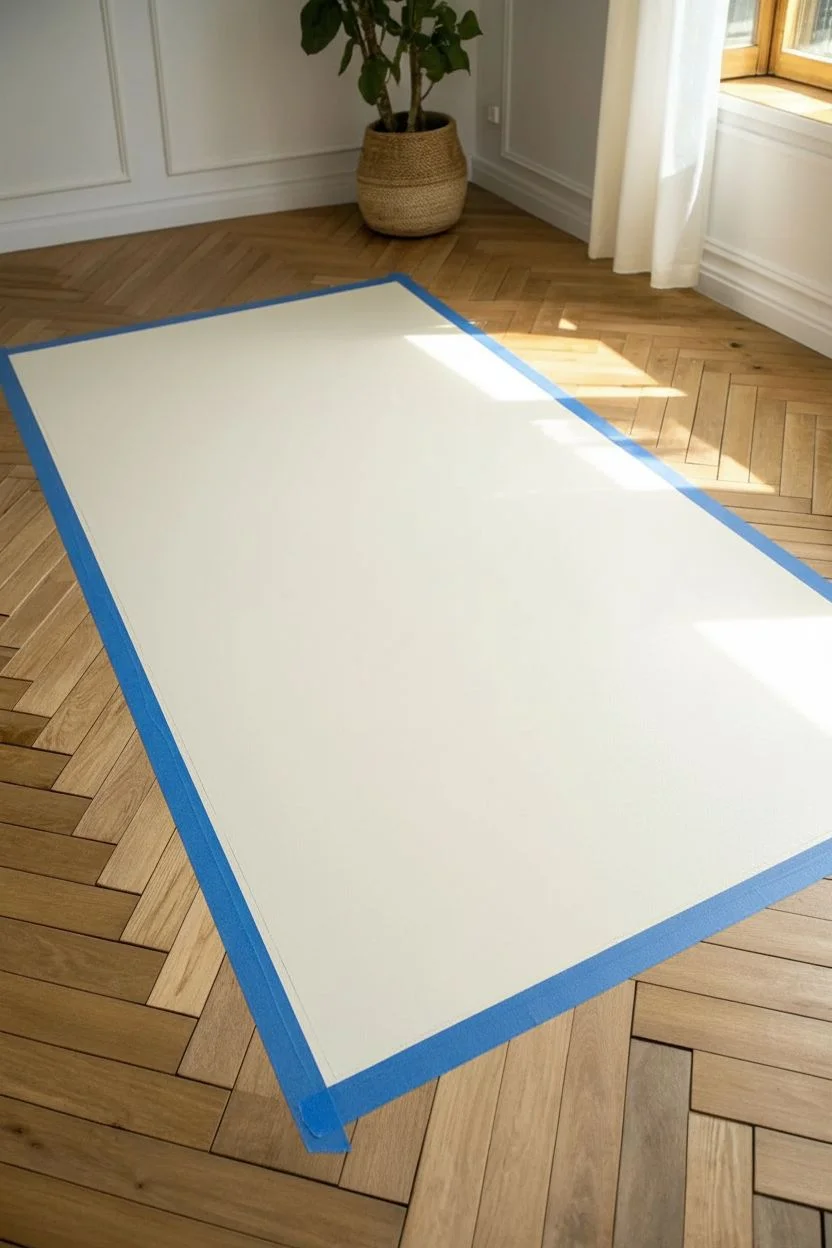
Transform a bare patch of floor into a cozy textile centerpiece without laying down a single thread. This trompe l’oeil project uses matte floor paints to mimic the texture of a woven rug, complete with convincing tassels and shadows that trick the eye.
Step-by-Step
Materials
- Heavy-duty floor primer
- Porcelain or chalk-style floor paint (cream/off-white base)
- Porcelain or chalk-style floor paint (beige/tan accent color)
- Dark grey or transparent glaze (for shadows)
- Painter’s tape (various widths: 1-inch and 2-inch)
- Long straight edge or yardstick
- Pencil
- Stencil brush or sponge dabber
- Artist liner brush (size 1 or 2)
- Small flat brush (1/4 inch)
- Matte polyurethane floor sealer
Step 1: Base and Border
-
Prepare the surface:
Clean your floor thoroughly to remove any dust or oils. If you are painting over finished wood like the photo, lightly sand the area to ensure adhesion, then wipe clean with a tack cloth. -
Map out the perimeter:
Use your yardstick and pencil to mark the large rectangular shape of your rug. Tape off the outside edges with painter’s tape to create a crisp boundary. -
Apply the primer:
Roll on a coat of high-quality floor primer within your taped rectangle. Let this dry completely according to the manufacturer’s instructions. -
Paint the base color:
Apply two coats of your cream or off-white base color. Allow ample drying time between coats to ensure a solid, opaque coverage that mimics canvas or wool.
Uneven Taping?
If paint bleeds under your tape, don’t panic. Wait for it to dry, then use the base color and a tiny angled brush to ‘erase’ the mistake and crisp up the line.
Step 2: Geometric Patterning
-
Mark horizontal sections:
Lightly pencil horizontal lines across the rug to divide it into wide bands. These will become the different pattern zones shown in the inspiration photos. -
Tape the large diamonds:
In the central bands, use tape to create large diamond shapes. To save time, you can cut a diamond template from cardboard and trace it before taping. -
Stipple the texture:
Dip a dry stencil brush or sponge into the beige paint. Instead of brushing smoothly, dab or stipple the paint inside the taped areas. This creates a ‘woven’ texture rather than a flat painted look. -
Create the side borders:
Remove the central tape. Run two long strips of tape down the long sides of the rug to create the border channel. Inside this channel, freehand or stencil a repeating triangle or zig-zag pattern using your small flat brush. -
Add line details:
Using a liner brush and the beige paint, add thin stripes and smaller geometric details like the ‘X’ shapes and smaller diamonds seen between the larger bands. I find that keeping these lines slightly imperfect adds to the hand-woven effect.
Add Virtual Texture
Mix a small amount of texture additive or fine sand into your beige paint for the geometric sections to give the ‘rug’ actual tactile grit and depth.
Step 3: Trompe L’Oeil Effect
-
Sketch the fringe:
At the short ends of the rug, lightly pencil in the shape of twisted tassels. They should not be perfectly straight; curve them slightly as if they are resting naturally on the floor. -
Paint the fringe base:
Use the cream base paint and a round brush to fill in the tassel shapes. Make the top part (attached to the rug) thicker and let the ends taper out. -
Detail the twist:
Mix a tiny drop of beige into your cream paint. Use the liner brush to paint diagonal lines across each tassel to simulate the twisted yarn texture. -
Mix the shadow glaze:
Create a translucent shadow color by mixing a drop of black or dark grey paint with a clear glazing medium or water. It should look like dirty water, not solid paint. -
Apply the drop shadow:
Paint a very thin line of shadow glaze along one side of each tassel and underneath the main rug rectangle. Determine your imaginary light source first so all shadows fall in the same direction. -
Seal the deal:
Once the artwork is cured (usually 24 hours), apply 2-3 coats of matte polyurethane sealer. This protects your ‘rug’ from foot traffic and locks in the illusion.
Step back and enjoy the warmth of your new area rug that never needs vacuuming


Have a question or want to share your own experience? I'd love to hear from you in the comments below!