
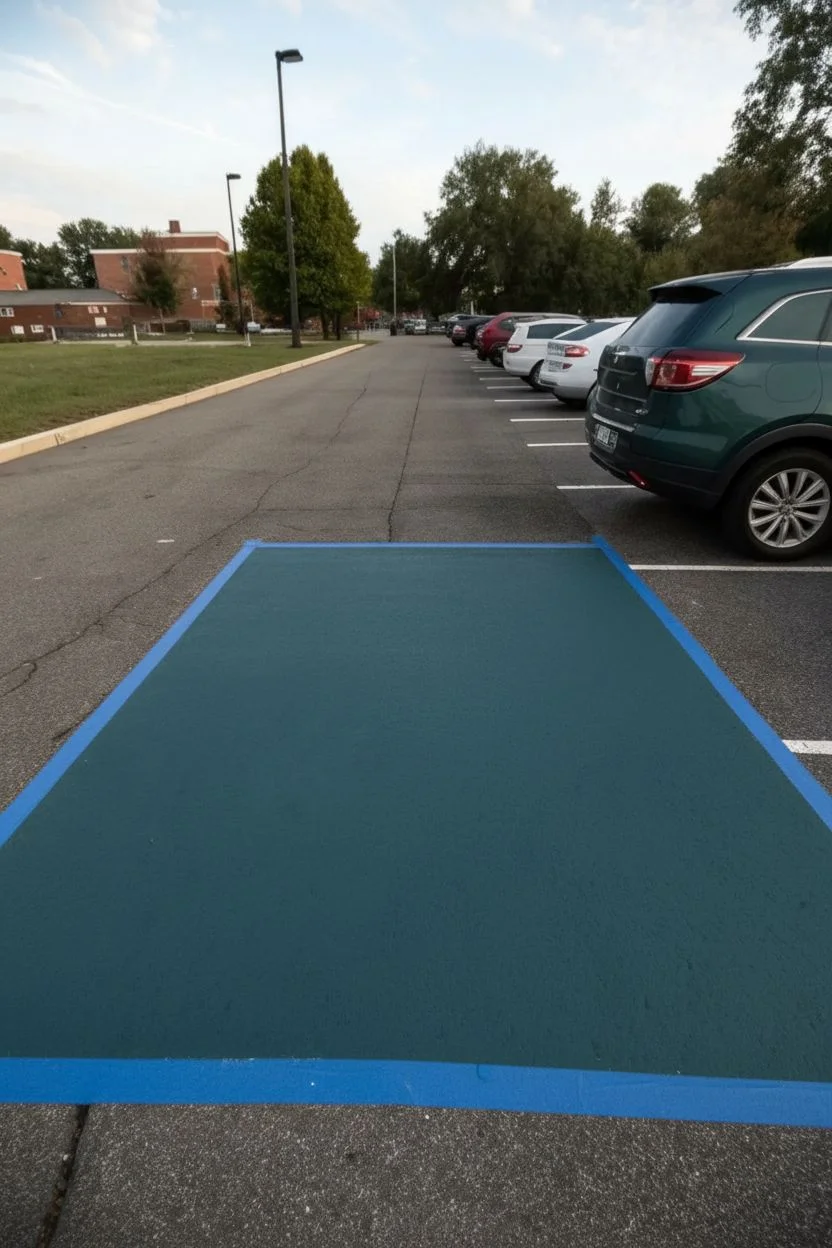
A plain rectangle of asphalt can turn into a loud-and-proud piece of art with the right parking space painting ideas and a little planning. I’m sharing my favorite senior parking spot concepts that read clearly from the drive lane and look amazing in daylight on dark pavement.
Classic Name and Graduation Year Block Letters
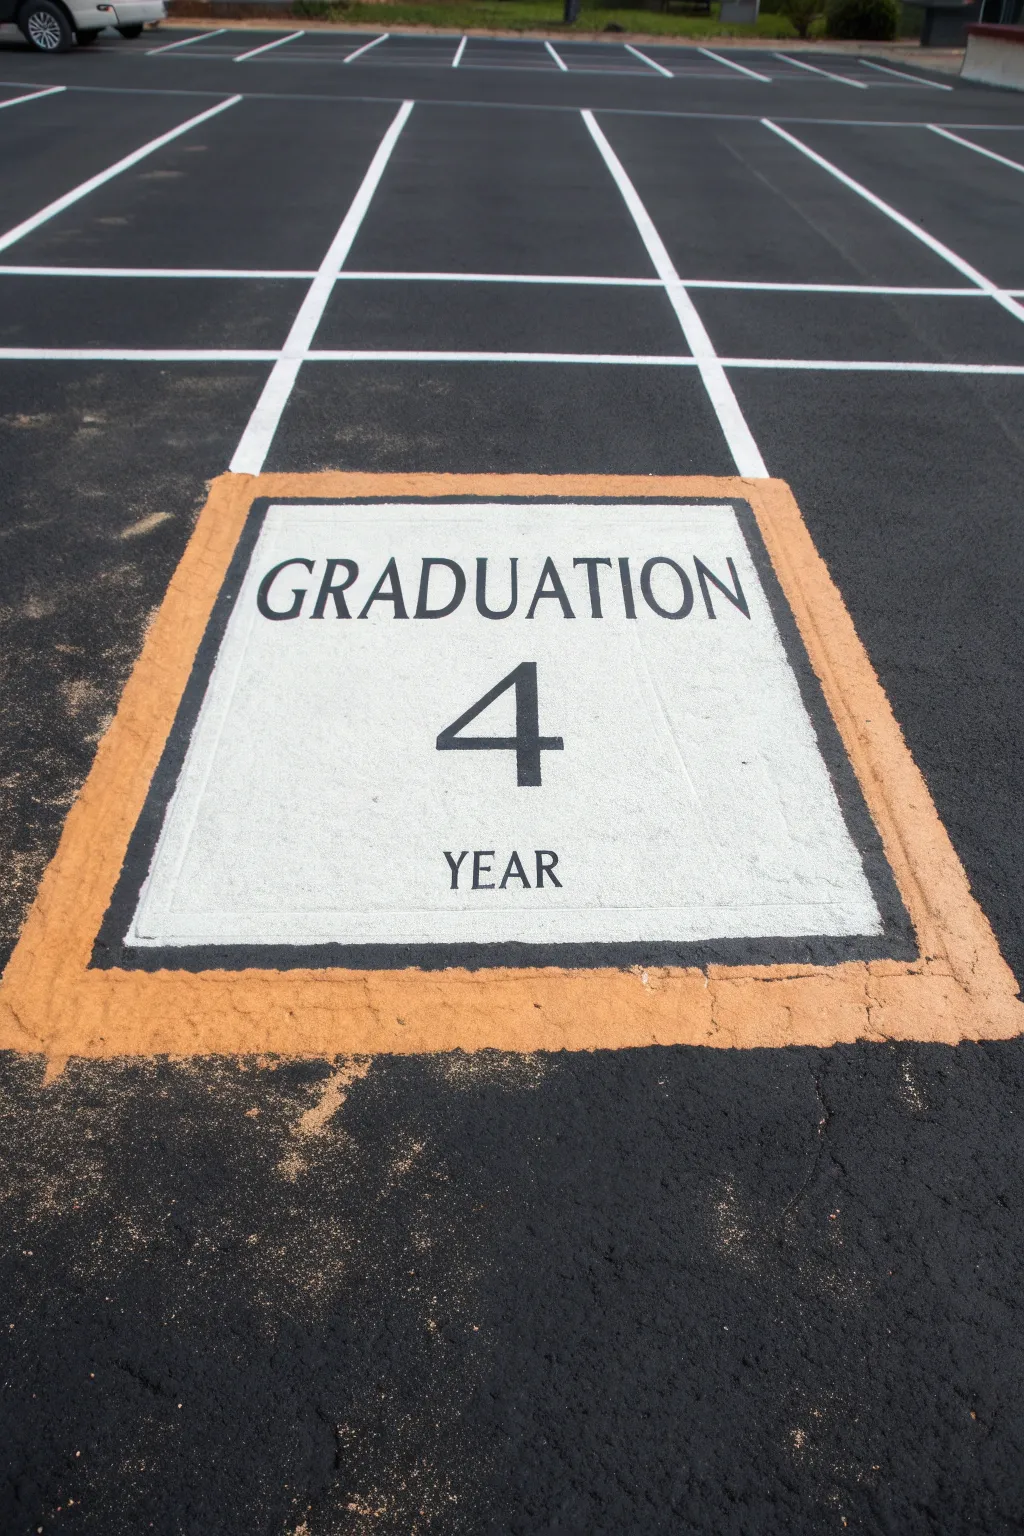
Achieve a dignified and classic look for your parking spot with this clean, high-contrast design. It features bold serif typography on a crisp white background, framed by a striking textured border that demands attention.
How-To Guide
Materials
- Outdoor concrete/asphalt paint (White, Black, Tintable Base)
- Painter’s tape (2-inch and 1-inch widths)
- Paint rollers (standard nap)
- Roller extension pole
- Small angled paintbrush
- Chalk line or straight edge
- Measuring tape
- Stencil set (Serif font) or printed templates
- Pencil or chalk
- Exterior clear coat sealer (optional)
- Texturing additive (sand or anti-slip aggregate)
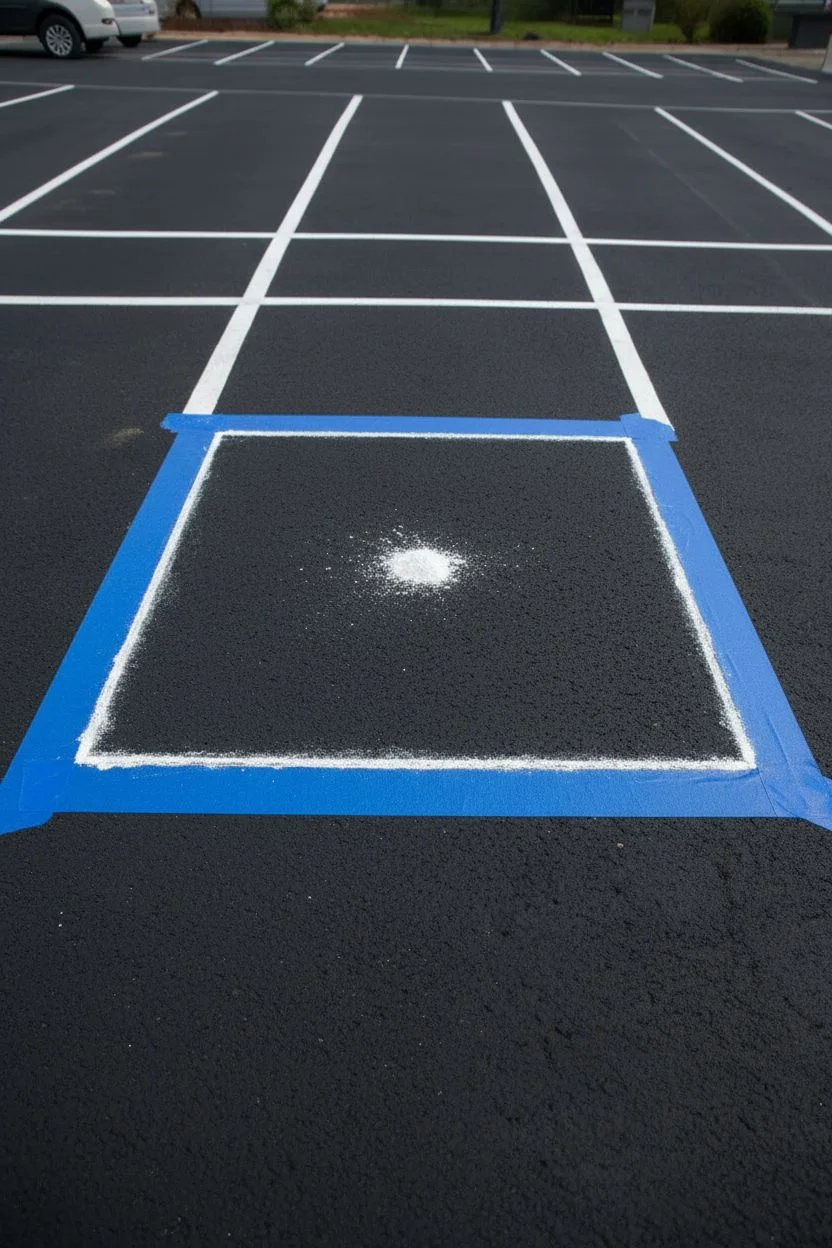
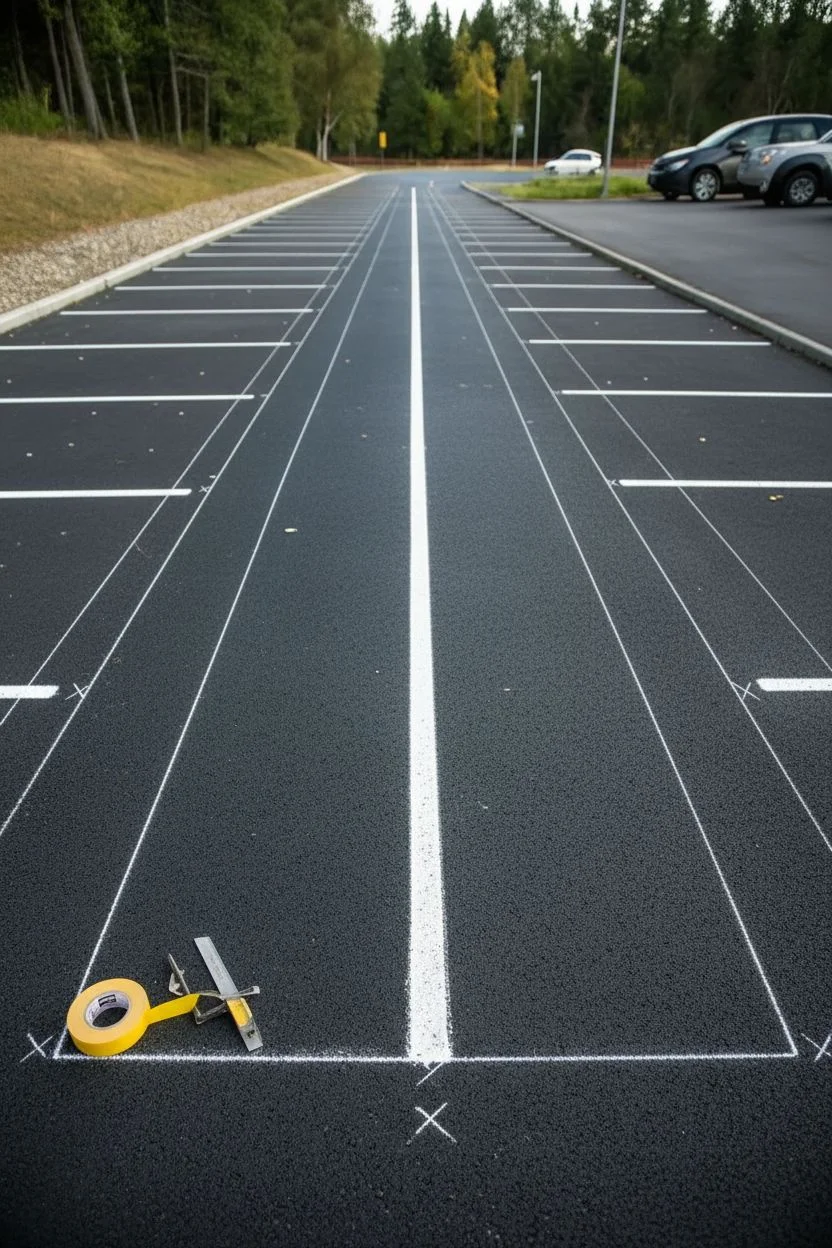
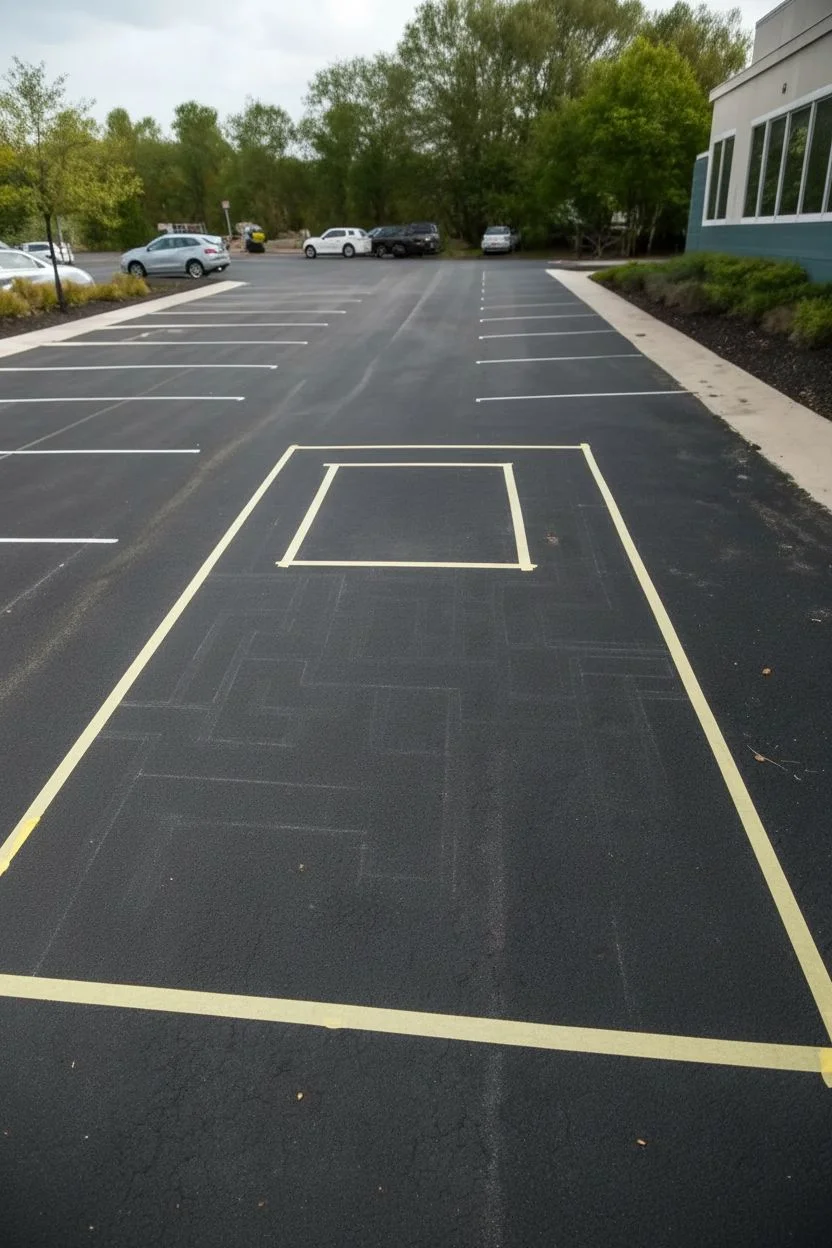
Step 1: Preparation and Base Layout
-
Clean the Surface:
Begin by thoroughly sweeping the parking spot to remove loose gravel, dirt, and debris. Ideally, power wash the area and let it dry completely for 24 hours to ensure the best paint adhesion. -
Mark the Center:
Using your measuring tape, locate the exact center of your parking space. Mark this spot with a piece of chalk; this will serve as the anchor for your entire symmetrical design. -
Establish the Outer Square:
Measure and snap chalk lines to create a large square centered on your mark. For a standard spot, a 4×4 or 5×5 foot square works well. This will be the outer edge of your textured border. -
Tape the Perimeter:
Apply wide painter’s tape along the *outside* of your chalk lines. Press the edges down firmly with your foot or a scraping tool to prevent paint bleed on the rough asphalt.
Tape Sealing Trick
Before painting the black text, brush a tiny amount of white paint over your pencil lines or stencil edges. This seals gaps so the black paint won’t bleed outward.
Step 2: Creating the Textured Border
-
Define the Inner Border Edge:
Measure about 4-6 inches inward from your taped perimeter on all sides. Snap new chalk lines here. -
Tape the Inner Border:
Place tape along the *inside* of these new lines. You now have a framed rectangular area exposed between two strips of tape which will become your orange border. -
Mix the Texture:
Pour your orange/tan paint into a tray. I like to mix in a silica sand additive or anti-slip texture at this stage; it gives the border that distinct, rough, sandy look seen in the photo. -
Roll the Border:
Generously roll the textured paint into the taped-off border area. Use a high-nap roller to get into the crevices of the asphalt. Two coats are usually necessary for full opacity. -
Remove Border Tape:
While the second coat is still slightly tacky, carefully peel up the inner tape strip only. Leave the outer perimeter tape for now.
Step 3: Painting the Center Field
-
Apply the White Base:
Once the orange border is dry to the touch, fill the large central square with exterior white paint. Use a fresh roller and apply 2-3 coats until the black asphalt is completely hidden and the white is bright. -
Create the Black Inset Frame:
After the white paint has fully cured (give it a few hours), measure about 2 inches inward from the orange border edge. Use 1-inch painter’s tape to mask off a thin rectangular stripe. -
Paint the Thin Black Line:
Using a small brush or mini-roller, paint the exposed strip black. This creates the ‘matting’ effect that frames your text. Remove the tape immediately after painting.
School Spirit Twist
Swap the neutral tan border for your school’s primary color, or add small paw prints or mascots inside the corners of the white square.
Step 4: Typography and Details
-
Layout the Text:
Arrange your stencils or paper templates on the dry white surface. Center the large number ‘4’ first, then position ‘GRADUATION’ above it in an arch or straight line, and ‘YEAR’ below. -
Trace the Letters:
Lightly trace the outline of your letters and numbers using a pencil. If you are freehanding, use a ruler to keep your serif lines sharp and straight. -
Fill the Text:
Using a small, stiff-bristled artist brush and exterior black paint, carefully fill in the letters. Start with the outlines and work your way inward. -
Sharpen the Serifs:
Pay special attention to the ‘feet’ (serifs) of the letters. Use the very tip of your angled brush to make these corners crisp and pointed. -
Final Cleanup:
Once all paint is dry, remove the final outer perimeter tape. Check for any ragged edges and touch them up with a small brush if needed. -
Seal (Optional):
To protect your bright white background from tire marks and weather, apply a clear, non-yellowing concrete sealer over the entire design.
Step back and admire a parking spot that looks as professional as a diploma


Bold School Colors With Clean Stripe Borders
Transform a standard parking spot into a crisp, professional-looking design using bold school colors and high-contrast striping. This project focuses on straight lines and perfect spacing to create a clean, organized aesthetic that really pops against the asphalt.
Step-by-Step Guide
Materials
- High-quality asphalt or concrete paint (yellow and dark blue/black)
- Painter’s tape (2-inch width recommended)
- Measuring tape (25-foot minimum)
- Chalk line tool
- Long straight edge or level
- String line for long guides
- Small roller (4-inch) for lines
- Standard roller (9-inch) for fill
- Roller extension pole
- Stiff broom or blower
- Paint tray and liners
Step 1: Preparation & Layout
-
Surface Cleaning:
Begin by thoroughly sweeping the area with a stiff broom to remove loose gravel, dirt, and debris. For the best adhesion, use a leaf blower to clear fine dust from the pores of the asphalt. -
Establish the Center Line:
Determine the exact center of your parking lane. Measure the total width and mark the midpoint at both the top and bottom of the designated area. -
Snap the Chalk Line:
Have a friend help you hold one end of the chalk line at your top mark while you hold the other at the bottom. Pull it taut and snap it to create a perfectly straight guide down the center. -
Measure Lane Widths:
From your center chalk line, measure outwards to define the width of the central double-yellow stripe zone. Typically, this is about 12-18 inches wide. Mark these outer boundaries with chalk. -
Horizontal Space Markings:
Measure the depth of standard parking stalls along the sides. Use your tape measure to mark equal intervals (usually 8-9 feet wide) for the horizontal parking dividing lines.
Keep It Straight
Use a heavy object like a brick to hold the end of your tape measure or string line if you are working alone to ensure tension.
Step 2: Taping the Design
-
Base Tape Lines:
Apply long strips of painter’s tape along the outside of your central chalk lines. This tape will define the clean outer edge of the yellow stripes. -
Define the Center Gap:
Run two more strips of tape down the middle of the central zone, leaving a 4-inch gap between them for the asphalt to show through, or to be painted a contrasting color later. -
Tape Horizontal Dividers:
Lay down tape for the horizontal parking lines perpendicular to your central stripes. Ensure these are perfectly square using a large carpenter’s square or the 3-4-5 triangle method. -
Seal the Edges:
Walk over all applied tape lines and press them firmly into the asphalt texture. I find using a rubber mallet or the edge of a shoe helps prevent paint bleed-under on rough surfaces.
Step 3: Painting & Finishing
-
Painting the Yellow Stripes:
Pour your bold yellow traffic paint into a tray. Using a 4-inch roller, carefully fill in the taped-off stripe areas. Apply a moderate amount of pressure to get paint into the asphalt crevices. -
Second Coat Application:
Once the first coat is dry to the touch (usually 15-30 minutes on a warm day), apply a second coat of yellow to ensure vibrant, solid coverage. -
Contrasting Fill (Optional):
If you are darkening the asphalt to match the ‘school color’ look shown, use a larger roller to apply a dark blue or fresh black sealcoat paint in the large rectangular parking sections, carefully rolling up to the yellow borders. -
Painting the Perpendicular Lines:
Roll the horizontal divider lines with yellow paint, connecting them visually to the central spine you just created. -
Remove Tape Carefully:
While the final coat is still slightly tacky but not wet, slowly peel up the painter’s tape at a 45-degree angle. This ensures the crispest possible edge. -
Inspect and Touch Up:
Walk the lines and look for any spots where gravel might have caused a skip. Use a small brush to manually touch up these imperfections.
Bleeding Lines?
If paint bleeds under the tape, let it dry completely, then carefully touch it up with black asphalt paint or a dark sharpie for small spots.
Step back and admire your professional-grade striping job, knowing your parking lot is now as sharp as a newly pressed uniform


Mascot-Inspired Center Emblem in the Parking Stall
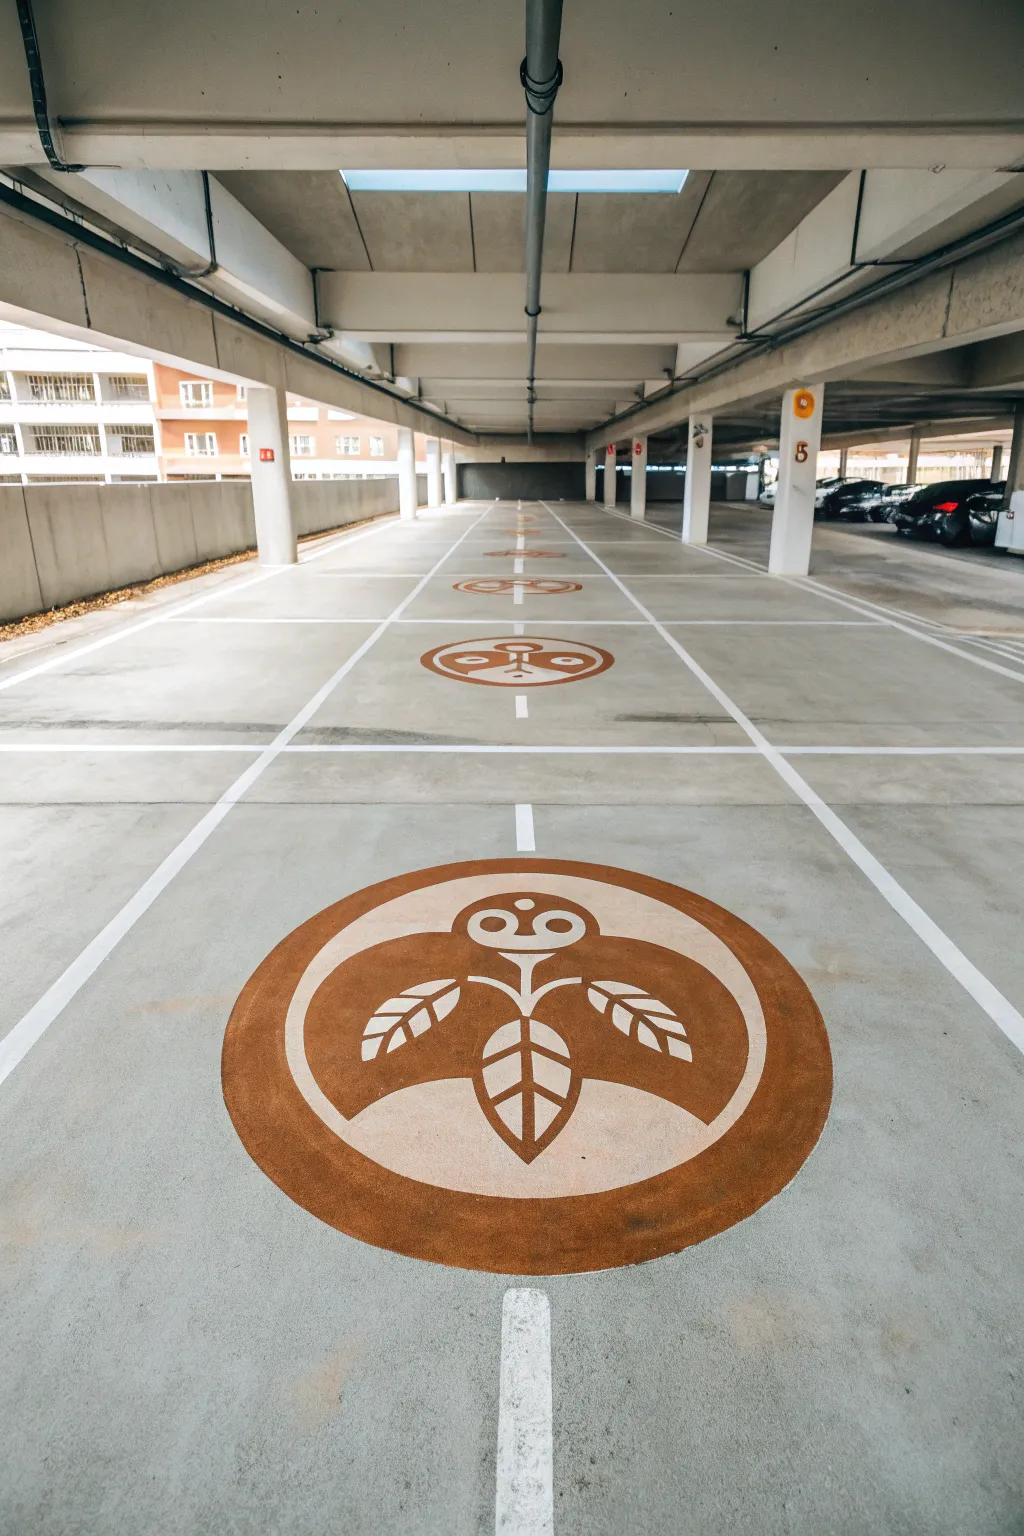
Transform a standard concrete parking surface into a branded or decorative statement with this clean, mascot-inspired floor emblem. The design features a stylized leaf and face motif in a warm rust-brown tone, repeating perfectly down the lane for a cohesive, professional look.
Detailed Instructions
Materials
- Heavy-duty concrete floor paint (rust/terracotta color)
- White or light gray concrete paint (for base highlight within the design)
- Large custom Mylar or heavy cardstock stencil (2-part recommended)
- Chalk snap line
- Measuring tape
- Industrial painter’s tape
- Short-nap roller (3/8 inch nap)
- Extension pole for roller
- Stencil adhesive spray
- Small touch-up brush
- Stiff bristle broom
- Concrete pressure washer (optional but recommended)
Step 1: Preparation & Layout
-
Clean the surface thoroughly:
Before painting anything, the concrete needs to be spotless. Sweep away all loose debris with a stiff bristle broom to ensure no pebbles get under your stencil. -
Pressure wash the area:
For the longest-lasting adhesion, power wash the center strip of the parking lane or stall to remove oil, tire marks, and deep-set dirt. Let the concrete dry completely, ideally for at least 24 hours. -
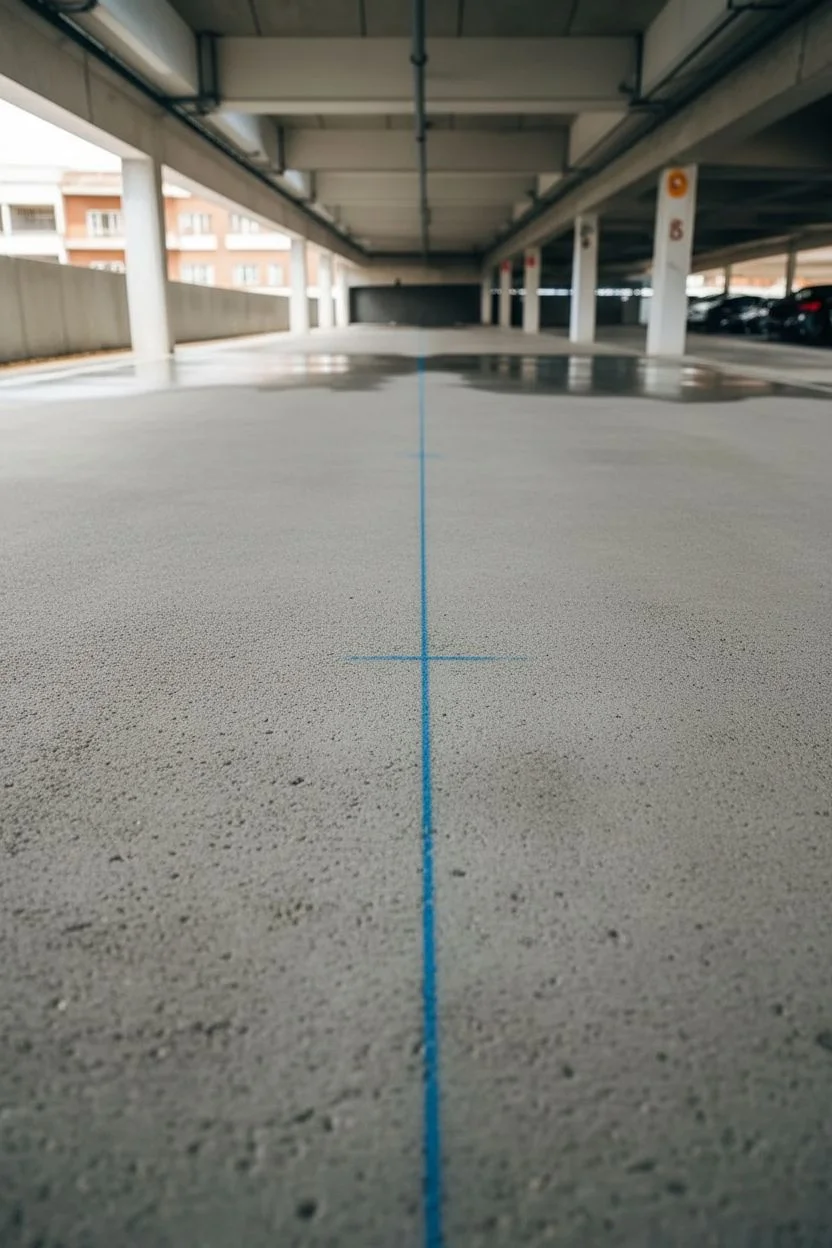
Find the center point:
Measure the width of the parking lane or stall accurately. Mark the exact center point at the top and bottom of your painting area. -
Snap a guide line:
Using a chalk snap line, connect your two center marks to create a straight reference line running purely down the middle of the workspace. This ensures your repeating emblems won’t drift left or right. -
Mark spacing intervals:
Decide on the spacing between each emblem. Use your measuring tape to mark the center point for each repetition along your chalk line so they are evenly distributed.
Bleed Blocker
Before rolling your color, paint a thin layer of clear matte medium or sealer over the stencil. This seals the edges so any bleed is invisible clear coat.
Step 2: Stenciling the Design
-
Prepare the stencil:
If your design is large (over 3 feet wide), cut your stencil from durable Mylar. Spray the back lightly with stencil adhesive; I prefer to let it get tacky for a moment before placing it down to prevent shifting. -
Position the first stencil:
Align the center registration marks of your stencil with the chalk line on the floor. Press the stencil firmly against the concrete, paying special attention to the fine details of the leaf veins. -
Tape the edges:
Secure the outer edges of the stencil frame with industrial painter’s tape to ensure the wind or roller action doesn’t lift it. -
Load the roller sparingly:
Dip your short-nap roller into the rust-colored concrete paint. Roll it off on a tray until it is almost ‘dry’—too much paint will bleed under the stencil edges. -
Apply the first layer:
Roll over the stencil with light, even pressure. It’s better to do two thin coats than one thick, gloppy one. -
Paint the inner details:
If your design requires the lighter contrasting color (like the cream background seen inside the circle), carefully hand-paint or use a secondary stencil mechanism for those specific areas before the main color dries fully. -
Remove the stencil:
Lift the stencil straight up while the paint is still slightly tacky to avoid peeling away dry edges. Wipe the back of the stencil clean if paint has seeped through. -
Repeat the process:
Move down the line to your next marked interval. Re-align with the chalk line and repeat the painting process until all emblems are complete.
Step 3: Finishing Touches
-
Inspect for bleeds:
Once the major shapes are down, check the edges of the leaves and the circular border. Use a small artist’s brush and the base concrete color to clean up any fuzzy edges. -
Add connecting lines:
If you are connecting the emblems with a white lane stripe as shown in the background, use painter’s tape to mask a 4-inch wide line connecting the emblems and roll it with white traffic paint. -
Apply a clear sealer:
To protect your artwork from tire friction and weather, roll a clear concrete sealer over the dried designs. This extends the life of the project significantly. -
Allow proper cure time:
Block off the area with cones or caution tape. Allow the paint to cure for at least 48 to 72 hours before allowing vehicles to drive over it.
Night Vision
Mix a small amount of retroreflective glass beads into your clear sealer topcoat. This makes the emblem reflect headlights at night for safety.
Now you have a professional, custom-branded parking area that guides drivers with style.


Sunburst Rays Pointing to Your Name
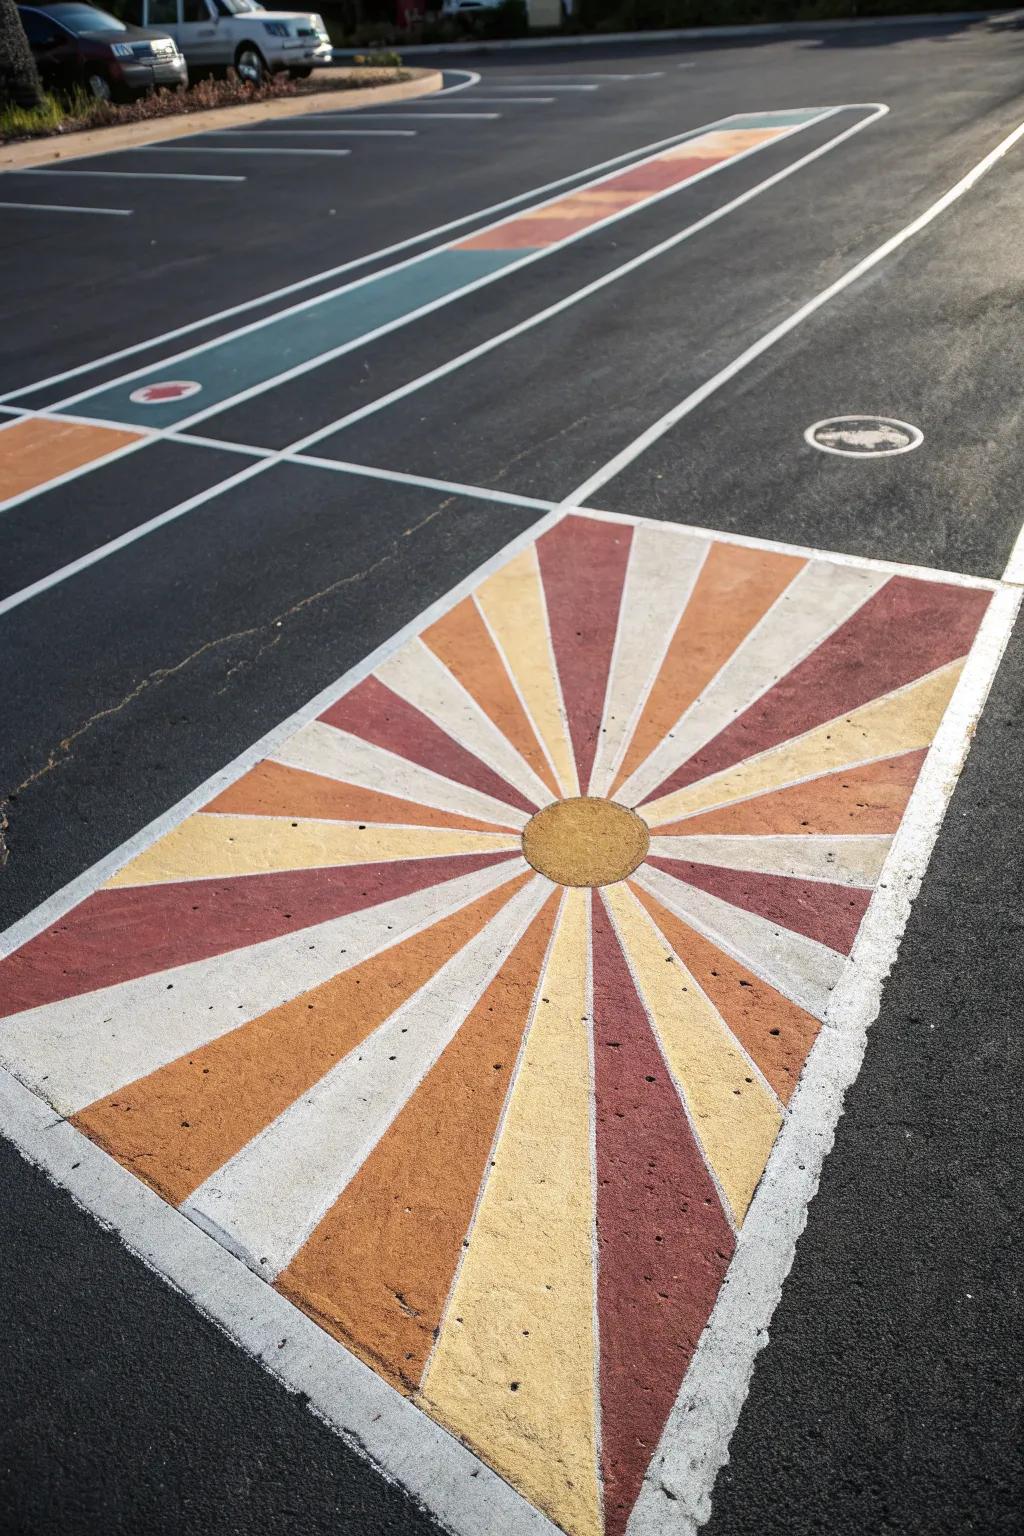
Transform a standard parking spot into a radiating statement piece with this geometric sunburst design. Using a warm, earthy palette of maroon, burnt orange, and gold against bright white segments creates a striking optical effect that draws the eye straight to the center.
Step-by-Step Tutorial
Materials
- Outdoor concrete/asphalt paint (White, Maroon, Burnt Orange, Mustard Yellow)
- Painter’s tape (2-inch width)
- Chalk line or long straight edge
- Measuring tape
- String and chalk (for the circle)
- Paint rollers (4-inch size is ideal for rays)
- Paintbrushes (for edges and touch-ups)
- Broom or leaf blower
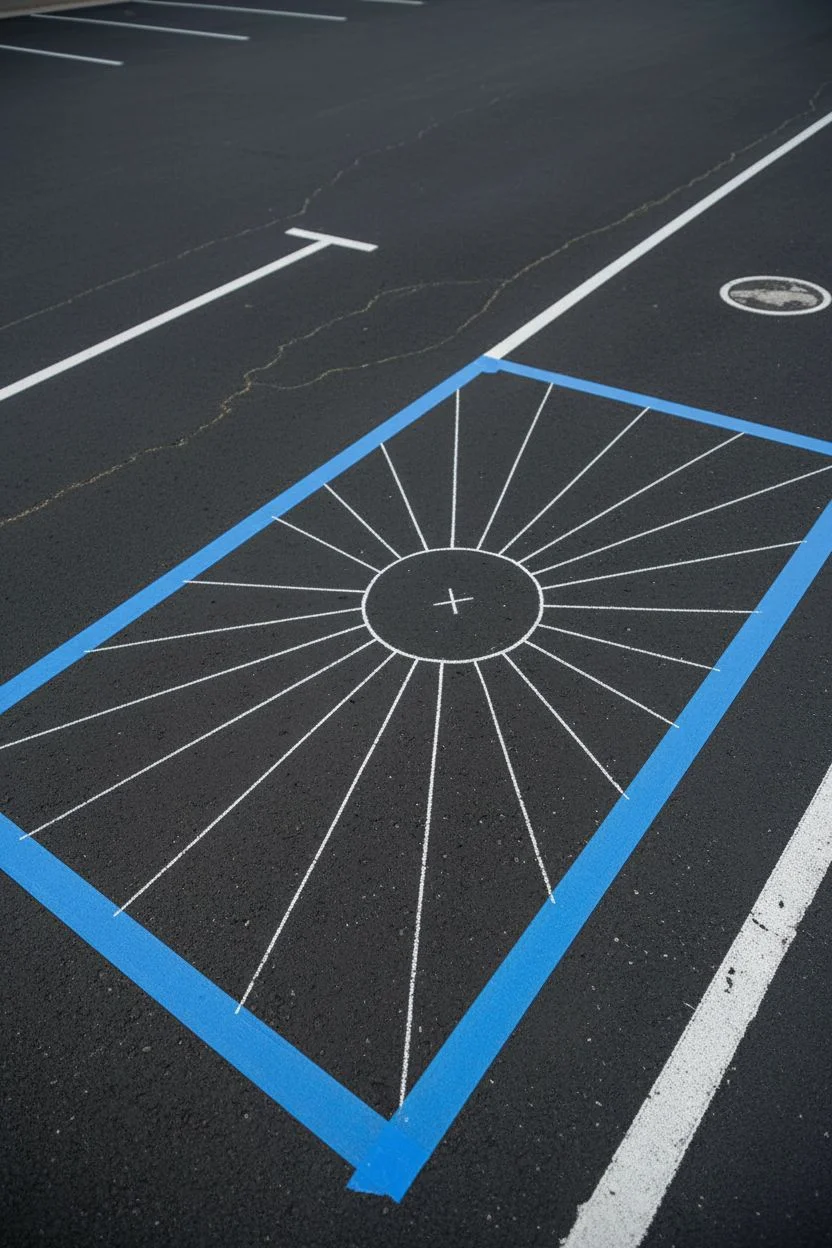
Step 1: Preparation and Layout
-
Clean the canvas:
Before laying down any tape, ensure the asphalt is completely free of debris. Use a stiff broom or a leaf blower to remove all dust, dirt, and loose gravel so the paint adheres properly. -
Define the perimeter:
Measure out the rectangular area for your design within the parking lines. Use chalk to mark the corners, then snap a chalk line to connect them, creating a perfect rectangle. -
Tape the border:
Apply wide painter’s tape along the outside of your chalk lines to create a crisp border. Press the tape down firmly, especially on textured asphalt, to prevent bleeding. -
Mark the center:
Find the exact center of your rectangle by measuring the diagonals; the point where they cross is your center. Mark this clearly with chalk. -
Create the sun circle:
Tie a piece of string to a piece of chalk. Hold one end of the string at the center point and pull it taut to draw a circle (about 12-18 inches in diameter) around the center.
Bleed Blocker
Before painting the colored rays, paint a thin layer of the base coat (white) over the edge of the tape. This seals the gap so color won’t bleed underneath.
Step 2: Drafting the Rays
-
Mark ray endpoints:
Along the outer rectangular border, verify your measurements and mark even intervals. For a balanced look, mark points every 18-24 inches along the perimeter. -
Snap ray lines:
Using your chalk line, connect the center point to each of the marks on the outer border. This will create the radiating lines for your sunburst. -
Tape the rays:
Apply painter’s tape along the chalk lines. Important: Place the tape on the *same side* of the line for every other ray, or plan to paint alternating sections. It’s often easier to tape and paint half the rays first.
Tape Texture Hack
On rough asphalt, traditional painter’s tape lifts easily. Use duct tape or specific outdoor masonry tape, and stomp on it to conform to the rocky texture.
Step 3: Applying Color
-
Prime the surface:
Roll a coat of white primer or base coat over the entire design area inside your border tape. This helps the colors pop against the dark asphalt. -
Paint the white rays:
Select the segments that will be white. Using a small roller, fill these sections completely. Two thin coats are better than one thick one to avoid peeling later. -
Apply the maroon sections:
Move on to your darkest color, the maroon. Fill in the specific rays designated for this hue, being careful near the center where the rays get narrow. -
Add orange tones:
Paint the burnt orange rays next. I find using a small angled brush helps navigate the tight corners near the central circle without crossing the lines. -
Fill the yellow rays:
Apply the mustard yellow paint to the remaining ray sections. Ensure solid coverage so the dark asphalt doesn’t show through. -
Paint the sun:
Carefully paint the central circle in your chosen yellow or gold tone. You may need a steady hand or a small brush to get a clean curve where it meets the rays.
Step 4: Finishing Touches
-
Wait for tacky dryness:
Let the paint dry until it feels tacky but not fully hardened—usually about 30 to 60 minutes depending on the heat. -
Peel the tape:
Slowly pull the tape up at a 45-degree angle. This is the magic moment where your crisp lines are revealed. -
Touch up edges:
Inspect the lines for any paint bleed. Use a small artist’s brush and your base white or black (asphalt color) to clean up any fuzzy edges. -
Add the outer rim:
To match the reference photo, paint a thick white border around the entire rectangle to frame your artwork. Let the whole project cure for at least 24 hours before parking on it.
Step back and admire how the radiating lines create a dynamic energy that will greet you every morning
BRUSH GUIDE
The Right Brush for Every Stroke
From clean lines to bold texture — master brush choice, stroke control, and essential techniques.
Explore the Full Guide
Geometric Tape Patterns for Crisp Parking Spot Shapes
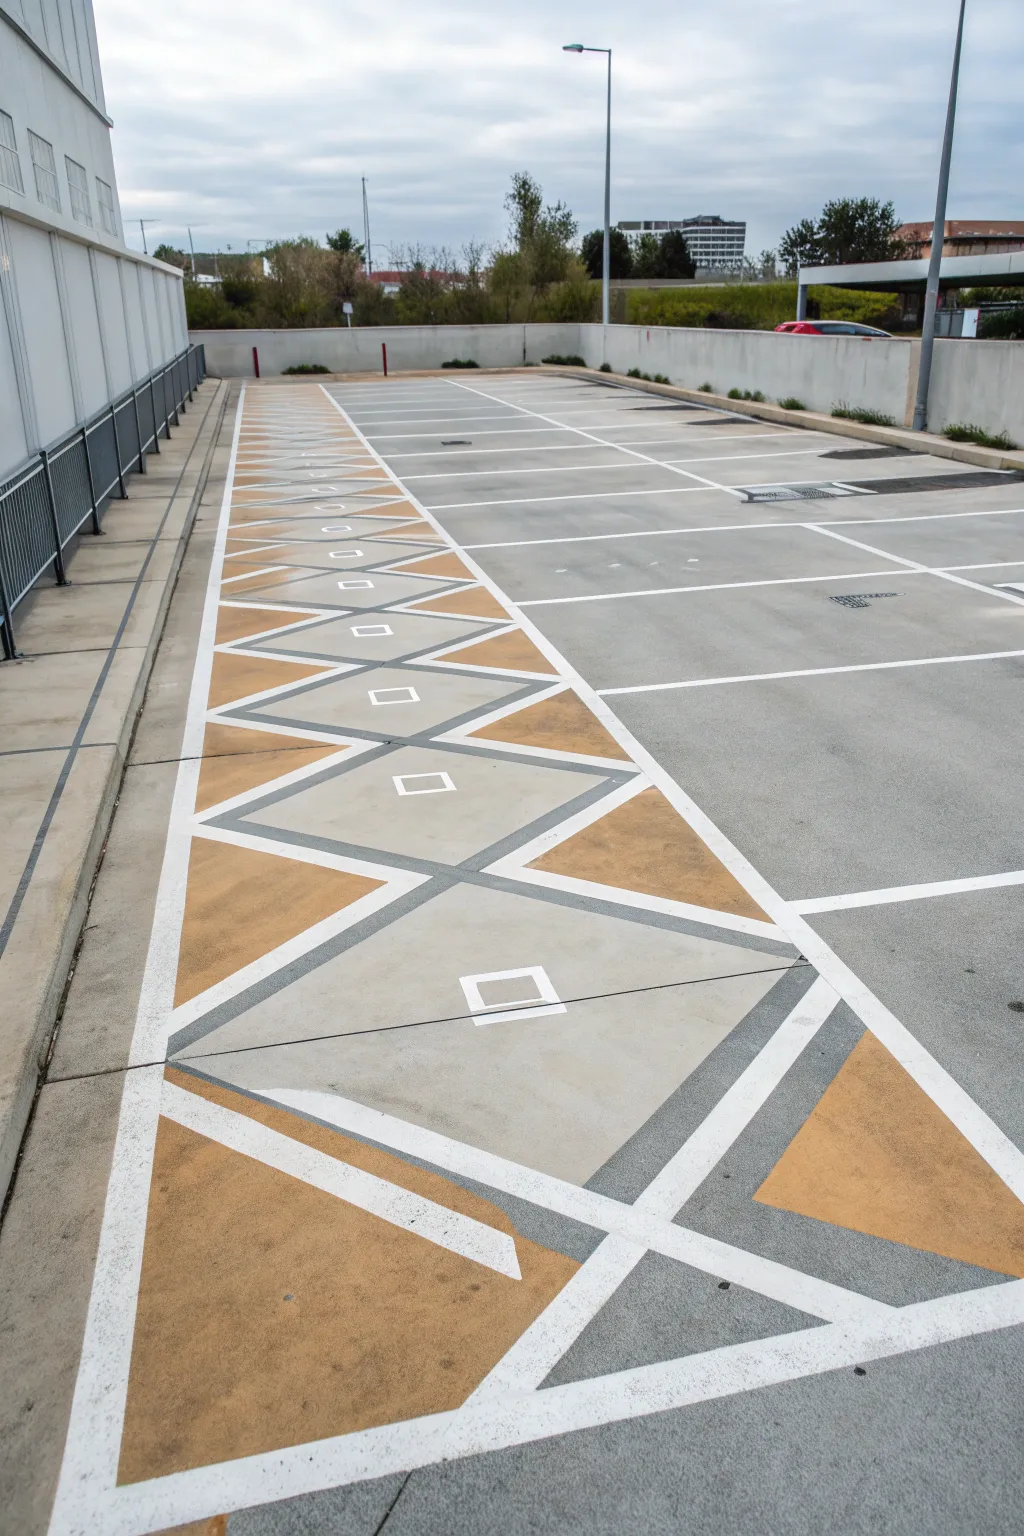
Transform a plain strip of asphalt into a striking geometric feature using bold diamonds and intersecting lines. This project combines industrial grey, warm ochre, and crisp white lines to create a sophisticated, modern border that clearly separates pedestrian areas from parking spots.
Step-by-Step
Materials
- Heavy-duty concrete/asphalt paint (White, Dark Grey, Ochre/Gold)
- Can of primer (for concrete/asphalt)
- Painter’s tape (2-inch width, heavy duty for exterior)
- Chalk line tool
- Measuring tape
- Straight edge or long ruler
- Pressure washer or stiff broom
- Roller frames and extension pole
- Roller covers (medium nap for rough surfaces)
- Small angled brush for touch-ups
- Cardboard stencil (for center squares)
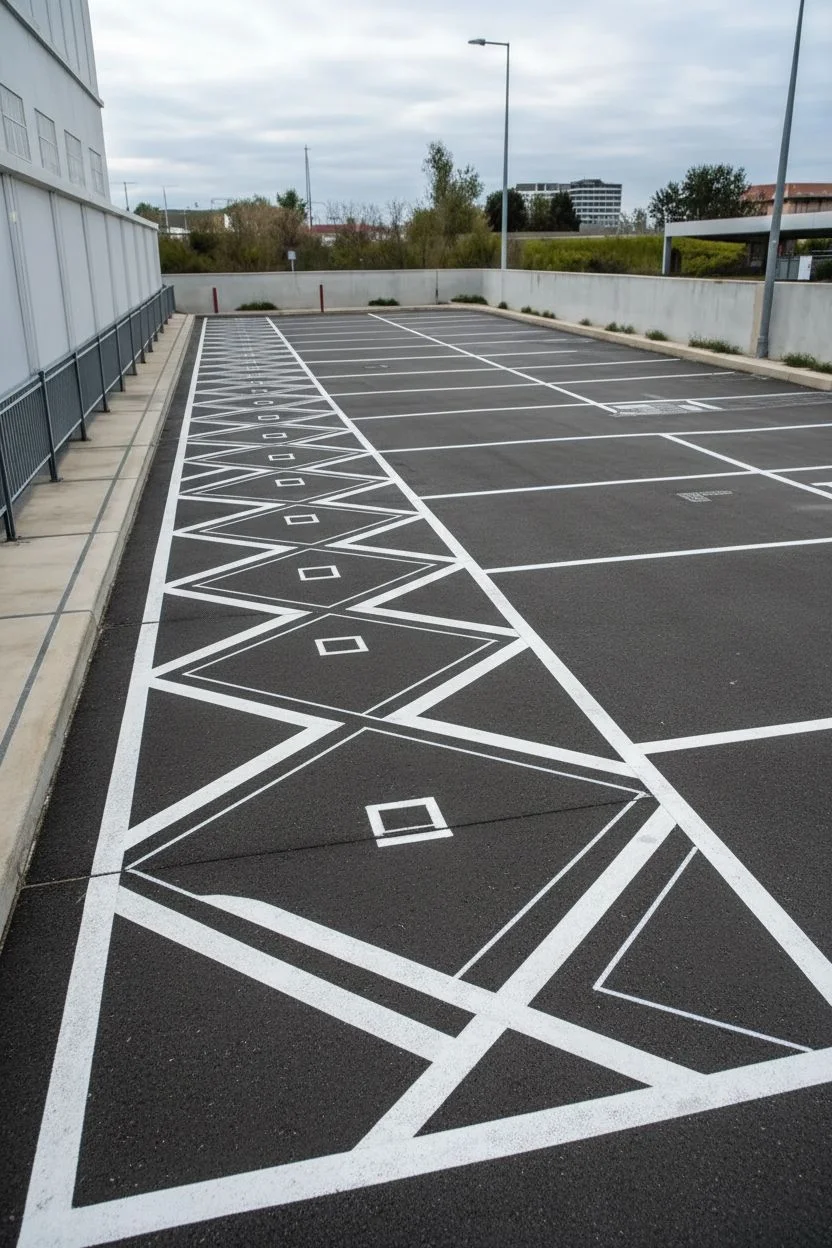
Step 1: Preparation and Base Layout
-
Clean the surface:
Begin by thoroughly cleaning the asphalt strip. Use a pressure washer to remove all dirt, oil, and loose debris, as paint won’t adhere to grime. Let the surface dry completely, ideally for 24 hours. -
Define the boundaries:
Measure the width of your designated walkway strip. Snap two parallel chalk lines running the full length of the area to define the outer edges of your design. -
Mark the center line:
Snap a third chalk line exactly down the center of the strip. This will act as the spine for your diamond shapes and ensure symmetry. -
Measure interval points:
Along the center line, measure and mark points at equal intervals (e.g., every 6 feet) where the tips of the diamonds will meet. Repeat these measurements on the outer boundary lines, but offset them so they align with the widest part of the diamonds. -
Snap the diagonal grid:
Use the chalk line to connect the center points to the outer boundary points, creating a repeating zigzag or diamond pattern down the entire length of the walkway.
Bleed-Through Fix
If paint bleeds under tape on rough asphalt, re-mask the line and touch up with the original background color first to seal the gap.
Step 2: Taping and Outlining
-
Tape the primary white lines:
Apply your 2-inch exterior painter’s tape along the chalk lines. Remember that the paint will go *between* tape strips if you want thick white separation lines, or you can paint the whole surface white first and tape over it to preserve the lines. For this specific look, I prefer taping the negative space first. -
Create the intersecting ‘X’ shapes:
Tape off the secondary lines that crisscross through the larger diamonds. These lines create the smaller triangular zones. Press the tape down firmly, especially on rough asphalt, to prevent bleeding. -
Mask the borders:
Run tape along the very outer edges of your dedicated strip to protect the surrounding sidewalk and driveway areas from wayward roller marks. -
Seal the tape edges:
Lightly brush a thin layer of the base coat or a clear sealer over the tape edges. This locks the tape to the asphalt and ensures your geometric lines stay razor-sharp.
Reflective Upgrade
Mix glass beads into the white paint immediately before applying. This makes the lines reflective at night for better visibility.
Step 3: Painting the Colors
-
Apply the ochre triangles:
Identify the triangular sections that point inward from the outer edges. Fill these in with the ochre/gold concrete paint using a roller. Two thin coats are better than one thick one. -
Paint the grey sections:
Fill the remaining large diamond sections with the dark grey paint. Be careful not to roll over the tape into the ochre sections if they are adjacent. -
Add the center squares:
Once the main colors are dry, use a small cardboard stencil cut into a square shape. Place it in the exact center of each grey diamond and dab on white paint to create the ‘floating’ square detail. -
Remove the tape:
While the final coat is tacky but not fully wet, slowly peel back the tape at a 45-degree angle. This reveals the unpainted asphalt lines (or white underlying lines) separating your shapes. -
Paint the dividing lines (Optional):
If you didn’t paint a white base coat first, you now have raw asphalt lines between colors. Use a small brush and white paint to hand-paint these strips for that bright, high-contrast look shown in the image. -
Clean up edges:
Inspect the design for any spots where paint might have bled under the tape. Use a small brush with the appropriate color to tidy up these lines. -
Seal the surface:
Apply a clear UV-resistant concrete sealer over the entire design to protect the colors from sun fading and tire marks.
Enjoy the professional, organized look this durable geometric pattern brings to your parking area
Ombre Background Fade Across the Asphalt
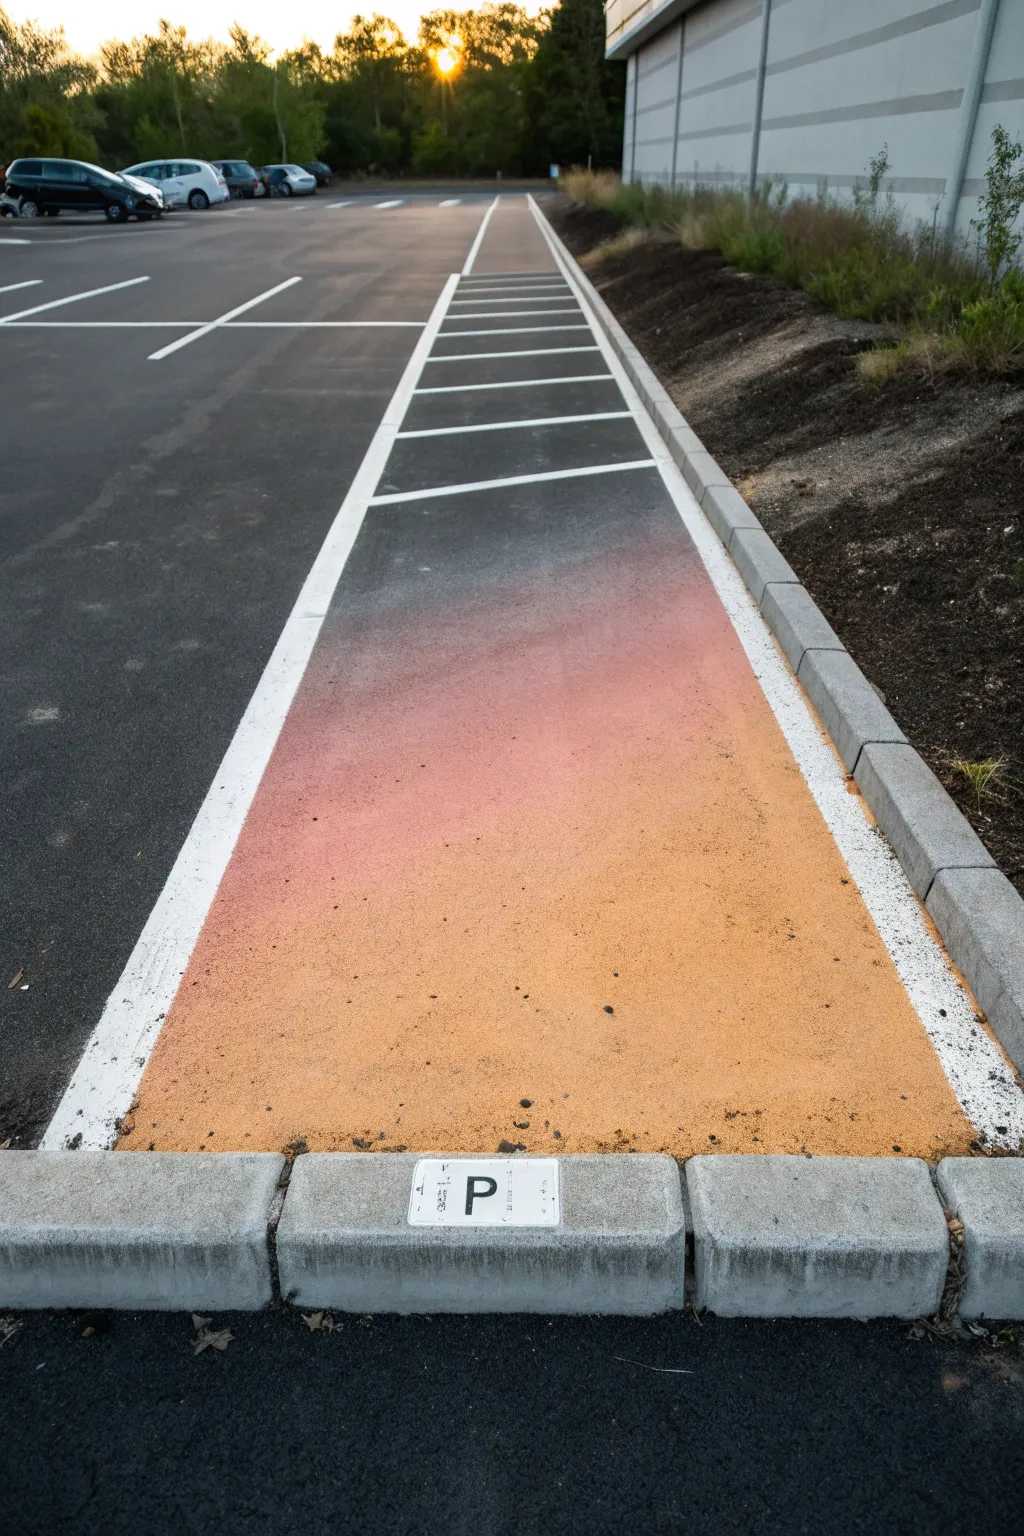
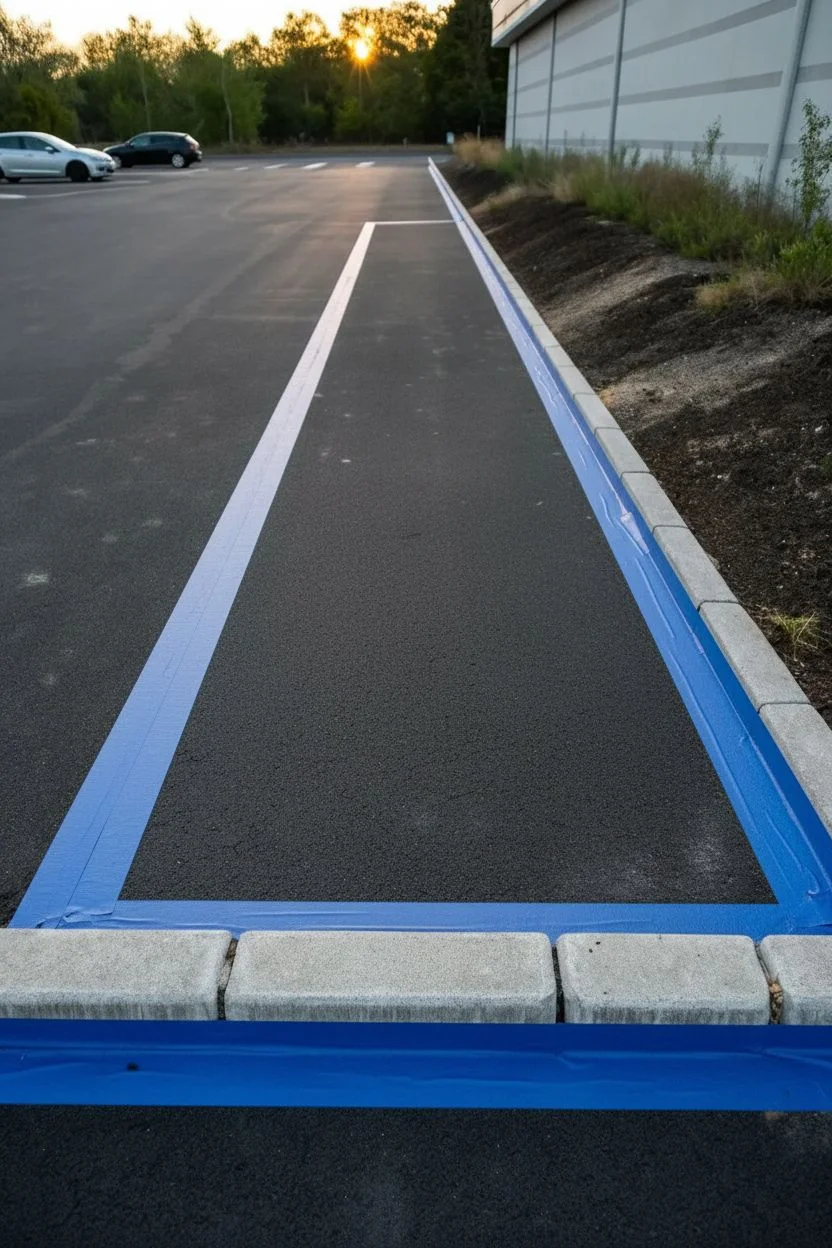
Transform a dull patch of asphalt into a stunning gradient masterpiece that mimics the warm hues of a sunset. This ombre effect transitions seamlessly from deep orange to a soft, misty white, creating a unique and welcoming space for your vehicle.
How-To Guide
Materials
- Outdoor concrete/asphalt paint (Deep Orange, Peach, White)
- White traffic paint or heavy-duty outdoor paint (for lines)
- Paint rollers (medium nap) with extension poles
- Synthetic angled sash brush (2-3 inch)
- Painter’s tape (wide, heavy-duty for exterior surfaces)
- String line or chalk line tool
- Measuring tape
- Stiff bristle broom
- Leaf blower (optional but helpful)
- Pressure washer (recommended)
- Paint tray and liners
- Small stencil (letter ‘P’, optional)
Step 1: Prep and Prime
-
Clear the area:
Start by vigorously sweeping the entire parking space with a stiff bristle broom to remove loose gravel, dirt, and debris. If you have a leaf blower, use it to ensure every speck of dust is gone. -
Deep clean the surface:
For the paint to adhere properly, the asphalt needs to be pristine. I highly recommend using a pressure washer to blast away deep-seated grime and oil spots. Allow the pavement to dry completely, which may take 24 hours depending on the weather. -
Measure your boundaries:
Using a measuring tape, determine the exact width and length of your parking stall. Use a chalk line to snap straight guides along the left and right sides to ensure your painted area is perfectly rectangular. -
Tape the perimeter:
Apply wide, heavy-duty painter’s tape along the outside of your chalk lines. Press the tape down firmly, especially into the crevices of the asphalt, to prevent paint bleed.
Fixing Blotchy Blends
If the blending looks choppy, don’t overwork tacky paint. Let it fully dry, then apply a diluted glaze of the middle color over the transition line to soften it.
Step 2: Creating the Ombre Gradient
-
Prepare your colors:
Pour your deep orange, peach (or mid-tone), and white paints into separate trays. Keep a separate ‘blending tray’ nearby where you can mix colors slightly. -
Paint the bottom section:
Start at the bottom of the parking spot (closest to the curb). Load your roller with the Deep Orange paint and cover the first third of the length, ensuring full coverage over the rough asphalt texture. -
Apply the middle tone:
With a clean roller (or the same one if you want a quicker dirty mix), apply the Peach paint to the middle third of the space. Leave a small gap of a few inches between the orange and peach sections initially. -
Blend the first transition:
Here is the key moment: While the paint is still wet, roll back and forth over the gap between the orange and peach. Use varied pressure to feather the orange up into the peach, creating a soft transition rather than a hard line. -
Paint the top section:
Apply the white (or very light gray) paint to the final top third of the parking spot. -
Final blend:
Blend the peach section into the white section using the same feathering technique. If the paint starts to dry too fast, mist it very lightly with water (if using water-based acrylics) to keep it workable. -
Check for consistency:
Step back and look at the gradient from a distance. If any areas look patchy, apply a second coat to deepen the colors, maintaining the blended transition.
Add Texture
Mix a non-slip additive (like silica sand) into your final coat of paint. This adds grip for rainy days and gives the surface a professional, finished texture.
Step 3: Detailing and Finishing
-
Tape the border lines:
Once the gradient base is fully dry (usually 2-4 hours), measure a few inches inside the painted area to create a border. Apply a new strip of painter’s tape to mark off the crisp white line seen in the image. -
Paint the white border:
Use a smaller brush or a mini roller to paint the solid white line distinguishing the parking spot boundary. Two coats are usually best for bright visibility. -
Add the curb marker:
Clean the concrete curb stop. Center your ‘P’ stencil on the face of the curb block. -
Stencil the letter:
Dab black outdoor paint over the stencil using a dry-brush technique to prevent running. Peel the stencil away immediately while the paint is wet for the sharpest edge. -
Remove tape:
Carefully peel up all painter’s tape at a 45-degree angle. Do this slowly to avoid pulling up any chunks of your fresh asphalt paint.
Let the paint cure for at least 48 hours before parking your car on your beautiful new sunset gradient

PENCIL GUIDE
Understanding Pencil Grades from H to B
From first sketch to finished drawing — learn pencil grades, line control, and shading techniques.
Explore the Full Guide
Floral Corner Vines Framing the Parking Space
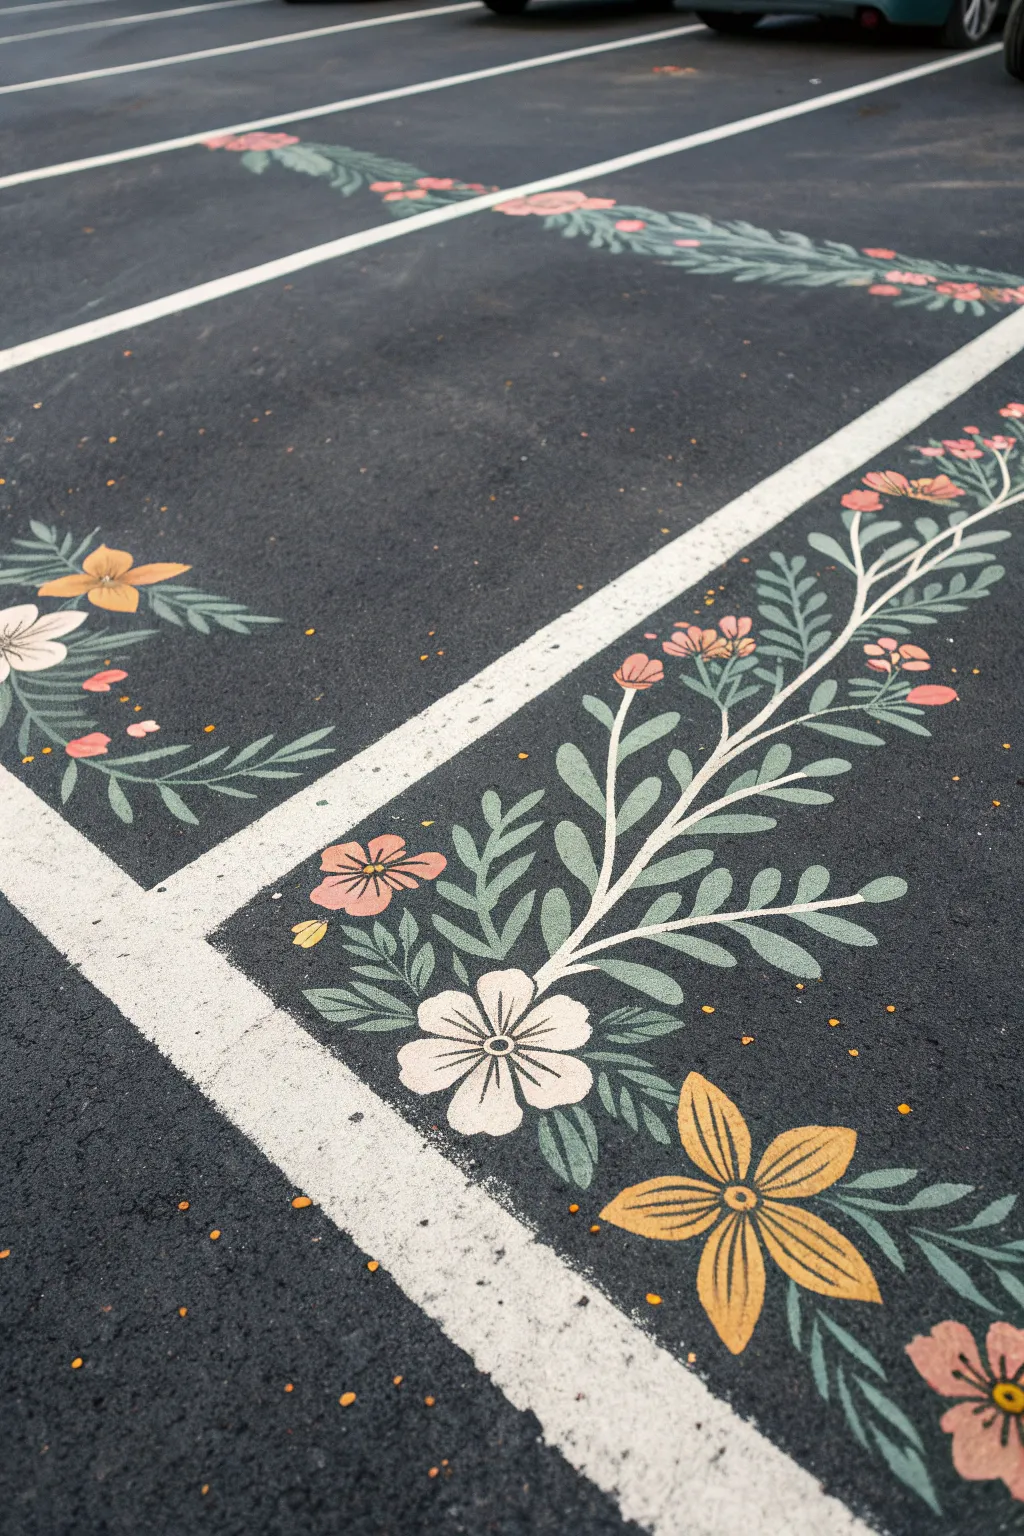
Transform a stark parking spot into a blooming garden path with these elegant corner vines that frame the space beautifully. The muted sage, cream, and mustard tones create a sophisticated, vintage-inspired look that contrasts stunningly against dark asphalt.
Step-by-Step Tutorial
Materials
- Outdoor concrete/asphalt paint (muted sage green, cream/white, mustard yellow, dusty pink)
- Chalk (white or yellow)
- Wide painters tape (2-inch)
- Assorted paintbrushes (1-inch flat brush, round detail brushes sizes #4 and #8)
- Measuring tape
- Rolling stool or knee pads
- Wire brush or stiff broom
- Paint tray or paper plates
Step 1: Prep & Planning
-
Clean the Canvas:
Before laying down any color, vigorously sweep the parking are with a stiff broom. You need to remove all loose gravel, dirt, and oil spots to ensure the paint adheres properly to the textured asphalt. -
Define Boundaries:
Using your 2-inch painter’s tape, mask off the existing white parking stall lines. This ensures your floral design doesn’t accidentally spill over into the neighboring spot while keeping a crisp edge. -
Sketch the Spine:
Take your chalk and draw the main ‘spine’ of the vine first. Start from the bottom corner intersection and curve it gently upwards alongside the taped line. Keep the line flowing naturally, avoiding stiff, straight segments. -
Layout the Leaves:
Along the chalk spine, sketch pair of leaves in a V-shape pattern. Vary the spacing slightly so it doesn’t look too uniform. Add smaller branching stems that reach further into the parking space. -
Placement of Blooms:
Mark circles where you want your main flowers to sit. I like to place the largest blooms at the bottom corners to anchor the design, with smaller buds tapering off towards the top.
Step 2: The Greenery
-
Paint the Vine Stem:
Load a medium round brush with cream or off-white paint stripes. Carefully trace over your main chalk spine line. Because asphalt is rough, you may need to dab the paint into the crevices rather than just dragging the brush. -
Base Leaf Color:
Switch to your sage green paint and a flat brush. Fill in the leaf shapes you sketched earlier. Don’t worry about perfect opacity yet; the texture of the road will show through, adding character. -
Second Leaf Coat:
Once the first green layer is dry to the touch (usually 15-20 minutes outdoors), apply a second coat to the leaves for a more solid, matte finish. -
Adding Leaf Veins:
Using a fine detail brush and the cream paint used for the stem, paint delicate central veins on each green leaf. This connects them visually to the main vine.
Asphalt Texture Tip
Pavement is extremely thirsty! Don’t water down your acrylics. Use “heavy body” outdoor paints and press firmly to get the pigment into the deep road crevices.
Step 3: Blooms & Details
-
Large Flower Base:
Paint the large, five-petal flowers using the cream or white paint. Start from the center and pull your brush outward to create petal shapes. -
Mustard Yellow Accents:
Paint the secondary flower variety—the star-shaped lilies—using mustard yellow. These should have sharper, more pointed petals than the round white ones. -
Dusty Pink Buds:
Add small clusters of dusty pink circles near the ends of the vines to represent buds or smaller wildflowers. Group them in threes for a pleasing composition. -
Flower Centers:
Once the white petals are dry, add a dark center. I often use a mix of the sage green and a tiny dot of black or dark grey to create contrast in the middle of the blooms. -
Defining Lines:
Use the smallest detail brush to add centers to the yellow flowers and fine lines on the pink buds. This sharpness brings the blurry asphalt texture into focus. -
Clean Up:
Wait until the paint is tacky but not fully cured before slowly peeling up the painter’s tape. If you wait until it’s rock hard, it might chip your design. -
Scrub the Chalk:
Finally, use a damp rag or a gentle spray of water to wash away any visible chalk guide lines that weren’t covered by paint.
Add Some Sparkle
While the paint is still wet on the flower petals, sprinkle a tiny pinch of reflective glass beads (used in road striping) so your flowers catch headlights at night.
Now you have a stunning botanical border that makes parking a little more joyful every day
Starry Night Galaxy Painted on Blacktop
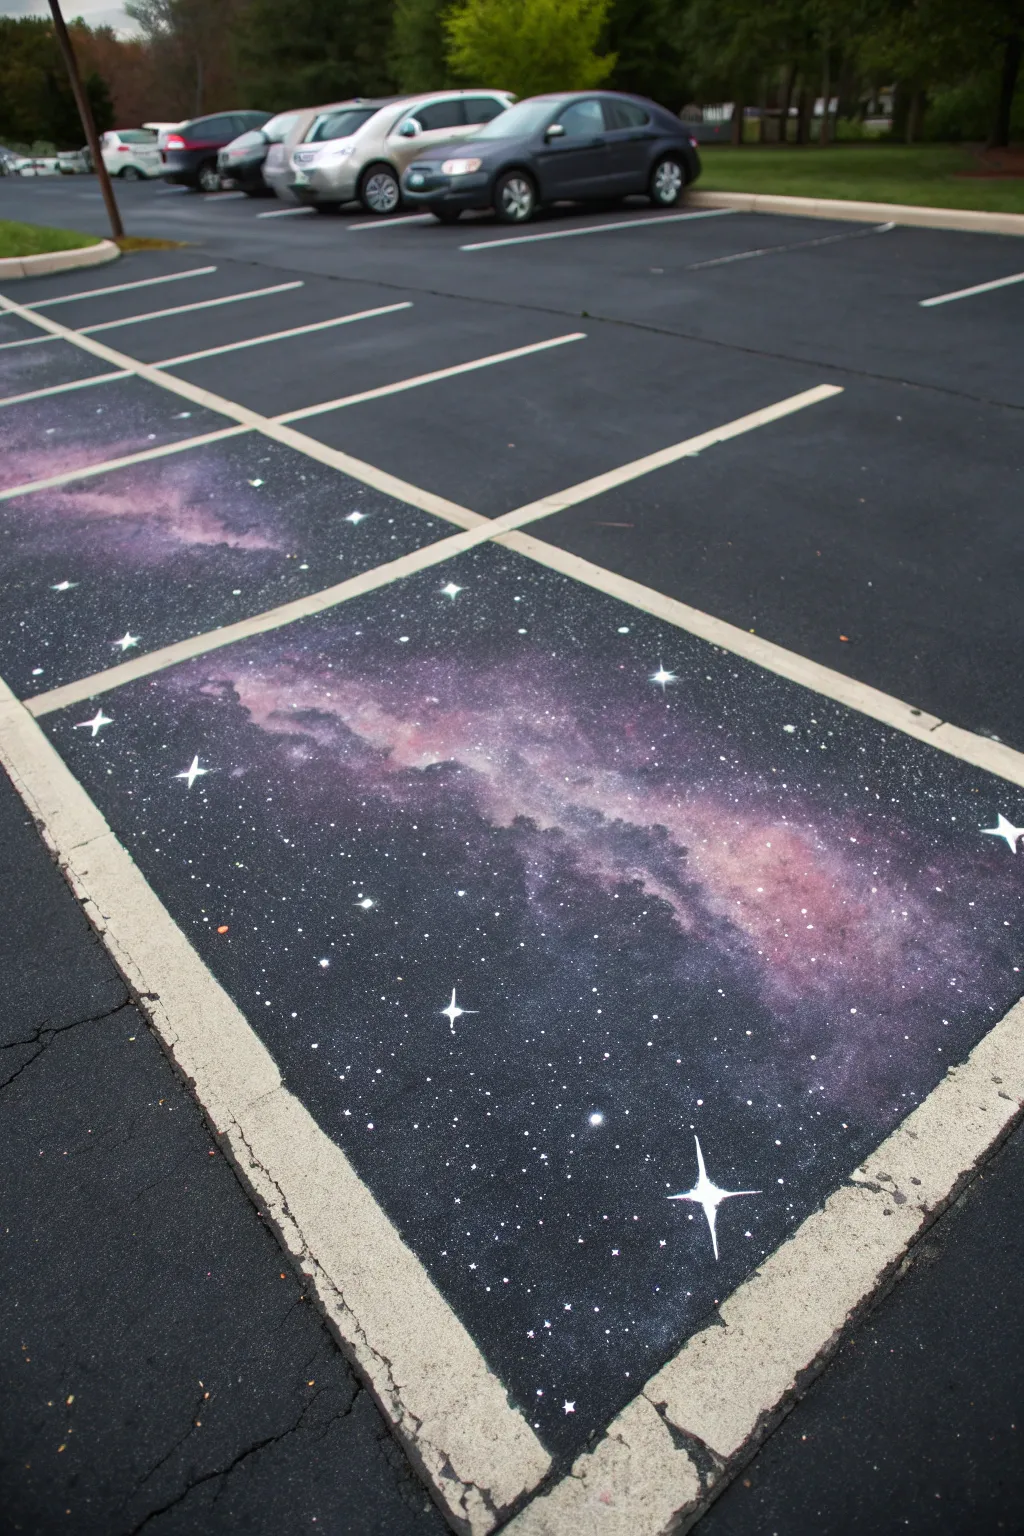

Transform an ordinary patch of asphalt into a stunning window to the cosmos with this galaxy-themed mural. Using a blend of deep purples, pinks, and brilliant white stars against the natural blacktop, you’ll create a breathtaking illusion of depth right under your feet.
Step-by-Step
Materials
- Outdoor acrylic exterior paint (black, white, deep purple, magenta, royal blue)
- Blacktop sealer (optional, for base)
- Wide paint rollers and tray
- Large sponge (natural sea sponge works best)
- Assorted bristled paintbrushes (assorted sizes)
- Detail liner brush
- Spray bottle with water
- Painters tape
- Chalk for sketching
- Clear concrete sealer (exterior grade)
Step 1: Preparation and Base
-
Clean the surface:
Start by thoroughly sweeping the parking space to remove all loose gravel, dirt, and debris. If possible, power wash the area and let it dry completely for 24 hours to ensure the paint adheres properly. -
Define boundaries:
Apply painters tape along the existing white parking lines to protect them and ensure your galaxy has crisp, clean edges. Verify the asphalt is dry before sticking the tape down firmly. -
Prime the canvas:
If the asphalt is faded or grey, roll a fresh coat of black exterior paint or blacktop sealer over the entire rectangular space. This provides the deep, infinite background needed for space art. Let this base coat dry fully.
Star Spatter Troubleshooting
If your stars look like big blobs instead of mist, your paint is too thick or your brush is too loaded. Test on cardboard first; the brush should be nearly dry for fine mist.
Step 2: Creating the Nebula
-
Map out the galaxy:
Using a piece of chalk, lightly sketch a diagonal, wandering path across the space. This will be the main body of your nebula cloud, guiding where you place your colors. -
Apply the first color layer:
Pour some royal blue and deep purple paint into separate trays. Dip a slightly damp sea sponge into the dark blue and dab it loosely along the outer edges of your chalk path. Keep the texture organic and cloudy. -
Blend in mid-tones:
While the blue is still tacky, sponge deep purple into the center of the blue areas, blending the edges outward. I find that keeping the sponge somewhat dry helps create a misty texture rather than solid blobs of color. -
Add vibrancy with pinks:
Load a clean sponge with magenta or bright pink. Dab this concentration through the very center of your nebula path, overlapping the purple. The transition should go from black -> blue -> purple -> pink. -
Incorporate white highlights:
Mix a tiny drop of white into your pink paint to create a pale pastel. Sponge this sparingly into the absolute planned brightest spots of the nebula to create luminosity and volume. -
Soften harsh edges:
If any sponge marks look too distinct, mist them lightly with water from your spray bottle and use a dry brush or rag to blot and soften the edges into the black background.
Level Up: Hidden details
Hide personal symbols in the constellation! Use the ‘connect-the-dots’ star technique to paint your zodiac sign or initials subtly into the background star field.
Step 3: Stars and Details
-
Prepare the spatter paint:
Thin down your white exterior paint with water until it reaches the consistency of heavy cream or ink. It needs to be fluid enough to fly off a brush. -
Create the distant star field:
Dip a stiff-bristled brush into the thinned white paint. Using your thumb or a stick, flick the bristles to spray tiny droplets across the entire mural. Focus heavier concentrations of ‘stars’ near the nebula cloud. -
Add medium stars:
Take a small round brush and white paint to manually dot slightly larger stars randomly throughout the black space and over the nebula colors. -
Sketch the hero stars:
Choose 5 to 7 specific locations for large, distinct stars. Use chalk to lightly draw a four-pointed star shape (a long vertical cross intersecting a horizontal cross). -
Paint the hero stars:
Using a detail liner brush and pure white paint, carefully fill in your four-pointed stars. Make the center point the brightest and drag the lines outward to a sharp, fading point. -
Add star halos:
Dry brush a very faint, small circle of white glow around the center of your largest stars to make them appear to shine brightly.
Step 4: Sealing and Finish
-
Remove the tape:
Carefully peel up the painters tape while the paint is dry to the touch but not fully cured, pulling away from the painted area to reveal sharp edges. -
Seal the artwork:
Once the painting has dried for at least 24-48 hours, apply two coats of clear, non-yellowing concrete sealer with a clean roller. This protects against tire marks and weather.
Now you have a durable, personalized slice of the universe that greets you every time you pull in to park


Sports Jersey Number Layout for Your Stall
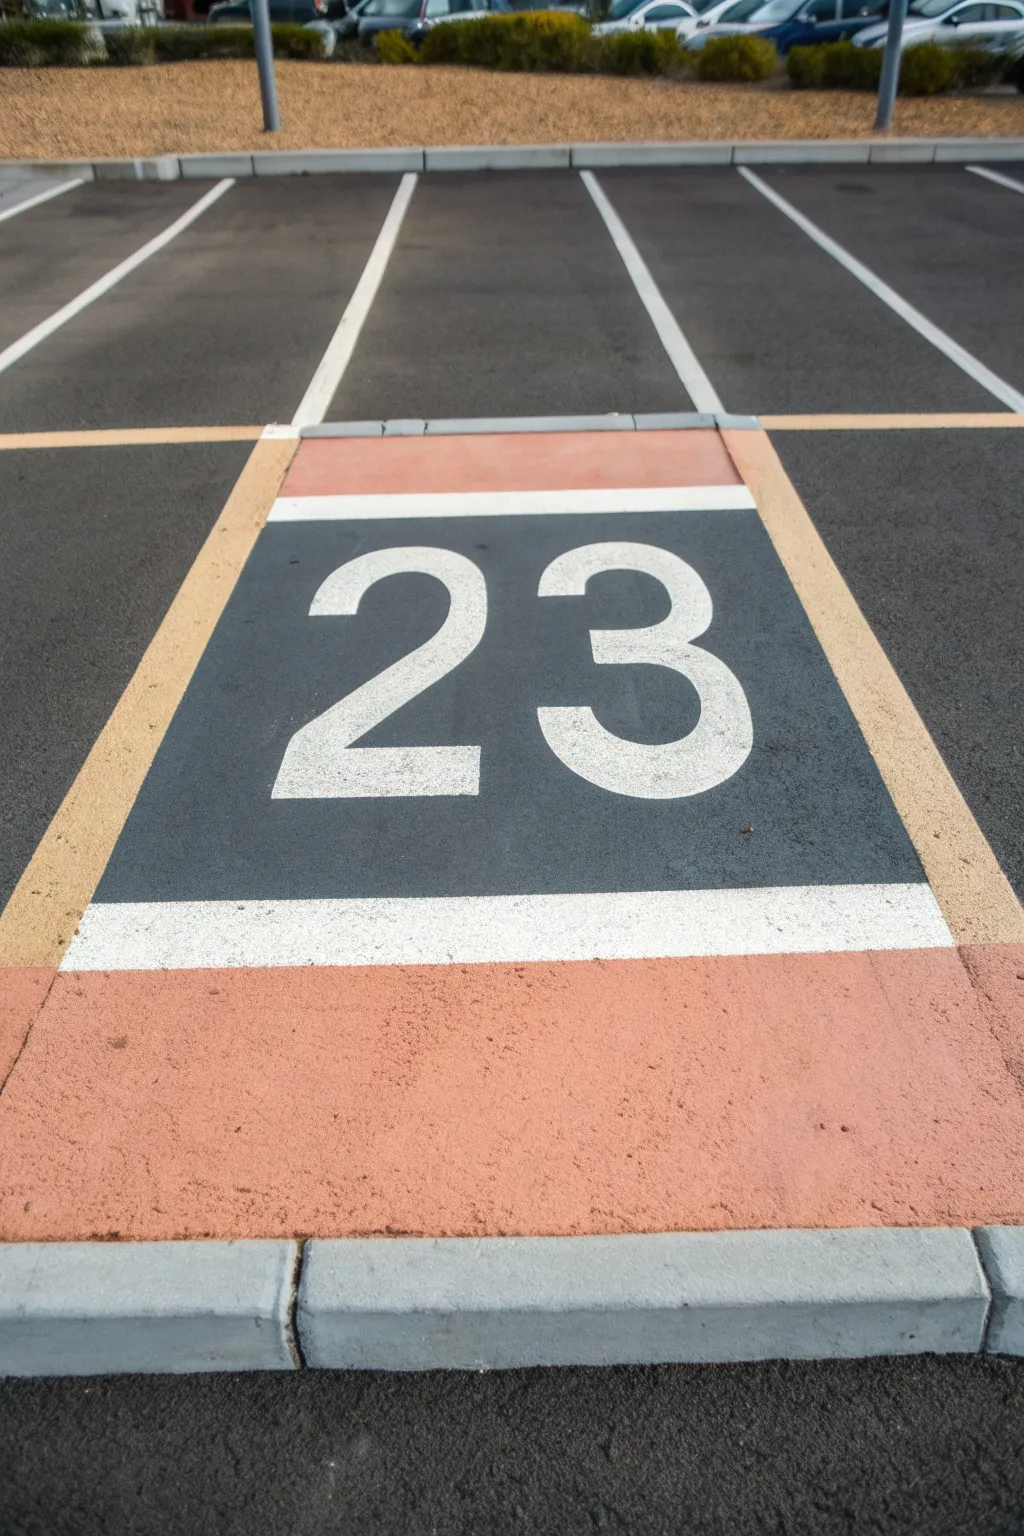
Transform a boring patch of asphalt into a personalized statement with this clean, athletic-inspired parking stall design. The bold number 23 stands out against a stark black background, framed by classic varsity stripes for a look that mimics a sports jersey.
Step-by-Step
Materials
- Outdoor concrete/asphalt paint (Black, White, Terracotta/Orange)
- Painter’s tape (2-inch width recommended)
- Measuring tape
- Chalk line reel or chalk stick
- Paint rollers (long handle)
- Small foam roller or brush for edging
- Cardboard or stiff paper for stencils
- Utility knife
- Push broom or leaf blower
Step 1: Preparation & Layout
-
Clean surface:
Begin by thoroughly sweeping the parking stall area to remove all loose dirt, gravel, and debris. If access to water is possible, a quick power wash will ensure the best paint adhesion, but ensure the asphalt is bone dry before proceeding. -
Measure the central box:
Determine the center of your parking stall. Measure and mark a large rectangle for the main black background section. A good size is typically about 4 feet wide by 3 feet tall, ensuring it sits centrally within the lane markings. -
Mark the header and footer:
Measure a strip above and below your central box for the white stripes (about 3-4 inches thick) and the larger colored sections. The large terracotta section in the foreground should extend from the bottom white stripe to the curb. -
Snap chalk lines:
Once your measurements are marked, use a chalk line to snap straight guides for every horizontal line and vertical edge. This ensures your geometry is crisp and professional.
Bleeding Edges?
If paint bleeds on rough asphalt, don’t wipe it wet. Let it dry completely, then touch it up with the background color using a small, stiff brush for a clean fix.
Step 2: Taping & Base Painting
-
Tape margins:
Apply wide painter’s tape along the outside edges of your chalk lines. Press the tape down firmly, especially on rough asphalt, to prevent bleed-under. -
Paint the background:
Starting with the central rectangle, roll on two coats of black outdoor asphalt paint. Allow the first coat to dry to the touch before adding the second for solid opacity. -
Paint the terracotta zone:
While the black dries, paint the large foreground section and the top header section with your terracotta or orange paint. Use a roller on an extension pole to save your back. -
Peel and wait:
Carefully peel the tape while the paint is still slightly tacky to avoid pulling up dried chips. Let these base layers cure for at least 2-4 hours, or per manufacturer instructions.
Step 3: Stripes & Numbers
-
Tape the white stripes:
Once the base colors are dry, apply fresh tape to define the thin horizontal stripes separating the black box from the terracotta sections. Cover the dry black and orange paint with paper or plastic to protect them from splatters. -
Paint stripes white:
Roll or brush white traffic paint into the taped-off stripe areas. These high-contrast lines are crucial for that ‘jersey’ aesthetic. -
Create number stencils:
Draw your chosen number (e.g., ’23’) onto cardboard or stiff paper. I like to use a simple collegiate block font for readability. Cut them out carefully with a utility knife to create a negative stencil. -
Position stencils:
Center your stencils precisely within the dry black rectangle. Use a tape measure to ensure equal spacing on the left and right sides. -
Secure stencils:
Tape the cardboard stencil down securely so it doesn’t shift in the wind or while painting. -
Stipple the numbers:
Using a small roller with very little white paint, or a stencil brush, lightly apply the white paint over the stencil. Multiple thin layers prevent the paint from bleeding under the cardboard edges. -
Final reveal:
Remove the stencils and the final masking tape for the white stripes. Check for any small bleeds and touch them up with a small artist’s brush if needed.
Sealing the Deal
For longevity against tires and oil, wait 24 hours and roll a clear concrete sealer over just the painted design. This prevents peeling and keeps the white bright.
Now you have a designated spot that shows off your team spirit every time you pull in
Music Player Screen Design With Your Song Title
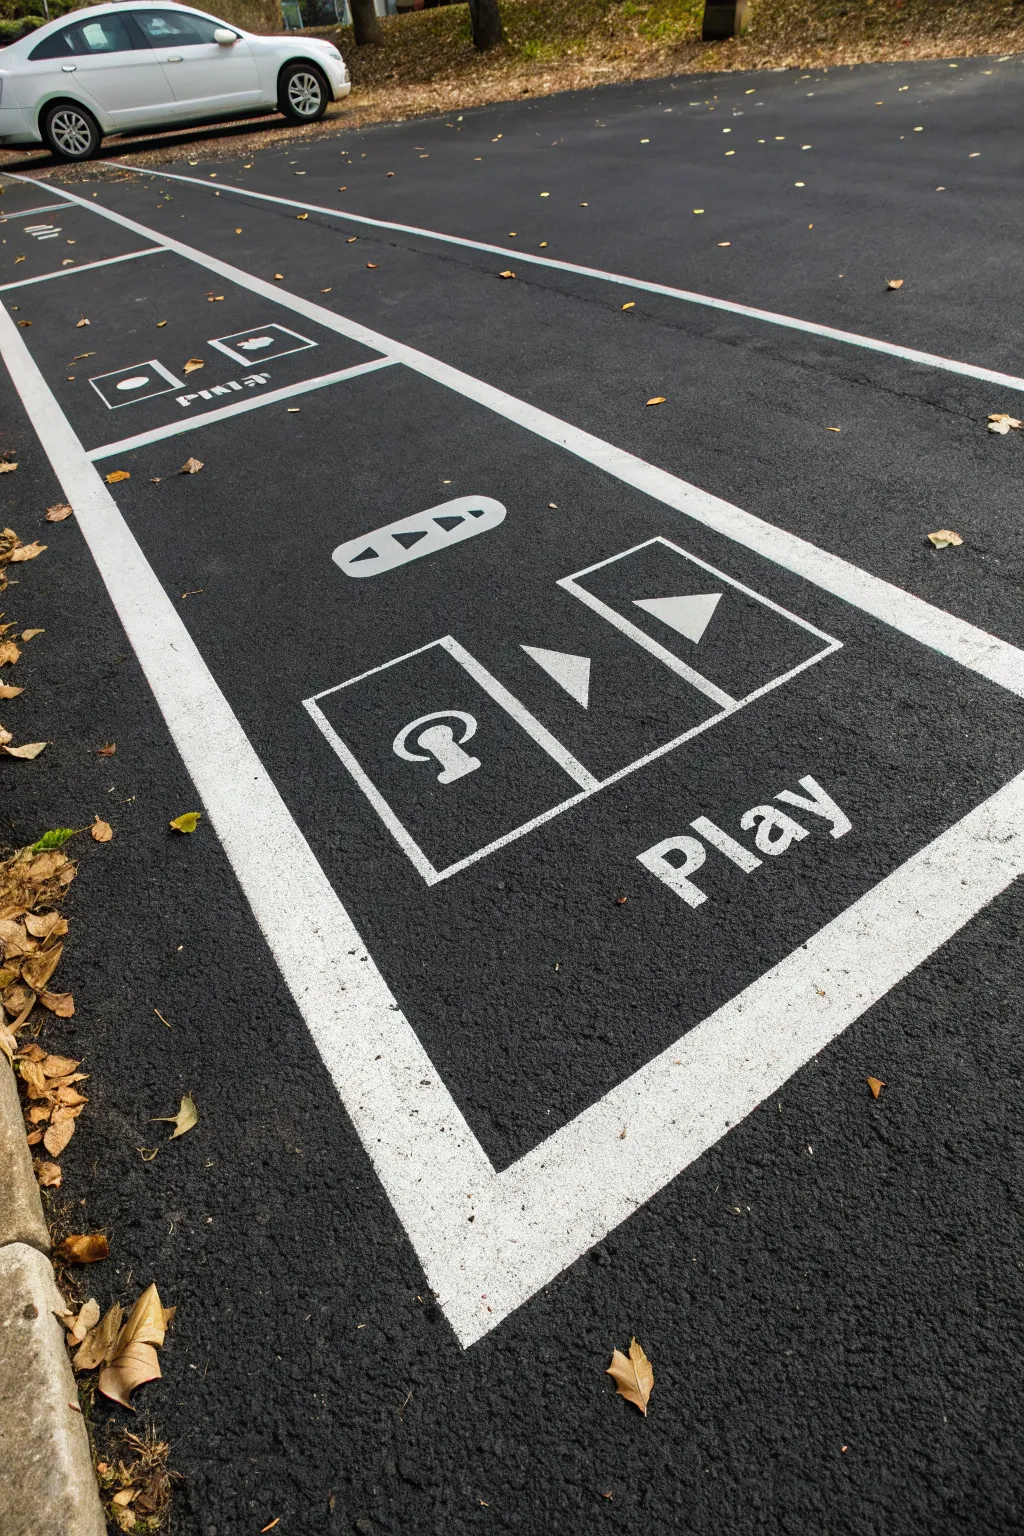
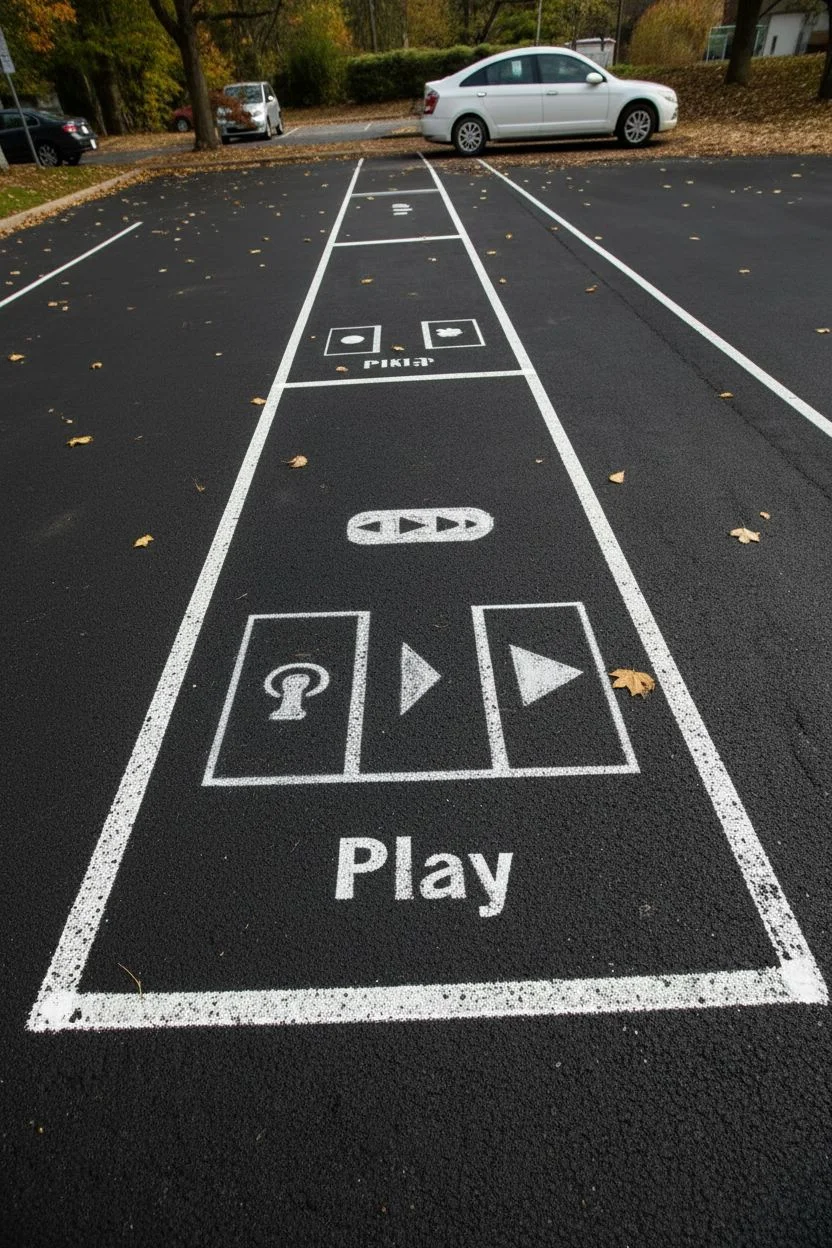
Turn your assigned parking space into a nostalgic tribute to the digital music revolution with this oversized media player interface design. The crisp white lines on black asphalt create a high-contrast, modern graphic that’s fun and instantly recognizable.
How-To Guide
Materials
- Outdoor concrete/asphalt paint (White)
- Outdoor concrete/asphalt paint (Black – strictly for touch-ups)
- Painter’s tape (2-inch width)
- Painter’s tape (1-inch width)
- Chalk line tool
- Tailor’s chalk or white sidewalk chalk
- Measuring tape
- 4-inch paint roller with extension pole
- 1-inch angled paintbrush (for details)
- Stencil material (cardboard or Mylar sheets)
- Utility knife
- Broom and leaf blower
Step 1: Cleaning and Layout
-
Prep the Surface:
Begin by thoroughly sweeping the entire parking space to remove every leaf, twig, and loose stone. Use a leaf blower if available to get the dust out of the asphalt crevices, as this ensures your paint adheres properly. -
Establish the Perimeter:
Measure the width of your parking spot. You want to create a large rectangular border that sits about 6-12 inches inside the actual parking lines. Snap a chalk line to mark this new internal rectangle. -
Draft the Interface Zones:
Using your chalk and a straight edge, divide your rectangle into three main sections horizontally. The bottom section will be the control panel, the middle narrow strip is the progress bar, and the top section is the ‘screen’ for album art.
Bleeding Lines?
If paint bleeds under the tape on rough asphalt, don’t panic. Let the white dry completely, then use a small brush and matte black outdoor paint to ‘erase’ the mistakes.
Step 2: Designing the Controls
-
Draft the Play Button Area:
In the bottom third of your layout, sketch a large rectangle centered horizontally. Inside this, draw two smaller squares side-by-side. The left square will house the ‘reverse’ icon, and the right will hold the ‘play’ triangle. -
Add the Text:
Below the button rectangles, freehand the word ‘Play’ in a bold, sans-serif font. If you aren’t confident in your lettering, print the letters on cardstock effectively creating large stencils to trace. -
Sketch the Progress Bar:
Move to the middle section. Draw a long, rounded capsule shape that features a slider button and triangles on either end indicating track progression. This sits between the control panel and the ‘screen’ area. -
Outline the Album Art:
In the top section (the furthest away from the entrance of the spot), draw a square for the album art and a smaller rectangle below it for the song title.
Step 3: Taping and Stenciling
-
Apply the Main Border Tape:
Run your 2-inch painter’s tape along the outside edge of your main perimeter chalk lines. Rub the tape down firmly with your foot or a roller to seal the edges against the texture of the asphalt. -
Create Icon Stencils:
For the complex icons like the circular arrow (replay) or the play triangle, it’s best to cut stencils from cardboard. Draw the shapes, cut them out with a utility knife, and tape the negative space stencils onto the asphalt. -
Tape Linear Elements:
Use the narrower 1-inch tape to mask off the straight lines of the button boxes and the progress bar. Remember, you are taping over the areas you want to remain black.
Personalize It
Instead of generic icons in the top ‘screen’ section, paint a simple version of your favorite album cover or write your actual favorite song lyrics in that space.
Step 4: Painting
-
Paint the Borders:
Dip your 4-inch roller into the white concrete paint. Roll the thick outer border first. I like to do two thin coats rather than one thick one to prevent peeling later. -
Fill in Large Areas:
Use the roller to fill in larger text letters (like ‘Play’) or big solid shapes if your stencil allows. Be careful not to push paint under the tape edges—roll away from the tape edge, not towards it. -
Detail Work:
Switch to the 1-inch angled brush. Carefully hand-paint the intricate icons (the circular arrow, the slider triangle) and sharpen any corners on your lettering. -
Remove Tape:
Wait until the paint is tacky but not fully dry (usually about 30-45 minutes). Slowly peel back the tape at a 45-degree angle. This prevents the dry paint from chilling and pulling up with the tape. -
Refine Edges:
Once the tape is gone, you might see some bleed. Use a small artist’s brush and a tiny bit of black asphalt paint to clean up any fuzzy lines and make the graphic snap.
Let the paint cure for at least 24 hours before parking your car on your new masterpiece
College Road Sign Arrow Theme
Transform a dull parking spot into a spirited statement with this collegiate-themed arrow design. Featuring crisp chevrons, a bold outline, and a classic color palette, this project mimics the aesthetic of official road signage with a personalized twist.
Step-by-Step Guide
Materials
- Outdoor concrete cleaner or pressure washer
- Outdoor concrete/pavement paint (Base color: Light Teal/Sage)
- Outdoor concrete/pavement paint (Accent color: Orange/Gold)
- Outdoor concrete/pavement paint (Detail color: White)
- Painters tape (2-inch and 1-inch widths)
- Chalk line tool or long straight edge
- Measuring tape
- Chalk
- Paint rollers (medium nap for textured surfaces)
- Extension pole for rollers
- Angled sash brush (2-inch)
- Small detail brush
- Clear concrete sealer (optional)
Step 1: Preparation and Base Coat
-
Clean the Surface:
Begin by thoroughly sweeping the area to remove loose debris. Use a concrete cleaner or a pressure washer to remove oil stains and dirt, ensuring the paint adheres properly. Let the pavement dry completely—moisture is the enemy here. -
Map the Arrow:
Find the center of your parking space. Using a measuring tape and chalk, mark the center line where your arrow will sit. Measure out the total length and width first to ensure it fits comfortably within the spot. -
Apply the Base Color:
If you are painting the entire background like in the image, roll out your Light Teal/Sage base color over the entire arrow area plus a margin. Apply two coats for solid coverage, allowing 2-4 hours of drying time between layers.
Bleed-Through Blues?
If paint bleeds under tape, wait for it to dry. Then, use a small artist brush and the background color to carefully touch up and straighten the line.
Step 2: Drafting the Design
-
Chalk the Outline:
Snap a chalk line down the exact center. Sketch the main arrow shape using a straight edge. Start with the long rectangular shaft, then draw the triangular head. Keep your measurements symmetrical on either side of the center line. -
Tape the Outer Border:
Apply wide painter’s tape along the *outside* of your chalked arrow outline. This will define the sharp exterior edge of the orange border. -
Tape the Inner Border:
Measure about 2-3 inches inward from your first tape line and apply a second strip of tape. The space between these two tape lines will become your orange border.
Level Up: Reflective finish
Mix a small amount of glass beads or anti-slip additive into the white paint for a reflective, genuine road-sign shimmer at night.
Step 3: Painting the Structure
-
Paint the Border:
Using the Orange/Gold paint and a smaller brush or mini-roller, fill in the space between your tape lines. Press the tape down firmly beforehand to prevent bleed. Two coats will make the color pop against the teal background. -
Fill the Center:
Paint the large interior section of the arrow with your White paint. Use a roller for the main areas and an angled brush to cut in carefully near the tape. This might need a third coat since white pavement paint can be translucent. -
Remove Tape:
While the paint is slightly tacky (not fully cured), carefully peel up the tape at a 45-degree angle. This helps keep the edges crisp. Let everything dry overnight before moving to details.
Step 4: Adding Details
-
Draft the Chevrons:
Once the white base is dry, use a ruler and pencil or chalk to lightly draw the internal chevron pattern. These are the V-shapes pointing upward inside the white arrow. Spacing them evenly is key to the professional look. -
Outline the Chevrons:
Ideally, use a thin detail brush and a steady hand to paint the thin black or grey lines that define the chevrons. If you aren’t confident freehanding, you can tape off these thin lines, though it is time-consuming. -
Line the Border:
Paint a thin separator line between the orange border and the white interior using the same dark grey or black detail color. This separation adds depth and mimics the printed look of a real sign. -
Add the Dot:
At the base of the arrow shaft, trace a circle (a paint can lid works great as a template). Paint this circle in the Light Teal base color or a coordinating accent tone. -
Clean Up:
Check for any uneven edges. You can touch up the background Teal paint to sharpen the outer lines of the arrow if any orange paint bled through. -
Seal the Deal:
Once the artwork has cured for at least 24 hours, roll a clear concrete sealer over the entire design. This protects your hard work from tire marks and weathering.
Now you have a professional-grade directional marker that shows exactly where you’re headed.
Car-Themed “Keep Back” Humor Lettering
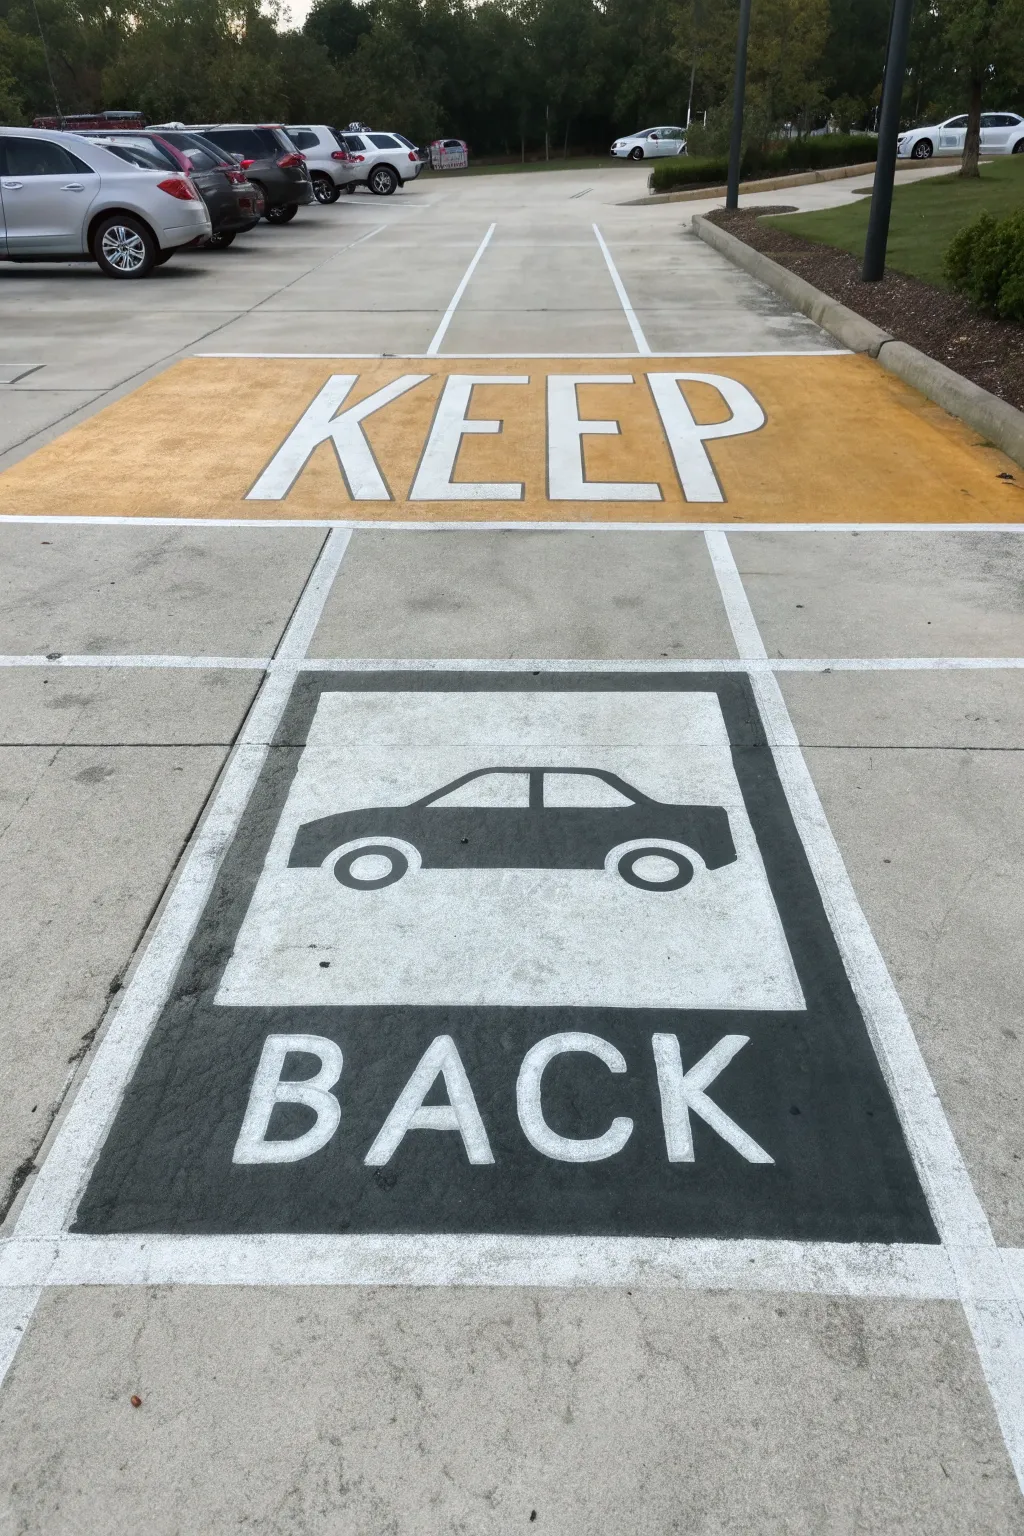
Transform a standard parking spot into a clear, visually striking directive with this bold typography project. Using parking lot-grade paint, you will create a high-contrast yellow zone and a sleek graphical icon that ensures drivers maintain their distance.
How-To Guide
Materials
- High-traffic pavement paint (mustard yellow, black, white)
- Pavement primer (optional, for porous surfaces)
- Painter’s tape (2-inch width)
- Chalk or pavement pencil
- Measuring tape
- Straight edge or long level
- Paint rollers (medium nap) with extension pole
- Small detail brushes
- Cardboard or stencil mylar sheets
- X-Acto knife or box cutter
- Broom or leaf blower
Step 1: Preparation & Layout
-
Clean surface:
Begin by thoroughly sweeping the area to remove all loose gravel, dirt, and debris. If possible, use a leaf blower or pressure washer (allow to fully dry) to ensure the paint adheres properly. -
Measure the yellow zone:
Measure a large rectangular area at the top of the space for the ‘KEEP’ background. Mark the corners with chalk. -
Tape the outline:
Apply painter’s tape along your chalk lines to define the outer edges of the yellow rectangle. Press the tape firmly onto the concrete to prevent bleed-under. -
Measure the black zone:
A few feet below the yellow zone, measure a second distinct rectangle for the car icon and ‘BACK’ text. This box should be narrower and centered relative to the yellow box above. -
Tape the black zone:
Apply painter’s tape for this lower rectangular area. Create a smaller inner rectangle with tape inside the top half of this box; this will frame the car icon.
Sticky Situation
Use duct tape instead of standard blue tape for concrete. Press edges down with a rubber mallet to stop paint from seeping into the pavement’s texture.
Step 2: The KEEP Zone
-
Draft the letters:
Inside the top taped rectangle, use chalk and your straight edge to sketch the large block letters K-E-E-P. Space them evenly, leaving equal margins on the sides. -
Mask the letters:
Apply tape over the chalk outlines of your letters. You are essentially masking off where the white paint will eventually go, or you can paint the background first and stencil later. I prefer painting the yellow background first, so tape off the *outside* of the letter shapes if you are stenciling, or just paint the whole block yellow first if you plan to paint white letters on top (which often covers better). -
Paint the background:
Using a roller, fill the entire top rectangle with the mustard yellow pavement paint. Apply two coats for solid opacity, letting the first tack up before applying the second. -
Reveal and fill letters:
Once the yellow is dry to the touch, remove any masking tape used for spacing. If you painted the whole block yellow, now tape off the negative space around the letters or use a stencil to paint the letters white. Use a smaller brush or mini-roller for control. -
Add dimension:
To match the reference, mix a tiny amount of black into your white to make a light gray. Carefully paint a thin shadow line on the right and bottom edges of each white letter to give them a 3D effect.
Night Mode
Mix a small packet of retro-reflective glass beads into your white and yellow paint immediately before applying. This makes the signage glow under headlights.
Step 3: The Car & BACK Zone
-
Paint the background grid:
For the lower section, paint the thick white border lines first. Use your tape guides to create a white grid structure: one large box, split horizontally. The top half will hold the car icon on a white background; the bottom half will be black. -
Fill the black base:
Paint the bottom half of this lower rectangle solid black. This will serve as the high-contrast background for the word ‘BACK’. -
Create the car stencil:
While base coats dry, draw a simple car silhouette on a piece of cardboard or heavy paper. The shape is a basic sedan profile with wheel wells cut out. Cut this shape out to create a negative stencil. -
Paint the car icon:
Place your stencil in the center of the upper white square. Use a foam roller or stippling brush with heavy dark grey or black paint to fill in the car silhouette. Don’t forget to hand-paint two small circles for tires. -
Letter the word BACK:
On the dry black lower section, sketch the letters B-A-C-K with chalk. Since white on black requires coverage, use a high-opacity pavement paint and a flat brush to hand-letter these characters. -
Detail the wheels:
Once the car body is dry, use white paint to add small circles inside the tires to represent hubcaps, giving the icon a finished look. -
Remove tape:
Carefully peel up all painter’s tape while the final coat is still slightly tacky to ensure crisp lines. pull at a 45-degree angle away from the wet paint.
Allow the entire project to cure for at least 24 hours before driving over it to ensure your bold new signage lasts for years
Retro Arcade Maze “Final Level” Concept
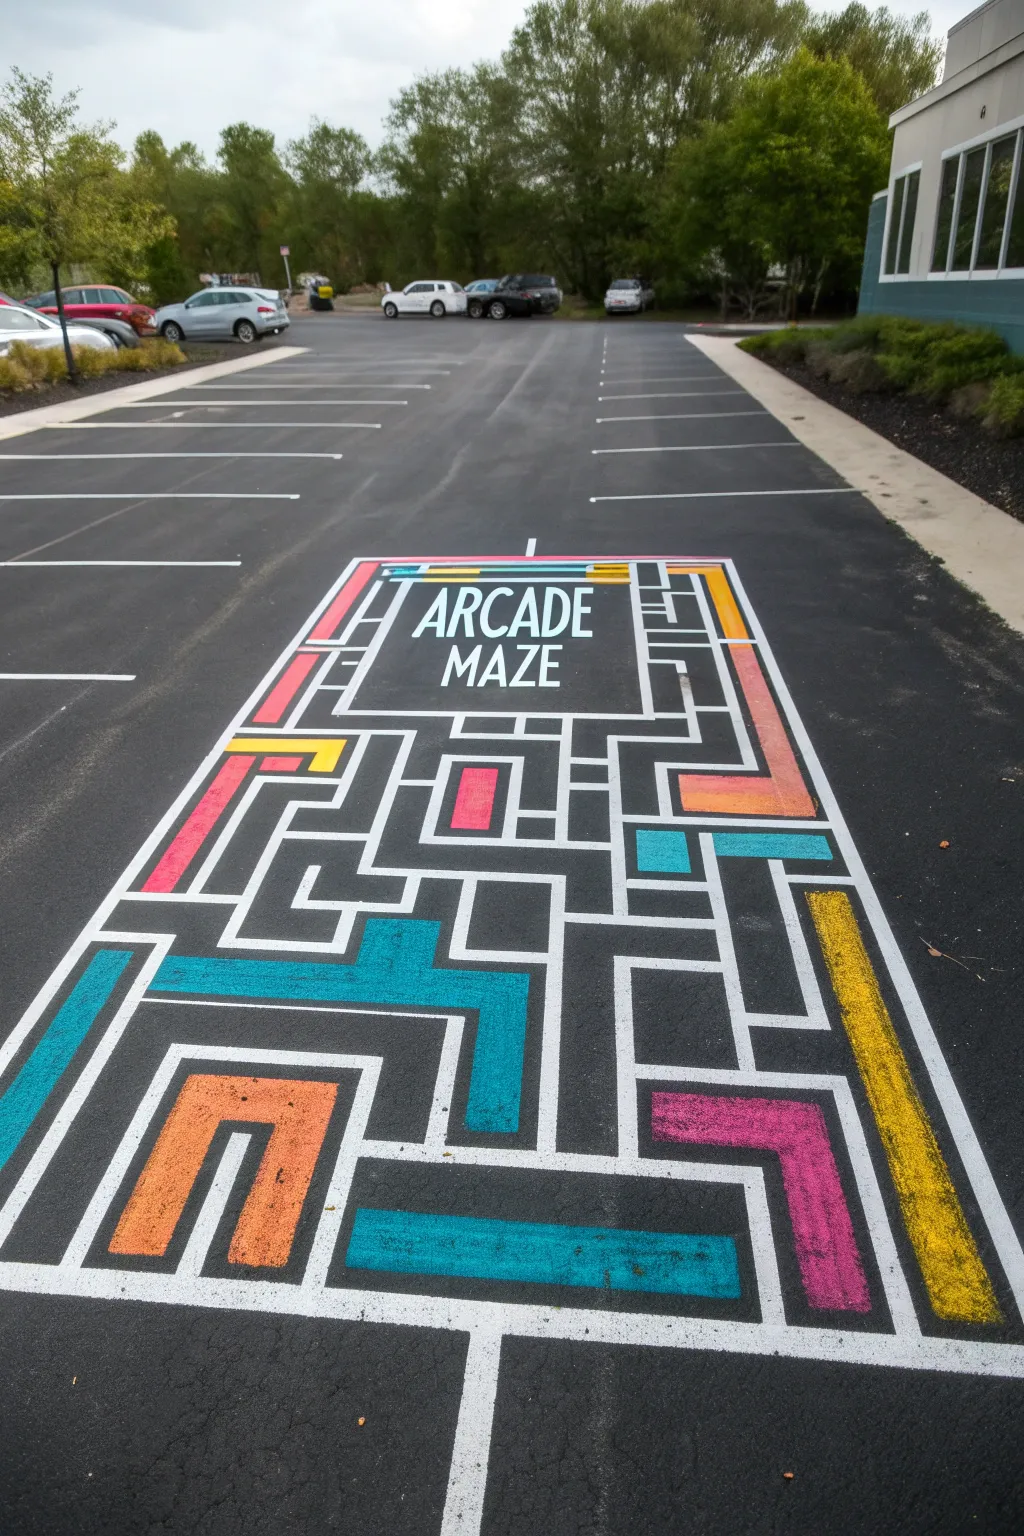
Transform a dull patch of asphalt into an interactive playground with this vibrant, nostalgia-packed arcade maze. Its bold geometric paths and punchy primary colors create an instant eye-catcher that’s as fun to look at as it is to navigate.
Step-by-Step Guide
Materials
- Outdoor pavement paint (white, cyan, magenta, yellow, orange)
- Painter’s tape (2-inch width)
- Blue painter’s tape (1-inch width for details)
- Chalk snap line
- Measuring tape
- Long straightedge or T-square
- Paint rollers (4-inch size)
- Extension pole for rollers
- Large letter stencils (optional)
- Broom or leaf blower
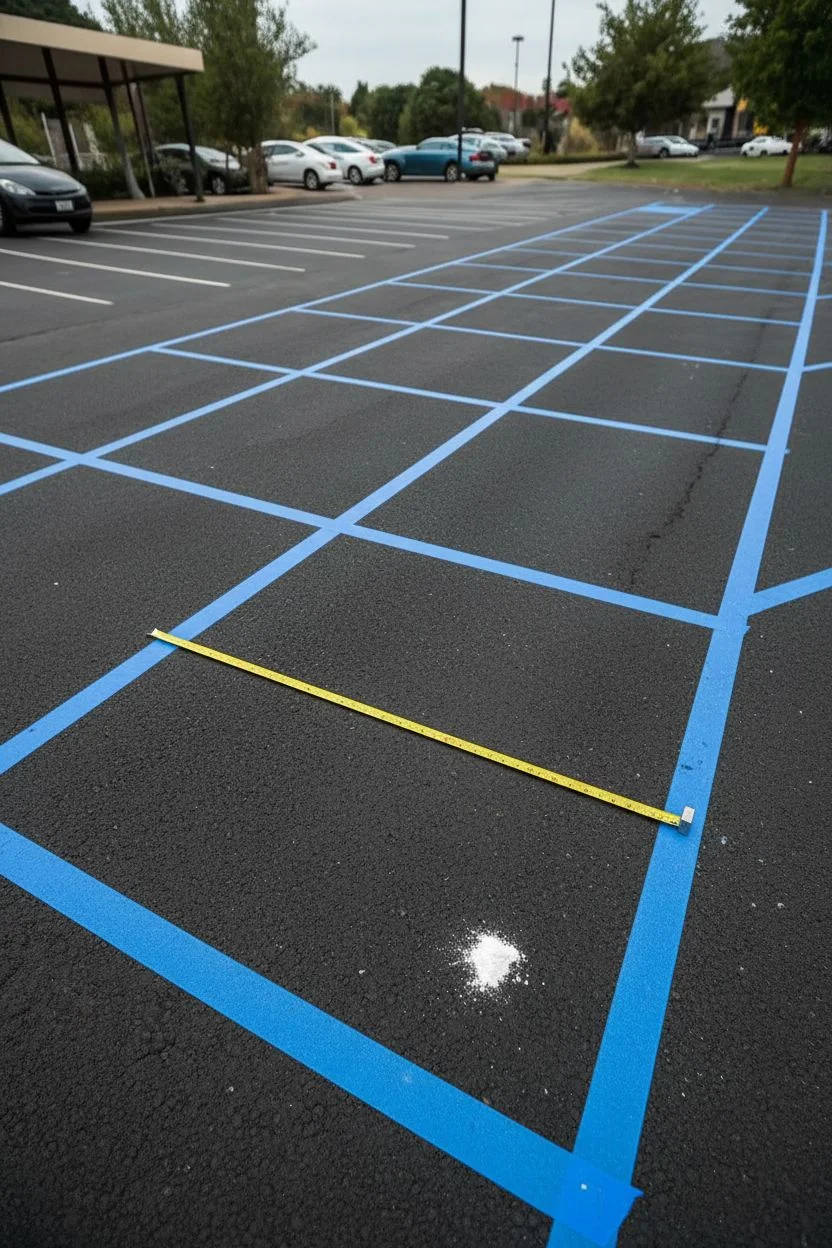
Step 1: Grid Preparation & Layout
-
Clean the canvas:
Before you even think about paint, thoroughly sweep or blow the entire parking space. Dirt and gravel are the enemies of crisp lines, so ensure the asphalt is completely dry and debris-free. -
Establish the perimeter:
Use your measuring tape to define the large rectangular boundary of the maze. Mark the four corners with chalk, ensuring the box is centered within the parking lines. -
Snap the outer lines:
With a friend’s help, run the chalk snap line between your corner marks to create a perfect rectangle on the ground. -
Tape the border:
Lay down 2-inch painter’s tape along the *outside* of your chalk lines. This ensures your paint stays inside the designated rectangle. -
Create the title box:
Measure a smaller rectangle near the top center for the ‘ARCADE MAZE’ text. Tape off this square area so it remains unpainted black asphalt for now.
Grid Game Logic
Use a large piece of graph paper to plan your maze layout beforehand. This saves massive amounts of time compared to improvising the geometry directly on the asphalt.
Step 2: Designing the Labyrinth
-
Draft the paths:
Using light chalk, sketch out your maze paths. Don’t worry about perfection yet; just focus on creating a mix of long straightaways and turning corners that resemble Tetris blocks or retro snake games. -
Refine with tape:
Once you like the layout, use the 1-inch tape to mask off the ‘walls’ of the maze. Remember, the tape represents the black asphalt lines that will separate your colored sections. -
Seal the tape edges:
Walk over all your tape lines, pressing them down largely with your foot or a roller. I find this crucial prevents bleeding on rough asphalt surfaces.
Bleeding Lines?
If paint bleeds under the tape on rough asphalt, don’t panic. Wait for it to dry, then use a stiff brush and black driveway sealer to ‘erase’ the mistake and crisp up the line.
Step 3: Applying Color
-
Paint the white outlines:
Using a 4-inch roller, apply crisp white pavement paint over all the exposed asphalt paths. This acts as a primer for colors and creates the bright white border seen in the design. -
Plan your color blocks:
Decide which sections of the path will be colored. Look for ‘L’ shapes or long rectangles to fill with retro cyan, magenta, and orange, leaving white borders around them. -
Fill in the neon zones:
Carefully paint the chosen sections with your bright colors. You may need two coats here to get that vivid arcade cabinet look against the dark ground. -
Let it cure:
Allow the paint to set for at least 30-60 minutes depending on the temperature. It doesn’t need to be fully cured, just dry to the touch so you don’t smudge it.
Step 4: Final Details
-
Add the typography:
Return to the top black square. Using stencils or freehand painting with a small brush, add the words ‘ARCADE MAZE’ in white. Center the text for a professional title screen vibe. -
The big reveal:
Slowly peel back all the tape. Pull at a 45-degree angle away from the paint to reveal those satisfyingly sharp black lines underneath. -
Touch-ups:
Inspect the edges for any bleed-through. Use a small artist’s brush and a bit of black asphalt paint (or carefully applied black topcoat) to tidy up any messy intersections.
Step back and admire your nostalgic creation as it turns an ordinary parking space into a playfully retro destination
Pop-Art Comic Panels With Speech Bubble Catchphrase
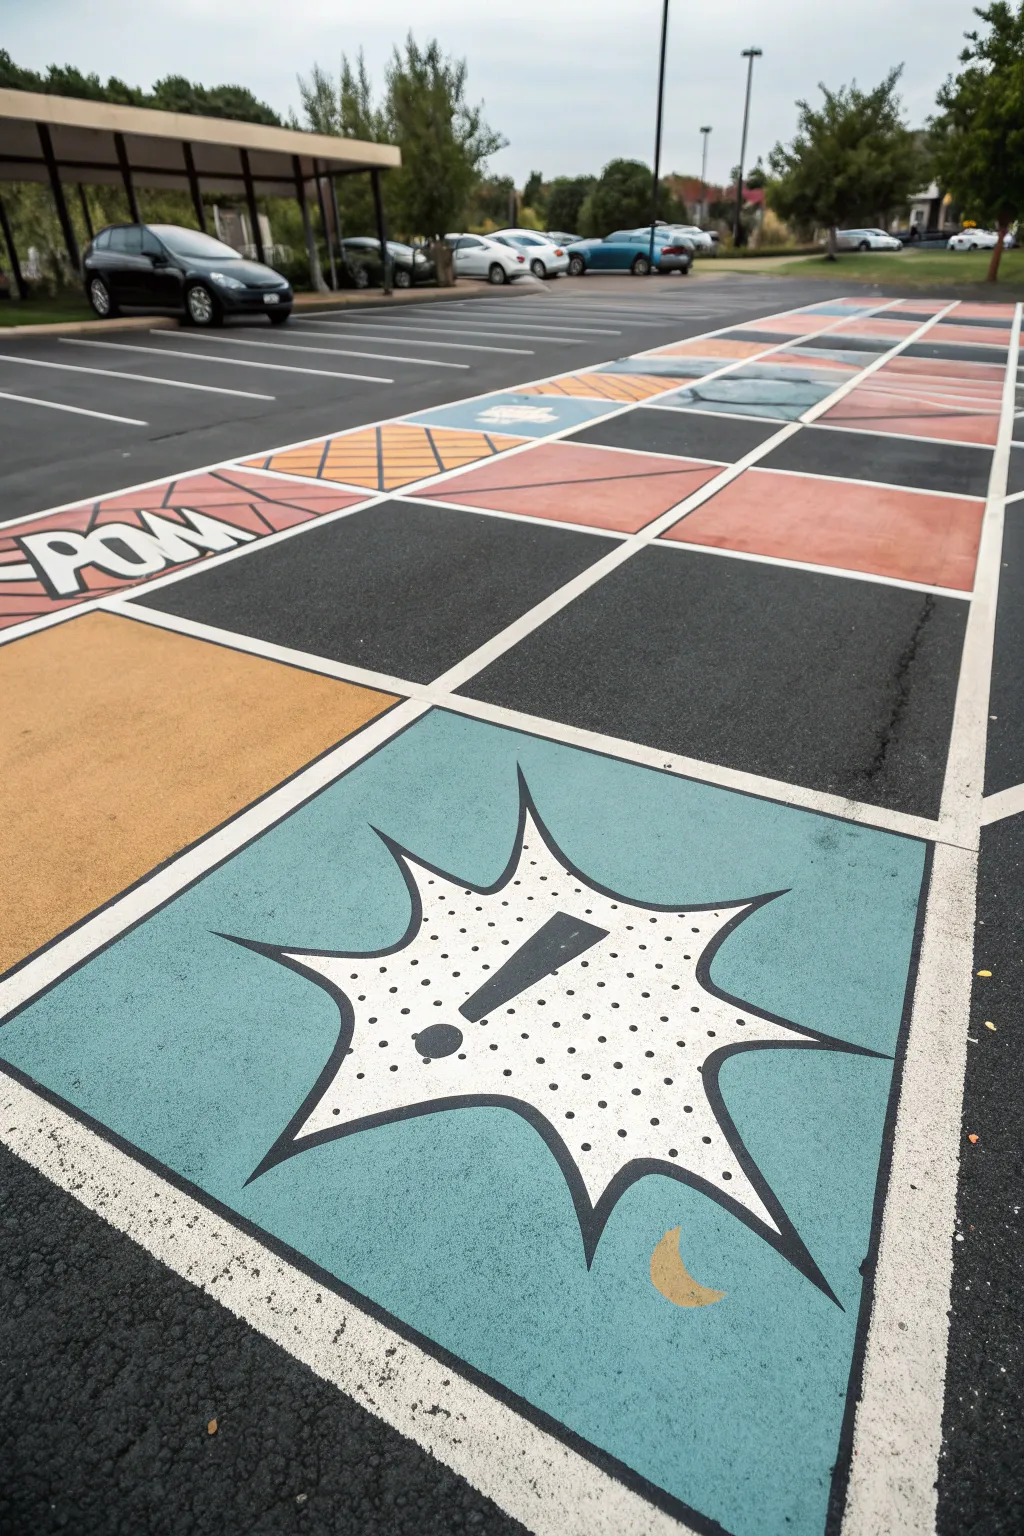
Transform a dull patch of asphalt into a vibrant comic book strip with this bold pop-art design. Featuring classic Roy Lichtenstein-style elements like ben-day dots, jagged speech bubbles, and onomatopoeia, this project turns your parking assignment into a punchy visual statement.
Step-by-Step
Materials
- Outdoor concrete/asphalt paint (Blue, Yellow, Red, Black, White)
- Painter’s tape (2-inch width)
- Chalk or soapstone
- Long straightedge or chalk line tool
- Paint rollers (4-inch size) and extension pole
- Paint tray and liners
- Assorted synthetic brushes (1-inch and 2-inch)
- Circle stencil (or bubble wrap for dot effect)
- Measuring tape
- Power washer or stiff broom
Step 1: Prep & Grid Layout
-
Clean surface:
Begin by thoroughly cleaning the asphalt. Use a power washer to remove oil, dirt, and loose gravel, ensuring the paint will adhere properly. Allow the surface to dry completely for at least 24 hours. -
Measure the grid:
Using your measuring tape and chalk, divide the parking space into equal rectangular sections. This design uses a clear grid system, so measure carefully to get straight lines. -
Snap lines:
Use a chalk line tool or a long straightedge to mark the final grid lines. These will separate your comic panels. -
Tape the grid Borders:
Apply 2-inch painter’s tape along your chalk lines. These taped areas will become the thick white borders between panels later. Press the edges of the tape down firmly with a putty knife or your shoe to prevent paint bleed.
Pro Tip: Dot Perfect
To get perfectly uniform ben-day dots quickly, dip the eraser end of a standard pencil into black paint and stamp it. For larger dots, use a round foam pouncer brush.
Step 2: Blocking Colors
-
Mix base colors:
Stir your outdoor concrete paints thoroughly. You need vibrant primary colors: cyan blue, bright yellow, and comic-book red. -
Paint background panels:
Use a roller to fill in the background colors of each rectangle. Alternate colors for that checkerboard comic feel—blue for the exclamation panel, orange-yellow for the adjacent one. -
Apply second coat:
Asphalt is porous and swallows paint. Apply a second coat once the first is dry to the touch to ensure the colors pop against the dark ground. -
Remove tape:
Carefully peel up the tape while the paint is still slightly tacky to reveal crisp dark lines where the asphalt shows through. We will fill these with white borders later.
Step 3: Graphic Details
-
Sketch the ‘splat’ shape:
In the blue panel, use chalk to sketch a jagged, explosive starburst shape. Make the points sharp and varied in length to create dynamic energy. -
Fill the shape:
Using a smaller brush, carefully outline your chalk sketch with white paint, then fill the interior solid white. It might need two coats for opacity. -
Add ben-day dots:
Mix a light grey or watered-down black. Use a circle stencil or simply dot the paint onto the white ‘splat’ area to mimic the retro printing texture found in old comics. -
Lettering and symbols:
Paint a large, bold black exclamation point in the center of your white burst. Tilt it slightly for added drama. -
Outline in black:
Once the white shape is dry, use a steady hand and a small brush with black paint to outline the entire starburst. Variation in line thickness adds character. -
Create text panels:
For the ‘POW’ panel, sketch block letters that break the frame border. Paint the letters white first, then outline them heavily in black, adding red fill or hash marks for texture.
Troubleshooting: Peeling Paint
If paint peels up with the tape, your paint layers might be too thick or dried too long. Score the edge of the tape with a utility knife before pulling to cut the dried film.
Step 4: Final Borders & Sealing
-
Tape the borders again:
Now that your panels are dry, re-tape the outside edges of your colored rectangles to define the separating grid lines. -
Paint grid lines white:
Paint the gaps between the panels solid white. This mimics the ‘gutter’ space between comic book frames and ties the whole piece together. -
Touch up:
Walk around your work and look for any spots where the rough texture caused skips. Dab in extra paint where needed. -
Optional clear coat:
If you want the mural to last through harsh weather, roll on a coat of concrete sealer. I advise waiting at least 48 hours for the paint to fully cure before sealing.
Step back and admire your heroic work of art that draws the eye from across the lot
Portrait Silhouette With Pattern Fill and Year
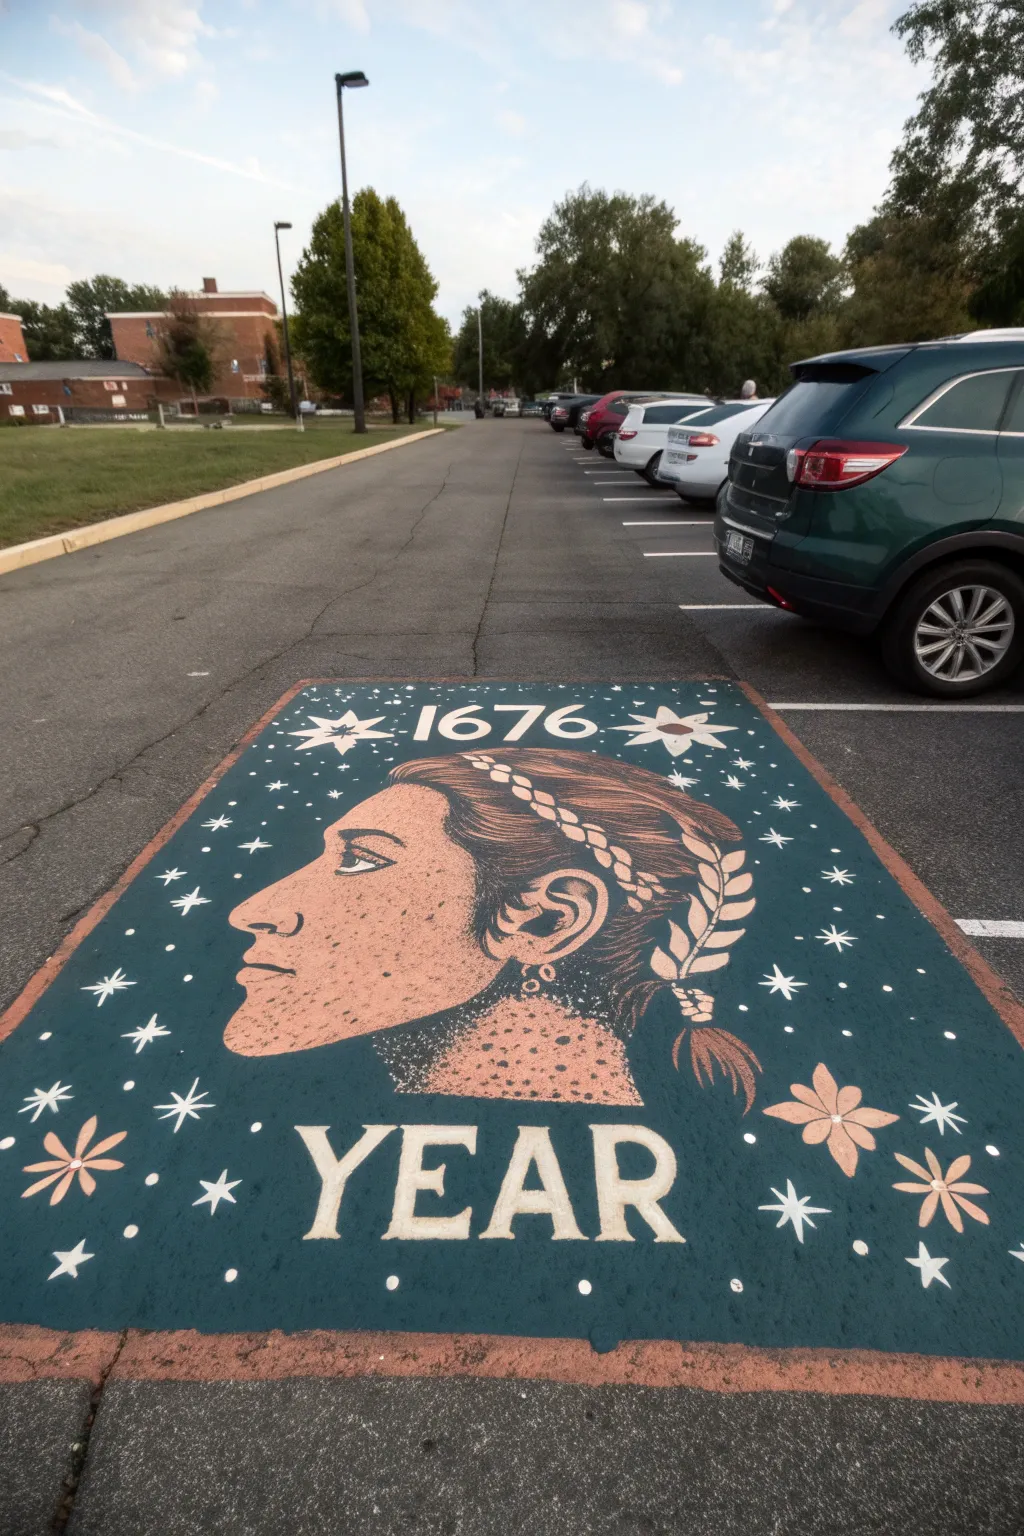
Transform a standard patch of asphalt into a work of art with this striking starry-night portrait design. Featuring a bold profile silhouette, stippled detailing, and elegant typography, this personalized spot combines portraiture with geometric celestial elements.
Detailed Instructions
Materials
- Outdoor concrete/pavement paint (Dark Teal/Forest Green for background)
- Outdoor concrete/pavement paint (Peach/Skin tone, White, Coral/Pink)
- Large paint roller and extension pole
- Paint tray
- Chalk (standard sidewalk chalk and chalk line)
- Painter’s tape or masking tape
- Assorted brushes (2-inch sash brush for edges, medium rounds for details, fine liner for stars)
- Measuring tape
- Reference photo of the profile
- Broom or leaf blower
Step 1: Preparation and Base Coat
-
Clean the surface:
Before putting any paint down, vigorously sweep the entire parking space to remove loose gravel, dirt, and debris. If possible, power wash the spot a day or two in advance so it’s completely dry and clean. -
Tape the borders:
Using painter’s tape, mark off the rectangular boundary of your painting area within the parking lines. Press the tape down firmly to prevent paint bleed. -
Roll the background:
Pour your dark teal outdoor paint into the tray. Use the roller to apply a solid, even coat across the entire taped-off rectangle. Start from the center and work your way out. -
Apply a second coat:
Allow the first layer to dry according to the manufacturer’s instructions (usually 2-4 hours). Apply a second coat to ensure opaque, rich coverage that hides the asphalt texture.
Chalk It Up First
Don’t trust your freehand skills? Draw your entire design in chalk first. If you mess up, just wipe it away with a damp rag and try again before painting.
Step 2: Sketching the Design
-
Grid the space:
Once the base is fully dry, use chalk and a yardstick to lightly draw a grid over the teal background. This will help you keep the proportions of the face and text accurate. -
Outline the profile:
Sketch the large profile of the face in chalk, focusing on the prominent nose, chin, and brow line. Keep the lines light so they are easy to correct. -
Draft the typography:
Measure out spaces at the top and bottom for your text. Sketch ‘1676’ (or your chosen numbers) at the top and ‘YEAR’ (or your name) at the bottom in a bold, serif font style. -
Place the celestial elements:
Mark the positions for the large eight-pointed stars, the smaller twinkling stars, and the flower motifs around the perimeter.
Step 3: Painting the Portrait
-
Block in skin tone:
Using a medium flat brush, fill in the face silhouette with your peach or skin-tone paint. You may need two coats here to cover the dark teal effectively. -
Add facial details:
Switch to a smaller round brush and use black or dark brown paint to outline the eye, eyebrow, nostril, and mouth. I find it easiest to work slowly here to get the expression right. -
Texture the skin:
Create the stippled effect on the cheek and neck by dotting slightly darker or lighter shades of the skin tone. This adds the stylized texture seen in the reference. -
Paint the hair:
Fill in the hair area with dark brown or black. While the paint is wet, use a lighter shade to define the braided headband and the loose ponytail strands.
Anti-Slip Additive
Mix a non-slip additive (like fine sand) into your final coat of paint. Large painted areas can become dangerously slippery when it rains or snows.
Step 4: Finishing Touches
-
Paint the text:
Use a steady hand and a flat 1-inch brush to paint the letters and numbers with white paint. Crisp edges are key here for readability. -
Add the stars:
Paint the various star shapes in white. For the smallest dots, you can dip the handle end of a paintbrush in paint and stamp it onto the surface. -
Detail the flowers:
Paint the flower petals in coral or pink, adding white centers or accents to make them pop against the dark background. -
Clean up borders:
Once everything is touch-dry, carefully peel away the painter’s tape at a 45-degree angle. Touch up any rough edges with a small brush and leftover teal paint.
Enjoy your customized space that showcases both your artistic skill and personal style
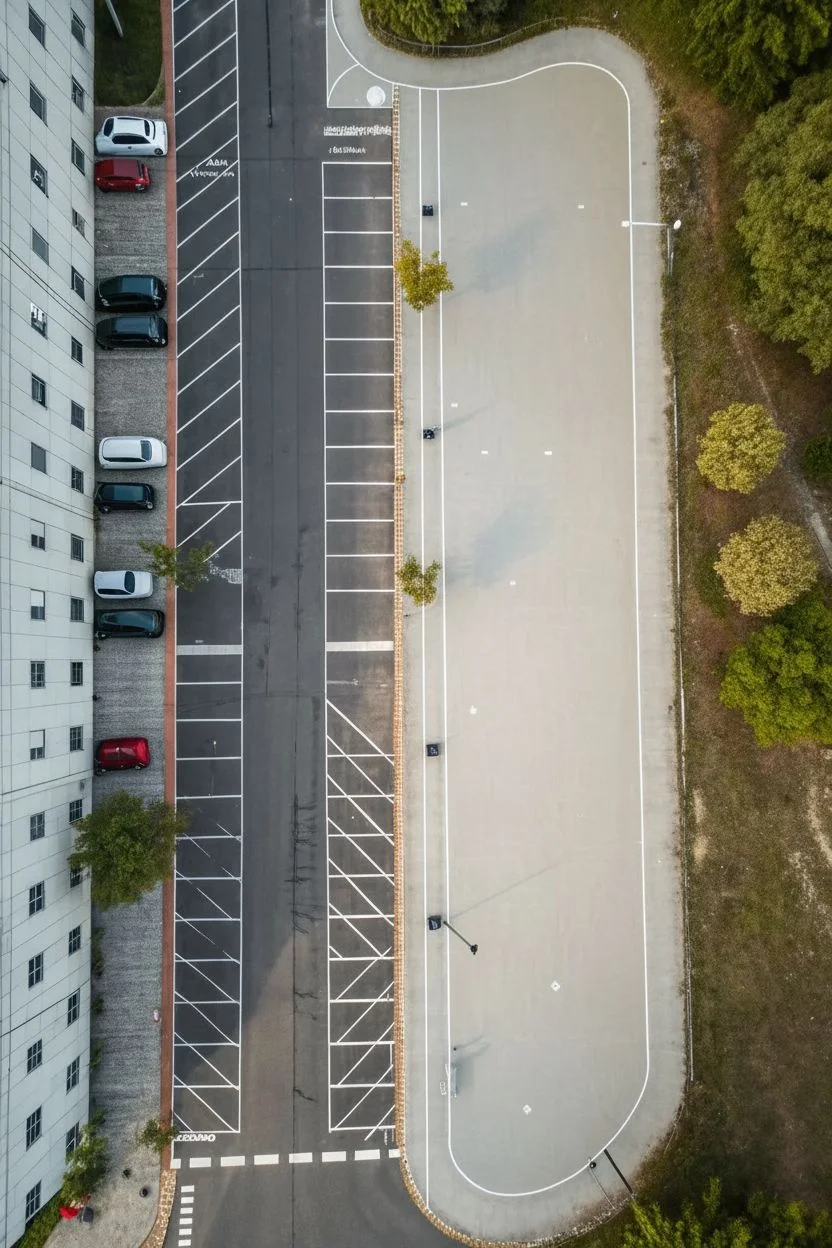
Collaborative Two-Spot Diptych That Connects Across the Line
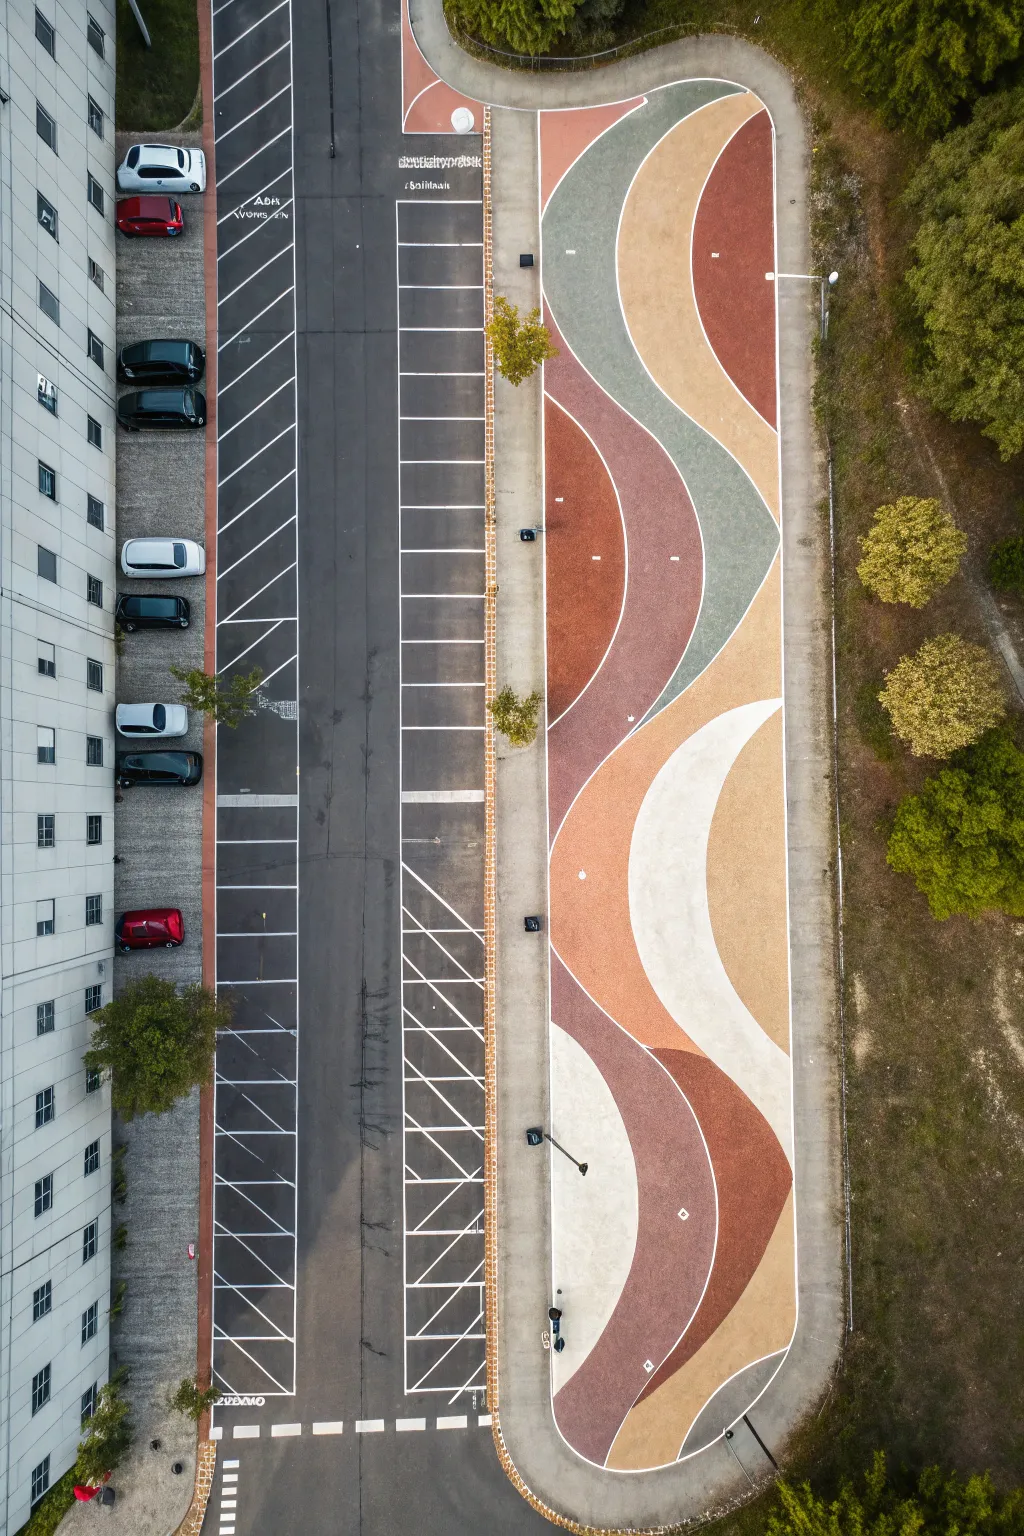
Transform a dull stretch of pavement into a dynamic visual journey with this large-scale abstract mural featuring sweeping curves and a harmonious palette of terracotta, sage, beige, and cream. The design uses organic wave-like shapes to soften the harsh lines of surrounding asphalt, creating a calming pedestrian walkway or decorative border.
Step-by-Step
Materials
- High-traffic exterior concrete/pavement paint (terracotta, sage green, cream, beige, deep mauve)
- Industrial surface primer (for asphalt/concrete)
- Chalk snap line tool
- Long flexible PVC pipes or garden hoses (for drafting curves)
- Sidewalk chalk (white and yellow)
- Pressure washer
- Stiff-bristle broom
- Paint rollers on extension poles (9-inch and 4-inch sizes)
- Paint trays and liners
- Painter’s tape or stencil tape (2-inch width)
- Measuring tape
- Anti-slip additive (e.g., shark grip)
Step 1: Preparation & Grid
-
Clean the substrate:
Begin by thoroughly pressure washing the entire strip of pavement to remove dirt, oil, and loose debris. This step is non-negotiable for adhesion. -
Scrub stubborn spots:
While wet, use a stiff-bristle broom and a degreaser to attack any oil stains or gum residue. Let the surface dry completely, ideally for 24 hours. -
Prime the surface:
Roll out a coat of high-quality concrete or asphalt primer. This seals the porous surface and ensures your colors will pop without soaking in. -
Establish the centerline:
Using your chalk snap line, mark a straight reference line down the distinct center of the walkway to help balance your curves.
Uneven Edges?
If your painted edges look shaky, wait for the paint to fully dry, then apply painter’s tape along the line and do a quick touch-up pass for a razor-sharp finish.
Step 2: Drafting the Design
-
Lay out the guides:
To create those smooth, continuous S-curves, lay down flexible PVC pipes or garden hoses along the walkway. Adjust them until they form the flowing, interlaced wave pattern seen in the reference. -
Trace the curves:
Walk along your hoses or pipes and trace their edge firmly with sidewalk chalk. I prefer White chalk here as it stands out well against the primer. -
Add secondary lines:
Move your guide hoses slightly inward or outward from your first lines to create the parallel bands and inner shapes, essentially ‘echoing’ the first wave. -
Refine the intersections:
Where the colors meet or overlap, use a yardstick or freehand drawing to ensure the transition points are sharp and deliberate, not messy. -
Map the colors:
Label each section with a letter code (e.g., T for Terracotta, S for Sage) directly on the pavement so you don’t paint the wrong color in the wrong zone.
Step 3: Painting
-
Prepare the paint mixture:
Mix your anti-slip additive into your paint cans according to the manufacturer’s ratio. This is crucial for outdoor safety when it rains. -
Outline the shapes:
Start with your lightest color (Cream). Use a 4-inch mini roller or a large brush to carefully cut in the edges along your chalk lines. -
Fill the light sections:
Switch to the roller on an extension pole to fill in the large Cream swoops. Apply two thin coats rather than one thick one for durability. -
Apply the mid-tones:
Move on to the Beige and Sage Green sections. Be careful not to cross over into your still-drying cream sections. -
Add the deep accents:
Paint the Terracotta and Deep Mauve sections last. These darker colors cover well and add the final visual weight to the design. -
Clean the edges:
I usually go back with a small brush to touch up any spots where the rollers might have bumped the wrong section, ensuring clean, crisp lines between colors. -
Seal the deal:
Once the color coats have cured for at least 48 hours, apply a clear concrete sealer to protect against UV fading and tire marks.
Create Flow
Use tent poles or thin fiberglass rods instead of hoses for tighter curves; they bend consistently without kinking, giving you perfect geometric arcs.
Now you have a stunning, durable pathway that turns a generic walk into an artistic experience


Have a question or want to share your own experience? I'd love to hear from you in the comments below!