When you paint as a duo, even the simplest shapes feel extra meaningful because you’re building one story together. These cute couple painting ideas are beginner-friendly, date-night-ready, and packed with little details you can personalize to make them feel like “you two.”
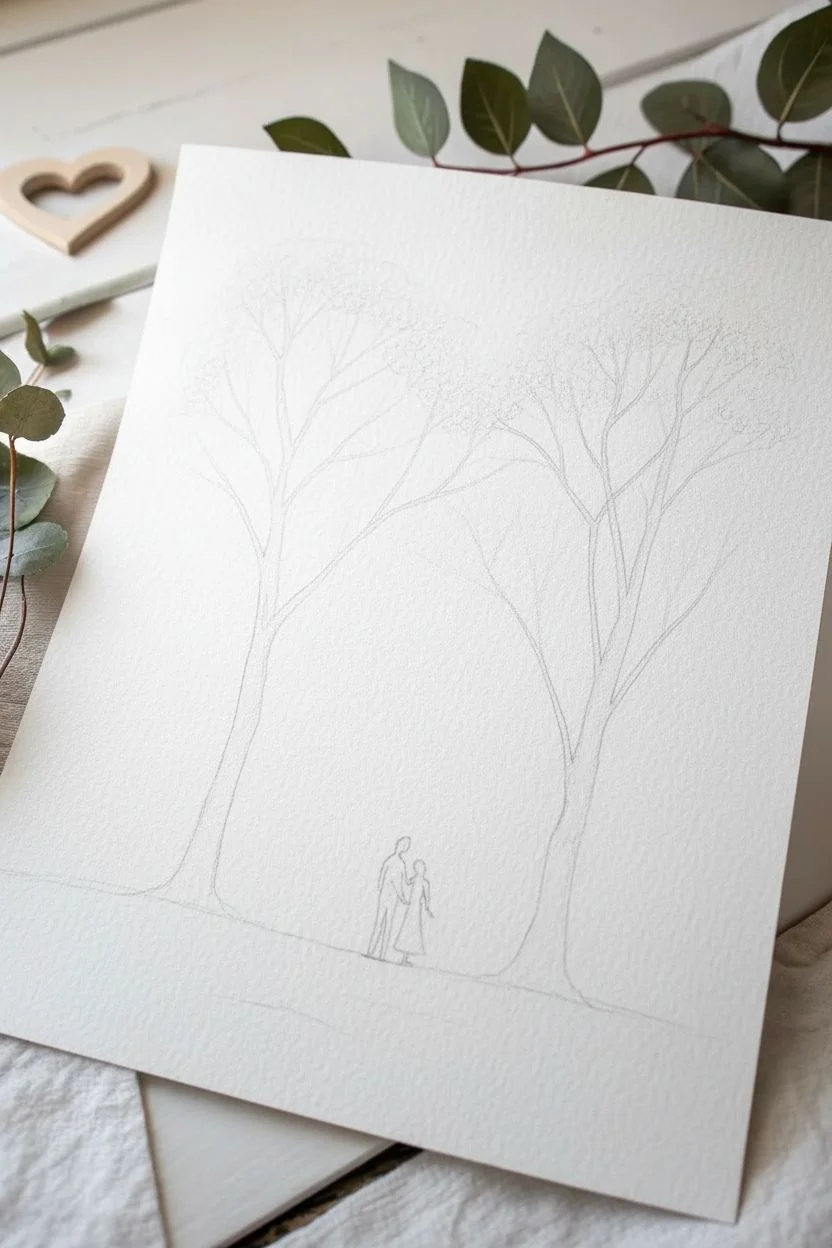
Split-Canvas Sunset Couple Silhouette
Create a unified romantic scene across two separate canvases featuring a vibrant sunset gradient and intimate couple silhouette. This dramatic split-canvas effect brings a modern, gallery-style aesthetic to your home decor while capturing a sweet moment between you and your partner.
Step-by-Step Tutorial
Materials
- Two tall rectangular canvases (e.g., 12×24 or 10×20 inches)
- Acrylic paints (Titanium White, Cadmium Yellow, Orange, Alizarin Crimson, Purple, Ultramarine Blue, Mars Black)
- Large flat wash brush (2-3 inch)
- Medium flat brush
- Small round detail brush (size 1 or 2)
- Pencil
- Painter’s tape or masking tape
- Palette and water cup
- Reference photo of couple (optional)
- Black posca pen or acrylic marker (optional)
Step 1: Setting the Sky Gradient
-
Prepare the Canvases:
Ideally, push the two canvases together side-by-side so they touch. Use painter’s tape on the back to hold them temporarily in place as one single unit; this ensures your horizon lines and gradients flow perfectly across the gap. -
Mix the Base Colors:
Prepare pots of your gradient colors. You will need a strong yellow-orange for the horizon, transitioning into deep orange, pink, lavender, and finally a deep violet-blue for the very top. -
Paint the Top Band:
Start at the top of the canvas with your darkest purple mixture. Use the large flat brush and paint horizontal strokes across both canvases, covering the top 20%. -
Blend Downward:
While the purple is still wet, mix in some pink/crimson on your palette. Apply this below the purple band, brushing back and forth where the colors meet to create a seamless transition. -
Add the Mid-Tones:
Continue working downward, introducing orange into your pink layer. Clean your brush if the colors start getting muddy; you want a vibrant glow, not brown. -
Create the Horizon Glow:
For the bottom section of the sky (just above where the ground will be), use your brightest yellow mixed with plenty of white. Blend this seamlessly upward into the orange layer. -
Paint the Ground:
While the sky dries, use Mars Black to paint the bottom 10-15% of the canvas. Create an uneven, organic line for the grass, sloping slightly if desired to add interest.
Muddy Gradient?
If colors turn brown while blending, stop! Let the layer dry completely, then glaze over it with a thin layer of the intended bright color to restore vibrancy.
Step 2: Painting the Textured Clouds
-
Mix Cloud Colors:
Mix a dusty rose color and a deeper purple-grey. These clouds catch the light from below, so they will be darker than the bright sunset but lighter than the night sky at the top. -
Lay in Cloud Shapes:
Using a medium flat brush, dab in horizontal cloud streaks mostly in the upper half of the painting. Keep the edges soft and fluffy rather than hard lines. -
Highlight the Clouds:
Mix a bright pink-orange. Lightly dry-brush this color onto the *bottom* edges of your purple clouds, simulating the setting sun illuminating them from underneath. -
Separate Canvases:
Once the background is fully dry, carefully remove the tape from the back and separate the canvases slightly. Paint the inner height edges of the canvas to match the gradient so it looks finished from the side.
Step 3: Adding the Silhouette
-
Sketch the Figures:
Lightly sketch the outline of the couple in pencil. Position them so the split between canvases runs directly between their joined hands, emphasizing the connection. -
Fill the Shapes:
Use your small round brush and Mars Black paint to fill in the figures. I prefer doing two thin coats rather than one thick one to ensure the black is completely opaque. -
Refine Edges:
If you struggle with clean lines using a brush, switch to a black acrylic paint marker or Posca pen to sharpen the edges of the clothing and hair. -
Add Ground Texture:
Using a fan brush or an old, splayed bristle brush, tap pure black paint along the top edge of the ground to create the look of tall grass blades overlapping the figures’ legs. -
Include Details:
Don’t forget small details like the tiny dog silhouette in the distance or wisps of hair, which make the silhouette look realistic rather than like a cutout.
Make it Yours
Customize the silhouette to match your reality: add a backpack, a specific hat, or adjust the height difference between the figures to truly represent you.
Now hang your masterpiece with a small gap in between to let the scene bridge the wall space


Two Hands Making a Heart Across Two Canvases
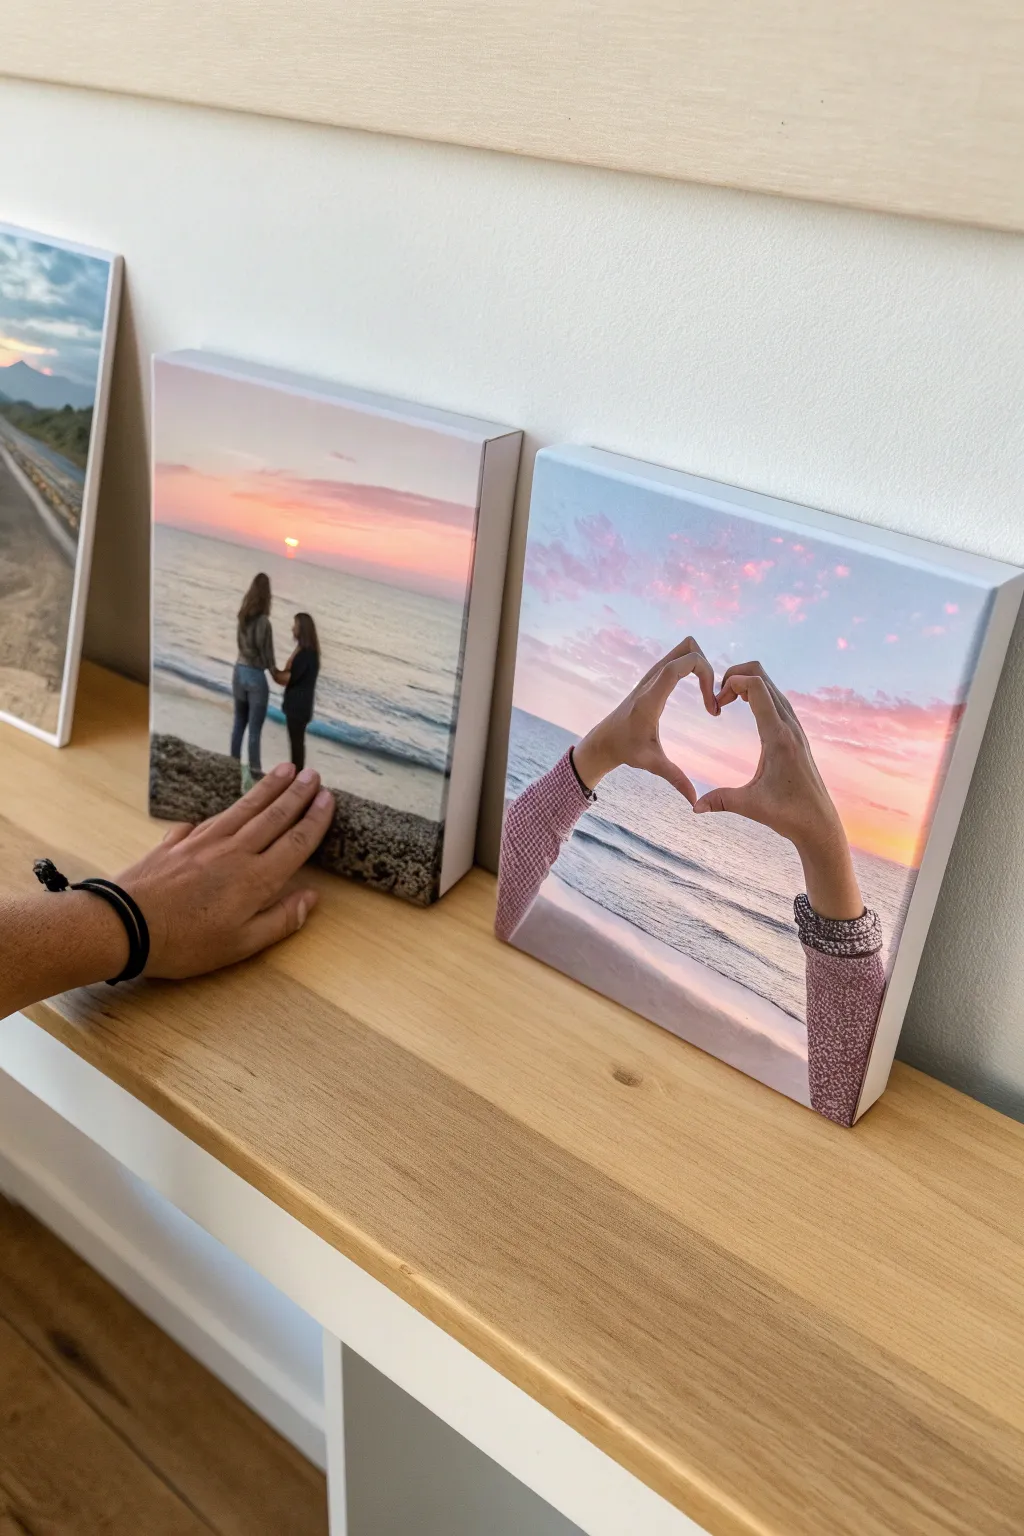
Transform a single romantic photo into a stunning multi-dimensional display by printing your favorite sunset memory across separate canvases. This project creates a modern, gallery-style look that adds depth and storytelling to your relationship milestones.
Detailed Instructions
Materials
- High-resolution digital photo (sunset/beach theme advised)
- Photo editing software (Photoshop, Canva, or similar)
- Two (or three) blank gallery-wrapped canvases (8×8 or 10×10 inches)
- Inkjet printer compatible with canvas sheets OR a professional printing service
- Spray adhesive (if mounting prints yourself)
- Mod Podge or archival varnish (matte or satin finish)
- Foam brush
- X-Acto knife or sharp scissors
- Self-healing cutting mat
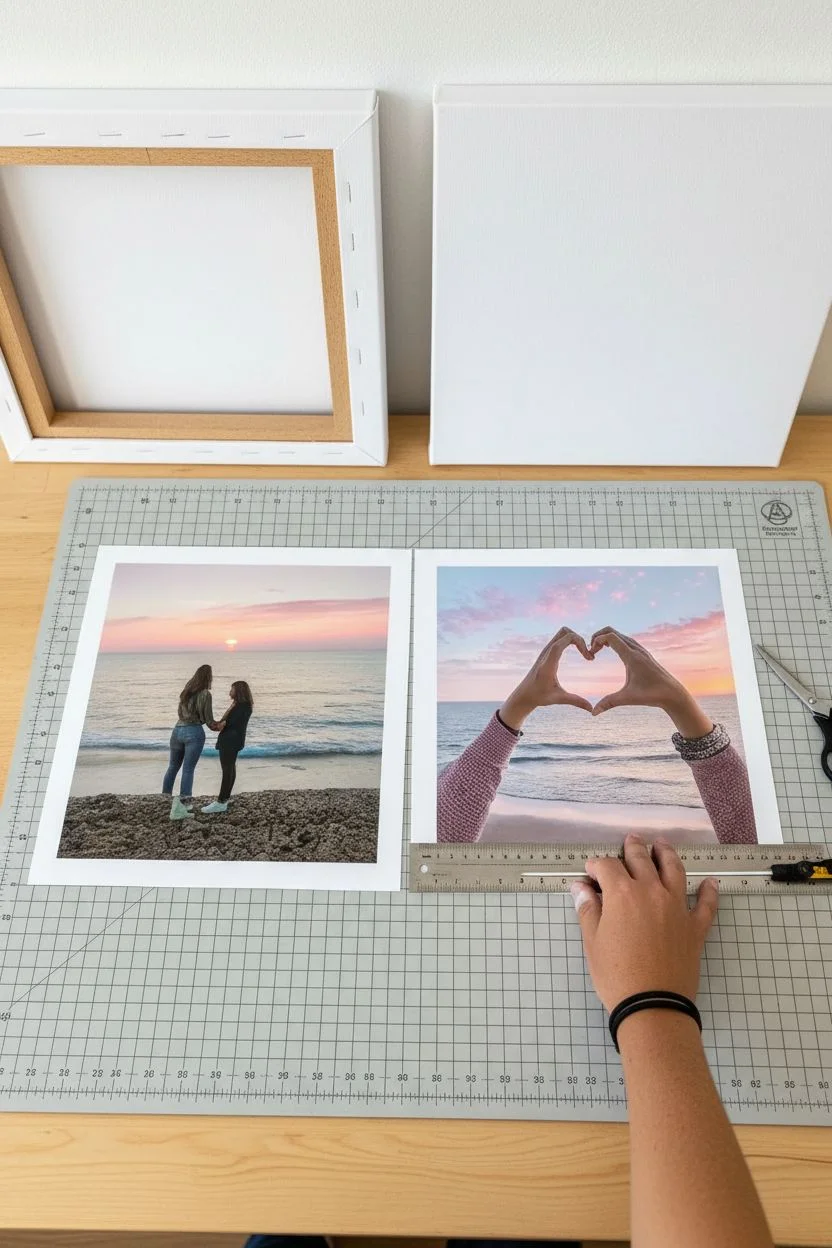
Step 1: Planning the Layout
-
Select the perfect image:
Choose a high-resolution photo where the subject matter (like hands making a heart or a couple walking) is centered or spans wide. A sunset background works beautifully because the gradient colors tie the separate pieces together visually. -
Measure your space:
Decide on the size of your canvases. The example uses square formats, likely 8×8 or 10×10 inches. Ensure your digital image has enough pixels to be printed at this size without becoming grainy. -
Crop and split digitally:
Open your image in editing software. Instead of trying to squeeze one photo onto one canvas, crop your image into two or three distinct square sections. For the heart-hands look, ensure the split doesn’t cut awkwardly through the fingers; keep the main subject on one canvas or perfectly centered. -
Account for the wrap:
If you are wrapping the image around the edges of the canvas (gallery wrap), add 1.5 to 2 inches of ‘bleed’ area to each side of your digital squares. This ensures you don’t lose important details on the sides of the frame.
Step 2: Printing and Transferring
-
Print your segments:
Print your prepared digital squares onto printable canvas sheets using high-quality photo settings. If you don’t have a wide-format printer, ordering giclée prints from a lab is a great alternative. -
Trim the excess:
Using a ruler and an X-Acto knife on a cutting mat, carefully trim any white borders from your printed canvas sheets, leaving only the image area (including your bleed allowance). -
Align the print:
Lay your first blank canvas face up. Center your print over it to check alignment. The specific section of the horizon line should be straight. -
Apply adhesive:
In a well-ventilated area, spray a generous, even coat of spray adhesive onto the surface of the blank canvas. I prefer to spray the back of the print as well for an extra-strong bond. -
Mount the image:
Carefully place the print onto the canvas face, smoothing it from the center outward to push out any air bubbles. Use a clean, soft cloth to press it down firmly.
Seamless Horizons
When cropping, don’t just slice the image. Slightly duplicate the edge content where the split happens (about 0.25 inch) so the image flows naturally across the gap when hung.
Step 3: Wrapping and Finishing
-
Prepare the corners:
Flip the canvas over. To create neat corners, cut small notches out of the excess canvas material at each corner point, allowing for a tight fold without bulk. -
Wrap the edges:
Apply adhesive to the wooden frame sides. Pull the canvas material tight and wrap it around the edge, securing it to the back frame. Use a staple gun on the back for a permanent hold if the adhesive isn’t gripping instantly. -
Repeat for the set:
Repeat the mounting and wrapping process for your second (and third) canvas. Ensure the horizon lines would match up perfectly if the canvases were placed side-by-side. -
Seal the surface:
Dip a foam brush into Mod Podge or clear acrylic varnish. Apply a thin, even layer over the front and sides of each canvas. This protects the ink from UV fading and dust. -
Create texture (optional):
For a painted look, you can use the varnish to create brushstrokes that follow the lines of the sunset or the hands. Let this dry completely for 24 hours. -
Display :
Arrange your finished canvases on a wooden shelf or mount them on the wall. Leave about 1-2 inches of space between them to create that cohesive gallery window effect.
Glow Up
Mix a tiny amount of iridescent medium into your final varnish coat. Apply it only over the sun or water highlights to make the sunset shimmer when the light hits it.
Now you have a professional-looking photo series that beautifully captures your special moment


Lovebirds on a Branch With Soft Sky Washes
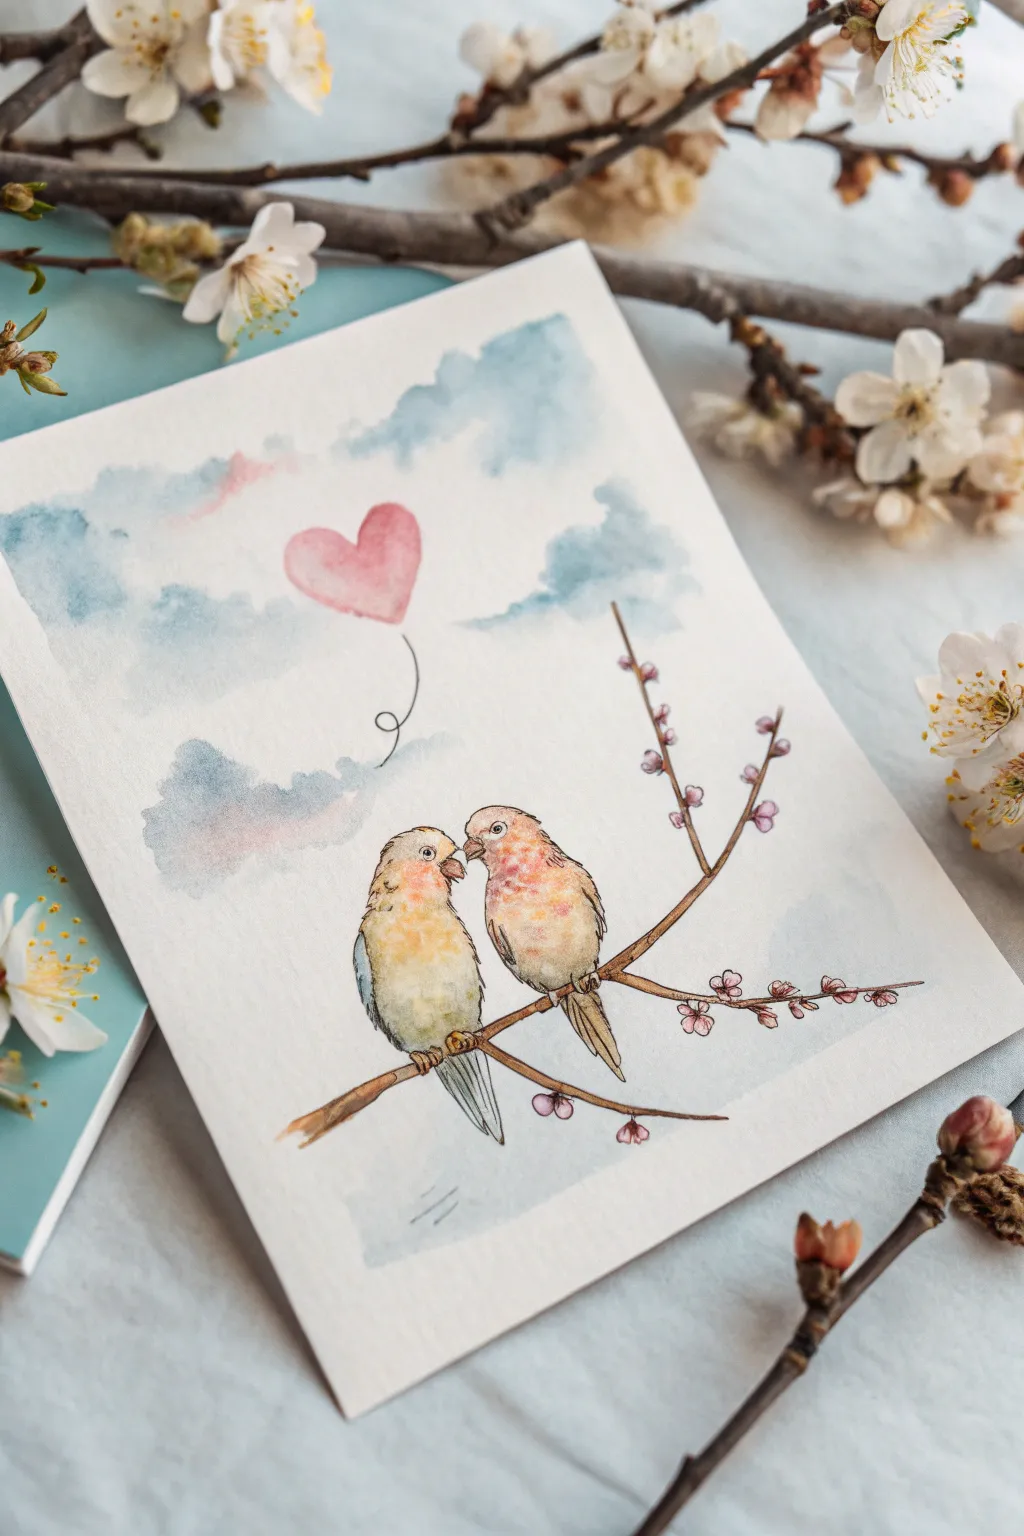
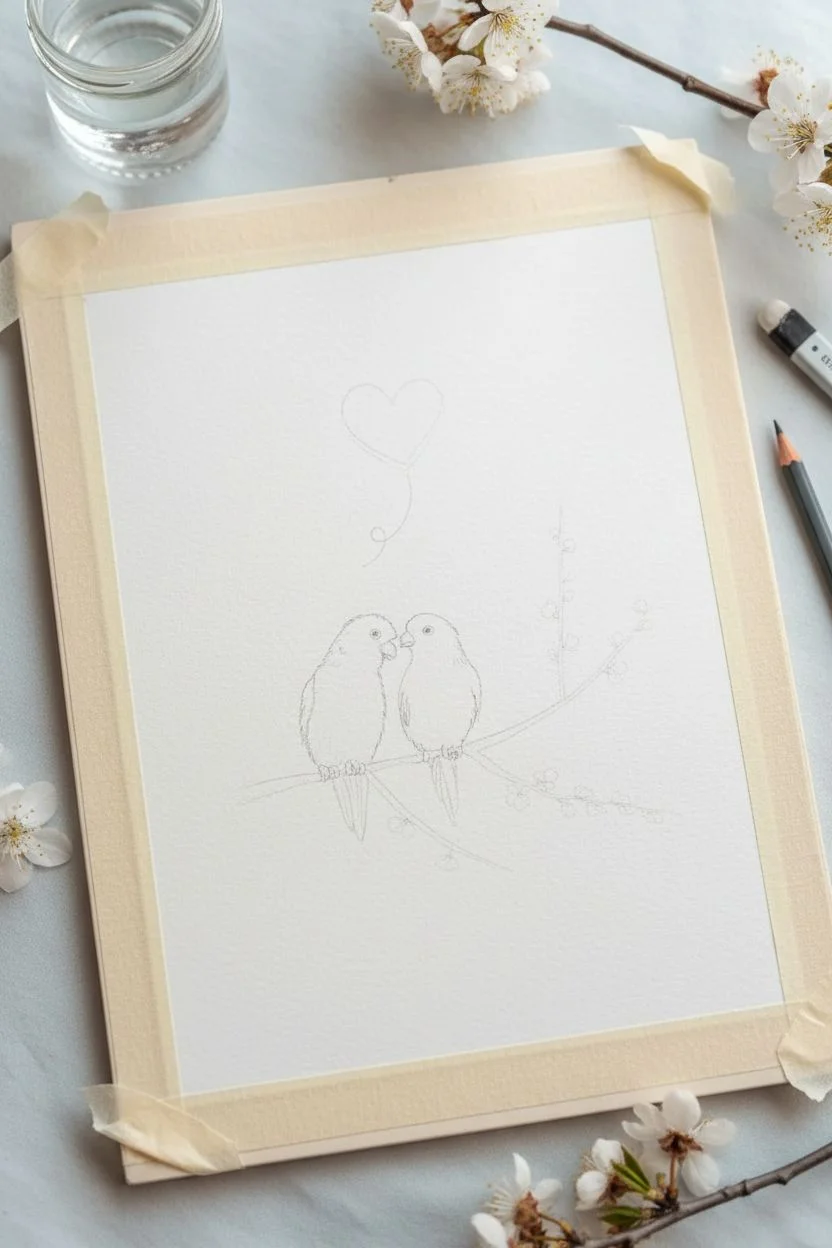
This whimsical watercolor project uses soft wet-on-wet washes to create a dreamy sky background for a charming pair of lovebirds perched together. It pairs delicate ink linework with loose, warm tones to capture a sweet, romantic moment perfect for a greeting card or small wall art.
Step-by-Step
Materials
- Cold press watercolor paper (300 gsm)
- Watercolor paints (Cerulean Blue, Rose Madder/Pink, Yellow Ochre, Burnt Sienna, Payne’s Gray)
- Fine liner pen (waterproof, brown or sepia, 0.1mm and 0.3mm)
- Round watercolor brushes (Size 2, 4, and 8)
- Masking tape
- Pencil and eraser
- Jar of clean water
- Paper towels
Step 1: Sketching and Preparation
-
Secure the paper:
Tape down your watercolor paper to a hard board on all four sides. This prevents buckling when we add the water for the sky washes later. -
Outline the birds:
Using a light pencil touch, sketch two small oval shapes touching each other in the center lower third of the paper. Add small circles for heads; notice the left bird faces right and the right bird faces left, almost touching beaks. -
Add the branch:
Draw a diagonal line sloping upwards from left to right for the main branch beneath their feet. Add a few smaller twigs branching off to the right side, and sketch tiny circles for future flower buds. -
Include the floating heart:
Sketch a simple heart shape floating high above the birds, slightly to the left of center. Draw a loose, curly string connecting the heart down toward the birds, but let it fade out in the middle.
Muddy Clouds?
If your pink and blue sky mixes turn purple or gray, wait for the blue layer to dry completely before adding a glaze of pink on top, rather than mixing them wet-on-wet.
Step 2: Painting the Sky & Heart
-
Wet the sky area:
With your size 8 brush and clean water, dampen the sky area around the birds and heart. Avoid wetting the shapes you just drew so they stay white for now. -
Create soft clouds:
Drop diluted Cerulean Blue into the wet paper to form cloud shapes. Leave random patches of white paper untouched to act as the highlights of the clouds. -
Add sunset touches:
While the blue is still damp, touch in tiny amounts of very watery pink near the bottom edges of the clouds for a soft sunset glow. Let the colors bleed slightly. -
Paint the heart balloon:
Once the sky is dry or if you are careful not to touch the wet blue, paint the heart with Rose Madder. Keep the left side lighter (more water) and the right side saturated to give it dimension. -
Dry completely:
Allow the entire background to dry completely before moving on to the birds. If the paper feels cool to the touch, it’s still wet.
Step 3: Birds and Details
-
Base coat for the birds:
Mix a watery Yellow Ochre. Paint the body of the left bird, starting light on the chest. For the right bird, use a mix of diluted Rose Madder and Yellow Ochre for a peachier tone. -
Add feathery texture:
While the bodies are damp but not soaking, drop in slightly darker pigment (Burnt Sienna or concentrated pink) on the wing areas and the tops of their heads to suggest texture. -
Paint the wings:
Use a mix of Payne’s Gray and Blue for the wing of the left bird and the tail feathers. Keep strokes loose and directional, following the shape of the wing. -
Color the branch:
Paint the branch with Burnt Sienna. I usually vary the pressure on the brush here to make the branch look natural and uneven—thick in some spots, thin in others. -
Flower buds:
Dab tiny dots of pink onto the small circles on the branch tips you sketched earlier to create the cherry blossoms. -
Inking the outlines:
Once the paint is bone dry, use your fine sepia pen to outline the birds. Use broken, sketchy lines rather than one solid contour to mimic fluffy feathers. -
Facial features:
carefully draw the beaks and eyes with the fine pen. Add a tiny white highlight in the eyes (or avoid inking a tiny spec) to bring them to life. -
Scale texture:
Add tiny etched lines on their feet where they grip the branch to suggest texture. -
Final string detail:
Trace the curly string line from the heart balloon with the pen, keeping the line incredibly thin and delicate.
Add Some Shimmer
Mix a tiny amount of metallic gold watercolor into the heart balloon or the wing feathers for a subtle sparkle that catches the light.
Peel off your masking tape carefully to reveal the crisp white border that frames your affectionate avian pair


Moonlight Dance Silhouette for Two
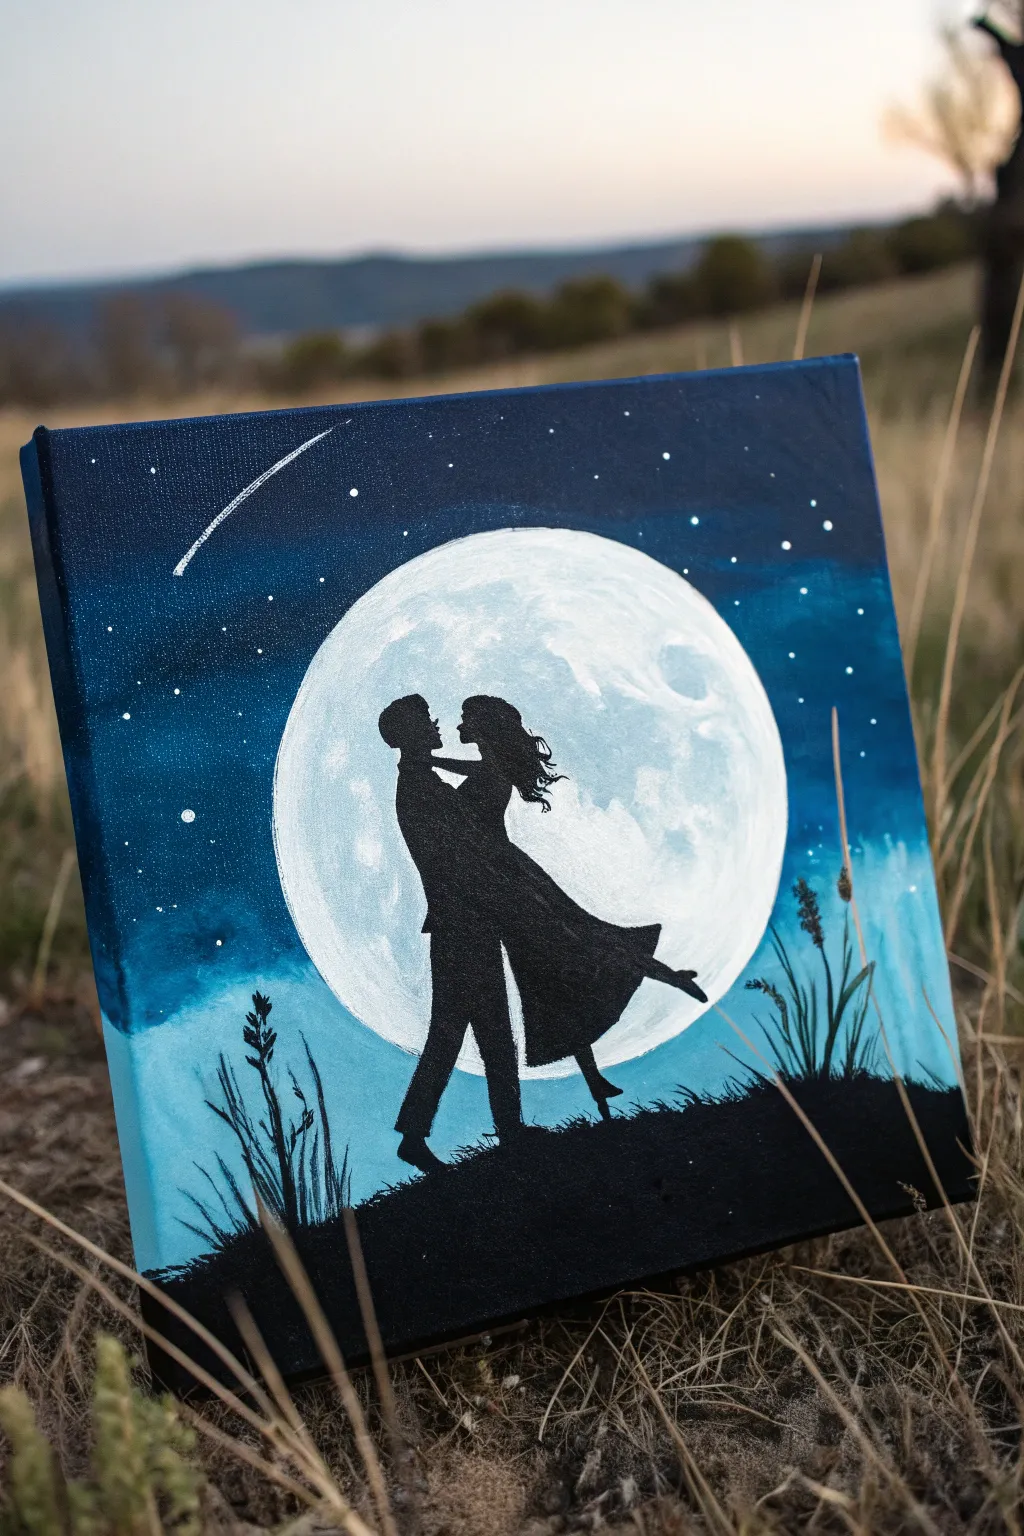
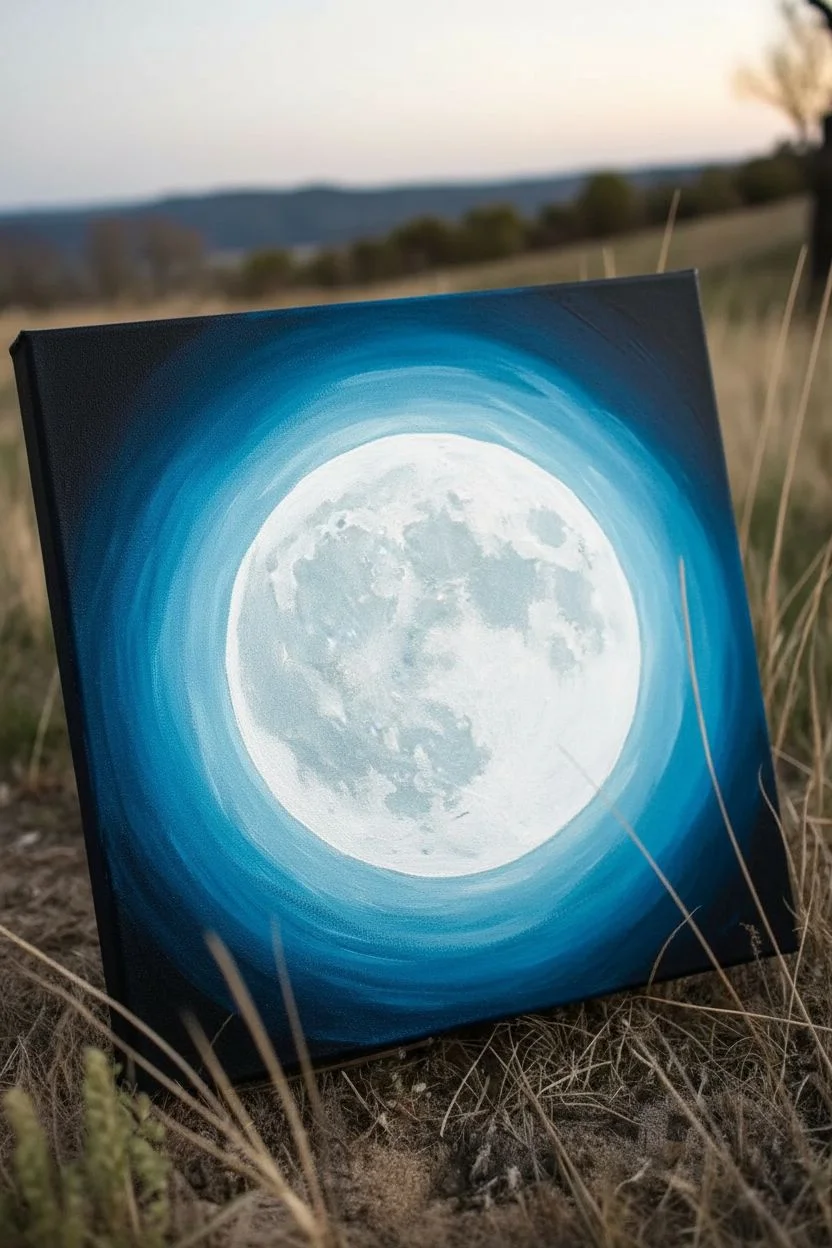
Capture the romance of a moonlit night with this striking silhouette painting that plays with light and shadow. The contrast between the brilliant white moon and the inky black figures creates a dramatic, eye-catching scene that is surprisingly simple to achieve.
Detailed Instructions
Materials
- Square stretched canvas (approx. 10×10 or 12×12 inches)
- Acrylic paints: Titanium White, Phthalo Blue (or Prussian Blue), Mars Black
- Large flat brush (1 inch)
- Medium round brush
- Small liner or detail brush
- Paper plate or bowl (for tracing the moon)
- Pencil
- Palette
- Cup of water and paper towels
- Old toothbrush (optional for stars)
Step 1: Setting the Scene
-
Outline the moon:
Place a paper plate, bowl, or large circular lid in the center of your canvas. Using a pencil, lightly trace around it to create a perfect circle for your moon. -
Paint the moon base:
Fill in the circle with a smooth coat of Titanium White. It doesn’t need to be perfectly opaque yet, as we will add texture later, but ensure the edges are crisp. -
Prepare the night sky color:
On your palette, load up a generous amount of Phthalo Blue. Since we want a gradient effect, you’ll work from the outside edges inward toward the moon. -
Paint the dark edges:
Using the large flat brush, apply the deep blue paint to the corners and outer edges of the canvas. Don’t forget to paint the sides of the canvas as well for a finished look. -
Create the atmospheric glow:
As you move closer to the white moon circle, mix a tiny bit of white into your blue paint stroke by stroke. This creates a lighter blue halo effect immediately surrounding the moon. -
Blend the sky:
While the paint is still wet, use long, smooth strokes to blend the dark blue edges into the lighter blue center. Be careful not to paint over your white moon circle. -
Moon texture:
Once the white base is dry, mix a very pale grey (mostly white with a speck of black). Dab your brush lightly inside the moon to create soft clouds and craters, keeping the texture subtle.
Step 2: Adding the Stars
-
Prepare splatter paint:
Dilute a small amount of white paint with water until it has an ink-like consistency. -
Create the starfield:
Dip an old toothbrush or stiff brush into the watery white paint. Use your thumb to flick the bristles, spraying tiny specs across the dark blue areas of the sky. -
Add a shooting star:
With your fine liner brush and pure white paint, drag a quick, thin line across one corner. Start with a tiny dot and pull the tail out so it fades into a whisper. -
Brightest stars:
Use the detail brush to manually place a few larger, distinct dots for the brightest stars in the constellation.
Sharpen Your Edges
If your black silhouette looks messy against the moon, wait for it to dry completely. Then, use white paint on a detail brush to ‘erase’ and reshape the edges from the outside.
Step 3: Painting the Silhouette
-
Draft the couple:
Wait until the background is 100% dry. Lightly sketch the outline of the dancing couple inside the moon circle using your pencil. Focus on the pose—one leg lifted slightly creates motion. -
Fill in the figures:
Using Mars Black and your medium round brush, carefully fill in the couple’s silhouette. Use a steady hand near the edges to keep the profile sharp against the white moon. -
Refine the details:
Switch to your smallest liner brush to paint delicate features like the nose profiles, flowing hair, and fingers. Sharp points here make the silhouette readable. -
Ground the scene:
Paint a gentle, sloping hill of black across the bottom of the canvas, covering the couple’s feet so they look firmly planted on the ground. -
Paint foreground grass:
Using the liner brush, flick upward strokes from the black hill to create tall blades of grass. -
Add nature details:
Top a few grass blades with small dots or thicker clusters to resemble wild wheat or seed heads.
Messy Star Splatter?
If you accidentally splattered stars onto your black silhouette area or the moon where you didn’t want them, simply wipe them away immediately with a damp Q-tip.
Hang this romantic piece on your wall and enjoy the eternal dance under the stars
BRUSH GUIDE
The Right Brush for Every Stroke
From clean lines to bold texture — master brush choice, stroke control, and essential techniques.
Explore the Full Guide
Bench Cuddle Scene With Tiny Floating Hearts
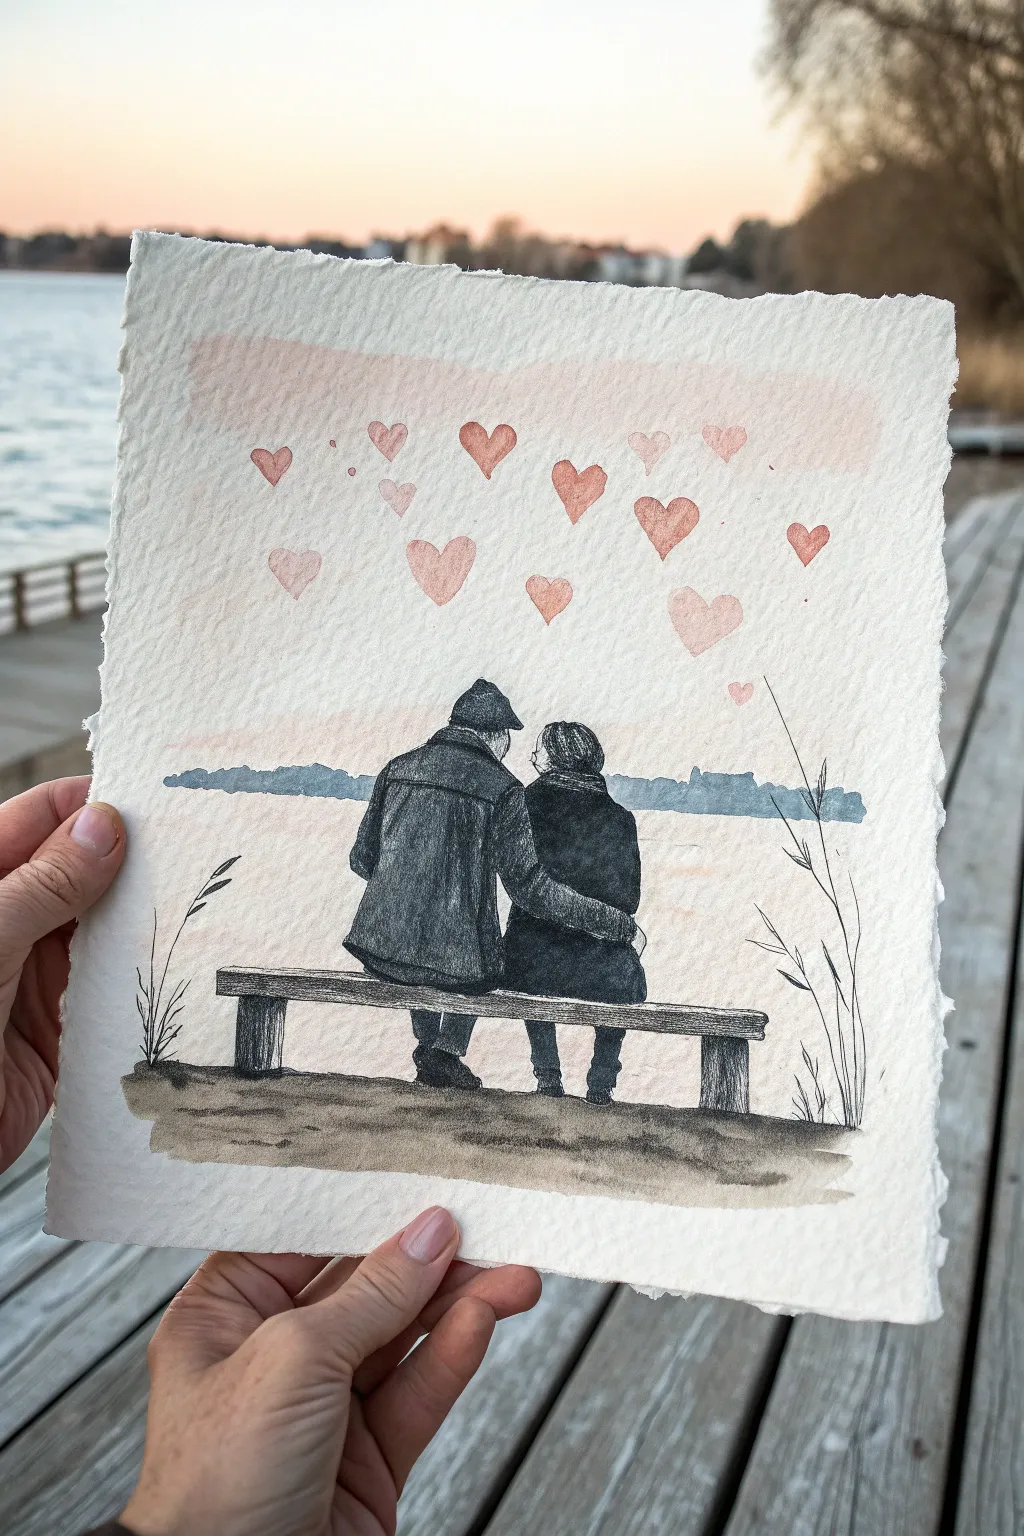
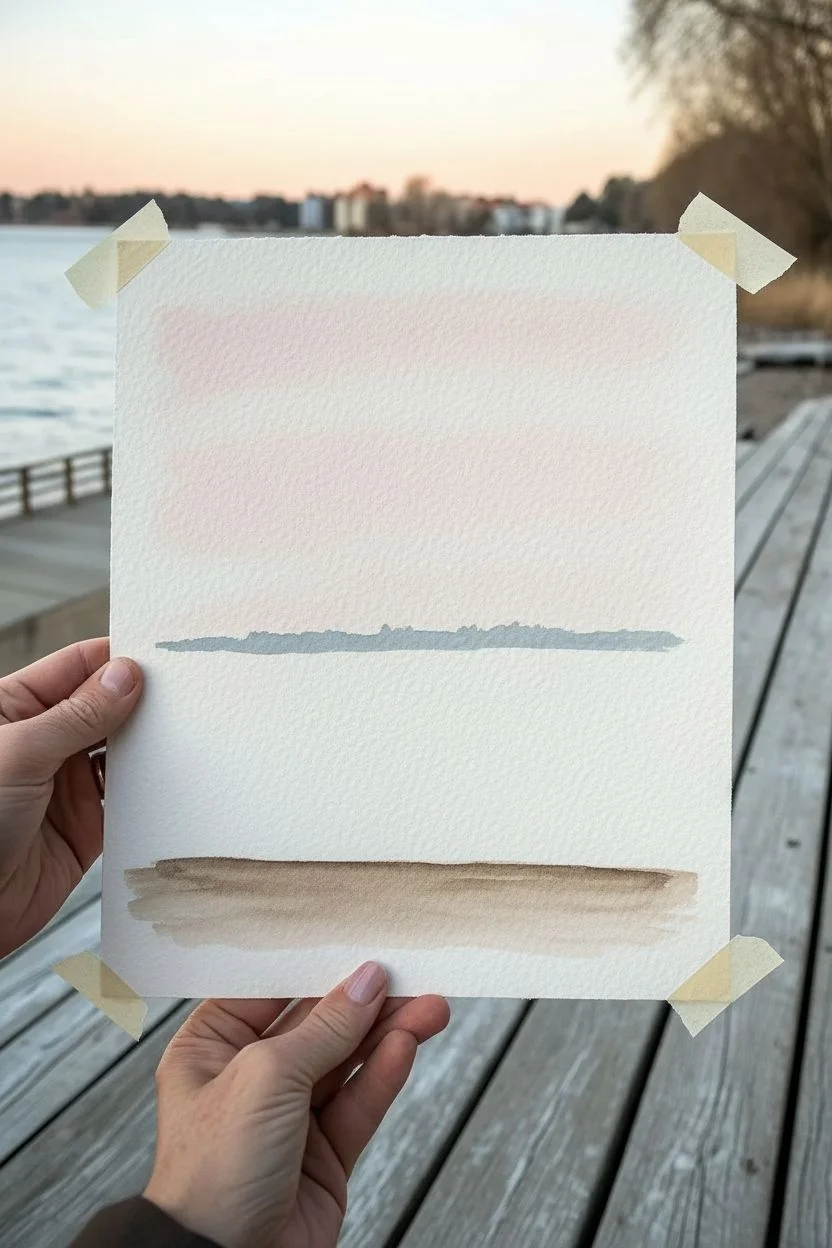
Capture a tender moment of togetherness with this charming mixed-media piece featuring a couple on a bench beneath a sky filled with floating hearts. The rough-edged paper adds a beautiful, rustic texture that complements the soft watercolor washes and detailed pencil sketch.
Step-by-Step Guide
Materials
- Heavyweight cold-press watercolor paper (300gsm) with deckled edges
- Watercolor paint set (pinks, muted blue-grey, brown)
- Black ink pen or fine liner (waterproof)
- Charcoal pencils or soft graphite pencils (2B-6B)
- Round watercolor brushes (size 4 and 8)
- Pencil for initial sketch
- Kneaded eraser
- Paper towels
- Clean water
Step 1: Setting the Scene
-
Paper Preparation:
If your paper doesn’t already have deckled edges, you can tear the edges carefully against a ruler to create that rustic, torn look. Tape your paper down to a board to prevent buckling. -
Sky Wash:
Mix a very dilute, pale pink wash. Using a large round brush, wet the upper third of the paper with clean water first, then drop in the pink paint loosely to create a soft, sunset-like background. -
Distant Horizon:
While the sky dries, mix a muted blue-grey color. Paint a thin, uneven organic strip across the middle of the page to represent the distant shoreline or treeline across the water. -
Ground Layer:
For the ground beneath the bench, mix a watery brown or sepia tone. Painting horizontally, create layers of ground at the bottom, letting the paint fade out naturally at the edges.
Step 2: Sketching the Figures
-
Positioning the Bench:
Once the paint is completely dry, use a light pencil to sketch the basic outline of the wooden bench. Place it centrally, overlapping the horizon line slightly. -
Outlining the Couple:
Lightly sketch the two figures sitting side-by-side. Focus on the big shapes first—the curve of the shoulders and the way the bodies lean into each other. -
Refining the Details:
Draw the details of their clothing, like the collar of the coat and the beanie hat on the left figure, and the scarf on the right figure. Sketch the arm wrapped around the partner’s back.
Edge Control
To get perfect deckled edges without buying expensive paper, run a wet paintbrush along the edge you want to tear, wait 30 seconds, and pull slowly.
Step 3: Adding Depth and Texture
-
Darkening the Figures:
Switch to your charcoal or soft graphite pencil. Begin shading the coats, pressing firmly to get deep, dark values. I prefer a textured stroke here to mimic fabric like wool. -
Creating Contrast:
Make the figure on the left slightly lighter grey and the figure on the right a deeper black to help differentiate them visually where they overlap. -
Bench Texture:
Use the charcoal pencil to draw vertical wood grain lines on the bench legs and horizontal strokes for the seat. Leave small gaps of white paper to suggest highlights on the wood. -
Ground Shadows:
Add shading underneath the bench legs and figures with your pencil to ground them, blending the charcoal slightly into the dried watercolor base. -
Foreground Elements:
Draw delicate, wispy reeds or tall grass on either side of the bench using quick, upward flicks of a fine liner pen or sharp pencil.
Make It Personal
Customize the coats to match a specific photo of you and your partner, or add a small date carved into the bench wood for an anniversary gift.
Step 4: Floating Hearts
-
Painting the Hearts:
Mix a slightly more saturated pink watercolor than your sky wash. Paint a variety of small and medium-sized hearts floating above the couple. -
Varying Opacity:
Make some hearts darker and others more transparent by adding more water. This creates a sense of depth, as if some hearts are further away. -
Placement:
Scatter the hearts unevenly, letting them drift upwards towards the right side of the paper for a whimsical, dreamy composition. -
Final Touches:
Check your contrast. If the darks of the coats have faded, add one final layer of charcoal to ensure the couple really pops against the soft background.
Now you have a sweet, romantic keepsake that perfectly captures a quiet moment of love
Shared Umbrella Hug in the Rain
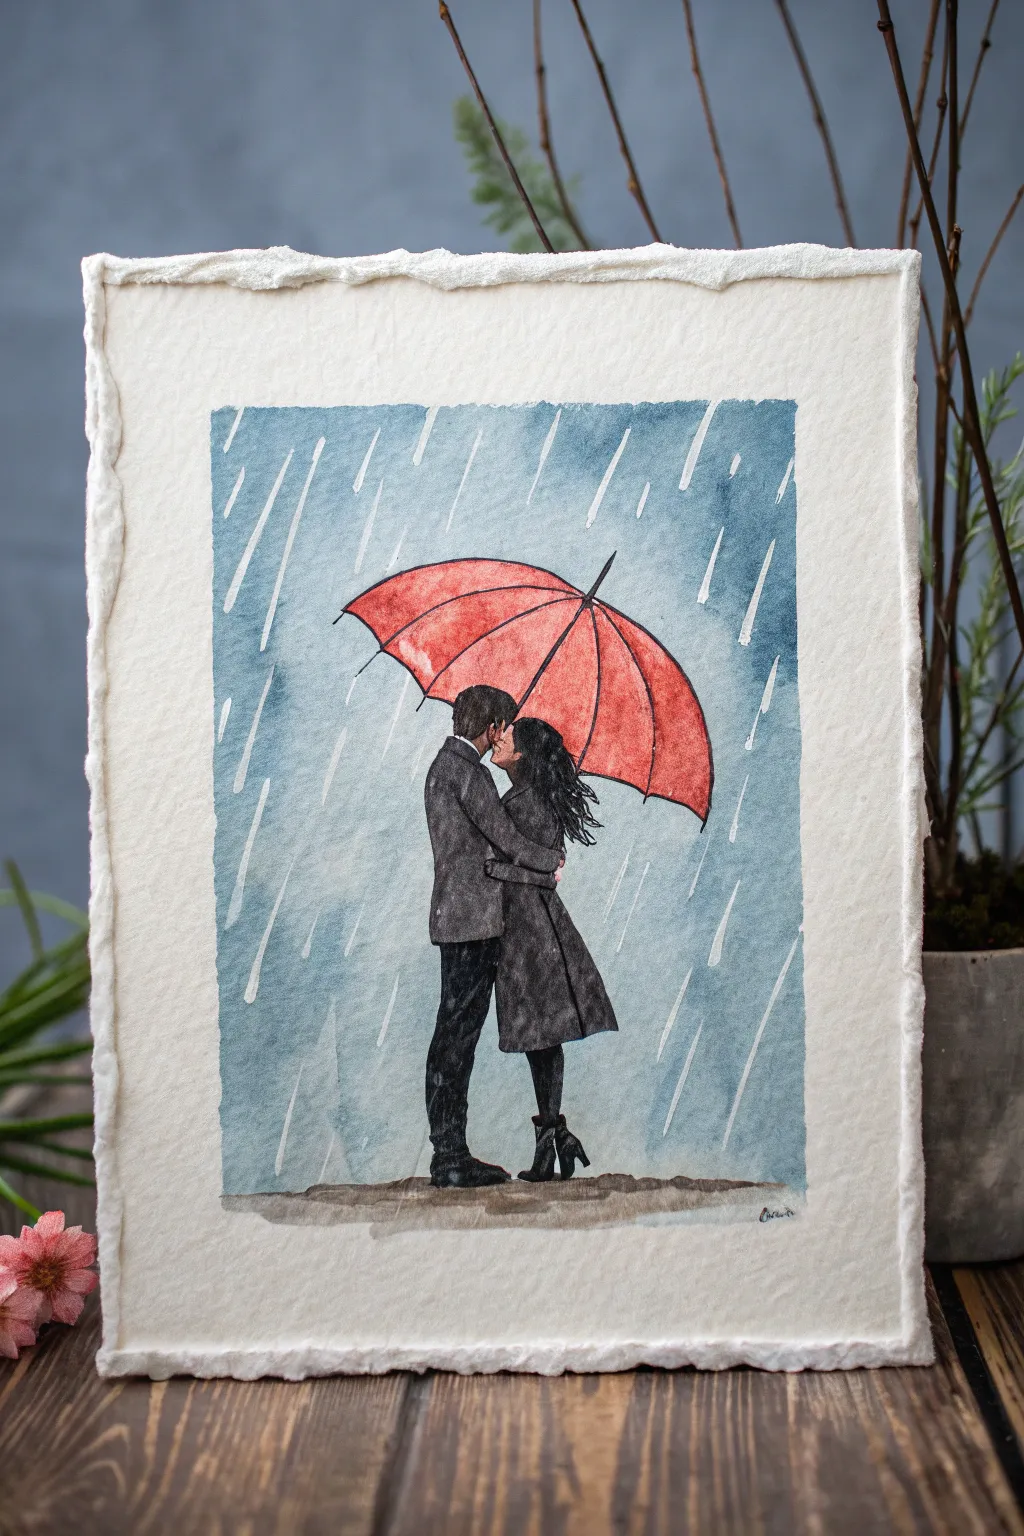
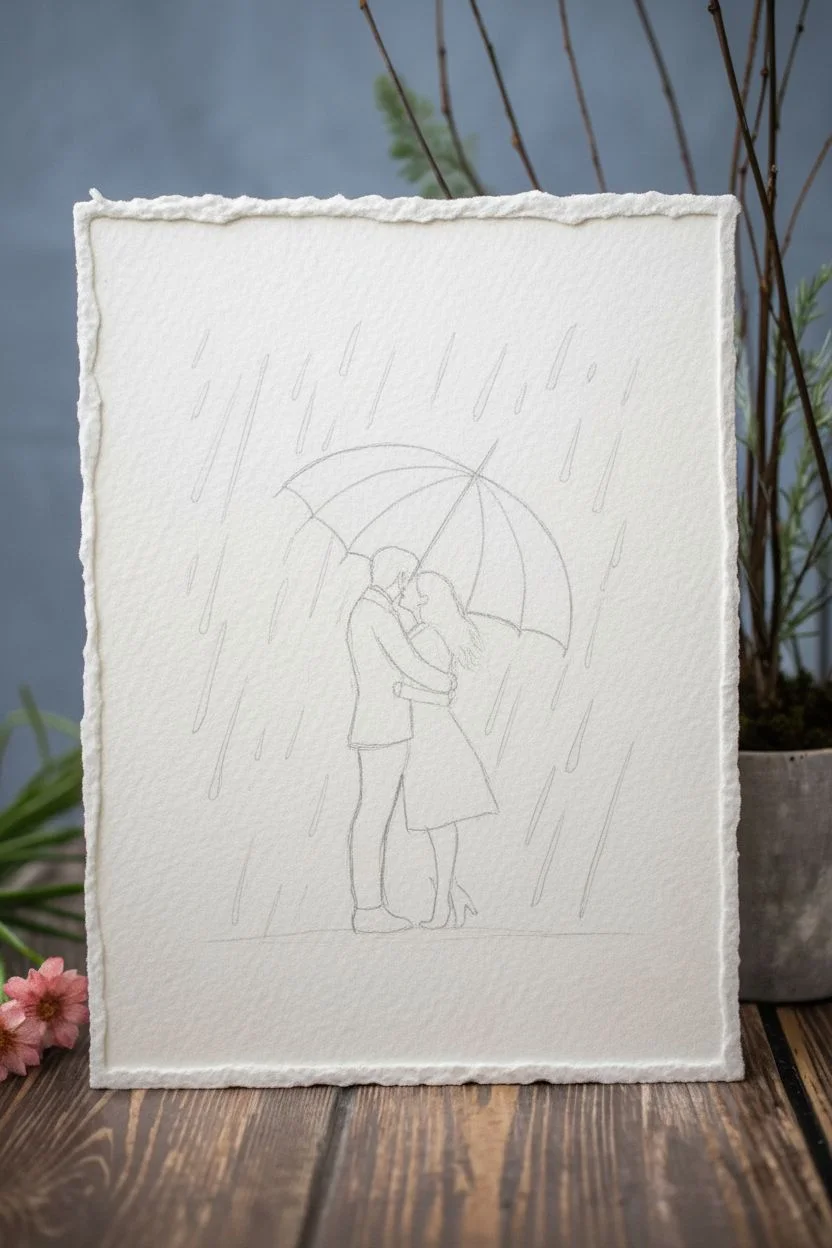
Capture the romantic atmosphere of a rainy day with this evocative watercolor painting featuring a couple sheltered under a bright red umbrella. Using wet-on-wet techniques for the background and crisp details for the figures, you’ll create a striking contrast that tells a sweet story.
Step-by-Step Tutorial
Materials
- Cold press watercolor paper (deckled edge optional but recommended)
- Watercolor paints (Indigo, Payne’s Grey, Alizarin Crimson, Burnt Umber, Lamp Black)
- Masking fluid or white gouache
- Pencil (HB or H)
- Round brushes (Sizes 2, 6, and 10)
- Palette for mixing
- Two jars of water
- Paper towels
- Masking tape
Step 1: Sketching and Preparation
-
Mark boundaries:
Lightly draw a rectangular border inside your paper’s edge, leaving about 1-2 inches of white space around the painting area to frame the scene. -
Sketch the umbrella:
Start by drawing the umbrella’s large semi-circle dome in the upper center of your frame. Add the structural ribs radiating from the top center point. -
Outline the figures:
Sketch the couple beneath the umbrella. Draw the taller figure on the left and the shorter figure on the right, interlocking them in a hug. Focus on the silhouette shapes rather than tiny details. -
Add the ground:
Draw a faint horizontal line near the bottom to indicate the ground they are standing on. -
Mask the rain (Option A):
If using masking fluid, use a rigger brush or a toothpick to apply thin, vertical dash lines throughout the sky area. Let this dry completely before painting.
Rain Direction Tip
Make sure all your rain streaks (masked or painted) follow the same diagonal angle. Slightly angled rain looks more dynamic and realistic than perfectly vertical lines.
Step 2: Painting the Rainy Background
-
Mix the sky wash:
Create a watery mix of Indigo and a touch of Payne’s Grey. You want a cool, moody blue tone. -
Apply the wash:
Using your size 10 brush, paint the entire background area around the couple and umbrella. Work quickly to keep a wet edge, allowing the color to be slightly uneven for a natural atmospheric look. -
Create rain texture:
While the wash is still damp but not soaking wet, use a clean, slightly thirsty brush to lift out faint vertical streaks, mimicking falling rain. -
Let it dry:
Allow the background to dry completely. If the paper feels cool to the touch, it’s still wet.
Step 3: The Red Umbrella
-
Base coat:
Mix a vibrant Alizarin Crimson. Paint the segments of the umbrella, leaving tiny slivers of white paper between some segments to act as highlights on the ribs. -
Add shadows:
While the red is still wet, drop in a slightly darker mixture (Crimson mixed with a tiny bit of Burnt Umber) near the bottom edges of the umbrella and along the ribs to create volume.
Level Up: Color Pop
For a unique twist, change the umbrella color to a bright dandelion yellow or electric teal. The high contrast against the grey moody background will make the artwork pop.
Step 4: Painting the Couple
-
Man’s coat:
Mix a dark grey using Lamp Black and a touch of Burnt Umber. Paint the man’s jacket and trousers, using less water to get a solid, opaque look. -
Woman’s coat:
Paint the woman’s coat in similar dark tones, perhaps adding slightly more brown to differentiate her garment from his. Ensure the embrace looks seamless where the coats meet. -
Hair details:
Switch to your size 2 brush and use concentrated black paint for the hair. Add fine strokes for the woman’s hair blowing slightly in the wind. -
Skin tones:
Mix a very dilute wash of Burnt Umber and perform the tiny painting required for their visible facial profiles and hands. -
Boots and shoes:
Fill in the shoes with solid black, grounding the figures firmly.
Step 5: Final Details
-
Ground shadows:
Mix a wash of Burnt Umber and Grey. Paint the ground beneath their feet, blending it out softly to the edges of your border. -
Reveal the rain:
If you used masking fluid, rub it off gently with your finger once everything is 100% dry. If -
White gouache rain (Option B):
If you didn’t mask, use white gouache on a fine brush to paint crisp white rain streaks over the blue background. -
Refine edges:
Use a small brush to sharpen any edges on the coats or umbrella that might have gotten fuzzy.
Once dry, frame your piece to highlight the cozy intimacy created by the rain and the vibrant red canopy

PENCIL GUIDE
Understanding Pencil Grades from H to B
From first sketch to finished drawing — learn pencil grades, line control, and shading techniques.
Explore the Full Guide
Starry Night Sky With a Couple Pointing at Constellations
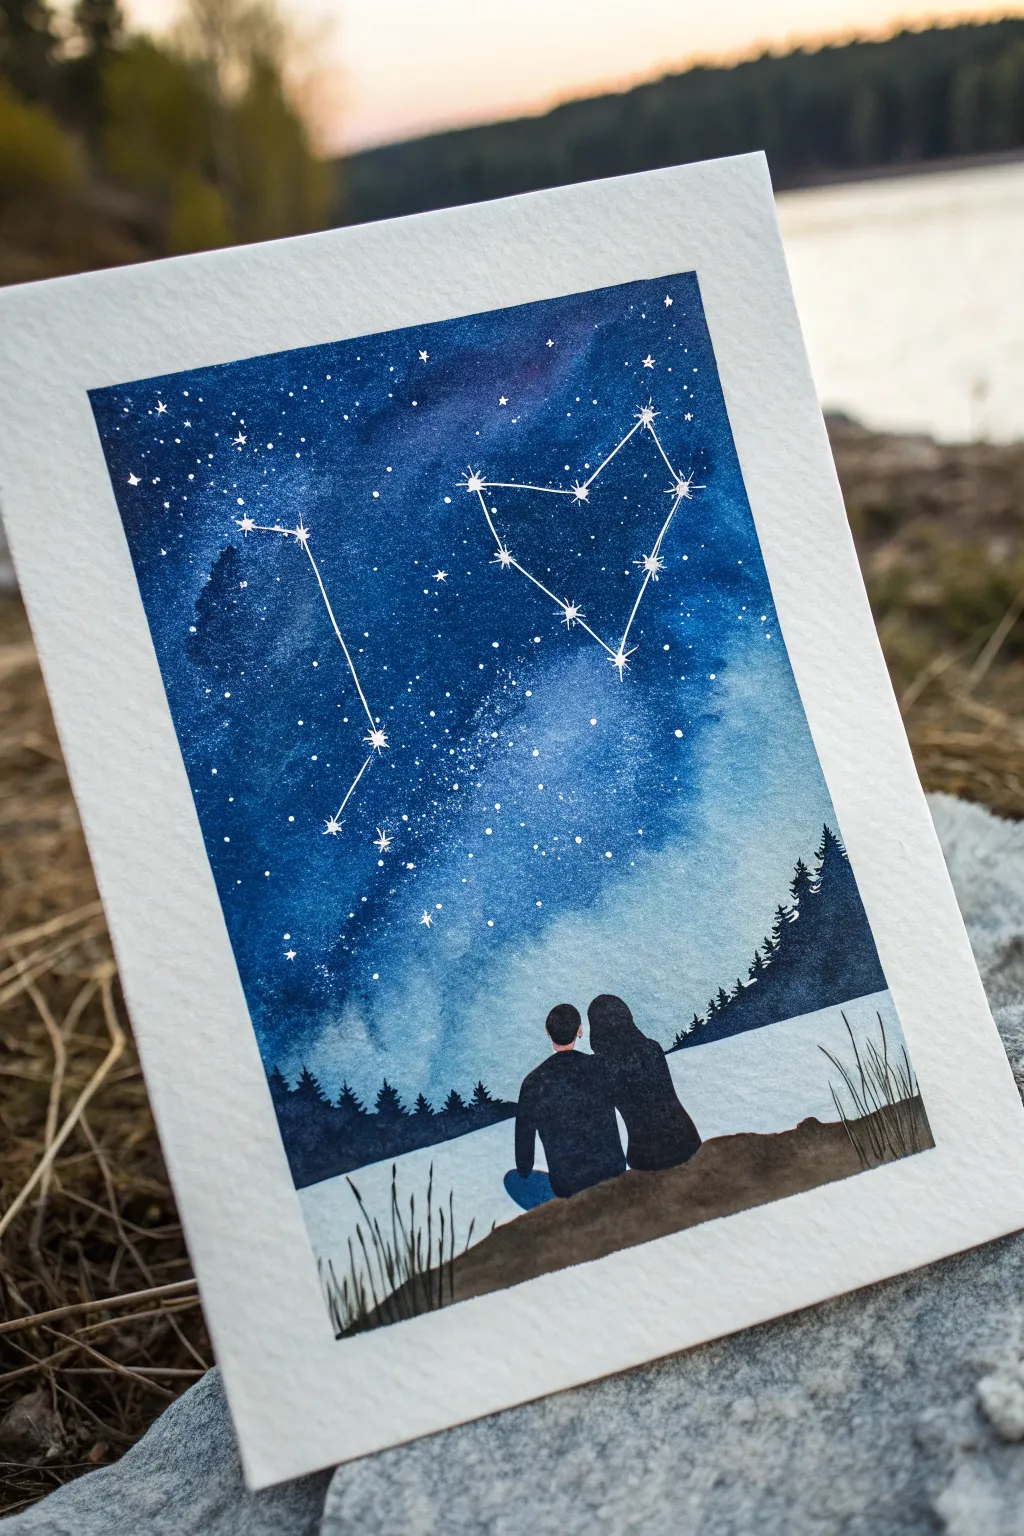
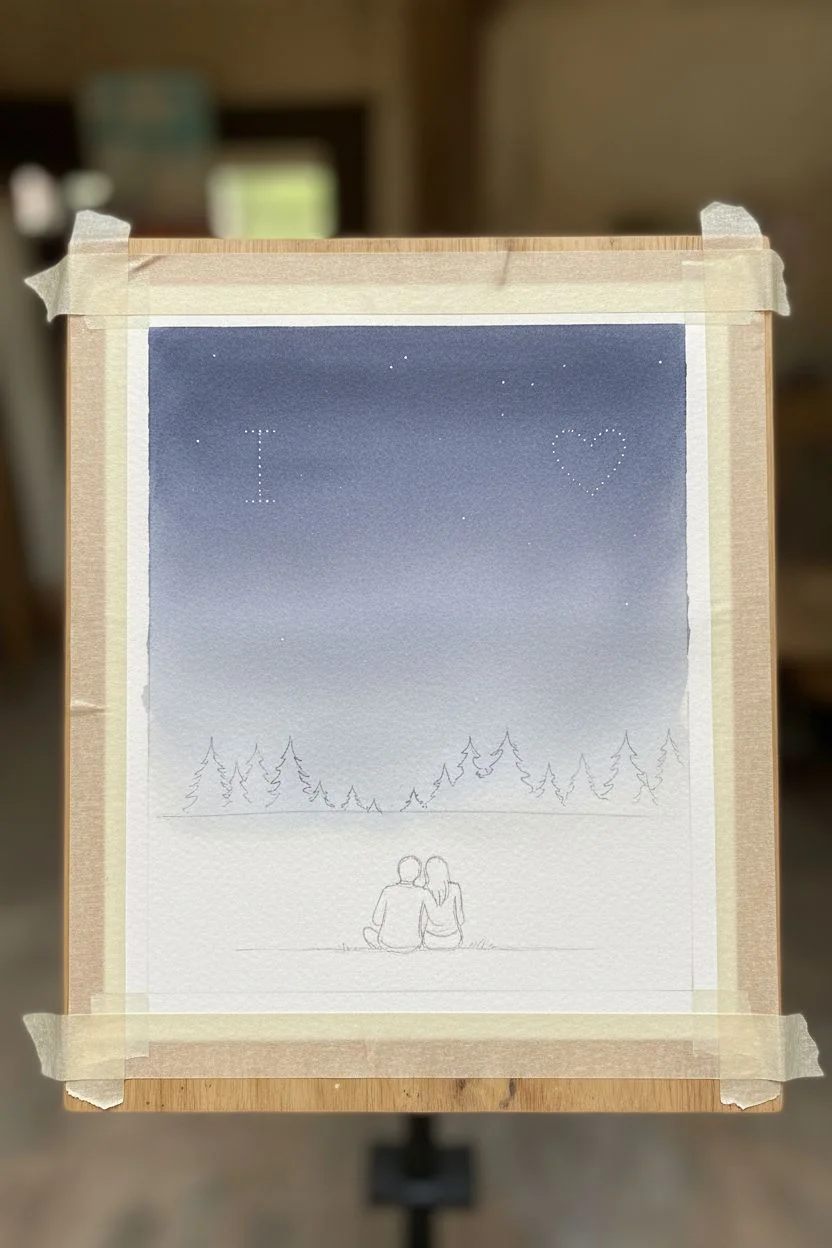
Capture the magic of stargazing with this romantic watercolor painting, featuring a deep indigo night sky where the stars align to form a secret message. Using wet-on-wet techniques and striking silhouettes, you’ll create a breathtaking scene of a couple enjoying a peaceful moment by the water.
How-To Guide
Materials
- Cold press watercolor paper (300 gsm)
- Masking tape
- Watercolor paints (Indigo, Prussian Blue, Black, Purple/Violet)
- White gel pen or white gouache
- Flat wash brush (large)
- Round brush (size 4 or 6)
- Fine liner brush (size 0 or 00)
- Two jars of water
- Paper towels
- Pencil and eraser
- Old toothbrush (optional for spatter)
Step 1: Setting the Scene
-
Tape it down:
Begin by taping your watercolor paper securely to a hard board or table. Press the edges of the masking tape firmly to ensure you get that crisp, clean white border later. -
Sketch the basics:
Lightly sketch the horizon line about a quarter of the way up from the bottom. Outline the silhouette of the couple sitting in the foreground and mark the faint treeline on the distant shore. -
Map the constellations:
Very faintly mark dots where your main stars will go. For this design, arrange the stars on the left to form a vertical line ‘I’ and the stars on the right to form a heart shape.
Step 2: Painting the Galaxy
-
Wet the sky:
Using your large flat brush, wet the entire sky area with clean water. Avoid the moonlit reflection area in the water and the couple’s silhouette, but paint right over where the trees will eventually go. -
Drop in color:
While the paper is glistening wet, load your brush with a light wash of blue. Drop it randomly, leaving some lighter patches near the bottom center to create a glowing Milky Way effect. -
Deepen the night:
While the paper is still damp, switch to a darker mix of Indigo and Prussian Blue. Concentrate this dark pigment at the very top of the sky and the corners, letting it blend naturally downwards into the lighter blue. -
Add violet hues:
I like to touch in small amounts of purple or violet into the wet areas to add richness and complexity to the galaxy sky, preventing it from looking too flat. -
Dry partially:
Let this layer dry until the shine has mostly gone but the paper feels cool to the touch.
Bleeding Lines?
If your silhouette edges are fuzzy, the background was too wet. Let it dry completely, then sharpen the edges with a black fine-liner pen or a thick consistency black gouache.
Step 3: The Water and Landscape
-
Paint the lake:
For the water, use a very diluted wash of your sky blue. Paint horizontal strokes below the horizon line, leaving the paper white in the center to represent the reflection of the starlight. -
Create the treeline:
Mix a strong black-blue color. Using the tip of your round brush, dab vertical, jagged shapes along the horizon line to create pine trees. Make the trees on the right side taller and more distinct. -
Ground the couple:
Paint the foreground land mass with a brownish-black mix. Paint around the couple’s silhouette carefully for now. -
Add the silhouette:
Fill in the couple’s shape with solid black paint using your fine brush. Keep the edges sharp. If you prefer, outline them first with a waterproof pen and fill them in.
Make it Yours
Instead of the ‘I’ and Heart, paint your actual zodiac constellations (like Leo and Gemini) facing each other for a deeply personal touch.
Step 4: Celestial Details
-
Add the stars:
Cover the bottom half of your painting with scrap paper to protect it. Load an old toothbrush or stiff brush with white gouache or diluted white acrylic. Run your thumb over the bristles to spatter tiny stars across the dark sky. -
Draw the constellations:
Using a white gel pen or a fine brush with white gouache, firmly dot the main stars for your ‘I’ and ‘Heart’ shapes. Draw thin straight lines connecting the dots to emphasize the constellations. -
Add starbursts:
On the largest stars in your constellations, draw tiny crosses or four-pointed shapes to give them a twinkling effect. -
Final touches:
Add a few wispy blades of grass in the foreground using the very tip of your fine liner brush with black paint.
Step 5: The Big Reveal
-
Remove tape:
Wait until the painting is 100% bone dry. Carefully peel the masking tape away at a 45-degree angle, pulling away from the artwork to prevent tearing.
Now you have a stunning, personalized piece of art that perfectly captures a quiet moment under the stars
Two Trees Bending Toward a Heart-Shaped Canopy
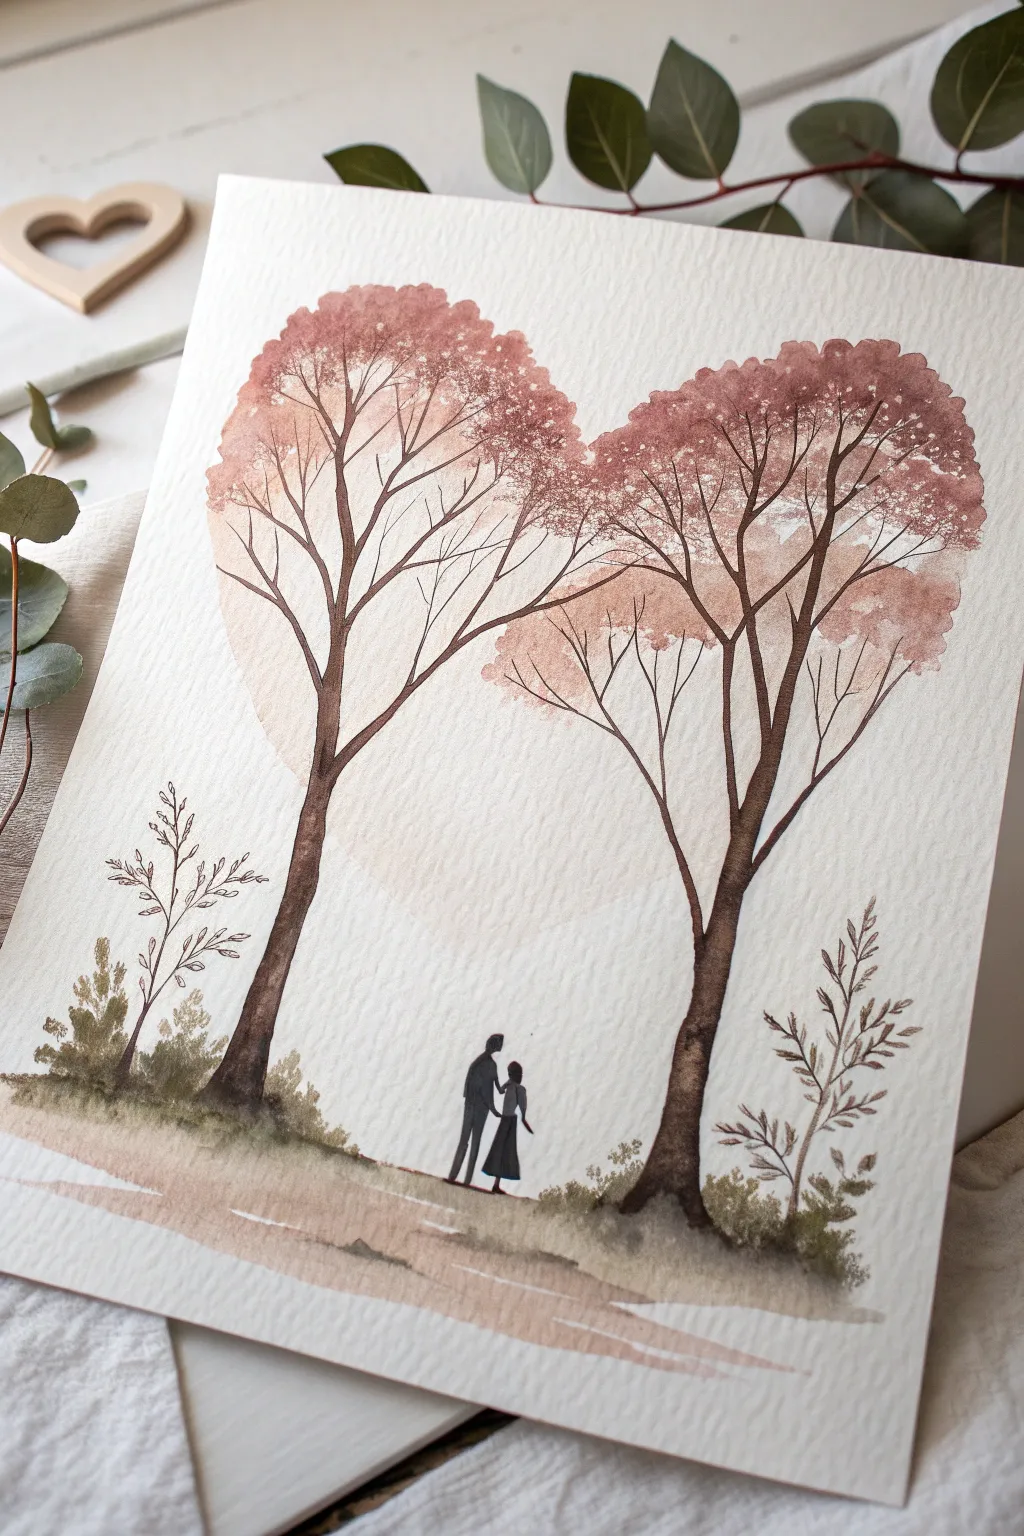
Capture the romance of two lives growing together with this lovely watercolor composition. Two gracefully curved trees join to form a canopy in a perfect heart shape, sheltering a delicate silhouette of a couple below.
Step-by-Step
Materials
- Cold press watercolor paper (300 gsm or 140 lb)
- Watercolor paints (burnt umber, sepia, raw sienna, rose madder or dusty pink, olive green)
- Round watercolor brushes (size 2, 6, and 10)
- Fine liner brush or black micron pen (0.3 or 0.5)
- Pencil (HB) and kneaded eraser
- Clean water jar and paper towels
- Mixing palette
Step 1: Sketching the Framework
-
Lightly outline the heart:
Begin by using your HB pencil to very faintly sketch a large heart shape in the upper center of your paper. This will serve as the boundary guide for your tree canopy, not a hard outline, so keep it extremely subtle. -
Position the trunks:
Draw two vertical lines starting from the bottom third of the paper. Curve the left trunk slightly inward to the right, and the right trunk inward to the left, so they lean toward each other but don’t quite touch at the base. -
Branch structure:
Extend branches from the tops of the trunks upwards. Fan them out specifically to fill the two lobes of your heart guide. The branches should reach up and out, acting like veins within the heart shape. -
Ground and couple:
Sketch a gentle, uneven horizon line near the bottom. In the center, between the trees but much smaller in scale, sketch the tiny silhouette outlines of a couple holding hands.
Keep it Airy
Don’t overfill the canopy with paint. The white paper showing through the pink “leaves” mimics light filtering through the trees and keeps the heart shape distinguishable.
Step 2: Painting the Canopy
-
Mix your foliage color:
Create a vintage dusty rose color by mixing rose madder with a tiny touch of burnt umber. For a subtle variation, prepare a secondary puddle that is slightly more diluted and orange-toned using raw sienna. -
Wet-on-dry stippling:
Using a size 6 or 10 brush, load it with your rosy mix. Tap the brush tip gently onto the paper to create leaf clusters, staying strictly within your heart pencil guide. Leave plenty of white space between the dabs for an airy look. -
Adding depth:
While the first layer is still damp, drop in slightly more concentrated pigment near the bottom of the leaf clusters. This creates a shadow effect where the foliage is denser. -
Softening edges:
Rinse your brush and use just damp bristles to softly blur some of the outer edges of the heart shape. This prevents the heart from looking like a strict cartoon cutout and makes it feel more organic. -
Background wash:
I like to take a very watery wash of raw sienna and paint a faint circle or glow behind the trees, just barely touching the foliage edges, to warm up the background.
Date It
This style is perfect for an anniversary gift. Simply use a fine-tip pen to write a significant date or initials subtly into the bark of one of the trees.
Step 3: Structuring the Trees
-
Painting the trunks:
Mix sepia and burnt umber for a rich, dark brown. Using a size 6 brush, paint the two main trunks. Start with more pressure at the base and lift as you go up to taper them. -
Connecting the branches:
Switch to a size 2 brush. extend fine lines from the main trunks up into your pink foliage clouds. The branches should flow naturally into the leaf clusters you already painted. -
Adding texture:
Once the trunks are semi-dry, use the tip of your brush with a darker sepia mix to add small vertical streaks or knots on the bark for texture.
Step 4: Ground and Details
-
Background foliage:
On the far left and right sides of the trunks, paint small, wispy bushes or young saplings. Use an olive green mixed with brown to keep the palette cohesive and earthy. -
Painting the ground:
Use broad, horizontal strokes with a watery mix of burnt umber and raw sienna to paint the ground. Let the paint be uneven to suggest dirt paths and grass. -
The silhouette:
Using your smallest brush or a black fine liner pen, carefully fill in the couple’s silhouette. Ensure their feet are grounded on the painted horizon so they don’t look like they are floating. -
Final touches:
Erase any visible pencil lines from your initial heart guide. If the bottom of the painting feels too empty, add a few extra loose brushstrokes of diluted brown to suggest shadows on the path.
Step back and admire the gentle warmth of your romantic landscape painting


Swan Pair on a Calm Blue Lake
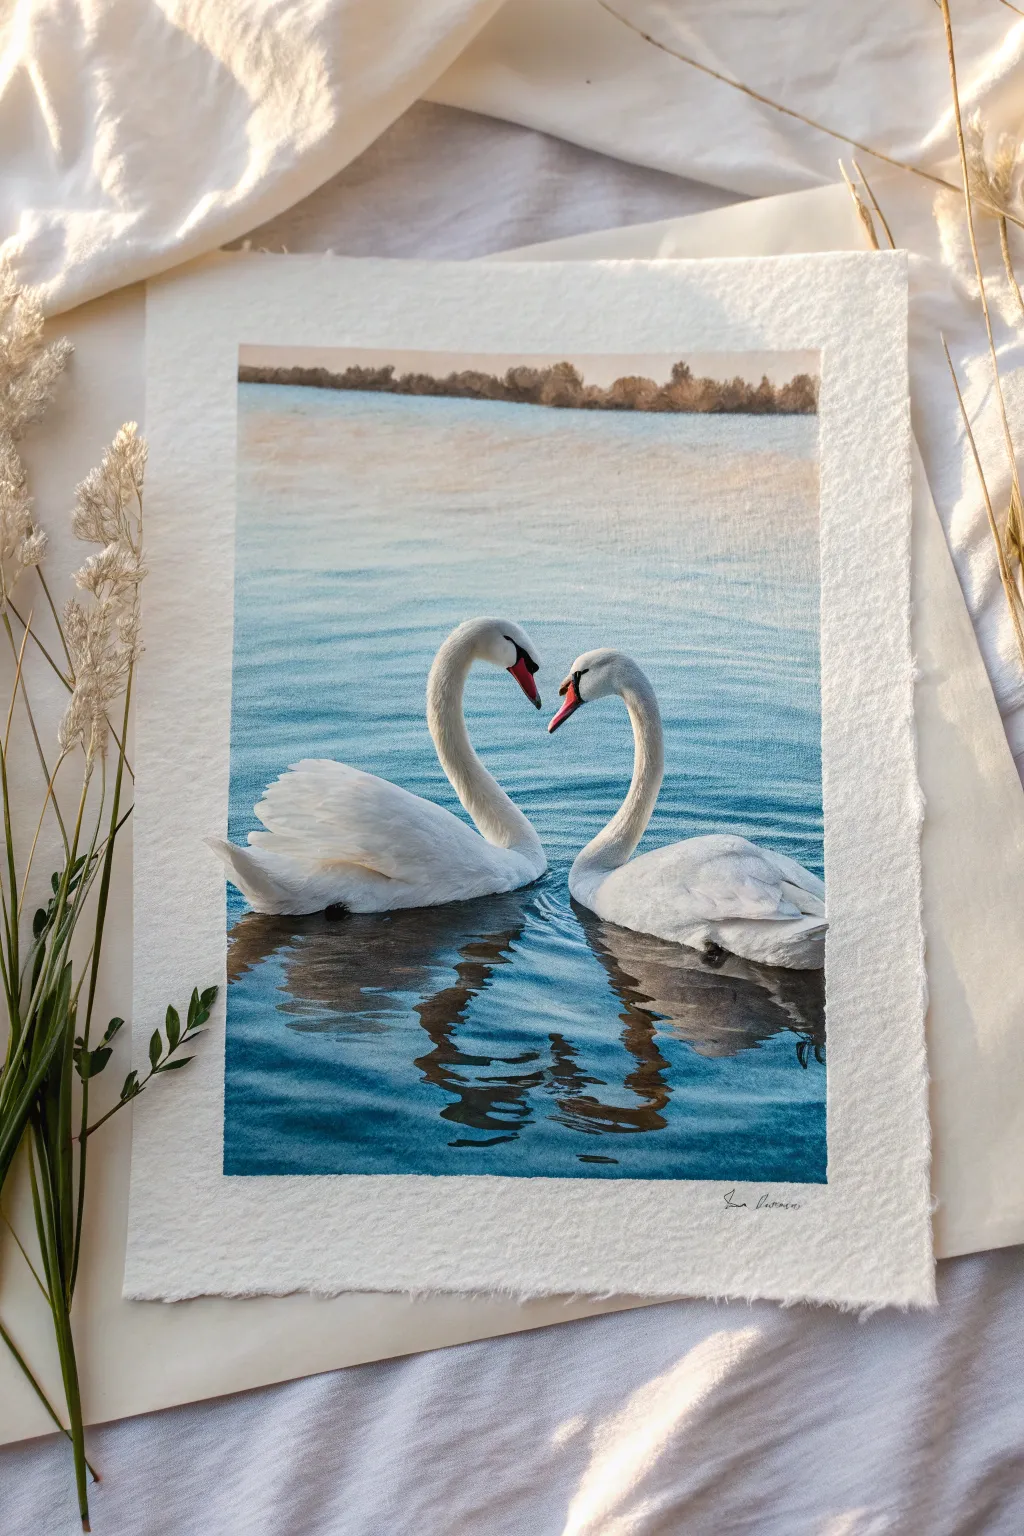
Capture the serene romance of nature with this delicate watercolor painting featuring two swans forming a heart shape. The soft, rippling blue water and textured, deckle-edged paper give this piece a timeless and elegant feel suitable for any skill level.
Step-by-Step Guide
Materials
- Cold press watercolor paper (deckle edge preferred, approx. 300gsm)
- Watercolor paints (Cerulean Blue, Burnt Sienna, Payne’s Grey, Alizarin Crimson, Orange)
- White gouache paint (optional, for highlights)
- Round watercolor brushes (sizes 2, 6, and 10)
- Masking fluid and applicator (optional)
- HB pencil and kneaded eraser
- Two jars of water
- Paper towels
- Masking tape (if not using a block)
Step 1: Sketching and Preparation
-
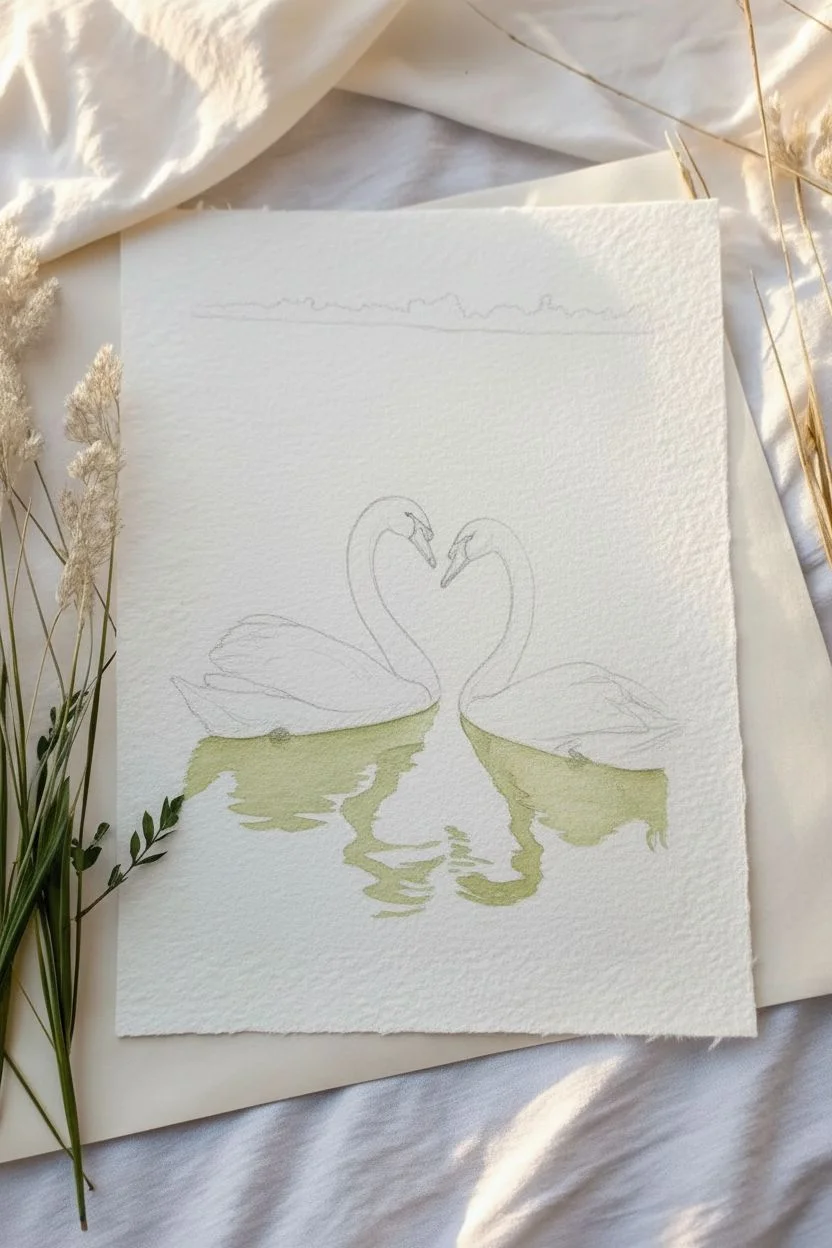
Outline the Composition:
Begin with a very light pencil sketch. Draw the two curved necks first to ensure they create that central heart shape, then outline the bodies and the water line in the background. -
Refine the Swans:
Detailed sketching isn’t necessary, but mark where the beaks meet the water and the general shape of the folded wings. Keep your lines faint so they don’t show through the transparent paint later. -
Protect the Whites:
The swans depend on the white of the paper. You can carefully apply masking fluid to the entire shape of the swans, or simply paint very carefully around them. Don’t forget the white reflections in the water immediately below them.
Step 2: Painting the Water and Background
-
Mix the Water Tones:
Prepare a watery mix of Cerulean Blue with a tiny touch of Payne’s Grey. For the distant water, add a hint of Burnt Sienna to dull the blue slightly. -
Wet-on-Dry Technique:
Using your size 10 brush, start painting the water from the top down. Use horizontal strokes. As you move lower towards the swans, increase the saturation of the blue. -
Create Ripples:
While the blue wash is still damp but not soaking, drop in slightly darker horizontal lines of blue to suggest ripples. Leave tiny slivers of white paper here and there for scattered light. -
Paint the Distant Shore:
Mix a soft brown using Burnt Sienna and a touch of blue. While the horizon line is still slightly damp, dab in the distant trees so they blur slightly, creating atmospheric perspective. -
Deepen the Foreground:
The water closest to the viewer should be the deepest blue. Mix Payne’s Grey and Cerulean for a richer tone and paint horizontal strokes around the base of the swans.
Clean Water Secret
Always keep two water jars: one for rinsing dirty brushes and one for picking up clean water. This prevents your vibrant blues from turning muddy grey.
Step 3: Detailing the Swans
-
Remove Masking:
Once the water is completely bone-dry, gently rub away the masking fluid if you used it. You should have crisp white silhouettes. -
Shadowing the Feathers:
Swans aren’t flat white; they have form. Mix a very dilute, pale grey-blue wash. With a size 6 brush, paint the shadows on the underbelly and under the wings to give the bodies volume. -
Neck Shadows:
Use the same pale grey mix to shade the side of the necks facing away from the light source. This makes the necks look cylindrical rather than flat ribbons. -
Painting the Beaks:
Switch to your size 2 brush. Paint the large part of the beak with a bright orange, blending into a reddish-pink near the face. Use pure black or stiff Payne’s Grey for the knob and masking around the eyes.
Level Up: Deckled Edge
To get the torn look in the photo, fold your paper repeatedly along a straight edge, wet the fold with a brush, and gently tear it while damp.
Step 4: Reflections and Final Touches
-
Mirror the Shapes:
Wet the area of the water directly beneath the swans. Drop in a mix of Payne’s Grey and Burnt Sienna to create the dark, wavy reflections of the birds’ bodies. -
Distort the Reflection:
While the reflection paint is wet, drag a dry brush horizontally through it a few times to break up the shape, mimicking the movement of water. -
Enhance Textures:
Add fine details to the wing feathers using a very dry brush with pale grey paint. This ‘dry brushing’ technique catches the tooth of the paper and looks like feather texture. -
Final Highlights:
If you lost any crucial white highlights during the process, used a small dab of white gouache to reclaim them on the brightest part of the feathers.
Sign your name in the corner with a fine liner or pencil and enjoy the peaceful atmosphere you have created
Cute Woodland Animals as a Couple Portrait
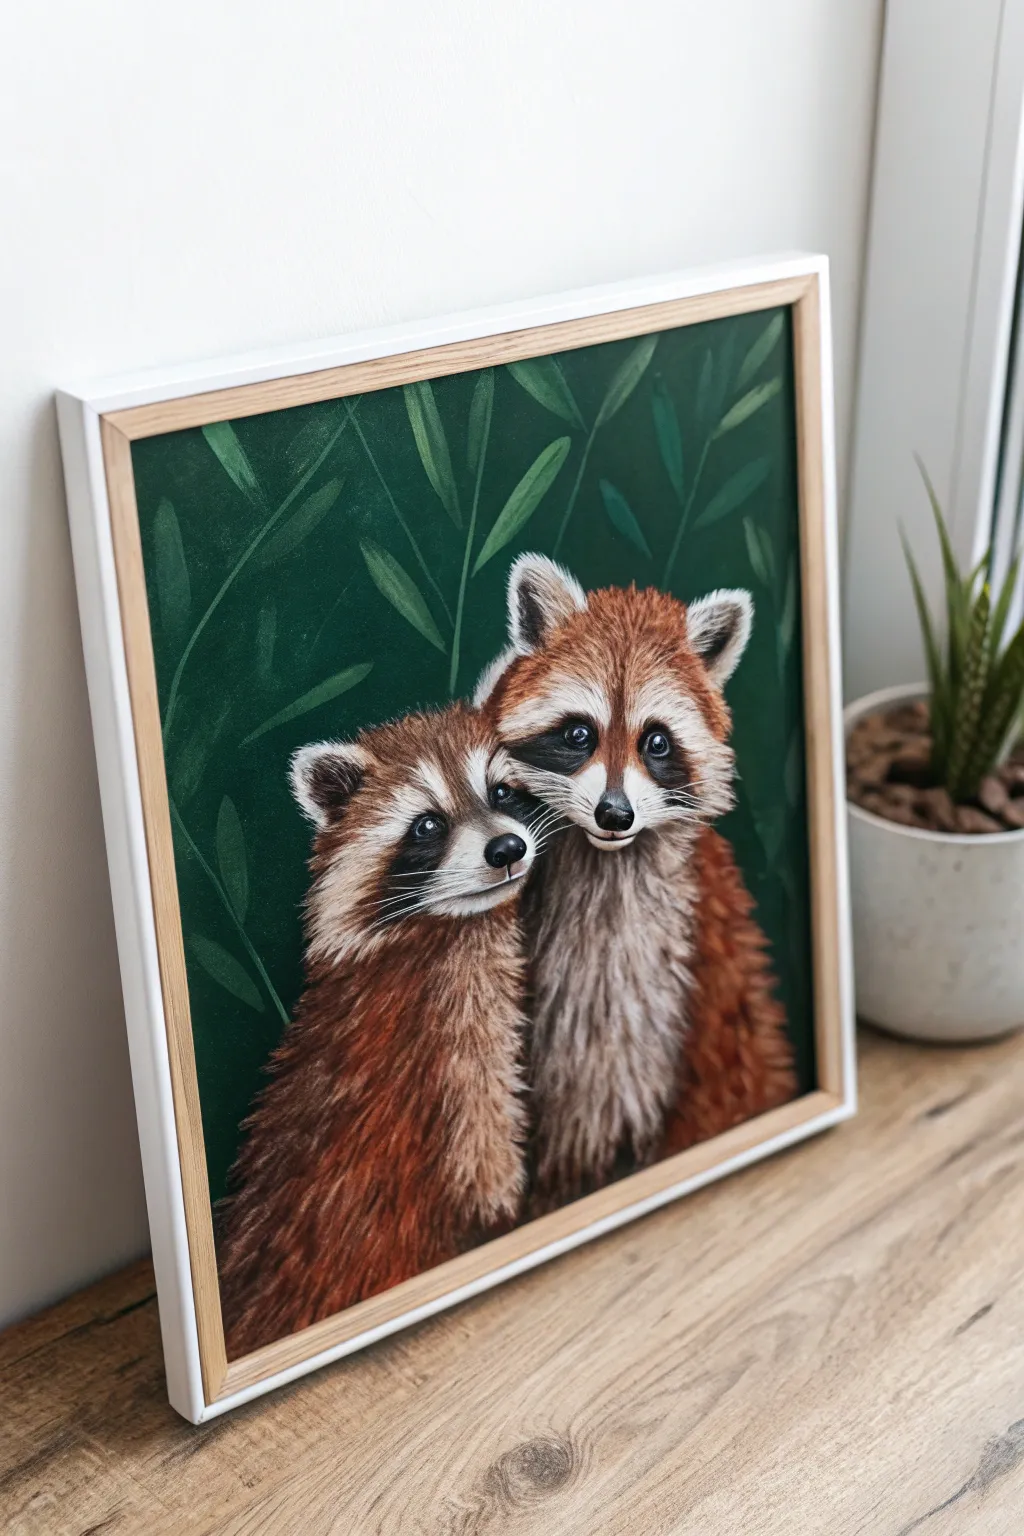
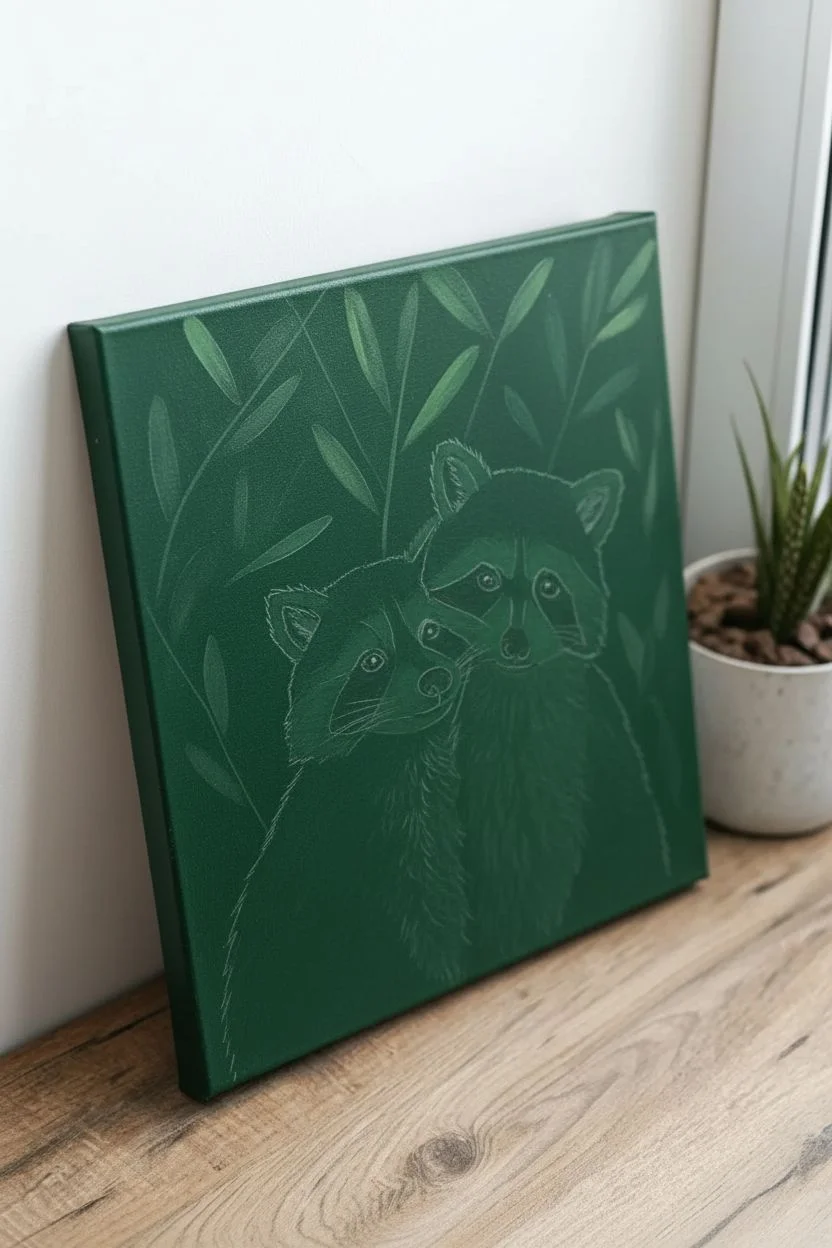
Capture the tender connection between two woodland spirits with this charming acrylic painting. The rich emerald background perfectly offsets the warm, russet tones of the raccoons’ fur, creating a piece that feels both cozy and sophisticated.
Step-by-Step
Materials
- Square canvas (12×12 or similar)
- Acrylic paints (Phthalo Green, Hookers Green, Burnt Sienna, Burnt Umber, Mars Black, Titanium White, Yellow Ochre)
- Set of synthetic brushes (flat shader, filbert, small round, fine liner)
- Pencil and eraser for sketching
- Mixing palette
- Water cup and paper towels
- Floating medium or slow-dry medium (optional)
Step 1: Setting the Scene
-
Prepare the background:
Mix a deep, moody green using Phthalo Green and a touch of Mars Black. Using a large flat brush, coat the entire canvas evenly. Apply two coats if necessary to ensure no white canvas shows through, letting it dry completely between layers. -
Add leafy textures:
Mix a slightly lighter green by adding a tiny bit of Yellow Ochre and White to your base green. With a round brush, paint simple, elongated leaf shapes floating in the background. Keep them somewhat transparent and loose; they should fade into the distance rather than compete for attention. -
Sketch the subjects:
Once the background is fully dry, lightly sketch the outline of the two raccoons. Allow their bodies to overlap slightly to show intimacy. Focus on getting the triangle shapes of their heads and the placement of their ears correct before moving on.
Fixing Flat Fur
If the fur looks too flat or solid, you likely over-blended. Let it dry completely, then go back over with distinct, unblended strokes of your highlight color to restore texture.
Step 2: Blocking and Base Layers
-
Underpainting the fur:
Start with a mid-tone mix of Burnt Sienna and Burnt Umber. Block in the main body shapes and the top of the heads. Don’t worry about individual hairs yet; just establish the warm brownish-red foundation where the fur will be thickest. -
Define the masks:
Using Mars Black, carefully paint the characteristic ‘bandit masks’ around the eyes. Keep the edges soft, not hard lines, as fur will blur these boundaries later. -
Map the light areas:
Mix a warm grey using Titanium White and a very small dot of Burnt Umber. Block in the muzzle area, the eyebrows, and the chest fur. This establishes your high-contrast map before the detailed texture work begins.
Step 3: Creating Texture and Depth
-
Layering mid-tones:
Load a filbert brush with pure Burnt Sienna. Using a flicking motion, start layering fur texture over the body area. Follow the natural direction of hair growth—generally flowing downwards and outwards from the center of the chest. -
Deepening shadows:
Mix Burnt Umber with a touch of Black. Apply this darker mix between the two raccoons where they touch, and under their chins, to create separation and depth. -
Refining the face:
Switch to a small round brush. With the light grey mix, refine the muzzle shape and the characteristic white patches above the eyes. Use short, controlled strokes to make these areas look fluffy rather than solid. -
Adding the eyes:
Paint the eyes jet black. While wet, add a tiny dot of white in the upper right corner of each pupil for a life-like glint. This instantly brings their personalities to life. -
Painting the nose:
Use Mars Black for the nose leather. Add a tiny swipe of grey on the top curve of the nose to make it look wet and three-dimensional.
Add Seasonal Flair
Customize the background for the season. Paint tiny falling snowflakes for a winter vibe, or add small yellow dots among the leaves to suggest fireflies for a summer night scene.
Step 4: Fine Details and Fur
-
Highlights on the reddish fur:
Mix Burnt Sienna with Yellow Ochre. Using a fine liner or a rake brush, add lighter hairs on the tips of the ears and the shoulders where the light would naturally hit. -
Texturing the white fur:
Take pure Titanium White on a liner brush. Add the finest, brightest hairs on the muzzle, eyebrows, and edges of the ears. I usually water the paint down slightly here so it flows smoothly off the bristles. -
Blending the mask:
Where the black mask meets the lighter fur on the face, use small, ticking strokes to interlock the colors. This prevents the mask from looking like a sticker and makes it look like part of the coat. -
Whiskers:
load your finest liner brush with inky, fluid white paint. With quick, confident wrist movements, pull long whiskers extending from the muzzle. Do the same with black paint for the dark whiskers. -
Final touches:
Check your background leaves. If the fur painting process covered them too much, gently repaint a leaf tip or two overlapping behind the raccoons to reintegrate them into the scene.
Enjoy the warmth these little woodland creatures bring to your space
Couple-and-Pet Snuggle Portrait
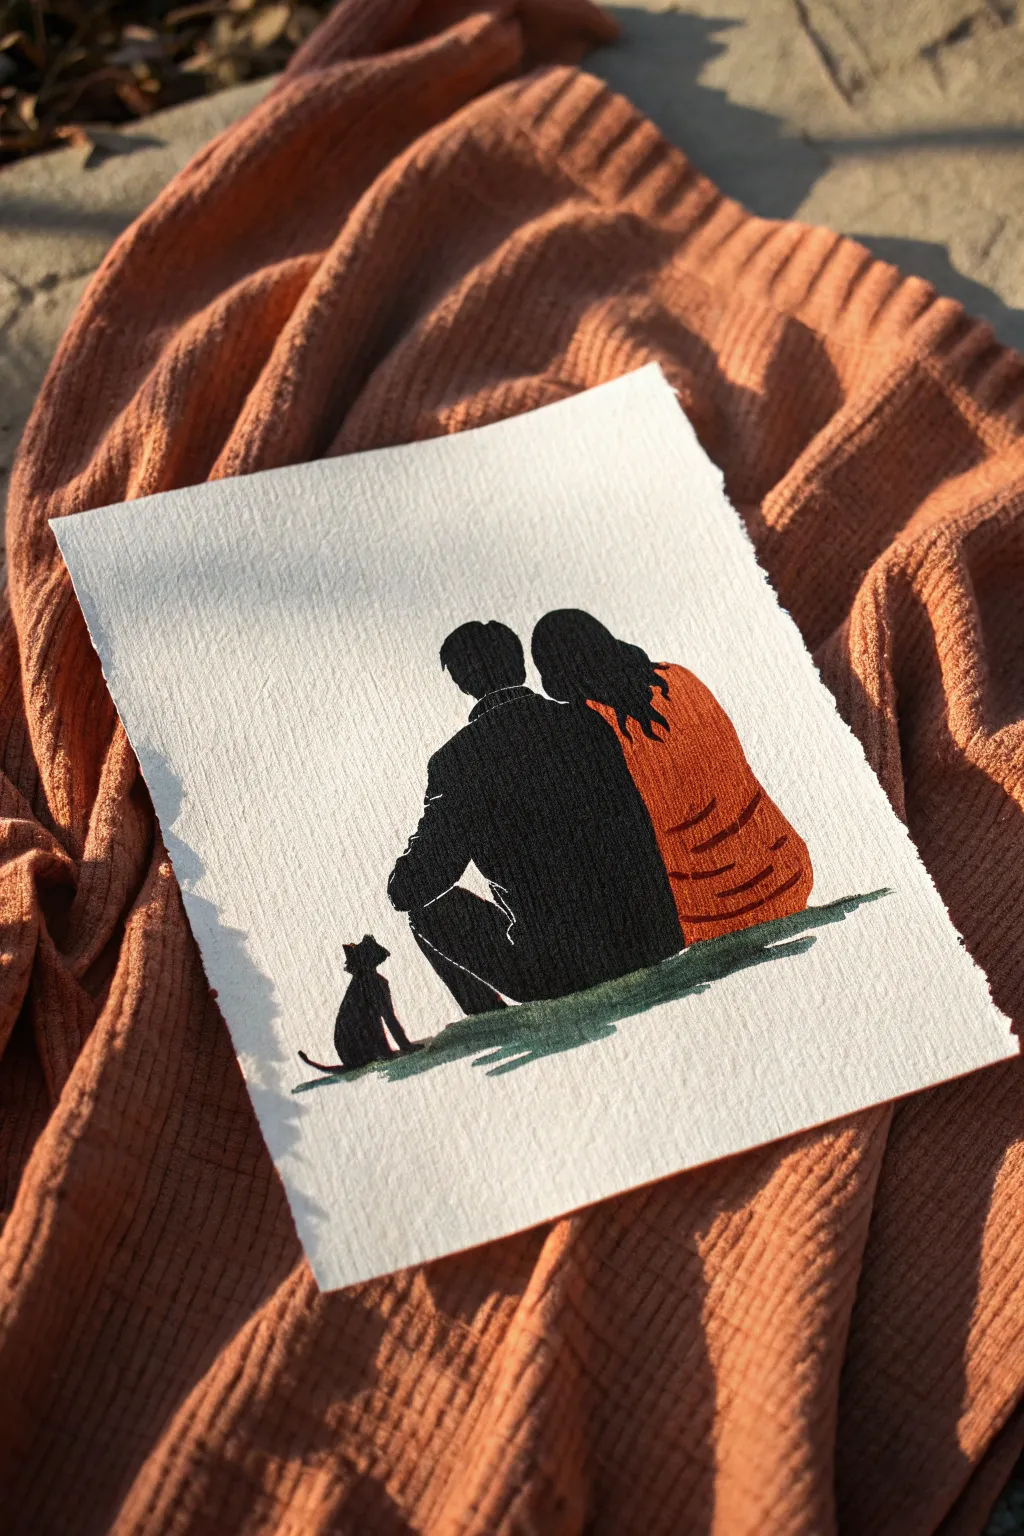
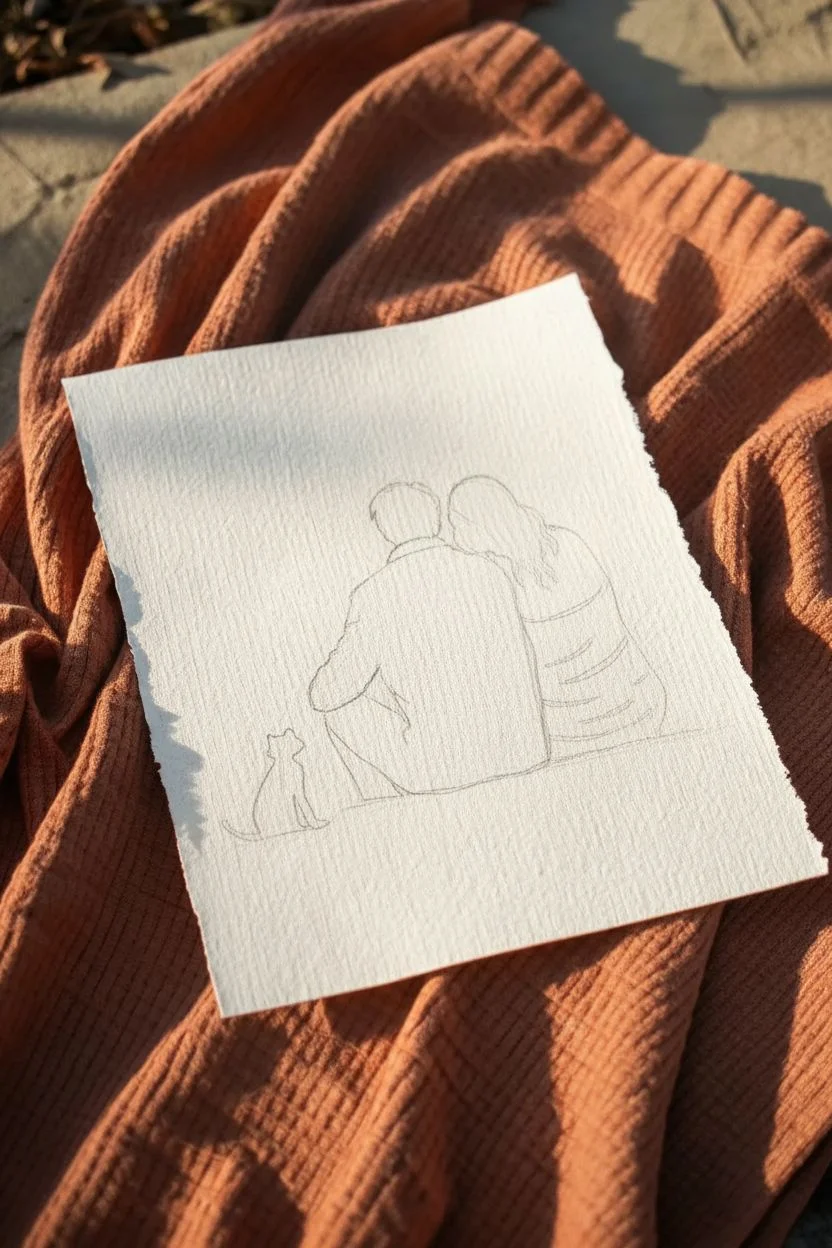
Capture a cozy, intimate moment with this charming silhouette-style painting of a couple and their feline friend. Using deep blacks and a bold splash of terracotta orange, you’ll create a striking contrast that pops beautifully against textured watercolor paper.
Detailed Instructions
Materials
- Cold press watercolor paper (300 gsm)
- Black gouache or high-pigment watercolor paint
- Terracotta or burnt orange watercolor paint
- Deep green watercolor paint
- Masking tape
- Pencil (HB or H)
- Fine liner brush (size 0 or 00)
- Round brush (size 4 or 6)
- Palette for mixing
- Water cups and paper towels
Step 1: Sketching the Figures
-
Prepare the paper:
Begin by tearing the edges of your watercolor paper if you want that rustic, deckled look shown in the photo. Alternatively, tape down a clean rectangle of cold press paper to your work surface. -
Outline the couple:
Lightly sketch the outline of the two seated figures in the center of the page. The figure on the left is slightly taller, leaning in, while the figure on the right leans her head on his shoulder. -
Add the cat:
To the left of the male figure, draw a small silhouette of a cat. Keep it simple: a teardrop shape for the body, a circle for the head, two triangle ears, and a curved tail. -
Refine the clothing draping:
Sketch the horizontal fold lines on the back of the woman’s sweater. These curved lines are crucial as they give volume and texture to the orange shape later.
Step 2: Painting the Colors
-
Mix the sweater color:
Create a warm, rusty orange by mixing burnt sienna with a touch of red or orange. You want this color to be fairly opaque, so don’t dilute it too much. -
Fill the woman’s silhouette:
Use your round brush to paint the woman’s sweater. Carefully follow your pencil lines, leaving her hair area unpainted for now. -
Add sweater folds:
Before the orange paint fully dries, drop in slightly darker, more concentrated orange pigment into the curved fold lines you sketched to add instant dimension. -
Let it dry completely:
Wait for the orange section to be bone dry. This is critical because the black paint we use next needs to touch it without bleeding into it.
Clean Lines Hack
If you struggle with steady hands, use a tiny bit of drawing gum (masking fluid) on the thin white lines of the jacket. Rub it off after painting for perfect gaps
Step 3: Applying the Black
-
Prepare the black paint:
For the male figure and the hair, you want a very deep, flat black. Gouache works perfectly here because of its matte opacity, but concentrated watercolor works too. -
Paint the male figure:
Using the round brush, fill in the man’s jacket and pants. Be careful around the edge where he meets the woman’s orange sweater; a steady hand creates a clean, puzzle-piece fit. -
Leave white lines:
Notice the thin white lines separating the man’s arm from his torso and defining the leg crease. I find it easiest to carefully paint around these tiny negative spaces rather than painting over them. -
Fill in the hair:
Switch to your smaller brush to paint the hair on both figures. For the woman, let the black flow over the top of the orange sweater slightly to show her long hair resting on her back. -
Paint the cat:
Fill in the cat silhouette with solid black using the fine liner brush. Ensure the ears are pointy and the tail has a nice, organic curve.
Personalize It
Customize the painting by changing the hair lengths to match you and your partner, or swap the cat silhouette for a dog outline to represent your own pet
Step 4: Grounding and Details
-
Mix the ground color:
Mix a dark, muddy green using sap green and a touch of your black paint. Dilute this mixture more than your previous colors so it’s transparent. -
Paint the shadow:
Paint a loose, horizontal wash beneath the figures and the cat. Let the brush strokes remain rough and uneven to suggest grass or textured ground. -
Layer the shadow:
While the green is still damp, dab a little more pigment directly under the figures to anchor them to the ground. -
Final assessment:
Check your edges. If the white separation lines on the man’s jacket got covered up, you can reclaim them using a tiny bit of white gouache or a white gel pen once the black is dry.
Display your finished silhouette in a simple floating frame to let those beautiful torn edges show
Paint-and-Swap: Finish Each Other’s Couple Scene
Capture the romance of a golden hour moment with this striking silhouette painting project. By focusing on dark profiles against a vibrant, soft sky, you can create a professional-looking artwork even without advanced portrait skills.
Step-by-Step Guide
Materials
- Square canvas (16×16 or similar)
- Acrylic paints (Titanium White, Phthalo Blue, Ultramarine Blue, Mars Black, Burnt Umber)
- Large flat brush or sponge
- Medium filbert brush
- Small round detail brush (size 0 or 1)
- Pencil and eraser
- Palette or mixing plate
- Water cup and paper towels
- Reference photo of a couple in profile
Step 1: Preparing the Sky Backdrop
-
Map out the horizon:
Begin by lightly sketching a low horizon line about one-quarter up from the bottom of your canvas. This will separate your detailed ground from the expansive sky. -
Mix your sky gradients:
On your palette, prepare three shades of blue: a deep Phthalo blue for the top, a medium Ultramarine mix, and a very pale, almost white blue for the horizon. Keep the paint fluid but not watery. -
Paint the upper sky:
Using a large flat brush, apply the darkest blue across the top third of the canvas. Use long, horizontal strokes to ensure smooth coverage. -
Create the transition:
While the top paint is still wet, blend in your medium blue shade for the middle section. Work the brush back and forth where the colors meet to create a soft, seamless gradient. -
Finish the horizon glow:
Paint the lowest section of the sky with your palest blue-white mixture. Blend specifically upwards into the medium blue so the sky looks brightest near the horizon line. -
Add cloud texture:
With a dry brush or sponge and a tiny amount of pure Titanium White, dab irregular, soft cloud shapes diagonally across the upper corners. Keep the edges wispy and undefined.
Step 2: Drafting the Figures
-
Sketch the couple:
Once the background is completely bone-dry, use a pencil to lightly outline the silhouette of the couple. Focus on the negative space between their faces—the ‘kiss’ gap needs to be distinct. -
Refine the shapes:
Pay attention to clothing details like the drape of a dress or the sharp line of a suit jacket. I usually step back a few feet here to check that the proportions look natural against the horizon. -
Outline the foreground:
Sketch in some rough shapes for bushes or tall grass along the bottom edge to ground the figures.
Clean Lines Hack
Struggling with steady hands? Use a Posca paint marker or black permanent marker to outline the intricate facial profiles before filling them in with paint.
Step 3: Painting the Silhouettes
-
Mix a rich dark tone:
Instead of using pure black, mix Mars Black with a touch of Burnt Umber. This creates a warmer, more natural silhouette color that looks less harsh. -
Paint the bodies:
Using a medium filbert brush, fill in the larger areas of the figures (torsos and legs). Apply the paint opaquely; you may need a second coat to ensure no sky shows through. -
Detail the profiles:
Switch to your smallest round brush. Carefully paint the profiles of the faces, working slowly to keep the edges crisp. The noses, chins, and foreheads define the likeness. -
Add clothing texture:
If you want the subtle suggestion of texture, like the polka dots seen on the dress, mix a slightly lighter grey-black. Dab tiny, barely visible dots onto the dress area. They should be subtle, not bright white. -
Paint the foliage:
Use a fan brush or stippling motion with your dark mix to create the bushes and grass at the bottom. Allow some ‘leaves’ to overlap the bottom of the figures’ legs to settle them into the scene. -
Final touches:
Stand back and check for any pinholes of light in your dark areas. Fill them in, and ensure the space between the couple’s faces remains clean and blue. -
Varnish and protect:
After the painting has cured for at least 24 hours, apply a coat of satin or matte varnish to unify the sheen of the dark and light paints.
Add a Golden Hour Glow
Make it warmer by glazing a very thin, translucent layer of yellow-orange paint right at the horizon line before you paint the black silhouettes.
Now you have a timeless romantic keepsake to display or gift to your favorite couple
Recreate Your Proposal in Simple Shapes
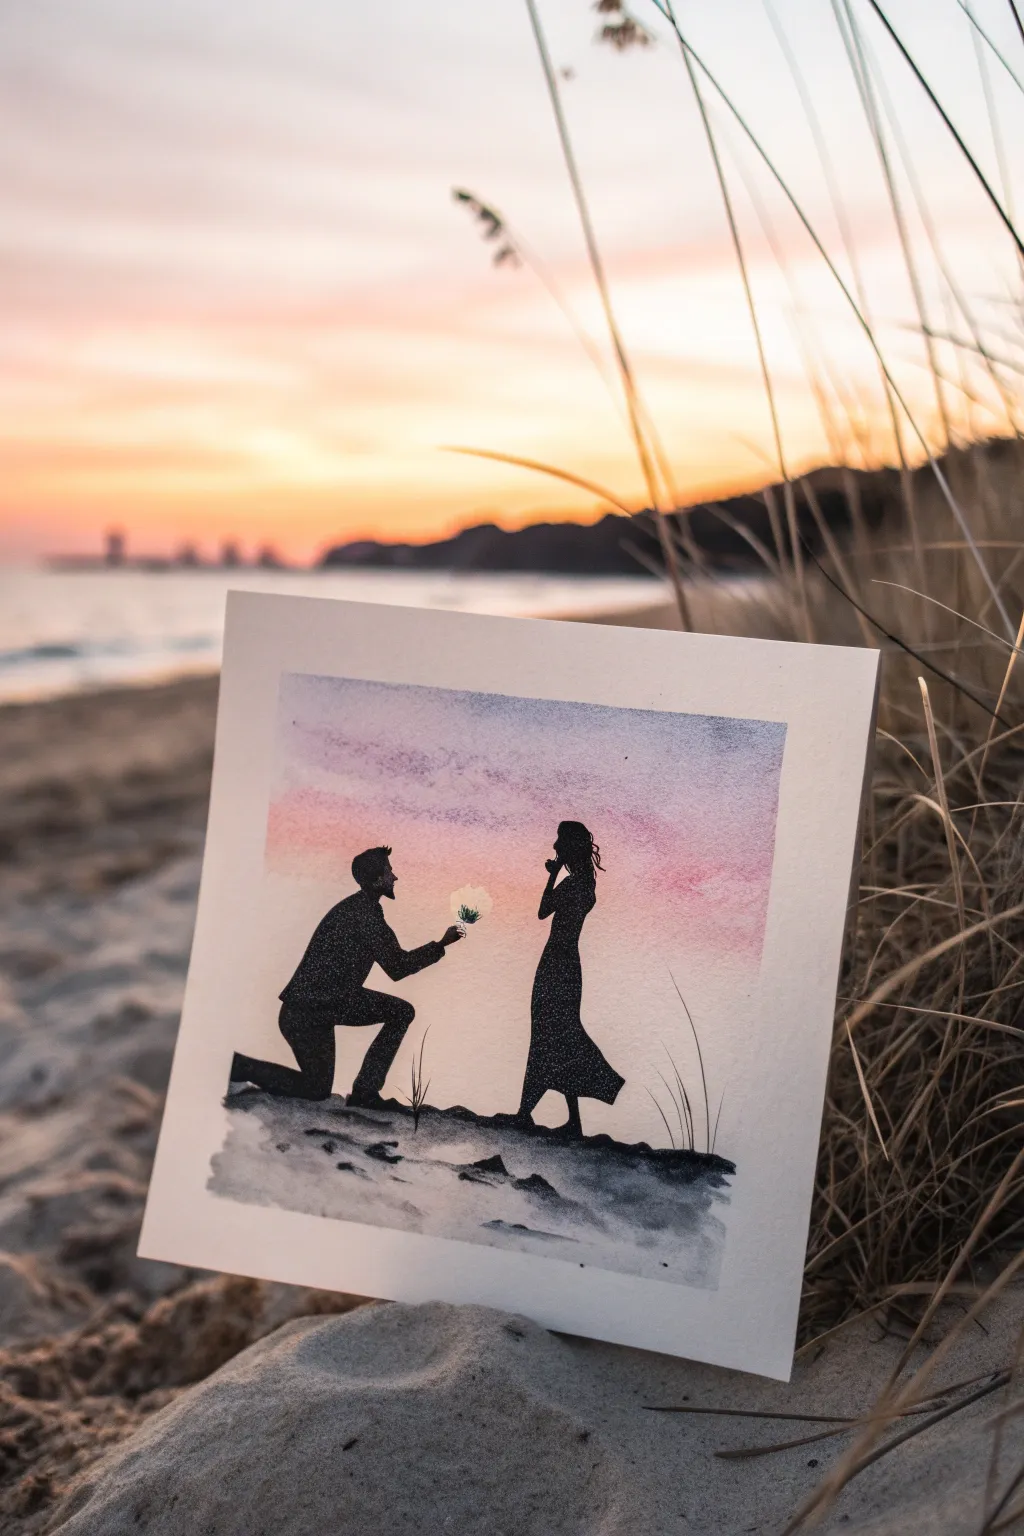
Immortalize a special memory with this striking silhouette painting, capturing the emotion of a proposal against a vibrant watercolor sunset. The contrast between the soft, blended sky and the crisp, dark figures creates a dramatic and timeless piece of art.
How-To Guide
Materials
- Square watercolor paper (ideally 300gsm cold press, roughly 6×6 or 8×8 inches)
- Watercolor paints (shades of pink, purple, violet, and indigo)
- Black gouache or waterproof black India ink
- Pencil (HB or H)
- Masking tape
- Painter’s tape or drawing board
- Soft round watercolor brushes (size 6 or 8 for washes)
- Fine detail brush (size 0 or 00 for silhouettes)
- Two jars of water
- Paper towels
Step 1: Preparing the Sky
-
Secure the paper:
Tape your square watercolor paper down to a board or table using masking tape along all four edges. This creates a clean white border and prevents the paper from buckling when wet. -
Wet the surface:
Using your larger round brush and clean water, apply an even coat of water across the upper two-thirds of the paper where the sky will be. The paper should be glisten, but not hold puddles. -
Apply the initial glow:
While the paper is wet, drop in a diluted, pale pink near the horizon line, which is about one-third up from the bottom. Let the color bloom naturally upwards. -
Build the gradient:
Above the pink, introduce a soft violet or purple. Use horizontal strokes to blend it slightly into the pink below, ensuring a smooth transition without harsh lines. -
Darken the upper sky:
At the very top, mix a deeper indigo or blue-violet. Apply this to the top edge and let it diffuse downwards into the purple layer, creating a twilight effect. -
Define the horizon:
While the sky is still damp, you can add a very faint, watery line of purple or grey at the horizon to suggest distant land or water, but keep it soft. -
Create the ground texture:
For the sandy ground below the horizon line, use a dry brush technique. Take a grey-blue mix with very little water on your brush and lightly drag it across the bottom third of the paper to create rough, textured strokes that resemble sand. -
Allow to dry completely:
Let the background paint dry fully. The paper must be bone-dry before you start drawing the silhouettes, or the ink will bleed. You can use a hair dryer on a low setting if you’re impatient.
Uneven Coverage?
If your black silhouette looks patchy or streaky after drying, don’t worry. Simply apply a second thin coat of black gouache or ink over the first layer to get that solid, opaque look.
Step 2: Painting the Silhouettes
-
Sketch the figures:
Lightly sketch the outlines of the couple with an H pencil. Draw the man kneeling on the left and the woman standing on the right. Keep the lines faint so they don’t show through later. -
Refine the poses:
Double-check the proportions. Ensure the kneeling figure’s extended arm aligns with the standing figure’s eye line or chest height to make the interaction look natural. -
Outline with black:
Switch to your fine detail brush (size 0) and black gouache or ink. Carefully trace the outer edges of your penciled figures. A steady hand is key here. -
Fill in the kneeling figure:
Once outlined, fill in the body of the kneeling man with solid black. Ensure the coverage is opaque; adding a second layer of gouache might be necessary if the first looks streaky. -
Fill the standing figure:
Repeat the process for the standing woman, paying close attention to the details of her dress and hair. These small shapes define the silhouette’s character. -
Add the ring detail:
Paint the small box in the man’s hand. If you want the ‘sparkle’ effect shown in the image, leave a tiny pin-prick of white paper unpainted, or add a dot of white gel pen later. -
Ground the figures:
Paint a thin, irregular shadow line underneath their feet connecting them to the textured ground. This prevents them from looking like they are floating in mid-air. -
Add subtle foreground details:
Using the very tip of your fine brush, flick a few tiny blades of grass or uneven bumps along the ground line near their feet to integrate them into the scene.
Custom Touch
Personalize the silhouettes! Adjust hair length, clothing shape (like a dress vs. pants), or add props like a pet sitting nearby to match the real couple you are depicting.
Step 3: Final Touches
-
Erase pencil marks:
Wait until the black paint is 100% dry. Gently erase any visible pencil sketch marks around the edges of the silhouettes. -
Peel the tape:
Slowly peel away the masking tape at a 45-degree angle, pulling away from the painting to ensure a crisp, clean border.
Frame this delicate piece in a simple floating glass frame to really let the light shine through the painted sky
Day-and-Night Diptych With the Same Couple Pose

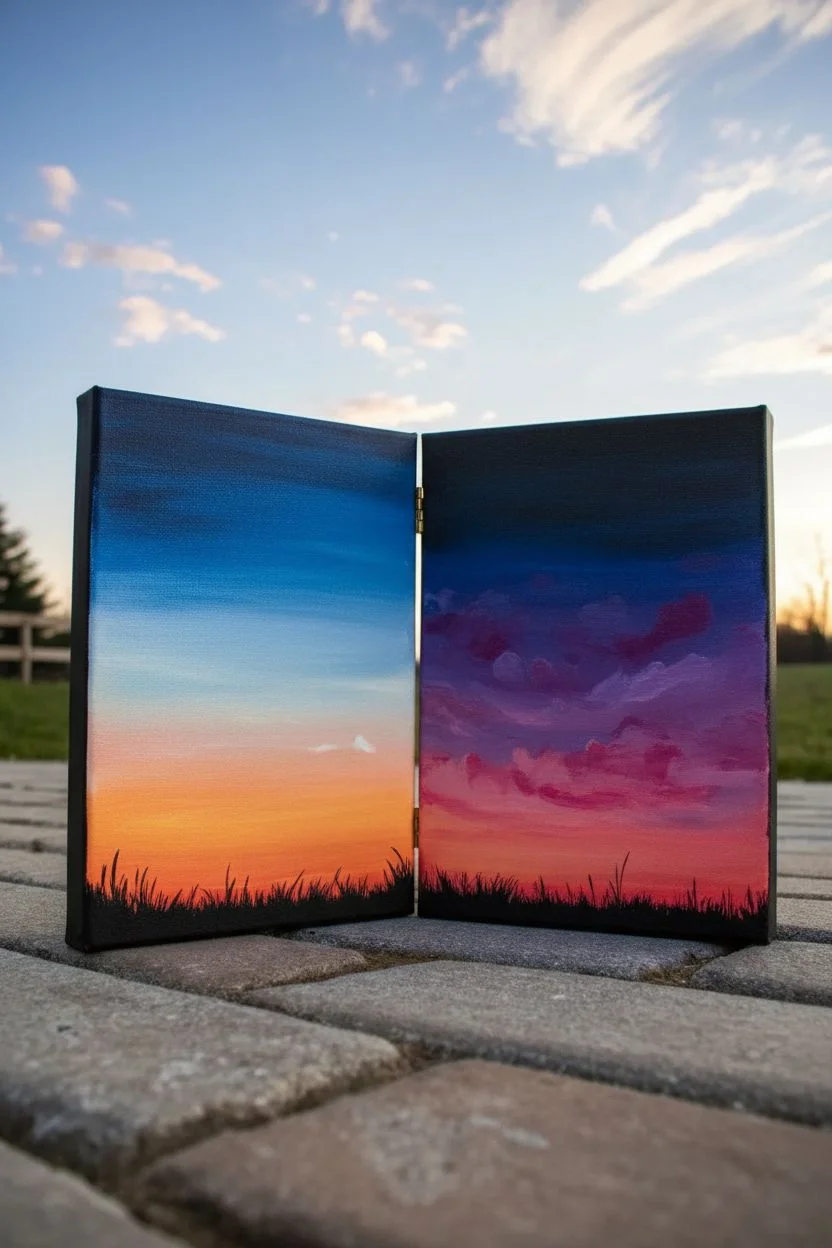
Capture the magic of romance spanning from sunset to starry night with this creative hinged canvas project. By painting a continuous silhouette across two panels, you create a beautiful storybook effect that stands upright on its own.
Step-by-Step Tutorial
Materials
- Two 8×10 or 9×12 inch stretched canvases
- Two small brass hinges with screws
- Screwdriver
- Acrylic paints (Titanium White, Mars Black, Phthalo Blue, Dioxazine Purple, Magenta, Cadmium Orange, Cadmium Yellow)
- Flat brushes (1-inch and 1/2-inch)
- Fine liner brush (size 0 or 00)
- Old toothbrush (for stars)
- Pencil and eraser
- Palette or paper plate
- Cup of water and paper towels
Step 1: Preparation and Base Gradient
-
Hingle Assembly First:
Before painting, align your two canvases side-by-side with their back edges touching. Mark and screw in your two brass hinges so the canvases open and close like a book. This ensures the horizon lines will match perfectly later. -
Open and Prep:
Open the canvases flat on your work surface. If the gap between them bothers you while painting, you can place a piece of tape on the back to hold them steady, but the hinges should do the work. -
Left Panel Sky – Top:
Start on the left canvas. Mix Phthalo Blue with a touch of White. Paint the top third using horizontal strokes, keeping the blue deeper at the very top edge. -
Left Panel Sky – Middle:
Blend the blue down into a lighter mix of White and a tiny dot of Blue. While the paint is still wet, introduce a very light wash of Orange near the middle to begin the sunset transition. -
Left Panel Sky – Horizon:
Near the bottom third, paint a vibrant gradient of Cadmium Orange mixing into Cadmium Yellow at the lowest point of the sky. Blend upwards into the blue using a clean, dry brush to create a soft, hazy transition. -
Right Panel Sky – Top:
Moving to the right canvas, start with a much darker mix. Combine Phthalo Blue, Dioxazine Purple, and a touch of Black for a deep midnight blue at the top corners. -
Right Panel Sky – Transition:
As you move down the right canvas, lighten the mixture with Magenta and purple. You want a galaxy feel here, so don’t blend as smoothly as the day side; let the colors swirl slightly. -
Right Panel Sky – Horizon:
At the bottom of the right canvas, blend a deep pinkish-orange that hints at the leftover sunset, ensuring the horizon color roughly coordinates with the right side of the left panel.
Smoother Blending
If your acrylics dry too fast while blending the sunset gradient, mix in a drop of acrylic retarder or keep a spray bottle handy to lightly mist the canvas as you work.
Step 2: Details and Silhouettes
-
Painting the Milky Way:
On the right panel, mix a watery White paint. Using a brush, dab a diagonal ‘cloud’ of white gently across the sky. I find using my finger to smudge the edges makes it look more ethereal and gaseous. -
Adding Stars:
Dip an old toothbrush into thinned white paint. Test it on a paper towel first, then flick the bristles to spray fine stars over the darker areas of the right panel and the very top of the left panel. -
Creating Sparkles:
Use your fine liner brush to paint a few distinct, larger four-point stars (cross shapes) in the darkest parts of the night sky for extra magic. -
Drafting the Couple:
Once the background is completely dry, lightly sketch the couple’s silhouette on the left panel with a pencil. Focus on the profiles of the faces and the seated posture. -
Painting the Couple:
Fill in your pencil sketch with Mars Black. Use your smallest brush for the noses, lips, and hair texture. Take your time to get the edges sharp against the sunset background. -
Adding the Grass:
Paint a solid black strip along the very bottom of both canvases to ground the scene. Use the liner brush to flick quick, upward strokes to create blades of grass sticking up. -
The Tree Silhouette:
On the right panel, paint a bare tree silhouette rising from the grass. Use the fine liner to create spindly, delicate branches that reach up into the stars. -
Final Connection:
Double-check that the grass line looks continuous when the ‘book’ is opened to your preferred display angle. Add more grass blades near the center seam to help bridge the gap visually.
Personalize the Story
Hide your initials or a significant date in the constellations on the right panel. Use the star splatter technique sparingly in that spot to make the letters stand out.
Display your romantic masterpiece on a shelf where the hinge allows it to stand freely, telling a story of love that lasts from day until night
Abstract Color Blocks Framing a Minimal Couple Line Drawing
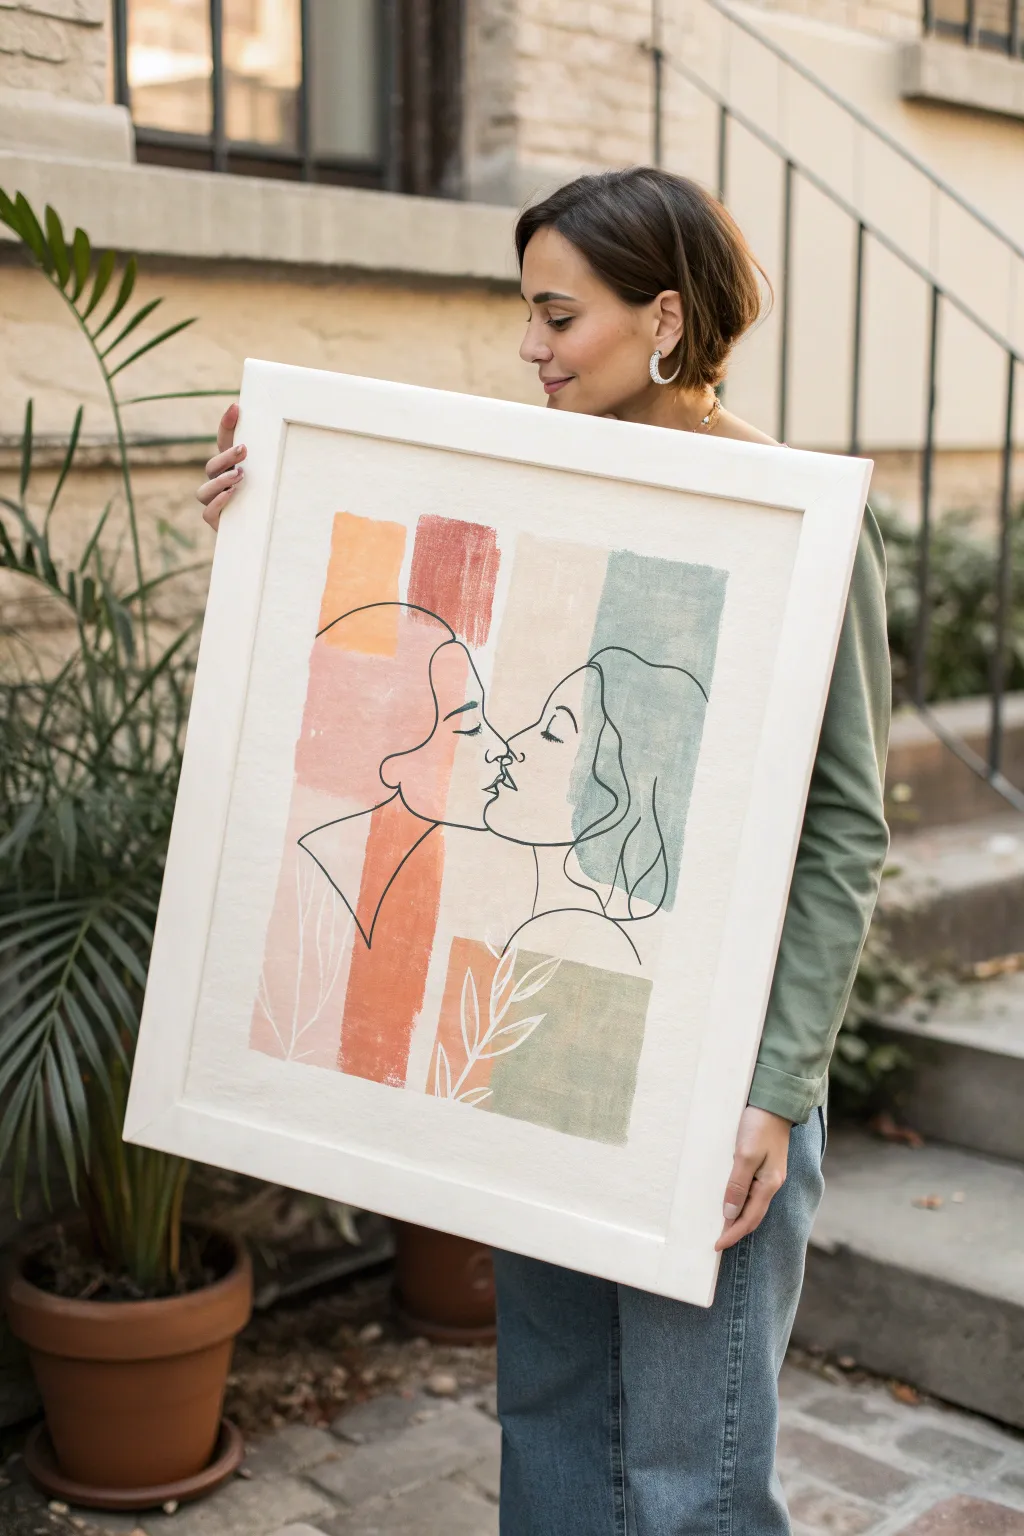
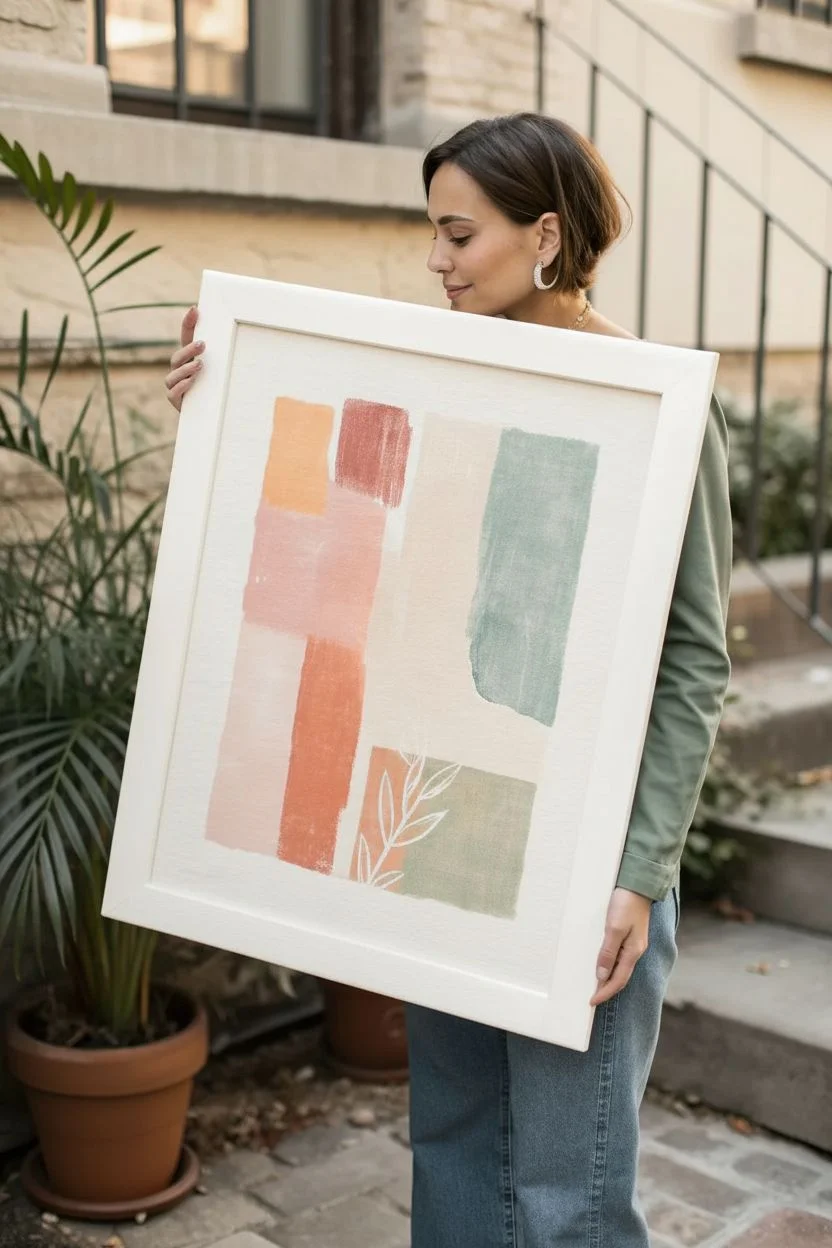
This project marries trendy abstract color blocking with the classic romance of minimal line art. The result is a soft, earthy statement piece that looks professionally printed but is wonderfully simple to hand-paint using basic acrylics.
Step-by-Step Guide
Materials
- Large stretched artist canvas (approx. 24×30 inches)
- Acrylic paints (terracotta, burnt orange, muted sage green, beige/cream, black)
- Wide flat paintbrush (2-inch)
- Fine liner paintbrush or black medium-point paint marker
- White paint marker or fine brush
- Pencil and eraser
- Masking tape or painter’s tape
- Ruler
- Palette or paper plate
- Paper towels and water cup
Step 1: Creating the Abstract Background
-
Prepare your palette:
Mix your acrylic colors to achieve that earthy, boho palette. You’ll want a muted sage green (mix green with a touch of grey/white), a warm terracotta (orange mixed with a tiny bit of brown), a brighter peach-orange, and a soft beige. -
Plan placement:
Visualize the vertical rectangular blocks on your canvas. They don’t need to be perfectly measured, but using a ruler and a pencil to lightly mark the general columns helps keep things balanced. -
First block application:
Dip your wide flat brush into the terracotta paint. Apply the first vertical rectangle on the left side. Don’t worry about perfect edges; a slightly rough, ‘dry brush’ texture at the top and bottom adds character. -
Add color variety:
Clean your brush and move to the peach-orange shade. Paint a block next to or slightly overlapping the first one to create depth. -
Painting the cool tones:
Using the sage green, paint a large rectangular block on the right side of the canvas. Keep your brush strokes vertical to maintain a cohesive direction in the texture. -
Fill the gaps:
Use the beige or cream paint to fill in the central column or any negative space between your main colors. This neutral tone grounds the brighter colors. -
Layering for texture:
Once the first layer is tacky but not fully dry, go back over some areas with a slightly lighter or darker version of the same color. Scumble the brush around to create that vintage, worn look. -
Dry completely:
Let the background dry thoroughly. This is crucial before moving to the line art phase so your black lines remain crisp. I usually wait at least an hour.
Uneven Coverage?
If the background looks too streaky, let it dry and add a second coat. A little transparency is good for the watercolor effect, but you want solid color intensity.
Step 2: Adding Line Art and Details
-
Sketch the silhouette:
Lightly sketch the outline of two faces kissing in the center of the canvas using a pencil. Focus on the profiles: the forehead, nose, lips, and chin. Keep the lines continuous where possible. -
Refine the lines:
Step back and check proportions. The drawing should span across the different color blocks, unifying them. -
Trace with black:
Using a fine liner brush with black acrylic paint (slightly thinned with water for flow) or a black paint marker, carefully trace over your pencil lines. -
Varying line weight:
Try to keep a steady hand, but allow for slight variations in line thickness to mimic a hand-drawn sketch style. -
Add hair details:
Continue the line work to suggest hair on both figures. Keep these lines wavy and loose, letting them fade out towards the bottom. -
Botanical accents:
Switch to a white paint marker or fine brush with white paint. Draw simple botanical stems or leaves overlapping the bottom sections of the color blocks. -
Final touches:
Add a few more subtle white lines or abstract marks if needed to balance the composition, but remember that less is often more with this style. -
Erase guidelines:
Once the black and white paint is 100% dry, gently erase any visible pencil sketch marks.
Smooth Lines Tip
Use a paint marker instead of a brush for the line art. It gives you way more control, prevents accidental drips, and creates a consistent, modern line weight.
Hang your new masterpiece in a bright spot where the earthy tones can warm up the room
Handprints With a Tiny Couple Scene Inside
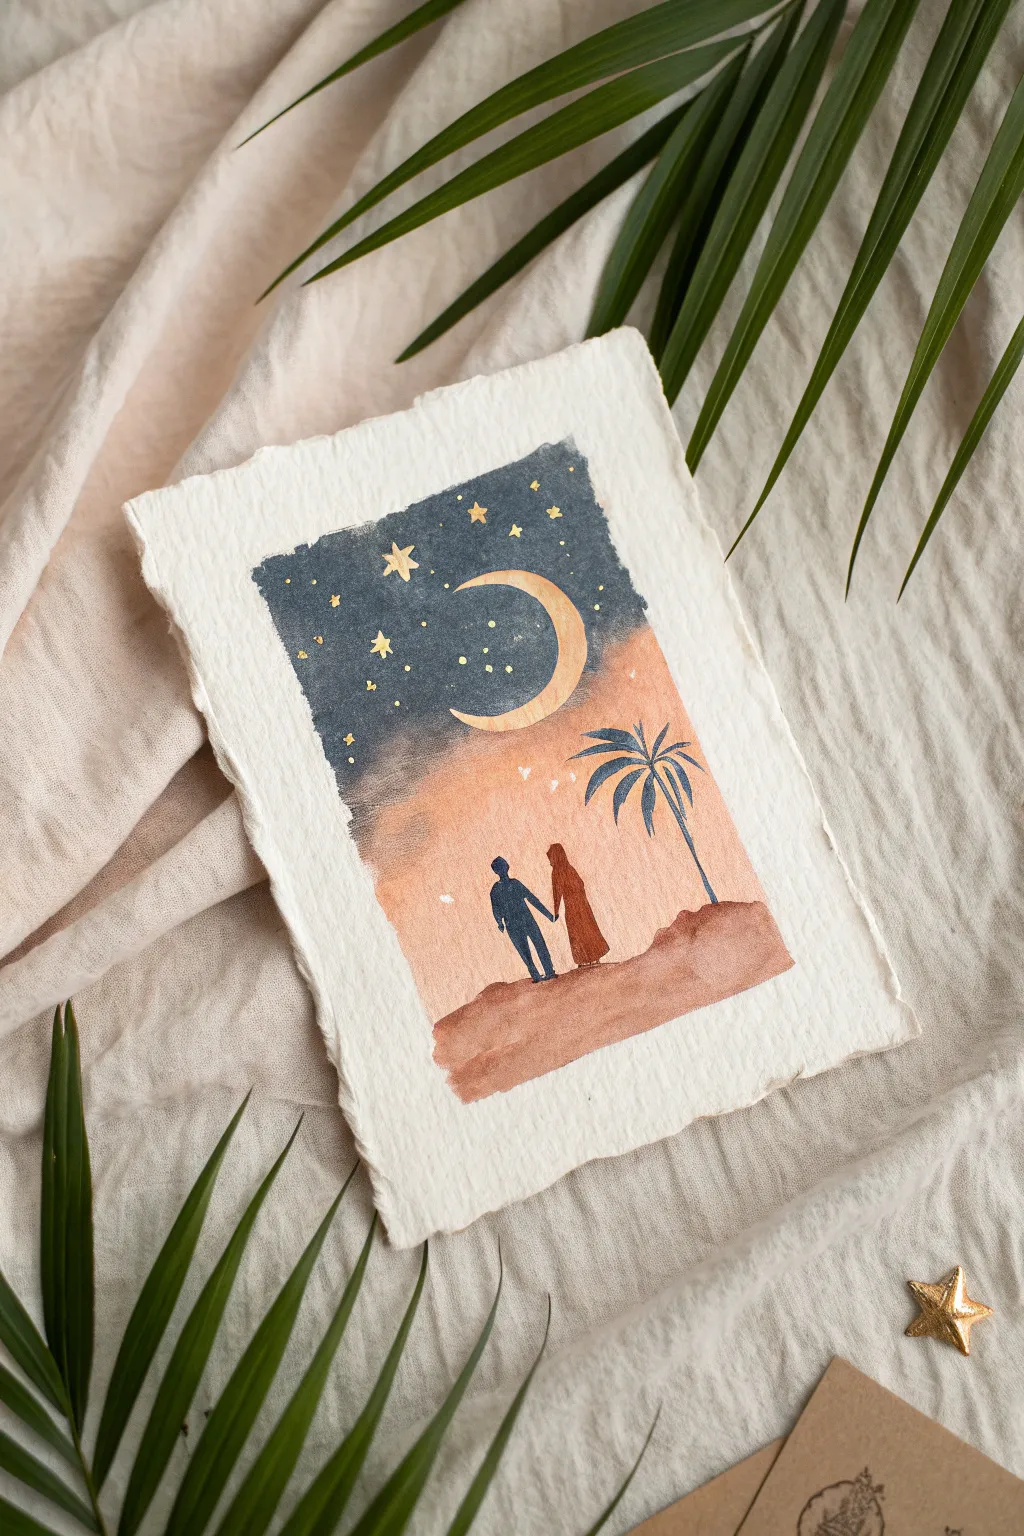
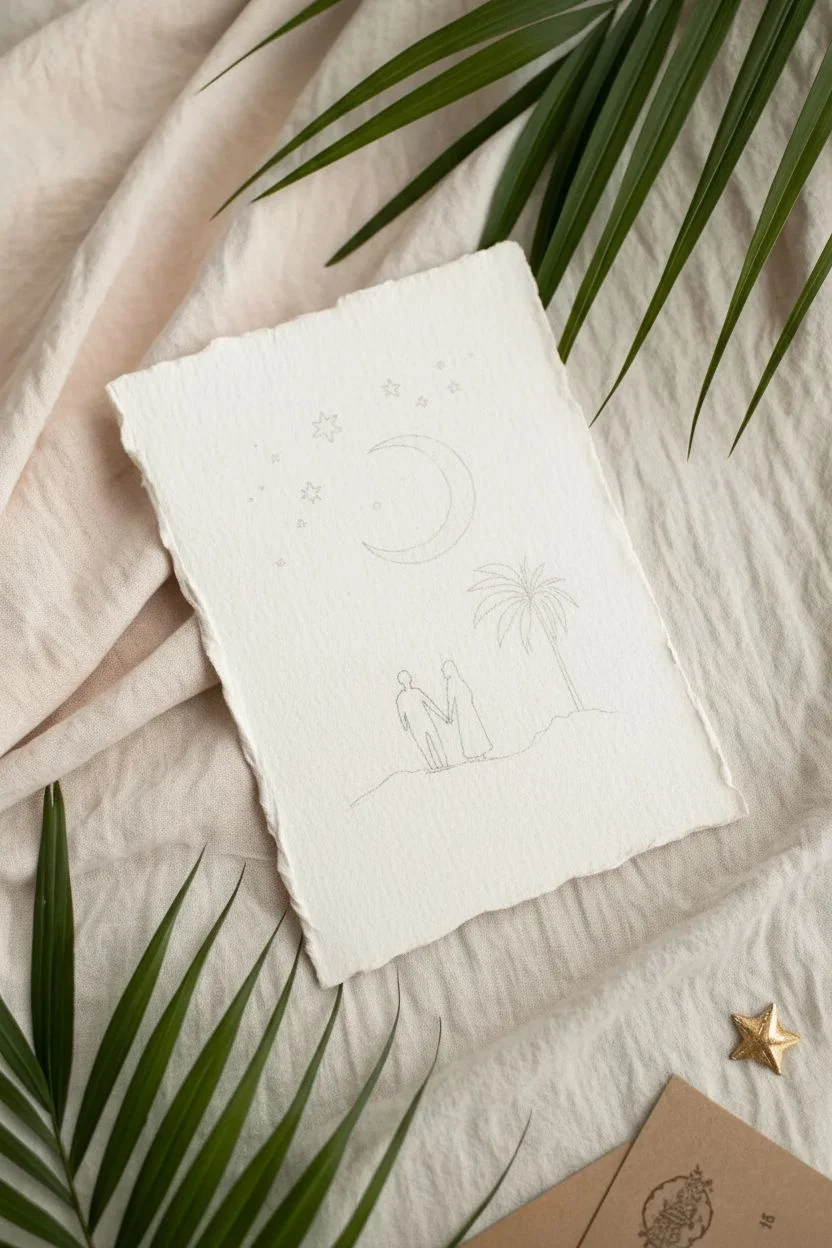
This charming watercolor study features a silhouette of a couple holding hands beneath a glowing crescent moon and a star-studded sky. The blend of deep indigo, soft peach, and warm terracotta creates a dreamy, romantic atmosphere perfect for a heartfelt gift.
How-To Guide
Materials
- Handmade deckle-edge watercolor paper (A5 size)
- Watercolor paints (Indigo, Peach/Light Orange, Terracotta/Burnt Sienna, Gold Metallic)
- White opacity gouache or white gel pen (optional)
- Fine detail brush (size 0 or 00)
- Flat wash brush (size 6 or 8)
- Pencil and eraser
- Masking tape (optional for stabilizing)
- Palette for mixing
Step 1: Preparation and Sketching
-
Paper Selection:
Choose a thick, handmade cotton rag paper with a rough deckled edge to replicate the rustic, textured look seen in the example. -
Rough Sketching:
Lightly sketch the horizon line for the dunes and the placement of the moon using a pencil. -
Positioning the Figures:
Sketch the tiny silhouettes of the couple holding hands. Keep the shapes simple—a woman in a long dress and a man in trousers. -
Adding the Palm:
Draw the trunk and overarching fronds of the palm tree to the right of the couple.
Uneven Gradients?
If the sky colors aren’t blending smoothly, re-wet the area slightly with clean water and tilt the paper to encourage the pigments to move and mix naturally.
Step 2: Painting the Sky Gradient
-
Preparing the Colors:
Mix a deep indigo blue for the night sky and a soft, watery peach for the sunset horizon. -
Applying the Horizon:
Start with the peach color near the horizon line (above the dunes). Use a wet-on-dry technique to keep the bottom edge crisp but let the top edge stay wet. -
Adding the Night Sky:
While the peach is slightly damp but not soaking, begin painting the top of the sky with your deep indigo. -
Creating the Blend:
Gently pull the indigo paint downward to meet the peach section. Allow the colors to bleed slightly into each other for a smoky transition, but try to keep the area immediately around the moon lighter. -
Painting the Moon:
Once the sky is dry enough that paint won’t run, carefully paint the crescent moon shape with a mix of yellow ochre or gold watercolor.
Step 3: Landscape and Silhouettes
-
Painting the Dune:
Mix a warm terracotta or burnt sienna shade. Paint the sand dunes at the bottom, carefully going around the feet of your sketched figures. -
Coloring the Palm Tree:
Use a darker blue-grey or diluted indigo to paint the palm tree trunk and fronds. Use the tip of your fine brush to get sharp, leafy edges. -
Painting the Couple:
Fill in the male figure with a dark navy blue (almost black) and the female figure with a deep rust or brownish-red to distinguish them. -
Refining Silhouettes:
Go back with your tiniest brush to sharpen the details of their joined hands and shoulders.
Gold Paint Trick
For the brightest stars, apply a tiny dot of white gouache first, let it dry, and then layer your metallic gold paint on top for extra opacity.
Step 4: Celestial Details
-
Adding Stars:
Load a small brush with metallic gold paint. Paint small five-point stars scattered across the dark blue section of the sky. -
Tiny Stardust:
Add tiny dots of gold or white gouache around the larger stars to create a sense of a distant galaxy. -
Final Highlights:
I like to add very subtle white highlights to the top of the palm leaves or the moon’s curve to make them pop. -
Drying:
Let the entire piece dry completely flat to prevent the thick paper from buckling too much.
Frame this delicate piece in a floating glass frame to show off those beautiful rough edges


Have a question or want to share your own experience? I'd love to hear from you in the comments below!