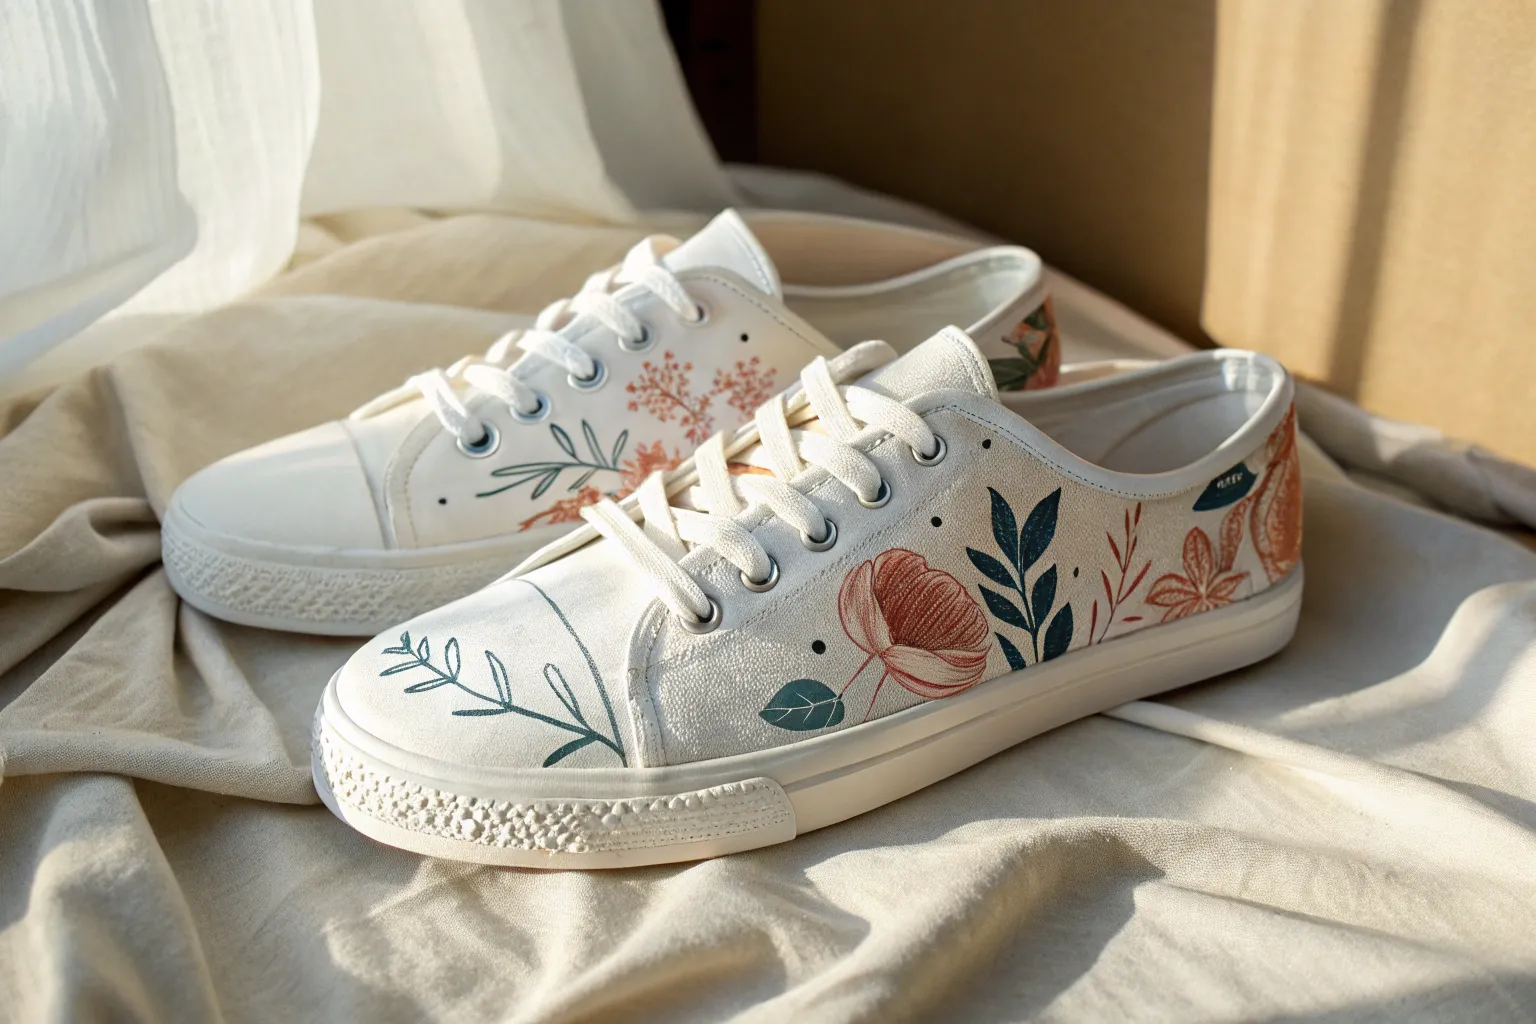
Plain white sneakers are basically tiny canvases you can take out into the world. Here are my favorite simple shoe painting ideas that look impressive but stay totally doable, even if you’re a beginner.
Classic Two-Color Color Blocking
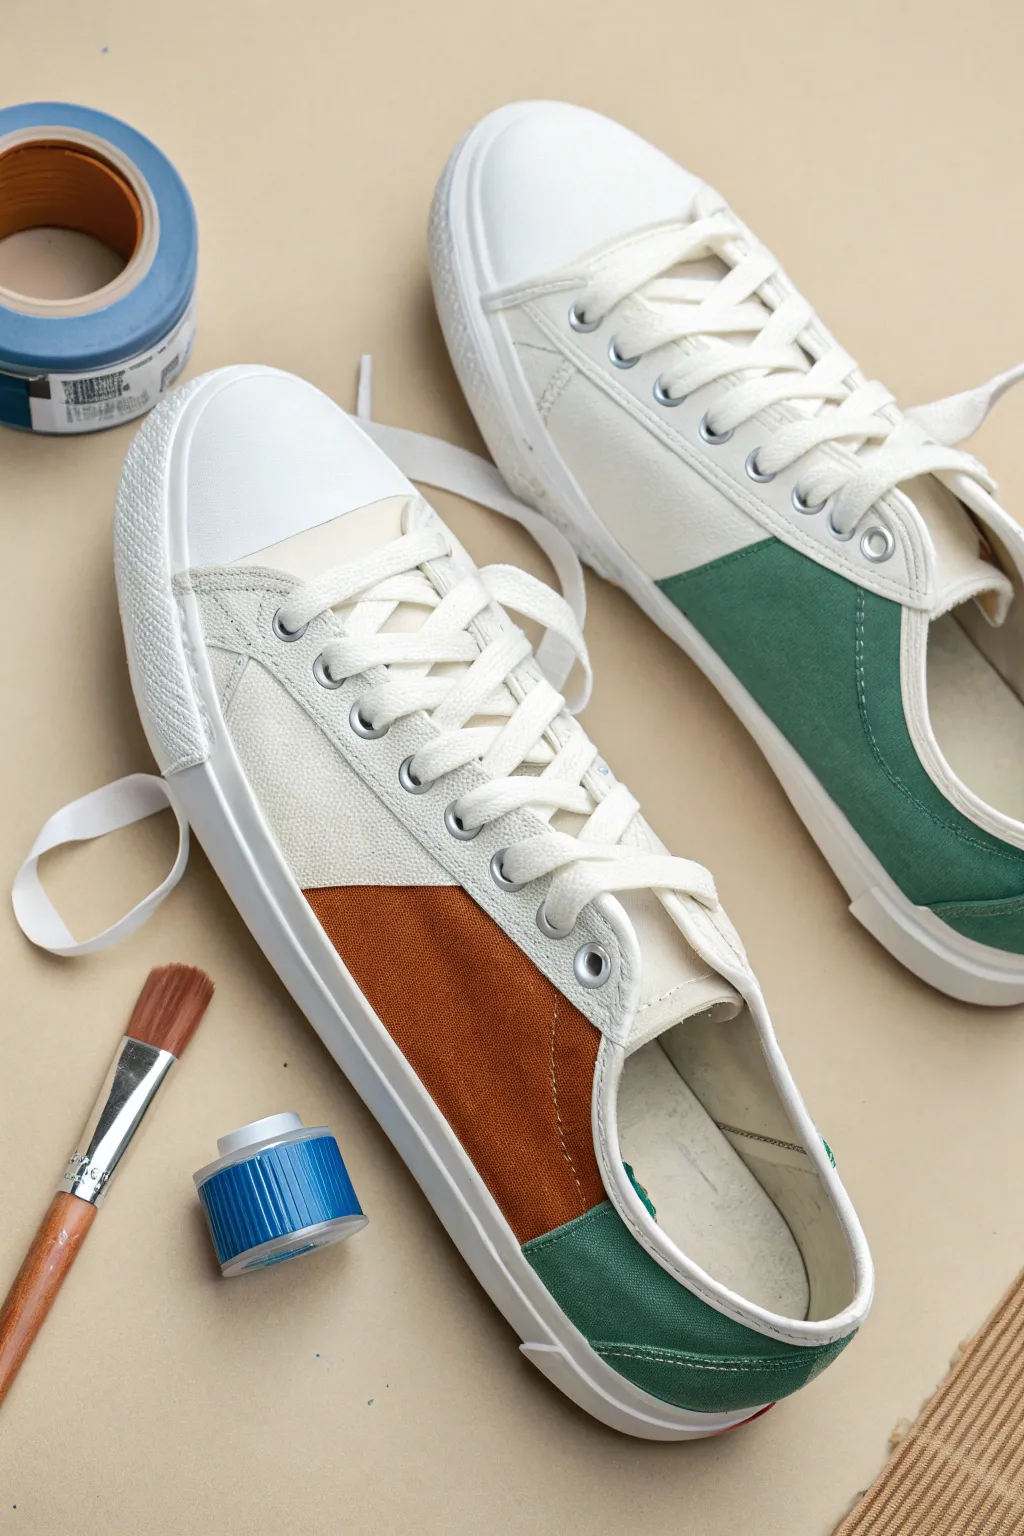
Give simple white canvas sneakers a sophisticated upgrade with this clean color-blocking technique. By combining warm rusty brown and cool distinct green, you can achieve a modern, minimalist look perfect for everyday wear.
Step-by-Step Tutorial
Materials
- White or cream canvas sneakers
- Painter’s tape or masking tape (approx 1-inch width)
- Fabric medium
- Acrylic paint (Burnt Sienna/Rust)
- Acrylic paint (Dark Forest Green)
- Flat shader brush (size 6 or 8)
- Small round detail brush
- Cup of water
- Paper towels
- Hairdryer (optional, for faster drying)
Step 1: Preparation & Mapping
-
Remove laces:
Begin by removing the shoelaces completely from both shoes to ensure you have full access to the canvas panels and to keep the laces clean. -
Stuff the shoes:
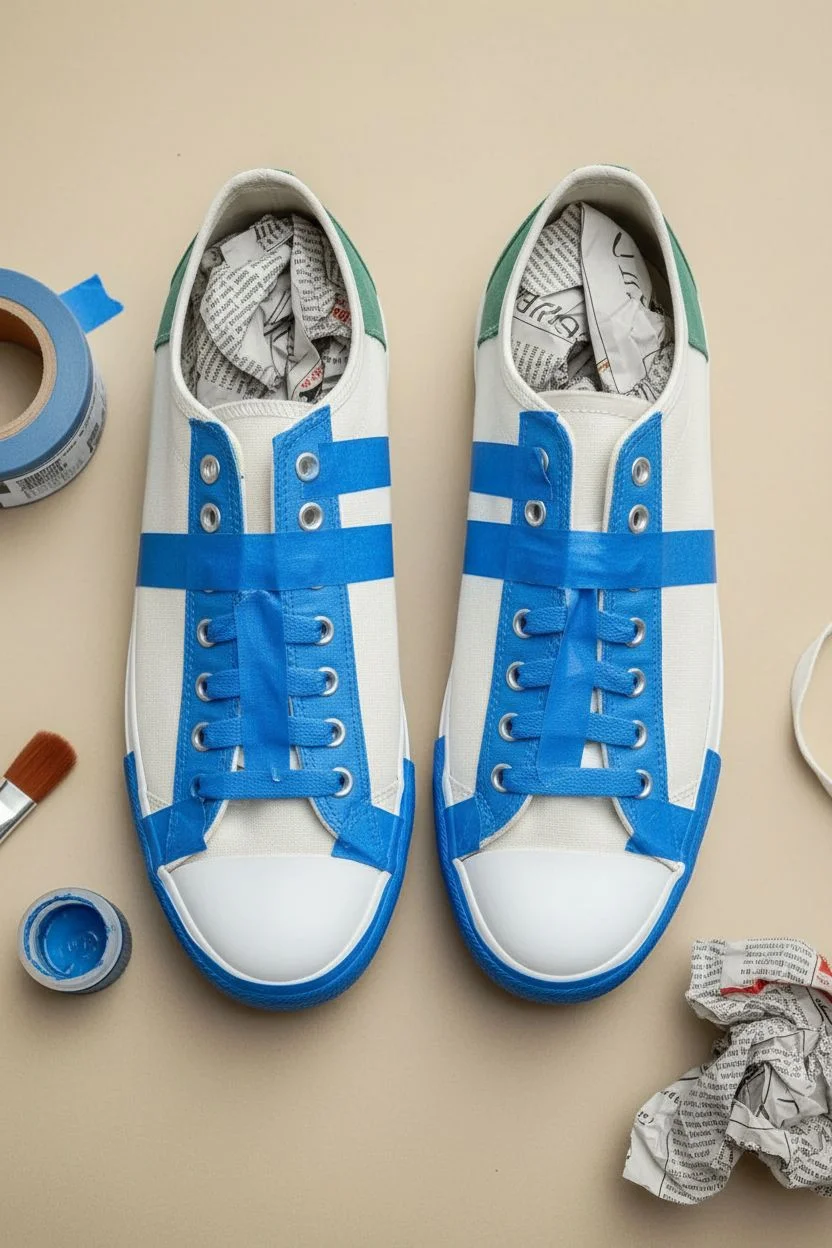
Stuff the inside of the sneakers with old newspaper, plastic bags, or clean rags. This creates a solid surface to paint against and keeps the shoe’s shape rigid while you work. -
Clean surface:
Even if the shoes are new, wipe the canvas down quickly with a slightly damp cloth to remove any factory dust or lint. -
Tape the soles:
Apply strips of painter’s tape carefully along the rubber sidewalls (the foxing) where the canvas meets the sole. Press the edge down firmly with your thumbnail to prevent paint seepage. -
Isolate the side panel:
Identify the side panel you want to paint rust-brown. Use tape to mask off the front toe area and the eyelet strip (where the laces go). Create a sharp, straight vertical line with the tape to define where the color block starts.
Clean Lines Secret
Before painting your color, paint a thin layer of clear medium or white paint over the tape edge. This seals any gaps, ensuring your colored lines come out razor-sharp.
Step 2: Painting the Rust Block
-
Mix fabric medium:
Mix your Burnt Sienna acrylic paint with fabric medium according to the bottle instructions (usually a 1:1 or 2:1 ratio). This ensures the paint stays flexible and doesn’t crack on the shoe. -
Outline the edges:
Using your flat shader brush, carefully paint a thin outline along the taped edges of the side panel area. This helps seal the tape line. -
Fill in the block:
Fill in the rest of the defined side panel with the rust mixture. Use smooth, even strokes following the grain of the canvas. -
Check for coverage:
Let the first coat dry to the touch (about 15-20 minutes). If the white canvas is still showing through, apply a second thin coat for opaque coverage. -
Remove tape immediately:
While the paint is still slightly tacky (not fully sticking, but not wet), carefully peel back the tape to ensure a crisp line. If you wait until it’s bone dry, it might peel up the paint.
Stitch Accent
Instead of painting over the stitching, try to carefully paint around it or use a gel pen to trace the white stitches afterward for a high-contrast, detailed effect.
Step 3: Painting the Green Heel
-
Dry time:
Wait until the rust section is completely dry before moving near it. I personally like to use a hairdryer on a cool setting for a minute to speed this up. -
Mask the heel:
Apply fresh tape along the vertical stitching that separates the heel counter from the main body of the shoe. You want a distinct line separating where the green will go. -
Protect the interior:
Put a small piece of tape inside the heel collar to protect the inner lining from accidental brush slips. -
Mix green paint:
Prepare your Dark Forest Green paint by mixing it with the fabric medium, just as you did before. -
Paint the heel:
Apply the green mixture to the heel section. Be very careful around the curve of the sole; you can switch to the small detail brush here for precision near the rubber. -
Second coat:
Apply a second coat of green if necessary for full saturation. -
Reveal and detail:
Remove the tape from the heel area. If there are any tiny rough edges, you can use the small round brush with a tiny bit of water or white paint to tidy them up.
Step 4: Finishing Touches
-
Remove sole tape:
Once all paint is dry to the touch, slowly remove the tape protecting the rubber soles. -
Heat set:
To make the design permanent and water-resistant, blast the painted areas with a hairdryer on high heat for about 3-5 minutes, keeping it moving so you don’t scorch the canvas. -
Re-lace:
Once the shoes are cool, re-lace them with fresh white laces to make the colors pop.
Step out in style with your custom color-blocked sneakers that look store-bought but are uniquely yours


Polka Dots in a Simple Repeat Pattern
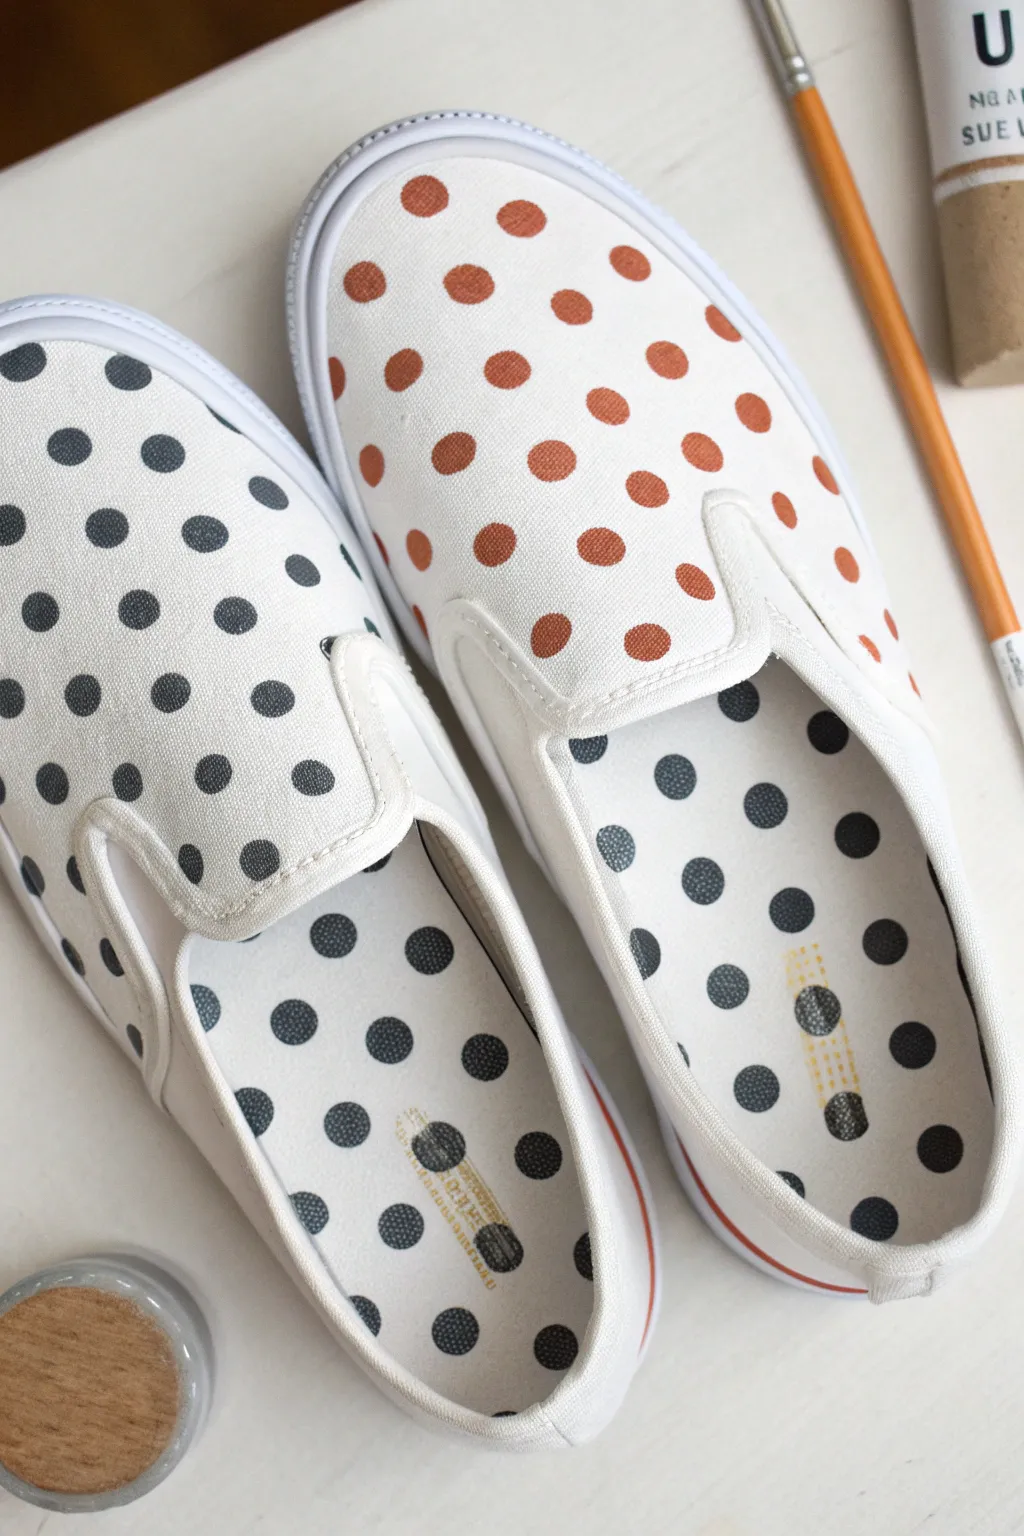

Transform plain white canvas slip-ons into custom statement pieces with this crisp, two-toned polka dot design. The look features a playful yet orderly pattern of burnt orange on one shoe and charcoal grey on the other, extending even onto the insoles for a professional finish.
Step-by-Step Tutorial
Materials
- White canvas slip-on shoes
- Fabric paint or acrylic paint mixed with fabric medium
- Colors: Terracotta/Burnt Orange and Charcoal Grey/Black
- Round sponge pouncers (small size, approx. 1/2 inch)
- Small round bristle brush (for touch-ups)
- Painter’s tape or masking tape
- Paper plate or palette
- Hairdryer (optional, for faster drying)
- Waterproofing spray or fabric sealant
Step 1: Preparation & Planning
-
Prep the surface:
Ensure your shoes are completely clean and dry. If they are brand new, you can paint directly; if used, give them a quick wash and dry to remove dust. -
Remove or cover insoles:
If the insoles are removable, take them out to paint separately. If they are glued in (like most classic slip-ons), simply prepare to paint them inside the shoe. -
Protect the soles:
Apply strips of painter’s tape along the rubber sidewalls (foxing) where the canvas meets the sole. This prevents accidental smudges while you work near the bottom edge. -
Prepare the pouncers:
Pour a small amount of the terracotta paint onto your palette. Dip your sponge pouncer into the paint, then dab it off several times on a clean part of the plate to ensure an even, thin coat without globs.
Use a Pencil Grid
Nervous about spacing? Lightly mark a grid of small ‘x’s on the canvas with a pencil before painting. Use the eraser end of the pencil to guide where your dots will land.
Step 2: Painting the Exterior
-
Start the center line:
Begin with the right shoe (the orange one). Press your sponge pouncer firmly onto the center of the toe box to create your first dot. -
Create a vertical row:
Working from that center dot, add dots in a straight line moving upwards towards the tongue and downwards towards the toe. -
Establish the pattern:
To create the offset honeycomb pattern, place your next row of dots in the spaces between the dots of the first row (the ‘windows’). -
Maintain spacing:
Keep the spacing consistent by eye; the gap between dots should be roughly equal to the size of the dot itself. -
Fill the sides:
Continue wrapping the pattern around the sides of the shoe, maintaining that offset alignment. Don’t worry if a dot goes partially off the edge near the sole; this makes the fabric look seamless. -
Switch colors:
Grab a fresh pouncer (or wash and thoroughly dry the first one). Load it with charcoal grey paint, dab off the excess, and repeat the same pattern process on the left shoe. -
Detail edges:
For tight spots near the elastic gore or seams where the pouncer feels too clumsy, use a small bristle brush to carefully paint partial circles.
Step 3: Painting the Insoles
-
Mirror the pattern:
Once the exterior is dry to the touch, move to the insoles. You’ll want to swap colors here for a fun contrast: paint grey dots on the orange shoe’s insole, and orange dots on the grey shoe’s insole. -
Stamp the heel:
Press the pouncer gently into the heel area first. Since the surface is curved, roll the sponge slightly to ensure the full circle transfers. -
Work forward:
Continue the pattern forward into the arch area. The deeper toe area won’t be visible when worn, so you only need to paint as far as the eye can easily see. -
Check density:
I find that spacing the dots slightly further apart on the insole keeps the design from looking too cluttered inside the shoe.
Uneven Dot Edges?
If your sponge leaves fuzzy edges, wait for the dot to dry, then use a tiny detail brush to trace the circumference with fresh paint for a crisp, sharp circle.
Step 4: Finishing Touches
-
Clean up:
Peel off the painter’s tape immediately while the paint is still slightly tacky to avoid pulling up dry flakes. -
Fix imperfections:
If any paint bled under the tape onto the rubber sole, use a wet Q-tip or a magic eraser to wipe it away immediately. -
Dry thoroughly:
Let the shoes sit for at least 24 hours. If you want to speed this up, a hairdryer on a low, cool setting helps set the surface. -
Seal the deal:
Once fully cured, heat set the paint with a hairdryer on high for a few minutes, or simply spray with a fabric waterproofing sealant to protect your hard work from puddles.
Step into your new kicks knowing you have a totally unique pair of artistic shoes


Mini Hearts Scattered Like Confetti
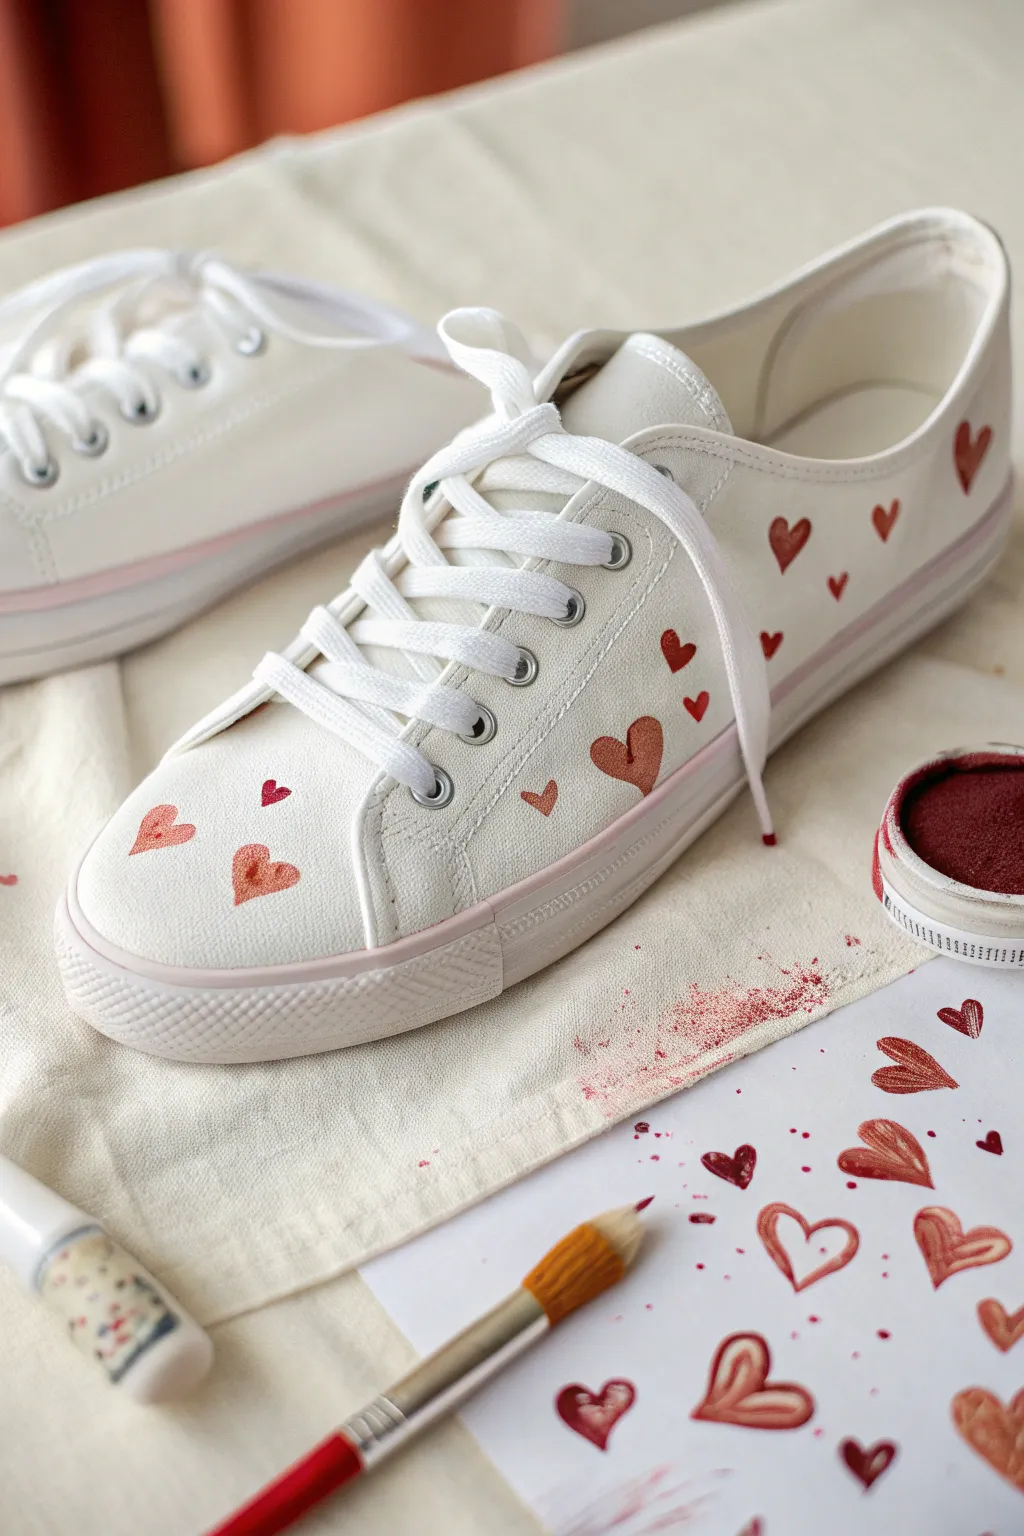

Transform plain white canvas sneakers into a charming statement piece with this sweet and simple heart motif. By scattering hand-painted hearts in varying shades of berry, rose, and rust across the shoe, you create a playful look that feels custom-made but effortless.
Step-by-Step Guide
Materials
- White canvas low-top sneakers
- Fabric paint or acrylic paint mixed with fabric medium (red, burgundy, and white)
- Small round synthetic brush (size 1 or 2)
- Painter’s tape or masking tape
- Practice paper
- Water cup and paper towels
- Pencil (optional)
Step 1: Preparation and Practice
-
Prepare the shoes:
Remove the shoelaces from both sneakers to ensure you have a clear canvas and don’t accidentally get paint on the laces. Stuff the toes with newspaper or paper towels to firm up the surface for easier painting. -
Mask the soles:
Carefully apply painter’s tape along the rubber sole edge where it meets the canvas. This creates a clean barrier so your brushstrokes can go right to the bottom without messy smudges. -
Mix your palette:
Squeeze out small amounts of red and burgundy paint. Create variations by mixing a tiny bit of white into the red to make pink, and mixing red with a touch of burgundy for a deeper rusted tone. You want about 3-4 distinct shades. -
Practice your stroke:
Before touching the shoe, take your practice paper and test painting small hearts. Try doing this with two simple strokes: curve down from the left, lift, then curve down from the right to meet at the bottom point.
Placement Pro Tip
Don’t just paint the flat surfaces; paint a few hearts near the eyelets or wrapping around the back heel seam. These unexpected placements make the design feel professionally printed.
Step 2: Painting the Hearts
-
Start on the toe box:
Pick one of your lighter pink shades to begin. Paint a few widely spaced hearts on the main toe area. Keep them small—about the size of a fingernail or smaller. -
Vary the sizes:
As you add more hearts, intentionally make some slightly larger and others tiny dots. This size variation is key to that scattered confetti look. -
Switch colors:
Clean your brush thoroughly and switch to the classic red shade. Paint new hearts in the empty spaces between your initial pink ones. Don’t worry about perfect alignment; randomness works best here. -
Add deep tones:
Dip into your burgundy or rust-colored paint. Add these darker hearts sparingly, placing them near the edges of the shoe and around the heel cup for contrast. -
Paint the sides:
Work your way along the side panels of the shoe. I find it helpful to angle the hearts slightly differently—some tilting left, some right—so they look like they are tumbling or falling. -
Check the density:
Step back and look at the overall pattern. You want a nice balance of empty white space and clustered hearts. If an area looks too empty, add a tiny speck or micro-heart there. -
Refine the shapes:
Go back over your earlier hearts. If the paint looks thin or the fabric absorbed too much, apply a second coat to make the colors pop and look opaque. -
Detail the edges:
carefully paint partial hearts right along the seams or near the sole tape. This ‘cropped’ effect makes the pattern look like a continuous fabric print.
Oops! Paint Splatter?
If you accidentally drip paint where you didn’t want it, turn that mistake into a new heart immediately while it’s wet, or cover it with opaque white fabric paint once it dries.
Step 3: Finishing Touches
-
Let the paint set:
Allow the paint to air dry completely for at least 24 hours. Don’t rush this, as fabric paint needs time to bond with the fibers. -
Heat set the design:
Once dry, use a hairdryer on a high heat setting for a few minutes, or toss the shoes (in a pillowcase) into a dryer on high heat for 15 minutes to permanently set the paint. -
Remove tape:
Peel off the painter’s tape from the soles slowly. If any paint seeped under, use a damp cotton swab or a little rubbing alcohol to wipe it off the rubber immediately. -
Re-lace:
Put the laces back in. You can stick with the original white laces for a clean look, or switch to red laces to coordinate with your new design.
Lace up your lovely new kicks and enjoy walking around in your own custom artwork


Simple Leaf Vines Up the Sides
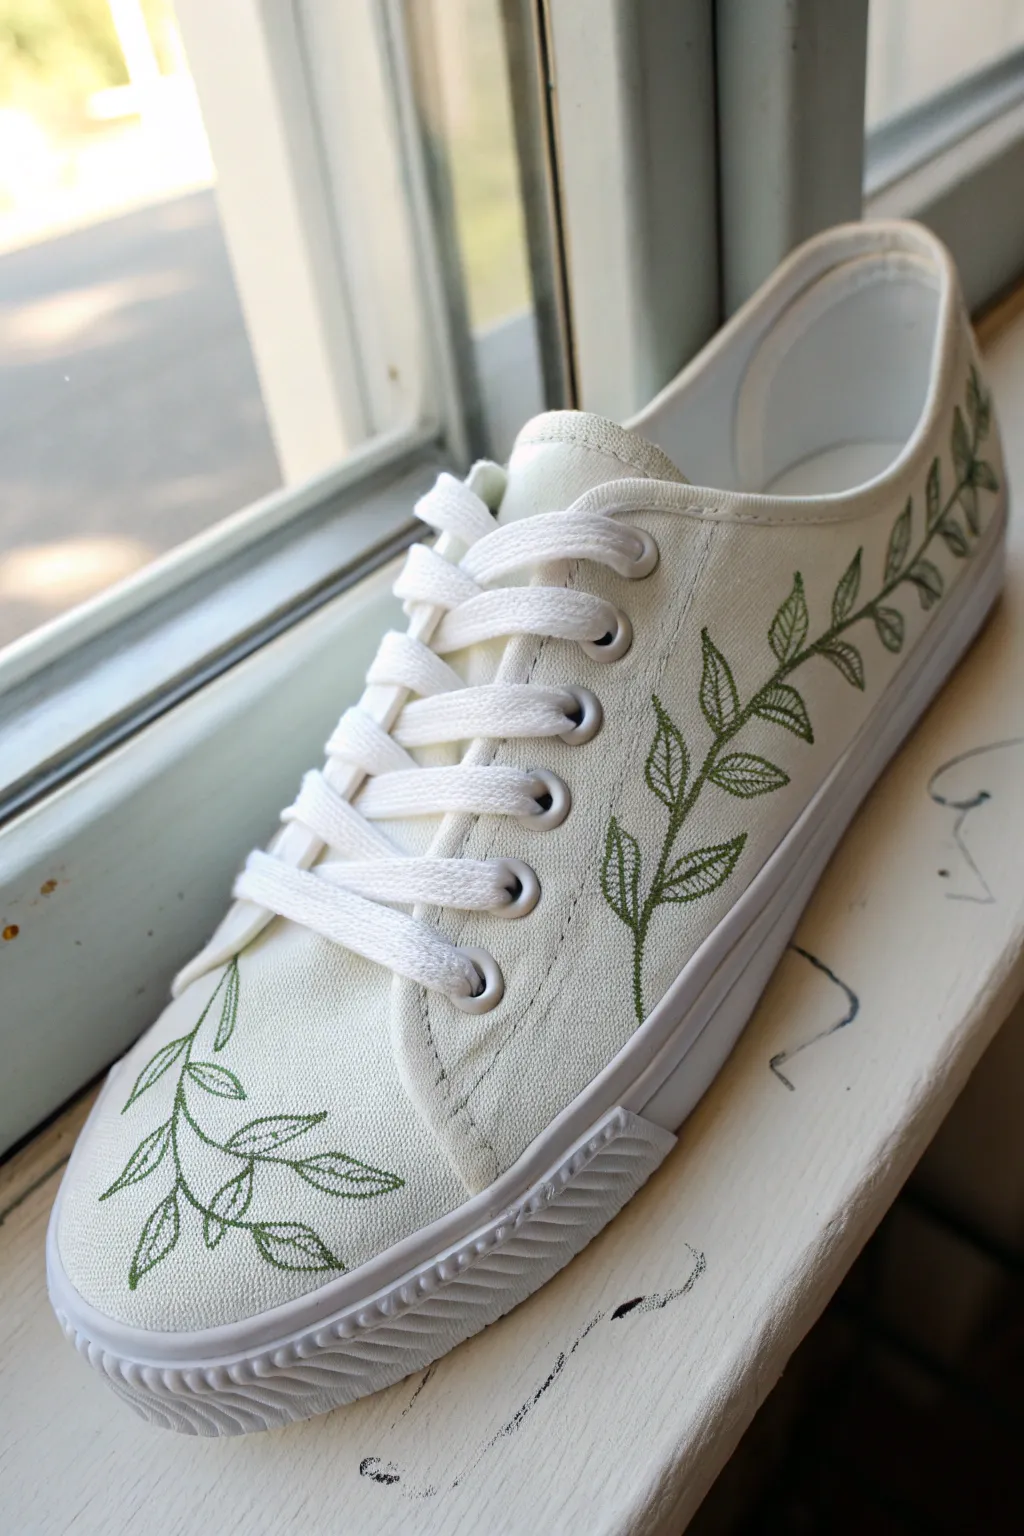
Transform a plain pair of white canvas sneakers into a botanical masterpiece with this elegant leaf vine design. Using a fine point and a steady hand, you’ll create intricate greenery that trails up the side and toe for a custom, nature-inspired look.
Step-by-Step
Materials
- Clean white canvas sneakers
- Fine point fabric marker (dark olive green) OR fine detail paintbrush and fabric paint
- Pencil for sketching
- Eraser
- Painter’s tape or masking tape
- Waterproof sealant spray (optional but recommended)
Step 1: Preparation
-
Clean the surface:
Before starting, ensure your sneakers are completely clean and dry. Even brand new shoes can have a coating that repels ink, so a quick wipe with a damp cloth is helpful. -
Remove the laces:
Take the shoelaces out of the shoes creates a flat, unobstructed workspace. This also prevents accidental ink smudges on the laces while you work. -
Tape the soles:
Apply painter’s tape along the rubber sole where it meets the canvas. This acts as a safety barrier so you can draw right to the edge without marking up the rubber.
Pro Tip: Steady Hand
Stuff the shoe tightly with a towel or newspapers before drawing. This creates a solid surface against the canvas, making it much easier to draw fine, straight lines.
Step 2: Sketching the Design
-
Plan the main stems:
Lightly sketch a central, slightly curved line with a pencil. Start from the rubber sole on the side of the shoe and curve it gently upward toward the heel collar. This will be the backbone of your main vine. -
Sketch the toe design:
Repeat the previous step on the toe box of the shoe. Draw a smaller, separate curved line that starts near the sole and flows inward toward the laces. -
Add leaf placement:
Along both stem lines, lightly mark small ticks or ovals where you want the leaves to go. Aim for spacing that feels natural—not perfectly uniform, but balanced.
Step 3: Inking the Vines
-
Draw the main stem:
Using your fine point fabric marker or brush, trace over your pencil line for the main stem. Use a confident, single stroke if possible to avoid jagged lines. -
Outline the leaves:
Begin drawing the leaf shapes attached to the stem. Use a pointed oval shape for each leaf. I find it easiest to start at the base of the leaf near the stem and pull the line outward to a point. -
Add the center vein:
Draw a thin line down the center of each leaf. It doesn’t need to go all the way to the tip; stopping slightly short adds a stylized, illustrative touch. -
Create the leaf texture:
This is the crucial detail step: Instead of coloring the leaves solid, draw tiny diagonal hatch marks or veins branching from the center line to the outer edge. -
Repeat the pattern:
Continue this process for every leaf along the side of the shoe, maintaining the same delicate hatching style for consistency. -
Ink the toe section:
Move to the toe area and replicate the same design: stem first, then leaf outlines, then the interior hatching details. -
Let it dry:
Allow the ink or paint to dry completely. Fabric markers usually dry instantly, but give it 15 minutes to be safe so you don’t smudge it while erasing.
Level Up: Floral Accents
Add tiny buds or small flowers in a contrasting color like pale pink or lavender at the tips of some vines for a pop of color.
Step 4: Finishing Touches
-
Erase guidelines:
Gently erase any visible pencil marks that weren’t covered by the ink. Be gentle so you don’t disturb the fabric nap too much. -
Seal the artwork:
Spray a light coat of waterproof sealant over the design. This protects your hard work from rain and dirt. -
Re-lace:
Once the sealant is dry, remove the tape from the soles and lace your sneakers back up.
Now step out in style with your custom botanical kicks
BRUSH GUIDE
The Right Brush for Every Stroke
From clean lines to bold texture — master brush choice, stroke control, and essential techniques.
Explore the Full Guide
One Big Sun on One Shoe, One Moon on the Other
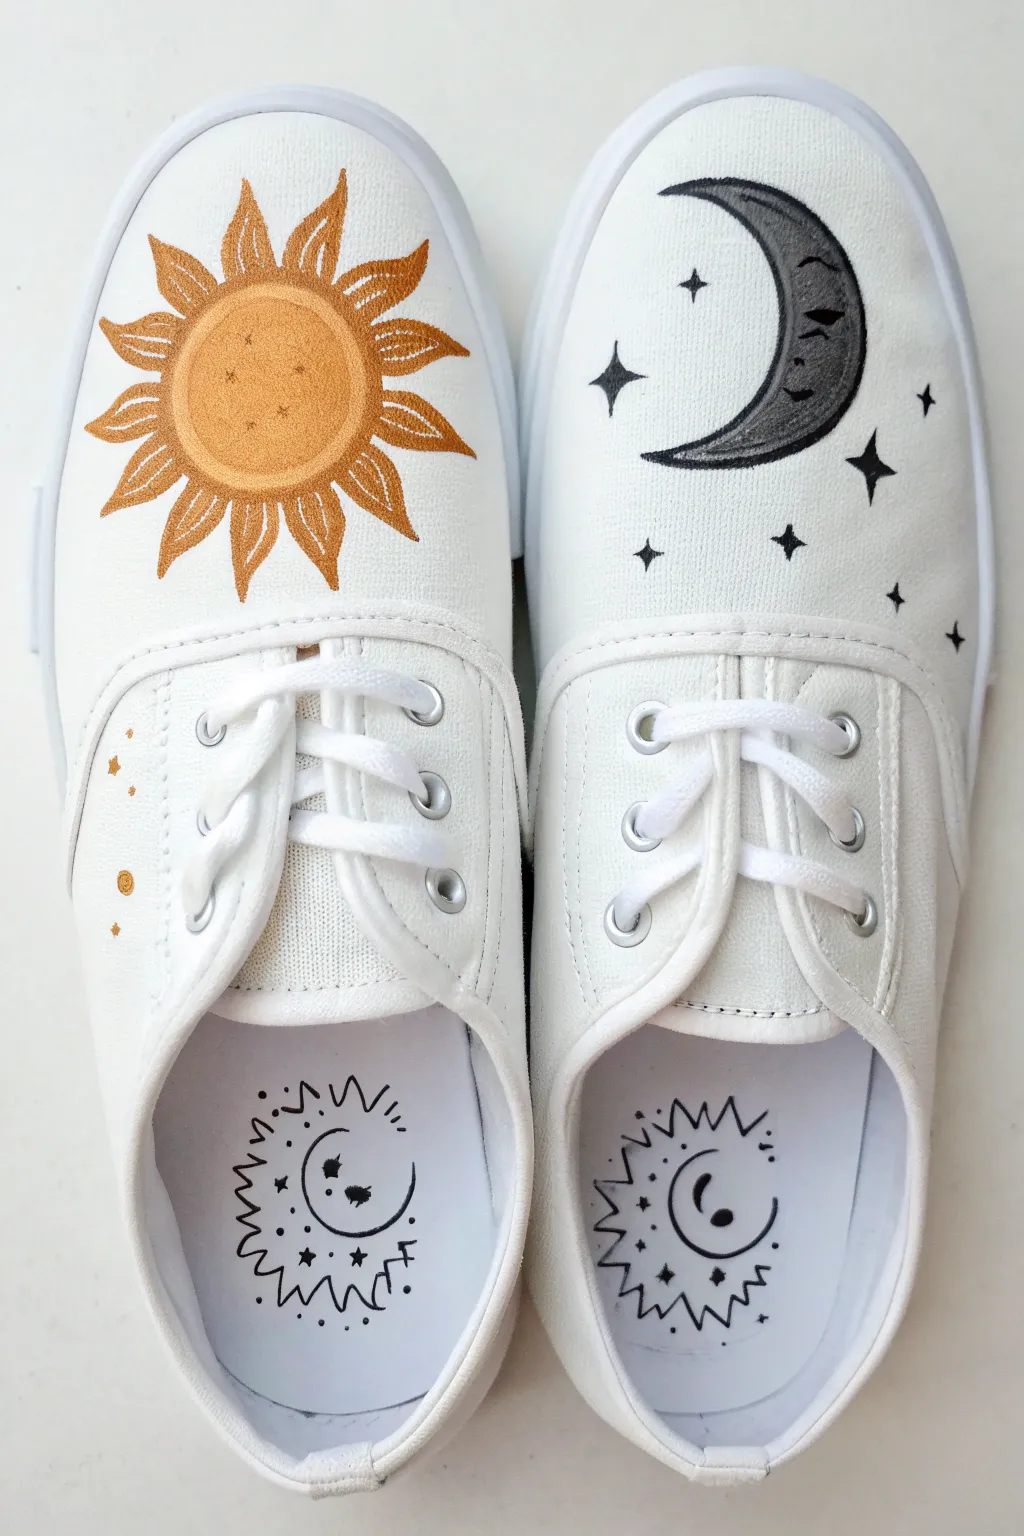
Transform a plain pair of white canvas shoes into a balanced work of celestial art featuring a radiant sun on one foot and a tranquil crescent moon on the other. This project uses bold, simple shapes and metallic accents to create a wearable day-and-night theme that looks professional yet is surprisingly easy to achieve.
Detailed Instructions
Materials
- White canvas sneakers (Vans or similar style)
- Fabric medium (to mix with acrylics)
- Acrylic paints: Golden yellow, burnt orange, black, white, metallic gold
- Fine detail paintbrushes (size 0 and 00)
- Small flat brush (size 2 or 4)
- Pencil or disappearing ink fabric marker
- Masking tape (optional)
- Water cup and palette
- Hairdryer (optional, to speed up drying)
- Clear acrylic sealer spray (matte or satin)
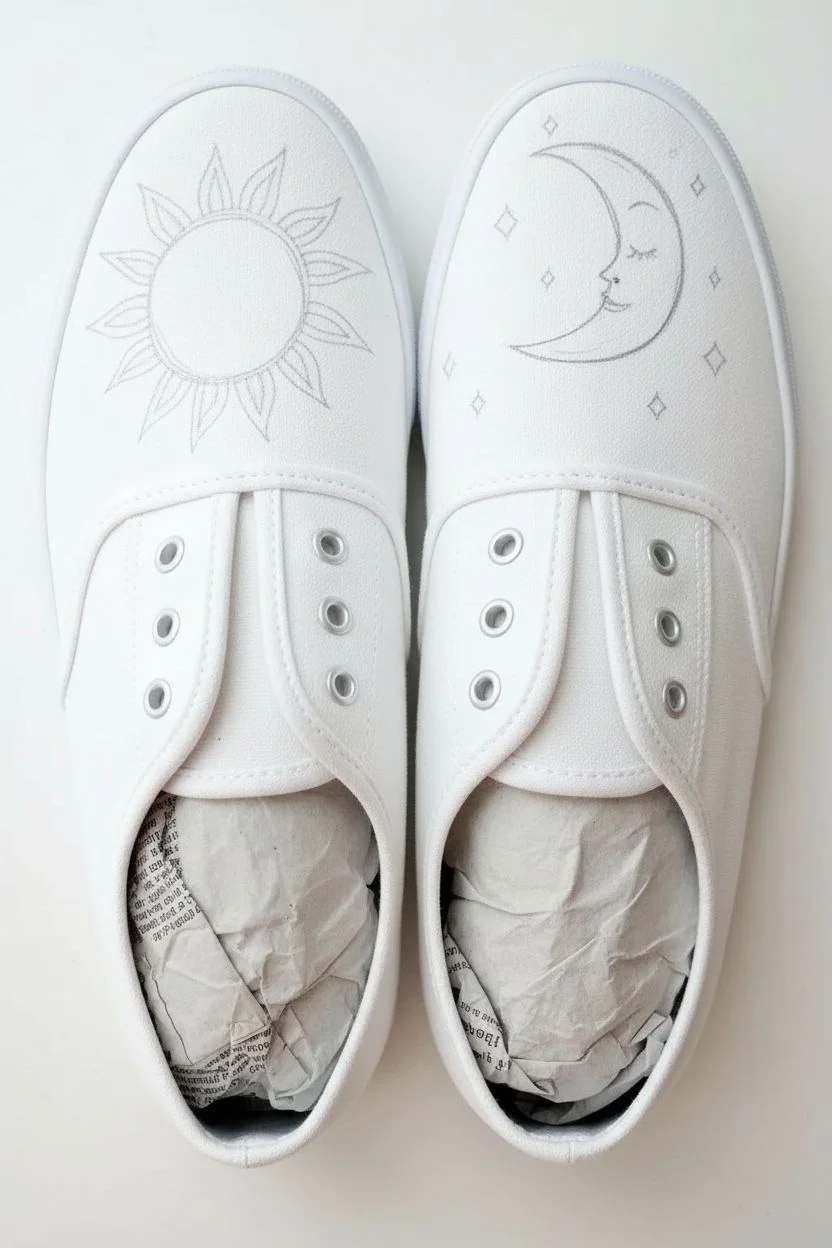
Step 1: Preparation & Sketching
-
Prep the surface:
Remove the laces from both shoes to give yourself a clear, unobstructed canvas. Create a stable base by stuffing the toes of the shoes with newspaper or paper towels; this creates a firm surface for painting and prevents the fabric from collapsing while you work. -
Sketch the sun:
On the left shoe’s toe box, lightly sketch a large circle in the center using a pencil. Draw triangular rays radiating outward from the circle, giving them a slight curve or wave so they look organic rather than rigid. -
Sketch the moon:
Moving to the right shoe, sketch a large ‘C’ shape for the crescent moon. Add a sleeping face profile inside the curve if you like, just like the reference photo, or keep it as a simple silhouette. Scatter small diamond-shaped stars and tiny dots around the moon.
Smooth Moves
If your paint feels too thick to make sharp points on the stars, mix in a tiny drop of water. This helps the paint flow smoothly off a liner brush for crisp edges.
Step 2: Painting the Sun (Left Shoe)
-
Mix your base color:
Mix golden yellow acrylic paint with fabric medium according to the bottle instructions (usually 1:1 or 2:1). This ensures the paint flexes with the shoe and doesn’t crack. -
Fill the sun center:
Use your flat brush to paint the central circle of the sun. Apply a thin, even layer. Let it dry to the touch, then add a second coat for full opacity. -
Outline the rays:
Switch to your fine detail brush. Using a darker burnt orange or brown-orange mix, carefully outline the wavy rays you sketched earlier. -
Fill the rays:
Fill in the rays with the golden yellow color, blending slightly with the darker outline if the paint is still wet to create a soft transition, or simply filling them in solid gold. -
Add texture and detail:
Once the base is dry, use the burnt orange color to add texture lines inside the rays and stipple small dots onto the main circle of the sun to give it depth and interest. -
Side accents:
On the outer side panel of the sun shoe (near where the laces start), paint three or four tiny gold or orange dots and small diamond stars to carry the theme around the side.
Step 3: Painting the Moon (Right Shoe)
-
Paint the moon base:
Mix black and a tiny drop of white to make a very dark charcoal grey, adding your fabric medium. Paint the entire crescent shape using the detail brush for the sharp points. -
Add shading:
While the grey is still slightly wet, dip just the tip of your brush in pure black and run it along the outer curved edge of the moon to create a shadow gradient. -
Detail the face:
If you sketched a face, use your finest brush (size 00) and pure black paint to define the closed eye, nose, and mouth lines over the grey base once it’s dry. -
Paint the stars:
Using pure black paint, fill in the diamond-shaped stars around the moon. For the tinier twinkling stars, just press the tip of the brush gently against the canvas.
Glow Up
Use glow-in-the-dark paint for the moon and stars! Apply it as a final topcoat over the white or light grey areas so your shoes light up at night.
Step 4: Finishing Touches
-
Insole surprise:
For a hidden detail, take a fine-tip permanent fabric marker or black paint and draw a hybrid sun/moon doodle on the heel of the insoles inside the shoe. -
Clean up sketch lines:
Once all paint is completely dry (I usually wait at least an hour), use a clean eraser or a damp cloth to remove any visible pencil marks. -
Seal the work:
Take the shoes to a well-ventilated area and spray a light, even coat of clear acrylic sealer over the painted areas to protect them from dirt and water. -
Re-lace:
Wait 24 hours for the sealer to cure fully before putting the laces back in.
Step out in style knowing you have a perfectly balanced day-and-night masterpiece on your feet
Tiny Stars and Sparkle Dots
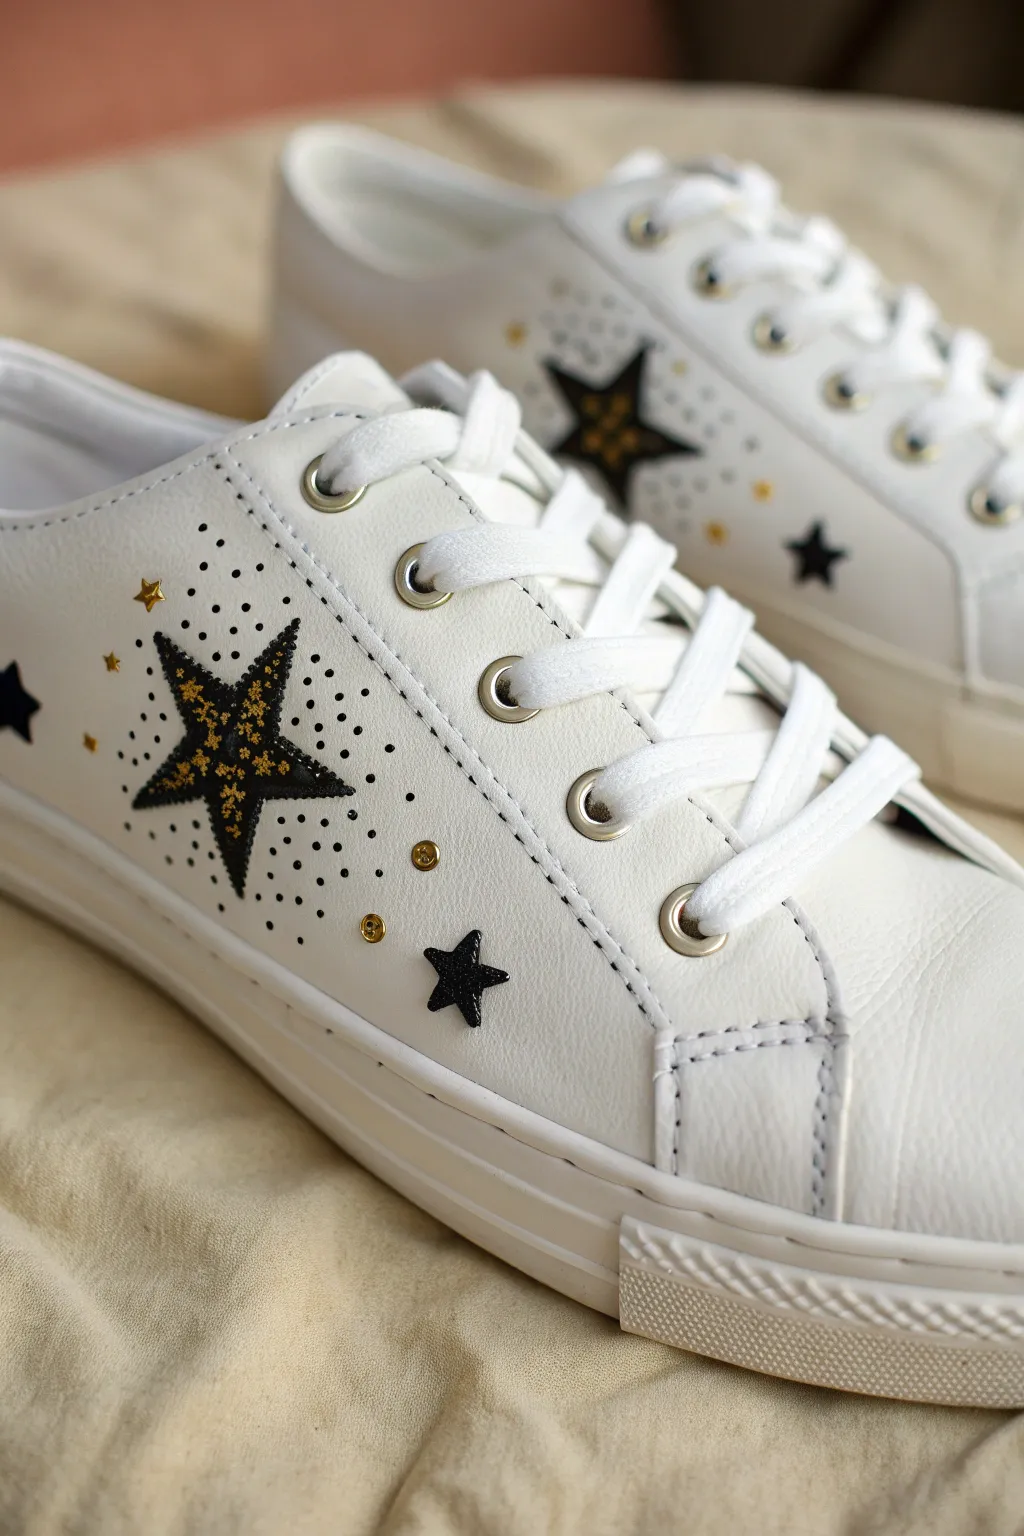

Transform plain white kicks into a starry night masterpiece with this elegant design featuring bold stars and delicate dot work. The combination of black and gold accents creates a sophisticated yet playful look that catches the light beautifully.
Step-by-Step Tutorial
Materials
- White leather or faux-leather sneakers
- Rubbing alcohol and cotton pads
- Black leather paint or acrylic paint mixed with fabric medium
- Gold fabric paint or metallic paint pen
- Fine glitter (gold)
- Mod Podge or specialized glitter glue
- Fine tip paint brushes (sizes 0 and 00)
- Dotting tool or toothpick
- Painter’s tape or stencil film (optional)
- X-acto knife
- Gold stud embellishments (flat back)
- Strong craft glue (e.g., E6000)
- Leather finisher or water-resistant sealant
Step 1: Preparation and Planning
-
Clean the Surface:
Start by removing the laces from your sneakers to give yourself a clear canvas. Wipe down the side panels where you plan to paint with rubbing alcohol and a cotton pad. This removes the factory finish and oils, ensuring your paint adheres properly. -
Map the Design:
Lightly sketch your main star placement using a pencil. You’ll want one large focal star on the outer side of each shoe, positioned centrally below the eyelets. Sketch a smaller star near the heel and a partial star shape near the toe if desired.
Star Sharpness Tip
Make a stencil from painter’s tape or sticky vinyl for the main stars. It ensures razor-sharp points without needing a surgeon’s steady hand.
Step 2: Painting the Stars
-
Outline the Main Star:
Using your finest brush and black leather paint, carefully outline the large five-pointed star you sketched. Keep your hand steady; I find resting my pinky on the sole of the shoe helps with stability. -
Fill the Star Base:
Fill in the entire star shape with the black paint. You may need two thin layers to get a solid, opaque black coverage. Let the first layer dry for about 15 minutes before adding the second. -
Paint Smaller Stars:
While the main star dries, use the black paint to create solid smaller stars around the perimeter. These should be solid black silhouettes, about a quarter of the size of the main star. -
Add Golden Glitter:
Once the black base of the main star is fully dry, mix a small amount of gold glitter with Mod Podge (or clear acrylic medium). Carefully paint this mixture onto the center of the black star, leaving a thin black border visible around the edges to define the shape. -
Detail the Glitter:
While the glitter medium is wet, sprinkle a tiny pinch of dry glitter on top for extra sparkle, then tap off the excess.
Paint Peeling?
If paint cracks, you likely applied it too thick. Use multiple thin layers instead of one thick coat, and always clean with acetone first.
Step 3: Detailed Dot Work
-
Create Black Dots:
Take a dotting tool or a toothpick dipped in black paint. Create a scattered pattern of tiny dots radiating outward from the main star. Keep the dots denser near the star and more spread out as they move away. -
Vary Dot Sizes:
Mix up your pressure to create slightly different dot sizes. Intersperse extremely fine dots (made with a sewing needle tip) amongst the larger ones for depth. -
Gold Accent Stars:
Using a gold metallic paint pen or fine brush, draw tiny, simple 5-point stars scattered among the black dots. These should be very small, almost like asterisks. -
Golden Dots:
Add a few gold dots into the mix using your dotting tool. Don’t overdo it—just a few sprinkles of gold helps tie the design together.
Step 4: Finishing Touches
-
Attach Studs:
Select a few spots in your design for 3D embellishment. Apply a tiny dab of strong jewelry glue (like E6000) to the back of small gold flat-back studs. -
Place the Hardware:
Using tweezers, press the studs firmly onto the leather. Good placements are near the tips of the main star or floating in empty space near the sole. -
Seal the Design:
Allow all paint and glue to cure for at least 24 hours. Once dry, apply a leather finisher or acrylic sealer over the painted areas to protect your artwork from scuffs and water. -
Re-lace:
Lace your crisp white laces back up, and your custom kicks are ready to wear.
Step out in style knowing your footwear is now a one-of-a-kind galaxy

PENCIL GUIDE
Understanding Pencil Grades from H to B
From first sketch to finished drawing — learn pencil grades, line control, and shading techniques.
Explore the Full Guide
Minimal Mountains on the Outer Sides

Transform plain white canvas sneakers into a wearable landscape with this serene mountain design. Using a simple gradient technique, you’ll create depth and atmosphere that looks far more complex than it actually is.
How-To Guide
Materials
- White canvas sneakers
- Fabric paint (Black, White, Forest Green, Soft Pink)
- Fabric medium (optional, if using acrylics)
- Small flat brush (size 4 or 6)
- Fine liner brush (size 0 or 00)
- Palette or small mixing plate
- Painter’s tape
- Cup of water and paper towels
Step 1: Preparation & Sky
-
Prep the canvas:
Remove the shoelaces completely from the sneaker to give yourself unobstructed access to the toe box. Stuff the toe of the shoe tightly with newspaper or a rag to create a firm, rounded surface for painting. -
Protect the sole:
Apply strips of painter’s tape carefully along the rubber sole where it meets the fabric. Press the edges down firmly to prevent paint from bleeding onto the white rubber. -
Mix the sky color:
On your palette, mix a generous amount of white fabric paint with just a tiny drop of soft pink. You want a very pale, barely-there blush color that mimics a dawn sky. -
Apply the base wash:
Using a flat brush, apply this pale pink mixture across the entire toe area where your mountains will sit. Don’t worry about perfect coverage near the tip of the toe, but ensure the area just below the laces—where the sky meets the highest peaks—is smooth and blended.
Fixing “Muddy” Mountains
If layers blend too much and turn grey, let the paint dry completely between layers. Crisp edges are needed to separate the mountain ranges.
Step 2: Layering the Mountains
-
Mix the first mountain shade:
Create a very light lavender-grey by mixing white with a speck of black and a touch of the pink you used for the sky. It should be only slightly darker than your background. -
Paint the distant peaks:
With the flat brush or a smaller round brush, paint a jagged, uneven line horizontally across the upper third of the toe box. Fill in the area below this line with the color. -
Soften the edges:
While the paint is still slightly wet, I like to gently dab the top edge of the mountains with a clean, damp brush. This creates that ‘misty’ atmospheric effect, blurring the line between the mountain and the sky. -
Mix the mid-tone grey:
Add a bit more black to your previous mix to create a distinct medium grey. You want enough contrast so this new layer stands out against the pale mountains. -
Create the middle range:
Paint a second range of mountains below the first layer. Make these peaks slightly larger and less numerous than the distant ones. Let the bottom of this layer fade out slightly as it moves toward the toe. -
Mix the foreground grey:
Mix a darker charcoal grey. This should be significantly darker than the previous layers but not quite pure black. -
Paint the lowest mountains:
Paint the final mountain layer near the front of the shoe. Keep the shapes angular and rough to mimic rocky terrain. -
Let it dry:
Allow these background layers to dry completely to the touch before moving on to the trees. If you rush this steps, the sharp details of the trees will bleed into the mountains.
Add Starlight
Once dry, dip a toothbrush in white paint and flick it over the sky area to create tiny stars, or use a toothpick to add a small crescent moon.
Step 3: Adding the Forest
-
Mix the pine green:
Mix forest green with a small amount of black to get a very deep, rich evergreen color. It should look almost black but have a green tint in the light. -
Start the tree trunks:
Switch to your fine liner brush. Paint thin, vertical lines of varying heights along the very bottom edge of the toe box. Group some together and leave spaces between others for a natural look. -
Paint the branches:
Starting from the top of each vertical line, use tiny, flicking horizontal strokes to create the branches. Make the strokes wider as you move down the trunk to form a conical shape. -
Vary the texture:
Keep your brush strokes loose and uneven. Nature isn’t perfect, so some trees should be fuller and others sparser. -
Fill the bottom edge:
Use the dark green mix to fill in the very bottom curve of the toe box solid, connecting the bases of all your trees to anchor them to the ground. -
Final dry and seal:
Remove the tape from the sole carefully. Let the shoes dry for at least 24 hours. Depending on your paint type, you may need to heat set the design with a hair dryer or an iron (using a pressing cloth).
Lace up your new custom kicks and enjoy walking through your own personal landscape
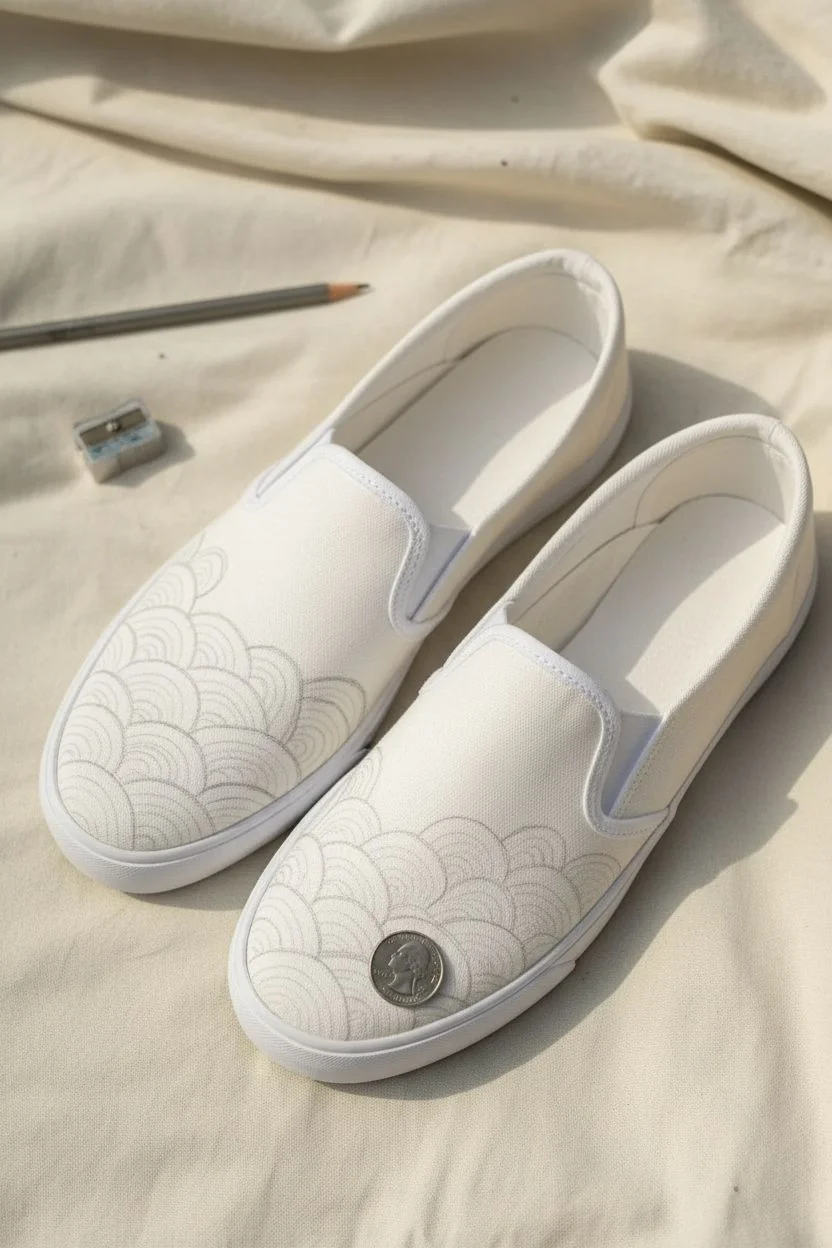
Simple Ocean Wave Lines
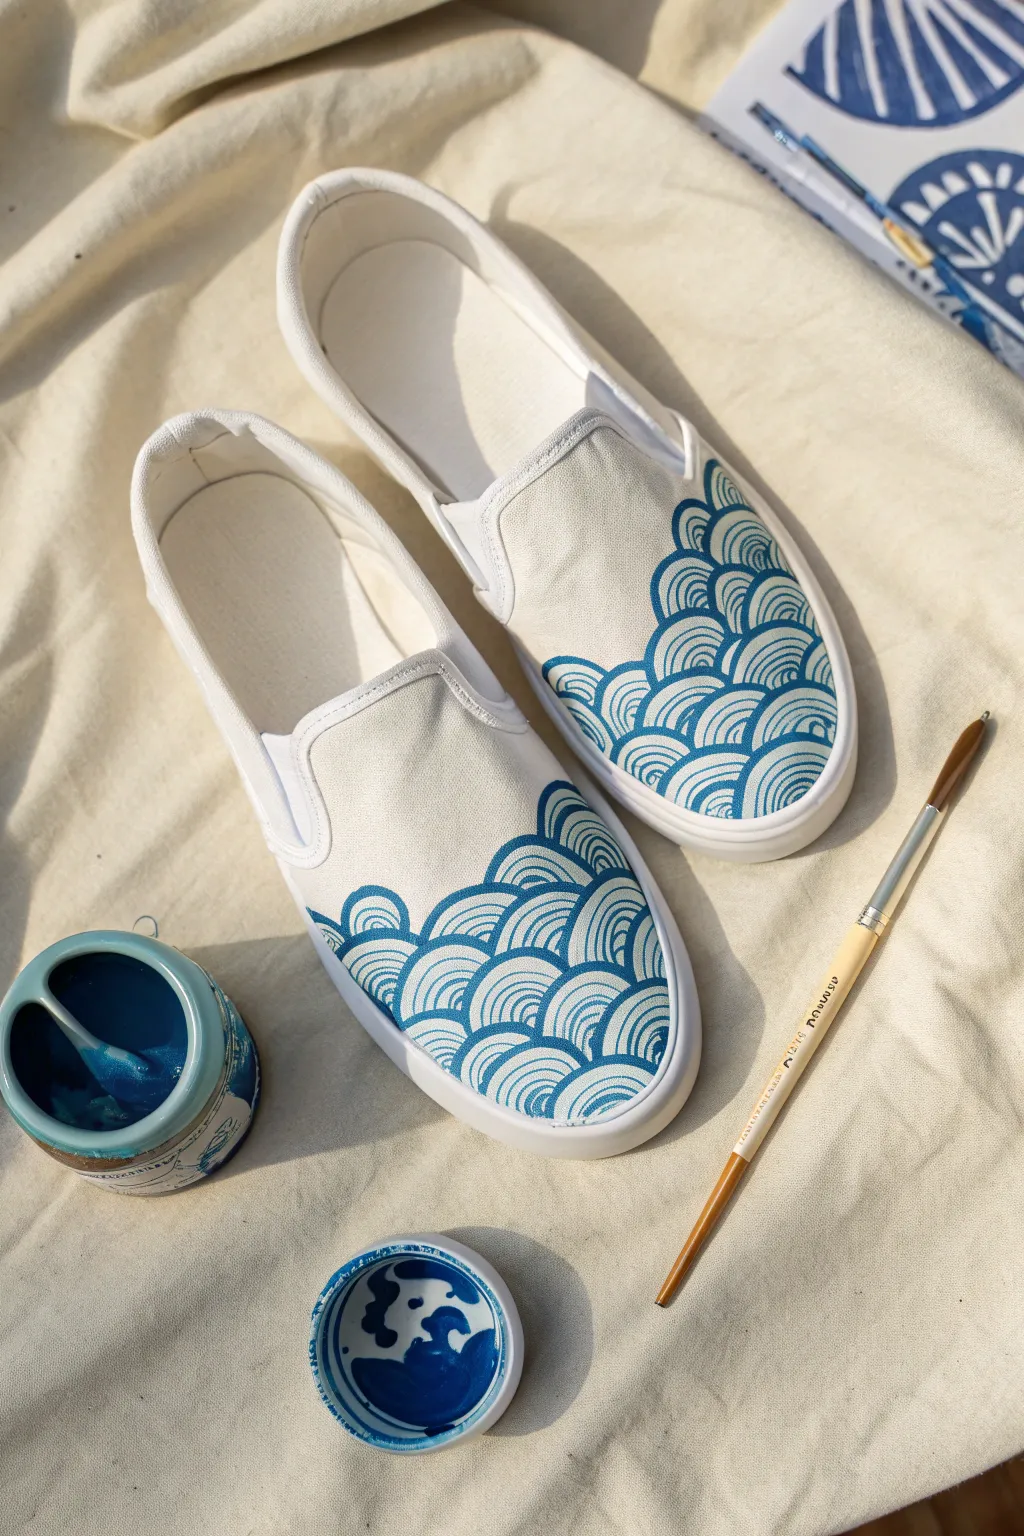
Customize a plain pair of white slip-ons with the timeless beauty of the Japanese Seigaiha wave pattern. This monochromatic design uses simple repeating arches to create a sophisticated, ocean-inspired look that feels both modern and traditional.
Step-by-Step Tutorial
Materials
- White canvas slip-on shoes
- Fabric paint or acrylic paint mixed with fabric medium (Dark Blue or Indigo)
- Round synthetic paintbrush (size 2 or 4)
- Pencil or disappearing fabric marker
- Small round object for tracing (like a coin or bottle cap) – optional
- Paint palette or small dish
- Paper towels
- Water cup
Step 1: Preparation and Sketching
-
Prepare the shoes:
Remove any stuffing or tags from your new canvas shoes. If they are not brand new, ensure they are clean and completely dry before you begin. -
Plan the placement:
Visualize where you want the wave pattern to sit. For this design, we are focusing on the toe box area, starting from the rubber sole and building upwards toward the tongue. -
Establish the first row:
Using a pencil or disappearing fabric ink, lightly mark the bottom row of arches right along the rubber sole. You can freehand these semicircles or trace a small coin to keep them uniform. -
Stack the waves:
Draw the second row of arches. Position each new arch so the center point aligns directly above the meeting point of the two arches below it, creating an offsetting ‘fish scale’ effect. -
Fill the toe box:
Continue stacking rows of arches until you have covered the desired area of the toe box. The pattern looks best if it fades out naturally or ends in a nice curve rather than a straight line across the top.
Steady Hands Pro-Tip
To stabilize your hand while painting curved lines, rest your pinky finger on the rubber sole of the shoe as an anchor while your other fingers move the brush.
Step 2: Painting the Design
-
Mix your paint:
Squeeze a small amount of dark blue fabric paint into your dish. If the paint feels too thick, add a tiny drop of water to help it flow smoothly off the brush. -
Load the brush:
Dip your round brush into the paint and roll the tip on the palette to shape it into a fine point. You don’t want a glob of paint, just enough to make clean lines. -
Paint the outer arches:
Starting at the bottom row, carefully paint over your pencil lines, creating the main outline for each semicircle. Keep a steady hand and use the very tip of the brush. -
Add inner details:
Inside the first arch, paint a slightly smaller concentric arch. Then add another smaller one inside that. A classic Seigaiha wave usually has 3-4 concentric lines total. -
Complete the first row:
Move horizontally and repeat this concentric line process for every arch in the bottom row. -
Work your way up:
Move to the second row of waves. Paint the outer outline first, then fill in the inner curved lines. I like to work from left to right to avoid smudging the wet paint with my hand. -
Maintain consistency:
As you paint higher up the shoe, try to keep the spacing between your blue lines consistent. The white space is just as important as the blue paint.
Step 3: Finishing Touches
-
Check for gaps:
Look closely at the edges where the canvas meets the rubber sole. Use the fine tip of your brush to extend any lines that stop short, ensuring the pattern looks grounded. -
Clean up edges:
If you accidentally got blue paint on the rubber sole, wipe it away immediately with a damp detailing cloth or a cotton swab. -
Let it dry:
Allow the paint to air dry completely for at least 24 hours. Do not touch the design while it is wet. -
Set the paint:
Once fully dry, follow the manufacturer’s instructions for your fabric paint. This usually involves heat-setting the design with a hair dryer or an iron (using a pressing cloth) to make it waterproof.
Level Up: Ombré Effect
Mix a tiny bit of white into your blue paint for each new row you move up. This creates a gradient effect where the waves get lighter as they reach the top of the shoe.
Step into your newly designed kicks and enjoy the handmade flair you’ve added to your wardrobe


Easy Animal Print Spots
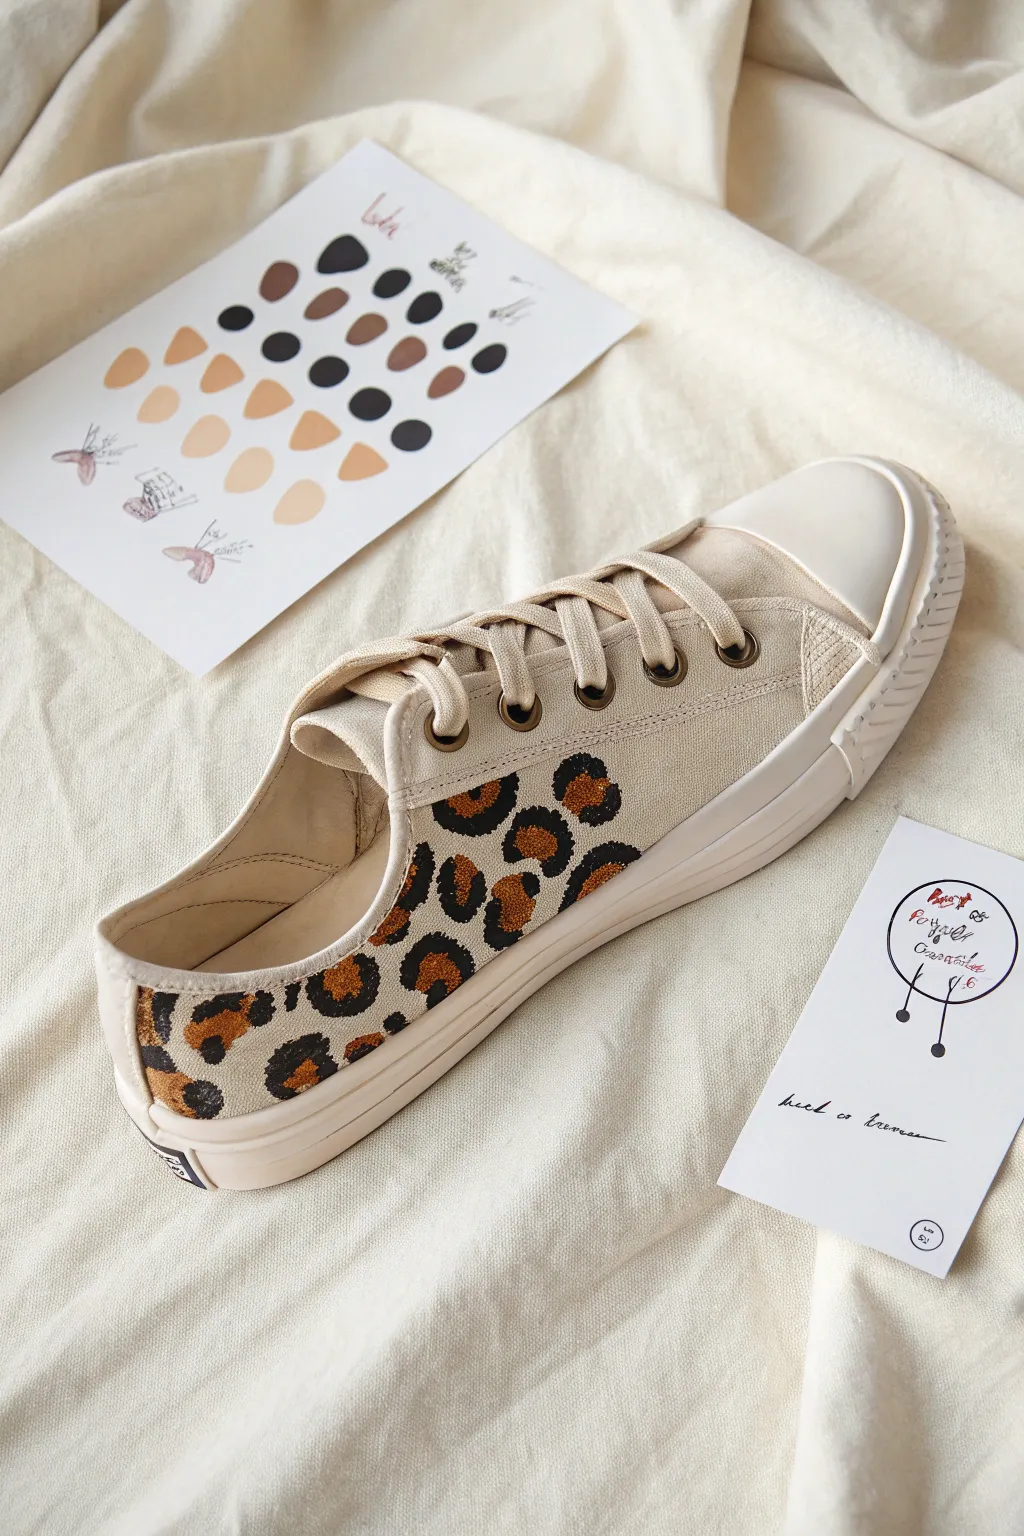
Transform a plain pair of cream canvas sneakers into a fierce fashion statement with this simple painting technique. The design features classic leopard spots with warm tan centers and bold black outlines, adding just the right amount of wild flair to your everyday kicks.
Step-by-Step Guide
Materials
- Clean, light-colored canvas sneakers (cream or white)
- Tan or golden-brown fabric paint
- Black fabric paint
- Small round paintbrush (size 2 or 3)
- Fine liner brush (size 0 or 00)
- Painter’s tape
- Cardboard or newspaper (to stuff shoes)
- Small paint palette or paper plate
- Water cup and paper towels
Step 1: Prep and Prime
-
Prepare the shoes:
Remove the laces from your sneakers to prevent accidental paint splatters and to give yourself better access to the tongue and eyelet areas. It’s much easier to work on an unlaced shoe. -
Stuff firmly:
Stuff the inside of the shoes tightly with old newspaper or crumpled cardboard. This creates a solid surface to paint against and helps stretch out the canvas slightly, ensuring the paint gets into the fabric’s weave. -
Protect the rubber:
Apply painter’s tape carefully along the rubber soles and the toe cap. Press the edges of the tape down firmly with your fingernail to prevent any paint from bleeding underneath.
Uneven Spots?
Don’t panic if your spots look messy. Leopard print is forgiving! Irregular shapes actually make the pattern look more realistic than perfect circles.
Step 2: Creating the Base Spots
-
Mix your spot color:
Pour a small amount of tan or golden-brown fabric paint onto your palette. If the color feels too flat, you can mix in a tiny drop of yellow or orange to give it a warmer, more vibrant tone. -
Paint the first spots:
Dip your small round brush into the tan paint. Dab uneven, organic rounded shapes onto the main side panel of the shoe. Avoid making perfect circles; leopard spots look best when they are slightly irregular. -
Vary the sizes:
Create a mix of medium and small spots. Leave roughly half an inch of space between them for the background canvas color and the black outlines we will add later. -
Continue around the heel:
Work your way towards the back of the shoe, wrapping the pattern around the heel strip. Be mindful of seams—paint right over flat seams, but treat raised seams as natural boundaries. -
Let it dry:
Allow these base spots to dry completely. Fabric paint usually feels dry to the touch within 15-20 minutes, but check your bottle’s specific instructions. They must be dry before adding the black.
Add Some Glam
Mix a fine gold glitter medium into your tan paint for the centers. It adds a subtle shimmer that catches the light when you walk.
Step 3: Detailing the Animal Print
-
Switch brushes:
Swap to your fine liner brush and load it with black fabric paint. You want enough paint to create a solid line, but not so much that it drips. -
Outline the C-shapes:
Paint a black outline around a tan spot, but don’t close the circle completely. Think of painting brackets or ‘C’ shapes that hug the spot. Usually, two or three disconnected lines around one spot look most natural. -
Vary line thickness:
As you paint the outlines, vary your pressure slightly. I like to press a bit harder at the curve of the ‘C’ and lift off at the ends to make the line taper elegantly. -
Fill the gaps:
Look at the empty spaces between your main tan spots. Use the black paint to add small, random dots, dashes, or tiny ‘V’ shapes in these gaps to make the pattern look dense and authentic. -
Check the edges:
Examine the edges where the canvas meets the sole or the eyelet strip. Add partial spots here so the pattern looks like it’s continuous and was ‘cut’ by the shoe’s construction, rather than just floating in the middle. -
Repeat on the second shoe:
While the first shoe dries, repeat the entire process on the second shoe. Don’t worry about making them identical twins; mirroring the general density is enough.
Step 4: Finishing Touches
-
Remove tape:
Once the black paint is tacky but almost dry, carefully peel off the painter’s tape. Pulling it off at a 45-degree angle usually gives the cleanest line. -
Clean up:
If any paint seeped onto the white rubber, dip a cotton swab in rubbing alcohol or nail polish remover and quickly wipe it away before it cures. -
Heat set:
Most fabric paints require heat setting to become permanent and washable. Follow the manufacturer’s directions, which usually involve blasting it with a hairdryer or ironing (with a cloth in between) once fully dry. -
Re-lace:
Once everything is cured and cool, put your laces back in. Your custom animal print kicks are ready to wear.
Enjoy styling your new custom kicks with denim or a simple dress to let the pattern really pop
Sticker-Style Outlined Shapes
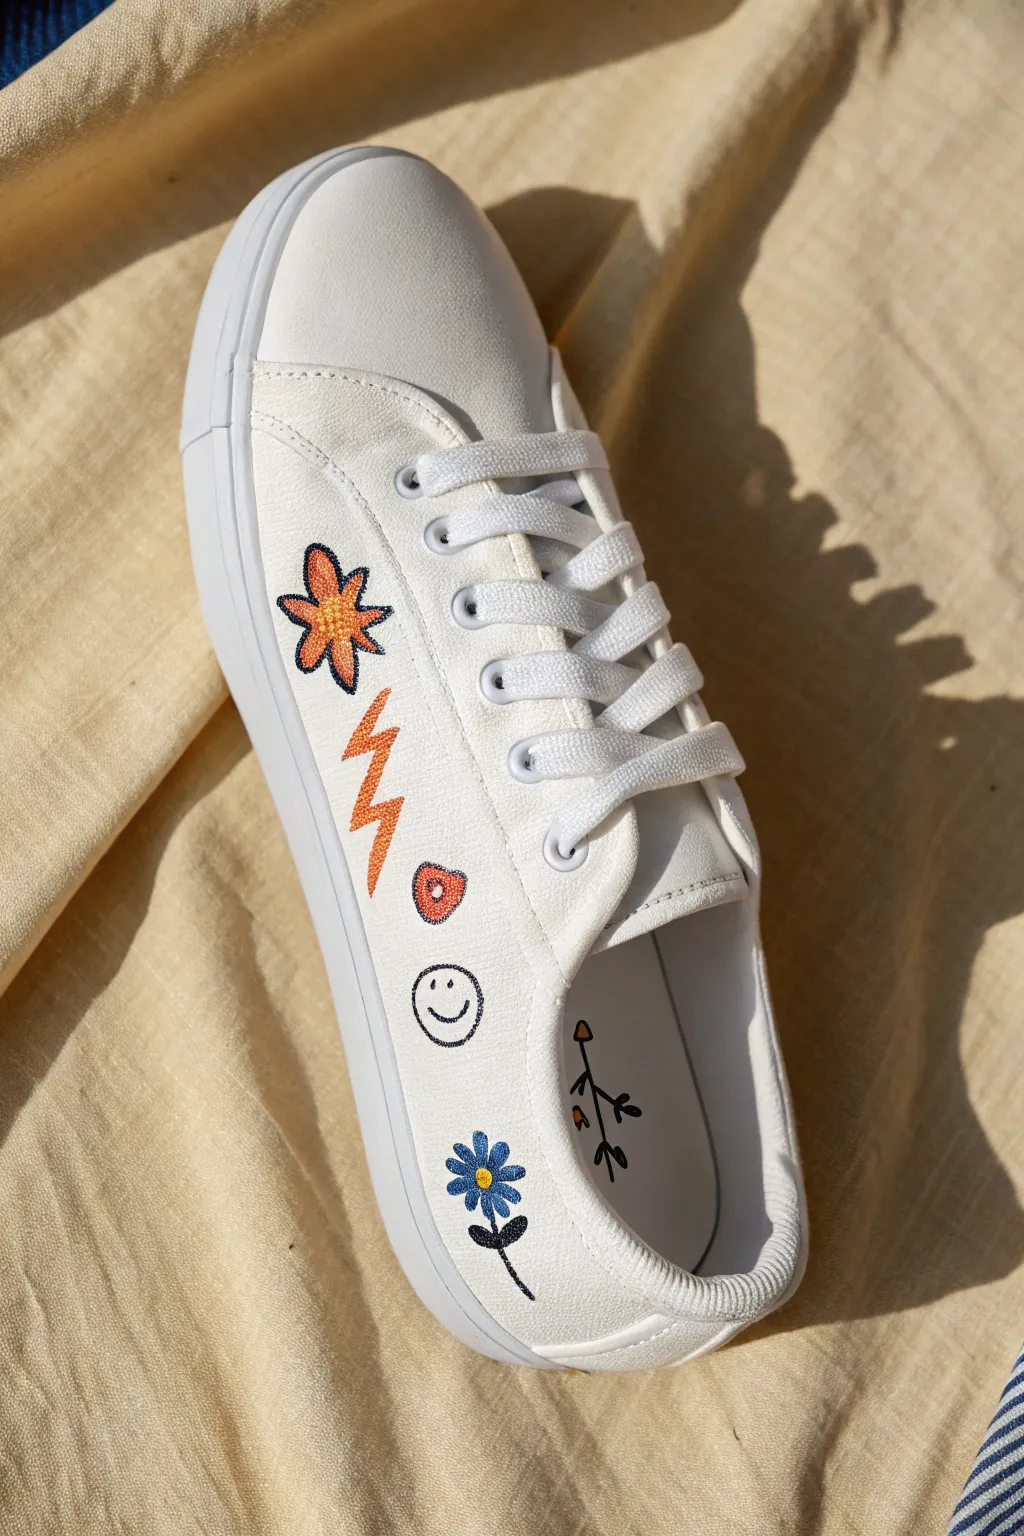
Transform a plain pair of white canvas sneakers into a trendy statement piece with these fun, sticker-style illustrations. By mimicking the look of embroidery patches with careful outlining and texture, you get the charm of stitched art without picking up a needle.
How-To Guide
Materials
- White canvas sneakers
- Fabric medium
- Acrylic paints (orange, yellow, blue, red, white, black)
- Fine liner brush (size 00 or 000)
- Small round brush (size 1)
- Black fabric marker (fine tip)
- HB pencil
- Eraser
- Small mixing palette
- Paper towels
- Masking tape (optional)
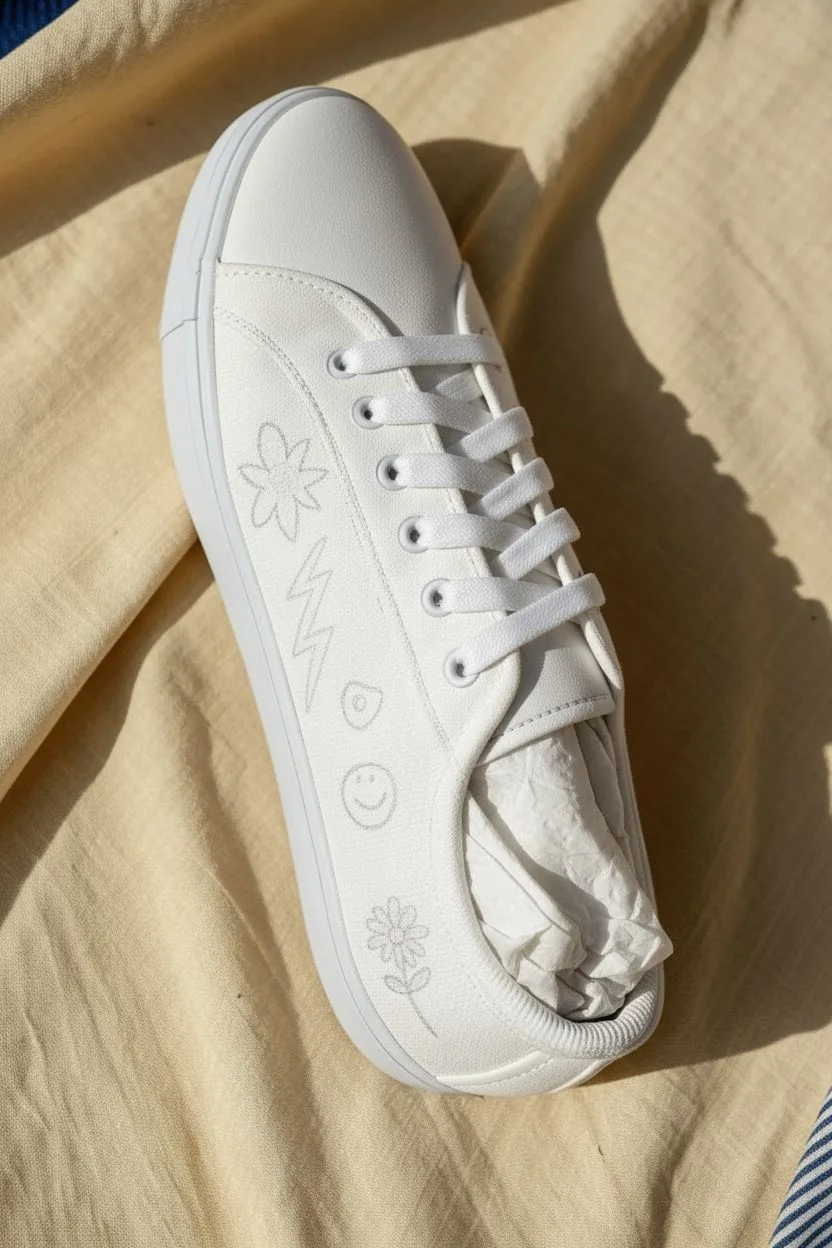
Step 1: Preparation & Sketching
-
Prepare the canvas:
Remove the shoelaces completely from your sneakers. This prevents accidental paint splatters on them and gives you clear access to the tongue and eyelet areas. -
Stuff the shoe:
Pack the toe box firmly with paper towels or newspaper. This creates a solid surface to draw on and stretches the canvas slightly, preventing the design from warping when you wear them later. -
Plan placement:
Visualize your layout. For this design, we are spacing five main elements along the outer side of the shoe: an orange flower, a lightning bolt, a small abstract shape, a smiley face, and a blue flower near the heel. -
Lightly sketch designs:
Using your HB pencil, very lightly sketch the outlines. Draw a five-petaled flower near the top eyelets, a jagged lightning bolt below it, a small oval shape, a simple circle for the smiley, and a stemmed daisy at the bottom rear.
Uneven Lines?
If your black outlines look too shaky, switch to a fabric marker instead of a brush. It gives you more control and perfectly mimics the ‘doodled’ aesthetic shown here.
Step 2: Color Blocking
-
Mix your base:
Combine your acrylic paints with fabric medium according to the bottle instructions (usually 1:1 or 2:1). This makes the paint flexible so it won’t crack when you walk. -
Paint the top flower:
Using the size 1 round brush, fill in the top flower with a bright orange. Don’t worry about the center yet; just focus on getting an opaque layer on the petals. -
Add the lightning bolt:
Mix a vibrant orange-yellow. Fill in the lightning bolt shape. You might need two thin coats here to cover the canvas texture completely, letting the first coat dry for about 10 minutes. -
Fill the abstract shape:
Paint the small oval shape beneath the lightning bolt with a reddish-orange hue. I like to keep the edges crisp here. -
Paint the blue flower:
For the flower near the heel, use a bright royal blue to fill in the petals. Use yellow for the center dot of this flower. -
Let colors set:
Allow all the colored shapes to dry completely. They should be dry to the touch before you attempt any outlining to prevent smearing.
Faux-Stitch Trick
To make it look even more like embroidery, paint tiny, diagonal white highlight dashes on top of your colored shapes to simulate light hitting glossy thread.
Step 3: Detailing & Outlining
-
Create the texture:
To mimic embroidery, we won’t just paint flat color. Take a slightly lighter shade of your base colors and paint tiny, directional dashes inside the petals and lightning bolt. This simulates thread direction. -
Outline the top flower:
Switch to your fine liner brush with black paint (mixed with medium). carefully outline the orange flower. Use short, slightly jagged strokes rather than a smooth line to imitate a stitched edge. -
Add the center detail:
Paint a small starburst shape in the center of the orange flower using blue paint, then outline it in black. -
Outline the lightning bolt:
Outline the lightning bolt in black. Again, think about how thread looks—make the line look slightly woven or textured. -
Draw the smiley face:
Using the black fabric marker (or steady paint brush), draw the outline of the smiley face circle. Add two dots for eyes and a simple U-curve for the mouth. -
Finish blue flower:
Outline the blue petals with black paint. Paint a black stem extending downwards and add two small leaves on either side of the stem. -
Insole surprise:
For a hidden detail, draw a simple black line sketch of a flower stem on the heel of the inner sole insert using your fabric marker.
Step 4: Finishing Touches
-
Clean up:
Check for any pencil marks that are still visible around your painted shapes. Once the paint is 100% dry, gently erase them. -
Seal the deal:
If you want extra protection, apply a clear matte acrylic finisher over the painted areas only. This isn’t strictly necessary with fabric medium, but it adds durability. -
Re-lace:
Once fully cured (usually 24 hours), remove the paper towel stuffing and lace your sneakers back up.
Enjoy walking around in your custom art pieces that look stitched but were actually a breeze to paint
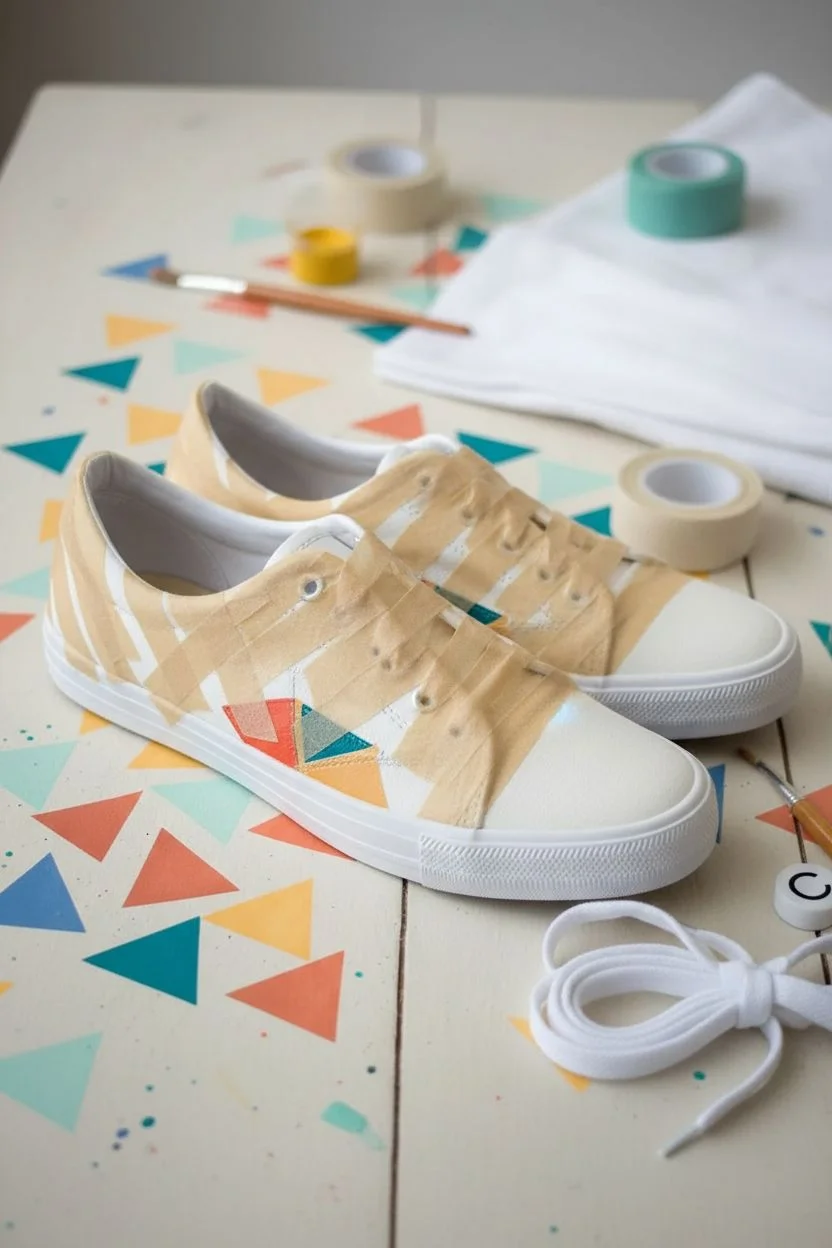
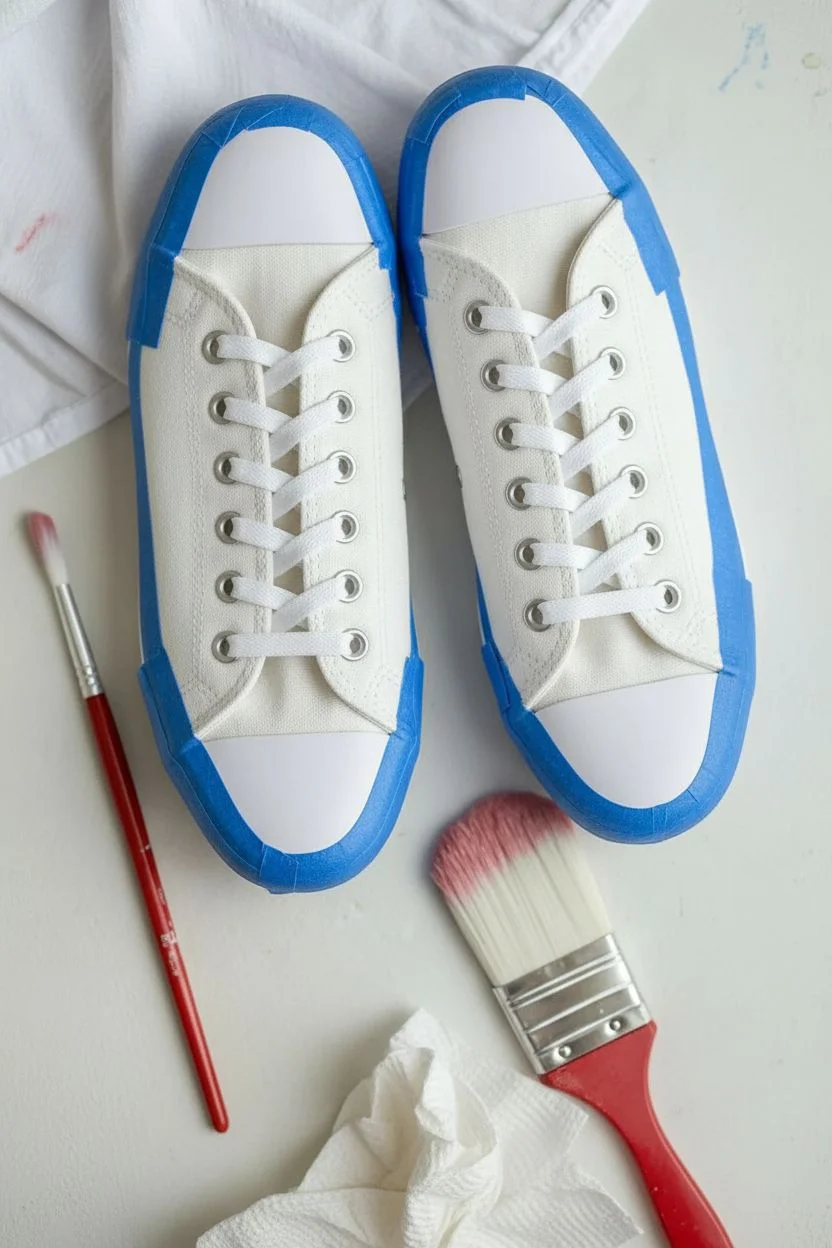
Tape-Resist Geometric Triangles
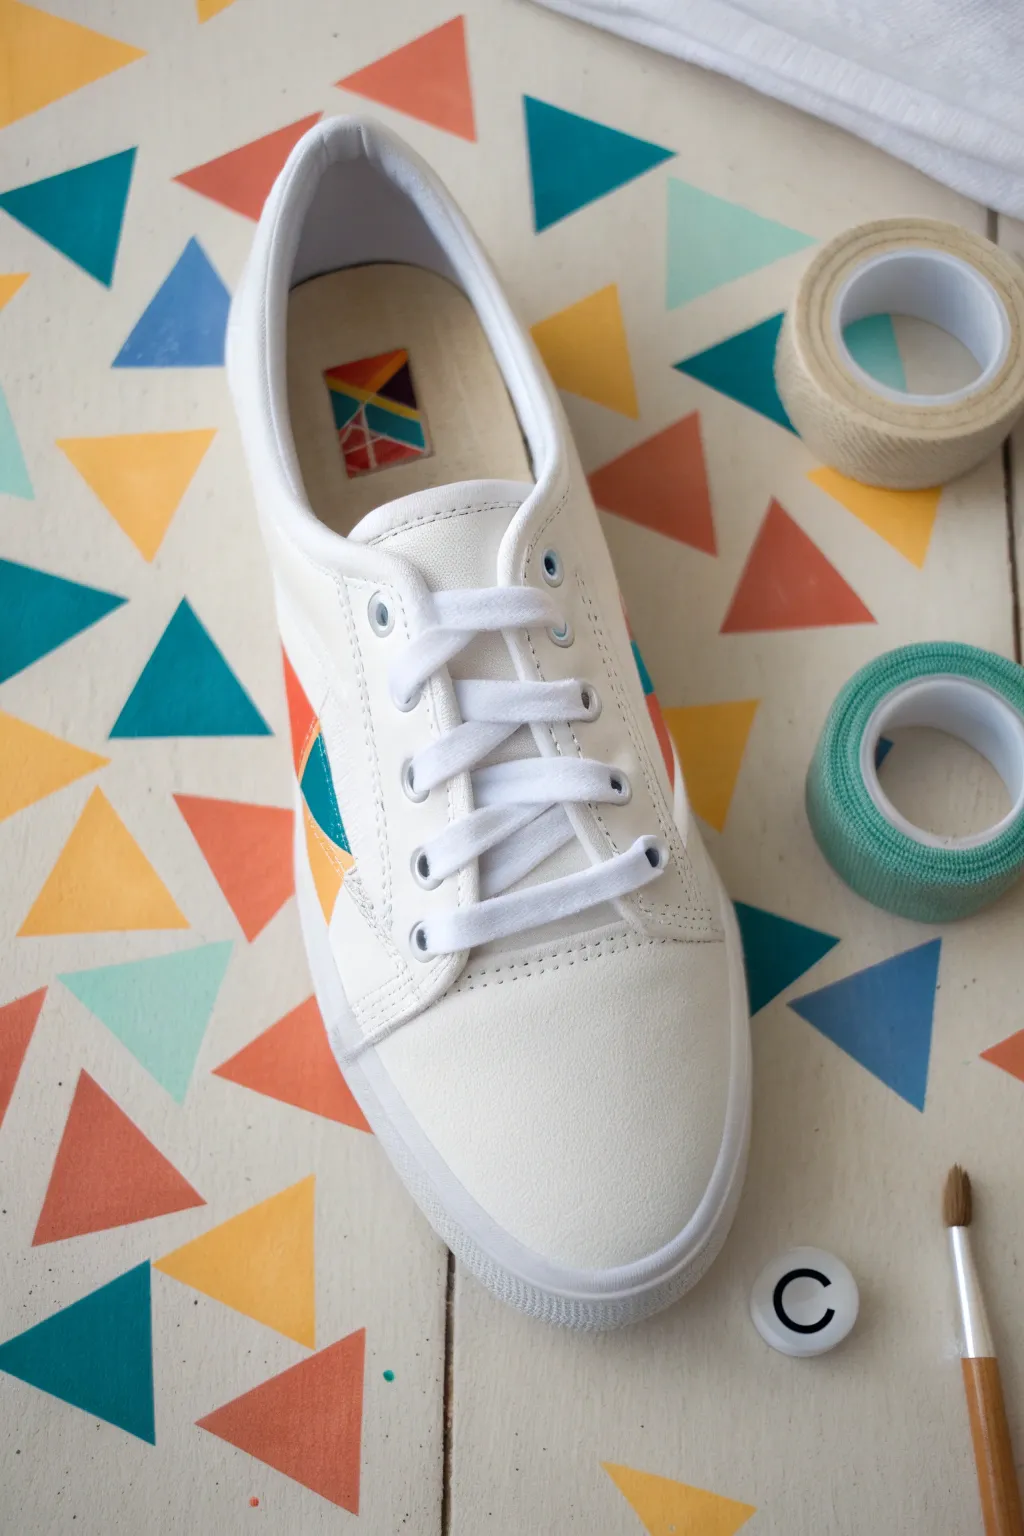
Transform a plain pair of white canvas sneakers into a colorful statement piece with this easy tape-resist technique. The result is a crisp, modern pattern of interlocking triangles that looks professionally printed rather than hand-painted.
Step-by-Step Tutorial
Materials
- White canvas sneakers
- Fabric paint (teal, orange, yellow, light blue)
- Masking tape or painter’s tape (various widths)
- Small flat paintbrush
- Small round paintbrush for touch-ups
- Water cup and paper towels
- Palette or small cups for mixing
- Hair dryer (optional for faster drying)
Step 1: Preparation and Taping
-
Prep the shoes:
Remove the shoelaces completely from both sneakers. This gives you a clear canvas to work with and prevents accidental paint drips on the laces. -
Clean the surface:
Even if the shoes are new, give the canvas a quick wipe with a damp cloth to remove any surface dust or sizing that might interfere with paint adhesion. Let them dry fully. -
Plan your design:
Visualize where you want your triangle clusters to be. It’s often best to place them on the side panels and heel rather than the toe box which flexes a lot during walking. -
Apply base tape lines:
Cut small strips of masking tape. Apply them to the canvas in random, intersecting diagonal lines. Press down firmly on the edges of the tape. -
Create triangle shapes:
Continue adding tape strips to form enclosed triangular shapes between the tape lines. Vary the size of these triangles for visual interest. -
Seal the edges:
Run your fingernail or a plastic card along the edge of every piece of tape. This is crucial to prevent paint from bleeding under the tape and ruining your crisp lines.
Step 2: Painting the Pattern
-
Start with lightest color:
Dip your flat brush into the yellow fabric paint. Fill in several random triangles across the shoe. I prefer starting light so if I make a mistake, darker colors can cover it. -
Apply orange tones:
Clean your brush and switch to the orange paint. Fill in triangles adjacent to or near the yellow ones, ensuring you don’t paint two shapes of the same color right next to each other. -
Add cool tones:
Move on to your teal and light blue paints. These cool tones balance out the warmth of the yellow and orange. Apply paint somewhat thickly but evenly to ensure solid coverage. -
Check for gaps:
Look closely at the corners of your triangles. Make sure the paint extends all the way to the tape edge, dab it gently into the corner if necessary. -
Second coat:
Depending on the opacity of your fabric paint, you may need a second coat. Let the first layer dry to the touch before adding another to avoid lifting the previous paint.
Seal Prior to Painting
To get perfectly crisp lines, paint a thin layer of clear acrylic medium or white paint over the tape edges first. This seals the gaps so colored paint can’t bleed under.
Step 3: Finishing Up
-
Let it dry completely:
Allow the paint to dry fully while the tape is still on. This helps ensure the paint film is solid before you disturb it. -
The reveal:
Carefully peel back the masking tape at a 45-degree angle. Pull slowly to reveal the crisp white lines of the canvas underneath. -
Clean up edges:
If any paint bled under the tape, use a very small brush with white acrylic or fabric paint to touch up the lines and restore sharpness. -
Heat set:
Follow your fabric paint manufacturer’s instructions for heat setting, which often involves using a hair dryer or tossing them in a dryer to make the design permanent. -
Re-lace:
Once everything is set and cool, lace your sneakers back up. You can use the original white laces or switch to a color that matches one of your paint triangles.
Fixing Fuzzy Lines
If your lines aren’t sharp after peeling, don’t panic. Use a fine-tip white paint pen to re-draw the separating lines. It’s much easier to control than a brush.
Now you have a custom pair of geometric sneakers that are ready for a sunny day out
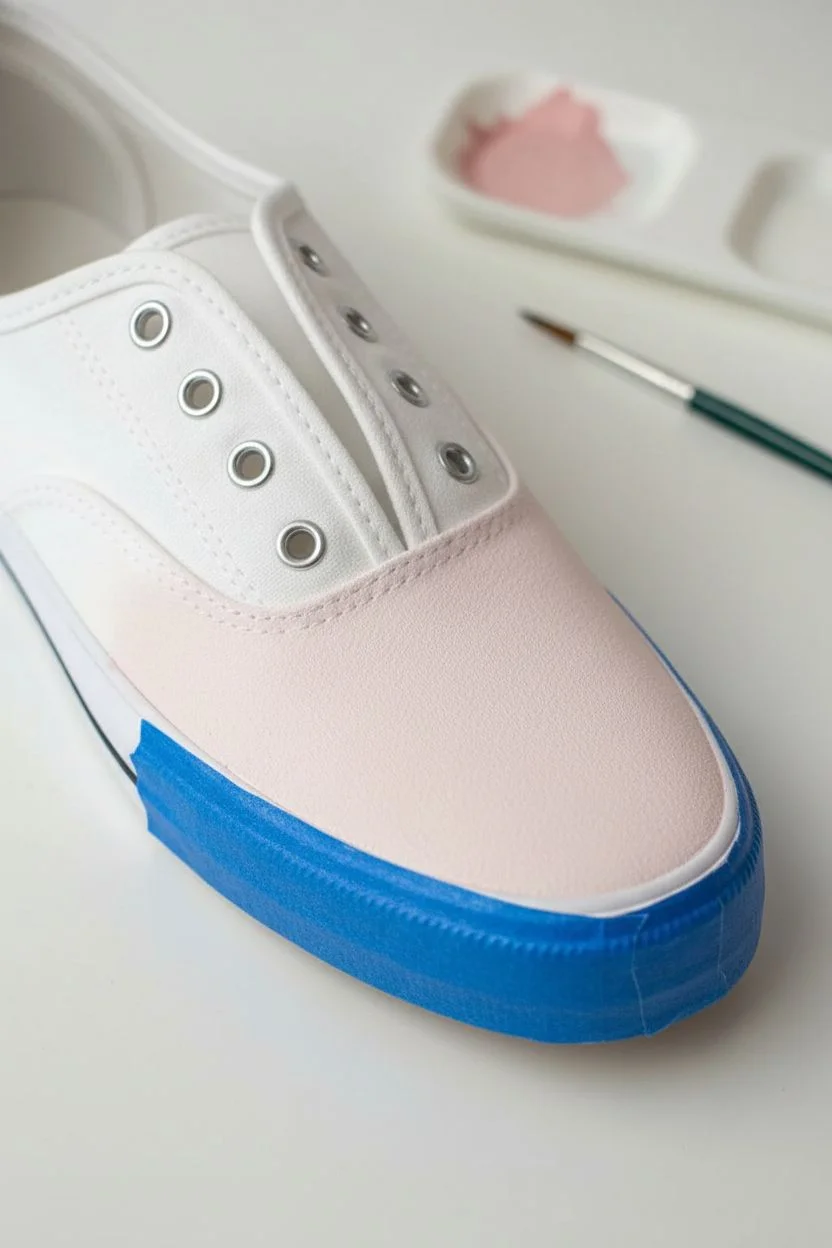
Loose Watercolor-Style Ombre Wash
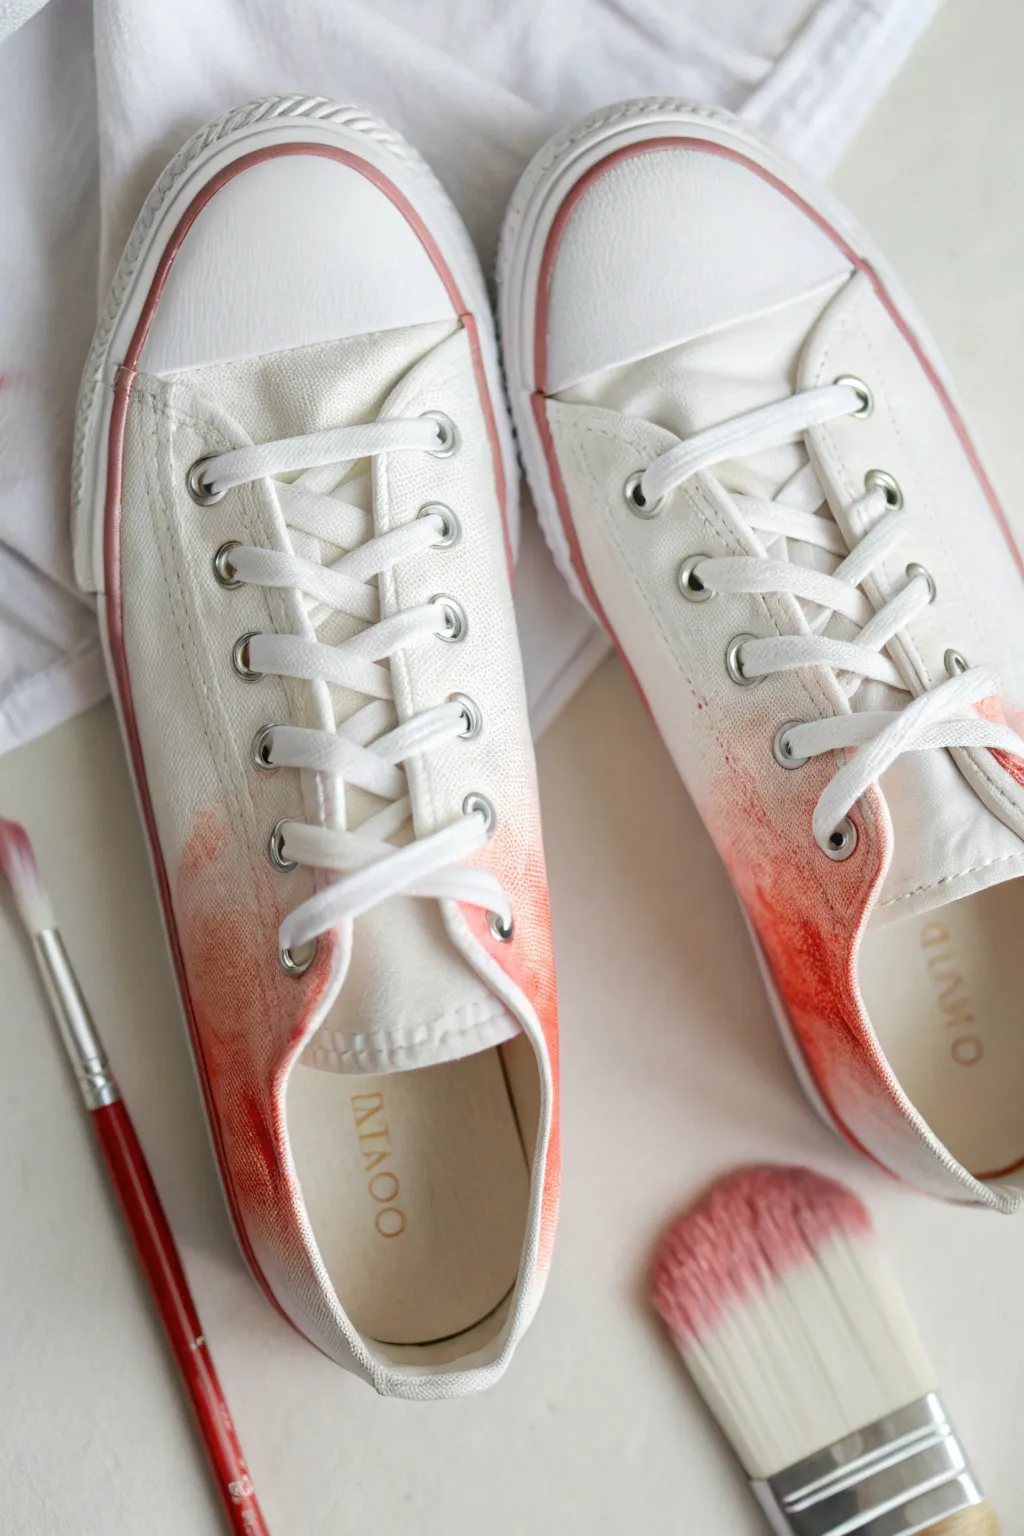
Transform plain white canvas sneakers into a wearable masterpiece with this soft, romantic watercolor technique. The look features a beautiful gradient that starts saturated at the heel and fades gently into the white canvas, perfect for adding a subtle pop of color to your outfit.
Step-by-Step
Materials
- White canvas sneakers (low-top style)
- Fabric medium
- Red or coral acrylic paint
- Water container
- Large flat paintbrush (wash brush)
- Small round detail brush
- Painter’s tape or masking tape
- Paper towels
- Palette or small dish for mixing
- Waterproof sealant spray (optional)
Step 1: Preparation
-
Remove laces:
Start by completely unlacing both shoes. This is crucial because you don’t want any stray paint getting on the laces, and it opens up the tongue area so you can work freely. -
Clean surface:
Even if the shoes are new, give the canvas a quick wipe with a damp cloth to remove any factory dust or lint that might interfere with the paint absorption. -
Protect the sole:
Carefully apply painter’s tape along the rubber sidewall where it meets the canvas. While we will be painting close to this line, taping it off ensures you don’t smudge paint onto the white rubber sole by accident.
Wet-on-Wet Magic
Work quickly! The ‘bleeding’ effect only happens while the canvas is wet. If it starts to dry, mist it lightly with a spray bottle of water to keep the paint moving.
Step 2: Mixing the Paint
-
Create the fabric mix:
On your palette, mix your red acrylic paint with fabric medium according to the bottle instructions (usually a 1:1 or 2:1 ratio). This ensures the paint stays flexible and won’t crack when you walk. -
Dilute for watercolor effect:
Now, take a portion of your fabric paint mixture and move it to a clean spot. Add water gradually. You want a very thin, watery consistency—think colored water rather than thick paint. This is the secret to that loose, organic look. -
Prepare a saturation gradient:
I like to create two puddles: one that is very watered down for the fade, and one that is slightly more pigmented for the intense color at the heel.
Step 3: Painting the Ombre
-
Wet the canvas:
Using your large flat brush and clean water only, dampen the heel area of the shoe and the sides, stopping just past the middle eyelets. The canvas should be moist but not dripping. -
Apply the base wash:
Dip your large brush into the most watery paint mix. Start creating loose, organic strokes near the middle of the shoe (around the lace area shown in the photo), brushing towards the heel. -
Feather the edge:
Where the color meets the white canvas near the toe, use a clean, damp brush to soften the line. You want it to look like a cloud, not a hard stripe. -
Intensify the heel:
Switch to your slightly more pigmented mix. Dab this onto the very back heel area and the lower edges near the sole. Because the shoe is wet, the color will naturally bleed upward and outward. -
Layering color:
While still damp, add drops of your most concentrated paint right at the seam where the canvas meets the sole. Watch it spread. If it doesn’t move enough, touch a wet brush to the edge of the paint spot. -
Create texture:
Use the tip of the large brush to dab rather than stroke in some areas. This creates those beautiful, mottled watercolor blooms visible in the reference photo.
Too Much Paint?
If a spot gets too dark or the water starts pooling, simply dab it gently with a dry paper towel near the edge to lift the excess liquid without smearing.
Step 4: Detaling and Finishing
-
Paint the trim line:
Using the small round detail brush and your un-watered fabric paint mixture, carefully paint the thin canvas piping strip that runs along the very top edge of the rubber sole. -
Refine the piping:
This line acts as a border. Keep your hand steady and paint it a solid, saturated red to frame the looser watercolor wash above it. -
Check symmetry:
Place the shoes side by side. The watercolor patterns don’t need to be identical—in fact, they shouldn’t be—but check that the color intensity and fade point are roughly balanced. -
Dry completely:
Let the shoes sit for at least 24 hours. Don’t rush this, as the fabric medium needs time to cure properly. -
Heat set:
Once dry, toss them in the dryer on high heat for 30 minutes, or use a blow dryer on the highest setting to heat set the paint. This makes it permanent. -
Re-lace:
Remove the painter’s tape from the soles and lace your shoes back up with crisp white laces to contrast the soft paint work.
Enjoy walking around in your custom-dyed kicks knowing you have a truly one-of-a-kind pair of shoes


Have a question or want to share your own experience? I'd love to hear from you in the comments below!