When I need my hands to relax, I grab a pen and fill a page with doodle page ideas that don’t require any pressure to be perfect. Below are my favorite ways to build a page that looks cohesive fast—whether you’re craving mini icons, patterns, or a theme you can riff on for days.
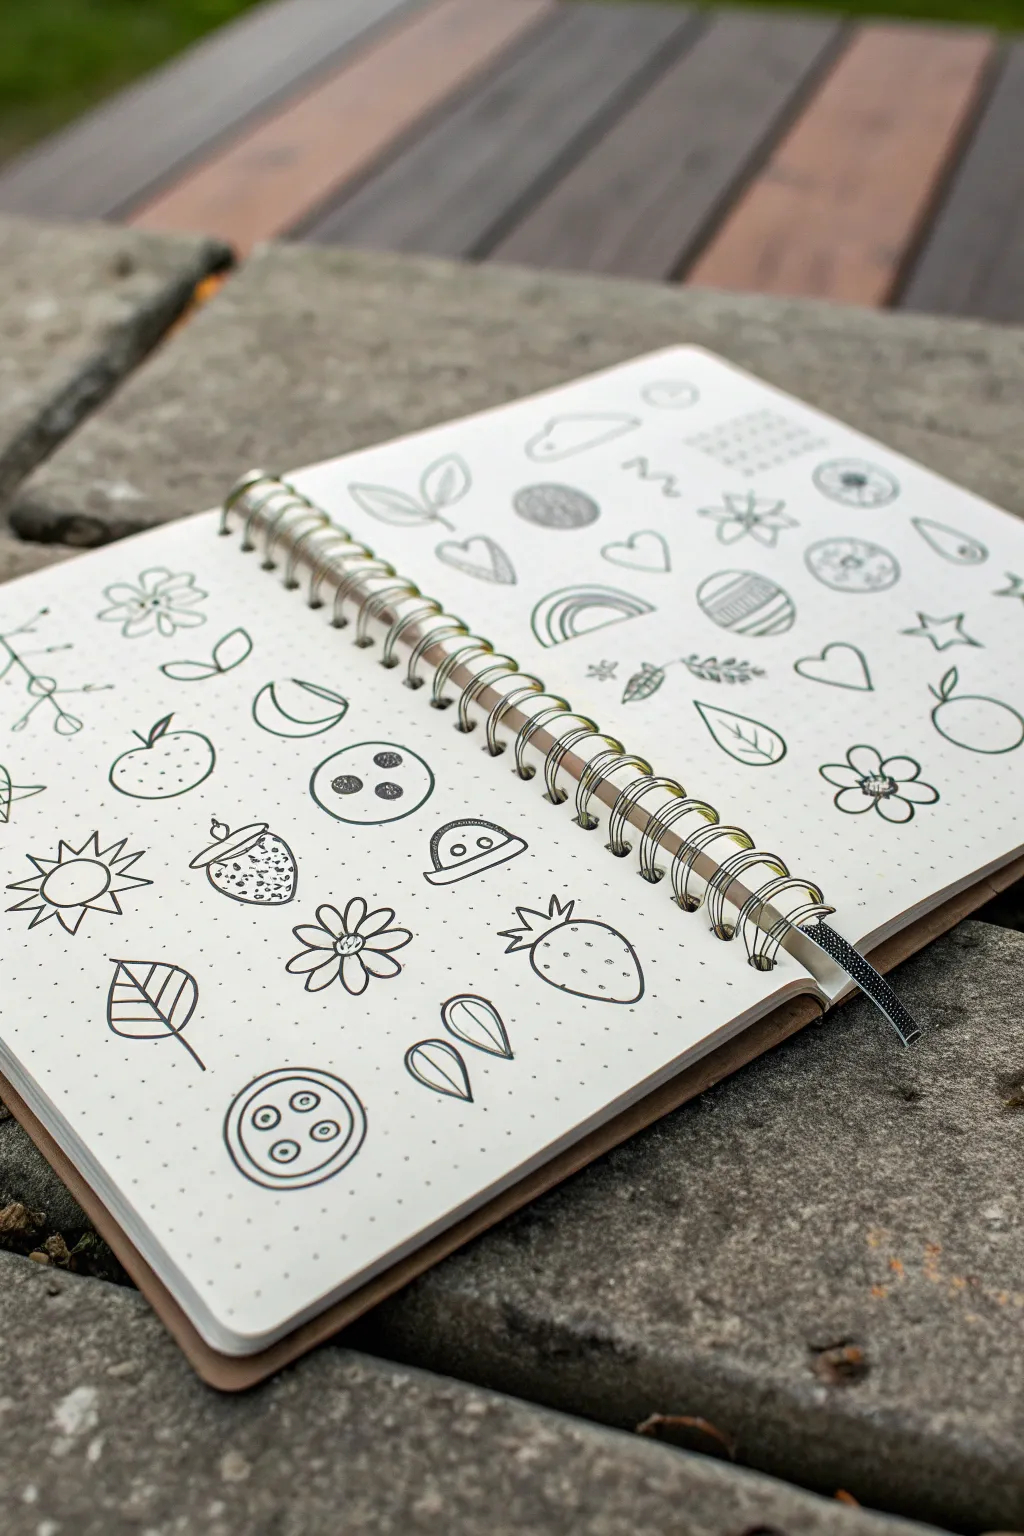
Classic Mini Icon Sampler Page
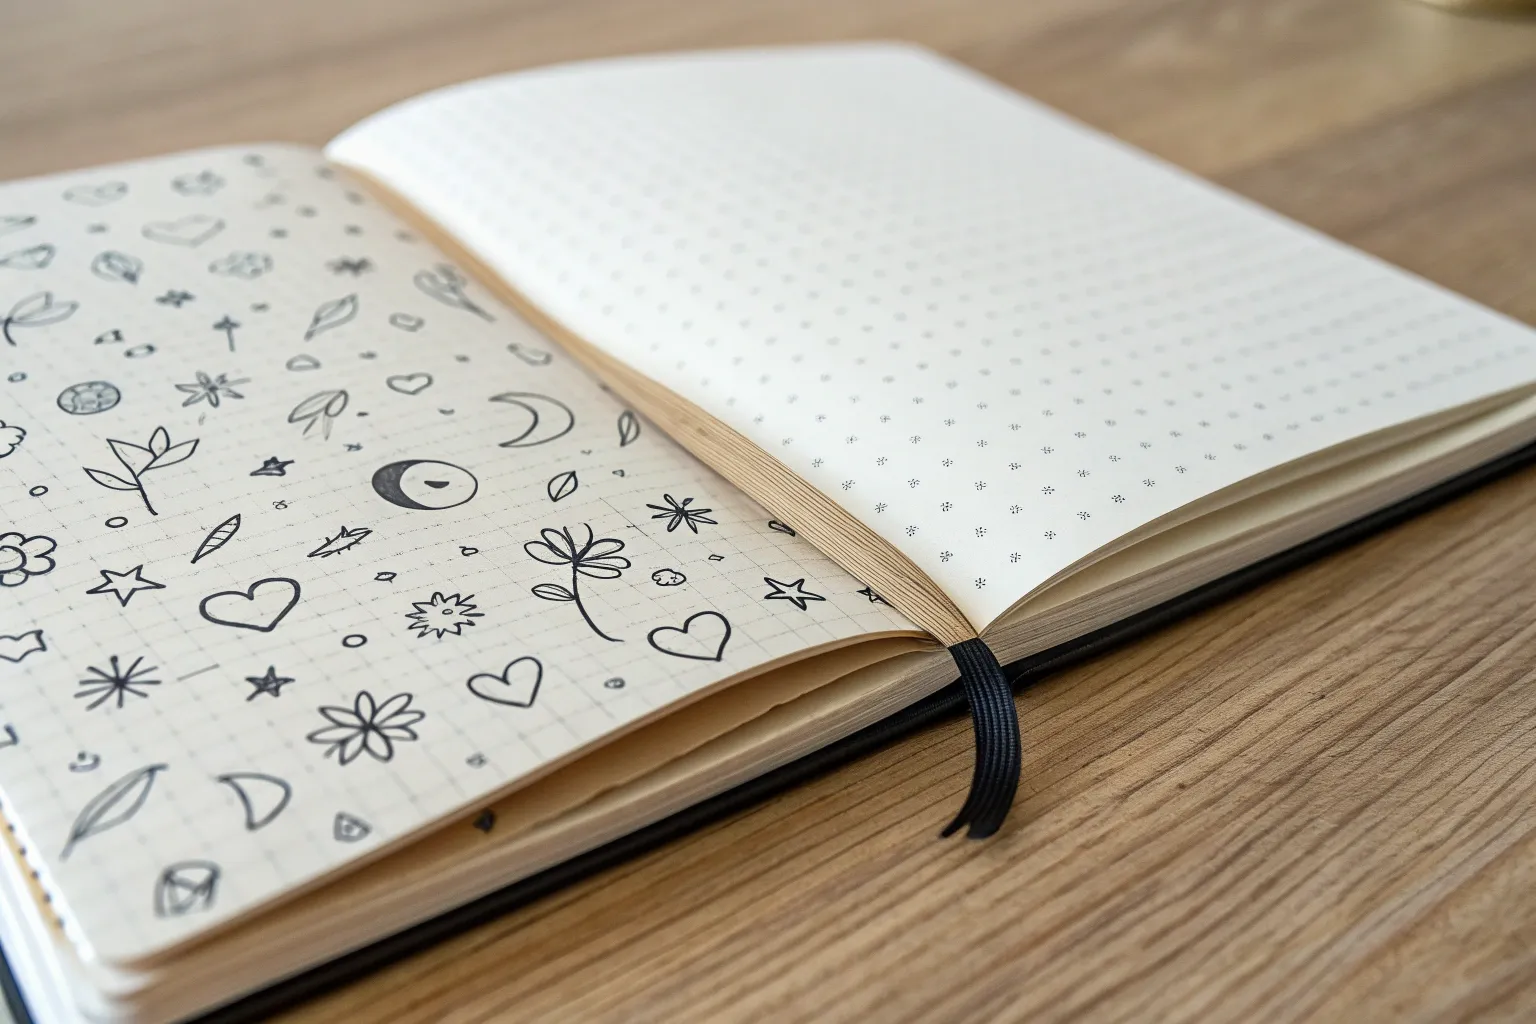
This project is a delightful exercise in simplicity, filling a dot grid page with a scattershot collection of tiny, charming icons. From celestial bodies to everyday objects, the clean black-ink aesthetic creates a satisfyingly organized yet whimsical sampler.
Detailed Instructions
Materials
- A5 Dot grid notebook or journal (ivory or cream paper recommended)
- Fine liner pen (black, size 0.3mm or 0.5mm)
- Pencil (optional, for sketching)
- Kneaded eraser (if sketching first)
- Scrap paper for practice
Step 1: Setting the Stage
-
Open your journal:
Begin with a fresh, blank page in your dot grid notebook. The dots will serve as quiet guides for sizing and spacing without being intrusive. -
Visualize the layout:
Unlike structured grids, this layout relies on ‘random’ placement. Imagine invisible rows, aiming for roughly 5-6 small icons across the width of the page to maintain airy spacing.
Uneven Spacing?
If you have accidentally clustered doodles too close together, draw tiny ‘filler’ dots or mini-stars in the wide gaps elsewhere to visually balance the density.
Step 2: Drawing Celestial & Nature Elements
-
Start with stars:
Near the top, draw a few five-point stars. Keep them open and simple, using the dots to help align the points if needed. -
Add a leaf:
Draw an oval shape with pointed ends for a simple leaf. Adding a central vein line and diagonal veins gives it instant recognition. -
Create a tiny tree:
Sketch a vertical line for the trunk, then add downward-slanting branches on either side, creating a classic pine tree silhouette. -
Draw the sun:
In the center area, draw a small circle and fill it in solidly with black ink. Add short, straight lines radiating outward for sunbeams. -
Include floral elements:
Draw tiny flowers using a central dot surrounded by five tear-drop shaped petals. Try variations, like a single stem with small leaves branching off.
Keep it Consistent
Use the same pen thickness for every doodle. Uniform line weight is the secret to making random collections look cohesive and intentional.
Step 3: Adding Objects & Symbols
-
Sketch a gift box:
Draw a small square or rectangle. Add a cross through the middle for the ribbon, and top it with two loops for a bow. -
Create an envelope:
Draw a rectangle, then add a ‘V’ shape inside extending from the top corners to the center to mimic a sealed envelope flap. -
Draw a lightbulb:
Outline a pear shape, flattening the bottom. Add a zigzag line inside for the filament and horizontal stripes at the base for the screw threads. -
Add a striped ball:
Draw a simple circle. Inside, draw two slightly curved lines to create a beach ball pattern. -
Draw a rainbow:
Create two or three concentric arches. I like to finish the ends with small cloud shapes to ground the rainbow.
Step 4: Filling the Gaps
-
Scatter small hearts:
Look for empty spaces between larger doodles. Fill these with small, simple hearts. Try varying them—some plain, some with a polka-dot pattern inside. -
Add sparkle details:
Draw small ‘sparkle’ shapes (a cross with a diagonal cross over it) or tiny individual stars to add texture to blank areas. -
Include geometric shapes:
Add visual interest with stacks of ovals (like a cairn of stones) or simple striped circles. -
Draw a lightbulb variation:
Try a second lightbulb style or a balloon shape to balance the composition if one side feels lighter than the other. -
Review spacing:
Step back and look at the page as a whole. The goal is even distribution, so if you spot a large white gap, add a tiny circle, star, or heart. -
Final erase:
If you used pencil guidelines, wait until the ink is completely dry—give it a good five minutes—before gently erasing the stray graphite.
You now have a charming reference page of icons ready to decorate future journal spreads


Simple Flower Doodle Library
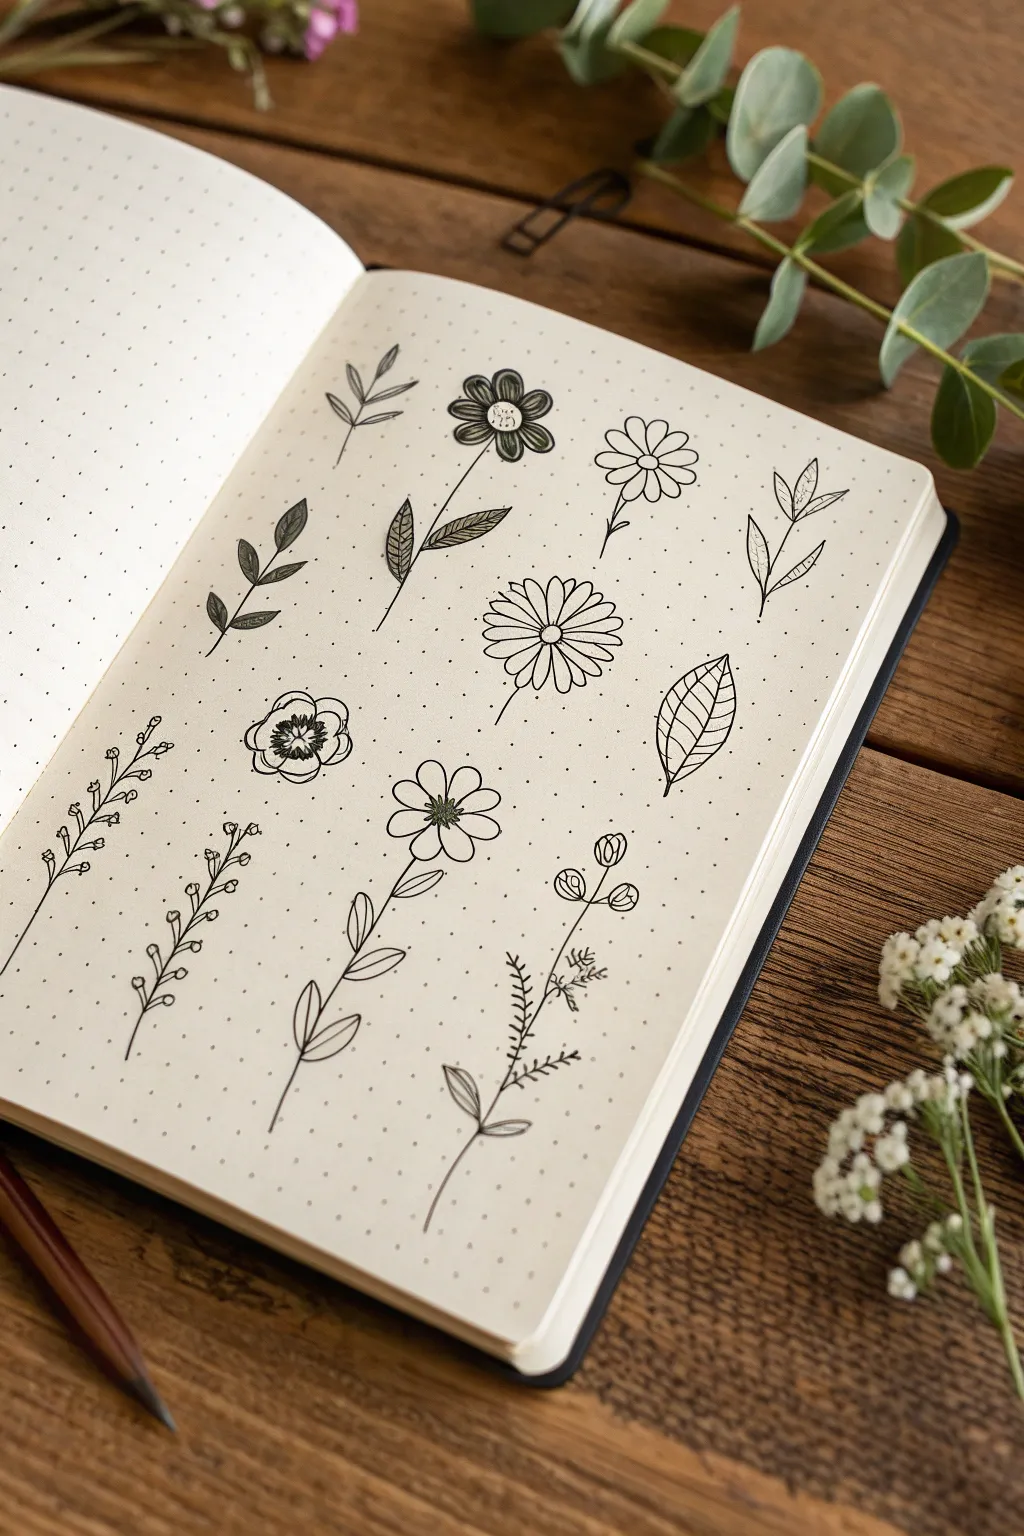
Transform a plain text page into a charming garden study with these minimalist botanical doodles. This tutorial guides you through creating a library of simple line-art flowers and leaves, perfect for adding organic touches to your weekly spreads or mood trackers.
Step-by-Step Guide
Materials
- A5 dotted notebook (bullet journal)
- Fine-liner pen (0.3mm or 0.5mm, black)
- Pencil (HB or H)
- Eraser
- Ruler (optional, for spacing)
Step 1: Planning the Layout
-
Set up the grid:
Begin by envisioning a 3×4 or 4×3 grid on your page to keep your doodles evenly spaced. You can lightly mark the center points of each invisible box with your pencil to help with alignment. -
Draft the stems:
Using your pencil, lightly sketch a vertical or slightly curved line for each stem. Varying the curve direction and height adds a natural, organic feel to the collection.
Use Dotted Guides
Use the dots on your paper to ensure symmetry. Count dots to make sure petals are roughly the same size or leaves appear at consistent intervals.
Step 2: Drawing the Top Row
-
Simple leaf sprig:
Start with the top left doodle. Draw a central stem, then add pairs of almond-shaped leaves branching off. Finish with a single leaf at the very tip. -
Bold shaded flower:
Move to the next space. Draw a small circle for the center, outline five rounded petals around it, and then fill the petals with dense vertical hatching lines to potential make them pop. -
Classic daisy:
For the third doodle, draw a slightly larger center circle. Surround it with simple, un-shaded petals. Keep the lines clean and open. -
Tall leafy branch:
On the far right, draw a stem that splits into a ‘Y’ shape. Add long, slender leaves with a central vein line to the tips of each branch.
Step 3: Creating the Middle Elements
-
Detailed leaf branch:
On the left side of the second row, draw a stem with larger leaves. Draw a line down the center of each leaf and fill one half of the leaf with diagonal shading lines for texture. -
Leafy stem variation:
Next to it, draw a simple stem with pairs of pointed oval leaves. Add a single vein line down the center of just the larger bottom leaves for variety. -
Full daisy bloom:
Draw a multi-petaled flower (like a zinnia or aster) by creating two layers of thin petals around a center. The back petals should peek out from between the front ones. -
Large textured leaf:
Draw a large, single leaf shape detached from a main plant. Draw a central vein and curved stripes extending to the edges to mimic leaf veins.
Add a Splash of Color
Highlight specific parts using a mildliner or watercolor. A single stroke of pale green on stems or yellow in flower centers brings the page to life.
Step 4: Sketching the Bottom Garden
-
Delicate vine:
For the bottom left, draw a long, slightly wavy stem. Add tiny, teardrop-shaped buds or leaves in alternating patterns going up the stem. -
Wildflower sprig:
Draw a stem with small branches. At the end of each tiny branch, add little clusters of three small circles to represent berries or buds. -
Tall cosmo:
Draw a prominent flower with a textured center (stippling works well here). Give it wide, heart-shaped petals and a long stem with two large leaves near the bottom. -
Budding branch:
Create a stem with multiple branches. Top each branch with a circular bud that has a small ‘v’ inside to show it is about to open. -
Fern frond:
Finally, draw a central stem and add many small, short horizontal lines or tiny leaves all the way up, creating a fern-like texture.
Step 5: Finalizing
-
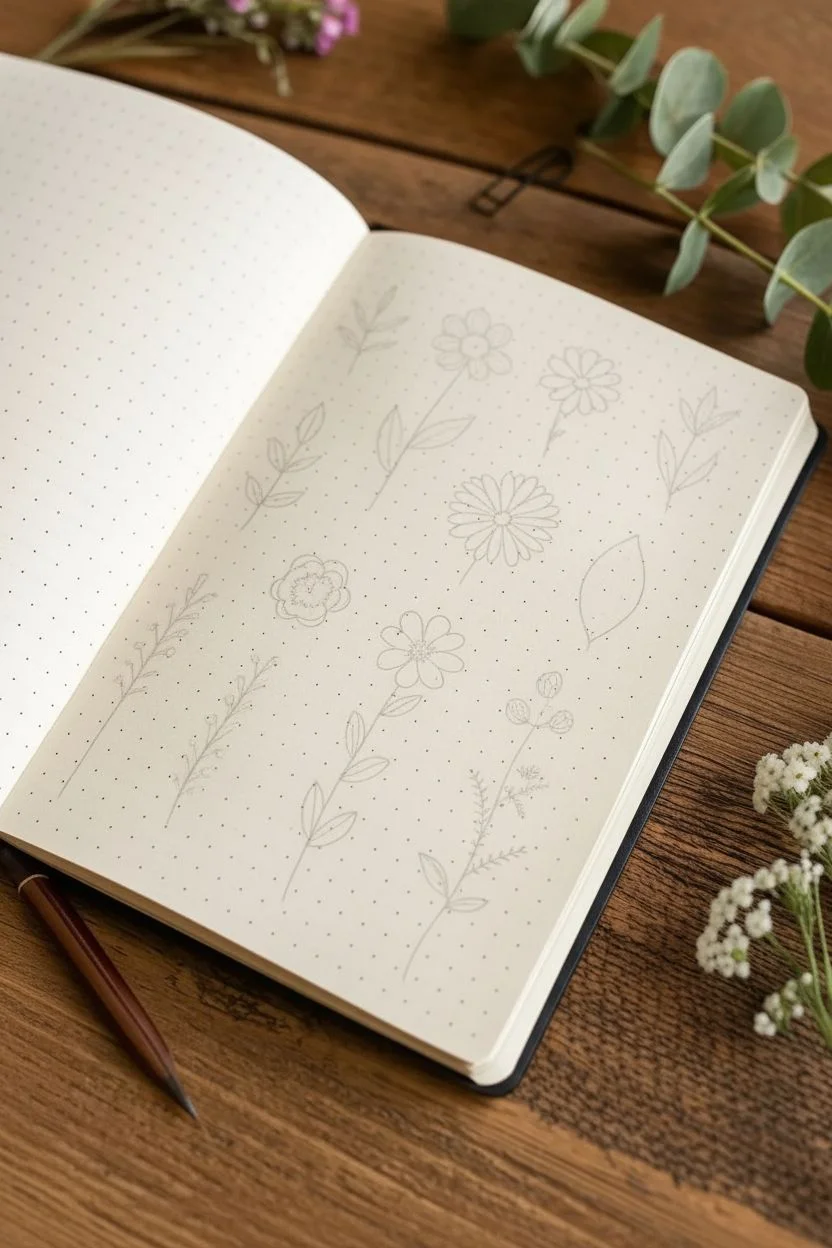
Inking the lines:
Once you are happy with your pencil sketches, go over everything with your fine-liner pen. Keep a steady hand and try to execute each curve in a single stroke for smoothness. -
Erase and clean:
Wait at least five minutes for the ink to dry completely to avoid smudging. Then, gently erase all pencil guidelines to reveal your crisp, black-and-white botanical library.
You now have a beautiful reference page of botanical doodles ready to decorate your future journal entries


Leaf Shapes and Botanical Sprigs Page
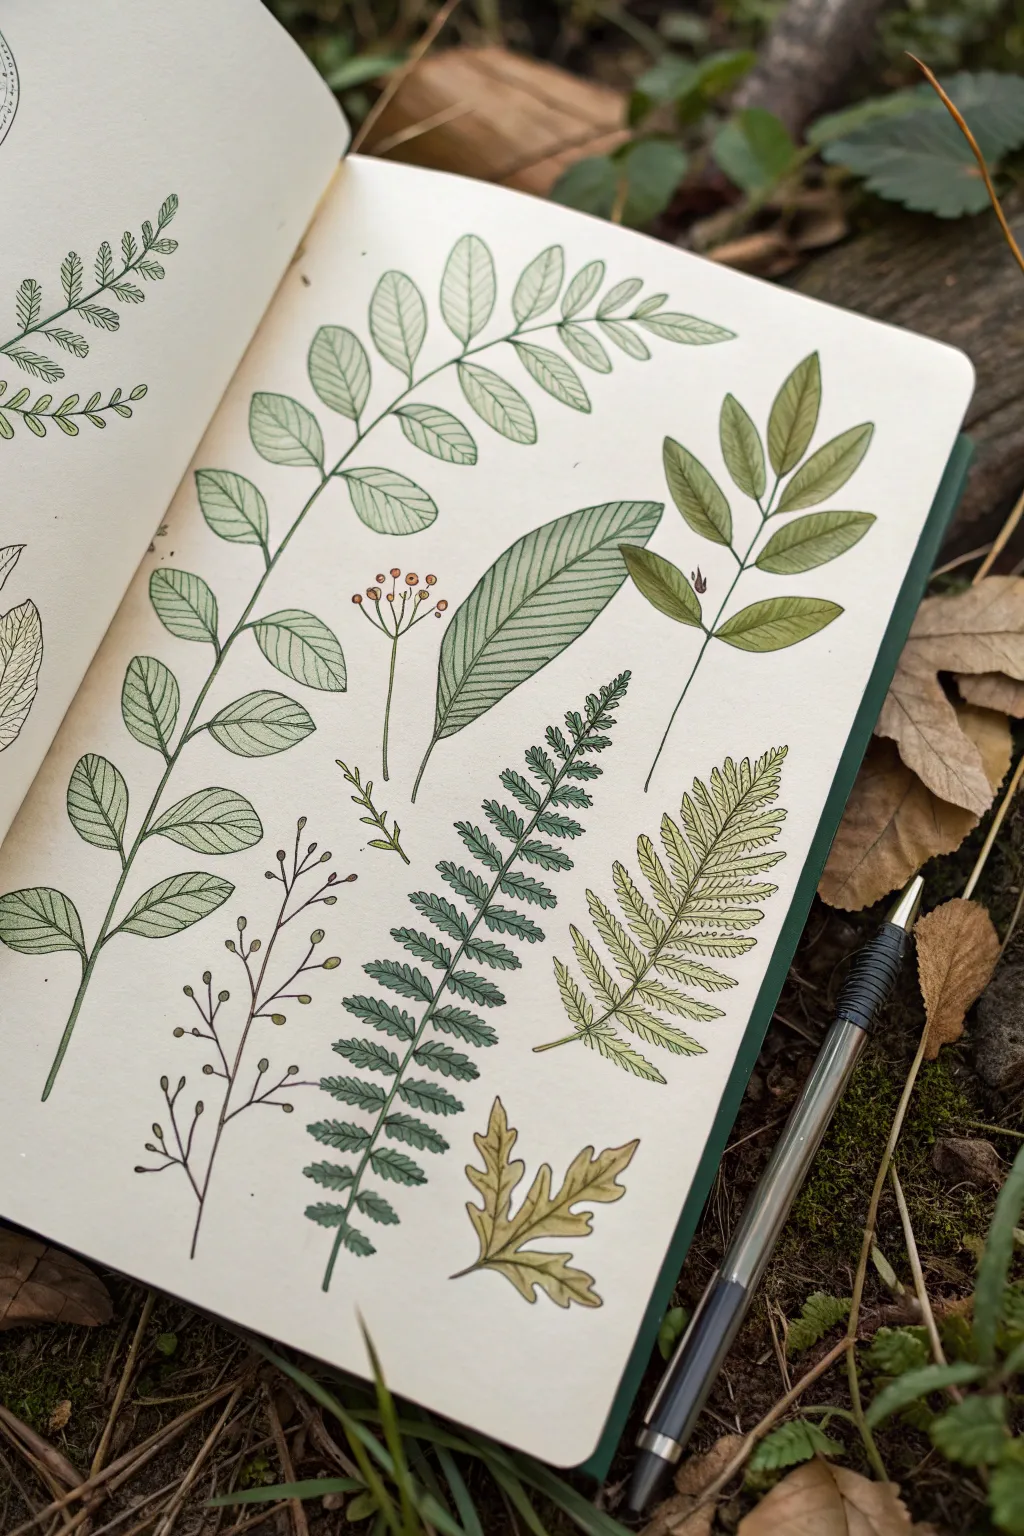
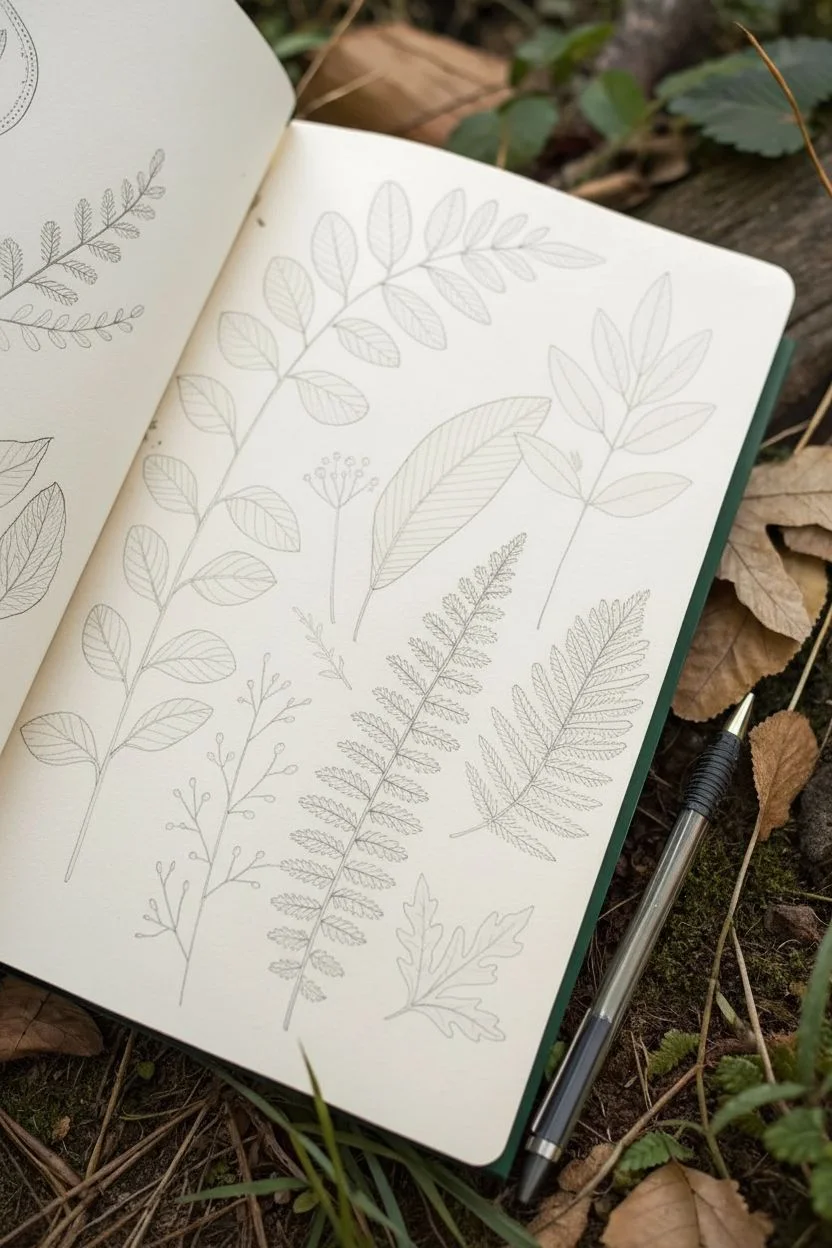
This project captures the delicate beauty of forest flora through a series of detailed leaf studies on a single sketchbook page. By combining fine liner precision with soft washes of color, you’ll create an illustrated collection that feels like a naturalist’s field notes.
Detailed Instructions
Materials
- Smooth heavyweight sketchbook paper (hot press watercolor paper works best)
- 0.1mm archival pigment liner (black)
- 0.05mm archival pigment liner (black) for fine details
- Watercolor set (pan or tube)
- Small round watercolor brush (size 2 or 4)
- Pencil (HB)
- Kneadable eraser
- Paper towel
- Small jar of water
Step 1: Pencil Layout
-
Map the stems:
Begin by lightly sketching the main ‘spines’ or stems of your botanical elements. Draw a long, curving line on the left for the largest branch, a diagonal line for the fern, and sporadic shorter lines for the smaller sprigs. Keep these lines faint so they can be erased later. -
Outline leaf shapes:
Lightly sketch the general shapes of the leaves attached to your stems. For the large left branch, draw paired ovals. For the fern, use small repeating triangles that tape off. Don’t worry about serrated edges just yet; capture the overall volume and placement.
Step 2: Inking the Outlines
-
Draw the main stems:
Switch to your 0.1mm pen. Trace over your pencil stems with confident strokes. For the woody branches, you might double the line slightly at the base to suggest thickness, tapering to a single line at the tip. -
Ink the large oval leaves:
On the large left branch, ink the oval leaves. Add a central vein line down the middle of each leaf, stopping just short of the tip. Keep your hand loose to avoid shaky lines. -
Detail the pinnate leaves:
For the sprig at the top center, draw slender, elongated oval leaflets arranged in pairs. Ink the central vein for each leaflet immediately after drawing the outline to maintain flow. -
Create the fern texture:
Move to the central fern frond. Instead of smooth lines, use small, jagged zigzag strokes to create the serrated edges of the fern leaves. This texture is crucial for distinguishing it from the smooth leaves nearby. -
Ink the miscellaneous specimens:
Outline the remaining elements: the wide, singular leaf with parallel veins in the center, the small berry sprig, and the lobed maple-like leaf at the bottom. Be precise with the sharp points of the maple leaf.
Natural Variation
Don’t make every leaf identical. Purposefully draw a few with bent tips, insect bites, or slightly asymmetrical shapes to make the botanical study look organic and realistic.
Step 3: Adding Fine Details
-
Add secondary veins:
Switch to the ultra-fine 0.05mm pen. Inside the large oval leaves on the left, draw delicate, parallel diagonal lines branching from the central vein. Keep these very light and evenly spaced. -
Texturize the broad leaf:
For the single broad leaf in the center, fill the entire shape with closely spaced parallel lines running from the center vein to the edge. This mimics the texture of a ribbed leaf like a hosta or plantain lily. -
Erase pencil guides:
Wait at least five minutes for the ink to dry completely. Gently run your kneadable eraser over the entire page to lift the graphite without damaging the paper surface.
Level Up: Vintage Vibe
Wash the entire background with cold tea or diluted coffee before drawing. This creates an aged, parchment-like effect perfect for old-world botanical illustrations.
Step 4: Watercolor Wash
-
Mix your greens:
Prepare three shades of green on your palette: a pale, watery sap green; a deeper, earthier olive green; and a brownish-yellow ochre mix for dried leaves. Having these ready prevents hard edges while mixing. -
Paint the large branch:
Dip your brush in the pale sap green. Paint the leaves of the large left branch. I like to leave tiny white gaps near the veins or edges to suggest highlights, rather than filling the shape solid. -
Color the fern:
Use the deeper olive green for the central fern frond. Paint carefully within the jagged lines. While the paint is still wet, you can touch the very center stem with a slightly darker mix to add depth. -
Paint the varied sprigs:
Paint the top pinnate leaves with a mix of the sap and olive greens. For the lone broad leaf, use a very diluted wash so the pen texture shows through clearly. -
Add autumnal touches:
Use the yellow-ochre mix for the bottom lobed leaf to give it a dried, autumnal look. Paint the small berries on the delicate sprig with a touch of burnt sienna or reddish-brown. -
Final shadow accents:
Once the first layer of paint is dry, add a tiny amount of darker green to the base of where leaves meet stems on the larger specimens. This subtle shading grounds the leaves.
Allow the page to dry completely before closing your sketchbook to preserve your crisp botanical collection


Cute Animal Faces Grid
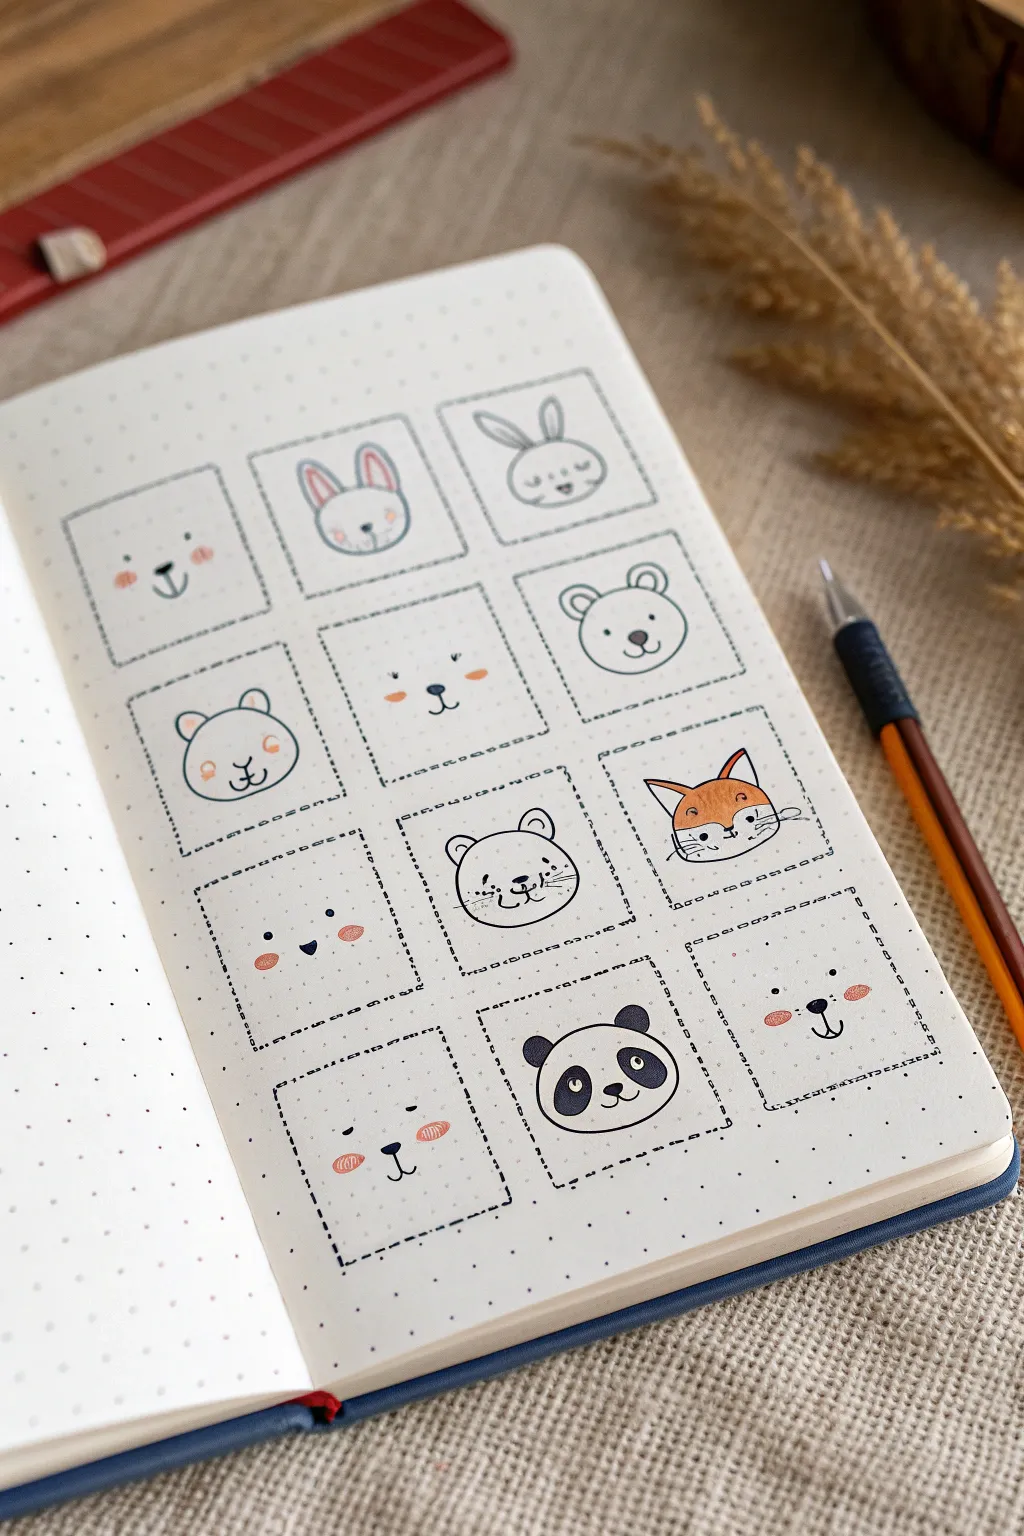
Transform a simple page in your dot grid journal into a menagerie of minimalist cuteness with this structured doodle spread. This project combines geometric precision with soft, kawaii-style animal illustrations for a relaxing and charming drawing session.
How-To Guide
Materials
- Dot grid notebook or journal
- Fine tip black drawing pen (0.3mm or 0.5mm)
- Pencil and eraser
- Ruler
- Colored pencils or markers (pale pink, orange, grey)
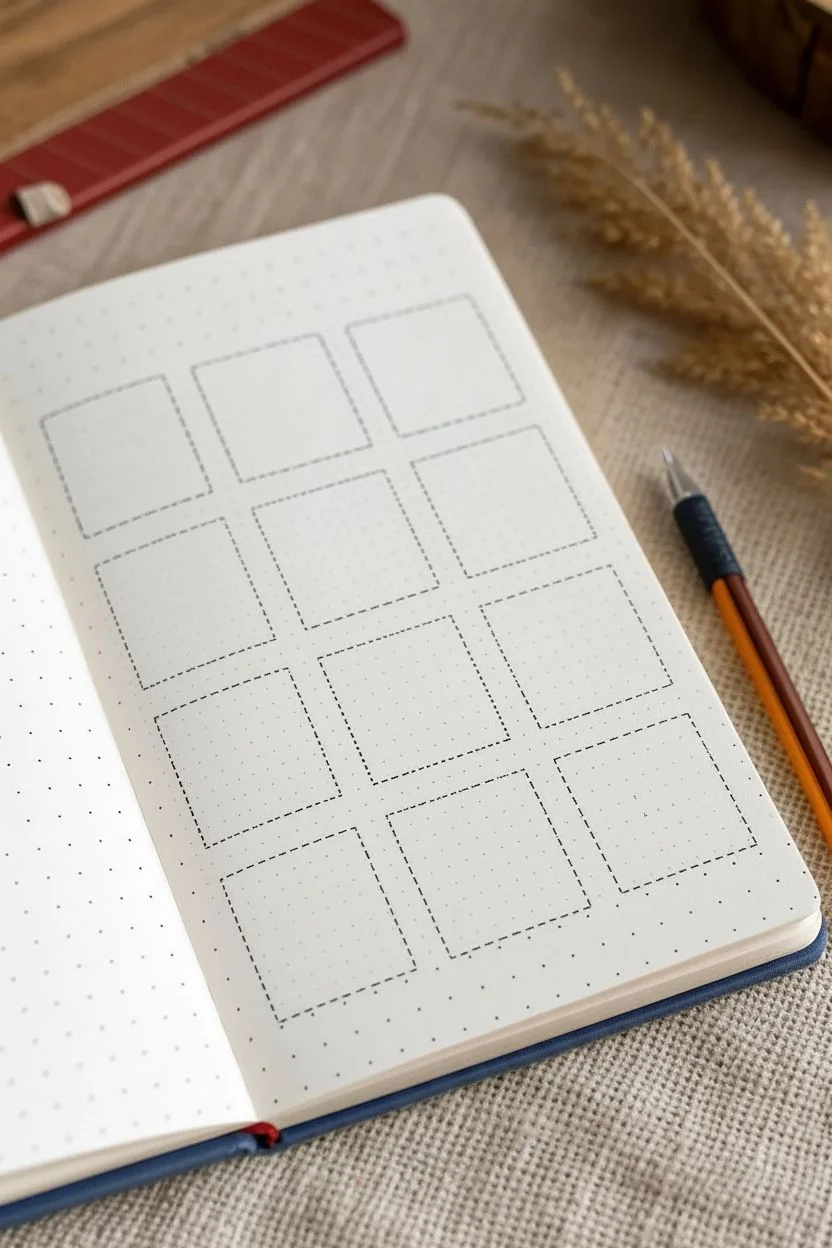
Step 1: Setting the Structure
-
Plan the layout:
Begin by counting the dots on your page to center your grid. You will need space for a 3-column by 4-row arrangement. -
Draft the boxes:
Using a pencil and ruler, lightly sketch out twelve equal squares. A 6×6 dot square size usually works perfectly for these doodles. -
Ink the frames:
Go over your pencil squares with a fine black pen. Instead of straight solid lines, switch up the line styles to add texture. Try a solid line for the top row, dotted lines for the middle, or dashed lines for the bottom to create variety. -
Erase guidelines:
Once the ink is completely dry, gently erase the pencil marks underneath to leave clean frames for your drawings.
Grid Master Tip
Count your dots meticulously before inking! A 2-dot gap between each frame keeps everything looking airy and prevents the page from feeling cluttered.
Step 2: Doodling the Top Rows
-
First bear:
In the top-left box, draw a simple bear. Start with two small dot eyes and a tiny triangular nose. Add a curved mouth and two small C-shaped ears at the top corners of the invisible head shape. -
Soft bunny:
Move to the middle box of the top row. Draw a U-shape for the head, then add two long, upright ears. Inside, draw sleepy curved eyes and a tiny ‘x’ mouth. -
Sleepy rabbit:
For the top-right box, draw a rounded head shape with lop ears that point slightly outwards. Give it a content, sleepy expression with closed eyes. -
Round bear:
On the second row, start with a perfectly round circle head. Add small semi-circle ears on the sides and large, wide-set eyes for a curious look. -
Minimalist cat:
In the center of the second row, just draw the facial features without a head outline. Two wide eyes, a tiny nose, and whiskers floating in space create a modern, airy feel. -
Teddy bear:
Finish the second row with a classic teddy. Draw a circle head with distinct round ears. Add a smaller oval inside the face for the snout area, placing the nose and mouth inside it.
Make It Yours
Turn this into a mood tracker by leaving the faces blank. Each day, draw an expression in a new box that matches how you’re feeling.
Step 3: Completing the Menagerie
-
Hamster cheeks:
Start the third row with a character defined by its cheeks. Draw two small eyes and a mouth, then place very round, rosy circles on the cheeks to suggest a hamster or chipmunk. -
Detailed cat:
In the middle box, draw a cat face with a distinct outline. Add triangular ears and draw three whiskers on each cheek for extra detail. -
Fox friend:
In the third row, far right, draw a fox. Start with a wide head that tapers to a point. Draw triangular ears and define the face mask by drawing curved lines from the ears down to the nose. -
Simple bear face:
On the bottom row, left side, draw a very clean face using just two dots for eyes and a small vertical line connecting to a mouth anchor shape. -
Panda portrait:
In the bottom-center box, draw a wide oval head. Add two large dark oval patches for the eyes, slanting them slightly downwards for a sad-cute look. Fill in the ears with black ink. -
Final cub:
For the last box, draw a simple bear face but place the features lower in the square to give it a ‘peeking’ effect. Add tiny eyebrows for expression.
Step 4: Adding Color Accents
-
Rosy cheeks:
Take a pale pink pencil or marker. Gently add small circular blushes to the cheeks of the bears and bunnies. I find that using a circular motion with a colored pencil gives a softer, fur-like texture. -
Fox fur:
Use an orange pencil to color in the top half of the fox face, leaving the muzzle white. -
Bunny ears:
Add a touch of pink to the inner parts of the bunny ears for a pop of color. -
Final touches:
Review your doodles and reinforce any black lines that might have faded during coloring. Add tiny highlight dots to the larger eyes if you want them to sparkle.
Now you have a charming collection of faces to brighten up your journal whenever you open it

PENCIL GUIDE
Understanding Pencil Grades from H to B
From first sketch to finished drawing — learn pencil grades, line control, and shading techniques.
Explore the Full Guide
Stars, Moon, and Planet Scatter Page
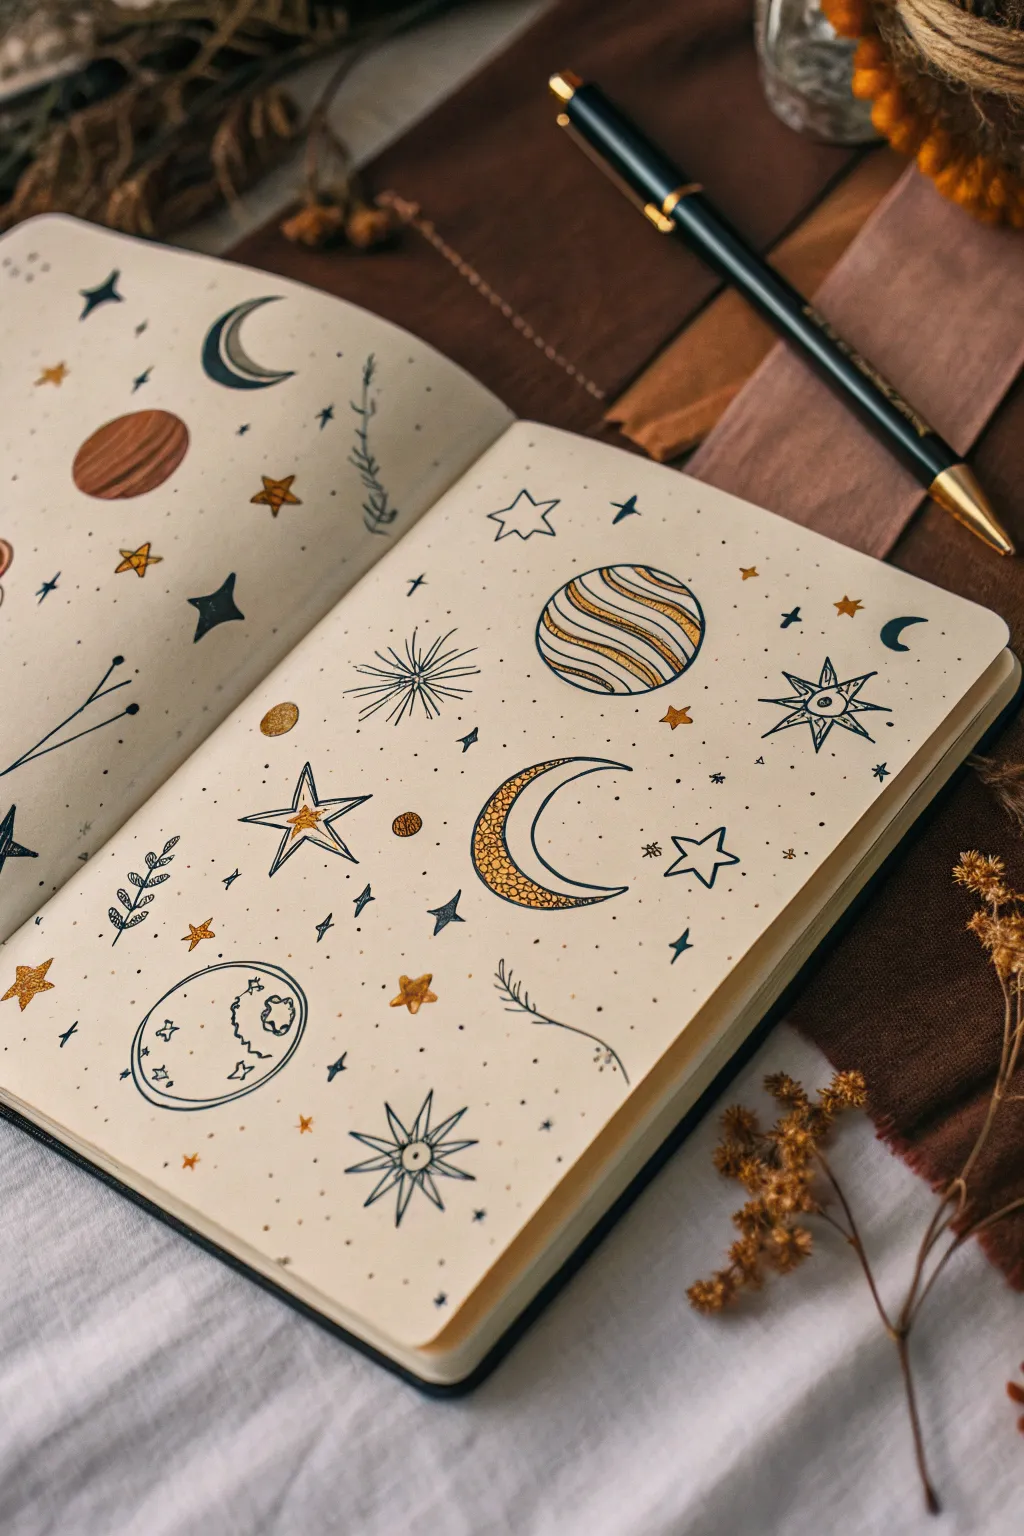
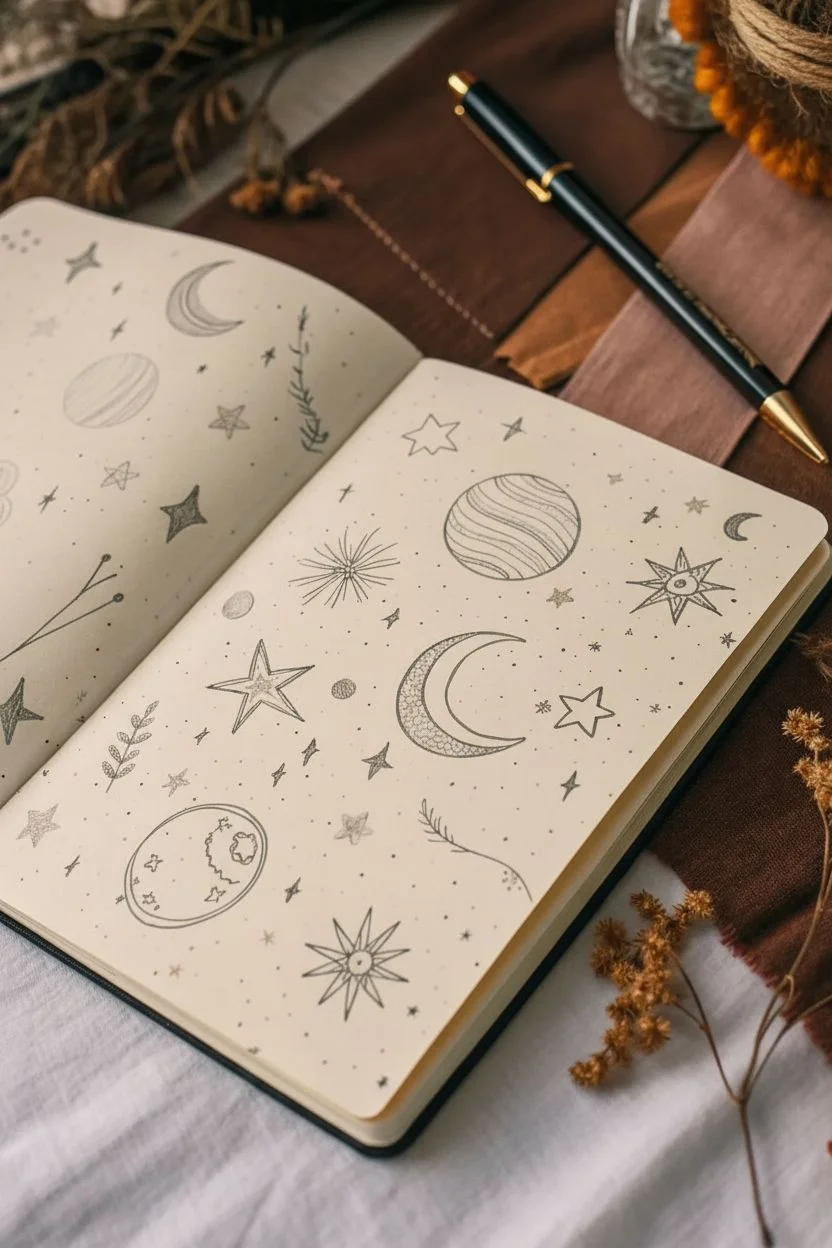
Transform a blank page into a magical night sky with this scattered celestial layout. By combining crisp black fine-liners with shimmering gold accents, you can create a dreamy, cohesive doodle spread perfect for bullet journaling or sketchbook practice.
Detailed Instructions
Materials
- Dotted or blank journal/sketchbook paper
- Fine-liner pen (black, 0.3mm or 0.5mm)
- Metallic gel pens or paint markers (gold, bronze, copper)
- Pencil (HB)
- Eraser
- Optional: Ruler
Step 1: Planning the Layout
-
Scatter sketch:
Begin by lightly sketching your largest elements first using a pencil. Place a large crescent moon near the center, a striped planet toward the top right, and another planet or circle shape on the opposite page to create balance. Don’t worry about perfect circles; a slight hand-drawn wobble adds charm. -
Medium elements:
Fill the larger gaps with medium-sized motifs. Sketch a few sizes of five-pointed stars, a radiant sun-starburst, and perhaps a delicate leafy vine or two curving around the edges. -
Tiny fillers:
Evenly adhere tiny filler elements throughout the empty spaces. Sketch small dots, tiny four-point sparkles, and miniature circles to make the page feel full and abundant without overcrowding the main drawings.
Don’t Overthink It
Turn your sketchbook as you draw the stars. It’s much easier to draw consistent points if you rotate the paper to suit your hand’s natural angle.
Step 2: Inking the Outlines
-
Outline main shapes:
Switch to your black fine-liner. Trace over your pencil sketches for the moon, planets, and large stars. Use a confident, steady hand, but remember that organic lines look better for this style than rigid ruler lines. -
Detail the moon:
For the central crescent moon, add a texture pattern inside. Draw small, tight scales or cobblestone-like circles filling the bottom half of the crescent to give it visual weight. -
Stripe the planet:
Ink the planet on the top right. Draw slightly curved horizontal bands across its surface to mimic gas giant stripes. Vary the thickness of these bands slightly for interest. -
Draw the starburst:
For the radiant starburst, draw a small center circle, then flick your pen outward rapidly to create thin, sharp rays extending in all directions. I find flicking away from the center keeps the lines sharper. -
Add botanical touches:
Ink the small vine branches. Keep the leaves simple and teardrop-shaped, attaching them to a thin, curving central stem. -
Inking the fillers:
Go over the remaining small stars and sparkles. For the tiniest dots, just touch the tip of the pen to the paper rather than drawing a full circle. -
Erase guidelines:
Wait at least five minutes for the black ink to fully dry to avoid smudging. Then, gently erase all your pencil sketches.
Try Watercolor
Instead of metallic pens, create the gold accents using metallic watercolor paint. The slight variations in opacity will give the page a vintage, celestial map vibe.
Step 3: Adding Metallic Accents
-
Gold moon details:
Take your gold or bronze metallic pen. Fill in the textured scaley area of the crescent moon, letting the black ink lines show through. -
Striped planet fill:
Color in alternating stripes on the planet. Leave some stripes white or just plain paper to create a high-contrast pattern. -
Star accents:
Select a few of the five-pointed stars to color completely solid with gold. For others, just draw a smaller gold star inside the black outline. -
Highlighting:
Add small touches of gold to the centers of the starbursts or specific leaves on the vines. This scattered color helps tie the whole composition together. -
Final sparkle:
Review the page and add freely drawn gold dots in any larger negative spaces. These act as distant stars and add that final magical shimmer.
Close your journal knowing you’ve captured a little piece of the universe on paper
Hearts and Mood Doodles Sheet
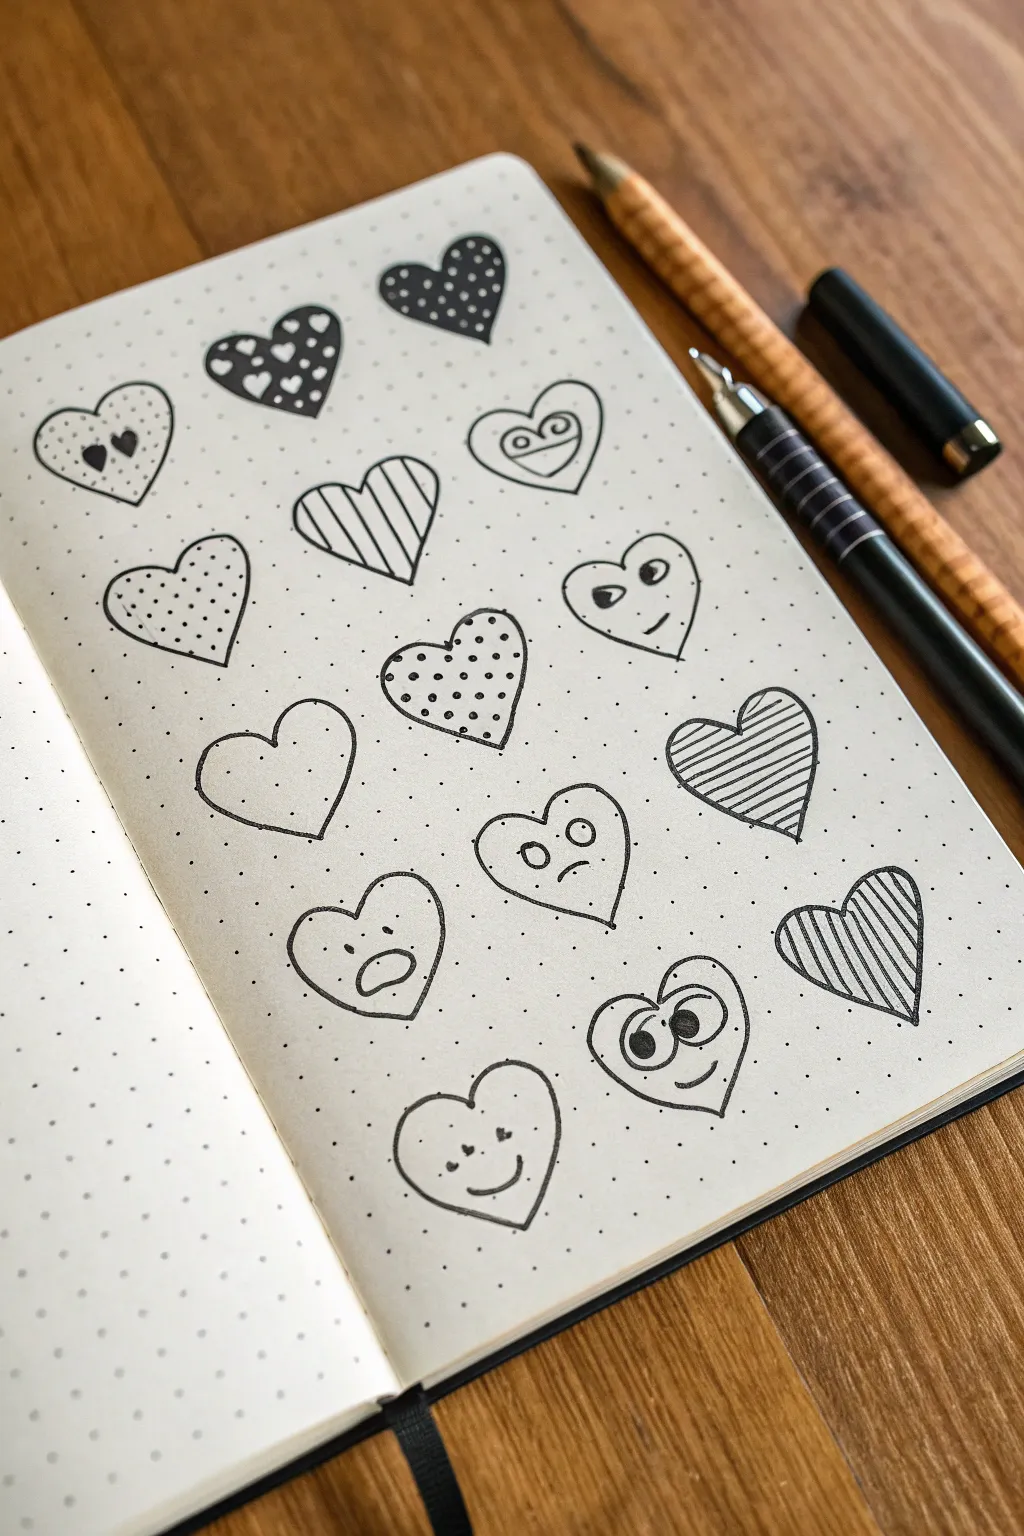
Fill a page with personality using these sixteen unique heart variations, each showcasing a different pattern or playful facial expression. This dot grid spread is perfect for mood tracking or simply practicing your line work with simple, charming motifs.
How-To Guide
Materials
- Dot grid notebook or journal
- Fine liner pen (black, 0.3mm to 0.5mm tip)
- Pencil (optional for sketching)
- Eraser
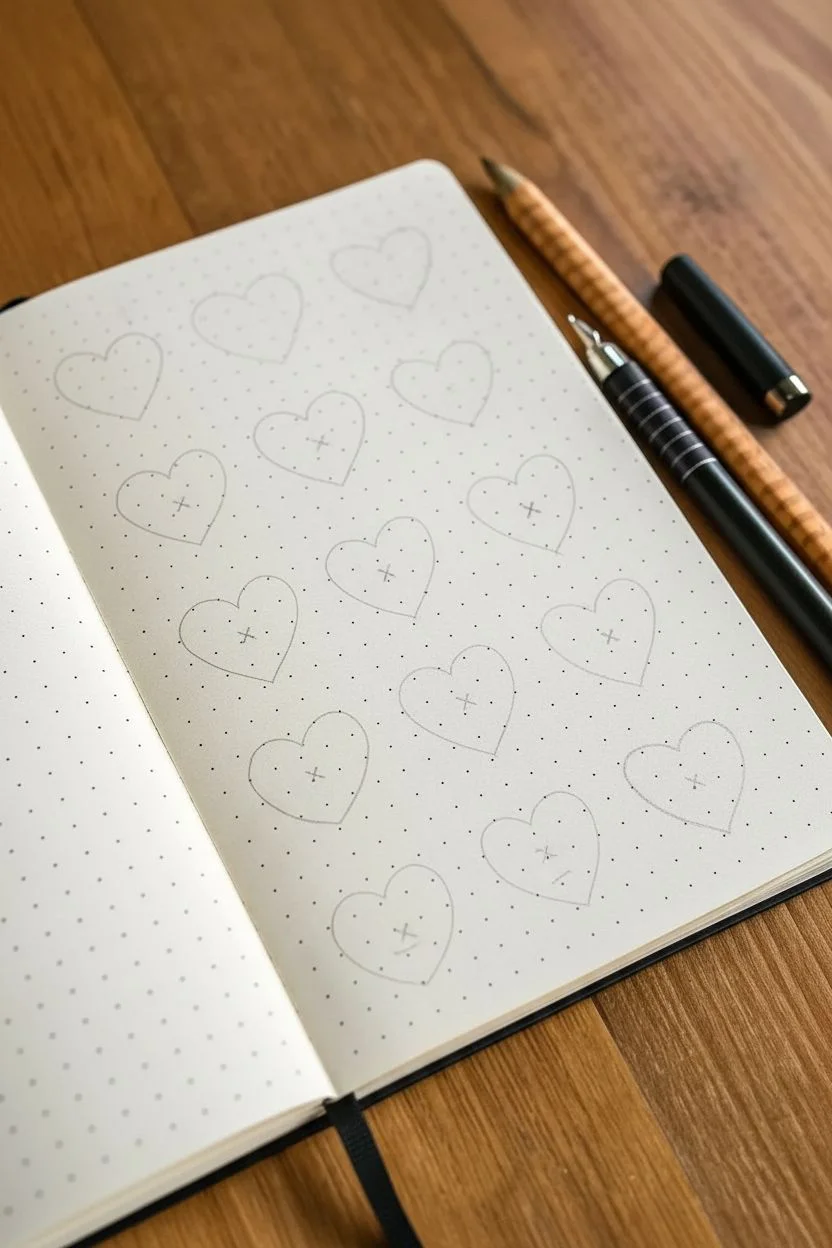
Step 1: Setting the Layout
-
Visualize the Grid:
Visualize a 4×4 grid on your dot grid paper. You don’t need to draw actual grid lines, but plan to place one heart in each imaginary cell to keep the spacing even and breathable. -
Drafting Outlines:
Using a pencil if you prefer extra caution, or going straight in with your pen, lightly mark the center point for each of the 16 hearts to ensure they align nicely down the page.
Fixing Wobbly Lines
If a line goes rogue, thicken the outline of that specific heart. The heavier line weight will hide the mistake and add variety to the page layout.
Step 2: Row 1: Patterned Hearts
-
The Simple Outline:
Start the top left heart by drawing a standard heart outline. Inside, draw two smaller black hearts near the bottom point to act as ‘cheeks’ or just a cute detail. -
Negative Space Hearts:
For the second heart, draw the outline and fill the entire interior with black ink, leaving small heart shapes uncolored to create a white-on-black pattern. -
Polka Dots:
Draw the third heart outline. Fill the inside with a solid black color, leaving tiny white circles untouched to create a polka dot effect. This looks striking next to the previous one. -
Silly Face:
The final heart in the first row gets a personality. Draw the outline, then add two large circles for eyes with dots in the center. Add a curved line underneath for a wide, happy smile.
Grid Guide
Use the dot grid to help with scale. Count grid squares (e.g., 4×4 squares per heart) to keep all your doodles exactly the same size without measuring.
Step 3: Row 2: Stripes & Textures
-
Stippling Texture:
Start the second row with a heart filled with tiny dots. Leave the center largely empty and concentrate the dots near the edges to give it a rounded, 3D effect. -
Diagonal Stripes:
Draw the next heart outline and fill it with simple diagonal lines running from top-right to bottom-left. Keep the spacing consistent for a clean look. -
Side-Galance Face:
Create the third heart. For the face, draw two eyes looking off to the left—one oval and one half-circle—and a small straight mouth line near the bottom right. -
Basic Loop:
For the fourth heart, draw a simple outline. Inside, draw a smaller heart shape that loops at the top, or add a spiral detail to signify confusion or whimsy.
Step 4: Row 3: Bold Patterns
-
Standard Heart:
Draw a plain, classic heart outline. Sometimes less is more, and this acts as a visual break in the busy page. -
Polka Dot Outline:
Draw a heart outline. Inside, fill the space with evenly spaced small black dots. Unlike the first row, the background here is white, making the dots pop. -
Horizontal Stripes:
Create a heart outline and fill it with horizontal lines. Use your dot grid as a guide to keep the lines perfectly straight and parallel. -
Annoyed Expression:
Draw the final heart of this row. Give it big round eyes with small pupils and a downward-curved mouth to create a grumpy or annoyed expression.
Step 5: Row 4: Mixed Emotions
-
Sad Face:
Start the bottom row with a sad heart. Draw two small dots for eyes and an open, downward-turning oval mouth to show dismay. -
Vertical Stripes:
Draw a heart and fill it with vertical lines. As the lines approach the curved edges of the heart, you can curve them slightly to emphasize volume. -
Goofy Face:
Draw a heart with two large eyes touching each other. Make one pupil look up and one look down for a silly, cross-eyed look, finishing with a crooked smile. -
Sweet Smile:
For the final heart, draw a simple smiling face. Use two small curved lines for closed, happy eyes and a simple U-shape for the smile. Add tiny hearts on the cheeks for blush.
Now you have a full sheet of expressive hearts ready to brighten your journal or be cut out for stickers
BRUSH GUIDE
The Right Brush for Every Stroke
From clean lines to bold texture — master brush choice, stroke control, and essential techniques.
Explore the Full Guide
Mushrooms and Woodland Bits Collection
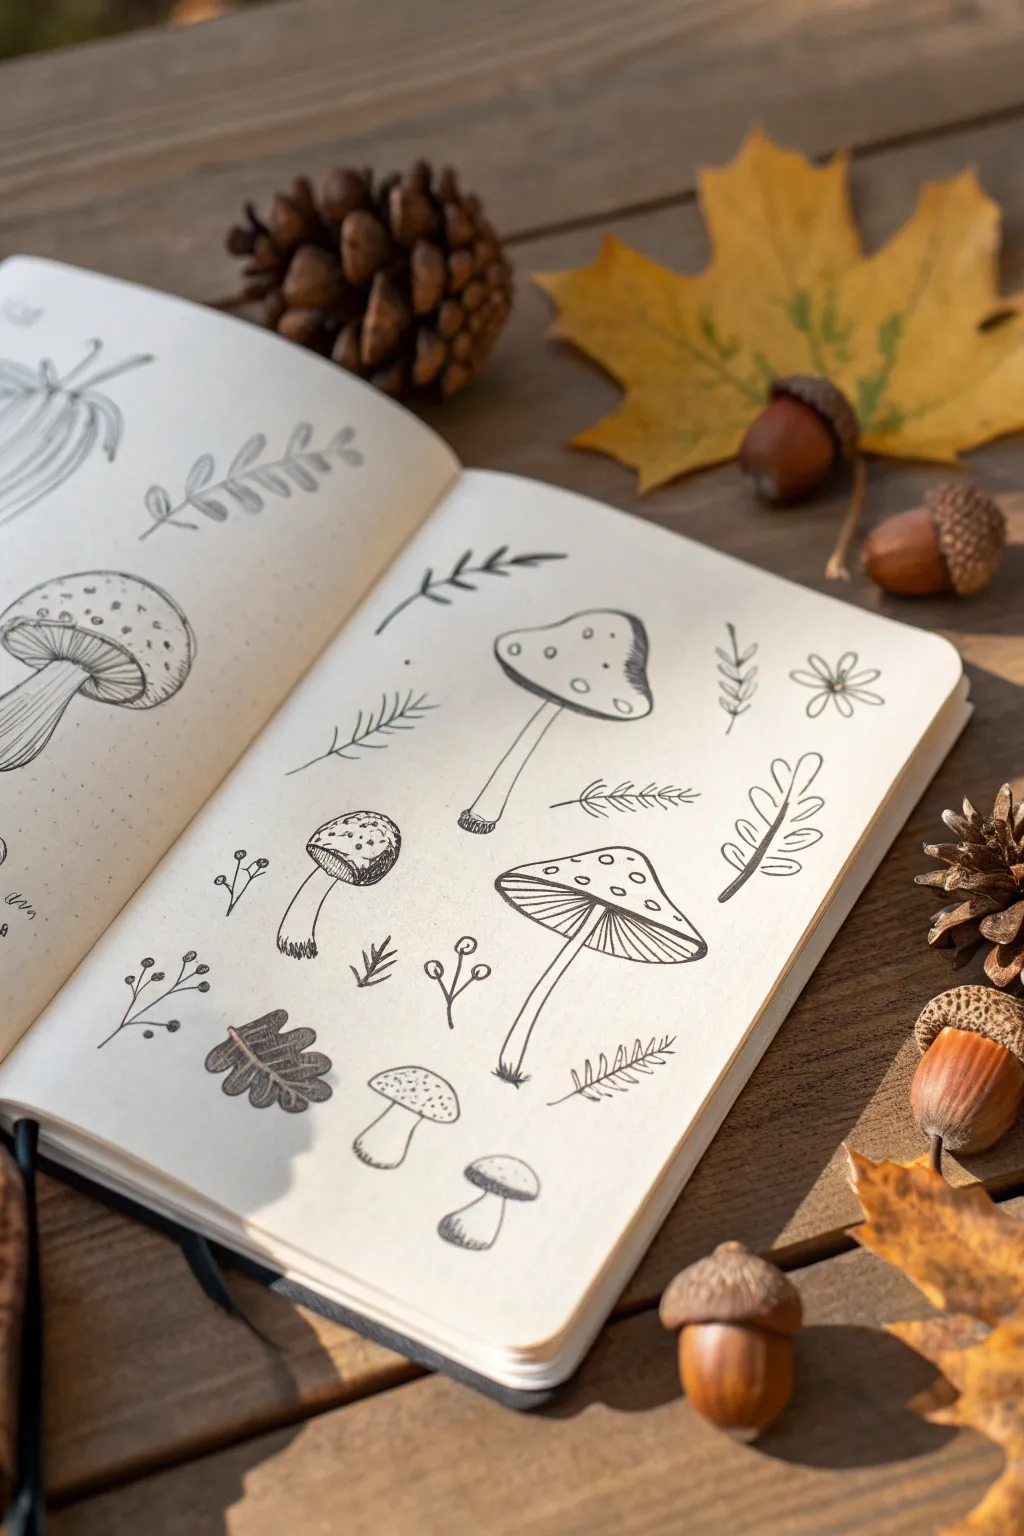
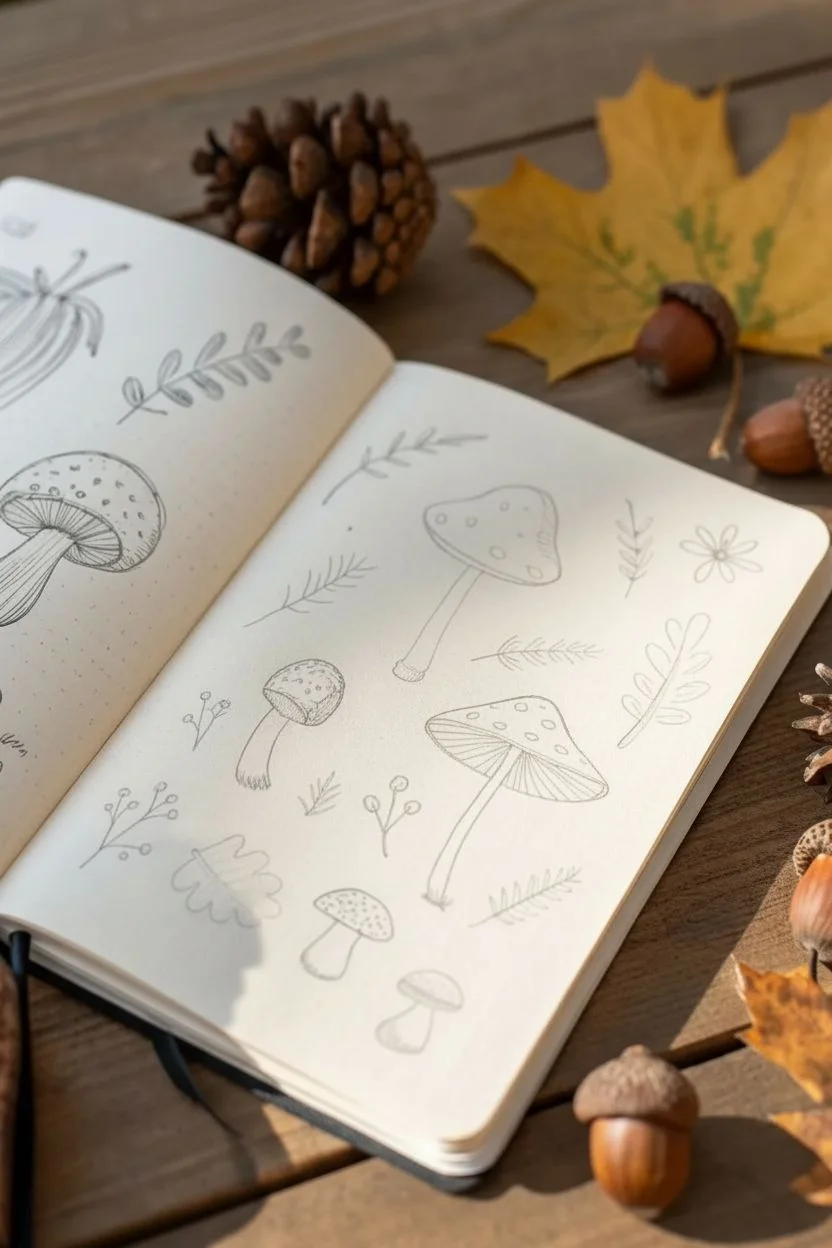
Capture the magic of an autumn forest floor with this charming collection of mushroom and woodland doodles. This spread combines simple line work with gentle shading to create a clean, botanical-inspired aesthetic perfect for bullet journals or sketchbooks.
Step-by-Step Guide
Materials
- A5 Sketchbook or dotted journal (neutral or cream paper)
- Fine liner pens (0.1, 0.3, and 0.5 mm tips)
- Pencil (HB or similar for sketching)
- Soft eraser (kneaded works best)
- Graphite pencil or light gray brush pen for shading
Step 1: Layout & Rough Sketching
-
Establish the focal points:
Start by lightly sketching the largest elements first using your pencil. Place three main mushrooms on the right-hand page to anchor the composition: one large capped mushroom at the top, a wide-brimmed spotted one in the center, and smaller clusters near the bottom. -
Fill the gaps:
Around your main mushrooms, lightly pencil in smaller botanical elements. Draw simple fern fronds, sprigs of leaves, tiny flower shapes, and a small acorn or oak leaf to balance the negative space. -
Mirror the left side:
On the left page, sketch a large mushroom cut in half by the spine of the book, along with a vine of leaves. Keeping the pencil pressure very light here makes erasing easier later.
Wobbly Lines?
Don’t panic! In nature drawing, uneven lines actually look more realistic. If a line goes astray, thicken it slightly to make it look intentional.
Step 2: Inking the Mushrooms
-
Outline the top mushroom:
Switch to your 0.3 mm fine liner. Trace the wavy, uneven cap of the top-right mushroom. Draw the stem slightly tapering downward, adding a small ‘skirt’ or ring near the base. -
Add cap details:
Draw small circles and ovals on the mushroom cap. Leave them white to look like spots. You can add tiny hatching lines underneath the cap rim to suggest shadow. -
Draw the wide mushroom:
For the prominent mushroom below it, draw a wide, umbrella-like triangular cap. Use a slightly thicker 0.5 mm line for the outer edge to make it pop. -
Detail the gills:
Use your finest 0.1 mm pen to draw lines radiating from the stem to the edge of the cap. These represent the gills. Keep your hand loose so the lines follow the curve of the cap. -
Texture the small mushrooms:
For the tiny round mushrooms at the bottom, use stippling (lots of tiny dots) on the caps instead of solid lines to give them a rough, textured look.
Step 3: Adding Woodland Foliage
-
Draw leaf sprigs:
Ink the leafy branches using single, continuous strokes for stems. Attach simple oval or teardrop-shaped leaves. Vary the angles so they look organic, not stiff. -
Ink the ferns:
For the fern-like plant, draw a central spine and add short, straight dashes or narrow V-shapes along it. These should be quick, sharp strokes. -
Create berry clusters:
Draw thin, branching Y-shapes and place tiny circles at the ends for berries. Fill some circles with black ink and leave others empty for visual interest. -
Add the oak leaf:
Trace your oak leaf pencil sketch with wavy lines. Add a central vein and just a few side veins. I like drawing these slightly imperfectly to mimic dried autumn leaves. -
Include the flower:
Ink the small five-petaled flower in the upper right. Draw a small circle for the center and looped ovals for petals.
Pro Tip: Perspective
Draw the gills of the mushroom slightly curved, not straight. Curving them around the stem creates a 3D effect instantly.
Step 4: Finishing Touches
-
Erase pencil guides:
Wait at least five minutes to ensure the ink is completely dry. Gently erase all your underlying pencil sketches with a kneaded eraser. -
Add weights and definition:
Go back over the ‘ground’ lines at the base of the mushroom stems. Add little grass tufts or scribbles to ground them so they aren’t floating in space. -
Shade for dimension:
Using a soft graphite pencil or very light gray marker, add shading to the left side of the stems and under the mushroom caps. This simple step adds immense depth. -
Final inspection:
Look for empty spots. If a section feels too open, add a few stray dots or tiny ‘+ ‘ marks to fill the void without cluttering the drawing.
Close your sketchbook and enjoy the satisfaction of having your own little forest floor captured on paper
Constraint Doodle Page (One Shape, Many Ways)
This practice page explores the incredible versatility of a single geometric shape by turning simple circles and ovals into an array of charming illustrations. Using a dot grid notebook as your guide, you will fill a spread with botanical, edible, and abstract doodles that all share the same circular foundation.
Step-by-Step Tutorial
Materials
- Spiral-bound dot grid notebook (A5 or similar size)
- Fine liner pen (0.3mm or 0.5mm, black)
- Pencil (optional, for sketching)
- Eraser (optional)
Step 1: Setting the Grid
-
Observe the spread:
Begin with your notebook open flat. The goal is to fill both the left and right pages with small, independent drawings, using the dot grid to keep spacing relatively even, though precision isn’t necessary. -
mental mapping:
Visualize a loose grid structure. You don’t need to draw boxes, but imagine each doodle occupying a space roughly 3-4 dots wide and tall. This keeps the page looking cohesive but organic.
Ink Confidence
Skip the pencil sketch! Drawing directly with ink forces you to embrace small imperfections, which gives doodles their charm.
Step 2: Left Page: Nature & Food
-
Draw the sun:
Start on the bottom left with a circle. Add varied triangles pointing outward for rays—some short, some long—to create a classic sun doodle. -
Create a strawberry:
Move slightly up and right. Sketch a rounded triangle (almost a heart shape without the dip). Add a leafy crown on top and small specks for seeds inside. -
Add a button:
Near the bottom center, draw a perfect circle. Inside, draw a slightly smaller circle, and within that, four tiny dots arranged in a square pattern. -
Sketch the apple:
Mid-way up the left edge, draw a circle with a slight dip at the top and bottom. Add a small curved stem and a single leaf popping out to the right. -
Doodle a cookie:
In the center of the left page, create a circle. Fill it with three or four dark filled-in circles to represent chocolate chips. -
Draw the acorn:
Draw an oval shape with a ‘hat’ on top. Texture the top hat with cross-hatching or dots, and add a tiny stem loop. -
Add a flower:
Draw a small central circle. Surround it with five or six looped petals. Add a line down the center of each petal for a little extra detail. -
Leaf variation:
Near the bottom, draw a teardrop shape that points diagonally down. Bisect it with a line and add diagonal veins. -
Abstract connectors:
Fill a gap on the far left with a ‘molecule’ style doodle: thin lines connecting small open circles in a branching pattern.
Add a Pop
Once the black ink is fully dry, use mild highlighters or colored pencils to fill in just one element per doodle for a minimalist look.
Step 3: Right Page: Patterns & whimsical Shapes
-
Create a striped egg:
On the upper middle of the right page, draw an oval. Decorate it with horizontal bands—some solid lines, some vertical hatching. -
Draw a donut:
Sketch a slightly irregular circle with a smaller hole in the middle. Add tiny sprinkles or dots on the surface for texture. -
Add a rainbow:
Draw three concentric arches. Close the bottom with a flat line to create a simple rainbow shape. -
Sketch a pear:
On the far right edge, draw a shape that is narrow at the top and bulbous at the bottom. Add a stem and a leaf. -
Add a halved avocado:
Near the top right corner, draw a teardrop shape. Inside, draw a large circle for the pit and add a tiny highlight dot to make it look shiny. -
Create a simple leaf:
Draw a pointed oval shape (like an eye). Add a central vein line and smaller veins branching off it. -
Doodle a heart:
Draw a simple outline heart. Keeping it near other curved doodles helps maintain the ’rounded’ theme of the page. -
Add clouds:
Near the top of the spine, draw a fluffy cloud shape using connected semi-circles. -
Finishing touches:
Scan the page for empty pockets of white space. Fill these with tiny accent doodles like mini-hearts, stars, spirals, or small floating leaves to balance the composition.
Now you have a lively reference page proving that simple circles can become almost anything with a little imagination


Have a question or want to share your own experience? I'd love to hear from you in the comments below!