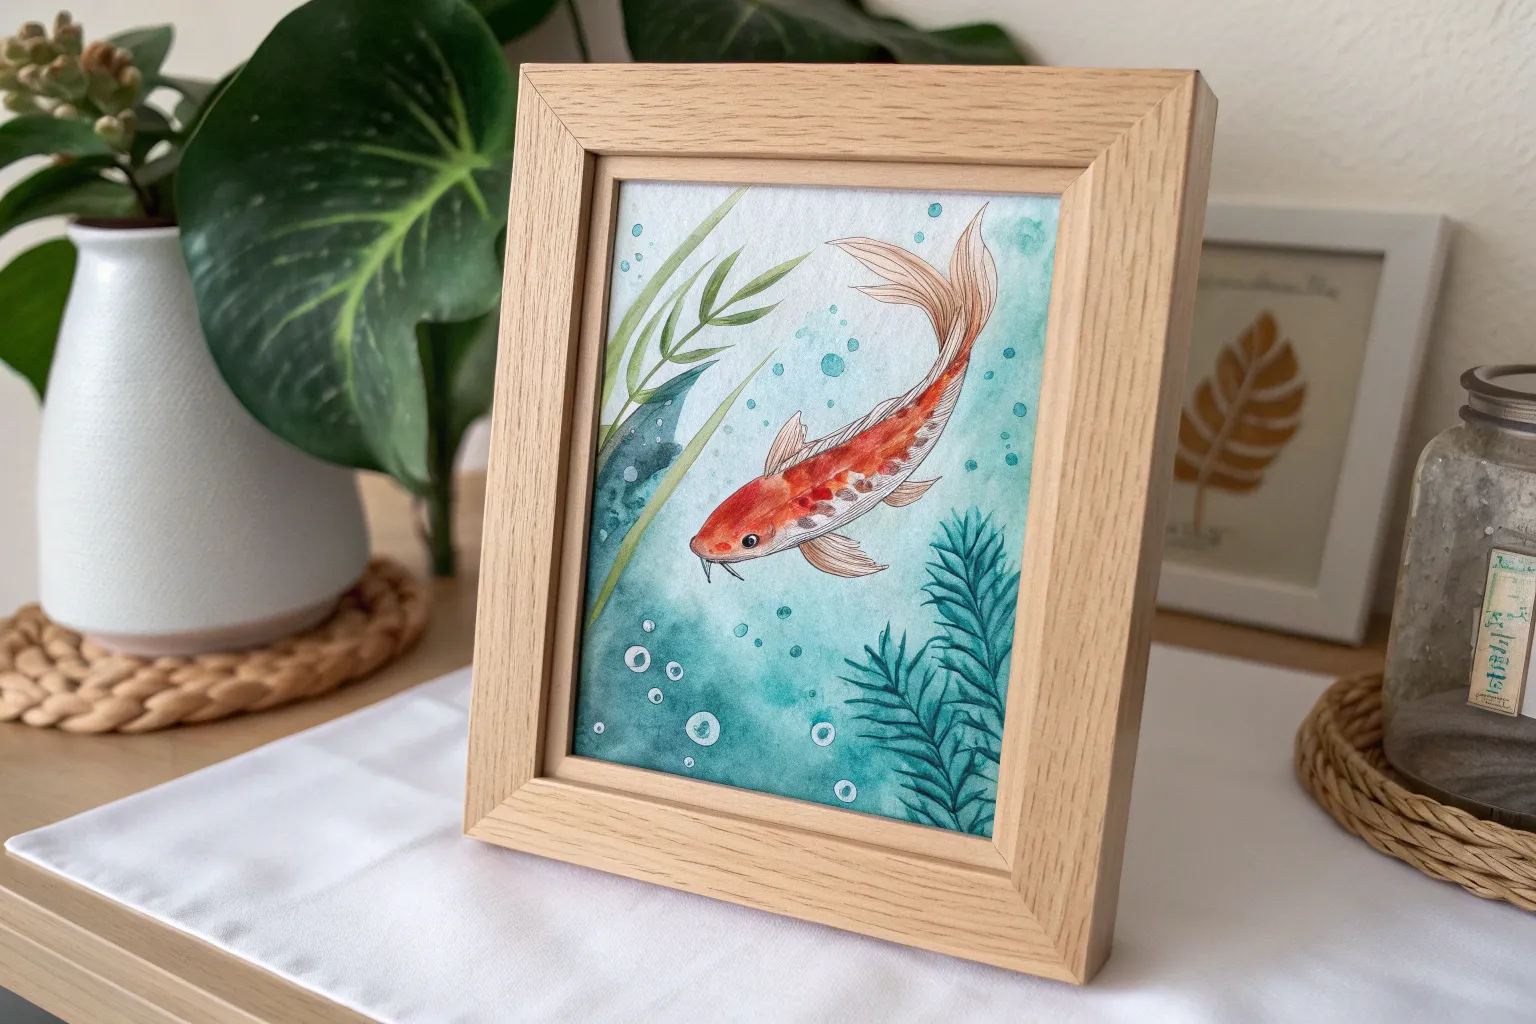
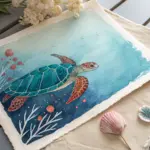
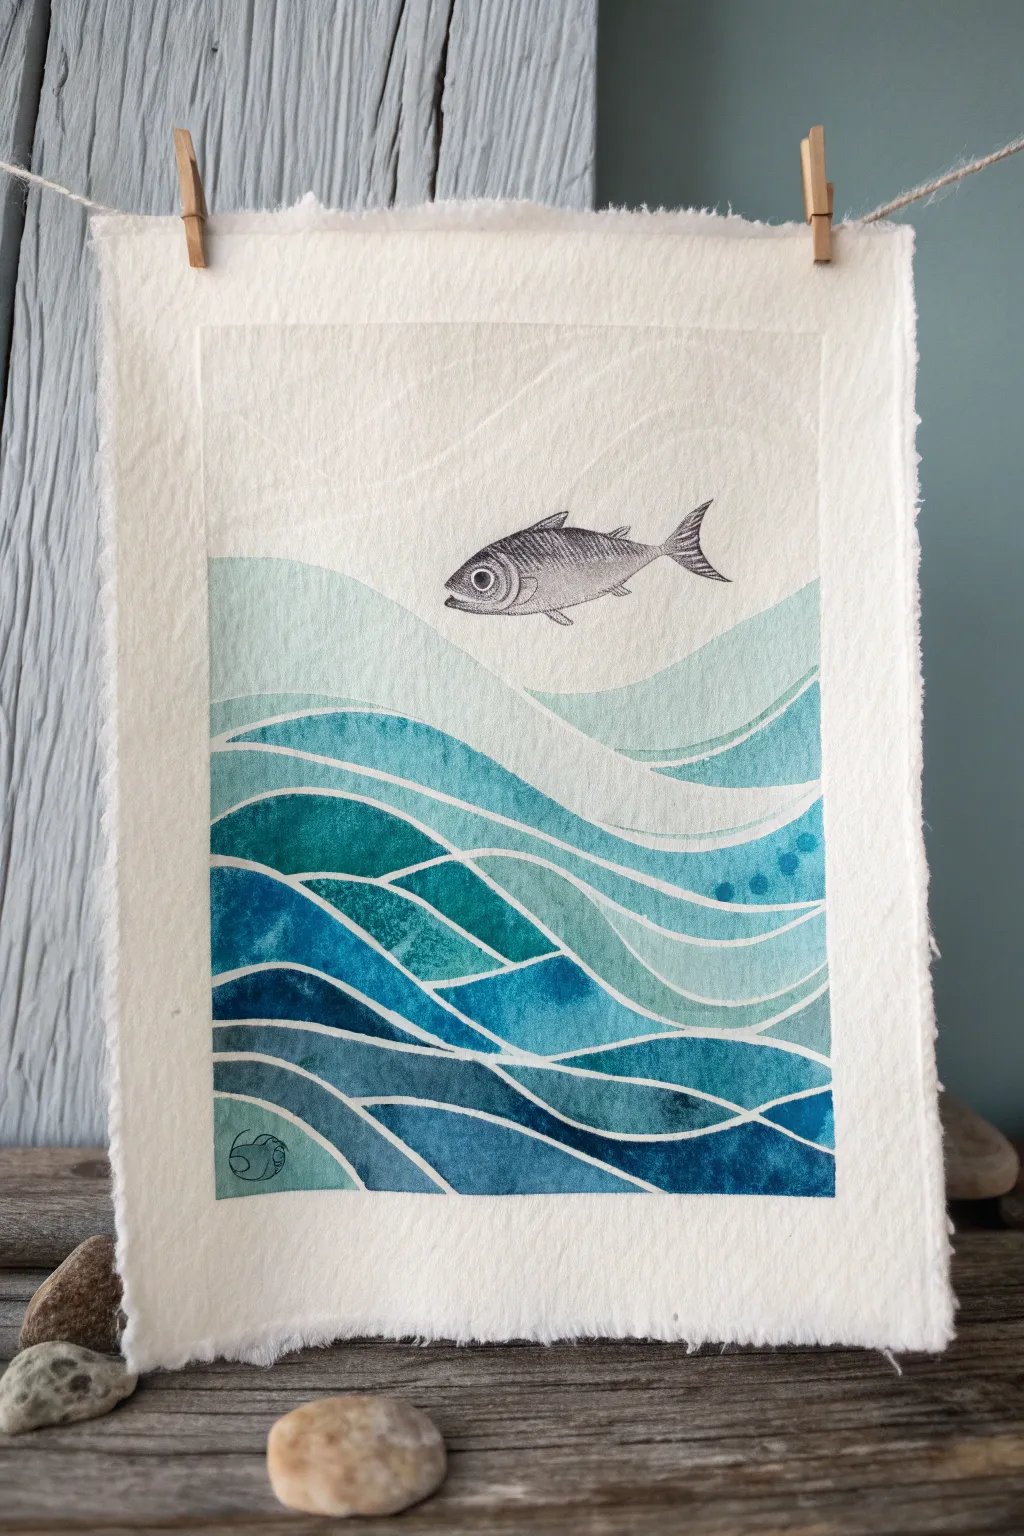
Fish are one of my favorite subjects to paint because you get color, motion, and that dreamy underwater glow all in one place. If you’re craving fresh fish painting ideas, here are options that range from classic koi pond vibes to wild, experimental textures.
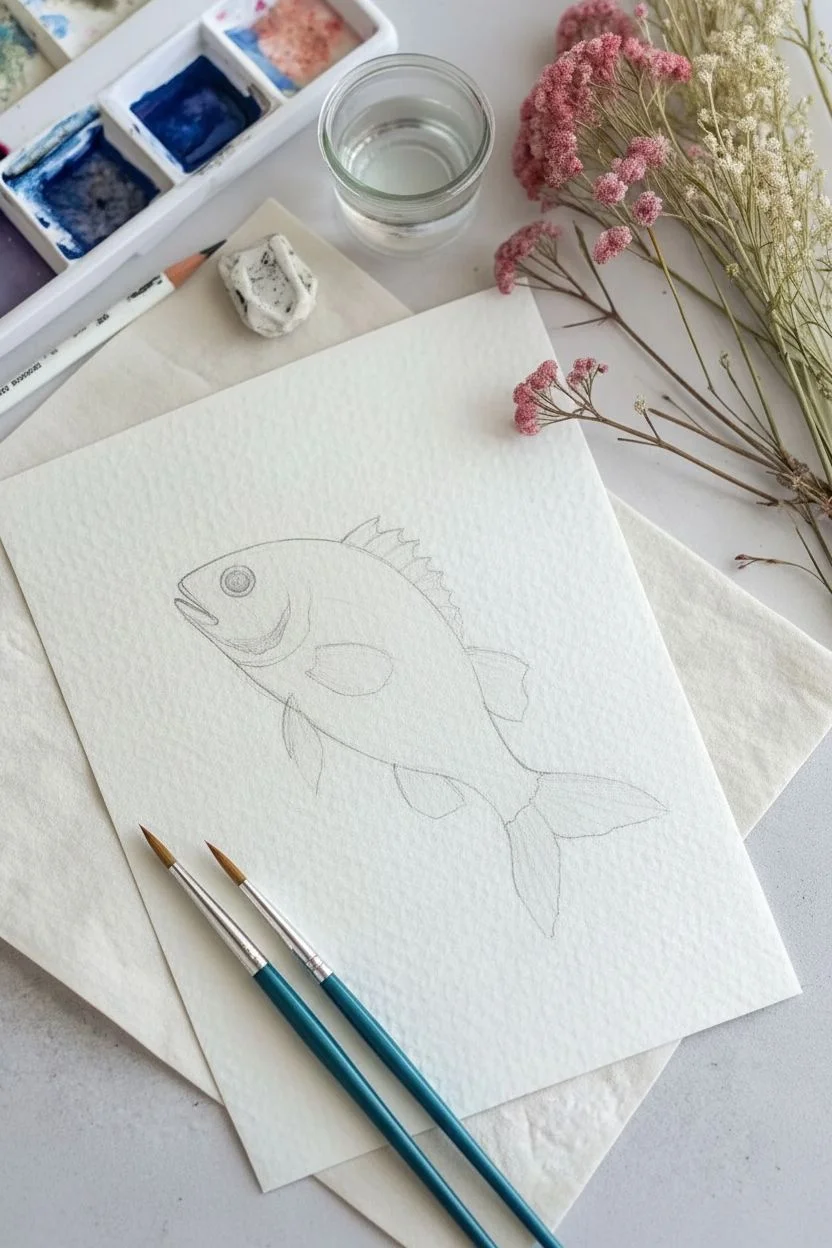
Shimmering Goldfish With Flowing Fins
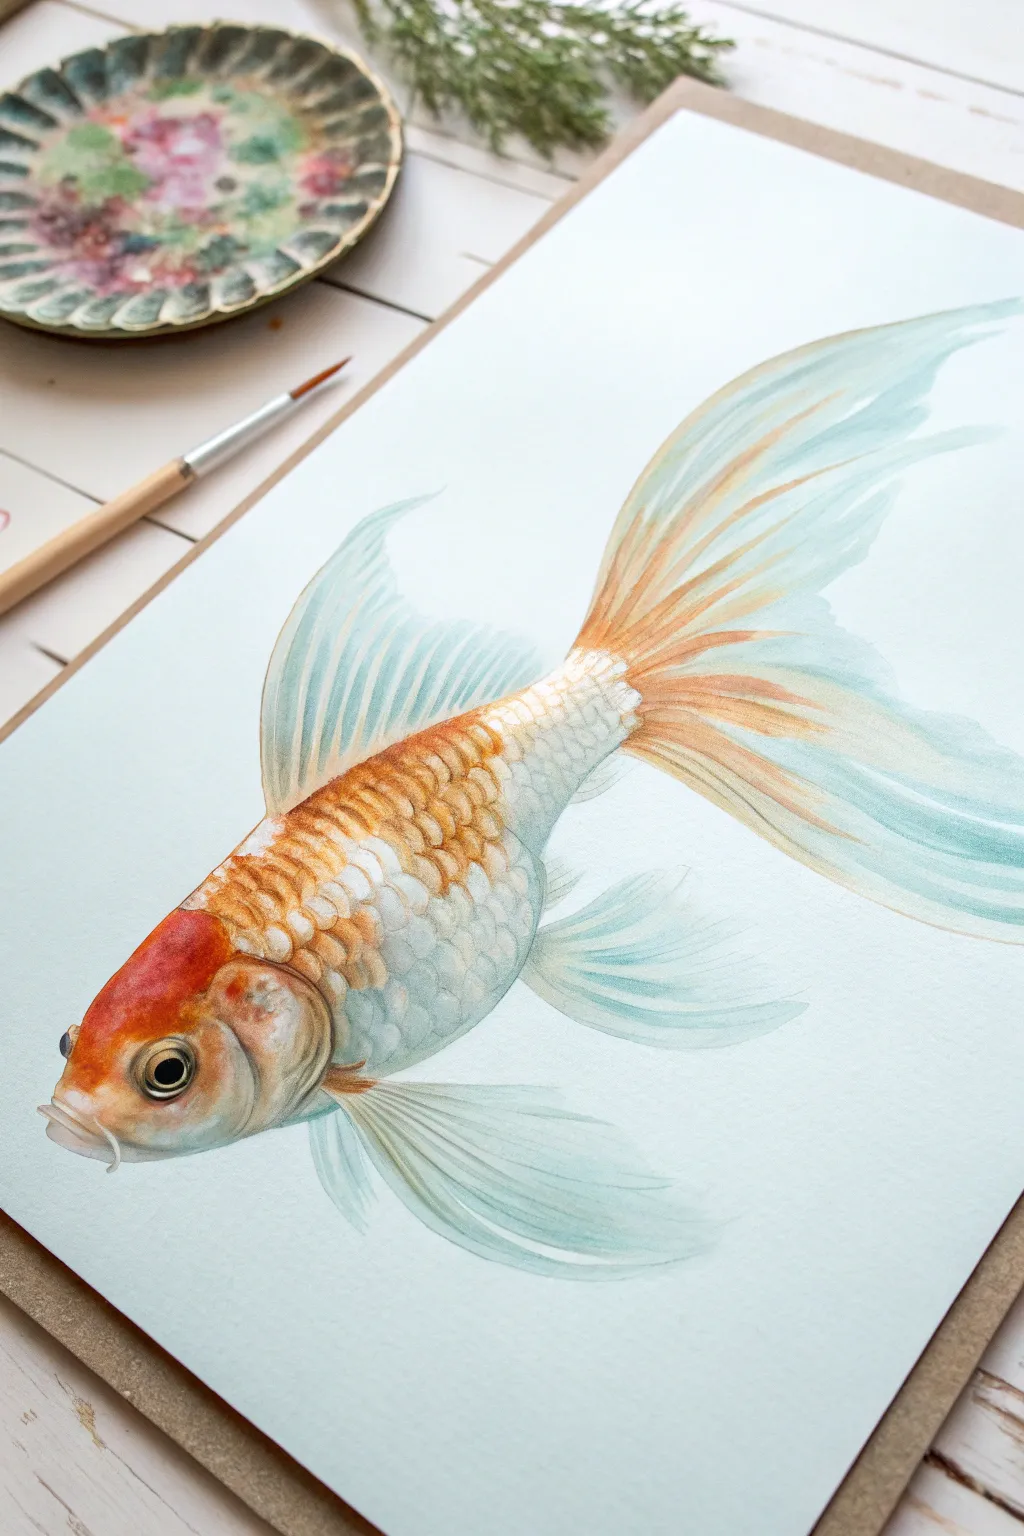
Capture the delicate beauty of aquatic life with this detailed watercolor tutorial featuring a shimmering goldfish. The combination of vibrant orange scales against translucent, flowing blue fins creates a sense of weightless movement on the page.
Detailed Instructions
Materials
- Cold press watercolor paper (300 gsm)
- Watercolor paints (Vermilion, Burnt Sienna, Payne’s Gray, Turquoise, Cerulean Blue)
- Round watercolor brushes (Size 2, 4, and 0 for details)
- Pencil (H or HB)
- Kneaded eraser
- Two jars of water
- Paper towels
- White gouache or white gel pen (optional)
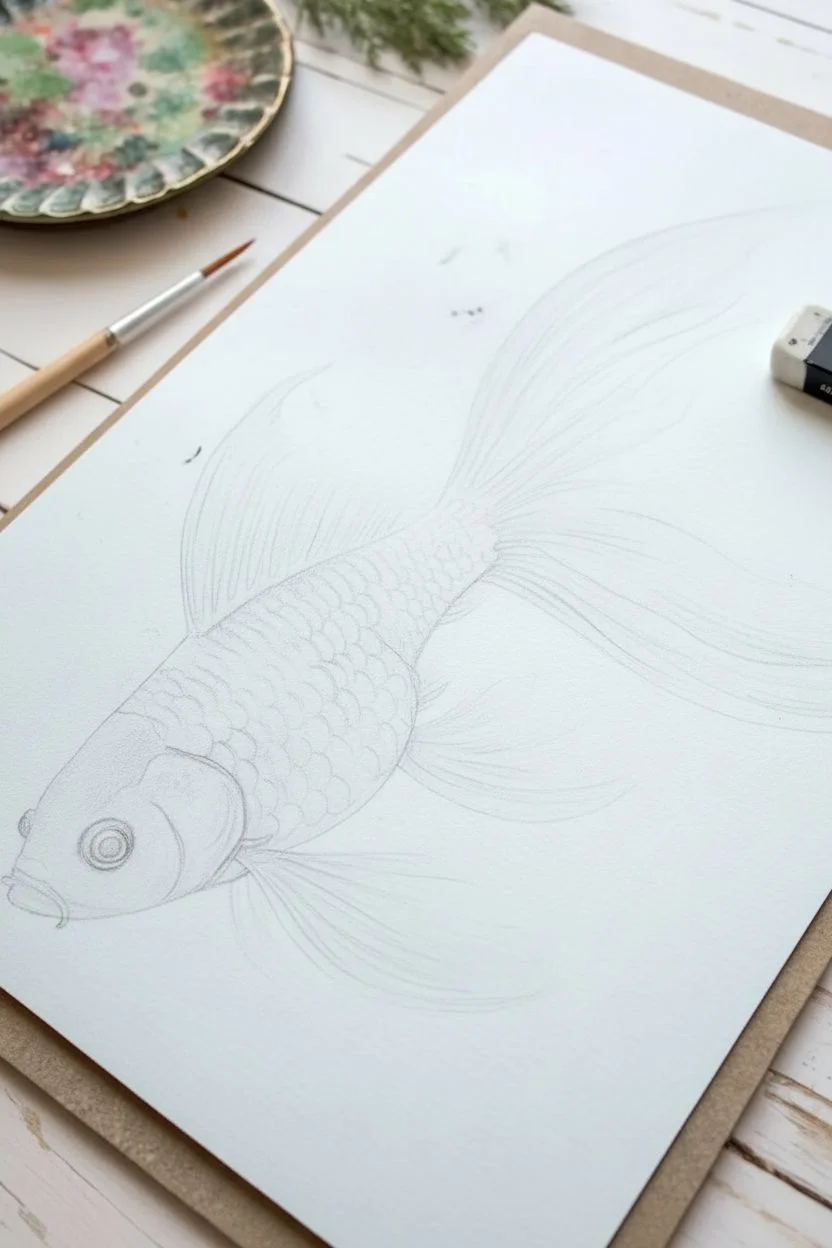
Step 1: Sketching and Preparation
-
Outline the body shape:
Begin by lightly sketching an elongated oval for the main body of the fish. Keep your pencil strokes very faint so they don’t show through the final paint layers. -
Add the flowing fins:
Sketch the dorsal fin on top and the long, sweeping caudal (tail) fin. Instead of rigid lines, use loose, curved strokes to mimic the movement of water. Add the smaller pectoral and pelvic fins near the bottom belly. -
Define facial features:
Draw the curve of the gill cover (operculum), the mouth, and a perfect circle for the eye. Refine the body shape to taper naturally towards the tail. -
Lighten the sketch:
Roll your kneaded eraser over the entire drawing to lift up excess graphite. You want the lines to be barely visible, serving only as a subtle guide.
Fin Transparency
To make fins look translucent, allow the background paper white to show through. Use more water than pigment in your mix for these areas.
Step 2: Painting the Body
-
Base wash for the head:
Mix a vibrant orange using Vermilion and a touch of Burnt Sienna. Apply a wet-on-dry wash to the head area, leaving a tiny sliver of white paper unpainted around the eye for a highlight. -
Create the scale gradient:
While the orange head is still damp, rinse your brush and pull the color slightly backwards into the body. Switch to a very watery light blue or diluted turquoise for the rear half of the body. -
Painting individual scales:
Once the base layer is dry, mix a slightly darker orange. Using the tip of a size 4 brush, paint small, ‘C’ shaped scallops to suggest scales on the upper body. Let these fade out as you move down the fish’s side. -
Adding depth to the scales:
To make the scales pop, add a tiny dot of concentrated orange or brown at the base of the scales near the dorsal fin. This creates shadow and dimension. -
Detailing the eye:
Use a dark mix of Payne’s Gray and Burnt Sienna to paint the pupil. Leave a crisp white highlight. Paint a thin gold or light orange ring around the dark pupil for realism.
Step 3: Painting the Fins
-
Base wash for the tail:
Prepare a very dilute mix of Turquoise and Cerulean Blue. Paint the entire shape of the tail fin with this pale wash. The goal is transparency, so use plenty of water. -
Adding the fin rays:
While the blue base is semi-dry, use a size 0 or 2 brush to paint long, thin lines radiating from the body outward using a slightly darker teal. These are the fin rays (spines). -
Warm tones in the tail:
Water down your orange mix significantly. Introduce subtle streaks of this pale orange into the sections of the tail closest to the body. Allow the orange and blue to bleed slightly for a seamless transition. -
Refining the dorsal fin:
Repeat the process for the top dorsal fin: a pale blue wash followed by thin, darker teal lines for structure. Keep the edges soft to suggest movement. -
Lower fins:
Paint the pectoral and pelvic fins with the same pale blue mixture. I find that keeping these lower fins lighter and less detailed helps push them into the background.
Muddy Colors?
If the orange body and blue fins mix and turn brown, ensure the body is completely dry before painting the adjacent blue fin areas.
Step 4: Final Details
-
Deepen contrast:
Assess your painting. If the head needs more punch, glaze a thin layer of pure Vermilion over the darkest areas. Deepen the shadows under the gill cover. -
Enhance fin transparency:
Use a clean, damp brush to gently lift a few streaks of color from the ends of the tail fin. This technique creates a gossamer, see-through effect. -
Final highlights:
If you lost any highlights during painting, use a tiny amount of white gouache or a white gel pen to accentuate the shine in the eye or the tips of the scales.
Let your beautiful goldfish dry completely before erasing any remaining pencil marks to reveal your serene aquatic artwork

Betta Fish With Dramatic Ribbon-Like Tails
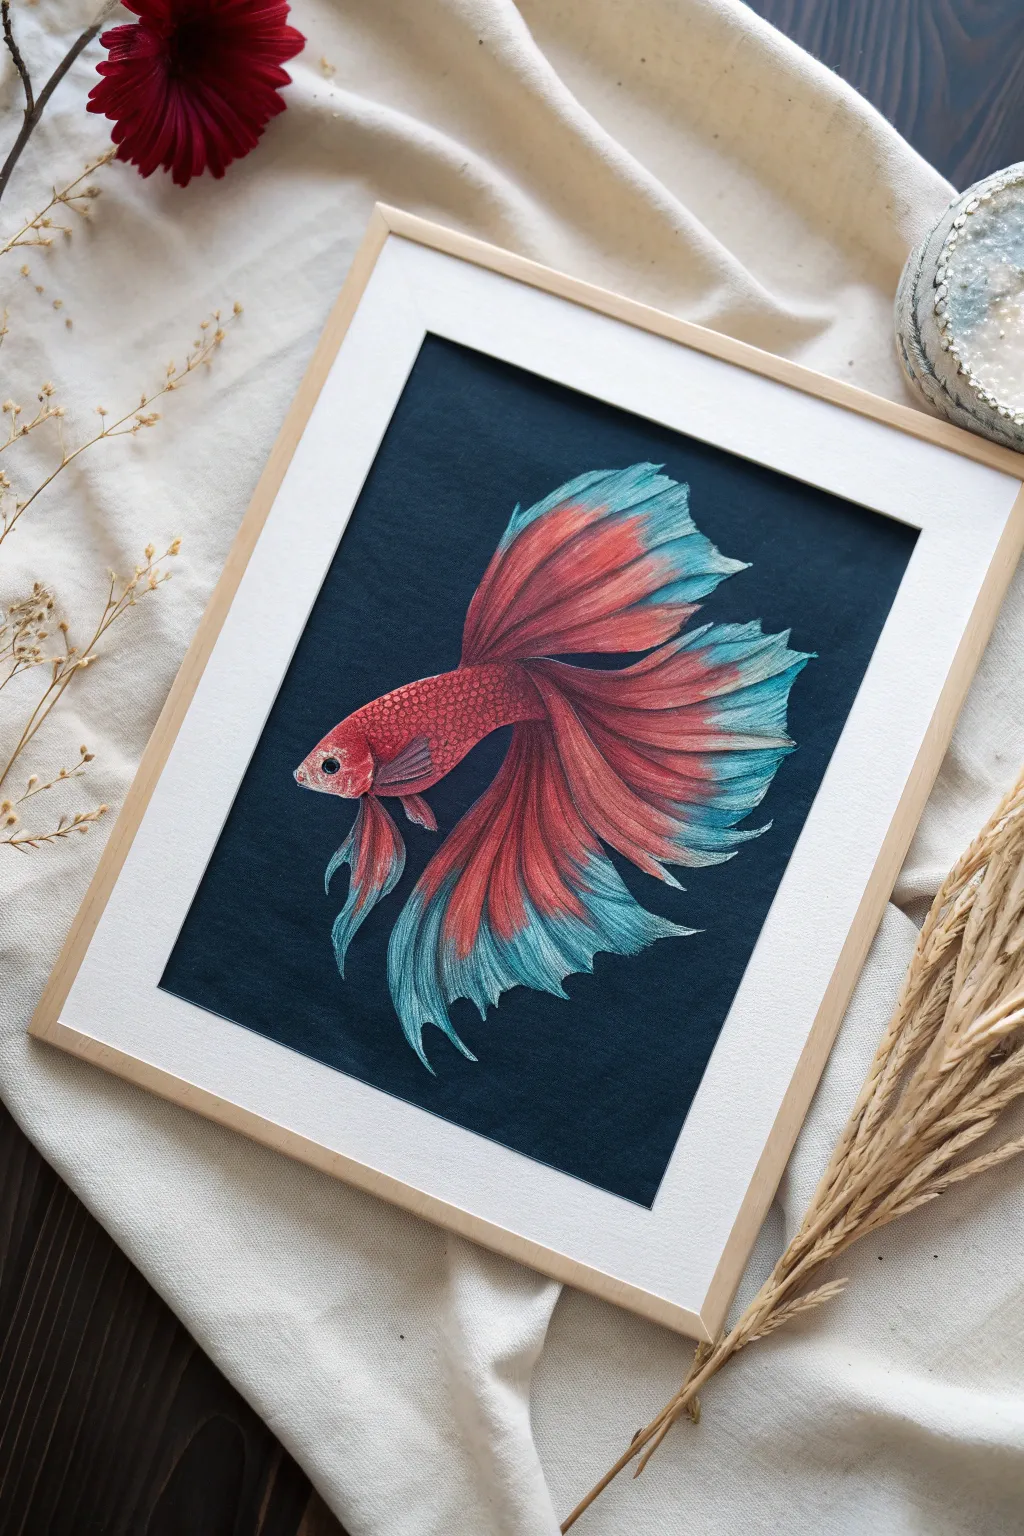
This striking project captures the elegance of a betta fish, contrasting vibrant red scales and teal-tipped fins against a deep, moody background. Whether you choose colored pencil or acrylic gouache, the result is a sophisticated piece of aquatic art perfect for framing.
Step-by-Step Guide
Materials
- Deep navy blue cardstock or mat board (approx. 8×10 inches)
- White transfer paper or white chalk pencil
- High-quality colored pencils (wax or oil-based) OR acrylic gouache
- Key colors: Crimson red, scarlet, deep maroon, turquoise, pale teal, white
- Fine liner brushes (if using paint) or fine-point erasers (if pencils)
- Reference photo of a betta fish
- Workable fixative spray (optional)
- Light wood frame with mat
Step 1: Sketching & Outline
-
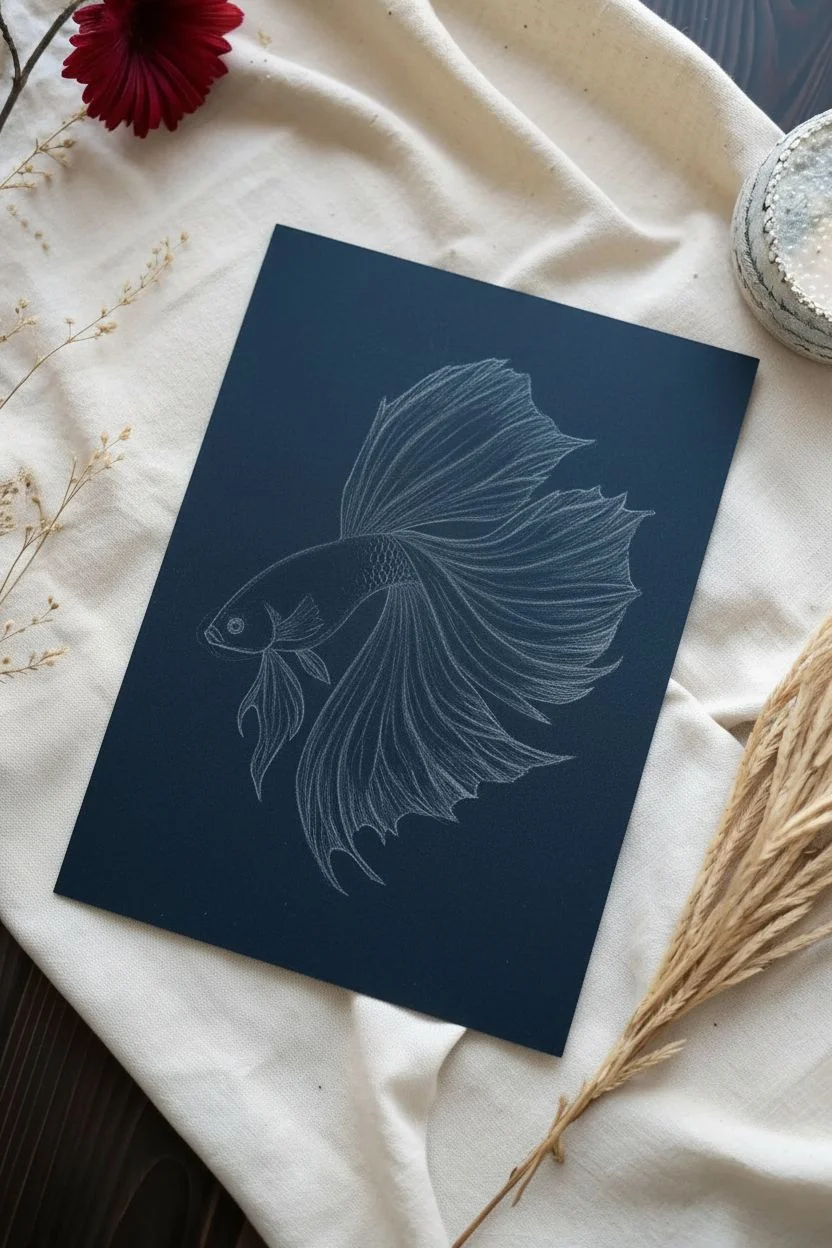
Prepare the surface:
Begin with a clean sheet of deep navy blue cardstock. The dark background is crucial for making the fin transparency pop later on. -
Map the basic shapes:
Using a white chalk pencil, very lightly sketch an oval for the body in the center-left. Extend long, sweeping curves outward to the right to define the flow of the dorsal, caudal, and anal fins. -
Refine the outline:
Tighten up your sketch, defining the betta’s mouth, eye placement, and the specific ragged edges of the tail. Keep your lines incredibly faint; you don’t want white outlines showing in the final red areas.
Colors looking dull?
Dark paper absorbs color. If your reds or teals look muddy, lay down a base layer of white pencil/paint first, let it set, and then apply the color on top to make it pop.
Step 2: The Body and Scales
-
Base layer for the body:
Start applying your deep maroon color to the fish’s body. If using pencils, use firm pressure to build opacity against the dark paper. If painting, lay down a solid base coat. -
Create the scale texture:
Using a brighter crimson or scarlet, draw small U-shaped scales starting from the tail and moving toward the head. Overlap them slightly like shingles. -
Highlighting the head:
The face area needs to be lighter to show dimension. Blend a touch of peach or pale pink into the red on the top of the head and around the gill cover. -
The eye:
Fill the eye with black, leaving a tiny preserved dot of white paper (or adding a dot of white gel pen) for the reflection. Outline the eye with a thin ring of pale pink or silver.
Add some shimmer
Once the matte colors are dry, use a metallic pearlescent watercolor or a metallic gel pen to glaze over the tips of the fins for a realistic iridescent scale effect.
Step 3: Fins and Flow
-
Establish the red fin base:
For the fins, stroke outward from the body using your medium red tone. These strokes should follow the curve of the fin, mimicking the rays/spines. -
Detailing the rays:
Use a darker maroon or black to draw thin lines between the fin rays. This creates the ribbed texture characteristic of betta tails. -
Transitioning to teal:
About two-thirds of the way down the fins, begin feathering in your turquoise color. Don’t create a hard line; instead, let the red and teal strokes interlock. -
Brightening the tips:
At the very ends of the fins, switch to your palest teal or a mix of turquoise and white. This creates the illusion of thin, translucent membrane edges. -
Enhancing the pleats:
Add deep shading in the folds of the tail where the fabric-like fins overlap. I usually use a dark indigo or black here to really separate the layers visually.
Step 4: Final Touches
-
The pelvic fins:
Don’t forget the long, thin ventral fins hanging below the chest. Paint these with a mix of red transitioning quickly into the pale teal tips. -
Texture refinement:
Go back over the main body scales with a very sharp white or pale pink pencil to add tiny highlights to the top of each scale, giving them a wet look. -
Clean up:
Use a kneaded eraser to lift any stray chalk sketch lines from the navy background. The background must remain pristine for the contrast to work. -
Seal and frame:
If you used colored pencils, apply a light coat of fixative. Place your work in a light wood frame with a wide white mat to emphasize the artwork’s colors.
Hang your new masterpiece in a well-lit area to let those vibrant fins catch the eye


Underwater Blue Gradient With Rising Bubbles
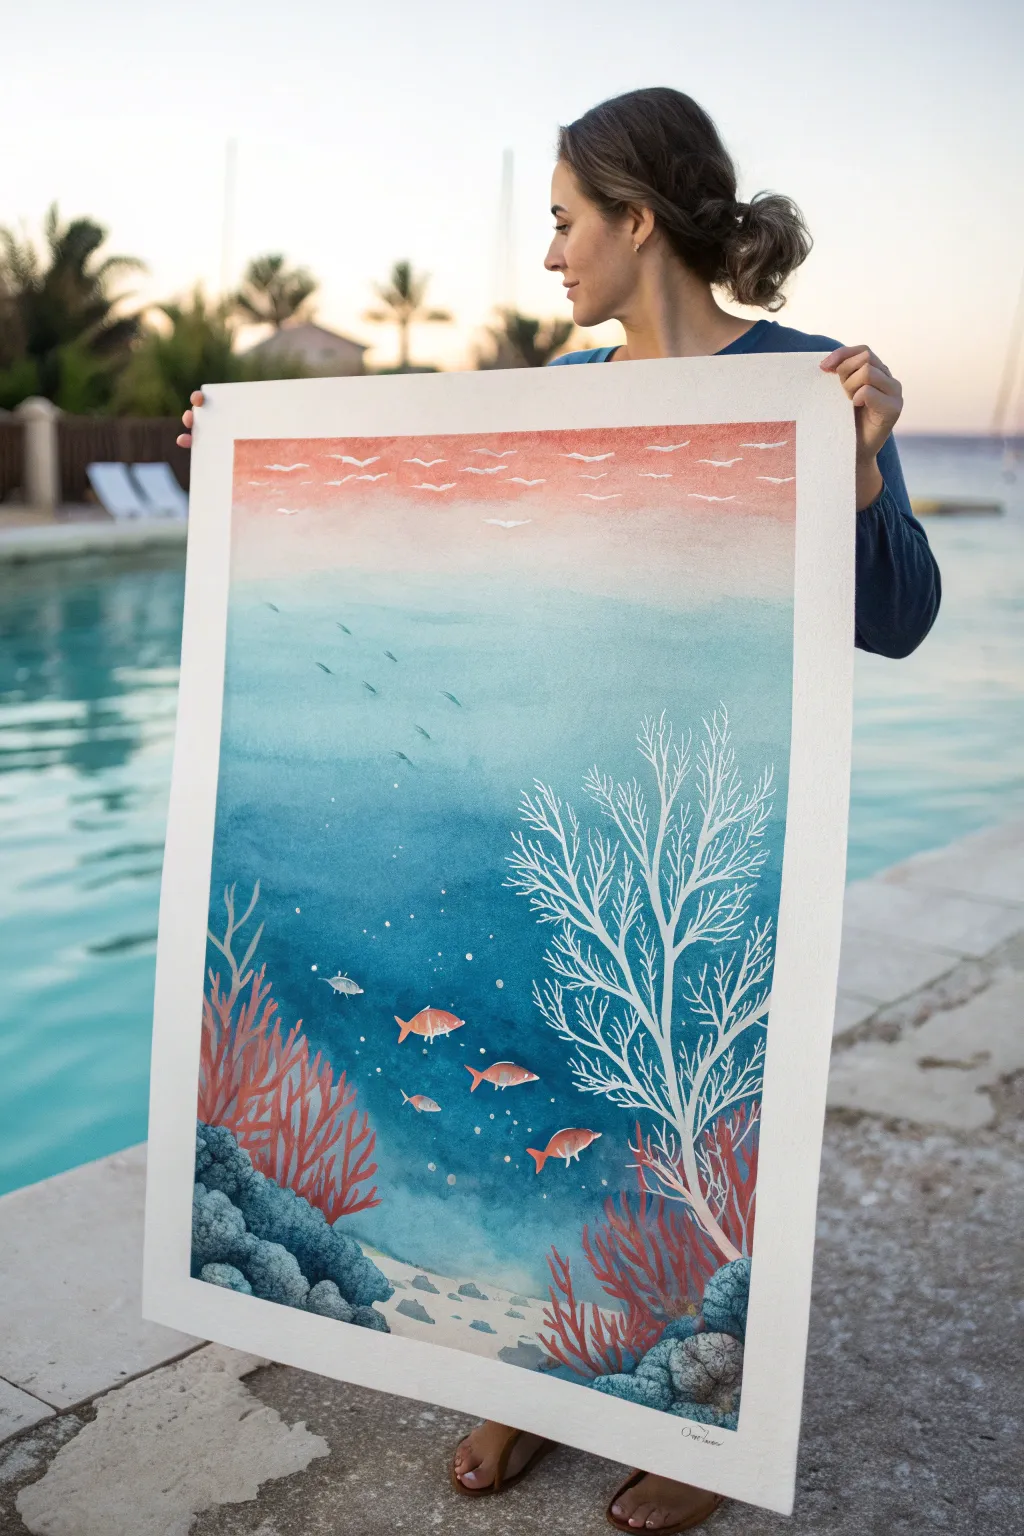
This stunning large-format watercolor piece captures the serene transition from surface sky to deep ocean floor. By mastering wet-on-wet blending techniques, you’ll create a seamless gradient backdrop for glowing coral and lively fish.
How-To Guide
Materials
- Large format watercolor paper (A2 or similar, 300gsm cold press)
- Watercolor paints (Coral, Turquoise, Prussian Blue, Payne’s Grey, Indigo)
- White Gouache or opaque white ink
- Large flat wash brush (2 inch)
- Round brushes (sizes 4, 8, and 0 for details)
- Masking tape
- Drawing board
- Clean water and palette
- Pencil and eraser
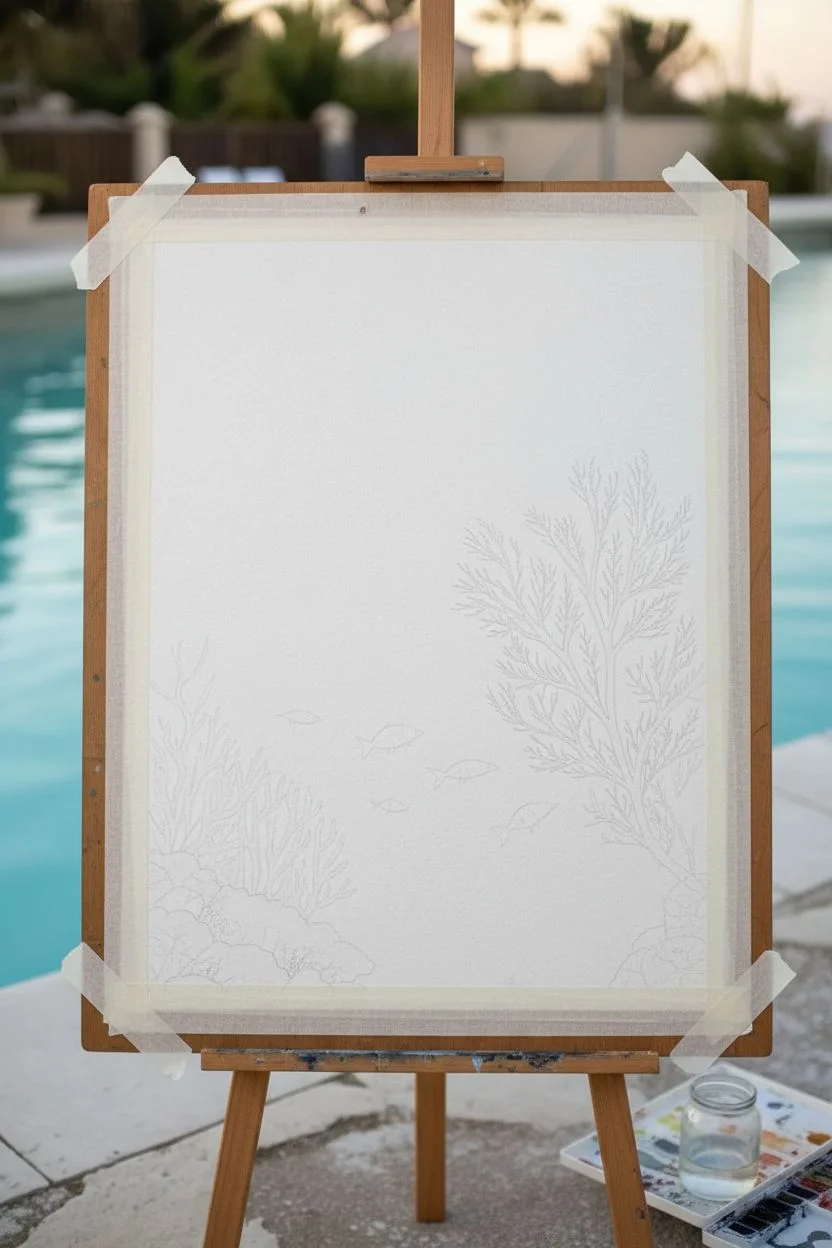
Step 1: Setting the Scene
-
Preparation:
Secure your large watercolor paper to a board using masking tape on all four sides. This prevents buckling when applying large washes of water and creates a crisp white border. -
Initial Sketching:
Lightly sketch the placement of the large white coral structure on the right and the rock formations at the bottom left. Keep lines faint so they don’t show through the final paint.
Uneven Gradients?
If your ocean layers show hard lines, re-wet the area with a clean, damp brush and gently smooth the transition while the paint is still workable.
Step 2: The Gradient Wash
-
Wet the Paper:
Using your large flat brush, apply clean water over the entire upper three-quarters of the paper. The surface should be glistening but not forming puddles. -
Sky Layer:
Mix a watery wash of soft coral or peach paint. Apply this to the very top section, letting it naturally diffuse downwards into the wet paper. -
Upper Ocean:
Before the peach layer dries, switch to a pale turquoise wash. Apply it just below the coral color, tilting the board slightly to encourage a soft blend where the colors meet. -
Deepening the Blue:
As you move down the paper, gradually introduce a stronger teal or marine blue. Use horizontal strokes and rely on the damp paper to soften edges. -
The Abyss:
For the bottom third, mix a saturated Prussian Blue with a touch of Indigo. Paint around your sketched coral and rock shapes, creating a dark, rich depth. -
Drying Time:
Let this major background layer dry completely. This is crucial; if it’s damp, your foreground details will bleed.
Add Sparkle
Mix a tiny pinch of mica powder or iridescent medium into your white gouache for the bubbles and fish scales to make them shimmer in the light.
Step 3: Painting the Reef
-
Rock Formations:
Mix a cool greyish-blue using Payne’s Grey and a touch of the background blue. Paint the bubbly rock clusters in the bottom left corner, dabbing the brush to create texture. -
Rock Highlights:
While the rocks are still slightly damp, drop in a slightly darker pigment in the crevices to define the spherical shapes. -
Red Coral:
Using a size 8 round brush and a vibrant coral-red paint, carefully fill in the branching coral shapes on the bottom left and right. Use deliberate, upward strokes. -
The White Tree:
For the large, skeletal coral tree on the right, use opaque white gouache. Paint the main trunk first, then extend outward with progressively thinner branches using a size 4 brush. -
Fine Branch Details:
Switch to your smallest brush (size 0) to add the delicate, lace-like tips to the white coral structure. Sharp, confident lines work best here.
Step 4: Life and Details
-
Adding Fish:
Paint the silhouettes of the fish using the coral-red mix for the larger ones and a grey-blue for the distant ones. Keep their shapes simple and streamlined. -
Fish Details:
Once the fish bodies are dry, use a tiny amount of white gouache to add fin outlines and subtle scales to give them dimension. -
Rising Bubbles:
Dip a clean brush in white gouache. Create vertical trails of dots rising from the deep blue section towards the surface to mimic air bubbles. -
Birds in Flight:
At the very top, within the peach sky, paint tiny white ‘V’ shapes to represent a flock of seabirds in the distance. -
Ocean Texture:
For a finishing touch, add very faint, diluted diagonal streaks in the mid-water section to suggest light rays penetrating the depths. -
Reveal:
Ensure the artwork is 100% bone dry before carefully peeling away the masking tape at a 45-degree angle.
Now you have a tranquil underwater window ready to hang on your wall


A Fish Leaping at the Surface With Splashy Water
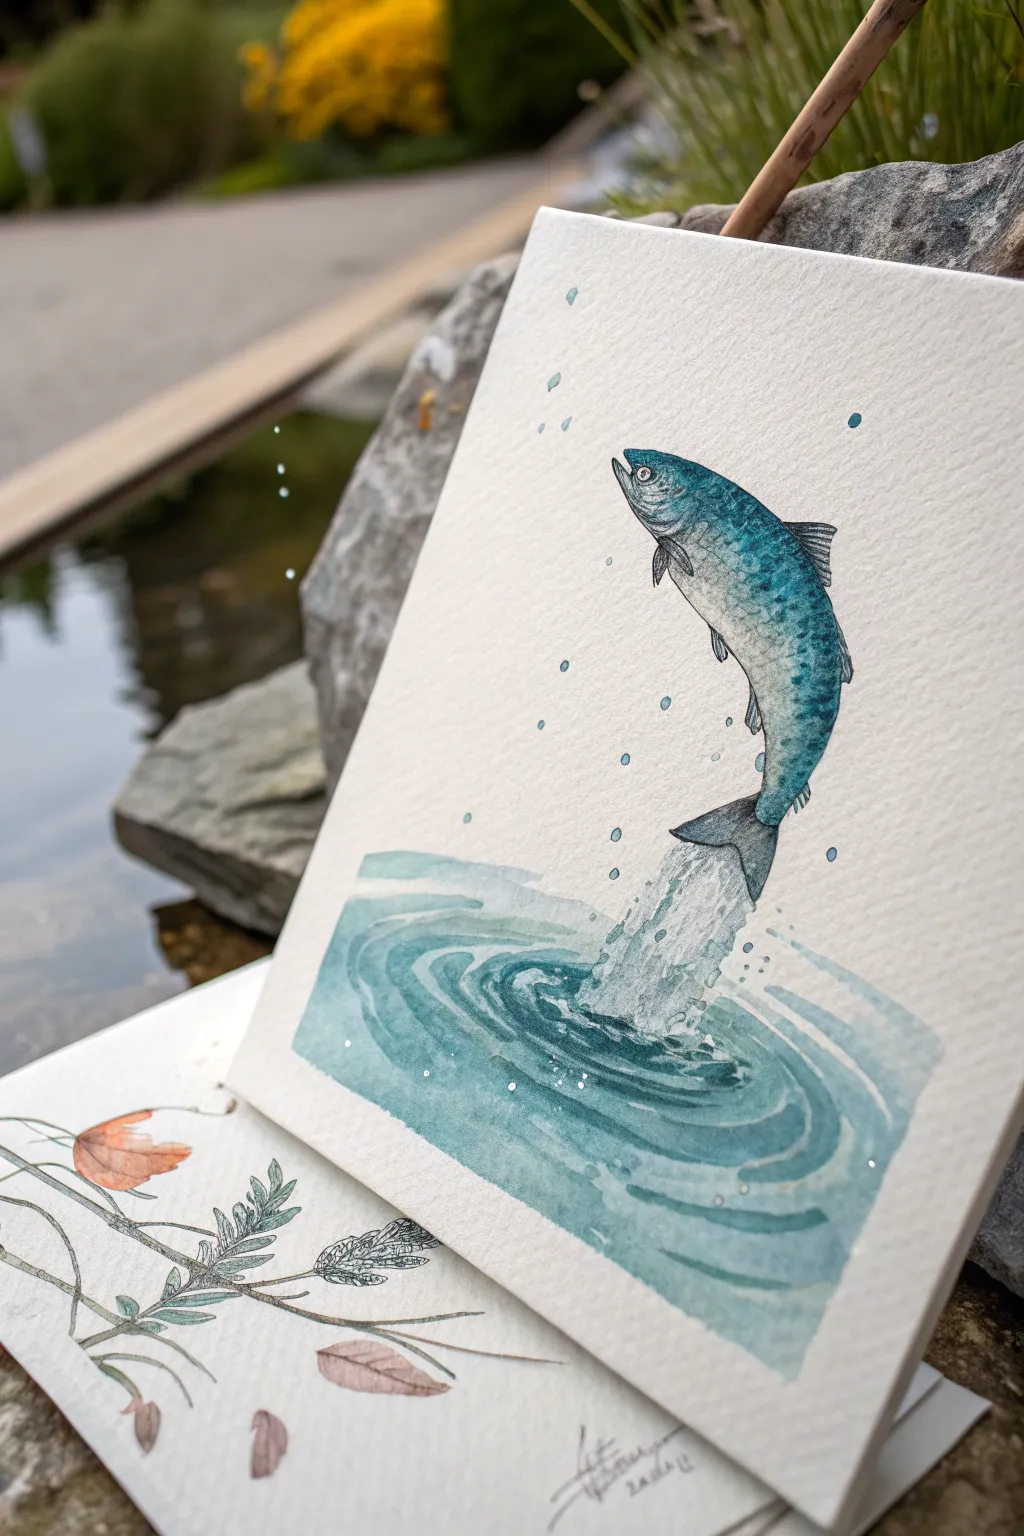
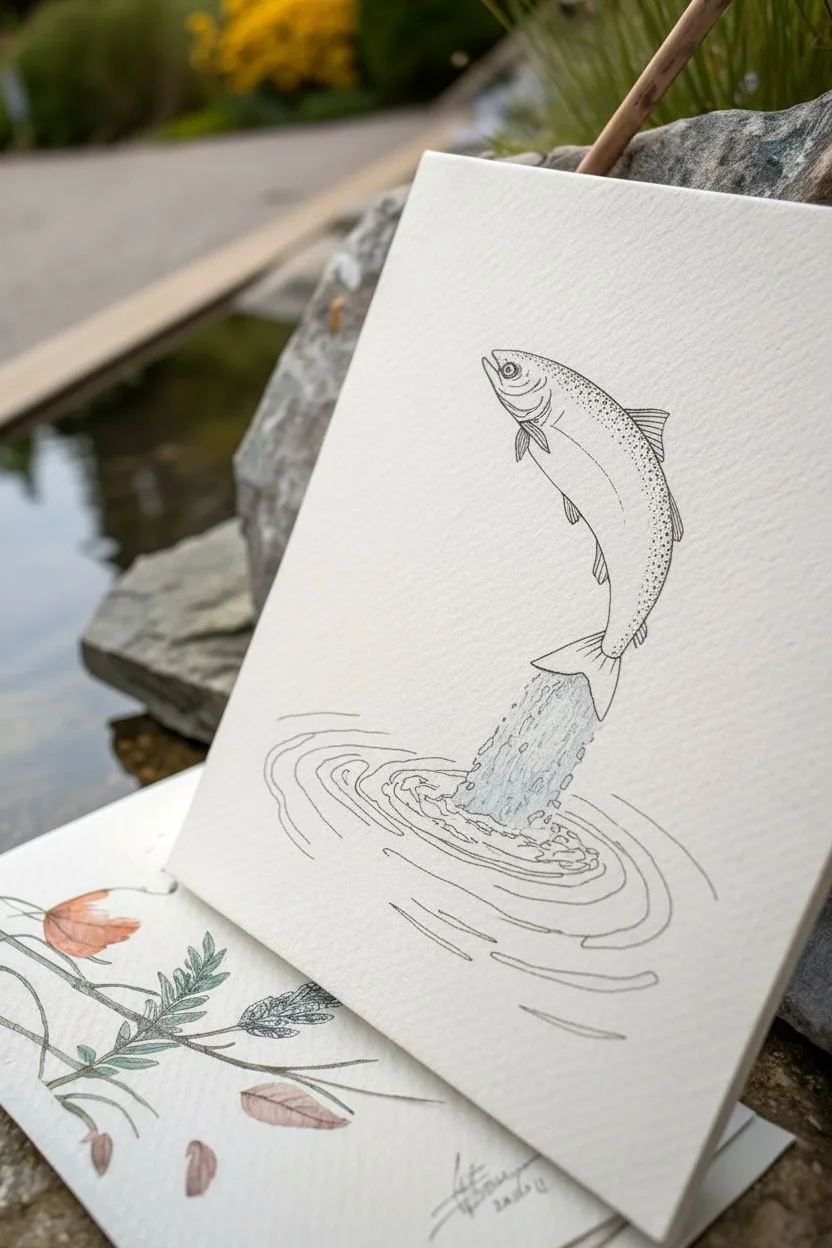
Capture the dynamic energy of a leaping fish with this crisp watercolor and ink illustration. Using a limited palette of cool blues and greens, you’ll create a sense of movement through precise ripples and splashing droplets.
Detailed Instructions
Materials
- Cold press watercolor paper (300 gsm)
- Waterproof fine liner pens (sizes 0.1 and 0.3, black)
- Watercolor paints (phthalo blue, sap green, indigo, payne’s gray)
- Round watercolor brushes (sizes 2 and 6)
- White gouache or white gel pen
- Pencil (HB) and eraser
- Masking fluid (optional)
- Water cups and paper towels
Step 1: Sketching and Inking
-
Outline the fish:
Start by lightly sketching the curved body of the fish leaping upwards. Place the head near the top third of the paper and the tail pointing down towards where the water surface will be. -
Add details:
Refine the shape by adding the dorsal fin, pectoral fins, and the forked tail. Sketch a small eye and the line of the mouth, keeping the details fairly simple at this stage. -
Sketch the water:
Draw concentric ellipses below the tail to represent the rippling water. Add an irregular, vertical shape connecting the tail to the water to mark where the splash will be. -
Ink the drawing:
Go over your pencil lines with a 0.3 waterproof fine liner. Use broken, dashed lines for the splash area to keep it looking airy and light. Erase all pencil marks once the ink is completely dry. -
Add texture:
Switch to a 0.1 fine liner to add subtle texture. Stipple tiny dots along the fish’s back and add fine lines on the fins to suggest spines.
Bleeding Lines?
If your black ink smears when you apply watercolor, your pen isn’t waterproof. Ensure the pen says ‘waterproof’ or ‘archival’ and let it dry for at least 30 minutes before painting.
Step 2: Painting the Fish
-
First wash:
Mix a watery wash of phthalo blue with a touch of green. Apply this to the top half of the fish’s body, fading it out to clear water as you move toward the belly to keep the underside white. -
Deepen the color:
While the first layer is still damp, drop in a slightly stronger mix of indigo along the very top edge of the back. This creates a rounded, 3D effect. -
Paint the fins:
Use a mix of payne’s gray and blue for the fins and tail. Keep the edges crisp, but allow some lighter areas within the fins to show transparency. -
Add spots:
Once the body is dry, use the tip of your size 2 brush or a fine liner to add distinct dark spots along the upper back, characteristic of a salmon or trout.
Make It Shimmer
Mix a tiny amount of iridescent medium or pearlescent watercolor into your blue paint for the fish scales. It gives a realistic shimmer when the light hits the paper.
Step 3: Creating the Splash
-
Water ripples base:
Mix a generous amount of turquoise using blue and green. Paint broad, circular strokes following your ripple sketches, leaving white paper gaps between the rings for highlights. -
Darken the depths:
Add indigo to your turquoise mix. Paint the areas of water directly beneath the splash and in the shadows of the ripples to create depth and contrast. -
Define the splash column:
For the vertical column of water under the tail, use a very pale, watered-down gray-blue. Apply it loosely, leaving plenty of white paper to represent the foam. -
Splatter effect:
Load a small brush with blue paint and tap it against your finger to create splatters around the fish and the splash zone. I find this creates the most natural-looking droplets.
Step 4: Finishing Touches
-
Refine the eye:
Carefully paint the eye, leaving a tiny white dot for the reflection, or add it back in later with white gel pen. -
Highlighting:
Use white gouache or a white gel pen to add sharp highlights on the wettest parts of the fish and the crests of the water ripples. -
Signature:
Sign your artwork in the corner with a fine liner, keeping it small so it doesn’t distract from the composition.
Frame your leaping fish with a stark white mat to emphasize the clean, refreshing colors of the water
BRUSH GUIDE
The Right Brush for Every Stroke
From clean lines to bold texture — master brush choice, stroke control, and essential techniques.
Explore the Full Guide
Coral Reef Fish With Bright Pattern Play
Dive into this vibrant project featuring a beautifully patterned Regal Angelfish swimming amongst delicate coral. The combination of warm ochres and cool blues creates a striking contrast that brings this underwater scene to life on textured paper.
Step-by-Step
Materials
- Hot press watercolor paper (deckled edge optional)
- Watercolor paints (Yellow Ochre, Ultramarine Blue, Alizarin Crimson, Burnt Sienna, Payne’s Grey, Turquoise)
- Round watercolor brushes (Size 4 for washes, Size 0 or 1 for details)
- Pencil (HB or H) and kneadable eraser
- Masking fluid (optional)
- Two jars of water
- Paper towels
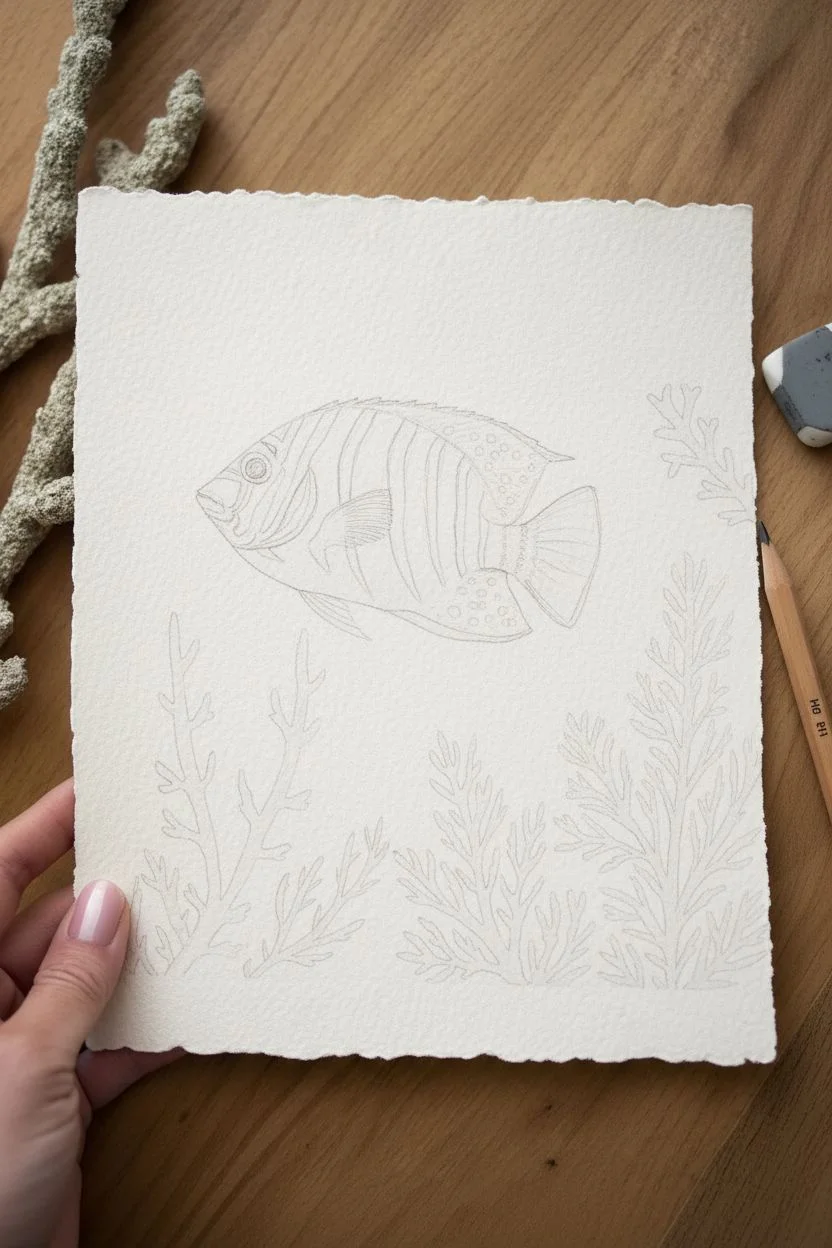
Step 1: Sketching the Reef Scene
-
Define the composition:
Begin by lightly marking the borders of your painting area, leaving a generous margin around the paper’s edge to frame the scene. -
Draw the fish outline:
In the upper center, sketch the oval body of the angelfish. Pay attention to the sweeping curves of the dorsal and anal fins, making sure they extend backward gracefully. -
Add stripe details:
Lightly map out the tell-tale vertical stripes. They curve slightly with the fish’s body shape. Don’t press too hard; you want these lines to be faint guidelines. -
Sketch the coral:
Draw organic, branching coral structures in the bottom corners. Keep the shapes loose and flowing, reaching upwards like tree branches. I like to vary heights to create visual interest.
Clean Edges
For those sharp stripes, wait until adjacent colors are 100% dry before painting the next. If you struggle with this, use masking fluid on the yellow stripes before painting the blue.
Step 2: Painting the Fish
-
Base yellow wash:
Mix a watery Yellow Ochre. Carefully fill in the yellow stripes and the face of the fish, skipping the areas that will be blue or white. Let this dry completely. -
Adding the shadows:
While the yellow is dry, mix a dilute purple gray. Glaze this over the bottom belly area of the fish to create rounded form and shadow. -
Painting the blue stripes:
Using your size 1 brush and a mix of Turquoise and a touch of Ultramarine, paint the blue stripes. Work carefully between the yellow sections. If your hand is shaky, rest your palm on a dry paper towel. -
Detailing the fins:
Paint the dorsal (top) and anal (bottom) fins. Use a mix of Burnt Sienna and Alizarin Crimson for the reddish sections, transitioning into a dark blue at the very edges. -
Tail fin texture:
Paint the tail fin with a sheer wash of blue-grey. Once dry, use the tip of your smallest brush to draw fine lines radiating outward to suggest fin rays. -
Eye and spots:
Paint the pupil black, leaving a tiny speck of white paper for the highlight. Then, add the small blue spots on the reddish fins using your opaque turquoise mix.
Add Subtle Shimmer
Mix a tiny amount of iridescent mediu or metallic watercolor into the blue stripe paint. It gives the scales a realistic wet shimmer when the light hits the artwork.
Step 3: Creating the Coral Environment
-
Painting the pink coral:
Mix a watery Alizarin Crimson or coral pink. Paint the branching coral on the right side. Keep the wash transparent, allowing the texture of the paper to show through. -
Painting the yellow coral:
On the left side, paint the branching coral with Yellow Ochre. Keep the edges crisp but the color varied—some parts lighter, some slightly more saturated. -
Background wash:
Prepare a very dilute, pale blue-green wash. Carefully paint the water around the fish and coral. Soften the edges as you move outward so the water fades into the white paper. -
Shadows and depth:
Once the coral is dry, mix a slightly darker version of your pink and yellow paints. Add thin lines or dark spots at the ‘V’ joints of the coral branches to suggest depth and dimension.
Step back and admire how your colorful fish pops against the soft, transparent watercolor background
Loose Watercolor Fish With Color Bleeds
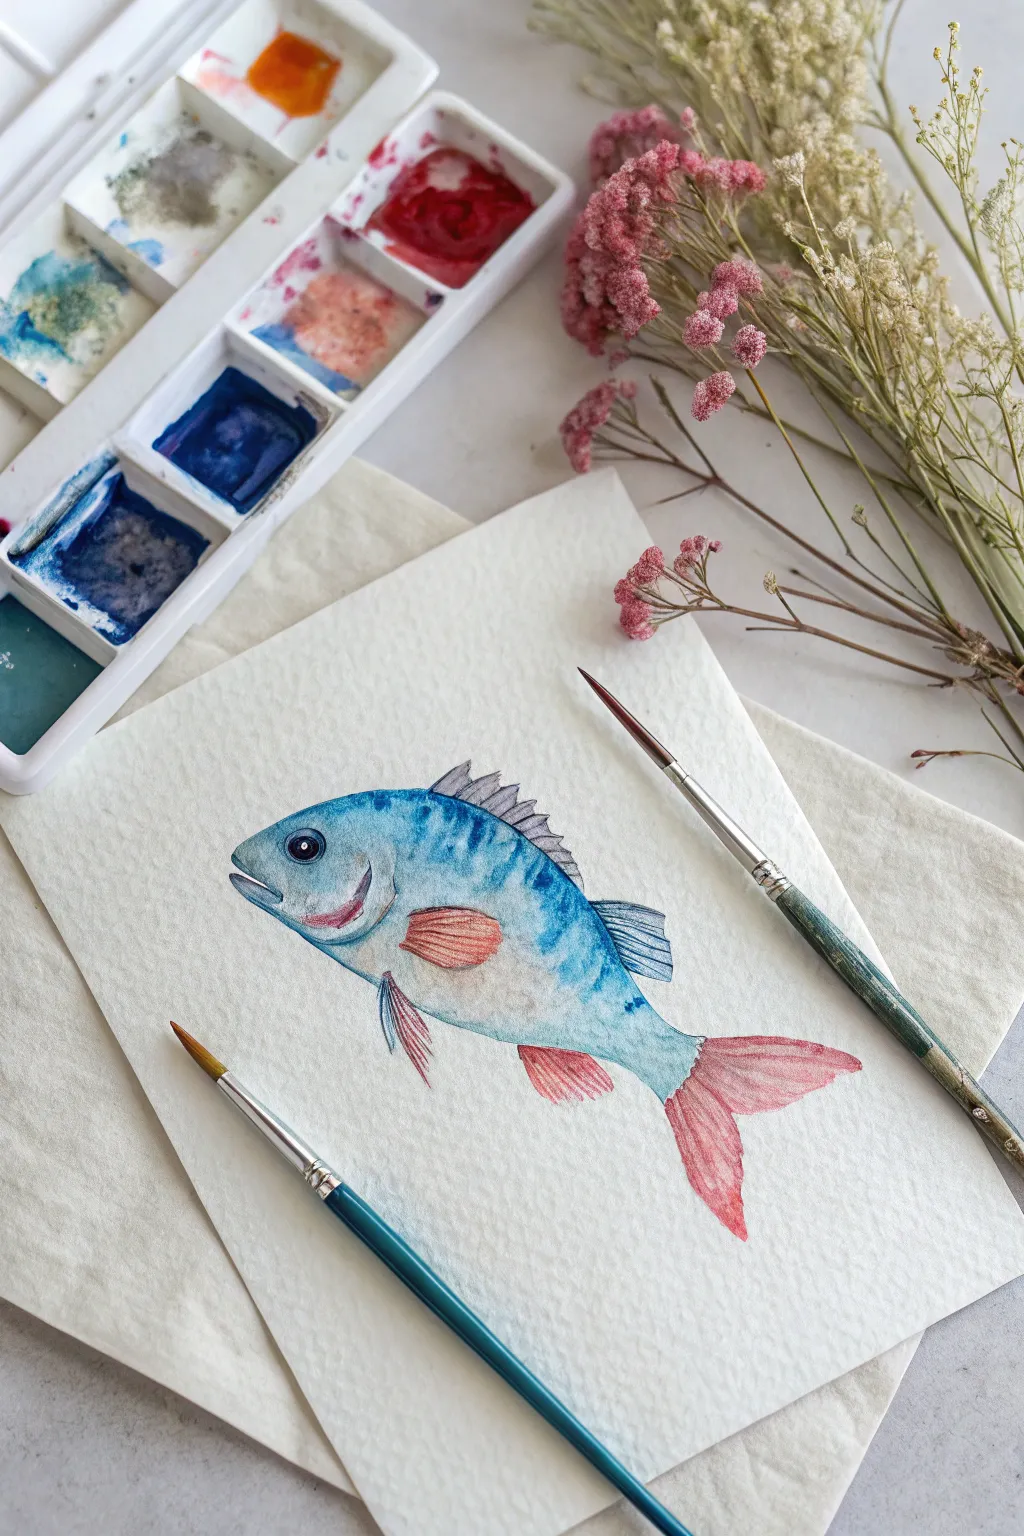
Capture the delicate beauty of aquatic life with this detailed yet airy watercolor study. By combining vibrant cerulean blues with soft blush tones, you’ll create a fish illustration that feels both lively and elegantly composed on textured paper.
Step-by-Step Guide
Materials
- Cold press watercolor paper (fine grain)
- Watercolor paints (Cerulean Blue, Indigo, Crimson or Rose Madder, Burnt Sienna)
- Round brushes (size 4 for body, size 0 or 1 for details)
- Graphite pencil (HB) and kneaded eraser
- Clean water jar
- Paper towel
Step 1: Sketching the Form
-
Light outline:
Begin by sketching the basic oval shape of the fish’s body lightly with your HB pencil. Add the triangular tail fin and the dorsal fin along the top ridge. -
Defining features:
Mark the position of the gills with a curved line behind the head area. Sketch the eye socket, mouth line, and the placement of the pectoral (side) and pelvic (bottom) fins. -
Refining the sketch:
Clean up your drawing with a kneaded eraser, lightening the graphite until it’s barely visible so the pencil lines won’t show through the transparent watercolor later.
Muddy colors?
If the blue body and pink tail mix and turn purple or brown, ensure the blue body layer is totally dry before painting the pink fins next to it.
Step 2: Painting the Body
-
Base wash:
Mix a watery wash of Cerulean Blue. Using your larger round brush, paint the upper two-thirds of the fish’s body, starting from the head and fading out towards the tail. -
Adding gradients:
While the first layer is still damp, drop in a slightly more concentrated blue near the dorsal fin to create a natural shadow and volume. -
Belly transition:
Wash your brush completely. With just clean water, soften the bottom edge of the blue paint so it fades seamlessly into the white of the paper at the belly area. -
Texturing scales:
Once the base is semi-dry, use a drier brush with Indigo or darker blue to add small, mottled dashes along the upper back. This suggests scales without painting every single one. -
The eye:
Paint the eye pupil with a mix of Indigo and a touch of Burnt Sienna for a near-black. Leave a tiny speck of white unpainted for the highlight to bring the fish to life.
Add a splash
Before the paint dries completely, tap your brush handle to splatter tiny droplets of blue or pink around the fish for a watery, dynamic effect.
Step 3: Adding the Fins & Details
-
Tail fin wash:
Mix a soft Crimson or Rose Madder. Paint the tail fin, keeping the color strongest at the tips and fading it as it connects to the blue body. -
Remaining fins:
Use the same reddish-pink mix for the pectoral and pelvic fins. I usually like to keep these strokes loose to imply movement. -
Dorsal definition:
Paint the spiky dorsal fin on top using a diluted grey-blue mix. Use the tip of your small brush to create the sharp spines. -
Fin texture:
Once the pink fins are dry, take a fine detail brush with a slightly darker red mix and paint thin, radiating lines to show the ribbed texture of the fins. -
Facial details:
Add a touch of diluted pink to the ‘cheek’ area and the mouth line. Use a fine blue line to define the gill plate more clearly. -
Deepening contrast:
Glaze a very light shadow of cool blue under the belly and near the tail connection to round out the form. -
Final touches:
Review your painting for any lost edges. You can crisp up the outer silhouette with a fine line of darker paint where needed, particularly around the head and dorsal fin.
Step back and admire the gentle color transition and delicate details of your watercolor creation

PENCIL GUIDE
Understanding Pencil Grades from H to B
From first sketch to finished drawing — learn pencil grades, line control, and shading techniques.
Explore the Full Guide
Iridescent Scales Using Stippling and Highlights
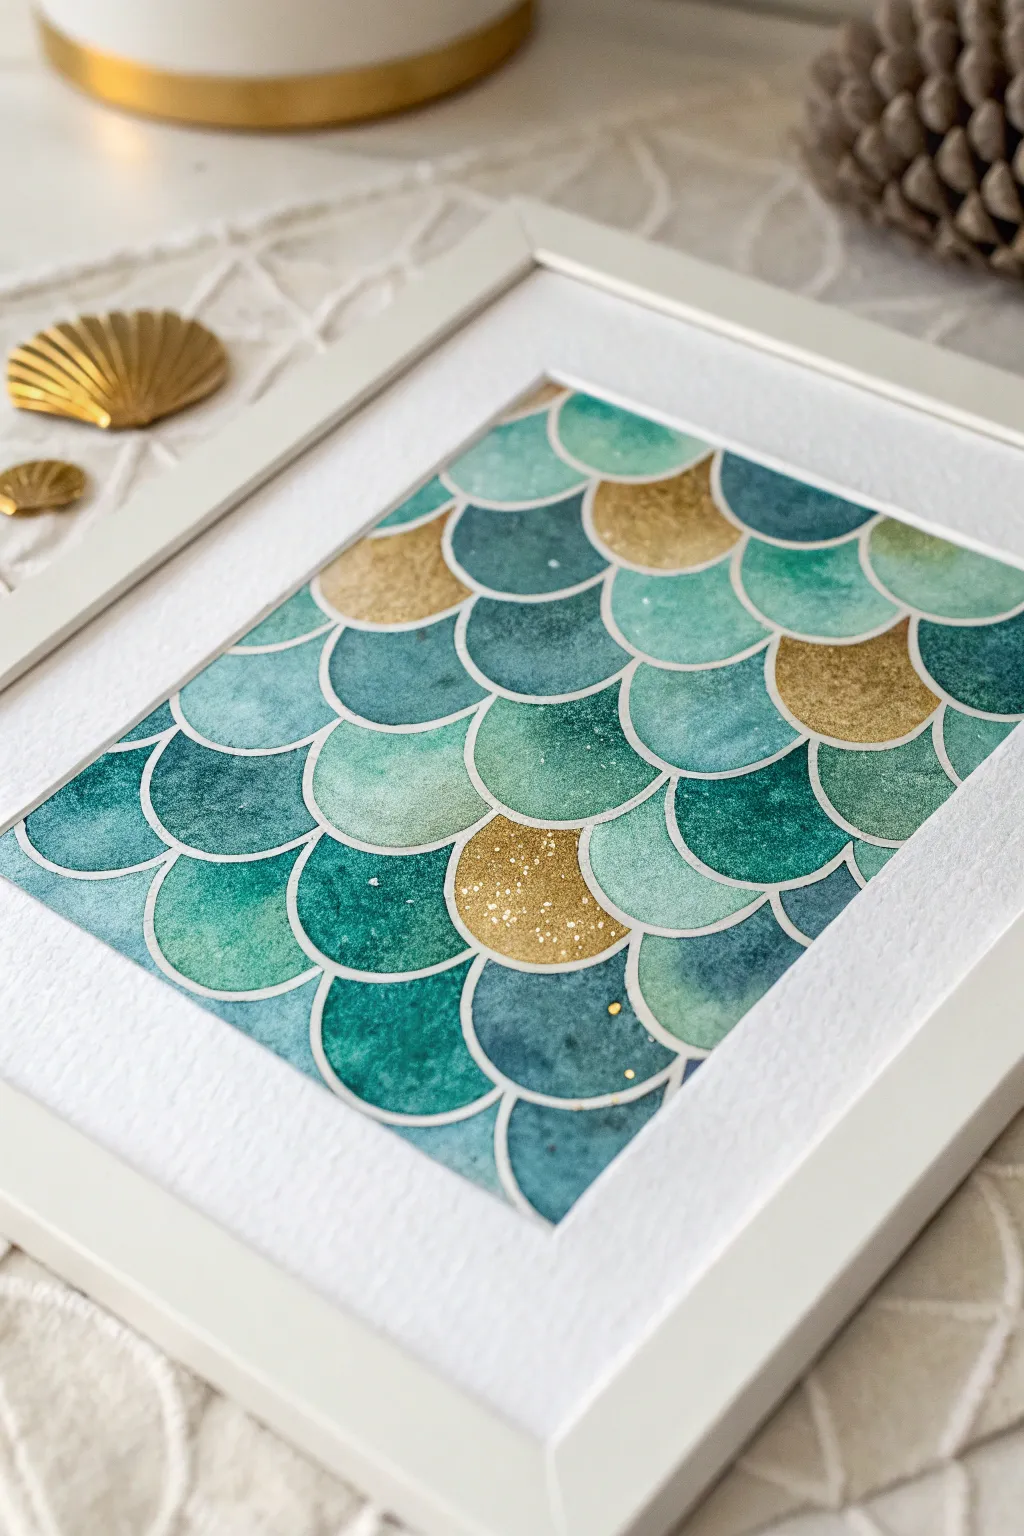
Capture the magic of the ocean with this mesmerizing fish scale pattern that blends deep teals, seafoam greens, and striking gold accents. This project uses simple watercolor techniques to create depth and movement, framed perfectly for a coastal home decor piece.
Step-by-Step
Materials
- Cold-press watercolor paper (300gsm)
- White or metallic masking marker/pen (fine tip)
- Watercolor paints (teal, turquoise, indigo, emerald)
- Metallic gold watercolor paint or gold gouache
- Gold glitter or gold leaf flakes (optional)
- Round watercolor brushes (size 4 and 6)
- Pencil and ruler
- Circular object for tracing (like a bottle cap) or a compass
- White mat and frame
- Paper towels and water cup
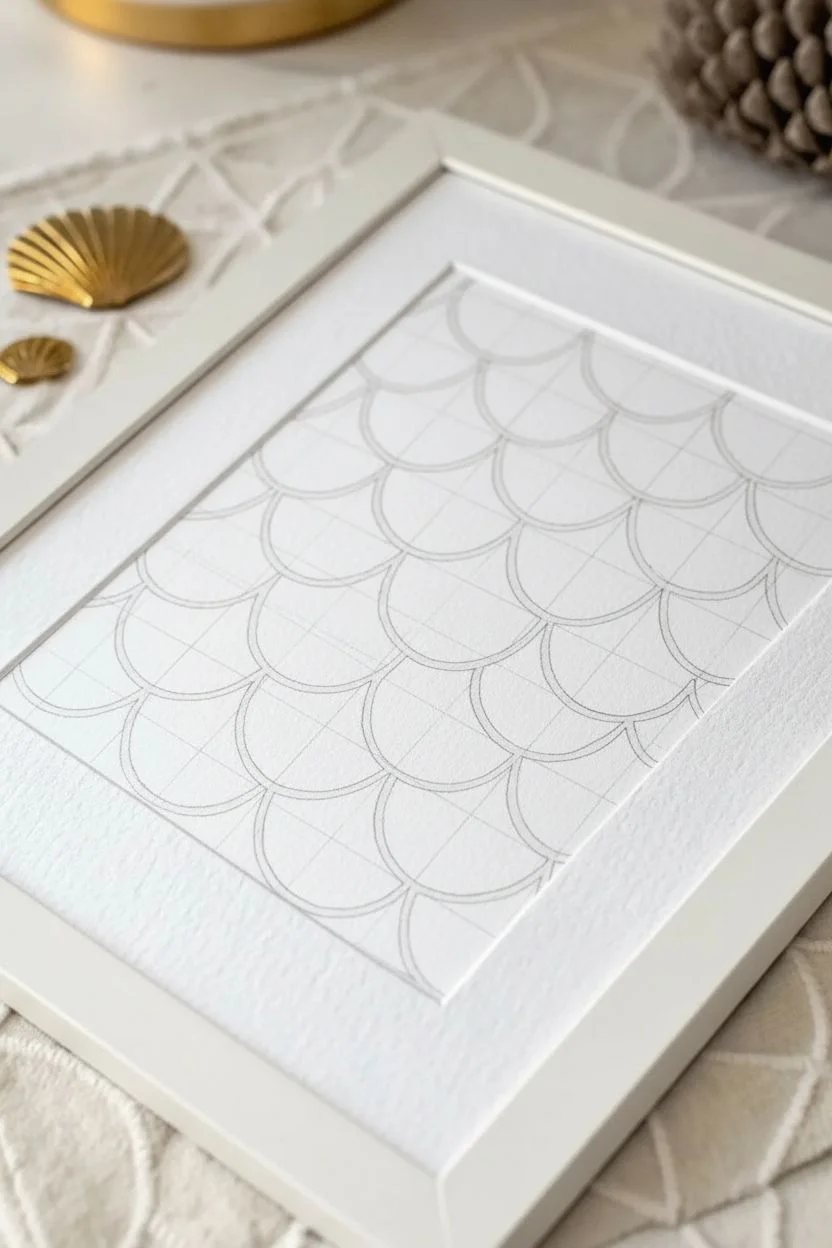
Step 1: Drafting the Design
-
Prepare your paper:
Cut your watercolor paper to fit the size of your mat opening, leaving a small margin for taping it down if desired. -
Draw the grid:
Lightly draw horizontal lines across your paper using a ruler. These lines will determine the height of each row of scales and help keep them straight. -
Trace the scales:
Using a small circular object or compass, sketch overlapping semi-circles along the grid lines. Start the second row offset from the first, positioning the peak of the new scale in the valley between the two above it. -
Outline the pattern:
Once your pencil sketch is complete, go over all the scale lines with a white masking marker or a fine-tip waterproof white pen. This creates the crisp white separation lines between the colors. -
Erase pencil marks:
Allow the white ink to dry completely, then gently erase the underlying pencil guides to keep the artwork clean.
Step 2: Applying Aqua Tones
-
Mix your palette:
Prepare a range of ocean-inspired colors on your palette: deep teal, sea green, light turquoise, and a moody indigo. -
Start painting randomly:
Select a specific scale and fill it with wet paint. I like to drop in a darker color at the bottom curve and let it bleed upward into a lighter shade for a curved, dimensional effect. -
Vary the hues:
As you move across the paper, switch between your different blue and green mixtures. Avoid placing two identical colors right next to each other to maintain visual interest. -
Create texture:
For some scales, dab up a little excess paint with a paper towel while it’s still wet to create a mottled, textured look. -
Add watercolor blooms:
Drop a tiny splash of clean water into drying scales to create natural ‘blooms’ or cauliflower patterns that mimic the organic texture of fish skin. -
Leave gaps for gold:
Intentionally leave about 10-15% of the scales entirely blank. These empty spots will become your metallic focal points later. -
Let the blue layer dry:
Before moving to the metallic phase, ensure all the blue and green paint is completely dry to prevent muddy bleeding.
Masking Pro-Tip
Instead of a white pen, use masking fluid for the outlines. Peel it off after painting and framing to reveal the raw white paper for a textured, authentic watercolor look.
Step 3: Gilding and Framing
-
Paint the gold scales:
Fill in the remaining empty scales using opaque metallic gold watercolor or gold gouache. Apply it thickly so it stands out against the translucent watercolors. -
Add gold speckles:
Load your brush with gold paint and gently tap the handle to splatter tiny gold specks over a few of the teal scales for added shimmer. -
Detail with glitter:
If you want extra sparkle, dab a tiny amount of glue onto the gold scales and sprinkle a pinch of fine gold glitter or press on small gold leaf flakes. -
Final drying:
Let the entire piece sit for at least an hour to ensure the metallic elements and any glue are fully set. -
Mount artwork:
Center your painting behind the white mat board. Use acid-free tape on the back to secure the paper to the mat so it doesn’t slip. -
Frame it:
Place the matted artwork into your frame, clean the glass, and secure the backing. Your shimmering scale art is ready to display.
Level Up: Ombre Effect
Instead of random colors, paint the scales in a gradient. Start with dark indigo at the bottom and transition slowly to pale seafoam at the top for a ‘rising from the deep’ effect.
Hang your luminous creation in a well-lit spot where the sunlight can catch those golden details
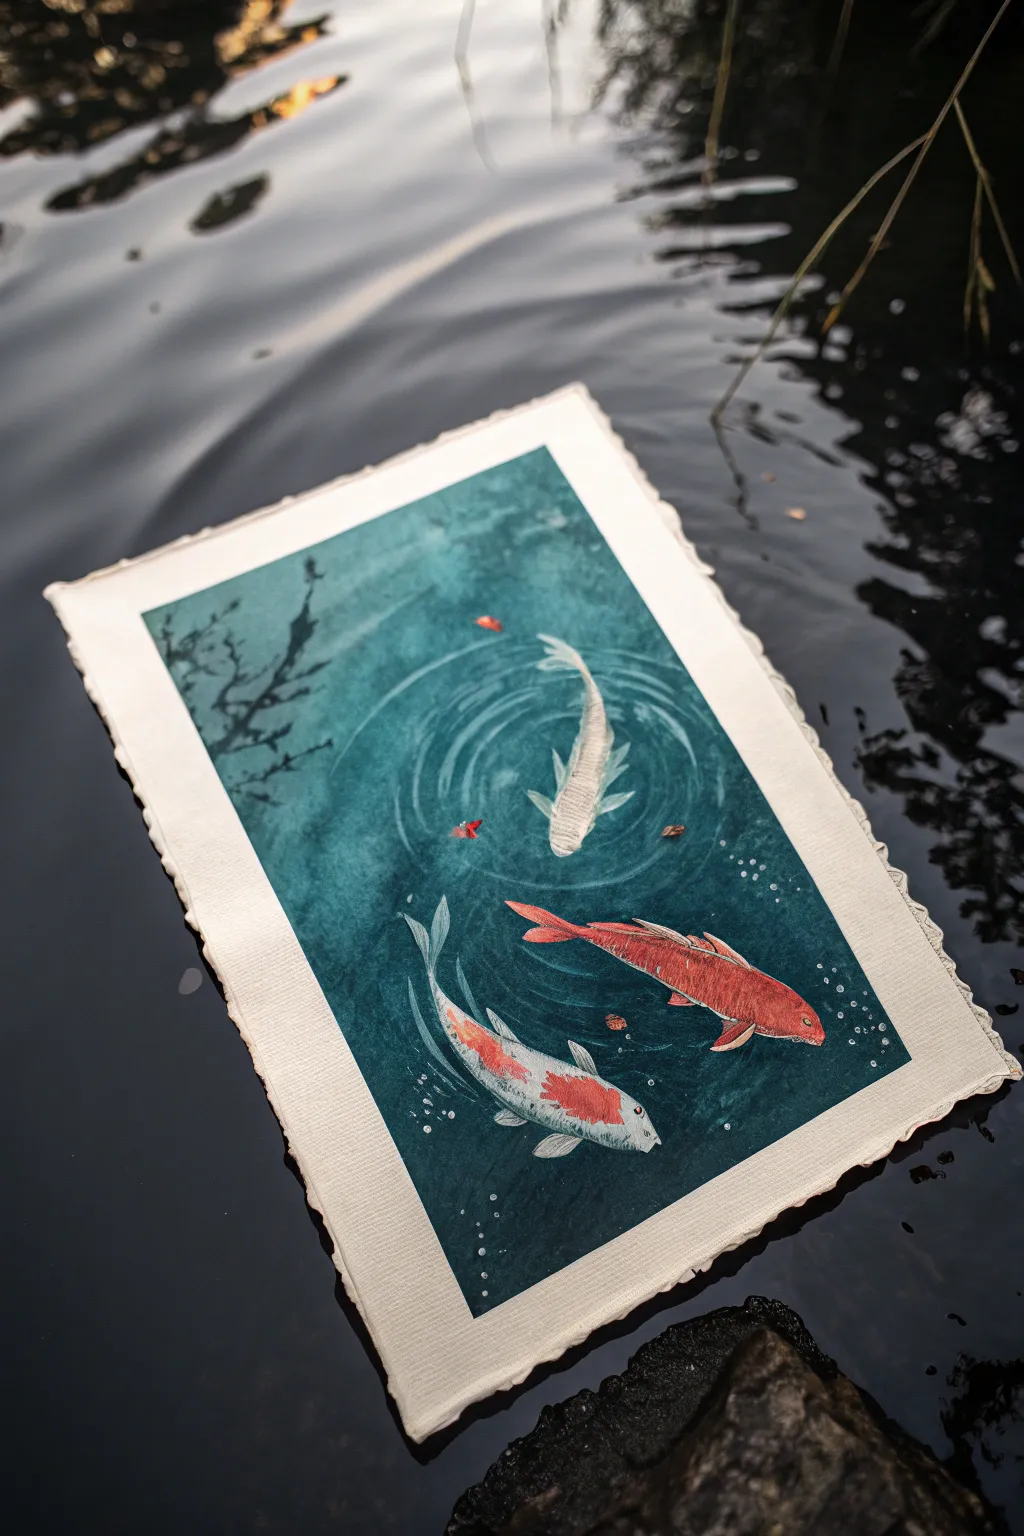
S-Curve Swimming Poses That Feel Alive
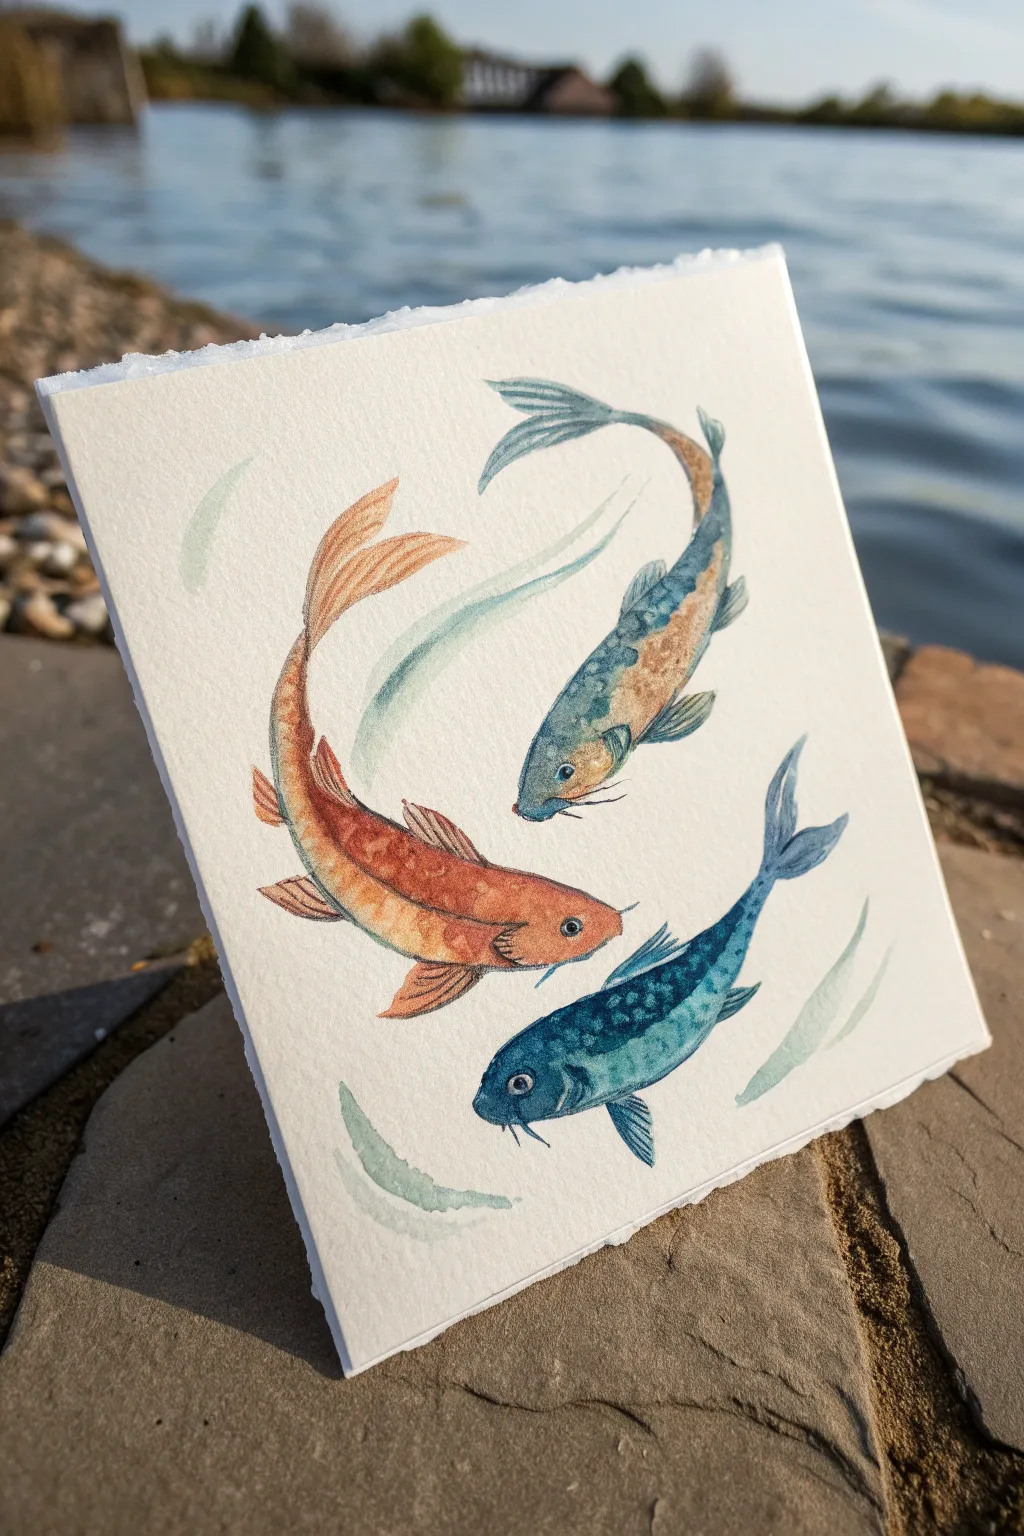

Capture the graceful fluidity of koi fish with this dynamic watercolor composition involving three distinct swimmers. The S-curve poses create a natural sense of movement, guiding the eye in a continuous loop around the textured paper.
Step-by-Step Tutorial
Materials
- Cold-pressed watercolor paper (300 gsm or heavier, rough texture preferred)
- Pencil (HB or H)
- Kneaded eraser
- Watercolor paints (Vermilion/Orange, Prussian Blue, Indigo, Yellow Ochre, Burnt Sienna)
- Round watercolor brushes (Size 4 and Size 0 or 00 for details)
- White gouache or white gel pen
- Clean water and paper towels
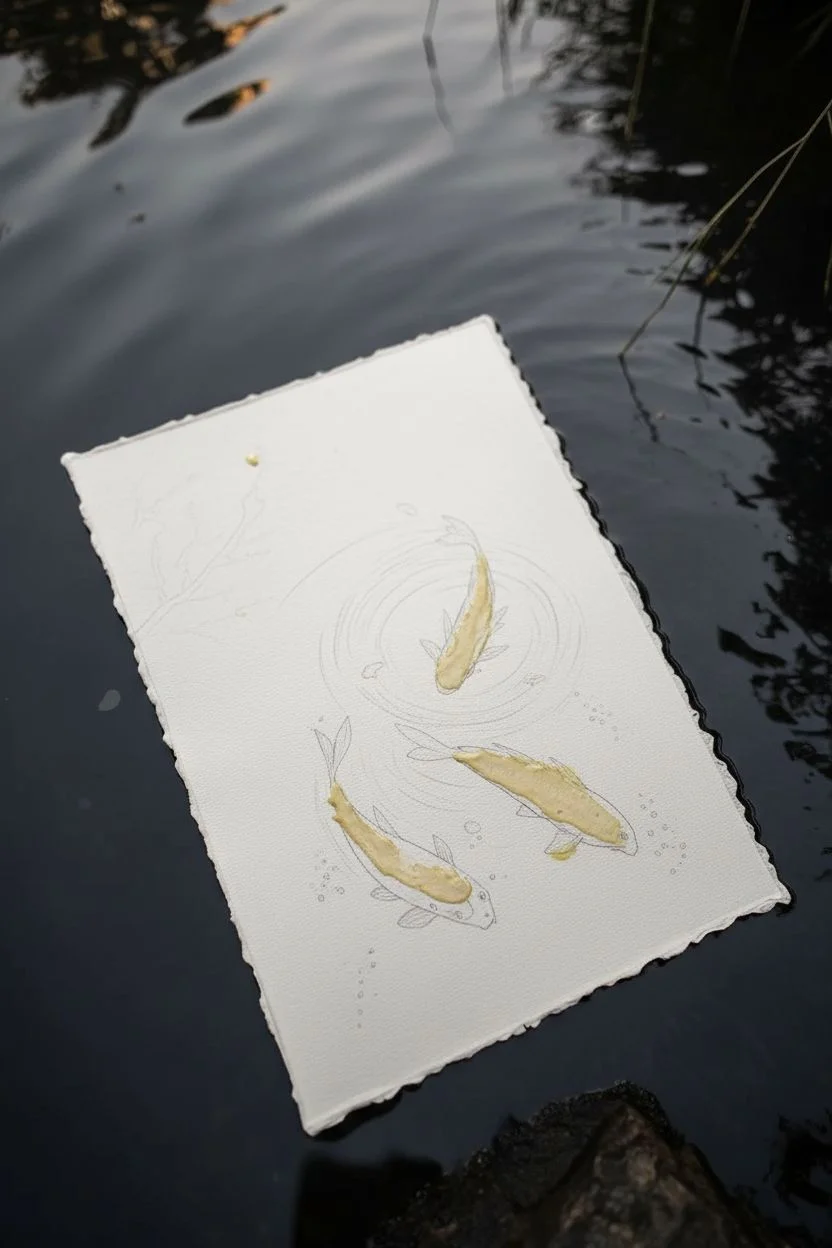
Step 1: Sketching the Flow
-
Establish the composition:
Begin by lightly drawing a large, invisible circle in the center of your square paper. This will serve as the path your fish will follow to ensure their movement looks continuous. -
Map the S-curves:
Sketch the spine of each fish along this circular path. Instead of stiff lines, draw gentle ‘S’ shapes for each spine to mimic the twisting motion of swimming. Place them equidistantly: one at the top right, one at the bottom, and one on the left. -
Flesh out the bodies:
Build the oval body shapes around your spine lines. The bodies should be widest near the head and taper smoothly toward the tail. Make sure the curvature follows the spine perfectly. -
Add fins and details:
Sketch the flowing tail fins and side pectoral fins. Notice how the fins drag behind the movement—if the fish turns left, the fins should flow slightly to the right. Add the eye placement and mouth details lightly.
Natural Flow Tip
Don’t outline the entire fish with a dark line. Let the contrast between the paint and the white paper define the edges for a softer, more aquatic feel.
Step 2: Painting the Gold-Blue Koi
-
First wash:
Start with the top-right fish. Wet the body area with clean water, then drop in a diluted Yellow Ochre mixed with a touch of Burnt Sienna on the lower half of the body. -
Introduce the blue:
While the paper is still damp but not soaking, introduce a soft grey-blue (mix Indigo with plenty of water) to the upper back of the fish, letting it bleed naturally into the gold tones. -
Define the scales:
Once the base layer is dry, use a size 0 brush and a slightly darker blue mix to paint small ‘U’ shapes for scales along the blue spine area. Keep the edges soft.
Step 3: Painting the Orange Koi
-
Base color application:
For the left-side fish, mix a vibrant Vermilion. Dilute it slightly for the belly area and keep it more concentrated for the spine. Paint the body, leaving tiny slivers of white paper for highlights. -
Adding texture:
I like to drop a tiny bit of Burnt Sienna into the wet orange paint near the fins and tail base to create immediate shadow and depth before it dries. -
Fin details:
Paint the fins with a very watery orange wash. Once dry, use a liner brush to add thin, darker orange stripes to suggest the ribbing of the fins.
Muddy Colors?
If the orange and blue fish accidentally touch while wet, they will create brown. Ensure one fish is completely dry before starting a neighboring one.
Step 4: Painting the Indigo Koi
-
Deep blue tones:
For the bottom fish, create a rich mix of Prussian Blue and a touch of Indigo. Paint the body, lightening the wash significantly as you move toward the belly to make it look round. -
Scale pattern:
Allow the base to dry completely. Mix a thick, dark Indigo and paint distinct scale patterns on the upper back. The contrast between the dark scales and lighter blue body makes this fish pop.
Step 5: Final Details & Atmosphere
-
Eyes and whiskers:
Using your smallest brush and the darkest paint mix (nearly black), carefully paint the pupil of the eyes. Add the delicate barbels (whiskers) near the mouth with a confident, sweeping stroke. -
Water current lines:
Mix a very pale, watery teal or green. Paint curved, swooping strokes distinct from the fish bodies to represent water currents. These should mirror the circular flow of the composition. -
Highlights:
Use white gouache or a gel pen to add a tiny sparkle in each eye and a few sharp highlights on the wet scales or fin edges to give them a glossy, wet look.
Now you have a serene aquatic scene that captures the endless elegant movement of koi


Top-Down Fish Silhouettes in Dark Water
Capture the serene beauty of a dark garden pond with this moody watercolor and gouache painting. You’ll create translucent water effects and vibrant koi fish swimming through deep teal depths, all framed on lovely deckled-edge paper.
Step-by-Step
Materials
- Cold press watercolor paper (300 gsm or heavier)
- Watercolor paints (Indigo, Phthalo Green, Payne’s Grey, Alizarin Crimson, Cadmium Red, Yellow Ochre)
- White gouache
- Iridescent medium (optional)
- Round brushes (sizes 2, 6, and 10)
- Masking fluid and an old brush
- Pencil and eraser
- Sea salt (optional for texture)
- Paper towels and two jars of water
Step 1: Sketching and Masking
-
Paper Preparation:
If your paper doesn’t already have deckled edges, you can create a faux deckle effect by wetting the edges with a brush and gently tearing the paper against a ruler. -
Compose the Scene:
Lightly sketch the outlines of three koi fish swimming in a circular formation. Place one near the top, one centrally, and one lower down to guide the eye. -
Add Subtle Details:
Sketch a few faint, irregular branch shapes on the left side to represent underwater foliage shadows. -
Apply Masking Fluid:
Use an old brush or a silicone tool to apply masking fluid over the fish shapes and the tiny bubble clusters trailing behind them. Let this dry completely before painting.
Uneven Wash?
If your background dries with unwanted ‘cauliflower’ blooms, glaze over the dry painting with a thin, even layer of the dark teal to unify the water.
Step 2: The Deep Water
-
Mix the Base Dark:
Create a rich, dark teal by mixing Phthalo Green with Indigo and a touch of Payne’s Grey. You want a color that feels deep and mysterious. -
Wet-on-Wet Wash:
Wet the entire paper around the masked fish with clean water. Apply your dark teal mix, letting it bloom and flow. Keep the wash uneven to suggest depth and movement. -
Deepen the Shadows:
While the paper is still damp, drop concentrated Indigo into the corners and around the edges of the ‘pond’ to create a vignette effect. -
Create Texture:
If you want organic water texture, sprinkle a pinch of sea salt on the wet wash on the left side near the foliage sketch. Wait for the paint to dry completely. -
Remove Masking:
Once the paint is bone dry, gently rub off the masking fluid with a clean finger or a rubber cement pickup tool to reveal the stark white paper beneath.
Step 3: Bringing the Koi to Life
-
The Ghost Koi:
For the top fish, use a very watery wash of grey or faint blue to shadow the belly and fins, leaving the top ridge white. I like to add a tiny drop of iridescent medium here for shimmer. -
The Red Koi:
Paint the middle fish with a vibrant mix of Cadmium Red and Alizarin Crimson. Keep the color most intense along the spine and fade it out slightly toward the belly. -
The Calico Koi:
For the bottom fish, paint irregular patches of red-orange and grey. Leave large sections of paper white to create the calico pattern. -
Defining Features:
Using your smallest brush (size 2), paint the eyes with black, leaving a tiny pinprick of white paper for the highlight. Add delicate lines for fin spines.
Depth Trick
Paint the fish slightly hazier or less saturated the ‘deeper’ they are in the water. Only the fish breaking the surface should have sharp, crisp edges.
Step 4: Ripples and Final Touches
-
Paint Surface Ripples:
Mix a semi-opaque light teal using your base water color and a touch of white gouache. Paint thin, curved concentric rings around where the fish break the surface. -
Add Foliage Shadows:
Using a very dark mix of Indigo and Black, paint the silhouette of the underwater branches on the left side. Soften the edges with a clean, damp brush. -
Enhance Bubbles:
Since the masking fluid preserved white dots, use white gouache to make them brighter and rounder. Add tiny shadow crescents to the bottom of each bubble for volume. -
Final Highlights:
Use pure white gouache to add the sharpest highlights on the wet backs of the fish and the crests of the water ripples.
Now you have a tranquil pond scene captured forever on paper, ready to be mounted or framed
Fish and Seagrass on a Sandy Ocean Floor
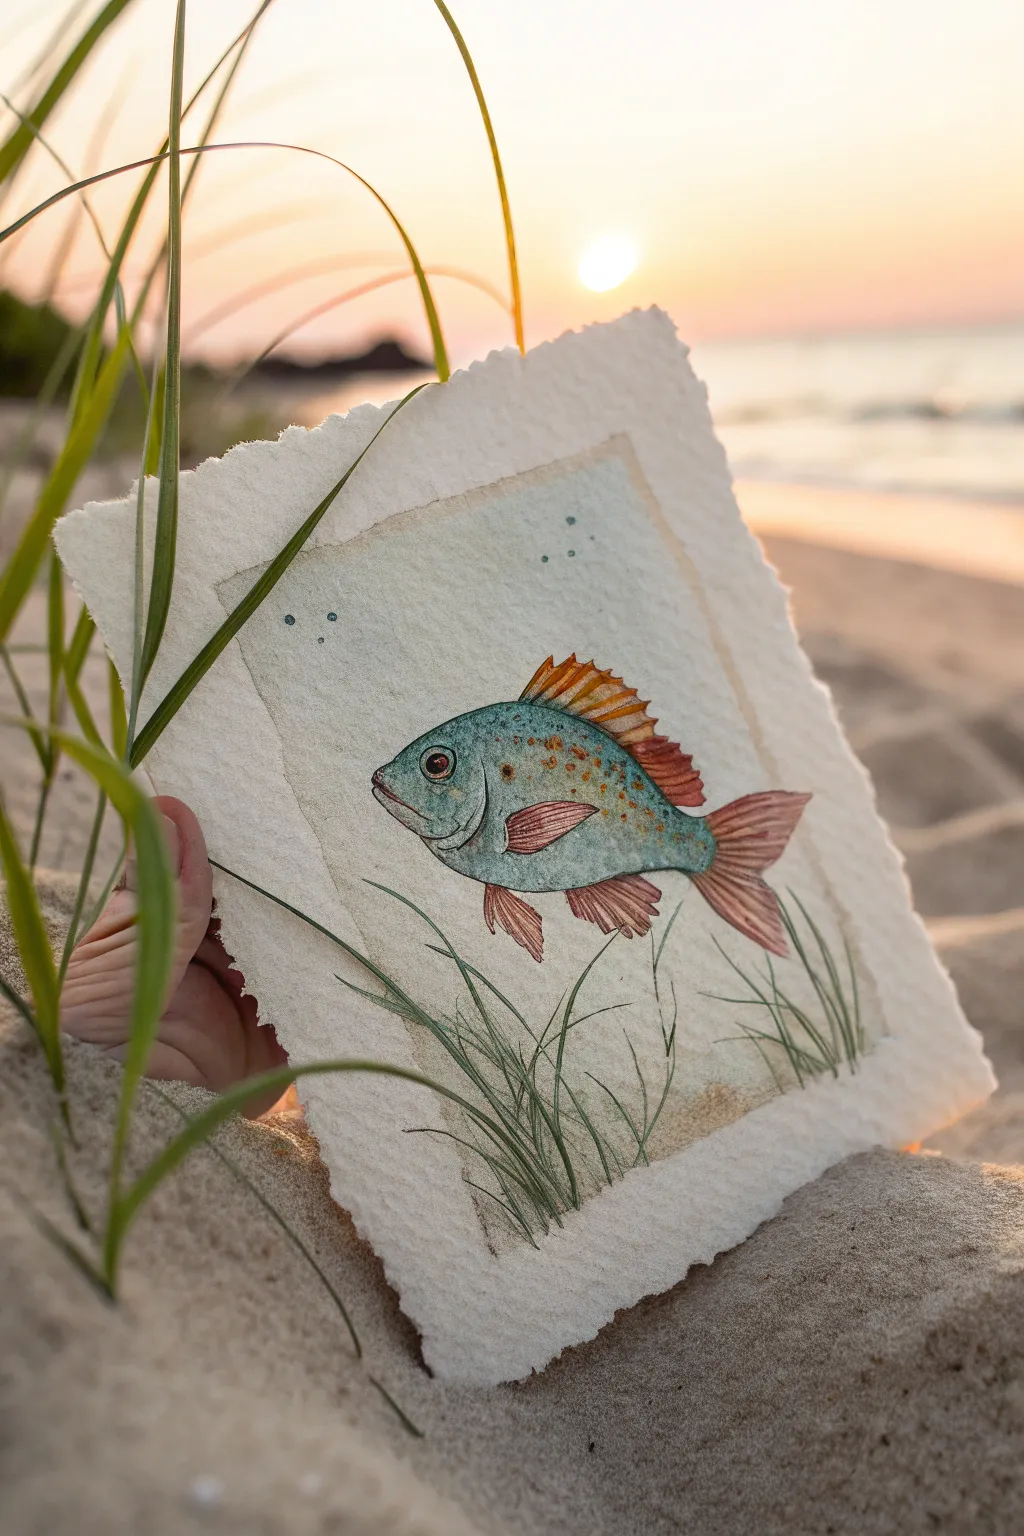
Capture the serene beauty of marine life with this charming mixed-media illustration featuring a colorful fish gliding over a sandy ocean floor. The project combines delicate ink linework with soft watercolor washes on textured handmade paper to evoke a natural, organic feel.
Step-by-Step Guide
Materials
- Heavyweight cold-press watercolor paper with deckled edges (or handmade cotton paper)
- Waterproof fine-liner pens (black or sepia, sizes 01 and 03)
- Watercolor paints (teal, burnt sienna, yellow ochre, sap green, indigo)
- Round watercolor brushes (size 2 and 4)
- Pencil (HB or H) and kneaded eraser
- Painter’s tape or drawing board
- Paper towels and water cup
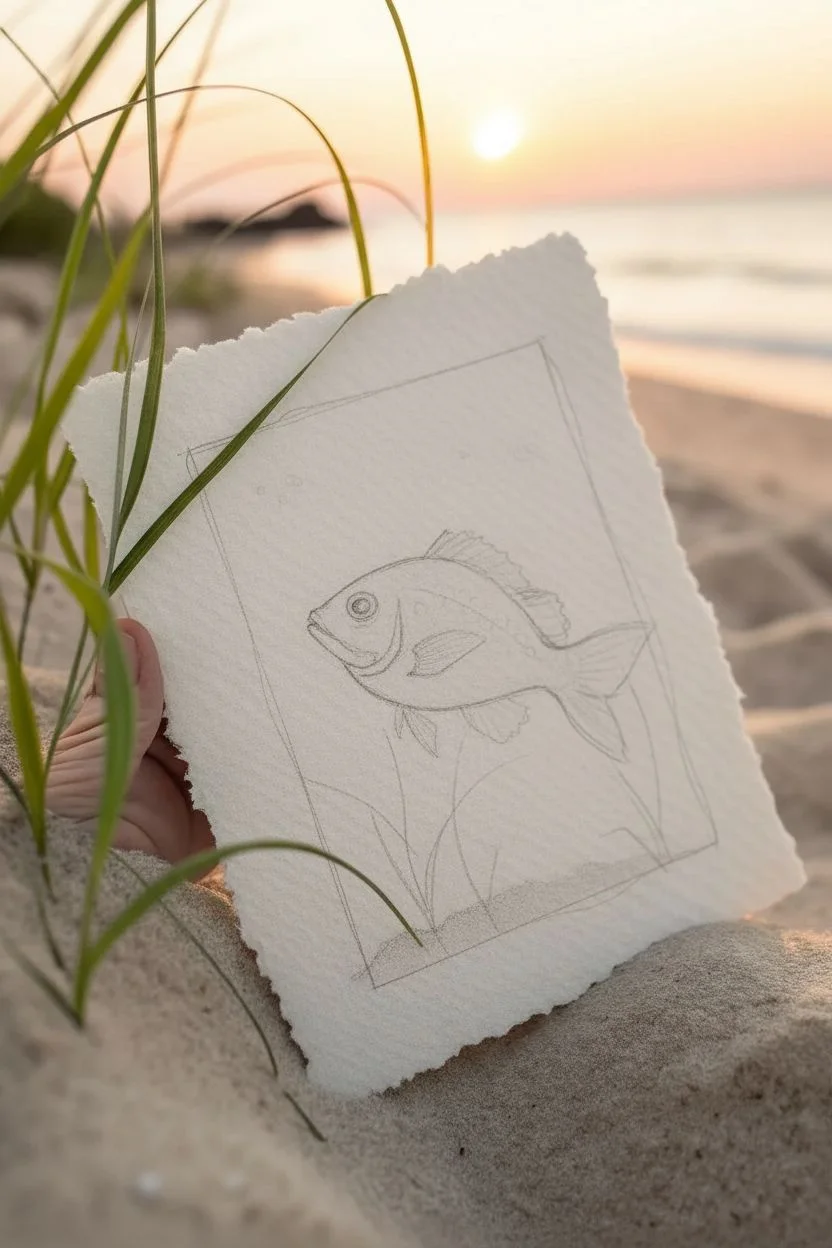
Step 1: Sketching the Composition
-
Define the borders:
Begin by lightly marking a rectangular border inside your deckled paper with a pencil. Leave a generous margin of about 1.5 inches around the edges to frame the scene within the textured paper. -
Outline the fish:
In the center of your framed area, sketch the rough oval shape of the fish body. Add a triangular shape for the tail and define the dorsal fin along the top ridge. -
Add facial details:
Draw the gill curve, the mouth, and a circular eye. Keep your pencil pressure very light so graphite doesn’t smudge into the paint later. -
Sketch the environment:
At the bottom of the rectangle, sketch long, flowing blades of seagrass reaching upwards. Add a low, uneven horizon line near the bottom to represent the sandy ocean floor.
Step 2: Inking the Lines
-
Trace the main subject:
Using a size 03 waterproof pen, carefully trace over your fish pencil lines. Use broken or slightly wavering lines for the scales to give them texture rather than rigidity. -
Texturing the fins:
Switch to a finer 01 pen to draw the delicate spines inside the fins and tail. These lines should fan out from the body. -
Define the grass:
Ink the seagrass blades with fluid, upward strokes. Allow the lines to taper off at the tips to look natural and sharp. -
Erase guidelines:
Once the ink is completely dry—wait at least 15 minutes to be safe—gently erase all visible pencil marks with a kneaded eraser.
Texturize It
Sprinkle a few grains of table salt onto the fish’s body while the teal paint is still wet. Brush it off when dry for a unique, scaly texture.
Step 3: Fins and Scales
-
Base wash for the body:
Load your size 4 brush with a watery mix of teal or turquoise. Paint the main body of the fish, avoiding the fins and eye. Drop in a tiny touch of indigo near the belly while wet for shadow. -
Painting the fins:
Mix a warm burnt sienna or rusty orange. Carefully fill in the dorsal fin, tail, and side fins. The contrast between the cool body and warm fins makes the subject pop. -
Adding scale details:
Once the body wash is dry, use a slightly thicker mix of teal and some yellow ochre to dab small spots or stippling effects on the upper back of the fish. -
The eye:
Paint the iris with a dark brown or black, leaving a tiny pure white speck of paper unpainted for the reflection highlight.
Ink Smearing?
If your pen smears when painting, switch to a waterproof India ink or wait longer. Use a hairdryer on low heat to ensure absolute dryness before wetting.
Step 4: Background and Foreground
-
Creating the sandy bottom:
Dilute yellow ochre heavily with water until it’s very pale. Wash this color across the bottom section for the sand, allowing it to bleed slightly into the seagrass area. -
Painting seagrass:
Use a sap green or olive tone for the grass blades. Start from the bottom and flick the brush upward to mimic the growth pattern. Vary the green intensity to show depth. -
The water background:
Prepare a very dilute, milky wash of cream or pale beige to fill the rest of the rectangular background. This ages the paper and unifies the scene. -
Final bubbles:
I like to add three or four tiny circles above the fish’s mouth using the teal paint or a blue pen to suggest bubbles rising. -
Optional edge detailing:
For a vintage look, brush a very faint tea-stain or jagged beige border along the pencil line of your inner rectangle to emphasize the ‘picture within a picture’ effect.
Place your finished piece in a floating frame to show off those beautiful deckled edges
Negative Space Fish Formed by Water Ripples
This elegant mixed-media piece combines the fluidity of watercolor waves with the crisp detail of an ink illustration. The unique deckle-edged paper gives it a rustic, handcrafted charm perfect for coastal decor.
Step-by-Step Tutorial
Materials
- Heavyweight watercolor paper (300gsm, cold press works best)
- Watercolor paints (phthalo blue, turquoise, indigo, sea green)
- Masking fluid (drawing gum) and old brush
- Fine liner pen (black, archival ink) or fish stamp
- Round watercolor brush (size 6 or 8)
- Pencil and eraser
- Water jars and paper towels
- Ruler (optional)
Step 1: Preparation & Sketching
-
Paper Prep:
If your paper doesn’t already have deckled edges, you can gently tear the edges against a ruler to create that soft, fibrous look. -
Layout Sketch:
Lightly sketch a rectangular border about 1 inch from the edge of your paper. This defines your painting area. -
Wave Design:
Inside the lower two-thirds of the rectangle, draw flowing, interlocking wave shapes. Think of them as curved ribbons stacking on top of each other. -
Leave a gap:
Leave the top third of the rectangle blank for the sky and the fish.
Step 2: Masking & Painting
-
Apply Masking Fluid:
Using an old brush (one you don’t care about) or a silicone tool, paint thin lines of masking fluid over your pencil lines separating the waves. -
Let it Dry:
Wait until the masking fluid is completely dry and rubbery to the touch. This prevents smearing. -
Mix Your Palette:
Prepare puddles of your blue and green watercolors. Aim for a gradient: light turquoise for the top waves, deepening to dark indigo at the bottom. -
Paint the Top Wave:
Start with the uppermost wave using a very diluted, pale blue-green wash to suggest distance. -
Work Downwards:
Paint each subsequent wave section, gradually adding more pigment for darker, richer colors as you move down the paper. -
Add Texture:
While the paint is still wet in some sections, drop in a slightly different blue hue to create varied water interest. -
Drying Time:
Allow the paint to dry completely. This is crucial before removing the mask.
Sticky Situation
If the paper tears when removing masking fluid, your paper might be too soft or the fluid stayed on too long. Try removing it sooner next time.
Step 3: Details & Determining the Fish
-
Remove Masking:
Gently rub away the masking fluid with your finger or a rubber cement pickup tool to reveal the crisp white lines between the waves. -
Clean Edges:
Erase any remaining pencil marks that might be showing through the white gaps. -
Add Bubbles:
Mix a small amount of medium-blue paint and dab three or four small dots on the right side of the waves for bubbles. -
Draw the Fish:
In the open upper section, use your fine liner pen to draw a fish. Start with the outline, then fill the body with fine hatching or stippling for texture. -
Alternative: Stamping:
If you aren’t confident drawing, I like to use a vintage-style fish rubber stamp with black ink here for a precise look. -
Artist’s Mark:
Add a small signature or stamp in the bottom left corner within the wave for a professional finish.
Make it Sparkle
Mix a tiny amount of iridescent medium or metallic watercolor into the blue paint for waves that shimmer in the light.
Hang your finished piece with small wooden clips to fully embrace the driftwood aesthetic
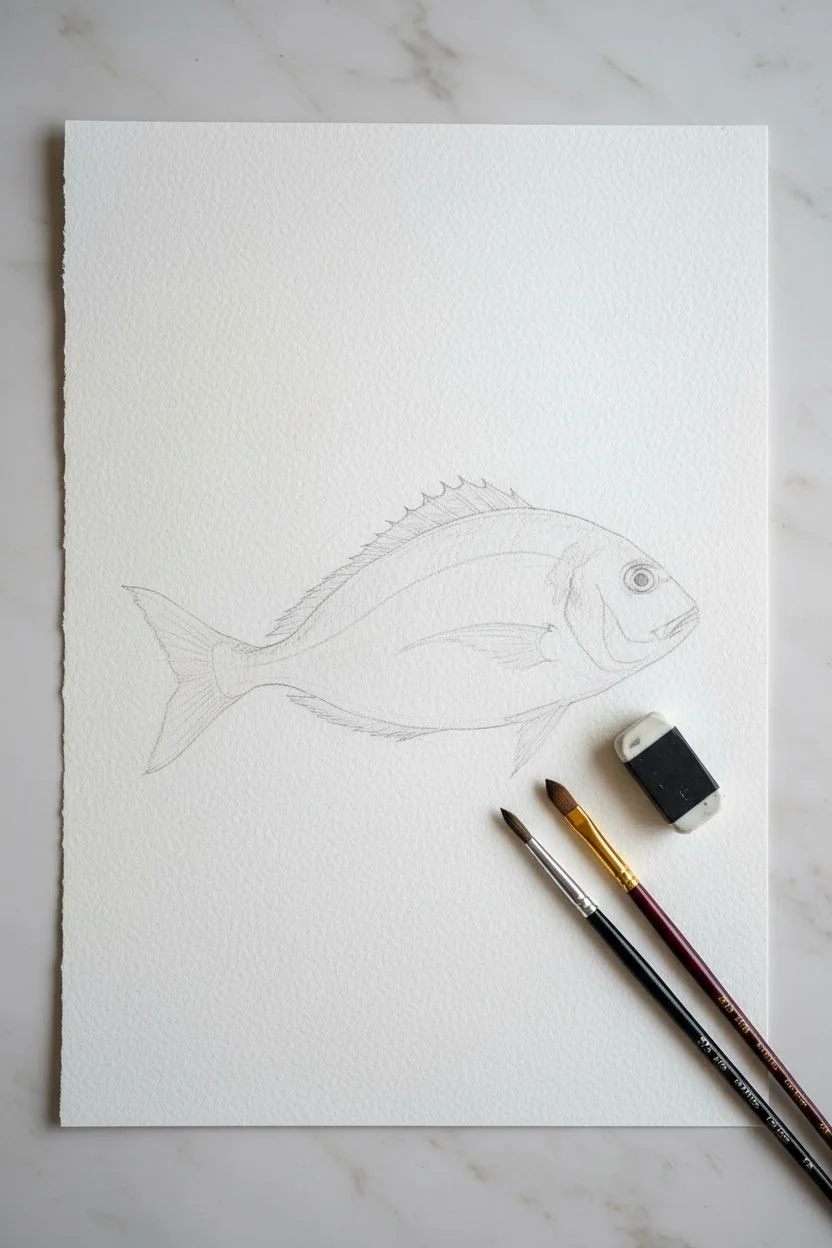
Monochrome Fish Painting Focused on Value
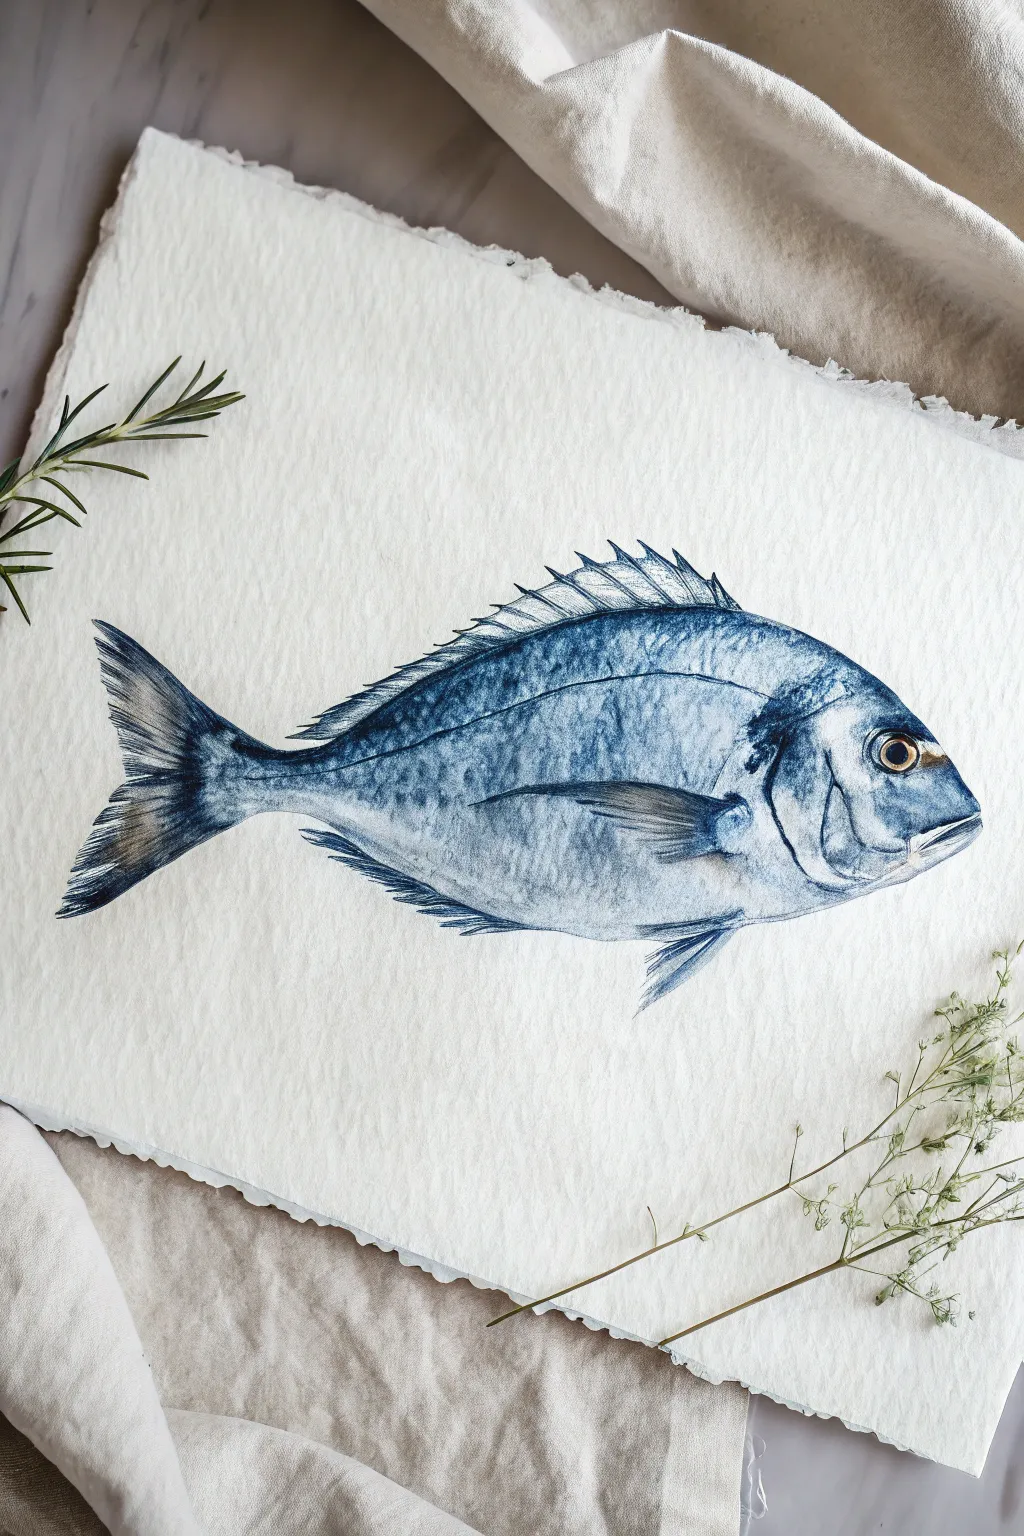
Focus entirely on light and shadow with this elegant monochrome study of a Gilthead Bream fish. By limiting your palette to a single rich indigo hue, you’ll learn to build dimension solely through value changes, resulting in a striking, scientific illustration style artwork.
Detailed Instructions
Materials
- Cold Press Watercolor Paper (Approx. 300gsm, heavy texture)
- Indigo Watercolor Paint (or Prussian Blue mixed with a touch of Black)
- Round Watercolor Brushes (Size 6 for washes, Size 0 or 1 for details)
- Pencil (HB or 2H)
- Kneaded Eraser
- Clean Water & Mixing Palette
- Paper Towels
Step 1: Sketching the Anatomy
-
Outline the basic shape:
Begin with a light pencil sketch. Draw a long oval shape that tapers significantly at the tail end. The body should feel substantial and rounded, typical of a Bream. -
Add fin placement:
Mark the positions for the fins. Place the spiny dorsal fin along the top back, the pectoral fin on the side gill area, and the forked tail at the rear. Keep lines faint so they won’t show through the paint later. -
Define the head:
Sketch the curve of the gill cover (operculum) and the mouth. Position the eye relatively high on the head, drawing a clear circle with a smaller pupil inside. -
Refine the sketch:
Go over your outline to sharpen the details, adding the jagged edges to the dorsal fin spines and the curve of the belly. Use a kneaded eraser to lift any excess graphite, leaving only a ghost of the image.
Muddy Washes?
If your layers are blending into a single flat blob, you aren’t letting the paper dry enough between steps. Patience is key! Use a hairdryer on low heat to speed up the process if needed.
Step 2: Establishing Base Values
-
Prepare your washes:
On your palette, create three puddles of your blue paint: a very watery, pale tea consistency; a medium milk consistency; and a thick, dark cream consistency. -
First pale wash:
Using the Size 6 brush and the palest wash, paint the entire body of the fish, excluding the eye and the very tips of the fins. Keep this layer wet and even. -
Defining the top edge:
While the paper is still slightly damp, drop the medium-strength paint along the top ridge of the fish’s back. Let gravity pull the pigment down slightly to create a soft gradient from the dark back to the lighter belly. -
The belly shadow:
Add a touch of the medium wash to the very bottom curve of the belly to give the fish roundness, keeping the center of the body the lightest point to suggest a highlight. -
drying time:
Let these initial base layers dry completely. If the paper feels cold to the touch, it’s still wet.
Level Up: Salt Texture
While the dark back wash is still wet, sprinkle a few grains of table salt onto the paper. Let it dry completely, then brush off. The salt pushes pigment away, creating incredible organic scale textures.
Step 3: Building Form and Texture
-
Deepening the dorsal area:
Switch to a slightly smaller brush if needed. Apply the urge dark paint to the upper third of the fish. Use distinct, small strokes to emulate the texture of scales starting from the head moving toward the tail. -
Painting the fins:
Fill in the tail and dorsal fins with the medium wash. Before it dries, drop concentrated indigo into the base of the fins (where they attach to the body) to create depth. -
Facial features:
Paint around the gill cover with darker values to make it pop out. Use the finest brush to carefully outline the eye ring, leaving a tiny white highlight unpainted in the pupil. -
Pectoral fin placement:
Paint the pectoral fin (the one on the side) using a medium-dark value. Make the edges sharp to show it sitting on top of the body scales. -
Scale texture suggestions:
I like to use a ‘dry brush’ technique here—dab excess paint off your brush and lightly drag it across the middle section of the fish. The texture of the paper will catch the pigment, creating an instant scale effect.
Step 4: Refining Details
-
Fin rays:
Switch to your Size 0 or 1 detail brush. Using the darkest, thickest paint, draw fine lines radiating through the fins to represent the bony rays or spines. -
Darkest contrasts:
Add the deepest shadows now: just under the gill cover, the very top edge of the dorsal fin, and the darkest part of the tail fork. This high contrast brings the monochrome image to life. -
The lateral line:
Paint a faint, thin line running horizontally from the gills to the tail, following the curve of the body. This is the fish’s lateral line organ. -
Eye details:
Fill the pupil with your darkest indigo (almost black). If you have a brownish-yellow ink or paint, you can add a tiny transparent glaze to the iris, or simply leave it paper-white for a stylized look. -
Final textural touches:
Look for areas that feel too flat. Add tiny hatched lines or dots with the tip of your smallest brush to suggest wet skin texture, particularly around the face and mouth. -
Clean up:
Once the paint is bone dry, carefully erase any remaining visible pencil marks around the edges to ensure a crisp, professional silhouette.
Step back and admire how a single color can create such a convincing and dimensional aquatic form
Abstract Fish Built From Geometric Shapes

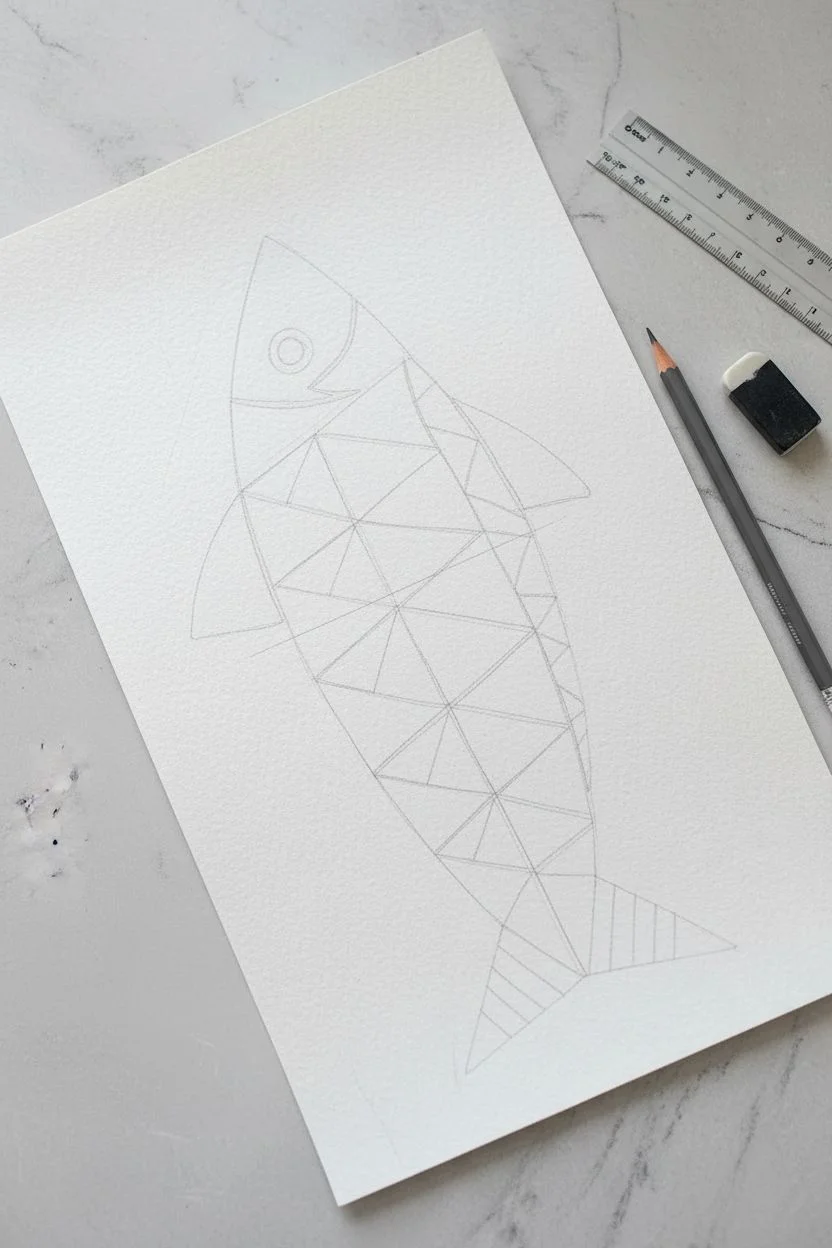
Bring a dash of modern art to your sketchbook with this striking geometric fish, constructed entirely from vibrant triangles and shapes. The interplay of cool blues and warm terracottas against crisp white lines creates a stained-glass effect that feels both playful and sophisticated.
How-To Guide
Materials
- Cold press watercolor paper (A4 or similar size)
- Masking fluid (drawing gum) with a fine applicator tip
- Watercolor paints (phthalo blue, turquoise, terracotta, coral, indigo)
- Round watercolor brush (size 4 or 6)
- Fine liner brush (size 0 or 1) for details
- Pencil and eraser
- Ruler
- Mixing palette
- Jar of water & paper towel
Step 1: Planning the Structure
-
Lightly sketch the outline:
Start with a light pencil sketch of the main fish body. Draw a long, tapering oval shape for the torso and add a simple triangular tail and dorsal fin. -
Mark the center line:
Using your ruler, draw a faint horizontal line straight through the middle of the fish’s body. This will be the anchor for your triangle pattern. -
Create the geometric grid:
Along that center line, make marks every inch or so. Connect these marks to the upper and lower edges of the fish outline to form a series of interconnected triangles. -
Refine the shapes:
Review your pencil grid. You can subdivide some larger triangles into smaller ones to create more variety, just like the smaller triangles seen near the tail and belly in the example.
Uneven Drying?
If your colors are pooling or creating ‘cauliflowers’ (blooms), try using less water on your brush. Blot excess water with a clean, dry brush or paper towel while the paint is still wet.
Step 2: Applying the Resist
-
Apply masking fluid:
Using a fine applicator or an old brush dipped in soap, trace over all your pencil lines with masking fluid. This is critical for achieving those crisp white separations between colors. -
Don’t forget the details:
Add the eye detail (a circle with a dot), the gill curve, and the decorative stripes on the fins using the masking fluid. -
Let it dry completely:
Wait until the masking fluid is transparent and rubbery to the touch. Painting over wet fluid will ruin the effect and your brush.
Add Metallic Flare
Once the piece is dry, re-trace select white lines with a gold or silver metallic gel pen. This adds a subtle shimmer that mimics cloisonné works.
Step 3: Adding Color
-
Mix your palette:
Prepare puddles of your chosen colors. I like to keep a good amount of turquoise and deep indigo ready, plus accent colors like terracotta and soft coral. -
Paint the first triangles:
Start filling in the triangles randomly with your teal and turquoise shades. Try not to paint two adjacent triangles the exact same color. -
Introduce warm tones:
Intersperse the cool blues with your warm terracotta and coral paints. These warm ‘pops’ give the piece its energy. -
Create depth with values:
Vary the saturation of your paint. Use watery, transparent washes for some segments and heavily pigmented, dark paint for others to create dimension. -
Fill the fins and head:
Paint the head section a solid, dusty blue. For the fins, use a deep indigo or dark blue to frame the body, making sure to paint over the masked stripes. -
Paint the tail detail:
For the tail fin, use a solid dark blue wash over the masked vertical stripes. The contrast here will look fantastic once revealed. -
Dry thoroughly:
Allow the painting to dry completely. If the paper feels cool to the touch, it is still wet deep down.
Step 4: The Final Reveal
-
Remove the masking fluid:
Once the paper is bone dry, gently rub your finger or a rubber cement pick over the masking fluid lines to peel them away. -
Clean up edges:
The revealed white lines should be crisp. If any pencil marks are still visible underneath the white space, gently erase them now. -
Detail the eye:
Use a small brush with black or dark indigo paint to fill in the pupil of the eye, leaving a tiny speck of white paper for a highlight if you can.
Step back and admire how simple geometric shapes have come together to form a lively aquatic creature
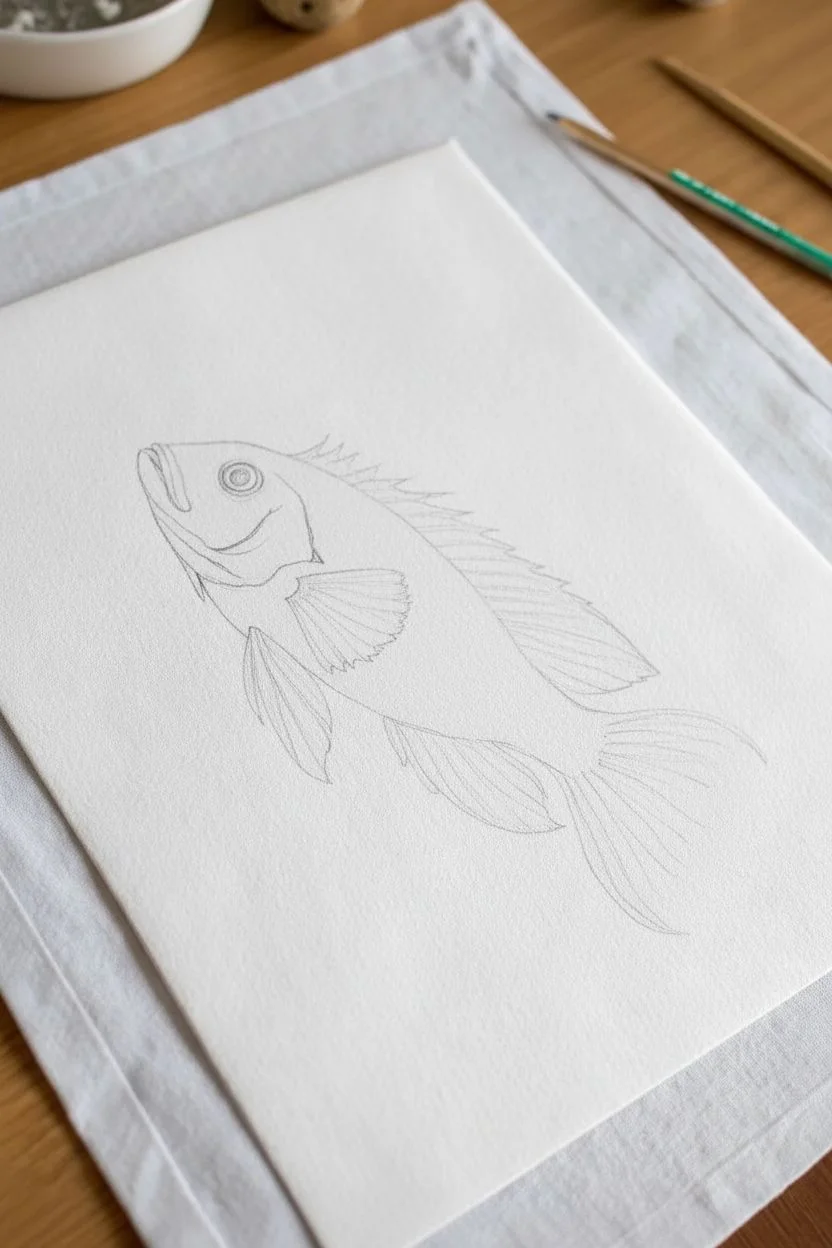
Fantasy Fish With Unexpected Colors and Glow
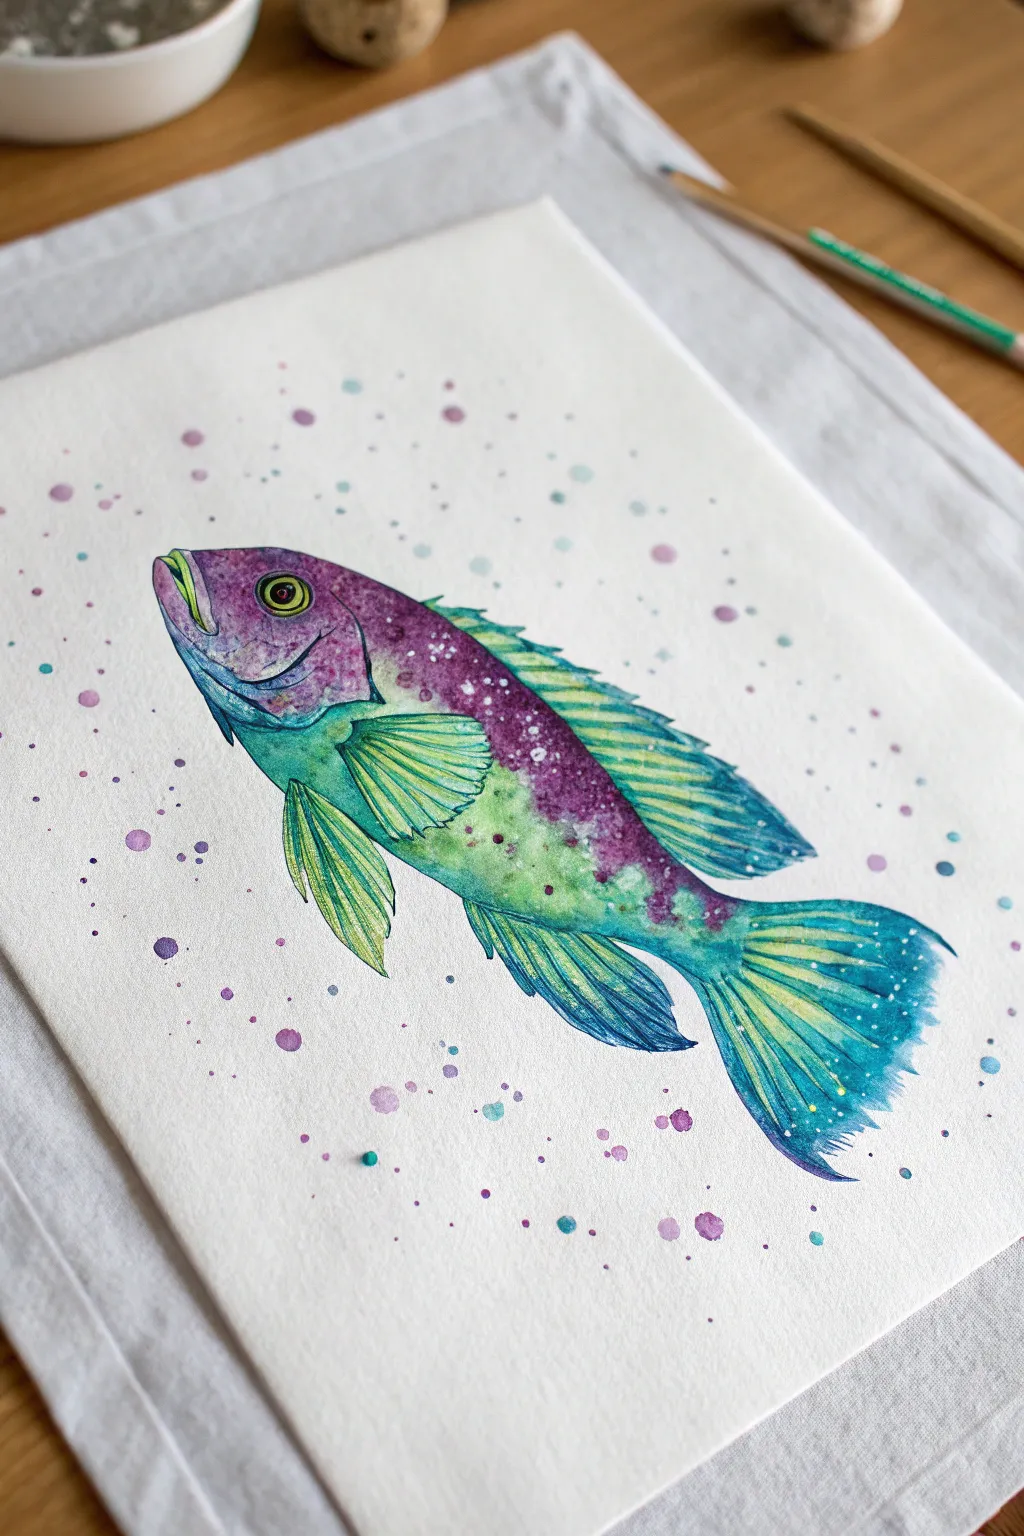
This project invites you to paint a vibrant fantasy fish that blends deep violets with oceanic teals and greens for a glowing, jewel-like effect. The loose, splattered background contrasts beautifully with the controlled details of the fins and scales, creating a modern illustration style.
Step-by-Step Guide
Materials
- Cold press watercolor paper (300 gsm)
- Watercolor paints (Purple, Teal, Viridian Green, Lemon Yellow, Indigo)
- White gouache or white gel pen
- Round watercolor brushes (Size 2, 6, and 10)
- HB pencil and kneaded eraser
- Masking fluid (optional)
- Two water jars and paper towels
Step 1: Sketching the Form
-
Outline the body shape:
Begin by lightly drawing a streamlined oval shape for the fish body, slightly tapered towards the tail. Keep your pencil pressure very light so the graphite doesn’t show through the transparent watercolor later. -
Add fin details:
Sketch the dorsal fin along the top edge, making it spiky and textured. Draw the pectoral fin on the side and the pelvic fins underneath. Finally, fan out the tail fin with gentle curves. -
Define the face:
Draw the gill curve, a rounded mouth, and a clear circle for the eye. Add a smaller inner circle for the pupil.
Step 2: Applying the Base Wash
-
Wet-on-wet technique:
Using your size 10 brush, apply clean water to the entire body of the fish, avoiding the eye and fins for now. -
Drop in the purple:
While the paper is wet, touch your brush loaded with purple paint to the upper back and head area. Let the pigment bloom and flow downward naturally. -
Introduce the greens:
Clean your brush and pick up a mix of teal and viridian green. Apply this to the belly and lower jaw, allowing it to bleed softly into the wet purple edge to create a seamless transition. -
Salt texture (optional):
If you want extra texture on the scales, sprinkle a tiny pinch of table salt onto the wet purple area and let it sit.
Control the Flow
To prevent colors from turning muddy where they meet, let the purple settle for just a few seconds before touching the green to it. This distinct separation keeps colors bright and cleaner.
Step 3: Building Vibrancy and Depth
-
Strengthen the colors:
Once the first layer is damp (not soaking), dab more concentrated purple along the spine and teal along the bottom edge to deepen the contrast. -
Paint the fins:
Use a size 6 brush to paint the fins with a gradient. Start with yellow or light green near the body and transition to teal or indigo at the tips. -
Define the eye:
Paint the iris with a bright yellow-green. Once dry, fill the pupil with solid black or dark indigo, leaving a tiny speck of white paper for the highlight. -
Let it dry completely:
Allow the entire piece to dry fully. If you used salt, gently brush it off now.
Bleeding Lines?
If your fine lines on the fins are blurring into the background, the paper is still too damp. Bone dry paper is essential for crisp details like spines and scales. Use a hairdryer to speed it up.
Step 4: Detailing and Splattering
-
Add fin spines:
Switch to your size 2 brush. Mix a dark teal or indigo and paint fine, steady lines through the fins to represent the bony spines. -
Create scale texture:
Using a slightly dry brush with dark purple, stipple small dots or ‘C’ shapes along the purple upper back to suggest scales without drawing every single one. -
Enhance shadows:
Glaze a thin layer of indigo under the pectoral fin and along the gill line to give the fish three-dimensional volume. -
Splash the background:
Load a wet brush with watered-down purple and teal. Tap the handle of the brush against your finger over the paper to create random droplets around the fish. -
Final highlights:
Use white gouache or a gel pen to add sharp highlights to the fin tips, the eye, and a few sparkling dots on the scales.
Step back and admire the vibrant, aquatic glow of your finished piece


Have a question or want to share your own experience? I'd love to hear from you in the comments below!