If you’ve got a few smooth stones and the urge to paint something adorable, painted rock animals are the easiest little mood-boosters I know. I love letting the rock’s shape do half the work—round bellies, tiny ears, and big shiny eyes make everything instantly cute.
Classic Fox Face Rock
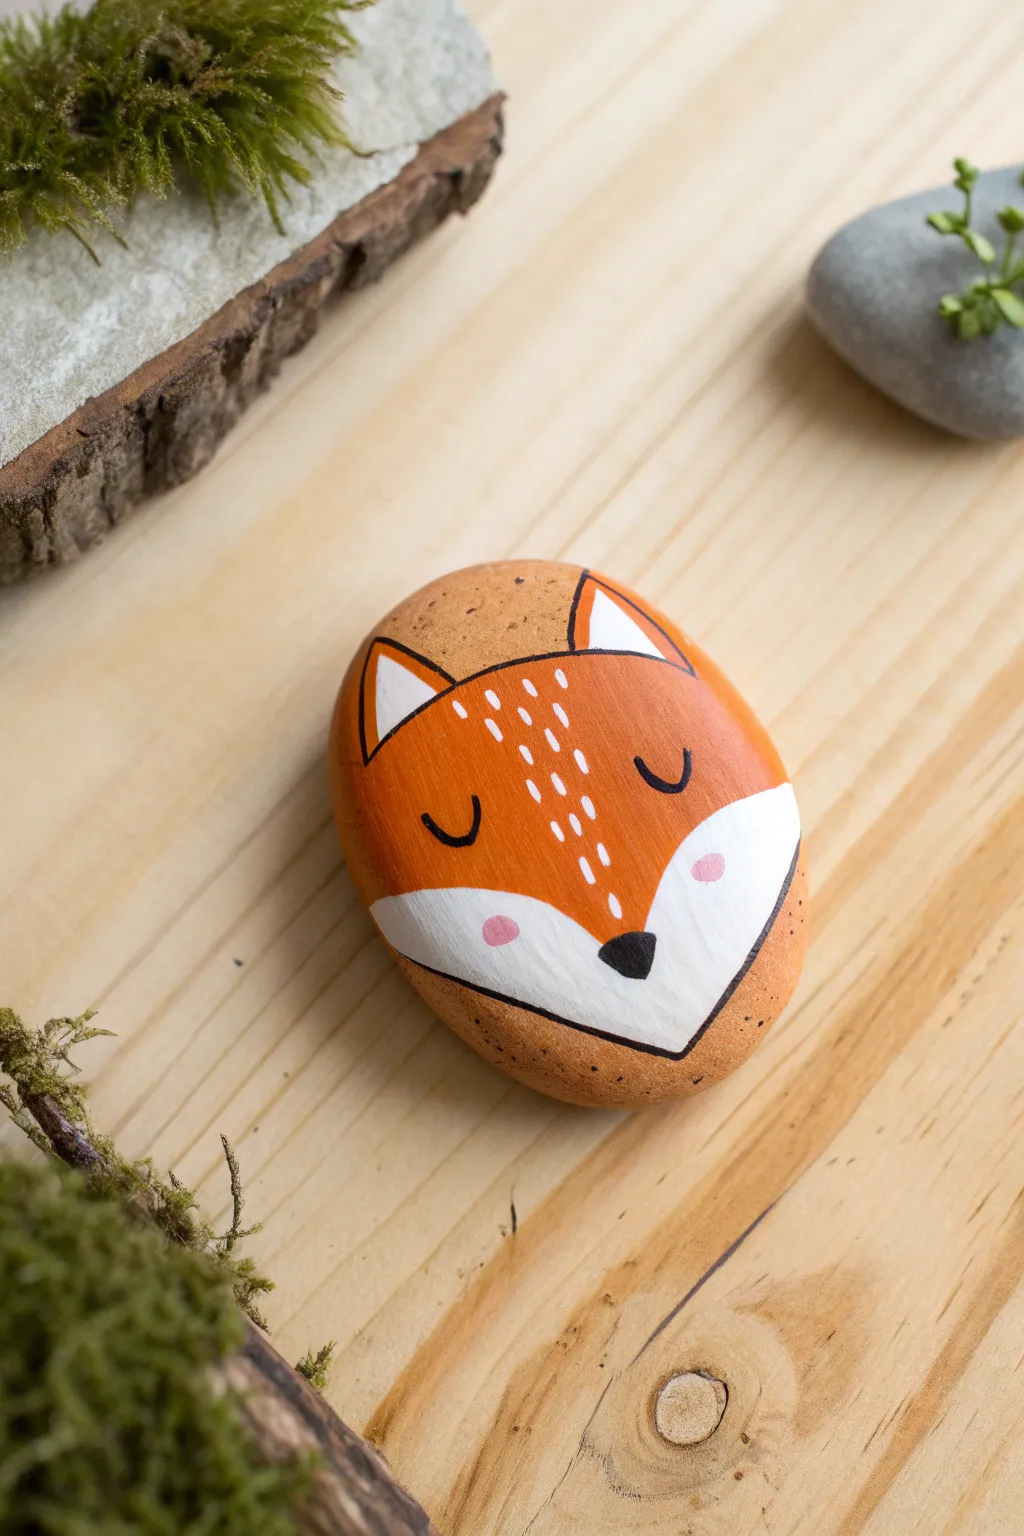
Transform a smooth garden stone into a serene, sleeping fox with this charming painted rock project. Using warm earthy tones and simple geometric shapes, you’ll create a peaceful woodland creature perfect for garden decor or a sweet paperweight.
Step-by-Step Guide
Materials
- Smooth, oval-shaped river rock (palm-sized)
- Acrylic paints: Orange-brown (terra cotta), White, Black, Soft pink
- Paintbrushes: Medium flat brush, small round brush, fine liner brush
- Pencil for sketching
- Paint palette or plate
- Cup of water and paper towels
- Clear sealant spray or varnish (matte or satin finish)
Step 1: Base and Sketch
-
Clean the canvas:
Start by washing your rock thoroughly with soap and water to remove any dirt or oils. Let it dry completely before beginning, as moisture can trap bubbles under the paint. -
Mix the base color:
Create a warm terra cotta shade by mixing orange with a little bit of brown. You want a natural, foxy color that covers most of the stone. -
Apply the first coat:
Using a medium flat brush, paint the entire rock with your mixed orange-brown color. Don’t worry if it looks streaky; this is just the foundation. -
Let it dry and repeat:
Allow the first layer to dry to the touch. I usually find two or three thin coats provide much better coverage than one thick, gloppy one. -
Sketch the face shape:
Once the paint is rock-hard dry, use a pencil to lightly sketch a heart-like shape for the white face area. The point of the heart should land near the bottom center for the nose. -
Add the ears:
Sketch two triangles at the top of the rock for ears. Include smaller triangles inside them to mark the white inner ear tufts.
Step 2: Blocking in Color
-
Paint the face mask:
Use a small round brush loaded with white paint to fill in the large heart shape you sketched on the lower half of the rock. -
Fill the ear tufts:
Carefully paint the inner triangles of the ears white. You might need a smaller brush for these corners to keep the edges sharp. -
Layer the white:
White paint over dark orange can look transparent. Let the white areas dry completely, then add a second coat to make them bright and opaque. -
Outline the ears:
With a steady hand and your base orange-brown color, tidy up the edges around the white ear triangles if you went outside the lines.
Uneven Lines?
If your black outlines look shaky, wait for them to dry fully. Then, come back with the neighboring color (orange or white) to ‘cut in’ and tidy up the edges.
Step 3: Facial Details
-
Paint the nose:
Load a fine liner brush or a small detail brush with black paint. Paint an inverted rounded triangle at the bottom point where the white cheeks meet for the nose. -
Draw the sleeping eyes:
Using the fine liner brush, paint two simple ‘U’ shapes in the middle of the orange forehead area for the closed eyelids. Position them widely for a peaceful look. -
Add the blush:
Dip the back end of a paintbrush handle into soft pink paint. Dot it gently onto the white cheek areas to create perfect circular rosy cheeks. -
Outline the mask:
Use your finest liner brush and black paint to carefully outline the bottom ‘V’ shape of the white face area, giving the jawline definition. -
Outline the ears:
Continue with the black liner to outline the triangular ears, defining them against the orange head.
Steady Hands
Rest your painting hand on the table and rock your wrist to create smooth curves. Use your pinky finger as a stabilizer against the table surface.
Step 4: Finishing Touches
-
Add forehead fur:
Using a very fine brush and white paint, add tiny vertical dashes on the orange forehead area, between the eyes, to mimic textured fur. -
Add freckles:
With the very tip of a brush or a toothpick, add three tiny black dots on the orange area on either side of the face, near the bottom edge. -
Seal the artwork:
Allow the rock to dry overnight to ensure all thick paint spots are cured. Finish by spraying a clear matte sealant over the rock to protect it from weather and chipping.
Now you have an adorable, sleeping guardian for your potted plants that will never need watering


Sleepy Owl with Oversized Eyes
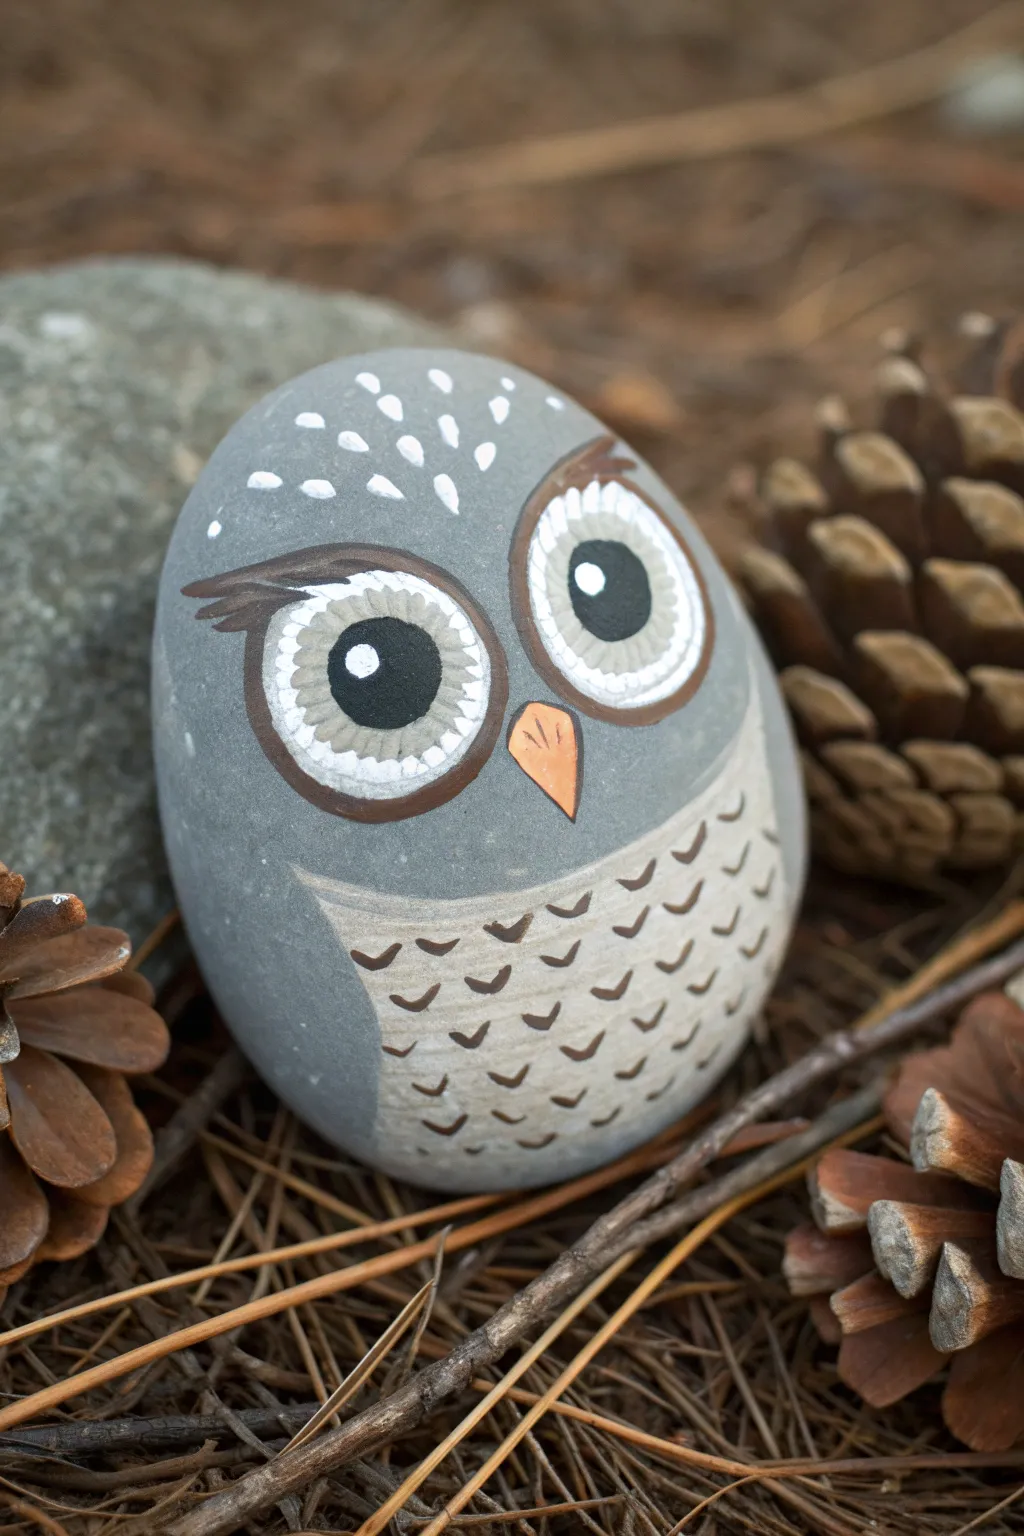
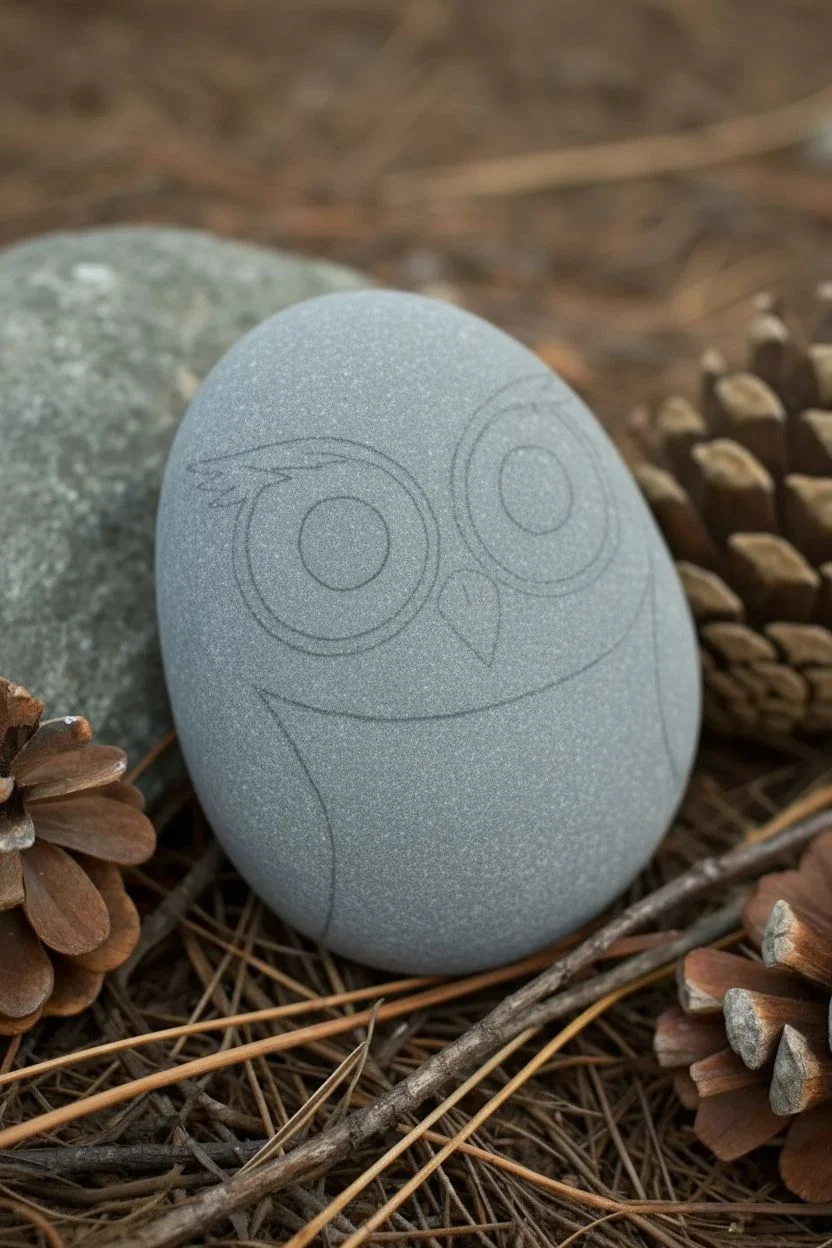
Transform a simple river rock into a charming woodland guardian with oversized, expressive eyes and delicate feather details. This painted stone owl uses the natural gray of the rock as a base, making it a perfectly organic addition to your garden or desk decor.
Step-by-Step
Materials
- Smooth, oval-shaped river rock (gray)
- Acrylic paints: White, Black, Burnt Umber (dark brown), Beige/Cream, Orange
- Assorted brushes: Flat shader (small/medium), Liner brush (fine point), Small round brush
- Paint palette or plate
- Water cup and paper towels
- Pencil (optional for sketching)
- Clear acrylic sealant (spray or brush-on, matte finish)
Step 1: Prepping the Canvas
-
Clean the stone:
Begin by scrubbing your rock with warm, soapy water to remove any dirt or oils. Let it dry completely before you start painting, as moisture trapped underneath can ruin the acrylics later. -
Inspect the shape:
Turn the rock over in your hands to find the best face. You want a smooth, slightly rounded surface that sits upright or leans back slightly, acting as the owl’s belly and face. -
Sketch the outlines (optional):
If you feel unsure about freehanding, use a pencil to lightly trace two large circles for eyes and a curved line near the bottom for the belly area.
Step 2: Painting the Base Features
-
Base the belly:
Load a flat shader brush with beige or cream paint. Paint a crescent moon shape at the bottom of the rock to create the chest and belly area. -
Refine the belly shape:
Make sure the top edge of this beige area curves gently downward. You may need two coats here to ensure the rock’s gray color doesn’t show through too much. -
Create the eye sockets:
Mix a small amount of white with a drop of gray (or use the original rock color if lighter) to create a pale gray. Paint two large, connected circles near the top of the rock. -
Outline the eyes:
Using your liner brush and Burnt Umber paint, carefully outline the two large eye circles. I like to make the outer lines slightly thicker to give the owl a bold, cartoonish look. -
Add the eyelashes:
Extend the dark brown outline on the left eye into three small, flicked brushstrokes pointing toward the left edge of the rock to create a feathered eyelash effect. -
Repeat for the right:
Do the same on the right eye, flicking three small strokes outward toward the right edge.
Natural Texture
Don’t try to cover the entire rock! Leaving the original gray stone exposed for the owl’s head and wings uses the natural texture to your advantage.
Step 3: Adding the Eyes and Beak
-
Start the inner eyes:
Switch to a small round brush and pure white paint. Fill in two smaller circles inside your eye sockets. These should touch in the middle. -
Paint the pupils:
Once the white is dry, use black paint to create large, round pupils inside the white circles. Position them slightly toward the center for a cute, focused expression. -
Add reflection spots:
Dip the very tip of a clean brush or a stylus tool into white paint. Place a small dot near the top-left of each black pupil to bring the eyes to life. -
Detail the irises:
Mix a very watery gray or diluted beige. Using your finest liner brush, paint tiny radial hatch marks inside the white part of the eye, surrounding the black pupil. -
Paint the beak:
Between the eyes at the bottom, paint a small, downward-pointing triangle using orange paint. Add a tiny vertical line in the center for dimension.
Make a Family
Paint stones of different sizes to create a nesting family. Use slightly different eye shapes or beak colors to give each owl its own personality.
Step 4: Feather Details and Finishing
-
Add forehead spots:
Using white paint and a fine brush, dab small, teardrop-shaped spots above the eyes on the gray forehead area to mimic speckled plumage. -
Create chest feathers:
Reload your liner brush with Burnt Umber. On the beige belly area, paint small ‘V’ or ‘U’ shapes in rows. Stagger them like bricks to look like layered feathers. -
Refine the pattern:
Continue these small feather marks all the way down to the bottom of the rock, keeping them evenly spaced but organic. -
Let it cure:
Allow the entire rock to dry for at least an hour. Since rocks can be cold, the paint sometimes takes a little longer to set than on paper. -
Seal the artwork:
Spray or brush on a clear acrylic sealer. A matte finish looks most natural for this woodland creature, but gloss will make the colors pop more.
Place your little stone guardian in a potted plant or on a windowsill to watch over your home


Cozy Bear Snout Rock
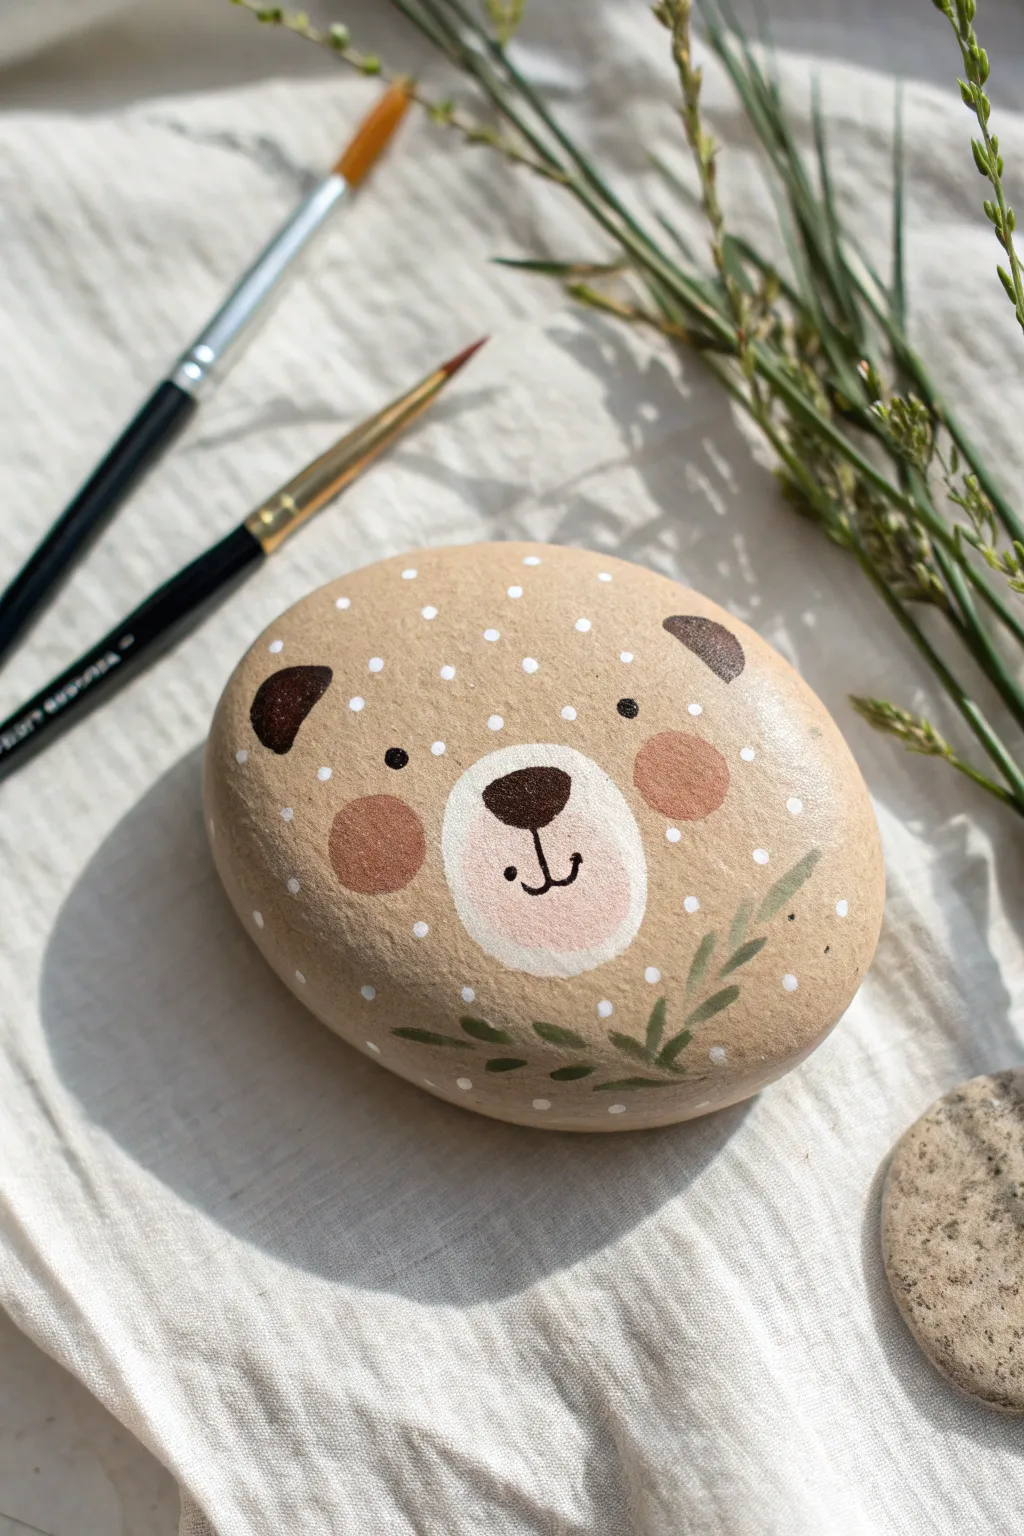
Turn a simple smooth stone into a warm, woodsy friend with this adorable bear snout rock painting tutorial. The natural beige background combined with delicate white stippling creates a charming folk-art feel perfect for garden decor or a paperweight.
Step-by-Step Guide
Materials
- Smooth, oval river rock (beige or tan base color is ideal)
- Acrylic paints (dark brown, lighter brown/terracotta, cream/off-white, pale pink, leafy green)
- Fine detail brushes (sizes 0 and 00)
- Small flat brush
- Dotting tool or toothpick
- Gesso or white base paint (optional)
- Matte or satin varnish sealant
Step 1: Base Prep
-
Clean surface:
Begin by washing your rock with soap and warm water to remove any dirt or oils. Let it dry completely before starting. -
Color check:
Examine your stone’s natural color. If you are using a tan or beige stone like the one shown, you can leave the background natural. If your stone is dark grey on its own, paint the entire surface with a beige or warm taupe acrylic paint and let dry.
Step 2: Painting the Features
-
Snout background:
Mix a small amount of cream paint with a tiny drop of pink to create a very pale, warm off-white. Using a small brush, paint a soft, inverted U-shape in the center of the rock to form the snout area. -
Cheek basics:
While the snout dries, pick up a terracotta or soft brown shade. Paint two round circles on either side of the snout for the rosy cheeks. -
Adding ears:
Using a dark brown paint, add two small semi-circles near the top edge of the rock. Position them wide apart to give the bear a sweet, wide face. -
Refining the nose:
Once the snout area is fully dry, take your dark brown paint and a fine detail brush. Paint a rounded triangular nose right in the upper center of the cream area. -
Drawing the mouth:
With the same dark brown and your finest liner brush, draw a straight line down from the nose, curving outward into a small ‘smile’ shape at the bottom. -
Eyes:
Place two small dots of black or dark brown paint above the cheeks for eyes. Keep them relatively small and wide-set for a gentle expression.
Uneven Dots?
If your white dots look messy or varied in size, practice on a scrap paper first. Reload your tool with fresh paint every 2-3 dots for consistency.
Step 3: Folk Art Details
-
Leafy accents:
Mix a muted olive green. Starting from the bottom center of the rock, paint a curved stem moving slightly upward to the right. -
Painting leaves:
Add small, simple leaf shapes coming off the stem. Use a ‘press and lift’ motion with your brush to get the tapered leaf shape. -
Snout texture:
To give the snout area a fuzzy texture, dip a dry brush lightly into the cheek color (terracotta) and gently stipple the bottom edge of the cream snout area. -
Adding the dots:
This step brings the whole piece together. Dip a dotting tool or a toothpick into white paint. Add tiny polka dots all over the brown ‘fur’ areas of the face, keeping the spacing random but even. -
Highlights:
Add a tiny speck of white to the top of the nose and the cheeks to give them a bit of shine.
Add Dimension
Before sealing, use a very watered-down brown paint to add little shadows under the ears and snout for a subtle 3D effect.
Step 4: Finishing Up
-
Final dry:
Allow the paint to cure for at least 24 hours to ensure moisture is fully evaporated. -
Sealing:
Apply a coat of satin or matte varnish. Avoid gloss if you want to maintain that natural, earthy stone look.
Place your little bear rock on a shelf or gift it to a friend to brighten their day


Simple Cat Whiskers Rock


Transform a smooth, oval river rock into an adorable orange tabby cat with just a few strokes of paint. This project uses simple shapes and expressive lines to capture a curious feline face that fits perfectly in the palm of your hand.
Detailed Instructions
Materials
- Smooth oval stone (white or light beige preferred)
- Acrylic paints: Orange/Ochre, White, Black, Pink, Red
- Fine detail paintbrush (size 0 or 00)
- Small flat paintbrush
- Pencil and eraser
- Matte or satin varnish spray
- Water cup and palette
Step 1: Preparation and Base
-
Select your stone:
Choose a smooth, oval-shaped rock. A naturally white or very light beige stone works best as it saves you from painting a full background layer. -
Clean surface:
Wash the stone with soapy water and let it dry completely to ensure the paint adheres properly. -
Optional base coat:
If your rock is dark or uneven in color, paint the entire top surface with a coat of white acrylic paint and let it dry.
Steady Hands
For the finest black outlines, stabilize your painting hand by resting your pinky finger on the table or a dry part of the rock while you work.
Step 2: Sketching the Features
-
Outline the face shape:
Using a light pencil, sketch a large arch shape for the top of the head. Add two triangular ears at the top corners. -
Mark the fur pattern:
Draw the contour lines where the orange fur will meet the white face. This usually involves a V-shape or curve dipping down between the ears towards the nose area. -
Add facial features:
Lightly sketch two large oval eyes, a small triangular nose, and the classic ‘3’ shape for the mouth.
Family Portrait
Paint a whole set of rocks featuring different family members’ cats using their specific fur colors and patterns for a custom gift set.
Step 3: Painting the Fur
-
Fill the orange patches:
Mix a warm orange-ochre shade. Fill in the top section of the head (around the ears) and add curved patches on the left and right sides of the cheeks. -
Add stripe details:
While the orange is dry, use a slightly darker red-orange or rust color to paint small, horizontal stripe markings on the head and cheek patches. -
Paint ear interiors:
Mix a soft pink and fill in the triangular inner sections of the ears. -
Add ear texture:
Once the pink is dry, use a very fine brush or white paint pen to add tiny cross-hatching or grid lines inside the pink ear triangles for texture.
Step 4: Eyes and Expression
-
Paint the eyes:
Fill the large oval eye shapes with solid black paint. Ensure the edges are smooth and round. -
Add the nose:
Paint the small nose triangle with a soft pink or coral color. -
Create the shine:
Dip the handle end of a paintbrush into white paint and dot a single highlight into the upper right area of each black eye. This brings the cat to life.
Step 5: Linework and Details
-
Outline facial features:
Using your finest detail brush and black paint (thinned slightly with water for flow), carefully outline the mouth and the bottom of the nose triangle. -
Outline the ears:
Add a thin black outline around the outer edges of the ears to define them against the stone. -
Draw the whiskers:
With a steady hand, flick the brush to create three long, thin whiskers radiating from each cheek area. Quick, confident strokes work best here. -
Add floating details:
Paint a small red heart floating above the head, slightly to the left. Add tiny black dash marks above the heart for a cute effect. -
Final touches:
Add a few small black dots on the white muzzle area where the whiskers originate. -
Seal the artwork:
Once the paint is thoroughly dry (give it a few hours), spray the entire rock with a matte or satin varnish to protect your new pet from scratches.
Place your charming stone kitty on a desk or shelf for a low-maintenance pet that always smiles back at you
BRUSH GUIDE
The Right Brush for Every Stroke
From clean lines to bold texture — master brush choice, stroke control, and essential techniques.
Explore the Full Guide
Puppy Dog Spot-and-Snout Rock
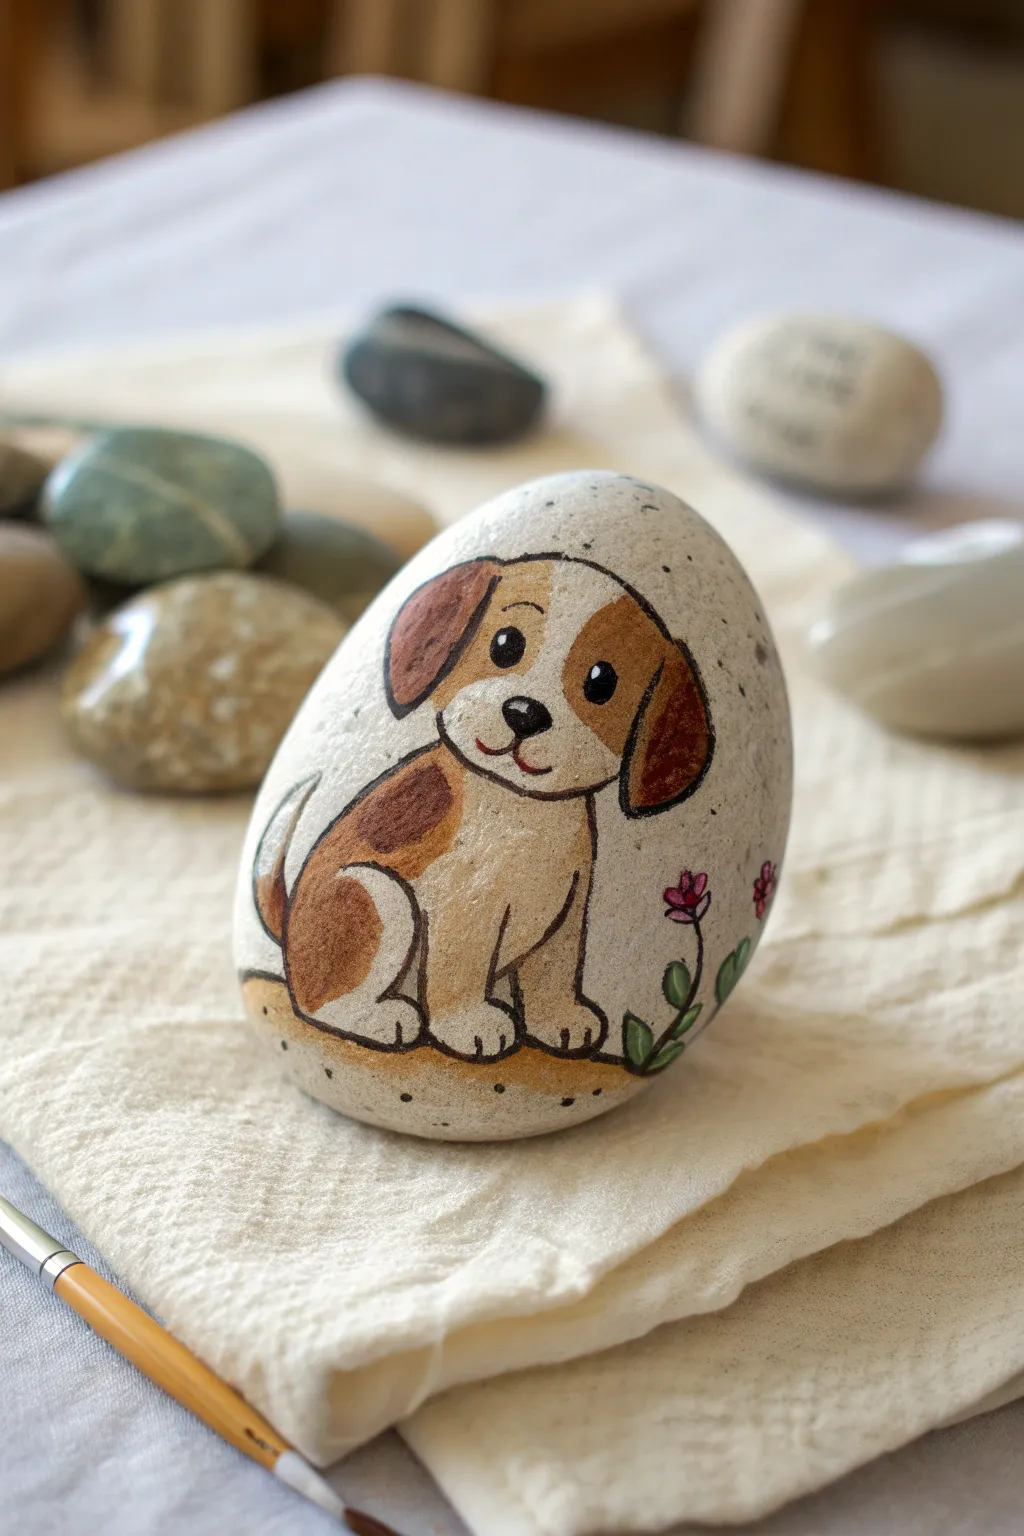
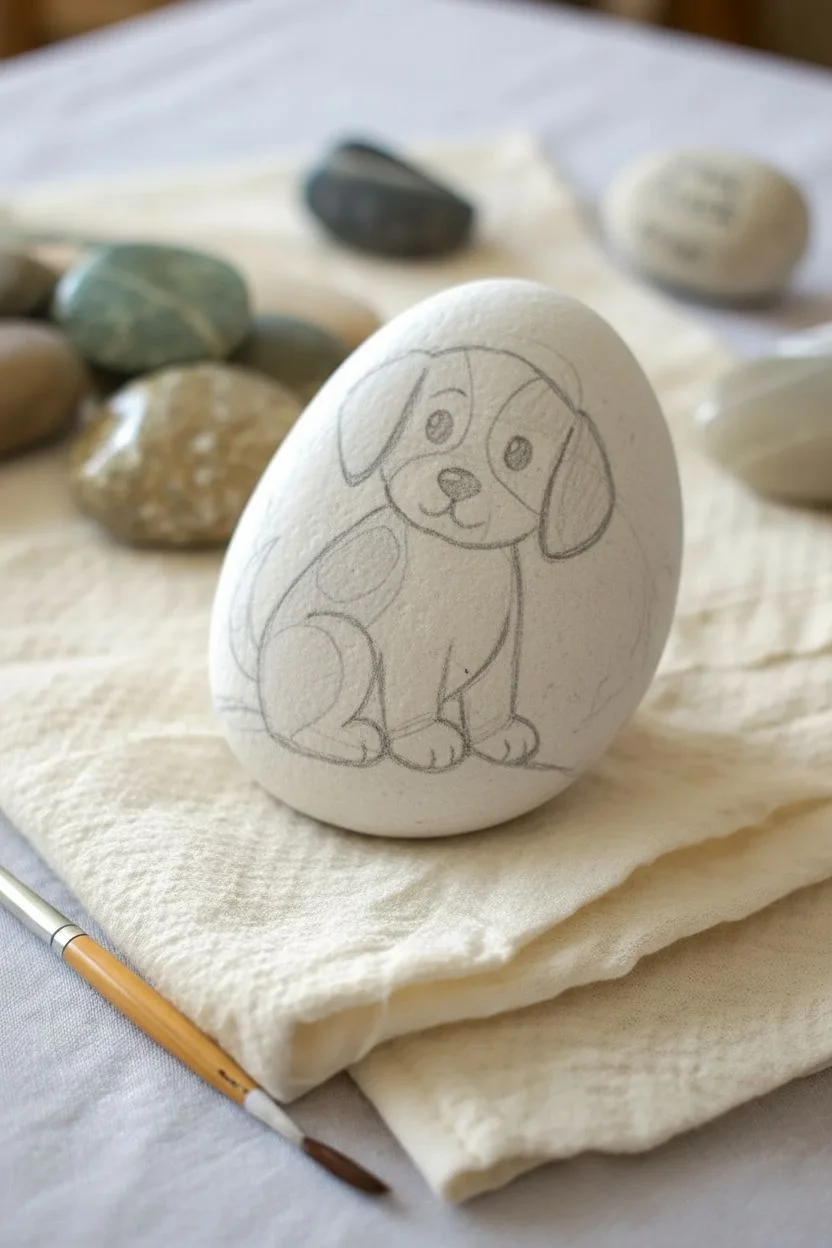
Transform a simple egg-shaped stone into an adorable sitting puppy with this charming rock painting project. The design uses warm earthy tones and clean black outlines to create a sweet, illustrative character that’s perfect for garden decor or a desk buddy.
Step-by-Step Tutorial
Materials
- Smooth, egg-shaped rock (approx. 3-4 inches tall)
- Acrylic paints (White, Beige/Tan, Chocolate Brown, Black)
- Fine liner detail brush (size 00 or 0)
- Small flat brush (size 2 or 4)
- Acrylic paint markers (Black extra-fine tip, White)
- Pencil and eraser
- Clear acrylic sealer (matte or satin finish)
- Water cup and paper towels
Step 1: Prepping and Sketching
-
Clean your canvas:
Start by scrubbing your rock with warm soapy water to remove any dirt or oils. Let it dry completely, ideally in the sun, to ensure the paint adheres properly. -
Map out the head:
Using a pencil, lightly sketch a large oval shape for the puppy’s head near the top center of the rock. It should be slightly wider than it is tall. -
Add the body shape:
Draw the body below the head. Picture a soft, rounded shape that sits securely at the bottom, slightly wider at the base for stability. -
Sketch the floppy ears:
Draw two large, drooping ears on either side of the head. Make them rounded at the bottom, hanging down to about the cheek level. -
Refine the features:
Lightly sketch the front paws, the curve of the back leg, and a little tail sticking out near the bottom left. Mark out the patches on the face and back where different colors will go.
Step 2: Adding Color Layers
-
Paint the light fur areas:
Load your small brush with beige or tan acrylic paint. Fill in the main body, the face area around the eyes, and the paws. Leave the snout area and chest blank if you want them white, or paint them beige now to layer white over later. -
Add the white highlights:
Once the beige is dry, paint the snout, the chest area, the tip of the tail, and the center blaze going up the forehead with white acrylic paint. You may need two coats for opaque coverage. -
Fill in the dark patches:
Switch to chocolate brown paint. Carefully fill in both ears and the large spot on the puppy’s back. I like to use a slightly smaller brush here to stay inside the pencil lines. -
Create the ground:
Mix a little tan with a touch of brown to create a sandy color. Paint a small, curved area horizontally beneath the puppy so it looks like it’s sitting on dirt. -
Let it cure:
Allow all paint layers to dry completely. If the rock feels cool to the touch, it’s still wet deep down.
Uneven Lines?
If your black outlines look shaky, try stabilizing your painting hand against the table and moving the rock with your other hand instead of moving the brush.
Step 3: Outlining and Details
-
Outline the puppy:
Using either a black acrylic paint marker or a very fine liner brush with thinned black paint, trace over your pencil outlines. Keep the lines smooth and continuous. -
Draw the facial features:
Paint a small, rounded triangular nose in black. Draw two large ovals for eyes, filling them in completely black except for tiny white spots you’ll add later. -
Add the smile:
Draw a small ‘w’ shape connecting to the bottom of the nose to create the mouth. Add a tiny curve under the chin for definition. -
Refine the paws:
Use your fine liner to add small curved lines on the paws to indicate toes. -
Add the flower accent:
Paint a simple green stem rising from the ground on the right side. Add two small pink or magenta flower shapes at the top with yellow centers.
Pro Tip: Smoother Base
For vibrant colors, paint a coat of white gesso or acrylic primer in the shape of the dog before adding the tan and brown colors. This makes the colors pop.
Step 4: Final Touches
-
Sparkle the eyes:
Using the tip of a toothpick or a white paint marker, place a small white dot in the upper corner of each black eye pupil. This brings the character to life. -
Add ground texture:
Dip a toothbrush or stiff brush into diluted brown paint and gently flick or stipple tiny dots onto the ground area for a sandy texture. -
Seal the artwork:
Once the rock is fully dry (wait at least 24 hours to be safe), apply a coat of clear acrylic sealer to protect your painting from chipping and weather.
Place your little stone pup in a potted plant or on a windowsill to enjoy its cheerful company every day
Bunny with Pink Ears Rock
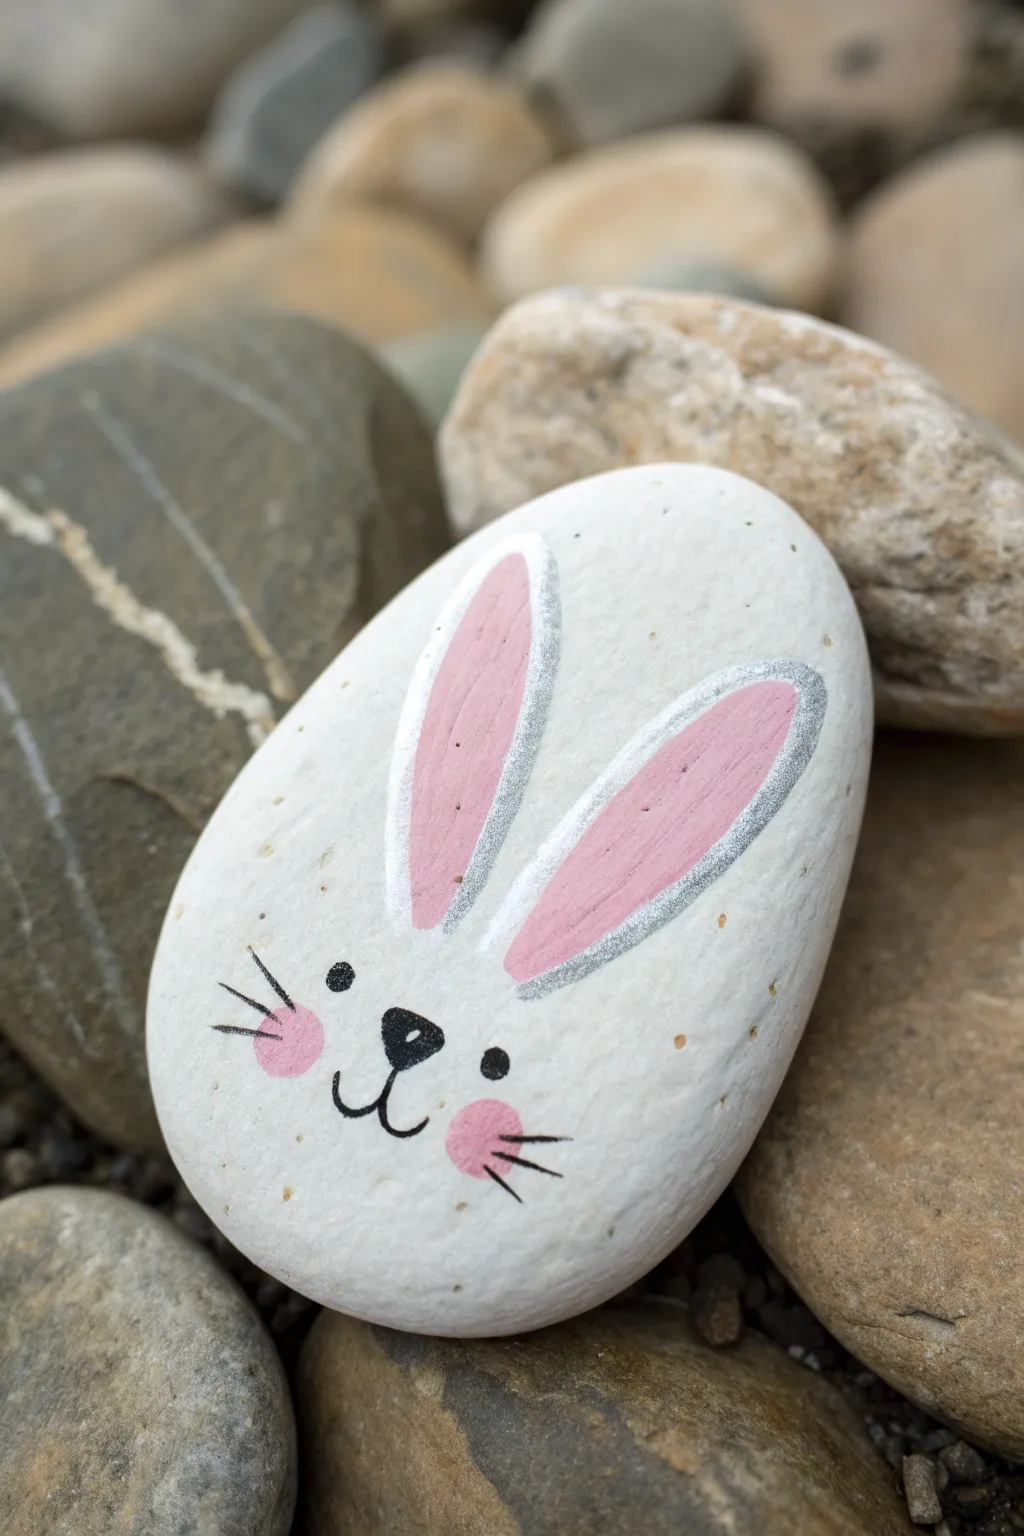
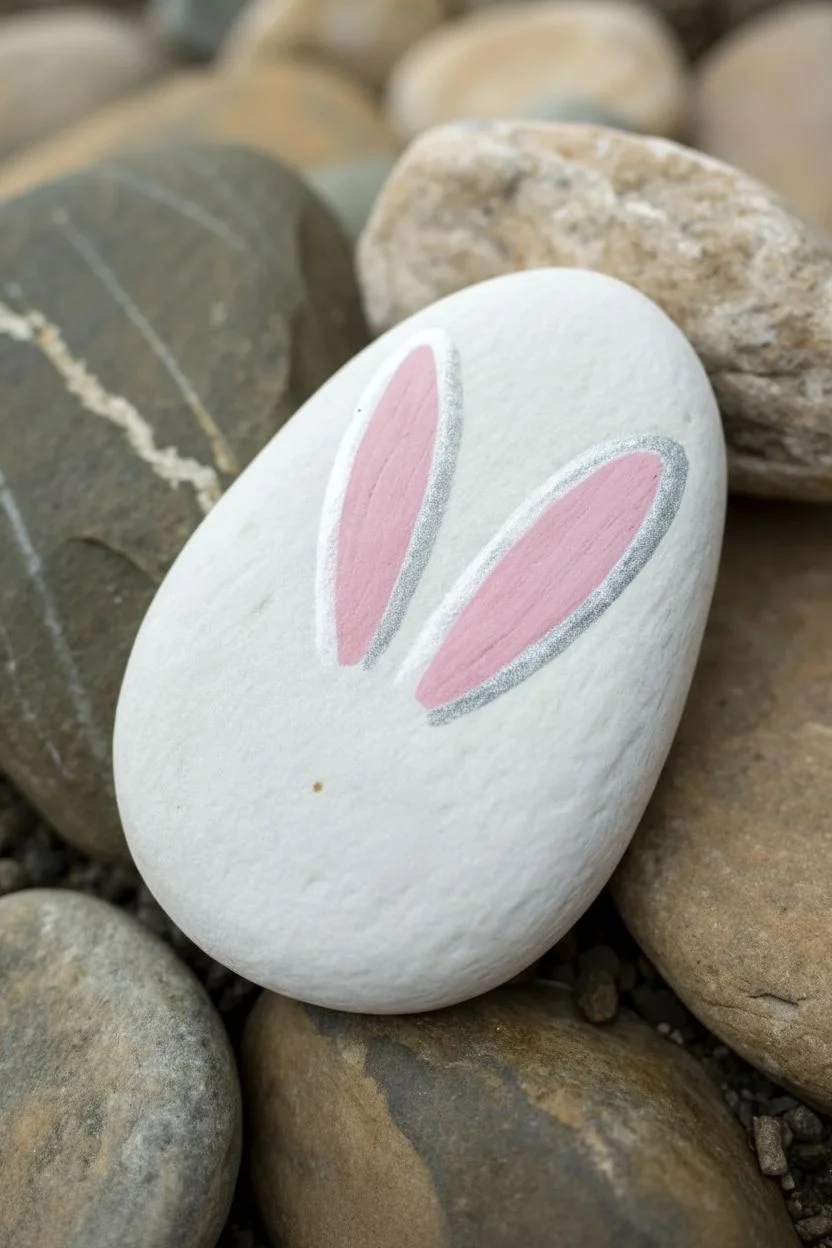
Transform a simple stone into this adorable bunny face, featuring soft pink ears and delicate speckling for a natural eggshell look. It’s a sweet, minimalist design that works perfectly on smooth, oval river rocks.
Step-by-Step Guide
Materials
- Smooth oval rock (river stone)
- White acrylic paint (matte finish)
- Soft pink acrylic paint
- Silver or metallic white acrylic paint
- Black acrylic paint or fine-tip paint pen
- Beige or light brown acrylic paint
- Flat paintbrush (medium)
- Fine liner brush
- Toothbrush (old)
- Spray sealer (matte or satin)
Step 1: Base and Ears
-
Clean the canvas:
Scrub your rock thoroughly with soap and water to remove any dirt or oils, then let it dry completely before starting. -
The base coat:
Apply a coat of matte white acrylic paint over the top surface of the stone. Let it dry, then add a second or third coat until the coverage is solid and opaque. -
Ear placement:
Visualize the ears starting near the top center of the rock. Use your fine liner brush with a very light wash of paint to sketch the outline first if you’re nervous about placement. -
Paint the pink:
Using the soft pink paint and a small flat or round brush, paint two long, elongated oval shapes for the inner ears. Make the right ear slightly angled for a jaunty look. -
Silver lining:
Once the pink is dry, use a fine liner brush and silver or metallic white paint to outline the pink shapes. This creates that distinct border seen in the original design.
Step 2: Face Details
-
Center the nose:
With black paint or a paint pen, draw a small, rounded triangle in the lower center of the face for the nose. -
Add the mouth:
Draw a tiny vertical line down from the nose, then curve outward to the left and right to create a classic anchor-shaped mouth. -
Eye contact:
Place two small black dots widely spaced apart, just slightly higher than the nose level. Keep them simple and round. -
Rosy cheeks:
Dip a round brush distinctively into the soft pink paint. Dab two circles on either side of the mouth for the cheeks. -
Cheek blending:
If the pink looks too opaque, I gently tap it with a fingertip before it dries to soften the edges into the white background. -
Whiskers:
Using your finest brush or a specialized ultra-fine black marker, draw three short, crisp lines extending outward from each pink cheek area.
Paint Pen Precision
Struggling with brush control on the whiskers? Switch to a 0.5mm acrylic paint marker. It gives you the steady hand of a drawing tool with the permanence of paint.
Step 3: Texture and Sealing
-
Prepare the speckle:
Mix a small amount of beige or light brown paint with a drop of water to make it fluid, almost like ink. -
Splatter application:
Dip an old toothbrush into this thinned paint. Hold it over the rock and run your thumb across the bristles to flick tiny speckles across the surface. -
Clean painting zones:
If any large speckles land on the black eyes or nose, carefully wipe them away with a damp Q-tip or touch them up with black paint after drying. -
Final dry:
Allow the entire rock to sit undisturbed for at least an hour to ensure all layers, especially the thick white base, are fully cured. -
Protect your art:
Finish with a coat of spray sealer. A matte sealer keeps the natural stone look, while a gloss will make it look like ceramic.
Make It 3D
Glue a small white pom-pom to the back of the rock for a fluffy tail. It adds a tactile surprise for anyone who picks it up
Place this little friend in a garden pot or on a desk for a daily dose of cuteness

PENCIL GUIDE
Understanding Pencil Grades from H to B
From first sketch to finished drawing — learn pencil grades, line control, and shading techniques.
Explore the Full Guide
Chubby Panda Eye-Patch Rock
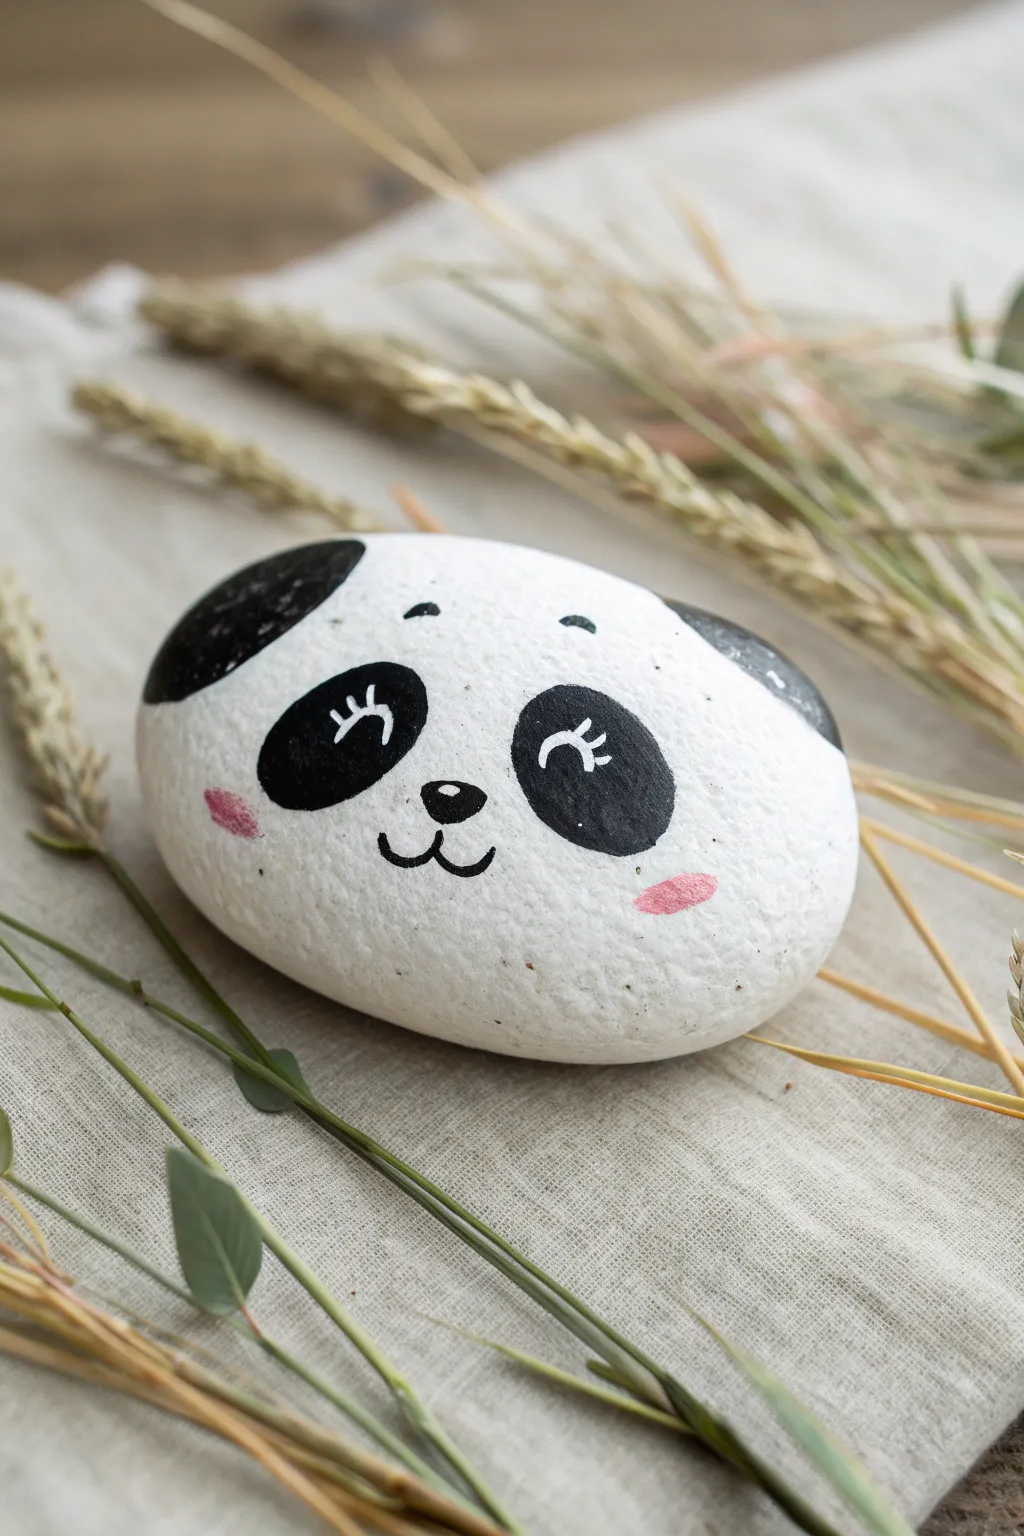
Transform a simple garden stone into an adorable panda friend with just a few strokes of paint. This project features a smooth white base with classic black eye patches and sweet pink cheeks, perfect for a desk buddy or garden decoration.
How-To Guide
Materials
- Smooth, oval-shaped river rock
- White acrylic paint (matte finish)
- Black acrylic paint
- Light pink acrylic paint
- Flat paintbrush (medium size)
- Small round paintbrush (size 0 or 1)
- Fine-point detail brush or toothpick
- Clear matte varnish or sealant
- Pencil for sketching
- Palette or paper plate
Step 1: Preparing the Base
-
Clean the stone:
Before starting, scrub your rock with warm soapy water and a stiff brush to remove any dirt or oils, then let it dry completely in the sun. -
Apply the first coat:
Using your medium flat brush, paint the entire top surface of the rock with white acrylic paint. Smooth out your brushstrokes as you go. -
Let it dry:
Allow the first layer to dry fully, which usually takes about 15-20 minutes depending on paint thickness. -
Add a second coat:
Apply a second layer of white paint to ensure opaque, solid coverage where no gray stone creates shadows underneath.
Smooth Operator
If your rock has pits or bumps, mix a little white glue with baby powder to create a paste. Fill the holes, let dry, and sand smooth before painting.
Step 2: Sketching Features
-
Outline the ears:
Once the white base is bone dry, use a pencil to very lightly sketch two semi-circles on the outer left and right edges for the panda’s ears. -
Draw the eye patches:
Sketch two large oval shapes in the center of the rock; tilt them slightly inward toward the nose area to create that signature sad-but-cute panda look. -
Place the nose and mouth:
Mark a small oval nose right between the eye patches and draw a simple ‘w’ shape or curved anchor shape beneath it for the mouth.
Bamboo Snack
Paint a small green bamboo shoot in the panda’s mouth or resting near its cheek to add a splash of color and storytelling to your rock.
Step 3: Painting the Details
-
Fill the ears:
Dip your round brush into black paint and carefully fill in the ear outlines on the sides of the rock. -
Paint the eye patches:
Using the same brush, fill in the sketched eye ovals with black paint. Take your time near the edges to keep them crisp. -
Add the nose:
Switch to a smaller detail brush to paint the nose black. An inverted triangle with rounded corners works best here. -
Detail the mouth:
Using your finest brush or the very tip of a round brush, trace the mouth line with thin black paint. -
Create eyebrows:
Paint two tiny, floating curved dashes above the eye patches to give the panda heightened expression. -
Paint the rosy cheeks:
Dip a clean small brush into pink paint and add two horizontal oval dabs just below the outer corners of the eye patches.
Step 4: Final Touches
-
Add eye details:
Once the black eye patches are dry, use your finest brush or a toothpick to add three tiny white lashes or gleam lines inside the black area for character. -
Clean up edges:
If any black paint smudged onto the white background, do touch-ups with a small dab of white paint. -
Seal the artwork:
Protect your panda by applying a layer of clear matte varnish over the entire dried surface.
Place your finished panda rock in a potted plant or on a windowsill to greet you every day
Easy Turtle Shell Pattern Rock
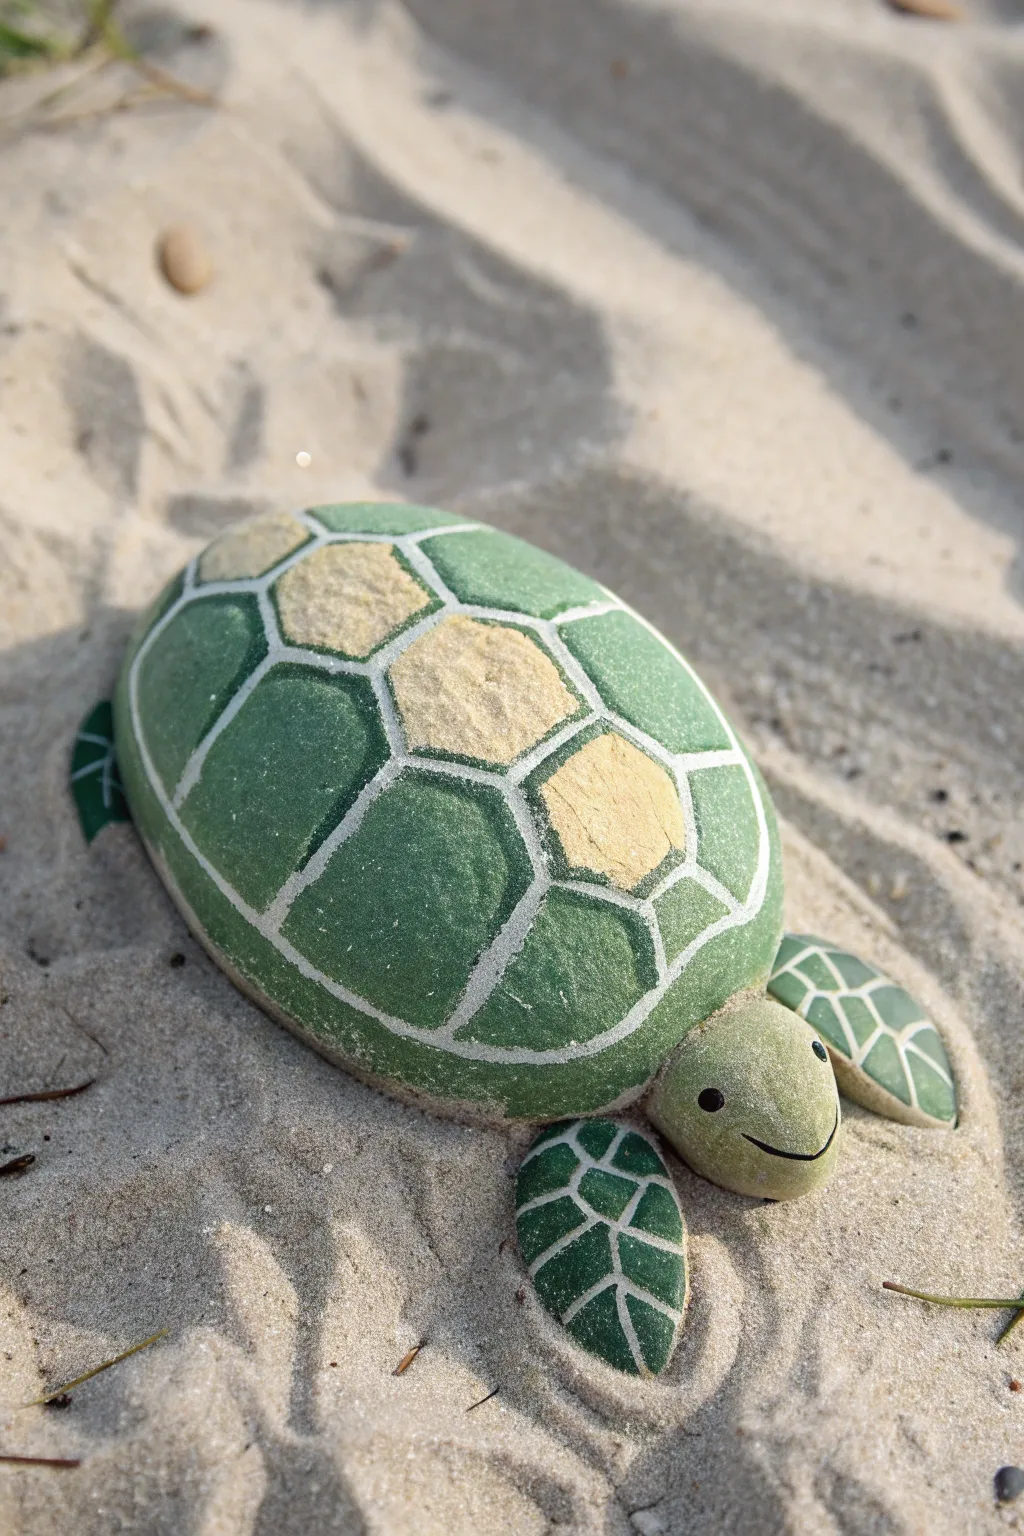
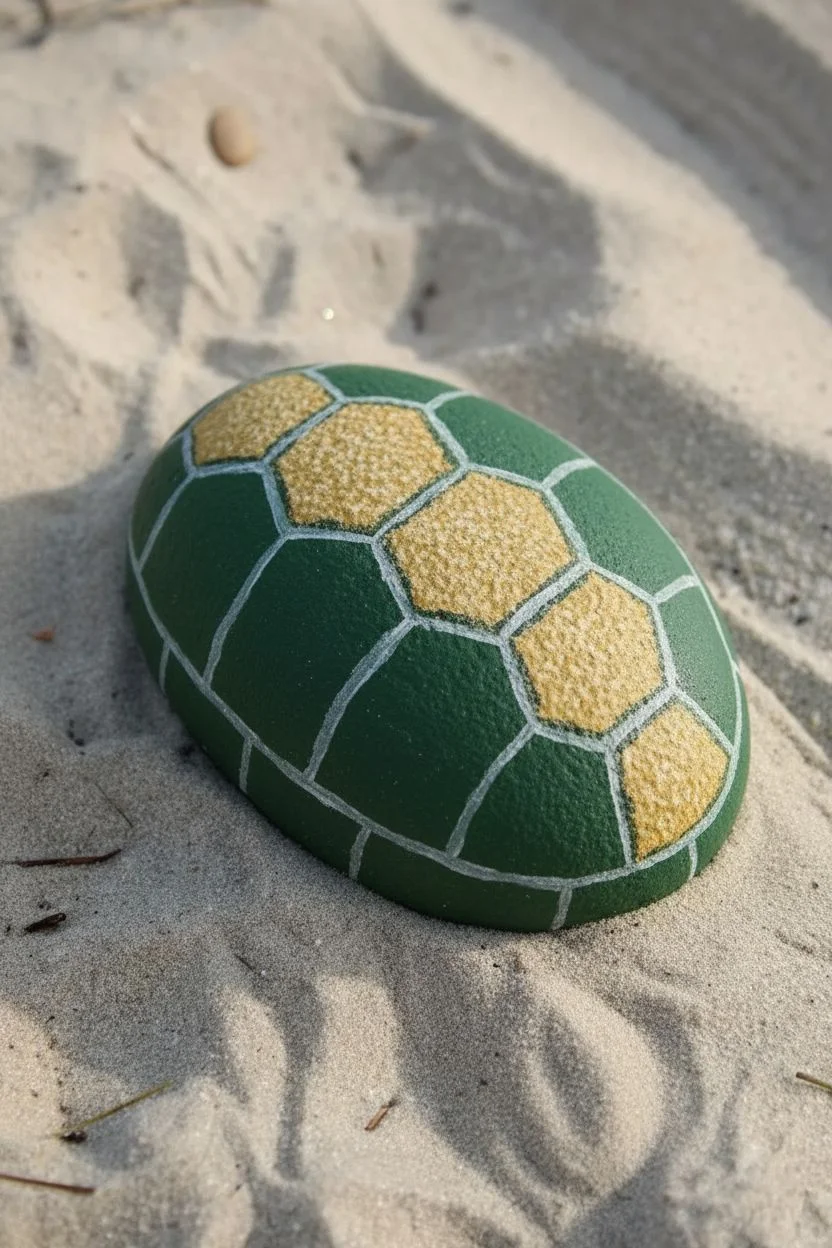
Transform a collection of smooth stones into an adorable sea turtle resting on the beach. This project uses multiple rocks to create a 3D effect, with a cleverly painted shell pattern that mimics the real thing.
Step-by-Step Guide
Materials
- One large oval river rock (for the shell)
- Five smaller, flatter oval stones (head and flippers)
- Acrylic paints: Dark green, light sage green, yellow-ochre, white, black
- Fine detail paintbrushes (liner or 00 size)
- Medium flat paintbrush
- Pencil
- Strong outdoor craft glue or epoxy (optional, for permanent assembly)
- Spray varnish (matte or satin)
Step 1: Painting the Shell Base
-
Clean your canvas:
Begin by scrubbing your chosen rocks with soap and water to remove any dirt or oils. Let them dry completely, ensuring the surface is warm and ready for paint. -
Map the pattern:
Take the largest oval rock. Using a pencil, lightly sketch a hexagonal grid down the center of the rock’s back. These will be the scutes (plates) of the shell. -
Add side details:
Draw pentagon or trapezoid shapes cascading down the sides of the rock, connecting to the central hexagons. Don’t worry about perfect symmetry; natural shells have variation. -
Paint the center scutes:
Mix a warm yellow-ochre with a tiny drop of white. Paint the central row of hexagons with this sandy color, stippling the paint slightly to give it a textured, bone-like appearance. -
Fill the outer shell:
Paint the remaining shapes on the sides with a rich, dark green acrylic. You may need two coats here to get solid coverage over the grey stone.
Step 2: Detailing the Shell
-
Create separation:
Once the base colors are dry to the touch, load a fine liner brush with white paint. Carefully trace the pencil lines between all your green and yellow shapes. -
Refine the lines:
Keep the white lines consistent in thickness. If they get too thick, you can touch them up with the green or yellow paint later. -
Add depth:
To make the shell look weathered, dry-brush a tiny amount of the light sage green over the center of the dark green panels. This creates a subtle highlight.
Uneven Lines?
If your white grid lines look shaky, don’t panic. Wait for the white to dry, then go back with the green or yellow paint to tidy up the edges and thin the lines down.
Step 3: Flippers and Head
-
Base coat the limbs:
Taking your four smaller, flatter stones for the flippers, paint them entirely deep green. Let them dry completely on one side before flipping to paint the other. -
Sketch the flipper scales:
Lightly draw a leaf-vein pattern on each flipper using your pencil. -
Paint limb details:
Using your fine brush and white paint, trace over the vein patterns on the flippers to create the look of scales. -
Paint the head:
Take the roundest small stone for the head. Paint it a solid light sage green, mixing a bit of yellow-ochre in if needed to warm it up. -
Add the face:
Dip the back end of your paintbrush in black paint to dot two small eyes on the sides of the head. Use your finest brush to paint a thin, curved black line for the smile. -
Eye highlights:
Once the black dots are dry, add a minuscule spec of white to each eye to bring the turtle to life.
Texture Trick
Dab a scrunched-up piece of plastic wrap onto the wet green paint of the shell to create a leathery, realistic reptile skin texture before adding the white lines.
Step 4: Assembly and Finish
-
Seal the pieces:
Before assembling, spray all painted rocks with a matte or satin varnish. This protects your hard work from the elements if you place it outside. -
Arrange the turtle:
Find a nice patch of sand or soil. Place the large shell in the center. -
Position the parts:
Tuck the four flipper stones slightly under the shell edges—two near the front, two near the back. Place the head stone centrally at the front. -
Optional gluing:
If you want a permanent sculpture rather than a loose arrangement, use strong outdoor adhesive to glue the limbs and head to the underside of the main shell rock.
Step back and admire your new zero-maintenance pet basking in the sun


Smiling Frog Pond Rock
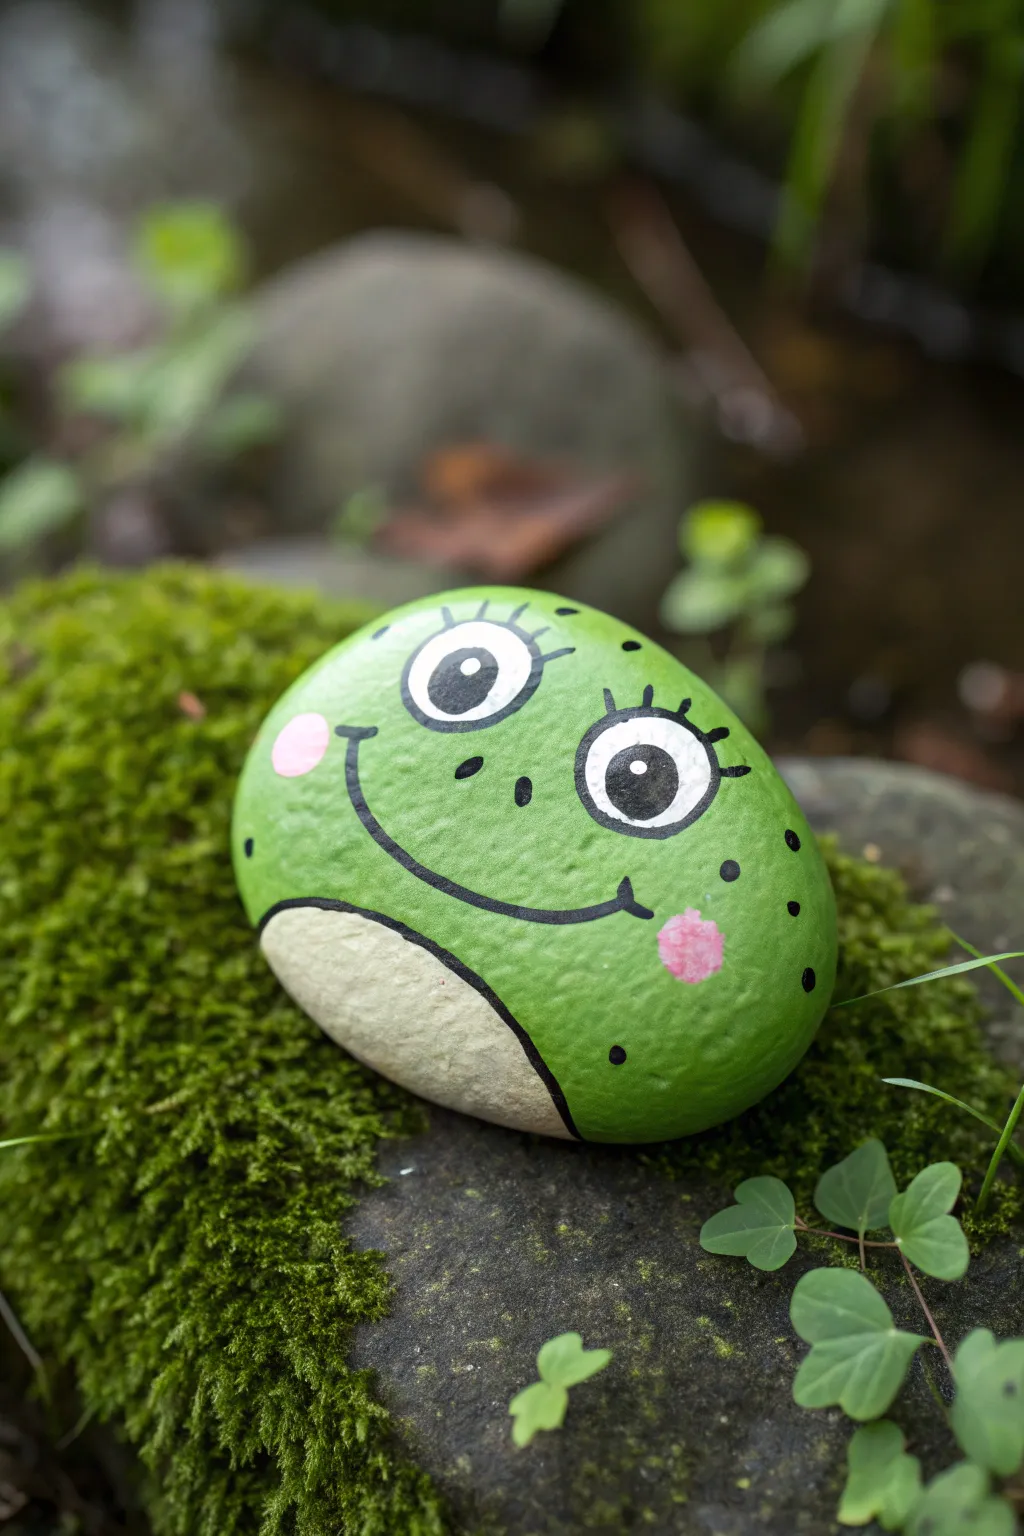
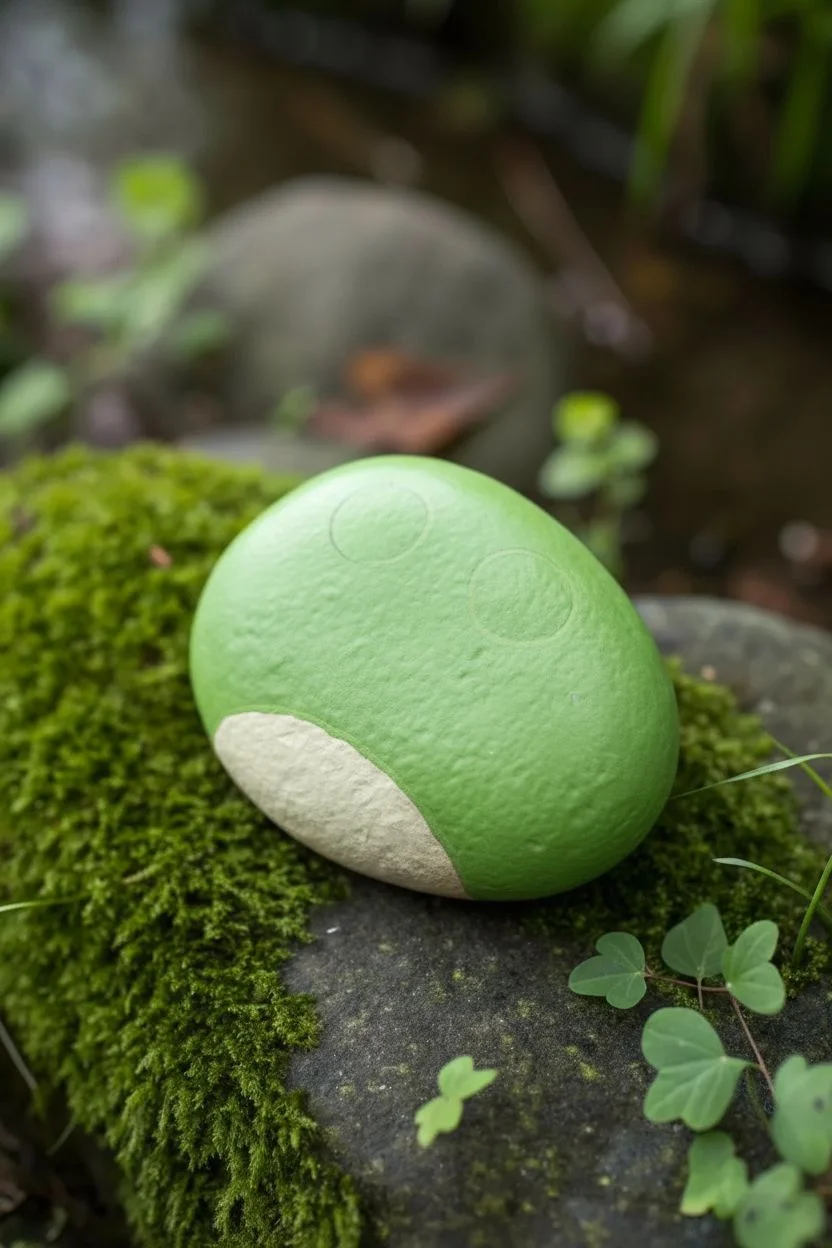
Transform a simple garden stone into a cheerful amphibian friend with this adorable frog rock painting project. The design uses bright, springy greens and big expressive eyes to create a charming decoration for your planters or walkways.
Detailed Instructions
Materials
- Smooth, oval-shaped river rock (palm-sized)
- Acrylic craft paints (Light Green, White, Black, Pink, Cream/Light Beige)
- Flat paintbrushes (medium size)
- Fine detail liner brush (size 0 or 00)
- Dotting tool or toothpick
- Clear acrylic sealer (spray or brush-on)
- Palette or paper plate
- Water cup and paper towels
- Pencil
Step 1: Base Coat & Shape
-
Clean your canvas:
Begin by thoroughly washing your rock with soap and water to remove any dirt or grit. Let it dry completely in the sun or use a hairdryer to speed things up. -
Sketch the outline:
Using a pencil, lightly sketch a curved line near the bottom third of the rock to separate the frog’s belly area from the main green body. -
Apply the green base:
Load a medium flat brush with your light green acrylic paint. Cover the entire top portion of the rock, painting above your pencil line. You may need two coats for opaque coverage, letting the paint dry between layers. -
Paint the belly:
For the bottom section, mix a tiny bit of brown or yellow into your white paint to make a cream or light beige color. Paint the remaining crescent shape at the bottom of the rock. -
Refine the edges:
Once both sections are touch-dry, use your green or cream paint to neaten up the dividing line where the two colors meet, ensuring a smooth, clean curve.
Step 2: Building the Face
-
Position the eyes:
Use a pencil to lightly draw two large circles side-by-side near the top of the green area. They should be fairly close together but not touching. -
Fill in the whites:
Using a smaller flat brush or a round brush, carefully fill these circles with white acrylic paint. This is a key step, so apply a second coat if the green shows through. -
Add pupils:
Once the white is fully dry, paint smaller black circles inside each white eye. Place them toward the center-bottom of the white circle to give the frog a friendly look. -
Create the sparkle:
Dip the non-brush end of a paintbrush or a large dotting tool into white paint. Add a single dot to the upper right area of each black pupil for a lively reflection. -
Outline the features:
Switch to your fine liner brush and black paint. Carefully outline the white of the eyes with a thin, steady line. -
Add eyelashes:
Flick three small, curved lines extending outward from the top corners of each eye to create cute eyelashes.
Uneven outlines?
If your black outline lines feel shaky or too thick, wait for them to dry completely. Then, use the original green base color to carefully paint over the mistakes and thin the lines back down.
Step 3: Details & Seal
-
Draw the smile:
With your liner brush and black paint, draw a wide, U-shaped smile. Start from under one eye, dip down toward the belly line, and curve up to the other eye. -
Define the belly:
Use the liner brush to outline the curve where the green body meets the cream belly, giving the frog clear definition. -
Add the nose:
Paint two tiny vertical dashes or dots right between the eyes, slightly lower than center, for the nostrils. -
Rosy cheeks:
Dip a fingertip or a round foam pouncer into pink paint. Gently dab a circle onto each cheek at the ends of the smile line. If the pink is too bright, blot it on paper first. -
Adding texture:
I like to add a few random black dots around the green face area using a toothpick to mimic natural frog skin texture. -
Protect your art:
Allow the rock to cure for at least 24 hours. Finish by applying a clear acrylic sealer to protect the paint from weather and moisture.
Making Highlights Pop
For the brightest eye highlights, use a toothpick instead of a brush. Dip the very tip in thick white paint and touch it gently to the dried black pupil without pressing down.
Now you have a delightfully happy frog that will never hop away from your garden
Bright Fish with Bubble Details
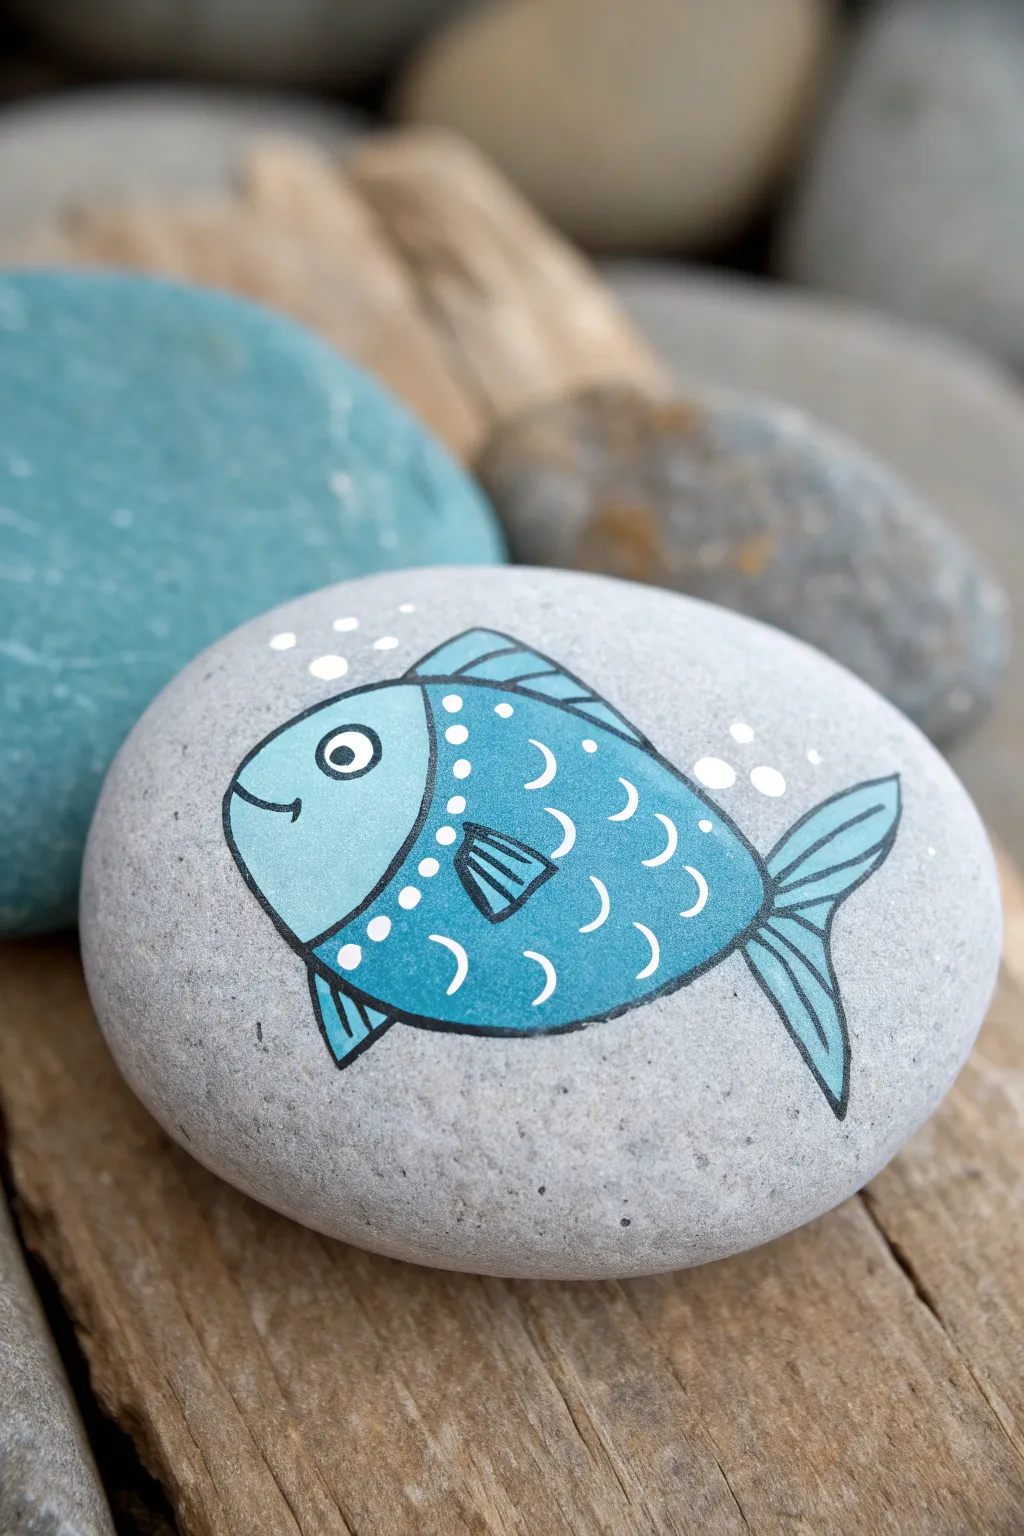
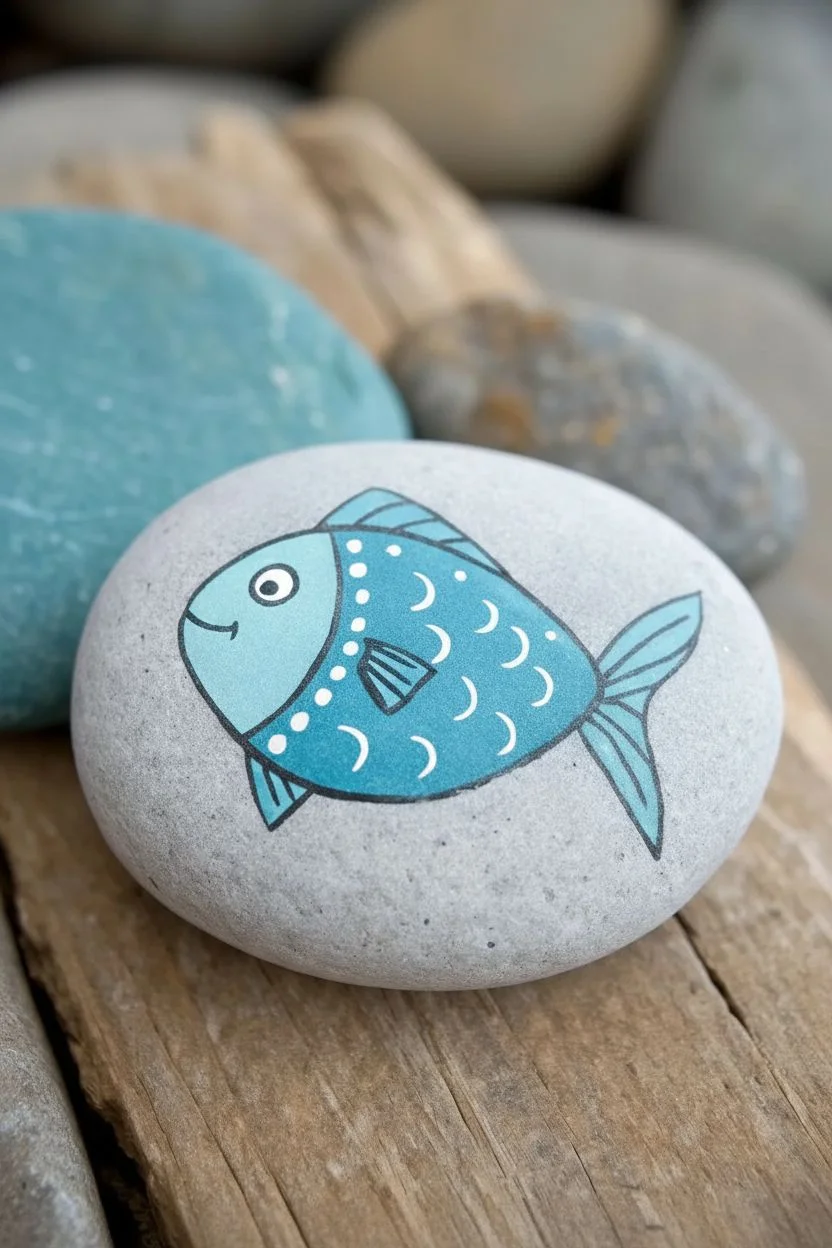
Transform a smooth, grey river stone into a playful underwater scene with this charming fish design. Using vibrant blues and crisp white detailing against the natural rock background creates a delightful focus for your rock garden or desk.
Step-by-Step Guide
Materials
- Smooth, oval-shaped river rock (cleaned and dried)
- Acrylic paints: Light cyan blue, medium teal/turquoise, white
- Fine liner posca paint pens: Black (0.7mm) and White (0.7mm)
- Flat shader brush (size 4 or 6)
- Small round detail brush (size 0 or 1)
- Pencil and eraser
- Matte or glossy spray varnish
Step 1: Planning and Base Colors
-
Prepare the canvas:
Begin by washing your stone thoroughly with warm soapy water to remove any dirt or oils. Let it dry completely before starting. -
Sketch the outline:
Use a pencil to lightly sketch the oval body of the fish in the center of the rock. Add a triangular shape for the tail fin at the back and a smaller dorsal fin on top. -
Define the face:
Draw a curved vertical line about one-third of the way from the front to separate the fish’s face from its body. Sketch a small bottom fin near the belly. -
Block in the face color:
Dip your flat shader brush into the light cyan blue paint. Carefully fill in the front face section of the fish, keeping the edges smooth. Apply a second coat if the rock shows through. -
Paint the body:
Switch to your medium teal or turquoise paint. Fill in the main body section, being careful not to paint over the light blue face area. The two colors should meet at that curved dividing line. -
Fill the fins:
Using the same teal color and a smaller brush, fill in the top dorsal fin, the tail fin, and the small bottom fin. Let all the base colors dry completely.
Step 2: Outlining and Details
-
Outline the shape:
Once the paint is bone dry, take your black fine liner pen. Trace the entire outer perimeter of the fish with a confident, steady hand. -
Define the sections:
Draw the black curved line separating the light blue face from the teal body. Outline each fin individually to separate them from the main body. -
Add facial features:
Draw a small circle for the eye with the black pen, then add a smaller black dot inside for the pupil. Don’t forget a small, curved smile near the front edge. -
Detail the gill line:
Start decorating the dividing line between face and body. Use your white paint pen (or a tiny brush with white paint) to create a vertical row of small dots just inside the teal body section. -
Add body scales:
Scattered across the teal body, draw small, white crescent shapes to represent scales. I like to keep them facing towards the tail for a natural look. -
Draw the side fin:
In the lower middle of the body, draw a small triangular pectoral fin using your black pen. Fill it with teal paint if needed, or just define it with lines. -
Stripe the fins:
Add thin black lines inside the tail, dorsal, and side fins to give them texture and structure.
Smooth Operator
If your paint feels too thick or leaves brush texture, mix a tiny drop of water into your acrylics on the palette to help them flow more smoothly like ink.
Step 3: Final Touches
-
Highlight the eye:
Paint the white of the eye around the pupil. Add a tiny white reflection dot inside the black pupil for extra life. -
Create bubbles:
Using white paint and a dotting tool or the back of a brush handle, stamp several white circles of varying sizes rising from the fish’s back and nose areas. -
Seal the artwork:
Allow the stone to dry for at least 24 hours. Finish by spraying a light coat of varnish to protect the paint from chipping and to make the colors pop.
School of Fish
Paint 3-4 rocks with fish facing different directions and colors. Arrange them in a line in your garden to look like they are swimming together in a stream.
Place your finished fish rock in a sunny spot or hide it in a park for someone to discover
Ladybug Polka-Dot Rock
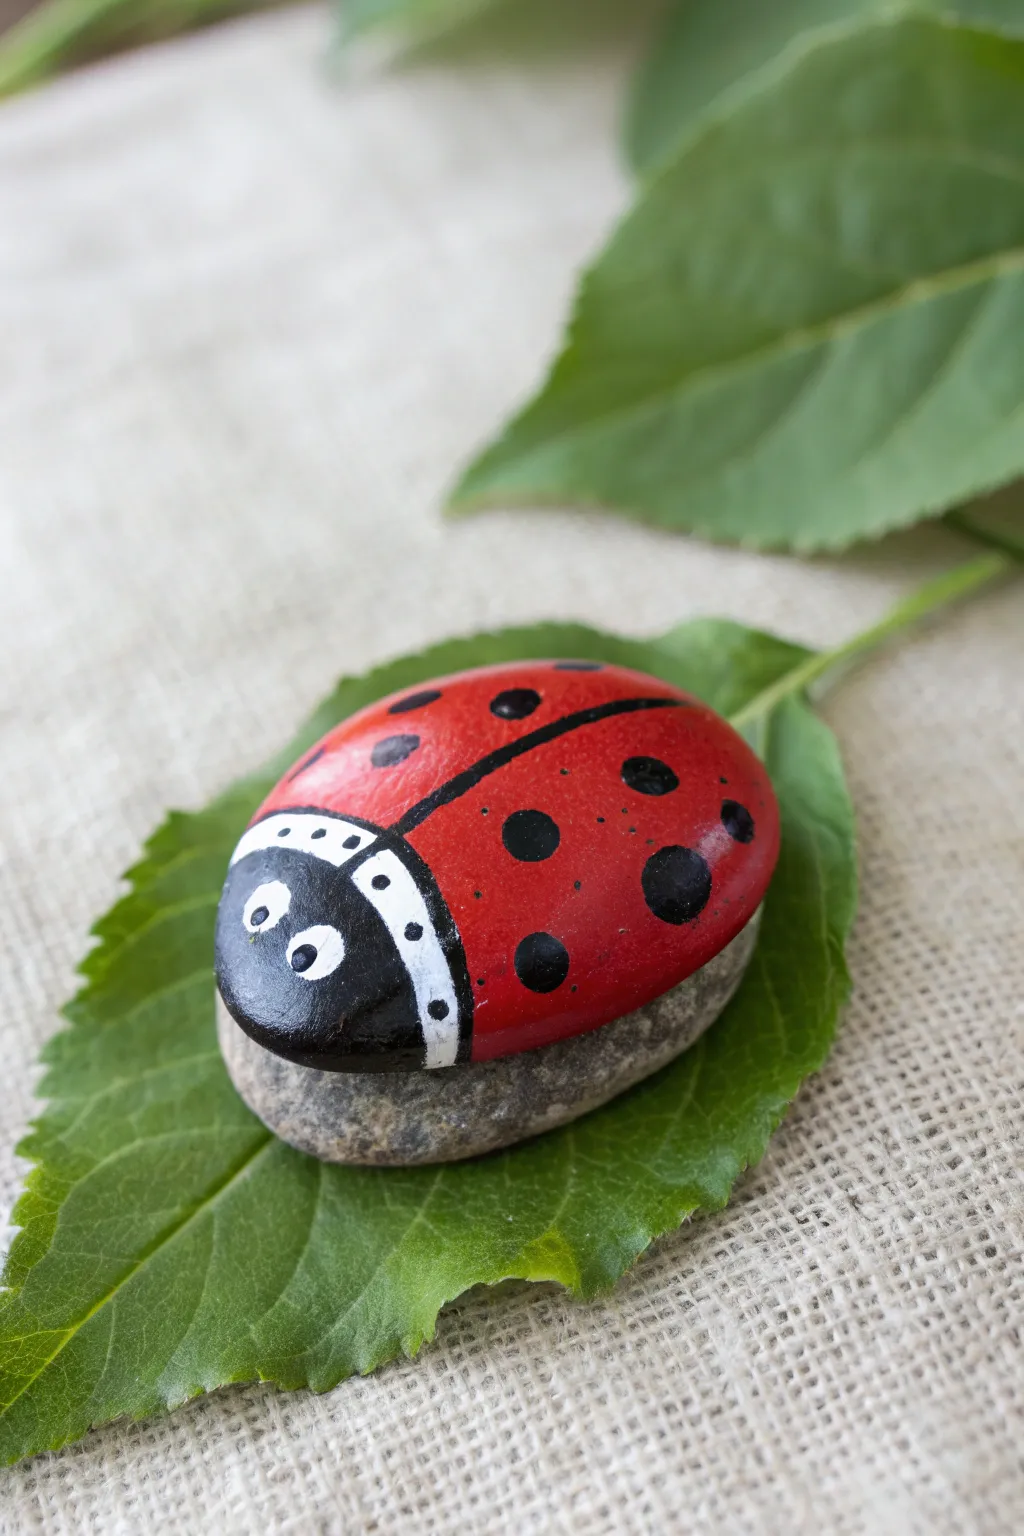
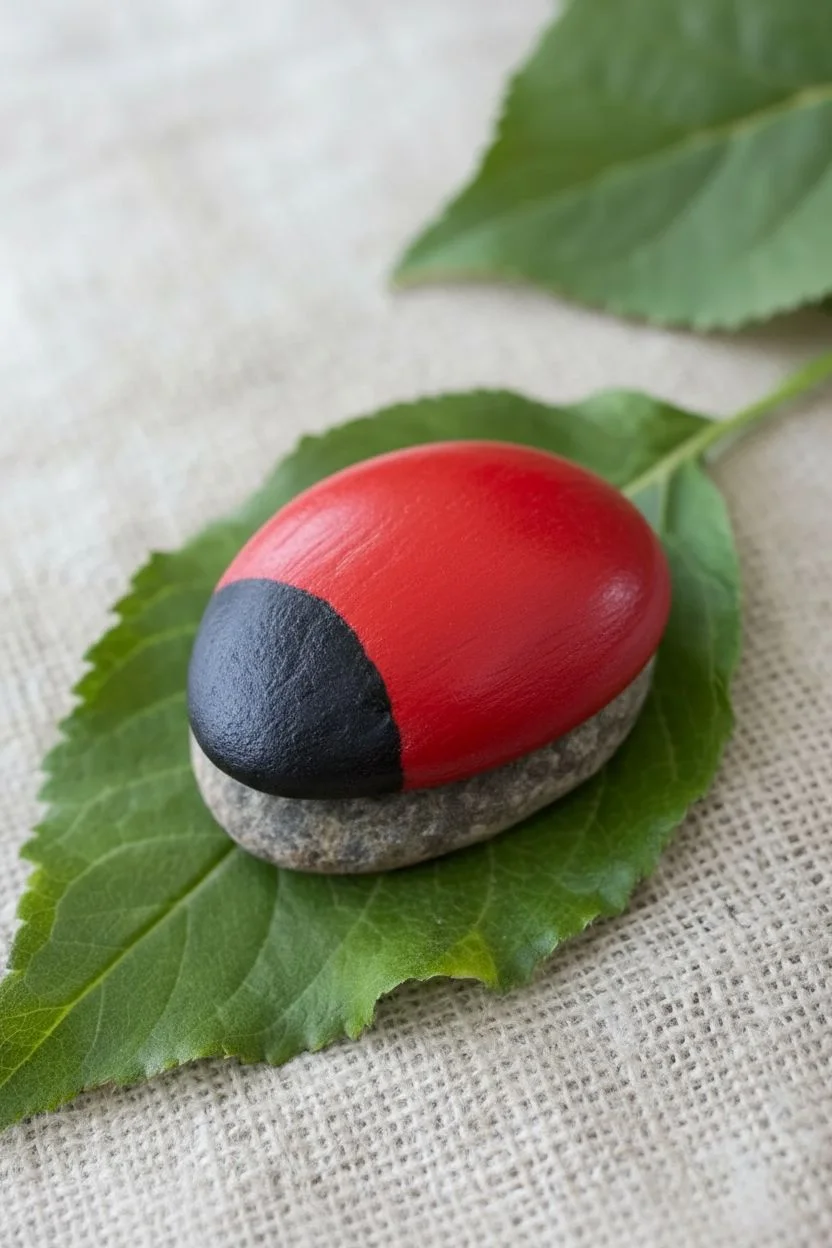
Transform a smooth garden pebble into a cheerful ladybug friend that never flies away. This project uses the natural texture of the stone for the base while adding bright, glossy acrylics to create a delightful garden decoration.
Step-by-Step Tutorial
Materials
- Smooth, oval-shaped river rock (palm-sized is ideal)
- Red acrylic paint (bright cherry red)
- Black acrylic paint
- White acrylic paint
- Flat paintbrush (medium size)
- Fine detail paintbrush or liner brush
- Dotting tool or the back of a paintbrush handle
- Clear acrylic sealer or varnish (glossy finish)
- Water cup and paper towels
Step 1: Preparation and Base Colors
-
Clean the canvas:
Begin by washing your rock thoroughly with soap and water to remove any dirt or oils. Let it dry completely in the sun or use a hairdryer to speed things up. -
Plan your canvas:
Examine your stone and decide which side is smoother or has a better ‘beetle’ shape. You can leave the very bottom unpainted for a natural look, just like the example. -
Paint the body base:
Using your medium flat brush, paint the back two-thirds of the rock with your bright red acrylic paint. This is the main body section. -
Ensure opaque coverage:
Acrylics can be translucent, especially on dark rocks. Let the first red coat dry completely, then apply a second or third coat until you have a solid, vibrant color. -
Create the head:
Paint the front one-third of the rock with black acrylic paint. Curve the line slightly where it meets the red to mimic the rounded shape of a ladybug’s pronotum (neck shield).
Uneven Dots?
If your black spots look lumpy or have peaks in the middle, try thinning your black paint slightly with a drop of water before dipping your dotting tool.
Step 2: Adding Details
-
Draw the center line:
Once both base colors are dry to the touch, use your fine detail brush and black paint to draw a thin line straight down the center of the red section, simulating the split wings. -
Thicken the divide:
Go back over that center line and thicken it slightly, making sure it connects seamlessly to the black head section. -
Add large spots:
Use a large dotting tool or dip the handle end of a thicker paintbrush into black paint. Stamp several large, bold spots symmetrically on both sides of the red wings. -
Add smaller spots:
Switch to a smaller tool or brush tip to add tiny black specks between the larger spots for variety and a more organic, detailed look. -
Paint the collar:
Carefully paint a curved white band or collar right where the black head meets the red body. It doesn’t need to be perfectly straight; a slight curve looks more natural. -
Detail the collar:
Inside that white collar strip, add small black dots or dashes using your finest brush tip to create a segmented pattern. -
Create the eyes:
On the black head section, paint two medium white circles for the eyes. I find it helpful to let the white tack up a bit before adding the next layer. -
Finish the eyes:
Add small black pupils inside the white circles. Place them slightly off-center or looking upward to give your ladybug a cute, curious expression.
Step 3: Finishing Touches
-
Clean up edges:
Check the bottom edge where the paint meets the bare stone. If the line is messy, you can tidy it up with a damp cotton swab or a steady hand and a little fresh paint. -
Allow to cure:
Let your rock sit undisturbed until the paint is fully cured. Usually, an hour or two is enough, but thicker spots might take longer. -
Seal the artwork:
Apply a coat of glossy clear acrylic sealer over the painted areas. This not only protects the stone from weather but gives the ladybug a brilliant, bug-shell shine.
Natural Texture
Don’t paint the underside! Leaving the bottom raw stone creates a cool contrast and makes the ladybug look like it’s resting on top of the rock.
Place your finished creation on a leafy plant or near a window to bring a little spot of joy to your day
Bumblebee Stripe Rock
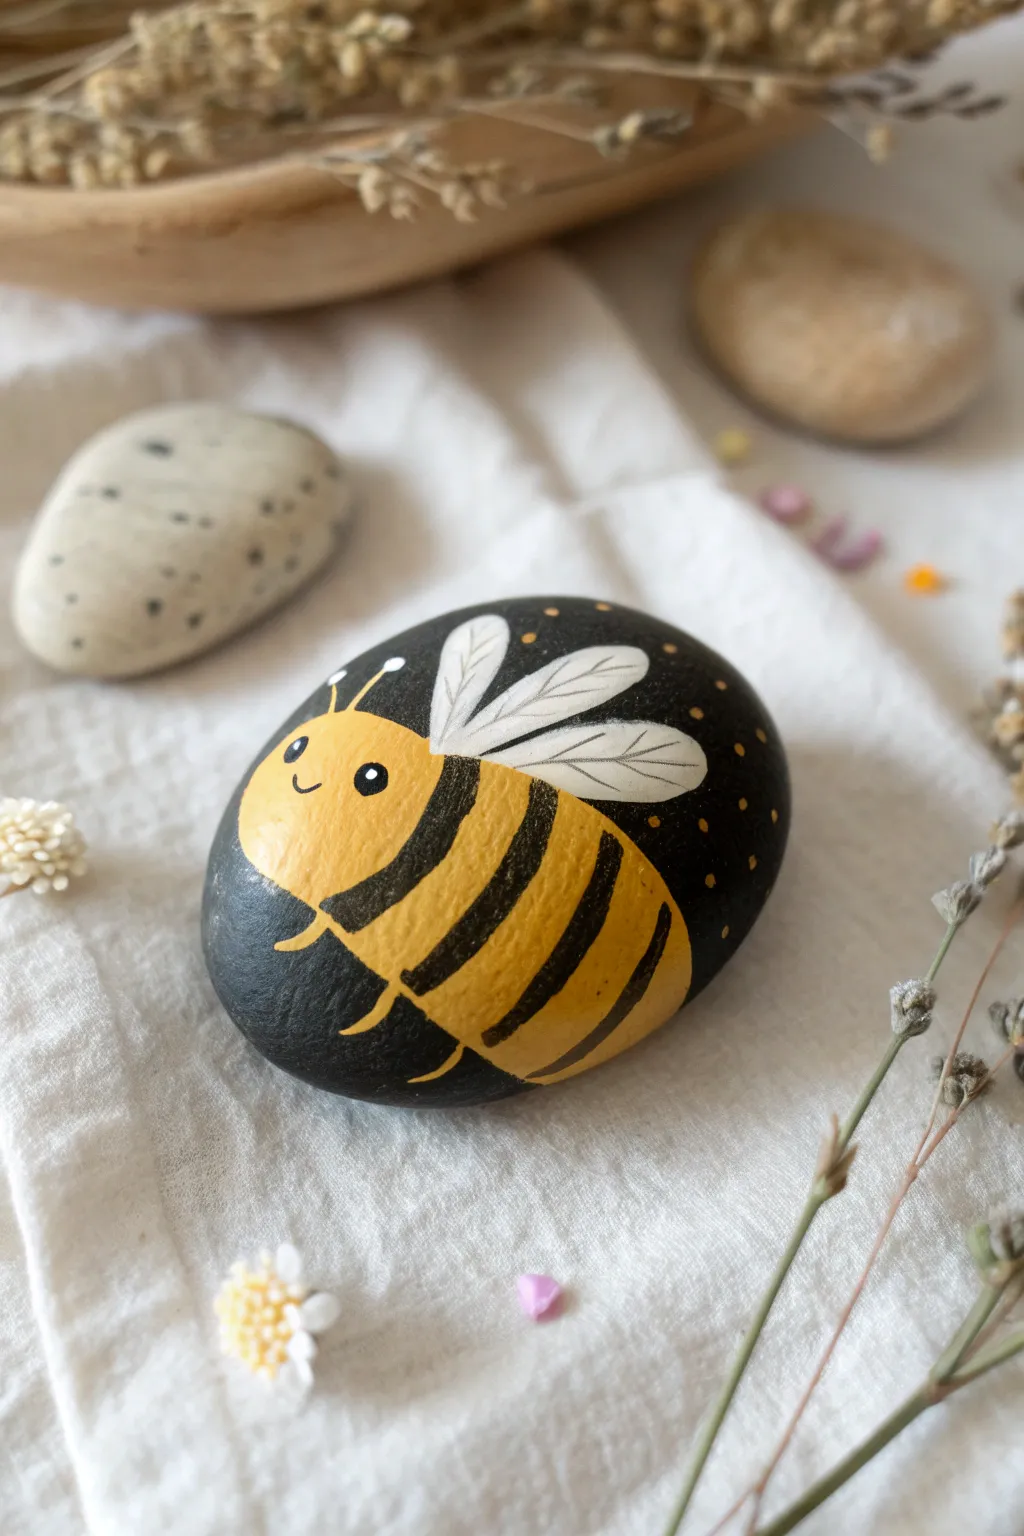
Transform a simple stone into a buzzing nighttime scene with this adorable bumblebee design. The contrast between the bright yellow stripes and the midnight black background makes this little character really pop.
Detailed Instructions
Materials
- Smooth, oval river rock (palm-sized)
- Black acrylic paint
- Yellow acrylic paint (bright/mustard tone)
- White acrylic paint
- Flat paintbrush (medium)
- Detail liner brush (fine tip)
- Dotting tool or toothpick
- Clear acrylic sealer (spray or brush-on)
- Pencil (optional)
Step 1: Base Coat Preparation
-
Clean the surface:
Before starting, ensure your rock is scrubbed clean of any dirt or dust and completely dry so the paint adheres properly. -
Apply the black base:
Using a flat brush, paint the entire top surface of the rock with black acrylic paint. You may need two coats for full opacity. -
Dry thoroughly:
Let the black base coat dry completely. This is crucial because painting yellow over wet black paint will turn muddy.
Transparency Issues?
If your yellow paint looks streaky or greenish over the black, paint the bee’s shape in white first. Let it dry, then layer yellow on top for vibrancy.
Step 2: Painting the Bee Body
-
Sketch the outline:
Lightly sketch a large oval shape for the bee’s body in the center of the rock using a white pencil or very thinned white paint, tilting it slightly diagonally. -
Paint the yellow base:
Fill in the entire oval shape with yellow paint. Since yellow is naturally translucent, apply 2-3 layers, letting each dry in between, until the color is solid and bright. -
Add the face curve:
Determine which end is the head and leave a solid yellow section there. Imagine a curved line separating the head from the body stripes. -
Paint the stripes:
Using your black paint and a smaller brush, carefully paint curved, thick stripes across the yellow body. These should follow the rounded contour of the bee to make it look 3D. -
Refine the edges:
Clean up any edges where the black stripes meet the yellow body to keep the lines sharp.
Step 3: Wings and Details
-
Outline the wings:
With a fine liner brush and white paint, draw two teardrop-shaped wings emerging from the upper back of the bee. -
Fill the wings:
Fill in the wing shapes with white paint. You might want the paint slightly thinner here so the black background shows through faintly, or go for solid white for high contrast. -
Add wing veins:
Once the white is dry, use a very fine brush with diluted grey or black paint just to add a tiny suggestion of veins inside the wings. -
Paint the face:
Dip the handle end of a paintbrush into black paint to dot a single eye on the yellow head. Add a tiny curved smile with your finest liner brush. -
Add the highlight:
Once the black eye dot is dry, add a minuscule white dot inside it to bring the character to life. -
Give it legs:
Switch back to the fine brush and black paint to draw tiny stick legs and antennae sticking out from the yellow body.
Clean Lines Hack
For ultra-crisp stripes, I sometimes use thin strips of washi tape to mask off the yellow sections before painting the black bands.
Step 4: Finishing Touches
-
Create the starry background:
Dip a dotting tool or toothpick into a mix of yellow and gold paint. Gently dot small ‘stars’ all over the remaining black background space. -
Vary dot sizes:
Make some background dots smaller than others to create depth in your night sky. -
Seal the artwork:
Allow the rock to dry overnight. Once cured, apply a layer of clear sealer to protect your painting from chipping and moisture.
Find a nice spot in your garden or on a shelf to display your cheerful new friend
Gentle Elephant with Curved Trunk
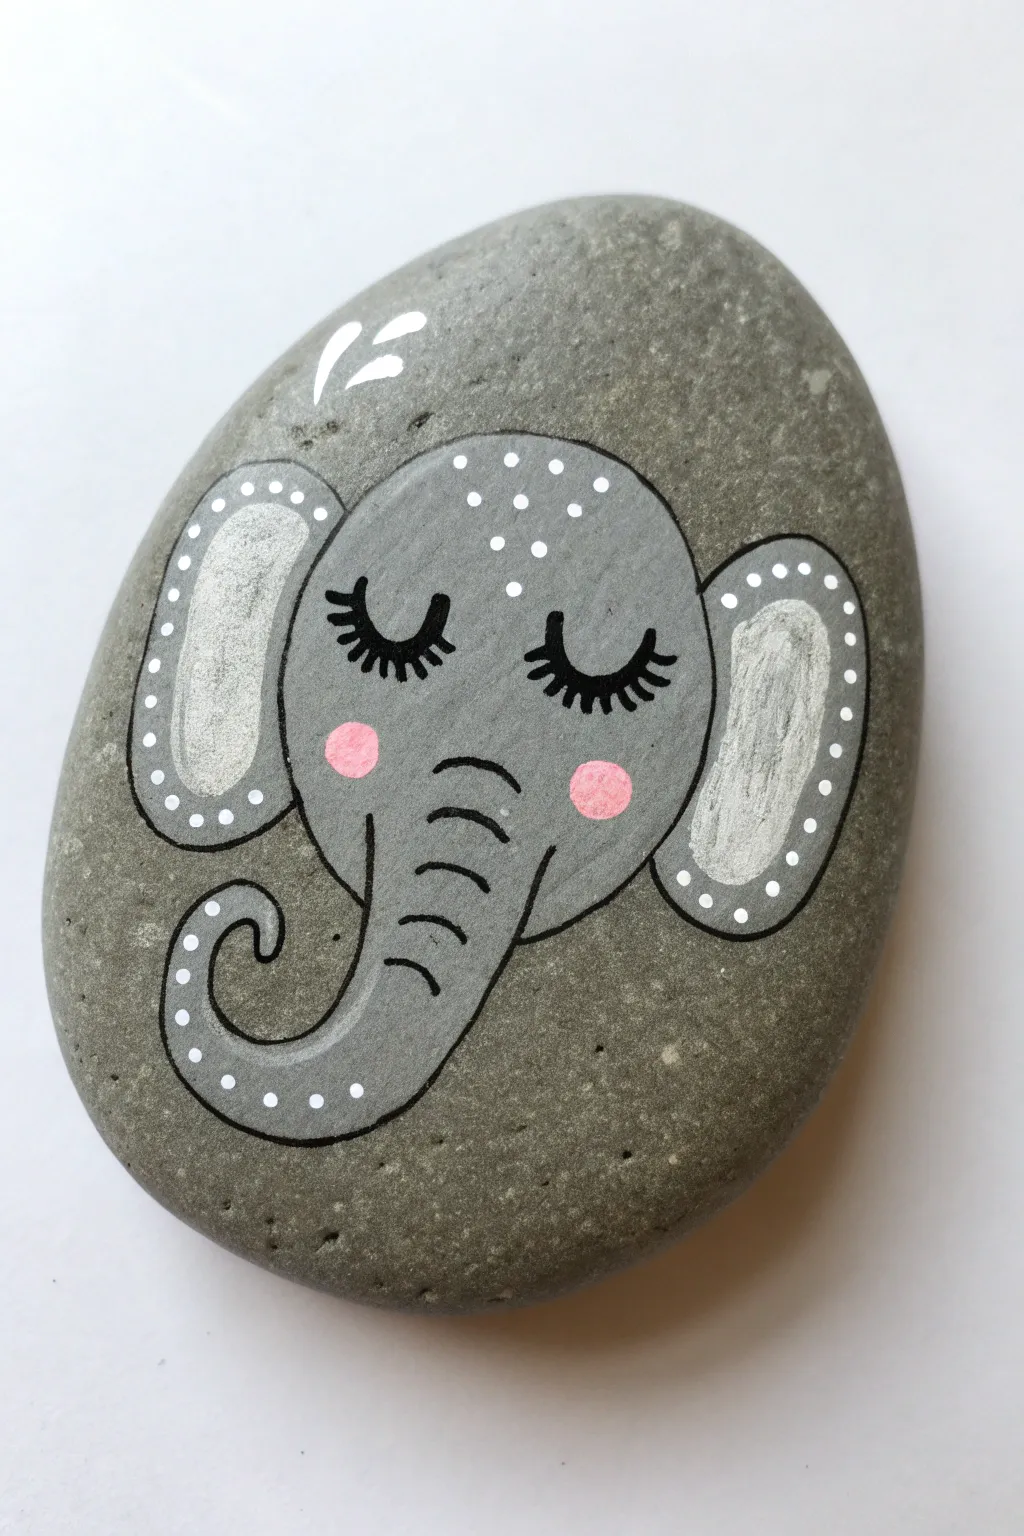
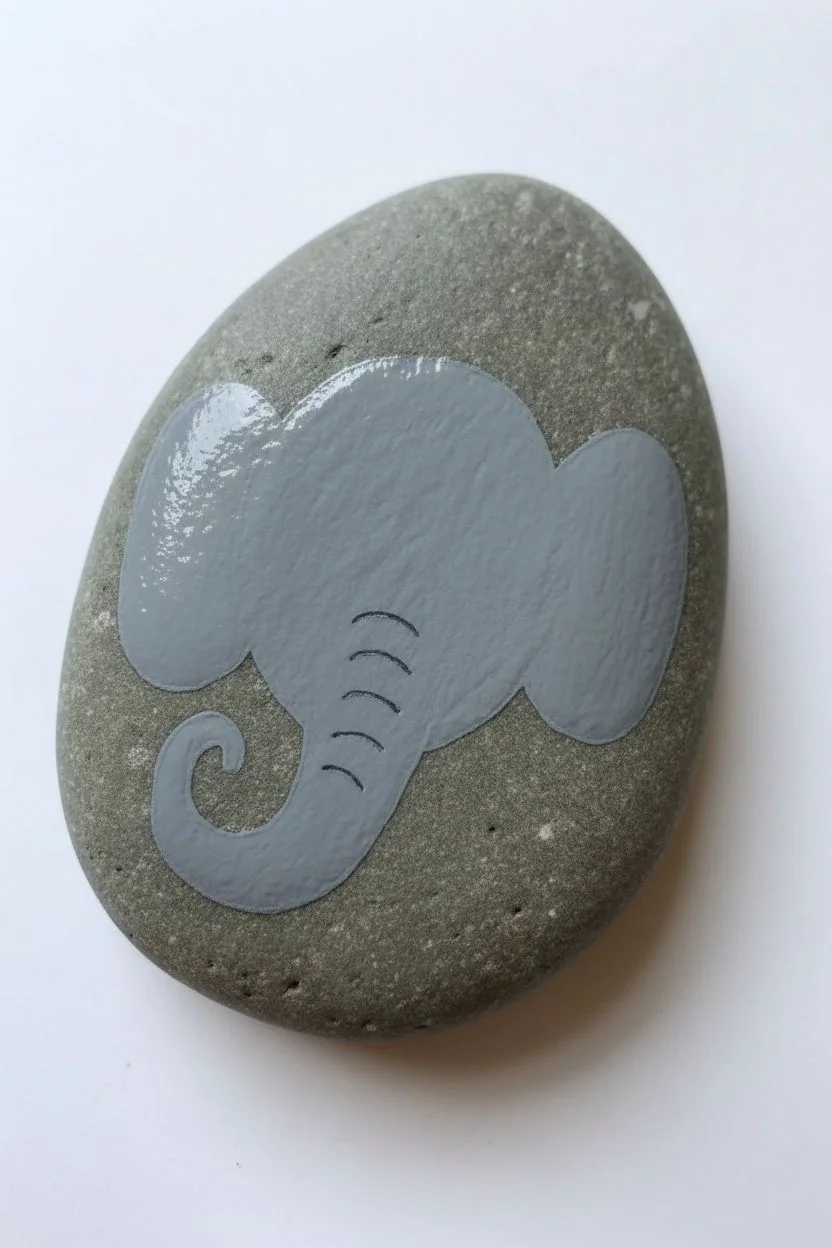
This adorable project transforms a simple smooth stone into a peaceful, sleeping elephant with just a few colors and steady brushstrokes. The soft grey tones against the natural rock background create a wonderfully subtle and sweet piece of decor perfect for a nursery or garden.
How-To Guide
Materials
- Smooth, oval-shaped river rock (clean and dry)
- Acrylic paint (light grey, white, pink, black)
- Fine detail brush (size 0 or 00)
- Medium round brush
- Dotting tool (or a toothpick/end of a paintbrush)
- Pencil (optional)
- Matte or glossy clear sealer
Step 1: Base Shapes
-
Select the perfect canvas:
Choose a rock that is relatively flat and smooth. Wash it thoroughly with soap and water relative to how dirty it is, and let it dry completely before starting. -
Outline the head:
Using a pencil very lightly, sketch the outline of the elephant’s head. Draw a rounded oval shape for the main head, centered on the rock but leaving room for ears. -
Add the trunk:
From the bottom of the head shape, sketch a curved trunk that hooks upward to the left side, slightly tapering as it curls. -
Block in the grey:
Mix a medium grey acrylic paint. Using your medium round brush, fill in the entire head and trunk shape. You aim for a solid, opaque coat, so apply a second layer if the rock color shows through after the first one dries. -
Paint the ear outlines:
Once the head is dry, use the same grey paint to add two large, rounded ear shapes on either side of the head. Think of them like butterfly wings or kidney bean shapes attached to the sides.
Steady Hands Pro-Tip
For the thin black outlines, slightly water down your black paint until it has an ink-like consistency. This helps the brush glide smoothly without dragging on the rough stone surface.
Step 2: Facial Features
-
Paint the inner ears:
Mix a small amount of white into your grey paint to create a lighter shade. Paint a smaller kidney shape inside each ear, leaving a border of the darker grey visible around the edges. -
Add rosy cheeks:
Dip a small brush into soft pink paint. Dab two small circles onto the main face area, placing them fairly wide apart where the cheeks would be. -
Outline the shapes:
Switch to your finest detail brush and black paint. Carefully outline the entire head, trunk, and ears. Keep your hand steady and rest your pinky finger on the rock for balance. -
Draw the lashes:
In the center of the face, paint two U-shaped curves for the closed eyes. Add three or four prominent, thick eyelashes extending upward from each curve. -
Detail the trunk:
Using the fine black liner brush, paint small, curved hatch marks along the length of the trunk to suggest wrinkles and texture.
Step 3: Whimsical Details
-
Dot the ears:
Dip your dotting tool or the non-brush end of a paintbrush into pure white paint. Place a series of evenly spaced dots along the grey border of both ears. -
Decorate the forehead:
I like to add a little sparkle here, so continue with the white dots, placing a small cluster of 5-6 dots near the top of the elephant’s forehead. -
Dot the trunk tip:
Add a few tiny white dots following the curve of the trunk’s tip for continuity. -
Add decorative accents:
Paint three small, teardrop-shaped splash marks floating above the elephant’s head on the left side using white paint. -
Clean up edges:
If any paint went outside your lines, you can gently scrape it off with a damp toothpick if it’s fresh, or paint over it with a color matching your rock if it’s dry. -
Seal the artwork:
Allow the rock to dry overnight. Once cured, apply a coat of clear sealer to protect your painting from chipping and UV light.
Oops, Smudged Paint?
If you smudge the black outline, don’t wipe it! Let it dry completely, then paint over the mistake with your grey base color. Re-paint the black line once the fix is dry.
Now you have a sweet, sleeping guardian for your desk or garden path
Koala Hugging a Branch Rock
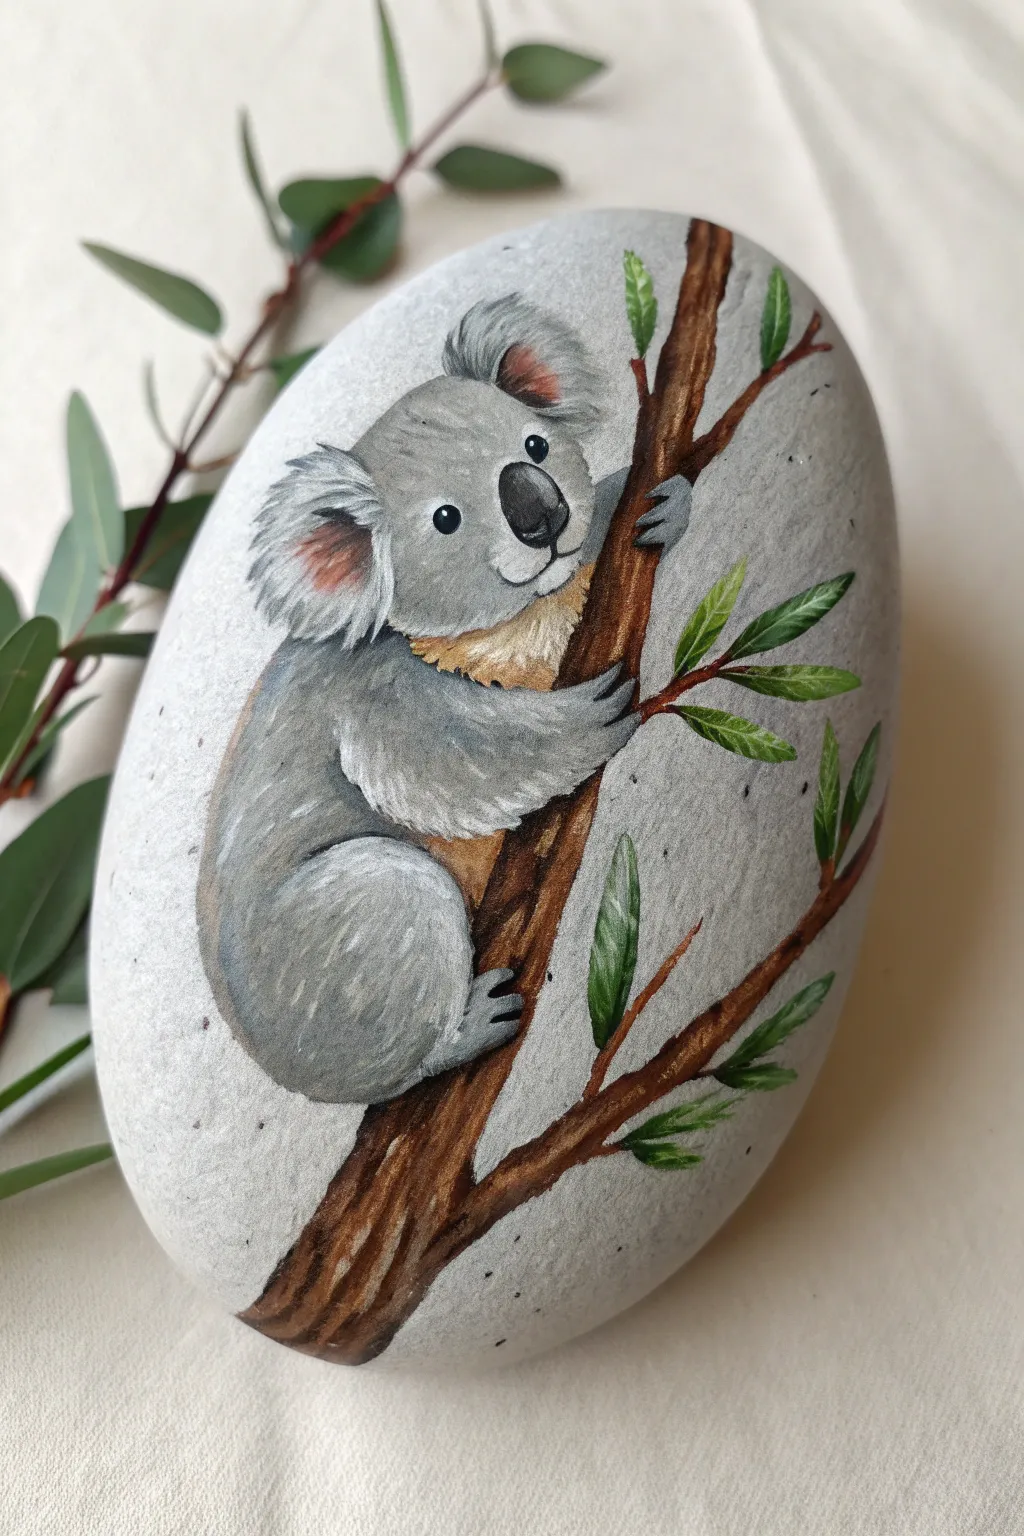
Transform a smooth, oval stone into an adorable piece of art featuring a sweet koala clinging to a eucalyptus branch. This project uses soft grey tones and fine detailing to bring the fluffy texture of the fur to life.
Detailed Instructions
Materials
- Smooth, oval river rock (light grey base helpful)
- Acrylic paints (Titanium White, Mars Black, Burnt Umber, Yellow Ochre, Sap Green, Deep Green)
- Fine liner brush (00 or 000)
- Small flat brush (size 2 or 4)
- Small round brush (size 1)
- Dotting tool or toothpick
- Palette for mixing
- Jar of water
- Paper towels
- Matte spray varnish (optional)
Step 1: Base and Sketching
-
Prep the surface:
Begin with a clean, dry rock. If your rock is dark, paint a base coat of very light grey or off-white over the entire surface to make your colors pop. Let this dry completely. -
Map out the branch:
Using a very diluted brown paint or a light pencil, sketch a diagonal line curving from the bottom left to the top right. This will be the main trunk. Add a secondary thinner branch stemming off to the right. -
Outline the koala:
Sketch the koala’s body shape hugging the left side of the trunk. Draw a large oval for the head positioned slightly above the shoulder, and a pear-shape for the body tucked against the wood. Don’t forget the rounded ears.
Pro Tip: Fur Direction
Always pull your brush strokes *outward* from the center of the body toward the edges. This mimics how real fur grows and makes the koala look much fluffier.
Step 2: Blocking in Colors
-
Base coat the branch:
Mix Burnt Umber with a touch of black. Use your round brush to fill in the tree trunk and branches. Apply the paint in long, vertical strokes to mimic the grain of wood. -
Paint the koala’s grey base:
Mix a medium grey using plenty of White and a drop of Black. Fill in the koala’s head, outer ears, body, and limbs. Avoid the inner ears and the chest area for now. -
Add warmth to the chest:
Mix White with a very small amount of Yellow Ochre and a tiny dot of brown to create a creamy beige. Paint the chest area just below the chin, blending it slightly where it meets the grey fur. -
Inner ear details:
For the inner ears, take your grey mix and add a tiny touch of red or pink if you have it, or just use a lighter, fresher grey tone. Paint the inside of the fluffy ear shapes.
Level Up: Branch Shadow
Mix a transparent dark grey glaze and paint a thin shadow on the branch directly under the koala’s bum and paws. This grounds the animal so it doesn’t look like it’s floating.
Step 3: Building Texture and Depth
-
Create wood texture:
Dip your fine liner brush into dark brown (nearly black). Paint thin, wiggly lines up the length of the branch to create bark texture. I like to add a few highlights using a lighter tan color to make the branch look cylindrical. -
Start the fur texture:
Switch to your smallest liner brush. Mix a lighter grey than your base coat. Start flicking tiny little distinct lines over the grey body and head areas. Keep the strokes short and follow the direction the fur would grow. -
Layering the fur:
Once the first layer of fur is dry, go back with an even lighter grey (almost white). Add more tiny flick marks, focusing on the tops of the ears, the shoulder, and the curve of the back to simulate light hitting the fur. -
Define the limbs:
Use a darker grey wash to gently shade underneath the arm and thigh. This separation is crucial so the limbs don’t look like a single blob against the body. -
Fluff up the ears:
Pay special attention to the ears. Paint longer, sweeping white hairs extending outward from the ear edges to give them that signature tufted koala look.
Step 4: Facial Features and Final Details
-
Paint the nose:
Use solid Black to paint the large, oval nose. Leave a tiny sliver of unpainted space or add a grey highlight on the top curve to make it look wet and leathery. -
Add the eyes:
Paint two small black circles for eyes spaced widely apart. Using a dotting tool or toothpick, add a tiny white sparkle dot to the upper right of each eye and the nose for life. -
Create the mouth:
Paint a very thin, small curved line under the nose using dark grey or black to create a gentle smile. -
Paint the paws:
Use dark grey to enable the claws to grip the tree. Paint sharp, curved distinct claws (two or three per visible paw) wrapping around the brown branch. -
Add leaves:
Mix Sap Green with a little yellow. Paint slender, pointed eucalyptus leaves attached to the branch tips. Add a darker green vein down the center of each leaf for realism. -
Final touches:
Inspect your painting. If the background looks messy, carefully touch it up with your original light grey base color. You can add tiny specks of dark grey in the background for an artistic stone effect.
Once sealed with a clear varnish, your adorable koala stone is ready to act as a sweet paperweight or garden companion
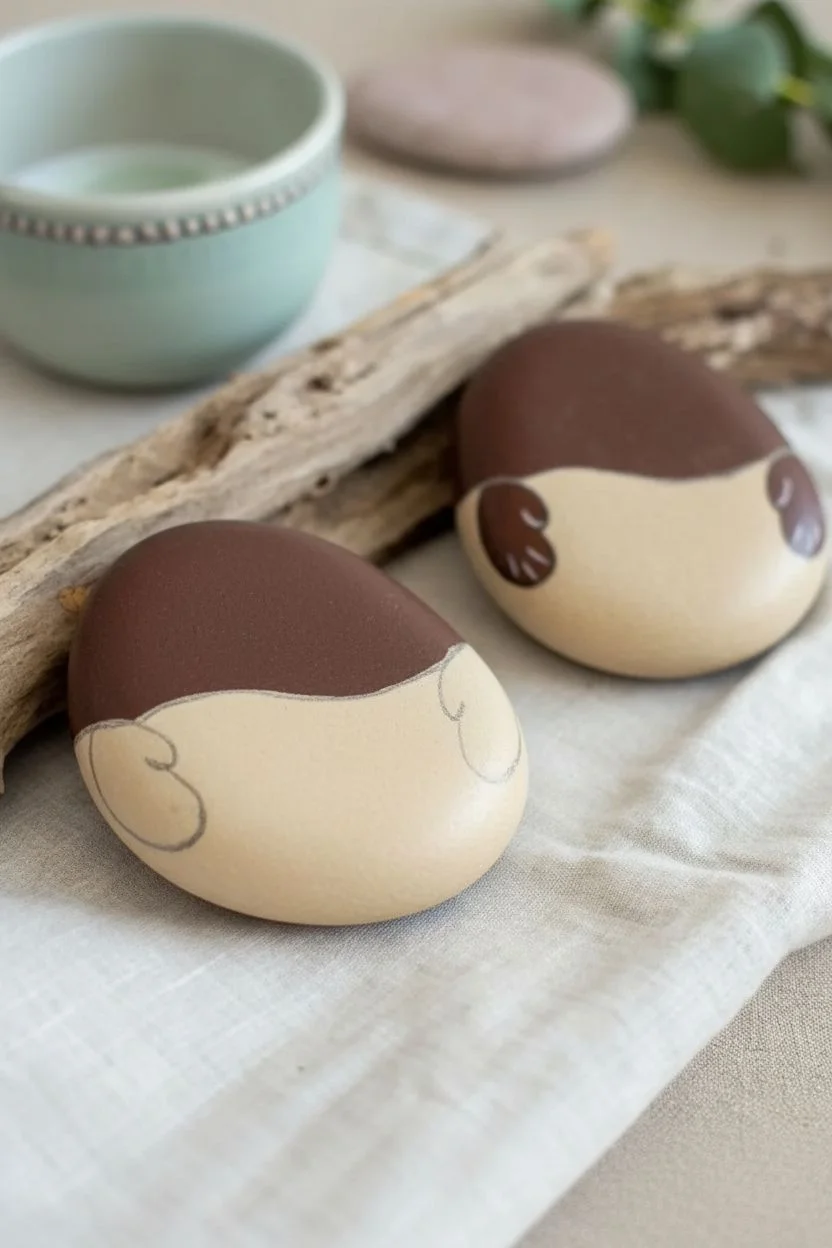
Relaxed Sloth Hanging Rock
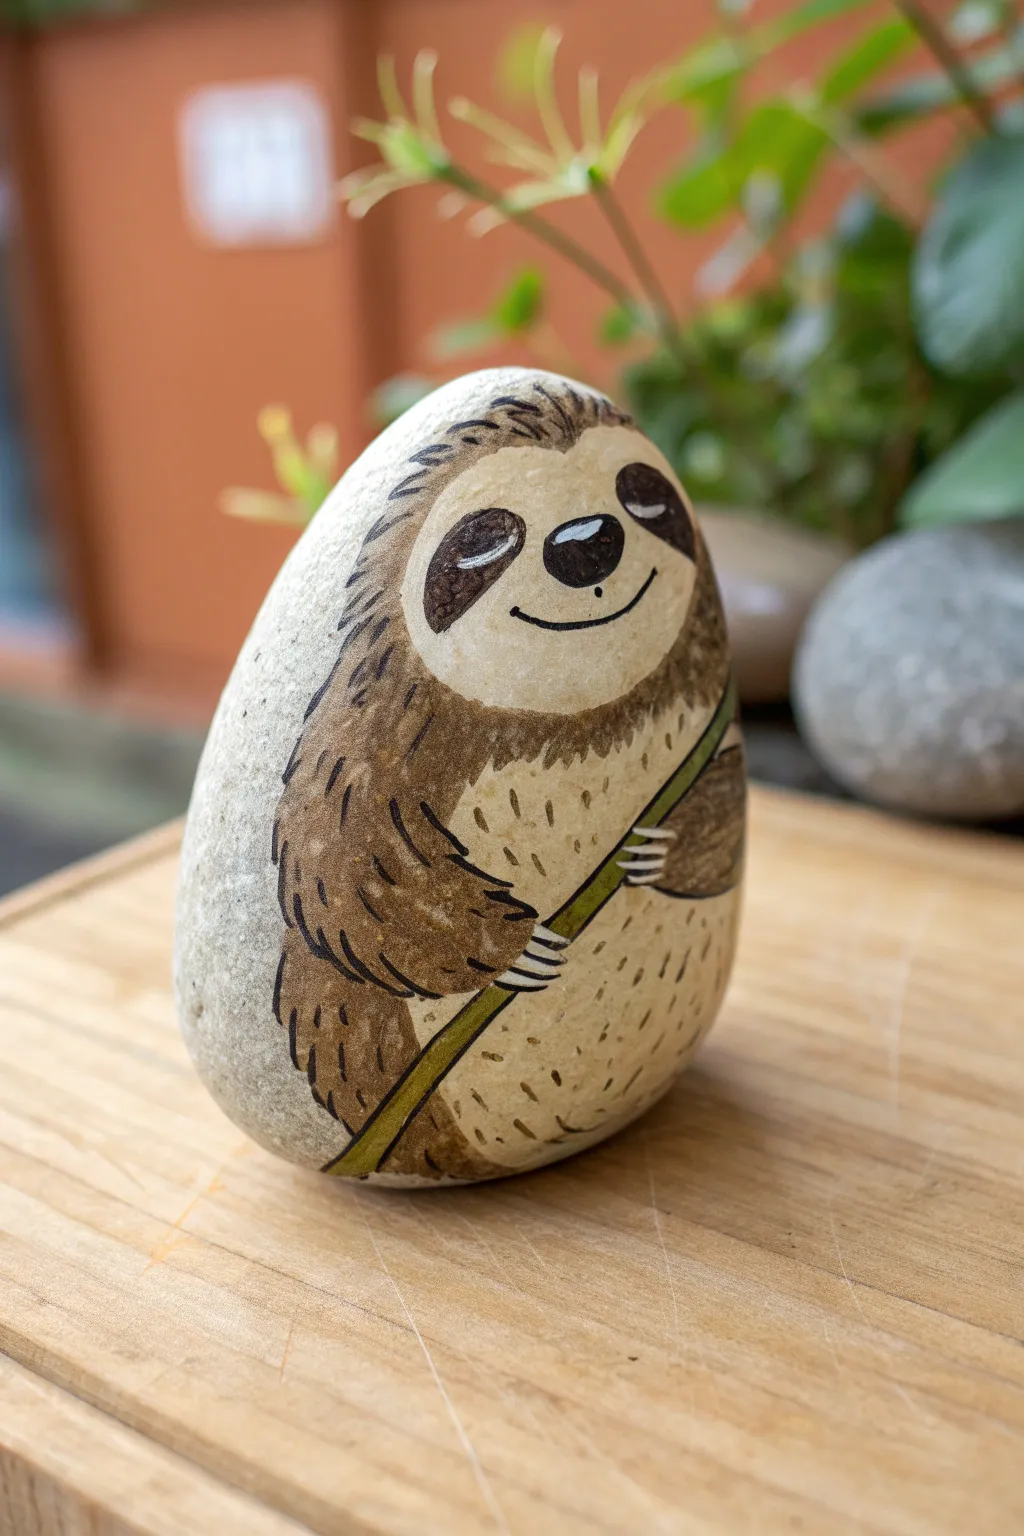

Capture the ultimate symbol of relaxation with this adorable painted rock project. Using a smooth, egg-shaped stone, you’ll paint a cheerful sloth clinging happily to its branch, complete with detailed fur texture and a sweet, sleepy expression.
How-To Guide
Materials
- Smooth, egg-shaped river rock (cleaned and dried)
- Pencil for sketching
- Acrylic paints: White, Cream/Beige, Light Brown, Dark Brown, Green, Black
- Fine liner paintbrush (0 or 00 size)
- Medium flat paintbrush
- Posca paint pens (optional, for details)
- Spray varnish or sealant
Step 1: Preparation and Base Coat
-
Clean surface:
Begin with a thoroughly washed and dried rock. Any dust or dirt will prevent the acrylic paint from sticking properly. -
Sketch the outline:
Using a pencil, lightly sketch the main shape of the sloth directly onto the stone. Draw a large oval for the face near the top, the curve of the back, and the limbs wrapping around the front. -
White base layer:
Paint the entire area inside your sloth outline white first. This primes the rock so your lighter brown and cream colors will pop against the grey stone background.
Uneven Surface?
If your rock has pits, apply a layer of gesso or matte medium first to level the surface before painting your base sketch.
Step 2: Blocking in Color
-
Paint the face:
Mix a creamy beige color using white and a tiny drop of brown. Fill in the large oval shape of the face completely. -
Body base color:
Mix a light tan or cafe-au-lait color. Paint the body area surrounding the face, extending down to the belly, but leave the darker fur areas for the next step. -
Dark fur accents:
Using a standard brown acrylic, paint the outer arm, the back of the head, and the leg area. This creates the ‘shadowed’ or darker fur sections seen on the left side of the rock. -
The branch:
Draw a thin diagonal line crossing the sloth’s body for the branch. Paint this with a mossy green mixed with a little brown to ground it.
Step 3: Adding Details and Texture
-
Fur texture on body:
Load a fine liner brush with slightly diluted dark brown paint. Create small, short dashes across the light tan belly area to simulate fur texture. -
Fur texture on dark areas:
Switch to a black paint or a very dark brown. Add fine, hair-like strokes over the darker brown sections (the arm and back) to define the fur direction. -
Eye patches:
Paint two teardrop-shaped patches in dark brown on the face. These should slant downwards slightly to give that sleepy look. -
The nose:
Paint a soft, rounded triangle for the nose in black right between the eye patches. -
Facial features:
With your finest brush or a black paint pen, draw the closed eyelids inside the brown patches and a simple curved smile line underneath the nose.
Make It 3D
Glue a small, real twig onto the rock instead of painting the green branch for a fun mixed-media texture effect.
Step 4: Finishing Touches
-
Claws:
Using white or very light grey, paint three small, curved claws wrapping over the green branch on both the hand and the foot. -
Highlights:
I like to add a tiny white reflection dot on the nose and thin white lines on the eyelids to bring the character to life. -
Outlining:
Use a thin black liner to gently outline the arms and branch if needed to separate them from the body, adding definition. -
Seal the rock:
Once absolutely dry, spray the rock with a clear varnish to protect your artwork from chipping and weather.
Place your finished sloth in a garden pot or on a desk for a gentle reminder to take it slow
Llama with Fluffy Forelock Rock
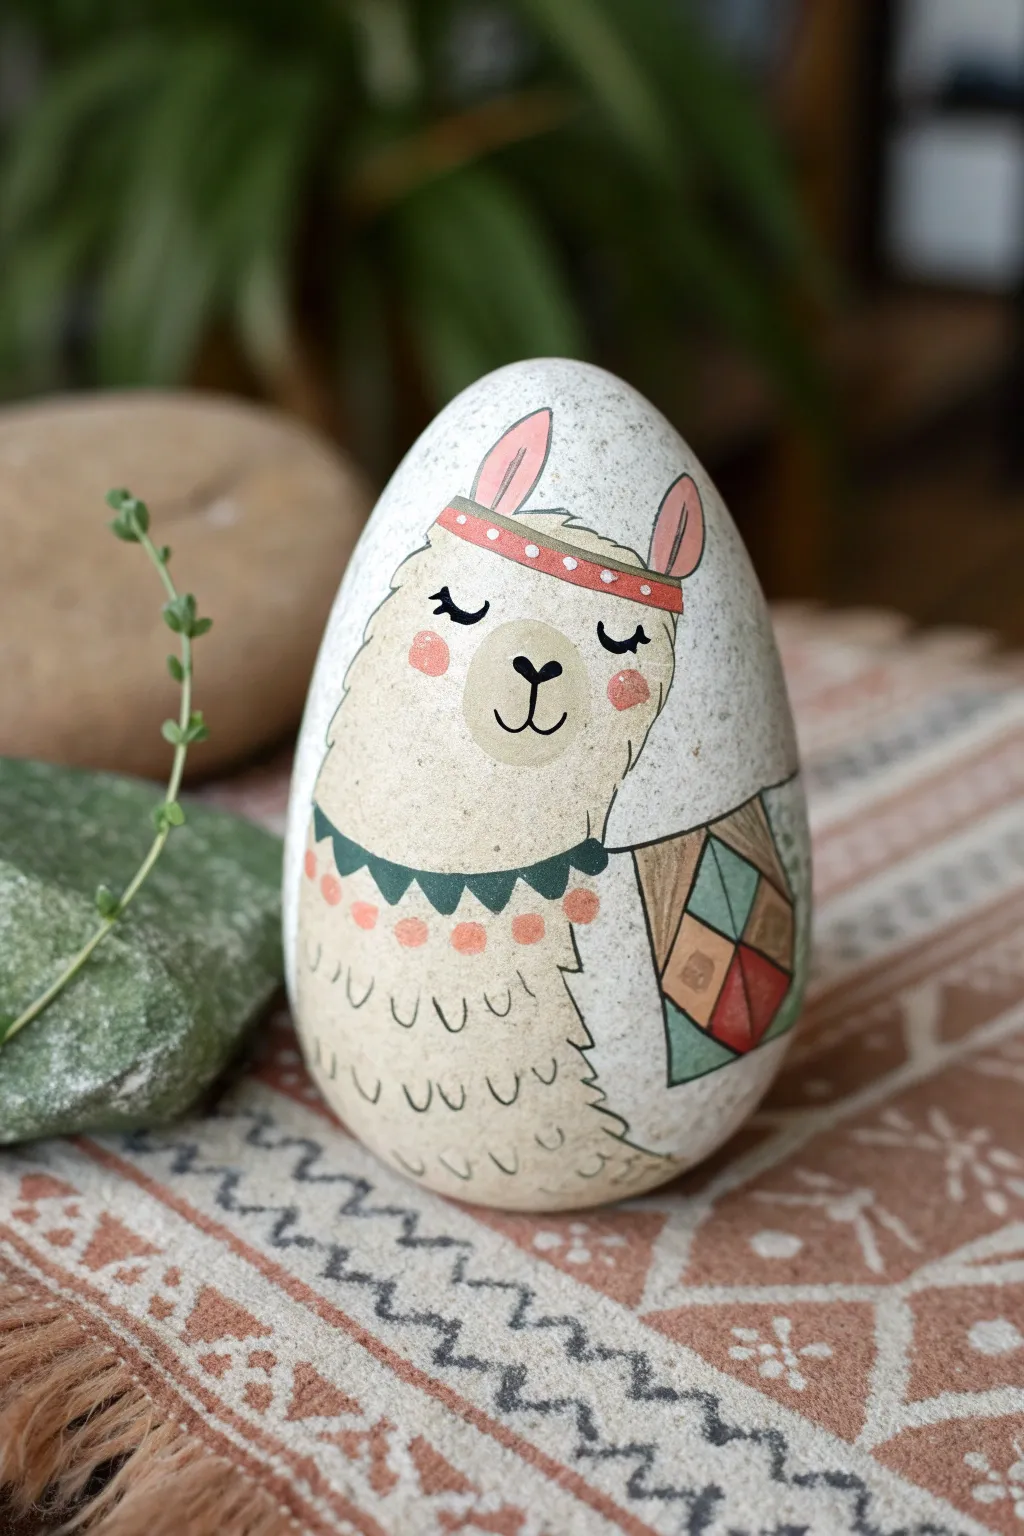
Transform a simple egg-shaped stone into an adorable llama character complete with a festive headband and patterned blanket. This project relies on clean lines and gentle curves to create a whimsical, peaceful expression that adds charm to any garden or desk.
Step-by-Step Guide
Materials
- Smooth, egg-shaped river rock
- White or cream acrylic paint (base coat)
- Beige or sand-colored acrylic paint
- Soft pink acrylic paint
- Dark green acrylic paint
- Red-orange acrylic paint
- Fine point black paint pen or liner brush
- Flat brush (medium)
- Detail brush (small/round)
- Matte spray sealant
Step 1: Base Prep
-
Clean the Canvas:
Scrub your rock thoroughly with warm soapy water and let it dry completely to ensure the paint adheres properly. -
Prime the Surface:
Apply a coat of white or cream acrylic paint over the entire front surface of the rock to create a bright, neutral background. -
Build Opacity:
Once the first layer is dry, add a second or third coat of the base color until the natural stone color is fully obscured.
Paint Slipping?
If your paint streaks or lifts the layer beneath, the bottom coat isn’t fully dry. Use a hair dryer on a cool setting to speed up drying between layers.
Step 2: Shaping the Llama
-
Sketch the Outline:
Lightly trace the llama’s shape with a pencil. Draw a large oval for the body and define the head area, leaving space at the top for ears. -
Paint the Body:
Mix a small amount of beige into your white paint to create a warm off-white tone. Fill in the main body shape, blending it softly at the edges. -
Add the Headband:
Paint a thin red-orange band across the forehead area. -
Create the Ears:
above the headband, paint two tall, leaf-shaped ears. Use the body color for the outer rim and fill the centers with soft pink.
Extra Fluff Factor
Make the fur texture stand out by outlining the little ‘U’ marks with a slightly darker beige paint first, then tracing over them with the black pen.
Step 3: Face Details
-
Pink Cheeks:
Dab two small circles of pink paint on the cheeks to give the llama a rosy complexion. -
Draw the Eyes:
Using your fine black paint pen, carefully draw two closed eyelids with little lashes curling upward for a sleeping or peaceful look. -
Nose and Mouth:
Draw a small ‘Y’ shape between the cheeks to form the nose and mouth. The top of the ‘Y’ should be rounded like a soft triangle. -
Headband Details:
Use a white paint pen or a toothpick dipped in paint to add tiny dots along the red headband for decoration.
Step 4: Accessories & Texture
-
Paint the Necklace:
create a scalloped necklace using dark green paint just below the neck area. Add small pink dots at the bottom of each scallop point. -
Design the Blanket:
On the lower right side, paint a diamond-patterned blanket using geometric blocks of green, red-orange, and beige. -
Outline Everything:
I prefer to use a very fine black liner to outline the ears, head, necklace, and blanket to make the design pop. -
Add Fur Texture:
Draw small ‘U’ shapes or tiny tick marks scattered across the llama’s chest and lower body to suggest fluffy wool texture. -
Seal the Work:
Allow the rock to dry overnight, then spray with a matte sealant to protect your artwork from chipping.
Now you have a serene little llama friend ready to sit on your shelf
Hedgehog with Dot-Spine Texture
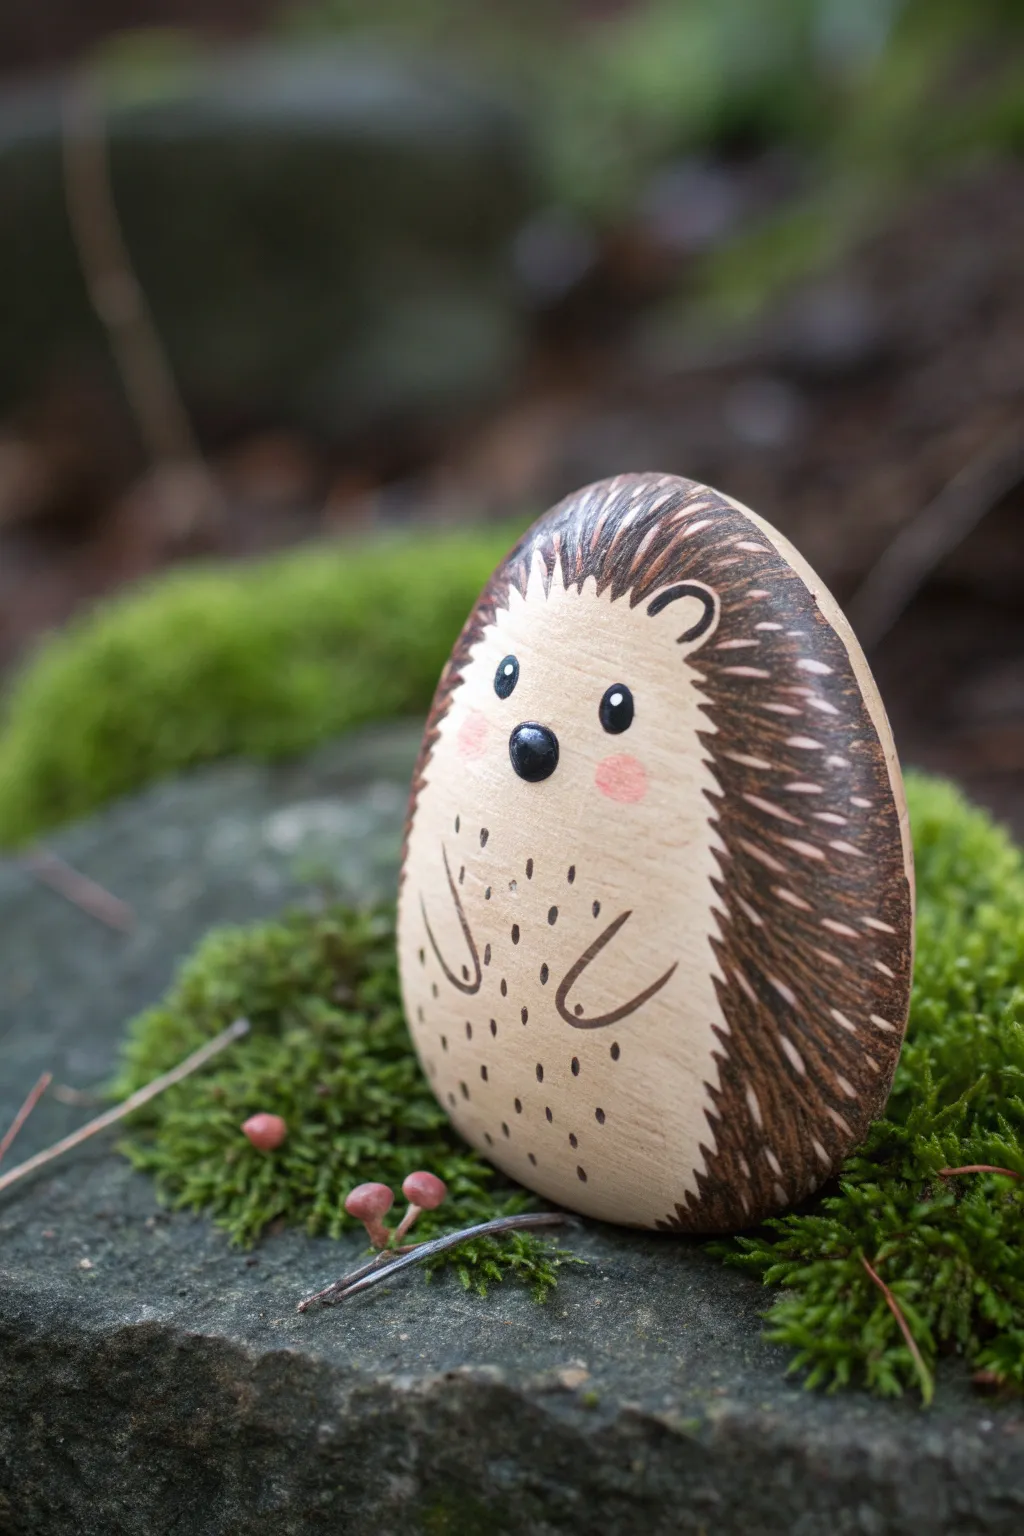
Transform a smooth, oval stone into an adorable woodland creature with this charming hedgehog design. The combination of simple lines and earthy tones creates a warm, illustrative character perfect for garden decor or a desk companion.
Step-by-Step
Materials
- Smooth, oval-shaped river rock (palm-sized)
- Acrylic paints: Beige/Cream, Dark Brown, White, Black, Soft Pink
- Pencil for sketching
- Fine liner brush (size 00 or 0)
- Flat brush (small/medium)
- Dotting tool or toothpick
- Matte or satin varnish/sealer
Step 1: Base and Body Shape
-
Clean your canvas:
Begin by scrubbing your rock with soap and warm water to remove any dirt or oils. Let it dry completely before starting; any moisture trapped inside can ruin the paint later. -
Map out the face:
Using a pencil, lightly sketch a large oval shape on the front of the rock for the hedgehog’s face and belly. Leave the back and sides empty for the spines later. -
Paint the belly:
Fill in the sketched oval area with your beige or cream acrylic paint. Use a flat brush for smooth coverage. -
Apply a second coat:
Acrylics can be translucent, especially light colors. I like to let the first layer dry for about 10 minutes and apply a second coat to ensure the stone color doesn’t peek through. -
Outline the body:
Once the beige is dry, use a fine liner brush and dark brown paint (watered down slightly for flow) to create a jagged, spiky outline around the top edge of the beige area. This creates the separation between fur and face.
Uneven Lines?
If your fine lines are thick or clumpy, your paint is likely too thick. Add a drop of water to your acrylics on the palette until the consistency resembles ink or heavy cream.
Step 2: Spines and Texture
-
Fill the background:
Paint the remaining exposed rock surface (sides and back) with the dark brown paint. Don’t worry about texture yet; just get a solid base coat down that meets your jagged outline. -
Create the spines:
Mix a lighter shade of brown by adding a touch of white to your dark brown. Using your finest brush, paint short, thin strokes over the dark brown area, radiating outward from the face to mimic spines. -
Add highlights:
For extra depth, add a few even lighter strokes (cream or white) interspersed among the brown spines. Keep these strokes very thin and delicate. -
Detail the ears:
Using black or very dark brown paint and your liner brush, paint a small, rounded ‘C’ shape on the upper right side of the beige face for the visible ear.
Level Up: 3D Nose
Instead of painting the nose flat, glue a tiny black bead or a small round pebble onto the face for a fun, tactile element that makes the snout actually poke out.
Step 3: Face and Details
-
Paint the eyes:
Dip a small brush handle or large dotting tool into black paint. Press two confident dots onto the upper middle of the face, spacing them apart slightly. -
Add the nose:
Paint a slightly larger, oval-shaped black dot lower down between the eyes for the nose. Make it prominent for that cute snout look. -
Rosy cheeks:
Mix a very soft pink (or water down bright pink for a glaze effect). Dab two small circles under the eyes to give the hedgehog a sweet expression. -
Sparkle in the eyes:
Once the black eyes are fully dry, use a toothpick or tiny dotting tool to add a single white speck to the top right of each eye and the nose. This brings the character to life. -
Draw the arms:
With watered-down dark brown or black paint and your liner brush, draw two simple curved lines on the lower belly to represent tiny arms folded in. -
Texture the belly:
Add tiny dashes or flicks of dark brown paint across the beige belly area. Keep these sparse and light to suggest soft fur texture without cluttering the design. -
Seal the rock:
Allow the entire project to cure for 24 hours. Finish with a coat of matte or satin varnish to protect the paint from chipping and weather.
Now find a cozy spot in your garden or on a shelf for your new little companion to rest
Crosshatched Octopus Tentacle Rock
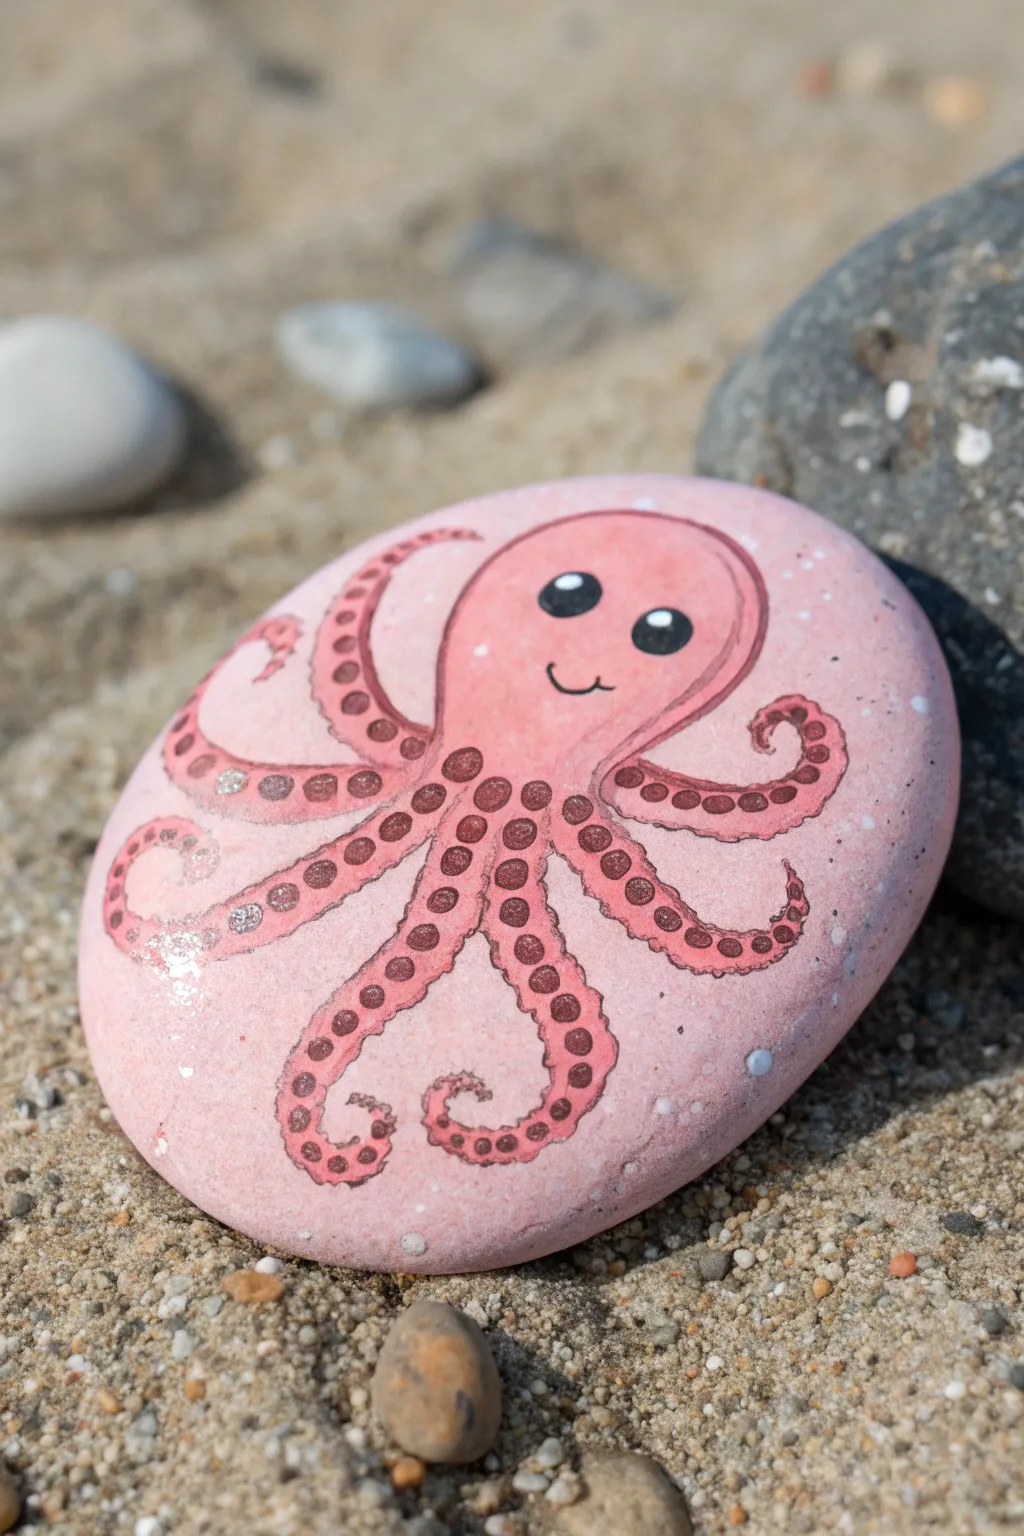
Transform a smooth beach stone into a cheerful sea creature with this adorable octopus design. The soft pink palette and detailed tentacles make for a captivating little art piece that fits perfectly in the palm of your hand.
Detailed Instructions
Materials
- Smooth, flat oval rock (approximately palm-sized)
- Acrylic paint (Light Pink, Darker Salmon Pink, Black, White)
- Fine detail paintbrush (size 0 or 00)
- Medium flat paintbrush
- Pencil for sketching
- White or colorless paint marker/posca pen (optional for details)
- Matte or glossy sealant spray
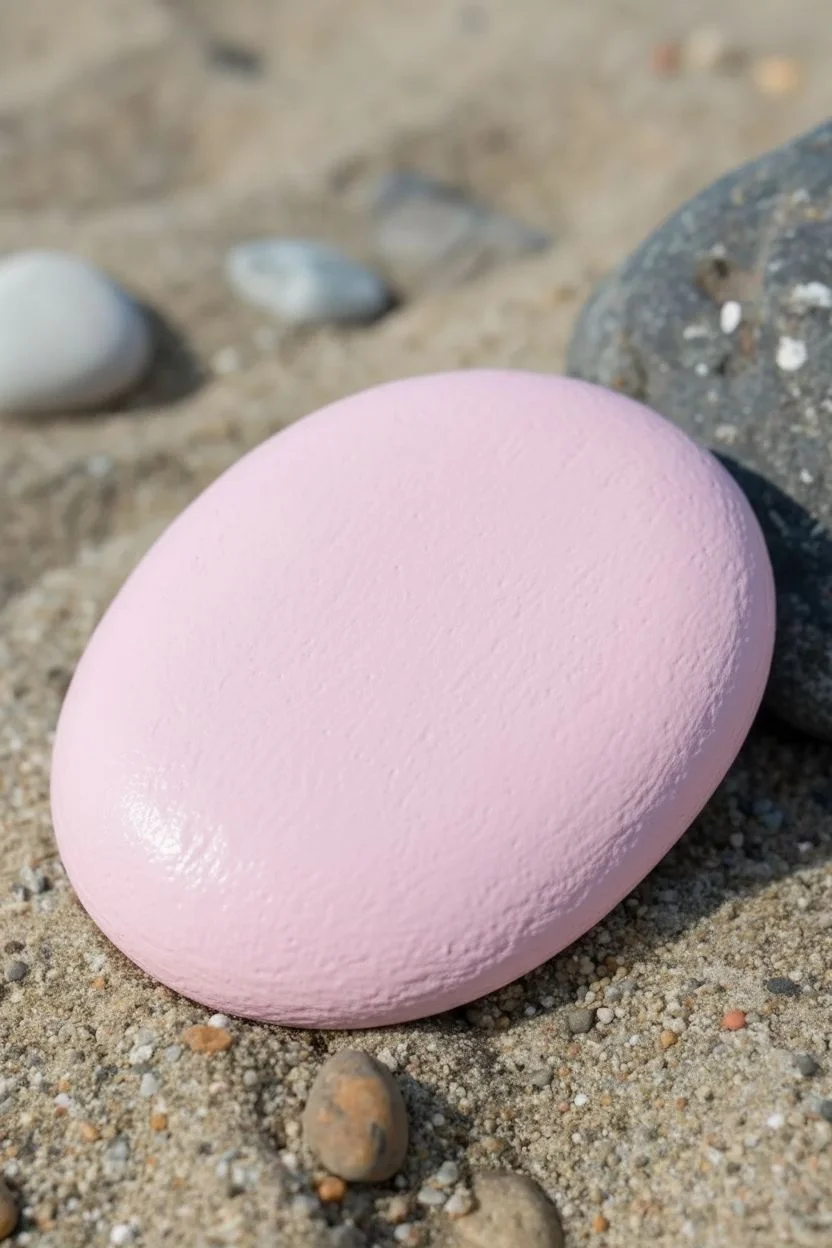
Step 1: Base Coat
-
Clean Your Canvas:
Begin by washing your rock with soap and water to remove any dirt or sand. Let it dry completely before starting to ensure the paint adheres properly. -
Pink Foundation:
Using your medium flat brush, apply a coat of light pink acrylic paint over the entire top surface of the rock. Depending on the opacity of your paint, you may need 2-3 coats to get a solid, even color without streaks. -
Dry Time:
Allow the base coat to dry fully. If the paint is still tacky, your pencil sketch might dig into it.
Step 2: Sketching the Octopus
-
Outline the Head:
Lightly sketch a large, rounded bulb shape near the top center of the rock for the octopus’s head. Keep your pencil pressure very light so mistakes are easy to erase. -
Draft the Tentacles:
Draw eight wavy tentacles extending from the base of the head. Curve the outer ones upward and let the lower ones curl inward at the tips to create a dynamic, floating appearance. -
Face Placement:
Mark two small circles for eyes in the middle of the head and a simple curved line for a smile right between them.
Wobbly Lines?
If your brush outlines are shaky, let them dry and clean them up by painting over the mistake with your background color. A paint pen is also much easier for beginners!
Step 3: Painting the Details
-
Outline in Dark Pink:
Using a fine detail brush and the darker salmon pink paint, carefully trace over your pencil lines. Outline the entire head and each tentacle with a steady hand. -
Define the Tentacles:
Paint a line down the center of each tentacle if you want to separate the sucker area from the smooth side, or simply outline the edges clearly. The image shows the suckers are the main detail, so focus on the outer shape first. -
Adding Suckers:
Dip your fine brush or a dotting tool into the dark salmon pink. Paint small circles in rows along the tentacles. Start with larger circles near the head and make them progressively smaller as you reach the tips. -
Fill the Suckers:
If your sucker outlines are thick, you can fill the centers with a tiny dot of a slightly lighter pink or leave the background color showing through for depth. -
Shading (Optional):
I like to add a very sheer wash of the darker pink on the underside of the head or tentacles to give the body a little dimension, but keeping it flat and graphic works too.
Make it Sparkle
Mix a tiny pinch of fine iridescent glitter into your sealant or topcoat for a ‘wet’ ocean look that shimmers in the sun.
Step 4: Face and Finishing Touches
-
Paint the Eyes:
Fill in the eye circles with solid black paint. Use your smallest brush to keep the edges crisp. -
Eye Highlights:
Once the black is dry, add a tiny white dot in the upper corner of each eye. This ‘catchlight’ brings the character to life instantly. -
The Smile:
Trace the smile line with a very thin black line. A fine-tip paint pen is often easier than a brush for this delicate curve. -
Textural Dots:
To mimic the sandy texture or add interest, simulate bubbles or sparkles by adding tiny white dots randomly around the background or on the octopus body. -
Final Inspection:
Check for any pencil marks that might still be visible. If the paint is fully dry, you may be able to gently erase them, or just touch them up with a bit of pink paint.
Step 5: Protection
-
Seal the Rock:
Once your artwork is completely dry (give it at least an hour or two), take it to a well-ventilated area and spray it with a clear acrylic sealer. This protects the paint from chipping and weather.
Now you have a charming sea companion that requires zero feeding and looks great on any desk or garden path
Sweet Otter Pair with Matching Expressions

Transform ordinary smooth stones into an adorable pair of river otters with this charming rock painting project. The natural oval shape of river rocks lends itself perfectly to the sleek, curved bodies of these playful creatures.
Step-by-Step
Materials
- Two smooth, oval-shaped river rocks (palm-sized)
- Acrylic paints (dark brown, light beige/ivory, black, white, caramel/ochre)
- Pencil for sketching
- Paintbrushes (flat shader brush, fine liner brush)
- Dotting tool or toothpick
- Matte or satin varnish (spray or brush-on)
- Water based paint sealer (optional)
- Palette for mixing
Step 1: Planning and Base Coating
-
Select your stones:
Choose two smooth stones that naturally mimic the elongated, rounded shape of an otter’s body. Wash them with soap and water and let them dry completely to ensure the paint adheres properly. -
Sketch the outline:
Using a pencil, lightly map out the main shapes. Draw a curved line to separate the dark brown ‘fur’ area on top from the lighter tummy and face area below. Mark out where the flippers will rest on the sides. -
Paint the light areas:
Start by filling in the face and belly area with a light beige or ivory acrylic paint. You may need two coats here to get a solid, opaque coverage over the stone. Let this dry fully before moving on. -
Block in the dark fur:
Paint the top of the head and the back of the otter with a rich dark brown. Use a flat brush to carefully follow the curved line you sketched earlier, ensuring a clean edge where it meets the beige.
Step 2: Adding the Face and Flippers
-
Create the flippers:
Paint kidney-bean shapes on the sides for the flippers. On the front otter, use a caramel or rusty brown color to make them stand out slightly against the beige body. On the rear otter, match the dark brown of the head. -
Paint the nose:
Using black paint and a small round brush, paint a soft, inverted triangle or rounded heart shape for the nose right in the center of the face area. -
Draw the mouth:
With your finest liner brush and black paint (thinned slightly with water for better flow), draw a ‘W’ shape extending down from the nose to create that classic smiling otter mouth. -
Add the eyes:
Paint two large, solid black circles for eyes. Position them wide apart to enhance the cute factor. Ensure they are symmetrical relative to the nose. -
Highlight the eyes:
Once the black eye paint is dry, use a dotting tool or the handle end of a brush dipped in white paint to add a small reflection dot in the upper corner of each eye. This brings them to life instantly.
Clean Lines Pro Tip
If you struggle with shaky hands on the whiskers, try using a black ultra-fine tip permanent marker instead of a paint brush. It offers much more control.
Step 3: Details and Finishing Touches
-
Add texture to the dark fur:
I find that dipping an old toothbrush or stiff brush into slightly watered-down white paint and flicking it creates a great texture, but for more control, use a fine brush to paint tiny white dashes or dots on the dark brown head area. -
Detail the belly:
For the front otter, use a dark brown paint to add small dashed lines or speckles on the beige belly area to suggest fur texture. Keep these delicate and randomized. -
Define the muzzle:
Using the dark brown paint, add a few tiny dots on the snout area, right next to the mouth lines. -
Paint the whiskers:
With a liner brush and black paint, sweep three thin, long lines outward from the muzzle dots on each side. Keep your wrist loose to get tapered lines. -
Highlight the flippers:
Add small, light yellow or cream dashes to the flippers to give them form and suggest toes or claws. -
Forehead details:
Add a few specific larger white dots or dashes between the eyes on the dark brown forehead to mimic markings. -
Seal the artwork:
Once the paint is completely cured (give it a few hours), apply a coat of matte or satin varnish. This protects the paint from chipping and gives the rocks a finished, professional look.
Level Up: Accessories
Paint a tiny pebble to look like a clam shell or a colorful fish and glue it to the otter’s tummy so it looks like it’s holding a snack.
Now you have a sweet pair of stone friends ready to decorate your desk or garden path


Have a question or want to share your own experience? I'd love to hear from you in the comments below!