Your driveway is basically a giant outdoor canvas, and a little driveway paint can totally change the vibe of your whole front yard. I love how the right color and pattern can fake expensive materials, hide imperfections, and add that satisfying “finished” look in a weekend.
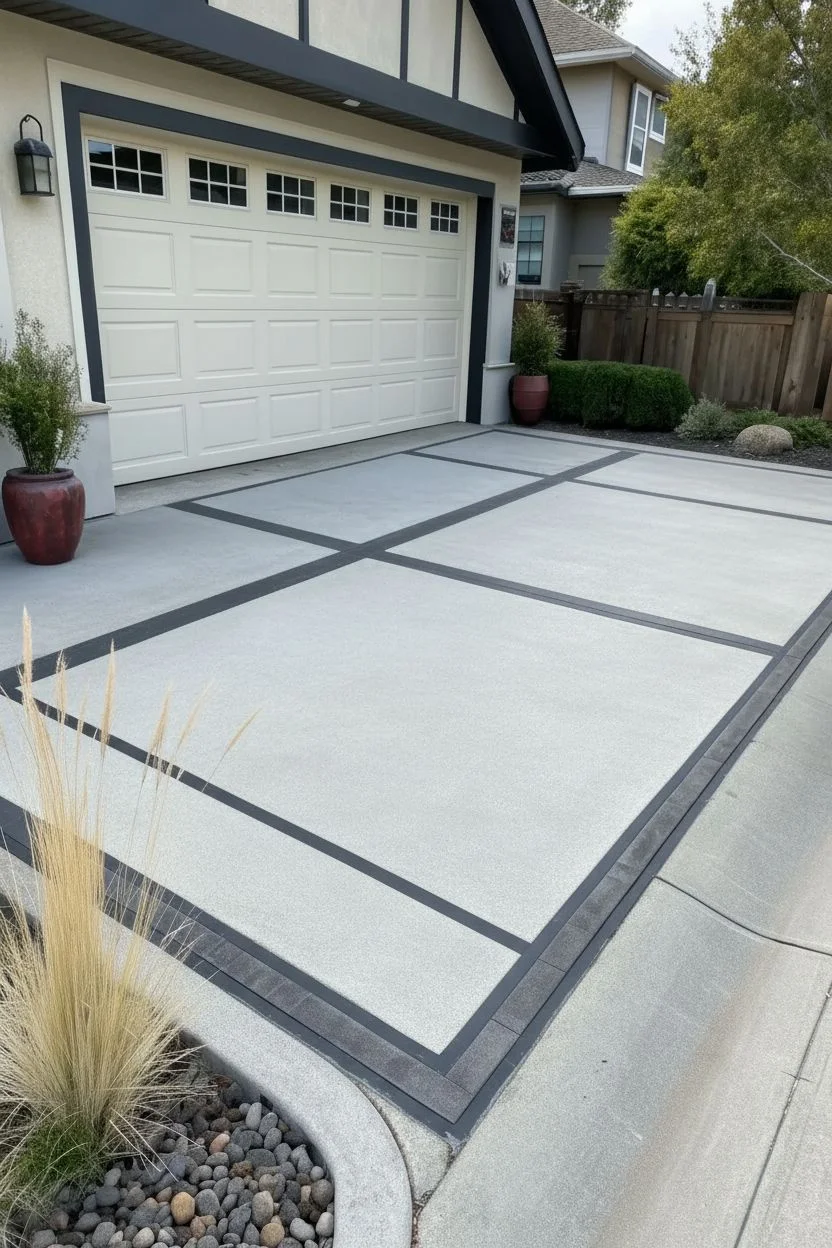
Solid Charcoal Gray for Instant Modern Curb Appeal
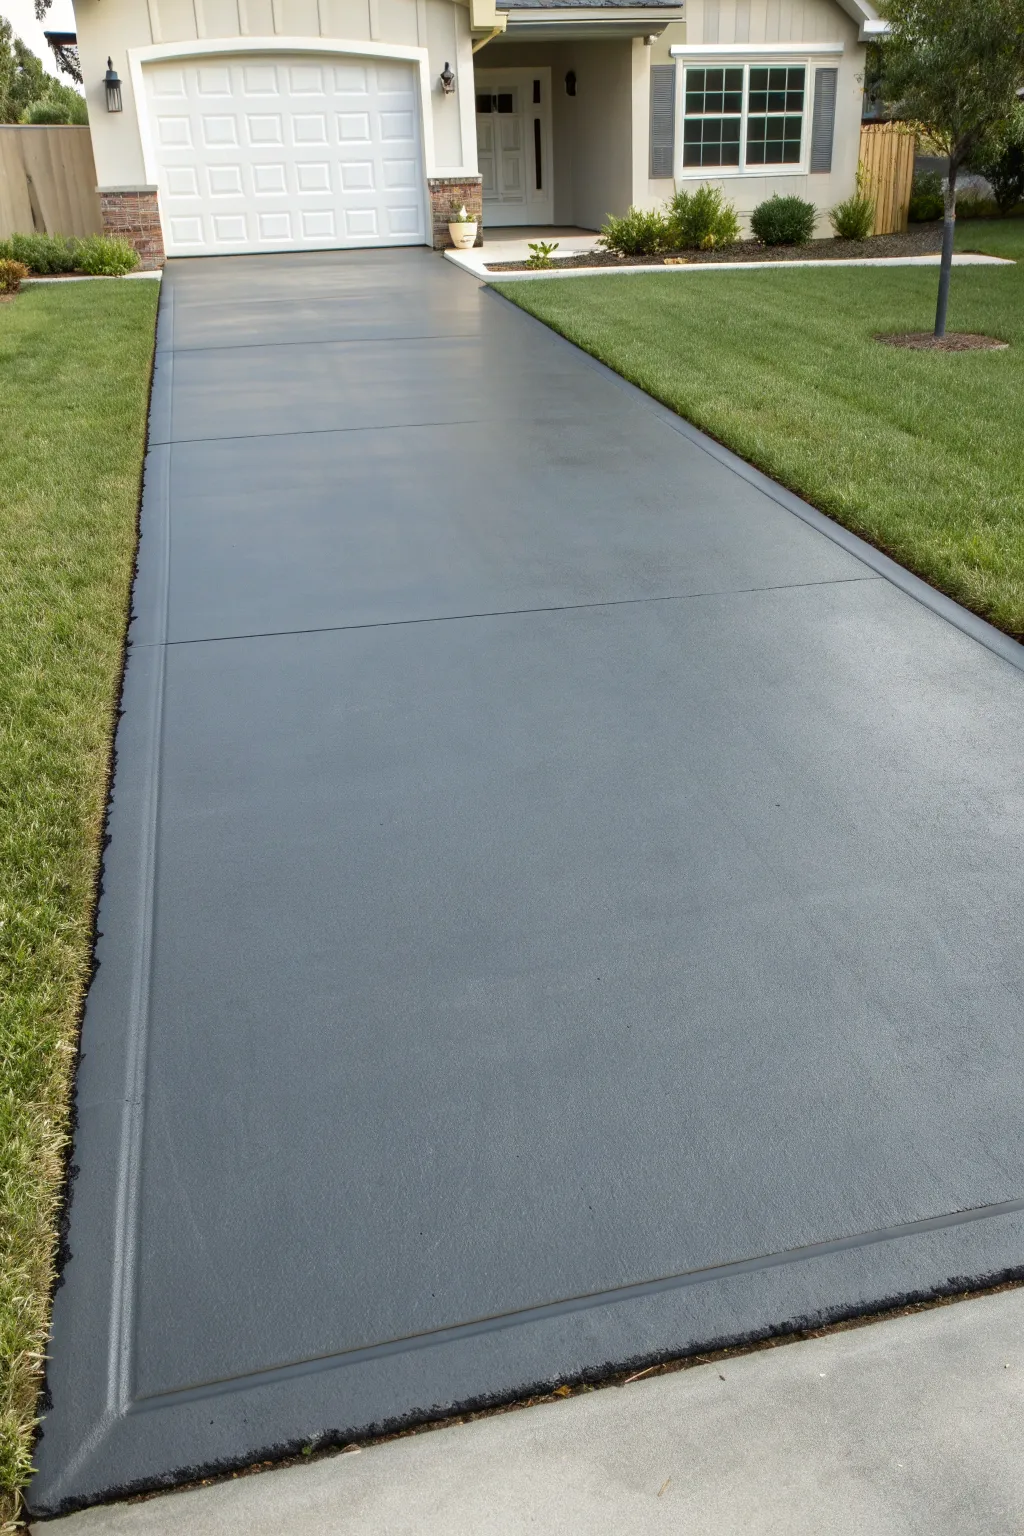
Transform a tired, stained concrete driveway into a sleek, modern entrance with a solid charcoal gray finish. This project delivers high-impact curb appeal with a uniform, matte look that hides imperfections beautifully.
Step-by-Step
Materials
- Concrete pressure washer (approx. 3000 PSI)
- Stiff-bristle broom
- Concrete degreaser/cleaner
- Masonry crack filler (if needed)
- Painter’s tape (wide width)
- Concrete etcher (muriatic acid alternative)
- High-quality acrylic latex concrete paint/stain (Charcoal Gray)
- Paint roller frame with extension pole
- 3/8-inch nap roller covers (for smooth/medium surfaces)
- 3-inch angled synthetic paintbrush
- Paint tray and liner
- Leaf blower
Step 1: Preparation & Cleaning
-
Clear the area:
Remove all vehicles, potted plants, and debris from the driveway. Use a leaf blower to get rid of loose leaves, dirt, and dust before you begin any wet work. -
Degrease stains:
Inspect the surface for oil spots. Pour undiluted concrete degreaser directly onto these stains, scrubbing vigorously with a stiff-bristle brush to lift the oil out of the pores. -
Power wash:
Thoroughly pressure wash the entire driveway. Work in consistent sections to remove all grime, moss, and loose paint. This step is critical for adhesion. -
Repair cracks:
Once the driveway is dry (usually 24 hours), fill any visible cracks with masonry crack filler. Smooth it out with a putty knife so it is flush with the surface. -
Etch smooth concrete:
If your concrete feels very smooth (like a garage floor), apply a concrete etcher according to the bottle instructions. This creates a microscopic rough texture that helps the paint grip. -
Final rinse and dry:
Rinse away any etching residue thoroughly. Allow the driveway to dry completely for at least 24-48 hours. Trapped moisture is the enemy of a lasting finish.
Peeling Paint?
If paint peels under tires quickly, moisture usually causes it. Always tape a plastic sheet to the concrete for 24 hours prior to painting; if moisture gathers under the plastic, it’s too wet to paint.
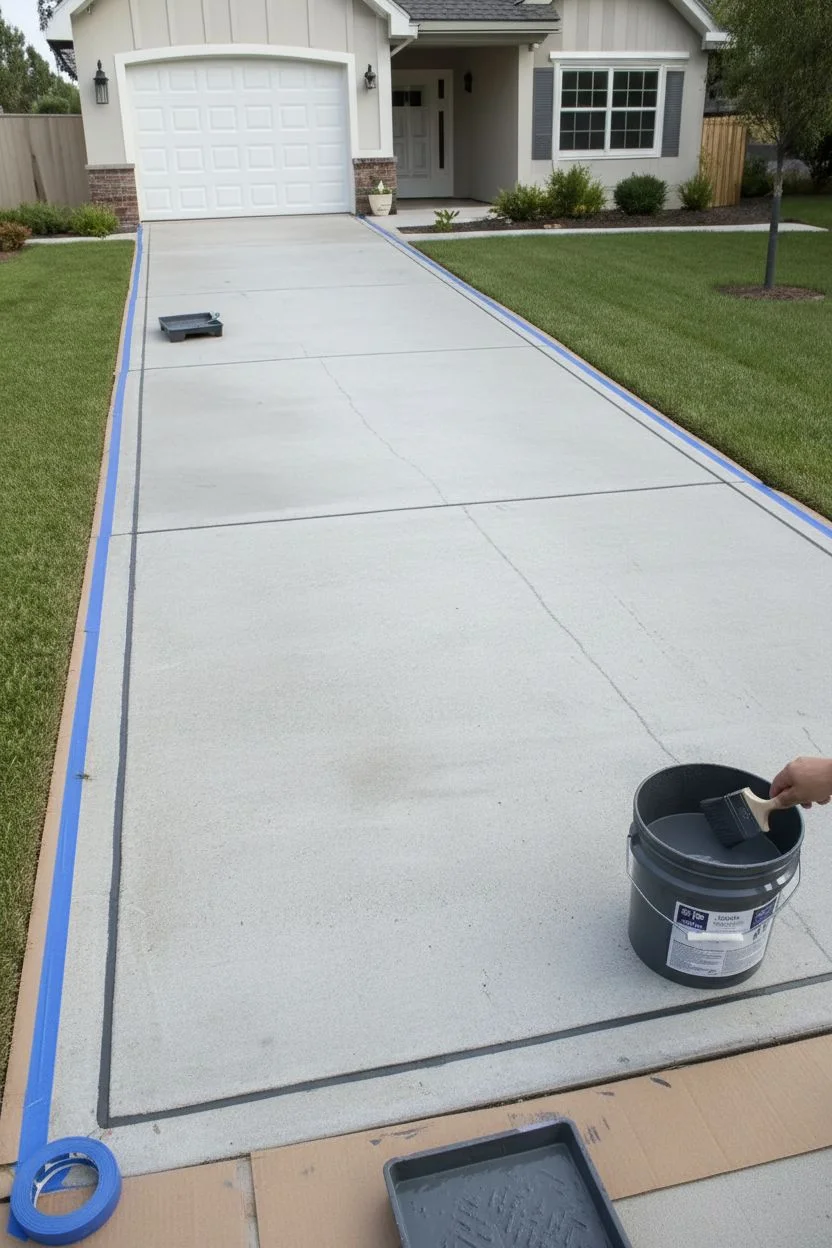
Step 2: Masking & Cutting In
-
Protect surroundings:
Apply wide painter’s tape along the garage door seal, adjacent brickwork, and any landscape edging to keep your lines crisp. -
Shield the grass:
You might want to lay cardboard strips or a drop cloth along the grass edge to prevent accidental roller splatters on your lawn. -
Mix the paint:
Open your charcoal gray concrete paint and stir it thoroughly. If using multiple cans, boxing them (mixing them together in a 5-gallon bucket) ensures color consistency. -
Cut in edges:
Using the 3-inch angled brush, paint a 3-4 inch border along the perimeter of the driveway and against the garage door. This creates a frame for rolling. -
Detail expansion joints:
Don’t forget the control joints or decorative grooves. Use the brush to work paint deep into these crevices so no raw concrete peeks through later.
Step 3: Rolling the Finish
-
Load the roller:
Saturate your roller cover with paint, but avoid overloading it to the point of dripping. A 3/8-inch nap works well for standard driveway textures. -
Apply the first coat:
Start at the top of the driveway (near the garage) and work your way down. Use a ‘W’ pattern to distribute paint, then back-roll vertically to smooth it out. -
Maintain a wet edge:
Keep moving steadily to maintain a wet edge. I prefer to work in 4×4 foot sections to prevent lap marks from drying before I can blend them. -
Let it cure:
Allow the first coat to dry according to the manufacturer’s instructions, typically 4-6 hours, though humidity can extend this time. -
Apply the second coat:
Depending on coverage, apply a second coat perpendicular to the first (rolling horizontally). This cross-hatching technique fills missed pores and deepens the charcoal color. -
Remove tape:
Carefully peel up the painter’s tape while the final coat is still slightly tacky. This prevents the dried paint from peeling up with the tape. -
Final cure:
Keep cars off the driveway for at least 3-7 days (check your paint can specifics) to allow the finish to harden completely against tire pickup.
Add Traction
For sloped driveways, mix a non-slip additive into the final coat of paint. This fine grit adds essential grip for wet tires and shoes without visibly changing the sleek charcoal finish.
Now you have a pristine, slate-colored entrance that dramatically upgrades the look of your home


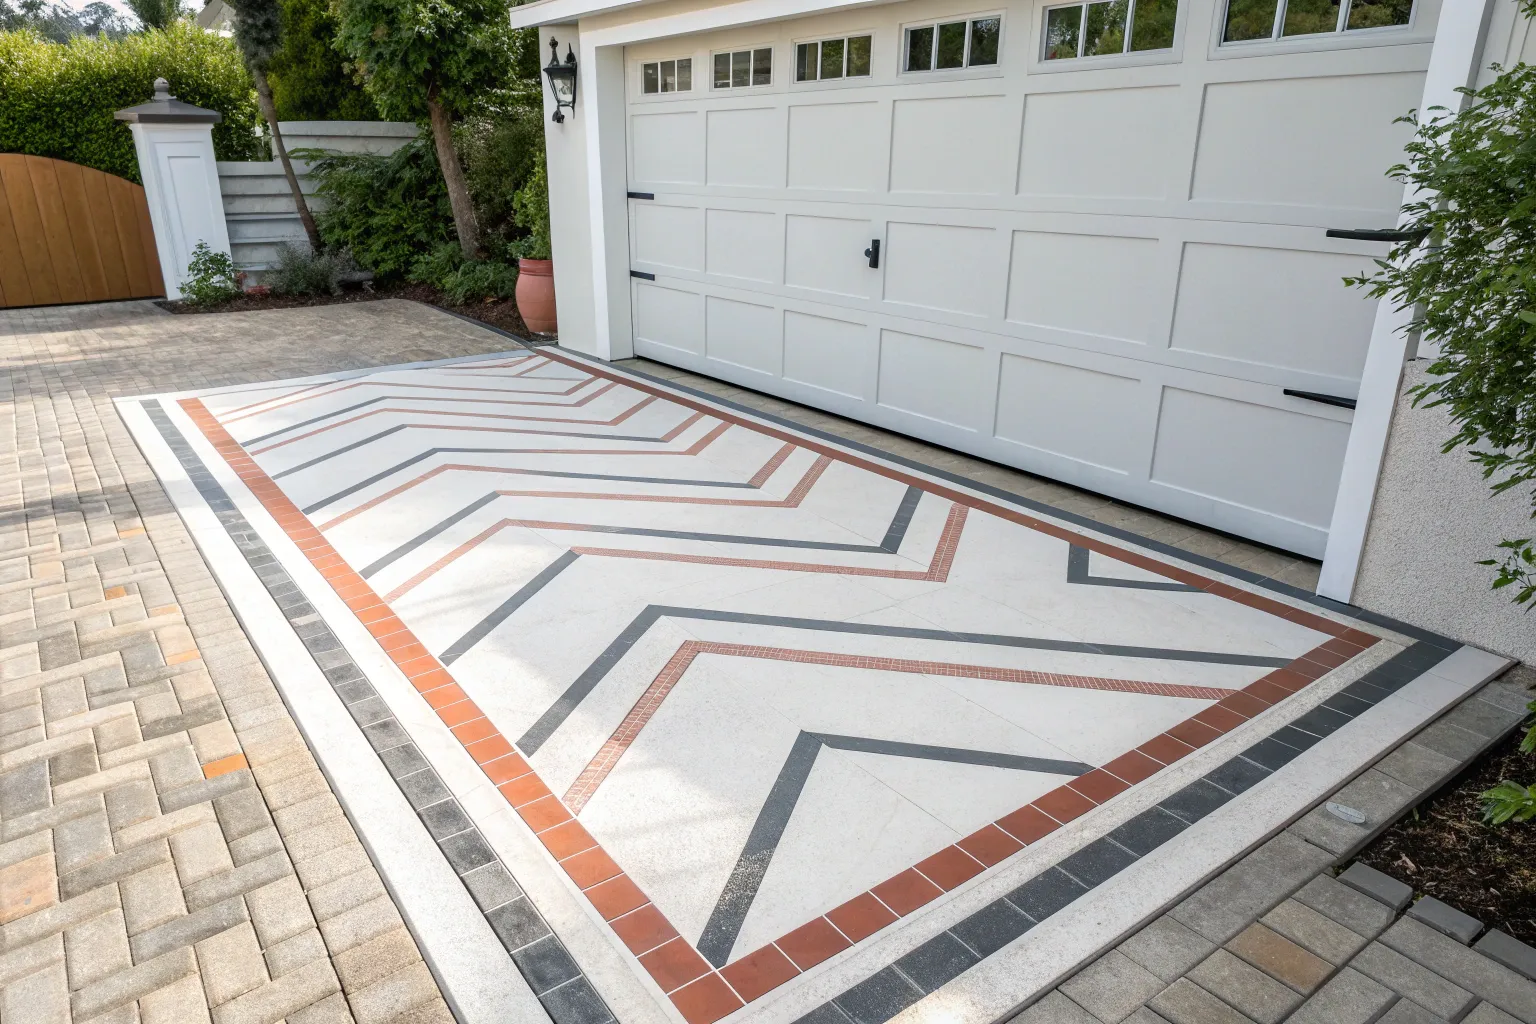
Two-Tone Border Frame to Make the Driveway Look Custom
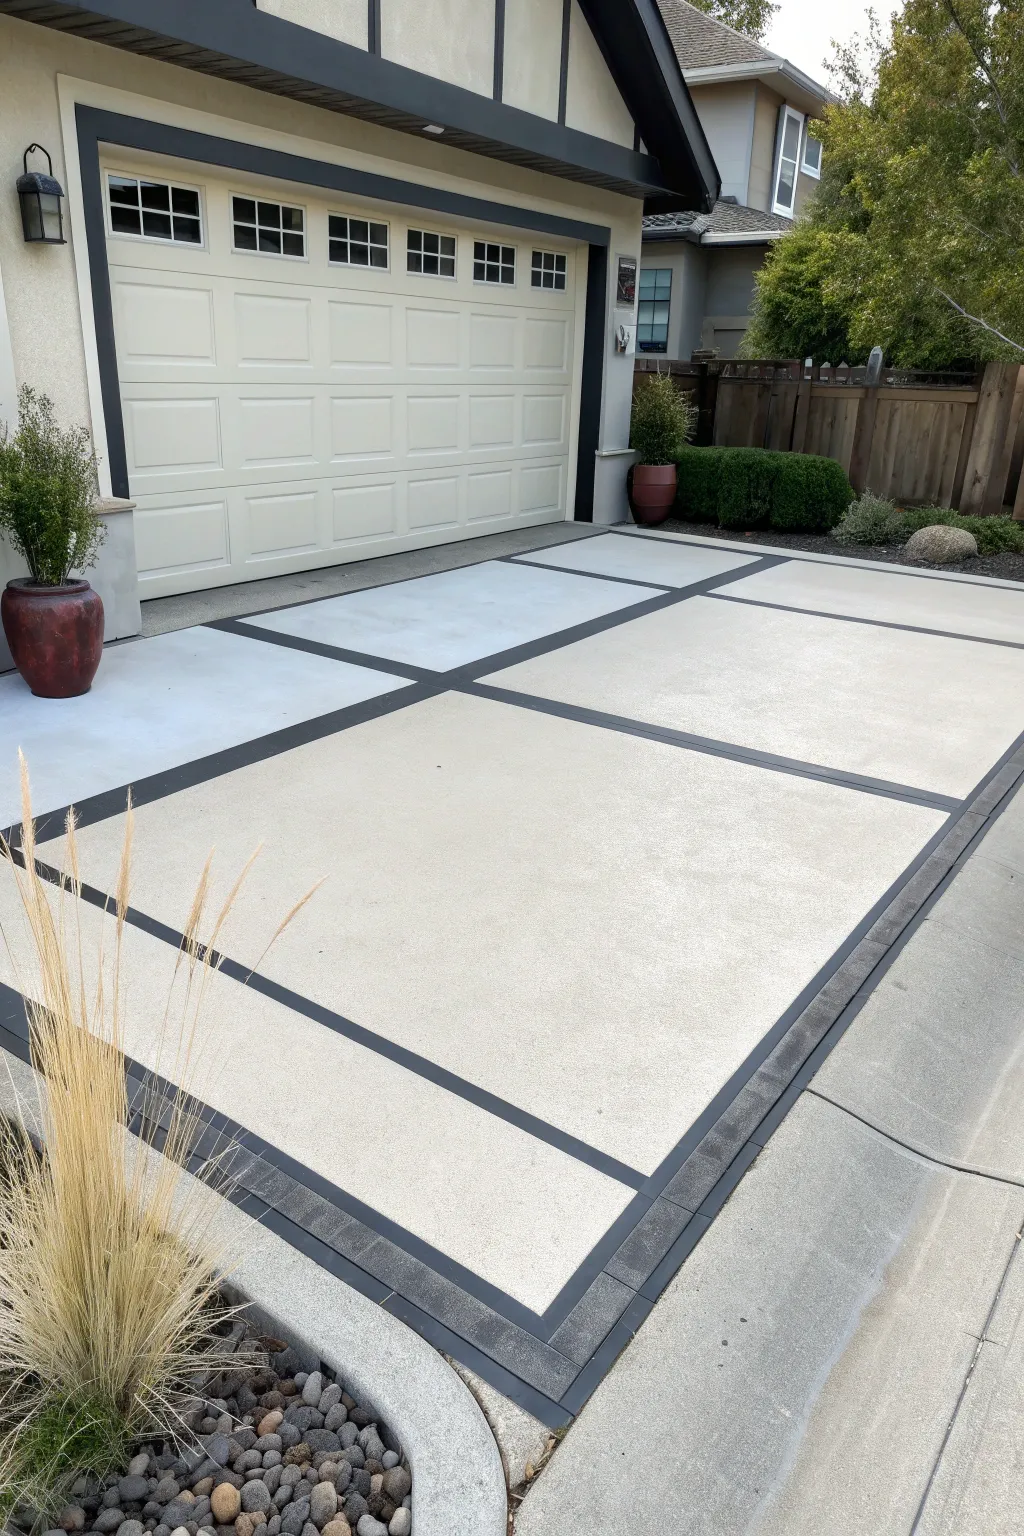
Transform a plain concrete slab into a high-end custom entrance with this sleek, geometric design. By using contrasting stain colors and strategic taping, you’ll create the illusion of large, custom-poured pavers separated by striking dark grout lines.
Step-by-Step Guide
Materials
- Concrete pressure washer
- Degreaser/concrete cleaner
- Concrete patch filler (if needed)
- Painter’s tape (1-inch and 2-inch widths)
- Chalk line reel
- Measuring tape
- Concrete primer (acrylic bonding style)
- Solid color concrete stain (Cream/Beige)
- Solid color concrete stain (Charcoal/Dark Grey)
- 3/4-inch nap rollers and roller frame
- Extension pole
- 3-inch paintbrush (for cutting in)
- High-gloss concrete sealer (solvent-based for durability)
Step 1: Preparation & Cleaning
-
Clear the area:
Remove all vehicles, planters, and debris from the driveway. Use a stiff broom to sweep away loose dirt and leaves to reveal the bare concrete surface. -
Address repairs:
Inspect the slab for significant cracks. Fill any pits or wide cracks with concrete patch filler, smoothing it out with a putty knife so it is flush with the surface. -
Deep clean the surface:
Apply a specialized concrete degreaser to lift oil spots. Follow up with a thorough pressure washing to remove mildew and old grime. Let the concrete dry completely for at least 24 hours.
Step 2: Base Coat Application
-
Prime the surface:
Roll on a coat of acrylic bonding primer. This step is crucial for ensuring your stain grips the concrete and lasts through seasonal weather changes. -
Apply the light base color:
Using a roller on an extension pole, apply the light cream or beige concrete stain across the entire driveway. I find that working in small sections prevents lap marks from forming. -
Add a second coat:
Once the first coat is dry (check the can for specific recoat times, usually 4-6 hours), apply a second coat of the cream stain to ensure solid, opaque coverage. -
Allow full cure:
Let this base color cure fully overnight. The surface must be hard and dry before you apply any tape, or you risk peeling up your fresh work.
Burnishing Tape
Use a plastic putty knife or an old credit card to ‘burnish’ or rub down the edges of the tape firmly before painting to stop any bleed-through.
Step 3: Creating the Grid Pattern
-
Measure the grid:
Determine the size of your ‘blocks.’ Measure the total width of the driveway and divide it to create equal sections. Mark these measurements lightly with a pencil. -
Snap the lines:
Have a helper hold one end of a chalk line. Snap horizontal and vertical lines across the driveway to create your grid pattern. -
Tape the ‘grout’ lines:
Run distinct lines of painter’s tape along your chalk marks. To create the grid shown in the image, you aren’t taping *over* the line; you are creating boundaries *for* the line. Place two strips of tape parallel to each other, leaving a 3-inch or 4-inch gap between them where the dark paint will go. -
Seal the tape edges:
Press down firmly on all tape edges. For extra crisp lines, lightly brush a tiny amount of the *base* (cream) color over the tape edges first. This seals the gap and prevents bleed-under. -
Paint the grid lines:
Using the charcoal grey stain and a smaller brush or mini-roller, carefully fill in the gaps between your tape strips. Apply two coats for a deep, rich contrast.
Faux Stone Texture
Before the sealer dries, sprinkle very subtle flecks of grey and white vinyl chips onto the wet sealer to mimic the look of real granite aggregation.
Step 4: Sealing & Finishing
-
Remove the tape:
While the dark stain is still slightly tacky (don’t wait until it’s rock hard), slowly peel up the tape at a 45-degree angle to reveal your crisp lines. -
Touch up edges:
Inspect your lines. If any paint bled through, use a small artist’s brush and the base cream color to tidy up the imperfections. -
Apply sealer:
Once all paint is cured (usually 24-48 hours), apply a solvent-based high-gloss concrete sealer. This protects the finish from tire marks and UV fading. -
Add slip resistance:
If your driveway gets wet often, mix a non-slip additive into the final coat of sealer to prevent the surface from becoming like an ice rink in the rain.
Enjoy the commanding curb appeal of your newly refreshed, custom-look driveway


Diamond Lattice Pattern for That High-End Driveway Style
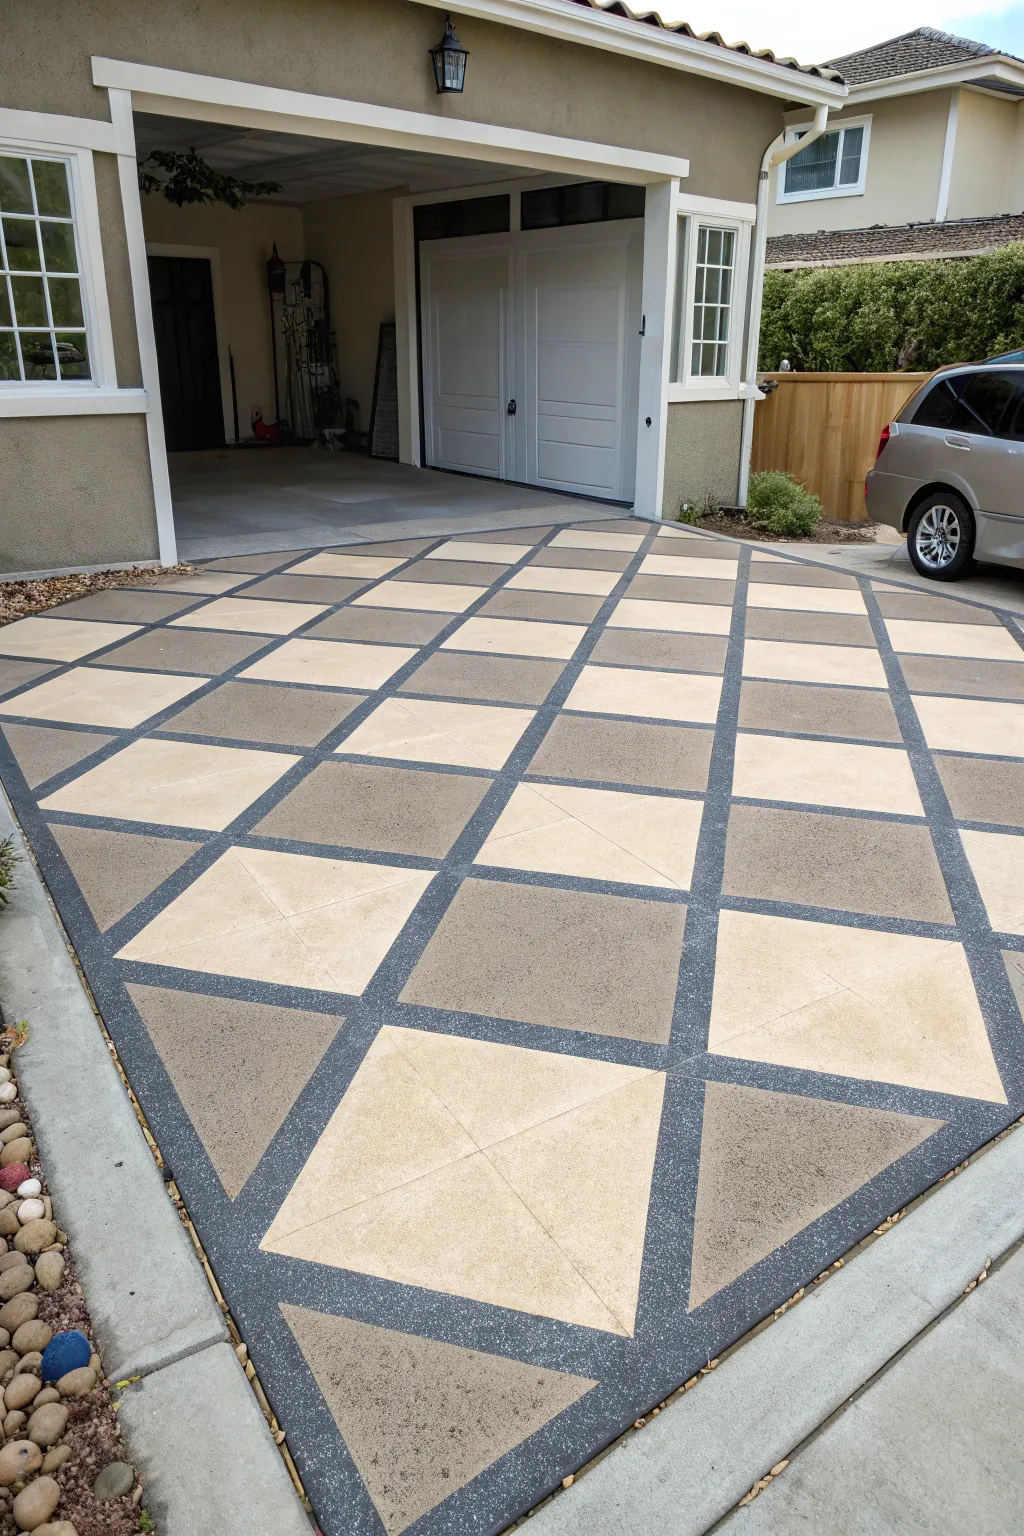
Transform a plain slab into a luxurious entrance with this stunning lattice effect. By using contrasting earth tones and crisp charcoal borders, you’ll create a sophisticated, high-end look that mimics expensive pavers.
Step-by-Step Tutorial
Materials
- Concrete cleaner/degreaser
- Pressure washer
- Concrete bonding primer
- High-quality concrete porch & floor paint (Cream, Taupe, Charcoal)
- Epoxy or acrylic concrete sealer (clear)
- Blue painter’s tape (1-inch width)
- Graph paper and pencil
- Chalk line reel (blue chalk recommended)
- Measuring tape
- Long straight edge (8ft 2×4 usually works)
- Paint rollers (3/8 inch nap) and extension pole
- Small angled paint brushes
- Anti-slip additive (e.g., silica sand)
Step 1: Preparation & Mapping
-
Clean the surface thoroughly:
Begin by removing all oil spots, dirt, and loose debris. Use a heavy-duty degreaser and a stiff brush, then follow up with a thorough pressure washing. Allow the driveway to dry completely for at least 24 hours. -
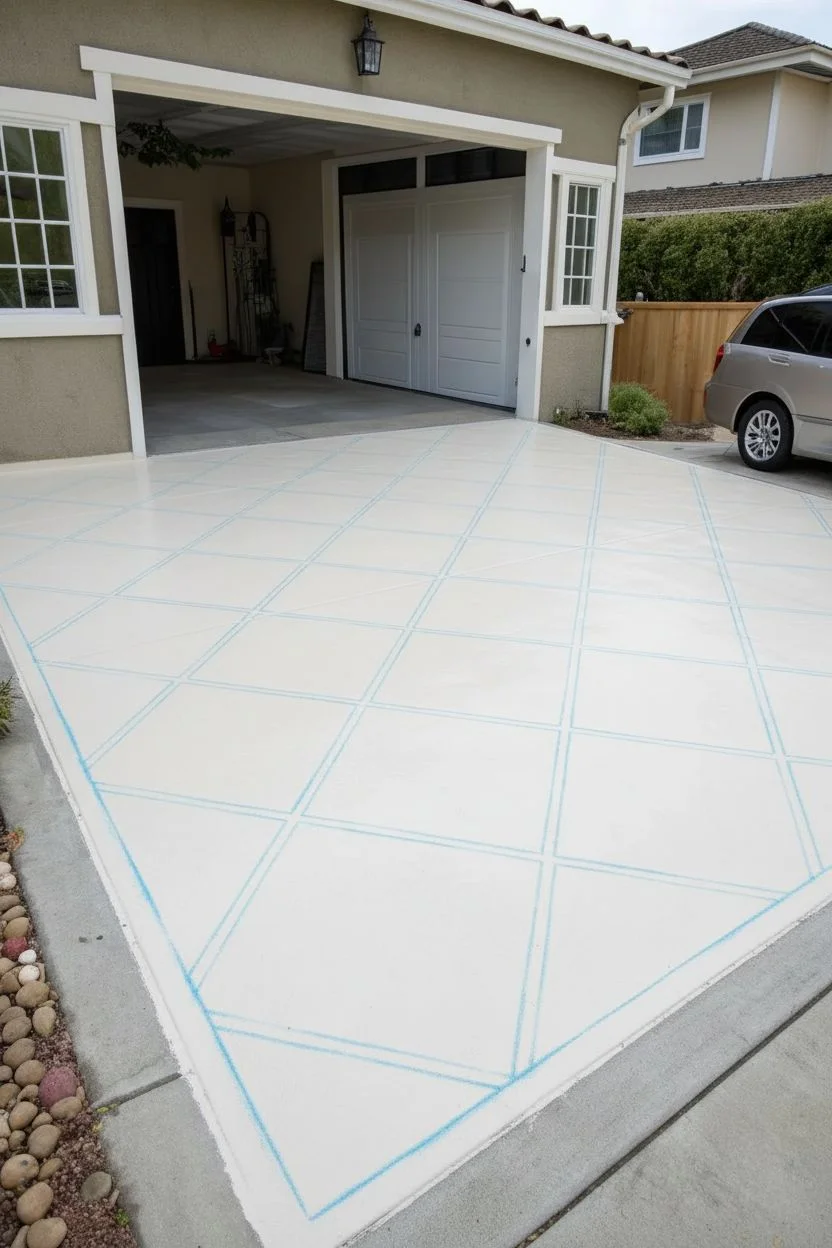
Sketch your layout:
Before putting tape to concrete, sketch your driveway dimensions on graph paper. Plan a grid where the intersection points will form the corners of your diamonds to ensure the pattern is centered. -
Prime the surface:
Roll on a coat of concrete bonding primer. This is crucial for ensuring your paint adheres properly and lasts through changing seasons. -
Mark center lines:
Find the exact center of the driveway width-wise at the garage door and the street end. Snap a chalk line connecting these two points to create your primary vertical axis. -
Snap the grid:
Measure out from your center line to create a grid of squares (e.g., 3×3 feet). Snap horizontal and vertical chalk lines to create a checkerboard grid across the entire surface.
Step 2: Taping the Lattice
-
Create the diagonals:
Using your square grid as a guide, snap diagonal chalk lines connecting the corners of the squares. This creates the diamond shapes. -
Apply the tape:
Carefully run your 1-inch painter’s tape along these diagonal lines. This tape will eventually become the charcoal ‘grout’ lines, so ensure your lines are straight and pressed down firm. -
Burnish the tape edges:
To prevent paint bleed, take a dry cloth or a putty knife and firmly rub down the edges of the tape. I find this extra minute of effort saves hours of touch-up work later. -
Designate colors:
Use small pieces of tape or a faint pencil mark to label each diamond ‘A’ (Cream) or ‘B’ (Taupe) to ensure you don’t accidentally paint two adjacent shapes the same color.
Clean Lines Secret
Before painting your colors, paint over the tape edges with your *base* color or a clear matte medium. This seals the tape so any bleed is invisible.
Step 3: Painting & Finishing
-
Paint the first color:
Mix your anti-slip additive into the Cream paint. Using a roller, fill in all the ‘A’ diamonds. Use a brush near the tape edges to ensure full coverage without pushing paint under the tape. -
Paint the second color:
Once the first color is dry to the touch, mix additive into the Taupe paint and fill in the ‘B’ diamonds. Apply two coats for the richest color depth. -
Paint the borders:
While the diamonds dry, carefully paint the wide perimeter borders. If you want the lattice lines to be dark charcoal, you can actually paint the entire driveway charcoal *before* taping, but painting the lines in last with a steady hand or smaller brush after peeling tape is often safer for beginners. -
The big reveal:
Wait until the paint is dry to the touch but not fully cured (usually about an hour). Slowly peel back the tape at a 45-degree angle to reveal your crisp lines. -
Fill the lattice lines:
If you didn’t base-coat the concrete dark, now use a small artist’s brush or a specifically sized foam brush to paint the exposed concrete lines in your Charcoal color. -
Seal the deal:
After allowing the driveway to cure for the manufacturer’s recommended time (often 3-5 days), apply a clear, UV-resistant concrete sealer to protect your artwork from tire marks and sun fading.
Faux Stone Texture
While the paint is wet, lightly sprinkle different colored flecks or use a sea sponge to dab a slightly lighter shade onto the diamonds for a stone look.
Step back and admire how a simple geometric pattern completely redefined your home’s curb appeal


Stencil Medallions That Feel Like Outdoor Tilework
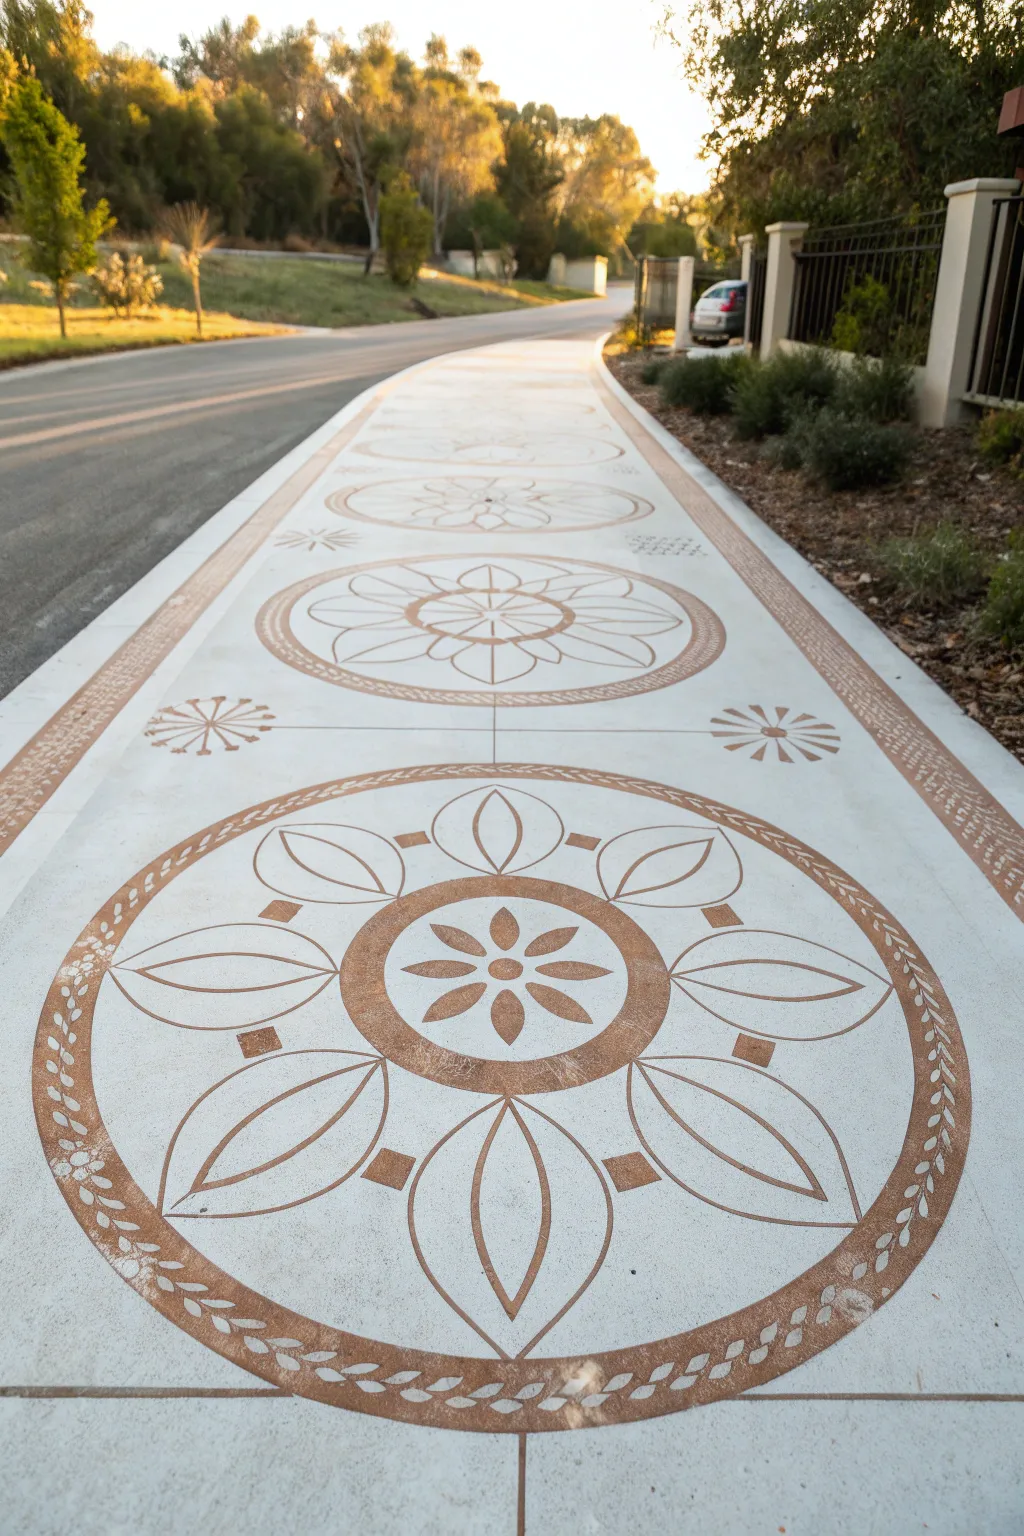
Transform a plain concrete path into a grand entrance with this elegant stencil project that mimics the look of custom tilework. Using large-scale medallions and warm earth tones, you create an inviting runner effect that dramatically boosts curb appeal.
Step-by-Step Guide
Materials
- Pressure washer
- Concrete cleaner/degreaser
- Concrete bonding primer
- Exterior porch & floor paint (Base color: Off-white/Cream)
- Exterior porch & floor paint (Accent color: Terracotta/Warm Brown)
- Large floral medallion stencil (approx. 36-48 inches)
- Border stencil (geometric or vine pattern)
- Corner accent stencils
- Painter’s tape (heavy duty)
- High-density foam rollers (4-inch and 9-inch)
- Stiff stencil brushes
- Chalk line reel
- Measuring tape
- Concrete sealer (matte or satin finish)
- Spray adhesive (repositionable)
Step 1: Prep and Prime
-
Clean the Surface:
Begin by thoroughly cleaning the concrete. Use a pressure washer and a concrete degreaser to remove all dirt, oil, and loose debris, as any grime will prevent the paint from bonding effectively. -
Repair Cracks:
Inspect the walkway for any significant cracks or pitting. Fill these with concrete filler and sand them smooth once dry to ensure your stenciled design lays flat later. -
Apply Primer:
Roll on a coat of high-quality concrete bonding primer. This step is crucial for longevity, especially for outdoor surfaces exposed to the elements and foot traffic. -
Paint the Base Coat:
Apply your base color using a standard 9-inch roller. For this look, choose a creamy off-white or soft beige to replicate the background of ceramic tile. Apply two coats, allowing full drying time between each.
Fixing Bleeds
If paint bleeds under the plastic, wait for it to dry completely. Then, use a small angled brush and your base coat color to re-paint the edges, acting like an eraser.
Step 2: Layout and Planning
-
Find the Center:
Measure the width of your walkway to find the exact center point. Snap a chalk line down the entire length of the path to act as your central guide for the medallions. -
Mark Spacing:
Determine the spacing between your large floral medallions. I find it helpful to lay the actual stencil down on the dry path and mark the registration points lightly with a pencil to visualize the flow before painting.
Step 3: Stenciling the Design
-
Secure the Main Stencil:
Apply a light mist of repositionable spray adhesive to the back of your large medallion stencil. Press it firmly onto the concrete, aligning the center of the design with your chalk line. -
Load the Roller:
Load a 4-inch high-density foam roller with your terracotta accent paint. Offload the excess paint onto a paper towel until the roller feels almost dry; too much paint causes bleed-under. -
Roll the Medallion:
Roll over the stencil with light to medium pressure. Build up the color in layers rather than trying to get full opacity in one pass, which helps keep lines crisp. -
Check and Repeat:
Carefully lift one corner to check your coverage. If satisfied, peel the stencil up vertically and move to your next marked position along the path. -
Add Decorative Fillers:
Once the main medallions are dry, use smaller corner accent stencils or smaller floral motifs to fill the negative space between the large circles, maintaining symmetry.
Add Dimension
Mix a tiny amount of dark grey into your terracotta paint for the second coat on specific petals. This subtle shading creates a 3D relief look similar to carved stone.
Step 4: Creating the Border
-
Tape the Runner Edge:
To create the ‘rug runner’ effect, run two long strips of painter’s tape down the sides of the path, leaving a gap about 4-6 inches wide for your border pattern. -
Stencil the Border:
Place your linear border stencil within the taped area. Stencil this continuously along both sides of the walkway, matching the medallion color to tie the design together. -
Detail Work:
Use a small artist’s brush to touch up any areas where paint might have bled under the stencil or to connect pattern bridges that disrupt the design’s flow.
Step 5: Sealing and Protection
-
Cure the Paint:
Allow the stenciled designs to cure for at least 24 hours. The paint needs to be completely hard before you introduce a sealer. -
Apply Sealer:
Finish by rolling on two thin coats of a clear, non-yellowing concrete sealer. A matte or satin finish looks most like natural stone or tile and provides necessary UV protection.
Once the sealer cures, your driveway will have the sophisticated charm of a Mediterranean villa entrance.
BRUSH GUIDE
The Right Brush for Every Stroke
From clean lines to bold texture — master brush choice, stroke control, and essential techniques.
Explore the Full Guide
Painted Parking Guides That Look Stylish, Not Industrial
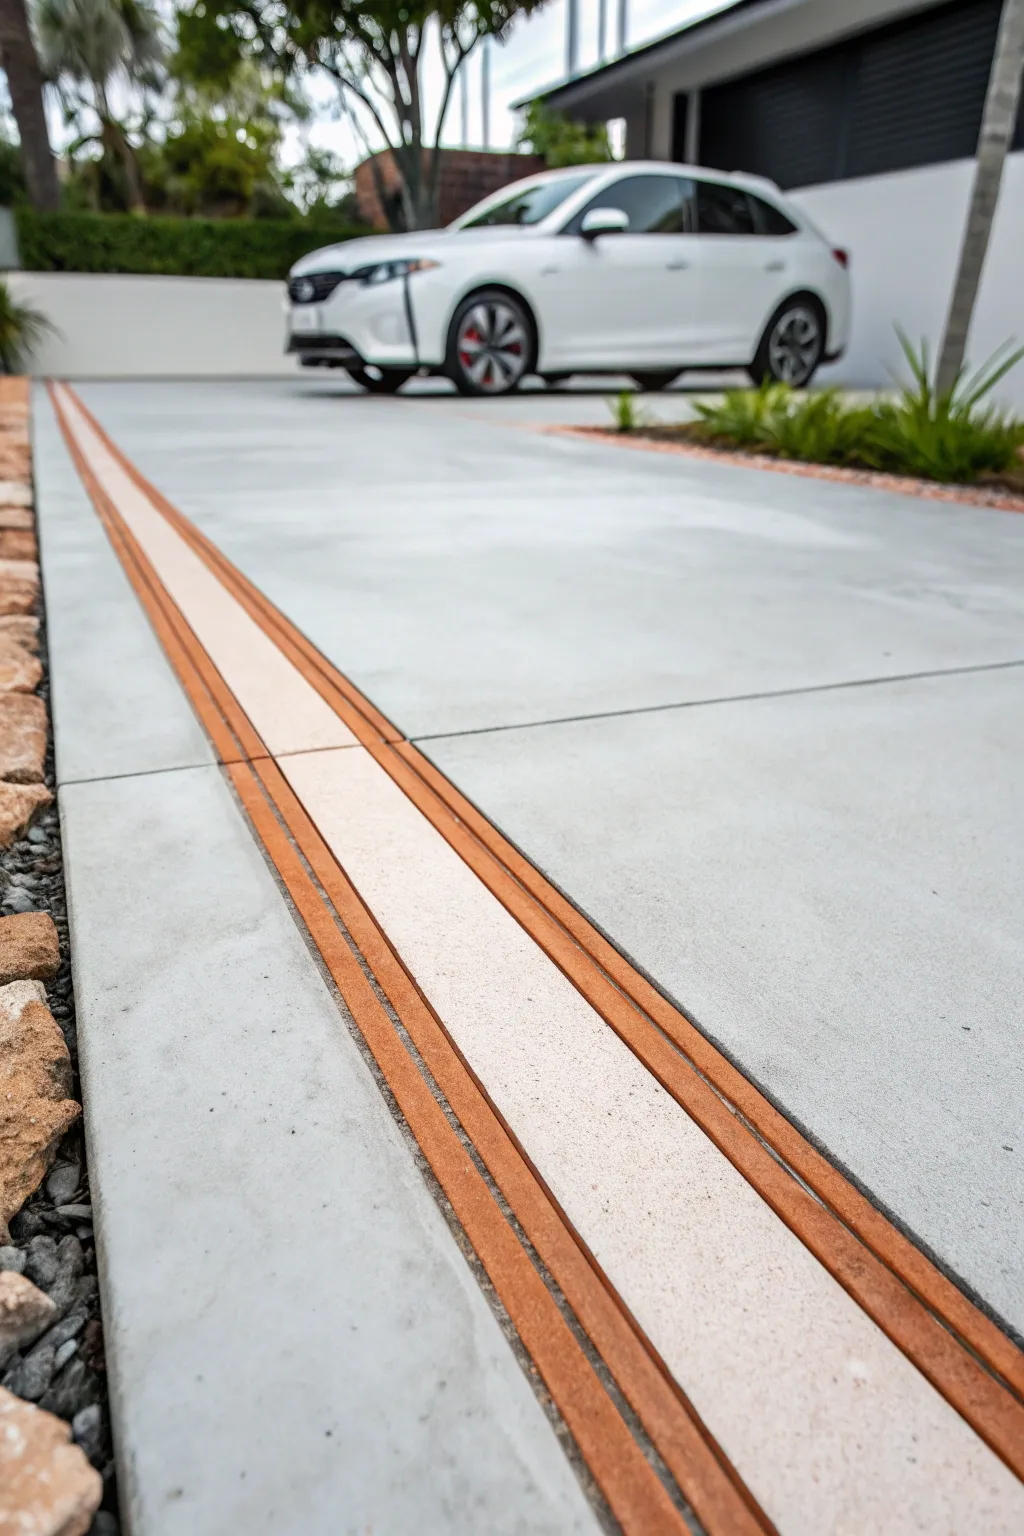
Transform a plain concrete slab into a high-end design feature with this minimalist parking guide. By combining crisp masking with earthy faux-rust tones and a textured cream center, this straightforward project adds architectural interest without looking like a municipal parking lot.
Step-by-Step
Materials
- High-quality concrete porch and floor paint (white/off-white base)
- Acrylic concrete stain or paint (burnt orange/terracotta color)
- Acrylic concrete stain or paint (dark brown/umber for detailing)
- Painter’s tape (2-inch width for spacing, 1-inch width for lines)
- Heavy-duty surface cleaner or concrete degreaser
- Pressure washer
- Stiff-bristled scrub brush
- Small foam roller (4-inch width)
- Fine-grit sandpaper or sanding block
- Natural sea sponge or distinctively textured rag
- Clear concrete sealer (matte finish)
- Measuring tape and chalk line
Step 1: Preparation & Layout
-
Deep clean the surface:
Begin by thoroughly cleaning the concrete strip where you intend to paint. Use a pressure washer and a concrete degreaser to remove any oil spots, dirt, or existing sealers that could prevent adhesion. Let the concrete dry completely for at least 24 hours. -
Position the guide:
Determine the ideal placement for your guide line, usually centered on one side of the parking bay. Measure about 2-3 feet in from the edge of the driveway to ensure it aligns with your vehicle’s wheels properly. -
Snap the first line:
Using a chalk line, snap a long, straight reference line down the entire length of the driveway to mark the outer edge of your design. -
Map out the stripes:
Measure and mark the width of your total design. For this look, you want two narrow outer stripes (approx. 1.5 inches wide) and a wider central stripe (approx. 3-4 inches wide). Snap chalk lines for all these boundaries.
Bleeding Lines?
If paint bleeds under the tape, don’t wipe it! Let it dry completely, then gently scrape the excess off the concrete with a razor blade or wire brush for a clean edge.
Step 2: Masking & Base Coat
-
Apply the tape:
Apply high-quality painter’s tape firmly along the outside of your chalk lines. Press the edges down aggressively with a putty knife or credit card to prevent paint bleed on the rough concrete texture. -
Mask the gaps:
Don’t forget to mask the ‘negative space’ between the rust lines and the center cream line. This small gap of unpainted concrete is crucial for the crisp, inlaid look shown in the photo. -
Lightly sand surface:
Scuff the exposed concrete inside your taped areas with fine-grit sandpaper. This creates a mechanical bond for the paint, ensuring it won’t peel up under hot tires. -
Apply primer coat:
Roll a thin layer of concrete bonding primer onto the exposed stripes. This step is often skipped but ensures longevity. Allow it to dry according to the manufacturer’s instructions.
Step 3: Painting the Detail
-
Paint the center stripe:
Using a small foam roller, apply your off-white or cream concrete paint to the wide central stripe. I like to apply two thin coats rather than one thick one to avoid a gummy texture. -
Create the base rust color:
For the outer stripes, start by painting a solid coat of your terracotta or burnt orange paint. Let this dry to the touch. -
Add faux-rust texture:
To achieve the weathered look, dip a sea sponge lightly into your dark brown paint. Blot excess paint onto cardboard until the sponge is almost dry, then gently dab along the orange stripes to create depth and variation. -
Add mineral texture (optional):
While the cream center paint is still slightly tacky, you can sprinkle a tiny amount of fine silica sand over it if you want extra grip and a stone-like appearance.
Pro Sealing Tip
Seal the tape edge first! Before painting your colors, brush a little clear sealer or base coat over the tape edge. This seals the gap so any bleed is invisible clear coat.
Step 4: Finishing
-
Remove tape carefully:
Pull the tape up slowly at a 45-degree angle while the final coat of paint is still slightly damp. This prevents the dried paint from cracking or pulling away with the tape. -
Clean up edges:
Inspect your lines. If any paint bled under the tape, use a small wire brush or a dab of paint remover on a Q-tip to clean up the edges immediately. -
Seal the work:
Once the paint has cured for at least 48 hours, apply a clear matte concrete sealer over the entire painted area and extending a few inches beyond. This protects your artwork from UV rays and tire marks.
Now you have a functional guide that elevates your home’s curb appeal with subtle sophistication
Leaf-Shadow Border for a Nature-Inspired Driveway Edge
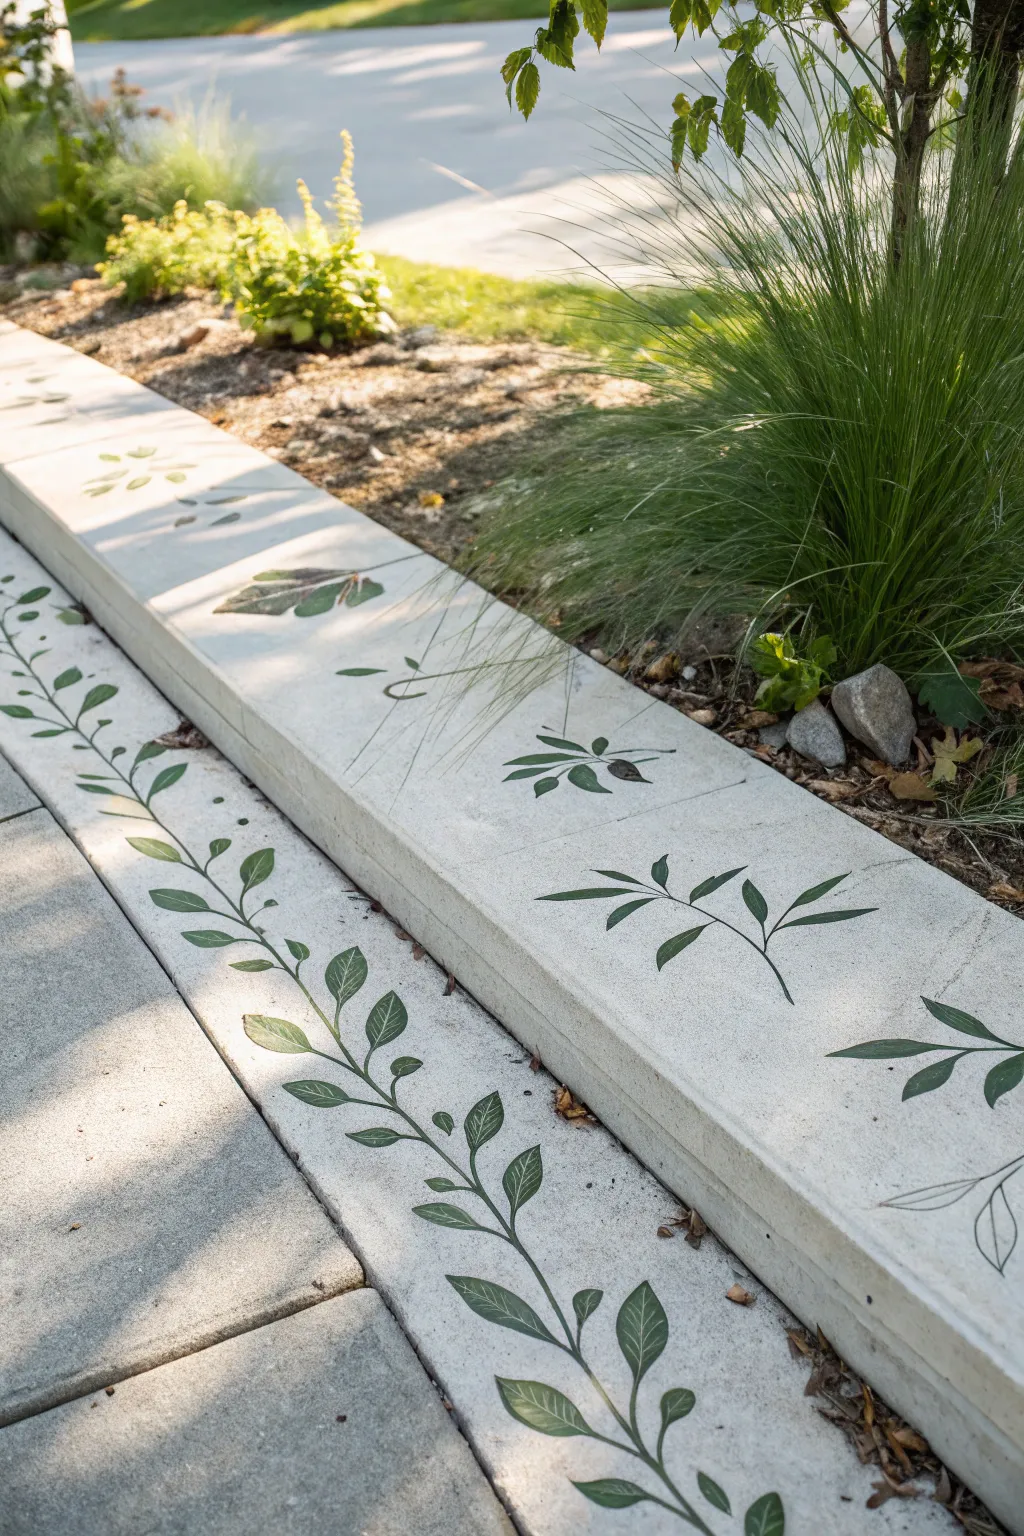
Transform a plain concrete curb into a whimsical garden path with these elegant, botanical-inspired painted details. The design features trailing vines along the ground and scattered leaf clusters on the raised curb, creating a seamless blend between your hardscaping and the garden beyond.
Step-by-Step Tutorial
Materials
- Exterior concrete paint or porch & floor paint (dark sage green)
- Exterior concrete paint (lighter olive green for highlights)
- Concrete primer (clear or neutral)
- Warm water and stiff bristle brush
- Pressure washer (optional)
- Painters tape
- Mylar stencil sheets or heavy cardstock
- X-Acto knife and cutting mat
- Stencil brushes (various sizes)
- Small artist detail brush
- Spray adhesive (repositionable)
- Clear concrete sealer (matte finish)
Step 1: Preparation & Cleaning
-
Scrub the surface:
Begin by thoroughly cleaning the concrete curb and the adjacent driveway strip where you plan to paint. Use warm water and a stiff bristle brush to remove dirt, moss, and loose debris. If available, a pressure washer makes this step much faster. -
Let it dry completely:
Allow the concrete to dry for at least 24 hours. Moisture trapped in the concrete can cause the paint to peel prematurely, so patience here is key. -
Prime the area:
Apply a coat of concrete primer to the clean, dry surface. This helps seal porous concrete and creates a better bond for your paint. Let the primer cure according to the manufacturer’s instructions.
Step 2: Creating the Stencils
-
Design the vine pattern:
Sketch a long, winding vine design about 3-4 feet long on paper first. Include a central stem with leaves branching off in alternating directions to mimic the nature-inspired look seen on the flat ground section. -
Design isolated leaf clusters:
Draw separate, smaller clusters of 3-5 leaves for the raised curb sections. Vary the shapes slightly—some oak-like, some simple ovals—to keep the look organic. -
Cut the stencils:
Place your mylar sheet over your sketches. Carefully trace and cut out the leaf shapes using an X-Acto knife. leave ‘bridges’ (small strips of material) to connect floating parts of the stencil if necessary, though this design works well as a silhouette.
Natural Edges Tip
Don’t aim for perfect, solid opacity. Allowing a little concrete texture to show through the leaf paint makes them look more like natural shadows.
Step 3: Painting the Driveway Vine
-
Position the vine stencil:
Starting at one end of the flat driveway border, spray the back of your vine stencil with repositionable adhesive. Press it firmly onto the concrete, ensuring the edges are sealed tight. -
Stipple the base color:
Load a stencil brush with your dark sage green paint. Remove excess paint on a paper towel until the brush is almost dry (dry brushing). Dab the paint vertically over the stencil openings to prevent bleed-under. -
Connect the pattern:
Once the first section is dry to the touch, lift the stencil and move it down the line. Align the start of the stencil with the end of the painted section to create a continuous, flowing vine. -
Refine the stems:
After stenciling the main shapes, use a small artist detail brush to hand-paint thin connections between leaves or extend the vine tips for a more fluid, hand-drawn appearance.
Correcting Bleeds
If paint bleeds under the stencil, don’t wipe it wet! Let it dry completely, then use a small piece of sandpaper to gently scratch away the mistake.
Step 4: Painting the Curb Accents
-
clean spacing:
For the raised curb, simplicity is best. Place your isolated leaf cluster stencils at irregular intervals—perhaps every 2 to 3 feet—rather than a continuous line. -
Apply the paint:
Using the same dry-brush stippling technique, fill in these curb leaves. I like to rotate the stencil slightly for each application so no two clusters look identical. -
Add subtle highlights:
While the dark green is still slightly tacky, lightly dip a clean brush into the lighter olive green. lightly stipple the centers of a few leaves to add dimension and mimic sun dappling.
Step 5: Sealing & Protection
-
Cure time:
Let the paint dry for at least 48 hours. Avoid walking or driving over the painted areas during this time. -
Apply sealer:
Roll or brush on a clear matte concrete sealer over the painted designs and the immediate surrounding area. This locks in the color and protects it from UV fading and weather wear.
Enjoy the charm of your new botanical border every time you pull into the driveway

PENCIL GUIDE
Understanding Pencil Grades from H to B
From first sketch to finished drawing — learn pencil grades, line control, and shading techniques.
Explore the Full Guide
Abstract Wave Mural That Turns the Driveway Into a Statement
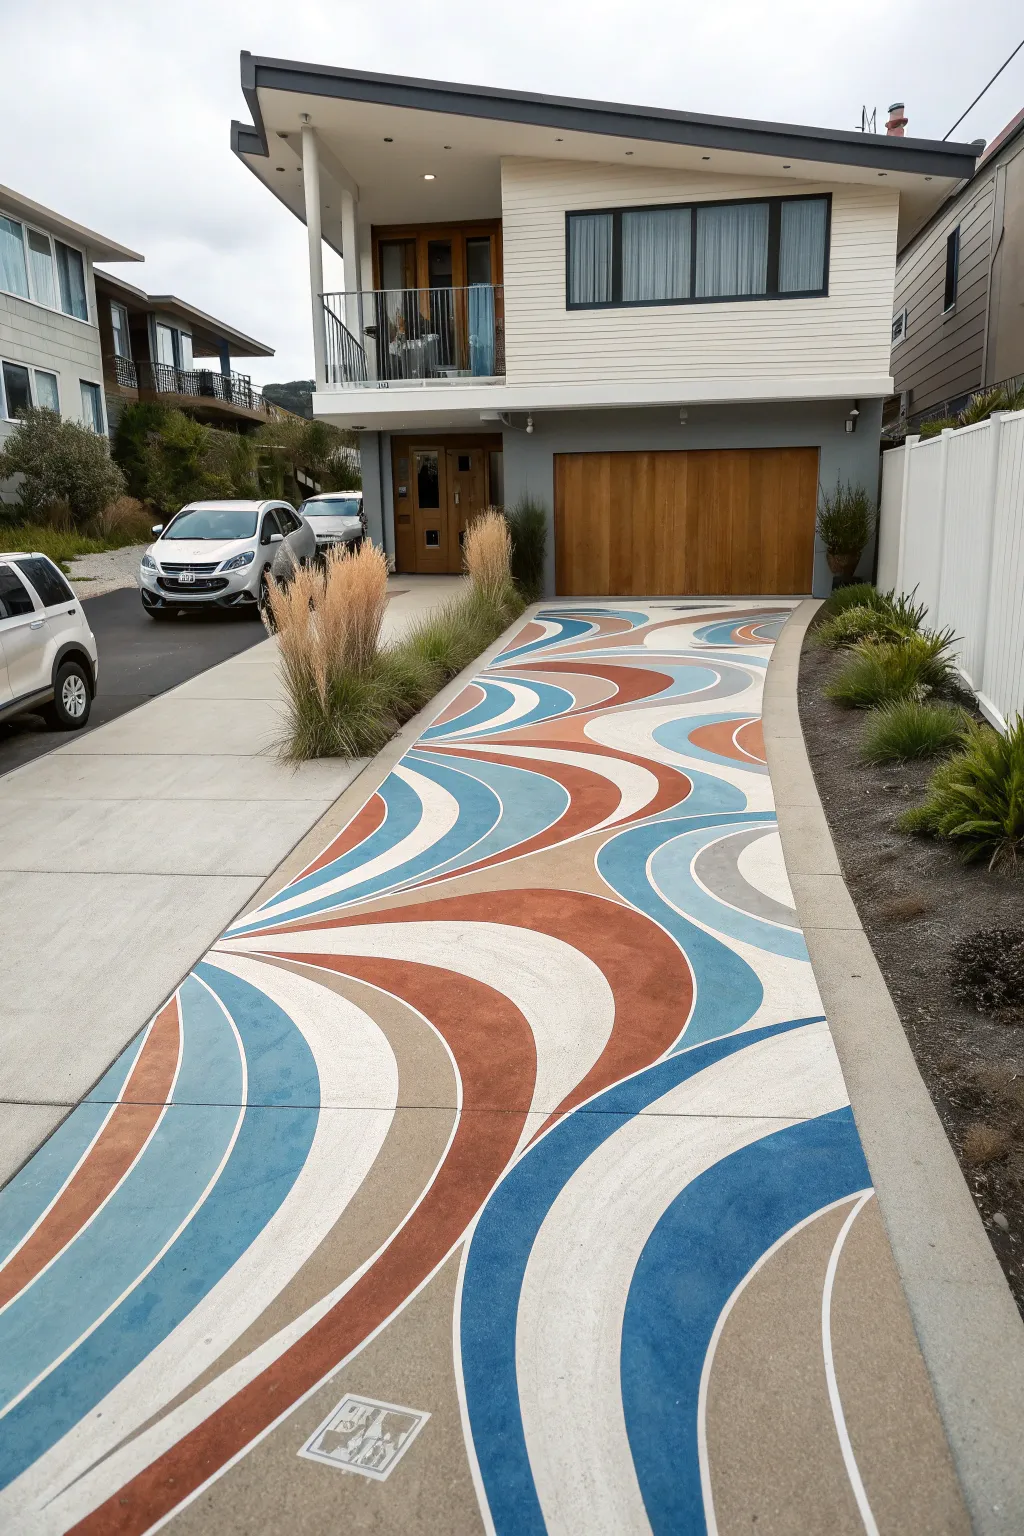
Transform a plain slab of concrete into a stunning piece of walk-on art with this bold, retro-inspired wave design. The flowing curves and earthy palette of rust, teal, and sand create a sense of movement that leads the eye directly to your front door.
Detailed Instructions
Materials
- High-quality concrete porch and floor paint (white, rust orange, teal blue, sky blue, beige)
- Concrete primer
- Concrete cleaner/degreaser
- Pressure washer
- Stiff bristle scrub brush
- Chalk snap line
- Sidewalk chalk (various colors)
- Painter’s tape (various widths, flexible grade for curves)
- Paint rollers (3/8 inch nap) with extension poles
- Assorted paint brushes (2-inch angled sash, small craft brushes)
- Clear concrete sealer (matte or satin finish)
- Knee pads
Step 1: Preparation
-
Clean the surface:
Begin by thoroughly sweeping the driveway to remove loose debris. Apply a concrete cleaner or degreaser according to the manufacturer’s instructions. -
Scrub and rinse:
Use a stiff bristle brush to work the cleaner into any oil spots or stains. Follow up with a rigorous pressure wash to ensure the pores of the concrete are open and ready to accept paint. -
Repair cracks:
Inspect the surface for deep cracks or pitting. Fill these with concrete filler and allow them to cure fully to ensure a smooth canvas. -
Prime the concrete:
Roll on a coat of high-quality concrete primer. This step is crucial for adhesion and color vibrancy. Let the primer dry completely, typically overnight.
Curve Control
For ultra-smooth curves, use vinyl tape (often used for auto detailing) rather than standard paper tape. It stretches around bends without buckling.
Step 2: Drafting the Design
-
Sketch basic flow lines:
Using sidewalk chalk, sketch the primary swooping lines of your wave pattern. Start with the largest curves that span the width of the driveway to establish the main movement. -
Refine the curves:
Step back frequently to view the design from the street. Adjust your chalk lines until the flow feels organic and balanced. -
Tape the white outlines:
This design relies on crisp white lines between colors. Apply flexible painter’s tape specifically designed for curves directly over your chalk lines. These taped areas will eventually become the white separating bands. -
Seal the tape edges:
I like to run a fingernail or a putty knife firmly along the edges of the tape to prevent bleed-under. You can also lightly brush a tiny amount of your white base paint (or primer) over the tape edges to seal them.
Color Coordination
Match one color in the driveway mural to your front door or window trim to visually tie the artwork to the architecture of the house.
Step 3: Painting the Colors
-
Plan your palette:
Mark each section with a small piece of tape or a chalk letter (e.g., ‘R’ for Rust, ‘T’ for Teal) to map out your color distribution before opening the cans. -
Apply the first color group:
Start with the lightest color, likely the beige or sky blue. Using a roller for large areas and a brush for edges near the tape, fill in all sections assigned to this color. -
Fill in remaining colors:
Move on to the darker hues—the rust orange and deep teal. Apply two coats for solid opacity, allowing proper drying time between coats as specified by your paint brand. -
Paint the white bands:
If you taped over raw primer, you will need to paint the gaps. However, for this specific look, the easiest method is often identifying the ‘white’ zones and painting them first, then taping over them. Alternatively, if you taped the lines first, simply remove the tape to reveal the primer/base, and then carefully hand-paint those lines white if the primer isn’t white enough. -
Detail work:
Use a small angled brush to touch up any spots where the roller missed or where colors need to meet the edge of the driveway cleanly.
Step 4: Finishing Touches
-
Remove the tape:
The moment of truth! Slowly peel back the painter’s tape while the final coat is still slightly tacky to ensure clean, crisp lines without chipping. -
Clean up lines:
If there was any bleed-under, use a small artist’s brush and the appropriate paint color to correct the edges. -
Apply clear sealer:
Once the mural is fully cured (usually 24-48 hours), roll on a high-traffic concrete sealer. This protects your hard work from UV rays, tire marks, and weather. -
Add anti-slip additive:
For safety, especially on a sloped driveway, mix a non-slip additive into the final coat of sealer to provide traction when it rains.
Enjoy the incredible curb appeal of your new custom-painted driveway


Have a question or want to share your own experience? I'd love to hear from you in the comments below!