
When I’m drawing male characters, the outfit is usually the fastest way to tell their story before I even add a face. Here are my favorite male outfit ideas for drawing, packed with layering, clear silhouettes, and satisfying fabric folds you can riff on.
Classic T-Shirt and Jeans Male Outfit Drawing
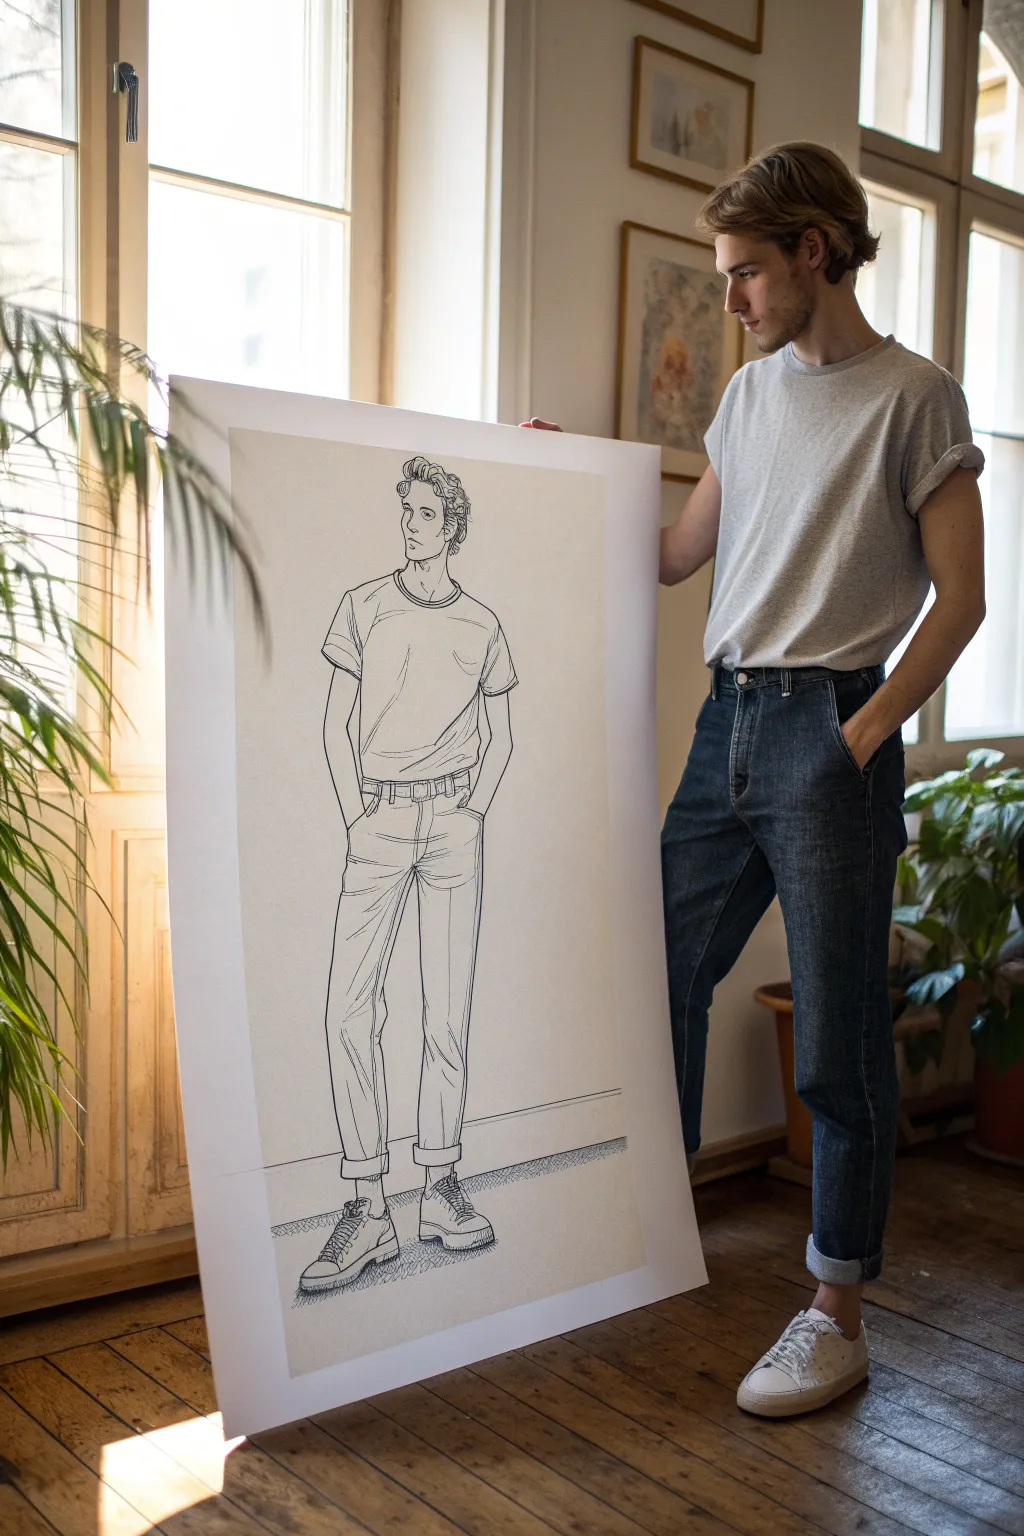
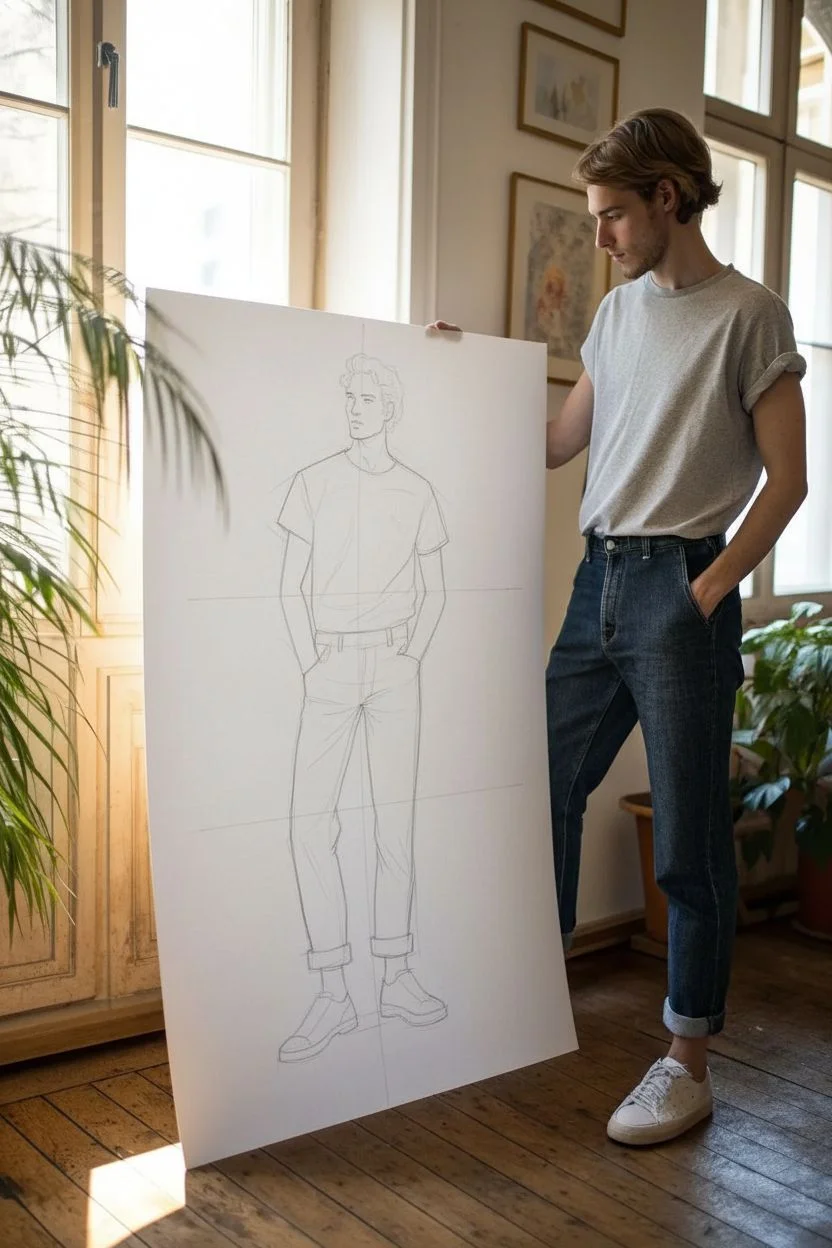
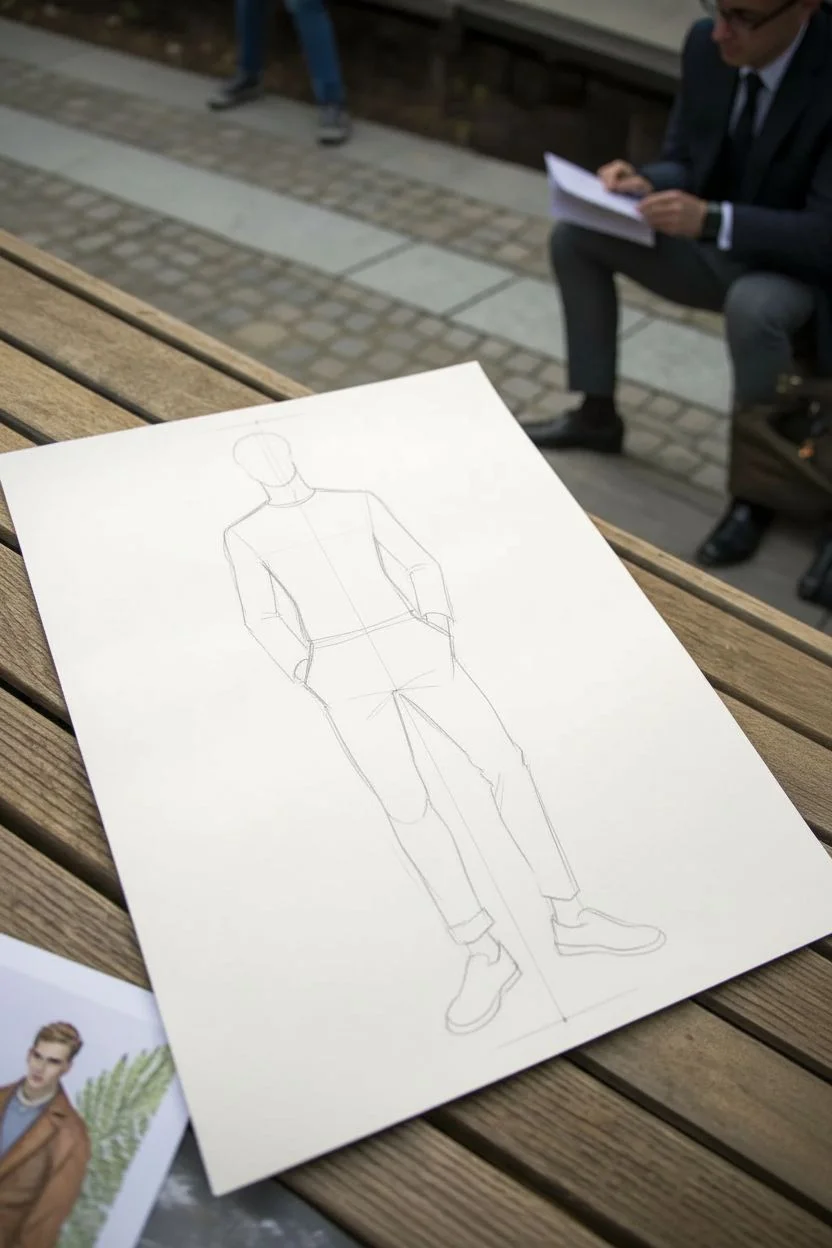
Capture the effortless style of a classic white tee and jeans in this striking large-scale line drawing. Using clean ink lines on warm-toned paper, you’ll create a minimalist fashion illustration that emphasizes posture, fabric folds, and confident simplicity.
Step-by-Step
Materials
- Large sheet of cream or off-white drawing paper (A1 or preferably larger)
- HB graphite pencil for sketching
- Kneadable eraser
- Fine liner pens (sizes 0.3mm, 0.5mm, and 0.8mm, black ink)
- Brush pen or chisel tip marker (black) for deeper shadows
- Long ruler (optional)
- Reference photo of a standing male model
Step 1: Drafting the Structure
-
Establish the pose:
Begin by lightly sketching a center line to establish balance on your large paper. Mark the head, shoulders, hips, knees, and feet positions with simple horizontal dashes to ensure the figure fits comfortably within the page margins. -
Construct the mannequin:
Using your HB pencil, build the underlying stick figure. Pay close attention to the ‘contrapposto’ stance—one hip slightly higher than the other, with the weight resting on the straight leg while the other knee bends slightly forward. -
Flesh out the forms:
Sketch oval shapes for the chest, upper arms, and thighs over your stick figure to add volume. Keep these lines extremely faint, as they serve only as a guide for the clothing later. -
Outline the clothing:
Draw the basic silhouette of the t-shirt and jeans. Focus on where the fabric sits loosely (like the sleeves) versus where it pulls tight (across the chest or hips). Don’t worry about details yet; just get the main shapes down. -
Define facial features:
Sketch the face in profile or three-quarter view. Keep the features angular—a sharp jawline, defined nose, and tousled hair texture. I find it helpful to group the hair into large clumps rather than drawing individual strands at this stage.
Step 2: Refining the Details
-
Add fabric folds:
Study where the body creates tension in the fabric. Add key fold lines: diagonals radiating from the armpit on the shirt, and horizontal bunching around the crotch and knees of the jeans. -
Detail the hands and pockets:
For the hands-in-pockets look, draw the curve of the wrist entering the pocket and the tension lines pulling the denim down from the belt loops. This posture is crucial for that casual vibe. -
Sketch the shoes:
Outline the sneakers at the bottom. Since this is a fashion-style drawing, you can slightly exaggerate the bulk of the shoes to ground the figure. Include the sole thickness and lace area. -
Initial clean-up:
Take your kneadable eraser and gently roll it over the entire drawing to lift the darkest graphite, leaving just a faint ‘ghost’ of your sketch to guide your ink work.
Pro Tip: Line Weight
Vary your line weight! Use thicker lines for the heavy denim jeans and thinner, delicate lines for the soft cotton t-shirt. This helps communicate fabric texture visually.
Step 3: Inking the Final Art
-
Outline the main contours:
Switch to your 0.8mm fine liner. boldy trace the outer silhouette of the jeans and t-shirt. Use confident, long strokes to avoid a ‘hairy’ line look. -
Detail the face and hair:
Using a thinner 0.3mm pen, carefully ink the facial features. Use broken lines for the hair to suggest texture and light hitting the curls, rather than closing every shape. -
Texturing the denim:
Switch to the 0.5mm pen for the jeans. Unlike the smooth t-shirt lines, use slightly more angular or jagged lines for the denim folds to suggest a heavier, stiffer fabric. -
Stitching details:
With your finest 0.3mm pen, add the double-stitching details along the seams of the jeans. This small detail adds immense realism to the illustration. -
Shadowing the shirt:
Use parallel hatching lines (all going in one direction) to create shadows under the sleeves and along the side of the torso. Keep the t-shirt relatively open and white to suggest lightness. -
Grounding the figure:
Draw the floor line and add hatched shading beneath the shoes. This cast shadow anchors the figure so it doesn’t look like it’s floating in space. -
Erase and assess:
Once the ink is completely dry (give it a good ten minutes), erase all remaining pencil marks. Step back to view the whole piece from a distance. -
Final shadow accents:
Use a brush pen or the 0.8mm pen to darken the deepest crevices—specifically under the collar, inside the pocket openings, and the soles of the shoes—to add pop and contrast.
Level Up: Wash Effect
Dilute a drop of black ink in water and paint very light grey washes over the jeans area. This creates a stylish ‘stone wash’ denim effect and adds depth to the line art.
Hang your finished large-scale drawing in a simple frame or lean it against a wall for an instant studio atmosphere


Denim Jacket Layering on a Male Character
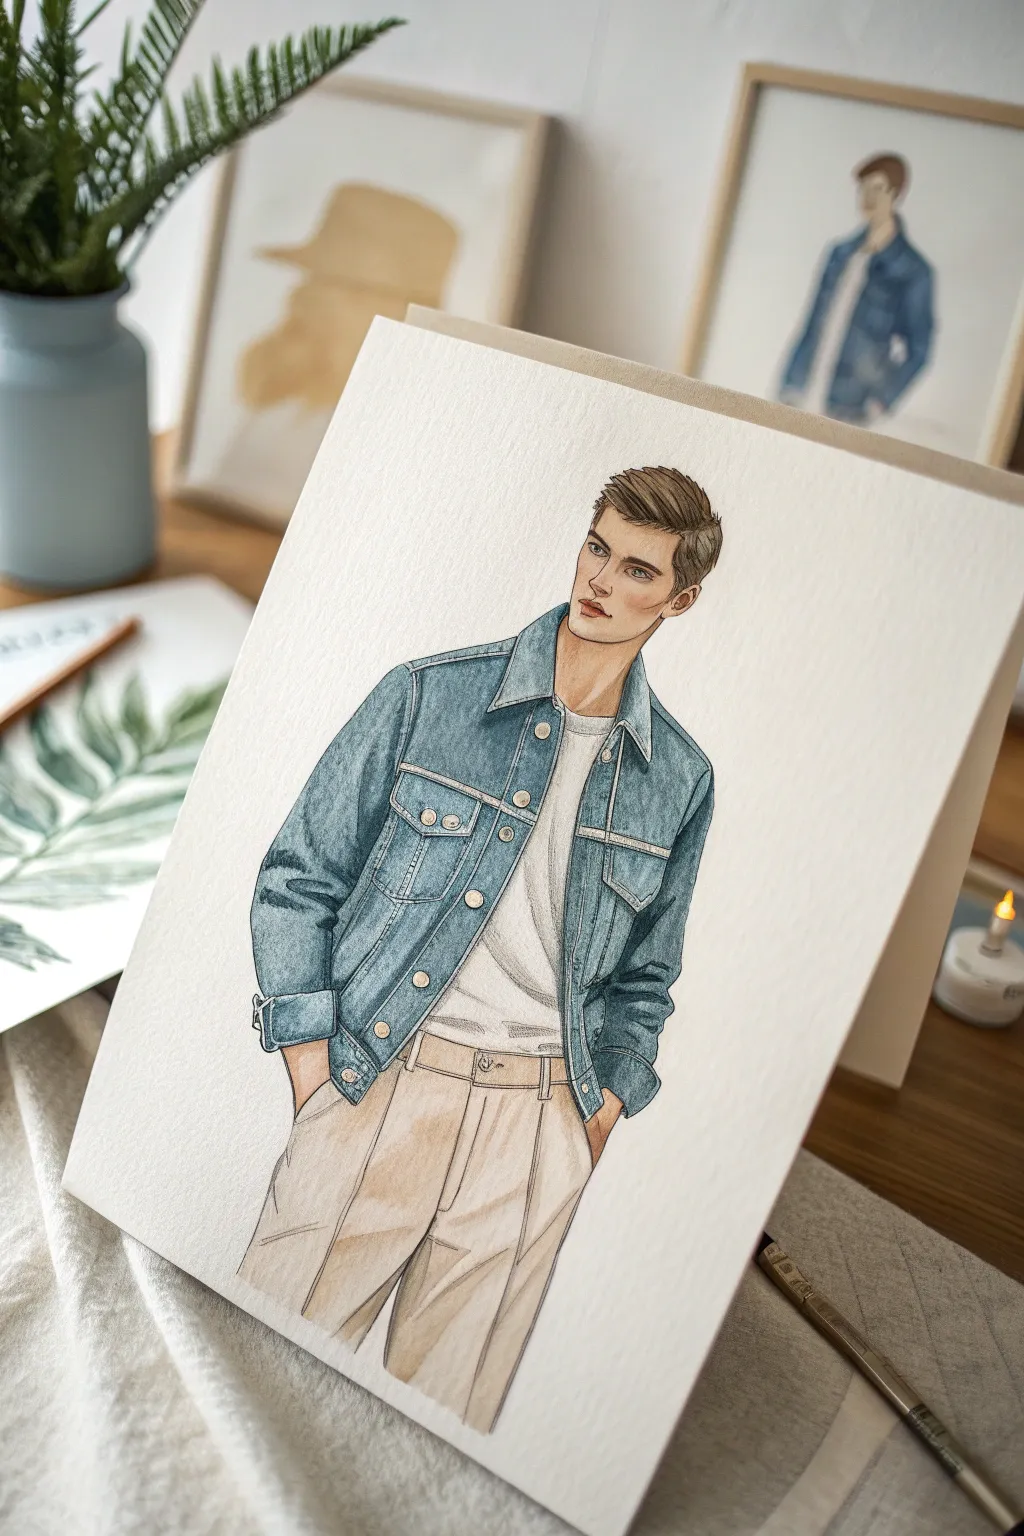
Capture the casual cool of modern menswear with this mixed-media fashion illustration. Using a blend of fine liners and markers or watercolors, you’ll create a stylized portrait featuring realistic denim textures and effortless layering.
Step-by-Step Tutorial
Materials
- Heavyweight mixed-media paper or hot-press watercolor paper
- HB pencil for sketching
- Kneaded eraser
- Fine liner pens (0.1, 0.3, and 0.5mm in black or dark gray)
- Alcohol markers or watercolors (Denim blue, Indigo, Beige, Tan, Skin tones)
- White gel pen
- Small round brushes (if using watercolor)
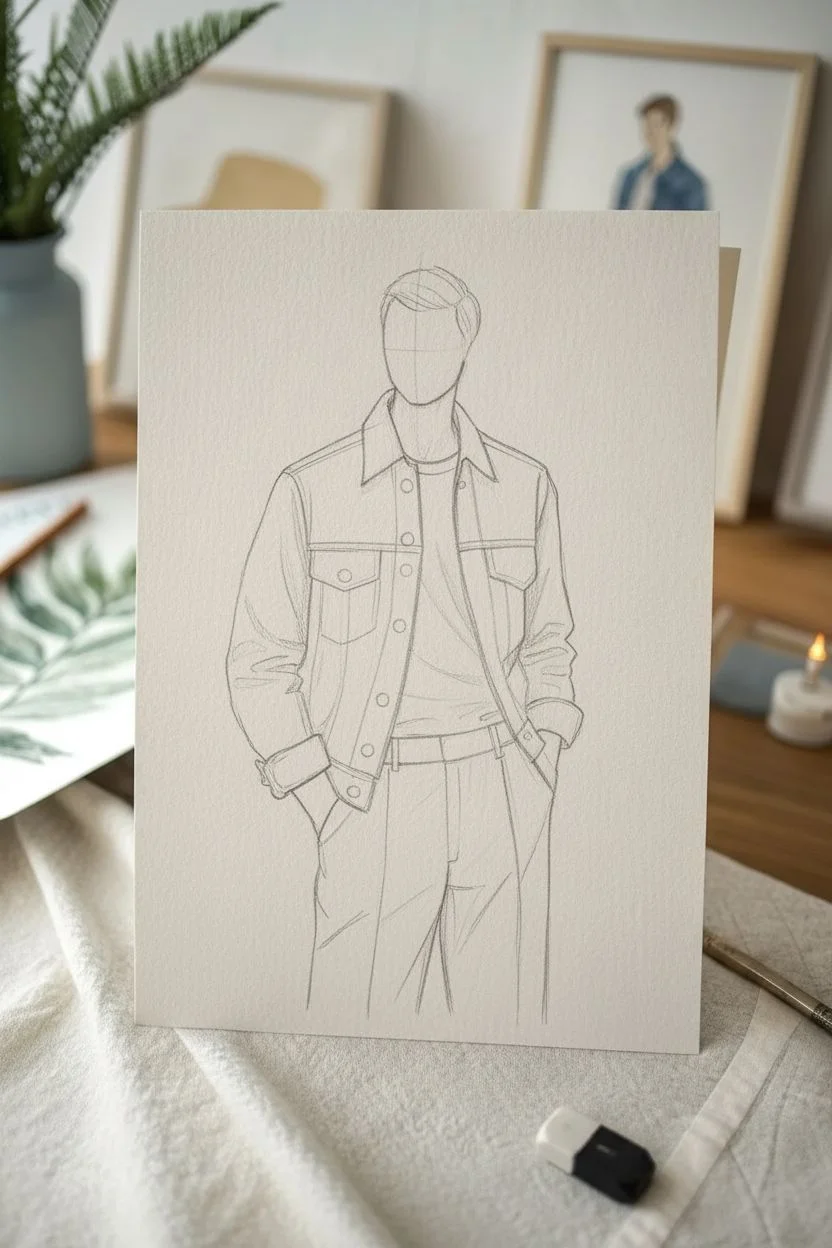
Step 1: Constructing the Figure
-
Gesture Drawing:
Begin with a light vertical line to establish the center of balance. Sketch a loose oval for the head and simple angled lines for the shoulders and hips to capture a relaxed, standing pose with hands in pockets. -
Fleshing Out the Form:
Refine the body shape using cylindrical forms for the arms and legs. Pay attention to the neck width and the angle of the jawline to give the character a masculine appearance. -
Drafting the Outfit:
Draw the outline of the t-shirt first, keeping the neckline round. Sketch the denim jacket over it, ensuring the collar sits high on the neck and the shoulders extend slightly beyond the body lines to suggest structure. -
Adding Details:
Detail the jacket with pockets, seams, and buttons. Sketch the trousers, adding pleats at the waist and natural wrinkling around the crotch and pockets where the hands are inserted.
Denim Texture Tip
Don’t blend your blue coloring too perfectly. Leaving streakiness or slightly uneven patches actually helps mimic the rough, twill texture of real denim fabric.
Step 2: Inking and Outline
-
Refining Facial Features:
Use a 0.1mm fine liner for the face. Draw the eyes, nose, and lips with delicate strokes. I like to keep the lines broken slightly around the hair to make it look softer. -
Clothing Outlines:
Switch to a 0.3mm pen for the clothing. Use confident, sweeping lines for the jacket’s outer edges, but keep internal folds slightly thinner to maintain depth. -
Seam Stitching:
For that authentic denim look, use a broken or dashed line technique along the collar, pockets, and front placket to imitate double-stitching. -
Clean Up:
Once the ink is completely dry, gently erase the underlying pencil sketch with your kneaded eraser to leave a clean, crisp drawing.
Step 3: Color and Texture
-
Skin Tones:
Apply a base skin tone using a marker or light watercolor wash. Add shadows under the jawline, inside the ears, and around the eye sockets with a slightly darker shade while the base is still damp/workable. -
Jacket Base Layer:
Lay down a mid-tone blue wash for the denim jacket. Leave small areas of white paper showing on the shoulders and chest to act as high-contrast highlights. -
Deepening the Denim:
While the blue is drying (or fully dry if using markers), add indigo shadows under the collar, inside the sleeves, and along the side seams to create volume. -
Painting the Trousers:
Use a warm beige or tan color for the pants. Apply the color vertically to mimic the fabric grain, darkening the areas between the thighs and inside the pocket folds. -
Hair Texture:
Color the hair with short, directional strokes that follow the hair growth. Start with a medium brown and layer a darker brown near the roots and parting for depth.
Paper Choice Boost
For a textured look similar to the reference, use cold-press watercolor paper. The slight grain of the paper will naturally break up the ink lines for a vintage feel.
Step 4: Final Highlights
-
Denim Distressing:
Take a very dry brush with pale blue paint, or a colorless blender marker, and lift some pigment on the elbows and chest pockets to create a worn-in denim effect. -
Button Details:
Dot the buttons on the jacket with a metallic gold or copper gel pen, or a mix of yellow ochre paint. -
White Accents:
Use a white gel pen to add sharp highlights to the eyes and the tip of the nose. -
Stitch Highlighting:
Finally, run the white gel pen very lightly over the stitching lines on the denim jacket to make the thread detail pop against the blue fabric.
Step back and admire your stylish fashion illustration, perfectly capturing the texture of denim and layering


Blazer With T-Shirt Male Outfit Mix-and-Match
Learn to capture relaxed elegance with this fashion illustration of a blazer and t-shirt combination. The sketch combines clean pencil lines with subtle marker shading to create texture and depth.
Step-by-Step
Materials
- A4 Marker paper or mixed media paper
- H pencil for initial sketching
- Micro-tip pigment liners (0.1, 0.3, and 0.5)
- Alcohol-based markers (Cool Greys, Warm Greys, Skin tones, Light Blue)
- Colored pencils (White, Dark Grey, Light Blue)
- Kneadable eraser
- Ruler (optional for ground lines)
Step 1: Constructing the Croquis
-
Establish the axis:
Begin by drawing a faint vertical line down the center of your page to act as the balance line. Mark the head size at the top, which will serve as your unit of measurement. For this fashion figure, aim for a slightly elongated 9-head height to give that stylish, long-legged look. -
Block in the torso:
Sketch the shoulder line with a slight tilt to show a relaxed posture. Draw the torso shape, keeping the waist slightly tapered but relatively straight since this is a male figure. Use simple geometric shapes—a rectangle for the chest and a trapezoid for the hips. -
Position the legs:
Sketch the legs extending from the hips. The left leg serves as the weight-bearing leg and should be straight, while the right leg is relaxed and slightly bent at the knee, creating a natural stance. -
Add arms and head:
Draw the arms hanging naturally, with the hands intended to go into the pockets. Sketch a basic oval for the head, marking the eye line purely as a guide for later features.
Texturing Tip
To mimic the heathered texture of the blazer, lightly drag the side of a colored pencil over the dried marker base. The paper’s tooth will catch the pigment perfectly.
Step 2: Drafting the Outfit
-
Outline the blazer:
Draft the blazer shape over the torso. Keep the lapels relatively slim and the fit structured but casual. Draw the sleeves pushed up slightly to create natural wrinkles at the elbows, emphasizing the relaxed vibe. -
Sketch the t-shirt:
Draw a crew neck line just below the collarbone. Indicate the t-shirt’s hemline sitting just below the belt area, showing it’s untucked but fitted. -
Define the trousers:
Sketch the trousers with a slight taper toward the ankle. Add faint lines to indicate creases down the center of the legs and rolled cuffs at the bottom. -
Add accessories:
Draw the simple loafers on the feet. Sketch a pocket square peeking out of the blazer’s breast pocket for a dash of detail.
Step 3: Inking the Lines
-
Refine the face:
Using a 0.1 fine liner, carefully ink the facial features. Keep the eyes sharp and the jawline defined. Add texture to the hair with short, sweeping strokes following the direction of the style. -
Ink the clothing:
Switch to a 0.3 liner for the clothing outlines. Use confident, broken lines for wrinkles and folds, particularly around the elbows and knees. I prefer to make the outer silhouette lines slightly thicker than internal detail lines to make the figure pop. -
Erase pencil guides:
Once the ink is completely dry, use your kneadable eraser to gently lift away all the graphite construction lines.
Custom Patterns
Level up by adding a pattern to the t-shirt. Wait for the base grey to dry, then use a white gel pen to draw horizontal naval stripes or a small logo.
Step 4: Adding Color and Depth
-
Color the skin:
Apply a base layer of light skin tone marker to the face, neck, and ankles. Once dry, add a slightly darker shade under the chin and hairline for shadow. -
Paint the t-shirt:
Use a very light warm grey marker for the t-shirt. Leave some areas white in the center of the chest to represent highlights. -
Texture the blazer:
Color the blazer with a textured light blue marker. Apply the marker in short, cross-hatching strokes rather than flat coloring to mimic the weave of the fabric. Darken the areas under the lapels and inside the arm folds. -
Shade the trousers:
Use a light cool grey marker for the trousers. Add a second layer of the same grey to the sides of the legs and the inner creases to create volume. -
Detail the shoes:
Fill in the shoes with a light brown or beige marker. Use a darker brown pencil to define the sole and laces.
Step 5: Finishing Touches
-
Enhance shading with pencil:
Take a dark grey colored pencil and lightly shade over the deepest shadow areas—under the blazer hem, inside the pocket openings, and behind the knees. This mixed media approach adds a sophisticated graininess. -
Add pattern details:
Use the 0.1 liner to add very fine stitching details on the shoe welt and the blazer pocket. -
Create a ground shadow:
Using a broad, cool grey marker, swipe a quick, confident shadow on the ground extending from the feet to the right, grounding the figure.
Now showcase your stylish illustration in a portfolio or frame it for inspiration


Techwear Cargo Straps Male Outfit Concept
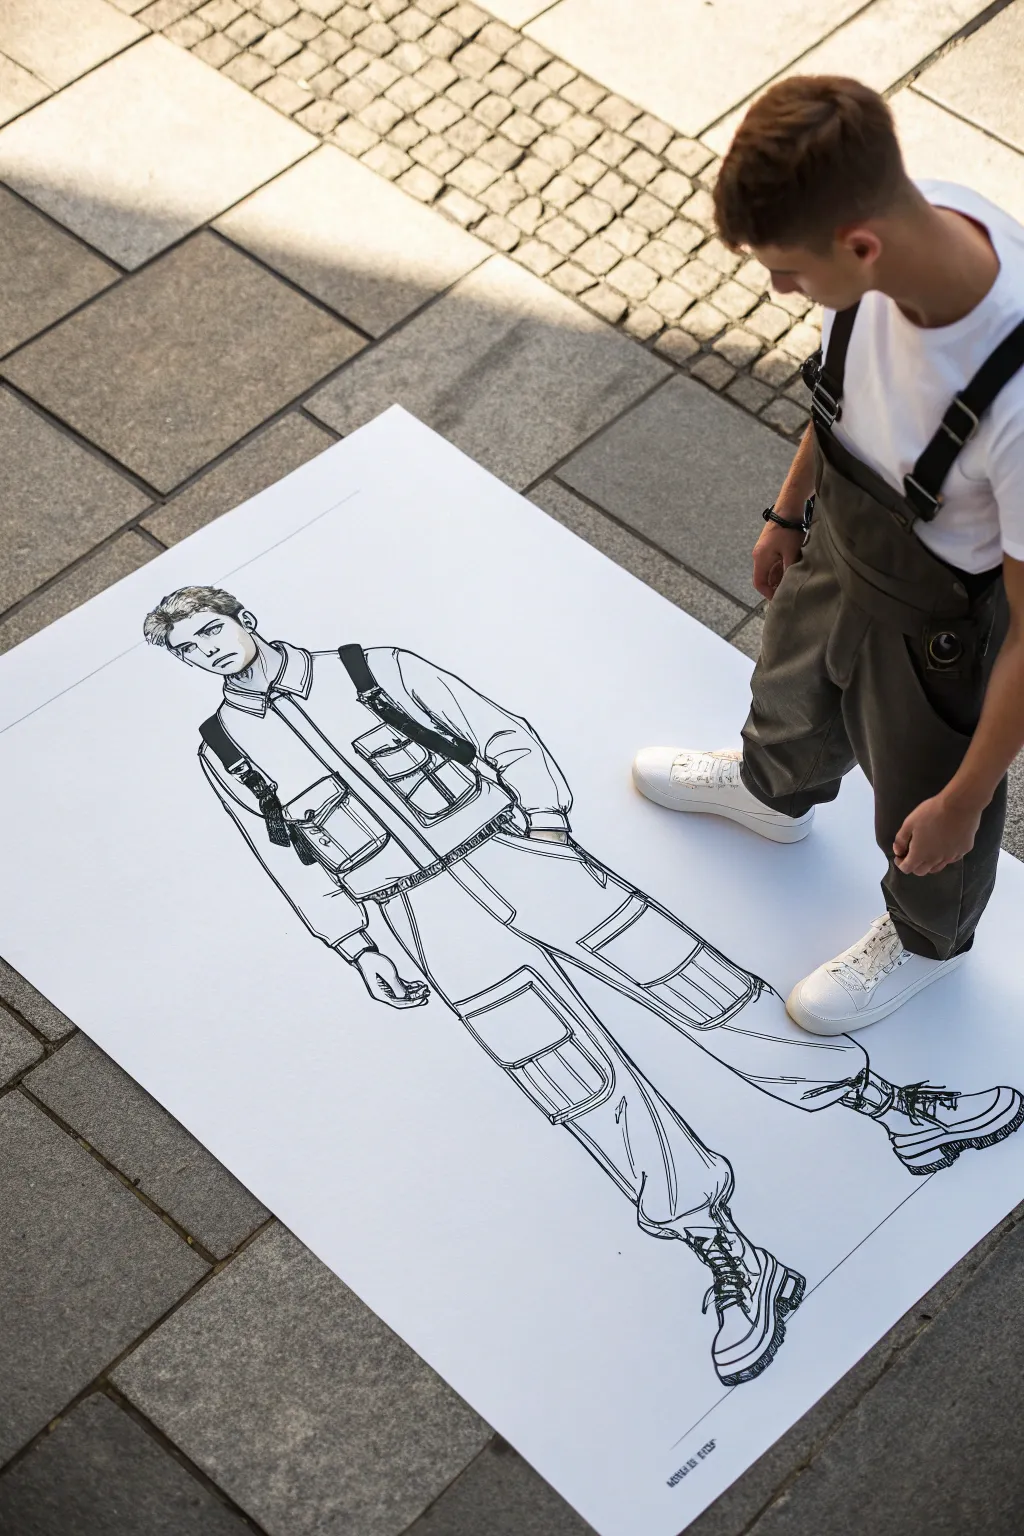
Capture the edgy, functional aesthetic of techwear with this life-sized fashion illustration. This project focuses on confident line work and exaggerated proportions to create a striking monochromatic statement piece.
Step-by-Step Guide
Materials
- Large format roll paper or poster board (at least A0 size)
- Graphite drawing pencil (HB or 2B)
- Large eraser
- Thick black alcohol markers (chisel tip)
- Fine liner pens (0.5mm and 0.8mm)
- Ruler or straight edge
- Masking tape
Step 1: Setting the Foundation
-
Prepare the workspace:
Find a clean, hard floor surface with ample room to move around. Unroll your large format paper and secure the corners to the floor with masking tape to keep it perfectly flat while you work. -
Establish the posture:
Using your graphite pencil, lightly sketch a vertical centerline to guide the figure’s balance. Mark the head, shoulder level, waist, knees, and feet positions to establish a tall, fashion-forward proportion. -
Block in the body shapes:
Sketch the basic anatomical volumes using simple cylinders and ovals. Keep the pose static and upright to emphasize the clothing details later. The arms should hang naturally, with one hand slightly forward. -
Define the head and face:
Refine the head shape, adding the jawline and hair. Keep facial features somewhat stylized and minimal, focusing on a neutral expression that fits the utilitarian mood of the outfit.
Ink Smearing?
Work from top to bottom (or left to right if right-handed) to avoid dragging your hand through wet marker ink. Place a scrap sheet of paper under your drawing hand as a guard.
Step 2: Designing the Techwear Layer
-
Draft the jacket silhouette:
Draw the outline of the utility jacket over the torso. Make sure to box out the shoulders and add slight bulk to the sleeves to suggest heavy, durable fabric. -
Add cargo pocket structures:
Lightly pencil in large, rectangular shapes on the chest and thighs for the signature cargo pockets. Use your ruler to keep the lines parallel and structured. -
Sketch the straps and harnesses:
Draw the diagonal lines for shoulder straps and connecting buckles. These should drape naturally over the shoulders and connect to the pockets, adding to the tactical look. -
Detail the pants:
Outline the baggy cargo pants, tapering them toward the ankles. Add fold lines around the knees and crotch to suggest movement and fabric weight. -
Construct the footwear:
Sketch chunky, high-top combat boots. Focus on the thick soles and the general volume of the shoe rather than intricate lace details at this stage.
Level Up: Utility Fabrics
Use a grey marker to add flat shading to the straps and pockets. This differentiates materials, making the straps look like nylon webbing against the cotton cargo fabric.
Step 3: Inking and Finalizing
-
Start the main outlines:
Switch to your thick chisel-tip marker. Confidently trace the outer silhouette of the entire figure. I find that varying the line weight—thicker on the shadow side—adds instant depth. -
Ink the clothing details:
Use the same thick marker to outline the major clothing seams, the pockets on the jacket, and the main straps. Create separation between the jacket and the pants. -
Add texture with fine liners:
Switch to your 0.8mm fine liner. Draw the zippers, buckles, and smaller stitching lines on the pockets. Use short, hatching lines to suggest fabric texture on the cargo rub-strips. -
Refine the face and hair:
Carefully ink the facial features with the 0.5mm pen. Use quick, directional strokes for the hair to give it a messy, textured look. -
Detail the straps:
Fill in the plastic buckles and adjusters with solid black inputs or heavy cross-hatching to make them stand out against the white fabric areas. -
Enhance the boots:
Ink the boots using a mix of thick lines for the soles and thin lines for the laces and upper stitching. Add a few scuff marks for realism. -
Clean up the drawing:
Once the ink is completely dry, use your large eraser to remove all visible pencil guidelines. Be thorough to leave a stark black-and-white contrast. -
Add final weight:
Review the drawing from a standing position. Use the thick marker to reinforce any outer lines that feel too thin, grounding the figure on the page.
Hang your massive illustration on a wall to see the full impact of your streetwear design work

PENCIL GUIDE
Understanding Pencil Grades from H to B
From first sketch to finished drawing — learn pencil grades, line control, and shading techniques.
Explore the Full Guide
Workwear Jacket and Utility Pants Male Outfit Study
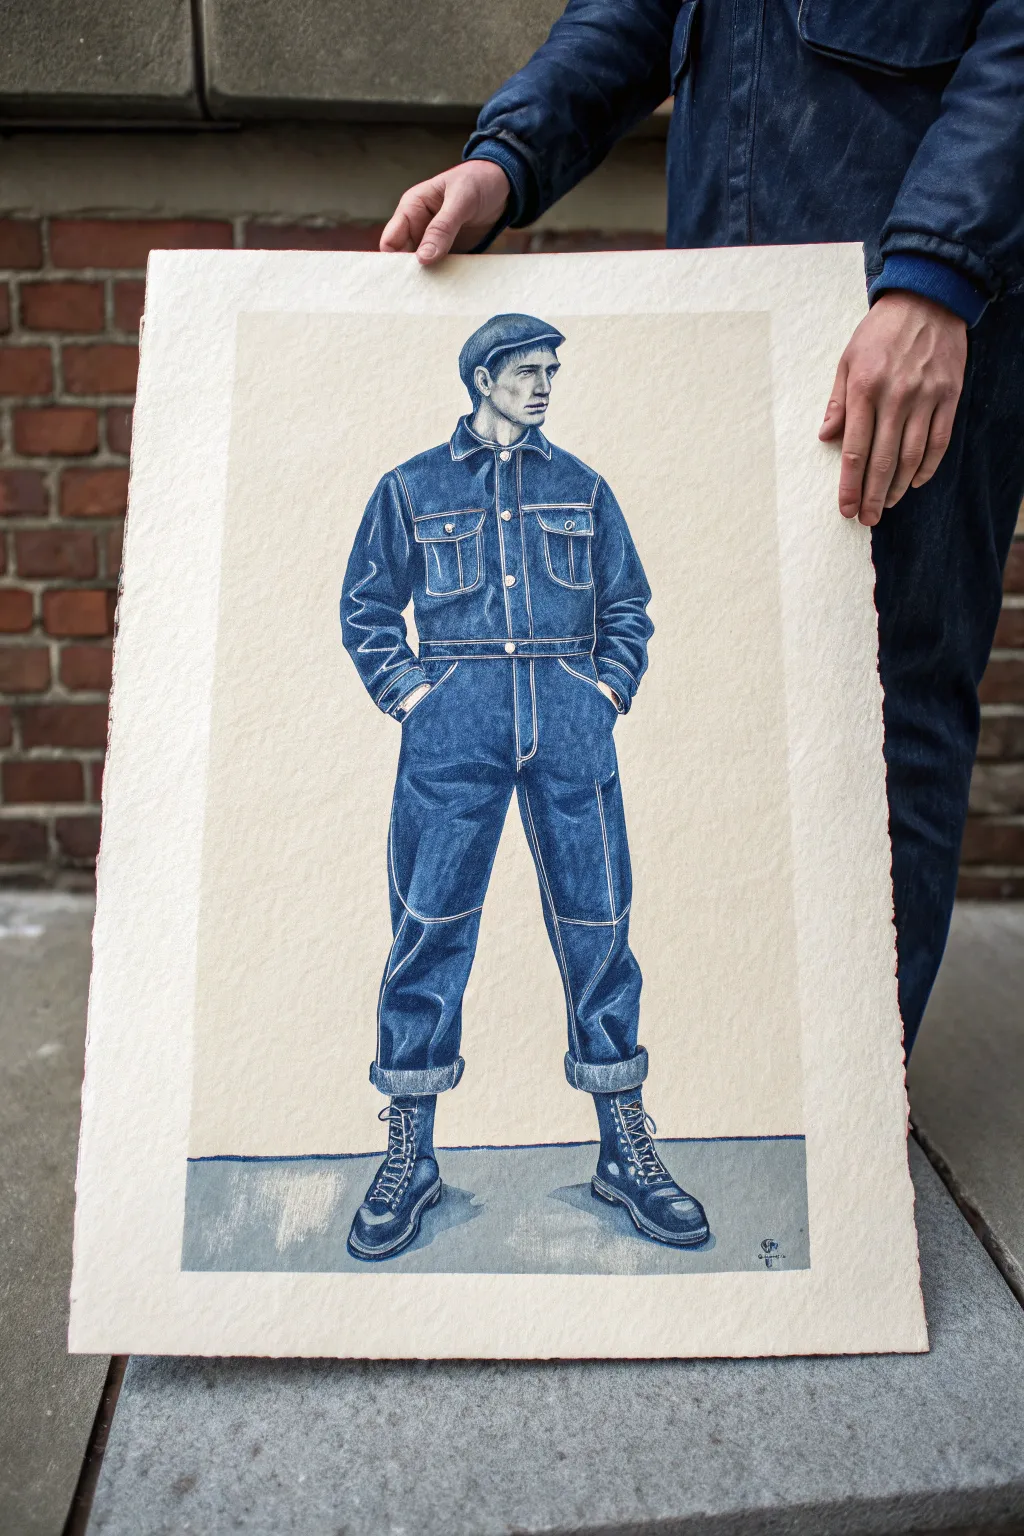

This project captures the rugged elegance of vintage workwear through a detailed fashion illustration. Using a limited palette of indigo hues on textured paper, you will recreate the heavy drape of denim and the subtle sheen of leather boots.
Detailed Instructions
Materials
- Heavyweight watercolor paper (rough or cold press, 300gsm)
- Graphite pencils (HB, 2B)
- Watercolor paints (Indigo, Payne’s Grey, Prussian Blue, Burnt Umber)
- White gouache or white gel pen
- Synthetic sable brushes (Sizes 2, 4, and 0 for details)
- Colored pencils (optional, for enhancing texture)
- Masking tape
- Mixing palette
Step 1: Sketching the Framework
-
Prepare the Paper:
Tape your watercolor paper down to a board to prevent warping. Leave a generous margin around the edges to frame the figure cleanly within a rectangular composition. -
Establish the Pose:
Begin with a light stick figure to map the anatomy. The subject stands with legs slightly apart and hands in pockets, creating a confident, stable stance essential for workwear modeling. -
Draft the Garment Shapes:
Draw the outline of the jumpsuit over the body. Pay attention to how heavy denim behaves; sketch stiff folds at the elbows, knees, and ankles, rather than soft drapery. -
Add Stitching Guides:
Lightly mark where the major seams and pockets lie. These double-stitched lines are crucial for defining the ‘denim’ look later. -
Detail the Face and Boots:
Sketch the facial features and the cap. Outline the boots, ensuring the laces and heavy soles are clearly defined.
Step 2: Painting the Base Layers
-
Mix Your Indigo:
Create a large pool of your main denim color. I like to mix Indigo with a touch of Prussian Blue for vibrancy, keeping a separate puddle of watered-down grey for the skin tones. -
Apply the Flesh Tones:
Paint the face, neck, and hands with a very pale wash. Let this dry completely before adding subtle shadows under the cap brim and jawline. -
First Denim Wash:
Apply a medium-strength wash of blue to the entire jumpsuit, but strategically leave thin white gaps along the seam lines and pocket flaps. This negative space preserves the lighter stitching areas. -
Ground the Figure:
Paint a simple grey block at the bottom of the paper for the floor. Allow some brush texture to show through to mimic concrete.
Denim Texture Tip
To mimic the worn ‘fade’ of denim, use a clean Q-tip to lift wet paint off the knees and thighs immediately after applying your wash.
Step 3: Building Texture and Depth
-
Shadow Mapping:
Once the base is dry, mix a darker, more saturated version of your blue (add Payne’s Grey). Paint the deep folds behind the knees, the armpits, and the crotch area. -
Enhancing the Seams:
Carefully paint right up to the edges of your reserved white seam lines. This contrast makes the stitching pop. -
Modeling the Fabric:
Use a damp, clean brush to soften the edges of your shadows, blending them into the mid-tones to create the rounded look of legs and arms. -
Painting the Boots:
Use a concentrated dark blue-black mix for the boots. Leave sharp white highlights on the toe and heel to represent polished leather.
Level Up: Vintage Wash
Apply a very faint, diluted wash of yellow ochre over the finished, dried denim. It gives the fabric an aged, vintage workwear tint.
Step 4: Final Details and Highlights
-
Refine Stitching:
If your reserved white lines got covered, use a white gel pen or thin white gouache to reinstate the contrast stitching on pockets, heavy seams, and cuffs. -
Add Metallic Hardware:
Dot in the buttons and rivets using small touches of white or light grey gouache. Add a tiny shadow under each button to give it dimension. -
Texture the Denim:
For a true denim effect, lightly drag a dry brush or a colored pencil over the dried blue paint. This cross-hatching mimics the weave of the fabric. -
Lace Detail:
Draw the bootlaces with a fine liner or size 0 brush using white or light grey paint, ensuring they crisscross accurately. -
Final Assessment:
Darken the deepest shadows one last time to increase contrast. Sign your work in the bottom corner of the floor area.
Once the paint is fully set, remove the tape to reveal the crisp edges of your monochromatic fashion study.
Monochrome Male Outfit Value Study for Drawing

This project is a masterclass in rendering varied textures using simple graphite tools, creating a stylish winter menswear illustration. You’ll learn how to distinguish between the heavy wool of a coat, the knitted texture of a sweater, and the smoothness of leather boots through careful shading and hatching.
Step-by-Step
Materials
- Heavyweight sketchbook paper (smooth or refined surface)
- Set of graphite pencils (HB, 2B, 4B, 6B)
- Mechanical pencil (0.5mm, HB) for fine details
- Kneaded eraser
- Precision stick eraser
- Blending stump (tortillon)
- Workable fixative
Step 1: Structure & Proportions
-
Establish the pose:
Begin with a loose gesture drawing using an HB pencil. Sketch a vertical line for balance, then block in the head, shoulders, torso, and legs. The figure is walking forward, so angle the legs slightly to show movement. -
Map the garments:
Lightly outline the clothing shapes over your stick figure. Draw the large, boxy shape of the overcoat, the high neck of the sweater, and the relaxed fit of the trousers bunching at the ankles. -
Refine the line art:
Switch to your mechanical pencil to crisp up the outlines. Focus on the lapels of the coat and the specific folds in the trousers. Keep these lines clean but faint enough to be integrated into the shading later.
Smudge Control
Graphite smudges easily. Place a clean sheet of scrap paper under your drawing hand to protect finished areas effectively.
Step 2: The Knitted Sweater
-
Base tone for the knit:
Using the side of a 2B pencil, lay down a medium-grey base tone across the entire sweater area, avoiding the collar rim and hem. -
Create texture:
To simulate the heavy knit, use a stippling motion or small, tight scribbles with a 4B pencil. I like to vary the pressure here to create the uneven, organic look of wool. -
Detail the ribbing:
Draw vertical, parallel lines for the turtleneck collar and the bottom hem. Add deeper shadows between the ribs to make them look three-dimensional.
Step 3: The Overcoat & Trousers
-
Shade the coat:
The coat requires a smoother texture than the sweater. Use long, unidirectional hatching strokes with an HB or 2B pencil. Darken the inside of the coat (the lining) significantly with a 6B to create contrast against the lighter trousers. -
Render the trousers:
These pants appear lighter in value. Use a light hand with an HB pencil to shade the folds. Focus on where the fabric bunches at the knees and ankles, leaving the center of the legs nearly white to imply a highlight. -
Refine the silhouette:
Darken the outer edges of the coat and the pockets. Add the buttons as small, dark circles with a highlight left white in the center.
Add a Pop of Color
For a mixed-media twist, color just one element—like the sweater or the boots—with watercolor or marker to create a focal point.
Step 4: Boots & Finishing Touches
-
Draw the boots:
Use a 4B pencil to block in the shape of the boots. These should be dark and heavy. press firmly to create a leather-like solidity, but leave small strips of white to show the shine on the toe cap. -
Add the laces:
Use your mechanical pencil to draw tiny crisscross patterns for the laces. Don’t over-detail; the suggestion of laces is often enough. -
Render the face:
Keep the facial features subtle. Shade under the brow and jawline to define the head, and add texture to the hair with short, curly strokes using a 2B pencil. -
Ground the figure:
Using the side of a broad pencil or graphite stick, create a horizontal wash of shadow beneath the boots. This ‘ground’ shadow anchors the figure so he isn’t floating in space. -
Final contrast check:
Step back and assess your values. Deepen the darkest darks—specifically under the collar, inside the coat, and the boots—to make the drawing pop. Use a kneaded eraser to lift out any highlights that became too muddy.
Finish your study by signing your name near the shoe shadow for a professional touch
BRUSH GUIDE
The Right Brush for Every Stroke
From clean lines to bold texture — master brush choice, stroke control, and essential techniques.
Explore the Full Guide
Patterned Shirt Male Outfit Idea Without Overwhelm
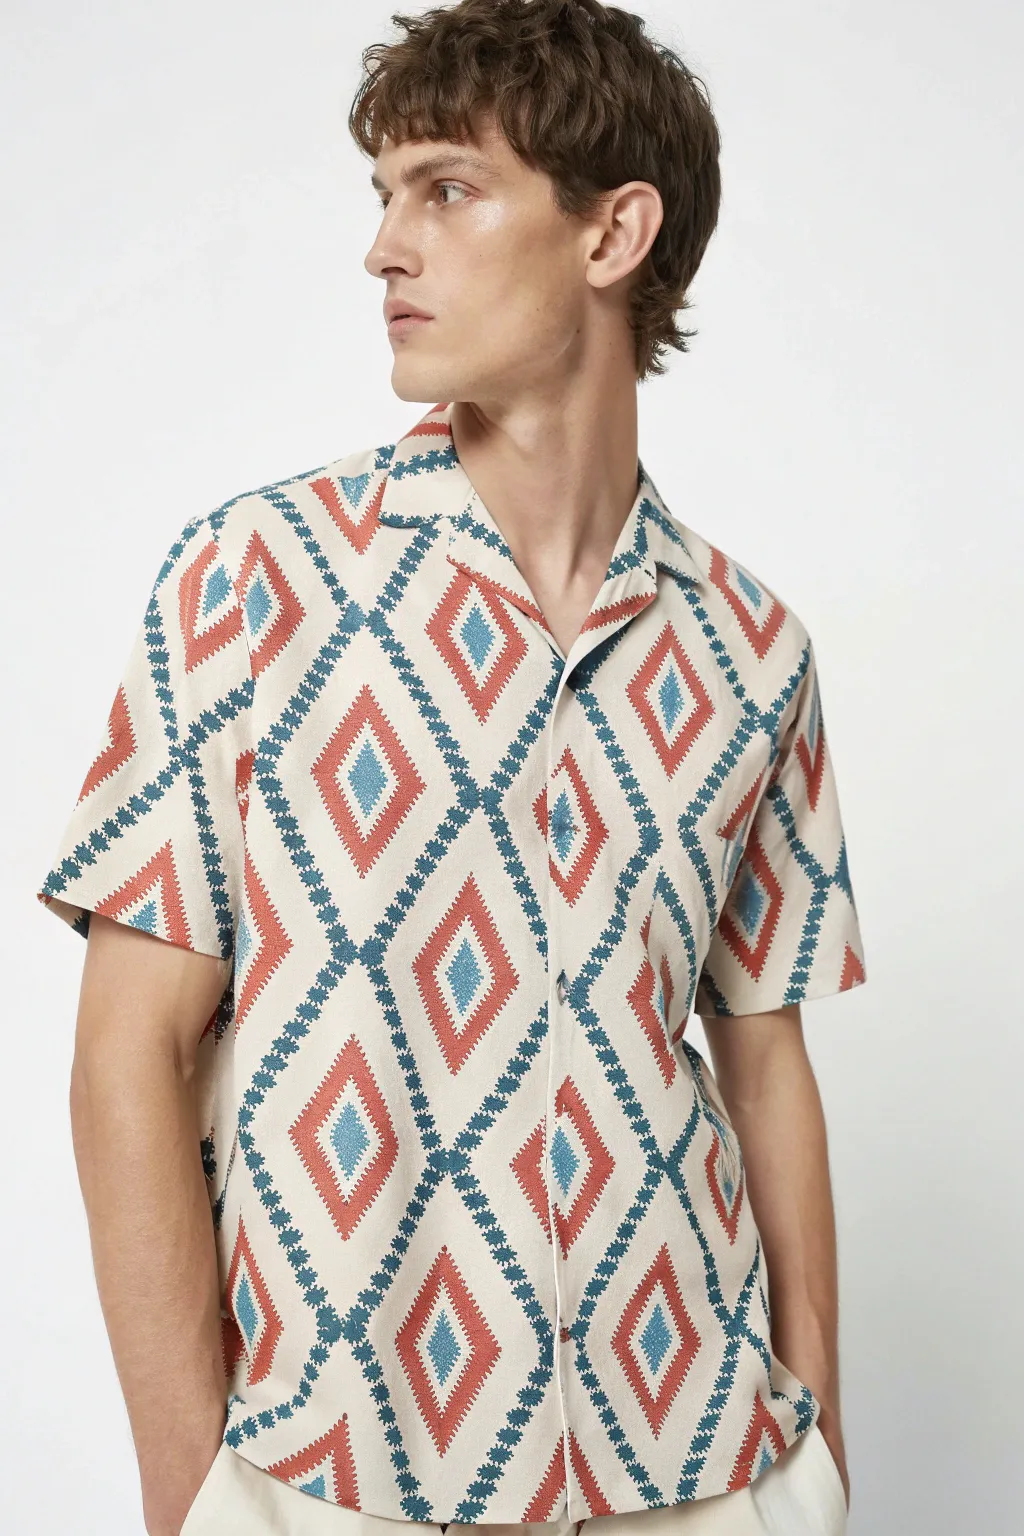
This tutorial guides you through illustrating a stylish male outfit featuring a complex geometric patterned shirt. You will learn how to map patterns onto fabric folds and use a limited color palette of teal, rust, and cream to create a sophisticated, clean look.
How-To Guide
Materials
- Bristol board or smooth drawing paper
- HB and 2B graphite pencils
- Kneaded eraser
- Fine liner pens (0.1mm and 0.3mm in sepia or dark grey)
- Alcohol-based markers (colors: Cream/Sand, Rust/Terracotta, Teal/Petrol Blue)
- White gel pen
- Ruler
Step 1: Sketching the Figure and Shirt Outline
-
Establish the pose:
Begin by lightly sketching the model’s head and neck with an HB pencil. He is looking off to the left in a three-quarter view, so defining the jawline and ear placement is crucial for anchoring the rest of the figure. -
Draft the shoulders and torso:
Draw the slope of the shoulders, keeping them relaxed. Sketch the torso’s basic block shape, noting that the shirt is loose-fitting but not baggy. -
Outline the shirt structure:
Define the open collar structure, which creates a ‘V’ shape revealing the neck. Draw the placket (the center strip for buttons) straight down the chest, but allow it to wave slightly to suggest fabric movement. -
Add sleeves and folds:
Sketch the short sleeves, stopping just above the elbow. Add gentle crease lines at the armpit and where the shirt tucks or hangs, as these folds show the fabric’s weight.
Step 2: Mapping the Geometric Pattern
-
Create a pattern grid:
This is the most critical step. Lightly draw diagonal grid lines across the shirt surface with your pencil. These lines should curve slightly with the cylindrical shape of the torso rather than being perfectly flat. -
Outline the diamond shapes:
Using your grid intersections, sketch the large diamond outlines. Ensure the diamonds wrap around the side seams and distort slightly near the armpits where the fabric folds. -
Add inner details:
Inside each large diamond, draw a smaller, concentric diamond shape. This creates the ‘frame’ for our colored sections later. -
Connect the diamonds:
Draw the connecting zig-zag lines that link the diamonds vertically and horizontally. Pay close attention to the collar; the pattern should continue naturally onto it but will be interrupted by the seam.
Pattern Distortion
Does the shirt look flat? Ensure your grid lines curve with the body’s volume. If a pattern goes into a deep fold, break the line visually to show depth.
Step 3: Inking and Coloring
-
Ink the main outlines:
Use a 0.3mm fine liner to ink the outer creating of the shirt, the face, and the arms. Use a steady hand for the straight collar edges. -
Ink the pattern texture:
Switch to a 0.1mm pen for the pattern itself. Instead of solid lines, use tiny, jagged scribbles or ‘sawtooth’ lines to mimic the embroidered or woven texture of the fabric shown in the reference. -
Erase pencil marks:
Once the ink is completely dry, gently remove the graphite grid and sketch lines with a kneaded eraser. -
Apply the base tone:
Color the entire shirt area with a Cream or Sand marker to create the fabric’s background color, avoiding the skin areas. -
Color the diamond centers:
Use a Teal or Petrol Blue marker to fill the innermost small diamonds. Keep the edges slightly rough to maintain that woven textile look. -
Fill the outer diamonds:
Color the thick diamond borders with a Rust or Terracotta marker. I find that doing a second pass on one side of the diamond adds a subtle shadow effect. -
Trace the connecting lines:
Carefully trace the zig-zag connecting lines with the Teal marker. Use the fine tip of the marker for precision here.
Texture Trick
Don’t draw straight lines for the pattern! Use a jittery, nervous hand motion to mimic the jagged ‘stair-step’ look of woven embroidery.
Step 4: Shading and Final Touches
-
Shade the skin:
Add skin tones to the face, neck, and arms. Concentrate shadows under the jawline, inside the ear, and along the inner arm to create volume. -
Add fabric shadows:
Using a cool gray marker (around 20-30% opacity), glaze over the patterned shirt where shadows fall—specifically under the collar, at the armpits, and along the side of the torso. -
Deepen the contrast:
Go back with your dark grey fine liner to deepen creases in the deepest folds of the shirt. -
Highlighting:
Use a white gel pen to add tiny highlights to the eyes and the tip of the nose. You can also add a few white stipples on the pattern to simulate light catching the thread texture.
With these steps, you have successfully captured the complex texture and relaxed fit of a patterned summer shirt.
Footwear-Focused Male Outfit Sketch: Boots vs Sneakers
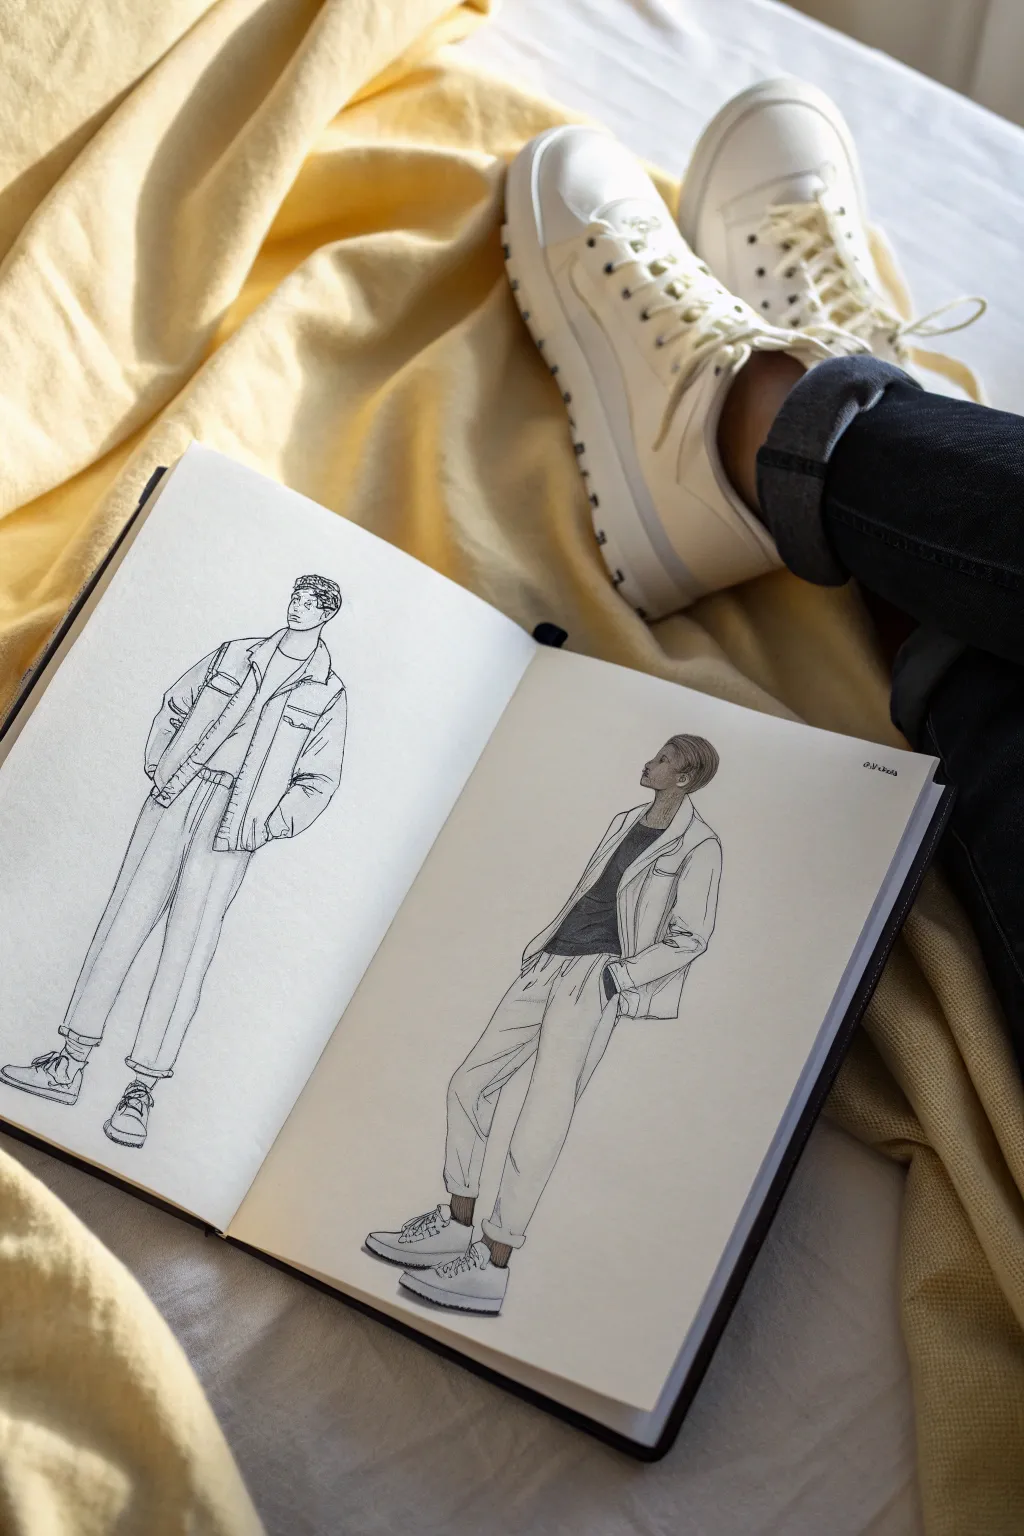
Capture the effortless style of modern menswear with this double-page sketchbook spread featuring two distinct male fashion figures. This project focuses on clean line work, realistic fabric folds, and subtle shading to bring these casual outfits to life.
Step-by-Step Guide
Materials
- Hardbound sketchbook (A4 or roughly 8×11 inches recommended)
- Graphite pencils (H for sketching, HB for outlines, 2B/4B for shading)
- Fine liner or black ink pen (optional for final lines)
- Kneadable eraser
- Paper blending stump or cotton styling swab
- Ruler (optional for proportions)
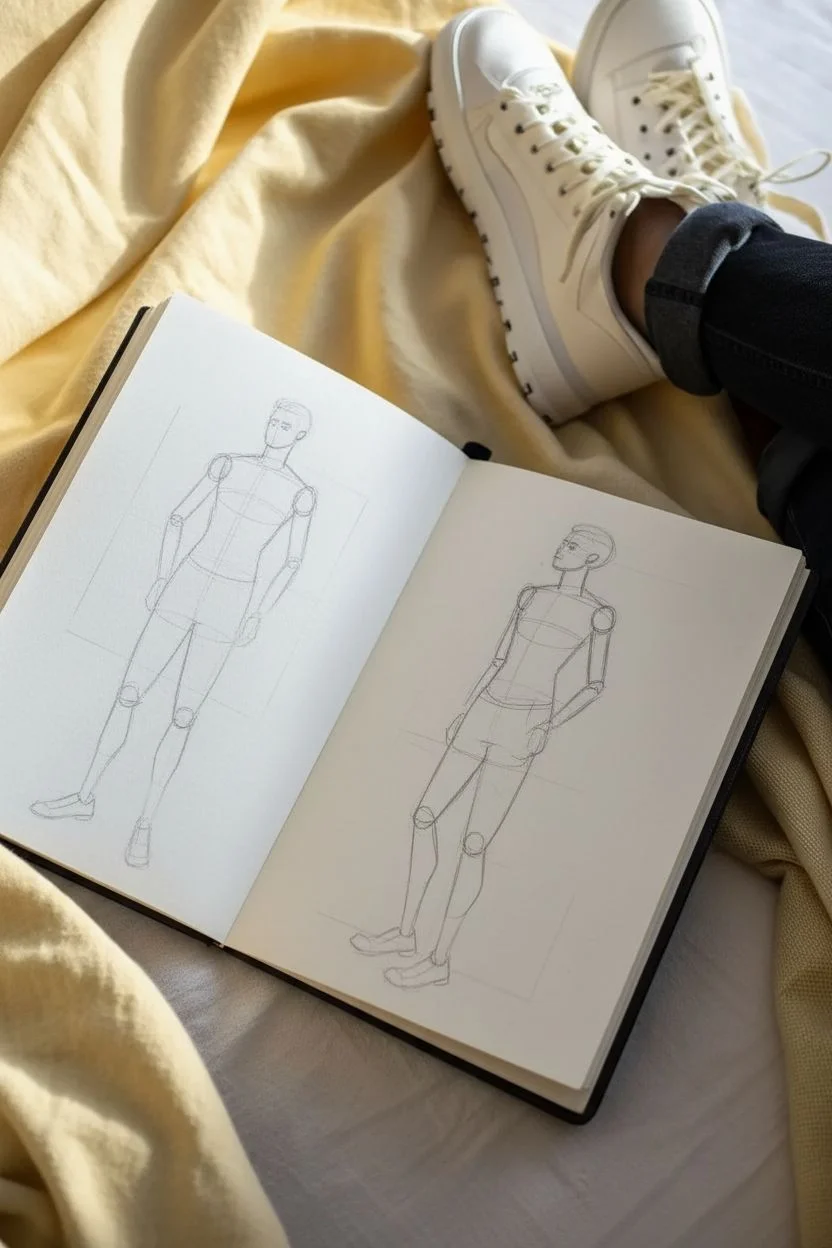
Step 1: Planning the Figures
-
Establish the croquis:
Begin on the left page by lightly sketching a basic stick figure ‘skeleton’ to establish the pose. For this relaxed look, keep the weight distributed evenly or slightly shifted to one leg. Repeat this process on the right page, angling the figure slightly away for variety. -
Flesh out the forms:
Using an H pencil, draw cylindrical shapes over your stick figures to create volume for the torso, arms, and legs. Remember that fashion illustration often elongates the legs slightly for elegance, but keep these relatively grounded for a realistic street-style vibe. -
Map facial features:
Lightly indicate the direction of the gaze. The left figure looks straight ahead, while the right figure looks upward and to the side. Mark the eye line, nose base, and mouth position with faint crosshairs.
Pro Tip: Fabric Weight
Use lighter, broken lines for soft fabrics (like the t-shirt) and harder, continuous lines for stiff materials (like the denim jacket).
Step 2: Left Page: The Denim Jacket Look
-
Draft the jacket silhouette:
Sketch the outline of the outer jacket. It appears to be a denim or heavy canvas trucker style. Draw the collar popped slightly and keep the shoulders boxy. -
Add the layers:
Draw the vertically striped shirt underneath. Indicate the buttons and the hemline tucking into the waistband. -
Define the trousers:
Sketch straight-leg trousers that taper slightly at the ankle. Add slight breaks in the fabric near the shoe to suggest the material resting on the footwear. -
Refine line work:
Switch to an HB pencil or fine liner to darken your lines. Focus on the pockets of the jacket and the seams down the front of the trousers. Keep the head sketch loose, adding texture for short, curly hair. -
Detail the footwear:
Draw simple, low-top sneakers. Add the laces and the distinct rubber sole lines.
Level Up: Mix Media
Use a grey alcohol marker to add quick shadows to the pants and jackets for instant depth without pencil smudging.
Step 3: Right Page: The Blazer Ensemble
-
Outline the blazer:
Draw a more fluid, unstructured blazer on this figure. Let the lapels drape naturally and sketch the sleeves pushed up slightly or ending at the wrist bone. -
Sketch the t-shirt:
Draw a simple crew neck t-shirt underneath. Use darker shading strokes here to indicate a darker fabric color, distinguishing it from the light jacket. -
Construct the pants:
Draw drawstring trousers or joggers. Illustrate the waistband and draw wrinkles radiating from the crotch and knees to show movement and fabric weight. -
Render the face and hair:
Refine the profile. Shade the side of the face gently to show the jawline structure. Use short, dense strokes for the hair to create a textured, dark appearance. -
Draw the shoes:
Sketch chunky sneakers with a prominent tread. I find outlining the sole first helps anchor the foot before adding the upper details.
Step 4: Shading and Finishing Touches
-
Add fabric folds:
Look for tension points—elbows, knees, and armpits. Add darker, deliberate lines here to represent deep folds in the clothing. -
Shadow the dark shirt:
On the right page, use your 2B or 4B pencil to fully fill in the t-shirt. Use cross-hatching to create a dense, woven texture while leaving small highlights near the chest. -
Ground the figures:
Add a very faint shadow under the feet of both figures so they don’t look like they are floating in space. -
Clean up:
Use your kneadable eraser to lift away the initial construction lines and the stick figure skeletons, leaving only your clean fashion illustration.
Now you have a stylish spread ready to inspire your next outfit coordination


Male Outfit Grid: 9 Jacket-and-Pants Combinations to Draw
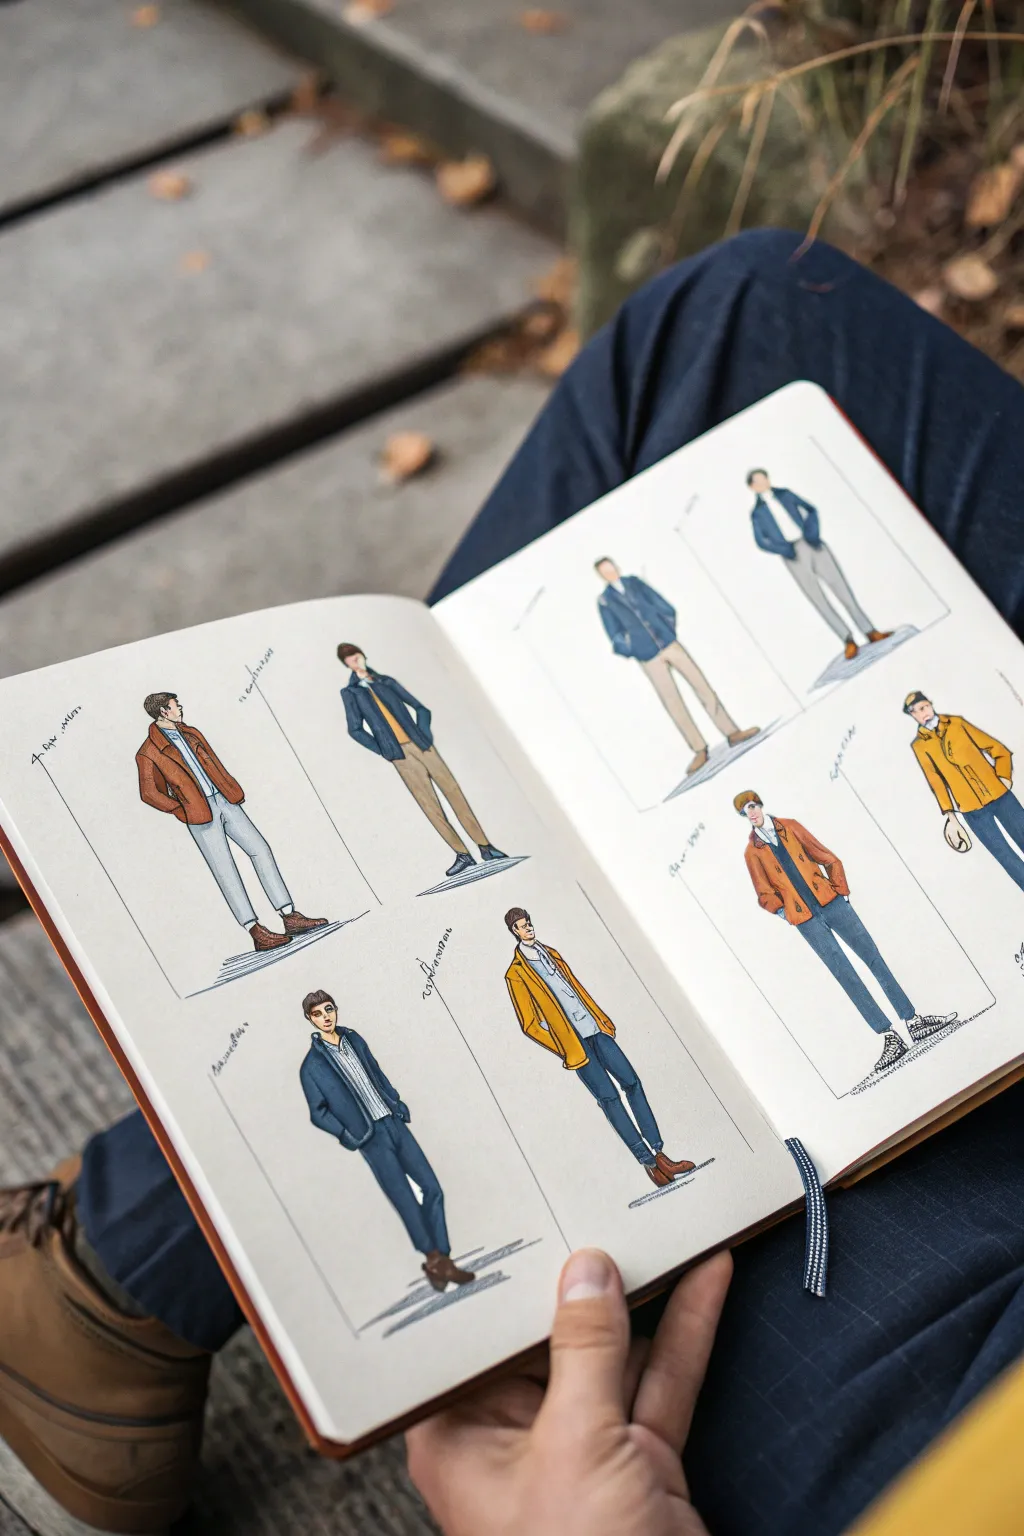
Create a sophisticated reference guide for men’s fashion by illustrating a grid of casual-smart outfits directly in your sketchbook. This project combines classic pose sketching with marker rendering techniques to capture textures like denim, wool, and cotton.
Step-by-Step Guide
Materials
- Heavyweight sketchbook paper (min. 160gsm, smooth surface)
- Mechanical pencil (HB or 2B)
- Kneaded eraser
- Fine liner pens (0.1, 0.3, and 0.5mm, black)
- Alcohol-based markers (assorted skin tones, blues, browns, greys, and yellows)
- White gel pen
- Ruler
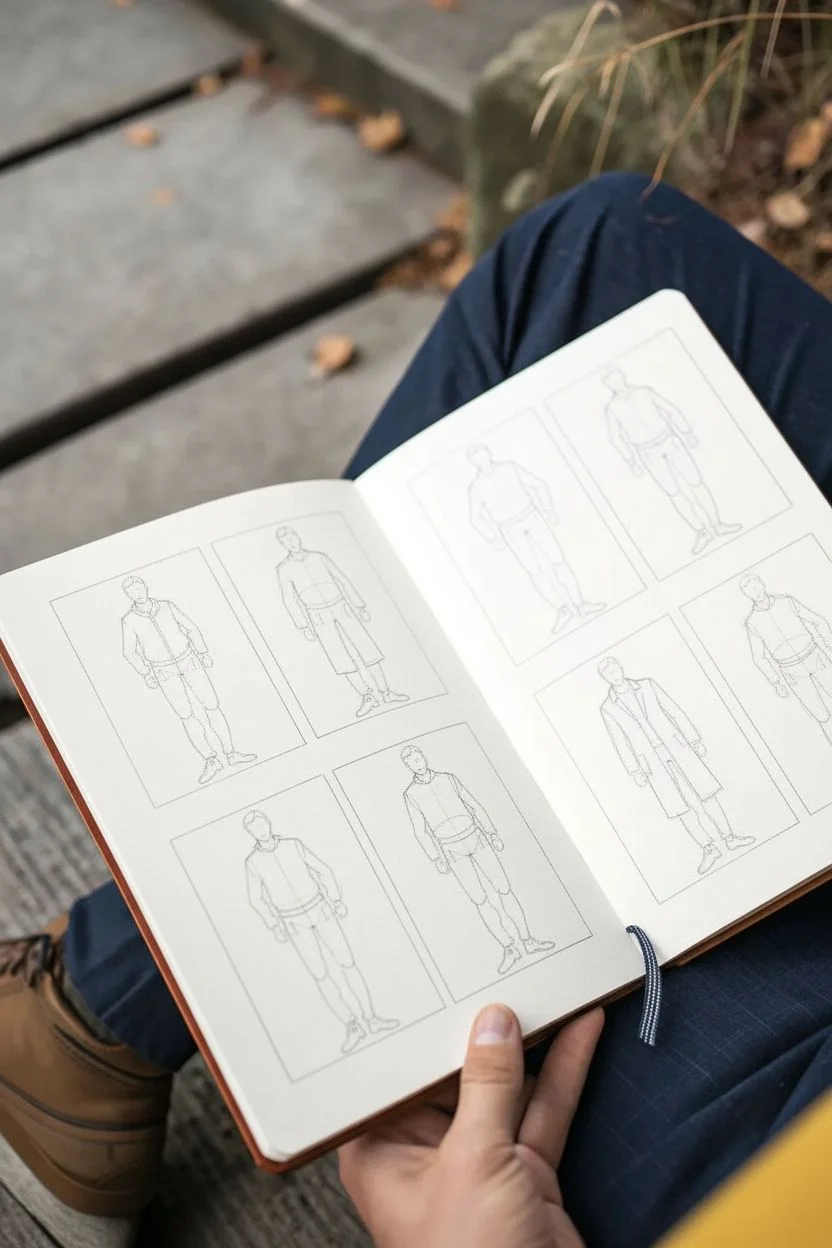
Step 1: Planning and Layout
-
Define the Grid:
Open your sketchbook to a fresh two-page spread. Using your ruler and mechanical pencil, lightly mark out four equal rectangular zones on each page. Leave a uniform margin around the edges and between the imaginary boxes to let the drawings breathe. -
Establish the Croquis:
In the center of each imaginary box, sketch a faint ‘croquis’ or figure template. Keep the poses simple and standing; a slight shift in weight to one hip adds naturalism. Use circles for joints and lines for limbs to get the proportions right before adding flesh. -
Draft the Clothing Silhouettes:
Lightly sketch the outlines of the garments over your figures. Vary the styles: try a bomber jacket on one, a long trench on another, and a blazer on a third. Focus on where the fabric folds at the elbows and knees.
Bleeding Lines?
If your marker bleeds outside the lines, use a colorless blender marker to ‘push’ the color back in while it is wet, or thicken the outer outline slightly to cover it.
Step 2: Inking the Lines
-
Refine the Outlines:
Switch to a 0.3mm fine liner. Go over your pencil lines with confident strokes. Don’t close every single line perfectly; leaving small gaps in the clothing folds keeps the sketch looking loose and energetic. -
Add Facial Details:
Use your finest 0.1mm pen for the faces. You don’t need hyper-realism here—simple indications of eyes, nose, and jawline are sufficient. Give each figure a slightly different hairstyle to create distinct characters. -
Detail the Garments:
Add structural details like collars, cuffs, pockets, and buttons. For thicker fabrics like denim or coats, I sometimes use a slightly thicker 0.5mm pen on the outer silhouette to give it weight. -
Erase Guidelines:
Once the ink is completely dry (give it a few minutes to be safe), gently use your kneaded eraser to lift all the underlying pencil marks. The page should look clean and crisp.
Fabric Texture Trick
To make a jacket look like wool or tweed, dab your marker tip repeatedly for a stippled effect rather than using smooth strokes.
Step 3: Color and Rendering
-
Base Skin Tones:
Start with your lightest skin tone marker. Fill in the faces and hands. Once the base is down, add a second layer under the hairline and chin to create shadow and dimension. -
Color the Pants:
Select markers for your trousers—blues for denim, tans for chinos, greys for slacks. Lay down a flat wash of color first. While the ink is still wet, go back over the shadowed areas (inner legs, beneath the jacket hem) to deepen the tone. -
Render the Jackets:
Apply color to the outerwear. For the yellow jacket, use a mustard tone rather than bright lemon for a more natural textile look. Use long, vertical strokes to mimic the weave of the fabric on longer coats. -
Layering Depth:
Don’t forget the shirts underneath. Use lighter colors like pale blue or white (leave the paper blank for white). If sketching a patterned shirt, add stripes or checks with a fine liner after the marker ink dries. -
Shadows and Contrast:
Using a cool grey marker, add cast shadows on the floor beneath the feet. This grounds the figures so they aren’t floating. Add deeper shadows inside the jackets and under collars.
Step 4: Final Touches
-
Highlights:
Use a white gel pen to add tiny highlights to buttons, belt buckles, and the tops of shoes. A small white line on the highest point of the hair adds a nice shine. -
Box Framing:
With a ruler and a thin pen (0.1mm), draw a clean, thin frame around each individual figure. This unifies the spread and makes it look like a professional catalog layout. -
Annotations:
Add handwritten notes in a cursive or architectural font next to each outfit. You can label specific fabrics like ‘Selvedge Denim’ or ‘Wool Blend’ to give the sketch context.
Now you have a stylish visual reference guide ready for your next project.


Have a question or want to share your own experience? I'd love to hear from you in the comments below!