
When pumpkins become your canvas, you get to play with light, color, and texture all at once. I pulled together my favorite pumpkin carving and pumpkin painting ideas—starting with the classics and sliding into the artsy, “how did you do that?” territory.
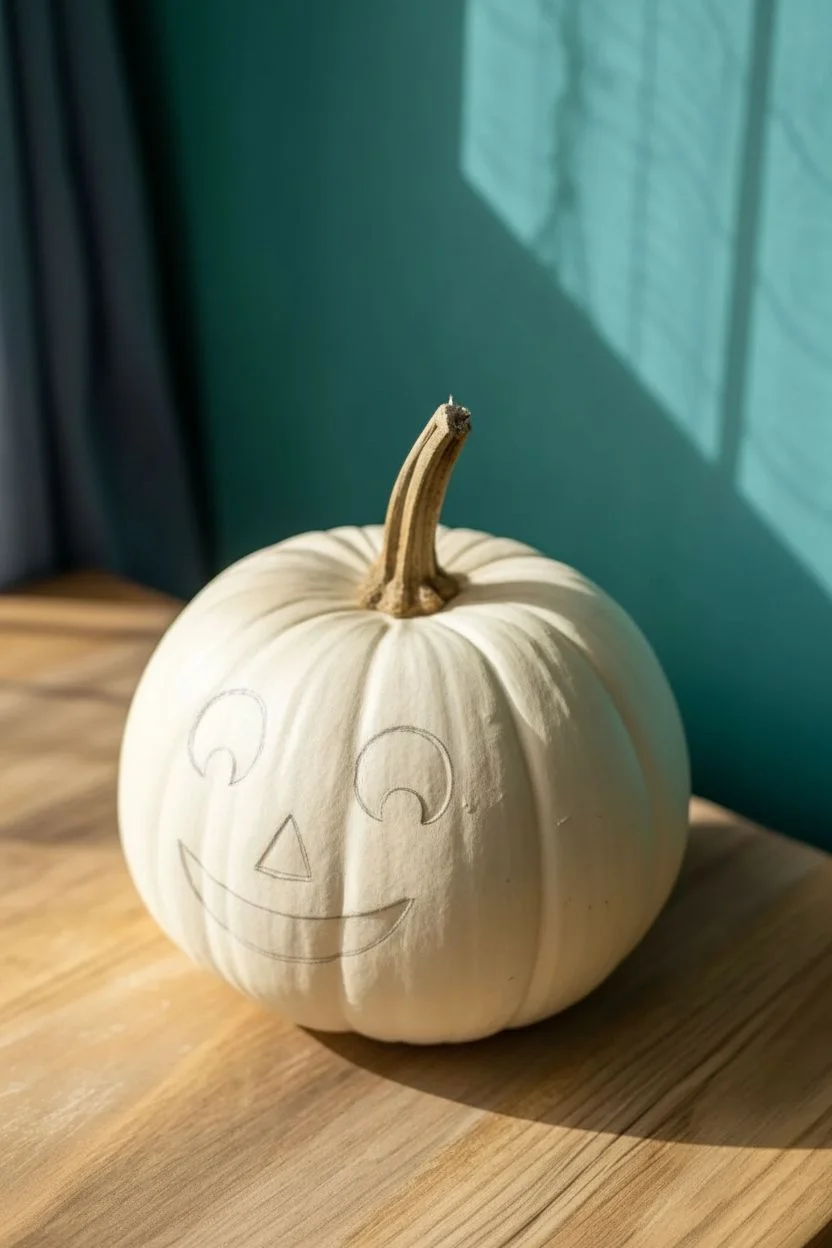
Classic Jack-o’-Lantern With Painted Shadow Shading

Recreate the quintessential Halloween icon with this classic grinning pumpkin. This project elevates a standard carving by using subtle painted shadows to add depth and dimension to the traditional features.
Step-by-Step Guide
Materials
- Medium to large orange pumpkin with a sturdy stem
- Pumpkin carving kit (serrated saw, scoop)
- Sharp paring knife
- Water-soluble marker or pencil
- Dark brown or black acrylic paint
- Small flat brush or stiff bristled brush
- Paper towels or rag
- Bowl for waste
Step 1: Preparation and Gutting
-
Clean and Dry:
Start by wiping down your pumpkin with a damp cloth to remove any dirt or field debris. Dry it completely so your marker lines won’t smudge. -
Map the Lid:
Using your marker, draw a circle around the stem for the lid. Instead of a perfect circle, add a small notch or ‘key’ mark at the back; this helps you align the lid perfectly when placing it back on. -
Cut the Lid:
Angle your serrated saw inward at roughly 45 degrees while cutting along your line. This creates a shelf so the lid won’t fall inside as the pumpkin shrinks. -
Scoop the Interior:
Remove the seeds and stringy pulp with a scoop or heavy spoon. Scrape the inner walls, specifically behind where the face will be, until they are about an inch thick—this makes carving much easier.
Uneven Lighting?
If your candle flickers out or looks dim, check that you scraped the inner wall thin enough. Also, cut a small hidden ‘chimney’ hole in the back top for airflow.
Step 2: Carving the Features
-
Draft the Face:
Lightly sketch the face directly onto the pumpkin skin. Draw two classic triangles for eyes, a smaller triangle for the nose, and a wide, crescent grin with squares blocked out for teeth. -
Start with Eyes:
Insert your serrated saw straight into the pumpkin for the eye triangles. Use a gentle up-and-down sawing motion, letting the tool do the work rather than forcing it. -
Carve the Nose:
Move onto the nose triangle next. I find it helpful to push the cut pieces out from the inside of the pumpkin to prevent tearing the skin. -
Tackle the Mouth:
Carve the mouth in sections. Carefully cut around the teeth first—these are delicate and can snap easily—then remove the larger sections of the mouth opening. -
Clean Up Edges:
Use a small paring knife or X-Acto blade to trim any jagged bits of flesh hanging inside the cutouts for a cleaner silhouette. -
Wipe Away Marks:
Use a damp paper towel to gently wipe away any remaining marker lines on the pumpkin’s surface.
Step 3: Adding the Shadow Shading
-
Prepare the Paint:
Squeeze a small amount of dark brown or diluted black acrylic paint onto a palette. You want a ‘dry brush’ consistency, so dab most of the paint off onto a paper towel first. -
Shade the Eyes:
Lightly drag your dry brush along the carved edges of the eyes, focusing on the vertical cuts. You aren’t painting the flesh orange, but rather dusting the outer orange skin right near the rim to suggest depth. -
Define the Mouth:
Apply the same dry-brush technique around the corners of the mouth and underneath the teeth. This subtle shadow makes the features look deeper and more three-dimensional even when unlit. -
Enhance Vertical Lines:
Identify the natural vertical ribs of the pumpkin. Very lightly brush a tiny bit of shadow into the deepest part of these grooves to exaggerate the pumpkin’s roundness. -
Final Polish:
If any paint looks too harsh, quickly smudge it with your finger or a clean rag to soften the effect before it dries fully.
Preserve the Magic
To keep your masterpiece fresh longer, rub petroleum jelly on all cut edges. This locks in moisture and prevents the shriveling that distorts the painted shading.
Place a tea light inside and enjoy the warm, spooky glow of your handiwork


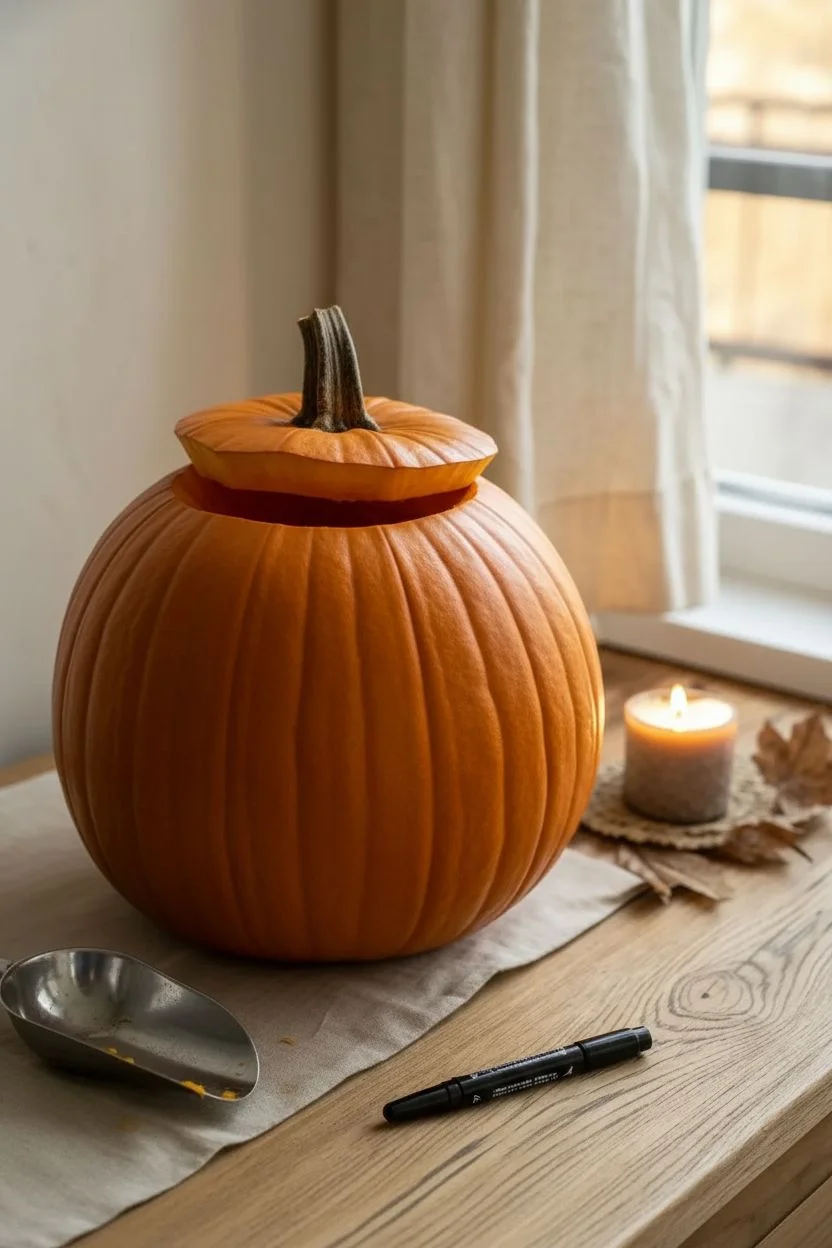
Black Painted Pumpkin With Carved Glow Details
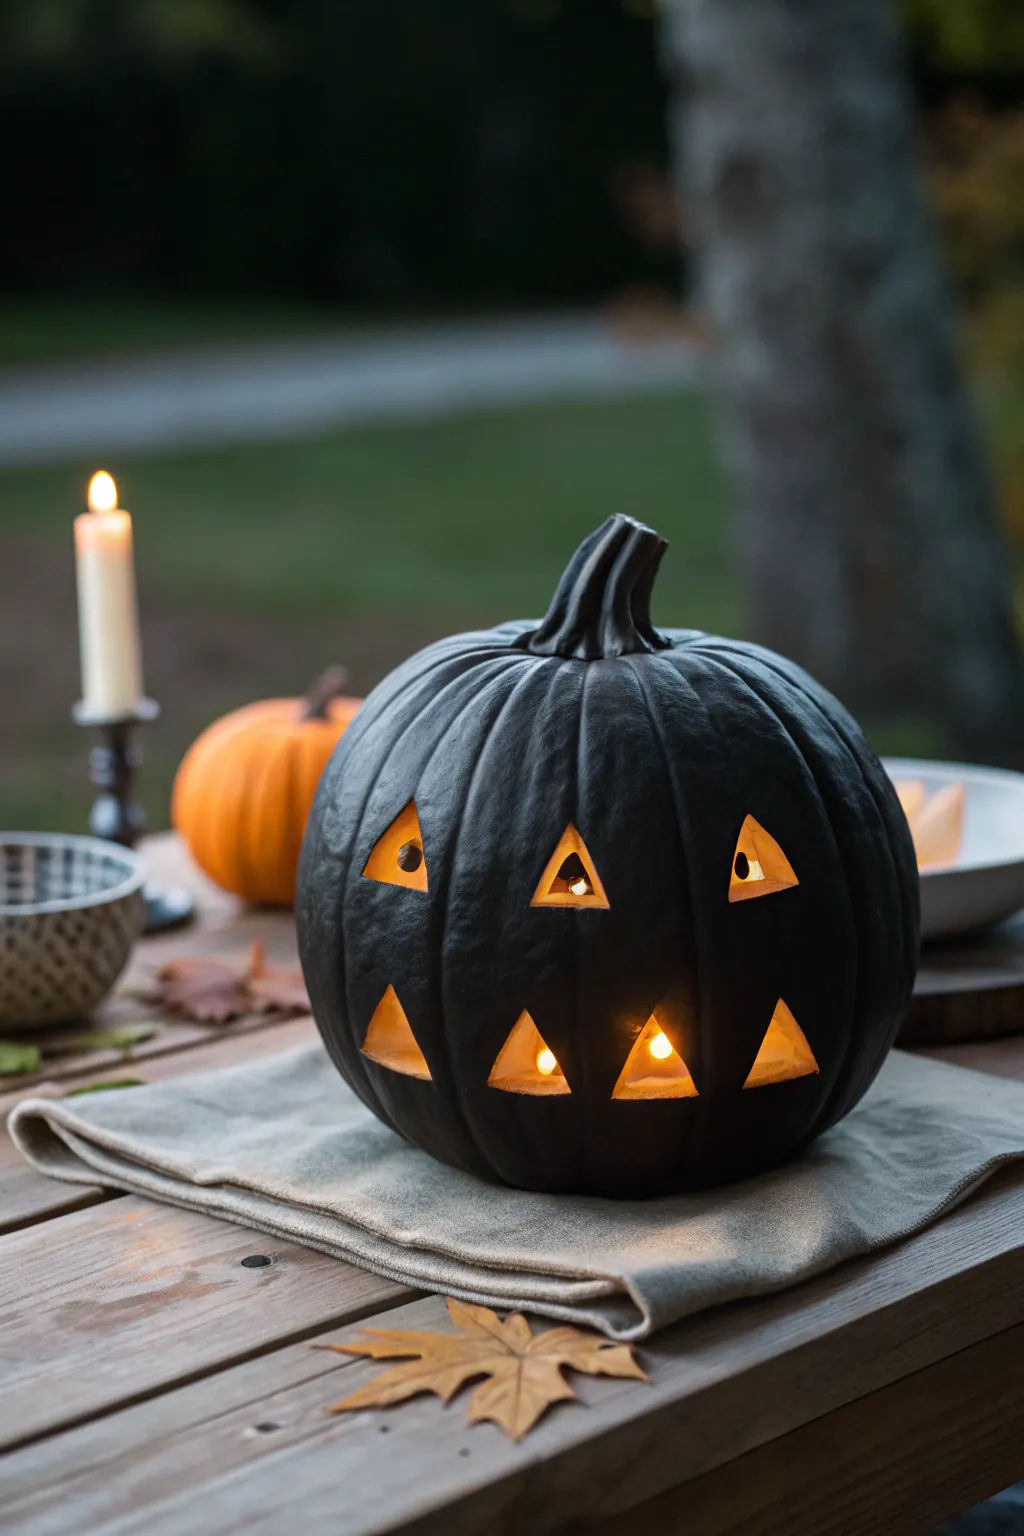
Transform a classic autumn gourd into a sleek, modern statement piece with this matte black pumpkin design. Featuring geometric triangular cutouts that glow warmly from within, this project balances moody elegance with festive fun.
How-To Guide
Materials
- Medium-sized pumpkin (real or carvable foam)
- Matte black spray paint (acrylic based)
- Painter’s tape or masking tape
- Carving knife or pumpkin saw
- Drill with small bit (optional for starting holes)
- Sandpaper (fine grit)
- Newspaper or drop cloth
- LED tea lights or string lights
- Pencil or white chalk marker
- Ruler
Step 1: Preparation & Painting
-
Clean surface:
Begin by wiping down your pumpkin thoroughly with a damp cloth to remove any dirt or debris. Let it dry completely, as moisture will prevent the paint from adhering properly. -
Protect the stem:
Carefully wrap the stem in painter’s tape to keep it natural, or you can choose to paint it black as well. I prefer to tape it off initially to see if I like the contrast later. -
Set up workspace:
Lay down newspaper or a drop cloth in a well-ventilated area, preferably outdoors, to protect your surroundings from overspray. -
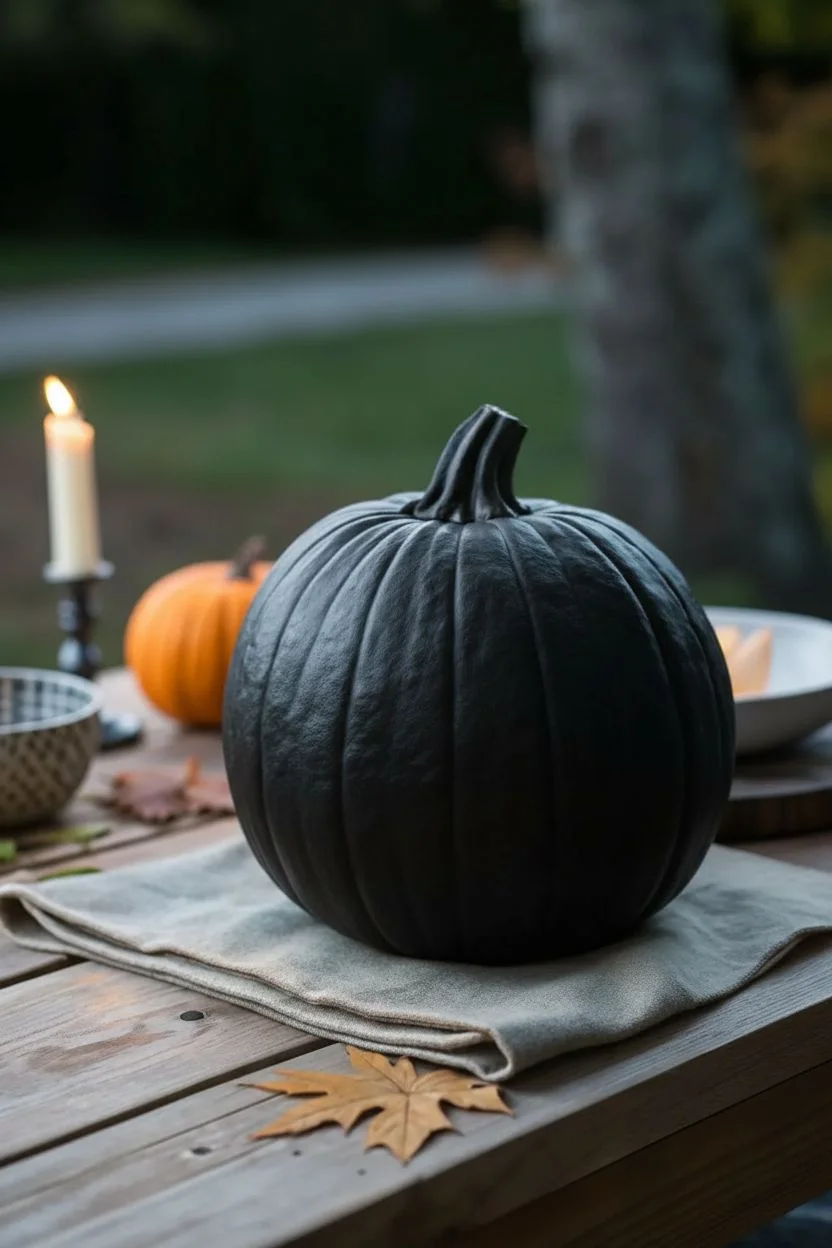
Apply base coat:
Holding the spray can about 8-10 inches away, apply a light, even coat of matte black paint. Don’t try to cover everything in one go, as this causes drips. -
Layer and dry:
Allow the first coat to dry for roughly 15-20 minutes. Apply a second and possibly third coat until the orange skin is completely obscured and the finish is opaque. -
Stem decision:
Once body painting is finished, decide on the stem. For the monochromatic look in the photo, remove the tape and hand-paint the stem black with a brush or carefully spray it. -
Full cure:
Let the pumpkin sit for at least an hour (or overnight) to ensure the paint creates a hard shell that won’t chip easily during handling.
Paint Peeling?
If paint peels while carving, score your design lines lightly with a craft knife *before* sawing all the way through to break the paint seal cleanly.
Step 2: Carving the Geometry
-
Mark the grid:
Using a ruler, lightly mark a horizontal line around the middle section of the pumpkin to guide your pattern placement. -
Draft the triangles:
With a white chalk marker or pencil, draw two rows of small, equilateral triangles. The top row should point upward, and the bottom row can mirror them or alternate. -
Gutting the pumpkin:
If using a real pumpkin, cut a circle around the stem (or in the bottom) and remove all seeds and pulp. Scrape the inner wall thin behind where your triangles will be. -
Initial incision:
For clean corners, I like to poke a small pilot hole with a drill bit or a sharp awl at the three points of each triangle before cutting. -
Carve the shapes:
Using a small, serrated pumpkin saw or craft knife, carefully cut along your triangle lines. Use a gentle sawing motion rather than forcing the blade. -
Clean the edges:
Once a triangle piece is removed, go back in with a craft knife to clean up any ragged pumpkin flesh or paint chips around the edges. -
Touch-ups:
If any black paint chipped during carving, spray a little paint into a cup and use a small brush to dab it onto the exposed orange edges for a seamless look.
Step 3: Illumination
-
Clean interior:
Wipe the interior walls one last time to ensure maximum reflectivity for the light. -
Insert light source:
Place two or three LED tea lights inside the pumpkin. Battery-operated candles are best here as they won’t heat up the paint or dry out the pumpkin as quickly. -
Positioning:
Adjust the lights so they sit directly behind the lower triangles, casting that warm, upward glow seen in the reference image.
Metallic Twist
Paint the *inside* of the pumpkin gold or silver before carving. The interior metallic wall will reflect the candlelight for an extra bright glow.
Place your sleek creation on a porch or table and watch the geometric shadows dance


Friendly Ghost Face: Carved Eyes, Painted Highlights
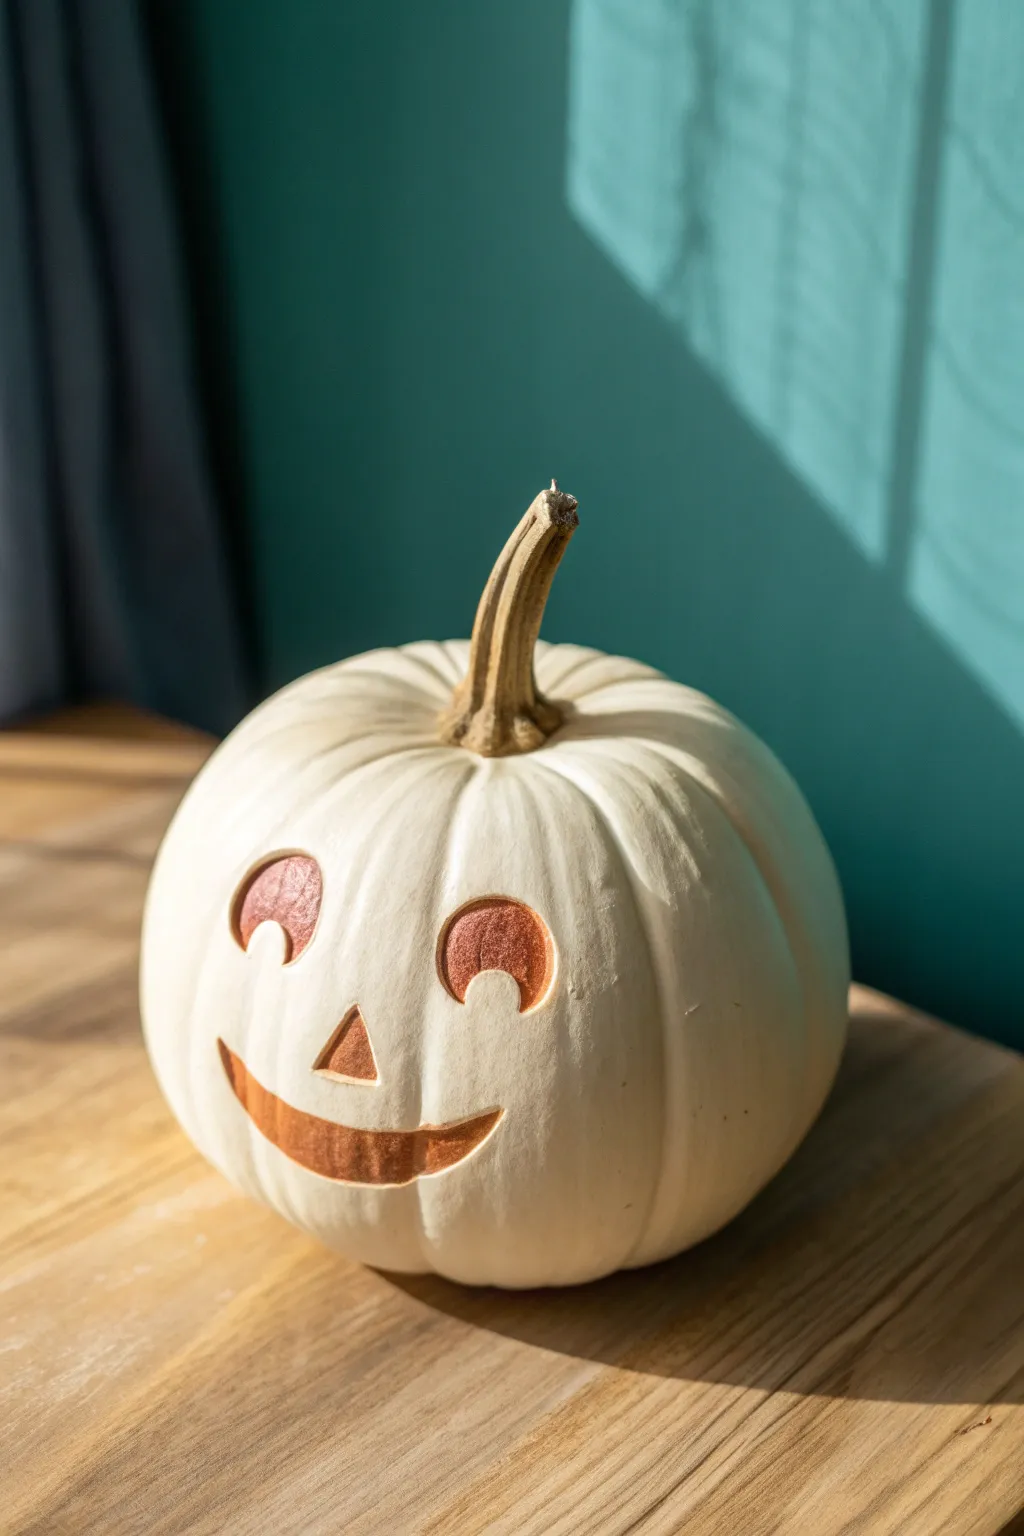
Move away from traditional deep carving with this charming surface-shaded ghost pumpkin that glows with warmth even without a candle. By gently shaving away just the outer white skin, you reveal the pumpkin’s natural orange flesh to create a soft, friendly expression that lasts longer than a hollowed-out jack-o’-lantern.
Step-by-Step Guide
Materials
- Medium-sized white pumpkin (specifically a ‘Casper’ or ‘Lumina’ variety)
- Linoleum cutter tool with V-gouge and U-gouge blades
- Pencil or dry-erase marker
- Masking tape
- Damp cloth
- Wood carving knife or X-Acto knife (for outlining)
- Lemon juice or petroleum jelly (optional preservative)
Step 1: Preparation & Planning
-
Select the perfect canvas:
Choose a white pumpkin that has a relatively smooth side for the face. Ensure the stem is intact and sturdy, as this adds character to the final look. -
Clean the surface:
Wipe down the entire pumpkin with a damp cloth to remove any dirt or field dust. Dry it completely to ensure your sketching tools will mark the surface properly. -
Sketch the expression:
Using a pencil or a light dry-erase marker, draw two large circles for eyes. This friendly ghost looks best with wide, open eyes spaced moderately apart. -
Add the details:
Inside the eye circles, draw two upward-curving crescent shapes at the bottom—these will serve as the cheek-like highlights, giving the eyes a smiling appearance. -
Draft the nose and mouth:
Draw a small, simple triangle for the nose. Below that, sketch a wide, shallow U-shape for the mouth, tapering the ends slightly to create a gentle smile.
Uneven Color?
If the exposed flesh looks patchy or pale, scrape slightly deeper. The orange color intensifies the further down you go, but be careful not to puncture the wall.
Step 2: Carving the Features
-
Score the outlines:
Take your X-Acto knife or sharp carving tool and very gently trace the outlines of your design. You only want to break the very top layer of the white skin, not cut deep into the flesh. -
Start with the eyes:
Switch to a linoleum cutter with a U-gouge blade. Carefully scrape away the white skin inside the main eye circle, but leave the crescent shape at the bottom completely white and untouched. -
Refine the edges:
Work slowly near the scored edges. I find it helpful to push the tool away from the outline toward the center of the shape to avoid slipping and scratching the surrounding white skin. -
Shave the nose:
Moving to the nose triangle, scrape the interior skin away. Aim for an even depth so the orange color is consistent. -
Shape the mouth:
Use the same scraping technique for the smiling mouth. Since this area is wider, try to keep your scraping strokes horizontal to mimic the direction of the smile. -
Check the depth:
Ensure you have removed all vestiges of the white skin within your shapes. The goal is to expose the orange flesh underneath clearly, creating a high-contrast look. -
Clean the grooves:
If there are any ragged bits of skin hanging on the edges, use the X-Acto knife to tidy them up for a crisp, professional finish.
Step 3: Finishing Touches
-
Wipe away markings:
Use your damp cloth to gently rub away any remaining pencil or marker lines from your original sketch. -
Preserve the flesh:
To stop the exposed orange flesh from browning too quickly, dab a little lemon juice or a thin layer of petroleum jelly over the shaved areas. -
Final inspection:
Place the pumpkin in subtle lighting. The contrast between the matte white skin and the moist orange flesh should pop, creating that friendly ghostly visage.
Add Some sparkle
Brush a light coat of metallic copper or orange glitter paint into the shaved areas. It enhances the natural color and catches the sunlight beautifully.
Now you have a long-lasting, cheerful decoration that brightens up any autumn display without the mess of pumpkin guts


Bat Silhouette Sky: Carved Shapes Over a Painted Night Gradient
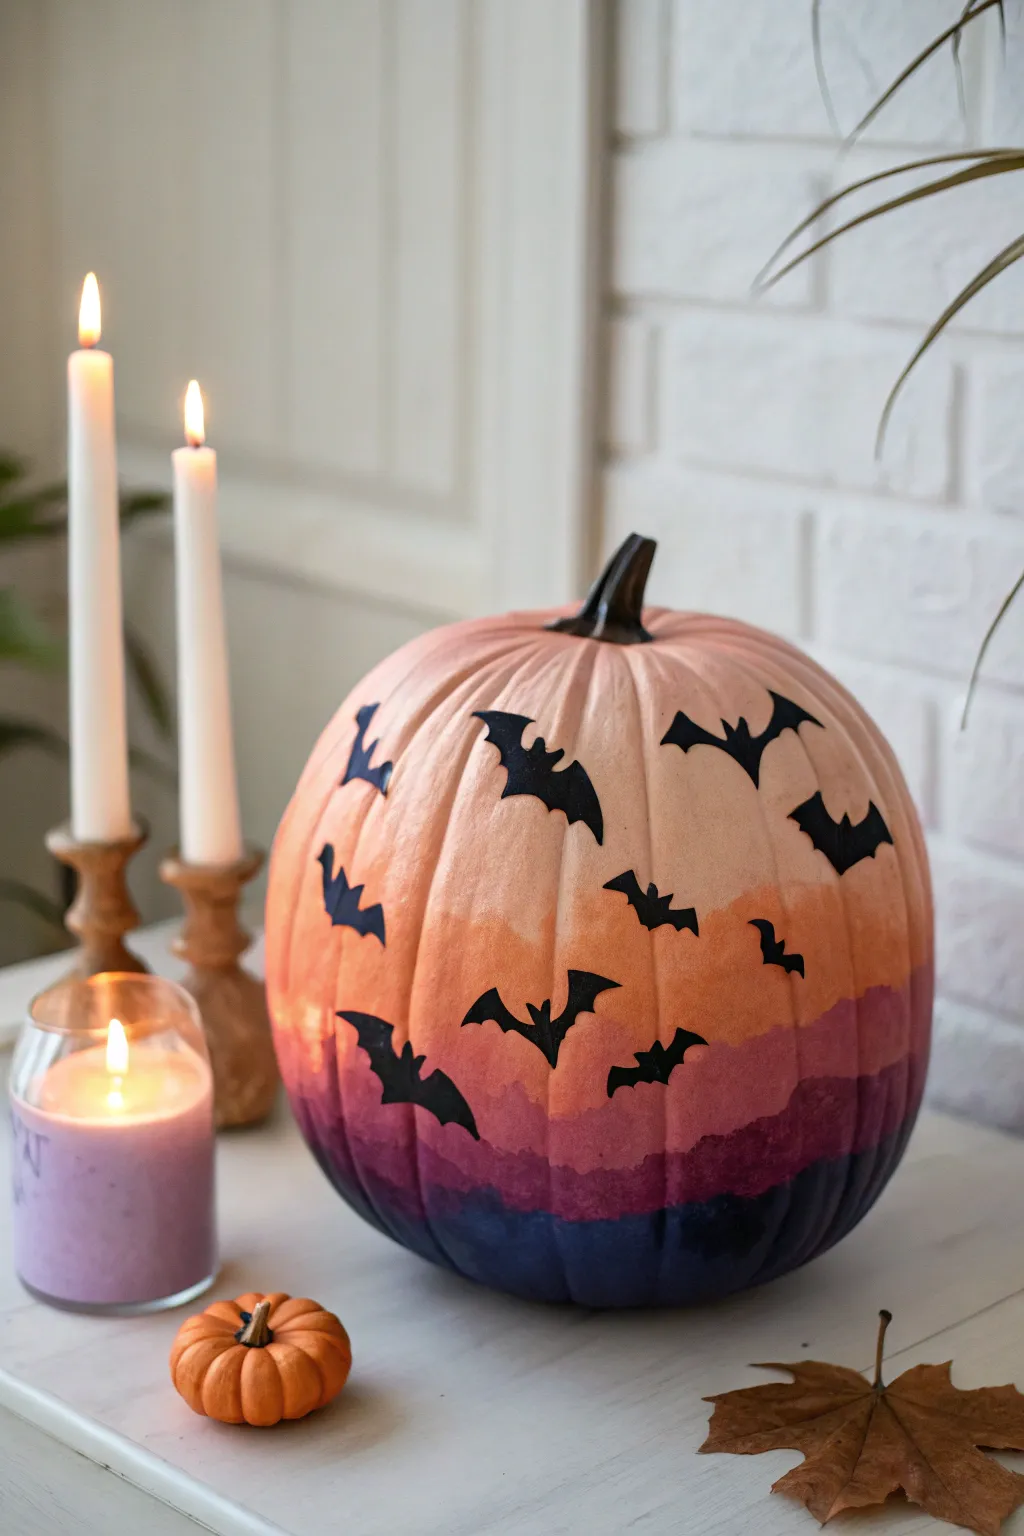
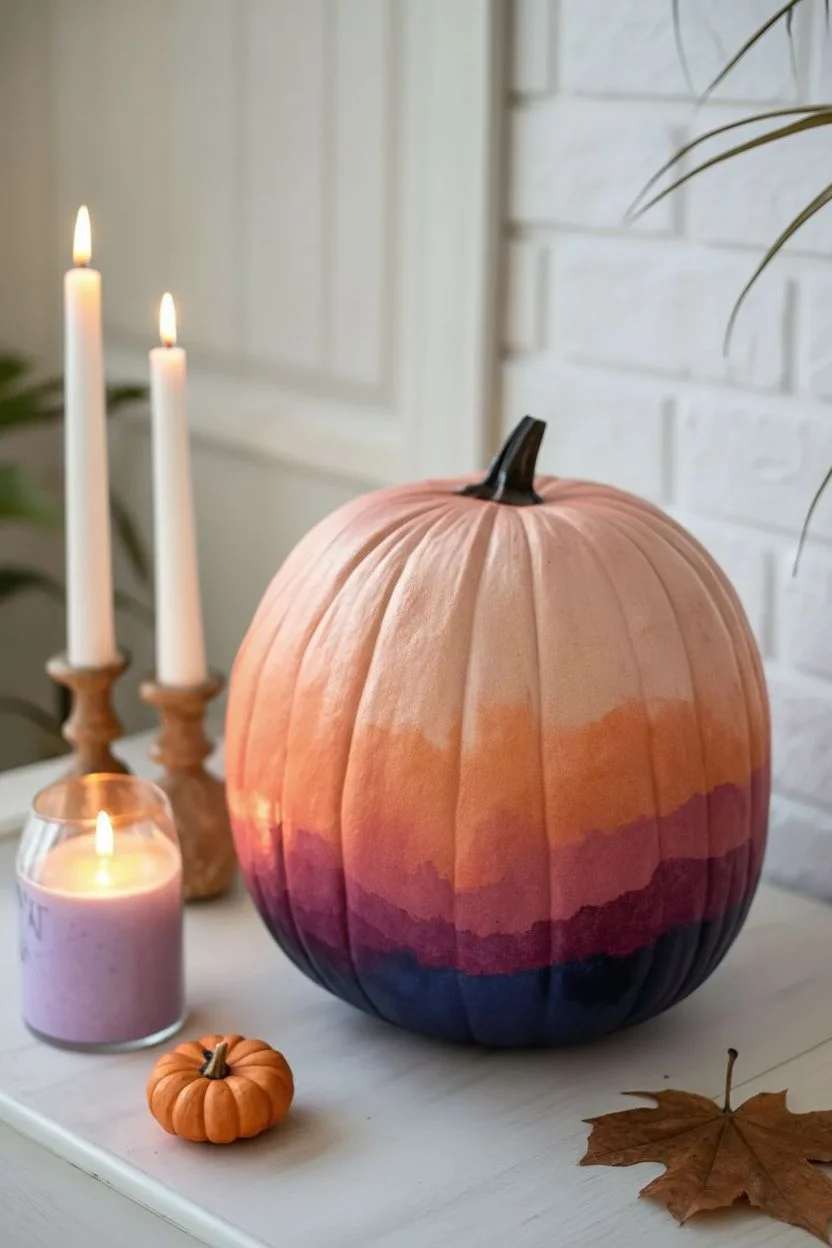
Capture the magic of dusk with this dreamy painted pumpkin project that mimics a fading sunset sky. By blending soft acrylics from peach to midnight blue and adding crisp bat silhouettes, you create an atmospheric centerpiece without picking up a carving knife.
Detailed Instructions
Materials
- Large white faux or real pumpkin
- Acrylic paints (pale peach, soft orange, magenta, dark purple, indigo/navy blue)
- Black cardstock or stiff black paper
- Scissors or cutting machine (like Cricut)
- Pencil
- Bat template (optional)
- Strong craft glue or hot glue gun
- Foam sponge brushes
- Medium soft-bristle paintbrush
- Matte clear sealant spray (optional)
- Palette or paper plate for mixing
Step 1: Creating the Sunset Gradient
-
Prep the Surface:
Begin with a clean, dry pumpkin. If you are using a real pumpkin, wash it with a mild soap and water solution to remove any dirt or oils, then dry completely. For faux pumpkins, a quick wipe with a damp cloth is sufficient. -
Mix the Base Colors:
Squeeze out your acrylic paints onto a palette. You will need a gradient progression: pale peach, soft orange, magenta, dark purple, and deep indigo. I like to pre-mix intermediate shades between these main colors to ensure the smoothest possible transition. -
Apply the Lightest Tone:
Starting at the very top of the pumpkin near the stem, use a foam sponge brush to dab on the pale peach paint. Bring this color down about one-quarter of the way, feathering the bottom edge so it isn’t a hard line. -
Blend in the Orange:
While the peach layer is still slightly tacky, apply the soft orange band right below it. Use your sponge to gently pat the area where the peach meets the orange to blend them seamlessly. -
Add the Magenta Layer:
Move down to the pumpkin’s midsection and apply the magenta or deep pink shade. This is the vibrant heart of the sunset. Work this color upwards into the orange and downwards slightly, keeping the edges soft and diffuse. -
Deepen with Purple:
Apply the dark purple paint below the magenta band. As you sponge this on, allow the texture of the sponge to help stipple the colors together, creating a cloudy, atmospheric look rather than solid stripes. -
Anchor with Indigo:
Finish the painting phase by applying the deep indigo or navy blue to the very bottom quarter of the pumpkin. Ensure this dark base is fully opaque to ground the design. -
Smooth the Transitions:
Look over your gradient. If any lines look too harsh, take a clean, slightly damp sponge and lightly dab over the transition zones to soften the look. Let the entire pumpkin dry completely, preferably for an hour or two.
Fixing Patchy Paint
If the dark paint looks streaky, don’t overwork wet paint. Let the first coat dry fully (use a hair dryer to speed it up), then sponge on a second coat for solid opacity.
Step 2: The Bat Flock
-
Prepare the Templates:
While the paint dries, draw simple bat shapes on a piece of scratch paper or find a template online. You want a variety of sizes to create the illusion of depth—some large bats appearing close and smaller ones appearing distant. -
Trace onto Cardstock:
Place your templates onto black cardstock. Using a pencil, trace about 12 to 15 bats. Creating more than you think you need is always safer so you can play with the layout later. -
Cut Out the Shapes:
Carefully cut out each bat silhouette using sharp scissors. If you have a digital cutting machine, this is a great time to use it for cleaner, quicker cuts. -
Shape the Wings:
To make the bats look like they are in mid-flight rather than flat stickers, create a gentle crease down the center of each body. Fold the wings slightly forward or backward on a few of them for variety. -
Plan the Layout:
Before gluing, use small pieces of painter’s tape or poster putty to temporarily stick the bats onto the dry pumpkin. Arranging them diagonally across the pumpkin face usually creates the most dynamic sense of movement. -
Glue the Bats:
Once satisfied with the arrangement, lift one bat at a time. Apply a small dot of strong craft glue or hot glue just to the center body section—leave the wingtips free. -
Secure and Set:
Press the glued center firmly against the pumpkin surface for a few seconds. Leaving the wings unglued adds a wonderful 3D shadow effect. -
Optional Sealing:
If this pumpkin will be displayed outdoors on a covered porch, you can lightly mist the painted surface with a matte clear sealant before attaching the bats to protect the water-based acrylics from humidity.
Add Some Sparkle
Mix a tiny amount of glitter medium into the dark purple paint, or flick a stiff toothbrush with white paint over the top to add tiny stars to your twilight sky.
Place your finished masterpiece alongside warm candlelight to watch the shadows dance across your twilight sky
BRUSH GUIDE
The Right Brush for Every Stroke
From clean lines to bold texture — master brush choice, stroke control, and essential techniques.
Explore the Full Guide
Cat Silhouette Pair: Two Pumpkins, One Scene
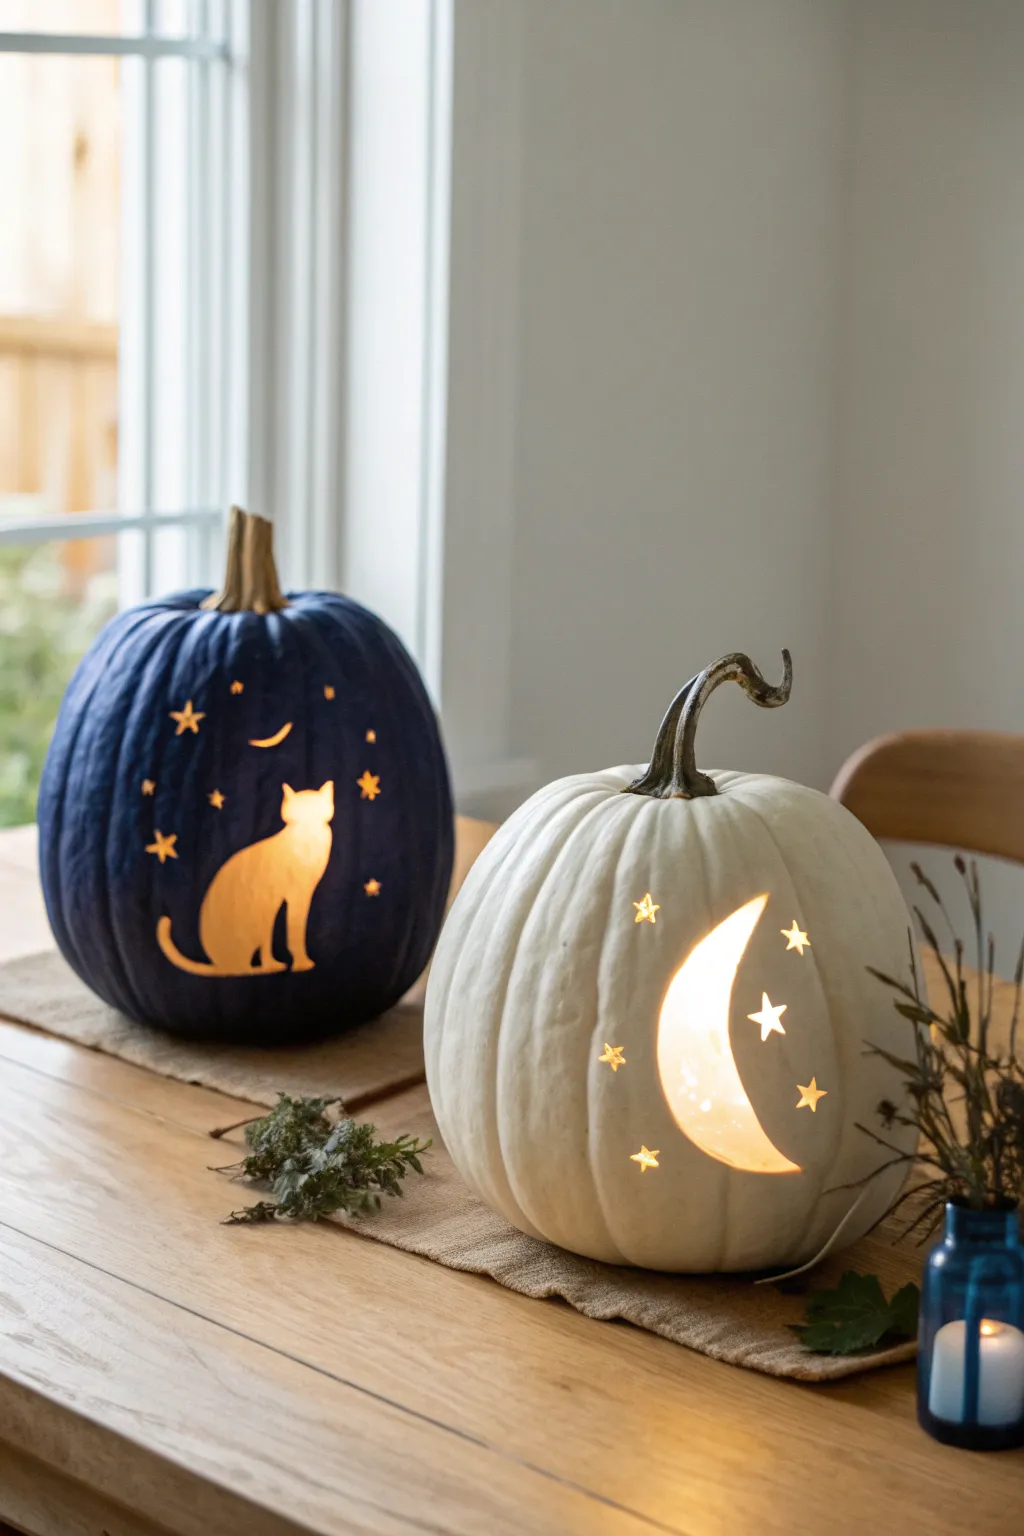
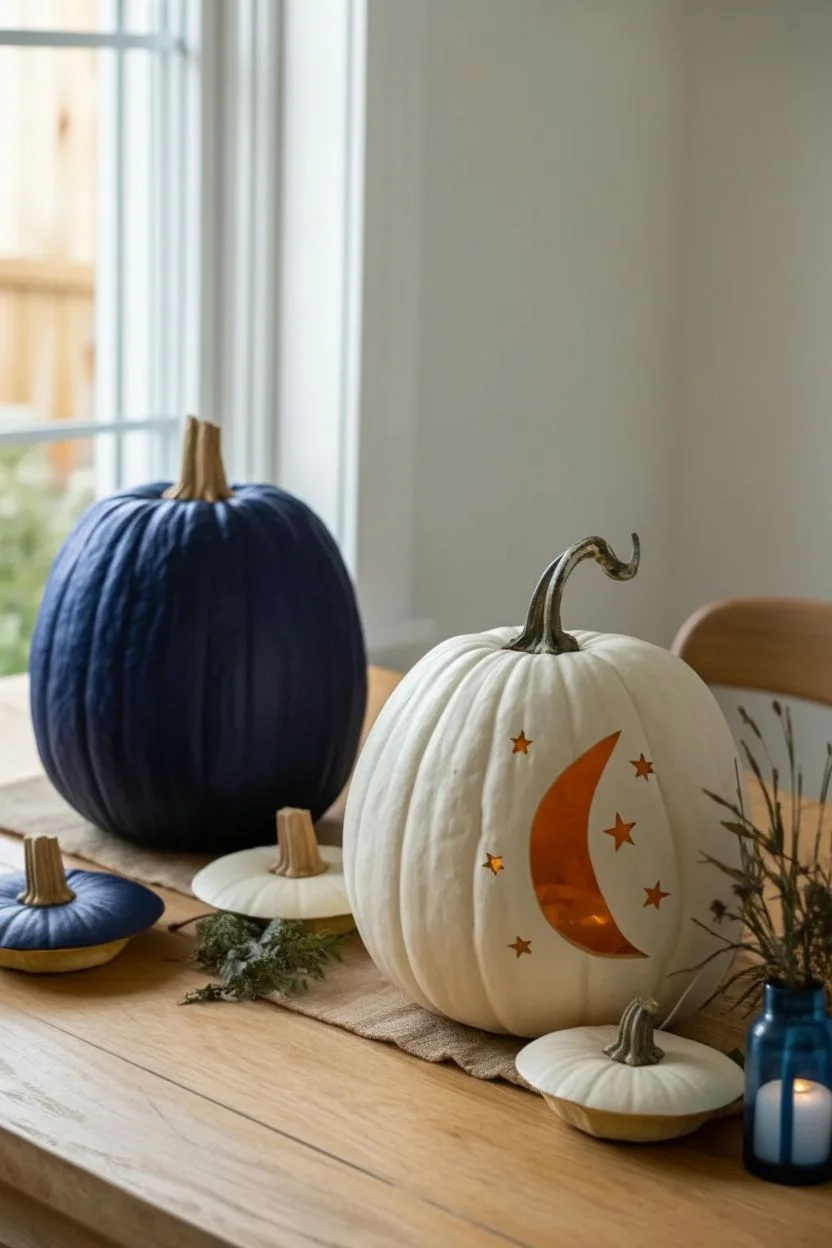
Transform two standard pumpkins into a magical evening scene featuring a mysterious feline and a glowing crescent moon. This contrasting pair uses deep midnight blue and soft creamy white paint to create a sophisticated, cozy autumn display.
Step-by-Step Tutorial
Materials
- Two medium-sized pumpkins with stems
- Midnight blue acrylic craft paint (matte finish)
- Cream or off-white acrylic craft paint (satin finish)
- Foam sponge brushes
- Small liner brush for touch-ups
- Pumpkin carving kit (serrated saw, scraper tool)
- Drill with small bit (1/4 inch) or a sturdy awl
- Printed stencils (cat profile, crescent moon)
- Masking tape
- Thumbtack or poking tool
- Battery-operated LED pillar candles
Step 1: Preparation and Painting
-
Clean and Prep:
Begin by washing both pumpkins with mild soapy water to remove any dirt or oily residue. Dry them completely with a towel so the paint adheres properly. -
Base Coat – The Moon Pumpkin:
Using a foam sponge brush, apply an even coat of cream or off-white paint to the first pumpkin. Don’t worry if the orange skin shows through slightly; let it dry for 20-30 minutes. -
Base Coat – The Cat Pumpkin:
While the white pumpkin dries, paint the second pumpkin with the midnight blue acrylic. Use long, vertical strokes following the pumpkin’s ribs for the smoothest finish. -
Second Coats:
Apply a second (and potentially third) coat to both pumpkins to ensure solid, opaque coverage. I find that dabbing the sponge slightly can help build texture and coverage on slick pumpkin skin. Let them dry completely, ideally for a few hours. -
Gutting the Pumpkins:
Once fully dry, cut a circular lid around the stem of each pumpkin. Remove the tops and use a scraper tool to thoroughly clean out the seeds and stringy pulp, thinning the inner wall where you plan to carve to make cutting easier.
Paint Adhesion Trick
If the acrylic paint beads up on the waxy pumpkin skin, mix a tiny drop of dish soap into your paint puddle before applying. This breaks the surface tension for a smoother coat.
Step 2: Transfer and Carving
-
Applying Stencils:
Tape your printed cat silhouette onto the center of the blue pumpkin and the crescent moon stencil onto the white pumpkin. Ensure they are positioned at the same visual height. -
Transfer the Design:
Using a thumbtack or a poking tool, pierce small holes through the paper along the outline of your shapes every 1/8 inch. This transfers the design onto the painted surface without using messy carbon paper. -
Carving the Moon:
Remove the stencil on the white pumpkin. Use a fine-tooth pumpkin saw to carefully cut out the crescent moon shape, following your dotted guide. -
Carving the Cat:
For the blue pumpkin, carefully saw along the cat outline. Take your time around delicate areas like the ears and tail to prevent breakage. Push the cut piece inward to remove it. -
Adding Stars:
Freehand mark small star shapes around the main subject on both pumpkins using a pencil. You can create variety by carving some as small multi-pointed stars and others as simple drilled holes. -
Drilling the Stars:
Use a drill with a small bit or a sharp awl to punch holes for the smallest stars. This creates pinpoints of light that look like a distant galaxy. -
Carving Larger Stars:
For the slightly larger stars, use a very small detail saw or an X-Acto knife to cut out diamond or five-point shapes. Be gentle, as the pumpkin wall is fragile here.
Starry Night Effect
For extra magic, take the drill and create a constellation of tiny holes on the *back* of the pumpkins too, casting starry shadows on the wall behind your display.
Step 3: Finishing Touches
-
Clean Up Edges:
Review your cutouts. If any paint chipped during carving, use a small liner brush and the corresponding paint color to touch up the edges for a crisp look. -
Preservation:
Rub a thin layer of petroleum jelly on the cut edges of the pumpkin flesh. This locks in moisture and prevents the carved areas from shriveling too quickly. -
Lighting:
Place battery-operated LED pillar candles inside each pumpkin. I recommend warm white lights to create that cozy, incandescent glow seen in the photo. -
Display:
Arrange the pumpkins side-by-side on a burlap runner, perhaps adding a few sprigs of greenery or dried botanicals around the base to complete the tableau.
Set these glowing beauties on your porch or dining table to enjoy a peaceful, starry autumn night atmosphere
Fall Leaves Cutouts With Painted Vein Details
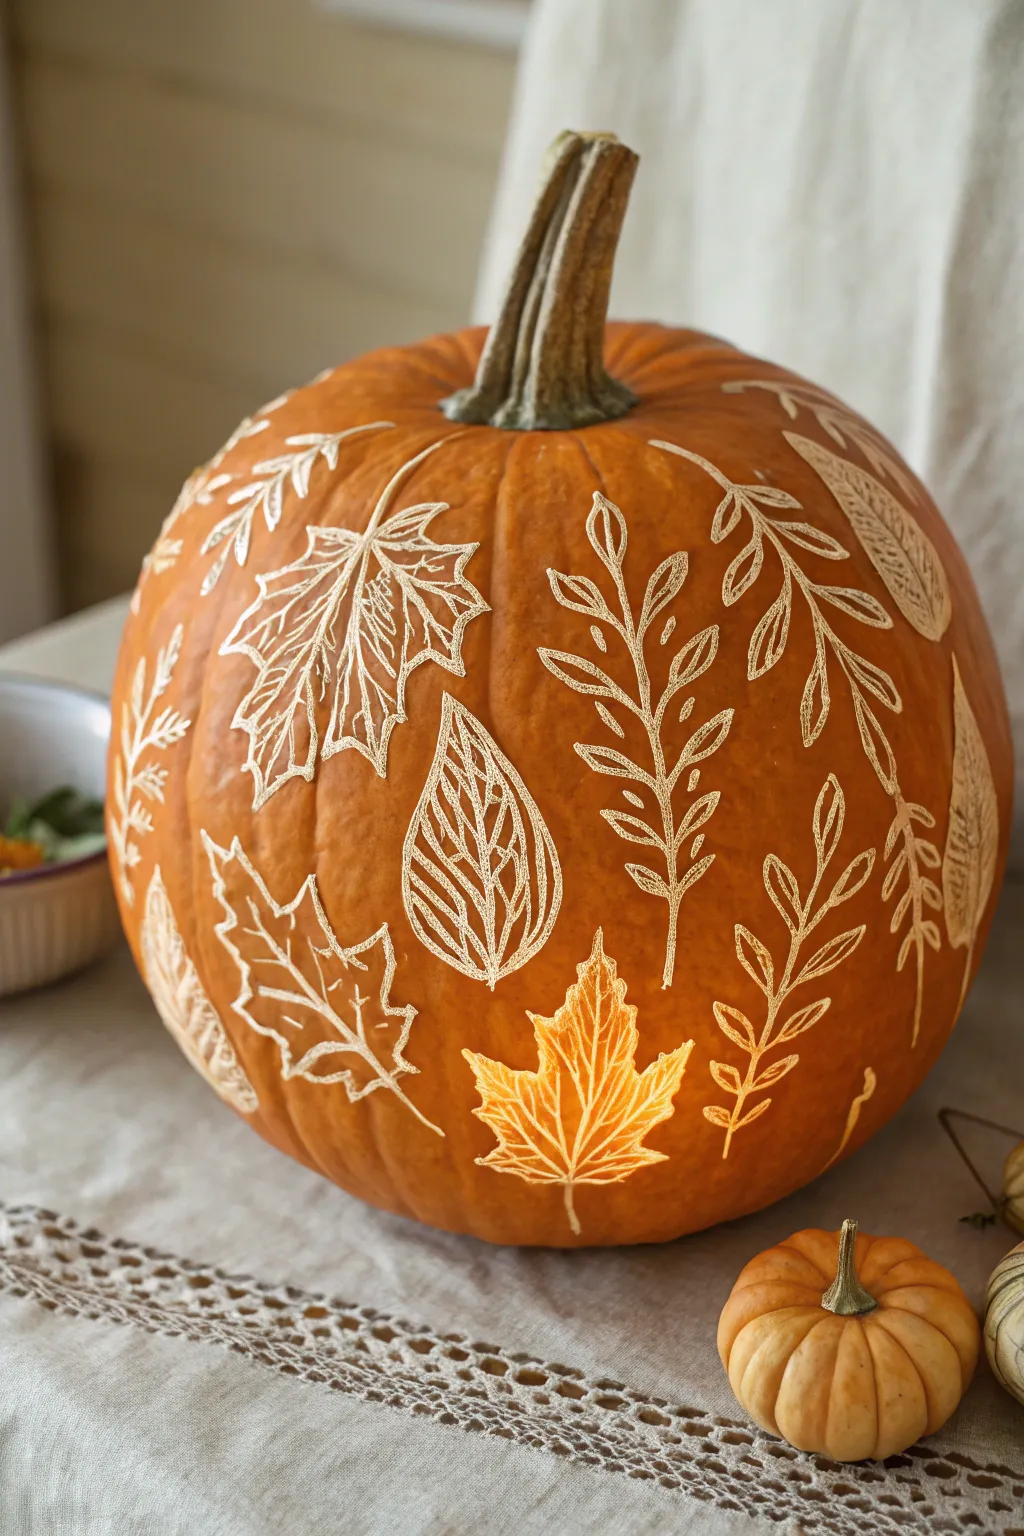
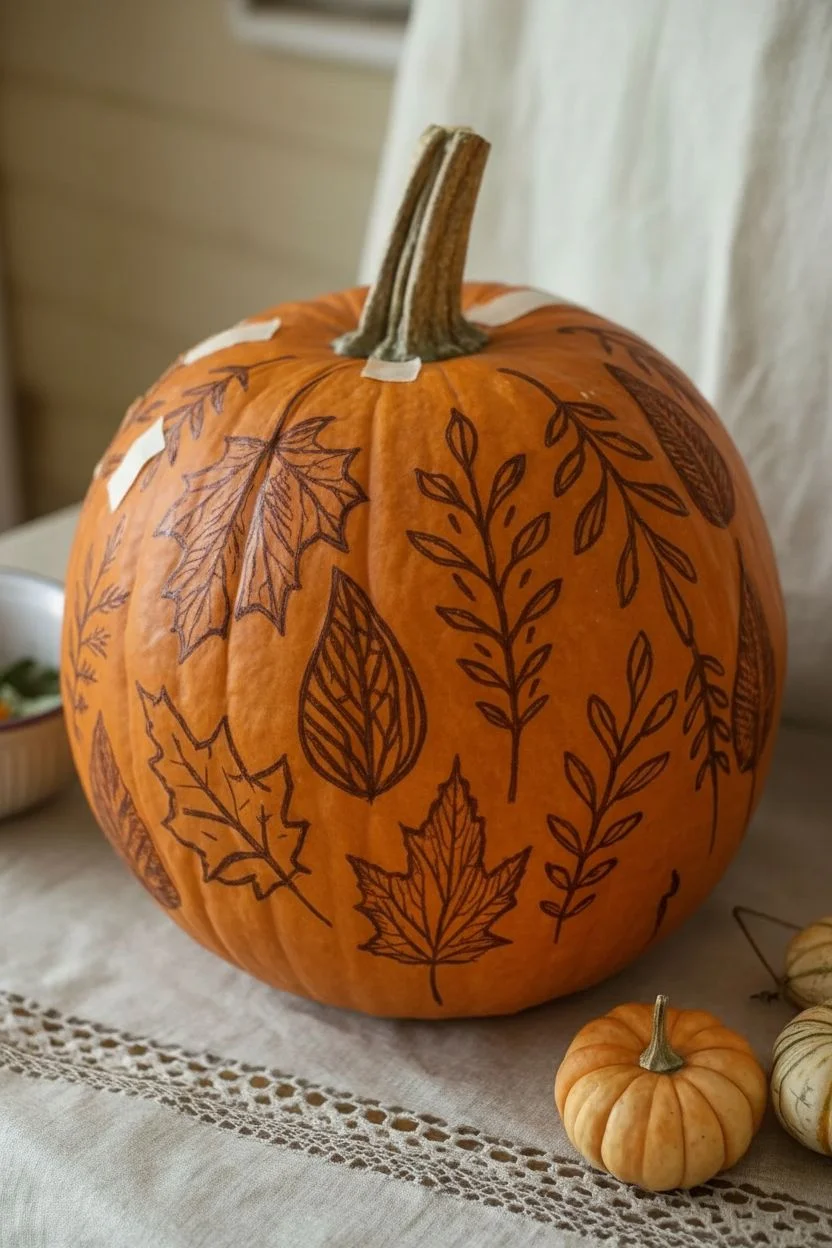
Transform a classic orange gourd into an elegant piece of fall decor with this intricate etching technique that mimics the look of delicate leaf prints. By shallowly carving away just the top layer of skin, you reveal the pale flesh underneath, creating a sophisticated, high-contrast design without the mess of deep gutting.
How-To Guide
Materials
- Large, smooth-skinned pumpkin
- Linoleum cutter set with V-shaped and U-shaped blades
- Fine-point permanent marker (brown or fine-tip washable marker)
- Leaf stencils or printed leaf clip art
- Masking tape
- Ballpoint pen or transfer paper
- Fine grit sandpaper (optional)
- Small detail carving knife or X-Acto knife
- Petroleum jelly or clear acrylic spray sealant
Step 1: Preparation and Design Transfer
-
Clean the canvas:
Begin by thoroughly washing and drying your pumpkin to remove any dirt or waxy residue. A clean surface ensures your tools won’t slip and the design transfers clearly. -
Plan the composition:
Before marking the pumpkin, arrange your paper leaf cutouts loosely on the surface using small loops of masking tape. Aim for a falling leaf pattern, mixing large maple leaves with smaller fern-like sprigs and oval shapes for variety. -
Trace the outlines:
Once satisfied with the placement, trace around the perimeter of each leaf stencil directly onto the pumpkin skin using a washable marker. If you are freehanding, sketch the basic outer shapes lightly. -
Detail the veins:
Inside each leaf outline, draw the internal structure. Sketch a central vein running from base to tip, then add branching angular veins for maples or flowing curved veins for the smaller foliage. Don’t worry about perfection; this is just a guide for your carving tool.
Uneven Etching Depth?
If you accidentally cut too deep, don’t panic. Dab the area with a paper towel to stop any weeping, let it dry for an hour, then seal it with clear nail polish to match the sheen.
Step 2: Etching the Foliage
-
Start the main outlines:
Equip your linoleum cutter with the finest V-shaped blade available. Begin by carving the exterior outline of your first leaf. Apply gentle, consistent pressure to remove just the top 1-2mm of orange skin—do not cut all the way through the pumpkin wall. -
Define the stem:
Carve the stem line slightly thicker than the rest of the outline to anchor the leaf. A slightly deeper cut here adds nice dimension. -
Etch the central veins:
Switch to a very sharp detail knife or keep the fine V-blade. Carefully etch the central vein line inside the leaf. You want this line to be crisp and bright against the orange background. -
Add secondary veins:
Working outward from the center vein, etch the smaller branching veins. I find it easiest to pull the tool toward me rather than pushing away, as this offers better control on the curved surface. -
Texturize the leaf body:
This is the most critical step for the ‘sketch’ look seen in the photo. Instead of clearing out the whole leaf, use your tool to create tiny hatching lines or texture between the veins. You want to leave some orange skin intact to create contrast, rather than scraping the whole leaf bare. -
Check line consistency:
Step back and look at your first completed leaf. If the etched lines look ragged, gently go over them one more time to smooth the edges. The exposed flesh should look pale yellow or cream.
Glow Up
For a magical twist, scrape the interior wall of the pumpkin behind the design until it’s very thin. Place a bright LED inside to make the etched leaves translucent and glowing.
Step 3: Refining and Sealing
-
Complete the pattern:
Move around the pumpkin, repeating the etching process for all your traced leaves. Rotate the pumpkin frequently to ensure you aren’t smudging completed areas with your hands. -
Connect with sprigs:
Fill in any large empty gaps with freehand sprigs or simple vine lines. These slender details help unify the design and make it feel like a continuous pattern rather than isolated stamps. -
Clean up marker lines:
Once all carving is done, take a damp cloth or a wipes and gently scrub away any remaining marker lines from your initial tracing. -
Preserve the Etching:
Exposed pumpkin flesh dries out and shrivels quickly. To prevent this, apply a thin layer of petroleum jelly over all the etched areas immediately after finishing. This locks in moisture. -
Optional painting:
If you want the veins to really pop white as shown in some areas of the photo, you can lightly brush a tiny amount of diluted white acrylic paint into the etched grooves, wiping away the excess rapidly from the surface.
Set your finished masterpiece on a table runner or porch step to enjoy the elegant woodland vibes as the season changes

PENCIL GUIDE
Understanding Pencil Grades from H to B
From first sketch to finished drawing — learn pencil grades, line control, and shading techniques.
Explore the Full Guide
Owl Pumpkin: Carved Eyes With Painted Feathers
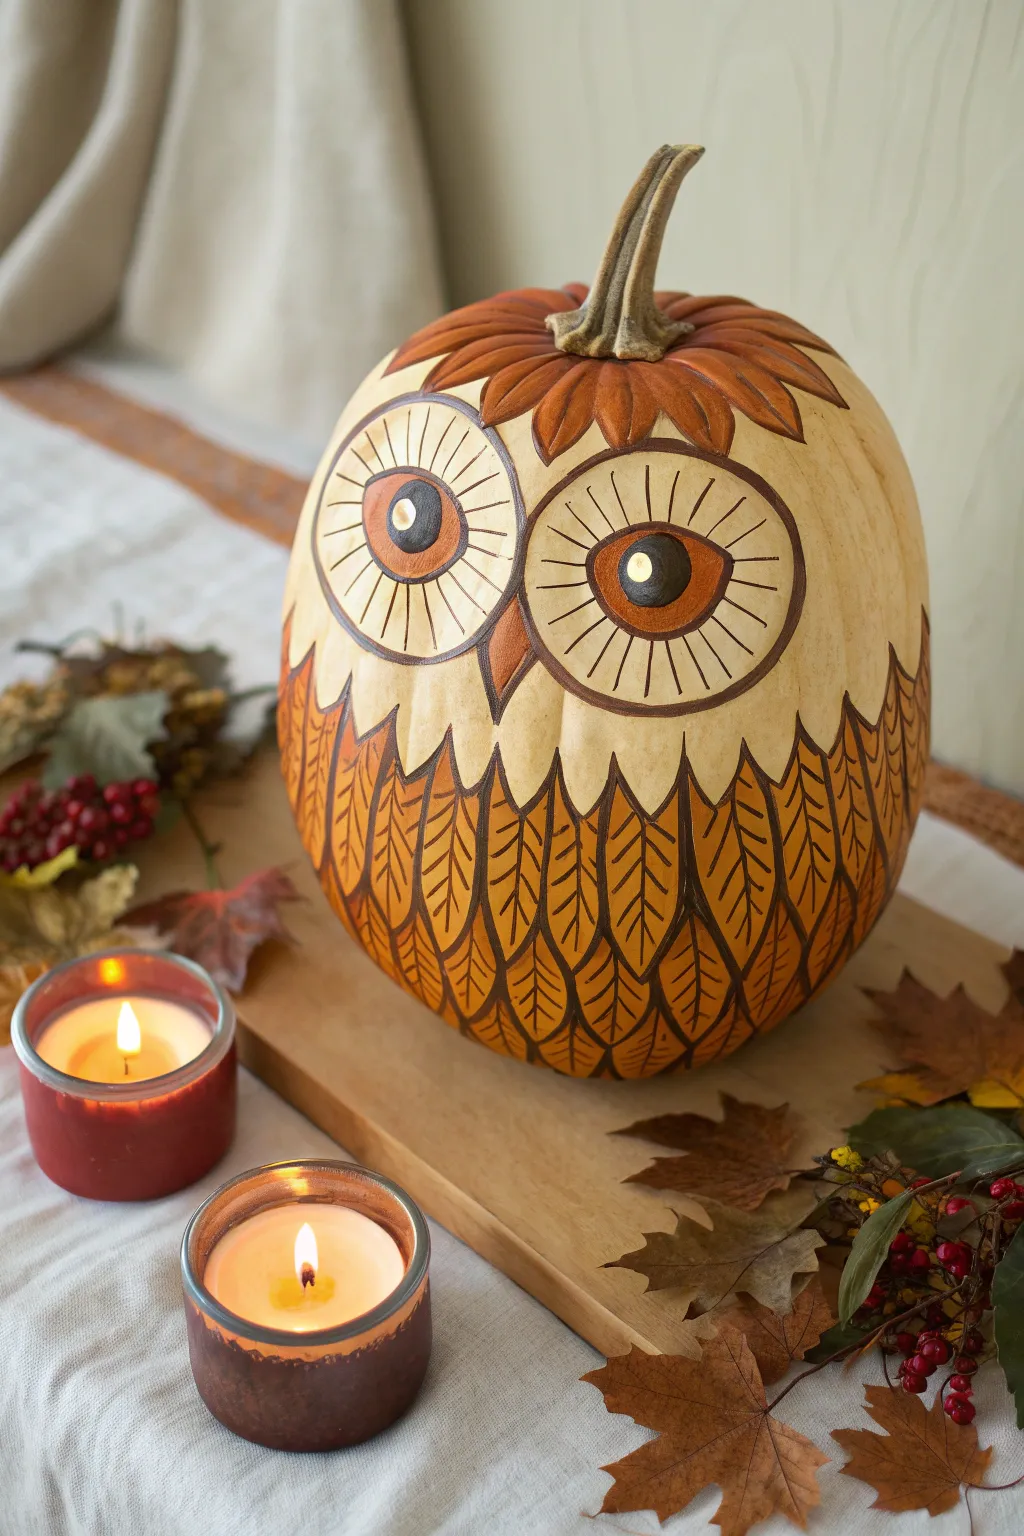
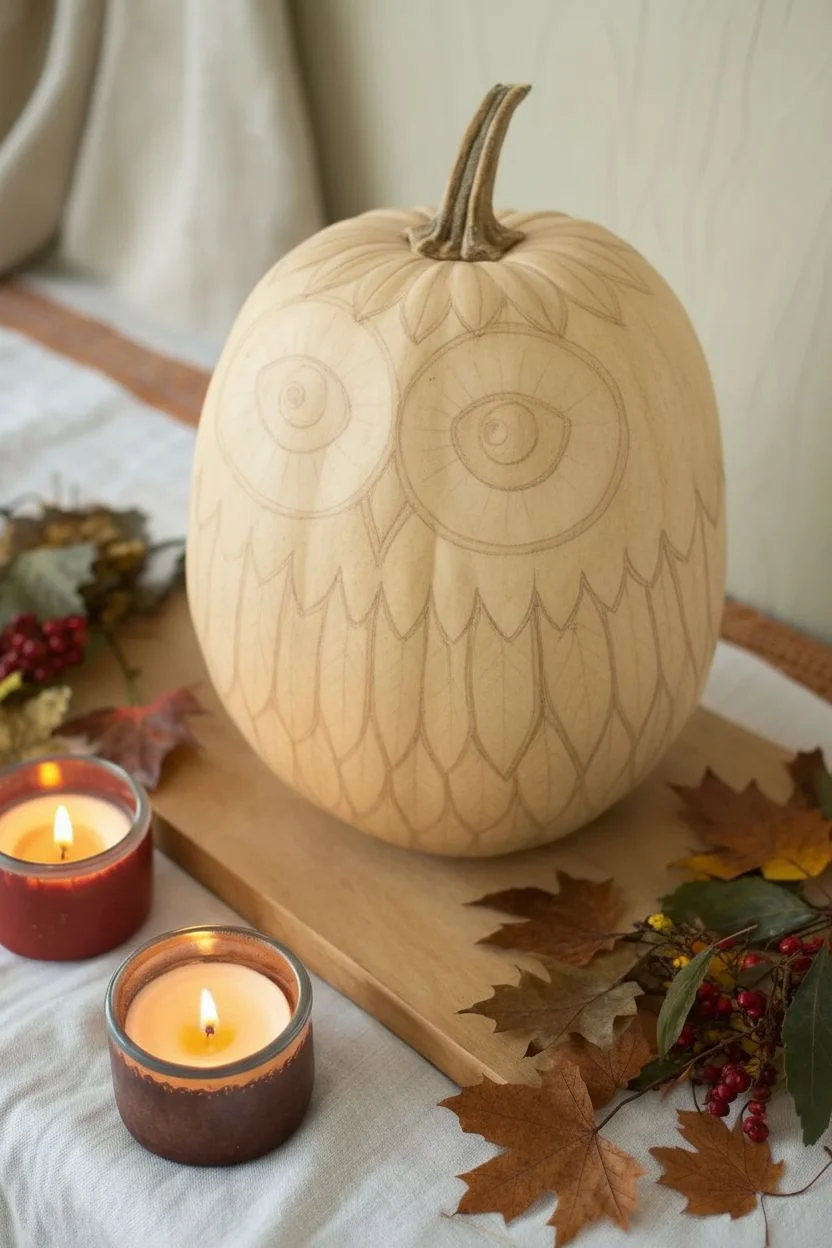
Transform a simple gourd into a wise woodland creature with this clever mix of carving and detailed painting. By combining shallow carving techniques for the eyes with intricate feather-work, you create a textured, multi-dimensional display piece perfect for indoor autumn decor.
Step-by-Step Tutorial
Materials
- Large, symmetrical pumpkin (white or pale orange works best for contrast)
- Pencil or disappearing ink marker
- Linoleum cutter or wood carving tools (V-gauge and U-gauge)
- Black acrylic paint
- Burnt orange or terracotta acrylic paint
- Golden yellow acrylic paint
- Fine detail paintbrush (size 0 or 1)
- Medium flat paintbrush
- Small round paintbrush
- Clear matte sealer spray (optional)
- Damp cloth
Step 1: Planning and Sketching
-
Clean surface:
Begin by wiping down your pumpkin with a damp cloth to remove any dirt or oily residue. Ensure it is completely dry before sketching. -
Sketch the face:
Using a pencil, lightly draw two large, connected circles near the top third of the pumpkin for the owl’s eyes. Add a small triangular beak pointing downward right between the lower inner curves of the eyes. -
Outline the head plumage:
Above the eyes, draw a series of leaf-like shapes radiating from the stem base, creating a feathery ‘cap’ on the owl’s head. -
Define the body:
Sketch a scalloped line across the middle of the pumpkin, dipping lower in the center. This separates the smooth face from the feathered body. -
Draw the feathers:
Below the scalloped line, draw vertical rows of elongated, leaf-shaped feathers. They should curve slightly with the pumpkin’s shape, filling the bottom half completely.
Paint Slipping?
If acrylic paint beads up on the shiny pumpkin skin, mix a tiny drop of dish soap into your paint. This breaks the surface tension and helps the color adhere smoothly without streaking.
Step 2: Carving the Features
-
Carve the pupils:
Rather than cutting all the way through, use a U-gauge carving tool to shave off just the pumpkin skin for the pupils (the center circles) and the beak. This exposes the lighter flesh underneath. -
Create the eye highlights:
Leave a tiny circle of original pumpkin skin untouched inside each pupil to acting as a ‘glint’ or highlight in the eye. -
Etch eye details:
Using a fine V-gauge cutter, gently etch the radiating lines inside the large eye circles, moving from the pupil outward to the eye border. Do not go deep; you just want surface texture.
Step 3: Painting the Design
-
Paint the eye rings:
With a small round brush and burnt orange paint, fill in the ring around the pupil. Keep your paint consistency slightly thick to cover the pumpkin skin opacity. -
Top feathers base coat:
Paint the leaf-shapes around the stem using the same burnt orange color. Let this dry completely before adding outlines. -
Body feathers base coat:
Using the golden yellow or lighter orange paint, fill in the bottom feather section. Painting a solid base color first makes the subsequent line work pop. -
Outline the eyes:
Switch to your fine detail brush and black paint. Carefully outline the large eye circles, the pupils, and the orange rings. -
Detail the radiating lines:
Trace over your etched lines inside the eyes with fine black strokes. The carving grooves you made earlier will help guide your brush. -
Outline head plumage:
Outline the orange feathers near the stem with black paint. Add a central vein line to each feather for texture. -
Define body feathers:
Using the fine brush, outline every feather on the lower body in black. I find it easiest to work from the top row down to avoid smudging the wet paint. -
Add feather texture:
Paint a central vein down the middle of each body feather, then add tiny diagonal hash marks (barbs) on either side of the vein to simulate realistic feather texture. -
Final Cleanup:
Once dry, check for any pencil marks still visible and gently erase them. If you plan to keep the pumpkin on a porch, mist it with a clear matte sealer to protect the paint.
Pro Tip: Depth Control
Use a linoleum cutter rather than a knife. The interchangeable blades allow you to control depth perfectly, shaving the skin without piercing the wall, keeping the pumpkin fresh longer.
Place your owl among some autumn leaves and candles to enjoy its wise and watchful presence all season long
Constellation Pumpkins: Painted Night Sky With Carved Star Points
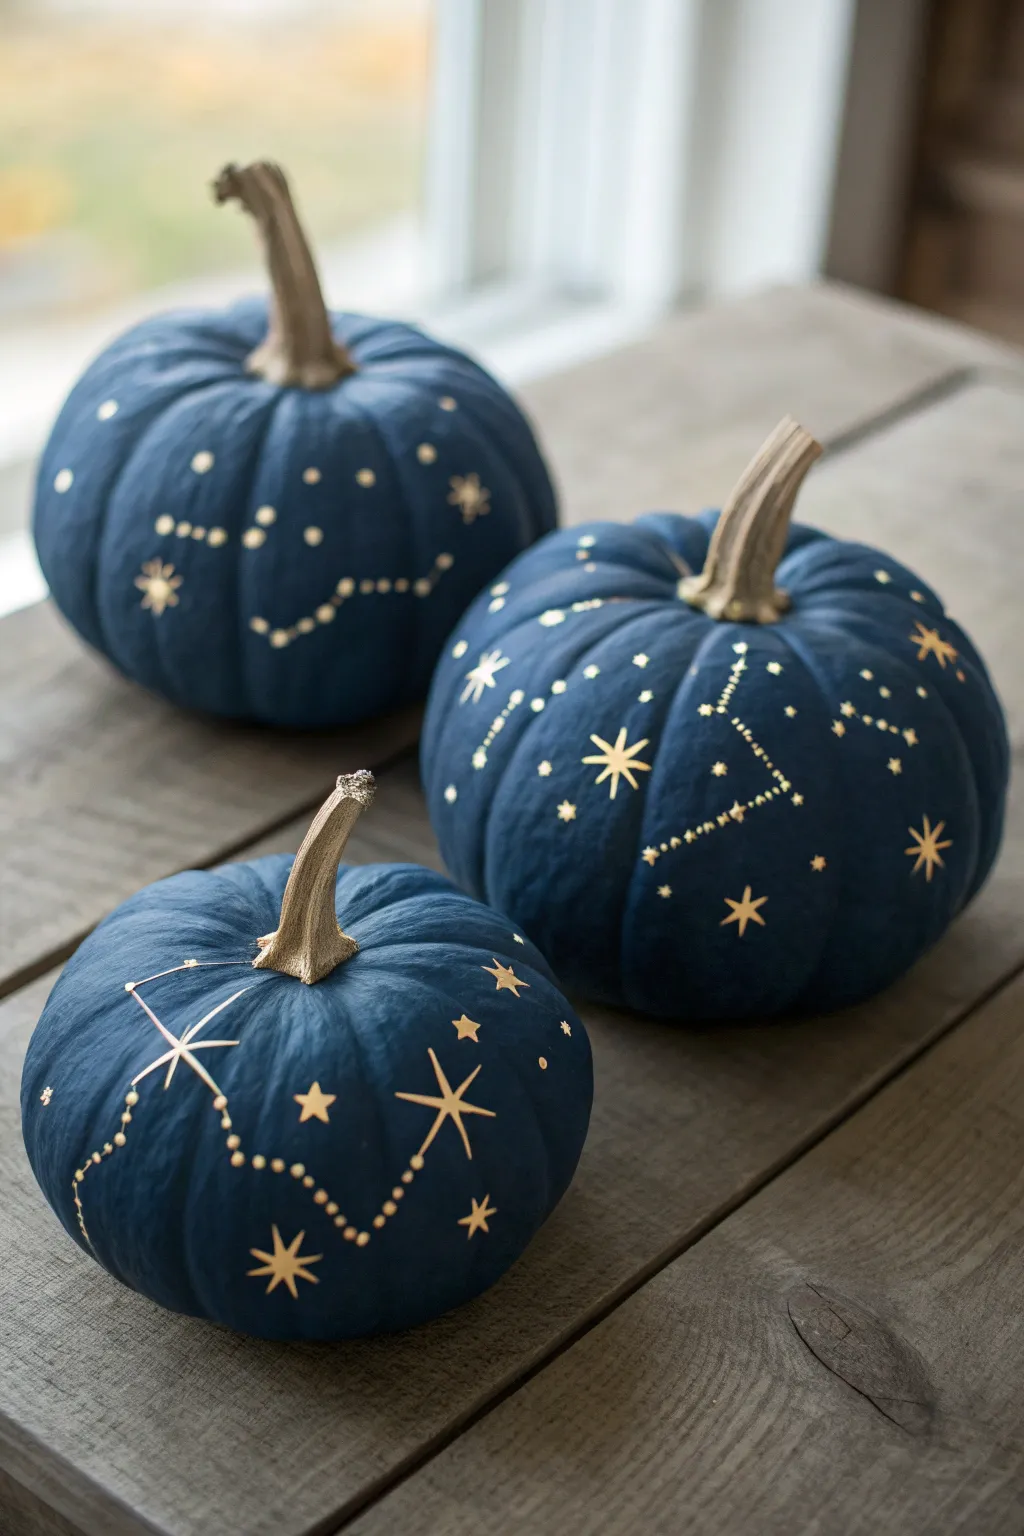
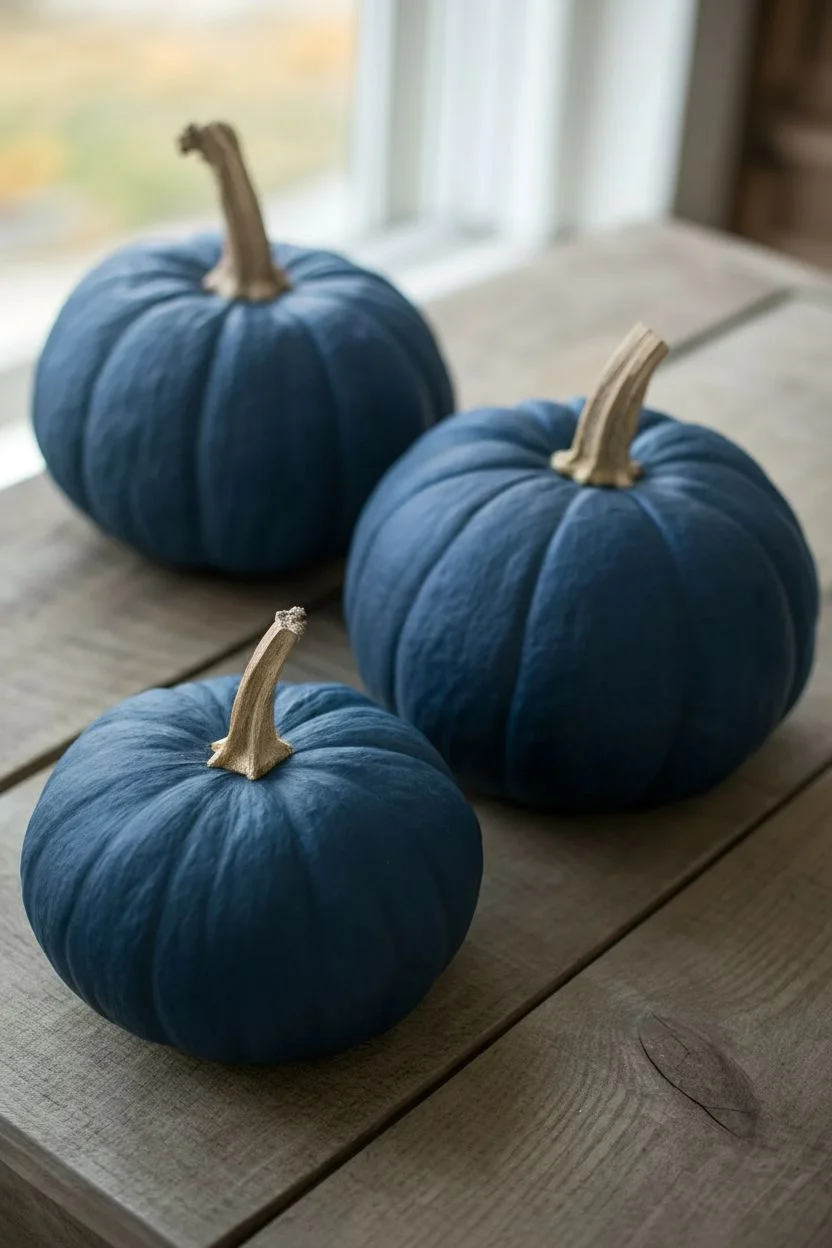
Transform ordinary gourds into a dreamy slice of the cosmos with this elegant no-carve project. The deep, matte navy finish provides a dramatic backdrop for shimmering gold constellations, creating a sophisticated centerpiece that feels lightyears away from traditional jack-o’-lanterns.
Step-by-Step
Materials
- Faux or real pumpkins (medium size)
- Matte navy blue acrylic paint (or chalk paint for extra matte finish)
- Wide flat paintbrush
- Gold metallic paint pen (fine point)
- Gold metallic paint pen (medium point)
- Liquid gold gilding leaf or metallic gold acrylic paint
- Small round paintbrush
- Pencil or white chalk pencil
- Reference images of constellations
- Matte spray sealer (optional)
- Damp cloth
Step 1: Preparation & Base Coat
-
Clean the surface:
Before putting brush to pumpkin, wipe the entire surface down with a damp cloth to remove any dust, dirt, or oils that might resist the paint. -
Dry thoroughly:
Allow the pumpkin to air dry completely to ensure the base coat adheres without streaking. -
Apply the first coat:
Using a wide flat paintbrush, apply an even layer of matte navy blue paint over the entire pumpkin body, stopping at the base of the stem. -
Check for coverage:
You will likely see some streakiness after the first pass; don’t worry, this is normal for dark colors on orange surfaces. -
Apply the second coat:
Once dry to the touch, apply a second coat of blue. I find brushing in a cross-hatch pattern helps eliminate visible brushstrokes for a smoother finish. -
Let it cure:
Let the pumpkin dry fully, preferably overnight or for at least a few hours, so the paint is hard enough to withstand the pressure of a paint pen.
Starry precision
If freehanding stars is tricky, use small star-shaped stickers as stencils. Apply the sticker, dot gold around it, and peel it off for a negative-space star.
Step 2: Gilding the Stem
-
Select your gold:
For the stem, you want a richer, more liquid look than a marker can provide. Use liquid gilding leaf or a high-pigment metallic acrylic paint. -
Paint the stem:
Using a small round brush, carefully paint the entire stem gold. Work slowly around the base where it meets the blue to keep a crisp, clean line. -
Apply a second layer:
Depending on the opacity of your gold, add a second layer to ensure the natural stem color doesn’t peek through.
Add a galaxy glow
Before drawing stars, sponge a very faint, cloudy layer of metallic teal or lighter blue in patches to create a subtle nebula effect behind the gold.
Step 3: Mapping the Stars
-
Sketch the design:
Using a white chalk pencil or very light graphite, gently mark out the main points of your chosen constellations (like the Big Dipper or Cassiopeia) directly onto the blue surface. -
Connect the dots:
Lightly trace the connecting lines between your star points so you have a clear guide to follow with ink. -
Draw the main stars:
Take your medium-point gold paint pen and draw five-pointed stars or large dots at the primary anchor points of your constellation. -
Create the connections:
Instead of solid lines, use a series of small, evenly spaced dots to connect the stars. This gives it that delicate, astronomical chart aesthetic. -
Add large feature stars:
Scatter a few large, eight-pointed ‘north star’ shapes (a cross with an X through it) around the pumpkin for visual interest. -
Fill the void:
Between the constellations, use a fine-point gold pen to add tiny, random dots representing distant stars. -
Vary star sizes:
Mix up tiny dots, medium dots, and small drawn stars to create depth and the illusion of a vast galaxy. -
Clean up sketch lines:
Once the gold ink is totally dry, gently wipe away any visible chalk or pencil guidelines with a slightly damp Q-tip.
Now you have a stunning set of galaxy-inspired pumpkins ready to light up your autumn display


Etched Swirls and Vines: Carve the Skin, Then Glaze With Paint
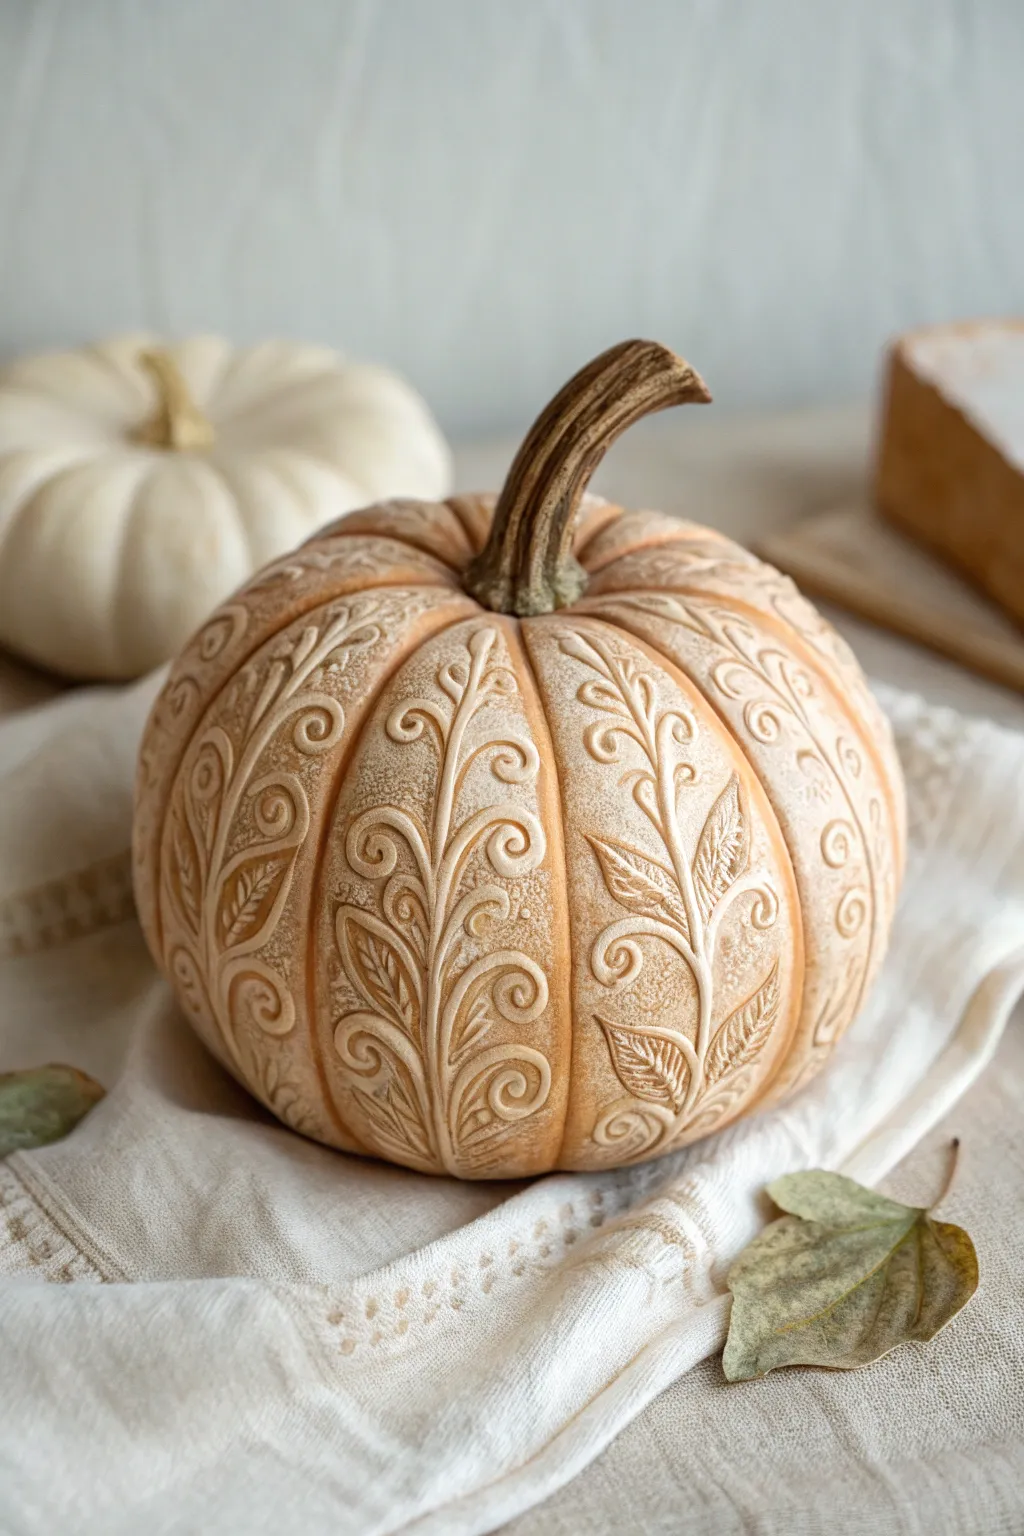
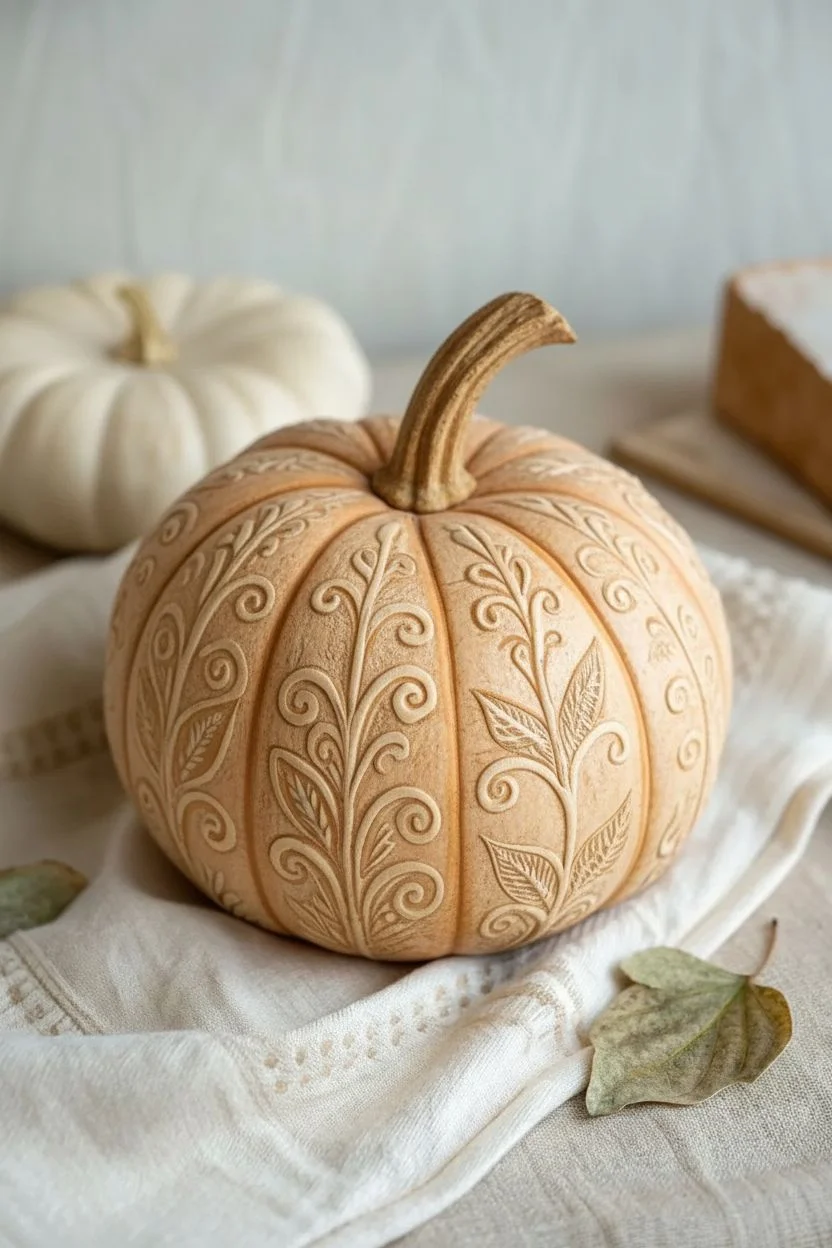
Transform a standard pumpkin into an elegant centerpiece with this relief-carving technique that mimics antique stoneware. By shallow-carving intricate vines and applying a subtle wash, you’ll create a sophisticated, textured look perfect for a refined autumn display.
Step-by-Step Guide
Materials
- Medium-sized pumpkin (smooth skin, cream or pale orange)
- Linoleum carving tools (V-gouge and U-gouge)
- Pencil or water-soluble marker
- Tracing paper (optional)
- Fine-grit sandpaper sponge
- Acrylic paint (burnt umber or raw sienna)
- Acrylic paint (cream or off-white)
- Matte clear spray sealer
- Soft rag or paper towels
- Small paintbrush
- Water container
Step 1: Preparation and Design
-
Clean surface:
Begin by thoroughly washing and drying your pumpkin to remove any dirt or natural oils. A clean surface ensures your carving tools won’t slip and the paint adheres properly. -
Plan the vines:
Using a pencil, lightly sketch a vertical vine pattern that follows the natural ribs of the pumpkin. Draw a central stem running up the groove, with symmetrical swirls and leaves branching out onto the rounded lobes. -
Refine the sketch:
Go over your pencil lines to define the shape of the leaves. Aim for a ‘paisley’ or classical acanthus style, keeping the curves flowing and organic.
Uneven Carving Depths?
If your gouge slips and goes too deep, don’t fill it. Instead, apply a bit more dark wash to that area. It will look like natural weathering or a deep shadow, adding to the antique charm.
Step 2: Carving the Relief
-
Outline cuts:
Take your small V-gouge linoleum cutter. Carefully carve along the pencil lines of your design. You want to break the skin but not cut deep into the flesh—go about 1/8th of an inch deep. -
Widen the stems:
Switch to a slightly wider U-gouge to thicken the main central stems. Carve slowly to ensure smooth, continuous lines rather than jagged edges. -
Detail the leaves:
For the leaves, use the V-gouge to create the veining inside the leaf shapes. I find it helpful to start the cut at the center of the leaf and flick the tool outward for a tapered look. -
Remove surrounding skin (Relief technique):
To create the raised ’embossed’ effect shown in the image, gently shave away a tiny layer of the pumpkin skin *immediately surrounding* your vines using a wide, flat gouge or sandpaper. This lowers the background slightly, making the vine pop. -
Smooth the texture:
Once all carving is complete, gently run a fine-grit sanding sponge over the carved areas to knock down any hanging bits of pumpkin skin or rough edges.
Gilded Age Upgrade
Swap the brown antiquing wash for a metallic gold glaze. Wipe it back just like the brown paint; the shimmering residue in the cracks will give the pumpkin a luxurious, jewelry-like finish.
Step 3: Painting and Glazing
-
Apply base coat:
Paint the entire pumpkin with a layer of cream or off-white acrylic paint. You want a matte finish. Let this layer dry completely to the touch. -
Create the glaze:
Mix a small amount of burnt umber acrylic paint with water until it reaches an inky, wash-like consistency. -
Apply the wash:
Brush the watery brown mix over a small section of the carved design, ensuring it gets into all the deep grooves and cut lines. -
Wipe back:
Immediately wipe the surface with a soft rag. The dark paint will stay trapped in the etched lines and recesses, while the high points will return to the cream color. Repeat this process section by section. -
Dry brush highlights:
If the design looks too dark, lightly dip a dry brush into your original cream paint and dust over the very top of the raised vines to bring back the brightness. -
Final seal:
Once you are happy with the antique effect and the paint is fully dry, spray the pumpkin with a clearer matte sealer to protect the finish and prevent moisture loss.
Place your finished masterpiece on a linen runner to enjoy the elegant texture throughout the season
Stacked Mushroom Lanterns With Painted Spots
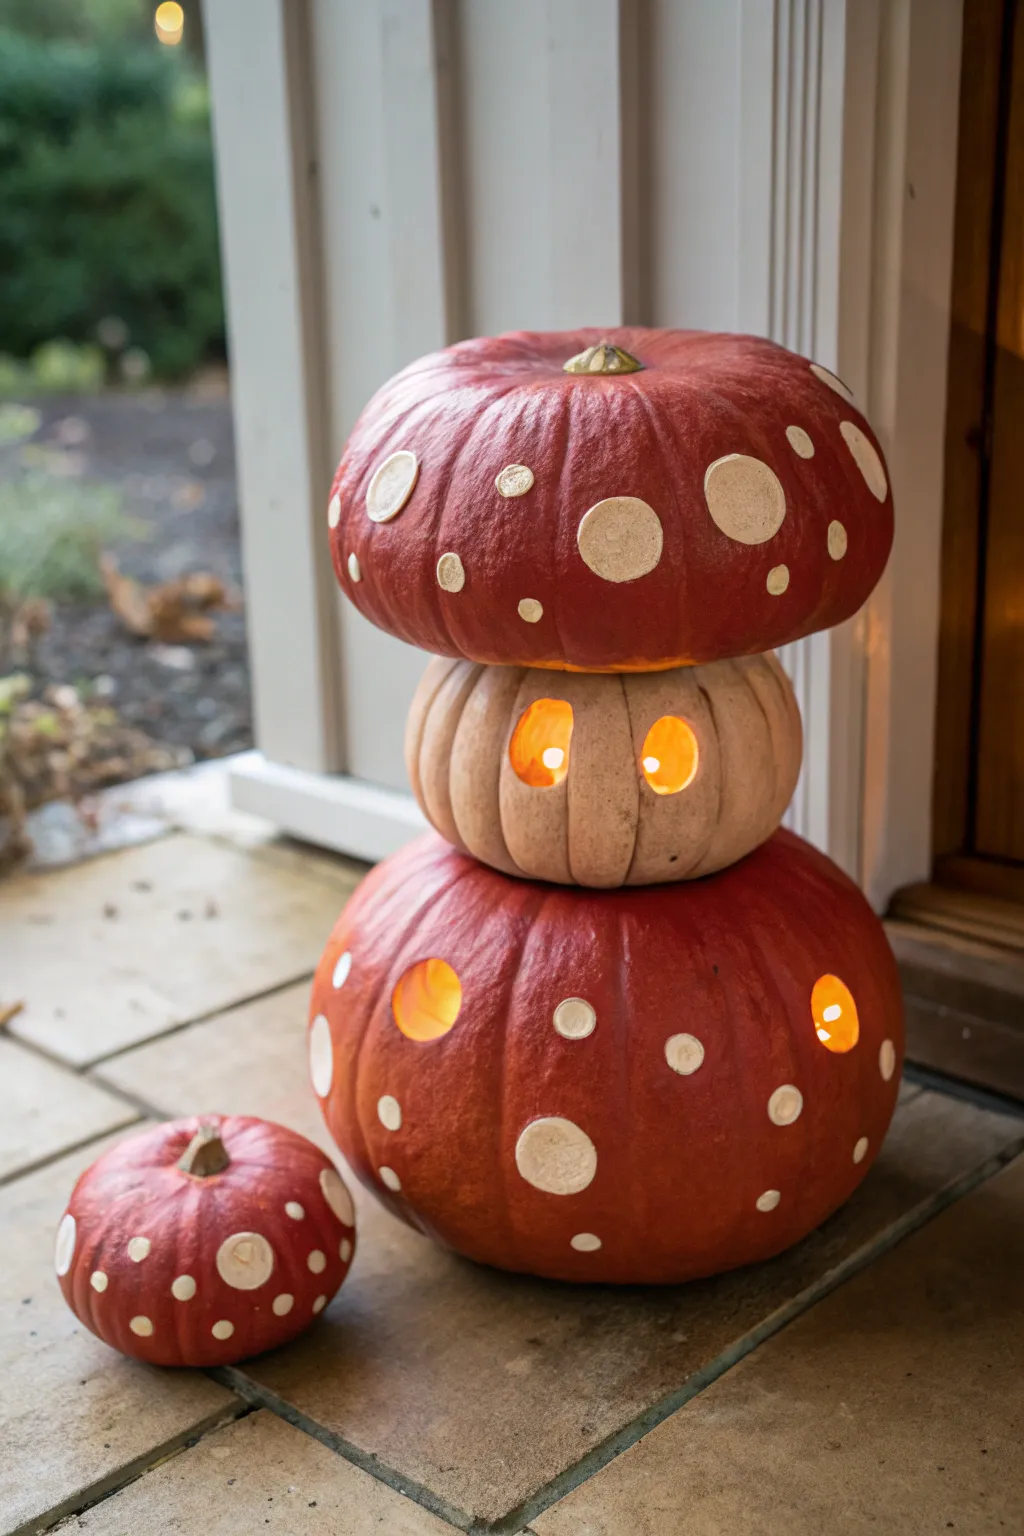
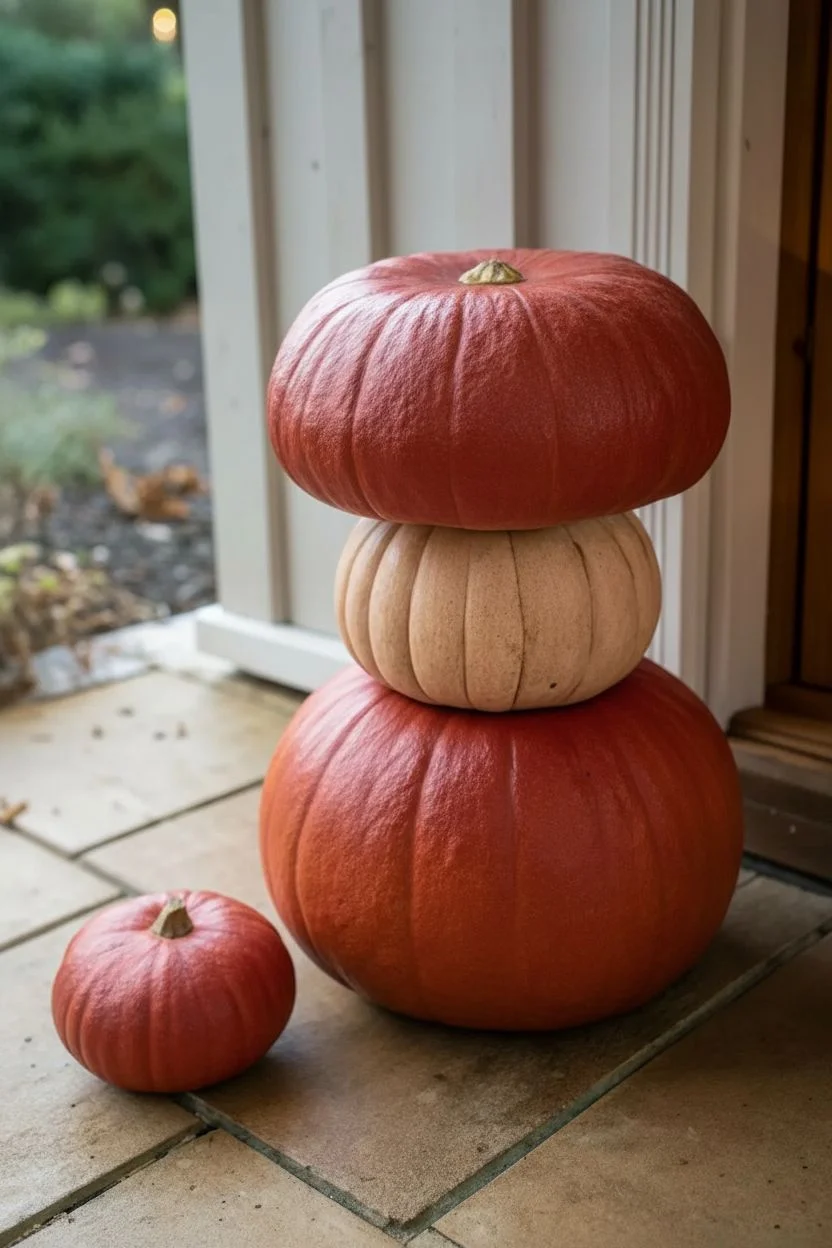
Transform ordinary pumpkins into an enchanting toadstool tower that glows warmly on your porch. By stacking a pale pumpkin between two vibrant red ones and adding carved details, you’ll create a storybook lantern perfect for autumn nights.
Step-by-Step
Materials
- Two wide, flattened pumpkins (Cinderella or cheese pumpkins work best)
- One smaller, tall white or beige pumpkin (for the stem)
- One tiny pumpkin (optional sidekick)
- Red acrylic craft paint (matte finish)
- Cream or off-white acrylic craft paint
- Wide foam brush or paintbrush
- Small round sponge dobber or stencil brush
- Carving knife or pumpkin saw
- Power drill with a large spade bit (optional)
- Strong craft adhesive or wooden skewers
- Tea lights or LED candles
Step 1: Preparing the Base
-
Clean the Pumpkins:
Wipe down all your pumpkins with a damp cloth to remove any dirt or debris. Let them dry completely, as paint won’t adhere well to a damp surface. -
Remove the Stems:
For the bottom and middle pumpkins, carefully cut or snap off the stems. The stacking surfaces need to be relatively flat to ensure stability. -
Plan the Stack:
Test your arrangement by stacking the pumpkins dry. Place the widest red pumpkin on the bottom, the tall white one in the middle, and the second red one on top like a cap. Rotate them to find the most stable locking position.
Paint Peeling?
If the pumpkin skin is waxy and the paint slips, lightly sand the surface with fine-grit sandpaper first to create a better grip for the acrylics.
Step 2: Carving the Light Sources
-
Gut the Pumpkins:
Cut a hole in the bottom of the lowest pumpkin and the middle pumpkin. Scoop out the seeds and pulp thoroughly. For the top pumpkin, you can leave it whole unless you want it to glow as well. -
Carve the Stem Windows:
Take the middle (white) pumpkin. Using your carving tool, cut two or three irregular, rounded window shapes into the front face. These will let the candlelight shine through the ‘stem’. -
Add Base Glo-Spots:
On the bottom pumpkin, carve a few circular holes. I like using a drill with a spade bit for perfectly round circles, but a small knife works too. These carved spots will mix with the painted spots later.
Glow Up
Carve the spots on the top cap deeply but don’t punch all the way through—called shaving or etching—to significantly increase the warm glow at the top.
Step 3: Painting the Caps
-
Apply the Base Red:
Using a wide brush, paint the entire surface of the top and bottom pumpkins with bright red acrylic paint. You may need two coats to get full opacity, especially if the pumpkins are dark orange. -
Dry the Base Coat:
Allow the red paint to dry completely. It should be dry to the touch before you attempt to add the spots. -
Paint Large Spots:
Dip a round sponge dobber or stencil brush into cream paint. Press firmly onto the red surface to create large, perfect circles. Vary the spacing so it doesn’t look too uniform. -
Add Small Details:
Use a smaller brush to add tiny dots between the large ones. If you have the tiny sidekick pumpkin, paint it red with spots now as well. -
Clean the Carved Edges:
If paint got inside the carved holes on the bottom pumpkin, wipe the inner flesh clean or touch up the edges so the glow remains distinct.
Step 4: Assembly
-
Insert Lighting:
Place your LED candles or tea lights on the ground or stand where the lantern will live. Place the bottom pumpkin over the lights. -
Stack the Stem:
Place the middle white pumpkin onto the bottom red one. Ensure the carved windows are facing forward. -
Secure the Cap:
Place the final red pumpkin on top. If the stack feels wobbly, you can drive a long wooden skewer or dowel down through the center of the top two pumpkins into the base to pin them together. -
Final Styling:
Add extra lights inside the middle pumpkin if needed, and arrange your tiny sidekick pumpkin next to the base for a complete scene.
Step back and admire your magical woodland decoration as it lights up the evening
Pumpkin Diorama Windows: Carved Openings With Painted Interior Scene

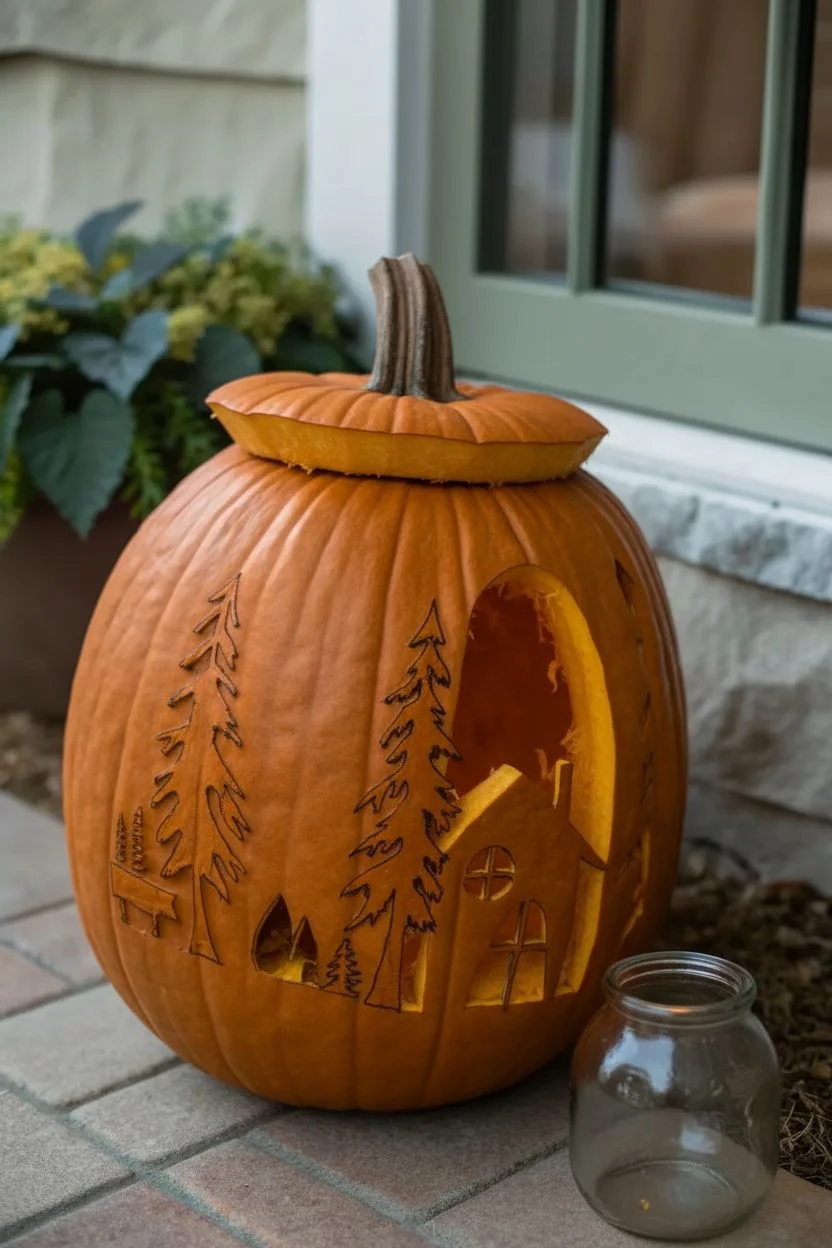
Transform a simple pumpkin into a cozy woodland scene by combining surface painting with strategic carving. This diorama-style project uses negative space and candlelight to create depth, featuring shadowed pines and a warm, inviting cabin.
Step-by-Step Tutorial
Materials
- Large, smooth-skinned pumpkin (tall shapes work best)
- Pumpkin carving kit (serrated saw, scraper)
- Black acrylic craft paint
- Small flat paintbrush
- Fine-point detail brush
- Permanent black marker
- Printed templates (cabin and trees) or paper for sketching
- X-Acto knife or craft knife
- Tea light candle or LED puck light
- Rubbing alcohol
- Masking tape
Step 1: Preparation and Planning
-
Prepare the surface:
Wipe the exterior of your pumpkin with a cloth dampened with rubbing alcohol. This removes natural oils and dirt, ensuring your paint and marker lines adhere properly. -
Gut the pumpkin:
Cut a lid from the top (or bottom, if you prefer) and thoroughly scrape out the insides. I like to scrape the interior wall behind where the design will go a bit thinner—about 3/4 inch thick—to make carving easier later. -
Plan the layout:
Sketch your design directly onto the pumpkin with a marker or tape on printed templates. You need two distinct elements: silhouette trees that will remain on the skin, and a large oval ‘window’ shape that will be carved out.
Step 2: Creating the Painted Silhouettes
-
Outline the trees:
Using your black permanent marker, draw the outlines of the tall pine trees on the front surface. Make sure these trees frame the area where your window will go. -
Paint the first layer:
Fill in the tree outlines with black acrylic paint using a small flat brush. Don’t worry about perfect opacity yet; the goal is to get the basic shape down. -
Add detail branches:
Switch to your fine-point detail brush. Paint small, jagged branches extending from the main tree shapes to mimic pine needles. A slightly rough, uneven hand actually helps here. -
Paint secondary elements:
Add smaller details like the tiny bench or rocks at the base of the trees. These ground the scene. Let the paint dry completely before moving to any carving steps to avoid smudging.
Pro Tip: Stick to the Plan
Use painter’s tape to mask off the edges of your ‘window’ area while painting the surrounding trees. This keeps your carving lines clean when you switch tools.
Step 3: Carving the Window
-
Trace the window cut lines:
Identify the large oval opening and the specific shapes inside it that need to stay (like the cabin frame and window panes). Mark the negative space that needs to be removed. -
Carve the main opening:
Use a serrated saw or craft knife to carefully cut out the large negative space around the cabin roof and surrounding the interior tree. Be extremely gentle near the thin window panes of the house. -
Refine the house details:
Use an X-Acto knife to clean up the edges of the house silhouette. Square off the chimney and ensure the window mullions (the crossbars) are distinct. -
Create the interior tree:
Notice the tree inside the oval? This isn’t painted; it’s the pumpkin skin left uncarved. Carefully cut around its jagged edges so it stands out against the candlelight.
Level Up: Deep Woods Depth
Carve a second silhouette layer into the back wall of the pumpkin interior (shaving the skin off). This creates a ghostly background forest when lit.
Step 4: Lighting and Finishing
-
Clean the edges:
Wipe away any marker lines that are still visible with a damp cloth or a little rubbing alcohol. -
Touch up paint:
If any orange pumpkin skin is showing through your black painted trees, apply a second coat of paint now for a solid, opaque silhouette. -
Position the light:
Place a tea light or LED candle inside the pumpkin. Position it slightly behind the house cutout to ensure the windows glow brightly. -
Check the effect:
Dim the room lights to see your diorama come to life. The painted trees will remain dark against the pumpkin skin, while the carved sections will glow.
Enjoy the warm glow of your handcrafted forest scene as it lights up your porch this season
Painted Portrait Pumpkin With Selective Carved Highlights
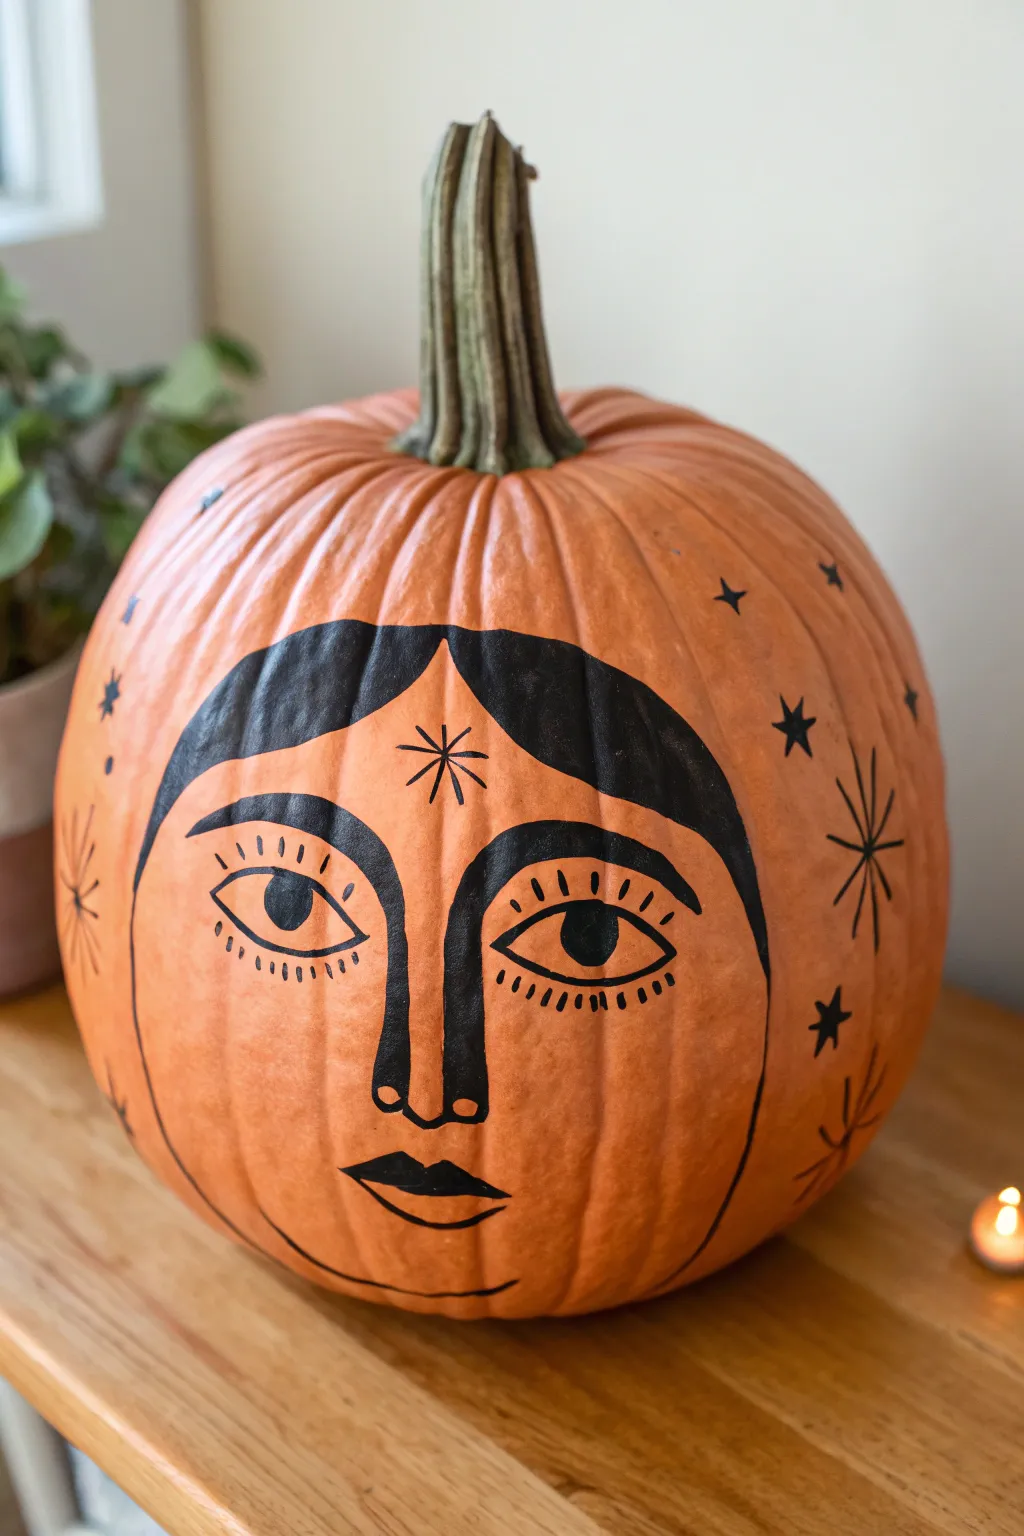
Bring a touch of mystical folk art to your autumn decor with this striking hand-painted pumpkin design. The bold black line work creates a stylized, celestial face that looks sophisticated yet is surprisingly simple to execute.
Step-by-Step
Materials
- Medium-sized orange pumpkin (clean and dry)
- Black acrylic paint (outdoor quality preferred)
- Black permanent marker or paint pen (medium and fine tips)
- Round synthetic paintbrush (size 4 or 6)
- Fine liner paintbrush (size 0 or 1)
- Pencil or white charcoal pencil
- Paper plate or palette
- Cotton swabs and rubbing alcohol (for cleanup)
- Clear matte acrylic sealer spray (optional)
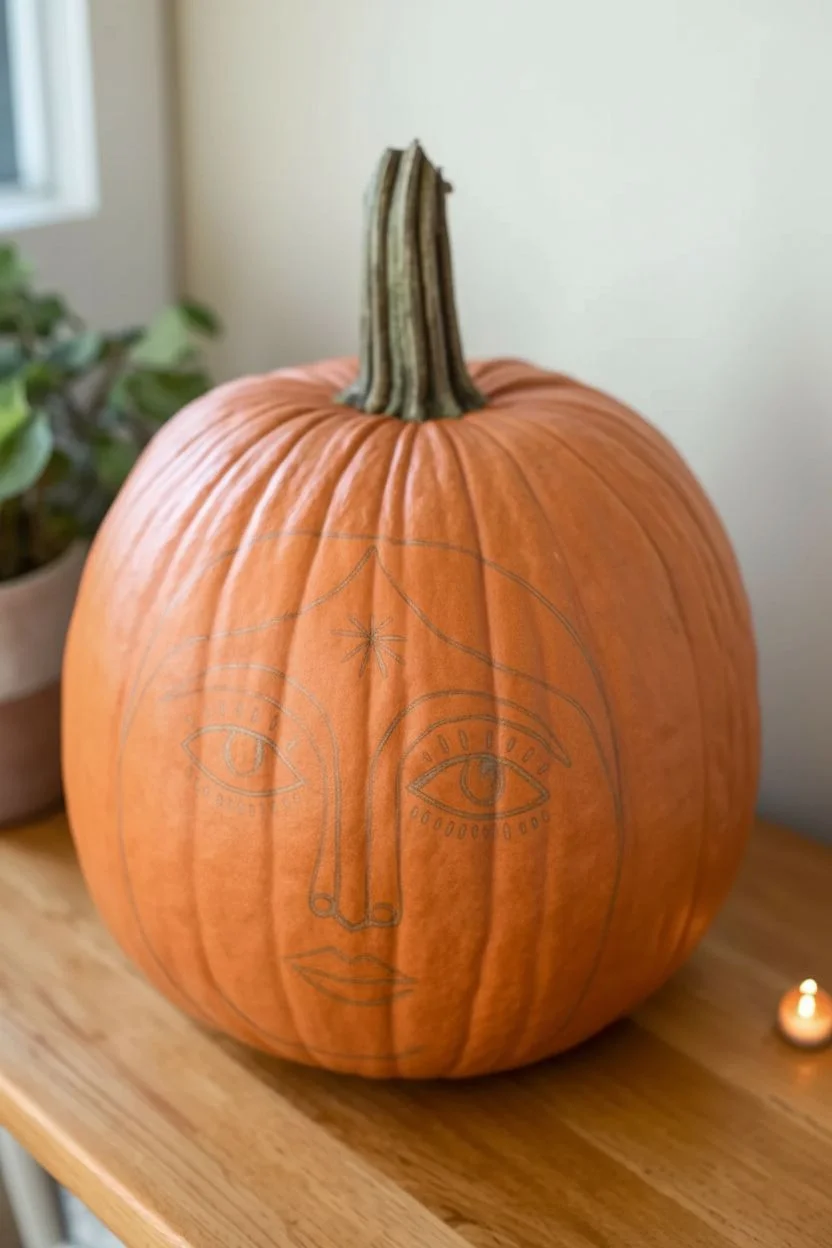
Step 1: Preparation & Planning
-
Select the best side:
Examine your pumpkin to find the smoothest side with the fewest deep ridges. A flatter surface will make painting the face details much easier. -
Clean surface:
Wipe the pumpkin down with a damp cloth or a little rubbing alcohol to remove dirt and oils. Let it dry completely. -
Sketch the outline:
Using a pencil or white charcoal pencil, lightly sketch the main outline of the face. Start with a large U-shape for the chin and jawline, centering it on the pumpkin. -
Map facial features:
Sketch a large T-shape in the center for the nose and eyes. Draw the sweeping hair line at the top, creating a distinct widow’s peak in the center.
Step 2: Painting the Hair & Face Shape
-
Outline the hair:
Using your medium-tip paint pen or a small brush, trace over your pencil lines for the hair section. The hair shapes look like two large sweeping curves meeting at the center forehead. -
Fill in the hair:
Switch to your larger round brush and black acrylic paint to fill in the hair shapes completely. Apply two coats if necessary for a solid, opaque black. -
Refine the jawline:
With the medium paint pen or a steady hand and a liner brush, trace the large U-shape that defines the chin and jawline. Keep this line relatively thin and consistent. -
Define the nose bridge:
Paint the central nose line. It should extend straight down from the widow’s peak area, widening slightly at the bottom to form the nostrils. -
Create the nostrils:
At the bottom of the nose line, paint two small, distinct loops for nostrils. Connecting these directly to the nose bridge gives that classic primitive art look.
Paint Pen Pro-Tip
If you struggle with brush control on the uneven surface, skip the brush altogether! A broad-tip acrylic paint marker works beautifully for filling in the hair.
Step 3: Eyes & Expression
-
Draw the eyebrows:
Paint thick, arching eyebrows that connect directly to the top of the nose bridge. They should sweep outward under the hairline. -
Outline the eyes:
Below the brows, draw large almond-shaped outlines for the eyes. Make sure they are level with each other. -
Add pupils:
Paint large, round black circles inside the almond shapes for pupils. Leave a tiny amount of negative space around them if you want, or fill them solid distinctively. -
Add double lids:
Draw a thin curved line just above each eye to suggest an eyelid or crease. -
Lashes:
Using a fine-tip marker or liner brush, add short, straight dashes around the eyes for lashes. Put some above the upper lid line and some below the lower eye line.
Make it Glow
For a ‘level up’ twist, carefully carve out just the pupils and the starburst centers. When lit from inside, the eyes and celestial marks will glow.
Step 4: Celestial Details & Finishing
-
Paint the lips:
Draw a small, stylized mouth below the nose. Use a ‘cupid’s bow’ shape for the top lip and a curved line for the bottom lip, filling them in black. -
Forehead starburst:
Draw an eight-pointed starburst in the center of the forehead, right between the eyebrows. Use a fine liner brush for crisp lines. -
Cheek accents:
Add small five-pointed stars or simple cross-stars high on the ‘cheeks’ (the sides of the pumpkin) to frame the face. -
Side bursts:
Add larger starbursts on the far sides of the pumpkin, varying the length of the rays for a hand-drawn feel. -
Final Cleanup:
Once dry, gently erase any visible pencil lines. If you want this to last outdoors, give it a light mist of clear matte sealer.
Place your mystical masterpiece on a porch or mantle to watch over the season
Mixed Gourds Collection: One Palette, Three Techniques (Carve, Paint, Etch)
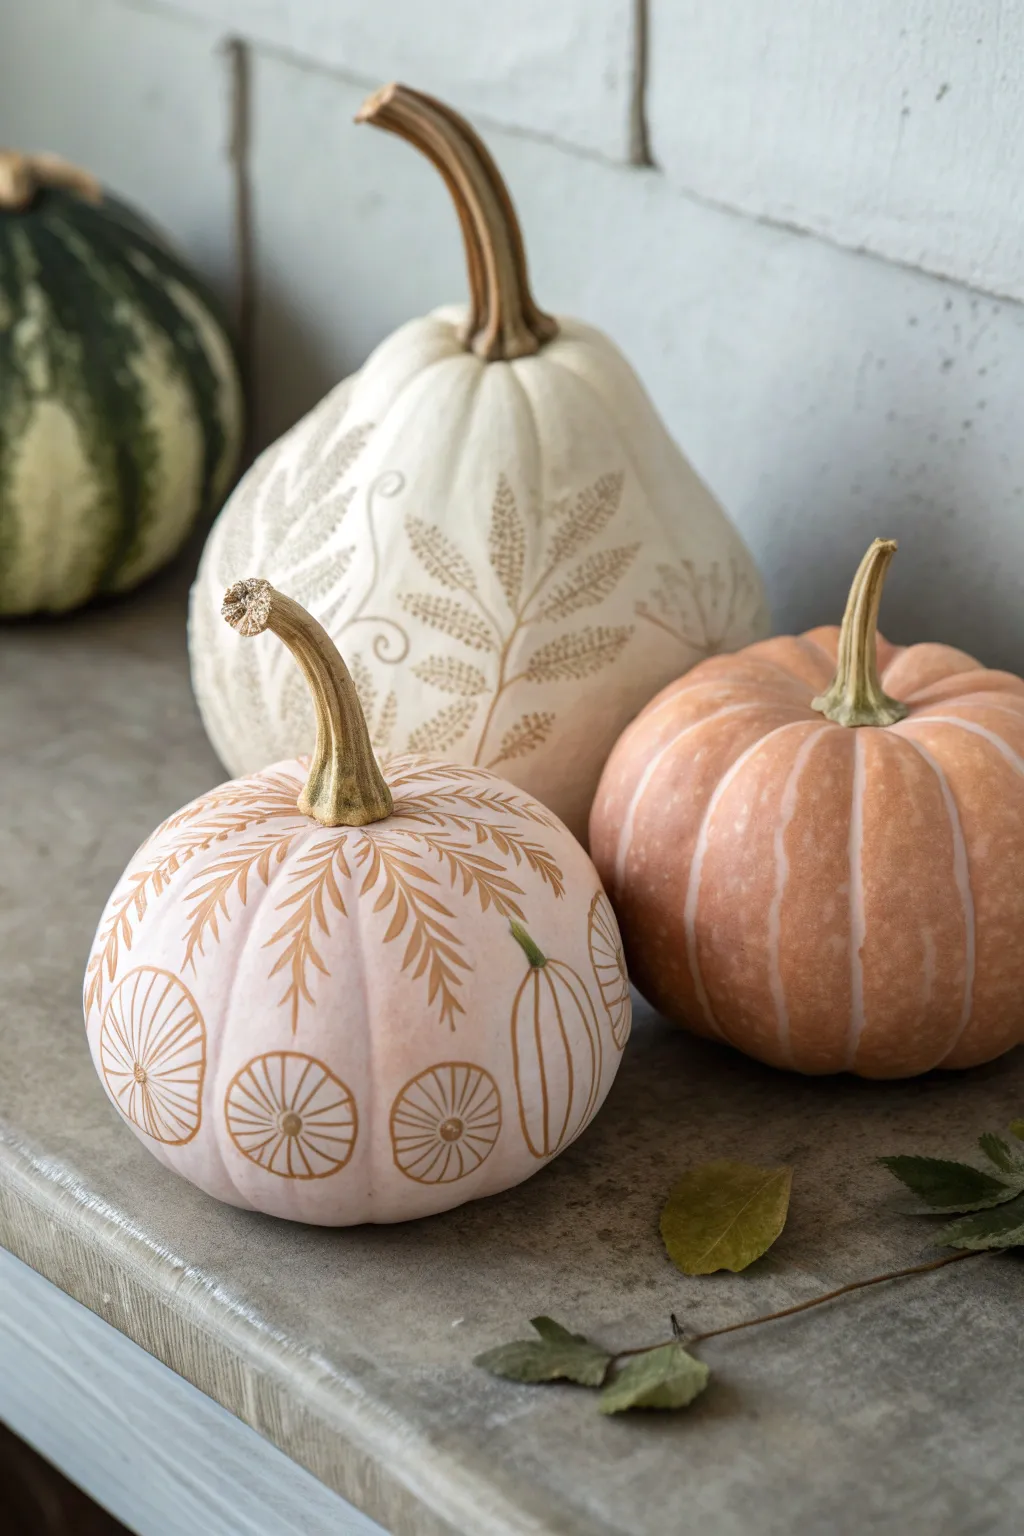
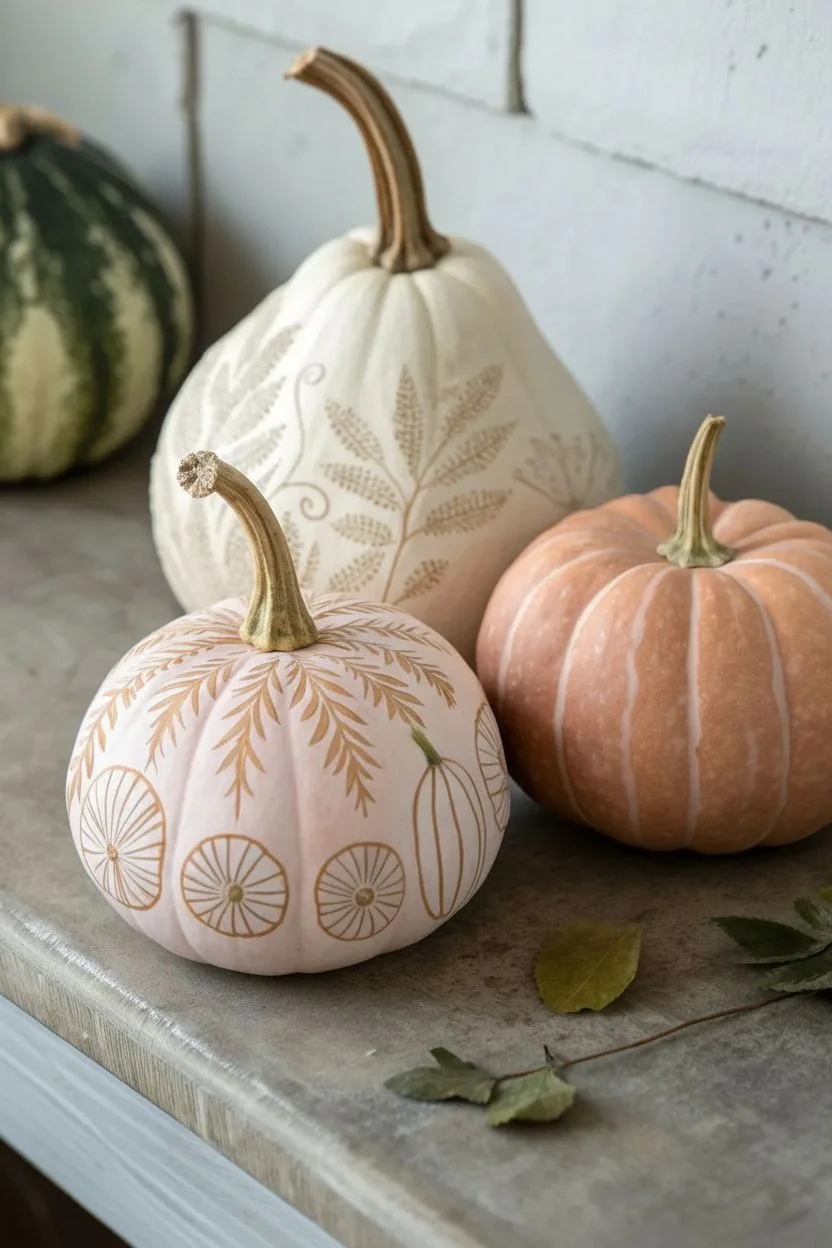
Elevate your autumn display with this sophisticated trio that blends natural textures with metallic elegance. By combining etching techniques on a white gourd with delicate gold painting on a pale pink pumpkin, you create a cohesive, gallery-worthy centerpiece.
Step-by-Step Tutorial
Materials
- 1 Large white gourd (tear-drop shape)
- 1 Small blush or pale pink pumpkin
- 1 Medium terracotta or orange pumpkin
- Linoleum carving tool (V-gouge)
- Pencil
- Gold paint pen (fine tip)
- Gold metallic acrylic paint
- Small fine-line paintbrush
- Masking tape (optional)
- Damp cloth
Step 1: Preparation & Planning
-
Clean surface:
Begin by wiping down all pumpkins with a damp cloth to remove dirt and oils. Let them dry completely to ensure the best adhesion for paint and smooth carving. -
Sketch the etching design:
On the large white gourd, lightly sketch a flowing fern pattern using a pencil. Start with a central spine curving upwards, then mark placement for individual leaflets.
Clean Lines Pro-Tip
If your hand is shaky with the paint pen, rest your pinky finger on the pumpkin surface to stabilize your hand while drawing the fine gold lines.
Step 2: The Etched White Gourd
-
Outline the spine:
Using the V-gouge linoleum tool, carefully carve along your pencil line for the main stem. Use shallow pressure; you only want to scrape away the top layer of skin to reveal the flesh underneath. -
Carve the leaves:
For the fern leaves, make short, controlled gouges extending outward from the spine. Vary the length to mimic organic growth—longer in the middle, shorter at the tips. -
Add intricate details:
I like to add tiny ‘V’ cuts within larger leaves or small curled flourishes near the base of the stems to create a more dimensional texture. -
Clean up edges:
Gently brush away any gourd shavings. If any pencil marks are still visible, erase them gently or carve slightly wider to remove them.
Step 3: The Painted Pink Pumpkin
-
Paint the stem:
Using a small brush and gold metallic acrylic paint, cover the stem of the small pink pumpkin. This anchors the color palette. Let it dry completely. -
Draw top foliage:
With the gold paint pen, start at the base of the stem and draw downward sweeping lines. These will be the spines for your wheat or palm leaf design. -
Fether the leaves:
Add small diagonal dashes along each gold spine to create a feathery leaf look. Keep your strokes light and consistent. -
Create lower medallions:
Around the lower half of the pumpkin, draw evenly spaced circles using the paint pen. These will become your stylized geometric motifs. -
Detail the medallions:
Inside each circle, draw a small dot in the center. Then, draw radial lines from the center to the edge, resembling a sliced citrus fruit or a wagon wheel. -
Add vertical accents:
Between the medallions, sketch simple vertical oval shapes with a vertical line running through them to fill the negative space.
Level Up: Gilded Etching
After etching the white gourd, rub a small amount of gold wax or dilute acrylic paint into the carved grooves to make the texture pop.
Step 4: The Terracotta Accent
-
Determine natural ribs:
Take the medium orange pumpkin and identify the natural vertical valleys (ribs) of the gourd. -
Enhance with wash:
Mix a very watery white paint or use a white chalk marker. Run a thin, translucent line down these valleys to accentuate the natural shape without overpowering the other two pumpkins. -
Final arrangement:
Group the three pumpkins together, placing the large etched gourd in the back and the detailed gold-painted pumpkin in the front for depth.
Place your finished trio on a mantel or sideboard to enjoy the subtle contrast of textures and tones
Skeleton Hand Illusion: Shallow Carving With Painted Bone Depth
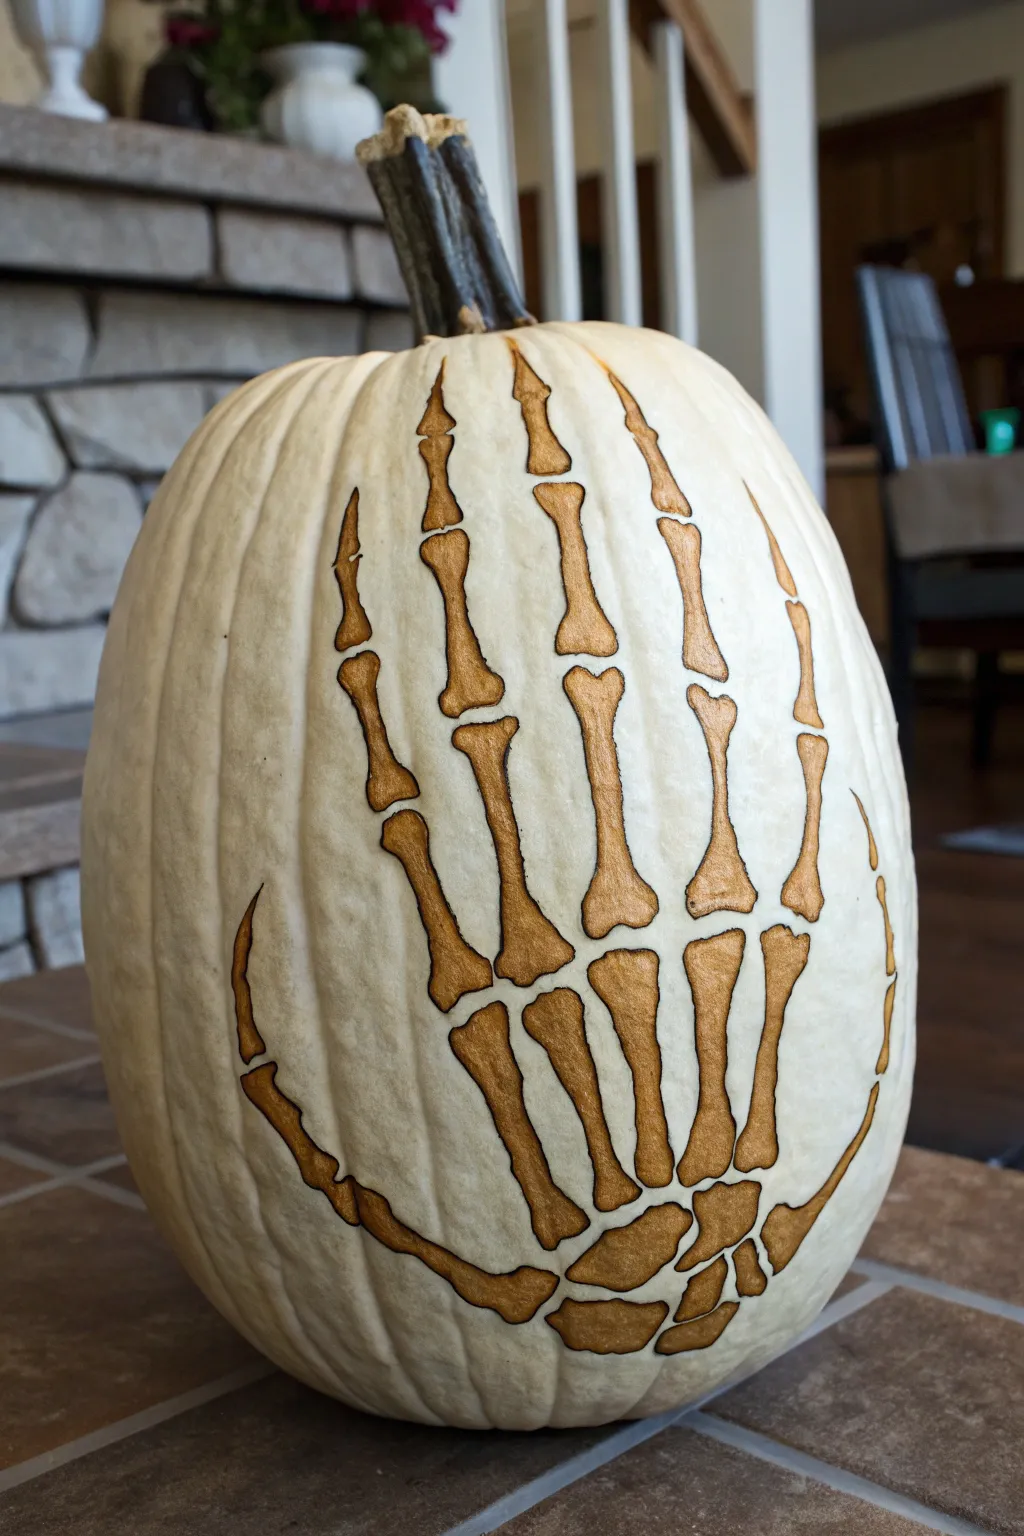
Transform a pale pumpkin into a spooky masterpiece with this skeleton hand design that capitalizes on simple shading techniques. By gently etching the skin rather than carving all the way through, you create a textured, sepia-toned bone effect that looks strikingly realistic against the white rind.
Step-by-Step Guide
Materials
- White pumpkin (Lumina or Casper variety)
- Pencil or water-soluble marker
- Linoleum cutter or wood carving gouge (V-shaped)
- Small craft knife (X-Acto)
- Brown acrylic paint (Burnt Umber or similar)
- Paper towels or soft rag
- Small dry paintbrush
- Reference image of a skeleton hand
- Clear matte sealer spray (optional)
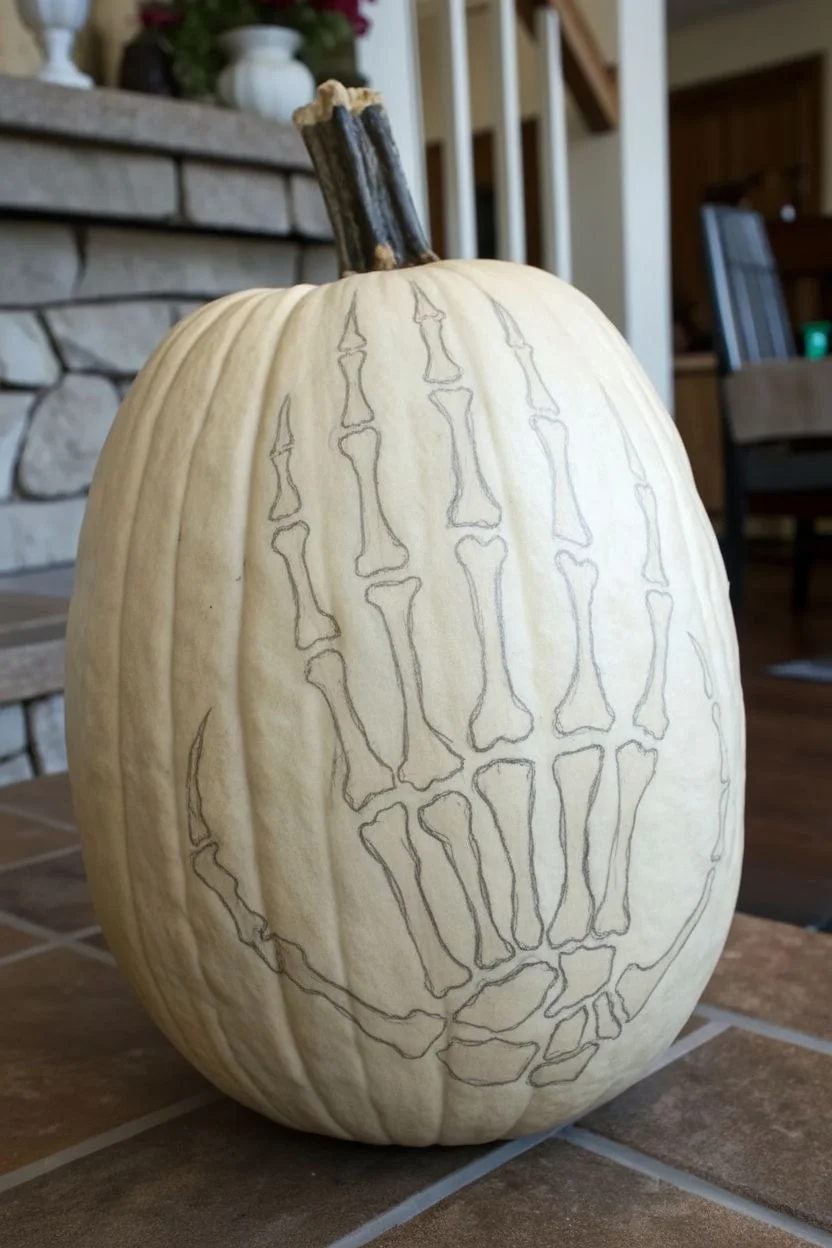
Step 1: Planning the Anatomy
-
Choose the right canvas:
For this project, select a white pumpkin with a largely smooth surface. A few ridges are fine—they add character—but deep valleys will make the hand shape harder to draw convincingly. -
Clean the surface:
Wipe down the pumpkin skin with a damp cloth to remove any field dirt or dust. Allow it to dry completely so your sketch lines don’t smudge. -
Sketch the palm:
Start by drawing the carpal bones (the wrist/palm area) near the bottom center of the pumpkin. Keep these shapes irregular and blocky, roughly grouping them to form the base of the hand. -
Map out the fingers:
Draw the metacarpals and phalanges radiating upward. I find it easiest to draw stick figures for the fingers first to get the spacing right, then flesh out the bone shapes around those lines. -
Refine the joints:
Go back over your finger sketches and emphasize the knobby joints where bones connect. Widen the ends of each bone segment to give it that classic skeletal look.
Uneven peeling?
If the skin is peeling unevenly or tearing outside lines, your initial score line wasn’t deep enough. Retrace the outline firmly with the knife before trying to lift the skin again.
Step 2: Etching the Design
-
Trace the outline:
Use your craft knife to gently score the pumpkin skin along your pencil lines. You don’t need to cut deep; just break the surface layer to define the edges of the bones. -
Peel the skin:
Using the tip of your knife or a small flat gouge, carefully peel away the white skin *inside* your scored lines. Remove only the very top layer to reveal the firmer flesh underneath. -
Clean up the edges:
Once the main ‘bones’ are peeled, use the knife tip to sharpen any corners or joints that look too rounded. The outline should be crisp against the white background. -
Create texture:
Take a linoleum cutter or a slightly rougher tool and gently scrape the exposed flesh of the bones. This creates tiny grooves that will hold the paint later, mimicing the texture of old bone.
Glow Up
For a creepy night effect, scrape the pumpkin wall from the *inside* until it’s very thin behind the hand. The light will glow red through the etched bones.
Step 3: Adding the Aged Patina
-
Apply the wash:
Dilute a small amount of brown acrylic paint with water until it has a milky consistency. Brush this generous wash over the exposed carved areas. -
Wipe away excess:
Immediately use a paper towel to wipe the paint off the surface. The pigment will cling to the edges and the textured grooves you created, while the high points remain lighter. -
Darken the edges:
With a smaller brush and undiluted brown paint, carefully trace just the very inside wall of your cut lines. This creates a shadow effect that makes the bones pop forward. -
Add detail lines:
Paint very thin, faint cracks or fissures on a few of the larger bone segments for extra realism. -
Clean the rind:
Use a damp corner of a rag to scrub away any stray paint or pencil marks left on the white uncarved skin, ensuring a high-contrast finish. -
Seal the work:
If you plan to keep the pumpkin outside, a light coat of clear matte sealer spray will prevent the exposed flesh from drying out too quickly.
Place your creation on a dark surface to really make that stark white contrast stand out


Have a question or want to share your own experience? I'd love to hear from you in the comments below!